

Page 1

User Manual
HW-K950
For further information, refer to the Web Manual.
Web manual : www.Samsung.com
Product name search → HW-K950
→ Support →
Page 2
SAFETY INFORMATION
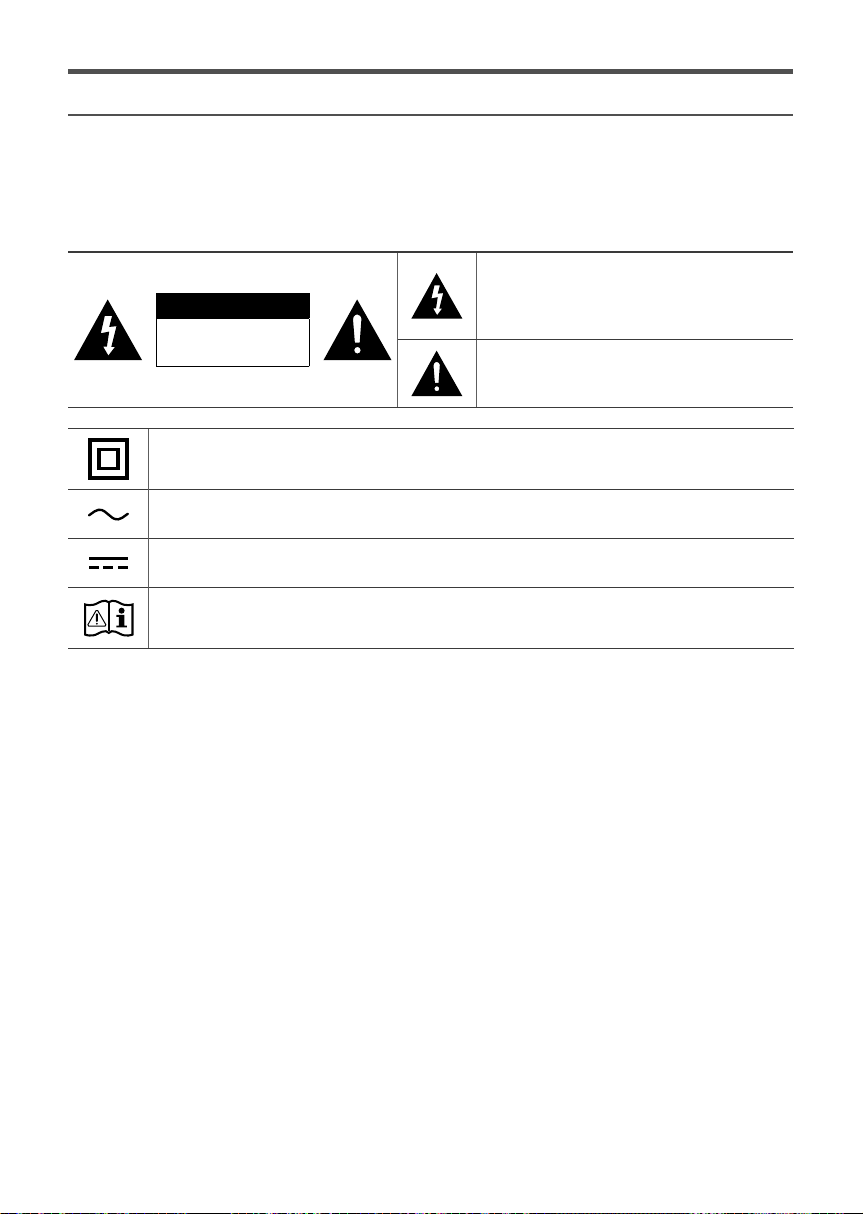
SAFETY WARNINGS
TO REDUCE THE RISK OF ELECTRIC SHOCK, DO NOT REMOVE THE COVER (OR BACK).
NO USER-SERVICEABLE PARTS ARE INSIDE. REFER SERVICING TO QUALIFIED SERVICE PERSONNEL.
This symbol indicates that high voltage is
present inside. It is dangerous to make any
CAUTION
RISK OF ELECTRIC SHOCK
DO NOT OPEN
Class II product : This symbol indicates that it does not require a safety connection to electrical
earth (ground).
AC voltage : This symbol indicates that the rated voltage marked with the symbol is AC
voltage.
DC voltage : This symbol indicates that the rated voltage marked with the symbol is DC
voltage.
Caution, Consult instructions for use : This symbol instructs the user to consult the user
manual for further safety related information.
kind of contact with any internal part of this
product.
This symbol indicates that important literature
concerning operation and maintenance has
been included with this product.
WARNING : To reduce the risk of fire or electric shock, do not expose this appliance to rain or moisture.
CAUTION : TO PREVENT ELECTRIC SHOCK, MATCH WIDE BLADE OF PLUG TO WIDE SLOT, FULLY
INSERT.
• This apparatus shall always be connected to a AC outlet with a protective grounding connection.
• To disconnect the apparatus from the mains, the plug must be pulled out from the mains socket, therefore the
mains plug shall be readily operable.
CAUTION
• Do not expose this apparatus to dripping or splashing. Do not put objects filled with liquids, such as vases on
the apparatus.
• To turn this apparatus off completely, you must pull the power plug out of the wall socket. Consequently, the
power plug must be easily and readily accessible at all times.
· 2 · English
Page 3

PRECAUTIONS
1. Ensure that the AC power supply in your house complies with the power requirements listed on the
identification sticker located on the back of your product. Install your product horizontally, on a suitable base
(furniture), with enough space around it for ventilation (7~10 cm). Make sure the ventilation slots are not
covered. Do not place the unit on amplifiers or other equipment which may become hot. This unit is
designed for continuous use. To fully turn off the unit, disconnect the AC plug from the wall outlet. Unplug the
unit if you intend to leave it unused for a long period of time.
2. During thunderstorms, disconnect the AC plug from the wall outlet. Voltage peaks due to lightning could
damage the unit.
3. Do not expose the unit to direct sunlight or other heat sources. This could lead to overheating and cause the
unit to malfunction.
4. Protect the product from moisture (i.e. vases), and excess heat (e.g. a fireplace) or equipment creating strong
magnetic or electric fields. Disconnect the power cable from the AC supply if the unit malfunctions. Your
product is not intended for industrial use. It is for personal use only. Condensation may occur if your product
has been stored in cold temperatures. If transporting the unit during the winter, wait approximately 2 hours
until the unit has reached room temperature before using.
5. The batteries used with this product contain chemicals that are harmful to the environment.
Do not dispose of batteries in the general household trash. Do not dispose of batteries in a fire. Do not short
circuit, disassemble, or overheat the batteries. There is a danger of explosion if the battery is incorrectly
replaced. Replace only with the same or equivalent type.
· 3 · English
Page 4
FEATURES
Lets you enjoy TV sound after connecting the Soundbar to your TV with or without a cable.
You can enjoy rich and realistic TV sound through the Soundbar connected to your TV with or without a cable.
c Refer to Method 1 on page 8 to see how to connect the Soundbar to your TV using an HDMI Cable.
c Refer to Method 2 on page 9 to see how to connect the Soundbar to your TV using a wireless network.
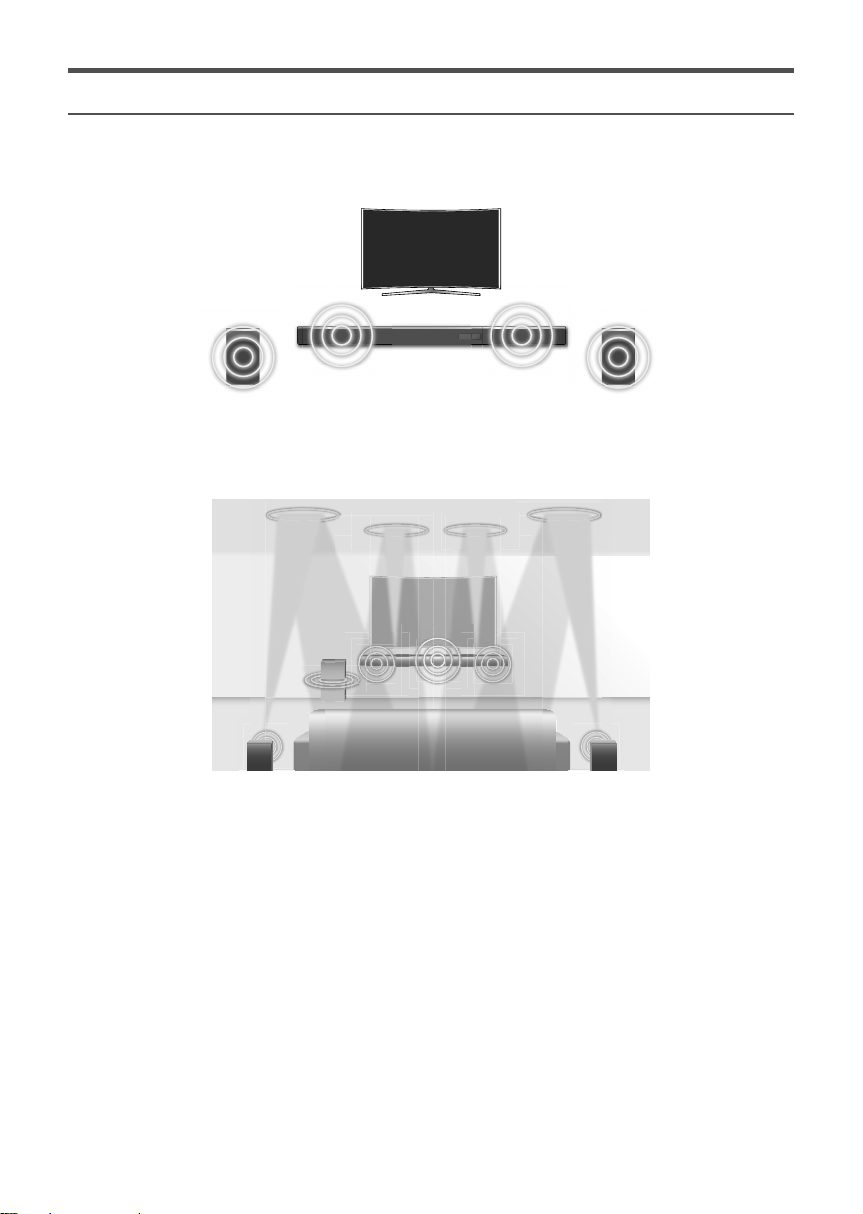
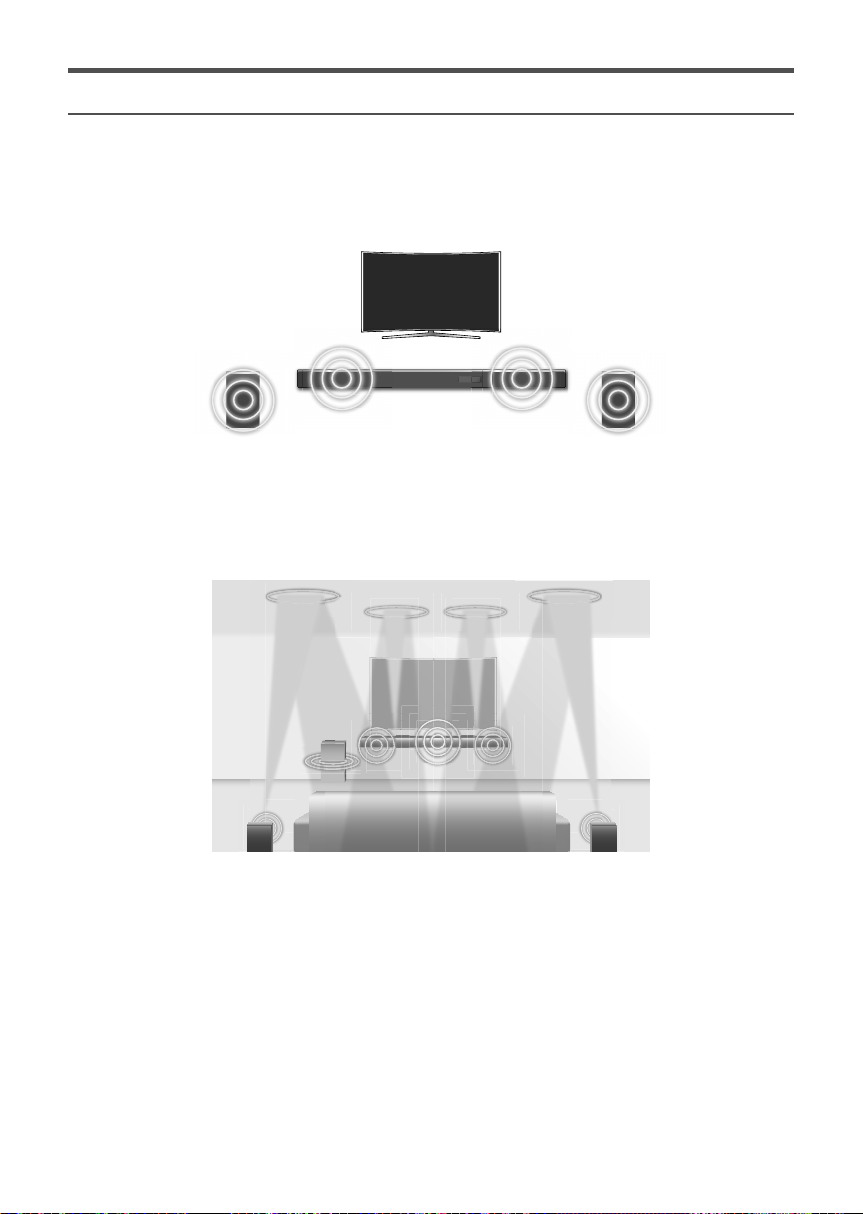
This product supports Dolby Atmos®.
* What is Dolby Atmos®?
Atmos technology enhances existing 5.1 channel surround sound systems by adding an overhead speaker. This
envelops the listener in 360 degrees of sound, delivering an immersive, high-definition, rich, detailed, and deeper
experience. See page 13 to learn how to connect the system.
· 4 · English
Page 5
POWER
POWER
DC 19V
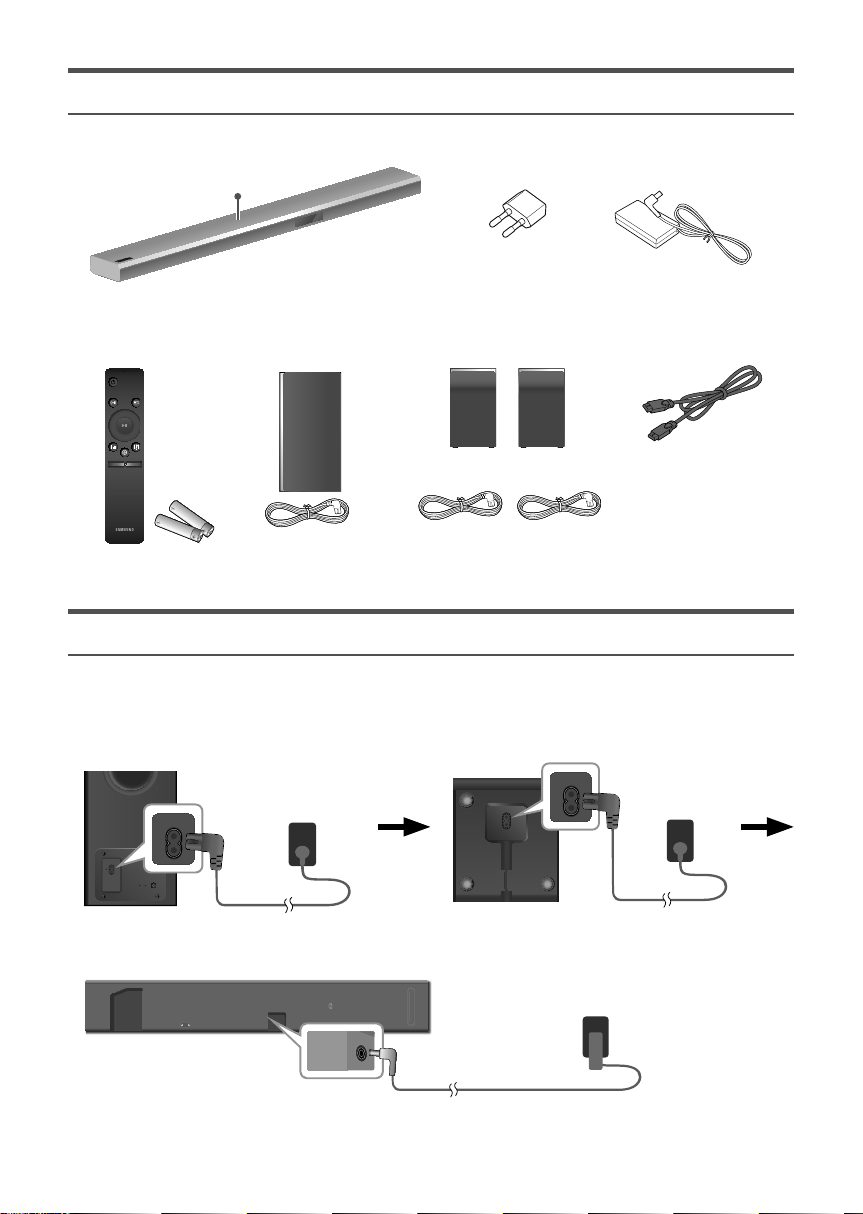
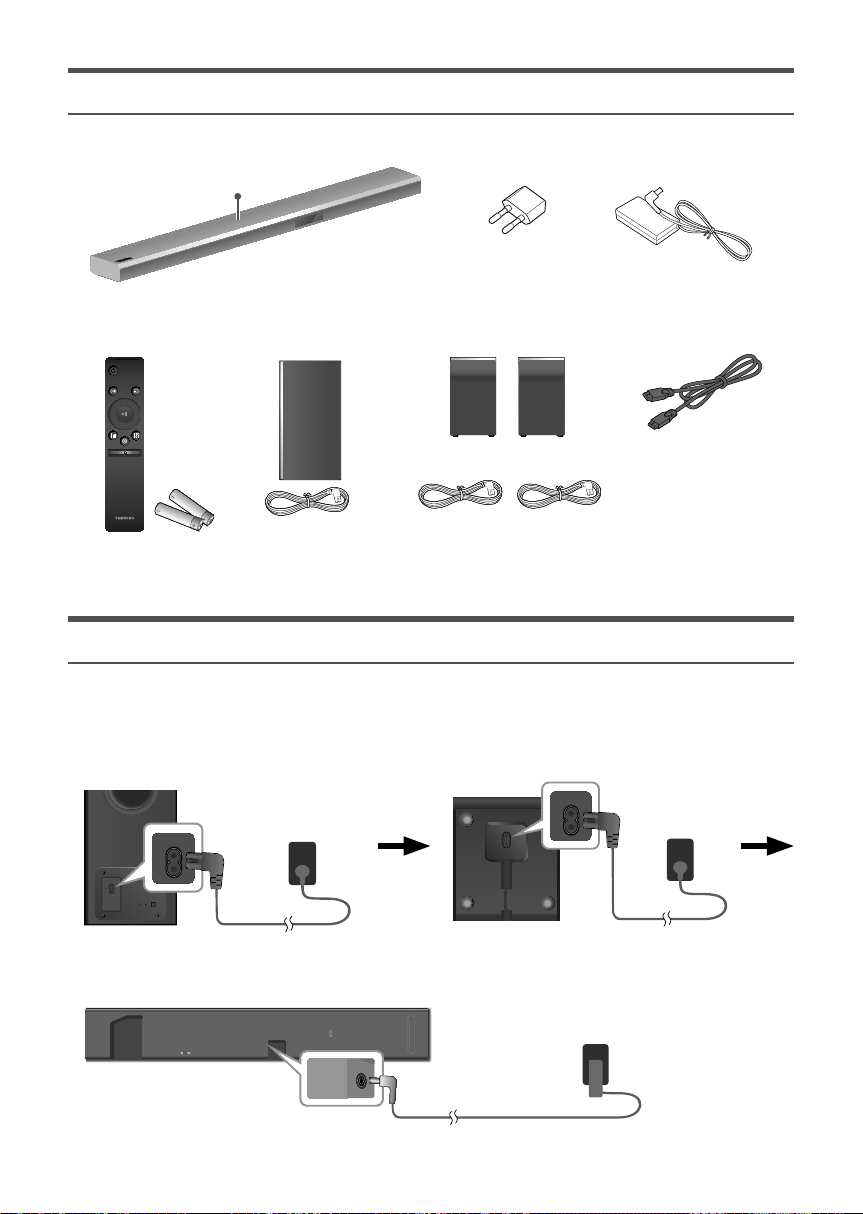
CHECKING THE COMPONENTS
Soundbar Main Unit
To p
(Depending on the
country and model)
Remote Control /
Batteries
SOURCE
SOUND
LEVEL
EFFECT
VOL WOOFER
SOUNDBAR
c To distinguish the left surround speaker from the right, check the label on the rear of each speaker.
Subwoofer Surround Speaker
Left Right
1 Power Cord 2 Power Cord
4 AC/DC Adapter3 AC Plug
HDMI Cable
CONNECTING ELECTRICAL POWER
Use the power components (1, 2, 3, 4) to connect the power supplies in the following order:
Subwoofer Left and Right Surround Speakers Soundbar Main Unit
c For more information about the power supply and power consumption, refer to the label attached to the
product. (Label : Bottom of Soundbar main unit)
1 Power Cord
POWER
LINK STANDBY ID SET
Rear of
Subwoofer
AUX IN
DIGITAL AUDIO IN
(OPTICAL)
HDMI OUT
(TV-ARC)
HDMI IN 1
Wi-Fi SETUPSPK ADD
HDMI IN 2
Connecting
electrical power
DC 19V
SERVICE
Bottom of the
Soundbar Main Unit
Bottom of the Left and
Right Surround Speakers
DC 19V
(Power Jack)
· 5 · English
POWER
2 Power Cord
Connecting
electrical power
3 AC Plug
4 AC/DC Adapter
Page 6
S
i
LINK
LINK
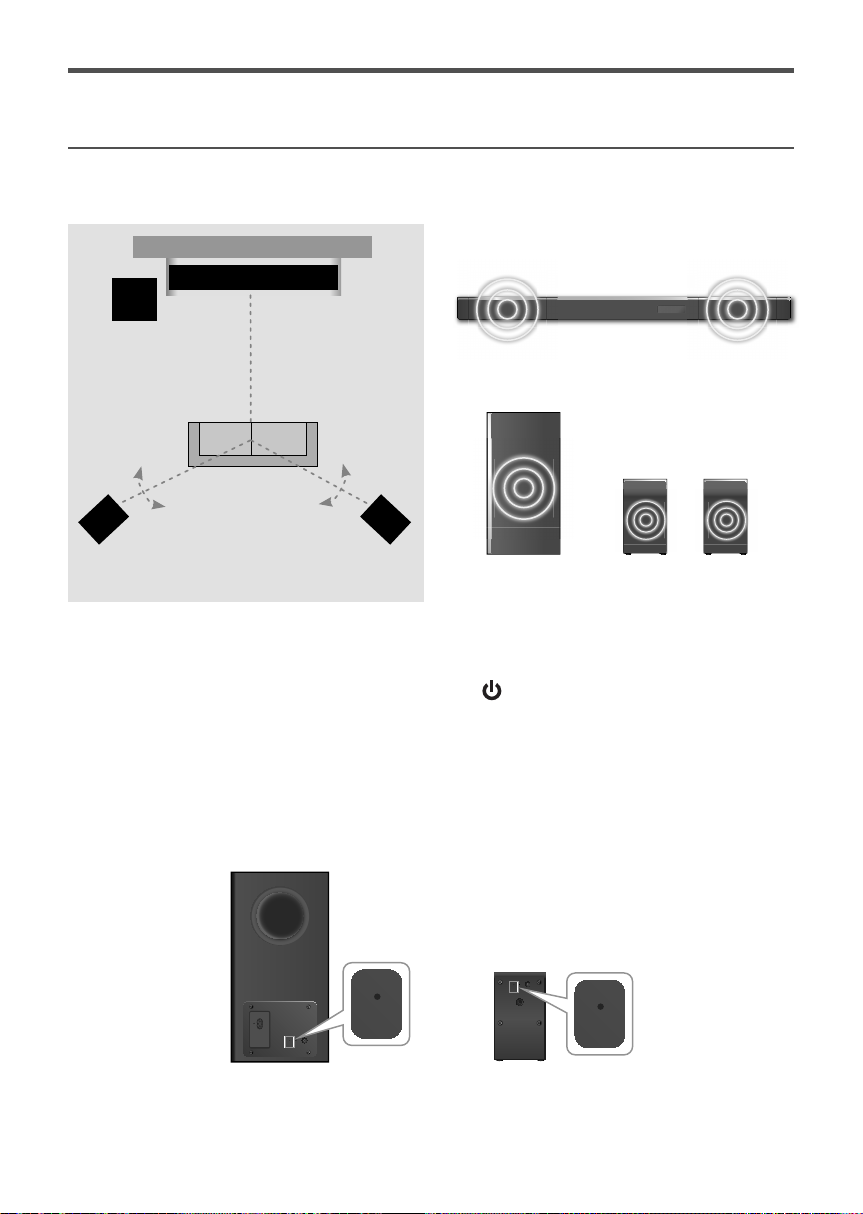
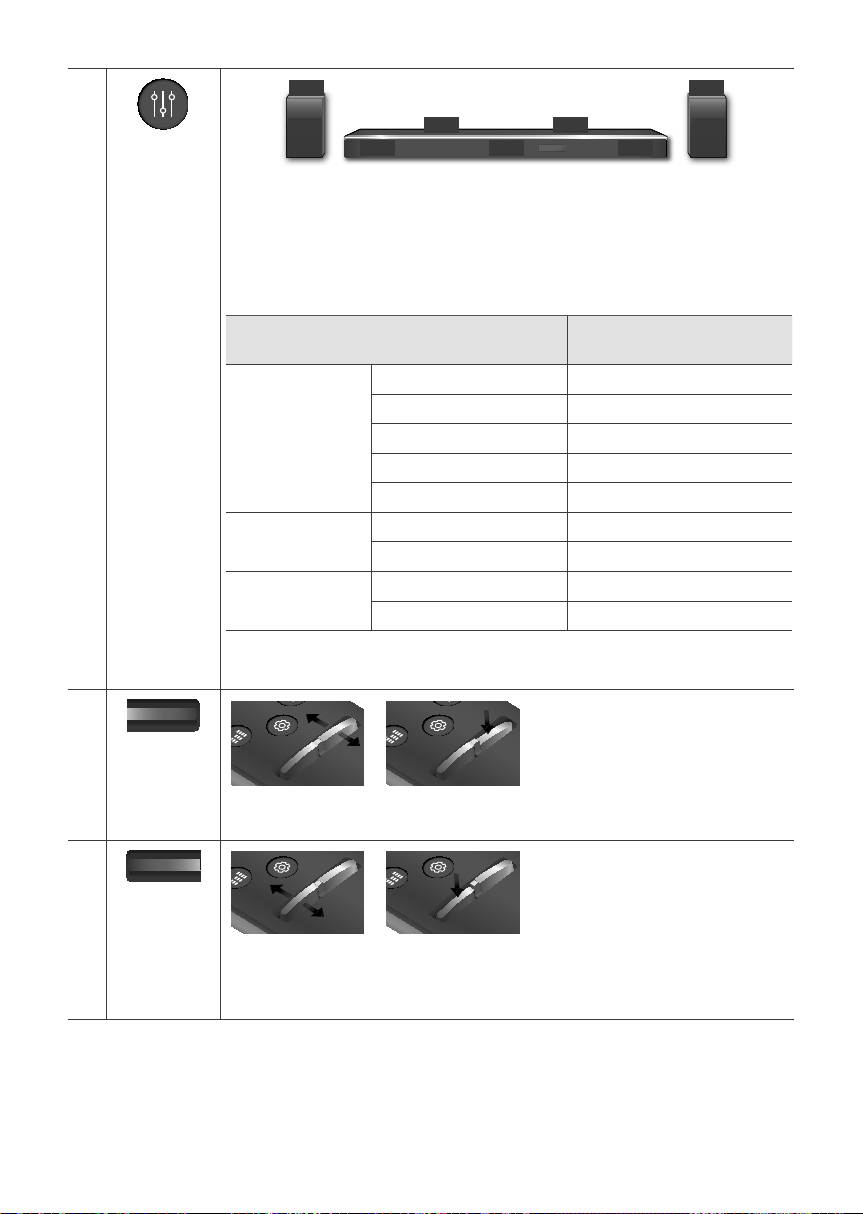
CONNECTING SUBWOOFER AND SURROUND SPEAKERS
TO THE SOUNDBAR MAIN UNIT
You can enjoy rich bass tones and better sound quality by linking the subwoofer to the Soundbar main unit.
Recommended Speaker Layout
TV
Soundbar Main Unit
Subwoofer
Subwoofer
Soundbar Main Unit
t
110°
90°
Surround
Speaker R
Surround Speaker
Left Right
90°
110°
Surround
Speaker L
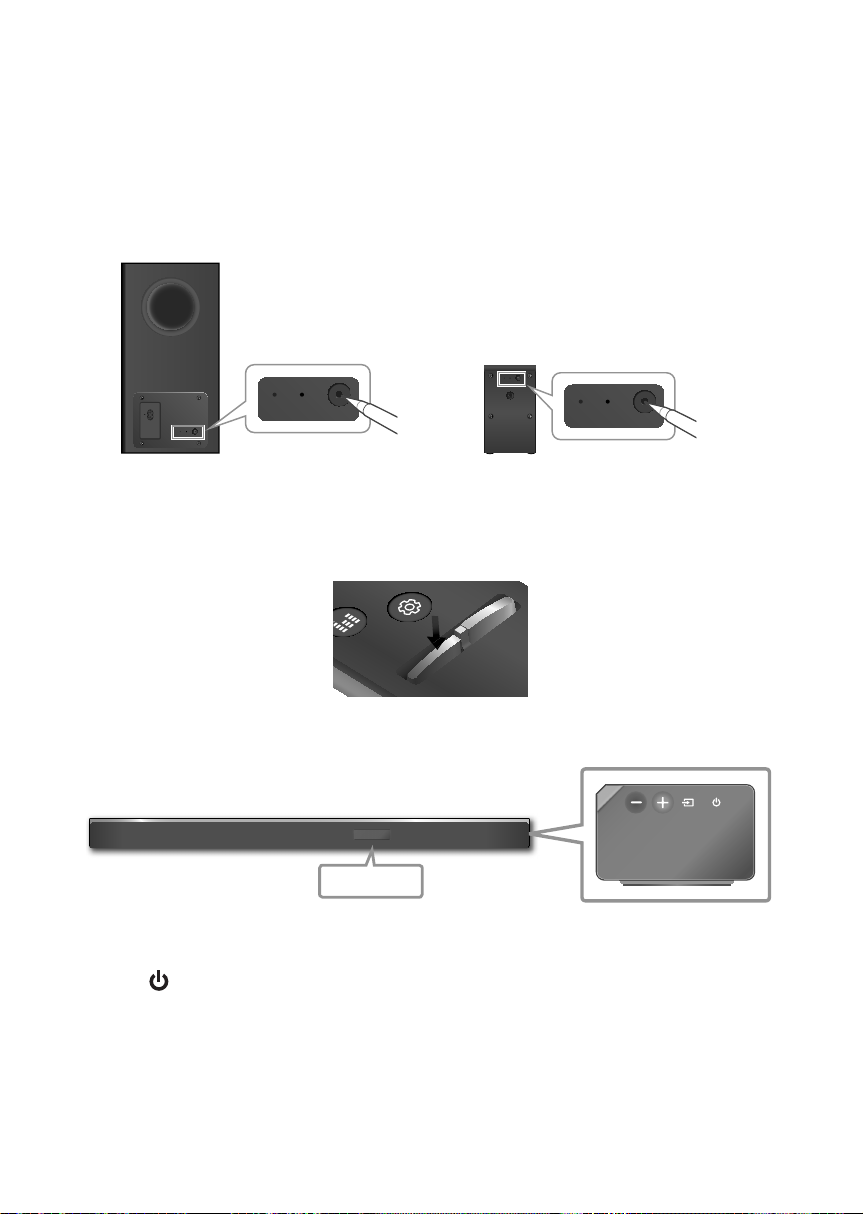
Automatic Connection
1. Connect a power supply to the subwoofer and surround sound speakers.
2. Connect a power supply to the Soundbar, and then press the button on the remote control or on the right
side of the Soundbar.
3. The subwoofer and surround sound speakers are automatically connected to the Soundbar.
4. When auto pairing is complete, the blue indicators at the rear of the subwoofer and surround speakers turn on.
c If the red indicator at the rear of the subwoofer or surround speakers is on or the blue indicator flashes
continuously, auto pairing cannot occur. If this happens, connect each of the speakers manually.
(See page 7)
c Important: Before you begin, put the batteries into the remote. See page 18 for instructions.
LINK STANDBY ID SET
POWER
LINK STANDBY ID SET
Rear of Subwoofer Rear of Surround Speaker
· 6 · English
Page 7
LINK STANDBY ID SET
LINK STANDBY ID SET
LE
R
BA
Connecting the Subwoofer and Surround Speakers Manually if the
Automatic Connection Fails
c Before You Begin
• Make sure that the Soundbar, the subwoofer, and the surround speakers are plugged in.
• Make sure that the Soundbar is turned on.
1. Press and hold ID SET on the rear of the subwoofer and surround speakers for at least 5 seconds. The red
indicator at the rear of each speaker turns off and the blue indicator blinks.
LINK STANDBY ID SET
POWER
LINK STANDBY ID SET
Rear of Subwoofer Rear of the Left and Right Surround Speakers
2. Turn off the Soundbar.
3. Press and hold the VOL button on the remote control for at least 5 seconds with the Soundbar turned off
(OFF).
VOL
WOOFE
SOUND
EFFECT
4. The ID SET message appears on the display of the Soundbar for a short period of time, and then
disappears.
ID SET
Right Side of the Soundbar
5. When the blue indicators on the subwoofer and surround sound speakers blink, turn on the power by
pressing button on the right side of the Soundbar or on the remote control.
6. When the connection is successfully established, the blue indicators on the rear of the subwoofer and
surround speakers turn on without blinking.
c If the connection process fails, the blue indicators will flash continuously. Go to Step 1 and start again.
· 7 · English
Page 8
HDMI OUT
(TV-ARC)
DIGITAL AUDIO IN
(OPTICAL)
HDMI OUT
(TV-ARC)
HDMI IN 1
HDMI IN 2
AUX IN
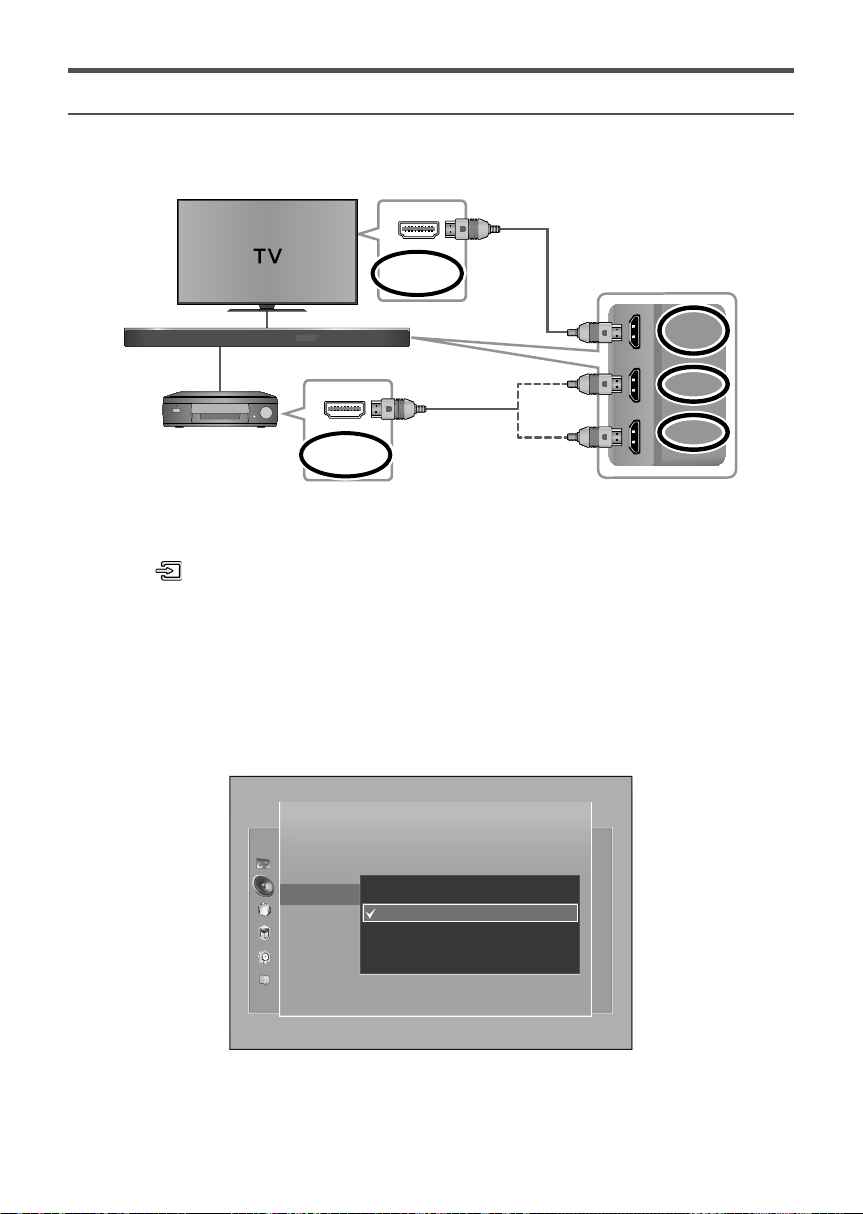
CONNECTING TO YOUR TV
You can enjoy TV sound after connecting the Soundbar to your TV with or without a cable.
c Important: Before you begin, put the batteries into the remote. See page 18 for instructions.
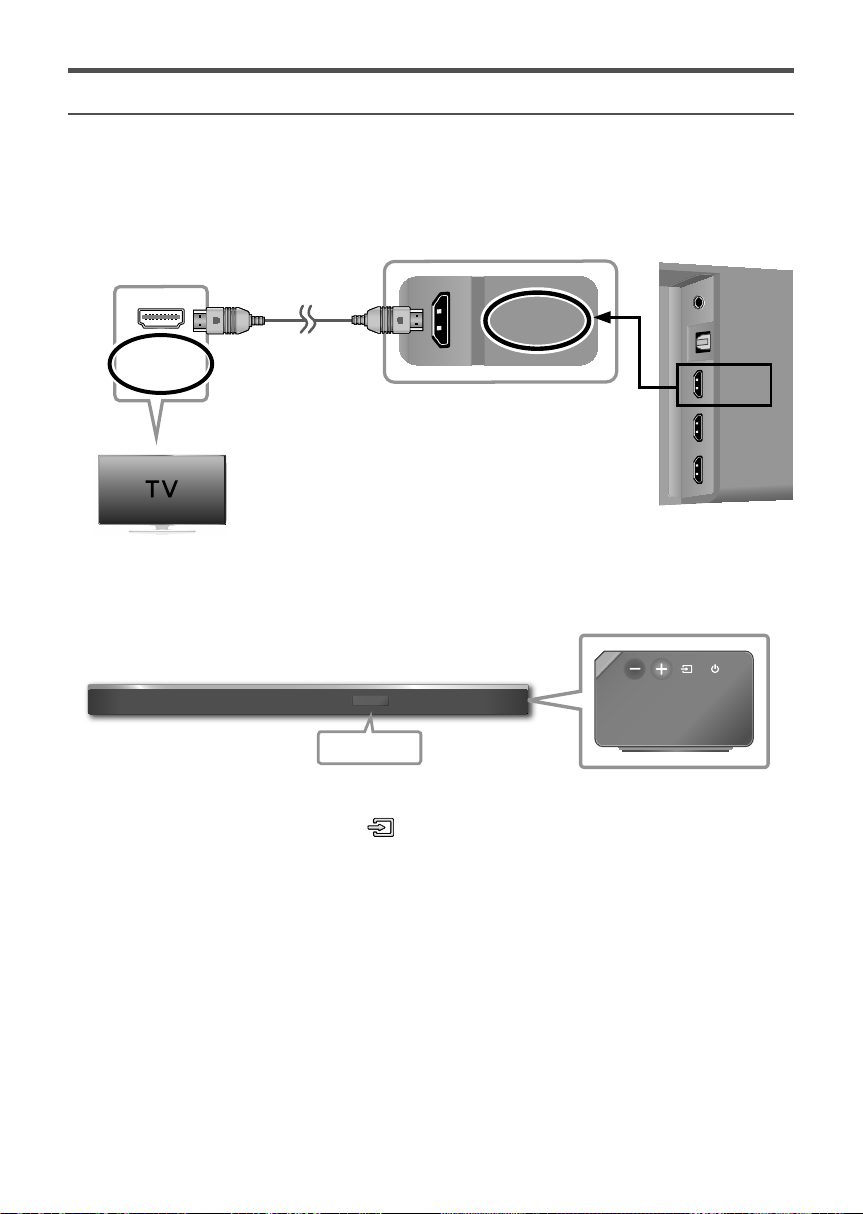
Method 1. Connecting with a Cable
Check the HDMI IN
(TV-ARC) port on your TV.
HDMI IN
(ARC)
HDMI Cable
Check the HDMI OUT (TV-ARC)
port on the Soundbar main unit.
Bottom of
Soundbar
1. Connect the HDMI cable as shown in the illustration above.
2. TV ARC appears on the display window of the Soundbar main unit and the TV sound is played.
TV ARC
Right Side of the Soundbar
c If the TV sound is not played, press either on the right side of the Soundbar or the SOURCE button on
the remote control, and then select D.IN on the display window of Soundbar main unit. The D.IN mode
changes to TV ARC and TV sound is output.
c If TV ARC does not appear on the display window of the Soundbar main unit, check that the cable is
connected to the correct port.
c You can conveniently control the volume of the Soundbar and can set Auto Power Link to ON and have the
Soundbar turn on automatically when you turn the TV on.
· 8 · English
Page 9
Wi-Fi SETUP SPK ADD
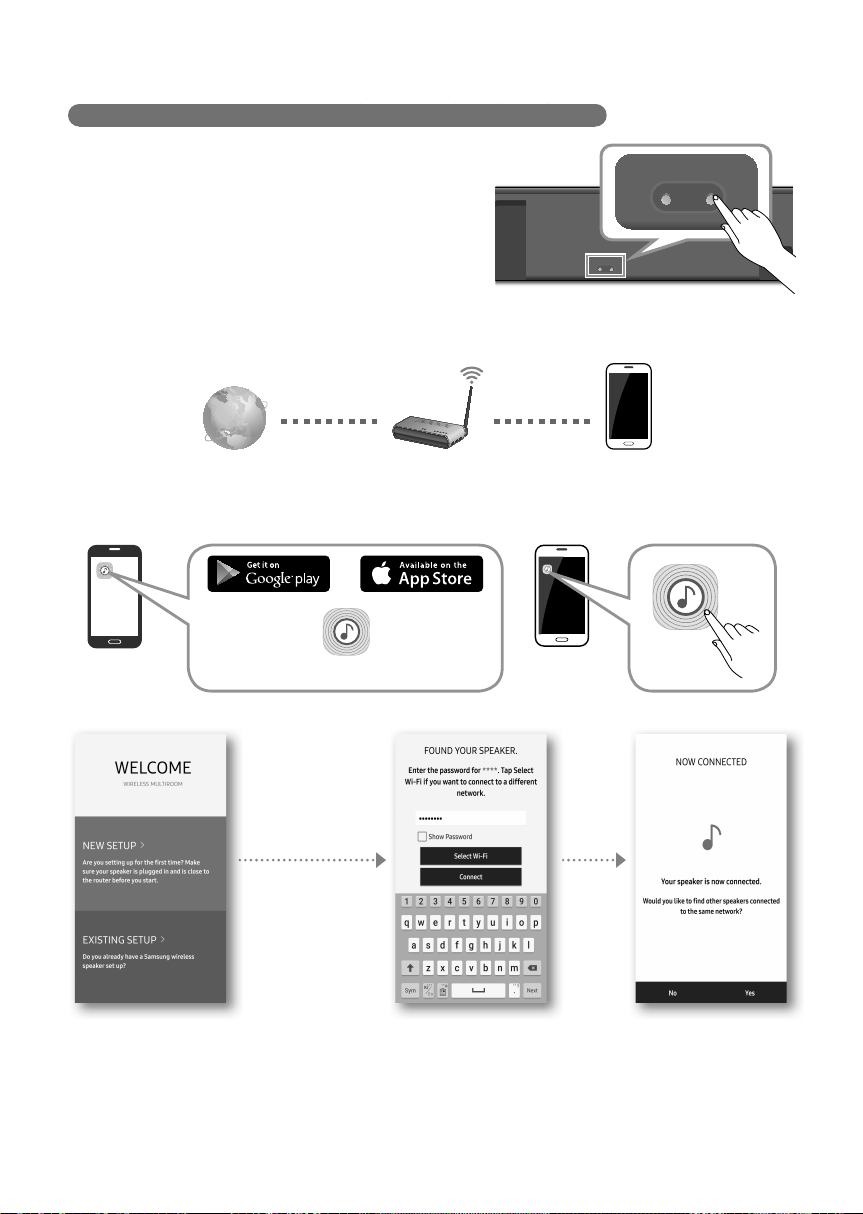
Method 2. Connecting to a Wireless Network
Installing the Samsung Multiroom App and Connecting Wirelessly
To install Samsung Multiroom app for the first time, follow the
steps shown below.
1. Press and hold the SPK ADD button on the bottom of the
Soundbar for more than 1 second.
• There is a notification sound and the message
“ADD SPEAKER” appears on the Soundbar’s main unit.
Afterwards, the message “WIFI READY” appears when
standby-for-connection mode activates.
2. Connect your smart device (smart phone, tablet, etc.)
to your wireless router.
Internet Wireless Router Smart Device
3. Install the Samsung Multiroom app on your smart device (smart phone, tablet, etc.).
4. Launch the Samsung Multiroom app.
AUX IN
DIGITAL AUDIO IN
(OPTICAL)
HDMI OUT
(TV-ARC)
HDMI IN 1
HDMI IN 2
Wi-Fi SETUP SPK ADD
Bottom of the Soundbar
Samsung
Multiroom
Samsung
Multiroom
DC 19V
SERVICE
Android iOS
Samsung Multiroom app
5. Complete the initial settings by following the instructions on the app screen.
Complete the settings
by following the
instructions on the
Samsung Multiroom
app screen.
Start screen Entering the password
for the wireless router
ou must enter the password of your wireless router to connect your Soundbar to your wireless network
c Y
thr
ough Samsung Multiroom app.
c If your wireless router has no designated password, the app completes the initial settings without asking you
to enter a password.
· 9 · English
Speaker connection
complete
Page 10
Wi-Fi SETUP SPK ADD
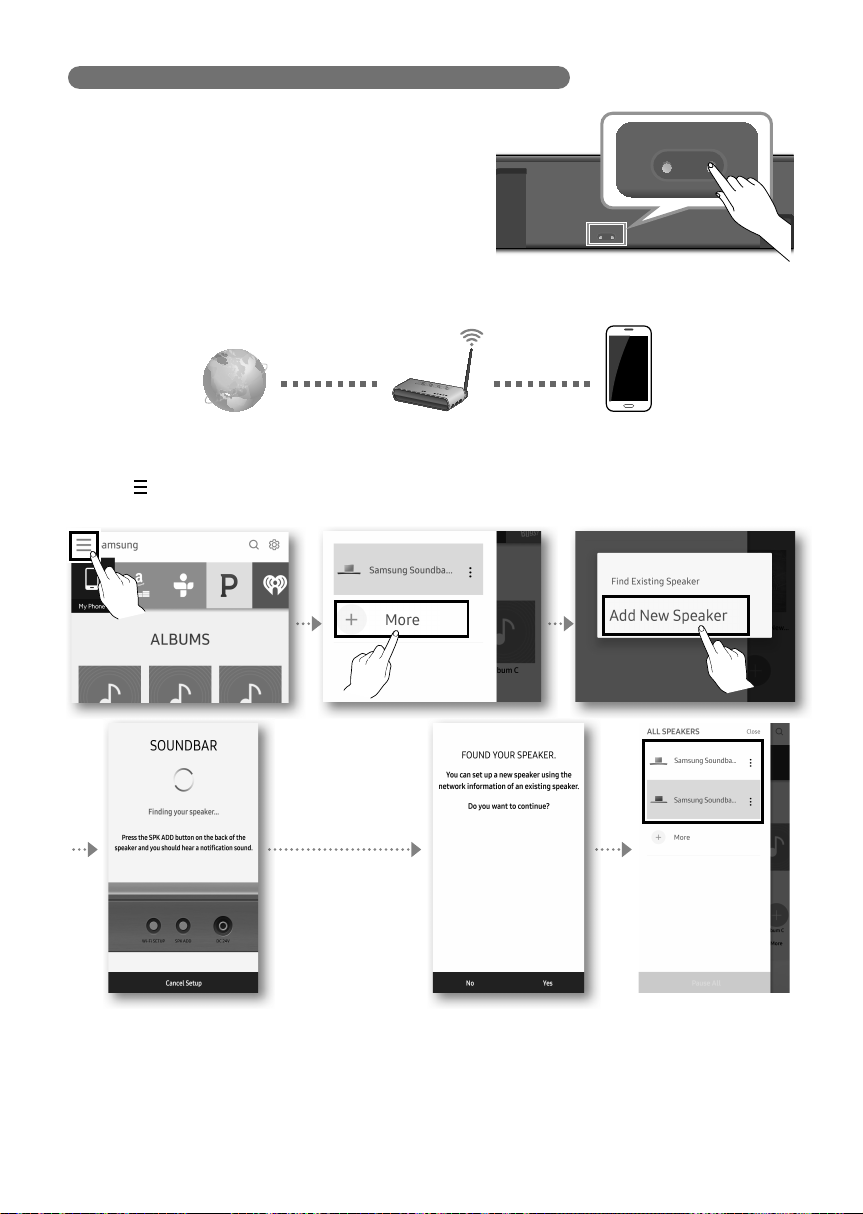
Adding the Soundbar to an Existing Multiroom Audio System
If the Samsung Multiroom app is already installed for use with another
multiroom audio device, follow these steps to add the Soundbar.
1. Press and hold the SPK ADD button on the bottom of the
Soundbar for more than 1 second.
• There is a notification sound and the message
“ADD SPEAKER” appears on the Soundbar’s main unit.
Afterwards, the message “WIFI READY” appears when
standby-for-connection mode activates.
2. Connect your smart device (smart phone, tablet, etc.)
to your wireless router.
Internet Wireless Router Smart Device
3. Launch the Samsung Multiroom app.
4. Touch
to go to the list of all speakers.
5. Select More > Add New Speaker in the app, and then follow the instructions on the app screen.
AUX IN
DIGITAL AUDIO IN
(OPTICAL)
HDMI OUT
(TV-ARC)
HDMI IN 1
HDMI IN 2
Wi-Fi SETUP SPK ADD
Bottom of the Soundbar
Samsung
Multiroom
DC 19V
SERVICE
c To connect a different network, select No.
You must enter the password of your wireless router to connect your Soundbar to your wireless network
through the Samsung Multiroom app.
If your wireless router does not have a designated password, the app completes the initial settings without
asking you to enter a password.
Complete the settings
by following the
instructions on the
Samsung Multiroom
app screen.
Start screen Selection of network
· 10 · English
Speaker addition
complete
Page 11
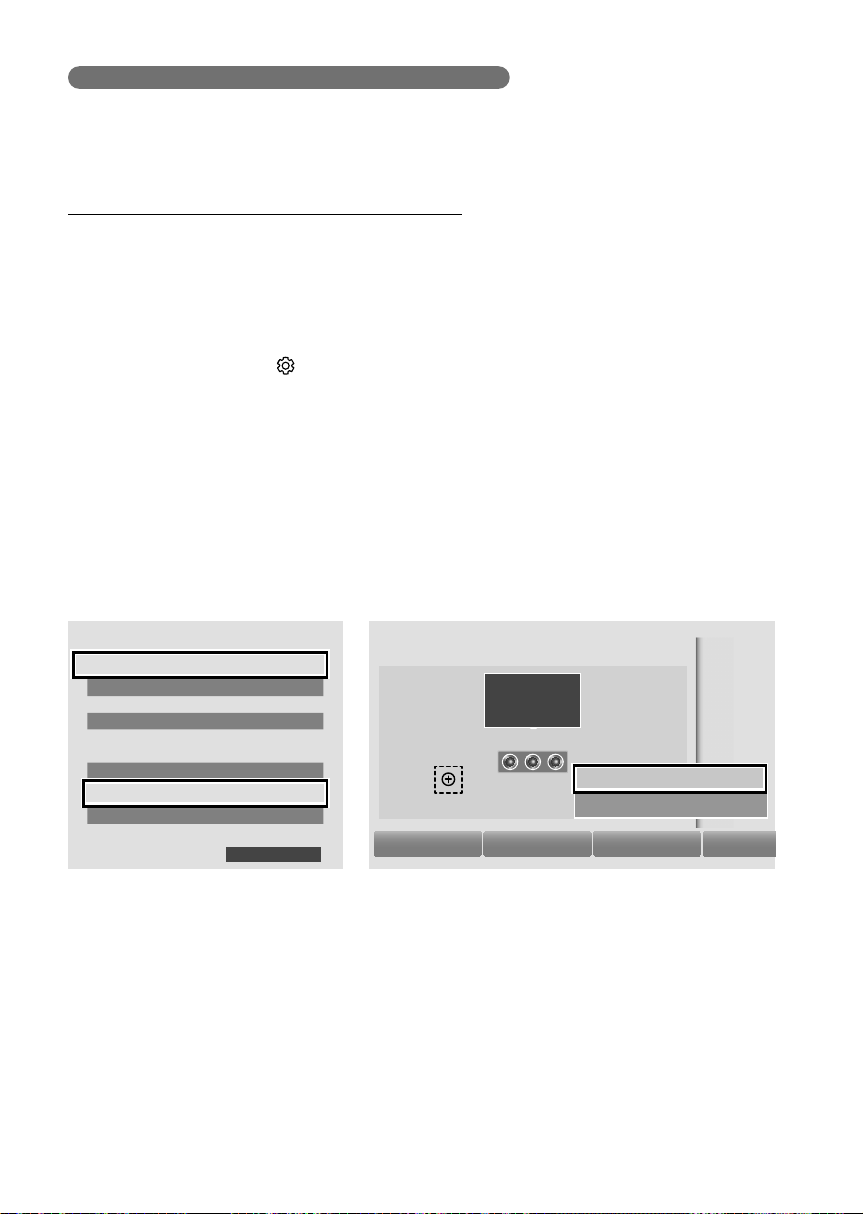
Connecting the Soundbar to your Samsung Smart TV
You can connect your TV to the Soundbar through a wireless network and enjoy the TV sound.
c Important: Make sure that the TV and Soundbar are connected to the same network.
(How to check your Samsung TV network : Home menu Network Network Status)
Configuring Settings from your Samsung Smart TV
c To play sound via the Soundbar, make sure that your TV model supports the Multiroom feature
(Samsung Smart TVs released after 2014).
c If the TV is disconnected from the wireless network due to a change to the input source of the Soundbar,
use the TV menu to re-establish the connection.
For TVs released in 2016
1. Home menu Settings ( ) Sound Sound Output Select [AV] Samsung Soundbar Kxxx (Wi-Fi)
2. TV sound is output.
For TVs released in 2015
1. Home menu
2. TV sound is output.
For TVs released in 2014
1. Home menu
2. From the Soundbar position, select "K950" and select "OK".
3. Home menu
Sound
Speaker List
Sound
Speaker Settings
Sound
Speaker Settings
Select [AV] Samsung Soundbar Kxxx (Wi-Fi)
Select
Multiroom Link - Settings Soundbar+Surround
Select
TV Sound Output Multiroom Link
Speaker Settings
TV Sound Output Multiroom Link
TV Speaker
TV Installation Type
•
TV SoundConnect
• Samsung Audio Device List
• Add New Device On
oom Link
Multir
• Settings
Bluetooth headphone
• Bluetooth headphone List
Soundbar+Surround
4. TV sound is output.
Stand
OK
Multiroom Link
· 11 · English
Soundbar+Surround
Soundbar
c
[AV] Samsung Soundbar K950
OK Volume Level Speaker Test
[AV] Samsung Soundbar K950
Don't Use
Edit Na
Page 12
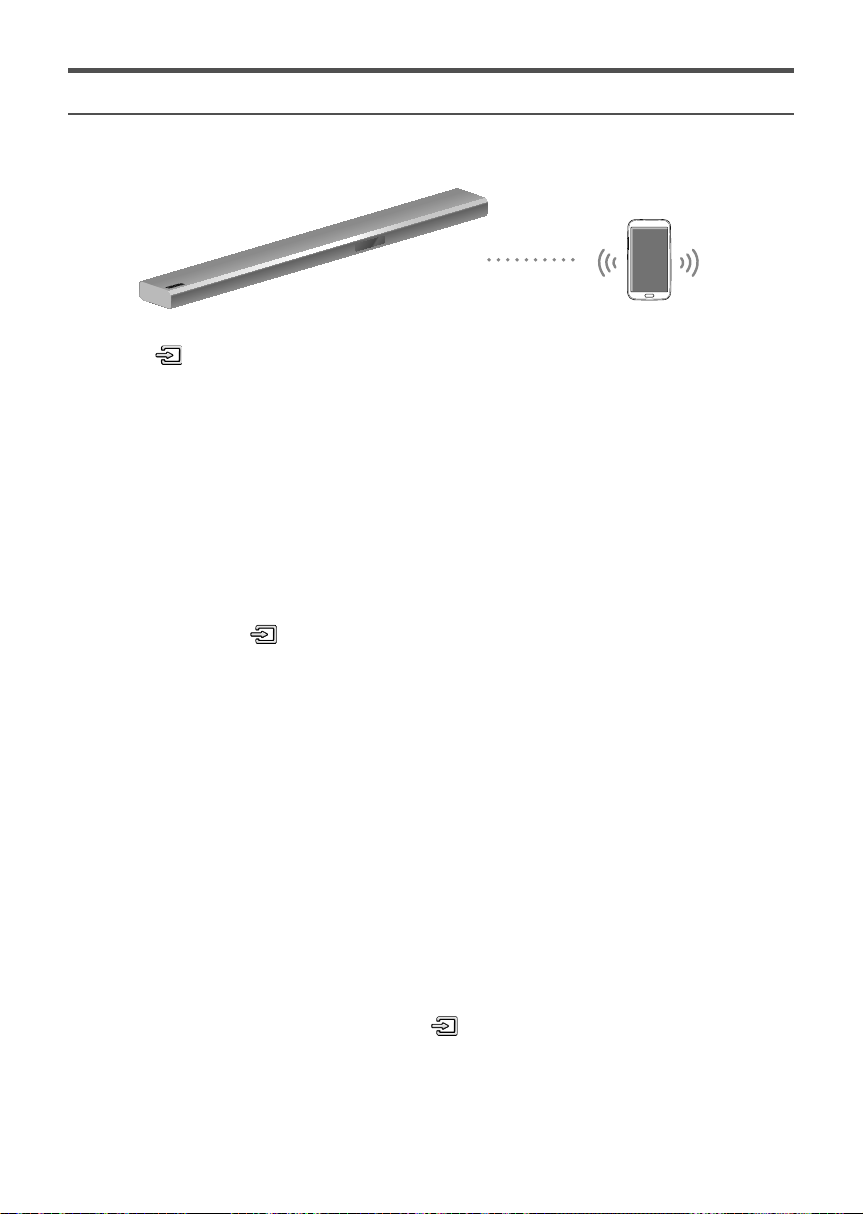
CONNECTION VIA BLUETOOTH
You can connect a Bluetooth device to the Soundbar and enjoy music with stereo sound, all without wires!
c It is not possible to connect multiple Bluetooth devices at the same time.
Connect
Bluetooth device
1. Press the
select BT.
2. Select the Bluetooth menu on the Bluetooth device you want to connect. (Refer to the Bluetooth device's
user manual.)
3. Select "[AV] Samsung Soundbar Kxxx" from the list.
• When the connection is established between the Soundbar and Bluetooth device, the front display
window of the Soundbar displays [Bluetooth device name] → BT.
4. Play music on the connected device.
[If failed to connect to the Bluetooth device / If device searching is needed again]
• If "[AV] Samsung Soundbar Kxxx" is found in the search results on the Bluetooth device, delete it.
• Press and hold either the
control to switch to BT PAIRING mode, then select "[AV] Samsung Soundbar Kxxx" from the displayed list
of available devices on the Bluetooth device. (Refer to steps 2 and 3 above).
c If asked for a PIN code when connecting a Bluetooth device, enter <0000>.
c In Bluetooth connection mode, the Bluetooth connection will be lost if the distance between the Soundbar
and the Bluetooth device exceeds 10 meters.
c The Soundbar automatically turns off after 5 minutes in the Ready state.
c The Soundbar may not perform Bluetooth search or connection correctly under the following
circumstances:
– If there is a strong electrical field around the Soundbar.
– If several Bluetooth devices are simultaneously paired with the Soundbar.
– If the Bluetooth device is turned off, not in place, or malfunctions.
c Electronic devices may cause radio interference. Devices that generate electromagnetic waves must be
kept away from the Soundbar main unit - e.g., microwaves, wireless LAN devices, etc.
button on the right side of the Soundbar or the SOURCE button on the remote control to
button on the right side of the Soundbar or the SOURCE button on the remote
Disconnecting the Soundbar from the Bluetooth device
Press the SOURCE button on the remote control or the button on the product's
BT to another mode or turn off the Soundbar.
• The connected Bluetooth device will wait a certain amount of time for a response from the Soundbar before
terminating the connection. (Disconnection time may differ, depending on the Bluetooth device)
· 12 · English
rig
ht side to switch from
Page 13
HDMI OUT
(TV-ARC)
HDMI IN 1
HDMI IN 2
CONNECTING DEVICES IN ORDER TO USE DOLBY ATMOS®
This product supports Dolby Atmos®.
c Important: Dolby Atmos® works only in HDMI mode. It is not compatible with other input sources.
HDMI Cable
HDMI IN
Bottom of the
Soundbar
Soundbar
Or
External
Device
HDMI OUT
HDMI Cable
1. Connect an HDMI cable from the HDMI IN 1 or HDMI IN 2 jack on the back of the product to the HDMI OUT
jack on your digital device.
Use the HDMI cable to connect the HDMI IN port on the TV to the HDMI OUT
(TV-ARC) port on the bottom of the Soundbar.
2. Press the
button on the right side of the Soundbar or the SOURCE button on the remote control to
select HDMI1 or HDMI2.
3. The selected HDMI mode is displayed on the Soundbar display panel and sound plays.
c When Dolby Atmos® operated, the Blue LED on the right edge of the Soundbar will turn on and glow.
4. Configuring Dolby Atmos® on your BD player, or other device.
• Check the audio output options using the settings menu on your BD player, or other device.
• Make sure that "No Encoding" is selected for bitstream in the audio output options.
e.g., On a Samsung Player: Home menu Settings Sound
Digital Output: Select Bitstream (Unprocessed).
Settings
Sound
Speaker Settings
Digital Output
PCM Downsampling
Dynamic Range Contr
Downmixing Mode
DTS Neo:6 Mode Of
Audio Sync 0 ms
• If the Audio Output options include Secondary Audio, make sure it is set to Off.
c Dolby Atmos® works only on 5.1.4 channels.
c Make sure that the content supports Dolby Atmos®.
PCM
Bitstream (Unprocessed)
Bitstream (Re-encoded DTS)
Bitstr
ol
eam (Re-encoded Dolby D)
f
· 13 · English
Page 14
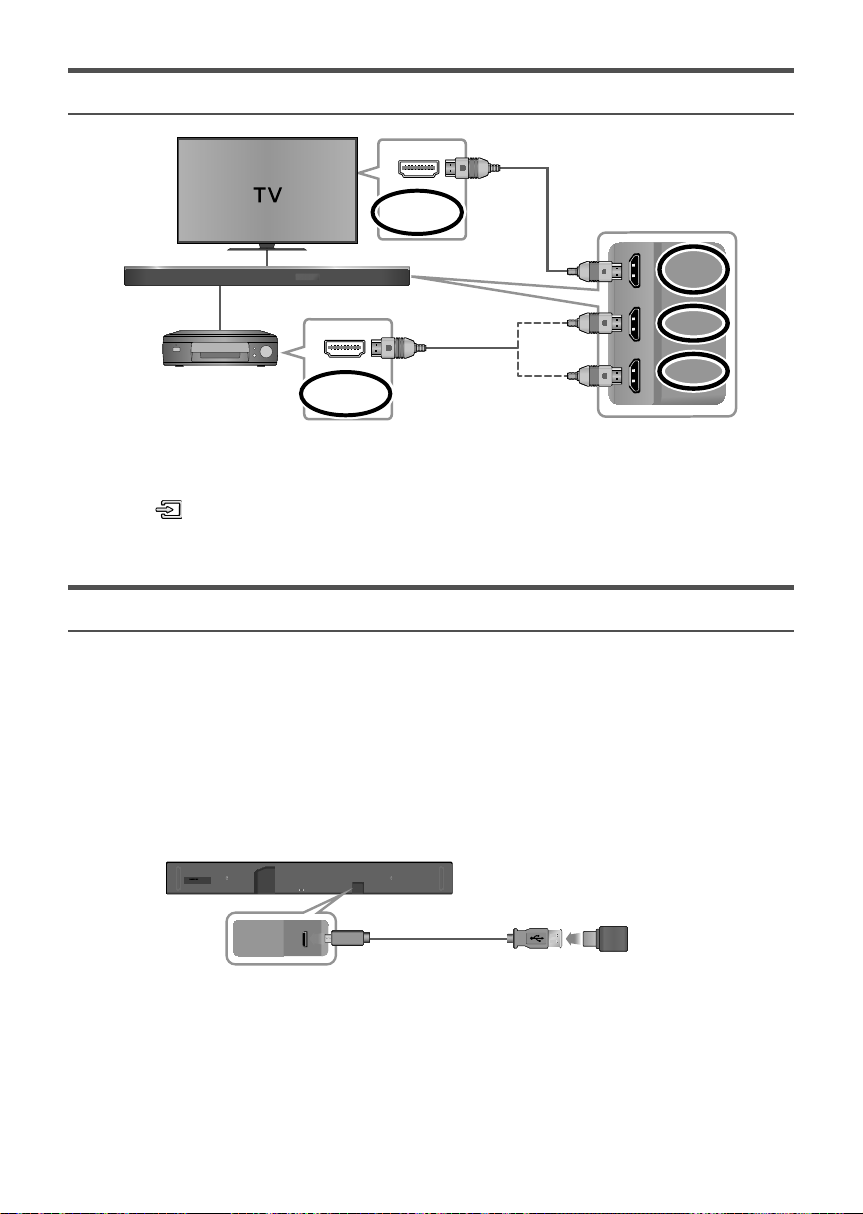
CONNECTING AN EXTERNAL DEVICE
HDMI OUT
(TV-ARC)
HDMI IN 1
HDMI IN 2
SERVICE
HDMI Cable
HDMI IN
Bottom of the
Soundbar
Soundbar
Or
External
Device
HDMI OUT
HDMI Cable
1. Connect an HDMI cable from the HDMI IN 1 or HDMI IN 2 jack on the back of the product to the HDMI OUT
jack on your digital device.
Use the HDMI cable to connect the HDMI IN port on the TV to the HDMI OUT
(TV-ARC) port on the bottom of the Soundbar.
2. Press the
button on the right side of the Soundbar or the SOURCE button on the remote control to
select HDMI1 or HDMI2.
3. The selected HDMI mode is displayed on the Soundbar display panel and sound plays.
SOFTWARE UPDATE
Samsung may offer updates for the Soundbar's system firmware in the future.
Auto Update
The automatic update function is enabled on the Soundbar by default. Automatic firmware updates are searched
for and performed if the Soundbar is connected to the Internet, irrespective of whether it is turned on or off.
c To use the Auto Update function, the Soundbar must be connected to the Internet.
The Wi-Fi connection to the Soundbar will be terminated if its power cord is disconnected or the power is cut
off. If the power is cut off, turn on the Soundbar and reconnect it.
Updating with USB
AUX IN
DIGITAL AUDIO IN
(OPTICAL)
HDMI OUT
(TV-ARC)
HDMI IN 1
HDMI IN 2
If an update is offered, you can update the firmware by connecting a USB device with the firmware update
stored on it to the USB port on your Soundbar.
For more information about how to download update files, go to the Samsung Electronics website at
(samsung.com/sec) search for the model name download the firmware from the customer support menu
option. The option name can vary.
c If the input source has been changed after an update or a reconnection of the power cable, change the input
source to TV, or the desired source.
DC 19V
Wi-Fi SETUPSPK ADD
SERVICE
Micro USB to USB adapter Cable (not supplied)
· 14 · English
Page 15
INSTALLING THE WALL
MOUNT
You can use the wall mount bracket to mount this unit
on a wall.
I nstallation Precautions
• Install on a vertical wall only.
• Do not install the Soundbar system in a location
with high temperature and/or humidity. Install the
system on a stable wall that can bear the weight of
the Soundbar main unit.
• Check the strength of the wall. To install the
Soundbar system on a wall that may not bear the
Soundbar main unit weight, reinforce the wall
before installation. If this is not possible, install the
system on another wall, one stable enough to bear
the weight of the Soundbar main unit.
• Purchase and use the fixing screws or anchors
appropriate for the kind of wall you have (plaster
board, iron board, wood, etc.). If possible, fix the
support screws into wall studs.
• Purchase wall mounting screws according to the
type and thickness of the wall you will mount the
Soundbar on.
- Diameter: M5
- Length: 35 mm or longer recommended.
• Connect cables from the unit to external devices
before you install it on the wall.
• Make sure the unit is turned off and unplugged
before you install it. Otherwise, it may cause an
electric shock.
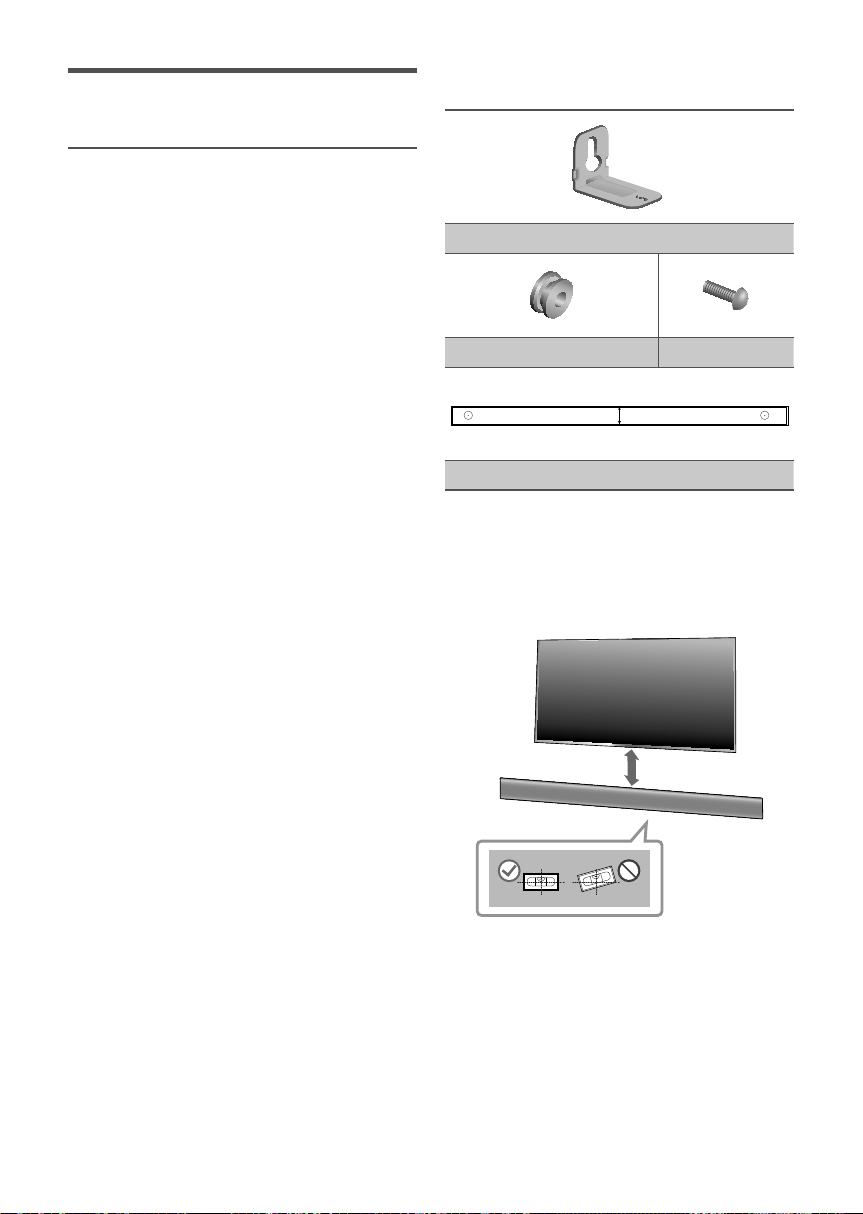
Wallmount Components
Bracket-Wall Mount (2 EA)
Holder-Screw (2 EA) Screw (2EA)
C C
1. Place the Wall Mount Guide against the wall
surface.
●
The Wall Mount Guide must be level.
●
If your TV is mounted on the wall, install the
Soundbar at least 5 cm below the TV.
CENTER LINE
C TYPE : 700mm
Wall Mount Guide
5 cm or more
· 15 · English
Page 16
C
C
C
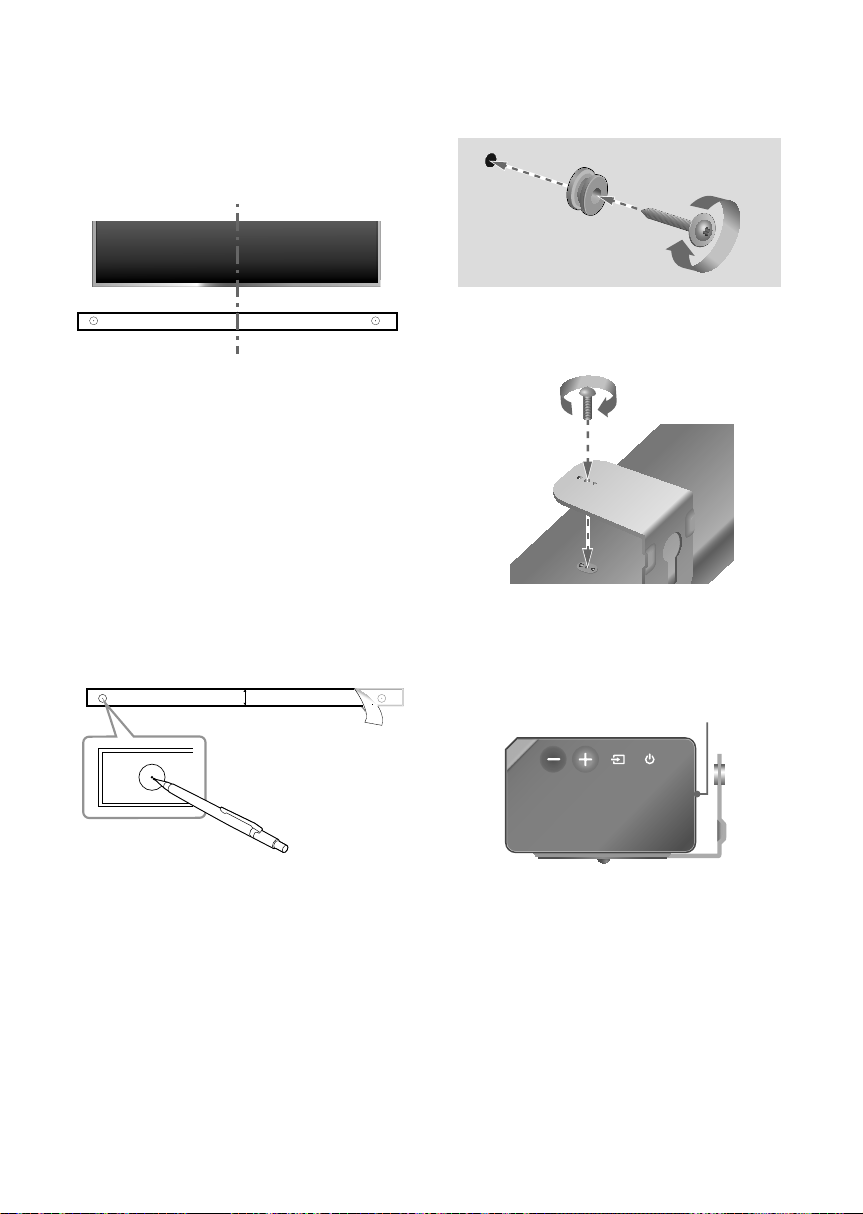
2. Align the Paper Template's Centre Line with the
centre of your TV (if you are mounting the
Soundbar below your TV), and then fix the Wall
Mount Guide to the wall using tape.
c If you are not mounting below a TV, place the
Centre Line in the centre of the installation area.
C C
CENTER LINE
C TYPE : 700mm
Centre Line
3. Push a pen tip or sharpened pencil tip through the
centre of the C-TYPE images on each end of the
Guide to mark the holes for the supporting
screws, and then remove the Wall Mount Guide.
4. Using an appropriately sized drill bit, drill a hole in
the wall at each marking.
c If the markings do not correspond to the
positions of studs, make sure you insert
appropriate anchors or mollies into the holes
before you insert the support screws. If you use
anchors or mollies, make sure the holes you drill
are large enough for the anchors or mollies you
use.
C
CENTER LINE
ENTER LINE
C TYPE : 700mm
5. Push a screw (not supplied) through each
Holder-Screw, and then screw each screw
firmly into a support screw hole.
6. Install 2 Bracket-Wall Mounts in the right
orientation on the bottom of the Soundbar, using
2 Screws (M4 x L12)
●
When assembling, make sure the hanger parts
of the Bracket-Wall Mounts are located
behind the rear of the Soundbar. See the
illustration below.
Rear of the Soundbar
Right end of the Soundbar
· 16 · English
Page 17
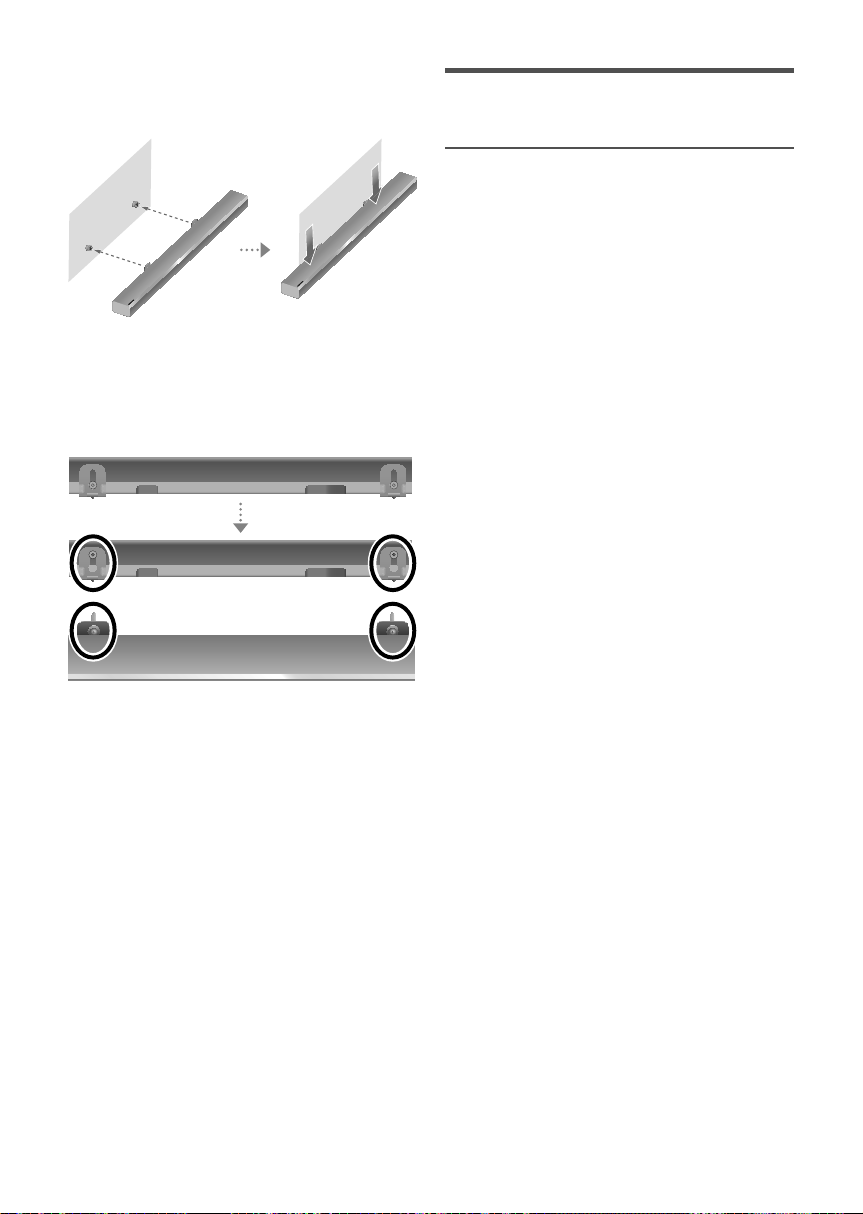
7. Install the Soundbar with the attached Bracket-
Wall Mounts by hanging the Bracket-Wall
Mounts on the Holder-Screws on the wall.
8. Slide the Soundbar down as shown below so that
the Bracket-Wall Mounts rest securely on the
Holder-Screws.
c Slide the Bracket-Wall Mounts down from the
bottom to install it onto the Holder-Screws.
INSTALLING THE SURROUND
SPEAKERS ON A WALL
You can purchase wall mounts separately to install
the surround speakers on a wall.
Considerations for Purchasing
• Endurable load : Above 8.0 Kg
• Hole size : 1/4 - 20 threaded insert
c Since wall-mount installation is optional, you
must purchase the corresponding accessories
separately.
c Please have a qualified installer install the
surround speaker Wall Mount Brackets.
c Ask a professional installation company to mount
your product on the wall.
c Check the strength of the wall before you install
the Wall Mount Brackets. If the strength is
insufficient, make sure to reinforce the wall before
installing the Wall Mount Brackets and the
speakers on the wall.
c For more information, please refer to the Wall
Mount's manual.
c Samsung Electronics is not liable for any damage
to the product due to the product being installed
inappropriately.
c Take care not to install the speakers sideways or
upside down.
· 17 · English
Page 18

REMOTE CONTROL BUTTONS & FEATURES
Inserting Batteries before using the Remote
Control (AA batteries X 2)
SOUND
EFFECT
VOL WOOFER
SOUNDBAR
SOURCE
LEVEL
Slide the battery cover in the direction of the arrow until it is
completely removed.
Insert 2 AA batteries (1.5V) in the correct +/- polarity. Slide the
battery cover back into position.
Controlling the Volume of Soundbar by using
Your TV Remote Control
1. Press and hold the SOUND button for more than
5 seconds while the Soundbar is turned on.
2. "ON - TV REMOTE" appears on the Soundbar's display.
3. In the TV's menu, set the TV speaker to external speaker.
c Not available in TV ARC, BT, HDMI1 and HDMI2 modes.
(Available only in D.IN (optical) and AUX modes)
c On the TV remote control, only the volume and mute buttons
are available. Other buttons are disabled.
c TV menus differ by manufacturer and model. Refer to the TV's
user manual for further information.
c Manufacturers supporting this function:
●
VIZIO, LG, Sony, Sharp, PHILIPS, PANASONIC, TOSHIBA,
GRUNDIG, Hisense, RCA
●
This function may not be compatible with your TV's remote
depending on the remote control's manufacturer.
c To turn off this function, press the
5 seconds. "OFF - TV REMOTE" appears on the Soundbar's
display.
SOUND button for
Power
SOUND
Turns the Soundbar on and off.
Turns Surround Sound on and off. The Surround Sound function adds depth and a
sense of space to sound.
• ON: Play sound over all the speakers.
c You can also hear 5.1.4 channel sound for music sources that are not Dolby
Atmos®.
• OFF: Play sound through the original source channel.
Each time you press this button, ON and OFF alternate.
· 18 · English
Page 19
SOUND
৻ࠗ۱
SOUND
৻ࠗ۱
EFFECT
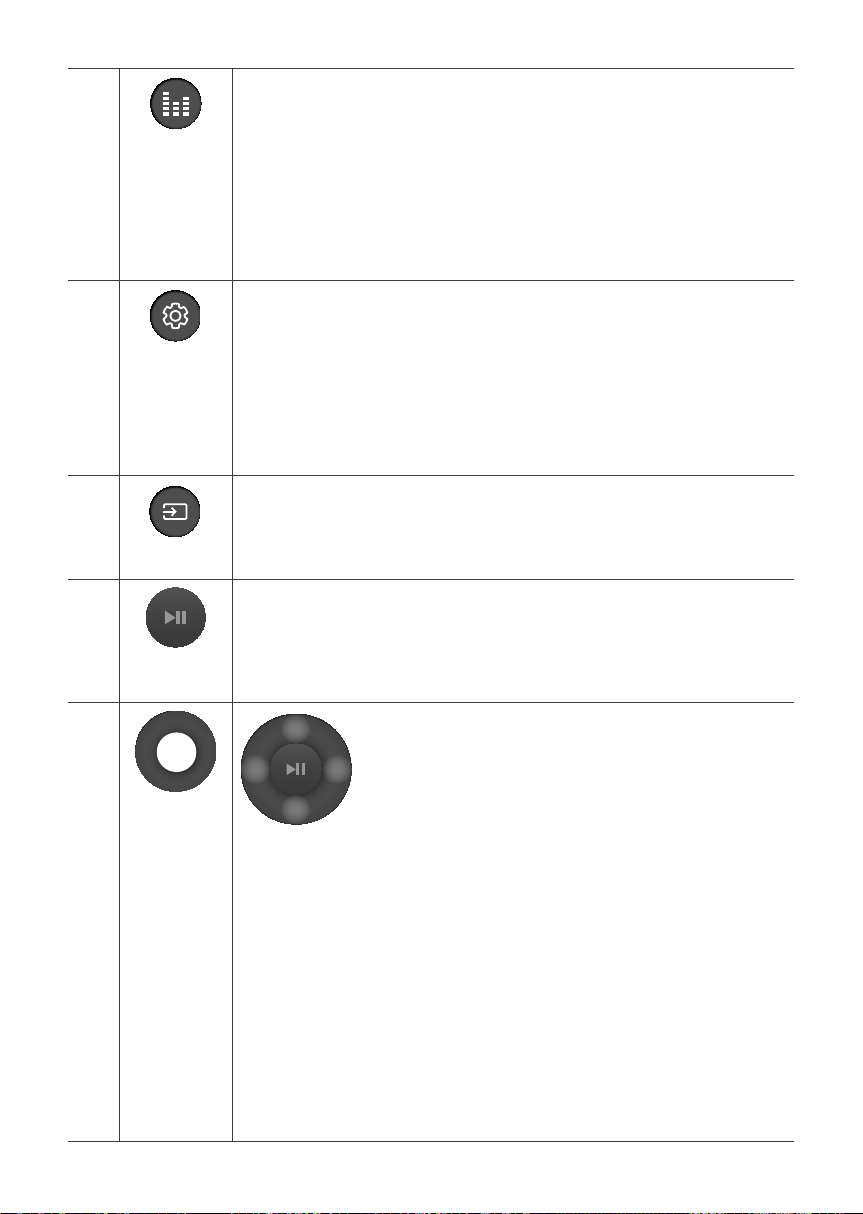
Sound control
SOURCE
Play/Pause
(BT/WIFI)
You can select from 6 sound modes: STANDARD, MUSIC, CLEAR VOICE, SPORTS,
MOVIE, and NIGHT.
c NIGHT mode
When changing a channel or music source, the volume difference between
different music input sources is automatically adjusted to be suitable for listening.
c DRC (Dynamic Range Control)
Lets you apply dynamic range control to Dolby Digital tracks. Press and hold the
EFFECT button for about 5 seconds in standby mode to toggle the DRC (Dynamic
Range Control) function ON - DRC and OFF - DRC.
You can select from TREBLE, BASS, or AUDIO SYNC.
• To control the volume of the treble or bass sound, select TREBLE or BASS in
Sound Settings, and then adjust the volume between -3~+3 by using the
Up/Down buttons.
• If the video and audio between the TV and your Soundbar are not synchronized,
select AUDIO SYNC in Sound Settings, and then set audio delay between 0~300
milliseconds by using the Up/Down buttons.
c Audio Sync is only supported in some functions.
Press to select a source connected to the Soundbar.
c BT PAIRING mode
To turn on BT PAIRING mode in Bluetooth function, press and hold the SOURCE
button for more than 5 seconds.
Press the
Press the & button again to play the selected music.
&
button to pause a music temporarily.
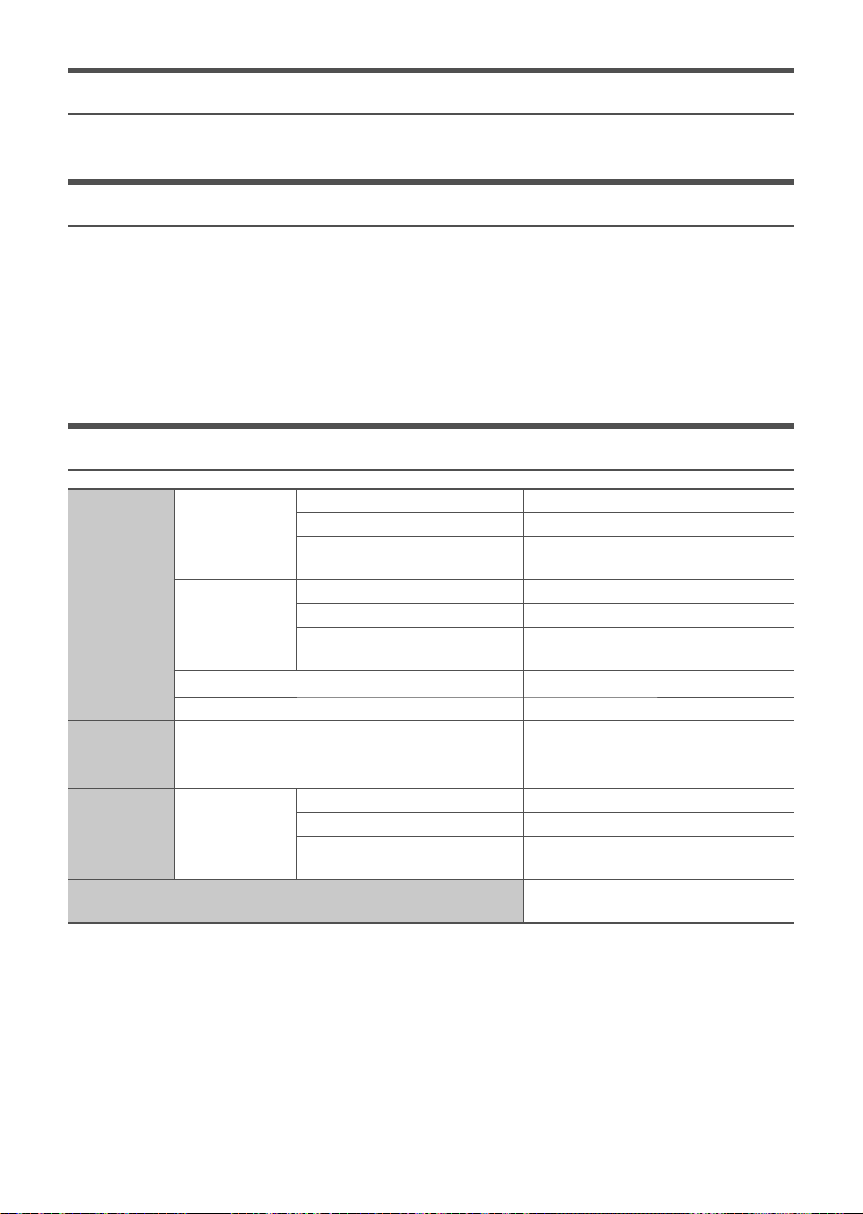
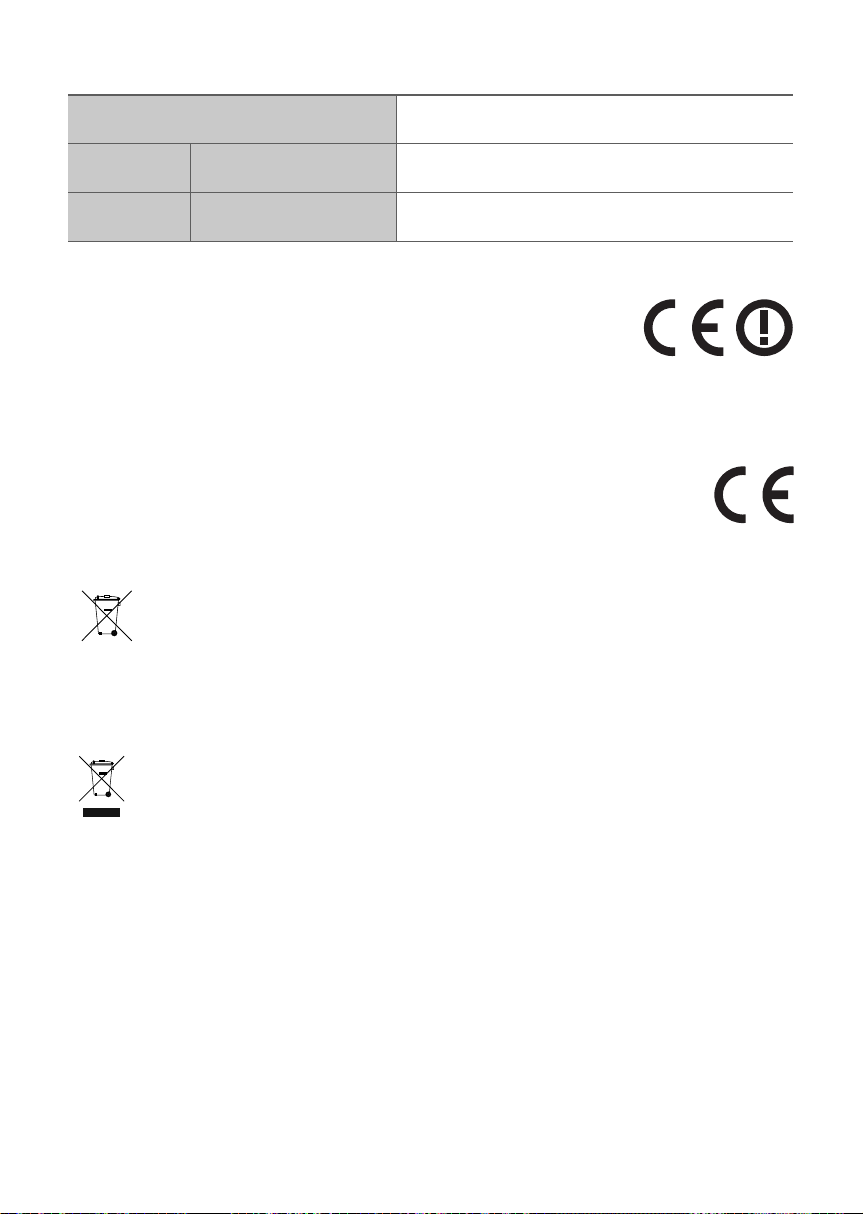
Up/Down/
Left/Right
Press the indicated areas to select Up/Down/Left/Right.
Press Up/Down/Left/Right on the button to select or set functions.
c Music Skip
Press the Right button to select the next music; press the Left button to select the
previous music.
c Anynet+ / Auto Power Link
You can turn the Anynet+ and Auto Power Link on or off.
The Anynet+ and Auto Power Link are controlled by the Right and Left buttons
respectively.
• Anynet+: If connected through an HDMI cable, you can control your Soundbar
with a Samsung TV remote control. Press and hold the Right button for
5 seconds to toggle Anynet+ ON and OFF.
• Auto Power Link: If connected through a digital optical cable, the Soundbar can
automatically turn on when you turn on your TV. Press and hold the Left button for
5 seconds to toggle Auto Power Link ON and OFF.
· 19 · English
Page 20
VE
R
DB
R
VE
ER
DB
R
DB
ER
DB
LEVEL
STL STR
SL
ound
Surr
Speaker L
FL FR
Soundbar Main Unit
FTRFTL
SR
C
Surround
Speaker R
The ATMOS Soundbar has 5.1.4 channel sound. Use this button to adjust the volume
of each of the speakers. Press this button, use the Left/Right buttons to select a
speaker, and then use the Up/Down buttons to increase or decrease the level
(volume).
Speaker
Displayed on OLED when
adjusting the level
Front Left FL
Front Top Left FTL
Soundbar Main Unit
Centre C
Front Right FR
Front Top Right FTR
Surround Speaker L
Surround Speaker R
Surround Left SL
Surround Top Left STL
Surround Right SR
Surround Top Right STR
c See the description under item 9 for instructions on how to adjust the subwoofer
level (volume).
LE
LE
WOOFER
EFFECT
WOOFE
EFFECT
VOL
SOUN
WOOF
VOL
SOUN
Push the button up or down to adjust the volume of the subwoofer to -12 or -6 to +6.
Pressing the button reverts the subwoofer volume to level 0.
VOL
EFFECT
WOOFE
EFFECT
VOL
SOUN
Push the button up or down to adjust the volume.
c Mute
Press the VOL button to mute the sound. Press it again to unmute the sound.
· 20 · English
WOOF
VOL
SOUN
Page 21

TROUBLESHOOTING
Before seeking assistance, check the following.
The unit will not turn on.
Is the power cord plugged into the outlet?
È Connect the power plug to the outlet.
A function does not work when the button is
pr
essed.
e static electricity in the air?
Is ther
È Disconnect the power plug and connect it again.
Sound is not produced.
Is the Mute function on?
È
Press the VOL button to cancel the function.
Is the volume set to minimum?
È Adjust the Volume.
The r
emote control does not work.
Are the batteries drained?
È Replace with new batteries.
Is the distance between the remote control and
Soundbar main unit too far?
È Move the remote control closer to the Soundbar
main unit.
LICENCE
Manufactured under licence from Dolby
Laboratories. Dolby, Dolby Atmos, Dolby Audio,
Dolby Digital Plus, Pro Logic, and the double-D
symbol are trademarks of Dolby Laboratories.
For DTS patents, see http://patents.dts.com.
Manufactured under licence from DTS Licencing
Limited. DTS, the Symbol, & DTS and the Symbol
together are registered trademarks, and DTS 2.0
Channel is a trademark of DTS, Inc. © DTS, Inc.
All Rights Reserved.
The terms HDMI and HDMI High-Definition
Multimedia Interface, and the HDMI Logo are
trademarks or registered trademarks of HDMI
Licencing LLC in the United States and other
countries.
The red LED on the subwoofer blinks and the
subwoofer is not producing sound.
This issue can occur if the subwoofer is not
connected to the Soundbar main unit.
È T
ry to connect your subwoofer again.
See page 6.
The subwoofer dr
Try to adjust the vibration of your subwoofer
È Push the WOOFER button on your r
ol up or down
contr
-12, -6 ~ +6).
ones and vibrates noticeably.
.
emote
to adjust its value (between
· 21 · English
• The Spotify Software is subject to third party
licences found here :
www.spotify.com/connect/third-party-licenses.
• For more information about Spotify Connect,
please visit www.spotify.com/connect
Page 22
OPEN SOURCE LICENCE NOTICE
For further information on Open Sources used in this product, please visit the website:
http://opensource.samsung.com
IMPORTANT NOTE ABOUT SERVICE
• Figures and illustrations in this User Manual are provided for reference only and may differ from actual product
appearance.
• An administration fee may be charged if either
a. an engineer is called out at your request and there is no defect with the product (i.e. where the user manual
has not been read).
b. you bring the unit to a repair centre and there is no defect with the product (i.e. where the user manual has
not been read).
• You will be informed of the administration fee amount before a technician visits.
SPECIFICATIONS
Soundbar Main Unit
Weight
GENERAL
HDMI Video
AMPLIFIER
• DTS 2.0 sound is played in DTS format.
• Nominal specification
– Design, specifications and App screen are subject to change without prior notice.
– Samsung Electronics Co., Ltd reserves the right to change the specifications without notice.
– Weight and dimensions are approximate.
– For more information about the power supply and power consumption, refer to the label attached to the
product. (Label : Bottom of Soundbar main unit)
Dimensions
(W x H x D)
Operating Temperature Range
Operating Humidity Range
Rated Output
Power
Supported play formats
Subwoofer (PS-KW1-2)
Surround Speaker
(PS-KS2-1 (L), PS-KS2-2 (R))
Soundbar Main Unit
Subwoofer (PS-KW1-2)
Surround Speaker
(PS-KS2-1 (L), PS-KS2-2 (R))
Soundbar Main Unit
Subwoofer (PS-KW1-2)
Surround Speaker
(PS-KS2-1 (L), PS-KS2-2 (R))
6.7 kg
9.6 kg
2.0 kg
1210.2 x 81.7 x 131.4 mm
203.9 x 399.0 x 414.3 mm
120.2 × 210.9 × 141.0 mm
+5°C to +35°C
10 % to 75 %
1080p,1080i, 720p, 576p, 480p
2160p@24/25/30Hz 4:4:4
2160p@60/50Hz 4:2:0
18W x 11, 4 ohm, THD≦10%
162W, 3 ohm, THD≦10%
35W x 4, 4 ohm, THD≦10%
LPCM 2ch, Dolby Digital, Dolby Atmos
(True HD/Digital Plus), DTS
· 22 · English
Page 23
Precaution : The product will restart automatically if you turn on/off Wi-Fi/Ethernet.
Overall Standby Power Consumption (W)
(All the network ports are “ON” condition)
Wi-Fi/Ethernet Port deactivation method
Bluetooth Port deactivation method
Wireless Models (including the frequency of 5.15GHz-5.35GHz)
• Hereby, Samsung Electronics, declares that this equipment is in compliance with the
essential requirements and other relevant provisions of Directive 1999/5/EC.
The original Declaration of Conformity may be found at http://www.samsung.com,
go to Support > Search Product Support and enter the model name.
This equipment may be operated in all EU countries.
This equipment may only be used indoors.
Wireless Models (excluding the frequency of 5.15GHz-5.35GHz)
• Hereby, Samsung Electronics, declares that this equipment is in compliance with the essential
requirements and other relevant provisions of Directive 1999/5/EC.
The original Declaration of Conformity may be found at http://www.samsung.com,
go to Support > Search Product Support and enter the model name.
This equipment may be operated in all EU countries.
5.8W
Press Wi-Fi SETUP button on the product for 30 seconds
to turn Wi-Fi/Ethernet On / Off.
Press SPK ADD button on the product for 30 seconds to
turn Bluetooth On / Off.
[Correct disposal of batteries in this product]
(Applicable in countries with separate collection systems)
This marking on the battery, manual or packaging indicates that the batteries in this product should not be disposed of with other
household waste at the end of their working life. Where marked, the chemical symbols Hg, Cd or Pb indicate that the battery
contains mercury, cadmium or lead above the reference levels in EC Directive 2006/66.
If batteries are not properly disposed of, these substances can cause harm to human health or the environment.
To protect natural resources and to promote material reuse, please separate batteries from other types of waste and recycle them
through your local, free battery return system.
Correct Disposal of This Product (Waste Electrical & Electronic Equipment)
(Applicable in countries with separate collection systems)
This marking on the product, accessories or literature indicates that the product and its electronic accessories (e.g. charger,
headset, USB cable) should not be disposed of with other household waste at the end of their working life. To prevent possible harm
to the environment or human health from uncontrolled waste disposal, please separate these items from other types of waste and
recycle them responsibly to promote the sustainable reuse of material resources.
Household users should contact either the retailer where they purchased this product, or their local government office, for details of where
and how they can take these items for environmentally safe recycling.
Business users should contact their supplier and check the terms and conditions of the purchase contract. This product and its electronic
accessories should not be mixed with other commercial wastes for disposal.
For information on Samsung’s environmental commitments and product specific regulatory obligations e.g.
REACH visit: samsung.com/uk/aboutsamsung/samsungelectronics/corporatecitizenship/data_corner.html
· 23 · English
Page 24
SICHERHEITSINFORMATIONEN
HINWEISE ZUR SICHERHEIT
ZUR VERMEIDUNG VON STROMSCHLÄGEN DARF DIESES GERÄT NICHT GEÖFFNET WERDEN.
ES ENTHÄLT KEINE BAUTEILE, DIE VOM BENUTZER GEWARTET ODER REPARIERT WERDEN KÖNNEN.
WARTUNGS- UND REPARATURARBEITEN DÜRFEN NUR VON FACHPERSONAL AUSGEFÜHRT WERDEN.
Dieses Symbol zeigt an, dass im Gerät eine
hohe Spannung vorliegt. Aufgrund der
ACHTUNG
GEFAHR ELEKTRISCHER
SCHLÄGE! GERÄT NICHT
ÖFFNEN!
Produkt der Klasse-II: Dieses Symbol zeigt an, dass das Gerät keinen elektrischen
Erdungsanschluss (Masse) benötigt.
Wechselspannung: Dieses Symbol zeigt an, dass es sich bei der mit diesem Symbol
gekennzeichneten Nennspannung um eine Wechselspannung handelt.
Gleichspannung: Dieses Symbol zeigt an, dass es sich bei der mit diesem Symbol
gekennzeichneten Nennspannung um eine Gleichspannung handelt.
bestehenden Stromschlaggefahr dürfen keine
Teile im Innern des Geräts berührt werden.
Dieses Symbol zeigt an, dass mit dem Gerät
wichtige schriftliche Anleitungen bezüglich der
Bedienung und Wartung mitgeliefert wurden.
Achtung! Gebrauchsanweisung beachten: Dieses Symbol weist den Benutzer an, weitere
sicherheitsrelevante Informationen der Gebrauchsanweisung zu entnehmen.
WARNUNG : Setzen Sie das Gerät nicht Nässe oder Feuchtigkeit aus, um die Gefahr eines Brandes bzw. eines
elektrischen Schlags zu vermeiden.
ACHTUNG : UM ELEKTRISCHE SCHLÄGE ZU VERMEIDEN, RICHTEN SIE DEN BREITEN KONTAKTSTIFT
DES STECKERS AN DEM BREITEN STECKPLATZ AUS, UND STECKEN SIE DEN STECKER VOLL EIN.
• Dieses Gerät darf nur an eine Netzsteckdose mit Schutzerdung angeschlossen werden.
• Um das Gerät vom Netzbetrieb zu trennen, muss der Stecker aus der Netzsteckdose gezogen werden.
Deshalb sollte der Netzstecker jederzeit zugänglich und leicht trennbar sein.
ACHTUNG
• Das Gerät keinem Spritz- oder Tropfwasser aussetzen. Keine mit Flüssigkeit gefüllten Behälter, wie Vasen auf
das Gerät stellen.
• Um das Gerät vollständig auszuschalten, muss der Netzstecker aus der Steckdose gezogen werden. Somit
muss der Netzstecker immer bequem erreichbar sein.
· 2 · Deutsch
Page 25

HINWEISE
1. Stellen Sie sicher, dass die Stromversorgung in Ihrem Haus den auf der Rückseite Ihres Produkts
angegebenen Anforderungen entspricht. Stellen Sie Ihr Produkt horizontal auf einer geeigneten Unterlage
(Möbel) auf, so dass rundherum ausreichend Platz 7~10 cm zur Belüftung bleibt. Achten Sie darauf, dass die
Belüftungsöffnungen nicht abgedeckt sind. Stellen Sie das Gerät nicht auf Verstärker oder andere Geräte, die
heiß werden können. Das Gerät ist für Dauerbetrieb eingerichtet. Um das Gerät vollständig auszuschalten,
den Stecker aus der Steckdose ziehen. Ziehen Sie den Netzstecker des Geräts wenn Sie beabsichtigen, es
für längere Zeit nicht zu nutzen.
2. Ziehen Sie bei Gewittern das Stromkabel aus der Steckdose. Durch Blitze verursachte Spannungsspitzen
können zur Beschädigung des Geräts führen.
3. Halten Sie das Gerät von direkter Sonneneinstrahlung oder anderen Wärmequellen fern. Dies kann zu einer
Überhitzung führen und zu einer Fehlfunktion des Geräts führen.
4. Schützen Sie das Produkt vor Feuchtigkeit (z. B. Vasen), übermäßiger Hitze (z. B. Kamine) oder Geräten, die
starke magnetische oder ele trische Felder erzeugen. Trennen Sie das Netzkabel bei Fehlfunktionen des
Geräts von der Stromversorgung. Ihr Produkt ist nicht für den gewerblichen Einsatz vorgesehen. Verwenden
Sie dieses Produkt nur für den privaten Bereich. Wenn Ihr Produkt oder die CD bei kalten Temperaturen
aufbewahrt wurden, kann Kondensation auftreten. Wenn Sie das Gerät bei kaltenTemperaturen transportiert
haben, warten Sie mit der Inbetriebnahme circa 2 Stunden, bis das Gerät Raumtemperatur erreicht hat.
5. Die in diesem Produkt verwendeten Batterien enthalten umweltschädliche Chemikalien. Entsorgen Sie die
Batterien nicht im Hausmüll. Entsorgen Sie Batterien niemals in einem Feuer. Schließen Sie die Batterien
nicht kurz, zerlegen und überhitzen Sie sie nicht.
Bei unsachgemäßem Austausch von Batterien besteht Explosionsgefahr. Setzen Sie nur Batterien des
gleichen oder eines gleichwertigen Typs ein.
· 3 · Deutsch
Page 26
FUNKTIONEN
Genießen Sie den vollen TV-Klang, nachdem Sie die Soundbar mit Ihrem Fernseher
mit oder ohne Kabel verbunden haben.
Erleben Sie eine brillante und realistische Tonwiedergabe Ihres Fernsehgeräts über die mit oder ohne Kabel an
Ihr Fernsehgerät angeschlossene Soundbar.
c In Methode 1 auf Seite 8 wird beschrieben, wie die Soundbar über ein HDMI-Kabel mit Ihrem Fernseher
verbunden wird.
c In Methode 2 auf Seite 9 wird beschrieben, wie die Soundbar über WLAN mit Ihrem Fernseher verbunden
wird.
Dieses Produkt unterstützt Dolby Atmos®.
* Was ist Dolby Atmos®?
Die Atmos-Technologie verbessert vorhandene 5.1-Kanal-Surround-Soundsysteme durch Hinzufügen eines
Overhead-Lautsprechers. Der Zuhörer wird somit von einem 360-Grad-Sound umgeben, für ein einzigartiges,
hochauflösendes, brillante, detailreiches und tieferes Hörerlebnis. Siehe Seite 13 für eine Anleitung zum
Anschluss des Systems.
· 4 · Deutsch
Page 27
POWER
POWER
DC 19V
ÜBERPRÜFEN DER KOMPONENTEN
Soundbar-Hauptgerät
Oben
3 AC-Stecker
(Abhängig von Land
und Modell)
Fernbedienung /
Batterien
SOURCE
SOUND
LEVEL
EFFECT
VOL WOOFER
SOUNDBAR
c Um den linken von dem rechten Surroundlautsprecher zu unterscheiden, überprüfen Sie den Aufkleber auf
der Rückseite jedes Lautsprechers.
Subwoofer Surroundlautsprecher
Links Rechts
1 Netzkabel 2 Netzkabel
4 Netzadapter
HDMI-Kabel
ANSCHLUSS AN DIE STROMVERSORGUNG
Verwenden Sie die Stromkomponenten (1, 2, 3, 4), um die Stromversorgung in der folgenden Reihenfolge
anzuschließen: Subwoofer Linke und rechte Surround-Lautsprecher Soundbar-Hauptgerät
eitere Informationen zur Stromversorgung und zum Stromverbrauch finden Sie auf dem Etikett am Gerät.
c W
(Beschriftung : Unter
POWER
LINK STANDBY ID SET
Rückseite des
Subwoofers
AUX IN
DIGITAL AUDIO IN
(OPTICAL)
HDMI OUT
(TV-ARC)
HDMI IN 1
HDMI IN 2
Unterer Teil des
Soundbar-Hauptgeräts
er Teil des Soundbar-Hauptgeräts)
1 Netzkabel
Anschluss der
Stromversorgung
Wi-Fi SETUPSPK ADD
DC 19V
SERVICE
POWER
Unterseite des linken
und rechten Surround-
Lautsprechers
DC 19V
(Stromanschluss)
· 5 · Deutsch
2 Netzkabel
Anschluss der
Stromversorgung
3 AC-Stecker
4 Netzadapter
Page 28

S
t
LINK
LINK
ANSCHLIESSEN DES SOUNDBAR-HAUPTGERÄTS AN DEN
SUBWOOFER UND DIE SURROUND-LAUTSPRECHER
Wenn Sie den Subwoofer mit dem Soundbar-Hauptgerät verbinden, können Sie ausdrucksstarke Bässe und
eine bessere Soundqualität erzielen.
Empfohlenes Lautsprecher-Layout
TV
Soundbar-Hauptgerät
Subwoofer
Subwoofer
Soundbar-Hauptgerät
ä
90°
110°
SurroundLautsprecher L
90°
110°
Surround-
Lautsprecher R
Surroundlautsprecher
Links Rechts
Automatisches Anschließen
1. Schließen Sie eine Stromversorgung an den Subwoofer und die Surroundton-Lautsprecher an.
2. Schließen Sie eine Stromversorgung an die Soundbar an und drücken Sie dann die Taste an der
Fernbedienung oder auf der rechten Seite der Soundbar.
3. Der Subwoofer und die Surroundton-Lautsprecher werden automatisch mit der Soundbar verbunden.
4. Wenn die automatische Kopplung abgeschlossen ist, leuchten die blauen Anzeigeleuchten auf der Rückseite
des Subwoofers und der Surround-Lautsprecher auf.
c Falls die rote Anzeigeleuchte auf der Rückseite des Subwoofers oder der Surround-Lautsprecher aufleuchtet
oder die blaue Anzeigeleuchte dauernd blinkt, kann die automatische Kopplung nicht ausgeführt werden. Falls
dies geschieht, schließen Sie jeden Lautsprecher manuell an. (Weitere Informationen finden Sie auf Seite 7)
c Wichtig: Setzen Sie die Batterien in die Fernbedienung ein, bevor Sie beginnen. Eine Anleitung finden Sie auf
Seite 18.
LINK STANDBY ID SET
POWER
LINK STANDBY ID SET
Rückseite des
Subwoofers
Rückseite des
Surround-Lautsprechers
· 6 · Deutsch
Page 29

LINK STANDBY ID SET
LINK STANDBY ID SET
LE
R
BA
Manuelles Anschließen des Subwoofers und der Surround-Lautsprecher
bei Fehlschlagen des automatischen Anschließens
c Bevor Sie beginnen
• Stellen Sie sicher dass die Soundbar, der Subwoofer und die Surround-Lautsprecher angeschlossen sind.
• Stellen Sie sicher, dass die Soundbar eingeschaltet ist.
1. Halten Sie ID SET auf der Rückseite des Subwoofers und der Surround-Lautsprecher mindestens
5 Sekunden lang gedrückt. Die rote Anzeigeleuchte auf der Rückseite jedes Lautsprechers erlischt und die
blaue Anzeigeleuchte blinkt.
LINK STANDBY ID SET
POWER
LINK STANDBY ID SET
Rückseite des
Subwoofers
Rückseite des linken und rechten
Surround-Lautsprechers
2. Schalten Sie die Soundbar aus.
3. Halten Sie die Taste VOL auf der Fernbedienung mindestens 5 Sekunden lang gedrückt, während die
Soundbar ausgeschaltet ist (AUS).
VOL
WOOFE
SOUND
EFFECT
4. Für kurze Zeit erscheint nun die Meldung ID SET im Display der Soundbar und erlischt dann.
ID SET
Rechte Seite der Soundbar
5. Wenn die blauen Anzeigeleuchten an dem Subwoofer und den Surround-Sound-Lautsprechern blinken,
schalten Sie die Stromversorgung durch Drücken der Taste auf der rechten Seite der Soundbar oder auf
der Fernbedienung ein.
6. Wenn die Verbindung erfolgreich hergestellt worden ist leuchten die blauen Anzeigeleuchten auf der
Rückseite des Subwoofers und der Surround-Lautsprecher auf, ohne zu blinken.
c Wenn der Verbindungsaufbau fehlgeschlagen ist, blinkt die Leuchte blau. Führen Sie den Verbindungsaufbau
ab Schritt 1 erneut durch.
· 7 · Deutsch
Page 30

HDMI OUT
(TV-ARC)
DIGITAL AUDIO IN
(OPTICAL)
HDMI OUT
(TV-ARC)
HDMI IN 1
HDMI IN 2
AUX IN
ANSCHLUSS AN IHR FERNSEHGERÄT
Nachdem Sie die Soundbar über Kabel oder Wi-Fi/Bluetooth mit Ihrem Fernsehgerät verbunden haben, können
Sie den Ton Ihres Fernsehgeräts über dieses Gerät genießen.
c Wichtig: Setzen Sie die Batterien in die Fernbedienung ein, bevor Sie beginnen. Eine Anleitung finden Sie auf
Seite 18.
Methode 1. Kabelverbindung
Überprüfen Sie den
HDMI IN (TV-ARC)-Port an
Ihrem Fernseher.
HDMI IN
(ARC)
HDMI-Kabel
Überprüfen Sie den
HDMI OUT (TV-ARC)-Port am
Soundbar-Hauptgerät.
Unterseite der
Soundbar
1. Schließen Sie das HDMI-Kabel wie in der obigen Abbildung dargestellt an.
2. Das Displayfenster des Soundbar-Hauptgeräts zeigt TV ARC an und der Ton des Fernsehers wird
ausgegeben.
TV ARC
Rechte Seite der Soundbar
c Wenn der Ton des Fernsehers nicht ausgegeben wird, drücken Sie entweder auf der rechten Seite der
Soundbar oder die Taste SOURCE auf der Fernbedienung und wählen Sie dann D.IN im Displayfenster des
Soundbar-Hauptgeräts aus. Der D.IN-Modus wechselt zu TV ARC und der TV-Ton wird ausgegeben.
c Wenn im Displayfenster des Soundbar-Hauptgeräts TV ARC nicht angezeigt wird, überprüfen Sie, ob das
Kabel an den korrekten Port angeschlossen ist.
c Sie können die Lautstärke der Soundbar bequem regeln und Auto Power Link auf EIN stellen und einstellen,
dass die Soundbar automatisch eingeschaltet wird, wenn Sie den Fernseher einschalten.
· 8 · Deutsch
Page 31

Wi-Fi SETUP SPK ADD
Methode 2. Verbindungsaufbau mit einem Wi-Fi-Netzwerk
Installieren der Samsung Multiroom app und Aufbau einer Wi-Fi-Verbindung
Befolgen Sie zur erstmaligen Installation der Samsung
Multiroom-Anwendung die nachfolgend gezeigten Schritte.
1. Halten Sie die Taste SPK ADD am unteren Rand der
Soundbar länger als 1 Sekunde gedrückt.
• Ein Benachrichtigungston ist zu hören und
„ADD SPEAKER“ wird an der Haupteinheit der
Soundbar angezeigt. Danach wird die Meldung
„WIFI READY“ angezeigt, wenn der
Verbindungsbereitschaftsmodus aktiviert wird.
2. Verbinden Sie Ihr Smart Device (Smart Phone, Tablet
usw.) mit ihrem Wi-Fi-Router.
Internet Wi-Fi-Router Smart Device
3. Installieren Sie die Samsung Multiroom app auf Ihrem smart device (Smart Phone, Tablet usw.).
4. Starten Sie die Samsung Multiroom app.
AUX IN
DIGITAL AUDIO IN
(OPTICAL)
HDMI OUT
(TV-ARC)
HDMI IN 1
HDMI IN 2
Wi-Fi SETUP SPK ADD
Unterseite der Soundbar
Samsung
Multiroom
Samsung
Multiroom
DC 19V
SERVICE
Android iOS
Samsung Multiroom app
5. Nehmen Sie die Starteinstellungen vor, indem Sie den Anweisungen auf dem app-Bildschirm folgen.
Nehmen Sie die
Einstellungen vor, indem
Sie den Anweisungen
auf dem Bildschirm der
Samsung Multiroom
app folgen.
Start Bildschirm Geben Sie das Passwort
für den Wi-Fi-Router ein.
Anschluss von Lautsprecher
abgeschlossen
c Sie müssen das Passwort Ihres Wi-Fi-Routers eingeben, um Ihre Soundbar über die Samsung Multiroom
app mit dem Wi-Fi-Netzwerk zu verbinden.
c Wenn Ihrem Wi-Fi-Router kein Passwort zugewiesen wurde, werden die Starteinstellungen ohne
Aufforderung zur Passworteingabe vorgenommen.
· 9 · Deutsch
Page 32

Wi-Fi SETUP SPK ADD
Hinzufügen der Soundbar zu einem vorhandenen Multiroom Audio System
Wenn die Samsung Multiroom-Anwendung bereits für die
Verwendung mit einem anderen Multiroom-Audiogerät installiert
ist, befolgen Sie diese Schritte zum Hinzufügen der Soundbar.
1. Halten Sie die Taste SPK ADD am unteren Rand der
Soundbar länger als 1 Sekunde gedrückt.
• Ein Benachrichtigungston ist zu hören und
„ADD SPEAKER“ wird an der Haupteinheit der
Soundbar angezeigt. Danach wird die Meldung „WIFI
READY“ angezeigt, wenn der
Verbindungsbereitschaftsmodus aktiviert wird.
2. Verbinden Sie Ihr Smart Device (Smart Phone, Tablet usw.) mit ihrem Wi-Fi-Router.
Internet Wi-Fi-Router Smart Device
3. Starten Sie die Samsung Multiroom app.
4. Tippen Sie
, um die Liste mit allen Lautsprechern anzuzeigen.
5. Wählen Sie in der app More > Add New Speaker aus und folgen Sie den Anweisungen auf dem app-Bildschirm.
AUX IN
DIGITAL AUDIO IN
(OPTICAL)
HDMI OUT
(TV-ARC)
HDMI IN 1
HDMI IN 2
Wi-Fi SETUP SPK ADD
Unterseite der Soundbar
Samsung
Multiroom
DC 19V
SERVICE
Nehmen Sie die
Einstellungen vor, indem
Sie den Anweisungen
auf dem Bildschirm der
Samsung Multiroom
app folgen.
Start Bildschirm Netzwerkauswahl
c Zum Anschließen eines anderen Netzwerks wählen Sie No.
Sie müssen das Passwort Ihres Wi-Fi-Routers eingeben, um Ihre Soundbar über die Samsung Multiroom
app mit dem Wi-Fi-Netzwerk zu verbinden.
Wenn Ihrem Wi-Fi-Router kein Passwort zugewiesen wurde, werden die Starteinstellungen ohne Aufforderung
zur Passworteingabe vorgenommen.
Hinzufügen von Lautsprecher
abgeschlossen
· 10 · Deutsch
Page 33

Anschließen der Soundbar an Ihren Samsung Smart TV
Sie können Ihr Fernsehgerät über ein Wi-Fi-Netzwerk mit der Soundbar verbinden und den Fernsehton
genießen.
c Wichtig: Stellen Sie sicher, dass der Fernseher und die Soundbar mit demselben Netzwerk
verbunden sind. (So prüfen Sie das Netzwerk von Ihrem Samsung TV: Home-Menü Netzwerk
Netzwerkstatus)
Konfigurieren von Einstellungen über Ihren Samsung Smart TV
c Um Audio mit der Soundbar wiederzugeben stellen Sie sicher, dass Ihr TV-Modell die Multiroom-Funktion
unterstützt (nach dem Jahr 2014 erschienene Samsung Smart TVs).
c Fall der Fernseher aufgrund einer Änderung der Eingangsquelle der Soundbar vom Wireless-Netzwerk
getrennt wird, verwenden Sie das TV-Menü, um die Verbindung wiederherzustellen.
Für 2016 erschienene Fernseher
1. Home-Menü Einstell. ( ) Ton Tonausgabe Wählen Sie [AV] Samsung Soundbar Kxxx (Wi-Fi)
2. Der Ton des Fernsehers wird ausgegeben.
Für 2015 erschienene Fernseher
1. Home-Menü Ton
2. Der Ton des Fernsehers wird ausgegeben.
Für 2014 erschienene Fernseher
1. Home-Menü Ton Lautsprechereinstellungen Wählen Sie
Soundbar+Surround
2. Wählen Sie über die Soundbar-Position „K950“ und „OK“.
3. Home-Menü
Lautsprecherliste
Ton Lautsprechereinstellungen Wählen Sie
Wählen Sie [AV] Samsung Soundbar Kxxx (Wi-Fi)
Multiroom Link - Einstell.
TV-Tonausgabe Multiroom Link
Lautsprechereinstellungen
TV-Tonausgabe Multiroom Link
TV-Lautsprecher
Fernseh-Installationstyp
•
TV SoundConnect
• Samsung Audiogeräteliste
• Neues Gerät hinzufügen
Multiroom Link
• Einstell.
Bluetooth-Kopfhörer
• Liste der Bluetooth-Kopfhörer
Standfuß
Soundbar+Surround
OK
4. Der Ton des Fernsehers wird ausgegeben.
Ein
Multiroom Link
[AV] Samsung Soundbar K950
OK Lautstärkepegel Lautsprechertest
Soundbar+Surround
Soundbar
c
· 11 · Deutsch
[AV] Samsung Soundbar K950
Nicht verwenden
Name bea
Page 34

ANSCHLUSS PER BLUETOOTH
Sie können an der Soundbar ein Bluetooth-Gerät anschließen und Musik mit Stereoton genießen – ohne
Kabelsalat!
c Es können nicht mehrere Bluetooth-Geräte gleichzeitig verbunden werden.
Verbinden
Bluetooth-Gerät
1. Drücken Sie die Taste
Fernbedienung, um BT auszuwählen.
2. Wählen Sie auf dem Bluetooth-Gerät, mit dem Sie eine Verbindung herstellen möchten, das Bluetooth-Menü
aus. (Weitere Informationen dazu finden Sie der Bedienungsanleitung des Bluetooth- Geräts.)
3. Wählen Sie "[AV] Samsung Soundbar Kxxx" aus der Liste.
• Wenn die Verbindung zwischen der Soundbar und dem Bluetooth-Gerät hergestellt wurde, zeigt das
vordere Displayfenster der Soundbar [Bluetooth-Gerätename] → BT an.
4. Starten sie auf dem verbundenen Gerät die Musikwiedergabe.
[Wenn die Verbindung zum Bluetooth-Gerät fehlgeschlagen ist / Wenn eine erneute Gerätesuche
erforderlich ist].
• Wenn „[AV] Samsung Soundbar Kxxx“ in den Suchergebnissen auf dem Bluetooth-Gerät zu finden ist,
löschen Sie sie.
• Halten Sie entweder die Taste
Fernbedienung gedrückt, um in den Modus BT PAIRING zu wechseln, wählen Sie dann „[AV] Samsung
Soundbar Kxxx“ aus der angezeigten Liste verfügbarer Geräte auf dem Bluetooth-Gerät. (Siehe die oben
beschriebenen Schritte 2 und 3).
c Wenn Sie bei der Verbindung eines Bluetooth-Geräts nach der PIN-Nummer gefragt werden, geben Sie
<0000> ein.
c Bei einer Bluetooth Verbindung geht die Bluetooth Verbindung verloren, wenn der Abstand zwischen dem
Soundbar und dem Bluetooth Gerät 10 m überschreitet.
c Wenn sich der Soundbar für mehr als 5 Minuten im Bereitschaftszustand befindet, schaltet er sich
automatisch aus.
c Der Soundbar führt unter den folgenden Umständen eventuell die Suche nach Bluetooth-Geräten oder den
Verbindungsaufbau nicht fehlerfrei durch:
– Wenn sich Soundbar in einem starken elektrischen Feld befindet.
– Wenn mit mehreren Bluetooth-Geräten gleichzeitig eine Verbindung zum Soundbar hergestellt wurde.
– Wenn das Bluetooth-Gerät ausgeschaltet oder nicht angeschlossen ist oder nicht richtig funktioniert.
c Elektronische Geräte können Funkstörungen verursachen. Elektromagnetische Wellen erzeugende Geräte
müssen vom Soundbar-Hauptgerät ferngehalten werden - z. B. Mikrowellen, WLAN-Geräte etc.
auf der rechten Seite der Soundbar oder die Taste SOURCE auf der
auf der rechten Seite der Soundbar oder die Taste SOURCE auf der
Trennen der Soundbar vom Bluetooth-Gerät
Drücken Sie die Taste SOURCE auf der Fernbedienung oder die Taste auf der rechten Seite des Geräts,
um vom Modus BT in einen anderen Modus zu wechseln oder die Soundbar auszuschalten.
• Das angeschlossene Bluetooth-Gerät wartet eine gewisse Zeit auf die Antwort des Soundbar, bevor es die
Verbindung unterbricht. (Je nach Bluetooth-Gerät kann der Zeitraum bis zur Trennung der Verbindung variieren)
· 12 · Deutsch
Page 35

HDMI OUT
(TV-ARC)
HDMI IN 1
HDMI IN 2
VERBINDEN VON GERÄTEN ZUM VERWENDEN VON
DOLBY ATMOS®
Dieses Produkt unterstützt Dolby Atmos®.
c Wichtig: Dolby Atmos® funktioniert nur im HDMI-Modus. Es ist nicht mit anderen Eingangsquellen kompatibel.
HDMI-Kabel
HDMI IN
Unterseite der
Soundbar
Soundbar
Oder
Externes Gerät
HDMI OUT
HDMI-Kabel
1. Verbinden Sie mit einem HDMI-Kabel den Anschluss HDMI IN 1 oder den Anschluss HDMI IN 2 auf der
Rückseite des Produkts mit dem Anschluss HDMI OUT Ihres digitalen Geräts. Verwenden Sie das HDMI-Kabel
zum Anschließen des HDMI IN-Ports am Fernseher an den HDMI OUT (TV-ARC)-Port unten an der Soundbar.
2. Drücken Sie die Taste auf der rechten Seite der Soundbar oder die Taste SOURCE auf der
Fernbedienung zur Auswahl von HDMI1 oder HDMI2.
3. Der ausgewählte HDMI-Modus wird auf dem Anzeigefeld der Soundbar angezeigt und der Ton wird
wiedergegeben.
c Wenn Dolby Atmos® eingeschaltet wird, geht die blaue LED auf der rechten Seite der Soundbar an und leuchet.
4. Konfigurieren von Dolby Atmos® an Ihrem BD-Player oder sonstigen Geräten.
• Überprüfen Sie die Audioausgabeoptionen unter Verwendung des Einstellungsmenüs an Ihrem BD-Player
oder sonstigem Gerät.
• Stellen Sie sicher, dass für den Bitstrom in den Audioausgabeoptionen „Keine Kodierung“ ausgewählt ist,
z. B. an einem Samsung-Player: Home-Menü Einstellungen Ton
Digital-Ausgang: Wählen Sie Bitstream (Unverarbeitet).
Einstellungen
To n
Lautsprechereinstellung
Digital-Ausgang
PCM-Downsampling
Dynamikumfangsteuerung
Downmix-Modus
DTS Neo:6-Modus
Audio-Sync 0 ms
• Falls die Audioausgabeoptionen sekundäres Audio beinhalten, stellen Sie sicher, dass es Ausgeschaltet ist.
c Dolby Atmos® funktioniert nur bei 5.1.4-Kanälen.
c Stellen Sie sicher, dass die Inhalte Dolby Atmos® unterstützen.
PCM
Bitstream (Unverarbeitet)
Bitstream (DTS Re-encoded)
Bitstr
eam (Dolby D Re-encoded)
Aus
· 13 · Deutsch
Page 36

HDMI OUT
(TV-ARC)
HDMI IN 1
HDMI IN 2
SERVICE
VERBINDUNG MIT EINEM EXTERNEN GERÄT HERSTELLEN
HDMI-Kabel
HDMI IN
Unterseite der
Soundbar
Soundbar
Oder
Externes Gerät
HDMI OUT
HDMI-Kabel
1. Verbinden Sie mit einem HDMI-Kabel den Anschluss HDMI IN 1 oder den Anschluss HDMI IN 2 auf der
Rückseite des Produkts mit dem Anschluss HDMI OUT Ihres digitalen Geräts. Verwenden Sie das HDMI-Kabel
zum Anschließen des HDMI IN-Ports am Fernseher an den HDMI OUT (TV-ARC)-Port unten an der Soundbar.
2. Drücken Sie die Taste auf der rechten Seite der Soundbar oder die Taste SOURCE auf der
Fernbedienung zur Auswahl von HDMI1 oder HDMI2.
3. Der ausgewählte HDMI-Modus wird auf dem Anzeigefeld der Soundbar angezeigt und der Ton wird wiedergegeben.
SOFTWARE AKTUALISIERUNG
Es ist möglich, dass Samsung in der Zukunft Firmware-Updates für die Soundbar anbietet.
Auto Update
Die Funktion für automatische Updates ist in der Soundbar standardmäßig aktiviert. Automatische FirmwareUpdates werden gesucht und ausgeführt, wenn die Soundbar mit dem Internet verbunden ist, unabhängig
davon, ob sie ein- oder ausgeschaltet ist.
c Um die Auto Update Funktion nutzen zu können, muss die Soundbar mit dem Internet verbunden sein.
Die Wi-Fi-Verbindung mit der Soundbar wird beendet, wenn das Netzkabel gezogen oder die
Stromversorgung unterbrochen wurde. Schalten Sie die Soundbar ein und stellen Sie die Verbindung erneut
her. Wird die Stromverbindung unterbrochen, schalten Sie die Soundbar ein und verbinden Sie sie erneut.
Aktualisierung über USB
AUX IN
DIGITAL AUDIO IN
(OPTICAL)
HDMI OUT
(TV-ARC)
HDMI IN 1
HDMI IN 2
Wenn ein Update verfügbar ist, kann die Firmware durch Anschließen eines USB-Laufwerks mit dem Firmware
Update an den USB-Anschluss Ihrer Soundbar aktualisiert werden.
Weitere Informationen zum Herunterladen von Update-Dateien finden Sie auf der Samsung Electronics Website
unter (samsung.com/sec) suchen Sie nach dem Modellnamen laden Sie die Firmwareoption aus dem
Kundenbetreuungsmenü herunter. Der Name der Option kann variieren.
c Falls die Eingangsquelle nach einer Aktualisierung oder nach einem erneuten Anschluss des Netzkabels
geändert wurde, ändern Sie die Eingangsquelle auf TV oder die gewünschte Quelle.
DC 19V
Wi-Fi SETUPSPK ADD
SERVICE
Micro-USB-auf-USB-Adapterkabel (Nicht enthalten)
· 14 · Deutsch
Page 37

MONTAGEDER
WANDHALTERUNG
Sie können die Wandhalterung verwenden, um diese
Einheit an der Wand zu befestigen.
Montagehinweise
• Nur an einer senkrechten Wand montieren.
• Bringen Sie das Soundbar-System nicht an einem
Ort mit hohen Temperaturen und/oder hoher
Luftfeuchtigkeit an. Bringen Sie das System an
einer stabilen Wand an, die das Gewicht des
Soundbar-Hauptgeräts tragen kann.
• Überprüfen Sie die Stabilität der Wand. Um das
Soundbar-System an einer Wand anzubringen, die
das Gewicht des Soundbar-Hauptgeräts
möglicherweise nicht tragen kann, verstärken Sie
die Wand vor der Anbringung. Wenn dies nicht
möglich ist, bringen Sie das System an einer
anderen Wand an, die stabil genug ist, um das
Gewicht des Soundbar-Hauptgeräts tragen zu
können.
• Verwenden Sie die für Ihre Wand geeigneten
Befestigungsschrauben oder Dübel
(Gipskartonplatte, Stahlplatte, Holz, usw.). Wenn
möglich die Schrauben in den Wandträgern
befestigen.
• Besorgen Sie sich für die Wand, an der Sie die
Soundbar befestigen wollen, geeignete
Befestigungsschrauben.
– Durchmesser : M5
– Länge : L 35 mm oder länger wird empfohlen.
• Schließen Sie die externen Geräte an dieses Gerät
an, bevor Sie es an der Wand installieren.
• Achten Sie darauf, dass das Gerät ausgeschaltet
ist, und trennen Sie das Gerät vor der Montage
vom Netzstecker. Ansonsten besteht das Risiko
elektrischer Schläge.
Komponenten für die Anbringung an
der Wand
Wandhalterung (2 Stck.)
Aufhängungsschraube (2 Stck.) Schraube (2 Stck.)
C C
Montagehilfe für die Wandhalterung
1. Platzieren Sie die Montagehilfe für die
Wandhalterung an der Wand.
●
Die Montagehilfe für die Wandhalterung
muss waagerecht positioniert sein.
●
Wenn das Fernsehgerät an der Wand befestigt
ist, installieren Sie die Soundbar mindestens
5 cm unterhalb des Fernsehgeräts.
CENTER LINE
C TYPE : 700mm
5 cm oder mehr.
· 15 · Deutsch
Page 38

C
C
C
2. Achten Sie darauf, dass sich die Mittellinie der
Papierschablone in der Mitte des Fernsehers
befindet (wenn Sie die Soundbar unter dem
Fernseher montieren). Befestigen Sie die
Montagehilfe für die Wandhalterung dann mit
Klebeband an der Wand.
c Wenn Sie die Soundbar nicht unter einem
Fernseher montieren, stellen Sie sicher, dass sich
die Mittellinie in der Mitte des Montagebereichs
befindet.
C C
CENTER LINE
C TYPE : 700mm
Mittellinie
3. Drücken Sie die Spitze eines Stifts oder einen
spitzen Bleistift durch die Mitte der C-TYPE-Bilder
an beiden Enden der Montagehilfe, um die Löcher
für die Aufhängungsschrauben zu markieren.
Entfernen Sie dann die Montagehilfe für die
Wandhalterung.
4. Bohren Sie mit einem geeigneten Bohrer an jeder
Markierung ein Loch in die Wand.
c Wenn die Markierungen nicht den Positionen der
Halterungsbolzen entsprechen, achten Sie darauf,
geeignete Dübel oder Molly-Dübel in die Löcher
einzuführen, bevor Sie die Aufhängungsschrauben
einführen. Wenn Sie Dübel oder Molly-Dübel
verwenden, achten Sie darauf, dass die gebohrten
Löcher für die verwendeten Dübel oder
Molly-Dübel groß genug sind.
C
CENTER LINE
ENTER LINE
C TYPE : 700mm
5. Stecken Sie eine Schraube (nicht im Lieferumfang
enthalten) durch jede
Aufhängungsschraube
und drehen Sie dann jede Schraube in einem
Aufhängungsschraubenloch.
6. Installieren Sie 2 Wandhalterung mit der richtigen
Ausrichtung auf der Unterseite der Soundbar
unter Verwendung von 2 Schraube (M4 x L12).
●
Achten Sie beim Zusammenbau darauf, dass
sich die Aufhängungsteile der Wandhalterung
hinter der Rückseite der Soundbar befinden.
Siehe die nachfolgende Abbildung.
Rückseite der Soundbar
Rechtes Ende der Soundbar
· 16 · Deutsch
Page 39

7. Montieren Sie die Soundbar mithilfe der
befestigten Wandhalterung, indem Sie die
Wandhalterung an die Aufhängungsschraube
an der Wand hängen.
8. Schieben Sie die Soundbar wie nachfolgend
dargestellt nach unten, sodass die Wandhalterung
sicher auf den Aufhängungsschraube ruhen.
c Schieben Sie die Wandhalterung von der
Unterseite nach unten, um sie an den
Aufhängungsschraube zu montieren.
MONTIEREN DER SURROUNDLAUTSPRECHERN AN EINER
WAND
Sie können Wandhalterungen separat erwerben, um die
Surround-Lautsprecher an einer Wand zu montieren.
Erwägungen zum Einkauf
• Zulässige Last : Mehr als 8,0 Kg
• Lochgröße : 1/4 - 20-Gewindeeinsatz
c Da die Wandmontage optional ist müssen Sie das
notwendige Zubehör separat erwerben.
c Bitte lassen Sie die Surround-Lautsprecher-
Wandhalterungen durch einen qualifizierten
Installateur installieren.
c Beauftragen Sie ein professionelles
Installationsunternehmen mit der Wandmontage
Ihres Produkts.
c Überprüfen Sie die Dicke der Wand, bevor Sie die
Wandhalterung montieren. Falls die Dicke
unzureichend ist verstärken Sie die Wand, bevor
Sie die Wandhalterungen und die Lautsprecher an
der Wand montieren.
c Weitere Informationen finden Sie in der Anleitung
der Wandhalterung.
c Samsung Electronics ist für keine Schäden an dem
Produkt verantwortlich, die von einer
unsachgemäßen Montage des Produkts herrühren.
c Achten Sie darauf, die Lautsprecher nicht seitlich
oder verkehrt herum einzubauen.
· 17 · Deutsch
Page 40

FUNKTIONEN & TASTEN DER FERNBEDIENUNG
Einlegen der Batterien vor der Verwendung
der Fernbedienung (AA-Batterien X 2)
Schieben Sie den Batteriedeckel in Pfeilrichtung, bis er vollständig
entfernt ist. Legen sie 2 AA-Batterien (1,5V) mit korrekter +/- Polarität
ein. Schieben Sie den Batteriedeckel wieder vollständig zurück.
SOUND
EFFECT
VOL WOOFER
SOUNDBAR
SOURCE
LEVEL
Die Lautstärke der Soundbar mit der
Fernbedienung des Fernsehers steuern
1. Halten Sie die Taste SOUND mindestens 5 Sekunden
gedrückt, während die Soundbar eingeschaltet ist.
2. Im Soundbar-Display wird „ON - TV REMOTE" angezeigt.
3. Stellen Sie im Menü des Fernsehers den Lautsprecher des
Fernsehers auf einen externen Lautsprecher ein.
c Nicht verfügbar in den Modi TV ARC, BT, HDMI1 und HDMI2.
(Verfügbar nur in den Modi D.IN (optisch) und AUX).
c Auf der TV-Fernbedienung sind nur die Lautstärke- und die
Stummschalttaste verfügbar. Andere Tasten sind deaktiviert.
c Fernsehermenüs unterscheiden sich je nach Hersteller und
Modell. Weitere Informationen finden Sie im Benutzerhandbuch
des Fernsehers.
c Diese Funktion wird von den folgenden Herstellern unterstützt:
●
VIZIO, LG, Sony, Sharp, PHILIPS, PANASONIC, TOSHIBA,
GRUNDIG, Hisense, RCA
●
Je nach Hersteller der Fernbedienung ist diese Funktion
möglicherweise nicht mit der Fernbedienung Ihres
Fernsehers kompatibel.
c Drücken Sie zum Ausschalten dieser Funktion die Taste
SOUND für 5 Sekunden. Im Soundbar-Display wird
„OFF - TV REMOTE" angezeigt.
Stromversorgung
SOUND
Schaltet die Soundbar ein und aus.
Schaltet den Surroundton ein und aus. Die Surroundton-Funktion verleiht dem Ton
Tiefe und Raumgefühl. Bei jedem Drücken dieser Taste wird zwischen EIN und AUS
gewechselt.
• EIN: Ton über alle Lautsprecher ausgeben.
c Sie können auch 5.1.4-Kanaltöne bei anderen als Dolby Atmos®
Musikquellen hören.
• AUS: Ton über den Kanal der Originalquelle ausgeben.
· 18 · Deutsch
Page 41

SOUND
৻ࠗ۱
SOUND
৻ࠗ۱
Lautstärkeregelung
Wiedergabe /
Pause (BT/WIFI)
EFFECT
SOURCE
Sie haben die Wahl zwischen sechs Soundmodi: STANDARD, MUSIC, CLEAR VOICE,
SPORTS, MOVIE, und NIGHT.
c NIGHT-Modus
Wenn der Kanal oder die Musikquelle gewechselt wird, wird der Lautstärkeunterschied
zwischen den verschiedenen Musikquellen automatisch angepasst.
c DRC (Dynamic Range Control)
Hiermit können Sie den Dynamikbereich von Dolby Digital-Tracks regeln. Halten Sie
die Taste EFFECT ca. 5 Sekunden lang gedrückt, um die Funktion DRC (Dynamic
Range Control) auf ON - DRC und OFF - DRC zu stellen.
Sie können zwischen TREBLE, BASS und AUDIO SYNC wählen.
• Um die Lautstärke der Höhen oder des Basses zu regeln, wählen Sie in den
Sound-Einstellungen TREBLE oder BASS. Passen Sie dann die Lautstärke
mithilfe der Tasten Oben/Unten zwischen 3~+3 an.
• Wenn Video und Audio zwischen dem Fernseher und der Soundbar nicht synchron
ist, wählen Sie in den Soundeinstellungen AUDIO SYNC aus und stellen Sie dann die
Audioverzögerung mit den Tasten Oben/Unten zwischen 0~300 Millisekunden ein.
c Audio Sync wird nur bei einigen Funktionen unterstützt.
Drücken, um eine an die Soundbar angeschlossene Quelle auszuwählen.
c BT PAIRING-Modus
Zum Einschalten des BT PAIRING-Modus in der Bluetooth-Funktion drücken und
halten Sie die Taste SOURCE länger als 5 Sekunden lang gedrückt.
Drücken Sie die &-Taste, um die Musik vorübergehend anzuhalten.
Drücken Sie die
&
-Taste erneut, um die ausgewählte Musik wiederzugeben.
Oben/Unten/
Links/Rechts
Drücken Sie die angegebenen Bereiche zum Auswählen von
Oben/Unten/Links/Rechts.
Drücken Sie Oben/Unten/Links/Rechts auf der Taste zum Auswählen oder Einstellen
von Funktionen.
c Musik überspringen
Drücken Sie die Taste Rechts zum Auswählen der nächsten Musik und drücken Sie
die Taste Links zum Auswählen der vorangehenden Musik.
c Anynet+ / Auto Power Link
Sie können Anynet+ und Auto Power Link ein- oder ausschalten. Anynet+ und
Auto Power Link werden jeweils durch die Taste Rechts und Links geregelt.
• Anynet+: Wenn eine Verbindung über ein HDMI-Kabel hergestellt wurde,
können Sie Ihre Soundbar mit der Fernbedienung des Samsung Fernsehgeräts
bedienen. Halten Sie die Taste Rechts 5 Sekunden lang gedrückt, um Anynet+
EIN und AUS zuschalten.
• Auto Power Link: Falls sie durch ein digitales optisches Kabel angeschlossen ist,
kann die Soundbar automatisch eingeschaltet werden, wenn Sie Ihren Fernseher
einschalten. Halten Sie die Taste
Link EIN
und AUS
zuschalten.
· 19 · Deutsch
Links
5 Sekunden lang gedrückt, um Auto Power
Page 42

VE
R
DB
R
VE
ER
DB
R
DB
ER
DB
LEVEL
STL STR
SL
ound-
Surr
Lautsprecher L
FL FR
Soundbar-Hauptgerät
FTRFTL
SR
C
Surround-
Lautsprecher R
Die ATMOS Soundbar verfügt über 5.1.4 -Kanalton. Verwenden Sie diese Taste, um
die Lautsprecher jedes Lautsprechers einzustellen. Drücken Sie diese Taste,
verwenden Sie die Tasten Links/Rechts, um einen Lautsprecher auszuwählen und
verwenden Sie dann die Tasten Oben/Unten zum Erhöhen oder Verringern der Stufe
(Lautstärke).
Lautsprecher
Auf OLED beim Anpassen der
Lautstärke angezeigt.
Vorne links FL
Vorne oben links FTL
Soundbar-
Hauptgerät
Mitte C
Vorne rechts FR
Vorne oben rechts FTR
Surround-
Lautsprecher L
Surround-
Lautsprecher R
Surround links SL
Surround oben links STL
Surround rechts SR
Surround oben rechts STR
c In der Beschreibung unter Posten 9 finden Sie Anweisungen zum Anpassen des
Subwoofer-Pegels (Lautstärke).
LE
LE
WOOFER
EFFECT
WOOFE
EFFECT
VOL
SOUN
WOOF
VOL
SOUN
Drücken Sie die Taste nach oben oder unten, um die Lautstärke des Subwoofers auf
-12 oder auf -6 bis +6 einzustellen.
Durch Drücken der Taste wird die Subwoofer-Lautstärke auf die Stufe 0
zurückgesetzt.
VOL
EFFECT
WOOFE
EFFECT
VOL
SOUN
Drücken Sie die Taste nach oben oder unten, um die Lautstärke einzustellen.
c Stummschaltung
Drücken Sie die Taste VOL, um den Ton stumm zu schalten.
Drücken Sie sie erneut, um den Ton wieder einzuschalten.
· 20 · Deutsch
WOOF
VOL
SOUN
Page 43

FEHLERSUCHE
Überprüfen Sie Folgendes, bevor Sie den
Kundendienst informieren.
Das Gerät lässt sich nicht einschalten.
Ist der Netzstecker an eine Steckdose
angeschlossen?
È Schließen Sie den Netzstecker an die Steckdose
an.
Das Gerät reagiert nicht auf das Drücken von
Tasten.
Ist die Luft elektrostatisch aufgeladen?
È Ziehen Sie den Netzstecker, und schließen Sie
ihn wieder an die Steckdose an.
Es wird kein Ton wiedergegeben.
Wurde das Gerät auf stumm geschalten?
È Drücken Sie die VOL Taste, um die Funktion zu
deaktivier
Ist die Lautstärke auf minimal eingestellt?
È Erhöhen Sie die Lautstärke.
Die Fernbedienung funktioniert nicht.
Sind die Batterien leer?
È Legen Sie neue Batterien ein.
Ist der Abstand zwischen Fernbedienung und
Soundbar-Hauptgerät zu groß?
È Gehen Sie mit der Fernbedienung näher an das
Soundbar
Die rote LED auf dem Subwoofer blinkt und der
Subwoofer erzeugt keinen Ton.
Dieses Problem kann auftreten, wenn der
Subwoofer nicht an das Soundbar-Hauptgerät
angeschlossen ist.
È Versuchen Sie, den Subwoofer erneut
anzuschließen. W
auf Seite 6.
Der Subwoofer dröhnt und vibriert merklich.
Versuchen Sie die Vibrationen des Subwoofers
einzustellen.
Drücken Sie die Taste
È
Fernbedienung nach oben oder unten, um den
Wert einzustellen (zwischen -12, -6 ~ +6).
en.
-Hauptgerät heran.
eitere Informationen finden Sie
WOOFER auf Ihrer
LIZENZ
Hergestellt unter Lizenz von Dolby Laboratories.
Dolby, Dolby Atmos, Dolby Audio, Dolby Digital
Plus, Pro Logic sowie das Doppel-D-Symbol sind
Warenzeichen der Dolby® Laboratories.
Pour les brevets DTS, voir http://patents.dts.com.
Fabriqué sous licence de DTS Licensing Limited.
DTS, le symbole & DTS et le symbole ensemble
sont des marques déposées et DTS 2.0 Channel
est une marque de commerce de DTS, Inc. © DTS,
Inc. Tous droits réservés.
Die Begriffe HDMI und HDMI High-Definition
Multimedia Interface sowie das HDMI-Logo sind in
den USA und anderen Ländern Warenzeichen oder
eingetragene Warenzeichen der HDMI Licensing LLC.
• Die Spotify Software ist Gegenstand einer
Drittanbieter Lizenz, die Sie unter folgender
Adresse finden:
www.spotify.com/connect/third-party-licenses.
• Weitere Informationen über Spotify Connect
finden Sie auf www.spotify.com/connect
· 21 · Deutsch
Page 44

BEKANNTMACHUNG ZU OPEN SOURCE LIZENZEN
Weitere Informationen über bei diesem Gerät eingesetzten Open Source finden Sie auf den Webseiten:
http://opensource.samsung.com
WICHTIGE HINWEISE ZUM KUNDENDIENST
• Die Abbildungen in dieser Anleitung dienen nur als Referenz und können sich vom aktuellen Produkt
unterscheiden.
• Es kann eine Gebühr erhoben werden, wenn:
a. Ein Techniker auf Ihre Anfrage bestellt wird und am Gerät kein Defekt vorliegt (z. B. weil Sie diese
Bedienungsanleitung nicht gelesen haben).
b. Sie das Gerät in einer Reparaturwerkstatt abgegeben haben und am Gerät kein Defekt vorliegt
(z. B. weil Sie diese Bedienungsanleitung nicht gelesen haben).
• Die Höhe dieser Gebühr wird Ihnen mitgeteilt, bevor irgendwelche Arbeiten durchgeführt werden oder der
Hausbesuch erfolgt.
TECHNISCHE DATEN
Soundbar-Hauptgerät
Gewicht
ALLGEMEIN
HDMI Video
VERSTÄRKER Nennausgangsleistung
• DTS 2.0-Sound wird im DTS-Format wiedergegeben.
• Nominelle Spezifikation
– Das Design, die Technischen Daten und der Appbildschirm können ohne vorherige Ankündigung geändert
werden.
– Samsung Electronics Co., Ltd behält sich das Recht auf unangekündigte Änderungen vor.
– Gewicht und Abmessungen können von den Angaben abweichen.
– Weitere Informationen zur Stromversorgung und zum Stromverbrauch finden Sie auf dem Etikett am Gerät.
(Beschriftung : Unterer Teil des Soundbar-Hauptgeräts)
Abmessungen
(B × H × T)
Betriebstemperatur
Zulässige Luftfeuchtigkeit
Unterstützte Wiedergabeformate
Subwoofer (PS-KW1-2)
Surroundlautsprecher
(PS-KS2-1 (L), PS-KS2-2 (R))
Soundbar-Hauptgerät
Subwoofer (PS-KW1-2)
Surroundlautsprecher
(PS-KS2-1 (L), PS-KS2-2 (R))
Soundbar-Hauptgerät
Subwoofer (PS-KW1-2)
Surroundlautsprecher
(PS-KS2-1 (L), PS-KS2-2 (R))
6,7 kg
9,6 kg
2,0 kg
1210,2 x 81,7 x 131,4 mm
203,9 x 399,0 x 414,3 mm
120,2 × 210,9 × 141,0 mm
+5 °C bis +35 °C
10 % bis 75 %
1080p,1080i, 720p, 576p, 480p
2160p@24/25/30Hz 4:4:4
2160p@60/50Hz 4:2:0
18W x 11, 4 ohm, THD≦10%
162W, 3 ohm, THD≦10%
35W x 4, 4 ohm, THD≦10%
LPCM 2ch, Dolby Digital, Dolby
Atmos (True HD/Digital Plus), DTS
· 22 · Deutsch
Page 45

Achtung : Das Gerät startet automatisch neu, wenn Sie Wi-Fi/Ethernet ein- oder ausschalten.
Leistungsaufnahme im Standby-Betrieb (W)
(Bei alle Netzwerk-Ports auf „ON“)
Wi-Fi/Ethernet Port Deaktivierungsmethode
Bluetooth Port Deaktivierungsmethode
Drahtlos-Modelle (auch die im Frequenzbereich von 5,15-5,35 GHz)
• Hiermit erklärt Samsung Electronics, dass dieses Gerät mit den wesentlichen
Anforderungen und die relevanten Bestimmungen der Richtlinie 1999/5/EC
übereinstimmt.
Die original Übereinstimmungserklärung finden Sie auf http://www.samsung.com,
unter Support > Produktsuche und geben Sie den Produktnamen oder die Artikelnummer ein.
Dieses Gerät darf in allen EU-Ländern betrieben werden.
Dieses Gerät darf nur in Innenräumen verwendet werden.
Drahtlos-Modelle (außer die im Frequenzbereich von 5,15-5,35 GHz)
• Hiermit erklärt Samsung Electronics, dass dieses Gerät mit den wesentlichen Anforderungen
und die relevanten Bestimmungen der Richtlinie 1999/5/EC übereinstimmt.
Die original Übereinstimmungserklärung finden Sie auf http://www.samsung.com,
unter Support > Produktsuche und geben Sie den Produktnamen oder die Artikelnummer ein.
Dieses Gerät darf in allen EU-Ländern betrieben werden.
5,8W
Halten Sie die Wi-Fi SETUP Taste am Gerät 30 Sekunden
lang gedrückt, um Wi-Fi/Ethernet ein- oder auszuschalten.
Halten Sie die SPK ADD Taste am Gerät 30 Sekunden
lang gedrückt, um Bluetooth ein- oder auszuschalten.
[Korrekte Entsorgung der Batterien dieses Produkts]
(Gilt für Länder mit Abfalltrennsystemen)
Die Kennzeichnung auf der Batterie bzw. auf der dazugehörigen Dokumentation oder Verpackung gibt an, dass die Batterie zu
diesem Produkt nach seiner Lebensdauer nicht zusammen mit dem normalen Haushaltsmüll entsorgt werden darf. Wenn die
Batterie mit den chemischen Symbolen Hg, Cd oder Pb gekennzeichnet ist, liegt der Quecksilber-, Cadmium- oder Blei-Gehalt der
Batterie über den in der EG-Richtlinie 2006/66 festgelegten Referenzwerten. Wenn Batterien nicht ordnungsgemäß entsorgt werden,
können sie der menschlichen Gesundheit bzw. der Umwelt schaden.
Bitte helfen Sie, die natürlichen Ressourcen zu schützen und die nachhaltige Wiederverwertung von stofflichen Ressourcen zu
fördern, indem Sie die Batterien von anderen Abfällen getrennt über Ihr örtliches kostenloses Altbatterie- Rücknahmesystem
entsorgen.
Korrekte Entsorgung von Altgeräten (Elektroschrott)
(Gilt für Länder mit Abfalltrennsystemen)
Die Kennzeichnung auf dem Produkt, Zubehörteilen bzw. auf der dazugehörigen Dokumentation gibt an, dass das Produkt und
Zubehörteile (z. B. Ladegerät,Kopfhörer, USB-Kabel) nach ihrer Lebensdauer nicht zusammen mit dem normalen Haushaltsmüll
entsorgt werden dürfen. Entsorgen Sie dieses Gerät und Zubehörteile bitte getrennt von anderen Abfällen, um der Umwelt bzw. der
menschlichen Gesundheit nicht durch unkontrollierte Müllbeseitigung zu schaden. Helfen Sie mit, das Altgerät und Zubehörteile
fachgerecht zu entsorgen, um die nachhaltige Wiederverwertung von stofflichen Ressourcen zu fördern.
Private Nutzer wenden sich an den Händler, bei dem das Produkt gekauft wurde, oder kontaktieren die zuständigen Behörden, um in
Erfahrung zu bringen, wo Sie das Altgerät bzw. Zubehörteile für eine umweltfreundliche Entsorgung abgeben können.
Gewerbliche Nutzer wenden sich an ihren Lieferanten und gehen nach den Bedingungen des Verkaufsvertrags vor. Dieses Produkt
und elektronische Zubehörteile dürfen nicht zusammen mit anderem Gewerbemüll entsorgt werden.
Weitere Informationen zum Engagement von Samsung für die Umwelt und zu produkspezifischen Auflagen wie z. B.
REACH finden Sie unter samsung.com/uk/aboutsamsung/samsungelectronics/corporatecitizenship/data_corner.html
· 23 · Deutsch
Page 46

VEILIGHEIDSINFORMATIE
VEILIGHEIDSINSTRUCTIES
OPEN NOOIT DE BEHUIZING VAN DIT APPARAAT, WANT DAN LOOPT U HET GEVAAR EEN ELEKTRISCHE
SCHOK TE KRIJGEN. DE BEHUIZING BEVAT GEEN ONDERDELEN DIE U ZELF KUNT REPAREREN. LAAT
ONDERHOUD OVER AAN DE VAKHANDEL.
Dit symbool geeft aan dat hoge spanning
aanwezig is in het product. Het is gevaarlijk
LET OP
GEVAAR OP ELEKTRISCHE
SCHOKKEN NIET OPENEN
Klasse II-product: Dit symbool geeft aan dat voor dit toestel geen veiligheidsaansluiting op aarde
(massa) is vereist.
Wisselspanning: Dit symbool geeft aan dat de nominale spanning wisselspanning is.
Gelijkspanning: Dit symbool geeft aan dat de nominale spanning gelijkspanning is.
contact te maken met onderdelen in het
product.
Dit symbool geeft aan dat belangrijke
informatie betreffende de bediening en het
onderhoud wordt geleverd bij het product.
Voorzichtig, raadpleeg de instructies voor gebruik: Dit symbool geeft aan dat de gebruiker de
handleiding moet raadplegen voor meer informatie over de veiligheid.
WAARSCHUWING : Om het gevaar voor een elektrische schok te vermijden dient u dit apparaat niet aan regen
of vocht bloot te stellen.
LET OP : OM EEN ELEKTRISCHE SCHOK TE VOORKOMEN, ZORGT U DAT HET BREDE UITEINDE VAN DE
STEKKER IN DE BREDE OPENING ZIT EN VOLLEDIG IS INGESTOKEN.
• Dit apparaat moet altijd aangesloten worden op een stroomingang met een geaard stopcontact.
• Om het apparaat los te koppelen van de stroomtoevoer, moet de stekker uit de stopcontact getrokken
worden, daarom moet de stroomstekker gemakkelijk bereikbaar zijn.
LET OP
• Stel dit apparaat niet bloot aan druppels of spatten. Plaats geen objecten op het apparaat die gevuld zijn met
water (zoals een vaas).
• Als u dit apparaat volledig wilt uitschakelen, moet u de stekker uit het stopcontact trekken. Vervolgens moet
de stekker altijd onder handbereik zijn.
· 2 · Nederlands
Page 47

VOORZORGSMAATREGELEN
1. Controleer of de stroomvoorziening in uw huis overeenkomt met die op de identificatiesticker aan de
achterkant van het product. Plaats de speler horizontaal op een geschikte ondergrond (meubelstuk) met
genoeg ruimte er omheen voor ventilatie 7 -10 cm. Zorg dat de ventilatieopeningen niet worden geblokkeerd.
Plaats het apparaat niet op versterkers of andere apparaten die warm kunnen worden. Dit apparaat is
bedoeld voor continu gebruik. Om het toestel volledig uit te schakelen, trekt u de stekker uit het stopcontact.
Haal de stekker van het toestel uit het stopcontact als u het een lange tijd niet gaat gebruiken.
2. Haal bij onweer de stekker uit het stopcontact. Bliksem kan spanningspieken veroorzaken waardoor het
apparaat beschadigd kan raken.
3. Stel het apparaat niet bloot aan direct zonlicht of andere warmtebronnen. Dit kan oververhitting veroorzaken
en ertoe leiden dat het apparaat niet goed functioneert.
4. Bescherm het product tegen vocht (bijv. vazen) en overmatige warmte (bijv. een open haard) of tegen
apparatuur die sterke magnetische of elektrische velden veroorzaakt. Haal de stekker uit het stopcontact
wanneer het apparaat niet goed functioneert. Dit product is niet bedoeld voor industrieel gebruik. Dit product
is uitsluitend bestemd voor particulier gebruik. Wanneer het product of een schijf bij een lage temperatuur
wordt bewaard, kan condensatie optreden. Als u het apparaat in de winter verplaatst, wacht u ongeveer 2
uur totdat het apparaat weer op kamertemperatuur is voordat u deze gaat gebruiken.
5. De batterijen die in dit product worden gebruikt, bevatten chemicaliën die schadelijk zijn voor het milieu. Gooi
batterijen niet met het gewone huisvuil weg. Werp de batterijen niet in het vuur. De batterijen mogen niet
worden kortgesloten, gedemonteerd of oververhit. Bij incorrecte plaatsing van de batterijen bestaat
ontploffingsgevaar. Vervang batterijen alleen door andere van hetzelfde type.
· 3 · Nederlands
Page 48

FUNCTIES
Maakt het mogelijk om te genieten van TV-geluid na het aansluiten van de
Soundbar op uw TV met of zonder kabel.
Via de Soundbar die met/zonder kabel met de tv is verbonden, kunt u genieten van rijk en realistisch geluid van
de tv.
c Raadpleeg Methode 1 op pagina 8 om te zien hoe u de Soundbar moet aansluiten op uw TV met behulp
van een HDMI-kabel.
c Raadpleeg Methode 2 op pagina 9 om te zien hoe u de Soundbar moet aansluiten op uw TV met behulp
van een draadloos netwerk.
Dit product ondersteunt Dolby Atmos®.
* Wat is Dolby Atmos®?
Atmos-technologie maakt bestaande 5.1-kanaals surround sound-systemen nog beter door een overhead
speaker. Hierdoor wordt de luisteraar omgeven door 360° geluid, wat zorgt voor een meeslepende, rijke,
gedetailleerde en diepere ervaring van hoge kwaliteit. Zie pagina 13 om te weten hoe u het systeem moet
aansluiten.
· 4 · Nederlands
Page 49

DE COMPONENTEN CONTROLEREN
POWER
POWER
DC 19V
Hoofdeenheid van de Soundbar
3 AC-stekker
4 Lichtnetadapter
Boven
(afhankelijk van het
land en model)
Afstandsbediening/
batterijen
SOURCE
SOUND
LEVEL
EFFECT
VOL WOOFER
SOUNDBAR
Subwoofer Surround Speaker
Links Rechts
1 Stroomsnoer 2 Stroomsnoer
c Om de linkse surround speaker van de rechtse te kunnen onderscheiden, controleert u het label aan de
achterkant van de speakers.
HDMI-kabel
AANSLUITEN OP NETSTROOM
Gebruik de stroomcomponenten (1, 2, 3, 4) om de voedingen aan te sluiten in deze volgorde:
Subwoofer Linkse en rechtse Surround Speakers Hoofdeenheid van de Soundbar
oor meer informatie over de stroomvoorziening en het stroomverbruik, raadpleeg het etiket op het product.
c V
(Label : Onderkant van de hoofdeenheid van de Soundbar)
Achterkant van
Subwoofer
Onderkant van de
hoofdeenheid van de
POWER
LINK STANDBY ID SET
AUX IN
DIGITAL AUDIO IN
(OPTICAL)
HDMI OUT
(TV-ARC)
HDMI IN 1
HDMI IN 2
Soundbar
1 Stroomsnoer
Aansluiten op
Wi-Fi SETUPSPK ADD
netstroom
DC 19V
SERVICE
POWER
Onderkant van de linkse en
rechtse Surround Speakers
3 AC-stekker
DC 19V
(Voedingsaansluiting)
· 5 · Nederlands
4 Lichtnetadapter
2 Stroomsnoer
Aansluiten op
netstroom
Page 50

H
LINK
LINK
DE HOOFDEENHEID VAN DE SOUNDBAR AANSLUITEN
OP DE SUBWOOFER EN SURROUND-LUIDSPREKERS
U kunt genieten van rijke, lage tonen en een betere geluidskwaliteit door de subwoofer te koppelen aan de
hoofdeenheid van de Soundbar.
Aanbevolen speakerplaatsing
TV
Hoofdeenheid van de
Soundbar
Hoofdeenheid van de
Soundbar
Subwoofer
Subwoofer
110°
90°
Surround
Speaker R
Surround Speaker
Links Rechts
90°
110°
Surround
Speaker L
Automatische verbinding
1. Sluit een voeding aan op de subwoofer en de surround sound speakers.
2. Sluit een voeding aan op de Soundbar en druk vervolgens op de knop op de afstandsbediening of op de
rechterkant van de Soundbar.
3. De subwoofer en de surround sound speakers worden automatisch verbonden met de Soundbar.
4. Wanneer de automatische koppeling voltooid is, gaan de blauwe indicatorlampjes achteraan de subwoofer en
de surround speakers branden.
c Als het rode indicatorlampje achteraan de subwoofer of de surround speakers brandt of het blauwe
indicatorlampje knippert continu, is de automatische koppeling niet gelukt. Als dit zich voordoet, verbindt u
de speakers manueel. (Zie pagina 7)
c Belangrijk: Voordat u begint, plaats de batterijen in de afstandsbediening. Zie pagina 18 voor instructies.
LINK STANDBY ID SET
POWER
LINK STANDBY ID SET
Achterkant van
Subwoofer
Achterkant van de
Surround Speaker
· 6 · Nederlands
Page 51

LINK STANDBY ID SET
LINK STANDBY ID SET
LE
R
BA
De Subwoofer en Surround Speakers manueel verbinden als de
automatische verbinding mislukt
c Voordat u begint
• Zorg dat de Soundbar, de subwoofer en de surround speakers ingeplugd zijn.
• Zorg dat de Soundbar is ingeschakeld.
1. Houd ID SET aan de achterkant van de subwoofer en surround speakers minstens 5 seconden ingedrukt.
Het rode indicatorlampje op de achterkant van elke speaker gaat uit en het blauwe indicatorlampje knippert.
LINK STANDBY ID SET
POWER
LINK STANDBY ID SET
Achterkant van
Subwoofer
Achterkant van de linkse en
rechtse Surround Speakers
2. Zet de Soundbar uit.
3. Houd de knop VOL op de afstandsbediening minstens 5 seconden ingedrukt met de Soundbar
uitgeschakeld (UIT).
VOL
WOOFE
SOUND
EFFECT
4. Het ID SET bericht verschijnt op het display van de Soundbar gedurende een korte tijd, en verdwijnt dan.
ID SET
Rechterkant van de Soundbar
5. Wanneer de blauwe indicatorlampjes op de subwoofer en surround-luidsprekers knipperen, schakelt u de
stroom in door op de knop aan de rechterkant van de Soundbar of op de afstandsbediening te drukken.
6. Wanneer de verbinding is geslaagd, gaan de blauwe indicatorlampjes op de achterkant van de subwoofer en
de surround speakers branden zonder te knipperen.
c Als het verbinden niet lukt, blijft het blauwe lampje knipperen. Ga naar Stap 1 en begin opnieuw.
· 7 · Nederlands
Page 52

HDMI OUT
(TV-ARC)
DIGITAL AUDIO IN
(OPTICAL)
HDMI OUT
(TV-ARC)
HDMI IN 1
HDMI IN 2
AUX IN
AANSLUITEN OP UW TV
U kunt het geluid van de tv beluisteren nadat u deze Soundbar met/zonder kabel met uw tv hebt verbonden.
c Belangrijk: Voordat u begint, plaats de batterijen in de afstandsbediening. Zie pagina 18 voor instructies.
Methode 1. Verbinding maken met een kabel
Controleer de HDMI IN
(TV-ARC)-poort op uw TV.
HDMI IN
(ARC)
HDMI-kabel
Controleer de
HDMI OUT (TV-ARC)-poort op de
hoofdeenheid van de Soundbar.
Onderkant van
Soundbar
1. Sluit de HDMI-kabel aan zoals hierboven afgebeeld.
2. TV ARC verschijnt op het display van de hoofdeenheid van de Soundbar en het tv-geluid wordt afgespeeld.
TV ARC
Rechterkant van de Soundbar
c Als het tv-geluid niet wordt afgespeeld, drukt u op de knop aan de rechterkant van de Soundbar of de
knop SOURCE op de afstandsbediening, en vervolgens selecteert u D.IN op het display van de
hoofdeenheid van de Soundbar. Vervolgens wordt de D.IN-modus veranderd naar TV ARC en wordt
TV-geluid uitgevoerd.
c Als TV ARC niet verschijnt op het display van de hoofdeenheid van de Soundbar, controleert u of de kabel is
aangesloten op de juiste poort.
c U kunt het volume van de Soundbar gemakkelijk regelen en Auto Power Link instellen op AAN en de
Soundbar automatisch laten inschakelen wanneer u de TV aanzet.
· 8 · Nederlands
Page 53

Wi-Fi SETUP SPK ADD
Methode 2. Verbinding maken met een draadloos netwerk
De app Samsung Multiroom installeren en draadloos verbinding maken
Volg de onderstaande stappen om de app Samsung Multiroom
de eerste keer te installeren.
1. Houd de knop SPK ADD aan de onderkant van de
Soundbar gedurende meer dan 1 seconde ingedrukt.
• Er klinkt een meldingsgeluid en het bericht “ADD SPEAKER”
verschijnt op de hoofdeenheid van de Soundbar. Nadien
verschijnt het bericht “WIFI READY” wanneer de modus
stand-by voor verbinding wordt geactiveerd.
2. Verbind uw smartapparaat (smartphone, tablet, enz.) met de draadloze router.
Internet Draadloze router Smartapparaat
3. Installeer de app Samsung Multiroom op uw smartapparaat (smartphone, tablet, enz.).
4. Start de app Samsung Multiroom.
AUX IN
DIGITAL AUDIO IN
(OPTICAL)
HDMI OUT
(TV-ARC)
HDMI IN 1
HDMI IN 2
Wi-Fi SETUP SPK ADD
Onderkant van Soundbar
Samsung
Multiroom
Samsung
Multiroom
DC 19V
SERVICE
Android iOS
App Samsung Multiroom
5. Voltooi de begininstellingen door de instructies op het app-scherm te volgen.
Voltooi de instellingen
door de instructies op
het scherm van de
app Samsung
Multiroom te volgen.
Startscherm Het wachtwoord voor de
draadloze router invoeren
oer het wachtwoord van de draadloze router in om de Soundbar met een draadloos netwerk te verbinden
c V
via de app Samsung Multir
oom.
c Als de draadloze router geen speciaal wachtwoord heeft, worden de begininstellingen voltooid zonder dat u
om een wachtwoord wordt gevraagd.
· 9 · Nederlands
Verbinding met
luidspreker voltooid
Page 54

Wi-Fi SETUP SPK ADD
So undbar toevoegen aan een bestaand Multiroom-geluidssysteem
Als de app Samsung Multiroom al is geïnstalleerd voor
gebruik met een ander multiroom-geluidsapparaat, volgt u
deze stappen om de Soundbar toe te voegen.
1. Houd de knop SPK ADD aan de onderkant van de
Soundbar gedurende meer dan 1 seconde ingedrukt.
• Er klinkt een meldingsgeluid en het bericht “ADD SPEAKER”
verschijnt op de hoofdeenheid van de Soundbar. Nadien
verschijnt het bericht “WIFI READY” wanneer de modus
stand-by voor verbinding wordt geactiveerd.
2. Verbind uw smartapparaat (smartphone, tablet, enz.) met de draadloze router.
Internet Draadloze router Smartapparaat
3. Start de app Samsung Multiroom.
4. Raak de
om naar de lijst met alle luidsprekers te gaan.
5. Selecteer More > Add New Speaker in de app en volg daarna de instructies op het app-scherm.
AUX IN
DIGITAL AUDIO IN
(OPTICAL)
HDMI OUT
(TV-ARC)
HDMI IN 1
HDMI IN 2
Wi-Fi SETUP SPK ADD
Onderkant van Soundbar
Samsung
Multiroom
DC 19V
SERVICE
Voltooi de instellingen
door de instructies op
het scherm van de
app Samsung
Multiroom te volgen.
Startscherm Selectie van netwerk
c Voor het maken van een verbinding met een ander netwerk, selecteert u No.
Voer het wachtwoord van de draadloze router in om de Soundbar met een draadloos netwerk te verbinden
via de app Samsung Multiroom.
Als de draadloze router geen speciaal wachtwoord heeft, worden de begininstellingen voltooid zonder dat
om een wachtwoord wordt gevraagd.
· 10 · Nederlands
Toevoeging van
eker voltooid
luidspr
Page 55

De Soundbar verbinden met uw Samsung Smart TV
U kunt de tv via een draadloos netwerk verbinden met de Soundbar en van het geluid van de tv genieten.
c Belangrijk: Zorg ervoor dat de tv en de Soundbar zijn verbonden met hetzelfde netwerk.
(Het netwerk van uw Samsung TV controleren: Home-menu Netwerk Netwerkstatus)
Instellingen configureren via uw Samsung Smart TV
c Om geluid af te spelen via de Soundbar, moet uw tv-model de Multiroom-functie ondersteunen (Smart TV's
van Samsung van na 2014).
c Als de tv is losgekoppeld van het draadloze netwerk wegens een wijziging van de invoerbron van de
Soundbar, gebruik dan het tv-menu om de verbinding te herstellen.
Voor tv's die zijn uitgebracht in 2016
1. Home-menu Instellingen ( ) Geluid Geluidsuitvoer Selecteer [AV] Samsung Soundbar Kxxx
(Wi-Fi)
2. Het tv-geluid wordt uitgezonden.
Voor tv's die zijn uitgebracht in 2015
1. Home-menu Geluid
2. Het tv-geluid wordt uitgezonden.
Voor tv's die zijn uitgebracht in 2014
1. Home-menu Geluid
Soundbar+Surround
2. Selecteer in de Soundbar-positie "K950" en selecteer "OK".
3. Home-menu
Luidsprekerlijst
Luidsprekerinstellingen
Geluid
Luidsprekerinstellingen
Selecteer [AV] Samsung Soundbar Kxxx (Wi-Fi)
Selecteer
Selecteer
Multiroom Link - Instellingen
Uitvoer tv-geluid Multiroom Link
Luidsprekerinstellingen
Uitvoer tv-geluid Multiroom Link
TV-luidspreker
Type tv-installatie
•
TV SoundConnect
• Lijst met Samsung-audioapparaten
Nieuw apparaat toev.
•
Multiroom Link
• Instellingen
Bluetooth-hoofdtelefoon
• Bluetooth-hoofdtelefoons
4. Het tv-geluid wordt uitgezonden.
Standaard
Aan
Soundbar+Surround
OK
Multiroom Link
OK Volumeniveau Luidsprekertest
· 11 · Nederlands
Soundbar+Surround
Soundbar
[AV] Samsung Soundbar K950
c
[AV] Samsung Soundbar K950
Niet gebruiken
Naam wi
Page 56

VERBINDING VIA BLUETOOTH
U kunt een Bluetooth-apparaat verbinden met de Soundbar en van muziek met stereogeluid genieten, volledig
draadloos!
c Het is niet mogelijk om meerdere Bluetooth-apparaten tegelijk te verbinden.
Aansluiten
Bluetooth-apparaat
1. Druk op de knop
om BT te selecteren.
2. Selecteer het Bluetooth-menu op het Bluetooth-apparaat waarmee u verbinding wilt maken. (Raadpleeg de
gebruiksaanwijzing van het Bluetooth-apparaat.)
3. Selecteer "[AV] Samsung Soundbar Kxxx" in de lijst.
• Wanneer de verbinding tussen de Soundbar en het Bluetooth-apparaat tot stand is gebracht, staat in het
display aan de voorkant van de Soundbar [naam Bluetooth-apparaat] → BT.
4. Muziek afspelen op het aangesloten apparaat.
[Als de verbinding met het Bluetooth-is mislukt / Als opnieuw naar het apparaat moet worden gezocht].
• Als "[AV] Samsung Soundbar Kxxx" wordt gevonden in de zoekresultaten op het Bluetooth-apparaat,
verwijdert u deze optie.
• Houd de knop
de afstandsbediening om over te schakelen naar de modus BT PAIRING en selecteer vervolgens
"[AV] Samsung Soundbar Kxxx" op de weergegeven lijst met beschikbare apparaten op het
Bluetooth-apparaat. (Zie stap 2 en 3 hierboven).
c Voer <0000> als u bij het aansluiten van een Bluetooth-apparaat naar een pincode wordt gevraagd.
c De Bluetooth-verbinding kan worden verbroken als in de Bluetooth-verbindingsmodus de afstand tussen de
Soundbar en het Bluetooth-apparaat meer dan 10 m.
c Soundbar wordt na 5 minuten in de stand Gereed automatisch uitgeschakeld.
c Onder de volgende omstandigheden voert de Soundbar mogelijk geen correcte Bluetooth-zoek- of
verbindingsactie uit:
– Indien er zich een sterk elektrisch veld rond Soundbar bevindt.
– Indien verschillende Bluetooth-apparaten tegelijkertijd met Soundbar worden gekoppeld.
– Indien het Bluetooth-apparaat is uitgeschakeld, niet is geplaatst of defect is.
c Elektronische apparaten kunnen radiostoring veroorzaken. Apparaten die elektromagnetische golven
genereren houdt u uit de buurt van de hoofdeenheid van de Soundbar, bijv. magnetrons, draadloze
LAN-apparaten, etc.
op de rechterkant van de Soundbar of op de knop SOURCE op de afstandsbediening
ingedrukt aan de rechterkant van de Soundbar of houd de knop SOURCE ingedrukt op
De verbinding tussen de Soundbar en het Bluetooth-apparaat verbreken
Druk op de knop SOURCE op de afstandsbediening of op de knop op de rechterkant van het product om
over te schakelen van BT naar een andere modus of zet de Soundbar uit.
• Het verbonden Bluetooth-apparaat wacht enige tijd op een reactie van de Soundbar alvorens de verbinding te
verbreken. (Hoe lang het duurt voordat de verbinding wordt verbroken, kan per Bluetooth-apparaat verschillen.)
· 12 · Nederlands
Page 57

HDMI OUT
(TV-ARC)
HDMI IN 1
HDMI IN 2
APPARATEN VERBINDEN OM DOLBY ATMOS® TE GEBRUIKEN
Dit product ondersteunt Dolby Atmos®.
c Belangrijk: Dolby Atmos® werkt alleen in HDMI-modus. Het is niet compatibel met andere invoerbronnen.
HDMI-kabel
HDMI IN
Onderkant van
Soundbar
Soundbar
Of
Extern
apparaat
HDMI OUT
HDMI-kabel
1. Sluit een HDMI-kabel aan vanaf een HDMI IN 1- of HDMI IN 2-jack aan de achterkant van het product op de
HDMI OUT-jack op uw digitale apparaat. Gebruik de HDMI-kabel om de HDMI IN-poort op de tv aan te sluiten
op de HDMI OUT (TV-ARC)-poort op de onderkant van de Soundbar.
2. Druk op de knop op de rechterkant van de Soundbar of op de knop SOURCE op de afstandsbediening
om HDMI1 of HDMI2 te selecteren.
3. De geselecteerde HDMI-modus wordt weergegeven op het weergavepaneel van de Soundbar en geluid
wordt afgespeeld.
c Wanneer Dolby Atmos® is ingeschakeld, licht de blauwe LED aan de rechtse hoek van de Soundbar op.
4. Dolby Atmos® configureren op uw BD-speler of een ander apparaat.
• Controleer de audio-uitvoeropties via het instellingenmenu op uw BD-speler of ander apparaat.
• Zorg dat "Geen codering" is geselecteerd voor bitstream in de audio-uitvoeropties.
Bijvoorbeeld, op een Samsung Player: Instellingen Geluid
Digitale uitvoer: Selecteer Bitstream (zonder omzetting).
Instellingen
Geluid
Luidsprekerinst.
Digitale uitvoer
PCM-downsampling
Dynamisch ber
Downmixingfunctie
Modus DTS Neo:6 Uit
Audio-sync. 0 msec
• Als de Audio-uitvoeropties ook Secundaire Audio bevat, zorg dan dat deze is uitgeschakeld.
c Dolby Atmos® werkt alleen op 5.1.4-kanalen.
c Zorg ervoor dat de inhoud Dolby Atmos® ondersteunt.
· 13 · Nederlands
PCM
Bitstream (zonder omzetting)
Bitstream (DTS opnw gecodeerd)
eik instellen
Bitstr
eam (Dolby D opnw gecodeer
d)
Page 58

HDMI OUT
(TV-ARC)
HDMI IN 1
HDMI IN 2
SERVICE
AANSLUITEN OP EEN EXTERN APPARAAT
HDMI-kabel
HDMI IN
Onderkant van
Soundbar
Soundbar
Of
Extern
apparaat
HDMI OUT
HDMI-kabel
1. Sluit een HDMI-kabel aan vanaf een HDMI IN 1- of HDMI IN 2-jack aan de achterkant van het product op de
HDMI OUT-jack op uw digitale apparaat. Gebruik de HDMI-kabel om de HDMI IN-poort op de tv aan te sluiten
op de HDMI OUT (TV-ARC)-poort op de onderkant van de Soundbar.
2. Druk op de knop op de rechterkant van de Soundbar of op de knop SOURCE op de afstandsbediening
om HDMI1 of HDMI2 te selecteren.
3. De geselecteerde HDMI-modus wordt weergegeven op het weergavepaneel van de Soundbar en geluid
wordt afgespeeld.
SOFTWARE-UPDATE
Samsung kan in de toekomst updates voor de firmware van de Soundbar aanbieden.
Automatisch bijwerken
De automatische updatefunctie is standaard ingeschakeld op de Soundbar. Als de Soundbar verbinding heeft
met internet worden updates gezocht en geïnstalleerd, ongeacht of het apparaat aan of uit is.
c Als u de functie voor automatisch bijwerken wilt gebruiken, moet de Soundbar verbinding hebben met het
internet. De Wi-Fi-verbinding met de Soundbar wordt verbroken als het netsnoer van het apparaat wordt
losgekoppeld of als de stroomtoevoer wordt onderbroken. Zet, als de stroom uitstaat, de Soundbar aan en
verbind hem opnieuw.
Bijwerken met USB
AUX IN
DIGITAL AUDIO IN
(OPTICAL)
HDMI OUT
(TV-ARC)
HDMI IN 1
HDMI IN 2
Indien een update wordt aangeboden, kunt u de firmware bijwerken door een USB-apparaat waarop de
firmware-update is opgeslagen aan te sluiten op de USB-poort van uw Soundbar.
Voor meer informatie over het downloaden van updatebestanden gaat u naar de website van Samsung
Electronics op (samsung.com/sec), zoekt u op de naam van het model downloadt u de firmware via de
menuoptie voor klantondersteuning. De naam van de optie kan afwijken.
c Als de invoerbron is gewijzigd na een update of het opnieuw aansluiten van het netsnoer, wijzig dan de
invoerbron naar tv of naar de gewenste bron.
DC 19V
Wi-Fi SETUPSPK ADD
SERVICE
Micro-USB-naar-USB-adapter-kabel (niet meegeleverd)
· 14 · Nederlands
Page 59

WANDMONTAGE
U kunt de muurbevestiging gebruiken om het
apparaat aan de muur te bevestigen.
Voorzorgsmaatregelen bij de
installatie
• Alleen op een verticale muur installeren.
• Installeer het Soundbar-systeem niet in een locatie
met een hoge temperatuur en/of luchtvochtigheid.
Installeer het systeem op een stabiele wand die het
gewicht van de hoofdeenheid van de Soundbar
kan dragen.
• Controleer of de wand stevig genoeg is. Bij het
installeren van het Soundbar-systeem aan een
muur die het gewicht van de hoofdeenheid van de
Soundbar niet kan dragen, versterkt u de muur
vóór de installatie. Als dit niet mogelijk is, installeert
u het systeem aan een andere muur die stabiel
genoeg is om het gewicht van de hoofdeenheid
van de Soundbar te dragen.
• Koop en gebruik bevestigingsschroeven of ankers
die geschikt zijn voor uw soort muur (gipsplaat,
plaatijzer, hout enz.).
Monteer de bevestigingsschroeven indien mogelijk
in de wandstijlen.
• Schaf schroeven voor wandmontage aan op basis
van het type en de dikte van de muur waaraan u
de Soundbar wilt monteren.
– Diameter: M5
– Lengte: L 35 mm of langer aanbevolen.
• Sluit de kabels van het toestel op de externe
apparaten aan voordat u het aan de muur
bevestigt.
• Zorg ervoor dat het apparaat is uitgeschakeld en
losgekoppeld voordat u dit installeert. Anders kan
dit elektrische schokken veroorzaken.
Componenten voor muurmontage
Steun muurmontage (2 st.)
Schroefhouder (2 st.) Schroef (2 st.)
C C
1. Plaats de Muurmontagegids tegen de muur.
●
De Muurmontagegids moet waterpas zijn.
●
Als de tv aan de wand wordt bevestigd,
installeer de Soundbar dan minimaal 5 cm
onder de tv.
CENTER LINE
C TYPE : 700mm
Muurmontagegids
5 cm of meer
· 15 · Nederlands
Page 60

C
E
C
C
2. Lijn de Centrale lijn van het papieren voorbeeld
uit met het midden van uw tv (als u de Soundbar
onder uw tv monteert) en bevestig vervolgens de
Muurmontagegids op de muur met behulp van
tape.
c Als u de soundbar niet onder een tv monteert,
plaats dan de Centrale lijn in het midden van het
installatiegebied.
C C
CENTER LINE
C TYPE : 700mm
Centrale lijn
3. Duw de punt van een pen of een geslepen
potloodpunt door het midden van de C-TYPEbeelden aan elk uiteinde van de gids om de gaten
voor de schroefsteunen te markeren en verwijder
vervolgens de Muurmontagegids.
4. Boor met behulp van een geschikt boorijzer een
gat in de muur bij elke markering.
c Als de markeringen niet overeenkomen met de
posities van de bouten, zorg er dan voor dat u de
geschikte steunen of pluggen in de gaten plaatst
voordat u de schroefsteunen bevestigt. Als u
steunen of pluggen gebruikt, zorg er dan voor dat
de gaten die u boort groot genoeg zijn voor de
steunen of pluggen die u gebruikt.
C
CENTER LINE
ENTER LIN
C TYPE : 700mm
5. Duw een schroef (niet meegeleverd) door elke
Schroefhouder
en draai de schroef stevig aan in
het gat.
6. Installeer 2 Steun muurmontage in de juiste
richting aan de onderkant van de Soundbar met
behulp van 2 Schroef (M4 x L12).
●
Bij het monteren moet u ervoor zorgen dat de
ophangingsonderdelen van de Steun
muurmontage zich achter de achterkant van
de Soundbar bevinden. Zie de onderstaande
illustratie.
Achterkant van de Soundbar
Rechteruiteinde van de Soundbar
· 16 · Nederlands
Page 61

7. Installeer de Soundbar met de bijgeleverde Steun
muurmontage door de Steun muurmontage op
te hangen aan de Schroefhouder op de muur.
8. Schuif de Soundbar omlaag zoals hieronder
weergegeven zodat de Steun muurmontage
stevig op de Schroefhouder rusten.
c Schuif de Steun muurmontage omlaag vanaf de
onderkant om ze op de Schroefhouder te
plaatsen.
DE SURROUND SPEAKERS
OP EEN WAND MONTEREN
U kunt wandbevestigingen afzonderlijk aankopen om
de surround speakers op een wand te monteren.
Belangrijke informatie voor de aankoop
• Draagkracht: Meer dan 8,0 kg
• Afmeting gat: 1/4 - 20 schroefdraad
c Aangezien wandbevestiging optioneel is, moet u
de nodige accessoires afzonderlijk aankopen.
c Laat de wandbevestigingsbeugels voor de
surround speakers uitvoeren door een erkend
installateur.
c Vraag een professioneel installatiebedrijf om uw
product op de wand te monteren.
c Ga na of de wand sterk genoeg is voordat u de
wandbevestigingsbeugels monteert. Als deze niet
sterk genoeg is, moet u de wand eerst versterken
voordat u de wandbevestigingsbeugels en de
speakers op de wand monteert.
c Raadpleeg voor meer informatie de handleiding
van de wandbevestiging.
c Samsung Electronics is niet aansprakelijk voor
enige schade aan het product als gevolg van
onjuiste installatie van het product.
c Installeer de speakers niet zijdelings of
ondersteboven.
· 17 · Nederlands
Page 62

KNOPPEN EN FUNCTIES AFSTANDSBEDIENING
Batterijen invoegen vóór het gebruik van de
afstandsbediening (AA-batterijen x 2)
Schuif het batterijdeksel in de richting van de pijl tot het volledig is verwijderd.
Plaats 2 AA-batterijen (1,5V), rekening houdend met de correcte +/polariteit. Schuif het batterijdeksel terug op zijn plaats.
SOUND
EFFECT
VOL WOOFER
SOUNDBAR
SOURCE
LEVEL
Het volume van de Soundbar regelen met de
afstandsbediening van uw tv
1. Houd de SOUND knop langer dan 5 seconden ingedrukt
terwijl de Soundbar is ingeschakeld.
2. "ON - TV REMOTE" verschijnt op het display van de Soundbar.
3. In het menu van de TV, stelt u de TV luidspreker in naar externe
luidspreker.
c Niet beschikbaar in de modi TV ARC, BT, HDMI1 en HDMI2.
(Alleen beschikbaar in de modi D.IN (optisch) en AUX)
c Op de afstandsbediening van de tv zijn alleen de volume- en dempen-
knoppen beschikbaar. De andere knoppen zijn uitgeschakeld.
c Het menu van een TV verschilt per fabrikant en model.
Raadpleeg de handleiding van de TV voor meer informatie.
c Fabrikanten ondersteunen deze functie:
●
VIZIO, LG, Sony, Sharp, PHILIPS, PANASONIC, TOSHIBA,
GRUNDIG, Hisense, RCA
●
Deze functie is mogelijk niet compatibel met de
afstandsbediening van uw TV, afhankelijk van de fabrikant van
de afstandsbediening.
c Om deze functie uit te schakelen, druk de
gedurende 5 seconden. "OFF - TV REMOTE" verschijnt op het
display van de Soundbar.
SOUND knop in
Aan/Uit
SOUND
Hiermee schakelt u de Soundbar in en uit.
Schakelt Surround Sound in en uit. De Surround Sound-functie voegt diepte en een
gevoel van ruimte toe aan geluid.
Telkens u op deze knop drukt, wordt de functie
• AAN: Geluid afspelen op alle speakers.
c U kunt ook luisteren naar 5.1.4-kanaals geluid voor muziekbronnen die niet
Dolby Atmos® zijn.
• UIT: Geluid afspelen op het originele bronkanaal.
· 18 · Nederlands
AAN
en
UIT
gezet.
Page 63

SOUND
৻ࠗ۱
SOUND
৻ࠗ۱
Geluidsregeling
Afspelen/pauze
EFFECT
SOURCE
(BT/WIFI)
U kunt kiezen uit 6 geluidsmodi: STANDARD, MUSIC, CLEAR VOICE, SPORTS, MOVIE,
en NIGHT.
c NIGHT-modus
Wanneer u van kanaal of muziekbron wisselt, wordt het verschil in volume tussen
verschillende muziekbronnen automatisch aangepast om ze geschikt te maken om
naar te luisteren.
c DRC (Dynamic Range Control)
Hiermee kunt u dynamic range control toepassen op Dolby Digital-nummers. Houd de
knop EFFECT ongeveer 5 seconden ingedrukt in stand-bymodus om de DRC-functie
(Dynamic Range Control) ON - DRC en OFF - DRC in of uit te schakelen.
U kunt kiezen uit TREBLE, BASS en AUDIO SYNC.
• Om het volume van de hoge of lage tonen in te stellen, selecteert u TREBLE of BASS
in de Geluidsinstellingen en vervolgens past u het volume aan tussen -3~+3 met
behulp van de knoppen Omhoog/Omlaag.
• Als de video en audio tussen de TV en uw Soundbar niet is gesynchroniseerd, selecteer
AUDIO SYNC in Geluidsinstellingen en stel audio vertraging in tussen 0~300 milliseconden
door gebruik te maken van de knoppen Omhoog/Omlaag.
c Audio Sync wordt slechts in enkele functies ondersteund.
Druk hierop om een bron te selecteren die is aangesloten op de Soundbar.
c BT PAIRING-modus
Om de BT PAIRING-modus in de Bluetooth-functie in te schakelen, houdt u de
knop SOURCE meer dan 5 seconden ingedrukt.
Druk op de knop & om muziek tijdelijk te pauzeren.
Druk opnieuw op de knop & om de geselecteerde muziek te spelen.
Omhoog/
Omlaag/Links/
Rechts
Druk op de aangegeven zones om Omhoog/Omlaag/Links/
Rechts te selecteren.
Druk op Omhoog/Omlaag/Links/Rechts op de knop om functies te selecteren of in te
stellen.
c Muziek overslaan
Druk op de knop Rechts om het volgende nummer te selecteren; druk op de knop
Links om het vorige nummer te selecteren.
c Anynet+ / Auto Power Link
U kunt Anynet+ en Auto Power Link aan of uit zetten.
De Anynet+ en Auto Power Link worden respectievelijk bediend door de knop
Rechts en
• Anynet+: Als u bent verbonden via een HDMI-kabel, kunt u de Soundbar met
• Auto Power Link: Indien de Soundbar is verbonden met een digitale optische
Links
.
de tv-afstandsbediening van Samsung bedienen. Houd de knop Rechts
gedurende 5 seconden ingedrukt om Anynet+ AAN
kabel, kan deze automatisch worden ingeschakeld wanneer u uw TV aan zet.
Houd de knop Links gedurende 5 seconden ingedrukt om Auto Power Link
of
UIT
te selecteren.
· 19 · Nederlands
of
UIT te selecteren.
AAN
Page 64

VE
R
DB
R
VE
ER
DB
R
DB
ER
DB
LEVEL
STL STR
SL
Surr
ound
Speaker L
FL FR
Hoofdeenheid van de
Soundbar
FTRFTL
SR
C
Surround
Speaker R
De ATMOS Soundbar heeft 5.1.4-kanaals geluid. Gebruik deze knop om het volume
van elke speaker te regelen. Druk op deze knop, gebruik de knoppen Links/Rechts
om een luidspreker te selecteren en gebruik vervolgens de knoppen Omhoog/Omlaag
om het niveau (volume) te verhogen of te verlagen.
Speaker
Weergegeven op OLED tijdens
het regelen van het volume
Vooraan links FL
Vooraan boven links FTL
Hoofdeenheid van
de Soundbar
Midden C
Vooraan rechts FR
Vooraan boven rechts FTR
Surround Speaker L
Surround Speaker R
Surround links SL
Surround boven links STL
Surround rechts SR
Surround boven rechts STR
c Zie de beschrijving onder item 9 voor instructies over hoe het subwoofervolume
kan worden geregeld.
LE
LE
WOOFER
EFFECT
WOOFE
EFFECT
VOL
SOUN
WOOF
VOL
SOUN
Druk op de knop omhoog of omlaag om het volume van de subwoofer te regelen op
-12 of -6 tot +6.
Als u op de knop drukt, keert het volume van de subwoofer terug naar niveau 0.
VOL
EFFECT
WOOFE
EFFECT
VOL
SOUN
Druk op de knop omhoog of omlaag om het volume te regelen.
c Dempen
Houd de knop VOL ingedrukt om het geluid te dempen. Druk opnieuw op de knop
om het geluid niet meer te dempen.
· 20 · Nederlands
WOOF
VOL
SOUN
Page 65

PROBLEMEN OPLOSSEN
Alvorens assistentie te zoeken, controleer het
volgende.
Het apparaat wordt niet ingeschakeld.
Is de stekker aangesloten op het stopcontact?
È Sluit de stekker aan op het stopcontact.
Een functie werkt niet als de knop wordt
ingedrukt.
Is er statische elektriciteit in de lucht?
È Haal de stekker uit het stopcontact en sluit deze
opnieuw aan.
Ik hoor geen geluid.
Is de functie voor geluid dempen aan?
È
Druk op de toets VOL om de functie te annuleren.
Is het volume minimaal?
È Het Volume aanpassen.
Afstandsbediening werkt niet.
Zijn de batterijen leeg?
È Plaats nieuwe batterijen.
Is de afstand tussen de afstandsbediening en de
hoofdeenheid van de Soundbar te groot?
È Plaats de afstandsbediening dichter bij de
hoofdeenheid van de Soundbar.
LICENTIE
Vervaardigd onder licentie van Dolby Laboratories.
Dolby, Dolby Atmos, Dolby Audio, Dolby Digital
Plus, Pro Logic en de dubbele D zijn handelsmerken
van Dolby Laboratories.
Raadpleeg http://patents.dts.com voor
DTS-patenten. Vervaardigd onder licentie van DTS
Licensing Limited. DTS, het symbool en DTS en het
symbool samen zijn gedeponeerde handelsmerken,
en DTS 2.0 Channel is een handelsmerk van DTS,
Inc. © DTS, Inc. Alle rechten voorbehouden.
De termen HDMI en High-Definition Multimedia
Interface en het HDMI-logo zijn handelsmerken of
gedeponeerde handelsmerken van HDMI Licensing
LLC in de Verenigde Staten en andere landen.
De rode LED op de subwoofer knippert en de
subwoofer produceert geen geluid.
Dit pr
obleem kan optreden als de subwoofer niet
is aangesloten op de hoofdeenheid van de
Soundbar.
È Pr
obeer uw subwoofer opnieuw te verbinden.
Zie pagina 6.
De subwoofer dreunt en trilt waarneembaar.
Probeer de vibratie van uw subwoofer aan te
passen.
È
Druk op de knop WOOFER op uw
afstandsbediening of omlaag om de waarde in
te stellen (tussen -12, -6 ~ +6).
· 21 · Nederlands
• De Spotify-software is onderworpen aan licenties
van derden :
www.spotify.com/connect/third-party-licenses.
• Ga naar www.spotify.com/connect voor meer
informatie over Spotify Connect
Page 66

KENNISGEVING OPEN SOURCE-LICENTIE
Voor verdere informatie over Open Source-software die wordt gebruikt in dit product, brengt u een bezoek aan
de website: http://opensource.samsung.com
BELANGRIJKE OPMERKING OVER SERVICE
• De afbeeldingen en illustraties in deze gebruiksaanwijzing dienen slechts te referentie en kunnen afwijken van
hoe het apparaat er in werkelijkheid uitziet.
• In de volgende gevallen kunnen administratiekosten in rekening worden gebracht:
a. een technicus komt bij u langs maar de speler vertoont geen gebreken (u hebt blijkbaar deze
gebruiksaanwijzing niet gelezen).
b. u brengt het product naar een reparatiecentrum maar het product vertoont geen gebreken (u hebt blijkbaar
deze gebruiksaanwijzing niet gelezen).
• U wordt op de hoogte gesteld van deze administratiekosten voordat een dergelijke reparatie of bezoek wordt
uitgevoerd.
SPECIFICATIES
Hoofdeenheid van de Soundbar
Gewicht
ALG EMEEN
HDMI Video
VERSTERKER Uitvoervermogen
• DTS 2.0-geluid wordt weergeven in DTS-formaat.
• Nominale specificatie
– Vormgeving, specificaties en app-scherm kunnen zonder kennisgeving worden gewijzigd.
– Samsung Electronics Co., Ltd behoudt zich het recht voor de specificaties zonder voorafgaande
waarschuwing te wijzigen.
– Gewicht en afmetingen zijn bij benadering.
– Voor meer informatie over de stroomvoorziening en het stroomverbruik, raadpleeg het etiket op het
product. (Label : Onderkant van de hoofdeenheid van de Soundbar)
Afmetingen
(B X H X D)
Temperatuurbereik voor gebruik
Vochtigheidspercentage voor gebruik
Ondersteunde weergaveformaten
Subwoofer (PS-KW1-2)
Surround Speaker
(PS-KS2-1 (L), PS-KS2-2 (R))
Hoofdeenheid van de Soundbar
Subwoofer (PS-KW1-2)
Surround Speaker
(PS-KS2-1 (L), PS-KS2-2 (R))
Hoofdeenheid van de Soundbar
Subwoofer (PS-KW1-2)
Surround Speaker
(PS-KS2-1 (L), PS-KS2-2 (R))
6,7 kg
9,6 kg
2,0 kg
1210,2 x 81,7 x 131,4 mm
203,9 x 399,0 x 414,3 mm
120,2 × 210,9 × 141,0 mm
+5 °C - +35 °C
10 % - 75 %
1080p,1080i, 720p, 576p, 480p
2160p@24/25/30Hz 4:4:4
2160p@60/50Hz 4:2:0
18W x 11, 4 OHM, THD≦10%
162W, 3 OHM, THD≦10%
35W x 4, 4 OHM, THD≦10%
LPCM 2ch, Dolby Digital, Dolby
Atmos (True HD/Digital Plus), DTS
· 22 · Nederlands
Page 67

Voorzorgsmaatregel : Het product wordt automatisch opnieuw gestart als u Wi-Fi/Ethernet
in-/uitschakelt.
Algeheel stroomverbruik bij stand-by (W)
(Alle netwerkpoorten in de toestand “AAN”)
Wi-Fi/Ethernet
Bluetooth
Methode voor deactivering
van poorten
Methode voor deactivering
van poorten
Draadloze modellen
(waaronder de modellen met de frequentie 5.15GHz-5.35GHz)
• Hierbij verklaart Samsung Electronics dat deze apparatuur compatibel is met de
essentiële vereisten en andere relevante bepalingen van Richtlijn 1999/5/EG.
U vindt de originele Conformiteitsverklaring op http://www.samsung.com. Ga naar
Ondersteuning > Productondersteuning zoeken en voer de modelnaam in.
Dit apparaat mag in alle Europese landen worden gebruikt.
Dit apparaat is uitsluitend geschikt voor binnengebruik.
Draadloze modellen
(met uitzondering van de modellen met de frequentie 5.15GHz-5.35GHz)
• Hierbij verklaart Samsung Electronics dat deze apparatuur compatibel is met de essentiële
vereisten en andere relevante bepalingen van Richtlijn 1999/5/EG.
U vindt de originele Conformiteitsverklaring op http://www.samsung.com. Ga naar
Ondersteuning > Productondersteuning zoeken en voer de modelnaam in.
Dit apparaat mag in alle Europese landen worden gebruikt.
5,8W
Houd de Wi-Fi SETUP-knop op het product 30 seconden
lang ingedrukt om Wi-Fi/Ethernet op Aan/Uit te zetten.
Houd de SPK ADD-knop op het product 30 seconden
lang ingedrukt om Bluetooth op Aan/Uit te zetten.
[Correcte behandeling van een gebruikte accu uit dit product]
(Van toepassing in landen waar afval gescheiden wordt ingezameld)
Dit merkteken op de accu, handleiding of verpakking geeft aan dat de accu in dit product aan het einde van de levensduur niet
samen met ander huishoudelijk afval mag worden weggegooid. De chemische symbolen Hg, Cd of Pb geven aan dat het kwik-,
cadmium- of loodgehalte in de accu hoger is dan de referentieniveaus in de Richtlijn 2006/66/EC.
Indien de gebruikte accu niet op de juiste wijze wordt behandeld, kunnen deze stoffen schadelijk zijn voor de gezondheid van
mensen of het milieu.
Ter bescherming van de natuurlijke hulpbronnen en ter bevordering van het hergebruik van materialen, verzoeken wij u afgedankte
accu’s en batterijen te scheiden van andere soorten afval en voor recycling aan te bieden bij het gratis inzamelingssysteem voor
accu’s en batterijen in uw omgeving.
Correcte verwijdering van dit product (elektrische & elektronische afvalapparatuur)
(Van toepassing in landen waar afval gescheiden wordt ingezameld)
Dit merkteken op het product, de accessoires of het informatiemateriaal duidt erop dat het product en zijn elektronische accessoires
(bv. lader, headset, USB-kabel) niet met ander huishoudelijk afval verwijderd mogen worden aan het einde van hun gebruiksduur. Om
mogelijke schade aan het milieu of de menselijke gezondheid door ongecontroleerde afvalverwijdering te voorkomen, moet u deze
artikelen van andere soorten afval scheiden en op een verantwoorde manier recyclen, zodat het duurzame hergebruik van
materiaalbronnen wordt bevorderd.
Huishoudelijke gebruikers moeten contact opnemen met de winkel waar ze dit product hebben gekocht of met de gemeente waar ze
wonen om te vernemen waar en hoe ze deze artikelen milieuvriendelijk kunnen laten recyclen.
Zakelijke gebruikers moeten contact opnemen met hun leverancier en de algemene voorwaarden van de koopovereenkomst
nalezen. Dit product en zijn elektronische accessoires mogen niet met ander bedrijfsafval voor verwijdering worden gemengd.
Ga voor informatie over de milieuverbintenissen en product specifieke wettelijke verplichtingen van Samsung naar:
samsung.com/uk/aboutsamsung/samsungelectronics/corporatecitizenship/data_corner.html
· 23 · Nederlands
Page 68

INFORMATIONS RELATIVES À LA SÉCURITÉ
AVERTISSEMENTS
POUR ÉVITER LES RISQUES DE CHOC ÉLECTRIQUE, NE DÉMONTEZ PAS LE CAPOT.
L’APPAREIL NE CONTIENT PAS DE PIÈCES RÉPARABLES PAR L’UTILISATEUR ; S’ADRESSER À UN
SERVICE APRÈS-VENTE QUALIFIÉ.
Ce symbole indique la présence d’une haute
tension à l’intérieur. Il est dangereux de mettre
ATTENTION
RISQUE DE CHOC
ÉLECTRIQUE. NE PAS
OUVRIR
Produit de classe II : ce symbole indique qu'aucun branchement de sécurité à la terre (prise de
terre) n'est requis.
Tension CA : ce symbole indique que la tension nominale indiquée par le symbole est une
tension CA.
Tension CC : ce symbole indique que la tension nominale indiquée par le symbole est une
tension CC.
Mise en garde, Consulter le mode d'emploi : ce symbole avertit l'utilisateur qu'il doit consulter le
manuel d'utilisation pour en savoir plus sur les informations relatives à la sécurité.
en contact quoi que ce soit avec une partie
interne de ce produit.
Ce symbole indique la présence d’importantes
instructions concernant le fonctionnement et la
maintenance jointes avec ce produit.
AVERTISSEMENT : Afin de diminuer les risques d’incendie ou de choc électrique, n’exposez pas cet appareil
à la pluie ou à l’ humidité.
ATTENTION : POUR PRÉVENIR LES CHOCS ÉLECTRIQUES, BRANCHEZ LA FICHE AU FOND, EN
PRENANT SOIN D'INSÉRER LA TIGE LARGE DANS LA FENTE LARGE.
• Cet appareil doit toujours être branché à une prise terre.
• Pour déconnecter l’appareil du circuit principal, la prise doit être débranchée de la prise principale ; il est de
ce fait nécessaire que la prise principale soit facile d'accès.
ATTENTION
• Évitez toute projection d’eau sur l’appareil. Ne posez jamais d’objet contenant un liquide (ex : un vase)
dessus.
• Pour éteindre complètement l'appareil, vous devez retirer le cordon d'alimentation de la prise murale. Par
conséquent, le cordon d'alimentation doit être facilement accessible à tout moment.
· 2 · Français
Page 69

PRÉCAUTIONS
1. Assurez-vous que l'alimentation électrique de votre maison est conforme à la plaque d'identification située au
dos de votre produit. Posez votre produit à plat sur un meuble stable en veillant à laisser un espace de 7 à
10 cm autour de l'appareil afin d’assurer une ventilation correcte de celui-ci. Faites attention à ne pas
obstruer les orifices de ventilation. Ne posez pas l'ensemble sur un amplificateur ou un autre appareil
susceptible de chauffer. Cet ensemble est conçu pour une utilisation en continu. Pour entièrement éteindre
l'appareil, débranchez la fiche CA de la prise murale. Débranchez l'appareil si vous envisagez de ne pas
l'utiliser durant une longue période.
2. En cas d'orage, débranchez la fiche de l'appareil de la prise murale. Les surtensions occasionnées par
l'orage pourraient endommager votre appareil.
3. N'exposez pas l'ensemble aux rayons directs du soleil ou à toute autre source de chaleur.
Ceci pourrait entraîner une surchauffe et un dysfonctionnement de l’appareil.
4. Protégez le produit de l'humidité (comme les vases) et d'une chaleur excessive (comme une cheminée) ou
de tout équipement capable de créer des champs magnétiques ou électriques. Débranchez le câble
d'alimentation en cas de dysfonctionnement. Votre produit n'est pas prévu pour un usage industriel. Ce
produit ne peut être utilisé qu'à des fins personnelles.
Une condensation peut se former si le produit ou un disque a été stocké à basse température.
Si vous devez transporter l'ensemble pendant l'hiver, attendez environ 2 heures que l'appareil ait atteint la
température de la pièce avant de l'utiliser.
5. Les piles utilisées dans ce produit peuvent contenir des produits ch miques dangereux pour l'environnement.
Ne jetez pas les piles dans votre poubelle habituelle. Ne vous débarrassez pas des piles en les faisant brûler.
Ne court-circuitez pas, ne désassemblez pas ni ne faites pas surchauffer les batteries. Le remplacement
incorrect de la batterie entraîne un risque d'explosion. Ne la remplacez que par une batterie du même type.
· 3 · Français
Page 70

FONCTIONS
Vous permet d'écouter le son de votre téléviseur sur votre Soundbar après avoir
raccordé cette dernière, avec ou sans câble.
Vous pouvez apprécier le son du téléviseur riche et réaliste après avoir connecté votre téléviseur avec/sans un
câble.
c Reportez-vous à la Méthode 1 page 8 pour voir comment raccorder la Soundbar à votre téléviseur à l'aide
d'un câble HDMI.
c Reportez-vous à la Méthode 2 page 9 pour voir comment raccorder la Soundbar à votre téléviseur par
l'intermédiaire d'un réseau sans fil.
Ce produit prend en charge Dolby Atmos®.
* Qu'est-ce que Dolby Atmos® ?
La technologie Atmos améliore les systèmes audio surround 5.1 existant en ajoutant une enceinte au plafond.
L'auditeur est ainsi entouré de son sur 360 degrés, ce qui lui offre une expérience immersive, haute définition,
riche, complète et plus profonde. Consultez la page 13 pour savoir comment connecter le système.
· 4 · Français
Page 71

CONTRÔLE DES COMPOSANTS
POWER
POWER
DC 19V
Unité Principale Soundbar
Supérieur
(En fonction du pays
et du modèle)
4 Adaptateur CA/CC3 Fiche CA
Télécommande/
Piles
SOURCE
SOUND
LEVEL
EFFECT
VOL WOOFER
SOUNDBAR
Caisson de
basse
Enceinte Surround
Gauche Droite
Câble HDMI
1 Cordon d'alimentation 2 Cordon d'alimentation
c Pour différencier l'enceinte surround gauche de la droite, vérifiez l'étiquette située sur l'arrière de chaque
enceinte.
CONNEXION À VOTRE TÉLÉVISEUR
Utilisez les composants d’alimentation (1, 2, 3, 4) pour connecter les alimentations électriques dans l’ordre
suivant : Caisson de basse Enceintes surround gauche et droite Unité Principale Soundbar
c Pour plus d'informations sur l'alimentation et la consommation électriques, reportez-vous à l'étiquette collée
sur le produit. (Étiquette: Bas de l’Unité Principale Soundbar)
2
1 Cordon d'alimentation
POWER
LINK STANDBY ID SET
POWER
Cordon d'alimentation
Arrière du
caisson de
basse
AUX IN
DIGITAL AUDIO IN
(OPTICAL)
HDMI OUT
(TV-ARC)
HDMI IN 1
HDMI IN 2
Bas de l’Unité
Principale Soundbar
Connexion à
l'alimentation électrique
Wi-Fi SETUPSPK ADD
DC 19V
SERVICE
Partie inférieure des
enceintes surround
gauche et droite
DC 19V
(Prise d'alimentation)
· 5 · Français
Connexion à
l'alimentation électrique
3 Fiche CA
4 Adaptateur CA/CC
Page 72

LINK
LINK
CONNEXION DE L’UNITÉ PRINCIPALE SOUNDBAR AU
CAISSON DE BASSE ET AUX ENCEINTES SURROUND
Vous pourrez profiter de sons graves riches et d’une meilleure qualité de son en reliant le caisson de basse à
l’unité principale Soundbar.
Disposition des enceintes
recommandée
TV
Unité Principale Soundbar
Unité Principale
Soundbar
Caisson de
basse
Caisson de basse
110°
90°
Enceinte
surround D
Enceinte Surround
Gauche Droite
90°
110°
Enceinte
surround G
Connexion automatique
1. Allumez le caisson de basse et les enceintes surround.
2. Allumez la Soundbar, puis appuyez sur la touche de la télécommande ou à droite de la Soundbar.
3. Le caisson de basse et les enceintes surround se connectent automatiquement à la Soundbar.
4. Une fois l'appariement automatique effectué, les indicateurs bleus situés à l'arrière du caisson de basse et des
enceintes surround s'allument.
c Si l'indicateur rouge à l'arrière du caisson de basse ou des enceintes surround est allumé, ou si l'indicateur
bleu clignote sans interruption, l'appariement automatique ne peut être effectué. Si cela se produit,
connectez chaque enceinte manuellement. (Voir page 7)
c Important : Avant de commencer, insérez les piles dans la télécommande. Reportez-vous à la page 18 pour
prendre connaissance des instructions.
LINK STANDBY ID SET
POWER
LINK STANDBY ID SET
Arrière du Caisson de basse Arrière de l'enceinte surround
· 6 · Français
Page 73

LINK STANDBY ID SET
LINK STANDBY ID SET
LE
R
BA
Connexion manuelle du caisson de basse et des enceintes surround en cas
d'échec de la connexion automatique
c Avant de commencer
• Assurez-vous que la Soundbar, le caisson de basse, et les enceintes surround sont branchés.
• Assurez-vous que la Soundbar est allumée.
1. Appuyez sur la touche ID SET à l'arrière du caisson de basse et des enceintes surround, et maintenez-la
enfoncée pendant au moins 5 secondes. L'indicateur rouge à l'arrière de chaque enceinte s'éteint et
l'indicateur bleu clignote.
LINK STANDBY ID SET
POWER
LINK STANDBY ID SET
Arrière du Caisson de basse Partie arrière des enceintes surround
gauche et droite
2. Éteignez la Soundbar.
3. Appuyez sur la touche VOL de la télécommande, et maintenez-la enfoncée pendant au moins 5 secondes,
avec la Soundbar éteinte (OFF).
VOL
WOOFE
SOUND
EFFECT
4. Le message ID SET s'affiche brièvement sur l'écran de la Soundbar, avant de disparaître.
ID SET
Côté droit de la Soundbar
5. Quand les indicateurs bleus sur le caisson de basse et sur les enceintes surround clignotent, mettez sous
tension en appuyant sur la touche sur le côté droit de la Soundbar ou sur la télécommande.
6. Une fois la connexion établie avec succès, les indicateurs bleus à l'arrière du caisson de basse et des
enceintes surround s'allument sans clignoter.
c Si le processus de connexion échoue, le voyant bleu clignote en continu. Passez à l'étape 1 et
recommencez.
· 7 · Français
Page 74

HDMI OUT
(TV-ARC)
DIGITAL AUDIO IN
(OPTICAL)
HDMI OUT
(TV-ARC)
HDMI IN 1
HDMI IN 2
AUX IN
CONNEXION À VOTRE TÉLÉVISEUR
Vous permet d'écouter le son de votre téléviseur sur votre Soundbar après avoir raccordé cette dernière, avec
ou sans câble.
c Important : Avant de commencer, insérez les piles dans la télécommande. Reportez-vous à la page 18 pour
prendre connaissance des instructions.
Méthode 1. Connexion avec un câble
Contrôlez le port HDMI IN
(TV-ARC) de votre téléviseur.
HDMI IN
(ARC)
Câble HDMI
Contrôlez le port HDMI OUT
(TV-ARC) sur l’unité principale
Soundbar.
Dessous de la
Soundbar
1. Raccordez le câble HDMI comme indiqué sur l'illustration ci-dessus.
2. TV ARC apparaît sur la fenêtre d’affichage de l’unité principale Soundbar et le son du téléviseur est lu.
TV ARC
Côté droit de la Soundbar
c Si le son du téléviseur n’est pas lu, appuyez sur à droite de la Soundbar ou sur la touche SOURCE de
la télécommande, puis sélectionnez D.IN sur la fenêtre d’affichage de l’unité principale Soundbar.
Le mode D.IN passe sur TV ARC et vous entendez de nouveau le son de votre téléviseur.
c Si TV ARC n’apparaît pas sur la fenêtre d’affichage de l’unité principale Soundbar, vérifiez que le câble est
connecté au bon port.
c Vous pouvez facilement contrôler le volume de la Soundbar, régler Auto Power Link sur ON et mettre
automatiquement la Soundbar sous tension lorsque vous allumez le téléviseur.
· 8 · Français
Page 75

Wi-Fi SETUP SPK ADD
Méthode 2. Connexion à un réseau sans fil
Installation de l'application Samsung Multiroom et Connexion sans fil
Pour installer l’application Samsung Multiroom pour la première
fois, suivez les étapes ci-dessous.
1. Appuyez sur la touche SPK ADD en bas de la Soundbar, et
maintenez-la enfoncée pendant plus de 1 seconde.
• Une notification sonore retentit et le message
“ADD SPEAKER” apparaît sur la Soundbar de l’unité
principale. Ensuite, le message “WIFI READY” apparaît
lorsque le mode d’attente pour la connexion s’active.
2. Connectez votre périphérique intelligent (smartphone, tablette, etc.) sur votre routeur sans fil.
Internet Routeur sans fil Périphérique intelligent
3. Installez l'application Samsung Multiroom sur votre périphérique intelligent (smartphone, tablette, etc.).
4. Lancez l'application Samsung Multiroom.
Android iOS
AUX IN
DIGITAL AUDIO IN
(OPTICAL)
HDMI OUT
(TV-ARC)
HDMI IN 1
HDMI IN 2
Wi-Fi SETUP SPK ADD
Dessous de la Soundbar
Samsung
Multiroom
Samsung
Multiroom
DC 19V
SERVICE
Application Samsung Multiroom
5. Terminez les paramètres initiaux en suivant les instructions indiquées sur l'écran de l'application.
Terminez les
paramètres en suivant
les instructions
indiquées sur l'écran de
l'application Samsung
Multiroom.
Écran de démarrage Saisie du mot de passe
pour le routeur sans fil
c Vous devez saisir le mot de passe de votre routeur sans fil pour connecter votre Soundbar à un réseau sans
fil via l'application Samsung Multir
oom.
c Si votre routeur sans fil n'a aucun mot de passe désigné, les paramètres initiaux sont terminés sans
demander de saisir un mot de passe.
· 9 · Français
Connexion des
enceintes terminée
Page 76

Wi-Fi SETUP SPK ADD
Ajout de la Soundbar au système audio Multiroom
Si l’application Samsung Multiroom est déjà installée pour
fonctionner avec un autre appareil audio multiroom, suivez ces
étapes pour ajouter la Soundbar.
1. Appuyez sur la touche SPK ADD en bas de la Soundbar, et
maintenez-la enfoncée pendant plus de 1 seconde.
• Une notification sonore retentit et le message
“ADD SPEAKER” apparaît sur la Soundbar de l’unité
principale. Ensuite, le message “WIFI READY” apparaît
lorsque le mode d’attente pour la connexion s’active.
2. Connectez votre périphérique intelligent (smartphone, tablette, etc.) sur votre routeur sans fil.
Internet Routeur sans fil Périphérique intelligent
3. Lancez l'application Samsung Multiroom.
4. Appuyez sur
pour afficher la liste de toutes les enceintes.
5. Sélectionnez More > Add New Speaker sur l’application, puis suivez les instructions affichées sur l’écran de
l’application.
AUX IN
DIGITAL AUDIO IN
(OPTICAL)
HDMI OUT
(TV-ARC)
HDMI IN 1
HDMI IN 2
Wi-Fi SETUP SPK ADD
Dessous de la Soundbar
Samsung
Multiroom
DC 19V
SERVICE
c Pour vous connecter à un réseau différent, sélectionnez No.
Vous devez saisir le mot de passe de votre routeur sans fil pour connecter votre Soundbar à un réseau sans
fil via l'application Samsung Multiroom.
Si votre routeur sans fil n'a aucun mot de passe désigné, les paramètres initiaux sont terminés sans
demander de saisir un mot de passe.
Terminez les
paramètres en suivant
les instructions
indiquées sur l'écran de
l'application Samsung
Multiroom.
Écran de démarrage Sélection du réseau
· 10 · Français
Ajout des enceintes
terminé
Page 77

Connexion de la Soundbar à votre Smart TV Samsung
Vous pouvez connecter votre téléviseur à la Soundbar via un réseau sans fil et profiter du son du téléviseur.
c Important : Assurez-vous que le téléviseur et la Soundbar sont connectés au même réseau.
(Comment vérifier le réseau de votre Samsung TV : Menu Accueil Réseau État du réseau)
Configuration des paramètres à partir de votre Smart TV Samsung
c Pour entendre le son via la Soundbar, assurez-vous que votre modèle de téléviseur prend en charge la
fonction Multiroom (Téléviseurs Samsung Smart fabriqués après 2014).
c Si le téléviseur est débranché du réseau sans fil en raison d'une modification de la source d'entrée de la
Soundbar, utilisez le menu du téléviseur pour rétablir la connexion.
Pour les téléviseurs sortis en 2016
1. Menu Accueil Paramètres ( ) Son Sortie son Sélectionnez [AV] Samsung Soundbar Kxxx
(Wi-Fi)
2. Le son du téléviseur est émis.
Pour les téléviseurs sortis en 2015
1. Menu Accueil Son Liste des haut-parleurs Sélectionnez [AV] Samsung Soundbar Kxxx (Wi-Fi)
2. Le son du téléviseur est émis.
Pour les téléviseurs sortis en 2014
1. Menu Accueil Son Paramètres haut-parleur Sélectionnez Multiroom Link - Paramètres
Soundbar+Surround
2. Depuis la position de la Soundbar, sélectionnez « K950 » puis « OK »
3. Menu Accueil
Son
Paramètres haut-parleur
Sélectionnez
Sortie son TV Multiroom Link
Paramètres haut-parleur
Sortie son TV Multiroom Link
Haut-parleur TV
Type installation TV
•
TV SoundConnect
• Liste des périph. audio Samsung
• Ajouter nv. périph. Activé
oom Link
Multir
• Paramètres
Casque Bluetooth
• Liste Casque Bluetooth
4. Le son du téléviseur est émis.
Support
Soundbar+Surround
OK
Multiroom Link
· 11 · Français
Soundbar+Surround
Soundbar
c
[AV] Samsung Soundbar K950
OK Niveau du volume Test haut-parleurs
[AV] Samsung Soundbar K950
Ne pas utiliser
Modif. N
Page 78

CONNEXION VIA BLUETOOTH
Vous pouvez connecter un appareil Bluetooth à la Soundbar et profiter du son stéréo sans aucun câble !
c Il n’est pas possible de connecter plusieurs appareils Bluetooth en même temps.
Connexion
Périphérique Bluetooth
1. Appuyez sur la touche
sélectionner BT.
2. Sélectionnez le menu Bluetooth sur le périphérique Bluetooth que vous désirez connecter. (Reportezvous
pour cela au manuel d'utilisation de ce périphérique.)
3. Sélectionnez "[AV] Samsung Soundbar Kxxx" dans la liste.
• Lorsque la connexion est établie entre la Soundbar et l’appareil Bluetooth, la fenêtre d’affichage avant de
la Soundbar affiche [Nom du périphérique Bluetooth] → BT.
4. Lisez de la musique sur le périphérique connecté.
[Si la connexion à l’appareil Bluetooth échoue / S’il y a besoin de rechercher à nouveau].
• Si vous trouvez « [AV] Samsung Soundbar Kxxx » dans les résultats de recherche sur l’appareil Bluetooth,
supprimez-le.
• Appuyez et maintenez le bouton
télécommande pour passer en mode BT PAIRING, puis sélectionnez « [AV] Samsung Soundbar Kxxx » à
partir de la liste d’appareils disponibles affichée sur l’appareil Bluetooth. (Se référer aux étapes 2 et 3
ci-dessus).
c Si le code PIN de sécurité est demandé lors de la connexion d’un périphérique Bluetooth, entrez <0000>.
c En mode Bluetooth, la connexion sera perdue si la distance entre le système Soundbar et le périphérique
Bluetooth dépasse 10 m.
c Le système Soundbar s'éteint après 5 minutes en état Prêt.
c Le Soundbar peut ne pas effectuer la recherche ou la connexion Bluetooth correctement dans les cas
suivants:
– En présence d'un champ électrique puissant autour du système Soundbar.
– Si plusieurs périphériques Bluetooth sont associés simultanément au système Soundbar.
– Si le périphérique Bluetooth est éteint, mal positionné ou s'il connaît des dysfonctionnements.
c Les appareils électroniques peuvent causer des interférences radio.
Les appareils qui génèrent des ondes électromagnétiques doivent être conservés à distance de l’unité
principale Soundbar - par ex. des micro-ondes, des appareils LAN sans fil, etc.
à droite de la Soundbar ou sur la touche SOURCE de la télécommande pour
à droite de la Soundbar ou appuyez sur le bouton SOURCE de la
Déconnexion de la Soundbar à partir de l’appareil Bluetooth
Appuyez sur la touche SOURCE de la télécommande ou sur la touche à droite du produit pour passer du
mode BT à un autre mode ou éteignez la Soundbar.
• Le périphérique Bluetooth attend un certain temps la réponse du système Soundbar avant de mettre fin à la
connexion. (Le temps de déconnexion peut varier en fonction du périphérique Bluetooth.)
· 12 · Français
Page 79

HDMI OUT
(TV-ARC)
HDMI IN 1
HDMI IN 2
CONNEXION DES APPAREILS POUR UTILISER DOLBY ATMOS®
Ce produit prend en charge Dolby Atmos®.
c Important : Dolby Atmos® ne fonctionne qu'avec le mode HDMI. Il n'est pas compatible avec d'autres
sources d'entrée.
Câble HDMI
HDMI IN
Dessous de la
Soundbar
Soundbar
Ou
Périphérique
externe
HDMI OUT
Câble HDMI
1. Branchez un câble HDMI de la prise jack HDMI IN 1 ou HDMI IN 2 située à l'arrière du produit sur la prise
jack HDMI OUT de votre appareil numérique. Utilisez le câble HDMI pour connecter le port HDMI IN sur le
téléviseur au port HDMI OUT (TV-ARC) en bas de la Soundbar.
2. Appuyez sur la touche à droite de la Soundbar ou sur la touche SOURCE de la télécommande pour
sélectionner HDMI1 ou HDMI2.
3. Le mode HDMI sélectionné s'affiche sur le panneau d'affichage de la Soundbar et vous pouvez entendre le son.
c Lorsque Dolby Atmos® est activé, la LED bleue sur le bord droit de la Soundbar s'allume et brille.
4. Configuration de Dolby Atmos® sur votre lecteur BD ou un autre appareil.
• Vérifiez les options de sortie audio à l'aide du menu des paramètres de votre lecteur BD, ou d'un autre
appareil.
• Assurez-vous que « Aucun encodage » est sélectionné pour le flux binaire des options de sortie audio.
p.ex. sur un lecteur Samsung : Accueil Paramètres Son
Sortie numérique : Sélectionnez Bitstream (non traités).
Paramètres
Son
Paramètre haut-parleur
Sortie numérique
Sous Echantillonnage PCM
Contrôle de la dynamique
Mode sous-mixage
Mode DTS Neo:6 Arrêt
Sync. audio 0 ms
• Si les options de sortie audio comprennent un flux audio secondaire, assurez-vous qu'il est réglé sur « Arrêt ».
PCM
Bitstream (non traités)
Bitstream (DTS Ré-encodé)
Bitstr
eam (Dolby D Ré-encodé)
c Dolby Atmos® ne fonctionne qu'avec les canaux 5.1.4.
c Assurez-vous que le contenu prend en charge Dolby Atmos®.
· 13 · Français
Page 80

CONNEXION À UN APPAREIL EXTERNE
HDMI OUT
(TV-ARC)
HDMI IN 1
HDMI IN 2
SERVICE
Câble HDMI
HDMI IN
Dessous de la
Soundbar
Soundbar
Ou
Périphérique
externe
HDMI OUT
Câble HDMI
1. Branchez un câble HDMI de la prise jack HDMI IN 1 ou HDMI IN 2 située à l'arrière du produit sur la prise
jack HDMI OUT de votre appareil numérique. Utilisez le câble HDMI pour connecter le port HDMI IN sur le
téléviseur au port HDMI OUT (TV-ARC) en bas de la Soundbar.
2. Appuyez sur la touche à droite de la Soundbar ou sur la touche SOURCE de la télécommande pour
sélectionner HDMI1 ou HDMI2.
3. Le mode HDMI sélectionné s'affiche sur le panneau d'affichage de la Soundbar et vous pouvez entendre le son.
MISE À JOUR LOGICIELLE
Samsung peut proposer à l’avenir des mises à jour pour le micrologiciel du système de la Soundbar.
Mise à jour automatique
La fonction de mise à jour automatique est activée par défaut sur la Soundbar.
Les mises à jour automatiques de micrologiciel sont recherchées et lancées si la Soundbar est connectée à
Internet, qu’elle soit allumée ou éteinte.
c Pour utiliser la fonction de mise à jour automatique, la Soundbar doit être connectée à Internet.
La connexion Wi-Fi à la Soundbar sera interrompue si son cordon d’alimentation est débranché ou si
l’alimentation est coupée. Si l'alimentation électrique est coupée, allumez la Soundbar et rebranchez-la.
Mise à jour via USB
AUX IN
DIGITAL AUDIO IN
(OPTICAL)
HDMI OUT
(TV-ARC)
HDMI IN 1
HDMI IN 2
Si une mise à jour est proposée, vous pouvez mettre le micrologiciel à jour en connectant un périphérique USB,
contenant la mise à jour du micrologiciel, au port USB de votre Soundbar.
Pour plus d’informations sur comment télécharger des fichiers de mise à jour, rendez-vous sur le site Samsung
Electronics (samsung.com/sec) recherchez le nom du modèle téléchargez le micrologiciel à partir de
l’option de menu d’assistance client. Le nom de l’option peut varier.
c Si la source d'entrée a été modifiée après une mise à jour ou après avoir rebranché le câble d'alimentation,
changez la source d'entrée sur le téléviseur ou la source souhaitée.
DC 19V
Wi-Fi SETUPSPK ADD
SERVICE
Câble adaptateur Micro USB à USB (non fourni)
· 14 · Français
Page 81

INSTALLATION DE LA
FIXATION MURALE
Vous pouvez utiliser le support de fixation mural pour
fixer l’unité au mur.
Précautions d’installation
• Procédez à l'installation sur un mur vertical
uniquement.
• N’installez pas le système Soundbar dans un
endroit chaud et/ou humide.Installez le système sur
un mur solide qui peut supporter le poids de l’unité
principale Soundbar.
• Vérifiez la solidité du mur. Pour installer le système
Soundbar sur un mur qui pourrait ne pas supporter
le poids de l’unité principale Soundbar, renforcez le
mur avant l’installation. Si ce n’est pas possible,
installez le système sur un autre mur, assez solide
pour supporter le poids de l’unité principale
Soundbar.
• Achetez et utilisez les vis de fixation ou l’ancrage
appropriés au type de mur dont vous disposez
(plaque de plâtre, fer forgé, bois, etc.).
Si possible, fixez les vis de fixation dans les
poteaux du mur.
• Achetez des vis pour fixation murale en fonction du
type et de l'épaisseur du mur sur lequel vous
souhaitez installer la Soundbar.
– Diamètre : M5
– Longueur : L 35 mm ou plus recommandée
• Branchez les câbles entre l'appareil et les
périphériques externes avant de l'installer sur le
mur.
• Veillez à éteindre et débrancher l’unité avant
installation. Autrement, vous vous exposeriez à un
risque de décharge électrique.
Composants de fixation au mur
Support de fixation murale (2 pièces)
Vis de fixation (2 pièces) Vis (2 pièces)
C C
1. Placez le Guide de fixation murale contre le mur.
●
Le Guide de fixation murale doit être de
niveau.
●
Si le téléviseur est monté sur le mur, installez la
Soundbar à au moins 5 cm en dessous du
téléviseur.
CENTER LINE
C TYPE : 700mm
Guide de fixation murale
5 cm minimum
· 15 · Français
Page 82

C
C
C
2. Alignez la Ligne centrale du modèle papier et le
centre de votre téléviseur (si vous fixez la
Soundbar sous votre téléviseur), puis fixez le
Guide de fixation murale au mur avec du ruban
adhésif.
c Si vous ne fixez pas la Soundbar sous un
téléviseur, placez la Ligne centrale au centre de
la zone d'installation.
C C
CENTER LINE
C TYPE : 700mm
Ligne centrale
3. Appuyez avec la pointe d'un stylo ou d'un crayon
bien taillé au centre des images C-TYPE à chaque
extrémité du guide pour marquer les trous des vis
portantes, puis retirez le Guide de fixation murale.
4. À l'aide d'une mèche appropriée, faites un trou
dans le mur au niveau de chaque marque.
c Si les marques ne correspondent pas aux
positions des poteaux muraux, veillez à insérer les
ancrages ou les chevilles Molly appropriées dans
les trous avant d'insérer les vis portantes.
Si vous utilisez des ancrages ou des chevilles
Molly, pensez à percer des trous suffisamment
larges pour les accueillir.
C
CENTER LINE
ENTER LINE
C TYPE : 700mm
5. Enfoncez une vis (non fournie) dans chaque
de fixation
, puis vissez fermement chaque vis
dans un trou pour vis portante.
6. Installez 2 Support de fixation murale sur la
partie inférieure de la Soundbar, en veillant à bien
les positionner, en utilisant 2 Vis (M4 x L12).
●
Lors de l'assemblage, veillez à ce que les
accroches des Support de fixation murale
soient placées à l'arrière de la Soundbar.
Reportez-vous à l'illustration ci-dessous
Arrière de la Soundbar
Vis
Extrémité droite de la Soundbar
· 16 · Français
Page 83

7. Installez la Soundbar, sur laquelle est fixé le
Support de fixation murale, en accrochant le
Support de fixation murale sur les Vis de
fixation sur le mur.
INSTALLATION DES
ENCEINTES SURROUND SUR
UN MUR
Vous pouvez acheter des supports muraux séparément
pour installer les enceintes surround sur un mur.
À prendre en compte lors de l'achat
• Charge supportable : Plus de 8,0 kg
• Taille du trou : 1/4 - 20 filets rapportés
8. Faites glisser la Soundbar vers le bas, comme
indiqué ci-dessous, afin que les Support de
fixation murale reposent de manière sûre sur les
Vis de fixation
c Faites glisser les Support de fixation murale vers
le bas depuis la base pour les installer sur les
de fixation
.
Vis
.
c Étant donné que l'installation des supports muraux
est optionnelle, vous pouvez acheter les accessoires
correspondants séparément.
c Veuillez laisser un installateur qualifié monter les
crochets de fixation murale des enceintes surround.
c Demandez à un professionnel d'une entreprise
d'installation de monter votre produit sur le mur.
c Contrôlez la résistance du mur avant d'installer les
crochets de fixation murale. Si la force est
insuffisante, assurez-vous de consolider votre mur
avant d'y installer les crochets de fixation murale et
les enceintes.
c Pour plus d'informations, reportez-vous au guide du
montage mural.
c Samsung Electronics ne peut être tenu responsable
d'un quelconque endommagement du produit suite
à une mauvaise installation de ce dernier.
c Veillez à ne pas monter les enceintes sur le côté ou à
l'envers.
· 17 · Français
Page 84

TOUCHES DE LA TÉLÉCOMMANDE ET CARACTÉRISTIQUES
Insertion des piles avant l’utilisation de la
télécommande (2 piles AA)
SOUND
EFFECT
VOL WOOFER
SOUNDBAR
SOURCE
LEVEL
Faites glisser le couvercle des piles dans la direction de la flèche
jusqu'à ce qu'il soit complètement retiré.
Insérez 2 piles AA (1,5 V) en respectant la polarité +/-. Remettez le
couvercle en le faisant glisser dans sa position.
Commande du volume de la Soundbar avec
la télécommande de votre téléviseur
1. Appuyez sur la touche SOUND et maintenez-la enfoncée pendant
au moins 5 secondes pendant que la Soundbar est sous tension.
2. Le message « ON - TV REMOTE » s'affiche sur l'écran de votre Soundbar.
3. Dans le menu de votre téléviseur, réglez le haut-parleur du téléviseur
sur le mode externe.
c Non disponible avec les modes TV ARC, BT, HDMI1 et HDMI2.
(Disponible uniquement avec les modes D.IN (optique) et AUX)
c Sur la télécommande du téléviseur, seules les touches de
volume et de coupure du son sont disponibles. Les autres
touches sont désactivées.
c Les menus des téléviseurs varient en fonction du fabricant et
du modèle de téléviseur. Reportez-vous au manuel d'utilisation
de votre téléviseur pour obtenir de plus amples informations.
c Fabricants prenant en charge cette fonction :
●
VIZIO, LG, Sony, Sharp, PHILIPS, PANASONIC, TOSHIBA,
GRUNDIG, Hisense, RCA
●
Cette fonction peut ne pas être compatible avec la
télécommande de votre téléviseur, selon le fabricant.
c Pour désactiver cette fonction, appuyez sur la touche
SOUND pendant 5 secondes. Le message « OFF - TV
REMOTE » s'affiche sur l'écran de votre Soundbar.
Marche/Arrêt
SOUND
Permet d’allumer et d’éteindre la Soundbar.
Active ou désactive le son surround. La fonction de son surround renforce l'étendue du
son et lui donne une plus grande sensation d'espace.
Les modes ON et OFF alternent à chaque pression de cette touche.
• ON : Diffuse du son à travers toutes les enceintes.
c Vous pouvez aussi utiliser le canal de son 5.1.4 pour des sources de musique qui
ne sont pas Dolby Atmos®.
• OFF : Diffuse du son à travers le canal d'origine.
· 18 · Français
Page 85

SOUND
৻ࠗ۱
SOUND
৻ࠗ۱
EFFECT
Contrôle du
son
SOURCE
Vous pouvez choisir entre 6 modes sonores: STANDARD, MUSIC, CLEAR VOICE, SPORTS,
MOVIE, et NIGHT.
c Mode NIGHT
Lorsque vous changez le canal ou la source musicale, la différence de volume entre les
différentes sources d'entrée musicales est réglée automatiquement pour s'adapter à
l'écoute.
c DRC (Dynamic Range Control)
Vous permet d'effectuer une commande de plage dynamique des pistes Dolby Digital.
Appuyez sur la touche EFFECT et maintenez-la enfoncée pendant environ 5 secondes
en mode veille pour activer les fonctions DRC (Commande de plage dynamique)
ON - DRC et OFF - DRC.
Vous pouvez sélectionner TREBLE, BASS ou AUDIO SYNC.
• Pour contrôler le volume des aigus et des graves, sélectionnez TREBLE ou BASS
dans les paramètres audio, puis réglez le volume, de -3 à +3, à l'aide des touches
Haut/Bas.
• Si l'image et le son ne sont pas synchronisés entre votre téléviseur et la Soundbar,
sélectionnez AUDIO SYNC dans les paramètres audio, puis réglez le décalage audio
(de 0 à 300 millisecondes) à l'aide des touches Haut/Bas.
c Synchronisation audio n'est pris en charge que dans certaines fonctions.
Permet de sélectionner une source connectée au Soundbar.
c Mode BT PAIRING
Pour activer le mode BT PAIRING dans la fonction Bluetooth, appuyez sur la touche
SOURCE et maintenez-la enfoncée pendant plus de 5 secondes.
Appuyez sur la touche
Appuyez à nouveau sur la touche & pour lire la musique sélectionnée.
&
pour mettre la musique temporairement en pause.
Lecture/Pause
(BT/WIFI)
Haut/Bas/
Gauche/
Droite
Appuyez sur les zones indiquées pour sélectionner Haut/
Bas/Gauche/Droite.
Appuyez sur Haut/Bas/Gauche/Droite sur la touche pour sélectionner ou paramétrer les fonctions.
c Changement de titre
Appuyez sur la touche Droite pour sélectionner la musique suivante ; appuyez sur la
touche Gauche pour sélectionner la musique précédente.
c Anynet+ / Auto Power Link
Vous pouvez activer ou désactiver Anynet+ ou Auto Power Link. Les fonctions Anynet+
et Auto Power Link sont contrôlées respectivement par les touches Droite et Gauche.
• Anynet+: en cas de connexion via un câble HDMI, vous pouvez contrôler votre Soundbar
avec la télécommande Samsung. Appuyez sur la touche Droite et maintenez-la enfoncée
pendant 5 seconds pour ON ou OFF Anynet+.
• Auto Power Link: Si la Soundbar est connectée par un câble optique numérique, elle
peut s'allumer automatiquement lors de la mise sous tension de votre téléviseur.
Appuyez sur la touche Gauche pendant 5 secondes pour ON ou OFF le lien de mise
sous tension automatique.
· 19 · Français
Page 86

VE
R
DB
R
VE
ER
DB
R
DB
ER
DB
LEVEL
STL STR
SL
Enceinte
ound G
surr
FL FR
Unité Principale Soundbar
FTRFTL
SR
C
Enceinte
surround D
La Soundbar ATMOS dispose d'audio 5.1.4 canaux. Utilisez cette touche pour régler le
volume de chaque enceinte. Appuyez sur cette touche, utilisez les touches Gauche/
Droite pour choisir une enceinte, puis utilisez les touches Haut/Bas pour augmenter
ou baisser le volume.
Enceinte
S'affiche sur OLED lors du
réglage du volume
Avant gauche FL
Supérieure gauche FTL
Unité Principale
Soundbar
Centrale C
Avant droite FR
Supérieure droite FTR
Enceinte surround G
Enceinte surround D
Surround gauche SL
Surround supérieure gauche STL
Surround droite SR
Surround supérieure droite STR
c Consultez la description dans la section 9 pour les instructions sur la façon
d’ajuster le niveau du subwoofer (volume).
LE
LE
WOOFER
EFFECT
WOOFE
EFFECT
VOL
SOUN
WOOF
VOL
SOUN
Appuyez sur les touches haut ou bas pour régler le volume du caisson de basse sur
-12 ou de -6 à +6.
Appuyer sur la touche remet le volume du caisson de basse sur le niveau 0.
VOL
EFFECT
WOOFE
EFFECT
VOL
SOUN
Appuyez sur les touches haut ou bas pour régler le volume.
c Muet
Appuyez sur la touche VOL pour couper le son. Appuyez de nouveau sur cette
touche pour activer le son.
· 20 · Français
WOOF
VOL
SOUN
Page 87

TÉPANNAGE
Avant de contacter l'assistance, vérifiez les
éléments suivants.
L'ensemble ne s'allume pas.
Le cordon d'alimentation est-il branché dans la
prise?
È Branchez la fiche d'alimentation électrique dans
la prise murale.
La fonction ne s'active pas lorsque vous
appuyez sur le bouton corr
L'air est-il chargé en électricité statique?
È Débranchez la fiche d'alimentation électrique et
rebranchez-la.
Aucun son n'est émis.
La fonction Silencieux est-elle activée?
È
Appuyez sur le bouton VOL pour annuler la
fonction.
Le volume est-il réglé au minimum?
È Permet de régler le Volume.
La télécommande ne fonctionne pas.
Les piles sont-elles usées?
È Remplacez-les.
Est-ce que la distance entre la télécommande et
l’unité principale Soundbar est trop grande ?
È Rapprochez la télécommande de l’unité
principale Soundbar.
espondant.
LICENCE
Fabriqué sous licence par Dolby Laboratories.
Dolby, Dolby Atmos, Dolby Audio, Dolby Digital
Plus, Pro Logic et le symbole représentant deux D
sont des marques de commerce de Dolby
Laboratories.
Pour les brevets DTS, consultez le site
http://patents.dts.com. Fabriqué sous licence de
DTS Licensing Limited. DTS, le symbole, & DTS et
le symbole qui lui est associé sont des marques
déposées, et DTS 2.0 Channel est une marque
déposée de DTS, Inc. © DTS, Inc. Tous droits
réservés.
Les termes HDMI et HDMI High-Definition
Multimedia Interface, et le logo HDMI sont des
marques de commerce ou des marques déposées
de HDMI Licensing LLC aux États-Unis et dans
d'autres pays.
La LED rouge sur le caisson de graves clignote
et le caisson de graves ne produit aucun son.
Ce pr
oblème peut se produire si le caisson de
basse n’est pas connecté à l’unité principale
Soundbar.
È
Essayez de reconnecter votre caisson de graves.
Voir page 6.
Le caisson de graves bourdonne et vibre
sensiblement.
Essayez d'ajuster les vibrations de votre caisson
de graves.
È Appuyez en haut ou en bas de la touche
WOOFER de votr
la valeur du volume (entr
e télécommande pour définir
e -12 et -6 à +6).
· 21 · Français
• Le logiciel Spotify Software fait l'objet de licences
tierces trouvées ici :
www.spotify.com/connect/third-party-licenses.
• Pour en savoir plus sur Spotify Connect, veuillez
consulter le site Web www.spotify.com/connect
Page 88

AVIS DE LICENCE LIBRE
Pour obtenir plus d’informations sur les sources libres utilisées dans ce produit, veuillez visiter notre site Web :
http://opensource.samsung.com
REMARQUE IMPORTANTE À PROPOS DU SERVICE
• Les figures et les illustrations du présent Manuel d'utilisation sont fournies à titre de référence uniquement et
peuvent différer de l'apparence du produit réel.
• Des frais supplémentaires pourront vous être facturés dans les cas suivants :
a. Vous demandez l'intervention d'un ingénieur, mais il s'avère que l'appareil ne présente aucune anomalie
(par ex. vous n'avez pas lu ce Manuel d'utilisation).
b. Vous portez l'unité à un centre de réparation, mais il s'avère que celle-ci ne présente aucune défaillance
(par ex. vous n'avez pas lu ce Manuel d'utilisation).
• Le montant de ces frais administratifs vous sera notifié avant que tout travail ou toute visite à votre domicile ne
soit effectuée).
SPÉCIFICATIONS
Unité Principale Soundbar
Poids
GÉNÉRAL
HDMI Vidéo
AMPLIFICATEUR
• Le son DTS 2.0 est lu au format DTS.
• Caractéristiques nominales
– La conception, les spécifications et l'écran de l'application sont soumis à modification sans avis préalable.
– Samsung Electronics Co,, Ltd se réserve le droit de modifier les caractéristiques sans préavis.
– Le poids et les dimensions sont approximatifs.
– Pour plus d'informations sur l'alimentation et la consommation électriques, reportez-vous à l'étiquette collée
sur le produit. (Étiquette : Bas de l’Unité Principale Soundbar)
Dimensions
(L x H x P)
Plage de températures en fonctionnement
Plage d'humidité en fonctionnement
Puissance
de sortie
nominale
Formats de lecture pris en charge
Caisson de basse (PS-KW1-2)
Enceinte Surround
(PS-KS2-1 (G), PS-KS2-2 (D))
Unité Principale Soundbar
Caisson de basse (PS-KW1-2)
Enceinte Surround
(PS-KS2-1 (G), PS-KS2-2 (D))
Unité Principale Soundbar
Caisson de basse (PS-KW1-2)
Enceinte Surround
(PS-KS2-1 (G), PS-KS2-2 (D))
6,7 kg
9,6 kg
2,0 kg
1210,2 x 81,7 x 131,4 mm
203,9 x 399,0 x 414,3 mm
120,2 × 210,9 × 141,0 mm
de +5 à +35 °C
de 10 à 75 %
1080p,1080i, 720p, 576p, 480p
2160p@24/25/30Hz 4:4:4
2160p@60/50Hz 4:2:0
18W x 11, 4 OHM, THD≦10%
162W, 3 OHM, THD≦10%
35W x 4, 4 OHM, THD≦10%
LPCM 2ch, Dolby Digital, Dolby
Atmos (True HD/Digital Plus), DTS
· 22 · Français
Page 89

Attention : le produit redémarre automatiquement si vous activez/désactivez le
Wi-Fi/Ethernet.
Consommation globale d’énergie en veille (W)
(Tous les ports du réseau sont en état activé “ON”)
Wi-Fi/Ethernet
Bluetooth
Méthode de désactivation
du port
Méthode de désactivation
du port
5,8W
Appuyez sur le bouton Wi-Fi SETUP sur le produit
pendant 30 secondes pour activer/désactiver le Wi-Fi/
Ethernet.
Appuyez sur le bouton SPK ADD sur le produit
pendant 30 secondes pour activer/désactiver le
Bluetooth.
Modèles sans fil (avec plage de fréquence de 5,15 GHz à 5,35 GHz)
• Par la présente, Samsung Electronics déclare que cet équipement est conforme aux
exigences principales et autres dispositions relatives à la Directive 1999/5/EC.
La déclaration de conformité originale se trouve sur le site
http://www.samsung.com, allez sur Assistance > Recherche assistance produit et
saisissez le nom du modèle. Cet appareil peut être utilisé dans tous les pays de l'Union Européenne.
Cet appareil ne peut être utilisé qu'en intérieur.
Modèles sans fil (sans plage de fréquence de 5,15 GHz à 5,35 GHz)
• Par la présente, Samsung Electronics déclare que cet équipement est conforme aux exigences
principales et autres dispositions relatives à la Directive 1999/5/EC.
La déclaration de conformité originale se trouve sur le site http://www.samsung.com, allez sur
Assistance > Recherche assistance produit et saisissez le nom du modèle. Cet appareil peut
être utilisé dans tous les pays de l'Union Européenne.
[Elimination des batteries de ce produit]
(Applicable aux pays disposant de systèmes de collecte séparés)
Le symbole sur la batterie, le manuel ou l'emballage indique que les batteries de ce produit ne doivent pas être éliminées en fin de
vie avec les autres déchets ménagers. L'indication éventuelle des symboles chimiques Hg, Cd ou Pb signifie que la batterie contient
des quantités de mercure, de cadmium ou de plomb supérieures aux niveaux de référence stipulés dans la directive CE 2006/66.
Si les batteries ne sont pas correctement éliminées, ces substances peuvent porter préjudice à la santé humaine ou à
l'environnement.
Afin de protéger les ressources naturelles et d'encourager la réutilisation du matériel, veillez à séparer les batteries des autres types
de déchets et à les recycler via votre système local de collecte gratuite des batteries.
Les bons gestes de mise au rebut de ce produit (Déchets d’équipements électriques & électroniques)
(Applicable aux pays disposant de systèmes de collecte séparés)
Ce symbole sur le produit, ses accessoires ou sa documentation indique que ni le produit, ni ses accessoires électroniques usagés
(chargeur, casque audio, câble USB, etc.) ne peuvent être jetés avec les autres déchets ménagers. La mise au rebut incontrôlée des
déchets présentant des risques environnementaux et de santé publique, veuillez séparer vos produits et accessoires usagés des
autres déchets. Vous favoriserez ainsi le recyclage de la matière qui les compose dans le cadre d’un développement durable.
Les particuliers sont invités à contacter le magasin leur ayant vendu le produit ou à se renseigner auprès des autorités locales pour
connaître les procédures et les points de collecte de ces produits en vue de leur recyclage. Les entreprises et particuliers sont invités à
contacter leurs fournisseurs et à consulter les conditions de leur contrat de vente. Ce produit et ses accessoires ne peuvent être jetés avec
les autres déchets.
Pour obtenir des informations sur les engagements environnementaux de Samsung et sur les obligations réglementaires spécifiques à l'appareil
(par ex. la réglementation REACH), rendez-vous sur : samsung.com/uk/aboutsamsung/samsungelectronics/corporatecitizenship/data_corner.html
· 23 · Français
Page 90

© 2016 Samsung Electronics Co., Ltd. All rights reserved.
Contact SAMSUNG WORLD WIDE
If you have any questions or comments relating to Samsung products, please contact the SAMSUNG customer
care Centre.
Country Contact Centre
`
Europe
U.K 0330 SAMSUNG (7267864) www.samsung.com/uk/support
EIRE 0818 717100 www.samsung.com/ie/support
GERMANY
FRANCE 01 48 63 00 00 www.samsung.com/fr/support
ITALIA 800-SAMSUNG (800.7267864) www.samsung.com/it/support
SPAIN 34902172678 www.samsung.com/es/support
PORTUGAL 808 20 7267 www.samsung.com/pt/support
LUXEMBURG 261 03 710
NETHERLANDS
BELGIUM 02-201-24-18
NORWAY 815 56480 www.samsung.com/no/support
DENMARK 70 70 19 70 www.samsung.com/dk/support
FINLAND 030-6227 515 www.samsung.com/fi/support
SWEDEN 0771 726 7864 (0771-SAMSUNG) www.samsung.com/se/support
POLAND
HUNGARY
0180 6 SAMSUNG bzw.
0180 6 7267864*
(*0,20 €/Anruf aus dem dt. Festnetz, aus
dem Mobilfunk max. 0,60 €/Anruf)
0900-SAMSUNG (0900-7267864)
(€ 0,10/Min)
801-172-678* lub +48 22 607-93-33 *
* (koszt połączenia według taryfy operatora)
0680SAMSUNG (0680-726-786)
0680PREMIUM (0680-773-648)
Web Site
www.samsung.com/de/support
www.samsung.com/be_fr/support
www.samsung.com/nl/support
www.samsung.com/be/support
(Dutch)
www.samsung.com/be_fr/
support (French)
www.samsung.com/pl/support
www.samsung.com/hu/support
Country Contact Centre
AUSTRIA
SWITZERLAND 0800 726 78 64 (0800-SAMSUNG)
CZECH 800 - SAMSUNG (800-726786) www.samsung.com/cz/support
SLOVAKIA 0800 - SAMSUNG (0800-726 786) www.samsung.com/sk/support
CROATIA 072 726 786 www.samsung.com/hr/support
BOSNIA 055 233 999 www.samsung.com/support
MONTENEGRO 020 405 888 www.samsung.com/support
SLOVENIA 080 697 267 (brezplačna številka) www.samsung.com/si
SERBIA 011 321 6899 www.samsung.com/rs/support
BULGARIA
ROMANIA
CYPRUS 8009 4000 only from landline, toll free
GREECE
LITHUANIA 8-800-77777 www.samsung.com/lt/support
LATVIA 8000-7267 www.samsung.com/lv/support
ESTONIA 800-7267 www.samsung.com/ee/support
0800-SAMSUNG (0800-7267864)
[Only for Premium HA] 0800-366661
[Only for Dealers] 0810-112233
*3000 Цена в мрежата
0800 111 31 , Безплатна телефонна линия
*8000 (apel in retea)
08008-726-78-64 (08008-SAMSUNG)
Apel GRATUIT
80111-SAMSUNG (80111 726 7864) only
from land line (+30) 210 6897691 from
mobile and land line
Web Site
www.samsung.com/at/support
www.samsung.com/ch/support
(German)
www.samsung.com/ch_fr/
support (French)
www.samsung.com/bg/support
www.samsung.com/ro/support
www.samsung.com/gr/support
AH68-02962C-00
AH68-02962C-00
 Loading...