

Page 1

User manual
HW-K950
Imagine the possibilities
Thank you for purchasing this Samsung product.
To receive more complete service, please register your product at
www.samsung.com/register
Page 2
GETTING STARTED
GETTING STARTED
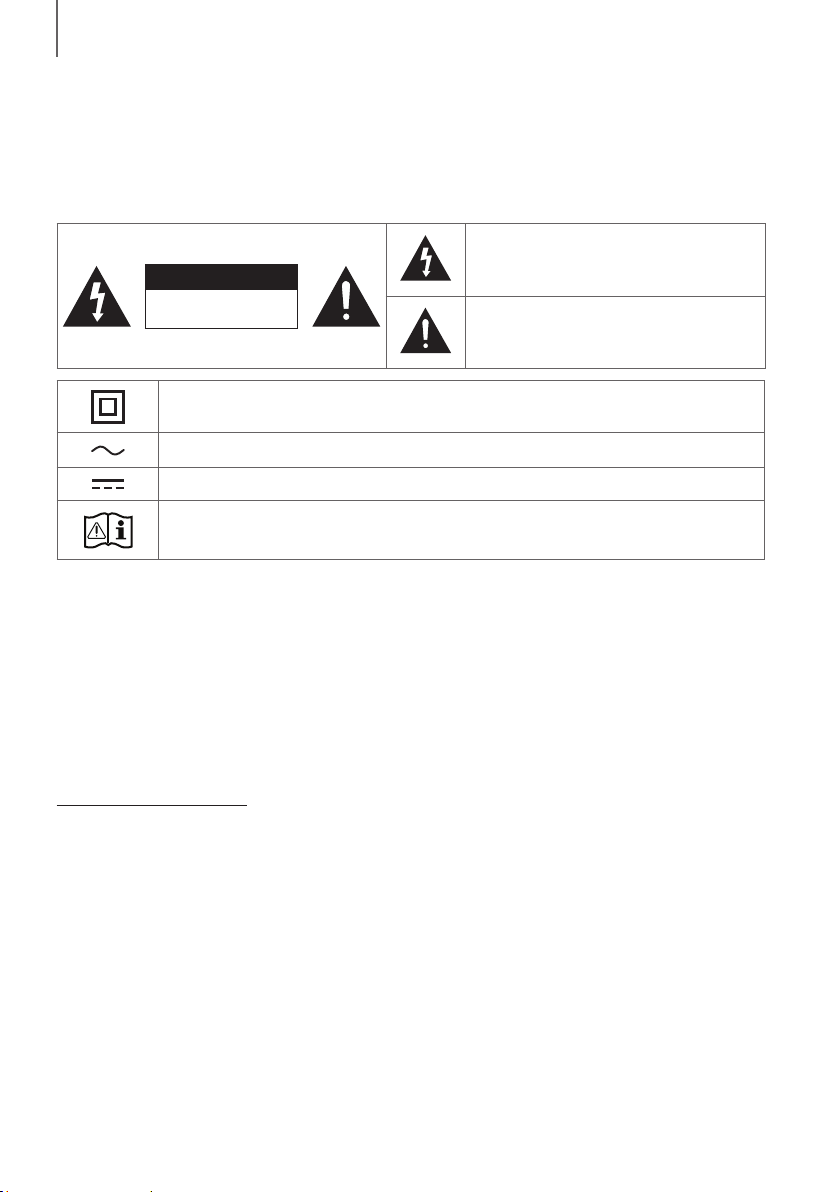
SAFETY INFORMATION
SAFETY WARNINGS
TO REDUCE THE RISK OF ELECTRIC SHOCK, DO NOT REMOVE THE COVER (OR BACK).
NO USER-SERVICEABLE PARTS ARE INSIDE. REFER SERVICING TO QUALIFIED SERVICE PERSONNEL.
This symbol indicates that high voltage is
present inside. It is dangerous to make any kind
CAUTION
RISK OF ELECTRIC SHOCK.
DO NOT OPEN.
Class II product : This symbol indicates that it does not require a safety connection to electrical
earth (ground).
AC voltage : This symbol indicates that the rated voltage marked with the symbol is AC voltage.
DC voltage : This symbol indicates that the rated voltage marked with the symbol is DC voltage.
Caution, Consult instructions for use : This symbol instructs the user to consult the user manual for
further safety related information.
WARNING
• To reduce the risk of fire or electric shock, do not expose this appliance to rain or moisture.
• To prevent injury, this apparatus must be securely attached to the floor/wall in accordance with the installation
instructions.
CAUTION
• Do not expose this apparatus to dripping or splashing. Do not put objects filled with liquids, such as vases on the
apparatus.
• To turn this apparatus off completely, you must pull the power plug out of the wall socket. Consequently, the power
plug must be easily and readily accessible at all times.
of contact with any internal part of this product.
This symbol indicates that important literature
concerning operation and maintenance has
been included with this product.
CAUTION (for Canada)
This equipment complies with Industry Canada licence-exempt RSS standard(s). Operation is subject to the following
two conditions: (1) this device may not cause interference, and (2) this device must accept any interference, including
interference that may cause undesired operation of the device.
This device and its antenna(s) must not be co-located or operation in conjunction with any other antenna or
transmitter.
This device may automatically discontinue transmission if there is no information to transmit, or an operational failure.
Note that this is not intended to prohibit the transmission of control or signaling information or the use of repetitive
codes where required by the technology.
This Class B digital apparatus complies with Canadian ICES-003.
FCC Radiation Exposure Statement
This equipment complies with IC RSS-102 radiation exposure limits set forth for an uncontrolled environment.
This equipment should be installed and operated with minimum distance 20cm between the radiator & your body.
2
Page 3

GETTING STARTED
Important Safety Instructions
Read these operating instructions carefully before using
the unit. Follow all the safety instructions listed below.
Keep these operating instructions handy for future
reference.
1) Read these instructions.
2) Keep these Instructions.
3) Heed all warnings.
4) Follow all instructions.
5) Do not use this apparatus near water.
6) Clean only with a dry cloth.
7) Do not block any ventilation openings. Install in
accordance with the manufacturer's instructions.
8) Do not install near any heat sources such as
radiators, heat registers, stoves, or other apparatus
(including amplifiers) that produce heat.
9) Do not defeat the safety purpose of the polarized or
grounding-type plug. A polarized plug has two
blades with one wider than the other. A grounding
type plug has two blades and a third grounding
prong. The wide blade or the third prong are
provided for your safety. If the provided plug does
not fit into your outlet, consult an electrician for
replacement of the obsolete outlet.
10) Protect the power cord from being walked on or
pinched particularly at plugs, convenience
receptacles, and the point where they exit from the
apparatus.
11) Only use attachments/accessories specified by the
manufacturer.
12) Use only with the cart, stand, tripod,
bracket, or table specified by the
manufacturer, or sold with the
apparatus. When a cart is used, use
caution when moving the cart/
apparatus combination to avoid injury from tip-over.
13) Unplug this apparatus during lightning storms or
when unused for long periods of time.
14) Refer all servicing to qualified service personnel.
Servicing is required when the apparatus has been
damaged in any way, such as when the powersupply cord or plug is damaged, liquid has been
spilled or objects have fallen into the apparatus, the
apparatus has been exposed to rain or moisture,
does not operate normally, or has been dropped.
LICENSES
ENG
Manufactured under license from Dolby Laboratories.
Dolby, Dolby Atmos, Dolby Audio, Dolby Digital Plus, Pro
Logic, and the double-D symbol are trademarks of Dolby
Laboratories.
For DTS patents, see http://patents.dts.com.
Manufactured under license from DTS Licensing Limited.
DTS, the Symbol, & DTS and the Symbol together are
registered trademarks, and DTS 2.0 Channel is a
trademark of DTS, Inc. © DTS, Inc. All Rights Reserved.
The terms HDMI and HDMI High-Definition Multimedia
Interface, and the HDMI Logo are trademarks or
registered trademarks of HDMI Licensing LLC in the
United States and other countries.
3
Page 4

GETTING STARTED
3.9 inch 3.9 inch
2.7 inch
3.9 inch
PRECAUTIONS
Ensure that the AC power supply in your house complies with the power requirements listed on the identification sticker
located on the back of your product. Install your product horizontally, on a suitable base (furniture), with enough space
around it for ventilation (3~4 inches). Make sure the ventilation slots are not covered. Do not place the unit on amplifiers
or other equipment which may become hot. This unit is designed for continuous use. To fully turn off the unit, disconnect
the AC plug from the wall outlet. Unplug the unit if you intend to leave it unused for a long period of time.
During thunderstorms, disconnect the AC plug from the
wall outlet. Voltage peaks due to lightning could damage
the unit.
Protect the product from moisture (i.e. vases), and
excess heat (e.g. a fireplace) or equipment creating
strong magnetic or electric fields. Unplug the power
cable from the AC wall socket if the unit malfunctions.
Your product is not intended for industrial use. It is for
personal use only. Condensation may occur if your
product has been stored in cold temperatures. If
transporting the unit during the winter, wait approximately
2 hours until the unit has reached room temperature
before using.
Do not expose the unit to direct sunlight or other heat
sources. This could lead to overheating and cause the
unit to malfunction.
The batteries used with this product contain chemicals
that are harmful to the environment. Do not dispose of
the battery in the general household trash. Do not
expose the battery to excess heat, direct sunlight, or fire.
Do not short circuit, disassemble, or overheat the battery.
Danger of explosion if the battery is replaced incorrectly.
Replace only with the same or equivalent type.
4
Page 5

GETTING STARTED
DOLBY ATMOS®
This product supports Dolby Atmos®.
* What is Dolby Atmos®?
Atmos technology enhances existing 5.1 channel surround sound systems by adding an overhead speaker.
This envelops the listener in 360 degrees of sound, delivering an immersive, high-definition, rich, detailed, and deeper
experience. See page 25 to learn how to connect the system.
ENG
5
Page 6

GETTING STARTED
CONTENTS
2 GETTING STARTED
2 Safety Information
5 Dolby Atmos®
7 What’s Included
8 DESCRIPTIONS
8 Front / Right Side Panel
9 Bottom Panel
10 Remote Control
15 INSTALLATION
15 Installing the Soundbar
15 Installing the Wall Mount
18 Detaching the Soundbar from the Wall
19 Installing the Surround Speakers on a
Wall
20 CONNECTIONS
20 Connecting the Subwoofer and
Surround Speakers
23 Connecting to a TV
23 Connecting to a TV Using an HDMI (Digital)
Cable
24 Connecting to a TV Using a Digital Optical
Cable
25 Connecting to External Devices
25 Connecting Devices in Order to Use Dolby
Atmos®
26 HDMI Cable
27 Optical or Analog Audio Cable
28 FUNCTIONS
28 Input Mode
29 Bluetooth
31 Using the Multiroom App
33 Using the Network Standby On
Function
34 Software Update
36 TROUBLESHOOTING
36 Troubleshooting
37 APPENDIX
37 Specifications
Figures and illustrations in this User Manual are
provided for reference only and may differ from
actual product appearance.
6
Page 7
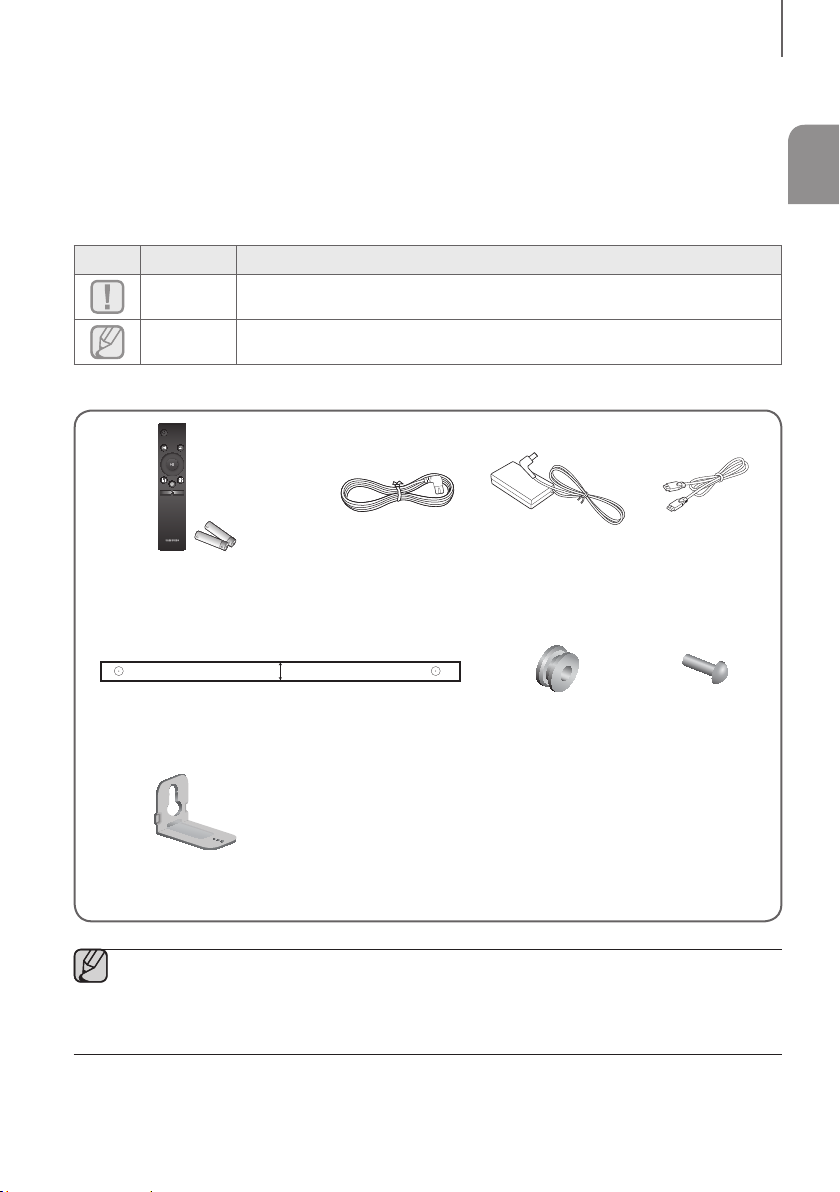
WHAT’S INCLUDED
BEFORE READING THE USER’S MANUAL
Note the following terms before reading the user manual.
+ Icons used in this manual
Icon Term Definition
GETTING STARTED
ENG
Caution
Note
Indicates a situation where a function does not operate or settings may be canceled.
Indicates tips or instructions on the page that help you operate a function.
Check for the supplied accessories shown below.
SOURCE
SOUND
LEVEL
EFFECT
VOL WOOFER
SOUNDBAR
Remote Control /
Batteries (AA Size)
C C
CENTER LINE
Power Cord : 3 EA
C TYPE : 700mm
Wall Mount Guide Holder-Screw : 2 EA Screw : 2 EA
AC/DC Adapter
(for main unit)
HDMI Cable
Bracket-Wall Mount : 2 EA
● The appearance of the accessories may differ slightly from the illustrations above.
● To distinguish the left surround speaker from the right, check the label on the rear of each speaker.
● Depending on the region, the AC plug may vary in appearance, or it may be supplied integrated with the
adapter
7
Page 8
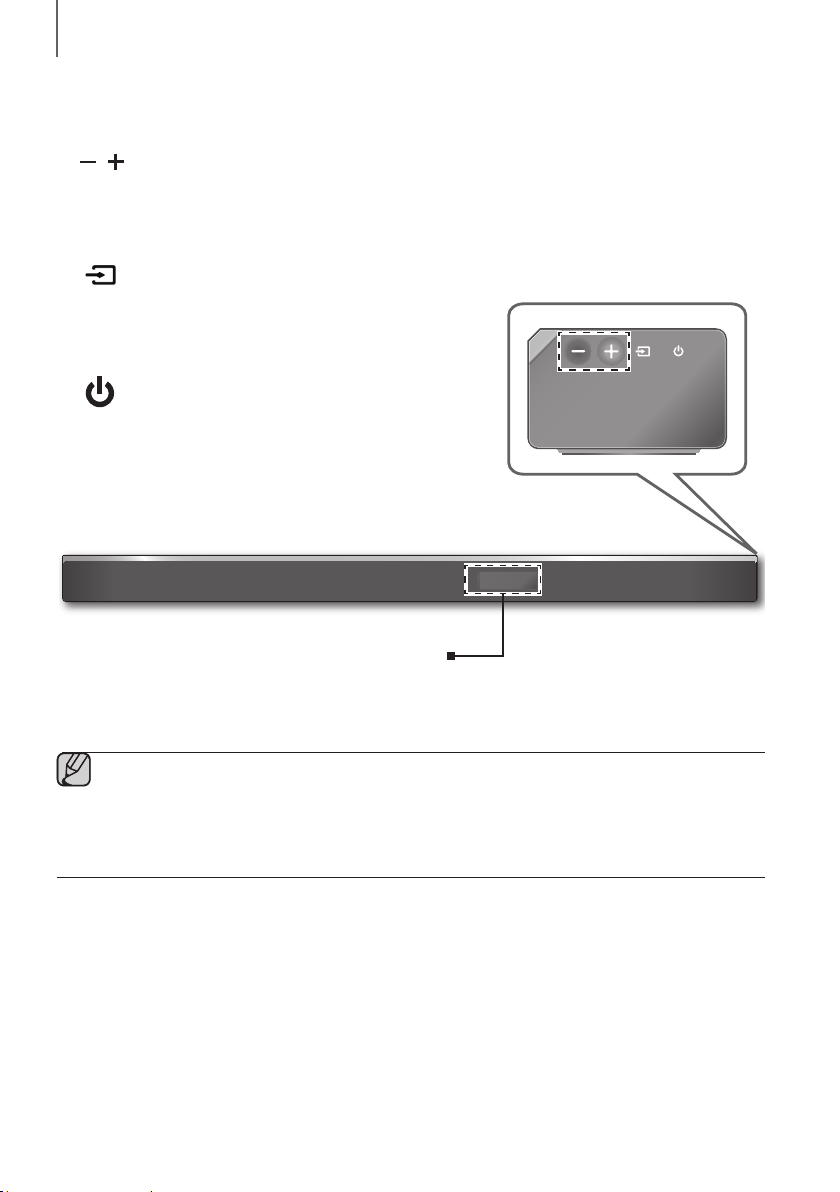
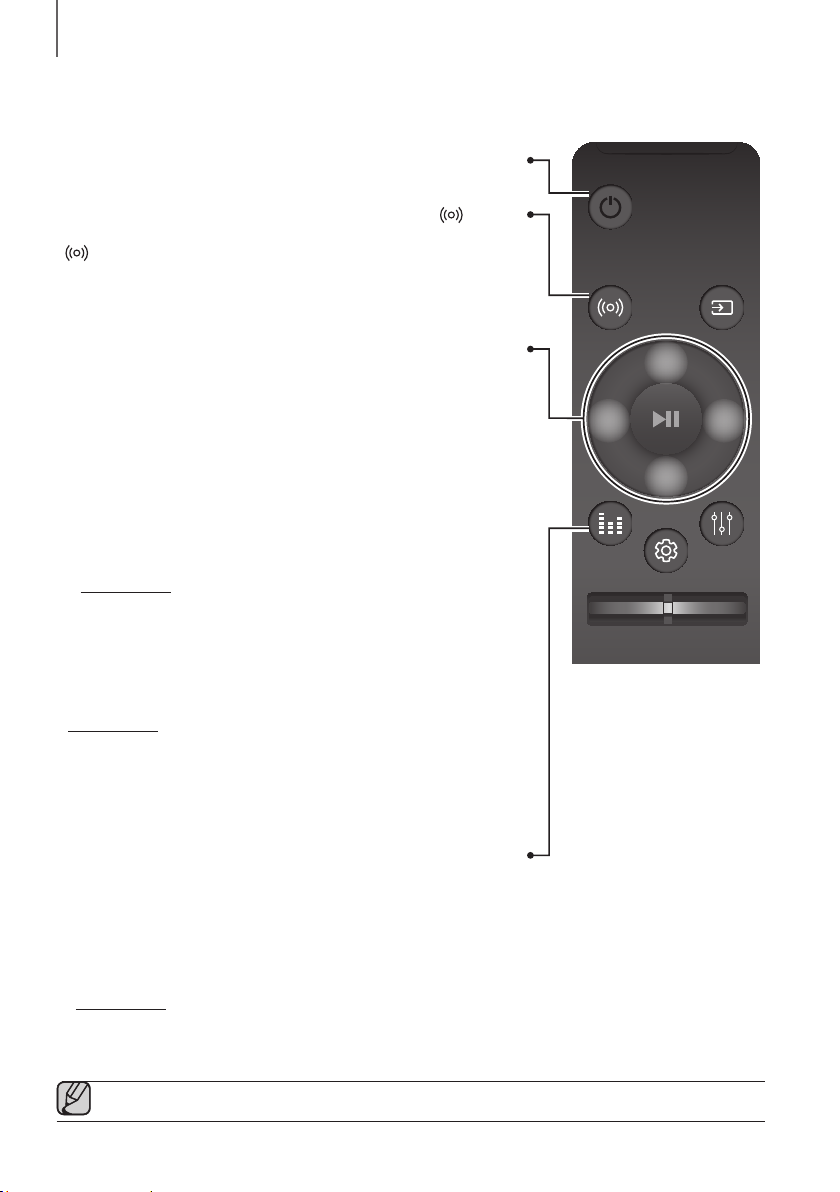
DESCRIPTIONS
DESCRIPTIONS
FRONT / RIGHT SIDE PANEL
1 /
Controls the volume level.
The numeric value of the volume level appears in the front panel
display.
(Volume) Button
2 (Source) Button
Selects the D.IN, AUX, HDMI1, HDMI2, or BT input.
● To turn on BT PAIRING mode, press and hold this button in BT
mode.
3 (Power) Button
Turns the power on and off.
Display
Displays the current mode.
Right Side
2 3
1
● When you plug in the AC cord, the power button will begin working in 4 to 6 seconds. When you press the
power button, there will be a 20 second delay before the unit produces sound.
● When you turn on this unit, there will be a 4 to 5 second delay before it produces sound.
● If you want to enjoy sound only from the Soundbar, you must turn off the TV's speakers in the Audio Setup
menu of your TV. Refer to the owner's manual supplied with your TV.
8
Page 9
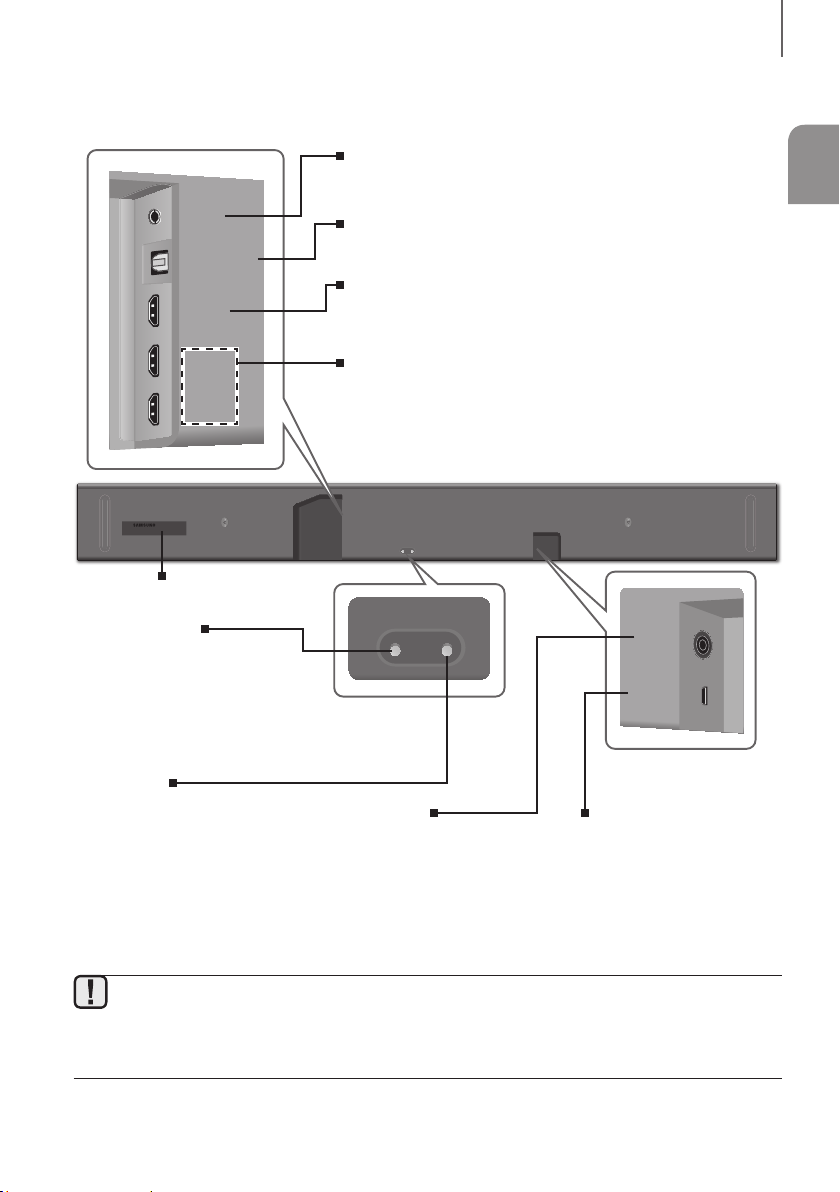
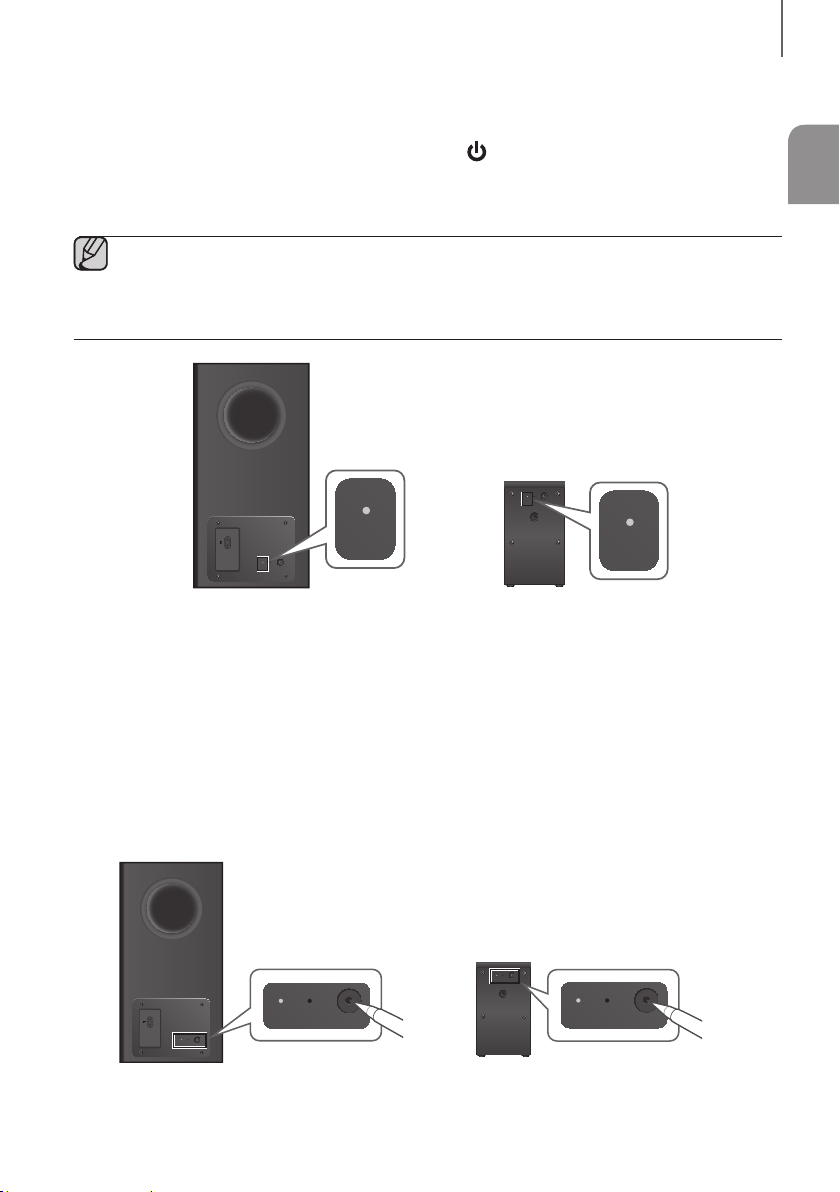
BOTTOM PANEL
DC 19V
SERVICE
Wi-Fi SETUP SPK ADD
DIGITAL AUDIO IN
(OPTICAL)
HDMI OUT
(TV-ARC)
HDMI IN 1
HDMI IN 2
AUX IN
AUX IN
Connect to the Analog output of an external device.
DIGITAL AUDIO IN (OPTICAL)
Connect to the digital (optical) output of an external device.
HDMI OUT (TV-ARC)
Outputs digital video and audio signals simultaneously using an HDMI
cable.
HDMI IN 1, HDMI IN 2
Inputs digital video and audio signals simultaneously using an HDMI
cable. Use when connecting a supported external device.
AUX IN
DIGITAL AUDIO IN
(OPTICAL)
HDMI OUT
(TV-ARC)
HDMI IN 1
HDMI IN 2
LABEL
Wi-Fi SETUP
Press this button to connect your
Soundbar to your network using
Wi-Fi setup. (Requires a smart
device and the Samsung
Multiroom app. See page 31.)
Wi-Fi SETUP SPK ADD
DESCRIPTIONS
ENG
DC 19V
SERVICE
SPK ADD
Press this button to connect the
Soundbar to a Samsung HUB
(purchased separately) or a network.
(Requires a smart device and the
Samsung Multiroom app.
See page 31.)
DC 19V
(Power Supply In)
Connect the AC/DC power
adaptor to the power supply
jack, and then connect the
AC/DC power adaptor plug to
a wall outlet.
● When disconnecting the power cable of the AC power adaptor from a wall outlet, pull the plug.
Do not pull the cable.
● Do not connect this unit or other components to an AC outlet until all connections between components
are complete.
SERVICE
USB micro jack. To upgrade the
product's software. Requires a
USB adapter. (Sold separately.)
See page 34.
9
Page 10
DESCRIPTIONS
REMOTE CONTROL
Turns the Soundbar on and off.
Power
Surround Sound adds depth and spaciousness to the sound. Pressing the
SOUND button repeatedly cycles through the Surround Sound settings :
Press the indicated areas to select Up/Down/Left/Right. Press Up/Down/
You can also activate the Wi-Fi SETUP function by pressing and holding
You can also activate the SPK ADD function of the Soundbar by pressing
Press the Right button to select the next music; press the Left button to
Press and hold
The Anynet+ function lets you control the Soundbar with the remote from an
Press and hold the
Synchronizes the Soundbar to a connected Optical source via the Optical
jack so it turns on automatically when you turn on your TV. (See page 24)
ON - SURROUND SOUND, OFF - SURROUND SOUND
• OFF: Play sound through the original source channel.
the Up button on the remote for more than 5 seconds.
and holding the Down button of the remote for more than 5 seconds.
the Right
The Soundbar must be connected to the TV via an HDMI cable.
Left
button for about 5 seconds to turn the Auto Power
(Default :
The Auto Power Link function is only available in the D.IN mode.
• ON: Play sound over all the speakers.
Up/Down/Left/Right
Left/Right on the button to select or set functions.
select the previous music.
button for about 5 seconds
(Default : ON - ANYNET+ or OFF - ANYNET+)
Anynet+ compatible Samsung TV.
OFF - POWER LINK
to turn the Anynet+
Link function on or off.
or
ON - POWER LINK)
SOUND
Music Skip
Anynet+
function on or off.
Auto Power Link
SOUND
EFFECT
VOL WOOFER
SOURCE
LEVEL
EFFECT
You can select from 6 sound modes - STANDARD (Original Sound),
MUSIC, CLEAR VOICE, SPORTS, MOVIE, and NIGHT - depending on
Select the STANDARD mode if you want to enjoy the original sound.
Lets you apply dynamic range control to Dolby Digital tracks.
Press and hold the EFFECT button for about 5 seconds in standby mode
to toggle the DRC (Dynamic Range Control) function ON - DRC and
● Operate the TV using the TV's remote control.
the content you want to listen to.
* DRC (Dynamic Range Control)
OFF - DRC.
10
Page 11
SOUND
EFFECT
SOURCE
LEVEL
DESCRIPTIONS
SOURCE
Press to select a source connected to the Soundbar.
* BT PAIRING mode
To turn on BT PAIRING mode in Bluetooth function, press and hold the
SOURCE button for more than 5 seconds.
Play / Pause (BT / WIFI)
p
Press the
Press the
LEVEL
The ATMOS Soundbar has 5.1.4 channel sound. Use this button to adjust
the volume of each of the speakers. Press this button, use the Left/Right
buttons to select a speaker, and then use the Up/Down buttons to increase
or decrease the level (volume).
button to pause a music temporarily.
p
button again to play the selected music.
FTRFTL
FL FR
STL
C
Main Unit
STR
ENG
VOL WOOFER
SL
Surround
Speaker L
Speaker
Front Left FL
Front Top Left FTL
Main Unit
Surround Speaker L
Surround Speaker R
* Network Standby On/Off
Press and hold
Standby on or off.
Center C
Front Right FR
Front Top Right FTR
Surround Left SL
Surround Top Left STL
Surround Right SR
Surround Top Right STR
the LEVEL
(See page 33)
Displayed on OLED
when adjusting the level
button for about 5 seconds
SR
Surround
Speaker R
to turn the Network
11
Page 12
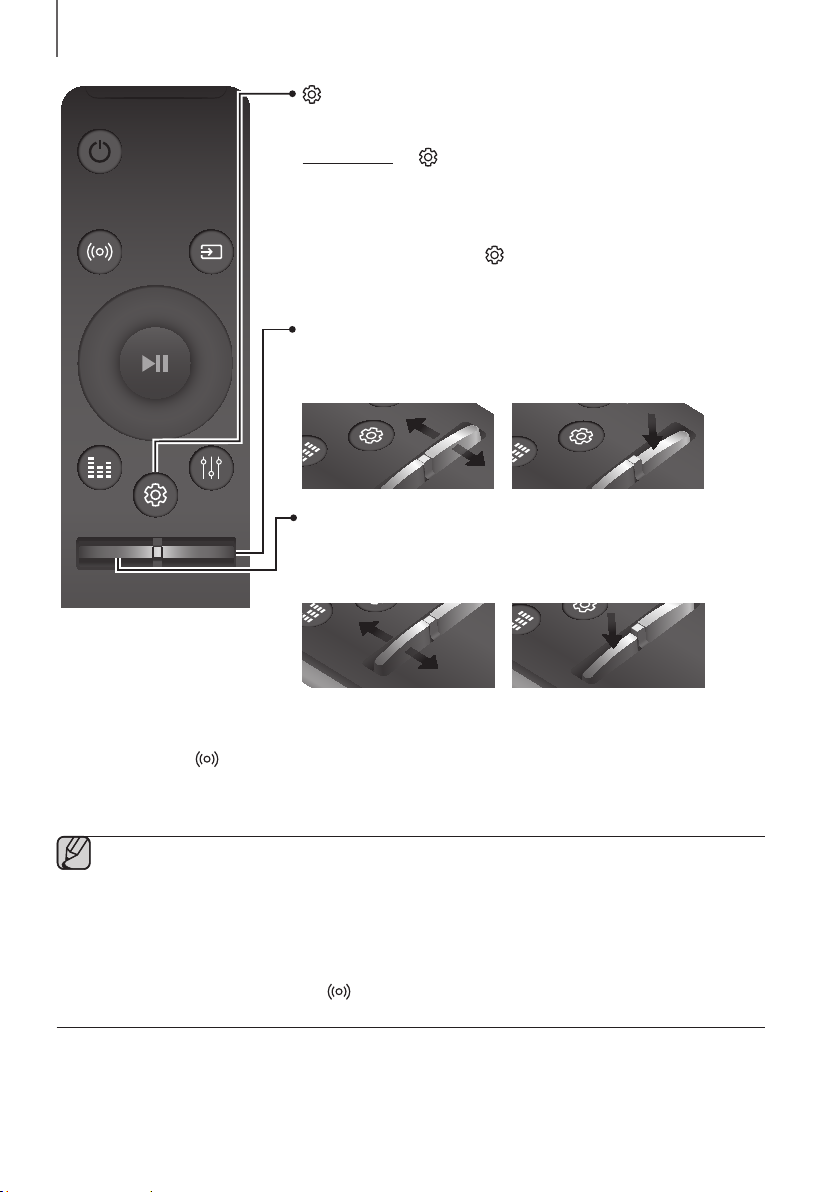
DESCRIPTIONS
EFFECT
LEVEL
VOL
WOOFER
SOUNDBAR
EFFECT
LEVEL
VOL
WOOFER
SOUNDBAR
LEVEL
WOOFER
EFFECT
LEVEL
WOOFER
EFFECT
LEVEL
VOL
WOOFER
SOUNDBAR
LEVEL
WOOFER
LEVEL
WOOFER
SOUNDBAR
EFFECT
LEVEL
VOL
WOOFER
SOUNDBAR
LEVEL
WOOFER
SOUND
SOURCE
(Sound Control)
Press to select TREBLE, BASS, or AUDIO SYNC. Then, use the
Up/Down buttons to adjust the TREBLE or BASS volume from -3 ~ +3.
Press and hold the
(Sound Control) button for about 5 seconds to
adjust the sound for each frequency band. 150Hz, 300Hz, 600Hz, 1.2KHz,
2.5KHz, 5KHz, and 10KHz are selectable (Left/Right) and each can be
adjusted to a setting between -6 ~ +6 (Up/Down).
If the Soundbar is connected to a digital TV and the video appears out of
sync with the audio, press the
(Sound Control) button to sync the audio
with the video. Use the Up/Down buttons to set the audio delay between
0 ms ~ 300 ms. In BT mode, the Audio Sync function may not available.
WOOFER
Push the button up or down to adjust the volume of the subwoofer to -12 or
-6 to +6.
Pressing the button reverts the subwoofer volume to level 0.
EFFECT
EFFECT
LEVEL
EFFECT
VOL
Push the button up or down to adjust the volume.
Mute
VOL WOOFER
Press the VOL button to mute the sound. Press it again to unmute the sound.
EFFECT
VOL
EFFECT
VOL
+ Controlling the Volume of Soundbar by using Your TV Remote Control
1. Press and hold the
2. "ON - TV REMOTE" appears on the Soundbar's display.
3. In the TV's menu, set the TV speaker to external speaker.
● Not available in TV ARC, BT, HDMI1 and HDMI2 modes. (Available only in D.IN (optical) and AUX
modes)
● On the TV remote control, only the volume and mute buttons are available. Other buttons are disabled.
● TV menus differ by manufacturer and model. Refer to the TV's user manual for further information.
● Manufacturers supporting this function:
- VIZIO, LG, Sony, Sharp, PHILIPS, PANASONIC, TOSHIBA, GRUNDIG, Hisense, RCA
This function may not be compatible with your TV's remote depending on the remote control's manufacturer.
-
● To turn off this function, press the
"OFF - TV REMOTE" appears on the Soundbar's display.
SOUND
button for more than 5 seconds while the Soundbar is turned on.
SOUND
button for 5 seconds.
12
Page 13
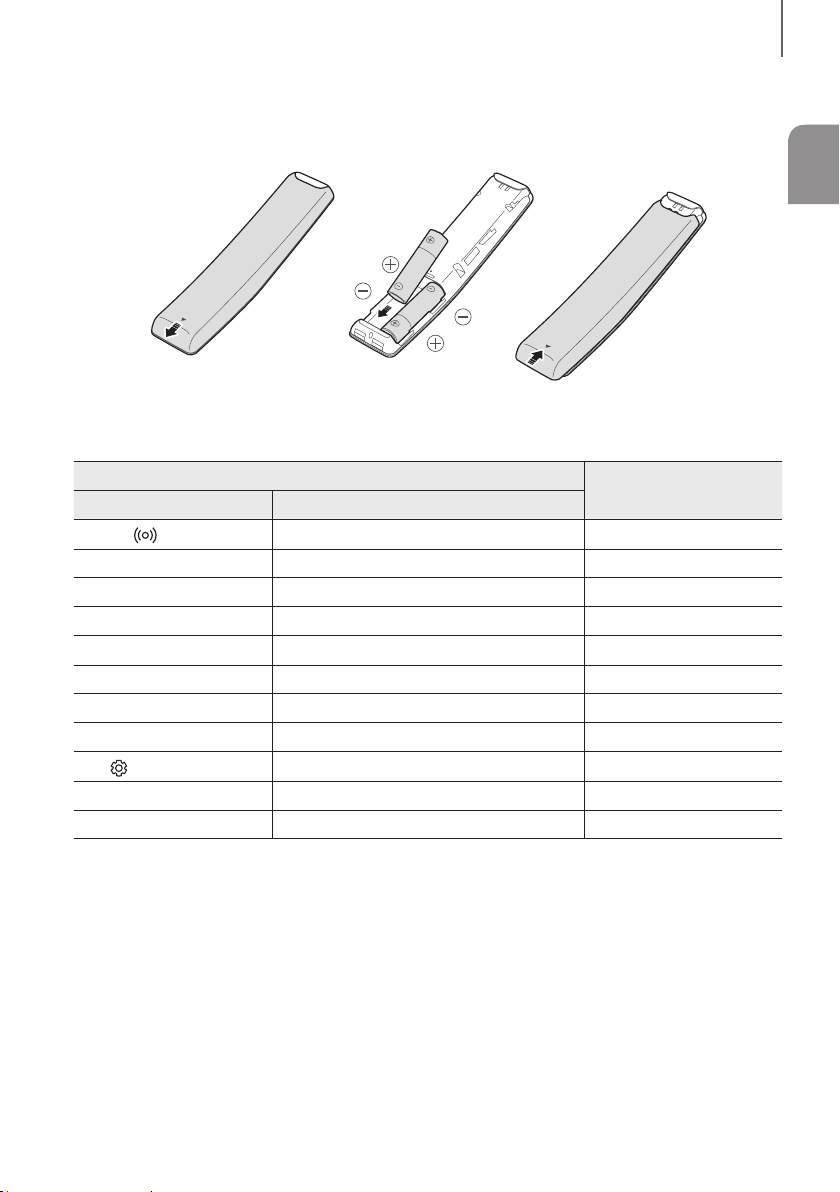
INSERTING BATTERIES (AA BATTERY X2)
Slide the battery cover in the direction of the arrow until it is completely removed.
Insert 2 AA batteries (1.5V) in the correct +/- polarity. Slide the battery cover back into position.
USING THE HIDDEN BUTTONS
DESCRIPTIONS
ENG
Hidden Button
Remote Control Button Function
SOUND
SOURCE
p
(Play / Pause)
VOL
Up
Down
Left
Right
(Sound Control)
EFFECT
LEVEL
TV remote control On/Off P
BT Paring P
Auto Power Down On/Off (AUX mode) P
ID SET P
WIFI SETUP P
ADD SPEAKER P
Auto Power Link On/Off P
Anynet+ On/Off P
7 Band EQ P
DRC On/Off P
Network Standby On/Off P
Reference page
age 12
age 29
age 28
age 21
age 10
age 10
age 24
age 10
age 12
age 10
age 33
13
Page 14
DESCRIPTIONS
SOURCE
SOUND
SOURCE
LEVEL
SOUND
SOURCE
LEVEL
SOUND
SOURCE
LEVEL
SOUND
SOURCE
LEVEL
SOUND
SOURCE
LEVEL
SOUND
SOURCE
LEVEL
OUTPUT SPECIFICATIONS FOR THE DIFFERENT MODES OF
SOUND EFFECT
Input Effect Output
2 ch
5.1.4 ch
ON
5.1 ch 5.1.4 ch
2 ch
SOUND
2.1 ch
STANDARD
5.1 ch 5.1 ch
2 ch
EFFECT
2.1 ch
MUSIC
5.1 ch 5.1 ch
2 ch
EFFECT
3.1 ch
CLEAR VOICE
5.1 ch 5.1 ch
2 ch
EFFECT
5.1.4 ch
SPORTS
5.1 ch 5.1.4 ch
2 ch
EFFECT
5.1.4 ch
MOVIE
5.1 ch 5.1.4 ch
2 ch
EFFECT
3.1 ch
NIGHT
5.1 ch 5.1 ch
EFFECT
* If the input source is Dolby Atmos®, 5.1.4 channel is outputted. The sound effect is not available.
14
Page 15
INSTALLATION
INSTALLATION
INSTALLING THE SOUNDBAR
INSTALLING THE WALL MOUNT
+ Installation Precautions
● Install on a vertical wall only.
● For the installation, avoid a location with high temperature or humidity, or a wall that cannot sustain the weight of
the set.
● Check the strength of the wall. If the wall is not strong enough to support the unit, reinforce the wall or install the
unit on a different wall that can support the unit's weight.
● Purchase and use the fixing screws or anchors appropriate for the kind of wall you have (plaster board, iron board,
wood, etc.). If possible, fix the support screws into wall studs.
● Purchase wall mounting screws according to the type and thickness of the wall you will mount the Soundbar on.
- Diameter: M5
- Length: 1 3/8 inches or longer recommended.
● Connect cables from the unit to external devices before you install it on the wall.
● Make sure the unit is turned off and unplugged before you install it. Otherwise, it may cause an electric shock.
ENG
2 inches or more
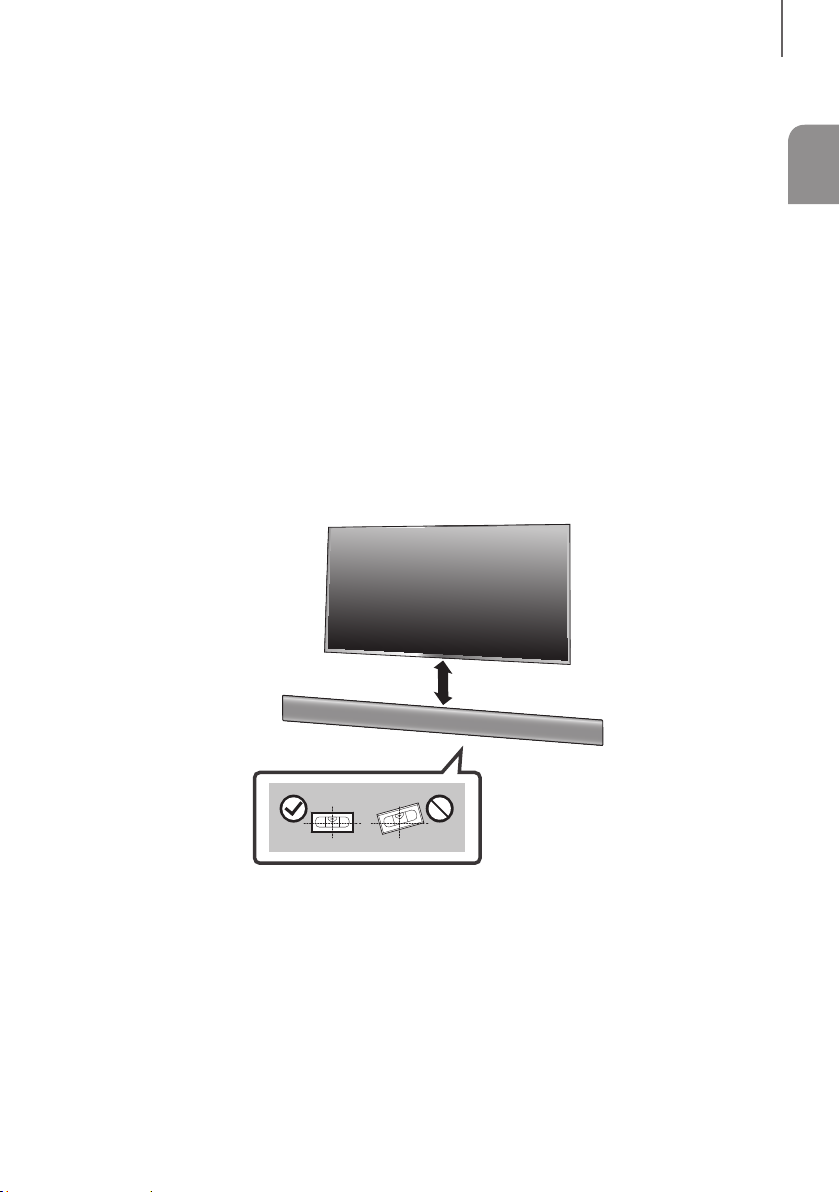
1. Place the Wall Mount Guide against the wall surface.
• The Wall Mount Guide must be level.
• If your TV is mounted on the wall, install the Soundbar at least 2 inches (5 cm) below the TV.
15
Page 16
INSTALLATION
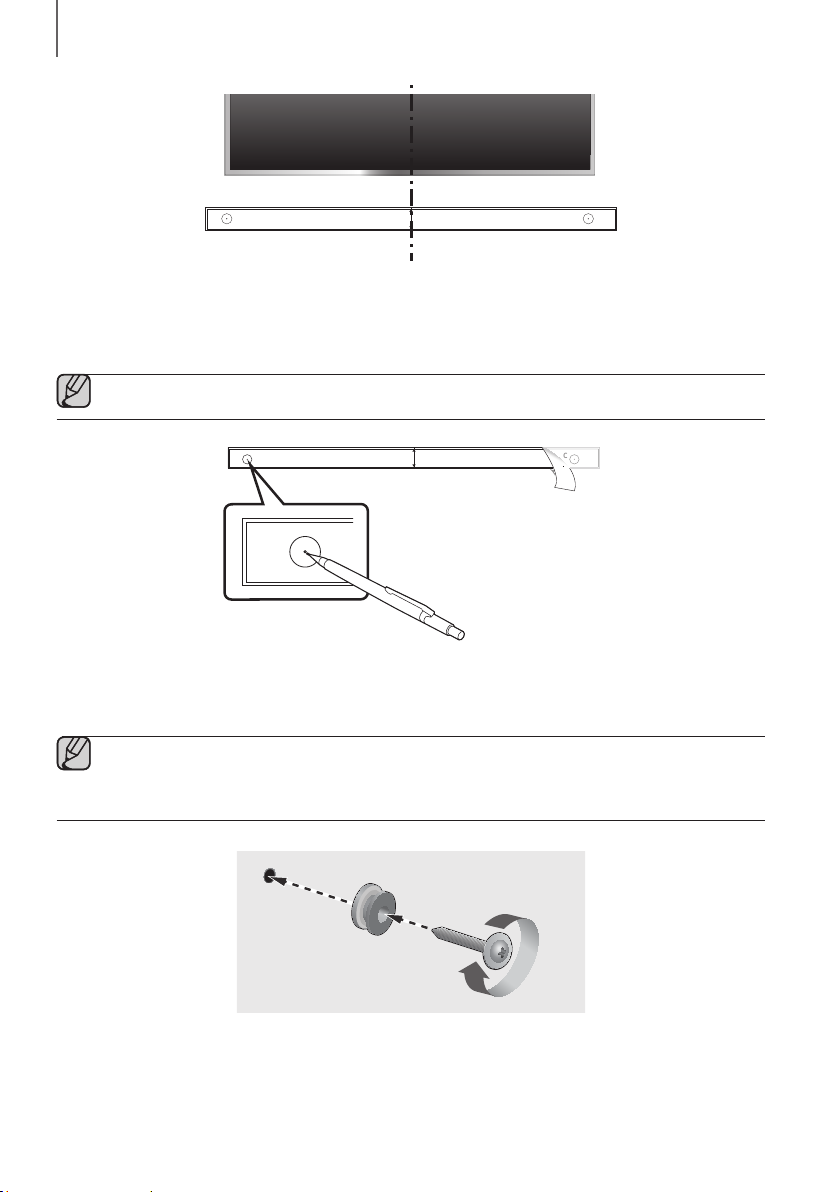
CENTER LINE
C
C B
C C
CENTER LINE
C TYPE : 700mm
Center Line
2. Align the Paper Template’s Center Line with the center of your TV (if you are mounting the Soundbar below your
TV), and then fix the Wall Mount Guide to the wall using tape.
● If you are not mounting below a TV, place the Center Line in the center of the installation area.
C
CENTER LINE
C TYPE : 700mm
3. Push a pen tip or sharpened pencil tip through the center of the C-TYPE images on each end of the Guide to
mark the holes for the supporting screws, and then remove the Wall Mount Guide.
4. Using an appropriately sized drill bit, drill a hole in the wall at each marking.
● If the markings do not correspond to the positions of studs, make sure you insert appropriate anchors or
mollies into the holes before you insert the support screws. If you use anchors or mollies, make sure the
holes you drill are large enough for the anchors or mollies you use.
5. Push a screw (not supplied) through each Holder-Screw, and then screw each screw firmly into a support
screw hole.
16
Page 17
INSTALLATION
ENG
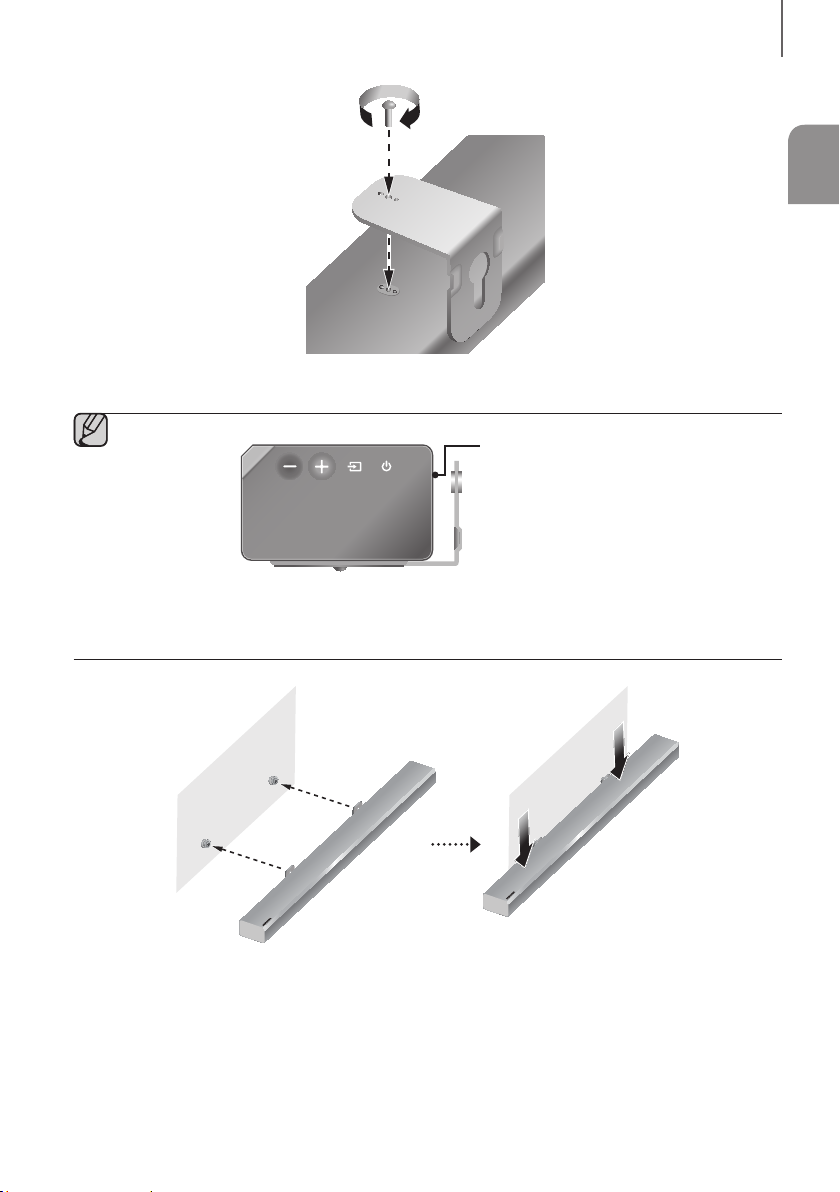
6. Install 2
Bracket-Wall Mounts
● When assembling, make sure the hanger parts of the Bracket-Wall Mounts are located behind the rear
of the Soundbar. See the illustration above.
in the right orientation on the bottom of the Soundbar, using 2
Rear of the Soundbar
Right end of the Soundbar
Screws
(M4 x L12).
7. Install the Soundbar with the attached Bracket-Wall Mounts by hanging the Bracket-Wall Mounts on the
Holder-Screws on the wall.
17
Page 18
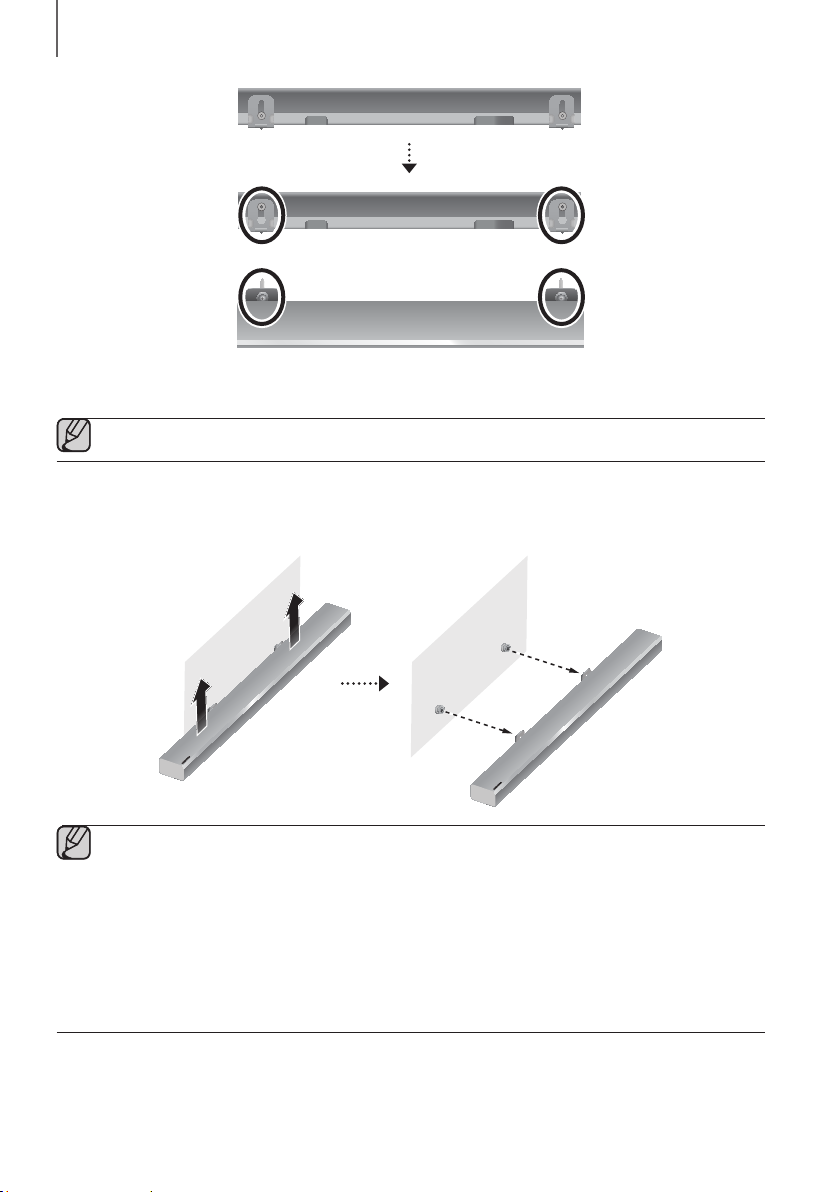
INSTALLATION
8. Slide the Soundbar down as shown above so that the Bracket-Wall Mounts rest securely on the Holder-Screws.
● Slide the Bracket-Wall Mounts down from the bottom to install it onto the Holder-Screws.
DETACHING THE SOUNDBAR FROM THE WALL
1. To separate the Soundbar from the wall mount, push it in the direction of arrow.
● Do not hang onto the installed unit and avoid striking or dropping the unit.
● Secure the unit firmly to the wall so that it does not fall off. If the unit falls off, it may cause an injury or
damage the product.
● When the unit is installed on a wall, please make sure that children do not pull any of the connecting
cables, as this may cause it to fall.
● For the optimal performance of a wall mount installation, install the speaker system at least 2 inches
(5 cm) below the TV, if the TV is mounted on the wall.
● For your safety, if you do not mount the unit on the wall, install it on a secure, flat surface where it is unlikely
to fall.
18
Page 19

INSTALLING THE SURROUND SPEAKERS ON A WALL
You can purchase wall mounts separately to install the surround speakers on a wall.
+ Considerations for purchasing
● Endurable load : Above 17.6 Ibs (8.0 Kg)
● Hole size : 1/4 - 20 threaded insert
● Since wall mount installation is optional, you must purchase the corresponding accessories separately.
● Please have a qualified installer install the surround speaker Wall Mount Brackets.
● Ask a professional installation company to mount your product on the wall.
● Check the strength of the wall before you install the Wall Mount Brackets. If the strength is insufficient, make
sure to reinforce the wall before installing the Wall Mount Brackets and the speakers on the wall.
● For more information, please refer to the Wall Mount's manual.
● Samsung Electronics is not liable for any damage to the product due to the product being installed
inappropriately.
● Take care not to install the speakers sideways or upside down.
INSTALLATION
ENG
19
Page 20
CONNECTIONS
CONNECTIONS
CONNECTING THE SUBWOOFER AND SURROUND SPEAKERS
● Do not connect the power cord of this product or your TV to a wall outlet until all connections between
components are complete.
● Before moving or installing this product, be sure to turn off the power and disconnect the power cord.
● If the main unit is powered off, the wireless subwoofer and surround speaker will go into stand-by mode
and the STANDBY LED on the rear will be Red after blinking Blue several times.
● If you use a device that uses the same frequency (2.4GHz) as the Soundbar near the Soundbar,
interference may cause some sound interruption.
● The maximum transmission distance of the wireless signal of the main unit is about 32.8 ft, but may vary
depending on your operating environment. If a steel-concrete or metallic wall is between the main unit and
the wireless subwoofer or surround speaker, the system may not operate at all, because the wireless signal
cannot penetrate metal.
● Wireless receiving antennas are built into the wireless subwoofer and surround speakers. Keep the units
away from water and moisture.
● For optimal listening performance, make sure that the area around the wireless subwoofer and surround
speakers location is clear of any obstructions.
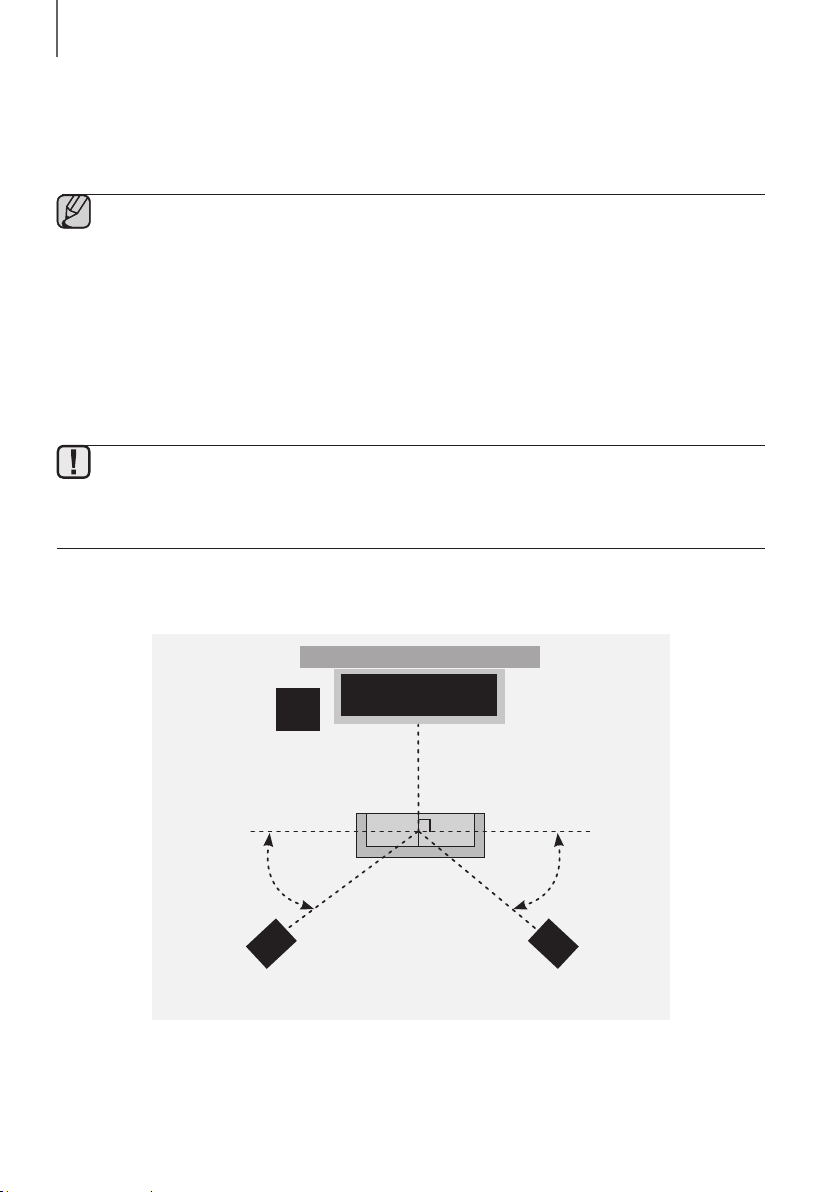
Recommended Speaker Layout
TV
Soundbar Main Unit
Subwoofer
90°
110° 110°
Surround Speaker L Surround Speaker R
90°
20
Page 21
CONNECTIONS
LINK
LINK
LINK STANDBY ID SET
LINK STANDBY ID SET
LINK STANDBY ID SET
POWER
LINK STANDBY ID SET
LINK STANDBY ID SET
LINK STANDBY ID SET
AUTOMATIC CONNECTION
1. Connect a power supply to the subwoofer and surround sound speakers.
2. Connect a power supply to the Soundbar, and then press the
of the Soundbar.
3. The subwoofer and surround sound speakers are automatically connected to the Soundbar.
4. When auto pairing is complete, the blue indicators at the rear of the subwoofer and surround speakers turn on.
● If the red indicator at the rear of the subwoofer or surround speakers is on or the blue indicator flashes
continuously, auto pairing cannot occur. If this happens, connect each of the speakers manually,.
● You can enjoy better sound from the wireless subwoofer by selecting a Sound Effect. (See page 10.)
● Important: Before you begin, put the batteries into the remote. See page 13 for instructions.
POWER
LINK STANDBY ID SET
Rear of Subwoofer Rear of Surround Speaker
button on the remote control or on the right side
LINK STANDBY ID SET
ENG
CONNECTING THE SUBWOOFER AND SURROUND SPEAKERS
MANUALLY IF THE AUTOMATIC CONNECTION FAILS
1. Press and hold ID SET on the rear of the subwoofer and surround speakers for at least 5 seconds. The red
+ Before You Begin
● Make sure that the Soundbar, the subwoofer, and the surround speakers are plugged in.
● Make sure that the Soundbar is turned on.
indicator at the rear of each speaker turns off and the blue indicator blinks.
Rear of Subwoofer
Rear of the Left and Right Surround Speakers
21
Page 22
CONNECTIONS
LEVEL
WOOFER
2. Turn off the Soundbar.
3. Press and hold the VOL button on the remote control for at least 5 seconds with the Soundbar turned off (OFF).
EFFECT
VOL
4. The ID SET message appears on the display of the Soundbar for a short period of time, and then disappears.
ID SET
Right Side of the Soundbar
5. When the blue indicators on the subwoofer and surround sound speakers blink, turn on the power by pressing
button on the right side of the main unit or on the remote control.
6. When the connection is successfully established, the blue indicators on the rear of the subwoofer and surround
speakers turn on without blinking.
● If the connection process fails, the blue indicators will flash continuously. Go to Step 1 and start again.
LED INDICATOR LAMP STATUS ON SUBWOOFER AND
SURROUND SOUND SPEAKERS
LED Status Description Resolution
Standby (with the Soundbar main
unit turned off)
Red On
Connection failed
On
Blue
Blinking
Red and blue Blinking Malfunction Contact the service center.
Successfully connected
(normal operation)
Standby (with the Soundbar main
unit turned off)
Connection failed
22
Check the power supply to the
Soundbar main unit
Connect again
(refer to the instructions on manual
connection in the user manual)
-
Check the power supply to the
Soundbar main unit
Connect again
(refer to the instructions on manual
connection in the user manual)
Page 23
CONNECTIONS
DIGITAL AUDIO IN
(OPTICAL)
HDMI OUT
(TV-ARC)
AUX IN
SOUND
SOURCE
SOURCE
CONNECTING TO A TV
● Important: Before you begin, put the batteries into the remote. See page 13 for instructions.
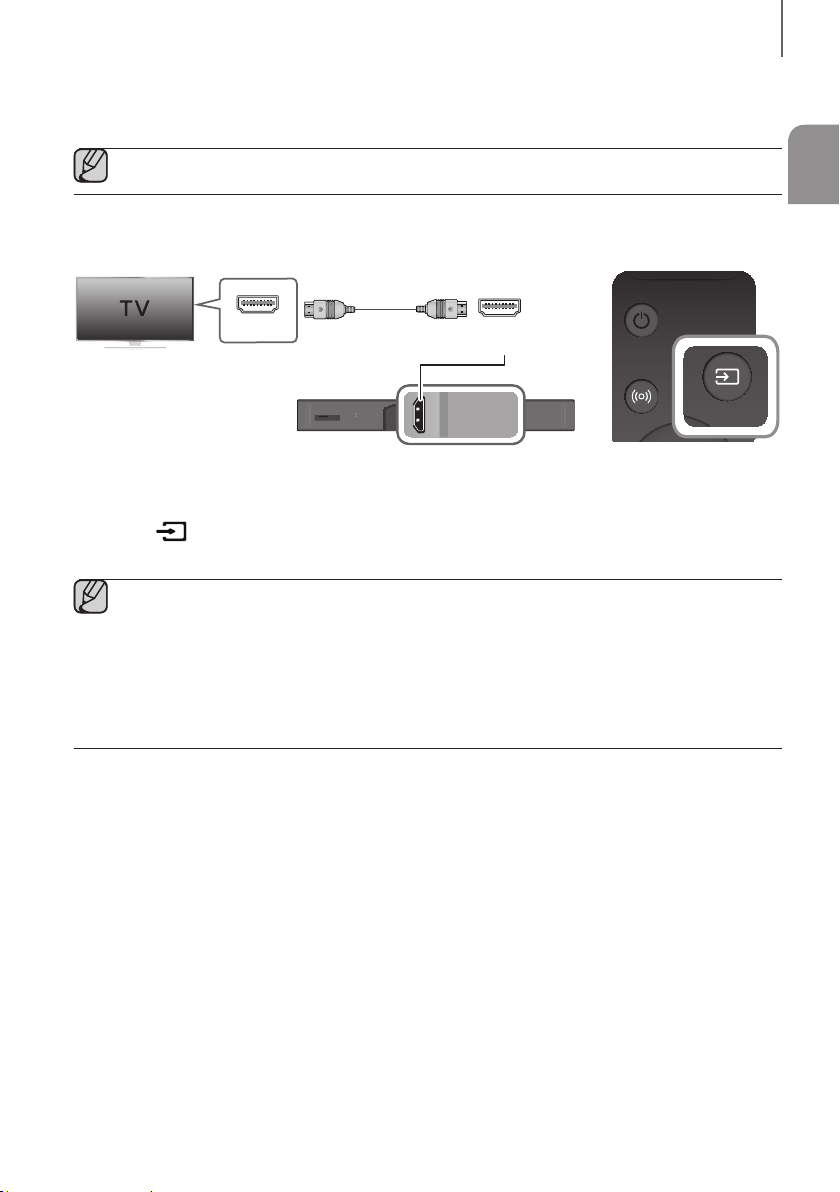
CONNECTING TO A TV USING AN HDMI (DIGITAL) CABLE
HDMI Cable
ENG
HDMI IN
AUX IN
DIGITAL AUDIO IN
(OPTICAL)
HDMI OUT
(TV-ARC)
HDMI IN 1
HDMI IN 2
Wi-Fi SETUPSPK ADD
HDMI OUT
(TV-ARC)
DC 19V
SERVICE
1. Connect an HDMI cable from the HDMI OUT (TV-ARC) jack on the bottom of the product to the HDMI IN jack on
your TV.
2. Press the
button on the right side of the Soundbar or the SOURCE button on the remote control to select
the D.IN mode.
● HDMI is an interface that enables the digital transmission of video and audio data with just a single
connector.
● If the TV provides an ARC port, connect the HDMI cable to the HDMI IN (ARC) port.
● We recommend you use a coreless HDMI cable if possible. If you use a cored HDMI cable, use one whose
diameter is less than 0.55 inches.
● Anynet+ must be turned on.
● This function is not available if the HDMI cable does not support ARC.
23
Page 24
CONNECTIONS
DIGITAL AUDIO IN
(OPTICAL)
AUX IN
SOUND
SOURCE
SOURCE
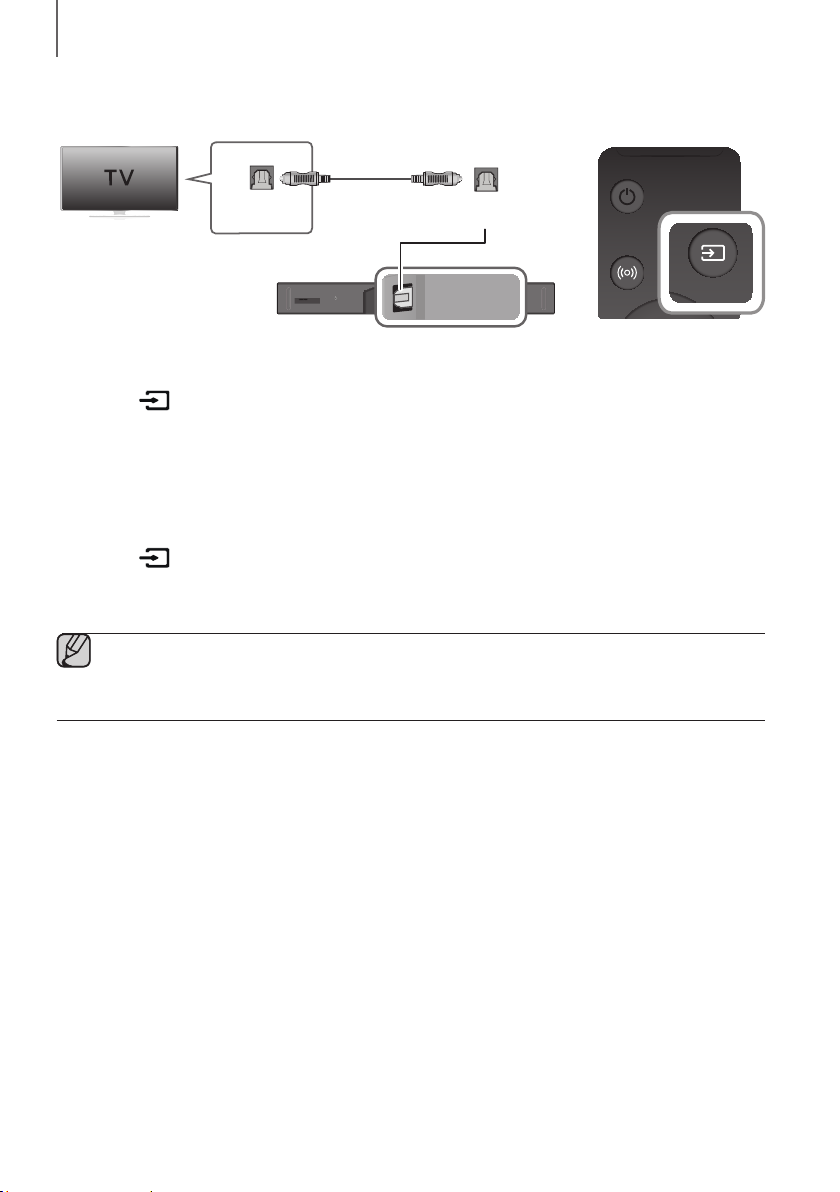
CONNECTING TO A TV USING A DIGITAL OPTICAL CABLE
Optical Cable
(not supplied)
AUX IN
DIGITAL AUDIO IN
(OPTICAL)
HDMI OUT
(TV-ARC)
HDMI IN 1
Wi-Fi SETUPSPK ADD
HDMI IN 2
DIGITAL AUDIO IN
(OPTICAL)
DC 19V
SERVICE
OPTICAL OUT
1. Connect the DIGITAL AUDIO IN (OPTICAL) (Audio) jack on the Soundbar to the OPTICAL OUT jack of the TV
with a digital optical cable (not supplied).
2. Press the
button on the right side of the Soundbar or the SOURCE button on the remote control to select
the D.IN mode.
+ Auto Power Link
If you have connected the main unit to a TV with a digital optical cable, you can set the Auto Power function ON
to have the Soundbar turn on automatically when you turn the TV on.
1. Connect the Soundbar and
2. Press the
D.IN
mode.
button on the main unit’s right side or the SOURCE button on the remote control to select the
3. Press the Left button on the remote control for 5 seconds to turn Auto Power Link on or off.
● Auto Power Link is set to ON by default.
● Depending on the connected device, Auto Power Link may not function.
● This function is only available in the D.IN mode.
a TV
with a digital optical cable (not supplied).
24
Page 25

CONNECTIONS
DIGITAL AUDIO IN
(OPTICAL)
HDMI OUT
(TV-ARC)
DIGITAL AUDIO IN
(OPTICAL)
HDMI OUT
(TV-ARC)
HDMI IN 1
HDMI IN 2
AUX IN
SOUND
SOURCE
SOURCE
CONNECTING TO EXTERNAL DEVICES
HDMI is the standard digital interface for connecting to TVs, projectors, DVD players, Blu-ray players, set top boxes,
and more.
HDMI prevents any degradation to the signal due to conversion to analog and maintains the video and audio
quality of the original digital source.
CONNECTING DEVICES IN ORDER TO USE DOLBY ATMOS®
This product supports Dolby Atmos®.
● Important: Dolby Atmos® is available only in HDMI mode.
HDMI Cable
ENG
HDMI IN
AUX IN
DIGITAL AUDIO IN
(OPTICAL)
HDMI OUT
(TV-ARC)
HDMI IN 1
HDMI IN 2
DC 19V
Wi-Fi SETUPSPK ADD
SERVICE
Or
Digital Devices
HDMI OUT
HDMI Cable
1. Connect an HDMI cable from the HDMI IN 1 or HDMI IN 2 jack on the back of the product to the HDMI OUT jack
on your digital device.
2. Press the
button on the right side of the Soundbar or the SOURCE button on the remote control to select
the HDMI1 or HDMI2 mode.
3. The selected HDMI mode is displayed on the Soundbar display panel and sound plays.
● When Dolby Atmos® operated, the Blue LED on the right edge of the Soundbar will turn on and glow.
25
Page 26

CONNECTIONS
DIGITAL AUDIO IN
(OPTICAL)
HDMI OUT
(TV-ARC)
DIGITAL AUDIO IN
(OPTICAL)
HDMI OUT
(TV-ARC)
HDMI IN 1
HDMI IN 2
AUX IN
SOUND
SOURCE
SOURCE
4. Configuring Dolby Atmos® on your BD player, or other device.
• Check the audio output options using the settings menu on your BD player, or other device.
• Make sure that "No Encoding" is selected for bitstream in the audio output options.
e.g., On a Samsung Player: Home menu Settings Sound Digital Output: Select Bitstream (unprocessed).
• If the Audio Output options include Secondary Audio, make sure it is set to Off.
● Dolby Atmos® works only in HDMI mode. It is not compatible with other input sources.
● Dolby Atmos® works only on 5.1.4 channels.
● Make sure that the content supports Dolby Atmos®.
HDMI CABLE
HDMI Cable
HDMI IN
AUX IN
DIGITAL AUDIO IN
(OPTICAL)
HDMI OUT
(TV-ARC)
HDMI IN 1
HDMI IN 2
DC 19V
Wi-Fi SETUPSPK ADD
SERVICE
Or
Digital Devices
HDMI OUT
HDMI Cable
1. Connect an HDMI cable from the HDMI IN 1 or HDMI IN 2 jack on the back of the product to the HDMI OUT jack
on your digital device.
2. Press the
button on the right side of the Soundbar or the SOURCE button on the remote control to select
the HDMI1 or HDMI2 mode.
3. The selected HDMI mode is displayed on the Soundbar display panel and sound plays.
26
Page 27

CONNECTIONS
DIGITAL AUDIO IN
(OPTICAL)
AUX IN
SOUND
SOURCE
SOURCE
OPTICAL OR ANALOG AUDIO CABLE
This unit comes equipped with one digital optical in jack and one analog audio (AUX) in jack, giving you two
ways to connect it to external devices.
Optical Cable
(not supplied)
ENG
DIGITAL AUDIO IN
(OPTICAL)
BD / DVD player /
OPTICAL OUT
Audio Cable
(not supplied)
Set-top box /
Game console
AUX OUT
AUX IN
DIGITAL AUDIO IN
(OPTICAL)
HDMI OUT
(TV-ARC)
HDMI IN 1
Wi-Fi SETUPSPK ADD
HDMI IN 2
AUX IN
DC 19V
SERVICE
+ AUX Cable
1. Connect AUX IN (Audio) on the main unit to the AUDIO OUT jack of the Source Device using an audio cable.
2. Press the
button on the right side of the Soundbar or the SOURCE button on the remote control to select
the AUX mode.
+ Optical Cable
1. Connect DIGITAL AUDIO IN (OPTICAL) (Audio) on the main unit to the OPTICAL OUT jack of the Source Device
using a digital optical cable.
2. Press the
the D.IN mode.
button on the right side of the Soundbar or the SOURCE button on the remote control to select
27
Page 28

FUNCTIONS
SOUND
SOURCE
SOURCE
FUNCTIONS
INPUT MODE
Press the button on the main unit’s
you want.
Right Side of the Soundbar
Input mode Display
Optical Digital input
ARC (HDMI OUT) input
AUX input
HDMI input HDMI1, HDMI2
BLUETOOTH mode
right side or the
D.IN
AUX
SOURCE button on the remote control to select the mode
BT
AUTO POwER DOwN FUNCTION
The unit turns off automatically in the following situations.
● D.IN / BT Mode
- If there is no audio signal for 5 minutes.
● HDMI1 / HDMI2 Mode
- If there is no audio signal for 15 minutes.
● AUX Mode
- If the AUX cable is disconnected for 5 minutes.
- If there is no KEY input for 8 hours when the AUX cable is connected. (Auto Power Down function can be
turned off only in that case.)
p
To turn off Auto Power Down function, while in AUX mode, press and hold the
ON - AUTO POwER DOwN / OFF - AUTO POwER DOwN appears on the display.
button for 5 seconds.
28
Page 29

FUNCTIONS
BLUETOOTH
You can connect a Bluetooth device to the Soundbar and enjoy music with stereo sound, all without wires!
TO CONNECT THE SOUNDBAR TO A BLUETOOTH DEVICE
Check if the Bluetooth device supports the Bluetooth compliant stereo headset function.
Connect
Bluetooth device
ENG
1. Press the
mode.
• You will see BT READY or BT PAIRING on the front display of the Soundbar.
2. Select the Bluetooth menu on the Bluetooth device you want to connect. (Refer to the Bluetooth device's user
manual.)
3. Select "[AV] Samsung Soundbar Kxxx" from the list.
• When the Soundbar is connected to the Bluetooth device, it will display [Bluetooth device name]
the front display.
• The device name can only be displayed in English. An underline " _ " will be displayed if the name is not in
English.
• If the Bluetooth device has failed to pair with the Soundbar, delete the previous "
Kxxx
on the main unit’s right side or the SOURCE button on the remote control, and then have the Bluetooth device
search for the Soundbar again.
4. Play music on the connected device.
• You can listen to the music playing on the connected Bluetooth device over the Soundbar.
• In BT mode, the Play / Pause / Next / Prev functions are not available. However, these functions are available
on Bluetooth devices supporting AVRCP.
button on the main unit’s right side or the SOURCE button on the remote control to select the BT
BT on
" found by the Bluetooth device, switch to BT PAIRING mode by pressing and holding the button
● If asked for a PIN code when connecting a Bluetooth device, enter <0000>.
● Only one Bluetooth device can be paired at a time.
● The Bluetooth connection will be terminated when you turn the Soundbar off.
● The Soundbar may not perform Bluetooth search or connection correctly under the following
circumstances:
- If there is a strong electrical field around the Soundbar.
- If several Bluetooth devices are simultaneously paired with the Soundbar.
- If the Bluetooth device is turned off, not in place, or malfunctions.
● Note that such devices as microwave ovens, wireless LAN adaptors, fluorescent lights, and gas stoves use
the same frequency range as the Bluetooth device, which can cause electric interference.
[AV] Samsung Soundbar
29
Page 30

FUNCTIONS
● The Soundbar supports SBC data (44.1kHz, 48kHz).
● Connect only to a Bluetooth device that supports the A2DP (AV) function.
● You cannot connect the Soundbar to a Bluetooth device that supports only the HF (Hands Free) function.
● Once you have paired the Soundbar to a Bluetooth device, selecting "
from the device's scanned devices list will automatically change the Soundbar to BT mode.
- Available only if the Soundbar is listed among the Bluetooth device’s paired devices. (The Bluetooth
device and the Soundbar must have been previously paired at least once.)
● Soundbar will appear in the Bluetooth device’s searched devices list only when the Soundbar is displaying
BT PAIRING.
[AV] Samsung Soundbar Kxxx
"
TO DISCONNECT A BLUETOOTH DEVICE FROM THE
SOUNDBAR
You can disconnect a Bluetooth device from the Soundbar. For instructions, see the Bluetooth device's user manual.
● The Soundbar will be disconnected.
● When the Soundbar is disconnected from the Bluetooth device, the Soundbar will display
BT DISCONNECTED on the front display.
TO DISCONNECT THE SOUNDBAR FROM A BLUETOOTH
DEVICE
Press the SOURCE button on the remote control or the button on the product's
another mode or turn off the Soundbar.
● The connected Bluetooth device will wait a certain amount of time for a response from the Soundbar before
terminating the connection. (Disconnection time may differ, depending on the Bluetooth device)
● In Bluetooth connection mode, the Bluetooth connection will be lost if the distance between the Soundbar
and the Bluetooth device exceeds 32.8 ft.
● The Soundbar automatically turns off after 5 minutes in the Ready state.
rig
ht side to switch from BT to
+ More About Bluetooth
Bluetooth is a technology that enables Bluetooth-compliant devices to interconnect easily with each other using a
short wireless connection.
● A Bluetooth device may cause noise or malfunction, depending on usage, if:
- A part of your body is in contact with the receiving/transmitting system of the Bluetooth device or the
Soundbar.
- It is subject to electrical variation from obstructions caused by a wall, corner, or office partition.
- It is exposed to electrical interference from same frequency-band devices including medical equipment,
microwave ovens, and wireless LANs.
● Pair the Soundbar with the Bluetooth device while they are close together.
● The further the distance between the Soundbar and Bluetooth device, the worse the quality is.
If the distance exceeds the Bluetooth operational range, the connection is lost.
● In poor reception areas, the Bluetooth connection may not work properly.
● The Bluetooth connection only works when it is close to the unit. The connection will be automatically cut off if the
Bluetooth device is out of range. Even within range, the sound quality may be degraded by obstacles such as
walls or doors.
● This wireless device may cause electric interference during its operation.
30
Page 31

FUNCTIONS
USING THE MULTIROOM APP
The Samsung Multiroom app lets you connect the Soundbar to a smart device, your network, and the Internet. Once
the Soundbar is connected to a smart device that has the Multiroom App installed, you can also connect the
Soundbar and multiple Samsung Multiroom devices together wirelessly and play audio through them.
BEFORE YOU BEGIN
+ Communication Basics
Smart Device:
Android or iOS
(App Control)
Internet Wireless Router
Requirements:
1. A Wireless Router and a Smart Device.
2. The wireless router must be connected to the Internet.
3. The smart device must be connected to the router via a Wi-Fi connection.
INSTALLING THE SAMSUNG MULTIROOM APP
To use the Soundbar with the Samsung Multiroom App, you must download and then install the Samsung Multiroom
App on your smart device. You can download the app from Google Play or the App Store. With the Samsung
Multiroom App installed, you can play music on your Soundbar that is stored on your smart device, located on other
connected devices, provided by other content providers, or streamed from Internet radio stations.
ENG
+ Android or iOS
Download the Samsung Multiroom app from Google Play or the App Store of your smart device.
* Market search : Samsung Multiroom
or
31
Page 32

FUNCTIONS
+ Launching the Samsung Multiroom App
To launch the Samsung Multiroom app, tap the Multiroom app icon on your smart device.
CONNECTING THE SOUNDBAR TO YOUR NETWORK
On your smart device, select the Samsung Multiroom app. Follow the directions on your smart device’s screen.
You can use the following music sources with the Samsung Multiroom app.
- Music files stored in your mobile phone, various music sources, and Internet radio.
[AV] Samsung Soundbar Kxxx
Music in mobile phone
Internet radio Music service
32
Page 33

FUNCTIONS
USING THE NETWORK STANDBY ON FUNCTION
The Network Standby On function becomes available if a wireless connection has been properly established between
a smart device and the Soundbar. This function turns on the Soundbar automatically when a smart device attempts to
connect to the Soundbar via Bluetooth or Wi-Fi. If you turn the Soundbar on via a Bluetooth connection, its input
mode is set to BT automatically. To turn the Soundbar on via Wi-Fi, you must have the Samsung Multiroom App
installed on your smart device.
1. Connect the smart device to your Soundbar.
2. Turn on the Network Standby On function by pressing the LEVEL button on the Soundbar's remote for more than
5 seconds. You can turn the function off by pressing the LEVEL button again for more than 5 seconds.
● Network Standby On is available only if the Soundbar is listed among the smart device’s paired devices.
(The Smart device and the Soundbar must have been previously paired at least once.)
● Soundbar will appear in the smart device’s searched devices list only when the Soundbar is displaying [BT
READY] or [WiFi READY].
● If the Network Standby On function did not work:
- The Network Standby On is set to Off. Set it to ON.
● The Wi-Fi connection to the Soundbar will be terminated if the Soundbar’s power cord is disconnected or
the power is cut off. If the power is cut off, turn on the Soundbar and reconnect it.
ENG
33
Page 34

FUNCTIONS
DC 19V
SERVICE
SOFTWARE UPDATE
AUX IN
DIGITAL AUDIO IN
(OPTICAL)
HDMI OUT
(TV-ARC)
HDMI IN 1
Wi-Fi SETUPSPK ADD
HDMI IN 2
UPDATING WITH USB
Samsung may offer updates for the Soundbar's system firmware in the future.
If an update is offered, you can update the firmware by connecting a USB device with the firmware update stored on it
to the USB port on your Soundbar.
Note that if there are multiple update files, you must load them onto the USB device singly and use them to update the
firmware one file at a time.
Please visit samsung.com or contact the Samsung call center to receive more information about downloading update
files.
DC 19V
SERVICE
Micro USB to
USB adapter Cable
(not supplied)
+ Updating Procedure
1. Connect a Micro USB to USB adapter cable with a male USB 2.0 Micro USB plug (Type B) on one end and a
standard female 2.0 USB jack (Type A) on the other end to the micro USB jack on your Soundbar.
● The Micro USB to USB adapter cable is sold separately. To purchase, contact a Samsung Service Center
or Samsung Customer Care.
2. Follow the steps below to download the product software:
Go to the Samsung website at (samsung.com/sec) search for the model name - select the customer support
option (the option name is subject to change)
3. Save the downloaded software to a USB stick and select "Extract to the folder name" to unzip the folder.
4. Turn off the Soundbar and connect the USB stick containing the software update to the female port on a Micro
USB adapter cable.
5. Turn on the Soundbar. Within 3 minutes, UPDATE is displayed and updating begins.
6. After the update is complete, the Soundbar turns off and on again.
● If the input source has been changed after an update or a reconnection of the power cable, change the
input source to TV, or the desired source.
34
Page 35

FUNCTIONS
+ If UPDATE is not displayed
1. Turn off the Soundbar, disconnect and then reconnect the USB storage device that contains the update files to the
Soundbar's USB port.
2. Disconnect the Soundbar's power cord, reconnect it, and then turn on the Soundbar.
● Insert a USB device containing the firmware update into the USB port on the main unit.
● Updating firmware may not work properly if audio files supported by the Soundbar are stored in the USB
storage device.
● Do not disconnect the power or remove the USB device while updates are being applied. The main unit will
turn off automatically after completing the firmware update.
● After update is completed, the user setup in Soundbar is initialized. We recommend you write down your
settings so that you can easily reset them after the update. Note that updating firmware resets the
subwoofer connection too.
If the connection to the subwoofer is not re-established automatically after the update, refer to page 20.
If the software update fails, check that the USB stick is not defective.
● Mac OS users should use MS-DOS (FAT) as the USB format.
● Depending on the manufacturer, some USB devices may not be supported.
AUTO UPDATE
If the Soundbar is connected to the Internet, it will automatically check for the latest firmware and update when new
firmware becomes available, even if it is turned off.
● The Soundbar is configured to run Auto Update by default.
● To use the Auto Update function, the Soundbar must be connected to the Internet.
● The Wi-Fi connection to the Soundbar will be terminated if its power cord is disconnected or the power is
cut off. If the power is cut off, turn on the Soundbar and reconnect it.
ENG
35
Page 36

TROUBLESHOOTING
TROUBLESHOOTING
TROUBLESHOOTING
Before requesting service, please check the following.
The unit will not turn on.
• Is the power cord plugged into the outlet? ¼ Connect the power plug to the outlet.
A function does not work when the button is pressed.
• Is there static electricity in the air? ¼ Disconnect the power plug and connect it again.
Sound is not produced.
• Is the Mute function on?
• Is the volume set to minimum?
The remote control does not work.
• Are the batteries drained?
• Is the distance between the remote control and main
unit too far?
The red LED on the subwoofer blinks and the subwoofer is not producing sound.
• Your subwoofer may not be connected to the
main unit of the product.
The subwoofer drones and vibrates noticeably.
• Try to adjust the vibration of your subwoofer.
¼ Press the VOL button to cancel the Mute function.
¼ Adjust the volume.
¼ Replace with new batteries.
¼ Move closer to the unit.
¼ Try to connect your subwoofer again.
(See Page 20)
¼ Push the WOOFER button on your remote control
up or down to adjust its value (between -12, -6 ~ +6).
36
Page 37

APPENDIX
SPECIFICATIONS
Main Unit
Weight
GENERAL
HDMI Video
AMPLIFIER
* Design, specifications and App screen are subject to change without prior notice.
* Nominal specification
- Samsung Electronics Co., Ltd reserves the right to change the specifications without notice.
- Weight and dimensions are approximate.
- For more information about the power supply and power consumption, refer to the label attached to the
product. (Label : Bottom of main unit)
a Open Source License Notice
- For further information on Open Sources used in this product, please visit the website:
http://opensource.samsung.com
a
- The Spotify Software is subject to third party licenses found here :
www.spotify.com/connect/third-party-licenses.
- For more information about Spotify Connect, please visit www.spotify.com/connect
Dimensions
(W x H x D)
Operating Temperature Range
Operating Humidity Range
Rated Output
Power
License
Subwoofer (PS-KW1-2)
Surround Speaker
(PS-KS2-1 (L), PS-KS2-2 (R))
Main Unit
Subwoofer (PS-KW1-2)
Surround Speaker
(PS-KS2-1 (L), PS-KS2-2 (R))
Main Unit
Subwoofer (PS-KW1-2)
Surround Speaker
(PS-KS2-1 (L), PS-KS2-2 (R))
14.8 lbs (6.7 kg)
21.2 lbs (9.6 kg)
4.4 lbs (2.0 kg)
47.6 x 3.2 x 5.2 inches
(1210.2 x 81.7 x 131.4 mm)
8.0 x 15.7 x 16.3 inches
(203.9 x 399.0 x 414.3 mm)
4.7 x 8.3 x 5.6 inches
(120.2 × 210.9 × 141.0 mm)
+41°F to +95°F (+5°C to +35°C)
10 % to 75 %
1080p,1080i, 720p, 576p, 480p
2160p@24/25/30Hz 4:4:4
2160p@60/50Hz 4:2:0
18W x 11, 4 ohm, THD
162W, 3 ohm, THD
35W x 4, 4 ohm, THD
≦10%
≦10%
≦10%
APPENDIX
ENG
37
Page 38

LIMITED WARRANTY TO ORIGINAL PURCHASER
Samsung Electronics Canada Inc.(SECA), warrants that this product is free from defective
material and workmanship.
SECA further warrants that if this product falls to operate properly within the speci ed warranty
period and the failure is due to improper workmanship or defective materials, SECA will repair
or replace the product at its option.
All warranty repairs must be performed by a SECA Authorized Service Center. (The name and
address of the location nearest you can be obtained by calling toll free: 1- 800- SAMSUNG)
LABOR
One year (Carry- in)
On carry-in models, transportation to and from the service center is the customer’s
responsibility.
The original dated sales receipt must be retained by the customer and is the only acceptable
proof of purchase. It must be presented to the authorized service center at the time service is
requested.
PARTS
One year
EXCLUSIONS (WHAT IS NOT COVERED)
This warranty does not cover damage due to accident, re, ood and/ or other acts of God;
misuse,incorrect line voltage, improper installation, improper or unauthorized repairs,
commercial use or damage that occurs in shipping. Exterior and interior nish, lamps, glass are
not covered under this warranty. Customer adjustments which are explained in the instruction
manual are not covered under the terms of this warranty. This warranty will automatically be
voided for any unit found with a missing or altered serial number. This warranty is valid only on
products purchased and used in Canada.
Samsung Electronics Canada Inc
2050 Derry Rd West
Mississauga, On. L5N 0B9
Tel: 1-800-SAMSUNG (726-7864)
Fax: (905) 542- 1199
Website: www.samsung.com/ca
Page 39

HEADQUARTERS
Samsung Electronics Canada Inc. 2050
Derry Road West, Mississauga, Ontario
L5N 0B9 Canada
TEL: 1-800-SAMSUNG (1-800-726-7864)
www.samsung.com/ca/support
© 2016 Samsung Electronics Co., Ltd. All rights reserved.
Contact SAMSUNG WORLD WIDE
If you have any questions or comments relating to Samsung products, please contact the SAMSUNG customer care
center.
Country Contact Center
`
North America
CANADA 1-800-SAMSUNG (726-7864)
U.S.A 1-800-SAMSUNG (726-7864) www.samsung.com/us/support
www.samsung.com/ca/support (English)
www.samsung.com/ca_fr/support (French)
Web Site
Page 40

Manuel d'utilisation
HW-K950
Imaginez les possibilités
Merci d’avoir choisi un appareil Samsung.
Pour recevoir une assistance plus complète, veuillez enregistrer votre produit sur
www.samsung.com/register
Page 41

démarrage
démarrage
INFORMATIONS RELATIVES À LA SÉCURITÉ
AVERTISSEMENTS
POUR ÉVITER LES RISQUES DE CHOC ÉLECTRIQUE, NE DÉMONTEZ PAS LE CAPOT.
L’APPAREIL NE CONTIENT PAS DE PIÈCES RÉPARABLES PAR L’UTILISATEUR. S’ADRESSER À UN SERVICE
APRÈS-VENTE QUALIFIÉ.
L’éclair et la flèche dans le triangle indiquent la
présente d’une tension dangereuse à l’intérieur du
MISE EN GARDE
RISQUE DE CHOC
ÉLECTRIQUE NE PAS OUVRIR
Produit de catégorie II : Ce symbole indique qu'il ne nécessite pas une connextion de sécurité à la
terre (masse).
Tension CA : Ce symbole indique que la tension nominale est la tension CA.
Tension CC : Ce symbole indique que la tension nominale est la tension CC.
Attention, consultez les instructions aux fins d'utilisation : Ce symbole indique à l'utilisateur qu'il
doit consulter le guide d'utilisation pour avoir de l'information au sujet de la sécurité.
AVERTISSEMENT
• Afin de diminuer les risques d’incendie ou de choc électrique, n’exposez pas cet appareil à la pluie ou à l’humidité.
• Pour éviter des blessures, cet appareil doit être solidement fixé au plancher/au mur conformément aux directives
d’installation.
produit.
Le point d’exclamation dans le triangle indique la
présence de directives importantes qui
accompagnent ce produit.
MISE EN GARDE
• Veillez à éviter toute projection sur l'appareil. Ne placez jamais de récipients contenant un liquide (ex. : vase) dessus.
• La prise d’alimentation fait office de système de déconnexion. Elle doit donc rester disponible en permanence.
ATTENTION (Pour le Canada)
Le présent appareil est conforme aux CNR d’Industrie Canada applicables aux appareils radio exempts de licence.
L’exploitation est autorisée aux deux conditions suivantes : (1) l’appareil ne doit pas produire de brouillage, et (2)
l’utilisateur de l’appareil doit accepter tout brouillage radioélectrique subi, même si le brouillage est susceptible d’en
compromettre le fonctionnement.
Cet appareil et son ou ses antennes ne doivent pas etre installés a proximité ou etre utilisés conjointement avec une
autre antenne ou un autre émetteur..
Le dispositif pourrait automatiquement cesser d’émettre en cas d’absence d’informations à transmettre, ou une
défaillance opérationnelle. Notez que ce n’est pas l’intention d’interdire la transmission des informations de contrôle ou
de signalisation ou l’utilisation de codes répétitifs lorsque requis par la technologie.
Cet appareil numerique de la classe B est conforme a la norme NMB-003 du Canada.
Declaration d’exposition aux radiations:
Cet equipement est conforme aux limites d’exposition aux rayonnements IC RSS-102 etablies pour un
environnement non controle. Cet equipement doit etre installe et utilise avec un minimum de 20 cm de distance
entre la source de rayonnement et votre corps.
Page 42

démARRAge
Consignes de sécurité importantes
Lisez attentivement ces consignes avant d'utiliser
l'appareil. Veillez à respecter toutes les consignes
répertoriées ci-après. Conservez ces instructions à
portée de main pour vous y référer ultérieurement.
1) Lisez attentivement ces consignes.
2) Conservez-les précieusement.
3) Tenez compte de tous les avertissements
mentionnés.
4) Respectez toutes les instructions sans exception.
5) N'utilisez pas cet appareil à proximité de l'eau.
6) Nettoyez-le à l'aide d'un tissu sec.
7) Ne bloquez pas les ouvertures de ventilation. Installez
l'appareil conformément aux instructions du
fabricant.
8) N'installez pas le lecteur à proximité d’une source de
chaleur de type radiateur, registre de chaleur,
cuisinière ou tout autre appareil (y compris les
récepteurs AV) générateur de chaleur.
9) Ne désactivez pas le dispositif de sécurité de la fiche
de mise à la terre ou de la fiche polarisée. Une fiche
polarisée comporte deux lames dont l’une est plus
large que l’autre. Une fiche de mise à la terre
comporte deux lames et une troisième broche de
mise à la terre. La lame la plus large et la troisième
broche sont destinées à assurer votre sécurité. Si la
fiche fournie ne s'insère pas dans la prise utilisée,
faites appel à un électricien pour faire remplacer
celle-ci.
10) Placez le cordon d'alimentation de sorte qu'il ne
puisse être ni piétiné ni pincé, particulièrement au
niveau de la fiche, de la prise de courant et du point
de sortie de l'appareil.
11) Utilisez exclusivement les fixations/ accessoires
spécifiés par le fabricant.
12) Utilisez exclusivement le meuble à
roulettes, le socle, le trépied, le
support ou la table recommandés
par le fabricant ou vendus avec
l’appareil. Si l’appareil est posé sur
un meuble à roulettes, déplacez
l’ensemble avec précaution pour
éviter de faire tomber le lecteur et de vous blesser.
13) Débranchez l’appareil en cas d'orage ou lorsqu’il est
inutilisé pendant une période prolongée.
14) Confiez toutes les réparations à un technicien
qualifié. Votre appareil doit impérativement être
réparé lorsqu’il a été endommagé de quelque
manière que ce soit : détérioration du cordon ou de
la fiche d’alimentation, projection de liquide sur
l’appareil, chute d’objets à l’intérieur de l’appareil,
exposition à la pluie ou à l’humidité,
dysfonctionnement, chute.
LICENCE
FRA
Fabriqué sous licence concédée par Dolby Laboratories.
Dolby, Dolby Atmos, Dolby Audio, Dolby Digital Plus et le
symbole du double-D sont des marques de commerce
de Dolby Laboratories.
Pour les brevets DTS, voir http://patents.dts.com.
Fabriqué sous licence de DTS Licensing Limited. DTS, le
Symbole & DTS et le Symbole ensemble sont des
marques déposées et DTS 2.0 Channel est une marque
de commerce de DTS, Inc. © DTS, Inc. Tous droits
réservés.
Les termes HDMI, High-Definition Multimedia Interface et
le logo HDMI sont des marques de commerce ou des
marques déposées de HDMI Licensing LLC aux
États-Unis ou dans d'autres pays.
3
Page 43

démarrage
3.9 inch 3.9 inch
2.7 inch
3.9 inch
PRÉCAUTIONS
po
po
po
po
Assurez-vous que l'alimentation c.a. de votre domicile satisfait aux normes inscrites sur l'étiquette d'identification
située à l'arrière du produit. Installez votre produit horizontalement, sur un socle approprié (meuble), en laissant un
espace suffisant pour la ventilation sur le pourtour 3~4 po. Faites attention à ne pas obstruer les orifices de ventilation.
Ne posez pas l'ensemble sur un amplificateur ou un autre appareil susceptible de chauffer. Cet ensemble est conçu
pour une utilisation en continu. Pour éteindre totalement l'appareil, débranchez la fiche c.a. de la prise murale.
Débranchez l'appareil si vous prévoyez une longue période d'inactivité.
En cas d'orage, débranchez la fiche de l'appareil de la
prise murale. Les surtensions occasionnées par l'orage
pourraient endommager votre appareil.
N'exposez pas l'ensemble aux rayons directs du soleil
ou à toute autre source de chaleur. Cela pourrait causer
une surchauffe du fil et causer un dysfonctionnement de
l’unité.
Protégez le produit de l'humidité (comme les vases) et
d'une chaleur excessive (comme une cheminée) ou de
tout équipement capable de créer des champs
magnétiques ou électriques. Débranchez le câble
d'alimentation en cas de dysfonctionnement. Votre
produit n'est pas prévu pour un usage industriel. Ce
produit ne peut être utilisé qu'à des fins personnelles.
Une condensation peut se former si le produit ou un
disque a été stocké à basse température. Si vous devez
transporter l'ensemble pendant l'hiver, attendez environ
2 heures que l'appareil ait atteint la température de la
pièce avant de l'utiliser.
Les piles utilisées dans ce produit peuvent contenir des
produits chimiques dangereux pour l'environnement. Ne
jetez pas les piles dans votre poubelle habituelle. Ne
vous débarrassez pas des piles en les faisant brûler. Les
piles ne doivent pas être court-circuitées, démontées ou
subir de surchauffe. Le remplacement incorrect des piles
peut entraîner un danger d'explosion. Remplacez-les
uniquement par des produits similaires ou équivalents.
Page 44

démARRAge
DOLBY ATMOS®
Ce produit prend en charge Dolby Atmos®.
* Qu’entend-on par Dolby Atmos®?
La technologie Atmos améliore le système sonore ambiophonique 5.1 existant en ajoutant un haut-parleur placé
au-dessus de la tête. Celui-ci enveloppe l'auditeur avec un son à 360 degrés, pour une expérience immersive, haute
définition, enrichie, détaillée et approfondie. Reportez-vous à la page 25 pour découvrir comment connecter le
système.
FRA
5
Page 45

démarrage
SOMMAIRE
2 DÉMARRAGE
2 Informations relatives à la sécurité
5 Dolby Atmos®
7 Contenu
8 DESCRIPTIONS
8 Façade avant/droite
9 Façade bas
10 Télécommande
15 INSTALLATION
15 Installation du Soundbar
15 Installation de la fixation murale
18 Retrait du Soundbar du mur
19 Installation des haut-parleurs
ambiophoniques sur un mur
20 BRANCHEMENTS
20 Raccordement du caisson des basses
et des enceintes d'ambiance
23 Connexion à un téléviseur
23 Connexions à l’aide d’un câble TV HDMI
(numérique)
24 Connexion à un téléviseur à l'aide d'un câble
optique numérique
25 Connexion avec un périphérique
externe
25 Connexion des appareils pour utiliser Dolby
Atmos®
26 Câble HDMI
27 Câble audio optique ou analogique
28 FONCTIONS
28 Mode entrée
29 Bluetooth
31 Utilisation de l'application Multiroom
33 Utilisation de la fonction Network
Standby On
34 Mise à jour du logiciel
36 DÉPANNAGE
36 Dépannage
37 ANNEXE
37 Spécifications
Les chiffres et les illustrations contenus dans ce
Guide d'utilisation sont fournis à titre de référence
uniquement et pourraient ne pas représenter
exactement le produit.
Page 46

démARRAge
CONTENU
AVANT DE LIRE LE MANUEL D'UTILISATION
Lisez attentivement la signification des termes suivants avant de commencer la lecture du manuel d'utilisation.
+ Icônes utilisées dans le présent manuel
Icône Terme Définition
Mise en garde
Remarque
Vérifiez que vous disposez bien des accessoires ci-dessous.
SOURCE
SOUND
LEVEL
EFFECT
VOL WOOFER
SOUNDBAR
Indique qu'une fonction ne fonctionne pas ou que des paramètres peuvent être
annulés.
Donne des conseils ou des instructions permettant d'améliorer l'utilisation de
chaque fonction.
FRA
Télécommande /
Piles (type AA)
C C
Guide du support à fixation murale
Cordon d’alimentation :
3 de chaque
CENTER LINE
C TYPE : 700mm
Adaptateur CA/CC
(pour l'unité principale)
Vis de support :
2 de chaque
Câble HDMI
Vis :
2 de chaque
Support mural :
2 de chaque
● Les accessoires pourraient légèrement différer de ceux figurant sur la photo ci-dessus.
● Pour distinguer le haut-parleur ambiophonique gauche du droit, regardez l'étiquette à l'arrière de chaque
haut-parleur.
● Selon votre zone géographique, la prise CA peut avoir différents aspects et peut être fournie avec
l'adaptateur intégré.
7
Page 47

descriptions
descriptions
FAÇADE AVANT/DROITE
1
Touche
Permet de régler le volume.
La valeur numérique du volume sonore s’affiche sur le panneau
avant.
/
(Volume)
2 Touche (Source)
Sélection des entrées D.IN, AUX, HDMI1, HDMI2, BT.
● Pour activer le mode BT PAIRING maintenez ce bouton enfoncé
en mode BT.
3 Touche (Alimentation)
Permet d'allumer/d'éteindre l'ensemble Soundbar.
Côté droit
1
Écran d’affichage
Affichent le mode actuel.
● Lorsque vous branchez le cordon c.a., la touche de mise en fonction s’activera dans un délai de 4 à 6
secondes. Lorsque vous appuyez sur le bouton d'alimentation, un délai de 20 secondes s'écoule avant
que l'appareil émette un son.
● Lorsque vous mettez cet appareil sous tension, un délai de 4 à 5 secondes précède l'émission du son.
● Si vous souhaitez restituer le son uniquement du Soundbar, vous devez mettre les haut-parleurs du
téléviseur hors fonction dans le menu de réglage du son de votre téléviseur. Reportez-vous au manuel
fourni avec votre téléviseur.
2 3
Page 48

FAÇADE BAS
DC 19V
SERVICE
Wi-Fi SETUP SPK ADD
DIGITAL AUDIO IN
(OPTICAL)
HDMI OUT
(TV-ARC)
HDMI IN 1
HDMI IN 2
AUX IN
ÉTIQUETTE
Wi-Fi SETUP
Appuyez sur cette touche pour
brancher votre Soundbar à votre
réseau à l’aide de la configuration
Wi-Fi. (Nécessite un appareil
intelligent et l'application Samsung
Multiroom. Voir page
SPK ADD
Appuyez sur le bouton pour
connecter le Soundbar à un
Samsung HUB (vendu
séparément) ou à un réseau.
(Nécessite un appareil intelligent et
l'application Samsung Multiroom.
31.)
Voir page
● Tenez la fiche lors du débranchement du câble d’alimentation de l’adaptateur d'alimentation c.a. de la prise
murale. Ne tirez pas sur le câble.
● Ne branchez pas cet appareil ni les autres composants dans une prise c.a. tant que tous les composants
ne sont pas interconnectés.
31
descRiptions
FRA
AUX IN
Connexion jusqu'à la sortie analogique d'un périphérique externe.
DIGITAL AUDIO IN (OPTICAL)
Connexion jusqu'à la sortie numérique (optique) d'un périphérique
externe.
HDMI OUT (TV-ARC)
Transmet les signaux vidéo et audio numériques simultanément au
moyen d’un câble HDMI.
HDMI IN 1, HDMI IN 2
Reçoit les signaux vidéo et audio numériques simultanément à l’aide
d’un câble HDMI. À utiliser lors de la connexion d’un périphérique
externe pris en charge.
AUX IN
DIGITAL AUDIO IN
(OPTICAL)
HDMI OUT
(TV-ARC)
HDMI IN 1
Wi-Fi SETUP SPK ADD
HDMI IN 2
.)
DC 19V
(Entrée
d’alimentation)
Branchez l'adaptateur CA/CC
au port d'alimentation de
l'appareil et à une prise
murale.
DC 19V
SERVICE
SERVICE
Port micro USB. Permet la mise à
niveau du logiciel du produit.
Requiert un adaptateur USB (vendu
séparément). Voir page 34.
9
Page 49

descriptions
TÉLÉCOMMANDE
Alimentation
Permet d'allumer/d'éteindre l'ensemble Soundbar.
Son ambiophonique ajoute de la profondeur et une dimension spacieuse au
son. Appuyer sur le bouton
ON - SURROUND SOUND, OFF - SURROUND SOUND
• ACTIVÉ: Diffuse le son à travers tous les haut-parleurs.
• DÉSACTIVÉ: Diffuse le son à travers le canal source d'origine.
Appuyez sur la zone indiquée pour sélectionner Haut/Bas/Gauche/Droite.
Appuyez sur Haut/Bas/Gauche/Droite sur le bouton pour sélectionner ou
Vous pouvez également activer la fonction WIFI SETUP en appuyant sur le
bouton Haut de la télécommande pendant plus de 5 secondes.
Vous pouvez aussi activer la fonction SPK ADD du Soundbar en appuyant
sur le bouton Bas de la télécommande pendant plus de 5 secondes.
Appuyez sur le bouton Droite pour sélectionner le morceau suivant;
appuyez sur le bouton Gauche pour sélectionner le morceau précédent.
Appuyez sur le bouton Droite et maintenez-le enfoncé pendant environ
5 secondes pour activer ou désactiver la fonction Anynet+.
La fonction Anynet+ vous permet de contrôler le Soundbar avec la
télécommande d'un téléviseur Samsung compatible Anynet+.
Le Soundbar doit être connecté au téléviseur via un câble HDMI.
Appuyez sur le bouton Gauche et maintenez-le enfoncé pendant environ
5 secondes pour activer ou désactiver la fonction Auto Power Link.
(Défaut :
Synchronise le Soundbar avec une source optique branchée par une prise
optique pour qu’il s’allume automatiquement lorsque vous allumez le
téléviseur. (Voir page 24) La fonction Auto Power Link est uniquement
Vous pouvez sélectionner 6 modes sonores différents -
STANDARD (Son Original), MUSIC, CLEAR VOICE, SPORTS, MOVIE
et NIGHT - selon le type de sources que vous désirez écouter.
Sélectionnez le mode STANDARD si vous souhaitez bénéficier du son original.
Vous permet d'appliquer la commande de portée dynamique aux pistes
Appuyez sur le bouton EFFECT et maintenez-le enfoncé pendant environ
5 secondes en mode Veille pour sélectionner la fonction ON – DRC ou
SOUND
parcourir les paramètres Son ambiophonique :
(Défaut : ON - ANYNET+ ou OFF - ANYNET+)
OFF - POWER LINK
à plusieurs reprises permet de
Haut/Bas/Gauche/Droite
régler des fonctions.
Avancement musique
ou
ON - POWER LINK)
disponible dans le mode D.IN.
* DRC (Dynamic Range Control)
SOUND
Anynet+
Auto Power Link
EFFECT
Dolby Digital.
OFF – DRC.
SOUND
EFFECT
VOL WOOFER
SOURCE
LEVEL
● Faites fonctionner le téléviseur au moyen de sa télécommande.
Page 50

SOUND
EFFECT
SOURCE
LEVEL
descRiptions
SOURCE
Appuyez pour sélectionner une source branchée au Soundbar.
* Mode BT PAIRING
Pour activer le mode BT PAIRING de la fonction Bluetooth, appuyez sur le
bouton SOURCE et maintenez-la enfoncée pendant plus de 5 secondes.
Lecture/Pause (BT / WIFI)
Appuyez sur le bouton p pour mettre temporairement un morceau en pause.
Appuyez à nouveau sur le bouton
LEVEL
Le Soundbar ATMOS est un système audio 5.1.4. Utilisez ce bouton pour
régler le volume sur chaque haut-parleur. Appuyez sur ce bouton, utilisez les
boutons Gauche/Droite pour sélectionner un haut-parleur, puis utilisez les
boutons Haut/Bas pour augmenter ou réduire le niveau sonore (volume).
p
pour lire le morceau sélectionné.
FTRFTL
FL FR
STL
C
Unité principale
STR
FRA
VOL WOOFER
SL
Haut-parleur
ambiophonique G
Haut-parleur
Avant gauche FL
Avant gauche supérieur FTL
Unité principale
Haut-parleur
ambiophonique G
Haut-parleur
ambiophonique D
* Activer/Désactiver Network Standby
Appuyez sur le bouton LEVEL et maintenez-le enfoncé pendant environ
5 secondes pour activer ou désactiver la fonction Network Standby
(voir page 33).
Centre C
Avant droit FR
Avant droit supérieur FTR
Ambiophonique gauche SL
Ambiophonique bord
supérieur gauche
Ambiophonique droit SR
Ambiophonique bord
supérieur droit
Affiché sur le voyant lors
du réglage du volume
SR
Haut-parleur
ambiophonique D
STL
STR
11
Page 51

descriptions
EFFECT
LEVEL
VOL
WOOFER
SOUNDBAR
EFFECT
LEVEL
VOL
WOOFER
SOUNDBAR
LEVEL
WOOFER
EFFECT
LEVEL
WOOFER
EFFECT
LEVEL
VOL
WOOFER
SOUNDBAR
LEVEL
WOOFER
LEVEL
WOOFER
SOUNDBAR
EFFECT
LEVEL
VOL
WOOFER
SOUNDBAR
LEVEL
WOOFER
SOUND
SOURCE
(Réglage Sonore)
Appuyez pour sélectionner TREBLE, BASS ou AUDIO SYNC. Utilisez
ensuite les touches Haut/Bas pour régler le volume TREBLE et BASS de
-3 ~ +3. Appuyez sur la touche
(Réglage Sonore) et maintenez-la
enfoncée pendant environ 5 secondes pour régler le son de chaque bande
de fréquence. Fréquences disponibles : 150 Hz, 300 Hz, 600 Hz, 1,2 KHz,
2,5 KHz, 5 KHz et 10 KHz (Gauche/Droite), avec un réglage de -6 à +6
(Haut/Bas).
Si le Soundbar est branché à un téléviseur numérique et que la
vidéo semble désynchronisée par rapport au son, appuyez sur les touches
(Réglage Sonore)
touches Haut/Bas pour configurer le délai audio entre 0 ms ~ 300 ms.
pour synchroniser le son et l’image. Utilisez les
En mode BT, la fonction Audio Sync peut ne pas être disponible.
WOOFER
Appuyez sur le bouton haut ou bas pour régler le volume du caisson de
basses de -12 de -6 à +6.
Si vous appuyez sur le bouton, le volume du caisson des basses passe à 0.
EFFECT
LEVEL
EFFECT
VOL
EFFECT
Appuyez sur le bouton haut ou bas pour régler le volume.
Sourdine
VOL WOOFER
Appuyez sur le bouton VOL pour mettre en sourdine. Appuyez une nouvelle
fois pour remettre le son.
EFFECT
VOL
EFFECT
+ Contrôle du volume du Soundbar à l'aide de la télécommande de votre
téléviseur
1. Appuyez sur la touche SOUND et maintenez-la enfoncée pendant plus de 5 secondes pendant que le
Soundbar est allumé.
2. « ON - TV REMOTE » apparaît sur l'écran du Soundbar.
3. Dans le menu du téléviseur, réglez le haut-parleur sur « externe ».
● Non disponible en modes TV ARC, BT, HDMI1 et HDMI2. (Disponible uniquement en modes D.IN
(optique) et AUX)
● Sur la télécommande du téléviseur, seuls les boutons de réglage du volume et de mise en sourdine sont
actifs. Les autres boutons sont désactivés.
● Les menus diffèrent selon le fabricant et le modèle du téléviseur. Pour plus de renseignements, reportez-
vous au guide d'utilisation du téléviseur.
● Fabricants qui utilisent cette fonction :
- VIZIO, LG, Sony, Sharp, PHILIPS, PANASONIC, TOSHIBA, GRUNDIG, Hisense, RCA
- Cette fonction peut ne pas être compatible avec la télécommande de votre téléviseur selon son
fabricant.
● Pour désactiver cette fonction, appuyez sur le bouton
« OFF - TV REMOTE » apparaît sur l'écran du Soundbar.
SOUND pendant cinq secondes.
VOL
Page 52

descRiptions
INSERTION DES PILES (2 PILES AA)
Faites glisser le couvercle des piles dans le sens de la flèche jusqu'à ce qu'il soit complètement retiré.
Insérez 2 piles AA (1,5 V) en vérifiant les polarités +/-. Faites glisser le couvercle dans sa position fermée.
UTILISATION DES BOUTONS MASQUÉS
Bouton masqué
Bouton de la
télécommande
SOUND
SOURCE
p
(Lecture/Pause)
VOL
Haut
Bas
Haut
Droite
(Réglage Sonore)
EFFECT
LEVEL
Fonction
Activer/Désactiver la fonction
Télécommande de votre téléviseur
Appariement BT P
Activer/Désactiver la fonction
Auto Power Down (mode AUX)
ID SET P
WIFI SETUP P
ADD SPEAKER P
Activer/Désactiver la fonction Auto Power Link P
Activer/Désactiver la fonction Anynet+ P
EQ 7 bandes P
Activer/Désactiver la DRC P
Activer/Désactiver la fonction Network Standby P
Page de référence
age 12
P
age 29
P
age 28
age 21
age 10
age 10
age 24
age 10
age 12
age 10
age 33
FRA
13
Page 53

descriptions
SOURCE
SOUND
SOURCE
LEVEL
SOUND
SOURCE
LEVEL
SOUND
SOURCE
LEVEL
SOUND
SOURCE
LEVEL
SOUND
SOURCE
LEVEL
SOUND
SOURCE
LEVEL
CARACTÉRISTIQUES DE SORTIE POUR LES DIFFÉRENTS
MODES DE EFFET SONORE
Entrée Effet Sortie
2 canaux
5.1.4 canaux
ON
5.1 canaux 5.1.4 canaux
2 canaux
SOUND
2.1 canaux
STANDARD
5.1 canaux 5.1 canaux
2 canaux
EFFECT
2.1 canaux
MUSIC
5.1 canaux 5.1 canaux
2 canaux
EFFECT
3.1 canaux
CLEAR VOICE
5.1 canaux 5.1 canaux
2 canaux
EFFECT
5.1.4 canaux
SPORTS
5.1 canaux 5.1.4 canaux
2 canaux
EFFECT
5.1.4 canaux
MOVIE
5.1 canaux 5.1.4 canaux
2 canaux
EFFECT
3.1 canaux
NIGHT
5.1 canaux 5.1 canaux
EFFECT
* Si la source d'entrée est Dolby Atmos®, la sortie se fait par le canal 5.1.4. Le effet sonore n'est pas disponible.
Page 54

INSTALLATION
Installation
INSTALLATION DU SOUNDBAR
INSTALLATION DE LA FIXATION MURALE
+ Précautions d’installation
● Ne procédez pas à l'installation sur un autre emplacement qu’un mur vertical.
● Pour l’installation, évitez les températures extrêmes et l’humidité ou encore un mur pas assez solide pour supporter
le poids de l’appareil.
● Vérifiez la solidité du mur. Si le mur n’est pas suffisamment solide pour supporter l’unité, renforcez-le ou installez
l’unité sur un autre mur qui peut supporter son poids.
● Achetez et utilisez des vis de fixation ou des ancrages convenant au type de mur que vous avez (plaque de plâtre
ou en fer, bois, etc.). Si cela est possible, fixez les vis de fixation dans les poteaux muraux.
● Des vis pour un montage mural doivent être achetées en fonction du type et de l’épaisseur du mur sur lequel le
Soundbar sera fixé.
- Diamètre : M5
- Longueur : une longueur de 1 3/8 po ou plus est recommandée.
● Connectez les câbles de l'appareil aux périphériques externes avant de l'installer au mur.
● Assurez-vous d’éteindre et de débrancher l’unité avant l’installation afin d’éviter tout choc électrique.
FRA
2 po ou plus
1. Placez le Guide de montage mural contre la surface du mur.
• Le Guide de montage mural doit être de niveau.
• Si le téléviseur est monté sur le mur, installez le Soundbar à une distance d’au moins 2 po sous le téléviseur.
15
Page 55

INSTALLATION
CENTER LINE
C
C B
C C
CENTER LINE
C TYPE : 700mm
Ligne centrale
2. Alignez la Ligne centrale du gabarit papier sur le centre de votre téléviseur (si vous montez le Soundbar sous ce
dernier), puis fixez le Guide de montage mural au mur avec du ruban adhésif.
● Si vous ne le montez pas sous un téléviseur, placez la Ligne centrale au centre de la zone d'installation.
C
CENTER LINE
C TYPE : 700mm
3. Poussez une pointe de stylo ou une pointe de crayon bien taillé au centre des images C-TYPE à chaque extrémité
du guide pour marquer les trous des vis de support, puis retirez le Guide de montage mural.
4. À l'aide d'un foret de taille appropriée, percez un trou dans le mur à chaque marque.
● Si les marques ne correspondent pas aux positions des montants de la cloison, veillez à insérer les
chevilles ou les chevilles Molly appropriées dans les trous avant d'insérer les vis de support. Si vous utilisez
des chevilles ou des chevilles Molly, assurez-vous que les trous que vous percez sont assez grands pour
recevoir celles-ci.
5. Poussez une vis (non fournie) dans chaque
vis de support.
Vis de support
, puis vissez fermement chaque vis dans un trou de
Page 56

INSTALLATION
6. Installez 2 Support mural dans le sens approprié à l'arrière du Soundbar, à l'aide de 2 Vis (M4 x L12).
Face arrière du Soundbar
Extrémité droite du Soundbar
FRA
● Lors du montage, assurez-vous que les pièces de suspension des Support mural sont situés à l'arrière du
Soundbar.
7. Installez le Soundbar à l'aide du Support mural en accrochant ce dernier sur les Vis de support fixées au mur.
Voir l'illustration ci-dessus.
17
Page 57

INSTALLATION
8. Faite glisser le Soundbar vers le bas comme illustré ci-dessous pour que les Support mural s'appuient fermement
sur les Vis de support.
● Faite glisser les Support mural vers le bas pour les installer sur les Vis de support.
RETRAIT DU SOUNDBAR DU MUR
1. Pour séparer le Soundbar du mur, tirez dans le sens de la flèche.
● Ne vous suspendez pas à l’unité installée et évitez de la heurter ou de l’échapper.
● Fixez fermement l’unité au mur afin qu’elle ne tombe pas. La chute de l’appareil peut provoquer des
blessures ou endommager le produit.
● Lorsque l’unité est fixée au mur, veillez à ce qu’un enfant ne tire pas sur les câbles de connexion au risque
de faire tomber l’appareil.
● Pour une performance optimale d’une installation murale d’un support, installez le système d’enceintes à
une distance d’au moins 2 po sous le téléviseur, si le téléviseur est monté sur le mur.
● Pour votresécurité, ne montez pas l’unitésur le mur. Installez-la sur une surface plane et sûre où elle est peu
susceptible de tomber.
Page 58

INSTALLATION
INSTALLATION DES HAUT-PARLEURS AMBIOPHONIQUES SUR UN MUR
Vous pouvez acheter des montages muraux séparément pour installer les haut-parleurs ambiophoniques sur un mur.
+ Considérations relatives à l'achat
● Charge admissible : Plus de 17,6 Ib (8,0 Kg)
● Taille des trous : Filet rapporté de 1/4 - 20
● Étant donné que l'installation murale est en option, vous devez acheter séparément les accessoires
correspondants.
● Il est recommandé de laisser un installateur qualifié procéder à la fixation des Supports de montage mural.
● Demandez à un professionnel d'installer le produit sur votre mur.
● Vérifiez la solidité du mur avant de procéder à la fixation des Supports de montage mural. Si le mur n'est
pas assez solide, veillez à le renforcer avant d'installer les Supports de montage mural et les haut-parleurs
sur le mur.
● Pour de plus amples informations, reportez-vous au manuel relatif au montage mural.
● Samsung Electronics ne peut être tenu responsable de tout dommage causé au produit suite à une
installation incorrecte.
● Veillez à ne pas installer les haut-parleurs latéralement ou à l'envers.
FRA
19
Page 59

branchements
Branchements
RACCORDEMENT DU CAISSON DES BASSES ET DES ENCEINTES D'AMBIANCE
● On ne doit pas brancher le cordon d'alimentation de ce produit ou de votre téléviseur dans une prise
murale à moins que toutes les connexions ne soient réalisées.
● Avant de déplacer ou installer ce produit, assurez-vous de couper l'alimentation et de débrancher le
cordon d’alimentation.
● Si l'unité principale est éteinte, le caisson des basses et l'enceinte d'ambiance sans fil passent en mode
Veille et la DEL STANDBY située à l'arrière devient rouge après avoir clignoté en bleu.
● Si vous utilisez un appareil qui utilise la même fréquence (2,4 GHz) que le Soundbar près de celui-ci,
l’inférence pourrait entraîner des interruptions du son.
● La distance maximale de transmission du signal sans fil de l'unité principale est d'environ 32,8 pi, mais
peut varier en fonction de l'environnement. Si un mur en béton armé ou une cloison métallique sépare
l'unité principale du caisson des basses ou de l'enceinte d'ambiance sans fil, le système peut ne pas
fonctionner du tout, parce que le signal sans fil ne peut pas traverser le métal.
● Des antennes de réception sans fil sont intégrées au caisson des basses et aux enceintes d'ambiance.
N'exposez pas les unités à de l'eau ou à des sources d'humidité.
● Pour des performances d'écoute optimales, assurez-vous que la zone entourant le caisson des basses et
les enceintes d'ambiance soit libre de tout obstacle.
Disposition recommandée pour les haut-parleurs
Caisson des
basses
90°
Haut-parleur
ambiophonique G
TV
Unité principale du
Soundbar
90°
110° 110°
Haut-parleur
ambiophonique D
Page 60

bRAnchements
LINK
LINK
LINK STANDBY ID SET
LINK STANDBY ID SET
LINK STANDBY ID SET
POWER
LINK STANDBY ID SET
LINK STANDBY ID SET
LINK STANDBY ID SET
CONNEXION AUTOMATIQUE
1. Branchez l'alimentation au caisson de basses et aux haut-parleurs ambiophoniques.
2. Branchez une alimentation au Soundbar, puis appuyez sur le bouton
Soundbar.
3. Le caisson de basses et les haut-parleurs ambiophoniques se connectent automatiquement au Soundbar.
4. Lorsque la synchronisation est effectuée, les voyants bleus à l'arrière du caisson de basses et des haut-parleurs
ambiophoniques s'allument.
● Si le voyant rouge s'allume ou si le voyant bleu clignote à l'arrière du caisson de basses ou des haut-
parleurs ambiophoniques, la synchronisation a échoué. Si cela se produit, connectez chacun des
haut-parleurs manuellement.
● Vous pouvez bénéficier d'une meilleure qualité de son du caisson des basses sans fil en sélectionnant un
effet sonore (voir page 10.)
● Important : avant de commencer, placez les piles dans la télécommande. Voir la page 13 pour les instructions.
POWER
LINK STANDBY ID SET
de la télécommande ou sur le côté droit du
LINK STANDBY ID SET
FRA
Arrière du caisson
de basses
Arrière du haut-parleur
ambiophonique
BRANCHEZ MANUELLEMENT LE CAISSON DE BASSES ET
LES HAUT-PARLEURS AMBIOPHONIQUES SI LA CONNEXION
AUTOMATIQUE ÉCHOUE
+ Avant de commencer
● Vérifiez que le Soundbar, le caisson de basses et les haut-parleurs ambiophoniques sont branchés.
● Vérifiez que le Soundbar est allumé.
1. Appuyez pendant au moins 5 secondes sur le bouton ID SET à l'arrière du caisson de basses et des haut-
parleurs. Le voyant rouge situé à l'arrière de chaque haut-parleur s'éteint et le voyant bleu clignote.
Arrière du caisson
de basses
21
Arrière des haut-parleurs
ambiophoniques gauche et droit
Page 61

branchements
LEVEL
WOOFER
2. Éteignez le Soundbar.
3. Appuyez pendant au moins 5 secondes sur le bouton VOL de la télécommande lorsque le Soundbar est éteint
(DÉSACTIVÉ).
EFFECT
VOL
4. Le message ID SET apparaît sur l'écran du Soundbar pendant un moment, puis disparaît.
ID SET
Côté droit du Soundbar
5. Lorsque le voyant bleu du caisson de basses et des haut-parleurs ambiophoniques clignote, allumez l’appareil en
appuyant sur le bouton
6. Lorsque la connexion est établie, les voyants bleus à l'arrière du caisson de basses et des haut-parleurs
ambiophoniques s'allument sans clignoter.
● Si la connexion s’établit, le voyant bleu clignote continuellement. Passez à l'étape 1 et recommencez.
, situé sur la droite de l’unité principale, ou sur la télécommande.
STATUT DU VOYANT LUMINEUX DEL SUR LE CAISSON DES
BASSES ET LES ENCEINTES AMBIOPHONIQUES
DEL Statut Description Résolution
Veille (avec l'unité principale
Soundbar éteinte)
Rouge Allumé
Echec de la connexion
Allumé
Bleu
Clignotant
Rouge et bleu Clignotant Mauvais fonctionnement Contacter le centre de service.
Connexion établie
(fonctionnement normal)
Veille (avec l'unité principale
Soundbar éteinte)
Echec de la connexion
Vérifier l'alimentation de l'unité
principale Soundbar
Connecter à nouveau (se reporter aux
instructions sur la connexion manuelle
dans le manuel d'utilisation)
-
Vérifier l'alimentation de l'unité
principale Soundbar
Connecter à nouveau (se reporter aux
instructions sur la connexion manuelle
dans le manuel d'utilisation)
Page 62

bRAnchements
DIGITAL AUDIO IN
(OPTICAL)
HDMI OUT
(TV-ARC)
AUX IN
SOUND
SOURCE
SOURCE
CONNEXION À UN TÉLÉVISEUR
● Important : avant de commencer, placez les piles dans la télécommande. Voir la page 13 pour les
instructions.
CONNEXIONS À L’AIDE D’UN CÂBLE TV HDMI (NUMÉRIQUE)
Câble HDMI
FRA
HDMI IN
AUX IN
DIGITAL AUDIO IN
(OPTICAL)
HDMI OUT
(TV-ARC)
HDMI IN 1
HDMI IN 2
Wi-Fi SETUPSPK ADD
HDMI OUT
(TV-ARC)
DC 19V
SERVICE
1. Branchez un câble HDMI de la prise HDMI OUT (TV-ARC) située à l’arrière du produit à la prise HDMI IN de votre
téléviseur.
2. Appuyez sur le bouton sur le côté droit du Soundbar ou sur le bouton SOURCE de la télécommande
pour sélectionner le mode D.IN.
● HDMI est une interface qui permet la transmission numérique de données vidéo et audio à partir d'un seul
connecteur.
● Si le téléviseur dispose d’un port SRC, branchez le câble HDMI au port HDMI IN (ARC).
● Il est recommandé d’utiliser un câble HDMI sans âme si possible. Si vous utilisez un câble HDMI sans âme,
utilisez-en un dont le diamètre est inférieur à 0,55 po.
● La fonction Anynet+ doit être activée.
● Cette fonction n'est pas accessible si le câble HDMI ne prend pas en charge l'ARC.
23
Page 63

branchements
DIGITAL AUDIO IN
(OPTICAL)
AUX IN
SOUND
SOURCE
SOURCE
CONNEXION À UN TÉLÉVISEUR À L'AIDE D'UN CÂBLE OPTIQUE NUMÉRIQUE
Câble Optique
(non fourni)
AUX IN
DIGITAL AUDIO IN
(OPTICAL)
HDMI OUT
(TV-ARC)
HDMI IN 1
Wi-Fi SETUPSPK ADD
HDMI IN 2
DIGITAL AUDIO IN
(OPTICAL)
DC 19V
SERVICE
OPTICAL OUT
1. Branchez le connecteur DIGITAL AUDIO IN (OPTICAL) (Audio) du Soundbar sur le connecteur OPTICAL OUT
du téléviseur avec un câble optique numérique (non fourni).
2. Appuyez sur le bouton
sur le côté droit du Soundbar ou sur le bouton SOURCE de la télécommande pour
sélectionner le mode D.IN.
+ Auto Power Link
Si vous avez connecté l’unité principale à un téléviseur à l'aide d'un câble optique numérique, réglez la fonction
de mise en fonction automatique à ACTIVÉ pour que le Soundbar se mette automatiquement en fonction
lorsque vous allumez le téléviseur.
1. Connectez le Soundbar et un téléviseur à l'aide d'un câble optique numérique (non fourni).
2. Appuyez sur le bouton sur le côté droit de l'unité principale ou sur le bouton SOURCE de la
télécommande pour sélectionner le mode D.IN.
3. Appuyez sur le bouton Gauche de la télécommande pendant 5 secondes pour activer ou désactiver la
fonction Auto Power Link.
● La fonction Auto Power Link est réglée sur ACTIVÉ par défaut.
● Selon le périphérique branché, la fonctionne Auto Power Link pourrait ne pas fonctionner.
● Cette fonction est uniquement disponible en mode D.IN.
Page 64

bRAnchements
DIGITAL AUDIO IN
(OPTICAL)
HDMI OUT
(TV-ARC)
DIGITAL AUDIO IN
(OPTICAL)
HDMI OUT
(TV-ARC)
HDMI IN 1
HDMI IN 2
AUX IN
SOUND
SOURCE
SOURCE
CONNEXION AVEC UN PÉRIPHÉRIQUE EXTERNE
HDMI est une interface numérique standard qui permet de connecter des appareils tels que des téléviseurs, des
projecteurs, des lecteurs de DVD, des lecteurs Blu-ray, des décodeurs et bien plus encore.
Étant donné que l’interface HDMI transmet un signal numérique de la plus haute qualité, vous pouvez profiter
d’une restitution visuelle et sonore plus précise qui se rapproche de la source numérique d’origine.
CONNEXION DES APPAREILS POUR UTILISER DOLBY ATMOS®
Ce produit prend en charge Dolby Atmos®.
● Important : Dolby Atmos® n'est disponible qu'en mode HDMI.
Câble HDMI
FRA
HDMI IN
AUX IN
DIGITAL AUDIO IN
(OPTICAL)
HDMI OUT
(TV-ARC)
HDMI IN 1
HDMI IN 2
DC 19V
Wi-Fi SETUPSPK ADD
SERVICE
Ou
Périphérique
externe
HDMI OUT
Câble HDMI
1. Branchez un câble HDMI entre le connecteur HDMI IN 1 ou HDMI IN 2 situé sous le produit et le connecteur HDMI
OUT de votre appareil numérique.
2. Appuyez sur le bouton
sur le côté droit du Soundbar ou sur le bouton SOURCE de la télécommande pour
sélectionner le mode HDMI1 ou HDMI2.
3. Le mode HDMI sélectionné s'affiche sur l'écran du Soundbar et le son est émis.
● Lorsque la fonctionnalité Dolby Atmos® est activée, le voyant bleu du côté droit du Soundbar s'allume en
continu.
25
Page 65

branchements
DIGITAL AUDIO IN
(OPTICAL)
HDMI OUT
(TV-ARC)
DIGITAL AUDIO IN
(OPTICAL)
HDMI OUT
(TV-ARC)
HDMI IN 1
HDMI IN 2
AUX IN
SOUND
SOURCE
SOURCE
4. Configuration de Dolby Atmos® sur votre lecteur BD ou autre appareil.
• Vérifiez les options de sortie audio à l'aide des paramètres du menu de votre lecteur BD ou autre appareil.
• Vérifiez que la mention Aucun encodage est sélectionnée pour le train de bits dans les options du menu audio.
Par exemple, sur un lecteur Samsung : Menu Accueil Paramètres Son
Sortie numérique: Sélectionnez Train de bits (non traité).
• Si les options incluent une sortie audio secondaire, vérifiez qu'elle est désactivée.
● Dolby Atmos® fonctionne uniquement en mode HDMI. Cette fonctionnalité n'est pas compatible avec les
autres sources en entrée.
● Dolby Atmos® fonctionne uniquement sur les canaux 5.1.4.
● Assurez-vous que le contenu prend en charge Dolby Atmos®.
CÂBLE HDMI
Câble HDMI
HDMI IN
AUX IN
DIGITAL AUDIO IN
(OPTICAL)
HDMI OUT
(TV-ARC)
HDMI IN 1
HDMI IN 2
DC 19V
Wi-Fi SETUPSPK ADD
SERVICE
Ou
Périphérique
externe
HDMI OUT
Câble HDMI
1. Branchez un câble HDMI entre le connecteur HDMI IN 1 ou HDMI IN 2 situé sous le produit et le connecteur HDMI
OUT de votre appareil numérique.
2. Appuyez sur le bouton
sur le côté droit du Soundbar ou sur le bouton SOURCE de la télécommande pour
sélectionner le mode HDMI1 ou HDMI2.
3. Le mode HDMI sélectionné s'affiche sur l'écran du Soundbar et le son est émis.
Page 66

bRAnchements
DIGITAL AUDIO IN
(OPTICAL)
AUX IN
SOUND
SOURCE
SOURCE
CÂBLE AUDIO OPTIQUE OU ANALOGIQUE
Cet appareil est équipé d'un connecteur d'entrée optique numérique et d'un connecteur d'entrée audio
analogique (AUX), vous offrant ainsi deux méthodes de connexion à des appareils externes.
Câble Optique
(non fourni)
FRA
DIGITAL AUDIO IN
(OPTICAL)
Lecteur BD/ DVD/
OPTICAL OUT
Câble Audio
(non fourni)
Boîtier décodeur/
Console de jeu
AUX OUT
AUX IN
DIGITAL AUDIO IN
(OPTICAL)
HDMI OUT
(TV-ARC)
HDMI IN 1
Wi-Fi SETUPSPK ADD
HDMI IN 2
AUX IN
DC 19V
SERVICE
+ Câble AUX
1. Branchez le connecteur AUX IN (Audio) de l'unité principale sur le connecteur AUDIO OUT de l'appareil source à
l'aide d'un câble audio.
2. Appuyez sur le bouton
sur le côté droit du Soundbar ou sur le bouton SOURCE de la télécommande pour
sélectionner le mode AUX.
+ Câble Optique
1. Branchez le connecteur DIGITAL AUDIO IN (OPTICAL) (Audio) de l'unité principale sur le connecteur OPTICAL
OUT de l'appareil source à l'aide d'un câble optique numérique.
2. Appuyez sur le bouton
sélectionner le mode D.IN.
sur le côté droit du Soundbar ou sur le bouton SOURCE de la télécommande pour
27
Page 67

fonctions
SOUND
SOURCE
SOURCE
fonctions
MODE ENTRÉE
Appuyez sur le bouton sur le côté droit de l'unité principale ou sur le bouton SOURCE de la télécommande
pour sélectionner le mode de votre choix.
Extrémité droite du Soundbar
Mode d'entrée Écran d’affichage
Entrée Optique
Entrée ARC (HDMI OUT)
D.IN
Entrée AUX
Entrée HDMI HDMI1, HDMI2
Mode BLUETOOTH
AUX
BT
FONCTION AUTO POwER DOwN
L'appareil s'éteint automatiquement dans les conditions suivantes:
● Mode D.IN/BT
- Si aucun signal audio n’est reçu pendant 5 minutes.
● Mode HDMI1 / HDMI2
- Si aucun signal audio n’est reçu pendant 15 minutes.
● Mode AUX
- Si le câble AUX audio n’est pas branché pendant 5 minutes.
- Si aucune CLÉ n’est entrée pendant 8 heures lorsque le câble AUX est branché. (Vous pouvez désactiver la
fonction Auto Power Down uniquement dans ce cas.)
Pour désactiver la fonction Auto Power Down, vérifiez que vous êtes en mode AUX, puis appuyez sur le bouton p et
maintenez-le enfoncé pendant 5 secondes.
à l’écran.
ON - AUTO POwER DOwN / OFF - AUTO POwER DOwN apparaît
Page 68

Fonctions
BLUETOOTH
Vous pouvez utiliser un dispositif BlueBooth connecté au Soundbar pour écouter de la musique en son stéréo de
haute qualité, tout cela sans fil!
CONNEXION DU SYSTÈME SOUNDBAR AU PÉRIPHÉRIQUE
BLUETOOTH
Vérifiez si le périphérique Bluetooth prend en charge la fonction de casque d'écoute stéréo compatible Bluetooth.
Connexion
Périphérique Bluetooth
FRA
1. Appuyez sur le bouton
sélectionner le mode BT.
• Le message BT READY ou BT PAIRING apparaît sur l'écran avant du Soundbar.
2. Sélectionnez le menu Bluetooth sur le périphérique Bluetooth que vous souhaitez connecter.
(Reportez-vous au manuel d'utilisation du périphérique Bluetooth)
3. Sélectionnez "[AV] Samsung Soundbar Kxxx" dans la liste.
• Lorsque Soundbar est branché au dispositif Bluetooth, il affiche [Nom du dispositif Bluetooth]
face avant.
• Le nom du dispositif peut seulement apparaître en anglais. Un trait de soulignement " _ " s’affichera si le nom
n’est pas en anglais.
• Si l'appairage du périphérique Bluetooth et du Soundbar échoue, supprimez la précédente entrée
"[AV] Samsung Soundbar Kxxx" détectée par le dispositif Bluetooth, passez en mode BT PAIRING en
maintenant enfoncé le bouton
télécommande, puis cherchez de nouveau le Soundbar à l'aide du périphérique Bluetooth.
4. Écoutez de la musique sur le périphérique connecté.
• Vous pouvez écouter de la musique provenant du périphérique Bluetooth sur le système Soundbar.
• En mode BT, les fonctions Lire/Pause/Suivant/Précédent ne sont pas accessibles. Ces fonctions seront par
contre accessibles pour les dispositifs Bluetooth prenant en charge le profil AVRCP.
● Si l’on vous demande le code NIP lors de la connexion à un dispositif Bluetooth, entrez <0000>.
● On ne peut apparier qu'un seul périphérique Bluetooth à la fois.
● La connexion Bluetooth sera coupée lors de la mise hors fonction de Soundbar.
● Le Soundbar pourrait ne pas être compatible avec les fonctions de recherche ou de connexion Bluetooth
dans les cas suivants :
- Si un puissant champ électrique est émis autour du système Soundbar.
- Si plusieurs périphériques Bluetooth sont appariés simultanément avec le système Soundbar.
- Si le périphérique Bluetooth est éteint, situé au mauvais endroit ou ne fonctionne pas bien.
● Prenez note que certains appareils tels que fours à micro-ondes, adaptateurs de réseau sans fil, lampes
fluorescentes et cuisinières à gaz utilisent la même bande de fréquences que le périphérique Bluetooth,
d'où un risque de brouillage.
sur le côté droit de l'appareil ou sur le bouton SOURCE de la télécommande pour
situé sur le côté droit de l'appareil ou le bouton SOURCE de la
29
BT sur la
Page 69

fonctions
● Le Soundbar prend en charge les données SBC (44,1kHz, 48kHz).
● La connexion est possible uniquement sur un périphérique Bluetooth compatible avec la fonction A2DP (AV).
● Vous ne pouvez pas brancher le Soundbar à un dispositif Bluetooth qui prend seulement en charge la
fonction HF (Hands Free).
● Une fois l'appariement du Soundbar avec un périphérique Bluetooth réalisé, la sélection de
"[AV] Samsung Soundbar Kxxx" dans la liste des périphériques numérisés de l'appareil fera
automatiquement passer le Soundbar en mode BT.
- Accessible seulement si le Soundbar est énuméré dans la liste des dispositifs Bluetooth appariés.
(Le dispositif Bluetooth et le Soundbar doivent avoir été appariés précédemment au moins une fois.)
● Soundbar apparaîtra dans la liste des appareils recherchés du dispositif Bluetooth seulement si le
Soundbar affiche la mention BT PAIRING.
DÉCONNEXION DU PÉRIPHÉRIQUE BLUETOOTH À PARTIR
DU SYSTÈME SOUNDBAR
Vous pouvez déconnecter le périphérique Bluetooth à partir du système Soundbar. Pour des directives, consultez le
manuel d'utilisation du périphérique Bluetooth.
● Le système Soundbar sera déconnecté.
● Lorsque le système Soundbar est déconnecté du périphérique Bluetooth, Soundbar affiche le message
BT DISCONNECTED sur le panneau avant.
DÉCONNEXION DU SYSTÈME SOUNDBAR À PARTIR DU
PÉRIPHÉRIQUE BLUETOOTH
Appuyez sur le bouton SOURCE de la télécommande ou sur le bouton sur le côté droit du produit pour basculer
entre BT et un autre mode ou éteindre le Soundbar.
● Le périphérique Bluetooth connecté attendra pendant un certain temps une réponse du système Soundbar avant
de mettre fin à la connexion. (Le temps de déconnexion peut varier selon le périphérique Bluetooth)
● En mode de connexion Bluetooth, la connexion Bluetooth sera perdue si la distance entre Soundbar et
l'appareil dépasse 32,8 pi.
● Le périphérique s'éteint automatiquement au bout de 5 minutes dans l'état Prêt.
+ Davantage d’information sur la technologie Bluetooth
Bluetooth est une technologie facilitant l'interconnexion d'appareils compatibles Bluetooth via une connexion sans fil à
faible distance.
● Un appareil Bluetooth peut engendrer des bruits ou un dysfonctionnement selon les conditions d’utilisation:
- Si une partie du corps est en contact avec le système de réception/transmission du périphérique Bluetooth ou
du système Soundbar.
- Variations électriques dues à un brouillage du signal par un mur, un coin ou une cloison de bureau.
- Interférences électriques causées par des appareils fonctionnant sur la même bande de fréquence, notamment
équipements médicaux, fours à micro-ondes et réseaux locaux sans fil.
● Maintenez la distance la plus courte possible lorsque vous jumelez le système Soundbar avec le périphérique
Bluetooth.
● La qualité diminue parallèlement à la distance entre le système Soundbar et le périphérique Bluetooth.
Si la distance excède la portée opérationnelle du périphérique Bluetooth, la connexion est perdue.
● La connexion Bluetooth peut s'avérer déficiente dans les zones à faible réception.
● La connexion Bluetooth ne fonctionne que lorsque l'appareil concerné est à proximité de l’unité. La connexion sera
automatiquement interrompue si la distance excède la portée. Même dans les limites de cette portée, des
obstacles tels que des murs ou des portes peuvent dégrader la qualité sonore.
● Le fonctionnement de ce périphérique sans fil peut engendrer un brouillage électrique.
Page 70

Fonctions
UTILISATION DE L'APPLICATION MULTIROOM
L'application Samsung Multiroom vous permet de connecter le Soundbar à un appareil intelligent, à votre réseau et à
Internet. Lorsque le Soundbar est relié à un appareil intelligent sur lequel l'application Multiroom est installée, vous
pouvez également connecter sans fil le Soundbar et plusieurs appareils Samsung Multiroom et lire du contenu audio
par leur intermédiaire.
AVANT DE COMMENCER
+ Principes de Communication
Appareil intelligent :
Androïde ou iOS
(Contrôle de
l’application)
Internet Routeur sans fil
Conditions requises :
1. Un routeur sans fil et un appareil intelligent.
2. Le routeur sans fil doit être connecté à Internet.
3. L’appareil intelligent doit être connecté au routeur par une connexion Wi-Fi.
FRA
INSTALLATION DE L’APPLICATION SAMSUNG MULTIROOM
Pour utiliser le Soundbar avec l'application Samsung Multiroom, téléchargez et installez l'application Samsung
Multiroom sur votre appareil intelligent. Vous pouvez télécharger l'application sur Google Play ou sur l'App Store.
Lorsque l'application Samsung Multiroom est installée, vous pouvez lire sur votre Soundbar la musique stockée sur
votre appareil intelligent, située sur d'autres appareils connectés, fournie par d'autres fournisseurs de contenu ou
diffusée sur des stations de radio Internet.
+ Androïde ou iOS
Téléchargez l'application Samsung Multiroom de Google Play ou du App Store de votre appareil intelligent.
* Recherche dans Market : Samsung Multiroom
ou
31
Page 71

fonctions
+ Lancement de l'application Samsung Multiroom
Pour lancer l'application Samsung Multiroom, appuyez sur l'icône de l'application Multiroom de votre appareil
intelligent.
CONNEXION DU SOUNDBAR À VOTRE RÉSEAU
Sur votre appareil intelligent, sélectionnez l’application Samsung Multiroom. Suivez les directives apparaissant à l’écran
de l’appareil intelligent.
Vous pouvez les fonctions suivantes avec l’application Samsung Multiroom.
- Vous pouvez écouter des fichiers musicaux sur votre téléphone mobile, des sources musicales variées et la radio
Internet.
[AV] Samsung Soundbar Kxxx
Contenu musical dans
mon téléphone mobile
Radio Internet Service musical
Page 72

Fonctions
UTILISATION DE LA FONCTION NETWORK STANDBY ON
Pour que la fonction Network Standby On devienne disponible si la connexion sans fil a été correctement établie entre
l’appareil intelligent et le Soundbar. Cette fonction active automatiquement le Soundbar si un appareil intelligent essaie
de se connecter au Soundbar par Bluetooth ou Wi-Fi. Si le Soundbar a été mis hors fonction par l’entremise d’une
connexion Bluetooth, son mode d’entrée se met automatiquement à BT. Pour activer le Soundbar via Wi-Fi,
l'application Samsung Multiroom doit être installée sur votre appareil intelligent.
1. Branchez l’appareil intelligent à votre Soundbar.
2. Activez la fonction Network Standby On en appuyant sur la touche LEVEL de la télécommande Soundbar pour
plus que 5 secondes. Vous pouvez désactiver la fonction en appuyant de nouveau sur la touche LEVEL pendant
plus que 5 secondes.
● La fonction Network Standby On est uniquement disponible si le Soundbar fait partie des dispositifs
appariés à l'appareil intelligent. (L'appareil intelligent et le Soundbar doivent avoir été appariés au moins
une fois précédemment.)
● Soundbar apparaîtra dans la liste des appareils intelligents recherchés seulement si le Soundbar affiche
[BT READY] ou [WiFi READY].
● Si la fonction Network Standby On ne fonctionne pas
- La fonction Network Standby On est définie sur Désactivée. Définissez-la sur ACTIVÉE.
● La connexion Wi-Fi au Soundbar sera interrompue si le cordon d’alimentation a été débranché ou si
l’alimentation a été coupée. Allumez le Soundbar et reconnectez-vous.
FRA
33
Page 73

fonctions
DC 19V
SERVICE
MISE À JOUR DU LOGICIEL
AUX IN
DIGITAL AUDIO IN
(OPTICAL)
HDMI OUT
(TV-ARC)
HDMI IN 1
Wi-Fi SETUPSPK ADD
HDMI IN 2
MISE À JOUR PAR USB
Samsung pourrait offrir des mises à jour pour le micrologiciel du système Soundbar dans le futur.
Si une mise à jour est offerte, vous pouvez l’intégrer au micrologiciel en connectant un périphérique USB contenant la
mise à jour du micrologiciel dans le port USB du Soundbar.
Notez qu’il y a plusieurs mises à jour de fichiers. Vous devez les télécharger séparément sur un périphérique USB et
les utiliser une à la fois pour mettre le micrologiciel à jour un fichier à la fois.
Veuillez visiter Samsung.com ou communiquez avec le centre d’appels Samsung pour recevoir plus d’information
concernant le téléchargement de fichiers de mise à jour.
DC 19V
SERVICE
Câble adaptateur
Micro USB-USB
(non fourni)
+ Procédure de mise à jour
1. Connectez un câble adaptateur Micro USB-USB doté d'un connecteur Micro USB-USB 2.0 (type B) à une extrémité
et d'un connecteur USB 2.0 femelle standard (type A) à l'autre sur le connecteur Micro USB de votre Soundbar.
● Le câble adaptateur Micro USB-USB est vendu séparément. Pour l'acheter, contactez un Centre de
service Samsung ou le service clientèle Samsung.
2. Suivez les étapes ci-dessous pour télécharger le logiciel du produit :
Allez sur le site Web de Samsung (samsung.com/sec), recherchez le nom du modèle, puis sélectionnez l'option de
soutien client (le nom de l'option peut changer).
3. Enregistrez le logiciel téléchargé sur une clé USB et sélectionnez "Extraire dans le nom de dossier" pour
décompresser le dossier.
4. Éteignez le Soundbar et branchez la clé USB contenant la mise à jour du logiciel au port femelle sur un câble
adaptateur USB micro.
5. Allumez le Soundbar. Dans les 3 minutes, UPDATE apparaît et la mise à jour commence.
6. Lorsque la mise à jour est terminée, le Soundbar s'éteint et se rallume automatiquement.
● Si la source d'entrée a changé après une mise à jour ou un rebranchement du câble d'alimentation,
réglez-la sur TV ou sur la source de votre choix.
Page 74

Fonctions
+ Si la UPDATE ne s'affiche pas
1. Éteignez le Soundbar, branchez le périphérique de stockage USB qui contient les fichiers de mise à jour au port
USB du Soundbar.
2. Débranchez le cordon d’alimentation, reconnectez-le puis mettez l’appareil sous tension.
● Insérez un périphérique USB contenant la mise à niveau du micrologiciel dans le port USB de l’unité
principale.
● La mise à jour du micrologiciel pourrait ne pas fonctionner correctement si les fichiers audio pris en charge
sont stockés dans le périphérique de stockage USB.
● Ne débranchez pas le courant et ne retirez pas le périphérique USB pendant l’exécution des mises à jour.
L’unité principale s'éteindra automatiquement après la fin du processus de mise à jour.
● Une fois la mise à jour terminée, la configuration de l'utilisateur est initialisée dans le Soundbar. Nous vous
recommandons de prendre note de vos paramètres pour pouvoir facilement les redéfinir après la fin de la
mise à jour. Veuillez noter que la mise à jour du micrologiciel réinitialise aussi la connexion du caisson des
basses. Si la connexion au caisson des basses n’est pas réétablie automatiquement après la mise à jour,
reportez-vous à la page 20. Si la mise à jour du logiciel échoue, vérifiez que la clé USB n'est pas
défectueuse.
● Les utilisateurs Mac OS doivent utiliser MS-DOS (FAT) comme format USB.
● Tout dépendant du fabricant, le USB pourrait ne pas être compatible.
MISE À JOUR AUTOMATIQUE
Même si le Soundbar est éteint, le Soundbar vérifiera automatiquement la présence de la version logicielle la plus
récente et continuera d'effectuer la mise à jour s'il est branché à Internet.
● Par défaut, le Soundbar est configuré pour exécuter automatiquement une mise à jour.
● Pour utiliser la fonction de mise à jour automatique, le Soundbar doit être connecté à Internet.
● La connexion Wi-Fi au Soundbar sera interrompue si le cordon d’alimentation a été débranché ou si
l’alimentation a été coupée. Si l'alimentation est coupée, mettez le Soundbar sous tension et reconnectez-le.
FRA
35
Page 75

Dépannage
Dépannage
DÉPANNAGE
Avant de contacter l'assistance, veuillez lire ce qui suit.
L'ensemble ne s'allume pas.
• Le cordon d'alimentation est-il branché dans la
prise?
La fonction ne s'active pas lorsque vous appuyez sur le bouton correspondant.
• L'air est-il chargé en électricité statique? ¼ Débranchez la fiche d'alimentation électrique et
Aucun son n'est émis.
• La fonction Mise en sourdine est-elle activée?
• Le volume est-il réglé au minimum?
La télécommande ne fonctionne pas.
• Les piles sont-elles usées?
• La distance entre la télécommande et l'unité
principale est-elle trop importante?
Le voyant DEL sur le caisson des basses clignote et le caisson des basses ne produit aucun son.
• Votre caisson des basses pourrait ne pas être
connecté au boîtier principal du produit.
Le caisson de basse bourdonne et vibre beaucoup.
• Essayez d’ajuster la vibration de votre caisson des
basses.
¼ Branchez la fiche d'alimentation électrique dans la
prise murale.
rebranchez-la.
¼ Appuyez sur la touche VOL pour désactiver la
fonction.
¼ Pour régler le Volume.
¼ Remplacez-les.
¼ Rapprochez-vous de l’unité.
¼ Essayez de connecter de nouveau votre caisson des
basses. (Voir page 20)
¼ Appuyez sur le bouton WOOFER de votre
télécommande vers le haut ou vers le bas pour ajuster
sa valeur (entre -12, -6 ~ +6).
Page 76

annexe
SPÉCIFICATIONS
Unité Principale
Annexe
FRA
14,8 lbs (6,7 kg)
Poids
GÉNÉRAL
Dimensions
(L x H x P)
Plage de températures en fonctionnement
Plage d'humidité en fonctionnement
HDMI Video
AMPLIFICATEUR
* La conception, les spécifications techniques et l’écran Application sont susceptibles d'être modifiés sans préavis.
* Caractéristiques nominales
- Samsung Electronics Co., Ltd se réserve le droit de modifier les caractéristiques sans préavis.
- Le poids et les dimensions sont approximatifs.
- Pour obtenir de l'information sur la source d'alimentation et la consommation électrique, veuillez vous reporter
à l'étiquette apposée sur le produit. (Étiquette : Dessous d’une unité principale)
Puissance de
sortie
nominale
Caisson des basses
(PS-KW1-2)
Haut-parleur ambiophonique
(PS-KS2-1 (G), PS-KS2-2 (D))
Unité Principale
Caisson des basses
(PS-KW1-2)
Haut-parleur ambiophonique
(PS-KS2-1 (G), PS-KS2-2 (D))
Unité Principale
Caisson des basses
(PS-KW1-2)
Haut-parleur ambiophonique
(PS-KS2-1 (G), PS-KS2-2 (D))
21,2 lbs (9,6 kg)
4,4 lbs (2,0 kg)
47,6 x 3,2 x 5,2 po
(1210,2 x 81,7 x 131,4 mm)
8,0 x 15,7 x 16,3 po
(203,9 x 399,0 x 414,3 mm)
4,7 x 8,3 x 5,6 po
(120,2 × 210,9 × 141,0 mm)
+41 °F à +95 °F (+5 °C à +35 °C)
10 % à 75 %
1080p,1080i, 720p, 576p, 480p
2160p@24/25/30Hz 4:4:4
2160p@60/50Hz 4:2:0
≦
18W x 11, 4 OHM, THD
162W, 3 OHM, THD
35W x 4, 4 OHM, THD
10%
≦
10%
≦
10%
a Avis de licences libres
- Pour de plus amples renseignements sur les licences libres utilisées pour ce produit, veuillez visiter le site
Web : http://opensource.samsung.com
a
- Le logiciel Spotify est assujetti à des licences de tiers que vous trouverez ici :
www.spotify.com/connect/third-party-licenses.
- Pour en savoir plus sur Spotify Connect, veuillez visiter www.spotify.com/connect
Licence
37
Page 77

GARANTIE LIMITÉE À L’ACHETEUR INITIAL
Samsung Electronics Canada Inc. (SECA) garantit ce produit contre tout défaut de fabrication.
SECA garantit aussi que si cet appareil ne fonctionne pas convenablement durant la période de
garantie SECA se réservera le droit de réparer ou de remplacer l’appareil défectueux.
Toutes les réparations sous garantie doivent être effectuées par un Centre de service autorisé
SECA. Le nom et l’adresse du Centre de service le plus près de chez vous peut être obtenu en
composant sans frais le 1-800-268-1620 ou en visitant notre site web au www.samsung.ca
Main-d’oeuvre
un (1) an (au comptoir)
Pour tous les modèles portatifs, le transport de l’appareil sera la responsabilité du client.
Le reçu de vente original doit être conservé par le client car cela constitue la seule preuve
d’achat acceptée. Le client doit le présenter au Centre de service agréé au moment où il fait la
demande d’une réparation sous garantie.
Pièces
un (1) an
EXCLUSIONS (CE QUI N’EST PAS COUVERT)
Cette garantie ne couvre pas les dommages causés par un accident, un incendie, une
inondation, un cas de force majeure, un mauvais usage ou une tension incorrecte. La garantie
ne couvre pas une mauvaise installation, une mauvaise réparation, une réparation non
autorisée et tout usage commercial ou dommages survenus durant le transport. Le ni extérieur
et intérieur de même que les lampes ne sont pas couverts par cette garantie. Les ajustements
par le client qui sont expliqués dans le guide de l’utilisateur ne sont pas couverts en vertu de
cette garantie. Cette garantie sera automatiquement annulée pour tout appareil qui aurait un
numéro de série manquant ou modié. Cette garantie est valable seulement sur les appareils
achetés et utilisés au Canada.
Samsung Electronics Canada Inc
2050 Derry Rd West
Mississauga, On. L5N 0B9
Tel: 1-800-SAMSUNG (726-7864)
Website: http://www.samsung.com/ca_fr
Fax: (905) 542- 1199
Page 78

SIÈGE SOCIAL
Samsung Electronics Canada Inc. 2050
Derry Road West, Mississauga, Ontario
L5N 0B9 Canada
TEL: 1-800-SAMSUNG (1-800-726-7864)
www.samsung.com/ca_fr/support
© 2016 Samsung Electronics Co., Ltd. Tous droits réservés.
Comment contacter Samsung dans le monde
Si vous avez des suggestions ou des questions concernant les produits Samsung, veuillez contacter le Service
Consommateurs Samsung.
Country Contact Center
`
North America
CANADA 1-800-SAMSUNG (726-7864)
U.S.A 1-800-SAMSUNG (726-7864) www.samsung.com/us/support
www.samsung.com/ca/support (English)
www.samsung.com/ca_fr/support (French)
Web Site
 Loading...