

Samsung HW-K850 User Manual

HW-K850
User Manual
For further information, refer to the Web Manual.
Web manual : www.Samsung.com → Owners & Support → Manuals & Downloads →
Product name search → HW-K850
* Design, specifications and App screen are subject to change without prior notice.

SAFETY INFORMATION
c The following also applies to the Wireless
Subwoofer (PS-KW1-3).
SAFETY WARNINGS
TO REDUCE THE RISK OF ELECTRIC SHOCK, DO
NOT REMOVE THE COVER (OR BACK).
NO USER-SERVICEABLE PARTS ARE INSIDE. REFER
SERVICING TO QUALIFIED SERVICE PERSONNEL.
CAUTION
RISK OF ELECTRIC SHOCK.
WARNING
• To reduce the risk of fire or electric shock, do not
expose this appliance to rain or moisture.
• To prevent injury, this apparatus must be securely
attached to the floor/wall in accordance with the
installation instructions.
• This product contains chemicals known to the
State of California to cause cancer and birth
defects or other reproductive harm.
CAUTION
• Do not expose this apparatus to dripping or
splashing. Do not put objects filled with liquids,
such as vases on the apparatus.
• To turn this apparatus off completely, you must pull
the power plug out of the wall socket.
Consequently, the power plug must be easily and
readily accessible at all times.
DO NOT OPEN.
The lighting flash and arrowhead within
the triangle indicates that there is
dangerous voltage Inside the product.
The explanation point within the triangle
indicates that there are important
instructions accompanying the product.
Class II product : This symbol indicates
that a safety connection to electrical
earth (ground) is not required.
AC voltage : Rated voltage marked
with this symbol is AC voltage.
DC voltage : Rated voltage marked
with this symbol is DC voltage.
Caution. Consult instructions for use :
This symbol instructs the user to
consult the user manual for further
safety related information.
FCC NOTE (for U.S.A):
Class B FCC Statement
The included module(s) has been tested and found to
comply with the limits for a Class B digital device,
pursuant to Part 15 of the FCC Rules. These limits are
designed to provide reasonable protection against
harmful interference in a residential installation. This
equipment generates, uses and can radiate radio
frequency energy and, if not installed and used in
accordance with the instructions, may cause harmful
interference to radio communications. However, there
is no guarantee that interference will not occur in a
particular installation. If this equipment does cause
harmful interference to radio or television reception,
which can be determined by turning the equipment
off and on, the user is encouraged to try to correct
the interference by one of the following measures:
• Reorienting or relocating the receiving antenna.
• Increasing the separation between the equipment
and receiver.
• Connecting the equipment to an outlet that is on a
different circuit than the radio or TV.
• Consulting the dealer or an experienced radio/TV
technician for help.
FCC Radiation Exposure Statement :
This equipment complies with FCC radiation exposure
limits set forth for an uncontrolled environment.
This equipment should be installed and operated so
there is at least 8 inches (20 cm) between the radiator
and your body. This device and its antenna(s) must
not be co-located or operated in conjunction with any
other antenna or transmitter.
FCC Caution :
• Any changes or modifications not expressly
approved by the party responsible for compliance
could void the user’s authority to operate this
equipment. This device complies with Part 15 of
the FCC Rules. Operation is subject to the
following two conditions: (1) This device may not
cause harmful interference, and (2) this device must
accept any interference received, including
interference that may cause undesired operation.
• This product satisfies FCC regulations when
shielded cables and connectors are used to
connect the unit to other equipment. To prevent
electromagnetic interference with electric
appliances, such as radios and televisions, use
shielded cables and connectors for connections.
· 1 · English

Important Safety Instructions
Read these operating instructions carefully before
using the unit. Follow all the safety instructions listed
below. Keep these operating instructions handy for
future reference.
1) Read these instructions.
2) Keep these Instructions.
3) Heed all warnings.
4) Follow all instructions.
5) Do not use this apparatus near water.
6) Clean only with a dry cloth.
7) Do not block any ventilation openings. Install in
accordance with the manufacturer's instructions.
8) Do not install near any heat sources such as
radiators, heat registers, stoves, or other
apparatus (including amplifiers) that produce
heat.
9) Do not defeat the safety purpose of the polarized
or grounding-type plug. A polarized plug has two
blades with one wider than the other.
A grounding type plug has two blades and a third
grounding prong. The wide blade or the third
prong are provided for your safety. If the provided
plug does not fit into your outlet, consult an
electrician for replacement of the obsolete outlet.
10) Protect the power cord from being walked on or
pinched particularly at plugs, convenience
receptacles, and the point where they exit from
the apparatus.
11) Only use attachments/accessories specified by
the manufacturer.
12) Use only with the cart, stand,
tripod, bracket, or table specified
by the manufacturer, or sold with
the apparatus. When a cart is
used, use caution when moving
the cart/apparatus combination to avoid injury
from tip-over.
13) Unplug this apparatus during lightning storms or
when unused for long periods of time.
14) Refer all servicing to qualified service personnel.
Servicing is required when the apparatus has
been damaged in any way, such as when the
power-supply cord or plug is damaged, liquid has
been spilled or objects have fallen into the
apparatus, the apparatus has been exposed to
rain or moisture, does not operate normally, or
has been dropped.
PRECAUTIONS
1. Ensure that the AC power supply in your house
complies with the power requirements listed on
the identification sticker located on the back of
your product. Install your product horizontally, on a
suitable base (furniture), with enough space
around it for ventilation (3~4 inches). Make sure
the ventilation slots are not covered. Do not place
the unit on amplifiers or other equipment which
may become hot. This unit is designed for
continuous use. To fully turn off the unit,
disconnect the AC plug from the wall outlet.
Unplug the unit if you intend to leave it unused for
a long period of time.
2. During thunderstorms, disconnect the AC plug
from the wall outlet. Voltage peaks due to lightning
could damage the unit.
3. Do not expose the unit to direct sunlight or other
heat sources. This could lead to overheating and
cause the unit to malfunction.
4. Protect the product from moisture (i.e. vases), and
excess heat (e.g. a fireplace) or equipment
creating strong magnetic or electric fields. Unplug
the power cable from the AC wall socket if the unit
malfunctions. Your product is not intended for
industrial use. It is for personal use only.
Condensation may occur if your product has been
stored in cold temperatures. If transporting the
unit during the winter, wait approximately 2 hours
until the unit has reached room temperature
before using.
5. The battery used with this product contains
chemicals that are harmful to the environment.
Do not dispose of the battery in the general
household trash. Do not expose the battery to
excess heat, direct sunlight, or fire. Do not short
circuit, disassemble, or overheat the battery.
Danger of explosion if the battery is replaced
incorrectly. Replace only with the same or
equivalent type.
· 2 · English
FEATURES
Lets you enjoy TV sound after connecting the Soundbar to your TV with or without a cable.
You can enjoy rich and realistic TV sound through the Soundbar connected to your TV with or without a cable.
c Refer to Method 1 on page 7 to see how to connect the Soundbar to your TV using an HDMI Cable.
c Refer to Method 2 on page 8 to see how to connect the Soundbar to your TV using a wireless network.
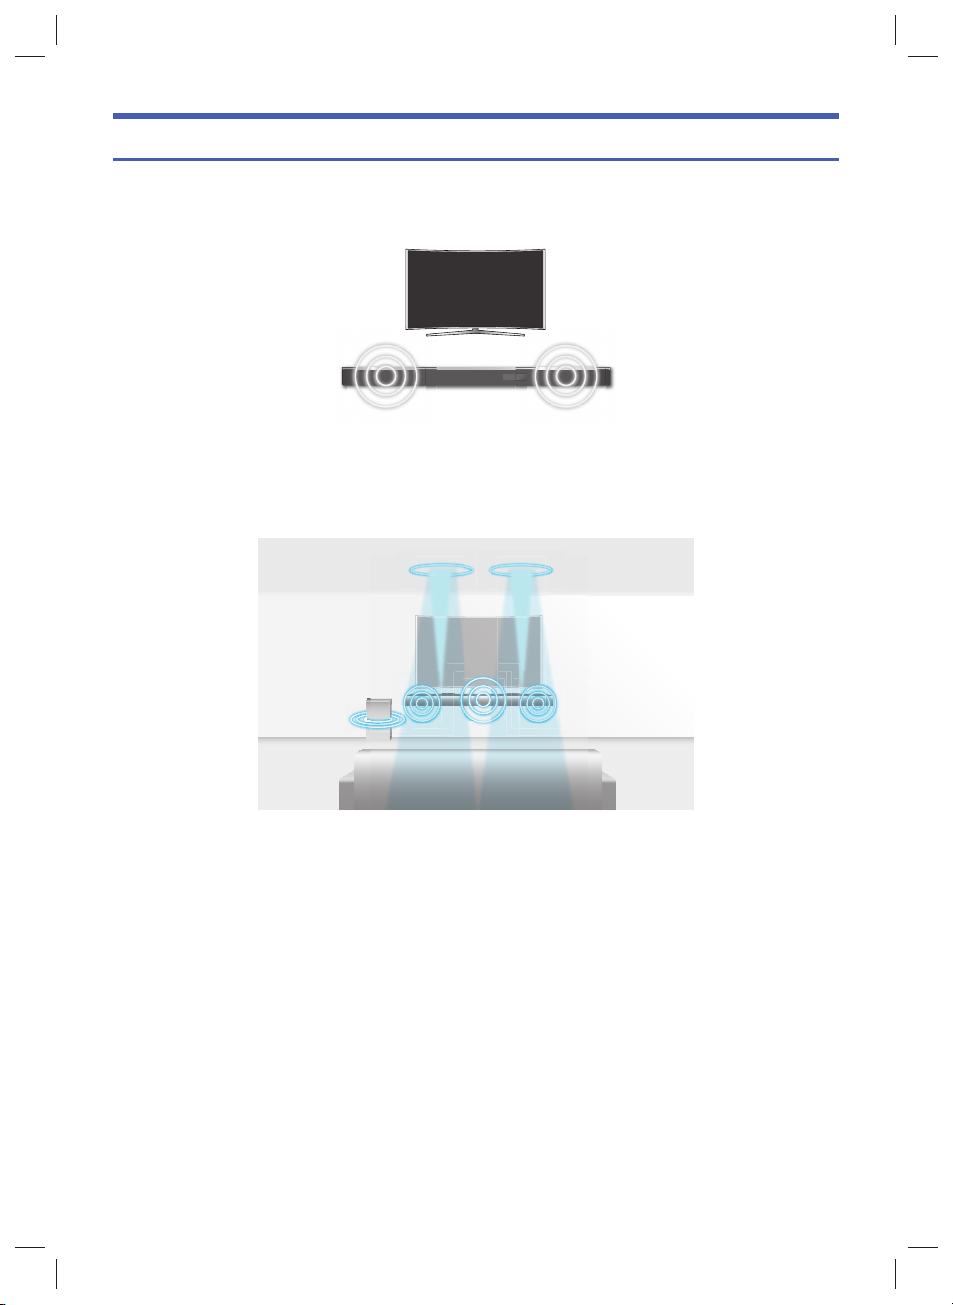
This product supports Dolby Atmos®.
* What is Dolby Atmos®?
Atmos technology enhances existing 5.1 channel surround sound systems by adding an overhead speaker.
This envelops the listener in 360 degrees of sound, delivering an immersive, high-definition, rich, detailed, and
deeper experience. See page 13 to learn how to connect the system.
· 3 · English

CHECKING THE COMPONENTS
POWER
DC 19V
Soundbar Main Unit
To p
2 AC/DC Adapter
Right Side of the Soundbar
HDMI Cable
SOUND
EFFECT
VOL WOOFER
SOUNDBAR
SubwooferRemote Control / Batteries
SOURCE
LEVEL
1 Power Cord
CONNECTING ELECTRICAL POWER
Use the power components (1, 2) to connect the power supplies in the following order:
Subwoofer Soundbar Main Unit
c For more information about the power supply and power consumption, refer to the label attached to the
product. (Label : Bottom of the Soundbar main unit)
2 AC/DC Adapter
1 Power Cord
DC 19V
POWER
LINK STANDBY ID SET
Rear of
Subwoofer
Connecting
electrical power
SERVICE
Bottom of the
Soundbar Main
Unit
DC 19V
(Power Jack)
· 4 · English

CONNECTING THE SOUNDBAR MAIN UNIT TO THE
LINK
LINK STANDBY ID SET
SUBWOOFER
You can enjoy rich bass tones and better sound quality by linking the subwoofer to the Soundbar main unit.
Automatic Connection
1. Connect a power supply to the subwoofer.
2. Connect a power supply to the Soundbar, and then press the button on the remote control or on the right
side of the Soundbar.
3. The subwoofer will be automatically connected to the Soundbar.
4. When auto pairing is complete, the blue indicators at the rear of the subwoofer turn on.
c If the red indicator at the rear of the subwoofer is on or the blue indicator flashes continuously, auto pairing
cannot occur. If this happens, connect the subwoofer manually, as shown below.
c Important: Before you begin, put the batteries into the remote. See page 18 for instructions.
POWER
LINK STANDBY ID SET
Rear of Subwoofer
Connecting the Subwoofer Manually if the Automatic Connection Fails
c Before You Begin
• Make sure that the Soundbar and the subwoofer are plugged in.
• Make sure that the Soundbar is turned on.
1. Press and hold ID SET on the rear of the subwoofer for at least 5 seconds. The red indicator on the rear of
the subwoofer turns off and the blue indicator blinks.
POWER
LINK STANDBY ID SET
Rear of Subwoofer
· 5 · English

2. Turn off the Soundbar.
L
R
BA
3. Press and hold the VOL button on the remote control for at least 5 seconds with the Soundbar turned off
(OFF).
VOL
WOOFE
SOUND
EFFECT
4. The ID SET message appears on the display of the Soundbar for a short period of time, and then
disappears.
ID SET
Right Side of the Soundbar
5. When the blue indicator on the subwoofer blinks, turn on the power by pressing
of the Soundbar or on the remote control.
6. When the connection is successfully established, the blue indicator on the rear of the subwoofer turn on
without blinking.
c If the connection process fails, the blue indicators will flash continuously. Go to Step 1 and start again.
button
on the right side
· 6 · English

CONNECTING TO YOUR TV
HDMI OUT
(TV-ARC)
DIGITAL AUDIO IN
(OPTICAL)
HDMI OUT
(TV-ARC)
HDMI IN 1
HDMI IN 2
AUX IN
You can enjoy TV sound after connecting the Soundbar to your TV with or without a cable.
c Important: Before you begin, put the batteries into the remote. See page 18 for instructions.
Method 1. Connecting with a Cable
Check the HDMI IN
(TV-ARC) port on your TV.
HDMI IN
(ARC)
HDMI Cable
Check the HDMI OUT (TV-ARC)
port on the Soundbar main unit.
Bottom of
Soundbar
1. Connect the HDMI cable as shown in the illustration above.
2. TV ARC appears on the display window of the Soundbar main unit and the TV sound is played.
TV ARC
Right Side of the Soundbar
c If the TV sound is not played, press either on the right side of the Soundbar or the SOURCE button on
the remote control, and then select D.IN on the display window of Soundbar main unit. The D.IN mode
changes to TV ARC and TV sound is output.
c If TV ARC does not appear on the display window of the Soundbar main unit, check that the cable is
connected to the correct port.
c You can conveniently control the volume of the Soundbar and can set Auto Power Link to ON and have the
Soundbar turn on automatically when you turn the TV on.
· 7 · English
 Loading...