

Samsung HT-E6530 User Manual

HT-E6530
5.1CH Blu-ray™
Home Entertainment System
user manual
imagine the possibilities
Thank you for purchasing this Samsung product.
To receive more complete service,
please register your product at
www.samsung.com/register
HT-E6530_ZC_0315.indd 1HT-E6530_ZC_0315.indd 1 2012-03-15 오후 4:37:052012-03-15 오후 4:37:05
Safety Information
Warning
TO REDUCE THE RISK OF ELECTRIC SHOCK, DO NOT REMOVE THE COVER (OR BACK).
NO USER-SERVICEABLE PARTS ARE INSIDE. REFER SERVICING TO QUALIFIED SERVICE PERSONNEL.
CAUTION
RISK OF ELECTRIC SHOCK
DO NOT OPEN
The lighting flash and Arrowhead
within the triangle is a warning sign
alerting you of dangerous voltage
inside the product.
CAUTION: TO REDUCE THE RISK OF
ELECTRIC SHOCK, DO NOT REMOVE COVER
(OR BACK) NO USER SERVICEABLE PARTS
INSIDE. REFER SERVICING TO QUALIFIED
SERVICE PERSONNEL.
WARNING
• To reduce the risk of fire or electric shock, do
not expose this appliance to rain or moisture.
Note to CATV system installer
This reminder is provided to call the CATV system
installer’s attention to Section 820~40 of the NEC
which provides guidelines for proper grounding
and, in particular, specifies that the cable ground
shall be connected to the grounding system of the
building, as close to the point of cable entry as
practical.
CLASS 1 LASER PRODUCT
This product is classified as a CLASS 1 LASER
product.
Use of controls, adjustments or performance of
procedures other than those specified herein may
result in hazardous radiation exposure.
The explanation point within the
triangle is a warning sign alerting you
of important instructions accompanying
the product.
DANGER :
• VISIBLE AND INVISIBLE LASER RADIATION
WHEN OPEN. AVOID DIRECT EXPOSURE TO
BEAM. (FDA 21 CFR)
CAUTION :
• CLASS 3B VISIBLE AND INVISIBLE LASER
RADIATION WHEN OPEN. AVOID EXPOSURE
TO THE BEAM (IEC 60825-1)
• THIS PRODUCT UTILIZES A LASER.
USE OF CONTROLS OR ADJUSTMENTS
OR PERFORMANCE OF PROCEDURES
OTHER THAN THOSE SPECIFIED HEREIN
MAY RESULT IN HAZARDOUS RADIATION
EXPOSURE. DO NOT OPEN COVER AND DO
NOT REPAIR YOURSELF. REFER SERVICING
TO QUALIFIED PERSONNEL.
CLASS 1 LASER PRODUCT
KLASSE 1 LASER PRODUKT
LUOKAN 1 LASER LAITE
KLASS 1 LASER APPARAT
PRODUCTO LÁSER CLASE 1
|
2 English
HT-E6530_ZC_0315.indd 2HT-E6530_ZC_0315.indd 2 2012-03-15 오후 4:37:162012-03-15 오후 4:37:16
Precautions
Important Safety Instructions
Read these operating instructions carefully before
using the unit. Follow all the safety instructions
listed below.
Keep these operating instructions handy for future
reference.
1 . Read these instructions.
2 . Keep these instructions.
3 . Heed all warnings.
4 . Follow all instructions.
5 . Do not use this apparatus near water.
6 . Clean only with a dry cloth.
7 . Do not block any ventilation openings. Install
in accordance with the manufacturer’s
instructions.
8 . Do not install near any heat sources such
as radiators, heat registers, stoves, or other
apparatus (including AV receivers) that
produce heat.
9 . Do not defeat the safety purpose of the
polarized or grounding-type plug. A polarized
plug has two blades with one wider than the
other. A grounding type plug has two blades
and a third grounding prong. The wide blade
or the third prong are provided for your safety.
If the provided plug does not fit into your
outlet, consult an electrician for replacement
of the obsolete outlet.
10 . Protect the power cord from being walked on
or pinched particularly at plugs, convenience
receptacles, and the point where it exits the
apparatus.
11 . Only use attachments/accessories specified
by the manufacturer.
12 . Use only with the cart,
stand, tripod, bracket,
or table specified by the
manufacturer, or sold with
the apparatus. When a cart
is used, use caution when
moving the cart/apparatus combination to
avoid injury from tip-over.
13 . Unplug this apparatus during lightning storms
or when unused for long periods of time.
14 . Refer all servicing to qualified service
personnel. Servicing is required when the
apparatus has been damaged in any way,
such as when the power-supply cord or plug
is damaged, liquid has been spilled or objects
have fallen into the apparatus, the apparatus
has been exposed to rain or moisture, does
not operate normally, or has been dropped.
Disc Storage & Management
• Holding Discs
- Fingerprints or scratches on
a disc may reduce sound and
picture quality or cause skipping.
- Avoid touching the surface of a disc where
data has been recorded.
- Hold the disc by the edges so that fingerprints
will not get on the surface.
- Do not stick paper or tape on the disc.
• Cleaning Discs
- If you get fingerprints or dirt on a
disc, clean it with a mild detergent
diluted in water and wipe with a
soft cloth.
- When cleaning, wipe gently from the inside to
the outside of the disc.
- Disc Storage
Do not keep in direct sunlight.
Keep in a cool ventilated area.
Keep in a clean protection jacket and store
vertically.
Handling Cautions
• Do not expose this apparatus to dripping or
splashing. Do not put objects filled with liquids,
such as vases, on the apparatus.
• To turn this apparatus off completely, you must
pull the power plug out of the wall socket.
Consequently, the power plug must be easily
and readily accessible at all times.
• Do not touch the power plug with a wet hand.
It can cause an electric shock.
01 Safety Information
English 3
HT-E6530_ZC_0315.indd 3HT-E6530_ZC_0315.indd 3 2012-03-15 오후 4:37:162012-03-15 오후 4:37:16
|

Safety Information
• Do not plug multiple electric devices into the
same wall socket. Ovedrloading a socket can
cause it to overheat, resulting in a fire.
• Maintenance of the Cabinet
- Before connecting other components to this
product, be sure to turn them off.
- If you move your product suddenly from a
cold place to a warm place, condensation
may occur on the operating parts and lens
and cause abnormal disc playback. If this
occurs, unplug the product, wait for two
hours, and then connect the plug to the
power outlet. Then, insert the disc, and try to
play back again.
• If the product makes an abnormal noise or
produces a burning smell or smoke, turn off
the power switch immediately and disconnect
the power plug from the wall outlet. Then,
contact the nearest customer service center for
technical assistance. Do not use the product.
Using the product as it is may cause a fire or an
electric shock.
• To turn this apparatus off completely, you must
pull the power plug out of the wall socket.
Consequently, the power plug must be easily
and readily accessible at all times.
Using the 3D Function
IMPORTANT HEALTH AND SAFETY
INFORMATION FOR 3D PICTURES.
Read and understand the following safety
information before using the 3D function.
• Some viewers may experience discomfort while
viewing 3D TV such as dizziness, nausea, and
headaches.
If you experience any such symptom, stop
viewing 3D TV, remove the 3D Active Glasses,
and rest.
• Watching 3D images for an extended period of
time may cause eye strain. If you feel eye strain,
stop viewing 3D TV, remove your 3D Active
Glasses, and rest.
• A responsible adult should frequently check on
children who are using the 3D function.
If there are any reports of tired eyes, headaches,
dizziness, or nausea, have the child stop viewing
3D TV and rest.
• Do not use the 3D Active Glasses for other
purposes (such as general eyeglasses,
sunglasses, protective goggles, etc.)
• Do not use the 3D function or 3D Active Glasses
while walking or moving around. Using the 3D
function or 3D Active Glasses while moving
around may cause you to bump into objects,
trip, and/or fall, and cause serious injury.
• If you want to enjoy 3D content, connect a 3D
device (3D compliant AV receiver or TV) to the
product’s HDMI OUT port using a high-speed
HDMI cable. Put on 3D glasses before playing
the 3D content.
• The product outputs 3D signals only through
HDMI cable connected to the HDMI OUT port.
• As the video resolution in 3D play mode is fixed
according to the resolution of the original 3D
video, you can not change the resolution to your
preference.
• Some functions such as BD Wise, screen size
adjustment, and resolution adjustment may not
operate properly in 3D play mode.
• You must use a high-speed HDMI cable for
proper output of the 3D signal.
• Stay at least three times the width of the screen
from the TV when watching 3D images. For
example, if you have a 46 inch screen, stay 138
inches (11.5 feet) from the screen.
- Place the 3D video screen at eye level for the
best 3D picture.
• When the product is connected to some 3D
devices, the 3D effect may not function properly.
• This product does not convert 2D content into
3D.
• “Blu-ray 3D” and “Blu-ray 3D” logo are
trademarks of the Blu-ray Disc Association.
Copyright
© 2012 Samsung Electronics Co.,Ltd.
All rights reserved; No part or whole of this user’s
manual may be reproduced or copied without the
prior written permission of Samsung Electronics
Co.,Ltd.
|
4 English
HT-E6530_ZC_0315.indd 4HT-E6530_ZC_0315.indd 4 2012-03-15 오후 4:37:172012-03-15 오후 4:37:17

License
• Dolby and the double-D symbol are registered
trademarks of Dolby Laboratories.
• Manufactured under license under U.S. Patent
Nos: 5,956,674; 5,974,380; 6,226,616;
6,487,535; 7,392,195; 7,272,567; 7,333,929;
7,212,872 & other U.S. and worldwide patents
issued & pending. DTS-HD, the Symbol, & DTSHD and the Symbol together are registered
trademarks & DTS-HD Master Audio | Essential
is a trademark of DTS, Inc. Product includes
software. © DTS, Inc. All Rights Reserved.
• The terms HDMI and HDMI High-Definition
Multimedia Interface, and the HDMI Logo are
trademarks or registered trademarks of HDMI
Licensing LLC in the United States and other
countries.
• Oracle and Java are registered trademarks of
Oracle and/or its affiliates. Other names may be
trademarks of their respective owners.
• This item incorporates copy protection
technology that is protected by U.S. patents
and other intellectual property rights of
Rovi Corporation. Reverse engineering and
disassembly are prohibited.
• Blu-ray Disc™, Blu-ray™, and the logos are
trademarks of Blu-ray Disc Association.
01 Safety Information
• iPad, iPhone, iPod, iPod classic, iPod nano,
iPod shuffle, and iPod touch are trademarks
of Apple Inc., registered in the U.S. and other
countries.
• This product uses Cinavia technology to
limit the use of unauthorized copies of some
commercially-produced film and videos and
their soundtracks. When a prohibited use of an
unauthorized copy is detected, a message will
be displayed and playback or copying will be
interrupted.
More information about Cinavia technology
is provided at the Cinavia Online Consumer
Information Center at http://www.cinavia.com.
To request additional information about Cinavia
by mail, send a postcard with your mailing
address to: Cinavia Consumer Information
Center, P.O. Box 86851, San Diego, CA, 92138,
USA.”
This product incorporates proprietary technology
under license from Verance Corporation and is
protected by U.S. Patent 7,369,677 and other
U.S. and worldwide patents issued and pending
as well as copyright and trade secret protection
for certain aspects of such technology. Cinavia
is a trademark of Verance Corporation.
Copyright 2004-2010 Verance Corporation. All
rights reserved by Verance. Reverse engineering
or disassembly is prohibited.
• Open Source License Notice
- In the case of using open source software,
Open Source Licenses are available on the
product menu.
English 5
HT-E6530_ZC_0315.indd 5HT-E6530_ZC_0315.indd 5 2012-03-15 오후 4:37:172012-03-15 오후 4:37:17
|

Contents
SAFETY INFORMATION
2 Warning
3 Precautions
3 Disc Storage & Management
3 Handling Cautions
4 Using the 3D function
4 Copyright
5 License
GETTING STARTED
7 Disk and Format Compatibility
8 Logos of Discs the product can play
11 Accessories
12 Front Panel
12 Rear Panel
13 Remote Control
CONNECTIONS
15 Connecting the Speakers
15 Speaker Components
16 Installing the Speakers on the Tallboy
16 Connecting The Speakers
17 Connecting the Optional Wireless
19 Attaching the Toroidal Ferrite Core to the
19 Connecting the FM Antenna
19 Connecting to an iPod/iPhone
19 Using a USB Cable
19 Using a Dock
20 Connecting to a TV
20
20
21 Connecting to External Devices
21
21
21
Stand
Receiver Module
Power Cord of the Main Unit
Method 1
with an HDMI Cable - Best Quality
(Recommended)
Method 2
Video Cable - Good Quality
Method 1
External Component with an HDMI Cable
Method 2
External Digital Audio Component
Method 3
External Analog Component
Connecting to a TV
Connecting to a TV with a
HDMI IN : Connecting to an
OPTICAL : Connecting an
AUX IN : Connecting an
22 Connecting to a Network Router
22 Wired Network
22 Wireless Network
SETTINGS
23 The Initial Settings Procedure
25 The Home Screen
26 Accessing the Settings Screen
27 Settings Menu Functions
32 Auto Sound Calibration
32 Networks and the Internet
37 Upgrading Software
MEDIA PLAY
39 The AllShare Play Screen
40 Playing Files on a USB Storage Device or
iPod/iPhone
40 iPod/iPhone Models You Can Use with
This Product
41 The Function Screen
41 Playing Commercial Video Discs
41 Playing Commercial Audio Discs
42 Playing a Disc with User Recorded
Content
42 Using the AllShare Network Function
44 Controlling Video Playback
46 Controlling Music Playback
47 Controlling Photo Playback
48 Using the Tools Menu when a File is
Highlighted
50 Listening to Radio
50 Using the Special Effects Remote Control
Buttons
NETWORK SERVICES
52 Using Smart Hub
54 BD-LIVE™
APPENDIX
55 Additional Information
61 Troubleshooting
64 Specifications
|
6 English
HT-E6530_ZC_0315.indd 6HT-E6530_ZC_0315.indd 6 2012-03-15 오후 4:37:182012-03-15 오후 4:37:18

Getting Started
Disk and Format Compatibility
Disc types and contents your product can play
Media Disc Type Details
Blu-ray Disc
3D Blu-ray Disc
VIDEO
MUSIC
PHOTO
NOTE
|
|
The product may not play certain CD-RW/-R and DVD-R because of the disc type or recording conditions.
If a DVD-RW/-R disc has not been recorded properly in DVD video format, it will not be playable.
Your product will not play content that has been recorded on a DVD-R at a bitrate that exceeds 10 Mbps.
Your product will not play content that has been recorded on a BD-R or USB device at a bitrate that exceeds 30 Mbps.
Playback may not work for some types of discs, or when you use specific operations, such as angle change and aspect ratio
adjustment. Information about the discs is written in detail on the disc box. Please refer to this if necessary.
When you play a BD-J title, loading may take longer than a normal title or some functions may perform slowly.
DVD-VIDEO, DVD-RW,
DVD-R, DVD+RW,
DVD+R
CD-RW/-R, DVD-RW/-R,
BD-RE/-R
CD-RW/-R, DVD-RW/-R,
BD-RE/-R
BD-ROM or BD-RE/-R disc recorded in the BD-RE format.
DVD-VIDEO, recorded DVD+RW/DVD-RW(V)/DVD-R/+R discs that have
been recorded and finalized, or a USB storage media containing MKV, MP4
contents.
Music recorded on CD-RW/-R, DVD-RW/-R, BD-RE/-R discs or a USB storage
media containing MP3 or WMA contents.
Photos recorded on CD-RW/-R, DVD-RW/-R, BD-RE/-R discs or a USB storage
media containing JPEG contents.
02 Getting Started
Disc types your product cannot play
• HD DVD
• DVD-ROM/PD/MVDisc, etc
NOTE
|
|
This product may not respond to all operating commands because some Blu-ray Disc, DVD, and CD discs allow specific or
limited operation and provide only certain features during playback.
Please note that this is not a defect in the product.
Samsung cannot guarantee that this product will play every disc bearing the Blu-ray Disc, DVD or CD logo because disc
formats evolve, and problems and errors may occur during the creation of Blu-ray Disc, DVD, and CD software and/or the
manufacture of discs.
Please contact the SAMSUNG Customer Care Center at 1-800-726-7864 if you have questions or encounter difficulty when
playing Blu-ray Disc, DVD, or CD discs in this product. Also, refer to rest of this user manual for additional information on
playback restrictions.
Some commercial discs and DVD discs purchased outside your region may not play on this product.
HT-E6530_ZC_0315.indd 7HT-E6530_ZC_0315.indd 7 2012-03-15 오후 4:37:192012-03-15 오후 4:37:19
• DVD-RAM
• Super Audio CD
(except CD layer)
• DVD-RW(VR mode)
• CVD/CD-ROM/CDV/
CD-G/CD-I/LD
(CD-Gs play audio
only, not graphics.)
• 3.9 GB DVD-R Disc
for Authoring.
English 7
|
Getting Started
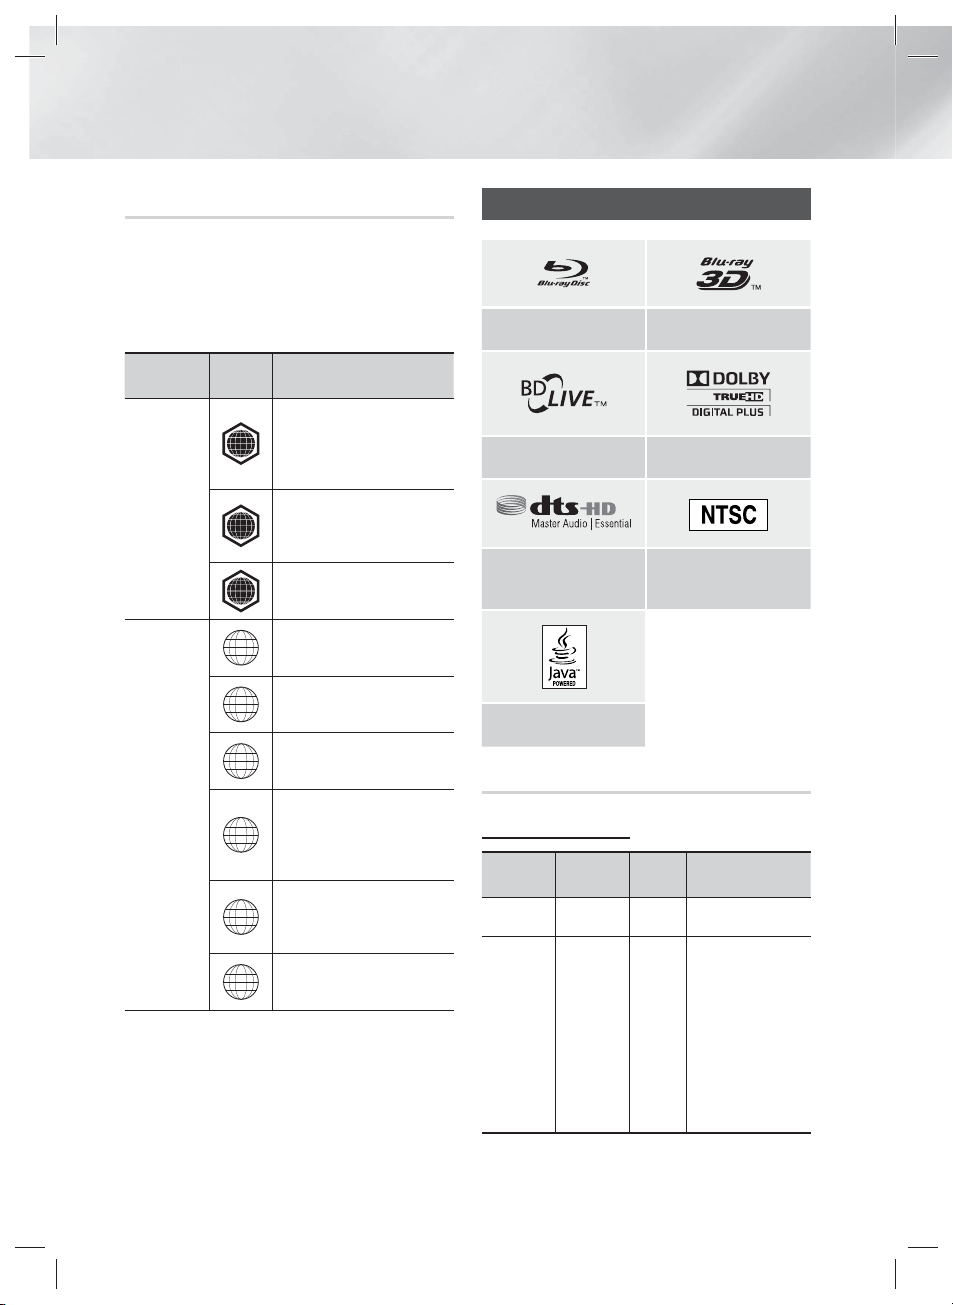
Region Code
Both products and discs are coded by region.
These regional codes must match for a disc to
play. If the codes do not match, the disc will not
play.
The Region Number for this product is displayed
on the rear panel of the product.
Disc Type
Blu-ray Disc
DVD-VIDEO
NOTE
|
If the Region number of a Blu-ray Disc/DVDs does not
correspond to the Region number of this product, the
product cannot play the disc.
Region
Code
North America, Central America,
South America, Korea, Japan,
A
Taiwan, Hong Kong and South
East Asia.
Europe, Greenland, French
territories, Middle East, Africa,
B
Australia and New Zealand.
India, China, Russia, Central and
C
South Asia.
The U.S., U.S. territories and
1
Canada
Europe, Japan, the Middle East,
2
Egypt, South Africa, Greenland
Taiwan, Korea, the Philippines,
3
Indonesia, Hong Kong
Mexico, South America,
Central America, Australia,
4
New Zealand, Pacific Islands,
Caribbean
Russia, Eastern Europe, India,
most of Africa, North Korea,
5
Mongolia
China
6
|
Area
Logos of Discs the product can play
Blu-ray Disc 3D Blu-ray Disc
BD-LIVE Dolby
DTS
Java
NTSC broadcast system in
U.S.A, Canada, Korea, Japan
Supported Formats
Music File Support
File
Extension
*.mp3
*.wma
Container
MP3
WMA
Audio
Codec
MP3 -
WMA
Support Range
Compliant with
WMA version 10
* Sampling rates (in
kHz) - 8, 11, 16,
22, 32, 44.1, 48
* Bitrates - All
bitrates in the
range 5kbps to
384kbps
|
8 English
HT-E6530_ZC_0315.indd 8HT-E6530_ZC_0315.indd 8 2012-03-15 오후 4:37:202012-03-15 오후 4:37:20

Video File Support
File Extension Container Video Codec Resolution
Frame rate
(fps)
H.264 BP/MP/HP 1920x1080 6 ~ 30 25
*.avi
*.mkv
*.asf
*.wmv
*.mp4
*.3gp
*.vro
*.mpg
*.mpeg
*.ts
*.tp
*.trp
AVI
MKV
ASF
WMV (wmv9)
MP4
3GPP
VRO
VOB
PS
TS
MPEG4 SP/ASP 1920x1080
H.264 BP/MP/HP 1920x1080
MPEG4 SP/ASP 1920x1080
H.264 BP/MP/HP 1920x1080
MPEG4 SP/ASP 1920x1080
Window Media
Video v9
1920x1080
H.264 BP/MP/HP 1920x1080
MPEG4 SP/ASP 1920x1080
H.264 BP/MP/HP 1920x1080
MPEG4 SP/ASP 1920x1080
MPEG2 1920x1080
MPEG1 1920x1080
MPEG1 1920x1080
MPEG2 1920x1080
H.264 1920x1080
MPEG2 1920x1080
H.264 1920x1080
VC1 1920x1080
6 ~ 30 8
6 ~ 30 25
6 ~ 30 8
6 ~ 30 25
6 ~ 30 8
6 ~ 30 25 WMA
6 ~ 30 25
6 ~ 30 8
6 ~ 30 25
6 ~ 30 8
24/25/30 25
24/25/30 25
24/25/30 25
24/25/30 25
6 ~ 30 25
24/25/30 25
6 ~ 30 25
6 ~ 30 25
Limitations
- Even when a file is encoded by a supported codec listed above, the file might not be played if its
content has a problem.
- Normal playback is not guaranteed if the file’s container information is wrong or the file itself is
corrupted.
- Files having higher bit or frame rates than standard may stutter when played back.
Bitrate
(Mbps)
Audio Codec
MP3
AC3
LPCM
DTS Core
MP3
AC3
LPCM
DTS Core
MP3
AC3
LPCM
WMA
MP3
AAC
AAC
AC3
MPEG
LPCM
AC3
MPEG
LPCM
AAC
AC3
AAC
MP3
DD+
02 Getting Started
English 9
HT-E6530_ZC_0315.indd 9HT-E6530_ZC_0315.indd 9 2012-03-15 오후 4:37:222012-03-15 오후 4:37:22
|

Getting Started
- The Seek (skip) function is not available if the
file’s index table is damaged.
- When you playback a file remotely through a
network connection, video playback may stutter
depending on the network speed.
Video decoder
- Supports up to H.264 Level 4.1
- Does not support H.264 FMO/ASO/RS, VC1
SP/MP/AP L4 and AVCHD
- MPEG4 SP, ASP :
Below 1280 x 720 : 60 frames max
Above 1280 x 720 : 30 frames max
- Does not support GMC 2 or higher
Audio decoder
- Supports WMA 7, 8, 9 and STD
- Does not support WMA 9 PRO multi-channel
files if the number of channels is more than 2 or
the files require lossless audio decoding.
- Does not support WMA sampling rate of
22050Hz mono
Notes on the USB connection
• Your product supports USB storage media,
MP3 players, digital cameras, and USB card
readers.
• The product does not support folder or file
names longer than 128 characters.
• Some USB/digital camera devices may not be
compatible with the product.
• Your product supports the FAT 16, FAT 32, and
NTFS files systems.
• Connect USB devices directly to the product’s
USB port. Connecting through a USB cable
may cause compatibility problems.
• Inserting more than one memory device into
a multi-card reader may cause the reader to
operate improperly.
• The product does not support the PTP protocol.
• Do not disconnect a USB device during a
“loading” process.
• The bigger the image resolution, the longer the
image takes to display.
• This product cannot play MP3 files with DRM
(Digital Rights Management) downloaded from
commercial sites.
• Your product only supports video that is under
30fps (frame rate).
• Your product only supports USB Mass Storage
Class (MSC) devices such as thumb drives and
USB HDD. (HUB is not supported.)
• Certain USB HDD Devices, multi-card readers
and thumb drives may not be compatible with
this product.
• If some USB devices require excessive power,
they may be limited by the circuit safety device.
• If playback from a USB HDD is unstable, provide
additional power by plugging the HDD into a
wall socket. If the problem continues, contact
the USB HDD manufacturer.
• You must remove the USB storage device safely
(by performing the “Safely Remove USB”
function) to prevent possible damage to the
USB memory.
Press the HOME button to move to the home
menu, press the YELLOW (C) button, and then
press the E button.
• SAMSUNG is not responsible for any data file
damage or data loss.
AVCHD
(Advanced Video Codec High Definition)
• This product can play back AVCHD format
discs. These discs are normally recorded and
used in camcorders.
• The AVCHD format is a high definition digital
video camera format.
• The MPEG-4 AVC/H.264 format compresses
images with greater efficiency than the
conventional image compressing format.
• Some AVCHD discs use the “x.v.Color” format.
This product can play back AVCHD discs that
use the “x.v.Color” format.
• “x.v.Color” is a trademark of Sony Corporation.
• “AVCHD” and the AVCHD logo are trademarks
of Matsushita Electronic Industrial Co., Ltd. and
Sony Corporation.
|
10 English
HT-E6530_ZC_0315.indd 10HT-E6530_ZC_0315.indd 10 2012-03-15 오후 4:37:222012-03-15 오후 4:37:22

|
NOTE
|
Some AVCHD format discs may not play, depending on the recording conditions.
AVCHD format discs need to be finalized.
“x.v.Color” offers a wider color range than normal DVD camcorder discs.
Some MKV and MP4 format discs may not play, depending on their video resolution and frame rate.
Accessories
Check for the supplied accessories below.
(For Power cord)
Video Cable FM Antenna Soft Cloth Toroidal Ferrite Core
RECEIVER
BD TV
123
4
7
DISC MENU TITLE MENU
VOL
HOME REPEAT
TOOLS
RETURN
ABCD
SMART SEARCH
HUB
vTuner
S/W LEVEL
AUDIO
56
809
MUTE
TUNER
MEMORY
'ĺ'
SUBTITLE
02 Getting Started
FUNCTION
TV
SOURCE
SLEEP
POPUP
TUNING
/ CH
INFO
EXIT
MO/ST
3D SOUND
SOUND
EFFECT
User Manual iPod Dock ASC microphone Remote Control/Batteries (AAA size)
Figures and illustrations in this User Manual are provided for reference only and may differ from actual
product appearance.
An administration fee may be charged if either
a. an engineer is called out at your request and there is no defect in the product (i.e. where you have
failed to read this user manual)
you bring the unit to a repair center and there is no defect in the product (i.e. where you have failed to
b.
read this user manual).
The amount of such administration charge will be advised to you before any work or home visit is carried
out.
English 11
HT-E6530_ZC_0315.indd 11HT-E6530_ZC_0315.indd 11 2012-03-15 오후 4:37:232012-03-15 오후 4:37:23
|
Getting Started
5V 500mA
ASC IN
DIGITAL
AUDIO IN
OPTICAL
VIDEO
OUT
AUX
IN
LANiPod
WIRELESS
DIGITAL
AUDIO IN
OPTICAL
VIDEO
OUT
AUX
IN
LANiPod
WIRELESS
SPEAKER IMPEDANCE : 3
SPEAKERS OUT
SURROUND
SURROUND
SPEAKER IMPEDANCE : 3
SPEAKERS OUT
SURROUND
SURROUND
HDMI IN
2
1
HDMI OUT
HDMI IN
2
1
HDMI OUT
FM ANT
FM ANT
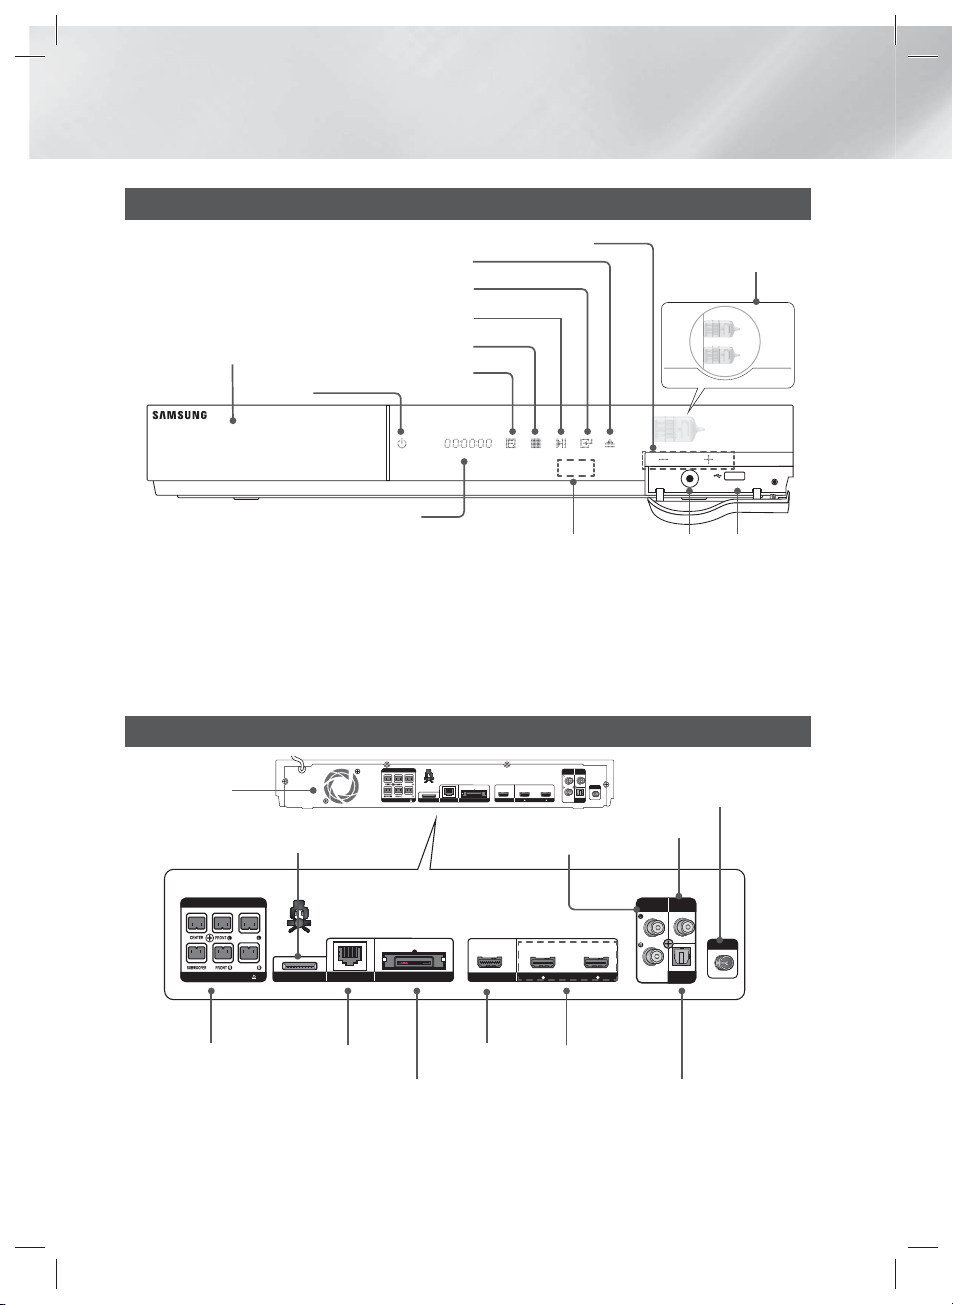
Front Panel
OPEN/CLOSE
VOLUME CONTROL
ENTER
PLAY/PAUSE
DISC TRAY
POWER
STOP
FUNCTION
DISPLAY
REMOTE CONTROL SENSOR
|
NOTE
|
If Cellular phone or mobile device is near vacuum tube amp, or put other electronic products on the top of the product would
cause noise from the audio.
Please be careful that children do not touch the product's surface When the set is on working. It would be hot.
To upgrade the product's software through the USB Host jack, you must use a USB memory stick.
When the product displays the Blu-ray Disc menu, you cannot start the movie by pressing the 6 button on the product or
the remote. To play the movie, you must select Play Movie or Start in the disc menu, and then press the
Rear Panel
VACUUM
TUBE AMP
ASC IN USB HOST
button.
E
COOLING FAN
SPEAKER OUTPUT
CONNECTORS
|
NOTE
|
iPod
LAN TERMINAL
HDMI OUT
TX CARD CONNECTION
(WIRELESS)
AUX IN
HDMI IN
FM ANTENNA
VIDEO OUT
EXTERNAL DIGITAL
AUDIO IN (OPTICAL)
Maintain a minimum of 4 inches of clear space on all sides of the home theater to ensure adequate ventilation. Do not
obstruct the cooling fan or ventilation holes.
|
12 English
HT-E6530_ZC_0315.indd 12HT-E6530_ZC_0315.indd 12 2012-03-15 오후 4:37:272012-03-15 오후 4:37:27
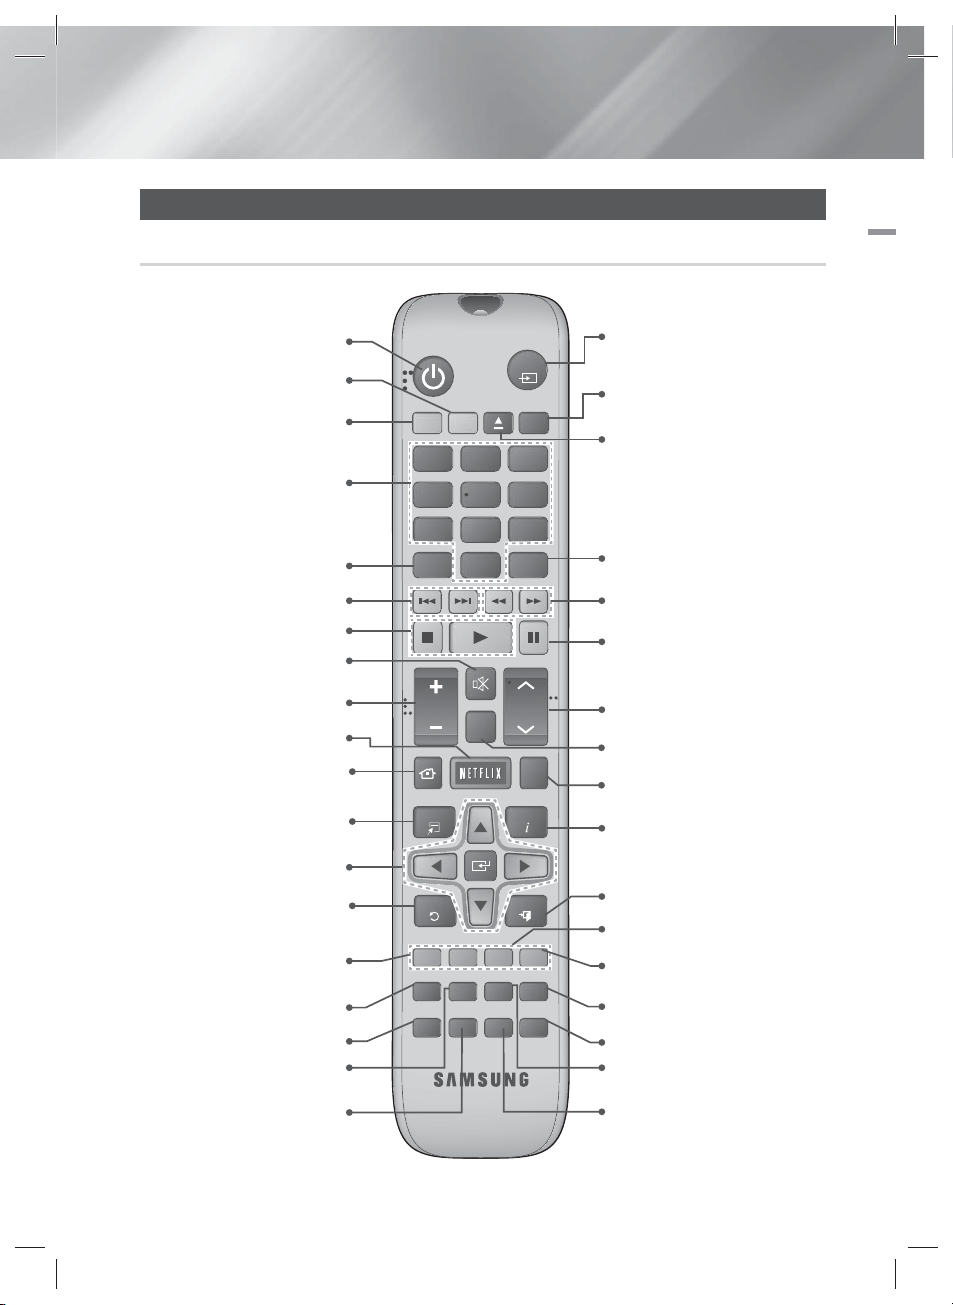
Remote Control
Tour of the Remote Control
Turn the product on and off.
To change to TV mode, press the
TV button.
To change to Home Theater,
press the BD button.
Press numeric buttons to operate
options.
Press to view the disc menu.
Press to skip backwards or
forwards.
Press to stop/play a disc.
Cut off the sound temporarily.
FUNCTION
TV
SOURCE
RECEIVER
BD TV
1
4
7
DISC MENU TITLE MENU
SLEEP
2
3
56
809
POPUP
MUTE
02 Getting Started
Press to select Blu-ray's mode
(HDMI1, AUX, BD/DVD, etc.).
or
Press to select TV's video mode.
Set a Sleep time to shut off the
product.
To open and close the disc tray.
Use to enter the Popup menu/
Title menu.
Press to search backwards or
forwards.
Press to pause a disc.
Adjust the volume.
Press to use Netflix.
VOL
HOME REPEAT
S/W LEVEL
TUNING
/ CH
Press to move to the Home screen.
Press to use the Tools menu.
TOOLS
INFO
Select on-screen menu items and
change menu values.
Return to the previous menu.
These buttons are used both for
menus on the product and also
several Blu-ray Disc functions.
Press to use Smart Hub.
RETURN
ABCD
SMART SEARCH
HUB
vTuner
AUDIO
TUNER
MEMORY
'ĺ'
SUBTITLE
EXIT
MO/ST
3D SOUND
SOUND
EFFECT
Press this to use the vTuner.
Press to search contents.
Selects the disc audio language.
HT-E6530_ZC_0315.indd 13HT-E6530_ZC_0315.indd 13 2012-03-15 오후 4:37:302012-03-15 오후 4:37:30
Search for active FM stations and
to change channels.
Use to adjust the level of the
subwoofer.
Allows you to repeat a title,
chapter, track or disc.
Use to display the playback
information when playing
a Blu-ray/DVD disc.
Press to exit the menu.
Use to set a preset radio frequency.
Select MONO or STEREO for radio
broadcasts.
Press to apply 3D sound effect.
Press to apply sound effects.
Press to enjoy an ordinary 2D video
in 3D mode.
Selects the disc subtitle language.
English 13
|

Getting Started
Installing batteries in the Remote
Control
Battery size: AAA
21
|
NOTE
|
Make sure to match the “+” and “–” ends of the batteries
with the diagram inside the compartment.
Assuming typical TV usage, the batteries last for about
one year.
The remote control can be used up to approximately 23
feet (7 meters) from the product in a straight line.
Setting up the Remote Control
You can control certain functions of your TV with
this remote control.
To operate a TV with the Remote Control
1 . Press the TV button to set the remote control
to TV mode.
2 . Turn on your TV.
3 . While holding down the POWER button,
enter the code corresponding to your brand
of TV.
• If there is more than one code listed for
your TV in the table, enter one at a time to
determine which code works.
• Example : For a Samsung TV
While holding down the POWER button,
use the number buttons to enter 00. If that
does not work, try 15, then 16, etc.
4 . If the TV turns off, the setting is complete.
• You can use the TV POWER, VOLUME,
CHANNEL, and Numeric buttons (0~9).
|
NOTE
|
The remote control may not work on some brands of TV's.
Also, some operations may not be possible, depending on
your brand of TV.
The remote control will work with Samsung TVs by
default.
|
14 English
TV Control Codes
Brand Code
Admiral
(M.Wards)
A Mark 01, 15
Anam
AOC 01, 18, 40, 48
Bell & Howell
(M.Wards)
Brocsonic 59, 60
Candle 18
Cetronic 03
Citizen 03, 18, 25
Cinema 97
Classic 03
Concerto 18
Contec 46
Coronado 15
Craig 03, 05, 61, 82, 83, 84
Croslex 62
Crown 03
Curtis Mates 59, 61, 63
CXC 03
Daewoo
Daytron 40
Dynasty 03
Emerson
Fisher 19, 65
Funai 03
Futuretech 03
General
Electric (GE)
Hall Mark 40
Hitachi 15, 18, 50, 59, 69
Inkel 45
JC Penny 56, 59, 67, 86
JVC 70
KTV 59, 61, 87, 88
KEC 03, 15, 40
KMC 15
LG (Goldstar)
Luxman 18
LXI (Sears)
Magnavox
Marantz 40, 54
Matsui 54
MGA 18, 40
56, 57, 58
01, 02, 03, 04, 05,
06, 07, 08, 09, 10, 11,
12, 13, 14
57, 58, 81
02, 03, 04, 15, 16, 17,
18, 19, 20, 21, 22, 23,
24, 25, 26, 27, 28,
29, 30, 32, 34, 35, 36,
48, 59, 90
03, 15, 40, 46, 59, 61,
64, 82, 83, 84, 85
06, 40, 56, 59, 66,
67, 68
01, 15, 16, 17, 37,
38, 39, 40, 41, 42,
43, 44
19, 54, 56, 59, 60, 62,
63, 65, 71
15, 17, 18, 48, 54, 59,
60, 62, 72, 89
Brand Code
Mitsubishi/
Onking 03
Onwa 03
Panasonic
Penney 18
Philco
Philips
Pioneer 63, 66, 80, 91
Portland 15, 18, 59
Proton 40
Quasar 06, 66, 67
Radio Shack 17, 48, 56, 60, 61, 75
RCA/Proscan
Realistic 03, 19
Sampo 40
Samsung
Sanyo 19, 61, 65
Sears 15, 18, 19
Sharp 15, 57, 64
Signature
2000
(M.Wards)
Soundesign 03, 40
Spectricon 01
Sylvania
Symphonic 61, 95, 96
Tatung 06
Techwood 18
Teknika 03, 15, 18, 25
Toshiba 19, 57, 63, 71
Vidtech 18
Videch 59, 60, 69
Wards
Yamaha 18
Yupiteru 03
Zenith 58, 79
Zonda 01
Dongyang 03, 54
18, 40, 59, 60, 75
MGA
MTC 18
NEC 18, 19, 20, 40, 59, 60
Nikei 03
06, 07, 08, 09, 54, 66,
67, 73, 74
03, 15, 17, 18, 48, 54,
59, 62, 69, 90
15, 17, 18, 40, 48,
54, 62, 72
18, 59, 67, 76, 77, 78,
92, 93, 94
00, 15, 16, 17, 40, 43,
46, 47, 48, 49,
59, 60, 98
Scott 03, 40, 60, 61
57, 58
Sony 50, 51, 52, 53, 55
SSS 18
18, 40, 48, 54, 59,
60, 62
TMK 18, 40
15, 17, 18, 40, 48,
54, 60, 64
York 40
HT-E6530_ZC_0315.indd 14HT-E6530_ZC_0315.indd 14 2012-03-15 오후 4:37:322012-03-15 오후 4:37:32
Connections
This section describes various methods of connecting the product to other external components.
Before moving or installing the product, be sure to turn off the power and disconnect the power cord.
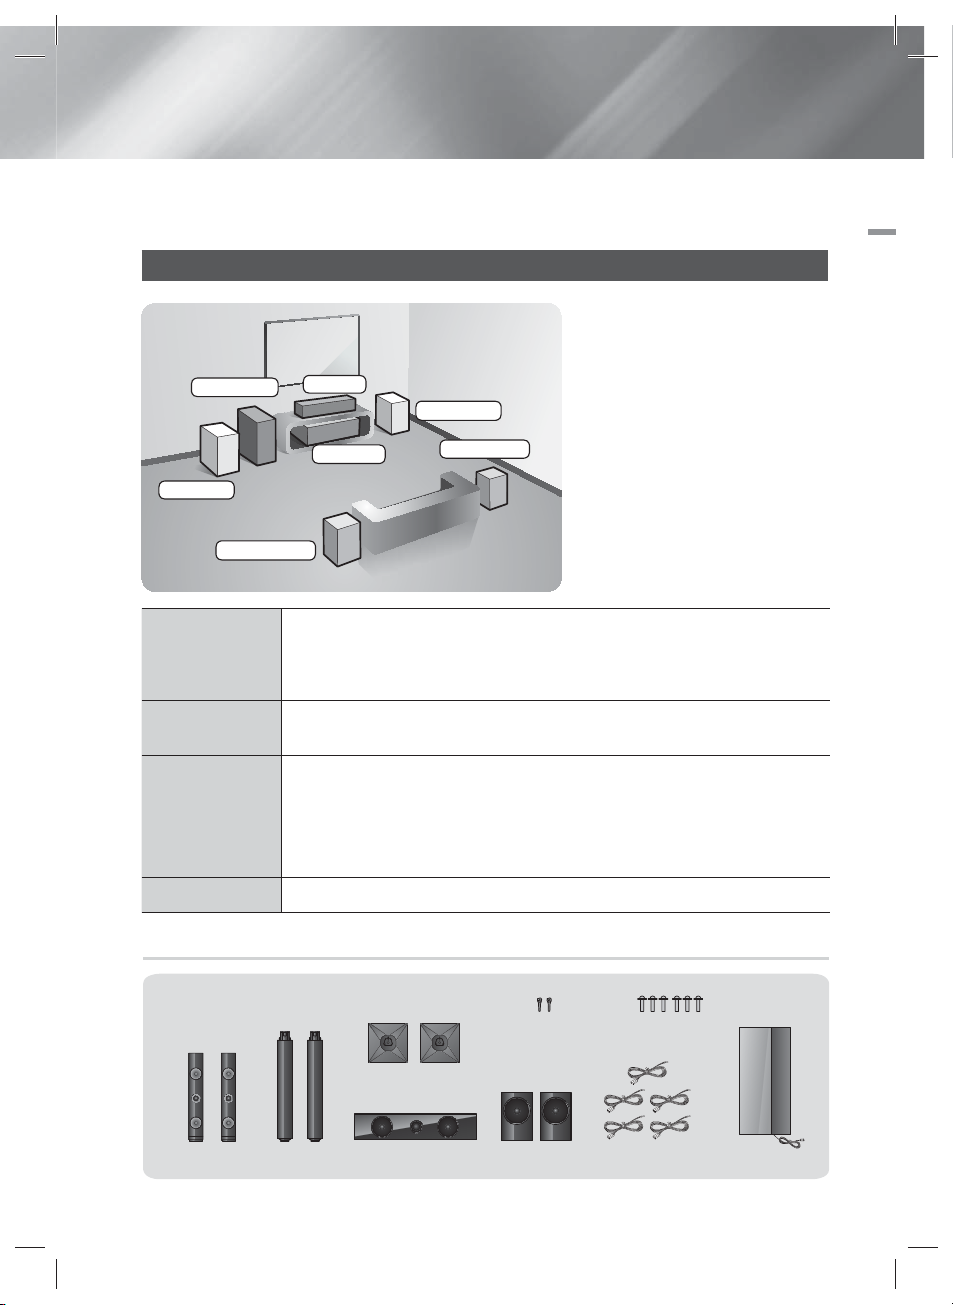
Connecting the Speakers
Position of the product
Place it on a stand or cabinet shelf, or
under the TV stand.
Selecting the Listening Position
The listening position should be
located about 2.5 to 3 times the
TV's screen size away from the TV.
For example, if you have a 46 inch
screen, locate the listening position
115 to 138 inches (9.6 to11.5 feet)
from the screen.
Subwoofer
Front (L)
Surround (L)
Front Speakers
Center
Front (R)
Product
Place these speakers in front of your listening position, facing inwards (about 45°)
toward you. Place the front speakers so that their tweeters will be at the same height as
your ear. Align the front face of the front speakers with the front face of the center
speaker or place them slightly in front of the center speakers.
Surround (R)
03 Connections
Center Speaker
Surround Speakers
Subwoofer
It is best to install the Center Speaker at the same height as the front speakers. You can
also install it directly over or under the TV.
Place these speakers to the side of your listening position. If there isn't enough room,
place these speakers so they face each other. Position them about 2 to 3 feet (60 to
90cm) above your ear, facing slightly downward.
Unlike the front and center speakers, the surround speakers are used mainly for
*
sound effects. Sound will not come from them all the time.
The position of the subwoofer is not so critical. Place it anywhere you like.
Speaker Components
X20): 6EASCREW (5X15): 2EA
(L) (R)
STAND BASE
FRONT
HT-E6530_ZC_0315.indd 15HT-E6530_ZC_0315.indd 15 2012-03-15 오후 4:37:332012-03-15 오후 4:37:33
STAND
CENTER SUBWOOFERSPEAKER CABLE
(L) (R)
SURROUND
SCREW (5
English 15
|
Connections
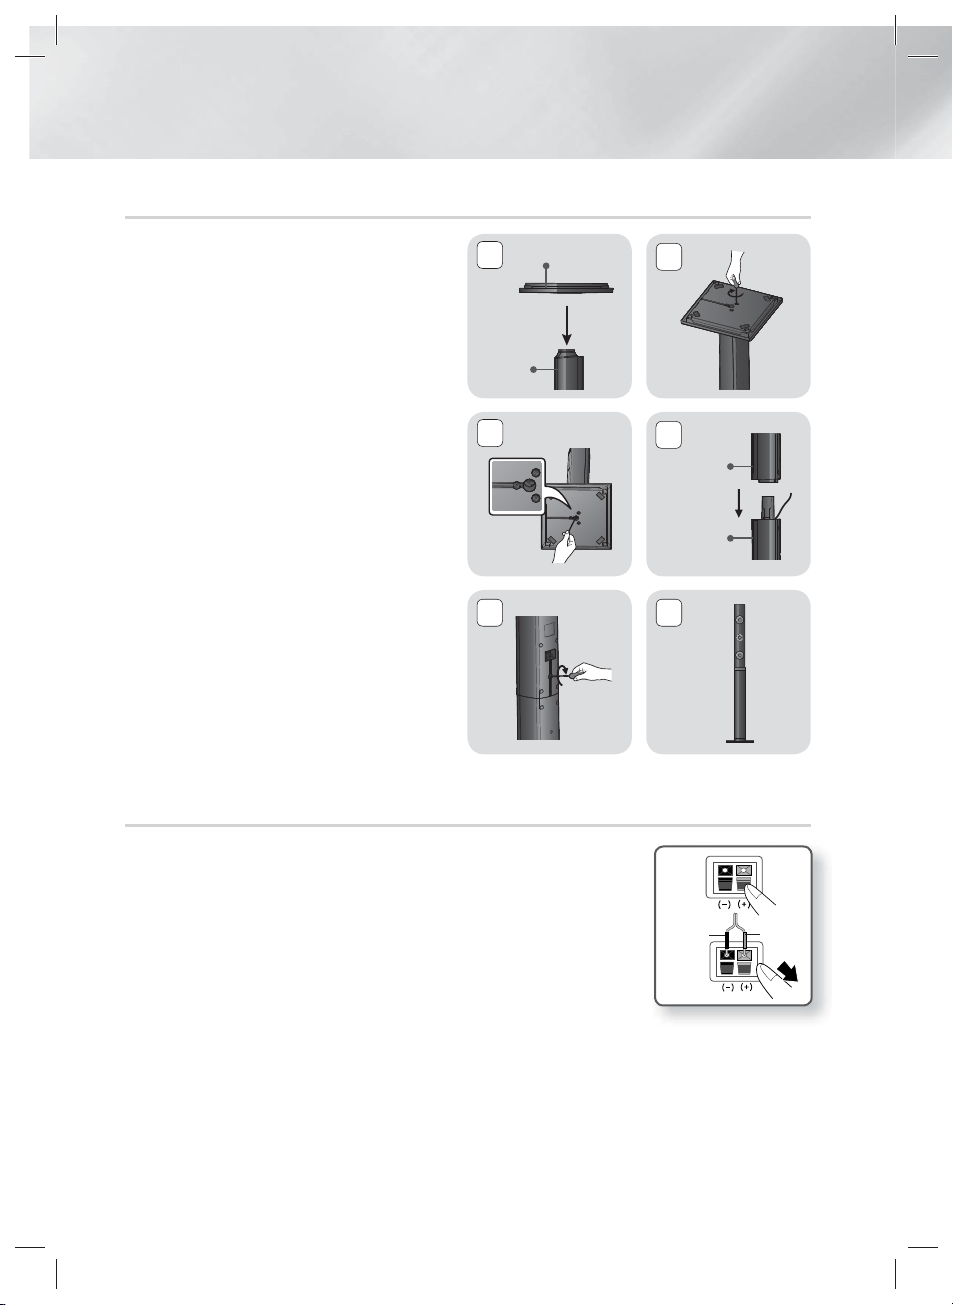
Installing the Speakers on the Tallboy Stand
1. Turn the Stand Base upside-down and
connect it to the Stand.
2. Insert screws (5x20) clockwise into the three
holes marked using a screwdriver as shown in
the illustration.
3. Straighten a supplied speaker wire and put in
the hole on the center of Stand Base.
4. Connect the upper Speaker to the assembled
Stand.
5. Insert a screw (5x15) clockwise into the hole
on the rear of the speaker using a screwdriver.
And then connect a speaker cable.
6. This is the appearance after the speaker is
installed.
Follow this steps to install other speaker.
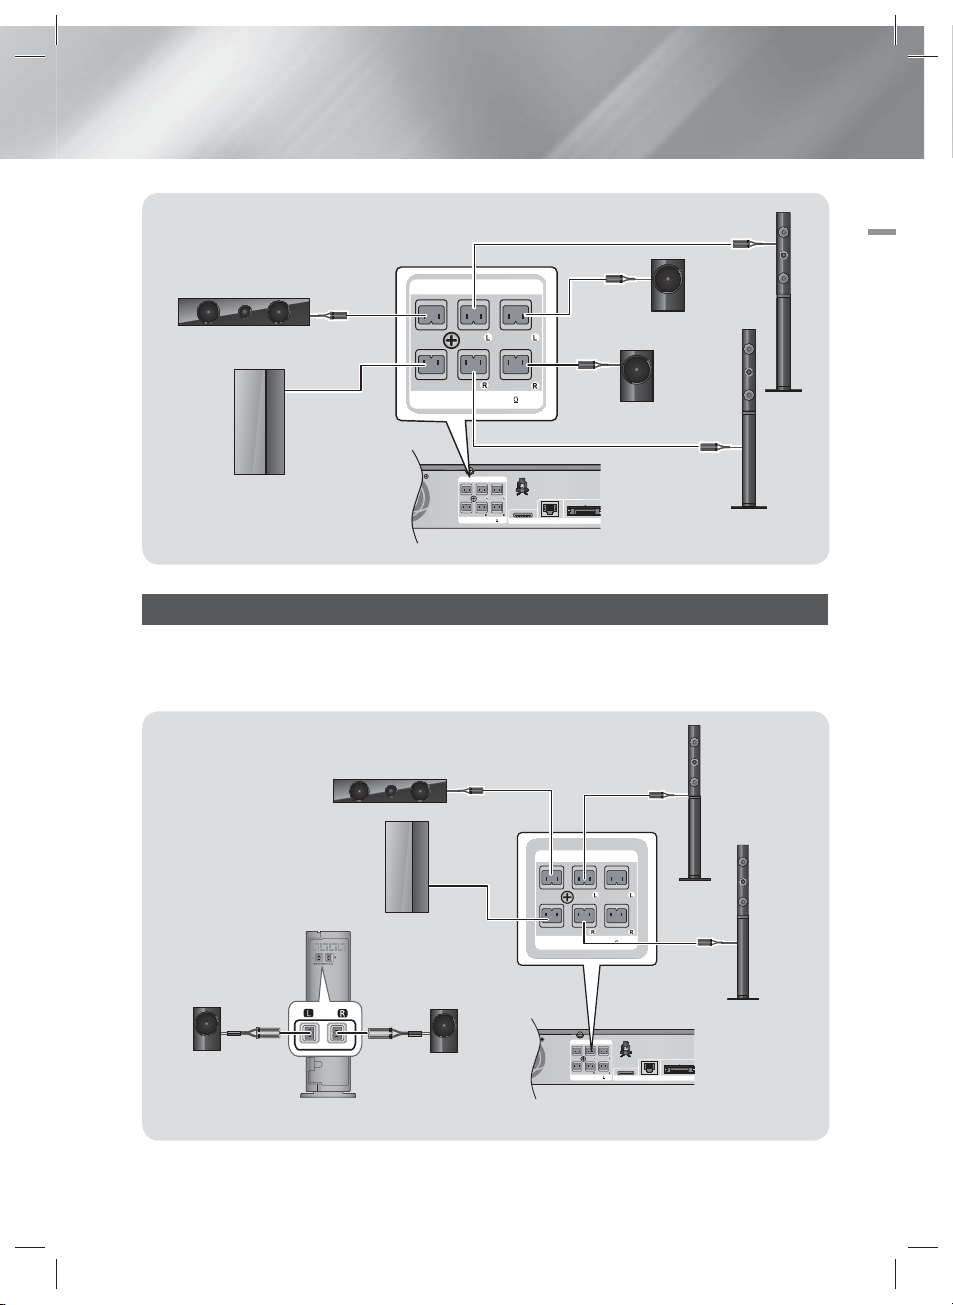
Connecting The Speakers
Stand Base
1
Stand
3
5 6
2
4
Speaker
Stand
1. Match each speaker cable bundle to the correct speaker by matching the
color coded plug on each bundle to the colored sticker on the bottom of
each speaker.
2. To attach speaker wire to each speaker:
a. Press down the red tab on the back of the speaker, insert the red wire,
and then release the tab.
b. Press down the black tab on the back of the speaker, insert the black
wire, and then release the tab.
3. Connect the speaker wire plugs from each speaker to the back of the
product by matching the colors of the speaker plugs to the colors of the speaker jacks.
|
16 English
HT-E6530_ZC_0315.indd 16HT-E6530_ZC_0315.indd 16 2012-03-15 오후 4:37:402012-03-15 오후 4:37:40
Black Red
LANiPod
WIRELESS
FRONT
SURROUND
SPEAKERS OUT
SUBWOOFER
CENTER FRONT
SURROUND
SPEAKER IMPEDANCE : 3
FRONT SURROUND
SPEAKERS OUT
SUBWOOFER
CENTER FRONT
SURROUND
SPEAKER IMPEDANCE : 3
Front Speaker (L)
LANiPod
WIRELESS
FRONT
SURROUND
SPEAKERS OUT
SUBWOOFER
CENTER FRONT
SURROUND
SPEAKER IMPEDANCE : 3
FRONT SURROUND
SPEAKERS OUT
SUBWOOFER
CENTER FRONT
SURROUND
SPEAKER IMPEDANCE : 3
Center Speaker
Surround Speaker (L)
Surround Speaker (L)
Subwoofer
Front
Speaker (R)
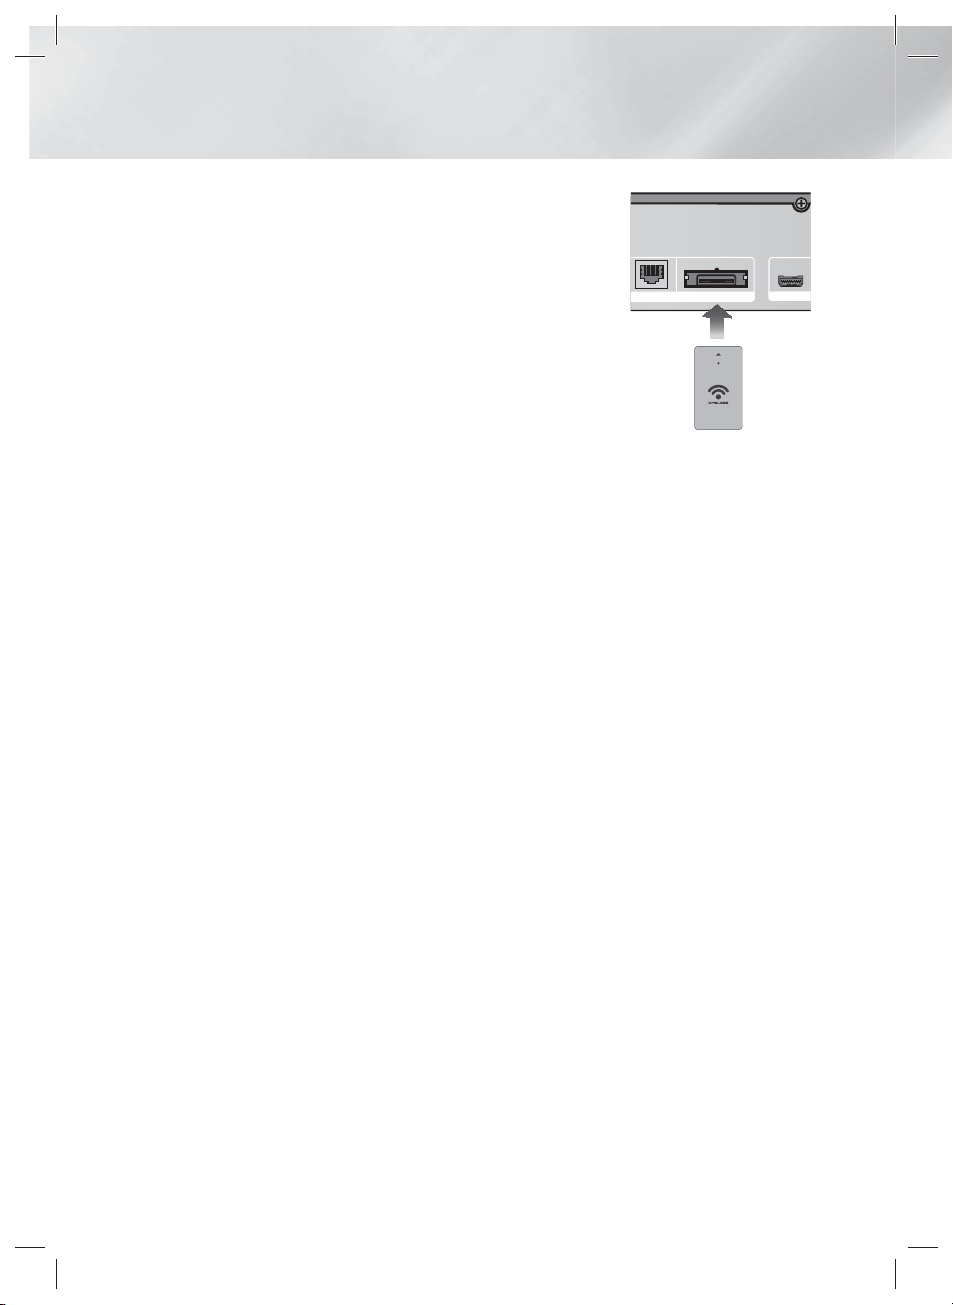
Connecting the Optional Wireless Receiver Module
To connect the surround speakers wirelessly, you have to purchase the wireless receiver module and TX
card from your Samsung retailer.
• This product should be connected with the SWA-5000 only.
03 Connections
Center Speaker
Front
Speaker (L)
Subwoofer
Surround
Speaker (L)
Surround
Speaker (R)
Front Speaker (R)
Wireless Receiver Module
English 17
HT-E6530_ZC_0315.indd 17HT-E6530_ZC_0315.indd 17 2012-03-15 오후 4:37:452012-03-15 오후 4:37:45
|
Connections
1. Follow the 1 to 3 steps as shown on the previous page.
2. With the product turned off, insert the TX card into the
TX Card Connection (WIRELESS) on the back of the product.
• Hold the TX card so that the label "WIRELESS" faces upward and
insert the card into the port.
• The TX card enables communication between the product and the
LAN
WIRELESS
wireless receiver module.
Connect the left and right surround speakers to the wireless Receiver
3.
module.
4.
Plug the power cord of the wireless receiver module into a wall outlet .
|
CAUTION
|
If you want to install the product on the wall, fasten the screws or nails on the wall firmly and use the holes on the rear of speaker to install.
TX card
However, when you install it, accessories (nails or screws) and installation is not provided by the company.
Do not let children play with or near the speakers. They could get hurt if a speaker falls.
When connecting the speaker wires to the speakers, make sure that the polarity (+/ –) is correct.
Keep the subwoofer speaker out of reach of children to prevent children from inserting their hands or alien substances into the duct (hole)
of the subwoofer speaker.
Do not hang the subwoofer on the wall using the duct (hole).
Do not insert any other card except the TX card dedicated to the product.
If you insert a different TX card, you can damage the product and may not be able to remove the card easily.
Do not insert the TX card upside down or in the reverse direction.
Insert the TX card when the product is turned off. Inserting the card when it is turned on may cause a problem.
The wireless receiving antenna is built into the wireless receiver module. Keep it away from water and moisture.
For optimal listening performance, make sure that the area around the wireless receiver module location is clear of any obstructions.
If you hear no sound from the wireless surround speakers, switch the mode to Dolby Pro Logic II.
In 2-CH mode, you will hear no sound from the wireless surround speakers.
HDMI OUT
|
NOTE
|
If you place a speaker near your TV set, the screen color may be distorted because of the magnetic field.
Place the wireless receiver module at the rear of the listening position. If the wireless receiver module is too close to the product, sound
from the speakers may be disrupted because of interference.
If you use a device such as a microwave oven, wireless LAN Card, Bluetooth equipment or any other device that uses the 2.4/5.8GHz
frequencies near the product, sound from the speakers may be disrupted because of interference.
The maximum transmission distance from the product to the wireless receiver module is about 33 feet (10m), but may vary depending on
your operating environment. If a steel-concrete wall or metallic wall is between the product and the wireless receiver module, the system
may not operate at all, because the radio wave cannot penetrate metal.
If the product doesn't make a wireless connection, you need to run an ID Set between the product and wireless receiver module. With the
product turned off, press "0""1""3""5" on the remote control. Turn on the wireless receiver module. Then, press and hold the “ID
SET” button on the back of the wireless receiver module for 5 seconds, and then turn the product on.
|
18 English
HT-E6530_ZC_0315.indd 18HT-E6530_ZC_0315.indd 18 2012-03-15 오후 4:37:472012-03-15 오후 4:37:47
DIG
AUDIO IN
L
V
O
OUT
AUX
N
SS
1
FRONT
S
S
SUBWOOFER
C
T
S
S
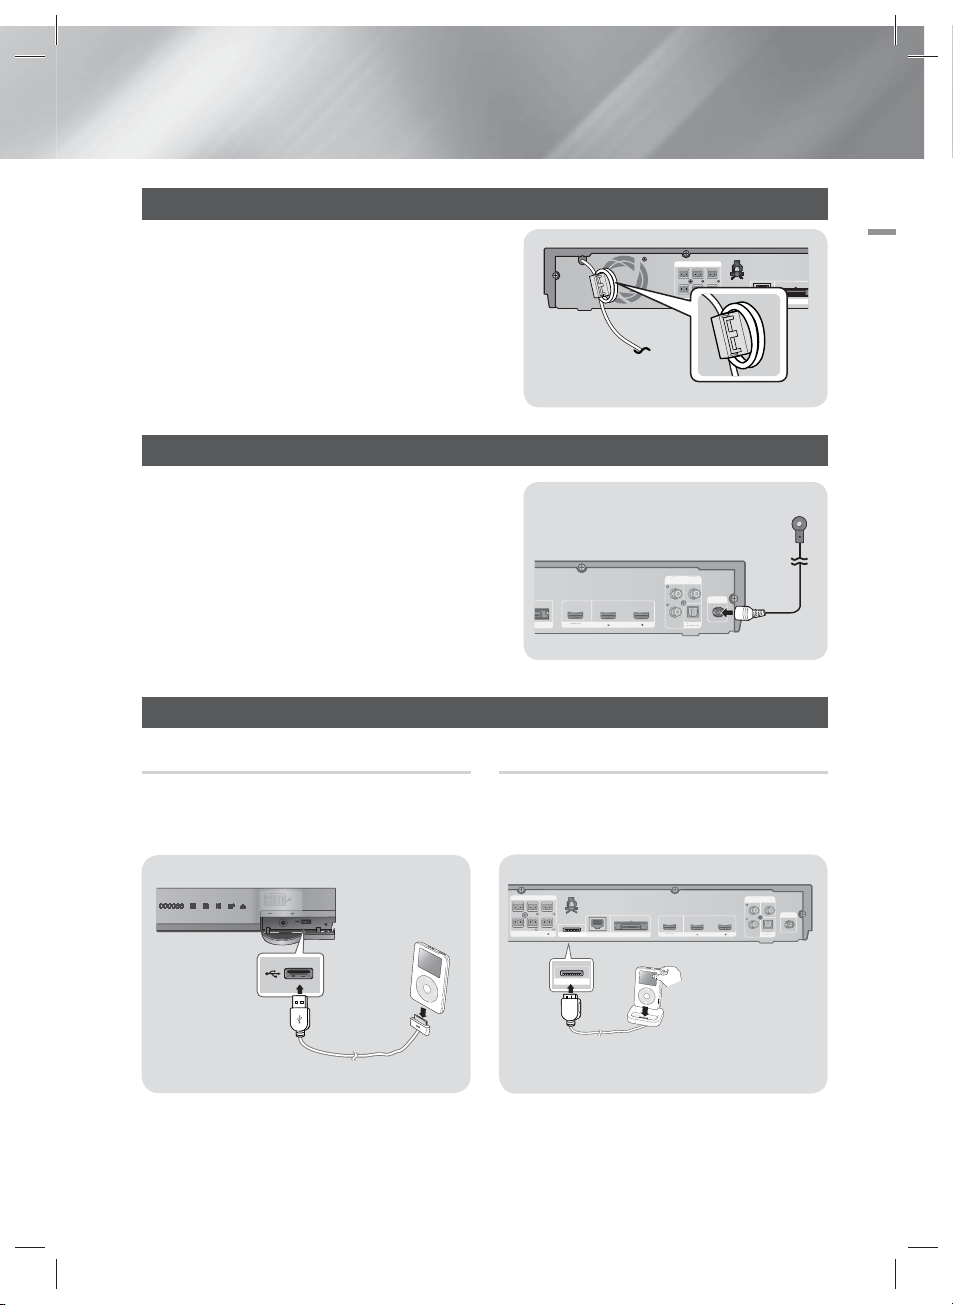
Attaching the Toroidal Ferrite Core to the Power Cord of the Main Unit
DIGITAL
AUDIO IN
OPTICAL
VIDEO
OUT
AUX
IN
S
HDMI IN
2
1
HDMI OUT
DIGITAL
AUDIO IN
OPTICAL
VIDEO
OUT
AUX
S
HDMI IN
2
1
HDMI OUT
FM ANT
If you attach a Toroidal ferrite core to the power cord of
the main unit, it will help to prevent RF interference from
radio signals.
1. Pull the fixing tab of the Toroidal ferrite core to open
it.
2. Double loop the main unit power cord.
3.
Attach the Toroidal ferrite core to the main unit power
cord as the figure shows and press it until it clicks.
CENTER FRONT
SUBWOOFER
SPEAKERS OUT
FRONT
SPEAKER IMPEDANCE : 3
FRONT TOP
FRONT TOP
Connecting the FM Antenna
1 . Connect the FM antenna supplied to the FM
ANTENNA Jack.
FM Antenna (supplied)
2 . Slowly move the antenna wire around until you find
a location where reception is good, then fasten it
to a wall or other rigid surface.
NOTE
|
|
This product does not receive AM broadcasts.
Connecting to an iPod/iPhone
03 Connections
LANiPod
WIRELESS
Using a USB Cable
Connect an iPod/iPhone using the USB cable to
the front USB port.
Using a Dock
To view a video from your iPod on your TV, you must
also connect the Video Out jack on the product to
the Video In jack on your TV. See page 20.
SPEAKERS OUT
|
NOTE
PEAKERS OUT
ENTERFRON
CENTER FRONT
SURROUND
ASC IN
5V 500mA
5V 500mA
SUBWOOFER
SPEAKER IMPEDANCE : 3
PEAKER IMPEDANCE : 3
URROUND
FRONT
URROUND
SURROUND
LANiPod
iPod
HDMI OUT
HDMI OUT
WIRELESS
WIRELE
1
|
VIDEO
AUX
IDE
I
OUT
IN
FM ANT
OPTICAL
OPTICA
DIGITAL
ITAL
2
HDMI IN
AUDIO IN
Make sure to connect the dock connector so that the label “” faces upward.
English 19
HT-E6530_ZC_0315.indd 19HT-E6530_ZC_0315.indd 19 2012-03-15 오후 4:37:482012-03-15 오후 4:37:48
|
Connections
DIGITAL
AUDIO IN
OPTICAL
VIDEO
OUT
AUX
IN
HDMI IN
2
1
HDMI OUT
FM ANT
HDMI IN
VIDEO IN
DIGITAL
AUDIO IN
OPTICAL
FM ANT
VIDEO
OUT
AUX
IN
LANiPod
WIRELESS
HDMI IN
2
1
HDMI OUT
FRONT
SURROUND
SPEAKERS OUT
SUBWOOFER
CENTER FRONT
SURROUND
SPEAKER IMPEDANCE : 3
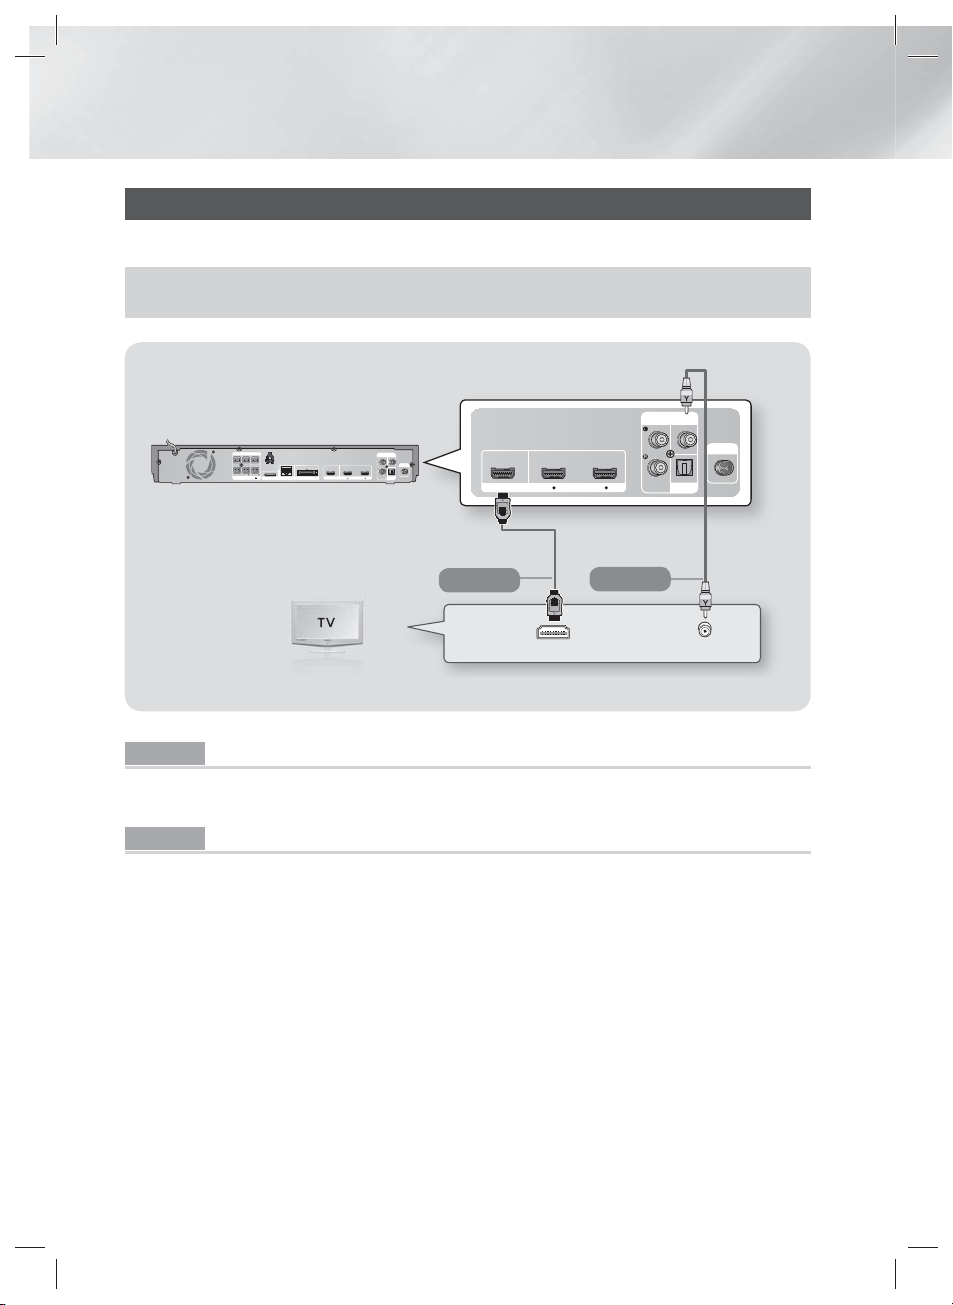
Connecting to a TV
Select either Method 1 or Method 2.
• If you have set the product's remote control to operate your TV, press the TV SOURCE button on the remote control, and
then select the source the product is connected to (HDMI, Video In, etc.) to view video from the home theater.
(Cable not supplied.)
Method 1
Method 2
Method 1 Connecting to a TV with an HDMI Cable - Best Quality (Recommended)
Connect an HDMI cable (not supplied) from the HDMI OUT jack on the back of the product to the HDMI IN
jack on your TV.
Method 2 Connecting to a TV with a Video Cable - Good Quality
Connect the supplied Video cable from the VIDEO OUT jack on the back of the product to the VIDEO IN
jack on your TV.
|
NOTE
|
The VIDEO Out jack always outputs in the 480i resolution regardless of the resolution set in the Setup menu.
Do not connect the unit through a VCR. Video signals fed through VCRs may be affected by copyright protection systems and
the picture will be distorted on the television.
You can connect the product to your TV using both the HDMI and Video connections.simultaneously.
To view videos from an iPod connected to the product on your TV, you must connect the product to the TV using the Video
connection. If you connect the product to the TV using the Video connection, you can also connect the product to the TV
using the HDMI connection.
|
20 English
HT-E6530_ZC_0315.indd 20HT-E6530_ZC_0315.indd 20 2012-03-15 오후 4:37:522012-03-15 오후 4:37:52
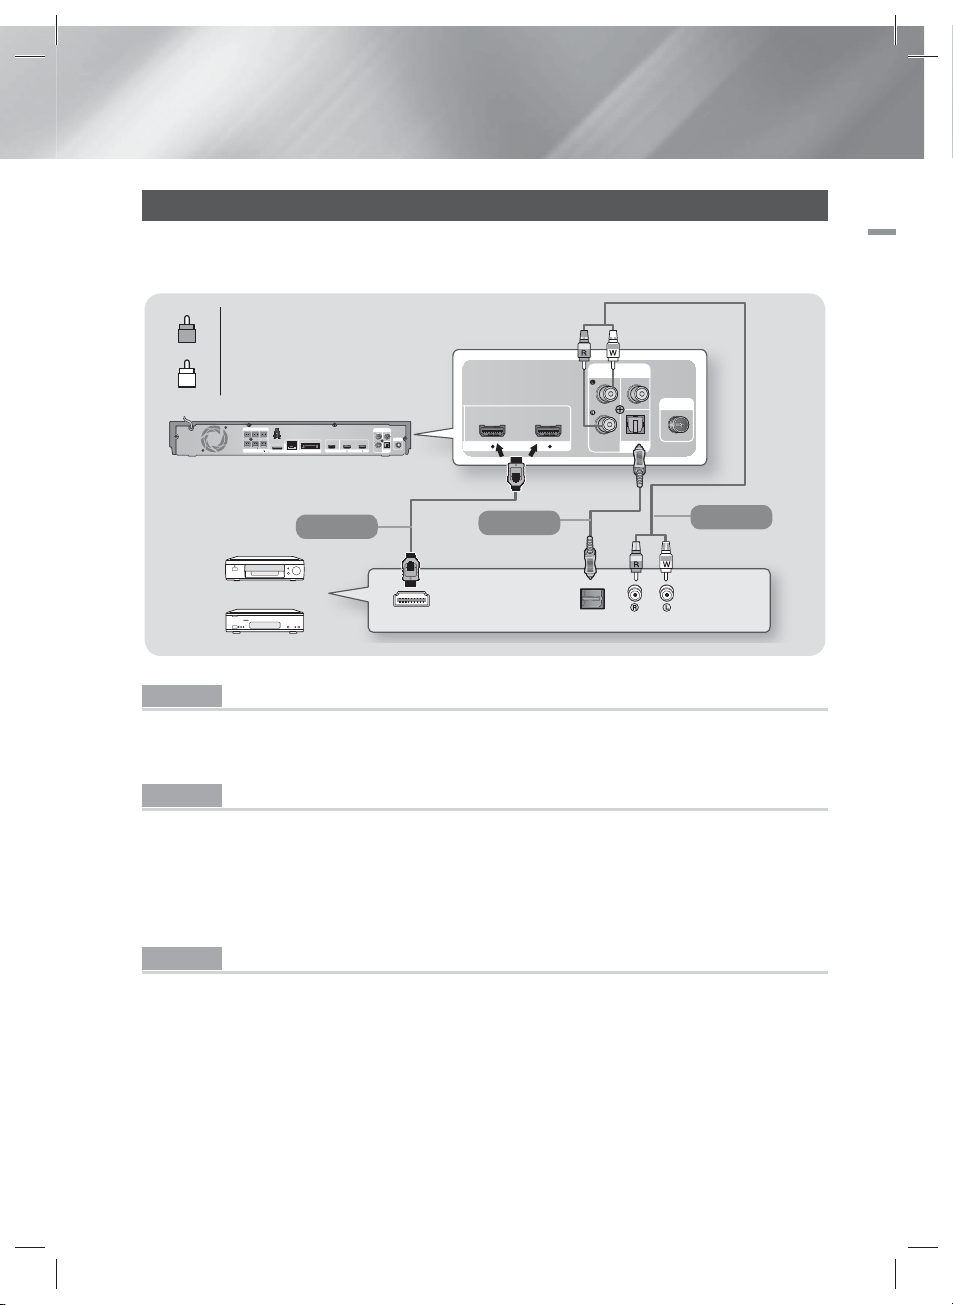
Connecting to External Devices
DIGITAL
AUDIO IN
OPTICAL
VIDEO
OUT
AUX
IN
HDMI IN
2
1
FM ANT
AUDIO OUT
HDMI OUT
OPTICAL OUT
DIGITAL
AUDIO IN
OPTICAL
FM ANT
VIDEO
OUT
AUX
IN
LANiPod
WIRELESS
HDMI IN
2
1
HDMI OUT
FRONT
SURROUND
SPEAKERS OUT
SUBWOOFER
CENTER FRONT
SURROUND
SPEAKER IMPEDANCE : 3
To select the correct mode for an external device, press the FUNCTION button. Each time you press the button,
the mode changes in this order : BD/DVD D. IN AUX R. IPOD HDMI1 HDMI2 FM
Red
R
White
W
03 Connections
(Cable not supplied.)
Method 1
External Devices
Method 2
(Cable not supplied.)
(Cable not supplied.)
Method 1 HDMI IN : Connecting to an External Component with an HDMI Cable
Connect an HDMI cable (not supplied) from the HDMI IN jack on the back of the product to the HDMI
OUT jack on your digital device. Select the HDMI1 or HDMI2 mode.
Method 2 OPTICAL : Connecting an External Digital Audio Component
To connect the digital audio output of digital signal components such as Cable Boxes and Satellite
Receivers (Set-Top-Boxes).
Using a digital optical cable (not supplied), connect the Optical Digital Audio In jack on the product to the
Digital Optical Out jack of the external digital device.
Select the D. IN mode.
Method 3 AUX IN : Connecting an External Analog Component
Using an RCA audio cable (not supplied), connect the AUDIO In jack on the product to the AUDIO Out
jack on the external analog component. Select the AUX mode.
• Be sure to match the colors on the cable plugs to the colors on the input and output jacks.
|
NOTE
|
To see video from your Cable Box/Satellite receiver, you must connect its video output directly to your TV.
This system supports Digital sampling frequencies of 32 kHz or higher from external digital components.
This system supports only DTS and Dolby Digital audio. MPEG audio, a bitstream format, is not supported.
Method 3
HT-E6530_ZC_0315.indd 21HT-E6530_ZC_0315.indd 21 2012-03-15 오후 4:37:532012-03-15 오후 4:37:53
English 21
|
Connections
DIGITAL
AUDIO IN
OPTICAL
FM ANT
VIDEO
OUT
AUX
IN
LANiPod
WIRELESS
HDMI IN
2
1
HDMI OUT
FRONT
SURROUND
SPEAKERS OUT
SUBWOOFER
CENTER FRONT
SURROUND
SPEAKER IMPEDANCE : 3
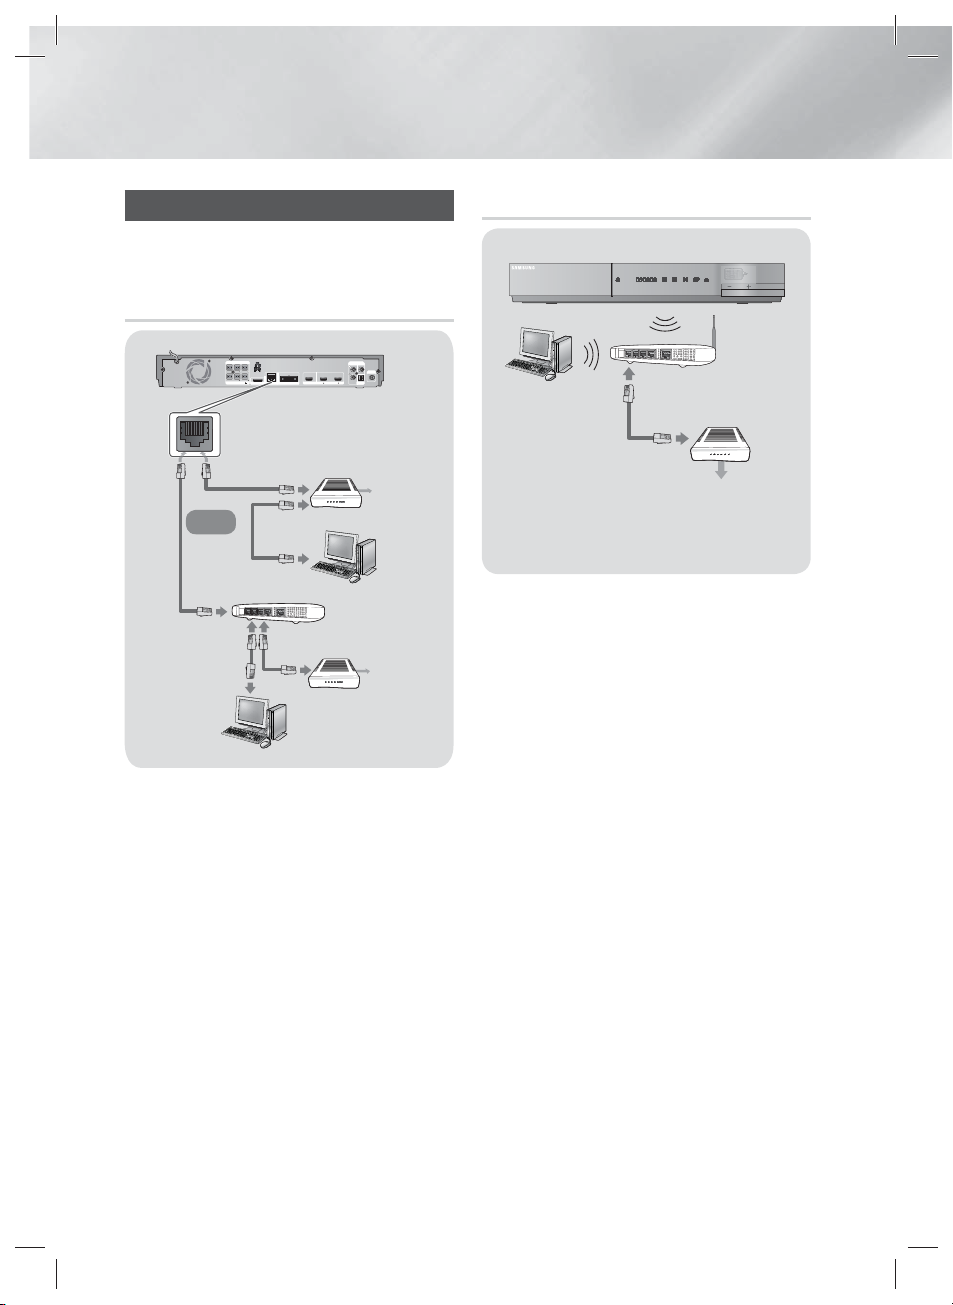
Connecting to a Network Router
You can connect your product to your network
router using one of the methods illustrated below.
Wired Network
Broadband modem
(with integrated router)
Or
Router
Broadband
modem
|
NOTE
|
Internet access to Samsung’s Software Update server
may not be allowed, depending on the router you use or
your ISP’s policy. For more information, contact your ISP
(Internet Service Provider).
DSL users, please use a router to make a network
connection.
To use the AllShare Play function, you must connect your
PC to your network as shown in the illustrations on the
left.
The connection can be wired or wireless.
Broadband
service
Broadband
service
Wireless Network
Wireless IP sharer
Broadband
service
NOTE
|
|
If your wireless IP router supports DHCP, this product can
use a DHCP or static IP address to connect to the wireless
network.
Set your wireless IP router to Infrastructure mode. Ad-hoc
mode is not supported.
The product supports only the following wireless security
key protocols:
- WEP (OPEN/SHARED), WPA-PSK (TKIP/AES), WPA2-PSK
(TKIP/AES)
Select a channel on the wireless IP router that is not
currently being used. If the channel set for the wireless IP
router is currently being used by another device nearby, it
will result in interference and communication failure.
If you select the Pure High-throughput (Greenfield)
802.11n mode and set the Encryption type on your router
or AP to WEP, TKIP or TKIP-AES (WPS2Mixed), the product
will not support a connection in compliance with new WiFi certification specifications.
Wireless LAN, by its nature, may cause interference,
depending on the operating conditions (AP performance,
distance, obstacles, interference by other radio devices,
etc).
|
22 English
HT-E6530_ZC_0315.indd 22HT-E6530_ZC_0315.indd 22 2012-03-15 오후 4:37:552012-03-15 오후 4:37:55
Settings
The Initial Settings Procedure
• The Home menu will not appear if you do not configure
the initial settings.
• The OSD (On Screen Display) may change in this
product after you upgrade the software version.
• The access steps may differ depending on the menu
you selected.
1 . Turn on your TV after connecting the product,
and then turn on the product. When you turn
on the product for the first time, the product
automatically displays the Initial Settings
Language screen.
Initial Settings > On-Screen Language
Select a language for the on-screen
displays.
▲
Dansk Nederlands
English Eesti keel
Suomi Français
Deutsch Ελληνικά
Magyar Italiano
Қазақ
▼
한국어
Select English as the
on-screen menu
language.
Next
NOTE
|
|
The product starts the wireless network connection
procedure by default. If you want to set up a wired
connection, select Skip, and then go to "Configuring
Your Network Connection" on page 32 after you have
completed the Initial Settings Procedure.
If you skip wireless network setup here, go to "Wireless
Network" on page 33 to set up the product's wireless
network connection later.
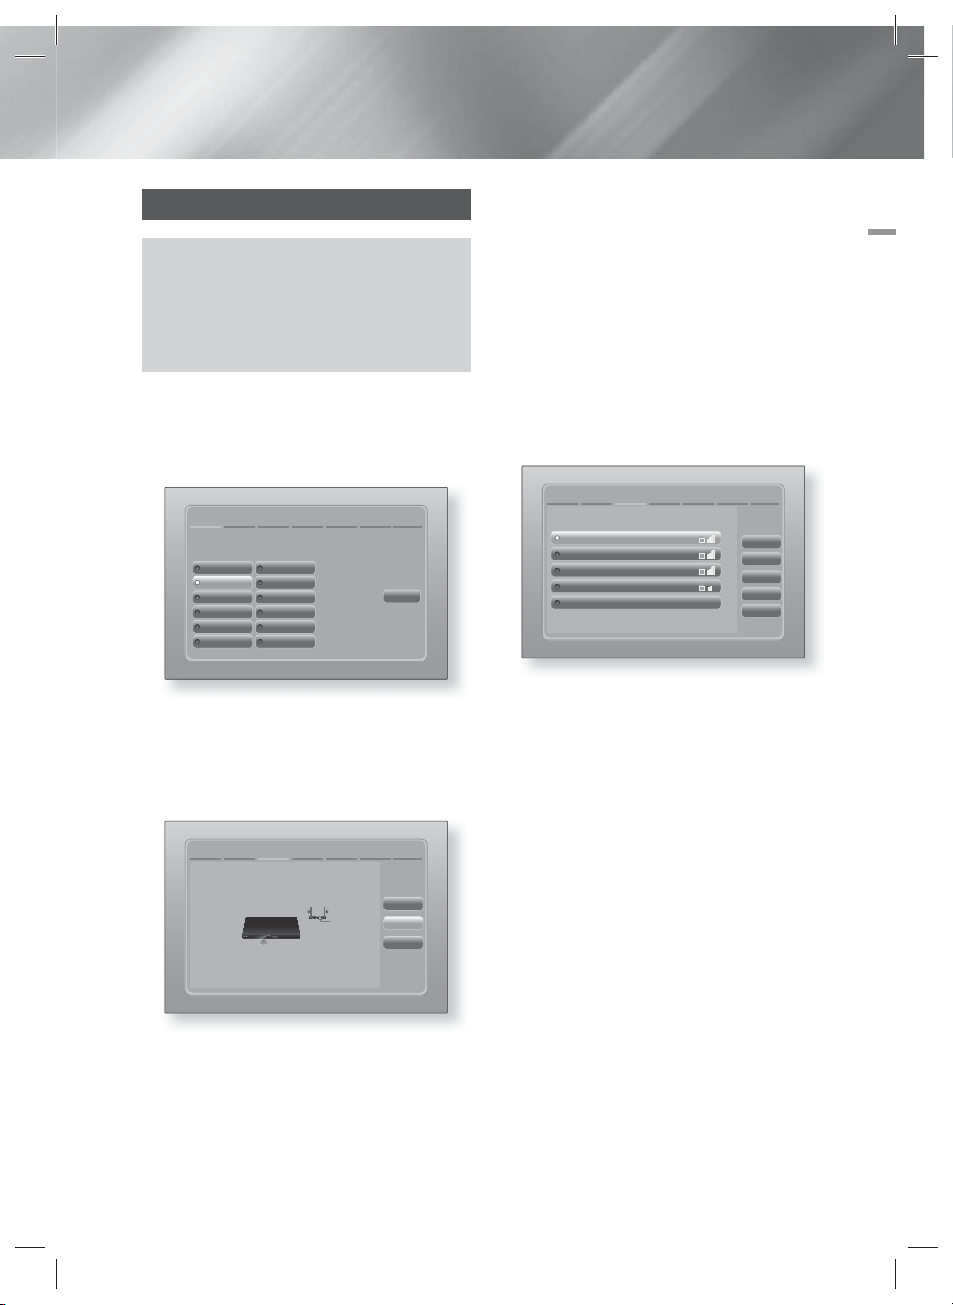
5 . The product searches for and then displays
all available wireless router network
connections.
Initial Settings > Network Settings (2/5)
Select your wireless router from the list:
KIMING_VTOWER
TIAS
si-ap
surlwang5
Add Network
1 / 4
Refresh
WPS(PBC)
Previous
Next
Skip
04 Settings
2 . Use the ▲▼◄► buttons on the remote
to select the desired language, and then
press the E button twice. The Start screen
appears.
3 . Press the E button to start setup. The
Network Settings screen appears.
>
Network Settings (1/5)
Initial Settings
The next step is to set up a wireless network using an
internal LAN Adapter.
If you want to connect to your wired network, plug in a
network cable.
Previous
Next
Skip
6 . Use the ▲▼ buttons to select a router, and
then press the E button. The Next button
is highlighted.
7 . Press the E button to continue.
The Security Key screen appears.
|
NOTE
|
If you have a WPS(PBC) compatible router, select
WPS(PBC) instead, press the E button, and then follow
the directions on the screen. When done, go to Step 10.
4 . Press the E button to set up the product's
wireless network connection or select
Skip, and then press the E button to skip
network setup. If you selected Skip, go to
Step 12.
English 23
HT-E6530_ZC_0315.indd 23HT-E6530_ZC_0315.indd 23 2012-03-15 오후 4:37:592012-03-15 오후 4:37:59
|
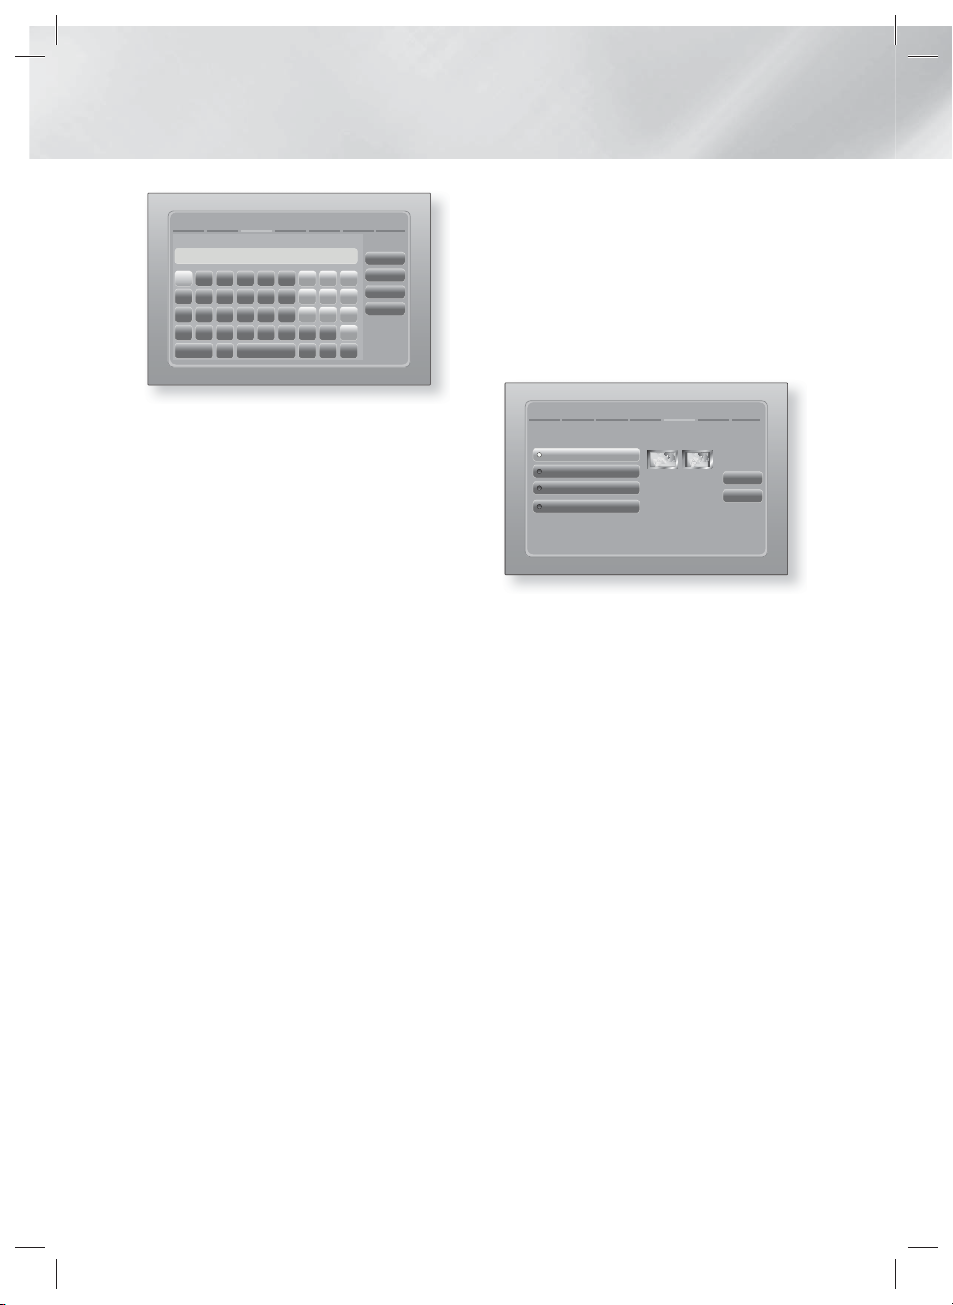
Settings
Initial Settings > Network Settings (4/5)
Enter security key.
-
a
b
g
h
m
n
s
t
A/a Space
e
c
d
k
i
j
q
o
p
w
u
v
0 entered
WPS PIN
1
f
4
l
7
r
y
x
Previous
2
3
Next
5
6
Skip
8
9
z
0
8 . Enter your network's security key. When
done, use the ▲▼◄► buttons to select
Next, and then press the E button.
|
NOTE
|
Enter numbers by pressing the number buttons on your
remote.
Enter letters by selecting a letter using the ▲▼◄►
buttons, and then pressing E button.
To display capital letters (or redisplay small letters if
capital letters are displayed), select A/a, and then press
the E button.
To display symbols and punctuation, select , and then
press the E button. To redisplay letters, select , and
then press the E button.
9 . If the connection is successful, the
Connection Complete screen appears. Select
Next, and then press the E button. The
Software Update screen appears.
|
NOTE
|
If the connection is not successful, select Next, and then
press the E button. After you have completed the Initial
Settings procedure, go to "Wireless Network" on page 33
to set up the product's wireless network connection.
10 . To upgrade the software, select Update
now, and then press the E button. To skip
the upgrade, select Update later, press the
button, and go to Step 12.
E
|
NOTE
|
If you skipped network set up, you must skip Software
Update also.
11 . If there is a Software Update available,
the product downloads and installs the
upgrade. This can take some time. If there
is no Software Update available, the "There
are no new software updates for you to
download. You already have the most up
to date version." message appears. And
then press the E button. The TV Aspect
Ratio screen appears.
Initial Settings > TV Aspect Ratio
Set to match the type of television connected.
16:9 Original
16:9 Full
4:3 Letter Box
4:3 Pan-Scan
Select when connecting to a
16:9 TV Screen. All content
will be displayed at original
aspect ratio. Content
formatted in 4:3 will be
displayed with black bars on
left and right.
Previous
Next
12 . Using the ▲▼ buttons, select the aspect ratio
that matches your TV screen, and then press
the E button. Select Next, and then press
the E button.
You have four choices:
16:9 Original - For widescreen TVs. Displays
widescreen pictures in their original 16:9
format and 4:3 pictures (the old, standard
format) in 4:3 pillar box format with black bars
on the left and right.
16:9 Full - For widescreen TVs. Displays
widescreen pictures in their original 16:9
format and expands 4:3 pictures to fill the
16:9 screen.
4:3 Letter Box - For older, standard screen
analog TVs. Displays 4:3 pictures in full
screen and 16:9 pictures in letter box format
that retains the 16:9 aspect ratio but puts
black bars above and below the picture.
4:3 Pan-Scan - For older, standard screen
analog TVs. Displays 4:3 pictures in full
screen and 16:9 pictures in Pan-Scan format
that fills the screen, but cuts off the left and
right sides of the picture and enlarges the
middle vertically.
|
24 English
HT-E6530_ZC_0315.indd 24HT-E6530_ZC_0315.indd 24 2012-03-15 오후 4:38:002012-03-15 오후 4:38:00
Initial Settings > Auto Sound Calibration
Connect the calibration microphone
to the ASC IN jack and set up all
speakers correctly as shown before
starting.
Note: Please be aware that this
process outputs a loud test sound
that is needed for proper calibration.
Press Next to set the best speaker
output level.
Press Skip to configure later.
Place Calibration Mic.
Here
User
1/4
Previous
Next
Skip
13 . The Auto Sound Calibration screen appears.
Plug the ASC microphone into the ASC IN
jack on the product.
14 . Press the E button to select the Next
button. Setting the Auto Sound Calibration
function takes about 3 minutes. Select Next,
and then press the E button.
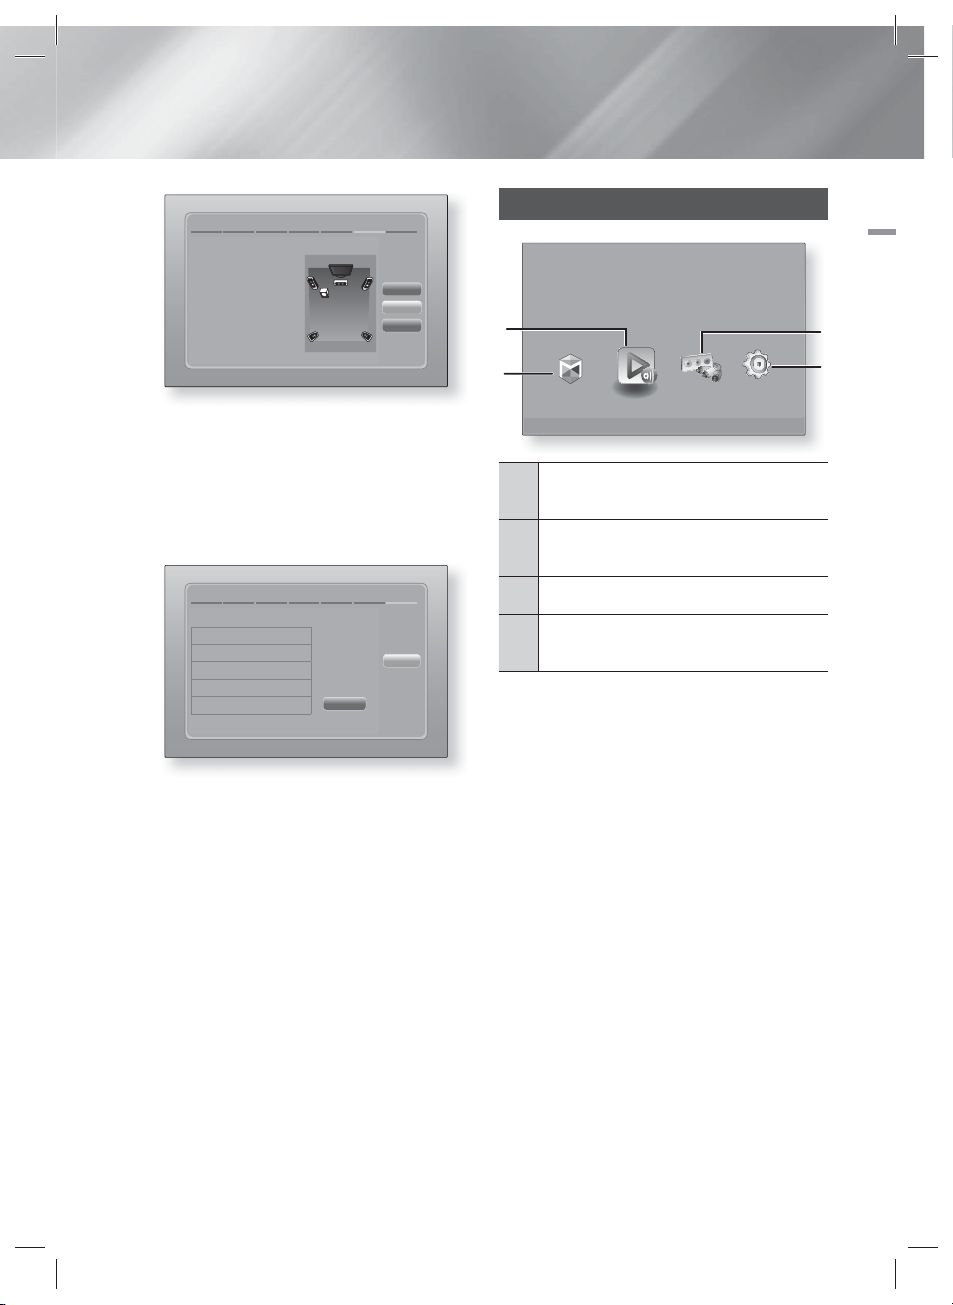
The Home Screen
Play videos, photos, or music from Disc or connected devices.
2
1
Smart Hub Function Settings
Smart Hub. Starts Smart Hub. From Smart Hub,
1
you can access YouTube, games, and other apps.
AllShare Play. Play videos, photos or music content
2
from Disc, USB, PC or mobile devices.
AllShare Play
04 Settings
3
4
Initial Settings > Complete
Setup completed.
On-Screen Language
Network Settings
Software Update -
TV Aspect
Auto sound calibration
Press Smart Hub to
enjoy variety of
Internet content.
Smart Hub
OK
15 . The Setup completed screen appears. Check
the settings to confirm they are correct.
Select OK, and then press the E button.
The Home screen appears.
|
NOTE
|
If you want to display the Initial Setting screen again and
make changes, select the Reset option. (See page 31)
If you use an HDMI cable to connect the product to an
Anynet+ (HDMI-CEC)-compliant Samsung TV and 1.) You
have set the Anynet+ (HDMI-CEC) feature to ON in both
the TV and the product and 2.) You have set the TV to a
language supported by the product, the product will select
that language as the preferred language automatically.
Function. Select the audio/video input source.
3
Settings. Set various functions to suit your personal
4
preferences.
Selecting an Option on the Home Screen
1 . To select an option on the Home screen,
move the cursor using the ◄► buttons until it
highlights the option of your choice, and then
press the E button.
English 25
HT-E6530_ZC_0315.indd 25HT-E6530_ZC_0315.indd 25 2012-03-15 오후 4:38:022012-03-15 오후 4:38:02
|
Settings
S/W LEVEL
HOME REPEAT
TOOLS
RETURN
EXIT
INFO
MO/ST
TUNER
MEMORY
ABCD
VOL
TUNING
/ CH
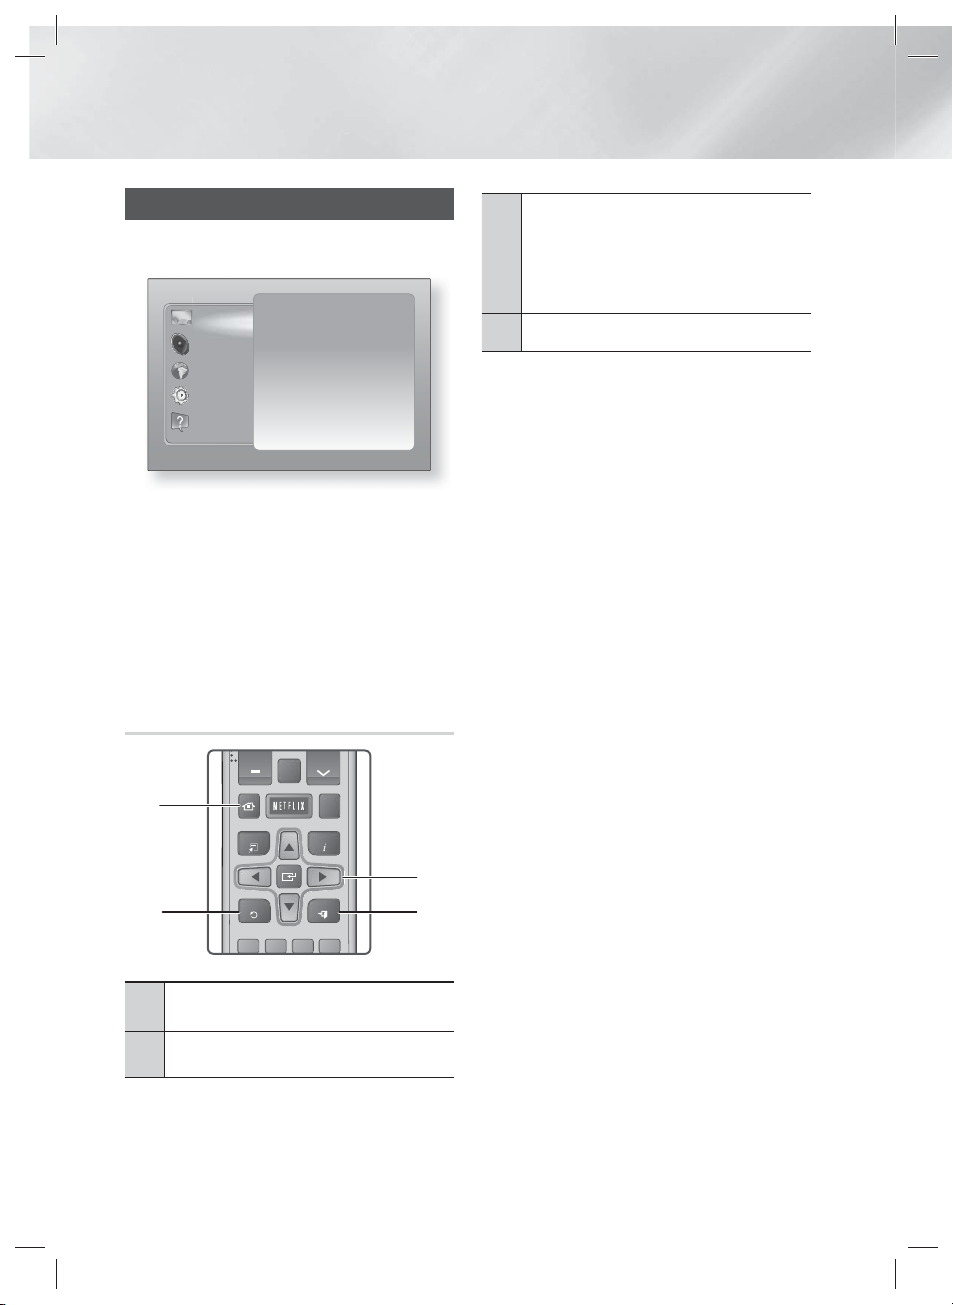
Accessing the Settings Screen
1 . Select Settings on the Home screen, and
then press E. The Settings screen appears.
Display
Audio
Network
System
Support
3D Settings
TV Aspect Ratio 16:9 Original
Smart Hub Screen Size Size 3
BD Wise Off
Resolution Auto
Movie Frame (24Fs) Auto
HDMI Color Format Auto
HDMI Deep Color Auto
Progressive Mode Auto
2 . To access the menus, sub-menus, and
options on the Settings screen, please refer
to the remote control illustration below.
|
NOTE
|
If you leave the product in the stop mode for more than
5 minutes without using it, a screen saver will appear on
your TV. If the product is left in the screen saver mode for
more than 20 minutes, the power will automatically turn
off.
Buttons on the Remote Control Used
for the Settings Menu
E
(Enter) / DIRECTION Button :
3
~Press
an item.
to move the cursor or select
▲▼◄►
~Press the E button to activate the currently
selected item or confirm a setting.
EXIT Button : Press to exit the current menu.
4
NOTE
|
|
The E button on the product's front panel can be
used for same purpose as the E button on the remote
control.
Detailed Function Information
Each Settings function, menu item, and individual
option is explained in detail on-screen. To view an
explanation, use the ▲▼◄► buttons to select the
function, menu item, or option.
The explanation will usually appear on the right of
the screen. A short description of each Settings
function starts on the next page. Additional
information on some of the functions is also in the
Appendix of this manual.
1
3
24
HOME Button : Press to move to the Home screen.
1
RETURN Button : Return to the previous menu.
2
|
26 English
HT-E6530_ZC_0315.indd 26HT-E6530_ZC_0315.indd 26 2012-03-15 오후 4:38:062012-03-15 오후 4:38:06

Settings Menu Functions
Display
3D Settings
04 Settings
Set up the 3D related functions.
3D Blu-ray Playback Mode: Select whether to play a Blu-
ray Disc with 3D contents in 3D Mode. If you move to the
Home or Smart Hub Home menu while in 3D mode, the
product will switch to 2D automatically.
Screen Size: Enter the size of the TV attached to the
product. The product will automatically adjust the 3D output
to the screen size of the TV.
TV Aspect
Ratio
Smart Hub
Screen Size
BD Wise
Resolution
Movie Frame
(24Fs)
HDMI Color
Format
Lets you adjust the output of the product to the screen size of
your TV. See page 24, Step 12 for a description of the screen
size options.
Lets you select the optimal size for the Smart Hub Screen.
BD Wise is Samsung’s latest inter-connectivity feature.
When you connect a Samsung product and a Samsung TV
with BD Wise to each other via HDMI, and BD Wise is on in
both the product and TV, the product outputs video at the
video resolution and frame rate of the Blu-ray/DVD Disc.
Lets you set the output resolution of the HDMI video signal to
Auto, 1080p, 1080i, 720p, 480p. If Composite is connected,
the resolution supports only 480i. The number indicates
the number of lines of video per frame. The i and p indicate
interlaced and progressive scan, respectively. The more lines,
the higher quality.
Setting the Movie Frame (24Fs) feature to Auto lets the product
adjust its HDMI output to 24 frames per second automatically
for improved picture quality if attached to a 24Fs compatible TV.
• You can enjoy the Movie Frame (24Fs) feature only on a TV
supporting this frame rate.
• Movie Frame is only available when the product is in the
HDMI 1080i or 1080p output resolution modes.
Lets you set the color space format for the HDMI output to match
the capabilities of the connected device (TV, monitor, etc).
HDMI Deep
Color
Progressive
Mode
HT-E6530_ZC_0315.indd 27HT-E6530_ZC_0315.indd 27 2012-03-15 오후 4:38:132012-03-15 오후 4:38:13
Lets you set the product to output video from the HDMI OUT
jack with Deep Color. Deep Color provides more accurate
color reproduction with greater color depth.
Lets you improve picture quality when viewing DVDs.
English 27
|

Settings
Audio
Speaker
Settings
Auto Sound
Calibration
Equalizer
Smart Volume
Speaker
Selection
Audio Return
Channel
Digital Output
Dynamic
Range Control
You can set the speaker options.
The product automatically creates a sound field optimized for
your environment. See page 32.
Lets you configure the Equalizer settings manually.
Lets you set the product so that the volume remains stable
when a scene change occurs or when you change the
channel.
Lets you select which speakers you want active, either the
TV's speakers or the Home theater's speakers.
Lets you direct the sound from the TV to the Home Theater
speakers. Requires an HDMI connection and an Audio Return
Channel (ARC) compatible TV.
• If Audio Return Channel is set to on and you are using an
HDMI cable to connect the product to the TV, digital optical
input will not work.
• If Audio Return Channel is set to auto and you are using an
HDMI cable to connect the product to the TV, ARC and
digital optical input are selected automatically.
Lets you set the Digital Output to match the capabilities of the
AV receiver you’ve connected to the product. For more details,
please refer to the digital output selection table. (See page 60)
Lets you apply dynamic range control to Dolby Digital, Dolby
Digital Plus, and Dolby True HD audio.
Auto: Automatically controls the dynamic range of Dolby
TrueHD audio, based on information in the Dolby TrueHD
soundtrack. Also turns dynamic range control on for Dolby
Digital and Dolby Digital Plus.
Off: Leaves the dynamic range uncompressed, letting you
hear the original sound.
On: Turns dynamic range control on for all three Dolby
formats. Quieter sounds are made louder and the volume of
loud sounds is reduced.
Audio Sync
|
28 English
HT-E6530_ZC_0315.indd 28HT-E6530_ZC_0315.indd 28 2012-03-15 오후 4:38:142012-03-15 오후 4:38:14
When the product is attached to a digital TV, lets you adjust
the audio delay so that the audio syncs with the video. You
can set the delay between 0 and 300 milliseconds.

Network
Network
Settings
For more information about Network Settings and network
functions, see "Networks and the Internet" starting on page
32.
04 Settings
Network
Status
Wi-Fi Direct
Soft AP
AllShare
Settings
Device Name
BD-Live
Settings
Lets you check whether a connection to the network and the
Internet have been established.
Lets you connect a Wi-Fi Direct device to the product using a
Peer-to-Peer network, without a wireless router. You can use
the device to control the product.
Lets you connect other types of Wi-Fi devices to the product
wirelessly. Requires that you create a security key which
you must enter into the other Wi-Fi devices when you are
connecting them to the network.
Lets you permit external devices such as smart phones to
connect to the product and share content with or control the
product.
Lets you assign an identifying name to the product. You use
this name to identify the product when you are connecting
external Wi-Fi devices (smart phones, tablets, etc.) to it.
Lets you allow, limit, or prohibit an Internet connection for the
BD-Live service.
English 29
HT-E6530_ZC_0315.indd 29HT-E6530_ZC_0315.indd 29 2012-03-15 오후 4:38:142012-03-15 오후 4:38:14
|

Settings
System
Initial Settings
Device
Manager
Lets you re-run the Initial Settings procedure. See page 23 for
details.
You can connect a wireless USB keyboard or mouse to
the USB port on the front of the product.
Keyboard Settings: Lets you configure a wireless USB
keyboard connected to the product.
|
NOTE |
You can use the keyboard only when a QWERTY keyboard screen or
window appears in the Web Browser.
Mouse Settings: Lets you configure a wireless USB mouse
connected to the product. You can use the mouse in the
product's menu in the same way you use a mouse on your
PC.
To use a mouse with the product's menu:
product
1 . Connect the USB mouse to the
2 . Click the primary button you selected in Mouse Settings.
The Simple Menu appears.
3 . Click the menu options you want.
|
NOTE |
Depending on the model of the USB HID keyboard and mouse may not
be compatible with your product.
Some HID keyboard keys may not work.
Wired USB keyboards are not supported.
Some applications may not be supported.
If a wireless HID Keyboard does not operate because of interference,
move the keyboard closer to the product.
.
Anynet+ is a convenient function that offers linked operations
Anynet+
(HDMI-CEC)
Language
|
30 English
HT-E6530_ZC_0315.indd 30HT-E6530_ZC_0315.indd 30 2012-03-15 오후 4:38:152012-03-15 오후 4:38:15
with other Samsung products that have the Anynet+ feature
and lets you control those products with one Samsung TV
remote. To operate this function, you must connect this
product to an Anynet+ Samsung TV using an HDMI cable.
You can select the language you prefer for the On-Screen
menu, disc menu, subtitles, etc.
• The language you select for the disc menu, disc audio, or
subtitles will only appear if it is supported on the disc.
 Loading...