

Samsung HL61A750A1FXZA, HL67A750A1FXZA Owner’s Manual
Contact SAMSUNG WORLD-WIDE
If you have any questions or comments relating to Samsung products, please contact the SAMSUNG customer care center.
Contacte con SAMSUNG WORLD WIDE
Si tiene alguna pregunta o comentario referente a nuestros productos, por favor contacte con nuestro Servicio de Atenci6n
al Cliente
Samsung Electronics Canada Inc., Customer Service 55
CANADA
U.S.A 1-800-SAMSUNG (7267864) www.samsung.com Ridgefietd Park, NJ07660-0511
1-800-SAMSUNG (7267864) www.samsung.com/ca
Standish Court Mississauga, Ontario L5R 4B2 Canada
Samsung Electronique Canada inc., Service _ la Clientele
55 Standish Court Mississauga, Ontario L5R 4B2
Canada
Samsung Electronics America, inc. 105 Challenger Road
I
BP68-00658A-00
the possibilities
Thank you for purcnaslng tnis Samsung proauct.
To receive -note complete service, olease
"eglster your proauct at
www.samsung.com/globaVregister
Model Serial No..
A Guide to Digital TV
t What is DigitalTelevision?
Digital television (DTV) is a new way of transmitting high quality video and audio to your TV set. Using DTV, broadcasters can
transmit high definition TV (HDTV) images, Dolby digital surround audio, and new services such as multicasting (transmitting
more than one program on the same TV channel) and datacasting. Several of these services can be combined into a single digital
broadcast.
Digital Television Services
= Digital Picture Quality
DTV programs are transmitted in two different formats. The first is Standard Definition Television (SDTV) and the second is High
Definition Television (HDTV).
• SDTV program formats include 480-line interlaced (480i) and 480-line progressive (480p) video. 480i programs are essentially
a digital version of our current analog TV programs, while the 480p format offers improved image detail over 480i. Some 480p
programs are broadcast in wJdescreenand are comparable to progressive-scan DVD movies in image quality.
HDTV program formats include 1080-line interlaced 1080i) and 720-line progressive (720p). Both HDTV formats are always
broadcast in widescreen, and offer much h gher p cture qua ty than SDTV.
U.S.A Only
The product unit accompanying this user manual is licensed under certain intellectual property rights of certain third parties. In
particular, this product is licensed under the following US patents:
5_991,715_5,740,317_4,972A84, 5_214,678,5_323,396,5,539,829, 5,606,618, 5_530,655,5,777,992_6,289_308,5_610_985,5_481,643_
5_544,247_5,960,037_6,023_490_5,878_080,and under US Published Patent Application No. 2001-44713-A1.
This license is limited to private non-commercial use by end-user consumers for licensed contents. No rights are granted for
commercial use. The license does not cover any product unit other than this product unit and the license does not extend to any
unlicensed product unit or process conforming to ISO/IEC 11172-3 or ISO/IEC 13818-3 used or sold in combination with this
product unit. The license only covers the use of this product unit to encode and/or decode audio files conforming to the ISO/IEC 11172-
3 or ISO/IEC 13818-3. No rights are granted under this license for product features or functions that do not conform to the ISO/IEC
11172-3or ISO/IEC 13818-3.
Other countries
The product unit accompanying this user manual is licensed under certain intellectual property rights of certain third parties. This license
is limited to private non-commercial use by end-user consumers for licensed contents. No rights are granted for commercial use. The
license does not cover any product unit other than this product unit and the license does not extend to any unlicensed product unit or
process conforming to ISO/IEC 11172-3or ISO/IEC 13818-3 used or sold in combination with this product unit. The license only covers
the use of this product unit to encode and/or decode audio files conforming to the ISO/IEC 11172-3 or ISO/IEC 13818-3. No rights are
granted under this license for product features or functions that do not conform to the ISO/IEC 11172-3 or ISO/IEC 13818-3.
SAMSUNG ELECTRONICS NORTH AMERICAN LIMITED WARRANTY STATEMENT
Subject to the requirements, conditions, exclusions and limitations of the original Limited Warranty supplied with Samsung Electronics
(SAMSUNG) products, and the requirements, conditions, exclusions and limitations contained herein_ SAMSUNG will additionally
provide Warranty Repair Service in the United States on SAMSUNG products purchased in Canada, and in Canada on SAMSUNG
products purchased in the United States_for the warranty period originally specified, and to the Original Purchaser only.
The above described warranty repairs must be performed by a SAMSUNG Authorized Service Center. Along with this Statement,
the Original Limited Warranty Statement and a dated Bill of Sale as Proof of Purchase must be presented to the Service Center.
Transportation to and from the Service Center is the responsibility of the purchaser.
Conditions covered are limited only to manufacturing defects in material or workmanship, and only those encountered in normal use
of the product.
Excluded_but not limited to, are any originally specified provisions for_in-home or on-site services, minimum or maximum repair times,
exchanges or replacements, accessories_ options, upgrades_or consumables.
For the location of a SAMSUNG Authorized Service Center, please call toll-free;
In the United States : 1-8OO-SAMSUNG(1-800-726-7864) In Canada : 1-800-SAMSUNG
See the warranty card for more information on warranty terms.
© 2008 Samsung Electronics Co., Ltd.All rights reserved.
Q&A
1. is the antenna i use for existing TV reception good enough for DTV?
Over-the-air (OTA) digital TV broadcasting uses the same channels as analog TV and works well with many existing TV antennas.
However, DTV broadcast channel assignments are different than analog channels. Youshould find out whether your local DTV
broadcasts are on VHF (channels 2-13) or UHF (channels 14-69) to see if you need a different antenna.
If your DTV channels are on UHF and you already get good UHF reception, your present antenna may work fine. The same holds
true for VHF DTV reception. Note that in some markets, both VHF and UHF channels are used for DTV broadcasts.
You can find out the latest DTV channel assignments for your area by browsing selected Internet web sites such as www.titantv.
com, www.10O00watts.com,and www.fcc.gov.
2. Now difficult is it to receive DTV signals indoors?
This depends on whether your local DTV stations are running full power or not and how close your location is to the transmission
tower. DTV receivers do not require as much signal as analog TV receivers to produce high-quality images and sound.
Once the DTV signat level exceeds a certain threshold at the receiver, the digital video and audio data is decoded at the same
quality it was originally encoded for broadcast.
This is a big advantage for DTV over analog TV - there is no noise,ghosting, static, or scratchy audio.
3. How can I connect an antenna in my townhouse, co-operative apartment, condominium,
or apartment?
The Federal Communications Commission's OTARD Rule (part of the Telecommunications Act of 1996) allows residents of
condominiums townhouse, or members of neighborhood associations to put up outside antennas for reception of broadcast TV
signals as long as those antennas are not located in common areas and are no more than 12' inheight.
Residents of rental units (apartments, etc.) are not covered by the OTARD rules and will have to use indoor antennas to receive
DTV broadcasts. It is possible that the landlord of an apartment complex can provide broadcast DTV signals via a master TV
antenna system to each apartment.
4. Can I connect my DTV set-top receiver to my cable TV service?
Cable TV systems use a different method for transmitting digital TV programs that is currently incompatible with broadcast DTV set-
top receivers. So you will still need to use an outdoor or indoor antenna to receive OTAbroadcast DTV programs.
The good news is that you won't have to pay a monthly or per-program charge to watch OTA DTV and HDTV programs. They're
free, unlike subscription satellite TV or premium cable TV.All you need is an antenna and a DTV set-top receiver to enjoy clear_
sharp widescreen images and high-quality audio.
,,, Viewing Position...................................................................... 5
! Listof Features ....................................................................... 5
,,, Checking Parts........................................................................ 6
! Viewing the Controt Panel ....................................................... 6
m Viewing the Connection Panel ................................................ 8
! Remote Control....................................................................... 9
! Installing Batteries in the Remote Control ............................. 10
m Connecting VHF and UHF Antennas .................................... 10
! Connecting CableTV ............................................................. 11
! Connecting a DVD Playeror Cable Box / Satellite receiver
(Set-Top Box) via HDMI ........................................................ 12
! Connecting a DVD Playeror Cable Box / Satellite receiver
(Set-Top Box) via DVI ........................................................... 12
! Connecting a DVD Playeror Cable Box / Satellite receiver
(Set-Top Box) via Componet cables ..................................... 13
,,, Connecting a Camcorder ...................................................... 13
! Connecting aVCR ................................................................ 14
,,, Connecting a Digital Audio System ....................................... 15
! Connecting anAmplifier / DVD Home Theater ..................... 15
,,, Connecting a PC................................................................... 16
Turning the TV On and Off.................................................... 16
,,, Plug & Play Feature .............................................................. 17
! Changing Channels .............................................................. 19
m Adjusting the Votume ............................................................ 20
! Viewing the Display............................................................... 20
,,, Viewing the Menus................................................................ 20
! Usingthe TOOLS Button ...................................................... 21
,,, Memorizing the Channels ..................................................... 21
! To Select the Source ............................................................. 23
! To Edit the Input Source Name ............................................. 23
,,, Changing the Picture Standard ............................................. 24
! Customizing the Picture Settings .......................................... 24
,,, Adjusting the Detailed Settings ............................................. 25
! Configuring Picture Options ................................................. 27
! Using the 3D Function .......................................................... 32
! Resetting the Picture Settings to the Factory Defaults .........33
! Viewing Picture-in-Picture ..................................................... 34
! UsingAutomatic Sound Settings ........................................... 36
! Customizing the Sound ......................................................... 36
m Settingthe TruSurround XT .................................................. 37
! Choosing Preferred Language .............................................. 38
,,, Choosing a Multi-Channel Sound (MTS) Track - Analog ...... 38
! Automatic Volume Control .................................................... 39
m Setting the TV Speakers On/Off............................................ 39
! Listening to the Sound of the Sub (PIP) Picture ................... 40
,,, Resetting the Sound Settings to the Factory Defaults .......... 40
Managing Channels .............................................................. 41
m Clearing Scrambled Channels- Digital ................................. 47
! FineTuning Analog Channels ............................................... 47
,,, Checking the Digital-Signal Strength .................................... 48
m Using YourTV as a Computer (PC) Display ......................... 49
! Display Modes ...................................................................... 49
,,, Setting up the TV with your PC ............................................. 50
! Setting theTime .................................................................... 52
Selecting a Menu Language ................................................. 56
m Using the V-Chip ................................................................... 57
! ViewingClosedCaptions(On-ScreenTextMessages)- Digital.......65
,,, ViewingClosedCaptions(On-ScreenTextMessages)- Analog.....66
! Adjusting the TV On/Off Melody Sound ................................ 67
m Setting the Light Effect.......................................................... 67
! Setting the Entertainment mode ........................................... 68
! Upgrading the Software ........................................................ 69
,,, Using the Photo List .............................................................. 72
! Viewing a Photo or Slide Show ............................................. 77
,,, Using the Music List.............................................................. 81
! Playing a Music File .............................................................. 85
,,, Using the Setup Menu .......................................................... 87
What is Anynet+? .................................................................. 88
m ConnectingAnynet + Devices ................................................ 88
! Setting UpAnynet + ............................................................... 89
,,, Recording .............................................................................. 90
! Listening through a Receiver (Home theater) ....................... 91
,,, Troubleshooting for Anynet+ ................................................. 91
Troubleshooting .................................................................... 92
m Cleaning and Maintaining YourTV........................................ 93
! Using Your TV in Another Country ........................................ 93
,,, Technical Specifications ........................................................ 94
Symbols
Press Important Note
One-Touch
Button
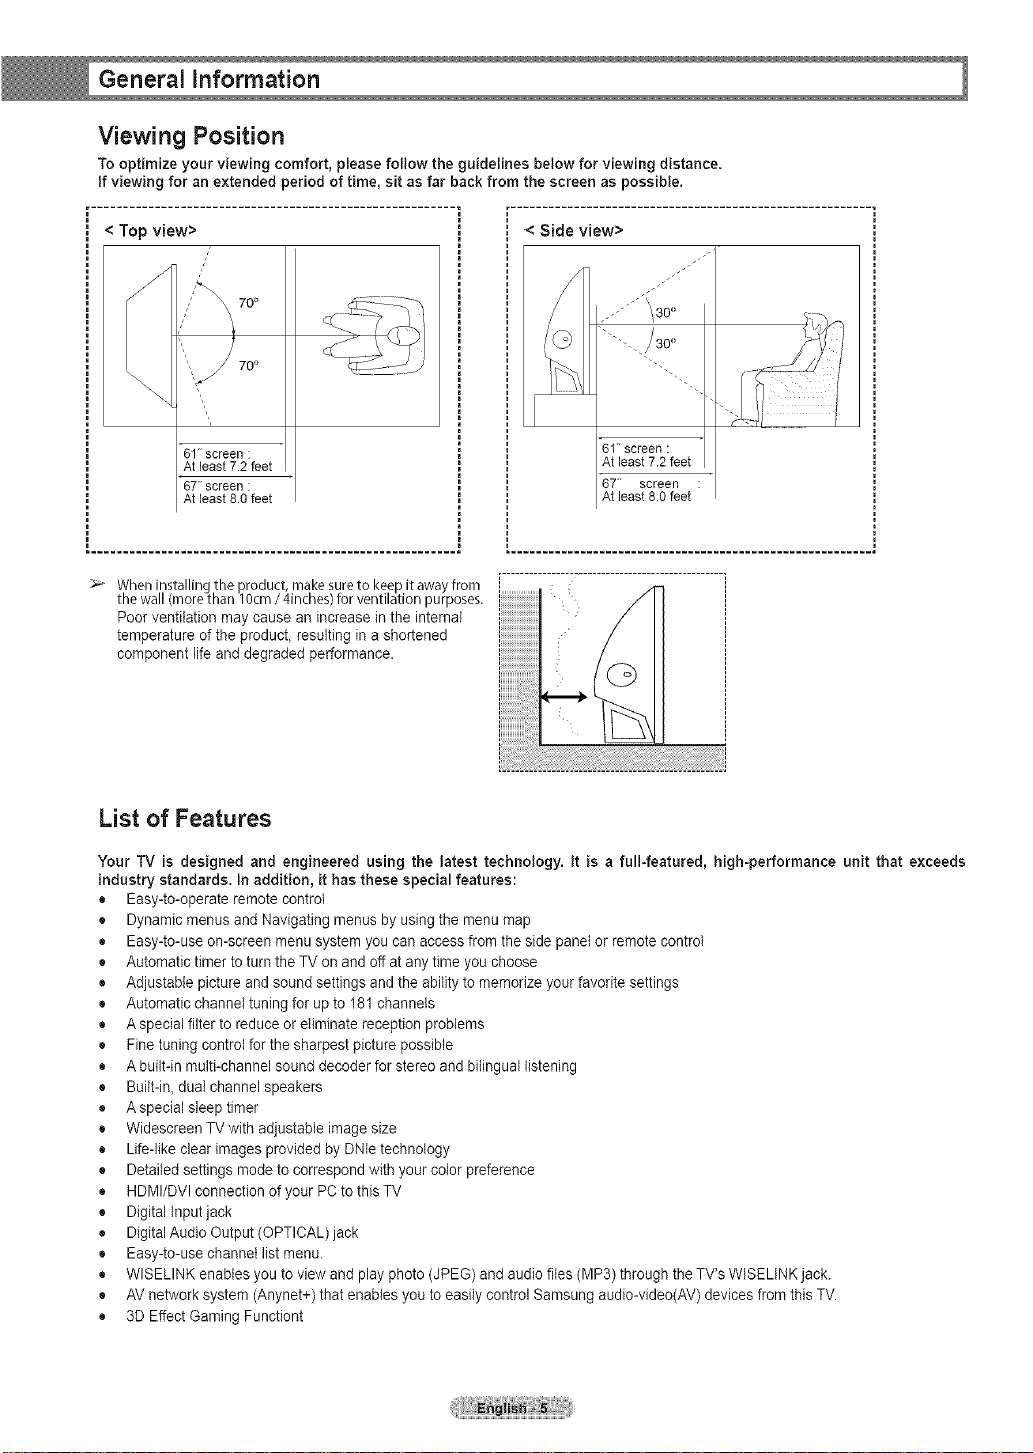
Viewing Position
To optimize your viewing comfort, please follow the guidelines below for viewing distance.
if viewing for an extended period of time, sit as far back from the screen as possible.
<Top view>
r
At least 8.0 feet
=......................................................... =
the wall (morethan 10cm/ 4inches)for ventilation purposes.
Poor ventilation may cause an increase inthe internal
component life and degraded performance.
When,n ta,,,ngthepro uctmakesuretokeep,tawayfrom!!!!!!!!!!!
temperature of the product, resulting in a shortened
•< Side view>
/
-... / 30 _
61" screen :
At least 7.2 feet
67" screen :
At least 8.0 feet
=......................................................... •
iiiiiiiiiiiiiii___iiiii___iiiii__!iiiii!iiiiiiiiiiiiiiiiiiiiii___iiiii___iiiii___iiiii__!iiiii!iii__i
List of Features
Your TV is designed and engineered using the latest technology. It is a full-featured, high-performance unit that exceeds
industry standards. In addition, it has these special features:
• Easy-to-operate remote controt
• Dynamic menus and Navigating menus by using the menu map
• Easy-to-use on-screen menu system you can access from the side panel or remote controt
• Automatic timer toturn the TV on and off at any time you choose
• Adjustable picture and sound settings and the ability to memorize your favorite settings
• Automatic channel tuning for up to 181channels
• Aspecial filter to reduce or eliminate reception problems
• Fine tuning control for the sharpest picture possible
• Abuilt-in multi-channel sound decoder for stereo and bilingual listening
• Built-in, duat channel speakers
• Aspecial sleeptimer
• Widescreen TV with adjustable image size
• Life-like clear images provided by DNIetechnotogy
• Detailed settings mode to correspond with your color preference
• HDMI/DVI connection of your PC to this TV
• Digital Inputjack
• DigitalAudio Output (OPTICAL) jack
• Easy-to-use channel list menu.
• WISELINK enables you to view and play photo (JPEG) and audio files (MP3) through theTV's WISELINK jack.
• AV network system (Anynet+) that enables you to easity control Samsung audio-video(AV) devices from this TV.
• 3D Effect Gaming Functiont
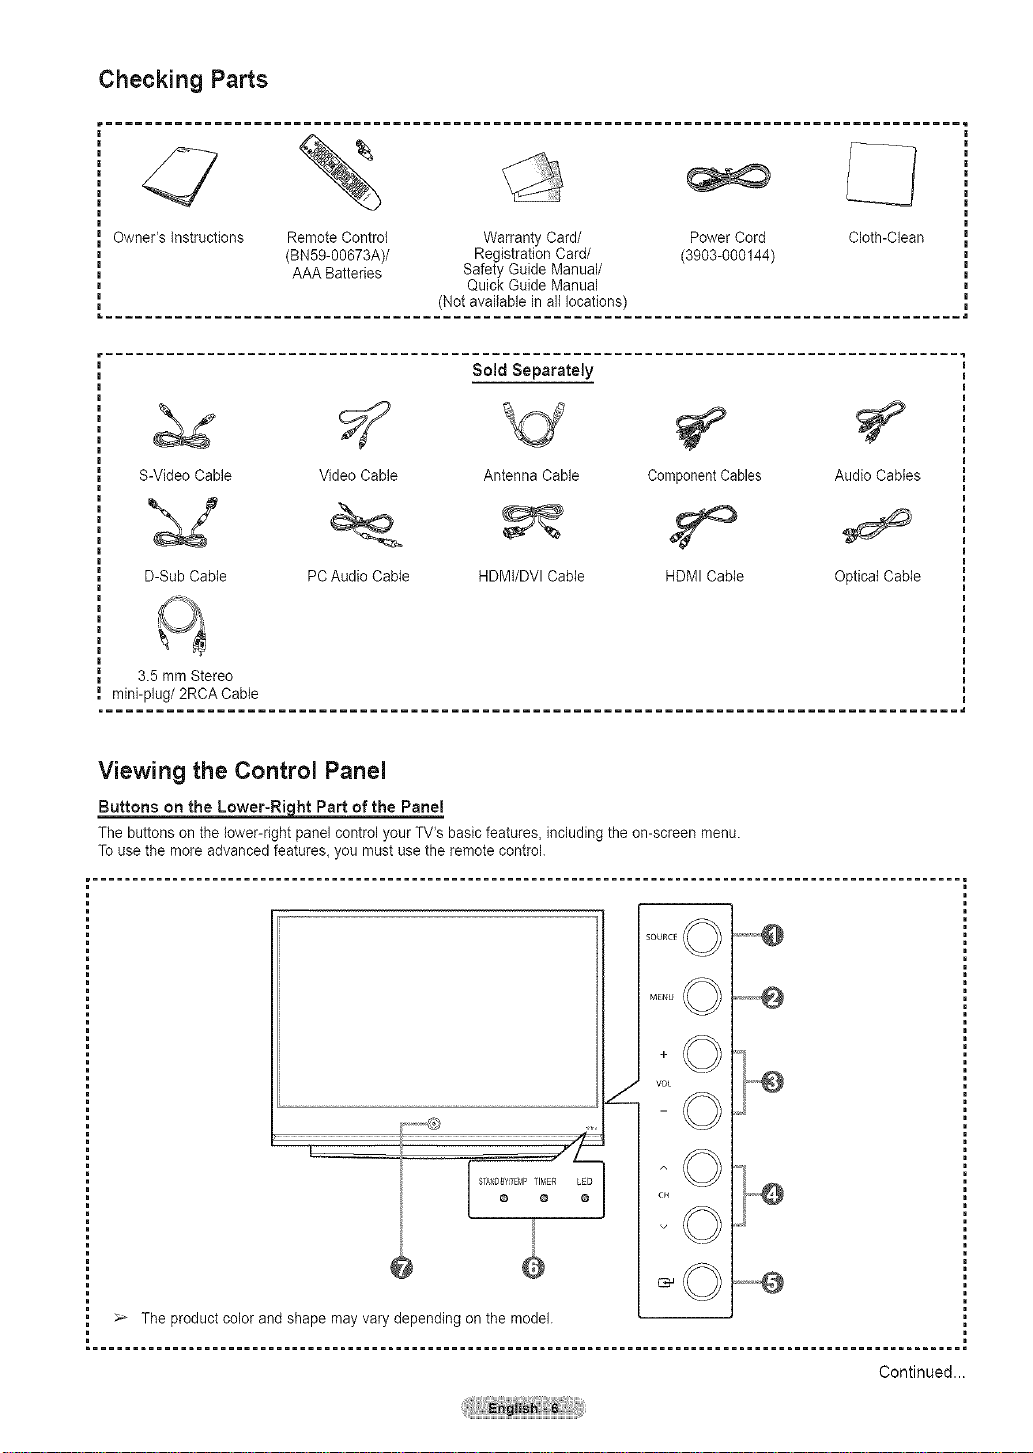
Checking Parts
Owner's instructions Remote Control Warranty Card/ Power Cord Cloth-Clean
(BN59-00673A)/ Registration Card/ (3903-000144)
AAA Batteries Safety Guide Manual/
L ...................................................................................... a
Quick Guide Manual
(Not available in all locations)
Sold Separately
S-Video Cable Video Cable Antenna Cable ComponentCables Audio Cables
D-Sub Cable PCAudio Cable HDMI/DVI Cable HDMI Cable Opticat Cable
Viewing the Control Panel
Buttons on the Lower-Right Part of the Panel
The buttons on the lower-right panel control your TV's basic features, including the on-screen menu.
To use the more advanced features_ you must use the remote control.
............................................................................................................. i
ST_DSY_EMPTIMER LED
o @ @
Continued...
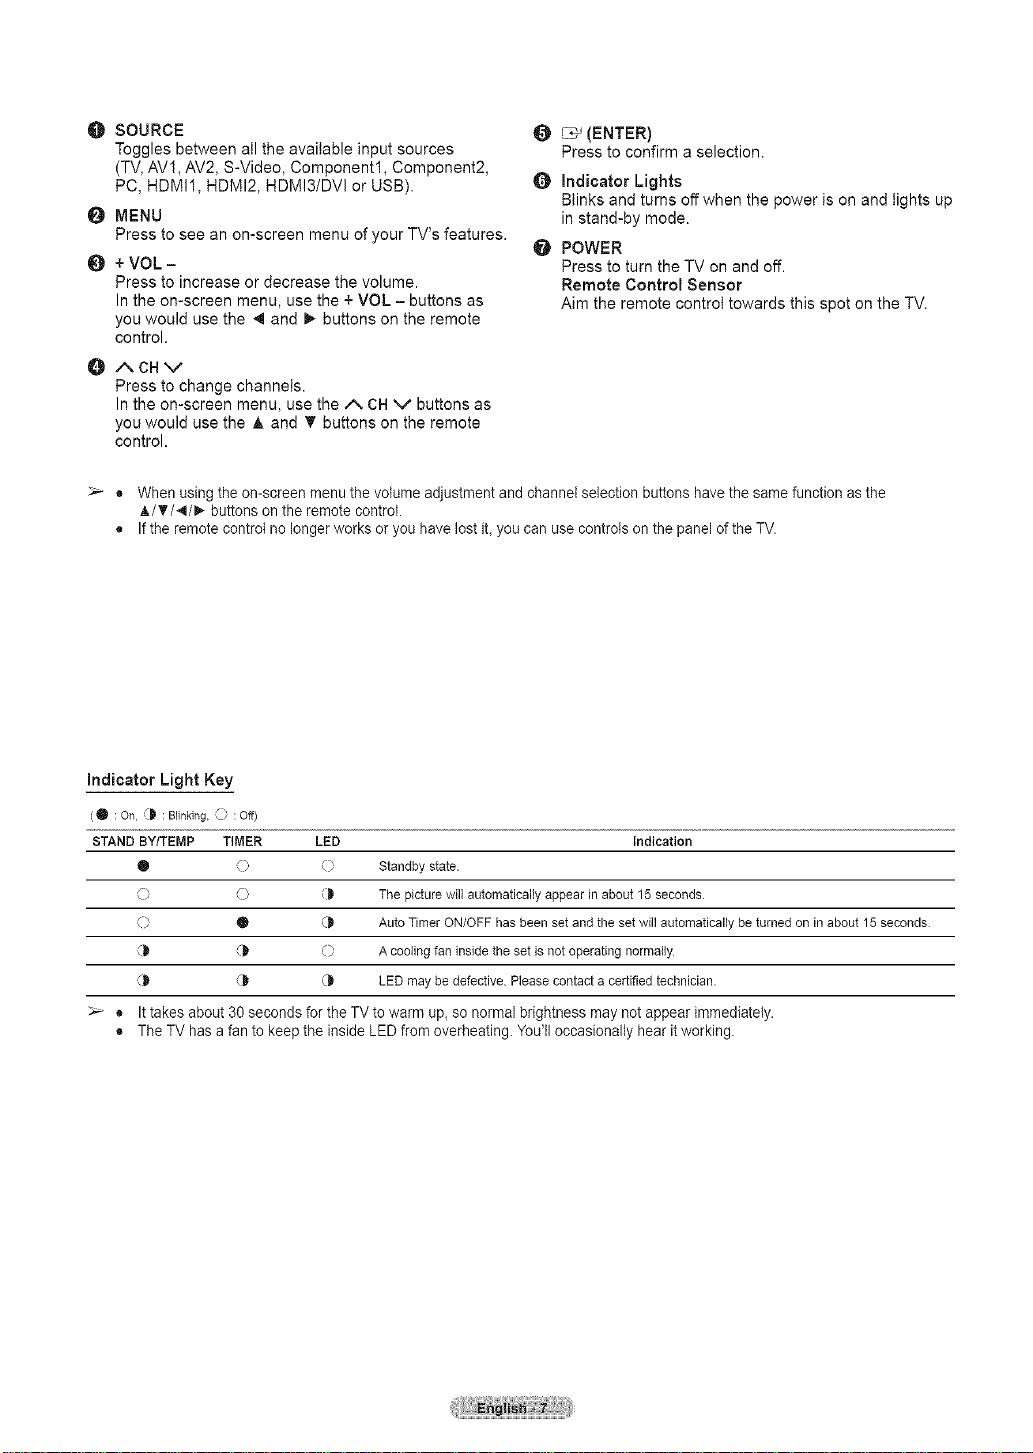
O SOURCE
Togglesbetweenalltheavailableinputsources
(TV,AVl,AV2,S-Video,Component1,Component2,
PC,HDMI1,HDMI2,HDMI3/DVlorUSB).
O MENU
Press to see an on-screen menu of your TV's features.
0 +VOL-
Press to increase or decrease the volume.
In the on-screen menu, use the + VOL - buttons as
you would use the _ and m,-buttons on the remote
control.
ACHV
Press to change channels.
In the on-screen menu, use the A CH V buttons as
you would use the A and _' buttons on the remote
control.
>_ • When using the on-screen menu the volume adjustment and channel selection buttons have the same function as the
A/_'/_/I_ buttons on the remote control.
• Ifthe remote control no longer works or you have lost iL you can use controls on the panel of the TV.
_ (ENTER)
Press to confirm a selection.
Q indicator Lights
Blinks and turns off when the power is on and lights up
in stand-by mode.
O POWER
Press to turn the TV on and off.
Remote Control Sensor
Aim the remote control towards this spot on the TV.
indicator Light Key
(O :On, _ :Blinking, _ :Off)
STAND BY/TEMP TIMER LED Indication
• (_ (i__ Standbystate.
O O (11 Thepicturewillautomaticallyappearinabout15seconds
O O @ AutoTimerON/OFFhasbeensetandthesetwill automaticallybeturnedonin about15 seconds
,_ (1t O A coolingfaninsidetheset is not operatingnormally
_Jl _lt L_ LEDmaybedefective.Pleasecontacta certifiedtechnician.
>_ • Ittakes about 30 seconds for the TV to warm up, so normal brightness may not appear immediately.
• The TV has a fan to keep the inside LED from overheating. You'll occasionally hear it working.

Viewing the Connection Panel
Side Panel Jacks
Use the side panel jacks to connect A/V components that will be connected continuously, such as VCR or DVD players.
For more information on connecting equipment, see pages 10~16.
...............................................................................................................
O_ @ _--®
ANT IN
o o @ 0 ®
m
The product cotor and shape may vary depending on the model.
............................................................................................... ._................................
O ANT IN
750CoaxialconnectorforAir/CableNetwork.
WISELINK
Connect an USB mass storage device to view photo files
(JPEG) and play audio files (MP3).
HDMI IN 1, HDMI IN 2
Connect to the HDMIjack of a device with HDMI output.
HDMI3/DVI IN
Connect to the HDMIjack of a device with HDMI output.
This input can also be used as a DVI connection with
separate analog audio inputs. An optional HDMI/DVI cable
wilt be necessary to make this connection.
When using an optional HDMI/DVl adapter, the DVI analog
audio inputs on your TV allow you to receive left and right
audio from your DVI device.
DVI IN (AUDIO-L/R)
Connect to the DVI audio output jack of an external device.
Q DIGITAL AUDIO OUT (OPTICAL)
Connect to a Digital Audio component.
RS2320
Connectorforserviceonly
S-VIDEO
Q
'Video input for external devices with an
S-Video output, such as a Camcorder or VCR.
O
VIDEO/AUDIO-L/R (AV IN 1, 2)
Video input for external devices, such as a Camcorder or
VCR.
@
AUDIO OUT-L/R
Audiooutputsforexternaldevices.
@
COMPONENT IN 1,2
Video(Y/PdP_)andaudio(L-AUDIO-R)componentinputs.
POWER IN
@
Connectthesuppliedpowercord.
3D SYNC OUT
@
Connect to 3D IR Emitter.
PC AUDIO IN
@
ConnecttotheaudiooutputjackonyourPC.
@
PC IN
ConnecttothevideooutputjackonyourPC.
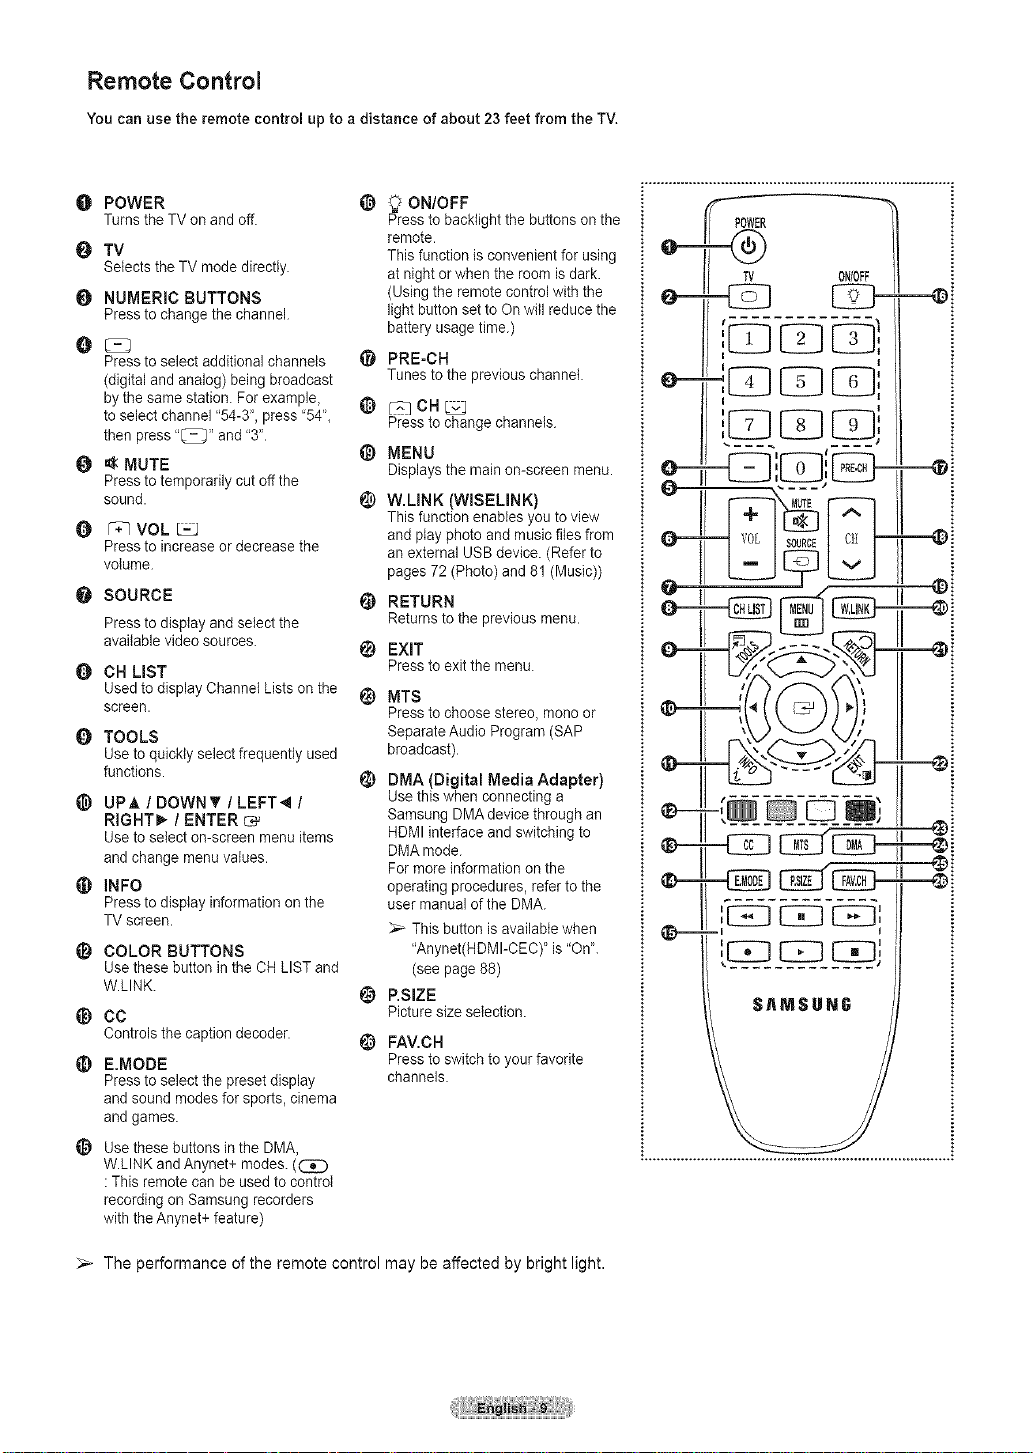
Remote Control
You can use the remote control up to a distance of about 23 feet from the TV.
O POWER
TurnstheTV onandoff.
O TV
SelectstheTVmodedirectly
O NUMERIC BUTTONS
Presstochangethechannel.
Press to select additional channels
(digital and analog) being broadcast
by the same station. For example, _)
to select channel "54-3', press '54',
then press "_" and "3'
O _ MUTE
Press to temporarily cut off the
sound _)
r_ VOL -L_J
Press to increase or decrease the
volume.
@
@ SOURCE @
Press to display and select the
available video sources. _)
Q CH LIST
Used to display Channel Lists on the _)
screen.
TOOLS
Use to quickly select frequently used
functions
_) UPA / DOWN_' / LEFT_ /
RIGHT_ / ENTER c,-_
Use to select on-screen menu items
andchange menu vatues.
_) INFO
Press to display information on the
TM screen
_) COLOR BUTTONS
Use these button inthe CH LIST and
W.LINK.
_) cc
controlsthecaptiondecoder
_) E.MODE
Press to select the preset display
andsound modes for sports, cinema
andgames.
Use these buttons in the DMA,
W LINK and Anynet+ modes. (C]D
:This remote can be used to control
recording on Samsung recorders
with the Anynet+ feature)
¢
@
@
ON/OFF
Pressto backtight the buttons onthe
remote
This function is convenient for using
at night or when the room is dark
(Using the remote control with the
light button set to On will reduce the
battery usage time.)
PRE-CH
Tunestothepreviouschannel.
[_q CH L_j
Pressto changechannels.
MENU
Displaysthe mainon-screenmenu
W.LINK (WISEUNK)
This function enables you to view
and play photo and music files from
an external USB device (Refer to
pages 72 (Photo) and 81 (Music))
RETURN
Returnstothe previousmenu
EXIT
Pressto exitthemenu.
MTS
Pressto choose stereo, mono or
Separate Audio Program (SAP
broadcast)
DMA (Digital Media Adapter)
Use this when connecting a
Samsung DMAdevice through an
HDMI interface and switching to
DMAmode.
For more information on the
operating procedures, refer to the
user manual of the DMA.
_-- This button is available when
"Anynet(HDMI-CEC)' is "On'.
(see page 88)
RSIZE
Picture size selection
FAV.DH
Pressto switch to your favorite
channels.
POWER i
TV ONIOFF
' :
t
e---{m D i?
I I
I I
I
.i
_-_ The performance of the remote control may be affected by bright light.

Installing Batteries in the Remote Control
1 Lift the cover at the back of the remote control upward as shown in the figure.
2 Instatl twoAAAsize batteries.
;'_ • Make sure to match the "+" and "-" ends of the batteries with the diagram inside the compartment.
• Do not mix battery types, i.e. alkaline and manganese.
3 Close the cover as shown in the figure.
;'_ Remove the batteries and store them in a cool and dry place if you won't be usingthe remote
control for a long time. The remote controt can be used up to about 23 feet from me TV. (Assuming
typical TV usage, the batteries last for about one year.))
Using the remote controt with the On/Off(Q) light button set to On will reduce the battery usage
time.
:-_ If the remote control doesn't workt Check the following
1. Is the TV power on?
2.Are the plus and minus ends of the batteries reversed?
3.Are the batteries drained?
4. Is there a power cut, or is the power cord unplugged?
5. Is there a special fluorescent light or a neon sign nearby?
Connecting VHF and UHF Antennas
If your antenna has a set of leads that look like this, see "Antennas with 300 _ Flat Twin
Leads" below.
If your antenna has one lead that looks like this, see "Antennas with 75 Q Round Leads".
If you have two antennas, see "Separate VHF and UHF Antennas".
Antennas with 300 £2 Fiat Twin Leads
If you are using an off-air antenna (such as a roof antenna or "rabbit ears") that has 300 Q twin flat leads, follow the
directions below.
1 Place the wires from the twin leadsunder the screws on a 300-75 O adapter (not supplied).
Use a screwdriver to tighten the screws.
2 Plug the adaptor into the ANT IN terminal on the side of the TV. ANT IN
Antennas with 75 O Round Leads
1 Plug the antenna lead into the ANT INterminal on the side of the TV. I j_:_. A_ J _,,,_,,NK
_arate VHF and UHF Antennas
If you have two separate antennas for your TV (one VHF and one UHF), you must combine the two antenna signals before
connecting the antennas to the TV. This procedure requires an optional combiner-adaptor (available at most electronics
shops).
1 Connect both antenna leads tothe combiner.
2 Plug the combiner into the ANT IN terminal on the bottom of the side panel.
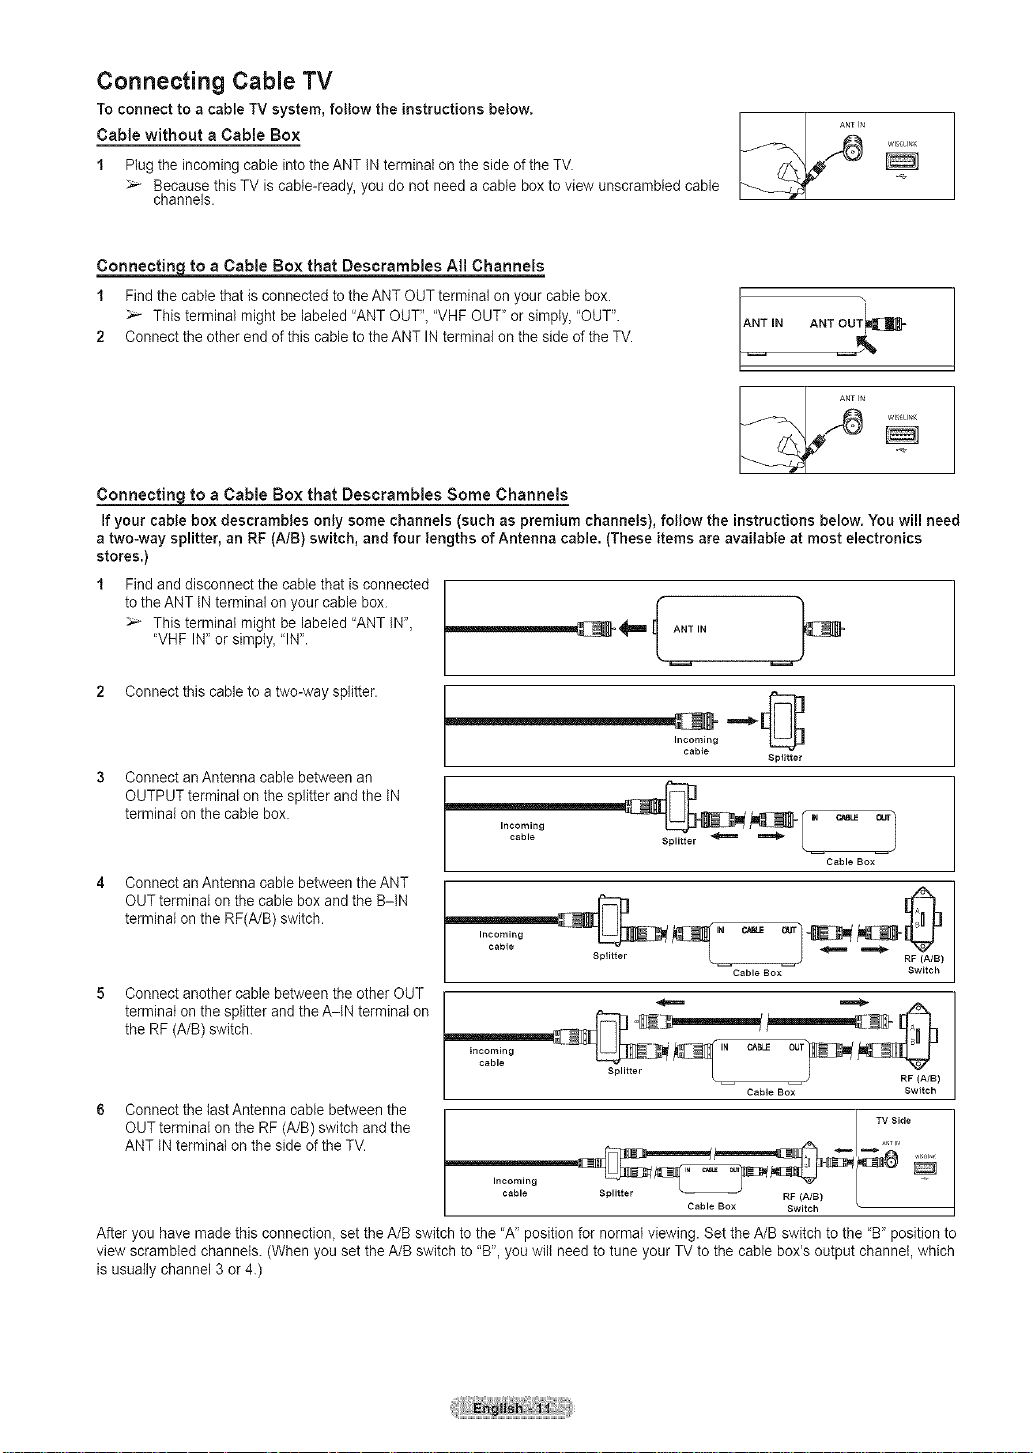
Connecting Cable TV
To connect to a cable TV system, follow the instructions below.
Cable without a Cable Box
1 Plugthe incoming cable into the ANT IN terminalon the side of the TV.
Because this TV is cable-ready, you do not need a cable box to view unscrambled cable
channels.
Connectin_ to a Cable Box that Descrambles All Channels
1 Find the cable that is connected tothe ANT OUTterminal on your cable box
This terminal might be labeled "ANT OUT", "VHF OUT" or simply, "OUT"
2 Connect the other end of this cableto theANT IN terminal on the side of the TV
to a Cable Box that Des€rambles Some Channels
If your cable box descrambles only some channels (such as premium channels), follow the instructions below. You will need
a two-way splitter, an RF (A/B) switch, and four lengths of Antenna cable. (These items are available at most electronics
stores.)
Findand disconnect the cable that is connected
to the ANT IN terminal on your cable box.
;'_ This terminal might be labeled "ANT IN",
"VHF IN' or simply, "INL
t AN ,°
ANTIN ANT OUT_=
2 Connect this cable to a two-way splitter.
Incoming
cable
Splitter
3 Connect anAntenna cable between an
OUTPUT terminal on the splitter andthe IN
terminal on the cable box.
Incoming
cable
Splitter
Cable Box
4 Connect an Antenna cable between the ANT
OUT terminal on the cable box andthe B-IN
terminal on the RF(A/B) switch.
Incoming
cable
Splitter
Cable Box
RF (A/B)
Switch
5 Connect another cable between the other OUT
terminal on the splitter and theA-IN terminal on
the RF (A/B) switch.
6 Connect the last Antenna cable between the
OUT terminal on the RF (A/B) switch and the
ANT INterminai on the side of the TV.
cable . r
-'=___ _ . _. _- ,......
cable Splitter _ RF (A/B) /
-
Cable BOX Switch
TV Side
Cable BOX Switch
After you have made this connection, set the A/B switch to the "A' position for normal viewing. Set the A/B switch to the "B' position to
view scrambled channels. (When you set the A/B switch to "B", you will need to tune your TV to the cable box's output channel, which
is usually channel 3 or 4.)
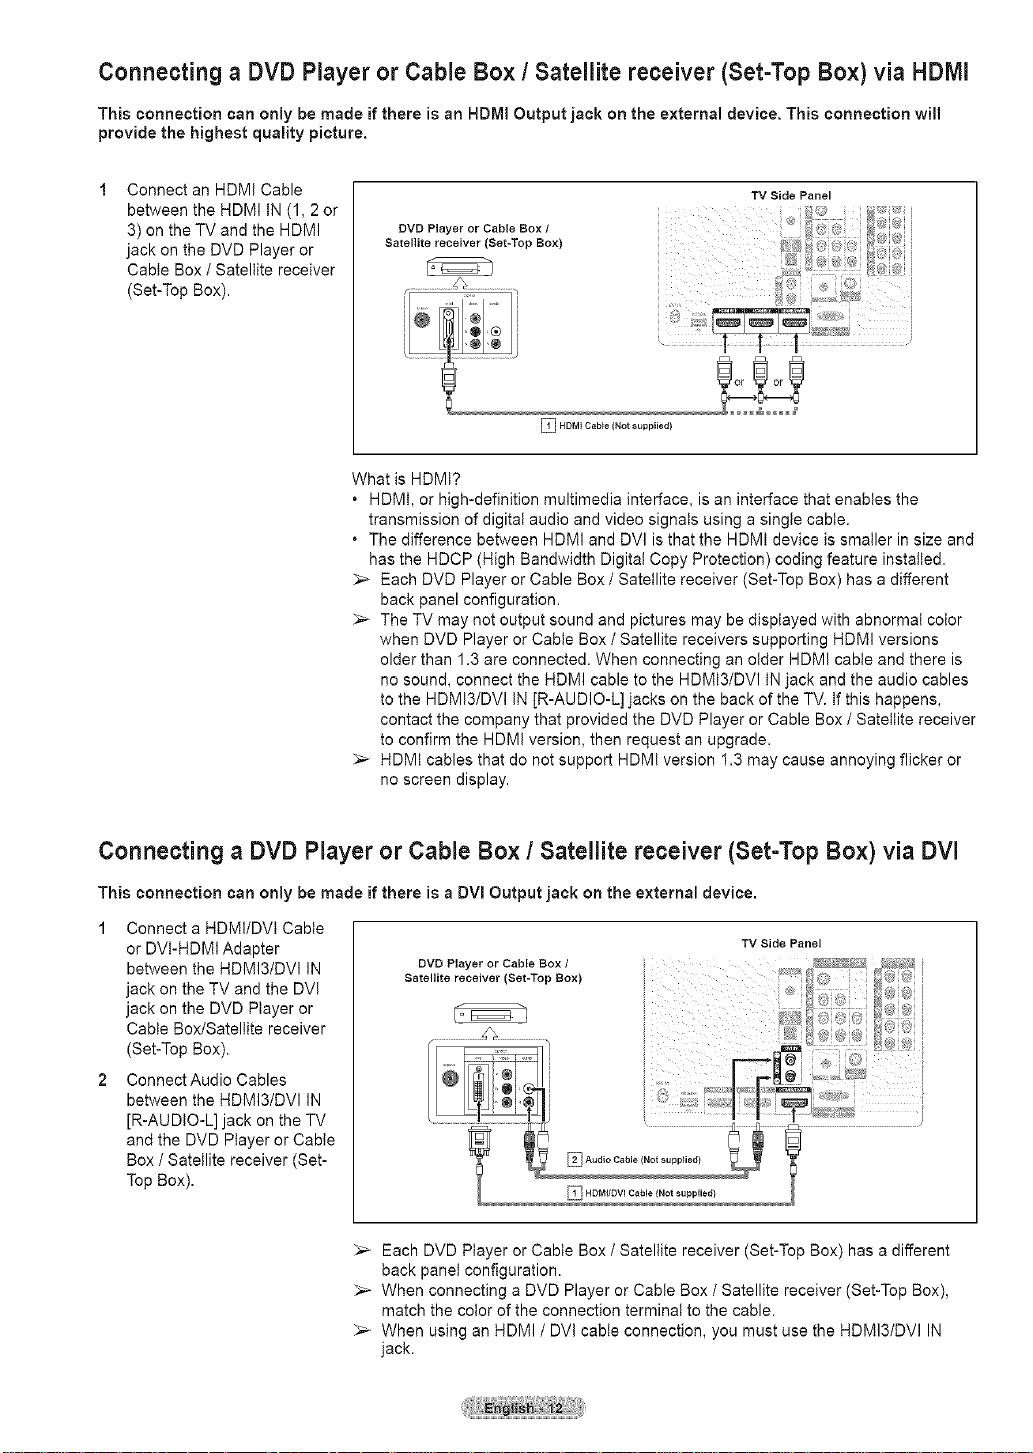
Connecting a DVD Player or Cable Box / Satellite receiver (Set-Top Box) via HDlVll
This connection can only be made if there is an HDMI Output jack on the external device. This connection will
provide the highest quality picture.
Connect an HDMI Cable
between the HDMI IN (1, 2 or
3) on the TV and the HDMI
jack on the DVD Player or
Cable Box / Satellite receiver
(Set-Top Box).
TV Side Panel
DVD Player or Cable Box /
Satellite receiver (Set=Top Box)
_l HDMt Cable (Not supplied)
What is HDMI?
. HDMI, or high-definition multimedia interface, is an interface that enables the
transmission of digital audio and video signals using a single cable.
. The difference between HDMI and DVl is that the HDMI device is smaller in size and
has the HDCP (High Bandwidth Digital Copy Protection) coding feature installed.
;'_ Each DVD Player or Cable Box / Satellite receiver (Set-Top Box) has a different
back panel configuration.
The TV may not output sound and pictures may be displayed with abnormal color
when DVD Player or Cable Box / Satellite receivers supporting HDMI versions
older than 1.3 are connected. When connecting an older HDMI cable and there is
no sound, connect the HDMI cable to the HDMI3/DVl IN jack and the audio cables
to the HDMI3/DVI IN JR-AUDIO-L] jacks on the back of the TV. If this happens,
contact the company that provided the DVD Player or Cable Box / Satellite receiver
to confirm the HDMI version, then request an upgrade.
;'_ HDMI cables that do not support HDMI version 1.3 may cause annoying flicker or
no screen display.
Connecting a DVD Player or Cable Box / Satellite receiver (Set-Top Box) via DVl
This connection can only be made if there is a DVl Output jack on the external device.
1 Connect a HDMI/DVI Cable
or DVI-HDMI Adapter
between the HDMI3/DVl IN
jack on the TV and the DVI
jack on the DVD Player or
Cable Box/Satellite receiver
(Set-Top Box).
2 ConnectAudio Cables
between the HDMI3/DVl IN
[R-AUDIO-L] jack on the TV
and the DVD Player or Cable
Box / Satellite receiver (Set-
Top Box).
;'_ Each DVD Player or Cable Box / Satellite receiver (Set-Top Box) has a different
back panel configuration.
When connecting a DVD Player or Cable Box / Satellite receiver (Set-Top Box),
match the color of the connection terminal to the cable.
When using an HDMI / DVl cable connection, you must use the HDMI3/DVl IN
jack.
TV Side Panel
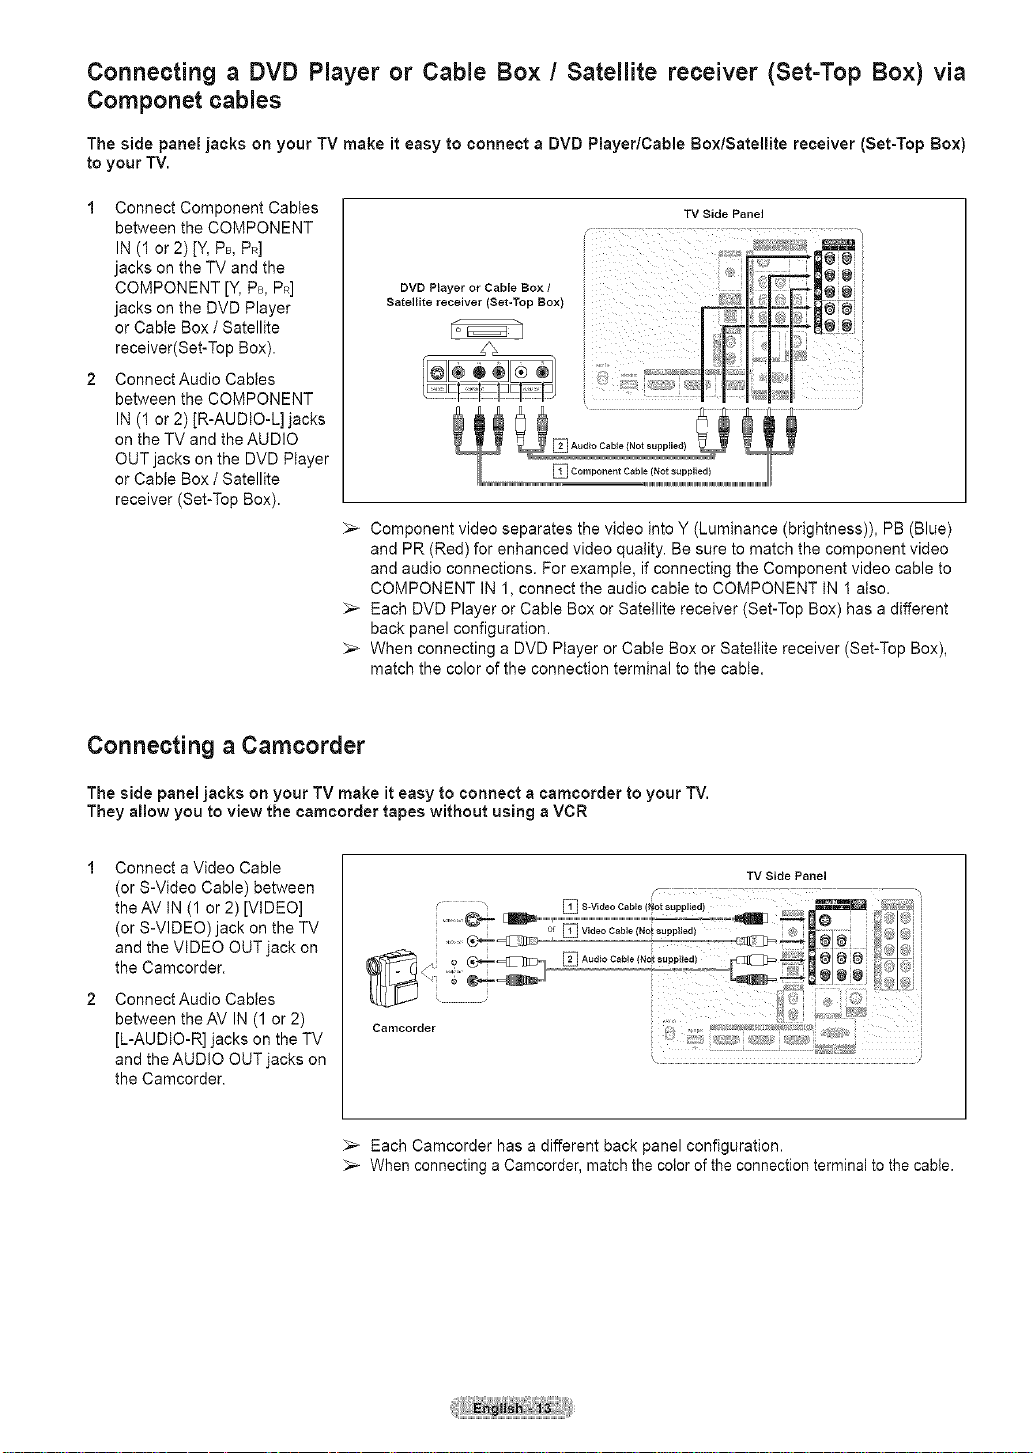
Connecting a DVD Player or Cable Box / Satellite receiver (Set=Top Box) via
Componet cables
The side panel jacks on your TV make it easy to connect a DVD Player/Cable Bo×/Satellite receiver (Set-Top Box)
to your TV.
1 Connect Component Cables
between the COMPONENT
IN (1 or 2) [Y, PB, PR]
jacks on the TV and the
COMPONENT [Y, PB, PR]
jacks on the DVD Player
or Cable Box / Satellite
receiver(Set-Top Box).
2 ConnectAudio Cables
between the COMPONENT
IN (1 or 2) JR-AUDIO-L] jacks
on the TV and the AUDIO
OUT jacks on the DVD Player
or Cable Box / Satellite
receiver (Set-Top Box).
Connecting a Camcorder
TV Side Panel
DVD Player or Cable Box /
Satellite receiver (Set-Top Box)
DE ,,,_ZE,, 3
Component video separates the video into Y (Luminance (brightness)), PB (Blue)
and PR (Red) for enhanced video quality. Be sure to match the component video
and audio connections. For example, if connecting the Component video cable to
COMPONENT IN 1, connect the audio cable to COMPONENT IN 1 aiso.
Each DVD Player or Cable Box or Satellite receiver (Set-Top Box) has a different
back panel configuration.
;'_ When connecting a DVD Player or Cable Box or Satellite receiver (Set-Top Box),
match the color of the connection terminal to the cable.
The side panel jacks on your TV make it easy to connect a camcorder to your TV.
They allow you to view the camcorder tapes without using a VCR
Connect a Video Cable
(or S-Video Cable) between
theAV IN (1 or 2) [VIDEO]
(or S-VIDEO) jack on the TV
......e"-" [lmm.._ DVideoC"ble/NOl_PP"_dt _.__,
_ S-Video Cable Not suppliea _ll_
................... ........ _l_ _ @
and the VIDEO OUT jack on
the Camcorder.
Connect Audio Cables
between theAV IN (1 or 2)
[L-AUDIO-R] jacks on the TV
Camcorder
and the AUDIO OUT jacks on
the Camcorder.
Each Camcorder has a different back panel configuration.
When connecting a Camcorder, match the cotor of the connection terminal to the cable.
TV Side Panel
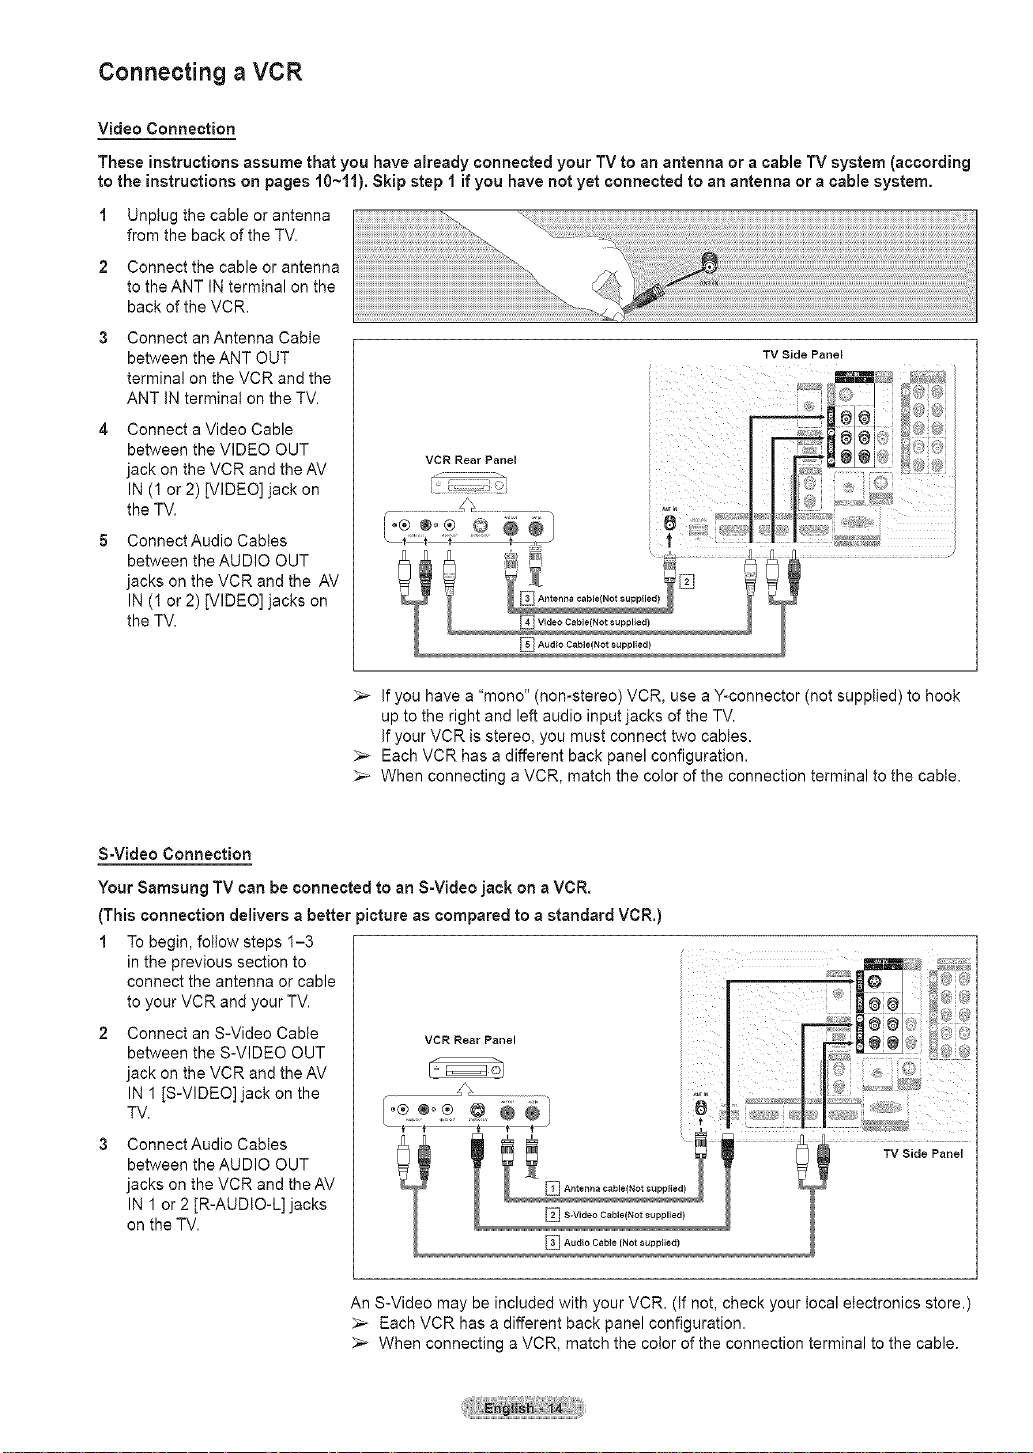
Connecting a VCR
Video Connection
These instructionsassume thatyou have already connected your TV to an antenna or a cable TV system (according
to the instructions on pages 10~11). Skip step 1 if you have not yet connectedto an antenna or a cable system.
1 Unplug the cable or antenna
from the back of the TV.
2 Connect the cable or antenna
to the ANT IN terminal on the
back of the VCR.
Connect an Antenna Cable
between the ANT OUT
terminal on the VCR and the
ANT iN terminal on the TV.
Connect a Video Cable
between the VIDEO OUT
jack on the VCR and the AV
IN (1 or 2) [VIDEO] jack on
the TV.
Connect Audio Cables
between the AUDIO OUT
jacks on the VCR and the AV
IN (1 or 2) [VIDEO] jacks on
the TV.
TV Side Panel
if you have a "mono" (non-stereo) VCR, use a Y-connector (not supplied) to hook
up to the right and left audio input jacks of the TV.
If your VCR is stereo, you must connect two cables.
Each VCR has a different back panel configuration.
When connecting a VCR, match the color of the connection terminal to the cable.
S-Video Connection
Your Samsung TV can be connected to an S-Video jack on a VCR.
(This connection delivers a better _icture as compared to a standard VCR.)
1 To begin, follow steps 1-3
in the previous section to
connect the antenna or cable
to your VCR and your TV.
2 Connect an S-Video Cable
between the S-VIDEO OUT
jack on the VCR and the AV
IN 1 IS-VIDEO] jack on the
TV.
3 ConnectAudio Cables
between the AUDIO OUT
jacks on the VCR and theAV
IN 1 or 2 [R-AUDIO-L] jacks
on the TV.
An S-Video may be included with your VCR. (if not, check your local electronics store.)
Each VCR has a different back panel configuration.
When connecting a VCR, match the color of the connection terminal to the cable.
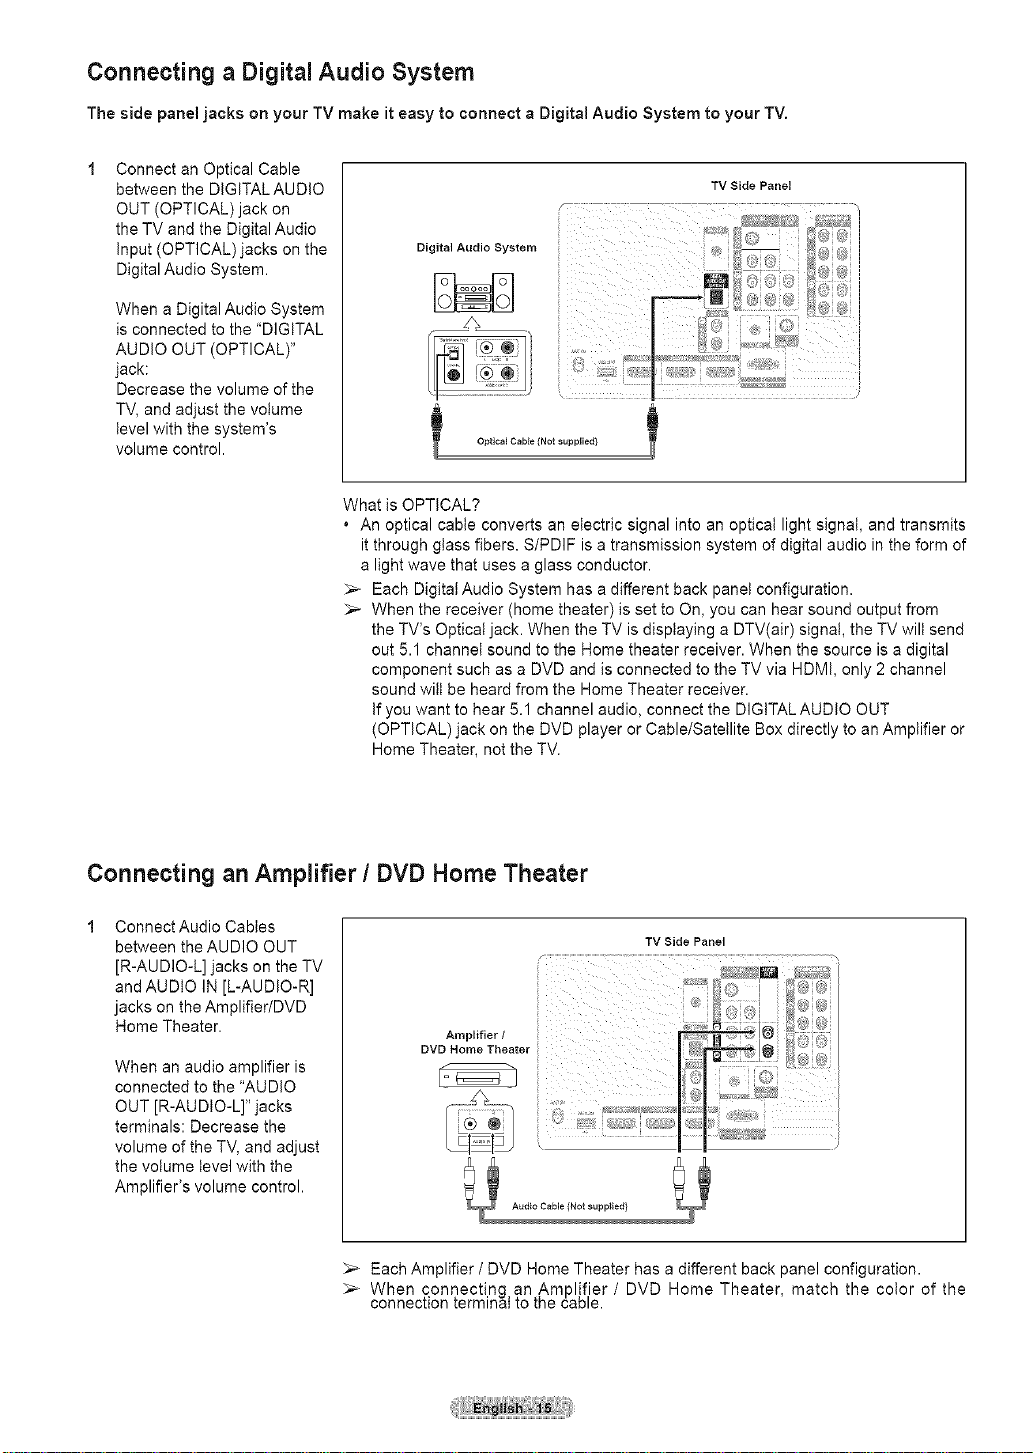
Connecting a Digital Audio System
The side panel jacks on your TV make it easy to connect a Digital Audio System to your TV.
Connect an Optical Cable
between the DIGITAL AUDIO
OUT (OPTICAL) jack on
the TV and the Digital Audio
Input (OPTICAL)jacks on the
Digital Audio System.
When a Digital Audio System
is connected to the "DIGITAL
AUDIO OUT (OPTICAL)"
jack:
Decrease the volume of the
TV, and adjust the volume
level with the system's
volume control.
TV Side Panel
What is OPTICAL?
. An optical cable converts an electric signal into an opticat light signaI, and transmits
it through glass fibers• S/PDIF is a transmission system of digital audio in the form of
a light wave that uses a glass conductor.
Each Digitat Audio System has a different back panel configuration•
;'_ When the receiver (home theater) is set to On, you can hear sound output from
the TV's Optical jack. When the TV is displaying a DTV(air) signal, the TV wilt send
out 5.1 channel sound to the Home theater receiver. When the source is a digital
component such as a DVD and is connected to the TV via HDMI, only 2 channel
sound wilt be heard from the Home Theater receiver.
If you want to hear 5.1 channel audio, connect the DIGITAL AUDIO OUT
(OPTICAL) jack on the DVD player or Cable/Satellite Box directly to an Amplifier or
Home Theater, not the TV.
Connecting an Amplifier / DVD Home Theater
Connect Audio Cables
between the AUDIO OUT
[R-AUDIO-L] jacks on the TV
and AUDIO IN [L-AUDIO-R]
jacks on the Amplifier/DVD
Home Theater.
When an audio amplifier is
connected to the "AUDIO
OUT [R-AU DIO-L]" jacks
terminals: Decrease the
volume of the TV, and adjust
the volume level with the
Amplifier's volume control.
_,_ Each Amplifier / DVD Home Theater has a different back panel configuration.
When connecting an Amplif,ier / DVD Home Theater, match the color of the
connection [erminai to [ne cable.
Amplifier /
DVD Home Theater
TV Side Panel
n
(:
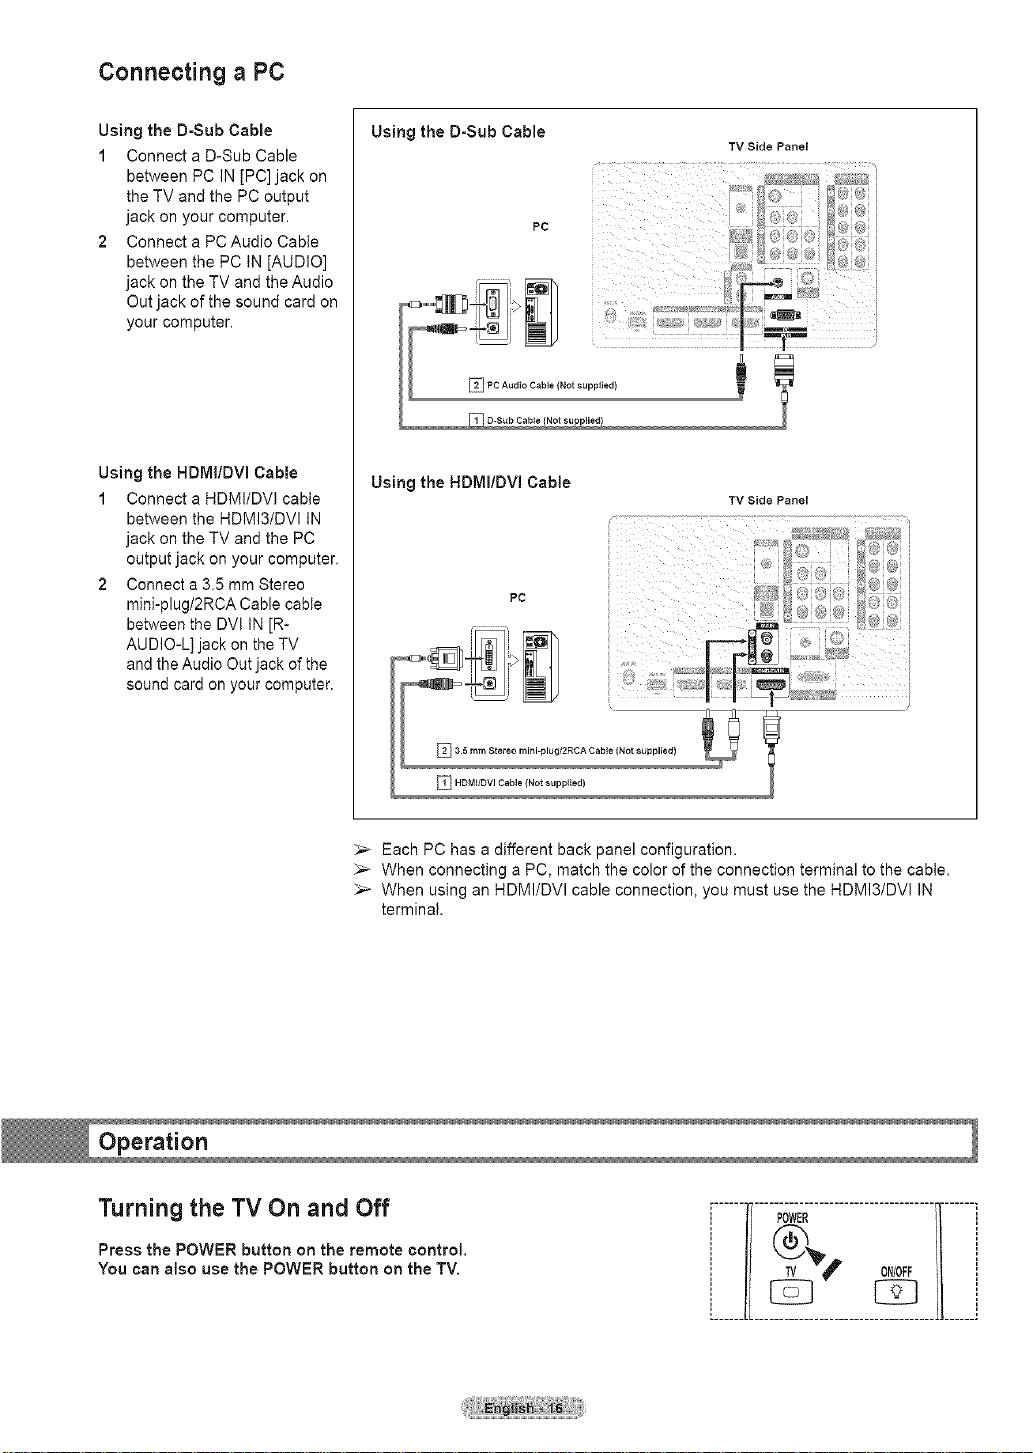
Connecting a PC
Using the D-Sub Cable
1 Connect a D-Sub Cable
between PC IN [PC] jack on
the TV and the PC output
jack on your computer.
2 Connect a PCAudio Cable
between the PC IN [AUDIO]
jack on the TV and the Audio
Out jack of the sound card on
your computer.
Using the HDMI/DVl Cable
1 Connect a HDMI/DVI cable
between the HDMI3/DVI IN
jack on the TV and the PC
output jack on your computer.
2 Connect a 3.5 mm Stereo
mini-plug/2RCA Cable cable
between the DVI IN [R-
AUDIO-L] jack on the TV
and the Audio Out jack of the
sound card on your computer.
Using the D-Sub Cable
Using the HDMI/DVl Cable
TV Side Panel
TV Side Panel
Each PC has a different back panel configuration.
When connecting a PC, match the color of the connection terminal to the cable.
When using an HDMI/DVI cable connection, you must use the HDMI3/DVI IN
terminal.
Turning the TV On and Off
Press the POWER button on the remote control.
You can also use the POWER button on the TV.
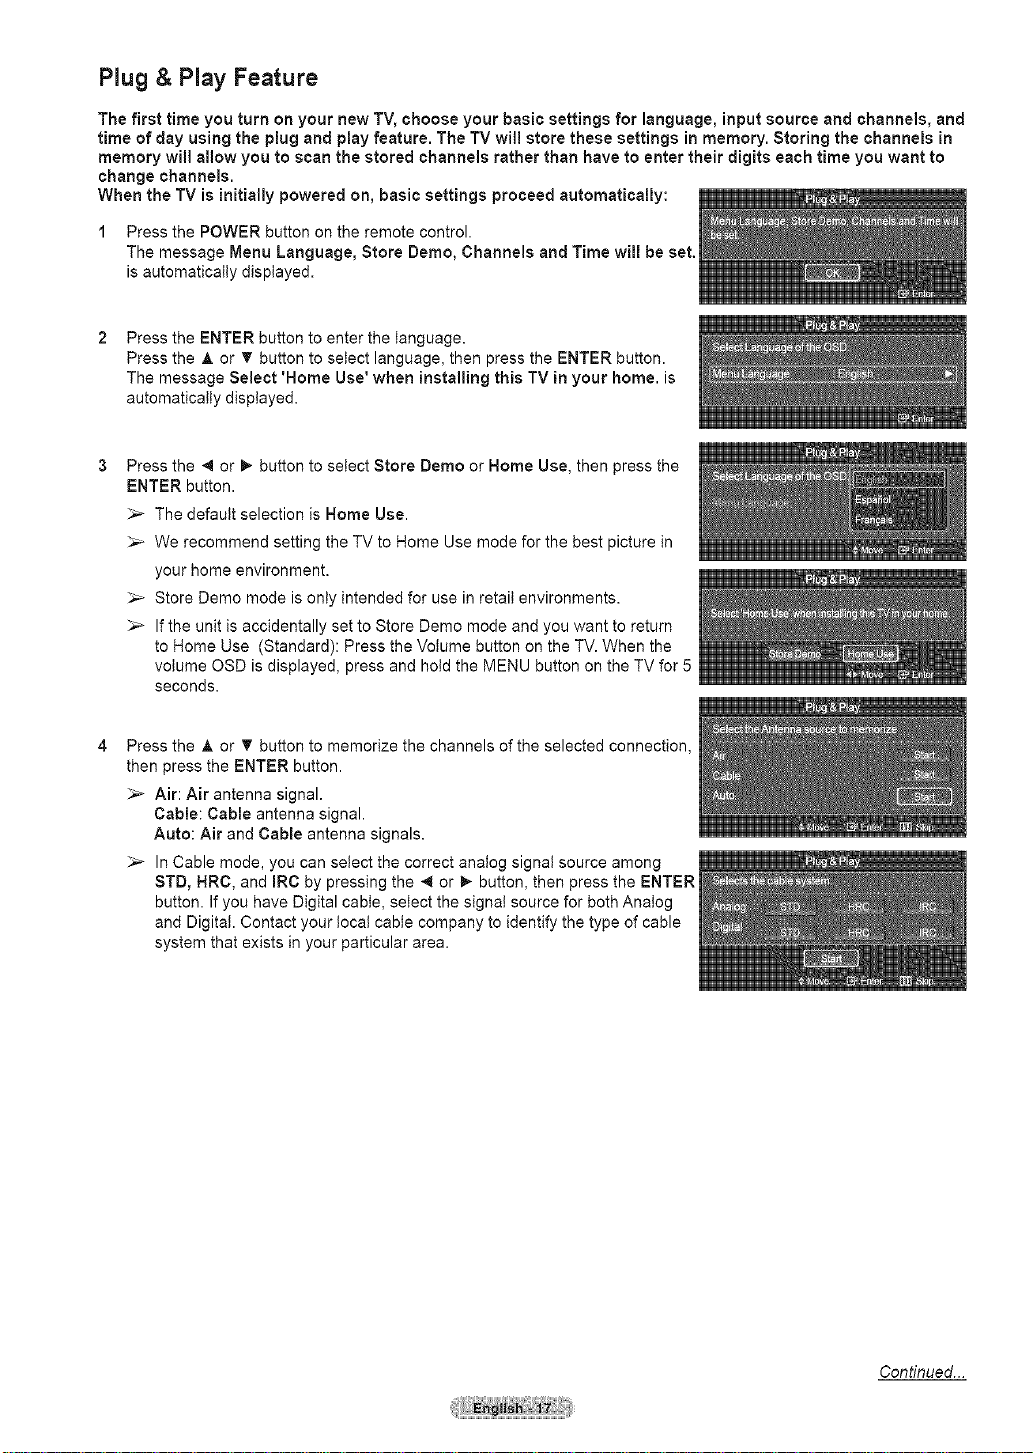
Plug & Play Feature
The first time you turn on your new TV, choose your basic settings for language, inputsource and channels, and
time of day usingthe plug and play feature. The TV will store these settings in memory. Storing the channels in
memory will allow you to scan the stored channels rather than have to enter their digits each time you want to
change channels.
When the TV is initially powered on, basic settings proceed automatically:
1 Press the POWER button on the remote control.
The message Menu Language, Store Demo, Channels and Time will be set,
is automatically displayed.
Press the ENTER button to enter the language.
Press the A or _' button to select language, then press the ENTER button.
The message Select 'Home Use' when installing this TV in your home. is
automatically displayed.
Press the _ or _ button to select Store Demo or Home Use, then press the
ENTER button.
_,_ The default selection is Home Use.
We recommend setting the TV to Home Use mode for the best picture in
your home environment.
Store Demo mode is only intended for use in retail environments.
If the unit is accidentally set to Store Demo mode and you want to return
to Home Use (Standard): Press the Volume button on the TV. When the
volume OSD is displayed, press and hotd the MENU button on the TV for 5
seconds.
Press the & or T button to memorize the channels of the selected connection,
then press the ENTER button.
Air: Air antenna signal.
Cable: Cable antenna signal.
Auto: Air and Cable antenna signals.
_,_ In Cable mode, you can select the correct analog signal source among
STD, HRC, and IRC by pressing the _ or I_ button, then press the ENTER
button. If you have Digital cable, select the signal source for both Analog
and Digital. Contact your local cable company to identify the type of cable
system that exists in your particular area.
Continued...
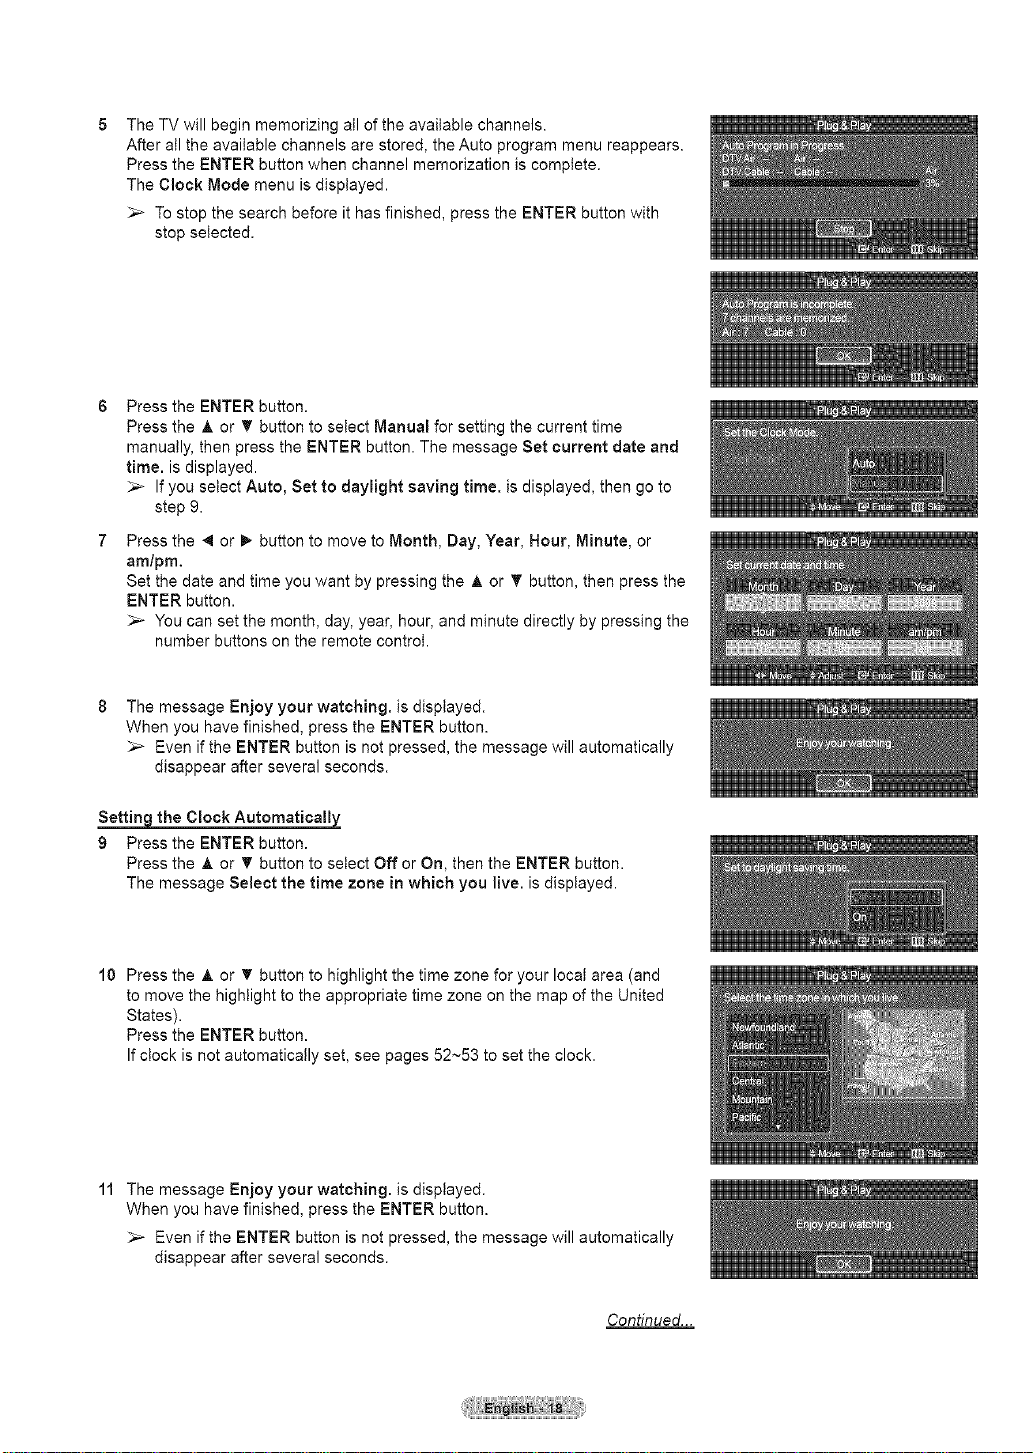
The TV will begin memorizing all of the available channels.
After atl the available channels are stored, the Auto program menu reappears.
Press the ENTER button when channel memorization is complete.
The Clock Mode menu is displayed.
To stop the search before it has finished, press the ENTER button with
stop selected.
Press the ENTER button.
Press the & or _' button to select Manual for setting the current time
manually, then press the ENTER button. The message Set current date and
time. is displayed.
If you select Auto, Set to daylight saving time. is displayed, then go to
step 9.
Press the _ or I_ button to move to Month, Day, Year, Hour, Minute, or
am/pro.
Set the date and time you want by pressing the A or T button, then press the
ENTER button.
You can set the month, day, year, hour, and minute directly by pressing the
number buttons on the remote control.
The message Enjoy your watching, is displayed.
When you have finished, press the ENTER button.
_,_ Even if the ENTER button is not pressed, the message will automatically
disappear after several seconds.
the Clock Automatically
9 Press the ENTER button.
Press the A or T button to select Off or On, then the ENTER button.
The message Select the time zone in which you live. is displayed.
10 Press the A or _' button to highlight the time zone for your local area (and
to move the highlight to the appropriate time zone on the map of the United
States).
Press the ENTER button.
If clock is not automatically set, see pages 52~53 to set the clock.
11 The message Enjoy your watching, is displayed.
When you have finished, press the ENTER button.
_,_ Even if the ENTER button is not pressed, the message will automatically
disappear after several seconds.
Continued...
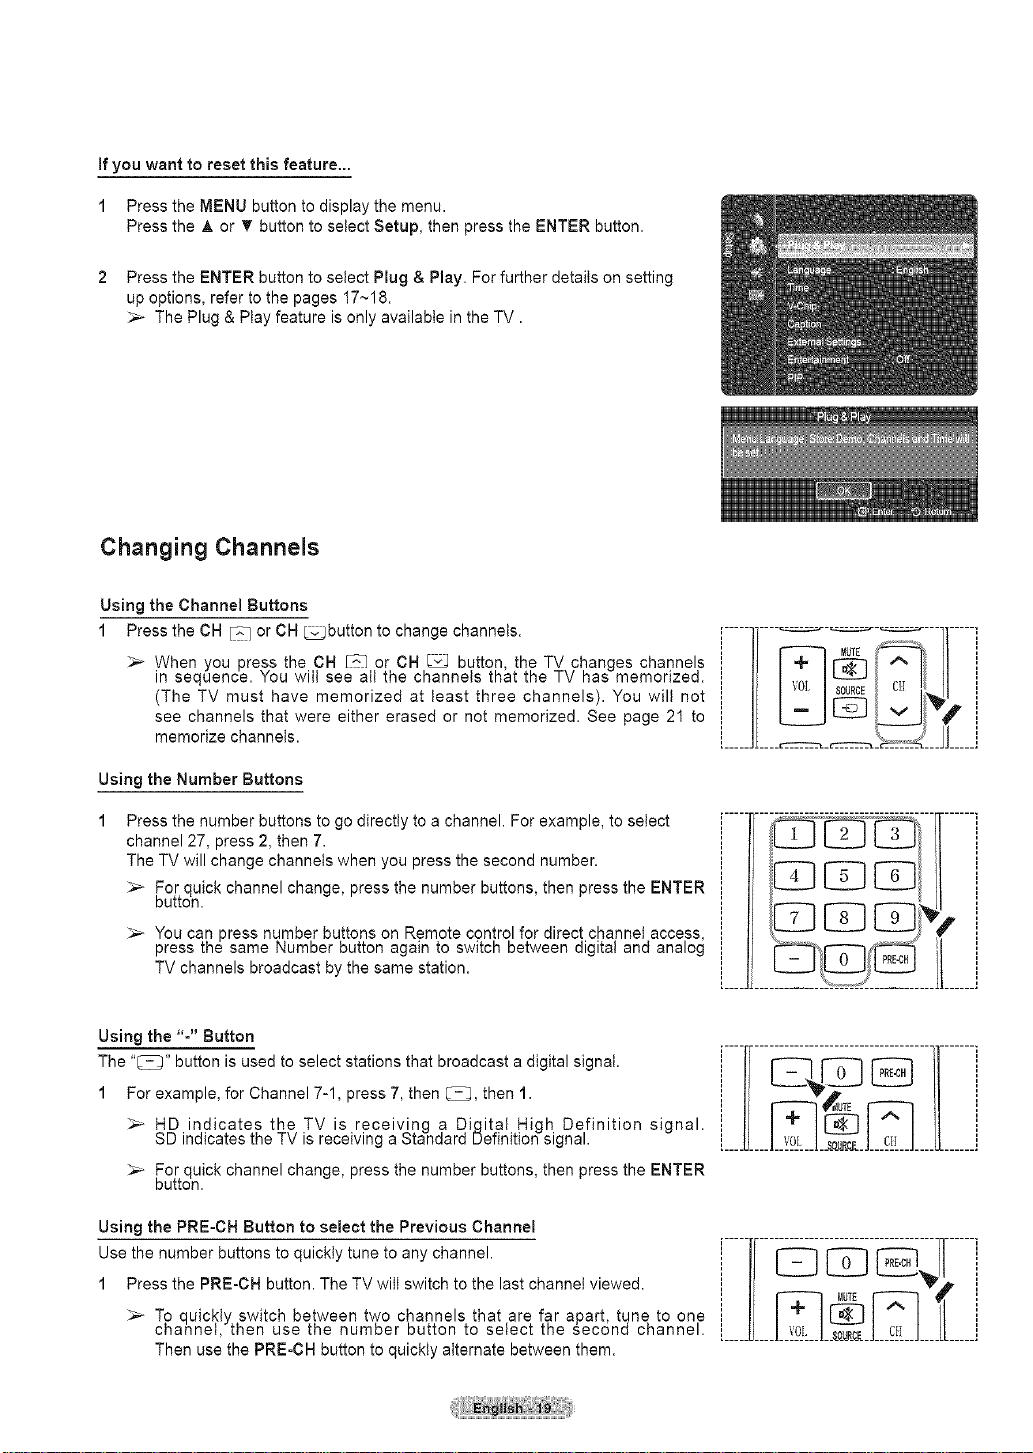
if you want to reset this feature,..
1 Press the MENU button to display the menu.
Press the A or _' button to select Setup, then press the ENTER button.
2 Press the ENTER button to select Plug & Play. For further details on setting
up options, refer to the pages 17~18.
The Plug & Play feature is only available in the TV.
Changing Channels
Using the Channel Buttons
1 Press the OH _ or CH L_button to change channels.
When you press the CH [_q or CH,L_J button, the TV changes channels
in sequence. YOU wilt see ait the channels that the TV has memorizeo.
(The TV must have memorized at bast three channels). You wilt not
see channels that were either erased or not memorized. See page 21 to
memorize channels.
= 1! I - I_ .... I/ // =
! |_ IV°I, I s0uRcECll i_ 11 !
' '
[ Jl _JJ_____j
Using the Number Buttons
Press the number buttons to go directty to a channel. For example, to setect
channel 27, press 2, then 7.
The TV will change channels when you press the second number.
_,_ ,For quick channel change, press the number buttons, then press the ENTER
Button.
;_ You can press number buttons on Remote control for direc! channel,access,
press the same t,4umuer Button again to switch between aigitai ana analog
TV channels broadcast by the same station.
Using the "-" Button
The "[_" button is used to select stations that broadcast a digital signal.
1 For example, for Channel 7-1, press 7, then (_, then 1.
HD indicates the TV is receiving ,a Diqital High De,finition signal.
SD inuicates the TV is receiving a Staneara uefinition signa.
,For quick channel change, press the number buttons, then press the ENTER
Button.
Using the PRE-CH Button to select the Previous Channel
Use the number buttons to quickly tune to any channel.
1 Press the PRE-CH button. The TV wilt switch to the last channel viewed.
To quicktyswitch be!ween two c,hannels that are far apart, tune to one
cnannet, men use me number Button [o setect the secona cnannel.
Then use the PRE-CH button to quickly alternate between them.
.... .......
.... ......
..... ......
Adjusting the Volume
the Volume Buttons
1 Press the VOL r_q or VOL =L_jbutton to increase or decrease the volume.
,----,,----.',--------,, ......i
J ,00_o, J
Using the Mute Button
At any time, you can cut off the sound using the MUTE button.
1 Press MUTE and the sound cuts off.
The [] is displayed on the screen.
2 To turn mute off, press the MUTE button again, or simpty press the VOL I%q or
VOL _ button.
L___II____,Z...... Jl......J
[----l _,T_ ....... i
.... ......
Viewing the Display
The display identifies the current channel and the status of certain audio-video settings.
1 Press the INFO button on the remote control.
The TV will disptay the channet, the type of sound, and the status of certain
picture and sound settings.
[ ............ _7" ............ _-,T7.............. 1
_Pressthe_NF_butt_n_ncem_re_rwaitappr_ximate_y1_sec_ndsanditdisappearsautomatically. [J t_____ J]
[____J]._ @ 0 1 ]J......j
Viewing the Menus
1 With the power on, press the MENU button.
The main menu appears on the screen. The menu's left side has icons:
Picture, Sound, Channel, Setup, input, Application.
2 Press the A or T button to select one of the icons.
Then press the ENTER button to access the icon's sub-menu.
3 Press the EXIT button to exit.
It takes about one minute until the on-screen menu disappears.
jIJ_-_qi.......@............@ .............jj
11.... ...........
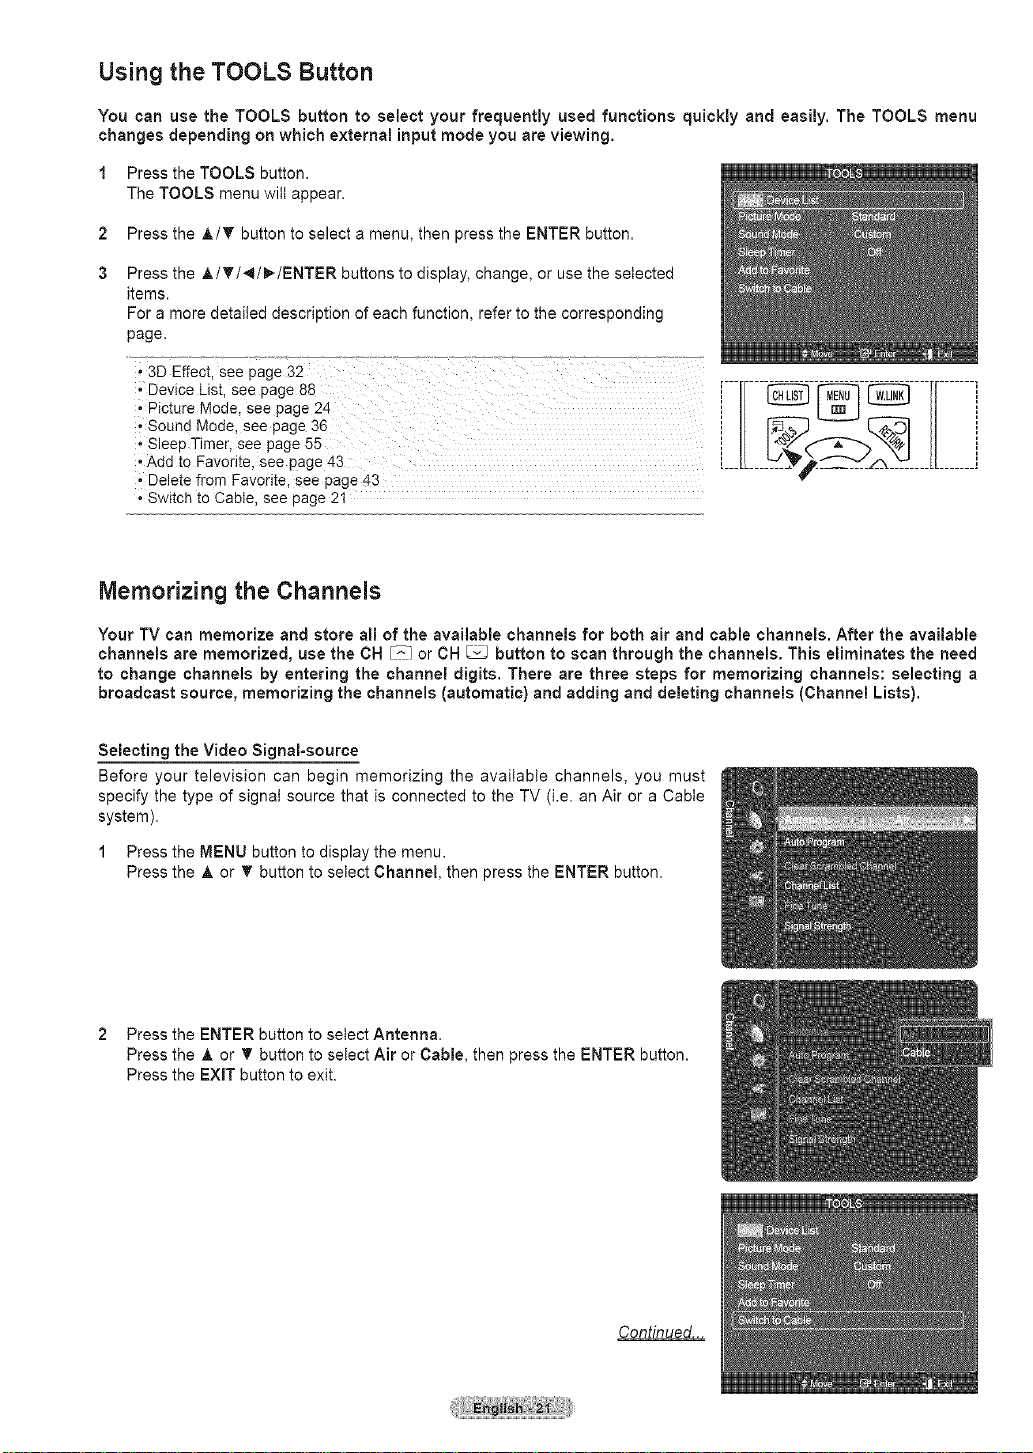
Using the TOOLS Button
You can use the TOOLS button to select your frequently used functions quickly and easily. The TOOLS menu
changes depending on which external input mode you are viewing.
1 Press the TOOLS button.
The TOOLS menu witt appear.
2 Press the A/T button to select a menu, then press the ENTER button.
Press the A../T/_/_/ENTER buttons to display, change, or use the selected
items.
For a more detailed description of each function, refer to the corresponding
page.
........................... .......... ........... ___.:
; 3D Effect, see page 32
° Device List, see page 88 [....... @--_--_ ........... ]
' Sound Mode, see page 36
° Sleep Timer, see page 55
° Picture Mode, seepage24 I[ __2X __ ]
• Add to Favorite, see page 43 ................................
, Delete from Favorite, see page #3
• Switch to Cable, see page 21
Memorizing the Channels
Your TV can memorize and store all of the available channels for both air and cable channels. After the available
channels are memorized, use the CN _ or CH L_J button to scan through the channels. This eliminates the need
to change channels by entering the channel digits. There are three steps for memorizing channels: selecting a
broadcast source, memorizing the channels (automatic) and adding and deleting channels (Channel Lists).
Selecting the Video Signal-source
Before your television can begin memorizing the available channels, you must
specify the type of signal source that is connected to the TV (i.e. an Air or a Cabte
system).
1 Press the MENU button to display the menu.
Press the A or _' button to select Channel, then press the ENTER button.
2 Press the ENTER button to select Antenna.
Press the A or V' button to setect Air or Cable, then press the ENTER button.
Press the EXiT button to exit.
Continued...
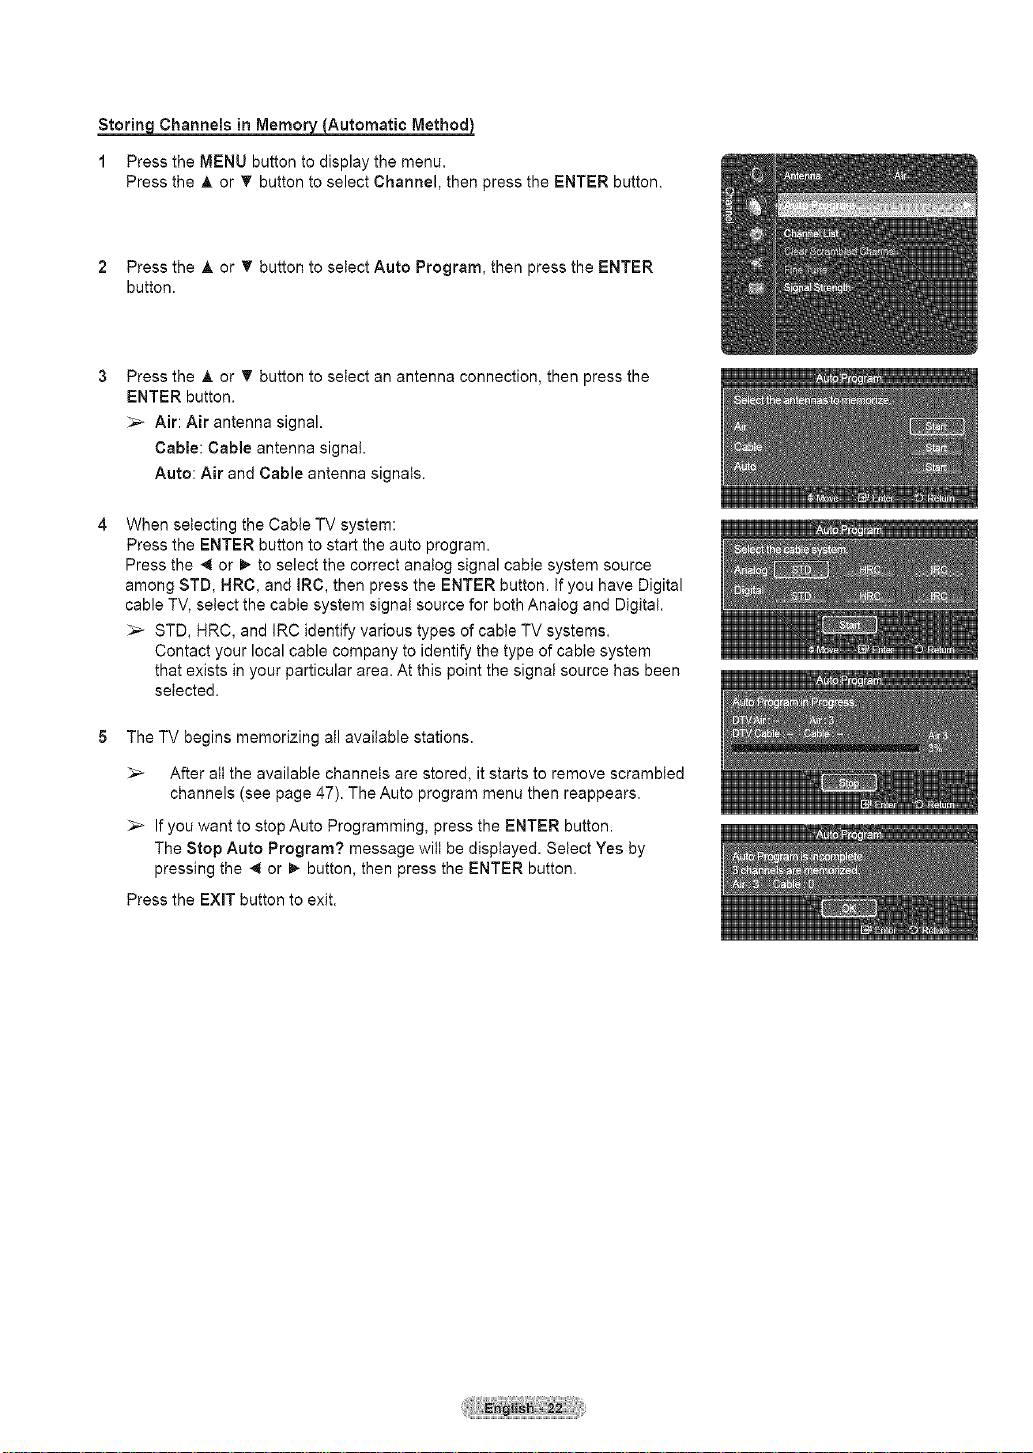
Storing Channels in Memory_ {Automatic Method)_
1 Press the MENU button to display the menu.
Press the A or _' button to select Channel, then press the ENTER button.
2 Press the A or _' button to select Auto Program, then press the ENTER
button.
Press the A or _' button to select an antenna connection, then press the
ENTER button.
Air: Air antenna signal.
Cable: Cable antenna signal.
Auto: Air and Cable antenna signals.
When selecting the Cable TV system:
Press the ENTER button to start the auto program.
Press the _ or _ to select the correct analog signal cable system source
among STD, NRC, and IRC, then press the ENTER button, if you have Digital
cable TV, select the cable system signal source for both Analog and Digital.
;'_ STD, HRC, and IRC identify various types of cable TV systems.
Contact your local cable company to identify the type of cable system
that exists in your particular area. At this point the signa! source has been
selected.
5 The TV begins memorizing all available stations.
;'_ After all the available channels are stored, it starts to remove scrambled
channels (see page 47). The Auto program menu then reappears.
If you want to stop Auto Programming, press the ENTER button.
The Stop Auto Program? message wilt be displayed. Select Yes by
pressing the _ or _ button, then press the ENTER button.
Press the EXiT button to exit.
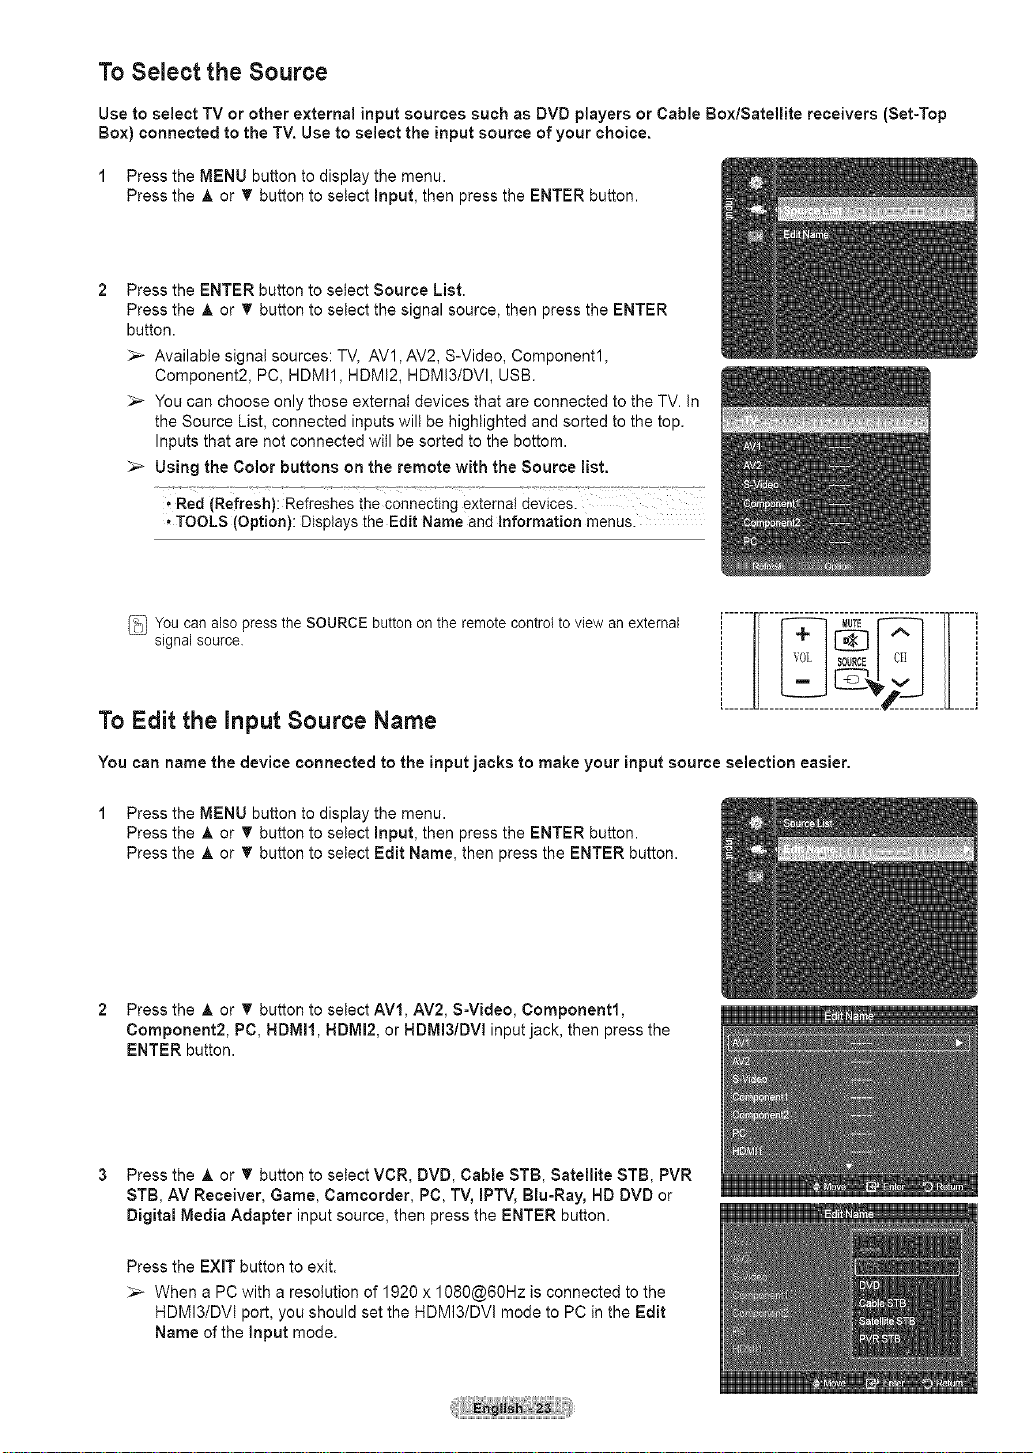
To Select the Source
Use to select TV or other external input sources such as DVD players or Cable Box/Satellite receivers (Set-Top
Box) connected to the TV. Use to select the input source of your choice.
1 Press the MENU button to display the menu.
Press the A or _' button to select input, then press the ENTER button.
Press the ENTER button to select Source List.
Press the A or _' button to setect the signal source, then press the ENTER
button.
Available signal sources: TV, AV1, AV2, S-Video, Component1,
Component2, PC, HDMI1, HDMI2, HDMI3/DVI, USB.
;_ You can choose only those external devices that are connected to the TV. In
the Source List, connected inputs will be highlighted and sorted to the top.
Inputs that are not connected will be sorted to the bottom.
Using the Color buttons on the remote with the Source list.
Red (Refresh): Refreshes the Connecting external devices.
*TOOLS (Option): Displays the Edit Name andInformation menus.
You can also press the SOURCE button on the remote controt to view an external
signal source.
i......
i......U
To Edit the input Source Name
You can name the device connected to the input jacks to make your input source selection easier.
1 Press the MENU button to display the menu.
Press the A or T button to select Input, then press the ENTER button.
Press the A or _' button to select Edit Name, then press the ENTER button.
2 Press the A or _' button to setect AVl, AV2, S-Video, Component1,
Component2, PC, BDMII, BDMI2, or BDMI3/DVl input jack, then press the
ENTER button.
Press the A or _' button to select VCR, DVD, Cable STB, Satellite STB, PVR
STB, AV Receiver, Game, Camcorder, PC, TV, IPTV, Blu-Ray, HD DVD or
Digital Media Adapter input source, then press the ENTER button.
Press the EXIT button to exit.
When a PC with a resolution of 1920 x 1080@60Hz is connected to the
HDMI3/DVI port, you should set the HDMI3/DVI mode to PC in the Edit
Name of the Input mode.
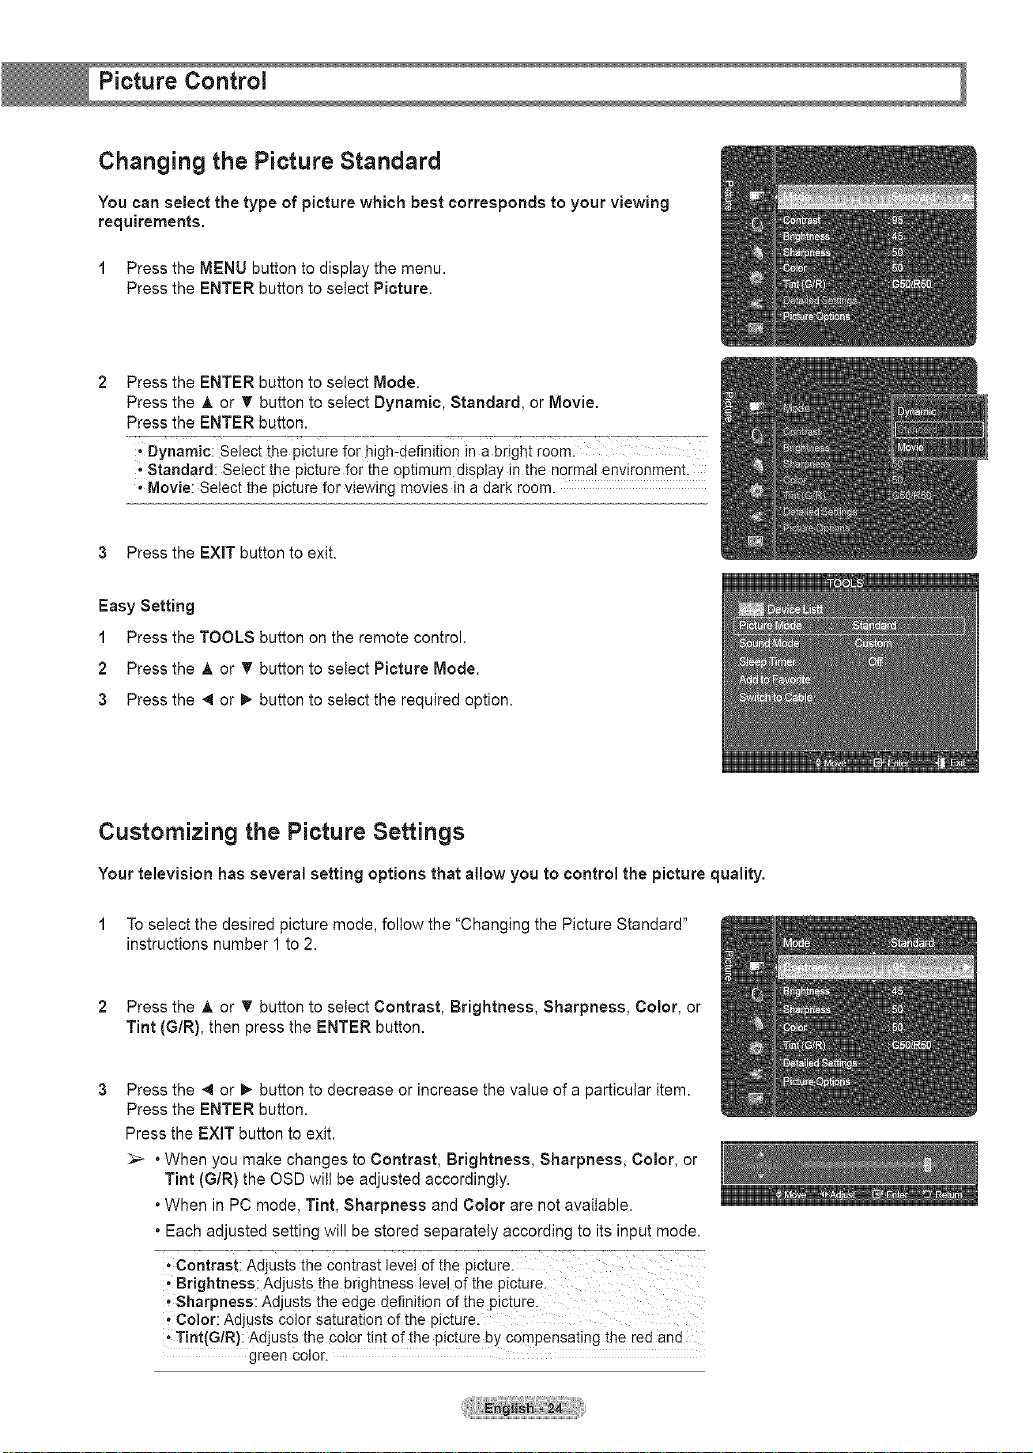
Changing the Picture Standard
You can select the type of picture which best corresponds to your viewing
requirements.
1 Press the MENU button to display the menu.
Press the ENTER button to select Picture.
Press the ENTER button to select Mode.
Press the A or _' button to setect Dynamic, Standard, or Movie.
Press the ENTER button.
* Dynamic: Select the picture for high-definition in a bright room.
, Standard: Select the picture for the Optimum display in the normal environment.
oMovie: Select the picture for viewing movies in a dark room.
3 Press the EXIT button to exit.
Easy Setting
1 Press the TOOLS button on the remote control.
2 Press the A or _' button to select Picture Mode.
3 Press the _ or I_ button to select the required option.
Customizing the Picture Settings
Your television has several setting options that allow you to control the picture quality.
1 To select the desired picture mode, follow the "Changing the Picture Standard"
instructions number 1 to 2.
2 Press the A or • button to select Contrast, Brightness, Sharpness, Color, or
Tint (G/R), then press the ENTER button.
Press the _ or 1,_button to decrease or increase the value of a particular item.
Press the ENTER button.
Press the EXIT button to exit.
:,_ , When you make changes to Contrast, Brightness, Sharpness, Color, or
Tint (G/R) the OSD wilt be adjusted accordingly.
, When in PC mode, Tint, Sharpness and Color are not available.
, Each adjusted setting will be stored separately according to its input mode.
° Contrast: Adjusts the contrast level of the picture.
, Brightness: Adjusts the brightness level of the picture.
* Sharpness: Adjusts the edge definiti0n Of the picture.
, Color: Adjusts ColorSaturation of the picture.
*Tint(G/R}: Adjusts the Color tint of the picture by compensating the red and
green color.
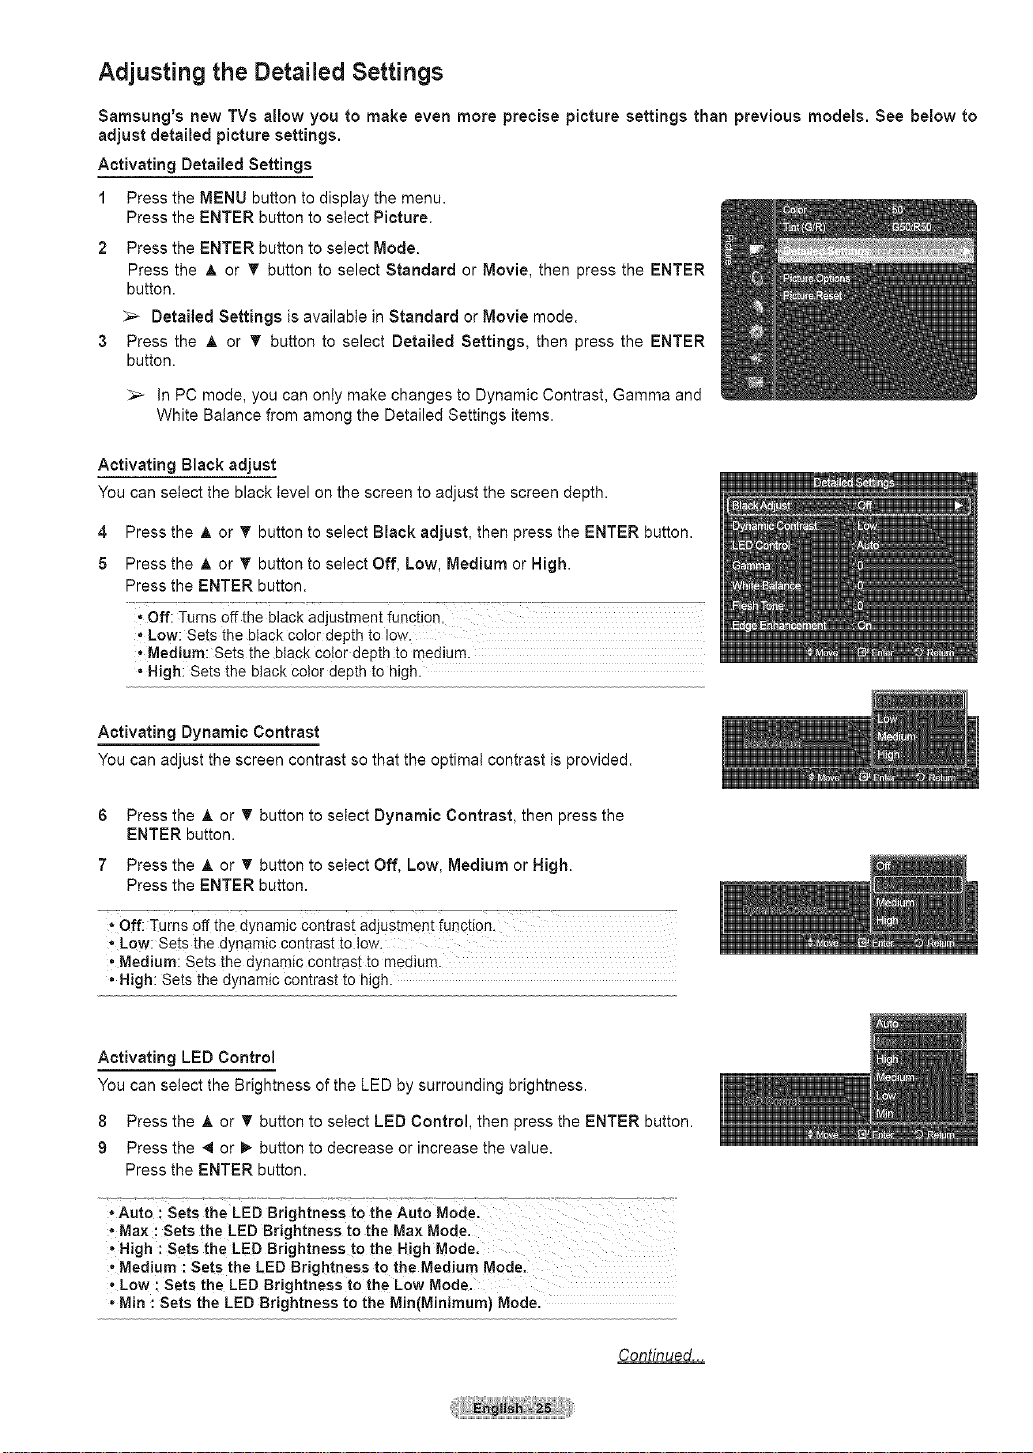
Adjusting the Detailed Settings
Samsung's new TVs allow you to make even more precise picture settings than previous models. See below to
adjust detailed picture settings.
Activating Detailed Settings
1 Press the MENU button to display the menu.
Press the ENTER button to select Picture.
2 Press the ENTER button to setect Mode.
Press the A or T button to select Standard or Movie, then press the ENTER
button.
Detailed Settings is available in Standard or Movie mode.
3 Press the A or T button to select Detailed Settings, then press the ENTER
button.
In PC mode, you can only make changes to Dynamic Contrast, Gamma and
White Balance from among the Detailed Settings items.
Activating Black adjust
You can select the black level on the screen to adjust the screen depth.
4
Press the A or T button to select Black adjust, then press the ENTER button.
5
Press the A or T button to select Off, Low, Medium or High.
Press the ENTER button.
,, Off: Turns off the black adjustment function.
• Low: Sets the black color depth to low.
• Medium: Sets the black color depth to medium.
• High: Sets the black color depth to high.
Activating Dynamic Contrast
You can adjust the screen contrast so that the optimal contrast is provided.
6 Press the A or T button to select Dynamic Contrast, then press the
ENTER button.
7 Press the A or _' button to select Off, Low, Medium or High.
Press the ENTER button.
Off: Turns Offthe dynamic Contrast adjustment function.
• Low: Sets the dynamic contrast to low.
• Medium: Sets the dynamic contrast to medium.
• High: Sets the dynamic contrast to high.
Activating LED Control
You can select the Brightness of the LED by surrounding brightness.
8 Press the A or _' button to select LED Control, then press the ENTER button.
g Press the _ or I_ button to decrease or increase the value.
Press the ENTER button.
* Auto ; sets the LED Brightness to the Aut0 Mode.
. Max : Sets the LED Brightness to the Max Mode.
High : sets the LED Brightness to the High Mode.
o Medium : Sets the LED Brightness to the Medium Mode.
, Low : Sets the LED Brightness to the Low Mode.
. Min : Sets the LED Brightness to the Min(Minimum) Mode.
Continued...
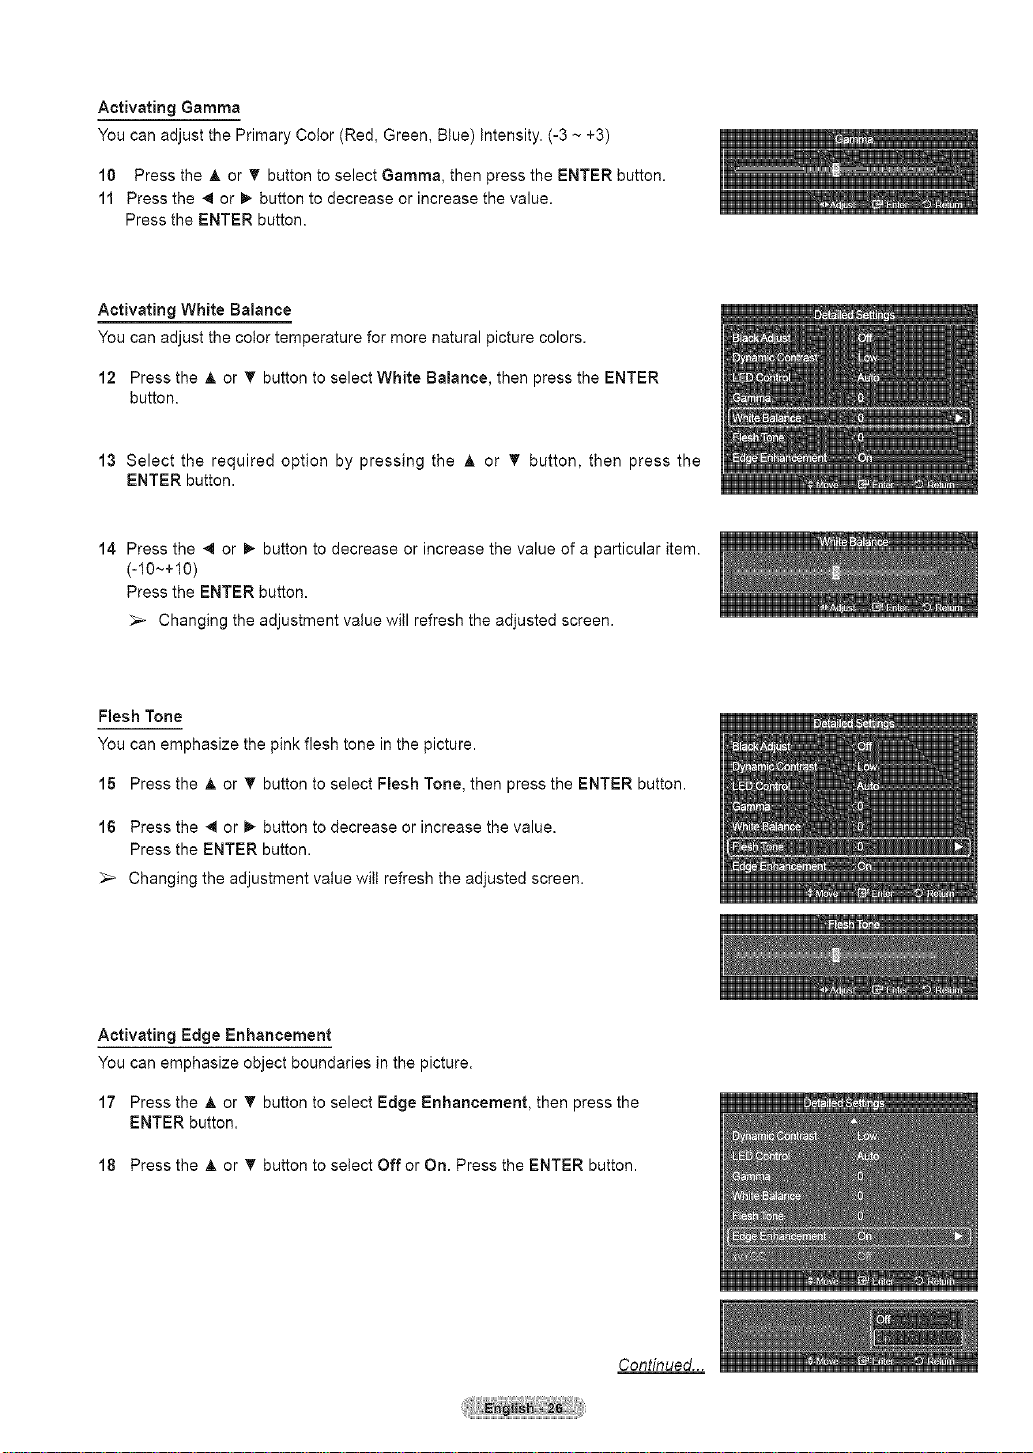
Activating Gamma
You can adjust the Primary Color (Red, Green, Blue) Intensity. (-3 ~ +3)
10 Press the A or T button to select Gamma, then press the ENTER button.
11 Press the _ or I_ button to decrease or increase the value.
Press the ENTER button.
Activating White Balance
You can adjust the color temperature for more natural picture colors.
12 Press the & or T button to select White Balance, then press the ENTER
button.
13 Select the required option by pressing the A or _' button, then press the
ENTER button.
14 Press the _ or _ button to decrease or increase the value of a particular item.
(-10~+10)
Press the ENTER button.
Changing the adjustment value will refresh the adjusted screen.
Flesh Tone
You can emphasize the pink flesh tone in the picture.
15 Press the A or T button to select Flesh Tone, then press the ENTER button.
16 Press the _ or m,-button to decrease or increase the value.
Press the ENTER button.
_,_ Changing the adjustment value wilt refresh the adjusted screen.
Activating Edge Enhancement
You can emphasize object boundaries in the picture.
17 Press the A or T button to select Edge Enhancement, then press the
ENTER button.
18 Press the A or _' button to select Off or On. Press the ENTER button.
Continued...
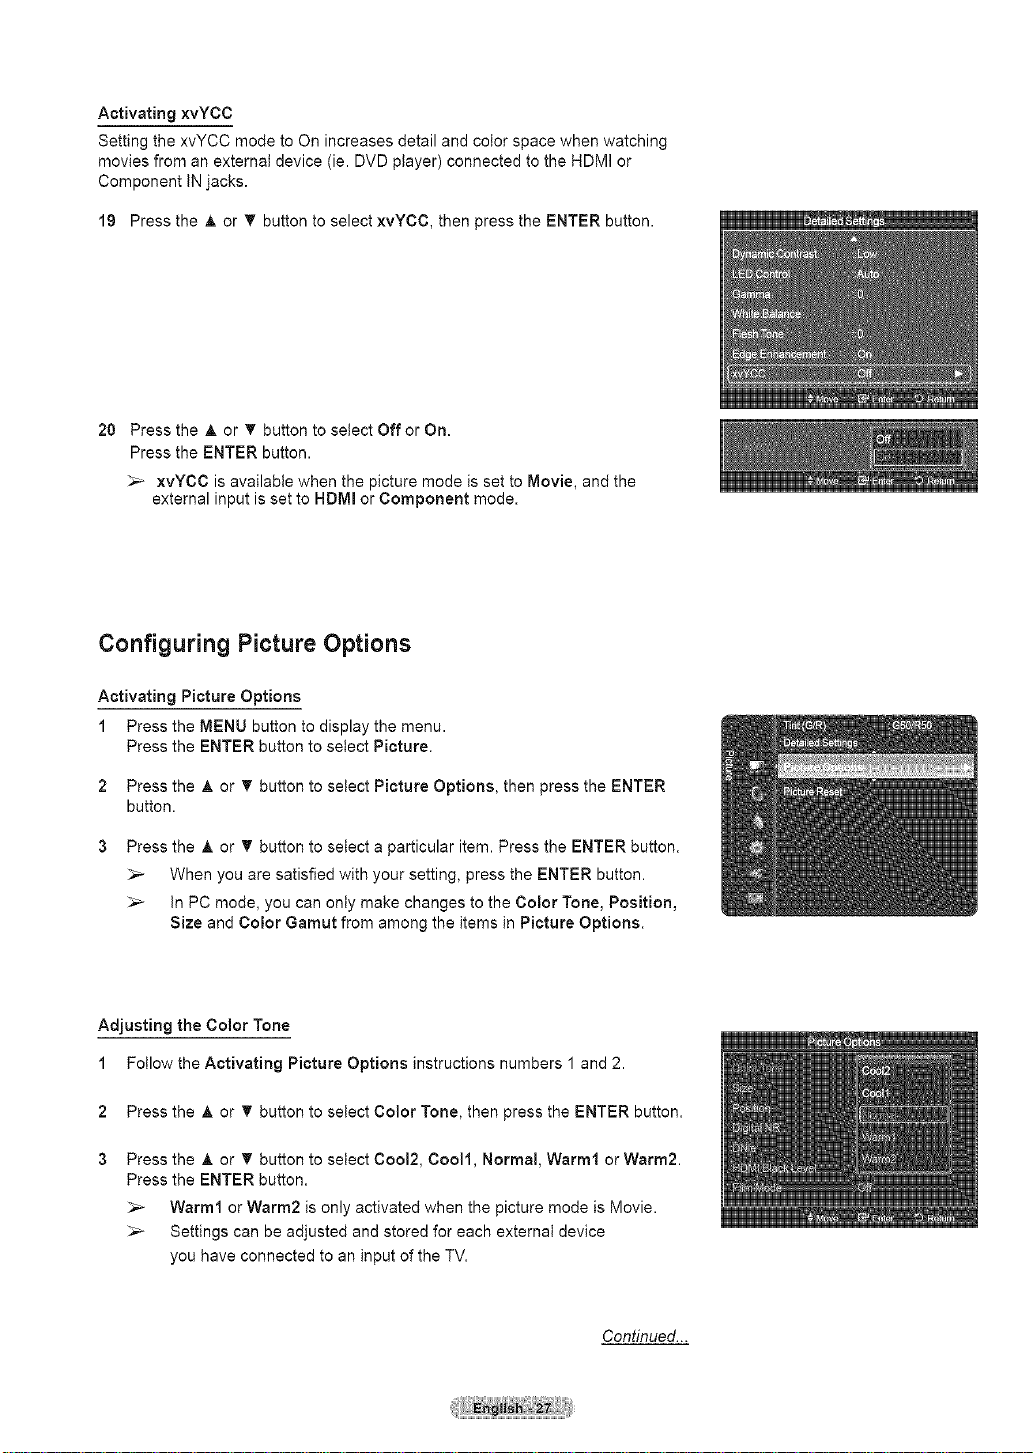
Activating xvYCC
Setting the xvYCC mode to On increases detail and color space when watching
movies from an external device (ie. DVD player) connected to the HDMI or
Component IN jacks.
19 Press the A or T button to select xvYCC, then press the ENTER button.
20 Press the A or _' button to select Off or On.
Press the ENTER button.
xvYCC is available when the picture mode is set to Movie, and the
external input is set to HDMI or Component mode.
Configuring Picture Options
Activating Picture Options
1 Press the MENU button to display the menu.
Press the ENTER button to select Picture.
2 Press the A or _' button to select Picture Options, then press the ENTER
button.
Press the A. or • button to select a particular item. Press the ENTER button.
_'_ When you are satisfied with your setting, press the ENTER button.
_'_ In PC mode, you can only make changes to the Color Tone, Position,
Size and Color Gamut from among the items in Picture Options.
Adjusting the Color Tone
1 Follow the Activating Picture Options instructions numbers 1 and 2.
2 Press the A or 'Y button to select Color Tone, then press the ENTER button.
Press the A or _' button to select Cool2, Coo11, Normal, Warm1 or Warm2.
Press the ENTER button.
Warm1 or Warm2 is only activated when the picture mode is Movie.
Settings can be adjusted and stored for each external device
you have connected to an input of the TV.
Continued...
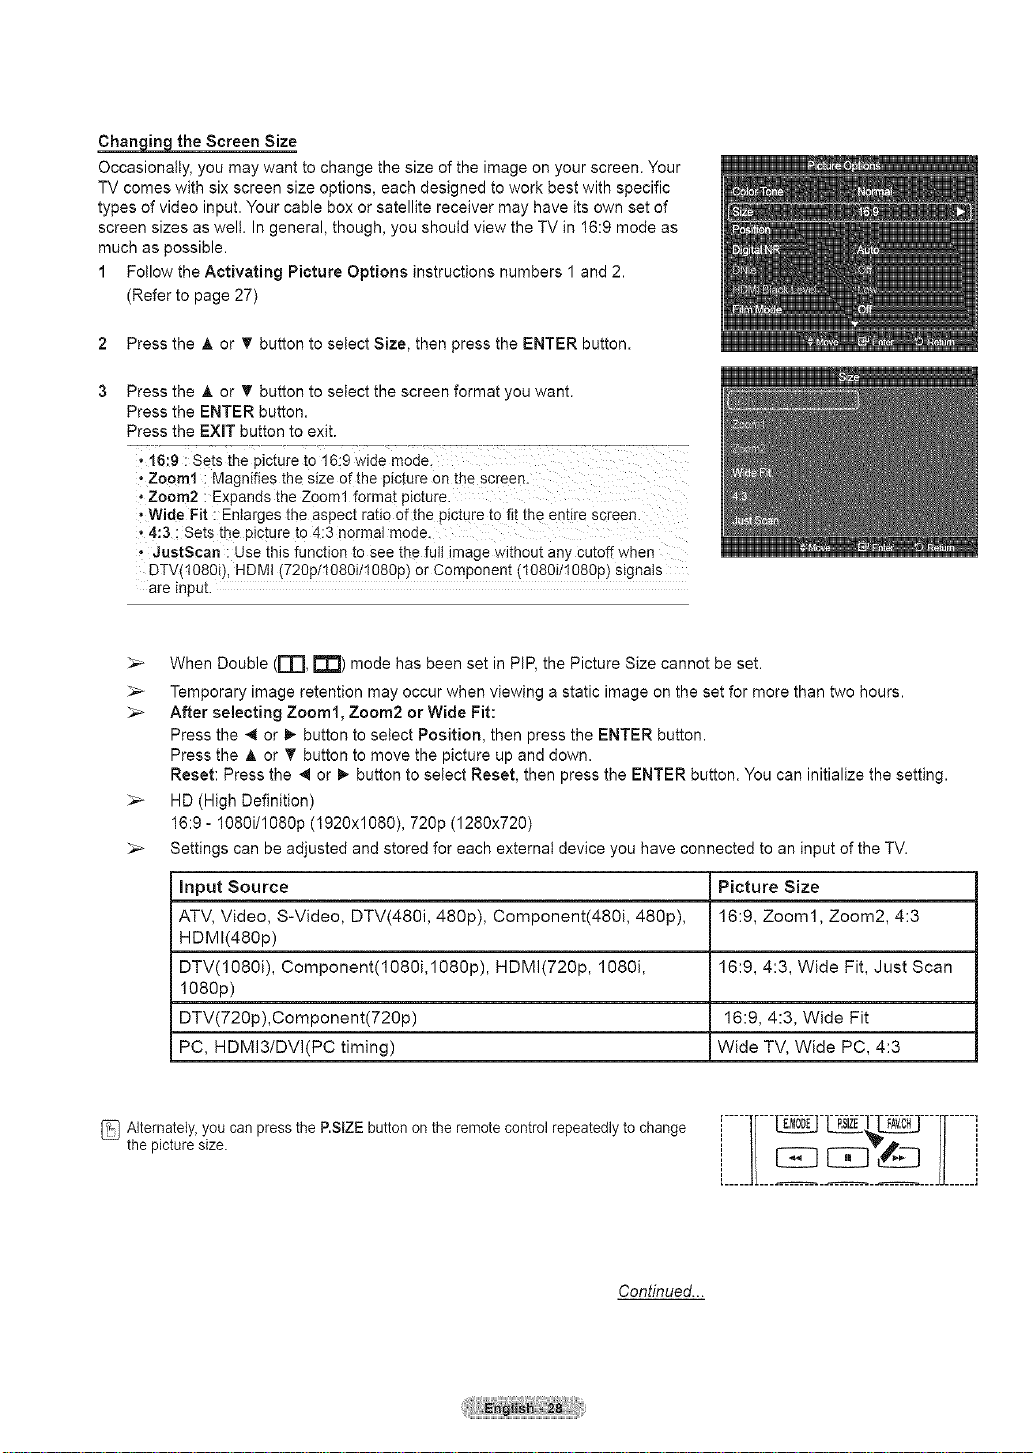
Chartig_theScreenSize
Occasionally, you may want to change the size of the image on your screen. Your
TV comes with six screen size options, each designed to work best with specific
types of video input. Your cable box or satellite receiver may have its own set of
screen sizes as wee In general, though, you should view the TV in 16:9 mode as
much as possible.
1 Fotlow the Activating Picture Options instructions numbers 1 and 2.
(Refer to page 27)
2 Press the A or _' button to select Size, then press the ENTER button.
Press the A or _' button to select the screen format you want.
Press the ENTER button.
Press the EXiT button to exit.
' 16:9 i Sets the picture io i6:9 Wide model
• zoom1 : Magnifies the size of the picture on the screen.
• Zoom2 : Expands the Zoom1 format picture.
, Wide Fit : Enlarges the aspect ratio of the picture to fit the entire screen.
,4:3 : Sets the picture to 4:3 normal mode.
JustScan : Use this function to see the full image without any cutoff when
DTV(108Oi), HDMi (720pl108OillO8Op) or Component (t08Oill08Op) signals
are input.
When Double (m, _) mode has been set in PiP, the Picture Size cannot be set.
_._ Temporary image retention may occur when viewing a static image on the set for more than two hours.
After selecting Zoom1, Zoom2 or Wide Fit:
Press the 41 or I_ button to select Position, then press the ENTER button.
Press the A or T button to move the picture up and down.
Reset: Press the _ or I_ button to select Reset, then press the ENTER button. You can initialize the setting.
HD (High Definition)
16:9 - 1O80i/1O8Op (1920x1080), 720p (1280x720)
Settings can be adjusted and stored for each external device you have connected to an input of the TV.
input Source Picture Size
ATV, Video, S-Video, DTV(480i, 480p), Component(480i, 480p), 16:9, Zoom1, Zoom2, 4:3
HDMI(48Op)
DTV(1O8Oi), Component(1O8Oi,1O8Op), HDMI(72Op, 1O8Oi, 16:9, 4:3, Wide Fit, Just Scan
1O8Op)
DTV(72Op),Component(72Op) 16:9, 4:3, Wide Fit
PC, HDMI3/DVI(PC timing) Wide TV, Wide PC, 4:3
_ AlternatelY,thepicture size.Y°Ucan press the P.SlZE button on the remote control repeatedly to change '-----,'--------'-------,-----,[__]'_L__
Continued...
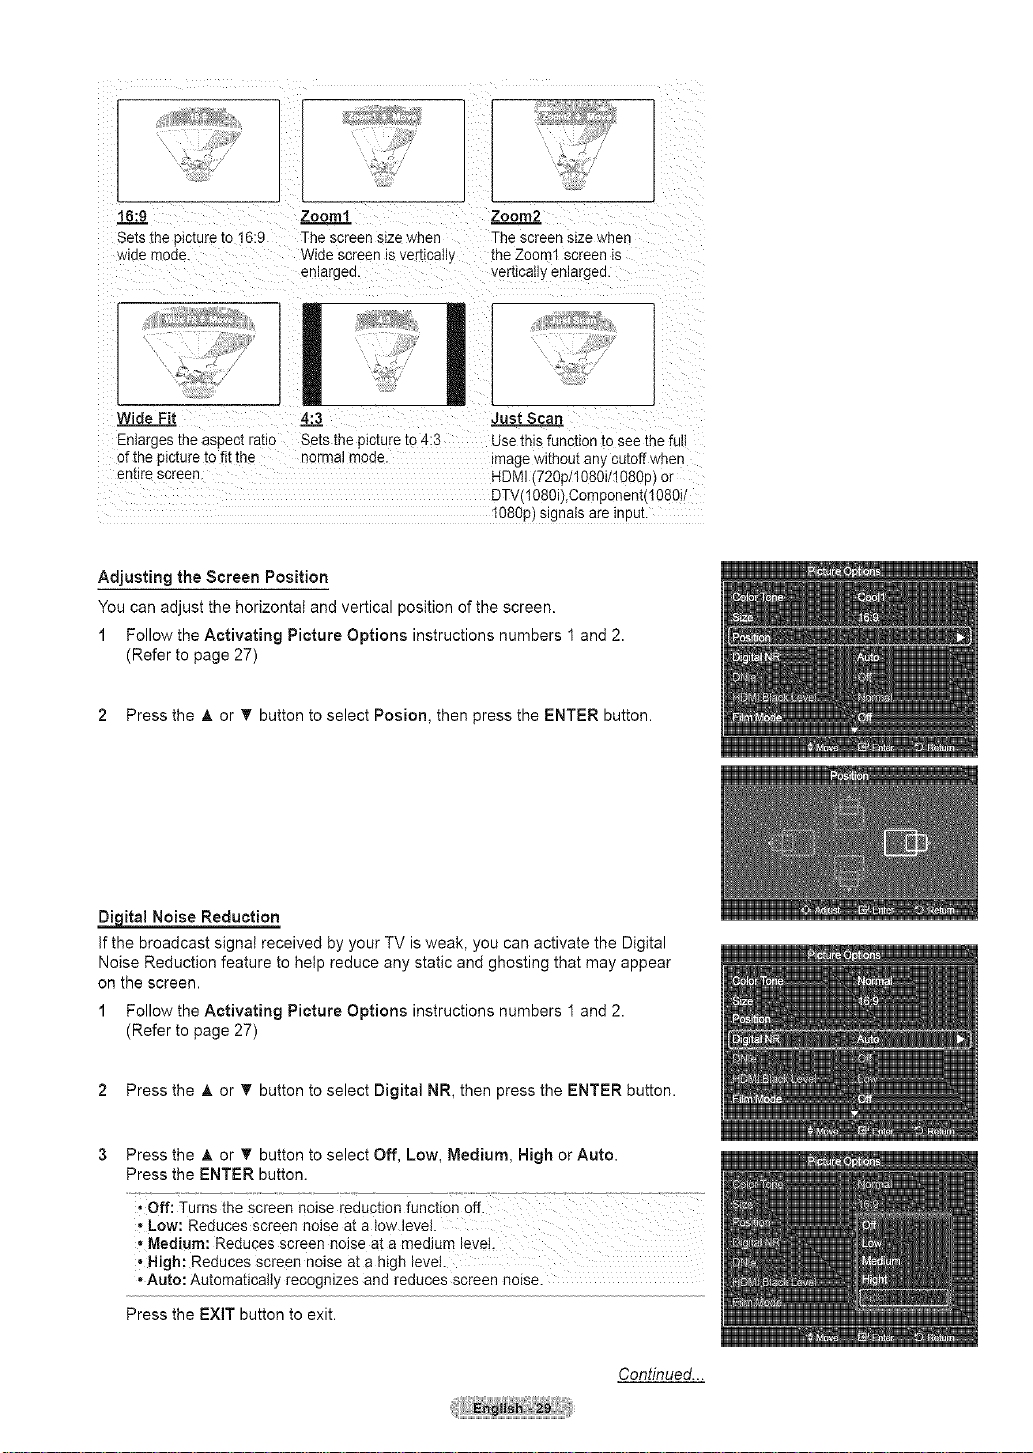
r
16:9 Zoomt Zoom2
Sets the 31ctureto 16:9 The screen size when The screen size when
N_aemoae. Ntdescreen is vertlcatly the Zoom1 screen is
enlargea, ver[lcaily en argea
Wide Fit 4:3 Just Sca_
Enlarges me aspect rauo Sets the picture to 4:3 Use this funcuon [o see the full
of the picture to fitthe normal mode. mage without an_ cutoff when
en[ire screen. HDMI (720p/1080i/1080D or
DTV,1080i),Component(1080i
I080p slgnais are tnpu[.
Adjusting the Screen Position
You can adjust the horizontal and vertical position of the screen.
1 Follow the Activating Picture Options instructions numbers 1 and 2.
(Refer to page 27)
2 Press the A or _' button to select Posion, then press the ENTER button.
Noise Reduction
If the broadcast signal received by your TV is weak, you can activate the Digital
Noise Reduction feature to help reduce any static and ghosting that may appear
on the screen.
1 Follow the Activating Picture Options instructions numbers 1 and 2.
(Refer to page 27)
2 Press the A or _' button to select Digital NR, then press the ENTER button.
Press the _, or _' button to select Off, Low, Medium, High or Auto.
Press the ENTER button.
*Off: Turns the Screen noise reduction function off.
. Low: Reduces screen noise at a low level
. Medium: Reduces screen no se at a medium level.
, High: Reduces Screen noise at a high level.
. Auto: Automatically recognizes and reduces screen noise.
Press the EXIT button to exit.
Continued...
DNle Di italNaturallma een ine
This TV includes the DNle function to provide high visual quality. If you set
DNle to on, you can view the screen with the DNle feature activated.
1 Follow the Activating Picture Options instructions numbers 1 and 2.
(Refer to page 27)
2 Press the A or _' button to select DNle, then press the ENTER button.
Press the _k or T button to select On or Off or then press the ENTER button.
, Off: Switches off the DNIe mode.
• On: Switches onthe DUle mode.
Press the EXiT button to exit.
DNle TM (Digital Natural Image engine)
This feature brings you a more detailed image with 3D noise reduction
and detailed, contrast and white enhancement.
;_ DNie is oniy available in Dynamic mode.
;_ This function doesn't work when the Input Source is PC.
the HDMI Black Level
Use this function to adjust the Black Level of the picture while in HDMI mode.
1 Follow the Activating Picture Options instructions numbers 1 and 2.
(Refer to page 27)
2 Press the A or _' button to select HDMI Black Level, then pressthe ENTER
button.
Press the & or _' button to seiect Normal or Low, then press the ENTER
button.
• Normal: The screen gets brighter.
• Low: The screen gets darkeL
This function is active only when an external device is connected to via
HDMI. NDMI Black Level function may not be compatible with or external
devices.
Press the EXiT button to exit.
Continued...
 Loading...