

Samsung GTS5150 Users Manual

Some of the contents in this manual may differ from your phone depending on the software of the phone or your
service provider.
World Wide Web
http://www.samsungmobile.com
Printed in Korea
Code No.:GH68-XXXXXA
English (EU). 11/2009. Rev. 1.0

GT-S5150
user manual
using this
manual
This user manual has been specially designed to
guide you through the functions and features of your
mobile phone. To get started quickly,
refer to “introducing your mobile phone,”
“assembling and preparing your mobile phone,”
and “using basic functions.”
ii
Instructional icons
Before you start, familiarise yourself with the icons
you will see in this manual:
Warning
—situations that could cause
injury to yourself or others
Caution
—situations that could cause
damage to your phone or other equipment
Note
—notes, usage tips, or additional
information
X
Refer to
—pages with related information;
X
for example:
page 12”)
p. 12 (represents “see

→
[]
Followed by
menus you must select to perform a step;
for example: In Menu mode, select
Messages → Create message
(represents Messages, followed by
Create message)
Square brackets
example: [ ] (represents the Power/
Menu exit key)
—the order of options or
—phone keys; for
Copyright information
Rights to all technologies and products that
comprise this phone are the property of their
respective owners:
®
•Bluetooth
Bluetooth SIG, Inc. worldwide
Bluetooth QD ID: B0XXXXX
• Java™ is a trademark of Sun Microsystems, Inc.
is a registered trademark of the
using this manual
< >
Angled brackets
different functions at each screen; for
example: <OK> (represents the OK
softkey)
—softkeys that control
iii

safety and usage information .................. 1
Safety warnings .......................................... 1
contents
iv
Safety precautions ...................................... 4
Important usage information ....................... 6
introducing your mobile phone ............. 12
Unpack ..................................................... 12
Phone layout ............................................. 13
Keys ......................................................... 14
Display ...................................................... 15
Icons ........................................................ 16
assembling and preparing your mobile
phone ...................................................... 17
Install the SIM card and battery ................. 17
Charge the battery .................................... 19
Insert a memory card (optional) ................. 20

using basic functions ............................ 22
Turn your phone on and off ....................... 22
Access menus .......................................... 23
Use shortcut menus from the
shortcut toolbar ........................................ 23
Customise your phone .............................. 24
Use basic call functions ............................ 26
Send and view messages ......................... 27
Add and find contacts ............................... 30
Use basic camera functions ...................... 31
Listen to music ......................................... 32
Browse the web ........................................ 34
using advanced functions ..................... 35
Use advanced call functions ..................... 35
Use advanced phonebook functions ......... 38
Use advanced messaging functions ..........39
Use advanced camera functions ............... 41
Use advanced music functions ................. 44
using tools and applications ................. 47
Use the Bluetooth wireless feature ............ 47
Activate and send an SOS message ......... 49
Activate the mobile tracker ........................ 49
Make fake calls ......................................... 50
Record and play voice memos .................. 51
Edit images ............................................... 52
View photos and videos on the web ......... 53
Use Java-powered games and
applications .............................................. 54
Create and view world clocks ................... 55
Set and use alarms ................................... 56
Use the calculator ..................................... 57
Convert currencies or measurements ....... 57
contents
v

Set a countdown timer .............................. 57
Use the stopwatch .................................... 57
Create new tasks ...................................... 58
Create new memos .................................. 58
Manage your calendar .............................. 58
contents
troubleshooting ........................................ a
index ......................................................... d
vi

Correct disposal of this product
(Waste Electrical & Electronic Equipment)
(Applicable in the European Union and
safety and usage information
its electronic accessories (e.g. charger, headset,
USB cable) should not be disposed of with other
household waste at the end of their working life. To
prevent possible harm to the environme
health from uncontrolled waste disposal, please
separate these items from other types of waste and
recycle them responsibly to promote the sustainable
reuse of material resources.
8
other European countries with separate
collection systems)
This marking on the product, accessories
or literature indicates that the product and
nt or human
Household users should contact either the retailer
where they purchased this product, or their local
government office, for details of where and how they
can take these items for environmentally safe
recycling.
Business users should contact their supplier and
check the terms and conditions of the purchase
contract. This product and its electronic accessories
should not be mixed with other commercial wastes
for disposal.
This EEE is compliant with RoHS.
Correct disposal of batteries in this
product
(Applicable in the European Union and
other European countries with separate
battery return systems)
This marking on the battery, manual or
packaging indicates that the batteries in this product
should not be disposed of with other household
waste at the end of their working life. Where marked,
the chemical symbols Hg, Cd or Pb indicate that the
battery contains mercury, cadmium or lead above
the reference levels in EC Directive 2006/66. If
batteries are not properly disposed of, these
substances can cause harm to human health or the
environment.
To protect natural resources and to promote material
reuse, please separate batteries from other types of
waste and recycle them through your local, free
battery return system.
safety and usage information
9

Disclaimer
Some content and services accessible through this
device belong to third parties and are protected by
copyright, patent, trademark and/or other intellectual
property laws. Such content and services are
safety and usage information
provided solely for your personal noncommercial
use. You may not use any content or services in a
manner that has not been authorised by the content
owner or service provider. Without limiting the
foregoing, unless expressly authorised by the
applicable content owner or service provider, you
may not modify, copy, republish, upload, post,
transmit, translate, sell, create derivative works,
exploit, or distribute in any manner or medium any
content or services displayed through this device.
“THIRD PARTY CONTENT AND SERVICES ARE
PROVIDED "AS IS." SAMSUNG DOES NOT
WARRANT CONTENT OR SERVICES SO
PROVIDED, EITHER EXPRESSLY OR IMPLIEDLY,
10
FOR ANY PURPOSE. SAMSUNG EXPRESSLY
DISCLAIMS ANY IMPLIED WARRANTIES,
INCLUDING BUT NOT LIMITED TO, WARRANTIES
OF MERCHANTABILITY OR FITNESS FOR A
PARTICULAR PURPOSE. SAMSUNG DOES NOT
GUARANTEE THE ACCURACY, VALIDITY,
TIMELINESS, LEGALITY, OR COMPLETENESS OF
ANY CONTENT OR SERVICE MADE AVAILABLE
THROUGH THIS DEVICE AND UNDER NO
CIRCUMSTANCES, INCLUDING NEGLIGENCE,
SHALL SAMSUNG BE LIABLE, WHETHER IN
CONTRACT OR TORT, FOR ANY DIRECT,
INDIRECT, INCIDENTAL, SPECIAL OR
CONSEQUENTIAL DAMAGES, ATTORNEY FEES,
EXPENSES, OR ANY OTHER DAMAGES ARISING
OUT OF, OR IN CONNECTION WITH, ANY
INFORMATION CONTAINED IN, OR AS A RESULT
OF THE USE OF ANY CONTENT OR SERVICE BY
YOU OR ANY THIRD PARTY, EVEN IF ADVISED OF
THE POSSIBILITY OF SUCH DAMAGES."

Third party services may be terminated or interrupted
at any time, and Samsung makes no representation
or warranty that any content or service will remain
available for any period of time. Content and
services are transmitted by third parties by means of
networks and transmission facilities over which
Samsung has no control. Without limiting the
generality of this disclaimer, Samsung expressly
disclaims any responsibility or liability for any
interruption or suspension of any content or service
made available through this device.
Samsung is neither responsible nor liable for
customer service related to the content and
services. Any question or request for service relating
to the content or services should be made directly to
the respective content and service providers.
safety and usage information
11
introducing your
mobile phone
In this section, learn about your mobile phone’s
layout, keys, display, and icons.
12
Unpack
Check your product box for the following items:
• Mobile phone
• Battery
• Travel adapter (charger)
• User manual
• The items supplied with your phone may vary
depending on the software and accessories
available in your region or offered by your
service provider. You can obtain additional
accessories from your local Samsung dealer.
• The supplied accessories perform best for
your phone.
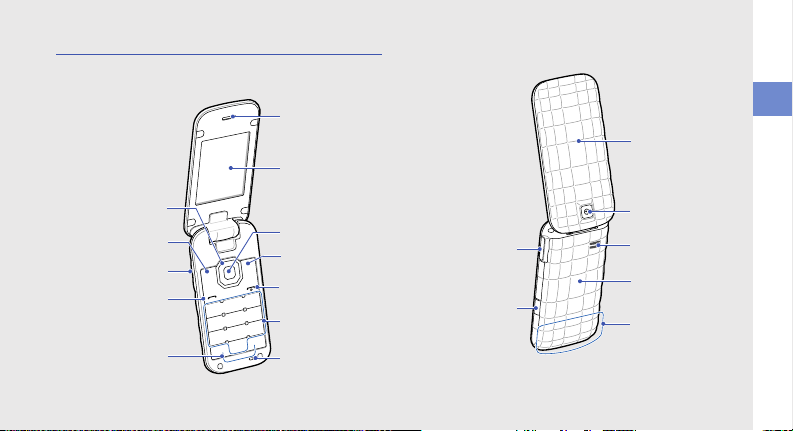
Phone layout
4-way
navigation key
Volume ke y
Left softkey
Mouthpiece
Dial key
Power/Menu
exit key
Right softkey
Earpiece
Display
Confirm key
Special
function keys
Alphanumeric
keys
Battery cover
Internal antenna
Speaker
Camera key
Multifunction jack
Camera lens
External LED
The front of your phone includes the following keys
and features:
The rear of your phone includes the following keys
and features:
introducing your mobile phone
13
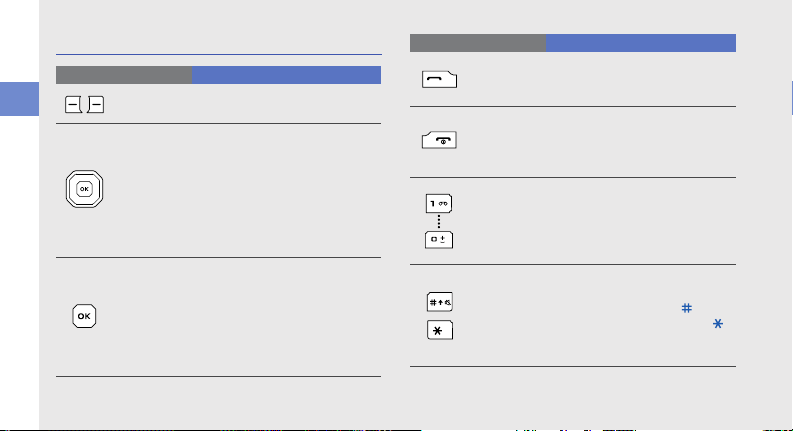
Keys
Key Function
Softkeys
introducing your mobile phone
4-way
navigation
Confirm
14
Perform actions indicated at the
bottom of the display
Scroll through menu options; In
Idle mode, move among the
home screen shortcuts. When
the home screen shortcuts are
deactivated, access user-defined
menus (depending on your
service provider, pre-defined
menus may differ)
Select the highlighted menu
option or confirm an input; In Idle
mode, when the home screen
shortcuts are deactivated, launch
the web browser or access
Menu mode (depending on your
service provider or region)
Key Function
Make or answer a call; In Idle
Dial
Power/Menu
exit
Alphanumeric/
Symbol
Special
function
mode, retrieve recently dialed,
missed, or received numbers
Turn the phone on or off (press
and hold); End a call; In Menu
mode, cancel input and return to
Idle mode
Enter numbers, characters, and
symbols in a text input field; In Idle
mode, press and hold [1] to
access voice mails and [0] to
enter an international call prefix
Enter special characters or
perform special functions; In Idle
mode, press and hold [ ] for the
silent profile; press and hold [ ]
to enter a pause between
numbers
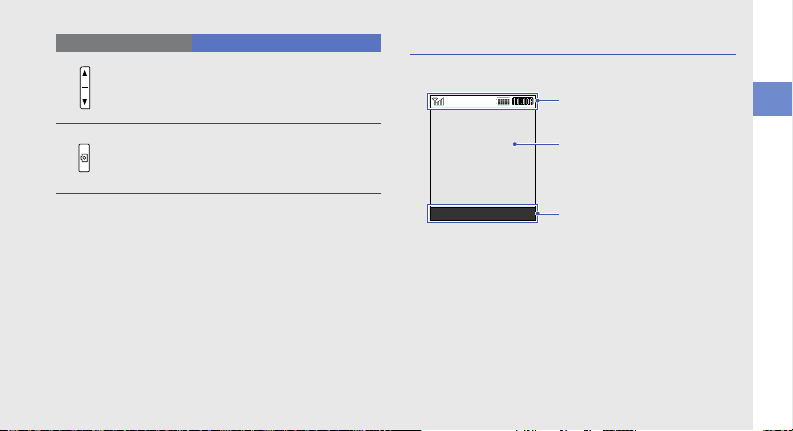
Key Function
Icon line
Displays various icons
Text and graphic area
Displays messages,
instructions, and
information you enter
Softkey line
Displays the current actions
assigned to each softkey
Adjust the phone's volume;
Volume
Camera
Silence a ringtone for incoming
calls or reject calls (press and
hold)
In Idle mode, turn on the camera
(press and hold); In Camera
mode, take a photo or record a
video
Display
Your phone’s display consists of three areas:
introducing your mobile phone
15
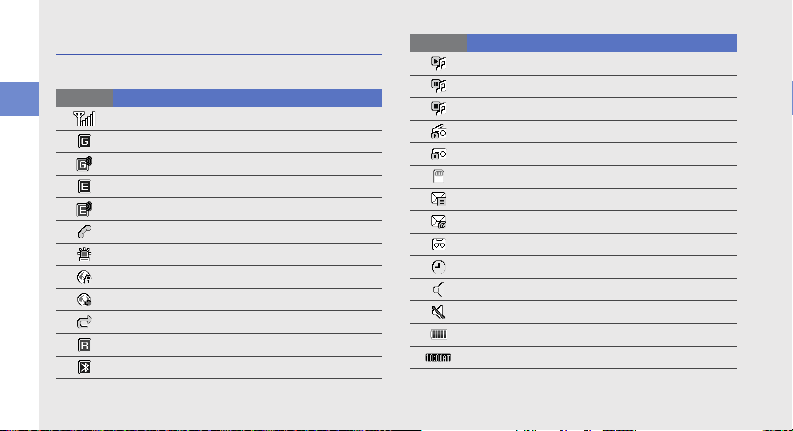
Icons
Learn about the icons that appear on your display.
Icon Definition
introducing your mobile phone
16
Signal strength
GPRS network connected
Transferring data via GPRS network
EDGE network connected
Transferring data via EDGE network
Call in progress
SOS message feature activated
Connecting to secured web page
Browsing the web
Call diverting activated
Roaming (outside of normal service area)
Bluetooth activated
Icon Definition
Music playback in progress
Music playback paused
Music playback stopped
FM radio on
FM radio suspended
Memory card inserted
New text or multimedia message
New email message
New voice mail message
Alarm activated
Normal profile activated
Silent profile activated
Battery power level
Current time
assembling and
preparing your
mobile phone
Install the SIM card and battery
When you subscribe to a cellular service, you will
receive a Subscriber Identity Module (SIM) with
subscription details, such as your personal
identification number (PIN) and optional services.
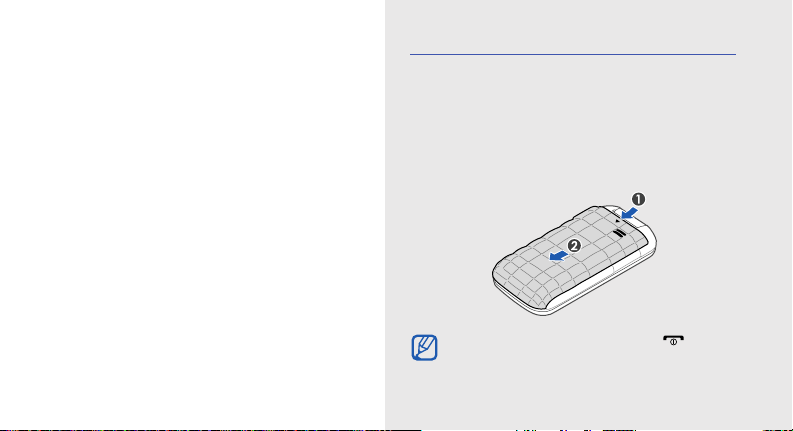
To install the SIM card and battery,
1. Remove the battery cover.
Get started by assembling and setting up your
mobile phone for its first use.
If the phone is on, press and hold [ ] to turn
it off.
17
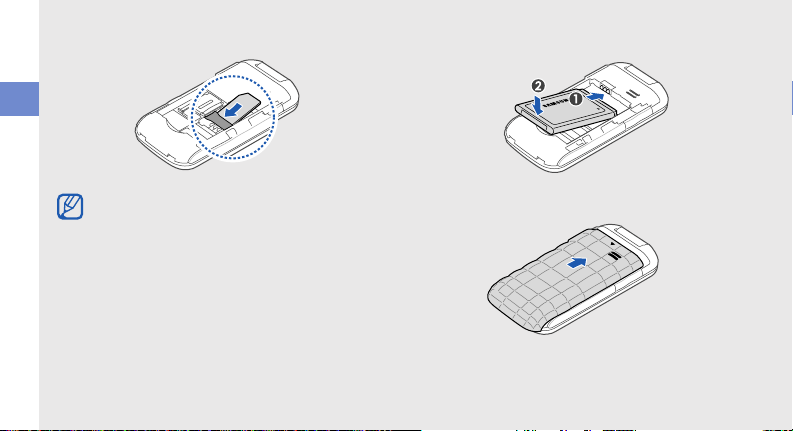
2. Insert the SIM card. 3. Insert the battery.
assembling and preparing your mobile phone
• Place the SIM card in the phone with the
gold-coloured contacts facing down.
• Without inserting a SIM card, you can use
your phone’s non-network services and
some menus.
18
4. Replace the battery cover.
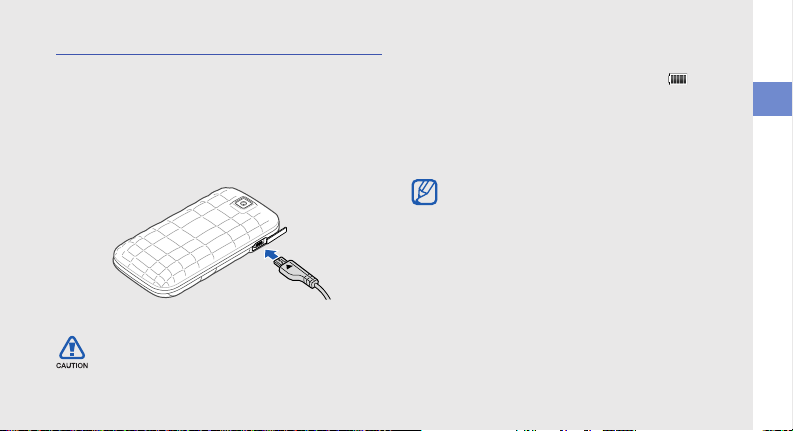
Charge the battery
With the triangle
facing up
Before using the phone for the first time, you must
charge the battery.
1. Open the cover to the multifunction jack on the
side of the phone.
2. Plug the small end of the travel adapter into the
multifunction jack.
Improperly connecting the travel adapter can
cause serious damage to the phone. Any
damages by misuse are not covered by the
warranty.
3. Plug the large end of the travel adapter into a
power outlet.
4. When the battery is fully charged (the icon is
no longer moving), unplug the travel adapter from
the power outlet.
5. Unplug the travel adapter from the phone.
6. Close the cover to the multifunction jack.
About the low battery indicator
When your battery is low, the phone will emit a
warning tone and a low battery message. The
battery icon will also be empty and blinking. If
the battery level becomes too low, the phone
will automatically power off. Recharge your
battery to continue using your phone.
assembling and preparing your mobile phone
19
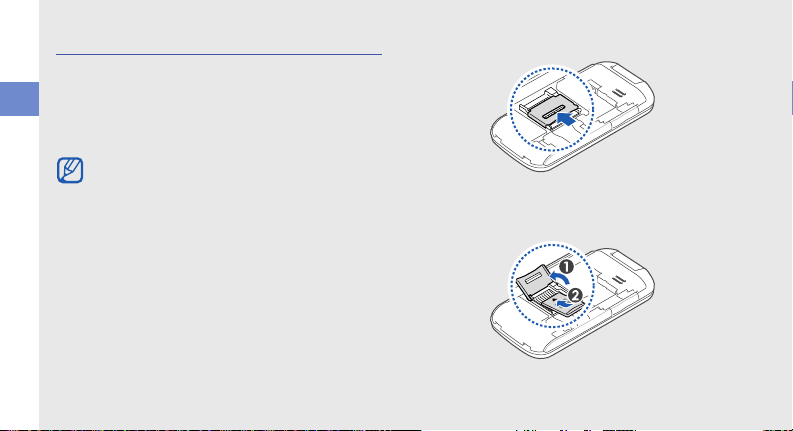
Insert a memory card (optional)
To store additional multimedia files, you must insert a
memory card. Your phone accepts microSD™ or
microSDHC™ memory cards up to 8 GB
assembling and preparing your mobile phone
(depending on memory card manufacturer and
type).
Formatting the memory card on a PC may
cause incompatibility with your phone. Format
the memory card only on the phone.
1. Remove the battery cover and battery.
20
2. Unlock the memory card cover.
3. Lift the memory card cover and insert a memory
card with the label side facing up.
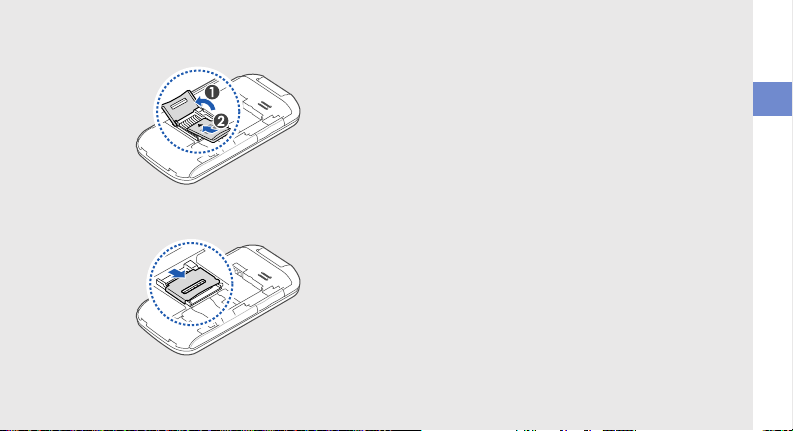
4. Close the memory card cover.
5. Lock the memory card cover.
6. Insert the battery and replace the battery cover.
To remove the memory card, remove the battery
cover and battery, unlock and lift the memory card
cover, and then remove the memory card.
assembling and preparing your mobile phone
21

using basic
functions
Learn how to perform basic operations and use the
main features of your mobile phone.
22
Turn your phone on and off
To turn your phone on,
1. Press and hold [ ].
2. Enter your PIN and press <OK> (if necessary).
3. When the setup wizard opens, customise your
phone as desired by following the screen.
To turn your phone off, repeat step 1 above.
Switch to the offline profile
By switching to the offline profile, you can use your
phone’s non-network services in areas where
wireless devices are prohibited, such as aeroplane
and hospitals.
To switch to the offline profile, in Menu mode, select
Settings → Phone profiles → Offline.
Follow all posted warnings and directions from
official personnel when in areas where wireless
devices are prohibited.
Access menus
To access your phone’s menus,
1. In Idle mode, press <Menu> to access Menu
mode.
You may need to press the Confirm key to
access Menu mode depending on your region
or service provider.
2. Use the Navigation key to scroll to a menu or
option.
3. Press <Select> or the Confirm key to confirm
the highlighted option.
4. Press <Back> to move up one level; Press [ ]
to return to Idle mode.
Use shortcut menus from the
shortcut toolbar
Learn to use the items on the toolbar.
To access an item from the shortcut toolbar, in Idle
mode, scroll left or right to the menu item you want
and press the Confirm key.
To edit items on the shortcut toolbar,
1. In Menu mode, select Settings → Display and
light → Shortcuts toolbar.
2. Press <Options> → Edit.
3. Select your favourite menus.
4. Press <Save>, or press <Options> → Save.
To deactivate the shortcuts toolbar, in Menu
mode, select
Home screen → Shortcuts toolbar → Off →
Save
Settings → Display and light →
.
using basic functions
23

Customise your phone
Get more from your phone by customising it to
match your preferences.
Adjust the volume of the key tones
In Idle mode, press the Volume key up or down to
using basic functions
adjust the key tone volume.
Switch to or from the silent profile
In Idle mode, press and hold [ ] to silence or
unsilence your phone.
Set a phone profile
To change the ringtone of the current profile,
1. In Menu mode, select Settings → Phone
profiles.
24
2. Scroll to the profile you are using.
If you are using the silent or offline profile, you
are not allowed to change the ringtone.
3. Press <Options> → Edit → Voice call ringtone.
4. Select a ringtone category → a ringtone.
5. Press <Save>.
To switch to another profile, select it from the list.
To create a phone profile,
1. In Menu mode, select Settings → Phone
profiles.
2. Press <Options> → Create.
3. Enter a name for the profile and press <Save>.
4. Customise the sound settings as desired.
5. When you are finished, press <Save>.

Select a wallpaper (Idle mode)
1. In Menu mode, select Settings → Display and
light → Home screen.
2. Scroll left or right to Images.
3. Select Wallpaper.
4. Select an image category → an image.
5. Press <Select> → <Save>.
Select a theme for the display
1. In Menu mode, select Settings → Display and
light → My theme.
2. Scroll to a theme and press <Save>.
Set display animations
You can set display animations on the external LED
for different phone events.
1. In Menu mode, select Settings → External LED
→ Event settings.
2. Scroll to an event and press the Confirm key.
3. Select an animation option.
4. Check the animation on the external LED
(if necessary).
5. Press <Set>.
6. Press <Save> to save the changes.
Set menu shortcuts
1. In Menu mode, select Settings → Phone
settings → Shortcuts.
2. Select a key to use as a shortcut.
3. Select a menu to assign to the shortcut key.
When the shortcuts toolbar is activated, the
Navigation keys (left/right) do not work as
shortcuts.
25
using basic functions

Lock your phone
1. In Menu mode, select Settings → Security →
Phone lock → On.
2. Enter a new 4- to 8-digit password and press
<OK>.
3. Enter the new password again and press <OK>.
using basic functions
• The first time you access a menu that
requires a password, you will be prompted to
create and confirm a password.
• Samsung is not responsible for any loss of
passwords or private information or other
damages caused by illegal software.
26
Use basic call functions
Learn to make or answer calls and use basic call
functions.
Make a call
1. In Idle mode, enter an area code and a phone
number.
2. Press [ ] to dial the number
3. To end the call, press [ ].
Answer a call
1. When a call comes in, press [ ].
2. To end the call, press [ ].
Adjust the volume
To adjust the volume during a call, press the Volume
key up or down.

Use the speakerphone feature
1. During a call, press the Confirm key → <Yes> to
activate the speaker.
2. To switch back to the earpiece, press the
Confirm key again.
In noisy environments, you may have difficulty
hearing the calls while using the speakerphone
feature. For better audio performance, use the
normal phone mode.
Record a conversation
This feature may not be available depending on
your region or service provider.
1. During a call, press <Options> → Menu →
Applications → Voice recorder.
2. Press the Confirm key to start recording.
3. Press the Navigation key down to stop
recording.
Use the headset
By plugging the supplied headset into the headset
jack, you can make and answer calls:
• To redial the last call, press the headset button
twice.
• To answer a call, press the headset button.
• To end a call, press the headset button.
Send and view messages
Learn to send or view text (SMS), multimedia (MMS),
or email messages.
Send a text or multimedia message
1. In Menu mode, select Messages → Create
message → Message.
2. Enter a destination number and scroll down.
27
using basic functions

3. Enter your message text. X p. 28
For sending as a text message, skip to step 5.
For attaching multimedia, continue with step 4.
4. Press <Options> → Add multimedia and add
an item.
5. Press the Confirm key to send the message.
using basic functions
Send an email
1. In Menu mode, select Messages → Create
message → Email.
2. Enter an email address and scroll down.
3. Enter a subject and scroll down.
4. Enter your email text.
5. Press <Options> → Attach multimedia and
attach a file (if necessary).
6. Press the Confirm key to send the email.
28
Enter text
When entering text, you can change the text input
mode:
• Press and hold [ ] to switch between T9 and
ABC modes. Depending on your country, you
may be able to access an input mode for your
specific language.
• Press [ ] to change case or switch to Number
mode.
• Press [ ] to switch to Symbol mode.
• Press and hold [ ] to select an input method or
an input language.

Enter text in one of the following modes:
Mode Function
Press an appropriate alphanumeric key
ABC
T9
Number
Symbol
until the character you want appears on
the display.
1. Press appropriate alphanumeric keys
to enter an entire word.
2. When the word displays correctly,
press the Confirm key. If the correct
word does not display, select an
alternate word from the list that
appears.
Press an appropriate alphanumeric key to
enter a number.
Press an appropriate alphanumeric key to
enter a symbol.
View text or multimedia messages
1. In Menu mode, select Messages → Inbox.
2. Select a text or multimedia message.
View an email
1. In Menu mode, select Messages → Email
inbox.
2. Select an account.
3. Press <Options> → Download.
4. Select an email or a header.
5. If you selected a header, press <Options> →
Retrieve to view the body of the email.
using basic functions
29
 Loading...