

Page 1

Some of the contents in this manual may differ from your
device depending on the software of the device or your service
provider.
To install Kies (PC Sync)
Download the latest version of Kies from the 1.
Samsung website (www.samsung.com/kies) and
install it on your PC.
Using a USB cable, connect your device to your PC. 2.
Samsung Kies will launch automatically.
Refer to the Kies help for more information.
www.samsung.com
English (EU). 01/2012. Rev. 1.0
Page 2

GT-P8110
user manual
Page 3

Using this manual
2
Using this manual
Congratulations on your purchase of the Samsung mobile
device. This powerful, “go anywhere” device, puts the best
of the web and mobile computing at your fingertips in a
lightweight, highly versatile platform that fits your active
lifestyle. Built on the Google Android operating system, the
Samsung mobile device gives you access to thousands of
useful and entertaining applications to enrich your mobile
web experience.
With integrated wireless access and a responsive touch
screen, you can read books and newspapers on the go; stay
up-to-date on the latest news, sports, and weather; manage
your multimedia and business files; and browse the web for
maps, business locations, and more.
Read me first
●
Please read all safety precautions and this manual carefully
before using your device to ensure safe and proper use.
●
The descriptions in this manual are based on the default
settings of your device.
●
Images and screenshots used in this user manual may differ
in appearance from the actual product.
●
Content in this user manual may differ from the product, or
from software provided by service providers or carriers, and
is subject to change without prior notice. Refer to
www.samsung.com for the latest version of the user
manual.
●
Available features and additional services may vary by
device, software, or service provider.
Page 4

Using this manual
3
●
Formatting and delivery of this user manual is based
on Google Android operating systems and may vary
depending on the user’s operating system.
●
Applications and their functions may vary by country,
region, or hardware specifications. Samsung is not liable for
performance issues caused by third-party applications.
●
Samsung is not liable for performance issues or
incompatibilities caused by edited registry settings or
modified operating system software. Attempting to
customise the operating system may cause your device or
applications to work improperly.
●
You may upgrade your mobile device’s software by
accessing www.samsung.com.
●
Software, sound sources, wallpapers, images, and other
contents provided in this device are licenced for limited use
between Samsung and their respective owners. Extracting
and using these materials for commercial or other purposes
is an infringement of copyright laws. Samsung is not liable
for such copyright infringement by the user.
●
Please keep this manual for future reference.
Instructional icons
Before you start, familiarise yourself with the icons you will
see in this manual:
Warning—situations that could cause injury to
yourself or others
Caution—situations that could cause damage to
your device or other equipment
Note—notes, usage tips, or additional information
Page 5

Using this manual
4
►
Refer to—pages with related information; for
example:
► p.12 (represents “see page 12”)
→
Followed by—the order of options or menus you
must select to perform a step; for example: Open the
→
application list and select Settings
networks (represents Settings, followed by Wireless
and networks)
Wireless and
Copyright
Copyright © 2012 Samsung Electronics
This user manual is protected under international copyright
laws.
No part of this user manual may be reproduced, distributed,
translated, or transmitted in any form or by any means,
electronic or mechanical, including photocopying, recording,
or storing in any information storage and retrieval system,
without the prior written permission of Samsung Electronics.
Trademarks
●
SAMSUNG and the SAMSUNG logo are registered
trademarks of Samsung Electronics.
●
The Android logo, Google Search
Google Mail
are trademarks of Google, Inc.
Talk
™
●
Bluetooth
Inc. worldwide.
●
Oracle and Java are registered trademarks of Oracle and/
or its affiliates. Other names may be trademarks of their
respective owners.
, YouTube™, Android Market™, and Google
™
is a registered trademark of the Bluetooth SIG,
®
, Google Maps™,
™
Page 6

Using this manual
5
●
Windows Media Player
Microsoft Corporation.
●
Wi-Fi
Wi-Fi CERTIFIED
trademarks of the Wi-Fi Alliance.
●
DivX
associated logos are trademarks
of Rovi Corporation or its
subsidiaries and are used under
licence.
●
All other trademarks and copyrights are the property of
their respective owners.
, Wi-Fi Protected Setup™, Wi-Fi Direct™,
®
, and the Wi-Fi logo are registered
™
, DivX Certified®, and
®
is a registered trademark of
®
Page 7

ABOUT DIVX VIDEO
DivX® is a digital video format created by DivX, LLC, a
subsidiary of Rovi Corporation. This is an official DivX
Certified
for more information and software tools to convert your files
into DivX videos.
DivX Certified
premium content
device that plays DivX video. Visit www.divx.com
®
to play DivX® video up to HD 720p, including
®
ABOUT DIVX VIDEO-ON-DEMAND
This DivX Certified® device must be registered in order to play
purchased DivX Video-on-Demand (VOD) movies. To obtain
your registration code, locate the DivX VOD section in your
device setup menu. Go to vod.divx.com for more information
on how to complete your registration.
Using this manual
6
Page 8

Contents
Assembling ....................................................... 11
Unpack ................................................................................................. 11
Charge the battery .......................................................................... 12
Insert a memory card (optional) ................................................ 14
Getting started ................................................. 17
Turn your device on and off ........................................................ 17
Get to know your device ............................................................... 18
Use the S Pen and the touch screen ........................................ 22
Get to know the Home screen ................................................... 24
Access applications ......................................................................... 28
Customise your device .................................................................. 28
Using special features ..................................... 37
Learn basic S Pen actions................................................................37
Learn advanced S Pen actions ......................................................37
Learn motions .....................................................................................39
Use Handwriting mode ...................................................................40
Use S Memo..........................................................................................44
Use the quick memo pad ...............................................................47
Web ................................................................... 48
Browser ................................................................................................. 48
Pulse ...................................................................................................... 52
Market ................................................................................................... 53
YouTube ............................................................................................... 54
Contents
7
Page 9

Contents
8
Maps ...................................................................................................... 55
Latitude ................................................................................................ 56
Places ..................................................................................................... 57
Navigation ........................................................................................... 57
Samsung Apps .................................................................................. 58
Entertainment .................................................. 73
Music player ....................................................................................... 73
Music Hub ........................................................................................... 76
Camera ................................................................................................. 76
Video player ........................................................................................ 86
Gallery ................................................................................................... 87
Video maker ....................................................................................... 89
Personal information ....................................... 91
Contacts ............................................................................................... 91
Calendar ............................................................................................... 95
S memo ................................................................................................ 96
Connectivity ..................................................... 99
PC connections ................................................................................. 99
Wi-Fi ..................................................................................................... 100
Page 10

Contents
9
Wi-Fi Direct ........................................................................................ 103
Bluetooth ........................................................................................... 104
AllShare .............................................................................................. 106
GPS ....................................................................................................... 110
VPN connections ............................................................................ 111
Tools ................................................................ 113
Alarm ................................................................................................... 113
Calculator .......................................................................................... 114
Downloads ........................................................................................ 114
eBook .................................................................................................. 114
Google Search ................................................................................. 116
My files ................................................................................................ 116
Polaris Office .................................................................................... 118
SIM Toolkit ......................................................................................... 120
Voice Search ..................................................................................... 120
World clock ....................................................................................... 121
Settings ........................................................... 122
Access the Settings menu .......................................................... 122
Wireless and networks ................................................................. 122
Sound .................................................................................................. 126
Screen ................................................................................................. 127
Power saving mode ...................................................................... 128
Location and security ................................................................... 128
Applications ..................................................................................... 131
Accounts and sync ........................................................................ 132
Page 11

Motion ................................................................................................ 132
Privacy ................................................................................................. 132
Storage ............................................................................................... 133
Language and input ..................................................................... 133
Accessibility ...................................................................................... 136
Date and time .................................................................................. 137
About device .................................................................................... 137
Troubleshooting ............................................ 138
Safety precautions ......................................... 143
Index ............................................................... 154
Contents
10
Page 12

Assembling
Unpack
Check your product box for the following items:
●
Mobile device
●
S pen with 8 extra tips
●
Quick start guide
Use only Samsung-approved software. Pirated or illegal
software may cause damage or malfunctions that are
not covered by your manufacturer's warranty.
●
The items supplied with your device and available
accessories may vary depending on your region or
service provider.
●
You can purchase additional accessories from your
local Samsung dealer.
●
The supplied accessories perform best for your device.
●
Accessories other than the supplied ones may not be
compatible with your device.
Assembling
11
Page 13

Assembling
13
●
Charge the battery only with a charger. You cannot
charge the battery with the USB cable.
●
When your battery is low, the device will emit a warning
tone and display a low battery message. The battery
icon
will also be empty. If the battery level becomes
too low, the device will automatically power off.
Recharge your battery to continue using your device.
●
If the battery is completely discharged, you cannot
turn on the device, even with the USB power adapter
connected. Allow a depleted battery to charge for a
few minutes before you try to turn on the device.
Connect the USB cable to the USB power adapter and
1
then plug the end of the USB cable into the multifunction
jack.
The shape of the USB power adapter may differ
depending on your region.
Connecting the USB cable improperly may cause
serious damage to the device or USB power adapter.
Any damage caused by misuse is not covered by the
warranty.
Page 14

Assembling
14
Plug the USB power adapter into a power outlet.
2
●
You can use the device while it is charging, but it may
take longer to fully charge the battery.
●
While the device is charging, the touch screen may
not function due to an unstable power supply. If
this happens, unplug the USB power adapter from
the power outlet or unplug the USB cable from the
device.
●
While charging, the device may heat up. This is
normal and should not affect your device’s lifespan or
performance.
●
If your device is not charging properly, bring your
device and the charger to a Samsung Service Centre.
When the battery is fully charged, first unplug the USB
3
power adapter and USB cable from the device and then
from the power outlet.
To save energy, unplug the USB power adapter when
not in use. The USB power adapter does not have a
power switch, so you must unplug the USB power
adapter from the outlet when not in use to avoid
wasting power. The USB power adapter should remain
close to the socket when in use.
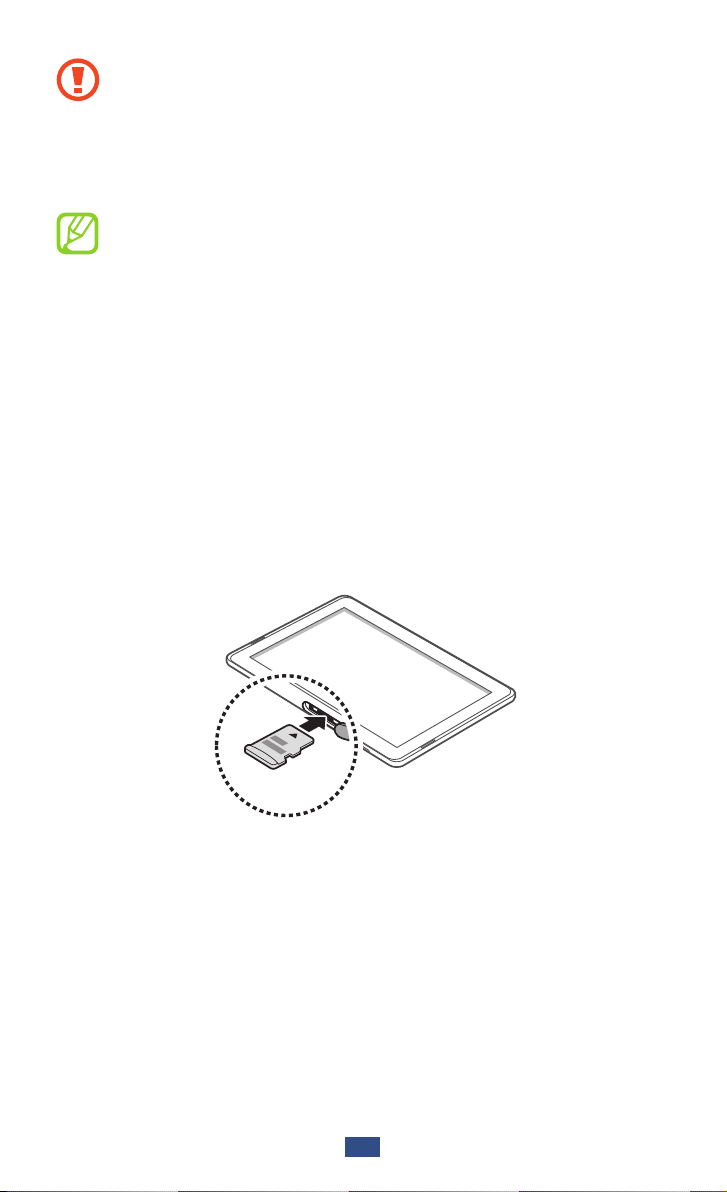
Insert a memory card (optional)
To store additional files, you must insert a memory card. Your
device accepts microSD
with maximum capacities of 32 GB (depending on memory
card manufacturer and type).
or microSDHC™ memory cards
™
Page 15
Assembling
15
Samsung uses approved industry standards for memory
cards, but some brands may not be fully compatible
with your device. Using an incompatible memory card
may damage your device or the memory card and can
corrupt data stored on the card.
●
Your device supports only the FAT file structure for
memory cards. If you insert a card formatted with
a different file structure, your device will ask you to
reformat the memory card.
●
Frequent writing and erasing of data will shorten the
lifespan of memory cards.
●
When you insert a memory card in your device, the
file directory of the memory card will appear in the
extStorages folder under the internal memory.
Open the cover of the memory card slot.
1
Insert a memory card with the gold-coloured contacts
2
facing down.
Push the memory card in the memory card slot until it
3
locks in place.
Close the memory card cover.
4
Page 16

Remove the memory card
›
Before removing a memory card, first unmount it for safe
removal.
Open the application list and select
1
→
Unmount SD card.
Open the memory card cover.
2
Push the memory card gently until it disengages from the
3
device.
Remove the memory card.
4
Close the memory card cover.
5
Do not remove a memory card while the device is
transferring or accessing information, as this could
result in loss of data or damage to the memory card or
device.
Format the memory card
›
Formatting your memory card on a PC may cause
incompatibilities with your device. Format the memory card
only on the device.
Open the application list and select Settings
→
Erase SD card
Format SD card → Erase everything.
Settings → Storage
→
Storage →
Before formatting the memory card, remember to make
backup copies of all important data stored on your
device. The manufacturer’s warranty does not cover loss
of data resulting from user actions.
Assembling
16
Page 17

Getting started
Turn your device on and off
To turn on your device, press and hold the Power key. If you
turn on your device for the first time, follow the on-screen
instructions to set up your device.
To turn off your device, press and hold the Power key and
→
select Power off
●
Follow all posted warnings and directions from
authorised personnel in areas where the use of
wireless devices is restricted, such as aeroplanes and
hospitals.
●
To use your device’s non-network services only, switch
to Flight mode.
Switch to Flight mode
›
In Flight mode, you can disable all wireless connections and
use non-network services in areas where wireless devices are
prohibited, such as aeroplanes and hospitals.
To activate Flight mode, go to Settings
→
networks
To deactivate Flight mode and use wireless connections, go
to Settings
box next to Flight mode.
Flight mode.
→
OK.
→
Wireless and
Wireless and networks and clear the check
Getting started
17
Page 18

18
Getting started
Get to know your device
Device layout
›
1
6
2
3
4
5
10
1 1
12
3
7
8
9
13
Page 19
19
Getting started
Number Function
Keys
›
1
2
3
4
5
6
7
8
9
10
11
12
13
Power/Reset/Lock key
Volume key
Speaker
Memory card slot
Multifunction jack
SIM card slot
Front camera lens
Ambient light sensor
Mouthpiece
1
Headset jack
Internal antenna
Rear camera lens
Flashbulb
Key Function
Turn on the device (press and hold);
Power/
Reset
Lock
Access the quick menus (press and
2
/
hold); Reset the device (press and hold
for 10-15 seconds); Lock the touch
screen.
Volume Adjust the device’s volume.
1. Connecting a headset to your device improperly can damage
the headset jack or the headset.
2. If your device has fatal errors or hang-ups, or freezes, you may
need to reset the device to regain functionality.
Page 20
20
Getting started
Indicator icons
›
Icons shown on the bottom of the screen may vary
depending on your region or service provider.
Icon Definition
No signal
Signal strength
GPRS network connected
EDGE network connected
UMTS network connected
Open Wi-Fi APs available
Wi-Fi AP connected
Bluetooth activated
GPS activated
Call in progress
Call on hold
Missed call
Synchronised with the web
Uploading data
Downloading data
Call diverting activated
Page 21

21
Getting started
Icon Definition
Connected to PC
Power saving mode activated
USB tethering activated
Wi-Fi tethering activated
New text or multimedia message
New email message
New Google Mail
New voice mail message
Alarm activated
Event notification
Roaming (outside of normal service area)
Flight mode activated
Music playback in progress
Error occurred or caution required
1
Battery power level
Unable to charge
10:00 AM
1. If you use a charger that is not approved by Samsung, this
indicator will not appear.
Current time
Page 22
24
Getting started
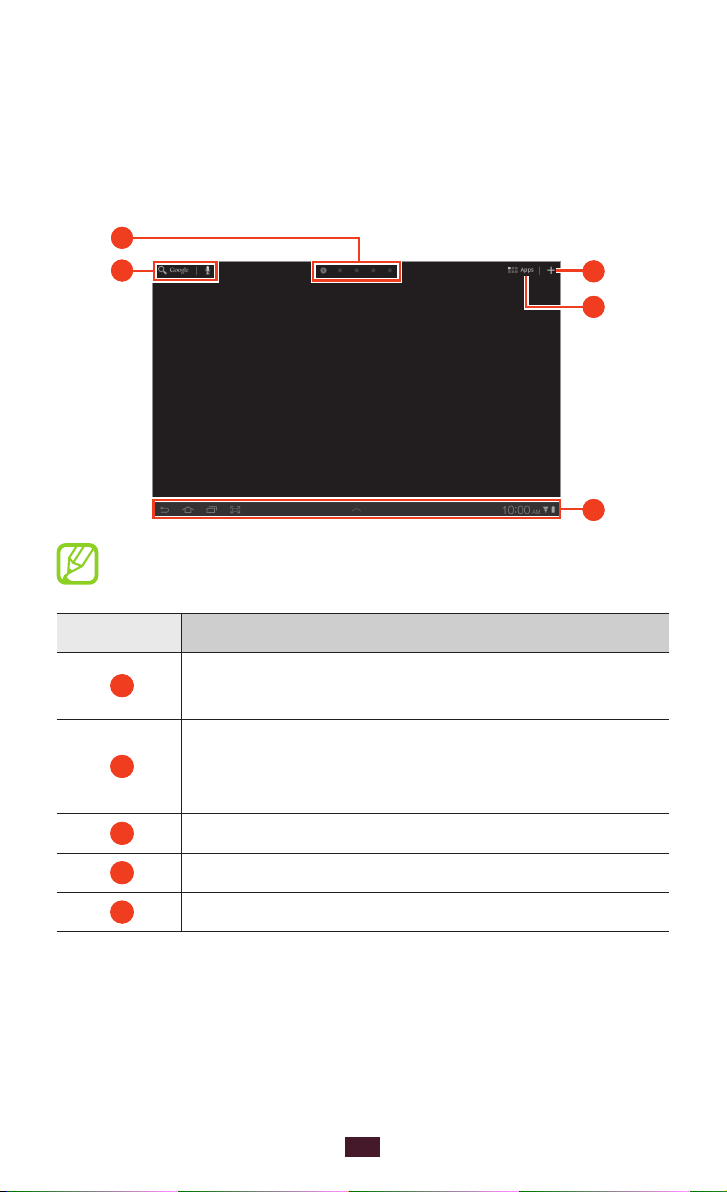
Get to know the Home screen
When the device is in Idle mode, you will see the Home
screen. From the Home screen, you can view indicator icons,
widgets, shortcuts to applications, and other items. Scroll left
or right to a panel of the Home screen.
1
2
The above screen may differ depending on your region
or service provider.
Number Function
3
4
5
1
2
3
4
5
Select a dot at the top of the screen to move
directly to the corresponding screen.
Search for applications and files in your device
and specific data on the web with the Google
Search widget.
Customise the Home screen.
Access the application list.
System bar (See the following section).
Page 23

25
Getting started
System bar
From the system bar, you can quickly navigate screens, access
applications, view system information, and more.
1
2
3
4
Number Function
Capture the current screen and open the
1
drawing pad; Capture the current screen (tap
and hold).
2
3
4
5
6
Return to the previous screen.
Return to the Home screen; Access the task
manager (tap and hold).
Open the list of recent applications; Access the
application list (tap and hold).
Display indicator icons and your device’s
current status; Open the notifications panel.
Open the mini apps panel.
5
6
Page 24

26
Getting started
Add items to the Home screen
›
You can customise the Home screen by adding shortcuts to
applications or items in applications, widgets, or folders.
To add an item to the Home screen,
From the Home screen, select
1
Select an item category:
2
Widgets ●: Add widgets. Widgets are small applications
that provide convenient functions and information.
●
App Shortcuts
●
Wallpaper
●
More
: Add shortcuts to items, such as bookmarks,
contacts, and maps.
●
Folders
contacts.
Select an item to add to the Home screen.
3
Move items on the Home screen
›
Tap and hold an item to move until the Home screen grid
1
appears.
Drag the item to the location you want.
2
Remove items from the Home screen
›
: Create a new folder or add folders for your
: Add shortcuts to applications.
: Set a background image.
.
Tap and hold an item to remove.
1
The trash bin appears at the top right of the Home screen.
Drag the item to the trash bin.
2
When the item turns red, release the item.
3
Page 25

27
Getting started
Add a shortcut to an application
›
From the application list, tap and hold an application icon
1
and drag it to a Home screen panel at the bottom of the
screen.
The shortcut icon for the application is added to the Home
screen.
Move the icon to the location you want or move it to
2
another panel of the Home screen.
Use the notifications panel
›
From the Home screen or while using an application, select
the right side of the system bar, and then select an option on
the notifications panel.
You can view the device’s current status and use the following
options:
●
●
●
●
●
●
: Activate or deactivate the Wi-Fi feature.
Wi-Fi
Notification
GPS
: Activate or deactivate the GPS feature.
Sound
Auto Rotation
Bluetooth
: Set the device to alert you for various events.
/Vibration: Activate or deactivate Vibration mode.
: Activate or deactivate the auto rotation.
: Activate or deactivate the Bluetooth wireless
connection feature.
●
Flight mode
: Activate or deactivate Flight mode.
You can also adjust the display brightness or access the
settings menu.
Available options may vary depending on your region
or service provider.
Page 26

28
Getting started
Access applications
From the Home screen, select 1 Apps to access the
application list.
Select
2
Select
3
return to the Home screen.
Access recent applications
›
Select 1 to view the applications you have accessed
recently.
Select an application.
2
Use the task manager
›
Your device is a multitasking device. It can run more than
one application at the same time. However, multitasking
may cause hang-ups, freezing, memory problems, or
additional power consumption. To avoid these problems, end
unnecessary programs using the task manager.
Tap and hold
1
All → an application.
●
To view downloaded applications, select
●
To view the frequently-used applications, select
Frequent.
to return to the previous screen; Select to
.
My apps.
To close an application, select
2
To close all active applications, select End all.
End.
Page 27

29
Getting started
Customise your device
Get more from your device by customising it to match your
preferences.
Change the language of the display
›
Open the application list and select 1 Settings →
→
Language and input
Select a language you want.
2
Set the current time and date
›
Open the application list and select 1 Settings → Date and
time.
Select your time zone, set the time and date, and change
2
other options.
Turn the touch tone on or off
›
Open the application list and select Settings → Sound →
Audible selection.
Select language.
Adjust the device’s volume
›
Press the Volume key up or down.
1
Select 2 and drag the sliders to adjust the volume level
for call ringtones, media sounds, notifications and alarm
sounds.
Switch to Silent mode
›
To mute or unmute your device, do one of the following:
●
Open the application list and select
tap and hold
●
Open the notifications panel at the right side of the system
bar and select Sound.
●
Press and hold the Power key and select
.
Phone → Dialer and
Silent mode.
Page 28

30
Getting started
You can set the device to alert you to various events
in Silent mode. Open the application list and select
→
Settings
in Silent mode. When you switch to Silent mode,
Vibration will appear in place of Silent on the
notifications panel.
Select a wallpaper for the Home screen
›
From the Home screen, select 1 → Wallpaper.
Select an image folder.
2
If you selected Wallpaper, select Home screen wallpaper.
Select an image.
3
If you selected an image from 4 Live Wallpapers, select Set
wallpaper.
If you selected an image from Gallery, move or resize the
rectangle to select a portion of the image, and then select
OK.
Samsung is not responsible for any use of default
images or wallpapers provided on your device.
Sound → Vibrate → Always or Only
Activate animation for switching windows
›
You can set a transition effect between windows while using
the device.
Open the application list and select
1
Animation.
Select an animation option.
2
Settings → Screen →
Page 29

31
Getting started
Adjust the brightness of the display
›
Open the application list and select 1 Settings → Screen →
Brightness.
Clear the check box next to
2
Drag the slider to adjust the level of brightness.
3
Select 4 OK.
The brightness level of the display will affect how
quickly the device consumes battery power.
Set a screen lock
›
You can lock the touch screen with an unlock pattern or
password to prevent unauthorised people from using the
device without your permission.
●
Once you set a screen lock, your device will require
an unlock code each time you turn it on or unlock the
touch screen.
●
If you forget your PIN or password, bring your device
to a Samsung Service Centre to reset it.
●
Samsung is not responsible for any loss of security
codes or private information or other damages
caused by illegal software.
Automatic brightness.
Set an unlock pattern
Open the application list and select 1 Settings → Location
→
and security
See the on-screen instructions and example patterns and
2
select Next.
Draw a pattern by dragging your finger to connect at least
3
4 dots and select Continue.
Draw the pattern again to confirm and select
4
Configure lock screen → Pattern.
Confirm.
Page 30

32
Getting started
Set an unlock PIN
Open the application list and select 1 Settings → Location
→
and security
Configure lock screen → PIN.
Enter a new PIN (numeric) and select
2
Enter the PIN again and select
3
OK.
Continue.
Set an unlock password
Open the application list and select 1 Settings → Location
→
and security
Enter a new password (alphanumeric) and select
2
Continue.
Enter the password again and select
3
Lock your SIM or USIM card
›
You can lock your device by activating the PIN supplied with
your SIM or USIM card.
Open the application list and select
1
and security
Enter your PIN and select
2
Once the PIN lock is enabled, you must enter the PIN each
time you turn on the device.
●
If you enter an incorrect PIN too many times, your SIM
or USIM card will be blocked. You must enter a PIN
unlock key (PUK) to unblock the SIM or USIM card.
●
If you block your SIM or USIM card by entering an
incorrect PUK, bring the card to your service provider
to unblock it.
Configure lock screen → Password.
OK.
Settings → Location
→
Set up SIM card lock → Lock SIM card.
OK.
Page 31

33
Getting started
Activate the Find my mobile feature
›
When someone inserts a new SIM or USIM card into your
device, the Find my mobile feature will automatically send the
contact number to specified recipients to help you locate and
recover your device.
To use this feature, you need a Samsung account for
controlling the device from the web remotely.
Open the application list and select
1
→
and security
Read the terms and conditions, select the check box next
2
to I accept all the terms above and select Accept.
Select
3
To create a Samsung account, select Sign up.
Enter your email address and password for your Samsung
4
account and select Sign in.
Select
5
Enter the password for your Samsung account and select
6
OK.
Select
7
Enter the password for your Samsung account again and
8
select OK.
Enter a phone number including a country code (with +).
9
Enter the text message to be sent to the recipients.
10
Select
11
Sign in.
SIM change alert.
Alert message recipients.
Done.
SIM change alert.
Settings → Location
Page 32

Connectivity
PC connections
Learn to connect your device to a PC with a USB cable in
various USB connection modes. By connecting the device to
a PC, you can synchronise files with Windows Media Player,
transfer data to and from your device directly, and use the
Samsung Kies program.
To use PC connections, you must deactivate USB debugging
→
mode. Open the application list and select Settings
→
Applications
next to USB debugging.
Connect with Samsung Kies
›
Ensure that Samsung Kies is installed on your PC. You can
download the program from the Samsung website
(www.samsung.com/kies).
Samsung Kies will work on both Windows and
Macintosh computers.
Development, and then clear the check box
Using a USB cable, connect the multifunction jack on your
1
device to a PC. Samsung Kies will launch automatically.
If Samsung Kies does not launch automatically, double-
click the Samsung Kies icon on your PC.
Copy files from the PC to the device.
2
Refer to the Samsung Kies help for more information.
Connectivity
99
Page 33

Connectivity
100
Synchronise with Windows Media Player
›
Ensure that Windows Media Player is installed on your PC.
Using the USB cable, connect the multifunction jack on
1
your device to a PC with Windows Media Player installed.
When connected, a pop-up window will appear on the PC.
Open Windows Media Player to synchronise music files.
2
Edit or enter your device’s name in the pop-up window
3
(if necessary).
Select and drag the music files you want to the sync list.
4
Start synchronisation.
5
Wi-Fi
Learn to use your device’s wireless networking capabilities to
activate and connect to any wireless local area network
(WLAN) compatible with the IEEE 802.11 a/b/g/n standards.
You can connect to the internet or other network devices
anywhere an access point or wireless hotspot is available.
Your device uses non-harmonised frequency and is
intended for use in all European countries. The Wi-Fi
network can be operated in the EU without restriction
indoors, but cannot be operated outdoors in France.
Activate the Wi-Fi feature
›
Open the application list and select 1 Settings → Wireless
and networks.
2
Select
Wi-Fi to activate the Wi-Fi feature.
The Wi-Fi feature running in the background will
consume battery power. To preserve battery power,
activate the feature only when needed.
Page 34

Connectivity
101
Find and connect to a Wi-Fi AP
›
Open the application list and select 1 Settings → Wireless
→
and networks
The device will automatically search for available Wi-Fi APs.
Select a network under 2 Wi-Fi networks.
Enter a password for the network (if necessary).
3
Select 4 OK.
Add a Wi-Fi AP manually
›
Open the application list and select 1 Settings → Wireless
and networks
Enter the SSID for the network and select the security
2
type.
Set the security settings depending on the selected
3
security type.
Wi-Fi settings.
→
Wi-Fi settings → Add Wi-Fi network.
Select
4
Connect to a Wi-Fi AP using a Wi-Fi Protected
›
Save.
Setup (WPS)
Using WPS, you can connect to a secured network.
To connect to a Wi-Fi AP with a WPS button,
Open the application list and select
1
→
and networks
Select a network indicated as WPS available and select the
2
drop-down menu next to Network Setup.
Select
3
Press a WPS button on the access point within 2 minutes.
4
WPS push-button → OK.
Wi-Fi settings.
Settings → Wireless
Page 35

Connectivity
102
To connect to a Wi-Fi AP with a WPS PIN,
Open the application list and select
1
→
and networks
Select a network indicated as WPS available and select the
2
drop-down menu next to Network Setup.
Select
3
device
On the access point, enter the PIN and press the start
4
button.
Set the static IP settings
›
Open the application list and select 1 Settings → Wireless
and networks
Select an access point on the network list.
2
Select the drop-down menu next to 3 IP settings.
Select
4
Change the IP settings for the access point such as IP
5
address, Network prefix length, Gateway, DNS.
Select
6
WPS pin from access point or WPS pin from this
→
OK.
Static.
OK.
Wi-Fi settings.
→
Wi-Fi settings.
Settings → Wireless
Page 36

Connectivity
103
Wi-Fi Direct
Learn to use the Wi-Fi Direct feature to connect two devices
via Wi-Fi without requiring an access point.
Connect your device to another device
›
Open the application list and select 1 Settings → Wireless
→
and networks
Direct.
Wi-Fi Direct settings → OK → Wi-Fi
Select
2
Select a device and then select
3
When the owner of the other device accepts the
connection, the devices are connected.
Send data via Wi-Fi
›
Select a file or item, such as a memo, media file, or web
1
address, from an appropriate application or My files.
Select an option for sending data via Wi-Fi.
2
The method for selecting an option may vary by data
type.
Search for and select another device.
3
Receive data via Wi-Fi
›
When prompted, select OK to confirm that you are willing to
receive data. Received data is saved to the ShareViaWifi folder.
→ Scan.
Connect.
Page 37

Connectivity
104
Bluetooth
Bluetooth is a short-range wireless communications
technology capable of exchanging information over
a distance of about 10 m without requiring a physical
connection.
You do not need to line up the devices to beam information
with Bluetooth. If the devices are within range of one another,
you can exchange information between them even if they are
located in different rooms.
●
Samsung is not responsible for the loss, interception,
or misuse of data sent or received via the Bluetooth
wireless feature.
●
Always ensure that you share and receive data with
devices that are trusted and properly secured. If there
are obstacles between the devices, the operating
distance may be reduced.
●
Some devices, especially those that are not tested
or approved by Bluetooth SIG, may be incompatible
with your device.
Turn on the Bluetooth wireless feature
›
Open the application list and select 1 Settings → Wireless
and networks.
Select
2
feature.
Find and pair with other Bluetooth-enabled
›
Bluetooth to turn on the Bluetooth wireless
devices
Open the application list and select 1 Settings → Wireless
→
and networks
devices.
Select a device.
2
Bluetooth settings → Scan for nearby
Page 38

Connectivity
105
Enter a PIN for the Bluetooth wireless feature or the
3
other device’s Bluetooth PIN, if it has one, and select OK.
Alternatively, select Accept to match the PIN between
your device and the device.
When the owner of the other device enters the same
PIN or accepts the connection, pairing is complete. If the
pairing is successful, the device will automatically search
for available services.
Some devices, especially headsets or hands-free car
kits, may have a fixed Bluetooth PIN, such as 0000. If the
other device has a PIN, you must enter it.
Send data using the Bluetooth wireless feature
›
Select a file or item, such as a contact, calendar event,
1
memo, or media file, from an appropriate application.
Select an option for sending data via Bluetooth.
2
The method for selecting an option may vary by data
type.
Search for and pair with a Bluetooth-enabled device.
3
Receive data using the Bluetooth wireless
›
feature
Open the application list and select 1 Settings → Wireless
→
and networks
When prompted, enter the PIN for the Bluetooth wireless
2
feature and select OK (if necessary).
Select
3
that you are willing to receive data from the device.
Received data is saved to the bluetooth folder. If you receive
a contact file, select My files
import it to your contact list.
on the system bar and select Accept to confirm
Bluetooth settings → Visible.
→
bluetooth → a contact file to
Page 39

Connectivity
106
AllShare
Learn to use the Digital Living Network Alliance (DLNA)
service that enables you to share media files between DLNAenabled devices in your home over Wi-Fi.
●
The supported file formats may vary depending on
the software of the device.
●
Some files may not play on the DLNA- enabled
devices depending on the devices.
Customise DLNA settings for sharing media
›
files
To allow other DLNA-enabled devices to access media files on
your device, you must activate media sharing.
Open the application list and select
1
Select
2
Adjust the following settings to customise the DLNA
3
feature:
Option Function
Media server
name
Share media
Access point
network
Upload from
other devices
Default
memory
.
Enter a name for your device as a
media server.
Turn on video, image, and music
sharing with other DLNA-enabled
devices.
Select a connection profile to use for
DLNA connections.
Set whether or not to accept the
upload from other devices.
Select a memory location for saving
downloaded media files.
AllShare.
Page 40

Connectivity
107
Play your files on another DLNA-enabled
›
device
Open the application list and select 1 AllShare.
Select
2
Select a media category
3
Select a player—the one that will play the media file.
4
Playback begins at the selected player.
Control playback using icons of your device.
5
Play others’ files on your device
›
Open the application list and select 1 AllShare.
Select a device as the media server—the one that
2
contains media files.
Select a media category
3
Playback begins at the selected player.
Control playback using icons of your device.
4
Play files of one device on the other device
›
My device.
→
a file.
Playback may be buffered, depending on the network
connection and the connected server.
→
a file.
Open the application list and select 1 AllShare.
Select a device as the media server—the one that
2
contains media files.
→
Select a media category
3
Playback begins at the selected player.
Select
4
Your device automatically searches for DLNA-enabled
devices.
.
a file.
Page 41

Connectivity
108
Select a player—the one that will play the media file.
5
Control playback using icons of your device.
6
Mobile network sharing
Learn to set your device as a wireless modem or wireless
access point for PCs or other devices, and share your device’s
mobile network connection.
Share your device’s mobile network via Wi-Fi
›
Open the application list and select 1 Settings → Wireless
→
and networks
Tethering and portable hotspot.
Select
2
tethering feature.
Select
3
network settings to use your device as an access point.
When you are finished, select
4
From another device, locate your device’s name in the
5
available connection list and connect to the network.
Your device shares the mobile network connection with
the other device.
Portable Wi-Fi hotspot to activate the Wi-Fi
Configure portable Wi-Fi hotspot to configure
Option Function
Network SSID
Security Select the security type.
Password
View and edit the device name that
will be shown to external devices.
View or edit the network key to
prevent unauthorised access to the
network.
Save.
Page 42

Connectivity
109
Share your device’s mobile network via USB
›
Using a USB cable, connect the multifunction jack on your
1
device to a PC.
Open the application list and select
2
→
and networks
Select
3
feature.
Your device shares the mobile network connection on
your PC.
To stop sharing the network connection, clear the check
box next to USB tethering.
Share your device’s mobile network via the
›
USB tethering to activate the USB tethering
The sharing method for the network connection may
differ depending on the PC’s operating system.
Tethering and portable hotspot.
Settings → Wireless
Bluetooth wireless feature
Open the application list and select 1 Settings → Wireless
→
and networks
Select
2
tethering feature.
Bluetooth tethering to activate the Bluetooth
Tethering and portable hotspot.
Page 43

Connectivity
110
GPS
Your device is equipped with a global positioning system
(GPS) receiver. Learn to activate location services.
To receive better GPS signals, avoid using your device in the
following conditions:
●
between buildings, in tunnels or underground passages, or
inside buildings
●
in poor weather
●
around high voltage or electromagnetic fields
●
in a vehicle with sun protection film
Do not touch or cover the antenna area with your hands
or other objects while using the GPS functions.
This feature may be unavailable depending on your
region or service provider.
Activate location services
›
You must activate location services to receive location
information and search the map.
Open the application list and select
1
and security.
Adjust the following settings to activate location services:
2
Option Function
Use wireless
networks
Use GPS
satellites
Use location
for Google
search
Set to use Wi-Fi and/or mobile
networks for finding your location.
Set to use the GPS satellite for finding
your location.
Set the device to use your current
location for Google search and other
Google services.
Settings → Location
Page 44

Connectivity
111
VPN connections
You can create virtual private networks (VPN) and connect to
your private network securely through a public network, such
as the internet.
Your device should already be configured with internet
access. If you have trouble accessing the internet, you
need to edit connections. If you are not sure about
the connection information to enter, ask your service
provider.
Set up VPN connections
›
Open the application list and select 1 Settings → Wireless
→
and networks
Select a VPN type.
2
Customise the connection information.
3
Available options may vary depending on the VPN type.
Option Function
VPN settings → Add VPN.
VPN name Enter a name of the VPN server.
Set VPN server Enter the IP address of the VPN server.
Enable
Encryption
Set IPsec pre-
shared key
Enable L2TP
secret
Set L2TP
security
Set to encrypt the VPN server.
Enter a pre-shared key.
Set to use the L2TP secret password.
Enter the L2TP secret password.
Page 45

Option Function
Select a user certificate that the VPN
Set user
certificate
Set CA
certificate
server uses to identify you. You can
import certificates from the VPN server
or download from the web.
Select a certificate authority (CA)
certificate that the VPN server uses
to identify you. You can import
certificates from the VPN server or
download from the web.
DNS search
domains
When you are finished, select
4
Connect to a private network
›
Open the application list and select 1 Settings → Wireless
and networks
Select a private network.
2
Enter the user name and password and select 3 Connect.
Enter the domain name server (DNS)
address.
→ Save.
→
VPN settings.
Connectivity
112
Page 46

Settings
122
Settings
Access the Settings menu
Open the application list and select 1 Settings.
Select a setting category and select an option.
2
Wireless and networks
Change the settings for wireless network connections.
Flight mode
›
Disable all wireless functions on your device. You can use only
non-network services.
Wi-Fi
›
Turn the Wi-Fi feature on or off.
Wi-Fi settings
›
Wi-Fi ●: Turn the Wi-Fi feature on or off. ► p. 100
●
Network notification
open network is available.
●
Wi-Fi sleep policy
Wi-Fi feature.
●
Add Wi-Fi network
: Set the device to notify you when an
: Set when the device will turn off the
: Add Wi-Fi APs manually.
Wi-Fi Direct settings
›
Wi-Fi Direct ●: Activate the Wi-Fi Direct feature to connect
two devices via Wi-Fi without requiring an access point.
► p. 108
●
Device name
: View or edit your device’s name.
Page 47

Settings
123
Status ●: View the connection status.
●
Disconnect Wi-Fi Direct
feature.
Kies via Wi-Fi
›
Connect your device to Samsung Kies via Wi-Fi.
Bluetooth
›
Turn the Bluetooth wireless feature on or off.
Bluetooth settings
›
Bluetooth ●: Turn the Bluetooth wireless feature on or off.
► p. 104
●
Device name
●
Visible
devices.
●
Visible time-out
●
Show received files
via the Bluetooth wireless feature.
●
Scan for nearby devices
devices.
: Set your device to be visible to other Bluetooth
: Set a Bluetooth name for your device.
: Set duration that your device is visible.
: Deactivate the Wi-Fi Direct
: View files received from other devices
: Search for available Bluetooth
Tethering and portable hotspot
›
USB tethering ●: Activate the USB tethering feature to share
your device’s mobile network connection with PCs via USB.
When connected to a PC, your device is used as a wireless
modem for a PC.
●
Portable Wi-Fi hotspot
tethering feature to share your device’s mobile network
connection with PCs or other devices through the Wi-Fi
feature.
► p. 108
► p. 109
: Activate the Portable Wi-Fi
Page 48

Settings
124
Configure portable Wi-Fi hotspot ●: Configure network
settings to use your device as an access point.
●
Bluetooth tethering
feature to share your device’s mobile network connection
with PCs via the Bluetooth wireless feature.
●
Help
: Learn more about USB, Bluetooth, and Wi-Fi
tethering.
VPN settings
›
Set up and connect to virtual private networks (VPNs).
► p. 111
: Activate the Bluetooth tethering
► p. 109
Mobile networks
Call
Page 49

Settings
126
●
Accounts
●
Use Internet calling
: Set up your accounts for IP call services.
: Set the device to use IP call services.
IP call services are provided only via a Wi-Fi connection.
Sound
Change the settings for various sounds on your device.
●
Silent mode
except media sounds and alarm ringtones.
●
Vibrate
●
Volume
notifications, media sounds, alarm ringtones, and system
sounds.
●
Vibration intensity
incoming calls, notifications, and haptic feedback.
●
Phone ringtone
calls.
●
Notification ringtone
events.
●
Audible touch tones
touch the keys on the dialling screen.
●
Audible selection
select an application or option on the touch screen.
●
Screen lock sounds
lock or unlock the touch screen.
●
Haptic feedback
the keys.
: Activate Silent mode to mute all sounds
: Set when the device will vibrate for various events.
: Adjust the volume level for call ringtones,
: Adjust the vibration intensity of the
: Select a ringtone to alert you to incoming
: Select a ringtone to alert you to
: Set the device to sound when you
: Set the device to sound when you
: Set the device to sound when you
: Set the device to vibrate when you touch
Page 50

Settings
127
Screen
Change the settings for the display.
●
Brightness
brightness of the display.
●
Screen display
Font style - : Change the font type for the display text. You
can download fonts from Android Market by selecting
Get fonts online.
Home screen - :
Wallpaper: Select a background image for the idle screen.
Lock screen - :
Wallpaper: Select an image to display when the screen is
locked.
●
Mode
●
Auto-rotate screen
content automatically when the device is rotated.
●
Animation
switch between windows.
●
Timeout
turning off the display’s backlight.
●
Quick launch
You can launch the application by selecting
●
Auto adjust screen power
the brightness of the display.
: Activate the automatic brightness or set the
:
: Select a display mode.
: Set whether or not to rotate the
: Set the device to display animation when you
: Set the length of time the device waits before
: Select an application to create a shortcut.
.
: Set to save power by adjusting
Page 51

Settings
128
Power saving mode
Use custom power saving ●: Automatically activate Power
saving mode when the battery is low.
●
Custom power saving settings
Power saving mode on - : Select a power level for Power
saving mode.
Turn off Wi-Fi - : Deactivate the Wi-Fi feature when the
device is not connected with a Wi-Fi AP.
Turn off Bluetooth - : Deactivate the Bluetooth feature
when not in use.
Turn off GPS - : Deactivate the GPS feature when not in use.
Turn off Sync - : Turn off sync when the device is not
synchronising with a web server.
Brightness - : Activate the brightness setting for Power
saving mode.
Brightness - : Set the brightness level for Power saving
mode.
Timeout - : Set the length of time the device waits before
turning off the display’s backlight.
●
Learn about power saving
consumption.
:
: Learn how to reduce battery
Location and security
Change the settings for securing your device and GPS
functionality.
●
Use wireless networks
networks for finding your location.
●
Use GPS satellites
your location.
: Set to use Wi-Fi and/or mobile
: Set to use the GPS satellite for finding
Page 52

Settings
129
Use location for Google search ●: Set the device to use
your current location for Google search and other Google
services.
●
Configure lock screen
: Set how to unlock the screen.
Off - : Disable the screen lock.
Unsecure - : Set to use the screen lock without a PIN,
password, or pattern.
Pattern - : Set an unlock pattern to unlock the screen.
PIN - : Set a PIN (numeric) to unlock the screen.
Password - : Set a password (alphanumeric) to unlock the
screen.
●
Owner information
: Edit the text you want to display on
the screen in Screen lock mode.
●
Encrypt device
: Set a PIN or a password to encrypt the
device to protect data and information saved on the device.
Once the device is encrypted, you must enter the password
each time you turn on the device. You must first charge the
battery because it may take more than an hour to encrypt
your device.
●
Encrypt SD card
:
Encrypt SD card - : Protect your personal information by
encrypting the data on your memory card.
Full encryption - : Set to encrypt all files on your memory
card.
Exclude multimedia files - : Set to encrypt all files except
multimedia files on your memory card.
You may not access the encrypted memory card after
the factory data reset. First, decode the memory card
before the factory data reset.
Page 53

Settings
130
SIM change alert ●: Activate or deactivate the Find my
mobile feature which helps you locate your device when it
is lost or stolen.
●
Alert message recipients
► p. 33
: Set up recipients to receive a
tracking message from your lost device.
●
Remote controls
: Set to control a lost device remotely via
the web.
●
Set up SIM card lock
:
Lock SIM card - : Activate or deactivate the PIN lock feature
to require the PIN before using the device.
Change SIM PIN - : Change the PIN used to access SIM or
USIM data.
●
Visible passwords
: Set the device to display your password
as you enter.
●
Device administrators
: View device administrators
installed on your device. You can activate device
administrators to apply new policies to your device.
●
Use secure credentials
: Use certificates and credentials to
ensure secure use of various applications.
●
Install from USB storage
: Install encrypted certificates that
are stored in the USB storage.
●
Set password
: Create and confirm a password for accessing
credentials.
●
Clear storage
: Erase the credential contents from the
device and reset the password.
Page 54

Settings
131
Applications
Change the settings for managing installed applications.
●
Manage applications
installed on the device and check the application
information.
●
Running services
access them to manage.
●
Memory usage
: View available memory and the memory
used by applications.
●
Battery use
: View the amount of power consumed by your
device.
●
Unknown sources
from any source. If you do not select this option, you can
download applications only from Android Market.
●
Development
:
USB debugging - : Select to connect your device to a PC by
using a USB cable. This is for application development.
Stay awake - : Set the device’s screen to stay on while
charging the battery.
Allow mock locations - : Allow mock locations and service
information to be sent to a Location Manager service for
testing. This is for application development.
●
Samsung Apps
: Select a network connection (Wi-Fi or
packet switched data network) to get notifications for new
applications from Samsung Apps.
: Access the list of the applications
: View the services you are using and
: Select to download applications
This feature may be unavailable depending on your
region or service provider.
Page 55

Settings
132
Accounts and sync
Change the settings for the auto sync feature or manage
accounts for synchronisation.
●
Background data
: Select this setting to use the auto sync
feature. The auto sync will run in the background without
opening applications and synchronise data.
●
Auto-sync
: Set the device to synchronise contact, calendar,
and email data automatically.
Motion
Change the settings that control motion recognition on your
device.
●
Motion activation
●
Tilt to zoom
: Set to zoom in or out while viewing images in
Gallery or browsing web pages when you tap and hold two
points with your fingers and then tilt the device back and
forth.
●
Pan to edit
: Set to move an item to another page when you
tap and hold the item and then pan the device to the left or
right.
: Set to use motion recognition.
Privacy
Change the settings for managing your settings and data.
●
Back up my data
application data to the Google server.
●
Backup account
back up your data.
: Set to back up your settings and
: Add and view your Google account to
Page 56

Settings
133
Automatic restore ●: Set to restore your settings and
application data when the applications are reinstalled on
your device.
●
Factory data reset
default values and delete all your data.
: Reset your settings to the factory
Storage
View memory information for your device and memory card.
You can also format the memory card.
Formatting a memory card will permanently delete all
data from the memory card.
Language and input
Change the settings for text input, the voice recogniser, and
the text-to-speech feature.
Select language
›
Select a display language for all menus and applications.
Voice recognition settings
›
Language ●: Select a language for the Google voice
recognition.
●
SafeSearch
images from voice search results.
●
Block offensive words
recognised from voice search results.
: Set the device to filter explicit text and/or
: Hide offensive words your device
Page 57

Settings
134
Text-to-speech settings
›
Listen to example ●: Listen to the spoken text for an
example.
●
Always use my settings
language settings you specify over the settings saved in
applications.
●
Default engine
used for spoken text.
●
Install voice data
text-to-speech feature.
●
Speech rate
●
Language
●
Pico TTS
Current input method
›
View a default keyboard type for text input.
Input method selector
›
Set the device to hide or display the text input settings icon (
). If you select Automatic, your device will automatically
hide or display the icon, based on the keyboard.
: View the text-to-speech engines in your device.
: Set the speech synthesis engine to be
: Download and install voice data for the
: Select a speed for the text-to-speech feature.
: Select a language for the text-to-speech feature.
: Set to use the speech rate and
Configure input methods
›
●
Android keyboard
Android keyboard - : Set the device to use the Android
keyboard.
Active input methods - : Select languages for text input.
Settings - :
Auto-capitalization: Set the device to automatically
capitalise the first letter after a final punctuation mark,
such as a full stop, question mark, or exclamation mark.
Vibrate on keypress: Set the device to vibrate when you
touch a key.
Page 58

Settings
135
Sound on keypress: Set the device to sound when you
touch a key.
Auto correction: Set the device to automatically correct
the misspelled words.
Show correction suggestions: Set the device to
predict words according to your input and display word
suggestions.
●
Samsung keypad
Samsung keypad - : Set the device to use the Samsung
keyboard.
Settings - :
Input language: Select languages for text input.
You cannot enter text in some languages. To enter text,
you should change the writing language to one of the
supported languages.
XT9: Activate XT9 mode to enter text using Predictive
input mode.
XT9 advanced settings: Activate the advanced features
of XT9 mode, such as auto completion, auto correction, or
auto substitution, and set up your own word list.
Automatic full stop: Set the device to insert a full stop
when you double-tap the space bar.
Sound on keypress: Set the device to sound when you
touch a key.
Auto-capitalization: Set the device to automatically
capitalise the first letter after a final punctuation mark,
such as a full stop, question mark, or exclamation mark.
Voice input: Activate the voice input feature to enter text
by voice on the Samsung keypad.
Handwriting settings: Customise the settings for
Handwriting mode, such as recognition time, pen
thickness or pen colour.
Tutorial: Learn how to enter text with the Samsung
keypad.
Page 59

Settings
136
Accessibility
Change the settings for accessibility features.
●
Accessibility
downloaded, such as Talkback or Kickback, which provide
voice, melody, or vibration feedback.
●
Accessibility applications
application to use.
●
Download accessibility scripts
of accessibility scripts from Google.
●
The power key ends calls
when you press the Power key.
●
Tap and hold delay
and holding the screen.
●
Torch ligh
●
Mono audio
with one earbud.
●
Accessibility shortcut
settings on the quick menu that appears when you press
and hold the Power key.
: Activate an accessibility application you have
: Select an accessibility
: Set to allow downloading
: Set the device to end a call
: Set the recognition time for tapping
t: Turn the torch light on or off.
: Enable mono sound when you listen to audio
: Add a shortcut to Accessibility
Page 60

Settings
137
Date and time
Access and alter the following settings to control how time
and date are displayed on your device:
If the battery remains fully discharged or removed from
the device, the time and date will be reset.
●
Automatic date and time
: Automatically update the date
and time when you move across time zones.
●
Set date
●
Set time
●
Select time zone
●
Use 24-hour format
: Set the current date manually.
: Set the current time manually.
: Set your home time zone.
: Set to the time to be displayed in
24-hour format.
●
Select date format
: Select a date format.
About device
Access information about your device, check the device’s
status, and update the device system.
Page 61

Troubleshooting
138
Troubleshooting
When you turn on your device or while you are
using the device, it prompts you to enter one of the
following codes:
Code Try this to solve the problem:
Password
PIN
PUK
PIN2
When the device lock feature is enabled, you
must enter the password you set for the device.
When using the device for the first time or
when the PIN requirement is enabled, you
must enter the PIN supplied with the SIM or
USIM card. You can disable this feature by
using the Lock SIM card menu.
Your SIM or USIM card is blocked, usually as a
result of entering your PIN incorrectly several
times. You must enter the PUK supplied by
your service provider.
When you access a menu requiring the PIN2,
you must enter the PIN2 supplied with the SIM
or USIM card. For details, contact your service
provider.
Your device displays network or service error
messages
●
When you are in areas with weak signals or poor reception,
you may lose reception. Move to another area and try
again.
●
You cannot access some options without a subscription.
Contact your service provider for more details.
Page 62

Troubleshooting
139
The touch screen responds slowly or improperly
If your device has a touch screen and the touch screen is not
responding properly, try the following:
●
Remove any protective covers from the touch screen.
Protective covers may prevent the device from recognising
your inputs and are not recommended for touch screen
devices.
●
Ensure that your hands are clean and dry when tapping the
touch screen.
●
Restart your device to clear any temporary software bugs.
●
Ensure that your device software is upgraded to the latest
version.
●
If the touch screen is scratched or damaged, take it to your
local Samsung Service Centre.
Your device freezes or has fatal errors
If your device freezes or hangs, you may need to close
programs or reset the device to regain functionality. If your
device is frozen and unresponsive, press and hold the Power
key for 10-15 seconds. The device will reboot automatically.
If this does not solve the problem, perform a factory data
→
reset. Open the application list and select Settings
→
Factory data reset → Reset device → Erase everything.
Privacy
Calls are being dropped
When you are in areas with weak signals or poor reception,
you may lose your connection to the network. Move to
another area and try again.
Outgoing calls are not connected
●
Ensure that you have pressed the Dial key.
●
Ensure that you have accessed the right cellular network.
Page 63

Troubleshooting
140
Incoming calls are not connected
●
Ensure that your device is turned on.
●
Ensure that you have accessed the right cellular network.
Others cannot hear you speaking on a call
●
Ensure that you are not covering the built-in microphone.
●
Ensure that the microphone is close to your mouth.
●
If using a headset, ensure that it is properly connected.
Audio quality is poor
●
Ensure that you are not blocking the device’s internal
antenna.
●
When you are in areas with weak signals or poor reception,
you may lose reception. Move to another area and try
again.
When dialling from contacts, the call is not connected
●
Ensure that the correct number is stored in the contact list.
●
Re-enter and save the number, if necessary.
The device beeps and the battery icon is empty
Your battery is low. Recharge the battery to continue using
the device.
The battery does not charge properly or the device
turns off
If the battery will no longer charge completely, you need to
replace it with a new battery. Take your device to your local
Samsung Service Centre.
Page 64

Troubleshooting
141
Your device is hot to the touch
When you use applications that require more power or use
applications on your device for an extended period of time,
your device may feel hot to the touch. This is normal and
should not affect your device’s lifespan or performance.
Error messages appear when launching the camera
Your Samsung mobile device must have sufficient available
memory and battery power to operate the camera
application. If you receive error messages when launching the
camera, try the following:
●
Charge the battery.
●
Free some memory by transferring files to a PC or deleting
files from your device.
●
Restart the device. If you are still having trouble with
the camera application after trying these tips, contact a
Samsung Service Centre.
Error messages appear when opening music files
Some music files may not play on your Samsung mobile
device for a variety of reasons. If you receive error messages
when opening music files on your device, try the following:
●
Free some memory by transferring files to a PC or deleting
files from your device.
●
Ensure that the music file is not Digital Rights Management
(DRM)-protected. If the file is DRM-protected, ensure that
you have the appropriate license or key to play the file.
●
Ensure that your device supports the file type.
Page 65

Another Bluetooth device is not located
●
Ensure that the Bluetooth wireless feature is activated on
your device.
●
Ensure that the Bluetooth wireless feature is activated on
the device you wish to connect to, if necessary.
●
Ensure that your device and the other Bluetooth device are
within the maximum Bluetooth range (10 m).
If the tips above do not solve the problem, contact a Samsung
Service Centre.
A connection is not established when you connect
the device to a PC
●
Ensure that the USB cable you are using is compatible with
your device.
●
Ensure that you have the proper drivers installed and
updated on your PC.
Troubleshooting
142
Page 66

Safety precautions
To prevent injury to yourself and others or damage to your device, read all of
the following information before using your device.
Warning: Prevent electric shock, fire, and
explosion
Do not use damaged power cords or plugs, or loose electrical
sockets
Do not touch the power cord with wet hands, or disconnect the
charger by pulling on the cord
Do not bend or damage the power cord
Do not use your device while charging or touch your device with
wet hands
Do not short-circuit the charger
Do not drop or cause an impact to the charger or the device
Do not charge the battery with chargers that are not approved by
the manufacturer
Do not use your device during a thunderstorm
Your device may malfunction and your risk of electric shock is increased.
Handle and dispose of the device and chargers with care
Use only Samsung-approved batteries and chargers specifically designed for •
your device. Incompatible chargers can cause serious injuries or damage to
your device.
Never dispose of devices in a fire. Follow all local regulations when disposing •
of used devices.
Never place devices on or in heating devices, such as microwave ovens, •
stoves, or radiators. Batteries may explode when overheated.
Never crush or puncture the device. Avoid exposing the device to high •
external pressure, which can lead to an internal short circuit and overheating.
Safety precautions
143
Page 67

Safety precautions
144
Protect the device and chargers from damage
Avoid exposing your device to very cold or very hot temperatures.•
Extreme temperatures can cause the deformation of the device and reduce •
the charging capacity and life of your device and batteries.
Never use a damaged charger.•
Caution: Follow all safety warnings and
regulations when using your device in restricted
areas
Turn off your device where prohibited
Comply with all regulations that restrict the use of a mobile device in a
particular area.
Do not use your device near other electronic devices
Most electronic devices use radio frequency signals. Your device may interfere
with other electronic devices.
Do not use your device near a pacemaker
Avoid using your device within a 15 cm range of a pacemaker if possible, as •
your device can interfere with the pacemaker.
If you must use your device, keep it at least 15 cm away from the pacemaker.•
To minimise the possible interference with a pacemaker, use your device on •
the opposite side of your body from the pacemaker.
Do not use your device in a hospital or near medical equipment
that can be interfered with by radio frequency
If you personally use any medical equipment, contact the manufacturer of the
equipment to ensure the safety of your equipment from radio frequency.
If you are using a hearing aid, contact the manufacturer for
information about radio interference
Some hearing aids may be interfered with by the radio frequency of your
device. Contact the manufacturer to ensure the safety of your hearing aid.
Turn off the device in potentially explosive environments
Always comply with regulations, instructions and signs in potentially •
explosive environments.
Do not use your device at refuelling points (service stations), near fuels or •
chemicals, and at blasting areas.
Page 68

Safety precautions
145
Do not store or carry flammable liquids, gases, or explosive materials in the •
same compartment as the device, its parts, or accessories.
Turn off your device when in an aircraft
Using your device in an aircraft is illegal. Your device may interfere with the
electronic navigation instruments of the aircraft.
Electronic devices in a motor vehicle may malfunction due to the
radio frequency of your device
Electronic devices in your car may malfunction due to radio frequency of your
device. Contact the manufacturer for more information.
Comply with all safety warnings and regulations
regarding mobile device usage while operating a
vehicle
While driving, safely operating the vehicle is your first responsibility. Never use
your mobile device while driving, if it is prohibited by law. For your safety and
the safety of others, practice good common sense and remember the following
tips:
Use a hands-free device.•
Get to know your device and its convenience features, such as speed dial and •
redial. These features help you reduce the time needed to place or receive
calls on your mobile device.
Position your device within easy reach. Be able to access your wireless device •
without removing your eyes from the road. If you receive an incoming call at
an inconvenient time, let your voice mail answer it for you.
Let the person you are speaking with know you are driving. Suspend calls •
in heavy traffic or hazardous weather conditions. Rain, sleet, snow, ice, and
heavy traffic can be hazardous.
Do not take notes or look up phone numbers. Jotting down a “to do” list or •
flipping through your address book takes attention away from your primary
responsibility of driving safely.
Page 69

Safety precautions
146
Dial sensibly and assess the traffic. Place calls when you are not moving or •
before pulling into traffic. Try to plan calls when your car will be stationary.
If you need to make a call, dial only a few numbers, check the road and your
mirrors, then continue.
Do not engage in stressful or emotional conversations that may be •
distracting. Make people you are talking with aware you are driving and
suspend conversations that have the potential to divert your attention from
the road.
Use your device to call for help. Dial a local emergency number in the case of •
fire, traffic accident, or medical emergencies.
Use your device to help others in emergencies. If you see an auto accident, •
a crime in progress, or a serious emergency where lives are in danger, call a
local emergency number.
Call roadside assistance or a special, non-emergency assistance number •
when necessary. If you see a broken-down vehicle posing no serious hazard,
a broken traffic signal, a minor traffic accident where no one appears injured,
or a vehicle you know to be stolen, call roadside assistance or another
special, non-emergency number.
Proper care and use of your mobile device
Keep your device dry
Humidity and all types of liquids may damage device parts or electronic •
circuits.
Do not turn on your device if it is wet. If your device is already on, turn it off •
and remove the battery immediately (if the device will not turn off or you
cannot remove the battery, leave it as-is). Then, dry the device with a towel
and take it to a service centre.
Liquids will change the colour of the label that indicates water damage •
inside the device. Water damage to your device can void your manufacturer’s
warranty.
Do not use or store your device in dusty, dirty areas
Dust can cause your device to malfunction.
Do not store your device on slopes
If your device falls, it can be damaged.
Page 70

Safety precautions
147
Do not store your device in hot or cold areas. Use your device at
-20 °C to 45 °C
Your device can explode if left inside a closed vehicle, as the inside •
temperature can reach up to 80 °C.
Do not expose your device to direct sunlight for extended periods of time •
(such as on the dashboard of a car).
Store the battery at -20 °C to 45 °C.•
Do not store your device with such metal objects as coins, keys and
necklaces
Your device may become deformed or malfunction.
Do not store your device near magnetic fields
Your device may malfunction or the battery may discharge from exposure to •
magnetic fields.
Magnetic stripe cards, including credit cards, phone cards, passbooks, and •
boarding passes, may be damaged by magnetic fields.
Do not use carrying cases or accessories with magnetic closures or allow •
your device to come in contact with magnetic fields for extended periods of
time.
Do not store your device near or in heaters, microwaves, hot
cooking equipment, or high pressure containers
The battery may leak.•
Your device may overheat and cause a fire.•
Do not drop your device or cause impacts to your device
The screen of your device may be damaged.•
If bent or deformed, your device may be damaged or parts may malfunction.•
Do not use your device or applications for a while if the device is
overheated
Prolonged exposure of your skin to an overheated device may cause low
temperature burn symptoms, such as red spots and pigmentation.
If your device has a camera flash or light, do not use a flash close to
the eyes of people or pets
Using a flash close to the eyes may cause temporary loss of vision or damage to
the eyes.
Page 71

Safety precautions
148
Use caution when exposed to flashing lights
While using your device, leave some lights on in the room and do not hold •
the screen too close to your eyes.
Seizures or blackouts can occur when you are exposed to flashing lights •
while watching videos or playing Flash-based games for extended periods. If
you feel any discomfort, stop using the device immediately.
Reduce the risk of repetitive motion injuries
When you repetitively perform actions, such as pressing keys, drawing
characters on a touch screen with your fingers, or playing games, you may
experience occasional discomfort in your hands, neck, shoulders, or other
parts of your body. When using your device for extended periods, hold the
device with a relaxed grip, press the keys lightly, and take frequent breaks. If
you continue to have discomfort during or after such use, stop use and see a
physician.
Ensure maximum battery and charger life
Avoid charging batteries for more than a week, as overcharging may shorten •
battery life.
Over time, unused batteries will discharge and must be recharged before •
use.
Disconnect chargers from power sources when not in use.•
Use manufacturer-approved batteries, chargers, accessories and
supplies
Using generic batteries or chargers may shorten the life of your device or •
cause the device to malfunction.
Samsung cannot be responsible for the user’s safety when using accessories •
or supplies that are not approved by Samsung.
Do not bite or suck on the device
Doing so may damage the device or cause explosion.•
If children use the device, make sure that they use the device properly.•
When using the device:
Hold the device upright, as you would with a traditional phone.•
Speak directly into the mouthpiece.•
Avoid contact with your device’s internal antenna. Touching the antenna •
may cause the device to transmit more radio frequency than necessary.
Page 72

Safety precautions
149
Protect your hearing and ears when using a headset
Excessive exposure to loud sounds can cause hearing •
damage.
Exposure to loud sounds while driving may distract your •
attention and cause an accident.
Always turn the volume down before plugging the •
earphones into an audio source and use only the minimum
volume setting necessary to hear your conversation or
music.
In dry environments, static electricity can build up in the •
headset. Avoid using headsets in dry environments or
touch a metal object to discharge static electricity before
connecting a headset to the device.
Use caution when using the device while walking or moving
Always be aware of your surroundings to avoid injury to yourself or others.
Do not carry your device in your back pockets or around your waist
You can be injured or damage the device if you fall.
Do not disassemble, modify, or repair your device
Any changes or modifications to your device can void your manufacturer’s
warranty. For service, take your device to a Samsung Service Centre.
Do not paint or put stickers on your device
Paint and stickers can clog moving parts and prevent proper operation. If you
are allergic to paint or metal parts of the product, you may experience itching,
eczema, or swelling of the skin. When this happens, stop using the product and
consult your physician.
When cleaning your device:
Wipe your device or charger with a towel or an eraser.•
Do not use chemicals or detergents.•
Do not use the device if the screen is cracked or broken
Broken glass or acrylic could cause injury to your hands and face. Take the
device to a Samsung Service Centre to have it repaired.
Do not use the device for anything other than its intended use
Avoid disturbing others when using the device in public
Page 73

Safety precautions
150
Do not allow children to use your device
Your device is not a toy. Do not allow children to play with it as they could hurt
themselves and others, or damage the device.
Install mobile devices and equipment with caution
Ensure that any mobile devices or related equipment installed in your vehicle •
are securely mounted.
Avoid placing your device and accessories near or in an air bag deployment •
area. Improperly installed wireless equipment can cause serious injury when
air bags inflate rapidly.
Allow only qualified personnel to service your device
Allowing unqualified personnel to service your device may result in damage to
your device and will void your manufacturer’s warranty.
Handle SIM cards or memory cards with care
Do not remove a card while the device is transferring or accessing •
information, as this could result in loss of data and/or damage to the card or
device.
Protect cards from strong shocks, static electricity, and electrical noise from •
other devices.
Do not touch gold-coloured contacts or terminals with your fingers or metal •
objects. If dirty, wipe the card with a soft cloth.
Ensure access to emergency services
Emergency calls from your device may not be possible in some areas or
circumstances. Before travelling in remote or undeveloped areas, plan an
alternative method of contacting emergency services personnel.
Keep your personal and important data safe
While using your device, be sure to back up important data. Samsung is not •
responsible for data loss.
When disposing of your device, back up all data and then reset your device •
to prevent misuse of your personal information.
Do not distribute copyright-protected material
Do not distribute copyright-protected material that you have recorded to
others without the permission of the content owners. Doing this may violate
copyright laws. The manufacturer is not liable for any legal issues caused by the
user’s illegal use of copyrighted material.
Page 74

Safety precautions
152
Correct disposal of this product
(Waste Electrical & Electronic Equipment)
(Applicable in the European Union and other European countries
with separate collection systems)
This marking on the product, accessories or literature indicates
that the product and its electronic accessories (e.g. charger,
headset, USB cable) should not be disposed of with other
household waste at the end of their working life.
To prevent possible harm to the environment or human health
from uncontrolled waste disposal, please separate these items from other types
of waste and recycle them responsibly to promote the sustainable reuse of
material resources.
Household users should contact either the retailer where they purchased this
product, or their local government office, for details of where and how they can
take these items for environmentally safe recycling.
Business users should contact their supplier and check the terms and
conditions of the purchase contract. This product and its electronic accessories
should not be mixed with other commercial wastes for disposal.
This EEE is compliant with RoHS.
Correct disposal of batteries in this product
(Applicable in the European Union and other European countries
with separate battery return systems)
The marking on the battery, manual or packaging indicates that
the battery in this product should not be disposed of with other
household waste. Where marked, the chemical symbols Hg, Cd
or Pb indicate that the battery contains mercury, cadmium or
lead above the reference levels in EC Directive 2006/66.
The battery incorporated in this product is not user replaceable. For
information on its replacement, please contact your service provider. Do not
attempt to remove the battery or dispose it in a fire. Do not disassemble,
crush, or puncture the battery. If you intend to discard the product, the
waste collection site will take the appropriate measures for the recycling and
treatment of the product, including the battery.
Page 75

Safety precautions
153
Disclaimer
Some content and services accessible through this device belong to third
parties and are protected by copyright, patent, trademark and/or other
intellectual property laws. Such content and services are provided solely for
your personal noncommercial use. You may not use any content or services in a
manner that has not been authorised by the content owner or service provider.
Without limiting the foregoing, unless expressly authorised by the applicable
content owner or service provider, you may not modify, copy, republish,
upload, post, transmit, translate, sell, create derivative works, exploit, or
distribute in any manner or medium any content or services displayed through
this device.
“THIRD PARTY CONTENT AND SERVICES ARE PROVIDED “AS IS.” SAMSUNG
DOES NOT WARRANT CONTENT OR SERVICES SO PROVIDED, EITHER EXPRESSLY
OR IMPLIEDLY, FOR ANY PURPOSE. SAMSUNG EXPRESSLY DISCLAIMS ANY
IMPLIED WARRANTIES, INCLUDING BUT NOT LIMITED TO, WARRANTIES OF
MERCHANTABILITY OR FITNESS FOR A PARTICULAR PURPOSE. SAMSUNG
DOES NOT GUARANTEE THE ACCURACY, VALIDITY, TIMELINESS, LEGALITY, OR
COMPLETENESS OF ANY CONTENT OR SERVICE MADE AVAILABLE THROUGH
THIS DEVICE AND UNDER NO CIRCUMSTANCES, INCLUDING NEGLIGENCE,
SHALL SAMSUNG BE LIABLE, WHETHER IN CONTRACT OR TORT, FOR ANY
DIRECT, INDIRECT, INCIDENTAL, SPECIAL OR CONSEQUENTIAL DAMAGES,
ATTORNEY FEES, EXPENSES, OR ANY OTHER DAMAGES ARISING OUT OF, OR IN
CONNECTION WITH, ANY INFORMATION CONTAINED IN, OR AS A RESULT OF
THE USE OF ANY CONTENT OR SERVICE BY YOU OR ANY THIRD PARTY, EVEN IF
ADVISED OF THE POSSIBILITY OF SUCH DAMAGES.”
Third party services may be terminated or interrupted at any time, and
Samsung makes no representation or warranty that any content or service will
remain available for any period of time. Content and services are transmitted
by third parties by means of networks and transmission facilities over which
Samsung has no control. Without limiting the generality of this disclaimer,
Samsung expressly disclaims any responsibility or liability for any interruption
or suspension of any content or service made available through this device.
Samsung is neither responsible nor liable for customer service related to the
content and services. Any question or request for service relating to the content
or services should be made directly to the respective content and service
providers.
Page 76

Health and safety information
Exposure to Radio F requency (RF) Signals
Your wireless device is a radio transmitter and receiver.
It is designed and manufactured not to exceed the
exposure limits for radio frequency (RF) energy set by
the Federal Communications Commission (FCC) of the
U.S. government. These FCC exposure limits are derived
from the recommendations of two expert organizations,
the National Counsel on Radiation Protection and
Measurement (NCRP) and the Institute of El
and Electronics Engineers (IEEE). In both cases, the
engineering experts drawn from industry, government,
The exposure limit set by the FCC for wireless mobile
devices employs a unit of measurement known as the
the rate of absorption of RF energy by the human body
expressed in units of watts per kilogram (W/kg). The FCC
ectrical
requires wireless devices to comply with a safety limit
of 1.6 watts per kilogram (1.6 W/kg). The FCC exposure
limit incorporates a substantial margin of safety to give
additional protection to the public and to account for
any variations in measurements.
SAR tests are conducted using recommended operating
positions accepted by the FCC with the device
tested frequency bands. Although the SAR is determined
of the device while operating can be well below the
maximum value. This is because the device is designed
to operate at multiple power levels so as to use only the
power required to reach the network. In general, the
closer you are to a wireless base station antenna, the
lower the power output.
Before a new model device is available for sale to the
it does not exceed the exposure limit established by
the FCC. Tests for each model are performed in
positions and locations (e.g. near the body) as required
by the FCC.
For typical operations, this model has been
tested and meets the FCC exposure guidelines.
SAR information on this and other models can
be viewed on-line at http://www.fcc.gov/oet/ea/fccid/.
This site uses the FCC ID number A3LGTP8110.
You can check the FCC ID on the rear case.
Once you have the FCC ID number for a particular device,
follow the instructions on the website and it should
provide values for typical or maximum SAR for
a particular device
SAR information can also be obtained at www.fcc.gov/
cgb/sar.
Operating Environment
Remember to follow any special regulations in force in
any area and always switch your device
forbidden to use it, or when it may cause interference or
danger. When c onnecting the device or any accessory to
another device, read its user’s guide for detailed safety
instructions. Do not connect incompatible products.
48
Page 77

FCC Notice and Cautions
FCC Notice
This device complies with Part 15 of the FCC Rules. Operation is subject to the
following two conditions:
(1) this device may not cause harmful interference, and
(2) this device must accept any interference received, including interference that
may cause undesired operation.
This equipment has been tested and found to comply with the limits for a Class B
digital device, pursuant to part 15 of the FCC Rules. These limits are designed to
provide reasonable protection against harmful interference in a residential
installation. This equipment generates, uses and can radiate radio frequency
energy and, if not installed and used in accordance with the instructions, may
cause harmful interference to radio communications. However, there is no
guarantee that interference will not occur in a particular installation. If this
equipment does cause harmful interference to radio or television reception, which
can be determined by turning the equipment off and on, the user is encouraged
to try to correct the interference by one or more of the following measures:
- Reorient or relocate the receiving antenna.
-Increase the separation between the equipment and receiver.
- Connect the equipment into an outlet on a circuit from that to which the
receiver is connected.
- Consult the dealer or an experienced radio/TV technician for help.
The device may cause TV or radio interference if used in close proximity to
receiving equipment. The FCC can require you to stop using the
interference cannot be eliminated. Vehicles using petroleum gas (such as
propane or butane) must comply with the National Fire Protection Standard
(NFPA-58). For a copy of this standard, contact the National Fire Protection
Association, One Battery march Park, Quincy, MA 02269, Attn
Divis
ion.
Cautions
Changes or modifications made in the radio device, not expressly approved by
Samsung, will void the user’s authority to operate the equipment.
The use of any unauthorized accessories may be dangerous and void the device
warranty if said accessories cause damage or a defect to the device. Although
your device is quite sturdy, it is a complex piece of equipment and can be broken.
Avoid dropping, hitting, bending or sitting on it.
device
: Publication Sales
if such
Page 78

This device is capable of operating in 802.11a/n mode. For 802.11a/n devices operating in the
frequency range of 5.15 - 5.25 GHz, they are restricted for indoor operations to reduce
any potential harmful interference for Mobile Satellite
Points that are capable of allowing your device to operate in 8
are optimized for
mode, please restrict your WIFI use indoors to not violate federal regulations to protect
Mobile Satellite Services.
indoor use only. If your WIFI network is capable of operating in this
Services (MSS) in the US. WIFI Access
02.11a/n mode (5.15 - 5.25 GHz)
 Loading...