

Samsung GTB7620 Users Manual

Some of the contents in this manual may differ from your
device depending on the software of the device or your service
provider.
World Wide Web
http://www.samsungmobile.com
Printed in Korea
Code No.:GH68-XXXXXA
English (EU). 05/2009. Rev. 1.0

GT-B7620
user manual
Draft 02
2009. 05. 25
SW version: PDA/Phone:
B7620XXIE2, CSC: B7620XXIE3CS

Read me first!
When you need information, instructions, and
tips to learn more about your device, you
have several options available:
Windows Help System
•
your device includes
This embedded, searchable help
Help.
system explains how to use various
Microsoft programs and features.
•
Extended Usage Guide
Samsung website, you will find the
Extended Usage Guide in Adobe Acrobat
(.pdf) format. You can either view the guide
online or download and print the file for
your convenience. The Extended Usage
Guide contains advanced usage tips and
more details about particular functions of
your device. To view the file, you must
have Adobe Reader or Adobe Acrobat
installed-you can download Adobe Reader
free from Adobe's website
(www.adobe.com).
•
User Manual (printed) - this user manual
has been specially designed to guide you
through the functions and features of your
device. It contains extensive information
about Samsung software and features and
tips for using and maintaining the device.
For any topics not covered in this manual,
please refer to the embedded help as
described above.
(on your device) -
Windows Mobile
(online) - on the
2

Instructional icons
Before you start, familiarise yourself with the
icons you will see in this manual:
Warning
cause injury to yourself or others
Caution
cause damage to your device or
other equipment
Note
additional information
X
Refer to
information; for example:
(represents "see page 12")
– situations that could
– situations that could
– notes, usage tips, or
– pages with related
X
p. 12
>
[]
Followed by
options or menus you must
select to perform a step; for
example: Tap
(represents
Settings
Square brackets
for example: [ ] (represents
the End/Power key)
– the order of
Start
Start
)
>
Settings
, followed by
– device keys;
3

Copyrights and trademarks
Rights to all technologies and products that
comprise this device are the property of their
respective owners:
• This product includes
software licensed from MS,
an affiliate of the Microsoft
Corporation. Microsoft and
software bearing the
Microsoft name are
registered trademarks of
the Microsoft Corporation.
• Java™‚ is a trademark of Sun
Microsystems, Inc.
•Bluetooth
Bluetooth SIG, Inc. worldwide. Bluetooth
QD ID: B0xxxxx
•Wi-Fi
Wi-Fi logo are registered trademarks of the
Wi-Fi Alliance.
• DivX
trademark of DivX, Inc.,
and is used under license.
•
SRS Labs, Inc. CS Headphone and
WOW HD technologies are
incorporated under licence from SRS
Labs, Inc.
®
is a registered trademark of the
®
, the Wi-Fi CERTIFIED logo, and the
®
is a registered
and
are trademarks of
4

ABOUT DIVX VIDEO
DivX® is a digital video format created by
DivX, Inc. This is an official DivX Certified
device that plays DivX video.
ABOUT DIVX VIDEO-ON-DEMAND
This DivX® Certified device must be
registered with DivX in order to play DivX
Video-on-Demand (VOD) content. First
generate the DivX VOD registration code for
your device and submit it during the
registration process. [Important: DivX VOD
content is protected by a DivX DRM (Digital
Rights Management) system that restricts
playback to registered DivX Certified devices.
If you try to play DivX VOD content not
authorised for your device, the message
"Authorization Error" will be displayed and
your content will not play.] Learn more at
www.divx.com.
5

Contents
Introducing your device ............................ 8
Unpack ........................................................ 8
Get to know your device .............................. 9
Assemble and prepare your device ............ 14
Turn on your device for first time ................ 18
Customise your device ............................... 21
Use Widgets ............................................... 24
Work with applications ............................... 26
Enter text .................................................... 30
Communication ...................................... 36
Work with contacts .................................... 36
Calling ........................................................ 40
Messaging .................................................. 43
Multimedia ............................................. 47
Camera ...................................................... 47
Touch Player .............................................. 55
Photo Album .............................................. 58
Digital Frame .............................................. 59
FM Radio ................................................... 60
Video Editor ................................................ 62
Games ....................................................... 66
Java ........................................................... 66
Personal productivity ............................. 67
ActiveSync ................................................. 67
Clock .......................................................... 71
Touch Calendar .......................................... 73
Notes ......................................................... 75
6

Smart Memo .............................................. 76
Audio Note ................................................. 77
Tasks ......................................................... 78
Calculator ................................................... 79
Smart Converter ......................................... 80
Smart Reader ............................................. 81
Smart Search ............................................. 84
Web applications .................................... 86
Web browsing with Opera .......................... 86
Streaming Player ........................................ 88
RSS Reader ............................................... 89
Podcast ...................................................... 91
Communities .............................................. 93
Connectivity ........................................... 96
Connect to the internet or your network ..... 96
Bluetooth ................................................ 100
Wi-Fi ........................................................ 104
Connected Home .................................... 106
Troubleshooting ................................... 110
Safety and usage information .............. 115
Index .................................................... 128
7

Introducing your
device
Unpack
Your package contains the following items:
• Handset
• Battery
• Travel adapter (charger)
•CD-ROM
• Stereo headset
• PC data cable
• User manual
*
The items supplied with your device
and available accessories may be
different depending on your region or
service provider.
* The CD-ROM contains Microsoft ActiveSync
software, add-on software, and other
applications.
8

Get to know your device
Front view
1
2
11
10
3
4
9
Earpiece
1
Proximity sensor
2
Front camera lens
3
Touch screen
4
Menu key
5
End/Power key
6
Mouthpiece
7
Talk/speakerphone key
8
QWERTY keyboard
9
Volume key
10
Memory card slot
11
5
6
7
8
9

Rear view
10
9
8
7
6
Speaker
1
Rear camera lens
2
Flashbulb
3
Battery cover
4
Internal antenna
5
Reset button
6
Camera/Photo album key
7
Multifunction jack
8
Hold key
9
Mode switch key
10
1
2
3
4
5
10
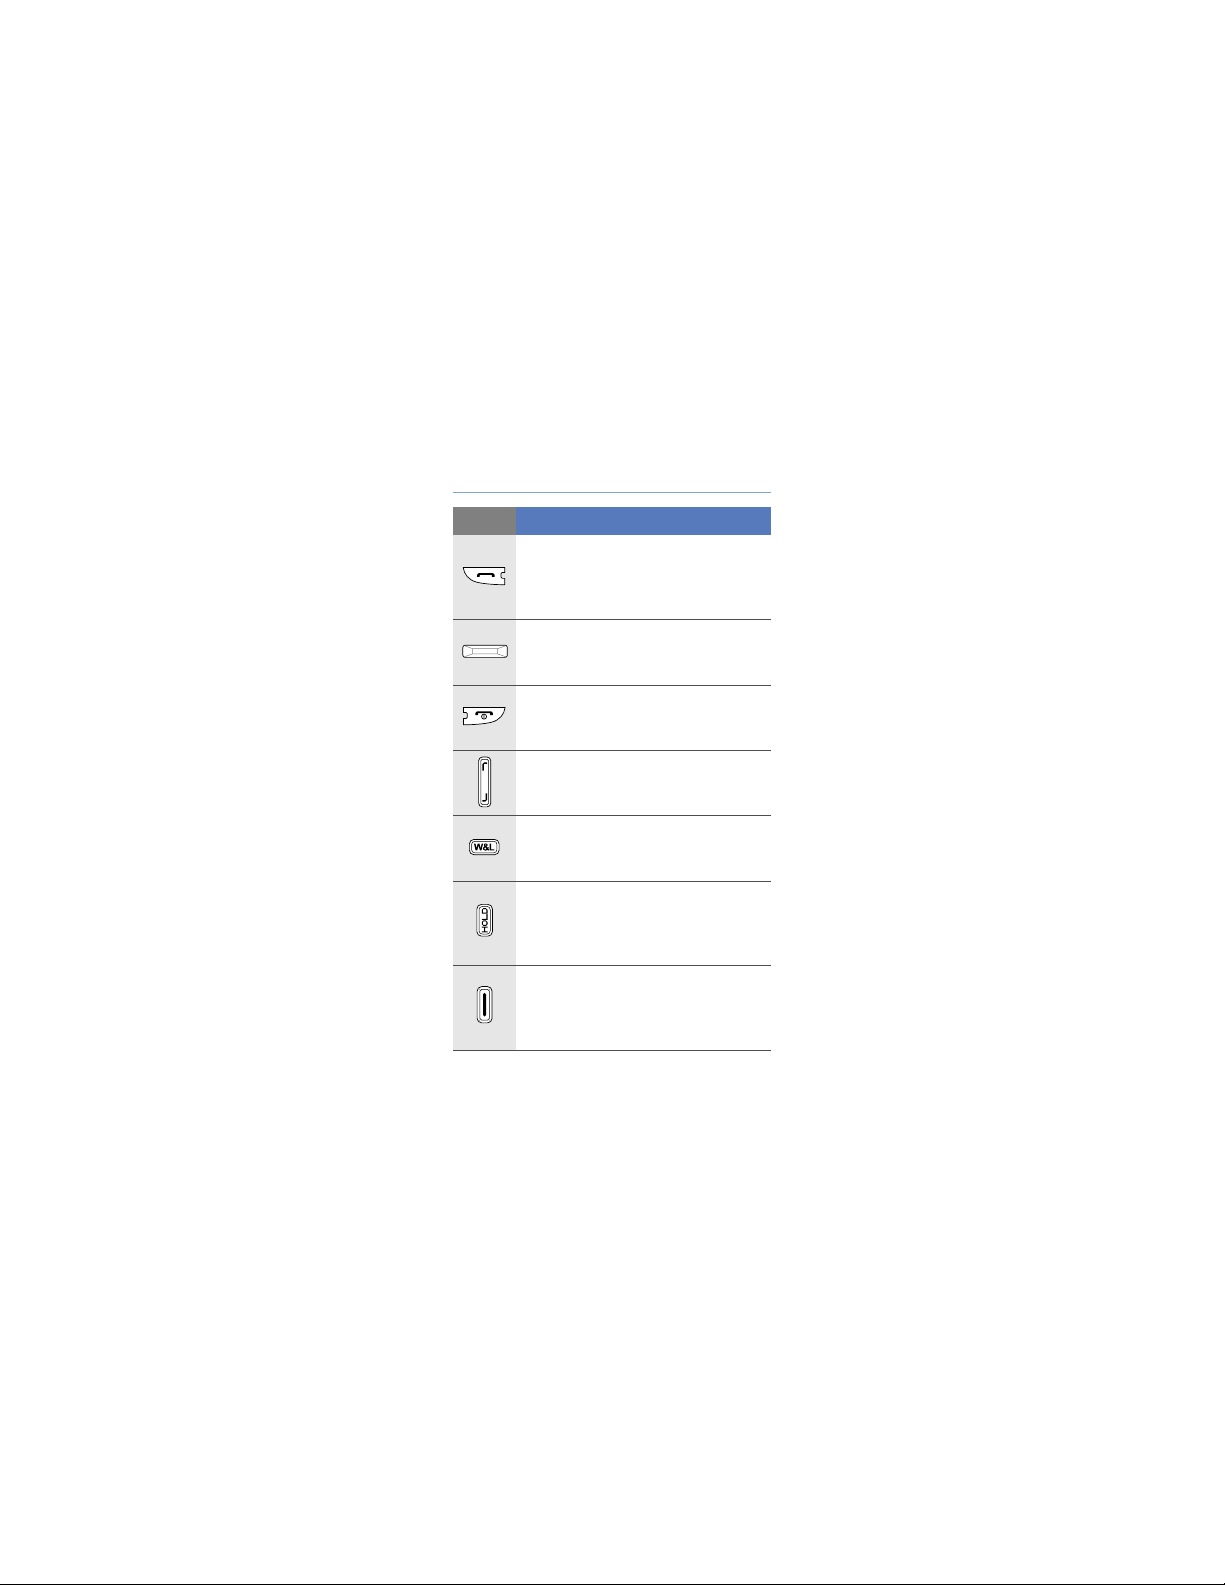
Keys
Key Function
Open the dialling screen; Make or
answer a call; Activate the
speakerphone during a call (press
and hold)
Access Main menu; Open the
Task Switcher screen (press and
hold)
Turn the device on or off (press
and hold); End a call; Return to the
Today screen
Adjust the volume; During a call,
adjust the voice volume; During an
incoming call, mute the call ringer
Switch between the Work mode
screen and the Life mode screen
(press and hold)
Activate or deactivate Sleep mode;
Lock or unlock the external keys
and the touch screen (press and
hold)
Launch Photo Album; Activate the
camera (press and hold); In
Camera mode, take a photo or
record a video
11
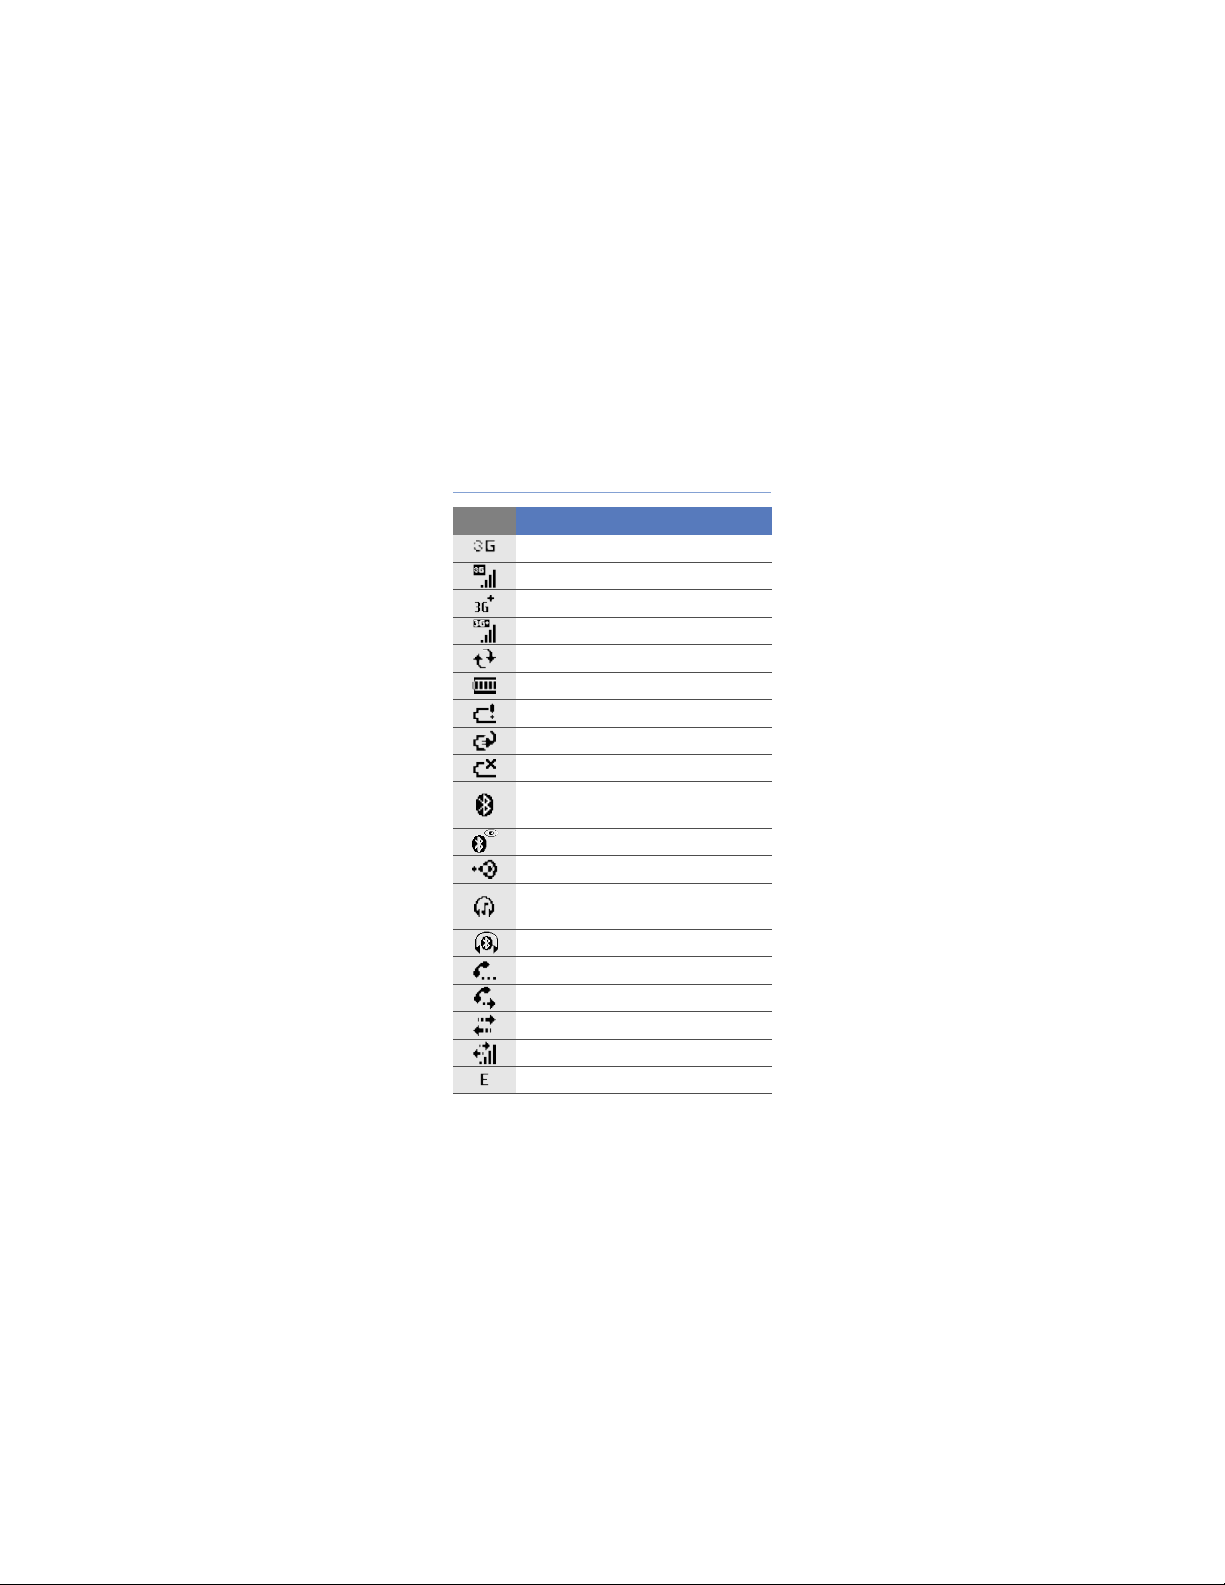
Icons
Icon Function
UMTS network available
UMTS network connected
HSDPA network available
HSDPA network connected
ActiveSync in progress
Battery level
Low battery
Battery charging
No battery
Attempt to access via Bluetooth or
Bluetooth activated
Bluetooth visibility activated
Receiving data via Bluetooth
Bluetooth stereo headset
connected
Bluetooth hands-free connected
Call on hold
Call forwarding activated
Connected to a computer
Data call in progress
EDGE network available
12
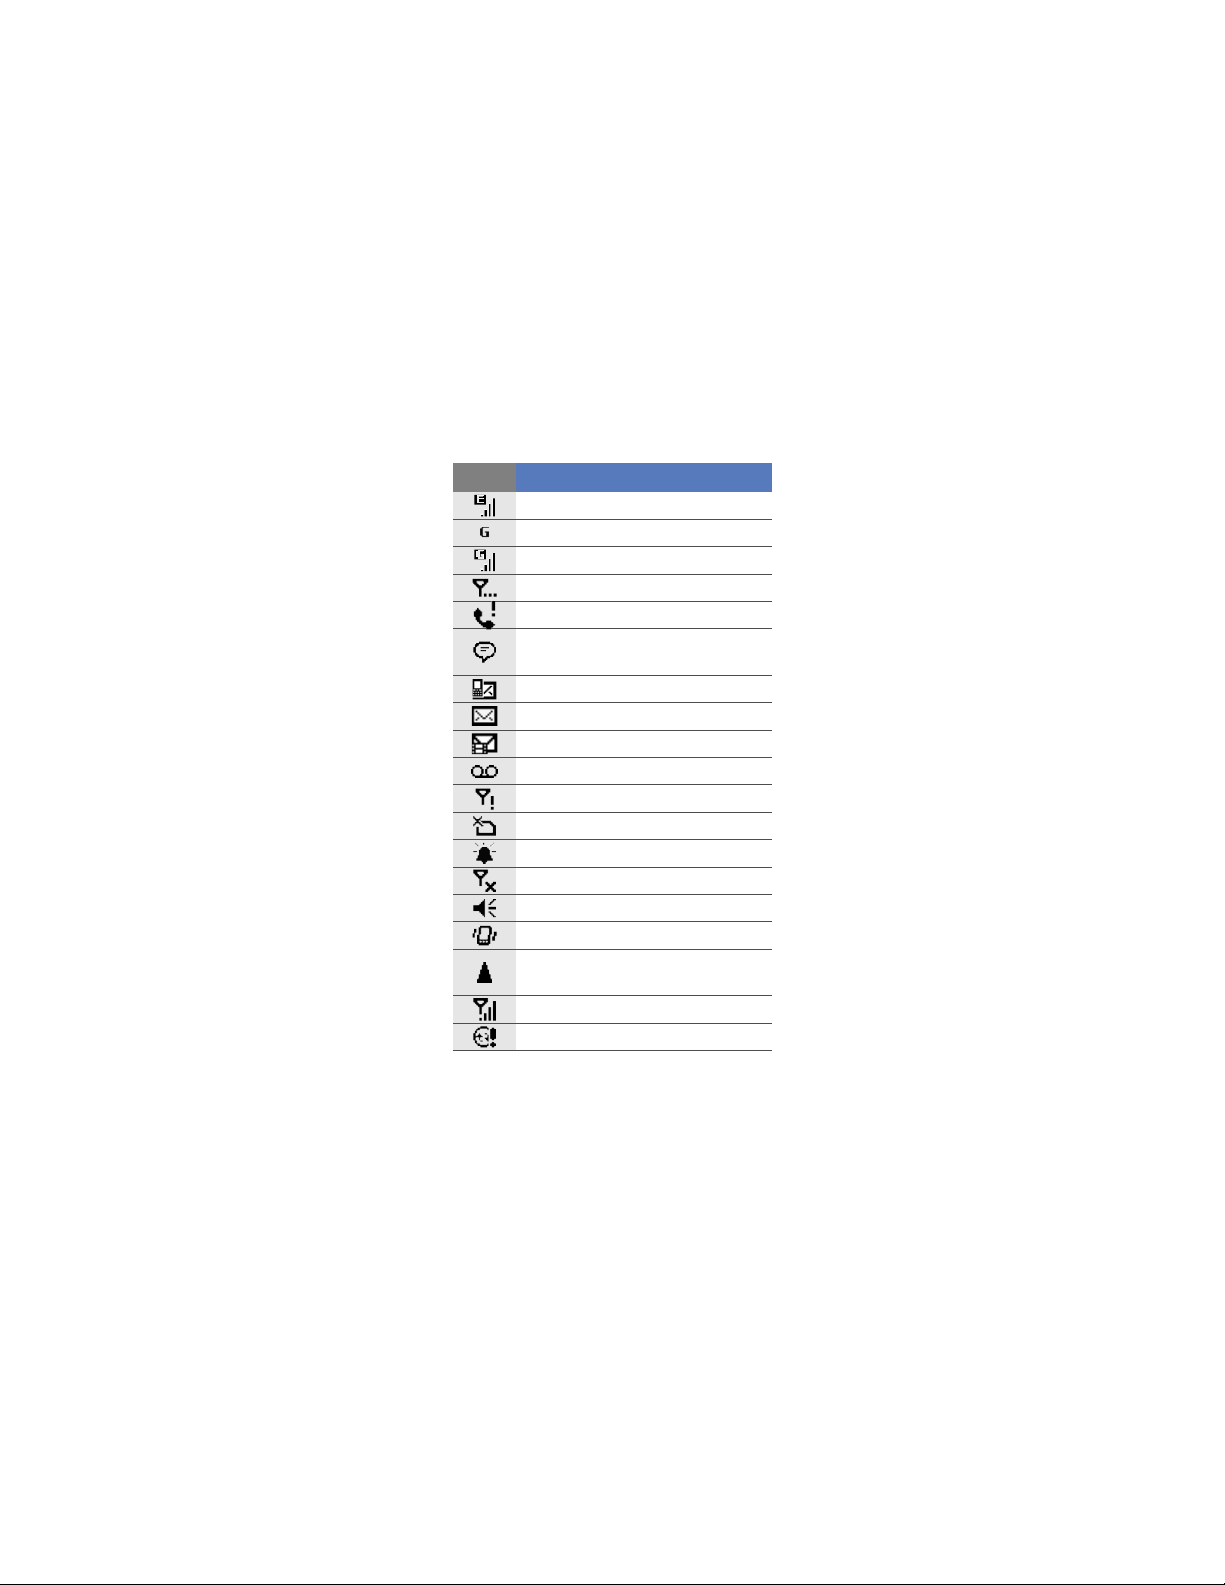
Icon Function
EDGE network connected
GPRS network available
GPRS network connected
Searching for a signal
Missed call
More status icons available (tap
the icon to see them)
New text message
New email message
New multimedia message
New voice mail message
No signal
No SIM or USIM card
Pending alarm
Radio off
Ringer on
Ringer set to vibrate
Roaming (outside of normal
service area)
Signal strength
Synchronisation error
13
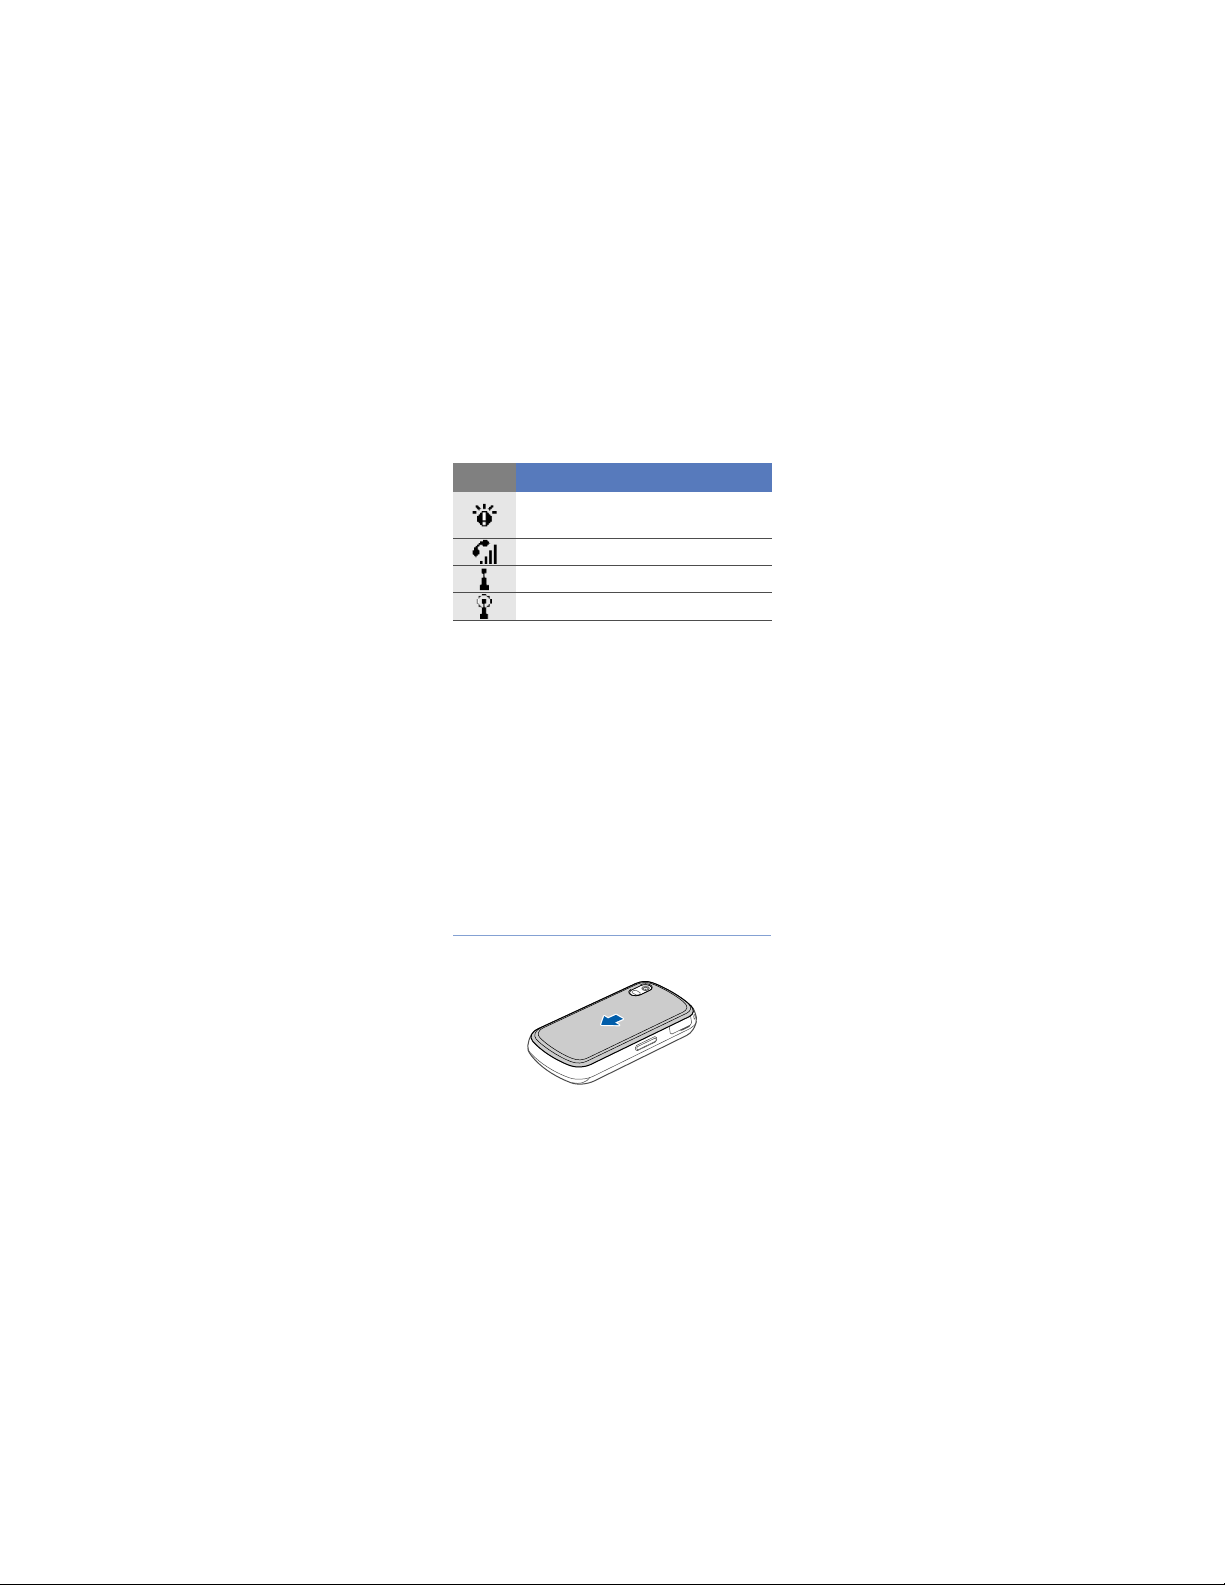
Icon Function
Urgent notification (tap the icon to
see the message)
Voice call in progress
Wi-Fi activated
Wi-Fi data call in progress
Assemble and prepare
your device
Before you can use your device, you must
install the SIM or USIM card, install the
battery, and charge the battery. Installing a
SIM or USIM card is optional, but may be
required to fully utilise some applications
and store media files.
Insert the SIM or USIM card
and battery
1
Remove the battery cover.
14
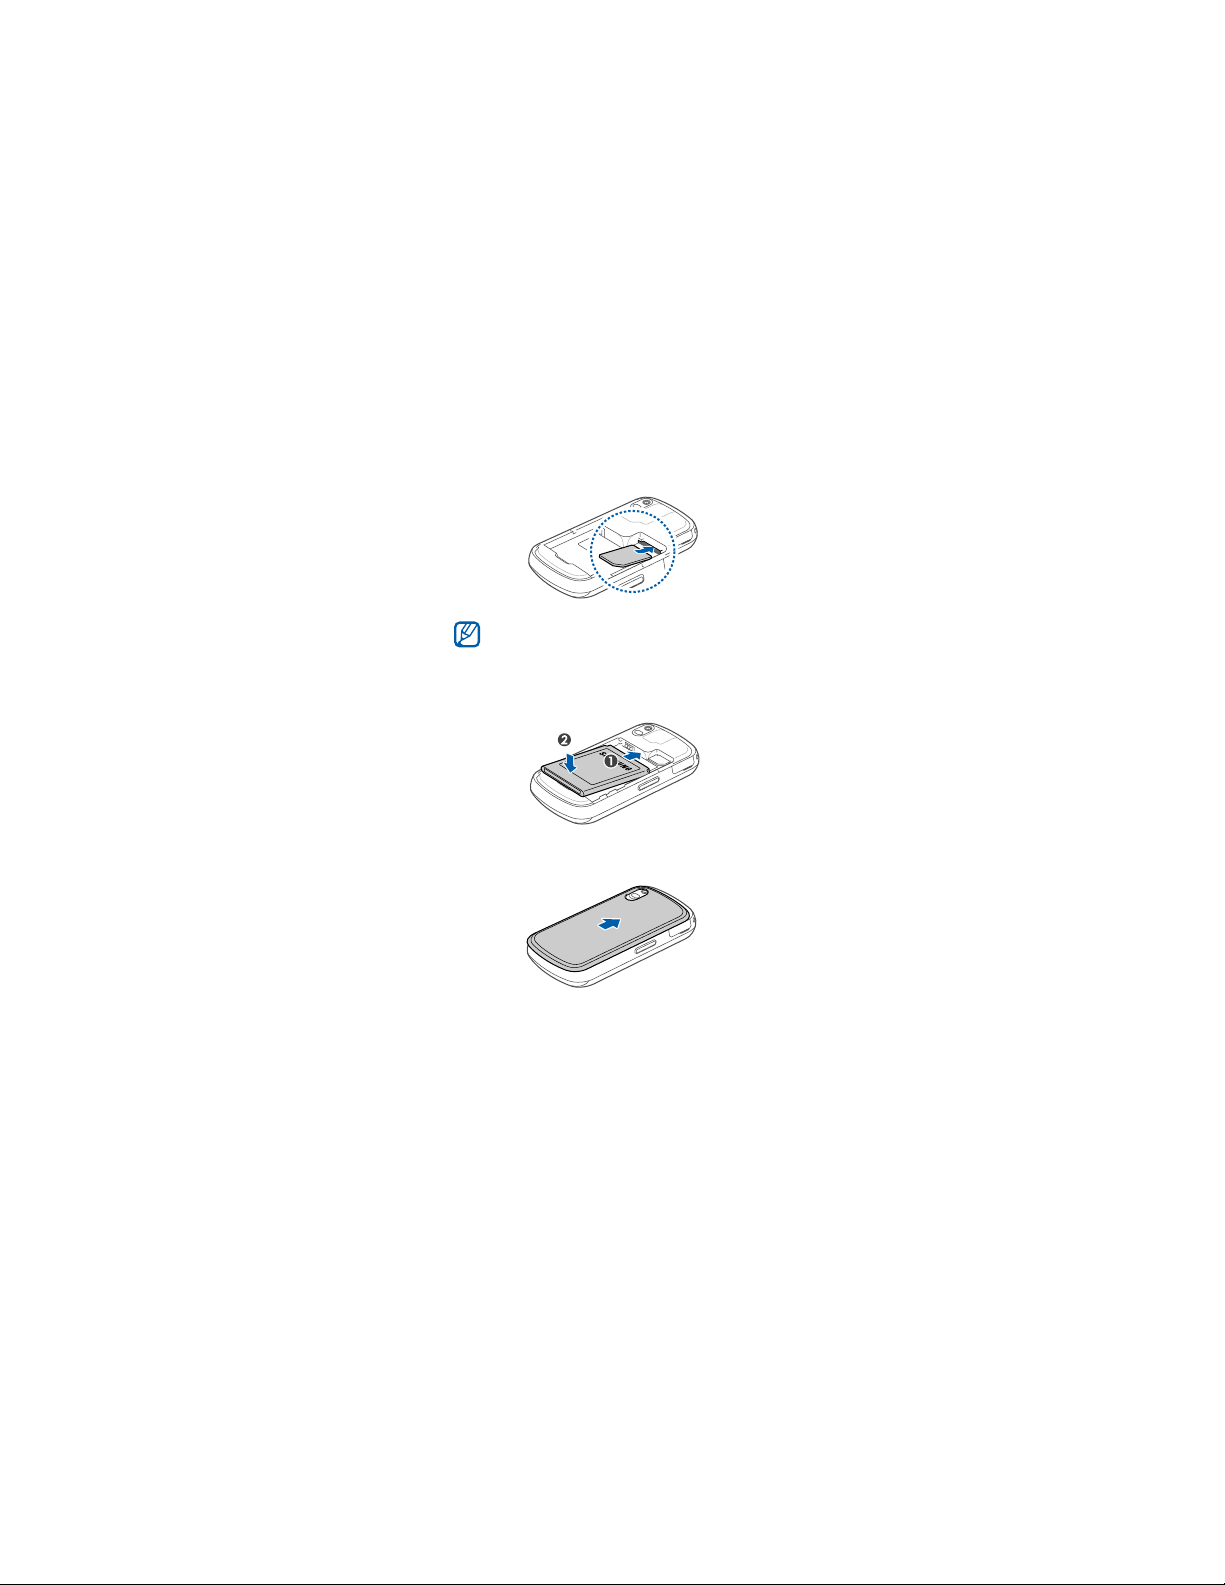
2
Insert the SIM or USIM card.
Insert the SIM or USIM card with the
gold-coloured contacts facing the
device.
3
Insert the battery.
4
Replace the battery cover.
15

Charge battery
1
Open the cover to the multifunction jack
on the right of the device.
2
Plug the small end of the travel adapter
into the device.
3
Plug the large end of the travel adapter
into a power outlet.
4
When charging is finished, unplug the
travel adapter from the power outlet.
5
Remove the travel adapter from the
device.
Although a charger cable is connected,
• The battery may not charge in some
situations to protect the device.
• The battery level may remain low if
the device is using a large amount of
power.
16

Insert a memory card (optional)
By inserting a memory card, you can store
multimedia files and messages or back up
your important information. Your device
accepts microSD™ or microSDHC™
memory cards up to 32 GB (depending on
memory card manufacturer and type).
1
Open the cover to the memory card slot
on the left of the device.
2
Insert a memory card with the label side
facing up.
3
Push the memory card in the memory
card slot until it locks in place.
17

Turn on your device for
first time
1
Press and hold [ ] to turn on your
device.
2
Follow the on-screen instructions. Your
device will automatically connect to the
cellular network.
Activate Sleep mode
You can activate Sleep mode to save
power when you do not use your device.
To activate Sleep mode, press [
Your device will turn off the screen. To
deactivate Sleep mode, press [
again.
Lock external keys and touch
screen
You can lock the external keys and the
touch screen to prevent any unwanted
device operations from accidentally
pressing any of the keys and the screen.
To lock the keys and the screen, press and
hold [
HOLD
].
To unlock, press and hold [
HOLD
HOLD
HOLD
] again.
].
]
18

Use the touch screen
You can perform the following actions on
your device's touch screen:
For optimal use of the touch screen,
remove the screen protection film
before using your device.
• Tap: Touch the screen once to select
commands or launch applications.
• Tap-and-hold: Tap and hold an item to
see a list of available actions. Tap the
action you want to perform on the popup menu.
• Drag: Tap-and-hold a scroll bar or text
and then drag it to move the bar or
select text.
If your device does not respond
accurately to your screen taps, realign
your touch screen. To realign the
screen, tap
Settings
Screen
Start
tab >
General Settings
>
Align Screen
>
Settings
>
Basic
>
.
Align
19
Disable wireless functions
1
Ta p
Start
>
Settings
2
On the
Basic Settings
>
Settings
3
Tap next to
• Your device will show on the
Today screen.
To enable wireless functions, repeat steps
1-3 above.
Wireless Manager
.
Phone
tab, tap
.
.
General
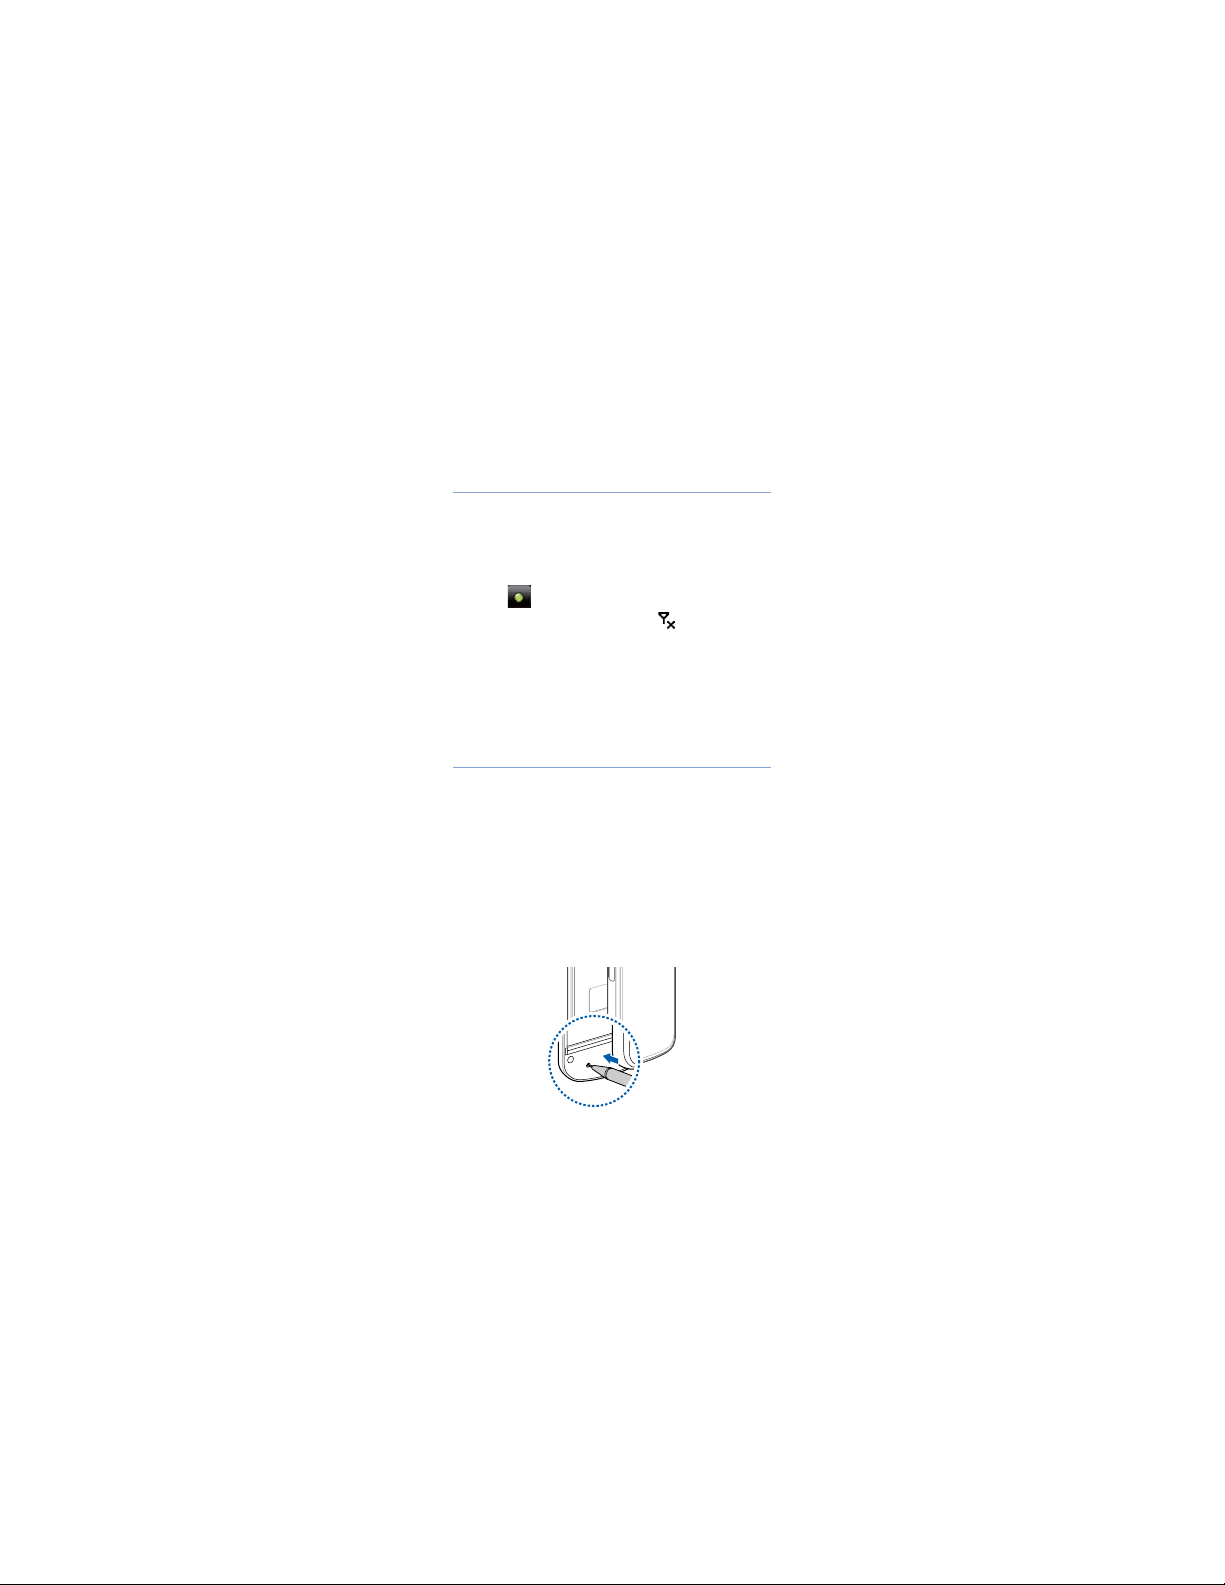
Reset the device
If your device freezes or hangs, you may
need to close programs or reset the device
to regain functionality. If your device is still
responsive but a program is frozen, close
the program via Task Switcher. X p. 28
If your device is frozen and unresponsive,
slide open the device and use a small
object, such as a toothpick, to press the
reset button.
20

Customise your device
Learn to change themes and background
images, add or remove items, and adjust
the system volume from the Today screen.
Change your theme or
background image
1
Ta p
Start
>
Settings
2
On the
Basic Settings
and Light
3
Ta p
desired option to customise the display.
4
Ta p
5
When you are finished, tap OK or
.
Theme
or
Yes
(if necessary).
Add or remove items on the
Today screen
1
Ta p
Start
>
Settings
2
On the
Basic Settings
and Light
3
Ta p
4
Ta p
.
Items on Today
Menu
>
Wallpaper
Edit
.
.
tab, tap
and select the
.
tab, tap
.
Display
Done
Display
.
21

5
Tap the check boxes next to each item
to add or remove items.
Some items are not compatible with
Samsung widgets. If you choose to
Samsung WidgetPlus
add
other items that will work
simultaneously are
and
Windows Live Search
6
Ta p
Done
.
7
Ta p
Option
next to each item to set the
options you want (if necessary).
8
When you are finished, tap OK.
, the only
Windows Live
.
Use Work mode and Life mode
You can use a different theme and
background image for Work mode and Life
mode. To change settings for each mode,
1
Ta p
Start
>
Others
>
Mode manager
2
Change the name for a mode (if
necessary).
3
Ta p
Settings
4
Change the theme, background image,
ring type, items on the Today screen,
and wireless manager settings.
5
Ta p
Done
under the mode you want.
.
.
22

Press and hold the Mode switch key to
switch between two mode.
Adjust the system volume
To adjust the system volume, press the
Volume key up or down. To set the device
to vibrate, press [ ] and tap and hold
. To deactivate the vibrate feature, tap
and hold again.
Activate Etiquette pause
You can temporarily pause the music
player or mute event alarms by placing the
device face down when Etiquette pause is
activated. To activate Etiquette pause,
1
Ta p
Start
>
2
On the
Basic Settings
Settings
3
Tap next to
4
Ta p
Done
Settings
>
Etiquette
.
.
tab, tap
.
Enable etiquette pause
Motion
.
23

Use Widgets
Use widgets on the Today screen. Widgets
are user friendly shortcuts to commonly
used applications allowing you to
customise the Today screen.
Open the toolbar
Tap the arrow at the bottom left of the
Today screen to open the toolbar. You can
rearrange widgets on the toolbar or drag
them to the Today screen.
Depending on your region or service
provider, available widgets may vary.
Widget Function
View the current time
View the calendar
Browse your photos and set a
photo as the wallpaper
Listen to music via the mini
player
Listen to the FM radio
Change the current sound
profile
View a new message or missed
calls
24

Widget Function
View the network connection
status
Monitor your wireless
connections
Get the latest weather updates
from AccuWeather
Get news updates from CNN*
Get updates from Yahoo!
Finance*
Search the web with Yahoo!*
Search the web with Google*
Add application shortcuts to the
Today screen
* These widgets require a connection to the
internet, which may result in additional
charges.
*
Drag the widgets to the Today
screen
1
Open the toolbar.
2
Drag a widget from the toolbar to the
Today screen. You can position the
widget anywhere on the screen.
25

Customise widgets
1
Open the toolbar.
2
Tap at the top of the toolbar.
3
Tap the check boxes next to items that
you want to appear on the toolbar.
4
When you are finished, tap
Done
.
Work with applications
Learn to open applications or folders and
switch between open applications.
Open applications or folders
1
Ta p
Start
or press the Menu key.
2
To open an application, tap the
application icon.
• Scroll left or right to move to one of
Menu mode screens.
Others
•Tap
applications.
3
To open a folder, tap
navigate to the desired folder.
to view more
File Manager
and
26

Organise applications
1
Ta p
Start >
Edit
.
2
Organise applications according to your
needs and preferences.
• Tap to move an application to
Others
.
• Tap to move an application from
Others
.
• Tap and hold an application icon and
move it to the location you want.
• Tap the screen name field to edit the
screen name.
3
Ta p
Save
.
Switch applications
Your device allows you to multi-task by
running multiple applications at the same
time.
To switch from one active application to
another,
1
Press and hold the Menu key.
• Task Switcher shows thumbnail
images of all open programs.
2
Tap a thumbnail to switch to the
corresponding application.
27

Close applications
To send the current application to the
background, tap
To close an application,
1
Press and hold the Menu key.
2
Ta p
End
3
Tap .
X
or ok.
.
Search for files or folders
1
Ta p
Start
>
Others>Search
2
Use the input panel to enter a keyword.
3
Ta p
Search
.
.
Use the Composer screen
1
Right slide open the device.
• Some applications you can use with
the QWERTY keyboard appear.
2
Tap an application.
3
Use the application and enter text using
the QWERTY keyboard.
28

Access the Windows Mobile
Help system
To access the help system of your device,
deactivate Samsung TouchWiz UI.
To deactivate Samsung TouchWiz UI,
1
Ta p
Start
>
Settings
2
On the
Basic Settings
>
Settings
3
Ta p next to
Tou c hW i z U I
4
Ta p
5
Open an application and tap
Help
• The embedded Windows Mobile
Help system appears.
Samsung TouchWiz UI
Done
.
.
.
tab, tap
Enable Samsung
.
General
.
Start
>
29
 Loading...