

Samsung GT-B3730 User Manual
Some of the contents in this manual may differ from your device depending
on the software of the device or your service provider.
www.samsungmobile.com
www.samsung.se
www.samsung.no
Printed in Korea
Code No.: GH68-29129A
08/2010. Rev. 1.3
Behöver du hjälp eller har frågor, hänvisar vi till http://www.samsung.se.
Klicka in på ”support”=>”vanliga frågor” och välj sedan produktgrupp och produkttyp.
Alternativt ring vår kundsupport, tel. 0771-400 200.
Trenger du hjelp eller har spørsmål, henviser vi til http://www.samsung.no.
Klikk inn på “support”=>”ofte stilte spørsmål” eller søk ved hjelp av modellnummer
Alternativt, ring vår kundesupport. Tel: 815-56 480
GT-B3730
user manual

English ................................................................................1
Svenska .............................................................................36
Norsk .................................................................................70

1
English
safety and usage information ..............................................4
Safety warnings..............................................................................4
Safety precautions .........................................................................6
Important usage information ..........................................................9
introducing your modem ...................................................13
Unpack .........................................................................................13
Modem layout...............................................................................14
Install the SIM card ......................................................................14
connecting your modem to a Computer ..........................16
using the connection manager program ..........................19
Install the connection manager program .....................................19
Run the connection manager program ........................................24
contents
English

2
Connect to the mobile broadband ...............................................25
Use the application launcher .......................................................25
customising your modem ..................................................26
Set general settings .....................................................................26
Enable or disable the SIM PIN .....................................................26
Change the PIN............................................................................27
Change the network settings .......................................................28
Change the network mode ...........................................................28
Check your network information ..................................................29
Change the Internet settings .......................................................29
Change the display language ......................................................30
View internet usage information ..................................................30
troubleshooting ...................................................................31
About the device and services .....................................................31
About the connection manager program .....................................33
3
English
Instructional icons
Before you start, familiarise yourself with the icons you will see in
this manual:
Warning–situations that could cause injury to yourself or
others
Caution–situations that could cause damage to your
device or other equipment
Note–notes, usage tips, or additional information

4
safety and usage
information
Comply with the following precautions to avoid dangerous or illegal
situations and ensure peak performance of your device.
Safety warnings
Keep your device away from small children and pets
Keep your device and all accessories out of the reach of small
children or animals. Small parts may cause choking or serious
injury if swallowed.

5
English
Handle and dispose of devices with care
Never dispose of the device in a re. Follow all local regulations •
when disposing of used devices.
Never place your device on or in heating devices, such as •
microwave ovens, stoves, or radiators. Devices may explode
when overheated.
Never crush or puncture the device. Avoid exposing the device to •
high external pressure, which can lead to an internal short circuit
and overheating.
Turn off the device in potentially explosive
environments
Do not use your device at refuelling points (service stations) or •
near fuels or chemicals. Turn off your device whenever directed
by warning signs or instructions. The device could cause
explosions or re in and around fuel or chemical storage and
transfer areas or blasting areas. Do not store or carry ammable
liquids, gases, or explosive materials in the same compartment
as the device, its parts, or accessories.
6
Safety precautions
Drive safely at all times
Avoid using your device while driving and obey all regulations that
restrict the use of devices while driving.
Follow all safety warnings and regulations
Comply with any regulations that restrict the use of a device in a
certain area.
Use only Samsung-approved accessories
Using incompatible accessories may damage your device or cause
injury.
Turn off the device near medical equipment
Your device can interfere with medical equipment in hospitals or
health care facilities. Follow all regulations, posted warnings, and
directions from medical personnel.

7
English
Turn off the device or disable the wireless functions
when in an aircraft
Your device can cause interference with aircraft equipment.
Follow all airline regulations and turn off your device or switch to a
mode that disables the wireless functions when directed by airline
personnel.
Protect the device from damage
Avoid exposing devices to very cold or very hot temperatures
(below 0° C or above 45° C). Extreme temperatures can reduce the
charging capacity and life of your devices.
Handle your device carefully and sensibly
Do not disassemble your device due to a risk of electric shock.•
Do not allow your device to get wet—liquids can cause serious •
damage and will change the colour of the label that indicates
water damage inside the device. Do not handle your device
with wet hands. Water damage to your device can void your
manufacturer’s warranty.
Avoid using or storing your device in dusty, dirty areas to prevent •
damage to moving parts.

8
Your device is a complex electronic device—protect it from •
impacts and rough handling to avoid serious damage.
Do not paint your device, as paint can clog moving parts and •
prevent proper operation.
Your device and memory cards may be damaged by exposure to •
magnetic elds. Do not use carrying cases or accessories with
magnetic closures or allow your device to come in contact with
magnetic elds for extended periods of time.
Avoid interference with other electronic devices
Your device emits radio frequency (RF) signals that may interfere
with unshielded or improperly shielded electronic equipment,
such as pacemakers, hearing aids, medical devices, and other
electronic devices in homes or vehicles. Consult the manufacturers
of your electronic devices to solve any interference problems you
experience.

9
English
Important usage information
Allow only qualied personnel to service your device
Allowing unqualied personnel to service your device may result in
damage to your device and will void your warranty.
Handle SIM cards with care
Do not remove a card while the device is transferring or accessing •
information, as this could result in loss of data and/or damage to
the card or device.
Protect cards from strong shocks, static electricity, and electrical •
noise from other devices.
Do not touch gold-coloured contacts or terminals with your ngers •
or metal objects. If dirty, wipe the card with a soft cloth.
10
Correct disposal of this product
(Waste Electrical & Electronic Equipment)
(Applicable in the European Union and other European
countries with separate collection systems)
This marking on the product, accessories or literature
indicates that the product and its electronic accessories
(e.g. charger, headset, USB cable) should not be
disposed of with other household waste at the end of their working
life. To prevent possible harm to the environment or human health
from uncontrolled waste disposal, please separate these items from
other types of waste and recycle them responsibly to promote the
sustainable reuse of material resources.
Household users should contact either the retailer where they
purchased this product, or their local government ofce, for details
of where and how they can take these items for environmentally
safe recycling.
Business users should contact their supplier and check the terms
and conditions of the purchase contract. This product and its
electronic accessories should not be mixed with other commercial
wastes for disposal.
This EEE is compliant with RoHS.

11
English
Disclaimer
Some content and services accessible through this device belong
to third parties and are protected by copyright, patent, trademark
and/or other intellectual property laws. Such content and services
are provided solely for your personal noncommercial use. You
may not use any content or services in a manner that has not
been authorised by the content owner or service provider. Without
limiting the foregoing, unless expressly authorised by the applicable
content owner or service provider, you may not modify, copy,
republish, upload, post, transmit, translate, sell, create derivative
works, exploit, or distribute in any manner or medium any content
or services displayed through this device.
“THIRD PARTY CONTENT AND SERVICES ARE PROVIDED
“AS IS.” SAMSUNG DOES NOT WARRANT CONTENT
OR SERVICES SO PROVIDED, EITHER EXPRESSLY OR
IMPLIEDLY, FOR ANY PURPOSE. SAMSUNG EXPRESSLY
DISCLAIMS ANY IMPLIED WARRANTIES, INCLUDING BUT
NOT LIMITED TO, WARRANTIES OF MERCHANTABILITY OR
FITNESS FOR A PARTICULAR PURPOSE. SAMSUNG DOES
NOT GUARANTEE THE ACCURACY, VALIDITY, TIMELINESS,
LEGALITY, OR COMPLETENESS OF ANY CONTENT OR
SERVICE MADE AVAILABLE THROUGH THIS DEVICE AND
UNDER NO CIRCUMSTANCES, INCLUDING NEGLIGENCE,
SHALL SAMSUNG BE LIABLE, WHETHER IN CONTRACT OR

12
TORT, FOR ANY DIRECT, INDIRECT, INCIDENTAL, SPECIAL
OR CONSEQUENTIAL DAMAGES, ATTORNEY FEES,
EXPENSES, OR ANY OTHER DAMAGES ARISING OUT OF, OR
IN CONNECTION WITH, ANY INFORMATION CONTAINED IN,
OR AS A RESULT OF THE USE OF ANY CONTENT OR SERVICE
BY YOU OR ANY THIRD PARTY, EVEN IF ADVISED OF THE
POSSIBILITY OF SUCH DAMAGES.”
Third party services may be terminated or interrupted at any time,
and Samsung makes no representation or warranty that any
content or service will remain available for any period of time.
Content and services are transmitted by third parties by means of
networks and transmission facilities over which Samsung has no
control. Without limiting the generality of this disclaimer, Samsung
expressly disclaims any responsibility or liability for any interruption
or suspension of any content or service made available through this
device.
Samsung is neither responsible nor liable for customer service
related to the content and services. Any question or request for
service relating to the content or services should be made directly
to the respective content and service providers.

13
English
introducing your
modem
Learn about your modem’s layout and get started by assembling
and setting up your modem for its rst use.
Unpack
Your product box has the following items:
USB modem•
USB cable•
User manual•
The items supplied with your modem may vary depending
on your region or service provider.

14
Modem layout
USB connector
Status light
SIM card cover
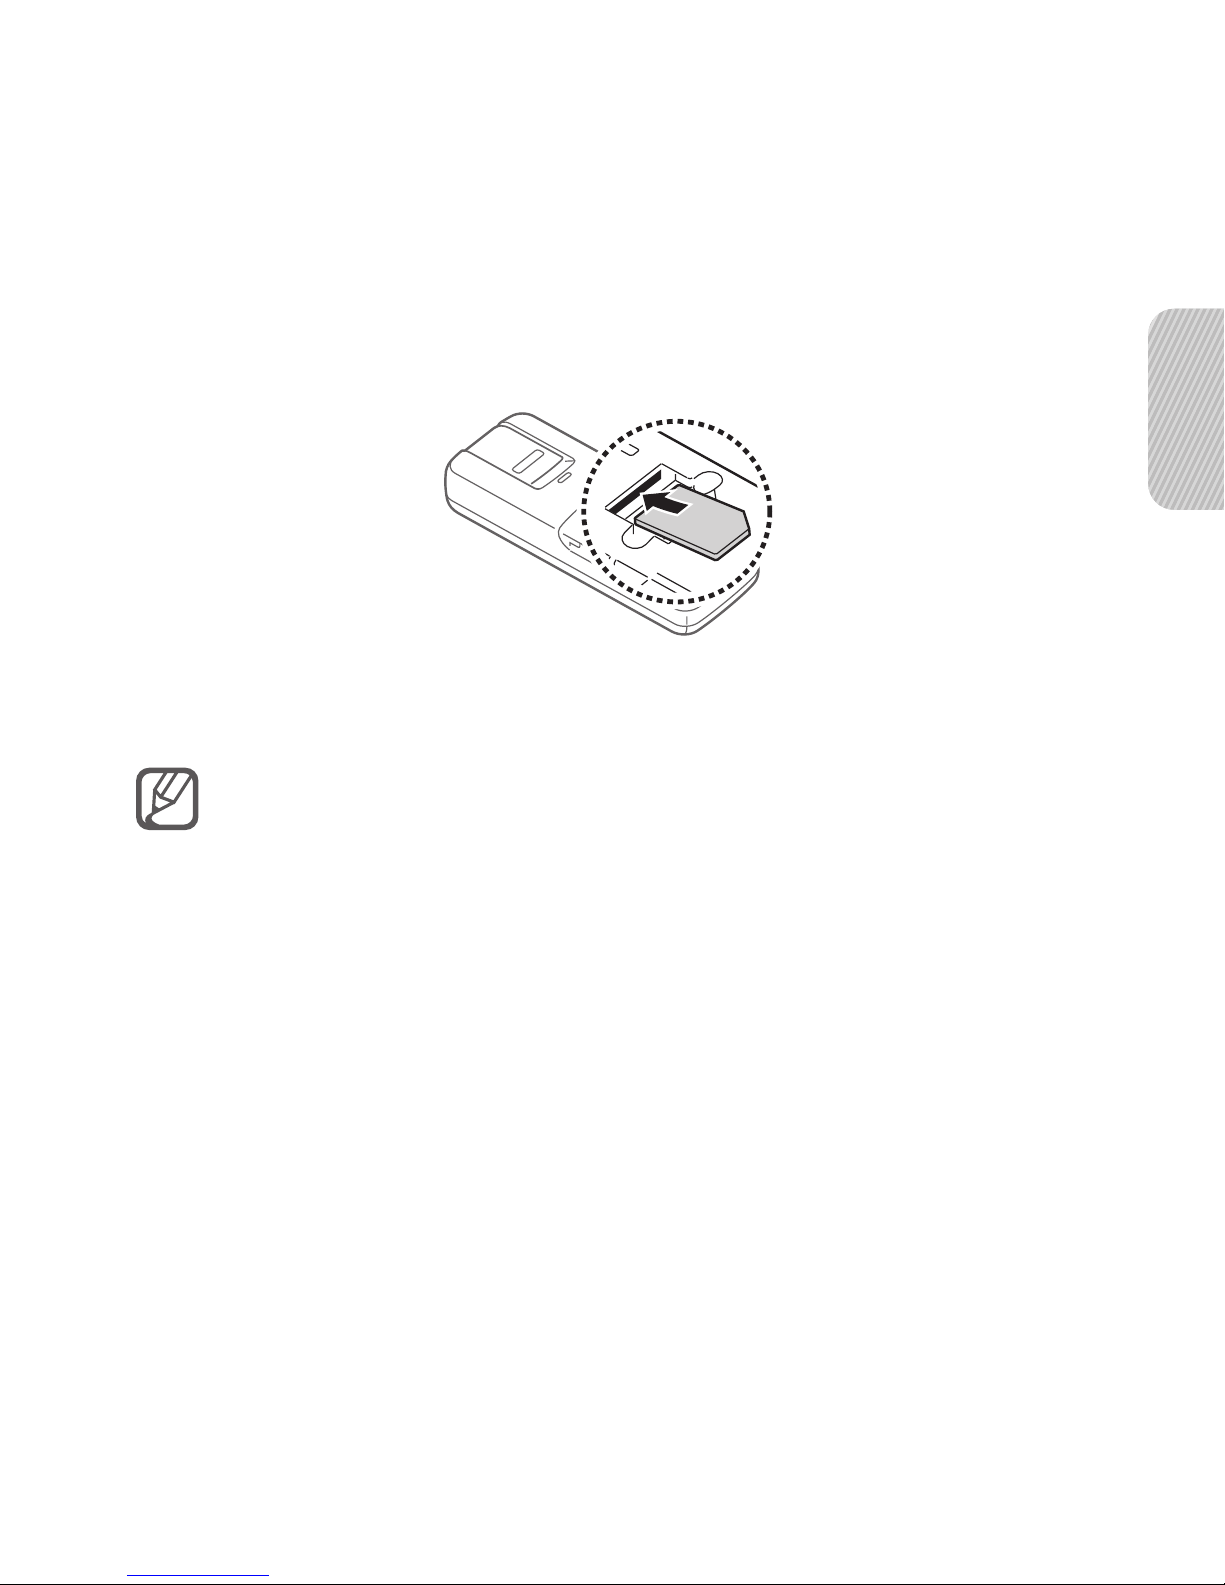
Install the SIM card
When you subscribe to a network service, you will receive a “SIM”
card, with subscription details, such as your personal identication
number “PIN” and optional services.
Remove the SIM card cover.1.
15
English
Insert the SIM card with the gold-coloured contacts facing down 2.
into the card slot.
Replace the SIM card cover.3.
To remove the SIM card, pull the SIM card out of the slot.
To prevent someone from using your SIM card when it is •
stolen or lost, you can lock the card. See page 19.
To purchase a SIM card or subscribe to a network service, •
contact your service provider.
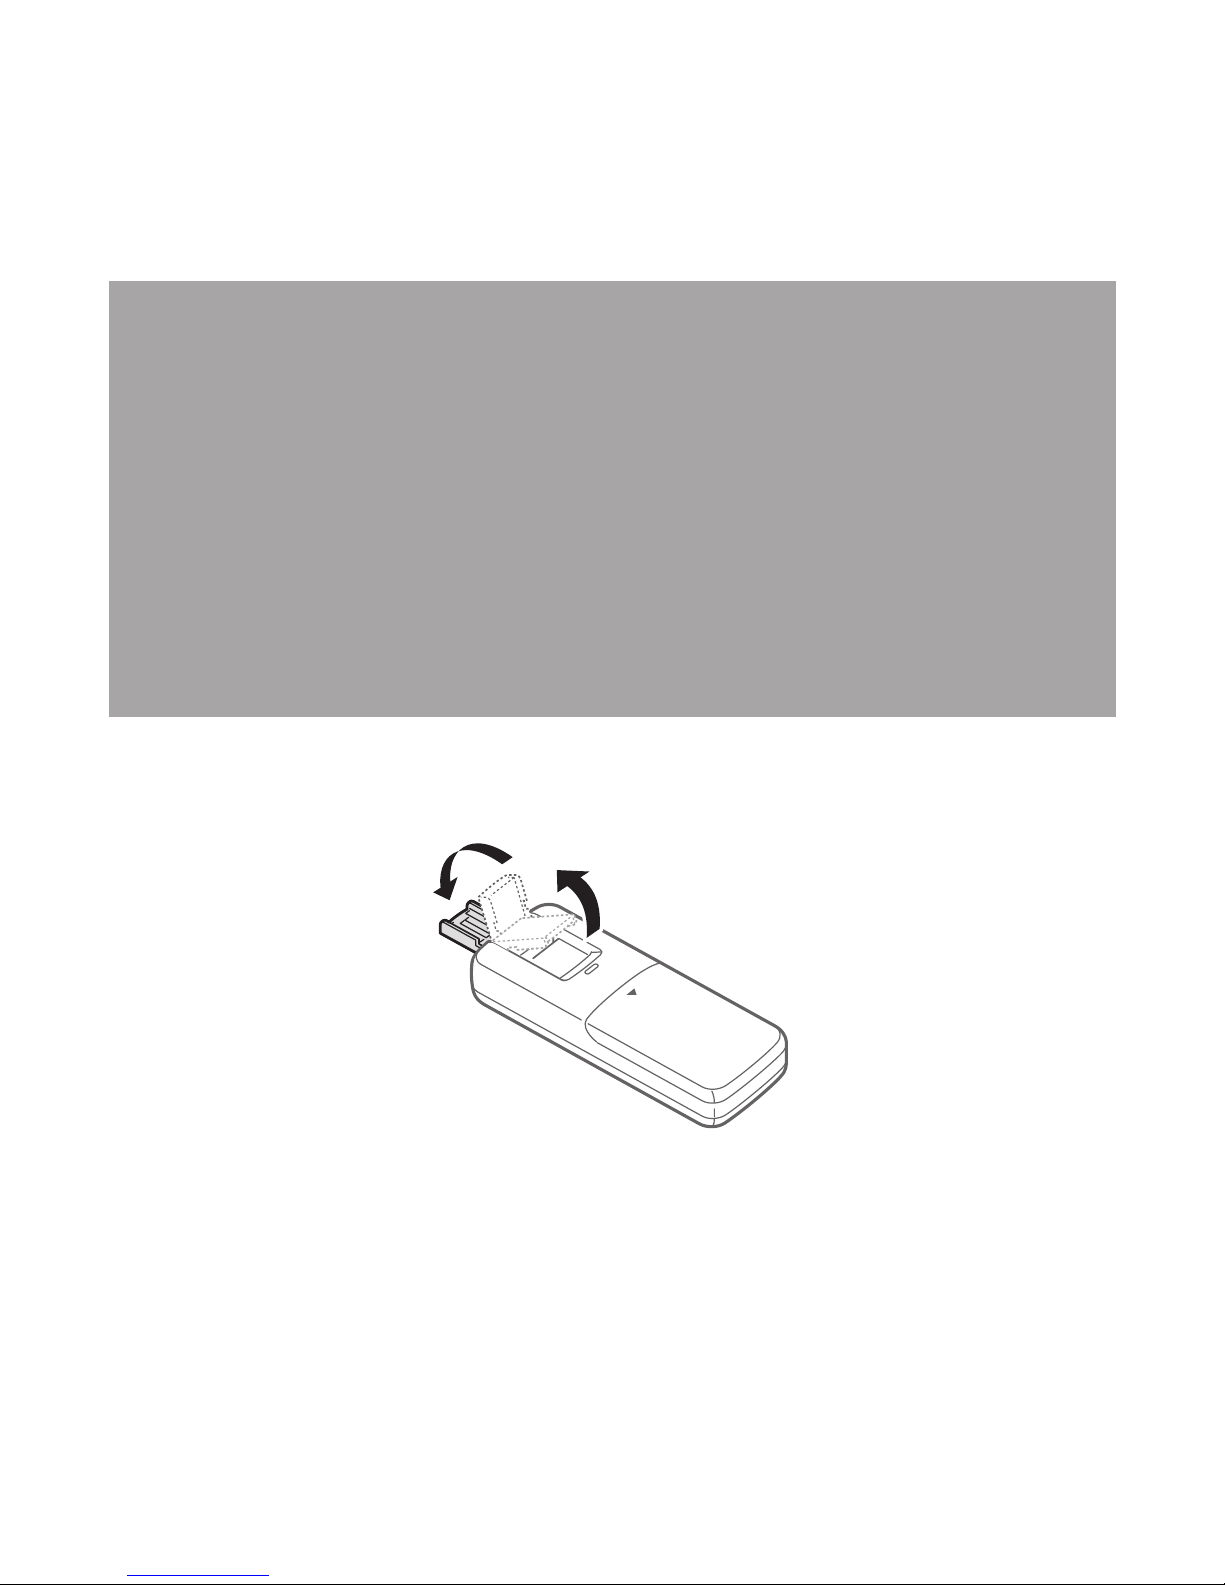
16
connecting your
modem to a Computer
Learn how to connect your modem to a Computer.
Pull out the USB connector.1.
17
English
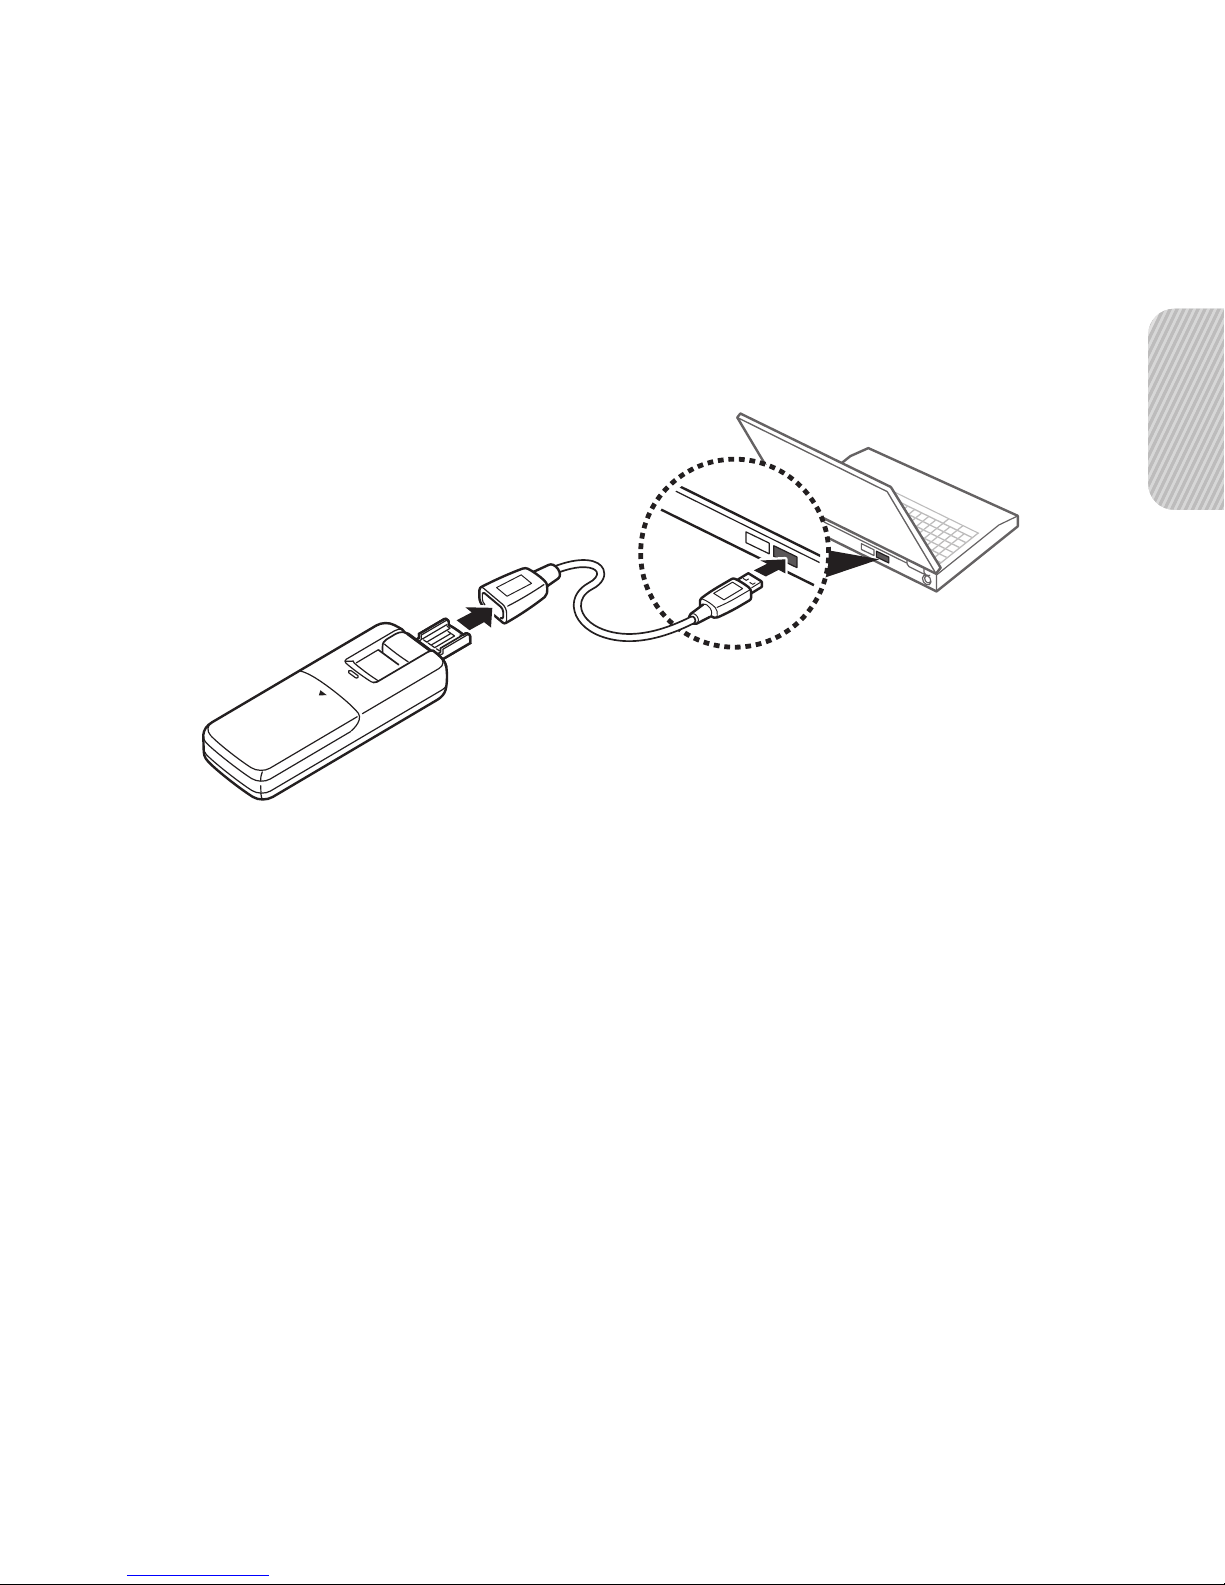
Connect the modem to a Computer with the supplied USB 2.
cable.
The status light becomes blue similar colour. Now the modem
is ready to be used.
18
Plug the USB cable into the modem and Computer with •
care. Forcing the cable in upside down may damage the
cable, modem, or USB port.
Use the supplied USB cable or a certied USB 2.0 •
cable only when connecting the modem to a Computer.
If you connect the modem directly to a USB port on a
Computer, the communication between the modem
and the Computer may be interrupted by noise that the
Computer emits.
When removing the USB modem from a PC with non-•
standard USB ports, rst tilt the USB connector of the
modem toward the status light, and then gently remove it
from the USB.
Meaning of the status light
Colour Meaning
Colour1
(Red Similar)
Out of network service area
Colour2
(Blue Similar)
Ready to be used
Colour3
(Green Similar)
Connected to a mobile broadband

19
English
using the connection
manager program
Learn how to install and use the connection manager program.
Install the connection manager program
Mobile Broadband 4G is a Computer application that helps you
connect to the mobile broadband using a Samsung 4G USB
modem.

20
For Windows user
Auto installation
Connect your modem to a USB port of your Computer. The 1.
install wizard window appears on the Computer
Click [Next] to continue.2.
Click [Install] to start the installation.3.
When the installation is nished, click [Finish]. The 4.
icon will
be added to the desktop
Manual installation I
If the Install Wizard doesn’t start automatically, follow the steps
below.
Ensure that your modem is attached to a USB port of your 1.
Computer.
Run Explorer on your Computer.2.
Find [My Computer] → [Devices with Removable Storage]3.
Double-click [Mobile_Broadband], then, the Install Wizard will 4.
start.
The Install Wizard may not work because of user settings in
the Computer or unknown causes.

21
English
Manual installation II
If you want to download the program from the web, follow the steps
below.
Run Internet Web Browser.1.
Go to http://fus.samsungmobile.com/GT-B3730/Telia/Install.2.
html.
Click [Download for Windows SW Package]. The File Download 3.
window will appear.
Click [Open]. The Install Wizard will start.4.
For Macintosh users
Auto installation
Connect your modem to a USB port of your Computer. The 1.
Mobile Broadband 4G window will appear on the Computer.
Double-click [Mobile Broadband 4G]. The Install Wizard will 2.
start.
Click [Continue] twice to continue.3.
Click [Install] to start the installation.4.

22
When the Administration Password input window appears, 5.
enter your password.
Click [Continue Installation].6.
When the installation is nished, click [Restart]. The 7.
icon is
added to the upper tray of your Computer.
Manual installation
If the Install Wizard doesn’t start automatically, follow the steps
below.
Run Internet Web Browser.1.
Go to http://fus.samsungmobile.com/GT-B3730/Telia/Install.2.
html.
Click [Download for Macintosh]. Download window will appear, 3.
and download starts automatically by web browser. Then, the
Install Wizard will start.
Click [Continue] twice to continue.4.
Click [Install] to start the installation.5.

23
English
When the Administration Password input window appears, 6.
enter your password.
Click [Continue Installation].7.
When the installation is nished, click [Restart]. The 8.
icon is
added to the upper tray of your Computer.
The Install Wizard may not work because of user settings in
the Computer or unknown causes.
Uninstall the connection manager program
Click [Start] and select [All Programs] → [Mobile Broadband 4G] →
[Uninstall Mobile Broadband 4G].
24
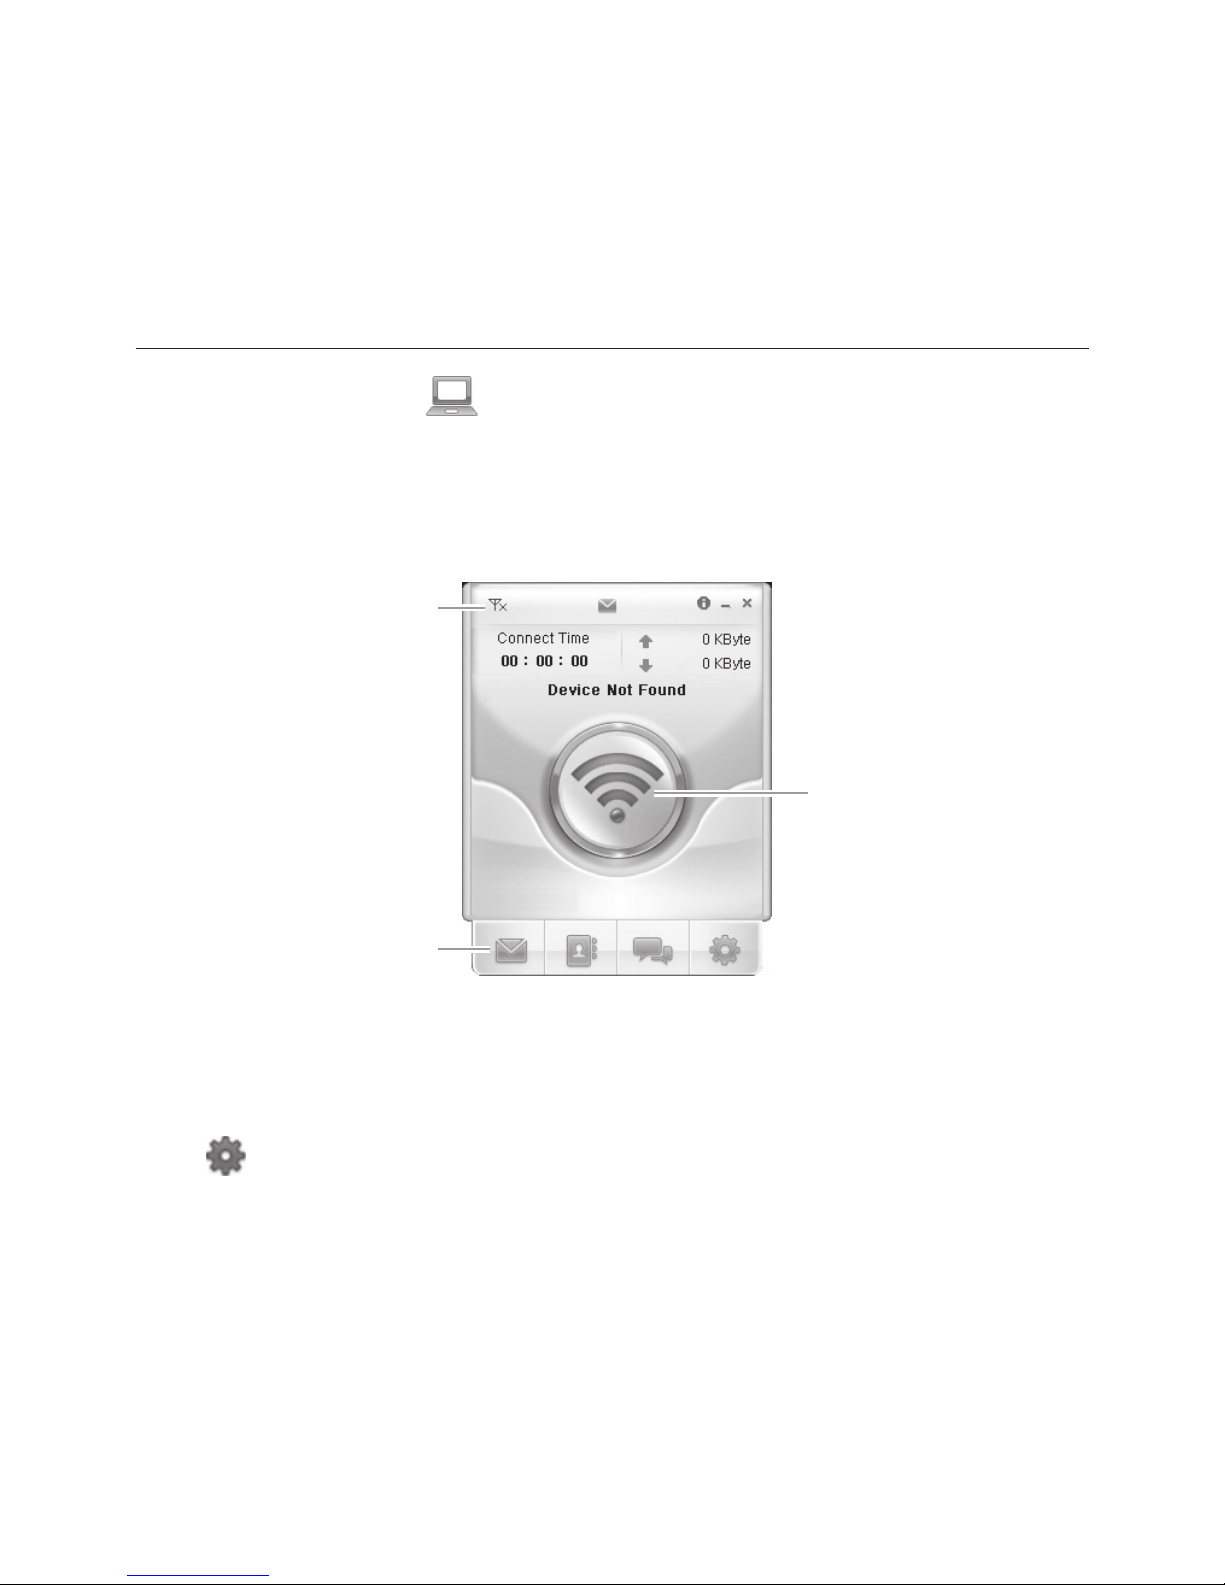
Run the connection manager program
Double-click the 1. icon on the desktop.
Select a service provider from the pop-up window if you run this 2.
program for the rst time.
The main window of the connection manager opens.
Notication area
Application launcher
Internet connection
button
You can view the connection time and the amount of data send and
received from/to your Computer.
For more information about using the connection manager program,
click
and select [Help].
25
English
Connect to the mobile broadband
From the connection manager window, click the button at the
centre. You can check the currently connected network, connection
time and its status.
To end the connection with the mobile broadband, click the
button again.
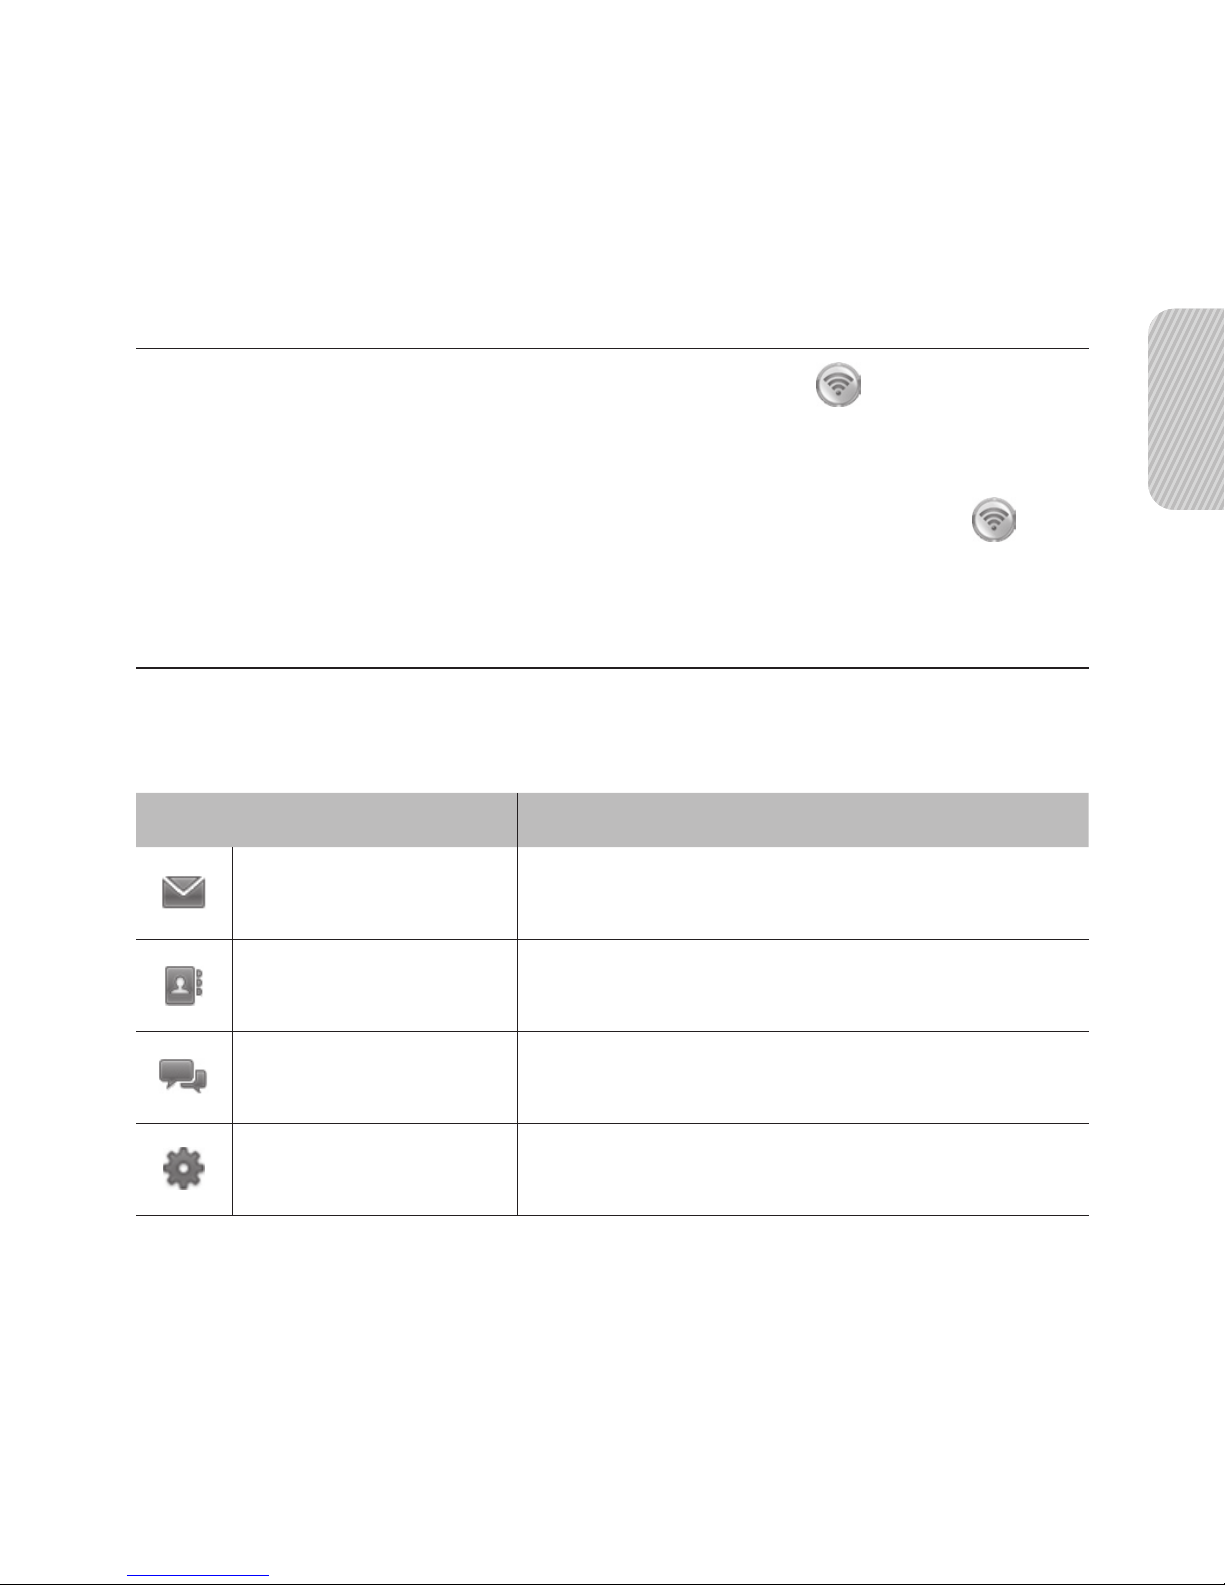
Use the application launcher
Using the application launcher, you can manage messages and
contacts, and use the instant messenger.
Application launcher Function
Message
manager
Manage messages saved in your SIM
card or on a Computer.
Phonebook
manager
Manage contacts saved in your SIM
card or on a Computer.
Messenger
manager
Send instant messages and view
received instant messages.
Settings and help
Customise settings for your modem
and view the help information.

26
customising your
modem
Get more from your modem by customising it to match your
preferences.
Set general settings
From the connection manager window, click 1. and select
[Settings].
Select the options you want and click [OK].2.
Enable or disable the SIM PIN
You can secure access to the connection manager program by
enabling the PIN (Personal Identication Number). You must enter
the PIN to use the connection manager program when the SIM PIN
is enabled.

27
English
From the connection manager window, click 1. and select
[Settings].
Click [SIM PIN Settings] → [Use PIN] or [Don’t Use PIN].2.
Enter the current PIN and click [OK].3.
Click [OK] to conrm.4.
Change the PIN
You can change the PIN that is used to enable or disable the SIM
PIN.
From the connection manager window, click 1.
and select
[Settings].
Click the [SIM PIN Settings] → [Change PIN].2.
Enter the current PIN in current PIN.3.
Enter a new PIN in modied PIN.4.
Enter the new PIN again and click [OK].5.
Click [OK] to conrm.6.
If you enter an incorrect PIN three times, the SIM card will
become blocked. To unlock it, you need to enter your PUK
(Personal Unblocking Key). The codes are supplied by your
service provider.
 Loading...