

Page 1

PORTABLE ALL DIGITAL
SMART PHONE
User Manual
Please read this manual before operating your
phone, and keep it for future reference.
Page 2

Intellectual Property
All Intellectual Property, as defined below, owned by or which is otherwise the property of Samsung or its respective suppliers relating to
the SAMSUNG Phone, including but not limited to, accessories, parts, or software relating there to (the “Phone System”), is proprietary to
Samsung and protected under federal laws, state laws, and international treaty provisions. Intellectual Property includes, but is not limited
to, inventions (patentable or unpatentable), patents, trade secrets, copyrights, software, computer programs, and related documentation
and other works of authorship. You may not infringe or otherwise violate the rights secured by the Intellectual Property. Moreover, you
agree that you will not (and will not attempt to) modify, prepare derivative works of, reverse engineer, decompile, disassemble, or
otherwise attempt to create source code from the software. No title to or ownership in the Intellectual Property is transferred to you. All
applicable rights of the Intellectual Property shall remain with SAMSUNG and its suppliers.
Samsung Telecommunications America (STA), LLC
Headquarters:
1301 E. Lookout Drive
Richardson, TX 75082
Toll Free Tel:
Customer Care Center:
1000 Klein Rd.
Plano, TX 75074
1.888.987.HELP (4357)
Internet Address:
©2011 Samsung Telecommunications America, LLC is a registered trademark of Samsung Electronics America, Inc. and its related
entities.
Do you have questions about your Samsung Mobile Phone?
For 24 hour information and assistance, we offer a new FAQ/ARS System (Automated Response System) at:
www.samsungtelecom.com/support
http://www.samsungusa.com
GEN_SCH-I100MR_Gem_English_UM_EF29_MM_070811_F5
Page 3

GH68-34975A
Printed in Korea
The Bluetooth® word mark, figure mark (stylized “B Design”), and combination mark (Bluetooth word mark and “B Design”) are registered
trademarks and are wholly owned by the Bluetooth SIG.
Nuance®, VSuite™, T9® Text Input, and the Nuance logo are trademarks or registered trademarks of Nuance Communications, Inc., or its
affiliates in the United States and/or other countries.
microSD™, microSDHC™ and the microSD logo are Trademarks of the SD Card Association.
Swype® and the Swype logos are registered trademarks of Swype, Inc.
Google, the Google logo, Google Maps, Gmail, Google Talk, YouTube, Picasa, Android, and the Android Market are trademarks of
Google, Inc.
Yah oo !® Finance and its abbreviation (Y! Finance) is a registered trademark of Yahoo! Inc.
AccuWeather® and AccuWeather.com® are registered trademarks of AccuWeather Inc.
Wi-Fi® is a Certification Mark of the Wireless Fidelity Alliance, Inc.
Samsung Telecommunications America, LLC, Samsung®, and Gem are trademarks of Samsung Electronics Co., Ltd. and/or its related
entities.
All product and brand names are trademarks or registered trademarks of their respective companies.
Screen images simulated. Appearance of the phone may vary.
Open Source Software
Some software components of this product incorporate source code covered under GNU General Public License (GPL), GNU Lesser General
Public License (LGPL), OpenSSL License, BSD License and other open source licenses. To obtain the source code covered under the open
source licenses, please visit:
http://opensource.samsung.com
.
Page 4

Disclaimer of Warranties; Exclusion of Liability
EXCEPT AS SET FORTH IN THE EXPRESS WARRANTY CONTAINED ON THE WARRANTY PAGE ENCLOSED WITH THE PRODUCT, THE
PURCHASER TAKES THE PRODUCT "AS IS", AND SAMSUNG MAKES NO EXPRESS OR IMPLIED WARRANTY OF ANY KIND WHATSOEVER
WITH RESPECT TO THE PRODUCT, INCLUDING BUT NOT LIMITED TO THE MERCHANTABILITY OF THE PRODUCT OR ITS FITNESS FOR ANY
PARTICULAR PURPOSE OR USE; THE DESIGN, CONDITION OR QUALITY OF THE PRODUCT; THE PERFORMANCE OF THE PRODUCT; THE
WORKMANSHIP OF THE PRODUCT OR THE COMPONENTS CONTAINED THEREIN; OR COMPLIANCE OF THE PRODUCT WITH THE
REQUIREMENTS OF ANY LAW, RULE, SPECIFICATION OR CONTRACT PERTAINING THERETO. NOTHING CONTAINED IN THE INSTRUCTION
MANUAL SHALL BE CONSTRUED TO CREATE AN EXPRESS OR IMPLIED WARRANTY OF ANY KIND WHATSOEVER WITH RESPECT TO THE
PRODUCT. IN ADDITION, SAMSUNG SHALL NOT BE LIABLE FOR ANY DAMAGES OF ANY KIND RESULTING FROM THE PURCHASE OR USE OF
THE PRODUCT OR ARISING FROM THE BREACH OF THE EXPRESS WARRANTY, INCLUDING INCIDENTAL, SPECIAL OR CONSEQUENTIAL
DAMAGES, OR LOSS OF ANTICIPATED PROFITS OR BENEFITS.
Page 5

Table of Contents
Section 1: Getting Started ..............................................4
Understanding this User Manual . . . . . . . . . . . . . . . . . . . . . . . . 4
Activating your Phone . . . . . . . . . . . . . . . . . . . . . . . . . . . . . . . 5
Displaying Your Phone Number . . . . . . . . . . . . . . . . . . . . . . . . 5
Battery . . . . . . . . . . . . . . . . . . . . . . . . . . . . . . . . . . . . . . . . . . . 5
Turning Your Phone On and Off . . . . . . . . . . . . . . . . . . . . . . . . 9
Your Google Account . . . . . . . . . . . . . . . . . . . . . . . . . . . . . . . . 9
System Tutorial . . . . . . . . . . . . . . . . . . . . . . . . . . . . . . . . . . . . 9
Voicemail . . . . . . . . . . . . . . . . . . . . . . . . . . . . . . . . . . . . . . . . 10
TTY Mode . . . . . . . . . . . . . . . . . . . . . . . . . . . . . . . . . . . . . . . 10
Roaming . . . . . . . . . . . . . . . . . . . . . . . . . . . . . . . . . . . . . . . . 11
Memory Card . . . . . . . . . . . . . . . . . . . . . . . . . . . . . . . . . . . . . 11
Securing Your Phone . . . . . . . . . . . . . . . . . . . . . . . . . . . . . . . 12
Section 2: Understanding Your Phone ......................... 13
Features . . . . . . . . . . . . . . . . . . . . . . . . . . . . . . . . . . . . . . . . 13
Front View . . . . . . . . . . . . . . . . . . . . . . . . . . . . . . . . . . . . . . . 14
Side Views . . . . . . . . . . . . . . . . . . . . . . . . . . . . . . . . . . . . . . . 15
Back View . . . . . . . . . . . . . . . . . . . . . . . . . . . . . . . . . . . . . . . 16
Touch Screen Display . . . . . . . . . . . . . . . . . . . . . . . . . . . . . . 17
Navigation . . . . . . . . . . . . . . . . . . . . . . . . . . . . . . . . . . . . . . . 19
Notification Panel . . . . . . . . . . . . . . . . . . . . . . . . . . . . . . . . . . 21
Home Screen . . . . . . . . . . . . . . . . . . . . . . . . . . . . . . . . . . . . . 21
Widgets . . . . . . . . . . . . . . . . . . . . . . . . . . . . . . . . . . . . . . . . . 24
Folders . . . . . . . . . . . . . . . . . . . . . . . . . . . . . . . . . . . . . . . . . 25
Wallpaper . . . . . . . . . . . . . . . . . . . . . . . . . . . . . . . . . . . . . . . 26
Applications . . . . . . . . . . . . . . . . . . . . . . . . . . . . . . . . . . . . . . 26
Your Phone’s Modes . . . . . . . . . . . . . . . . . . . . . . . . . . . . . . . 27
Entering Text . . . . . . . . . . . . . . . . . . . . . . . . . . . . . . . . . . . . . 31
Section 3: Call Functions ............................................. 32
Making a Call . . . . . . . . . . . . . . . . . . . . . . . . . . . . . . . . . . . . 32
Call Progress Screen . . . . . . . . . . . . . . . . . . . . . . . . . . . . . . . 35
Answering a Call . . . . . . . . . . . . . . . . . . . . . . . . . . . . . . . . . . 36
Ignoring a Call . . . . . . . . . . . . . . . . . . . . . . . . . . . . . . . . . . . . 36
Adjusting the Call Volume . . . . . . . . . . . . . . . . . . . . . . . . . . . 36
Call Waiting . . . . . . . . . . . . . . . . . . . . . . . . . . . . . . . . . . . . . . 36
Three Way Calling . . . . . . . . . . . . . . . . . . . . . . . . . . . . . . . . . 37
Call Log . . . . . . . . . . . . . . . . . . . . . . . . . . . . . . . . . . . . . . . . . 37
Roaming . . . . . . . . . . . . . . . . . . . . . . . . . . . . . . . . . . . . . . . . 38
Section 4: Contacts List ............................................... 39
Your Contacts List . . . . . . . . . . . . . . . . . . . . . . . . . . . . . . . . . 39
Launching the Contacts List . . . . . . . . . . . . . . . . . . . . . . . . . . 39
Adding a New Contact . . . . . . . . . . . . . . . . . . . . . . . . . . . . . . 40
Contact Options Menu . . . . . . . . . . . . . . . . . . . . . . . . . . . . . . 43
Searching for a Contact . . . . . . . . . . . . . . . . . . . . . . . . . . . . . 43
Editing an Existing Contact . . . . . . . . . . . . . . . . . . . . . . . . . . 44
Favorites . . . . . . . . . . . . . . . . . . . . . . . . . . . . . . . . . . . . . . . . 46
Deleting a Contact . . . . . . . . . . . . . . . . . . . . . . . . . . . . . . . . . 47
Sending a Contacts Entry . . . . . . . . . . . . . . . . . . . . . . . . . . . . 47
1
Page 6

Section 5: Entering Text ...............................................48
Virtual QWERTY Keyboard . . . . . . . . . . . . . . . . . . . . . . . . . . . . 48
Entering Text Using the Android Keyboard . . . . . . . . . . . . . . . 48
Section 6: Messaging ...................................................50
Types of Messages . . . . . . . . . . . . . . . . . . . . . . . . . . . . . . . . . 50
Sending Messages . . . . . . . . . . . . . . . . . . . . . . . . . . . . . . . . .50
Retrieving a Message . . . . . . . . . . . . . . . . . . . . . . . . . . . . . . .51
Changing Messaging Settings . . . . . . . . . . . . . . . . . . . . . . . . . 52
Accessing Email . . . . . . . . . . . . . . . . . . . . . . . . . . . . . . . . . . .52
Section 7: Camera–Camcorder ....................................56
Taking Pictures and Videos . . . . . . . . . . . . . . . . . . . . . . . . . . . 56
Screen Layout . . . . . . . . . . . . . . . . . . . . . . . . . . . . . . . . . . . .59
Camera-Camcorder Settings . . . . . . . . . . . . . . . . . . . . . . . . . . 60
Gallery . . . . . . . . . . . . . . . . . . . . . . . . . . . . . . . . . . . . . . . . . . 60
Section 8: Playing Music and Videos ...........................63
Loading Media Files . . . . . . . . . . . . . . . . . . . . . . . . . . . . . . . . 63
Playing Your Media Files . . . . . . . . . . . . . . . . . . . . . . . . . . . . . 64
Section 9: Apps (Applications) ....................................65
Google Apps . . . . . . . . . . . . . . . . . . . . . . . . . . . . . . . . . . . . . . 65
Launching an App . . . . . . . . . . . . . . . . . . . . . . . . . . . . . . . . . 66
Available Apps . . . . . . . . . . . . . . . . . . . . . . . . . . . . . . . . . . . . 66
Accessing Apps Directly . . . . . . . . . . . . . . . . . . . . . . . . . . . . . 68
Section 10: Connections ..............................................69
Accessing Wireless & network settings . . . . . . . . . . . . . . . . . . 69
Wi-Fi . . . . . . . . . . . . . . . . . . . . . . . . . . . . . . . . . . . . . . . . . . .69
Bluetooth . . . . . . . . . . . . . . . . . . . . . . . . . . . . . . . . . . . . . . . . 70
2
Mobile AP . . . . . . . . . . . . . . . . . . . . . . . . . . . . . . . . . . . . . . . . 73
VPN . . . . . . . . . . . . . . . . . . . . . . . . . . . . . . . . . . . . . . . . . . . . 75
Mobile networks . . . . . . . . . . . . . . . . . . . . . . . . . . . . . . . . . . 75
Dial Up Networking . . . . . . . . . . . . . . . . . . . . . . . . . . . . . . . . 76
Section 11: Web and Social Networking ..................... 77
YouTube . . . . . . . . . . . . . . . . . . . . . . . . . . . . . . . . . . . . . . . . . 77
Voice Search . . . . . . . . . . . . . . . . . . . . . . . . . . . . . . . . . . . . . 77
Browser . . . . . . . . . . . . . . . . . . . . . . . . . . . . . . . . . . . . . . . . . 77
Maps . . . . . . . . . . . . . . . . . . . . . . . . . . . . . . . . . . . . . . . . . . . 82
Section 12: Changing Your Phone’s Settings .............. 84
Accessing the Settings Menu . . . . . . . . . . . . . . . . . . . . . . . . . 84
Wireless & networks Settings . . . . . . . . . . . . . . . . . . . . . . . . . 84
Call Settings . . . . . . . . . . . . . . . . . . . . . . . . . . . . . . . . . . . . . . 84
Sound settings . . . . . . . . . . . . . . . . . . . . . . . . . . . . . . . . . . . . 85
Display settings . . . . . . . . . . . . . . . . . . . . . . . . . . . . . . . . . . . 86
Location & security settings . . . . . . . . . . . . . . . . . . . . . . . . . . 87
Applications settings . . . . . . . . . . . . . . . . . . . . . . . . . . . . . . . 89
Accounts & sync settings . . . . . . . . . . . . . . . . . . . . . . . . . . . . 89
Privacy settings . . . . . . . . . . . . . . . . . . . . . . . . . . . . . . . . . . . 90
SD card & phone storage settings . . . . . . . . . . . . . . . . . . . . . 90
Language & keyboard . . . . . . . . . . . . . . . . . . . . . . . . . . . . . . 92
Voice input &output settings . . . . . . . . . . . . . . . . . . . . . . . . . . 94
Accessibility settings . . . . . . . . . . . . . . . . . . . . . . . . . . . . . . . 94
Date & time settings . . . . . . . . . . . . . . . . . . . . . . . . . . . . . . . . 94
About phone . . . . . . . . . . . . . . . . . . . . . . . . . . . . . . . . . . . . . . 95
Page 7

Section 13: Health and Safety Information .................96
Exposure to Radio Frequency (RF) Signals . . . . . . . . . . . . . . . 96
Specific Absorption Rate (SAR) Certification Information . . . . 100
Smart Practices While Driving . . . . . . . . . . . . . . . . . . . . . . . 101
Battery Use and Safety . . . . . . . . . . . . . . . . . . . . . . . . . . . . . 103
Samsung Mobile Products and Recycling . . . . . . . . . . . . . . . 104
UL Certified Travel Charger . . . . . . . . . . . . . . . . . . . . . . . . . 105
Display / Touch-Screen . . . . . . . . . . . . . . . . . . . . . . . . . . . . 105
GPS & AGPS . . . . . . . . . . . . . . . . . . . . . . . . . . . . . . . . . . . . . 106
Emergency Calls . . . . . . . . . . . . . . . . . . . . . . . . . . . . . . . . . 107
Care and Maintenance . . . . . . . . . . . . . . . . . . . . . . . . . . . . . 107
Responsible Listening . . . . . . . . . . . . . . . . . . . . . . . . . . . . . 108
Operating Environment . . . . . . . . . . . . . . . . . . . . . . . . . . . . . 110
FCC Hearing Aid Compatibility (HAC) Regulations for
Wireless Devices . . . . . . . . . . . . . . . . . . . . . . . . . . . . . . . 112
Restricting Children's Access to Your Mobile Device . . . . . . . 113
FCC Notice and Cautions . . . . . . . . . . . . . . . . . . . . . . . . . . . 114
Other Important Safety Information . . . . . . . . . . . . . . . . . . . 114
Section 14: Warranty Information .............................115
Standard Limited Warranty . . . . . . . . . . . . . . . . . . . . . . . . . . 115
End User License Agreement for Software . . . . . . . . . . . . . . 119
Index ............................................................................124
3
Page 8

Section 1: Getting Started
This section helps you to start using your Samsung SCH-i100
phone quickly by installing and charging the battery, activating
your service, and setting up your voicemail.
Understanding this User Manual
The sections of this manual generally follow the features of your
i100 phone. A robust index of features begins on page 124.
Also included is important safety information that you should
know before using your phone. Most of this information is near
the back of the guide, beginning on page 96.
This manual gives navigation instructions according to the
default display settings. If you select other settings, navigation
may be different.
Unless otherwise specified, all instructions in this manual
assume that you are starting from the Home screen, and using
the external keys. To get to the Home screen, you may need to
unlock the phone or keypad. (For more information, refer to
“Lock Mode” on page 28.)
4
Note:
Instructions in this manual are based on default settings, and may vary
from your phone, depending on the software version on your phone,
and any changes to the phone’s Settings.
Unless stated otherwise, instructions in this User Manual start with the
phone unlocked, at the Home screen.
All screen images in this manual are simulated. Actual displays may
vary, depending on the software version of your phone and any
changes to the phone’s Settings.
Notes and Tips
Throughout this manual, you’ll find text that is set apart from the
rest. These are intended to point out important information, share
quick methods for activating features, to define terms, and more.
The definitions for these methods are as follows:
•
Notes
: Presents alternative options for the current feature, menu, or
sub-menu.
•
Tips
: Provides quick or innovative methods, or useful shortcuts.
•
Important
: Points out important information about the current feature
that could affect performance.
•
Warning
: Brings to your attention important information to prevent
loss of data or functionality, or even prevent damage to your phone.
Page 9
Text Conventions
This manual provides condensed information about how to use
your phone. To make this possible, the following text conventions
are used to represent often-used steps:
➔
Arrows are used to represent the sequence of
selecting successive options in longer, or
repetitive, procedures.
Example:
“From the Home screen, press the Menu Key
Settings ➔ Wireless & networks ➔ Wi-Fi settings
, then touch
.”
Activating your Phone
Displaying Your Phone Number
Your can display the ten-digit phone number assigned to your
phone.
䊳
From the Home screen, press , then touch
About phone ➔
Phone number
Status
. Your phone number appears under
.
Settings ➔
Battery
Your phone is powered by a rechargeable, standard Li-Ion
battery. A Wall/USB Charger (Charging Head and USB cable) are
included with the phone, for charging the battery.
Note:
The battery comes partially charged. You must fully charge the battery
before using your phone for the first time. A fully discharged battery
requires up to 4 hours of charge time.
After the first charge, you can use the phone while charging.
Warning!:
Use only Samsung-approved charging devices and batteries.
Samsung accessories are designed to maximize battery life. Using
other accessories may invalidate your warranty and may cause
damage.
Battery Indicator
The battery icon in the annunciator line shows battery
power level. Two to three minutes before the battery becomes
too low to operate, the empty battery icon will flash and a tone
will sound. If you continue to operate the phone without charging,
the phone will power off.
Getting Started 5
Page 10
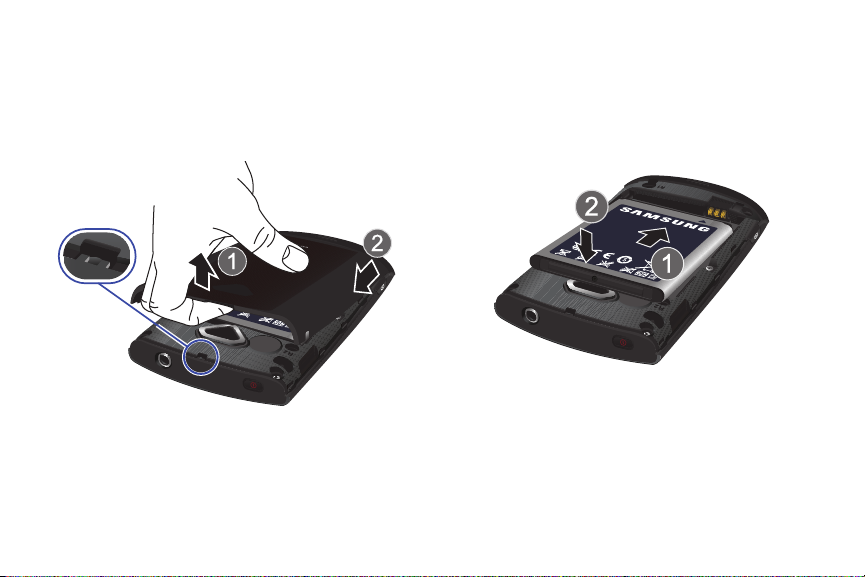
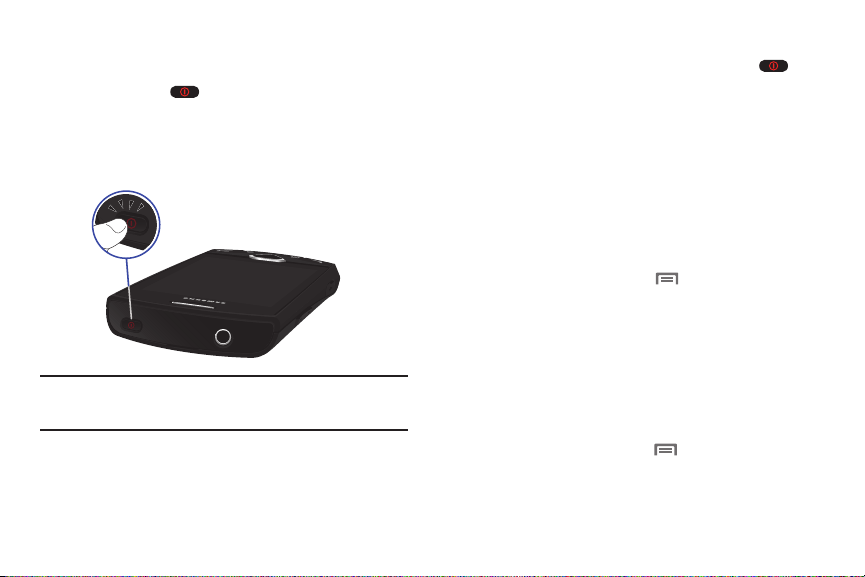
Battery Cover
The battery is under a removable cover on the back of the phone.
Removing the battery cover
䊳
Pull up using the slot provided (1), while lifting the cover off
the phone (2).
Installing the battery cover
䊳
Align the cover and press it firmly into place, being sure it
snaps into place at the corners.
6
Installing the Battery
1. Remove the battery cover.
2. Insert battery into the phone housing, aligning the gold
contacts on the battery with the gold contacts in the
phone. Push down on the bottom of the battery until it
snaps into place.
3. Install the battery cover.
Page 11
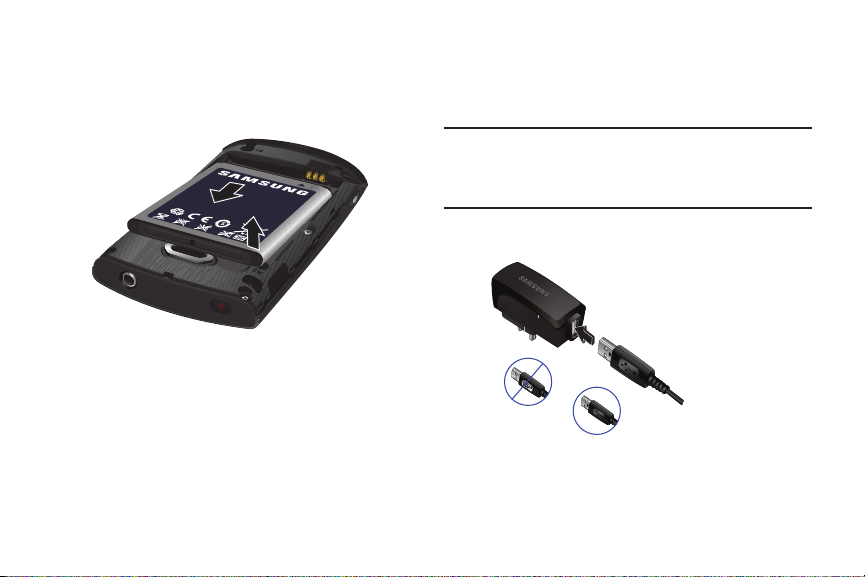
Removing the Battery
1. Remove the battery cover. For more information, see
“Removing the battery cover” on page 6.
2. Lift the battery up by the slot provided.
Charging the Battery
Your phone comes with a Wall/USB Charger (Charging Head and
USB cable) to rapidly charge your phone from any 120/220 VAC
outlet.
Note:
The battery comes partially charged. You must fully charge the battery
before using your phone for the first time. A fully discharged battery
requires up to 4 hours of charge time.
After the first charge, you can use the phone while charging.
1. Connect the USB cable to the charging head.
Charging Head
3. Lift the battery up and out of the phone.
USB Cable
Incorrect
Correct
Getting Started 7
Page 12
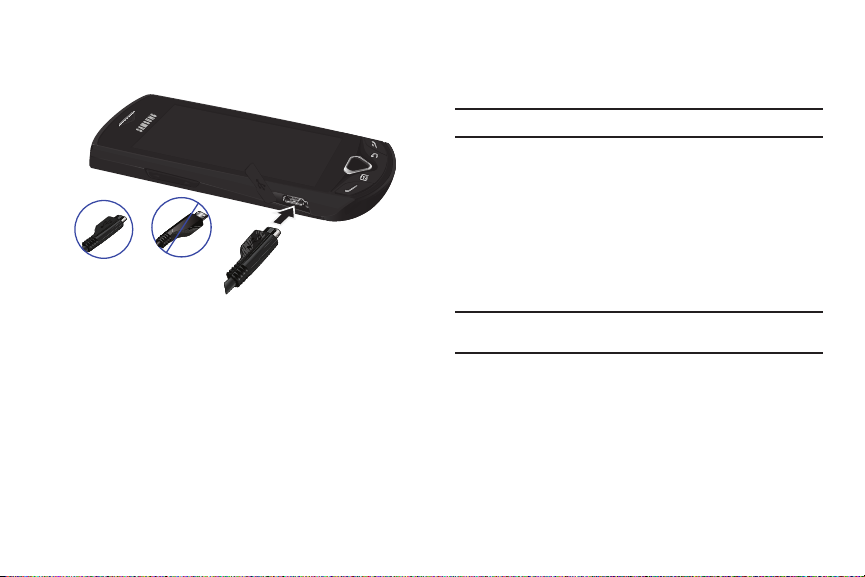
Incorrect
Correct
2.
Pull the connector cover out and turn to expose the
connector.
3. Insert the USB cable into the port.
4. Plug the charging head into a standard AC power outlet.
5. When charging is complete, unplug the charging head
from the power outlet and remove the USB cable from the
phone.
8
Non-Supported Batteries
Samsung handsets do not support the use of non-approved
batteries.
Important!:
Using a non-supported battery may damage to your phone.
When using a non-supported battery you will hear a series of
beeps and see a warning message:
“
NON-SUPPORTED BATTERY. SEE USER MANUAL
”
If you receive this warning, battery charging has been disabled.
Samsung charging accessories, such as the charging head and
cigarette lighter adapter, will only charge Samsung-approved
batteries.
Note:
When using a non-supported battery, the phone can only be used for
the duration of the life of the battery and cannot be recharged.
Page 13
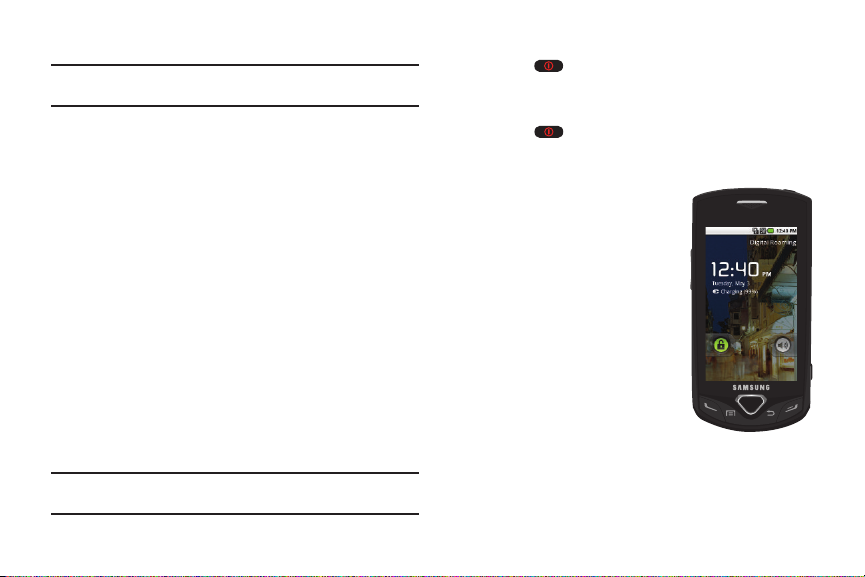
Turning Your Phone On and Off
Turning Your Phone On
䊳
Press and hold for three seconds.
While powering on, the phone connects with the network,
then displays the Home screen and active alerts.
You are now ready to place and receive calls.
Note:
Your phone’s internal antenna is located along the bottom back of the
phone. Do not block the antenna; doing so may affect call quality or
cause the phone to operate at a higher power level than is necessary.
Turning Your Phone Off
1. With the phone on and unlocked, press and hold for
two seconds. The Phone options menu displays.
2. At the prompt, touch
Power off
and confirm.
Your Google Account
Your new phone uses your Google account to fully utilize its
Android features, including Gmail, Google Maps, Google Talk and
the Android Market. When you turn on your phone for the first
time, set up a connection with your existing Google account, or
create a new Google account.
To create and/or link your Google account to your phone:
1. From the Home screen, press , then touch
Settings➔Accounts & sync
2. At the bottom of the screen, touch
.
Add account
, then follow
the screen prompts to create and/or link your Google
account to your phone.
System Tutorial
Learn about important concepts to get the most out of your
phone.
䊳
From the Home screen, press , then touch
About phone ➔ System tutorial
.
Settings
Getting Started 9
➔
Page 14
Voicemail
All unanswered calls to your phone are sent to voicemail, even if
your phone is turned off, so you’ll want to set up your voicemail
and personal greeting as soon as you activate your phone.
Voicemail allows callers to leave voice messages, which can be
retrieved any time.
Dial Voicemail
1. From the Home screen, touch the
Phone
screen appears in the display.
2. Touch the Voicemail icon ( ).
Phone
icon ( ). The
– or –
Touch and hold or dial your own mobile number
and press the Send key ( ). For more information,
refer to “Manual Digit Dialing” on page 32.
3. Follow the prompts in the new user tutorial to setup your
voice mail box.
10
Listen to Voicemail
1. From the Home screen, touch the
2. Touch the Voicemail icon ( ).
Phone
icon ( ).
– or –
Touch and hold or dial your own mobile number
and press the Send key ( ). For more information,
refer to “Manual Digit Dialing” on page 32.
3. You are prompted to enter your password.
4. Follow the prompts in to listen to the voice messages in
your voice mail box.
TTY Mode
Your phone is fully TTY-compatible, allowing you to connect a
TTY device to the phone’s headset jack. Before you can use your
phone with a TTY device, you’ll need to enable TTY Mode. For
more information, see “TTY” on page 84.
Page 15
Roaming
When you travel outside your home network’s coverage area,
your phone can roam to acquire service on other compatible
digital networks. When Roaming is active, the Roaming icon
appears in the Annunciator Line of the display.
Tip:
You can set your phone’s roaming behavior. For more information, refer
to “Wireless & networks Settings” on page 84.
During roaming, some services may not be available. Depending
on your coverage area and service plan, extra charges may apply
when making or receiving call.
Note:
Contact your Wireless Provider for more information about your
coverage area and service plan.
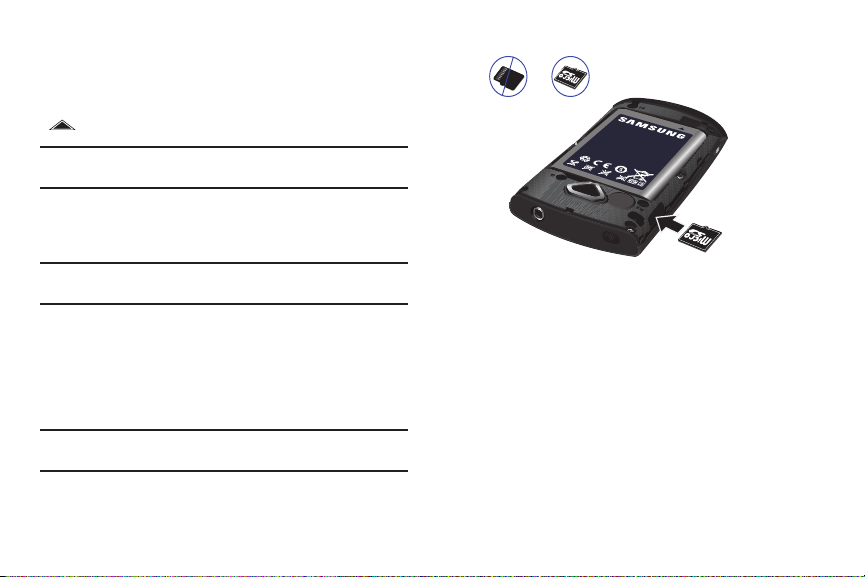
Memory Card
Your phone supports optional, removable microSD™ or
microSDHC™ memory cards of up to 32GB capacity, for storage
of music, pictures, and other files. For more information, refer to
“SD card” on page 90.
Note:
You can only store music files that you own (from a CD or purchased
with the phone) on a memory card.
Incorrect Correct
Installing a Memory Card
1. Remove the battery cover. For more information, see
“Removing the battery cover” on page 6.
2. Locate the memory card slot and orient the memory card
so the gold contacts are facing down.
3. Carefully insert the memory card into the slot and push it in
until it clicks into place.
4. Replace the battery cover.
Getting Started 11
Page 16
Removing a Memo r y Car d
Important!:
To prevent damage to information stored on the memory card,
unmount the card before removing it from the phone.
1. Unmount the memory card. For more information, refer to
“Unmount / Mount SD card” on page 90
2. Remove the battery cover. For more information, see
“Removing the battery cover” on page 6.
3. Gently press on the memory card, then release, so that it
pops out from the slot.
4. Carefully pull the card out of the slot.
5. Replace the rear cover.
Securing Your Phone
By default, the phone locks automatically when the backlight
goes off, or you can lock it manually. For increased security, use
a personal screen unlock pattern.
For more information about creating and enabling a Personal
Screen Unlock Pattern, see “Screen unlock” on page 87.
For other settings related to securing your phone, see “Location
& security settings” on page 87.
Note:
Unless stated otherwise, instructions in this User Manual start with the
phone unlocked, at the Home screen.
12
Locking the phone manually
䊳
Press on the top of the phone. The display becomes
dark when locked.
Unlocking the phone
1. Press to wake the screen. The last screen you
viewed displays with the Lock/Unlock icon and the Sound
On/Off icon.
2. To unlock the phone, touch
and slide the unlock icon to
the right.
Page 17

Section 2: Understanding Your Phone
9This section outlines key features of your phone, including keys,
displays, and icons.
Features
•
3.2-inch WQVGA full-color touch screen
•
CDMA 1X/EVDO Rev. A Wireless Technology
•
Android platform
•
Full integration with Google applications, including Google Search,
Google Maps, Google Talk and Gmail
•
Android Market, plus pre-loaded applications
•
Support for Wi-Fi 802.11 b/g
•
Music Player, supporting MP3, AAC, AAC+ and WMA9 formats
•
Messaging Services
–
Text Messaging
–
Picture Messaging
–
Video Messaging
–
Voice Messaging
–
Email
–
Chat
•
3.2 Megapixel CMOS Camera/Camcorder
•
Speakerphone
•
Support for microSD™ and microSDHC™ Memory Cards (up to 32GB
capacity)
•
Bluetooth® 2.1 + EDR Wireless Technology. For more information
about supported profiles, see
“Bluetooth”
on page 70.
Understanding Your Phone 13
Page 18
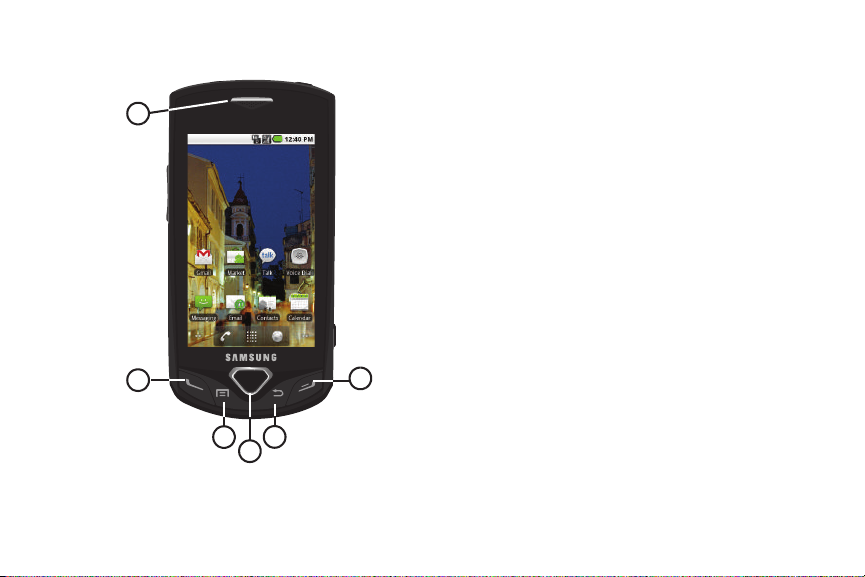
Front View
1
2
3
4
5
6
1.
Earpiece
: Lets you hear ringing and alert tones, alarm
tones, and the other parties to calls.
2.
Send Key
: Press to place or answer a call. From the Home
screen, press to access the Phone screen. From the Home
screen, press and hold to dial the last number you dialed.
While on a call, press to answer a new incoming call, then
press to switch back to the first call.
3.
Menu Key
: Press to display options for the current screen.
Press and hold at any time to launch Quick Search.
4.
Home Key
: Press to display the Home screen. Press and
hold to display the recent application list.
5.
Back Key
: Press to return to the previous screen or option.
6.
End Key
: Press to end a call. Press to send an incoming call
to Voicemail.
14
Page 19

Side Views
1
2
3
4
1.
Volume Key
: From the Home screen, press to adjust Ringer
Volume. During calls or music playback, press to adjust
volume. Press to mute the ringtone of an incoming call.
2.
USB Power/Accessory Port
: Plug in a USB cable for
charging or to sync music and files.
3.
Camera Key
: Press and hold to activate the camera. While
in Camera mode, press to take a picture.
4.
Strap holder
included). Remove the battery cover to install a strap
holder.
: Attach an optional carrying strap (not
Understanding Your Phone 15
Page 20
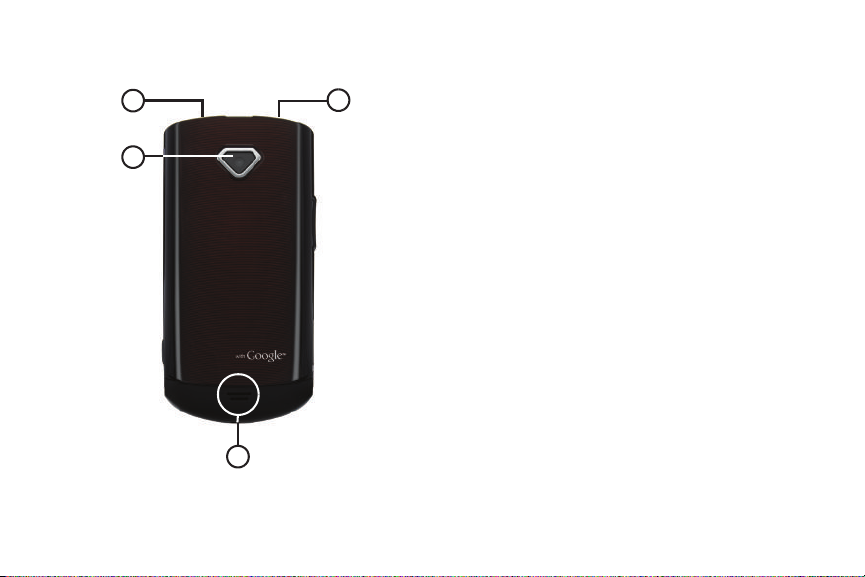
Back View
2
1
3
4
1.
Power/Lock Key
: Press and hold to turn the phone on or off.
Press to lock the phone, or to wake the screen for
unlocking.
2.
Camera lens
3.
External Speaker
: Used when taking photos or recording videos.
: Listen to ringers, music and other
sounds.
4.
3.5mm Headset Jack
equipment.
: Plug in an optional headset or TTY
16
Page 21
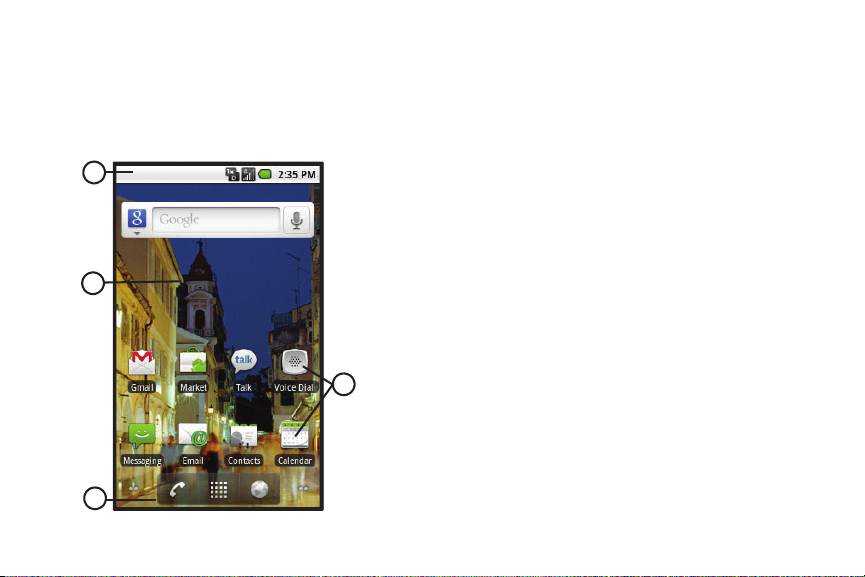
Touch Screen Display
1
3
4
2
Your phone’s display is the interface to its features. With the
phone in the upright position, the display defaults to Portrait
mode.
Portrait Mode
1.
Annunciator Line
: Presents icons to show network status,
battery power, and connection details. For a list of icons,
see “Annunciator Line” on page 18.
2.
Home screen
: The starting point for using your phone.
Place icons, widgets and other items to customize your
phone to your needs. For more information, see “Home
Screen” on page 21.
3.
Primary Shortcuts
: Shortcuts to your phone’s common
features. For more information, see “Primary Shortcuts”
on page 20.
4.
Shortcuts
: Shortcuts to common applications.These
shortcuts are found on the Home screen by default. For
more information, see “Shortcuts” on page 23.
Understanding Your Phone 17
Page 22
Landscape Mode
1
Some of your phone’s screens automatically rotate when you
hold your phone on it’s side. As shown, the
such screen.
Messaging
and
Email
Settings
are two more.
menu is one
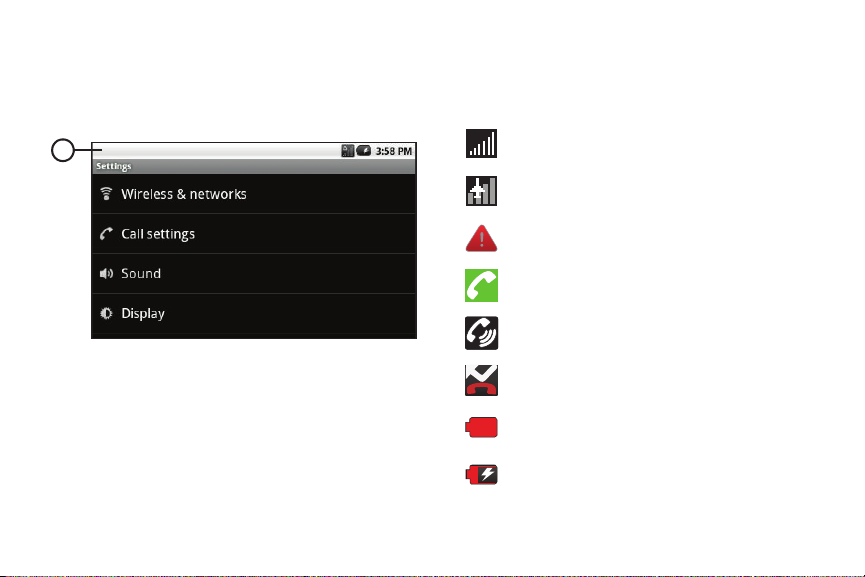
Annunciator Line
The Annunciator line displays icons to show network status,
battery power, and other details.
Signal Strength
: Current signal strength. The greater
the number of bars, the stronger the signal.
Airplane Mode Active
: All wireless communications
are disabled.
1.
Annunciator Line
battery power, and connection details. For a list of icons,
: Presents icons to show network status,
see “Annunciator Line” on page 18.
Display settings
You can customize display settings to your preferences. For more
information, see “Display settings” on page 86.
18
System Alert
Voice Call
Speakerphone
Missed Call
Battery Level
: Check Notifications Panel for alerts.
: A voice call is in progress.
: Speakerphone is enabled.
: Displays when there is a missed call.
: Shown fully charged.
Charging Indicator
: Battery is charging.
Page 23
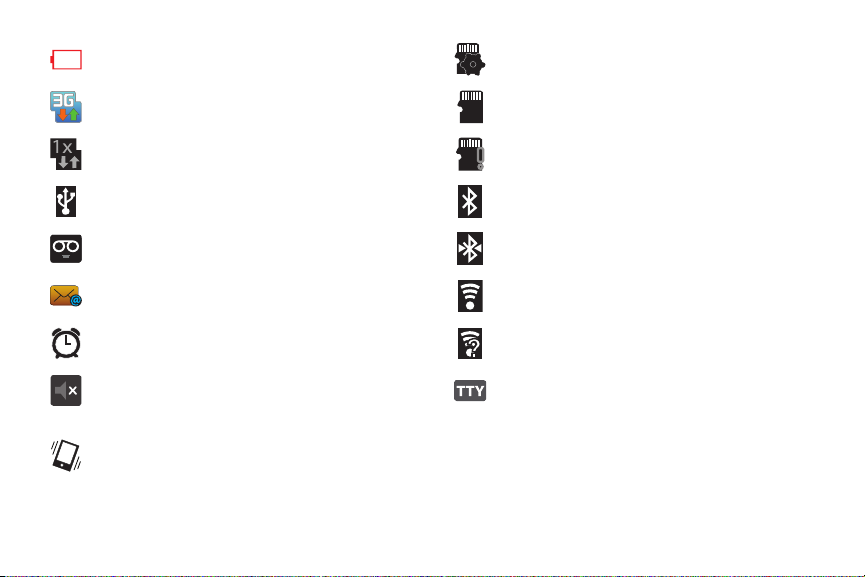
Device Power Critical
: Battery has only three percent
power remaining. Charge immediately.
3G Connection Active
1X Connection Active
USB Connected
: Phone is active on a 3G system.
: Phone is active on a 1X system.
:The phone is connected to a computer
using a USB cable.
New Voicemail
New Email Message
Alarm Set
Silent mode
silenced, and
: You have new voicemail.
: You have new email.
: An alarm is active.
: All sounds except media and alarms are
Vibrate
is set to Never or Only when not
in Silent mode. See “Silent mode” on page 85.
Vibrate mode
: All sounds are silenced, and
Vibrate
set to Always or Only in Silent mode. See “Vibrate” on
page 85.
SD Card Preparing
: Installed optional memory card is
being readied for mounting.
SD Card Unmounted
: A memory card was unmounted
and be removed.
SD Card Alert
: A memory card has been removed or
inserted.
Bluetooth Active
Bluetooth Connected
: Bluetooth is turned on.
: The phone is paired with
another Bluetooth device.
Wi-Fi Active
: Wi-Fi is connected, active, and
communicating with a Wireless Access Point (WAP).
Wi-Fi Action Needed
: Action needed to connect to
Wireless Access Point (WAP).
TTY
: TTY Mode is active.
is
Navigation
Navigate your phone’s features using the command keys and the
touch screen.
Understanding Your Phone 19
Page 24
Warning!:
If your handset has a touch screen display, please note that a
touch screen responds best to a light touch from the pad of your
finger or a non-metallic stylus. Using excessive force or a metallic
object when pressing on the touch screen may damage the
tempered glass surface and void the warranty. For more
information, see “Warranty Information” on page 115.
Command Keys
Menu Key
Press the Menu
key ( ) to display a context-sensitive menu
of options for the current screen or feature.
Press and hold the Menu
Home Key
Press the
Home
Press and hold the
key ( ) to launch Quick Search.
key ( ) to display the Home screen.
Home
key ( ) to display the recent
application list.
Back Key
Press the Back
key ( ) to return to the previous screen,
option or step.
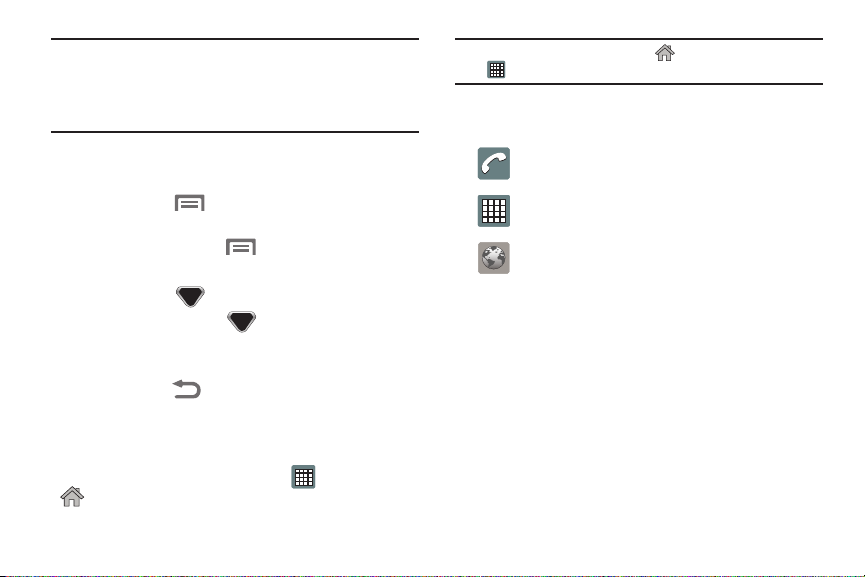
Primary Shortcuts
Primary Shortcuts appear at the bottom of the display. You can
edit the Primary Shortcuts, except for the
Home
shortcut.
20
Applications
Note:
When you access
Applications
Applications
, the
Home
shortcut to provide quick return to the Home screen.
shortcut replaces the
The default primary shortcuts are:
Phone
: Launches the Phone, to make calls. For more
information, see “Making a Call” on page 32.
Applications
: Access your phone’s applications. For
more information, see “Applications” on page 26
Browser
: Access the Internet. For more information,
see “Browser” on page 77.
/
Page 25
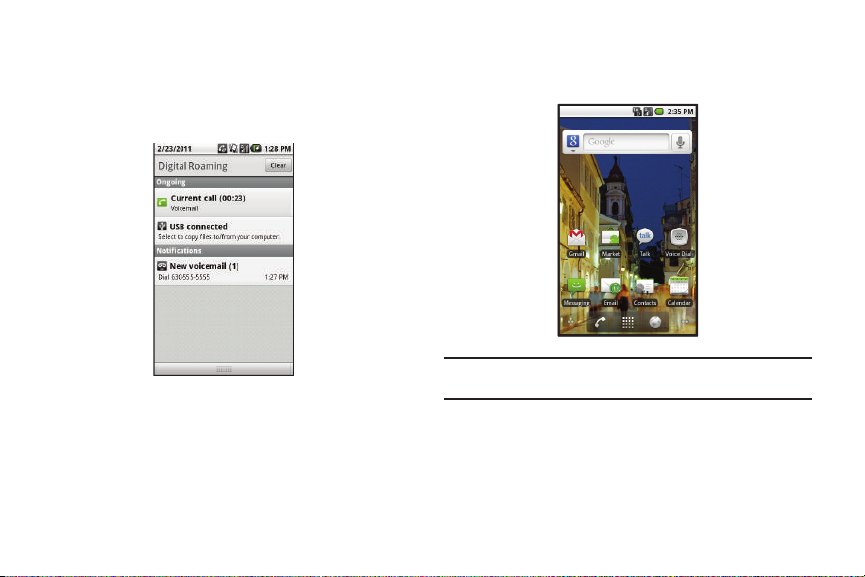
Notification Panel
The Notification Panel shows information about connections,
messages and other items.
䊳
Sweep your finger downward from the top of the screen.
Clearing Notifications
1. Sweep your finger downward from the top of the screen to
display the Notifications Panel.
2. Touch
Clear
to clear all notifications.
Home Screen
The Home screen is the starting point for using your phone.
Note:
Unless stated otherwise, instructions in this User Manual start with the
phone unlocked, at the Home screen.
Understanding Your Phone 21
Page 26
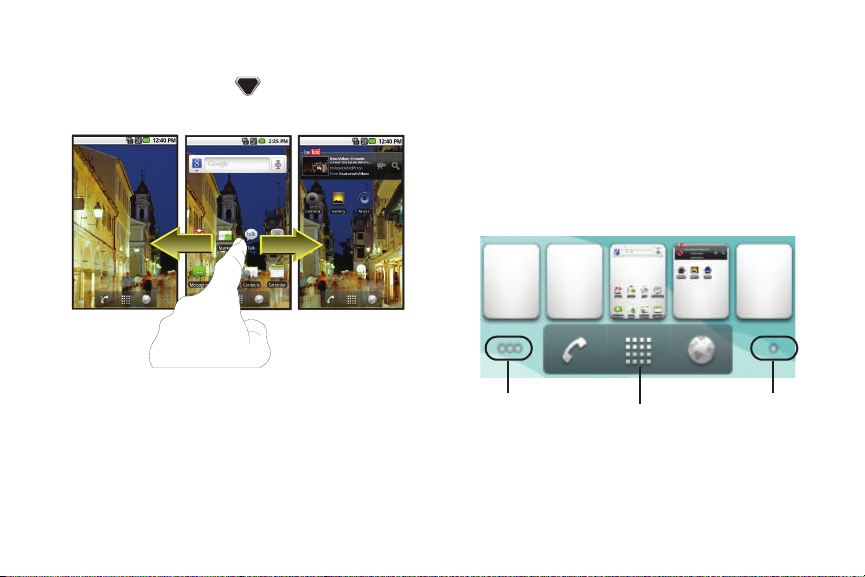
Home Screen Panels
Quick Panel Access
Panels on left
Panels on right
(touch and hold)
The Home screen has five panels. The Center panel appears
when you press the Home key ( ). To navigate to the other
panels, use one of the following methods:
Swipe
To access the Left panels, swipe across the Home screen, left to
right.
To access the Right panels, swipe across the Home screen, right
to left.
Navigation Nodes
The Navigation Nodes are visual indications of the currently
active panel. These on screen dots (located at the bottom left and
right of the Home screen) indicate your current panel location.
When the Center panel is displayed, both Navigation Nodes have
two dots (this indicates there are two panels at either side of the
current panel).
•
To access the Left panels, touch the left Navigation Node.
•
To access the Right panels, touch the right Navigation Node.
22
Page 27
Quick Panel Access Menu
To display the Quick Panel Access menu, touch and hold .
To select and display a panel, touch a thumbnail in the Quick
Panel Access menu.
Customizing the Home Screen
Customize the Home screen to suit your preferences.
•
Add Shortcuts
•
Add Widgets
•
Add Folders
•
Change the Wallpaper
: For more information, see
: For more information, see
: For more information, see
: For more information, see
“Shortcuts”
“Widgets”
“Folders”
on page 23
on page 24
on page 25
“Wallpaper”
page 26
Shortcuts
Use Shortcuts for quick access to applications or features, such
as Email or other applications. You can create a Shortcut to call
or send a message to a contact you specify, or even to directions
to a destination or a setting you use often.
Adding Shortcuts from the Home screen
1. Navigate to the desired Home screen, then touch and hold
on the screen to display the
2. Touch
Shortcuts
, then touch a selection.
Add to Home screen
menu.
on
Applications
: Launch an application. For a list,
see “Applications” on page 26
Bookmark
: Launch bookmarked web page
Contact
: View a contact you specify.
Direct dial
: Automatically call a contact you
specify.
Direct message
: Create a message to a contact
you specify.
Directions & Navigation
: Get directions to a
destination. See “Maps” on page 82.
Latitude
: Find friends and family on Maps. See
“Maps” on page 82.
Music playlist
Settings
: Access a playlist.
: Go to a specific setting.
Understanding Your Phone 23
.
Page 28
3.
Follow the prompts to configure the Shortcut and add it to
the Home screen.
Adding Shortcuts from Applications
1. Navigate to the Home screen panel.
2. From the Home screen, touch
3. Touch and hold on an application icon. The Shortcut icon is
Applications
.
automatically placed on the selected Home screen.
Removing Shortcuts
䊳
Touch and hold the Shortcut until
then drag the Shortcut to the
Trashcan
Trashcan
.
appears,
Widgets
Widgets are self-contained applications that you can place on the
Home screen to access favorite features.
Adding Widgets to the Home screen
1. Navigate to the desired Home screen, then touch and hold
on the screen to display the
2. Touch
Widgets
, then touch a selection to add it to the Home
Add to Home screen
menu.
screen.
Removing Widgets
䊳
Touch and hold the Widget until
then drag the Widget to the
24
Trashcan
Tra sh ca n
.
appears,
Analog Clock
Google Search
Home Screen Tips
: Display an analog-style clock.
: Perform Google searches.
: Briefly tells you how to add,
remove, arrange, and use application
shortcuts and widgets on the Home screen
panels.
Latitude
: Find friends and family on Maps. See
“Maps” on page 82.
Market
: Find and download Android apps from
Google Market.
Music
: Control music playback.
News & Weather
: View Google news and
weather.
Picture frame
Power c ontrol
: Display a picture.
: Set network and power settings.
Page 29

Rate Places
Latitude
YouTube
: Find places of interest near your
location.
: Search YouTube and watch videos.
Folders
Place Folders on the Home screen to organize items together on
the Home screen.
Adding Folders
1. Navigate to the desired Home screen, then touch and hold
on the screen to display the
2. Touch
Folders
, then touch a selection to add it to the Home
Add to Home screen
menu.
screen.
Removing Folders
䊳
Touch and hold the Folder until
drag the Folder to the
Trashcan
.
Trashcan
appears, then
New folder
: Create a new empty folder.
All contacts
: Create a folder containing all
contacts.
Contacts with phone numbers
: Create a folder
containing contacts with stored phone
numbers.
Google Contacts
: Create a folder giving you
access to your Contacts via Google.
Received list from Bluetooth
: Create a folder
containing a list of items received via
Bluetooth.
Recent documents
: Create a folder containing
quick links to Office documents you recently
stored and/or accessed on your device.
Starred contacts
: Create a folder containing
contacts marked as Favorites.
Understanding Your Phone 25
Page 30

Wallpaper
Choose a picture to display in the background of the Home
screen. You can choose from pre-loaded wallpaper images, or
select a picture you’ve taken with the Camera or downloaded.
1. From the Home screen, touch and hold on the screen to
display the
Wallpapers
Add to Home screen
.
menu, then touch
– or –
From the Home screen, press the Menu Key
touch
Wallpaper
.
2. Choose a source for images:
•Pictures
: Access the Gallery to choose a picture from an optional
, then
installed memory card. Touch a picture to select it, then use the
crop tool to resize the picture, if desired. Touch
Save
to save the
picture as wallpaper.
• Wallpapers
26
: Choose from pre-loaded wallpaper images. Touch a
wallpaper, then touch
Set wallpaper
.
Applications
Applications display in the Applications list to provide access to
your phone’s applications. (For more information, refer to “Apps
(Applications)” on page 65.)
You can also place shortcuts to applications on the Home screen,
for quick access to the application. For more information, refer to
“Adding Shortcuts from Applications” on page 24.
Accessing Applications
1. From the Home screen, touch
2. Sweep your finger up or down to scroll through the
Applications
.
Applications list.
3. Touch an application’s icon to launch the application.
Page 31

Your Phone’s Modes
Screen keypad landscape
Screen keypad portrait
:-)
Talk Mode
You can place and receive calls only when your phone is on.
While in a call, your phone is in talk mode. Press to display
a list of menu options.
Input Mode
Input mode determines how you enter text, numbers, and
symbols with any of the following QWERTY keypads:
Optional input modes are:
•
ABC
: Lets you enter lower-case letters (abc), initial capital letters
(Abc), or all upper-case letters (ABC). To toggle between these entry
options, touch the Shift ( ) key.
•
?123
: Lets you enter numbers and punctuation characters.
•
Voice input
: Lets you enter words and characters by speaking
them into your phone’s microphone.
•
Smiley
: Lets you enter “smiley” characters (emoticons) by
touching shortcut buttons.
•
ALT
: Lets you enter mathematical, currency, and other special
symbols.
Understanding Your Phone 27
Page 32

Lock Mode
When the phone is in Lock Mode,
restrictions are placed on phone use.
You can receive calls and messages,
but cannot place outgoing calls
(except for emergency numbers) until
you unlock the phone. Lock Mode
also restricts access to menus and
the Volume key.
To set up Screen unlock options, see
“Screen unlock” on page 87.
To enter Lock Mode:
䊳
In Standby mode, press . The screen goes dark.
To exit Lock Mode:
䊳
While in Lock mode, press . The Lock mode screen
appears in the display. Touch and slide the unlock icon to
unlock your phone.
28
Standby Mode
Standby mode is the state of the phone once it has found service
and is idle. The phone goes into Standby mode:
•
After you power the phone on.
•
When you press from within a menu.
In Standby mode, you will see the Home screen, showing the
time and phone status icons.
Place Calls in Standby Mode
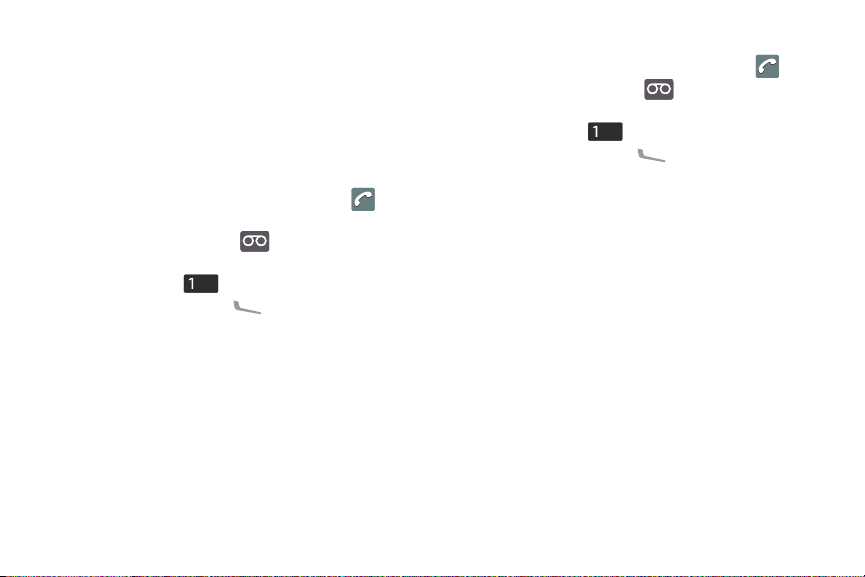
1. From the Home screen center panel, touch . Enter a
phone number, and press to place a call.
2. Touch and slide to the left to end the call and display
the
Call log
screen.
Receive Messages in Standby Mode
While your phone is in Standby mode, new incoming messages
automatically appear in the screen as they are received. Touch
and slide the display Up or Down to scroll through text or to view
complete images.
Page 33

Adjust the Ringer
To adjust the Ringer volume, while in Standby mode, press the
Volume key( ) Up or Down.
Note:
The Volume key is on the left side of phone.
Silent Mode
Silences the ringers, the alerts, and the tones your keypad makes
when you press a key.
䊳
From the Home screen, repeatedly press the Volume key
( ) Down until the Silent Mode icon ( ) or the
Vibrate mode icon ( ) appears in the display.
Note:
The Silent mode icon displays when Vibrate is set to Never or Only
when not in Silent mode. The Vibrate mode icon displays when Vibrate
is set to Always or Only in Silent mode. For more information on these
settings, see “Vibrate” on page 85.
Music Player Mode
The Music Player in your phone can play music files (MP3, CMX,
Midi, AAC, AAC+, and eAAC+), but only if they are stored in the
My Music folder on an optional microSD Memory Card.
Note:
For more information, refer to “Memory Card” on page 11.
•
Entering Music Player Mode:
䊳
From the Home screen, display the Applications menu by
touching at the bottom of the display, then touch
.
Note:
For more information, refer to “Playing Music and Videos” on page 63.
•
Exiting Music Player Mode
: While music is playing, touch the
Pause
button, then press .
Understanding Your Phone 29
Page 34

Camera Mode
Camera mode lets you take pictures with your phone’s camera.
In Camera mode, you can also adjust the resolution and
appearance of your pictures.
For more information, refer to “Camera–Camcorder” on
page 56.
•
Entering Camera Mode:
–
From the Home screen, press and hold the Camera key ( ) — on
the right side of the phone.
–
From the Home screen, touch
screen), then touch .
–
In Camcorder mode, touch and slide the Camera-Camcorder mode
switch to Camera ( ).
•
Exiting Camera Mode
30
Applications
: Press or .
(at the bottom of the
Camcorder Mode
Camcorder mode lets you record videos with your phone’s
camera. In Camcorder mode, you can also adjust the resolution
and appearance of your videos.
For more information, refer to “Camera–Camcorder” on
page 56.
•
Entering Camcorder Mode:
–
From the Home screen, press and hold the Camera key ( ) — on
the right side of the phone — then, touch and slide the CameraCamcorder mode to Camcorder ( ).
– or –
From the Home screen, touch
and slide the Camera-Camcorder mode switch to Camcorder ( ).
•
Exiting Camcorder Mode
➔
Camera
: Press or .
( ) — then touch
Page 35

Video Player Mode
The Video Player in your phone can play video files [3GS, MP4,
H.263, and H.264 (Decoding: QCIF Only)], but only if they are
stored in the My Video folder in the phone or on an optional
microSD Memory Card.
Note:
For more information, refer to “Memory Card” on page 11.
•
Entering Video Player Mode:
1. From the Home screen,
touch
➔
Gallery
()
.
– or –
In camcorder mode, press ➔
Gallery
( ).
The Gallery screen appears containing a list of thumbnail
images of photos.
2. Select the desired video. The Video Player screen appears
in the display and begins playing the highlighted video.
Note:
For more information, refer to “Playing Music and Videos” on page 63.
•
Exiting Video Player Mode
: Press .
Entering Text
Your phone has an on-screen QWERTY keypad
( ) to support quick and easy text
input. You can enter text as you would when using a computer
keyboard.
To enter numbers or symbols, touch , then press/touch the
key corresponding to the character you want to enter. To return to
the alphabetic keys, touch .
In addition, you can use the following special function keys:
Press to delete a character.
Press to insert a space in a text entry.
• Press once to enter a single upper case letter
(Abc).
• Press twice to enter all upper case letters
(ABC).
• Press once more to return to entering lower
case letters (abc).
Understanding Your Phone 31
Page 36

Section 3: Call Functions
This section explains how to make or answer a call. This section
also includes the features and functionality associated with
making or answering a call.
Making a Call
Manual Digit Dialing
1. Press ➔ . The
Phone
screen appears in the
display.
2. Enter the number you wish to call using the touch keypad.
3. To dial the number you’ve entered, press . A call
Notification icon appears.
Emergency Number Dialing
When you call an Emergency Number, such as 911, your phone
locks itself in emergency mode, only allowing you to make calls
to the emergency call center you originally contacted. This
enables emergency operators to more easily dispatch aid, such
as police, fire fighting, and emergency medical personnel.
1. Press ➔ . The
Phone
screen appears in the
display.
2. Enter
911
.
3. To place the call, press .
32
Important!:
Emergency number 911 is preset into your phone.
If you call 911 an audible tone is heard and an Emergency
prompt appears in the display for the duration of the call.
Important!:
Because of various transmission methods, network parameters,
and user settings necessary to complete a call from your
wireless phone, a connection cannot always be guaranteed.
Therefore, emergency calling may not be available on all
wireless networks at all times.
Important!:
DO NOT depend on this phone as a primary method of calling
911 or for any other essential or emergency communications.
Note:
You can specify other numbers than 911 as emergency numbers using
the Emergency # settings. (For more information, refer to “Emergency
Number” on page 85.)
Page 37

Voice Digit Dialing
Your phone includes a voice recognition system that you can use
to place calls.
1. Press ➔ ➔
The
Voice Dialer
pop-up appears in the display and plays
Voice Dialer
.
through the earpiece-speaker.
2. Say “
Call
” followed by a Contact name, or “
Dial
” followed
by a phone number.
Voice Dialer prompts you to confirm the number you want
to call.
3. Touch
OK
or the desired number, and Voice Dialer dials it.
Manual Pause Calling
When you call automated systems (like banking services), you
are often required to enter a password or account number.
Instead of manually waiting for these systems then making
addition entries, you can enter special characters (called
“pauses”) followed by the additional entries, all before you dial
the number. These pauses do the waiting for you.
•
Wait
: A hard pause stops the calling sequence until you select
from a pop-up menu.
•
2-sec. Pause
: A two-second pause stops the calling sequence for two
seconds and then automatically sends the remaining digits.
Tip:
You can create pauses longer than two seconds by entering multiple 2second pauses.
To manually call a number using pause(s):
1. Press ➔ . The
Phone
screen appears in the
display.
2. Enter the number you wish to call.
3. Press , then touch
Add 2-sec pause
/
Add wait
. A
related character (“,” — for a 2-sec. Pause, or “;” — for a
Wait) is added to your number entry.
4. Enter any additional digits.
5. To place the call, press .
Call Functions 33
Yes
Page 38

Call Log Dialing
Your phone stores records of your calls (incoming and outgoing).
You can use these records to place calls.
1. From the Home screen, touch
➔
Call log
. The
Call log
screen appears in the display.
2. Scroll through the Call Log and
locate the desired call.
3. To call the indicated number,
touch .
34
Contact Dialing
1. From the Home screen, touch
Contacts
. The
Contacts
list
appears in the display. (For
more information, refer to
“Contacts List” on page 39.)
2. Find the desired Contact by
pressing ➔
Search
. A
Search field appears at the top
of the screen with a virtual
QWERTY keypad below.
3. Enter the first few characters
of the desired Contact’s name.
A list of matching Contacts
appears in the display.
4. Scroll to the desired Contact and touch it. The Contact’s
information appears in the display.
5. To call the indicated Contact, touch .
Page 39

Voice Contact Dialing
1. Press ➔ ➔
Voice Dialer
( ).
Voice Dialer
pop-up appears in the display.
2. Say “
Call
” followed by the name of one of your Contacts.
Tip:
Voice Dialing Tips:
Wait for the beep before speaking.
Speak clearly at a normal volume, as if you were talking to someone on
the phone.
When saying a name, say the first name then the last name.
Speak clearly and say the name of a person in the Contacts
list, first name followed by last name.
Voice Dialer displays a second Voice Dialer pop-up with a
list of possible calls or a prompt to confirm a single call.
3. Select the desired call options or touch “
Yes
” to confirm
the call to the name.
Call Progress Screen
During a call, you have the following options:
•
Speaker
: Touch and slide to the right to place your phone in
Speakerphone mode for sharing the call with others nearby or for
conducting the call hands free.
•
End
: Touch and slide to the left to hang up the current call.
•
Dialpad
: Displays a keypad for entering additional numbers, such as
an automated system password.
•
Menu key
( ): Displays the following additional options:
–
Add call
: Used to make three-party calls.
–
Mute
/
Unmute
–
Bluetooth
: Disables/enables the phone or headset microphone.
: Transfers the call audio from the phone earpiece and
microphone to a Bluetooth headset, and back again.
Tip:
You also have the option of pressing to return to the Home screen
and use other functions and/or Applications.
To return to the Call Progress Screen, touch and pull down the
Notifications list, then touch
Current call
.
Call Functions 35
Page 40

Answering a Call
Your phone notifies you of a call in the following ways:
•
A ring tone sounds and/or your phone vibrates (Your phone provides
eight ring volume settings
, and/or
different ring types to distinguish
callers.)
•
A phone number (unless blocked by the caller) and a name appear in
the display (If the caller’s number and name are stored in your
Contacts list).
•
If the caller can’t be identified,
restricted number
•
Your phone continues to notify you of the call until one of the following
Call from unavailable #, Call from
, or no number appears in the display.
events occurs:
–
You answer the call.
–
You ignore the call.
–
The calling party ends the call.
–
The call is sent to voicemail.
Answering an Incoming Call
䊳
Touch and drag to the right. The ring tone and/or
vibration stop and the caller’s voice can be heard in the
earpiece.
Tip:
You can set your phone to answer calls automatically. (For more
information, refer to “Call Settings” on page 84.)
36
Ignoring a Call
When you ignore an incoming call, the call is immediately
forwarded to your voice mail.
Adjusting the Call Volume
䊳
In Standby mode, repeatedly press the Volume key Down
until the Call Volume Level desired appears in the display.
The Volume key is on the left side of phone.
Call Waiting
When you sign up for Call Waiting service, you phone notifies you
of incoming calls during a call. You have the option of answering
or ignoring an additional incoming call.
1. During a call, your phone
notifies you of an incoming
call and the
Call Waiting
screen appears in your
display.
2. Answer the incoming call. Your
original call is placed on hold,
as shown here.
3. To return to your original call,
press ➔
4. To alternate between calls,
press ➔
Swap calls
Swap calls
.
.
Page 41

Three Way Calling
Three Way Calling lets you add a third party to your current call.
1. During a call, press ➔
Add call
. The Dialer screen
appears in the display, and your existing call is placed on
hold.
2. Enter a number and press or select a Contact and
touch . The call progress screen appears in the
display.
3. When the third party answers, press ➔
The
Three Way Call
screen displays, showing both active
Merge calls
calls and a call timer.
Call Log
The Call log retains information about Outgoing, Incoming, and
Missed calls. You can also view times for your last call and the
total times for all calls.
Review the Call Log
1. From the Home screen, touch ➔
Call log
. The
Call log
screen appears in the display.
Note:
In cases where a Calls log entry concerns a call to or from a Contacts
entry, the Contact name associated with the number appears in the
Calls log list instead of the number.
2. Swipe the list up or down to browse the Call log.
Note:
To empty your device’s Call Timers, press ➔
To review your device’s Call Timers, press ➔
3. For other options, touch and hold a desired call record. The
Clear call log
View call timer
.
.
following options pop up in the display:
• Call <number>
.
• Edit number before call
the changed number.
• Send text message
Contact. (For more information, refer to
Messages”
• Add to contacts
: Dial the number in this call record.
: Change the digits to be dialed, then dial
: Send a text message to this number or
“Creating and Sending
on page 50.)
: (non-Contact call records) — Add the number in
this call record to a new or existing Contact. (For more information,
refer to
“Saving a Number from a Call”
• Remove from call log
: Remove this call record from the Call log.
on page 41.)
Call Functions 37
Page 42

Call Timer
View the duration of your last call, total calls, and calls made
during the life cycle of you phone using the Call Timer feature.
Note:
Call Timer is not for billing purposes.
1. From the Call list, press ➔
Timer
screen appears in the display showing the following
View call timer
. The
timers:
•
Last Call
: View the duration of your last call.
•
Outgoing Calls
: View the duration of the total outgoing calls made
on your phone since all timers were last reset.
•
Incoming Calls
: View the duration of the total incoming calls
received on your phone since all timers were last reset.
•
Roaming Calls
: View the total calls duration on your phone while
roaming since all timers were last reset.
•
All Calls
: View the duration of the total call, incoming, outgoing,
and data calls made on your phone since all timers were last reset.
•
Last Reset
: View the time and date all timers were last reset.
•
Lifetime Calls
: View the number and total duration of all calls
since your phone was activated.
2. To reset all counters except
Reset all timer
38
.
Lifetime Calls
, press ➔
Call
Note:
Although Total Calls timers can be erased, the Lifetime Calls timer can
never be erased.
Roaming
What is Roaming?
Roaming lets you use your phone when you travel outside of your
Wireless Provider’s coverage area. The Roaming icon ( )
appears in the top line of the display when Roaming is active,
and extra charges may apply when making or receiving calls.
Note:
Some features may be unavailable while roaming. Roaming also
consumes additional power from the battery requiring more frequent
recharging. Contact your Wireless Provider for more information about
Roaming.
How Roaming Works
Roam Option lets you set roaming preferences if you move in and
out of your home network. The following roaming options are
available:
•
Home only
: Your phone is available for normal operation only in the
designated coverage area.
•
Automatic:
Your Wireless Provider’s Preferred Roaming List (PRL) of
networks is used to acquire service. If no preferred networks are
found, any digital system is acquired.
Page 43

Section 4: Contacts List
This section explains how to manage your daily contacts by
storing their name and number in your Contacts. Contacts entries
are sorted by name.
Your Contacts List
Your Contacts list can store more than 2000 entries, with each
contact having a picture ID and multiple associated phone
numbers and Email addresses.
Each phone number can be more than 32 digits in length,
including hard pauses. Contact names can be more than 32
characters in length. You can also specify a memory location for
each entry, and you can restrict access to the Contacts list to
prevent unauthorized use.
Launching the Contacts List
1. From the Home screen, touch . The
Phone
screen
appears in the display.
2. Touch the
Contacts
tab. The
Contacts
list appears in the
display.
Contacts List Menu
䊳
From the
Contacts
list, press . The Contacts List menu
pops-up at the bottom of the screen with the following
options:
•Search
: Find a Contact by entering the first few letters of the
Contact’s Given (first) name.
• New contact
: Opens
New contact
screen. Use it to create a new
Contact.
• Display options
: Enable/disable
Only contacts with phones
When disabled (default setting), the Contacts list shows all
Contacts.
Sort list by
names.
View contact names as
lets you sort your Contacts by first or last
lets you list your Contacts with
either first name or last name first.
• Accounts
: Opens
Accounts & sync settings
control how Apps synchronize, send, and receive data, and to add
and manage
•Import / Export
Corporate
and/or
Google
accounts.
: Import (copy) Contacts information from a
Memory Card or Export (save) Contacts information to a Memory
Card.
• Delete all contacts
: Delete all Contacts from the list.
.
screen. Use it to
Contacts List 39
Page 44

Adding a New Contact
1. From the
Contacts
➔
New contact
contact
screen appears in the
list, press
. The
display.
2. Touch the
First name
field.
With the phone closed and
upright, a virtual QWERTY
keypad appears at the bottom
of the screen.
3. Enter the new Contact’s first
name, then touch
highlighted
Next
Last name
. The
field
displays.
4. If desired, enter a last name.
5. Touch
Next
. The highlighted
the Home label.
6. If desired, touch
Home
and select a different label (number
type).
40
New
Phone
field displays showing
7. Enter the phone number.
•
To add another number, touch +.
•
To add an Email address, touch
Next
. The
Home
Email
field
appears highlighted.
If desired, touch
8. Touch each field in turn and enter the required information.
9. To save your new Contact, touch
discard your new Contact, touch
Home
and select a different label (Email type).
Done
or press . To
Revert
or press .
Edit contact Menu
䊳
From the
Edit contact
screen, press . The menu pops-
up at the bottom of the screen with the following options:
•Done
: Save your entries.
• Revert
: Discard your entries.
• New contact
: Opens
New contact
screen. Use it to create a new
Contact.
• Delete contact
•Join
• Separate
: Delete this Contact.
: Combine this Contact with one or more other Contacts.
: Joined Contacts only — Divide a joined Contact into its
original, separate Contacts.
Page 45

Saving a Number from a Call
Once you’ve finished a call, you can save the number of the
caller to your Contacts list.
Note:
If the call was incoming and Caller ID information was unavailable, the
calling number is not available to save to a Contact.
1. After you end a call, the Call log screen appears, showing
the call you just ended at the top of the list.
2. Touch the call you just ended. The following options
appear in the display:
• Call information
: Type of call; call time, day, and date; and length
of call.
• Call back
/
Call again
: (Incoming call / Outgoing call) Dial this
number.
• Send text message
• Add to contacts
3. Touch
Add to contacts
: Send a message to this number.
: Add this number to a new or existing Contact.
. A
Contacts
screen appears in the
display showing the following options:
• Create new contact:
•
Contacts list: Lets you add the number to an existing Contact.
Tip:
To search this Contacts list, press and hold .
Save this number as a new Contact.
Creating a new Contacts entry:
4. Touch
Create new contact
. The
New contact
screen appears
in the display with the number you’re saving populating
the
Phone
field.
5. To save the number as other than the Contact’s
number, touch
Home
. The
Select label
menu pops-up with
the following number types:
•
Home
•
Mobile
• Work
• Work Fax
•
Home Fax
• Other
•
Pager
•
If your phone is not linked to a Google account, additional
number types appear:
•
Callback
• Main
•
Tel ex
•
•
Car
•
Other Fax
•
TTY TDD
•
•
Company
•
Radio
•
Main
Work Mobile
•
ISDN
6. Touch the number type that matches your new entry.
• MMS
Contacts List 41
Home
Custom
Work Pa ger
Assistant
Page 46

Adding the number to an existing Contacts entry:
7. Search for and touch the existing Contact to receive this
number. The
Edit contact
screen appears in the display
with the Call log number populating the next available
number type.
8. To change the number type, touch the current number type
label. The
Select label
menu pops-up with the following
number types:
•
Home
•
Mobile
• Work
• Work Fax
•
Home Fax
• Other
•
Pager
•
Custom
If your phone is not linked to a Google account, additional
number types appear:
•
Callback
• Main
•
Tel e x
•
Work Pa ger
•
Car
•
Other Fax
•
TTY TDD
• Assistant
•
Company
•
Radio
•
Main
Work Mobile
•
ISDN
42
• MMS
9. Touch the number type that matches your new number.
10. Make any added changes you wish to the Contacts entry.
(For more information, refer to “Editing an Existing
Contact” on page 44.)
11. To save your changes, press . To discard your
changes, press .
Saving a Number from the Phone Screen
1. From the Home screen, touch ➔
number you wish to store (such as your bank’s teleservice
number).
•
Press ➔
Add to contacts
. A
Phone
Contacts
and enter the
screen
appears in the display showing the following options:
•
Contacts list: Lets you add the number to an existing Contact.
Tip:
To search this Contacts list, press and hold .
2. Refer to “Saving a Number from a Call” on page 41 and
Create new contact:
Save this number as a new Contact.
do Steps 4 through 11, as needed.
Page 47

Contact Options Menu
There are a number of options available for individual Contacts.
1. From the
Contacts
list, find the desired Contact. (For more
information, refer to “Searching for a Contact” on
page 43.)
2. Touch and hold the desired Contact. A menu pops-up
listing the following options:
•View contact
• Call contact
•Text contact
number for this Contact. (For more information, refer to
and Sending Messages”
• Add to favorites
information, refer to
• Edit contact
more information, refer to
: Show the stored information for this Contact.
: Call this Contact.
: Opens the Message composer screen, including a
“Creating
on page 50.)
: Add this Contact to the Favorites list. (For more
“Favorites”
on page 46.)
: Change the information stored for this Contact. (For
“Editing an Existing Contact”
page 44.)
• Delete contact
: Remove this Contact from your Contacts list.
on
Searching for a Contact
Keypad Me th od
1. From the
Contacts
➔
list, find the desired Contact by pressing
Search
. A Search field appears at the top of the
screen with a virtual QWERTY keypad below.
2. Enter the first few characters of the desired Contact’s
name. A list of matching Contacts appears in the display.
3. Scroll to the desired Contact and touch it. The Contact’s
information appears in the display.
4. Press . The following options are available:
• Edit contact
: Opens
Edit contact
screen. Use it to change this
Contact.
•Share
: Send a copy of this Contact to another device over a
Bluetooth connection or in an Gmail message. (For more
information, refer to
• Options
–
Ringtone
–
Incoming calls
your Voicemail account.
• Delete contact
“Sending a Contacts Entry”
on page 47.)
: Select a unique ringtone to identify calls from this Contact.
: When enabled, sends all calls from this Contact to
: Remove this Contact from the Contacts list.
Contacts List 43
Page 48

Editing an Existing Contact
Once stored in the Contacts list, an entry can be changed quite
easily.
1. In the Contacts list, search for and touch the desired
Contact. (For more information, refer to “Searching for a
Contact” on page 43.) The select Contact’s information
appears in the display.
2. Press ➔
Edit contact
. The
Edit contact
screen
appears in the display.
3. Touch each number or other field in turn whose contents
you wish to enter or change.
4. When you’re finished editing the Contact, press to
save your changes.
44
Adding Pauses to Contact Numbers
When you call automated systems (like banking services), you
are often required to enter a password or account number.
Instead of manually entering the numbers each time, you can
store the numbers in your Contacts along with special characters
called pauses.
•
Wait
: A hard pause stops the calling sequence until further input from
you.
•
2-Sec Pause
: A two-second pause stops the calling sequence for two
seconds and then automatically sends the remaining digits.
Tip:
You can enter multiple two-second pauses to extend the length of a
pause. For example, two consecutive two-second pauses cause a total
pause time of four seconds.
Note:
Keep in mind that pauses count as digits towards the 32-digit
maximum.
Page 49

Store Pauses in a New Contacts Entry
1. Press ➔ and enter the number you wish to
store (such as your bank’s teleservice number).
2. Press . The following menu options appear in the
display:
• Add to contacts
•
Add 2-sec pause
•
Add wait
3. Touch the pause option of your choice to enter the selected
: Add this number to a new or existing Contact.
: a two-second pause.
: a hard pause (awaits input from you).
pause into your number sequence. The appropriate
character (“,” or “;”) appears in your number sequence.
4. Enter any additional digits into your number sequence.
5. Repeat Steps 3 and 4 as needed.
6. When your number sequence is complete, press ➔
Add to contacts
. The
Contacts
screen appears in the
display showing the following options:
• Create new contact:
Save your number sequence as a new
Contact.
• Contacts list
: Lets you save your number sequence to an existing
Contact.
7. To save your changes, press . To discard your
changes, press .
Add Pauses to an Existing Contacts Entry
1. In the Contacts list, search for and touch the desired
Contact. (For more information, refer to “Searching for a
Contact” on page 43.) The select Contact’s information
appears in the display.
2. Press ➔
Edit contact
. The
Edit contact
screen
appears in the display.
3. Touch the number stored in this Contact to which you wish
to add a Wait or 2-Sec Pause. The phone-style keypad
appears at the bottom of the screen.
4. Touch the
* # (
key, then touch the
Pause
/
Wait
key. The
appropriate character (“,” or “;”) appears in the number
sequence.
5. Touch the
123
key and enter any additional digits into your
number sequence.
6. Repeat Steps 4 and 5 as needed.
7. When your number sequence is complete, touch
Done
save your changes.
Contacts List 45
to
Page 50

Add a Number or Email Address to an Existing Entry
1. In the Contacts list, touch the desired Contact. (For more
information, refer to “Searching for a Contact” on
page 43.) The select Contact’s information displays.
2. Press ➔
Edit contact
. The
Edit contact
screen
displays.
3. Touch a number field or the
4. Enter the new phone number or Email address.
5. Touch
Done
to add the number or Email address to the
Email
field.
existing entry.
Edit an Existing Email Address
1. Find the desired entry in the
Contacts
list. (For more
information, refer to “Searching for a Contact” on
page 43.)
2. Press ➔
Edit contact
. The
Edit contact
screen
appears in the display with the contact name highlighted.
3. Highlight the
4. Use the touch screen QWERTY keypad (portrait or
Email
field (labeled with the @ symbol).
landscape) to edit the Email address. (For more
information, refer to “Entering Text” on page 48.)
5. Touch
46
Done
to save your changes.
Favorites
The Favorites screen shows Contacts you added to the list so you
can call them without searching or browsing your entire Contacts
list. The Favorites screen also lists Contacts you call frequently.
Launching the Favorites list
䊳
Press ➔
Contacts
➔
Favorites
. The
Favorites
list
appears in the display.
Adding Contacts to Favorites
1. In the Contacts list, search for and touch a Contact you
wish to add to Favorites. (For more information, refer to
“Searching for a Contact” on page 43.) The select
Contact’s information appears in the display.
2. Touch the star-shaped button to the right of the Contact’s
name. The button changes color to yellow.
3. Press ➔
Contacts
➔
Favorites
. The
Favorites
list
appears in the display with your newly added Favorite
appearing in the list.
Page 51

Removing Favorites
Use this option to remove a speed dial number in your Contacts
list.
1. Press ➔
Contacts
➔
Favorites
. The
Favorites
list
appears in the display.
2. Touch the Contact you wish to remove from the Favorites
list. The select Contact’s information appears in the
display.
3. Touch the star-shaped button to the right of the Contact’s
name. The button changes color from yellow to
background color.
4. Press . The
Favorites
list appears in the display, minus
the Contact you wished removed.
Deleting a Contact
1. In the Contacts list, search for and touch a Contact you
wish to remove from Favorites. (For more information,
refer to “Searching for a Contact” on page 43.) The select
Contact’s information appears in the display.
2. Press ➔
Delete contact
. You are prompted to confirm
the deletion.
3. To delete the selected Contact, touch
OK
.
Sending a Contacts Entry
Use the
Share
option to send a selected Contact’s information as
part of an Email or Gmail message.
1. Press ➔
Contacts
. The
Contacts
screen appears in
the display.
2. Find and touch the Contact you want to send to another
device. (For more information, refer to “Searching for a
Contact” on page 43.) The associated Contact information
appears in the display.
3. Press ➔
Share
. An Email or Gmail message
composer appears in the display with the selected contact
information attached.
•
If you do not have an Email account or a Google account defined to
your phone, you are prompted to create a Google account. (For
more information, refer to
page 65 and to
4. Address and compose the rest of your message, then
touch
Send
.
“Creating a Google Account”
“Setting Up an Email Account”
Contacts List 47
on
on page 52.)
Page 52

Section 5: Entering Text
This section describes how to enter words, letters, punctuation
and numbers when you need to enter text.
Virtual QWERTY Keyboard
Your phone provides a virtual QWERTY keyboard for text entry.
Use the keyboard to enter letters, punctuation, numbers, and
other characters into text entry fields or applications. Access the
keyboard by touching any text entry field.
The virtual QWERTY keyboard displays at the bottom of the
screen, in either portrait or landscape orientation. By default,
when you rotate the phone, the screen orientation updates to
display the keyboard at the bottom of the screen.
48
Entering Text Using the Android Keyboard
The Android Keyboard is a custom virtual QWERTY keyboard,
featuring predictive text. Input characters by tapping the onscreen keys with your finger.
As you enter characters, predictive text matches your key
touches to common words and displays them. Select a word
from the display to insert it into your text.
Configuring Android Keyboard
You can configure the Android Keyboard to your preferences. For
more information, see “Android keyboard settings” on page 92.
Entering Upper and Lower Case Letters
The default case is lower case (abc). Enter upper and lower case
alphabet letters by touching the Shift key to toggle the case,
before touching the letter key(s).
•
Touch once to switch from abc to Abc mode
•
Touch and hold to switch to ABC mode
Page 53

Entering Symbols and Numbers
Enter common symbols by touching to switch to symbol
mode, then touching the corresponding key.
To enter less-common symbols, touch
➔
, then
touch the corresponding key.
Enter numbers by touching , then touching the number keys.
Entering Text 49
Page 54

Section 6: Messaging
This section explains how to send or receive different types of
messages. This section also describes the features and
functionality associated with the various types of messaging.
Types of Messages
Your i100 can send Text (SMS) messages, Multimedia [picture or
video (MMS)] messages, and Email, Gmail, and Instant (IM)
messages.
Text and Multimedia Messages
You can send Text and Multimedia messages by simply entering
the phone number of the recipient in the
To:
field when creating a
new message. Text messages can be up to 160 characters in
length.
Email / Gmail Messages
With the i100 you can send email in two ways:
•
Through an Internet Protocol (IP) account, and/or
•
Through a Gmail account. (For more information, refer to
Google Account”
on page 9.)
“Your
Instant Messages
The i100 includes support for instant messaging.
50
Sending Messages
Creating and Sending Messages
1. Press ➔
Messaging
() ➔
New message
message composer screen appears with the To field
highlighted and the virtual keyboard showing (phone
upright only).
Tip:
With the phone on its side, the virtual keyboard does not appear until
you touch the To or
2. Enter or search for a recipient, then type a phone number,
Type t o compo se
field.
email address, or the first few letters of a Contact name. (If
a Contact name, scroll to and touch the desired name.)
For more recipients, type another phone number, email
address, or the first few letters of another Contact name.
3. To enter the message text, touch the
Type to compose
and type the text content of your message. (For more
information, refer to “Entering Text” on page 31.)
. The
field
Page 55

For more message composition options, press . The
4.
following options are available:
• Add subject
• Attach
• Insert smiley
•Discard
• All threads
5. Touch
: Add a subject line to your message.
: Add a picture, video clip, audio file, or slideshow to your
message. (For more information, refer to
“Attaching Media”
: Select from a list of smileys to add to your message.
: Discard the current message.
: Return to the
Send
to transmit your message to the selected
Messaging
screen.
recipients.
Attaching Media
1. While composing a message, press ➔
following options are available:
•Pictures
: Attach an existing picture from the Gallery.
• Capture picture
: Launch the Camera, take a new picture, and
attach it to your message. (For more information, refer to
a Snap Shot (Single Picture)”
•Videos
: Attach an existing video from the Gallery.
•Capture video
: Launch the Camcorder, record a new video, and
on page 56.)
attach it to your message. (For more information, refer to
“Recording a Video”
• Audio
: Attach a pre-loaded audio file.
on page 58.)
Attach
.)
. The
“Taking
• Record audio
•Slideshow
: Record and attach a new audio file.
: Attach an existing slideshow or create and attach a
new slideshow.
2. Touch the desired option and select the desired media file
to be attached to this message. The message is
automatically converted from a Text (SMS) message to an
MMS message.
Retrieving a Message
When you receive a new text, picture, or video message, the
message ringer sounds (unless turned off) and the new message
icon ( ) appears and the message text scrolls automatically in
the Notification bar.
1. To view a new message, touch the Notifications bar and
drag downward to display the Notifications list.
2. Touch the new message Notification. The Messaging
screen appears in the display.
3. To read the complete message, touch its Messaging list
entry. The complete message appears in the display.
4. To compose a reply message, touch the
Type to compose
field. (For more information, refer to “Creating and Sending
Messages” on page 50.)
Messaging 51
Page 56

Changing Messaging Settings
1. Press ➔
Messaging
. The
Messaging
in the display showing the currently saved threads.
2. Press ➔
Settings
. The following options appear in
the display:
• Storage Settings:
–
Delete old messages
message count limits are reached.
–
Text message limit
per thread.
–
Multimedia message limit
messages per thread.
: Erase old, read messages as maximum
: Select a new maximum number of text messages
: Select a new maximum number of MMS
• Multimedia message (MMS) Settings:
–
–
–
• Notification Settings:
–
–
52
Delivery reports
MMS message sent.
Auto-retrieve
incoming MMS messages.
Roaming auto-retrieve
(downloads) incoming MMS messages when outside your home
network.
Notifications
message received.
Screen on
icon appears.
: When enabled, requests delivery report for each
: When enabled, automatically retrieves (downloads)
: When enabled, automatically retrieves
: When enabled, displays message notification icon when
: When enabled, display lights when message notification
screen appears
–
Select ringtone
–
Vibr ate
3. Select the desired options and settings.
: Select unique ringtone for new incoming messages.
: When enabled, phone vibrates for new incoming messages.
Accessing Email
You can configure i100 Messaging to send and receive Email
messages using personal or business accounts.
Setting Up an Email Account
You can use your i100 to access the Internet for Email using a
connection through your Wireless Carrier or using a Wi-Fi
connection. (For more information, refer to “Wi-Fi” on page 69.)
Tip:
Before beginning the Email account setup process, you should have
copies of the email server settings from the Email provider(s) for each of
your accounts to verify and/or correct all automatically retrieved
settings.
1. Press ➔
Set up email
to configure
2. Enter your E-mail address and password into the
appropriate fields, then touch
Email
. The first time you select
Email
, the
screen appears in the display, prompting you
Email
for an account.
Next
. Your phone
automatically obtains account information from the Email
server.
To access a private Email server, touch
Manual setup
follow the prompts to set up the Email account.
and
Page 57

At the prompt, enter a screen name for this Email account
3.
and your name for inclusion in outgoing messages, then
touch
Next
. Email begins downloading to your phone.
Manually Setting Up an Email Account
If your i100 is unable to automatically contact and setup to
access your Email account, use the following procedure.
Tip:
Before beginning the Email account setup process, you should have
copies of the email server settings from the Email provider(s) for each of
your accounts to verify and/or correct all automatically retrieved
settings.
1. Press ➔
2. Enter your E-mail address and password into the
appropriate fields, then touch
Email
. The Set up email screen appears.
Manual setup
. You are
prompted to select the type of account. Available options
are:
• POP3 account
• IMAP account
• Exchange account
3. Select the account type. The appropriate server settings
screen appears in the display.
4. Enter the server settings information from your Email
provider, then touch
Next
. Your phone contacts your Email
Provider’s server. You are notified when setup is complete.
Sending Email
1. Address the Email message to a Contact:
•
Press
➔
Contacts
.
•
Find and touch the desired Contact. The Contact’s information
appears in the display. (For more information, refer to
for a Contact”
•
Touch the desired Email address. The
on page 43.)
Complete action using
menu pops-up in the display.
•
Choose the Email account you wish to use. The Email
screen appears in the display with the Contact’s Email address
already populating the To field.
– or –
Address the Email to a non-Contact recipient:
•
Press ➔ Email
. Your default Email account folder appears in
the display.
•
Press ➔ Compose
. The Email composer screen appears in
the display.
•
Enter the recipient’s Email address. (For more information, refer to
“Entering Text”
2. Touch the
on page 31.)
Subject
field and enter the subject of this
message.
3. Enter the message text in the field provided.
“Searching
Compose
Messaging 53
Page 58

4.
To attach a file(s) to your message, Touch
The
Choose attachment
menu pops-up in the display.
Add attachment
Select the desired location(s) and file(s).
5. To send your message to the intended recipient, touch
Send
.
•
To save the message as a draft message for later reuse, touch
➔
Save as draft
•
To discard this message without sending or saving it, touch
Discard
.
.
Receiving Email
When you receive a new Email message, the message ringer
sounds (unless turned off) and the new Email message icon
( ) appears in the Notification bar.
1. To access your received Email, press ➔
Email
default Email account folder appears in the display.
2. To read your received Email, touch the new message
listing.
54
. Your
.
Email Account Settings
Use settings to configure handling of email on your device.
Note:
Available settings may depend on the email account, and include
setting how much email to synchronize, creating signatures for emails
you send, and other handling options.
1. Press ➔
Email
➔ ➔
accounts list appears.
2. Touch and hold the account you wish to configure. The
account options menu pops-up.
3. Touch Account settings. Depending on the account, some
or all of the following options are available:
• General settings
–
Account name
–
Your name
–
Email check frequency
check for new email.
–
Default account
automatically sent from this account.
• Exchange Sync settings
–
Days to sync Emai l
device.
–
Empty Server Trash
folder on the Email server.
:
: Enter a name to identify this account.
: Enter your name, to appear on emails from this account.
: Choose a time period for your device to
: When enabled, email from your device is
(Exchange accounts only):
: Choose how much email you want to see on your
: Touch to delete emails from the Trash or Deleted
Accounts
. The
Email
Page 59

–
Sync schedule
: Set the schedule for synchronizing email from the
server.
–
Out-of-office Settings
–
Size to retrieve emails
• Notification settings
–
Email notifications
: (not supported).
: Set a maximum size for retrieving emails.
:
: When enabled, the New Email icon appears in
the Status Bar when a new email arrives.
–
Select ringtone
: Choose a ringtone for email notifications for this
account.
–
Vibrat e
: When enabled, email notifications for this accounts are
accompanied by vibration.
• Server settings
Tip:
Before changing these settings, you should have a copy of the email
server settings from the Email provider for this account.
–
Incoming settings
–
Outgoing settings
–
Sync contacts
:
: Configure server settings.
: Configure outgoing settings.
: (Exchange accounts only) When enabled, contacts
from your account are synchronized with your device’s Contacts.
–
Sync calendar
: (Exchange accounts only) When enabled, events from
your account are synchronized with your device’s Calendar.
• Common Settings
–
Forward with files
–
Add signature
:
: Enable or disable forwarding of file attachments.
: Enable or disable adding signature to emails from this
account.
–
Signature
: Enter a signature to add to emails from this account.
Removing an Email Account
1. Press ➔
Email
➔ ➔
Accounts
. The
accounts list appears.
2. Touch and hold the account you wish to remove. The
account options menu pops-up.
3. Touch
Remove account
. You are prompted to confirm the
removal of this Email account.
4. To re mov e the sel ected account, touch
OK
.
Messaging 55
Email
Page 60

Section 7: Camera–Camcorder
Use your Samsung phone to take full color digital pictures and
videos, display them on your phone’s vivid color display, and
instantly share them with family and friends. It’s fun, and as easy
to use as a traditional point-and-click camera or camcorder. This
section explains how you can do the following:
•
Take pictures and record videos with your phone’s built-in digital
Camera-Camcorder.
•
Send and receive pictures and videos taken with your phone’s
Camera-Camcorder.
•
Set the several Camera-Camcorder options that help you take crisp,
clear pictures and videos.
56
Taking Pictures and Videos
Taking pictures and videos with the built-in Camera-Camcorder
is as simple as choosing a subject, pointing the lens (located on
the rear of your phone, at the top), and pressing a button.
Taking a Snap Shot (Single Picture)
To take a single picture using the current Camera settings, do the
following:
1. Press and hold the Camera key ( — on the right side
of the phone). The Camera viewfinder screen appears in
the display.
(For more information, refer to “Screen Layout” on
page 59).
Page 61

Tip:
You can also launch the camera by pressing ➔ ➔
2. Using the display as a viewfinder, point the camera lens
Camera
(on the back of your phone) at your subject.
3. When the image that you wish to capture appears in the
display, press the Camera key ( ) or touch .
After the Camera takes the picture, a thumbnail view of it
fills the preview pane in the lower right corner.
4. To review the picture full-screen, touch the preview pane.
The Gallery displays thumbnail views of your saved
pictures.
5. Touch the picture you wish to view to display full screen.
The selected picture fills the screen. The following options
are available:
SET AS
: Set this picture as a Contact Icon or as
Wallpaper on the Home screen.
SHARE
: Send a copy of this picture to another
device or person using Bluetooth, Gmail, Email,
Messaging, or Picasa.
DELETE
: Erase this picture from the Gallery.
.
6. For additional options, press . The following
additional options are available:
•Share
: Send a copy of this picture to another device or person
using Bluetooth, Gmail, Email, Messaging, or Picasa.
•Rotate
: Rotate the picture Left (counter-clockwise) or Right
(clockwise).
• Delete
: Erase this picture from the Gallery.
•Crop
: Erase unwanted portions of this picture.
•Set as
: Set this picture as a Contact Icon or as Wallpaper on the
Home screen.
•More
: Displays the following additional options:
–
Details
: List the name, File size, Resolution, Manufacturer, Model,
White Balance setting, and Date taken for this picture.
–
Show on Maps
–
Slideshow
–
Settings
7. To exit the Camera, press .
: Indicate location where picture was taken on a map.
: Displays pictures in the Gallery in a slideshow.
: Displays the Gallery settings.
Camera–Camcorder 57
Page 62

Recording a Video
To record a video using the current camcorder settings, do the
following:
1. Press and hold the Camera key ( — on the right side
of the phone). The camera viewfinder screen appears in
the display.
2. Touch and slide the Camera-Camcorder switch to
Camcorder position. The Camcorder viewfinder screen
appears in the display. (For more information, refer to
“Screen Layout” on page 59).
3. Using the display as a viewfinder, point the camera lens
(on the back of your phone) at your subject.
58
4. When the image that you wish to capture appears in the
display, press the Camera key ( ) or touch . When
you’re finished recording your video, press the Camera key
( ) again or touch .
A thumbnail view of the new video fills the preview pane in
the upper right corner of the viewfinder screen.
5. To review the video full-screen, touch the preview pane.
Touch and hold a video thumbnail to access the following
options:
•Play
: Play the new video.
•Share
: Send a copy of this video to another device or person using
Bluetooth, Email, Gmail, Messaging, or YouTube.
Note:
To share a video using Messaging requires sending a Video MMS
message and the video clip must be no larger than 1 MB.
• Delete
: Erase this video from the Gallery.
• Details
: Displays video name, File size, Duration, Frame rate, Bit
rate, Format, and Date taken.
6. To exit the Camcorder, press .
Page 63

Screen Layout
1
2
3
4
5
6
8
7
Screen Indicators and Buttons
1.
Viewfinder
: Displays the image currently seen by the
Camera lens.
2.
Settings
: Touch to open the
Camera
/
Camcorder settings
menu.
3.
Store a location
with the image. Select On or
: Touch to store GPS location information
Off
to enable or disable this
feature. Lets you Show on Maps where you took a selected
picture. (See “Show on Maps” on page 62.)
Note:
You must agree to Google’s location service, also known as
Geotagging, to collect anonymous location data. Go to
Location & security ➔ Use wireless networks
deselect this feature.
Settings ➔
to select or
4.
White balance
: Touch to select White balance to match
available light: Auto / Incandescent / Daylight / Fluorescent
/ Cloudy.
5.
Zoom
: (Camera) Touch to adjust Zoom setting: 1x / 1.6x /
2.2x / 2.8x / 3.4x / 4x. Video quality: (Camcorder) Touch to
adjust Video quality setting: High (30m) / Low (30m) / MMS
(Low, 20s) / YouTube (High, 10m).
6.
Thumbnail
: Displays the last picture you took with the
Camera or the first frame of the last video you recorded
with the Camcorder. Touch to access the Gallery.
7.
Mode
: Swipe down for Camera mode (as shown), swipe up
for Camcorder mode.
8.
Tak e
/
Record
/
Stop
stops video recordings (Camcorder).
: Takes pictures (Camera) or starts and
Camera–Camcorder 59
Page 64

Camera-Camcorder Settings
To access the Camera or Camcorder settings menu, do the
following:
䊳
From the Camera / Camcorder viewfinder screen, touch
Settings
(see “Screen Layout” on page 59). The following
settings are available:
• Focus mode
(Camera only):
Auto
/
Infinity
/
Macro
— Keep
center of subject in focus (Auto), maintain full image in focus
(Infinity), or focus on a very close object (Macro).
• Scene mode
Beach/Snow
• Metering
• Picture size
VGA pixels
• Picture quality
(Camera only):
/
Sunset
(Camera only):
(Camera only):
/
Fireworks
Matrix
3M Pixels
Auto /
/
Portrait
.
Center
/
/
Spot
/
2M Pixels
Landscape
.
/
1M Pixels
— Control picture size and file size as needed.
(Camera only):
Super fine
/
Fine
/
Normal
Control picture clarity and file size as needed.
• Color effect: None
Whiteboard
• Camera settings
60
/
Mono
/
Sepia
/
Negative
/
Aqua
— Apply special color effects to your pictures / videos.
: Restore to default.
Gallery
The Camera-Camcorder stores your photos and videos in the
Gallery, where you have easy access to review and manage
your files.
䊳
From the Home screen, press ➔
The
Gallery
screen displays showing the following media
Gallery
.
file clusters:
•
/
Night
Camera pictures
/
views of up to four of the pictures
taken with your phone’s Camera
: Thumbnail
and stored in the phone. The total
/
—
/
number of pictures also appears.
•
Camera videos
: Thumbnail views
of up to four of the videos recorded
with your phone’s Camcorder and
stored in the phone. The total
number of videos also appears.
•
Camera media
: Thumbnail views
of up to four of the pictures and
videos taken with your phone’s
Camera-Camcorder and stored in
the phone. The total number of
pictures and videos also appears.
Page 65

To access the files in one of the clusters, touch the desired
cluster. A 3 x 4 array of the files in the cluster appears in the
display.
Gallery and Camera Media Menu Options
䊳
In the
Gallery
screen, press . The following menu
options are available:
• Capture picture
•Capture video
• Settings
–
General settings
and videos, and select whether to Confirm deletions of pictures and
videos.
–
Slideshow settings
what order, when in Slideshow mode.
: Launches the Camera.
: Launches the Camcorder.
: The following Gallery settings are available:
: Select a Display size and Sort order for your pictures
: Select how your photos are presented, and in
Camera and Video Pictures Options
䊳
Touch
Camera pictures
/
Camera videos
. The following menu options are available:
• Capture picture
•Capture video
•Slideshow
: Launches the Camera.
: Launches the Camcorder.
: Camera Pictures only — View pictures taken with your
phone’s Camera as a slideshow.
• Multiselect
• Settings
: Select pictures/videos to Share or Delete.
: The following Gallery settings are available:
–
General settings
and videos, and select whether to Confirm deletions of pictures and
videos.
–
Slideshow settings
what order, when in Slideshow mode.
: Select a Display size and Sort order for your pictures
: Select how your photos are presented, and in
/
Camera media
Camera–Camcorder 61
➔
Page 66

Picture Menu Options
1. In the Gallery Camera Pictures array, select a photo. The
photo expands for easier viewing.
2. Press . The following menu options are available:
•Share
: Send a copy of this picture to other devices, to various online services, and/or to individuals as part of a picture or email
message.
•Rotate
: Rotate the picture clockwise or counter-clockwise.
• Delete
: Erase this picture from the Gallery.
•Crop
: Erase selected portions of this picture.
•Set as
: Set this picture as a Contact icon or as Home screen
Wallpaper.
•More
: Displays the following additional options:
–
Details
: Show File size, Resolution setting, Manufacturer, Model,
WhiteBalance setting, and Date taken for this picture.
–
Show on Maps
taken indicated on the map.
Tip:
To use the
Show on Maps
pictures are taken with the pictures. (See the “Store location” option on
page 59.)
–
Slideshow
–
Settings
62
: Show a map with the location where this picture was
option, you must store the locations where
: Show all Gallery Camera Pictures as a slideshow.
: Select values for Gallery General and Slideshow settings.
Send Pictures and Videos
Send a picture or video you have taken to anyone with a
compatible device in a few easy steps.
1. From the Camera / Camcorder view finder screen, take a
picture or record a video.
2. Touch the thumbnail preview image in the upper right
corner of the display. The photo/video review screen
appears in the display.
3. Touch and hold the picture/video you want to send, then
touch
Share
, The Share pictures via menu pops up
showing the following available options:
•Bluetooth
•Email
•Gmail
• Messaging
•Picasa
4. Touch the desired option and follow the prompts to send a
copy of this photo/video. (For more information, refer to
“Messaging” on page 50.)
Page 67

Section 8: Playing Music and Videos
Loading Media Files
You can load media files (MP3 or WMA music and/or MP4 or 3GP
video) to your phone over the air or using a Personal Computer.
Downloading
Over the Air
䊳
Save music obtained using the Browser or from the Market
to the microSD or microSDHC Memory Card.
Note:
For more information, refer to “Apps (Applications)” on page 65.
Via PC
1. Connect the phone to your Personal Computer using the
USB Data Cable. “
icon appear on the top line of the display. The
connected
2. Touch
Turn on USB storage
USB connected
” and a USB Notification
USB
screen appears in the center of the display.
. The
USB storage in use
screen
appears in the display, and a new “Removable Disk”
appears on your Personal Computer.
3. Copy your MP3 or WMA music files to the ./DCIM/Music
directory on the Memory Card.
Note:
If there is no ./DCIM/Music directory, create one.
4. Copy your MP4 or 3GP video files to the Memory Card.
Sideloading
1. Remove the microSD or microSDHC Memory Card from
your phone. (For more information, refer to “Removing a
Memory Card” on page 12.)
2. Insert the Memory Card in a compatible Card Reader
connected to a personal computer.
3. Copy your MP3 or WMA music files to the ./DCIM/Music
directory on the Memory Card.
Note:
If there is no ./DCIM/Music directory, create one.
4. Copy your MP4 or 3GP video files to the Memory Card.
5. Remove the Memory Card from the Card Reader and insert
the Memory Card in your i100 phone. (For more
information, refer to “Installing a Memory Card” on
page 11.)
Playing Music and Videos 63
Page 68

Playing Your Media Files
Launching the Music Player
1. Press ➔
Music
. The
Music Library screen appears
in the display.
2. Touch the
Songs
tab. A list of
songs on the Memory Card
appears in the display.
3. To play a song, touch it in the
list. The Music Player screen
appears in the display and the
selected song begins playing.
64
Launching the Video Player
4. Press ➔
Gallery
➔
Camera videos
. An array of
thumbnail images appears in the display.
Note:
Videos are indicated by a Play arrowhead overlay.
5. Locate and touch the desired video. The Video Player
screen appears (in landscape mode) and the selected
video begins playing.
Note:
The Video Player controls fade out as video playback continues. To
restore the controls, touch the display.
Page 69

Section 9: Apps (Applications)
Your i100 phone includes a number of useful Apps and offers
access to the Android Market, where you can purchase and
download still more Apps.
Google Apps
Some of the Apps loaded on your i100, such as
Market
, require you to have a Google account to use them.
Gmail
and
Creating a Google Account
To create a Google account, you can use either your i100 phone
or a personal computer. When creating the account, Google asks
you to enter an Email address:
•
To create a Gmail address along with the account, use your i100
phone.
•
To enter an existing address, use a personal computer.
Using Your i100 Phone
1. From the Home screen, touch . The Apps menu
appears in the display.
2. In the last row of Apps, touch either
Set up your Google Account
3. Follow the onscreen prompts to create your free account.
4. Log into the email address you entered on the
accounts
page, and locate the email from Google.
5. Respond to the new email to both confirm and activate
Gmail
or
Market
screen appears in the display.
Google
your new account.
Using a Personal Computer
1. From a computer, launch a Web browser and navigate to
www.google.com
2. On the Google home page, click
account now
3. Follow the onscreen prompts to create your free account.
4. Log into the email address you entered on the
accounts
5. Respond to the new email to both confirm and activate
.
Sign-in
➔
Create an
.
Google
page, and locate the email from Google.
your new account.
Apps (Applications) 65
. The
Page 70

Launching an App
1. From the Home screen, touch
. The Apps menu appears
in the display.
2. Swipe up or down across the
screen to scroll the menu and
find a particular App.
3. To launch the desired App,
touch the related icon.
Note:
Some applications, such as Market, require you have a Google account
and a network connection.
Available Apps
The following Apps are pre-loaded on your i100 phone:
Books
: Read eBooks from the web-based
Google Books service.
Browser
: Access the World Wide Web.
The Browser supports “Pinch and Zoom” on
some web pages.
66
Calculator
: Divide, multiply, subtract, and
add numbers of any length, with results
presented in exponential format.
Calendar
: Schedule events and set
reminder alarms.
Camera
: Take pictures and record and
playback videos.
Clock
: Displays current time, date. and
weather information. Use to set up multiple
alarms, select background image from the
Gallery, and select a sound or music file to
play when a set alarm time is reached.
Contacts
: Create and maintain a phonebook
of Contact information (phone numbers,
Email addresses, postal addresses, and so
on).
Email
: Access business and personal Email
accounts.
Gallery
: View pictures, play slideshows and
videos of pictures and videos taken with the
Camera in your phone.
Page 71

Gmail
: Create and/or access a Gmail
(Google mail) account.
Google Search
: Search your phone’s
contents and/or the Internet.
Latitude
: Share your location with selected
friends.
Maps
: Access Google maps.
Market
: Find, purchase, and download
Apps for your i100 phone.
Messaging
: Exchange Text, Picture, and
Video messages with other devices.
Music: Play and manage music files stored
on a Memory Card. Create and play music
playlists. Assign music files as ringtones.
Navigation: An internet-connected GPS
navigation system with voice guidance.
Type or speak your destination.
News & Weather:
View Google news and
weather.
Phone
: Place phone calls.
Places
: Find places of interest near your
Latitude
location.
Settings
: Customize your phone’s operation
and functions to suit yourself.
Tal k
: Exchange instant messages using
Google Talk.
ThinkFree Office
: Create, edit, and manage
Microsoft® Word™, Powerpoint™, and
Excel™ files.
Voice Dialer
: Place calls with spoken
commands.
Voice Search
: Search the contents of your
phone with spoken commands.
YouTube
: Access YouTube video sharing
site.
Apps (Applications) 67
Page 72

Accessing Apps Directly
You can access an App directly from one of the Home screen
panels after copying a Shortcut or Widget for the App to the
desired Home screen panel.
Pre-positioned Shortcuts and Widgets
Your i100 comes with a number of Shortcuts and Widgets prepositioned on two of the Home screen panels.
Panel 3 Panel 4
• Google search • You Tub e
• Gmail • Camera
• Market • Gallery
• Ta lk • Music
• Voice Dial
• Messaging
• Email
• Contacts
• Calendar
68
Page 73

Section 10: Connections
This section explains how to setup your phones network, Wi-Fi
(Wireless Fidelity), Bluetooth, and VPN (Virtual Private Network)
connections.
Note:
Use of these Wi-Fi, Bluetooth, and/or VPN wireless connections can
increase the drain on your i100’s battery, shortening your usage time.
Accessing Wireless & network settings
To launch the
䊳
Wireless & network settings
Press ➔ ➔
settings
. The
Wireless & network settings
Settings
menu:
➔
Wireless & network
menu appears in
the display.
Wi-Fi
You can use your i100 to access the Internet and other services
through secured Wireless Access Points (WAPs) (those requiring
knowledge of the Router name and password) and over
unsecured (open or “public”) WAPs (“hot spots”).
Tip:
Although public hot spots do not require you to provide a password, you
may need to launch the
more information on using your phone’s
page 77.)
Browser
to complete an access process. (For
Browser
, see “Browser” on
Turn Wi-Fi Interface On
䊳
From the
Wireless & network settings
The associated check box changes color to green.
Turn Wi-Fi Interface Off
䊳
From the
Wireless & network settings
The associated check box changes from green to
background color.
Setting Up a Wi-Fi Connection
1. From the
Wireless & network settings
settings
. The
Wi-Fi settings
menu appears in the display.
The following options are available:
•Wi-Fi
: Turns the phone’s Wi-Fi interface On/Off.
• Network notification
: When enabled, your phone notifies you
when it detects a Wi-Fi open network (hot spot).
• Wi-Fi networks
: List of detected open, visible secured, and/or
manually added hidden secured Wi-Fi networks. Wi-Fi networks
listings show network names and security settings, if any. Select a
network listing to connect to that network. If the network is secured,
but you have not manually added it, you are prompted to enter the
WAP password.
• Add Wi-Fi network
networks
: Manually add a Wi-Fi network to the
list.
menu, touch
menu, touch
menu, touch
Connections 69
Wi-Fi
Wi-Fi
Wi-Fi
Wi-Fi
.
.
Page 74

2.
To manually add a Wi-Fi network to the Wi-Fi networks list:
•
Tou ch
•
Tou ch t he
Add Wi-Fi network
Network SSID
. The Add Wi-Fi network screen pops up .
field and enter the name of the Wireless
Access Point. This entry lets you add hidden secured Wi-Fi
networks.
•
For a secured network, touch the
Security
field. Select the
appropriate security setting by touching it. You are prompted to
enter the WAP password.
•
To save your entries to the list, touch
Note:
When you manually add a secured Wi-Fi network, you are not
prompted to enter the WAP password each time your phone connects.
Save
.
Advanced Wi-Fi settings
The
Wi-Fi settings
–
Advanced
menu lets you further customize
how your phone communicates with Wi-Fi networks.
䊳
From the
Wi-Fi settings
menu, press ➔
The Advanced menu appears in the display with the
following options available:
• Wi-Fi sleep policy
: Set your Wi-Fi interface to sleep When the
screen turns off / Never when the phone is plugged in / Never.
• MAC address
•Proxy
70
: View your phone’s Media Access Control address.
: Assign a Proxy Name to your device.
Advanced
•Port
: Assign a Wi-Fi communications Port to your device.
• IP settings
: Enable and specify a static Internet Protocol address.
(Sometimes required by enterprise networks.)
Bluetooth
Bluetooth is a short-range wireless communications technology
capable of exchanging information over a distance of about 30
feet without requiring a physical connection.
Unlike infrared, you don't need to line up the devices to beam
information with Bluetooth. If the devices are within a range of
one another, you can exchange information between them, even
if they are located in different rooms.
The Bluetooth wireless technology settings menu provides the
ability to view and change the device name, show the visibility,
and set the security for the device.
.
Turn Bluetooth On/Off
When the Bluetooth is turned on, you can use the Bluetooth
features available. When the Bluetooth is turned off, you cannot
send or receive information via Bluetooth. To save battery life or
in situations where Bluetooth use is prohibited, such as airline
traveling, you can turn off the Bluetooth wireless technology
headset.
Page 75

Turn Bluetooth On
䊳
From the
Wireless & network settings
menu, touch
Bluetooth. The associated check box changes color to
green.
Turn Bluetooth Off
䊳
From the
Wireless & network settings
menu, touch
Bluetooth. The associated check box changes color from
green to the background color.
Pair with a New Device
1. From the
Wireless & network settings
menu, touch
Bluetooth settings. The following options are available:
• Bluetooth
: Turns the phone’s Bluetooth technology interface On/
Off.
• Device name
: View or change your phone’s Bluetooth device
name.
• Visible
: Make your phone visible to other scanning and un-paired
Bluetooth devices.
• Scan devices
: Make your phone scan for other discoverable and
un-paired Bluetooth devices.
• Bluetooth devices
: List of Bluetooth devices already paired with
your phone or discovered by your phone when scanning.
2. To pair your phone with a new Bluetooth device:
•
Place the other Bluetooth device in discoverable mode. (See the
device user manual for more information.)
•
From the
Bluetooth settings
menu, touch
Scan devices
Your phone searches for available Bluetooth devices. Named listings for
available devices appear in the display.
•
Touch the device listing you want to pair with your phone. You are
prompted to enter the passkey or PIN for the selected device.
•
Enter the device passkey or PIN and touch OK. (See the device user
manual for more information.) Pop-up messages appear to inform
you that pairing with the device and connecting to it are complete.
Note:
If you are pairing and connecting to another phone or to a personal
computer, both devices prompt for a passkey or PIN. To successfully
pair and connect your phone with the other device, the same passkey
or PIN must be entered on both devices.
Note:
Pairing between two Bluetooth devices is a one-time process. Once
paired, the devices will recognize each other and reconnect without
your having to re-enter a passkey or PIN.
Connections 71
.
Page 76

Reconnecting to a Paired Bluetooth Device
To reconnect to a paired Bluetooth headset or handsfree device:
䊳
In the
Bluetooth settings
menu, touch the listing for the
preferred device. The device status changes to indicate the
connection is complete.
Note:
Your phone automatically reconnects with another phones or to
personal computers when you select
select a device. (For example, when sharing a Contact (see “Sending a
Contacts Entry” on page 47)].
Share
➔
Bluetooth
and then
Bluetooth Device Listing Options
Paired and Connected Device
䊳
In the
Bluetooth devices
list, touch and hold a connected
device listing. The following options are available:
• Disconnect
: Break the connection between your phone and this
device. Device remains paired with your phone.
• Disconnect and unpair
: Break the connection between your phone
and this device and desolve the pairing with your phone.
• Options
:
–
Connect
: Make a Bluetooth connection between this device and your
phone.
–
Phone
: Connect this device to your phone’s send and receive audio for
voice calls. (For connections with phone headsets and handsfree
devices.)
72
–
Media
: Connect this device to your phone’s media (music, video, and
so on) audio. (For stereo headsets and handsfree devices.)
Paired and Disconnected Headset
䊳
In the
Bluetooth devices
list, touch and hold a disconnected
Bluetooth headset listing. The following options are
available:
• Connect
: Establish a connection between your phone and this
device.
• Unpair
: Desolve the pairing with your phone.
• Options
:
–
Connect
: Make a Bluetooth connection between this device and your
phone.
–
Phone
: Connect this device to your phone’s send and receive audio for
voice calls. (For connections with phone headsets and handsfree
devices.)
–
Media
: Connect this device to your phone’s media (music, video, and
so on) audio. (For stereo headsets and handsfree devices.)
Paired and Disconnected Device
䊳
In the
Bluetooth devices
list, touch and hold a disconnected
device (other than a headset) listing. The following option
is available:
• Unpair
: Desolve the pairing with your phone.
Page 77

Mobile AP
Use Mobile AP to share your device’s 3G internet connection with
a PC or other device through Wi-Fi, using your device as a mobile
wireless hotspot.
Note:
Mobile AP consumes battery power and uses data service.
To use Mobile AP, you need the Mobile AP feature from your wireless
provider. There is a monthly charge for the Mobile AP feature, and all
data used by connected devices will apply to the customer’s data
allowance. Contact your wireless provider for more information.
Configuring Mobile AP Settings
Configure your device’s Mobile AP settings, including your
device’s name and password, and set the visibility of your
device’s Mobile AP.
For more information, see “Mobile AP settings” on page 74.
Launching Mobile AP
Activate your device’s Mobile AP application to allow other
devices to use your device’s 3G internet connection.
1. From the
2. Touch
3. Mobile AP consumes battery power. Read the information
4. Your device establishes a connection to the network for the
Wireless & network settings
Mobile AP
.
Mobile AP
about Mobile AP, then touch
to launch Mobile AP. Read the information
Accept
about battery usage, then touch
menu, touch
to proceed.
Accept
to proceed.
Mobile AP.
5. Activate Wi-Fi on your PC or other device, then follow the
prompts on your device to connect.
Tip:
Your device’s default password is your device phone number. For more
information, see “Mobile AP” on page 73.
6. When you are finished using Mobile AP, touch
to close the application.
Connections 73
Mobile AP
Page 78

Connecting a Device via Mobile AP
Use the other device’s Wi-Fi control to connect to your device’s
Mobile AP.
1. Launch Mobile AP on your device. For more information,
see “Launching Mobile AP” on page 73.
2. Activate Wi-Fi on the other device, using the device’s Wi-Fi
control.
3. Scan for Wi-Fi hotspots, and select your Mobile AP from
the list. To find your device’s name, see “Mobile AP
settings” on page 74.
4. At the prompt, enter your device’s Mobile AP password. By
default, the password is your device’s number. For more
information, see “Mobile AP settings” on page 74.
74
Mobile AP settings
1. From the
2. Tou ch
Wireless & network settings
Mobile AP
.
Mobile AP settings
• Network SSID
: The default name for your device is displayed.
menu, touch
for these settings:
Touch to enter a new name for your hotspot, if desired.
• Security
: Choose a security level for your hotspot, from Open or
WPA2 PSK.
• Password
: When Security is set to WPA2 PSK, touch to require a
password to access your device as a hotspot, and set a password.
When enabled, a checkmark appears in the check box.
• Show password
: When enabled, your password appears in the
Password field.
• Hide my device
: Touch to hide your device from other devices
searching for a hotspot. When enabled, a check appears in the
check box.
Tip:
By default, your device’s Mobile AP password is your device number. To
change the password, touch Password, then enter a new password.
Page 79

VPN
You can connect your i100 to an enterprise Virtual Private
Network, such as your employer’s.
To add a VPN:
1. From the
Wireless & network settings
settings ➔
Add VPN
. The screen appears in the display
menu, touch VPN
with the following VPN types:
• Add PPTP VPN
• Add L2TP VPN
• Add L2TP/IPSec PSK VPN
: Point-to-Point Tunneling Protocol
: Layer 2 Tunneling Protocol
: Layer 2 Tunneling Protocol / Internet
Protocol Security Pre-Shared Key
• Add L2TP/IPSec CRT VPN
: Layer 2 Tunneling Protocol / Internet
Protocol Security Certificate-based
2. Touch the desired VPN type. The following settings are
available, depending on the VPN type:
Note:
Contact the Information Technology Security support personnel for the
correct values for these settings.
•
VPN name
•
Set VPN server (L2TP/IPSec PSK and L2TP/IPSec CRT networks)
•
Set IPSec pre-shared key (L2TP/IPSec PSK networks only)
•
Enable encryption (PPTP)
•
Enable L2TP secret (L2TP, L2TP/IPSec PSK networks and L2TP/
IPSec CRT networks)
•
Set L2TP secret (L2TP, L2TP/IPSec PSK networks and L2TP/IPSec
CRT networks)
•
Set user certificate (L2TP/IPSec CRT networks only)
•
Set CA (Certificate Authority) certificate (L2TP/IPSec CRT networks
only)
•
DNS search domains
Mobile networks
You can select roaming options for your i100,
䊳
From the
Wireless & network settings
networks. The following options are available:
• Data enabled
: When enabled, allows you to access data over a
Mobile network.
• Data roaming
: When enabled, lets you use data services on your
phone while you are roaming outside your Home network.
• System select
: Restricts your i100 to use within your Home
network (no roaming), or allows Automatic roaming.
menu, touch Mobile
Connections 75
Page 80

Dial Up Networking
With Dial Up Networking enabled, your phone’s access to all
other data services [such as the Browser and Multimedia
Messaging Service (MMS)] is disabled.
Important!:
Please contact your Wireless Carrier before using your phone as
a modem through Internet Sharing or Tethering. A tethering
service plan is required due to high data usage.
Enabling Dial Up Networking
1. From the
Wireless & network settings
menu, touch Dial Up
Networking. A Notification appears to inform you that, if
you enable Dial Up Networking, you cannot use other data
services. You are prompted to confirm that you want to use
this service.
2. To enable Dial Up Networking, touch
OK
. The check box
changes color from background to green.
Note:
For information on creating a Dial Up Network connection, refer to your
personal computer user documentation.
Disabling Dial Up Networking
䊳
From the
Wireless & network settings
menu, touch Dial Up
Networking. The check box changes color from green to
background. You can now use other data services.
76
Page 81

Section 11: Web and Social Networking
YouTube
View and upload YouTube videos, right from your phone.
䊳
From the Home screen, select
YouTube
.
Applications
➔
Voice Search
Voice Search offers voice-activated Google searches.
1. From the Home screen, select
Voice Search
2. Voice Search uses your location to improve search results
.
and offer other services. Touch
based searches, or
3. At the
Speak now
Disagree
prompt, speak your search criteria slowly
Applications
Agree
to disallow.
➔
to allow location-
and clearly. Google searches for the information and
displays results.
Browser
Your phone is equipped with a full HTML Browser, which allows
you to access the internet.
䊳
From the Home screen, touch
Browser
.
Navigating the web
Command Keys
䊳
Press
䊳
To go forward, press
Touching and dragging
䊳
Touch and drag your finger on the screen to navigate
Back
to return to the previous page.
Menu
➔
Forward
.
pages, and to reposition pages within the screen.
Entering text in a field
䊳
While browsing, touch a text field to display the virtual
QWERTY keyboard to enter text.
Web and Social Networking 77
Page 82

Selecting items on a page
While browsing pages, use gestures and menus to navigate links
on pages:
•
Touch an item or hyperlink to select it.
•
Touch and hold on a hyperlink for these options:
–
Open
: Go to the linked page.
–
Open in new window
–
Bookmark link
–
Save link
–
Share link
–
Copy link URL
: Open a new window to display the linked page.
: Add a bookmark to linked page (without loading it).
: Save the linked page to Download history.
: Send the link via Email, Gmail, or Message.
: Save the link’s URL to the clipboard.
Entering a URL
Access a website quickly by entering the URL.
1. From the Home screen, touch
2. Touch the
URL
field at the top of the screen, then enter the
Browser
.
URL using the virtual QWERTY keyboard.
3. As you enter characters, potential matches display.
Continue entering characters, or touch a match to
complete the URL.
4. Touch
78
Go
to load the page.
Using Browser Windows
You can have up to eight windows open at one time, switching
between windows.
1. From the Home screen, touch
2. To open a new window, press
3. To switch to another open window, press
Windows
. Touch a window to display it.
4. To close a window, press
Close
beside a window to close it.
Menu
Browser
Menu
➔
➔
Windows
.
New window
Menu
. Touch
Using Bookmarks
While browsing, bookmark a site to quickly access it in the
future.
Creating a bookmark
Create a bookmark to a page, for later browsing.
1. From the Home screen, touch
2. Browse to the desired website, then touch ➔
Bookmarks
3. The new website is displayed as a thumbnail with the
command
4. At the
next to the
Add
Add bookmark
URL
. Touch the bookmark to add it.
prompt, confirm the Name and
field.
Browser
.
Location for the bookmark, then touch OK to save the
bookmark.
.
➔
Page 83

Accessing bookmarks and history
Launch a bookmarked page, or reload recent pages.
1. From the Home screen, touch
2. Touch ➔
3. On the
•
Touch a bookmark to load the page.
•
Touch and hold on a bookmark for these options:
–
–
–
–
–
–
–
–
•
Press Menu
4. On the
•
Touch a page to reload it.
•
Touch the star next to a page to bookmark it.
•
Touch and hold on a page for these options:
–
–
Bookmarks
Bookmarks
Open
: Launch the bookmarked page.
Open in new window
Edit bookmark
Add shortcut to Home
Share link
: Send the page’s URL via Email, Gmail, or Messaging.
Copy link URL
Delete bookmark
Set as homepage
Most visited
Open
: Launch the web page.
Open in new window
next to the
tab, use these options:
: Open the linked page in a new window.
: Modify the URL.
: Create a bookmark on the Home screen.
: Save the link’s URL to the clipboard.
: Remove the bookmark.
: Assign the bookmarked link as the home page.
➔
List view
tab, use these options:
: Launch the web page in a new window.
Browser
URL
to view bookmarks as a list.
field.
–
Add bookmark/Remove from bookmarks
remove the bookmark for this page.
–
Share link
.
5. On the
•
•
•
•
: Send the page’s URL via Email, Gmail, or Messaging.
–
Copy link URL
–
Remove from history
–
Set as homepage
opening the Browser.
: Copy the page’s URL to the clipboard for pasting.
: Remove the record of this page.
: Set this page as the default first page when
History
tab, use these options:
Touch a page to load it.
Touch the star next to a page to bookmark it.
To clear the history, press Menu
Touch and hold on a page for these options:
–
Open
: Launch the web page.
–
Open in new window
–
Add bookmark/Remove from bookmarks
remove the bookmark for this page.
–
Share link
–
Copy link URL
another location.
–
Remove from history
–
Set as homepage
opening the Browser.
: Launch the web page in a new window.
: Send the page’s URL via Email, Gmail, or Messaging.
: Copy the page’s URL to the clipboard to paste in
: Remove the record of this page.
: Set this page as the default first page when
Web and Social Networking 79
: Bookmark the page, or
➔
Clear history
: Bookmark the page, or
.
Page 84

Copying Fields or Text
Copy information from a web page to the clipboard for pasting.
Copying text
1. From the Home screen, touch
2. Browse to the desired website.
3. Press
4. On the web page, touch and drag over the text. When you
Menu
➔
More
➔
Select text
Browser
.
.
lift your finger, the text is saved to the clipboard.
5. To paste the copied text, navigate to the desired field (or to
another application), then touch and hold in a text field and
touch
Paste
.
Copying a hyperlink or URL
1. From the Home screen, touch
2. Browse to the desired website.
3. Touch and hold on a hyperlink or URL, then press
Menu
for these options:
•Open
: Launch the web page.
• Open in new window
• Bookmark link
• Save link
• Share link
• Copy link URL
80
: Launch the web page in a new window.
: Create a bookmark to the page (without loading it).
: Save the linked page to Download history.
: Send the page’s URL via Email, Gmail, or
: Save the link’s URL to the clipboard.
Browser
.
Messaging
.
Browser Menu
While viewing a web page, press Menu
•
New window
: Open a new browser window. The previous browser
for these options:
windows remain open in the background (use the Windows option to
switch between windows).
•
Bookmarks
•
Windows
•
Refresh
•
Forward
•
More
–
–
–
–
–
–
–
: Create and manage bookmarks for favorite sites.
: Switch between windows, or open a new window.
: Update the current page’s content from the server.
: Move forward to a previously-viewed page.
:
Add bookmark
Find on page
Select text
where you can drag your finger over text to select it and copy it to the
clipboard.
Page info
Share page
Email, Gmail, or
Downloads
Settings
: Create a bookmark for the current page.
: Search for content on the current page.
: Enable the text selector. Returns you to the web page,
: View information about the current page, including the URL.
: Send the current page’s URL via Bluetooth, Facebook,
Messaging
: View a list of downloads. While viewing downloads, press
Menu
for access to
: Customize the Browser (see Browser Settings).
.
Cancel all downloads
command.
Page 85

Browser Settings
䊳
From the Home screen, touch
More ➔ Settings
➔
• Page content settings
–
Tex t si ze
: Choose a default size for web page content.
–
Default zoom
–
Open pages in overview
: Choose a default zoom level for web pages.
newly-opened pages.
–
Text encoding
–
Block pop-up windows
–
Load images
: Choose a default character set for web pages.
: When enabled, images are automatically loaded when
you visit a page. When disabled, images are indicated by a link, which
you can touch to download the picture.
–
Auto-fit pages
: When enabled, the browser automatically sizes web
pages to fit your phone’s display.
–
Landscape-only display
in the wider landscape orientation (rotate your phone counterclockwise
to view pages in landscape mode).
–
Enable JavaScript
JavaScript scripts on pages you visit.
–
Enable plug-ins
run plug-ins on pages you visit.
Browser ➔
Menu
:
: When enabled, displays an overview of
: When enabled, blocks pop-up windows.
: When enabled, Browser displays all pages
: When enabled, Browser will automatically run
: When enabled, Browser will automatically load and
–
Open in background
current window.
–
Set home page
: When enabled, new windows open behind the
: View and set the default first page that displays when
you launch Browser.
• Privacy settings
–
Clear cache
: Delete content and databases stored on the phone.
–
Clear histor y
: Delete the list of previously-visited pages.
–
Accept cookies
: When enabled, allows Browser to save and read
cookie information used by web pages.
–
Clear all cookie data
–
Remember form data
: Delete cookie information saved to the phone.
: When enabled, stores information you enter
into forms to make future forms easier.
–
Clear form data
–
Enable location
: Deletes saved form information.
: When enabled, sites you visit can request access to
your location.
–
Clear location access
: Clear location access for all web sites.
Web and Social Networking 81
Page 86

• Security settings
• Advanced settings
82
–
Remember passwords
: When enabled, saves usernames and
passwords for sites you visit, to make future visits easier.
–
Clear passwords
–
Show security warnings
: Clear all saved usernames and passwords.
: When enabled, Browser will warn you if
there is a problem with a site’s security.
–
Set search engine
: Select Google / Yahoo! / Bing as your Browser’s
default search engine.
–
Website settings
–
Reset to default:
: View and manage settings for individual websites.
Clear all browser data and reset all settings to the
factory defaults.
Maps
Use Google Maps to find your current location, get directions, and
other location-based information.
Note:
You must enable location services to use Maps, and some features
require Standalone or Google location services. For more information,
see “Location & security settings” on page 87.
䊳
From the Home screen, touch
Maps
.
Applications
➔
Navigating the Map
Zooming
•
Double-tap on the screen to zoom in.
•
Touch Zoom in or Zoom out.
Scrolling
•
Touch and drag on the screen to reposition the map in the display.
Page 87

Touch and Touch and hold
• Touch and hold
on an area of the map to display pop-up
information about the location.
•Touch
a pop-up for these options:
–
Map
: Move the map’s focus to this location.
–
Directions
: Get driving, public transport, or walking directions.
–
Call
: Call the number for this location.
–
Street view
: Get a street-level view of this location (if available).
–
What’s nearby?
–
Search nearby
–
Share this place
Message.
–
Report a problem with the map
Maps.
: Display nearby points of interest.
: Enter search criteria to find nearby points of interest.
: Send these map corrdinates via Email, Gmail, or
: Send an error report to Google
Maps Menu
1. From the Home screen, select
Maps
.
2. While viewing a map, press
•Search
: Enter text criteria to find locations or points of interest.
•Directions
•Layers
• My Location
: Get driving, public transport, or walking directions.
: Choose map layers to display.
: Indicate your location on the map (requires Google
location services; see page 87).
• Join Latitude
: Use the Google Latitude service to share locations
and status with other Google Latitude users.
•More
:
–
Clear Map
: Reset the map after searching or following directions.
–
Starred Places
maps.
–
Labs
–
Cache Settings
connected to a Wi-Fi network and whether to Clear user data from the
tile cache memory.
–
Help
–
Terms, Privacy & Notices
–
About
: Synchronize your starred map items with Google
: Access experimental features.
: Select whether to Prefetch map tiles when not
: Display a searchable Google Mobile Help screen.
: Display legal information.
: Displays information about Google Maps.
Applications
Menu
Web and Social Networking 83
➔
for these options:
Page 88

Section 12: Changing Your Phone’s Settings
This section explains the settings available to customize your
phone to suit your needs and preferences.
Accessing the Settings Menu
䊳
From the Home screen, press ➔
Settings
menu appears in the display.
Settings
. The
Wireless & networks Settings
These settings let you control and tailor how your phone
communicates with networks and other Bluetooth devices. (For
more information, refer to “Connections” on page 69.)
Call Settings
These settings control how your phone places and responds to
calls.
Voicemail
Provides Voicemail service through My carrier.
Voicemail settings
Displays the voicemail number for your carrier.
84
North american dialing
Activating this setting sets your phone’s International Dialing
Code to the North American Dialing Plan value of 011.
Deactivating this setting activates the
International dialing
This setting lets you change your phones International Dialing
Code to one used in countries outside the North American Dialing
Plan.
TTY
Activates your phone’s ability to communicate with a TTY or TDS
device connected to the headset jack.
View call timer
Touching this setting launches the
information, refer to “Call Timer” on page 38). To reset all timers
except Lifetime Calls, press ➔
Call Restrictions
This setting lets you Allow All calls, Allow Contacts calls only, or
Allow None for both Incoming and Outgoing calls.
Internation dialing
Call Timer
screen (For more
Reset all timer
setting.
.
Page 89

Emergency Number
This setting lets you enter up to 3 emergency phone numbers
(including 911, if you want). Calls to these numbers will place
your phone in Emergency mode (For more information, refer to
“Emergency Number Dialing” on page 32).
Auto Answer
This setting lets you select whether your phone automatically
answers incoming calls, and how quickly (that is, after 1, 3, or 5
seconds).
Sound settings
Sound settings let you customize your phone’s audio properties,
such as for ringers, keypad tones, alerts, and more. Touch this
option to access the following settings:
General
Silent mode
Touching this setting silences or restores all phone sounds
except alarms and media players (music and video).
Vibrate
Touch this setting to select when or whether your phone vibrates
to indicate incoming calls.
Vol um e
This setting lets you adjust the volume of the incoming call ringer,
media playing on your phone, and alarms. You can also elect to
apply this volume setting to notification alert tones.
Incoming calls
Phone ringtone
This setting lets you select the default ringtone that plays for all
incoming calls except those from Contacts for whom you have
set unique, identifying ringtones. (For more information, refer to
“Contacts List” on page 39.)
Notifications
Notification ringtone
This setting lets you select the default ringtone that plays for all
Notifications when they occur.
Feedback
Audible touch tones
Touch this setting to enable/disable playing of key tones when
you touch virtual keypad keys or press physical keypad keys.
Changing Your Phone’s Settings 85
Page 90

Audible selection
Touch this setting to enable/disable playing of a tone when you
select an object on the touch screen.
Screen lock sounds
Touch this setting to enable/disable playing of a tone when you
lock or unlock the screen.
Haptic feedback
Touch this setting to enable/disable your phone momentarily
vibrating when you select an object on the touch screen.
Emergency tone
Touching this setting enables/disables the alert tone your phone
sounds during an Emergency call.
Tip:
This feature can be valuable during emergency situations, such as, a
home invasion.
Disabling the Emergency call alert tone can prevent a home invader
from locating you by means of that tone.
86
Display settings
Display settings let you change your phone’s menu appearance,
display brightness and contrast, and display content to better
meet your needs. Touch this option to access the following
settings:
Brightness
With the Auto Brightness setting disabled, this setting lets you
adjust the display brightness to suit yourself.
Automatic brightness
When enabled, this setting disables the manual
Brightness
setting and lets the phone automatically adjust display brightness
for best visibility under existing ambient light.
Auto-rotate screen
Touching this setting enables/disables you phone’s ability to
automatically switch the display between portrait and landscape
orientations depending on how you hold your phone, upright or
on its side.
Animation
This setting lets you select whether No animations, Some
animations, or All animations play on your phone.
Page 91

Screen timeout
This setting lets you set the display backlight to remain on for 8,
15, or 30 seconds; or for 1, 2, 10, or 30 minutes with no activity.
Note:
Prolonged backlight use drains your battery faster.
Location & security settings
Touch this option to access the following settings:
My Location
Use these settings to determine what location method(s) are
available to emergency services and location-based Apps.
Use wireless networks
When enabled, this setting lets your phone use cell towers,
femtocells, and/or Wi-Fi hot spots to determine your location for
emergency and location-based services.
Use GPS satellites
When enabled, this setting lets your phone use GPS satellites to
determine your location to street-level for emergency and
location-based services.
Note:
Prolonged GPS satellite use drains your battery faster.
Screen unlock
Set up screen lock
Use these settings to determine the unlock method for your
phone.
None
Disables the other screen unlock settings and returns you to the
default unlock swipe.
Pattern
When enabled, this setting requires that you draw a pattern on
the display to unlock your phone, instead of the default single
swipe across the display.
PIN
When enabled, this setting requires that you enter a Personal
Identification Number (PIN) to unlock your phone, instead of the
default single swipe across the display.
Passwor d
When enabled, this setting requires that you enter a numeric
password, an alphabetical password, or combination of letters
and numbers to unlock your phone, instead of the default single
swipe across the display.
Changing Your Phone’s Settings 87
Page 92

Passwords
Visible passwords
Touching this setting makes passwords visible/or invisible while
you type them.
Device Administration
Select device administrators
Touching this option lets you add or remove device
administrators.
Credential storage
Use the following settings to establish, maintain, and secure
credentials storage for your phone.
88
Use secure credentials
When enabled, this setting requires that your phone’s functions
and Apps use stored credentials to secure data communications
(such as for E-mail and secure web sites).
Install from SD card
Touch this setting to install secure credentials from a Memory
Card, instead of from network or internet sources.
Set password
Touch this setting to set or change the secure credential storage
on your phone.
Clear storage
Touch this setting to erase all data from the secure credential
storage on your phone.
Page 93

Applications settings
Unknown sources
When enabled, this setting lets you install Apps on your phone
from sources other than Google Market. (For more information,
refer to “Apps (Applications)” on page 65.)
Manage applications
Touch this setting and select an App to move (between phone
memory and memory card), and uninstall third-party Apps
installed on your phone.
Note:
Not all third-party Apps can be moved to the microSD memory card.
The
Move to SD card
Running services
option must be active (highlighted).
Touching this setting lets you free up phone memory by
reviewing and/or disabling services currently running on your
phone.
Development
Touching this setting lets you enable/disable your phone’s App
development support functions.
Accounts & sync settings
Touch this option to access the following settings:
General sync settings
These settings let you control how and when Apps (for example,
Email and Maps) synchronize their data files with network or
internet sources (such as, your Wireless Provider’s and Google’s
servers).
Background data
When enabled, this setting lets Apps installed on your phone
schedule their synchronization, sending, and receiving of data.
Auto-sync
When enabled, this setting lets Apps installed on your phone
synchronize, their data automatically, rather than requiring you to
manually synchronize each App’s data.
Manage accounts
Lists the messaging accounts (personal and business) that
you’ve defined to your phone, and lets you add more accounts or
remove existing accounts.
Changing Your Phone’s Settings 89
Page 94

Privacy settings
Touch this option to access the following settings:
Backup and restore
Back up my data
Enable or disable backup of your data and settings to the Google
server.
Automatic restore
When enabled, Automatic restore will restore backed-up settings
when you reinstall an application.
Personal data
Factory data reset
Touch this option to erase all user data (such as Contact entries
and messages) from your phone.
90
SD card & phone storage settings
Touch this option to access the following settings:
SD card
Total space
Lists the total amount of usable storage space on the Memory
card you have installed in your phone. (For more information,
refer to “Memory Card” on page 11.)
Available space
Lists the amount of unused storage space on the Memory card
you have installed in your phone.
Unmount / Mount SD card
Touching this option frees the Memory card you have installed in
your phone so that you can remove it or mounts a Memory card
you have inserted so that you can use it.
Page 95

Format SD card using Your Phone
Touch this option to prepare a Memory card you have installed for
use by your phone.
Tip:
If you wish to re-use a memory card from another device. It is best to
format the used card before letting your phone store any data on the
card.
Caution!:
Formatting a memory card removes all data from the card.
Warning!:
Repeated formatting of a memory card reduces its service life. Do
not use this option to clear storage space on a memory card.
Formatting a Memory Card
Formatting erases all content from the memory card and
prepares it for use with your phone.
Formatting a Memory Car d using Your Phone
1. From the Home screen, press , then touch
Settings
SD card & phone storage
2. Tou ch
Unmount SD card
3. After unmounting the SD card, touch
4. Follow the prompts to confirm the formatting of the card.
and touch OK.
Format SD card
.
Formatting a Memory Card using Your PC
For best playback of songs stored on a microSD™ or
microSDHC™ memory card, use the PC file system FAT32.
Consult your PC and/or memory card reader documentation for
information about formatting memory cards.
Internal phone storage
Available space
Lists the amount of unused memory in your phone.
➔
Changing Your Phone’s Settings 91
Page 96

Language & keyboard
Language & keyboard settings
Select language
Lets you select English or Español as your phone’s display and
default input language.
Text settings
Swype
Configure Swype settings. Swype is a new way to enter text by
gliding your finger over the characters on the keyboard.
1. From the Home screen, press the
touch
Settings ➔ Language & keyboard ➔ Swype
2. Touch items to configure the setting. Settings include:
• Preferences
–
–
–
–
–
92
:
Language
: Choose US English or Español.
Word Prediction
as you enter text.
Audio Feedback
Vibrate on keypress
Enable Tip Indicator
quick help as you enter text.
: When enabled, suggests possible matching words
: When enabled, plays sounds as you enter text.
: When enabled, the phone vibrates on text entry.
: When enabled, displays a flashing indicator for
Menu Key
, then
.
• Swype Advanced Settings
–
Auto-spacing
selected words and after punctuation marks.
–
Auto-capitalization
letter of the first word in a sentence.
–
Show complete trace
entries display.
–
Word choice window
during text entry.
–
Speed vs. accuracy
•Help
:
–
Swype help
: View the Swype User Manual.
–
Tut or i al
: View a tutorial for learning how to Swype.
• About
:
–
Versi on
: View the current Swype software version.
Android keyboard settings
:
: When enabled, automatically adds spaces after
: When enabled, automatically capitalizes the first
: Choose how long the trace of your Swype
: Select how often word predictions display
: Send the sensitivity of Swype text recognition.
These settings let you select the type of feedback you receive
when you touch an on-screen keyboard key and enable/disable
automatic capitalization and voice input. You can also control
how the Word suggestion (predictive text input) function
operates, enabling/disabling automatic fixing of common typos,
the multiple word pop-up suggestion list, and automatic insertion
of the highlighted word in the suggestion list.
Page 97

Android keyboard
Configure Android keyboard settings. For more information about
entering text with the Android keyboard, see “Entering Text Using
the Android Keyboard” on page 48.
1. From the Home screen, press the
then touch
Android keyboard
2. Touch items to enable or disable the setting. When
Settings ➔ Language & keyboard
.
Menu Key
➔
,
enabled, a check mark appears in the check box.
Settings include:
• Vibrate on keypress
: When enabled, the phone vibrates for each
key press.
• Sound on keypress
: When enabled, a sound plays for each
key press.
• Auto-capitalization
: When enabled, automatically capitalizes the
first letter of the first word in a sentence.
• Voice input
: Voice Input is an experimental feature using Google’s
networked speed recognition. When enabled, Voice input key
appears on the Android keyboard. To use Voice input, touch the
Voice input key, or slide your finger over the keyboard.
• Input languages
: Slide finger on spacebar to change language.
• Word suggestion settings
–
Quick fixes
–
Show suggestions
entering text.
–
Auto-complete
punctuation character automatically inserts the highlighted suggested
word.
User dictionary
: When enabled, corrects common mistakes.
:
: When enabled, displays suggested words while
: When enabled, pressing the spacebar or a
When you enter text, the predictive text features of Swype and
Android keyboard suggest words matching your key touches. If
you find that predictive text often predicts the wrong word, or if
you have special words that you enter often, add them to the
User dictionary.
Add and manage words in your user dictionary.
•
To add a word, press the Menu Key
•
To edit a word, touch the word, then select
•
To delete a word, touch the word, then select
, then select
Changing Your Phone’s Settings 93
Edit
.
Delete
Add
.
.
Page 98

Voice input &output settings
Voice input
Voice recognizer settings
Let you select an input voice language, filter explicit images from
voice searches, block offensive words, elect to show search
hints.
Voice output
Text-to-speech settings
Let you play a sample of speech synthesis, select whether to use
default settings or your selected settings, enable/disable spoken
caller ID,
Default settings
Let you select the default speech engine, install speech synthesis
voice data, select the desired speech rate, select the English or
Spanish as the spoken language.
Engines settings
Let you select and install language-specific speech synthesis
engine settings.
94
Accessibility settings
Touch this option and you are prompted to download and install a
“screen reader” to your phone. This activates the following
setting:
Accessibility
Touching this setting enables/disables the Accessibility services.
Date & time settings
Automatic
Touch this setting to enable/disable automatic setting of the
phone clock-calendar with values from the nework provided by
your Wireless Provider.
Note:
When enabled, this setting disables the
Set time
settings.
Set date, Select time zone
Set date
When enabled, this setting lets you select the current month, day,
and year.
, and
Page 99

Select time zone
When enabled, this setting lets you select current time zone by
city name from a list.
Set time
When enabled, this setting lets you select the current hour,
minute, and time of day (AM / PM).
Use 24-hour format
When enabled, this setting displays the current hour as a number
between 0 and 23. The AM / PM indicator is disabled.
Select date format
Touch this setting to set the date format as
network),
12/31/2011, 31/12/2011
, or
2011/12/31
Normal
(set by the
.
About phone
Touch this option to list the following options and information
about your phone’s current operating condition, hardware, and
software:
•
Status
•
Battery use
•
Legal information
•
System tutorial
•
Model number
•
Android version
•
Baseband version
•
Kernel version
•
Build number
•
Hardware version
Changing Your Phone’s Settings 95
Page 100

Section 13: Health and Safety Information
This section outlines the safety precautions associated with using
your phone. The terms “mobile device” or “cell phone” are used
in this section to refer to your phone.
using your mobile device
.
Read this information before
Exposure to Radio Frequency (RF) Signals
The U.S. Food and Drug Administration (FDA) has published
information for consumers relating to Radio Frequency (RF)
exposure from wireless phones. The FDA publication includes the
following information:
Do cell phones pose a health hazard?
Many people are concerned that cell phone radiation will cause
cancer or other serious health hazards. The weight of scientific
evidence has not linked cell phones with any health problems.
Cell phones emit low levels of Radio Frequency (RF) energy. Over
the past 15 years, scientists have conducted hundreds of studies
looking at the biological effects of the radio frequency energy
emitted by cell phones. While some researchers have reported
biological changes associated with RF energy, these studies have
failed to be replicated. The majority of studies published have
failed to show an association between exposure to radio
frequency from a cell phone and health problems.
96
The low levels of RF cell phones emit while in use are in the
microwave frequency range. They also emit RF at substantially
reduced time intervals when in the stand-by mode. Whereas high
levels of RF can produce health effects (by heating tissue),
exposure to low level RF that does not produce heating effects
causes no known adverse health effects.
The biological effects of radio frequency energy should not be
confused with the effects from other types of electromagnetic
energy.
Very high levels of electromagnetic energy, such as is found in
X-rays and gamma rays, can ionize biological tissues. Ionization
is a process where electrons are stripped away from their normal
locations in atoms and molecules. It can permanently damage
biological tissues including DNA, the genetic material.
The energy levels associated with radio frequency energy,
including both radio waves and microwaves, are not great
enough to cause ionization of atoms and molecules. Therefore,
RF energy is a type of non-ionizing radiation. Other types of
non-ionizing radiation include visible light, infrared radiation
(heat), and other forms of electromagnetic radiation with
relatively low frequencies.
 Loading...