

Page 1

User Manual
Please read this manual before operating your device
and keep it for future reference.
Page 2

Table of Contents
Support .......................................................................... 2
Read me first ................................................................ 3
Health and Safety Warnings .................................. 3
Wearing the Gear VR for S6 .................................4
Before Using the Gear VR for S6 Headset .........4
About the Gear VR for S6 ..................................... 5
Additional Notifications ........................................... 6
Device Functions ......................................................... 8
Function Overview .................................................11
Device Installation and Set Up ............................12
Removing the Mobile Device ..............................19
Connecting a Headset ..........................................20
Using the Charger .................................................21
Replacing the Foam Cushion .............................23
Installing Gear VR for S6 Software ....................25
Completing the Set Up Process .........................27
i
Basic Navigation and Selection ............................28
Using the Touchpad ..............................................28
Moving the Pointer ................................................31
Making a Selection ...............................................32
Navigation - Home Screen ...................................33
Navigation - App Screen ......................................34
Using the Universal Menu ....................................37
Calls .........................................................................43
Viewing Notifications .............................................44
Applications ................................................................45
Loading New Applications ...................................45
Uninstalling Existing Applications .......................46
Oculus Cinema ......................................................47
VR Gallery ...............................................................48
Oculus 360 Videos ...............................................49
Oculus 360 Photos ...............................................50
GEN_SM-R321_ENG_UM_CH_042415_R2
Page 3

Support
Warning! This product contains chemicals known to the State of California to cause cancer and reproductive
toxicity. For more information, please call 1-800-SAMSUNG (726-7864).
This guide provides you with the information you need to get started. For more information and additional
support, please visit the main www.samsung.com support page.
Get support for your Gear VR for GALAXY S6 online.
•
Review your Gear VR for S6’s troubleshooting FAQs, and solutions.
•
Note: Mobile devices and software are constantly evolving—screen images you see here are for reference only.
Note: The Gear VR for S6 and its connected mobile device should only be used with firmware versions that
were approved for use by the device manufacturer.
Important: Some third-party Android “cleanup” programs may recognize the Oculus folder and files as content
to remove and then prompt you to “clean” the related material.
Taking this action will delete your Oculus data used by your Gear VR for S6 and you must reinstall your
content.
For additional information, please visit: www.samsung.com/us/gearsupport.
2
Page 4

Read me first
Please read this guide before using the Gear VR for S6 to ensure safe and proper use.
The Gear VR for S6 is an Innovator Edition device intended specifically for developers and early adopters
of technology. The Gear VR for S6 does not require charging.
Descriptions in this guide are based on the mobile device’s default settings.
•
Important: Use the Gear VR for S6 for its intended purpose only. Using the Gear VR for S6 for other purposes
may result in injury.
The Gear VR for S6 must be connected with a Samsung GALAX Y S®6 mobile device when in use. The Gear
VR for S6 cannot be operated by itself.
Some languages or content may not be available depending on the region or network.
To view the open source license for the Gear VR for S6, refer to opensource.samsung.com.
Health and Safety Warnings
Please ensure that all users of the Gear VR for S6 carefully read the warnings below before using the
•
Gear VR for S6 to reduce the risk of personal injury, discomfort or property damage.
These health and safety warnings are periodically updated for accuracy and completeness. Check www.
•
oculus.com/warnings for the latest version.
3
Page 5

Wearing the Gear VR for S6
Warning! Do not wear glasses when using the Gear VR for S6. Doing so may cause facial injuries. If you have
poor eyesight, we recommended wearing contact lenses when using the Gear VR for S6.
Note: Keep the lenses clean and protect them from getting scratched. If the lenses get dirty or steam up, clean
them with the lens cleaning cloth.
Caution: The Gear VR for S6 can be affected by magnetic interference created by items, such as computers,
TVs, or electric cables. Avoid using the Gear VR for S6 in areas affected by magnetic interference.
Before Using the Gear VR for S6 Headset
The Gear VR for S6 should be adjusted for each individual user, and calibrated by using the
•
configuration software (if available) before starting a virtual reality experience. Failure to follow this
instruction may increase the risk of discomfort.
People who are prone to motion sickness in the real world also have a heightened risk of experiencing
•
discomfort while using the Gear VR for S6. Such individuals should take extra care to read and follow
these warnings carefully.
We recommend consulting with a doctor before using the Gear VR for S6 if you are pregnant, elderly,
•
have psychiatric disorders, suffer from a heart condition, have pre-existing binocular vision abnormalities
or suffer from a heart condition or other serious medical condition.
4
Page 6

Do not use the Gear VR for S6 if you have symptoms of squint, amblyopia, or anisometropia. Using the
•
Gear VR for S6 may aggravate these symptoms.
Do not use the Gear VR for S6 when the attached mobile device is hot as this may cause burns.
•
To prevent any injuries, take frequent breaks when using the Gear VR for S6.
Make sure the Gear VR for S6 is level and secured comfortably on your head, and that you see a single,
•
clear image. If you wear the Gear VR for S6 tilted to one side, you may feel discomfort.
Just as with the symptoms people can experience after they disembark a cruise ship, symptoms of virtual
•
reality exposure can persist and become more apparent hours after use.
These post-use symptoms can include the symptoms above, as well as excessive drowsiness and
•
decreased ability to multi-task. These symptoms may put you at an increased risk of injury when
engaging in normal activities in the real world.
About the Gear VR for S6
The Samsung Gear™ VR for S6 Innovator Edition powered by Oculus™ (also referred to as Gear VR
for S6) is a headmounted, virtual reality device that provides an immersive experience for a wide range
of users.
When you connect a GALAX Y S6 to the Gear VR for S6, you can enjoy multimedia content and play games
by launching apps on the GALAX Y S6. You can use the Gear VR for S6 with the GALAXY S6 or GALAXY
S6 edge and connect additional devices, such as a game controller or a Bluetooth headset, by connecting
them via Bluetooth to your Galaxy S6 device.
5
Page 7

Additional Notifications
The GALAXY S6 may become hotter than normal when used with the Gear VR for S6, especially if
•
you use the devices to play games for an extended period. When the Gear VR for S6 detects a high
temperature, the quality of the application may be degraded or VR applications may be terminated in
order to prevent overheating.
This is normal and does not affect the GALAXY S6’s lifespan or performance.
The GALAXY S6’s battery runtime may become shorter than normal when it is used with the Gear VR for
•
S6 since VR applications use more of the device’s resources and may contribute to battery drain.
You may experience slow loading speed or diminished playback quality in some circumstances, such as
•
after extended use (to prevent the device from overheating) or if your carrier or Wi-Fi network is slow or
out of range.
The availability of VR-enabled content and applications and language support may vary by region.
•
6
Page 8

This product contains chemicals known to the State of California to cause cancer and reproductive toxicity.
For more information, please call 1-800-SAMSUNG (726-7864).
Samsung Electronics America (SEA) , Inc
Address:
85 Challenger Road
Ridgefield Park, New Jersey 07660
Phone:
1-800-SAMSUNG (726-7864)
Internet Address: www.samsung.com
©2015 Samsung Electronics America, Inc. Samsung is a registered trademark of Samsung Electronics Co.,
Ltd. Do you have questions about your Samsung Mobile Device? For 24 hour information and assistance,
we offer a new FAQ/ARS System (Automated Response System) at: www.samsung.com/us/support
7
Page 9

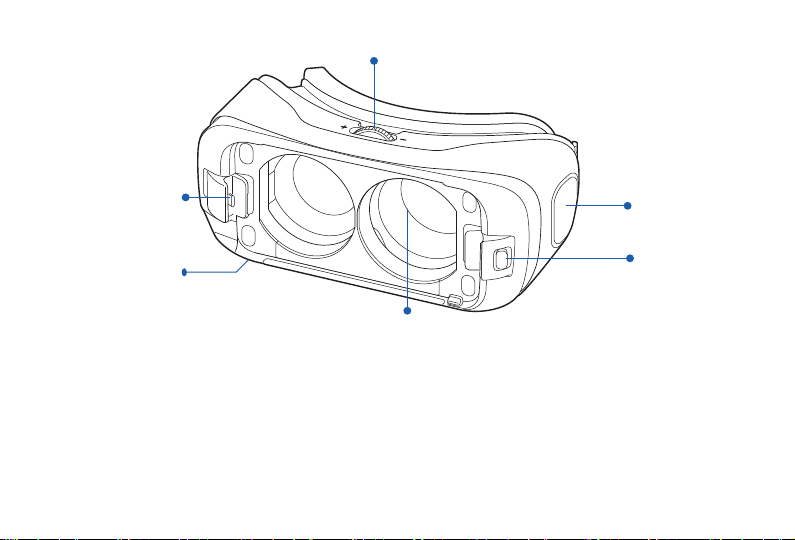
Device Functions
Focus Adjustment Wheel
USB
Connector
Charging
Port
Lens
Note: Ensure that the fan air inlet on the left side of the Gear VR for S6 is clean and unobstructed.
The fan may make noise during operation. This is normal and does not affect the Gear VR for S6’s lifespan or
performance.
Factory lens protectors are pre-installed on the Gear VR for S6. Remove the lens protectors before you use the
Gear VR for S6 so you can see clearly
8
Fan
Phone
Lock
Key
Page 10
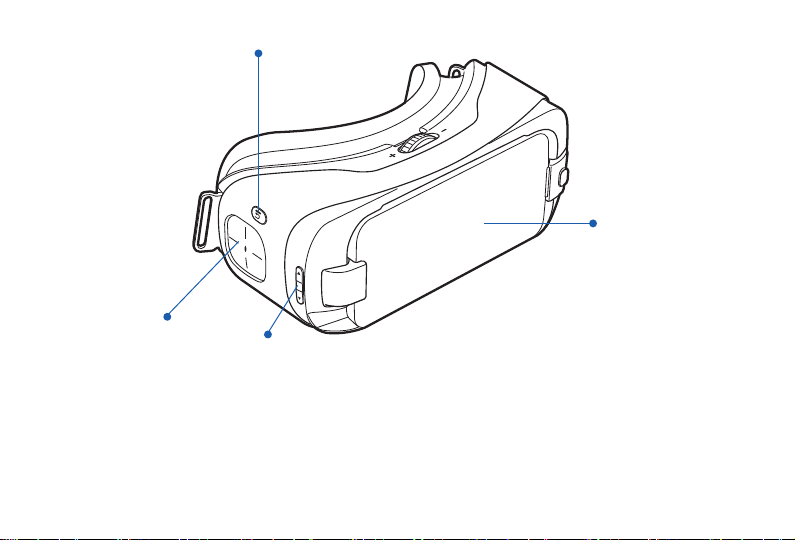
Focus Adjustment Wheel
USB
Connector
Charging
Port
Lens
Note: When you are not wearing the Gear VR for S6, do not place objects on the internal proximity sensor.
Doing so may cause the proximity sensor to remain on and drain the connected Samsung GALAXY S6’s
battery.
Fan
Phone
Lock
Key
9
Page 11
Back Key
Front
Cover
touchpad
Note: The connected Gear VR for S6 does not require charging because it obtains power from the
GALAXY S6.
10
Volume Key
Page 12
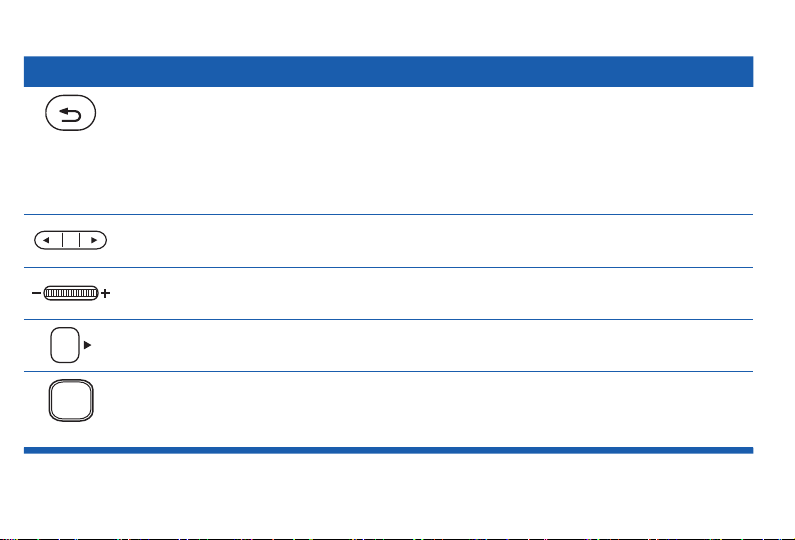
Function Overview
Keys Function
Back
Press to return to the previous screen.
•
Press and hold to access the Universal menu. You can view
•
the status of the Gear VR for S6 and configure settings.
Volume
Focus Adjustment
Wheel
Phone Lock Key
Touchpad
Press to adjust the volume.
•
Rotate to focus by adjusting the distance between the
•
GALAXY S6 and the Gear VR for S6’s lenses.
Press to separate the GALAX Y S6 from the Gear VR for S6.
•
Swipe across to move around the screen.
•
Tap or double-tap to make selections. (Similar to a laptop
•
touchpad).
11
Page 13
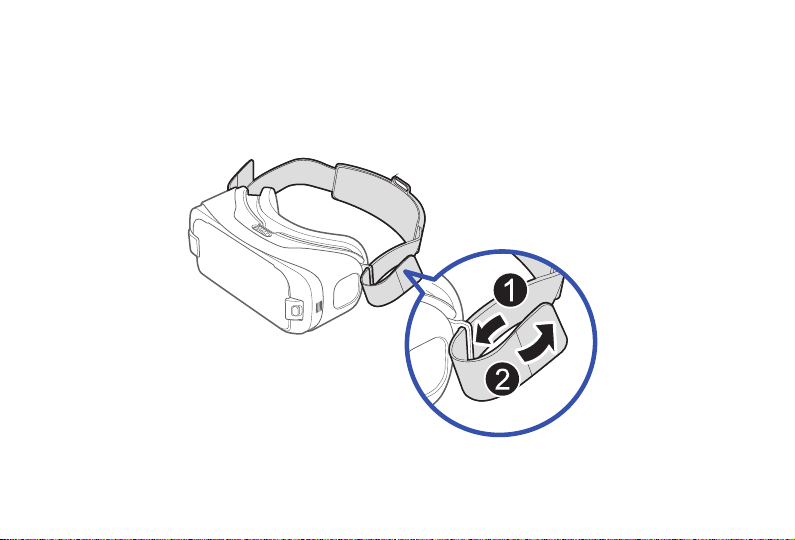
Device Installation and Set Up
Install the straps
1. Insert each end of the main strap through a strap loop on the Gear VR for S6 (1) and use the velcro to
fasten each end (2).
12
Page 14
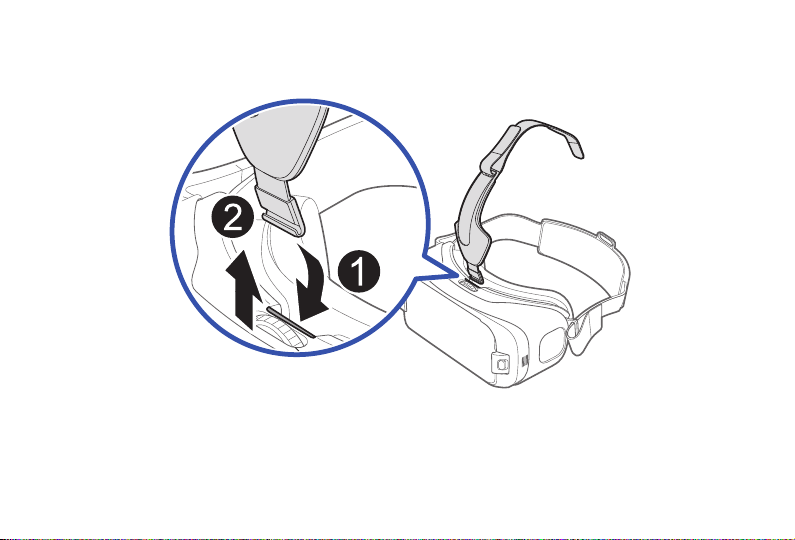
2. Carefully insert the hook (from the top head strap) into the front bar of the Gear VR for S6 (1), then pull
it upward until it locks in place (2).
The hook snaps when secured.
13
Page 15

3. Slide the opposite end of the top head strap through the hole on the back of the main strap (3) and
secure the velcro tip to the underside of the strap (4).
This end of the strap contains a shorter velcro strip.
4
3
Note: The opposite end of this strap contains a longer velcro strip and is used to secure the top head strap to
the front of the Gear VR for S6 frame.
14
Page 16
Install the Mobile Device
1. Deactivate the screen lock feature on the Samsung GALAX Y S6.
2. Press the Phone Lock key to release the latch and then remove the
front cover.
Note: The Gear VR for S6 is compatible only with the GALAXY S6 and the GALAX Y S6 edge.
3. Carefully insert the mobile device (face down) at an angle and insert the Gear VR for S6 connector (1)
into the mobile device’s USB port. This process is similar to installing the mobile device into a standard
charging port. Ensure that the connector is fully inserted into the mobile device’s USB port.
15
Page 17

4. Once securely connected, carefully push the opposite end of the mobile device downward (2) until the
Phone Lock latch snaps onto the mobile device and secures it against the lenses.
Important: Do not forcefully insert the connector into the mobile device as this may damage the connector.
Improper installation can cause scratching on the mobile device.
If it is not securely locked, the GALAXY S6 may accidentally separate from the Gear VR for S6 and be
damaged.
16
Page 18

Note: Verify that your device volume is not set to silent.
If the sound is not emitted when you insert the connector into the
GALAXY S6, the Gear VR for S6 may not have recognized the connection. Carefully reconnect the mobile
device until you hear the sound.
Beginning Gear VR for S6 Software Installation
1. When you connect the mobile device and the Gear VR for S6 for the first time, the mobile device
notifies you with an audio message that you should remove it from the Gear VR for S6.
2. Follow the procedures described in “Installing Gear VR for S6 Software”.
The Gear VR for S6 software installation process requires an active network or Wi-Fi connection.
Important: This software is required to properly use the Gear VR for S6.
17
Page 19

Wearing the Gear VR for S6
1. Align your face and the foam cushion and put on the Gear VR for S6.
Caution! Do not walk or drive while wearing the Gear VR for S6. Always be aware of your surroundings while
using the Gear VR for S6 to avoid injury to yourself or others.
2. Secure the Gear VR for S6 to your head with the straps and place it comfortably over your face.
3. Adjust the length of the top head strap and the main strap.
Caution! If you wear the Gear VR for S6 tilted to one side, it may cause discomfort.
18
Page 20

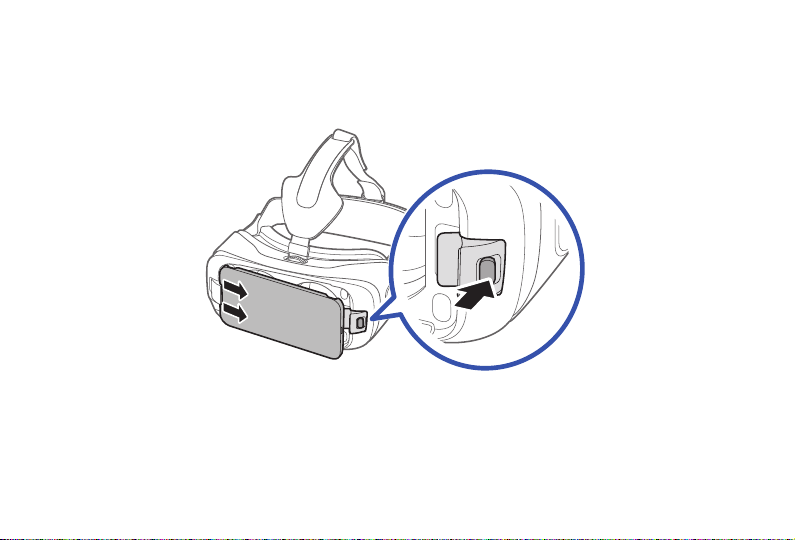
Removing the Mobile Device
Remove the mobile device from the Gear VR for S6 when you are not using it.
► Take off the Gear VR for S6, press the Phone Lock key on the left side of the Gear VR for S6 and
remove the connected mobile device. Then replace the front cover.
2
1
19
Page 21

Connecting a Headset
► Connect a headset/headphone to the currently connected mobile device’s headset jack.
Note: You can connect a headset or a Bluetooth headset to the GALAX Y S6 when using the Gear VR for S6. A
headset is not supplied with the Gear VR for S6. For more information about connecting a Bluetooth headset,
refer to the GALAXY S6’s user manual.
20
Page 22

Using the Charger
You can connect the charger to the charging port on the Gear VR for S6.
•
Note: Use only Samsung-approved USB cables and 2A power adapters.
If using the Gear VR for S6 while the charger is connected:
•
It is powered by the charger and does not use the Samsung GALAX Y S6’s battery. When using
–
content that has high power demands (more than 1.5A) while the charger is connected, the Gear VR
for S6 uses two power sources.
In high power demand situations, the Gear VR for S6 is powered by the charger and the Samsung
–
GALAXY S6’s battery at the same time.
If the Gear VR for S6 is disconnected from the charger while it is being used:
•
The image on the screen may be briefly inactive.
–
During this period, the screen recalibrates and the Gear VR for S6 may not recognize your head
–
movements.
If the Gear VR for S6 is not used while the charger is connected:
•
The Samsung GALAXY S6’s battery will be charged.
–
To save energy, unplug the charger when not in use. The charger does not have a power switch, so you
•
must unplug the charger from the electric socket when not in use to avoid wasting power.
21
Page 23

The charger should remain close to the electric socket and easily accessible while charging.
•
Replace the front cover once you have finished using the Gear VR for S6.
•
Note: For the safest experience always remain seated when using the Gear VR for S6. Take special care to
ensure that you are not near other people, objects, stairs, balconies, windows, furniture,, or other items that
you can bump into or knock down when using — or immediately after using—the Gear VR for S6 headset.
Caution! Take care not to stand up or move around while the Gear VR for S 6 is “plugged in”, as this may
cause injury to the user or damage the device.
22
Page 24

Replacing the Foam Cushion
Over time and with normal use, the foam cushion deteriorates. Replace the foam cushion when necessary.
Note: You can either replace the foam cushion if it deteriorates, or you can change it to another type of foam
cushion that fits comfortably over your nose.
1. Place the Gear VR for S6 face down and carefully detach the previous foam cushion.
2. Carefully align the new foam cushion and press it onto the Gear VR
for S6.
23
Page 25

Caution! When you replace the foam cushion, grip the foam and velcro together firmly and remove it slowly so
you will not deform or tear it.
Do not use the Gear VR for S6 without the foam cushion. Without the foam cushion, the Gear VR for S6 may
not sit properly on your face and may cause discomfort.
24
Page 26

Installing Gear VR for S6 Software
You must install the Gear VR for S6 software in order to use the Gear VR for S6. When you connect the
GALAXY S6 to the Gear VR for S6 for the first time, the set up process automatically begins.
Note: The setup process requires an active network or Wi-Fi connection. The Gear VR for S6 software files
occupy some storage space on your GALAXY S6 device.
1. Unlock your GALAX Y S6 and turn up the volume so you can hear the voice prompts.
2. Carefully install the compatible mobile device into the Gear VR for S6 compartment. For more
information refer to Install the Mobile Device.
Important: If the GALA XY S6 is not connected properly to the Gear VR for S6, you are not prompted to
continue with the set-up process.
3. At the voice prompt, separate the GALAXY S6 from the Gear VR for S6 and remove the GALAXY S6.
4. On the Welcome screen, tap Next to begin the installation process.
5. When prompted to allow Google to check your GALAX Y S6, tap Accept.
6. Read and agree to the terms and conditions in the End User License Agreement (EULA) , then tap Next.
7. Read the health and safety warnings and tap Confirm.
8. From the Gear VR setup wizard screen, tab Install to install the software.
The Gear VR for S6 software begins downloading onto your device.
9. Select a language and tap Continue → Continue. You can change the language later.
25
Page 27

10. Follow the audio prompts. Make a selection.
Create an Account: To begin the process of creating a new Oculus account using your mobile
•
device.
Log In: To enter your previously created Oculus account information.
•
11. If prompted, create a secured Oculus PIN and confirm your account password.
12. To complete the Oculus account registration, access the verification email and follow its’ instructions.
13. Read the OCULUS TERMS OF SERVICE and tap Agree and Continue.
14. Carefully re-connect the mobile device into the Gear VR for S6. The next step checks whether or not
you are correctly wearing the Gear VR for S6.
Note: If the screen appears tilted or skewed while using the Gear VR for S6, take it off. Then, place the Gear
VR for S6 on a flat surface with the lenses facing forward and the Focus Adjustment wheel at the top.
Wait 5-7 seconds before using it again.
26
Page 28

Completing the Set Up Process
1. Read the displayed Health & Safety Warning! information and then use your head to position the Pointer
(crosshair) into the Oculus logo area to continue.
2. Follow the displayed instructions to learn how to:
Position your cursor at desired locations.
•
Use the Touchpad to make selections.
•
Swipe forward and backward using the Touchpad.
•
Swipe up and down
•
Use the VR’s Back key to return to a previous selection.
•
Press and hold the Back key to access the Universal menu. Press the Back key again to exit.
•
This menu contains items such as: Home, Passthrough Camera, Reorient, Do Not Disturb mode,
Brightness, and Comfort mode.
3. Select Continue at each option to complete the tutorial.
4. If prompted to take a tour of the gamepad, make a selection.
27
Page 29

Basic Navigation and Selection
Using the Touchpad
The Touchpad, located at the right side of the Gear VR for S6, is used for both selection and navigation of
displayed elements.
Making Selections (Tapping)
1. Move your head to place the pointer on top of the desired item.
2. Tap the touchpad with your finger.
Note: When you are not wearing the Gear VR for S6, the touchpad does not work
28
Page 30

Moving Around the screen (Swiping)
Swipe forward across the touchpad to move to the next item.
•
Swipe backward across the touchpad to view the previous item.
•
Swiping to next
item (Forward)
Swiping to next
list item
Swiping to previous
item (Backward)
Swiping to previous
list item
29
Page 31

Swipe downward across the touchpad to move ot the next item in a list.
•
Swipe upward across the touchpad to move to the previous item in a list.
•
Note: Some apps may not support upward or downward swiping actions.
30
Swiping to next
item (Downward)
Swiping to previous
item (Upward)
Page 32

Moving the Pointer
The Gear VR for S6 recognizes your head movements and then translates that information as a location
within your current screen environment. Some screens may not display a pointer.
Moving your head around also changes the views and perspectives of the current screen.
•
Pointer
Pointer
The pointer and screen views change depending on the detected location of your head.
•
Note: The pointer is centered in your line sight and follows your head movements.
Pointer
31
Page 33

Making a Selection
You can select items or apps by moving your head and then tapping the touchpad.
1. Move your head to place the displayed pointer onto a desired selection.
2. Tap the touchpad (on the right side of the unit).
32
Page 34

Navigation - Home Screen
Note: Any time the GearVR for S6 application restarts, you are prompted to read the displayed Health and
Safety information and tap the touchpad to accept the terms before proceeding.
Recent
Apps
Oculus
Store
Samsung
Featured
Content
Access to different pages
The Oculus Home screen is the starting point for accessing Apps, files, and features.
From this Home screen you can navigate to any of the three main screens:
Application
Library
33
Page 35

HOME screen: Provides access to the Oculus store, Samsung content, Recent apps, and Library (of
•
apps)
STORE screen: Provides access to either All (new downloadable VR applications) or Samsung
•
(providing Samsung Features content). Use either of the available category tabs (All/Samsung) to then
swipe through the available downloads.
LIBRARY screen: Provides access to all currently installed VR content and applications. Swipe through
•
your available selections and tap the touchpad to activate an app.
Navigation - App Screen
Once you have selected an app (from either your Recent Apps or Library screen), you can then select
additional related options.
Launching a Loaded Application
1. From the Home screen, select Library > Installed tab.
2. Swipe backward or forward across the touchpad to move through your available applications.
3. Hover the pointer over an available app and select Start.
34
Page 36

Accessing Additional Application Functions
1. Navigate to the HOME screen, direct the pointer to the Store tab and tap the touchpad.
2. Select an application entry to view the Apps screen.
– or –
User
Ranking
Application
Logo
Additional
Functions
Comfort
Rating
Launch
App
Access to different pages
35
Page 37

3. From the Library screen, scroll to the desired application, and select View Details.
4. This Apps screen provides both useful application information and additional related options such as:
Rating: View current user ranking for this application (1-5).
•
Comfort: View the current user comfort rating for this application (1-3) .
•
Install/Launch/Play Now: Install an application that is not currently downloaded or Launch/Play the
•
available app.
Summary: Review a brief description of the current application. Tap Close to go back.
•
Details: provides game related information such as Genre, Publisher, Developer, Controllers, Game
•
mode, and Number of players. Tap Close to go back.
Media: displays related application images. Tap Close to go back.
•
Updates: provides access to available application updates.
•
36
Page 38

Using the Universal Menu
This menu can be accessed from any active VR application screen and provides ready access to some
very useful features.
Accessing the Universal Menu
1. From an active VR screen, press and hold the Back key.
2. Place the displayed pointer on top of an available entry and tap the touchpad. Options include:
Oculus Home: Returns you to the Oculus Home screen.
•
Passthrough Camera: Activates the S6’s rear camera and allows you to see through and to
•
the outside environment.
Reorient: Realigns the screen based on the current direction you are facing.
•
Do Not Disturb (On/Off): When activated, sets the Gear VR for S6 to mute the sounds of
•
incoming calls and notifications. Incoming calls do not display and are ignored.
Note: The default state of the Do Not Disturb feature is Off.
Brightness: Adjusts the brightness.
•
Comfort Mode (On/Off): Restores the default color settings or using warm color settings.
•
37
Page 39

Notifications
Charge
Status
Passthrough
Camera
Oculus
Home
Reorient
Note: These features may not be available in some apps.
38
Brightness
Comfort
Mode
Do Not
Disturb
Page 40

Going to Oculus Home
1. From an active VR screen or application, press and hold the Back key.
2. Place the pointer on top of Oculus Home, to begin exiting the current app and return to the main
Home screen.
Using Passthrough Camera
This feature activates the S6’s rear camera and projects it onto your screen so that you can see your
surroundings while keeping the Gear VR for S6 on.
To activate Passthrough Camera:
1. From an active VR screen, press and hold the Back key.
2. Place the pointer on top of Passthrough Camera and tap the touchpad to activate the feature. The
screen displays Passthrough Camera: On.
To deactivate Passthrough Camera:
1. From the active passthrough screen, place the pointer on top of Passthrough Camera.
2. Tap the touchpad to deactivate the feature and turn off the GALAXY S6 camera. The screen displays
Passthrough Camera: Off.
39
Page 41

Reorienting the Gear VR for S6
There may be times when the viewing angle of the screen might change and not appear centered in your
line of sight. Reorienting the screen “resets” the viewing angle to match your current line of sight and
orientation by “resetting the forward location”.
1. From an active VR screen, press and hold the Back key.
2. Orient your head to the direction you want to set as the new “forward” view.
3. Place the pointer on top of Reorient and tap the touchpad to “reset” the view.
Using Do Not Disturb
When activated, this feature is enabled, you will not receive any audio notifications and incoming calls will
be ignored.
To activate the Do Not Disturb Mode:
1. From an active VR screen, press and hold the Back key.
2. Place the pointer on top of Do Not Disturb and tap the touchpad to activate the feature. The
screen displays Do Not Disturb: On.
40
Page 42

To deactivate the Do Not Disturb Mode:
1. From an active Gear VR for S6 screen, press and hold the Back key.
2. Place the pointer on top of Do Not Disturb and tap the touchpad to deactivate the feature. The
screen displays Do Not Disturb: Off.
Note: Once deactivated, you ear new notifications such as those for new incoming calls.
Adjusting Brightness
1. From an active Gear VR for S6 screen, press and hold the Back key.
2. Place the pointer on top of Brightness, then position it over the displayed slider.
3. Swipe upward/downward over the touchpad to move the displayed slider up (increase brightness) or
down (decrease brightness).
41
Page 43

Using Comfort Mode
There might be times when you need to soften the brightness or intensity of the background blue light. This
is accomplished by activating the Comfort Mode feature.
To activate the Comfort Mode:
1. From an active Gear VR for S6 screen, press and hold the Back key.
2. Place the pointer on top of Comfort Mode and tap the touchpad to activate the feature. The blue
background light dims. The screen displays Comfort Mode: On.
To deactivate the Comfort Mode:
1. From an active Gear VR for S6 screen, press and hold the Back key.
2. Place the pointer on top of Comfort Mode and tap the touchpad to deactivate the feature. The blue
background light returns to standard illumination levels. The screen displays ComfortMode:Off.
42
Page 44

Calls
The icon displays on the screen if you receive a call while you are using the Gear VR for S6.
► You can reject the call, by using the pointer on top of your selection and tapping the touchpad.
Caution! The Samsung GALAXY S6 may become hotter than normal when it is used with the Gear VR for
S6. To avoid overheating of the Samsung GALAXY S6, it is recommended you answer incoming calls by
connecting an audio headset or by using a speakerphone to avoid overheating.
Important: If the Do Not Disturb feature (from the Universal menu) is enabled, you are not notified of any
new notifications and incoming calls are ignored.
Answering a call
1. When a call comes in, move your head to place the pointer on top of Incoming Call.
2. Take off the Gear VR for S6 and separate the Samsung GALAXY S6 from the Gear VR for S6.
3. On the S6, tap Answer from the pop-up window.
Note: When you answer a call, the currently running VR app closes.
Note: If you do not see the calling pop up on your S6, you might have to tap the X at the top of the blank
screen to close the current VR app.
43
Page 45

Rejecting a call
1. When a call comes in, move your head to place the pointer on top of Incoming Call.
2. Move your head to position the pointer on top of Reject Call.
3. Once the button highlights, tap the touchpad to reject the incoming call.
Viewing Notifications
While using the Gear VR for S6, you can view general notifications, such as events, messages, and alarms
when they display as a pop-up notification on the screen.
To see more notification details, review them on the Samsung GALAXY S6 after you separate it from the
Gear VR for S6.
44
Page 46

Applications
Loading New Applications
Applications can be loaded from one of two locations:
STORE: Found on the HOME page.
•
OCULUS app: Available on the GALA XY S6’s Applications page.
•
Loading Using the Store
1. Navigate to the HOME screen, direct the pointer to the Store tab and tap the touchpad.
2. Select an application type (All or Samsung).
3. Swipe through the available pages and select an application entry.
4. Place the pointer over the Install button and tap the touchpad to make your selection.
5. Once your application completes loading, select Play.
45
Page 47

Loading from the GALAXY S6
1. From the Home screen, tap Apps > Oculus.
2. Tap Menu and select either Library or Apps.
3. Scroll to an available application and select INSTALL.
4. Once successfully installed, place the GALAXY S6 securely back into the Gear VR for S6 compartment
(Install the Mobile Device).
5. Navigate to the HOME screen, direct the pointer to the Library tab and tap the touchpad.
6. Select the application and follow the prompts.
Uninstalling Existing Applications
You must uninstall applications from the OCULUS application (available on the GALAX Y S6’s
Applications page).
Uninstalling Apps from the GALAXY S6:
1. From the Home screen, tap Apps > Oculus.
2. Tap Menu and select Library.
3. Scroll to an available application and select UNINSTALL.
4. Once successfully uninstalled, place the GALAXY S6 securely back into the Gear VR for S6
compartment (Install the Mobile Device).
46
Page 48

Oculus Cinema
Enjoy videos on a screen in your own virtual movie theatre.
1. Navigate to the HOME screen, direct the pointer to the Library button and tap the touchpad.
2. Select All and then swipe across your touchpad until the Oculus Cinema app displays.
3. Select Start and choose a screen category from the top of the page. Videos are sorted based on the
screen type.
Shorts: View or download free videos from Oculus that are optimized for a standard screen.
•
My Videos: View a video stored in the Samsung GALAXY S6 on a standard screen.
•
4. Select a video and then choose an available surrounding for your movie watching experience.
Note: When the video finishes, the next video automatically plays after several seconds.
To access the playback controls:
1. While the movie is playing, hover your pointer over the bottom area of the displayed movie and tap the
touchpad.
2. Once the controls display, hover over a selection use the touchpad to activate a function.
/ : Pause and resume playback.
•
/ : Rewind or fast-forward a video.
•
Note: You can also swipe backward across the touchpad to rewind a video or swipe forward across it to fastforward a video.
: View the list of available videos.
•
47
Page 49

VR Gallery
View images and videos you created using the Samsung GALAXY S6.
1. Navigate to the HOME screen, direct the pointer to the Library button and tap the touchpad.
2. Select All and then swipe across your touchpad until the VR Gallery app displays.
Playing videos
► Select a video folder, then select a video to watch
To access the playback controls:
1. While the movie is playing, hover your pointer over the bottom area of the displayed movie and tap the
touchpad.
2. Once the controls display, hover over a selection use the touchpad to activate a function.
/ : Pause and resume playback.
•
/ : Rewind or fast-forward a video.
•
To rewind a video, swipe backward across the touchpad.
To fast-forward a video, swipe forward across the touchpad.
48
Page 50

Viewing images
Select an image folder and then select an image.
To view the previous image, swipe backward across the touchpad.
To view the next image, swipe foward across the touchpad.
To enlarge the size of the image, swipe upward on the touchpad.
To reduce the size of the image, swipe downward on the touchpad.
To start a slide show from the image you are currently viewing, tap Play slideshow.
Press the Back key twice to align the screen with the current direction you are facing.
Oculus 360 Videos
This application provides 360 degree views of available panoramic videos.
1. Navigate to the HOME screen, direct the pointer to the Library button and tap the touchpad.
2. Select All and then swipe across your touchpad until the Oculus 360 Videos app is visible.
3. Select Start and choose a video. Turn your head and view a panorama of the video.
To view the previous video, swipe backward across the touchpad.
•
To view the next video, swipe forward across the touchpad.
•
To view the list of videos, tap the touchpad twice.
•
49
Page 51

Oculus 360 Photos
This application provides 360 degree views of available panoramic images.
1. Navigate to the HOME screen, direct the pointer to the Library button and tap the touchpad.
2. Select All and then swipe across your touchpad until the Oculus 360 Photos app displays.
3. Select Start and select an image. Turn your head and view a panorama of the image.
While viewing the image, you can tap the touchpad to use the following features:
• View a list of images.
• Set the image as your favorite image.
To view the previous image, swipe backward across the touchpad.
-
To view the next image, swipe forward across the touchpad.
-
50
 Loading...