

Page 1

User Manual
SM-R210
English. 06/2017. Rev.1.0
www.samsung.com
Page 2

Table of Contents
Basics
3 About the Gear 360
4 Read me first
5 Package contents
6 Device layout
8 Indicator light
9 Camera status screen
11 Memory card
14 Battery
17 Attaching the strap to the Gear 360
18 Turning the Gear 360 on and off
19 Connecting the Gear 360 to a mobile
device
Appendix
50 Troubleshooting
52 Removing the battery
Using the Gear 360
23 Using the Gear 360’s menus
24 Recording videos and taking photos
with the Gear 360 solely
25 Connecting to a mobile device
remotely
26 Recording videos or taking photos
36 Live broadcast
37 Configuring camera settings
39 Viewing videos or images
46 Using the computer program
47 Transferring files to a computer
47 Configuring the settings
49 Updating the software
2
Page 3

Basics
About the Gear 360
The Gear 360 camera captures 360-degree videos and photos of you and your surroundings
in one shot. The two fisheye lenses capture lively photos and videos.
When you connect the Gear 360 to your mobile device via Bluetooth or Wi-Fi, you can capture
videos and photos remotely from your mobile device. You can also view, edit, and share
videos and photos.
If you connect the Gear 360 to a Gear VR, you can view your Gear 360 videos more realistically.
3
Page 4

Basics
Read me first
Please read this manual before using this device to ensure safe and proper use.
•
Images may differ in appearance from the actual product. Content is subject to change
without prior notice.
•
Before using the Gear 360 make sure they are compatible with your device.
•
This product includes certain free/open source software. To see the instructions for
viewing the open source licence, go to the Samsung website (opensource.samsung.com).
Instructional icons
Warning: situations that could cause injury to yourself or others
Caution: situations that could cause damage to your device or other equipment
Notice: notes, usage tips, or additional information
4
Page 5

Basics
Package contents
Check the product box for the following items:
•
Gear 360
•
USB Cable (USB Type-C)
•
Strap
•
Pouch
•
Quick start guide
•
The items supplied with the Gear 360 and any available accessories may vary
depending on the region or service provider.
•
The supplied items are designed only for this Gear 360 and may not be compatible
with other devices.
•
You can only use a computer which is compatible with the USB cable provided.
Visit www.samsung.com to see a list of compatible computers.
•
Appearances and specifications are subject to change without prior notice.
•
You can purchase additional accessories from your local Samsung retailer. Make
sure they are compatible with the Gear 360 before purchase.
•
Use only Samsung-approved accessories. Using unapproved accessories may cause
the performance problems and malfunctions that are not covered by the warranty.
•
Availability of all accessories is subject to change depending entirely on
manufacturing companies. For more information about available accessories, refer
to the Samsung website.
•
Always store the Gear 360 in its pouch. If its lenses are scratched, image quality
may decrease.
5
Page 6

Basics
Front camera status
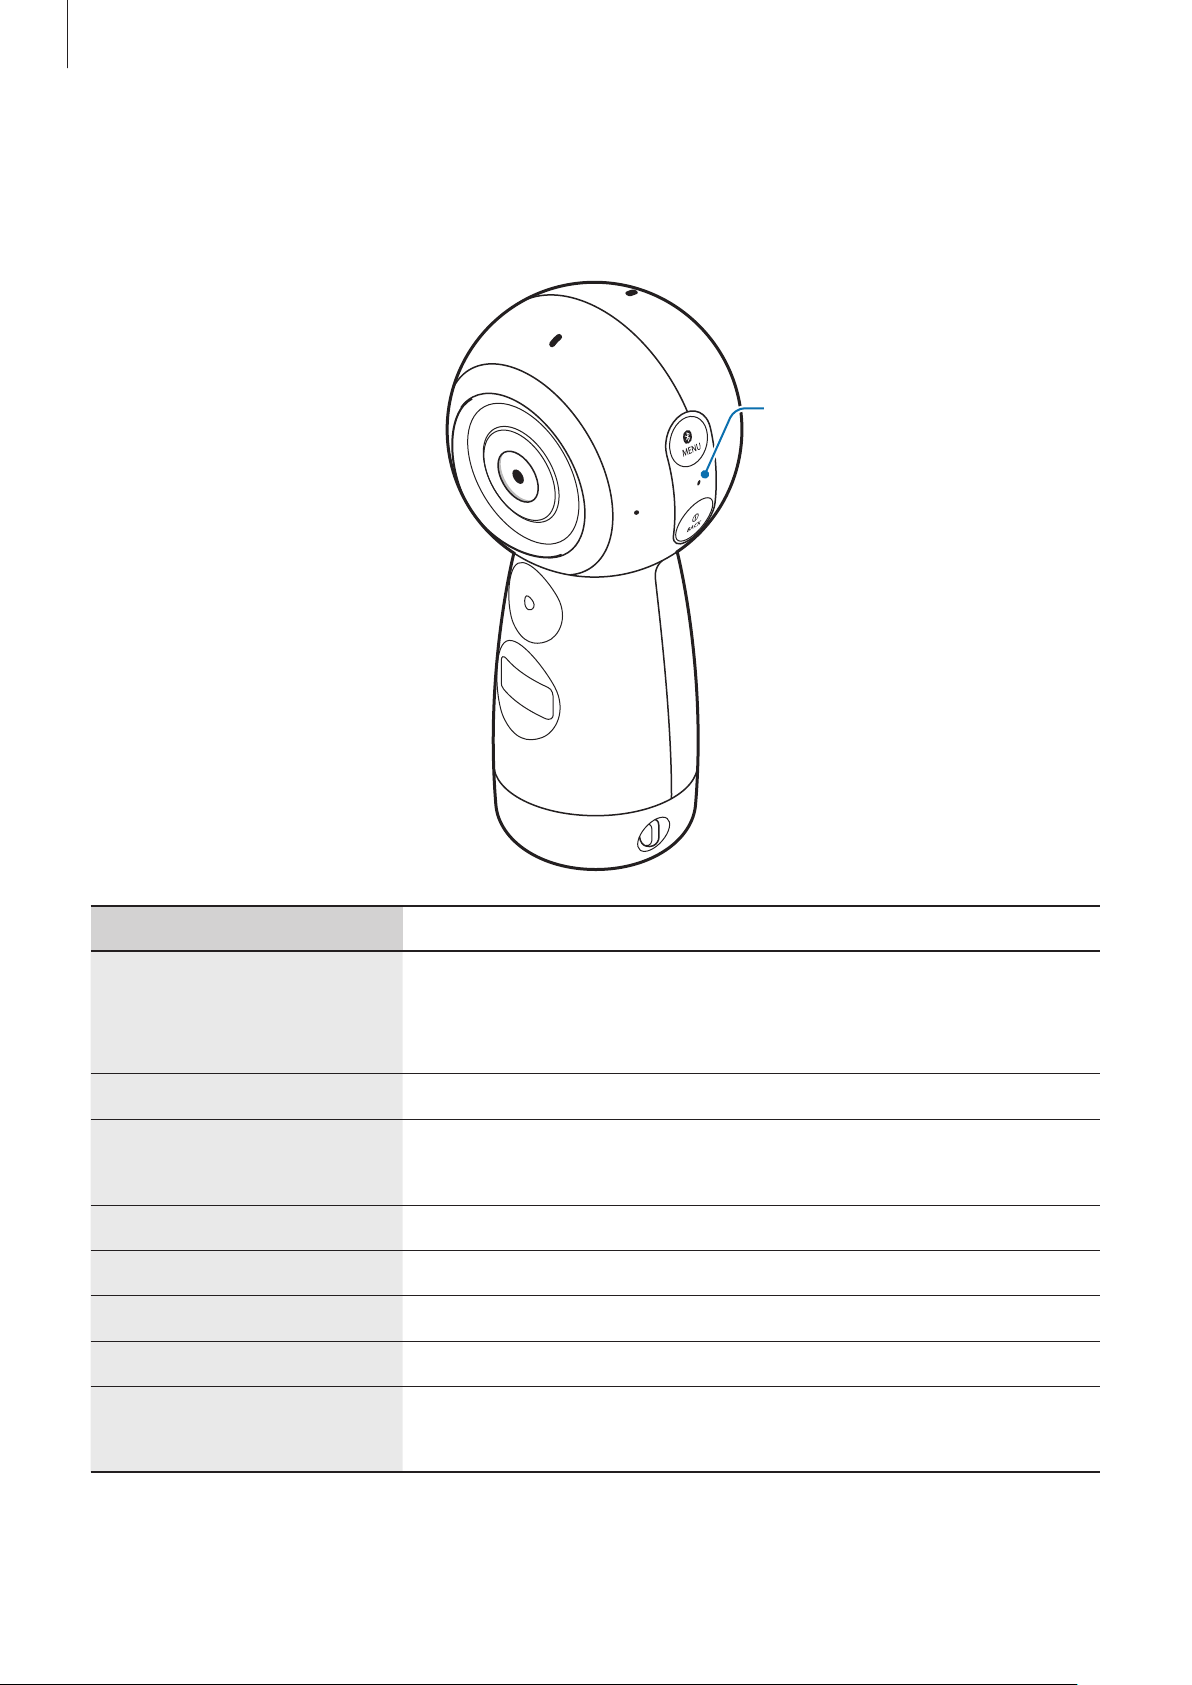
Device layout
light
Front camera
OK key
Camera status screen
Rear camera status
light
Menu key
Indicator light
Power key
Microphone
Strap hole
Rear camera
Speaker
Memory card tray
Multipurpose jack
(USB Type-C)
6
Page 7

Basics
Keys
Key Function
•
Press and hold to turn the Gear 360 on or off.
Power
Menu
OK
•
Press to return to the previous screen on the camera status
screen.
•
Press repeatedly to move to the menu you want.
•
Press and hold to access connection modes.
•
Press to record a video or take a photo, or select the option
you want.
Tripod socket
7
Page 8
Basics
Indicator light
The indicator light informs you of your Gear 360’s status.
Indicator light
Colour Status
•
Power on
Flashes blue three times
Flashes red three times
Flashes red
Red
Green
→
Red
Blue
Flashes blue
Green → Blue
•
Formatting a memory card or successfully resetting the
Gear 360
•
Power off
•
Battery power is low (lower than 10 %)
•
Overheating
•
The battery is charging.
•
The battery is fully charged.
•
Waiting for the mobile device to connect
•
Connected to the mobile device
•
Transferring videos or photos
•
Updating software
8
Page 9

Basics
Current shooting mode
Mobile device
Camera status screen
Access menus, such as camera modes and connection modes, and view the Gear 360’s status
via messages and indicator icons on the camera status screen.
Camera status screen
Indicator icons
Indicator icons appear on the camera status screen. You can check the Gear 360’s status on
the camera status screen.
connection status
Available video
recording time /
Available number of
photos you can take
Battery power /
Charging status
9
Page 10
Basics
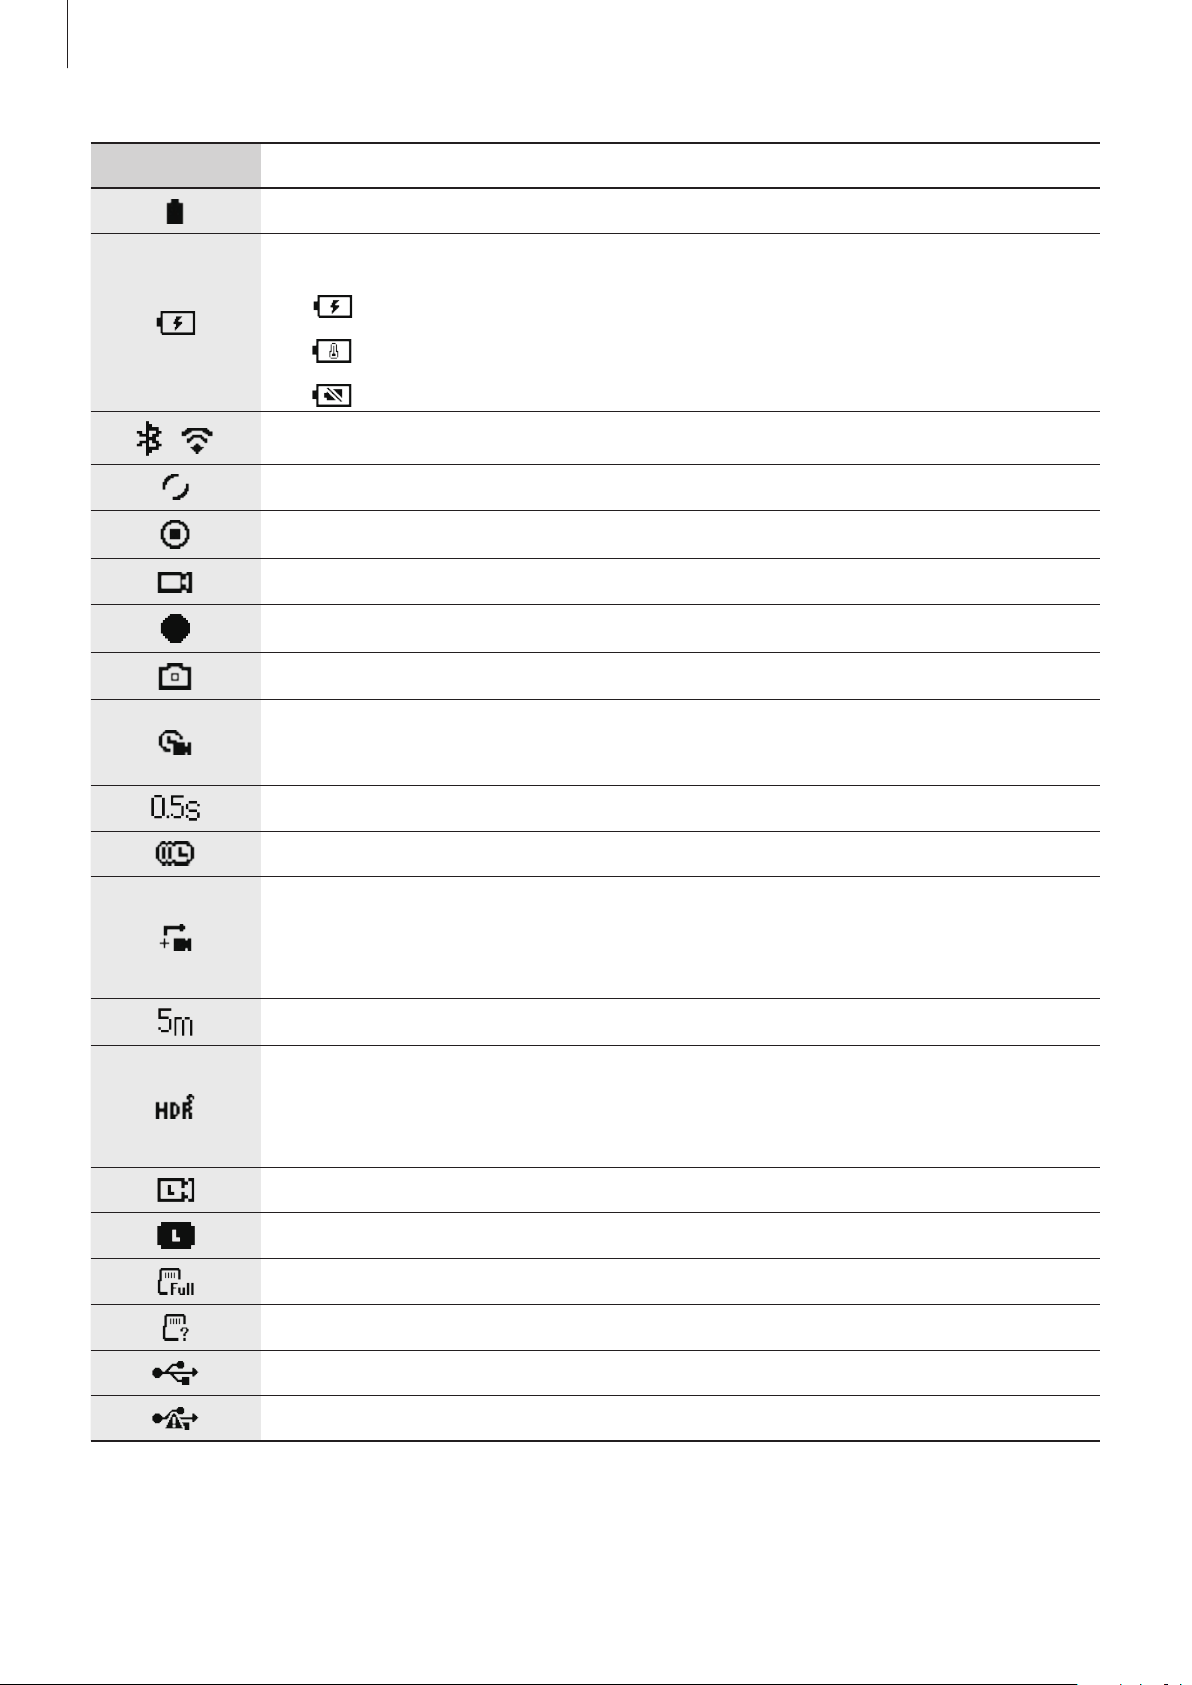
Icon Meaning
Battery power level
Battery charging status
/
•
•
•
Connected to a mobile device
Waiting for the mobile device to connect
Not connected to a mobile device
Recording mode
Recording a video
Photo shooting mode
Time lapse mode
Take several photos at set intervals and save them as one video.
Time lapse shooting interval
Recording a time lapse video
: Charging
: Overheating
: Charger connected improperly
Video looping mode
Record a video continuously by deleting a set period of the previously
recorded content and saving the new content.
Video looping recording time
Landscape HDR mode
Automatically take three photos, combine them, and then calibrate the
colours.
Live broadcast mode
Broadcasting a live video
Memory card is full
No memory card / Memory card error
Connected to a computer with a USB cable
USB connection error
10
Page 11

Basics
Memory card
Installing a memory card
A memory card must be inserted to record videos or take photos. Depending on the memory
card manufacturer and type, some memory cards may not be compatible with your Gear 360.
•
Some memory cards may not be fully compatible with the Gear 360. Using an
incompatible card may damage the Gear 360 or the memory card, or corrupt the
data stored in it.
•
If you use a slow writing memory card, the recording of your video can be
interrupted because the card cannot process data at the rate the video is being
shot. If this occurs, replace the card with a faster memory card or reduce the video
resolution.
•
Use caution to insert the memory card right-side up.
•
Memory cards are sold separately.
•
If you insert or remove a memory card while the Gear 360 is turned on, the power
will turn off.
•
Frequent writing and erasing of data shortens the lifespan of memory cards.
•
When a memory card is not inserted,
status screen.
Check SD Card
is displayed on the camera
11
Page 12
Basics
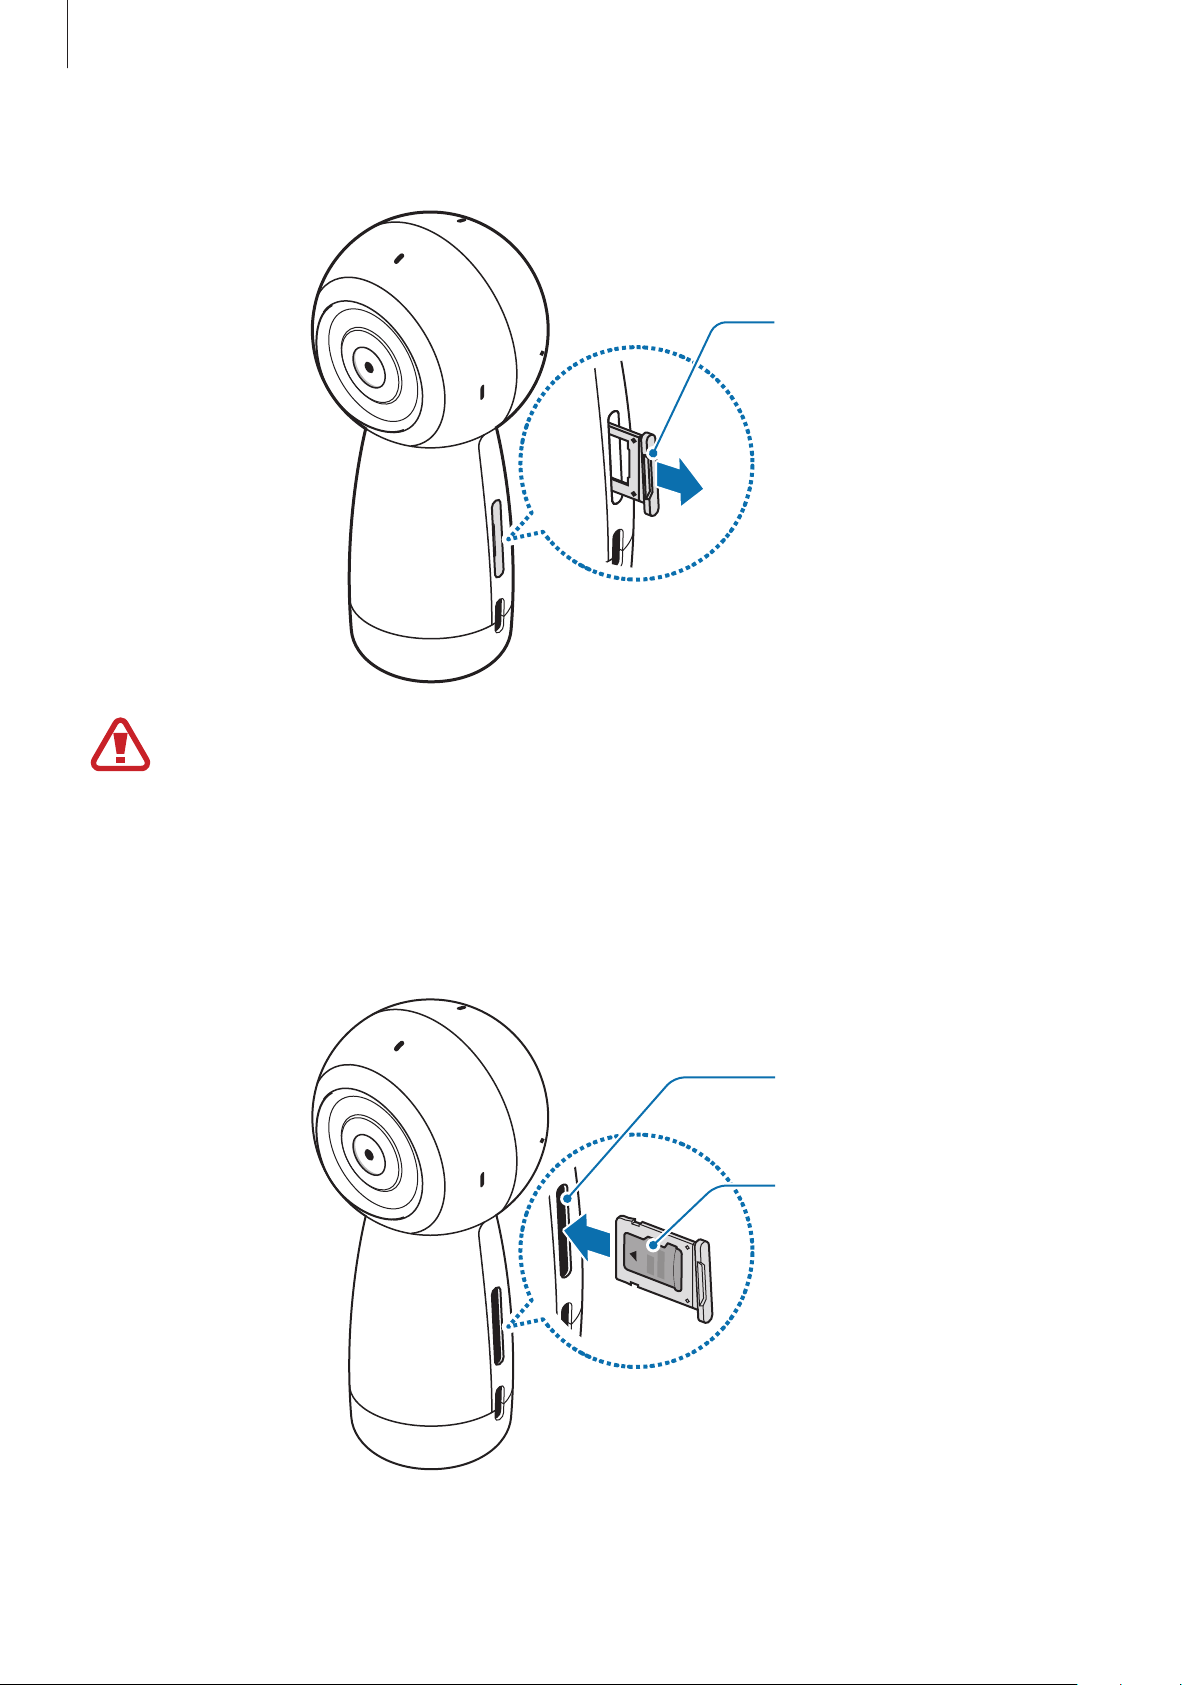
Pull out the memory card tray gently from the memory card tray slot.
1
Memory card tray
Be careful not to damage your fingernails when you remove the memory card tray.
Gently press the memory card into the memory card tray with the gold-coloured
2
contacts properly aligned with the Gear 360’s contacts.
Insert the memory card tray back into the memory card tray slot.
3
Memory card tray slot
Memory card
12
Page 13

Basics
Removing the memory card
Pull out the memory card tray gently from the memory card tray slot.
1
Remove the memory card.
2
Insert the memory card tray back into the memory card tray slot.
3
Formatting the memory card
A memory card formatted on a computer may not be compatible with the Gear 360. Format
the memory card on the Gear 360 or on the mobile device.
Before formatting the memory card, remember to make backup copies of all
important data stored in the memory card. The manufacturer’s warranty does not
cover loss of data resulting from user actions.
Formatting on the Gear 360
Press the Menu key until
1
the OK key to select it.
Press the Menu key until
2
OK key to select it.
Press the Menu key until
3
key to select it.
A confirmation message will appear on the camera status screen when the formatting is
finished.
Settings
Format
Yes
appears on the camera status screen, and then press
appears on the camera status screen, and then press the
appears on the camera status screen, and then press the OK
13
Page 14

Basics
Formatting on the mobile device
On the mobile device, tap the
1
Tap
2
Reset and format
A confirmation message will appear on the camera status screen when the formatting is
finished.
If you want to format a memory card on the mobile device, you must connect the
Gear 360 to the mobile device. Refer to Connecting the Gear 360 to a mobile device
for more information.
→
Samsung Gear 360
Format Gear 360 SD card
app or the
Gear 360
.
app →
Settings
.
Battery
Charging the battery
Charge the battery before using the Gear 360 for the first time or when it has been unused for
extended periods.
Use only Samsung-approved chargers. Unapproved chargers can cause the battery to
explode or damage the Gear 360.
Connecting the charger improperly may cause serious damage to the device. Any
damage caused by misuse is not covered by the warranty.
•
Chargers are sold separately.
•
To save energy, unplug the charger when not in use. The charger does not have a
power switch, so you must unplug the charger from the electric socket when not in
use to avoid wasting power. The charger should remain close to the electric socket
and easily accessible while charging.
14
Page 15

Basics
Plug the small end of the charger into the multipurpose jack of the Gear 360, and plug
1
the large end of the charger into an electric socket.
Multipurpose jack
(USB Type-C)
After fully charging, disconnect the Gear 360 from the charger. First unplug the charger
2
from the Gear 360, and then unplug it from the electric socket.
15
Page 16

Basics
Battery charging tips and precautions
•
When the battery power is low, the battery icon appears empty.
•
If the battery is completely discharged, the device cannot be turned on immediately
when the charger is connected. Allow a depleted battery to charge for a few minutes
before turning on the device.
•
Using a power source other than the charger, such as a computer, may result in a slower
charging speed due to a lower electric current.
•
The device can be used while it is charging, but it may take longer to fully charge the
battery.
•
While charging, the Gear 360 and the charger may heat up. This is normal and should not
affect the Gear 360’s lifespan or performance. If the temperature rises above a certain
level, battery charging will be stopped.
•
You cannot charge the Gear 360 while recording a video, using the time lapse feature, or
using the viewfinder remotely on the connected mobile device.
•
To save the battery power, activate the auto shut-off feature.
•
When you do not use the auto shut-off feature, the battery will be charged only when the
Gear 360 is turned off.
•
If the Gear 360 is not charging properly, take the Gear 360 and the charger to a Samsung
Service Centre.
16
Page 17

Basics
1
2
Attaching the strap to the Gear 360
You can conveniently carry the Gear 360 by attaching the strap to the Gear 360. Insert the
strap into the strap hole, and then pull the loop.
You can also use the strap’s rubber ring to fix the Gear 360 to record videos or take photos.
17
Page 18

Basics
Turning the Gear 360 on and off
Press and hold the Power key to turn on the Gear 360.
To turn off the Gear 360, press and hold the Power key.
•
The Gear 360 turns off if it is not used for a specified period. By using the
power off after
turns off. Refer to Configuring the settings for more information.
•
Follow all posted warnings and directions from authorised personnel in areas, such
as aeroplanes and hospitals.
option, you can set the length of time the Gear 360 waits before it
Auto
Restarting the Gear 360
If your Gear 360 is frozen and unresponsive, press and hold the Power key for more than
7 seconds to restart it.
18
Page 19

Basics
Connecting the Gear 360 to a mobile device
Installing the app on a mobile device
To connect your Gear 360 and mobile device, install the Samsung Gear 360 app or the Gear
360 app on the mobile device.
Download the Samsung Gear 360 (New) app from
For iOS devices, download the Samsung Gear 360 app from
Depending on your mobile device, it may not be compatible with the Gear 360 or
may not support some features. Visit www.samsung.com to see a list of compatible
mobile devices.
Galaxy Apps
App Store
or
Play Store
.
.
Connecting to a mobile device
To control the Gear 360 from your mobile device, the Gear 360 must be paired with the
mobile device. After the Gear 360 has paired with the mobile device, the Gear 360 will try to
connect to the mobile device every time you turn on the Gear 360.
For Android devices, you can capture videos and photos and view them on your mobile
device via Wi-Fi Direct after connecting for the first time.
Connection methods may vary depending on your mobile device and software
version. To connect with an iOS device, connect the Gear 360 with the mobile device
in the Wi-Fi settings, launch the Gear 360 app, and then complete the connection.
Gear 360
Turn on the Gear 360.
1
Press and hold the Menu key.
2
19
Page 20

Basics
When
3
For iOS devices, press the Menu key again, and when
camera status screen, press the OK key.
Mobile device
Launch the
4
For iOS devices, launch the
Tap
5
Connect to Android
If you connect the Gear 360 to your iOS mobile device via Wi-Fi, iOS mobile device
pairing mode (Wi-Fi) will be activated automatically from next time without having
to press the Menu key. Also, Connect to iOS appears on the camera status screen first
when you press and hold the Menu key.
Samsung Gear 360
CONNECT TO GEAR 360
appears on the camera status screen, press the OK key.
app on the mobile device.
Gear 360
.
app.
Connect to iOS
appears on the
Follow the on-screen instructions to complete the connection.
6
When your Gear 360 and mobile device are connected, the Bluetooth or Wi-Fi icon will
appear on the camera status screen.
20
Page 21

Basics
Disconnecting or reconnecting the Gear 360
On the mobile device, tap the
be disconnected from the mobile device.
To reconnect the Gear 360, tap
device.
Samsung Gear 360
CONNECT
on the Samsung Gear 360 app screen of the mobile
app → →
Disconnect
. The Gear 360 will
Connecting a new Gear 360
After you unpair the Gear 360 from your mobile device, you can connect another Gear 360.
On your mobile device, tap
Samsung Gear 360
→ →
Connect to new Gear 360
.
Notices for using Bluetooth
Bluetooth is a wireless technology standard that uses a 2.4 GHz frequency to connect to
various devices over short distances. It can connect and exchange data with other Bluetooth
enabled devices, such as mobile devices, without connecting via cables.
•
To avoid problems when connecting your Gear 360 to another device, place the devices
close to each other.
•
Ensure that your Gear 360 and the other Bluetooth device are within the Bluetooth
connection range (10 m). The distance may vary depending on the environment the
devices are used in.
•
Ensure that there are no obstacles between the Gear 360 and a connected device,
including human bodies, walls, corners, or fences.
•
Do not touch the Bluetooth antenna of a connected device.
•
Bluetooth uses the same frequency as some industrial, scientific, medical, and low power
products and interference may occur when making connections near these types of
products.
•
Some devices, especially those that are not tested or approved by the Bluetooth SIG, may
be incompatible with the Gear 360.
•
Do not use the Bluetooth feature for illegal purposes (for example, pirating copies of files
or illegally tapping communications for commercial purposes).
21
Page 22

Basics
Notices for using Wi-Fi
•
Use your Gear 360 and the connected device within the specified connection range (5 m).
The distance may vary depending on the environment the devices are used in.
•
Ensure that there are no obstacles between the Gear 360 and a connected device,
including human bodies, walls, corners, or fences.
•
If a mobile device connects to the Gear 360 via Wi-Fi Direct while it is connected to a Wi-Fi
network, the mobile device’s screen may flicker due to the limited capability of the Wi-Fi
network.
•
Using a mobile device near other devices which are connected to the Wi-Fi network may
affect the signal strength and cause the screen to flicker.
•
Wi-Fi performance may vary depending on the region. If you connect the Gear 360 to
your mobile device in a place where outdoor Wi-Fi networks are restricted, the device
may become slower or take longer to send files.
•
The transfer time may take longer depending on the Wi-Fi connection status and file size.
22
Page 23

Using the Gear 360
Using the Gear 360’s menus
Select menus that appear on the camera status screen by pressing the keys on the Gear 360.
Accessing and selecting menus
Press, or press and hold, the Menu key.
1
Press the Menu key until the menu you want appears.
2
Press the OK key to select the menu.
3
To undo the selection or return to the previous menu, press the Power key.
Available menus
When pressing the Menu key:
•
Video
•
Photo
•
Time lapse
•
Video looping
•
Landscape HDR
•
Settings
When pressing and holding the Menu key:
•
Connect to Android
•
Connect to iOS
•
Connect to remote
: Recording mode. Refer to Recording videos for more information.
: Photo shooting mode. Refer to Taking photos for more information.
: Time lapse mode. Refer to Time lapse for more information.
: Video looping mode. Refer to Video looping for more information.
: Landscape HDR mode. Refer to Landscape HDR for more information.
: Customise settings. Refer to Configuring the settings for more information.
: Enter pairing mode for an Android mobile device.
: Enter pairing mode for an iOS mobile device.
: Enter remote control mode. A remote control is sold separately.
23
Page 24

Using the Gear 360
Recording videos and taking photos with the Gear 360 solely
You can use the Gear 360 to record videos and take photos without connecting to any other
devices.
Press the Menu key to select a shooting mode and press the OK key.
1
Press the OK key to record a video or take a photo.
2
To stop recording a video, press the OK key.
24
Page 25

Using the Gear 360
Connecting to a mobile device remotely
When the Gear 360 and your mobile device are remotely connected, you can record videos
and take photos using the mobile device as a viewfinder. You can also view the videos and
images captured by the Gear 360 on the mobile device.
Launch the
Camera
Samsung Gear 360
to activate the remote viewfinder. Or, tap
saved in the Gear 360.
Connect to the Gear 360's
camera remotely.
Live broadcast with the Gear
app or the
360.
Gear 360
Gallery
app on your mobile device, and then tap
to access the videos and images
View videos and photos saved in
the Gear 360.
Configure the Gear 360 and app
settings.
For Android devices, the mobile device’s Wi-Fi feature will be activated automatically and the
Gear 360 is connected with your mobile device via Wi-Fi Direct.
The screen and some features may be different depending on the mobile device or
software version.
25
Page 26

Using the Gear 360
Recording videos or taking photos
Introduction
Record videos and take photos directly from the Gear 360 using the front and rear cameras.
When the Gear 360 is connected to your mobile device, you can capture videos and photos
remotely using the mobile device as a viewfinder.
•
A memory card must be inserted into the Gear 360 to record videos or take photos.
•
Due to the camera lens’ structure, blind spots may occur on captured videos and
images. When capturing videos and photos using both the front and rear cameras,
the border where two images are stitched together may not be smooth.
Camera etiquette
•
Do not record videos or take photos of other people without their permission.
•
Do not record videos or take photos where legally prohibited.
•
Do not record videos or take photos in places where you may violate other people’s
privacy.
Tips for getting the best shots
•
Place the subject in the centre of the frame of the camera’s front and rear lenses.
•
In dual lens mode, the border where two images are stitched together will be more
natural when you keep a suitable distance from the subject.
•
Make sure that the lenses are clean and avoid touching the lenses while capturing videos
and images.
26
Page 27

Using the Gear 360
Selecting a camera
Select a camera to use. The selected camera’s status light will turn green.
Using the mobile device
Launch the
1
For iOS devices, launch the
Tap
2
3
Camera
The viewfinder will appear.
Tap and select a camera.
•
•
•
videos or photos.
Samsung Gear 360
.
Dual
: Use both the front and rear cameras simultaneously to capture 360-degree
Front
: Use the front camera to capture wide-angle videos or photos.
Rear
: Use the rear camera to capture wide-angle videos or photos.
Using the Gear 360
Press the Menu key until
1
the OK key to select it.
app on the mobile device.
Gear 360
Settings
app.
appears on the camera status screen, and then press
Press the Menu key until
2
press the OK key to select it.
Press the Menu key until the camera you want to use appears on the camera status
3
screen, and then press the OK key to select it.
•
Dual lens
videos or photos.
•
Single lens Front
•
Single lens Rear
: Use both the front and rear cameras simultaneously to capture 360-degree
Switch lens
: Use the front camera to capture wide-angle videos or photos.
: Use the rear camera to capture wide-angle videos or photos.
appears on the camera status screen, and then
27
Page 28

Using the Gear 360
Recording videos
Record 360-degree videos in dual lens mode, or record wide-angle videos in single lens
mode.
When recording videos or using the streaming feature for an extended period, the
Gear 360 may heat up. If the temperature rises above a certain level, the Gear 360
will stop recording and turn off automatically to prevent damage. If the Gear 360 is
turned off due to overheating, wait for it to cool down before resuming use.
•
iOS devices do not support the preview feature when recording videos.
•
Large files will be divided into 1.8 GB units and saved.
Using the mobile device
Launch the
1
For iOS devices, launch the
Tap
2
Camera
The viewfinder will appear.
Samsung Gear 360
.
Quick settings
Change camera mode.
app on the mobile device.
Gear 360
app.
Camera settings
Change preview mode.
Change the shooting mode.
Preview thumbnail
28
Page 29

Using the Gear 360
Tap
3
4
MODE
Point the camera at a subject and tap to record a video.
While recording, the camera status light will flash red.
→
Video
.
Tap
Tap to finish recording the video.
5
The video will be saved in the Gear 360’s memory card.
to pause the recording. Tap to restart the recording.
The available video recording time will be displayed on the camera status screen.
Changing preview mode
In dual lens mode, you can preview images that will be taken with the front and rear cameras
in different forms by changing preview mode.
On the viewfinder, tap
•
•
•
360° view
Round view
Stretched view
: Display the preview image spherically.
: Display the preview image as an inverted panorama.
to change preview mode.
: Display the preview image with a stretched view.
•
screens.
•
Dual view
Panoramic view
In the 360° view, Round view, and Stretched view modes, you can view images from
different angles by dragging your finger across the screen in any direction. To reset
the angle to the default setting, tap
: Split the preview image to display each of the front and rear cameras’
: Display the preview image with a wide view.
Reset view
.
29
Page 30

Using the Gear 360
Using the Gear 360
Press the Menu key until
1
OK key to select it.
Press the OK key to record a video.
2
While recording, the camera status light will flash red and the recording time will appear
on the camera status screen.
Press the OK key to finish recording the video.
3
The video will be saved in the Gear 360’s memory card.
The available video recording time will be displayed on the camera status screen.
Video
appears on the camera status screen, and then press the
Taking photos
Take 360-degree photos in dual lens mode, or take wide-angle photos in single lens mode.
Using the mobile device
Launch the
1
For iOS devices, launch the
Tap
2
3
4
Camera
The viewfinder will appear.
Tap
MODE
Point the camera at a subject and tap to take a photo.
The photo will be saved in the Gear 360’s memory card.
The available number of photos you can take will be shown on the camera status
screen.
Samsung Gear 360
Gear 360
.
→
Photo
.
app on the mobile device.
app.
30
Page 31

Using the Gear 360
Using the Gear 360
Press the Menu key until
1
Press the OK key to take a photo.
2
The photo will be saved in the Gear 360’s memory card.
The available number of photos you can take will be shown on the camera status
screen.
Photo
appears and then press the OK key to select it.
Time lapse
Take several photos at set intervals and save them as one video. By playing the videos, you
can view how the subject looks different from various perspectives.
You cannot preview the images while recording the time lapse videos.
Using the mobile device
Launch the
1
For iOS devices, launch the
Tap
2
3
4
5
6
Camera
The viewfinder will appear.
Tap
MODE
Tap to set intervals.
Tap to record a video.
Tap
Tap to finish recording the video.
The video will be saved in the Gear 360’s memory card.
Samsung Gear 360
.
→
Time lapse
to pause the recording. Tap to restart the recording.
.
app on the mobile device.
Gear 360
app.
31
Page 32

Using the Gear 360
Using the Gear 360
Press the Menu key until
1
the OK key to select it.
The recording intervals will appear on the camera status screen.
To change the recording intervals, select
lapse Video interval
viewfinder.
Press the OK key to record videos.
2
Press the OK key to finish recording videos.
3
The video will be saved in the Gear 360’s memory card.
Time lapse
on the Gear 360 or tap on the connected mobile device’s
appears on the camera status screen, and then press
Settings
→
Mode settings
→
Time
Video looping
Record a video continuously by deleting a set period of the previously recorded content and
saving the new content. You can make the most of the memory card’s capacity.
iOS devices do not support the preview feature.
Selecting the recording cycle
Launch the
1
For iOS devices, launch the
Tap
2
Camera
The viewfinder will appear.
Samsung Gear 360
Gear 360
.
app on the mobile device.
app.
32
Page 33

Using the Gear 360
Tap
3
4
MODE
Tap and select a recording cycle.
•
5 minutes
beginning of the previously recorded content will be deleted to allow new footage to
be captured.
•
30 minutes
The beginning of the previously recorded content will be deleted to allow new
footage to be captured.
•
60 minutes
The beginning of the previously recorded content will be deleted to allow new
footage to be captured.
•
Maximum
→
Video looping
: Record a video for 5 minutes and save the video at 1-minute intervals. The
: Record a video for 30 minutes and save the video at 5-minute intervals.
: Record a video for 60 minutes and save the video at 5-minute intervals.
: Record a video and save the video at 5-minute intervals until the memory
.
card is full. The beginning of the previously recorded content will be deleted to allow
new footage to be captured.
The saving time of videos may differ depending on the memory card’s capacity.
Using the mobile device
Launch the
1
For iOS devices, launch the
Tap
2
3
4
Camera
The viewfinder will appear.
Tap
MODE
Tap to record a video.
Samsung Gear 360
.
→
Video looping
app on the mobile device.
Gear 360
.
app.
Tap
Tap to finish recording the video.
5
The video will be saved in the Gear 360’s memory card.
to pause the recording. Tap to restart the recording.
33
Page 34

Using the Gear 360
Using the Gear 360
Press the Menu key until
1
press the OK key to select it.
The recording cycle will appear on the camera status screen.
To change the recording cycle, select
recording time
viewfinder.
Press the OK key to record a video.
2
Press the OK key to finish recording the video.
3
The video will be saved in the Gear 360’s memory card.
on the Gear 360 or tap on the connected mobile device’s
Video looping
appears on the camera status screen, and then
Settings
→
Mode settings
→
Video loop
Landscape HDR
Automatically take three photos, combine them, and then calibrate the colours. The dark or
bright parts of photos can be expressed with rich colours.
•
In the Landscape HDR mode, photos may be blurred if they are taken while the
camera or subjects are moving. Place the Gear 360 on a flat surface or use a tripod
to take photos.
•
It may take some time to calibrate colours.
Using the mobile device
Launch the
1
For iOS devices, launch the
Tap
2
Camera
The viewfinder will appear.
Samsung Gear 360
Gear 360
.
app on the mobile device.
app.
34
Page 35

Using the Gear 360
Tap
3
4
MODE
Tap to take a photo.
The photo will be saved in the Gear 360’s memory card.
The available number of photos you can take will be shown on the camera status
screen.
→
Landscape HDR
.
Using the Gear 360
Press the Menu key until
1
press the OK key to select it.
Press the OK key to record a video.
2
The photo will be saved in the Gear 360’s memory card.
•
The available number of photos you can take will be shown on the camera status
screen.
•
The total number of remaining photos may not appear to decrease after taking
photos, depending on the Gear 360’s settings.
Landscape HDR
appears on the camera status screen, and then
35
Page 36

Using the Gear 360
Live broadcast
Invite your family and friends to watch the videos you record with the Gear 360 in real time.
•
This feature may not be available depending on the service region.
•
This feature is only supported by a mobile device running on the Nougat OS or
later.
•
You may incur additional charges for broadcasting via the mobile network.
•
Do not broadcast live videos in places where you may violate other people’s
privacy.
Starting your broadcast
Launch the
1
Tap
2
3
4
5
Live broadcast
The broadcast standby screen will appear. You can set your broadcast to be public or
private.
Tap to invite contacts.
When the broadcast starts, the video link will be sent to the selected contacts via
message. The invited contacts can watch the broadcast by tapping the link.
Tap to start broadcasting.
Tap to end your broadcast.
You can upload the live video or share the live video’s link with others.
Samsung Gear 360
, select the service you want to use, and then sign in to the account.
app on the mobile device.
Watching a live broadcast
Invited contacts can watch the broadcast by tapping the video link they received. For public
broadcasts, viewers can search for your channel name on the service they use.
During your broadcast, viewers can add comments and choose to like or dislike your
broadcast.
Some features may be different depending on the service provider.
36
Page 37

Using the Gear 360
Configuring camera settings
Configuring settings on your mobile device
You can configure camera settings from the viewfinder of the connected mobile device. On
the mobile device, tap the
Quick settings
Samsung Gear 360
app or the
Gear 360
Camera settings
app →
Camera
.
Quick settings
You can use the following options on the connected mobile device’s viewfinder.
The available options may vary depending on the shooting mode and which camera
is being used.
•
•
•
•
•
: Change the exposure value. This determines how much light the camera’s sensor
receives. For low-light situations, use a higher exposure.
: Select an appropriate white balance, so images have a true-to-life colour range.
: Take photos with rich colours and reproduce details even in areas with different
exposure values.
: Set recording intervals while recording time lapse videos. Short intervals are suitable
when recording a video of a fast-moving object and long intervals are suitable when
recording a video of a slow-moving object, such as the setting sun or clouds.
: Set the recording cycle while recording a video looping.
37
Page 38

Using the Gear 360
Camera settings
Tap on the viewfinder or select
app or the Gear 360 app screen.
The available options may vary depending on the shooting mode and which camera
is being used.
•
Photo size
•
Video size
quality videos, but they will take up more memory.
•
Main lens in preview
or front lens to appear in the centre or preview.
•
Timer
•
ISO sensitivity limit
Low values are for stationary or brightly lit objects. Higher values are for fast-moving or
poorly lit objects. However, higher ISO settings can result in noise in photos.
•
Sharpness
: View the resolution for photos.
: Select a resolution for videos. Using a higher resolution will result in higher
: When you use the dual lens, select which lens screen from the rear
: Select the length of the delay before the camera automatically takes a photo.
: Set a limit for the ISO value. This controls camera light sensitivity.
: Set the sharpness of your photos.
Settings
→
Camera settings
on the Samsung Gear 360
•
Reduce wind noise
to improve sound quality.
•
Location tags
•
If you want to use the location tags feature, connect the Gear 360 to your mobile
device.
•
GPS signal strength may decrease in locations where the signal is obstructed, such
as between buildings or in low-lying areas, or in poor weather conditions.
•
Your location may appear on your photos when you upload them to the Internet.
To avoid this, deactivate the location tag setting.
: Attach a GPS location tag to the photo.
: Reduce the permitted range of background noise during recording
Configuring settings on the Gear 360
Press the Menu key until
OK key to select it. Press the Menu key until the settings option you want to change appears,
and then press the OK key to select it.
Settings
appears on the camera status screen, and then press the
On the Gear 360, you can configure settings, such as the camera which is being used,
video size, timer, time lapse interval, recording cycle for video looping, and the auto
power off option.
38
Page 39

Using the Gear 360
Viewing videos or images
Viewing videos
View the recorded videos on the remotely connected mobile device.
Launch the
1
For iOS devices, launch the
Tap
2
3
4
5
Gallery
Tap
PHONE
•
PHONE
•
GEAR 360
Select a video and tap the play icon.
•
: Videos recorded by a single lens
•
: 360-degree videos recorded by dual lenses
The video will start playing.
During playback, spread two fingers apart on the screen to zoom in, and pinch them
together to zoom out.
Samsung Gear 360
.
or
GEAR 360
: View videos saved on your mobile device.
: View videos saved on the Gear 360’s memory card.
.
app on the mobile device.
Gear 360
app.
To rewind or fast-forward the video, drag the play bar. Tap the point on the play bar that
you want to skip to view that section of the video.
Viewing 360-degree videos
You can use additional features when viewing 360-degree videos recorded by both the front
and rear cameras.
Viewing videos from different angles
During playback, drag your finger across the screen in any direction you want. You can
change the viewing angle vertically and horizontally in a 360-degree range.
39
Page 40

Using the Gear 360
Using the motion view feature
You can also view the video from different angles using the motion feature. During playback,
Motion view
tap
To deactivate the motion feature, tap
and tilt or move the device in desired angle.
Changing view mode
During playback, tap
to change the view mode.
•
•
•
•
•
360° view
Round view
Stretched view
Dual view
Panoramic view
In the 360° view, Round view, and Stretched view modes, you can view images from
different angles by dragging your finger across the screen in any direction. To reset
the angle to the default setting, tap
360° view, Round view, Stretched view, Dual view
: Display the image spherically.
: Display the image as an inverted panorama.
: Display the image with a stretched view.
: Split the image to display each of the front and rear cameras’ screens.
: Display the image with a wide view.
Motion view
Reset view
.
or
Panoramic view
.
Viewing photos
View the taken images on the remotely connected mobile device.
Launch the
1
For iOS devices, launch the
Tap
2
3
4
Gallery
Tap
PHONE
•
PHONE
•
GEAR 360
Select an image. If the image was taken by dual lenses, the
preview screen.
Samsung Gear 360
.
or
GEAR 360
: View images saved on your mobile device.
: View images saved on the Gear 360’s memory card.
.
app on the mobile device.
Gear 360
app.
icon will appear on the
40
Page 41

Using the Gear 360
If the image was taken by dual lenses, tap .
5
One image taken by the front camera and another from the rear camera will be stitched
together to create a 360-degree image.
Viewing 360-degree images
You can use additional features when viewing 360-degree images taken by both the front
and rear cameras.
Viewing images from different angles
Drag your finger across the screen in any direction you want. You can change the viewing
angle vertically and horizontally in a 360-degree range.
Using the motion view feature
You can also view the image from different angles using the motion feature. While viewing
the image, tap
To deactivate the motion feature, tap
Motion view
and tilt or move the device in desired angle.
Motion view
.
Changing view mode
While viewing an image, tap
Panoramic view
•
•
•
•
•
360° view
Round view
Stretched view
Dual view
Panoramic view
In the 360° view, Round view, and Stretched view modes, you can view images from
to change the view mode.
: Display the image spherically.
: Display the image as an inverted panorama.
: Split the screen to display each of the front and rear cameras’ screens.
360° view, Round view, Stretched view, Dual view
: Display the image with a stretched view.
: Display the image with a wide view.
or
different angles by dragging your finger across the screen in any direction. To reset
the angle to the default setting, tap
Reset view
41
.
Page 42

Using the Gear 360
Deleting videos or images
On the Samsung Gear 360 app or the Gear 360 app screen, tap
photos you want to delete, and then tap
To delete multiple videos or images, tap and hold a video or an image to delete, select
multiple videos or images, and then tap
files to delete and then tap
Delete
.
Delete
DELETE
.
. For iOS devices, tap
Gallery
, select the videos or
Select
and select the
Saving videos and images to the mobile device
You can save videos and images captured by the Gear 360 to your mobile device.
On the Samsung Gear 360 app or the Gear 360 app screen, tap
Save
videos and images to save, and then tap
mobile device.
You can view the saved files in
•
The resolution of videos and images may be reduced depending on whether your
mobile device supports high resolutions.
•
When you save 360-degree videos to your mobile device, the file size will be larger
PHONE
.
. The videos and images will be saved in the
Gallery
→
GEAR 360
, select
due to the use of a different video compression method.
•
You can change the storage location to the mobile device or the mobile device’s
memory card from
Gallery settings
.
Sharing videos or images
Select the videos or photos you want to share in
method.
You can only share videos and images saved on your mobile device.
PHONE
, tap
Share
, and then select a sharing
42
Page 43

Using the Gear 360
Editing videos and photos
Saving 360-degree photos as standard photos
While viewing a 360-degree photo, tap
The 360-degree photo will be saved as the standard photo.
•
The photo will be saved differently depending on the view mode or angle.
•
You can view saved photos in
•
This feature may not be available depending on your mobile device or software
version.
SAVE AS STANDARD PICTURE
PHONE
.
Saving 360-degree videos as standard videos
While viewing a 360-degree video in
The 360-degree video will be saved as the standard video.
•
The video will be saved differently depending on the view mode or angle.
•
You can view saved videos in
•
You can save 360-degree videos as standard videos only if they are saved on your
mobile device.
PHONE
PHONE
, tap →
.
Save as standard video
.
.
•
This feature may not be available depending on your mobile device or software
version.
Trimming videos
Select a video from the list in
Drag the start bracket and the end bracket to the desired points to set the duration of the
video to be played, and then tap
•
The way for editing the videos may differ depending on the connected mobile
device.
•
You can view edited videos in
•
You can only edit videos saved on your mobile device.
PHONE
SAVE
, and tap
.
PHONE
Trim
.
.
43
Page 44

Using the Gear 360
Capturing images from 360-degree videos
While viewing a 360-degree video in
→
Show capture frame controls
Tap
to capture the current screen.
•
You can view captured images in
•
You can only capture videos saved on your mobile device.
PHONE
. The icon will appear on the screen.
, tap →
PHONE
Capture frame
.
. For iOS devices, tap
Viewing videos and images using the Gear VR
You can enjoy a more lively 360-degree screen when viewing 360-degree videos and images
using the Gear VR.
This feature may not be supported depending on the mobile device or software
version.
Installing and signing in to the Oculus app
To view videos and images captured by the Gear 360 on the Gear VR, install the Oculus app
on the connected mobile device, and then sign in to your Oculus account.
Connect your mobile device to the Gear VR.
1
When a voice prompt requests you to separate the mobile device from the Gear VR,
2
remove the mobile device.
Follow the on-screen instructions on the mobile device to complete the installation.
3
When the sign-in screen appears, sign in to your Oculus account.
4
•
Refer to the Gear VR’s manual for more information about connecting the mobile
device to the Gear VR and the installation process.
•
This content is based on the Gear VR (SM-R324) but some content may differ from
the Gear VR’s manual.
44
Page 45

Using the Gear 360
Viewing 360-degree videos and photos on the Gear VR
You can only view the Gear 360’s content saved in the connected mobile device.
Save videos and images captured by the Gear 360 to the mobile device.
1
•
Method 1: On the mobile device, tap the
Samsung Gear 360
app →
Gallery
→
GEAR
, select files to save, and then tap
360
•
Method 2: On the mobile device, tap
, and then save files.
360
On the mobile device, sign in to your Oculus account.
2
On the mobile device, tap the
3
View on Gear VR
Connect the mobile device to the Gear VR.
4
The list of content saved in the mobile device will appear on the Gear VR screen.
Select content to view using the touchpad on the Gear VR.
5
You can enjoy the videos and images in a 360-degree view.
Refer to the Gear VR’s manual for more information about viewing content using the
touchpad.
.
Samsung Gear 360
Save
.
My Files
→
Internal storage
app →
Gallery
→
→
PHONE
DCIM
→ →
→
Gear
45
Page 46

Using the Gear 360
Using the computer program
On your computer, you can watch videos or create 360-degree videos by stitching together
wide-angle videos taken with the front and rear cameras. You can broadcast live videos in real
time.
Windows OS supports the Gear 360 ActionDirector program and Mac OS supports the
Gear 360 program. You can download these programs from www.samsung.com. For more
information, refer to the program’s help menu.
•
The Gear 360 ActionDirector program provides the video editing feature.
•
You can connect the Gear 360 only to a computer which has a USB Type-A port.
•
When you start the program for the first time, you have to activate the Gear 360.
Follow the instructions to complete the activation process. When activating the
Gear 360 by inserting the serial number, select
number
to check the serial number on your Gear 360.
Settings
→
About device
→
Serial
46
Page 47

Using the Gear 360
Transferring files to a computer
You can transfer files from the Gear 360 to a computer using the Gear 360 as a removable disk
for data transfer.
Do not disconnect the USB cable from the device when you are transferring files.
Doing so may cause data loss or device damage.
The devices may not connect properly if they are connected via a USB hub. Directly
connect the device to the computer’s USB port.
Connect the Gear 360 to the computer using the USB cable.
1
The Gear 360 will be recognised as a removable disk.
Transfer files between your Gear 360 and the computer.
2
Configuring the settings
You can configure settings for the Gear 360 and the app.
On the mobile device, tap the
GEAR 360
•
Sound and LED
–
Volume
–
LED indicator
Even when
following situations:
•
Battery power is low
•
Charging
•
Fully charged
•
Overheating
: Change the notification sound and the light settings.
: Adjust the notification sound volume or mute the sound.
: Set the indicator light and camera status light to turn on or off.
LED indicator
Samsung Gear 360
is deactivated, the indicator light will turn on in the
app or the
Gear 360
app →
Settings
.
47
Page 48

Using the Gear 360
•
Auto power off after
When you do not use the auto shut-off feature, the battery will be charged only when
the Gear 360 is turned off.
•
Battery status
•
Storage space
•
Reset and format
This feature does not appear when a memory card is not inserted or a memory card
error occurs.
•
Firmware version
GEAR 360 APP
•
Camera settings
: Set the length of time the Gear 360 waits before turning off.
: View the battery charging status.
: Check the memory card’s used and available memory capacity.
: Format a memory card or reset the Gear 360.
: View the software version of the Gear 360 and update the software.
: Configure the camera settings.
•
Gallery settings
–
Tilt correction
device.
This feature automatically straightens captured videos and photos when you save
them on your mobile device, so playback may differ from your intended purpose.
Turn off this feature when you record videos or take photos by moving the Gear 360
or with a purposely tilted angle.
–
Storage location
•
About Gear 360 App
: Change the save settings.
: Adjust the tilt of photos and videos when saving them on your mobile
: Select the storage location for photos and videos.
: View the app’s information or update the software.
48
Page 49

Using the Gear 360
Updating the software
The Gear 360 and app can be updated to the latest software.
Updating the Gear 360
You can remotely update the Gear 360’s firmware using the mobile device.
On the mobile device, tap the
Firmware version
•
Ensure that the Gear 360 and the mobile device are sufficiently charged before
updating the firmware.
•
Ensure that the Gear 360 and the mobile device are connected.
•
Do not turn off the Gear 360 or mobile device while updating the firmware.
→
CHECK FOR UPDATES
Updating the app
On the mobile device, tap the
About Gear 360 App
→
UPDATE NOW
Samsung Gear 360
.
Samsung Gear 360
.
app or the
app or the
Gear 360
Gear 360
app →
app →
Settings
Settings
→
→
49
Page 50

Appendix
Troubleshooting
Before contacting a Samsung Service Centre, please attempt the following solutions. Some
situations may not apply to your Gear 360.
Your Gear 360 does not turn on
When the battery is completely discharged, your Gear 360 will not turn on. Charge the
battery completely before turning on the Gear 360.
Another Bluetooth or Wi-Fi device cannot locate your Gear 360
•
Ensure that your Gear 360 enters Bluetooth or Wi-Fi pairing mode. Press and hold the
Menu key. Then, when
status screen, press the OK key to enter Bluetooth or Wi-Fi pairing mode.
•
Ensure that your Gear 360 and the mobile device to connect with are within the
Bluetooth connection range (10 m) or the Wi-Fi connection range (5 m).
If the tips above do not solve the problem, contact a Samsung Service Centre.
Connect to Android
, or
Connect to iOS
appears on the camera
A Bluetooth connection is not established or your Gear 360 and the
mobile device are disconnected
•
Ensure there are no obstacles, such as walls or electrical equipment, between the devices.
•
Ensure that the latest version of the Samsung Gear 360 app or the Gear 360 app is
installed on the mobile device. Update the Samsung Gear 360 app or the Gear 360 app if
it is not up to date.
•
Ensure that your Gear 360 and the other Bluetooth device are within the Bluetooth
connection range (10 m). The distance may vary depending on the environment the
devices are used in.
•
Restart both devices and launch the
mobile device again.
Samsung Gear 360
50
app or the
Gear 360
app on the
Page 51

Appendix
The battery icon is empty
Your battery is low. Charge the battery.
The battery does not charge properly (For Samsung-approved
chargers)
•
Ensure that the charger is connected properly.
•
Visit a Samsung Service Centre and have the battery replaced.
The battery depletes faster than when first purchased
•
When you expose the Gear 360 or the battery to very cold or very hot temperatures, the
useful charge may be reduced.
•
The battery is consumable and the useful charge will get shorter over time.
The time on the Gear 360 has been reset
The time will be reset when you update the Gear 360. You can set the time by connecting it to
the mobile device via Bluetooth.
Your Gear 360 is hot to the touch
When using the Gear 360 for an extended period, the Gear 360 and its battery may heat up.
If the temperature rises above a certain level, the Gear 360 will stop recording and turn off
automatically to prevent damage. If the Gear 360 is turned off due to overheating, wait for it
to cool down before resuming use.
The memory card icon appears on the camera status screen
•
Ensure that a memory card is inserted.
•
Ensure that your memory card is not damaged.
51
Page 52

Appendix
Data stored in the Gear 360 has been lost
Always make backup copies of all important data stored in the Gear 360. Otherwise, you
cannot restore data if it is corrupted or lost. Samsung is not responsible for the loss of data
stored in the Gear 360.
A small gap appears around the outside of the Gear 360 case
•
This gap is a necessary manufacturing feature and some minor rocking or vibration of
parts may occur.
•
Over time, friction between parts may cause this gap to expand slightly.
The lens is dirty
Wipe the lens in a circular motion with a clean, soft cloth.
Removing the battery
•
To remove the battery, contact an authorised service centre. To obtain battery removal
instructions, please visit www.samsung.com/global/ecodesign_energy.
•
For your safety, you must not attempt to remove the battery. If the battery is not
properly removed, it may lead to damage to the battery and device, cause personal
injury, and/or result in the device being unsafe.
•
Samsung does not accept liability for any damage or loss (whether in contract or tort,
including negligence) which may arise from failure to precisely follow these warnings and
instructions, other than death or personal injury caused by Samsung’s negligence.
52
Page 53

Copyright
Copyright © 2017 Samsung Electronics
This manual is protected under international copyright laws.
No part of this manual may be reproduced, distributed, translated, or transmitted in any form
or by any means, electronic or mechanical, including photocopying, recording, or storing
in any information storage and retrieval system, without the prior written permission of
Samsung Electronics.
Trademarks
•
SAMSUNG and the SAMSUNG logo are registered trademarks of Samsung Electronics.
•
Bluetooth® is a registered trademark of Bluetooth SIG, Inc. worldwide.
•
Wi-Fi®, Wi-Fi Protected Setup™, Wi-Fi Direct™, Wi-Fi CERTIFIED™, and the Wi-Fi logo are
registered trademarks of the Wi-Fi Alliance.
•
All other trademarks and copyrights are the property of their respective owners.
 Loading...