

Page 1
Galaxy Watch4
Watch4 Classic
User manual
User manual
Page 2

Contents
Getting started
Device Layout: Galaxy Watch4 | Galaxy Watch4 Classic
Set up your device: Charge the battery | Wireless PowerShare | Wear the Watch
Start using your device: Start using your device | Activation | Galaxy Wearable app |
Lock or unlock your device | Customize keys | Navigation | Change the watch face |
Quick panel | Notifications | Water lock mode | Bedtime mode | Theater mode | Enter
text
Apps
Tools: Alarm | Bixby | Calculator | Calendar | Compass |Contacts | Find My Phone |
Reminder| Samsung Pay | Stopwatch | Timer | Voice Recorder | Weather | World clock
Media: Buds controller | Camera controller | Gallery | Media controller | Messages |
Phone
Health: Samsung Health | Samsung Health Monitor
Google: Play store | Maps
Microsoft: Outlook
Settings
Connections: Bluetooth | Wi-Fi | NFC | Disconnection alerts | Airplane mode | Mobile
networks
Notifications: Notification settings | Advanced notification settings | Wireless
emergency alerts
Sounds and vibration: Sound mode | Vibration | Call vibration | Notification vibration |
Volume | Ringtone | Notification sound | System vibration | System sounds
| Data usage
2
WEA_R89X_R88X_R87X_R86X_EN_UM_TN_UG9_071621_FINAL
Page 3

Contents
Display: Adjust screen brightness | Always on Display | Screen wake-up | Show media
controls
charging info
Device maintenance: Battery | Power saving mode | Watch only mode | Text to
speech
Accessibility: TalkBack | Visibility enhancements | Hearing enhancements | Advanced
settings
Security and privacy: Set a screen lock | Permission manager
Accounts: Samsung account | Google account
Other: Software update | Tips and tutorials | About watch
| Set the screen timeout | Show last app | Font style | Touch sensitivity | Show
| Date and time | Connect to a new phone | Reset the Watch | Location
| Installed services
Learn More
Videos | Tips | Samsung Care | Talk to an agent
Legal information
Samsung Knox | Legal information | Restricting children’s access to your mobile
device
3
Page 4
Getting started
Galaxy Watch4
Galaxy Watch4 Classic
Set up your device
Start using your device
4
Page 5
Getting started
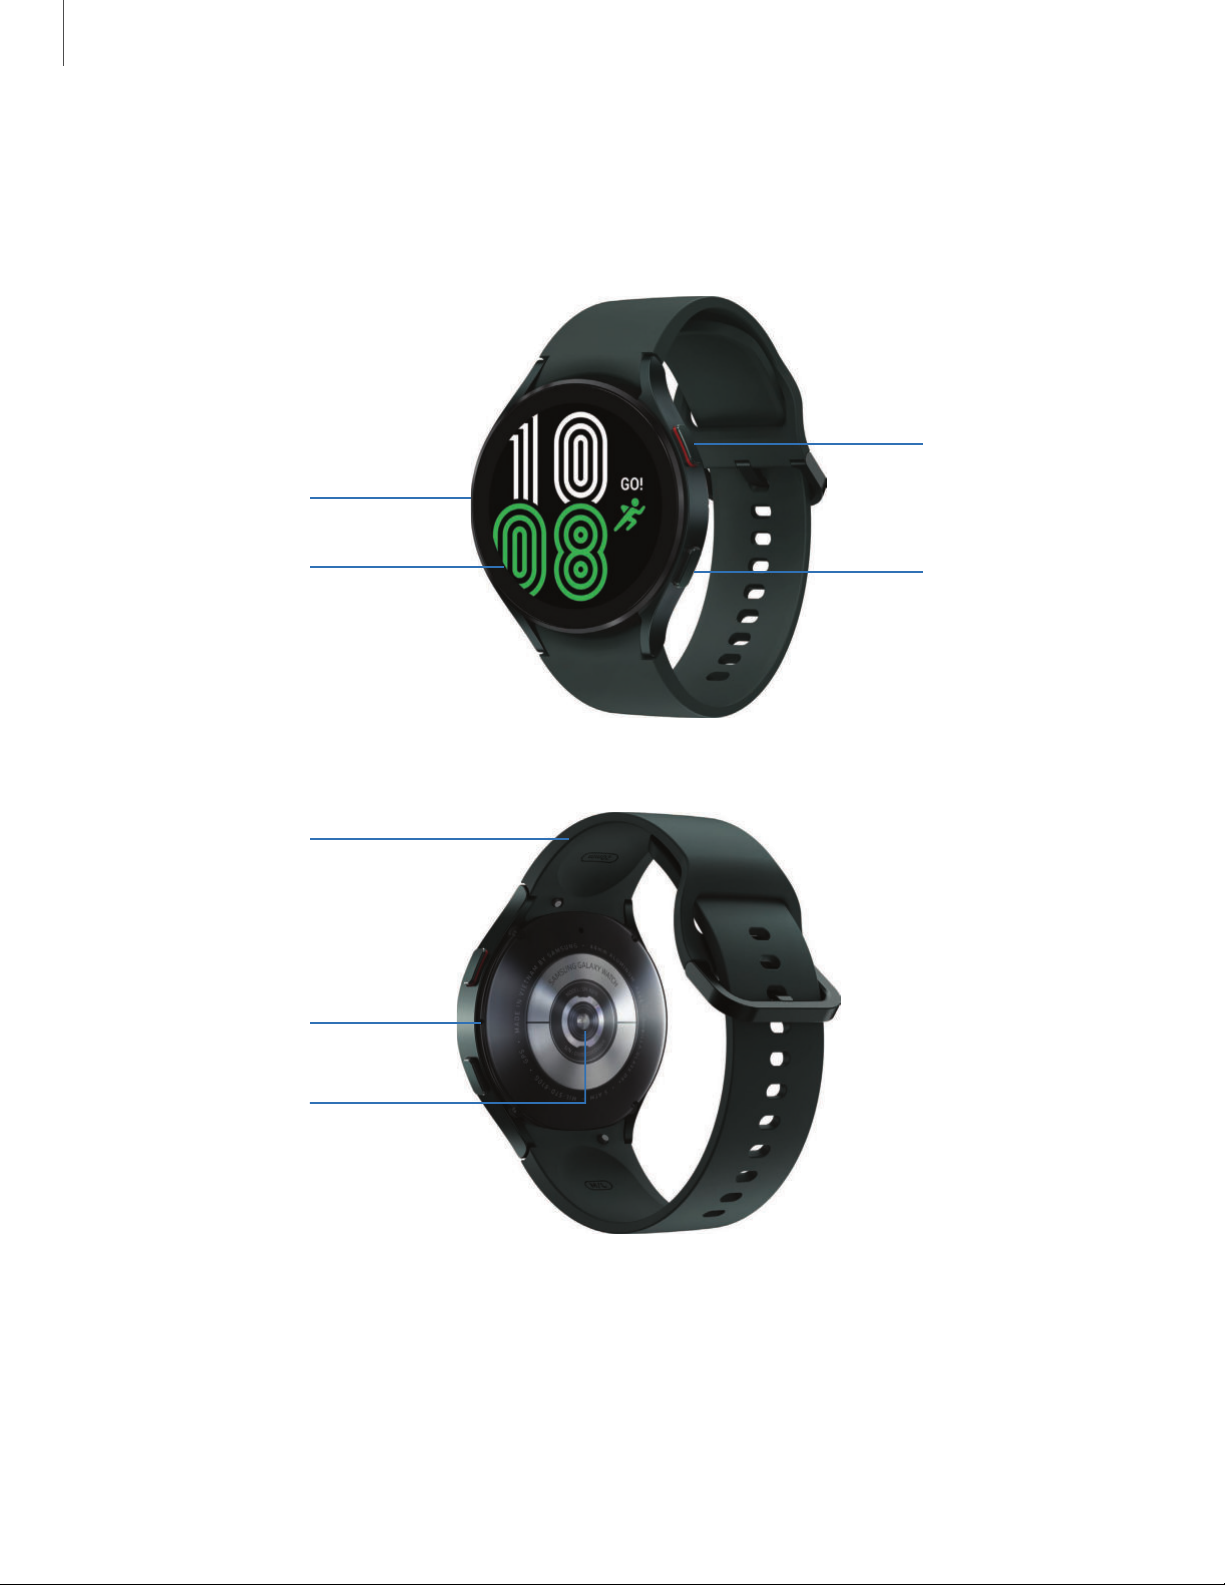
Touchscreen
Band
Heart rate
sensor
Speaker
Back key
Home key
Microphone
Galaxy Watch4
Devices and software are constantly evolving — the illu strations you see here are for reference only.
5
Page 6
Getting started
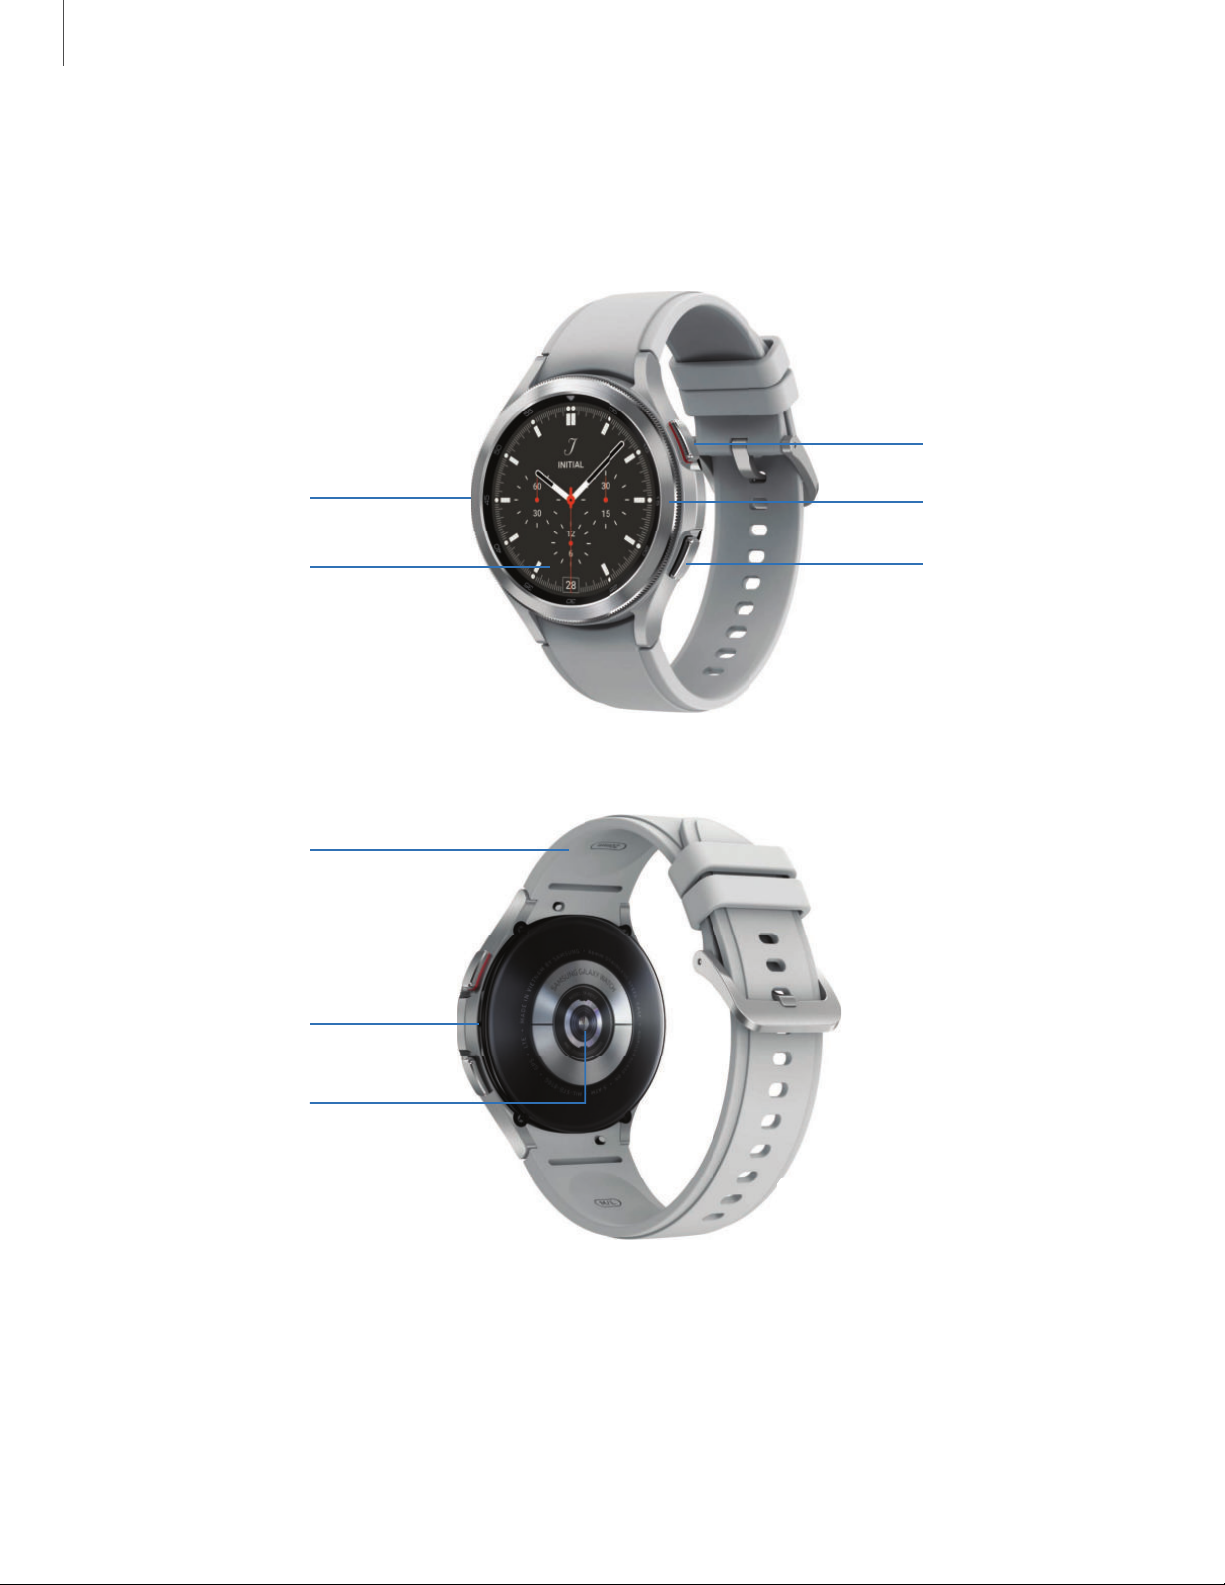
Touchscreen
Back key
Home key
Band
Heart rate
sensor
Speaker
Microphone
Bezel
Galaxy Watch4 Classic
Devices and software are constantly evolving — the illu strations you see here are for reference only.
6
Page 7
Getting started
Set up your device
Learn more about your device hardware, assembling and charging, and how to get
started using your new device.
Charge the battery | Wireless PowerShare | Wear the Watch
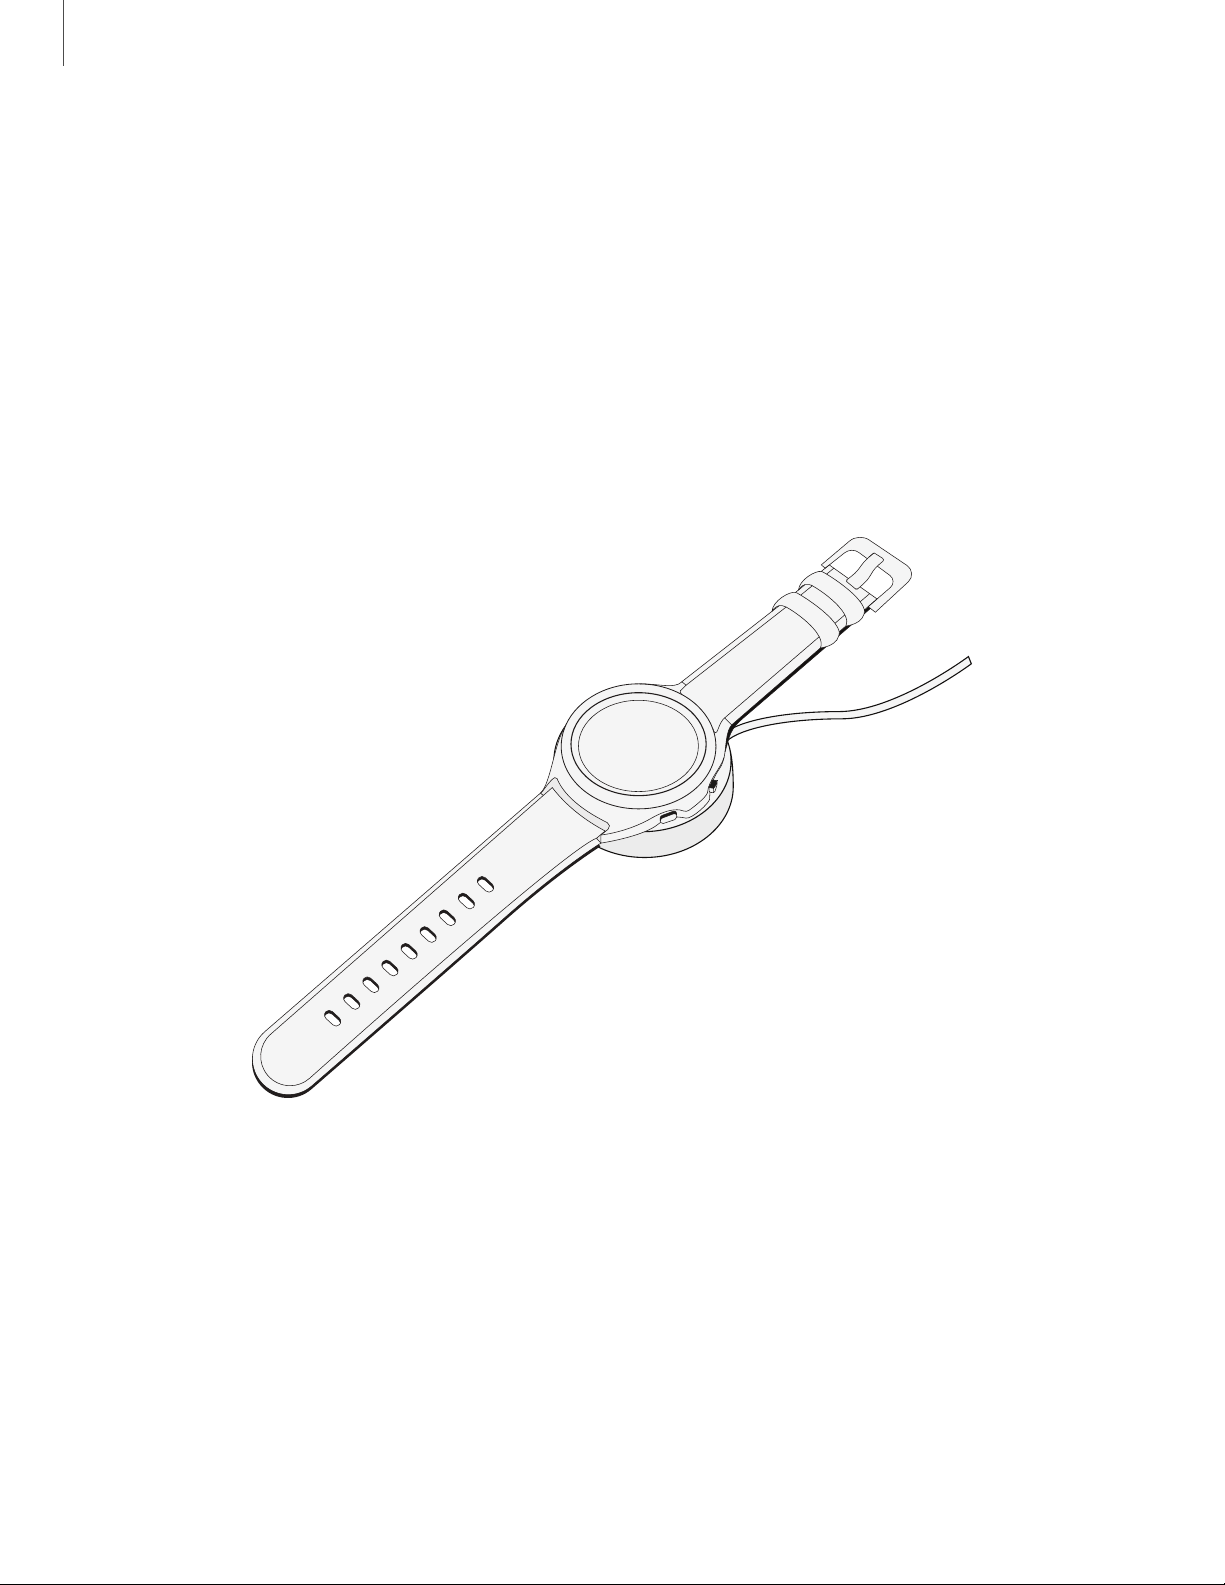
Charge the battery
Your device is powered by a rechargeable battery.
1. Connect the wireless charger to a USB charging port.
2. Place the watch onto the wireless charger, aligning the center of your
watch with the center of the wireless charger.
3. After fully charging, disconnect the watch from the wireless charger.
Devices and software are constantly evolving — the illu strations you see here are for reference only.
7
Page 8

Getting started
CAUTION The charging head for plugging the USB cable into a wall outlet is not
included. Use only Samsung charging devices rated with an output voltage of 5v
and an output current of over 150mA (sold separately). Samsung accessories are
designed for your device to maximize battery life. Using other accessories may
void your warranty and may cause damage.
NOTE Prevent the USB charger port and the small end of the charger cable from
coming into contact with conductive materials, such as liquids, dust, metal
powders, and pencil leads.
While charging, the device and the charger may become hot. This does not affect
the device’s lifespan or performance and is in the device’s normal range of
operation.
Remove the device from the charger and wait for the device to cool down. For more
information, visit
https://www.samsung.com/us/support/answer/ANS00076952.
NOTE Do not disassemble, modify, or repair your device. Placing objects, such as
magnetic stripe cards, including credit cards, phone cards, passbooks, and
boarding passes, next to the device or charger may cause damage from the
charger or device’s magnetic field.
8
Page 9
Getting started
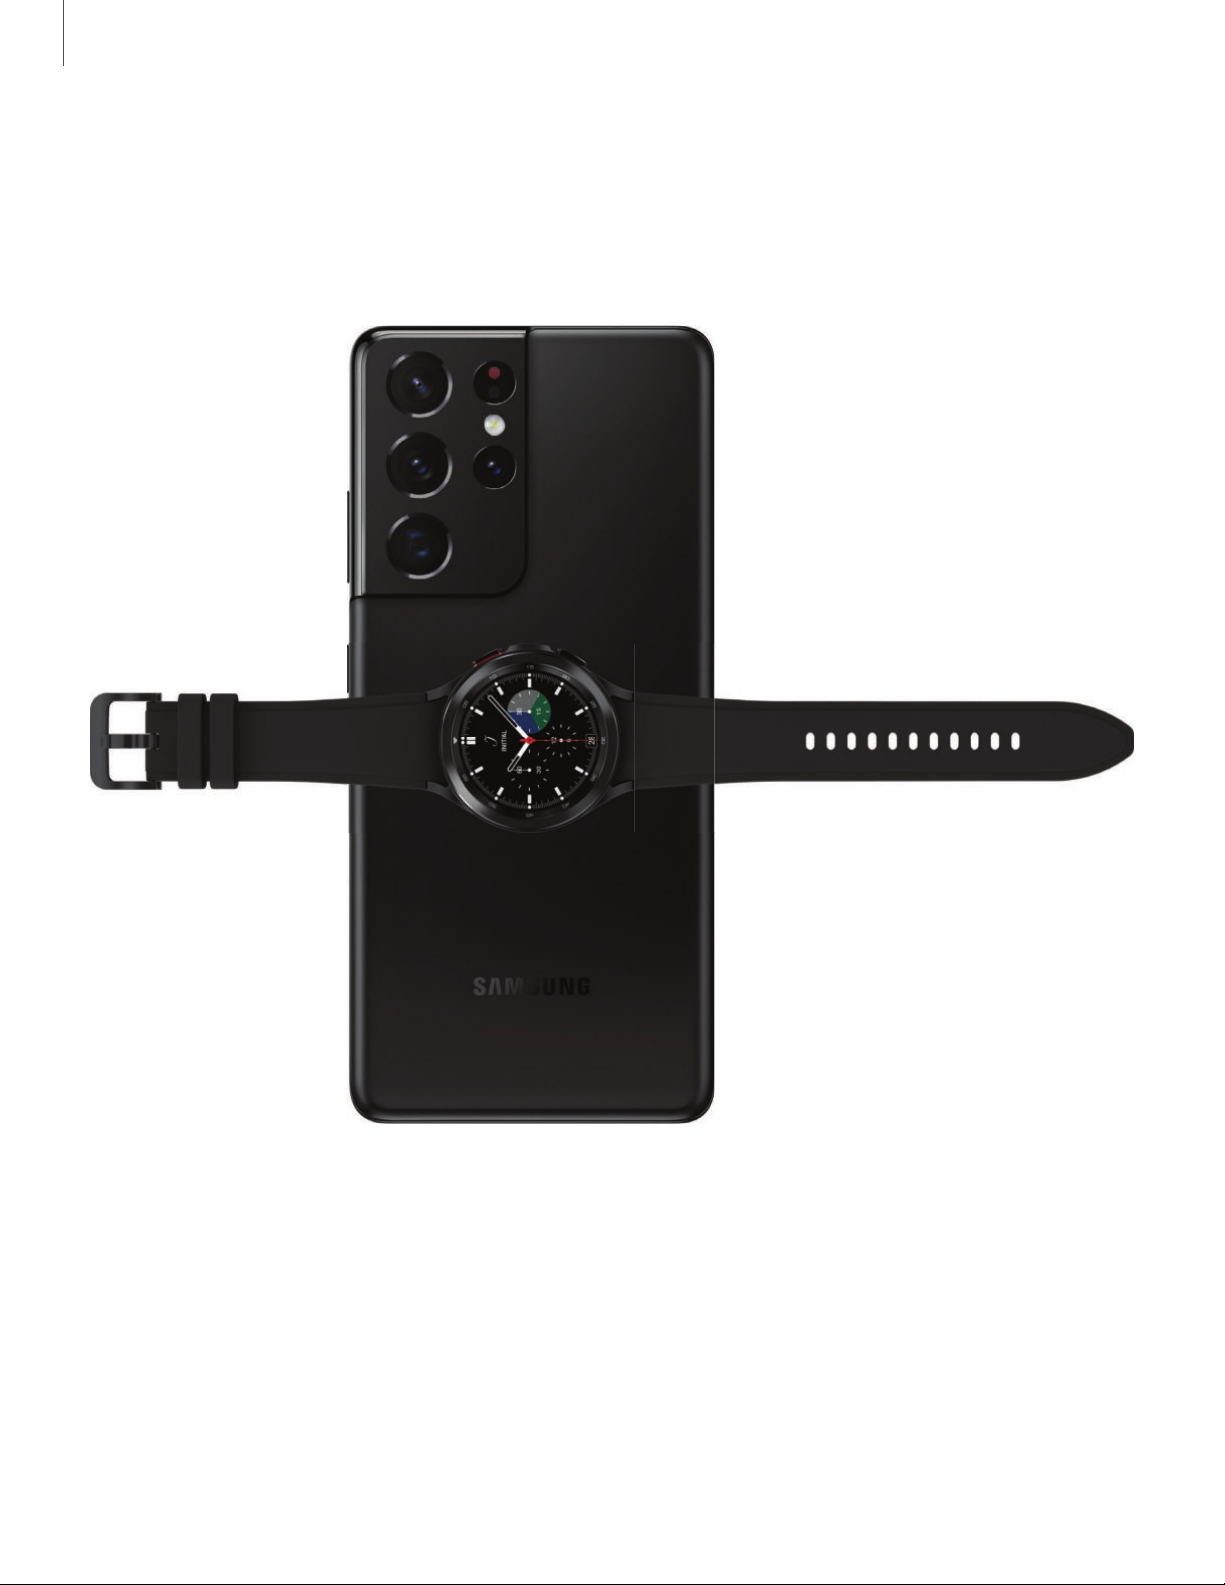
Wireless PowerShare
Wirelessly charge your device using a supported Samsung smartphone. Some
features are not available while sharing power.
1. From your phone, enable the Wireless PowerShare feature.
2. With the phone face down, place the compatible device on the back of the
phone to charge. A notification sound or vibration occurs when charging
begins.
Devices and software are constantly evolving — the illu strations you see here are for reference only.
9
Page 10

Getting started
NOTE Wireless PowerShare works with most Qi-Certified devices. Requires
minimum 30% battery to share. Speed and power efficiency of charge varies by
device. May not work with some accessories, covers, or other manufacturer’s
devices. If you have trouble connecting or charging is slow, remove any cover
from each device.
For best results when using Wireless PowerShare, please note:
•
Remove any accessories or cover before using the feature. Depending on the
type of accessory or cover, Wireless PowerShare may not work properly.
•
The location of the wireless charging coil may vary by device, so you may need
to adjust the placement to make a connection. When charging starts, a
notification or vibration will occur, so the notification will help you know you've
made a connection. During charging, do not move or use either device.
•
Call reception or data services may be affected, depending on your network
environment.
•
Charging speed or efficiency can vary depending on device condition or
surrounding environment.
•
Do not use headphones.
10
Page 11
Getting started
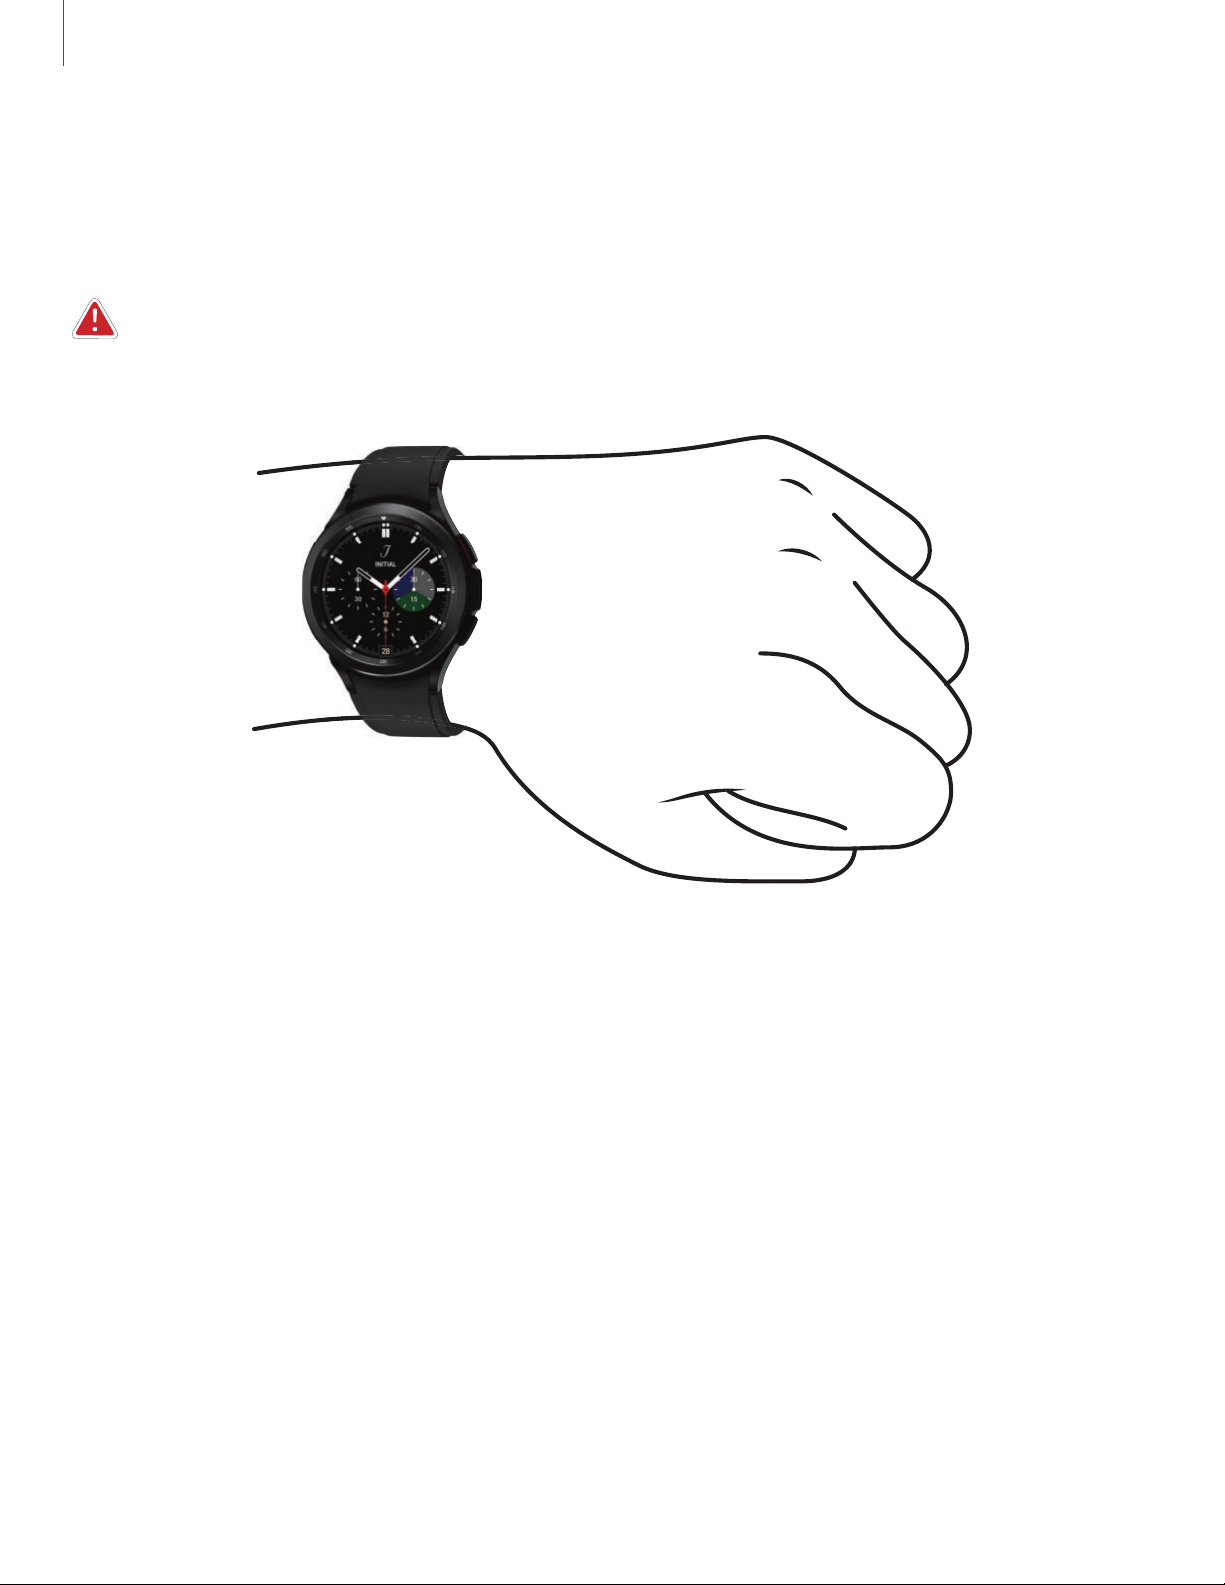
Wear the Watch
Wrap the watch firmly around your lower arm just above your wrist as shown below.
Do not fasten the watch too tightly.
WARNING Wear the device correctly. If you feel discomfort while using the
device, stop using it. If your device becomes hot, please remove it until it cools.
1. Open the buckle and place the strap around your wrist.
2. Fit the strap to your wrist, insert the pin into an adjustment hole, and then secure
the buckle to close it.
Strap tips and precautions
l Some people may experience discomfort when wearing the watch for prolonged
periods.
l If you have sensitive skin or fasten the watch too tightly, you may feel some
discomfort.
l Do not expose the straps to very wet conditions. Wet straps can cause skin
irritations. Dry the straps first. If you experience skin irritation when wearing the
watch, stop wearing it and consult a physician.
Devices and software are constantly evolving — the illu strations you see here are for reference only.
11
Page 12
Getting started
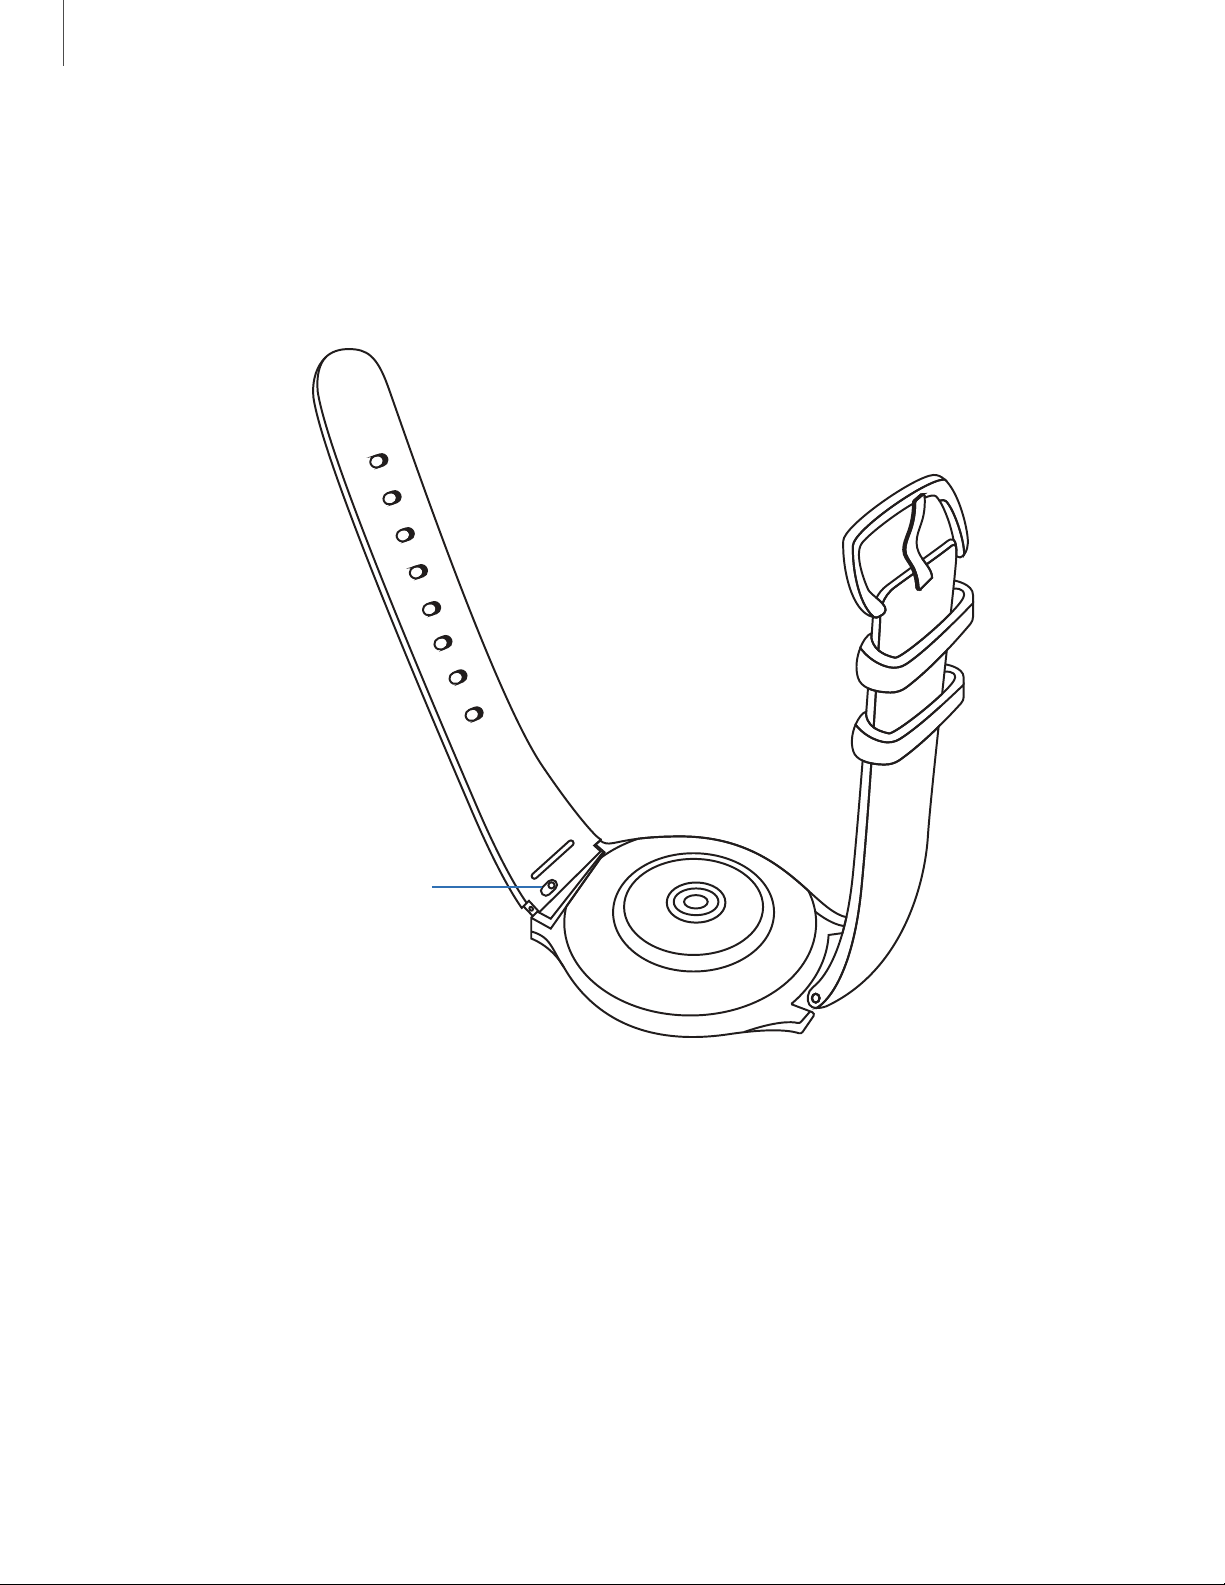
Spring bar
Replace the strap
Detach the strap from the watch to replace it with a new one.
To remove the strap:
◌
Slide the strap’s spring bar inward and pull the strap away from the watch.
To replace the strap:
1. Insert one end of the spring bar into the hole on the side of the watch.
2. Slide the other spring bar inward, and release it once the strap is in place.
Devices and software are constantly evolving — the illu strations you see here are for reference only.
12
Page 13
Getting started
Wear
Start using your device
Start using your device | Activation | Galaxy Wearable app | Lock or unlock your
| Customize keys | Navigation | Change the watch face | Quick panel |
device
Notifications | Water lock mode | Bedtime mode | Theater mode | Enter text
Turn on your device
Use the Home key to turn your watch on or off.
◌
Press and hold the
To turn the watch off, swipe down from the top of the watch screen to open
•
the Quick panel, and tap
TIP To restart the watch, press and hold the Home and Back keys for more than
seven seconds.
Home key.
> Turn off.
Activation
Galaxy Watch4 and Galaxy Watch4 Classic (R865U, R875U, R885U, and R895U) are 4G
LTE-enabled. Get texts, alerts, make and receive calls, even when you leave your
phone behind.
To manage your watch's mobile plan:
From
◌
service provider for more information about activation.
Galaxy wearable tap Watch settings > Mobile plans. Consult your
Galaxy Wearable app
To connect your watch to a smartphone, install the Galaxy Wearable app on the
smartphone. You can download the app from the Galaxy Store or the Google Play
store.
Galaxy Wearable is compatible with select devices using Android 6.0 and later with at
least 1.5 GB RAM. Supported devices may vary by carrier and device. Some features
may not be available. For best results, connect with compatible Samsung Galaxy
™
devices. Visit
list of compatible smartphones.
samsung.com/us/support/owners/app/galaxy-wearable-watch for a
13
Page 14
Getting started
Wear
Wear
Wear
Wear
Connect the watch to a smartphone
Turn on the watch before connecting to your phone.
From the smartphone, tap
1.
Galaxy Wearable. If necessary, update the app to
the latest version.
2. Tap
3. When the Bluetooth
Start and select your device.
®
pairing request window is displayed, confirm the passkeys
displayed on your watch and smartphone match, and then tap
Confirm.
4. Follow the prompts to complete the connection.
When the devices are connected, a tutorial is displayed on the watch’s screen.
Follow the prompts to learn the basic controls.
Back up data
The watch can only be connected to one smartphone at a time. When you connect
the watch to a new smartphone, the watch automatically resets and all data is
removed from its memory. Make sure you back up any important data stored on
your watch.
1.
2.
From
Tap
Galaxy Wearable, tap Watch settings.
Account and backup to customize your backup settings.
Remote connection
Set the watch to remotely connect to the smartphone when a Bluetooth connection
between the devices is not available. With this connection, you can still receive
notifications from your smartphone.
1.
2.
From
Tap
Galaxy Wearable, tap Watch settings.
Advanced features > Remote connection to enable the feature.
Disconnect
To disconnect the watch from your phone:
1.
2.
From
Tap
Galaxy Wearable, tap Menu.
Disconnect by the name of your watch.
14
Page 15
Getting started
Lock or unlock your device
By default your screen is not locked. You can use the screen lock feature to secure
your device. See
When enabled, your watch locks when you remove it from your wrist or when the
screen times out while you are wearing it.
To lock the watch:
◌
Cover the screen with your palm.
To unlock the watch:
◌
Press any key to turn on the watch screen.
If you have a lock screen enabled, press any key to enter your pattern or pin
•
and unlock the watch.
Set a screen lock.
Customize keys
You can customize the shortcuts assigned to the Home and Back keys.
Home key
Configure shortcuts for the Home key.
From
1.
2. Tap an option under Home key to choose a shortcut.
l Double press: Choose which feature is launched when the Home key is
pressed twice. By default this option is set to open Samsung Pay.
l Press and hold: Choose which feature is launched when you press and hold
the Home key. By default this option is set to wake Bixby.
Settings, tap Advanced features > Customize keys.
Back key
Configure shortcuts for the Back key.
From
1.
2. Tap
to the previous screen.
Settings, tap Advanced features > Customize keys.
Short press and choose a shortcut option. By default this option is set to go
15
Page 16
Getting started
Navigation
The touchscreen responds best to a light touch from the pad of your finger. Using
excessive force or a metallic object on the touchscreen may damage the tempered
glass surface and void the warranty.
Tap
Lightly tap the screen to launch an app or select a menu item.
Devices and software are constantly evolving — the illu strations you see here are for reference only.
16
Page 17
Getting started
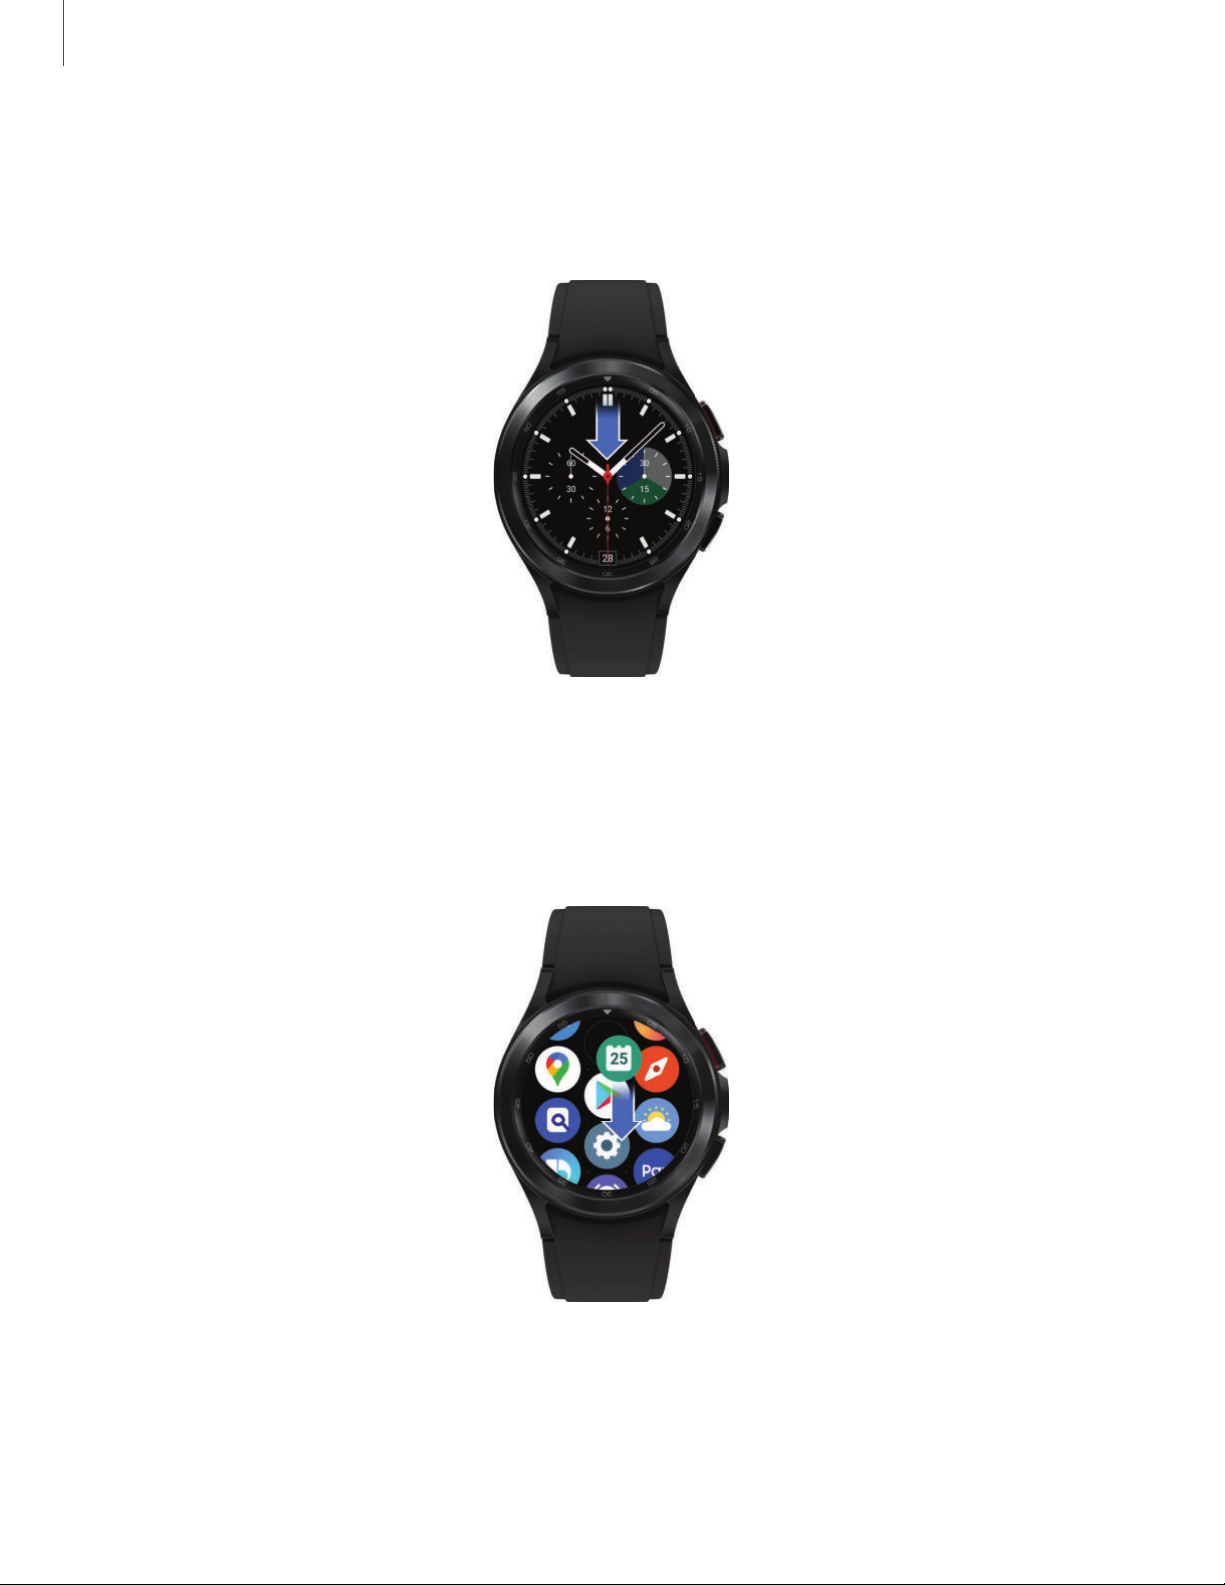
Swipe
Lightly drag your finger vertically or horizontally across the screen to view panels.
Drag
Touch and hold an item, and then move it to a new location.
Devices and software are constantly evolving — the illu strations you see here are for reference only.
17
Page 18
Getting started
Rotate
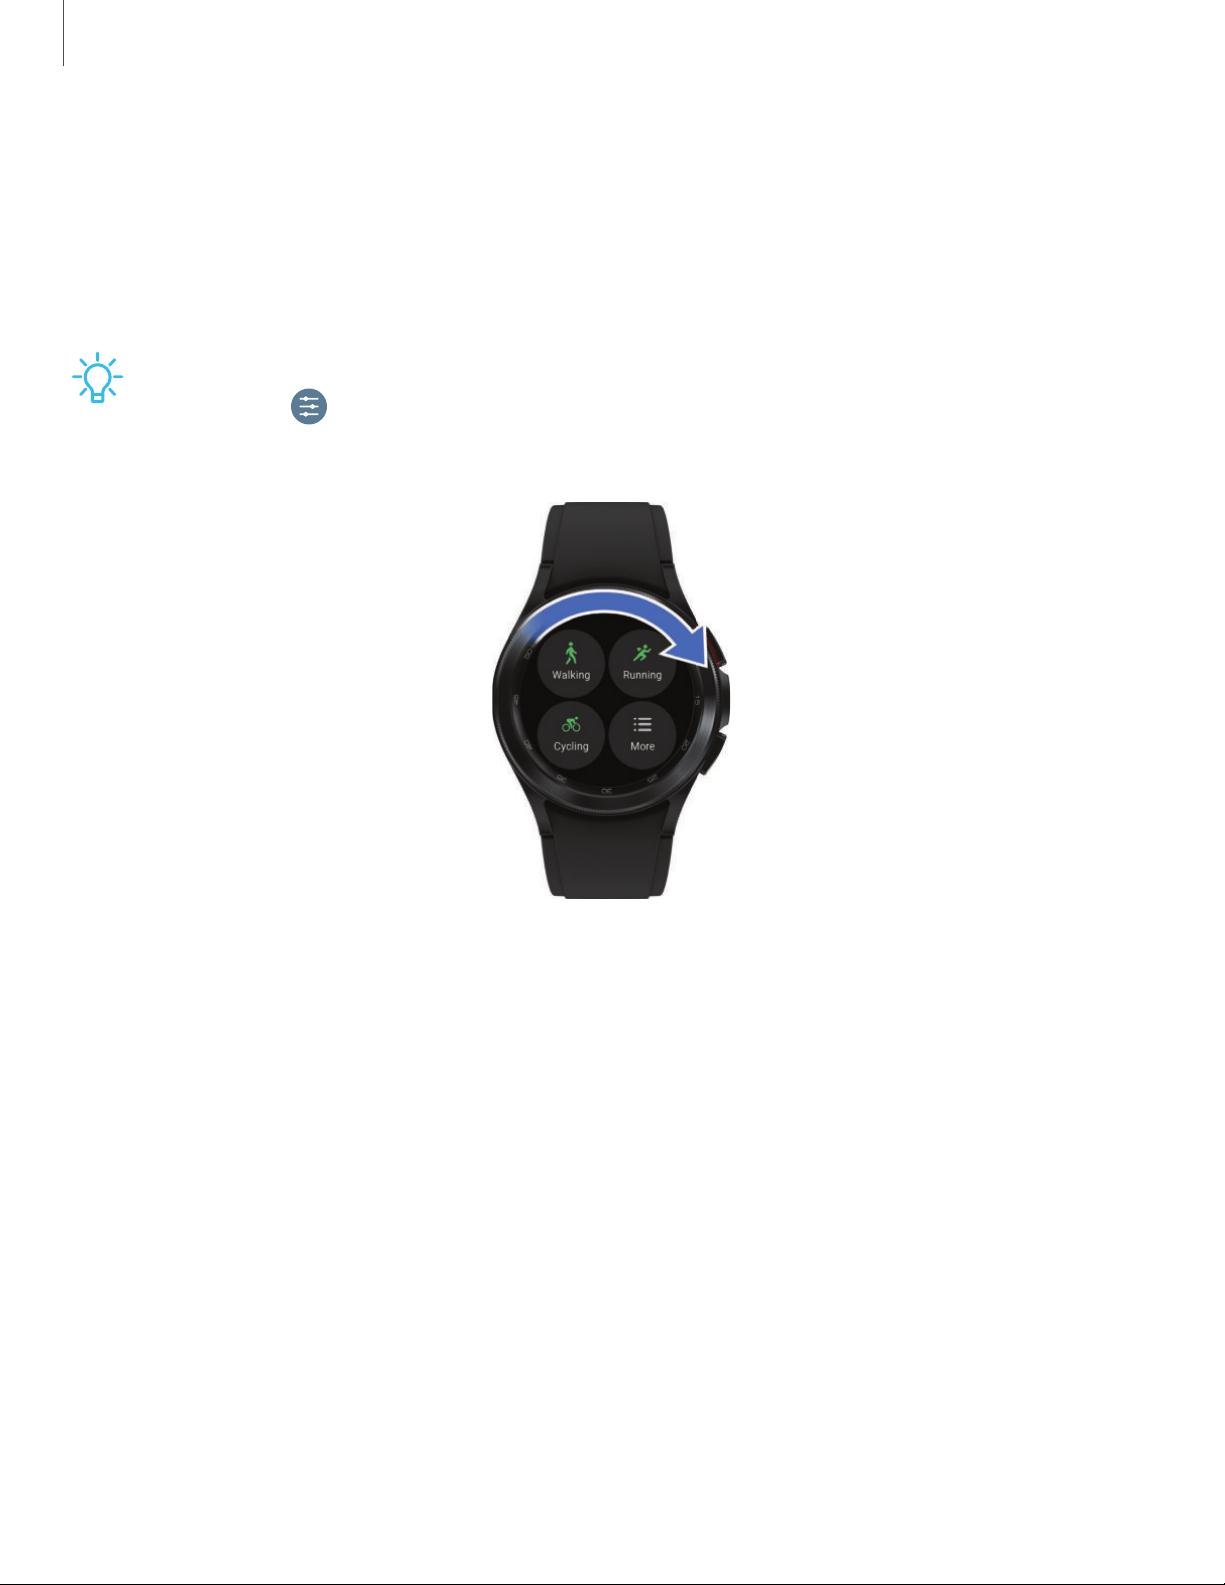
The Galaxy Watch4 Classic features a physical bezel that you can rotate with your
fingers. The Galaxy Watch4 has a digital bezel. Lightly press and drag your finger
clockwise or counterclockwise using the digital bezel on the edge of the screen to
move through a list.
TIP On the Galaxy Watch4 you can disable the digital rotating bezel. From
Settings, tap
General > Touch bezel, and disable the feature.
Devices and software are constantly evolving — the illu strations you see here are for reference only.
18
Page 19

Getting started
Wear
Change the watch face
The first screen when you turn on the Galaxy Watch4 and Galaxy Watch4 Classic is
the watch face. You can choose a watch face with different colors, styles, and
information displayed.
On your smartphone, tap
1.
2. Tap a watch face to select it.
From the watch:
1. Touch and hold the watch face.
2. Swipe left or right to choose a new style.
3. Tap
Customize to select a background color and items to display on the watch
face.
Galaxy Wearable > Watch faces.
19
Page 20
Getting started
Quick settings
Quick panel
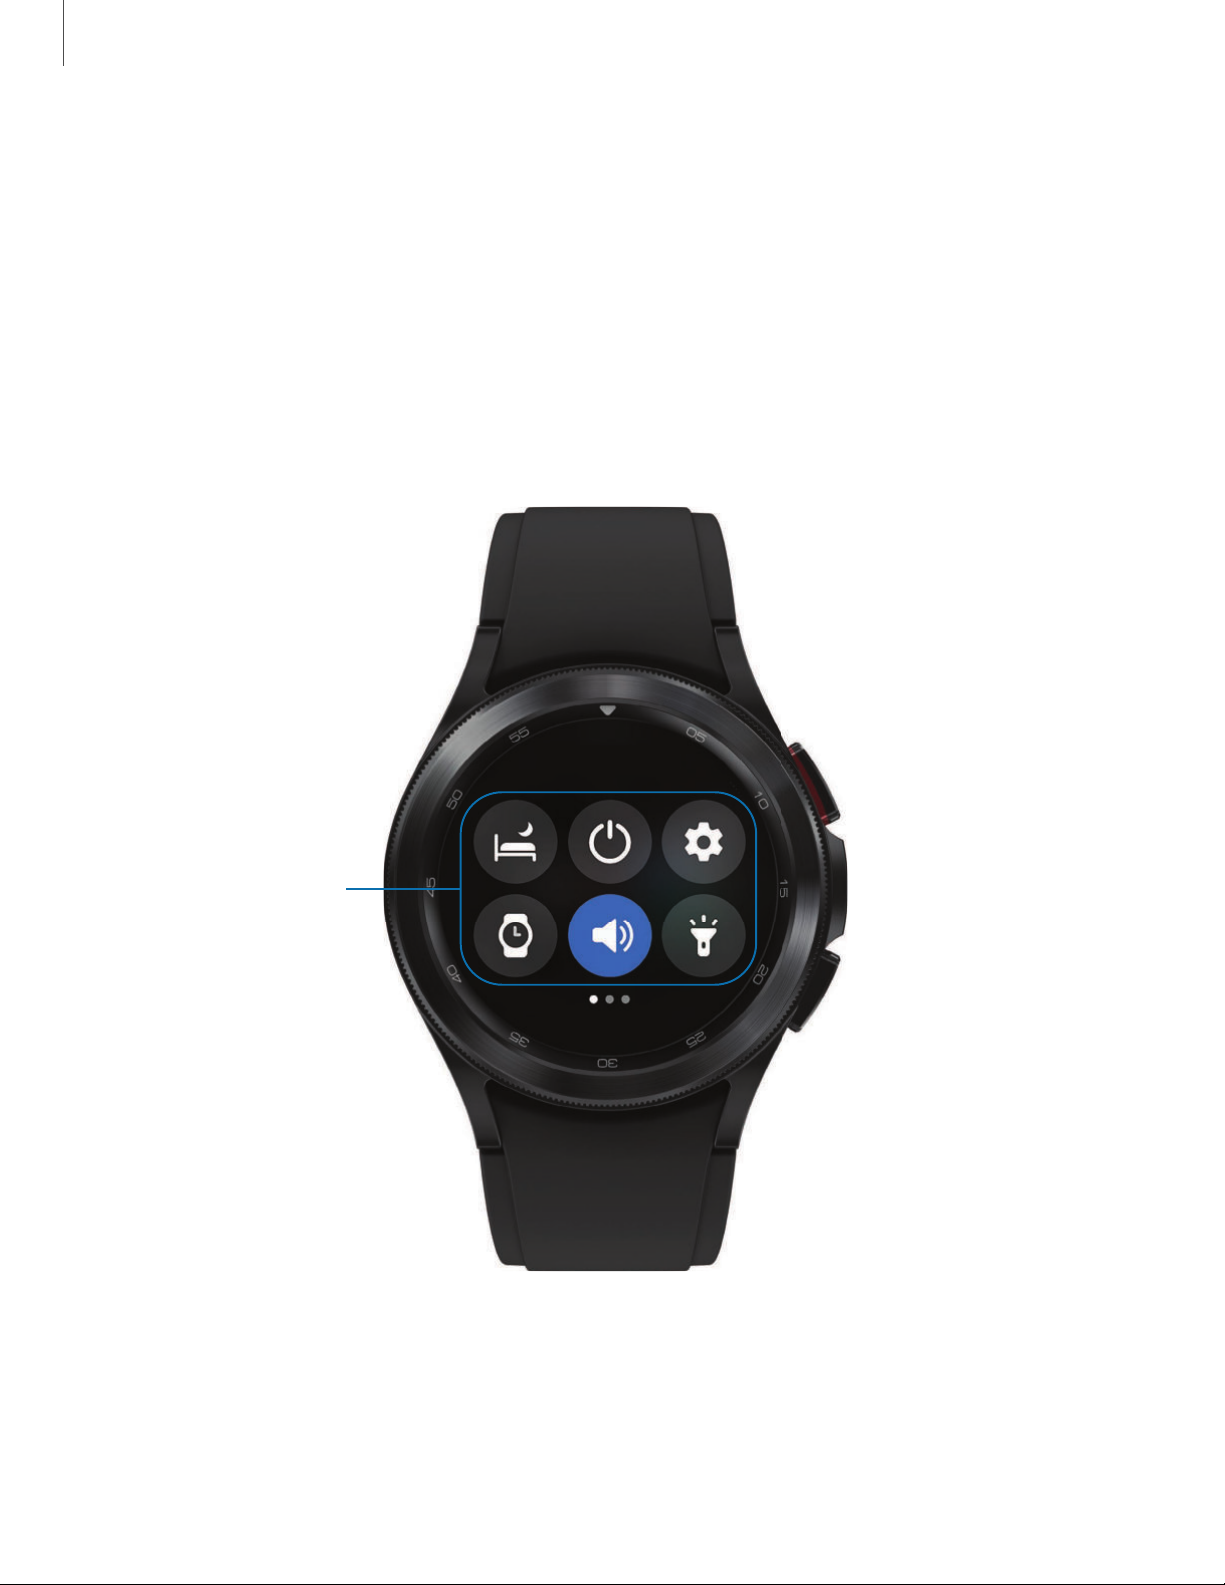
Instead of navigating through the Settings menu, you can access commonly used
settings through the Quick panel, where you can also view the Status bar.
◌
Swipe down from the top of the watch screen to open the Quick panel.
•
Tap a quick setting to open it.
•
Touch and hold a quick setting to edit the placement, remove a setting, or
add a new setting.
Devices and software are constantly evolving — the illu strations you see here are for reference only.
20
Page 21
Getting started
Wear
Status bar
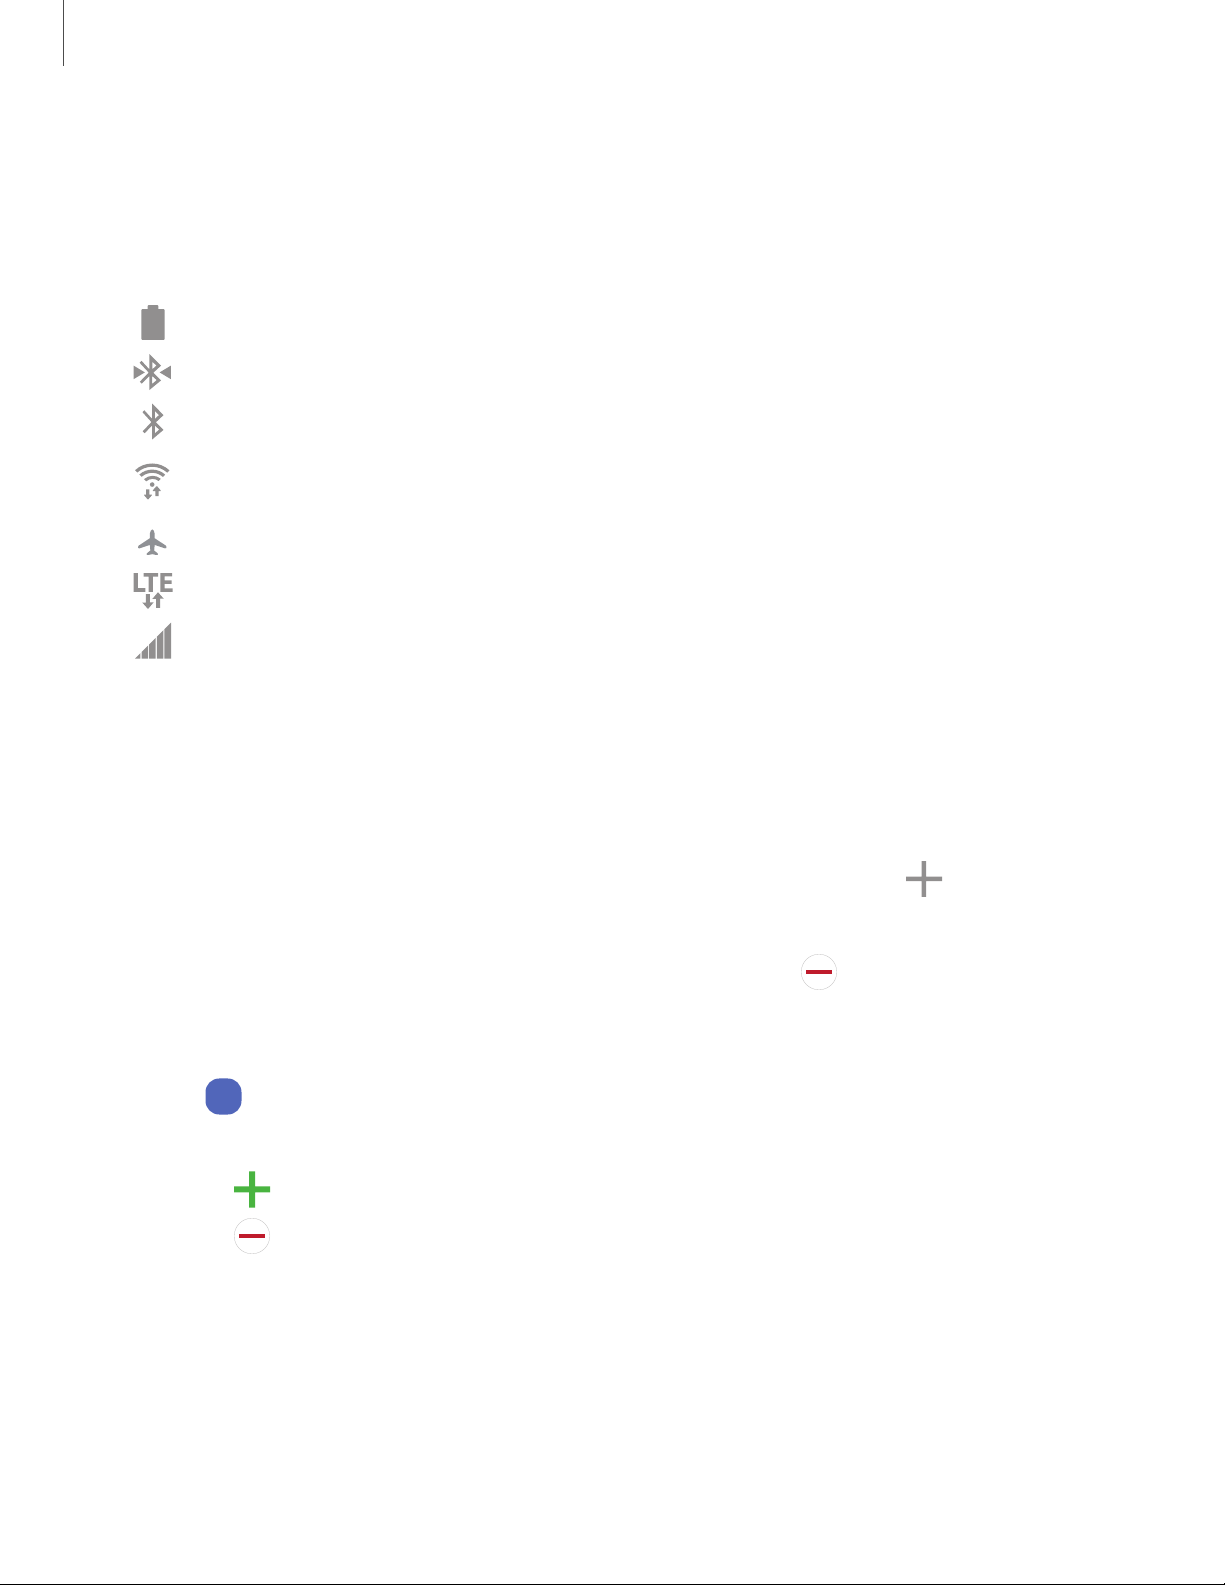
Indicator icons display at the top of the screen in the Status bar. Swipe down from the
top of the watch screen to view the Status bar.
Indicator icons
Battery full
Bluetooth connected
Bluetooth enabled, but not connected
Wi-Fi connected
Airplane mode
LTE network connected (LTE model only)
Signal strength (LTE model only)
Tiles
Tiles are shortcuts to apps and features that you can add as a screen on your watch.
◌
From the watch face, swipe left to view tiles.
To add tiles, swipe to the end of the tiles screens, and tap
•
To move tiles, touch and hold a tile, and then drag it to the desired location.
•
To delete tiles, touch and hold a tile, and then tap
•
Manage tiles from your phone
◌
From
Drag to reorder tiles.
•
Tap
•
Galaxy Wearable, tap Tiles.
Add to add the tile.
Remove.
Add tiles.
•
Tap
Remove to delete tiles.
21
Page 22
Getting started
App icon
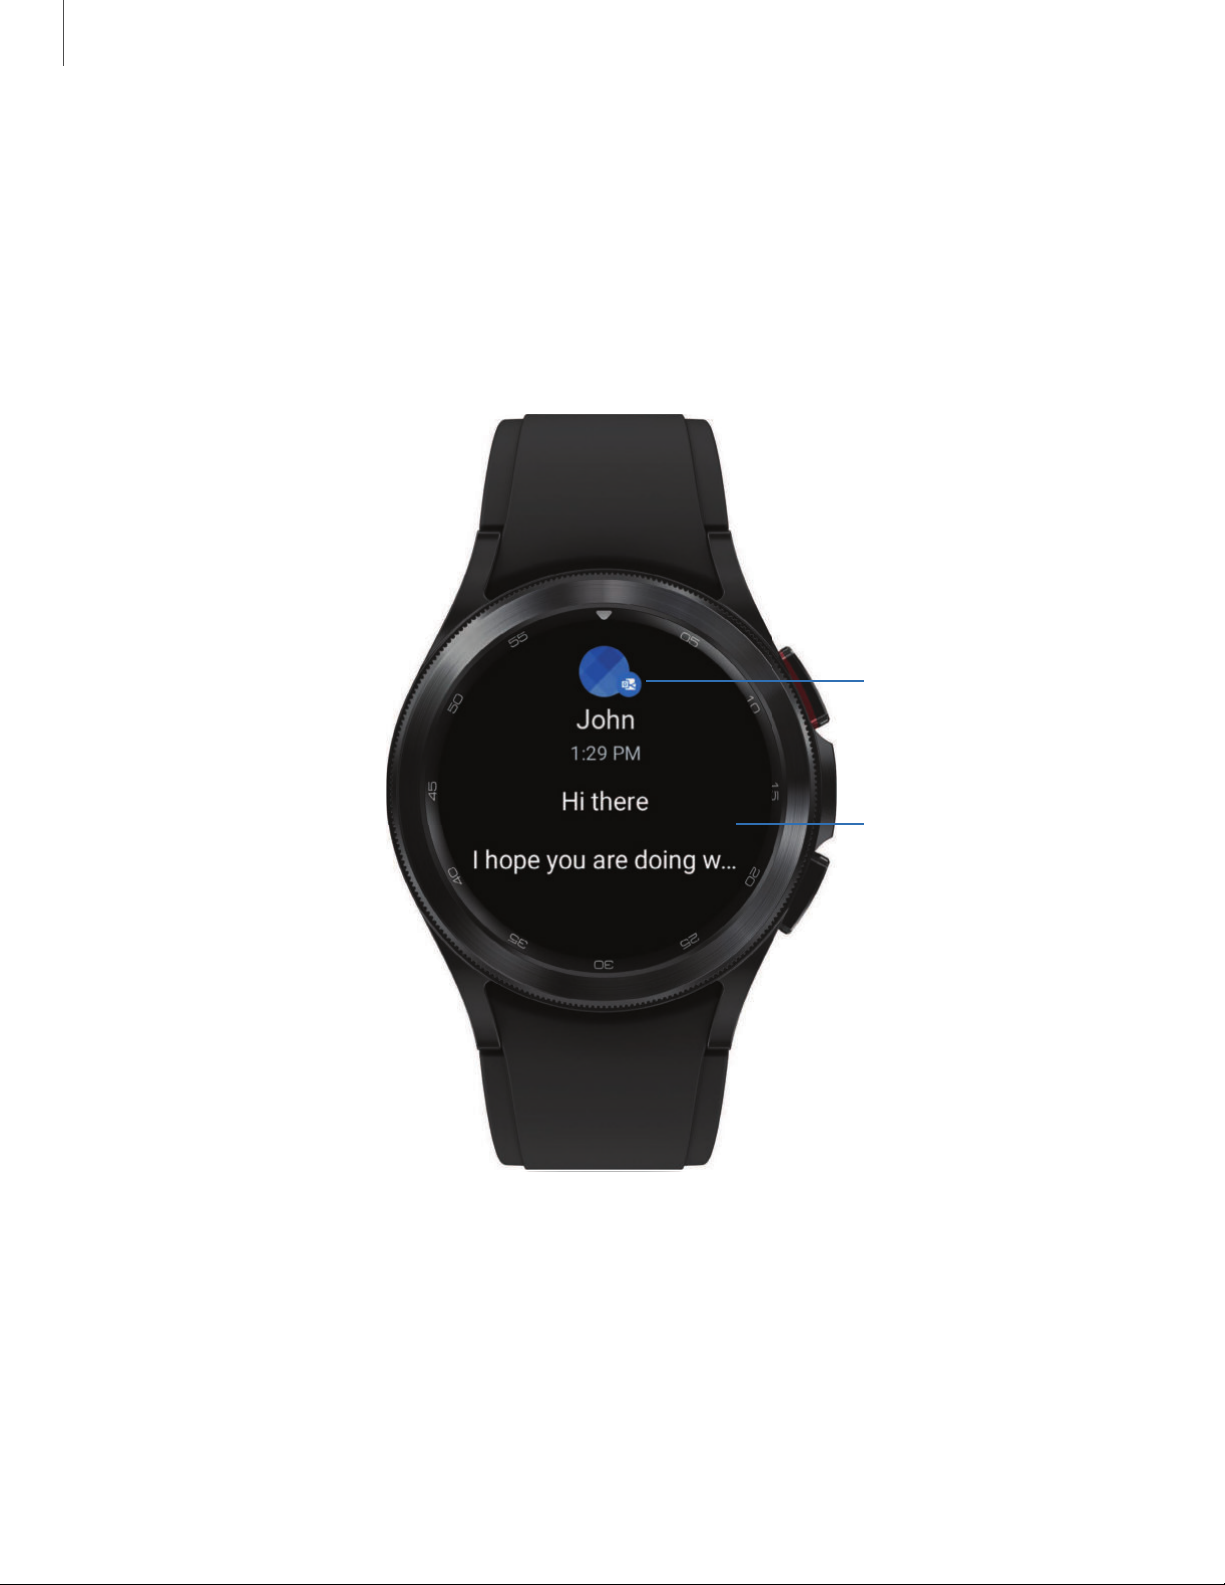
Notification
Notifications
Stay up to date with events, notifications, and messages from your smartphone.
When you receive a notification, information about the notification, such as its type, is
displayed on the screen while the watch is vibrating.
◌
From the watch screen, swipe right and tap a notification to view details.
Devices and software are constantly evolving — the illu strations you see here are for reference only.
22
Page 23
Getting started
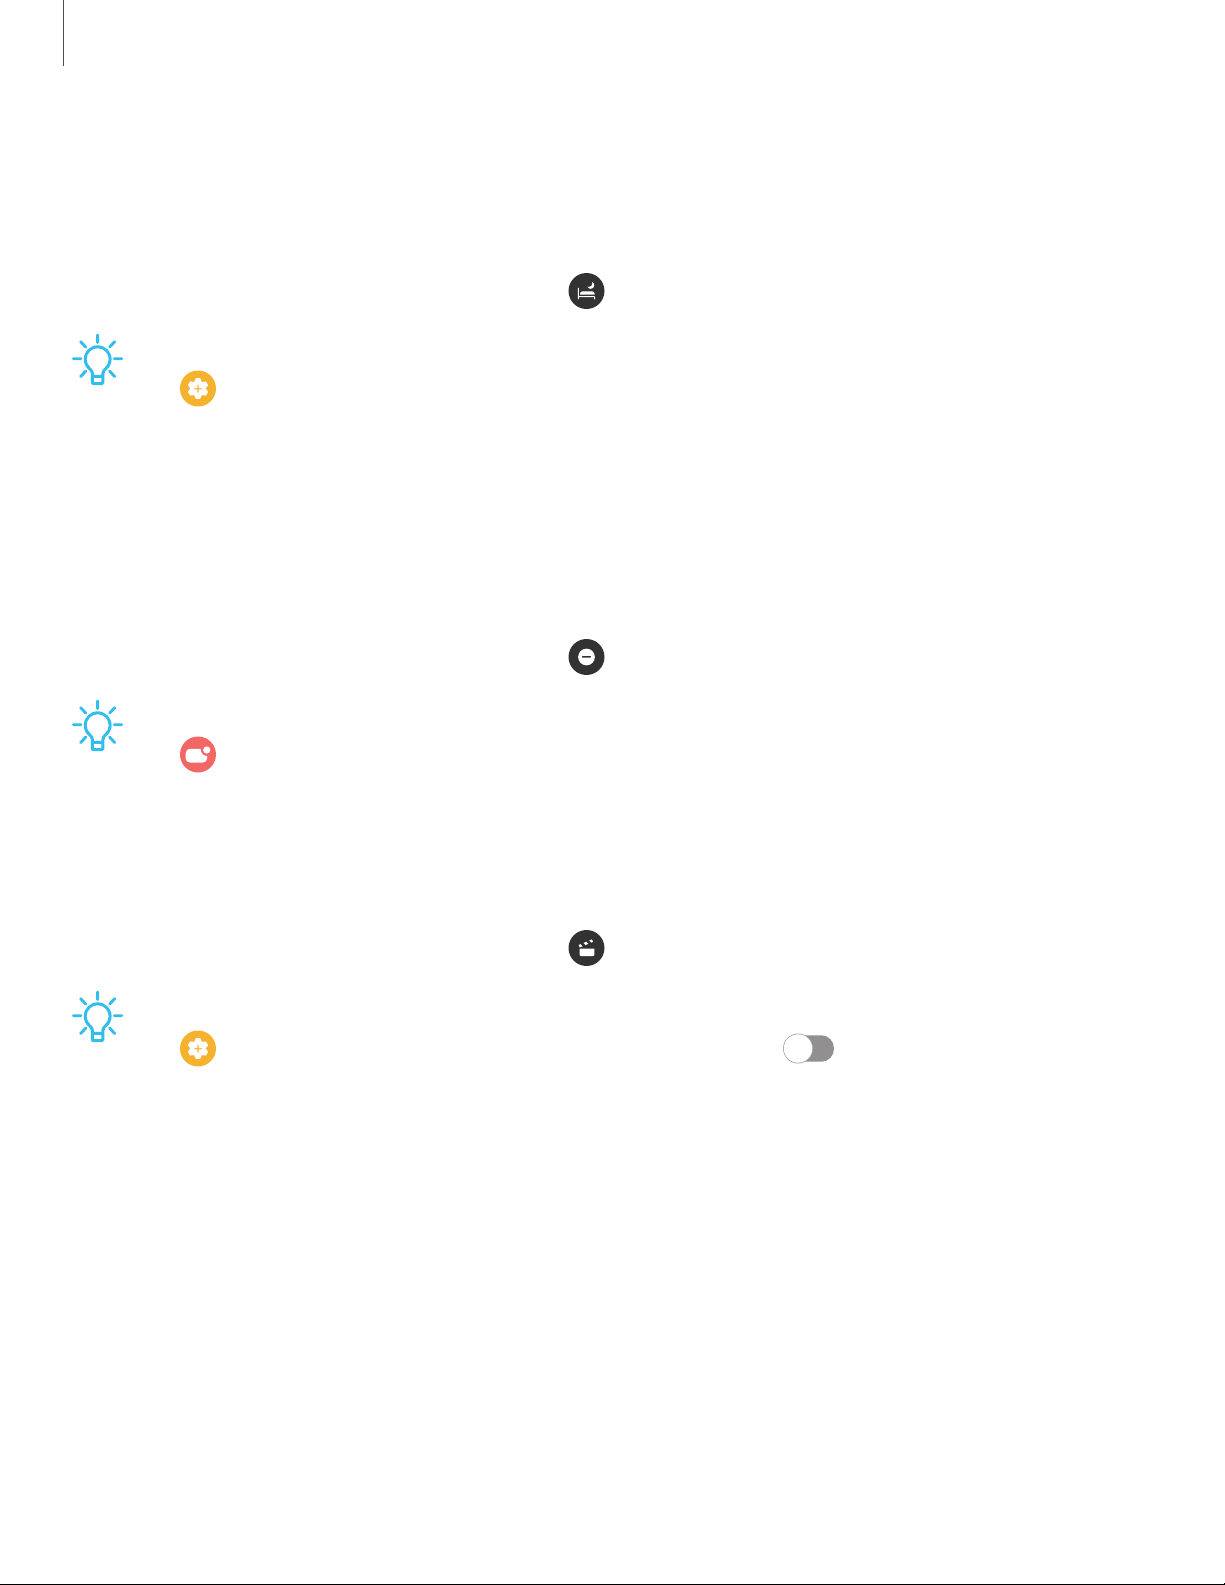
Bedtime mode
Bedtime mode mutes all alerts, except for alarms and notifications. This keeps the
screen off and mutes most sounds while you sleep.
From the Quick settings panel, tap
◌
TIP You can also access Bedtime mode from the Settings menu. From Settings,
tap
mode.
Advanced features > Bedtime mode. Here you can schedule bedtime
to put the watch in Bedtime mode.
Do not disturb
Use these options to determine block out time where notifications are turned off, and
during which time periods you want to enter this mode.
From the Quick settings panel, tap
◌
TIP You can also access Do not disturb from the Settings menu. From Settings,
tap
Notifications > Do not disturb.
to put the watch in Do not disturb mode.
Theater mode
Theater mode keeps the screen turned off and silences all sounds.
From the Quick settings panel, tap
◌
TIP You can also access Theater mode from the Settings menu. From Settings
tap
Advanced features > Theater mode, and tap to enable this feature.
to put the watch in Theater mode.
23
Page 24
Getting started
Water lock mode
You can use Water lock mode to exercise in the water while wearing your watch.
While in Water lock mode, touchscreen, wake-up gestures, and watch always on will
be disabled.
From the Quick settings panel, tap
◌
TIP You can also enable Water lock mode from the Setting menu. From Settings,
tap
Advanced features > Water lock. Tap to enable.
to put the watch in Water lock mode.
Exit water lock mode
1. Press and hold the
will make sounds to eject water from the speaker.
2. Press the
3. Shake the watch to remove any water from the pressure sensor.
Home key to stop the sound.
Home key for two seconds to turn off the mode. The watch
24
Page 25
Getting started
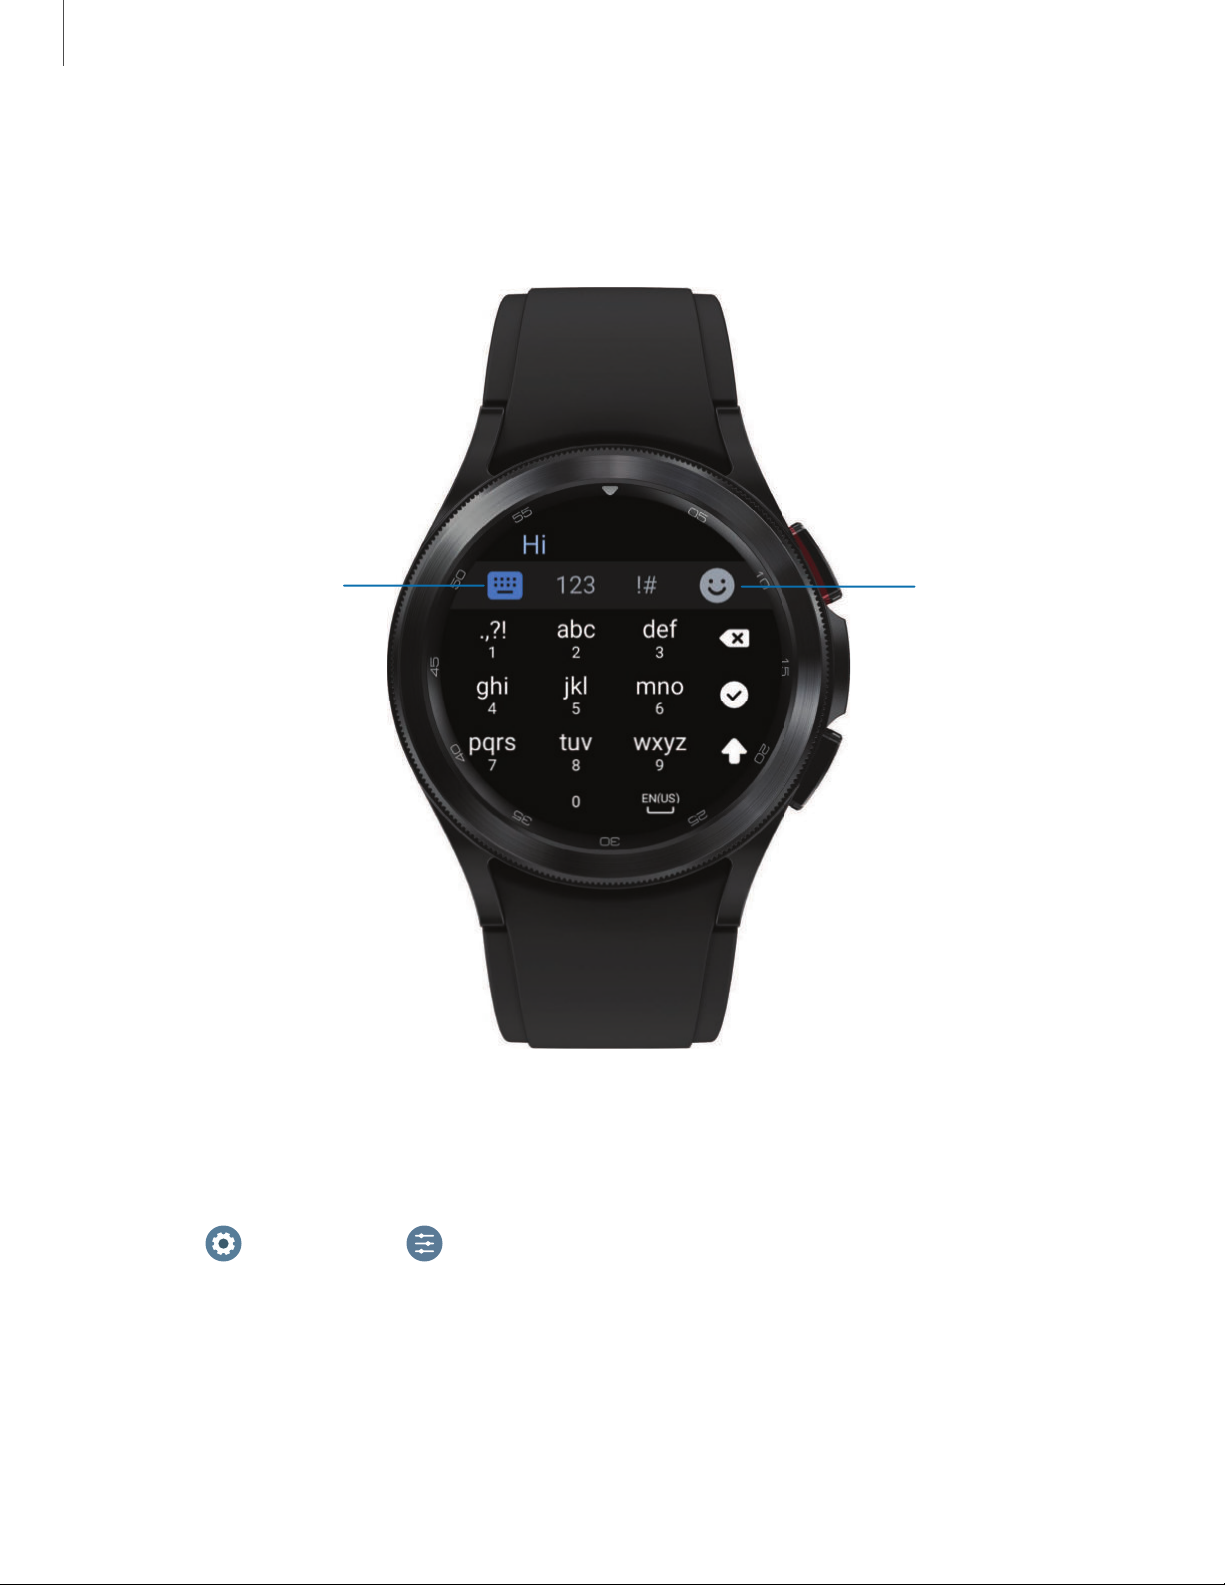
Emojis
Change keyboard
Enter text
Text can be entered by speaking, drawing, or by using a keyboard.
Default keyboard
Select a default keyboard type for text input.
From
◌
default keyboard.
Settings, tap General > Input > Default keyboard and select your
Devices and software are constantly evolving — the illu strations you see here are for reference only.
25
Page 26
Getting started
Choose a keyboard
When you need to enter text from your watch, you can choose which keyboard you
prefer.
◌
Tap an option for text input:
•
•
•
•
•
•
Tap
Tap
Tap
Tap
Tap
Tap
Voice input and speak the message you want to enter.
Record to create a recording and attach it to your message.
Emoji to add emojis to your message.
Write, and then use your finger to draw letters.
Samsung Keyboard to use the QWERTY keyboard.
Open phone to use your phone's keyboard.
Keyboard settings
Change the Samsung keyboard settings.
From
◌
customize:
Input languages: Select languages for text input.
•
Smart typing: Customize features like predictive text, auto capitalize, and
•
auto punctuate.
Settings, tap General > Input > Samsung keyboard, and tap options to
Touch feedback: Set the watch to vibrate when you tap a key on the
•
keyboard.
Keyboard data: Return your keyboard to the default settings and remove
•
word predictions and personalized data.
Quick input settings
From
◌
customize:
Voice: Select languages for voice input.
•
Quick responses: Enable message suggestions and customize your
•
responses.
Settings, tap General > Input, and tap an option under Quick input to
26
Page 27
Apps
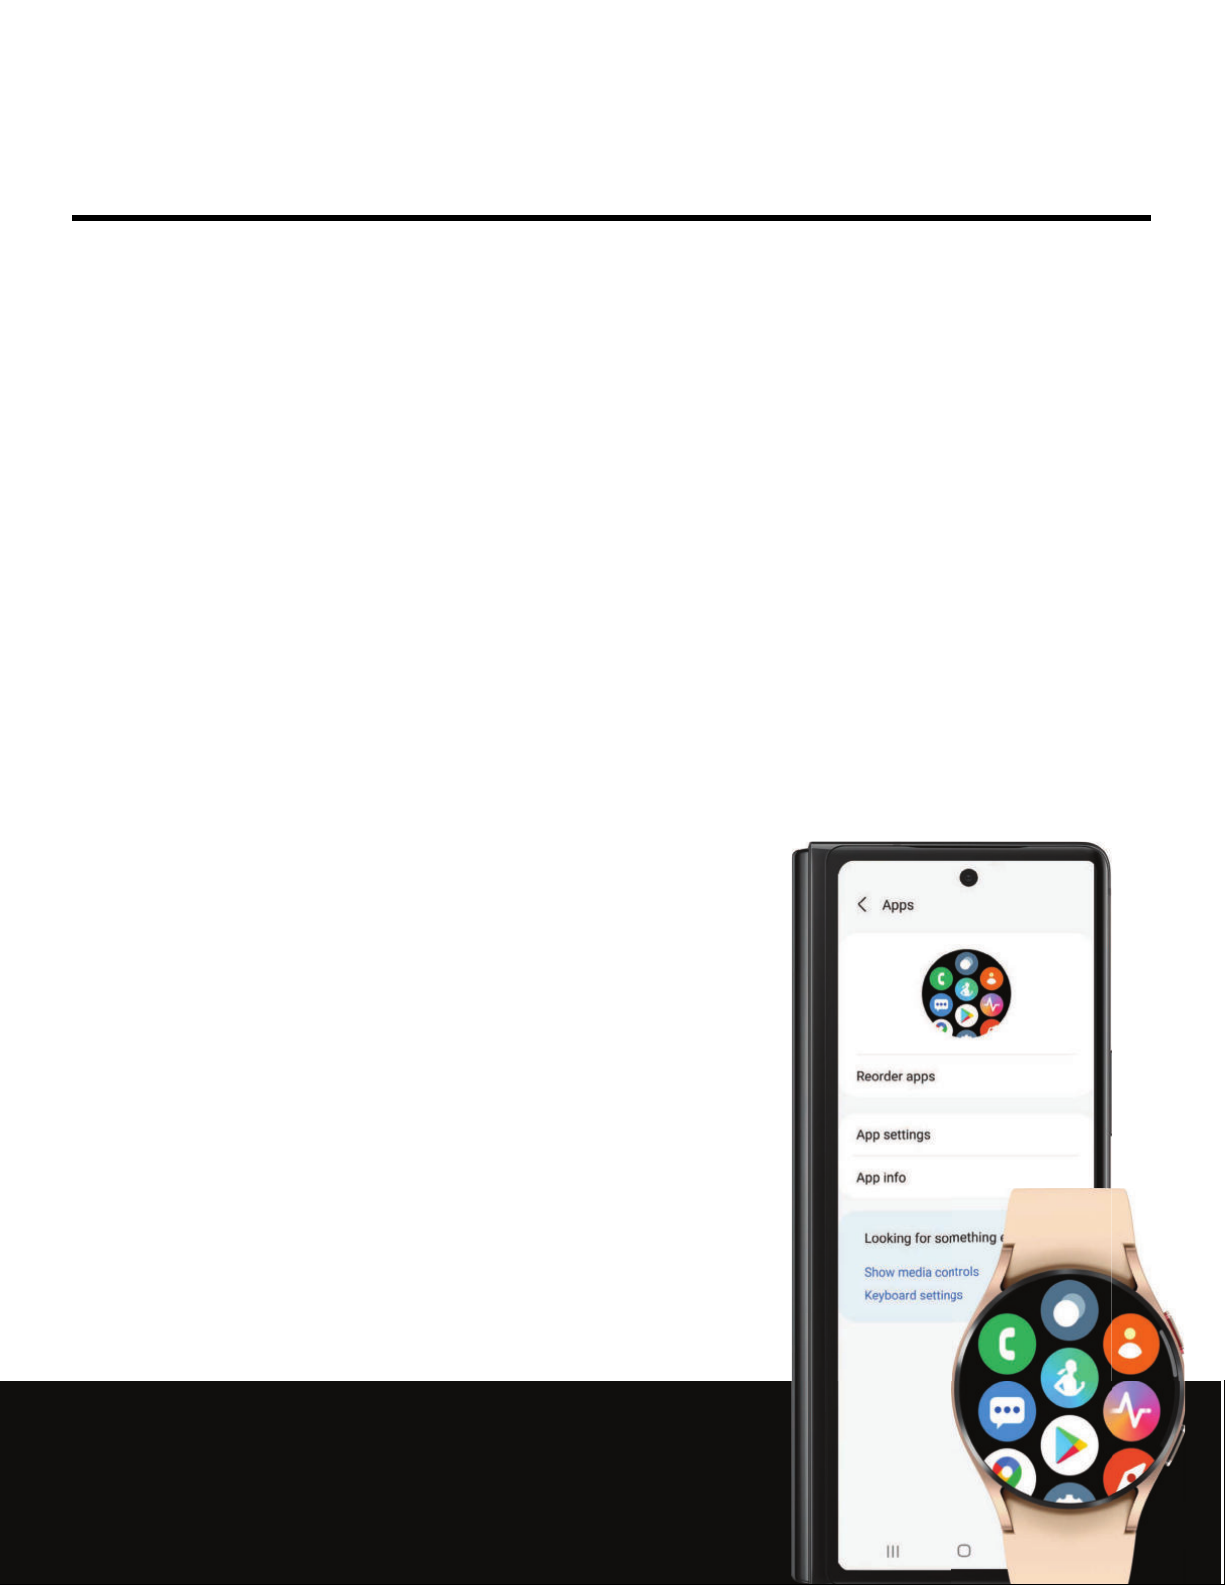
Navigate the apps screen
Tools
Media
Health
Google
Microsoft
27
Page 28
Apps
Navigate the apps screen
Uninstall apps | Apps Settings
The Apps list displays all preloaded and downloaded apps. Apps can be downloaded
from the Google Play store.
◌
From the watch screen, swipe up from the bottom of the screen to open the
Apps screen.
To scroll through the list of apps, swipe up and down.
•
To view recently opened apps, tap
•
Recent apps.
Uninstall apps
Uninstall apps you have download.
1. From Apps on your watch, touch and hold an app.
2.
Tap
Uninstall. This option is not available for all apps.
Apps Settings
Customize how apps are displayed on the Apps screen.
Default apps
Choose which apps to use for making calls, sending messages, and more.
From
◌
each category.
Health Platform
Choose which Health platform to use.
From
◌
Settings, tap Apps > Choose default apps, and choose an option for
Settings, tap Apps > Health platform, and choose an app.
28
Page 29

Apps
App permissions
Configure permissions for each installed app.
From Apps, tap
1.
Tap
2.
3. Tap each feature to enable or disable permission to access or use the feature.
Apps > Permissions.
Settings.
29
Page 30
Apps
Tools
The following apps are useful tools that come pre-installed or downloaded over-the-
air to your device.
Alarm | Bixby | Calculator | Calendar | Compass |Contacts | Find My Phone | Reminder |
Samsung Pay | Stopwatch | Timer | Voice Recorder | Weather | World clock
Alarm
Set an alarm to ring at a specific time.
Create an alarm
Create an alarm event. You can set one-time or recurring alarms.
From Apps, tap
1.
2. Tap Add on watch and enter the time.
3. Tap
4. Tap
Next, and select the days to repeat the alarm.
Save when finished.
Alarm.
NOTE You can also view alarms saved on your phone. To add an alarm on your
phone, tap
Add on phone.
Stop or snooze an alarm
◌
Tap
Cancel to stop an alarm or tap Snooze to snooze.
Delete an alarm
You can disable alarms or delete them.
◌
From
To disable the alarm, tap
•
To delete the alarm, touch and hold the alarm and tap
•
Alarm view the list of alarms on your watch and phone.
.
Delete.
30
Page 31
Apps
Bixby
Bixby is a voice service that helps you use your watch more conveniently. You can
talk to Bixby to launch a function or provide you with information. To use Bixby, your
mobile device must be connected to a Wi-Fi or mobile network, and you must sign in
to your Samsung account.
From Apps, tap
1.
2. Follow the prompts to set up Bixby.
TIP You can also press and hold the Home key to access Bixby. For more
information, see
Bixby.
Customize keys.
Calculator
The Calculator app features basic math functions.
From Apps, tap
◌
Calculator, and enter the math equation.
Calendar
View events scheduled on the smartphone.
From Apps, tap
1.
Calendar.
2. Swipe up or down to view a list of upcoming events.
Tap
•
Tap for week view.
•
•
Tap
for month view.
Show on phone to edit and add events.
Compass
View and use your watch as a compass. The first time you use the Compass app the
watch will guide you on how to calibrate your watch.
From Apps, tap
◌
Compass.
31
Page 32
Apps
Wear
Contacts
View your smartphone’s contact list on your watch.
Find a contact
You can search for a contact or scroll through the list to find one by name.
From
◌
that match.
Contacts, tap Search, and then enter characters to find contacts
Call or message a contact
You can send a message or make a phone call from Contacts.
◌
From
•
•
Contacts, tap the contact you want to connect with, and tap an option:
Call: Begin a phone call with the contact.
Message: Type a message to the contact.
Find My Phone
If you misplace your smartphone, your watch can help you find it.
From Apps, tap
1.
2. Tap Start.
Find My Phone.
•
The Phone vibrates and the screen turns on.
3.
Tap
Dismiss on your smartphone or Stop on the watch.
Find your Watch
You can also locate your watch by making it light up and make sounds from the
Galaxy Wearable app.
From
1.
2. Tap Start.
Tap
3.
Galaxy Wearable, tap Find My Watch.
Stop on the smartphone or tap
on the watch.
32
Page 33
Apps
Reminder
Add reminders for events and set alarms outside of the Calendar app.
Create a reminder
Set up and track reminders on your watch:
From Apps, tap
1.
Tap
2.
3. Tap Set time, set the time for your reminder, and then tap Next.
4. Set the date and repeat options, then tap
5. Tap
Write, and then enter the reminder information.
Save when finished.
Reminder.
Done.
Complete a reminder
To mark reminders as complete:
◌
From
To view completed reminders, tap
•
Reminder, tap the checkbox beside a reminder to set it as complete.
Completed.
Samsung Pay
Pay almost anywhere that accepts a debit, credit, or gift card. Samsung Pay supports
Near Field Communication (NFC) to allow quick and secure payment through
standard credit card readers. For more information, see
pay.
samsung.com/us/samsung-
Set up Samsung Pay
From Apps, tap
1.
2. Follow the prompts to complete the setup.
Samsung Pay.
33
Page 34
Apps
Make a payment
From any screen, press the
1.
2. Swipe to select a card.
3. Hold the watch near an NFC reader to pay.
NOTE You can use Samsung Pay for up to 5 transactions without the
smartphone. This may vary depending on the bank/institution issuing the
account.
Home key twice to launch
Samsung Pay.
Stopwatch
The Stopwatch lets you time events down to a hundredth of a second.
From Apps, tap
1.
2. Tap Start to begin timing.
•
To keep track of lap times, tap
Stopwatch.
Lap.
3. Tap
Stop to end timing.
•
To continue timing after stopping the clock, tap
•
To reset the Stopwatch to zero, tap
Reset.
Resume.
Timer
Set a countdown timer for up to 59 hours, 59 minutes, and 59 seconds.
Set a timer
Create an alarm event. You can set one-time or recurring alarms.
From Apps, tap
1.
Tap a time or
2.
3.
Tap
Start.
Timer.
Custom to set the Timer.
Stop the timer
◌
Tap
Cancel or Restart when the timer goes off.
34
Page 35
Apps
Voice Recorder
Use your voice to record memos.
From Apps, tap
1.
2.
3.
Tap
•
•
Tap
•
Record and begin recording your message.
To convert your speech to text, tap
To pause the recording, tap
Stop when you are finished.
You can access your voice recordings, from
Voice Recorder.
Speech-to-text before recording.
Pause.
Recordings.
Weather
View weather information on the watch for locations set on the smartphone.
From Apps, tap
◌
information.
To add a city, tap the location, and tap
•
Weather. Swipe through the screens to view the weather
Manage on phone.
World clock
Keep track of the current time in multiple cities around the globe.
From Apps, tap
1.
2. Tap a city to view the time and temperature at that location.
•
To add a city to the World clock, tap
World clock.
Manage on phone.
35
Page 36
Apps
Media
The following media apps come pre-installed or downloaded over-the-air to your
device.
Buds controller | Camera controller | Gallery | Media controller | Messages | Phone
Buds controller
Control your earbuds with your watch. Connect your earbuds directly to your watch
or to the Galaxy Wearable app on your phone.
From Apps, tap
1.
2. Follow the instructions to connect your earbuds.
Buds controller.
Camera controller
You can use Camera Controller to take pictures using the camera on your phone with
your watch.
From Apps, tap
1.
your phone's screen.
Camera controller. You will see a preview on your watch of
2.
Tap
Capture on your watch to take pictures using your phone's camera.
Gallery
View and manage images.
From Apps, tap
1.
2. Swipe through the image list and then tap an image to view it.
•
To zoom in or out, double tap the image.
To delete an image, touch and hold the image, and then tap
•
Gallery.
Delete.
36
Page 37
Apps
Wear
Wear
Import and export images
Images can be exchanged between your watch and smartphone.
Import images from your smartphone
Send images or entire albums from your smartphone to your watch.
From
1.
2. Tap Manage content > Copy images to watch.
3. Select files or albums and tap
To automatically sync images on your smartphone with your watch:
From
1.
2. Tap Manage content > Auto sync to enable. Images will be synced while the
watch battery power is at least 15 percent.
•
Image limit: Set a limit to the number of images that can be synced to your
watch.
•
Albums to sync: Select which Gallery albums to sync to your watch.
Galaxy Wearable, tap Watch settings.
Done.
Galaxy Wearable, tap Watch settings.
Export images to your phone
Send images from your watch to your phone.
1.
2.
From
Tap
Gallery, touch and hold an image.
Copy to phone.
Take a screenshot
Capture an image of your screen. It is automatically saved to the Gallery app.
◌
From any screen, press the
Home and Back keys at the same time.
37
Page 38
Apps
Volume
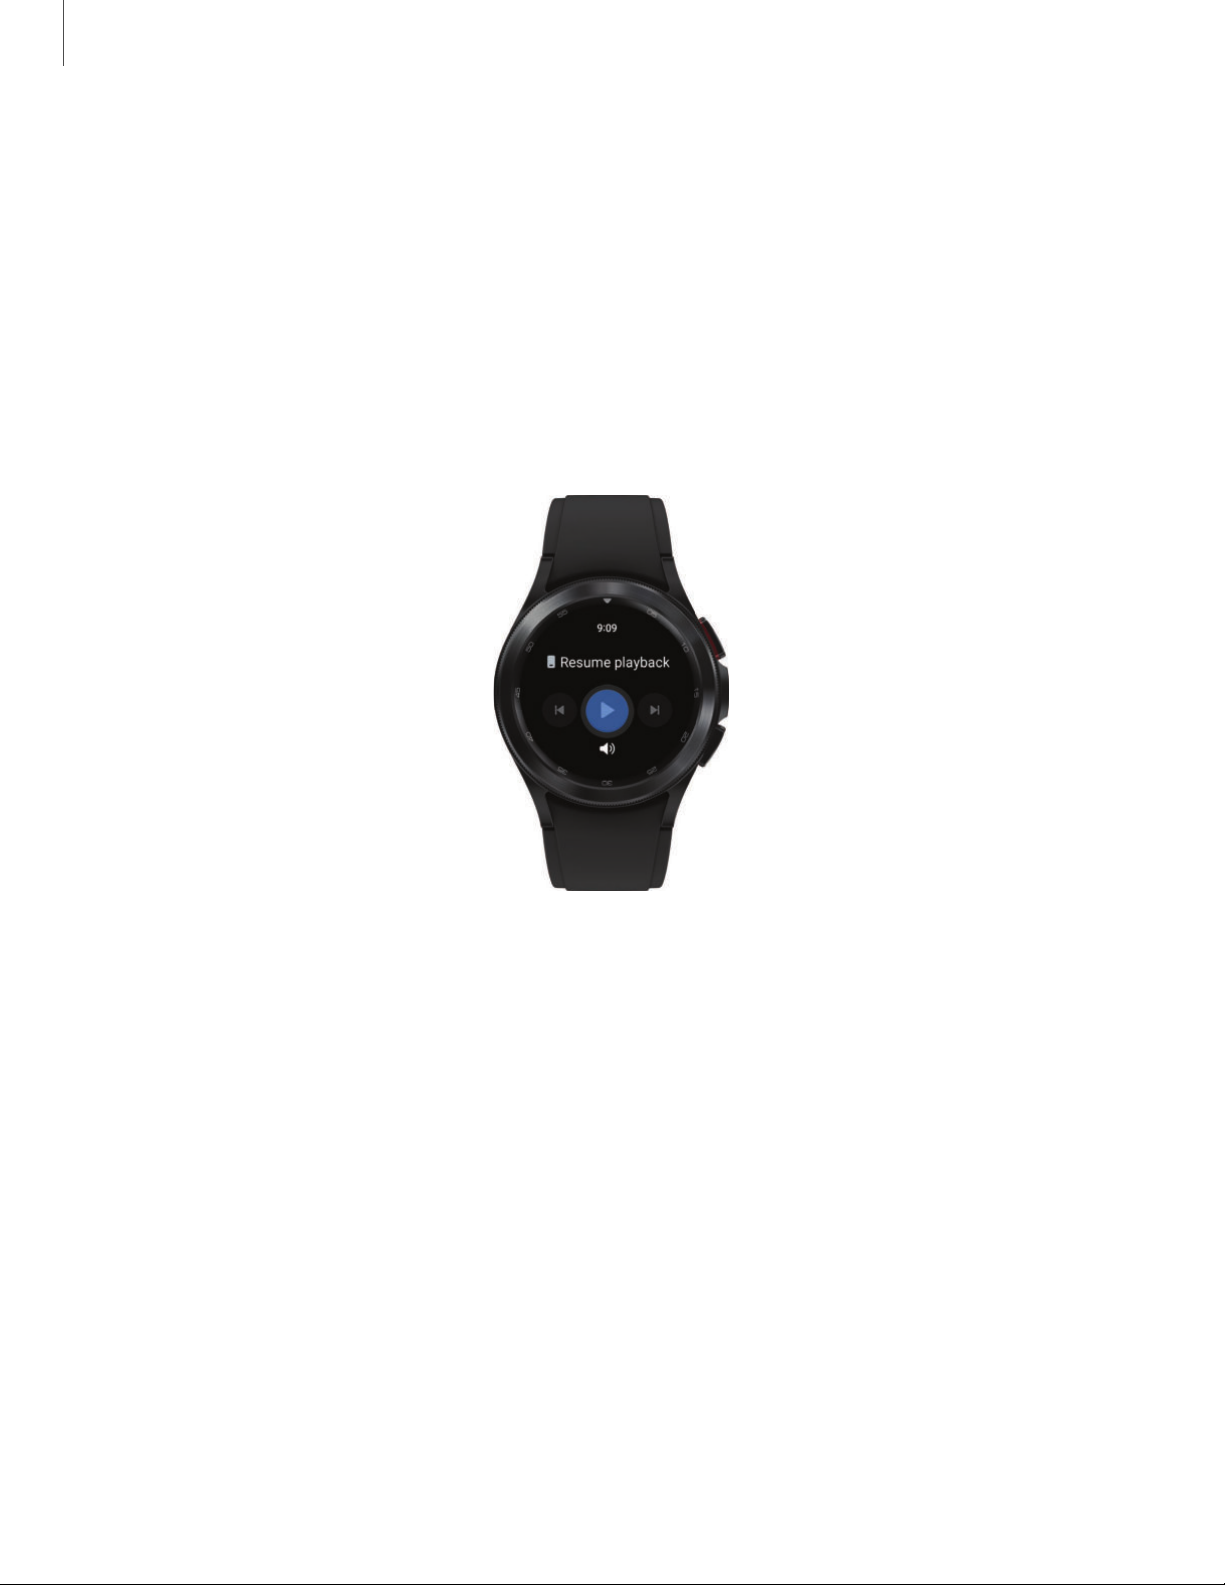
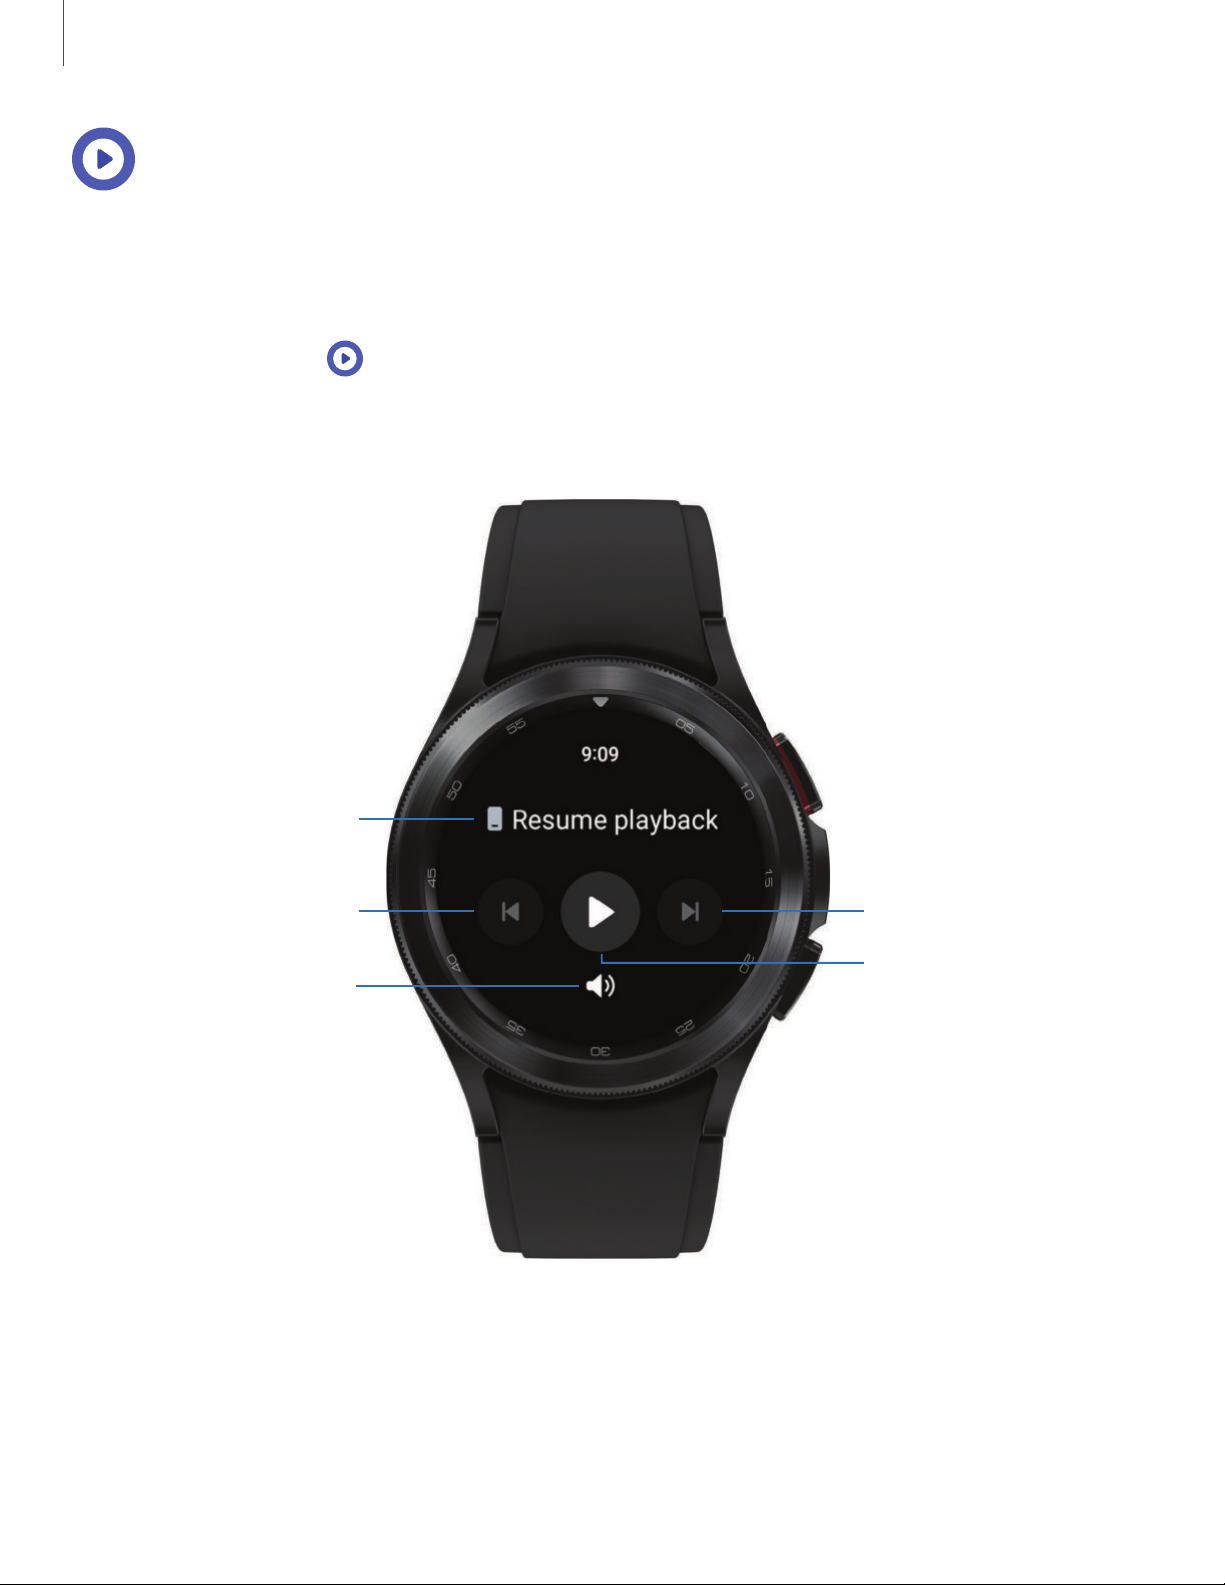
Fast-forwardRewind
Output
Play/Pause
Media controller
You can use the Media controller to connect to a computer, phone, or tablet using
Bluetooth and control media with your watch.
To connect:
From Apps, tap
1.
2. Tap a device in the list to connect your watch.
3. Use the media controls on your watch.
Media Controller.
Devices and software are constantly evolving — the illu strations you see here are for reference only.
38
Page 39

Apps
Wear
Wear
Import music
Import music saved on your smartphone to your watch.
1.
From
Galaxy Wearable, tap Watch settings.
2. Tap Manage content > Add tracks.
3. Select files and tap
Done.
To sync recently added music on your smartphone with your watch:
1.
From
Galaxy Wearable, tap Watch settings.
2. Tap Manage content > Auto sync, music will be synced while the watch’s
battery power is at least fifteen percent.
39
Page 40
Apps
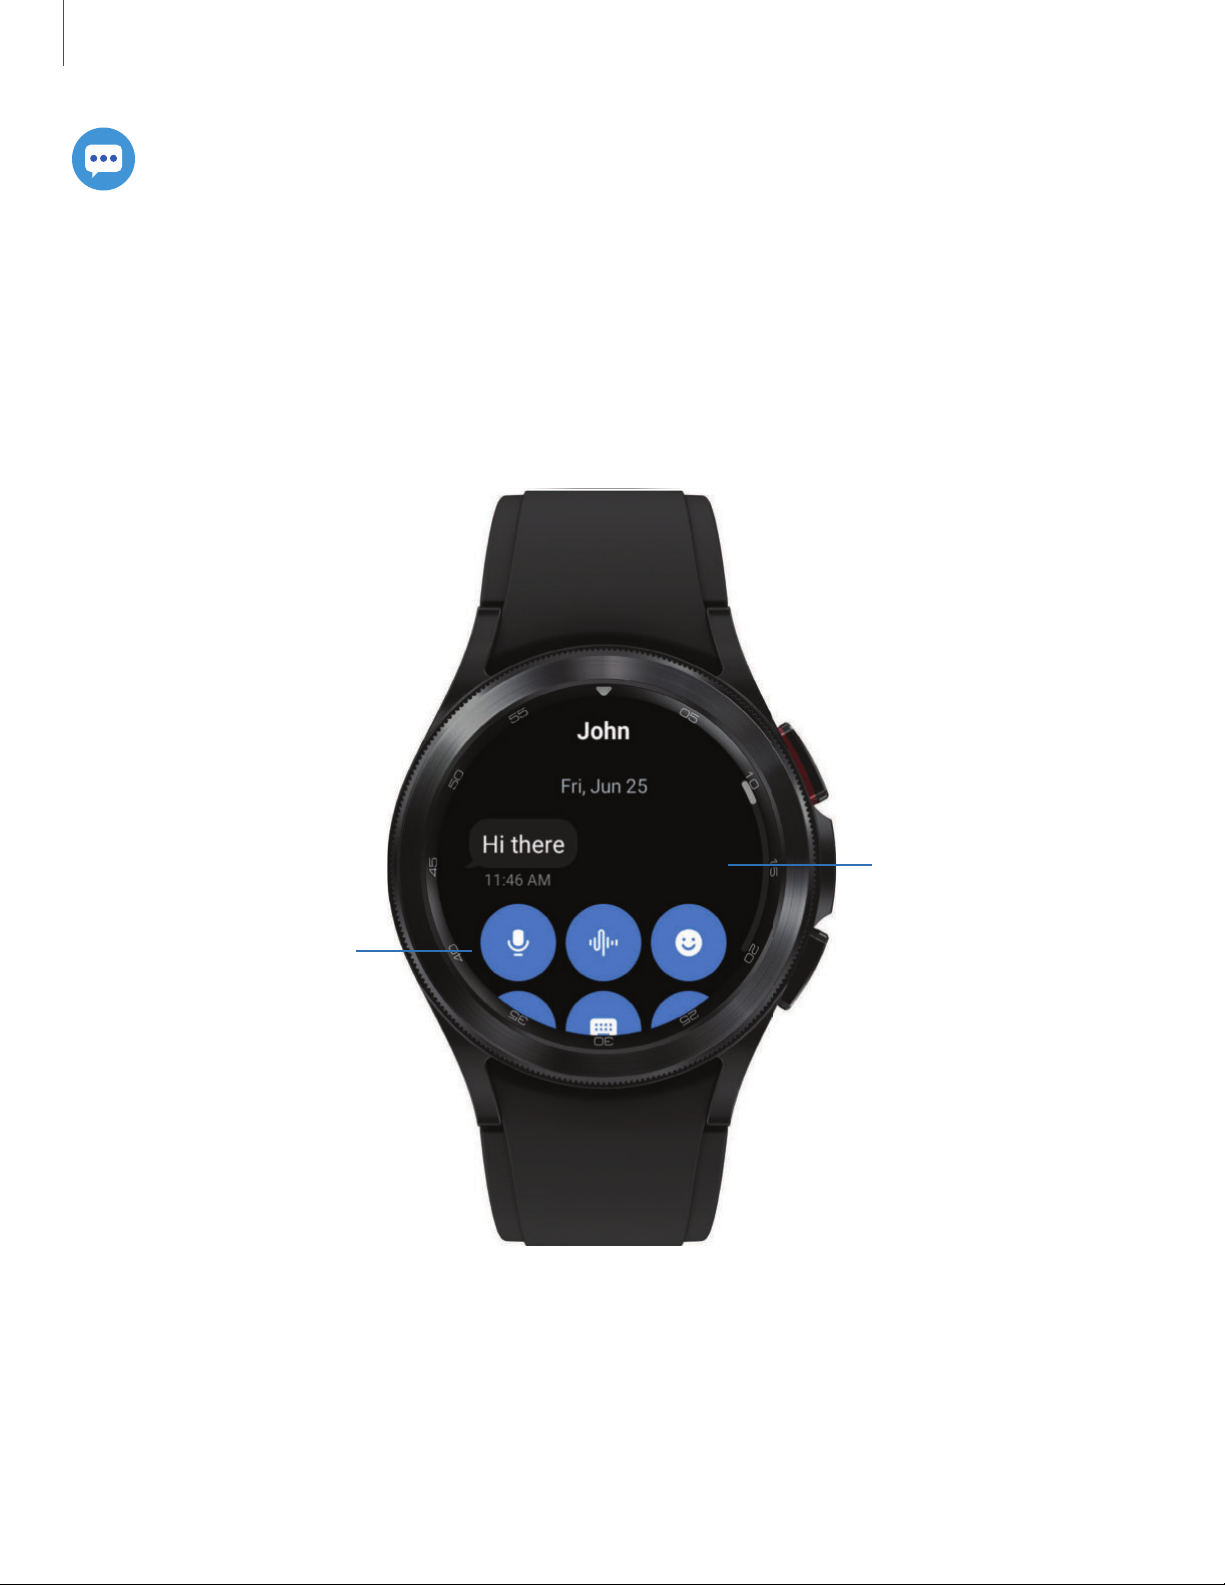
Tap a keyboard icon
to compose a reply
Swipe down for
additional
keyboards, quick
replies, and more
Messages
View messages and reply to or call the sender using the watch.
View and Send messages
You may incur additional charges for receiving messages while you are roaming.
◌
From the notifications screen, tap message to view it.
Devices and software are constantly evolving — the illu strations you see here are for reference only.
40
Page 41
Apps
Wear
Send messages
Create and send messages from your watch.
From Apps, tap
1.
Enter recipient to enter a phone number, or
Tap
2.
Messages > Compose.
Contacts to add a number
you have saved.
3. Choose a keyboard to compose your message.
4. Tap
Send.
Delete messages
Delete messages from your watch.
◌
From
Messages, touch and hold a conversation to select it, and tap Delete.
SOS messages
Send a message with your location to designated contacts when you are in an
emergency situation.
1.
From
Galaxy Wearable, tap Watch settings > Advanced features > SOS.
2. Tap options for when to send SOS messages to enable them:
l When Home key pressed 3 times: Press the Home key quickly 3 times to send
an SOS message.
l When hard fall detected: Makes an SOS call and send an SOS message when
a hard fall is detected.
3. Tap an option to select the emergency contacts that you want to receive your
SOS.
l
Send messages to: Tap the contacts you want to receive your SOS messages.
l Make SOS calls to: Tap the contacts you want to receive your SOS calls.
TIP You can also enable SOS options from the Settings menu on the watch. From
Settings, tap
Advanced features > SOS to customize.
To send SOS messages:
◌
Press the
Home key quickly three times to send an SOS message.
41
Page 42
Apps
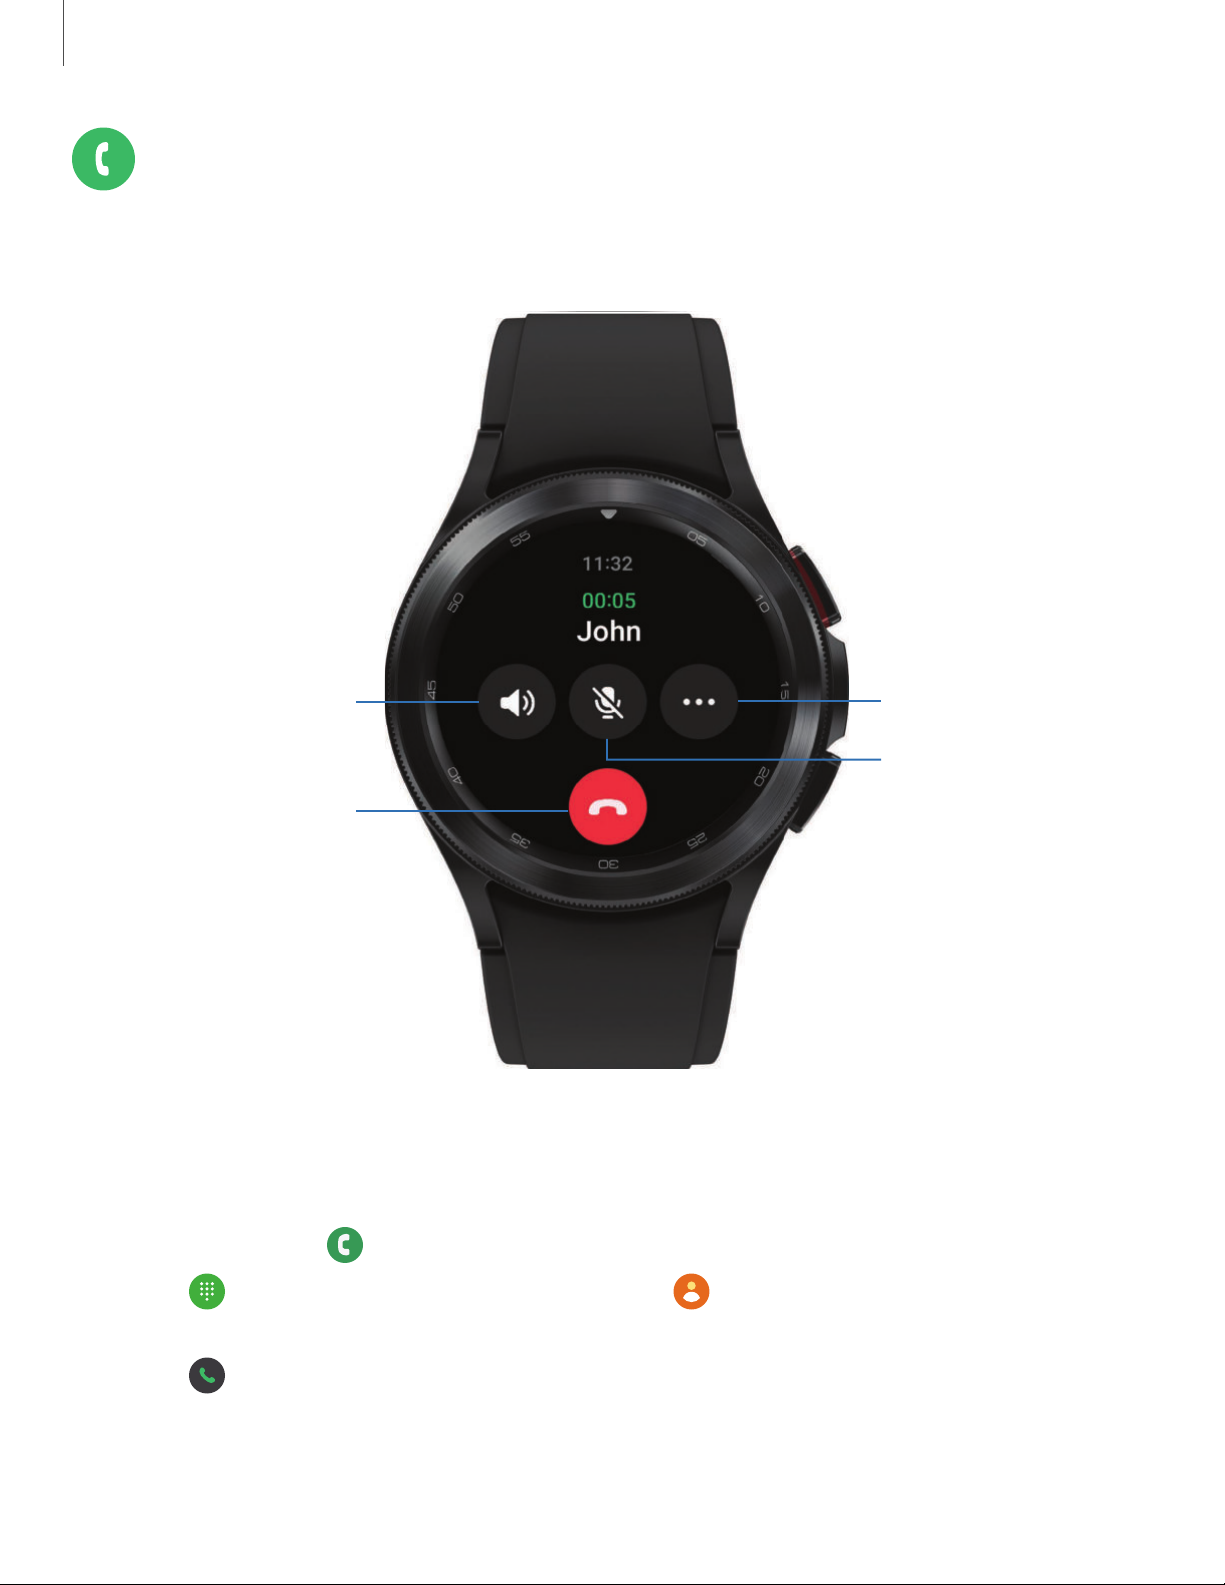
More options
End call
Volume
Mute
Phone
Make and answer calls on your phone from your watch.
Make a call
Make a call from your watch.
From Apps, tap
1.
2.
3.
Tap
call.
Tap
Keypad and enter a number or tap Contacts and select a contact to
Call.
Devices and software are constantly evolving — the illu strations you see here are for reference only.
Phone.
42
Page 43
Apps
Answer a call
Answer incoming calls.
On the incoming call screen, drag
◌
your phone.
Answer to the right to answer the call on
Reject a call
Reject incoming calls.
Tap
◌
voicemail.
Decline and drag it to the left to reject a call and send it to your
End a call
End a call from your watch.
◌
Tap
End when you are ready to end your call.
Phone settings
Configure settings for the Phone app. Options may vary by carrier.
From Apps, tap
◌
Block numbers: View the list of blocked numbers, and choose to block
•
unknown callers.
Preferred number: Choose your phone or watch phone number as default.
•
This option is only available on LTE devices with a mobile plan.
Voicemail: Listen and edit your voicemail message.
•
Supplementary services: Configure any supplementary service settings.
•
Phone > Settings and tap an option to customize:
43
Page 44

Apps
Gestures
Use gestures as shortcuts on the watch.
◌
From
Answer calls: Shake your arm twice bending at the elbow to answer
•
incoming calls.
Dismiss alerts and calls: Rotate your wrist twice to dismiss alarms or decline
•
incoming calls.
Settings, tap Advanced features, and tap an option under Gestures:
44
Page 45

Apps
Health
The following health apps come pre-installed or downloaded over-the-air to your
device.
Samsung Health | Samsung Health Monitor
Samsung Health
Samsung Health helps you manage your wellness and fitness. Set fitness goals and
regularly record and check your progress.
When the watch is synced with the Samsung Health app, you can save and manage
health-related data and receive useful information about your health every day.
Only your most recent activity records are stored on your watch. You can view
previous data on the smartphone where the Samsung Health app is installed.
From the Apps screen, tap
◌
CAUTION The information gathered from this device, Samsung Health, or related
software is not intended for use in the diagnosis of disease or other conditions,
or in the cure, mitigation, treatment or prevention of disease.
The accuracy of the information and data provided by this device and its related
software, including heart rate readings, may be affected by factors such as
environmental conditions, skin condition, specific activity performed while
using/wearing the device, settings of the device, user configuration/user-provided
information, placement of the sensor on the body, and other end-user interactions.
For more information on proper wear and use, visit
samsung.com/us/heartratesensor.
Samsung Health.
45
Page 46

Apps
Before you start exercising
Although the Samsung Health application is a great companion to your exercise
routine, it is always best to make sure you consult with your physician before
beginning any exercise regimen. While moderate physical activity, such as brisk
walking, is safe for most people, health experts suggest that you talk with your doctor
before you start an exercise program, particularly if you have any of the following
conditions:
l Heart disease; Asthma or lung disease; Diabetes, or liver or kidney disease; and
Arthritis.
Before beginning your exercise regimen check with your doctor if you have
symptoms suggestive of heart, lung, or other serious disease, such as:
l Pain or discomfort in your chest, neck, jaw, or arms during physical activity;
l Dizziness or loss of consciousness;
l Shortness of breath with mild exertion or at rest, or when lying down or going to
bed;
l Ankle swelling, especially at night;
l A heart murmur or a rapid or pronounced heartbeat;
l Muscle pain when walking upstairs or up a hill that goes away when you rest.
It is recommended that before engaging in an exercise routine, you consult with your
doctor or medical practitioner. If you are unsure of your health status, have several
health problems, or are pregnant, you should speak with your doctor before starting
a new exercise program.
46
Page 47

Apps
Daily activity
View a summary of your daily activity broken down by your step count, active time,
and active calories.
From
◌
your activity.
Samsung Health, tap Daily activity and swipe down to view a graph of
Steps
Your watch counts your number of steps, measures the distance traveled, calories
burned, and floors climbed.
From
◌
To set your steps target:
From
1.
2. Swipe to the bottom of the screen, and tap Set target.
3. Set your target step count, and tap
Samsung Health, tap Steps to view a graph of your step count records.
Samsung Health, tap Steps.
Done.
Exercise
Record your exercise information using Samsung Health’s exercise feature.
When your watch and smartphone are connected, this feature uses your
smartphone’s location information.
Exercise with the watch
From
1.
2. Tap Choose workout and swipe to an activity type.
3. Tap the activity to start monitoring your exercise. Your heart rate measurement
will be displayed after you begin your exercise.
4. Press and hold the
•
Swipe right to view the exercise controls.
•
Press the
•
Tap
Samsung Health, tap Exercise.
Back key to pause the workout.
Resume to resume the workout.
Finish to complete your workout and view your workout summary.
5. Swipe to and tap View log to see your workout log.
47
Page 48

Apps
TIP You can also press and hold the Back key to quickly access the Exercise list
and begin working out. For more information, see
Customize keys.
Sleep
Automatically track your sleep patterns.
From
1.
2. Swipe up to view your sleep data.
Samsung Health, tap Sleep.
Heart rate
Measure and record your heart rate. Take heart rate measurements when you are
seated and relaxed.
From
1.
2. Tap Measure to begin measuring your heart rate.
•
After a moment, your current heart rate is displayed on the screen.
Samsung Health, tap Heart rate.
3. Tap
Tag to select a status tag for your measured heart rate.
•
The watch displays information about your heart rate in relation to your
selected tag.
Stress
Keep track of your stress. Breathing exercises are also available to help reduce
stress.
From
1.
2. Tap Measure to measure your current stress level.
•
After a moment, your stress level is displayed on the screen.
Breathing exercise
Use the Breathe feature to help reduce stress by doing a breathing exercise.
From
1.
Samsung Health, tap Stress.
Samsung Health, tap Stress.
2. Swipe up to see the Breathe feature, and adjust the number of breathing cycles.
3. Tap
Breathe to begin.
48
Page 49

Apps
Blood oxygen
Keep track of your oxygen level, also known as saturation of percutaneous oxygen
(SpO2).
From
1.
2. Tap Measure and follow the prompts to begin measuring your blood oxygen
level.
•
After a moment, your current blood oxygen level is displayed on the screen.
3. Tap
Samsung Health, tap Blood oxygen.
Tag to select a status tag for your measured blood oxygen level.
Body composition
Keep track of your Body composition.
From
1.
2. Tap Measure and enter your information.
3. Follow the prompts to measure your body composition.
•
After a moment, your body composition is displayed on the screen.
Samsung Health, tap Body composition.
Food
Record and track how many calories you eat each day.
From
1.
2. Tap Add when you eat something to enter the calories.
3. Tap the
4. Tap
To set your daily calorie target:
From
1.
2. Swipe to the bottom of the screen, and tap Set target.
3. Set your target calories, and tap
Samsung Health, tap Food.
meal type at the top of the screen to change it.
Done to save.
Samsung Health, tap Food.
Done.
49
Page 50

Apps
Water
Record and track how many glasses of water you drink each day.
From
1.
Tap
2.
To decrease the count, tap
•
To set your daily water target:
From
1.
2. Swipe to the bottom of the screen and tap Set target.
3. Set the number for your target, and tap
Samsung Health, tap Water.
Add when you drink a glass of water.
Remove.
Samsung Health, tap Water.
Done.
Together
Compete with other Samsung Health users.
Steps leaderboard
Add challenges through Samsung Health on your smartphone.
From Apps, tap
◌
and challenges.
Samsung Health > Together > Start. Here you can add friends
Women's health
Record and track your menstrual cycle.
◌
From
Tap
•
Swipe up on the screen to view your ovulation and predicted period
•
information.
Tap
•
Samsung Health, tap Women's health.
Enter period to record your menstrual cycle.
Add log to record your symptoms.
50
Page 51
Apps
Settings
Customize your Samsung Health settings.
From
1.
2. Tap an item to customize:
•
Notification: Set the watch to alert you if you have been still for almost an
hour.
•
Measurement: Configure automatic heart rate, stress, and blood oxygen
during sleep measurements.
•
Auto detect workouts: Set the watch to recognize and encourage you when
it detects that you are exercising.
•
Connected services: Configure connected services such as the Health
platform.
Samsung Health, tap Settings.
Samsung Health Monitor
Use the Samsung Health Monitor app to track your blood pressure and record
electrocardiogram (ECG) measurements, analyze them quickly, and share the
results with experts.
To view detailed reports of your blood pressure and ECG readings on your
smartphone, install the Samsung Health Monitor app. You can download the app from
the Galaxy Store or the Google Play
From your smartphone, tap
1.
app to the latest version.
2. Tap
Continue and create your profile.
™
store.
Samsung Health Monitor. If necessary, update the
51
Page 52

Apps
Measure ECG
Use your Galaxy watch to record ECG for 30 seconds similar to a standard single-lead
ECG. The ECG Monitor app will also check the recording for signs of Atrial Fibrillation-a
common form of irregular heart rhythm.
Requires Samsung Galaxy smartphone with Android 7 or later, and Samsung Health
Monitor app (available only at the Samsung Galaxy app store).
CAUTION The ECG app is not intended for users with known arrhythmias other
than atrial fibrillation or users under 22 years old. Users should not interpret or
take clinical action based on the device output without consultation of a
qualified healthcare professional. The ECG app is not intended to replace
traditional methods of diagnosis or treatment.
From
1.
2. Rest your finger lightly on the Home key to begin the ECG.
•
After a moment, your ECG is displayed on the screen.
3. Tap
4. Tap
Samsung Health Monitor, tap ECG.
Add to add any symptoms you are experiencing.
Done when you are finished.
Share your report
You can view your ECG readings as daily, weekly, and monthly charts, or view
detailed reports for each measurement. You can share the PDF report of your ECG
recording with your healthcare provider using Samsung Health Monitor app on your
compatible Galaxy phone.
From your smartphone, tap
1.
2. Tap the ECG tab to view your measurements.
3. Tap
4. Tap
See details to view the latest report or View history to see all available
reports.
Share this report and choose a sharing method to send a PDF.
Samsung Health Monitor.
52
Page 53
Apps
Enjoy these apps from Google. Certain apps require a Google Account. Visit
google.com to learn more.
Play store | Maps
Play store
Find new, recommended, and essential apps as well as watch faces and games in
the Google Play store.
From Apps, tap
◌
Play store.
Maps
Get directions and other location-based information. You must enable location
services to use Google Maps. For more information, see
From Apps, tap
◌
Maps.
Location.
53
Page 54

Apps
Microsoft
The following Microsoft apps may be preloaded on your device. Apps can be
downloaded from Galaxy Store and the Google Play store.
Outlook
View new emails on your watch.
From Apps, tap
1.
2. Tap a message to view its content.
Outlook.
View calendar events
View your Outlook calendar events on your watch.
◌
From
Outlook, tap an event to view its content.
Notification settings
Customize Microsoft Outlook
◌
From
Mail: Choose to receive notifications in the same way as your phone, or set a
•
vibration option.
Calendar: Choose to receive notifications in the same way as your phone, or
•
set a vibration option.
Outlook, tap Notifications and tap an option to customize:
54
Page 55
Settings
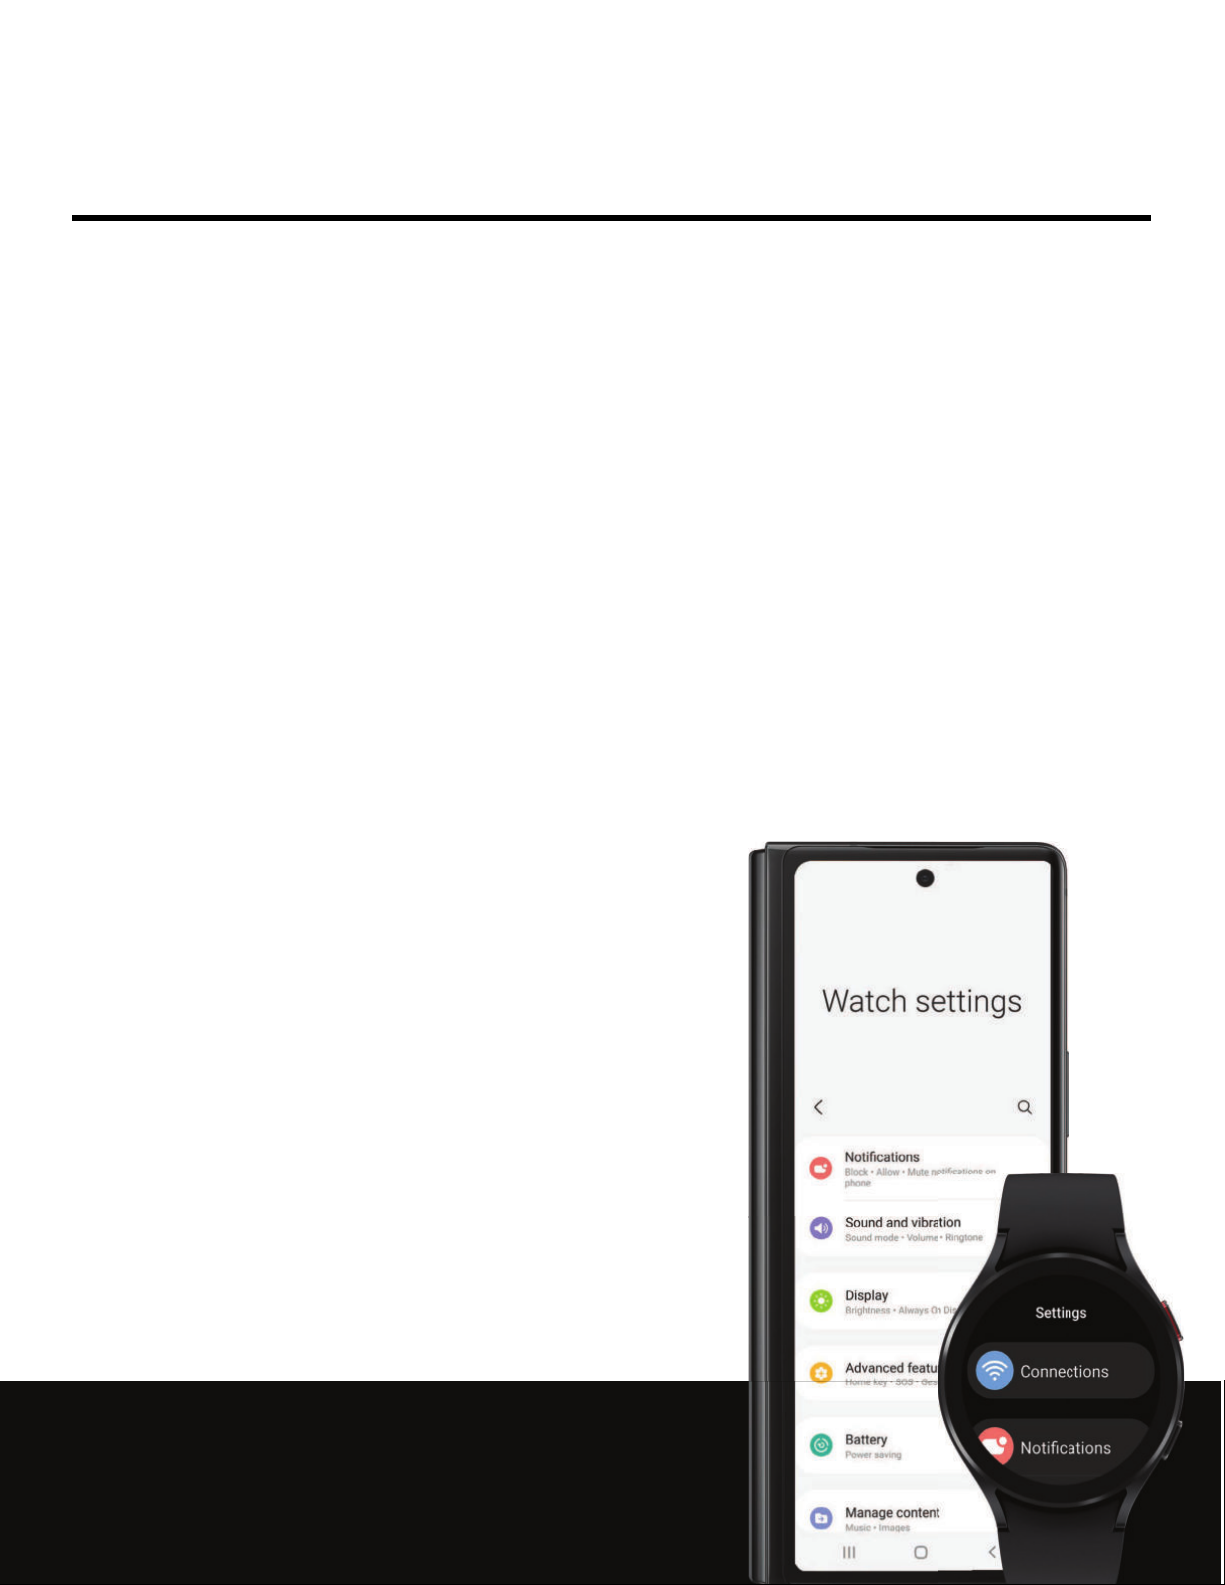
Access Settings
Connections
Notifications
Sounds and vibration
Display
Device maintenance
Accessibility
Security and privacy
Accounts
Other settings
55
Page 56
Settings
Access Settings
You can personalize your device by configuring various setting options.
From Apps, tap
◌
the status panel and tap
Settings, or swipe down from the top of the screen to open
Settings.
Connections
Manage connections between your device and a variety of networks and other
devices.
Bluetooth | Wi-Fi | NFC | Disconnection alerts | Airplane mode | Mobile networks | Data
usage
Bluetooth
Use Bluetooth to connect the watch to a smartphone or an optional headset for
playing music (headset not included).
1.
From
Settings, tap Connections > Bluetooth.
2.
Tap
to turn on the feature.
Wi-Fi
Activate the Wi-Fi feature to connect to a Wi-Fi network.
1.
2.
From
Tap
Settings, tap Connections > Wi-Fi.
to turn on the feature.
56
Page 57
Settings
Connect to a Wi-Fi network
This feature is available when the watch is not connected to the smartphone
through Bluetooth.
From
1.
2. Tap a network from the Available networks list.
•
Networks that require a password display a lock icon.
•
To manually add a hidden network, tap
3. Enter the password if required, and tap
NOTE Once the watch connects to a Wi-Fi network, the watch reconnects to
that network each time it is available without requiring a password. To prevent
the watch connecting to the network automatically, select the network, and
then tap
Settings, tap Connections > Wi-Fi.
Add network at the bottom of the list.
Connect.
Forget.
NFC
Near Field Communication (NFC) allows you to communicate with another device
without connecting to a network. Make payments and buy tickets for transportation
or events after downloading and configuring the required apps.
From
1.
Tap
2.
3. Tap
•
Settings, tap Connections > NFC.
to enable the feature.
Payment to set the default payment app for mobile payments.
To use a payment app that is open, tap
Pay with open app.
57
Page 58
Settings
Make payments with the NFC feature
Before you can use the NFC feature to make payments, you must register for the
mobile payment service. To register or get more information about the service,
contact your service provider.
◌
Touch the top of the watch’s touchscreen to the credit card reader.
NOTE The payment services list may not include all available payment apps.
Open with NFC
You can select supported apps to open with NFC.
From
1.
2. Tap Others, and select an app.
Settings, tap Connections > NFC.
Disconnection alerts
Receive alerts when disconnected from Bluetooth.
1.
From
Settings, tap Connections > Disconnection alerts.
2. Tap an alert style to select it.
Airplane mode
Airplane mode disconnects your device from all networks and turns off connectivity
features, such as phone calls and Wi-Fi.
From
◌
TIP You can also access Airplane mode from Quick settings. Swipe down from
the top of the watch, and tap
Settings, tap Connections > Airplane mode to enable this option.
.
58
Page 59

Settings
Mobile networks
Customize your mobile networks. This feature is only available on the LTE model.
From
1.
2. Tap Mobile networks, and tap an option for mobile network use.
3. Swipe down and tap
Settings, tap Connections.
Mobile plans to view available mobile plans for your device
Data usage
Explore options for your data plan. This feature is only available on the LTE model.
From Apps, tap
1.
2. Tap Data usage and tap an option:
•
Start billing cycle on: Change the monthly date to align with your carrier's
billing date (if applicable).
•
Set data limit: Enable the data limit feature.
•
Data limit: Customize your data limit.
Settings, tap Connections.
59
Page 60
Settings
Notifications
You can prioritize and streamline app alerts by changing which apps send
notifications and how notifications alert you.
Notification settings | Advanced notification settings | Wireless emergency alerts
Notification settings
Coordinate notifications between your phone and watch.
◌
From
Show phone notifications on watch: When the phone is not in use receive
•
phone notifications on your watch.
Mute notifications on phone: Notifications on your phone will be muted while
•
you are wearing your watch.
Settings, tap Notifications, and tap an option to enable it:
Advanced notification settings
Use these options to determine block out time where notifications are turned off, and
during which time periods you want to enter this mode.
From
◌
to enable:
Notification indicator: Show indicator for unread notifications.
•
Read notifications aloud: When headphones are connected the watch can
•
read your notifications aloud.
Settings, tap Notifications, and tap options under Advanced settings
60
Page 61

Settings
Wireless emergency alerts
Emergency alerts notify you of imminent threats and other situations. There is no
charge for receiving an Emergency alert message.
◌
From
Allow alerts: Allow your watch to receive wireless emergency alert
•
notifications.
Alerts: Choose which alert types you would like to receive on your watch.
•
Emergency alert history: View previous alerts.
•
Alert preferences: Customize alert reminders, accessibility options, and
•
more.
Settings, tap Notifications > Wireless emergency alerts.
Sounds and vibration
Configure the vibrations used to indicate notifications, screen touches, and other
interactions.
Sound mode | Vibration | Call vibration | Notification vibration | Volume | Ringtone |
Notification sound | System vibration | System sounds
Sound mode
Switch between sound modes, while preserving the individual sound settings you
have made.
From
1.
2. Tap an option under Sound mode:
•
Sound: Enable sounds for notifications and alerts.
•
Vibrate: Use vibration only for notifications and alerts.
•
Mute: Set your device to make no sounds.
Settings, tap Sounds and vibration.
–
Vibrate while ringing: Set your device to vibrate in addition to ringing
when you receive a call (This option is only available if Sound is
enabled.)
61
Page 62

Settings
Vibration
Set how long and intensely the device vibrates for notifications.
From
1.
2. Select options under
preference.
Settings, tap Sounds and vibration > Vibration.
Vibration duration and Vibration intensity to set your
Call vibration
Vibrate for calls.
From
1.
2. Tap
Settings, tap Sounds and vibration.
Call vibration and select a vibration pattern.
Notification vibration
Choose a vibration pattern for new notifications.
From
◌
a vibration pattern.
Settings, tap Sounds and vibration > Notification vibration and select
Volume
Set volume levels.
From
1.
2. Tap a mode to customize the volume level.
Settings, tap Sounds and vibration > Volume.
Ringtone
Choose from preset ringtones or add your own.
From
1.
2. Tap a ringtone to hear a preview and select it.
Settings, tap Sounds and vibration > Ringtone.
Notification sound
Choose from preset notification sounds.
1.
From
Settings, tap Sounds and vibration > Notification sound.
2. Tap a notification sound to hear a preview and select it.
62
Page 63

Settings
System vibration
Enable vibrations when the watch screen is tapped.
◌
From
Settings, tap Sounds and vibration > System vibration to enable.
System sounds
Enable sounds for actions like tapping the screen and charging the watch.
From
1.
2. Tap System sounds, and then an option to enable it:
•
Ticking: Hear a ticking sound.
•
Hourly chime: Hear a sound and feel a vibration at the start of each hour.
•
Touch: Play tones when you touch or tap the screen to make selections.
•
Unlock: Play a sound when you lock or unlock the screen.
•
Charging: Play a sound when a charger is connected.
•
Dialing keypad: Play a tone when dialing numbers on the Phone keypad.
Settings, tap Sounds and vibration.
Display
You can configure the screen brightness, timeout delay, font size, and many other
display settings.
Adjust screen brightness | Always on Display | Screen wake-up | Show media controls |
Set the screen timeout | Show last app | Font style | Touch sensitivity | Show charging
info
Adjust screen brightness
Manually adjust the brightness of the display.
◌
From
Brightness: Manually adjust the brightness of the display.
•
Auto brightness: Set the watch to automatically adjust the brightness
•
depending on ambient light conditions.
Settings, tap Display and select an option:
63
Page 64
Settings
Always on Display
Keep the screen on without unlocking your device using Always On Display (AOD).
From
◌
feature.
Settings, tap Display, and tap Always on Display to enable the
Screen wake-up
Use a gesture to turn on the watch screen.
From
◌
enable:
•
•
•
Raise wrist to wake: Lift your wrist to turn on the watch screen.
Touch screen to wake: Touch the watch screen to turn it on.
Turn bezel to wake: Rotate the bezel to turn on the watch screen (Galaxy
Watch4 Classic only).
Settings, tap Display, and tap an option under Screen wake-up to
Show media controls
Show controls on your screen when you start playing audio or video on your phone.
From
◌
feature.
Settings, tap Display, and tap Show media controls to enable the
Set the screen timeout
Set the length of time the watch waits before turning off the display’s backlight.
◌
From
Settings, tap Display > Screen timeout, and select a timeout value.
Show last app
Set the length of time the watch displays the last app used when you turn the screen
on.
◌
From
Settings, tap Display > Show last app, and select a timeout value.
64
Page 65
Settings
Font style
Customize the font style and size on your watch.
◌
From
Font style: View and select a font.
•
Font size: Choose from small, medium, and large.
•
Settings, tap Display, and tap an option under Font to customize:
Touch sensitivity
Set the watch to allow use of the touch screen with gloves on.
1.
2.
From
Tap
Settings, tap Display > Touch sensitivity.
to enable this feature.
Show charging info
Display the battery level until full.
◌
From
Settings, tap Display > Show charging info to enable the feature.
Device maintenance
View the status of your device’s battery, storage, and memory. You can also
automatically optimize your device’s system resources.
Battery | Power saving mode | Watch only mode | Text to speech | Date and time |
Connect to a new phone | Reset the Watch | Location
Battery
View your battery level percentage and remaining hours.
From
◌
watch.
Settings, tap Battery to view the remaining battery life for your
65
Page 66
Settings
Power saving mode
Activate Power saving mode to save battery power by limiting the watch’s functions,
such as:
l Use a grayscale Home screen.
l Turn off all functions except calls, messages, and notifications.
l Turn off Wi-Fi and mobile networks (if applicable).
l Limit performance.
From
1.
2. Tap Power saving to enable the feature.
To disable Power saving mode:
◌
From the Home screen, swipe from the top of the screen down to open the
Quick settings panel. Tap
Settings, tap Battery.
Power saving to turn off the feature.
Watch only mode
Activate Watch only mode to save battery power by limiting the watch’s functions to
only showing the time.
From
1.
2. Tap Turn on.
•
Press the
•
Press and hold the
Settings, tap Battery > Watch only.
Home key to show the time.
Home key to turn watch only mode off.
Text to speech
To set accessibility settings related to Text to speech:
◌
From
Preferred engine: Choose your default TTS engine.
•
TTS engine settings: Install voice data for use with text-to-speech and view
•
the TTS version information.
Language: Choose the language for spoken text.
•
Speech rate: Set the speed at which the text is spoken.
•
Settings, tap General > Text-to-speech and select a mode:
66
Page 67
Settings
Date and time
You can set the date and time manually. These options are only available when your
watch is not connected to your mobile device.
◌
From
Automatic: Use the network to set date and time.
•
Set date: Set the date manually.
•
Set time: Set the time manually.
•
Select time zone: Select the time zone manually.
•
Settings, tap General > Date and time.
Connect to a new phone
Connect your watch to a new mobile device. For more information, see Back up data.
From
◌
prompts.
Settings, tap General > Connect to new phone and follow the
Reset the Watch
Reset settings to their factory default values and delete all data.
From
1.
2. Tap Reset again to confirm.
Settings, tap General > Reset.
Location
Some apps may require location services to be turned on for full functionality.
From
1.
Tap
2.
3. Tap
location detection, even when they are off.
4. Tap
location information.
Settings, tap Location.
to enable this feature.
Improve accuracy to use Wi-Fi and mobile networks for more accurate
Permissions to view apps and features that have permission to access your
67
Page 68
Settings
Accessibility
Accessibility services are special features that make using the device easier for
those with certain physical disabilities.
For more information about Accessibility for Samsung products, please contact us at
[email protected].
TalkBack | Visibility enhancements | Hearing enhancements | Advanced settings |
Installed services
TalkBack
Receive spoken feedback when using your device, such as what you touch, select, or
activate.
From
1.
Tap
2.
l To configure TalkBack, tap
Settings, tap Accessibility > TalkBack.
to enable the feature.
Settings.
Visibility enhancements
You can configure Accessibility features to assist with visual aspects of your device.
From
◌
options:
•
•
•
•
•
Settings, tap Accessibility > Visibility enhancements for the following
Magnification: Triple tap to zoom in and out. After zooming out, drag two
fingers apart or together to adjust the zoom level.
Font size: Adjust the size of the font.
Grayscale: Remove all colors from the display, and use shades of gray.
Color inversion: Reverse the display of colors from white text on a black
background to black text on a white background.
Add color filter: Adjust the screen colors if you have difficulty reading the
text.
68
Page 69
Settings
Hearing enhancements
You can configure Accessibility features to assist with audial aspects of the device.
From
◌
option:
Mute all sounds: Turn off all notifications and audio for privacy.
•
Mono audio: Switch audio from stereo to mono when using one earphone.
•
Settings, tap Accessibility > Hearing enhancements and tap an
Advanced settings
You can configure Accessibility features.
From
◌
options:
•
•
Settings, tap Accessibility > Advanced settings for the following
Vibration watch: The watch will use vibrations to communicate the time.
Two finger triple tap: Use two fingers when using the gesture triple tap.
Installed services
You can install additional assistance services for your device.
From
◌
services.
Settings, tap Accessibility > Installed services to see a list of installed
69
Page 70

Settings
Security and privacy
You can secure your device and protect your data by setting a screen lock.
Set a screen lock | Permission manager
Set a screen lock
It is recommended that you secure your device using a screen lock.
From
1.
2. Tap Type to select a screen lock type:
•
Pattern: Create a pattern that you draw on the screen to unlock your device.
•
PIN: Set a PIN to use for unlocking the device when it is removed from your
wrist and the screen is turned off.
•
None: Do not lock the screen.
3. Tap
the watch screen.
Settings, tap Security > Lock.
Hide information to keep notifications and personal information hidden on
Permission manager
Apps might access features of your watch that you permit them to (like the sensors,
microphone, or location) when they are running in the background, not just when
you are using the app. You can set your watch to notify you when this happens.
1.
From
Settings, tap Privacy > Permission manager.
2. Tap a category, then tap an app to select which permissions you want to be
notified about.
70
Page 71

Settings
Accounts
Set up and manage your accounts.
Samsung account | Google account
Samsung account
Sign in to your Samsung account to access exclusive Samsung content and make full
use of Samsung apps.
From
◌
account information.
TIP You can also quickly access your Samsung account from the top of the
settings menu.
Settings, tap Account and backup > Samsung account to add your
Google account
Sign in to your Google Account to access your Google Cloud Storage, apps installed
from your account, and make full use of your device’s Android™ features.
From
◌
account information.
Settings, tap Account and backup > Google account to add your
Other settings
Configure features on your device that make it easier to use.
Software update | Tips and tutorials | About watch
Software update
Check for and install available software updates for your device. Options may vary
by carrier.
From
◌
updates.
Settings, tap Software update to check for available software
71
Page 72
Settings
Wear
Tips and tutorials
View tips and techniques as well as tutorials for your device.
From
◌
tutorials on your watch.
TIP To view the user manual from the
smartphone, tap
Settings, tap Tips and tutorials to view tips on your phone, and
Tips and user manual.
About watch
View information about the watch.
◌
From
Device info: View your device name and Bluetooth identifier.
•
Watch phone number: View the phone number assigned to your watch
•
(LTE model only).
Model number: Check your watch’s model number.
•
Serial number: View your watch’s serial number.
•
Settings, tap About watch to view information about your watch:
Galaxy Wearable app on your
IMEI: View your watch’s IMEI number.
•
Storage: Check the available storage space.
•
Device: Access device information about the watch.
•
Legal info: Access legal information related to the watch.
•
Software: Check your watch’s software version and security status.
•
Battery: Check the watch’s battery voltage and capacity.
•
72
Page 73
Learn more
Videos
youtube.com/samsungcare
Tips
samsung.com/us/support/tips
Samsung Care
samsung.com/us/support
Talk to an agent
Contact us on Facebook Messenger
Find us on Facebook
Follow us on Twitter
73
Page 74

Legal information
READ THIS INFORMATION BEFORE USING YOUR MOBILE DEVICE.
Arbitration Agreement - This Product is subject to a binding arbitration agreement
between you and SAMSUNG ELECTRONICS AMERICA, INC. (“Samsung”). You can opt out of
the agreement within 30 calendar days of the first consumer purchase by emailing
[email protected] or calling 1-800-SAMSUNG (726-7864) and providing the
applicable information.
The full Arbitration Agreement, Standard One-year Limited Warranty, End User License
Agreement (EULA), and Health & Safety Information for your device are available
online at
https://www.samsung.com/us/Legal/Gear-HSGuide.
Samsung Knox
Samsung Knox is Samsung’s security platform and is a mark for a Samsung device
tested for security with enterprise use in mind. Additional licensing fee may be
required. For more information about Knox, please refer to:
samsung.com/us/knox.
Maintaining water and dust resistance
CAUTION To avoid electric shock and damage to your device, do not charge
device while it is wet or in an area where it could get wet. Do not handle device,
charger or cords with wet hands while charging.
The device is not impervious to dust and water damage in any situation. It is
important that all compartments are closed tightly.
74
Page 75

Legal information
Follow these tips carefully to prevent damage to the device and maintain dust and
water resistance performance:
Water resistant based on 5ATM rating, which means submersion up to 50 meters per
ISO standard 22810:2010. Not intended for scuba diving. Avoid excessive, sudden
temperature changes, and high velocity activities. Falls and shocks may breach
integrity.
After use in sea water, rinse in fresh water and dry device. Despite this classification,
your device is not impervious to water damage in any situation. It is important that all
compartments are closed tightly.
Follow these tips carefully to prevent damage to the device.
Whenever your device gets wet, dry it thoroughly with a clean, soft cloth. Failure to
rinse the device in fresh water and dry it as instructed may cause the device to
suffer from operability or cosmetic issues.
Do not expose the device to water at high pressure.
If the device is dropped or receives an impact, the water and dust resistant
features of the device may be damaged.
Restricting children’s access to your mobile device
Your device is not a toy. Do not allow children to play with it because they could hurt
themselves and others, or damage the device, or make calls that increase your
device bill. Keep the device and all its parts and accessories out of the reach of small
children.
75
Page 76

Legal information
Samsung Electronics America, Inc.
Address:
85 Challenger Road
Ridgefield Park
New Jersey 07660
Phone: 1-800-SAMSUNG (726-7864)
Internet: samsung.com
©2021 Samsung Electronics America, Inc. Samsung, Samsung Galaxy, and Samsung
Health are all trademarks of Samsung Electronics Co., Ltd.
Other marks are the property of their respective owners.
Some multimedia (audio/video) files contain Digital Rights Management (DRM)
technology to verify you have the right to use the files. Preloaded apps on your
device may not be compatible with DRM-protected files.
Screen images are simulated. Appearance of device may vary.
Descriptions are based on the device’s default settings. Some content may differ
depending on carrier, model, or software.
The actual available capacity of the internal memory is less than the specified
capacity because the operating system and default applications occupy part of the
memory. The available capacity may change when you upgrade the device.
Please check with your service provider to verify qualifying services/features.
76
 Loading...