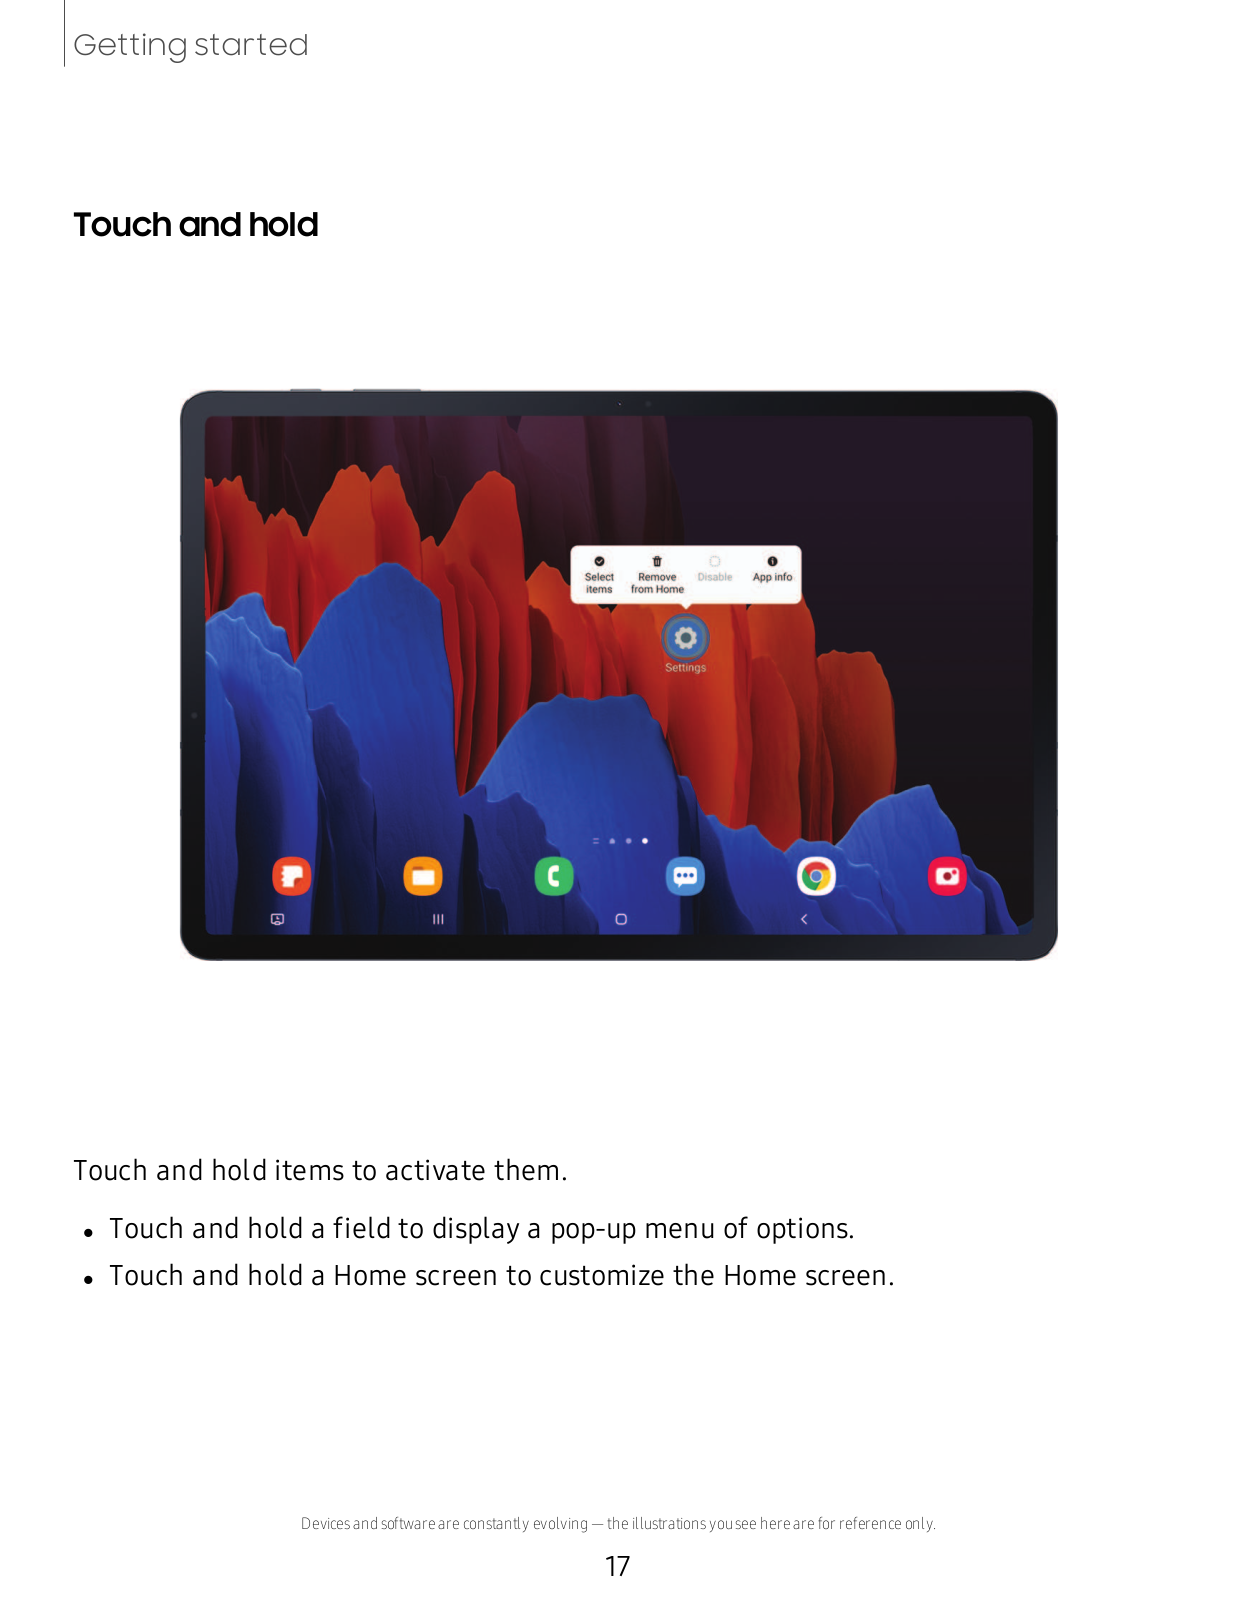
Samsung GalaxyTabS7 User Manual

SAMSUNG

GalaxyTabS7 S7+

Usermanual

Contents

Features

S Pen | Mobile continuity | Bixby | Biometric security | Dark mode

Gettingstarted

Device layout: Galaxy Tab S7 | Galaxy Tab S7+

Set up your device: Charge the battery | Accessories

Start using your device: Turn on your device | Use the Setup Wizard | Transfer data from an old device | Lock or unlock your device | Side key settings | Accounts | Navigation | Navigation bar | Customize your home screen | S Pen | Samsung Daily | Bixby | Digital wellbeing and parental controls | Biometric security | Mobile continuity | Multi window | Edge screen | Enter text

Customize your home screen: App icons | Wallpaper | Widgets | Home screen settings | Status bar | Notification panel

CameraandGallery

Camera: Navigate the camera screen | Configure shooting mode | AR Zone | Single take | Live focus | Scene optimizer | Record videos | Live focus video | Camera settings

Gallery: View pictures | Edit pictures | Play video | Video enhancer | Edit video | Share pictures and videos | Delete pictures and videos | Group similar images | Create a movie | Take a screenshot | Screen recorder

Mobilecontinuity

Samsung DeX | Call and text on other devices

2 WIF_T870U_T970U_EN_UM_TN_TG7_081820_FINAL

Contents

Samsungapps

Galaxy Essentials | AR Zone | Bixby | Galaxy Store | Game Launcher | PENUP | Samsung Flow | Samsung Members | SmartThings | Tips | Voice Recorder | Calculator | Calendar | Clock | Contacts | Internet | Messages | My Files | Phone | Samsung Notes

Googleapps

Chrome | Drive | Duo | Gmail | Google | Maps | Photos | Play Movies & TV | Play Store | YouTube | YT Music

Microsoftapps

Outlook | Office | OneDrive

Settings

Connections: Wi-Fi | Bluetooth | Airplane mode | Data usage | Nearby device scanning | Connect to a printer | Virtual Private Networks | Private DNS | Ethernet

Customization: Display | Notifications | Sounds and vibration

Security: Lock screen and security | Face recognition | Fingerprint scanner

Accounts: Samsung Cloud | Add an account | Account settings | Remove an account | Users | Backup and restore | Google settings

Backup: Samsung account | Google Account | External storage transfer

Accessibility: Screen Reader | Visibility enhancements | Hearing enhancements | Interaction and dexterity | Advanced settings | Installed services | About Accessibility

Other: Tips and user manual | Daily Board | About tablet

Learn more

Legal information

3

Gettingstarted

GalaxyTab S7

GalaxyTab S7+

Set up your device

Start using your device

4

Getting started

GalaxyTabS7


Microphone


Volume keys

Magnetic S Pen


Side key/

charging strip


fingerprint


scanner


Rear cameras


Flash


Front camera

Accessory dock port

USB charger/


Accessory port

/>

Devicesandsoftwareareconstantlyevolving— theillustrationsyouseeherearefor referenceonly.

5

Getting started

GalaxyTabS7+


Microphone

Magnetic S Pen


Volume keys

charging strip


Side key


Rear cameras


Flash


Front camera

Accessory dock port USB charger/

Accessory port

Fingerprint scanner

Devicesandsoftwareareconstantlyevolving— theillustrationsyouseeherearefor referenceonly.

6

Getting started

Setupyourdevice

Charge the battery | Accessories

Install microSD

Gently press the microSD card into the front of the tray.

Charge yourdevice

Before turning on your device, charge it fully.

NOTE The use of mobile deviceson an aircraft or a shipmay be subject to federal andlocal guidelinesandrestrictions. Check with appropriate authorities andalwaysfollow crew instructionsregarding when andhow youmay use your device.

-~- NOTE Use only charging devicesandbatteries(if applicable) that are approved by Samsung. Samsung charging devicesandbatteriesare designedfor your device to maximize battery life. Using other charging devicesandbatteriesmay voidyour warranty andmay cause damage.

Devicesandsoftwareareconstantlyevolving— theillustrationsyouseeherearefor referenceonly.

7

Getting started

Charge the battery

Your device ispoweredby a rechargeable battery. A charger (charging headandUSB Type-C cable) isincludedwith the device for charging the battery from a power outlet.

TIP Whilecharging,thedeviceandthechargermaybecomehotandstop charging.This usuallydoesnotaffectthedevice’slifespanorperformanceandis inthedevice’snormalrangeofoperation.Disconnectthechargerfromthedevice andwaitforthedevicetocooldown.For moreinformation,visit samsung.com/us/support/answer/ANS00076952.

Accessories

Supportedaccessories(soldseparately) can be configuredthrough Settings. This option may only appear after youhave connectedan accessory to your device.

Visit samsung.com/us/mobile/mobile-accessories to learn more.

From Settings, tapAdvanced features > Accessories.

Startusingyourdevice

Turn on your device | Use the Setup Wizard | Transfer data from an old device | Lock or unlock your device | Side key settings | Accounts | Navigation | Navigation bar | Customize your home screen | S Pen | Samsung Daily | Bixby | Digital wellbeing and parental controls | Biometric security | Mobile continuity | Multi window | Edge screen | Enter text

Turn on yourdevice

Use the Side key to turn your device on. Do not use the device if the body iscrackedor broken. Use the device only after it hasbeen repaired.

Pressandholdthe Side key to turn the device on.

To turn the device off, open the Notification panel, andtap C) Power >

Power off. Confirm when prompted.

To restart your device, open the Notification panel, andtap C) Power > Restart. Confirm when prompted.

8

Getting started

TIP Youcan also turn your device off by pressing the Side and Volume down keys at the same time. To learn more about powering off your device from Settings, tapAdvanced features > Side key > How to power off your tablet.

Use the Setup Wizard

The first time youturn your device on, the SetupWizardguidesyouthrough the basics of setting upyour device.

Follow the promptsto choose a default language, connect to a Wi-Fi® network, set up accounts, choose location services, learn about your device’sfeatures, andmore.

Transferdata from an old device

Use Smart Switchto transfer contacts, photos, music, videos, messages, notes, calendars, andmore from your olddevice. Smart Switch can transfer your data via USB cable, Wi-Fi, or computer.

Visit samsung.com/us/support/owners/app/smart-switch to learn more.

1.From Settings, tapAccountsand backup > Smart Switch.

2.Follow the promptsandselect the content to transfer.

Visit samsung.com/smartswitch for more information.

9

Getting started

Lock orunlock yourdevice

Use your device’sscreen lock featuresto secure your device. By default, the device locksautomatically when the screen timesout. For more information about screen locks, see Lock screen and security.

Side key

Press to lock. Press to turn on the screen, and then swipe the screen to unlock it.

Devicesandsoftwareareconstantlyevolving— theillustrationsyouseeherearefor referenceonly.

10

Getting started

Side keysettings

Youcan customize the shortcutsassignedto the Side key.

Double press

Choose which feature islaunchedwhen the Side key ispressedtwice.

1.From Settings, tapAdvanced features > Side key.

2.Tap Double press to enable thisfeature, andtapan option: Quick launch camera (default)

Open Bixby Open app

Pressandhold

Choose which feature islaunchedwhen youpressandholdthe Side key.

1.From Settings, tapAdvanced features > Side key.

2.Under the Pressandholdheading, tapan option:

Wake Bixby (default)

Power off menu

Accounts

Set upandmanage your accounts.

TIP Accountsmay support email, calendars, contacts, andother features. See your carrier for more information.

AddaGoogle Account

Sign in to your Google Account to accessyour Google CloudStorage, appsinstalled from your account, andmake full use of your device’sAndroidfeatures.

1.From Settings, tapAccountsand backup > Accounts.

2.Tap +Add account > Google.

11

Getting started

NOTE When yousign in to a Google Account, Factory Reset Protection (FRP) is activated. FRP requiresyour Google Account information when resetting to factory settings. For more information, see Factory Reset Protection.

AddaSamsungaccount

Sign in to your Samsung account to accessexclusive Samsung content andmake full use of Samsung apps.

1.From Settings, tapAccountsand backup > Accounts.

2.Tap+Add account > Samsung account.

TIP To quickly accessyour Samsung account, from Settingstape Samsung account profile.

AddanOutlook account

Sign in to your Outlook® account to view andmanage email messages.

1.From Settings, tapAccountsand backup > Accounts.

2.Tap+Add account > Outlook.

12

Getting started

Draganddrop

Touch andholdan item, andthen move it to a new location.

Drag an appshortcut to addit to a Home screen.

Drag a widget to place it in a new location.

Devicesandsoftwareareconstantlyevolving— theillustrationsyouseeherearefor referenceonly.

15

Samsung GalaxyTabS7 User Manual

Getting started

Zoominandout

Bring your thumbandforefinger together or apart on the screen to zoom in andout.

Move your thumbandforefinger together on the screen to zoom out.

Move your thumbandforefinger apart on the screen to zoom in.

Devicesandsoftwareareconstantlyevolving— theillustrationsyouseeherearefor referenceonly.

16

Getting started

Touchandhold

Touch andholditemsto activate them.

Touch andholda fieldto display a pop-upmenuof options.

Touch andholda Home screen to customize the Home screen.

Devicesandsoftwareareconstantlyevolving— theillustrationsyouseeherearefor referenceonly.

17

Getting started

Navigation bar

Youmay navigate your device by using either the navigation buttonsor full screen gestures.

Recent apps

Daily Board

Back

Home

Devicesandsoftwareareconstantlyevolving— theillustrationsyouseeherearefor referenceonly.

18

Getting started

Navigationbuttons

Use buttonsalong the bottom of the screen for quick navigation.


<![if ! IE]>

<![endif]>,,,

1.

<![if ! IE]>

<![endif]>-•

From Settings, tap-,,,

Display > Navigation bar > Navigation buttons.

2.Tapan option under Button order to choose which side of the screen the Back andRecent appsiconsdisplay.

Navigationgestures

Hide the navigation buttonsat the bottom of the screen for an unobstructedscreen experience. Insteadswipe to navigate your device.


<![if ! IE]>

<![endif]>•-


1.

<![if ! IE]>

<![endif]>,,,

Display > Navigation bar > Full screen gestures to enable

From Settings, tap-,,,

the feature.

2. Tapan option to customize:

More options: Choose a gesture type andsensitivity.

Gesture hints: Display linesat the bottom of the screen where each screen gesture islocated.

Show button to hide keyboard: Show an icon on the bottom right corner of the screen to hide the keyboardwhen the device isin portrait mode.

Block gestureswith S Pen: Prevent the S Pen from making navigation gestures.

Customize yourhome screen

The Home screen isthe starting point for navigating your device. Youcan place your favorite appsandwidgetshere, in addition to setting upadditional Home screens, removing screens, changing the order of screens, andchoosing a main Home screen.

App icons | Wallpaper | Widgets | Home screen settings | Status bar | Notification panel

Appicons

Use appiconsto launch an appfrom any Home screen.

From Apps, touch andholdan appicon, andtap D

Add to Home.

19

Getting started

To remove an icon:

From a Home screen, touch andholdan appicon, andthen tapRemove from Home.

NOTE Removing an icon doesnot delete the app, it just removesthe icon from a Home screen.

Wallpaper

Change the look of the Home andLock screensby choosing a favorite picture, video, or preloadedwallpaper.

1.From a Home screen, touch andholdthe screen, andthen tapWallpaper.

2.Tapone of the following menusfor available wallpapers:

Mywallpapers: Choose from featuredanddownloadedwallpapers.

Gallery: Choose picturesandvideossavedin the Gallery app.

Wallpaper services: Enable additional featuresincluding guide page and Dynamic Lock screen.

ApplyDark mode to Wallpaper: Enable to apply Dark mode to your wallpaper.

3.Tapa picture or video to choose it.

4.Tap Set on Home screen, Set on Lock screen, or Set on Lock and Home screens

(depending on which screensare applicable).

If applying a wallpaper to both the Home andLock screens, enable Sync my edits if youwant any editsmade to that wallpaper to be appliedto both screens.

Widgets

Addwidgetsto your home screensfor quick accessto info or apps.

1.From-a Home screen, touch andholdthe screen.

2.Tap •• Widgets, andthen touch andholda widget, drag it to a Home screen, and release it.

20

Getting started

Customize Widgets

Once youhave addeda widget, youcan customize where it'slocatedandhow it functions.

From a Home screen, touch andholda widget, andtapan option:

l1tRemove from Home: Delete a widget from your screen.

(I Widget settings: Customize the function or appearance of the widget.

0 App info: Review the widget usage, permissions, andmore.

Home screensettings

Customize your Home andAppsscreens.

1.From a Home screen, touch andholdthe screen.

2.Tap (IHome screen settings to customize:

Home screen layout: Set your device to have separate Home andApps screens, or only a Home screen where all appsare located.

Home screen grid: Choose a layout to determine how iconsare arrangedon the Home screen.

Appsscreen grid: Choose a layout to determine how iconsare arrangedon the Appsscreen.

Appsbutton: Adda button to the Home screen for easy accessto the Apps screen.

App icon badges: Enable to show badgeson appswith active notifications. Youcan also choose the badge style.

Lock Home screen layout: Prevent itemson the Home screen from being removedor repositioned.

Add appsto Home screen: Automatically addnewly-downloadedappsto the Home screen.

Swipe down for notification panel: Enable thisfeature to open the Notification panel by swiping down anywhere on the Home screen.

21

Getting started

Hide apps: Choose appsto hide from the Home andAppscreens. Return to thisscreen to restore hidden apps. Hidden appsare still installedandcan appear asresultsin Finder searches.

About Home screen: View version information.

22

Getting started

Statusbar

The Statusbar providesdevice information on the right side andnotification alertson the left.

Status icons

Battery full

Battery low

Charging

Mute

Vibrate

Airplane mode

Bluetooth active

Wi-Fi active

Location active

Alarm

Notificationicons


-


1'


New email


-

Wi-Fi available

Appupdate

Download


Upload

Configure display optionsfor the Statusbar.


More options > Statusbar for the following options:

From Quick settings, tap


Show notification icons: Choose how to display notification iconson the Statusbar.

Show batterypercentage: Display the battery charge percentage next to the battery icon on the Status bar.

23

Getting started

Notificationpanel

For quick accessto notifications, settings, andmore, simply open the Notification panel.

Device Quick settings

settings

View all

Notification

cards

Devicesandsoftwareareconstantlyevolving— theillustrationsyouseeherearefor referenceonly.

24

Getting started

Viewthe Notificationpanel

Youcan accessthe Notification panel from any screen.

1.Drag the Statusbar down to display the Notification panel.

2.Swipe down the list to see notification details.

To open an item, tapit.

To clear a single notification, drag the notification left or right.

To clear all notifications, tap Clear.

To customize notifications, tap Notification settings.

3.Drag upwardfrom the bottom of the screen or tap <Back to close the Notification panel.

Quicksettings

The Notification panel providesquick accessto device functionsusing Quick settings.

1.

Drag the Statusbar down to display the Notification panel.

2.

Drag

View all downward.


Tapa quick setting icon to turn it on or off.


Touch andholda quick setting icon to open the setting.


Tap

Q Finder search to search the device.


Tap

C) Power off for Power off, Restart, andEmergency mode options.


Tap

0

Open settings to quickly accessthe device'ssettingsmenu.


Tap


More options to reorder Quick settingsor to change the button layout.


Drag the Brightnessslider to adjust the screen brightness.

3.

Drag

View all upwardto close Quick settings.

25

Getting started

S Pen

The S Pen providesa variety of helpful functions. Use your S Pen to launch apps, take notes, or draw a picture. Some S Pen functions, such ascharging or tapping the touchscreen, may not work if the device isnear a magnet.

S PEN BUTTON

AirActions

The S Pen can be usedto perform remote functionsusing the button andmovements or gestures. Youcan set upshortcutsto your favorite apps, navigate screenson your devices, complete actions, andmore.

The S Pen remote feature isonly supportedby Samsung-approvedS Penswith Bluetooth Low Energy (BLE). If the S Pen istoo far from the device, or if there is interference, the S Pen disconnectsfrom the device. The S Pen must be connectedfor Air actionsto work.

Devicesandsoftwareareconstantlyevolving— theillustrationsyouseeherearefor referenceonly.

26

Getting started

Holdthe SPenbuttonshortcut

Set a shortcut when youpressandholdthe S Pen button. By default, thisoption isset to launch the Camera app.

1.From Settings, tapAdvanced features > S Pen > Air actions.

2.Tap Hold down Pen button to, andtapto enable the feature.

3.Tapan option to set the shortcut.

Anywhere actions

Anywhere actionsare configurable shortcutsthat are accessedby holding the S Pen button while making one of the following gestures: up, down, left, right, or shake. These can be accessedfrom any screen andcan include navigation, S Pen features, or apps.

Action

Gesture

<Back

Left to right

II I Recent apps

Right to left

0

e e

Home

Upanddown

Smart select

Down andup

Screen write

Zigzag

Youcan change the Anywhere actionsin Settings.

1.From Settings, tapAdvanced features > S Pen > Air actions.

2.Tapa Gesture icon under Anywhere actionsto customize the shortcut.

27

Getting started

Appactions

Youcan use your S Pen to do specific actionsin certain apps. These are some of the default Appactions:


Single Press

Double

Up/Down

Left/Right

Rotate


Press


Camera

Take picture

Switch

Switch

Next/Previous

Zoom

cameras

cameras

mode

in/out

Gallery

Next

Previous

View details

Next/Previous


Media

Play/Pause

Play next

Volume

Play


up/down

previous/next


Youcan change the appactionsin Settings.

1.From Settings, tap Advanced features > S Pen > Air actions.

2.Tapan appto view the available shortcuts.

3.Tap to enable the shortcutswhile using that app.

Generalappactions

Youcan customize some general actionswhile using camera andmedia appsnot specifiedin the appaction list.

1.From Settings, tap Advanced features > S Pen > Air actions.

2.Under General appactions, tapan action to change it.

28

Getting started

Airview

Hover the S Pen over the screen to preview content or view information about an item on the screen. The following Air view featuresare available:

Preview an email message before opening it.

Preview the contentsof a photo album or enlarge a picture.

Preview a video andnavigate to a specific scene by hovering over the timeline.

View the name or description of an icon or a button.

NOTE The preview function isonly available when the S Pen’son-screen pointer isa solidcolor.

29

Getting started

Aircommand

Accesssignature S Pen featuresfrom any screen, including Smart select, Screen write, andSamsung Notes.

Connectivity status

Settings

1.Tap0 Air command or holdthe S Pen near the screen so that the pointer appears, andthen pressthe S Pen button once.

2.Tapan option:

Create note: Launch a new note in the Samsung Notesapp.

View all notes: Launch the Samsung Notesappandview a listing of the notesyouhave created.

Smart select: Draw aroundan area of the screen to collect it in the Gallery app.

Screen write: Capture screenshotsandwrite or draw on them.

Devicesandsoftwareareconstantlyevolving— theillustrationsyouseeherearefor referenceonly.

30

Loading...
+ 127 hidden pages