

Page 1
Page 2
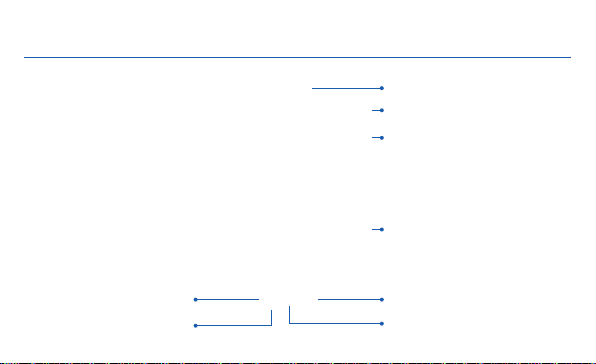
Galaxy Tab S2 NOOK® Ke y F eatures
Recent Back
Headset Jack
Front-facing Camera
Power/Lock
Volume
Memory Card
Slot
Home
Page 3
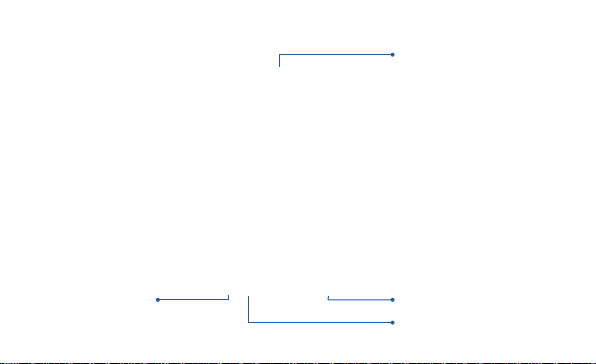
Camera
Speaker
Speaker
USB/Accessory Port
Page 4
Basic Functions
Charging the Battery
Before turning on your NOOK tablet, charge it fully.
1. Plug the smaller end of the cable into the USB charger port on your NOOK tablet and the other end
into the charger.
2. Plug the charger into an electrical outlet to charge the NOOK tablet.
WARNING: Please use only an approved charging access ory to charge your dev ice. Impro per handling of the charging port, as
well as the us e of an incomp atible charger, may cause damage to your de vice and void the warranty.
Page 5

Turn Your Device On and Off
1. To turn ON, press and hold the Power/Lock key.
2. To turn OFF, press and hold Power/Lock key and follow the prompts.
Initial Device Configuration
1. Select a language and tap or tap ACCESSIBILITY if you are visually impaired
or hard of hearing.
2. Ta p Start and follow the prompts to complete setup.
Locking and Unlocking Your Device
To lock your device screen:
¬ Press the Power/Lock key.
To unlock your device from the lock screen:
¬ Press the Power/Lock key then swipe your finger across the screen.
Page 6

Customize Home & Lock Screen
Changing Wallpaper and Adding Widgets
Change the look of the Home and Lock screens with wallpaper.
¬ Touch and hold a blank space on a home screen to access options.
• Wallpapers: Change the look of the Home and Lock screens.
• Widgets: Widgets are self-contained apps that run on a Home screen. There are all kinds
of widgets, including links to a specific contact, Internet bookmarks, Gmail and email
accounts, and many others.
Page 7

Connecting to Wi-Fi and Bluetooth
Connection to Wi-Fi
1. From the Home screen, tap Apps g Settings g Wi-Fi.
2. Tap the Wi-Fi slider to turn it on. The device scans and displays a list
of Wi-Fi networks in-range.
3. Tap a network to connect and enter a password if prompted.
Connecting to Bluetooth
1. From the Home screen, tap Apps g Settings g Bluetooth.
2. Tap the Bluetooth slider to turn it on.
3. If necessary, tap SCAN. Review the list of discovered in-range Bluetooth® devices.
4. Tap a device from the list to initiate pairing.
5. The devices automatically pair once the external device accepts the connection.
Page 8

Using your NOOK
®
Start Reading
You’ll find all your NOOK content, like books, magazines, & movies in your NOOK Library.
1. From the home screen, tap Apps g NOOK Library icon.
2. Tap a cover of the book or any item to open it.
NOTE: If you did not sign in to your N OOK acc ount during initial setup, tap Apps g NOOK Home and create
or sign in to your account.
Changing Text Size in a NOOK Book
1. Tap the center of the screen to bring up reading tools while a book is open.
2. Tap on the (Aa) Font icon at the top of the screen.
3. Select your preferred text size, font style, line spacing, background color, and other customizable
options for your best possible reading experience.
®
Page 9

Shopping for New Content
Browse and purchase your favorite books, magazines, newspapers, kids’ books, and videos from the
NOOK Store®:
1. Be sure you are connected to Wi-Fi.
2. From the home screen, tap the NOOK Shop icon.
You can scroll through recommendations on the first screen of the NOOK Shop, browse by categories
or search for a specific title, author, or topic.
Once a valid credit card is saved to your NOOK account, you can make purchases with just a couple of
taps by following the prompts.
Page 10

Email
Gmail
¬ From the Home screen, tap Apps g Google Folder g Gmail.
• Tap Add an email address to create a new account or to log into an existing Gmail
account.
• Tap TAKE ME TO GMAIL if you have an account setup on your device.
Setting Up Your Email Accounts
1. From the Home screen, tap Apps g Email.
2. Enter your email address and password into the appropriate fields and tap Next.
3. Follow the prompts to complete setup.
Page 11

Installing Apps from Google Play™ Store
Downloading Apps
Apps are available to download from Google Play™ Store.
1. From the Home screen, tap Apps g Play Store.
2. Tap an app you want to download and tap INSTA LL or the app’s price.
Uninstalling Apps
1. From the Home screen, tap Apps.
2. Ta p EDIT. Apps that can be uninstalled or disabled display Uninstall/disable on their
associated icon.
3. Ta p Uninstall/disable and follow the prompts to either uninstall or disable the application.
NOTE: Before you can acces s Google™ applications, you must first sign into or set up a new G mail account.
Page 12

Camera and Video
Take a Photo
¬ From the Home screen, tap Apps g Camera.
• Tap Camera icon to take a photo.
• Tap Selfie icon to take self portraits.
• Tap Mode icon to select camera shooting modes.
Take a Video
¬ From the Home screen, tap Apps g Camera.
• Tap Camcorder icon to begin recording.
• Tap Stop to finish recording a video.
Page 13

Gallery
Launching Gallery displays available folders. When another application, such as Email, saves an
image, a Download folder is automatically created to contain the image. Likewise, capturing a
screenshot automatically creates a Screenshots folder.
1. From the Home screen, tap Apps g Gallery.
2. Tap the drop down menu in the upper left corner, and then tap Time or Album to choose the way
items display.
3. Depending on the view mode selected, either tap an image or video to view it, or first tap an album
or folder and then tap an image or video.
4. When viewing an image or video, you can scroll left or right to view the next or previous image or
video.
Page 14

Internet
1. From the Home screen, tap Chrome.
2. Type the website address in the URL field and then tap Go.
Navigation
• Go back: Tap the left facing arrow.
• Go forward : Tap the right facing arrow.
• Zoom in or out while browsing: Double tap or pinch in or out.
Page 15

NOOK Support
For additional assistance and information, please refer to the comprehensive User Guide found in
the NOOK Library on your device as well as on NOOK.com and Samsung.com. You can also contact
Customer Service at 1-800-THE-BOOK to speak with a Customer Service Representative.
Page 16

Notes
 Loading...