

Samsung Galaxy Prevail 2 User Guide

Online User Guide
Samsung Galaxy Prevail
©2013 Samsung. All rights reserved. BOOST and BOOSTMOBILE and Logo are
trademarks of Boost. Other marks are the property of their respective owners.
TM
II
www.boostmobile.com
Consejo: Para encontrar esta guía para usuarios en Español,
Important Privacy Message
not apply to third-party applications. Third-party applications
may access your personal information or require Boost to
disclose your customer information to the third-party
application provider. To find out how a third-party application
will collect, access, use, or disclose your personal information,
check the application provider’s policies, which can usually be
found on their website. If you aren’t comfortable with the thirdparty application’s policies, don’t use the application.
por favor visita a
haz clic en
To find this user guide in English, please visit
www.boostmobile.com/userguides
www.boostmobile.com/espanol
ASISTENCIA.
– Boost Mobile’s policies often do
y
laws, state laws, and international treaty provisions.
Intellectual Property includes, but is not limited to,
inventions (patentable or unpatentable), patents, trade
secrets, copyrights, software, computer programs, and
related documentation and other works of authorship.
You may not infringe or otherwise violate the rights
secured by the Intellectual Property. Moreover, yo u
agree that you will not (and will not attempt to) modify,
prepare derivative works of, reverse engineer,
decompile, disassemble, or otherwise attempt to
create source code from the software. No title to or
ownership in the Intellect
you. All applicable rig
ual Property is transferred to
hts of the Intellectual Property
shall remain with SAMSUNG and its suppliers.
Intellectual Property
All Intellectual Property, as defined below, owned by
or which is otherwise the property of Samsung or its
respective suppliers relating to the SAMSUNG Phone,
including but not limited to, accessories, parts, or
software relating there to (the “Phone System”), is
proprietary to Samsung and protected under federal
BST_SPH-M840_UG_Eng_MD5_TE_051013_F3
Open Source Software
Some software components of this product incorporate
source code covered under GNU General Public
License (GPL), GNU Lesser General Public License
(LGPL), OpenSSL License, BSD License and other
open source licenses. To obtain the source code
covered under the open source licenses, please visit:
http://open
source.samsung.com
.

Disclaimer of Warranties; Exclusion of
Liability
EXCEPT AS SET FORTH IN THE EXPRESS
WARRANTY CONTAINED ON THE WARRANTY PAGE
ENCLOSED WITH THE PRODUCT, THE PURCHASER
TAKES THE PRODUCT "AS IS", AND SAMSUNG
MAKES NO EXPRESS OR IMPLIED WARRANTY OF
ANY KIND WHATSOEVER WITH RESPECT TO THE
PRODUCT, INCLUDING BUT NOT LIMITED TO THE
MERCHANTABILITY OF THE PRODUCT OR ITS
FITNESS FOR ANY PARTICULAR PURPOSE OR USE;
THE DESIGN, CONDITION OR QUALITY OF THE
PRODUCT; THE PERFORMANCE OF THE PRODUCT;
THE WORKMANSHIP OF THE PRODUCT OR THE
COMPONENTS CONTAINED THEREIN; OR
COMPLIANCE OF THE PRODUCT WITH THE
REQUIREMENTS OF ANY LAW, RULE, SPECIFICATION
OR CONTRACT PERTAINING THERETO. NOTHING
CONTAINED IN THE INSTRUCTION MANUAL SHALL
BE CONSTRUED TO CREATE AN EXPRESS OR
IMPLIED WARRANTY OF ANY KIND WHATSOEVER
WITH RESPECT TO THE PRODUCT. IN ADDITION,
SAMSUNG SHALL NOT BE LIABLE FOR ANY
DAMAGES OF ANY KIND RESULTING FROM THE
PURCHASE OR USE OF THE PRODUCT OR ARISING
FROM THE BREACH OF THE EXPRESS WARRANTY,
INCLUDING INCIDENTAL, SPECIAL OR
CONSEQUENTIAL DAMAGES, OR LOSS OF
ANTICIPATED PROFITS OR BENEFITS.
Modification of Software
SAMSUNG IS NOT LIABLE FOR PERFORMANCE
ISSUES OR INCOMPATIBILITIES CAUSED BY YOUR
EDITING OF REGISTRY SETTINGS, OR YOUR
MODIFICATION OF OPERATING SYSTEM SOFTWARE.
USING CUSTOM OPERATING SYSTEM SOFTWARE
MAY CAUSE YOUR DEVICE AND APPLICATIONS TO
WORK IMPROPERLY. YOUR CARRIER MAY NOT
PERMIT USERS TO DOWNLOAD CERTAIN
SOFTWARE, SUCH AS CUSTOM OS.
c

Samsung Telecommunications America
(STA), LLC
Headquarters:
1301 E. Lookout Drive
Richardson, TX 75082
Customer Care Center:
1000 Klein Rd.
Plano, TX 75074
Toll Free Tel: 1.88 8 . 987.HEL P
(4357)
Internet Address:
http://www.samsung.com
©2013 Samsung Telecommunications America, LLC.
Samsung is a registered trademark of Samsung
Electronics Co., Ltd.
Do you have questions about your Samsung Mobile
Phone?
For 24 hour information and assistance, we offer a new
FAQ/ARS System (Automated Response System) at:
www.samsung.com/us/support
d
Nuance®, VSuite™, T9® Text Input, and the Nuance logo
are trademarks or registered trademarks of Nuance
Communications, Inc., or its affiliates in the United
States and/or other countries.
®
The Bluetooth
word mark, figure mark (stylized “B
Design”), and combination mark (Bluetooth word mark
and “B Design”) are registered trademarks and are
wholly owned by the Bluetooth SIG.
microSD™ and the microSD logo are Trademarks of the
SD Card Association.
Google, the Google logo, Android, the Android logo,
Google Play, Gmail, Google Mail, Google Maps,
Google Music, Google Talk, Picasa, YouTube and other
marks are trademarks of Google Inc.
Wi-Fi is a registered trademark of the Wireless Fidelity
Alliance, Inc.
Swype and the Swype logos are trademarks of Swype,
Inc.
®
, DivX Certified® and associated logos are
DivX
trademarks of Rovi Corporation or its subsidiaries and
are used under license.

DivX Certified® to play DivX® video up to HD 720p,
including premium content.
®
ABOUT DIVX VIDEO: DivX
created by DivX, LLC, a subsidiary of Rovi Corporation.
This is an official DivX Certified
is a digital video format
®
device that has passed
rigorous testing to verify that it plays DivX video. Visit
www.divx.com for more information and software tools
to convert your files into DivX videos.
ABOUT DIVX VIDEO-ON-DEMAND: This DivX Certified
device must be registered in order to play purchased
DivX Video-on-Demand (VOD) movies. To obtain your
registration code, locate the DivX VOD section in your
device setup menu (tap
Apps > Settings > About device >
Legal information > License settings > DivX® VOD >
). Go to vod.divx.com for more information on
Register
how to complete your registration.
©2013 Samsung Telecommunications America, LLC.
Samsung is a registered trademark of Samsung
Electronics Co., Ltd. All product and brand names are
trademarks or registered trademarks of their respective
companies. Screen images simulated. Appearance of
the device may vary.
BOOST and BOOSTMOBILE and Logo are trademarks
of Boost. Other marks are the property of their
respective owners.
®
e
Table of Contents
Tip: Looking for something? If you don’t see it in the headings
listed here, try the Index on page 181.
Introduction i . . . . . . . . . . . . . . . . . . . . . . . . . . . . . . . .
1A. Setting Up Your Device 2 . . . . . . . . . . .. . . .
Installing the Battery and Charging 2 . . . . . . . . . . . .
Turning the Phone On or Off 4 . . . . . . . . . . . . . . . . .
Securing Your Phone 5 . . . . . . . . . . . . . . . . . . . . . . .
Activating Your Phone 5 . . . . . . . . . . . . . . . . . . . . . .
Displaying your Phone Number 5 . . . . . . . . . . . . . .
Installing an Optional Memory Card 6 . . . . . . . . . . .
Adding a Google Account 7. . . . . . . . . . . . . . . . . . .
Adding a Samsung Account 8 . . . . . . . . . . . . . . . . .
Setting Up Your Voicemail 8 . . . . . . . . . . . . . . . . . . .
Getting Help 9 . . . . . . . . . . . . . . . . . . . . . . . . . . . . . . .
Mobile ID 10 . . . . . . . . . . . . . . . . . . . . . . . . . . . . . . . . .
2A. Device Basics 12 . . . . . . . . . . . . . . . . . . . . . . .
Features 12 . . . . . . . . . . . . . . . . . . . . . . . . . . . . . . . . . .
Home Screen 16 . . . . . . . . . . . . . . . . . . . . . . . . . . . . .
Notifications 22 . . . . . . . . . . . . . . . . . . . . . . . . . . . . . .
Entering Text 23 . . . . . . . . . . . . . . . . . . . . . . . . . . . . . .
2B. Making and Answering
Calls 27
Making Calls 27 . . . . . . . . . . . . . . . . . . . . . . . . . . . . . .
Receiving Calls 31 . . . . . . . . . . . . . . . . . . . . . . . . . . .
Calling Options 32 . . . . . . . . . . . . . . . . . . . . . . . . . . .
Voicemail 35 . . . . . . . . . . . . . . . . . . . . . . . . . . . . . . . . .
Call Settings 36 . . . . . . . . . . . . . . . . . . . . . . . . . . . . . .
Visual Voicemail 40 . . . . . . . . . . . . . . . . . . . . . . . . . . .
2C. Settings 41 . . . . . . . . . . . . . . . . . . . . . . . . . . . . .
Accessing Settings 41 . . . . . . . . . . . . . . . . . . . . . . . .
Wireless and Network 42 . . . . . . . . . . . . . . . . . . . . . .
Home screen mode 49 . . . . . . . . . . . . . . . . . . . . . . .
Blocking mode 50 . . . . . . . . . . . . . . . . . . . . . . . . . . . .
Sound 51 . . . . . . . . . . . . . . . . . . . . . . . . . . . . . . . . . . .
Display 55 . . . . . . . . . . . . . . . . . . . . . . . . . . . . . . . . . . .
Storage 59 . . . . . . . . . . . . . . . . . . . . . . . . . . . . . . . . . .
Power saving mode 60 . . . . . . . . . . . . . . . . . . . . . . .
Battery 60 . . . . . . . . . . . . . . . . . . . . . . . . . . . . . . . . . . .
Application manager 61 . . . . . . . . . . . . . . . . . . . . . . .
Location services 61 . . . . . . . . . . . . . . . . . . . . . . . . . .
Lock screen 63 . . . . . . . . . . . . . . . . . . . . . . . . . . . . . .

Security . . . . . . . . . . . . . . . . . . . . . . . . . . . . . . . . . . 65
Language and input . . . . . . . . . . . . . . . . . . . . . . . 68
Back up and reset . . . . . . . . . . . . . . . . . . . . . . . . . 73
Add account . . . . . . . . . . . . . . . . . . . . . . . . . . . . . . 74
Accessory . . . . . . . . . . . . . . . . . . . . . . . . . . . . . . . . 75
Date and time . . . . . . . . . . . . . . . . . . . . . . . . . . . . . 75
Accessibility . . . . . . . . . . . . . . . . . . . . . . . . . . . . . . 76
Developer options . . . . . . . . . . . . . . . . . . . . . . . . . 80
Activate this Device . . . . . . . . . . . . . . . . . . . . . . . . 83
System Update . . . . . . . . . . . . . . . . . . . . . . . . . . . . 84
About device . . . . . . . . . . . . . . . . . . . . . . . . . . . . . . 84
2D. Logs . . . . . . . . . . . . . . . . . . . . . . . . . . .. . . . 85
Logs . . . . . . . . . . . . . . . . . . . . . . . . . . . . . . . . . . . . . 85
2E. Contacts . . . . . . . . . . . . . . . . . . . . . . . . . . . 88
Get Started with Contacts . . . . . . . . . . . . . . . . . . . 88
2F. Calendar & Tools . . . . . . . . . . . . . . . . . . . 100
Calendar . . . . . . . . . . . . . . . . . . . . . . . . . . . . . . . . 100
Clock . . . . . . . . . . . . . . . . . . . . . . . . . . . . . . . . . . . 101
Calculator . . . . . . . . . . . . . . . . . . . . . . . . . . . . . . . 101
My Files . . . . . . . . . . . . . . . . . . . . . . . . . . . . . . . . . 102
2G. Voice Services . . . . . . . . . . . . . . . . . . . . 103
Voice Search . . . . . . . . . . . . . . . . . . . . . . . . . . . . 103
Voice Recorder . . . . . . . . . . . . . . . . . . . . . . . . . . 103
Text-to-Speech . . . . . . . . . . . . . . . . . . . . . . . . . . 103
2H. Pictures and Videos . . . . . . . . . . . . . . . 104
Camera . . . . . . . . . . . . . . . . . . . . . . . . . . . . . . . . . 104
Gallery . . . . . . . . . . . . . . . . . . . . . . . . . . . . . . . . . . 109
Video Player . . . . . . . . . . . . . . . . . . . . . . . . . . . . . 112
YouTube . . . . . . . . . . . . . . . . . . . . . . . . . . . . . . . . 112
2I. Connections . . . . . . . . . . . . . . . . . . . . . . . 113
Wi-Fi . . . . . . . . . . . . . . . . . . . . . . . . . . . . . . . . . . . 113
Bluetooth . . . . . . . . . . . . . . . . . . . . . . . . . . . . . . . 116
Nearby devices . . . . . . . . . . . . . . . . . . . . . . . . . . 118
VPN . . . . . . . . . . . . . . . . . . . . . . . . . . . . . . . . . . . . 119
Connecting to a Computer . . . . . . . . . . . . . . . . 119
Kies via Wi-Fi . . . . . . . . . . . . . . . . . . . . . . . . . . . . 120
3A. Service: The Basics . . . . . . . . . . . . . . . . 122
Service: The Basics . . . . . . . . . . . . . . . . . . . . . . 122
3B. Data Services . . . . . . . . . . . . . . . . . . . . . . 128
Getting Started with Data Services . . . . . . . . . 128
Internet . . . . . . . . . . . . . . . . . . . . . . . . . . . . . . . . . 129

Chrome . . . . . . . . . . . . . . . . . . . . . . . . . . . . . . . . 129
Email . . . . . . . . . . . . . . . . . . . . . . . . . . . . . . . . . . . 129
Play Books . . . . . . . . . . . . . . . . . . . . . . . . . . . . . . 132
Play Movies . . . . . . . . . . . . . . . . . . . . . . . . . . . . . 132
Music Player . . . . . . . . . . . . . . . . . . . . . . . . . . . . 133
Google Play Music . . . . . . . . . . . . . . . . . . . . . . . 133
Google Play Store . . . . . . . . . . . . . . . . . . . . . . . . 134
Google Navigation . . . . . . . . . . . . . . . . . . . . . . . 135
Google Maps . . . . . . . . . . . . . . . . . . . . . . . . . . . 136
Local . . . . . . . . . . . . . . . . . . . . . . . . . . . . . . . . . . . 136
Boost Zone . . . . . . . . . . . . . . . . . . . . . . . . . . . . . . 137
4A. Important Safety Information . . . . . . . . 139
4B. Manufacturer’s Warranty
. . . . . . . . . . . . 166

Introduction
This User Guide introduces you to Boost Mobile service
and all the features of your new phone. It’s divided into
four sections:
Section 1: Getting Started
Section 2: Your Phone
Section 3: Service Features
Section 4: Safety and Warranty Information
WARNING: Please refer to the Important Safety Information
WARNING: If your phone has a touchscreen display, please
section on page 139 to learn about information
that will help you safely use your phone. Failure to
read and follow the Important Safety Information
in this phone guide may result in serious bodily
injury, death or property damage.
note that a touchscreen responds best to a light
touch from the pad of your finger. Using
excessive force when pressing on the
touchscreen may damage the tempered glass
surface and void the warranty. “4B.
Manufacturer’s Warranty” on page 166.
i

Section 1
Getting Started
1A. Setting Up Your Device
Installing the Battery and Charging (page 2)
Turning the Phone On or Off (page 4)
Securing Your Phone (page 5)
Activating Your Phone (page 5)
Installing an Optional Memory Card (page 6)
Adding a Google Account (page 7)
Adding a Samsung Account (page 8)
Setting Up Your Voicemail (page 8)
Getting Help (page 9)
Mobile ID (page 10)
1A. Setting Up Your Device
2
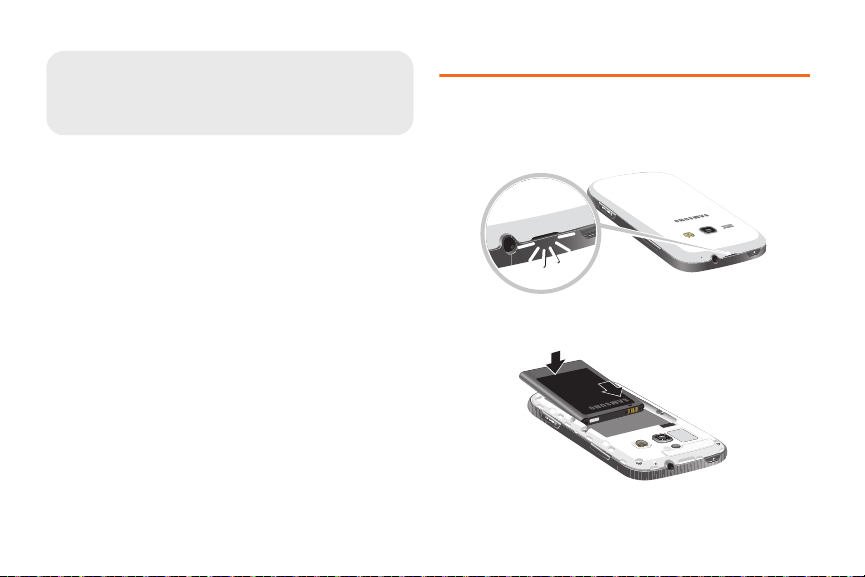
Installing the Battery and Charging
Installing the battery
1. Remove the battery cover by gently pulling up on
the slot provided.
2. Insert the battery into the back of the phone,
making sure to align the gold contacts.
3. Replace the battery cover.
Removing the battery
1. Remove the battery cover by gently pulling up on
the slot provided.
2. Lift the battery out of the phone.
3. Replace the battery cover.
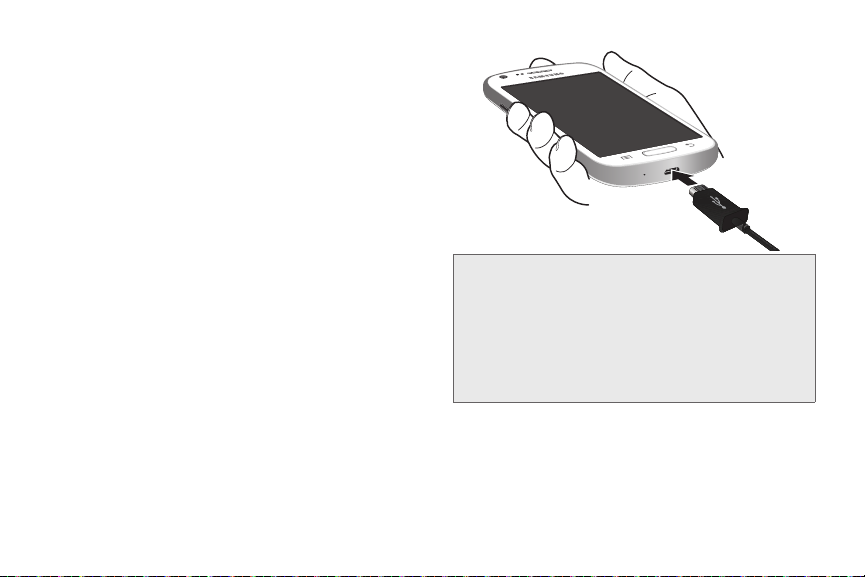
Charging the Battery
Keeping track of your battery’s power level is important.
If the power level becomes too low, the phone turns off
automatically, and you can lose any unsaved
information.
With the Samsung-approved Li-Ion battery, you can
recharge the battery before it completely runs down.
The battery comes partially charged, but you should
fully charge the battery before using your phone. After
the first charge, you can use the phone while charging.
Connect the charger to the USB/Accessory port,
then plug the Charger into an electrical outlet.
WARNING: Use only Samsung-approved batteries
and chargers with your device. The failure
to use a Samsung-approved battery and
charger may increase the risk that your
device will overheat, catch fire or explode,
resulting in serious bodily injury, death or
property damage.
1A. Setting Up Your Device 3
Battery Capacity
Your device is equipped with a Lithium Ion (Li-Ion)
battery. It lets you recharge your battery before it is fully
drained.
Note: Watch your device’s battery level indicator and
charge the battery before it runs out of power.
Long backlight settings, searching for service, vibrate
mode, browser use and other variables may reduce the
battery’s talk and standby times.
1A. Setting Up Your Device 4
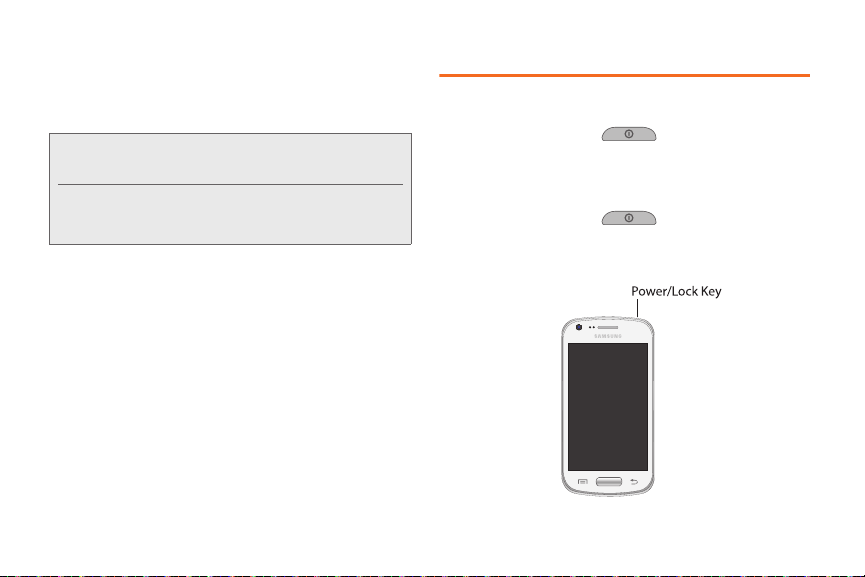
Turning the Phone On or Off
Turning the Phone On
Press and hold the Power/Lock Key until
the phone starts up.
Turning the Phone Off
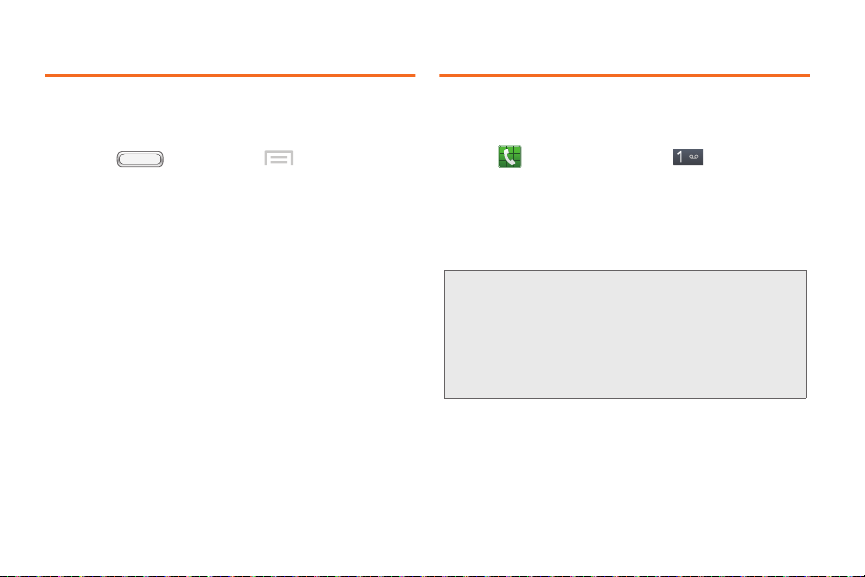
1. Press and hold the
the Device Options menu displays.
2. On the Device Options menu, touch Power off.
Power/Lock Key until
Securing Your Phone Activating Your Phone
Use your phone’s screen lock features to secure your
phone.
To set a personal screen lock
related to securing your phone, press , and
then tap
Menu > Settings > Lock screen.
, and for other settings
Locking the phone
By default, the phone locks automatically when the
screen times out.
– or –
Press the
Tip: When the phone is locked, the Emergency call feature is
Power/Lock Key.
available on the lock screen, to allow you to make
emergency calls even while the phone is locked.
Unlocking the phone
Unlock the phone using one of the default unlock screens, or
use Screen lock options for increased security.
Press the
your finger across the screen.
Power/Lock Key, then touch and drag
To activate your new phone, please refer to the
Activation Instructions in the Getting Started Guide.
For additional support information visit us at:
www.boostmobile.com
– or –
1-888-BOOST-4U
Call Boost Customer Care at
1-888-266-7848).
(
Displaying your Phone Number
Press , and then tap Menu > Settings
About device
>
The phone number assigned to
displayed under
Status.
>
your device is
My phone number.
1A. Setting Up Your Device 5
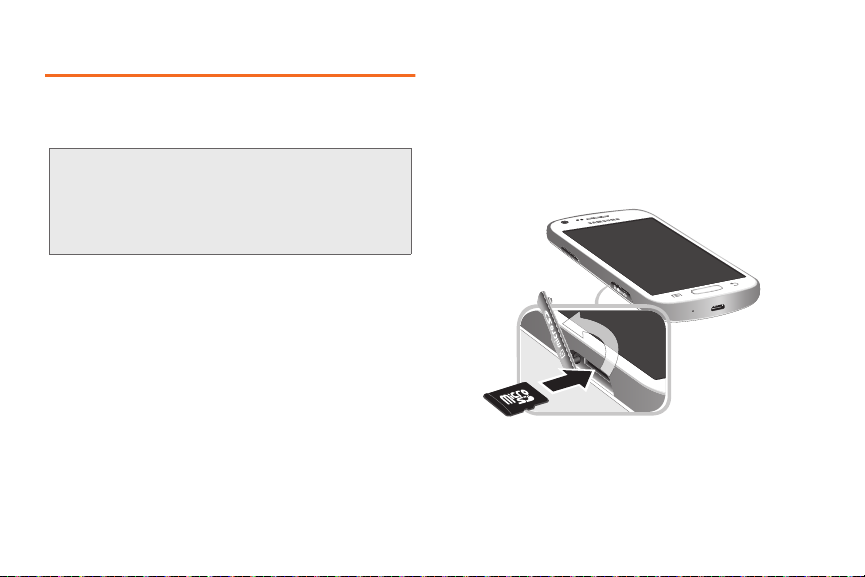
Installing an Optional Memory Card
Your phone supports optional microSDTM or
microSDHC
TM
memory cards (not included) for storage
of music, pictures, and other files.
Important: Please be careful when inserting, removing, or
handling a memory card because is it easily
damaged during improper operation.
Do not over-insert a card as this can damage the
contact pins.
1A. Setting Up Your Device 6
Installing a Memory Card
1. Open the memory card cover, turning the cover to
the side to expose the card slot.
2. With the gold contacts facing down, slide the
memory card into the slot, pushing gently until it
locks into place.
3. Close the memory card cover.
Removing a Memory Card
Important: To prevent damage to data stored on a memory
Use the following procedures to remove an optional
memory card (not included) from your phone.
card, unmount the card before removing it from
the phone.
1. Press , and then tap Menu > Settings
> Storage > Unmount SD card.
2. At the prompt, read the warning and select OK to
continue. Wait for
in the Status bar and Notifications before removing
the card.
3. Open the memory card cover, turning the cover to
the side to expose the card slot.
4. Gently press the memory card to release the lock,
then carefully pull the card out.
5. Close the memory card cover.
SD card safe to remove to display
Adding a Google Account
Your new phone uses your Google account to fully
utilize its Android features, including Gmail, Google
Talk and Play Store. When you turn on your phone for
the first time, set up a connection with your existing
Google account, or create a new Google account.
1. Press , and then tap Menu > Settings.
2. Touch Add account > Google.
3. Follow the prompts to enter your account
credentials and set up your account on your
phone, or create a new account on your phone.
1A. Setting Up Your Device 7
Adding a Samsung Account
Setting Up Your Voicemail
Create a Samsung account, for access to Samsung
apps on your phone, including S Suggest and
Samsung Apps.
1. Press , and then tap Menu > Settings
> Add account.
2. To uch Samsung account, and then follow the
prompts to enter your account credentials and set
up your account on your phone, or create a new
account on your phone.
1A. Setting Up Your Device 8
All unanswered calls are transferred to voicemail. You
should set up your Voicemail and personal greeting as
soon as your device is activated.
1. Tap then touch and hold
2.
Note: Boost Mobile strongly recommends that you
Follow the system prompts to:
Create your password.
Record your name announcement.
Record your greeting.
create a password when setting up your
voicemail to protect against unauthorized
access. Without a password, anyone who has
access to your device can access your
voicemail messages.
.
Getting Help
Managing Your Account
Online: www.boostmobile.com
Access your account information.
Check your minutes used (depending on your Boost
Mobile service plan).
View and add money to your account.
Enroll in Auto Re-Boost to make automatic
payments.
Purchase accessories.
Shop for the latest Boost Mobile phones.
View available Boost Mobile service plans and
options.
Learn more about data services and other products
like games, ringtones, wallpapers, and more.
From Any Other Phone
1-888-BOOST-4U
(
1-888-266-7848).
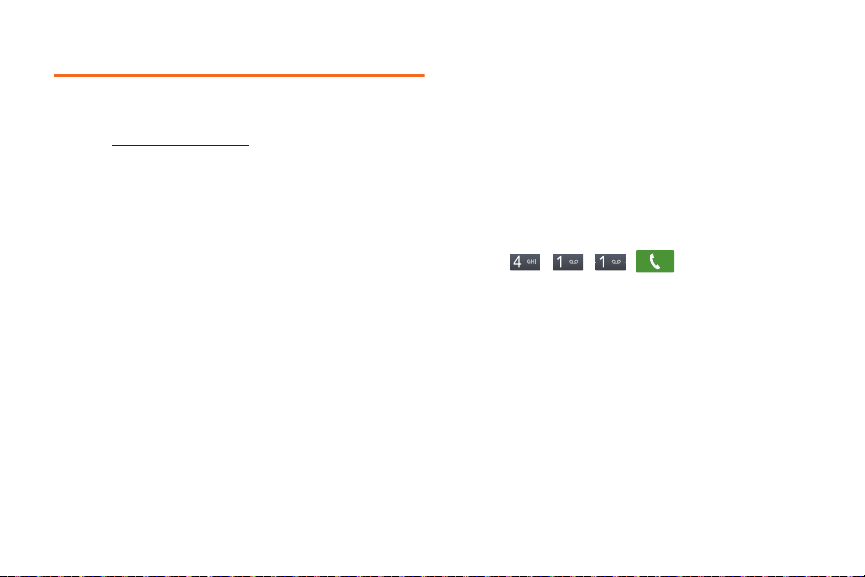
411
411 gives you access to a variety of services and
information, including residential, business and
government listings, movie listings or showtimes,
driving directions, restaurant reservations and major
local event information. You can get up to three pieces
of information per call, and the operator can
automatically connect your call at no additional charge.
A per call charge and standard airtime fee may apply
depending on your plan.
Tap
.
1A. Setting Up Your Device 9
Mobile ID
Mobile ID is an exclusive service from Boost Mobile,
loaded with a variety of “ID Packs” for Android powered
phones. Each pack is a customized experience of the
best applications, widgets, shortcuts, wallpapers and
ringers.
You can install as many as many as six ID Packs,
including MyID, at any one time, and you can easily
switch from one ID Pack to another without losing any
applications already installed.
Note: Your device must be activated on the Boost
10 1A. Setting Up Your Device
network, your battery should be fully charged,
and you should be in a network coverage area
before you install an ID Pack.
You cannot access Mobile ID when connected
to a Wi-Fi network.
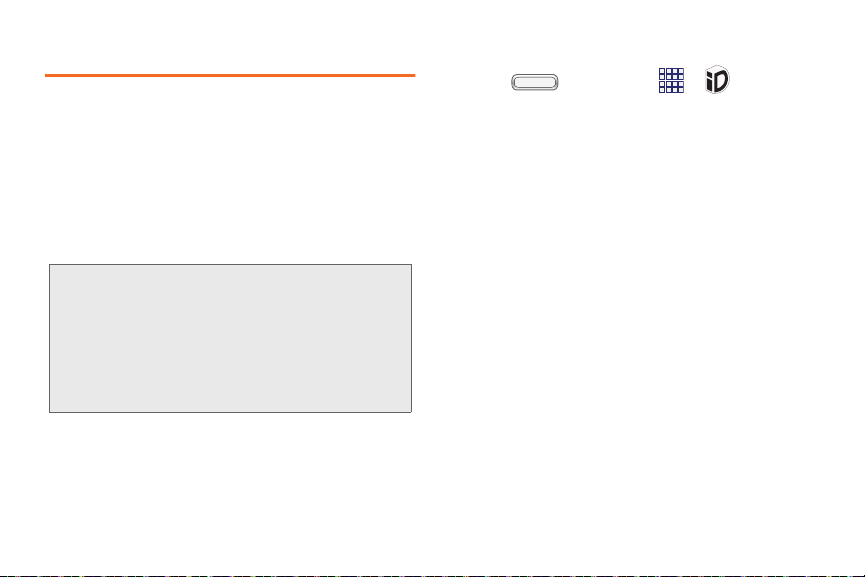
Installing Your First ID Pack
1. Press , and then tap > Mobile ID.
2. On the Choose Your ID screen, tap Get New ID
Packs.
3. Touch an ID Pack on the Mobile ID > Get New ID
Packs screen, then follow the prompts to read a
description of the ID Pack, accept the Terms &
Conditions, and install the ID Pack.

Section 2
Your Phone
2A. Device Basics
Features (page 12)
Home Screen (page 16)
Entering Text (page 23)
Features
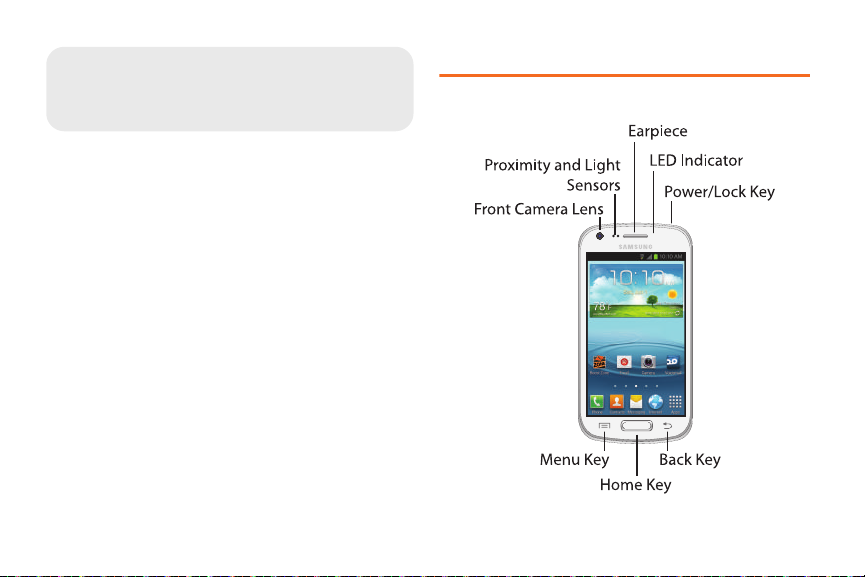
Front View
2A. Device Basics 12

Features
Front Camera Lens lets you take pictures and videos
of yourself when you set the camera shooting mode
to Self portrait.
Proximity and Light Sensors detects the presence of
objects, for use with motion settings,and to control
the screen display, such as when you move the
phone away from your ear during a call. Detects
ambient light when Automatic brightness is enabled,
and when using the Front camera.
Earpiece lets you hear the caller and automated
prompts.
Power/Lock Key lets you turn the device on or off,
or turn off the touchscreen display. When the screen
is turned off, press once to turn on the screen and
display the lock screen.
LED Indicator flashes or glows for alerts or phone
status, when the screen is turned off.
Menu Key allows you to display a context-sensitive
menu of options for the current screen or feature.
While using your phone, you may notice that the
Menu Key dims, but it is always available at a touch
to provide a context-sensitive menu for the current
screen or app.
Home Key lets you return to the Home screen. Press
and hold to display recent applications or launch
Tas k Manager.
Back Key returns to the previous screen or option.
While using your phone, you may notice that the
Back Key dims, but you can always use it to return to
the previous item.
2A. Device Basics 13
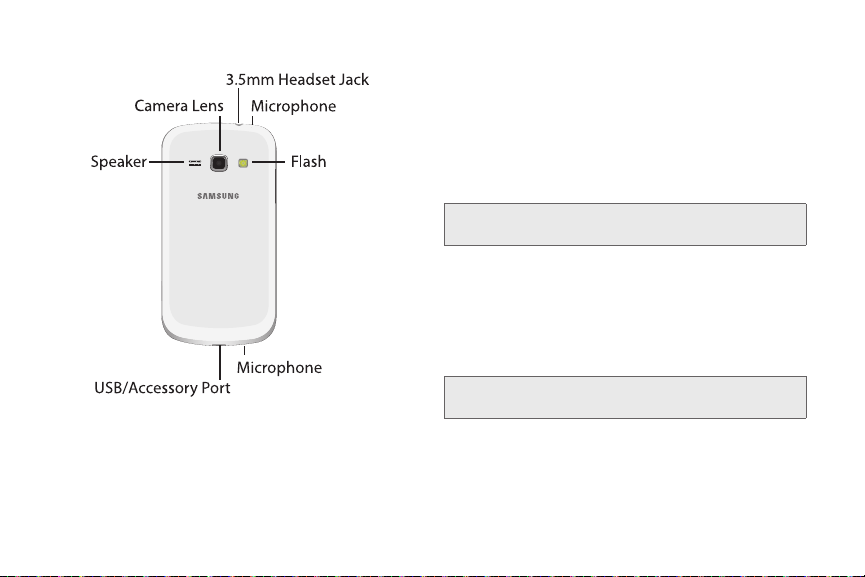
Back View
2A. Device Basics 14
Speaker lets you hear the different ringers and
sounds. You can mute the ringer when receiving
incoming calls by pressing the volume button. The
speaker also lets you hear the caller’s voice in
speakerphone mode.
Camera Lens lets you take pictures and videos.
3.5 mm Headset Jack lets you plug in an optional
headset for convenient, hands-free conversations.
WARNING: Inserting an accessory into the incorrect
jack may damage the device
Microphones capture audio during recording, phone
.
calls, and video chat.
Flash helps illuminate subjects in low-light
environments when capturing a photo or video.
USB Charger/Accessory Jack lets you connect the
phone charger or a USB cable (included).
WARNING: Inserting an accessory into the incorrect
jack may damage the device.
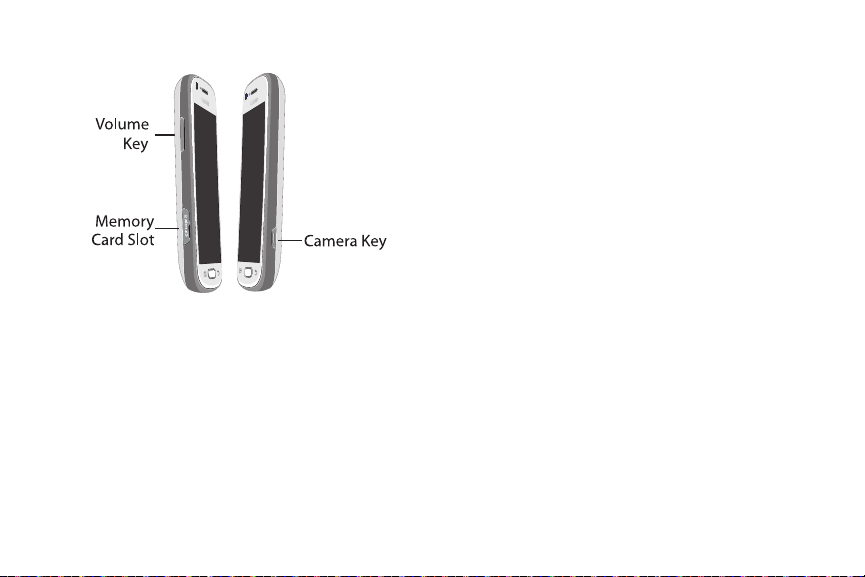
Side Views
Volume Key: From the Home screen, press to adjust
master volume. During calls or media playback,
press to adjust volume. Press to mute the ringtone of
an incoming call.
Memory Card Slot: Install an optional memory card
(not included) for additional file storage.
Camera Key: From an unlocked screen, press and
hold to launch the Camera. In Camera, press to take
a picture or record video.
2A. Device Basics 15
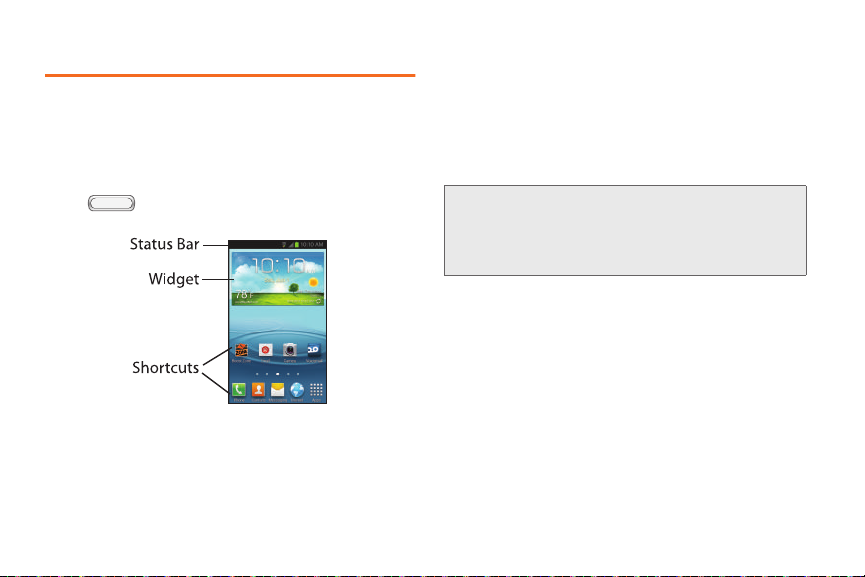
Home Screen
The Home screen is the starting point for using your
phone.
You can customize the the Home Screen by adding
app shortcuts, folders, or widgets to give you instant
access to information and applications.
Press from any screen to display the main
Home screen.
Status Bar displays icons associated with the status
of the device such as communication, coverage,
Bluetooth and Wi-Fi communication, battery level,
GPS.
Shortcuts launch applications, such as Camera,
Samsung Apps, and Play Store.
Widgets run on the Home screen.
Note: All screen images in this guide are
simulated. Actual displays may vary,
depending on the software version of your
phone and any changes to the phone’s
Settings
.
2A. Device Basics 16
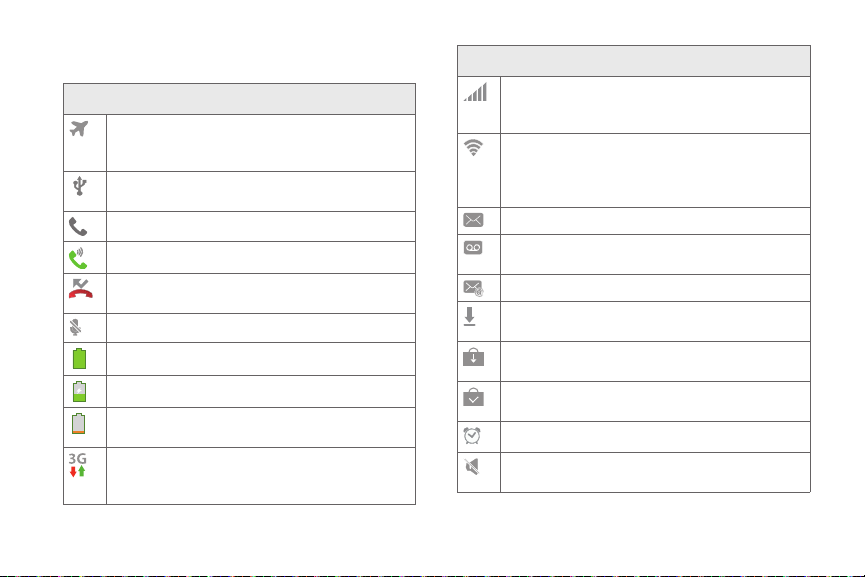
Status Icons
Airplane Mode Active: All wireless
communications are disabled. See “Airplane
mode” on page 46.
USB Connected: The phone is connected to a
computer using a USB cable..
Voice Call: A voice call is in progress.
Speakerphone: Speakerphone is enabled.
Missed Call: Displays when there is a missed
call.
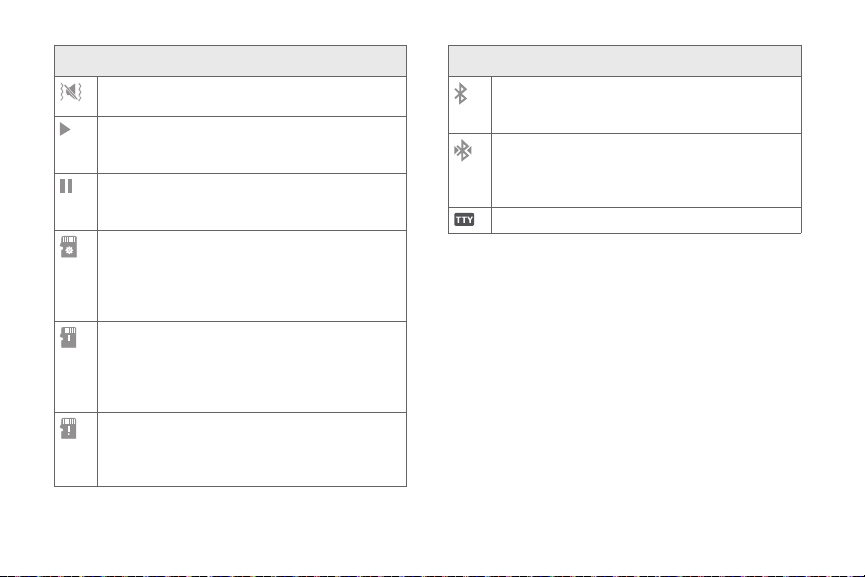
Mute: Voice or playback volume is muted.
Battery Level: Shown fully charged.
Battery Charging: Battery is charging.
Device Power Critical: Battery has very little
power remaining. Charge immediately.
3G connection: Phone is active on a 3G
system. The arrows are colored when data is
being transferred.
Status Bar – Status Icons
Status Bar – Status Icons
Signal Strength: Current signal strength. The
greater the number of bars, the stronger the
signal.
Wi-Fi Active: Wi-Fi is active, and connected to a
Wi-Fi network. The greater the number of rays,
the stronger the signal. For more information
about configuring Wi-Fi, see “Wi-Fi” on page 42.
New Message: You have new message(s).
New Voicemail: You have new voicemail. A
number indicates the number of new messages.
New Email Message: You have new email.
Download Successful: A file was downloaded
successfully.
Update Available: An update is available for an
installed app.
Update Successful: An update was installed for
an app.
Alarm: An alarm is set.
Mute: All sounds except media and alarms are
silenced temporarily, and Vibrate is not active.
2A. Device Basics 17
Status Bar – Status Icons
Vibrate: All sounds are temporarily replaced
with vibrations.
Music Playing: Music is playing, but the app is
in the background. You can control playback
from Notifications, or from Music player.
Music Paused: Music playback is paused. You
can control playback from Notifications, or from
Music player.
SD Card Ready: A scan is underway on an
optional installed memory card (not included), to
prepare the card for use. For more information
about using memory cards, see “Memory Card”
on page 11.
SD Card Safe to Remove: An optional installed
memory card (not included) was unmounted,
and it is safe to uninstall it. For more information
about using memory cards, see “Memory Card”
on page 11.
SD Card Removed: An optional memory card
(not included) was uninstalled. For more
information about using memory cards, see
“Memory Card” on page 11.
Status Bar – Status Icons
Bluetooth Active: Bluetooth is turned on. For
more information, see “Turning Bluetooth On or
Off” on page 84.
Bluetooth Paired: Your device is connected
with another Bluetooth device. For more
information, see “Pairing with a Bluetooth
Device” on page 84.
TTY: TTY Mode is active.
Extended Home Screens
The Home screen consists of the Home panel, plus
panels that extend beyond the display width to provide
more space for adding shortcuts, widgets and folders.
Slide your finger horizontally across the screen to scroll
to the left or right side panels. As you scroll, the
indicator at the bottom of the display shows your
current position.
2A. Device Basics 18
Customizing the Home Screen
You can customize your Home Screen to your
preferences:
Add Shortcuts to apps
Add Widgets
Add Folders
Add Pages
Change the Wallpaper
Shortcuts
Adding Shortcuts
Use App shortcuts for quick access to applications
from the Home screen. Your phone comes with app
shortcuts already placed on the Home screen, and you
can add your favorites.
1. Press , and then navigate to the desired
Home screen panel.
2. Tap to display apps.
3. Touch and hold an app, then drag it to a new
position on the Home screen.
4. Release the shortcut to lock to lock it in the new
position.
Adding Shortcuts from the Home Screen
1. Press , and then navigate to the desired
Home screen panel.
2. Touch and hold an empty area of the Home
screen, then tap
3. Touch and hold an app, then drag it to a new
Apps and widgets.
position on the Home screen.
4. Release the icon to lock the new shortcut into its
new position.
Removing a Shortcut
Touch and hold the desired shortcut until
Remove
appears, then drag the shortcut to the Remove
icon.
Note: This action does not delete the app, it simply removes
the shortcut from the Home screen.
2A. Device Basics 19

Primary Shortcuts
Primary shortcuts display at the bottom of the Home
screen. You can change the Primary shortcuts, except
Apps.
Touch and hold a shortcut, then drag it from the
Primary Shortcuts to the Home screen, or from the
Home screen to the Primary Shortcuts.
Widgets
Widgets are self-contained apps that you can place on
the Home screen for quick access. Widgets can
include Contacts shortcuts, bookmarks, Gmail and
email accounts.
1. Press , and then navigate to the desired
Home screen panel.
2. Tap , and then tap the Widgets tab.
3. Touch and hold a widget, then drag it to a new
position on the Home screen.
4. Release the widget to lock it in the new position.
Adding a Widget from the Home screen
1. Press , and then navigate to the desired
Home screen panel.
2. Touch and hold an empty area of the Home
3. Tap the Widgets tap, and then touch and hold a
screen, then tap
Apps and widgets.
widget and drag it to a new position on the Home
screen.
Removing Widgets
Touch and hold the widget until
Remove appears,
then drag the widget to the Remove icon.
Note: This action does not delete the widget, it simply
removes it from the Home screen.
20 2A. Device Basics

Folders
Place folders on the Home screen to organize items.
Adding folders
1. Press , and then navigate to the desired
Home screen panel.
2. Touch and hold an empty area of the Home
screen, then tap
3. Tap Folder to create a folder on the Home screen.
Touch the folder to name it.
Removing Folders
Touch and hold the folder until
then drag the folder to the Remove icon.
Add to Home screen.
Remove appears,
Panels
>
Edit page.
>
Edit page.
Your phone comes with 5 Home screen panels. You
can add and remove panels, up to a total of 7 panels.
Adding Panels
1. Press , and then tap
2. Tap a page thumbnail with the plus sign on it to
add a new page.
Removing Panels
1. Press , and then tap
2. Drag the page thumbnail to Remove.
2A. Device Basics 21
 Loading...