

Page 1

SI\MSUNG
SMARTPHONE
User Manual
Please read this manual before operating
your device and keep it for future reference.
Galaxy
J7
Penc
Page 2

Table of Contents
Special Features
Side Speaker .................................2
Getting Started
Introduction .................................4
Set Up Your Device .............................6
Assemble Your Device ........................7
Start Using Your Device ......................12
Set Up Your Device ..........................13
Learn About YourDevice .......................18
Front View ..................................19
Back View ..................................21
..............................1
.............................. 3
Home Screen and Applications (Apps) List ... 23
Your Phone’s Home Screen .................. 24
Status Bar ................................. 30
Notification Panel .......................... 32
Navigation ................................ 34
Enter Text ................................. 37
Multi Window ..............................40
Apps .........................................42
Using Apps ................................ 43
Apps Settings .............................. 46
Boost Apps ................................ 50
ii
BST_J727P_EN_UM_TN_QA5_042517_FINAL
Page 3

Calculator ................................. 54
Calendar .................................. 55
Camera and Video .......................... 57
Camera Overview .......................... 58
Clock .....................................64
Contacts ...................................67
Email ..................................... 79
Galaxy Apps ............................... 86
Gallery .................................... 87
Google Apps ................................91
Internet ................................... 94
Messaging ................................. 97
My Files .................................. 105
Phone .................................... 107
Place and Answer Calls .................... 108
S Health ................................. 123
Samsung Notes ........................... 125
Samsung+ .................................127
Secure Folder App ..........................127
Settings .................................... 128
How to Use Settings ....................... 129
Connections ................................ 130
Wi-Fi ......................................131
Bluetooth ................................ 135
Airplane Mode Settings .....................141
Hotspot and Tethering ......................141
Data Usage ............................... 144
Mobile Networks .......................... 145
Location .................................. 146
Nearby Devices ........................... 148
Table of Contents iii
Page 4

Phone Visibility ........................... 148
Printing .................................. 148
Virtual Private Networks (VPN) ............ 150
Sounds and Vibration ........................ 153
Sound Mode .............................. 154
Vibrations ................................ 154
Volume ...................................155
Ringtone ................................. 156
Notification Sounds ....................... 156
Do Not Disturb .............................157
System Sounds ........................... 158
Key-Tap Feedback ......................... 158
Sound Quality andEffects ................. 159
Notifications ............................... 160
Block App Notifications .....................161
Customize App Notifications ................161
Display ..................................... 162
Screen Brightness ......................... 163
Screen Zoom and Font ..................... 163
Easy Mode ................................ 164
Icon Frames .............................. 165
Status Bar ................................ 165
Screen Timeout ........................... 166
Screen Saver .............................. 166
Wallpapers andThemes ......................167
Wallpaper ................................ 168
Themes .................................. 168
Device Maintenance ........................ 169
Quick Optimization ........................ 170
Battery ................................... 170
Table of Contents iv
Page 5

Storage ...................................171
Memory ...................................175
Language and Input ........................175
Date and Time .............................176
Report Diagnostic Info ......................177
Reset .....................................177
Factory Data Reset .........................178
System Updates ...........................179
Lock Screen andSecurity .....................181
Set a Screen Lock ......................... 182
Unknown Sources ......................... 184
Secure Folder Settings ..................... 184
Secure Startup ............................ 184
Encrypt SD Card .......................... 184
View Passwords ........................... 185
Security Update Service ................... 185
Device Administration ..................... 186
Credential Storage ........................ 186
Advanced Security Settings .................187
Accounts ................................... 188
Accessibility ................................ 194
Samsung Cloud Settings ................... 189
Accounts Settings ......................... 190
Backup and Restore ........................191
GoogleSettings ............................192
Vision .................................... 195
Hearing .................................. 196
Dexterity and Interaction Settings ...........197
Configure Other Accessibility Settings ...... 199
Accessibility Services ...................... 199
Table of Contents v
Page 6

Other Settings ..............................200
Help ..................................... 201
One-Handed Mode ........................ 201
Transfer Files Between Your Phone and a
Computer ................................ 201
About Device .............................203
Getting Help ...............................205
Videos ...................................206
Simulators ...............................206
Tips ......................................206
Samsung Support .........................206
For Assistance ............................ 207
Legal ........................................ 211
Legal Information ..........................212
Table of Contents vi
Page 7

Special Features
Learn about your mobile
device’s special features.
Page 8
Side Speaker
This device features the speaker on
thesideofthedevice.
Speaker
Special Features 2
Page 9

Getting Started
Learn about your mobile
device hardware, assembly
procedures, and how to get
started usingyour new device.
Page 10

Introduction
The following topics describe the basics of using this
guide and your new phone.
About the User Guide
Thank you for purchasing your new Samsung Galaxy
J7Perx. The following topics explain how best to use
this guide to get the most out of your phone.
Before Using Your Phone
Read the Get Started guide and Important Information
booklet that were packaged with your phone
thoroughly for proper usage.
Accessible services may be limited by subscription
contract conditions.
Getting Started 4
Descriptions in the User Guide
Note that most descriptions in this guide are based
on your phone’s setup at the time of purchase.
Unless otherwise noted, instructions begin from the
phone’shome screen, which is displayed by pressing
the Homekey. Some operation descriptions may
besimplified.
Screenshots and Key Labels
Screenshots and other illustrations in this user guide
may appear differently on your phone. Key labels in the
user guide are simplified for description purposes and
differ from your phone’s display.
Other Notations
In the user guide, the phone may be referred to
either as “phone,” “device,” or “handset.” A microSD™,
microSDHC™, or microSDXC™ card is referred to as an
“SD card” or a “memory card.”
Page 11

Get Support from BoostZone
You can access support for your phone and service
through the preloaded Boost® Zone app.
1. From home, tap Apps > BoostZone.
2. From the Boost Zone main page, tap My Account.
3. Tap a topic to view its contents.
Getting Started 5
Page 12

Set Up Your Device
Learn how to set up your device for the firsttime.
Page 13
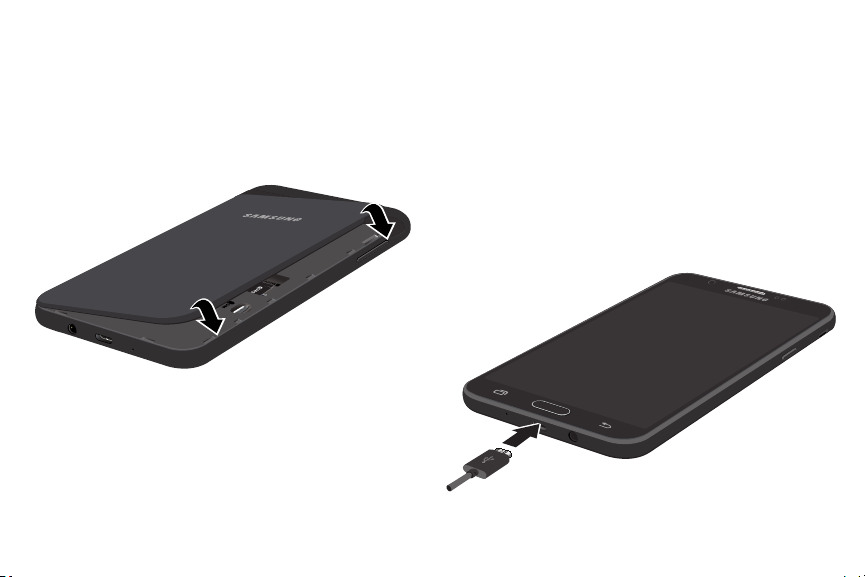
Assemble Your Device
This section helps you to assemble your device.
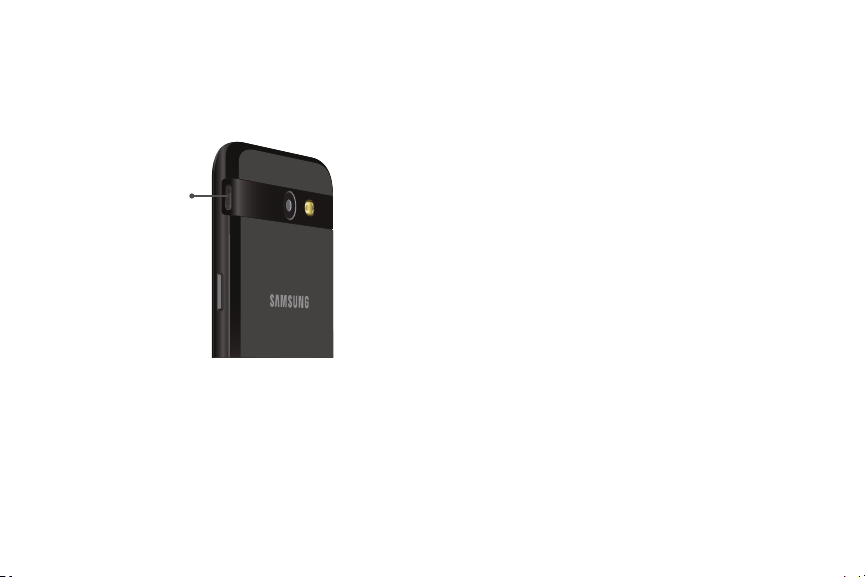
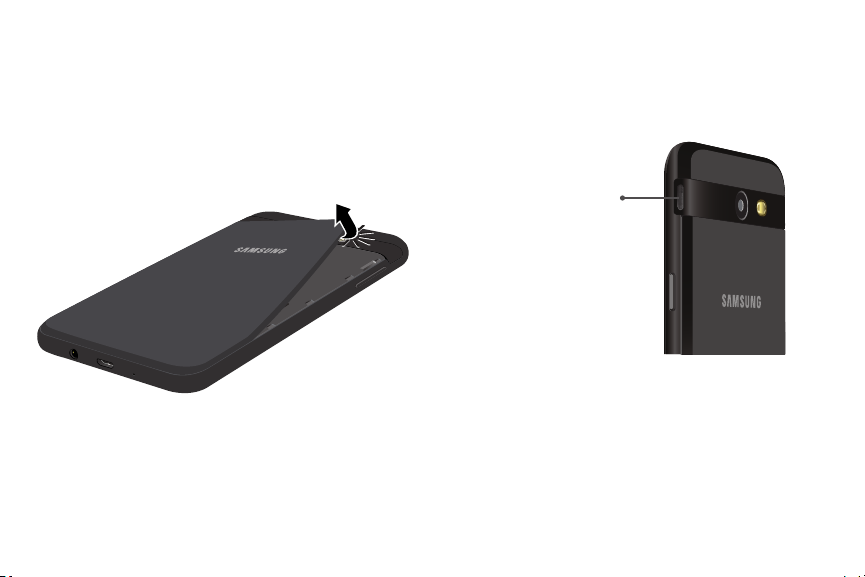
Remove the Back Cover
1. Remove the back cover.
Caution: When removing the back cover, use the
slot next to the Volume key to gently lift the cover
off. Pulling on the Speaker (located next to the
Powerbutton) may cause damage.
Do not pull
onSpeaker
2. Lift the cover up and to the left of the device.
Getting Started 7
Warning: Do not bend or twist the back cover
excessively. Using excessive force on the cover during
removal or installation of an internal component can
cause the material to break.
Page 14
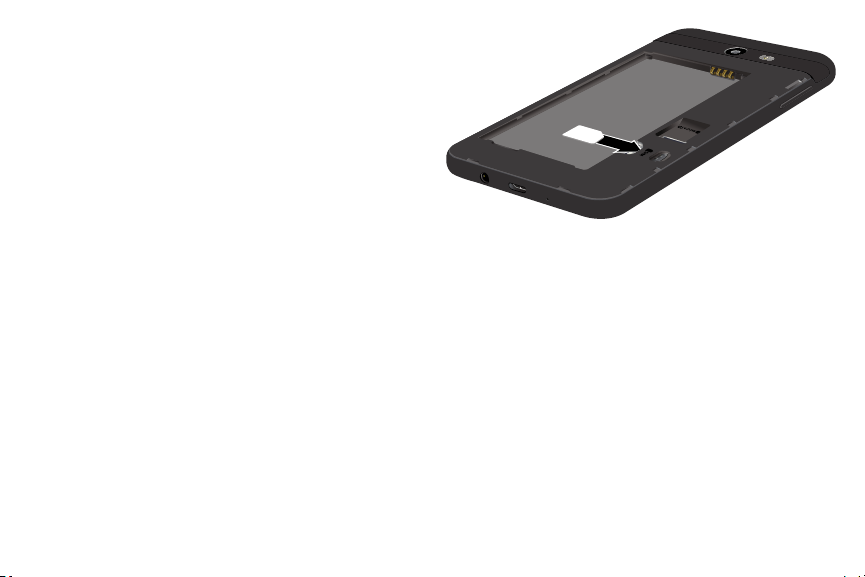
Install the SIM Card
When you subscribe to a cellular network, you are
provided with a plug-in SIM card. During activation,
your SIM card is loaded with your subscription details,
such as your Personal Identification Number (PIN),
available optional services, and other features.
Warning: Please be careful when handling the SIMcard
to avoid damaging it. Keep all SIM cards outof reach of
small children.
► Carefully slide the SIM card into the SIM card slot.
Make sure that the card’s gold contacts face
•
down into the device and that the card is
positioned as shown.
Getting Started 8
Install an Optional Memory Card
You can install a microSD™ or microSDHC™ memory
card (notincluded) to add more memory space to
yourdevice.
A memory card can be installed at any time. It is not
necessary to install it prior to using the device.
Page 15
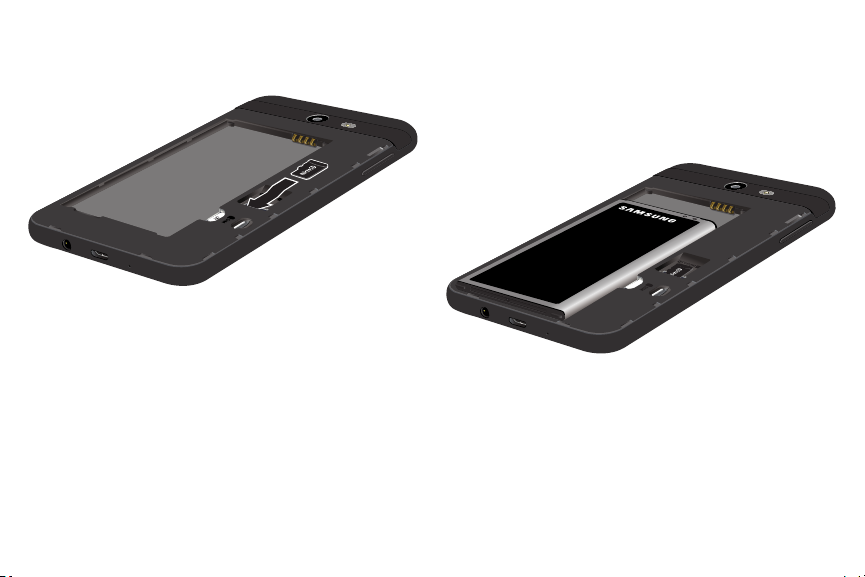
► Slide the memory card into the slot with the gold
contacts facing down.
Getting Started 9
Install the Battery
The battery is installed in the back of the device.
1. Insert the battery into the opening on the back of
the device, making sure the connectors align.
2. Gently press down to secure the battery.
Page 16
Replace the Back Cover
The back cover should be replaced before using
thedevice.
1. Place the back cover onto the back of the device
and press down.
2. Press along the edge of the back cover until you
have a secure seal.
Getting Started 10
Charge the Battery
Your device is powered by a rechargeable, standard
Li-Ion battery. A USB charger (charging head and
USBcable) is included with the device for charging the
battery from any standard outlet.
The battery comes partially charged. You can use the
device while charging.
1. Insert the USB cable into the USB charger/
Accessory port.
Page 17

Caution: Use only charging devices and batteries
approved by Samsung. Samsung accessories are
designed for your device to maximize battery life. Using
other accessories may void your warranty and may
cause damage.
2. Connect the USB cable to the charging head, and
then plug the charging head into a standard outlet.
3. Unplug the charging head from the outlet and
remove the USB cable from the device when
charging is complete.
When to Charge the Battery
When the battery is low and only a few minutes of
operation remain, the device sounds a warning tone at
regular intervals.
In this condition, your device conserves its remaining
battery power by dimming the screen.
Getting Started 11
When the battery level becomes too low, the device
automatically turns off.
For a quick check of your battery level:
► View the battery charge indicator located in the top
right corner of your device’s display. Asolid color
( ) indicates a full charge.
You can also choose to display a percentage value.
Viewing a percentage value can provide a better idea
of the remaining charge on the battery. For more
information, see “Battery” on page170.
While charging, the device and the charger may
become hot. This does not affect the device’s lifespan
or performance and is in the device’s normal range of
operation.
The charger may stop charging if the battery becomes
too hot.
Page 18

If the device heats up while charging the battery:
1. Disconnect the charger from the device and close
any running apps.
2. Wait for the device to cool down, and then begin
charging the device again.
If the lower part of the device overheats,
•
check for damage to the connected USB cable.
Replace the damaged USB cable with a new
Samsung-approved cable.
Getting Started 12
Start Using Your Device
Turn Your Device On or Off
The instructions below explain how to turn your device
on or off.
To turn the device on:
► Press and hold the Power key until the device
turnson.
To turn the device off:
1. Press and hold the Power key until the
Deviceoptions menu is displayed.
2. Tap Power off, and confirm if prompted.
Page 19

Lock or Unlock Your Device
Use your device’s screen lock features to secure
yourdevice.
By default, the device locks automatically when the
screen times out.
To lock the device:
► Press the Power key.
The default Screen lock on your device is Swipe.
Tochoose a more secure screen lock, see
“Set a Screen Lock” on page182.
To unlock the device:
► Press the Power key or Home key, and then
dragyour finger across the screen.
Getting Started 13
Restart the Device
If your device stops responding to taps or finger
gestures and you are unable to turn it off, youcan
restart your device.
► Press and hold the Power key and the
Volumedown key at the same time for morethan
seven seconds.
Set Up Your Device
Use the Set Up Wizard
The first time you turn your device on, a Welcome
screen is displayed. It guides you through the basics of
setting up your device.
Follow the prompts to choose a default language,
connect to a Wi-Fi® network, set up accounts, choose
location services, learn about your device’s features,
and more.
Page 20
Note: On the Welcome screen, there may be an
Accessibility button. If you are visually impaired or hard
of hearing, tap Accessibility to change the accessibility
settings.
1. From home, tap Apps > Settings.
2. Tap Accounts.
3. Tap Addaccount > Google.
+
0
Google Account
Your new device uses your Google™ Account to fully
utilize its Android™ features, including Gmail™,
GoogleDuo, and the Google Play™ store.
When you turn on your device for the first time, set
up your existing Google Account or create a new
GoogleAccount.
– or –
To create a new Google Account or set up your
GoogleAccount on your device at any time, use
Accounts settings.
Getting Started 14
Factory Reset Protection
When you sign in to a Google Account on your device,
Factory Reset Protection is turned on. Factory Reset
Protection (FRP) prevents other people from using
your device if it is reset to factory settings without your
permission. For example, if your device is lost or stolen
and a factory data reset is performed, only someone
with your Google Account username and password can
use the device.
You will not be able to access the device after a factory
data reset if you do not have your GoogleAccount
username and password. For more information, see
“Factory Data Reset” on page178.
Page 21
Caution: Before shipping your device back to Samsung
or taking it to your nearest Samsung-authorized service
center, you should remove your Google Account before
resetting the device back to factory settings. For more
information, visit: samsung.com/us/support/frp.
Enable Factory Reset Protection
Adding a Google Account to your device automatically
turns on the Factory Reset Protection (FRP) security
feature. For more information, visit: google.com.
Disable Factory Reset Protection
To disable FRP, remove all Google Accounts from the
device.
1. From home, tap Apps > Settings.
2. Tap Accounts > Google.
If you have more than one Google Account set
•
up on your device, tap the Google Account you
want to remove.
3. Tap Moreoptions > Remove account.
Getting Started 15
m
e
Samsung Account
Create a Samsung account for access to Samsung
content and apps on your device. When you turn on
your device for the first time, set up your existing
Samsung account or create a new Samsung account.
– or –
To create a new Samsung account or set up your
Samsung account on your device at any time, use
Accounts settings.
1. From home, tap Apps > Settings.
2. Tap Accounts.
3. Tap Addaccount > Samsungaccount.
+
:::
e
Page 22

Add an Email Account
Use the Email app to view and manage all your email
accounts in oneapp.
When you turn on your device for the first time, set
up your existing email account or create a new email
account.
– or –
To create a new email account or set up your email
account on your device at any time, use Accounts
settings.
1. From home, tap Apps > Settings.
2. Tap Accounts.
3. Tap Addaccount > Email.
For more information on using Email, see
“Email” on page79.
Getting Started 16
m
Activation and Service
Before using your phone, you must set up your service
with Boost Mobile. You will need your phone’s serial
number (MEID), printed on a sticker inside the battery
compartment.
For more information about your Boost Mobile account,
see Boost Account Information and Help.
Create Your Account and Pick Your Plan
Set up your Boost Mobile account.
1. From your computer, visit boostmobile.com and click
Activate.
2. Choose an activation option and click Next.
3. When prompted, enter the serial number (MEID)
printed on the sticker located on the back of your
phone in the battery compartment. This number
can also be found on the bottom panel of the
phone’s package.
Page 23

4. Follow the remaining instructions to choose your
plan and select a payment method.
5. Follow the activation instructions below and you’ll
be able to start using your phone.
Note: You can also activate by phone by calling
1-888-BOOST-4U (1-888-266-7848) from any other
phone.
Activate Your Phone
After setting up your account on boostmobile.com,
simply turn your device on. Your device is designed
to activate automatically. If you are swapping from
another Boost Mobile device to a new one, be sure
to turn off the old device before swapping the serial
number (MEID). Once the MEID swap is complete, turn
on the new device and the programming information
will be pushed to your device automatically.
Getting Started 17
Set Up Voicemail
You can access your voicemail from a Home screen.
1. From home, tap Apps > Voicemail.
2. Follow the tutorial to create a password, record a
greeting, and record your name.
For more information on voicemail, see
“Voicemail” on page53.
Page 24

Learn About Your Device
Learn some of the key features of your
mobile device, including the screens and
icons, as well as how to navigate the device
and enter text using the keyboard.
Page 25
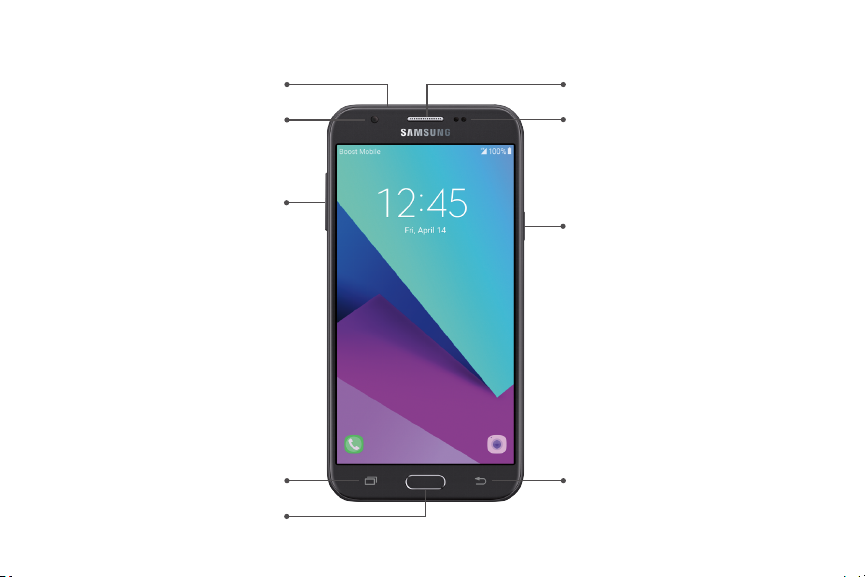
Front View
Microphone
Front camera
Volume keys
Recent apps
Home key
Learn About YourDevice 19
Earpiece
Proximity sensors
Power key
Back
Page 26

Earpiece: Listen to calls and automated prompts
•
when using the phone.
Proximity sensors: Detect when objects are close
•
to the screen. For example, when you hold the
phone to your ear while on a phone call, the sensors
temporarily lock the screen to prevent accidental
screen touches.
Power/Lock key: Turn the phone or screen on or off,
•
enable Emergency mode, or restart the phone.
Back key: Returns you to the previous screen, or
•
close a dialog box, options menu, the notification
panel, or the keyboard.
Home key: Returns you to the home screen.
•
Recent Apps key: Access recently used apps.
•
Touchscreen: Display information needed to operate
•
your phone, such as the call status, the Contacts list,
and the date and time. Also provides one-tap access
to all of your features and applications.
Learn About YourDevice 20
Volume key: Adjust the ringtone or media volume or
•
adjust the voice volume during a call.
Front camera: Takes pictures and records videos
•
while facing the screen, and allows you to video
conference.
Page 27
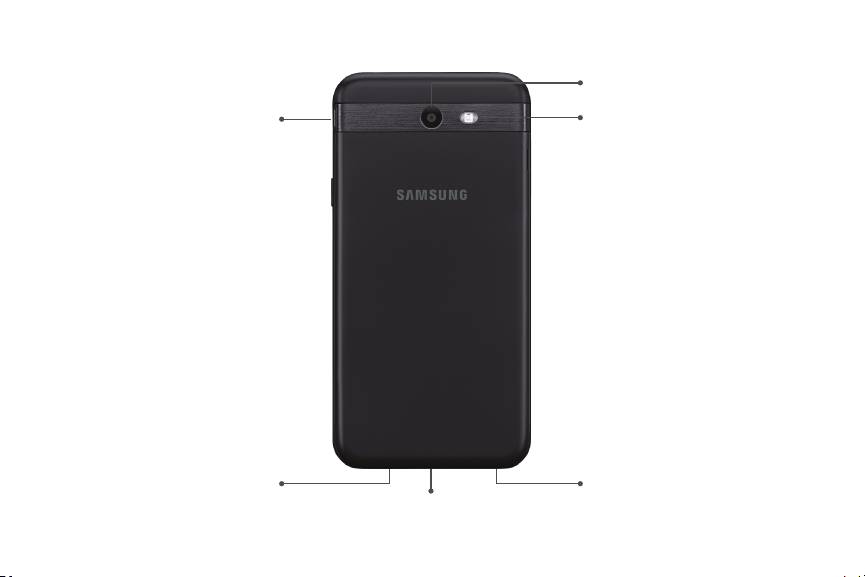
Back View
Rear camera
Speaker
Headset jack Microphone
USB charger/accessory port
Learn About YourDevice 21
Flash
Page 28

Microphone: Transmit your voice for phone calls
•
or record your voice or ambient sounds for voice
recordings and videos. There are two microphones,
one on the top and one on the bottom.
Flash: Help illuminate subjects in low‑light
•
environments when the camera is focusing and
capturing a picture or video.
Rear camera: Take pictures and videos.
•
USB charger/accessory port: Connect the phone to
•
the charger using a USB cable.
Headset jack: Plug in a headset for convenient,
•
hands-free conversations.
Speaker: Play ringtones and sounds. The speaker
•
also lets you hear the caller’s voice in speakerphone
mode.
Learn About YourDevice 22
Page 29

Home Screen and Applications (Apps) List
Most of your phone’s operations originate from the
home screen or the Apps list.
1. From any screen press the Home key to display the
home screen.
2. Tap Apps to display the Apps list.
3. Tap an app icon to launch the corresponding
application.
For information about using the home screen, see
“Home Screen Basics” on page25.
Select Options and Navigate Screens
► Tap icons, keys, and other items to open or activate
the assigned function.
Tap Back to return to the previous screen.
•
Learn About YourDevice 23
:::
Recent Applications
You can display a list of recently used applications
using the Recent Apps key.
► Tap Recent Apps to view a list of recently used
applications.
Phone Settings Menu
You can customize your phone’s settings and options
through the Settings menu.
► From home, tap Apps > Settings.
– or –
Pull down the status bar and tap Settings.
e
0
Page 30
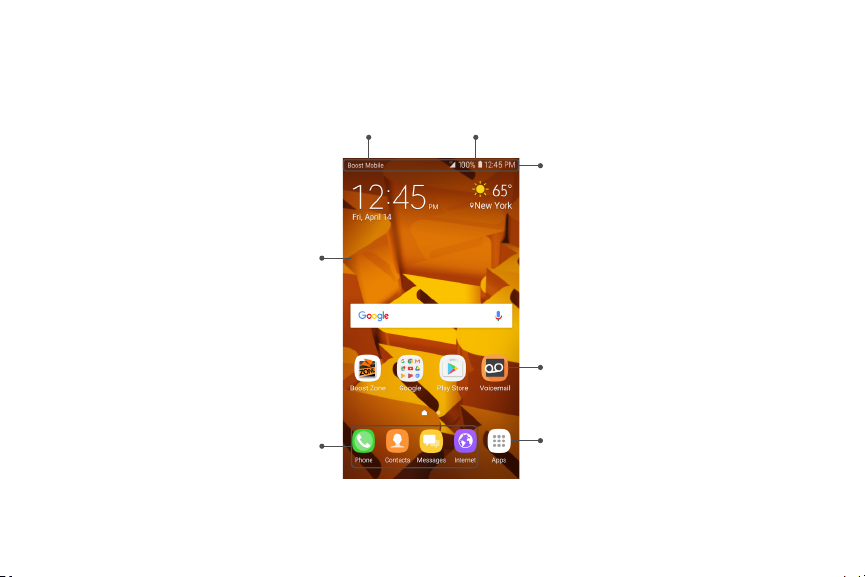
Your Phone’s Home Screen
Notification
Widget
Primary shortcuts
Learn About YourDevice 24
area
Status
area
Status bar
Application icons
Apps list
Page 31

The following topics describe how to use and customize
your phone’s home screen, understand the status bar,
and use the notification panel.
Home Screen Basics
The home screen is the starting point for your phone’s
applications, functions, and menus. You can customize
your home screen by adding application icons,
shortcuts, folders, widgets, and more.
Status area: The status area of the status bar (on the
•
right) displays phone and service status information
such as signal strength, battery status, Wi-Fi and
data connectivity, ringer status, and time.
Status bar: The status bar displays icons to notify
•
you of your phone’s status (on the right side) and
notifications (on the left side).
Widget: Widgets are simple application extensions
•
that run on your phone’s home screen.
Learn About YourDevice 25
Application icons: Application icons are shortcuts to
•
favorite applications. You can add and remove these
shortcuts as you wish.
Applications (Apps) list: Tap to open the
•
applications (apps) list. The Apps list icon is a
primary shortcut available from all home screens.
Primary shortcuts: Primary shortcuts are
•
application shortcuts that appear in the same
location on all of your phone’s home screens. These
are customizable except for the Applications (Apps)
shortcut, which remains static.
Notification area: The notification area of the status
•
bar (on the left) displays notifications for incoming
messages, missed calls, application updates, and
more. Pull down the status bar to display the
notification panel.
Tip: Press the Home key to return to the main
homescreen from any other screen.
Page 32

Extended Home Screens
In addition to the main home screen, your phone
features extended home screens to provide more
space for adding icons, widgets, and more. Press the
Homekey to display the main home screen and then
swipe the screen right or left to move from the main
screen to an extended screen.
Additional screens are available in addition to the
mainhome screen.
•
•
Learn About YourDevice 26
If you are not already using the maximum number
of screens for your phone, you can add more screens
by touching and holding an empty space on a home
screen, sliding the thumbnails to the left, and then
tapping Add page.
While on an extended screen, press the Home key to
return to the main home screen.
+
Customize Your Home Screen
Learn how to set the wallpaper and add, move, or
remove shortcuts, widgets, and folders from the home
screen.
Operations for Rearranging the
HomeScreen
•
•
•
Moving widgets and icons: From home, touch
and hold an item, and then drag it to the desired
location.
Deleting widgets and icons: From home, touch and
hold an item, and then drag it to Remove.
Displaying the home screen menu: From home,
touch and hold an empty space to display the home
screen menu. Menu options include Wallpapers and
themes, Widgets, and Screen grid settings. You also
have the option to add or remove home screens.
Page 33

Change the Wallpaper
Select and assign your phone’s background wallpaper.
1. From home, touch and hold an empty space, and
then tap Wallpapers and themes.
•
2. Tap an option to select the wallpaper, and then
select:
•
•
•
3. Tap Set as wallpaper.
Learn About YourDevice 27
You can also access the wallpaper menu
through settings. From home, tap Apps >
Settings> Wallpapers and themes.
Home screen to set the background wallpaper
for your home screen.
Lock screen to set the wallpaper for your
phone’s lock screen.
Home and lock screens to set a wallpaper for
both your home screen and your lock screen.
Add Shortcuts to the Home Screen
You can add shortcuts for quick access to favorite apps
from the home screen.
1. From home, tap Apps.
2. Touch and hold an app icon to select it.
3. Drag the icon to an empty location on the
homescreen.
Page 34

Add Widgets to the Home Screen
You can add widgets to your phone’s home screen.
Widgets are simple application extensions that run
on your phone’s home screen. Unlike a shortcut, the
Widget works like as an onscreen application. There
are all kinds of widgets, including links to a specific
contact, Internet bookmarks, Facebook status windows,
Gmail and email accounts, and many others.
1. From home, touch and hold an empty space, and
then tap Widgets.
2. Touch and hold a widget icon to select it.
3. Drag the icon to an empty location on the
homescreen.
Learn About YourDevice 28
Add Folders to the Home Screen
You can group home screen shortcuts into folders for
convenient access.
1. From home, touch and hold a shortcut you want to
place in a folder, and then drag it on top of another
shortcut and release it.
2. Type a name, and then tap Back.
3. To add more app shortcuts to the folder, touch and
hold a shortcut, and then drag it on top of the new
folder.
Change Folder Names
Once you have added folders, you can change the name
easily from the folder display.
1. From home, tap the folder to open it, and then tap
the folder name.
2. Type a new name, and then tap Back.
Page 35

Change the Folder Color
You can change the color of a folder.
1. From home, tap the folder to open it.
2. Tap Palette and select a color, and then tap
Back.
Capture Screenshots
You can use your phone’s power and home keys to
capture screenshots.
► Press and hold the Power/Lock key and Home key
at the same time to capture a screenshot of the
current screen.
Learn About YourDevice 29
Page 36

Status Bar
The status bar at the top of the home screen provides
phone and service status information on the right
side and notification alerts on the left. To view the
notification panel or access the quick settings menu,
pull down the status bar from the top of the screen.
Main Status Icons
Bluetooth is active.
*
GPS is active.
Q
~
Wi-Fi is active.
it
Download of a file or app is in progress.
Mute mode is enabled.
~
Vibrate mode is enabled.
~!
Learn About YourDevice 30
Main Status Icons
Cellular network signal strength is displayed.
~
Roaming network signal strength is
R~
displayed.
The device is connected to a 3G wireless
3~
network.
The device is connected to a 4G LTE
L~
network.
Airplane mode is active.
+
Battery is charging.
Battery is fully charged.
0
Connected as a mobile hotspot.
(M)
™
wireless
Page 37

Main Notification Icons Main Notification Icons
JV
,..
A call has been missed.
A call is on hold.
\!'
New voicemail message has been received.
Em
New email has arrived.
•
New Gmail has arrived.
~
New text or MMS message.
..
.
~
v
0
A
Learn About YourDevice 31
A calendar event is approaching.
A USB connection is active.
An alarm has been set.
A new Emergency alert has arrived.
An app update is available from the
~
GooglePlay store.
File is being uploaded or sent.
•
An app update was successful.
•
View additional notifications.
Cl
Note: Additional notification icons may appear.
Allnotifications may be accessed through the
notification panel.
Page 38

Notification Panel
The notification panel gives you access both to
notifications and the quick settings menu.
Quick settings
@Mobileln
stalle
rv
Boost · Featured Apps ApplicatiOn installed
App Spotlight Application installed successfulty.
About Voicemail·to-Text
Notification cards
Visual Voicemaii.tC>' Text is
..
,.,,.,,
Set
up
Transferring media files
TapforotherUSBoptions
Learn About YourDevice 32
screen
an
lock
.
add·<m servic ..
via
USB
Settings
View all
successL
Page 39

Settings: Display the Settings screen.
•
Quick settings: Quickly enable or disable a feature.
•
View all: See all available Quick settings, adjust
•
screen brightness, and more.
Notification cards: View details about notifications.
•
Clear all: Clear all notifications.
•
Open the Notification Panel
1. Pull down the status bar. (Slide your finger down
from the top of the screen.)
2. Drag down Expand to display additional
quicksettings.
Learn About YourDevice 33
-
Close the Notification Panel
► Slide the notification panel up. (Slide your finger up
from the bottom of the screen.)
– or –
Tap Back to close the notification panel.
Notification Panel Quick Settings
The Quick settings list at the top of the notification
panel lets you quickly access frequently used settings
options. Scroll left or right to display all available
settings, and tap an icon to turn the selected feature
on or off.
Page 40

Navigation
Learn the basics for how to navigate through
yourdevice.
Double -Tap
Lightly tap items twice to select or launch them.
Double‑tap an image to zoom in or out.
•
Touchscreen Navigation
Please note that a touch screen responds best to a light
touch from the pad of your finger or a capacitive stylus.
Using excessive force or a metallic object on the touch
screen may damage the tempered glass surface and
void the warranty.
Use the following motions and gestures on your
touchscreen to navigate the device.
Tap
Lightly tap items to select or launch them.
Tap the keyboard to enter characters or text.
•
Tap an item to select it.
•
Tap an app shortcut to launch the application.
•
Learn About YourDevice 34
Touch and Hold
Touch and hold items on the screen to activate them.
Touch and hold a widget on a Home screen to
•
moveit.
Touch and hold a field to display a pop-up menu of
•
options.
Page 41

Swipe
Lightly drag your finger vertically or horizontally across
the screen.
Swipe the screen to unlock the device.
•
Swipe the screen to scroll through the Homescreens
•
or menu options.
Drag
Touch and hold an item, and then move it to a new
location.
Drag an app shortcut to add it to a Home screen.
•
Drag a widget to place it in a new location on a
•
Homescreen.
Learn About YourDevice 35
Pinch and Spread
Pinch the screen using your thumb and forefinger or
spread by moving your fingers apart.
Pinch the screen to zoom out while viewing a picture
•
or a webpage.
Spread your fingers on the screen to zoom in while
•
viewing a picture or a web page.
Page 42

Common Options
The device uses basic command options to perform
common actions.
Moreoptions: Tap to view more menu options for
•
a screen. This often allows you to select items to
delete or share.
Delete: Tap to select items to delete.
•
Share: Tap to select items to share, and then choose
•
a sharing method.
Edit: Tap to customize the screen.
•
On/Of f: Tap to turn the option on or
•
off .
•
enabled, a checkmark is displayed. You can often tap
•
a checkbox at the top of the screen to selectall.
•
Learn About YourDevice 36
( )
C)
( )
Q
Checkbox: Tap to enable or select. When
Menu: Tap to view available options for the field.
Page 43

Enter Text
You can type on your phone using the touchscreen
Samsung keyboard or Google voice typing.
Note: Keyboard layouts and options may change
depending on where you are using them. For example,
if you are entering text to do a Web search, a search
icon may be available instead of an enter key.
Samsung Keyboard
Use the touchscreen Samsung keyboard for entering
text. The keyboard appears automatically when you
tap a text entry field, and can be used in either portrait
or landscape mode. You can also use the Google voice
typing option to enter text using your voice.
The Samsung keyboard offers a traditional QWERTY
keyboard setup for entering text by tapping keys
(likeon a computer), along with enhancements and
options that allow you to enter text faster and more
accurately, such as continuous key input, personalized
usage dictionaries, and more.
Learn About YourDevice 37
Assign Samsung Keyboard for Text Entry
If you have multiple text input methods installed on
your device, you can select the Samsung keyboard to
be your default text input method from Settings, or you
can choose it at any time while entering text.
Note: The Samsung keyboard is the default text input
method on your phone. Additional keyboards and
input methods are available for download from the
GooglePlay store.
1. From home, tap Apps > Settings >
-<>-
-0-
General management > Language and input.
-<>-
2. Tap Virtual keyboard > Manage keyboards, and
then tap Samsungkeyboard to enable it.
m
e
Page 44

Configure Samsung Keyboard
To customize Samsung keyboard:
1. From a Home screen, tap Apps > Settings >
-0--- -0---
---0-
General management > Language and input>
-0--- -0---
Virtual keyboard.
2. Tap Samsung keyboard for options.
:::
e e
Google Voice Typing
Use Google voice typing instead of the keyboard to
enter text by speaking.
To enable Google voice typing:
1. Tap Voice input on the Samsung keyboard.
You may need to touch and hold Options
•
tofind it.
2. Speak your text.
Note: Tap Settings > Languages to download
additional languages for use with Google voice typing.
Learn About YourDevice 38
Configure Google Voice Typing
To customize Google voice typing:
1. From a Home screen, tap Apps > Settings >
---0-
General management > Language and input>
Virtual keyboard.
2. Tap Google voice typing for options.
For more information, see “Language and Input” on
page175.
Tips for Editing Text
Your phone gives you many options to make entering
text easier, including copying, cutting, and pasting.
Touch and hold text to highlight it, and then select
from the following options:
Cut: Remove the selected text and save it to the
•
clipboard.
Copy: Copy the selected text to the clipboard.
•
Page 45

Paste: Insert the last copied or cut text into the
•
current field.
Clipboard: View and select items copied to the
•
clipboard.
Share: Send the text with others using a variety of
•
sharing methods.
Select all: Highlight all the text in the field.
•
Dictionary: Look up a word in the installed
•
dictionary. If a dictionary is not yet installed for the
current language, you will be prompted to install an
available dictionary.
Assist: Launch the Google app to search for more
•
information.
Learn About YourDevice 39
Page 46

Multi Window
Multitask by using multiple applications at the
sametime.
Window Controls
Tap Window controls in the middle of the
windowborder for options.
TODAY
15
J'
Aud,o
-1,
_.,.,
VIEW
X
Q
[§
V1dfOI
1n11,11,oo
FEB
MY
FILES
,m.,..
Doo:umenu
0
""'"
Learn About YourDevice 40
Switch windows: Switch locations between
()
Multiwindow apps.
Close app: Close the selected app.
X
Enable Multi Window
1. From a Home screen, tap Apps > Settings.
2. Tap Advanced features > Multi window.
3. Tap Split screen view action to enable this feature.
e
Page 47

Use MultiWindow
Apps that support Multiwindow display together on
a split screen. You can switch between the apps and
adjust the size of their display on the screen.
Multi window is not available for all apps.
1. From any screen, touch and hold Recentapps.
2. Tap two apps that support Multi window.
– or –
If you are currently using an app that supports
Multiwindow, tap another app to add it in split
screen view.
Learn About YourDevice 41
You can also launch recently used apps directly into
Multi window view. Only applications that support
Multi window have the Multi window icon.
1. Tap Recentapps.
•
2. Tap Multi window in the title bar to launch an
application in split screen view.
•
3. Tap an app icon to add it to the split screenview.
Recently used apps that support Multiwindow
CJ
have a Multi window icon in their title bar.
CJ
CJ
Other recently used apps that support
Multiwindow display below the launched app.
CJ
Page 48

Apps
Learn how to change the
way apps are displayed,
organize apps into folders,
and uninstall or disable
apps.
Page 49

Using Apps
The Apps list displays all preloaded apps and apps that
you downloaded. You can uninstall, disable, or hide
apps from view.
Access Apps
You can access and launch all applications from the
Apps list.
1. From home, tap Apps.
2. Tap an app’s shortcut to launch it.
To return to the main Home screen, press the
•
Home key.
Apps 43
Download and Install Apps
Find new apps to download and install on your device.
Play Store: Download new apps from
theGooglePlay store. Visit • play.google.com/store/
apps to learnmore.
u
Galaxy Apps: View and download Samsung
apps that are optimized for use with Galaxy devices.
Visit• samsung.com/levant/apps/mobile/galaxyapps to
learn more.
Uninstall or Disable Apps
You can uninstall or disable apps you download and
install.
Preloaded apps cannot be uninstalled.
•
Apps that are disabled are turned off and hidden
•
from view.
Page 50

To uninstall or disable an app:
1. From home, tap Apps.
2. Tap Moreoptions > Edit. Apps that
3. Tap Uninstall/disable and follow the prompts
4. Tap Done when finished.
To enable apps after disabling them:
1. From home, tap
2. Tap Apps > Application manager.
3. Tap Menu > Disabled, and then tap the app you
4. Tap Enable. The app is displayed again in the
Apps 44
can be uninstalled or disabled display
_ ,
Uninstall/disable on their shortcut.
' ,
'-
/
to either uninstall or disable the app.
want to enable.
Appslist.
:::
Apps > Settings.
m 0
Organize Apps
Arrange the Order
App shortcuts can be listed alphabetically or in your
own custom order.
To change the order apps are listed:
1. From home, tap
2. Tap Moreoptions > Edit.
3. Touch and hold an app shortcut or folder, and then
drag it to a new location.
4. Tap Done when finished.
To alphabetize your apps:
1. From home, tap
2. Tap Alphabetical order.
Apps.
Apps > Moreoptions > S
or
t.
Page 51

Use Folders
You can organize App shortcuts in a folder on an Apps
list screen.
1. From home, tap Apps > Moreoptions > Edit.
2. Touch and hold an app shortcut, and then drag it on
top of another app shortcut until a highlighted box
is displayed.
3. Release the app shortcut to create the folder.
Enter folder name: Name the folder.
•
Palette: Change the folder color.
•
Add application: Place more apps in the
•
folder. Tapapps to select them, and then
tap Add.
4. Tap anywhere outside of the folder to close it.
To add more apps, touch and hold an app
•
shortcut and drag it to the folder.
5. Tap Done when finished.
Apps 45
To launch apps in a folder:
► Tap a folder, and then tap an app shortcut to
launchit.
To delete a folder:
1. From home, tap
2. Tap the folder to delete, and then tap
Removefolder. Confirm when prompted.
3. Tap Done when finished.
To add a folder to a Home screen:
1. From home, tap
2. Touch and hold a folder, drag it to a Homescreen,
and then release it.
Apps > Moreoptions > Edit.
Apps.
Page 52

Apps Settings
View information and configure settings for all apps on
your phone.
Access Apps Settings
1. From home, tap Apps > Settings > Apps.
2. Tap on an app to view and configure its settings.
Depending on the app and its location, you
•
may be able to force the app closed, uninstall
or disable the app, clear cache and data, and
more.
m
Apps Overview
You can download and install new applications on your
device. Use Apps settings to manage your downloaded
and preloaded applications.
Warning: Because this device can be configured with
system software not provided by or supported by
Google or any other company, you operate this software
at your own risk.
Apps 46
00
00
Application Options
1. From home, tap Apps > Settings > Apps.
2. If you have disabled applications:
Tap All apps at the top left of the screen.
•
Tap All apps, Enabled, or Disabled.
•
:
3. Tap More options to configure the following:
.
Sort by size/name: Sort apps either by size or
•
by name.
Default apps: Choose or change apps that are
•
used by default for certain features, like email
or browsing the Internet.
App permissions: Grant permission for access
•
to your device’s information to individual apps.
Show/Hide system apps: Show or hide system
•
(background) apps.
m
00
00
Page 53

Special access: Configure the following types
•
of access for specific applications:
Optimize battery usage: Restrict functions
-
in applications to save battery power.
Device administrators: Select apps for
-
device administration.
Do not disturb permission: Allow apps to
-
override Do not disturb.
Apps that can appear on top: Choose apps
-
that can run on top of other running apps.
VR helper services: Choose apps that
-
provide helper services for VR functions.
Apps that can change system settings:
-
Select which apps can change system
settings.
Notification access: Enable notification
-
access for individual apps.
Apps 47
Use Premium text message service:
-
Choose which apps can use installed
premium text message services.
Allow unrestricted data usage: Permit
-
apps to use mobile data without
restriction.
Usage data access: Permit apps to access
-
your usage data.
Reset app preferences: Reset options that have
•
been changed. Existing app data is not deleted.
Note: Options vary by application.
Page 54

Manage Apps
You can view and update information about an
application, including memory usage, default settings,
and permissions.
1. From home, tap Apps > Settings > Apps.
2. Tap an application to view and update information
about the application. The following options are
displayed:
Uninstall/Disable: Uninstall or disable the
•
application. Preloaded apps can only be
disabled.
Force stop: Stop an app that is misbehaving.
•
Restart your device if stopping an app, process,
or service causes your device to stop working
cor rectly.
Mobile data: View mobile data usage by the
•
app.
Battery: View battery usage since the last full
•
charge.
Apps 48
00
00
Storage: Manage the app’s storage usage.
•
Memory: View the app’s memory usage.
•
Notifications: Configure notifications from the
•
app.
Permissions: View permissions granted to the
•
app for access to your device’s information.
Set as default: Set the app as a default for a
•
certain category of apps.
App details in store: View details about an app
•
in the app store it was downloaded from.
Default Applications
Set or clear default applications for certain built-in
features of the phone.
1. From home, tap Apps > Settings > Apps.
2. Tap More options > Default apps.
3. Tap each default setting to see what services or
applications are available to set as the default.
00
00
Page 55

Browser app: Choose a default browser app.
•
Calling app: Choose a default calling app.
•
Messaging app: Choose a default messaging
•
(text and multimedia) app.
Default app selection: Choose whether to have
•
the phone set default apps automatically or to
have the phone ask before setting default apps.
Set as default: Select a different app to open
•
related files.
Select which Home screen you want to use:
•
Choose a Home screen type.
Device assistance app: Choose an app that
•
provides assistance for using your device.
Note: If you choose a default messaging app other than
Messages, you will not be able to use the Messages app
unless you restore it as the default messaging app.
Apps 49
App Permission Settings
Configure settings and permissions for your phone’s
apps.
1. From home, tap Apps > Settings > Apps.
2. Tap More options > App permissions.
3. Tap an embedded device app to configure its
settings and permissions.
Note: Available settings and permissions vary by app.
:::
00
00
Page 56

Boost Apps
Enjoy these apps from Boost.
Certain apps require a data plan or paid subscription.
Visit boostmobile.com to learn more or contact your
service provider for additional information.
1Weather
Receive real-time local weather information at any
location in the world. Access seven-day and hourly
weather forecasts for your area.
► From home, tap Apps > 1Weather.
AirG
Meet new friends instantly with just one click using
AirG. Real-time feeds allow you to browse through the
latest community activity or just see what your friends
are up to.
► From home, tap Apps > AirG.
Apps 50
m
m
0
I!
Amazon
Shop at amazon.com ™ from your device.
► From home, tap Apps > Amazon folder >
Amazon Shopping.
m
Amazon Kindle
Download books for reading right on your device. You
must have an account with Amazon to use the Kindle
application.
► From home, tap Apps > Amazon folder >
Amazon Kindle.
•
Amazon Music
Purchase, download, and play music from Amazon.
► From home, tap Apps > Amazon folder >
Amazon Music.
:::
Page 57

App Spotlight
Use App Spotlight to discover new apps from the
Google Play store.
► From home, tap Apps > App Spotlight.
m
0
Audiobooks
Access audible.com’s library of audiobooks in every
genre.
► From home, tap Apps > Amazon folder >
Audiobooks.
Apps 51
m
Boost 411
Boost 411 gives you access to a variety of services
and information, including residential, business, and
government listings; movie listings or show times;
driving directions, restaurant reservations, and major
local event information. You can get up to three
pieces of information per call, and the operator can
automatically connect your call at no additional charge.
► From home, tap Apps > Boost 411.
m
•
Boost Zone
Use Boost Zone to stay connected to all the latest news
and information from Boost. Included here are news,
feedback, featured applications and tips/tricks for your
device.
► From home, tap Apps > Boost Zone.
m
Page 58

Caller ID
See who is calling, even if the caller is not in your
contact list.
► From home, tap Apps > Caller ID.
m
DraftKings
Play daily fantasy sports against other users with
DraftKings.
► From home, tap Apps > DraftKings.
m
Facebook
Keep up with friends and family with the Facebook app.
Share updates, photos, and videos, as well as text, chat,
and play games.
► From home, tap Apps > Facebook.
Apps 52
m
Instagram
Capture and share photos and videos with your friends.
Customize what you capture, and then share it on your
feed or post it directly to your friends.
► From home, tap Apps > Instagram.
m
@)
Messenger
Reach out to your friends and family with Facebook
Messenger, which works just like texting. A data plan is
required to use Messenger.
► From home, tap Apps > Messenger.
m
NextRadio
Listen to your favorite FM radio stations on the go with
NextRadio. Tune in to any FM frequency in your area
and listen to the radio without the cost of streaming
music.
► From home, tap Apps > NextRadio.
m
Page 59

Note: To listen to radio from your device, you must
plug in either headphones or a speaker cable to the
headphone jack on bottom of the device. To listen
through the device’s speaker (after plugging in
headphones), tap More options > Output to speaker.
Tex ture
Get unlimited access to all the best digital magazine
subscriptions with Texture®.
► From home, tap Apps > Texture.
m
Playphone
Use Playphone to discover and purchase new games.
Recommend games to others.
► From home, tap Apps > Playphone.
Prime Photos
Store your photos on Amazon’s cloud server
► From home, tap Apps > Prime Photos.
Apps 53
Uber
Use Uber to hire a private driver in more than 130 cities
and 30 countries. Uber is an entirely new and modern
way to travel.
► From home, tap Apps > Uber.
El
Voicemail
Easily manage your inbox without ever dialing into your
voicemail.
► From home, tap Apps > Voicemail.
Page 60

Calculator
The Calculator provides basic and advanced arithmetic
functions.
Basic Operation
You can use your calculator to perform basic
operations.
1. From home, tap Apps > Calculator.
2. Tap keys for calculations.
Tip: To use the scientific calculator, make sure
Autorotate is turned on (notification panel >
Autorotate) and rotate the screen to the
landscapeorientation.
Apps 54
m
Page 61

Calendar
Use Calendar to create and manage events, meetings,
and appointments. Your Calendar helps organize your
time and reminds you of important events. Depending
on your synchronization settings, your phone’s
Calendar stays in sync with your Calendar on the Web,
Exchange ActiveSync calendar, Google Calendar™, and
Outlook® calendar.
In order to sync with your Google calendar, you must
sign in to a Google Account on your phone.
See “Google Account” on page14.
Apps 55
Calendar Operations
View Today’s Calendar: From the Calendar, tap
•
Today.
Change Calendar View: From the Calendar, tap
•
View, and then tap Year, Month, Week, Day, or Tasks
to change the current view.
View Next/Previous Month (Month View): From the
•
Calendar, swipe left or right.
View Next/Previous Week (Week View): From the
•
Calendar, swipe left or right.
View Next/Previous Day (Day View): From the
•
Calendar, swipe left or right.
Page 62

Add an Event to the Calendar
Add events to your calendar directly from the Calendar
application.
1. From home, tap Apps > Calendar.
2. Tap Add.
3. Enter an event title, start date/time, end date/time,
etc., and then tap Save.
View Calendar Events
You can display the Calendar in daily, weekly, monthly,
or agenda view. To change the Calendar view, tap the
current view in the top right corner, and then tap Year,
Month, Week, Day, or Task s.
1. From home, tap Apps > Calendar.
2. Tap a date and then tap an event.
Tap the event to edit it.
•
Apps 56
Sync Calendars
You can select which calendars you would like to sync
on your phone, along with what types of information
you want to sync.
1. From home, tap Apps > Calendar.
2. Tap More options > Manage calendars.
3. Select sync options by sliding the selector next to
each option.
4. Tap Back to return to Calendar view.
Page 63

Camera and Video
Settings
Flash
Switch cameras
Modes, camera, or effects
Apps 57
Beauty
Gallery
Take a picture
Record video
Page 64

Camera Overview
The camera’s viewfinder screen lets you view your
subject and access camera controls and options.
Portrait: Adjust skin tone of faces.
•
Gallery: View your picture or video in the Gallery
•
application.
Capture picture: Take a picture.
•
Record video: Begin recording video.
•
Camera, Modes, or Effects: Swipe right to change
•
the shooting mode. Swipe left to add an effects
filter.
Switch cameras: Switch between the rear camera
•
and the front camera.
Flash: Activate or deactivate the flash. Toggle
•
through flash options—on, auto, or off (rear camera
only).
Apps 58
Camera settings: Opens the camera settings menu
•
and lets you change additional camera settings. See
“Camera Settings” on page61.
Camera Shortcut
Open the Camera by quickly pressing the Home key
twice.
1. From home, tap Apps > Settings.
2. Tap Advanced features > Quick launch camera,
and tap On/Of f to enable.
0
Page 65

Take Pictures and Record Videos
The following topics teach you how to take pictures and
record videos with your phone’s camera.
Capturing Pictures/Videos
File Format for Pictures: File format for pictures is
•
JPEG or RAW format.
File Format for Videos: File format for videos is
•
MPEG4.
Camera Cautions
If Lens Becomes Dirty: Fingerprints/smudges on
•
lens prevent capturing of clear still images/videos.
Wipe lens with a soft cloth beforehand.
Avoid Exposure to Direct Sunlight: Be careful not to
•
expose lens to direct sunlight for long periods. May
discolor color filter and affect color of images.
Apps
Flash Warning
Do not shine the flash close to eyes. Do not look
directly at the flash when shining. Do not shine the
flash at other people’s eyes. May affect eyesight, etc.
Take a Picture
You can take high-resolution pictures using your
phone’s camera.
Note: If you have an SD card installed, pictures and
videos are stored to the SD card. If no card is installed,
pictures and videos are saved to your phone’s memory.
1. From home, tap Apps > Camera.
2. Select options:
To add an effects filter, swipe to the left and
•
59
tap a preview filter to apply it to the screen.
To add a shooting mode, swipe to the right and
•
select a mode.
To quickly switch between the front and rear
•
cameras, swipe the screen up or down.
Page 66

3. Aim the camera at your subject.
4. Tap Capture picture to take the picture.
0
Record Videos
Record high-quality videos using your phone’s video
camera.
Note: If you have an SD card installed, pictures and
videos are stored to the SD card. If no card is installed,
pictures and videos are saved to your phone’s memory.
1. From home, tap Apps > Camera.
2. Aim the camera at your subject, and then tap
Record.
•
3. The following actions are available:
Tap Capture to take a picture while
•
recording.
•
Tap Pause to pause recording.
•
•
Tap Resume to resume recording.
•
•
Tap Stop to stop recording.
•
Apps 60
0
m
•
Shooting Mode
Several visual effects are available. Some modes are
not available when taking self-portraits.
1. From home, tap Apps > Camera.
2. Swipe to the right for the Mode options. Each
section indicates which camera (front or rear) the
modes are available for.
Rear camera
Auto: Allow the camera to evaluate the
•
surroundings and determine the ideal mode for
the picture.
Pro: Manually adjust the ISO sensitivity,
•
exposure value, white balance, and color tone
while taking pictures.
Panorama: Create a linear image by taking
•
pictures in either a horizontal or vertical
direction.
m
..
Page 67

Continuous shot: Touch and hold the Camera
•
button to take pictures continuously.
HDR (Rich tone): Enables the light sensitivity
•
and color depth features of the device to
produce a brighter and richer picture.
Night: Use this to take photos in low-light
•
conditions, without using the flash.
Sports: Take clearer pictures of fast moving
•
subjects.
Sound & shot: Enrich your pictures by adding a
•
few seconds of background sound.
Front camera
Selfie: Take selfie shots and apply various
•
effects, such as an airbrushed effect.
Wide selfie: Take wide-angle selfie shots to fit
•
more people into your pictures.
Sound & shot: Enrich your pictures by adding a
•
few seconds of background sound.
Apps 61
Camera Settings
You can adjust your camera’s settings using the
icons on the main camera screen and the full camera
settings menu.
Switch Cameras
Your phone lets you use different types of cameras
depending on your settings and downloads.
1. From home, tap Apps > Camera.
2. Tap Switch cameras.
– or –
Swipe the screen up or down.
..
Page 68

Set Camera Functions
You can configure your camera’s settings to fit any
situation and event.
1. From home, tap Apps > Camera.
2. Tap Settings to configure settings for the
Camera. Available options vary depending on the
camera or recording mode used.
Rear camera
Picture size: Select a resolution. Use higher
•
resolution for higher quality. Higher resolution
pictures take up more memory.
Video size: Select a resolution. Use higher
•
resolution for higher quality. Higher resolution
videos take up more memory.
Front camera
Picture size: Select a resolution. Use higher
•
resolution for higher quality. Higher resolution
pictures take up more memory.
Apps 62
..
Video size: Select a resolution. Use higher
•
resolution for higher quality. Higher resolution
videos take up more memory.
Save pictures as previewed: Save the
•
self-portrait or self-recording as viewed on the
camera screen, not as flipped images.
Ways to take pictures:
•
Tap to take pictures: Tap the screen to take
-
selfies.
Gesture control: Detect your palm and
-
automatically take a picture two seconds
la ter.
Common
Timer: Take time-delayed pictures or videos.
•
Grid lines: Display viewfinder grid lines to help
•
composition when selecting subjects.
Location tags: Attach a GPS location tag to the
•
picture.
Page 69

Review pictures: Set to show pictures after
•
taking them.
Quick launch: Open camera by pressing the
•
Home key twice in quick succession.
Storage location: Select the memory location
•
for storage. This option only appears if an
optional memory card (not included) is
installed.
Volume key function: Use the Volume key
•
asthe camera key, the record key, or for system
volume.
Shutter sound: Enable or disable a shutter
•
sound when pictures are taken.
Reset settings: Reset the camera settings.
•
Apps 63
Page 70

Clock
The Clock app offers features for keeping track of time
and setting alarms.
1. From home, tap Apps > Clock.
2. Tap a tab to use a feature:
Alarm: Set an alarm to ring at a specific time.
•
World clock: View the time of day or night in
•
other par ts of the world. World clock displays
time in hundreds of different cities, within all
24time zones around the world.
Stopwatch: Measure intervals of time.
•
Timer: Use a timer to count down to an event
•
based on a preset time length (hours, minutes,
and seconds).
Apps 64
Alarm
Set an alarm to ring at a specific time.
Create an Alarm
Create an alarm event. You can set one-time or
recurring alarms, and choose options for how to be
notified.
1. From home, tap Apps > Clock.
2. Tap Add alarm.
0
3. Tap the following items to configure an alarm:
Date: Choose the day for this alarm.
•
Time: Set a time for the alarm.
•
Repeat: Choose when to repeat the alarm.
•
Alarm name: Enter a name for the alarm.
•
Snooze: Allow snoozing. Set interval and
•
repeat values for the alarm while snoozing.
Page 71

Alarm tone and volume: Choose a sound to
•
play for the alarm, and drag the slider to set
the volume of the alarm.
Vibration: Choose whether the alarm uses
•
vibration alert.
Read time aloud: Set the device to read the
•
time aloud when the alarm rings.
4. Tap Save to save the alarm.
Delete an Alarm
You can delete an alarm that you created.
1. From home, tap Apps > Clock.
2. Find the alarm in the alarm list (under Alarm), and
then touch and hold it to select it.
3. Tap Delete.
Apps 65
:::
World Clock
The World clock lets you keep track of the current time
in multiple cities around the globe.
To list a city on the main World clock screen:
1. From home, tap Apps > Clock.
2. Tap World clock.
3. Tap Add city.
0
4. Swipe through the list or tap Search to find a
specific city.
5. Tap the city to add it to the World clock list.
6. Repeat to add more cities.
Page 72

To remove a city from the main World clock screen:
1. From home, tap Apps > Clock.
2. Tap World clock.
3. Find the city to remove, and then touch and hold it
to select it.
4. Tap Delete.
Stopwatch
The Stopwatch lets you time events down to a
hundredth of a second.
1. From home, tap Apps > Clock.
2. Tap Stopwatch and use the following options:
Start: Begin timing.
•
Stop: Stop timing.
•
Lap: Keep track of lap times.
•
Apps 66
Resume: Continue timing after stopping the
•
clock.
Reset: Reset the Stopwatch to zero.
•
Timer
The Timer provides a countdown timer for up to
99hours, 59 minutes, and 59 seconds.
1. From home, tap Apps > Clock.
2. Tap Timer.
3. Use the keypad and tap Hours, Minutes, and
Seconds to set the length of the Timer. The
following options are available:
Start: Begin the Timer.
•
Pause: Pause the Timer.
•
Resume: Resume the Timer.
•
Cancel: Stop the Timer.
•
Page 73

Contacts
The following illustration shows your Contacts app layout and describes the various features.
Search
Image
Apps 67
Q Search
@
MY
PROFILE
Set
my
UPDATED
0
©
0
0
0
0
0
ICE· emergency
profile
Bill
Carlos
James
Jason
Jennifer
John
Juan
Linda
contacts
"'
More options
Contact
V
w
Add a contact
Page 74

The Contacts application lets you store and manage
contacts from a variety of sources, including contacts
entered and saved directly in your phone as well as
contacts synchronized compatible accounts.
Caution: Information saved in Contacts may be lost
or changed if the battery is removed for a long period
or left uncharged. Accident or malfunction may also
cause loss or change to information. It is recommended
that you keep a separate copy of contacts and other
important information. Boost is not responsible for any
damages from lost or changed contacts.
Add a Contact
You can add contacts from your phone’s Contacts
application. Enter details such as name, phone
numbers, email addresses, mailing addresses, and
more.
1. From home, tap Apps > Contacts.
2. Tap Add to add a contact.
0
3. If you have multiple account types associated with
Apps 68
0
your phone, select a contact type.
Select Google if you want to save contacts
•
to your Google Account; these will be synced
automatically with your Google Account online.
Select Device as the sync account if you want
•
your contacts on your phone only; they will not
be synced with your Google Account.
Select Samsung account if you want to save
•
contacts to your Samsung account; these will
be synced automatically with your Samsung
account online.
4. Use the keyboard to enter as much information as
you want.
Picture: Tap the picture icon to assign a
@)
•
picture to the contact.
Name: Enter the name of the contact.
•
Organization: Enter organization information
•
for the contact.
Phone: Enter the phone number for the
•
Page 75

contact.
Email: Enter email addresses for the contact.
•
Groups: Assign the contact to a group.
•
More: Show additional fields such as Web
•
address, Notes, Nickname, Website, etc.
Scan business card: Take a picture of a business
•
card to add the information for the contact.
Apps 69
Note: To select a type (label) for a phone number, email
address, or postal address (such as Mobile, Home, or
Work), tap the type to the right of the field and select
the appropriate type.
Note: To add more phone numbers, email addresses,
etc., tap Add on the right side of the entry field.
5. When you have finished adding information,
tapSave.
Page 76

Save a Phone Number
You can save a phone number to Contacts directly from
the phone keypad.
1. From home, tap Phone.
2. Enter a phone number and tap Add Add to
Contacts.
3. To add the number to an existing contact, tap
Update existing. To add a new contact, tap
Create contact.
For an existing contact, tap the contact name
•
and select a number type for the new number.
For a new contact, enter the name and any
•
additional information.
4. Tap Save.
Apps 70
+
View Contacts
View a contact’s details by displaying a contact entry.
1. From home, tap Apps > Contacts.
2. Tap a contact to view quick options.
Tap Call to dial the contact ’s default phone
•
~
nu mbe r.
Tap Message to send the contact a
•
CD
message.
Tap Details to view more information about
•
CD
the contact.
m 0
Page 77

Edit a Contact
Once you have added a contact, you can add or edit
any of the information in the entry, assign a caller ID
picture, customize with a unique ringtone, and more.
1. From home, tap Apps > Contacts.
2. Tap a contact, and then tap Details.
3. Tap Edit.
4. Tap any field you want to change or add. See “Add a
Contact” on page68.
5. Add or edit the information, and then tap Save.
Apps 71
m
0
CD
Delete a Contact
You can delete a contact from the contacts details
page.
1. From home, tap Apps > Contacts.
2. Tap a contact, and then tap Details.
.
.
3. Tap More options > Delete.
.
4. Tap Delete.
m
0
CD
Page 78

Favorites
Marking contacts as favorites lists them at the top
of the Contacts tab in the Phone app, allowing you to
quickly access your most used or preferred Contacts
entries.
Mark Contacts as Favorites
1. From home, tap Apps > Contacts.
2. Tap a contact, and then tap Details.
3. Tap Favorite to turn the star yellow.
5 0
CD
Remove Contacts as Favorites
1. From home, tap Apps > Contacts.
2. Tap a contact, and then tap Details.
3. Tap Favorite to turn the star white.
~
0
CD
*
Apps 72
Make a Call from Favorites
1. From home, tap Apps > Contacts.
2. Tap a contact to display it, and then tap Call.
·
J!:
0
Groups
You can use groups to organize your contacts. Your
phone comes with preloaded groups, and you can
create your own. You might create a group for your
family, for coworkers, or a team. Groups make it easy
to find contacts, and you can send messages to the
members of a group.
Create a Group
1. From home, tap Apps > Contacts.
2. Tap More options > Groups, and then tap Create.
3. Tap fields to enter information about the group:
Tap Group name to enter a name for the new
•
group.
Page 79

Tap Group ringtone to select a ringtone for
•
notifications for incoming calls from group
members.
Tap Add member, select a member or members
•
to add to the new group, and then tap Done.
4. Tap Save to save the new group.
Add Contacts to a Group
1. From home, tap Apps > Contacts.
2. Tap More options > Groups, and then tap a group.
3. Tap Edit > Add member, select a member or
members to add to the new group, and then tap
Done.
4. Tap Save.
Apps 73
m
0
Send a Message to a Group
You can send a message to members of a group, if the
members have a telephone number stored in their
contact record.
A message to multiple recipients is treated as a group
conversation.
1. From home, tap Apps > Contacts.
2. Tap More options > Groups, and then tap a group.
3. Tap More options > Send message.
4. Tap Recipients to edit the group’s members
receiving the message.
5. Continue to enter your message and send it.
For more information, see “Text and Multimedia
Messaging” on page97.
m
0
Page 80

Send an Email to a Group
You can send an email to members of a group, if the
members have an email address stored in their contact
record.
1. From home, tap Apps > Contacts.
2. Tap More options > Groups, and then tap a group.
3. Tap More options > Send email.
4. Select recipients from the group’s members.
5. Continue to choose an email account, or Gmail, and
then enter your email and send it.
Apps 74
0
Delete a Group
You can delete any group you created. When removing
a group, you will have the option to also remove any
members of the group from your accounts.
1. From home, tap Apps > Contacts.
2. Tap More options > Groups, and then tap a group.
3. Tap More options > Delete, and then tap
Grouponly to delete only the group, or
Groupandmembers to delete the group and
allofits members.
0
Page 81

Share a Contact
You can quickly share contacts using Bluetooth, email,
Gmail, or text messaging.
1. From home, tap Apps > Contacts.
2. Tap a contact, and then tap Details.
3. Tap Share.
4. Tap vCard file (VCF) to share the contact as a vCard
5. Select a sharing method:
Apps 75
file, or tap Tex t to share the contact information in
a text file.
Link sharing: Send large files to others, even
•
to people who are not in your Contacts (vCard
only).
Bluetooth: Send the information using
•
Bluetooth. See “Bluetooth” on page135 for
information on pairing and sending using
Bluetooth.
0
CD
Copy to clipboard: Save the information to the
•
clipboard (Text only).
Save to Drive: Save the information to your
•
Google Drive™ account.
Email: Send the information as an email
•
attachment. If prompted, select an email
account. Address the message, add a subject
and a message, and then tap Send. See “Create
and Send an Email Message” on page81 for
details on sending email.
Gmail: Send the information as a Gmail
•
attachment.
Messages: Send the information in a tex t
•
message. Select a contact or enter a wireless
phone number or email address, enter any
additional information, and then tap Send. For
more information on text messaging, see “ Tex t
and Multimedia Messaging” on page97.
Page 82

Messenger: Send the information using the
•
•
•
6. Complete the required steps as prompted for the
selected method.
Google Messenger™ app.
Samsung Notes: Save the information in
Samsung Notes (Text only).
Wi-Fi Direct: Send the information to another
device using Wi-Fi Direct. See
page134.
“Wi- Fi Direct” on
Profile Sharing
Share your profile information with your contacts. You
can select which contacts you want to share it with, as
well as select additional information you want to share.
1. From home, tap Apps > Contacts.
2. Tap Set my profile.
3. Tap Profile sharing, and then tap On/Off to enable
the feature.
Apps 76
0
4. Set Profile sharing options:
Share with: Share your profile with the public,
•
all contacts, your favorite contacts, or selected
contacts.
Shared profile info: In addition to your name,
•
status, and profile picture, you can share your
email, organization, address, and date of birth.
Back up profile data: Back up and restore your
•
profile using your Samsung account.
Registered information: View and set the
•
registered information for your phone number.
Page 83

Import Contacts
Your phone offers a couple of options for importing
contacts from installed SD memory cards or external
devices using USB.
Before Importing Contacts from an SD Card
You will need to have installed an SD card with
previously backed up contacts information into your
phone before you can import contacts. See “Memory
Card (SD Card)” on page172 for SD card information.
Import Contacts from an SD Card or
USB Storage
1. From home, tap Apps > Contacts.
2. Tap More options > Settings > Import/export
contacts.
3. Tap Import and follow the prompts to complete the
import.
Apps 77
m
0
Back Up Contacts
If you are saving contacts to an account that does
not automatically back them up to the Cloud, you can
manually back them up to an optional installed SD card
for re-import if needed.
Before Backing Up Contacts to an SD Card
You will need to have installed an SD card (not
included) into your phone before you can back up your
contacts. See “Memory Card (SD Card)” on page172 for
SD card information.
Back Up Contacts to Your SD Card
1. From home, tap Apps > Contacts.
2. Tap More options > Settings > Import/export
contacts.
3. Tap Export and follow the prompts to complete the
export.
0
Page 84

Contacts Settings
Configure options for contacts stored on your phone.
1. From home, tap Apps > Contacts.
2. Tap More options > Settings to configure options.
Apps 78
0
Page 85

Use the Email application to send and receive email
from your webmail or other accounts, using POP3
or IMAP, or access your ActiveSync account for your
corporate email needs.
3. Follow the prompts to set up your Gmail or email
account.
Add an Email Account
You can add several types of personal email accounts,
such as POP3 and IMAP accounts, on your phone.
Set Up an Email Account
Your phone supports several types of email accounts
and allows you to have multiple email accounts set up
at one time.
Before setting up an email account, make sure you
have the username (user ID), password, server name,
etc., so you can get set up successfully.
1. From home, tap Apps > Samsung folder >
Email.
2. Tap a configured Gmail account to use it with
the Email app, or tap Add new account to add a
different email account.
Apps 79
Add an Email Account from the Email App
You can add email accounts directly from the email
app, even if you have another email account set up.
1. From home, tap Apps > Samsung folder >
Email.
2. Tap Menu > Settings.
3. Tap Add account.
4. Follow the prompts to complete the account setup.
Page 86

Add an Email Account from the
SettingsMenu
You can also set up email accounts from the Settings >
Accounts menu.
1. From home, tap Apps > Settings.
2. Tap Cloud and accounts > Accounts.
3. Tap Add account > Email.
4. Enter the Email address and Password for the
email account and then tap Sign in.
If you have custom settings you need to
•
configure, tap Manual setup and enter your
settings. These may include mail type, user
name, password, server, security type, etc.
5. Select your sync settings, and then tap Next.
6. Enter an account name and a display name and tap
Done to complete setup.
Apps 80
m
e
Important: If the account type you want to set up is not
in the phone database, you will be asked to enter more
details. You should get all pertinent information for the
email account, such as incoming and outgoing server
settings, before you proceed.
Add an Exchange ActiveSync
Account
If you synchronize your phone with your Exchange
ActiveSync account, you can read, manage, and send
email in the same easy way as with a POP3/IMAP
account. However, you can also access some powerful
Exchange features.
Important: Before setting up a Microsoft Exchange
ActiveSync Account, contact your company’s Exchange
Server administrator for required account settings
information.
1. From home, tap Apps > Settings.
2. Tap Cloud and accounts > Accounts.
m
e
Page 87

3. Tap Add account > Microsoft Exchange
ActiveSync.
4. Enter the Email address and Password for the
email account and then tap Manual setup.
5. Enter the required information:
Domain\username: Enter your network domain
•
and username, separated by “\”.
Password: Enter your network access password
•
(case-sensitive).
Exchange server: Enter your system’s
•
Exchange server remote email address. Obtain
this information from your company network
administrator.
Use secure connection (SSL): Tap to place a
•
checkmark in the box if your system requires
SSL encryption.
Use client certificate: Tap to place a checkmark
•
in the box if your system requires certification.
Apps 81
6. Follow the prompts to configure options for the
account.
7. Enter an account name and a display name and tap
Done to complete the setup.
Create and Send an Email Message
Compose and send email using any account you have
set up on your phone. Increase your productivity by
attaching files such as pictures, videos, or documents
to your email messages.
1. From home, tap Apps > Samsung folder >
Email.
If you want to switch to a different email
•
account, tap the account name at the top of the
screen and select another account.
2. Tap Compose new email.
~ -
Page 88

3. Enter the message recipient(s).
You can add multiple recipients to an email
•
message.
To add recipients from Contacts, tap Add from
•
Contacts , select the contact(s) you wish to
include, and then tap Done.
4. Enter the email subject and message.
To add an attachment to the message, tap
•
Attach, select an attachment type and an
attachment, and then tap Done.
5. Tap Send.
Apps 82
Open Email Messages
You can open and read email messages directly from
the email Inbox. Reading and replying to email on your
phone is as simple as on your computer.
1. From home, tap Apps > Samsung folder >
Email.
2. Tap the message you want to view.
3. Tap Reply o r Reply all to reply to the message.
Tip: Tap the account name at the top of the Inbox to
switch to a different email account.
Tip: You can also access new email messages from
the notification panel. Pull down the status bar to
display the notification panel, and then tap an email
notification. The email Inbox will open and display the
new email message.
Page 89

Options When Reviewing Email Messages
Resetting mail as unread: Touch and hold a
•
message to select it, and then tap More options >
Mark as unread.
Deleting email: Touch and hold a message to select
•
it, tap the check box on the left side of any other
messages, and then tap Delete.
Syncing accounts manually: Sync sent and received
•
email messages manually at any time regardless of
the automatic sync settings. Switch to the account
you want to sync, and then swipe down.
Replying to email messages: With an email
•
message open, tap Reply or Reply all , compose your
reply message, and tap Send.
Forwarding email messages: With the email
•
message open, tap Forward , enter a recipient and
an additional message, and tap Send.
Apps 83
Delete an Email Account
You can delete an email account from your phone if you
no longer wish to receive messages for the account on
your phone.
1. From home, tap Apps > Samsung folder >
2. Tap Menu > Settings.
3. Tap an account name, and then tap Remove >
Email.
Remove.
Page 90

Manage Your Email Inbox
Your email Inbox provides management options for
viewing, sorting, and deleting your email messages.
View Your Email Inbox
1. From home, tap Apps > Samsung folder >
Email.
2. Tap the email account at the top of the screen to
select a different Inbox, or tap All accounts to see
all your email Inboxes at once.
Refresh an Email Account
Whatever your automatic synchronization settings are,
you can also synchronize your sent and received email
messages manually at any time.
► While viewing the account you want to synchronize,
Apps 84
swipe down.
Sort Email Messages
1. On the email account Inbox, tap Sort by.
2. Select from the options to sort email messages by
date received, sender, read/unread, attachments,
or priority.
Delete Email Messages
1. On the email account Inbox, touch and hold the
message you want to delete.
Tap check boxes to select additional emails to
•
delete.
2. Tap Delete.
Note: Depending on your settings, you may be
prompted to confirm the deletion by tapping Delete.
Page 91

Email Settings
Configure options for email accounts you set up on your
phone.
General Email Preferences
1. From home, tap Apps > Samsung folder >
Email.
2. Tap Menu > Settings to configure settings.
General email settings affect all email
•
accounts.
Email Account Settings
► From the general settings menu above, tap an
account name to access its settings.
Apps 85
Page 92

Galaxy Apps
Samsung Galaxy Apps provides a quick and easy way
to find and download free premium apps that are
compatible with your Galaxy device.
A Samsung account is required to purchase and
download apps.
To access the Samsung Galaxy Apps website:
► From home, tap
u
GalaxyApps.
Apps 86
m
Apps > Samsung folder >
Page 93

Gallery
Using the Gallery application, you can view pictures
and watch videos that you have taken with your phone’s
camera or downloaded.
You can do basic editing such as rotating and cropping.
You can also set a picture as your contact picture or
wallpaper and share pictures with your friends.
While viewing pictures in the Gallery, scroll up the
screen to view more albums. Simply tap an album to
view the photos or videos in that album.
If you have downloaded any photos and videos, these
will be placed in the All downloads album.
1. From home, tap Apps > Gallery.
2. From the main Gallery screen, you can use the
following options:
Tap a picture or video to display it in full screen
•
view.
Apps 87
Touch and hold thumbnails to select them
•
(indicated by a checkmark).
Tap tabs along the top to change views. You can
•
view by Pictures, Albums, or Stories.
Tap More options for other options. Available
•
options depend on which Gallery screen you
are viewing, and may include:
Camera: Launch the Camera to take
-
pictures or record video.
Edit: Depending on the view, tap albums or
-
items to select them. After selection, you
can tap More again for options you can use
with the selected item(s).
Share: Share albums, pictures, or videos.
-
Animate: Create an animation from several
-
pictures.
Collage: Create a collage from several
-
pictures.
Page 94

Create album: Create a new album in the
-
Albums view.
Slideshow: Create a slideshow from
-
several pictures in the Stories view.
For more information about using Gallery, see “View
Pictures and Videos” on page88, “Edit Pictures” on
page89, and “Share Pictures and Videos” on page90.
View Pictures and Videos
You can access and view all your stored pictures and
videos from your phone’s Gallery.
1. From home, tap Apps > Gallery.
2. Tap an album (such as Camera).
To select another album, tap Back to return to
•
the Albums tab.
3. Tap an image to view the picture or video.
Tap a picture or video to view it full screen.
•
Apps 88
*
When viewing pictures and videos, you can
•
touch and hold an image to open a selection
menu and choose what to do with the picture
or video.
Pictures and Videos: Review Screen
After capturing a picture or video, from the camera
screen, tap the thumbnail image to see the item in the
review screen. From there, you can access options such
as save, view, send, or delete the picture or video.
Pictures and Videos: Options While
Viewing
Zoom In or Out on a Picture or Video: Tap the screen
•
twice or pinch the screen to zoom in or out on a
picture or video.
Viewing Videos: Use the controls to play, pause, or
•
stop the video playback.
Page 95

After selecting an album from the Albums tab, you
can browse through the pictures and videos of that
album. Tap a picture or video to view it in full screen.
By default, the pictures and videos in an album are
displayed in grid view.
Note: When viewing pictures, you can touch and hold
on a picture or video to open a selection menu and
choose what to do with the picture or video.
Edit Pictures
Whether you are browsing pictures in filmstrip or grid
view in the Gallery application, you can tap a picture
to open a selection menu and choose to delete the
picture, rotate or crop it, and more.
Rotate a Picture
The editing options let you rotate pictures 90 degrees
clockwise. Repeat the action for additional rotations.
1. From home, tap Apps > Gallery.
2. Tap the picture you want to rotate.
Apps 89
3. Tap More options > R
otate left or Rotate right.
Edit Tools
Perform advanced edits on your pictures, including
straightening, adjusting the tone, adding visual effects,
and adding decoration.
1. From home, tap Apps > Gallery.
2. Tap the picture you want to edit.
3. Tap Edit.
4. Adjust your picture with these tools:
Position: Straighten, crop, and freely rotate
•
your picture.
Ton e: Adjust the brightness, contrast,
•
saturation, temperature, and hue of the
picture.
Effects: Add color effects to your picture.
•
Decoration: Apply other images, stickers, or
•
labels to your picture.
Page 96

5. After using an editing tool, tap Apply to apply the
changes.
6. When you are finished editing the picture, tap Save.
Share Pictures and Videos
The Gallery application lets you send pictures and
videos using email, multimedia messages, social
networks, and more.
1. From home, tap Apps > Gallery.
2. Tap the pictures or videos you want to share.
To select multiple items, touch and hold an
•
image to turn on multiple select. Tap all the
items you want to include.
3. Tap Share, and then on the sharing menu, tap a
sharing method.
Apps 90
Page 97

Google Apps
Enjoy these apps from Google.
Certain apps require a Google Account. Visit google.com
to learn more.
Chrome
Browse the Internet and bring your open tabs,
bookmarks and address bar data from your computer to
your mobile device.
► From home, tap Apps > Google folder>
Chrome.
Visit support.google.com/chrome to learn more about
Chrome.
Apps 91
Drive
Open, view, rename, and share your GoogleDocs™ and
files.
► From home, tap Apps > Google folder>
Drive.
Visit support.google.com/drive to learn more about
GoogleDrive™.
Duo
Make one-to-one video calls.
► From home, tap Apps > Google folder> Duo.
Visit duo.google.com to learn more about Google Duo.
0
Page 98

Gmail
Send and receive email with Gmail, Google’s web-based
email service. Before using Gmail, you must register
a Google (Gmail) Account on your phone. See “Google
Account” on page14 for details.
► From home, tap Apps > Google folder>
Gmail .
M
Visit support.google.com/mail to learn more.
m
Google
Search not only the Internet, but also the apps and
contents of your device.
From home, tap Apps > Google folder>
Google.
G
Apps 92
m
Maps
Find your current location and get directions and other
location-based information.
► From home, tap Apps > Google folder>
Maps .
Visit support.google.com/maps to learn more.
You must enable location services to use
GoogleMaps™. For more information, see
“Location” on page146.
m
Photos
Automatically backs up your photos and videos to your
GoogleAccount.
► From home, tap Apps > Google folder>
Photos.
Visit support.google.com/photos to learn more about
GooglePhotos™.
m
Page 99

Play Movies & TV
Watch movies and TV shows purchased from Google
Play. You can stream them instantly or download them
for viewing when you are not connected to the Internet.
You can also view videos saved on your device.
► From home, tap Apps > Google folder >
PlayMovies & TV.
Visit play.google.com/store/movies to learnmore.
m
Play Music
Play music and audio files on your device.
► From home, tap Apps > Play Music.
Visit support.google.com/music to learn more.
Apps 93
Play Store
Find new apps, movies and TV shows, music, books,
magazines, and games in Google Play store.
.-
► From home, tap Apps > Play Store.
Visit support.google.com/play to learn more.
m
1
YouTube
View and upload YouTube™ videos right from your
device.
► From home, tap Apps > Google folder >
a
YouTu be.
Visit support.google.com/youtube to learn more.
m
Page 100

Internet
Browse the Internet using a full-featured browser.
Use the Browser
Launching the browser is as easy as tapping an icon.
► From home, tap Apps > Samsung folder >
Internet.
You can also launch the browser by tapping a
•
URL in a text message, email message, or Gmail
message.
Browser Use Options
Searching within a web page: With a web page
•
displayed, tap More options > Find on page, and
enter your search text.
Tip: To change the phone’s default launch page to
your current page, tap More options > Settings >
Homepage > Current page.
Apps 94
Add a Bookmark
Bookmark favorite sites using the browser menu
options.
► From home, tap Apps > Samsung folder >
Internet.
1. Navigate to the Web page you want to bookmark,
and tap More options > Add to Bookmarks.
2. Check or change the bookmark title, URL, or more,
and then tap Save.
Bookmark Options
Editing Bookmarks: From the browser, tap
•
op
Bookmarks, touch and hold a bookmark,
tap Moreoptions > Edit bookmark, edit the
bookmark, and then tap Save.
Deleting Bookmarks: From the browser, tap
•
op
Bookmarks, touch and hold a bookmark, and
then tap Delete.
m
 Loading...