

Page 1

User guide.
Page 2

SMARTPHONE
User Manual
Please read this manual before operating
your device and keep it for future reference.
Page 3

Table of Contents
Special Features ..............................1
Side Speaker .................................2
Getting Started .............................. 3
Set Up Your Device .............................4
Assemble Your Device ........................5
Start Using Your Device ......................10
Set Up Your Device ..........................11
Learn About Your Device .......................15
Front View ..................................16
Back View ..................................18
Home Screen ...............................19
Notification Panel
Navigation ................................28
Entering Text ..............................30
Multi Window .............................. 33
Emergency Mode .......................... 35
.......................... 22
Apps .........................................37
Using Apps ................................ 38
Applications Settings ........................41
Calculator .................................43
Calendar ..................................44
Camera and Video .......................... 47
VZW_J327VPP_EN_UM_TN_QE2_052217_FINAL
Page 4

..................................... 52
Clock
Contacts .................................. 55
Email .....................................62
Gallery ...................................65
Google Apps ............................... 69
Message+ ..................................72
Messages ..................................75
My Files ...................................80
Phone ..................................... 82
SHealth ....................................91
Samsung Gear ............................. 93
SamsungNotes ............................ 94
Verizon Apps ..............................96
Settings .....................................98
How to Use Settings ........................99
Connections
Wi‑Fi ......................................101
Bluetooth ................................104
Data Usage ............................... 107
Airplane Mode ............................ 109
Mobile Hotspot ........................... 109
Tethering ..................................112
Mobile Networks ...........................112
Location ...................................113
Nearby Device Scanning ....................115
Printing ...................................115
Virtual Private Networks (VPN) .............115
Sounds and Vibration .........................117
Sound Mode ...............................118
Easy Mute .................................118
iii Table of Contents
................................100
Page 5

Vibrations
Volume ...................................119
Ringtone ................................. 120
Notification Sounds ........................121
Do Not Disturb .............................121
System Sounds ............................122
Key‑Tap Feedback ..........................122
Sound Quality and Effects ................. 123
Notifications ................................ 124
Block App Notifications .................... 125
Customize App Notifications ............... 125
Smart Alert ............................... 125
Display ......................................126
Screen Brightness ..........................127
Screen Zoom and Font ......................127
.................................118
Home Screen ............................. 128
Easy Mode ................................ 128
Icon Frames .............................. 129
Status Bar ................................ 129
Screen Timeout ........................... 129
Screen Saver .............................. 130
One‑Handed Mode ........................ 130
Wallpapers and Themes ......................131
Wallpapers ................................132
Themes ...................................132
Icons ......................................132
Device Maintenance ......................... 133
Battery ................................... 134
Storage .................................. 134
Emergency Mode ..........................137
iv Table of Contents
Page 6

Language and Input
Date and Time ............................ 139
Reset ....................................140
Factory Data Reset ........................140
Software Update ...........................141
Lock Screen and Security .................... 142
Set a Screen Lock ......................... 143
Unknown Sources ......................... 144
Secure Folder ............................. 144
Secure Startup ............................ 144
Encrypt SD Card ..........................144
Set Up SIM Card Lock ...................... 145
View Passwords ........................... 145
Security Update Service ................... 145
Phone Administration ..................... 146
........................137
Credential Storage ........................146
Advanced Security Settings .................147
Accounts ................................... 148
Add an Account ........................... 149
Backup and Restore ........................151
GoogleSettings ............................151
Accessibility ................................ 153
Vision .................................... 154
Hearing ...................................155
Dexterity and Interaction ...................155
More Accessibility Settings ................ 156
Accessibility Services .......................157
Other Settings .............................. 158
About Phone ............................. 159
Help ..................................... 159
v Table of Contents
Page 7

Phone Assistance App
..................... 160
Getting Help ................................161
Videos ................................... 162
Simulators ............................... 162
Tips ...................................... 162
Samsung Support ......................... 162
Verizon Glossary .......................... 162
Legal ........................................ 163
Legal Information ......................... 164
vi Table of Contents
Page 8

Special Features
Learn about your mobile device’s
special features.
Page 9
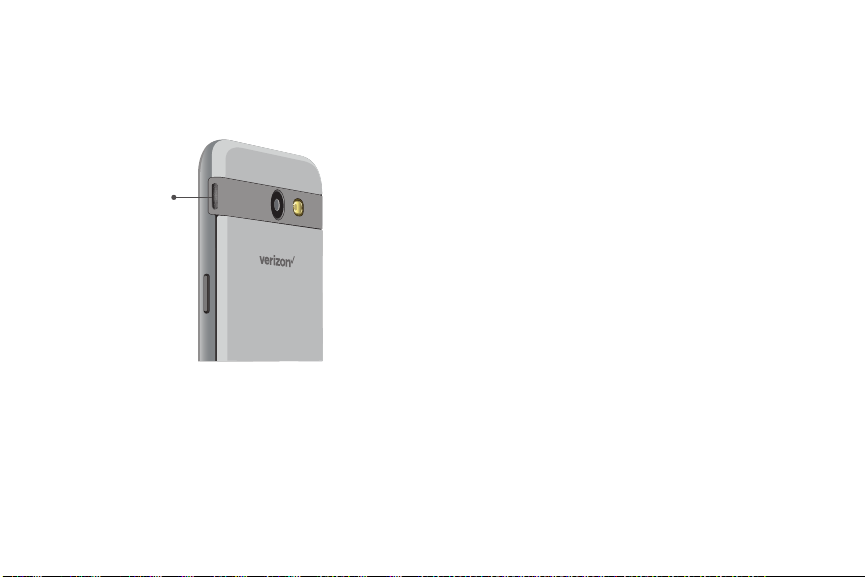
Side Speaker
This device features the speaker on the side of the
device.
Speaker
2Special Features
Page 10

Getting Started
Learn about your mobile device
hardware, assemblyprocedures,
and how to get started usingyour
new device.
Page 11

Set Up Your Device
Learn how to set up your device
forthefirsttime.
Page 12

Assemble Your Device
This section helps you to assemble your device.
Remove the Back Cover
► Lift the cover up and to the left of the device.
Caution: When removing the back cover, use
the slot next to the Volume key to gently lift the
coveroff. Pulling on the Speaker (located next to the
Powerbutton) may cause damage.
Do not pull
onSpeaker
Warning: Do not bend or twist the back cover
excessively. Using excessive force on the cover during
removal or installation of an internal component can
cause the material to break.
5Set Up Your Device
Page 13

Install the SIM Card
When you subscribe to a cellular network, you are
provided with a plug-in SIM card. During activation,
your SIM card is loaded with your subscription details.
Warning: Please be careful when handling the SIMcard
to avoid damaging it. Keep all SIM cards outof reach of
small children.
► Carefully slide the SIM card into the SIM card slot.
Make sure that the card’s gold contacts face
•
down into the device and that the card is
positioned as shown.
Install an Optional Memory Card
You can install a microSD™ memory card (notincluded)
to add more memory space to yourdevice.
A memory card can be installed at any time. It is not
necessary to install it prior to using the device.
6Set Up Your Device
Page 14

► Slide the memory card into the slot with the gold
contacts facing down.
Install the Battery
The battery is installed in the back of the device.
1. Insert the battery into the opening on the back of
the device, making sure the connectors align.
2. Gently press down to secure the battery.
7Set Up Your Device
Page 15
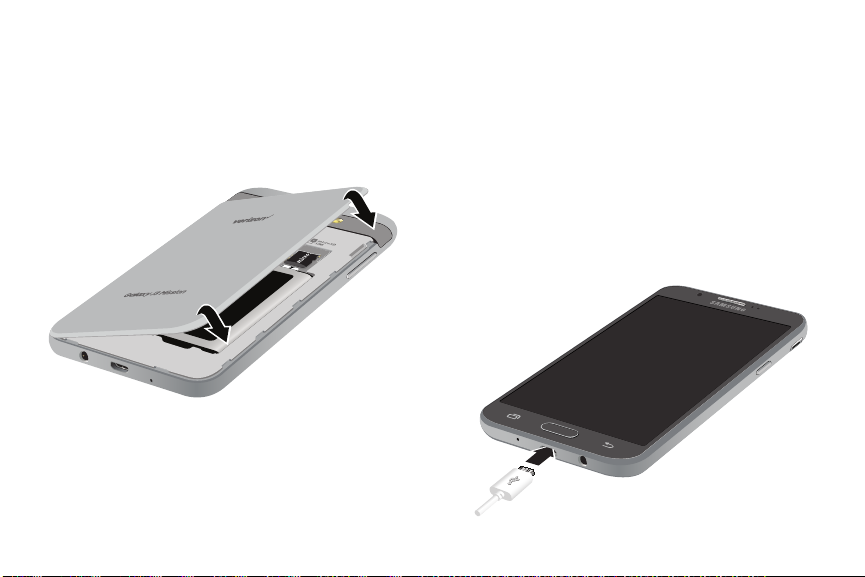
Replace the Back Cover
The back cover should be replaced before using
thedevice.
1. Place the back cover onto the back of the device
and press down.
2. Press along the edge of the back cover until you
have a secure seal.
Charge the Battery
Your device is powered by a rechargeable, standard
Li-Ion battery. A USB charger (charging head and USB
cable) is included with the device for charging the
battery from any standard outlet.
The battery comes partially charged. You can use the
device while charging.
1. Insert the USB cable into the USB charger/
Accessory port.
8Set Up Your Device
Page 16

Caution: Use only charging devices and batteries
approved by Samsung. Samsung accessories are
designed for your device to maximize battery life. Using
other accessories may void your warranty and may
cause damage.
2. Connect the USB cable to the charging head, and
then plug the charging head into a standard outlet.
3. Unplug the charging head from the outlet and
remove the USB cable from the device when
charging is complete.
When to Charge the Battery
When the battery is low and only a few minutes of
operation remain, the device sounds a warning tone at
regular intervals.
In this condition, your device conserves its remaining
battery power by dimming the screen.
When the battery level becomes too low, the device
automatically turns off.
For a quick check of your battery level:
► View the battery charge indicator located in the top
right corner of your device’s display. Asolid color
( ) indicates a full charge.
You can also choose to display a percentage value.
Viewing a percentage value can provide a better idea
of the remaining charge on the battery. For more
information, see “Battery” on page134.
While charging, the device and the charger may
become hot. This does not affect the device’s lifespan
or performance and is in the device’s normal range of
operation.
The charger may stop charging if the battery becomes
too hot.
9Set Up Your Device
Page 17

If the device heats up while charging the battery:
1. Disconnect the charger from the device and close
any running apps.
2. Wait for the device to cool down, and then begin
charging the device again.
If the lower part of the device overheats,
•
check for damage to the connected USB cable.
Replace the damaged USB cable with a new
Samsung-approved cable.
Start Using Your Device
Turn Your Device On or Off
The instructions below explain how to turn your device
on or off.
To turn the device on:
► Press and hold the Power key until the device
turnson.
To turn the device off:
1. Press and hold the Power key.
2. Tap Power off, and confirm if prompted.
10Set Up Your Device
Page 18

Lock or Unlock Your Device
Use your device’s screen lock features to secure your
device.
By default, the device locks automatically when the
screen times out.
To lock the device:
► Press the Power key.
The default Screen lock on your device is Swipe.
Tochoose a more secure screen lock, see
“Set a Screen Lock” on page143.
To unlock the device:
► Press the Power key or Home key, and then drag
your finger across the screen.
Restart the Device
If your device stops responding to taps or finger
gestures and you are unable to turn it off, youcan
restart your device.
► Press and hold the Power key and the
Volumedown key at the same time for morethan
seven seconds.
Set Up Your Device
Use the Setup Wizard
The first time you turn your device on, a Welcome
screen is displayed. It guides you through the basics of
setting up your device.
Follow the prompts to choose a default language,
connect to a Wi-Fi® network, set up accounts, choose
location services, learn about your device’s features,
and more.
11Set Up Your Device
Page 19
Google Account
Your new device uses your Google™ Account to fully
utilize its Android™ features, including Gmail™ and the
Google Play™ store.
When you turn on your device for the first time, set
up your existing Google Account or create a new
GoogleAccount.
– or –
To create a new Google Account or set up your
GoogleAccount on your device at any time, use
Accounts settings.
1. From a Home screen, tap Apps > Settings.
2. Tap Accounts.
3. Tap Addaccount > Google.
Factory Reset Protection
When you sign in to a Google Account on your device,
Factory Reset Protection is activated. Factory Reset
Protection (FRP) prevents other people from using
your device if it is reset to factory settings without your
permission. For example, if your device is lost or stolen
and a factory data reset is performed, only someone
with your Google Account username and password can
use the device.
You will not be able to access the device after a factory
data reset if you do not have your GoogleAccount
username and password. For more information, see
“Factory Data Reset” on page140.
12Set Up Your Device
Page 20

Caution: Before shipping your device back to Samsung
or taking it to your nearest Samsung-authorized service
center, you should remove your Google Account before
resetting the device back to factory settings. For more
information, visit: samsung.com/us/support/frp.
Enable Factory Reset Protection
Adding a Google Account to your device automatically
activates the Factory Reset Protection (FRP) security
feature.
Disable Factory Reset Protection
To disable FRP, remove all Google Accounts from the
device.
1. From a Home screen, tap Apps > Settings.
2. Tap Accounts > Google.
If you have more than one Google Account set
•
up on your device, tap the Google Account you
want to remove.
3. Tap Moreoptions > Remove account.
Samsung Account
Create a Samsung account for access to Samsung
content and apps on your device. When you turn on
your device for the first time, set up your existing
Samsung account or create a new Samsung account.
– or –
To create a new Samsung account or set up your
Samsung account on your device at any time, use
Accounts settings.
1. From a Home screen, tap Apps > Settings.
2. Tap Accounts.
3. Tap Addaccount > Samsungaccount.
13Set Up Your Device
Page 21

Add an Email Account
Use the Email app to view and manage all your email
accounts in oneapp.
When you turn on your device for the first time, set
up your existing email account or create a new email
account.
– or –
To create a new email account or set up your email
account on your device at any time, use Accounts
settings.
1. From a Home screen, tap Apps > Settings.
2. Tap Accounts.
3. Tap Addaccount > Email.
Transfer Data from Your Old Device
Easily transfer your photos, videos, music, apps and
more with Samsung Smart Switch™.
Get started today at samsungsmartswitch.com.
Set Up Your Voicemail
You can access your voicemail from a Home screen.
1. From the Home screen, tap Phone, and touch
and hold the 1 key.
2. Follow the tutorial to create a password, record a
greeting, and record your name.
For more information on voicemail, see
“Voicemail” on page89.
14Set Up Your Device
Page 22

Learn About Your Device
Learn some of the key features of your
mobile device, including the screens and
icons, as well as how to navigate the device
and enter text using the keyboard.
Page 23
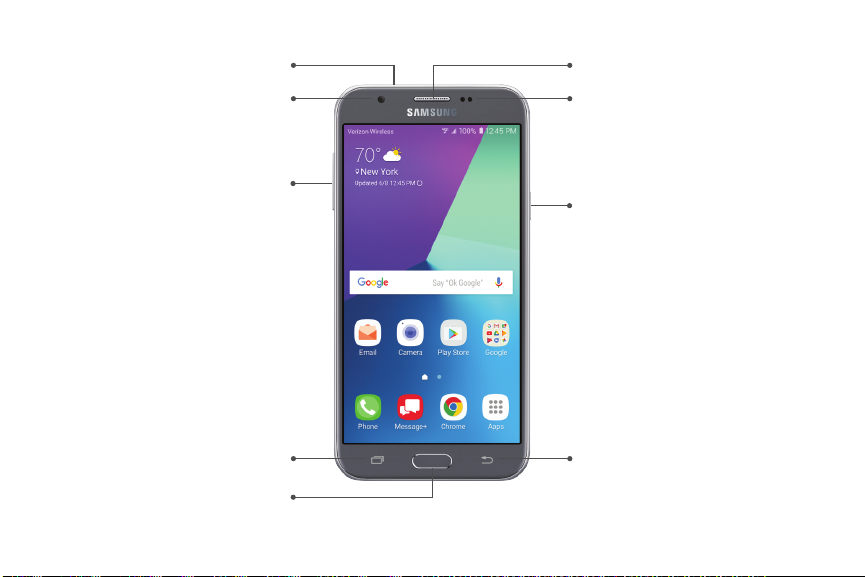
Front View
Microphone
Front camera
Volume keys
Earpiece
Proximity sensors
Power key
Recent apps
Home key
Devices and software are constantly evolving — the illustrations you see here are for reference only.
16Learn About Your Device
Back
Page 24

Proximity sensor
•
Turns off the screen and disables touch
-
functionality when the device is in close
proximity to the human body.
Turns the screen back on and enables touch
-
functionality when the device is outside a
specific range from the human body.
Power key
•
Briefly press to turn on or off the screen.
-
Press and hold to select a power control option.
-
Home key
•
Press and hold to launch Google.
-
Press twice to launch the camera.
-
•
17Learn About Your Device
Volume keys
Adjust the volume for ringtones, calls, or
-
notifications.
In the camera app, press a volume key to take
-
aphoto.
Page 25
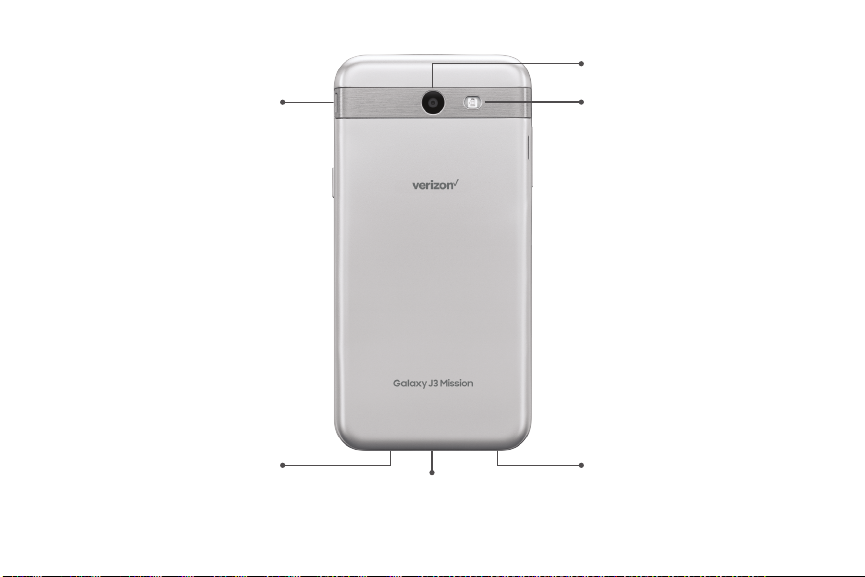
Back View
Rear camera
Speaker
Headset jack
USB charger/Accessory port
Devices and software are constantly evolving — the illustrations you see here are for reference only.
18Learn About Your Device
Flash
Microphone
Page 26

Home Screen
Status bar
App shortcuts
Home screen indicator
Devices and software are constantly evolving — the illustrations you see here are for reference only.
19Learn About Your Device
Page 27
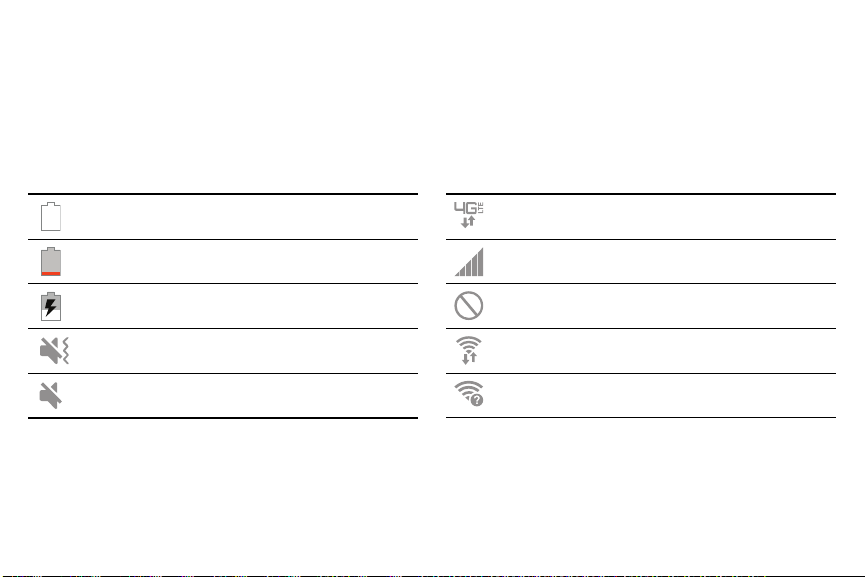
Status Bar
The Status bar at the top of the Home screen provides
device information (such as network status, battery
charge, and time) on the right side and notification
alerts on the left.
Status Icons
Battery full
Battery low
Battery charging
Vibrate mode
Mute mode
4G LTE™ active
Signal strength
Network not available
Wi-Fi active
Wi-Fi available
20Learn About Your Device
Page 28
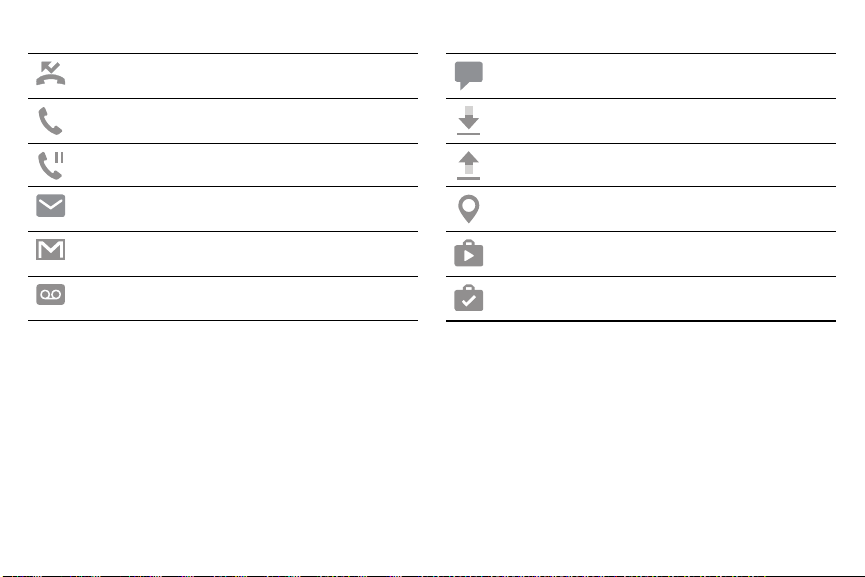
Notification Icons
Missed call
Call in progress
Call on hold
New email
New Gmail
New voicemail
New message
File download in progress
File upload in progress
GPS active
App updates available
App updates complete
21Learn About Your Device
Page 29
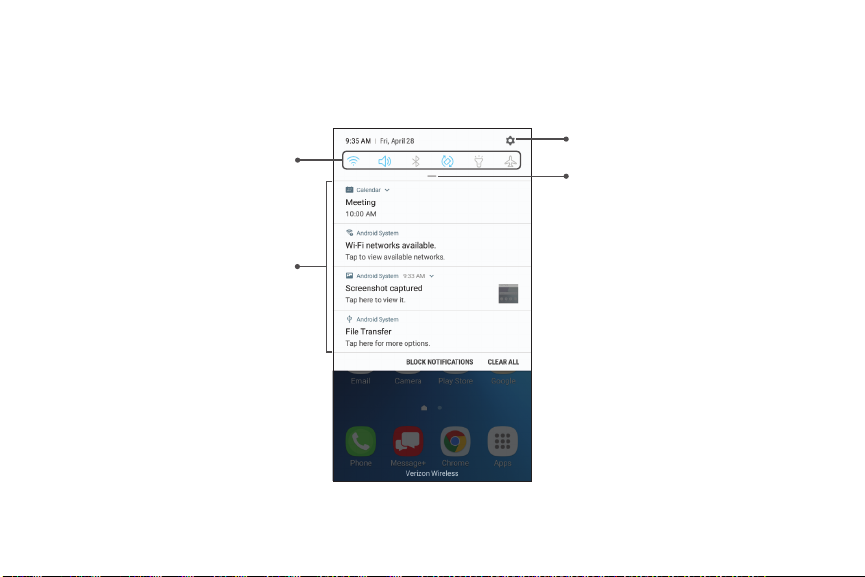
Notification Panel
Quick settings
Notification cards
Devices and software are constantly evolving — the illustrations you see here are for reference only.
Settings
View all
22Learn About Your Device
Page 30

View the Notification Panel
You can access the Notification panel from any
Homescreen.
1. Drag the Status bar down to display the
Notificationpanel.
2. Swipe down the list to see notification details.
To open an item, tap it.
•
To clear a single notification, drag the
•
notification left or right.
To clear all notifications, tap Clear all.
•
3. Drag upward from the bottom of the screen or tap
Back to close the Notification panel.
Quick Settings
In addition to notifications, the Notification panel also
provides quick access to device functions such as Wi-Fi,
allowing you to quickly turn them on or off.
To view additional Quick settings and customize the
Quick settings that display:
1. Drag the Status bar down to display the
Notificationpanel.
2. Drag View all downward.
Tap a setting to turn it on or off.
•
Tap More options to edit Quick settings
•
ortochange the button layout.
3. Drag View all upward to close the
Quicksettings.
23Learn About Your Device
Page 31

Customize Your Home Screen
Screens
Your device comes with multiple Home screens to
hold app shortcuts and widgets. You can add, remove,
change the order of screens, as well as choose a
different main Home screen.
1. From a Home screen, pinch the screen.
2. Use these options to manage screens:
Remove a screen: Touch and hold a screen, and
•
then drag it to Remove.
Set a screen as the main Home screen: Tap
•
Main Home screen at the top of a screen.
This screen is displayed when you press the
Homekey.
Change the order of screens: Touch and hold a
•
screen, and then drag it to a newposition.
Add a screen: Swipe to the end of the screens,
•
and then tap Add.
Wallpapers and Themes
Set visual themes for all system screens and icons
on your device. Change the look of the Home and
Lockscreens with wallpaper. You can display a favorite
picture or choose from preloaded wallpapers.
1. From a Home screen, pinch the screen.
2. Tap Wallpapers and themes to customize.
For more information, see “Wallpapers and Themes” on
page131.
Widgets
Widgets are simple application extensions that
run on a Home screen. There are many kinds of
widgets, including links to a specific contact, Internet
bookmarks, Gmail and email accounts, and many
others.
24Learn About Your Device
Page 32

To add a widget to a Home screen:
1. From a Home screen, pinch the screen.
2. Tap Widgets.
3. Touch and hold a widget, drag it to a Homescreen,
and release it.
To remove a widget:
1. From a Home screen, touch and hold a widget to
releaseit.
2. Drag the widget to Remove and releaseit.
Removing a widget does not delete the
•
widget, itjust removes the widget from the
Homescreen.
Screen Grid
Change the number of icons that can be placed on each
Home screen by changing the Screen grid dimensions.
1. From a Home screen, pinch the screen.
2. Tap Screen grid.
3. Tap a dimension option (4 x 4, 4 x 5, or 5 x 5) to
preview its appearance. The numbers indicate how
many icons can be placed horizontally by how many
icons can be placed vertically.
4. Tap Apply to apply the selected dimensions.
25Learn About Your Device
Page 33

App Shortcuts
You can use app shortcuts to launch an app from any
Home screen.
To add a shortcut:
1. From a Home screen, tap Apps.
2. Touch and hold an app shortcut, drag it to a
Homescreen, and then release it.
To remove a shortcut:
1. Touch and hold an app shortcut to releaseit.
2. Drag the app shortcut to Remove shortcut and
releaseit.
Removing a shortcut does not delete the
•
app, it just removes the shortcut from the
Homescreen.
To move a shortcut from one Home screen to another:
1. Touch and hold an app shortcut to releaseit.
2. Drag the app shortcut to Move apps and
releaseit.
3. Swipe to a new Home screen.
4. Tap the shortcut to place it in the next available
location, or drag it to a specific location and
releaseit.
26Learn About Your Device
Page 34

Folders
Place folders on a Home screen to organize items.
Create a Folder
You can create an app folder on a Home screen.
1. From a Home screen, touch and hold an app
shortcut and drag it on top of another app shortcut
until it is highlighted.
2. Release the app shortcut to create the folder.
Enter folder name: Enter a name for the folder.
•
Palette: Change the color.
•
Add: Place more apps in the folder. Tapapps
•
to select them, and then tapAdd.
3. Tap anywhere outside of the folder to close it.
To add more apps, touch and hold an app
•
shortcut and drag it to the folder.
Remove a Folder from a Home Screen
You can remove a folder that you added to a
Homescreen.
1. Touch and hold the folder until it detaches.
2. Drag the folder to Delete and release it.
Confirmwhen prompted.
27Learn About Your Device
Page 35

Navigation
Learn the basics for how to navigate through your
device.
Double -Tap
Lightly tap items twice to select or launch them.
Double-tap an image to zoom in or out.
•
Touchscreen Navigation
Please note that a touch screen responds best to a light
touch from the pad of your finger or a capacitive stylus.
Using excessive force or a metallic object on the touch
screen may damage the tempered glass surface and
void the warranty.
Tap
Lightly tap items to select or launch them.
Tap the keyboard to enter characters ortext.
•
Tap an item to select it.
•
Tap an app shortcut to launch the application.
•
Touch and Hold
Touch and hold items on the screen to activate them.
Touch and hold a widget on a Home screen to
•
moveit.
Touch and hold a field to display a pop-up menu of
•
options.
Swipe
Lightly drag your finger vertically or horizontally across
the screen.
Swipe the screen to unlock the device.
•
Swipe the screen to scroll through the Homescreens
•
or menu options.
28Learn About Your Device
Page 36

Drag
Touch and hold an item, and then move it to a new
location.
Drag an app shortcut to add it to a Home screen.
•
Drag a widget to place it in a new location on a
•
Homescreen.
Pinch and Spread
Pinch the screen using your thumb and forefinger or
spread by moving your fingers apart.
Pinch the screen to zoom out while viewing a picture
•
or a webpage.
Spread your fingers on the screen to zoom in while
•
viewing a picture or a web page.
Common Options
The device uses basic command options to perform
common actions.
Moreoptions: Tap to view more menu options for
•
a screen. This often allows you to select items to
delete or share.
Delete: Tap to select items to delete.
•
Share: Tap to select items to share, and then choose
•
a sharing method.
Edit: Tap to customize the screen.
•
On/Off: Tap to turn the option on ( ) or
•
off ( ).
Checkbox: Tap to enable or select. When
•
enabled, a checkmark is displayed. You can often tap
a checkbox at the top of the screen to selectall.
Menu: Tap to view available options for thefield.
•
29Learn About Your Device
Page 37

Entering Text
Text can be entered using a keyboard or by speaking.
Special Keys
Symbol: Tap to insert symbols.
Use the SamsungKeyboard
Enter text using a QWERTY keyboard.
Predictive text
Options
Touch and hold Options for the following:
Voice input: Enter text using Google Voice™
typing.
Clipboard: Access the clipboard.
Emoticon: Insert an emoticon at the
cursorposition.
One-handed keyboard: Change the keyboard
layout to accommodate use with one hand.
Keyboard settings: Access keyboard
settings.
30Learn About Your Device
Page 38

Configure the Samsung Keyboard
To customize the Samsung keyboard:
1. From a Home screen, tap Apps > Settings.
2. Tap Language and input > On-screen keyboard >
Samsung keyboard for options.
Languages and types: Set the keyboard type
•
and choose which languages are available on
the keyboard. To switch between languages,
slide the Space bar sideways.
Predictive text: Predictive text suggests
•
words that match your text entries, and can
automatically complete common words.
Predictive text can learn your personal writing
style from your contacts, messages, Gmail, and
social networking sites — improving its accuracy
of predicting your text entries.
Additional keyboard settings provide assistance
•
with capitalization, punctuation, and much
more.
Use Google Voice Typing
Instead of typing, enter text by speaking.
Settings
To enable Google voice typing:
1. Tap Voice input on the Samsung keyboard.
You may need to touch and hold Options (leftof
•
the Space bar) to find it.
2. Speak your text.
31Learn About Your Device
Delete text
Page 39

Configure Google Voice Typing
To customize Google voice typing:
1. From a Home screen, tap Apps > Settings.
2. Tap Language andinput > On-screen keyboard >
Google voice typing for options.
Languages: Select languages for Google voice
•
typing.
“Ok Google” detection: Launch a Google search
•
whenever you say “OK Google”.
Hands-free: Allow requests with the device
•
locked.
Speech output: Select options for spoken
•
feedback.
Offline speech recognition: Download and
•
install speech recognition engines, allowing you
to use voice input while not connected to the
network.
Block offensive words: Hide search results that
•
contain offensive words.
Bluetooth headset: Use audio input from a
•
Bluetooth® headset (not included) if one is
connected.
32Learn About Your Device
Page 40

Multi Window
Multitask by using multiple applications at the
sametime.
Devices and software are constantly evolving — the illustrations you see here are for reference only.
Window Controls
Tap Windowcontrols in the middle of the
windowborder for options.
Switch windows: Switch locations between
Multiwindow™ apps.
Close app: Close the selected app.
33Learn About Your Device
Page 41

Enable Multi Window
1. From a Home screen, tap Apps > Settings.
2. Tap Advanced features > Multi window.
3. Tap Split screen view action to enable this feature.
Use MultiWindow
Apps that support Multiwindow display together
on a split screen. You can switch between the apps
and adjust the size of their display on the screen.
Multiwindow is not available for all apps.
1. From any screen, touch and hold Recent apps.
2. Tap two apps that support Multi window to open
them in split screen view.
– or –
If you are currently using an app that supports
Multiwindow, tap another app to add it in split
screen view.
You can also launch recently used apps directly into
Multi window view. Only applications that support
Multi window have the Multi window icon.
1. Tap Recent apps.
Recently used apps that support Multiwindow
•
have a Multiwindow icon in their title bar.
2. Tap Multiwindow in the title bar to launch an
application in split screen view.
Other recently used apps that support
•
Multiwindow display below the launched app.
3. Tap an app icon to add it to the split screenview.
34Learn About Your Device
Page 42

Emergency Mode
Emergency mode conserves your device’s remaining
power when you areinan emergency situation.
Emergency mode saves battery power by:
Restricting application usage to only essential
•
applications and those you select.
Turning off Mobile data when the screen is off.
•
Turning off connectivity features such as Wi-Fi and
•
Bluetooth.
Activate Emergency Mode
To activate Emergency mode:
1. Press and hold the Power key.
2. Tap Emergency mode.
When accessing for the first time, read the
•
Termsand conditions. If you accept them, tap
the Checkbox, and then tap Agree.
3. Tap Turn on.
Turn Off Emergency Mode
After Emergency mode is turned off, the Location
settings may stay the same as they were in Emergency
mode.
► From the Emergency mode Home screen, tap
Moreoptions > Turn off Emergency mode.
35Learn About Your Device
Page 43

Use Emergency Mode Features
While in Emergency mode, your device conserves
power. The following apps and features are available on
the Home screen:
Flashlight: Use the device’s flash as a steady source
•
of light.
Emergency alarm: Sound an audible siren.
•
Message my location: Send your location
•
information to your emergency contacts.
Phone: Launch the call screen.
•
Add: Add other available apps.
•
Chrome: Browse the internet with
-
GoogleChrome™.
Maps: Launch Google Maps™.
-
Battery charge: Display estimated battery charge
•
remaining.
Estimated usage time remaining: Display
•
estimated standby time that can be reached based
on current battery charge and usage.
Emergency call: Dial the emergency telephone
•
number (for example, 911). This kind of call can be
made even without activated cellular service.
Moreoptions:
•
Turn off Emergency mode: Disable Emergency
-
mode and return to standard mode.
Remove: Choose apps to remove from the
-
screen.
Manage emergency contacts: Manage your
-
medical profile and ICE (In Case of Emergency)
group contacts.
Settings: Configure the available settings.
-
Onlya limited number of settings are enabled in
Emergency mode.
36Learn About Your Device
Page 44

Apps
Learn how to change the way
apps are displayed, organize
apps into folders, and uninstall
or disable apps.
Page 45

Using Apps
The Apps list displays all preloaded and downloaded
apps. You can uninstall, disable, or hide apps from view.
Access Apps
You can access and launch all applications from the
Apps list.
1. From a Home screen, tap Apps.
2. Tap an app’s shortcut to launch it.
To return to the main Home screen, press the
•
Home key.
Download and Install New Apps
Find new apps to download and install on your device.
Play Store: Download new apps from the
•
GooglePlay store. Visit play.google.com/store/apps
tolearnmore.
Uninstall Apps
You can uninstall or disable apps you download and
install.
Preloaded apps cannot be uninstalled.
•
Apps that are disabled are turned off and hidden
•
from view.
38Apps
Page 46

To uninstall or disable an app:
1. From a Home screen, tap Apps.
2. Tap Moreoptions > Edit. Apps that
can be uninstalled or disabled display
Uninstall/disable on their shortcut.
3. Tap Uninstall/disable and follow the prompts
to either uninstall or disable the app.
4. Tap Done when finished.
Organize Apps
Arrange the Order
App shortcuts can be listed alphabetically or in your
own custom order.
To change the order apps are listed:
1. From a Home screen, tap Apps >
Moreoptions> Edit.
2. Touch and hold an app shortcut or folder, and then
drag it to a new location.
3. Tap Done when finished.
To alphabetize your apps:
1. From a Home screen, tap Apps >
Moreoptions> Sort.
2. Tap Alphabetical order.
39Apps
Page 47

Use Folders
You can organize App shortcuts in a folder on an Apps
list screen.
1. From a Home screen, tap Apps >
Moreoptions> Edit.
2. Touch and hold an app shortcut, and then drag it on
top of another app shortcut until a highlighted box
is displayed.
3. Release the app shortcut to create the folder.
Enter folder name: Name the folder.
•
Palette: Change the folder color.
•
Add: Place more apps in the folder. Tapapps
•
to select them, and then tapAdd.
4. Tap anywhere outside of the folder to close it.
To add more apps, touch and hold an app
•
shortcut and drag it to the folder.
5. Tap Done when finished.
To launch apps in a folder:
► Tap a folder, and then tap an app shortcut to
launchit.
To delete a folder:
1. From a Home screen, tap Apps >
Moreoptions> Edit.
2. Tap the folder to delete, and then tap
Removefolder. Confirm when prompted.
3. Tap Done when finished.
To add a folder to a Home screen:
1. From a Home screen, tap Apps.
2. Touch and hold a folder, drag it to a Homescreen,
and then release it.
40Apps
Page 48

Applications Settings
You can download and install new applications on your
device. UseApplication manager settings to manage
your downloaded and preloaded applications.
Warning: Because this device can be configured with
system software not provided by or supported by
Google or any other company, you operate this software
at your own risk.
1. From a Home screen, tap Apps > Settings.
2. Tap Apps > App manager.
3. Tap Menu at the top left of the screen, and then
choose All apps, Enabled, or Disabled.
4. Tap Moreoptions for the following options:
Sort by size/name: Sort the apps by size
•
orname.
Memory: View memory usage over various time
•
frames.
Show/Hide system apps: Show or hide system
•
(background) apps.
Special access: Optimize battery usage for
•
individual apps, enable device administrator
apps, choose apps that can appear over other
running apps, select which apps can change
system settings, and more.
Reset app preferences: Reset options that have
•
been changed. Existing app data is not deleted.
5. Tap an application to view and update information
about the application. The following options may be
displayed:
Uninstall/Disable: Uninstall or disable the
•
application. Preloaded apps can only be
disabled.
Force stop: Stop an app that is misbehaving.
•
Restart your device if stopping an app, process,
or service causes your deviceto stop working
correctly.
41Apps
Page 49

Mobile data: View mobile data usage.
•
Battery: View battery usage since the last full
•
charge.
Storage: Manage the app’s storage usage.
•
Memory: View memory usage.
•
Notifications: Configure notifications from
•
theapp.
Permissions: View permissions granted to the
•
app for access to your device’s information.
Set as default: Set the app as a default for a
•
certain category of apps.
42Apps
Page 50

Calculator
The Calculator provides basic and advanced arithmetic
functions.
Basic Operation
You can use your calculator to perform basic
operations.
1. From a Home screen, tap Apps > Calculator.
2. Enter the first number using the numeric keys.
3. Tap the appropriate arithmetic function key, and
enter the next number.
4. Tap Equals to view the result.
5. Tap Clear to clear the results.
View Calculator History
You can view and clear your Calculator history.
1. From a Home screen, tap Apps > Calculator.
2. Tap History.
To return to the calculator, tap Keypad.
•
To clear the calculator history, tap Clear history.
•
Scientific Calculator
The Calculator app also provides advanced arithmetic
functions.
To use the Scientific calculator:
1. From a Home screen, tap Apps > Calculator.
2. Turn the device to landscape view.
If Auto rotate is not enabled, tap
•
Rotatescreen.
43Apps
Page 51

Calendar
Manage your events and tasks.
Add Calendars
Add existing calendars to the Calendar app.
1. From a Home screen, tap Apps > Calendar.
2. Tap Moreoptions > Manage calendars.
3. Tap Add account, and select an account type.
4. Enter your account information and follow the
prompts.
Calendar View
To choose a calendar view:
1. From a Home screen, tap Apps > Calendar.
2. Tap View, and then tap an option:
Year: Display all twelve months of this year.
•
Swipe across the screen to display another year.
Month: Display the current month. Swipe across
•
the screen to display another month. Events and
tasks are also displayed.
Week: Display the current week. Swipe across
•
the screen to display another week.
Day: Display today’s schedule by hour. Swipe
•
across the screen to display another day.
Tasks: Display all tasks.
•
3. Tap Today to return to the current date.
44Apps
Page 52

Create an Event
You can use your Calendar to create events.
1. From a Home screen, tap Apps > Calendar.
2. Tap Add to add an event.
3. Enter details for the event, and then tapSave.
Delete an Event
You can delete events you create from your Calendar.
1. From a Home screen, tap Apps > Calendar.
2. Tap an event to view it, and then tap again to editit.
3. Tap Delete. Confirm when prompted.
Share an Event
You can share events you create from your Calendar.
1. From a Home screen, tap Apps > Calendar.
2. Tap an event to view it, and then tap again to editit.
3. Tap Share, choose a sharing method, and follow the
prompts.
Create a Task
You can use your Calendar to create tasks. Tasks are
items you add to the calendar to be accomplished on
a certain day. A task appears as a checklist item and is
removed once you mark the task as complete.
1. From a Home screen, tap Apps > Calendar.
2. Tap View > Tasks .
3. Tap Add to add a task.
4. Enter details for the task, and then tap Save.
45Apps
Page 53

Delete a Task
You can delete tasks you create from your Calendar.
1. From a Home screen, tap Apps > Calendar.
2. Tap a day on the calendar to view the tasks for the
day, or tap View > Tasks .
3. Tap the Checkbox by the task to mark it as
complete and remove it from the calendar.
To delete an individual task, tap the task to open
•
it, and then tap Delete. Confirm when prompted.
To delete all tasks, tap Delete all.
•
Calendar Settings
These settings allow you to modify settings associated
with using the Calendar.
1. From a Home screen, tap Apps > Calendar.
2. Tap Moreoptions > Settings.
3. Tap an option and follow the prompts.
46Apps
Page 54

Camera and Video
Settings
Flash
Switch cameras
Beauty
Gallery
Take a picture
Record video
Modes, camera, or effects
Devices and software are constantly evolving — the illustrations you see here are for reference only.
47Apps
Page 55

Camera Shortcut
Open the Camera by quickly pressing the Home key
twice.
1. From a Home screen, tap Apps > Settings.
2. Tap Advanced features, and tap On/Off next to
Quick launch camera to enable.
Take Pictures
Take pictures with your device’s front or rear camera.
If you have an SD card installed, pictures and videos are
stored to the SD card. If no card is installed, pictures
and videos are saved to your phone’s memory.
1. From a Home screen, tap Apps > Camera.
2. Use the display screen as a viewfinder by aiming
the camera at the subject. While composing your
picture, use the available options or these gestures:
To focus the shot, tap the screen. When you
•
tap the screen, a brightness scale is displayed.
Slide the light bulb up or down to adjust the
brightness.
To add an effects filter, swipe to the left and tap
•
a preview filter to apply it to the screen.
To add a shooting mode, swipe to the right and
•
select a mode.
To quickly switch between the front and rear
•
cameras, swipe the screen up or down.
To add a camera setting, tap a Quick settings
•
icon or Settings.
3. Tap Take a picture to take the picture.
48Apps
Page 56

Record Videos
Record high-quality videos using your phone.
1. From a Home screen, tap Apps > Camera.
2. Aim the camera at your subject, and then tap
Record. The following actions are available:
Tap Capture to take a picture while
•
recording.
Tap Pause to pause recording.
•
Tap Resume to resume recording.
•
Tap Stop to stop recording.
•
Configure Shooting Mode
Several visual effects are available. Some modes are
not available when taking self-portraits.
1. From a Home screen, tap Apps > Camera.
2. Swipe to the right for the Mode options. Each
section indicates which camera (front or rear) the
modes are available for.
Rear camera
Auto: Allow the camera to evaluate the
•
surroundings and determine the ideal mode for
the picture.
Pro: Manually adjust the ISO sensitivity,
•
exposure value, white balance, and color tone
while taking pictures.
Panorama: Create a linear image by taking
•
pictures in either a horizontal or vertical
direction.
Continuous shot: Touch and hold the Camera
•
button to take pictures continuously.
Sports: Take clearer pictures of fast moving
•
subjects.
49Apps
Page 57

Front camera
Selfie: Take selfie shots and apply various
•
effects, such as an airbrushed effect.
Common
Sound & shot: Enrich your pictures by adding a
•
few seconds of background sound.
Moreoptions: See more options for the
•
camera modes.
Camera Settings
You can adjust your camera’s settings using the
icons on the main camera screen and the full camera
settings menu.
1. From a Home screen, tap Apps > Camera.
2. Tap Settings to configure settings for the
Camera. Available options vary depending on the
camera or recording mode used.
Rear camera
•
•
Front camera
•
•
•
50Apps
Picture size: Select a resolution. Use higher
resolution for higher quality. Higher resolution
pictures take up more memory.
Video size: Select a resolution. Use higher
resolution for higher quality. Higher resolution
videos take up more memory.
Picture size: Select a resolution. Use higher
resolution for higher quality. Higher resolution
pictures take up more memory.
Video size: Select a resolution. Use higher
resolution for higher quality. Higher resolution
videos take up more memory.
Save pictures as previewed: Save the
self-portrait or self-recording as viewed on the
camera screen, not as flipped images.
Page 58

Ways to take pictures:
•
Tap to take pictures: Tap the screen to take
-
selfies.
Gesture control: Detect your palm and
-
automatically take a picture two seconds
later.
Common
Timer: Take time-delayed pictures or videos.
•
Grid lines: Display viewfinder grid lines to help
•
composition when selecting subjects.
Location tags: Attach a GPS location tag to the
•
picture.
Review pictures: Set to show pictures after
•
taking them.
Quick launch: Open camera by pressing the
•
Home key twice in quick succession.
Storage location: Select the memory location
•
for storage. This option only appears if an
optional memory card (not included) is installed.
Volume key function: Use the Volume key
•
asthe camera key, the record key, or for system
volume.
Shutter sound: Enable or disable a shutter
•
sound when pictures are taken.
Reset settings: Reset the camera settings.
•
51Apps
Page 59

Clock
The Clock app offers features for keeping track of time
and setting alarms.
1. From a Home screen, tap Apps > Clock.
2. Tap a tab to use a feature:
Alarm: Set an alarm to ring at a specific time.
•
World clock: View the time of day or night in
•
other parts of the world. World clock displays
time in hundreds of different cities, within all
24time zones around the world.
Stopwatch: Measure intervals of time.
•
Timer: Use a timer to count down to an event
•
based on a preset time length (hours, minutes,
and seconds).
Alarm
Set an alarm to ring at a specific time.
Create an Alarm
Create an alarm event. You can set one-time or
recurring alarms, and choose options for how to be
notified.
1. From a Home screen, tap Apps > Clock.
2. Tap Add alarm.
3. Tap the following items to configure an alarm:
Date: Choose the day for this alarm.
•
Time: Set a time for the alarm.
•
Repeat: Choose when to repeat the alarm.
•
Alarm name: Enter a name for the alarm.
•
Snooze: Allow snoozing. Set interval and repeat
•
values for the alarm while snoozing.
52Apps
Page 60

Alarm tone and volume: Choose a sound to
•
play for the alarm, and drag the slider to set the
volume of the alarm.
Vibration: Choose whether the alarm uses
•
vibration alert.
Read time aloud: Read the time aloud when the
•
alarm rings.
4. Tap Save to save the alarm.
Delete an Alarm
You can delete an alarm that you created.
1. From a Home screen, tap Apps > Clock.
2. Find the alarm in the alarm list (under Alarm), and
then touch and hold it to select it.
3. Tap Delete.
World Clock
The World clock lets you keep track of the current time
in multiple cities around the globe.
To list a city on the main World clock screen:
1. From a Home screen, tap Apps > Clock.
2. Tap World clock.
3. Tap Add city.
4. Tap Search to find a specific city.
5. Tap the city, and then tap Add to add it to the
Worldclock list.
To remove a city from the main World clock screen:
1. From a Home screen, tap Apps > Clock.
2. Tap World clock.
3. Find the city to remove, and then touch and hold it
to select it.
4. Tap Delete.
53Apps
Page 61

Stopwatch
The Stopwatch lets you time events down to a
hundredth of a second.
1. From a Home screen, tap Apps > Clock.
2. Tap Stopwatch and use the following options:
Start: Begin timing.
•
Stop: Stop timing.
•
Lap: Keep track of lap times.
•
Resume: Continue timing after stopping the
•
clock.
Reset: Reset the Stopwatch to zero.
•
Timer
The Timer provides a countdown timer for up to
99hours, 59 minutes, and 59 seconds.
1. From a Home screen, tap Apps > Clock.
2. Tap Timer.
3. Use the keypad and tap Hours, Minutes, and
Seconds to set the length of the Timer. The
following options are available:
Start: Begin the Timer.
•
Pause: Pause the Timer.
•
Resume: Resume the Timer.
•
Cancel: Stop the Timer.
•
54Apps
Page 62

Contacts
Store and manage your contacts with the Contacts
app, which can be synchronized with a variety of your
existing personal accounts.
For more information on connecting with and
managing your accounts through your device, see
"Add an Account" on page149.
Note: The Contacts app is different from the Contacts
tab in the Phone app. Although both list the contacts
in your phone and accounts, the available options and
functions are different.
Add a Contact
Use the following procedure to add a new contact.
1. From a Home screen, tap Apps > Contacts.
2. Tap Create contact, and then tap contact fields
to enter information.
•
•
•
•
3. Tap Save.
55Apps
Choose a storage account for the contact. You
can store the contact on the device or sync it
with an account.
Tap Contact photo to assign a picture to the
new contact.
Enter a name and other contact information.
Tap Add field to enter additional entries.
-
Tap Remove field to remove an entry.
-
Tap View more for additional fields.
-
Tap the label to the right of an entry to
-
choose a label for the field (for example,
Home or Work).
Tap Scan business card to import contact
information from a business card through the
device’s camera.
Page 63

Edit a Contact
When editing a contact, you can tap a field and change
or delete the information, or you can add more fields to
the contact’s list of information.
1. From a Home screen, tap Apps > Contacts.
2. Tap the contact to select it, and then tap
Details> Edit.
3. Tap any of the fields to add, change, or delete
information.
4. Tap Save.
Share, Import, or Export Contacts
When you share a contact, the contact’s information is
sent as a vCard file (VCF) or as a text file. You can share
a vCard using Bluetooth or Wi-Fi Direct, attach it to a
message, or save it to a storage location.
Share a Contact
1. From a Home screen, tap Apps > Contacts.
2. Tap the contact to select it, and then tap
Details> Share.
3. Choose whether to send the contact as a
vCardfile(VCF) or as a Text.
4. Choose a sharing method and follow the prompts.
Import Contacts
Your phone can import contacts from an installed
memory card (not included).
1. From a Home screen, tap Apps > Contacts.
2. Tap Moreoptions > Settings >
Import/Export contacts.
3. Tap Import and follow the prompts.
56Apps
Page 64

Export Contacts
If you are saving contacts to an account that does
not automatically back them up to the Cloud, you can
manually back them up to an optional installed SD card
for re-import if needed.
1. From a Home screen, tap Apps > Contacts.
2. Tap Moreoptions > Settings >
Import/Export contacts.
3. Tap Export and follow the prompts.
Link or Unlink Contacts
When you have contacts from various accounts, you
may have multiple similar entries for a single contact.
Contacts lets you link multiple entries into a single
contact.
To link contacts:
1. From a Home screen, tap Apps > Contacts.
2. Tap the contact to select it, and then tap
Details.
3. Tap Moreoptions > Link contacts.
4. Tap contacts to choose them.
5. Tap Link.
To unlink contacts:
1. From a Home screen, tap Apps > Contacts.
2. Tap the contact to select it, and then tap
Details.
3. Tap Moreoptions > Manage linked contacts.
4. Tap Disconnect beside contacts to unlink them
from the main contact.
57Apps
Page 65

Mark Contacts as Favorites
When you mark contacts as favorites, they are easily
accessible from other apps.
To mark contacts as Favorites:
1. From a Home screen, tap Apps > Contacts.
2. Tap the contact to select it, and then tap
Details.
3. Tap Addto Favorites (thestar brightens ).
To remove contacts from Favorites:
1. From a Home screen, tap Apps > Contacts.
2. Tap the contact to select it, and then tap
Details.
3. Tap Remove from Favorites (the star dims ).
Delete Contacts
You can delete a single contact or choose multiple
contacts to delete.
1. From a Home screen, tap Apps > Contacts.
2. Touch and hold a contact to select it.
You can also tap other contacts or tap the All
•
checkbox at the top of the screen to select all
contacts.
3. Tap Delete, and then confirm when prompted.
58Apps
Page 66

Groups
You can use groups to organize your contacts. Your
device comes with preloaded groups, and you can
create your own. You might create a group for your
family, for coworkers, or a team. Groups make it easy
to find contacts, and you can send messages to the
members of a group.
Create a Group
You can create your own contact groups.
1. From a Home screen, tap Apps > Contacts.
2. Tap Moreoptions > Groups.
3. Tap Create, and then tap fields to enter information
about the group:
Group name: Enter a name for the new group.
•
Group ringtone: Customize the sounds for the
•
group.
Add member: Select contacts to add to the new
•
group, and then tap Done.
4. Tap Save.
Add to or Remove Contacts from a Group
You can add more contacts to a group, or remove
contacts.
1. From a Home screen, tap Apps > Contacts.
2. Tap Moreoptions > Groups, and then tap a group.
3. Tap Edit.
To add a contact, tap Add member, and then tap
•
the contacts you want to add. When finished,
tapDone.
To remove a contact, tap Delete next to a
•
contact.
4. Tap Save.
59Apps
Page 67

Edit a Group
You can rename a contact group.
1. From a Home screen, tap Apps > Contacts.
2. Tap Moreoptions > Groups, and then tap a group.
3. Tap Edit and enter a new name.
4. Tap Save.
Send a Message to a Group
You can send a text message to members of a group.
1. From a Home screen, tap Apps > Contacts.
2. Tap Moreoptions > Groups, and then tap a group.
3. Tap Moreoptions > Send message.
Send an Email to a Group
You can send an email to members of a group.
1. From a Home screen, tap Apps > Contacts.
2. Tap Moreoptions > Groups, and then tap a group.
3. Tap Moreoptions > Send email.
4. Tap contacts to select them, or tap the All checkbox
at the top of the screen to select all, and then
tapDone.
Only group members that have an email address
•
in their records are displayed.
5. Choose an email account and follow theprompts.
60Apps
Page 68

Delete a Group
Preset groups cannot be deleted.
1. From a Home screen, tap Apps > Contacts.
2. Tap Moreoptions > Groups, and then tap the
group to delete.
3. Tap Moreoptions > Delete.
4. Tap Group only to only delete the group or tap
Group and members to delete the group and the
contacts in the groups.
Contacts Settings
These settings allow you to modify settings associated
with using the Contacts app.
1. From a Home screen, tap Apps > Contacts.
2. Tap Moreoptions > Settings.
3. Tap an option and follow the prompts.
61Apps
Page 69

Use the Email app to view and manage all your email
accounts in one app. To add an email account, see
"Add an Email Account" on page14.
To access Email:
► From a Home screen, tap Apps > Email.
Create and Send an Email
This section describes how to create and send an email
using the Email app.
1. From a Home screen, tap Apps > Email.
2. Tap Composenewemail.
3. Tap the To field to manually add an email address
or tap Add from Contacts to select a recipient
from Contacts, Groups, or Recents.
If manually entering recipients, enter additional
•
recipients by separating each entry with a
semicolon (;). More recipients can be added at
any time before the message is sent.
If adding a recipient from your Contacts, tap
•
the contact to place a checkmark, and then
tapDone. The contact is displayed in the
recipients field.
Tap Show additional fields to add Cc and
•
Bcc fields.
4. Tap the Subject and Message fields to enter text.
Tap Attach to add files, images, audio, and more
•
to your email.
Tap Moreoptions for additional email options.
•
5. Review your message and tap Send.
62Apps
Page 70

Manage the Inbox
There are several tools available from the Inbox screen.
► From a Home screen, tap Apps > Email.
Tap a message to read and reply or forward it.
•
Tap Search to search for key words in your email
•
inbox.
Tap Edit for additional message options like
•
sorting, deleting, sharing and more.
Tap Sort by to customize how messages display.
•
View Multiple Email Accounts
You can view email you receive for multiple accounts
on the Combined inbox screen or you can view email
accounts individually.
1. From a Home screen, tap Apps > Email.
2. Tap Mailbox at the top left of the screen to view
the current account mailbox.
3. Tap the account name to view:
All accounts: View all email in a combined
•
inbox.
[Account Name]: View email for only one email
•
account.
63Apps
Page 71

Remove Email Accounts
To remove an email account:
1. From a Home screen, tap Apps > Email.
2. Tap Mailbox > Settings.
3. Tap the account you want to remove.
4. Tap Remove. Confirm when prompted.
Email Settings
These settings allow you to modify settings associated
with using the Email app.
1. From a Home screen, tap Apps > Email.
2. Tap Mailbox > Settings.
3. Under General, tap an option, and then follow the
prompts.
4. Tap an account to configure specific settings for
only that account.
64Apps
Page 72

Gallery
View, edit, and manage pictures and videos.
View Pictures
Launching Gallery displays available folders. When
another app, such as Email, saves a picture, a Download
folder is automatically created to contain the picture.
Likewise, capturing a screenshot automatically creates
a Screenshots folder.
1. From a Home screen, tap Apps > Gallery.
2. Tap Pictures, Albums, or Stories to choose the way
items are displayed.
3. Tap a picture to view it, or first tap an album or
folder, and then tap a picture.
4. When viewing a picture:
Swipe left or right to view the next or previous
•
picture.
Tap Favorite to mark the picture as a
•
favorite, and then access it from the Favorites
album.
To start a slideshow with pictures and videos
•
in the current folder, tap Moreoptions >
Slideshow.
To set the picture as the photo for a contact,
•
tap Moreoptions > Set as contact picture.
To send the picture to your connected printer,
•
tap Moreoptions > Print.
65Apps
Page 73

Edit Pictures
You can edit pictures stored on your device.
1. From a Home screen, tap Apps > Gallery.
2. Tap a picture to view it.
Edit: View and use the editing tools.
•
Moreoptions > Details: View and edit
•
information about the picture, including the
date created, location, and properties.
Moreoptions > Rotate left or Rotate right:
•
Rotate the picture.
Play Video
You can play videos stored on your device.
1. From a Home screen, tap Apps > Gallery.
2. Tap a folder or category to open it.
3. Tap a video to view it.
4. Tap Play video to play the video.
Edit Video
You can trim segments of a video.
1. From a Home screen, tap Apps > Gallery.
2. Tap a video to view it.
3. Tap Edit and tap an option.
4. Use the sliders at the bottom of the screen to trim
the video. Move the left bracket to the desired
starting point, and then move the right bracket to
the desired ending point.
5. Tap Save to save your new video.
66Apps
Page 74

Share Pictures and Videos
You can share pictures and videos from your Gallery.
1. From a Home screen, tap Apps > Gallery.
2. Tap a folder to open it.
3. In a folder, tap Moreoptions > Share, select
pictures and videos, and then tap Share to send
them to others or share them with social network
services.
– or –
While viewing a single picture or video, tap
Share to send it to others or share it with social
network services.
Direct Share
Share content with specific people directly using the
sharing panel from within any app.
1. From a Home screen, tap Apps > Settings.
2. Tap Advanced features > Direct share, and tap
On/Off to enable.
Once enabled, contacts you have shared with in the
past will appear as an option in the Share window for
each app.
67Apps
Page 75

Delete Pictures and Videos
You can delete pictures and videos stored on your
device.
1. From a Home screen, tap Apps > Gallery.
2. Tap a folder to open it.
3. Tap Moreoptions > Edit.
4. Tap pictures and videos to select them, or tap the
All checkbox at the top of the screen to select all
pictures and videos.
5. Tap Delete, and confirm when prompted.
– or –
When viewing a single picture or video, tap
Delete.
Take a Screenshot
Capture an image of your screen. It will automatically
create a Screenshots album in the Gallery app.
► From any screen, press and hold the Power and
Home keys.
68Apps
Page 76

Google Apps
Enjoy these apps from Google.
Certain apps require a Google Account. Visit google.com
to learn more.
Chrome
Browse the Internet and bring your open tabs,
bookmarks and address bar data from your computer to
your mobile device.
► From a Home screen, tap Apps > Google folder>
Chrome.
Visit support.google.com/chrome to learn more about
Chrome™.
Drive
Open, view, rename, and share your GoogleDocs™ and
files.
► From a Home screen, tap Apps > Google folder>
Drive.
Visit support.google.com/drive to learn more about
GoogleDrive™.
Duo
Make one-to-one video calls.
► From a Home screen, tap Apps > Google folder>
Duo.
Visit support.google.com/duo to learn more about
Google Duo.
69Apps
Page 77

Gmail
Send and receive email with Gmail, Google’s web-based
email service.
► From a Home screen, tap Apps > Google folder>
Gmail.
Visit support.google.com/mail to learn more.
Google
Search not only the Internet, but also the apps and
contents of your device.
► From a Home screen, tap Apps > Google folder >
Google.
Maps
Find your current location and get directions and other
location-based information.
► From a Home screen, tap Apps > Google folder>
Maps.
Visit support.google.com/maps to learn more.
You must enable location services to use Google Maps.
For more information, see"Location" on page113.
Photos
Automatically backs up your photos and videos to your
GoogleAccount.
► From a Home screen, tap Apps > Google folder>
Photos.
Visit support.google.com/photos to learn more about
GooglePhotos™.
70Apps
Page 78

Play Movies & TV
Watch movies and TV shows purchased from Google
Play. You can stream them instantly or download them
for viewing when you are not connected to the Internet.
You can also view videos saved on your device.
► From a Home screen, tap Apps > Google folder >
Play Movies & TV.
Visit play.google.com/store/movies to learnmore.
Play Music
Play music and audio files on your device.
► From a Home screen, tap Apps > Play Music.
Visit support.google.com/music to learn more.
PlayStore
Find new apps, movies and TV shows, music, books,
magazines, and games in Google Play store.
► From a Home screen, tap Apps > Play Store.
Visit support.google.com/play to learn more.
YouTube
View and upload YouTube™ videos right from your
device.
► From a Home screen, tap Apps > Google folder>
YouTube.
Visit support.google.com/youtube to learn more.
71Apps
Page 79

Message+
This section describes how to create and send a
message using the Verizon Messages app.
Create and Send Messages
Use the Verizon Messages app to send and receive
messages with your friends and family.
1. From the Home screen, tap Apps >
Verizonfolder > Message+.
2. Tap Newmessage.
Tap the To: field and then enter a contact name,
•
a mobile phone number, or an email address
using the keyboard. As you enter letters,
possible matches from your accounts and
contacts display on the screen. Touch a match to
add it to the message.
Tap Type a message and enter your message.
•
Tap Attach to attach an item, such as
•
a postcard, picture, video, audio recording,
Glympse location, location, contact card, or
song.
Tap Emoticon to insert emoticons into your
•
message.
Tap Voice to record and insert an audio
•
recording into your message.
3. Review your message and tap Send.
Read Messages
When you receive a message, your phone notifies
you by displaying the New message icon in the
Statusbar.
72Apps
Page 80

To access a new message:
► Drag your finger down from the Status bar to
display the Notification panel, and then tap the
message notification to open the message.
– or –
From the Home screen, tap Apps >
Verizonfolder > Message+, and then tap the
message to openit.
Reply to Messages
Messages you exchange with another person are
displayed as conversations in the Messages app, so you
can see all the messages in one place.
1. From the Home screen, tap Apps >
Verizonfolder > Message+.
2. Tap a conversation to display it.
3. Tap the Type a message field and then type your
reply message.
4. When the message is complete, tap Send.
Delete Messages
1. From the Home screen, tap Apps >
Verizonfolder > Message+.
2. Tap a conversation to display it.
3. Touch and hold the message you want to delete,
and then tap Delete messages on the pop-up
menu. Follow the prompts to confirm the deletion.
73Apps
Page 81

Delete Conversations
You can delete all the messages you’ve exchanged with
another person.
1. From the Home screen, tap Apps >
Verizonfolder > Message+.
2. Touch and hold a conversation you want to delete
and tap Delete Conversation. Follow the prompts
to confirm the deletion.
Note: Locked messages will not be deleted unless you
select Delete locked messages before confirming the
deletion.
Protect a Message from Deletion
You can lock a message so that it will not be deleted
even if you delete the other messages in the
conversation.
1. From the Home screen, tap Apps >
Verizonfolder > Message+.
2. Tap a conversation to display it.
3. Touch and hold the message that you want to lock,
and then tap Lock message on the pop-up menu.
Alock icon displays on the message.
74Apps
Page 82

Messages
Learn how to send and receive different messages
using the Samsung Messages app on your device.
Types of Messages
The Samsung Messages app provides the following
message types:
Text Messages (SMS)
•
Multimedia Messages (MMS)
•
The Short Message Service (SMS) lets you send and
receive text messages to and from other mobile phones
or email addresses. To use this feature, you may need to
subscribe to your service provider’s message service.
The Multimedia Messaging Service (MMS) lets you send
and receive multimedia messages (such as picture,
video, and audio messages) to and from other mobile
phones or email addresses. To use this feature, you may
need to subscribe to your service provider’s multimedia
message service.
Messaging icons are displayed at the top of the
screen and indicate when messages are received and
theirtype.
75Apps
Page 83

Create and Send Messages
This section describes how to create and send a
message using the Messages app.
1. From a Home screen, tap Apps > Messages.
2. Tap Compose.
3. Tap contacts, if desired, and then tap Compose.
Tap the Recipient field to manually enter a
•
recipient. You can also select the recipient based
on Groups or recent calls.
Enter additional recipients by separating each
•
entry with a semicolon (;) and then using the
previous procedure. More recipients can be
added at any time before the message is sent.
4. Tap the Enter message field to enter a message.
Attach: Add images, audio, and more to your
•
message.
Emoticon: Choose an available emoticon
•
from the list and add it into your message at the
cursor location.
5. Review the message and tap Send.
Note: If you exit a message before you send it, the
message is automatically saved as a draft.
76Apps
Page 84

Send SOS Messages
Send a message with your location to designated
contacts when you are in an emergency situation.
View New Messages
When you receive a new message, Newmessage
appears on the Status bar.
To enable SOS messages:
1. From a Home screen, tap Apps > Settings.
2. Tap Privacy and emergency > Send SOS messages.
3. Tap On/Off to turn the feature on and configure the
following options:
Send messages to: Add recipients by creating
•
new contacts or selecting from Contacts.
Attach pictures: Send pictures to your
•
emergency contacts.
Attach audio recording: Send a short audio
•
message to your emergency contacts.
To send an SOS message:
► Press the Power key quickly three times.
To view the message:
► Open the Notification panel and tap the message.
For more information, see "Notification Panel" on
page22.
– or –
From a Home screen, tap Apps > Messages,
and then tap the new message to view it.
To play a multimedia message attachment
•
(audio or video), tap Play.
To scroll through the list of messages, swipe up
•
or down the page.
77Apps
Page 85

Delete Messages
To delete messages, follow these steps:
1. From a Home screen, tap Apps > Messages.
2. Tap Moreoptions > Edit.
3. Tap each message you want to delete or tap the
All checkbox at the top of the screen to select all
messages.
4. Tap Delete and confirm when prompted.
Message Search
You can search through your messages by using the
Message Search feature.
1. From a Home screen, tap Apps > Messages.
2. Tap Search.
3. Enter a word or phrase to search for, and then tap
Search on the keyboard.
Messages Settings
Configure the settings for text messages, multimedia
messages, push messages, and more.
1. From a Home screen, tap Apps > Messages.
2. Tap Moreoptions > Settings.
Emergency Alerts
This device is designed to receive wireless emergency
alerts from the Commercial Mobile Alerting System
(CMAS), which may also be known as the Personal
Localized Alerting Network (PLAN). For more
information, contact your wireless provider.
Emergency alerts allows customers to receive
geographically-targeted messages. Alert messages
notify customers of imminent threats to their safety
within their area. There is no charge for receiving an
Emergency alert message.
78Apps
Page 86

There are three types of Emergency alerts:
Alerts issued by the President
•
Alerts involving imminent threats to safety of life
•
(extreme and severe)
AMBER alerts (missing child alert)
•
Users may choose not to receive Imminent alerts
(extreme and severe) and AMBER alerts.
Note: Alerts issued by the President cannot be
disabled.
To disable Imminent and AMBER alerts:
1. From a Home screen, tap Apps > Settings.
2. Tap Privacy and emergency > Emergency alerts.
3. Tap Settings > Alert types.
All alerts are enabled (on) by default.
•
4. Tap an alert option to disable it.
79Apps
Page 87

My Files
Access files stored on your device, including images,
videos, music, and sound clips.
To view files in My Files:
1. From a Home screen, tap Apps >
Samsungfolder > MyFiles.
2. Tap a category to view the relevant files or folders.
3. Tap a file or folder to open it.
File Groups
Files stored in the device are organized into the
following groups:
Recent files: View recently saved files.
•
This option appears if one or more files have
-
been accessed recently.
80Apps
Categories
•
Images: View image files.
-
Audio: View audio files.
-
Videos: View video files.
-
Documents: View document files.
-
Downloads: View all apps and files that have
-
been downloaded to the device.
Installation files: View all APK files.
-
Phone
•
Internal storage: View folders and files located
-
on the device.
SD card: View folders and files located on the
-
optional SD card (not included).
Page 88

My Files Options
Use My File options to search, edit, clear file history,
and more.
► From a Home screen, tap Apps >
Samsungfolder > MyFiles. The following
options are available:
Search: Search for a file or folder.
•
Moreoptions: Tap for the following options:
•
Verizon Cloud: Connect to the Verizon
-
Cloud service.
Clear recent file history: Clear the Recent
-
files category. This option only appears if
files have been accessed recently.
Storage usage: View memory information
-
for your device.
Settings: View settings for the My Files app.
-
81Apps
Page 89

Phone
More options
Voice command
Call
Devices and software are constantly evolving — the illustrations you see here are for reference only.
82Apps
Hide the keypad
Video call
Page 90

Make a Call
You can make a call from a Home screen.
Using the Dialer
1. From a Home screen, tap Phone.
2. Enter a number on the keypad and tap Call.
Tap Keypad if the keypad is not displayed.
•
From Recents
All incoming, outgoing, and missed calls are recorded
in the Call log. If the number or caller is listed in your
contacts list, the associated name is also displayed.
1. From a Home screen, tap Phone.
2. Tap Recents. A list of recent calls is displayed.
3. Tap a contact, and then tap Call.
From Contacts
To make a call from Contacts.
1. From a Home screen, tap Apps > Contacts.
2. Swipe your finger across a contact to the right to
call the contact.
Direct Calls
Call the contact whose call log, message, or contact
details are currently on the screen by bringing the
device close to your ear.
1. From a Home screen, tap Apps > Settings.
2. Tap Advanced features > Direct call, and tap
On/Off to enable.
83Apps
Page 91

Answer a Call
When a call is received, the phone rings and the caller’s
phone number or name is displayed, if it is storedin the
Contacts list.
► On the incoming call screen, drag Answer to the
right to answer the call.
If you are using an app, a pop-up screen is displayed for
the incoming call.
► On the incoming call pop-up screen, tap Answer
to answer the call.
Decline a Call
► On the incoming call screen, drag Decline to the
left to reject the call and send it to your voicemail.
If you are using an app, a pop-up screen is displayed for
the incoming call.
► Tap Decline to reject the call and send it to
your voicemail.
Decline with Message
► On the incoming call screen, drag Send message
upward and select a message.
If you are using an app, a pop-up screen is displayed for
the incoming call.
► Tap Send message and select a message.
End a Call
To finish your call:
► Tap End when you are ready to end your call.
84Apps
Page 92

While on a Call
Adjust the Call Volume
► Press the Volume keys to increase or decrease the
volume.
– or –
Tap Moreoptions > Turn on extra volume to
quickly add more volume to the incoming audio.
Multitasking
If you exit the call screen and return to a Homescreen,
your active call is indicated by Callon the Status bar.
This lets you continue with your current call and do
something else, such as access the contacts list, view a
recent email, or locate a picture.
To return to the call screen:
► Drag the Status bar down to display the Notification
panel, and then tap Callnotification.
To end a call from any application:
► Drag the Status bar down to display the Notification
panel, and then tap End call.
Switch to Headset or Speaker
Listen to the call using the speaker or through a
Bluetoothheadset (not included).
► Tap Speaker to hear the caller using the
speaker.
– or –
Tap Bluetooth to hear the caller using a
Bluetooth headset.
85Apps
Page 93

Call Log
The numbers of the calls you have dialed, received, or
missed are stored in the Call log.
1. From a Home screen, tap Phone.
2. Tap Recents. A list of recent calls is displayed. If
the caller is in your Contacts list, the caller’s name
is displayed.
Save a Contact from a Recent Call
Use recent call information to create a contact or
update your Contacts list.
1. From a Home screen, tap Phone.
2. Tap Recents.
3. Tap the call that contains the information that you
want to save to your Contacts list.
4. Tap Details.
5. Tap Create contact.
– or –
If you want to replace the number for an existing
contact, tap Update existing.
Delete Call Records
To delete Call log entries:
1. From a Home screen, tap Phone.
2. Tap Recents.
3. Touch and hold the call you want to delete from the
Call log.
4. Tap Delete.
86Apps
Page 94

Block a Number
By adding a caller to your Block list, future calls from
this number are sent directly to your voicemail, and
messages are not received.
1. From a Home screen, tap Phone.
2. Tap Recents.
3. Tap the caller you want to add to the Block list.
4. Tap Details > Moreoptions > Block number.
Confirm when prompted.
You can also modify the Block list in Settings:
► From a Home screen, tap Phone >
Moreoptions > Settings > Block numbers.
Speed Dial
You can assign a shortcut number to a contact for
speed dialing their default number.
Create a Speed Dial
You can assign 999 speed dial numbers.
1. From a Home screen, tap Phone.
Tap Keypad if the keypad is not displayed.
•
2. Tap Moreoptions > Speed dial. The Speed dial
screen displays the reserved speed dial numbers.
3. Tap an unassigned number.
Tap Menu to select a different Speed dial
•
number than the next one in sequence.
Number 1 is reserved for Voicemail.
•
4. Type in a name or number, or tap Add from
Contacts to assign a contact to the number.
The selected contact is displayed in the
•
Speeddial number box.
87Apps
Page 95

Make a Call with Speed Dial
You can make a call using Speed dial.
1. From a Home screen, tap Phone.
Tap Keypad if the keypad is not displayed.
•
2. Touch and hold the Speed dial number.
If the Speed dial number is more than one digit
•
long, enter the first digits, and then hold the
lastdigit.
Remove a Speed Dial Number
You can remove an assigned Speed dial number.
1. From a Home screen, tap Phone.
2. Tap Moreoptions > Speed dial.
3. Find the contact to remove from Speed dial.
4. Tap Remove.
Emergency Calls
You can dial the emergency telephone number in your
region regardless of the phone’s cellular service status.
Make an Emergency Call
You can dial the emergency telephone number
from your phone whether or not cellular service has
beenactivated. If your phone is not activated, you can
only make an emergency call.
1. From a Home screen, tap Phone.
2. Enter the emergency telephone number (911 in
North America) and tap Call.
3. Complete your call. During this type of call, you
have access to most in-call features.
88Apps
Page 96

Make an Emergency Call from a
LockedScreen
The emergency telephone number can be dialed even if
the phone is locked, allowing anyone to use your phone
to call for help in an emergency. When accessed from
a locked screen, only the emergency calling feature is
accessible to the caller. The rest of the phone remains
secured.
1. Drag Phone upward to open the call screen.
2. Tap Emergency call to display the Emergency
dialer.
3. Enter the emergency telephone number (911 in
North America) and tap Call.
4. Complete your call. During this type of call, you
have access to most in-call features.
Voicemail
Use your phone’s voicemail feature.
For information on setting up voicemail, see
"Set Up Your Voicemail" on page14.
► From the Home screen, tap Phone, and touch
and hold the 1 key.
89Apps
Page 97

Optional Calling Services
Place a Multi-Party Call
If your service plan supports this feature, you can make
another call while a call is in progress.
1. From the active call, tap Add call to dial the second
call.
2. Dial the new number and tap Call. When the
call is answered:
Tap Swap to switch between the two calls.
•
Tap Merge to hear both callers at once
•
(multi-conferencing).
Video Calls
To make Video calls:
1. From a Home screen, tap Phone.
2. Enter a number and tap Video call.
Note: Not all devices support video calling. The
receiver has the option to accept the video call or
answer the call as a regular voice call.
Phone Settings
To access settings:
► From a Home screen, tap Phone >
Moreoptions > Settings.
90Apps
Page 98

S Health
Use S Health to plan, track, and manage your health
goals and activities, including exercise, sleep, and
meals.
Caution: The information gathered from this device,
SHealth, or related software is not intended for use in
the diagnosis of disease or other conditions, or in the
cure, mitigation, treatment or prevention of disease.
The accuracy of the information and data provided
by this device and its related software, including
heart rate readings, may be affected by factors
such as environmental conditions, skin condition,
specific activity performed while using/wearing the
device, settings of the device, user configuration/
user-provided information, placement of the sensor
on the body, and other end-user interactions. For more
information on proper wear and use, see:
samsung.com/us/heartratesensor.
1. From a Home screen, tap Apps >
Samsungfolder > SHealth.
2. Read and accept the terms and conditions.
3. Set up your health profile and goals.
Before You Start Exercising
Although the SHealth application is a great companion
to your exercise routine, it is always best to make sure
you consult with your physician before beginning any
exercise regimen. While moderate physical activity,
such as brisk walking, is safe for most people, health
experts suggest that you talk with your doctor before
you start an exercise program, particularly if you have
any of the following conditions:
Heart disease; Asthma or lung disease; Diabetes, or
•
liver or kidney disease; and Arthritis.
91Apps
Page 99

Before beginning your exercise regimen check with
your doctor if you have symptoms suggestive of heart,
lung, or other serious disease, such as:
Pain or discomfort in your chest, neck, jaw, or arms
•
during physical activity;
Dizziness or loss of consciousness;
•
Shortness of breath with mild exertion or at rest, or
•
when lying down or going to bed;
Ankle swelling, especially at night;
•
A heart murmur or a rapid or pronounced heartbeat;
•
Muscle pain when walking upstairs or up a hill that
•
goes away when you rest.
It is recommended that before engaging in an exercise
routine, you consult with your doctor or medical
practitioner. If you are unsure of your health status,
have several health problems, or are pregnant, you
should speak with your doctor before starting a new
exercise program.
92Apps
Page 100

Samsung Gear
Connect your device to your Samsung Gear using this
application.
► From a Home screen, tap Apps >
SamsungGear.
93Apps
 Loading...