

Page 1
SGH-A797 Series
PORTABLE Quad-BAND
MOBILE PHONE
User Manual
Please read this manual before operating your
phone, and keep it for future reference.
a797 Bourbon.book Page i Tuesday, November 17, 2009 1:53 PM
Page 2

a797_UCIIB_WC_111709_F12
Intellectual Property
All Intellectual Property, as defined below, owned by or which is otherwise the property of Samsung or its respective suppliers relating to
the SAMSUNG Phone, including but not limited to, accessories, parts, or software relating there to (the “Phone System”), is proprietary to
Samsung and protected under federal laws, state laws, and international treaty provisions. Intellectual Property includes, but is not limited
to, inventions (patentable or unpatentable), patents, trade secrets, copyrights, software, computer programs, and related documentation
and other works of authorship. You may not infringe or otherwise violate the rights secured by the Intellectual Property. Moreover, you
agree that you will not (and will not attempt to) modify, prepare derivative works of, reverse engineer, decompile, disassemble, or
otherwise attempt to create source code from the software. No title to or ownership in the Intellectual Property is transferred to you. All
applicable rights of the Intellectual Property shall remain with SAMSUNG and its suppliers.
Samsung Telecommunications America (STA), LLC
Headquarters: Customer Care Center:
1301 E. Lookout Drive 1000 Klein Rd.
Richardson, TX 75082 Plano, TX 75074
Toll Free Tel: 1.888.987.HELP (4357)
Internet Address: www.samsungusa.com
©
2009 Samsung Telecommunications America, LLC is a registered trademark of Samsung Electronics America, Inc. and its related
entities.
Do you have questions about your Samsung Mobile Phone?
For 24 hour information and assistance, we offer a new FAQ/ARS System (Automated Response System) at:
www.samsungtelecom.com/support
T9 Text Input is licensed by Tegic Communications and is covered by U.S. Pat. 5,818,437; U.S. Pat. 5,953,541; U.S. Pat. 6,011,554 and
other patents pending.
a797 Bourbon.book Page ii Tuesday, November 17, 2009 1:53 PM
Page 3

ACCESS® and NetFront™ are trademarks or registered trademarks of ACCESS Co., Ltd. in Japan and other countries.
The Bluetooth® word mark, figure mark (stylized “B Design”), and combination mark (Bluetooth word mark and “B Design”) are registered
trademarks and are wholly owned by the Bluetooth SIG.
microSD™ and the microSD logo are Trademarks of the SD Card Association.
Openwave® is a registered Trademark of Openwave, Inc.
Your phone is designed to make it easy for you to access a wide variety of content. For your protection, we want you to be aware that
some applications that you enable may involve the location of your phone being shared. For applications available through AT&T, we offer
privacy controls that let you decide how an application may use the location of your phone and other phones on your account. However,
the AT&T privacy tools do not apply to applications available outside of AT&T. Please review the terms and conditions and the associated
privacy policy for each location-based service to learn how location information will be used and protected. In addition, your AT&T phone
may be used to access the Internet and to download, and/or purchase goods, applications, and services from AT&T or elsewhere from
third parties. AT&T provides tools for you to control access to the Internet and certain Internet content. These controls may not be
available for certain devices which bypass AT&T controls.
Open Source Software
Some software components of this product incorporate source code covered under GNU General Public License (GPL), GNU Lesser General
Public License (LGPL), OpenSSL License, BSD License and other open source licenses. To obtain the source code covered under the open
source licenses, please visit:
http://www.samsungnetwork.com/Home/opensource
.
a797 Bourbon.book Page iii Tuesday, November 17, 2009 1:53 PM
Page 4

Disclaimer of Warranties; Exclusion of Liability
EXCEPT AS SET FORTH IN THE EXPRESS WARRANTY CONTAINED ON THE WARRANTY PAGE ENCLOSED WITH THE PRODUCT, THE
PURCHASER TAKES THE PRODUCT "AS IS", AND SAMSUNG MAKES NO EXPRESS OR IMPLIED WARRANTY OF ANY KIND WHATSOEVER
WITH RESPECT TO THE PRODUCT, INCLUDING BUT NOT LIMITED TO THE MERCHANTABILITY OF THE PRODUCT OR ITS FITNESS FOR ANY
PARTICULAR PURPOSE OR USE; THE DESIGN, CONDITION OR QUALITY OF THE PRODUCT; THE PERFORMANCE OF THE PRODUCT; THE
WORKMANSHIP OF THE PRODUCT OR THE COMPONENTS CONTAINED THEREIN; OR COMPLIANCE OF THE PRODUCT WITH THE
REQUIREMENTS OF ANY LAW, RULE, SPECIFICATION OR CONTRACT PERTAINING THERETO. NOTHING CONTAINED IN THE INSTRUCTION
MANUAL SHALL BE CONSTRUED TO CREATE AN EXPRESS OR IMPLIED WARRANTY OF ANY KIND WHATSOEVER WITH RESPECT TO THE
PRODUCT. IN ADDITION, SAMSUNG SHALL NOT BE LIABLE FOR ANY DAMAGES OF ANY KIND RESULTING FROM THE PURCHASE OR USE OF
THE PRODUCT OR ARISING FROM THE BREACH OF THE EXPRESS WARRANTY, INCLUDING INCIDENTAL, SPECIAL OR CONSEQUENTIAL
DAMAGES, OR LOSS OF ANTICIPATED PROFITS OR BENEFITS.
a797 Bourbon.book Page iv Tuesday, November 17, 2009 1:53 PM
Page 5

1
Table of Contents
Section 1: Getting Started .............................................. 5
Setting Up Your Phone . . . . . . . . . . . . . . . . . . . . . . . . . . . . . . . 5
Charging a Battery . . . . . . . . . . . . . . . . . . . . . . . . . . . . . . . . . . 7
Switching the Phone On or Off . . . . . . . . . . . . . . . . . . . . . . . . . 8
Locking the Touch Screen . . . . . . . . . . . . . . . . . . . . . . . . . . . . 9
Setting Up Your Voice Mail . . . . . . . . . . . . . . . . . . . . . . . . . . . . 9
Section 2: Understanding Your Phone ......................... 10
Features of Your Phone . . . . . . . . . . . . . . . . . . . . . . . . . . . . . 10
Front Open View of Your Phone . . . . . . . . . . . . . . . . . . . . . . . 10
Side Views of Your Phone . . . . . . . . . . . . . . . . . . . . . . . . . . . . 12
Rear View of Your Phone . . . . . . . . . . . . . . . . . . . . . . . . . . . . 13
Display Layout . . . . . . . . . . . . . . . . . . . . . . . . . . . . . . . . . . . . 13
Using the Multitasking Menu . . . . . . . . . . . . . . . . . . . . . . . . . 15
Section 3: Menu Navigation ......................................... 17
Menu Navigation . . . . . . . . . . . . . . . . . . . . . . . . . . . . . . . . . . 17
Shortcuts . . . . . . . . . . . . . . . . . . . . . . . . . . . . . . . . . . . . . . . . 19
Section 4: Call Functions .............................................21
Displaying Your Phone Number . . . . . . . . . . . . . . . . . . . . . . . 21
Making a Call . . . . . . . . . . . . . . . . . . . . . . . . . . . . . . . . . . . . . 21
Making a Call Using Speed Dial . . . . . . . . . . . . . . . . . . . . . . . 23
Making a Call from the Address Book . . . . . . . . . . . . . . . . . . . 23
Answering a Call . . . . . . . . . . . . . . . . . . . . . . . . . . . . . . . . . . 23
Quick Reply . . . . . . . . . . . . . . . . . . . . . . . . . . . . . . . . . . . . . . 24
Dialing Options . . . . . . . . . . . . . . . . . . . . . . . . . . . . . . . . . . . . 24
Video Share . . . . . . . . . . . . . . . . . . . . . . . . . . . . . . . . . . . . . . 24
Recent Calls . . . . . . . . . . . . . . . . . . . . . . . . . . . . . . . . . . . . . 26
Call Time . . . . . . . . . . . . . . . . . . . . . . . . . . . . . . . . . . . . . . . . 28
Data Counter . . . . . . . . . . . . . . . . . . . . . . . . . . . . . . . . . . . . . 29
Options During a Call . . . . . . . . . . . . . . . . . . . . . . . . . . . . . . . 29
Section 5: Entering Text ............................................... 34
Using the QWERTY Keypad . . . . . . . . . . . . . . . . . . . . . . . . . . 34
Changing the Text Input Mode . . . . . . . . . . . . . . . . . . . . . . . . 35
Using T9 Predictive Text Mode . . . . . . . . . . . . . . . . . . . . . . . . 36
Using Numeric/Symbols Mode . . . . . . . . . . . . . . . . . . . . . . . . 37
Using Emoticon Mode . . . . . . . . . . . . . . . . . . . . . . . . . . . . . . 37
Using Abc Mode . . . . . . . . . . . . . . . . . . . . . . . . . . . . . . . . . . 38
Section 6: Changing Your Settings .............................. 39
Quick Tips . . . . . . . . . . . . . . . . . . . . . . . . . . . . . . . . . . . . . . . 39
Sound Profile . . . . . . . . . . . . . . . . . . . . . . . . . . . . . . . . . . . . . 39
Normal Profile . . . . . . . . . . . . . . . . . . . . . . . . . . . . . . . . . . . . 39
Silent Profile . . . . . . . . . . . . . . . . . . . . . . . . . . . . . . . . . . . . . 41
Driving Profile . . . . . . . . . . . . . . . . . . . . . . . . . . . . . . . . . . . . 42
Outdoor Profile . . . . . . . . . . . . . . . . . . . . . . . . . . . . . . . . . . . 44
Display and Light Settings . . . . . . . . . . . . . . . . . . . . . . . . . . . 45
Time & Date . . . . . . . . . . . . . . . . . . . . . . . . . . . . . . . . . . . . . 47
Phone Settings . . . . . . . . . . . . . . . . . . . . . . . . . . . . . . . . . . . 48
Call Settings . . . . . . . . . . . . . . . . . . . . . . . . . . . . . . . . . . . . . 54
Connectivity . . . . . . . . . . . . . . . . . . . . . . . . . . . . . . . . . . . . . . 55
a797 Bourbon.book Page 1 Tuesday, November 17, 2009 1:53 PM
Page 6

2
Bluetooth Secure Mode . . . . . . . . . . . . . . . . . . . . . . . . . . . . . . 57
Configuring Your Phone’s USB Settings . . . . . . . . . . . . . . . . . . 57
Network Profile Configuration . . . . . . . . . . . . . . . . . . . . . . . . . 58
Applications Settings . . . . . . . . . . . . . . . . . . . . . . . . . . . . . . . 59
Memory Management . . . . . . . . . . . . . . . . . . . . . . . . . . . . . . . 61
Software Update . . . . . . . . . . . . . . . . . . . . . . . . . . . . . . . . . . . 63
Phone Information . . . . . . . . . . . . . . . . . . . . . . . . . . . . . . . . . 63
Section 7: Understanding Your Address Book ............ 64
Address Book Settings . . . . . . . . . . . . . . . . . . . . . . . . . . . . . . 64
Adding a New Contact . . . . . . . . . . . . . . . . . . . . . . . . . . . . . .64
Using Contacts . . . . . . . . . . . . . . . . . . . . . . . . . . . . . . . . . . . . 68
Address Book Entry Options . . . . . . . . . . . . . . . . . . . . . . . . . . 69
Finding My Own Phone Number . . . . . . . . . . . . . . . . . . . . . . . 70
FDN Mode . . . . . . . . . . . . . . . . . . . . . . . . . . . . . . . . . . . . . . . 70
Group Settings . . . . . . . . . . . . . . . . . . . . . . . . . . . . . . . . . . . . 71
Address Book Favorites . . . . . . . . . . . . . . . . . . . . . . . . . . . . . 72
Managing Address Book Entries . . . . . . . . . . . . . . . . . . . . . . . 72
Yellow Pages Mobile . . . . . . . . . . . . . . . . . . . . . . . . . . . . . . . . 75
Section 8: My Stuff ....................................................... 76
My Stuff Functions . . . . . . . . . . . . . . . . . . . . . . . . . . . . . . . . . 76
Applications . . . . . . . . . . . . . . . . . . . . . . . . . . . . . . . . . . . . . . 77
Audio . . . . . . . . . . . . . . . . . . . . . . . . . . . . . . . . . . . . . . . . . . . 77
Games . . . . . . . . . . . . . . . . . . . . . . . . . . . . . . . . . . . . . . . . . . 79
Picture . . . . . . . . . . . . . . . . . . . . . . . . . . . . . . . . . . . . . . . . . . 79
Tools . . . . . . . . . . . . . . . . . . . . . . . . . . . . . . . . . . . . . . . . . . . 80
Video . . . . . . . . . . . . . . . . . . . . . . . . . . . . . . . . . . . . . . . . . . . 80
Other Files . . . . . . . . . . . . . . . . . . . . . . . . . . . . . . . . . . . . . . . 81
Used Space . . . . . . . . . . . . . . . . . . . . . . . . . . . . . . . . . . . . . . 81
Section 9: Camera ........................................................ 82
Using the Camera . . . . . . . . . . . . . . . . . . . . . . . . . . . . . . . . . . 82
Camera and Camcorder Options . . . . . . . . . . . . . . . . . . . . . . . 83
Using the Camcorder . . . . . . . . . . . . . . . . . . . . . . . . . . . . . . . 87
Section 10: Mobile Video ............................................. 90
Viewing a Video Clip . . . . . . . . . . . . . . . . . . . . . . . . . . . . . . . . 90
Using the Video Categories . . . . . . . . . . . . . . . . . . . . . . . . . . . 90
Customizing Mobile Video . . . . . . . . . . . . . . . . . . . . . . . . . . . 91
Section 11: Messaging ................................................. 93
Types of Messages . . . . . . . . . . . . . . . . . . . . . . . . . . . . . . . . 93
Creating and Sending Messages . . . . . . . . . . . . . . . . . . . . . . 93
Additional Message Options . . . . . . . . . . . . . . . . . . . . . . . . . . 94
Viewing New Received Messages . . . . . . . . . . . . . . . . . . . . . . 95
Using Message Options . . . . . . . . . . . . . . . . . . . . . . . . . . . . . 96
Using Mobile Email . . . . . . . . . . . . . . . . . . . . . . . . . . . . . . . . . 97
Using Instant Messaging (IM) . . . . . . . . . . . . . . . . . . . . . . . . . 97
Deleting Messages . . . . . . . . . . . . . . . . . . . . . . . . . . . . . . . . . 98
Messaging Settings . . . . . . . . . . . . . . . . . . . . . . . . . . . . . . . . 99
Templates . . . . . . . . . . . . . . . . . . . . . . . . . . . . . . . . . . . . . . 101
Used Space . . . . . . . . . . . . . . . . . . . . . . . . . . . . . . . . . . . . . 102
Section 12: Games & Applications ............................ 103
Games . . . . . . . . . . . . . . . . . . . . . . . . . . . . . . . . . . . . . . . . . 103
Applications . . . . . . . . . . . . . . . . . . . . . . . . . . . . . . . . . . . . . 103
Section 13: AppCenter ............................................... 106
Downloading Multimedia Files . . . . . . . . . . . . . . . . . . . . . . . 106
a797 Bourbon.book Page 2 Tuesday, November 17, 2009 1:53 PM
Page 7

3
Ringtones . . . . . . . . . . . . . . . . . . . . . . . . . . . . . . . . . . . . . . 106
Games . . . . . . . . . . . . . . . . . . . . . . . . . . . . . . . . . . . . . . . . . 106
Videos . . . . . . . . . . . . . . . . . . . . . . . . . . . . . . . . . . . . . . . . . 107
Color Graphics . . . . . . . . . . . . . . . . . . . . . . . . . . . . . . . . . . . 107
Answer Tones . . . . . . . . . . . . . . . . . . . . . . . . . . . . . . . . . . . 107
Multimedia Store . . . . . . . . . . . . . . . . . . . . . . . . . . . . . . . . . 107
AppCenter Options . . . . . . . . . . . . . . . . . . . . . . . . . . . . . . . . 108
Section 14: AT&T Music .............................................109
Music Player . . . . . . . . . . . . . . . . . . . . . . . . . . . . . . . . . . . . 109
Shop Music . . . . . . . . . . . . . . . . . . . . . . . . . . . . . . . . . . . . . 111
Using Playlists . . . . . . . . . . . . . . . . . . . . . . . . . . . . . . . . . . . 113
MusicID . . . . . . . . . . . . . . . . . . . . . . . . . . . . . . . . . . . . . . . . 117
XM Radio . . . . . . . . . . . . . . . . . . . . . . . . . . . . . . . . . . . . . . 118
Music Videos . . . . . . . . . . . . . . . . . . . . . . . . . . . . . . . . . . . . 119
Make-UR-Tones . . . . . . . . . . . . . . . . . . . . . . . . . . . . . . . . . . 119
Community . . . . . . . . . . . . . . . . . . . . . . . . . . . . . . . . . . . . . 120
Music Applications . . . . . . . . . . . . . . . . . . . . . . . . . . . . . . . . 120
Section 15: AT&T GPS ................................................121
Launching AT&T Navigator . . . . . . . . . . . . . . . . . . . . . . . . . . 121
Using Navigator . . . . . . . . . . . . . . . . . . . . . . . . . . . . . . . . . . 121
Obtaining Driving Directions . . . . . . . . . . . . . . . . . . . . . . . . . 122
Shopping for GPS Applications . . . . . . . . . . . . . . . . . . . . . . . 123
Where . . . . . . . . . . . . . . . . . . . . . . . . . . . . . . . . . . . . . . . . . 123
Section 16: Mobile Web ..............................................124
Accessing the Mobile Web . . . . . . . . . . . . . . . . . . . . . . . . . . 124
Homepage - att.net . . . . . . . . . . . . . . . . . . . . . . . . . . . . . . . 124
Navigating with the Mobile Web . . . . . . . . . . . . . . . . . . . . . . 125
Enter a URL . . . . . . . . . . . . . . . . . . . . . . . . . . . . . . . . . . . . . 125
Search the Internet . . . . . . . . . . . . . . . . . . . . . . . . . . . . . . . 126
My Shortcuts . . . . . . . . . . . . . . . . . . . . . . . . . . . . . . . . . . . . 126
My Account . . . . . . . . . . . . . . . . . . . . . . . . . . . . . . . . . . . . . 126
Using Bookmarks . . . . . . . . . . . . . . . . . . . . . . . . . . . . . . . . 126
Emptying the Cookies . . . . . . . . . . . . . . . . . . . . . . . . . . . . . 127
Using your History . . . . . . . . . . . . . . . . . . . . . . . . . . . . . . . . 128
Changing the WAP Profiles . . . . . . . . . . . . . . . . . . . . . . . . . 128
Section 17: Tools ........................................................ 130
Tools . . . . . . . . . . . . . . . . . . . . . . . . . . . . . . . . . . . . . . . . . . 130
Camera . . . . . . . . . . . . . . . . . . . . . . . . . . . . . . . . . . . . . . . . 130
Voice Recognition . . . . . . . . . . . . . . . . . . . . . . . . . . . . . . . . 130
Record Audio . . . . . . . . . . . . . . . . . . . . . . . . . . . . . . . . . . . . 131
Alarms . . . . . . . . . . . . . . . . . . . . . . . . . . . . . . . . . . . . . . . . . 132
Calendar . . . . . . . . . . . . . . . . . . . . . . . . . . . . . . . . . . . . . . . 133
Recent Calls . . . . . . . . . . . . . . . . . . . . . . . . . . . . . . . . . . . . 135
Sketchpad . . . . . . . . . . . . . . . . . . . . . . . . . . . . . . . . . . . . . . 135
Memo . . . . . . . . . . . . . . . . . . . . . . . . . . . . . . . . . . . . . . . . . 136
Tasks . . . . . . . . . . . . . . . . . . . . . . . . . . . . . . . . . . . . . . . . . 136
Calculator . . . . . . . . . . . . . . . . . . . . . . . . . . . . . . . . . . . . . . 136
Tip Calculator . . . . . . . . . . . . . . . . . . . . . . . . . . . . . . . . . . . 136
Converter . . . . . . . . . . . . . . . . . . . . . . . . . . . . . . . . . . . . . . 137
World Clock . . . . . . . . . . . . . . . . . . . . . . . . . . . . . . . . . . . . . 138
Timer . . . . . . . . . . . . . . . . . . . . . . . . . . . . . . . . . . . . . . . . . 138
Stopwatch . . . . . . . . . . . . . . . . . . . . . . . . . . . . . . . . . . . . . . 138
a797 Bourbon.book Page 3 Tuesday, November 17, 2009 1:53 PM
Page 8

4
Section 18: Accessibility ............................................ 139
Section 19: Health and Safety Information ...............140
Health and Safety Information . . . . . . . . . . . . . . . . . . . . . . . . 140
Warning Regarding Display . . . . . . . . . . . . . . . . . . . . . . . . . . 141
Samsung Mobile Products and Recycling . . . . . . . . . . . . . . . 141
UL Certified Travel Adapter . . . . . . . . . . . . . . . . . . . . . . . . . . 142
Consumer Information on Wireless Phones . . . . . . . . . . . . . . 142
Road Safety . . . . . . . . . . . . . . . . . . . . . . . . . . . . . . . . . . . . . 148
Responsible Listening . . . . . . . . . . . . . . . . . . . . . . . . . . . . . . 149
Operating Environment . . . . . . . . . . . . . . . . . . . . . . . . . . . . . 151
Using Your Phone Near Other Electronic Devices . . . . . . . . . 151
FCC Hearing-Aid Compatibility (HAC) Regulations for
Wireless Devices . . . . . . . . . . . . . . . . . . . . . . . . . . . . . . . 152
Potentially Explosive Environments . . . . . . . . . . . . . . . . . . . . 153
Emergency Calls . . . . . . . . . . . . . . . . . . . . . . . . . . . . . . . . . . 154
FCC Notice and Cautions . . . . . . . . . . . . . . . . . . . . . . . . . . . 155
Other Important Safety Information . . . . . . . . . . . . . . . . . . . . 155
Product Performance . . . . . . . . . . . . . . . . . . . . . . . . . . . . . . 156
Availability of Various Features/Ring Tones . . . . . . . . . . . . . . 156
Battery Standby and Talk Time . . . . . . . . . . . . . . . . . . . . . . . 157
Battery Precautions . . . . . . . . . . . . . . . . . . . . . . . . . . . . . . . 157
Care and Maintenance . . . . . . . . . . . . . . . . . . . . . . . . . . . . . 158
Section 20: Warranty Information .............................160
Standard Limited Warranty . . . . . . . . . . . . . . . . . . . . . . . . . . 160
End User License Agreement for Software . . . . . . . . . . . . . . 163
Index ............................................................................168
a797 Bourbon.book Page 4 Tuesday, November 17, 2009 1:53 PM
Page 9
Getting Started 5
Section 1: Getting Started
This section explains how to start using your phone by first
configuring your hardware, activating your service, and then
setting up your voice mail.
Setting Up Your Phone
Prior to use it is necessary to install both the battery and SIM into
their corresponding internal compartments. The microSD card
slot is also located in this same internal area.
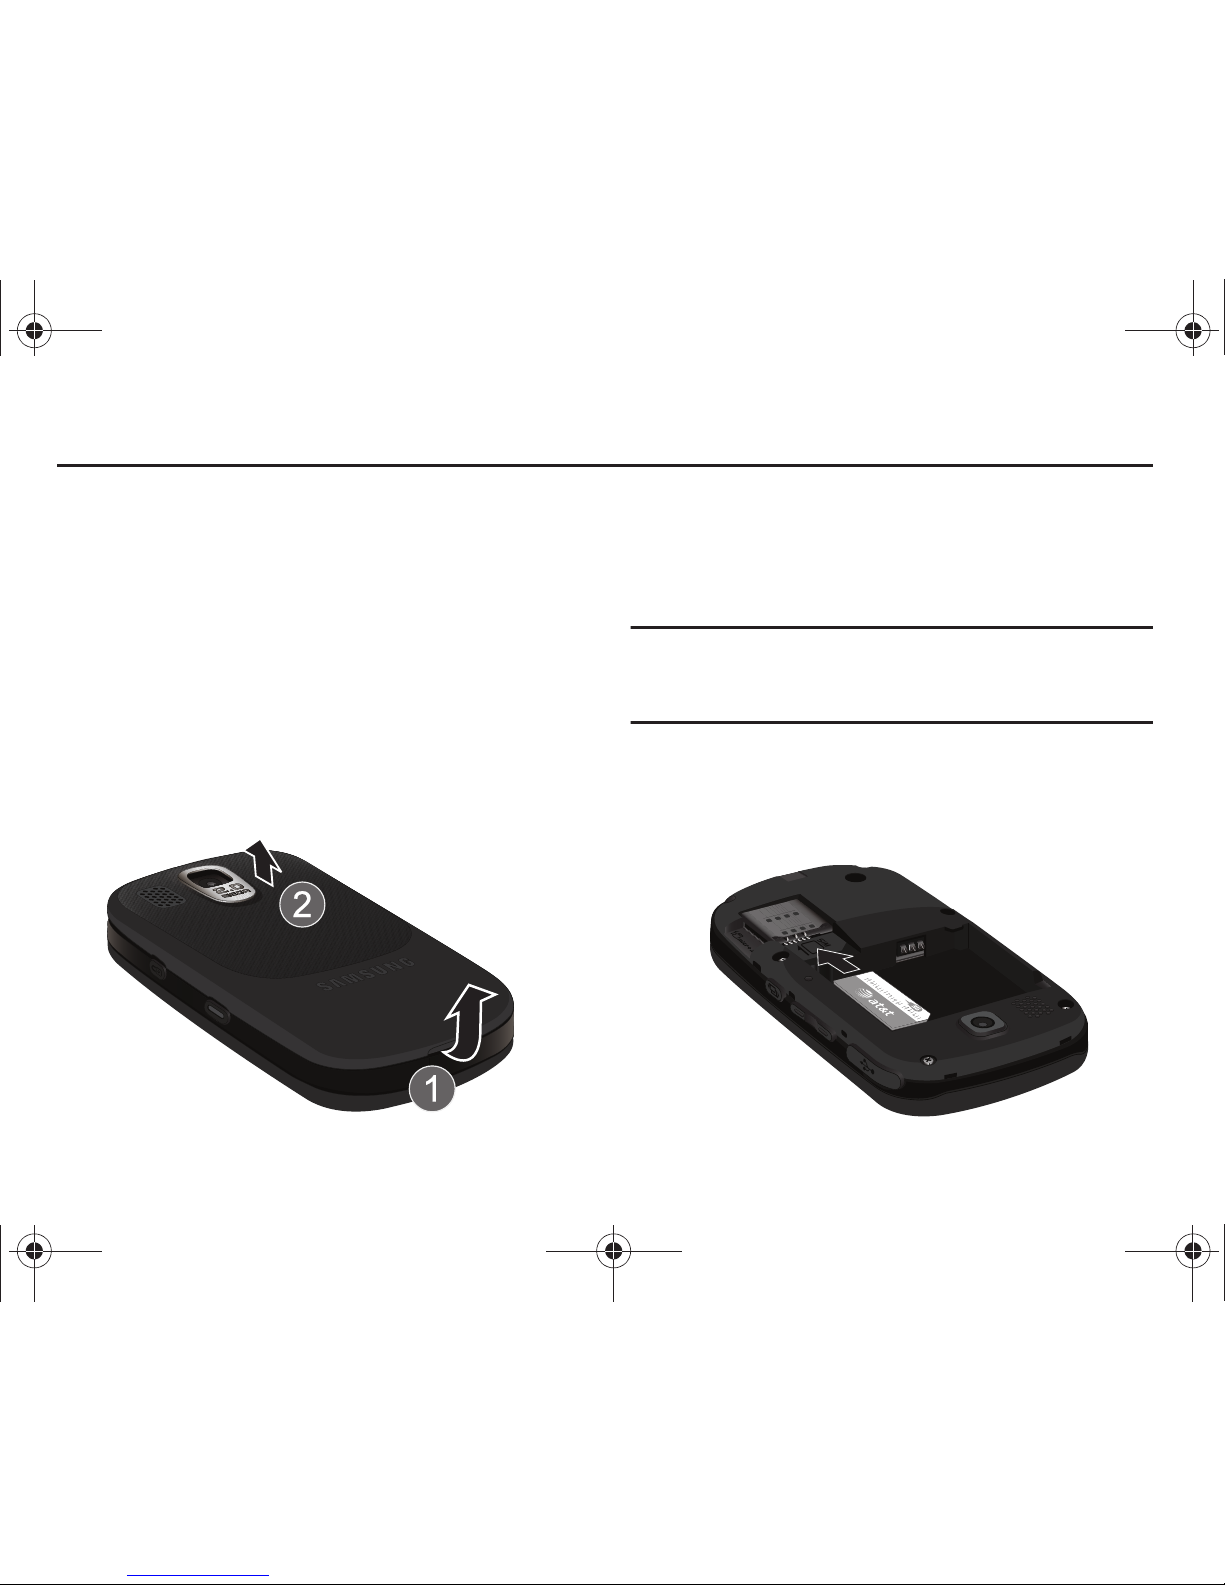
1. Remove the battery cover by placing your thumbnail into
the slot at the bottom of the phone (1) and lifting up.
2. Lift the cover away from the phone (2).
Installing the SIM Card
When you subscribe to a cellular network, you are provided with
a plug-in SIM card loaded with your subscription details, such as
your PIN, available optional services, and many others features.
Important!:
The plug-in SIM card information and its contacts can be easily
damaged by scratching or bending, so be careful when handling,
inserting, or removing the card. Keep all SIM cards out of reach
of small children.
䊳
Carefully slide the SIM card into the SIM card socket until the
card locks into place.
•
Make sure that the card’s gold contacts face into the phone and
that the upper-left angled corner of the card is positioned as shown.
a797 Bourbon.book Page 5 Tuesday, November 17, 2009 1:53 PM
Page 10
6
Note:
If the card is not inserted correctly, the phone does not detect the SIM
card. Re-orient the card back into the slot.
Installing the Memory Card
Your phone also supports the use of a memory card (microSD™)
for data storage of such things as data, music, pictures, and
video files. This type of memory card is designed for use with this
mobile phone and other devices.
䊳
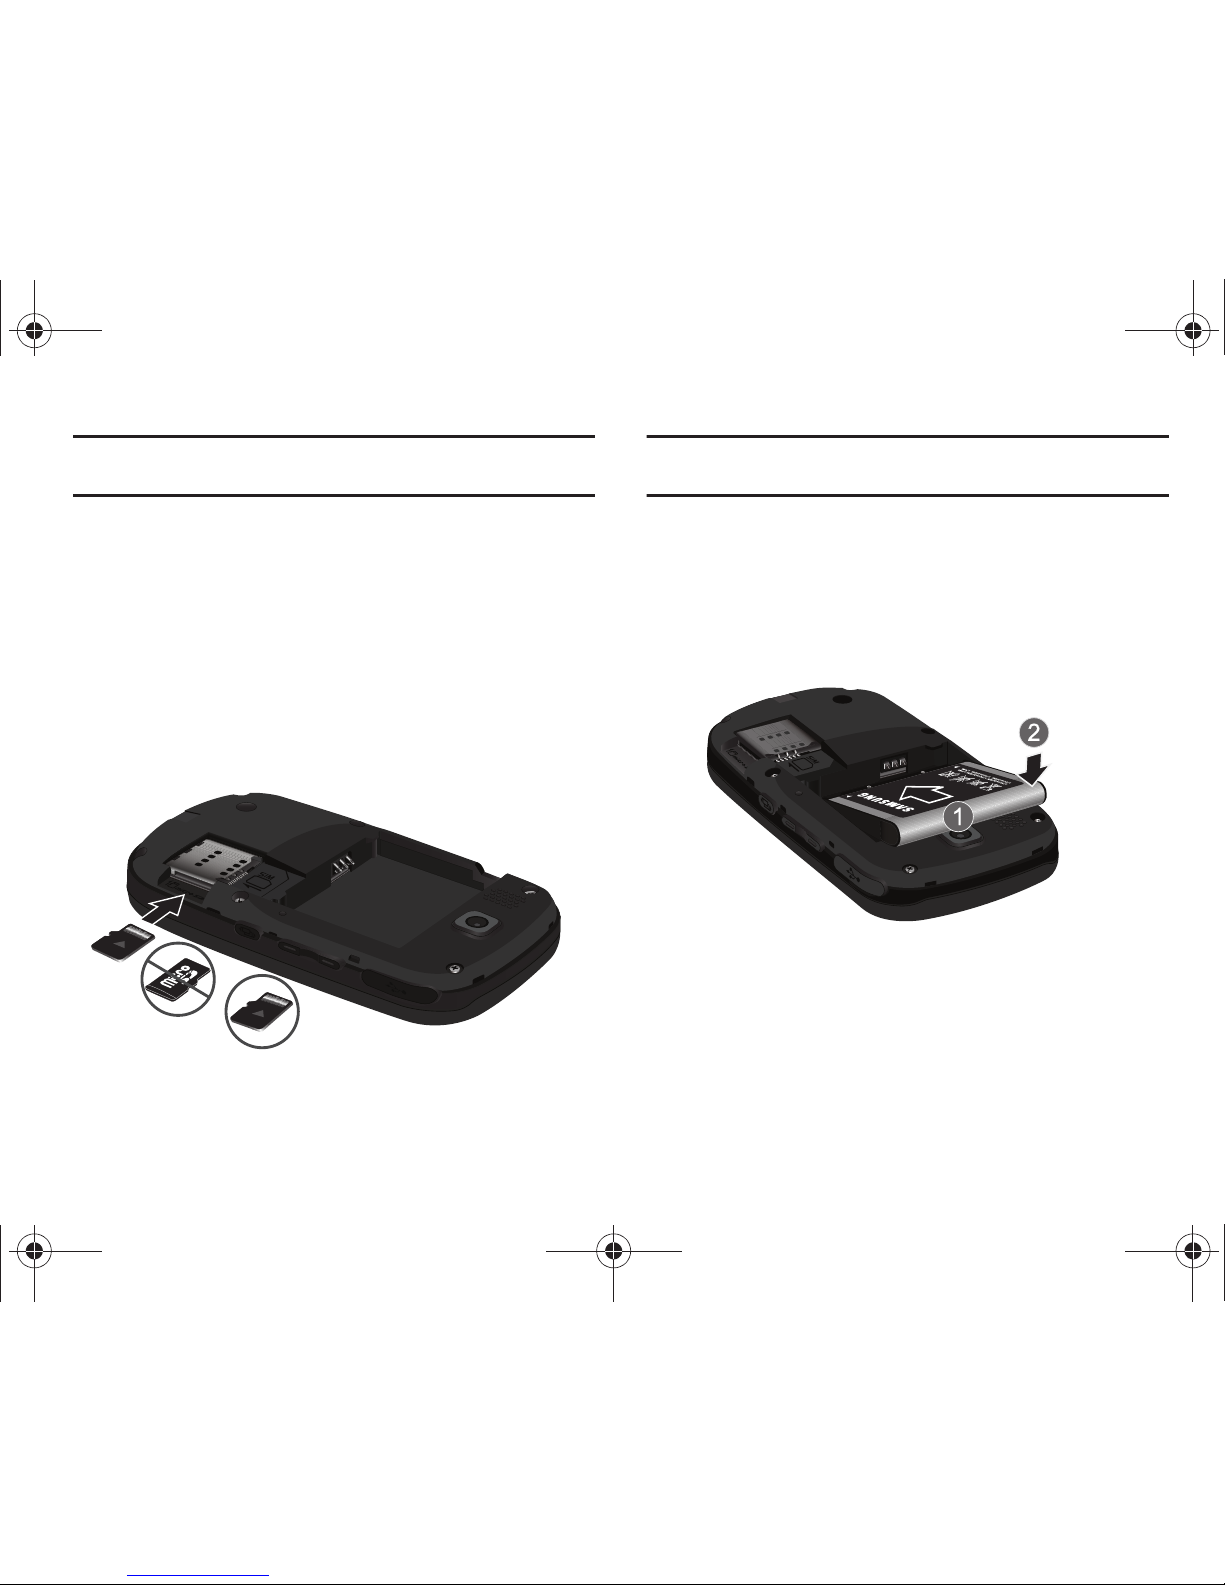
Push the microSD card into the slot until it clicks (as shown).
•
Make sure the microSD’s gold contact pins face upward and the
card is securely inserted.
Note:
The Samsung a797 has been tested to support up to a 16GB memory
card.
Installing the Batter y
1. Insert the battery into the opening on the back of the
phone, making sure the connectors align (1).
2. Gently press down to secure the battery (2).
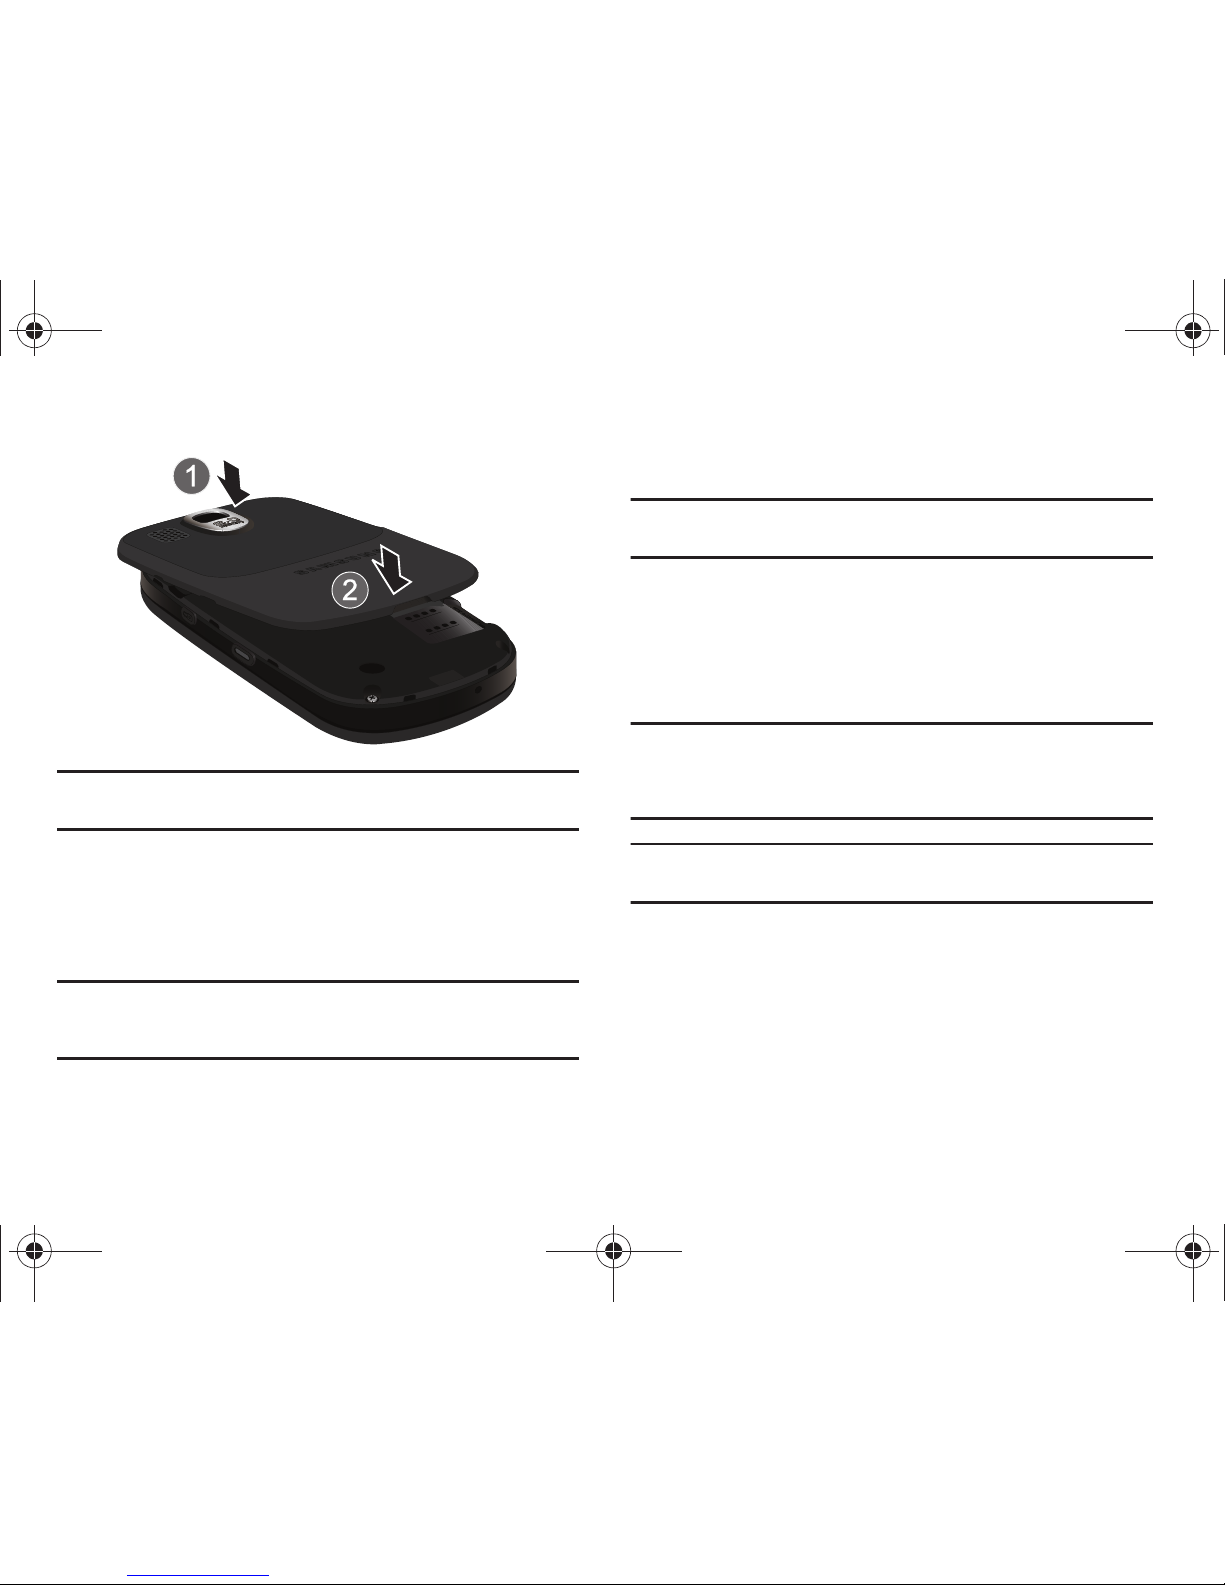
3. Replace the battery cover onto the back of the phone (1).
Incorrect
Correct
a797 Bourbon.book Page 6 Tuesday, November 17, 2009 1:53 PM
Page 11
Getting Started 7
4.
Press down until you hear a light click (2).
Note:
Make sure the battery is properly installed before switching on the
phone.
Charging a Battery
Your phone is powered by a rechargeable Li-ion battery. The
Travel Adapter that is used to charge the battery, is included with
your phone. Use only Samsung-approved batteries and chargers.
Note:
Long backlight settings, searching for service, vibrate mode, browser
use, and other variables may reduce the battery’s talk and standby
times.
Although you can use the phone while the battery is charging,
doing so will require additional charging time.
Note:
You must fully charge the battery before using your phone for the first
time. A discharged battery recharges fully in approximately 4 hours.
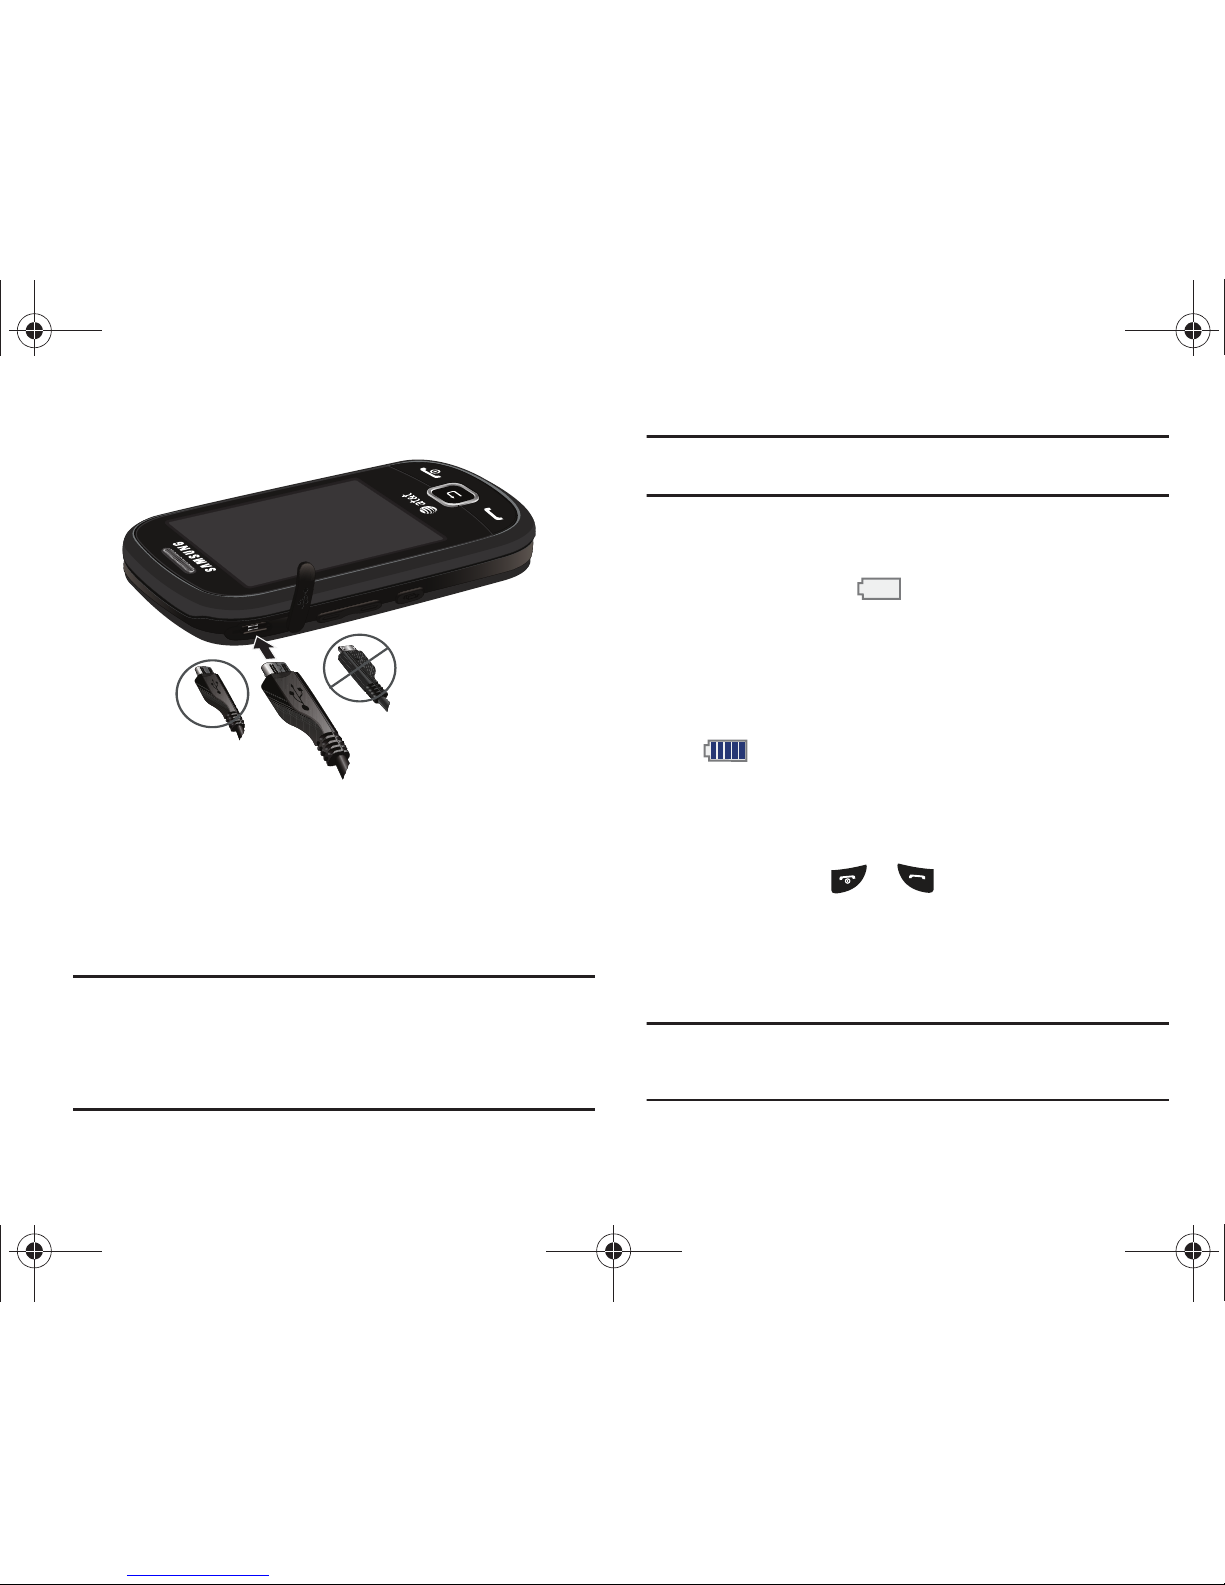
Using the Travel Adapter
1. With the battery installed, temporarily remove the plastic
cover (upper left side of phone) and plug in the wall
charger’s connector into the jack.
Important!:
Verify that the handset battery is installed prior to connection. If
the battery is not properly installed and the wall charger is
connected, the handset may power off and on continuously,
preventing proper operation.
Note:
The wall charger’s connector will be attached to the phone at a slight
angle.
a797 Bourbon.book Page 7 Tuesday, November 17, 2009 1:53 PM
Page 12
8
2.
Plug the flat end of the Travel Adapter into the Power/
Accessory Interface connector and the other end into a
standard AC wall outlet.
3. When charging is finished, remove the flat end from the
interface connector jack on the phone.
Warning!:
If your handset has a touch screen display, please note that a
touch screen responds best to a light touch from the pad of your
finger or a non-metallic stylus. Using excessive force or a metallic
object when pressing on the touch screen may damage the
tempered glass surface and void the warranty. For more
information, refer to “Standard Limited Warranty” on page 160.
Note:
Failure to unplug the wall charger before you remove the battery, can
cause damage to the phone.
Low Battery Indicator
When the battery is weak and only a few minutes of talk time
remain, the battery icon ( ) blinks and the device sounds a
warning tone at regular intervals. In this condition, your phone
conserves its remaining battery power, not by turning off the
backlight, but by entering the dimming mode. For a quick check
of your battery level, glance at the battery charge indicator
located in the upper-right corner of your device’s display. Five
bars ( ) indicate a full charge.
When the battery level becomes too low, the phone automatically
turns off.
Switching the Phone On or Off
1. Press and hold or until the phone switches on.
The phone launches the activation splash screen and then
proceeds to search for the network. Once the network has
been found, you can make or receive calls.
Note:
The display language is preset to English at the factory. To change the
language, use the Language menu. For more information, refer to
“Changing Your Settings” on page 39.
Correct
Incorrect
a797 Bourbon.book Page 8 Tuesday, November 17, 2009 1:53 PM
Page 13
Getting Started 9
2.
Press and hold , until the phone switches off.
Locking the Touch Screen
1. Press (on the right side of the phone) to lock the
touch screen.
2. Press and hold again to unlock the touch screen.
Setting Up Your Voice Mail
1. In Idle mode, press and hold or .
You may be prompted to enter a password.
2. Follow the tutorial to create a password, record a greeting,
and record your name.
Note:
These steps may be different depending on your network.
Accessing Your Voice Mail
1. In Idle mode, press and hold or .
2. When connected, follow the voice prompts from the voice
mail center.
Accessing Your Voice Mail From Another Phone
1. Dial your wireless phone number.
2. When you hear your voicemail greeting, press the asterisk
key (*).
3. Enter your passcode using the onscreen keypad.
a797 Bourbon.book Page 9 Tuesday, November 17, 2009 1:53 PM
Page 14
10
Section 2: Understanding Your Phone
This section outlines some key features of your phone. It also
displays the screen and the icons that appear when the phone is
in use.
Features of Your Phone
Your phone is lightweight, easy-to-use and offers many useful
features. The following list outlines a few of the features included
in your phone.
•
Touch screen provides quick response to a variety of in-phone menus
and options
•
Multitasking
•
User friendly, menu driven access to features and options
•
Ready access to the Internet
•
Built-in Bluetooth technology
•
Instant Messaging capability
•
AT&T GPS Navigation functionality provides real-time navigation
•
microSD card compatibility for use in data storage and access
•
My Stuff feature provides Applications, Audio, Games, Pictures, Tools,
Videos, Other Files and Used Space.
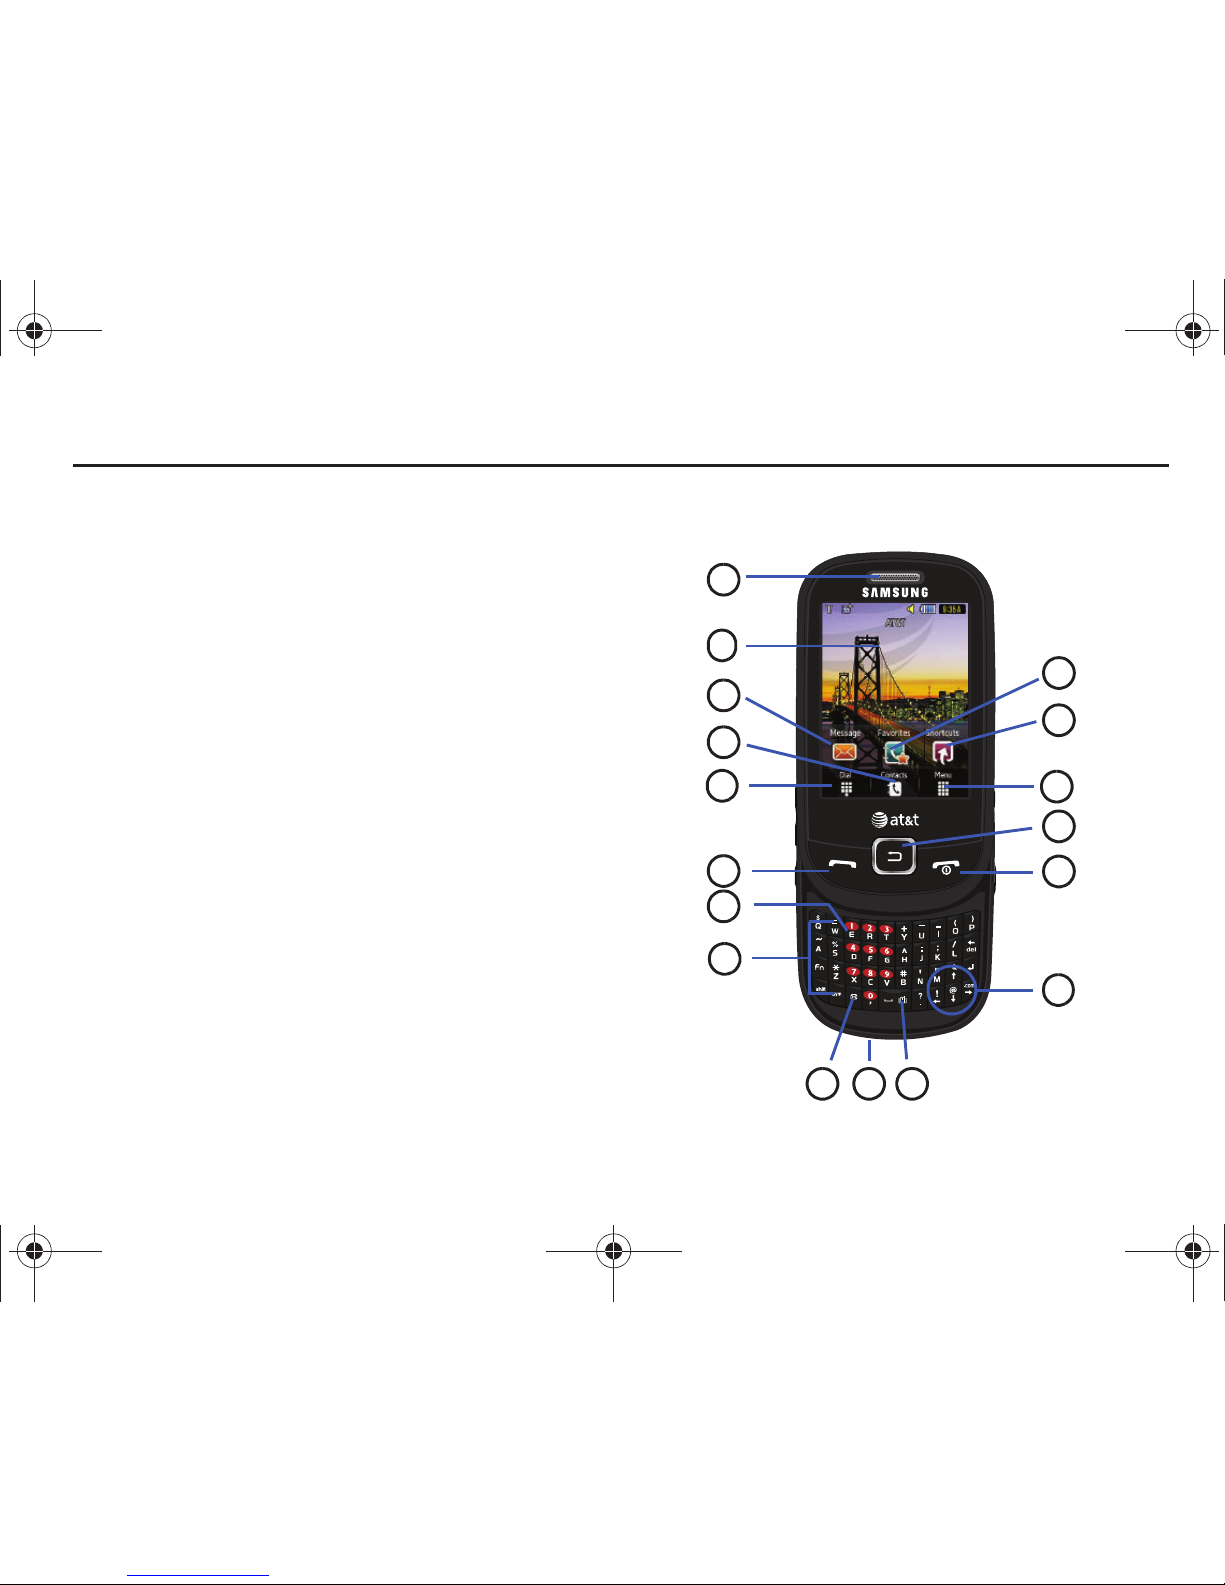
Front Open View of Your Phone
7
3
2
1
4
5
8
9610 11
17
16
15
14
13
12
a797 Bourbon.book Page 10 Tuesday, November 17, 2009 1:53 PM
Page 15

Understanding Your Phone 11
1.
External speaker: allows you to hear the caller.
2. Display: shows the information needed to operate your
phone, such as the received signal strength, phone battery
level, time, etc.
3. Message Key: allows you to access the Create Message
option.
4. Contacts key: allows you to access your current Contacts,
Groups and Favorites lists.
5. Dial key: allows you to access the Phone Functions menu,
such as Dialer, Contacts, and New Message screen.
6. Talk/Send key: allows you to power on the phone, make
or answer a call, access your Call History, Call Manager,
and Call Block features. Press and hold to redial the last
phone number.
7.
Voicemail key
: Allows you to press and hold to
automatically dial your voicemail.
8.
Built in QWERTY Keypad
: Allows you to enter numbers,
letters, and characters using a full QWERTY keypad
interface.
9.
Messaging
: Press the Messaging key to compose a text or
multimedia message.
10.
Microphone
: The Microphone allows the other callers to
hear you when you are speaking to them.
11.
Silent mode
: Press and hold to place your device in silent
mode. In text entry mode, press to add a space.
12. Directional keys: allows you to scroll up, down, left, and
right while navigating menus and the Mobile Web.
13. Power/End key: ends a call. Press and hold for three
seconds to turn the phone on or off. While in a menu,
pressing this key once cancels the current input and twice
returns the phone to Idle mode.
14. Back key: allows you to return to the previous menu. This
key also allows you to return to the previous page within
the Web browser. In Idle mode, this key displays your
calendar.
15. Menu key: allows you to access your phone’s menu
functions menu, such as IM, Messaging, Mobile Email,
Mobile Web, AppCenter, YPmobile, AT&T GPS, Address
Book, AT&T Music, My Stuff, Mobile Video, and Settings.
a797 Bourbon.book Page 11 Tuesday, November 17, 2009 1:53 PM
Page 16
12
16.
Shortcuts key: allows you to set up shortcuts to your
favorite applications, tools, or features.
17. Favorites key: allows you to access and maintain a
favorite list of contacts.
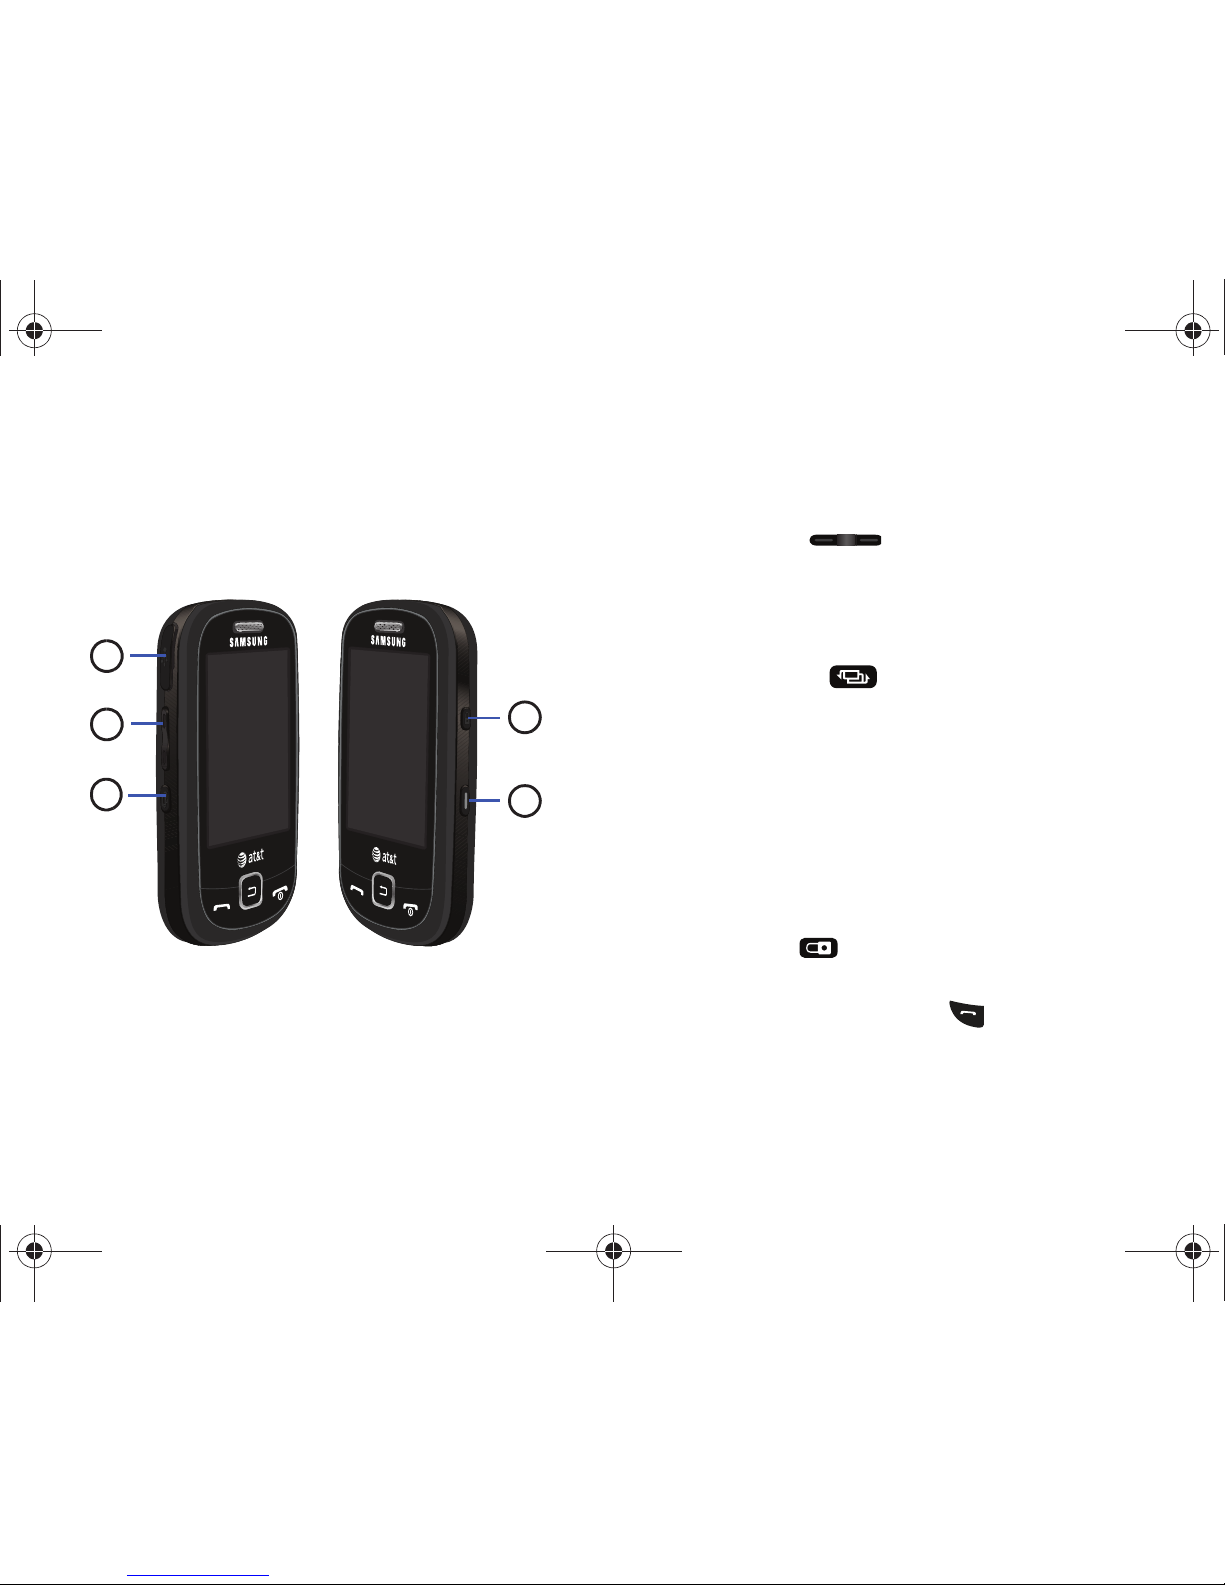
Side Views of Your Phone
1. Power/Accessory Interface connector: allows you to
connect a Travel Charger or other optional accessories
such as a USB/data cable or a hands-free headset for
convenient, hands-free conversations.
2.
Volume keys
: allow you to adjust the ringer volume while in
standby mode or adjust the voice volume during a call.
When receiving an incoming call, briefly press down either
volume key ( ) to mute the ring tone. Press and
hold either volume key to reject the call and send it directly
to voicemail. Adjusts text size when reading a message or
using your browser.
3.
Multitask key
: ( ) launches the multitask menu. This
menu provides ready access to some of the most
commonly used features such as: Call, Messaging, Mobile
Web, Music Player, and Games. You can also End all
running features.
4.
Camera key
: allows you to both access the Picture camera
menu and take pictures when you are in camera mode. In
Idle mode, press to launch the camera.
5. Lock key: ( ) lets you lock or unlock the touch screen.
If you receive an incoming call while the screen is locked,
you can answer it by pressing or
Accept
without
unlocking the screen.
3
2
5
1
4
a797 Bourbon.book Page 12 Tuesday, November 17, 2009 1:53 PM
Page 17
Understanding Your Phone 13
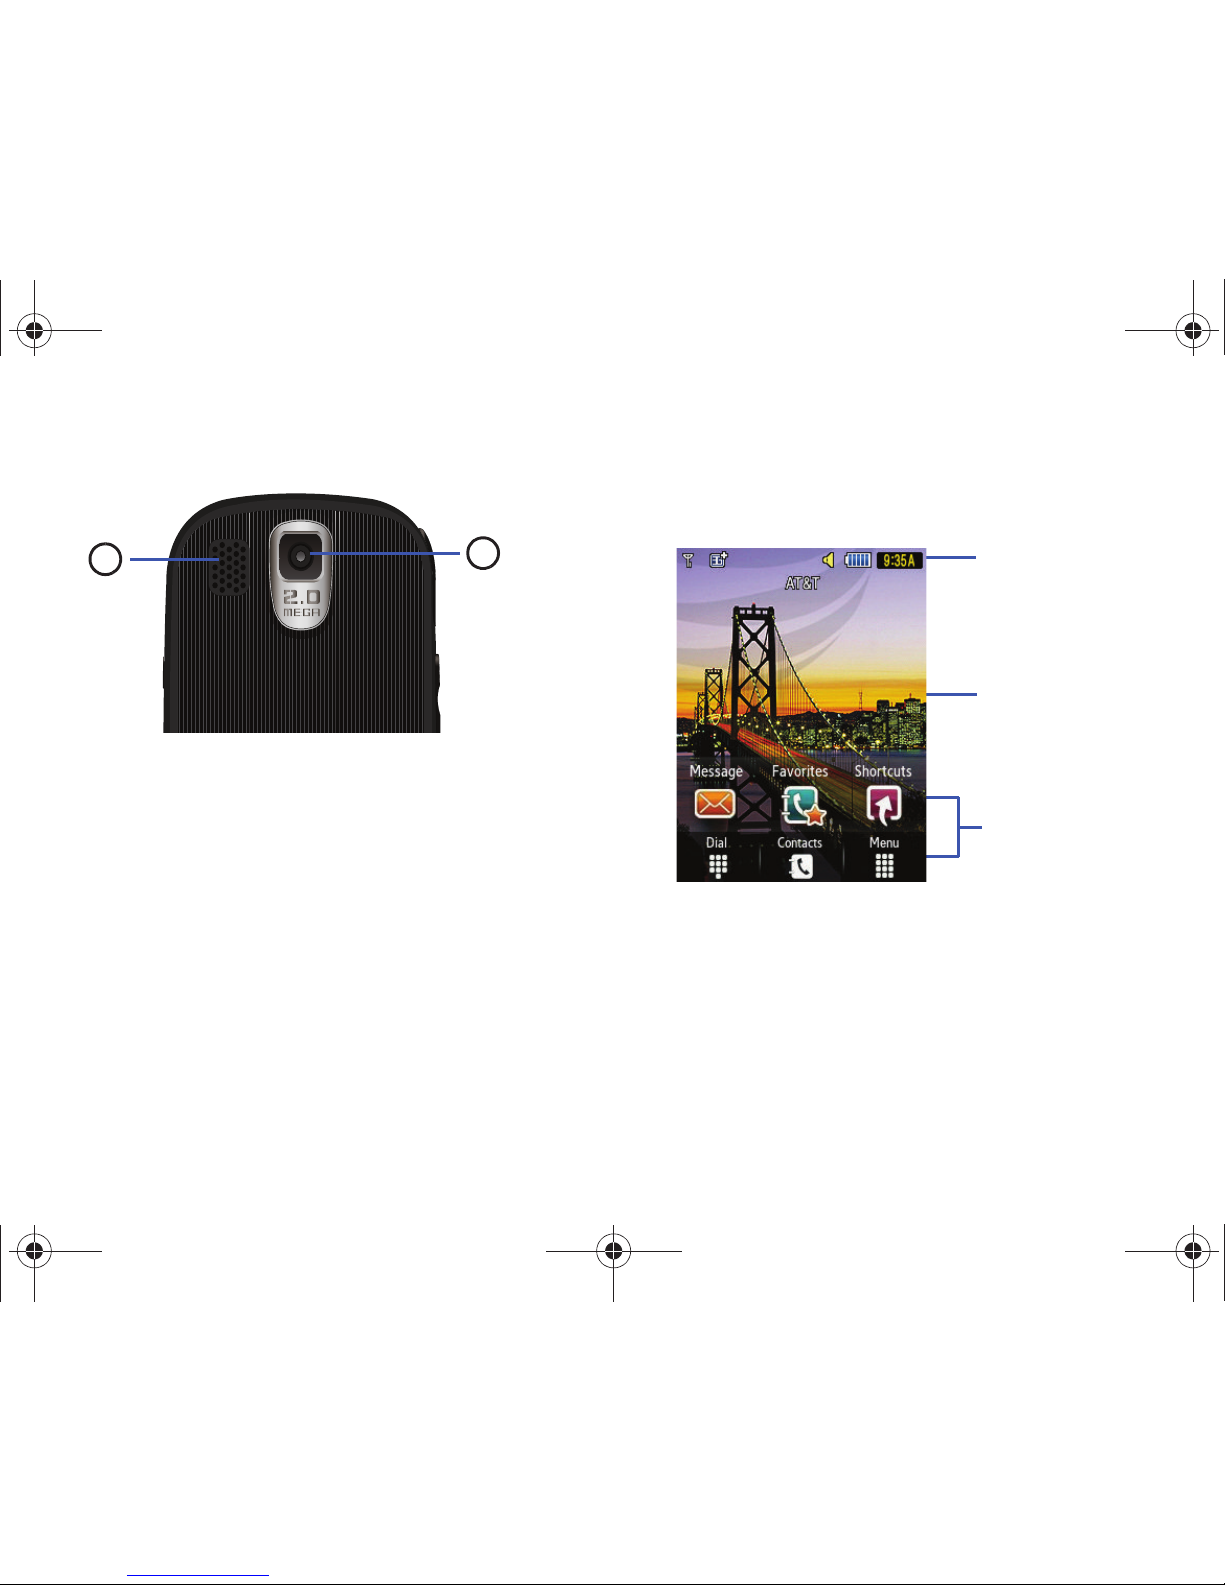
Rear View of Your Phone
1.
Speaker
— Allows you to hear music.
2.
Camera lens
: is used to take pictures and shoot videos.
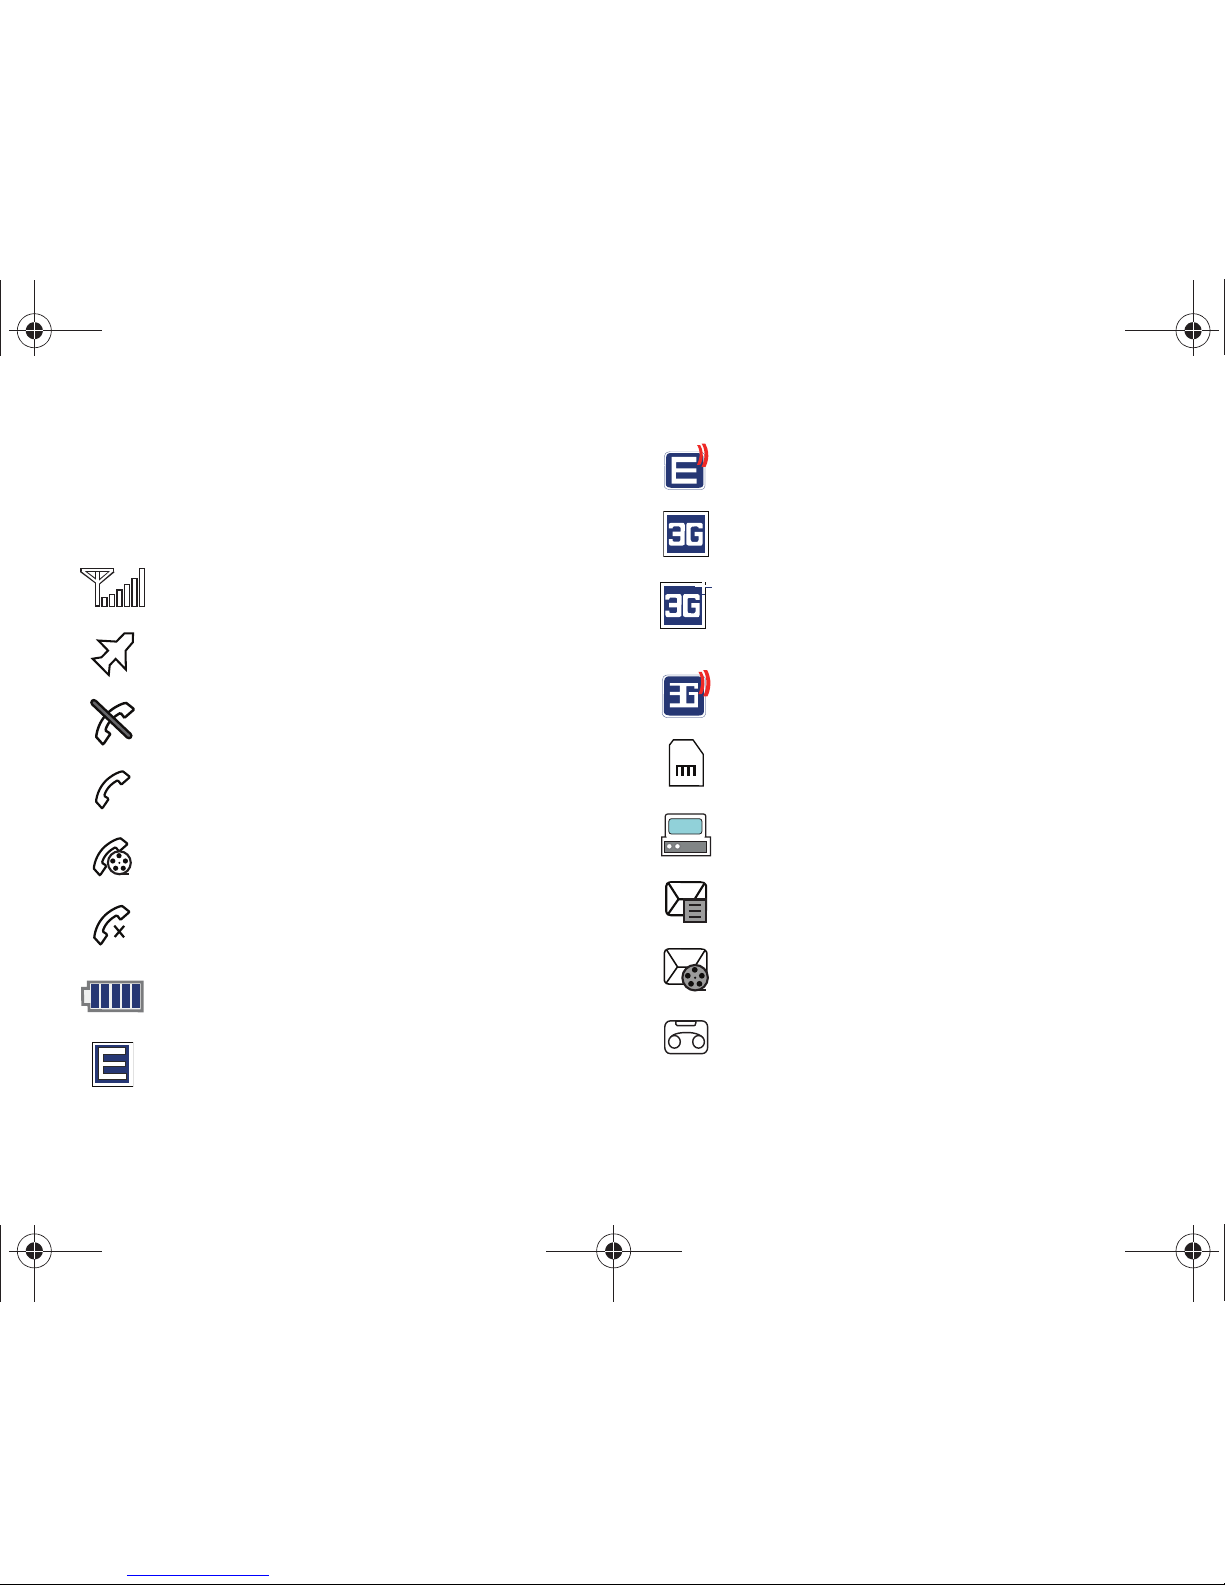
Display Layout
Your display screen provides a wealth of information about the
phone’s status and options.The display has 3 main areas:
Function Categories
Function Categories are shortcuts to Dial (for dialing a number),
Contacts (accessing the Contacts list), Menu (displays the icons
for application access), Message (takes you to the Create
Message screen), Favorites (displays your Contact Favorites), and
Shortcuts (displays shortcuts that you have set up to easily
access your favorite applications).
1
2
Indicators
Main Display
area
Function
categories
a797 Bourbon.book Page 13 Tuesday, November 17, 2009 1:53 PM
Page 18
14
Icons
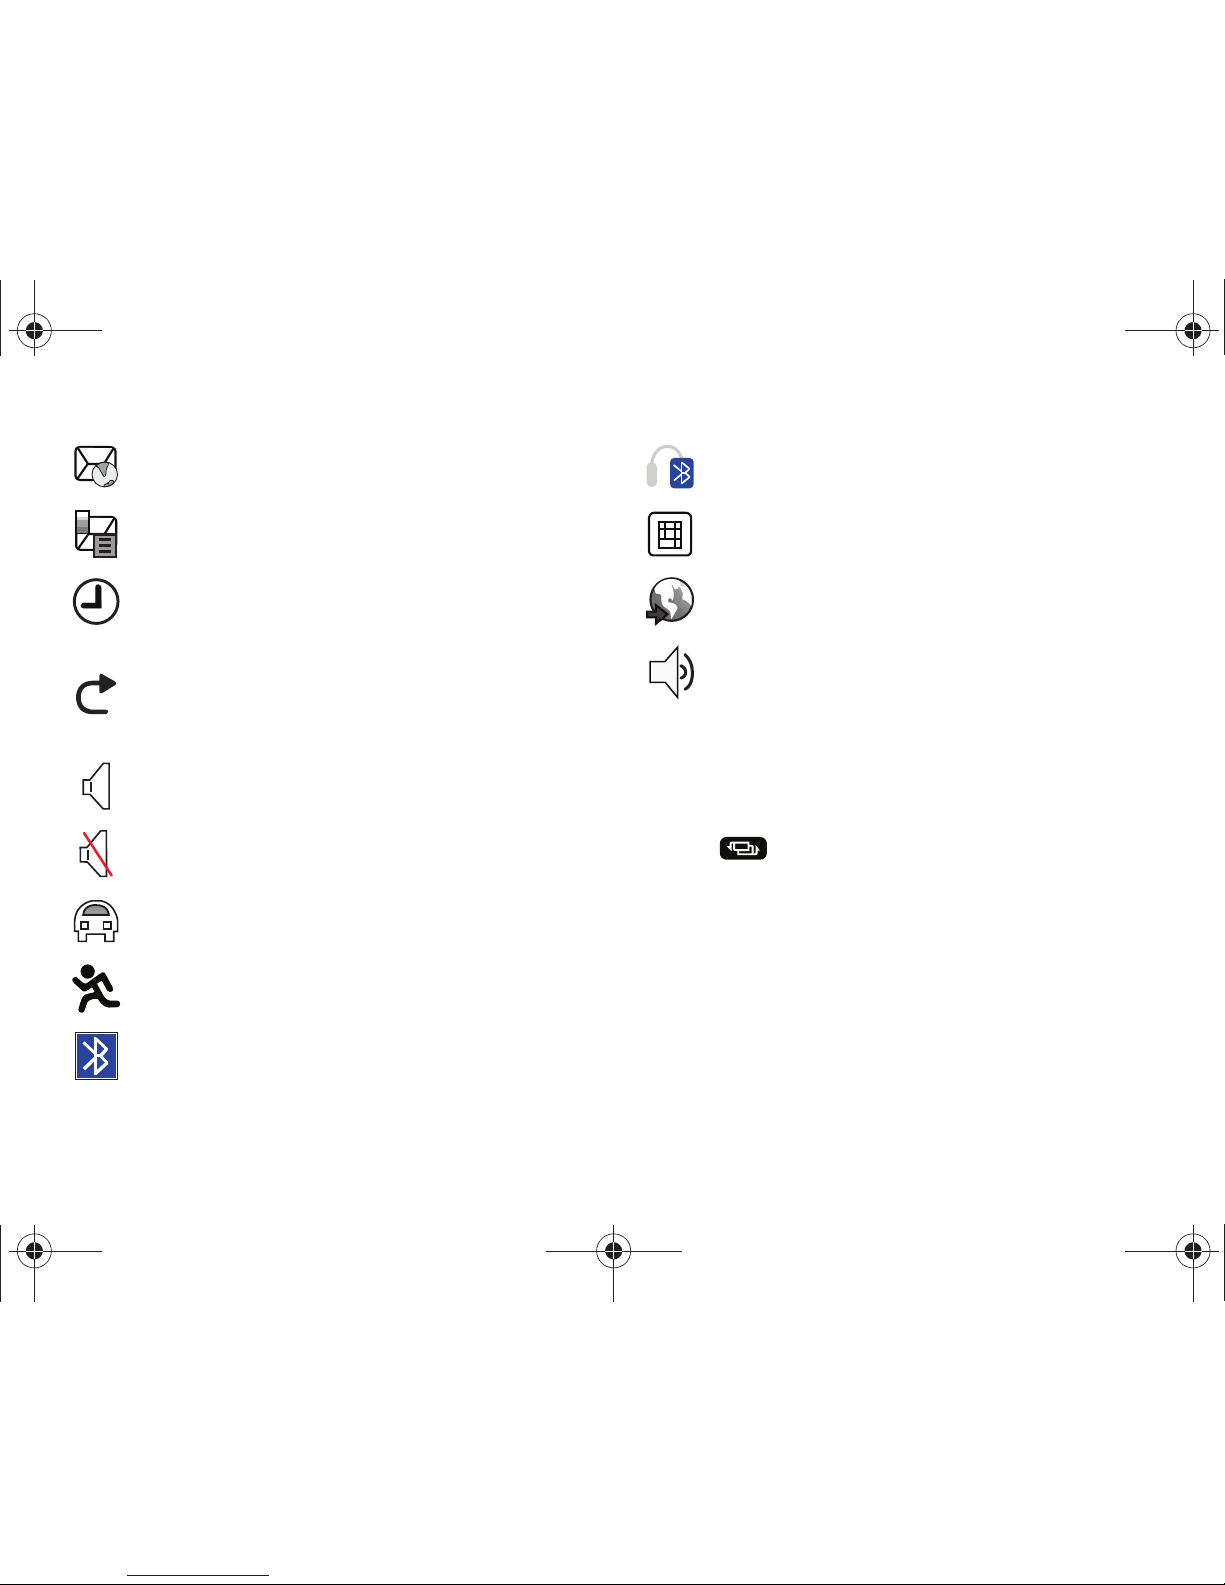
This list identifies the symbols you’ll see on your phone’s display
and Indicator area:
Displays your current signal strength. The greater the
number of bars, the stronger the signal.
Indicates that the Airplane Mode is active. You cannot
send or receive any calls or access online information.
Displays when you are out of your service area.
Displays when a call is in progress.
Displays when a Video Share call is in progress.
Displays within the lock screen when a call has been
missed.
Displays your battery’s charge level. The more bars you
see, the more power you have remaining.
Displays when your connection to an EDGE network is
active.
Displays when your phone is communicating with the
EDGE network.
Displays when your connection to a 3G network is
active.
Displays when the phone is accessing services in a
3G+ (HSDPA) network. When data is being transferred,
this icon animates.
Displays when your phone is communicating with the
3G network.
Displays when an internal microSD memory card is
detected.
Displays when the phone is connected to a computer
via a supported USB cable connection.
Displays within the Indicators area when a new text
message is received.
Displays within the Indicators area when a new
Multimedia message is received.
Displays within the Indicators area when a new voice
mail is received.
a797 Bourbon.book Page 14 Tuesday, November 17, 2009 1:53 PM
Page 19
Understanding Your Phone 15
For more details on configuring your phone’s settings, see
“Changing Your Settings” on page 39.
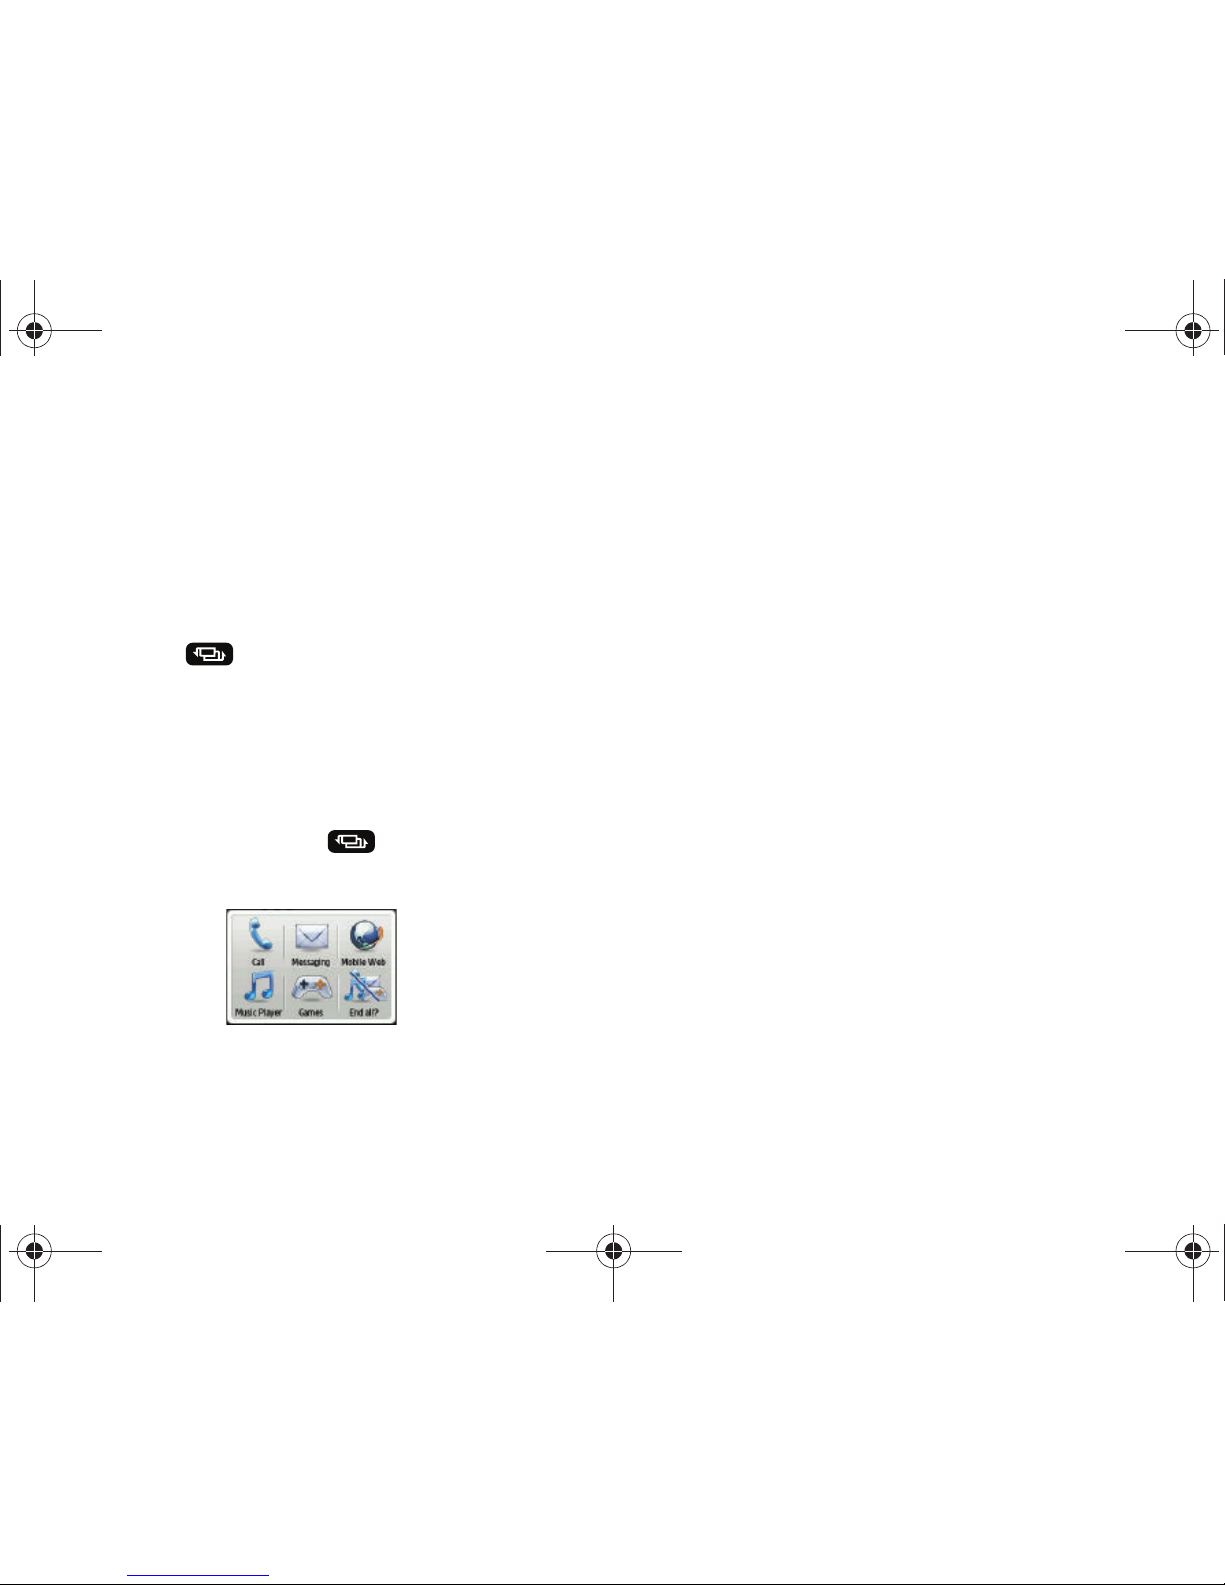
Using the Multitasking Menu
This key ( ) launches the Multitask menu that can be
activated from within any active window or page on the phone.
There is no need to stop what you are doing, if you quickly want
to jump out and activate another common feature.
The idea is to allow you to temporarily exit from your current
location to access a group of common functions such as: Call,
Messaging, Mobile Web, Music Player, Games, and End all. This
key keeps you from having to completely exit from your current
task or window, whether that be a text message, a web page, or
an active call, just to quickly do something else.
Displays within the Indicators area when a new WAP
message is received.
Displays when Inbox is full - Text Message.
Displays when you set an alarm to ring at a specified
time. For more information, refer to “Alarms” on
page 132.
Displays when Call forwarding is set to Forward always.
For more information, refer to “Call Settings” on
page 54.
Displays when the Sound profile is set to Normal.
Displays when the Sound profile is set to silent or the
volume has been manually lowered below level 1.
Displays when the Sound profile is set to Driving.
Displays when the Sound profile is set to Outdoor.
Displays when Bluetooth is activated.
Displays when a Bluetooth stereo headset has been
paired with the phone.
Displays when TTY device has been inserted.
Displays when browsing the web.
Displays when T-Coil is enabled. For more information,
refer to “T-Coil Mode” on page 54.
a797 Bourbon.book Page 15 Tuesday, November 17, 2009 1:53 PM
Page 20
16
Here is an example:
You might be in the middle of typing up an email or text message,
when you suddenly realize that you need to make a quick call.
Typically, you would have to exit from your current message,
navigate to the Idle screen, make your call (page 21), after which
you would have to go back and re-create your message.
Using this same situation, all you would have to do is:
1. Press until the you see the Multitask menu screen.
2. Touch
Call
, then enter your number and continue the call.
3. Once you are done, hang up the call normally and you are
returned to the previous message screen.
Multitask Functions
Pressing the Multitasking key ( ) on the right side of the
handset, allows you to choose from one of the following
functions:
•
Call
: allows you to make a voice call while using the handset for other
tasks. If Music Player is active, it is muted during the call.
•
Messaging
: allows you to send a text or multimedia message while
using the handset for other tasks.
•
Mobile Web
: allows you to launch the Mobile Web while using the
handset for other tasks.
•
Music Player
: allows you to launch the Music Player while using the
handset for other tasks. If an incoming call is received or you want to
make a call, the Music Player is muted.
•
Games
: allows you to quickly access Games while using the handset
for other tasks.
•
End all?
: closes all running applications or tasks and returns you to the
Idle screen.
a797 Bourbon.book Page 16 Tuesday, November 17, 2009 1:53 PM
Page 21
Menu Navigation 17
Section 3: Menu Navigation
This section explains the menu navigation for your phone. The
a797 is completely navigable by either an onscreen touch or by
using the QWERTY keypad.
•
Touching an onscreen option activates the feature.
•
Long menu list can be easily viewed by either using your fingertip to
scroll either up or down the onscreen list, pressing the volume keys
up or down, or using the directional keys on the keypad.
Menu Navigation
Menus, sub-menus, and features can be accessed by scrolling
through the available onscreen menus.
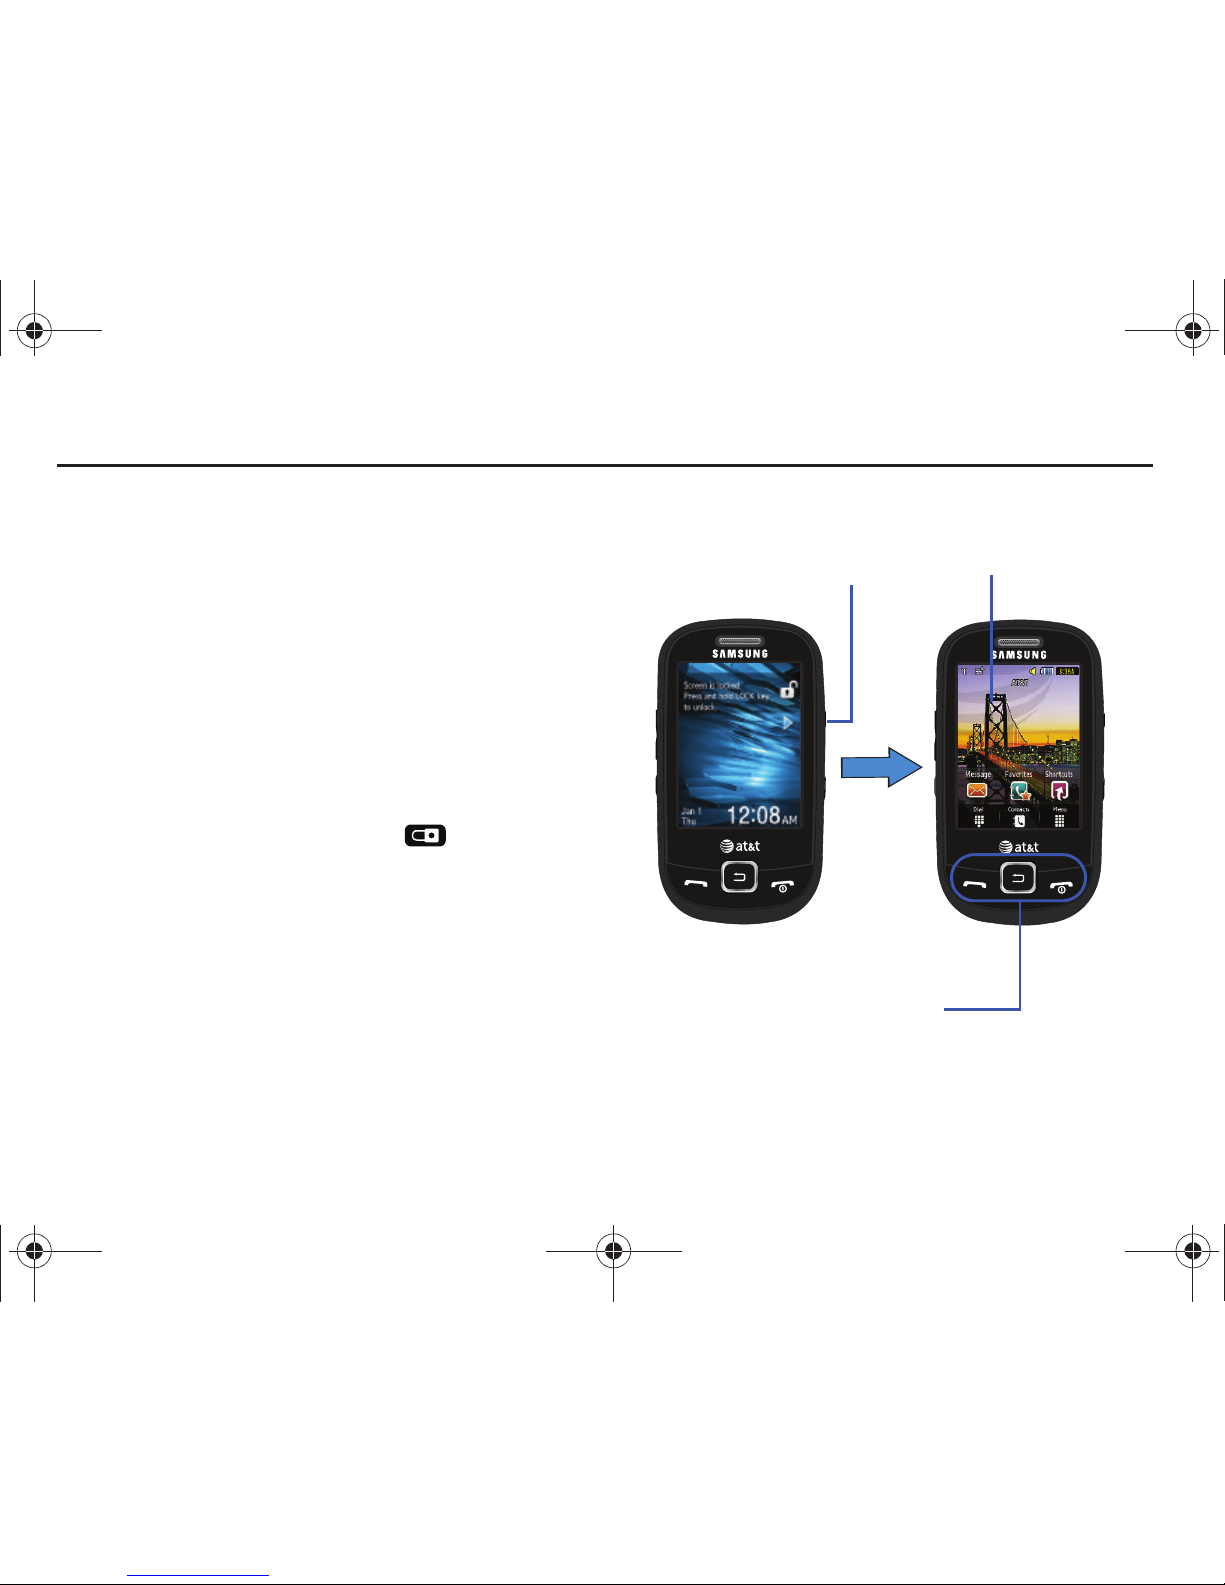
Locking and Unlocking the Phone
When the device is locked, press and hold to unlock the
a797 and display the Idle screen.
The Idle screen provides access to a wealth of phone features,
including Menu tabs (Dial, Contacts, and Menu), Message,
Favorites, and Shortcuts.
Command Keys
Idle screen
Lock key
a797 Bourbon.book Page 17 Tuesday, November 17, 2009 1:53 PM
Page 22
18
Opening an Application
䊳
Touch and tap the associated onscreen icon.
•
Press to exit from the current menu and return to the
previous screen.
•
Press to exit from the current location/function, cancel your
input and return to the Idle screen.
Navigating Through Menus
As you navigate through a menu, options display on the screen
as scrollable lists. Menu tabs (located at the bottom of most
screens, provide access to additional screen options).
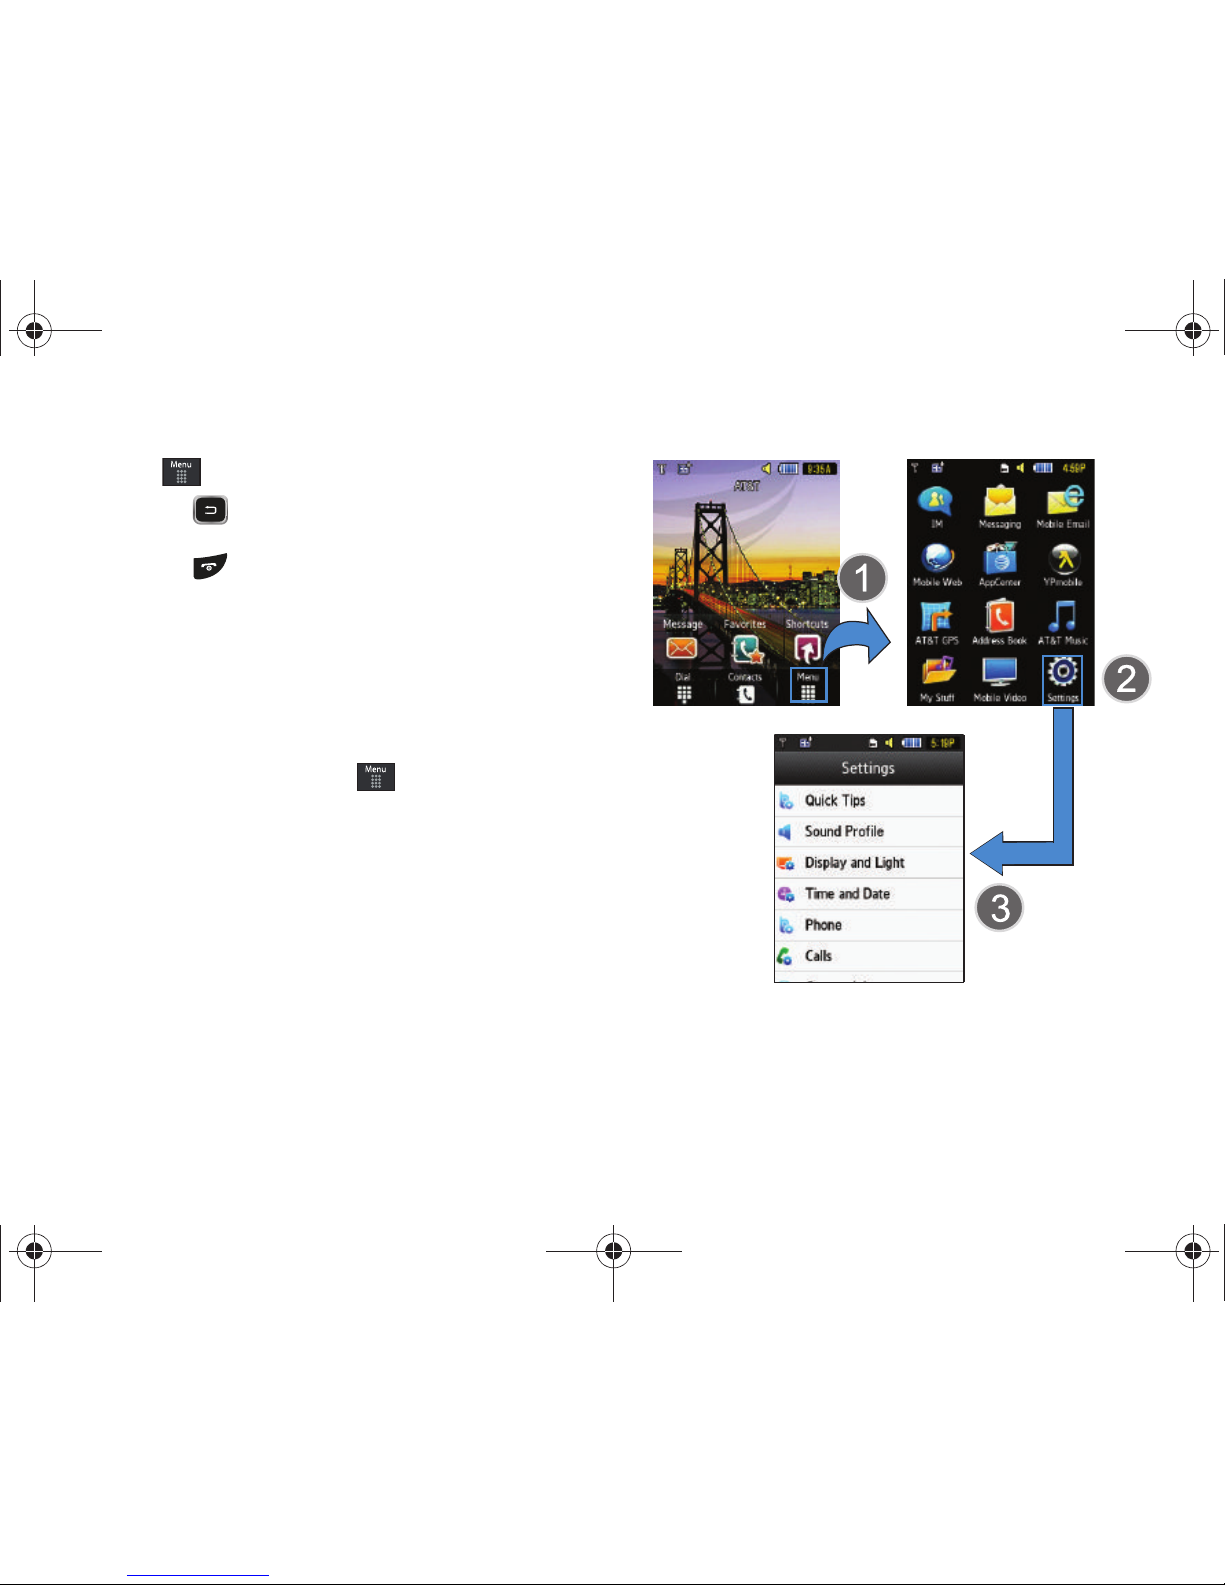
To navigate a scrollable list:
1. From the Idle screen, touch .
2. Gently press an onscreen option.
3. From the available list of options you can either:
•
Touch an onscreen entry to activate it.
•
Firmly press and slide your finger up or down the screen to scroll
through lists of menu items.
•
Navigate through a long list by pressing either volume key up or
down.
•
Navigate through a long list by pressing the directional keys on the
keypad.
a797 Bourbon.book Page 18 Tuesday, November 17, 2009 1:53 PM
Page 23
Menu Navigation 19
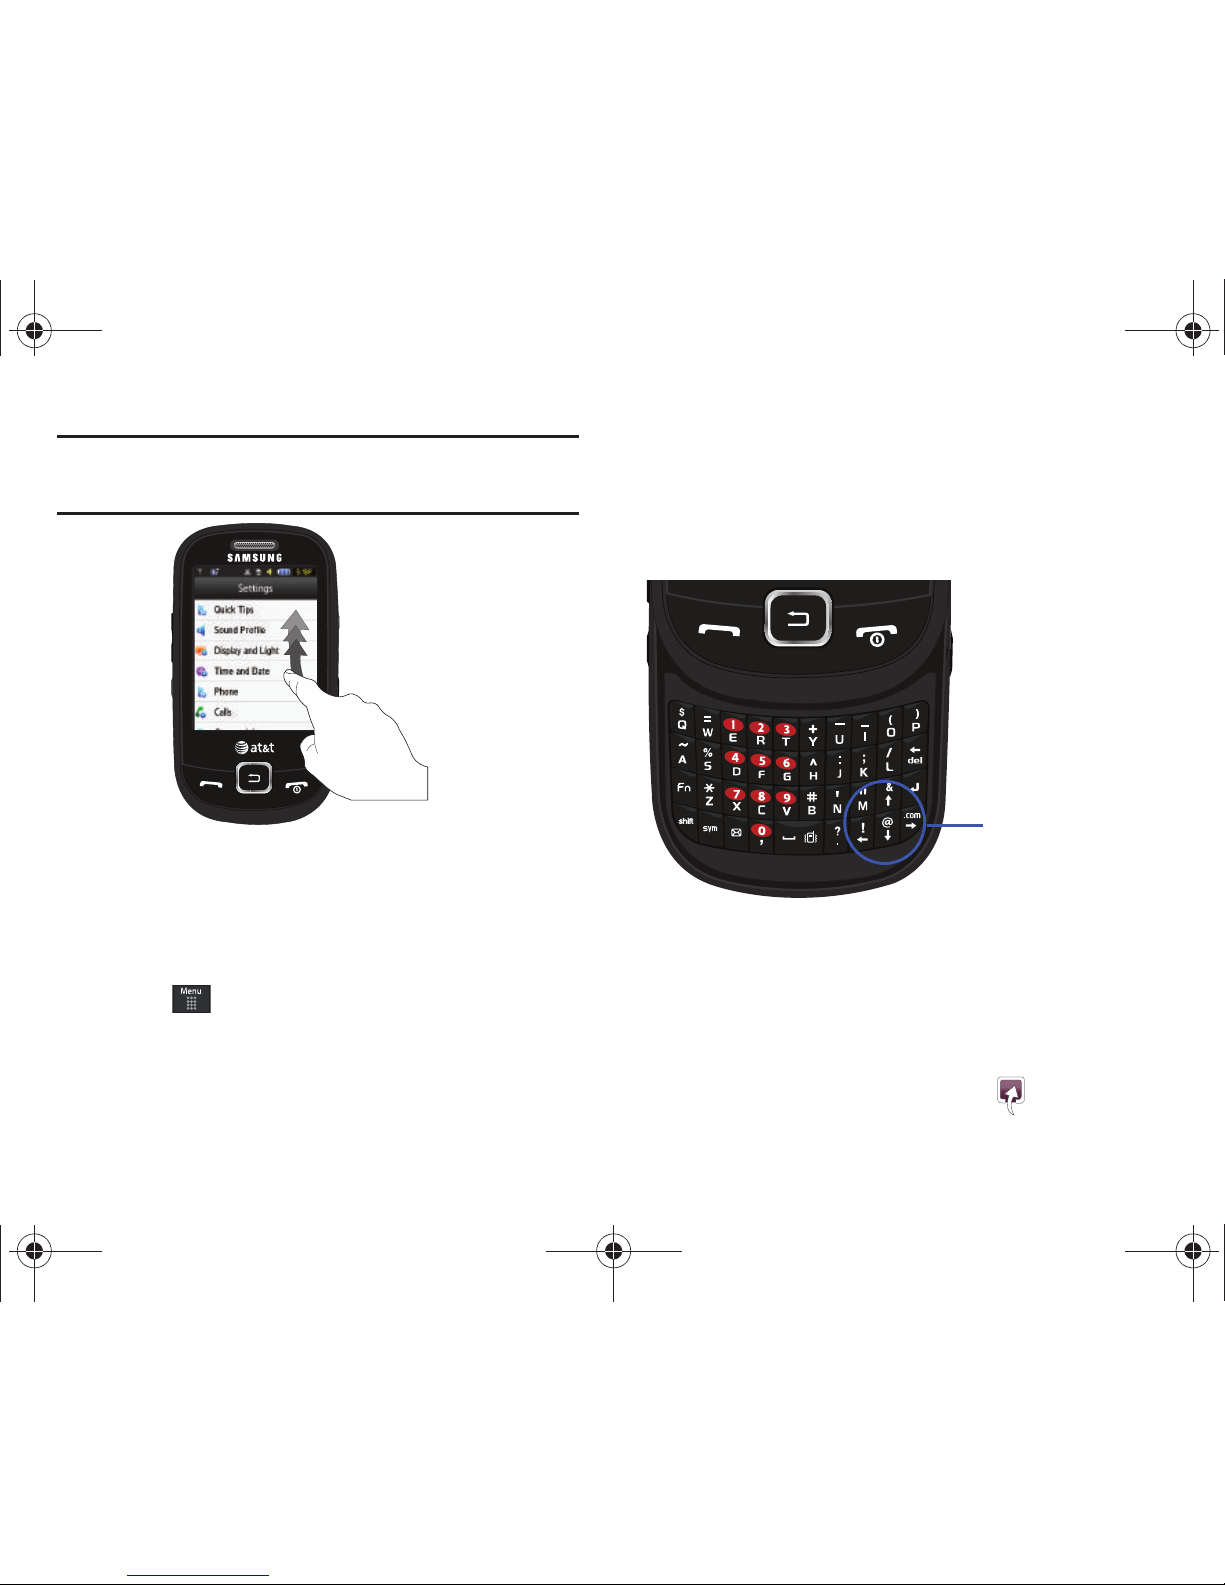
Note:
Scrolling requires that you press firmly on the screen then drag. When
scrolling through a list make sure not to touch or press individual
entries on the list as this will open the list entry.
Accessing the Phone’s Main Menu
Once you display a menu list, tapping an item causes different
functions, depending on its function. For example, you can open
another list, add text to a message, send a message, play a song,
or view a photo.
1. Touch ➔
Settings
.
2. Scroll through the list to then touch/activate the desired
phone function.
Scrolling using the Directional Keys
When you need to scroll through a menu or scroll while using the
Browser, not only can you use touch, but you can use the
directional keys on the QWERTY keyboard.
Shortcuts
The Shortcuts option allows you quick access to your favorite
applications, features, and tools. You can Add, Change, and
Remove Shortcuts.
Accessing the Shortcuts Menu
1. From the Idle screen, touch
Shortcuts
().
Directional Keys
(Up, Down, Left,
Right)
a797 Bourbon.book Page 19 Tuesday, November 17, 2009 1:53 PM
Page 24
20
2.
The menu listing your Shortcuts will display.
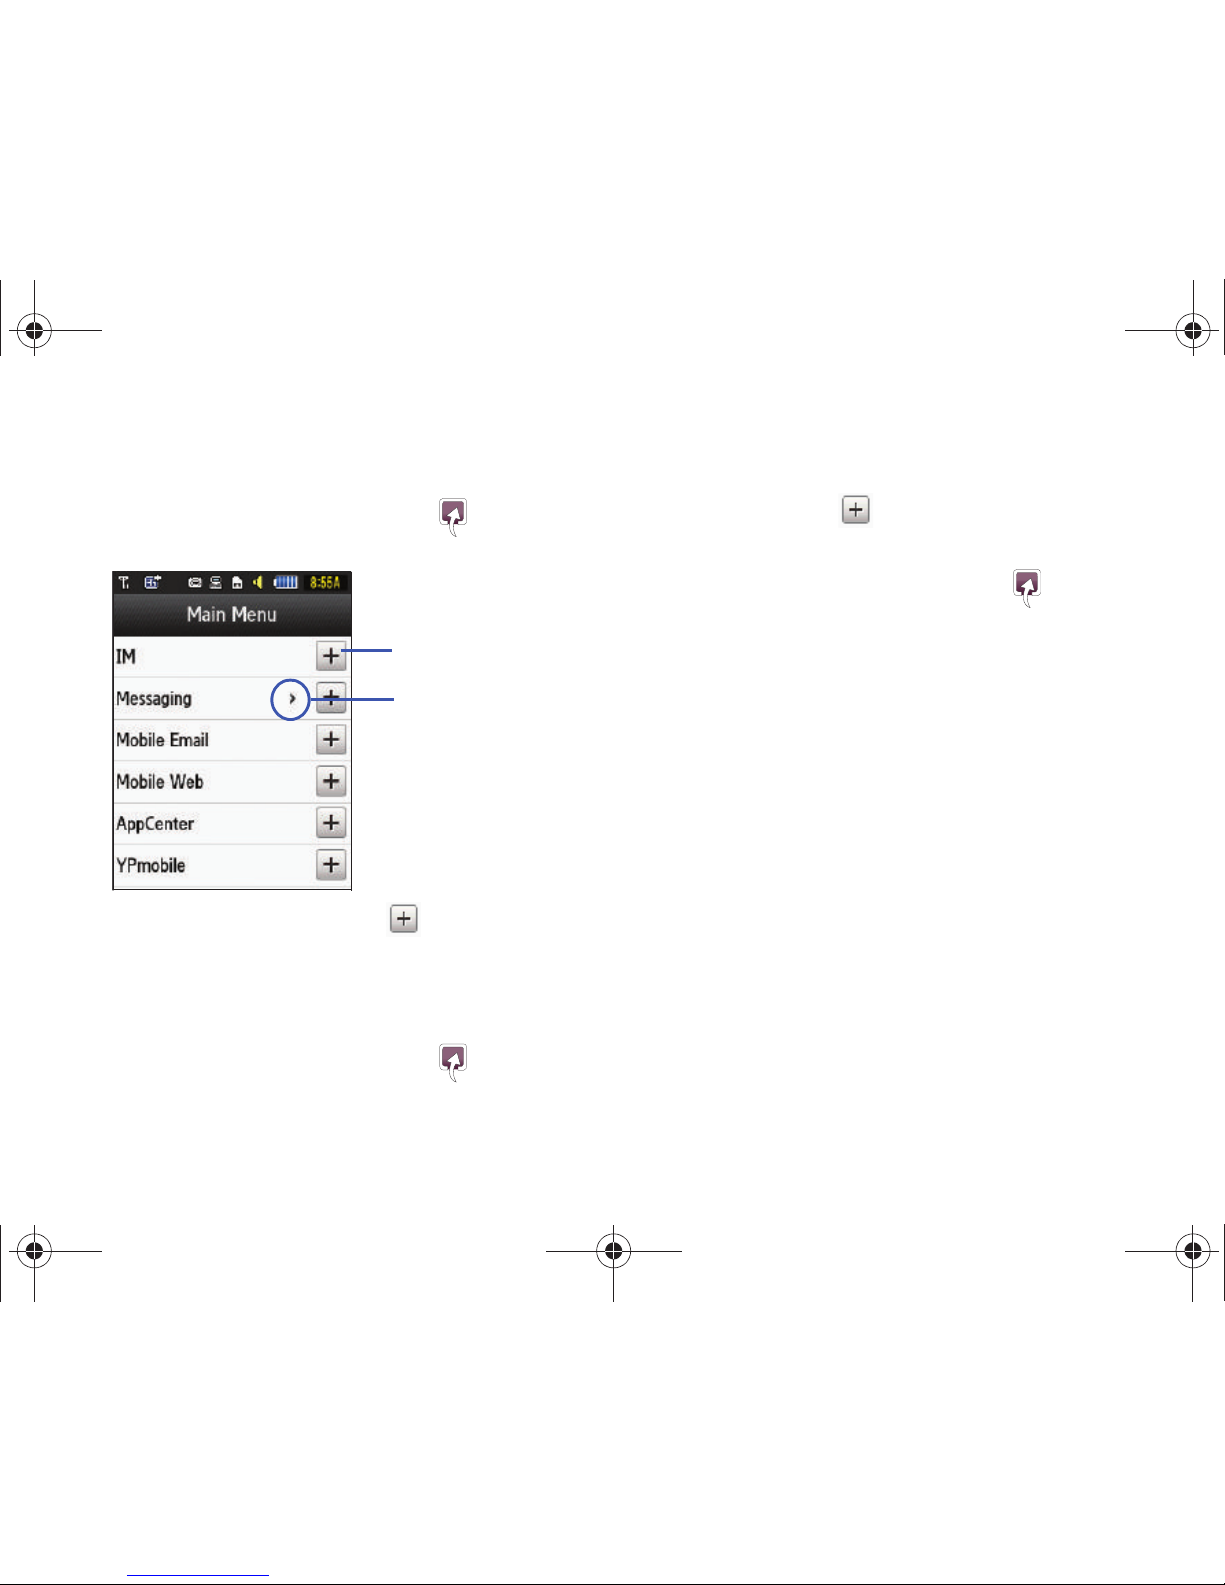
Adding Shortcuts
1. From the Idle screen, touch
Shortcuts
().
2. Touch
Add
.
3. Select an application and touch to add it to your
shortcuts. Items that contain other applications, will have
>
displayed next to them. Select > to expand the menu.
Changing Shortcuts
1. From the Idle screen, touch
Shortcuts
().
2. Touch
Change
.
3. Touch the Shortcut that you would like to replace.
4. Select an application that you would like to be added in its
place and touch .
Removing Shortcuts
1. From the Idle screen, touch
Shortcuts
().
2. Touch
Remove
.
3. Select the applications you want to remove from your
Shortcut list. A checkmark will appear next to each one. Or,
touch
All
to remove all Shortcuts.
4. Touch
Remove
.
The Shortcut is removed from your Shortcut list.
Touch to add shortcut
Touch to expand menu
a797 Bourbon.book Page 20 Tuesday, November 17, 2009 1:53 PM
Page 25
Call Functions 21
Section 4: Call Functions
This section describes how to make or answer a call. It also
includes the features and functionality associated with making or
answering a call.
For more information, refer to “Call Settings” on page 54.
Displaying Your Phone Number
䊳
Touch ➔
Settings ➔ Phone Information
.
Making a Call
1. From the Idle screen, with the phone open, use the keypad
to enter the number you wish to call.
– or –
From the Idle screen, with the phone closed, touch
and use the onscreen keypad to enter the number you
wish to dial.
2. Touch or press .
Note:
When you activate the
Auto Redial
option in the Voice Call menu, the
phone will automatically redial up to 10 times when the person does
not answer the call or is already on the phone. For more information,
refer to “Call Settings” on page 54.
Making an International Call
1. From the Idle screen, press . The + character appears.
2. Use the keypad to enter the country code, area code, and
phone number.
•
If you make a mistake, touch until the desired numbers have
been deleted.
3. Touch or press .
Manual Pause Dialing
To manually call a number with pause(s) without storing it in your
Contacts list:
1. From the Idle screen, use the keypad to enter the phone
number.
2. Press to add a two-second pause, and use the keypad
to enter the additional numbers.
Tip:
You can create pauses longer than two seconds by entering multiple p
pauses.
3. Touch or press .
a797 Bourbon.book Page 21 Tuesday, November 17, 2009 1:53 PM
Page 26
22
For more information, refer to “Adding Pauses to Contact
Numbers” on page 67.
Correcting an Entered Number
Use the following steps to correct a mis-typed entry when
dialing.
1. After entering a number using the keypad.
•
If you make a mistake, press to erase a single character.
•
Press and hold to erase the entire string of numbers.
2. Press to return to the Idle screen.
Ending a Call
䊳
Press key.
Dialing a Recent Number
All incoming, outgoing and missed calls are recorded in the Calls
menu. If the number or caller is listed in your Address Book, the
associated name also displayed.
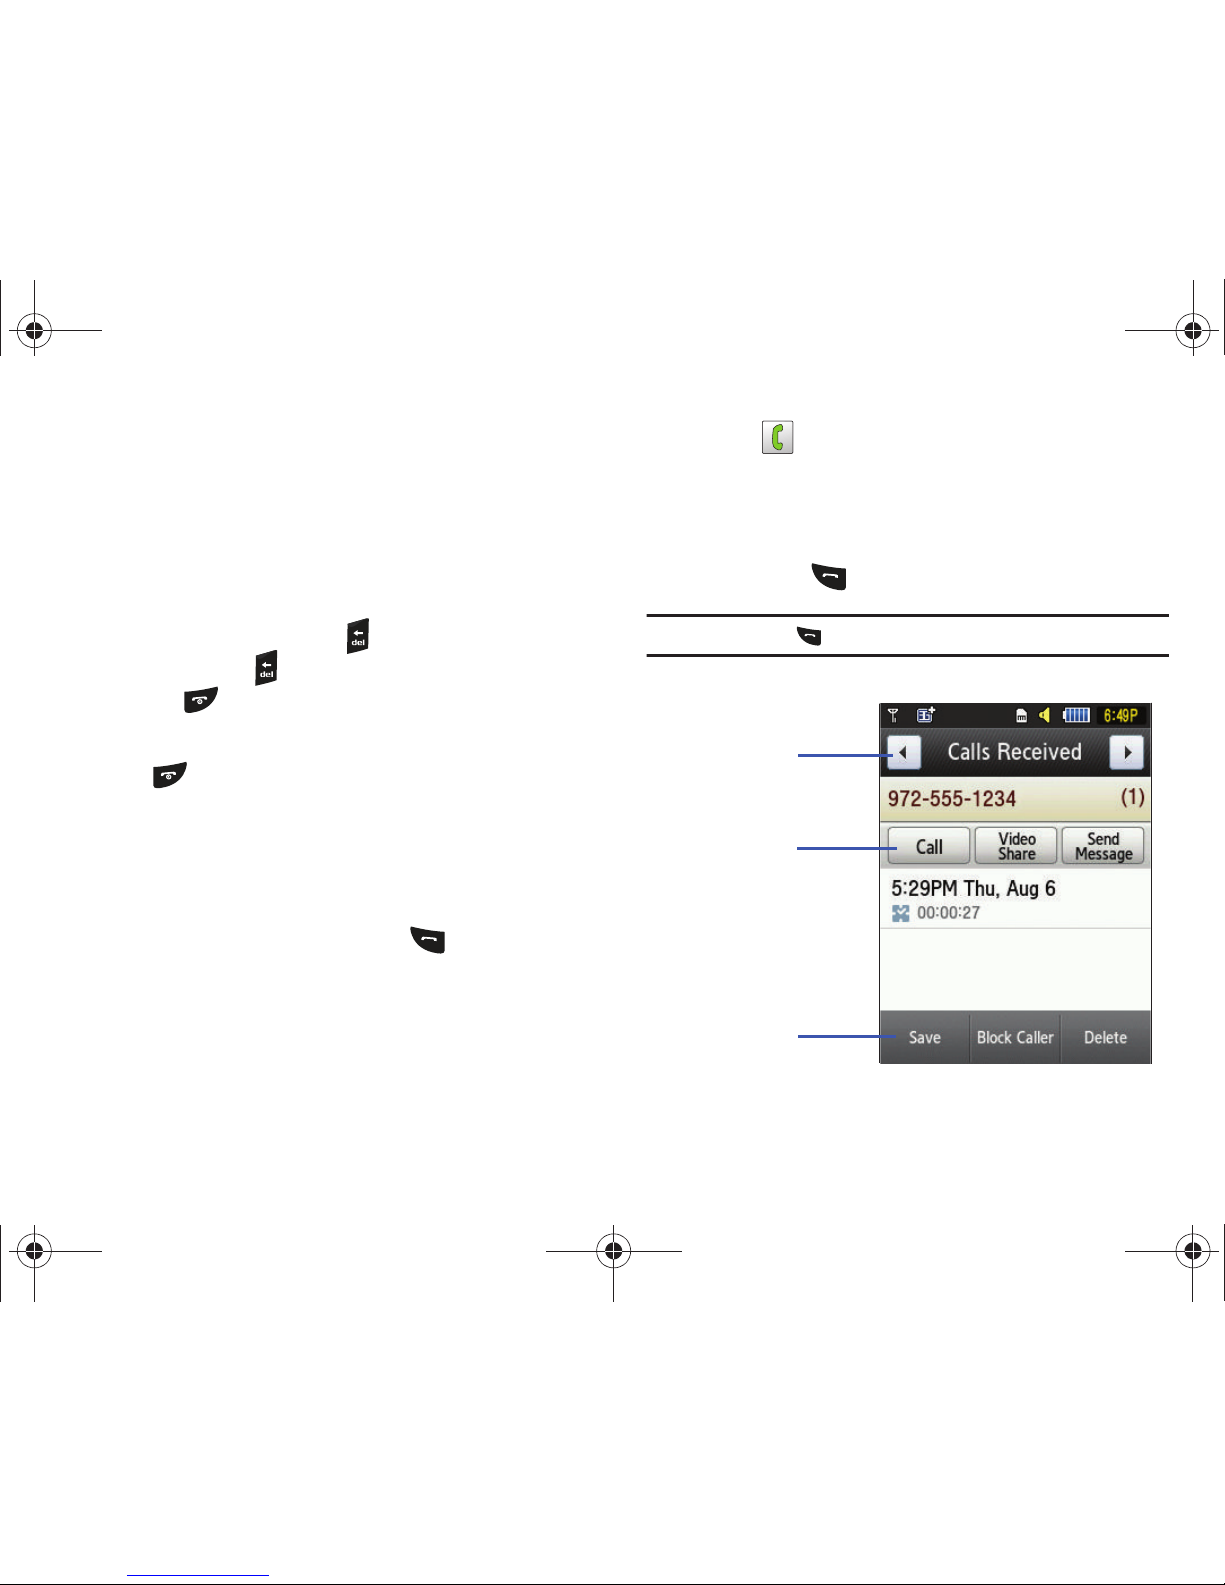
1. From the Idle Screen, briefly press .
2. Find the number by touching the drop down arrow to the
right to view the call logs from the various options screens.
Choose from: All, Missed, Made, or Received.
3. Touch next to the desired phone number (or entry
name if already in your Address Book).
– or –
Select the Contact to enter the
Details
page, then touch
Call
or press to dial the number.
Note:
Press and hold to redial the last number.
To call the
selected number
To save the
number to the
Address Book
To scroll between
Calls Made, Calls
Received, and
Missed Calls
a797 Bourbon.book Page 22 Tuesday, November 17, 2009 1:53 PM
Page 27
Call Functions 23
Making a Call Using Speed Dial
You can assign a shortcut number to a phone number for speed
dialing.
1. Touch ➔
Address Book
➔
Address Book Settings
➔
Speed Dial
.
2. The
Speed Dial
screen displays showing the numbers 1
through 9. The number 1 is reserved for Voice Mail.
3. Touch an unused number and the
Contacts
screen
displays.
4. Select a contact to assign to the number. You can also tap
on the search box and enter the first few letters of the
name you are searching for.
5. Follow the on-screen instructions to replace, add, or delete
an entry.
Making a Call from the Address Book
You can store phone numbers that you use regularly on the SIM
card or in the phone’s memory. These entries are collectively
called the Address Book.
For further details about the Address Book feature, see “Finding
an Address Book Entry” on page 68.
Answering a Call
When a call is received the phone rings and displays the caller’s
phone number, or name if stored in the Address Book.
1. From the Incoming call screen, press or slide
Accept
to the right.
•
If the
Any Key
option is activated (
Menu
➔ Settings
➔ Calls
➔
General
➔ Call Answer
), you can press any key to answer a call
except .
2. End the call by pressing .
Note:
You can answer a call while using the Address Book or other menu
feature. After ending the call, the phone returns to the previously active
function screen.
Other Answering Options
When receiving an incoming call:
•
Briefly press down either volume key ( ) to mute the ring
tone.
•
Press and hold either volume key or slide
Reject
to the right to reject
the call and send it directly to voicemail.
•
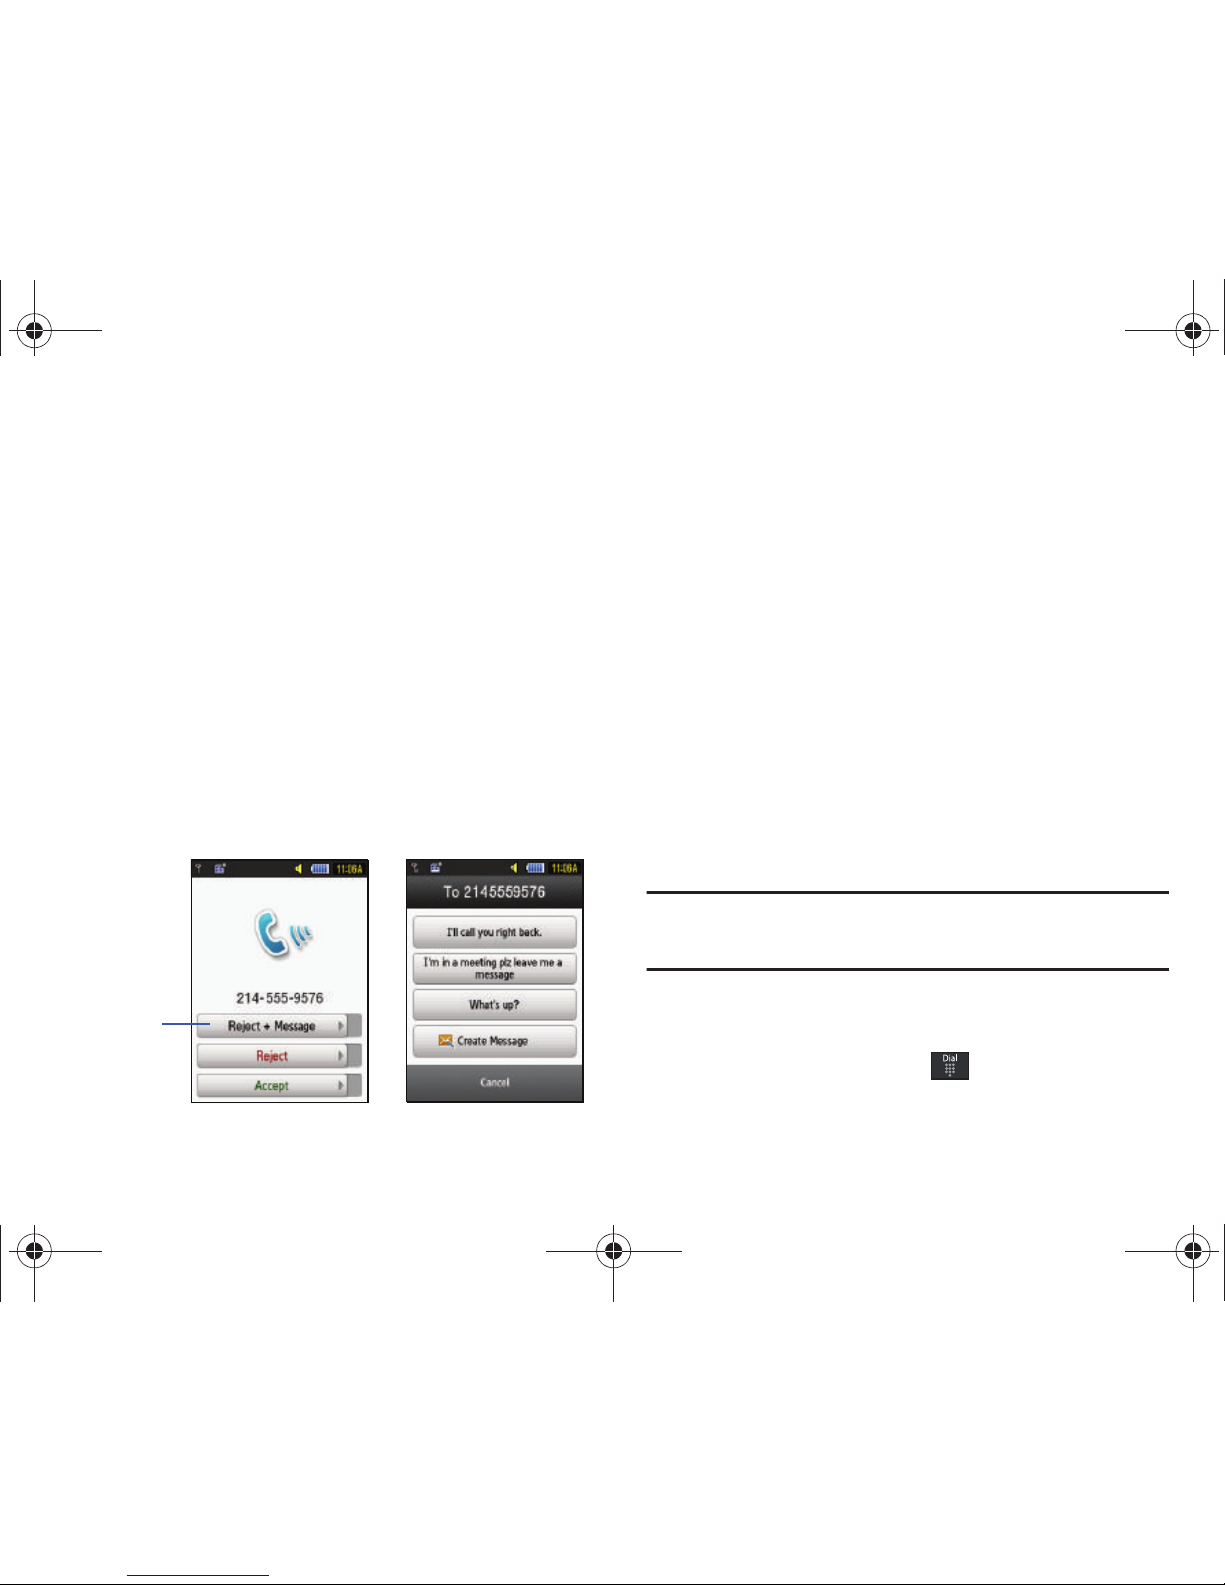
Slide
Reject + Message
to the right to use the Quick Reply feature
and send the caller a pre-defined text message. For more information,
refer to
“Quick Reply”
on page 24.
a797 Bourbon.book Page 23 Tuesday, November 17, 2009 1:53 PM
Page 28
24
Quick Reply
You can use the Quick Reply feature to send a text message to
someone when you are not able to take their call.
To use the Quick Reply feature, follow these steps:
1. At the incoming call screen, touch and slide
Reject +
Message
to the right. The Quick Reply screen will display.
2. Touch one of the following pre-defined messages:
•
I’ll call you right back.
•
I’m in a meeting plz leave me a message.
•
What’s up?
•
Create Message
3. The message is sent and you are returned to the previous
menu.
Dialing Options
From the Idle screen, you have the option to access the Dialer
and initiate a call. Before you manually enter numbers from the
Dialer, you will see three dialing options displayed on the screen.
•
Call
: dials the current number entered using the onscreen keypad.
•
Send Message
: to create a new text message and address it to either
a manually entered number or a current entry from your Address Book.
•
Contacts
: takes you to your Address Book where you can select a
contact to call.
After you begin to enter numbers, the
Contacts
options changes
to
Save
so you can save the Contact if needed.
Video Share
The Video Share features allows you to place a call and share live
or recorded video while on the call. You can initiate or receive
video by using the following steps.
Note:
In order to share video, both parties must be subscribed to Video
Share, both must have phones that support Video Share, and both
must be in a 3G coverage area.
Initiating and Receiving a Video Share Session
To initiate and receive a Video Share session:
1. From the Idle screen, touch and use the keypad to
enter the number you wish to dial.
Touch and
Slide here
a797 Bourbon.book Page 24 Tuesday, November 17, 2009 1:53 PM
Page 29
Call Functions 25
2.
Touch or press .
3. Once the call is answered, if you're both capable of Video
Sharing, the Video Share icon appears on the screen and
turns from grey to black ( ).
4. Touch the Video Share onscreen button to invite the other
party to see video shot from your phone. “Inviting ######-####” displays. A message is sent to the recipient
“###-###-#### Wants to Share Video With You.”
Important!:
When establishing a Video Share session, only the sender of the
video clip can save the file.
5. The recipient will receive a Video Share pop-up to either
Accept or Reject the Video Share call. They should touch
Accept to continue or Reject to reject the invitation.
6. If the
Auto Record
option is On, a
Recording Started
popup
displays showing the memory available for the video.
Note:
The
Auto Record
option (page 59) must be enabled for this popup to be
displayed.
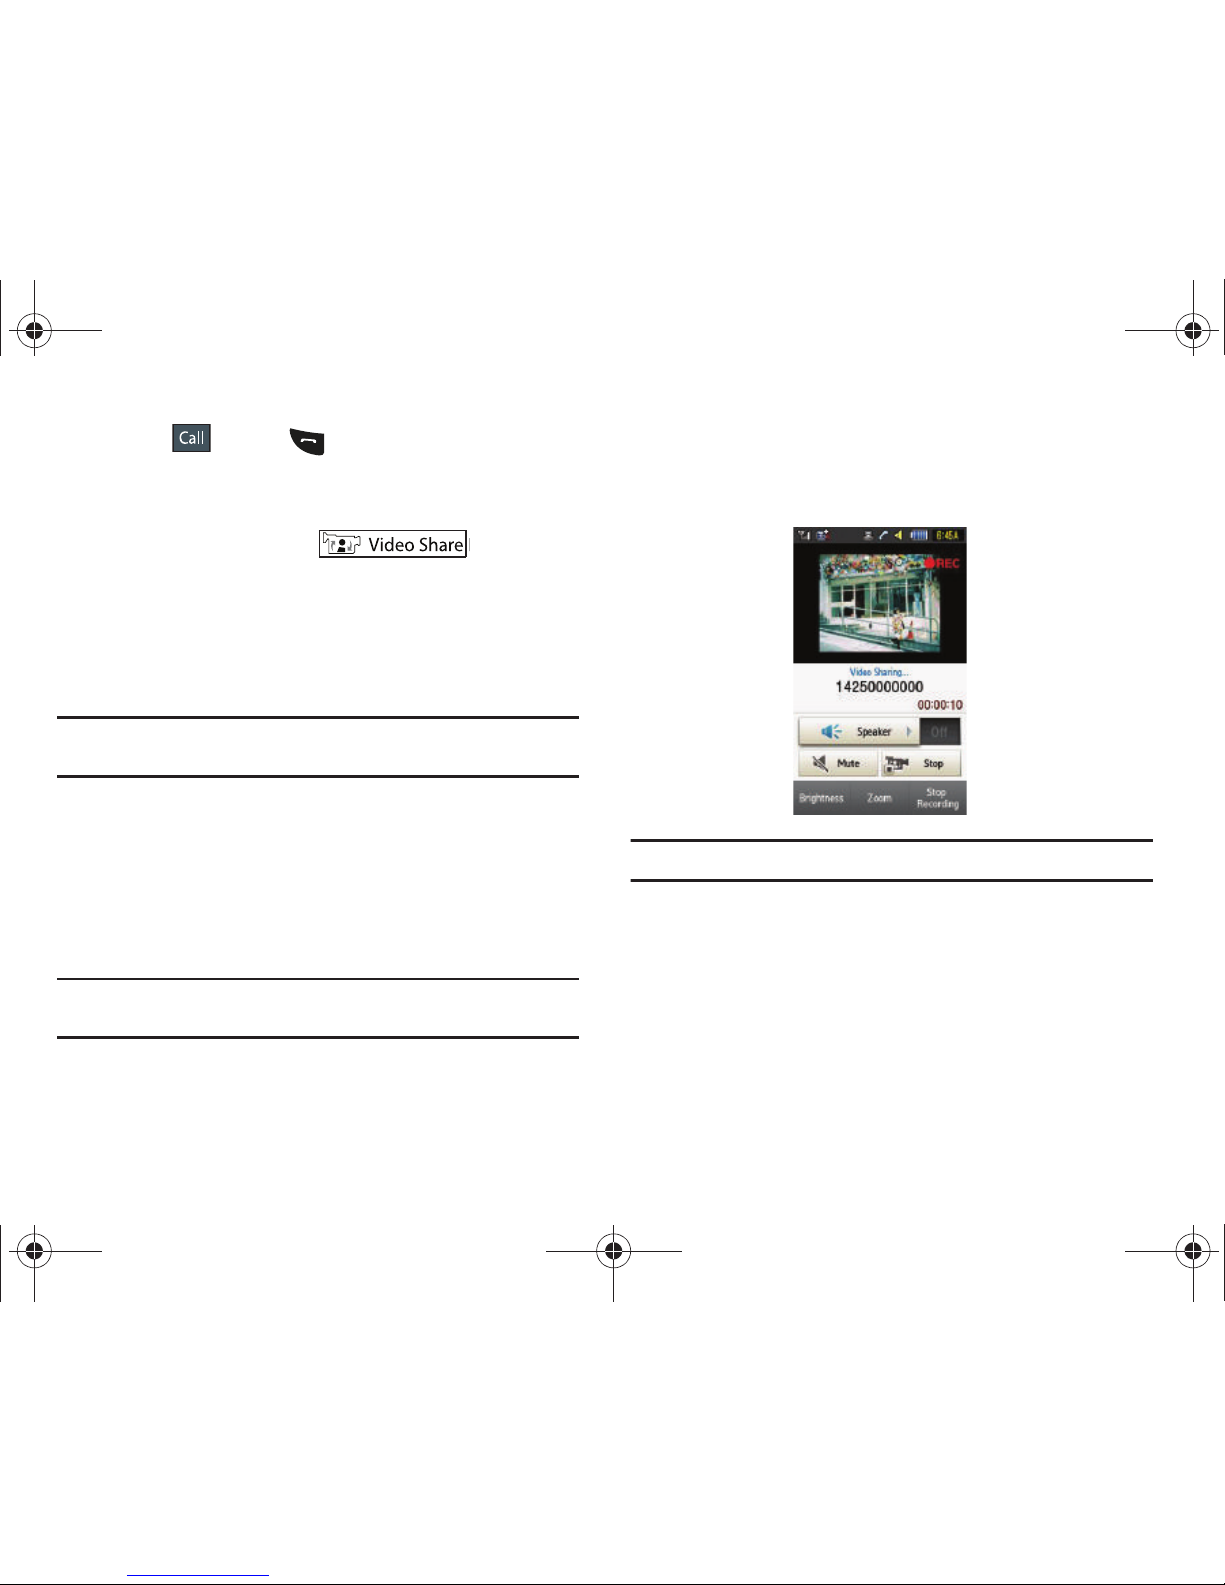
7. During a Video Share session, your options are displayed
as icons on the screen. Touch the corresponding icon to
activate the feature.
Tip:
To stop the video share call touch Stop.
8. A pop-up message displays
Video Share has stopped. Your
recorded video “VSxxxxxxxx” is saved in the Video folder in
My Stuff
.
Video Share (In-Call)
You can begin a Video Share call during an existing call by
touching the Video Share icon, or touching More ➔ Video
Share ➔ Live.
a797 Bourbon.book Page 25 Tuesday, November 17, 2009 1:53 PM
Page 30
26
Play a Video Share Recording
During a call (while not in a Live Video Share session) you can
share a recorded video for the recipient.
1. Touch
More
➔
Video Share
➔
Recorded
and then select
from the available files in your Video folder.
2. To make the connection, the recipient should touch Accept
and the Video begins to play on both phones.
Recent Calls
The phone stores the numbers of the calls you’ve dialed,
received, or missed in the Calls menu. You can access this menu
by from the Idle screen by doing one of the following:
1. Briefly press .
– Or –
Touch ➔
My Stuff ➔ Tools
➔
Recent Calls
.
2. Touch the drop-down list located at the top right of the
screen to select from
All, Missed, Made
, or
Received
.
If the number or caller is listed in your Address Book, the
associated name is displayed.
Viewing All Calls
1. From the
Recent Calls
menu, touch the drop-down and
select the
All
option. All calls made, received, and missed
are listed.
2. Touch an entry from the list to view the following options:
•Call
: allows you to return the call automatically.
•Video Share
: allows you to call the number and share a video.
• Send Message
: allows you to sent a text or Multimedia message to
the caller.
•Save
: allows you to save the number to your Address Book on
either the phone or SIM card.
• Block Caller
: allows you to add the sending number to your Reject
List, where incoming calls are sent directly to voice mail.
• Delete
: allows you to delete the selected call.
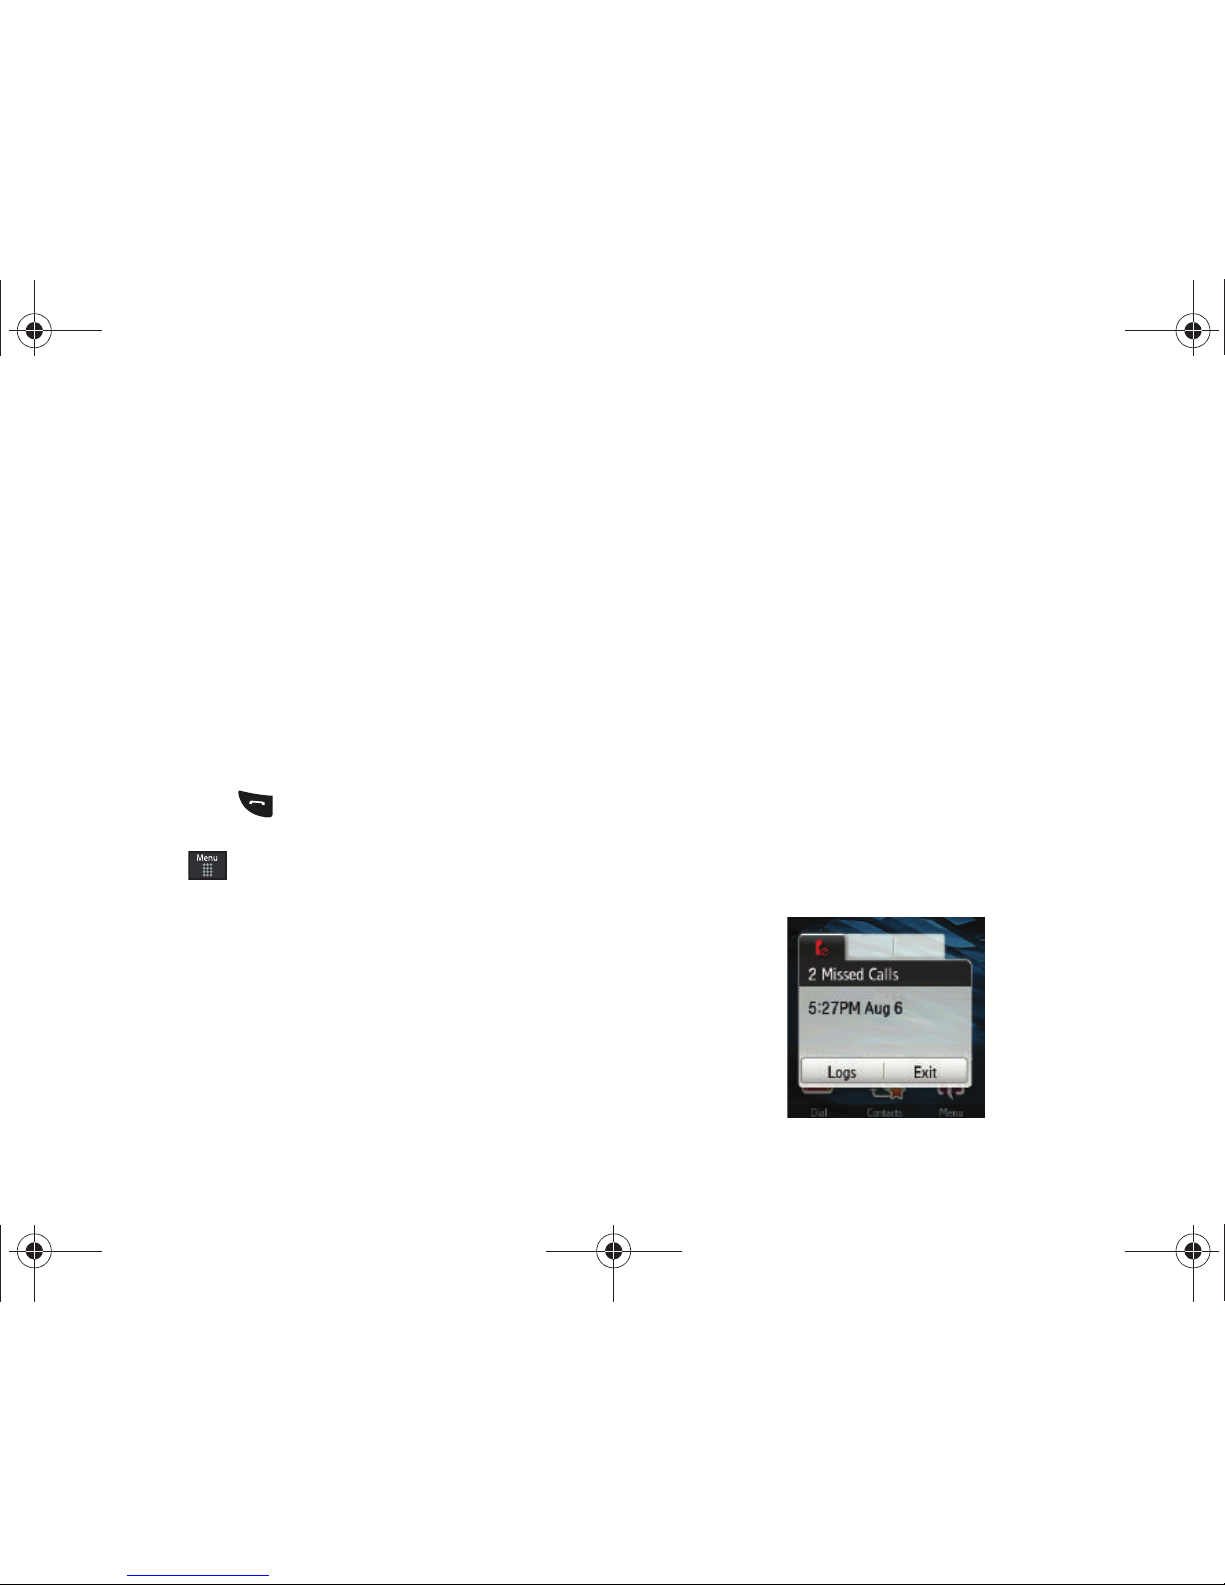
Viewing Missed Calls
The number of calls you have missed is displayed on the Idle
screen.
1. Touch the onscreen
Missed Calls
dialog. The most recently
missed calls are displayed.
a797 Bourbon.book Page 26 Tuesday, November 17, 2009 1:53 PM
Page 31
Call Functions 27
Note:
If there is a voicemail sent by the same number, associated icons are
displayed and can then be selected.
2. Scroll through the list of missed calls.
3. To move to another call type, touch the call drop-down list
(upper right of Calls page) and make your selection.
Viewing the Details of a Missed Call
To view the details of a selected missed call, use the following
steps:
1. Touch the
Missed Calls
dialog. A list of the most recently
missed calls is displayed.
2. Touch the desired missed call. Information for that caller is
then displayed within a Missed Calls page. For more
information regarding the available options, see “Viewing
All Calls” on page 26.
Calling Back a Missed Call
To call back a missed call number:
䊳
Touch Call on the
Missed Calls
dialog if there was only a single
missed call.
– or –
1. If more than one missed call, touch the
Missed Calls
dialog.
A list of the most recently missed calls is displayed.
2. Touch the desired missed call.
3. Touch either
Call
or press .
Saving a Missed Call to your Address Book
1. Touch the
Missed Calls
dialog. A list of the most recently
missed calls is displayed.
2. Touch the desired missed call.
Note:
You may see different choices depending upon the settings for your
“Save New Contacts to” option.
3. Touch Save ➔ New.
For further details about the Address Book feature, see “Adding
a New Contact” on page 64.
Sending a Message to a Missed Call
1. Touch the
Missed Calls
dialog. A list of the most recently
missed calls is displayed.
2. Touch the desired missed call.
3. Touch Send Message.
a797 Bourbon.book Page 27 Tuesday, November 17, 2009 1:53 PM
Page 32
28
4.
At the
Create
screen, touch the empty text field and use the
keypad to type in a message.
5. When you are done with your message, touch Send.
6. To add additional recipients, touch the recipients field.
Insert new recipients by:
•
Pressing the
Tap to Add
field and then entering the number
manually.
•
Selecting from
Recent Contacts
to choose your recipient.
•
Select an entry from your
Contacts
list.
•
Selecting members of a
Group
.
7. Touch Send to initiate delivery.
Deleting a Missed Call
1. Touch the
Missed Calls
dialog. A list of the most recently
missed calls is displayed.
2. Touch Delete.
3. Place a check mark adjacent to those entries you wish to
select for deletion.
•
Touching
All
toggles the placement of a check mark next to every
entry in the list.
4. Touch
Delete
.
Note:
You can press at any time to exit the Missed Call feature.
Call Time
1. Touch ➔
My Stuff ➔ Tools
➔
Recent Calls ➔ Call
Manager
➔ Call Time.
2. The following times are displayed:
• Last Call Duration
: shows the length of time for the last call.
• Total Dialed
: shows the total length of time for the calls made.
• Dialed Voice Calls
: shows the total length of time for all voice calls
made.
• Dialed Data Calls
: shows the total length of time for all data calls
made.
• Total Received
: shows the total length of time for the calls
received.
• Received Voice Calls
: shows the total length of time for all voice
calls received.
• Received Data Calls
: shows the total length of time for all data
calls received.
•Total Call Duration
: shows the total length of time for all calls made
and received.
3. Reset these fields by touching
Reset All
.
a797 Bourbon.book Page 28 Tuesday, November 17, 2009 1:53 PM
Page 33
Call Functions 29
4.
Touch
Yes
to confirm the reset or No to cancel the
operation.
5. Enter the user-defined password and touch OK to reset all
counters. For more information, refer to “Change Phone
Password” on page 51.
•
Press or to cancel this operation.
Data Counter
Data Counter refers to the amount of data (volume) to and from
the phone.
1. Touch ➔
My Stuff ➔ Tools
➔
Recent Calls ➔ Call
Manager
➔ Data Counter.
2. The following data items are displayed:
•Last Sent
: shows the size of the last data packet (measured in KB kilobytes) sent by the phone since the last time this counter was
reset.
• Last Received
: shows the size of the last data packet (measured in
KB - kilobytes) received by the phone since the last time this
counter was reset.
•Total Sent
: shows the size of the total data packet (measured in KB
- kilobytes) which have been sent by the phone since the last time
this counter was reset.
• Total Received
: shows the size of the total data packet (measured
in KB - kilobytes) which have been received by the phone since the
last time this counter was reset.
3. To set these counters back to zero, touch
Reset
.
•
Place a checkmark adjacent to those individual fields you would like
reset.
•
To uc h
All
to place a checkmark adjacent to all fields.
4. Enter the password and touch OK to reset all counters. For
more information, refer to “Change Phone Password” on
page 51.
5.
Press or to cancel this operation.
Options During a Call
Your phone provides a number of control functions that you can
use during a call.
Adjusting the Call Volume
During a call, to adjust the earpiece volume, use the
Volume
keys
on the left side of the phone.
䊳
Press the Up volume key to increase the volume level and
press the
Down
volume key to decrease the volume level.
In Idle mode, you can also adjust the ringer volume using these
same keys.
a797 Bourbon.book Page 29 Tuesday, November 17, 2009 1:53 PM
Page 34
30
In-Call Options
During an active call there are several functions available by
touching a corresponding onscreen button.
•
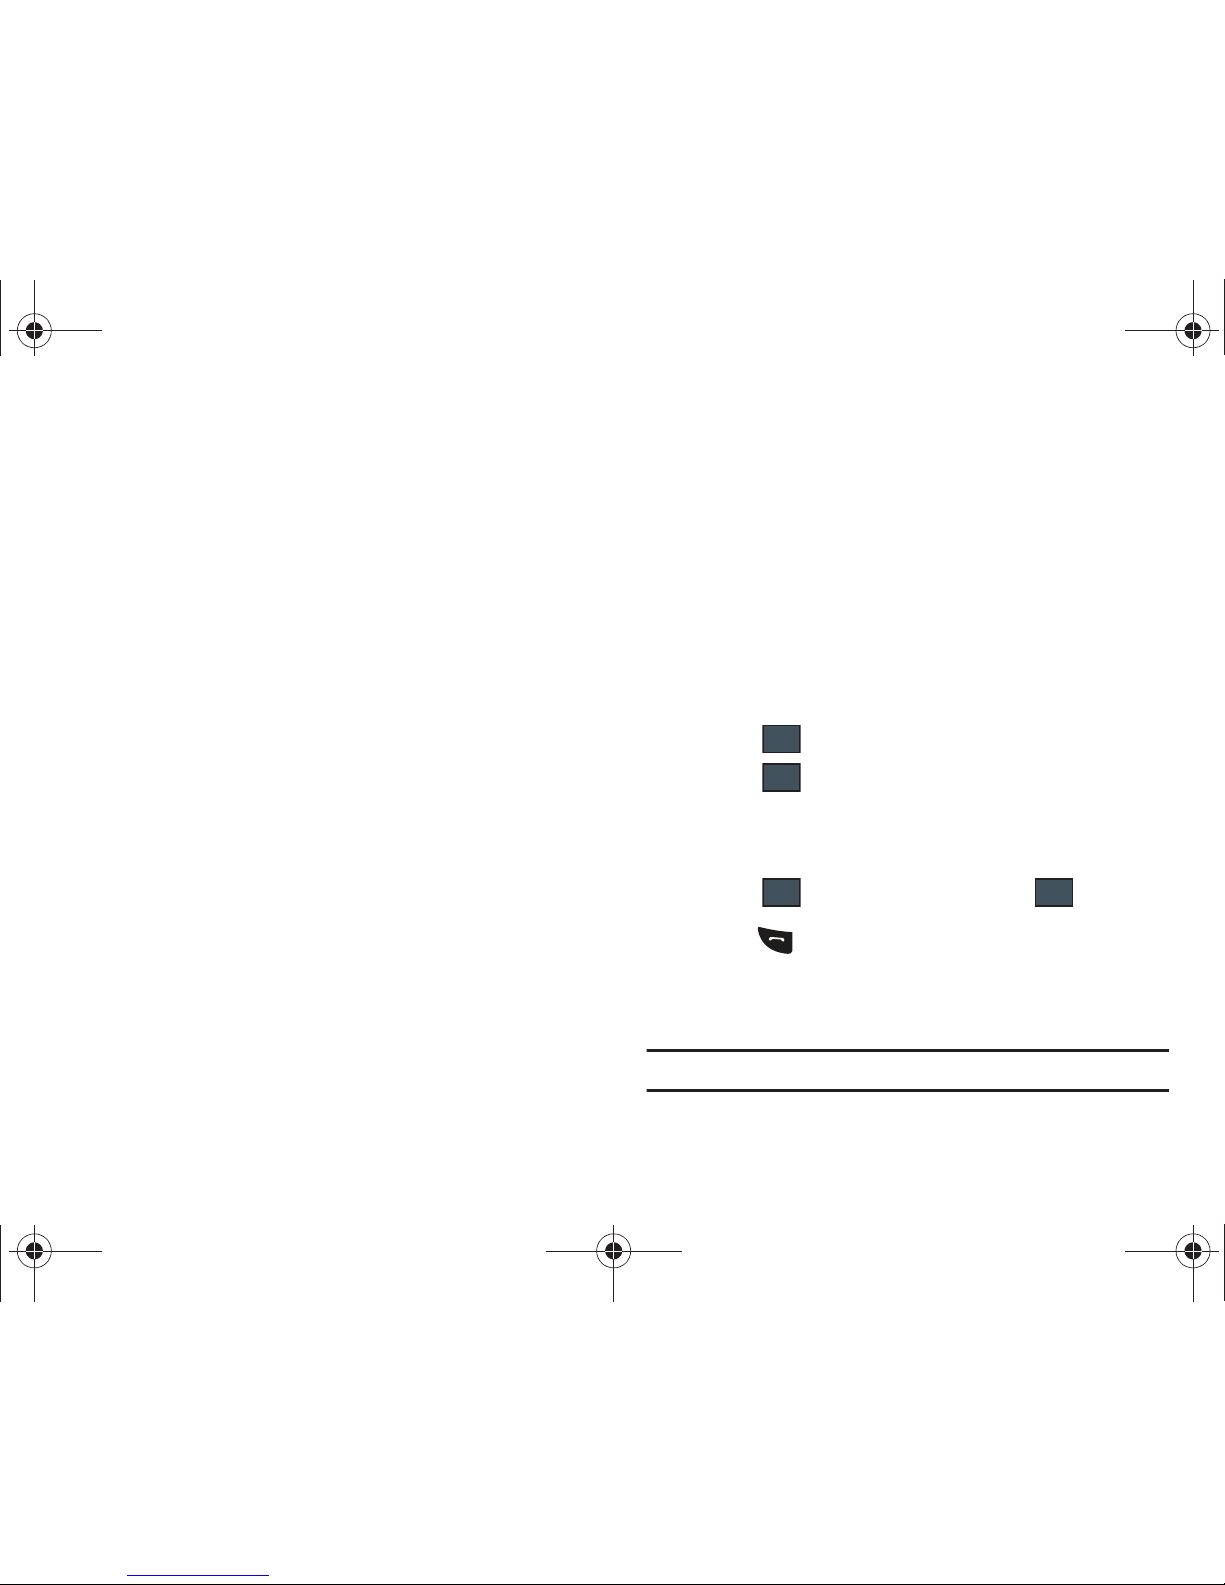
Speaker On/Off
routes the phone’s audio through either the speaker
or through the earpiece.
–
Slide
Speaker
to
On
to route the audio through the speaker. (You can
adjust the speaker volume using the volume keys.)
–
Slide
Speaker
to
Off
to use the phone’s earpiece.
•
Mute/Unmute
turn the onboard microphone either on or off.
–
Touch
Mute
during a call to mute the microphone.
–
Touch
Unmute
to unmute the microphone.
•
Video Share
lets you share video during an active call. For more
information, refer to
“Video Share”
on page 24.
•
Dial
to display the onscreen keypad, where you can choose to Save
the entered number to your Address Book, Send a new text message,
or initiate a new call.
•
Hold
to place the current active call on hold.
•
More
to access additional in-call options such as:
–
Address Book
to display your current Address Book entries.
–
Save to Address Book
to store the current phone number into your
Address Book.
–
Send Message
to send a new text message.
–
Memo
to write a memo concerning this call.
Placing a Call on Hold
You can place the current call on hold at any point during a
conversation. You can also make another call while you have a
call in progress if your network supports this service.
1. While on a call, touch Hold. This action places the current
caller on hold (which is displayed onscreen as a
greyed-out box).
2. You can later reactivate this call by touching Resume.
To make a new call while you have a call in progress:
1. Touch .
2. Touch ➔
Address Book
to look up a number in the
Address Book.
- or -
Touch ➔ enter the new number ➔ .
3. Press to dial the second number.
Once connected, each call is displayed within either an
In
call
or
On hold
tab.
Note:
The caller currently on hold appears within the
On Hold
tab.
Hold
More
Dial
New Call
a797 Bourbon.book Page 30 Tuesday, November 17, 2009 1:53 PM
Page 35
Call Functions 31
Switching Between Calls
When you have an active call and a call on hold, you may switch
between the two calls, changing the one on hold to active and
placing the other on hold.
1. Touch Swap.
•
The current call (caller #2) is placed on hold and the previous call
on hold (caller #1) is then reactivated so that you can continue
conversing with that person.
2. Press to end the currently active call.
To end a specific call:
1. Press the associated tab (
In call
or
On hold
).
2. Touch to end the specific call.
3. Press the key to end the remaining call.
Using the Speakerphone During an Active Call
While in an active call, it is possible to enable the speakerphone
feature.
1. Dial the number and press .
2. Once the call is answered, slide
Speaker
to On to activate
the speakerphone.
3. Use the
Volume
keys (located on the left side of your
phone) to adjust the volume.
4. To deactivate the speakerphone, slide
Speaker
to
Off
.
Important!:
For more information, see “Responsible Listening” on page 149.
Switching off the Microphone (Mute)
You can temporarily switch your phone’s microphone off, so that
the other person cannot hear you.
a797 Bourbon.book Page 31 Tuesday, November 17, 2009 1:53 PM
Page 36
32
Example:
You wish to say something to person in the room, but do not want
the person on the phone to hear you.
Note:
If you are already in Video Share or you have a call on hold, you need to
select Mute/Unmute.
To switch the microphone off temporarily during a call:
1. Touch Mute. The option is then replaced with Unmute.
2. Touch Unmute to deactivate the Mute function and
reactivate the microphone.
Searching for a Number in Address Book
1. During the active call, touch More ➔ Address Book.
2. Touch the Address Book entry.
For further details about the Address Book feature, see “Finding
an Address Book Entry” on page 68.
Call Waiting
The Call Waiting feature allows you to answer an incoming call
while you have a call in progress, if this service is supported by
the network, and you have set the Settings ➔ Calls ➔
Voice Call
➔
Call Waiting
Menu to Activated. You are notified of an
incoming call by a call waiting tone.
To answer a call while you have a call in progress:
1. Press to answer the next incoming call. The first call
is automatically put on hold.
2. To switch between the two calls, touch Swap.
•Swap
: Places the current call on hold and then activates the
previous call.
To end a call on hold
1. Touch the On hold tab and touch adjacent to the
caller you wish to disconnect.
2. Press to end the current active call.
3-Way Calling (Multi-Party Calling)
The 3-Way or Multi-Party feature allows you to answer a series of
incoming calls and place them on hold. If this service is
supported by the network, all calls can be joined together. You
are notified of an incoming call by a call waiting tone.
Note:
The Join option combines all of the calls you have established with
your phone (both active and on hold).
Swap places the current call on hold and then activates the previous
call.
This feature joins all of the calls you have established with your
phone (both active and on hold) into a multi-party call.
a797 Bourbon.book Page 32 Tuesday, November 17, 2009 1:53 PM
Page 37

Call Functions 33
1.
Press to answer the first incoming call.
2. Press or
Accept
to answer the next incoming call. The
first call is automatically put on hold.
3. Join the first two callers by pressing touching Join.
•Join
: combines your current set of callers into a single multi-party
call (both active and on hold).
4. Press to end the call.
a797 Bourbon.book Page 33 Tuesday, November 17, 2009 1:53 PM
Page 38
34
Section 5: Entering Text
This section outlines how to select the desired text entry mode
when entering characters using the QWERTY keyboard-style
keypad.
This section also describes how to use the T9 predictive text
entry system to reduce the number of key strokes needed to
enter text.
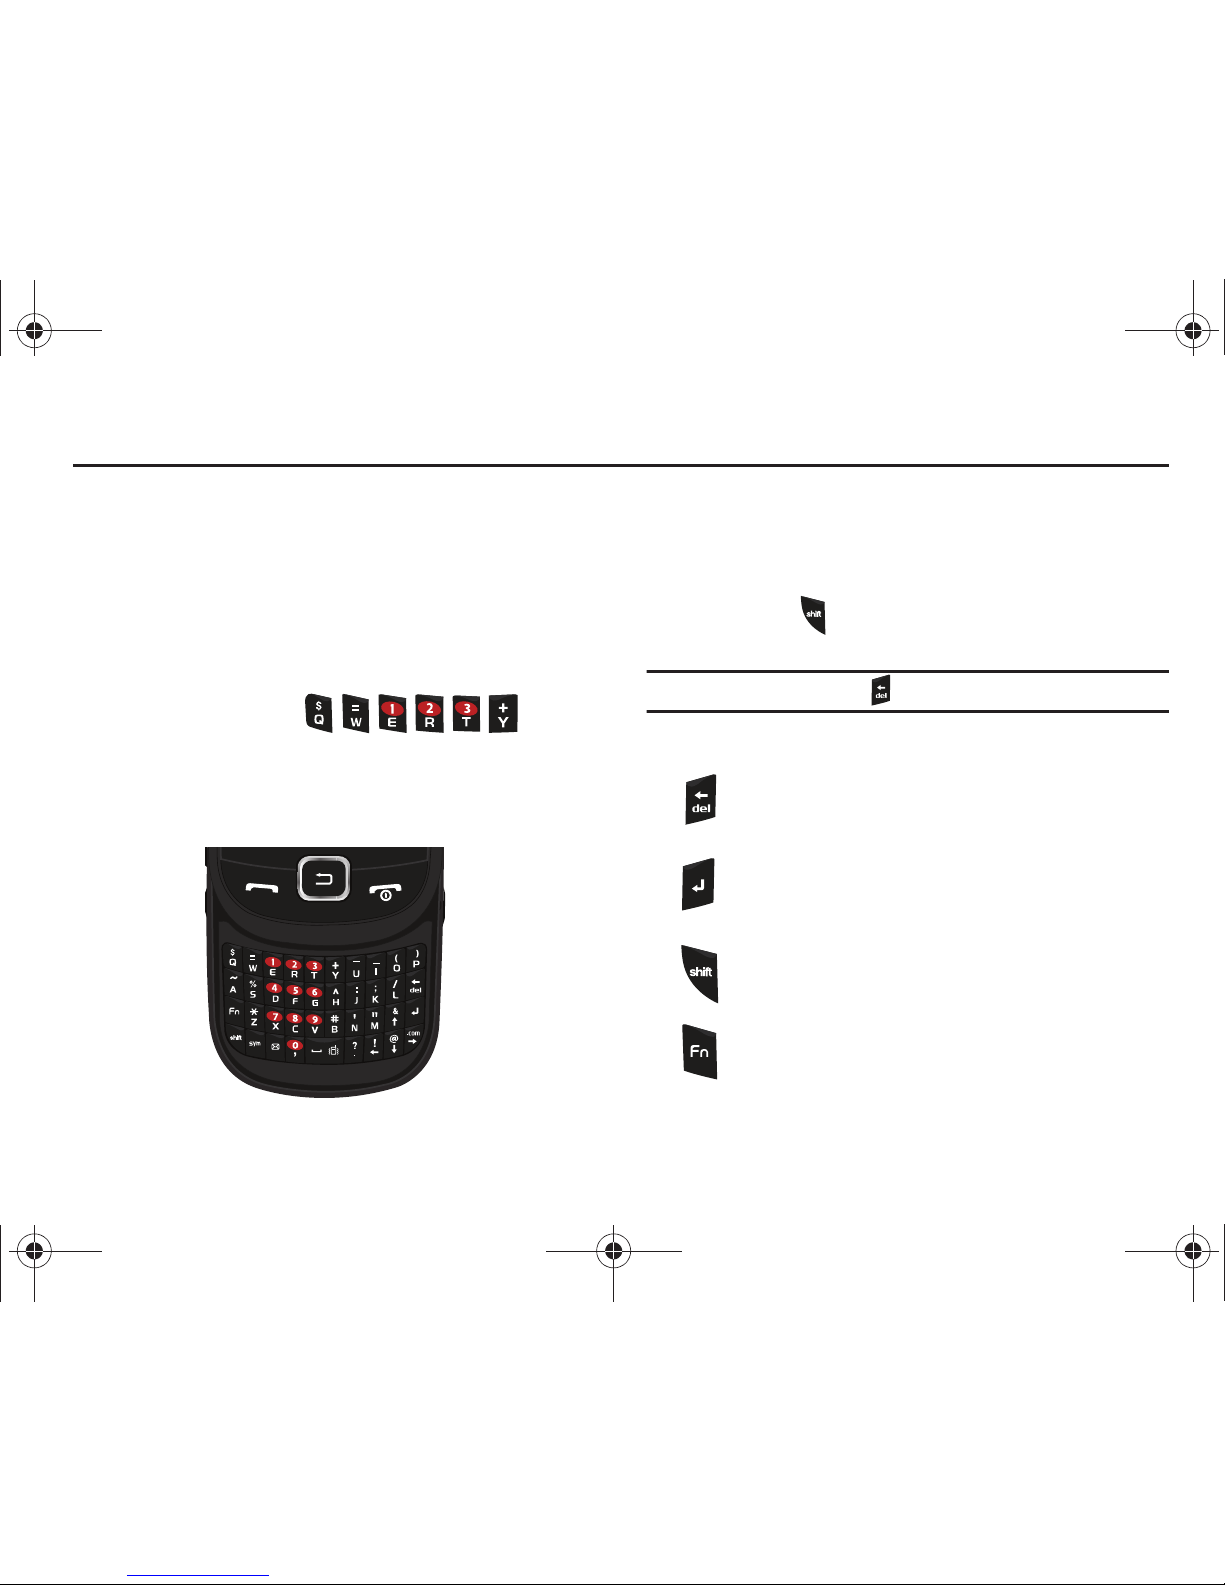
Using the QWERTY Keypad
Your phone has a QWERTY ( ) keypad
to support easy and quick text input. You can enter text as you
would when using a computer’s keyboard. To access the
QWERTY keypad, slide your phone open to expose the keypad.
The keys are labelled with alphabet on the lower half and
numbers and symbols on the upper half. Press the key
corresponding to the character you want to enter. To switch
between using the upper case characters and lower case
characters, press . You can move the cursor by moving the
Navigation key.
Tip:
To delete a character, press the key.
In addition, you can use the following function keys:
Press to delete characters.
Press to start a new line.
Press twice to select CAP LOCK.
Press once more to remove CAP LOCK.
Press twice to select Function lock.
Press once more to remove Function lock.
a797 Bourbon.book Page 34 Tuesday, November 17, 2009 1:53 PM
Page 39
Entering Text 35
Changing the Text Input Mode
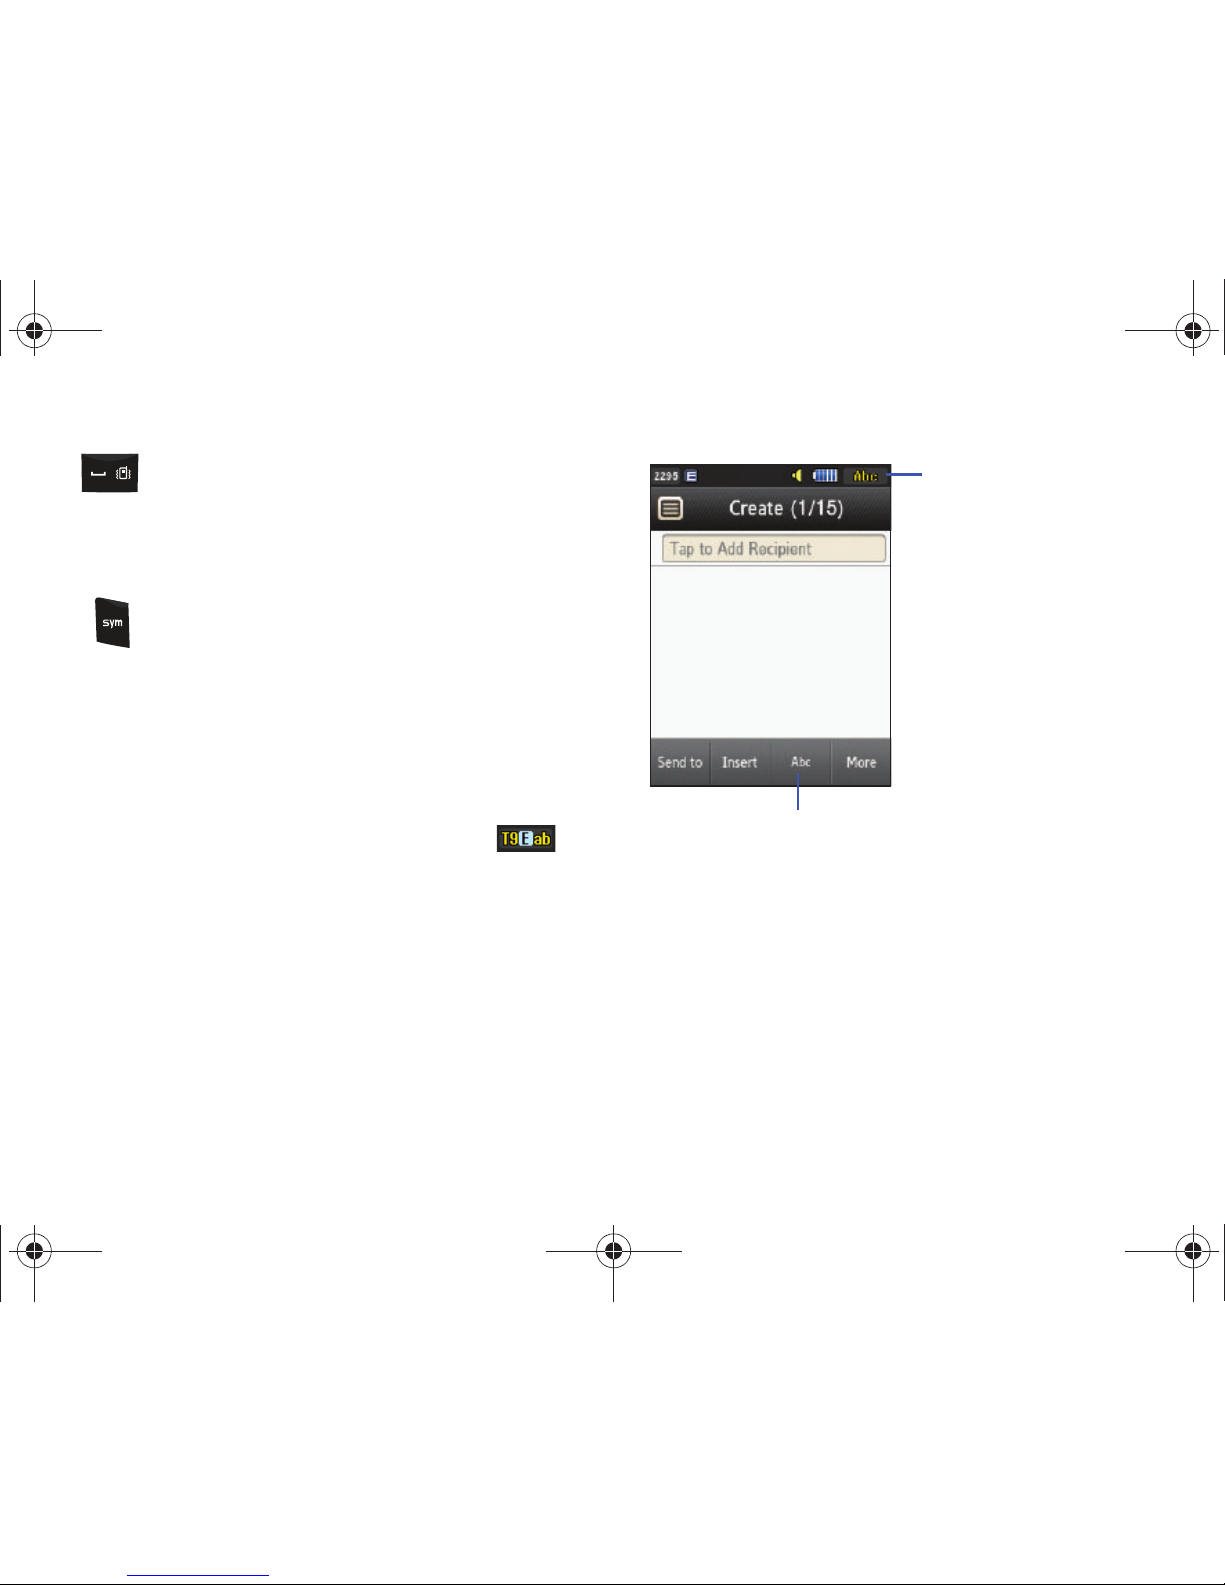
The available Text Input modes are:
T9 Predictive Text, Numeric/
Symbols (123Sym)
, and
Abc
. Refer to the Text Input mode in the
upper right hand corner to identify which mode you are currently
in.
•
T9
: activates the T9 mode in either
abc
(all lower case) or
(where the keys default to lowercase until the Shift key is touched
[activated]).
•
Symbol-Numeric
: activates the number and symbol keys.
•
Emoticons
: activates the emoticon keys.
•
Abc
: activates the default alphabet keys. This function works in
conjunction with the T9 feature.
To change the Text Input mode, follow these steps:
1. Touch the on-screen Text Input mode button.
2. Touch one of the available Text Input modes.
3. Enter the desired text.
Short press inserts a space.
Double press inserts a period and a space.
Press and hold in Idle mode to set phone to Silent
mode.
Press to display the symbols grid.
Present Text Input mode
Touch to change Text Input mode
a797 Bourbon.book Page 35 Tuesday, November 17, 2009 1:53 PM
Page 40
36
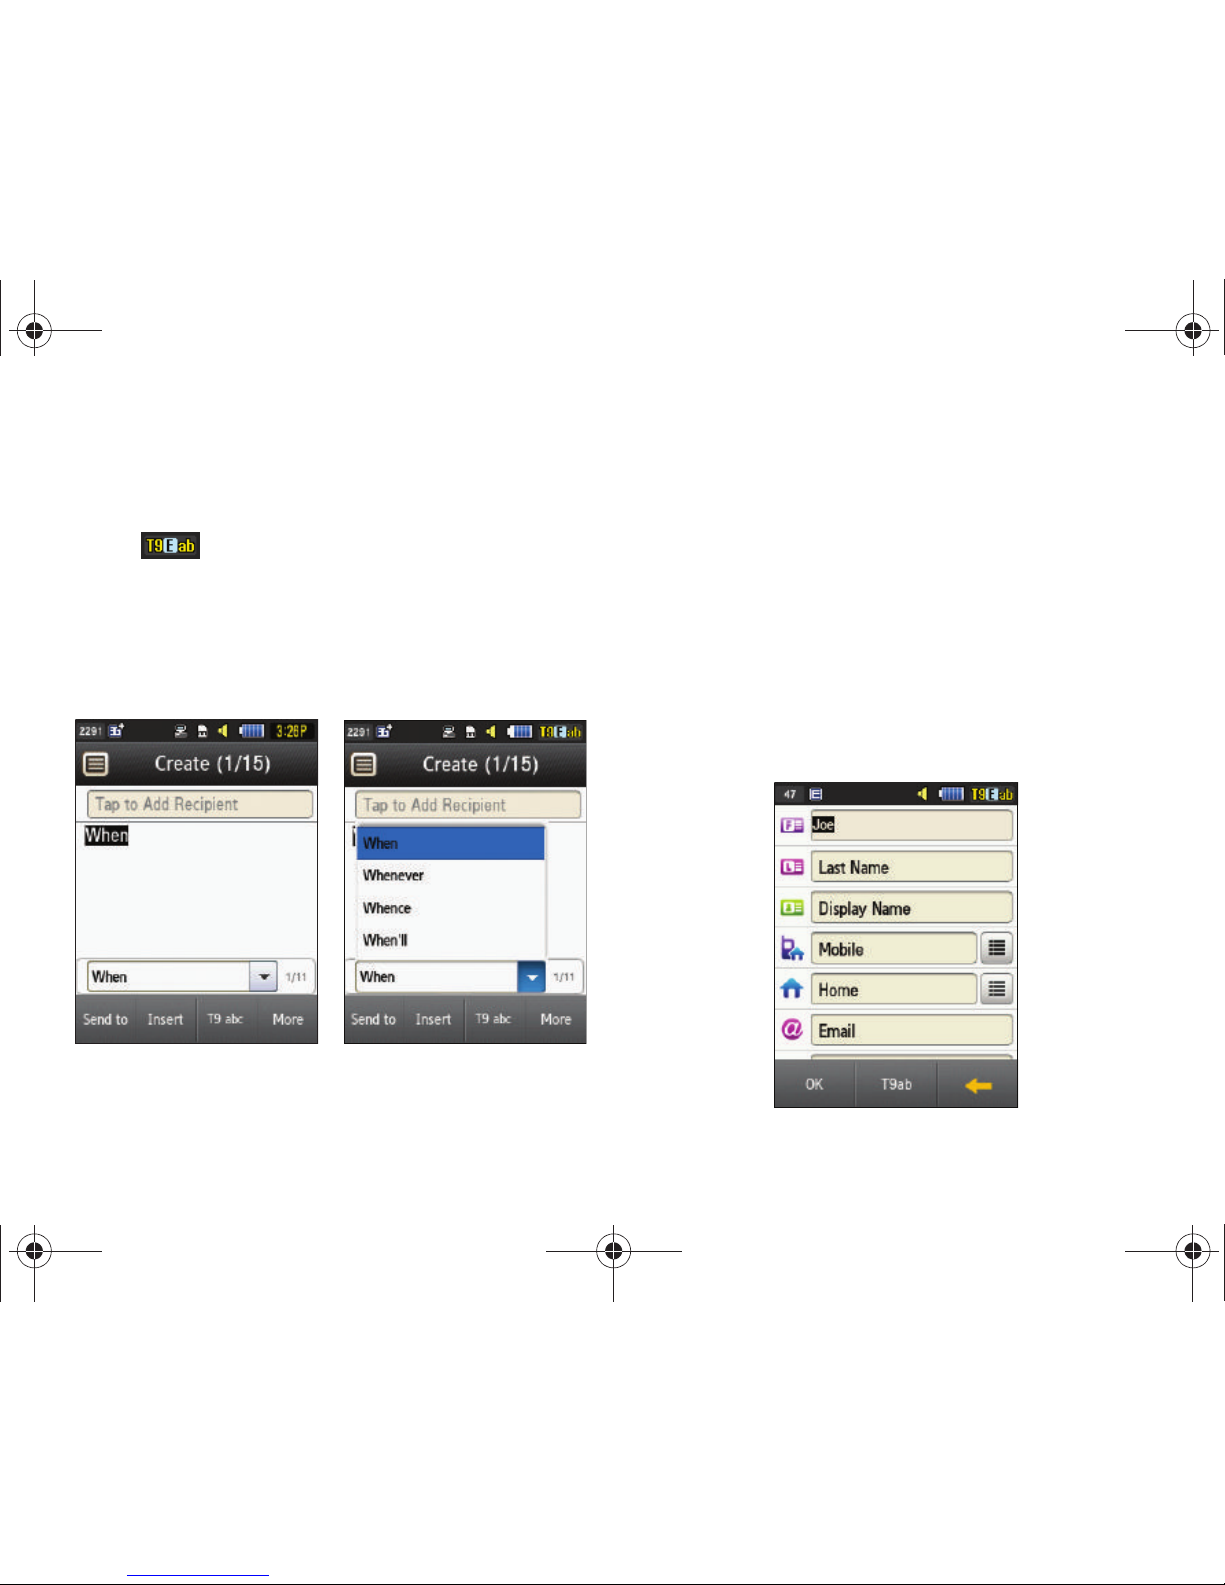
Using T9 Predictive Text Mode
1. Touch the Text Input Mode button at the bottom of the
screen and touch
T9 Predictive Text
.
2. will appear in the upper right corner of the
screen.
3. Press each key only once for each letter. A list of word
options displays and includes a number indicating the
words available to chose from.
4. Use your finger to scroll up and down the word options box
to select the desired word.
5. Continue until you have finished your message.
For more information on sending messages, see “Creating
and Sending Messages” on page 93.
Using T9 Predictive Text Mode in an Edit Field
When you are editing a field, such as a contact name, in T9
Predictive Text Mode, words are not displayed on the screen as in
the previous example. Use the Up and
Down
keys on the QWERTY
keyboard to display different suggested spellings.
a797 Bourbon.book Page 36 Tuesday, November 17, 2009 1:53 PM
Page 41
Entering Text 37
Using Numeric/Symbols Mode
1. Touch the Text Input Mode button at the bottom of the
screen and touch
Numeric/Symbols
.
2. will appear in the upper right corner of the
screen.
3. Press the keys for the numbers or symbols that you want
in your message.
4. When you are finished adding numbers or symbols, touch
the Text Input Mode button and change back to your
previous text input mode.
5. Continue until you have finished your message.
For more information on sending messages, see “Creating
and Sending Messages” on page 93.
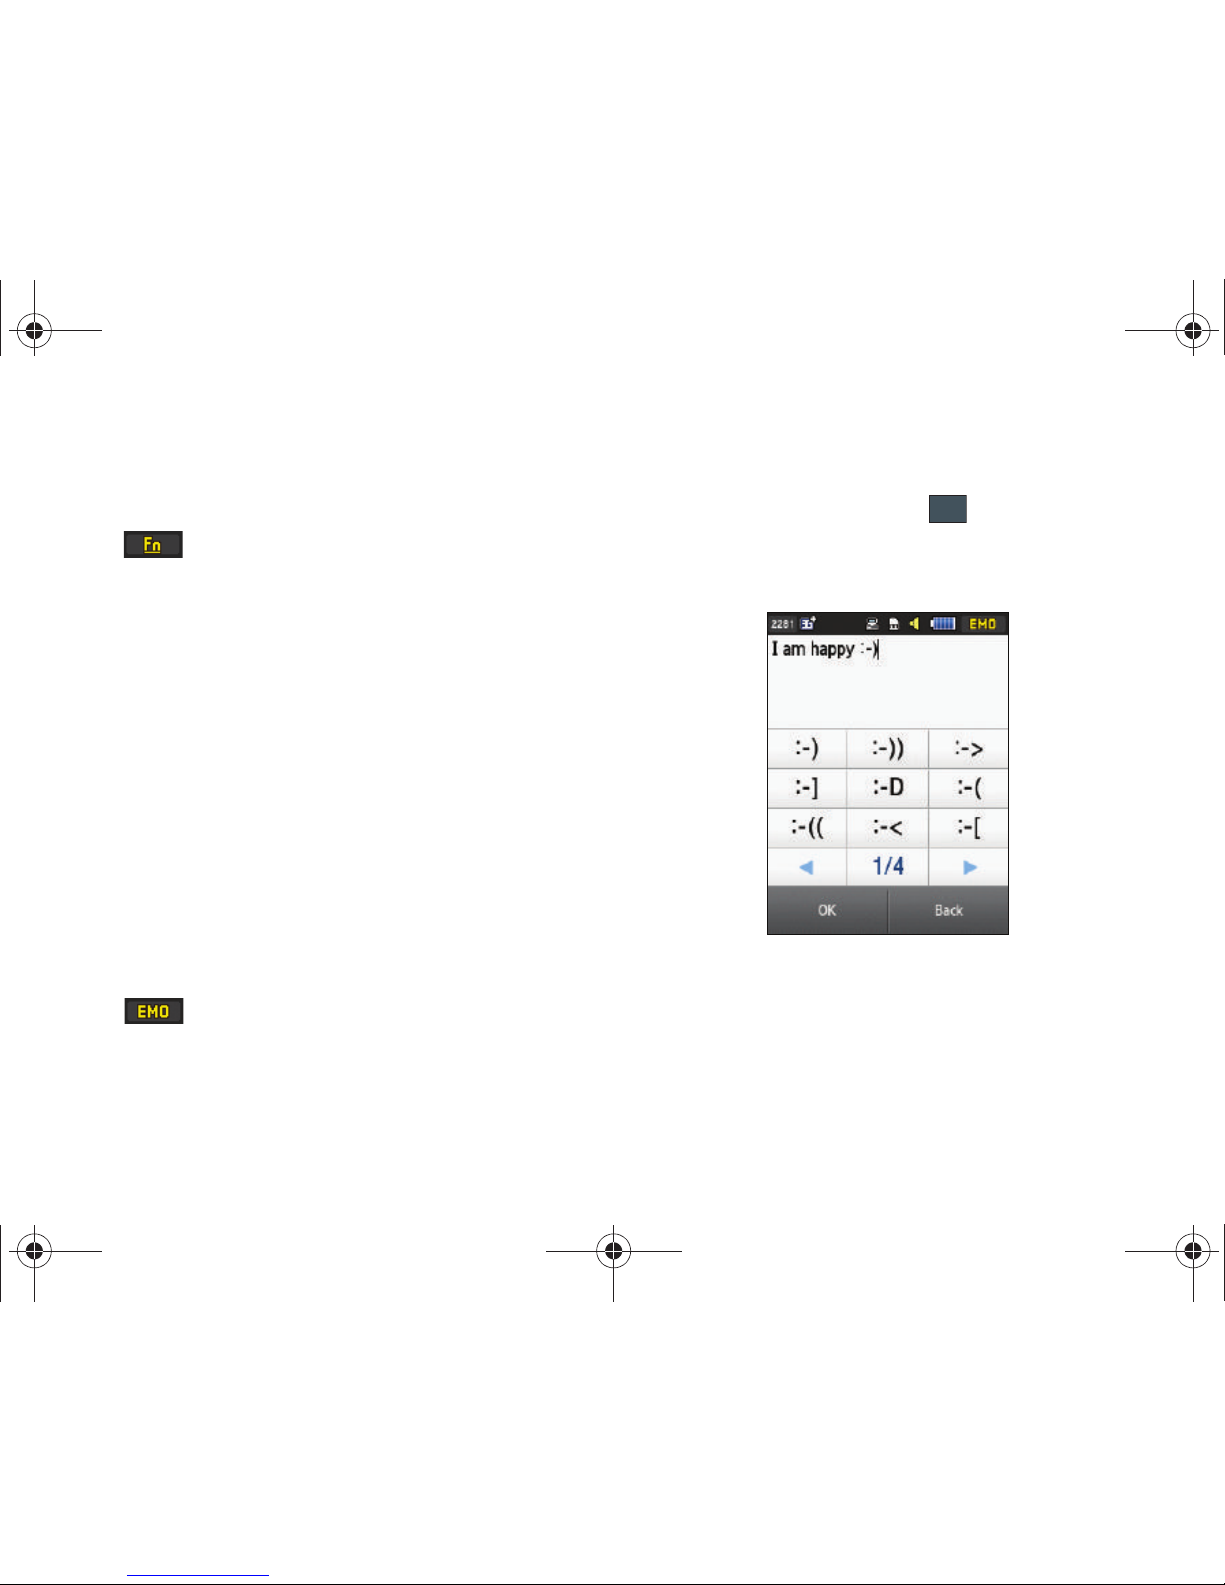
Using Emoticon Mode
1. Touch the Text Input Mode button at the bottom of the
screen and touch
Emoticons
.
2. will appear in the upper right corner of the
screen.
3. Touch the Emoticon symbol or symbols that you would like
in your message.
4. When you are finished, touch .
5. You will be returned to your message and the previous Text
Input mode.
6. Continue until you have finished your message.
For more information on sending messages, see “Creating
and Sending Messages” on page 93.
OK
a797 Bourbon.book Page 37 Tuesday, November 17, 2009 1:53 PM
Page 42
38
Using Abc Mode
1. Touch the Text Input Mode button at the bottom of the
screen and touch
Abc Mode
.
2. will appear in the upper right corner of the
screen.
3. Touch each key only once for each letter.
To add a number or a symbol, you can change Text Input
Mode or you can press and then the key that
corresponds to the number or symbol.
4. Continue until you have finished your message.
For more information on sending messages, see “Creating
and Sending Messages” on page 93.
a797 Bourbon.book Page 38 Tuesday, November 17, 2009 1:53 PM
Page 43
Changing Your Settings 39
Section 6: Changing Your Settings
This section includes tips on how to use your phone’s features,
as well as how to change and customize the display settings, call
handling, security settings, and other settings associated with
your phone.
Quick Tips
Quick Tips connects you to the AT&T Quick Tips web page where
you can find information on the operation of your phone.
䊳
Touch ➔
Settings ➔ Quick Tips
.
The AT&T Quick Tips web page is displayed.
Sound Profile
This menu allows you to specify how you are informed of
incoming calls and messages as well as other notification sounds
your phone can make.
Selecting a Profile
1. Touch ➔
Settings ➔ Sound Profile
.
2. Touch the radio button next to the profile name. The
selected profile activates. Choices include:
•Normal
•Silent
•Driving
• Outdoor
Normal Profile
The phone’s profile defaults to Normal where the incoming Alert
Type is set to melody.
Editing the Normal - Call Profile
1. Touch ➔
Settings ➔ Sound Profile ➔ Normal
.
•
Touch the name field and not the radio button to the right.
2. Touch drop-down menu (upper-right of the screen) and
select
Call.
3. Select the
Call Alert Type
field and select one of the
following and touch
Save
:
•Melody
: the phone rings using the ring melody selected in the Ring
tone menu.
• Vibration then Melody
: the phone vibrates and then starts ringing.
• Vibration & Melody
: the phone vibrates and plays a melody
simultaneously.
4. Touch the
Voice Call Ringtone
field, touch to select a
ringtone and touch
Save
.
a797 Bourbon.book Page 39 Tuesday, November 17, 2009 1:53 PM
Page 44
40
5.
Drag the
Ringtone Volume
slider to the volume level you
desire (range is 1-7).
6. Touch the
Vibration Pattern
field, then touch to select
Vibration 1 - 5
and touch
Save
.
7. Touch
Save
to return to the Sound Profile menu.
Editing the Normal - Message Profile
1. Touch ➔
Settings ➔ Sound Profile ➔ Normal
.
•
Touch the name field and not the radio button to the right.
2. Touch drop-down menu (upper-right of the screen) and
select
Message.
3. Touch the
Message Alert Type
field, select one of the
following and touch
Save
:
•Melody
: the phone rings using the ring melody selected in the
Message Alert Tone menu.
•Vibration
: the phone vibrates.
• Vibration & Melody
: the phone vibrates and plays a melody
simultaneously.
•Mute
: the phone is silent and does not play a melody or vibrate.
4. Touch the
Message Alert Tone
field, touch to select a
ringtone and touch
Save
.
5. Touch the
Message Alert Repetition
pull-down and select
one of the following options:
•Once
: repeats the message alert once.
•Periodic
: repeats the message alert periodically.
6. Drag the
Alert Tone Volume
slider to the volume level you
desire (range is 1-7).
7. Touch the
Vibration Pattern
field, then touch to select
Vibration 1 - 3
and touch
Save
.
8. Touch
Save
to return to the Sound Profile menu.
Editing the Normal - Phone Profile
1. Touch ➔
Settings ➔ Sound Profile ➔ Normal
.
•
Touch the name field and not the radio button to the right.
2. Touch drop-down menu (upper-right of the screen) and
select
Phone.
3. Touch the
Keypad Tone
pull-down and select one of the
following tones:
• Beep
•Glossy
•Mute
a797 Bourbon.book Page 40 Tuesday, November 17, 2009 1:53 PM
Page 45
Changing Your Settings 41
4.
Touch the
Power On Type
field, select one of the following
and touch
Save
:
•Melody
: the phone rings using a pre-set ring melody.
•Vibration
: the phone vibrates but does not play a melody.
• Vibration & Melody
: the phone vibrates and plays a melody
simultaneously.
•Mute
: the phone is silent and does not play a melody or vibrate.
5. Touch the
Power Off Type
field, select one of the following
and touch
Save
:
•Melody
: the phone rings using a pre-set ring melody.
•Vibration
: the phone vibrates but does not ring.
• Vibration & Melody
: the phone vibrates and plays a melody
simultaneously.
•Mute
: the phone is silent and does not play a melody or vibrate.
6. Drag the
Phone Sound Volume
slider to the volume level
you desire (range is 0-7).
7. Touch
Save
to return to the Sound Profile menu.
Silent Profile
Silent mode is convenient when you wish to stop the phone from
making noise, in a theater for example.
䊳
Touch ➔
Settings ➔ Sound Profile ➔ Silent
.
All sound tones are now changed to Silent.
Editing the Silent - Call Profile
1. Touch ➔
Settings ➔ Sound Profile ➔ Silent
.
•
Touch the name field and not the radio button to the right.
2. Touch drop-down menu (upper-right of the screen) and
select
Call.
3. Select the
Call Alert Type
field and select one of the
following and touch
Save
:
•Vibration
: the phone vibrates.
•Mute
: the phone is silent and does not play a melody or vibrate.
4. Touch the
Vibration Pattern
field, then touch to select
Vibration 1 - 5
and touch
Save
.
5. Drag the
Vibration Intensity
slider to the intensity level you
desire (range is 0-7).
6. Touch
Save
to return to the Sound Profile menu.
Editing the Silent - Message Profile
1. Touch ➔
Settings ➔ Sound Profile ➔ Silent
.
•
Touch the name field and not the radio button to the right.
2. Touch drop-down menu (upper-right of the screen) and
select
Message.
a797 Bourbon.book Page 41 Tuesday, November 17, 2009 1:53 PM
Page 46
42
3.
Touch the
Message Alert Type
field, select one of the
following and touch
Save
:
•Vibration
: the phone vibrates.
•Mute
: the phone is silent and does not play a melody or vibrate.
4. Touch the
Message Alert Repetition
pull-down and select
one of the following options:
•Once
: repeats the message alert once.
•Periodic
: repeats the message alert periodically.
5. Touch the
Vibration Pattern
field, then touch to select
Vibration 1 - 3
and touch
Save
.
6. Drag the
Vibration Intensity
slider to the intensity level you
desire (range is 0-7).
7. Touch
Save
to return to the Sound Profile menu.
Driving Profile
In this case, the speaker is active and launches the currently
selected Call alert type when the associated notification is
activated.
Editing the Driving - Call Profile
1. Touch ➔
Settings ➔ Sound Profile ➔ Driving
.
•
Touch the name field and not the radio button to the right.
2. Touch drop-down menu (upper-right of the screen) and
select
Call.
3. Select the
Call Alert Type
field and select one of the
following and touch
Save
:
•Melody
: the phone rings using the ring melody selected in the Ring
tone menu.
• Vibration then Melody
: the phone vibrates and then starts ringing.
• Vibration & Melody
: the phone vibrates and plays a melody
simultaneously.
4. Touch the
Voice Call Ringtone
field, touch to select a
ringtone and touch
Save
.
5. Drag the
Ringtone Volume
slider to the volume level you
desire (range is 1-7).
6. Touch the
Vibration Pattern
field, then touch to select
Vibration 1 - 5
and touch
Save
.
7. Touch
Save
to return to the Sound Profile menu.
Editing the Driving - Message Profile
1. Touch ➔
Settings ➔ Sound Profile ➔ Driving
.
•
Touch the name field and not the radio button to the right.
2. Touch drop-down menu (upper-right of the screen) and
select
Message.
a797 Bourbon.book Page 42 Tuesday, November 17, 2009 1:53 PM
Page 47

Changing Your Settings 43
3.
Touch the
Message Alert Type
field, select one of the
following and touch
Save
:
•Melody
: the phone rings using the ring melody selected in the
Message Alert Tone menu.
•Vibration
: the phone vibrates but does not ring.
• Vibration & Melody
: the phone vibrates and plays a melody
simultaneously.
•Mute
: the phone is silent and does not play a melody or vibrate.
4. Touch the
Message Alert Tone
field, then touch to select
Message Tone 1 - 4
and touch
Save
.
5. Touch the
Message Alert Repetition
pull-down and select
one of the following options:
•Once
: repeats the message alert once.
•Periodic
: repeats the message alert periodically.
6. Drag the
Alert Tone Volume
slider to the volume level you
desire (range is 1-7).
7. Touch the
Vibration Pattern
field, then touch to select
Vibration 1 - 3
and touch
Save
.
8. Touch
Save
to return to the Sound Profile menu.
Editing the Driving - Phone Profile
1. Touch ➔
Settings ➔ Sound Profile ➔ Driving
.
•
Touch the name field and not the radio button to the right.
2. Touch drop-down menu (upper-right of the screen) and
select
Phone.
3. Touch the
Keypad Tone
pull-down and select one of the
following tones:
•Beep
• Glossy
•Mute
4. Touch the
Power On Type
field, select one of the following
and touch
Save
:
•Melody
: the phone rings using a pre-set ring melody.
•Vibration
: the phone vibrates but does not play a melody.
• Vibration & Melody
: the phone vibrates and plays a melody
simultaneously.
•Mute
: the phone is silent and does not play a melody or vibrate.
5. Touch the
Power Off Type
field, select one of the following
and touch
Save
:
•Melody
: the phone rings using a pre-set ring melody.
•Vibration
: the phone vibrates but does not ring.
• Vibration & Melody
: the phone vibrates and plays a melody
simultaneously.
a797 Bourbon.book Page 43 Tuesday, November 17, 2009 1:53 PM
Page 48
44
•Mute
: the phone is silent and does not play a melody or vibrate.
6. Drag the
Phone Sound Volume
slider to the volume level
you desire (range is 0-7).
7. Touch
Save
to return to the Sound Profile menu.
Outdoor Profile
In this case, you are outdoors and might not be able to hear the
phone, or need an increased volume in order to hear the phone.
For example, you might be jogging and need the phone to vibrate
and ring loudly.
Editing the Outdoor - Call Profile
1. Touch ➔
Settings ➔ Sound Profile ➔ Outdoor
.
•
Touch the name field and not the radio button to the right.
2. Touch drop-down menu (upper-right of the screen) and
select
Call.
3. Select the
Call Alert Type
field and select one of the
following and touch
Save
:
•Melody
: the phone rings using the ring melody selected in the Ring
tone menu.
• Vibration then Melody
: the phone vibrates and then starts ringing.
• Vibration & Melody
: the phone vibrates and plays a melody
simultaneously.
4. Touch the
Voice Call Ringtone
field, touch to select a
ringtone and touch
Save
.
5. Drag the
Ringtone Volume
slider to the volume level you
desire (range is 1-7).
6. Touch the
Vibration Pattern
field, then touch to select
Vibration 1 - 5
and touch
Save
.
7. Touch
Save
to return to the Sound Profile menu.
Editing the Outdoor - Message Profile
1. Touch ➔
Settings ➔ Sound Profile ➔ Outdoor
.
•
Touch the name field and not the radio button to the right.
2. Touch drop-down menu (upper-right of the screen) and
select
Message.
3. Touch the
Message Alert Type
field, select one of the
following and touch
Save
:
•Melody
: the phone rings using the ring melody selected in the
Message Alert Tone menu.
•Vibration
: the phone vibrates but does not ring.
• Vibration & Melody
: the phone vibrates and plays a melody
simultaneously.
•Mute
: the phone is silent and does not play a melody or vibrate.
a797 Bourbon.book Page 44 Tuesday, November 17, 2009 1:53 PM
Page 49
Changing Your Settings 45
4.
Touch the
Message Alert Tone
field, then touch to select
Message Tone 1 - 4
and touch
Save
.
5. Touch the
Message Alert Repetition
pull-down and select
one of the following options:
•Once
: repeats the message alert once.
•Periodic
: repeats the message alert periodically.
6. Drag the
Alert Tone Volume
slider to the volume level you
desire (range is 1-7).
7. Touch the
Vibration Pattern
field, then touch to select
Vibration 1 - 3
and touch
Save
.
8. Touch
Save
to return to the Sound Profile menu.
Editing the Outdoor - Phone Profile
1. Touch ➔
Settings ➔ Sound Profile ➔ Outdoor
.
•
Touch the name field and not the radio button to the right.
2. Touch drop-down menu (upper-right of the screen) and
select
Phone.
3. Touch the
Keypad Tone
pull-down and select one of the
following tones:
•Beep
• Glossy
•Mute
4. Touch the
Power On Type
field, select one of the following
and touch
Save
:
•Melody
: the phone rings using a pre-set ring melody.
•Vibration
: the phone vibrates but does not play a melody.
• Vibration & Melody
: the phone vibrates and plays a melody
simultaneously.
•Mute
: the phone is silent and does not play a melody or vibrate.
5. Touch the
Power Off Type
field, select one of the following
and touch
Save
:
•Melody
: the phone rings using a pre-set ring melody.
•Vibration
: the phone vibrates but does not ring.
• Vibration & Melody
: the phone vibrates and plays a melody
simultaneously.
•Mute
: the phone is silent and does not play a melody or vibrate.
6. Drag the
Phone Sound Volume
slider to the volume level
you desire (range is 0-7).
•
Touch
Save
to return to the Sound Profile menu.
Display and Light Settings
In this menu, you can change various settings for the display or
backlight.
a797 Bourbon.book Page 45 Tuesday, November 17, 2009 1:53 PM
Page 50
46
1.
From Idle mode, touch ➔
Settings
➔
Display and
Light
.
2. Select one of the following options:
•
Wallpaper
•
Clock
•
Font Type
•
Greeting Message
•
Transition Effect
•
Brightness
•
Backlight Time
Wallpaper
This menu allows you to change the background image displayed
on the Main screen.
1. From Idle mode, touch ➔
Settings
➔
Display and
Light
➔
Wallpaper.
2. Drag an onscreen image to the left or right to view either
the next or previously available images (located in your
Picture folder) for the wallpaper selection.
3. Touch one of the following options:
•
Set
: assigns the current image as the new wallpaper image that
appears when the Main screen.
•Pictures
: allows you to choose a photo from your Picture folder,
that are displayed in a thumbnail view.
Clock
Allows you to select how your clock is displayed on the top right
side of your screen.
1. From Idle mode, touch ➔
Settings
➔
Display and
Light
➔
Clock
.
2. Touch
Digital Clock, Analog Clock
, or
Off
.
3. Touch
Save
.
Font Type
You can select the text style for the informational text displayed
on your phone.
1. From Idle mode, touch ➔
Settings
➔
Display and
Light
➔
Font Type
.
2. Select
Type1, Typ e2
or
Type3
and touch
Save
.
Greeting Message
In this menu you enter the text which displays on the main
screen when the phone powers on.
1. From Idle mode, touch ➔
Settings
➔
Display and
Light
➔
Greeting Message.
a797 Bourbon.book Page 46 Tuesday, November 17, 2009 1:53 PM
Page 51
Changing Your Settings 47
2.
Touch and hold to erase the current greeting message.
3. Use either the onscreen keypad/keyboard to enter a new
greeting.
4. Touch .
Transition Effect
Allows you to activate/deactivate the default transition effect
(wipe) during transitions between menu/options pages.
1. From Idle mode, touch ➔
Settings
➔
Display and
Light
➔ Transition Effect.
2. Touch either
On
(activate) or
Off
(deactivate).
3. Touch .
Brightness
Allows you to adjust the display brightness for the LCD to see
better within different lighting conditions.
1. From Idle mode, touch ➔
Settings
➔
Display and
Light
➔ Brightness.
2. Drag the
Level
slider to the brightness level you desire
(range is 1-5).
3. Touch .
Note:
Modifying this setting will impact your battery life.
Backlight Time
The backlight turns the screen on using a preset brightness level.
When the time (set in this feature) runs out, the touch screen
turns off. The phone can also be set to lock when the Backlight
Time runs out. For more information, refer to “Locking and
Unlocking the Phone” on page 17.
1. From Idle mode, touch ➔
Settings
➔
Display and
Light
➔ Backlight Time.
2. Touch one of the backlight times to set the amount of time
the phone’s touchscreen remains lit without activity.
Options include:
8 Seconds, 15 Seconds, 30 Seconds
,
1 Minute, 3 Minutes
, or
10 Minutes
).
3. Touch .
Note:
Modifying this setting will impact your battery life.
Time & Date
This menu allows you to change the current time and date
displayed.
1. From Idle mode, touch ➔
Settings
➔
Time and Date
.
OK
Save
Save
Save
a797 Bourbon.book Page 47 Tuesday, November 17, 2009 1:53 PM
Page 52
48
2.
Touch the
Time Zone Updating
drop-down list and select
one of the following:
•
Automatic
: the phone automatically updates the time and date
according to the current time zone using the network service.
•
Prompt First
: you are prompted before a time change is applied.
•
Manual Only
: you need to manually set the time and date
according to the current time zone using the Set time menu.
3. Touch the
Time Zone
field and assign a new time zone by
touching a corresponding area of the world map. (
Time
Zone
field is not displayed when
Time Zone Updating
is set
to
Automatic
)
•
Touch to save the new setting.
•
Major cities in each zone are displayed upon selection.
•
Current time zones are based upon Greenwich Mean Time.
4. Touch
12 hr
(12 hour) or
24 hr
(24 hour) from the
Time
Format
field.
5. Touch the
Time
field then adjust the hour and minutes
values by using either the up/down input arrows or by
quickly sliding your fingertip over the numbers to scroll
through their available values. (
Time
field is not displayed
when
Time Zone Updating
is set to
Automatic
).
•
Touch either AM or PM.
•
Tou ch
to complete the assignment.
6. Touch the
Date Format
pull-down list and select the format
in which you want the date to display.
7. Touch the
Date
field then adjust the
Month, Day
, and
Year
values by using either the up/down input arrows or by
quickly sliding your fingertip over the numbers to scroll
through their available values. (
Date
field is not displayed
when
Time Zone Updating
is set to
Automatic
)
•
Tou ch
to complete the assignment.
8. Touch
Save
to store all the new Time and Date settings.
Phone Settings
You can customize various phone settings.
䊳
From Idle mode, touch ➔
Settings
➔
Phone
.
Language
This menu allows you to select a display language for Text
language and Text Input mode. Choose from Automatic, English,
Français, and Español.
1. From Idle mode, touch ➔
Settings
➔
Phone
➔
Language
.
OK
Set
Set
a797 Bourbon.book Page 48 Tuesday, November 17, 2009 1:53 PM
Page 53
Changing Your Settings 49
2.
Touch the
Screen Text
field, touch one of the following
selections and touch :
•Automatic
(uses the language set on your SIM card).
• English
•Français
•Español
3. Touch the
Input Language
field, touch one of the following
selections and touch :
• English
•Français
•Español
4. Touch to return to Phone settings page.
Vibration Feedback
You can set the level of vibration intensity that occurs when you
touch the screen.
1. From Idle mode, touch ➔
Settings
➔
Phone
➔
Vibration Feedback
.
2. Drag the
Vibration Intensity
slider to the intensity level you
desire (range is 0-4).
3. Touch
Save
.
Calibration
The Calibration feature allows you to re-align the screen’s touch
accuracy. Use this feature only when the device does not respond
properly when you touch the screen.
1. From Idle mode, touch ➔
Settings
➔
Phone
➔
Calibration
.
2. Touch the center of each target and repeat this step for all
four targets displayed.
The new settings are automatically saved.
Note:
When touching the screen in Calibration mode, you must touch the
center of the cross hair area.
QWERTY Slide Setting
This setting allows you to choose what will be displayed on the
main screen when you slide open your phone.
1. From Idle mode, touch ➔
Settings
➔
Phone
➔
QWERTY Slide Setting
.
2. Touch
Off, Create New Message, IM,
or
Mobile Email
. If you
choose
Off
, the Idle screen will display when you slide
open your phone.
3. Touch
Save
.
Save
Save
a797 Bourbon.book Page 49 Tuesday, November 17, 2009 1:53 PM
Page 54
50
Auto Screen Lock
The Auto Screen Lock feature locks your phone when the
Backlight turns off. Press and hold the key to unlock the
keypad.
1. From Idle mode, touch ➔
Settings
➔
Phone
.
2. Touch
On
or
Off
from the
Auto Screen Lock
field.
For more information on setting the Backlight time settings, see
“Backlight Time” on page 47.
Security
The Security feature enables you to restrict the use of your phone
by others and to restrict the types of calls.
Various codes and passwords are used to protect the features of
your phone.
䊳
From Idle mode, touch ➔
Settings
➔
Phone
➔
Security
.
Lock Phone
When the Lock Phone feature is enabled, the phone is locked and
you must enter the 4 to 8 digit phone password each time the
phone is switched on.
Note:
You will be prompted to create a password the first time this feature is
enabled.
To change the phone password, see “Change Phone Password”
on page 51. Once you enter the correct password, you can use
the phone until you switch it off.
䊳
Touch On or
Off
from the
Lock Phone
field.
Lock SIM Card
When the Lock SIM Card feature is enabled, your phone only
works with the current SIM. You must enter the lock code to
unlock the SIM so you can use a different SIM card. Once you
have entered the lock code, you are asked to confirm your
password.
䊳
Touch On or
Off
from the
Lock SIM Card
field.
Note:
This lock code is typically the last four digits of the current phone
number or can be obtained from an AT&T customer service
representative.
Check PIN code
When the Check PIN code feature is enabled, you must enter
your PIN each time you switch on the phone. Consequently, any
person who does not have your PIN cannot use your phone
without your approval.
䊳
Touch On or
Off
from the
Check PIN Code
field.
Note:
You can obtain your PIN from an AT&T customer service representative.
a797 Bourbon.book Page 50 Tuesday, November 17, 2009 1:53 PM
Page 55
Changing Your Settings 51
Lock Applications
Using this menu, you can lock your applications and media
contents (apps, messages, images, and sounds) from being
accidentally accessed, altered or deleted. Once you lock the
contents, you must enter the phone’s password to access the
associated menus.
Note:
The first time you access the password screen, you will be prompted to
create a password.
1. Touch the
Lock Applications
field.
2. Touch the check box next to each application you wish to
lock, or touch
All
to select all applications.
•
Applications include: Messaging, My Stuff, Recent Calls, Address
Book, Calendar, Memo, IM, and Tasks.
•
Touch to store your new selections.
3. Enter a new password (during the first use) using the
onscreen keypad into the
New Password
field and touch
.
4. Enter the new password again and touch .
Note:
To change this password, see “Change Phone Password” on page 51.
Fixed Dialing Mode
FDN (Fixed Dial Number) mode, if supported by your SIM card,
restricts your outgoing calls to a limited set of phone numbers.
When this feature is enabled, you can make calls only to phone
numbers stored in the FDN list on the SIM card. For more
information, refer to “FDN Mode” on page 70.
1. Touch
On
or
Off
from the
Fixed Dialing Mode
field.
•On
: you can only call phone numbers stored in the Fixed Dial
Contacts. You must enter your PIN2 to continue this configuration.
You can obtain your PIN2 from AT&T’s customer service
department.
•Off
: you can call any number.
2. Use the onscreen keypad to enter your PIN2 Code and
touch .
Note:
The PIN2 code is provided by AT&T. Entering an incorrect PIN2 code
can cause the phone to lock, at which point, you will have to call AT&T
customer service for assistance.
Change Phone Password
The Change password feature allows you to change your current
phone password to a new one. You must enter the current
password before you can specify a new one.
1. Touch the
Change Phone Password
field.
Save
OK
OK
OK
a797 Bourbon.book Page 51 Tuesday, November 17, 2009 1:53 PM
Page 56
52
2.
Enter the current phone password and touch .
Note:
Initially, the phone will not have a password assigned, and step 2 will
not be necessary. Once a password is assigned, all steps are
necessary.
3. Enter the new password and touch .
4. Re-enter the same password and touch .
Note:
If you change your password, be sure to write it down and keep it in a
safe place. If you forget your password, your phone will require AT&T
customer service to have it unlocked.
Change PIN code
This feature allows you to change your current PIN, provided that
the Check PIN Code feature is enabled. The Check PIN Code field
must be active before you can access this function (page 50).
Note:
This code is provided by AT&T. Entering an incorrect code can cause
the phone to lock, at which point, you will have to call AT&T customer
service for assistance.
1. If the Check PIN Code feature has not been enabled, touch
On
from the
Check PIN Code
field.
2. Touch the
Change PIN Code
field.
3. Enter your current PIN code and touch .
4. Enter your new PIN code and touch .
5. Confirm your new PIN code and touch .
Change PIN2 code
The Change PIN2 code feature allows you to change your current
PIN2 to a new one. You must first enter the current PIN2
(obtained from AT&T) before you can specify a new one. Once
you have entered a new PIN2, you are asked to confirm it by
entering it again.
Note:
Not all SIM cards have a PIN2. If your SIM card does not, this menu
does not display.
1. Touch the
Change PIN2 Code
field.
2. Use the onscreen keypad/keyboard to enter your PIN2
code and touch .
3. Enter the new PIN2 code and touch .
4. Re-enter (reconfirm) the same code and touch .
APN Control
Allows you to turn control of Access Point Names (APN) On or Off.
APNs are a method by which you can access advanced
communication using your handset. This advanced
communication can include instant messaging, multimedia
OK
OK
OK
OK
OK
OK
OK
OK
OK
a797 Bourbon.book Page 52 Tuesday, November 17, 2009 1:53 PM
Page 57
Changing Your Settings 53
messaging, email, and Internet access. Turning On APN Control
requires the PIN2 code.
1. Touch
On
or
Off
from the
APN Control
field.
2. Use the onscreen keypad/keyboard to enter your PIN2
code and touch .
Note:
When the APN Control is on, you must enter the Carrier’s Access Name
to the APN Control List for Data Service.
3. Press to return to the previous Phone settings page.
Note:
If your SIM card does not support the APN Control feature, this menu
will not appear.
Reset Phone
You can easily reset your phone to its default settings. To reset
your phone:
1. From Idle mode, touch ➔
Settings
➔
Phone ➔ Reset
Phone
.
2. At the
Continue?
prompt, touch Yes to reset, or No to
cancel.
3. Enter your phone password, if prompted and touch
.
4. After the phone settings have been reset, the
Reset Phone
done
confirmation displays.
Once your phone has been reset to its default settings for
those selected options, it will restart itself in order to
incorporate the new settings.
Note:
User Data such as contacts, messages, pictures, videos, and music is
not deleted.
Restore Phone
The Restore Phone option is the same as the Reset Phone option
described above in that all settings are reset to factory defaults.
However, with the Restore Phone option, all user data is deleted.
Warning!:
All User Data such as contacts, messages, pictures, videos, and
music will be deleted. Ensure that you remove your MicroSD card
if applicable as it will be erased with the Restore Phone option.
Warning!:
When performing the Restore Phone option, do not remove your
battery until the phone has completed the task and has restarted,
otherwise your phone may be damaged.
Airplane Mode
Airplane Mode allows you to use many of your phone’s features,
such as Games, Voice note, etc., when you are in an airplane or
OK
OK
a797 Bourbon.book Page 53 Tuesday, November 17, 2009 1:53 PM
Page 58
54
in any other area where making or receiving calls or data is
prohibited. When your phone is in Airplane Mode, it cannot send
or receive any calls or access online information. The ( ) icon
appears in place of the signal strength indicator when active.
1. From Idle mode, touch ➔
Settings
➔
Phone
.
2. Touch On or Off from the
Airplane Mode
field.
T-Coil Mode
T-Coil mode allows you to use a hearing aid with a T-coil setting
in connection with the handset. You can set this mode to On or
Off
. When T-Coil Mode is On, the icon displays on the Idle
screen.
T-Coil mode can be set to on or off.
1. In Idle mode, press Menu ➔ Settings ➔ Phone ➔ T-Coil
Mode.
2. Touch
On
or
Off
.
3. Touch
Yes
when the T-Coil confirmation displays.
Important!:
The hearing aid category specified for this product represents
compatibility only when the phone is open, which has maximum
antenna efficiency. When the option is enabled and the phone is
open during a call, the T-coil adjusts the audio for use with T-coil
hearing aids (see “FCC Hearing-Aid Compatibility (HAC)
Regulations for Wireless Devices” on page 152.)
Call Settings
䊳
From Idle mode, touch ➔
Settings
➔
Calls
.
Adjusting the General Call Settings
1. Touch
General
and select from the following options:
• Show My Number
: allows you to select how your caller ID is
handled when an outgoing call is initiated. This is what others see
on their Caller ID screen. This value can be made blank if you do not
wish your number displayed to other users.
•Auto Reject
: selects which numbers will be automatically sent to
voicemail based on a user-created list from within the
Reject List
.
• Quick Reply
: allows you to select from several pre-written
messages that you can send to callers when you can’t take a call.
• Call Answer
: selects how your phone answers incoming calls.
Selections are: Send Key, Open Slide, Any Key, and Automatic
(Time - 1-5 seconds).
• Call Status Tones
: allows you to activate an alert tone for one of
two available status categories. Touch an option to make your
selection and then touch to store your new selection.
Options include:
–
Call Connect Tone
: allows you to activate an alert tone when the a
connection has been made.
–
Minute Minder
: allows you to activate an alert tone which sounds
every minute the call is active.
• Alerts on Call
: activates an alert tone for new messages being
received during an active call. Touch to store setting.
Save
Save
a797 Bourbon.book Page 54 Tuesday, November 17, 2009 1:53 PM
Page 59
Changing Your Settings 55
2.
Press twice return to the previous Phone settings
page.
Adjusting the Voice Call Settings
1. Touch
Voice Call
and select from the following options:
• Call Forwarding
: incoming calls are re-routed to a secondary
number that you specify. Select the condition for the call forward
action:
–
Forward Always
activates an automatic forward of all incoming calls
regardless of condition.
–
Busy
activates an forward function only when your number is currently
in use and the caller receives a busy signal.
–
No Reply
activates an automatic forward of all incoming calls after a
preset amount of time (5 seconds - 30 seconds).
–
Unreachable
activates an automatic forward of all incoming calls only
when you can not be reached and your phone status is set to
unreachable.
–
Cancel All
cancels all call forwarding functions.
• Call Waiting
: this network service informs you when someone is
trying to reach you during another call. You can specify individual
call waiting options for voice calls and/or data calls.
–
Touch of the available options:
Activate, Deactivate, Check Status
(checks the status of this service on your account).
• Auto Redial
: the phone automatically redials the last active number
if the call was either cut off or you were unable to connect.
–
Touch either On or
Off
to activate/deactivate the function.
–
Touch to store the new setting.
2. Press twice return to the previous Phone settings
page.
Connectivity
The phone has several communication/connection parameters
which can be edited.
Bluetooth
Bluetooth is a short-range wireless communications technology
capable of exchanging information over a distance of about 30
feet without requiring a physical connection. Unlike infrared, you
don't need to line up the devices to beam information with
Bluetooth. If the devices are within a range of one another, you
can exchange information between them, even if they are located
in different rooms. The following Bluetooth options are available:
Bluetooth Activation and Deactivation
1. From Idle mode, touch ➔
Settings
➔
Connectivity
➔
Bluetooth
.
2. Touch the onscreen Phone icon to activate Bluetooth.
– or –
Touch to deactivate Bluetooth.
Save
a797 Bourbon.book Page 55 Tuesday, November 17, 2009 1:53 PM
Page 60
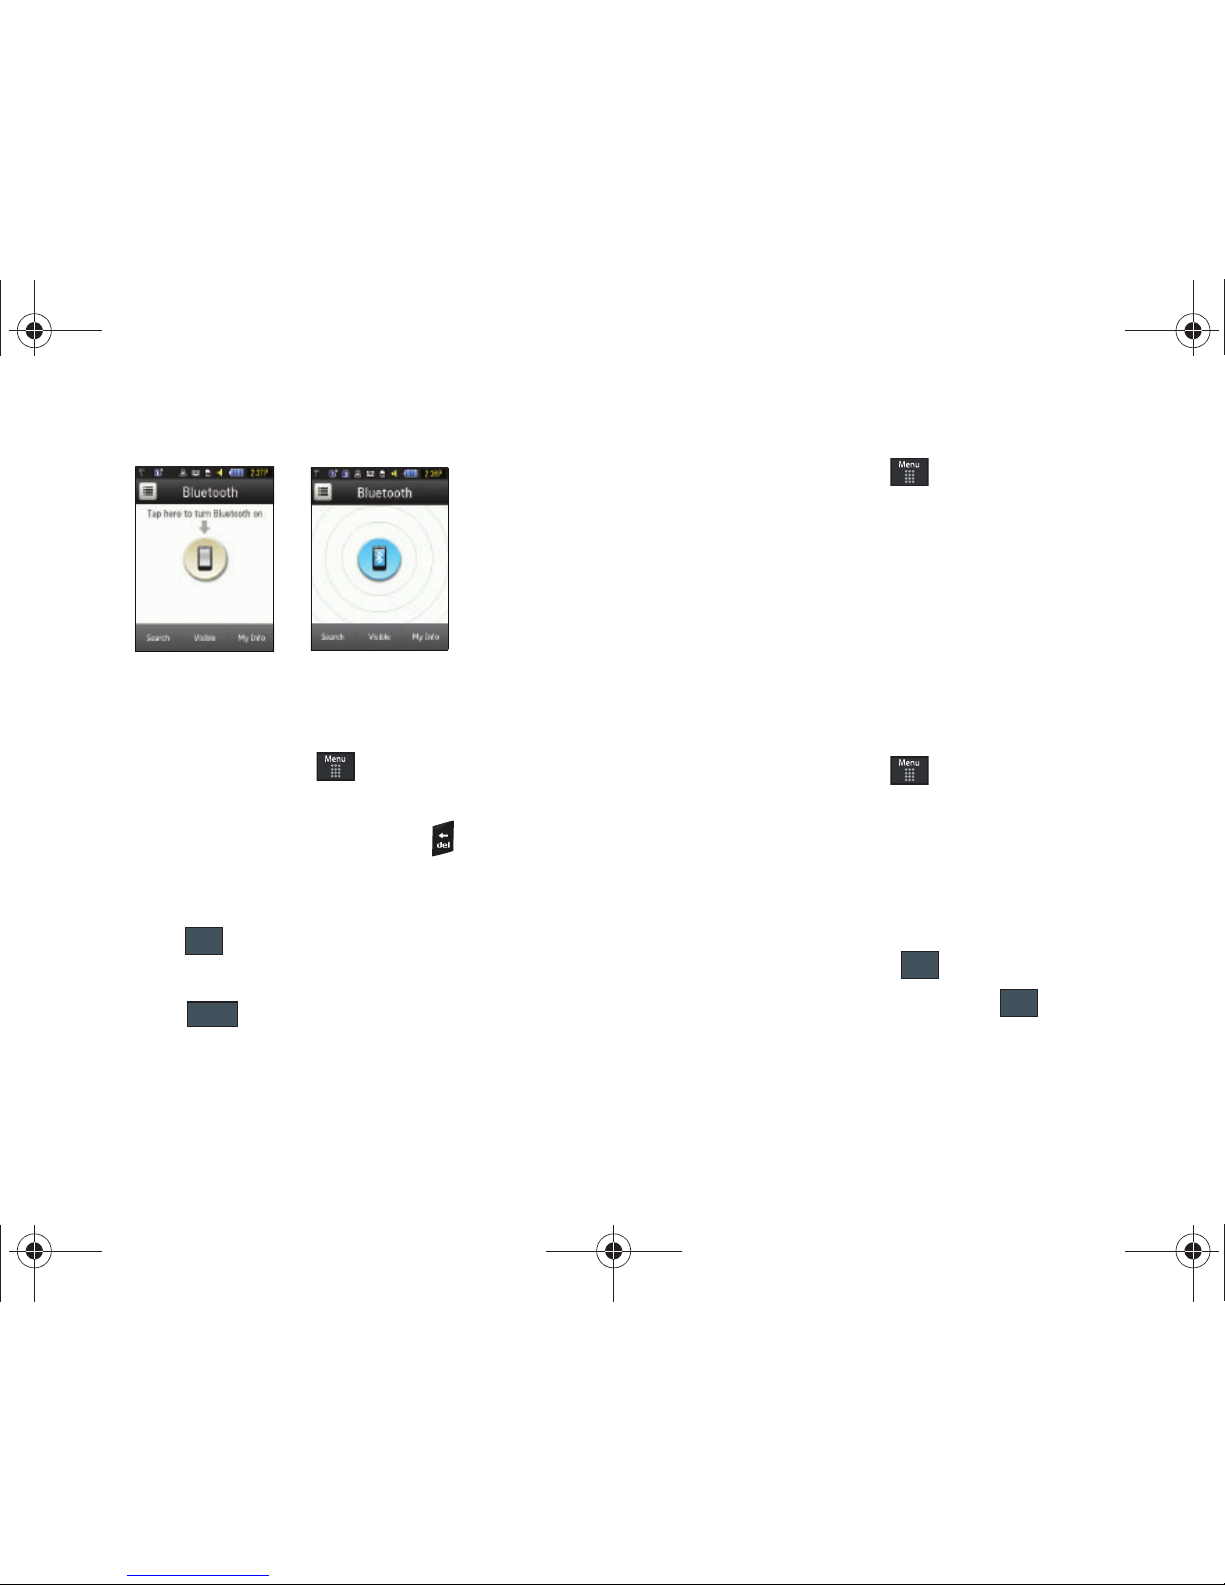
56
Device Name
1. From Idle mode, touch ➔
Settings
➔
Connectivity
➔
Bluetooth
➔
My Info
.
2. Touch the
Name
field, touch and hold to erase the
current name.
3. Use the keypad to enter the new name for this device and
touch . For more information, refer to “Entering Text”
on page 34.
4. Touch .
Phone’s Visibility
1. From Idle mode, touch ➔
Settings
➔
Connectivity
➔
Bluetooth
➔
Visible
.
2. Touch
Yes
or No to enable or disable the visibility
(discoverability) of your phone.
•
Your phone becomes visible to other devices when you transmit
your device’s name to others in your area. This allows other devices
to detect your phone and request a connection. If your phone is not
visible, you can still detect and connect to other devices, while still
hiding yourself from others.
Connecting to Other Bluetooth Devices
1. From Idle mode, touch ➔
Settings
➔
Connectivity
➔
Bluetooth
➔
Search
.
•
Detected Bluetooth devices then appear as buttons on the
Bluetooth page.
2. Touch the desired device to begin pairing.
3. Touch the
Passkey
field, enter the passkey used by the
target device and touch .
4. Select
Connection Options
and touch .
5. Once the target device accepts the pair your new device
shows as connected (green) within the Bluetooth page.
Bluetooth
Inactive
Bluetooth
Active
OK
Save
OK
OK
a797 Bourbon.book Page 56 Tuesday, November 17, 2009 1:53 PM
Page 61
Changing Your Settings 57
Bluetooth Secure Mode
When the Bluetooth Visibility is turned on, your phone is
wirelessly transmitting its phone name and status to every device
within its range. This transmission can pose a security risk and
incite unauthorized connection to your phone. It is recommended
that you remain hidden unless necessary.
Bluetooth Ser vices
The Bluetooth specification is a protocol that describes how the
short-range wireless technology works, whereas services
describe the individual devices that are supported. These
services reduce the chance that incompatible devices are
allowed to connect to your phone.
•
Headset
: a Bluetooth headset enables both incoming and outgoing
calls using Bluetooth headsets.
•
Handsfree
: a Bluetooth car kit or speakerphone enables both
incoming and outgoing calls.
•
Bluetooth Stereo Headset
: used to make calls and listen to music
through the Bluetooth stereo headset.
•
Serial Port
: used to connect to other Bluetooth devices through a
virtual serial port.
•
Dial up
: used to provide Internet access for Bluetooth devices through
the phone’s modem.
•
File transfer
: used to transfer files to and from Bluetooth devices.
•
Object Push
: used to exchange personal data (namecards, Address
Book contacts, etc.) with Bluetooth devices.
Configuring Your Phone’s USB Settings
This menu selects the method of communication for the USB
port.
Note:
The Bluetooth feature
must first be disabled before initiating a USB
connection
with the phone. Prior to connecting the USB cable to the
phone, install the latest version of the PC Studio application. This
application installs the necessary USB drivers onto your machine. For a
free download of PC Studio, go to www.samsung.com/us/support.
1. From Idle mode, touch ➔
Settings
➔
Connectivity
➔
Select USB Mode
.
2. Select one of the following USB modes:
• Ask on Connection
: causes the phone to present a “Select USB
Mode” pop-up when you connect to the PC. You can then choose
from either:
PC Studio, Media Player
, or
Mass Storage
.
• Samsung PC Studio
: sets PC Studio to launch as the default
application when a USB connection is detected.
• Media Player
: sets the Media Player to launch as the default
application when a USB connection is detected.
• Mass Storage
: allows you to utilize the onboard storage capacity of
the phone’s MicroSD card to store and upload files. This option
allows your computer to detect the phone’s MicroSD card as a
removable storage drive.
a797 Bourbon.book Page 57 Tuesday, November 17, 2009 1:53 PM
Page 62
58
3.
Touch .
Network Profile Configuration
Your phone is wirelessly connecting to the Internet via a built in
WAP browser. Connection can be made via either one of three
available WAP browsers: MEdia Net, AT&T MMS (MultiMedia
Server), and AT&T IMS. These configurations are pre-configured
and cannot be modified by the user. You need these settings to
use the web browser or send MMS messages or Emails. Your
phone is set up by default to connect to the internet.
You can use this menu to create and customize the profiles
containing the settings for connecting your phone to the network.
Although the active connection can be changed by the user, it is
recommended that this choice be made with the assistance of
either the retailer or customer service representative.
To create a new configuration, follow these steps:
1. From Idle mode, touch ➔
Settings
➔
Connectivity
➔
Network Profiles
.
2. Touch .
3. Select the parameter you want to add or edit:
• Set Name
: enter a profile name.
• Access Name
: edit the access point name.
• Auth Type
: select the type of authentication used for this WAP
connection: None, Normal, or Secure.
•User ID
: enter the User ID required to connect to the network.
• Password
: enter the user password required to connect to the
network.
•Protocol
: set the connection protocol used by the WAP browser:
WAP, HTTP, or Other.
•Home URL
: enter the URL address of the page to be used as your
homepage.
• Proxy Address
: MEdia Net set as the proxy server address and
port.
• Linger Time (sec.)
: set a time period (in seconds) after which the
network is disconnected if there has been no new data traffic in that
time.
• Advanced Settings
: allows you to configure some of the IP-specific
information: Static IP, Static DNS, Server information, and Traffic
Class.
–
Static IP
: specify if you want to manually enter an IP address. If you
want the IP address to be automatically assigned by the server, remove
the check mark.
–
Static DNS
: specify if you want to manually enter the Domain Name
Server (DNS) address. If you want the address to be automatically
assigned by the server, remove the check mark.
–
Traffic Class
: select the traffic class.
Save
Create
a797 Bourbon.book Page 58 Tuesday, November 17, 2009 1:53 PM
Page 63
Changing Your Settings 59
Note:
The WAP settings may vary depending on the service provider.
4. Touch to exit Advanced Settings.
5. Touch to store these new settings.
IMS Settings
IMS is the method used to connect to the server in order set up
the Video Share option.
1. From Idle mode, touch ➔
Settings
➔
Connectivity
➔
IMS Settings
.
2. Touch one of these options:
• IMS Service
allows you to set the IMS service to On or
Off
.
Important!:
If you reset the IMS Service to
Off
, you will not be able to use the
Video Share Option.
• IMS Profiles
allows you to set the server that service is coming
from. Select a profile and make your alterations.
Important!:
If you change from the default
AT&T IMS
, you may not be able to
use Video Sharing.
Applications Settings
The Applications Settings feature allows you to configure the
functional parameters for most of the onboard applications.
These applications are described in more detail within other
sections of this manual.
1. From Idle mode, touch ➔
Settings
➔ Applications
Settings.
2. Select the type of application which you want to change:
• Messaging
(see page 93)
•Browser
(see page 124)
•Music Player
(see page 109)
• Mobile Video
(see page 90)
• Video Share
(see page 59)
• Record Audio
(see page 60)
• Calendar
(see page 60)
• Address Book
(see page 64).
Video Share Settings
To enable the Alerts, Auto Record, and Recording Location for
Video Share, use the following steps.
1. From Idle mode, touch ➔
Settings
➔ Applications
Settings
➔
Video Share
.
2. Activate any of the following options by touching the
onscreen button.
OK
Save
a797 Bourbon.book Page 59 Tuesday, November 17, 2009 1:53 PM
Page 64
60
•
Audio Alert
: allows you to turn On or
Off
the Video Share Alerts
which play a tone.
•
Auto Record
: allows you to turn On or
Off
the Auto Record which
records the Video Share call.
• Recording Location
: allows you to set whether video recorded is
stored on the
Phone
or on the microSD
Memory Card
.
3. Touch .
Record Audio Settings
To configure the filename and maximum length for a recording.
1. From Idle mode, touch ➔
Settings
➔ Applications
Settings
➔
Record Audio
.
2. Touch either of the following fields and edit the
information:
•
Default Name
: allows you to use the onscreen keyboard to enter a
prefix name of all recorded audio files. Touch to store the
new name.
•
Recording Time
: allows you to choose the maximum limit allowed
for the recorded audio file (1 Minute, 5 Minutes, 10 Minutes,15
Minutes, 30 Minutes, 60 Minutes, or Limit for MMS). Touch
to save the new Recording Time.
3. Touch .
Calendar Settings
To configure the starting day and view used when opening the
Calendar application.
1. From Idle mode, touch ➔
Settings
➔ Applications
Settings
➔
Calendar
.
2. Touch either of the following fields and edit the
information:
•
Starting Day
: allows you choose which day mark the first day in
your calendar week (Sunday or Monday).
•
View by
: allows you to choose the default view for appointments
used by the Calendar application when launched (Month, Week, or
Day).
3. Touch .
Address Book Settings
To configure your Address Book application.
1. From Idle mode, touch ➔
Settings
➔ Applications
Settings
➔
Address Book
.
2. Touch one of the following fields and edit the information:
• My Business Card
: creates and attaches a virtual business card to
be used as an attachment to outgoing messages. For more
information, see
“Attaching Business Card to a Message”
on page 95.
Save
OK
Save
Save
Save
a797 Bourbon.book Page 60 Tuesday, November 17, 2009 1:53 PM
Page 65
Changing Your Settings 61
•Speed Dial
: allows you to set up Speed Dial for your contacts. For
more information, refer to
“Making a Call Using Speed Dial”
on page 23.
• Save New Contacts to
: defines the destination for new contact
entries (Phone, SIM Card, or Always Ask).
• View Contacts from
: to filter the display of current Address Book
entries. Options include: All, Phone, or SIM Card.
•Own Number
: to display your current phone number.
• Fixed Dial Contacts
: assigns phone numbers as FDN entries.
•Used Space
: displays the memory storage allocation (total available
and remaining) within both your Phone, SIM card, and FDN list.
3. Touch (not all of the above options require that you
save).
Memory Management
You can easily check the amount of memory being used for
storing data, such as messages, media, calendar data, or
contacts entries. You can also delete any selected information
from your phone:
1. From Idle mode, touch ➔
Settings
➔
Memory
Management
.
2. Touch any of the following options:
•
Clear Phone Memory
•
Memory Card Details
•Used Space
Clear Phone Memory
From this menu you can clear the memory for Files, Messages,
Address Book entries, Calendar entries, Tasks, or Memos. You
can all select All to clear everything listed.
Note:
To completely remove any personal information stored on your device,
see “Warranty Information” on page 160.
1. From Idle mode, touch ➔
Settings
➔
Memory
Management ➔ Clear Phone Memory
.
2. Place a checkmark alongside those applications you wish
to clear by touching individual applications
– or –
Touch
All
to clear all the memory settings.
3. Touch .
4. Enter the user-defined password and touch
OK
to clear the
memory settings. For more information, refer to “Change
Phone Password” on page 51.
5. Touch
Yes
to confirm or No to cancel.
Save
Clear
a797 Bourbon.book Page 61 Tuesday, November 17, 2009 1:53 PM
Page 66
62
Memory Card Details
Allows you to view specific information related to the current
microSD card being used for storage.
䊳
From Idle mode, touch ➔
Settings
➔
Memory
Management ➔ Memory Card Details
.
Note:
Memory card is optional.
Formatting the Memor y Card
Allows you to format your memory card. All information on the
memory card will be removed and new folders will be created for
your content. New folders include Music, Tones, Recorded Audio,
Picture, Video, and Other Files.
1. Ensure that your memory card is inserted properly in your
phone. For more information, refer to “Installing the
Memory Card” on page 6.
2. From Idle mode, touch ➔
Settings
➔
Memory
Management ➔ Memory Card Details
.
3. At the bottom of the screen, touch
Format
.
4. The prompt,
Formatting will erase all data. Continue?
is
displayed. Touch
Yes
to continue or No to cancel.
5. After formatting, the
Memory Card Details
screen appears.
6. Touch
Rename
if you would like to rename your memory
card.
7. When you are finished, press to return to Idle screen.
Check the Used Space
1. From Idle mode, touch ➔
Settings
➔
Memory
Management
➔ Used Space.
2. Select one of the following storage categories to view the
contents of a category’s memory:
• Shared Memory
• Messaging
•My Stuff
•Calendar
•Tasks
•Memo
• Address Book
3. When you are finished, press to return to Idle screen.
a797 Bourbon.book Page 62 Tuesday, November 17, 2009 1:53 PM
Page 67
Changing Your Settings 63
Software Update
The Software Update feature enables you to use your phone to
connect to the network and upload any new phone software
directly to your phone.
1. From Idle mode, touch ➔
Settings
➔
Software
Update
.
2. Follow the on screen instructions.
Phone Information
This option allows you to see the phone number on the SIM card
(within the phone), the manufacturer, and the model number.
This information may be necessary if talking to Customer Service
in the event of a problem.
1. From Idle mode, touch ➔
Settings
➔ Phone
Information.
2. When you are finished, press to return to Idle screen.
a797 Bourbon.book Page 63 Tuesday, November 17, 2009 1:53 PM
Page 68
64
Section 7: Understanding Your Address Book
This section allows you to manage your daily contacts by storing
their name and number in your Address Book. Address Book
entries can be sorted by name, entry, or group.
Note:
When storing an Address Book entry into your SIM card, note that only
the name, phone number, group, and slot location are initially offered
as fields (some SIM cards may allow an address as well). Although you
may add additional fields to a SIM entry; if you move that same SIM
card to another model phone, it is possible that only the basic
information will be transferred.
Address Book Settings
1. Touch ➔
Address Book
➔
Address Book Settings
.
2. Touch any of the following options to activate a function:
• My Business Card
: creates and attaches a virtual business card as
an attachment to outgoing messages. For more information, see
“Attaching Business Card to a Message”
on page 95.
• Speed Dial
: touch an unused number and then assign it to
someone in your Contacts list. From the Dial screen, touch and hold
the number to speed dial your contact. For more information, refer
to
“Making a Call Using Speed Dial”
on page 23.
• Save New Contacts to
: defines the destination for new contact
entries (Phone, SIM Card, or Always Ask).
• View Contacts from
: to filter the display of current Address Book
entries. Options include: All, Phone, or SIM Card.
• Own Number
: to display your current phone number (page 70).
• Fixed Dial Contacts
: assigns phone numbers as FDN entries
(page 70).
•Used Space
: displays the memory storage allocation (total available
and remaining) within both your Phone, SIM card, and FDN list
(page 74).
Adding a New Contact
Use the following procedure to store a new contact to your
Address Book. New contacts are stored on your phone by default.
Saving a Number from the Idle screen
1. Touch ➔ (
Create Contact
). This opens the
Add New Contact
screen.
2. Touch the image icon and assign a picture to the new entry
by choosing one of three options:
•Remove
although not an option with a new entry, deletes any
previously assigned image.
•Take Photo to use the camera to take a new picture and assign it
to this entry.
Create Contact
a797 Bourbon.book Page 64 Tuesday, November 17, 2009 1:53 PM
Page 69
Understanding Your Address Book 65
• Caller Image
to retrieve a previously stored image from your
Picture folder and assign it to this entry. Select an image and touch
Add
to assign the image and return to the previous
Add New
Contact
screen.
3. Touch the
First Name, Last Name
, and
Display Name
fields
and use the onscreen keyboard to enter names for the new
entry, and touch . (For more information, refer to
“Entering Text” on page 34.)
• First Name
: allows you enter a first name for this entry.
• Last Name
: allows you enter a Last name for this entry.
• Display Name
: allows you enter a display name for this entry which
then appears when you receive a call from this contact.
4. Touch the
Mobile
field and use the onscreen keypad to
enter the phone number for the entry, and touch .
5. Touch to change the category type of the entry.
Choose from among:
Mobile, Home, Work, Fax
, or
Others
.
6. Use your fingertip to scroll down the screen and touch any
of the remaining fields to update their information. Touch
, if required, to save your updates. Available fields
consist of:
•Email
: adds a contact email address for this entry.
•Group
: assigns this contact to group. Touch an group type to
complete the assignment. For more information, refer to
“Creating New Group”
on page 71.
•Ringtone
: assigns a ringtone for this contact information. Choose
from
To ne s, Music
, or
Recorded Audio
categories. Touch a music
file to play a short sample and then touch
Add
to complete the
assignment.
•Vibration
: assigns a vibration type for this contact information.
Touch a setting (
Vibration 1 - 5)
to be provided with a sample.
To uc h
Save
to complete the assignment.
• Birthday
: assigns a calendar date for the contact’s birthday. Touch
OK
to store the new date.
•Note
: allows you enter notes associated with this contact.
(For
more information, refer to “Entering Text”
on page 34.
)
7. Touch to store the new entry into the Address Book.
Note:
By default, Contacts are saved on the phone. To copy them to a SIM
card, see “Copying an Entry to the SIM Card” on page 73.
Adding More Fields to a Number
While in the process of creating a new entry or editing an existing
contact, you can add additional fields to the entry’s list of
information.
1. Within the open Contact Screen, touch (
Add More
Fields
).
OK
OK
OK
Save
Add More Fields
a797 Bourbon.book Page 65 Tuesday, November 17, 2009 1:53 PM
Page 70
66
2.
Place a checkmark adjacent to an individual field by
touching each entry.
– or –
Place a checkmark alongside all entries by touching
All
.
Additional fields include:
•Mobile
: adds an additional Mobile number field for the entry.
•Home
: adds an additional Home number field for the entry.
•Work
: adds an additional Work number field for the entry.
•Fax
: adds an additional Fax number field for the entry.
•Others
: adds an Others field for the entry.
•Email
: adds an additional contact Email address field for this entry.
•URL
: adds a Web site’s URL to the entry.
•DTMF
: adds a DTMF tone string for use with this entry.
•Group
: creates an additional group field for group assignment.
•Message Tone
: adds a field used to assign a message tone that
will sound when messages are received from this contact.
•NickName
: adds a field that can be used to enter a nickname for
the entry. The NickName is not displayed when calls are made to or
received from the contact.
•Company
: adds a Company field for this entry.
•Job Title
: adds a Job Title field for this entry.
• Address - Home
: adds a field used to assign a physical home
address for this entry.
• Address - Work
: adds a field used to assign a physical work
address for this entry.
3. Touch to store the new fields to the entry and
return to the previous screen.
– or –
To add even more fields, touch and repeat the
previous step.
Deleting Fields From a Number
1. Within the open Contact Screen, touch (
Delete
Fields
).
Note:
Only certain new fields may be deleted. If you have not added any new
fields to the contact, the
Delete Fields
button will not appear.
2. Touch each field you wish to delete and a checkmark will
appear.
3. Tou ch .
4. Once you have made your deletions, touch to store
the contact and its fields.
Done
Add More
Fields
Delete
Fields
Delete
Save
a797 Bourbon.book Page 66 Tuesday, November 17, 2009 1:53 PM
Page 71
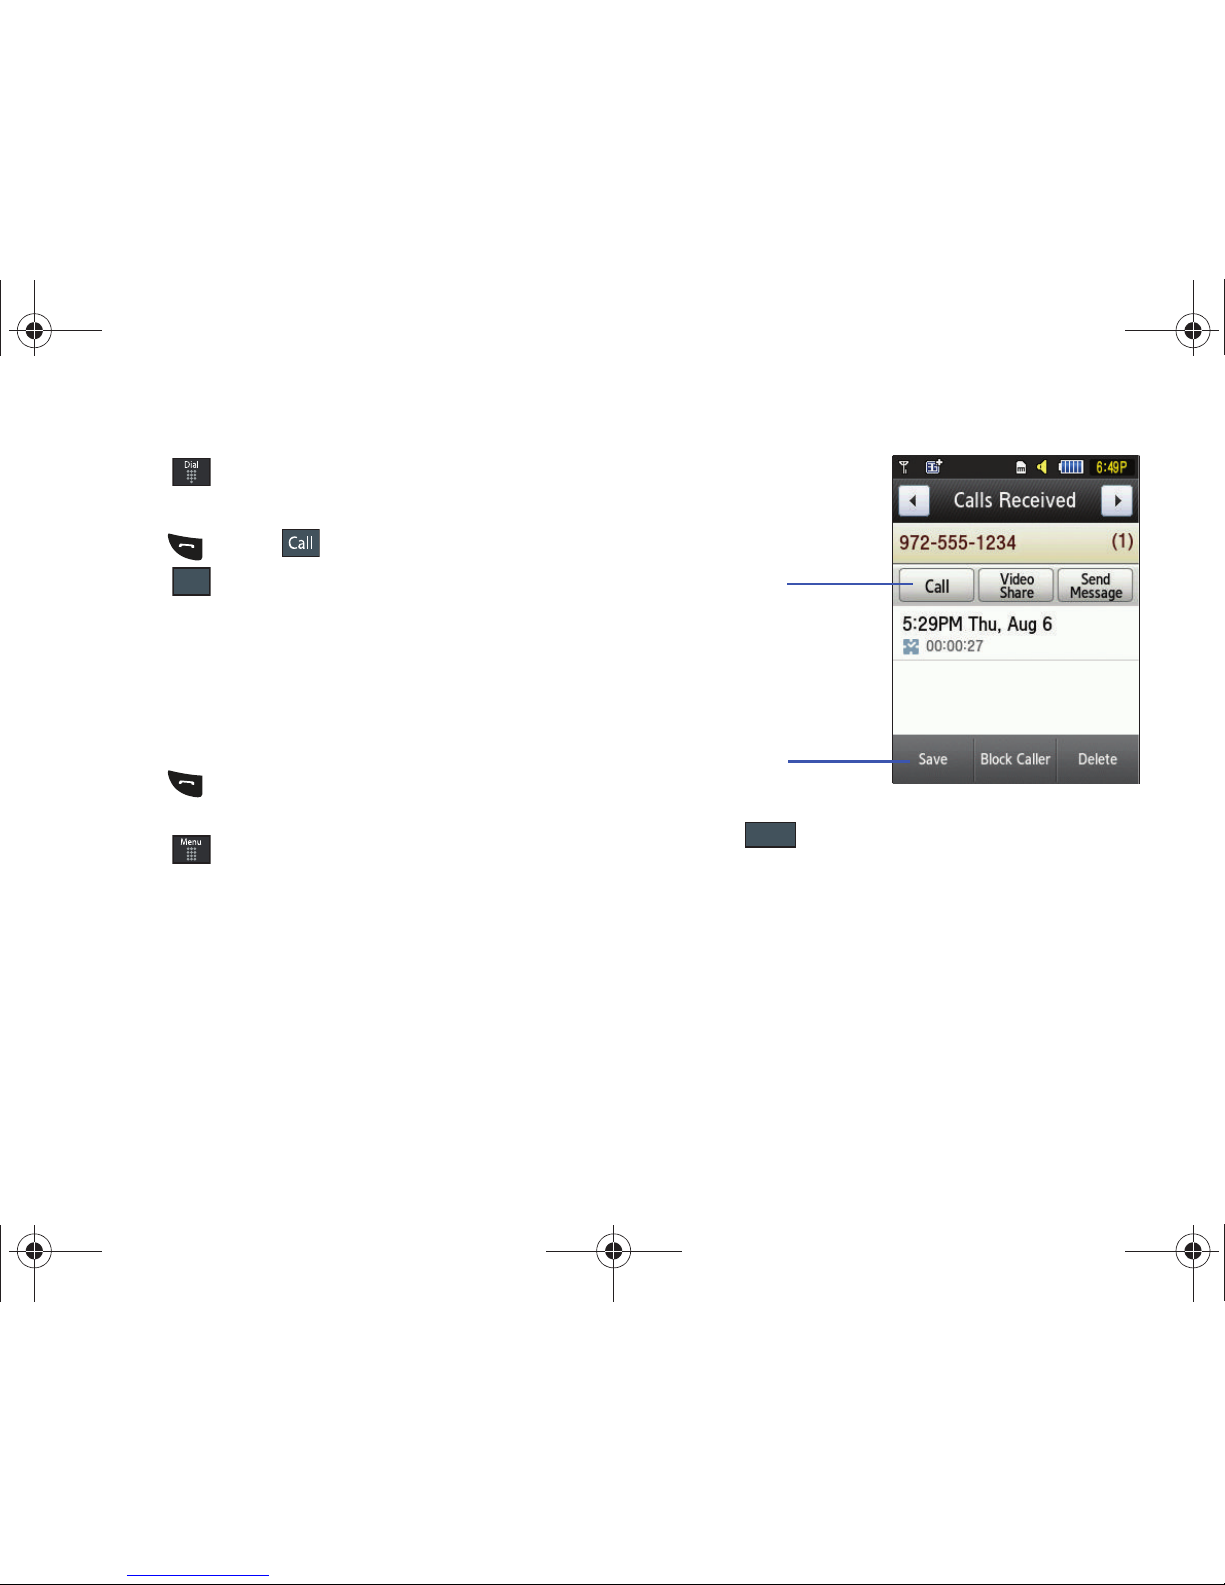
Understanding Your Address Book 67
Saving a Number During a Call
1. Touch and use the onscreen keypad to enter your
number.
2. Press or touch to initiate the call.
3. Touch ➔
Save to Address Book ➔ New
.
•
Select
Update
if this was a previously created entry and your are
adding the current number to the previous entry.
4. Enter the desired information, see “Saving a Number from
the Idle screen” on page 64.
Saving a Number After a Call Has Ended
1. Press to bring up the recent calls screen.
– or –
Touch ➔
My Stuff ➔ Tools
➔
Recent Calls
.
2. Touch a phone number from the list to reveal the
Details
page (shown below) for the phone entry.
3. Touch ➔
New
.
•
Select
Update
if this was a previously created entry and your are
adding the current number to the previous entry.
4. Enter the desired information, see “Saving a Number from
the Idle screen” on page 64.
Adding Pauses to Contact Numbers
When you call automated systems, you are often required to
enter a password or account number. Instead of manually
More
To call the
selected number
To save the
number to the
Address Book
Save
a797 Bourbon.book Page 67 Tuesday, November 17, 2009 1:53 PM
Page 72
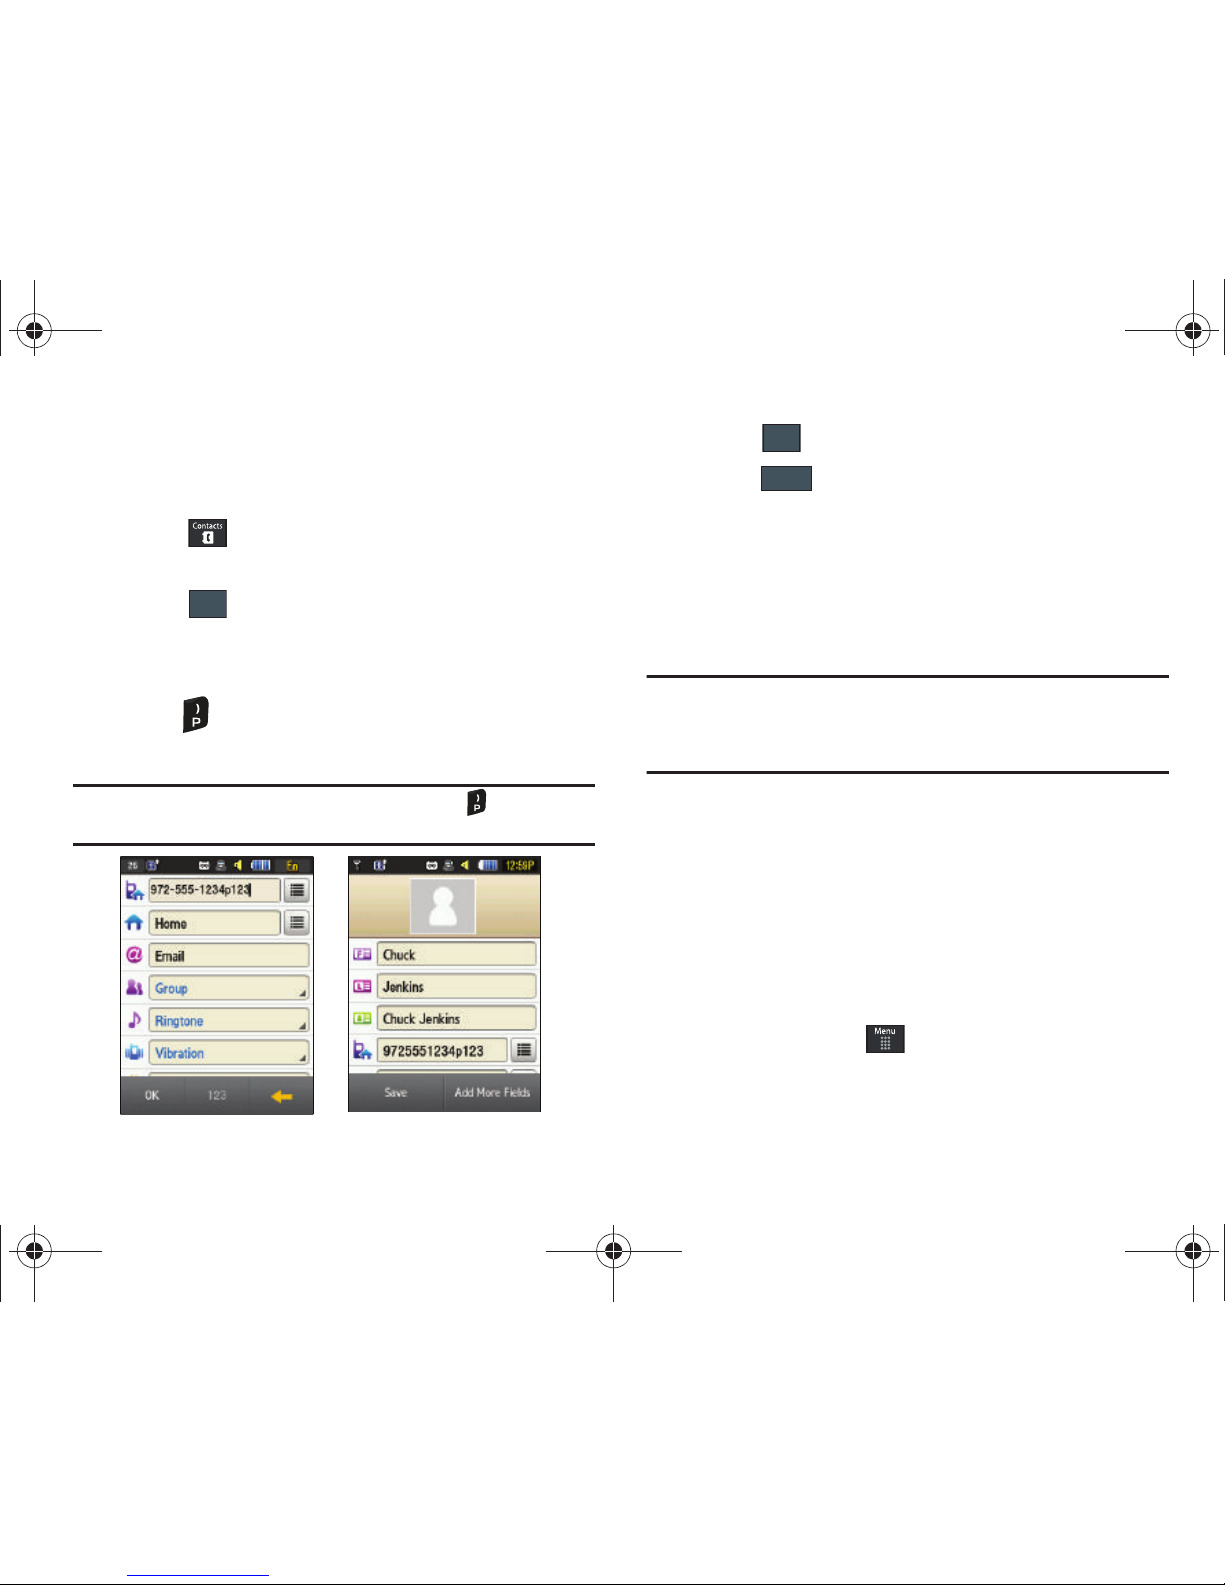
68
entering the numbers each time, you can store the numbers in
your Contacts along with special characters called pauses.
To add a pause to a Contact:
1. Touch , and then touch the image icon or name to
open the Contact.
2. Touch
and then select the desired phone number.
3. Touch the
Phone Number
field and then touch the screen at
the place where the additional numbers need to be added.
4. Press to add a two-second pause, and use the keypad
to enter the additional numbers.
Note:
If more than a two-second pause is required, press as many times
as needed to add additional two-second pauses.
5. Touch .
6. Touch to store your changes.
Using Contacts
Dialing a Number from Address Book
Once you have stored phone numbers in the Address Book, you
can dial them easily and quickly by either using their SIM card
location number or by using the Search field to locate the entry.
Note:
The default Address Book entries are: *Now - *669, Check Bill Balance
- *225#, Customer Care - 1-800-331-0500, Directory Assistance 411, Pay My Bill - *729, View Data Usage - *3282#, View My Minutes *646#, Voice Dial - *08, and Music ID - #43.
Finding an Address Book Entry
You can store phone numbers and their corresponding names
onto your SIM card and phone’s onboard memory. The two
locations are physically separate but are used as a single entity,
called the Address Book.
Depending on your particular SIM card, the maximum number of
phone numbers the SIM card can store and how they are stored
may differ.
1. In Idle mode, touch ➔
Address Book ➔ Contacts
.
Edit
OK
Save
a797 Bourbon.book Page 68 Tuesday, November 17, 2009 1:53 PM
Page 73
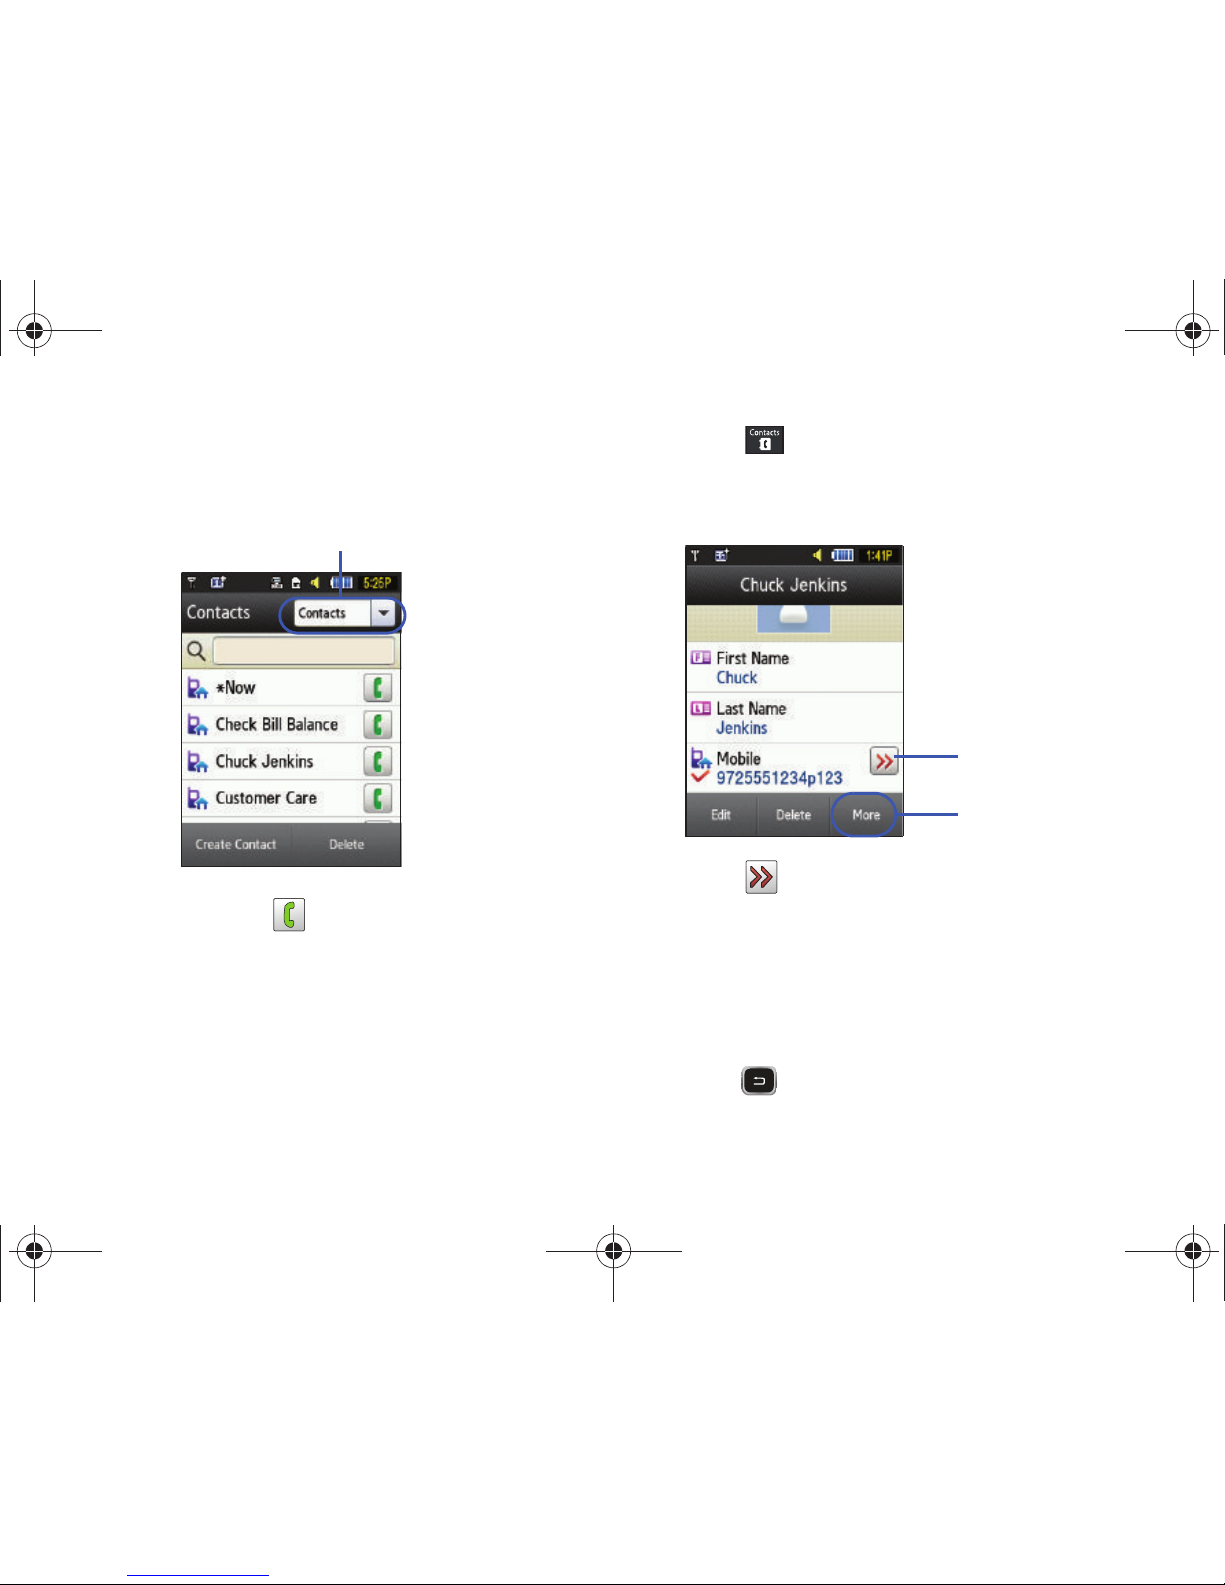
Understanding Your Address Book 69
2.
Touch the
Contacts Filter
field (upper-right) and select
Contacts
. Additional entry categories include Groups and
Favorites.
3. When found, touch adjacent to the entry to make the
call.
Address Book Entry Options
While in the details page for a specific entry (seen below) you
have two sets of options, each accessible from two of the
onscreen buttons.
1. Touch and touch an Address Book name from the list
to reveal the
Entry Options
page (shown below) for the
phone entry.
2. Touch to reveal the first set of options:
•Call:
allows you to call a currently selected entry.
• Video Share
: allows you to share either a live video recording or
recorded video with a phone that is similarly equipped, and if both
SIMs have the feature enabled.
• Send Message: allows you to send a text message or a multimedia
message to the selected entry.
3. Press to return to the previous Entry Options page.
Contacts Filter
Phone Options
Additional
Options
a797 Bourbon.book Page 69 Tuesday, November 17, 2009 1:53 PM
Page 74
70
4.
Touch
to alter the properties of the current entry
such as: Name, Number, Email, Group, or Birthday. Touch
to store your changes.
5. Touch to delete the current address book entry from
a target location such as the Phone and/or SIM card.
6. Touch to reveal the second set of entry options:
• Send Business Card via
: allows you to send a business card
containing information on the selected contact.
This can be sent as either a message or via Bluetooth.
• Add to Favorites
: allows you add the current contact entry to your
favorite list of callers (Favorites list).
Finding My Own Phone Number
This function is a memory aid, which you can use to check your
own phone number if you need to do so.
䊳
In Idle mode, touch ➔
Address Book
➔
Address Book
Settings
➔
Own Number
➔
<voice line #>
.
FDN Mode
FDN (Fixed Dialing Number) mode, if supported by your SIM card,
restricts your outgoing calls to a limited set of phone numbers.
When this feature is enabled, you can make calls only to phone
numbers stored in the FDN list on the SIM card.
Note:
FDN Mode must be set to On in the
Menu
➔
Settings
➔
Phone
➔
Security
➔
Fixed Dialing Mode
option before you can add, change, or
delete contacts on the FDN List.
Changing the FDN mode Status
1. In Idle mode, touch ➔
Settings
➔
Phone
➔
Security
.
2. Scroll down to the
Fixed Dialing Mode
field and touch
On
(to enable fixed dialing) or
Off
to disable the option.
Important!:
With Fixed Dial Mode enabled, you will NOT be able to dial any
number other than those created Fixed Dial Numbers.
Creating New FDN Numbers
With the Fixed Dial mode On, follow these procedures:
1. In Idle mode, touch ➔
Address Book ➔ Fixed Dial
Contacts ➔
Create FDN
.
Note:
If FDN is Off: touch
Menu -> Address Book -> Address Book Settings ->
Fixed Dial Contacts -> Create FDN
. Then follow steps 2-7.
2. Enter your PIN2 password and touch . This number is
provided to you by your Service Provider.
3. Touch
Name
and use the onscreen alphanumeric keypad to
enter a name for this FDN contact. Touch .
Edit
Save
Delete
More
OK
OK
a797 Bourbon.book Page 70 Tuesday, November 17, 2009 1:53 PM
Page 75
Understanding Your Address Book 71
4.
Touch
Phone Number
and use the onscreen numeric
keypad to enter a contact phone number for this FDN
contact. Touch .
5. Touch the SIM card location field to then use the onscreen
numeric keypad to enter a location value for the entry on
the SIM card. Touch .
6. Touch to store the new FDN entry.
7. Press to return to Idle mode.
Group Settings
Creating New Group
1. In Idle mode, touch ➔
Address Book ➔ Groups
➔
Create Group
.
2. Touch the
Group Name
field and use the onscreen
keypad/keyboard to enter a new group name. For more
information, refer to “Entering Text” on page 34.
•
Touch to store the new group name.
3. Touch the
Group Picture
field and choose a location for the
new image:
• Reset
: although not an option with a new group, deletes any
previously assigned image.
•Take Photo: to use the camera to take a new picture and assign it
to this entry.
• Group Picture
: to retrieve a previously stored image from your
Picture folder and assign it to this group entry.
4. Touch
Group Ringtone
to choose an audio file for
assignment to this new group. Choose from
Tones, Music
,
or
Recorded Audio
categories.
•
Touch a music file to play a short sample and then touch
Add
to
complete the assignment.
5. Touch
Group Vibration
to choose a vibration type for
assignment to this new group. Choose from five vibration
options (
Vibration 1-5
).
•
Touch a vibration option to activate a short sample and then touch
Save
to complete the assignment.
6. Touch to store the new Group category.
Adding an Entry to a Group
1. In Idle mode, touch ➔
Address Book ➔ Groups
.
2. Touch a group entry.
3. Touch
Add Member
and place a checkmark alongside those
entries you wish to add to the current Group.
4. Touch
Add
.
OK
OK
Save
OK
Save
a797 Bourbon.book Page 71 Tuesday, November 17, 2009 1:53 PM
Page 76
72
Removing an Entry From a Group
1. In Idle mode, touch ➔
Address Book ➔ Groups
.
2. Touch a group entry.
3. Touch
Remove Member
and place a checkmark alongside
those entries you wish to remove from the current Group.
4. Touch
Remove
.
Editing a Caller Group
To edit a Group entry, there must be at least one member as part
of the selected group.
1. In Idle mode, touch ➔
Address Book ➔ Groups
.
2. Touch a current Group entry.
3. Touch ➔
Edit Group
.
4. Make modifications to the
Group Name, Group Picture
,
Group Ringtone
, and
Group Vibration
fields. For more
information, refer to “Creating New Group” on page 71.
5. Touch to store your changes.
Address Book Favorites
Once you have stored phone numbers in the Address Book, you
can add them to your Favorites list.
Adding Favorites to your Address Book
1. From the Idle screen, touch
Favorites
( ).
– or –
In Idle mode, touch ➔
Address Book ➔ Favorites
.
2. Touch .
3. Select either
Existing Contact
or
New Contact
.
4. Select the Contacts you want to add to your Favorites or
create a new Contact.
5. Touch .
Removing Favorites from your Address Book
1. In Idle mode, touch ➔
Address Book ➔ Favorites
.
2. Touch .
3. Touch the Contacts you want to remove from your
Favorites. A checkmark will appear in the box.
4. Touch .
Managing Address Book Entries
You can copy, delete, and view the memory status for the Phone
and SIM entries on your phone.
More
Save
a797 Bourbon.book Page 72 Tuesday, November 17, 2009 1:53 PM
Page 77
Understanding Your Address Book 73
Copying an Entry to the SIM Card
Note:
When storing an Address Book entry into the SIM card, note that only
the name, phone number, group, and slot location are initially offered
as fields (some SIM cards may allow an address as well). To save
additional information for a particular contact, such as other phone
numbers, or e-mail, it is important to add new fields to that Contact
information. It is also important to note that if you move the SIM card to
another phone that does not support additional fields on the SIM card,
this additional information may not be available.
1. In Idle mode, touch ➔
Address Book ➔ SIM
Management ➔ Copy Contacts to SIM
. The phone then
displays a list of your current contacts.
2. Place a checkmark adjacent to those entries you wish to
have copied to the SIM card.
•
Repeat this step for all individual entries you wish copied to the SIM
or touch
All
to place a checkmark alongside all entries.
3. Touch
Copy
. The selected numbers are copied to the SIM
card.
4. Press to return to Idle mode.
Copying an Entry to the Phone
1. In Idle mode, touch ➔
Address Book ➔ SIM
Management ➔ Copy Contacts from SIM
. The phone then
displays a list of your current contacts held on the SIM
card.
•
If the entry’s associated Group image has a SIM location icon on it,
then the entry exists on the SIM card. This is the type you can
duplicate.
•
If the entry’s associated Group image does not have a SIM location
icon, then this entry currently exists on the phone.
2. Place a checkmark adjacent to those entries you wish to
have copied from the SIM card to the Phone.
•
Repeat this step for all individual entries you wish copied to the
Phone or touch
All
to place a checkmark alongside all entries.
3. Touch
Copy
.
4. When you are finished, press to return to Idle mode.
Deleting All of the Address Book Entries
You can delete all Phone or SIM entries from your phone’s
memory.
Deleting all entries from the Phone
1. In Idle mode, touch ➔
Address Book ➔ Contacts
➔
Delete
.
2. Touch the
All
field to place checkmarks alongside all the
current Address Book entries.
a797 Bourbon.book Page 73 Tuesday, November 17, 2009 1:53 PM
Page 78
74
3.
Touch
Delete
.
4. When you are finished, press to return to Idle mode.
Deleting all entries from the SIM
1. In Idle mode, touch ➔
Address Book ➔ SIM
Management ➔ Delete Contacts from SIM
.
Touch the
All
field to place checkmarks alongside all the
current Address Book entries.
2. Touch
Delete
.
3. At the prompt, touch
Yes
to delete all entries from the SIM
or touch No to cancel.
4. When you are finished, press to return to Idle mode.
Note:
Entries on the FDN Address Book must be deleted from within the FDN
Address Book
Using the Service Dialing Numbers
You can view the list of Service Dialing Numbers (SDN) assigned
by your service provider. These numbers may include emergency
numbers, customer service numbers, and directory inquiries.
1. In Idle mode, touch ➔
Address Book
➔ Service
Numbers.
2. Scroll through the available numbers.
3. To dial the number displayed, press .
Note:
This menu is available only when your SIM card supports Service
Dialing Numbers.
Checking the Address Book’s Used Space
You can check how many names and numbers are stored in the
Address book, in both SIM card and the phone memory. You can
also see the capacity of both memories.
1. In Idle mode, touch ➔
Address Book ➔ Address Book
Settings ➔ Used Space.
• Phone
: tells you how many Address Book entries (out of a possible
1000) are in use.
•USIM
: tells you how many entries are in use on your SIM card.
–
Additional No. 1
: if you have added additional numbers to contacts
saved on the SIM card, this is a counter of the number of SIM contacts
with a second number saved on your SIM card.
–
Additional No. 2
:if you have added additional numbers to contacts
saved on the SIM card, this is a counter of the number of SIM contacts
with a third number saved on your SIM card.
–
Email
: tells you how many entries are in use.
•FDN
: tells you how many entries are in use on your FDN SIM
memory.
a797 Bourbon.book Page 74 Tuesday, November 17, 2009 1:53 PM
Page 79
Understanding Your Address Book 75
Note:
Depending on the SIM card, the number of entries may differ.
2. Once finished, press to return to Idle mode.
Yellow Pages Mobile
The Yellowpages Mobile application provides quick and ready
access to businesses, map locations, and storage of your favorite
searches (My Place). This application allows you to tap into local
businesses, locations, and events, connecting you to your search
in real-time.
1. Touch ➔
YPmobile
.
2. Follow the onscreen prompts to enter the desired business
name, location or search by category types.
a797 Bourbon.book Page 75 Tuesday, November 17, 2009 1:53 PM
Page 80
76
Section 8: My Stuff
The topics covered in this section include Applications, Audio,
Games, Picture, Tools, Video, Other Files, and Used Space.
1. Touch ➔
My Stuff
.
2. Select from one of the following functions:
Applications,
Audio, Games, Picture, Tools, Video, Other Files,
or
Used
Space
.
3. Touch the filter drop down (upper-right of My Stuff page) to
filter the entries based on their current location (
All, Phone
,
or
Memory Card
).
My Stuff Functions
This page provides you with several functions that can be
activated from virtually any page within the My Stuff directories.
Most editing features are only applicable to those files/folders
that are not locked, and therefore editable.
1. Touch ➔
My Stuff
.
2. Select from the following:
• Create Folder
: create a new My Stuff folder on either the Phone or
Memory Card.
•Manage
: allows you to move or copy an existing unlocked folder or
file.
•More
: provides you with the ability to Delete, Rename, Sort by,
Send via Bluetooth, Bluetooth Visibility, and Lock/Unlock certain files
or folders.
Creating a New Folder
1. Touch ➔
My Stuff
➔
Create Folder
.
2. Use the onscreen alphanumeric keypad to create a new
name for the folder and touch once your are done.
Managing Files and Folders
1. Touch ➔
My Stuff
➔
Manage
.
2. Select a migration option by touching either
Move
or
Copy
.
•Move
: takes an unlocked file/folder and moves it to a new location.
•Copy
: takes the unlocked file/folder and duplicates it in the new
location.
3. Select an unlocked entry by touching it to then place a
checkmark next to the entry.
•
Tou ch
All
to place a checkmark alongside all available/unlocked
items.
4. Once complete, touch
Move/Copy
.
OK
a797 Bourbon.book Page 76 Tuesday, November 17, 2009 1:53 PM
Page 81
My Stuff 77
5.
Touch
Phone
or
Memory Card
depending on where you
want to copy or move the files to.
6. Select the folder to copy or move the files to. Touch
New
folder
to create a new folder.
7. Touch
Paste here/Move here
to copy or move the files.
More Functionality
1. Touch ➔
My Stuff
➔
More
.
2. Select an onscreen option:
• Delete
: erases selected files/folders.
•Rename
: renames the selected files/folders.
•Sort by
: sorts the current available files and folders using either:
Date, Type, Name, or Size.
• Send via Bluetooth
: sends a selected file via Bluetooth to another
compatible device.
• Bluetooth Visibility
: allows you to make specific files visible to
other Bluetooth devices.
•Lock/Unlock
: locks or unlocks available files and folders.
Applications
The
Applications
menu option allows you to access applications
and shop for applications using AppCenter (MEdia Mall).
For more information, refer to “Applications” on page 103.
Audio
The
Audio
menu option allows you to shop tones, answer tones,
and music using AppCenter. You can also access previously
stored (pre-recorded) audio files from your internal microSD card.
1. Touch ➔
My Stuff
➔
Audio
.
2. Touch an onscreen option (
Tone s, Answer Tones, Music
, or
Recorded Audio
).
Tone s
You can shop, download, and save to your Downloaded
Ringtones folder.
1. Touch ➔
My Stuff
➔
Audio ➔ Tones
. A menu then
displays to give you the option of either shopping for tones
or selecting from files previously stored to your phone.
2. Touch Shop Tones ➔ select a file to download, and follow
the on-screen options. (These files are downloaded and
stored in the Ton es folder.)
– or –
Touch an available entry.
3. From the playback page, touch
Set as
and select from the
following options:
a797 Bourbon.book Page 77 Tuesday, November 17, 2009 1:53 PM
Page 82
78
• Call Ringtone
: allows you to assign the selected ringtone for use
with general incoming calls when no other caller ringtone has been
assigned.
• Caller Ringtone
: allows you to assign a ringtone to someone in
your Contacts list. Select
Search Contact
to find an existing contact
or
Create Contact
to create a new one.
• Alarm Tone
: allows you to assign the tone to an alarm.
Answer Tones
You can shop and download Answer Tones, manage your Answer
Tones, and access Help files. To access the
Answer Tones
menu
option, use the following steps:
1. Touch ➔
My Stuff
➔
Audio ➔ Answer Tones
.
2. Touch one of the following options and follow the onscreen
instructions.
• Shop Answer Tones
: launches the browser from which you can
touch Shop Answer Tones, then follow the onscreen instructions to
purchase a file.
• Manage Answer Tones
: launches the browser from which you can
assign Answer Tones to Callers and Groups, turn your greeting on
or off, and shop for more Answer Tones.
• About Answer Tones
: launches the browser from which you can
navigate through the frequently asked questions regarding Answer
Ton es .
Music
This menu displays all of your purchased songs. From this menu,
you can also shop for music using the browser.
1. Touch ➔
My Stuff
➔
Audio ➔ Music ➔ Shop Music
to launch AppCenter.
2. Follow the on-screen options.
Recorded Audio
This menu shows a list of saved voice memos. When a voice
memo is recorded and saved, it is stored in the Recorded Audio
folder. To access this menu use the following steps:
1. Touch ➔
My Stuff
➔
Audio ➔ Recorded Audio
.
2. Touch a pre-recorded memo to begin playback.
3. To exit, press .
Creating a new audio recording
1. Touch ➔
My Stuff ➔ Tools ➔ Record Audio
.
2. To start recording, touch .
For more information, refer to “Record Audio” on page 131.
a797 Bourbon.book Page 78 Tuesday, November 17, 2009 1:53 PM
Page 83
My Stuff 79
Games
The
Games
menu option allows you to shop games using
AppCenter. You can download new games, then save them to the
Games
folder.
For more information, refer to “Games” on page 103.
Picture
The Picture menu option allows you to shop for and download
new graphics (using AppCenter), then save them to your
Picture
folder. To access the Picture menu option, use the following
steps:
䊳
Touch ➔
My Stuff
➔
Picture
.
From the Picture page you can access the following menu
options (see “My Stuff Functions” on page 76.):
• Create Folder
: create a new My Stuff folder on either the Phone or
Memory Card.
• Manage
: allows you to move or copy an existing unlocked folder or
file.
•More
: provides you with the ability to Delete, Rename, Sort by,
Send via Bluetooth, Bluetooth Visibility, and Lock/Unlock certain files
or folders.
Shop Graphics
1. Touch ➔
My Stuff
➔
Picture
➔
Shop Graphics
.
AppCenter is launched.
2. Follow the onscreen options to purchase the new image.
The file is downloaded and stored in the
Picture
folder.
Image Features
Touch a graphic from the Pictures page to display the image.
From the image viewer page, you have access to both macro
functions (Zoom, Edit, and Info) and menu options.
•
Zoom
: allows you to magnify the current image.
•
Edit
: allows you to edit the current image by applying various image
effects. For more information, refer to
“Editing Images”
on page 80.
Note:
Editing is only available for unlocked images or non DRM images.
•
Information
: displays an onscreen listing of the image’s properties
such as: name, format, size, etc.
•
Send
: lets you send the currently active image as part of a new
multimedia message or to an external device via Bluetooth.
•
Set as
: allows you to assign the current image as either your current
Wallpaper, or as a display image used by a specific entry within your
Address Book.
•
More
: allows you to choose from the following image options:
• Delete
: allows you to delete the current graphic.
•Rename
: allows you to rename the current graphic.
a797 Bourbon.book Page 79 Tuesday, November 17, 2009 1:53 PM
Page 84
80
• Slide Show
: allows you play a slideshow using the graphics
currently available from within the Picture folder. Press to stop
the slideshow.
• Bluetooth Visibility
: allows you to make specific graphics visible to
other Bluetooth devices.
•Lock/Unlock
: locks or unlocks available files.
• Properties
: allows you to view the properties of a photo.
Editing Images
1. Touch ➔
My Stuff
➔
Picture ➔ <image>
.
Note:
Pre-loaded images cannot be edited.
2. Touch
Edit
() ➔
Files
➔
Open
or
Save as
(to save a
renamed copy of this image).
– or –
Touch
Edit
() ➔
Edit
and select from any of the
following:
• Effects
: allows you to choose from among several effects such as:
Filter, Style, Warp
, or
Partial Blur
.
• Adjust
: allows you to adjust
Auto Level, Brightness, Contrast
,
and
Color
.
•Transform
: allows you to
Resize, Rotate
, and
Flip
the image.
•Crop
: allows you to crop the image. Touch one corner of the image
and, in a single motion, drag to another location to create the crop
area, then touch
Crop
.
•Insert
: allows you to add
Frames, Picture, Clip Art, Emoticon
,
and
Te xt
to the image.
• Memo on screen
: allows you to select a color, then handwrite a
message onto the current image. Touch
Done
to store the new
changes.
Tools
The Tools folder provides access to and allows you to use the
Camera, Voice Recognition, Record Audio files, set Alarms, use
the Calendar features, view Recent Calls, use the Sketchpad,
create Memos, create Tasks, use the Calculator, use the Tip
Calculator, use the Converter (for currency, length, weight,
volume, area, and temperature), view World Clock, set the Timer,
and use the Stopwatch.
For more information, refer to “Tools” on page 130.
Video
This menu allows you shop for videos and to set up folders to
save your videos using AppCenter.
1. Touch ➔
My Stuff
➔
Video
➔
Shop Videos
.
AppCenter is launched.
a797 Bourbon.book Page 80 Tuesday, November 17, 2009 1:53 PM
Page 85

My Stuff 81
2.
Follow the onscreen options to purchase the new video.
The file is downloaded and stored in the
Video
folder.
Other Files
This feature provide additional storage of other miscellaneous file
types that may not fit into any of the previous categories.
䊳
Access the Other Files menu by selecting
My Stuff
➔
Other
Files
.
Used Space
The Used Space menu option allows you to view the usage and
available memory for Applications, Audio, Games, Picture, Video,
and Other Files. To access the Used Space option, use the
following steps:
1. Touch ➔
My Stuff
➔
Used Space
.
The memory usage for the different items are listed.
2. To delete items to free up memory, choose from
Applications, Audio, Games, Picture, Video
, or
Other Files
.
3. Touch the items you want to delete. A checkmark should
appear in the box next to the item. Touch
All
to delete all
items.
4. Touch
Delete
.
a797 Bourbon.book Page 81 Tuesday, November 17, 2009 1:53 PM
Page 86
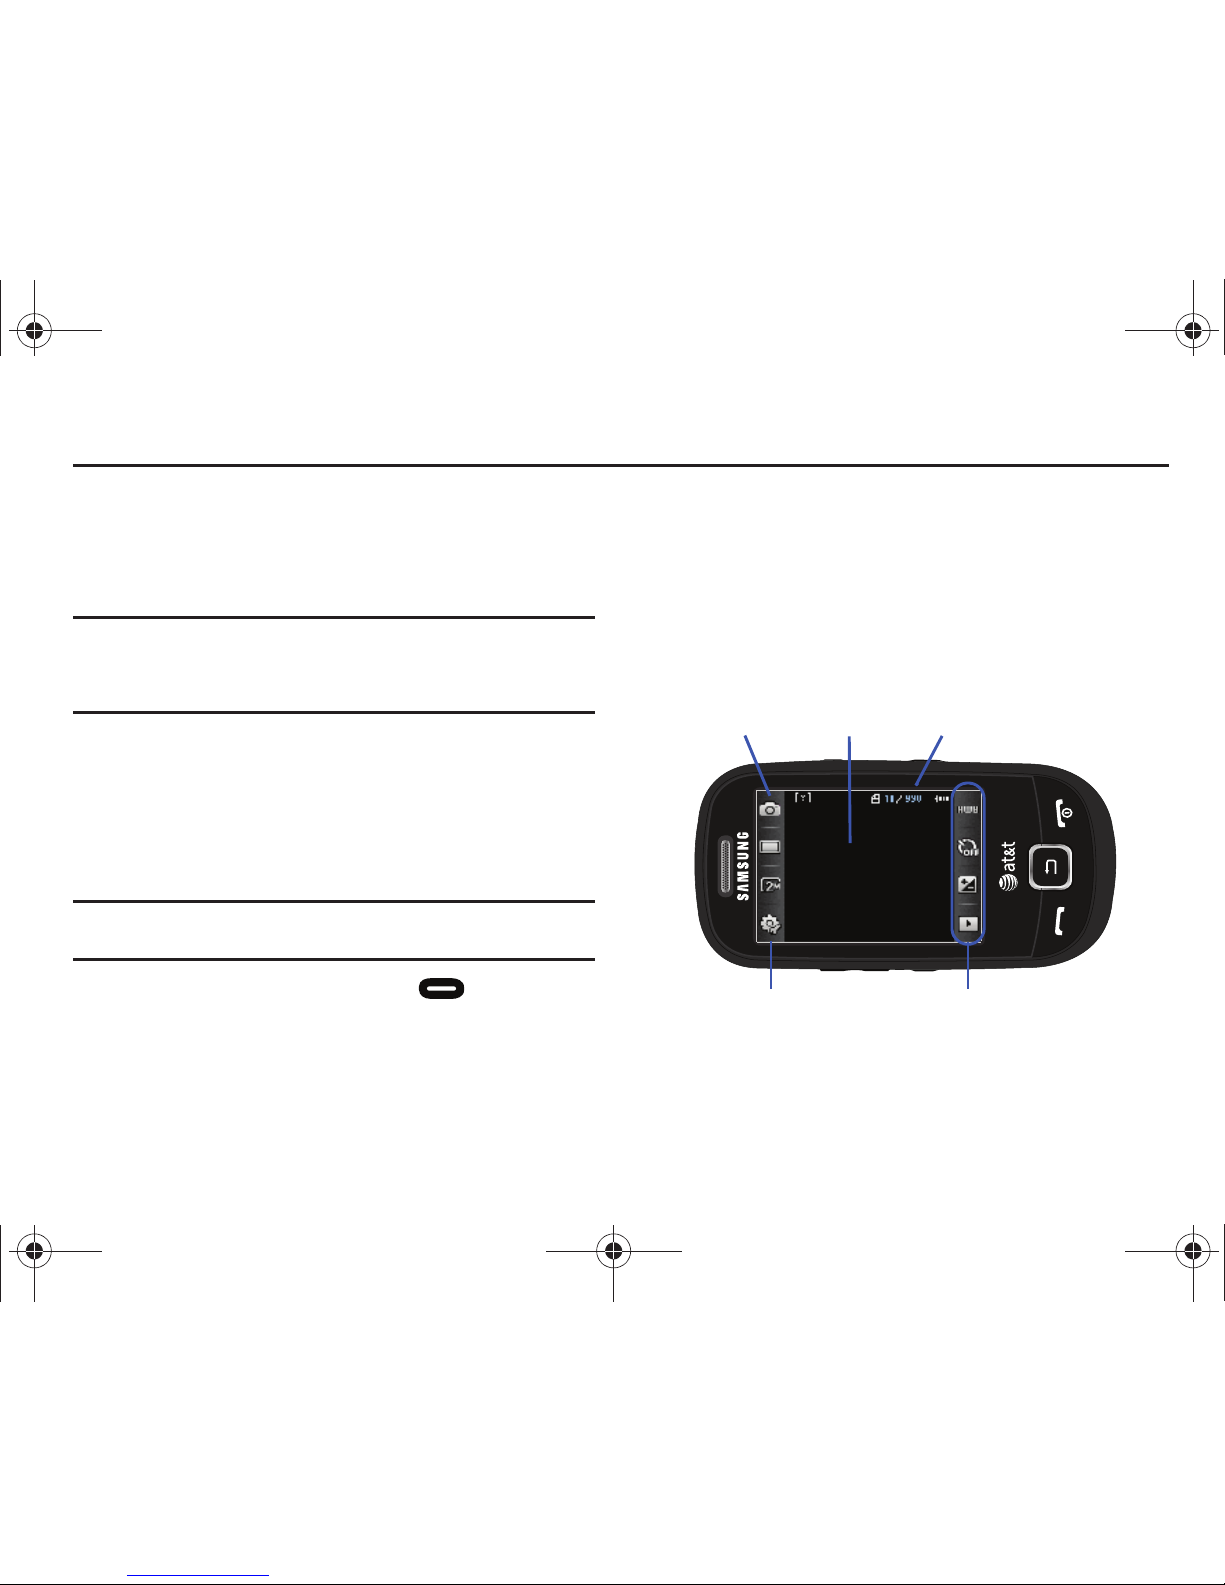
82
Section 9: Camera
This section explains how to use the camera on your phone. You
can take photographs and shoot video by using the built-in
camera functionality. Your 2.0 megapixel camera produces
photos in JPEG format.
Important!:
Do not take photos of people without their permission.
Do not take photos in places where cameras are not allowed.
Do not take photos in places where you may interfere with
another person’s privacy.
Using the Camera
Taking Photos
Taking pictures with your device’s built-in camera is as simple as
choosing a subject, pointing the camera, then pressing the
camera key.
Note:
When taking a photo in direct sunlight or in bright conditions, shadows
may appear on the photo.
1. In Idle mode, press the Camera key to activate the
camera mode.
2. Using the phone’s main display screen as a viewfinder,
adjust the image by aiming the camera at the subject.
3. Press the Camera key until the shutter sounds. (The
picture will automatically be stored within your designated
storage location. If no microSD is installed, all pictures will
be stored on the Phone.) For more information, refer to
“Camera and Camcorder Options” on page 83.
Display Image Current mode
Settings
Pictures Remaining
Current Configurations
a797 Bourbon.book Page 82 Tuesday, November 17, 2009 1:53 PM
Page 87
Camera 83
Note:
The number of JPEG pictures remaining on the selected media appears
in the upper-right of the screen. This is an approximate number of total
pictures which can be taken at the current image size.
4. If desired, before taking the photo, you can touch onscreen
icons to access various camera options.
5. When viewing a picture after you have taken it, use the
Up
and
Down
Volume keys to zoom in or out. You can magnify
the picture up to x10.
6. Press to return to the viewfinder.
Camera and Camcorder Options
Options are represented by icons across both sides of the screen.
Note:
The options will disappear after a few seconds. Touch the screen and
they will reappear.
Camera/Camcorder/Video Share Mode
: allows you to take a
photo in various modes. Once you change the mode, the
corresponding indicator appears at the top left of the
display. Choose from Camera, Camcorder, or Video Share.
Recording Mode
: allows you to set the recording mode to
either: Normal (limited only by available space on
destination location), Limit for MMS (limited by MMS size
restrictions), Video Share (only available in Camcorder
mode).
Shooting mode
: allows you to set the shooting mode.
Options are:
•
Single
: takes a single photo and view it before
returning to the shooting mode.
•
Continuous
: takes a succession of consecutive photos
by pressing and holding the Camera key.
•
Panorama
: takes a landscape photo by taking an
initial photo and then adding additional images to
itself. The guide box lets you view the area where the
second part of the panoramic picture should fall
within.
•
Smile Shot
: the camera focuses on the face of your
subject. Once the camera detects the person’s smile,
it will take the picture.
•
Mosaic
: takes multiple photos and then groups them
together into a single final photo.
S
a797 Bourbon.book Page 83 Tuesday, November 17, 2009 1:53 PM
Page 88
84
Shooting mode (continued)
:
•
Frame
: allows you to choose a custom frame border
for your image. Choose from one of the 20 available
frames. Touch OK to assign the frame.
Camera Resolution
: allows you to set the image size to
either: 2M(1600x1200), 1M(1280x960), 0.3M(640x480),
or 320x240.
Camcorder Resolution
: allows you to set the video size to
either: 320x240 or 176x144.
Settings
: allows you to customize your camera settings.
Choose the following options and touch OK:
Camera
:
•
Effects
: allows you to change the color tone or apply
special effects to the photo. Options include: None,
Black and White, Sepia, Negative, or Watercolor.
•
Exposure Meter
: allows you to set how the camera
measures or meters the light source: Matrix,
Center-Weighted, or Spot.
•
Night Mode
: allows you to set the Night Mode to On or
Off.
S
•
Image Quality
: allows you to set the image quality to:
Superfine, Fine, or Normal.
Camcorder
:
•
Effects
: allows you to change the color tone or apply
special effects to the video. Options include: None,
Black and White, Sepia, Negative, or Watercolor.
•
Video Quality
: allows you to set the video quality to:
Fine, Normal, or Economy.
Settings tab
:
•
Guidelines
: allows you to turn the guidelines On or Off.
•
Review
: allows you to review the photo or video
immediately after taking it.
•
GPS
: allows you to turn GPS On or Off (also known as
Geotagging). The location of where the picture is
taken is attached to the picture. This option is only
available in Camera mode.
•
Shutter Sound
: allows you to select a tone to play
when the camera’s shutter opens and closes. Sound
selections are Shutter 1, Shutter 2, Shutter 3, or Off.
a797 Bourbon.book Page 84 Tuesday, November 17, 2009 1:53 PM
Page 89
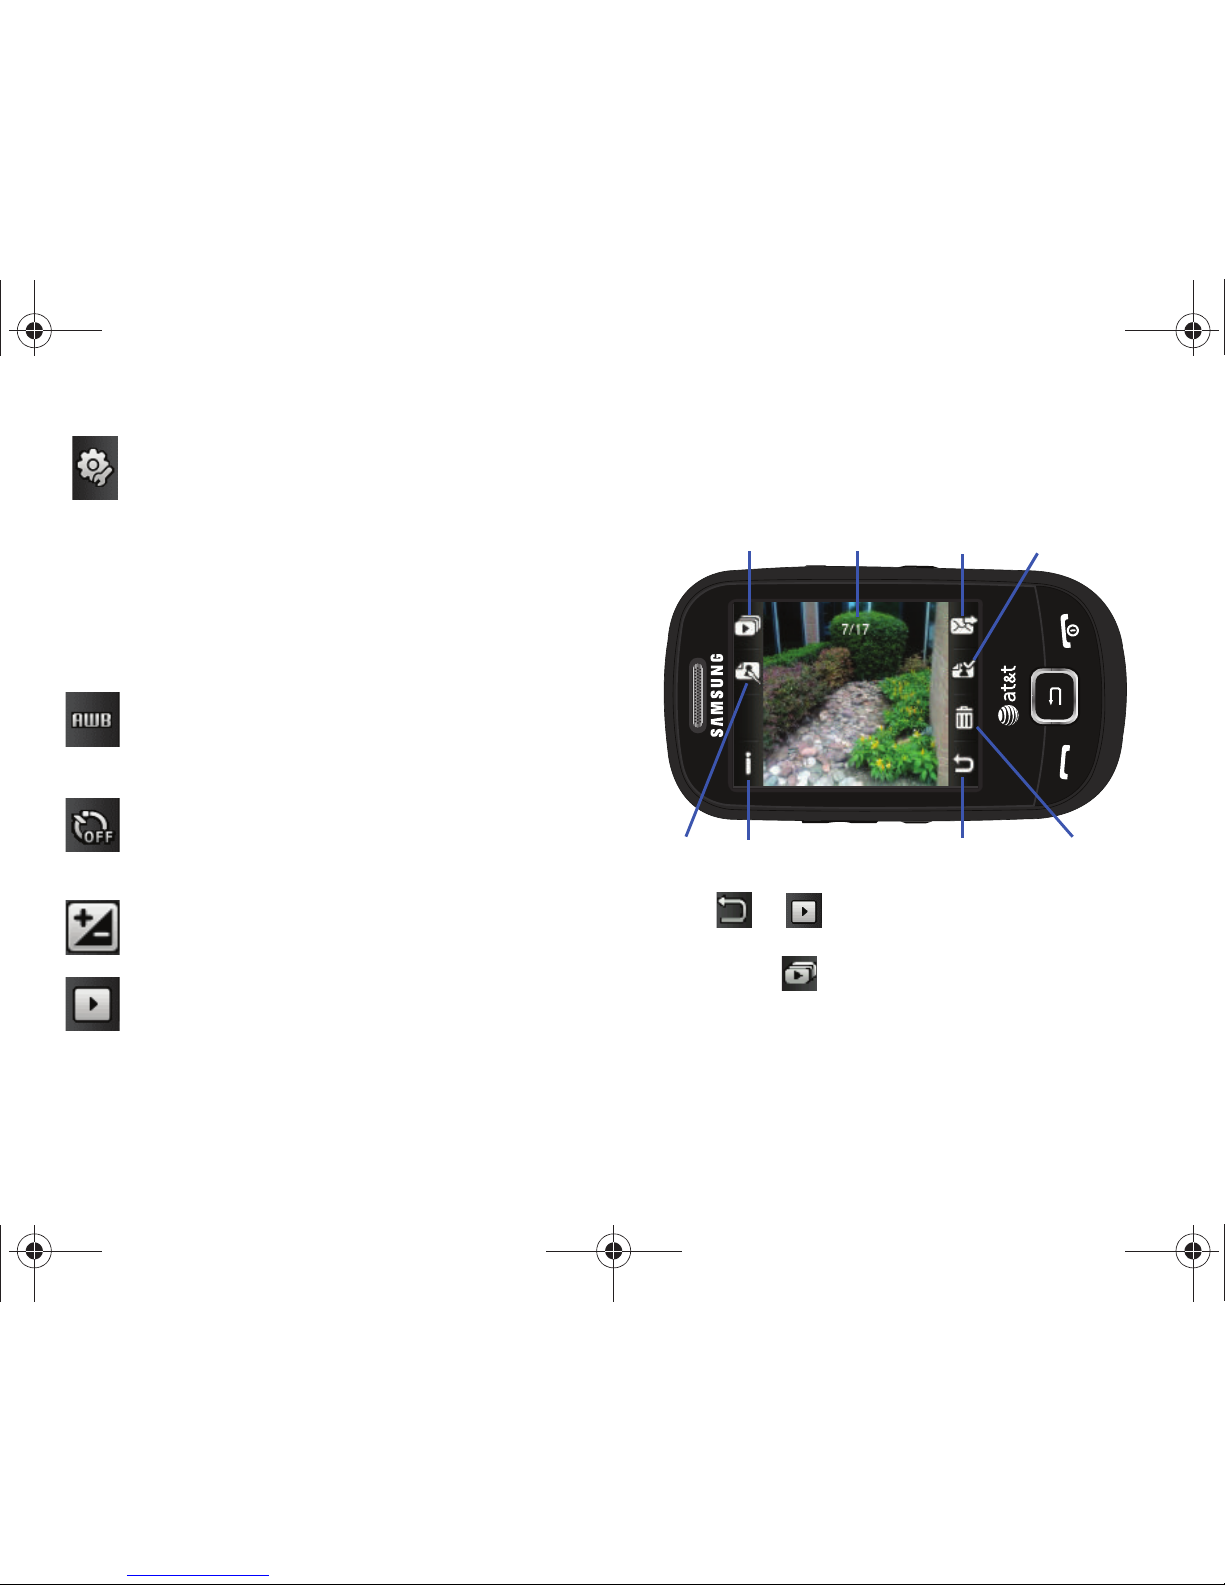
Camera 85
Pictures/Videos Folder Options
After you have taken a photo or shot a video, you can access
various options from the Pictures/Video Folder page.
䊳
Touch
➔ and then touch one of the available
options:
•
Play Slideshow
( ): to play the available images (from the Picture
and Video folders) within a slideshow. Touch the Up/Down arrows to
set the duration of each onscreen image.
Settings tab (continued)
:
•
Audio Recording
: allows you to record audio while
recording video. Selecting Off, temporarily mutes the
microphone and records only video. This option is
only available in Camcorder mode.
•
Storage
: allows you to configure the default storage
location for images/videos as either Phone or Memory
Card (if inserted).
White Balance
: allows you to set this option from the
following choices: Auto, Daylight, Incandescent,
Fluorescent, or Cloudy.
Timer: allows you to set a time delay before the camera
takes the photo or the camcorder begins recording video.
Options include: Off, 2 seconds, 5 seconds, or 10 seconds.
Brightness
: allows you to adjust the brightness level by
moving the slider across the page.
Access Pictures/Video Folder Options
: allows you to access
the options page for a selected image/video. Options
include: Play slideshow, Edit, Information, Send, Set as,
Delete, and Return to previous page.
Image/Video
Play Slideshow
Edit
Return to previous page
Send
Set as
Delete
Information
a797 Bourbon.book Page 85 Tuesday, November 17, 2009 1:53 PM
Page 90
86
•
Edit
( ): allows you to edit the current image using any of the
following:
–
Effects
: allows you to choose from among several effects such as
Filter, Style, Warp,
and
Partial blur
.
–
Adjust
: allows you to adjust
Auto Level, Brightness, Contrast
, and
Color
.
–
Tra ns fo rm
: allows you to
Resize, Rotate
, and
Flip
the image.
–
Crop
: allows you to crop the image. Touch one corner of the image and,
in a single motion, drag to another location to create the crop area,
then touch
Crop
.
–
Insert
: allows you to add
Frames, Picture, Clip Art, Emoticon
, and
Tex t
to the image.
–
Memo on screen
: allows you to select a color, then handwrite a
message onto the current image. Touch
Done
to store the new
changes.
Note:
Edit and Set as features are not available when the camcorder mode is
active.
•
Information
( ): displays file information such as name, format,
size, resolution, etc.
•
Send
( ): lets you send the currently active image as part of a
new multimedia message, to an external device via Bluetooth, or to
HP’s Snapfish.
•
Set as
( ): allows you to assign the current image as either your
current Wallpaper, or as a display image used by a specific entry
within your Address Book.
•
Delete
( ): erases the currently selected image/video.
•
Return
( ): takes you back to the previously active camera or
camcorder page where you can take another photo or shoot a new
video.
Accessing the Picture Folder
1. Touch ➔
My Stuff
➔
Picture
.
2. Touch a photo to open it in the viewer.
Selecting and Using the Picture Folder
Touch a picture from the Picture page to display the image. From
the image viewer page, you have access to both macro functions
(Zoom, Edit, and Info) and menu options.
Note:
Menu options only appear in portrait view.
For more information, see “Image Features” on page 79.
Editing a Photo
For information on editing a photo, see “Editing Images” on
page 80.
a797 Bourbon.book Page 86 Tuesday, November 17, 2009 1:53 PM
Page 91
Camera 87
Assigning an Image to an Address Book Entry
1. Touch ➔
My Stuff
➔
Picture ➔ <image>
.
2. Touch
Set as
➔
Caller Image
➔
Search Contact
, touch an
onscreen entry and touch .
– or –
Touch
Set as
➔
Caller Image
➔
Create Contact
, and follow
the create a new Address Book entry with the image
already assigned. For more information, refer to
“Understanding Your Address Book” on page 64.
Assigning an Image as a Wallpaper
1. Touch ➔
My Stuff
➔
Picture ➔ <image>
.
2. Touch
Set as
➔
Wallpaper
.
3. Touch the screen to reveal the adjustment tools:
• Zoom slider
: touch the magnifying icons at either the top or bottom
of the slider to adjust the magnification of the current image.
•Rotate
: orients the current image in either a landscape or portrait
orientation. The bottom left of the page indicates how much of the
image will be displayed as the wallpaper.
4. Touch to store the new settings and assign the
wallpaper image.
Using the Camcorder
In addition to taking photos, the camera also doubles as a
camcorder allowing you to also record, view, and send videos.
Shooting Video
Tip:
When shooting video in direct sunlight or in bright conditions, it is
recommended that you provide your subject with sufficient light by
having the light source behind you.
1. In Idle mode, press the Camera key to activate the
camera mode.
2. Touch then touch Camcorder ( ).
3. Using the phone’s main display screen as a viewfinder,
adjust the image by aiming the camera at the subject.
4. Press the Camera key again to begin shooting video.
5. Touch or the Camera key to stop the recording and
save the video file to your Video folder.
– or –
Before shooting, touch and select .
•
Video Share allows you to make a Video Share call by displaying a
screen where you can input the number of a recipient that also has
Video Share. (This option will only display if you have the Video
Save
Set
a797 Bourbon.book Page 87 Tuesday, November 17, 2009 1:53 PM
Page 92
88
Share service.) If the recipient accepts the Video Share call, you
continue using the camcorder as usual.
•
Touch to end the Video Share session. The
recorded file is saved automatically and the file name is displayed.
You can then continue the call or terminate it.
6. Once the file has been saved, touch to play back your
video for review.
7. Press to return to the viewer.
Camcorder Options
Camcorder options are represented by icons across both sides of
the screen.
For more information, refer to “Camera and Camcorder Options”
on page 83.
Camcorder Options after a Video is Taken
After you have shot a video, you can use various options that
appear as icons on the screen. Touch an icon to activate the
function.
䊳
Touch
➔ and then touch one of the available
options:
•
Play Slideshow
( ): to play the available images (from the Picture
and Video folders) within a slideshow. Touch the Up/Down arrows to
set the duration of each onscreen image.
Note:
Edit and Set as are not a features available when the camcorder mode
is active.
•
Information
( ): displays file information such as name, format,
size, resolution, etc.
•
Send
( ): lets you send the currently active video as part of a new
multimedia message, or to an external device via Bluetooth.
•
Delete
( ): erases the currently selected video.
•
Return
( ): takes you back to the previously active camcorder
page where you can shoot a new video.
Accessing the Video Folder
1. Touch ➔
My Stuff
➔
Video
.
2. Touch a video to open it in the viewer and initiate playback.
3. To play the video, touch .
Options available from the main Video page, and before you
select it to play:
•
Create Folder
: create a new My Stuff folder on either the Phone or
Memory Card.
•
Manage
: allows you to move or copy an existing unlocked folder or
file.
–
Move
: allows you to choose the Selected or Multiple videos to move.
–
Copy
: allows you to copy a selected or multiple videos.
a797 Bourbon.book Page 88 Tuesday, November 17, 2009 1:53 PM
Page 93
Camera 89
•
More
: provides you with the ability to Delete, Rename, Sort by, Send
via Bluetooth, Bluetooth Visibility, and Lock/Unlock certain files or
folders.
–
Delete
: allows you to delete the Selected video or Multiple videos.
–
Rename
: allows you to rename the video file.
–
Sort by
: allows you to sort video clips by Date, Type, Name, or Size.
–
Send via Bluetooth
: allows you to send the video to a Bluetooth
device.
–
Bluetooth Visibility
: allows you to make the Selected or Multiple
videos visible to Bluetooth devices.
–
Lock/Unlock
: allows you to lock/unlock the video file to prevent
deletion. Lock prevents the video clip from being deleted; Unlock allows
the video clip to be deleted.
Once you have selected the video to play, your options are:
•
Options
( ): to access the following:
–
Video Share
: allows you to send the video clip via Video Share.
–
Send via
: allows you to send the video clip via a multimedia message
or via a Bluetooth device.
–
Display Mode
: allows you to select Full Screen, Full Screen in Ratio, or
Original Size to view your video.
–
Properties
: allows you to view the properties for this video file.
•
Full-Screen View
( ): allows you to change the display mode to
the full-screen option while the video is playing. Press the Normal View
icon ( ) to return to Normal View.
•
Portrait Mode
( ): allows you to change the display mode to the
portrait view. From the Portrait View, touch
to return to
Landscape mode.
•
Pause/Resume
: (
)
allows you to pause the video being
played, and then resume playing.
•
Previous/Next
: (
)
allows you to jump to either the
previously played video or the next file in the Videos folder.
•
Exit
: ( )takes you back to the Videos page.
a797 Bourbon.book Page 89 Tuesday, November 17, 2009 1:53 PM
Page 94
90
Section 10: Mobile Video
Your phone is equipped with a WAP (Wireless Application
Protocol) browser which allows you to access the Internet and
download media files directly to your phone. These media files
are displayed using the built-in Media Player. Mobile Video is a
media service which allows you to stream media content
(Weather, News, Sports highlights, etc.) directly to your phone.
1. In Idle mode, touch ➔
Mobile Video
to launch the
default Mobile Video homepage. This homepage provides
you with access to content categories & settings:
•My Favorites
: allows you to choose from recently uploaded video
clips from media providers such as CNN, ESPN, HBO Mobile
Preview, and NBC.
• Video Categories
: provides some general content categories from
which to begin searching for media: Entertainment, Sports, News &
Weather, Music, Kids & Cartoons & HBO Mobile.
•Customize CV
: allows you to access the Mobile Video Settings
menu where you can configure most of the settings associated with
Mobile Video.
• Parental Controls
: provides you with settings which can be
configured to restrict certain media content from being displayed on
the phone.
•MEdia Net
: exits from the Mobile Video application and launches
the MEdia Net homepage.
•Help
: provides basic on-line assistance which answers most of the
common issues users come across while using this feature.
2. Select from one of the available categories by touching an
option.
Viewing a Video Clip
1. In Idle mode, touch ➔
Mobile Video
.
2. Select the video clip by touching the entry from within the
Favorites section.
3. After the stream has been buffered into memory, you can
choose to either pause or play the content.
•
Touch the Pause/Play button to toggle between the two functions.
•
Touch the Exit button to be taken back to the Mobile Video
homepage.
Using the Video Categories
This grouping of media categories provides access to an
additional listing of streaming media. Where the previous
Favorites list of media stream can be user edited and updated,
this list of categories is defined by Mobile Video’s homepage and
cannot be changed.
a797 Bourbon.book Page 90 Tuesday, November 17, 2009 1:53 PM
Page 95
Mobile Video 91
Customizing Mobile Video
Updating the Favorites List
The list of media providers which appear in the Favorites section
of the Mobile Video homepage can be edited and changed by the
user.
1. In Idle mode, touch ➔
Mobile Video
➔ Customize
CV ➔
Edit
My Favorites. The screen is composed of two
sections:
•
Manage My Favorites: lists the current Favorites list and gives you
the option of opening the page or deleting it from your Favorites.
•
Add to Favorites: selecting an item moves it to the Favorites list.
2. Do one of the following:
•
To uc h
to delete a Favorite.
•
To uc h
to open a Favorite.
•
To uc h
to
move an item to the Favorites.
Adding a Video Alert
When new media is available for upload to your phone (such as
breaking news), you can set your phone to notify you of the new
available content.
1. In Idle mode, touch ➔
Mobile Video
➔ Customize
CV ➔ My Video Alerts ➔
Add to My Alerts
.
2. Touch the red circle next to any of the available alert
services listed within the Add to My Alerts section of the
page (ex: Breaking News).
My Purchases
The CV homepage can be used to shop for streaming multimedia
content. The
My Purchases
section can help keep track of your
purchase history and view any new resale products.
1. In Idle mode, touch ➔
Mobile Video
➔ Customize
CV ➔
My Purchases ➔ Purchase History
. This provides you
with an on screen listing of your “to date” purchase history
for media content.
2. Touch
My Account
. This provides you with an onscreen
description of your account details.
Parental Controls
Your phone can be configured to block both purchased and
streamed media content. Before filtering, you must first establish
a pin/password and a contact e-mail address. Once those have
been established, you can the two available filter options:
•
Content Filters
: let you restrict access to inappropriate content both
on and outside of MEdia Net.
a797 Bourbon.book Page 91 Tuesday, November 17, 2009 1:53 PM
Page 96

92
•
Purchase Blocker
: lets you restrict the ability to buy ringtones,
downloads, games, etc., from MEdia Net on this phone.
Setting up Parental Controls
1. In Idle mode, touch ➔
Mobile Video
➔ Customize
CV ➔
Parental Controls
to access the MEdia Net parental
setup fields.
2. Touch each of the following fields and use the onscreen
keypad/keyboard to enter the information:
PIN, Re-enter
,
contact email address
.
3. Touch
Save
and allow a few minutes for your information to
be received and accepted by MEdia Net. You can then use
this information to activate the parental filters.
Configuring the Filters
1. In Idle mode, touch ➔
Mobile Video
➔ Customize
CV ➔
Content Filters
➔ On button to toggle the On/Off
state.
2. Touch
Purchase Blocker
➔ On button to toggle the On/Off
state.
3. Touch
OK
to activate the filter.
a797 Bourbon.book Page 92 Tuesday, November 17, 2009 1:53 PM
Page 97
Messaging 93
Section 11: Messaging
This section describes how to send or receive different types of
messages. It also includes the features and functionality
associated with messaging.
Types of Messages
Your phone provides the following message types:
•
Text Messages
•
Multimedia (Picture and Video) Messages
•
IM Messages
•
Mobile Email
The Short Message Service (SMS) lets you send and receive text
messages to and from other mobile phones or email addresses.
To use this feature, you may need to subscribe to your service
provider’s message service.
The Multimedia Messaging Service (MMS) lets you send and
receive multimedia messages (such as picture messages and
video messages) to and from other mobile phones or email
addresses. To use this feature, you may need to subscribe to
your service provider’s multimedia message service.
Important!:
When creating a message, adding an image, a sound file, or a
video clip to a text message changes the message from a text
message to a multimedia message.
Messaging icons are displayed at the top of the screen and
indicate when messages are received and their type. For more
information, refer to “Icons” on page 14.
Creating and Sending Messages
1. From the Idle screen, touch
Message
( ).
– or –
Touch ➔
Messaging ➔ Create Message
.
2. Select a recipient by selecting an entry method by
touching
Tap to Add Recipient
and then selecting an
associated option:
• Enter Number
: to manually enter a destination using a valid cellular
phone number.
• Enter Email
: to manually enter a destination using a valid email
address.
•Contacts
: to select a recipient from your Contacts list (valid entries
must have a wireless phone number or email address).
• Recent Contacts
: to select a recipient from a list of recently sent
messages.
•Group
: to select a recipient from the Group list.
a797 Bourbon.book Page 93 Tuesday, November 17, 2009 1:53 PM
Page 98
94
Note:
If the number of recipients are less than 10, all members in the group
will be added. You will need to delete any unnecessary members in the
list by selecting the trash can icon and deleting unwanted entries.
Note:
Enter additional recipients by separating each entry with a semicolon
(;) then using the previous procedure.
3. Touch the empty onscreen text field and use the keypad to
enter a message. For more information, refer to “Entering
Text” on page 34.
4. Review your message and touch .
Additional Message Options
1. While composing your message, touch to reveal
additional insert options.
•Picture
: allows you to choose an existing image from the Pictures
list, then add it to your message by touching
Add
.
•Video
: allows you to choose an existing video from the Videos list,
then add it to your message by touching
Add
.
• Audio
: allows you to choose an existing audio file from the Audio
list, then add it to your message by touching
Add
.
• Templates
: allows you to insert one of the preset message
templates to the text (for example, “Where is the meeting?”).
•Take Picture
: allows you to temporarily exit the message, take a
photo with phone’s camera, and then add it to your message by
touching OK.
• Record Video
: allows you to temporarily exit the message, record a
video clip using the phone’s camera, and then add it to your
message by touching OK.
• Record Audio
: allows you to temporarily exit the message, record
an audio clip using the phone’s microphone, and then add it to your
message by touching
Add
.
•Favorite URL
: allows you to temporarily exit the message, access
your Favorites list then select those URLs you would like to add to
the current message by touching
Add
.
• Contact Info
: allows you to choose an existing Address Book entry,
then add it to your message by touching
Insert
.
2. Touch to reveal additional options:
•Preview
: allows you to preview your current message before
delivery (multimedia messages only).
• Slide Options
: allows you to add more pages to the current
message. Options include: Add Slide, Delete Slide, or Edit Style
(multimedia messages only).
• Attach Files
: allows you to add attachments to your message. The
following options are available:
–
File
: allows you to insert an audio, graphic, or video clip to your
message as an attached file.
–
Business Card
: allows you to insert the contact information for an
entry from Address Book directly to your message as an attached file.
Send
Insert
More
a797 Bourbon.book Page 94 Tuesday, November 17, 2009 1:53 PM
Page 99
Messaging 95
–
Event
: allows you to insert an Event entry from your calendar directly to
your message as an attached file.
–
Ta sk s
: allows you to insert a Task entry from your Tasks directly to your
message as an attached file.
–
Memo
: allows you to insert a pre-saved Memo (text) directly to your
message as an attached file.
–
Favorite URL
: allows you to insert a URL address from your web
favorites list.
• Add Subject/Remove Subject
: allows you to either add or delete a
subject field to the new message (multimedia messages only).
• Save to Drafts
: saves the current message to the Drafts folder.
• Save as Template
: allows you to save the message as a template
so you can use it again later.
• Delivery Options
: allows you to configure the options associated
with sending the message.
• Request Reports
: allows you to be alerted when the message is
received and when it is read (text messages only). When the Report
option is checked, the text message will be changed to a
multimedia message.
3. When you have finished composing your message, touch
Send to and confirm the recipient(s). For more
information, refer to “Creating and Sending Messages” on
page 93.
4. Touch to deliver the message to the selected
recipients.
Attaching Business Card to a Message
To attach your Business Card to an outgoing message, follow
these steps:
1. Touch ➔
Address Book
➔
Address Book Settings
➔
My Business Card
.
2. Create your Business Card by entering the information that
you want (this must only be done once).
3. Touch
More ➔ Send Business Card via ➔ Message
.
4. Enter your message and touch .
5. Add recipient(s) and touch .
Viewing New Received Messages
1. In Idle mode, new messages are indicated by icons and a
New Messages
pop-up.
2. Touch the
View
button from the New Messages pop-up.
Note:
If you accidentally exit from this notification screen, you will need to go
to
Menu ➔ Messaging
➔
Inbox
to access your messages.
Send
OK
Send
a797 Bourbon.book Page 95 Tuesday, November 17, 2009 1:53 PM
Page 100
96
3.
Touch a message you wish to view. The selected message
appears in the display.
Tip:
When viewing a text message, press the Up or
Down
volume keys to
increase or decrease the font size of the message text. Six different font
sizes are available.
4. To play a multimedia message, touch .
•
To pause playback of the multimedia message, touch
.
•
To stop playback of the multimedia message, touch
Stop
.
5. To scroll through the message (if additional text pages
have been added), touch the screen and in a single motion,
scroll up or down the onscreen page.
6. When you have finished, press .
Note:
Messages can also be accessed by navigating to your Inbox (
Menu
➔
Messaging
➔
Inbox
).
Using Message Options
Message options at the Inbox level differ according to the
message type, what you have done with the message, and
whether you are viewing the message. Some of the main
message category types include:
•
Inbox
: stores any incoming message (text or multimedia).
•
Sent
: stores a copy of the messages you sent.
•
Outbox
: contains messages until they are sent and then the message
no longer displays in this box but instead displays in the Sent box.
•
Drafts
: stores unsent messages that you want to edit or send later.
䊳
With the list of current message displayed onscreen, use any
of the following menu options:
•List by
: sort the current list based on one of the following criteria
(criteria will be different depending on the type of message):
–
Date, Sender, Type, Subject, Size, or Lock/Unlock status.
• Delete
: deletes either a single or multiple set of messages. Touch
an entry from the list to place a checkmark alongside the entry and
mark it for deletion. Touch to complete the process.
䊳
With a message open for reading, use any of the following
menu options:
• Reply (to)
: allows you to compose and send a reply to the
message. This option reads Reply (when replying to an SMS [Text]
message), and Reply to (when replying to an MMS [Multimedia]
message).
• Delete
: deletes the current message.
•More
: provides these additional message functions:
–
Forward
: allows you to forward the message.
–
Save to Address Book
: allows you to save the recipient or sender’s
information from the message to your Address Book as either a New or
Delete
a797 Bourbon.book Page 96 Tuesday, November 17, 2009 1:53 PM
 Loading...