

Samsung Exhibit II User Manual
PORTABLE QUAD-BAND
MOBILE PHONE
User Manual
Please read this manual before operating your
phone, and keep it for future reference.

Intellectual Property
All Intellectual Property, as defined below, owned by or which is otherwise the property of Samsung or its respective
suppliers relating to the SAMSUNG Phone, including but not limited to, accessories, parts, or software relating there
to (the “Phone System”), is proprietary to Samsung and protected under federal laws, state laws, and international
treaty provisions. Intellectual Property includes, but is not limited to, inventions (patentable or unpatentable),
patents, trade secrets, copyrights, software, computer programs, and related documentation and other works of
authorship. You may not infringe or otherwise violate the rights secured by the Intellectual Property. Moreover, you
agree that you will not (and will not attempt to) modify, prepare derivative works of, reverse engineer, decompile,
disassemble, or otherwise attempt to create source code from the software. No title to or ownership in the
Intellectual Property is transferred to you. All applicable rights of the Intellectual Property shall remain with
SAMSUNG and its suppliers.
Samsung Telecommunications America (STA), LLC
Headquarters:
1301 E. Lookout Drive
Richardson, TX 75082
Toll Free Tel:
Internet Address:
©
2011 Samsung Telecommunications America, LLC. Samsung is a registered trademark of Samsung Electronics
Co., Ltd.
GH68-35618A
Printed in USA
Do you have questions about your Samsung Mobile Phone?
For 24 hour information and assistance, we offer a new FAQ/ARS System (Automated Response System) at:
www.samsung.com/us/support
http://www.samsung.com
Customer Care Center:
1000 Klein Rd.
Plano, TX 75074
1.888.987.HELP (4357)
T679_UG_UVKJ1_PS_101111_F9

Nuance®, VSuite™, T9® Text Input, and the Nuance logo are trademarks or registered trademarks of Nuance
Communications, Inc., or its affiliates in the United States and/or other countries.
ACCESS® and NetFront™ are trademarks or registered trademarks of ACCESS Co., Ltd. in Japan and other
countries.
The Bluetooth® word mark, figure mark (stylized “B Design”), and combination mark (Bluetooth word mark and “B
Design”) are registered trademarks and are wholly owned by the Bluetooth SIG.
microSD™ and the microSD logo are Trademarks of the SD Card Association.
Openwave® is a registered Trademark of Openwave, Inc.
Google, the Google logo, Android, the Android logo, Android Market, Gmail, Google Mail, Google Maps, Google Talk,
Picasa, and YouTube are trademarks of Google Inc.
Wi-Fi is a registered trademark of the Wireless Fidelity Alliance, Inc.
Swype and the Swype logos are trademarks of Swype, Inc. © 2010 Swype, Inc. All rights reserved.
Open Source Software
Some software components of this product incorporate source code covered under GNU General Public License
(GPL), GNU Lesser General Public License (LGPL), OpenSSL License, BSD License and other open source licenses.
To obtain the source code covered under the open source licenses, please visit:
http://opensource.samsung.com
.

Dynamic Noise Suppression from Audience
Your phone is equipped with an advanced voice processing chip that delivers clear mobile calls by suppressing
background noise, intermittent sounds (like a siren or nearby conversation), and echoes, allowing you to hear and
be heard nearly anywhere.
How Does It Work?
Based on the intelligence of the human hearing system, the technology:
•
Captures, evaluates and distinguishes all the sound signals surrounding your phone, and the person you're speaking with.
•
Then isolates the primary voice in conversation and filters out the background noise - so the person you're calling hears only
your voice, without disturbing background noise.
•
Dynamically equalizes and adjusts voice volume to optimize your calling experience, so you can hear clearly and don't need to
speak louder to overcome surrounding noise.
The noise suppression technology is built-in and already enabled in your new mobile phone. So it's ready to provide
unsurpassed voice clarity with every call.
Disclaimer of Warranties; Exclusion of Liability,
EXCEPT AS SET FORTH IN THE EXPRESS WARRANTY CONTAINED ON THE WARRANTY PAGE ENCLOSED WITH THE
PRODUCT, THE PURCHASER TAKES THE PRODUCT "AS IS", AND SAMSUNG MAKES NO EXPRESS OR IMPLIED
WARRANTY OF ANY KIND WHATSOEVER WITH RESPECT TO THE PRODUCT, INCLUDING BUT NOT LIMITED TO THE
MERCHANTABILITY OF THE PRODUCT OR ITS FITNESS FOR ANY PARTICULAR PURPOSE OR USE; THE DESIGN,
CONDITION OR QUALITY OF THE PRODUCT; THE PERFORMANCE OF THE PRODUCT; THE WORKMANSHIP OF THE
PRODUCT OR THE COMPONENTS CONTAINED THEREIN; OR COMPLIANCE OF THE PRODUCT WITH THE
REQUIREMENTS OF ANY LAW, RULE, SPECIFICATION OR CONTRACT PERTAINING THERETO. NOTHING CONTAINED IN
THE INSTRUCTION MANUAL SHALL BE CONSTRUED TO CREATE AN EXPRESS OR IMPLIED WARRANTY OF ANY KIND
WHATSOEVER WITH RESPECT TO THE PRODUCT. IN ADDITION, SAMSUNG SHALL NOT BE LIABLE FOR ANY
DAMAGES OF ANY KIND RESULTING FROM THE PURCHASE OR USE OF THE PRODUCT OR ARISING FROM THE
BREACH OF THE EXPRESS WARRANTY, INCLUDING INCIDENTAL, SPECIAL OR CONSEQUENTIAL DAMAGES, OR LOSS
OF ANTICIPATED PROFITS OR BENEFITS.

Table of Contents
Section 1: Getting Started ................5
Understanding this User Manual . . . . . . . . . . . 5
Battery Cover . . . . . . . . . . . . . . . . . . . . . . . . . 6
Battery . . . . . . . . . . . . . . . . . . . . . . . . . . . . . . 9
Extending Your Battery Life . . . . . . . . . . . . . . 11
Power Savings . . . . . . . . . . . . . . . . . . . . . . . 12
Initial Phone Configuration . . . . . . . . . . . . . . 12
Switching the Phone On or Off . . . . . . . . . . . 13
Locking and Unlocking the Phone . . . . . . . . . 13
Creating a New Google Account . . . . . . . . . . 14
Signing into Your Google Account . . . . . . . . . 14
Retrieving your Google Account Password . . 15
Voice Mail . . . . . . . . . . . . . . . . . . . . . . . . . . 15
Visual Voicemail . . . . . . . . . . . . . . . . . . . . . . 16
Task Manager . . . . . . . . . . . . . . . . . . . . . . . 16
Section 2: Understanding
Your Phone ...................................17
Features of Your Phone . . . . . . . . . . . . . . . . 17
Front View . . . . . . . . . . . . . . . . . . . . . . . . . . 18
Back View of Your Phone . . . . . . . . . . . . . . . 19
Phone Display . . . . . . . . . . . . . . . . . . . . . . . 19
Status Bar . . . . . . . . . . . . . . . . . . . . . . . . . . 20
Function Keys . . . . . . . . . . . . . . . . . . . . . . . . 24
Home Screen . . . . . . . . . . . . . . . . . . . . . . . . 26
Screen Navigation . . . . . . . . . . . . . . . . . . . . 28
Menu Navigation . . . . . . . . . . . . . . . . . . . . . 30
Applications . . . . . . . . . . . . . . . . . . . . . . . . . 32
Customizing the Screens . . . . . . . . . . . . . . . 39
Section 3: Memory Card .................45
Using the SD Card . . . . . . . . . . . . . . . . . . . . 45
SD card Overview . . . . . . . . . . . . . . . . . . . . . 45
Section 4: Call Functions
and Contacts List ......................... 48
Displaying Your Phone Number . . . . . . . . . . . 48
Making a Call . . . . . . . . . . . . . . . . . . . . . . . . 48
Ending a Call . . . . . . . . . . . . . . . . . . . . . . . . . 48
Making Emergency Calls . . . . . . . . . . . . . . . . 49
Dialing Options . . . . . . . . . . . . . . . . . . . . . . . 50
Answering a Call . . . . . . . . . . . . . . . . . . . . . . 50
Managing Reject Calls . . . . . . . . . . . . . . . . . . 51
International Calls . . . . . . . . . . . . . . . . . . . . . 52
Pause Dialing . . . . . . . . . . . . . . . . . . . . . . . . 52
Wait Dialing . . . . . . . . . . . . . . . . . . . . . . . . . . 52
Redialing the Last Number . . . . . . . . . . . . . . 53
Speed Dialing . . . . . . . . . . . . . . . . . . . . . . . . 53
Wi-Fi Calling . . . . . . . . . . . . . . . . . . . . . . . . . 54
In Call Options . . . . . . . . . . . . . . . . . . . . . . . . 56
Logs Tab . . . . . . . . . . . . . . . . . . . . . . . . . . . . 60
Section 5: Entering Text ................. 63
Text Input Methods . . . . . . . . . . . . . . . . . . . . 63
Selecting the Text Input Method . . . . . . . . . . 63
Entering Text Using Swype . . . . . . . . . . . . . . 64
Using the Samsung Keypad . . . . . . . . . . . . . . 67
Using XT9 Predictive Text . . . . . . . . . . . . . . . 70
Section 6: Contacts ........................ 72
Accounts . . . . . . . . . . . . . . . . . . . . . . . . . . . . 72
Contacts List . . . . . . . . . . . . . . . . . . . . . . . . . 72
Finding a Contact . . . . . . . . . . . . . . . . . . . . . 75
Contact List Options . . . . . . . . . . . . . . . . . . . 77
Contact Menu Options . . . . . . . . . . . . . . . . . . 78
Contact Entry Options . . . . . . . . . . . . . . . . . . 78
Joining Contact Information . . . . . . . . . . . . . . 79
1

Sending a Namecard . . . . . . . . . . . . . . . . . . .80
Copying Contact Information . . . . . . . . . . . . .81
Synchronizing Contacts . . . . . . . . . . . . . . . . .82
Display Options . . . . . . . . . . . . . . . . . . . . . . . 82
Adding more Contacts via Accounts
and Sync . . . . . . . . . . . . . . . . . . . . . . . . . .83
My Profile . . . . . . . . . . . . . . . . . . . . . . . . . . .84
Additional Contact Options . . . . . . . . . . . . . . . 84
Groups . . . . . . . . . . . . . . . . . . . . . . . . . . . . . . 85
The Favorites Tab . . . . . . . . . . . . . . . . . . . . .87
Section 7: Messaging ......................88
Types of Messages . . . . . . . . . . . . . . . . . . . .88
Creating and Sending Messages . . . . . . . . . .88
Message Options . . . . . . . . . . . . . . . . . . . . . .89
Viewing Newly Received Messages . . . . . . . . 89
Deleting Messages . . . . . . . . . . . . . . . . . . . . .91
Message Search . . . . . . . . . . . . . . . . . . . . . .91
Messaging Settings . . . . . . . . . . . . . . . . . . . .91
Text Templates . . . . . . . . . . . . . . . . . . . . . . .92
Email . . . . . . . . . . . . . . . . . . . . . . . . . . . . . . .93
Microsoft Exchange Email (Outlook) . . . . . . . .96
Using Google Mail . . . . . . . . . . . . . . . . . . . . .99
Google Talk . . . . . . . . . . . . . . . . . . . . . . . . .101
Section 8: Multimedia ...................102
Using the Camera . . . . . . . . . . . . . . . . . . . .102
Camera and Camcorder Options . . . . . . . . . .102
Using the Camcorder . . . . . . . . . . . . . . . . . .107
Files . . . . . . . . . . . . . . . . . . . . . . . . . . . . . . .110
The Gallery . . . . . . . . . . . . . . . . . . . . . . . . .110
Using the Video Player . . . . . . . . . . . . . . . . .111
Media Hub . . . . . . . . . . . . . . . . . . . . . . . . . .111
Music . . . . . . . . . . . . . . . . . . . . . . . . . . . . . .112
Using Playlists . . . . . . . . . . . . . . . . . . . . . . .114
Creating a Playlist . . . . . . . . . . . . . . . . . . . .114
Transferring Music Files . . . . . . . . . . . . . . . .115
Removing Music Files . . . . . . . . . . . . . . . . . 115
T-Mobile TV HD . . . . . . . . . . . . . . . . . . . . . .115
YouTube . . . . . . . . . . . . . . . . . . . . . . . . . . .116
Section 9: Applications
and Development .......................117
Applications . . . . . . . . . . . . . . . . . . . . . . . . .117
411 & More . . . . . . . . . . . . . . . . . . . . . . . . .117
Accounts and sync . . . . . . . . . . . . . . . . . . . . 117
AllShare . . . . . . . . . . . . . . . . . . . . . . . . . . . .117
Bejeweled 2 . . . . . . . . . . . . . . . . . . . . . . . . . 118
Blio . . . . . . . . . . . . . . . . . . . . . . . . . . . . . . .119
Bonus Apps . . . . . . . . . . . . . . . . . . . . . . . . .119
Books . . . . . . . . . . . . . . . . . . . . . . . . . . . . .119
Calculator . . . . . . . . . . . . . . . . . . . . . . . . . .119
Calendar . . . . . . . . . . . . . . . . . . . . . . . . . . .120
Contacts . . . . . . . . . . . . . . . . . . . . . . . . . . .121
Camera . . . . . . . . . . . . . . . . . . . . . . . . . . . .121
Clock . . . . . . . . . . . . . . . . . . . . . . . . . . . . . .121
Downloads . . . . . . . . . . . . . . . . . . . . . . . . . .121
Email . . . . . . . . . . . . . . . . . . . . . . . . . . . . . .121
Files . . . . . . . . . . . . . . . . . . . . . . . . . . . . . . .121
Gallery . . . . . . . . . . . . . . . . . . . . . . . . . . . . .122
Gmail . . . . . . . . . . . . . . . . . . . . . . . . . . . . . .122
Google Search . . . . . . . . . . . . . . . . . . . . . . .122
Highlight . . . . . . . . . . . . . . . . . . . . . . . . . . .122
Kies air . . . . . . . . . . . . . . . . . . . . . . . . . . . .123
Latitude . . . . . . . . . . . . . . . . . . . . . . . . . . . .123
Lookout Security . . . . . . . . . . . . . . . . . . . . .124
Maps . . . . . . . . . . . . . . . . . . . . . . . . . . . . . .125
Market . . . . . . . . . . . . . . . . . . . . . . . . . . . . .127
Media Hub . . . . . . . . . . . . . . . . . . . . . . . . . .129
Memo . . . . . . . . . . . . . . . . . . . . . . . . . . . . .129
Messaging . . . . . . . . . . . . . . . . . . . . . . . . . .130
2

Mini Diary . . . . . . . . . . . . . . . . . . . . . . . . . . 130
More for Me . . . . . . . . . . . . . . . . . . . . . . . . 131
Music . . . . . . . . . . . . . . . . . . . . . . . . . . . . . 131
My Account . . . . . . . . . . . . . . . . . . . . . . . . 131
My Device . . . . . . . . . . . . . . . . . . . . . . . . . 132
Navigation . . . . . . . . . . . . . . . . . . . . . . . . . 133
News & Weather . . . . . . . . . . . . . . . . . . . . 135
Places . . . . . . . . . . . . . . . . . . . . . . . . . . . . 135
Polaris Office . . . . . . . . . . . . . . . . . . . . . . . 136
Settings . . . . . . . . . . . . . . . . . . . . . . . . . . . 136
Slacker . . . . . . . . . . . . . . . . . . . . . . . . . . . . 137
Social Hub . . . . . . . . . . . . . . . . . . . . . . . . . 137
T-Mobile Mall . . . . . . . . . . . . . . . . . . . . . . . 137
T-Mobile Name ID . . . . . . . . . . . . . . . . . . . 138
T-Mobile TV HD . . . . . . . . . . . . . . . . . . . . . 138
Talk . . . . . . . . . . . . . . . . . . . . . . . . . . . . . . 138
Task . . . . . . . . . . . . . . . . . . . . . . . . . . . . . . 138
Task Manager . . . . . . . . . . . . . . . . . . . . . . 139
TeleNav GPS . . . . . . . . . . . . . . . . . . . . . . . 139
Tetris . . . . . . . . . . . . . . . . . . . . . . . . . . . . . 140
Video Chat . . . . . . . . . . . . . . . . . . . . . . . . . 140
Videos . . . . . . . . . . . . . . . . . . . . . . . . . . . . 141
Visual Voicemail . . . . . . . . . . . . . . . . . . . . . 141
Voice Recorder . . . . . . . . . . . . . . . . . . . . . . 141
Voice Search . . . . . . . . . . . . . . . . . . . . . . . 141
Web . . . . . . . . . . . . . . . . . . . . . . . . . . . . . . 142
Wi-Fi Calling . . . . . . . . . . . . . . . . . . . . . . . . 142
Yelp . . . . . . . . . . . . . . . . . . . . . . . . . . . . . . 142
YouTube . . . . . . . . . . . . . . . . . . . . . . . . . . . 142
Zinio Reader . . . . . . . . . . . . . . . . . . . . . . . . 143
Section 10: Connections ...............144
Internet . . . . . . . . . . . . . . . . . . . . . . . . . . . 144
Bluetooth . . . . . . . . . . . . . . . . . . . . . . . . . . 149
Enable Downloading for Web Applications . 152
PC Connections . . . . . . . . . . . . . . . . . . . . . 152
Kies Air . . . . . . . . . . . . . . . . . . . . . . . . . . . . 153
Wi-Fi . . . . . . . . . . . . . . . . . . . . . . . . . . . . . . 154
Tethering . . . . . . . . . . . . . . . . . . . . . . . . . . . 156
Portable Wi-Fi Hotspot . . . . . . . . . . . . . . . . . 157
Section 11: Time Management .... 159
Calendar . . . . . . . . . . . . . . . . . . . . . . . . . . . 159
Clock . . . . . . . . . . . . . . . . . . . . . . . . . . . . . . 160
World Clock . . . . . . . . . . . . . . . . . . . . . . . . . 161
Stopwatch . . . . . . . . . . . . . . . . . . . . . . . . . . 162
Setting a Timer . . . . . . . . . . . . . . . . . . . . . . 162
Configuring a Desk Clock . . . . . . . . . . . . . . 162
Section 12: Changing
Your Settings ............................. 163
Wireless and Networks . . . . . . . . . . . . . . . . 163
Tethering . . . . . . . . . . . . . . . . . . . . . . . . . . . 165
VPN settings . . . . . . . . . . . . . . . . . . . . . . . . 166
Call Settings . . . . . . . . . . . . . . . . . . . . . . . . 169
Sound Settings . . . . . . . . . . . . . . . . . . . . . . 172
Display Settings . . . . . . . . . . . . . . . . . . . . . 173
Power Saving Mode . . . . . . . . . . . . . . . . . . . 174
Location and Security . . . . . . . . . . . . . . . . . 175
Screen Unlock Pattern Settings . . . . . . . . . . 176
Applications . . . . . . . . . . . . . . . . . . . . . . . . 178
Android Development . . . . . . . . . . . . . . . . . 180
Accounts and Synchronization . . . . . . . . . . . 181
Motion Settings . . . . . . . . . . . . . . . . . . . . . . 182
Privacy Settings . . . . . . . . . . . . . . . . . . . . . . 182
SD Card & Phone Storage . . . . . . . . . . . . . . 183
Search Settings . . . . . . . . . . . . . . . . . . . . . . 184
Language & Keyboard Settings . . . . . . . . . . 184
Voice Input and Out Settings . . . . . . . . . . . . 187
Accessibility Settings . . . . . . . . . . . . . . . . . . 188
Date and Time . . . . . . . . . . . . . . . . . . . . . . . 188
About Phone . . . . . . . . . . . . . . . . . . . . . . . . 189
3

Software Update . . . . . . . . . . . . . . . . . . . . .189
Section 13: Health and
Safety Information ......................190
Exposure to Radio Frequency (RF) Signals . .190
Specific Absorption Rate (SAR)
Certification Information . . . . . . . . . . . . .194
Smart Practices While Driving . . . . . . . . . . .195
Battery Use and Safety . . . . . . . . . . . . . . . . . 196
Samsung Mobile Products and Recycling . . . 197
UL Certified Travel Charger . . . . . . . . . . . . .198
Display / Touch-Screen . . . . . . . . . . . . . . . . 198
GPS & AGPS . . . . . . . . . . . . . . . . . . . . . . . . .199
Emergency Calls . . . . . . . . . . . . . . . . . . . . .199
Care and Maintenance . . . . . . . . . . . . . . . . .200
Responsible Listening . . . . . . . . . . . . . . . . .201
Operating Environment . . . . . . . . . . . . . . . .202
FCC Hearing Aid Compatibility (HAC)
Regulations for Wireless Devices . . . . . . .204
Restricting Children's Access to Your
Mobile Device . . . . . . . . . . . . . . . . . . . . . 205
FCC Notice and Cautions . . . . . . . . . . . . . . . 205
Other Important Safety Information . . . . . . .206
Section 14: Warranty Information 207
Standard Limited Warranty . . . . . . . . . . . . . .207
End User License Agreement for Software . .210
Index ...............................................216
4

Section 1: Getting Started
This section explains how to get started with your
phone by installing and charging the battery,
installing the SIM card and optional memory card,
and setting up your voice mail.
Before using your phone for the first time, you’ll need
to install and charge the battery and install the SIM
card. The SIM card is loaded with your subscription
details, such as your PIN, available optional services,
and many other features. If desired, you can also
install an SD card to store media for use with your
phone.
Understanding this User Manual
The sections of this manual generally follow the
features of your phone. A robust index for features
begins on page 216.
Also included is important safety information that you
should know before using your phone. This
information is available near the back of the guide,
beginning on page 190.
This manual provides navigation instructions
according to the default display settings. If you select
other settings, navigation may be different.
Unless otherwise specified, all instructions in this
manual assume you are starting from the Home
screen and using the available keys.
Note:
Instructions in this manual are based on default settings,
and may vary from your phone, depending on the
software version on your phone, and any changes to the
phone’s Settings.
Unless stated otherwise, instructions in this User Manual
start with the phone unlocked, at the Home screen.
All screen images in this manual are simulated. Actual
displays may vary, depending on the software version of
your phone and any changes to the phone’s Settings.
Special Text
Throughout this manual, you’ll find text that is set
apart from the rest. These are intended to point out
important information, share quick methods for
activating features, to define terms, and more. The
definitions for these methods are as follows:
•
Notes
: Presents alternative options for the current
feature, menu, or sub-menu.
•
Tips
: Provides quick or innovative methods, or useful
shortcuts.
•
Important
: Points out important information about the
current feature that could affect performance.
•
Warning
: Brings to your attention important information
to prevent loss of data or functionality, or even prevent
damage to your phone.
Getting Started 5
Text Conventions
Release Latch
This manual provides condensed information about
how to use your phone. To make this possible, the
following text conventions are used to represent
often-used steps:
➔
Arrows are used to represent the
sequence of selecting successive
options in longer, or repetitive,
procedures.
Example:
“From the Home screen, press (
Settings
➔
Wireless and network ➔ Bluetooth
settings
.
Menu
) ➔
Battery Cover
The battery, SIM card and SD card are installed under
the battery cover.
Important!:
Before removing or replacing the battery cover,
make sure the phone is switched off. To turn the
phone off, hold down the key until the
power-off image displays, then tap
Power off
.
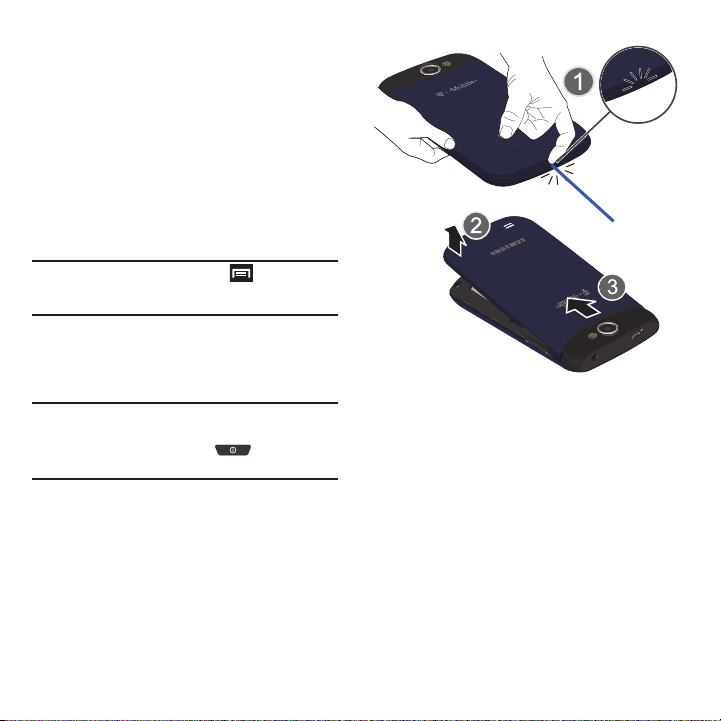
To remove the battery cover:
1. Hold the device firmly and locate the cover
release latch.
2. Place your fingernail in the opening (1) and
firmly “pop” the cover off the device (similar to
a soda can) (2).
3. Carefully remove the cover (3).
6
To replace the battery cover:
1. Align the cover tabs into their respective slots
along the top of the battery compartment (1).
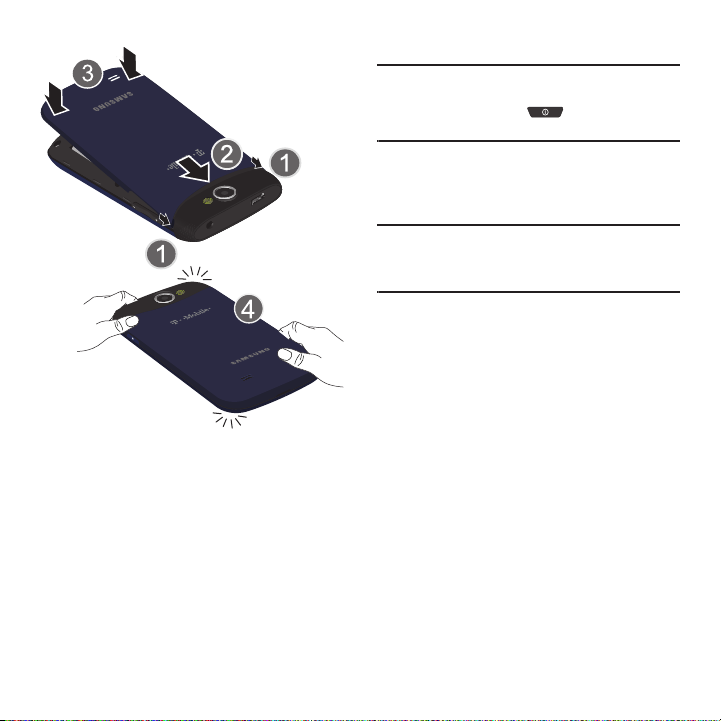
2. Carefully slide the cover into the top of the
phone (2).
3. Press down on the back of the battery cover
until you hear a click (3).
4. Squeeze along the edges of the cover to
guarantee a secure fit.
SIM Card Overview
Important!:
Before removing or replacing the SIM card, make
sure the phone is switched off. To turn the phone
off, hold down the key until the power-off
image displays, then tap
Power off
.
The SIM card is loaded with your subscription details
such as your telephone number, PIN, available
optional services, and many other features.
Important!:
The SIM card and its information can be easily
damaged by scratching or bending, so be careful
when handling, inserting, or removing the card.
Keep all SIM cards out of reach of small children.
Installing and Removing the SIM card
To install the SIM card:
1. Carefully slide the SIM card into the SIM card
socket until the card clicks into place.
2. Make sure that the card’s gold contacts face
into the phone and that the upper-left angled
corner of the card is positioned as shown.
To remove the SIM card:
1. Remove the battery cover.
2. Carefully place your fingernail into the end of
the SIM slot and push the card slightly out.
3. Carefully slide the SIM card out of the SIM card
socket.
Getting Started 7
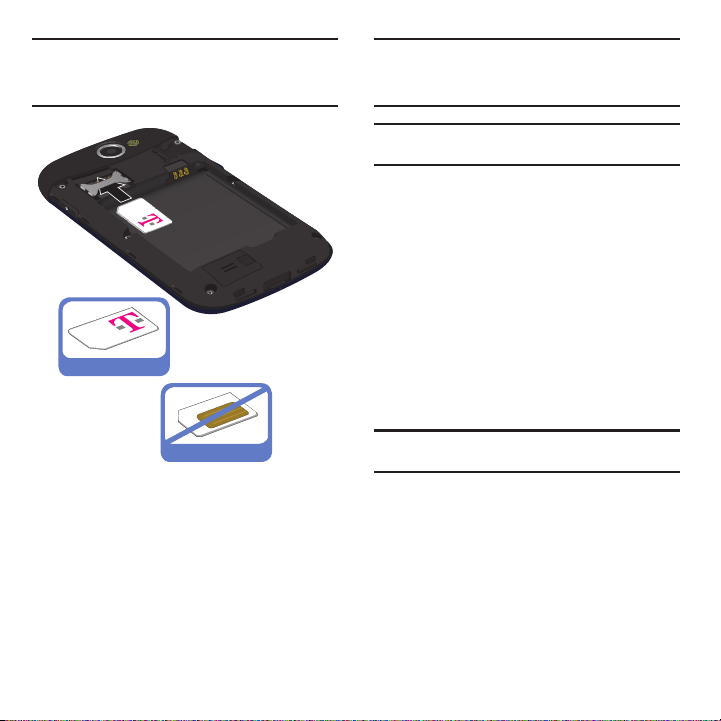
Note:
Correct
Incorrect
If the card is not inserted correctly, the phone will not
detect it and no service will be available. If this happens,
turn off the phone, remove the card, and reinstall the card
in the correct orientation.
Installing the microSD Memory Card
Your phone supports an optional (external) microSD™
or microSDHC™ memory card for storage of media
such as music, pictures, video and other files. The SD
card is designed for use with this mobile phone and
other devices.
Note:
The microSD memory cards include capacities of up to
2GB.
microSDHC™ memory card types can range from 4GB to
up to 32GB.
Note:
This device supports up to a 32GB microSDHC memory
card.
1. Remove the battery cover.
2. Locate the microSD card slot on the inside of
the device.
3. Orient the card with the gold strips facing
down.
4. Firmly press the card into the slot and make
sure that it catches with the push-click
insertion. For more information on how to use
the SD card see “Using the SD Card” on
page 45.
Important!:
Be sure to align the gold contact pins on the card
with the phone’s contacts.
8

Removing the microSD Memory Card
Correct
Incorrect
1. Remove the battery cover.
2. Firmly press the card into the slot and release
it. The card should pop partially out of the slot.
3. Remove the card from the slot.
4. Replace the battery cover.
Battery
Before using your phone for the first time, install the
battery and charge it fully.
Important!:
Before removing or replacing the battery, make
sure the phone is switched off. To turn the phone
off, hold down the key until the power-off
image displays, then tap
Power off
.
Installing the Battery
1. Slide the battery into the compartment (1) so
that the tabs on the end align with the slots at
the bottom of the phone, making sure the
connectors align.
2. Gently press down to secure the battery (2).
Removing the Battery
䊳
Grip the battery at the top end (3) and lift it up
and out of the battery compartment (4).
Getting Started 9
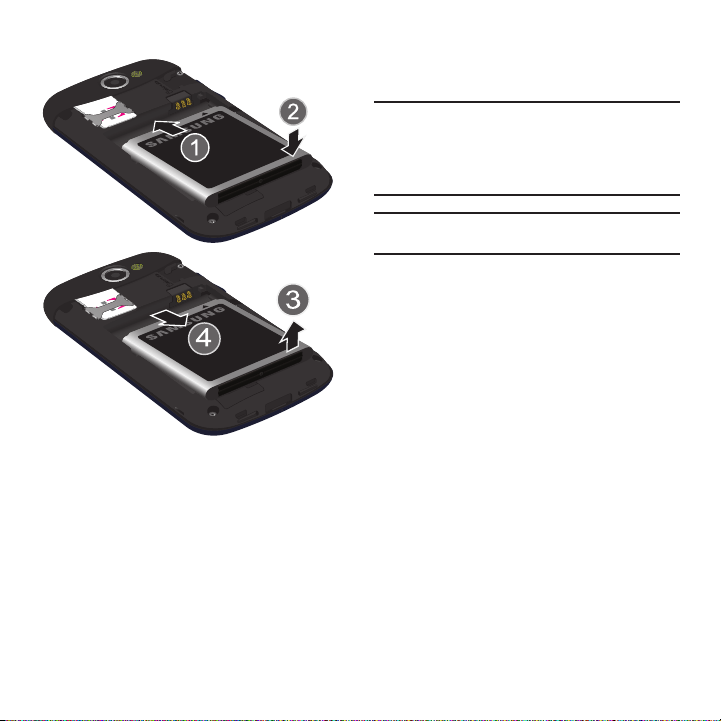
Installing Battery
Removing Battery
Charging the Battery
Your phone is powered by a rechargeable Li-ion
battery. A wall charger, which is used for charging the
battery, is included with your phone. Use only
approved batteries and chargers. Ask your local
Samsung dealer for further details.
Before using your phone for the first time, you must
fully charge the battery. A discharged battery
recharges fully in approximately 4 hours.
Note:
Verify that the battery is installed prior to connecting the
wall charger. If both the wall charger is connected and the
battery is not installed, the handset will power cycle
continuously and prevent proper operation. Failure to
unplug the wall charger before you remove the battery,
can cause the phone to become damaged.
Important!:
It is recommended you fully charge the battery
before using your device for the first time.
1. Locate the Charger/Accessory jack and slide
open the cover (1).
2. Insert the USB cable into the device’s Charger/
Accessory jack (2).
3. Plug the charging head into a standard AC
power outlet. The device turns on with the
screen locked and indicates both its charge
state and percent of charge.
10
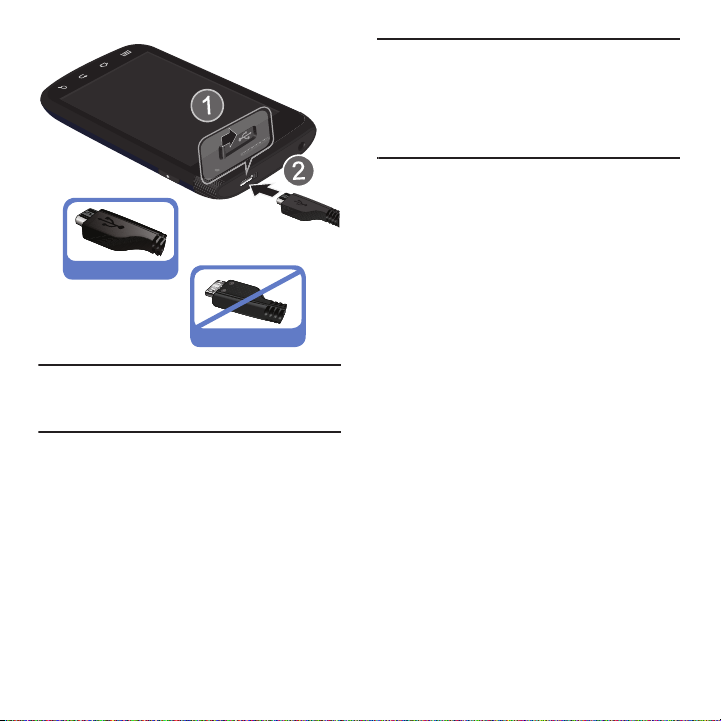
Correct
Incorrect
Note:
This illustration displays both the
orientation for connecting the charger. If the charger is
incorrectly connected, damage to the accessory port will
occur therefore voiding the phone’s warranty.
4. When charging is finished, first unplug the
correct
and incorrect
charger’s power plug from the AC wall outlet,
then disconnect the charger’s connector from
the phone.
Important!:
If your handset has a touch screen display, please
note that a touch screen responds best to a light
touch from the pad of your finger or a non-metallic
stylus. Using excessive force or a metallic object
when pressing on the touch screen may damage
the tempered glass surface and void the warranty.
For more information, refer to “Standard Limited
Warranty” on page 207.
Low Battery Indicator
When the battery level is low and only a few minutes
of talk time remain, a warning tone sounds and the
“Low battery” message repeats at regular intervals
on the display. In this condition, your phone
conserves its remaining battery power, by dimming
the backlight.
When the battery level becomes too low, the phone
automatically turns off.
Extending Your Battery Life
Active applications, light levels, Bluetooth usage, and
GPS functionality all act to drain your battery. The
following is a list of helpful tips that can help
conserve your battery power:
•
Reduce your backlight on time.
•
Turn Bluetooth off when not in use.
•
Turn Wi-Fi off when not in use.
•
Deactivate the GPS when not needed. Most applications
using this function will periodically query the GPS
satellites for your current location; each query drains your
battery.
Getting Started 11
•
Do not wait until your battery is completely depleted
before charging your device. Repeating this process of a
complete discharge and recharge can over time reduce
the storage capacity of any battery.
•
Turn off Automatic application sync.
•
Use the Power Savings Widget to deactivate hardware
functions such as Wi-Fi, Bluetooth, GPS, Synchronization,
or LCD brightness setting.
•
Check the Battery use screen to review what features or
functions have been consuming your battery resources.
•
Check the Running Services and close any unnecessary
applications.
•
Use the Task Manager feature to end/shutdown
background applications that are still running. These
minimized applications can, over time, cause your device
to “slow down”.
•
Turn off any streaming services after use (see Running
Services).
•
Animated wallpapers use processing power, memory, and
more power. Change your Live Wallpaper to a nonanimated Wallpaper gallery or Gallery image.
Power Savings
Active applications, Wi-Fi, Bluetooth, GPS,
Synchronization, Location consent, or the LCD
Brightness functionality all act to drain your battery.
The Power Savings application was designed to
quickly activate (turn on), or deactivate (turn off) those
functions or applications that use the most battery
power.
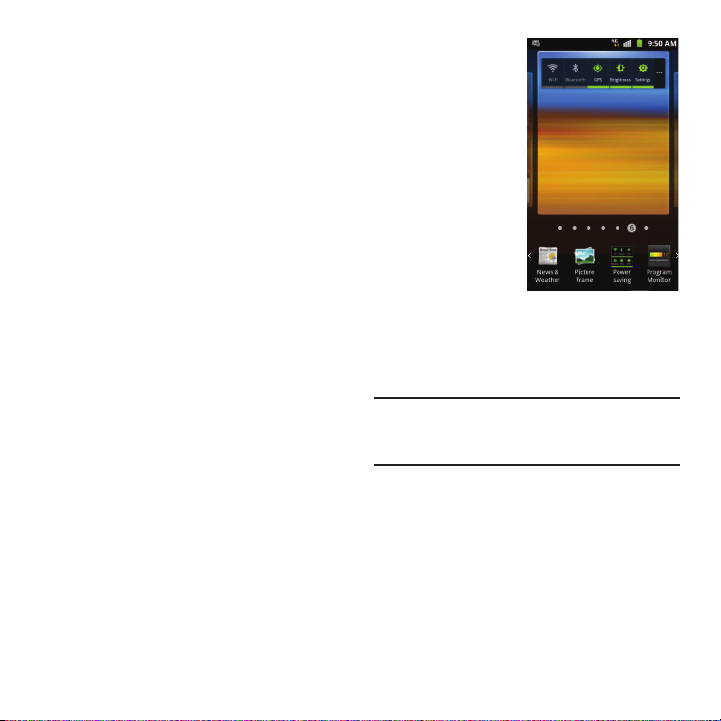
1. From the Home
screen, touch
and hold an
empty area until
the
Add to Home
screen
menu
displays.
2. Ta p
Widgets
➔
Power savings
.
The Power
Control shortcut
is added to the
current screen.
3. Tap any of the icons on the Power Savings
shortcut bar to activate/deactivate the feature.
Note:
A green bar displayed beneath the icon means the
application is active (turned on). The green bar is removed
from beneath the icon when the feature is deactivated
(turned off).
Initial Phone Configuration
1. Tap the on-screen Android icon to begin the
setup process.
2. Ta p
Skip
to ignore the Wi-Fi connection setup
process.
3. Select/deselect the desired Google location
services and tap
Next
.
12
4.
Configure the Data and Time settings and tap
Next
.
Note:
Enabling Google location services can drain battery
power. For more information, refer to “Power Savings”
on page 12.
5. Press and hold until the Phone
options screen appears.
6. Tap
Power off
().
Switching the Phone On or Off
If you have not already configured your phone after
an initial firmware update, you will be prompted with
a series of configuration screens.
Once the phone has been configured, you will not be
prompted with these screens again.
Important!:
Before the initial configuration, you quickly access
emergency services by tapping
using the on-screen dialer.
1. Press and hold until the phone
Emergency call
switches on.
The phone searches for your network and after
finding it, you can make or receive calls.
Note:
The display language is preset to English at the factory.
To change the language, use the Language menu. For
more information, refer to “Language & Keyboard
Settings” on page 184.
2. Press and hold until the Phone
options screen appears.
3. Tap
Power Off
().
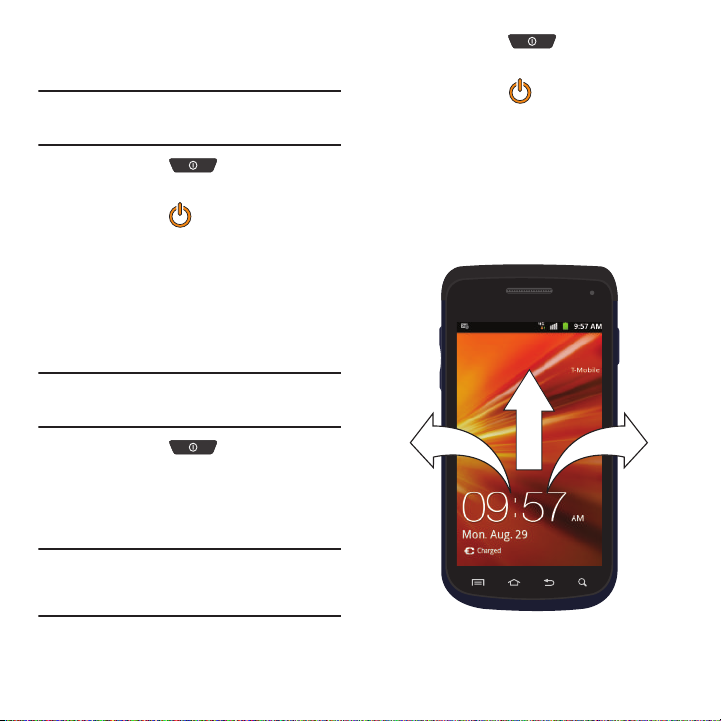
Locking and Unlocking the Phone
By default, the phone screen locks when the
backlight turns off.
䊳
Place your finger on the screen and swipe the
glass in any of the directions shown unlock the
phone.
and
Getting Started 13
Note:
You can choose to configure lock settings to prevent
unauthorized use of your phone. For more information,
refer to “Setting up SIM Card Lock” on page 177.
Creating a New Google Account
You should create a Google™ Account when you first
use your device in order to fully utilize the
functionality. This account provides access to several
device features such as Gmail, Google Maps, Google
Search, and the Android Market applications. Before
you are able to access Google applications, you must
enter your account information. These applications
sync between your device and your online Google
account.
To create a new Google Account from your phone:
1. From the Home screen, tap (
2. Read the introduction and tap
Market
).
Next ➔ Create
begin.
3. Follow the on-screen instructions to create a
Google Account.
– or –
If this is not the first time you are starting the
phone, tap ➔ (
Note:
If you already have a Google account, you only need to
sign in.
Gmail
).
To create a new Google Account from the Web:
1. From a computer, launch a Web browser and
navigate to
2. On the main page, click
account now
3. Follow the on-screen prompts to create your
www.google.com
.
free account.
4. Look for an email from Google in the email box
you provided, and respond to the email to
confirm and activate your new account.
Signing into Your Google Account
1. Launch an application that requires a Google
account (such as Android Market or Gmail).
2. Click
3. Tap t he
Next ➔ Sign in
Username
and
to
enter your information.
4. Ta p
Sign in
. Your device communicates with the
Google servers to confirm your information.
5. If prompted, create a new Gmail username by
entering a prefix for your
address.
.
Sign-in ➔ Create an
.
Password
fields and
@gmail.com
email
14
Retrieving your Google Account
1
1
Password
A Google account password is required for Google
applications. If you misplace or forget your Google
Account password, follow these instructions to
retrieve it:
1. From your computer, use an Internet browser
and navigate to
2. Click on the
3. Enter your full Gmail address and click
http://google.com/accounts.
Can’t access your account?
link.
Submit
Follow the password recovery procedure.
Voice Mail
Setting Up Your Voice Mail
Your device automatically transfers all unanswered
calls to voicemail, even if your device is in use or
turned off. As soon as your battery is charged and the
SIM card inserted, activate your voicemail account.
Important!:
Always use a password to protect against
unauthorized access.
For new users, follow the instructions below to set up
voice mail:
Note:
Voicemail setup may be different depending on your
network.
1. From the Home screen, tap and then
touch and hold the key until the phone
dials voice mail. You may be prompted to enter
a password.
2. Follow the tutorial to create a password, a
greeting, and a display name.
Accessing Your Voice Mail
You can access your Voice Mail by either pressing
and holding on the keypad, or by using the
.
phone’s Application icon, then touching the Voice
Mail application.
To access Voice Mail using the menu:
1. From the Home screen, tap and then
touch and hold until the phone dials
1
voice mail.
Note:
Touching and holding will launch Visual voicemail
if it is already active on your phone.
2. When connected, follow the voice prompts
1
from the voice mail center.
Accessing Your Voice Mail From Another Phone
1. Dial your wireless phone number.
2. When you hear your voicemail greeting, press
the asterisk key on the phone you are using.
3. Enter your passcode.
Getting Started 15
Visual Voicemail
Visual Voicemail enables users to view a list of people
who left a voicemail message, and listen to the any
message they want without being limited to
chronological order.
1. From the Home screen, tap (
➔
Visual Voicemail
2. Read the on-screen information and tap
3. Enter your new PIN code and tap
().
Applications
Next.
Next
to
activate Visual Voicemail if this is the first time
it was accessed. A list of the voicemail
messages displays.
Note:
You must subscribe to Visual Voicemail service to use this
feature. Charges may apply. Please contact your service
provider for further details.
4. Tap an on-screen voicemail message to play it
back.
Task Manager
Your phone can run applications simultaneously, with
some applications running in the background.
Sometimes your device might seem to slow down
over time, and the biggest reason for this are
background applications. These are applications that
were not properly closed or shutdown and are still
active but minimized. The Task Manager not only lets
you see which of these applications are still active in
the background but also easily lets you choose which
applications are left running and which are closed.
16
Note:
The larger the number of applications running on your
phone, the larger the energy drain on your battery.
Task Manger Overview
䊳
From the Home screen, tap (
)
➔
Task manager
().
– or –
Press and hold then tap
This screen contains the following tabs:
• Active applications
display those currently active
applications running on your phone.
• Downloaded
displays any installed packages or
applications from the Market that are taking up
memory space. Tap
Uninstall
to remove them from
your phone.
• RAM
, which displays the amount of current RAM
(Random Access Memory) currently being used and
allow you to
Clear Memory
for either Level 1 or Level
2 (both Level memory locations).
•Storage
displays a visual graph indicating the
available and used space within the Random Access
Memory (RAM), Program, and External SD card.
•Help
provides additional battery saving techniques.
Shutting Down an Currently Active Application
1. From the Home screen, tap ➔
Manager
().
2. From the
Active applications
tab, tap
close selected applications or tap
close all background running applications.
Applications
Task manager
Tas k
Exit
to
Exit all
to
)
.

Section 2: Understanding Your Phone
This section outlines key features of your phone. It
also describes the phone’s keys, screen and the
icons that display when the phone is in use.
Features of Your Phone
Your phone is lightweight, easy-to-use and offers
many significant features. The following list outlines
a few of the features included in your phone.
•
Touch screen with virtual (on-screen) QWERTY keyboard
•
High Speed Packet Access Plus (HSPA+) delivering data
speeds faster than the current 3G network technology.
•
Android 2.3, Gingerbread Platform
•
Compatible with Adobe® Flash® technology
•
Wi-Fi ® Capability
•
USB Tethering-capable
•
Bluetooth enabled
•
Full Integration of Google Mobile™ Services (Gmail,
YouTube, Google Maps, Google Voice Search)
•
Multiple Messaging Options: Text/Picture/Video
Messaging, Google Talk, and SWYPE™
•
Corporate and Personal Email
•
3 Megapixel Camera and Camcorder with autofocus and
multi-shot
•
MP3 Player with multitasking features
•
Pre-loaded Games including Bejeweled 2® and Tetris
•
Over 250,000 Apps available to download from the
Android Market™
•
Pre-loaded e-reader applications such as: Blio® and
Zinio®
•
Social Networking capabilities
•
Polaris® Office for document viewing and editing
•
Assisted GPS (TeleNav GPS Navigation)
•
Webkit-based browser
•
Downloadable applications from Android Market
•
Up to 32GB expandable memory slot
•
Front Facing camera for Video Chat
•
Mobile Hotspot Capability
•
Lookout® Security (Security, Backup, Missing Device
capabilities)
•
T-M obi le® TV HD
•
Slacker® Radio
•
Wi-Fi Calling
®
Understanding Your Phone 17
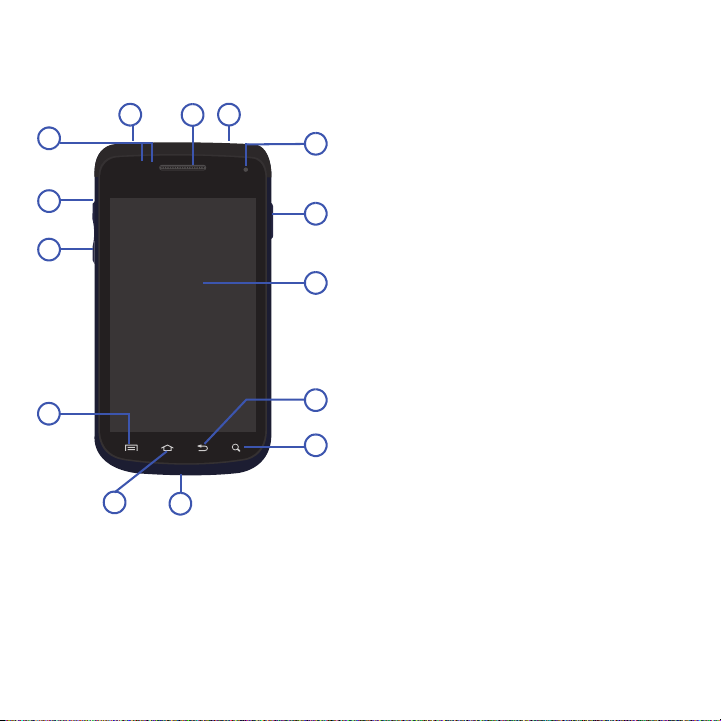
Front V iew
7
8
9
10
11
12
5
4
1
14
13
6
2
3
The following illustrations show the main elements of
your phone:
The following list correlates to the illustrations.
1.
Proximity Sensor
detects how close an object is
to the surface of the screen. This is typically
used to detect when your face is pressed up
against the screen, such as during a phone call.
18
•
While talking on the phone, the sensor detects talk
activity and locks the keypad t o prevent accidental key
presses.
2.
microSD Card Slot
(internal) allows you use a
microSD card to expand the memory of your
phone.
3.
Volume key
allows you to adjust the ringer
volume in standby mode (with the phone open)
or adjust the voice volume during a call.
When
receiving an incoming call:
•
Pressing the volume key down mutes the ring tone.
•
Pressing and holding the volume key rejects the call.
4.
Menu key
displays a list of options available for
the current screen. From the Home screen it
displays Add, Wallpaper, Search, Notifications,
Edit, and Settings options.
5.
Home
key displays the Home screen when
pressed. Touch and hold to display the Task
manager.
6.
Microphone
allows other callers to hear you clearly when
during phone calls and
is used
you are speaking to them. It is also used to
make voice note recordings.
7.
Quick search
applications, contact information, or searches
is used to search the device for
the internet for information.
8.
1 2 3
Back key
redisplays the previous screen or
clears entries.
9.
Display
shows all the information needed to
operate your phone, such as the connection
status, received signal strength, phone battery
level, and time.
10.
Power/Reset/Lock key
turns the device off
(press and hold). Resets the device if it ever
freezes (press and hold for
15-17 seconds). Access the Phone options
menu (press and hold) to turn on/off Silent
mode, Flight mode, or power off the device.
11.
Front Facing Camera
allows you to take
pictures while facing the screen and allows
you to video conference.
Note:
Video recorded in Portrait mode is reversed during
playback.
12.
USB Power/Accessory connector
connect a power cable or optional accessories
such as a USB/data cable.
13.
Receiver
allows you to hear the other caller and
the different ring tones or sounds offered by
your phone.
14.
Headset jack
allows you to connect a hands-
free headset so you can listen to music.
allows you to
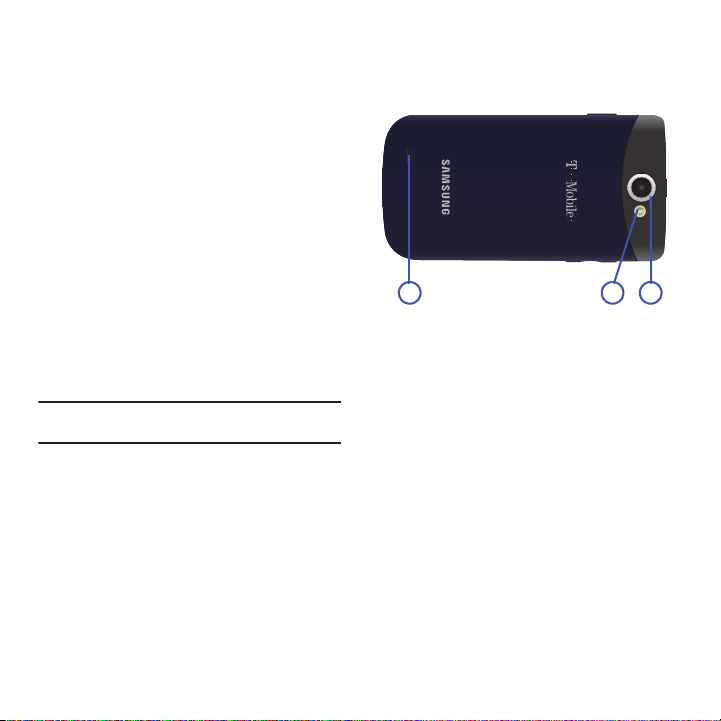
Back View of Your Phone
The following illustration shows the external
elements of your phone:
1.
External speaker
allows you to hear ringers,
music, and other sounds offered by your
phone.
2.
Flash
is used to take photos in lo-light
conditions.
3.
Camera lens
is used to take photos.
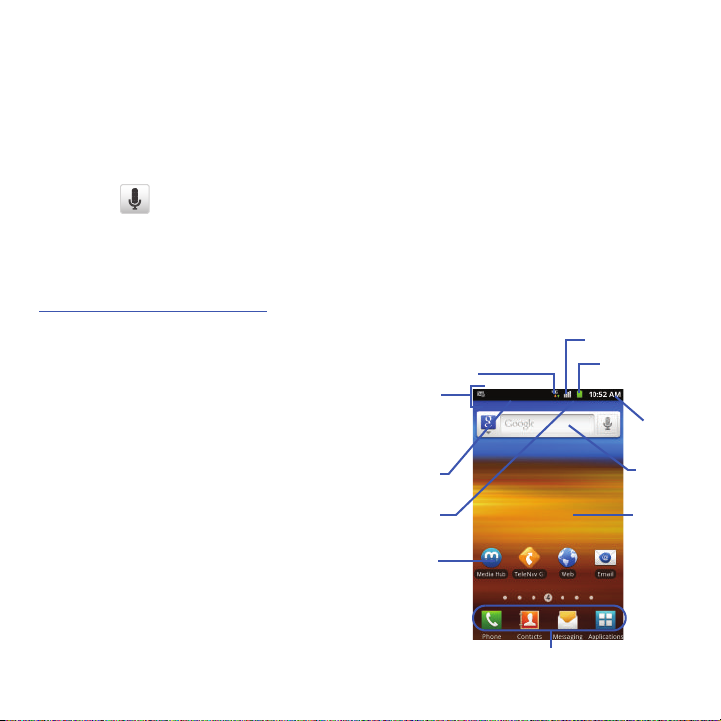
Phone Display
Your phone’s display provides information about the
phone’s status, and is the interface to the features of
your phone. The display indicates your connection
status, signal strength, battery status and time. Icons
display at the top of the phone when an incoming call
or message is received and also alerts you at a
specified time when an alarm was set.
Understanding Your Phone 19
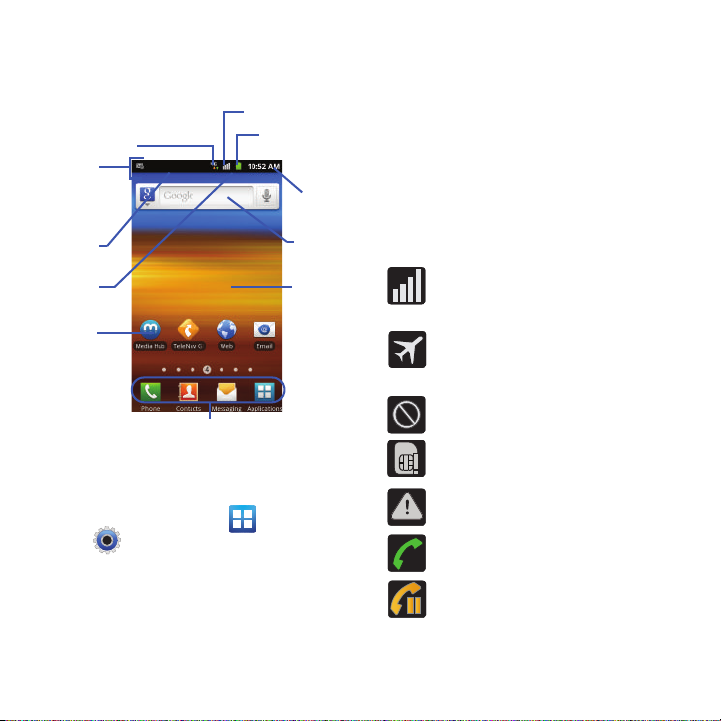
The screen also displays notifications, and Application
Home
Primary Shortcuts
Notification
Status Bar
area
Status
area
Shortcuts
Battery status
Connection Status
Time
Signal strength
Google
Search
Screen
(or shortcut) bar with four icons: Phone, Contacts,
Messaging, and Applications.
Display settings
In this menu, you can change various settings for the
for the wallpaper, cube, brightness or backlight.
䊳
From the Home screen, tap (
➔
(Settings
) ➔
information, refer to “Display Settings” on
page 173.
Display
. For more
Applications
Status Bar
The Status Bar shows information about the
connection status, signal strength, phone battery
level, and time, and displays notifications about
incoming messages, calls and other actions.
This list identifies the icons you see on your phone’s
display screen:
Indicator Icons
This list identifies the symbols you’ll see on your
phone’s display and Indicator area:
Displays your current signal strength. The
greater the number of bars, the stronger
the signal.
Indicates that the Flight Mode is active.
You cannot send or receive any calls or
access online information.
Indicates there is no signal available.
Displays when there is no SIM card in the
phone.
Displays when there is a system error or
)
alert.
Displays when a call is in progress.
Displays when a call is on hold.
20

Displays when you have missed an
A
incoming call.
Displays when the Auto reject mode
feature is enabled and set to All numbers.
Displays when you have received a call
from an unknown caller and the T-Mobile
Name ID service is asking to name the
contact.
Displays when the speakerphone is on.
Displays when the microphone is muted.
Displays when Call forwarding is set to
Always forward. For more information,
refer to “Configuring Additional Voice Call
Settings” on page 170.
Displays your current battery charge
level. Icon shown is fully charged.
Displays your current battery is 100
percent charged. This icon is followed by
100%
an audible beep.
Displays your battery is currently
charging.
Displays your current battery charge level
is very low.
Shows your current battery only has three
percent power remaining and will
immediately shutdown. Represented as a
blinking icon.
Displays when connected to the EDGE
network.
Displays when your phone is
communicating with the EDGE network.
Displays when connected to the 3G
network.
Displays when your phone is
communicating with the 3G network.
Displays when connected to the HSPA+
network.
Displays when your phone is
communicating with the HSPA+ network.
Displays when the phone is connected to
a computer using a supported USB cable
connection.
Displays when there is a new text
message.
Displays when an outgoing text message
has failed to be delivered.
Displays when there is a new voicemail
message.
Displays when there is a new visual
voicemail message.
Understanding Your Phone 21
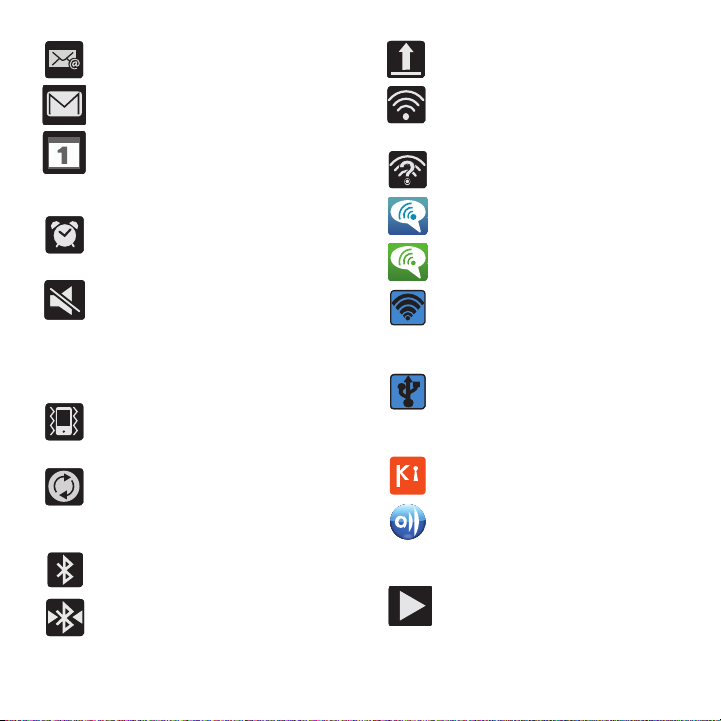
Displays in the notifications window when
there is a new Email message.
Displays in the notifications window when
there is a new Gmail message.
Displays when the time and date for a
Calendar Event has arrived. For more
information, refer to “Calendar” on
page 159.
Displays when an alarm is set.
For more information, refer to “Setting an
Alarm” on page 160.
Displays when the phone is in Silent mode.
All sounds except media and alarms are
silenced, and Vibrate mode is set to
when not in silent mode
.
Only
For more information, refer to “Silent
mode” on page 172.
Displays when the Sound profile is set to
Silent mode and Vibrate is set to Always
or Only in silent mode.
Displays when data synchronization and
application sync is active and
synchronization is in progress
for Gmail, Calendar, and Contacts.
Displays when Bluetooth technology is
active and enabled.
Displays when the Bluetooth technology
is active and communicating with an
external device.
Displays when the an outbound file
transfer is in progress.
Displays when Wi-Fi is connected, active,
and communicating with a Wireless
Access Point (WAP).
Displays when Wi-Fi is active and there is
an available open wireless network.
Displays when the Wi-Fi calling feature is
active.
Displays when the Wi-Fi calling feature is
in use and a call is currently active.
Displays when the Portable Wi-Fi Hotspot
feature is active and communicating. For
more information, refer to “Portable Wi-Fi
Hotspot” on page 157.
Displays when the USB Tethering feature
is active and communicating. For more
information, refer to “Tethering” on
page 165.
Displays when your phone is connected to
a PC using Kies air.
Displays when your phone is connected to
a Digital Living Network Alliance (DLNA)
certified device using the AllShare
application.
Displays in the notifications window when
a song is currently playing.
22
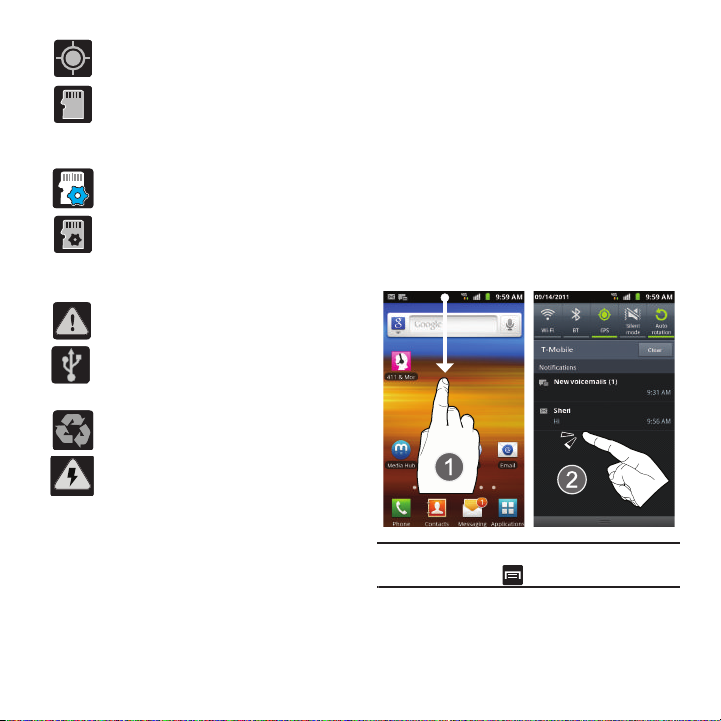
Displays when your phone’s GPS is on
and communicating.
Displays when the external SD card
(internal microSD) has been disconnected
(unmounted) from the phone and is now
ready for either removal or formatting.
Displays when the contents of the
microSD card are being scanned.
Displays when the External SD card is
being prepared for mounting to the
device. This is required for
communication with the External SD card.
Displays when the phone’s microSD card
has been improperly removed.
Displays when the phone has detected an
active USB connection and is in a USB
Debugging mode.
Displays when Power saving mode is
enabled.
Displays when the Power saving alert
notification has been activated. You are
then prompted to view your current
battery level.
For more details on configuring your phone’s settings,
see “Changing Your Settings” on page 163.
Notification Bar
The Notification area indicates new message events
(data sync status, new messages, calendar events,
call status, etc). You can expand this area to provide
more detailed information about the current onscreen notification icons.
1. Tap the Status bar to reveal the Notifications
tab, and then drag the tab to the bottom of the
screen to open the Notifications panel (1).
2. Tap a notification entry to open the associated
application (2).
Note:
The Notifications panel can also be opened on the Home
screen by pressing and then tapping
Notifications
.
Understanding Your Phone 23
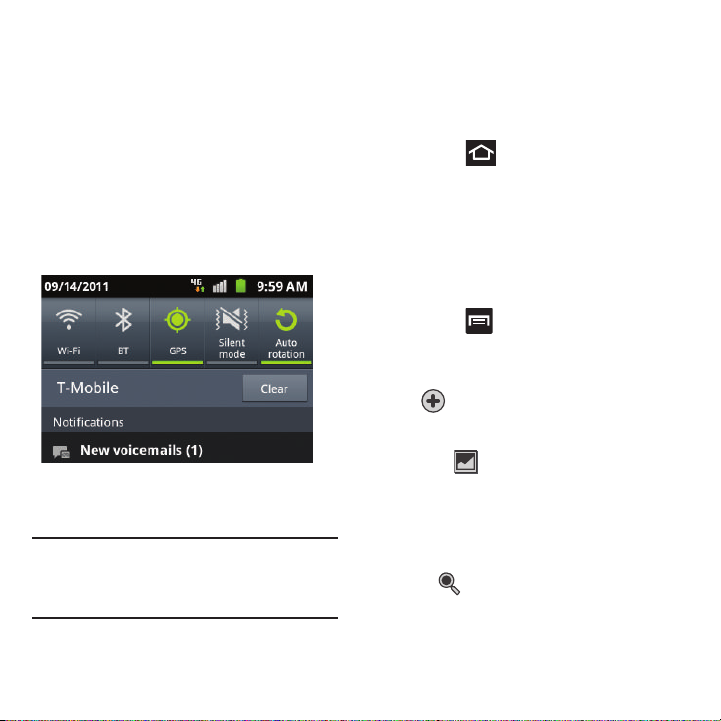
Clearing Notifications
1. Tap the status bar to reveal the Notifications
tab, and then drag the tab to the bottom of the
screen to open the Notifications panel
2. Ta p
Clear
. The notifications are cleared from the
panel.
Accessing Additional Panel Functions
In addition to notifications, this panel also provides
quick and ready access to five device functions.
These can be quickly activated or deactivated.
The following functions can either be activated
(green) or deactivated (white):
GPS, Silent mode
Note:
Vibration mode is available after pressing the Volume key
down.
Silent mode (no vibration) is only available if the
setting (
Only when not in Silent mode
Settings
, or
>
Auto rotation
Sound settings
.
Wi-Fi, BT
.
>
Vibrat ion
(Bluetooth),
Vibrat ion
) is set to
Function Keys
Your phone comes equipped with four main function
keys that can be used on any screen:
Back
and
Search
.
Home Key
The
Home
key ( ) takes you back to your Home
screen (#4 of the 7 available screens).
䊳
Press and hold to launch the Recent apps/Task
manager screen. For more information, refer to
“Accessing Recently-Used Applications” on
page 31.
Menu Key
The
Menu
key ( ) activates an available menu
function for the current screen or application. When
on the Home screen, the following menu options are
available:
•
Add
( ) adds one of the following functions to a
selected screen: Widgets, Shortcuts, Folders, and
Wallpapers.
•
Wallpaper
( ) lets you to customize the current
screen’s wallpaper image by choosing from either Gallery,
Live Wallpaper or Wallpaper gallery).
–
You can obtain images from either your Pictures folder,
from any of the available images within the device’s
Wallpaper gallery, or from the animated Live Wallpapers.
•
Search
( ) displays the Google Search box that you
can use to search for a key term both on the phone and
online.
Home, Menu
,
24
•
Go to
Search
Options
Search
Field
Search
Settings
Results
Notifications
( ) allows you to expand popup
notifications area to provide more detailed information
about the current on-screen notification icons.
•
Edit
( ) allows you to add or remove extended
screens from your device. You can have up to six
extended screens (one Home screen and six Extended
screens).
•
Settings
( ) provides quick access to the device’s
settings menu.
–
The Settings menu can also be accessed by pressing
and then tapping
➔
Back Key
The
Back
key ( ) returns you to the previously
active screen. If the on-screen keyboard is currently
open, this key closes the keyboard.
Search Key
The
Search
key ( ) displays the Google Search
box that can be used to search for either a key term
both on the phone and online. In some instances, this
key opens a search box specific only to the current
application.
1. Press to launch the Google Search box.
– or –
Press and tap ➔ .
2. From the on-screen keyboard, tap (top
of screen) to launch the Google
function.
Settings
Voice Search
.
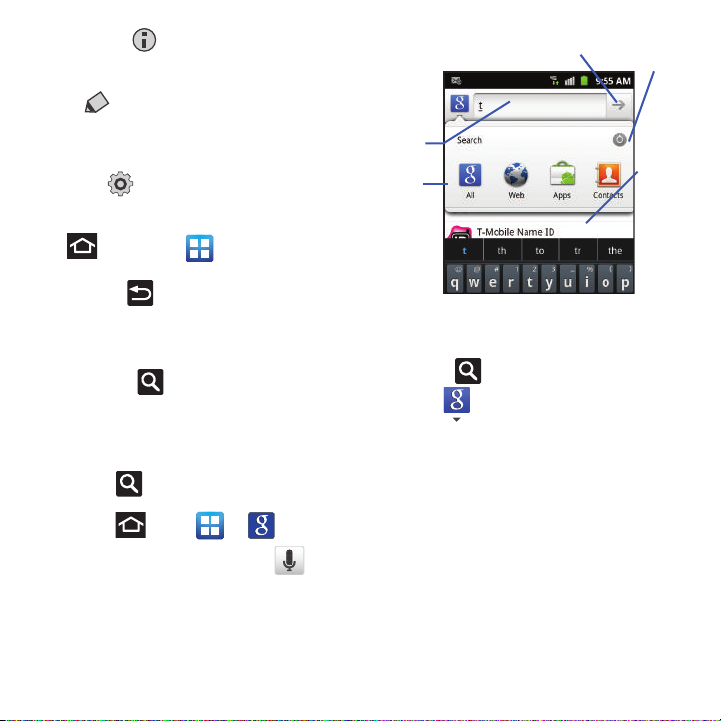
Using Google Search
Use the Google Search box to manually search for a
term on both your device and on the Web.
1. Press to launch the Google Search box.
2. Tap to select a search area:
•All
searches your device, the Web, and the Android
Market for your search term.
•Web
searches for your term only on the Web using
the Google search engine.
• Apps
searches for your term only within the Android
Market.
•Contacts
searches for your term only within your
current Contacts entries.
• Settings
configures the items that are searched
against. Example: Web, Apps, Memo, etc.
Understanding Your Phone 25
3.
Home
Primary Shortcuts
Notification
Status Bar
area
Status
area
Shortcuts
Battery status
Connection Status
Time
Signal strength
Google
Search
Screen
Enter a search term and tap a match from the
list of suggestions, phone search results, or
previously chosen search matches. Once
touched, the item opens in the appropriate
application.
– or –
From the on-screen keyboard, taping
Search
( ) lets you speak into your device's
microphone to enter a search term.
Using Additional Voice Search Functions
For more information, refer to:
http://www.google.com/mobile/voice-actions/
From an open Voice Search dialog, speak the
following words to access additional features:
•
voice actions
the web by speaking the search parameters.
•
listen to [artist/song/album]
listening to the selected song on Slacker radio.
•
send text to [recipient] [message]
(such as: [your query]) allows you to search
allows you to begin
the Messaging screen.
•
navigate to [address/city/business name]
to receive directions via Google maps™. Use either an
Address name, Business name, business type, or other
navigation information to get the desired directions.
•
call [name]
•
allows you to open the phone dial and
automatically
send email to [recipient] [subject]
your email account and compose a new email message.
Voice
.
allows you to open
allows you
allows you to open
•
map of [location]
allows you to view a map of an area via
Google maps. Use either an Address name, Business
name, zip code, or other navigation information.
•
go to [website]
allows you to navigate to any component
of your device.
•
note to self [message]
allows you to search for a note
save to your Memo Pad.
•
directions to [location]
using your current location,
allows you to receive directions to a selected destination.
Home Screen
The Home screen is the starting point for using the
applications on your phone. There are initially five
available panels, each populated with default
shortcuts or applications. You can customize each of
these panels.
26
 Loading...