

Page 1

SPH-m350
PORTABLE Dual-Mode
TELEPHONE
User Guide
Please read this manual before operating your phone, and keep it for future
reference.
BMC_m350_UG_EN_0716010_D8
Page 2

Intellectual Property
All Intellectual Property, as defined below, owned by or which is otherwise the property of
Samsung or its respective suppliers relating to the SAMSUNG Phone, including but not
limited to, accessories, parts, or software relating thereto (the “Phone System”), is
proprietary to Samsung and protected under federal laws, provincial laws, and
international treaty provisions. Intellectual Property includes, but is not limited to,
inventions (patentable or unpatentable), patents, trade secrets, copyrights, software,
computer programs, and related documentation and other works of authorship. You may
not infringe or otherwise violate the rights secured by the Intellectual Property. Moreover,
you agree that you will not (and will not attempt to) modify, prepare derivative works of,
reverse engineer, decompile, disassemble, or otherwise attempt to create source code
from the software. No title to or ownership in the Intellectual Property is transferred to you.
All applicable rights of the Intellectual Property shall remain with SAMSUNG and its
suppliers.
Copyright
© 2010 Samsung Electronics Canada, Inc.. SAMSUNG is a registered trademark of
Samsung Electronics Co., Ltd. and its related entities.
Licensed by Qualcomm Incorporated under one or more of the following patents: U.S.
Patent No. 4, 901, 307; 5, 056, 109; 5, 099, 204; 5, 101, 501; 5, 103, 459; 5, 107, 225; 5,
109, 390.
Openwave® is a registered Trademark of Openwave, Inc.
RSA® is a registered Trademark of RSA Security, Inc.
Post-it® is a registered Trademark of Minnesota Mining and Manufacturing Company aka
3M CORPORATION DELAWARE.
The Bluetooth® word mark and logos are owned by the Bluetooth SIG, Inc. and any use of
such marks by Samsung Electronics Canada, Inc. is under license. Other trademarks and
trade names are those of their respective owners.
Page 3

Disclaimer of Warranties; Exclusion of Liability
Except as set forth in the express warranty contained on the warranty page enclosed with
the product, the purchaser takes the product "as is", and Samsung makes no express or
implied warranty of any kind whatsoever with respect to the product, including but not
limited to the merchantability of the product or its fitness for any particular purpose or use;
the design, condition or quality of the product; the performance of the product; the
workmanship of the product or the components contained therein; or compliance of the
product with the requirements of any law, rule, specification or contract pertaining thereto.
Nothing contained in the instruction manual shall be construed to create an express or
implied warranty of any kind whatsoever with respect to the product. In addition, Samsung
shall not be liable for any damages of any kind resulting from the purchase or use of the
product or arising from the breach of the express warranty, including incidental, special or
consequential damages, or loss of anticipated profits or benefits.
Privacy
The privacy and copyright laws of Canada govern the disclosure, reproduction and
distribution of data, media and other content, including music and video content. Certain
activities, including downloads or transfer by any means (including, via cable, Bluetooth®
or otherwise) of such content may be an infringement of privacy or copyright law. Neither
Samsung Electronics Canada Inc. nor any of its affiliates shall be liable or responsible for
any data or content disclosed, reproduced, downloaded or distributed by the user of this
equipment.
Warning
Depending on the user interface used in the handset, you may experience slow keypad
response when performing tasks in the background. This can impact making phone calls.
When there is no activity or change in the icons at the top of the main LCD display, the
handset will resume normal operations.
Page 4

Open Source Announcement
Some software components of this product incorporate source code covered
under the the Mozilla Public License.
And this product includes software developed by the OpenSSL Project for use in
the OpenSSL Toolkit. (http://www.openssl.org/)
To obtain the source code covered under the MPL, please visit
http://opensource.samsung.com/category/mobile/mobile-phone/.
Component License
OpenSSL OpenSSL License
Mozilla Mozilla Public License 1.1
LICENSE ISSUES
==============
The OpenSSL toolkit stays under a dual license, i.e. both the conditions of the
OpenSSL License and the original SSLeay license apply to the toolkit. See below
for the actual license texts. Actually both licenses are BSD-style Open Source
licenses. In case of any license issues related to OpenSSL please contact
openssl core@openssl.org.
OpenSSL License
Copyright (c) 1998-2004 The OpenSSL Project. All rights reserved.
Redistribution and use in source and binary forms, with or without modification,
are permitted provided that the following conditions are met:
1. Redistributions of source code must retain the above copyright notice, this
list of conditions and the following disclaimer.
2. Redistributions in binary form must reproduce the above copyright notice,
this list of conditions and the following disclaimer in the documentation and/
or other materials provided with the distribution.
3. All advertising materials mentioning features or use of this software must
display the following acknowledgment: "This product includes software
Page 5

developed by the OpenSSL Project for use in the OpenSSL Toolkit. (http://
www.openssl.org/)"
4. The names "OpenSSL Toolkit" and "OpenSSL Project" must not be used to
endorse or promote products derived from this software without prior written
permission. For written permission, please contact opensslcore@openssl.org.
5. Products derived from this software may not be called "OpenSSL" nor may
"OpenSSL" appear in their names without prior written permission of the
OpenSSL Project.
6. Redistributions of any form whatsoever must retain the following
acknowledgment: "This product includes software developed by the OpenSSL
Project for use in the OpenSSL Toolkit (http://www.openssl.org/)"
THIS SOFTWARE IS PROVIDED BY THE OpenSSL PROJECT ''AS IS'' AND ANY
EXPRESSED OR IMPLIED WARRANTIES, INCLUDING, BUT NOT LIMITED TO, THE
IMPLIED WARRANTIES OF MERCHANTABILITY AND FITNESS FOR A PARTICULAR
PURPOSE ARE DISCLAIMED. IN NO EVENT SHALL THE OpenSSL PROJECT OR ITS
CONTRIBUTORS BE LIABLE FOR ANY DIRECT, INDIRECT, INCIDENTAL, SPECIAL,
EXEMPLARY, OR CONSEQUENTIAL DAMAGES (INCLUDING, BUT NOT LIMITED TO,
PROCUREMENT OF SUBSTITUTE GOODS OR SERVICES; LOSS OF USE, DATA, OR
PROFITS; OR BUSINESS INTERRUPTION) HOWEVER CAUSED AND ON ANY
THEORY OF LIABILITY, WHETHER IN CONTRACT, STRICT LIABILITY, OR TORT
(INCLUDING NEGLIGENCE OR OTHERWISE) ARISING IN ANY WAY OUT OF THE
USE OF THIS SOFTWARE, EVEN IF ADVISED OF THE POSSIBILITY OF SUCH
DAMAGE.
This product includes cryptographic software written by Eric Young
(eay@cryptsoft.com). This product includes software written by Tim Hudson
(tjh@cryptsoft.com).
Original SSLeay License
Copyright (C) 1995-1998 Eric Young (eay@cryptsoft.com) All rights reserved.
This package is an SSL implementation written by Eric Young (eay@cryptsoft.com).
The implementation was written so as to conform with Netscapes SSL.
This library is free for commercial and non-commercial use as long as the following
conditions are adheared to. The following conditions apply to all code found in this
distribution, be it the RC4, RSA, lhash, DES, etc., code; not just the SSL code. The
SSL documentation included with this distribution is covered by the same copyright
terms except that the holder is Tim Hudson (tjh@cryptsoft.com). Copyright remains
Page 6

Eric Young's, and as such any Copyright notices in the code are not to be removed.
If this package is used in a product, Eric Young should be given attribution as the
author of the parts of the library used.
This can be in the form of a textual message at program startup or in
documentation (online or textual) provided with the package.
Redistribution and use in source and binary forms, with or without modification,
are permitted provided that the following conditions are met:
1. Redistributions of source code must retain the copyright notice, this list of
conditions and the following disclaimer.
2. Redistributions in binary form must reproduce the above copyright notice,
this list of conditions and the following disclaimer in the documentation and/
or other materials provided with the distribution.
3. All advertising materials mentioning features or use of this software must
display the following acknowledgement: "This product includes
cryptographic software written by Eric Young(eay@cryptsoft.com)" The word
'cryptographic' can be left out if the rouines from the library being used are
not cryptographic related:-).
4. If you include any Windows specific code (or a derivative thereof) from the
apps directory (application code) you must include an acknowledgement:
"This product includes software written by Tim Hudson (tjh@cryptsoft.com)"
THIS SOFTWARE IS PROVIDED BY ERIC YOUNG ``AS IS'' AND ANY EXPRESS OR
IMPLIED WARRANTIES, INCLUDING, BUT NOT LIMITED TO, THE IMPLIED
WARRANTIES OF MERCHANTABILITY AND FITNESS FOR A PARTICULAR
PURPOSE ARE DISCLAIMED. IN NO EVENT SHALL THE AUTHOR OR
CONTRIBUTORS BE LIABLE FOR ANY DIRECT, INDIRECT, INCIDENTAL, SPECIAL,
EXEMPLARY, OR CONSEQUENTIAL DAMAGES (INCLUDING, BUT NOT LIMITED
TO, PROCUREMENT OF SUBSTITUTE GOODS OR SERVICES; LOSS OF USE, DATA,
OR PROFITS; OR BUSINESS INTERRUPTION) HOWEVER CAUSED AND ON ANY
THEORY OF LIABILITY, WHETHER IN CONTRACT, STRICT LIABILITY, OR TORT
(INCLUDING NEGLIGENCE OR OTHERWISE) ARISING IN ANY WAY OUT OF THE
USE OF THIS SOFTWARE, EVEN IF ADVISED OF THE POSSIBILITY OF SUCH
DAMAGE.
The license and distribution terms for any publically available version or derivative
of this code cannot be changed. i.e. this code cannot simply be copied and put
under another distribution license [including the GNU Public Licence.]
Page 7

Mozilla Public License 1.1 (MPL 1.1)
1. Definitions.
1.0.1. "Commercial Use" means distribution or otherwise making the Covered Code
available to a third party.
1.1. ''Contributor'' means each entity that creates or contributes to the creation of
Modifications.
1.2. ''Contributor Version'' means the combination of the Original Code, prior
Modifications used by a Contributor, and the Modifications made by that particular
Contributor.
1.3. ''Covered Code'' means the Original Code or Modifications or the combination
of the Original Code and Modifications, in each case including portions thereof.
1.4. ''Electronic Distribution Mechanism'' means a mechanism generally accepted
in the software development community for the electronic transfer of data.
1.5. ''Executable'' means Covered Code in any form other than Source Code.
1.6. ''Initial Developer'' means the individual or entity identified as the Initial
Developer in the Source Code notice required by Exhibit A.
1.7. ''Larger Work'' means a work which combines Covered Code or portions
thereof with code not governed by the terms of this License.
1.8. ''License'' means this document.
1.8.1. "Licensable" means having the right to grant, to the maximum extent
possible, whether at the time of the initial grant or subsequently acquired, any and all
of the rights conveyed herein.
1.9. ''Modifications'' means any addition to or deletion from the substance or
structure of either the Original Code or any previous Modifications. When Covered
Code is released as a series of files, a Modification
is:
A. Any addition to or deletion from the contents of a file containing Original Code or
previous Modifications.
B. Any new file that contains any part of the Original Code or previous Modifications.
1.10. ''Original Code'' means Source Code of computer software code which is
described in the Source Code notice required by Exhibit A as Original Code, and
which, at the time of its release under this License is not already Covered Code
governed by this License.
1.10.1. "Patent Claims" means any patent claim(s), now owned or hereafter
acquired, including without limitation, method, process, and apparatus claims, in
any patent Licensable by grantor.
Page 8

1.11. ''Source Code'' means the preferred form of the Covered Code for making
modifications to it, including all modules it contains, plus any associated interface
definition files, scripts used to control compilation and installation of an
Executable, or source code differential comparisons against either the Original
Code or another well known, available Covered Code of the Contributor's choice.
The Source Code can be in a compressed or archival form, provided the
appropriate decompression or de-archiving software is widely available for no
charge.
1.12. "You'' (or "Your") means an individual or a legal entity exercising rights
under, and complying with all of the terms of, this License or a future version of
this License issued under Section 6.1. For legal entities, "You'' includes any entity
which controls, is controlled by, or is under common control with You. For
purposes of this definition, "control'' means (a) the power, direct or indirect, to
cause the direction or management of such entity, whether by contract or
otherwise, or (b) ownership of more than fifty percent (50%) of the outstanding
shares or beneficial ownership of such entity.
2. Source Code License.
2.1. The Initial Developer Grant.
The Initial Developer hereby grants You a world-wide, royalty-free, non-exclusive
license, subject to third party intellectual property claims:
(a) under intellectual property rights (other than patent or trademark) Licensable by
Initial Developer to use, reproduce, modify, display, perform, sublicense and
distribute the Original Code (or portions thereof) with or without Modifications,
and/or as part of a Larger Work; and
(b) under Patents Claims infringed by the making, using or selling of Original Code,
to make, have made, use, practice, sell, and offer for sale, and/or otherwise
dispose of the Original Code (or portions thereof).
(c) the licenses granted in this Section 2.1(a) and (b) are effective on the date Initial
Developer first distributes Original Code under the terms of this License.
(d) Notwithstanding Section 2.1(b) above, no patent license is granted: 1) for code
that You delete from the Original Code; 2) separate from the Original Code; or 3) for
infringements caused by: i) the modification of the Original Code or ii) the
combination of the Original Code with other software or devices.
Page 9

2.2. Contributor Grant.
Subject to third party intellectual property claims, each Contributor hereby grants
You a world-wide, royalty-free, non-exclusive license
(a) under intellectual property rights (other than patent or trademark) Licensable by
Contributor, to use, reproduce, modify, display, perform, sublicense and distribute
the Modifications created by such Contributor (or portions thereof) either on an
unmodified basis, with other Modifications, as Covered Code and/or as part of a
Larger Work; and
(b) under Patent Claims infringed by the making, using, or selling of Modifications
made by that Contributor either alone and/or in combination with its Contributor
Version (or portions of such combination), to make, use, sell, offer for sale, have
made, and/or otherwise dispose of: 1) Modifications made by that Contributor (or
portions thereof); and 2) the combination of Modifications made by that Contributor
with its Contributor Version (or portions of such combination).
(c) the licenses granted in Sections 2.2(a) and 2.2(b) are effective on the date
Contributor first makes Commercial Use of the Covered Code.
(d) Notwithstanding Section 2.2(b) above, no patent license is granted: 1) for any
code that Contributor has deleted from the Contributor Version; 2) separate from the
Contributor Version; 3) for infringements caused by: i) third party modifications of
Contributor Version or ii) the combination of Modifications made by that Contributor
with other software (except as part of the Contributor Version) or other devices; or
4) under Patent Claims infringed by Covered Code in the absence of Modifications
made by that Contributor.
3. Distribution Obligations.
3.1. Application of License.
The Modifications which You create or to which You contribute are governed by the
terms of this License, including without limitation Section 2.2. The Source Code
version of Covered Code may be distributed only under the terms of this License or a
future version of this License released under Section 6.1, and You must include a
copy of this License with every copy of the Source Code You distribute. You may not
offer or impose any terms on any Source Code version that alters or restricts the
applicable version of this License or the recipients' rights hereunder. However, You
may include an additional document offering the additional rights described in
Section 3.5.
Page 10

3.2. Availability of Source Code.
Any Modification which You create or to which You contribute must be made
available in Source Code form under the terms of this License either on the same
media as an Executable version or via an accepted Electronic Distribution
Mechanism to anyone to whom you made an Executable version available; and if
made available via Electronic Distribution Mechanism, must remain available for at
least twelve (12) months after the date it initially became available, or at least six
(6) months after a subsequent version of that particular Modification has been
made available to such recipients. You are responsible for ensuring that the Source
Code version remains available even if the Electronic Distribution Mechanism is
maintained by a third party.
3.3. Description of Modifications.
You must cause all Covered Code to which You contribute to contain a file
documenting the changes You made to create that Covered Code and the date of
any change. You must include a prominent statement that the Modification is
derived, directly or indirectly, from Original Code provided by the Initial Developer
and including the name of the Initial Developer in (a) the Source Code, and (b) in
any notice in an Executable version or related documentation in which You describe
the origin or ownership of the Covered Code.
3.4. Intellectual Property Matters
(a) Third Party Claims.
If Contributor has knowledge that a license under a third party's intellectual
property rights is required to exercise the rights granted by such Contributor under
Sections 2.1 or 2.2, Contributor must include a text file with the Source Code
distribution titled "LEGAL'' which describes the claim and the party making the
claim in sufficient detail that a recipient will know whom to contact. If Contributor
obtains such knowledge after the Modification is made available as described in
Section 3.2, Contributor shall promptly modify the LEGAL file in all copies
Contributor makes available thereafter and shall take other steps (such as notifying
appropriate mailing lists or newsgroups) reasonably calculated to inform those
who received the Covered Code that new knowledge has been obtained.
(b) Contributor APIs.
If Contributor's Modifications include an application programming interface and
Contributor has knowledge of patent licenses which are reasonably necessary to
implement that API, Contributor must also include this information in the LEGAL
file.
Page 11

(c) Representations.
Contributor represents that, except as disclosed pursuant to Section 3.4(a) above,
Contributor believes that Contributor's Modifications are Contributor's original
creation(s) and/or Contributor has sufficient rights to grant the rights conveyed by
this License.
3.5. Required Notices.
You must duplicate the notice in Exhibit A in each file of the Source Code. If it is not
possible to put such notice in a particular Source Code file due to its structure, then
You must include such notice in a location (such as a relevant directory) where a
user would be likely to look for such a notice. If You created one or more
Modification(s) You may add your name as a Contributor to the notice described in
Exhibit A. You must also duplicate this License in any documentation for the Source
Code where You describe recipients' rights or ownership rights relating to Covered
Code. You may choose to offer, and to charge a fee for, warranty, support, indemnity
or liability obligations to one or more recipients of Covered Code. However, You may
do so only on Your own behalf, and not on behalf of the Initial Developer or any
Contributor.
You must make it absolutely clear than any such warranty, support, indemnity or
liability obligation is offered by You alone, and You hereby agree to indemnify the
Initial Developer and every Contributor for any liability incurred by the Initial
Developer or such Contributor as a result of warranty, support, indemnity or liability
terms You offer.
3.6. Distribution of Executable Versions.
You may distribute Covered Code in Executable form only if the requirements of
Section 3.1-3.5 have been met for that Covered Code, and if You include a notice
stating that the Source Code version of the Covered Code is available under the
terms of this License, including a description of how and where You have fulfilled the
obligations of Section 3.2. The notice must be conspicuously included in any notice
in an Executable version, related documentation or collateral in which You describe
recipients' rights relating to the Covered Code. You may distribute the Executable
version of Covered Code or ownership rights under a license of Your choice, which
may contain terms different from this License, provided that You are in compliance
with the terms of this License and that the license for the Executable version does
not attempt to limit or alter the recipient's rights in the Source Code version from the
rights set forth in this License.
Page 12

If You distribute the Executable version under a different license You must make it
absolutely clear that any terms which differ from this License are offered by You
alone, not by the Initial Developer or any Contributor. You hereby agree to
indemnify the Initial Developer and every Contributor for any liability incurred by
the Initial Developer or such Contributor as a result of any such terms You offer.
3.7. Larger Works.
You may create a Larger Work by combining Covered Code with other code not
governed by the terms of this License and distribute the Larger Work as a single
product. In such a case, You must make sure the requirements of this License are
fulfilled for the Covered Code.
4. Inability to Comply Due to Statute or Regulation.
If it is impossible for You to comply with any of the terms of this License with
respect to some or all of the Covered Code due to statute, judicial order, or
regulation then You must: (a) comply with the terms of this License to the
maximum extent possible; and (b) describe the limitations and the code they affect.
Such description must be included in the LEGAL file described in Section 3.4 and
must be included with all distributions of the Source Code. Except to the extent
prohibited by statute or regulation, such description must be sufficiently detailed
for a recipient of ordinary skill to be able to understand it.
5. Application of this License.
This License applies to code to which the Initial Developer has attached the notice
in Exhibit A and to related Covered Code.
6. Versions of the License.
6.1. New Versions.
Netscape Communications Corporation (''Netscape'') may publish revised and/or
new versions of the License from time to time. Each version will be given a
distinguishing version number.
6.2. Effect of New Versions.
Once Covered Code has been published under a particular version of the License,
You may always continue to use it under the terms of that version. You may also
choose to use such Covered Code under the terms of any subsequent version of
the License published by Netscape. No one other than Netscape has the right to
modify the terms applicable to Covered Code created under this License.
Page 13

6.3. Derivative Works.
If You create or use a modified version of this License (which you may only do in
order to apply it to code which is not already Covered Code governed by this
License), You must (a) rename Your license so that the phrases ''Mozilla'',
''MOZILLAPL'', ''MOZPL'', ''Netscape'', "MPL", ''NPL'' or any confusingly similar
phrase do not appear in your license (except to note that your license differs from
this License) and (b) otherwise make it clear that Your version of the license
contains terms which differ from the Mozilla Public License and Netscape Public
License. (Filling in the name of the Initial Developer, Original Code or Contributor in
the notice described in Exhibit A shall not of themselves be deemed to be
modifications of this License.)
7. DISCLAIMER OF WARRANTY.
COVERED CODE IS PROVIDED UNDER THIS LICENSE ON AN "AS IS'' BASIS,
WITHOUT WARRANTY OF ANY KIND, EITHER EXPRESSED OR IMPLIED,
INCLUDING, WITHOUT LIMITATION, WARRANTIES THAT THE COVERED CODE IS
FREE OF DEFECTS, MERCHANTABLE, FIT FOR A PARTICULAR PURPOSE OR NONINFRINGING. THE ENTIRE RISK AS TO THE QUALITY AND PERFORMANCE OF THE
COVERED CODE IS WITH YOU. SHOULD ANY COVERED CODE PROVE DEFECTIVE
IN ANY RESPECT, YOU (NOT THE INITIAL DEVELOPER OR ANY OTHER
CONTRIBUTOR) ASSUME THE COST OF ANY NECESSARY SERVICING, REPAIR OR
CORRECTION. THIS DISCLAIMER OF WARRANTY CONSTITUTES AN ESSENTIAL
PART OF THIS LICENSE.
NO USE OF ANY COVERED CODE IS AUTHORIZED HEREUNDER EXCEPT UNDER
THIS DISCLAIMER.
8. TERMINATION.
8.1. This License and the rights granted hereunder will terminate automatically if
You fail to comply with terms herein and fail to cure such breach within 30 days of
becoming aware of the breach. All sublicenses to the Covered Code which are
properly granted shall survive any termination of this License. Provisions which, by
their nature, must remain in effect beyond the termination of this License shall
survive.
8.2. If You initiate litigation by asserting a patent infringement claim (excluding
declatory judgment actions) against Initial Developer or a Contributor (the Initial
Developer or Contributor against whom You file such action is referred to as
"Participant") alleging that:
(a) such Participant's Contributor Version directly or indirectly infringes any patent,
then any and all rights granted by such Participant to You under Sections 2.1 and/or
2.2 of this License shall, upon 60 days notice from Participant terminate
Page 14

prospectively, unless if within 60 days after receipt of notice You either: (i) agree in
writing to pay Participant a mutually agreeable reasonable royalty for Your past and
future use of Modifications made by such Participant, or (ii) withdraw Your
litigation claim with respect to the Contributor Version against such Participant. If
within 60 days of notice, a reasonable royalty and payment arrangement are not
mutually agreed upon in writing by the parties or the litigation claim is not
withdrawn, the rights granted by Participant to You under Sections 2.1 and/or 2.2
automatically terminate at the expiration of the 60 day notice period specified
above.
(b) any software, hardware, or device, other than such Participant's Contributor
Version, directly or indirectly infringes any patent, then any rights granted to You
by such Participant under Sections 2.1(b) and 2.2(b) are revoked effective as of the
date You first made, used, sold, distributed, or had made, Modifications made by
that Participant.
8.3. If You assert a patent infringement claim against Participant alleging that such
Participant's Contributor Version directly or indirectly infringes any patent where
such claim is resolved (such as by license or settlement) prior to the initiation of
patent infringement litigation, then the reasonable value of the licenses granted by
such Participant under Sections 2.1 or 2.2 shall be taken into account in
determining the amount or value of any payment or license.
8.4. In the event of termination under Sections 8.1 or 8.2 above, all end user
license agreements (excluding distributors and resellers) which have been validly
granted by You or any distributor hereunder prior to termination shall survive
termination.
9. LIMITATION OF LIABILITY.
UNDER NO CIRCUMSTANCES AND UNDER NO LEGAL THEORY, WHETHER TORT
(INCLUDING NEGLIGENCE), CONTRACT, OR OTHERWISE, SHALL YOU, THE
INITIAL DEVELOPER, ANY OTHER CONTRIBUTOR, OR ANY DISTRIBUTOR OF
COVERED CODE, OR ANY SUPPLIER OF ANY OF SUCH PARTIES, BE LIABLE TO
ANY PERSON FOR ANY INDIRECT, SPECIAL, INCIDENTAL, OR CONSEQUENTIAL
DAMAGES OF ANY CHARACTER INCLUDING, WITHOUT LIMITATION, DAMAGES
FOR LOSS OF GOODWILL, WORK STOPPAGE, COMPUTER FAILURE OR
MALFUNCTION, OR ANY AND ALL OTHER COMMERCIAL DAMAGES OR LOSSES,
EVEN IF SUCH PARTY SHALL HAVE BEEN INFORMED OF THE POSSIBILITY OF
SUCH DAMAGES. THIS LIMITATION OF LIABILITY SHALL NOT APPLY TO
LIABILITY FOR DEATH OR PERSONAL INJURY RESULTING FROM SUCH PARTY'S
NEGLIGENCE TO THE EXTENT APPLICABLE LAW PROHIBITS SUCH LIMITATION.
SOME JURISDICTIONS DO NOT ALLOW THE EXCLUSION OR LIMITATION OF
Page 15

INCIDENTAL OR CONSEQUENTIAL DAMAGES, SO THIS EXCLUSION AND
LIMITATION MAY NOT APPLY TO YOU.
10. U.S. GOVERNMENT END USERS.
The Covered Code is a ''commercial item,'' as that term is defined in 48 C.F.R. 2.101
(Oct. 1995), consisting of ''commercial computer software'' and ''commercial
computer software documentation,'' as such terms are used in 48 C.F.R. 12.212
(Sept. 1995). Consistent with 48 C.F.R. 12.212 and 48 C.F.R. 227.7202-1 through
227.7202-4 (June 1995), all U.S. Government End Users acquire Covered Code with
only those rights set forth herein.
11. MISCELLANEOUS.
This License represents the complete agreement concerning subject matter hereof.
If any provision of this License is held to be unenforceable, such provision shall be
reformed only to the extent necessary to make it enforceable.
This License shall be governed by California law provisions (except to the extent
applicable law, if any, provides otherwise), excluding its conflict-of-law provisions.
With respect to disputes in which at least one party is a citizen of, or an entity
chartered or registered to do business in the United States of America, any litigation
relating to this License shall be subject to the jurisdiction of the Federal Courts of the
Northern District of California, with venue lying in Santa Clara County, California,
with the losing party responsible for costs, including without limitation, court costs
and reasonable attorneys' fees and expenses. The application of the United Nations
Convention on Contracts for the International Sale of Goods is expressly excluded.
Any law or regulation which provides that the language of a contract shall be
construed against the drafter shall not apply to this License.
12. RESPONSIBILITY FOR CLAIMS.
As between Initial Developer and the Contributors, each party is responsible for
claims and damages arising, directly or indirectly, out of its utilization of rights under
this License and You agree to work with Initial Developer and Contributors to
distribute such responsibility on an equitable basis. Nothing herein is intended or
shall be deemed to constitute any admission of liability.
13. MULTIPLE-LICENSED CODE.
Initial Developer may designate portions of the Covered Code as Multiple-Licensed.
Multiple-Licensed means that the Initial Developer permits you to utilize portions of
the Covered Code under Your choice of the MPL or the alternative licenses, if any,
specified by the Initial Developer in the file described in Exhibit A.
EXHIBIT A -Mozilla Public License.
Page 16

``The contents of this file are subject to the Mozilla Public License Version 1.1 (the
"License"); you may not use this file except in compliance with the License. You
may obtain a copy of the License at
http://www.mozilla.org/MPL/
Software distributed under the License is distributed on an "AS IS" basis, WITHOUT
WARRANTY OF ANY KIND, either express or implied. See the License for the
specific language governing rights and limitations under the License.
The Original Code is ______________________________________.
The Initial Developer of the Original Code is ________________________.
Portions created by ______________________ are Copyright (C) ______
_______________________. All Rights Reserved.
Contributor(s): ______________________________________.
Alternatively, the contents of this file may be used under the terms of the _____
license (the [___] License), in which case the provisions of [______] License are
applicable instead of those above. If you wish to allow use of your version of this
file only under the terms of the [____] License and not to allow others to use your
version of this file under the MPL, indicate your decision by deleting the provisions
above and replace them with the notice and other provisions required by the [___]
License. If you do not delete the provisions above, a recipient may use your version
of this file under either the MPL or the [___] License."
[NOTE: The text of this Exhibit A may differ slightly from the text of the notices in
the Source Code files of the Original Code. You should use the text of this Exhibit A
rather than the text found in the Original Code Source Code for Your Modifications.]
Page 17

Table of Contents
Getting Started...... ........................................ .... ... ........................................ .1
Portrait Mode Phone Features . . . . . . . . . . . . . . . . . . . . . . . . . . . . . . . . . . . . . . . . . 1
Landscape Mode Phone Features . . . . . . . . . . . . . . . . . . . . . . . . . . . . . . . . . . . . . . 3
Viewing the Display Screen. . . . . . . . . . . . . . . . . . . . . . . . . . . . . . . . . . . . . . . . . . . . 3
Turning Your Phone On and Off . . . . . . . . . . . . . . . . . . . . . . . . . . . . . . . . . . . . . . . . 5
Using Your Phone’s Battery and Charger. . . . . . . . . . . . . . . . . . . . . . . . . . . . . . . . . 6
Using the Travel Adapter. . . . . . . . . . . . . . . . . . . . . . . . . . . . . . . . . . . . . . . . . . . . . . 8
Using a microSDTM Memory Card in Your Phone . . . . . . . . . . . . . . . . . . . . . . . . . 9
Phone Basics..............................................................................................11
Accessing Menus. . . . . . . . . . . . . . . . . . . . . . . . . . . . . . . . . . . . . . . . . . . . . . . . . . . 11
Displaying Your Phone Number . . . . . . . . . . . . . . . . . . . . . . . . . . . . . . . . . . . . . . . 11
Making and Answering Calls. . . . . . . . . . . . . . . . . . . . . . . . . . . . . . . . . . . . . . . . . . 12
Caller ID. . . . . . . . . . . . . . . . . . . . . . . . . . . . . . . . . . . . . . . . . . . . . . . . . . . . . . . . . . 16
Responding to Call Waiting. . . . . . . . . . . . . . . . . . . . . . . . . . . . . . . . . . . . . . . . . . . 17
Making a Three-Way Call . . . . . . . . . . . . . . . . . . . . . . . . . . . . . . . . . . . . . . . . . . . . 17
TTY Use With Handset . . . . . . . . . . . . . . . . . . . . . . . . . . . . . . . . . . . . . . . . . . . . . . 18
Entering Text ..... ........................................ ... .... ... ... ....................................20
Predictive Text Input . . . . . . . . . . . . . . . . . . . . . . . . . . . . . . . . . . . . . . . . . . . . . . . . 20
Using the Keyboard. . . . . . . . . . . . . . . . . . . . . . . . . . . . . . . . . . . . . . . . . . . . . . . . . 21
Roaming .....................................................................................................23
Setting Your Roaming Mode. . . . . . . . . . . . . . . . . . . . . . . . . . . . . . . . . . . . . . . . . . 23
Update PRL . . . . . . . . . . . . . . . . . . . . . . . . . . . . . . . . . . . . . . . . . . . . . . . . . . . . . . . 24
Voice Command .................... ... ... .... ........................................ ... .... ............25
Customizing Voice Command. . . . . . . . . . . . . . . . . . . . . . . . . . . . . . . . . . . . . . . . . 28
Main Menu..... ........................................ .... ... .... ........................................ ..30
User Interface. . . . . . . . . . . . . . . . . . . . . . . . . . . . . . . . . . . . . . . . . . . . . . . . . . . . . . 30
Menu Layout . . . . . . . . . . . . . . . . . . . . . . . . . . . . . . . . . . . . . . . . . . . . . . . . . . . . . . 30
Web ............................................................................................................31
Navigating the Web . . . . . . . . . . . . . . . . . . . . . . . . . . . . . . . . . . . . . . . . . . . . . . . . . 31
Creating a Bookmark. . . . . . . . . . . . . . . . . . . . . . . . . . . . . . . . . . . . . . . . . . . . . . . . 32
Using the Menu to Navigate . . . . . . . . . . . . . . . . . . . . . . . . . . . . . . . . . . . . . . . . . . 33
Messaging ..................................................................................................34
Text Messaging . . . . . . . . . . . . . . . . . . . . . . . . . . . . . . . . . . . . . . . . . . . . . . . . . . . . 34
Picture Messages . . . . . . . . . . . . . . . . . . . . . . . . . . . . . . . . . . . . . . . . . . . . . . . . . . 35
Instant Messaging . . . . . . . . . . . . . . . . . . . . . . . . . . . . . . . . . . . . . . . . . . . . . . . . . . 37
Email . . . . . . . . . . . . . . . . . . . . . . . . . . . . . . . . . . . . . . . . . . . . . . . . . . . . . . . . . . . . 37
Voicemail . . . . . . . . . . . . . . . . . . . . . . . . . . . . . . . . . . . . . . . . . . . . . . . . . . . . . . . . . 37
Settings . . . . . . . . . . . . . . . . . . . . . . . . . . . . . . . . . . . . . . . . . . . . . . . . . . . . . . . . . . 39
General . . . . . . . . . . . . . . . . . . . . . . . . . . . . . . . . . . . . . . . . . . . . . . . . . . . . . . . . . . 39
Page 18

Text Message Settings . . . . . . . . . . . . . . . . . . . . . . . . . . . . . . . . . . . . . . . . . . . . . . 42
Picture Message Settings . . . . . . . . . . . . . . . . . . . . . . . . . . . . . . . . . . . . . . . . . . . . 43
Alert Setup . . . . . . . . . . . . . . . . . . . . . . . . . . . . . . . . . . . . . . . . . . . . . . . . . . . . . . . . 44
Contacts......................................................................................................45
Adding a New Contact. . . . . . . . . . . . . . . . . . . . . . . . . . . . . . . . . . . . . . . . . . . . . . . 45
Saving a Phone Number . . . . . . . . . . . . . . . . . . . . . . . . . . . . . . . . . . . . . . . . . . . . . 45
Finding Contacts . . . . . . . . . . . . . . . . . . . . . . . . . . . . . . . . . . . . . . . . . . . . . . . . . . . 46
Editing an Existing Contact . . . . . . . . . . . . . . . . . . . . . . . . . . . . . . . . . . . . . . . . . . . 46
Tools...........................................................................................................48
Self Serve. . . . . . . . . . . . . . . . . . . . . . . . . . . . . . . . . . . . . . . . . . . . . . . . . . . . . . . . . 48
Voice Command . . . . . . . . . . . . . . . . . . . . . . . . . . . . . . . . . . . . . . . . . . . . . . . . . . . 48
Calculator. . . . . . . . . . . . . . . . . . . . . . . . . . . . . . . . . . . . . . . . . . . . . . . . . . . . . . . . . 48
Notes . . . . . . . . . . . . . . . . . . . . . . . . . . . . . . . . . . . . . . . . . . . . . . . . . . . . . . . . . . . . 50
Calendar. . . . . . . . . . . . . . . . . . . . . . . . . . . . . . . . . . . . . . . . . . . . . . . . . . . . . . . . . . 51
Clock . . . . . . . . . . . . . . . . . . . . . . . . . . . . . . . . . . . . . . . . . . . . . . . . . . . . . . . . . . . . 54
Music . . . . . . . . . . . . . . . . . . . . . . . . . . . . . . . . . . . . . . . . . . . . . . . . . . . . . . . . . . . . 58
Update Phone . . . . . . . . . . . . . . . . . . . . . . . . . . . . . . . . . . . . . . . . . . . . . . . . . . . . . 58
Voice Memo. . . . . . . . . . . . . . . . . . . . . . . . . . . . . . . . . . . . . . . . . . . . . . . . . . . . . . . 58
Calls............................................................................................................61
Recent Calls Options. . . . . . . . . . . . . . . . . . . . . . . . . . . . . . . . . . . . . . . . . . . . . . . . 62
Bluetooth.....................................................................................................63
Enabling Bluetooth. . . . . . . . . . . . . . . . . . . . . . . . . . . . . . . . . . . . . . . . . . . . . . . . . . 63
Visibility . . . . . . . . . . . . . . . . . . . . . . . . . . . . . . . . . . . . . . . . . . . . . . . . . . . . . . . . . . 63
Trusted Devices. . . . . . . . . . . . . . . . . . . . . . . . . . . . . . . . . . . . . . . . . . . . . . . . . . . . 64
Device Info. . . . . . . . . . . . . . . . . . . . . . . . . . . . . . . . . . . . . . . . . . . . . . . . . . . . . . . . 64
Device Name. . . . . . . . . . . . . . . . . . . . . . . . . . . . . . . . . . . . . . . . . . . . . . . . . . . . . . 64
Pairing Bluetooth Devices . . . . . . . . . . . . . . . . . . . . . . . . . . . . . . . . . . . . . . . . . . . . 65
Sending Items Via Bluetooth. . . . . . . . . . . . . . . . . . . . . . . . . . . . . . . . . . . . . . . . . . 66
My Downloads............................................................................................68
Downloading . . . . . . . . . . . . . . . . . . . . . . . . . . . . . . . . . . . . . . . . . . . . . . . . . . . . . . 68
Assigning Ringers and Wallpaper. . . . . . . . . . . . . . . . . . . . . . . . . . . . . . . . . . . . . . 68
Playing Games. . . . . . . . . . . . . . . . . . . . . . . . . . . . . . . . . . . . . . . . . . . . . . . . . . . . . 69
Launching Applications . . . . . . . . . . . . . . . . . . . . . . . . . . . . . . . . . . . . . . . . . . . . . . 69
Camera.......................................................................................................70
Taking Pictures . . . . . . . . . . . . . . . . . . . . . . . . . . . . . . . . . . . . . . . . . . . . . . . . . . . . 70
My Album. . . . . . . . . . . . . . . . . . . . . . . . . . . . . . . . . . . . . . . . . . . . . . . . . . . . . . . . . 71
Camera Settings . . . . . . . . . . . . . . . . . . . . . . . . . . . . . . . . . . . . . . . . . . . . . . . . . . . 73
Settings.......................................................................................................75
Display . . . . . . . . . . . . . . . . . . . . . . . . . . . . . . . . . . . . . . . . . . . . . . . . . . . . . . . . . . . 75
Volume. . . . . . . . . . . . . . . . . . . . . . . . . . . . . . . . . . . . . . . . . . . . . . . . . . . . . . . . . . . 77
Ringers & Vibrations . . . . . . . . . . . . . . . . . . . . . . . . . . . . . . . . . . . . . . . . . . . . . . . . 78
Page 19

Messaging . . . . . . . . . . . . . . . . . . . . . . . . . . . . . . . . . . . . . . . . . . . . . . . . . . . . . . . . 79
General . . . . . . . . . . . . . . . . . . . . . . . . . . . . . . . . . . . . . . . . . . . . . . . . . . . . . . . . . . 79
Web Browser. . . . . . . . . . . . . . . . . . . . . . . . . . . . . . . . . . . . . . . . . . . . . . . . . . . . . . 83
Speech to Action . . . . . . . . . . . . . . . . . . . . . . . . . . . . . . . . . . . . . . . . . . . . . . . . . . . 84
Lock . . . . . . . . . . . . . . . . . . . . . . . . . . . . . . . . . . . . . . . . . . . . . . . . . . . . . . . . . . . . . 86
Reset . . . . . . . . . . . . . . . . . . . . . . . . . . . . . . . . . . . . . . . . . . . . . . . . . . . . . . . . . . . . 86
Roaming. . . . . . . . . . . . . . . . . . . . . . . . . . . . . . . . . . . . . . . . . . . . . . . . . . . . . . . . . . 87
Safety..........................................................................................................88
Getting the Most Out of Your Reception . . . . . . . . . . . . . . . . . . . . . . . . . . . . . . . . . 88
Maintaining Safe Use of and Access to Your Phone . . . . . . . . . . . . . . . . . . . . . . . 89
Caring for the Battery. . . . . . . . . . . . . . . . . . . . . . . . . . . . . . . . . . . . . . . . . . . . . . . . 91
Acknowledging Special Precautions and Industry Canada Notice. . . . . . . . . . . . . 92
Owner’s Record. . . . . . . . . . . . . . . . . . . . . . . . . . . . . . . . . . . . . . . . . . . . . . . . . . . . 93
User Guide Proprietary Notice. . . . . . . . . . . . . . . . . . . . . . . . . . . . . . . . . . . . . . . . . 93
Manufacturer’s Warranty.............................................................................94
Index...........................................................................................................97
Page 20

Getting Started
9. Volume
Button
4. Back Key
3. Display Screen
13. Accessories/
Power Cable
Jack
7. Camera Lens
11. Microphone
10. microSD Slot
2. Signal Strength
Indicator
1. Earpiece
1. Earpiece
12. Camera Button
14. Power/Lock Button
15. Front Indicator
Light (LED)
5. Talk Key
6. End Key
16. Headset Jack
8. Speaker
Portrait Mode Phone Features
1 Getti ng Started
1. Earpiece: The Earpiece lets you hear the other caller and automated
prompts.
2. Signal Strength Indicator: This shows the signal strength by displaying bars.
The more bars displayed, the better the signal strength.
3. Display Screen: The Display Screen shows indicators for signal and battery
strength, time, day, and date. It also displays incoming calls or messages.
Page 21

4. Back Key: Press to return to the previous menu or screen when navigating
features on your phone.
5. Talk Key: Press to answer an incoming call.
6. End Key: Press to end a call.
7. Camera Lens: Allows you to take pictures with the integrated digital camera.
8. Speaker: Allows you to hear a caller’s voice in speakerphone mode, and to
hear ringtones and sounds.
9. Volume Button: Allows you to adjust the ringer volume in idle mode or to
adjust the voice volume during a call. It can also be used to scroll up or down
in various menus to access the options.
10. MicroSD™ Slot: This expansion slot allows you to insert a microSD™
memory card to add additional memory and storage capacity
11. Microphone: The Microphone allows the other caller to hear you clearly when
you are speaking to them.
12. Camera Button: This key is used to launch the integrated digital camera.
13. Accessories/Power Cable Jack: The power/accessory interface connector is
used to plug in the charging accessories and to connect any available
accessory cables to your phone.
14. Power/Lock Button: Allows you to turn on or off, or lock or unlock the phone.
In a menu, it returns the phone to the unlock screen and cancels any input.
15. Front Indicator Light (LED): Displays the phone’s connection status.
16. Headset Jack: Allows you to plug in a headset for safe, convenient
conversations.
Getting Started
Getting Started 2
Page 22
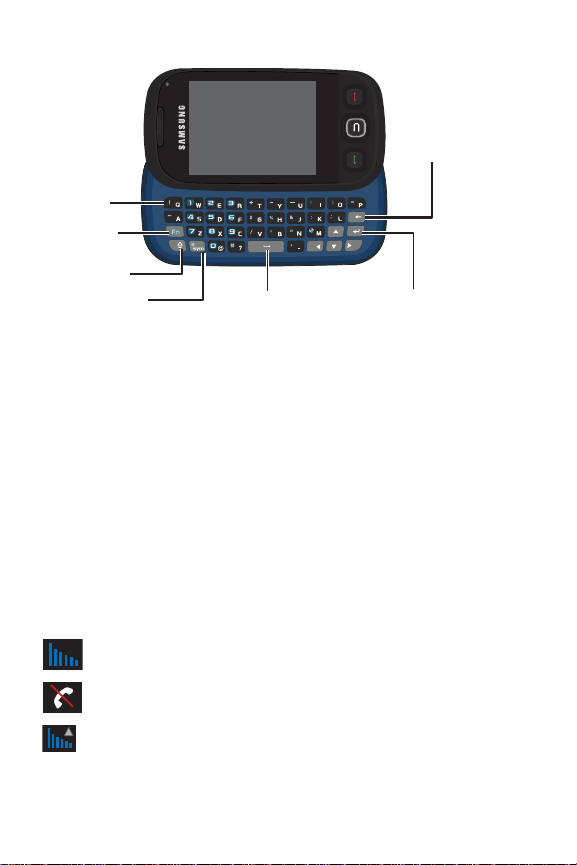
Landscape Mode Phone Features
22. Enter/OK Key
19. Shift Key
18. Fn Key
20. Symbol Key
17. QWERTY
Keyboard
21. Space Key
23. Back Key
17. QWERTY Keyboard: A retractable alphnumeric character keyboard layout.
18. Fn Key: Allows you to access the blue numbers/symbols on the QWERTY
keyboard.
19. Shift Key: T oggles the alpha characters between mixed case, uppercase, and
lowercase. Case remains selected until Shift key is pressed again.
20. Symbol Key: Allows you to access symbol characters.
21. Space Key: Allows you to add spaces between words and characters.
22. Enter/OK Key: Press to select the function highlighted in the current menu or
to enter additional lines of text.
23. Back Key: Deletes characters from the display when you are in text entry
mode and also returns to the previous menu or previous web page when in a
menu or web mode.
Viewing the Display Screen
The following list identifies the icons you’ll see on your phone’s display screens:
Signal Strength: Displays your current signal strength. When you are
receiving maximum signal strength, six bars are shown.
No Service: Means there is no service because your phone cannot find a
3 Getti ng Started
signal.
Roaming: Indicates that your phone is roaming.
Page 23

Data Service Status: Indicates that your 1X connection is active. Incoming
voice calls go directly to Voicemail. Outgoing voice calls can be made, but th e
connection will terminate.
Data Service Transmitting/Receiving: Indicates that data is being
transferred over the 1X network. The arrow direction indicates whether the
handset is sending or receiving data.
Data Service Unavailable: Indicates that your 1X connection is unavailable or
dormant.
Battery Strength: Displays your current battery charge level.
Battery Strength Low: Displays your current battery strength at 20% charge
remaining.
Battery Strength Critical: Displays your current battery strength at 3%
charge remaining.
Ringers: Indicates that the ringer is turned on.
Beep: Indicates that the ringer is set to 1-Beep.
Vibrate All: Indicates that your phone is in vibrate all mode.
Silence All: Indicates that the phone is set to Silence.
Alarm: Indicates that an alarm has been scheduled.
Bluetooth Active: Indicates that Bluetooth technology is enabled.
Getting Started
Bluetooth Searching: Indicates that Bluetooth technology is searching for
available (visible) Bluetooth devices..
Bluetooth Connected: Indicates that Bluetooth technology is connected to a
wireless headset.
Missed Indicator: Indicates that you have new text messages. It also
indicates that you have missed a call, voicemail message, Calendar event,
Alarm, Email, Picture Mail, or Text Message.
Getting Started 4
Page 24
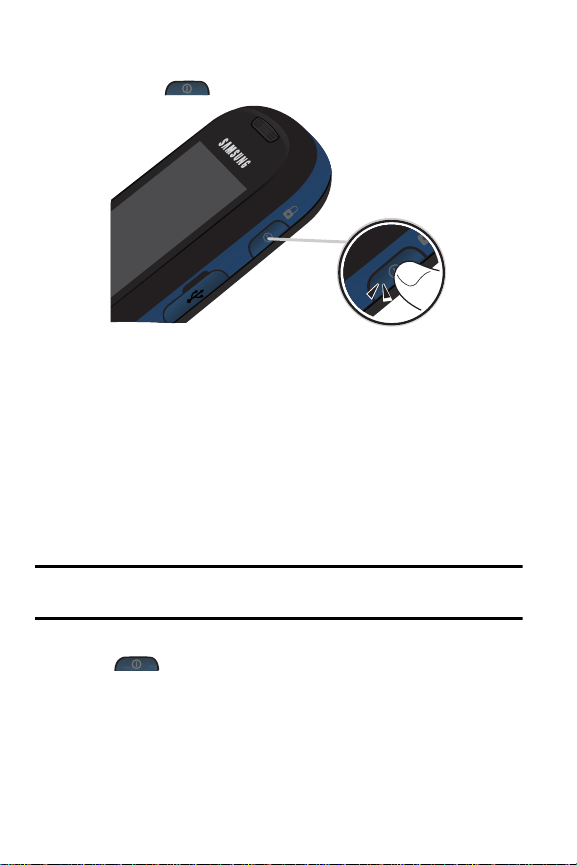
Turning Your Phone On and Off
To turn your phone on:
• Press and hold to turn your phone on.
Once your phone is On, it displays “Entering SVC area” which indicates that your phone is
searching for a signal. When your phone finds a signal, it automatically enters standby
mode – the phone’s idle state. At this point, you are ready to begin making and receiving
calls.
If your phone is unable to find a signal after 15 minutes of searching, a Power Save
feature is automatically activated. When a signal is found, your phone automatically
returns to standby mode.
In Power Save mode, your phone searches for a signal periodically without your
intervention. You can also initiate a search for service by pressing any key (when your
phone is turned On).
Tip: The Power Save feature helps to conserve your battery power when you are in an
area where there is no signal.
To turn your phone off:
• Press for two or more seconds until you see the powering down
animation on the display screen.
Your screen remains blank while your phone is off (unless the battery is charging).
5 Getti ng Started
Page 25

Using Your Phone’s Battery and Charger
Battery Capacity
Your phone is equipped with a Lithium Ion (LiIon) battery. It allows you to recharge your
battery before it is fully drained.
When the battery is at 20% charge capacity, is displayed to remind you to
recharge the battery. At 3% charge capacity, is displayed and blinks, an audible
alert sounds, and the phone powers down.
Note: Long backlight settings, low signal strength, searching for service, vibrate mode,
playing games, or browser use affect the battery’s talk and standby times.
Tip: Be sure to watch your phone’s battery level indicator and charge the battery before it
runs out of power.
Installing the Battery
To install the LiIon battery:
1. Press the top of the battery cover and slide the it in the direction of the arrow
to release it. Lift the cover up by the bottom corners to remove it.
Getting Started
Getting Started 6
Page 26

2. Insert the bottom end of the battery into the phone housing in the direction of
the arrow printed on the battery. The gold contacts on the bottom of the battery
should match those on the phone.
3. Push the top end of the battery down until it snaps into place.
4. Insert the top end of the battery cover into the grooves of the phone. Snap the
lid into place.
Removing the Battery
Note: Make sure the power is off so that you don’t lose any stored numbers or messages.
To remove your battery:
• Use your finger to lift the battery (top end first) up and away from the phone.
Charging the Battery
Your phone’s LiIon battery is rechargeable and should be charged as soon as possible so
you can begin using your phone.
Keeping track of your battery’s charge is important. If your battery level becomes too low,
your phone automatically turns off and you will lose all the information you were just
working on. For a quick check of your phone’s battery level, glance at the battery charge
7 Getti ng Started
Page 27
indicator located in the upper-right corner of either of your phone’s display screens.
indicates that the battery is full. If the battery charge is getting too low, the battery
icon blinks and the phone sounds a warning tone and shuts off.
Always use a Samsung-approved desktop charger, travel adapter, or vehicle power
adapter to charge your battery.
WARNING! FOR CONNECTION TO AN ELECTRICAL SU PPLY NOT LOCATED IN
NORTH AMERICA, YOU MUST USE AN ADAPTER OF THE PROPER
CONFIGURATION FOR THE POWER OUTLET. USE OF THE WRONG ADAPTER
COULD DAMAGE YOUR PHONE AND VOID YOUR WARRANTY.
IMPORTANT SAFETY INSTRUCTIONS - TO REDUCE THE RISK OF FIRE OR
ELECTRIC SHOCK, CAREFULLY FOLLOW THESE INSTRUCTIONS. THIS POWER
UNIT IS INTENDED TO BE CORRECTL Y ORIENTED IN A VERTICAL OR HORIZONTAL
OR FLOOR MOUNT POSITION.
Note: You must unplug the adapter before removing the battery from the phone during
charging to avoid damage.
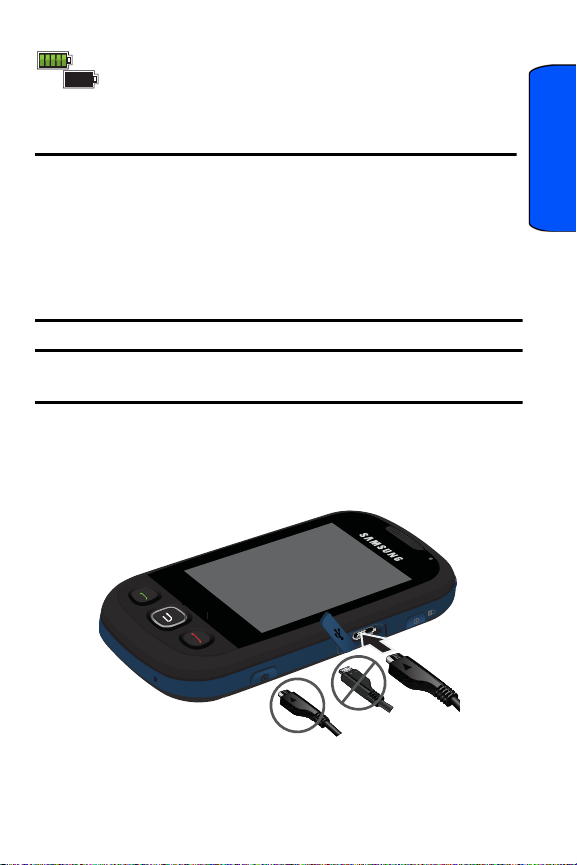
Using the Travel Adapter
1. Locate the interface connector on the side of the phone and pull out and turn
the plastic cover.
2. Plug the flat end of the charger into the phone’s charger jack.
Getting Started
Correct
3. Plug the other end into an electrical outlet.
Incorrect
Getting Started 8
Page 28

4. An animated battery icon is displayed on the main screen and the screen is
locked. The icon indicates the battery’s charge state and percent of charge.
Note: It takes approximately 4 hours to fully recharge a completely drained standard
battery. With the Samsung approved LiIon battery, you can recharge the battery before it
drains completely.
Using a microSD
Your phone is capable of supporting a memory storage media known as a microSDTM
memory card. This card is the newest standard of flash memory specifically designed for
use with ultra-small mobile phones and other devices. It is ideal for storing media-rich files,
such as music and photographs in your phone.
The maximum storage size for this media card is 32 GB.
Note: Compatibility with all high capacity microSDTM memory cards is not guaranteed.
Using non-recommended microSDTM cards could cause data loss and damage your
phone.
TM
Memory Card in Your Phone
Installing the microSDTM Memory Card
Your phone has a memory card slot on the lower left side. You can install a microSDTM
card to provide additional memory for storing files (such as sound files and photos) in your
phone.
To install the card:
1. Locate the memory slot on the left side of the phone and pull out and turn the
plastic cover.
9 Getti ng Started
Page 29

2. Make sure the microSD
TM
card’s gold contacts are facing down.
Getting Started
3. Carefully insert the microSD
TM
card into the opening and firmly push it in until
you hear a click, indicating that the card is now securely installed.
4. With the card now securely installed, resecure the plastic cover over the
microSDTM slot on the phone.
Note: T o remove the card once it has been inserted, firmly push the end of the card further
into the phone and release—the card should pop out of the memory card slot. If this does
not work, repeat the process again.
Note: The microSDTM card can be easily damaged by improper operation. Please be
careful when inserting, removing, or handling the card.
Note: DO NOT remove the microSDTM card while files are being accessed or transferred.
Doing so will result in loss or damage of data. Make sure your battery is fully charged
before using the microSDTM card. Your data may become damaged or unusable if the
battery runs out while using the microSDTM card.
Getting Started 10
Page 30

Phone Basics
Your handset supports a flexible user interface that allows you to modify the user interface
via downloadable themes. The availability of a custom user interface is subject to your
carrier. The following description of the basic capabilities of the phone is a general
description and not specific to a particular user interface.
However, there are some general principles that govern the handset's user interface. For
each user interface, you can access a main menu that provides access and control for
most of the phone's capability.
Accessing Menus
When the phone is locked and is pressed, the unlock screen displays. To access
the menu functions you must first drag the screen to unlock the phone (drag up from the
blue arrow tab at the bottom left of the unlock screen).
Note: You can also slide open the keyboard to unlock the phone.
1. Touch Menu.
2. Touch the menu items to open them.
Displaying Your Phone Number
1. Touch Menu.
2. Touch Settings.
3. Touch General.
4. Touch Phone Information.
11 P hone Basics
Page 31

Making and Answering Calls
To make a call:
1. Touch Phone.
2. Enter a phone number using the onscreen dialpad. (If you make a mistake
while dialing, press to erase one digit at a time. Press and hold to
erase the entire number.)
Talk
3. The phone number appears in the button as you type. Touch
to call the number, the press .
4. Press when you are finished.
Tip: To redial your last recent call, press twice.
Tip: Some networks support + dialing. + dialing automatically indicates to the network that
you are dialing an international call and adds the international dialing prefix (typically ‘01 1’)
to the call automatically. To use + dialing, press and hold the 0 key (until the + appears)
before entering the phone number.
To answer an incoming call:
1. Make sure your phone is on. (If your phone is off, incoming calls go to
Voicemail.)
2. Press to answer the call.
Your phone notifies you of incoming calls in the following ways:
TALK
• The phone rings or vibrates (unless set to Silence All).
• The backlight illuminates.
• The screen displays an incoming call message.
• The is displayed at the top of the display screen.
Phone Basics
If the incoming call is from a number stored in your Contacts, the Contacts entry’s name is
displayed. The caller’s phone number may also be displayed, if available.
The following options are also available to handle an incoming call:
• Press to end the call and send the caller to Voicemail. You can press the
volume key on the side of the phone to quiet the ringer.
Phone Basics 12
Page 32

• Touch or press and hold the volume key to send the incoming call to
Ignore
Ignore + TXT
your Voicemail box immediately.
• Touch to send the call to your Voicemail box and immediately send the
caller a text message.
To disconnect a call when you are finished:
• Press .
Missed Call Notification
When an incoming call is not answered, a Missed Call message is displayed on your
screen.
• To dial a missed call back, press .
Calling Emergency Numbers
You can place calls to 911 (dial 911 and press ), even if your phone is locked or your
account is restricted.
Warning: After initiating a 911 call, you must end the call by pressing * and # on your
keypad. This notifies the phone that the 911 call was terminated intentionally by the user.
No other calls can be made prior to terminating the emergency call.
In-Call Options
During a call, touch an option on the screen to Mute or UnMute your phone or use the
speakerphone.
• Mute On or Mute Off: Drag the keys left or right to toggle the phone’s microphone
on/off.
• Speaker On or Speaker Off: Drag the keys left or right to activate or deactivate
the speakerphone.
• Add Call: Allows you to talk to two different people at the same time. (For more
information, see "Making a Three-Way Call" on page 17.)
• Dialpad: Displays the onscreen dialpad where you can Save or Pause the current
number or End Call.
• Options: Allows you to access other functions during the call:
• Contacts: Accesses the Contacts menu options.
• Recent Calls: Checks your call log for Missed, Outgoing, Incoming and
Recent calls. You can also erase the logs from this menu.
• Messaging: Allows you to check notifications and access the contents of
voice or text messages.
13 P hone Basics
Page 33

• Notes: Allows you to type notes.
• Calendar: Allows you to open the Calendar.
• Clock: Allows you to display the Clock.
• Calculator: Allow you to use the Calculator.
• Phone Info: Displays the phone number, hardware/software version, and
advanced information.
WARNING! Because of higher volume levels, do not place the device near your ear
during speakerphone use.
End-of-Call Options
After receiving a call from or making a call to a phone number that is not in your Contacts,
the phone number and the duration of the call are displayed. Touch Save to save the new
number in your Contacts. (See "Saving a Phone Number" on page 15” below for more
information.) T ouch Redial to redial the number. Touch Done to exit the end-of-call screen.
Saving a Phone Number from the End-of-Call Screen
After you have received or made a call, the phone displays end-of-call options.
1. Press to end the current call.
2. Touch Save.
3. Touch New Contact or Existing Contact.
4. T ouch a label (Mobile, Home, Work, Pager, or Others). The screen changes
to the Landscape orientation.
Note: Step 3 does not appear when your Contacts list is empty.
5. Touch the Enter Name field and use the keyboard to enter the new contact
name. See "Using the Keyboard" on page 21
6. Touch Done (onscreen) to store the name and save the new entry.
Phone Basics
Note: If the current number has already been stored in your Contacts, Save is replaced
with Contacts.
Phone Basics 14
Page 34

Note: The End-of-Call options are not displayed for calls identified as Unknown ID or
Restricted Number.
Saving a Phone Number
You can store up to 600 phone numbers in the Contacts list. (For more information, see
"Adding a New Contact" on page 45.)
1. Touch Phone.
2. Enter a number and touch Save.
3. Touch New Contact or Existing Contact.
4. T ouch a label (Mobile, Home, Work, Pager, or Others). The screen changes
to the Landscape orientation.
Note: Step 3 does not appear when your Contacts list is empty.
5. Touch the Enter Name field and use the keyboard to enter the new contact
name. See Entering Text
6. Enter information into the other field as needed using the keyboard.
7. Touch Done (onscreen) to store the name and save the new entry.
Finding a Phone Number
1.
In the Main menu, touch Contacts.
2. Touch Contacts again.
3. Scroll down through your list of contacts to highlight the name. Touch the
name to select it and then touch the phone number to make the call.
Tip: To search through your list more quickly, switch to landscape mode and enter the first
few letters in the Name box. The display will move down the list to the first entry that
matches the text in the Name box.
Tip: If the entry contains more than one phone number, scroll up or down to highlight the
number you want to call and then touch the number to make the call.
15 P hone Basics
Page 35

Dialing and Saving Phone Numbers With Pauses
You can dial or save phone numbers with pauses for use with automated systems, such
as Voicemail or credit card billing numbers.
• Pause: Sends the next set of numbers when you press .
Note: You can have multiple pauses in a phone number.
To dial or save phone numbers with pauses:
1. Touch Phone and enter a phone number.
2. Touch Pause. A P is displayed at the end of the phone number.
3. Enter additional numbers.
4. Press or touch to dial the number.
— or—
Touch Save to save the number in your Contacts.
Using Speed Dialing
You can store up to 8 numbers in your phone’s speed dial memory to make it easy to
contact friends and family. With this feature, you can dial Speed Dial entries by touching
one of the numbers on the screen.
To use Speed Dialing:
1. Touch Contacts.
2. Touch Speed Dial.
3. Touch a speed dial number to call the number.
Note: Speed dialing is not available when you are roaming. When roaming you must
always dial the number using eleven digits (1 + area code + number).
Phone Basics
Caller ID
Caller ID allows people to identify a caller before answering the phone by displaying the
number of the incoming call. You can block your number from being displayed when you
make a call.
To block Caller ID:
1. Touch Phone.
2. Enter *67 + Phone Number.
Phone Basics 16
Page 36

3. Press or touch .
T o permanently block your number, call your service provider.
Responding to Call Waiting
When you’re on a call, Call Waiting alerts you of incoming calls by sounding two beeps.
Your phone’s screen informs you that another call is coming in and displays the caller’s
phone number (if it is available and you are in digital mode).
To respond to an incomi ng call while you’re on a call:
• Press . (This puts the first caller on hold and answers the second call.)
To switch back to the first caller:
• Touch the caller entry to re-activate the first call and place the second caller on
hold.
Making a Three-Way Call
With three-way calling, you can talk to two people at the same time. When using this
feature, the normal airtime rates will be charged for each of the two calls.
To use Add Call:
1. Touch Phone.
2. Enter the number you want to call and press or touch .
3. Once you have established the connection, touch Add Call.
4. Select Speed Dial, Contacts, History, or Dialpad.
5. T ouch an entry, use the dialpad to enter the second number, or touch Talk to
connect to the second caller.
6. When the second call is connected, touch to begin your three-way
call.
If one of the people you called hangs up during your call, you and the remaining caller stay
connected. If you initiated the call and are the first to hang up, all three callers are
disconnected.
Tip: You can also begin a three-way call by displaying a phone number stored in your
Contacts, Recent History, or Messaging. To call the third party, press .
Once disconnected, a redial screen appears to provide you with the opportunity to call
back any of the individual callers from the recent three-way call.
17 P hone Basics
Page 37

To use Redial:
1. Touch Redial for the first caller.
2. Repeat steps 4-5 in "To use Add Call:" on page 17.
3. When the second call is connected, touch to begin your three-way
call.
TTY Use With Handset
A TTY (also known as a TDD or Text Telephone), is a telecommunications device that
allows people who are deaf or hard of hearing, or who have speech or language
disabilities, to communicate by telephone.
Your phone is compatible with sel ected TTY devices. Please check with the manufacturer
of your TTY device to ensure that it supports digital wireless transmission. Your phone and
TTY device will connect via a special cable that plugs into your phone's headset jack. If
this cable was not provided with your TTY device, contact your TTY device manufacturer
to purchase the connector cable.
Note: Not all service providers support TTY. Consult your service provider for more
information.
To turn TTY Mode on or off:
1. Touch Menu.
2. Touch Settings.
3. Touch General.
4. Touch TTY. (A brief explanation of TTY will display.)
5. Touch OK to continue.
6. Touch TTY On or TTY Off.
Phone Basics
Note: In TTY Mode, your phone will display the TTY access icon. If TTY mode is enabled,
the audio quality of non-TTY devices connected to the headset jack my be impaired.
Phone Basics 18
Page 38

IMPORTANT Note for 911 Emergency Calling: We recommend that TTY users make
emergency calls by other means, including Telecommunications Relay Services (TRS),
analog cellular, and land line communications. Wireless TTY calls to 91 1 may be corrupted
when received by public safety answering points (PSAPs) rendering some
communications unintelligible. The problem encountered appears related to TTY
equipment or software used by PSAPs. The wireless industry and PSAP community are
currently working to resolve this.
19 P hone Basics
Page 39

Entering Text
The phone includes a built-in QWERTY keyboard, which is located beneath the display
screen and is accessed by sliding it open. This orients the phone’s display to landscape
(widescreen) mode. Using the QWERTY keyboard, you can type letters, numbers,
punctuation, and other special characters into text entry fields or other applications.
To open the phone and access the keyboard:
1. Rotate the phone 90 degrees counter-clockwise.
2. Slide the top section of the phone up to open the keyboard. The display
screen rotates to the landscape viewing mode.
Your phone’s keyboard provides a convenient way of entering letters, numbers, and
symbols when you are prompted to enter text. Using your phone’s keyboard is like using
a standard computer keyboard, except that each key had a primary character in white on
the bottom (usually letters) and a secondary character in red on the top (numbers and
punctuation).
Function: Allows you to enter the numbers or characters displayed in blue at
the top of the QWERTY keys. (Press twice to turn Fn lock on.)
Shift: Toggles the text input mode between Upper Case, Lower Case, and
Mixed Case. (Press twice to turn Shift lock on.)
Sym: Launches the Symbols page. Select from onscreen symbols by using
their associated numbers.
Space: Inserts an empty space.
Enter: Accepts a change or option. While entering text, moves the insertion
point to the next line in a message.
Back: Deletes the previous character.
Predictive Text Input
Predicitve T ext (XT9) Inpu t analyzes the letters you enter using an intuitive word database
and creates a suitable word. (The word may change as you type.) Other possible words
appear in a list below your text.
• To choose a word displayed in the list, scroll up and down using the up and down
navigation keys.
• To accept a word, press .
• To accept a word and insert a space, press .
• Press to erase a single character. Press and hold to delete an entire
entry.
Entering Text
Entering Text 20
Page 40

• To enter a period, press the “.” key. To enter other special characters, press
and press the key for the required character. If the required character does not
display, press .
• To insert a number, press and press the key for the required number.
Note: To use the keyboard, the phone must be in Landscape mode. You can only enter
text using the keyboard.
To enter text using Predictive Text:
1. Touch Menu.
2. Touch Settings.
3. Touch General.
4. Touch Text Entry.
5. Turn Predictive Text on.
Using the Keyboard
To enter text:
• Press the required letter keys to enter words
• Press once to capitalize the next letter.
• Press twice to turn on Shift (Caps) lock.
• Press to erase the previous letter.
• Press and hold to erase all previous text.
To enter numbers and punctuation:
• Press and then press the key displaying the required character.
• To enter only the top row of characters, press twice to fix all consecutive
characters.
Note: In some applications, certain fields may default to entering numbers (such as the
phone number fields in Contacts). In others, you will need to use to enter numbers.
Symbols
Symbols are entered by accessing onscreen menus and touching the required item.
To enter symbols:
1. Press .
21 Entering Text
Page 41

2. Touch the numeric key corresponding to the required symbol.
Note: You can exit from the Symbols page by pressing any keyboard key or .
To edit specific text by touching the screen:
• Touch a location in your text message to move the cursor to that location.
To edit specific text using the onscreen navigation keys:
• Use the navigation keys to move your cursor to the required location.
• If you make a mistake, press to reveal the keyboard and press to
erase a single character.
• Press and hold to erase an entire word or all entered characters.
Entering Text
Entering Text 22
Page 42

Roaming
Recognizing Icons on the Display Screen
Your phone ’ s di splay screen alw ays lets you kno w when you’re off the network. If you are
roaming on a digital system, the roaming icon will be displayed along with the text Roaming.
Roaming Indicator
Other Digital Networks
Note: You might pay a higher per-minute rate for roaming calls.
Roaming on Other Digital Networks
When you’re roaming, you may not be able to access certain features, such as web
services.
Note: If you’re on a call when you leave the network and enter an area where roaming is
available, your call is dropped. If your call is dropped in an area where you think service is
available, turn your phone off and on again to reconnect to the network.
Setting Your Roaming Mode
By using the Roaming menu option, you can determine which signals your phone
accepts. Choose from three different settings on your phone to control your roaming
experience:
1. Touch Menu.
2. Touch Settings.
3. Touch Roaming.
4. Touch Roaming Mode.
5. Highlight an option:
• Automatic: This setting seeks service. When service is unavailable, the
phone searches for an alternate system.
• Home Only: This setting allows you to access the home network only and
prevents roaming on other networks.
23 Roaming
Page 43

Update PRL
You can manually update your PRL (Preferred Roaming List) to access additional
networks provided by new roaming partners of your service provider, or by new systems
that have been enabled. This typically results in either a better signal or expanded
coverage. This is not a frequent activity and does not require constant checking. Access
this feature if you know you will be traveling outside of your service provider’s network to
ensure that you always have the best coverage possible.
1. Touch Menu.
2. Touch Settings.
3. Touch Roaming.
4. Touch Update PRL.
5. Follow the onscreen instructions.
Roaming
Roaming 24
Page 44

Voice Command
Voice recognition allows you to say commands to perform common functions supported by
your phone.
To activate voice recognition:
1. Touch Menu.
2. Touch Tools.
3. Touch Voice Command. (The phone prompts you to say a voice command.)
4. Wait for the beep and then say one of the following commands:
• Call <Name or #> • Go To <Menu>
• Send Text <Name or #> • Check <Item>
• Lookup <Name>
Call <Name or #>
You can dial any valid 7 , 10 or 11 digit North American phone number. You can also dial by
pronouncing a name stored in your Contacts.
Tips for using Call <Name or #>:
• Voice Service works best in quieter environments.
• When saying a number, speak at a normal speed and say each digit clearly. There
is no need to pause between digits.
• The phone recognizes the digits one, two, three, four, five, six, seven, eight, nine,
zero, and oh. The phone does not recognize numbers such as "one eight
hundred" for "1-800." Instead, say "one-eight-zero-zero."
• The phone recognizes only valid 7, 10 or 11 digit North American phone numbers.
• If your phone does not usually recognize you correctly when you are using Voice
Service, try adapting Voice Service to your voice, which can significantly improve
accuracy for some speakers.
To place a call using Call <Name or #>:
1. Touch Menu.
2. Touch Tools.
3. Touch Voice Command.
25 Voice Command
Page 45

4. When the phone says, "Say a command", say “Call” followed by either a
name stored in your Contacts or a valid 7, 10 or 11 digit North American phone
number naturally and clearly.
• If the phone asks you, "Did Y ou Say" followed by the correct number, say
Yes. (You can also select the correct number from those displayed on the
screen by touching the correct number. The phone will then dial the
number.)
• If the phone asks you, "Did You Say" followed by an incorrect number, say
No. (If there are other alternatives, the phone will prompt you with the next
one. You can also press the navigation key up or down to select the
correct number from the Choice List, and then touch the correct number to
dial it.)
5. Alternatively, you can call a person in your Contacts by saying the name of
the person, exactly as it is entered in your Contacts. (The phone plays the
name through the earpiece and displays it on the screen.)
If you said a name listed in your Contacts that has more than one number
associated with it, the phone displays the different locations (Home, Work,
Mobile, Pager, Others) and asks you which one to dial. Say one of the
location names and the phone will dial the number for the location you
specified.
Send Text <Name or #>
To compose a text message using Voice Service:
1. Touch Menu.
2. Touch Tools.
3. Touch Voice Command.
4. When the phone says, "Say a command", say “Send Text” followed by either
a name stored in your Contacts or a valid 7, 10 or 11 digit North American
phone number.
• If the phone asks you, "Did Y ou Say" followed by the correct number, say
Yes. (You can also touch the correct number from those displayed on the
screen.)
• If the phone asks you, "Did You Say" followed by an i ncorrect number, say
No. (If there are other alternatives, the phone will prompt you with the next
one. You can also touch the correct number in the Choice List.)
5. Compose your text message and touch Send to deliver it. For more
information, see "To send a text message:" on page 34.
Voice Command 26
Voice Command
Page 46

Lookup <Name>
You can retrieve contact information for any person in your Contacts by saying the full
name of the person.
To retrieve information using Lookup <Name>:
1. Touch Menu.
2. Touch Tools.
3. Touch Voice Command.
4. When the phone says, “Say a command”, say “Lookup” followed by the
name of the person, exactly as it is entered in your Contacts. (The phone will
play the name it recognized through the speaker, and then open the contact
information for that name.)
If the phone says, “Did You Say” followed by an incorrect name, say “No”.
The phone then prompts you with the next name, if there is one. If there are no
more names, the phone will say "Sorry, No Match Found".
Go To <Menu>
You can open an application or access a menu by saying “Go To” followed immediately by
the “destination”, either an application or menu.
To see a list of possible destinations:
1. Touch Menu.
2. Touch Tools.
3. Touch Voice Command.
4. When the phone says, “Say a command”, say “Go To”. A list of valid
destinations is displayed and the phone prompts you with “Which shortcut”. If
the list is too long to fit on one screen, the screen displays “Next Menu”. You
can say the name of a destination, or say “Next Menu” to view the next
screen.
5. Say the name of the application that you want the phone to activate.
Check <Item>
The voice recognition Status option gives you an update on your phone's service, signal
strength, and battery level.
To retrieve your phone's status information:
1. Touch Menu.
2. Touch Tools.
27 Voice Command
Page 47

3. Touch Voice Command.
4. When the phone says, “Say a command”, say “Check” followed by one of the
following items:
• Status: Plays back and displays ALL status information.
• Time: Plays back and displays current date and time information.
• Signal Strength: Plays back and displays current signal strength.
• Network: Plays back and displays the type of network coverage.
• Battery: Plays back and displays the current level of battery charge.
• My Phone Number: Plays back and displays your phone number.
Customizing Voice Command
Configuring Confirmation
You can configure your phone’s confirmation setting for voice-based commands.
To configure confirmation:
1. Touch Menu.
2. Touch Settings.
3. Touch Speech to Action.
4. Touch Confirmation.
5. Highlight one of the following options: Automatic, Always Confirm, or Never
Confirm.
Configuring Voice Adaptation
You can configure your phone to adapt to your voice when using voice-based commands.
To configure voice adaptation:
1. Touch Menu.
2. Touch Settings.
3. Touch Speech to Action.
4. Touch Adaptation.
5. Touch Adapt Voice.
6. Touch Start.
7. You will be prompted to record a series of commands.
8. When you have finished the session an Adapting message is displayed.
9. Touch OK to save.
Voice Command
Voice Command 28
Page 48

Note: It is recommended that you perform the complete Adapt Voice session at least once
to achieve the maximum benefit of this feature. If a partial adaptation is performed, you
can return later and resume the process from the halfway point.
Tip: To reset the voice, touch Reset Voice in the Adaptation menu.
Changing Audio Guidance Mode
By default, your phone is set to prompt mode and provides audio prompts such as “Please
say a command”.
To change the audio guidance mode:
1. Touch Menu.
2. Touch Settings.
3. Touch Speech to Action.
4. Touch Audio Modes.
5. Touch one of the following:
• Expert Mode: Displays a selectable list of matching entries. If the first entry
is not correct, the phone continues to read each available option until it
detects a confirmation (Yes) or rejection (No).
• Prompt Mode: Displays a selectable list of available dialing options and
only reads out the entry name. You have to touch an option to activate a
command.
29 Voice Command
Page 49

Main Menu
User Interface
Your phone is equipped with the capability to provide mu lti ple user interfaces that can
provide a different look and feel, and be customized to user preference. The availability of
a customized user interface is subject to your service provider.
Below the idle screen, all user interfaces provide a main menu to support the operation
and configuration of the handset's feature. This user guide focuses on describing the
functions and features of the main menu. For other ways of accessing the main menu,
please see the additional printed material that comes with your phone or talk to your
service provider's customer support.
Menu Layout
The main menu consists of the following sub-menus:
• Web: Access the internet to browse pages customized for mobile devices.
Please see "Web" on page 31 for more information.
• Messaging: Stay in touch with others via messaging. Please see "Messaging" on
page 34 for more information.
• Contacts: Manage your phone book. Please see "Contacts" on page 45 for detail
description.
• Tools: Access productivity tools to help manage your daily work. Please see
"Tools" on page 48 for more information.
• Calls: Manage incoming, outgoing, missed, and recent calls. Please see "Calls"
on page 61 for more information.
• Bluetooth: Enable and use Bluetooth. Please see ‘Bluetooth” on page 63 for more
information.
• My Downloads: Download contents like screen savers, ringers, games, and
applications to personalize your phone. Please see "My Downloads" on page 68
for more information.
• Camera: Use the Camera and Camcorder features. Please see "Camera" on page
70 for more information.
• Settings: Configure the phone to your preferences and network environment.
Please see "Settings" on page 75 for more information.
Main Menu
Main Menu 30
Page 50

Web
When you launch the browser, the phone will connect to the Internet and the service
indicator icon will display.
Launching the Web Browser
• Touch Menu and then touch Web.
The first time you use the Web Browser, you will be prompted to go through a setup
process that takes approximately three minutes. If you had a previous web connection, the
last page you visited will be displayed.
Navigating the Web
By default both the Address Bar (top of display screen) and Navigation toolbar (bottom of
display screen) are displayed when the browser is launched. They can be toggled on to
reveal more features and functions.
• Touch FUL L SCR to switch the display from URL Mode to Full Screen mode in
which the Address Bar is hidden.
• Touch MENU to reveal additional Browser menu options.
• Slide your finger up or down the display screen to scroll through the web page.
• Touch and drag in any direction to move around a web page.
• Touch an onscreen item or hyperlink to select it. Links are displayed as underlined
text and allow you to jump to web pages, select special functions, and place
phone calls.
• Touch an onscreen text field or Search field to display the text input screen and
then enter text into the field. See ‘Using the Keyboard” on page 21.
• Press to go back one web page. This button is also used to delete text when
you are entering it into a text field.
• If the items on a page are numbered, you can use the number keys on your
keyboard to select an item.
Tip: The tenth item in a numbered list can be selected by pressing the 0 key on the
keyboard, even though the number 0 doesn’t appear on the screen.
31 Web
Page 51

Creating a Bookmark
Bookmarks allow you to store the addresses of websites so that you can easily access
them again later.
To create a bookmark:
1. Touch Menu.
2. Touch Web.
3. Go to the web page that you want to bookmark.
4. Touch MENU.
5. Touch My Favorites.
6. Touch Add this page to favorites.
7. Touch Add.
8. Touch OK. The new bookmark is added to the top of the list of bookmarks.
Note: Bookmarking a page does not store the page contents, just its address. Some
pages cannot be bookmarked. Whether a web page can be bookmarked or not is
controlled by its creator.
To access a bookmark:
1. Touch Menu.
2. Touch Web.
3. Touch MENU.
4. Touch My Favorites.
5. T ouch an entry in the list to launch the bookmark’s web page.
To delete a bookmark:
1. Touch Menu.
2. Touch Web.
3. Touch MENU.
4. Touch My Favorites.
5. Touch an entry in the list and touch OPTIONS.
6. Touch Delete this Favorite.
7. Touch REMOVE to confirm the deletion.
8. Touch OK.
Web
Web 32
Page 52

Using the Menu to Navigate
Touch MENU to display a list of options for navigating between web pages. The Browser
Menu can be opened when a data session is active and from any web page. It contains
the following options:
• Back: Move back by one web page (if you have not accessed more than one web
page, this option is greyed out).
• Forward: Move forward by one web page (if you have not returned from a
previous web page, this option is greyed out).
• Home: Returns to your service provider’s home page.
• My Favorites: Displays your list of Bookmarks.
• Search: Takes you to a search engine.
• Settings: Displays the following options:
• Font Size: Allows you to use a slider to adjust the current text size
displayed in the browser. Touch Save to save your settings.
• Send this page to...: Copies the current web address and attaches it to an
outgoing text message.
• Clear private data: Allows you to delete the current browsing history,
browser cache, cookies, and stored passwords.
• Advanced: Allows you to access additional Browser Menu options, such
as: Page info, Images on/off, Reset browser, Turn on error logging,
Send referrer, Redirect prompt, Reset browser settings, and About
browser.
33 Web
Page 53

Messaging
You can send and recieve email messages and text messages, and participlate in webbased chat rooms right from your phone. After you access the Messaging menu, you will
see the following options:
• Send Message: Allows you to send text and picture messages.
• Text & Picture Message: All ows you to view text and picture messages that you have
received, sent, and saved.
• IM: Allows you to send instant messages.
• Email: Allows you to send email messages.
• Web Alert: Allows you to receive an alert that a new web message is available.
• Voicemail: Allows you to listen to any voice messages saved on the voice mail
server.
• Settings: Allows you to configure the messaging options.
Text Messaging
To send a text message:
1. Touch Messaging.
2. Touch Send Message.
3. The list of recipients of recently sent messages is displayed. T ouch one of the
names or touch one of the following options:
• Recent List: Select a recipient from a list of recently sent messages.
• Contacts: Select a recipient from your Contacts (the Contacts entry must
contain a wireless phone number or an email address).
• Manual Entry: Use the keyboard to manually enter a recipient by
selecting either:
• Enter phone number: Use the keyboard or onscreen dialpad to enter
a wireless phone number. Touch Done to continue.
• Enter email address: Use the keyboard to enter the recipient’s email
address.
4. Enter your message using the keyboard. If you want to change your text
message options, touch OPTIONS and select one of the following:
• Preview: Displays a preview of the message as it will be displayed on the
recipient’s phone.
• Add Item: Allows you to add a picture or voice memo to the message.
Messaging
Messaging 34
Page 54

• Sending Options: Allows you to set the message priority and callback
number.
• Save as Draft: Stores a copy of the text message in your Drafts folder.
• Save Text: Stores a copy of the text message in the Preset Messages
folder.
• Message Details: Displays the recipient’s number or email address,
message priority, and message size.
• Preset Messages: Allows you to select from a list of preset messages.
5. Touch Send to send the message.
To reply to the text message:
1. While the message is open, touch Reply.
2. Compose your reply or use a pre-composed message.
• To type a message, use your keyboard to enter the text.
• To use pre-written messages, touch OPTIONS and touch Preset
Messages. Touch the preset message to add it to the reply message.
3. Touch Send.
To erase messages:
1. Touch Messaging.
2. Touch Text & Picture Message.
3. Touch Inbox.
4. Touch to open the Delete menu.
5. T ouch the message(s) that you want to delete or touch to select all of the
messages. Selected messages are highlighted in blue.
6. Touch Delete selected to delete the selected messages.
7. Touch Delete to confirm the deletion.
Picture Messages
Your phone lets you take pictures, view them using the phone's display , and instantly send
them to your friends and family.
To send a Picture Message from your Phone
1. Touch Messaging.
2. Touch Send Message.
35 Messaging
Page 55

3. The list of recipients of recently sent messages is displayed. Touch one of the
names or touch one of the following options:
• Recent List: Select a recipient from a list of recently sent messages.
• Contacts: Select a recipient from your Contacts (the Contacts entry must
contain a wireless phone number or an email address).
• Manual Entry: Use the keyboard to manually enter a recipient by selecting
either:
• Enter phone number: Use the keyboard or onscreen dialpad to enter a
wireless phone number. Touch Done to continue.
• Enter email address: Use the keyboard to enter the recipient’s email
address.
4. Scroll up and touch Picture.
5. Touch My Album to select an existing picture, touch one or more thumbnail
images, and touch OK.
• You ca n also to uch Take New Picture to take a new picture and then touch
to attach it to the message.
6. Enter your message using the keyboard. If you want to change your text
message options, touch OPTIONS and touch one of the following options:
• Preview: Displays a preview of the message as it will be displayed on the
recipient’s phone.
• Add Item: Allows you to add a picture or voice memo to the message.
• Erase Item: Allows you to remove a picture or voice memo from the
message.
• Priority: Allows you to set the message priority.
• Save as Draft: Stores a copy of the text message in your Drafts folder.
• Save Text: Stores a copy of the text message in the Preset Messages
folder.
• Message Details: Displays the recipient’s number or email address,
message priority, and message size.
• Preset Messages: Allows you to select from a list of preset messages.
7. Scroll up and use Voice Memo to record and attach a voice memo, if needed.
8. Touch Send to send the message.
Messaging
Messaging 36
Page 56

Note: If you have not registered and configured this feature, you will be prompted to do so.
Follow the instructions on screen, then continue with this procedure.
Instant Messaging
You can use your phone to access popular instant messaging clients and have online
chats.
To access Instant Messaging:
1. Touch Messaging.
2. Touch IM.
3. Select an IM program and follow the on-screen instructions.
Your phone can access online emails using the preloaded Email application.
To access the online e-mail service:
1. Touch Messaging.
2. Touch Email.
3. Follow the on-screen instructions.
Voicemail
All unanswered calls to your phone are automatically transferred to your V oicemail, even if
your phone is in use or turned off. However, you are only notified of new messages when
your phone is turned on and you are in a Service Area.
To set up your Voicemail:
1. Press and hold 1 on your phone’s keyboard. (Your phone will automatically
dial your voicemail box.)
2. Follow the system prompts to create your passcode, record your greeting, and
record your name announcement.
To call your Voicemail:
• Press and hold 1 on your phone’s keyboard. (Your phone will automatically dial
your voicemail box.)
• Touch at the top of the display screen to open an onscreen popup. Touch
New Voicemail.
37 Messaging
Page 57

To display your Missed Calls:
• Touch Menu and then touch Calls. The Recent Calls list is displayed.
• From the While you were out screen, touch a number or Contacts entry in the list.
Important: When you are roaming off the network, you might not receive notification of
new Voicemail messages. It is recommended that you periodically check your Voicemail
by dialing 1 + area code + your Phone Number. When your Voi cemail answers, enter your
passcode. You will be charged roamin g rates when accessing Voicemail while roaming off
the network.
Voicemail Noti fication
Your phone alerts you to new messages in several ways:
• By displaying a message on the display screen.
• By the LED blinking red.
• By sounding the assigned ringer type.
• By displaying at the top of the display screen.
When you have missed a call or recieve a new message (such as a Voicemail or Text),
your phone alerts you and displays a While you were out icon ( ).
Retrieving Your Voicemail Messages
You can review your messages directly from your phone or from any other touch-tone
phone. To dial from your phone, you can either speed dial your Voicemail or use the
menu keys.
To Use One-Touch Message Access
• Press and hold 1 on your phone’s keypad. (Your phone will automatically dial
your voicemail box.) Follow the system prompts.
To Use the Menu Keys on Your Phone to Access Your Messages
1. Touch Messaging.
2. Touch Voicemail.
3. Touch Call Voicemail to call the Voicemail server.
Clearing the Message Icon
Your phone may temporaril y continue to display th e message icon after you have checked
your voicemail, text messages, missed events, email, etc.
To clear the icon from the display screen:
1. T ouch at the top of the display screen.
Messaging 38
Messaging
Page 58

2. Touch a voicemail, text message, or missed call entry. When the messages
have been reviewed, is no longer displayed.
Voicemail #
This menu allows you to change your voice mail number.
To change your voice mail number:
1. Touch Messaging.
2. Touch Voicemail.
3. Touch Voicemail #.
4. Touch Other.
5. Use the keyboard to enter the new voice mail # .
6. Touch Save.
To change your voice mail back to the default voice mail:
1. Touch Messaging.
2. Touch Voicemail.
3. Touch Voicemail #.
4. Touch the default number.
Settings
Several options are associated with voicemail and text messaging. The Settings menu
allows you to customize the options to fit your preferences.
To access the Settings menu:
1. Touch Messaging.
2. Touch Settings.
3. Select General, Text Message, Picture Message, or Alert Setup.
General
General settings affect voicemail and text messages.
• Preset Messages: Allows you add or delete preset messages.
• Message Alert: Allows you to configure the default ringer for messages,
voicemail, and reminder alerts.
• Auto-Erase: Sets the phone to automatically delete old messages from the mail
boxes when they become full. This allows new messages to be added to a full mail
box without having to manually delete old messages to free up space first.
39 Messaging
Page 59

• Save in Outbox: Sets the phone to automatically save the message in the Outbox
folder, to prompt you before saving the message, or to not save the message.
• Draft Alert: Sets the phone to automatically display an alert when the message is
saved to the Draft folder. You can also turn the alert off.
Preset Messages
A preset message can be selected and automatically entered into the current message.
To add a preset message:
1. Touch Messaging.
2. Touch Settings.
3. Touch General.
4. Touch Preset Messages.
5. Touch .
6. Touch Add New.
7. Enter your message using the keyboard.
8. Touch Save when finished to add your message to the list.
To edit a quick message:
1. Touch Messaging.
2. Touch Settings.
3. Touch General.
4. Touch Preset Messages.
5. Scroll up or down and touch the message that you want to edit.
6. Edit the message using the keyboard. Press and hold to erase the
message. Enter your new message or edit the existing one and touch Save.
To delete a preset message:
1. Touch Messaging.
2. Touch Settings.
3. Touch General.
4. Touch Preset Messages.
5. Touch .
6. Touch Delete.
7. Scroll up or down and touch the message that you want to delete.
Messaging
Messaging 40
Page 60

8. Touch Delete Selected.
9. Touch Yes to confirm the deletion.
Note: When you send a message using Preset Messages, the last message selected
automatically displays as the first choice when sending a new message.
Message Alert
The Message Alert menu allows you to configure the default Message Ringer, Voicemail
Ringer, and Reminder settings for your messages.
To set the Message Ringer:
1. Touch Messaging.
2. Touch Settings.
3. Touch General.
4. Touch Message Alert.
5. Touch Message Ringer.
6. Select a ringer from the list.
To set the Volume Ringer:
1. Touch Messaging.
2. Touch Settings.
3. Touch General.
4. Touch Message Alert.
5. Touch Voicemail Ringer.
6. Select a ringer from the list.
To set the Reminder:
1. Touch Messaging.
2. Touch Settings.
3. Touch General.
4. Touch Message Alert.
5. Touch Reminder.
6. Set the required duration to Off, Once, or Every 2 min.
41 Messaging
Page 61

Auto-Erase
This option allows you to automatically delete old messages when the memory becomes
full. This prevents new messages from being rejected due to the Inbox being full.
To turn this option On or Off:
1. Touch Messaging.
2. Touch Settings.
3. Touch General.
4. Select Auto-Erase.
5. Touch Yes or No.
Save in Outbox
Save In Outbox allows you to save a copy of the outgoing text message in the outbox.
To turn the Save in Outbox option On or Off:
1. Touch Messaging.
2. Touch Settings.
3. Touch General.
4. Touch Save in Outbox.
5. Touch Auto Save, Prompt, or Do not Save.
Draft Alert
Allows you set your phone to display a prompt to save a text message in the Draft folder.
To turn the Draft Alert option On or Off:
1. Touch Messaging.
2. Touch Settings.
3. Touch General.
4. Touch Draft Alert.
5. Touch On, or Off.
Text Message Settings
Text Message settings only affect text messages.
• Priority: Allows you to configure the default priority level for your text message.
• Callback #: Allows you to change the default callback number for text messages.
To set the Priority level:
1. Touch Messaging.
Messaging
Messaging 42
Page 62

2. Touch Settings.
3. Touch Text Message.
4. Touch Priority.
5. Touch Normal or Urgent.
To change the Callback #:
1. Touch Messaging.
2. Touch Settings.
3. Touch Text Message.
4. Touch Callback #.
5. Touch None, your mobile directory number, or Other for a different phone
number.
6. For Other, enter the number using the keyboard and touch Save.
Picture Message Settings
Picture Message settings only affect text messages.
• Priority: Allows you to configure the default priority level for your picture message.
• Auto Download: Allows you to toggle the Auto Download option on or off .
To set the Priority level:
1. Touch Messaging.
2. Touch Settings.
3. Touch Picture Message.
4. Touch Priority.
5. Touch High, Normal, or Low.
To change the Auto Download setting:
1. Touch Messaging.
2. Touch Settings.
3. Touch Picture Message.
4. Toggle Auto Download to be On or Off.
43 Messaging
Page 63

Alert Setup
This menu allows you to set your phone to automatically connect to the Internet to receive
Web Alerts.
1. Touch Messaging.
2. Touch Settings.
3. Touch Alert Setup.
4. Touch On or Off.
Messaging
Messaging 44
Page 64

Contacts
Adding a New Contact
Your phone can store up to 600 phone numbers. Each contact entry can store up to a total
of seven phone numbers, three email addresses, one URL, one memo, and each entry’s
name can contain up to 64 characters.
To add a new contact:
1. Touch Contacts.
2. Touch Contacts again.
3. In the upper left corner of the display screen, touch to create a new
Contacts entry. The screen is re-oriented to display in Landscape mode.
4. Touch the Enter Name field and enter a name using the keyboard.
5. Touch the Add Number field and enter a number using the keyboard.
6. Use the navigation keys or touch an empty white area to the left of the newly
entered number. The Select Number Type menu opens. Scroll up or down and
touch Mobile, Home, Work, Pager, or Others.
7. Enter information into any of the other fields using the keyboard.
8. Touch Done to save the Contacts entry. Once saved, the new Contacts entry
is displayed within the Contacts page.
Tip: ICE - In Case Of Emergency. To make it easier for emergency personnel to identify
important contacts, you can list your local emergency contacts under “ICE” in your phone’s
contact list.
Saving a Phone Number
You can save the phone number from your call history.
To save a phone number from your call history:
1. Touch Menu.
2. Touch Calls.
3. T ouch the arrow to the right of the number that you want to save.
4. Touch Save.
5. Touch New Contact or Existing Contact.
45 Contacts
Page 65

6. T ouch an option for the number type: Mobile, Home, Work, Pager, or Others.
The screen changes to the Landscape orientation.
7. Touch the Enter Name field and enter a name for the Contact.
8. Enter information into any of the other fields using the keyboard.
9. Touch Done to store the name and save the new entry.
Finding Contacts
1. Touch Contacts.
2. Touch Contacts again.
3. Touch the Search field and use the keyboard to type the letters of the
Contact’s name. The display changes to display all names starting with those
letters. Touch the required name to make the call.
4. You can also scroll down through your list of contacts and touch the name to
make the call.
Editing an Existing Contact
To add a number to an existing entry:
1. Touch Contacts.
2. Touch Contacts again.
3. Touch the entry that you want to edit and touch .
4. Scroll up to the Add Number box. Enter the phone number using the
keyboard and use the navigation keys or touch an empty white area to the left
of the newly entered number.
5. The Select Number Type menu opens. Scroll up or down and touch Mobile,
Home, Work, Pager, or Others.
6. When you are finished, touch Done.
To edit an entry’s phone number:
1. Touch Contacts.
2. Touch Contacts again.
3. Touch the entry that you want to edit and touch .
4. Select the phone number to be edited.
5. Press and hold to erase the entire number or press once to erase the last
digit.
Contacts
Contacts 46
Page 66

6. Enter the phone number using the keyboard and then use the navigation keys
or touch an empty white area to the left of the newly entered number.
7. Select the number type (Mobile, Home, Work, Pager, Fax, or Others).
8. Touch Done.
To select a ringer type for an entry:
1. Touch Contacts.
2. Touch Contacts again.
3. Touch the entry that you want to edit and touch .
4. Touch the Set Ringer field.
5. Scroll up or down and touch the required Ringer.
6. Touch Done.
47 Contacts
Page 67

Tools
After you access Tools menu, you will see the following options:
• Self Serve: Allows you to access your service provider’s customer service area
where you can check your account balance, service plan details, etc.
• Voice Command: Allows you to use voice recognition to perform common
functions that are supported by your phone.
• Calculator: Allows you to use your phone’s built-in calculator.
• Notes: Allows you to compose and store reminders and notes to help keep you
organized.
• Calendar: Helps you to organize your time and reminds you of important events.
• Clock: Displays the time in different time zones around the world together with
one or more major cities, states, regions, or countries in a time zone.
• Music: Allows you to download and store music on a memory card in your phone.
• Update Phone: Allows you to automatically download and update the software in
your phone. Only the internal software is updated. No contact entries or other
information saved to your phone will be deleted.
• V oice Memo: Allows you to record brief memos to remi nd you of important events,
phone numbers, or other items.
Self Serve
Launches the web browser and opens your service provider’s self service page in which
you can access your account balance, etc.
To use self serve:
1. Touch Menu.
2. Touch Tools.
3. Touch Self Serve.
4. The web browser launches and your service provider’s self serve page
opens. Follow the onscreen instructions.
Voice Command
For information on Voice Command, see "Voice Command" on page 25.
Calculator
Your phone comes with three built-in calculators.
• Calculator: Your phone comes with a built-in calculator. This application becomes
the default until another calculator option is selected.
Tools
Tools 48
Page 68

• Tip Calculator: The tip calculator calculates the tip on a meal or service and splits
the bill between the number of people paying.
• Unit Convertor: Your phone comes with a built-in conversion application.
To use the calculator:
1. Touch Menu.
2. Touch Tools.
3. Touch Calculator.
4. Touch Calculator again.
5. Enter a number with onscreen keypad.
6. Touch the appropriate icons to select add, subtract, multiply, and divide.
7. Enter the next number using the onscreen keypad. Repeat steps 5 and 6 as
needed.
8. Touch the Equals (=) icon to view the results.
To use the tip calculator:
1. Touch Menu.
2. Touch Tools.
3. Touch Calculator.
4. Touch Tip Calculator.
5. Use the onscreen keypad to enter the total bill amount and touch Done. The
tip amount is then displayed at the default percentage (default is 15%).
6. T ouch the Tip Rate field and use the onscreen keypad to enter a new tip
percentage value. Touch Done. The correct tip will be calcualted instantly.
7. If you’re splitting the check, touch the Split field and enter the number of
people in your party. Touch Done.
8. Touch Reset to delete all values.
To use the unit convertor:
1. Touch Menu.
2. Touch Tools.
3. Touch Calculator.
4. Touch Unit Convertor.
49 Tools
Page 69

5. Select a type of unit to convert from: Distance, Temperature, Speed,
Volume, Weight, and Area.
6. T ouch the unit fields to select the initial and target units.
7. Use the onscreen keypad to enter a value for the initial unit. (The converted
value is instantly calculated.)
8. Touch Reset to delete all of the numbers.
Notes
Your phone comes with a notepad that you can use to compose and store reminders and
notes to help keep you organized.
To compose a note:
1. Touch Menu.
2. Touch Tools.
3. Touch Notes.
4. In the upper left corner of the display screen, touch to add a new note.
5. Use the keyboard to type your note.
6. Touch Save.
To read a saved note:
1. Touch Menu.
2. Touch Tools.
3. Touch Notes.
4. Touch a note in the list.
To delete saved notes:
1. Touch Menu.
2. Touch Tools.
3. Touch Notes.
4. Touch an hold a note in the list until it detaches from the page, drag the
selected note to and release it by lifting your finger off the display
screen.
5. You can also touch , touch the note you want to delete, touch Delete
Selected and touch Delete.
Tools
Tools 50
Page 70

To send a saved note:
1. Touch Menu.
2. Touch Tools.
3. Touch Notes.
4. T ouch the note that you want to send.
5. Edit the note if needed.
6. Touch Send. For more information on sending messages, see ‘Messaging” on
page 34.
Calendar
Your Calendar helps you organize your time and reminds you of important events.
Event Alert Menu
When your phone is turned on and you have an event alarm scheduled, your phone alerts
you and displays the event summary. By default, the alarm will sound 10 minutes before
the event, and then again on the event. Your phone alerts you to scheduled events by
playing the assigned ringer type or illuminating the backlight.
To silence the alarm and reset the schedule, touch and drag the Dismiss button. You can
also silence the alaem by pressing the side volume button.
To view additional options, use the appropriate onscreen slider:
• View: Silences the alarm and displays the details of the current event.
• Dismiss: Silences the alarm and replays it again at the time of the event.
• Snooze: Silences the alarm and schedules it to replay again later.
To add an event to the calendar:
1. Touch Menu.
2. Touch Tools.
3. Touch Calendar.
4. T ouch the day to which you want to add an event by either:
• Touching a day on the calendar.
• Use the and navigation arrows to view a different month and
then touch the required day.
5. Touch to open the New Event window.
6. Switch to Landscape mode and use the keyboard to enter the event
description. See ‘Using the Keyboard” on page 21.
51 Tools
Page 71

7. Select a start and end time for the event by touching the corresponding Start
and End fields.
8. Assign an hour and minute by either:
• Scrolling through both reels (Hours and Minutes) by sliding your finger up
and down on the display screen.
• Touching the arrows above/below each field.
Tip: Touching and holding down the arrows (up or down) increases the speed at which the
numbers scroll through each reel.
• Touch either am or pm.
• When you have finished setting the times, touch Done.
Note: If you need to adjust the end date for an event, touch the Date field and select a new
end date by touching a day in the onscreen calendar.
9. Select an alert time for the event by touching the Alert field and touching one
of the following options: On Time, 5 minutes before, 10 minutes before, 15
minutes before, 30 minutes before, 1 hour before, 3 hours before, 5
hours before, 1 day before.
10. Select a ringer type for the alarm by touching Set Ringer and then selecting
a ringer.
• Touch to play a sound sample for a selected ringer.
• If a ringer has been previously selected, scroll through the list of available
ringers and touch a ringer name to assign it.
11. Select a reminder status for the event by touching the Reminder field and
then touching one of the following options: Off, Every 2 minutes, and Every
15 minutes.
12. Touch Save to save the new event.
Tools
Note: If the end time and date fall before the start time and date, an onscreen warning
message is displayed and you can edit the values onscreen.
Tools 52
Page 72

To view an event in the calendar:
1. Touch Menu.
2. Touch Tools.
3. Touch Calendar.
4. Touch the day for which you want to view events by touching it. (If you have
events scheduled for the selected day, they will be listed in chronological
order.)
Tip: In the calendar view, days with events scheduled are underlined in blue.
5. To display an event’s details, touch the event entry from the selected day’s
listing.
To delete an event from the calendar:
1. Touch Menu.
2. Touch Tools.
3. Touch Calendar.
4. T ouch the day from which you want to erase the event.
5. Touch an event to display its details page.
6. Touch and touch Delete to erase the event.
To delete all or multiple scheduled events:
1. Touch Menu.
2. Touch Tools.
3. Touch Calendar.
4. T ouch the day from which you want to erase the event.
5. Touch .
6. Touch the events that you want to delete to select them.
• You can also touch to select all events in the list.
7. Touch Delete selected and then touch Delete to erase the selected events.
53 Tools
Page 73

Clock
Your phone comes with a clock that allows you use it as an alarm clock, timer, and
stopwatch, and to display the time in different world locations.
Alarm Clock
Your phone comes with a built-in alarm clock that has multiple alarm capabilities.
To use the alarm clock:
1. Touch Menu.
2. Touch Tools.
3. Touch Clock.
4. Touch Alarm.
5. Touch to create a new alarm.
6. Touch the alarm activation button to turn the alarm On or Off.
7. Select a time for the alarm by touching the time field.
• Assign an hour and minute by either scrolling through both reels (Hours
and Minutes) or by touching the up and down arrows above/below each
field.
Tip: Touching and holding down the arrows (up or down) increases the speed at which the
numbers scroll through each reel.
• Touch either am or pm.
• When you have finished setting the times, touch Done.
8. Select a reminder status for the event by touching Repeat and selecting an
option: Once, Mon to Fri, Sat & Sun, Daily, or Set days.
9. Select a ringer type for the alarm by touching the RInger field and selecting a
ringer type.
• Touch to play a sound sample for a selected ringer.
• If a ringer has been previously selected, scroll through a list of available
ringer sounds and touch a ringer name to assign it.
10. Select a snooze status for the alarm by touching the Snooze field and
selecting an option: 5 minutes, 10 minutes, 15 minutes, or 20 minutes.
11. T ouch Save to save the new alar,
Tools 54
Tools
Page 74

Note: Any stored alarms will appear on the Alarm page in the order in which they were
created.
To turn off an alarm (when sounding ):
1. With the alarm sounding an alert, touch either:
• Stop Alarm: Permanently deactivates the alarm notification.
• Snooze: Temporarily deactivates the alarm for a few minutes until the new
notification.
To delete alarm events:
1. Touch Menu.
2. Touch Tools.
3. Touch Clock.
4. Touch Alarm.
5. Touch to open the Delete menu.
6. Touch to select all alarms in the list. Selected events are highlighted in
blue.
7. Touch Delete Selected.
8. Touch Delete to delete the selected alarms.
Timer
Use the timer to count down to an event based on a preset time length (hours, minutes,
and seconds).
To use the timer:
1. Touch Menu.
2. Touch Tools.
3. Touch Clock.
4. Touch Timer.
5. Select the countdown time length for the alert by setting the Hours, Minutes,
and Seconds values.
• Assign the time by scrolling through the reesl or touching the up or down
arrows above/below each field.
55 Tools
Page 75

Tip: Touching and holding down the arrows (up or down) increases the speed at which the
numbers scroll through each reel.
6. Touch Start to start the countdown.
7. Touch Stop to stop the countdown and touch Restart to start it again.
8. Touch Reset to set the timer back to 00.
9. Press to return to the previous screen.
Stopwatch
To use the stopwatch:
1. Touch Menu.
2. Touch Tools.
3. Touch Clock.
4. Touch Stopwatch.
5. Touch Start to turn on the timer.
6. Touch Lap to place a marker in the list. This helps you to keep track of specific
time segments.
7. Touch Stop to stop the stopwatch.
8. Touch Restart to continue the stopwatch from its last paused time marker or
touch Reset to stop the process and set the counter back to zero.
9. Press to return to the previous screen.
World Clock
To add a world clock entry:
1. Touch Menu.
2. Touch Tools.
3. Touch Clock.
4. Touch World Clock.
5. Touch to begin using the world map.
6. Touch Canada or Other Countries. An alphabetical list of the available cities
available in that category is displayed.
• Touch Canada to display all available major cities within Canada.
Tools
Tools 56
Page 76

• Touch Other Countries to display countries and in some cases, cities and
their corresponding countries.
Note: Dark clocks indicate that the selected time zone is currently in its evening (nightime)
hour.
7. Touch a city in the list.
8. Repeat the process to add other cities.
To delete a world clock entry:
1. Touch Menu.
2. Touch Tools.
3. Touch Clock.
4. Touch World Clock.
5. Touch to open the Delete menu.
6. Touch the location(s) you want to delete. Selected entries are highlighted in
blue.
7. Touch Delete Selected.
8. Touch Delete to delete the selected entries.
To assign daylight saving time:
1. Touch Menu.
2. Touch Tools.
3. Touch Clock.
4. Touch World Clock. Stored locations indicate the Daylight Saving Time icon
at the bottom-right of each onscreen clock.
• indicates that Daylight Saving Time is on.
• indicates the Daylight Saving Time is off.
5. Touch a location containing to turn Daylight Saving Time off or touch a
location containing to turn Daylight Saving Time on.
57 Tools
Page 77

Music
You can download and store music to your phone. Music requires that a microSD™ card
be installed in the phone.
To access the music player:
1. Touch Menu.
2. Touch Tools.
3. Touch Music.
4. Navigate through the library option and select a song to launch the music
player.
5. Use the onscreen control buttons to play, pause, forward to the next song in
your playlist or return to the previous song.
Update Phone
Update Phone allows you to automatically download and update the software on your
phone. Only the internal software is updated. No Contacts entries or other information
saved on your phone will be deleted.
To access the Update Phone setting:
1. Touch Menu.
2. Touch Tools.
3. Touch Update Phone.
4. Touch Update Firmware.
5. Follow the on-screen instructions to update your phone.
Voice Memo
A total of 10 minutes in 10 separate memos can be recorded and saved. Individual
memos can record up to 60 seconds of audio.
To record a voice memo:
1. Touch Menu.
2. Touch Tools.
3. Touch Voice Memo.
4. Touch Record. (The phone prompts you to start recording after the beep.)
5. Wait for the beep and then start speaking.
Tools
Tools 58
Page 78

• Touch Pause to pause the recording of the memo. (When a memo is
paused, touch Resume to start recording again.)
6. Touch Finish to stop the recording and save it to the phone.
To play a voice memo:
1. Touch Menu.
2. Touch Tools.
3. Touch Voice Memo.
4. Touch Review. (The phone displays a list of saved voice memos.)
5. Touch a memo to play it.
• Touch Pause to pause the recording of the memo. (When a memo is
paused, touch Resume to start recording again.)
To erase a voice memo:
1. Touch Menu.
2. Touch Tools.
3. Touch Voice Memo.
4. Touch Review. (The phone displays a list of saved voice memos.)
5. Touch to open the Delete menu.
6. T ouch the voice memo(s) that you want to delete. Selected entries are
highlighted in blue.
7. Touch Delete Selected.
8. Touch Delete to delete the selected voice memos.
To erase all voice memos:
1. Touch Menu.
2. Touch Tools.
3. Touch Voice Memo.
4. Touch Erase All.
5. Touch Delete to delete all of the voice memos in the list.
To edit a voice memo caption:
1. Touch Menu.
2. Touch Tools.
59 Tools
Page 79

3. Touch Voice Memo.
4. Touch Review. (The phone displays a list of saved voicememos.)
5. Touch beside the voice memo you want to edit.
6. Touch Edit Caption.
7. The phone switches to Landscape mode. Use the keyboard to edit the
caption.
8. Touch Save to save the caption.
To view voice memo information:
1. Touch Menu.
2. Touch Tools.
3. Touch Voice Memo.
4. Touch Review. (The phone displays a list of saved voicememos.)
5. Touch beside the voice memo you want to edit.
6. Touch Info.
7. View the voice memo’s information (Title, Recorded Date, and Length).
8. Press to return to the previous screen.
Tools
Tools 60
Page 80

Calls
Your phone displays your call history, which includes incoming, outgoing, and missed
calls. Recent Calls makes redialing a number fast and easy. The list of your call history is
continually updated as new numbers are added to the beginning of the list and the oldest
entries are removed from the bottom of the list.
When you place, accept, or miss a call, a record of the call is saved in the Recent Calls
list. When you view the numbers in this list, the phone icon to the left of the number
indicates the call type:
• Received: Indicates any received calls that were answered.
• Missed: Indicates any missed calls.
• Dialed: Indicates all outgoing calls made from your phone.
Each entry contains a phone number (if available) and Contacts entry name (if the phone
number is in your Contacts). Duplicate calls (same number and type of call) might only
appear once in the list.
To call an entry in the Recent Calls list:
1. Touch Menu.
2. Touch Calls.
3. Touch an entry’s phone number to dial it.
Tip: You can also access your list of recent calls by pressing .
Note: You cannot make calls from within the Recent Calls list that are identified as No
Caller ID or Restricted.
Note: Recent Calls only records calls that occur while the phone is turned on. If a call is
received while your phone is turned off, it will not be included in the phone’s call history.
SMS conversation histories are also saved. If you return a call from the voicemail menu, it
will not be included in your phone’s history.
61 Calls
Page 81

Recent Calls Options
To display the Recent Calls options:
1. Touch Menu.
2. Touch Calls.
3. Touch to display the entry’s options.
Tip: An unknown entry only displays a contact number. A known entry (found in the
Contacts list) displays the entry’s name and contact number.
4. If the entry is not currently part of your Contacts list, touching displays
the following options:
• Save: To store the entry in your Contacts list.
• Call: To dial the phone number for the currently selected entry.
• Message: To send the current history entry a new text message.
5. If the entry has previously been entered into your Contacts list, touching
displays the Contacts entry page and the following options:
• Caller’s name: Displays if the number is already in your Contacts.
• Edit Entry ( ): To either edit the existing number (if already in your
Contacts list) or create a new entry.
• Send New Text Message ( ): To send a text message to the current
recent call entry.
• Send Contact: Delivers the current recent call entry information to an
available user via a wireless connection. See ‘Bluetooth” on page 63.
Calls
Calls 62
Page 82

Bluetooth
Bluetooth is a short-range communications technology that allows you to connect
wirelessly to a number of Bluetooth devices, such as headsets, hands-free car kits, and
Bluetooth-enabled handhelds, computers, printers, and wireless phones. The Bluetooth
communication range is usually up to approximately 10 meters (30 feet).
Note: There are many Bluetooth devices in the market whose compatibility with the SPHm350 cannot be guaranteed.
Enabling Bluetooth
By default, your device’s Bluetooth functionality is turned off. Turning Bluetooth on makes
your phone “discoverable” to other in-range Bluetooth devices.
To turn Bluetooth on or off:
1. Touch Menu.
2. Touch Bluetooth.
3. Touch the Bluetooth button to toggle it On or Off. (The page refreshes to
display new functionality and options.)
Bluetooth Status Indicators
The following icons show your Bluetooth connection status at a glance:
• Bluetooth is active and visible.
• Bluetooth is paired and connected to a device.
• Bluetooth is active, visible and searching for a compatible device.
Visibility
The Visibility setting allows you to manage your availability to other Bluetooth devices.
To configure your phone’s visibility (discoverability):
1. Touch Menu.
2. Touch Bluetooth.
3. Touch Visibility.
4. Select a Visibility setting:
• Always visible: Allows other Bluetooth devices to detect and identify your
phone.
63 Bluetooth
Page 83

• Visible for 3min: Allows other devices to detect and identify your phone for
three minutes before changing your status to hidden.
• Hidden: Prevents other Bluetooth devices from detecting and identifying
your phone.
Trusted Devices
Displays a list of trusted connections between your phone and other Bluetooth devices.
To display the list of trusted devices:
1. Touch Menu.
2. Touch Bluetooth.
3. Touch Trusted devices.
4. The phone searches for the other devices with which it has a trusted
connection and displays them in a list.
Device Info
Displays your phone’s Bluetooth profiles and address.
To view the device information for your phone:
1. Touch Menu.
2. Touch Bluetooth.
3. Touch Device Info.
Device Name
Your phone’ s Bluetooth name will appear to other in-range Bluetooth devices, depending
on your Visibility settings.
To change your Bluetooth name for your phone:
1. Touch Menu.
2. Touch Bluetooth.
3. Touch Device name.
4. The phone switches to Landscape mode. Use the keyboard to edit the current
name. See "Using the Keyboard" on page 21.
Bluetooth
Tip: Give your handset an easily recognized name so other people can select your
handset quickly in environments in which multiple Bluetooth devices are visible.
Bluetooth 64
Page 84

Pairing Bluetooth Devices
Paired Devices
The Bluetooth pairing process allows you to establish trusted connections between your
phone and another Bluetooth device. When devices are paired, a passkey is shared
between devices, allowing for fast, secure connections while bypassing the discovery and
authentication process.
Note: To pair Bluetooth devices with your phone it must be visible to other devices. See
"Visibility" on page 63.
To pair your phone with another Bluetooth device:
1. Touch Menu.
2. Touch Bluetooth.
3. Touch Trusted devices. Your phone searches for and then displays a list of
discovered, in-range Bluetooth devices.
4. Scroll down the list and touch a device name to begin the pairing process.
5. If necessary, enter the passkey (PIN) for the external device and touch Pair.
6. Once the recipient enters the passkey the pairing will be complete.
Note: Due to different specifications and features of other Bluetooth-compatible devices,
display and operations may be different, and functions such as transfer or exchange may
not be possible with all Bluetooth-compatible devices.
To disconnect your paired device:
1. Touch Menu.
2. Touch Bluetooth.
3. Touch Trusted devices. Your phone searches for and then displays a list of
discovered, in-range Bluetooth devices.
4. Touch an entry’s name in the Trusted Devices list to begin the disconnection
process.
65 Bluetooth
Page 85

Sending Items Via Bluetooth
You can send data saved on your phone to another bluetooth device.
To send contact information via Bluetooth
1. Touch Menu.
2. Touch Bluetooth.
3. Touch Trusted devices.
4. Touch the target Bluetooth device in the list.
5. Touch Contacts to begin searching in your available Contacts (Transfer
Contacts list).
6. Select a Contacts entry from the Transfer contacts page. Selected Contacts
are highlighted in blue.
7. Touch Send.
8. Touch Send again to confirm the transfer.
9. The recipient must accept the incoming Contact card. Accepting places a
copy of the incoming entry into the recipient’s Contacts list.
To send My Info via Bluetooth
1. Touch Menu.
2. Touch Bluetooth.
3. Touch Trusted devices.
4. Touch the target Bluetooth device in the list.
5. Touch My Info to send your contact information to the recipient.
• If you have not created a My Info card, use the keypad to enter your
personal information in the required fields, such as your name, phone
numbers, email addresses, url, etc. T ouch Done, touch the target Bluetooth
device in the list, and touch My Info.
6. The recipient must accept the incoming My Info data. Accepting places a copy
of the information on the recipient’s phone.
To send pictures via Bluetooth
1. Touch Menu.
2. Touch Bluetooth.
3. Touch Trusted devices.
Bluetooth
Bluetooth 66
Page 86

4. Touch the target Bluetooth device in the list.
5. Touch My Album to begin searching for an available image.
6. Touch a folder and touch a picture to send. You can select multiple pictures,
which are then highlighted in blue.
• To deselect a picture, touch it again so that it is no longer highlighted.
7. Touch OK to accept the image selection and begin transferring the image(s).
8. The recipient must either accept or decline the incoming image file.
67 Bluetooth
Page 87

My Downloads
You can download the following types of items to your phone:
• Ringers: Allows you to download and assign ringer types to voice calls.
• Wallpaper: Allows you to download and assign wallpaper to your phone.
• Games: Allows you to download and play games. You can also play pre-installed
demo games.
• Applications: Allows you to download and run applications on your phone.
Downloading
To download items to your phone:
1. Touch Menu.
2. Touch My Downloads.
3. Touch Ringers, Wallpaper, Games, or Applications.
4. Touch Get New... The browser will launch and take you to the specified
download menu.
5. Highlight and select the item that you want to download. (For more information
on navigating the Web, see "Navigating the Web" on page 31.)
6. Follow the web page instructions to complete your purchase.
Note: You can store a limited number of downloaded applications, ringers, wallpapers,
games, and themes on your phone, depending on the file sizes. To check the Memory
Status, touch Menu, touch Settings, touch General, and then touch Memory status.
Assigning Ringers and Wallpaper
Assigning Downloaded Ringers
You may assign a ringer to more than one type of call.
1. Touch Menu.
2. Touch My Downloads.
3. Touch Ringers.
4. Touch a ringer to select it.
5. Touch Play.
6. Touch Assign To to assign the ringer to a phone function.
7. Touch Voice Call, Contact ID, Voicemail, Message, Alarm/Timer/Calendar.
My Downloads 68
My Downloads
Page 88

Assigning Downloaded Wallpaper
You can assign a Wallpaper to more than one task.
1. Touch Menu.
2. Touch My Downloads.
3. Touch Wallpaper.
4. T ouch an image from the list.
5. Touch Assign.
6. Touch Background.
Note: Wallpaper for Contacts and Incoming/Outgoing Calls can also be set.
Playing Games
1. Touch Menu.
2. Touch My Downloads.
3. Touch Games.
4. Touch the game you want to play.
5. Follow the on-screen instructions to play the game. When you are finished,
touch Exit (or Quit).
Launching Applications
1. Touch Menu.
2. Touch My Downloads.
3. Touch Applications.
4. T ouch the application you want to launch.
5. Follow the on-screen instructions to launch the application. When you are
finished, select Exit (or Quit).
Note: Your phone comes equipped with preloaded tools such as Backup Manager. To
activate these services, please contact your service provider.
69 My Downloads
Page 89

Camera
Resolution White Balance Battery Charge
Settings
Display
Image
Saved Location
View My
Photos Folder
You can take pictures with your phone’s built-in camera.
Taking Pictures
To take a picture:
1. Touch Menu.
2. Touch Camera.
3. Touch Camera again.
Tip: To activate Camera mode, you can also press and hold the side camera button (see
"Portrait Mode Phone Features” on page 1).
4. Using the phone’s display screen as a viewfinder, aim the camera lens at your
subject.
5. Press until the shutter sounds. (Make sure the camera is steady.) The
picture is automatically saved in the current default storage location (by
default, this is In phone).
Note: Pictures can be stored in either the phone’s internal memory or on a microSD™
card (sold separately). Your phone’s internal memory contains 100 MB of storage capacity
and the phone can support microSD™ cards of up to 32 GB.
6. Take a few minutes to get familiarized with the layout of the Camera screen.
Camera
Camera 70
Page 90

My Album
Picture
Launch
Slideshow
Send
Delete
Grid View
Pictures are stored on the phone and accessed through My Album.
Using My Album
To use My Album:
1. When the picture has been taken, touch to open the display screen,
displaying the current picture.
• You can also touch Menu, touch Camera, and touch My Album.
2. Touch a CAMERA folder on either the phone or microSD™ card.
3. Select a picture file.
To use the My Album options:
1. Touch Menu.
2. Touch Camera.
3. Touch My Album.
4. Touch a CAMERA location (phone or microSD™ card).
5. Touch one of the options:
• Slideshow ( ): Display a slideshow sequence of the pictures in the
current folder.
• Send ( ): Send the picture via Messaging or Bluetooth.
• Delete ( ): Delete the active file.
To use the Picture options:
1. Touch Menu.
71 Camera
Page 91

2. Touch Camera.
3. Touch My Album.
4. Touch a CAMERA location (phone or microSD™ card).
5. Touch an picture and select one of the following options:
• Delete ( ): Delete the active file.
• Bluetooth ( ): Send the picture via Bluetooth.
• Slideshow ( ): Display a slideshow sequence of the pictures in the
current folder.
• Zoom ( ): Increase/decrease the magnification of the currently active
file.
• Send ( ): Send the picture via Messaging or Bluetooth.
• Information ( ): Display information about the current picture, such as
File Name, Date, File Size, and Resolution.
• Assign ( ): Assign the active picture to either a Picture ID picture or as
a Background.
Assigning Pictures
To assign a picture to a Contacts entry:
1. Touch Menu.
2. Touch Camera.
3. Touch My Album.
4. Touch a CAMERA location (phone or microSD™ card).
5. Touch the picture that you want to use with the Contacts entry.
6. Touch and touch Picture ID.
• This option allows the selected picture to be displayed when an incoming
call is from the selected Contacts entry.
7. Prepare the selected image for use (by adjusting, cropping, and zooming),
and then touch OK.
8. Touch an entry in the Contacts page to complete the picture assignment.
To assign a picture to the background display:
1. Touch Menu.
2. Touch Camera.
3. Touch My Album.
Camera
Camera 72
Page 92

4. Touch a CAMERA location (phone or microSD™ card).
5. T ouch the picture that you want to use as the background.
6. Touch and touch Background.
• This option allows the selected picture to be displayed as the background
image.
7. Prepare the selected image for use (only resize and rotate are available), and
then touch OK.
Storing Pictures
Even if a microSD™ card is detected, all pictures are automatically stored in the phone’s
CAMERA folder. To use the larger storage capacity of an internal microSD™ card, the
storage destination must be set differently.
To set the storage options:
1. Touch Menu.
2. Touch Camera.
3. Touch Camera again.
4. Touch and touch Storage.
5. Touch Phone or Memory Card.
Camera Settings
The settings associated with the full-color digital camera allow you to customize how the
camera operates when taking pictures.
To set a camera option:
1. Touch Menu.
2. Touch Camera.
3. Touch Camera again.
4. Touch and touch one of the following options:
• Self-Timer: Allows you to configure a timer to be Off, 5 sec or 10 sec.
• Resolution: Allows you to change the resolution of pictures. Pictures taken
at a higher resolution require more memory to save. The available sizes are
1.3M, 0.5M, 0.3M, or 0.1M.
• Color Tone: Allows you to set the primary color tone of the picture to None,
Mono, Negative, Sepia, Green, or Aqua.
• Metering: Allows you to set the metering to be Center or Spot.
73 Camera
Page 93

• Night Mode: Allows you to set the camera to take pictures in low light
situations. You can set the option to be On or Off.
• Image Quality: Allows you to select between High, Normal, and
Economy. These settings reflect the picture quality settings for the pictures.
• White Balance: Allows you to set the white balance to Auto, Sunny,
Cloudy, Tungsten, Flourescent, or Manual.
• Show Grid: Allows you to set the pictures to be displayed in a grid . You can
set the option to be On or Off.
• Shutter Sound: Allows you to select between different shutter sounds. The
shutter sound is heard when you take a picture.
• Storage: Allows you to switch the saved file location between Phone or
Memory Card.
Camera
Camera 74
Page 94

Settings
Display
You can choose what you see on the display screen when powering on/off and when using
the phone. You can also control the brightness of the display screen and keyboard.
Background
You can set the picture the appears on the display screen when in standby mode and for
incoming/outgoing calls.
To change the wallpaper:
1. Touch Menu.
2. Touch Settings.
3. Touch Display.
4. Touch Background.
5. T ouch one of the foll owing options: Take Picture, Preset Images, My Album,
or My Downloads.
• Take Picture: Use the camera take picture. Touch OK to assign the picture
to the background.
• Preset Images: T ouch a picture from the display of preset images. A larger
picture opens. Touch Assign to assign the picture to the background.
• My Album: Use a picture from a folder in My Album. Touch the picture and
then touch OK to assign it to the background.
• My Downloads: Use a picture that you have downloaded from the web.
Touch the picture and then touch OK to assign it to the background.
Greeting
1.
Touch Menu.
2. Touch Settings.
3. Touch Display.
4. Touch Greeting. The phone switches to Landscape mode.
5. Use the keyboard to enter the greeting that you want to display when in
standby mode.
6. Touch Save.
Note: The Greeting menu does not appear when using the Bell phone interface.
75 Settings
Page 95

Brightness
You can change the brightness of the LCD screen, making it brighter or dimmer.
To change the brightness setting:
1. Touch Menu.
2. Touch Settings.
3. Touch Display.
4. Use the Brightness slider to adjust the brightness of the display screen.
Screen Backlight
The backlight setting lets you select how long the display screen is backlit after it has last
been touched.
To change the backlight setting:
1. Touch Menu.
2. Touch Settings.
3. Touch Display.
4. Touch Dim.
5. Touch one of the following options to set the length of time that the display
screen remains lit after last being touched: Never Dim, 30 seconds, 15
seconds, 8 seconds, or Always Dim.
• Never Dim: The backlight does not turn off or become darker.
• Always Dim: The brightness of the backlight is reduced.
Note: Long backlight settings reduce the battery’s talk and standby times.
Keypad Backlight
The keypad light setting lets you select how long the keyboard light is on after any key
press is made.
1. Touch Menu.
2. Touch Settings.
3. Touch Display.
4. Touch Keypad Backight.
5. Touch one of the following options: Always On, 1 minute, 30 seconds, or 15
seconds.
Settings
Settings 76
Page 96

Language
Language selection changes all menu settings.
1. Touch Menu.
2. Touch Settings.
3. Touch Display.
4. Touch Language.
5. Touch English or French.
Volume
Adjust your phone’s volume settings to suit your needs and your environment.
Ringer Volume
To adjust the volume of the ringer:
1. Touch Menu.
2. Touch Settings.
3. Touch Volume.
4. In the Ringer Volume area, use the Level slider to adjust the volume level of
the ringer.
5. Toggle Always Vibrate to be On or Off.
Tip: You can adjust the ringer volume (or the earpiece volume during a call) using the
volume buttons on the left side of the phone.
System Volume
To adjust the system volume:
1. Touch Menu.
2. Touch Settings.
3. Touch Volume.
4. In the System Volume area, use the Level slider to adjust the volume level of
the system.
5. Toggle Touch Vibrate to be On or Off.
6. Toggle Touch Tone to be On or Off.
7. Toggle Startup/Shutdown to be On or Off.
77 Settings
Page 97

Silence All
This option allows you to mute all sounds without turning off your phone.
To silence your phone:
• Press and hold the volume button on the left side of the phone down until Silence
All is displayed onscreen.
To deactivate Silence All:
• Press and hold the volume button on the left side of the phone up repeatedly to
select a new volume level.
Ringers & Vibrations
Ringer types help you to identify incoming calls and messages. You can assign ringer
types to individual Contacts entries, types of calls, and types of messages. The phone
provides a variety of ringer options that allow you to customize your ringer and volume
settings. These options allow you to identify incoming calls, messages, voicemails,
alarms, timers, and calendar entries by their rings.
Voi ce Call
To set the voice call ringer:
1. Touch Menu.
2. Touch Settings.
3. Touch Ringers & Vibrations.
4. Scroll up and down the list of ringers and touch the one that you want to use.
Voicemail
To set the voicemail ringer:
1. Touch Menu.
2. Touch Settings.
3. Touch Ringers & Vibrations.
4. Scroll up and down the list of ringers and touch the one that you want to use.
Message
To set the message ringer:
1. Touch Menu.
2. Touch Settings.
3. Touch Ringers & Vibrations.
4. Scroll up and down the list of ringers and touch the one that you want to use.
Settings
Settings 78
Page 98

Alarm/Timer/Calendar
To set the alarm/timer/calendar ringer:
1. Touch Menu.
2. Touch Settings.
3. Touch Ringers & Vibrations.
4. Scroll up and down the list of ringers and touch the one that you want to use.
Voice Notification
This feature will call out the phone number instead of using your assigned ringer.
To adjust the voice notification:
1. Touch Menu.
2. Touch Settings.
3. Touch Ringers & Vibrations.
4. Toggle Voice Notification to be On or Off.
Messaging
You can send and receive many different kinds of text messages with your phone without
placing a voice call. See "Messaging" on page 34. Messaging settings make text
messaging easier by letting you decide how you want to be notified of new messages.
• Reminder: Sets the number of times that the message reminder is displayed.
Touch Off, Once, or Every 2 min.
• Callback #: Sets the default callback number used when sending messages.
Touch None, your mobile phone number, or Other (allows you to enter a different
number using the keyboard).
• Auto-Erase: Touch Yes to have the phone automatically erase old messages
when the folders are full.
• Draft Alert: Toggle On or Off to have the phone display an alert when a message
is saved to the Draft folder.
General
Phone Information
To display the phone’s information:
1. Touch Menu.
2. Touch Settings.
3. Touch General.
79 Settings
Page 99

4. Touch Phone Information.
5. The phone displays the phone number, MSID number, Firmware Version, and
Advanced information.
Memory status
To display the phone’s memory status:
1. Touch Menu.
2. Touch Settings.
3. Touch General.
4. Touch Memory status.
5. The phone displays the amount of memory that has been used in both the
phone and memory card.
Airplane Mode
When your phone is in Airplane Mode, it cannot send or receive any calls or access online
information. All incoming calls will be sent directly to your Voicemail box. The Bluetooth
interface will be disabled when Airplane Mode is on.
To set your phone to Airplane Mode:
1. Touch Menu.
2. Touch Settings.
3. Touch General.
4. Touch Airplane Mode. (A brief explanation of Airplane Mode will display.)
5. Touch OK to toggle Airplane Mode to be On or Off.
Note: While in Airplane Mode, your phone’s standby screen will display “Phone Off”.
Location
The Location feature allows the network to detect your position. Turning Location off will
hide your location from everyone except 911.
Note: Even if the Location feature is enabled, no service may use your location
information without your expressed permission.
To enable your phone’s Location feature:
1. Touch Menu.
Settings 80
Settings
Page 100

2. Touch Settings.
3. Touch General.
4. Touch Location. (A brief explanation will display. Scroll up or down to read the
entire text.)
5. Touch OK.
One Hand operation
You can configure the Power Search tab to be on the left o r right of the display screen. For
example, when the Right Handed option is selected, the Power Search tab is located on
the right side of the screen and Contacts entries are selected by pressing their field names
along the left side of the display screen.
To modify one hand operation:
1. Touch Menu.
2. Touch Settings.
3. Touch General.
4. Touch One Hand operation.
5. T ouch Right Handed or Left Handed. This places the Power Search tab
along the right or left side of the display screen respectively.
TTY
See "TTY Use With Handset" on page 18 and "Voice Command" on page 25.
Ignore with Text
Sends an incoming call to your voicemail box and automatically sends the caller a text
message at the same time. You can select a preset message to be sent or create a
custom message.
To use Ignore with Text:
1. Touch Menu.
2. Touch Settings.
3. Touch General.
4. Touch Ignore with Text.
5. Touch to create a custom message. The phone switches to Landscape
mode.
• You can also touch a preset message in the list.
6. Use the keyboard to enter the text for the message.
81 Settings
 Loading...