

Samsung EC-L100ZBBA-US User Manual [en, de, fr, it, cs, pl]

Getting to know your camera
O
Microsoft Windows and Windows logo are registered trademarks of Microsoft
Corporation incorporated in the United States and/or other countries
O
All brand and product names appearing in this manual are registered
trademarks of their respective companies.
O
The contents and illustrations of this manual are subject to change without prior
notice for upgrading the camera functions.
O
Refer to the user manual included on the Software CD for more information.
Contents
Getting to know your camera
Identifi cation of features / Contents of camera
Battery life & Number of shot (Recording time)
When Using the Camera for the First Time
LCD monitor indicator
Mode dial
Taking a picture
Playing back / Deleting images / Protecting images
Downloading images
Specifi cations
2
4
5
6
7
8
9
10
11
12
FCC notice
Q
NOTE :
This equipment has been tested and found to comply with the limits for a Class B digital
device, pursuant to part 15 of the FCC Rules. These limits are designed to provide reasonable
protection against harmful interference in a residential installation.
This equipment generates, uses and can radiate radio frequency energy and, if not installed
and used in accordance with the instructions, may cause harmful interference radio
communications. However, there is no guarantee that interference will not occur in a particular
installation. If this equipment does cause harmful interference to radio or television reception,
which can be determined by turning the equipment off and on, the user is encouraged to try to
correct the interference by one or more of the following measures:
- Reorient or relocate the receiving antenna.
- Increase the distance between the equipment and receiver.
- Connect the equipment to an outlet on a circuit different to that to which the receiver is
connected.
- Consult the dealer or an experienced radio/TV technician for help.
Q
CAUTION :
Changes or modifications not expressly approved by the manufacturer responsible for compliance
could void the user’s authority to operate the equipment.
Q
Declaration of Conformity
Trade Name : SAMSUNG DIGITAL IMAGING CO., LTD.
Model No. : SAMSUNG L100
Responsible Party : SAMSUNG ELECTRONICS AMERICA INC.
Address : 105 Challenger Road Ridgefield Park NJ
Telephone No. : 1-800-SAMSUNG(726-7864)
This device complies with Part 15 of the FCC Rules. Operation is subject to the following
two conditions: (1) This device may not cause harmful interference, and (2) this device
must accept any interference received, including interference that may cause undesired
operation.
ENGLISH
Getting to know your camera
DANGER WARNING
DANGER indicates an imminently hazardous situation which, if not avoided, will
result in death or serious injury.
WARNING indicates a potentially hazardous situation which, if not avoided, could
result in death or serious injury.
Do not attempt to modify this camera in any way. To do so may result in
fire, injury, electric shock or severe damage to you or your camera. Internal
inspection, maintenance and repairs should only be carried out by your
dealer or Samsung Camera Service centre.
Should any form of liquid or a foreign object enter the camera, do not use
it. Switch off the camera, and then disconnect the power source. You must
contact your dealer or Samsung Camera Service centre. Do not continue to
use the camera as this may cause a fire or electric shock.
Please do not use this product in close proximity to flammable or explosive
gases, as this could increase the risk of explosion.
Do not insert or drop metallic or inflammable foreign objects into the camera
through access points e.g. the memory card slot and battery chamber. This
may cause a fire or electric shock.
Do not operate this camera with wet hands. This could pose a risk of electric
shock.
Do not use the flash in close proximity to people or animals. Positioning the
flash too close to your subject’s eyes may cause eyesight damage.
For safety reasons keep this product and accessories out of reach of
children or animals to prevent accidents e.g.:
- Swallowing battery or small camera accessories. If an accident should
occur, please consult a doctor immediately.
- There is the possibility of injury from the camera’s moving parts.
Battery and camera may become hot during prolonged use and it may result
in camera malfunction. Should this be the case, allow the camera to sit idle
for a few minutes to allow it time to cool.
Do not leave this camera in places subject to extremely high temperatures,
such as a sealed vehicle, direct sunlight or other places of extreme
variances in temperature. Exposure to extreme temperatures may adversely
affect the camera’s internal components and could cause a fire.
When in use, do not cover the camera or Charger. This may cause heat to
build up and distort the camera body or cause a fire. Always use the camera
and its accessories in a well-ventilated area.
2
CAUTION
CAUTION indicates a potentially hazardous situation which, if not avoided, may
result in a minor or moderate injury.
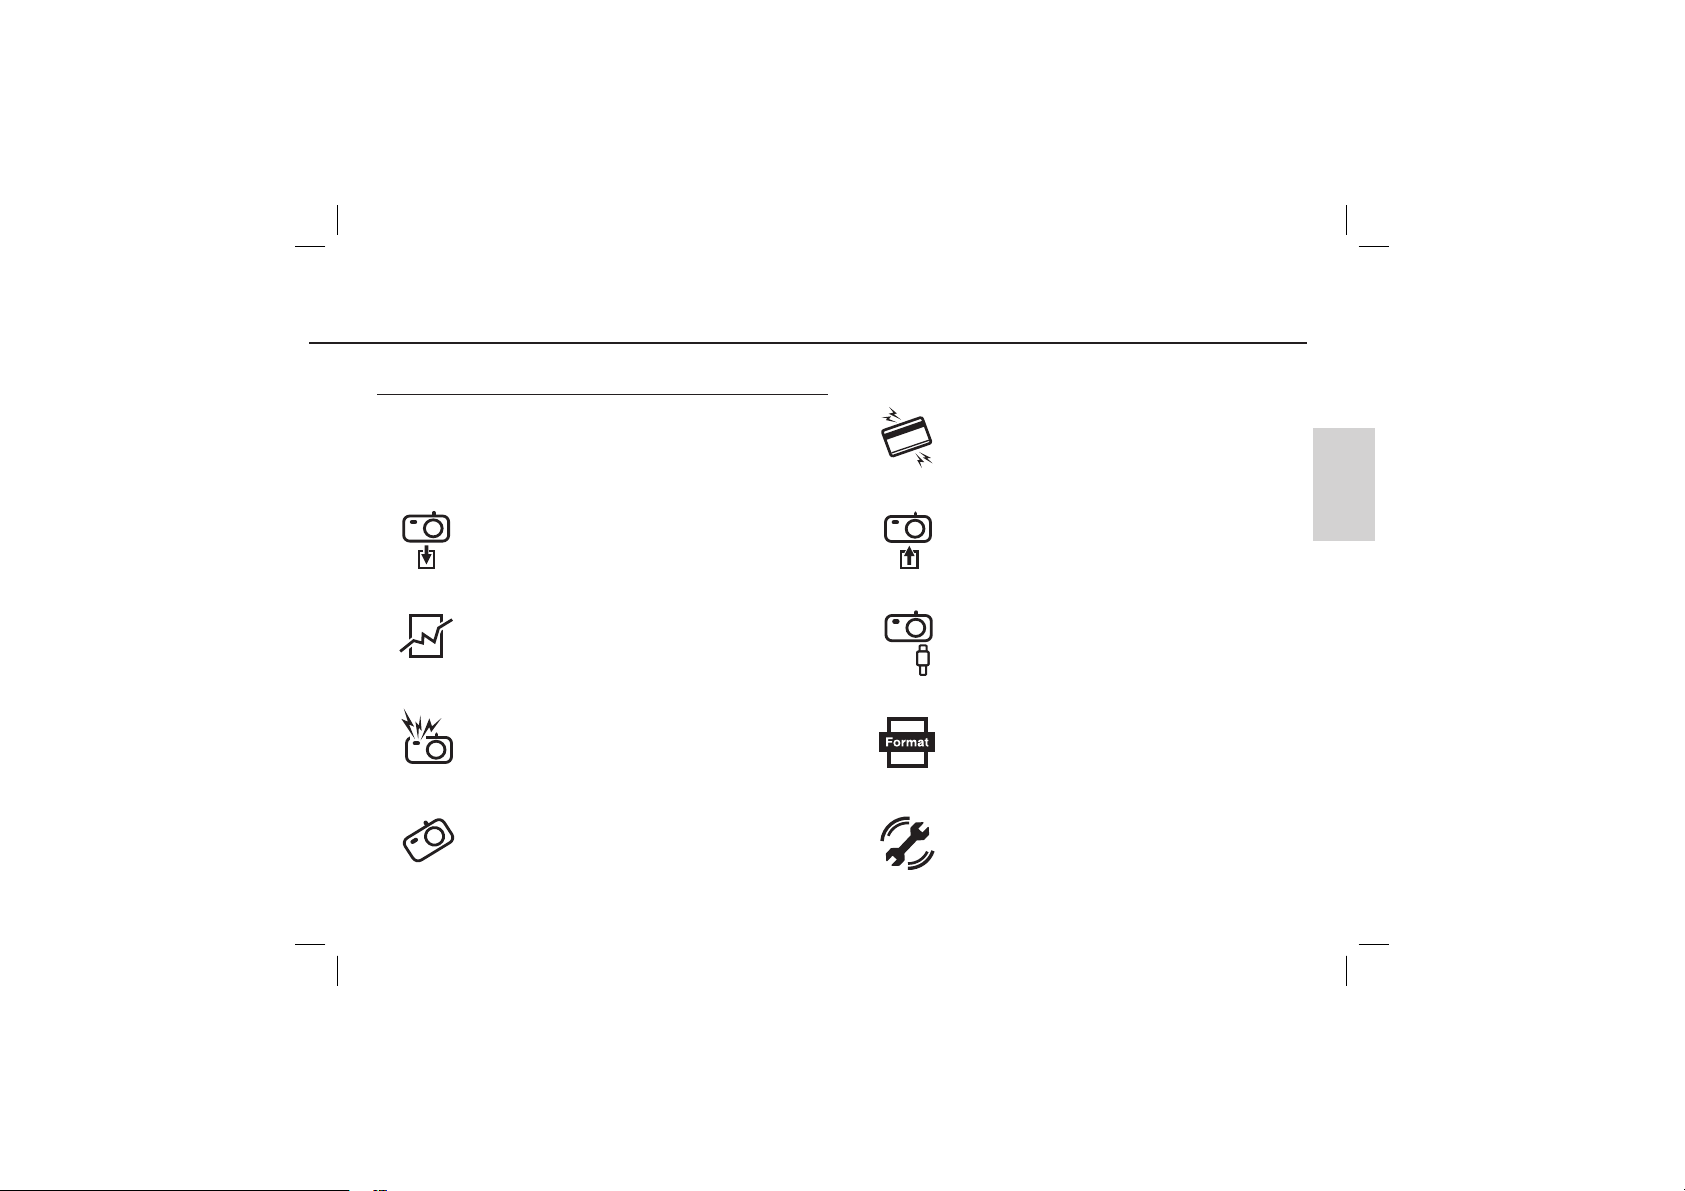
Remove the battery when not planning to use the camera for a long
period of time. Otherwise the battery may leak corrosive electrolyte and
permanently damage the camera’s components.
Getting to know your camera
Credit cards may be demagnetized if left near a camera case.
Avoid leaving magnetic strip cards near the case.
Do not insert the memory card the wrong way round.
ENGLISH
Leaking, overheating, or damaged battery could result in fire or injury.
- Use battery with the correct specification for the camera.
- Do not short circuit, heat or dispose of battery in fire.
- Do not insert the battery with the polarities reversed.
Do not fire the flash while it is in contact with hands or objects. Do not touch
the flash after using it continuously. It may cause burns.
Take care not to touch the lens or lens cover to avoid taking an unclear
image and possibly causing camera malfunction.
It is highly likely to result in computer malfunctions when the 20 pin
connector is connected to the USB port of a PC. Never connect the 20 pin
connector to USB port of a PC.
Be sure to format the memory card if you are using a newly purchased
memory for the first time, if it contains data that the camera cannot
recognise, or if it contains images captured with a different camera.
Before an important event or going on a trip, you should check the
camera condition. Samsung cannot be held responsible for camera
malfunctions.
3
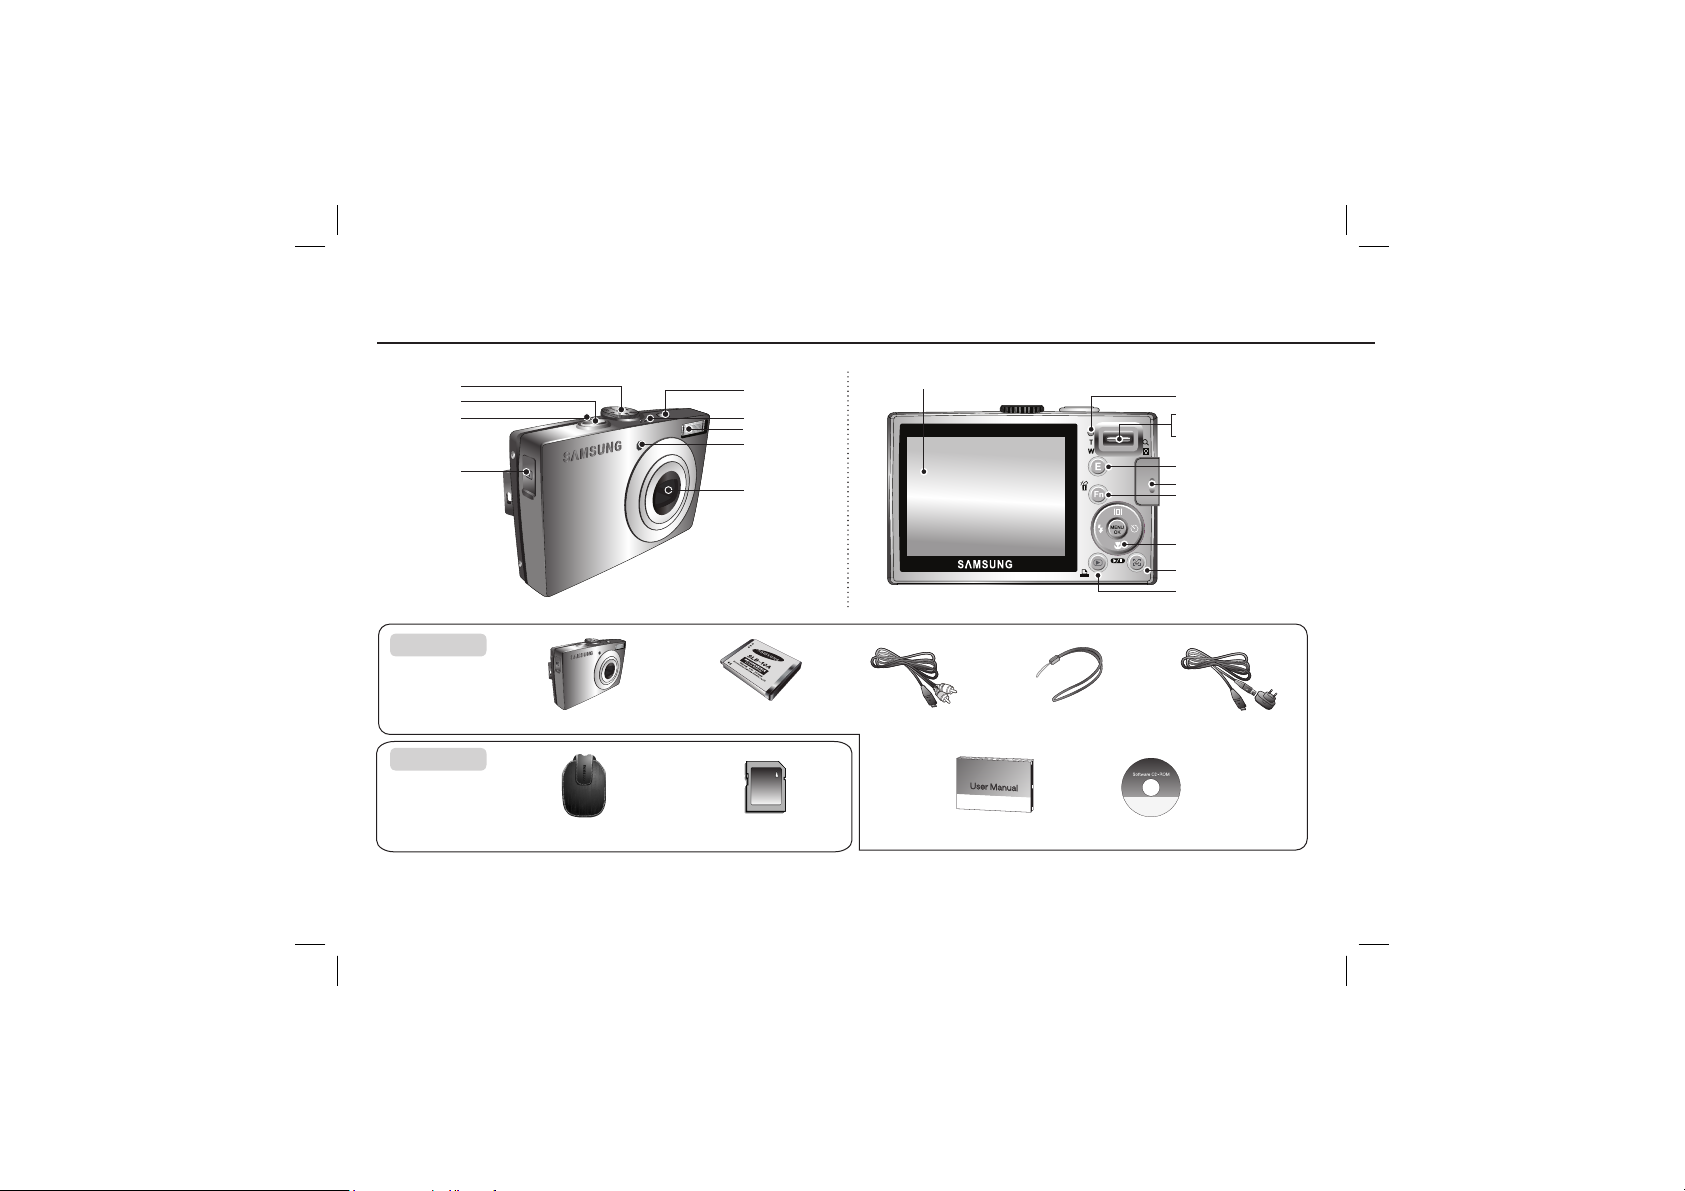
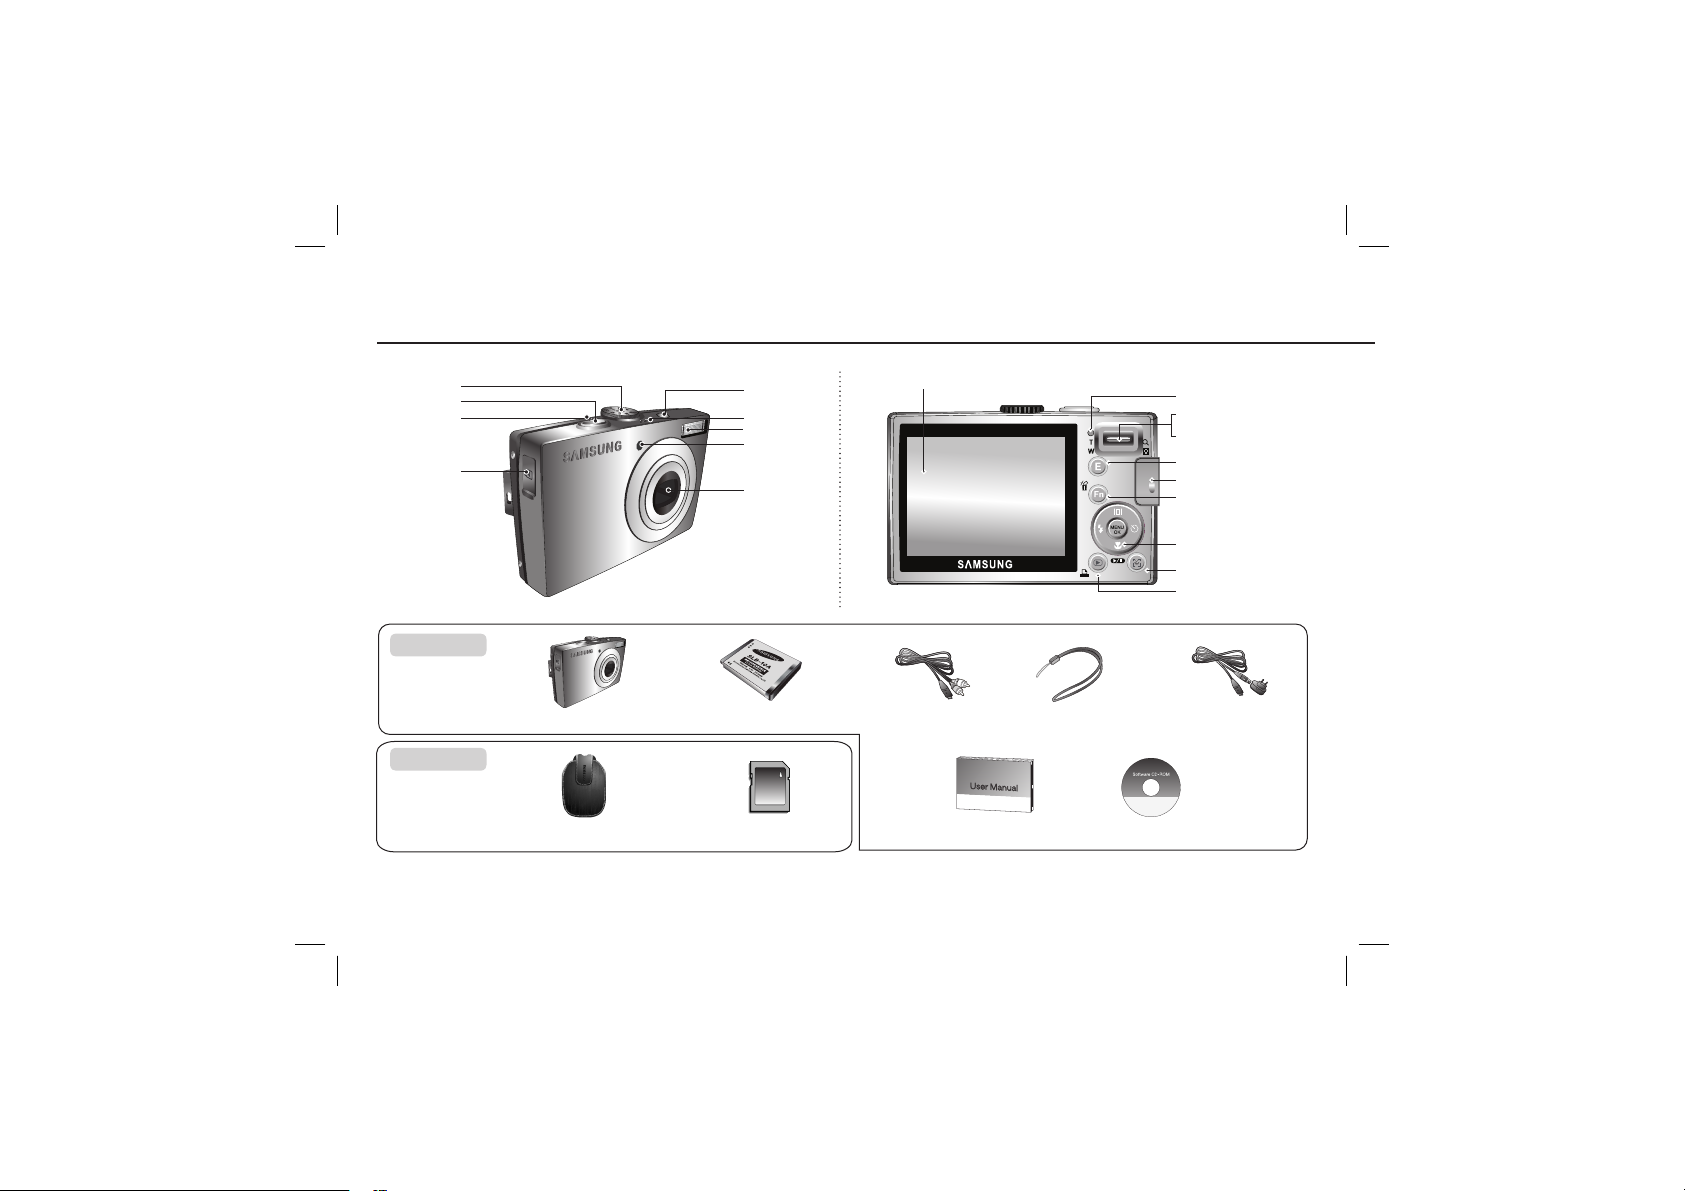
Identification of features / Contents of camera
LCD monitor
Camera status lamp
Zoom T button (Digital zoom)
Zoom W button (Thumbnail)
E (Effect) button
Eyelet for camera strap
Fn/Delete button
5-function button
FD (Face Detection) button
Play mode/Print button
USB / AV
Mode dial
Shutter button
Microphone
connection
terminal
Power button
Speaker
Flash
AF sensor/Self-timer lamp
Lens/ Lens cover
Included items
Camera
Rechargeable Battery (SLB-10A)
AV cable
Camera strap
AC Adapter(SAC-47)/
USB cable(SUC-C3)
Optional items
Camera case
Please check that you have the correct contents before using this product. The contents can vary depending on the sales region. To buy the optional equipment, contact your nearest Samsung dealer or
Samsung service centre.
SD/SDHC/MMC
memory card
User manual, Product warranty
Software CD
4
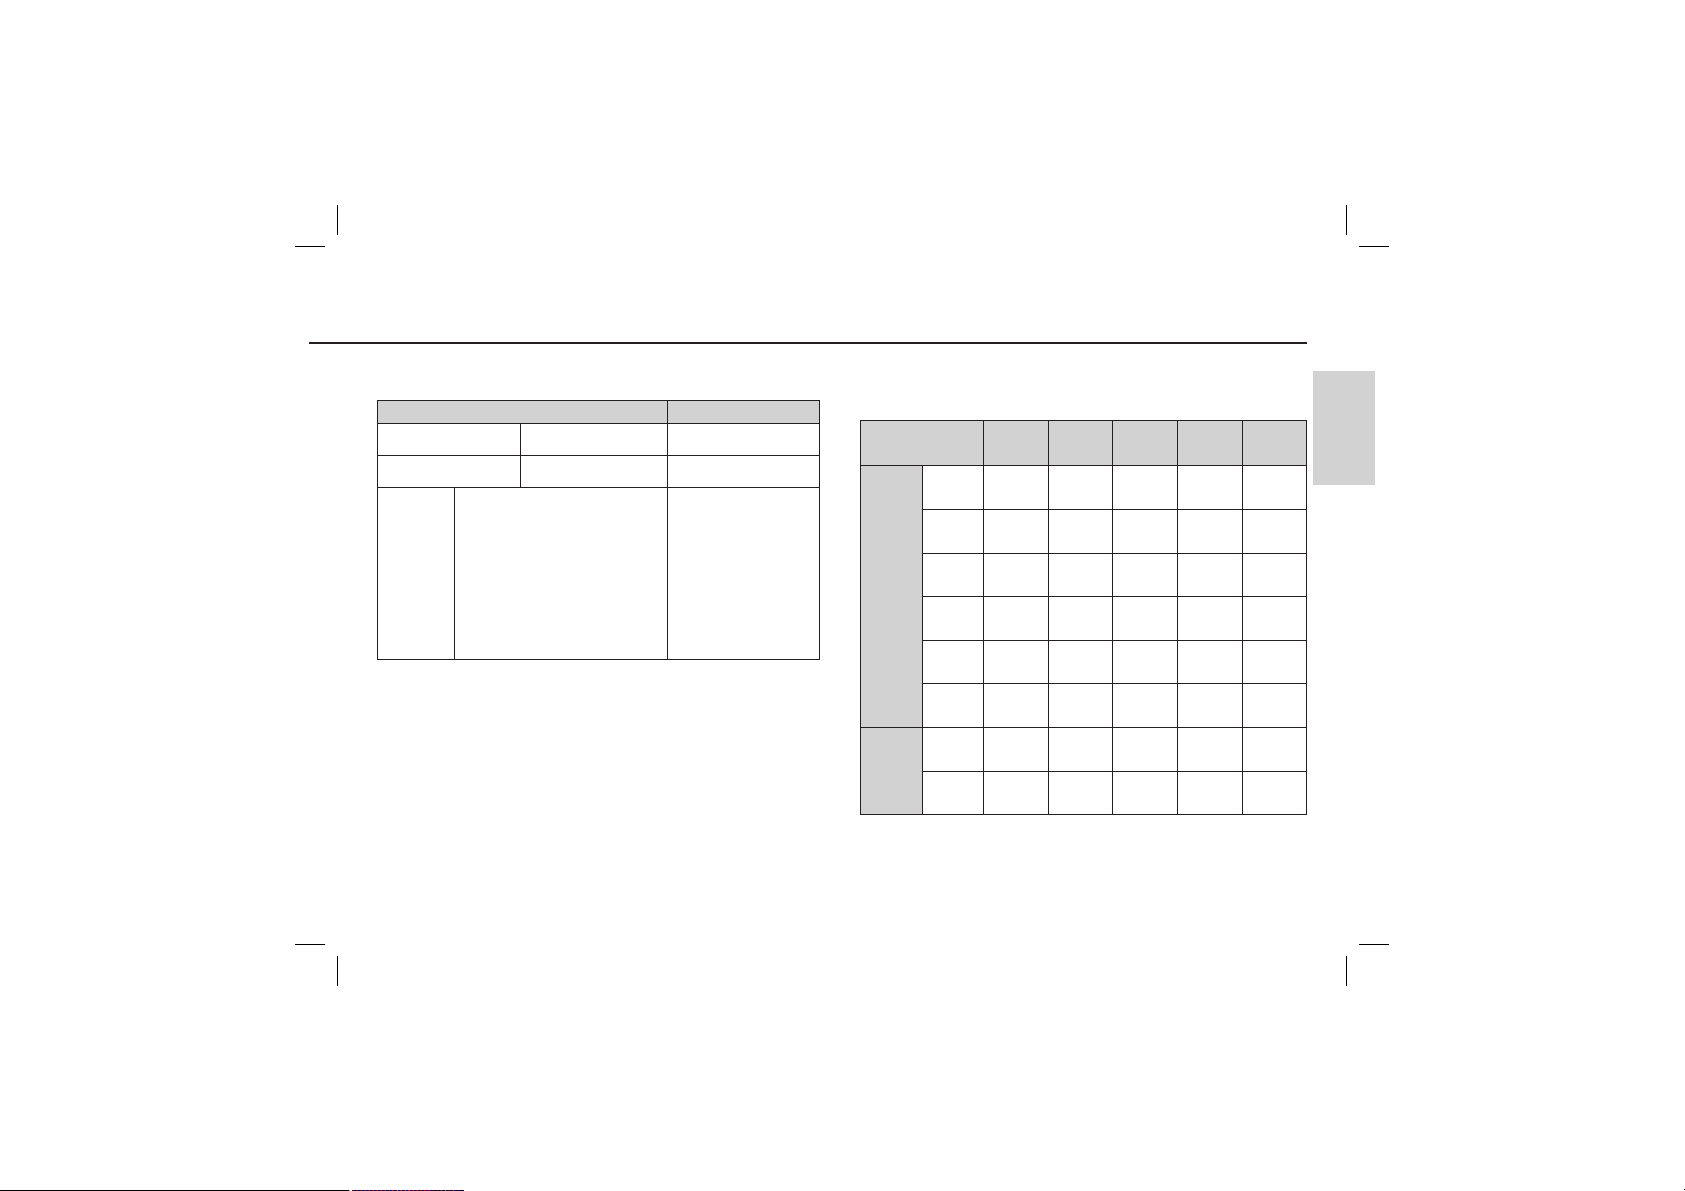
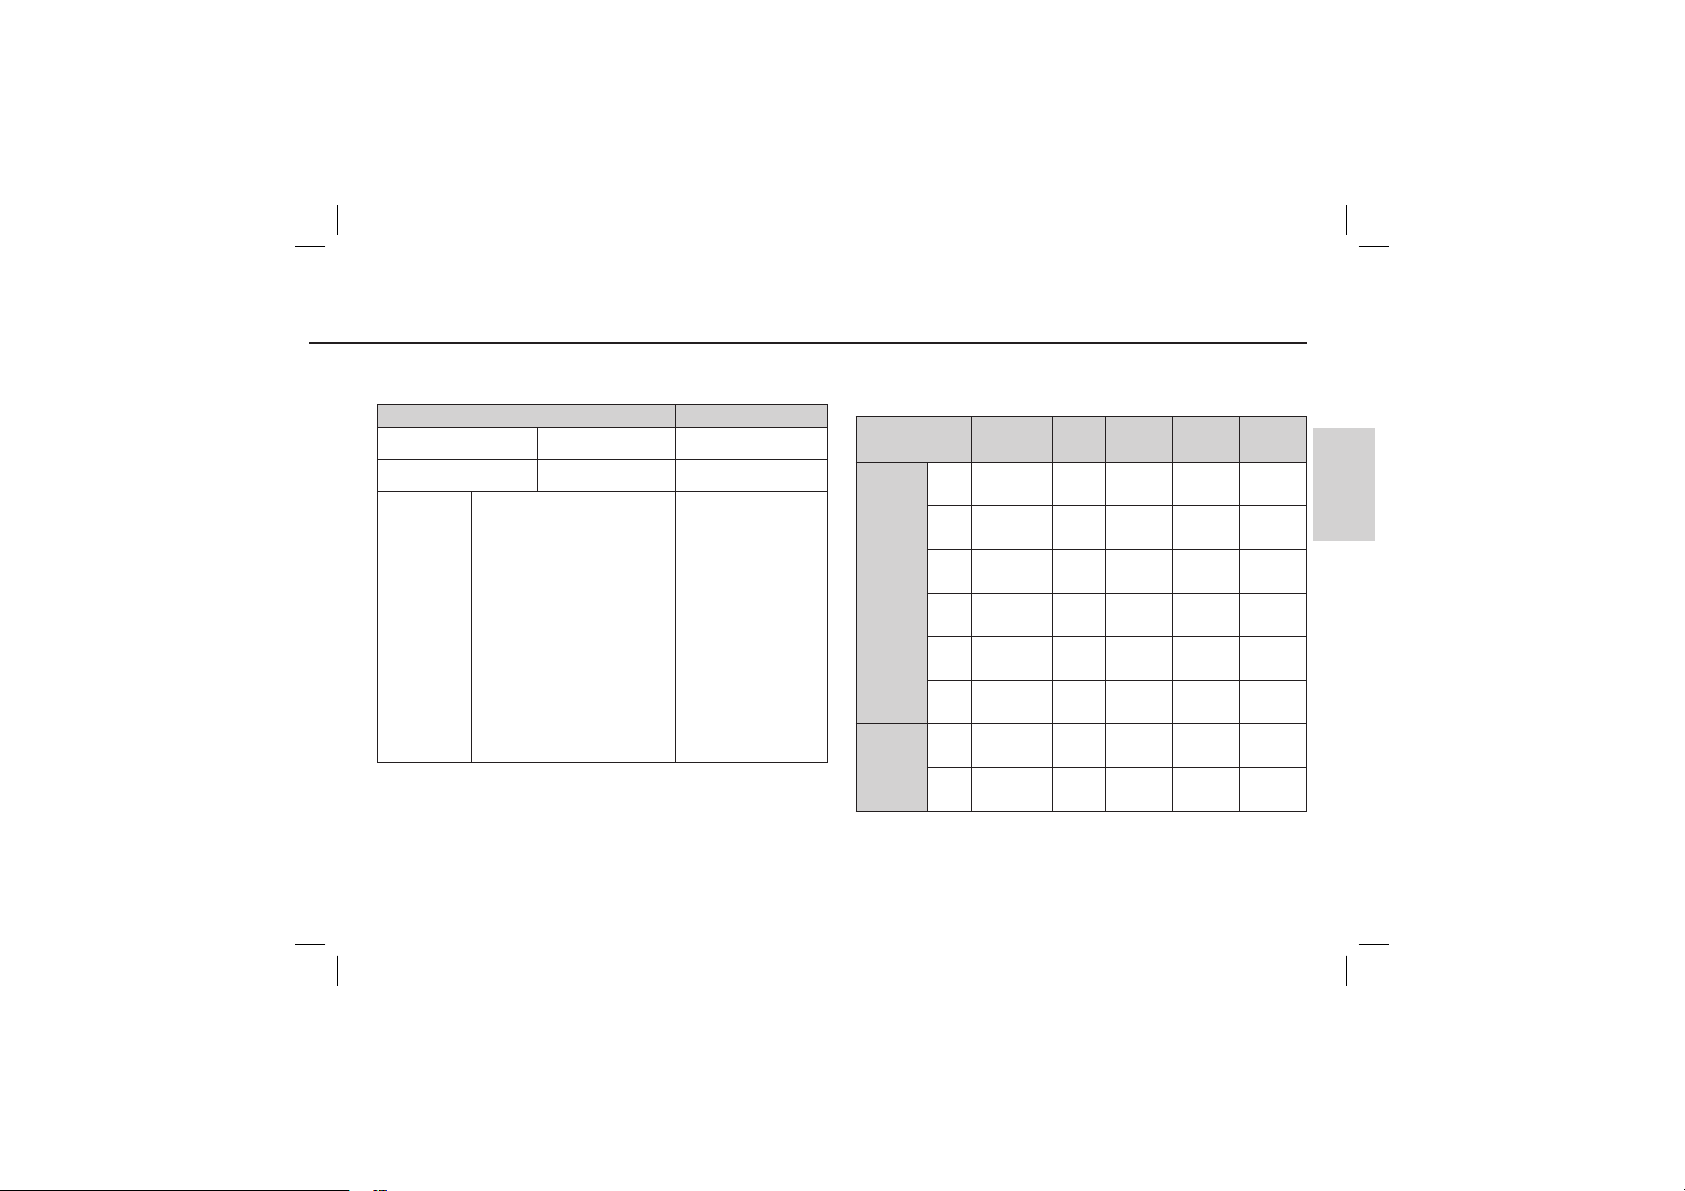
Battery life & Number of shot (Recording time)
Number of images and battery life : Using the SLB-10A
Still image Movie
Battery life Number of images Recording time
Approx. 130 MIN Approx. 260 shots Approx. 120 MIN
Using the fully charged battery,
Auto mode, 8M image size
Fine image quality, Shot to shot
interval: 30Sec. Changing the
Conditions
* These figures are measured under Samsung’s standard conditions and shooting
conditions and may vary depending on the user’s methods.
zoom position between the Wide
and the Tele after every shot.
Using the fl ash on every second
shot. Using the camera for 5
minutes and then Powering it off
for 1 minute.
Using the fully charged
battery
640x480 image size
30fps frame rate
When using a 256MB MMC (Multi Media Card), the specified
shooting capacity will be as follows.
Recorded image
size
Still
image
Movie
* The recording times can be changed by the zoom operation.
The zoom button doesn’t use during the movie recording.
Super
Fine
About64About
About71About
About84About
About
100
About
150
About
459
Fine Normal 30FPS 15FPS
About
117
135
157
About
186
About
269
About
822
---
---
171
About
192
About
220
About
256
About
372
About
868
--
--
--
--
--
--
About
2'02"
About
7'39"
ENGLISH
About
4'05"
About
13'15"
5
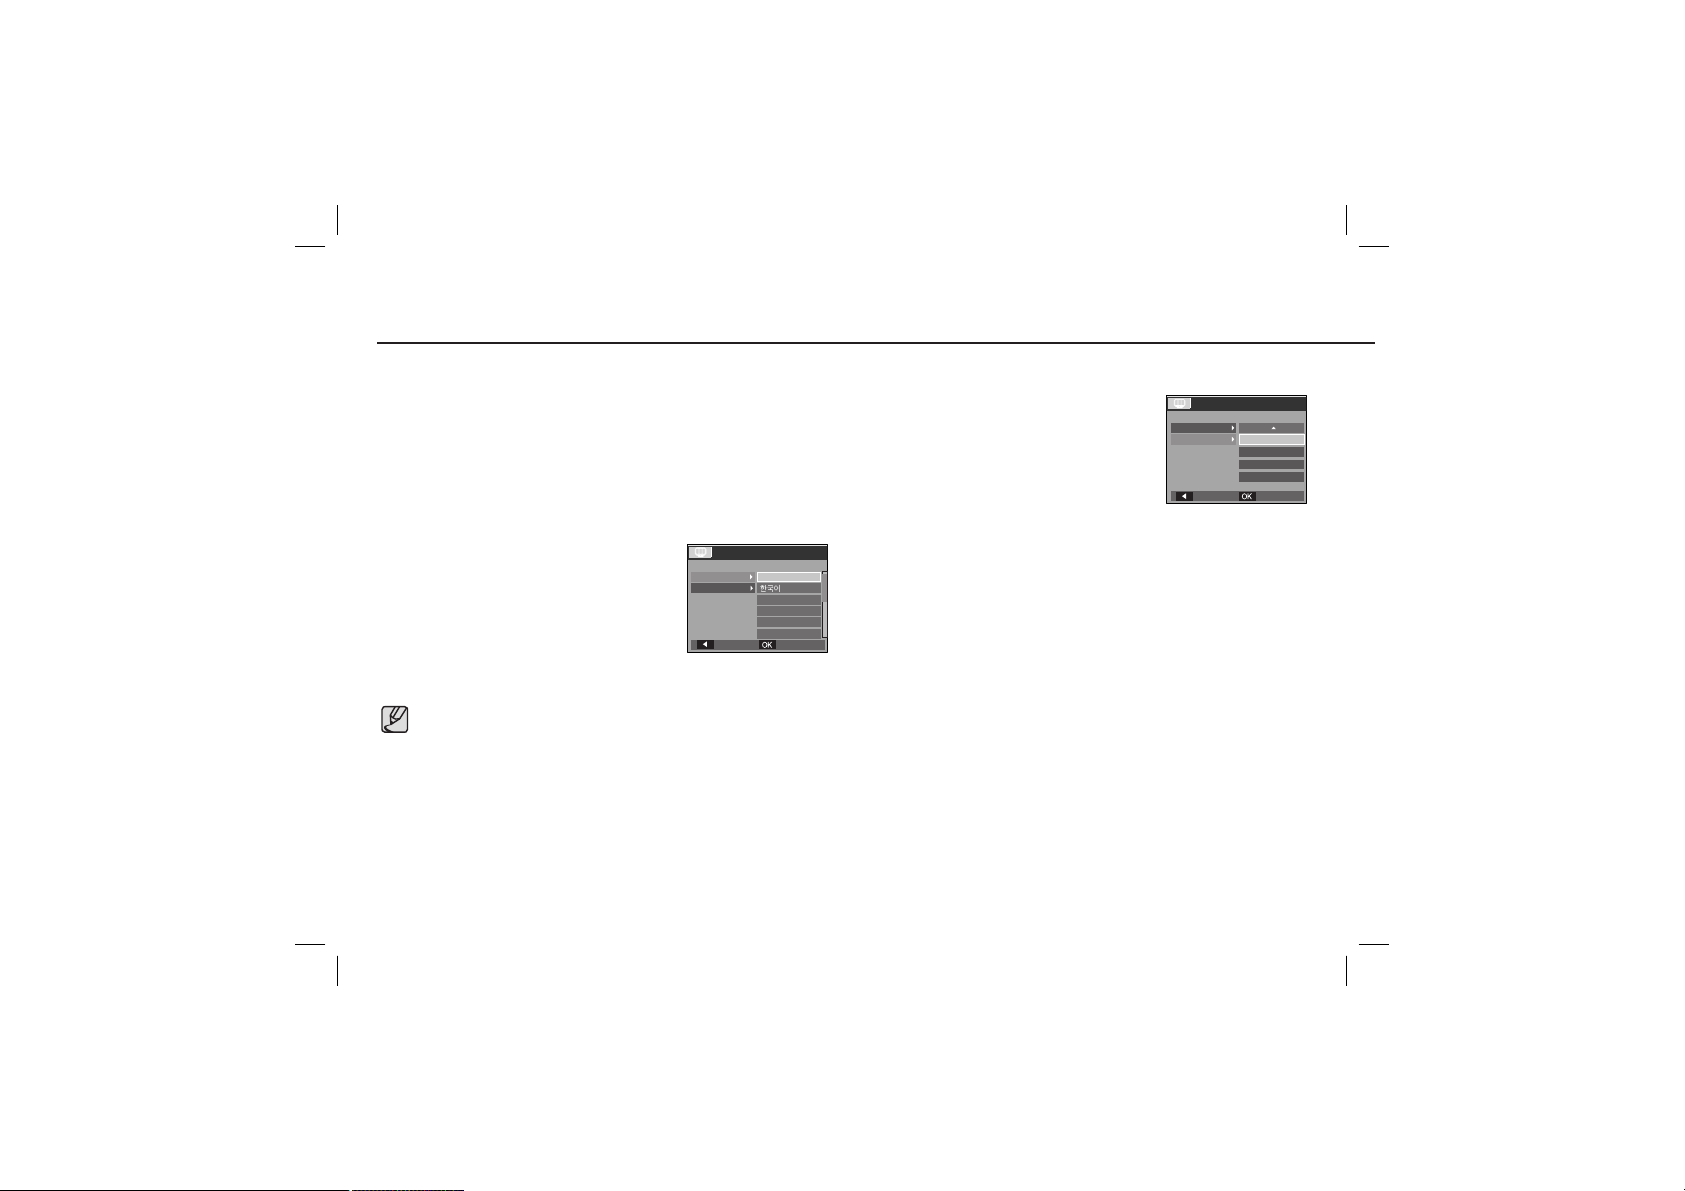
When Using the Camera for the First Time
Charge the rechargeable battery fully before using the camera for the first time.
When the camera is turned on for the first time, a menu will be displayed to set
date / time and language in the LCD monitor. This menu will not be displayed after
setting up. Set up the date / time and language before using this camera.
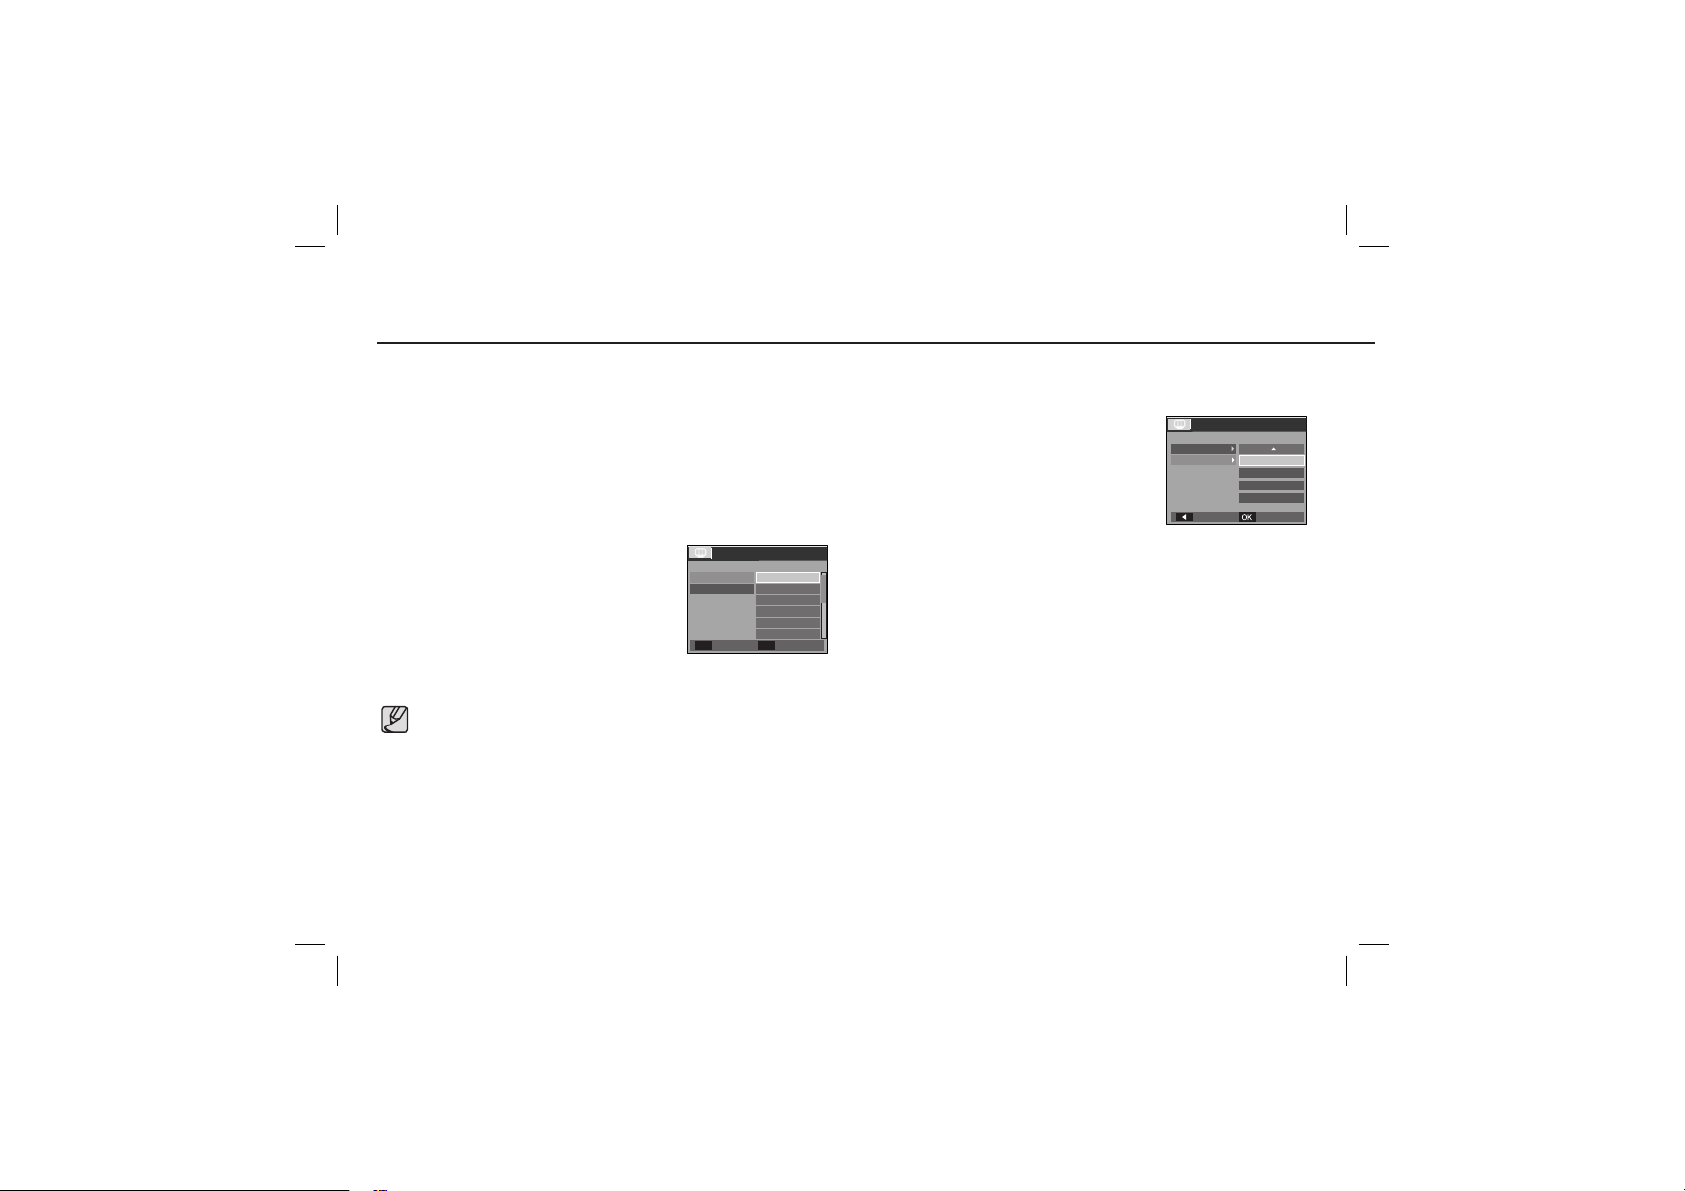
Setting up the Language
1. Select the [Language] menu by pressing the UP/
DOWN button and press the RIGHT button.
2. Select the desired sub menu by pressing the
UP / DOWN button and press the OK button.
You can select one of 22 languages. These are listed below :
DISPLAY
Language
Date&Time
Back
ENGLISH
FRANÇAIS
DEUTSCH
ESPAÑOL
ITALIANO
Set
- English, Korean, French, German, Spanish, Italian, S.Chinese,
T.Chinese, Japanese, Russian, Portuguese, Dutch, Danish, Swedish,
Finnish, Thai, Bahasa (Malay/ Indonesian), Arabic, Czech, Polish,
Hungarian and Turkish.
Even if the camera is restarted, the language setting will be maintained.
6
Setting up the date, time and date type
1. Select the [Date&Time] menu by pressing the UP/
DOWN button and press the RIGHT button.
2. Select the desired sub menu by pressing the UP/
DOWN/ LEFT/ RIGHT button and press the OK
button.
RIGHT button : Selects WORLD TIME/ YEAR/
DISPLAY
Language
Date&Time
Back Set
London
08/01/01
13:00
yyyy/mm/dd
MONTH/ DAY/HOUR/ MINUTE/
DATE TYPE
LEFT button : Moves the cursor to the [Date&Time] main menu if the
cursor is at the first item of the date and time setup. In all
other instances, the cursor will be shifted to the left of its
current position.
UP/ DOWN button : Changes the value of each item.

The LCD monitor displays information about the shooting functions and
selections. Refer to the user manual included on the Software CD for more
information.
[Image & Full Status]
No. Description Icons
1 Recording mode
2
Face Detection / Self Portrait
3 Flash
4 Self-timer
5 Macro
6 Contrast
/
LCD monitor indicator
No. Description Icons
7 Sharpness
8 Color / Saturation
9 Auto Focus Frame
10 Camera shake Warning
11 Date / Time
12 Exposure compensation
13 White Balance
14 ISO
15 Drive mode
16 Metering
17
18 Image Size
19 Battery
20
21
22 Voice Memo/Mic. Off
23
Image Quality /
Frame Rate
Memory card icon / Internal
memory icon
Number of available shots
remaining / Remaining time
Optical / Digital Zoom bar
/Digital Zoom rate
/
2008/01/01 01:00 PM
/
/
6/00:00:00
/
ENGLISH
7
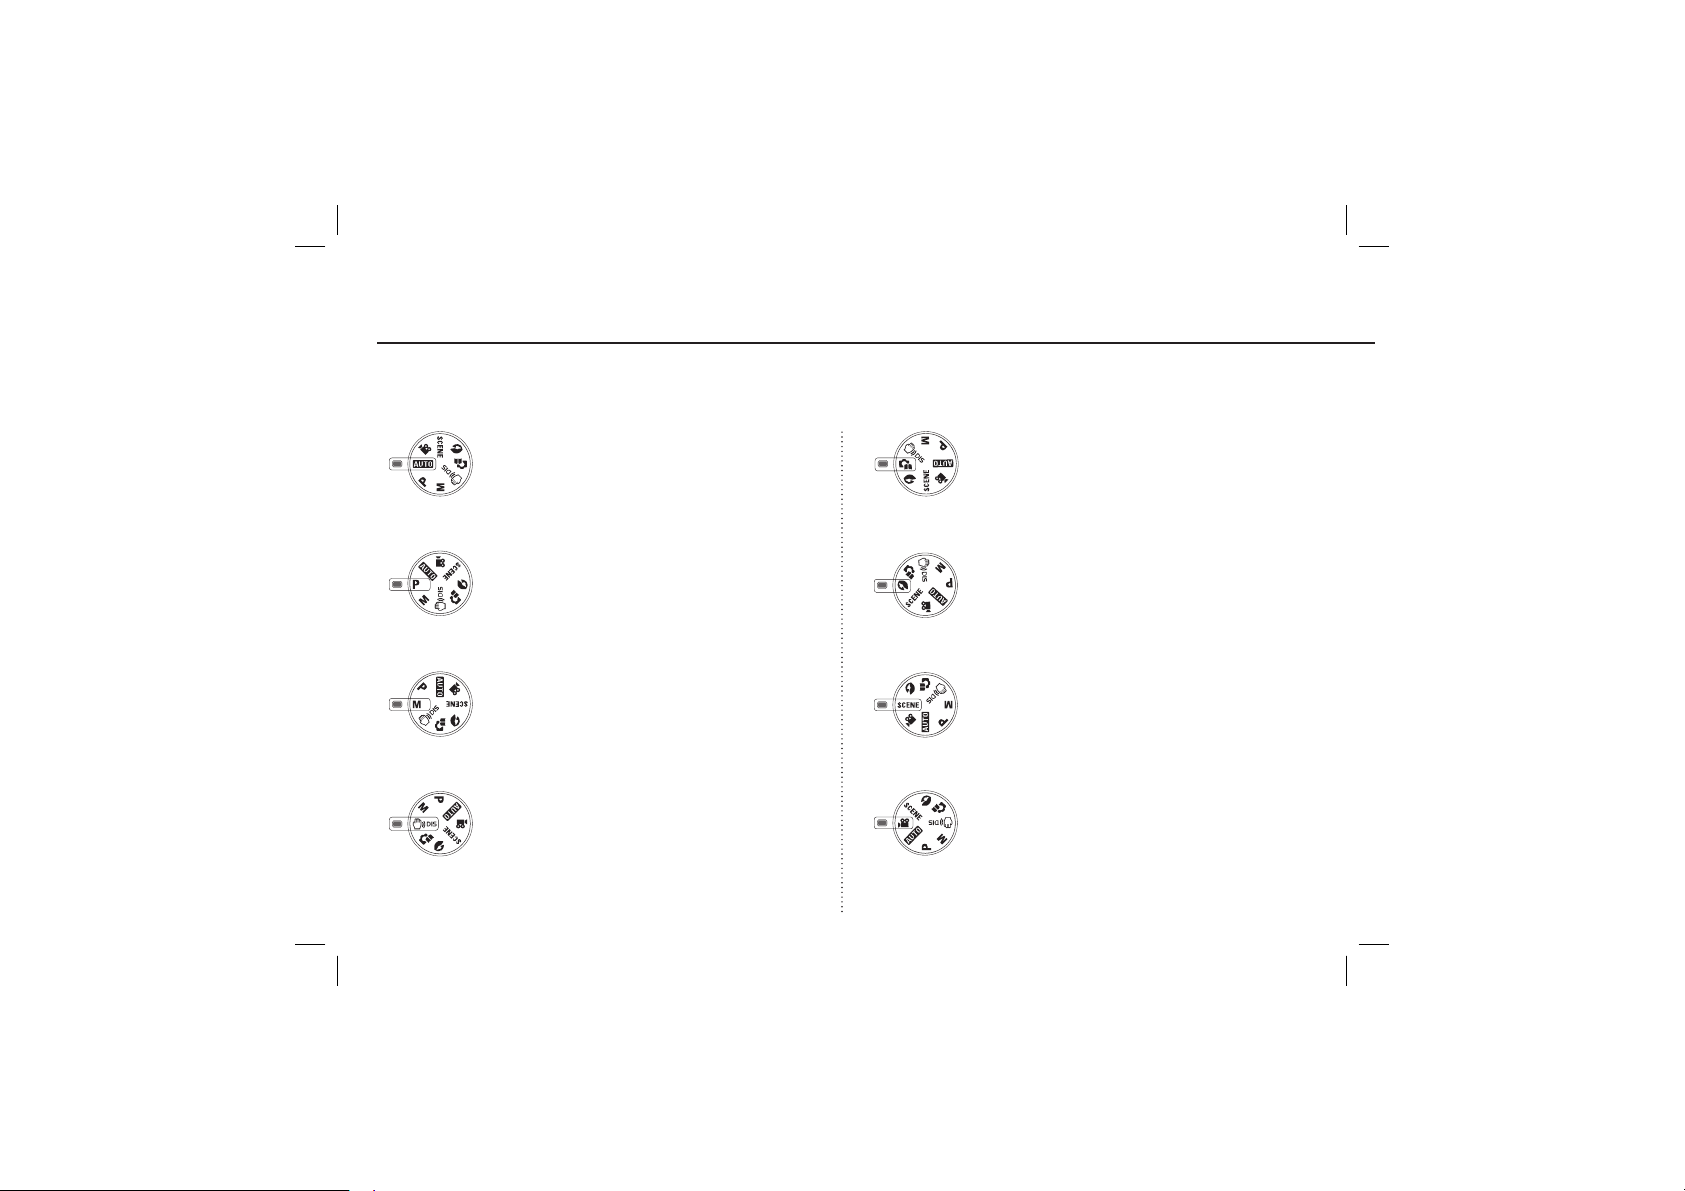
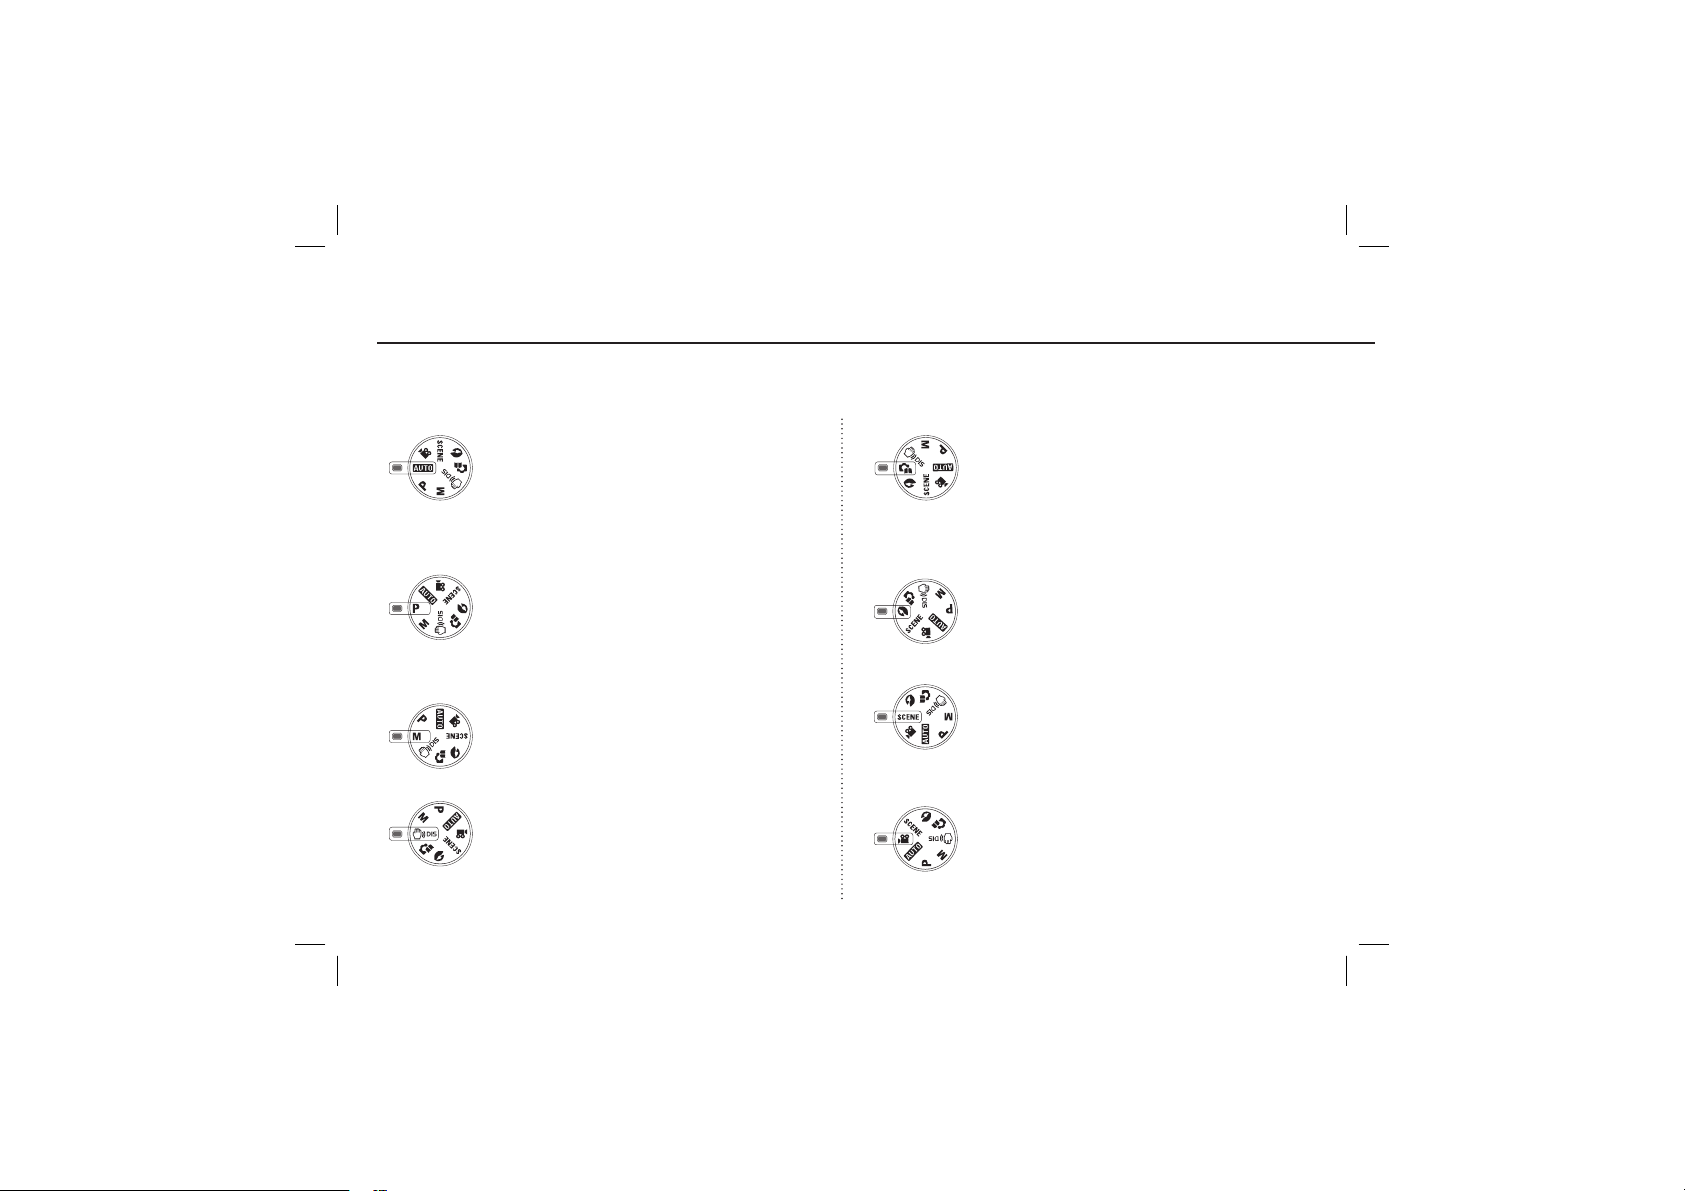
Mode dial
You can select a desired camera mode by using the Mode dial on the top of the camera
AUTO
Selects this mode for quick and easy picture taking with minimal
user interaction. In this mode, you can select the basic menus.
To select an advanced menu, select the other camera mode.
PROGRAM
Selecting the automatic mode will configure the camera with
optimal settings. You can still manually configure all functions
except the aperture value and shutter speed.
MANUAL
You can manually configure all functions aperture value and
shutter speed.
DIS
This mode will reduce the effect of camera shake and help you
get a well-exposed image in dim conditions.
8
PHOTO HELP GUIDE
Helps the user learn the correct picture taking method and
includes solutions for potential problems that may occur. This
also enables the user to practice the best way to take the
pictures.
PORTRAIT
Please select this mode for quick and easy portraits.
SCENE
Use the menu to easily configure optimal settings for a variety
of shooting situations.
MOVIE
A movie can be recorded for as long as the available recording
time of the memory capacity allows.
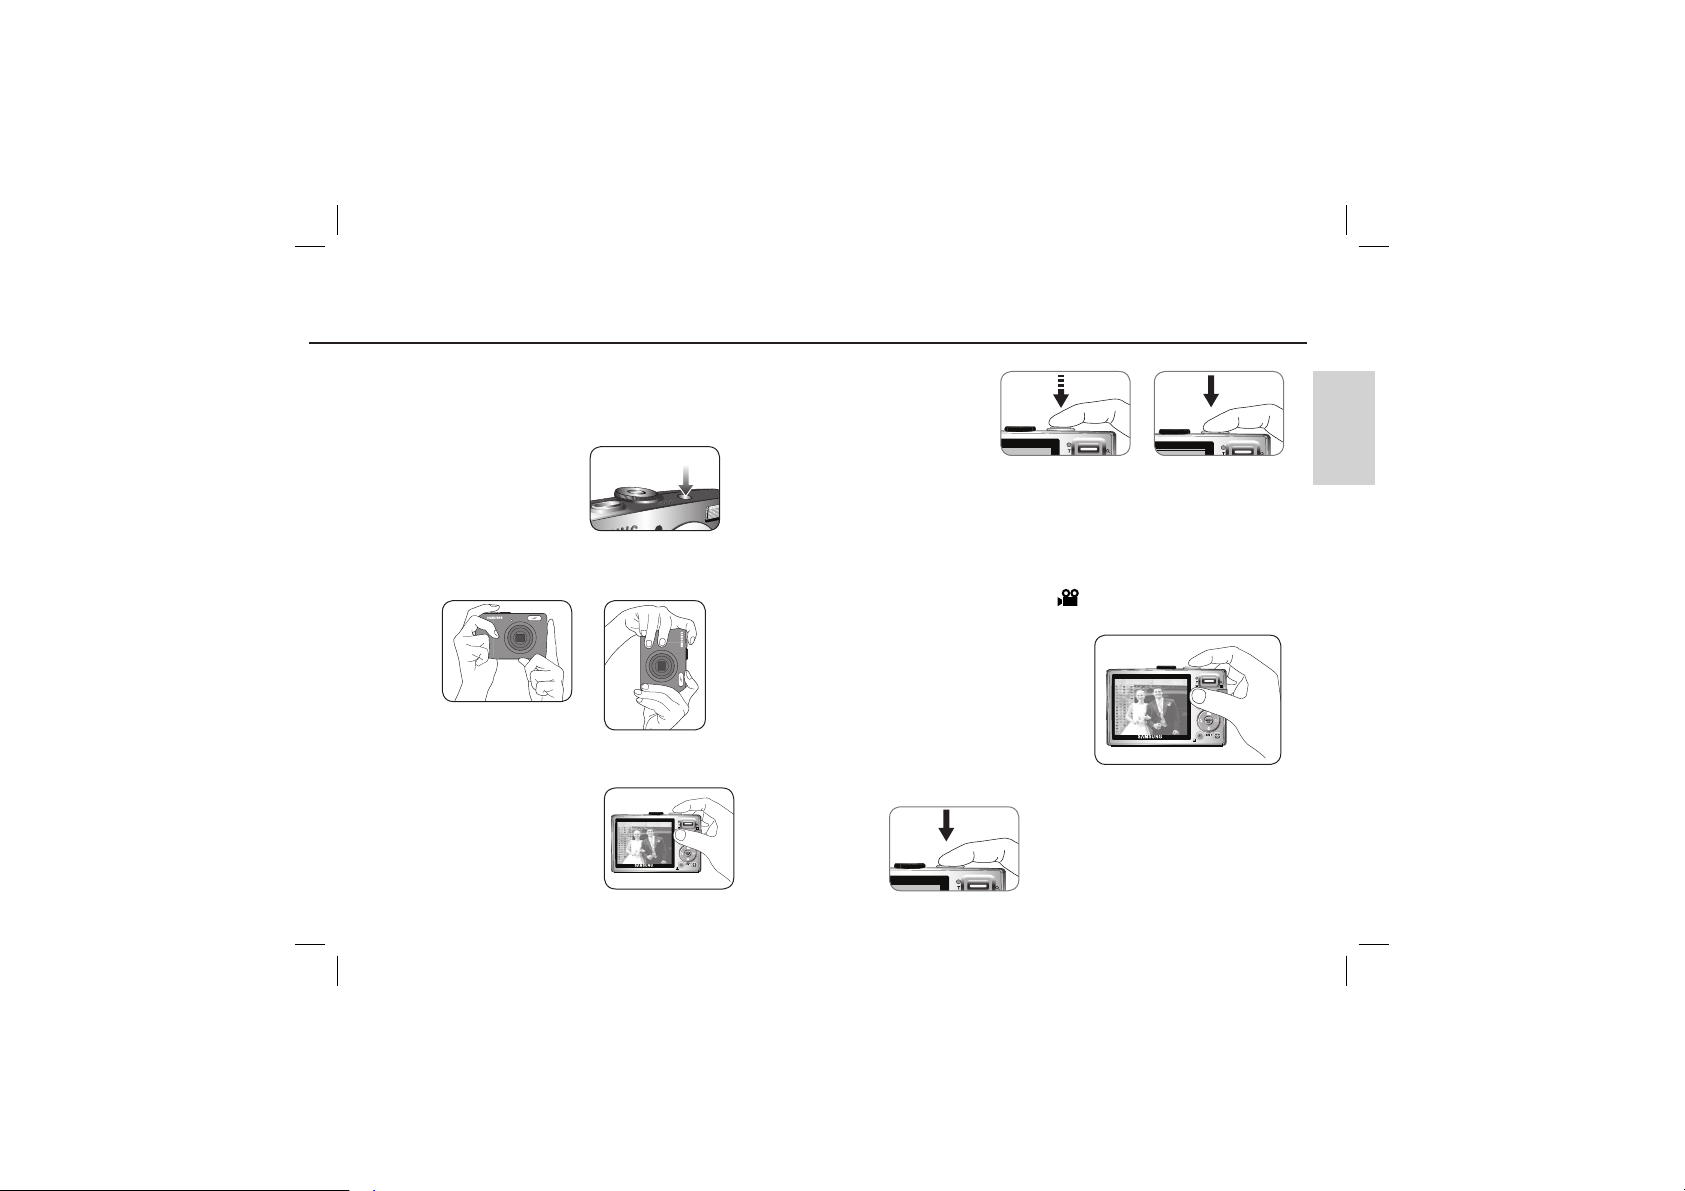
Taking a picture
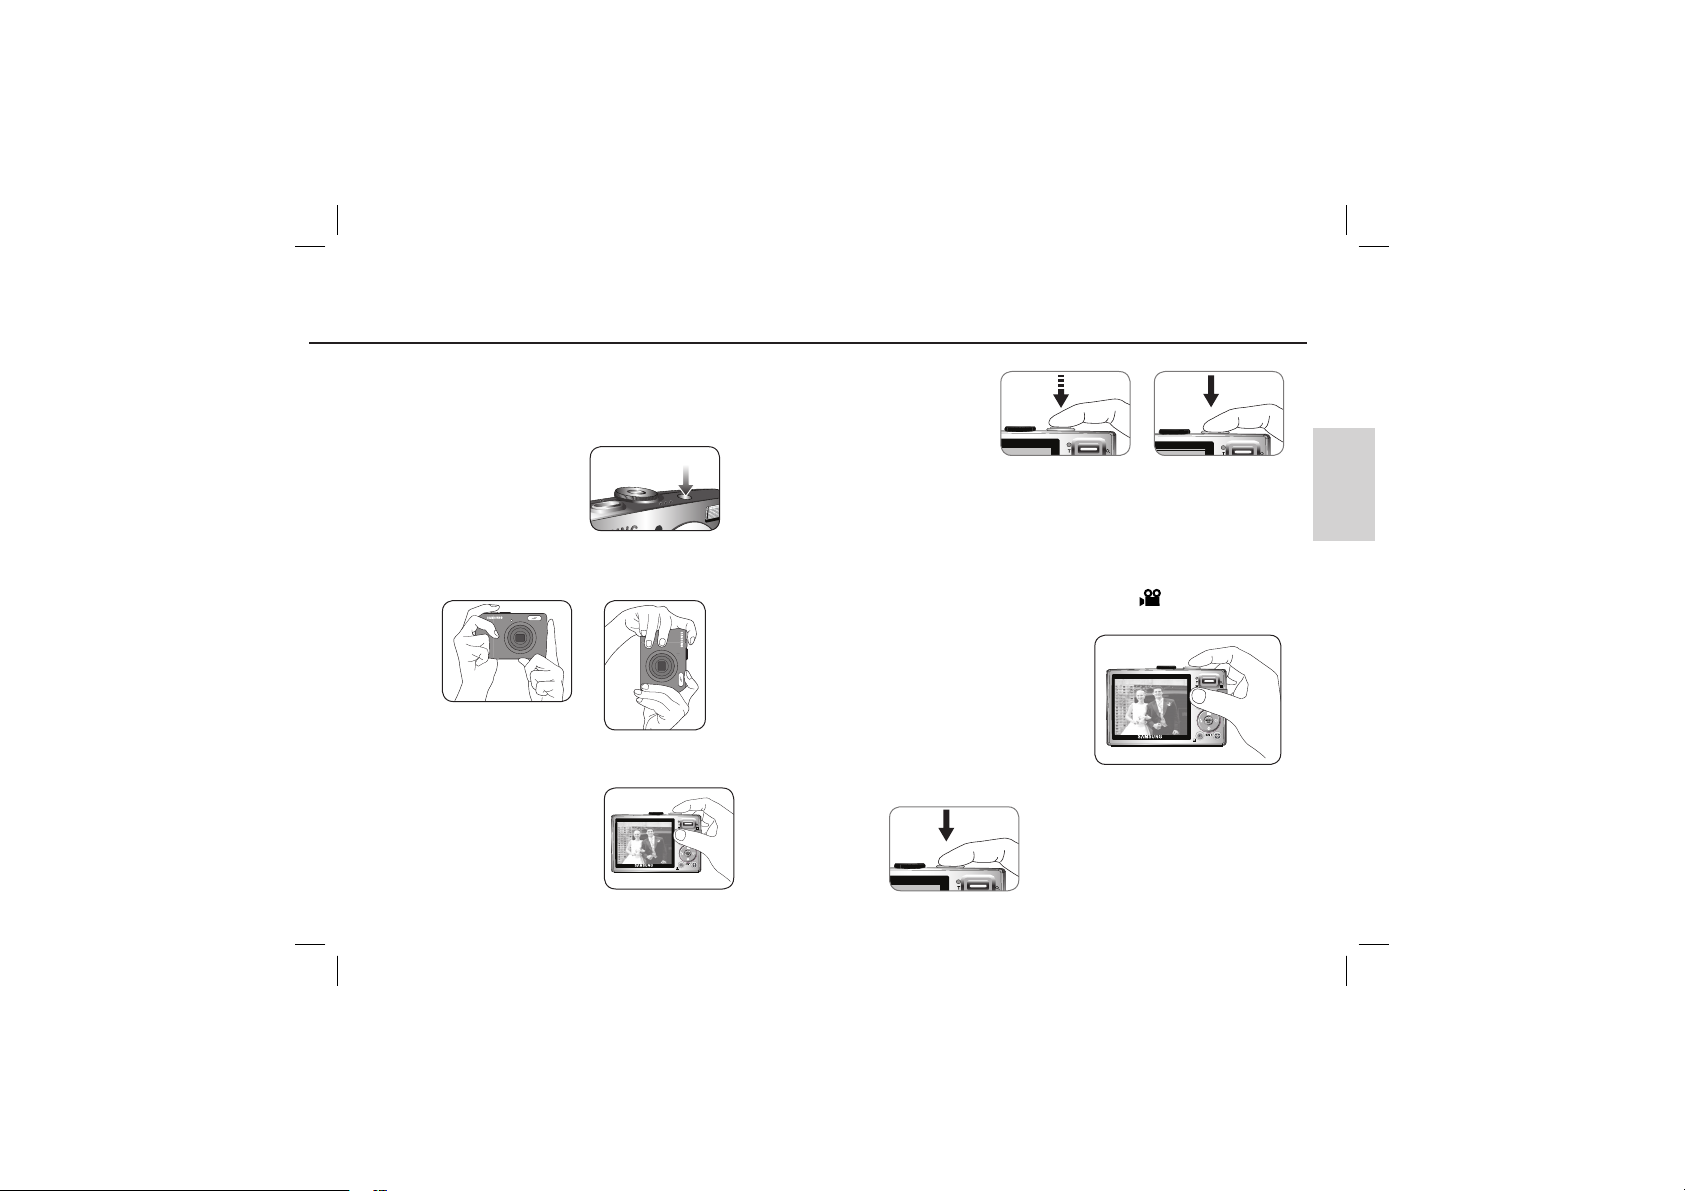
How to take a picture
Select a camera mode.
1. Turn on the camera
2. Hold the camera as shown
3. Confirm the composition
4. Take a picture
Pressing halfway down
Focus and Flash status
are checked.
How to record a movie
Rotate the Mode dial and select ( ).
1. Confirm the composition
2. Start the recording
Press the Shutter button and the recording starts
and press the Shutter button again to stop the
recording
ENGLISH
Pressing fully
Image is taken
9
Prev
Next
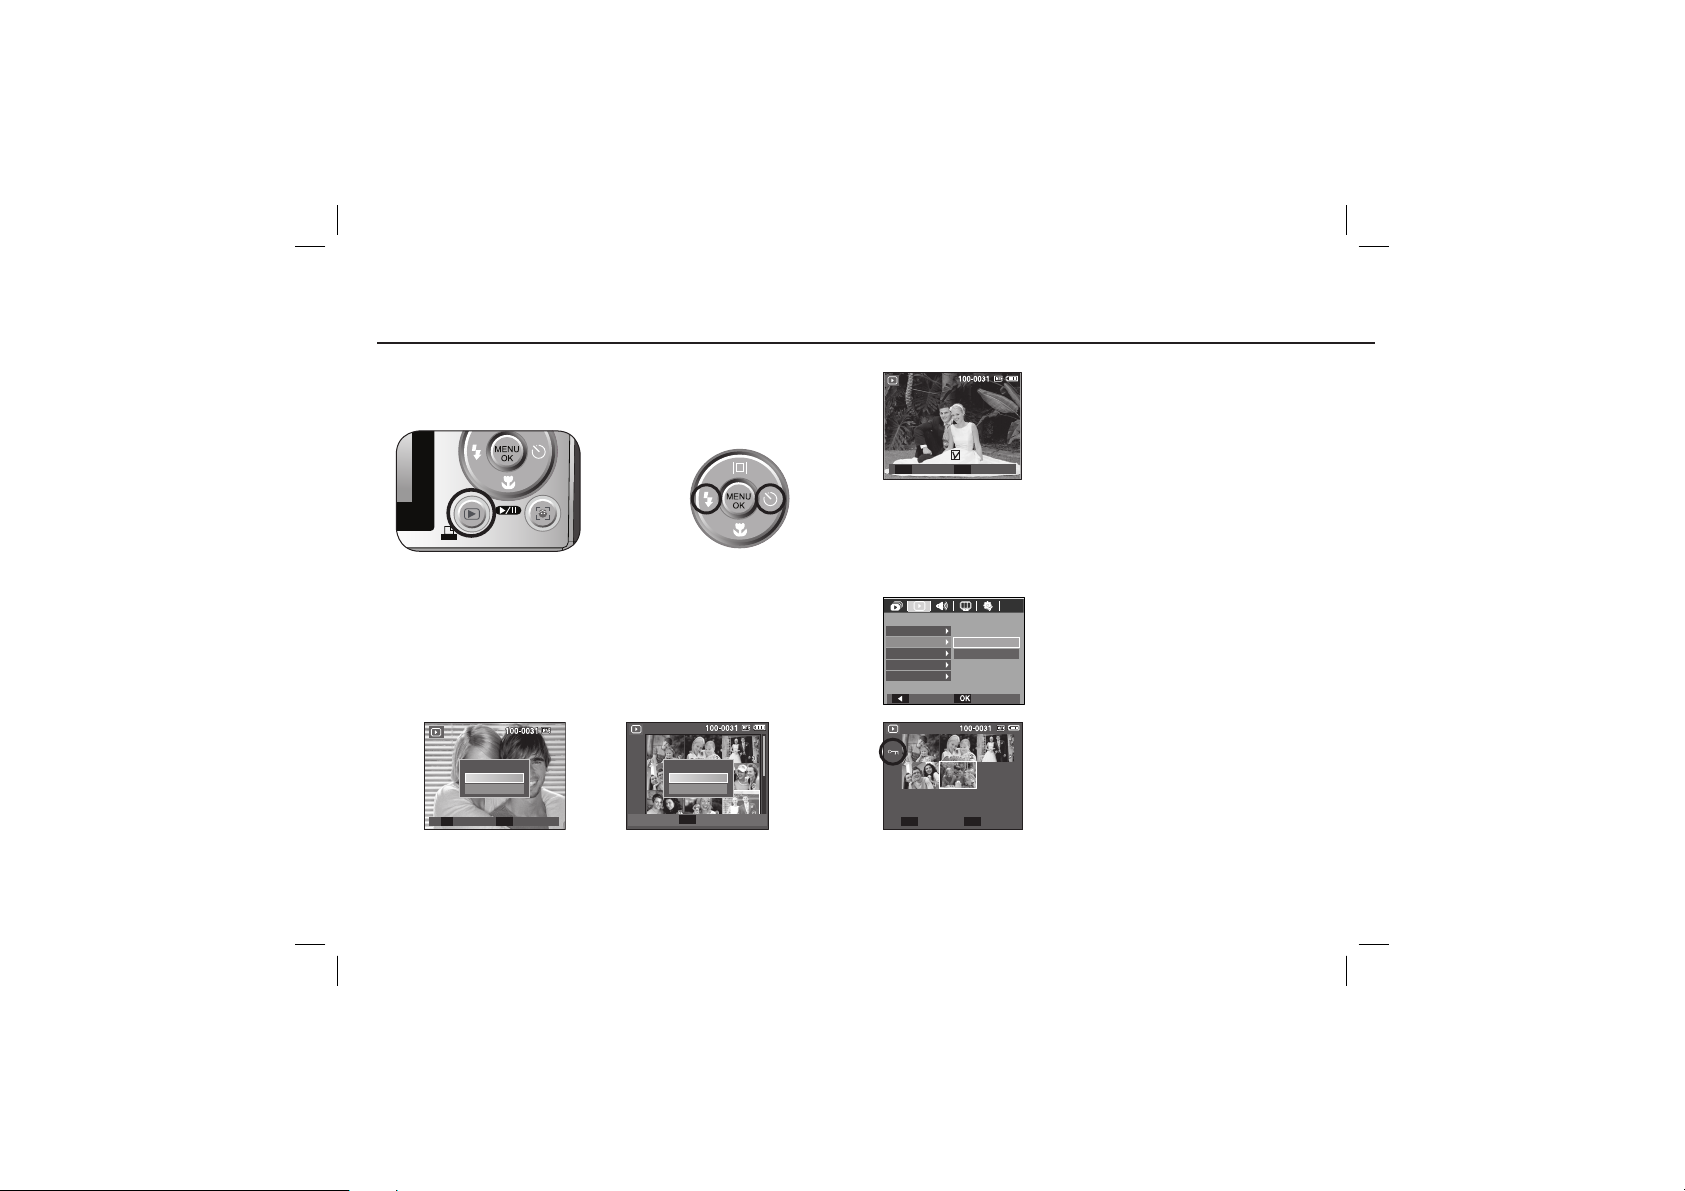
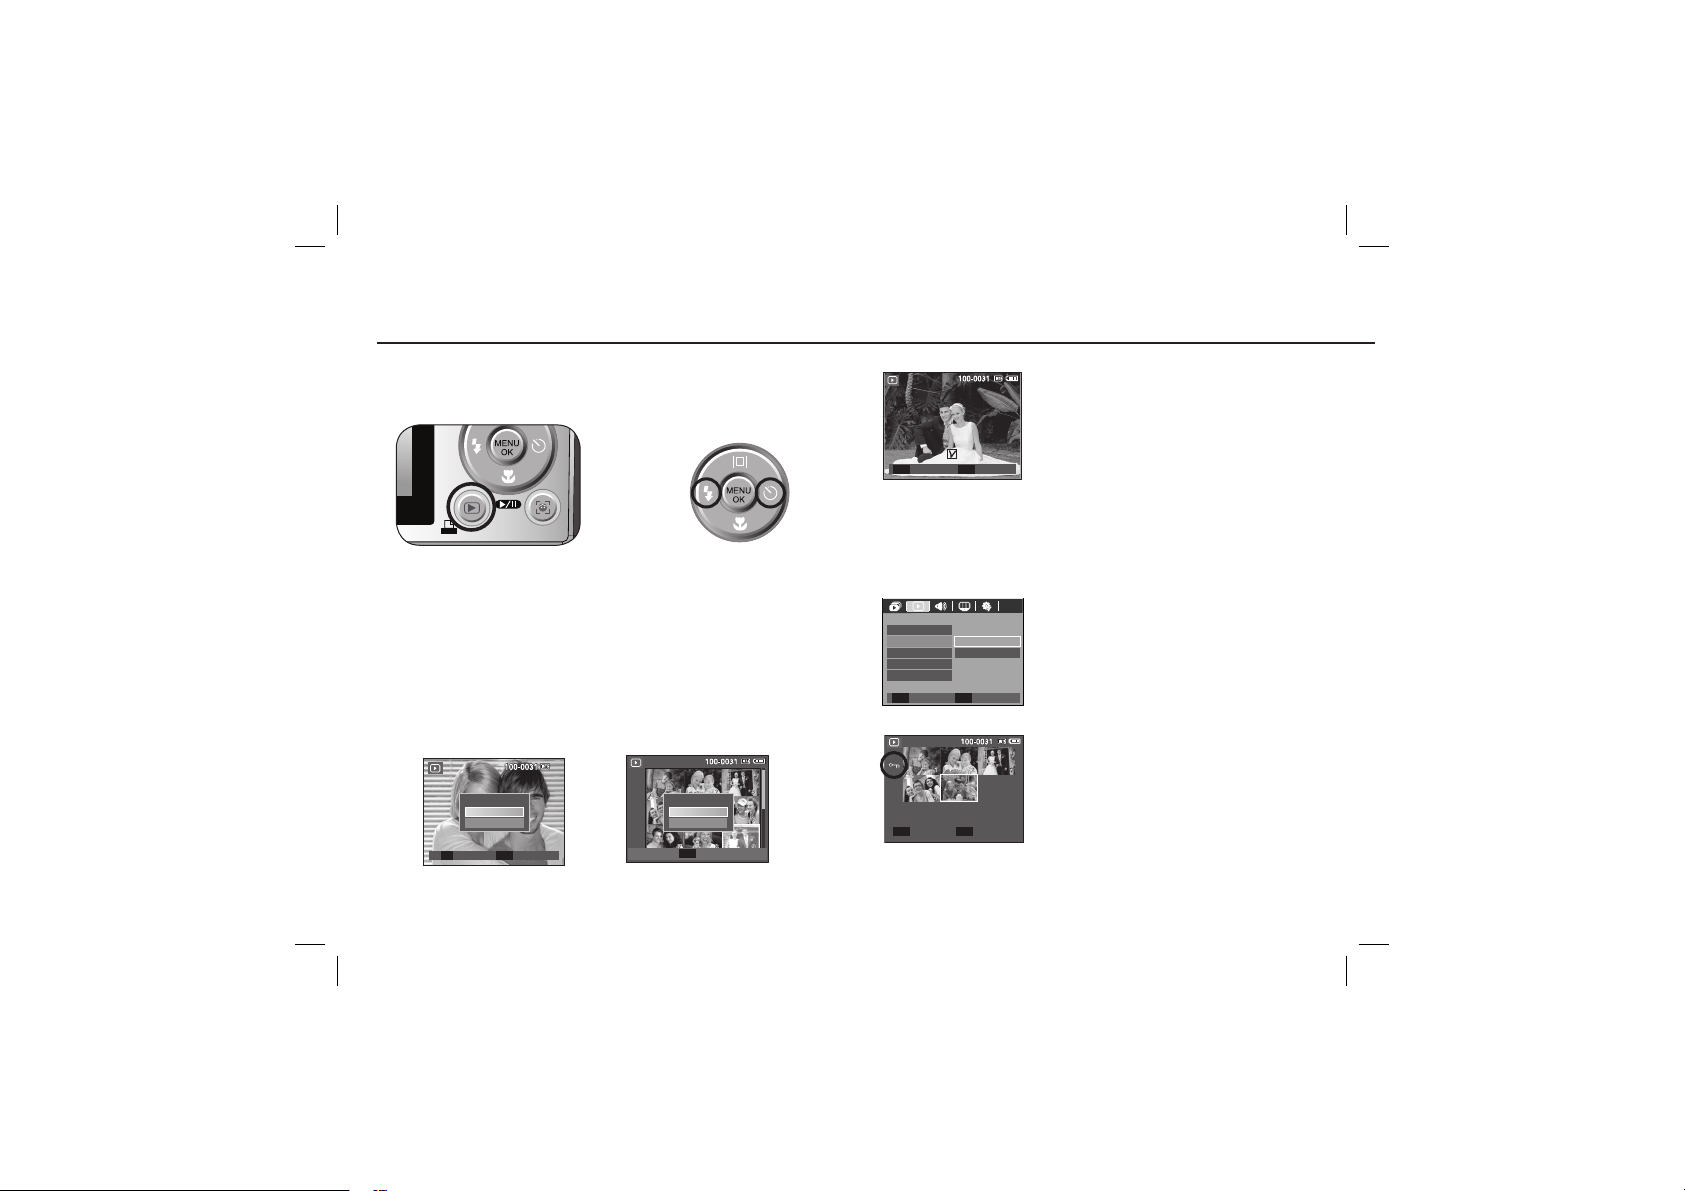
Playing back / Deleting images / Protecting images
Playingback the images
- The last image stored on the memory is displayed.
Press the
button to
select the Playback mode
Select an image that you
want to play back by pressing
the Left/ Right button
Deleting images
- This deletes images stored on the memory card.
1. Select an image that you want to delete by pressing the Left / Right button
and press the DELETE (
Delete ?
No
Yes
T
Select Confirm
OK
10
) button.
Delete ?
No
Yes
Confirm
OK
2. To delete images, press the T button.
- Left/Right button : Selects images
- T button : Checks for deletion
- OK button : Deletes the selected
Prev
T
Select Delete
OK
Next
images
Protecting images
- This is used to protect specific shots from being accidentally erased (Lock).
PLAYBACK
Voice memo
Protect
Delete
DPOF
Copy To Card
Back Set
Unlock Set
T/W OK
Select
All
[Select] : Selection window for an image to be
protected / released is displayed.
[All] : Protect / release all saved images
If you protect an image, the protect icon will be
displayed on the LCD monitor.
An image in LOCK mode will be protected from
the delete function or [Delete] functions, but will
NOT be protected from the [Format] function.
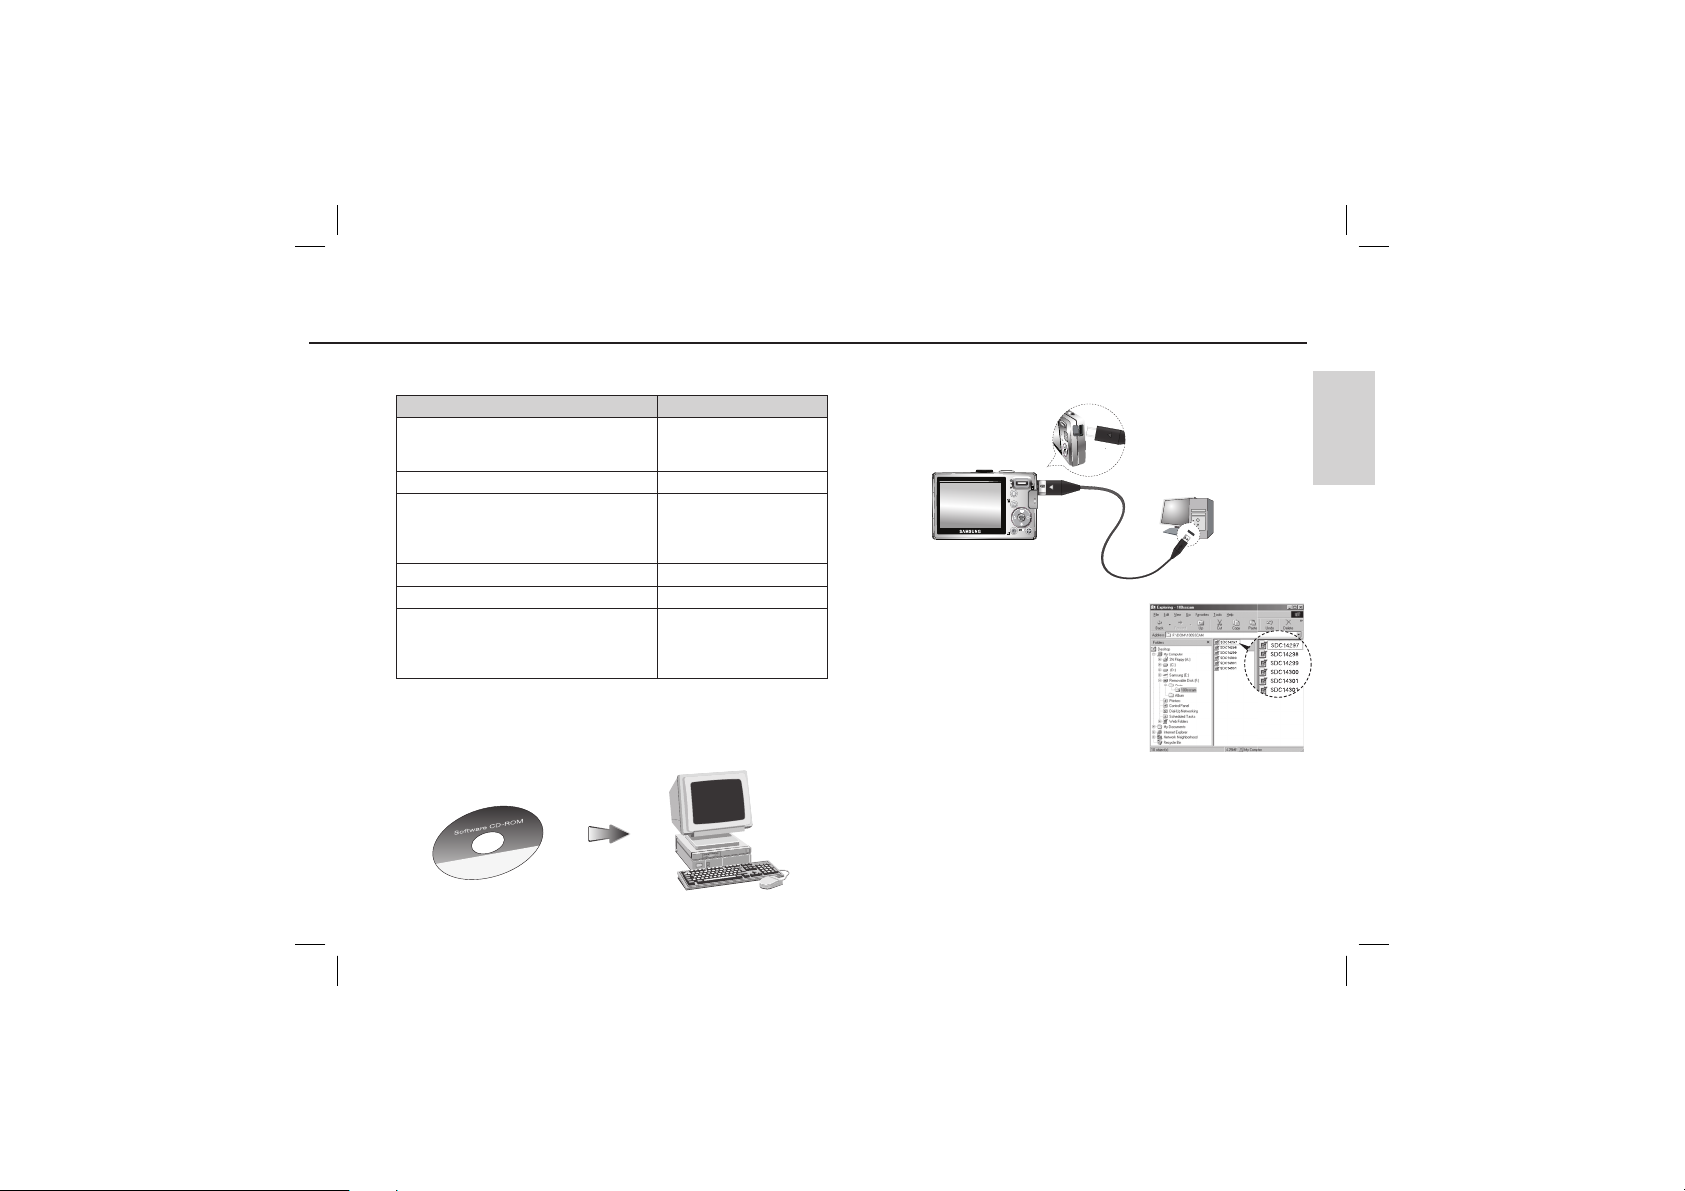
Downloading images
System Requirements
For Windows For Macintosh
PC with processor better than
Pentium II 450MHz
(Pentium 800MHz recommended)
Windows 98SE / 2000 / ME / XP/Vista Mac OS 10.0 ~ 10.4
Minimum 128MB RAM
(Over 512MB recommended)
200MB of available hard disk space
(Over 1GB recommend)
USB port USB port
CD-ROM drive CD-ROM drive
1024x768 pixels, 16bit color display compatible
monitor
(24bit color display recommended)
MicroSoft DirectX 9.0C
PC connection mode
1. Install the supplied Software.
Power Mac G3 or later
Minimum 64MB RAM
110MB of available hard-disk
space
MPlayer (For movie)
2. Download the images
ENGLISH
- Connect the camera and Computer with
supplied USB cable and download the image
on your computer to save them.
11
Specifications
Image Sensor - Type : 1/2.5" CCD
- Effective Pixel : Approx. 8.2 Mega-pixel
- Total Pixel : Approx. 8.3 Mega-pixel
Lens - Focal Length : SAMSUNG Lens f = 6.2 ~ 18.6mm
- F No. : F 2.8(W) ~ F 5.2(T)
- Digital Zoom :·Still Image mode : 1.0X ~ 3.0X
·Play mode : 1.0X ~ 10.2X
(depends on image size)
LCD Monitor - 2.5" color TFT LCD (230,000 dots)
Focusing - Type : TTL auto focus (Multi-AF, Center AF, Face Detection AF)
- Range
Wide
Tele 50cm ~ 80cm 50cm ~ Infinity
Shutter - Speed 1 ~ 1/1,500 sec. (Manual : 8 ~ 1/1,500 sec.)
Exposure - Control : Program AE
- Metering : Multi, Spot, Center Weighted
- Compensation : ±2EV (1/3EV steps)
- ISO : Auto, 80, 100, 200, 400, 800, 1600
Flash - Modes : Auto, Auto & Red-eye reduction, Fill-in flash,
- Range :
- Recharging Time : Approx. 4 sec
Sharpness - -2, -1, 0, +1, +2
Color Effect -
12
80cm ~ Infinity
Normal, B&W, Sepia, Red, Green, Blue, Negative, Custom Color
(35mm film equivalent : 37 ~ 111mm)
Normal Macro Auto Macro
Slow sync, Flash off, Red-eye Fix
Wide : 0.2m ~ 4.7m, Tele : 0.5m ~ 2.5m(ISO AUTO)
5cm ~ 80cm 5cm ~ Infinity
White Balance - Auto, Daylight, Cloudy, Fluorescent_H, Fluorescent_L,
Voice Recording - Voice Recording (max. 10 hours)
- Voice Memo in Still Image (max. 10 sec.)
Date Imprinting - Date, Date & Time, Off (user selectable)
Shooting - Still Image
·Mode :
·Scene : Nightscene, Children, Landscape, Close up, Text,
·Shooting : Single, Continuous, AEB, Motion Capture
·Self-timer : 10 sec., 2 sec., Double, Motion Timer
- Movie
·With Audio or without Audio
·Size : 640x480, 320x240
·Frame rate : 30 fps, 15 fps
Storage - Media
·Internal memory : 10MB flash memory
- File Format
·Still Image :
·Movie : AVI (MJPEG)
·Audio : WAV
Tungsten, Custom
Auto, Program, Manual, DIS, Photo Help Guide, Scene,
Portrait
Sunset, Dawn, Backlight, Firework, Beach & Snow
※
The maximum memory capacity of continuous
movie is 2 hours.
· External Memory (Optional) : SD (up to 2GB guaranteed)/
SDHC Card (up to 4GB guaranteed)/
MMC Plus (Up to 2GB)
JPEG (DCF), EXIF 2.2, DPOF 1.1, PictBridge 1.0
Specifications
- Image Size
3264
X
2448
3264
X
2176
3264
X
1836
2592
X
1944
2048
X
1536
1024
X
768
- Capacity (256 MB Size)
Super Fine 64 71 84 100 150 459
Fine
Normal 171 192 220 256 372 868
117 135 157 186 269 822
※ These figures are measured under Samsung standard conditions and may
vary depending on shooting conditions and camera settings.
"E" Button - Effect : Color, Image Adjust(Sharpness, Contrast, Saturation)
- Editing : Resize, Rotate, Color, Image Adjust (ACB, Red Eye
Fix, Brightness, Contrast ,Saturation)
Image Play - Type : Single image, Thumbnails, Multi Slide show, Movie
Interface - Digital output connector : USB 2.0 High Speed
- Audio : Mono
- Video output : NTSC, PAL (user selectable)
Power Source - Rechargeable battery : SLB-10A, 3.7V (1,050mAh)
- Adaptor : SAC-47 (DC 4.2V, 400mA)
Dimensions (WxHxD)
- 87.7 X 56.3 X 20mm (excluding protrusions)
Weight - 114.5g (without batteries and card)
Operating Temperature
- 0 ~ 40°C
Operating Humidity
- 5 ~ 85%
Software - Samsung Master, Adobe Reader
※ Specifications are subject to change without prior notice.
※ All trademarks are the property of their respective owners.
ENGLISH
13
Correct Disposal of This Product
Correct disposal of batteries in this product
Correct Disposal of This Product (Waste Electrical & Electronic
Equipment)
(Applicable in the European Union and other European countries with
separate collection systems) This marking shown on the product or its
literature, indicates that it should not be disposed of with other household
wastes at the end of its working life.
To prevent possible harm to the environment or human health from uncontrolled
waste disposal, please separate this from other types of wastes and recycle it
responsibly to promote the sustainable reuse of material resources. Household
users should contact either the retailer where they purchased this product, or their
local government office, for details of where and how they can take this item for
environmentally safe recycling. Business users should contact their supplier and
check the terms and conditions of the purchase contract.
This product should not be mixed with other commercial wastes for disposal.
Samsung Eco-mark
It is Samsung’s own symbol mark is used to effectively
communicate Samsung’s environmental friendly product
activities to the consumers. The mark represents
Samsung’s continuous effort on development of
environmental conscious products.
14
Correct disposal of batteries in this product (Applicable in the
European Union and other European countries with separate battery
return systems.)
This marking on the battery, manual or packaging indicates that the batteries in
this product should not be disposed of with other household waste at the end of
their working life. Where marked, the chemical symbols Hg, Cd or Pb indicate that
the battery contains mercury, cadmium or lead above the reference levels in EC
Directive 2006/66. If batteries are not properly disposed of, these substances can
cause harm to human health or the environment.
To protect natural resources and to promote material reuse, please separate
batteries from other types of waste and recycle them through your local, free battery
return system.
The rechargeable battery incorporated in this product is not user replaceable.
information on its replacement, please contact your service provider.
For

MEMO
ENGLISH
15

MEMO
16

Die Kamera kennen lernen
Microsoft Windows und das Windows-Logo sind eingetragene Warenzeichen
der Microsoft Corporation Incorporated in den Vereinigten Staaten und/oder
anderen Ländern.
Alle in dieser Bedienungsanleitung genannten Marken- und Produktnamen sind
eingetragene Warenzeichen der jeweiligen Firmen.
Inhalt und Illustrationen in diesem Handbuch können bei Aktualisierung der
Kamerafunktionen ohne vorherige Ankündigung verändert werden.
Weitere Informationen finden Sie in der Bedienungsanleitung auf der
Software- CD.
Inhalt
DEUTSCH
Die Kamera kennen lernen
Identifi kation der Funktionen / Lieferumfang der Kamera
Batteriebetriebsdauer und Anzahl der Aufnahmen (Aufnahmezeit)
Wenn die Kamera zum ersten Mal benutzt wird
LCD-Monitoranzeige
Moduswahl
Fotografi eren
Wiedergabe / Fotos löschen / Schützen von Bildern
Downloaden von Bildern
Technische Daten
2
4
5
6
7
8
9
10
11
12
Die Kamera kennen lernen
GEFAHR WARNUNG
Mit GEFAHR gekennzeichnete Informationen weisen auf eine unmittelbar drohende
Gefahr hin, die zum Tode oder zu schweren Verletzungen führen kann.
Versuchen Sie nicht, die Kamera in irgendeiner Weise zu verändern.
Dies kann Feuer, Verletzungen, einen Stromschlag oder schwerwiegende
Schäden Ihrer Person oder Ihrer Kamera verursachen. Die Inspektion des
Kamerainneren, Wartung und Reparatur dürfen nur von Ihrem Händler oder
einem Samsung Camera Kundendienstzentrum durchgeführt werden.
Benutzen Sie die Kamera nicht, wenn Flüssigkeiten oder Fremdkörper in
das Innere der Kamera gelangt sind. Schalten Sie die Kamera aus und
unterbrechen Sie dann die Stromversorgung. Wenden Sie sich unbedingt an
Ihren Händler oder ein Samsung Camera Kundendienstzentrum.
Benutzen Sie die Kamera auf keinen Fall weiter, da dies einen Brand oder
Stromschlag verursachen kann.
Benutzen Sie bitte dieses Gerät nicht in nächster Nähe zu feuergefährlichen
oder explosiven Gasen, da damit die Explosionsgefahr vergrößert werden
kann.
Stecken Sie keine metallenen oder entzündlichen Fremdkörper in die
Öffnungen der Kamera, wie z. B. den Speicherkar tensteckplatz und die
Batteriekammer. Das kann zu einem Brand oder Stromschlag führen.
Bedienen Sie die Kamera nicht mit nassen Händen. Es besteht die Gefahr
eines Stromschlags.
Mit WARNUNG gekennzeichnete Informationen weisen auf eine mögliche Gefahr
hin, die zum Tode oder zu schweren Verletzungen führen kann.
Benutzen Sie den Blitz nicht in nächster Nähe von Menschen oder Tieren.
Wird der Blitz zu nah an den Augen des Motivs gezündet, kann es zu
Augenschäden kommen.
Bewahren Sie aus Sicherheitsgründen dieses Gerät und die Zubehörteile
außer Reichweite von Kindern und Tieren auf, um Unfälle zu verhindern
wie z. B.:
- Verschlucken von Batterien oder Kamerakleinteilen. Bei einem Unfall
suchen Sie bitte sofort einen Arzt auf.
- Es besteht Verletzungsgefahr durch die beweglichen Teile der Kamera.
Wenn Sie Batterien und Kamera über einen längeren Zeitraum verwenden,
kann es zu Fehlfunktionen der Kamera kommen. Bei längerer Benutzung
sollten Sie die Kamera zwischendurch für einige Minuten abschalten, damit
sich das Gerät abkühlen kann.
Setzen Sie diese Kamera keinen hohen Temperaturen aus, wie z. B. in
einem geschlossenen Fahrzeug, direktem Sonnenlicht oder anderen Orten
mit starken Temperaturunterschieden. Zu hohe Temperaturen können die
Funktion der Kamera beeinträchtigen, die Bauteile der Kamera zerstören
und Feuer verursachen.
Weder Kamera noch Ladegerät dürfen während der Benutzung zugedeckt
werden. Das kann zur verstärkten Erwärmung führen und das
Kameragehäuse beschädigen oder ein Feuer verursachen. Benutzen Sie
die Kamera und ihr Zubehör immer an einem gut belüfteten Ort.
~2~
ACHTUNG
Mit ACHTUNG gekennzeichnete Informationen weisen auf eine mögliche Gefahr hin,
die zu leichten oder mäßigen Verletzungen führen kann.
Entfernen Sie die Batterien, wenn die Kamera längere Zeit nicht benutzt
wird.
Aus den Batterien kann korrosiver Elektrolyt austreten und die Bauteile der
Kamera irreparabel beschädigen.
Durch das Auslaufen, Überhitzen oder Explodieren der Batterien können
Feuer oder Verletzungen verursacht werden.
- Benutzen Sie nur solche Batterien, die die richtigen Spezifikationen für die
Kamera aufweisen.
- Die Batterien dürfen niemals kurzgeschlossen, erhitzt oder in Feuer
geworfen werden.
- Legen Sie die Batterien stets polrichtig ein.
Der Blitz darf beim Zünden nicht mit der Hand oder irgendwelchen
Gegenständen berührt werden. Berühren Sie den Blitz niemals, wenn er
mehrmals hintereinander benutzt wurde, sonst kann es zu Verbrennungen
kommen.
Die Kamera kennen lernen
Bevor Sie irgendwelche Kabel oder den Netzadapter anschließen,
überprüfen Sie die Richtung und führen Sie sie nicht gewaltsam ein.
Dies könnte zu Schäden an Kabeln und Kamera führen.
Setzen Sie die Speicherkarte nicht falsch herum ein.
Es wird höchstwahrscheinlich zu Fehlfunktionen des Computers kommen,
wenn der 20-Pin-Anschluss mit dem USB-Anschluss des PCs verbunden
wird. Verbinden Sie den 20-Pin-Anschluss nie mit dem USB-Anschluss
des PCs.
Sie müssen eine neu gekaufte Speicherkarte vor dem ersten Gebrauch
formatieren, ebenso Speicherkarten, die Daten enthalten, die die Kamera
nicht lesen kann oder Bilder, die mit einer anderen Kamera gemacht
wurden.
DEUTSCH
Vermeiden Sie Kontakt mit dem Objektiv bzw. der Objektivabdeckung, da es
andernfalls zu unscharfen Aufnahmen und zur Fehlfunktion der Kamera
kommen kann.
Vor einem wichtigen Ereignis oder dem Antritt einer Reise sollten Sie den
Zustand der Kamera überprüfen. Samsung kann nicht für
Funktionsstörungen der Kamera verantwortlich gemacht werden.
~3~
Identifikation der Funktionen / Lieferumfang der Kamera
Moduswahl
Auslöser
Mikrofon
USB-/ AV-Anschluss
EIN-/AUS-Schalter
Lautsprecher
BLITZ
AF-Sensor /
SelbstauslöserLampe
Objektiv /
Objektivabdeckung
LCD-Monitor
Kamerastatuslampe
Zoom-T-Taste (Digitalzoom)
Zoom-W-Taste (Indexbild)
E-Taste (Effekt)
Öse zur Befestigung der
Trageschlaufe
Fn / Löschtaste
Steuerkreuz
FD (Gesichtserkennung)-
Taste
Wiedergabemodus- /
Druck-Taste
Lieferumfang
Kamera
Wiederaufladbarer Akku (SLB-10A)
Wechselstrom-Kabel
Trageschlaufe
USB-Kabel (SUC-C3)
Wechselstromadapter (SAC-47)
Optional
Soft-Tasche
Bitte überprüfen Sie vor dem Gebrauch des Gerätes, ob Sie alle Teile erhalten haben. Der Lieferumfang kann je nach Verkaufsland unterschiedlich sein. Wenn Sie Sonderzubehör kaufen möchten,
wenden Sie sich bitte an einen Samsung Ver triebspartner in Ihrer Nähe oder ein Samsung Kundendienstzentrum.
SD/SDHC/MMC Speicherkarte
Bedienungsanleitung,
Produktgarantie
Software-CD
~4~
Batteriebetriebsdauer und Anzahl der Aufnahmen (Aufnahmezeit)
Anzahl der Bilder und Akkudauer: Verwendung des SLB-10A
Foto Videoclip
Akkulebensdauer Anzahl der Bilder Aufnahmedauer
Ca. 130 Minuten Ca. 260 Aufnahmen Ca. 120 Minuten
Bei Verwendung des voll
aufgeladenen Akkus,
Auto-Modus, Bildgröße
8 M, Bildqualität fein,
Aufnahmeintervall: 30s
Änderung der Zoomposition
Bedingungen
* Diese Werte wurden unter den Standardbedingungen von Samsung gemessen
und können je nach Gebrauch variieren.
zwischen Weitwinkel und Tele
wird nach jeder Aufnahme
rückgängig gemacht.
Verwendung des Blitzes bei
jeder zweiten Aufnahme.
Verwendung der Kamera für 5
Minuten und dann Ausschalten
für 1 Minute.
Bei Verwendung des
voll aufgeladenen
Akkus640x480
Bildgröße30fps
Bildfrequenz
Bei Verwendung eines 256 MB großen MMC (Multi Media Card)
- Speichers ergibt sich folgende Aufnahmekapazität.
Aufgenommene
Bildgröße
Foto
Videoclip
* Die Zoomtasten sollten während der Videoclip-Aufnahme nicht gedrückt werden.
Durch den Zoombetrieb können sich die Aufnahmezeiten ändern.
SUPERFEIN FEIN NORMAL 30 FPS 15FPS
Etwa64Etwa
Etwa71Etwa
Etwa84Etwa
Etwa
100
Etwa
150
Etwa
459
Etwa
Etwa
Etwa
---
---
117
135
157
186
269
822
Etwa
171
Etwa
192
Etwa
220
Etwa
256
Etwa
372
Etwa
868
--
--
--
--
--
--
Etwa
2' 02"
Etwa
7' 39"
Etwa
4' 05"
Etwa
13' 15"
DEUTSCH
~5~
Wenn die Kamera zum ersten Mal benutzt wird
Laden Sie Akkus vor dem ersten Gebrauch der Kamera vollständig auf.
Wenn die Kamera das erste Mal eingeschaltet wird, erscheint ein Menü auf dem
LCD-Monitor, um Datum, Uhrzeit und Sprache einzustellen. Nach der Einstellung
von Datum, Uhrzeit und Sprache wird dieses Menü nicht mehr angezeigt. Stellen
Sie vor dem Gebrauch der Kamera das Datum, die Uhrzeit und die Sprache ein.
So stellen Sie Datum, Uhrzeit und Datumstyp ein
1. Wählen Sie das Menü [Language], indem Sie
die AUF/AB Taste drücken und die RECHTSTaste drücken.
2. Wählen Sie das gewünschte Untermenü mit der
AUF / AB - Taste und drücken Sie anschließend
OK.
Sie können eine von 22 Sprachen auswählen. Diese sind unten
DISPLAY
Language
Date&Time
Back Set
ENGLISH
한국어
FRANÇAIS
DEUTSCH
ESPAÑOL
ITALIANO
OK
aufgelistet :
- Englisch, Koreanisch, Französisch, Deutsch, Spanisch, Italienisch,
Chinesisch (vereinfacht), Chinesisch (traditionell), Japanisch, Russisch,
Portugiesisch, Niederländisch, Dänisch, Schwedisch, Finnisch,
Thailändisch, Bahasa (Malaysia/Indonesien), Arabisch, Tschechisch,
Polnisch, Ungarisch und Türkisch.
Die Spracheinstellung wird auch dann beibehalten, wenn die Kamera
aus- und eingeschaltet wird.
~6~
So stellen Sie Datum, Uhrzeit und Datumstyp ein
1. Wählen Sie das Menü [Date&Time], indem Sie die AUF/AB Taste drücken und
die RECHTS-Taste drücken.
2. Wählen Sie das gewünschte Untermenü mit der
AUF / AB /LINKS / RECHTS - Taste und drücken
Sie anschließend OK.
RECHTS-Taste :
Auswahl von JAHR / MONAT /
TAG / STUNDE / MINUTE /
DATUMSTYP
DISPLAY
Language
Date&Time
Back Set
London
08/01/01
13:00
yyyy/mm/dd
LINKS-Taste : bewegt den Cursor zum [Date&Time]-Hauptmenü, wenn sich
der Cursor auf dem ersten Menüpunkt der Datumseinstellung
befindet. In allen anderen Fällen wird der Cursor von seiner
momentanen Position aus nach links gesetzt.
AUFWÄRTS/ABWÄRTS-Taste : ändert den Wert jeder Anzeige.
Der LCD-Monitor zeigt Informationen über die Aufnahmefunktionen
und ausgewählten Optionen an. Weitere Informationen finden Sie in der
Bedienungsanleitung auf der Software-CD.
[Bild & voller Status]
Nr. Beschreibung Symbole
1 Aufnahmemodus
2
Gesichtserkennung / Eigenporträt
3 Blitz
4 Selbstauslöser
5 Makro
6 Kontrast
/
LCD-Monitoranzeige
Nr. Beschreibung Symbole
7 Schärfe
8 Farbe / Sättig.
9 Autofokus-messfeld
10 Warnung Vor Verwacklungen
11 Datum / Uhrzeit
12 Belichtungskorrektur
13 White Balance
14 Iso
15 Bildfolgemodus
16 Belichtung
17 Bildqualität / Bildrate
18 Bildgröße
19 Batterie
Speicherkartensymbol / Internationales
20
21
22 Sprachnotiz/mik. Aus
23
Speichersymbol
Anzahl Der Verbleibenden Aufnahmen
/ Verbleibende Zeit
Balken Für Optisches / Digitales Zoom /
Digitalzoomfaktor
/
2008/01/01 01:00 PM
/
/
6/00:00:00
/
DEUTSCH
~7~
Moduswahl
Sie können den gewünschten Kameramodus mithilfe der Moduswahl auf der Oberseite der Kamera wählen.
~8~
AUTOMATIK
Wählen Sie diesen Modus für schnelle und einfache
Aufnahmen mit minimaler Benutzerbeteiligung.
In diesem Modus können Sie grundlegende Einstellungen
vornehmen. Um ein Menü mit zusätzlichen Funktionen
anzuzeigen, einen anderen Kameramodus wählen.
PROGRAMM
Mit der Auswahl des Automatik-Modus wird die Kamera auf
die optimalen Einstellungen gesetzt. Sie können aber auch
alle Funktionen mit Ausnahme von Blende und Verschlusszeit
manuell konfigurieren.
MANUELL
Sie können alle Funktionen mit Blende und Verschlusszeit
manuell konfigurieren.
DIS
Dieser Modus reduziert die Auswirkung von Verwacklungen
der Kamera und hilft Ihnen dabei unter schlechten
Lichtbedingungen ein gut belichtetes Bild zu erhalten.
TIPPS UND TRICKS
Hilft dem Benutzer dabei, die richtige Aufnahmemethode zu
lernen und beinhaltet Lösungen für potenzielle Probleme, die
eventuell auftreten können. Das ermöglicht dem Benutzer auch,
die am besten geeignete Methode, für das Aufnehmen von
Bildern zu üben.
PORTRÄT
Bitte wählen Sie diesen Modus für schnelle und einfache
Porträts.
SZENE
Verwenden Sie dieses Menü, um ohne großen Aufwand
die optimalen Einstellungen für eine Vielzahl von
Aufnahmesituationen zu konfigurieren.
VIDEOCLIP
Videoclips können so lange aufgenommen werden, wie es die
verfügbare Aufzeichnungszeit (Speicherkapazität) erlaubt.
Fotografieren
So werden Aufnahmen gemacht
Wählen Sie einen Kameramodus.
1. Schalten Sie die Kamera ein.
2. Halten Sie die Kamera wie im Bild gezeigt.
3. Bestätigen Sie die Komposition.
4. Machen Sie
eine Aufnahme.
Auslöser leicht andrücken
Fokus und Blitzstatus
werden geprüft.
Aufnahme eines Videoclips
Drehen Sie das Moduswahlrad und wählen Sie ( ).
1. Bestätigen Sie die Komposition.
2. Beginnen Sie mit der Aufnahme
Beim Drücken auf den Auslöser beginnt die
Aufnahme. Bei nochmaligem Drücken des
Auslösers wird die Aufnahme gestoppt.
Auslöser durchdrücken
Das Bild wird
aufgenommen
DEUTSCH
~9~
Wiedergabe / Fotos löschen / Schützen von Bildern
Prev
Next
Wiedergabe der Bilder
- Das zuletzt gespeicherte Bild wird angezeigt.
Drücken Sie die Taste
,
um den Wiedergabemodus
auszuwählen.
Löschtaste
- Damit werden auf der Speicherkarte gespeicherte Bilder gelöscht.
1. Die Links-/Rechts-Taste drücken, um das zu löschende Bild auszuwählen,
und dann die LÖSCH-Taste (
T
AUSWAHL BESTÄT
~10~
LÖSCHEN?
NEIN
JA
OK
Berühren Sie die Taste und
gleiten Sie mit dem Finger
nach links / rechts, um ein
Bild auszuwählen.
) drücken.
LÖSCHEN?
NEIN
JA
OK
BESTÄT
2. Um Bilder zu löschen, auf die T-Taste drücken.
- LINKS- / RECHTS - Taste : Bilder
- T-Taste : Löschung überprüfen
Prev
Next
AUSWÄHLEN LÖSCHEN
T
OK
- OK-Taste : Auswahl bestätigen
So schützen Sie die Bilder
- Diese Funktion wird verwendet, um bestimmte Aufnahmen vor
versehentlichem Löschen zu schützen (SPERREN).
WIEDERGABE
SPRACHNOTIZ
SCHÜTZEN
LÖSCHEN
DPOF
KOPIEREN
ZURÜCK FESTLEG
T/W
FREIGABE FESTLEG
AUSWAH L
ALLE
OK
OK
[AUSWAHL] : Das Auswahlfenster für ein zu
schützendes / freizugebendes Bild
wird angezeigt.
[ALLE] : Alle gespeicherten Bilder schützen /
freigeben
Wenn ein Bild geschützt ist, erscheint das
Löschschutz- Symbol auf dem LCD-Monitor.
Im Modus SPERREN wird das Bild vor den
Löschfunktionen oder [LÖSCHEN] geschützt,
aber NICHT vor der Funktion [FORMAT.].
auswählen
Downloaden von Bildern
Systemanforderungen
Für Windows Für Macintosh
PC mit einem Prozessor besser als
Pentium II 450MHz
(Pentium 800 MHz empfohlen)
Windows 98SE/2000/ME/XP/Vista Mac OS 10,0 – 10,4
Minimum 128 MB RAM
(über 512 MB empfohlen)
200 MB verfügbarer Festplattenspeicherplatz
(über 1 GB empfohlen)
USB-Anschluss USB-Anschluss
CD-ROM-Laufwerk CD-ROM-Laufwerk
Monitor, der 1024x768 Pixel bei 16 Bit
Farbtiefe darstellen kann
(24-Bit-Farbanzeige empfohlen)
Microsoft DirectX 9.0C
PC-Anschlussmodus
1. Installieren Sie die mitgelieferte Software.
Power Mac G3 oder höher
Minimum 64MB RAM
110 MB verfügbarer
Festplattenspeicherplatz
MPlayer (für Videoclips)
2. Laden Sie die Bilder herunter
DEUTSCH
- Verbinden Sie die Kamera und den Computer
mithilfe des mitgelieferten USB-Kabels
und laden Sie das Bild auf Ihren Computer
herunter, um es zu speichern.
~11~
Technische Daten
Bildsensor - Typ : 1/2,5” CCD
- Effektive Pixel : ca. 8,2 Megapixel
- Pixel insgesamt : ca. 8,3 Megapixel
Objektiv - Brennweite : SAMSUNG Lens f = 6,2 ~ 18,6mm
- F Nr. : F 2,8 (Weitwinkel) ~ F 5,2 (Tele)
- Digitalzoom :·Fotomodus: 1,0X ~ 3,0X
·Wiedergabemodus: 1,0X ~ 10,2X
(je nach Bildgröße)
LCD-Monitor - 2,5"-Farb-TFT-LCD (230,000 Bildpunkte)
Fokussierung - Type : TTL Autofokus (Multi-AF, Manuelle AF, Gesichtserkennungs-AF)
- Bereich
WEITWINKEL
TELE 50cm ~ 80cm 50cm ~ unendlich
Auslöser - Zeit : 1-1/1,500 s (Manuell : 8 – 1/1.500 s)
Belichtung - Kontrolle : Programm-AE
- Belichtungsmessung : MULTI, SPOT, ZENTRIER
- Belichtungskorrektur : ± 2 EV (in 1/3 EV - Schritten)
- ISO : Auto, 80, 100, 200, 400, 800, 1600
BLITZ - Modi : Automatikblitz & Rote-Augen-Reduzierung, Aufhellblitz,
- Bereich : Weitwinkel : 0,2m ~ 4,7m,
- Aufladezeit : ca. 4s
SCHÄRFE - -2, -1, 0, +1, +2
FARBEFFEKT -
~12~
Normal, S/W, Sepia, Rot, Grün, Blau, Negativ, eigene Farbe
(entspricht bei 35 mm Film: 37 ~ 111mm)
NORMAL MAKRO AUTO-MAKRO
80cm - unendlich
Slow Synchro, Blitzabschaltung, Rote-Augen-Korrektur
Tele : 0,5m ~ 2,5m (ISO AUTO)
5cm ~ 80cm 5cm ~ unendlich
WEISSABGLEICH
- Automatik, Tageslicht, Bewölkt, Kunstlicht H, Kunstlicht L, Glühlicht,
Sprachaufnahme
- Tonaufnahme (max. 10 Stunden)
- Sprachnotiz im Foto-Modus (max. 10 Sek.)
Datumseinbelichtung
- DATUM, DAT&ZEIT, AUS (wählbar)
Aufnahme - Foto
·Modus : AUTOMATIK, PROGRAMM, MANUELL, DIS, Tipps und
·SZENE : NACHT, KINDER, LANDSCHFT, NAHAUFN., TEXT,
·Aufnahme : EINZELBILD, SERIENBILDER, BELICHTUNGSREIHE
·Selbstauslöser : 10s, 2s, Doppelt, Bewegungstimer
- Videoclip
·Mit oder ohne Ton
·Größe : 640x480, 320x240
·Bildwiederholfrequenz : 30FPS, 15FPS
Speicher - Speichermedium
·Interner Speicher: 10MB Flash-Speicher
- Dateiformat
·Foto : JPEG (DCF), EXIF 2.2, DPOF 1.1, PictBridge 1.0
·Videoclip: AVI (MJPEG)
·Audio : WAV
Benutzerdefiniert
Tricks (Aufnahme), SZENE, PORTRÄT
SONNENUN., DÄMMERUNG, GEGENLICHT,
FEUERWERK, STR.&SCHN
(AEB), BEWEGUNGSAUFNAHME
※
Die maximale Speicherkapazität eines fortlaufenden Videoclips
beträgt 2 Stunden.
· Externer Speicher (Optional) : SD (bis zu 2GB)
SDHC Card (bis zu 4GB)
MMC Plus (Bis zu 2GB)
Technische Daten
- Bildgröße
3264
X
2448
3264
X
2176
3264
X
1836
2592
X
1944
2048
X
1536
1024
X
768
- Kapazität (256MB Größe)
SUPERFEIN 64 71 84 100 150 459
FEIN 117 135 157 186 269 822
NORMAL 171 192 220 256 372 868
※ Diese Werte wurden unter den Normbedingungen von Samsung gemessen und
können je nach Aufnahmebedingungen und Kameraeinstellung variieren.
„E“-Taste - EFFEKT : Farbe, Bild Einstellen (Schärfe, Kontrast, Sättigung)
- Bearbeitung : GRÖSSE ÄNDERN, DREHEN, FARBE, BILD
EINSTELLEN (ACB, R.AUG.RED, HELLIGKEIT,
KONTRAST, SÄTTIGUNG)
Bildwiedergabe - Typ: EINZELBILD, INDEXBILDER, MULTI-DIASHOW, VIDEOCLIP
Schnittstelle - Digitaler Ausgangsanschluss : USB 2.0 High Speed
- Ton : Mono
- Videonorm : NTSC, PAL (wählbar)
Energieversorgung - Aufladbarer (Akku) : SLB-10A, 3,7V (1,050mAh)
- Adapter : SAC-47 (Gleichstrom 4,2V, 400mA)
Abmessungen (B x H x T)
- 87,7 x 56,3 X 20mm (ohne Überstand)
Gewicht - 114.5g (ohne Batterien und Karte)
Betriebstemperatur
- 0 ~ 40°C
Betriebs-Luftfeuchtigkeit
- 5 ~ 85%
Software - Samsung Master, Adobe Reader
※ Änderung der Spezifikationen ohne Vorankündigung vorbehalten.
※ Alle Warenzeichen sind Eigentum ihrer jeweiligen Inhaber.
DEUTSCH
~13~
 Loading...