

Pico Projector
User manual
www.samsung.com
Type A. 05/2012. Rev. 1.0
Please read all Safety precautions before using your
device to ensure safe and proper use.
Samsung is not responsible for injuries or damages
that result from improper usage or failure to follow
safety precautions.
Safety precautions
Do not touch the power cord with wet hands,
or disconnect the charger by pulling on the
cord
It may cause electric shock.•
Be careful When you use the battery
Do not apply strong pressure to or pierce the •
battery.
Avoid exposing your device and batteries to •
very cold or very hot temperatures..
Do not allow your device to get wet: liquids can •
cause serious damage.
Do not allow your child or pet to suck or bite •
the device.
Do not let the battery contacts touch metal •
object.
Do not use if the product overheats
Prolonged exposure of your skin to an •
overheated device may cause low temperature
burn symptoms, such as red spots and
pigmentation
Do not store your device near or in heaters,
microwaves, hot cooking equipment, or high
pressure containers
Your device may overheat and cause a fire.•
Do not expose your device to direct sunlight
for extended periods of time
Do not drop your device or cause impacts to
your device
Do not allow children to use it as they could
hurt themselves and others, or damage the
device
This may damage the device or cause a fire.•
If children use the device, make sure that they •
use the device properly
2 3 4 5 6
Keep your device in a dry place away from
moisture or water
Dust can cause your device to malfunction.•
Humidity and all types of liquids may damage •
device parts or electronic circuits.
If you use the product for a long time, it may
cause seizures and fainting symptoms. If you
feel discomfort, stop using it immediately
For service, take your device to a Samsung
Service Centre
Any changes or modifications to your device •
can void your manufacturer’s warranty.
RiskGroup 2
CAUTION. Possibly hazardous
optical radiation emitted from this
product. Do not stare at operating
lamp. May be harmful to the eye.
Product tested against IEC62471
Copyright
Copyright © 2012 Samsung Electronics
This user manual is protected under international
copyright laws.
No part of this user manual may be reproduced,
distributed, translated, or transmitted in any
form or by any means, electronic or mechanical,
including photocopying, recording, or storing
in any information storage and retrieval system,
without the prior written permission of Samsung
Electronics.
Trademarks
SAMSUNG, and the SAMSUNG logo are •
registered trademarks of Samsung Electronics.
Bluetooth• ® is a registered trademark of
the Bluetooth SIG, Inc. worldwide. More
information about Bluetooth is available at
www.bluetooth.com.
All other trademarks and copyrights are the •
property of their respective owners.
Graphics used in this manual are for illustration
purposes. The actual products may vary.
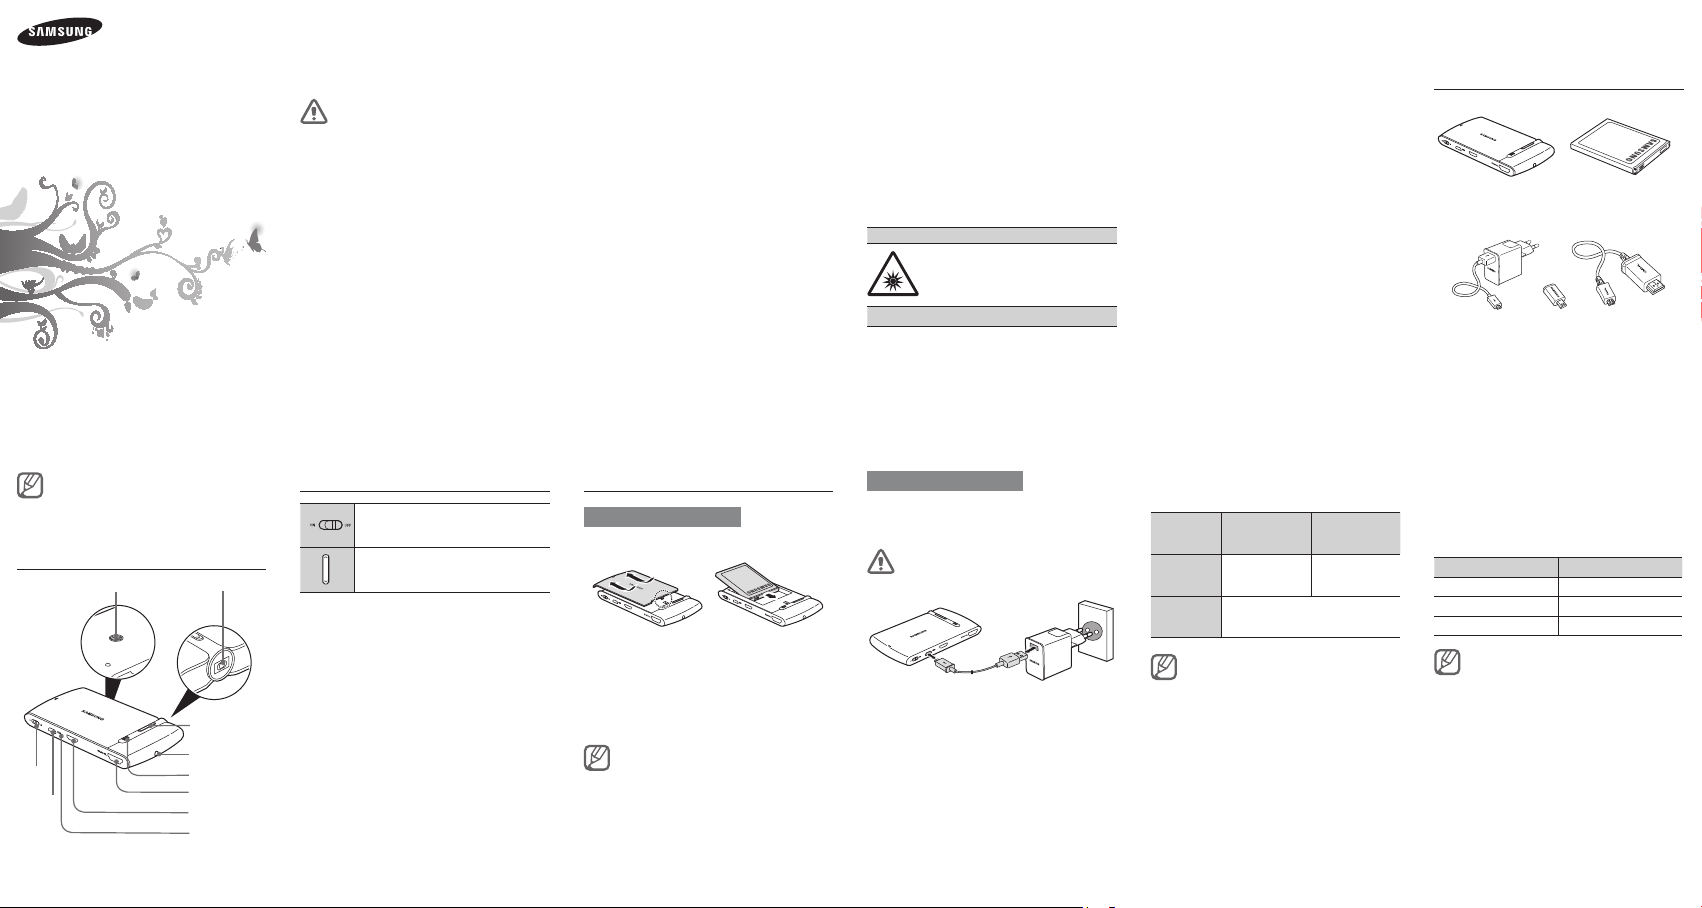
Unpack
Projector Battery
Trav el
adapter
* Data synchronization is unavailable when you
connect 5 to 11 pin connectors to your PC via a
data cable.
*5 to 11 pin
connector
5 pin MHL
cable
The supplied items may vary.
•
Tripod and HDMI cables are sold
•
separately.
Overview
Tripod mount
Power
key
Charger
input jack
Lens
Focus
adjustment button
Headset jack
Speaker
HDMI output port
MHL/HDMI input port
Status LED
Buttons functions
Slide the power key left or right to
turn the projector on or off.
Press the button to adjust the focus
and definition of the screen.
Charging the device
Installing the battery
Install the battery before charging the projector.
Press and slide the battery cover with both
1
thumbs.
Insert the new battery as shown in the
2
above drawing.
Close the battery cover.
3
As the battery is consumable, the
battery life will drain gradually. When
the battery life is significantly depleted,
replace the new battery.
Charging the battery
This projector has a rechargeable battery. Make
sure the projector is fully charged before using it
for the first time.
Use only Samsung-approved chargers
and cables.
Connect the travel adapter to the charger
1
input jack on the projector. During charging,
the status LED will turn red. If charging does
not begin, unplug the charger and plug it
in again.
When fully charged, the status LED changes
2
to blue. Unplug the charger from the wall
outlet and the projector.
Charging time and standard
operating time
Connection Projector
Operating
Charging
About 2 hours About 5 hours
time
time
Depending on the status of the
•
charge and the environment, the
actual time may vary.
Charging automatically pauses if the
•
projector is being used at the same
time.
When overheating, status LED blinks
•
purple.
relay function
About 3 hours
(when powered off)
Multimedia
Checking the battery level
Press the two focus adjustment buttons
simultaneously.
Depending on the battery level, the status LED
will automatically blinks in the following colours.
Battery level Status LED color
Above 80% Blue
80%~10% Purple
Below 10% Red
When using the projector with the travel
adapter connected, the status LED turns
purple.
121110987

Using the projector
You can enjoy a variety multimedia on your HDMI
supported device (TV, monitor).
The projector may not be compatible
•
or may intermittently lose connection
depending on some product/OS
versions.
Using the projector for extended
•
periods will drain the battery quickly.
Turn the projector off when not in use
to avoid wasting power.
When you use the projector, connect
•
to a charger. Although the battery
is not fully charged, the projector is
supplied with the necessary power for
stable use.
Part of screen may be cut if its
•
projection is too big or small
compared to the stored image on the
mobile device or laptop.
The screen may be distorted if it is
•
projected in at angle or used with
some lenses.
Connecting the projector to a
mobile device
Slide the power key ON and turn the
1
projector on.
Using a 5 to 11pin cable, connect the
2
projector to a mobile device.
Adjust the distance between the projector
3
and the screen to fit projected screen size.
Press the focus adjustment button and
4
adjust the focus and definition for screen.
The projected screen displays the
•
same orientation as the connected
mobile device screen. If the mobile
device is in landscape mode, the
projector displays in full screen. This
may differ depending on the mobile
device.
If a call comes in during the playback,
•
the multimedia automatically pauses
and switches to the call screen.
If a message or dialogue box related
•
to the battery appears during
playback, it is projected on the screen.
Adjust the media volume on your
•
mobile device.
If your mobile device is 11 pin,
•
connect the 5-to-11pin connector
to the 5pin MHL cable provided and
then reconnect the projector to the
mobile device.
Connecting the projector to a
laptop computer.
Slide the power key ON and turn the projector
1
on.
Using the HDMI cable, connect the projector
2
to a laptop computer. Select the clone or
dual mode on the control or resolution panel
of the laptop computer. (recommendation :
Dual mode).
Adjust the distance between the projector
3
and the screen to fit projected screen size.
Press the focus adjustment button and
4
adjust the focus and definition of the screen.
You can configure the sound path
•
from your laptop computer.
Using the multi adapter, do not
•
connect to the projector and
mobile device or laptop computer
at the same time. It may confuse an
incoming signal and cause a problem
with your projector.
Distance and screen size
-Recommended projection distance
Set the projected screen size and adjust the
distance.
Distance (cm) Screen Size (cm)
38.1 cm 22.15 x 12.46 cm
57.2 cm 33.26 x 18.71 cm
76.0 cm 44.19 x 24.85 cm
114.3 cm 66.45 x 37.38 cm
152.2 cm 88.49 x 49.77 cm
190.4 cm 110.7 x 62.27 cm
Use the projector in a dark place.
•
Projected images may not be visible in
bright surroundings.
The farther the device is placed from
•
the screen, the more likely images are
to be blurred.
Connecting a HDMI device and a
mobile device with the projector
Slide the power key ON and turn the projector
1
on.
Using a MHL cable, connect the mobile
2
device to the MHL/HDMI input port on the
projector.
Using a HDMI cable, connect the HDMI
3
supported devices (HDTV, monitor) to the
MHL/HDMI output port on the projector.
When you connect an HDMI supported
4
devices to the projector, the device will
automatically display the projector screen.
If you connect the projector to an HDTV,
you can control the mobile device menu
with the TV remote control keys.
14
Using a tripod stand
Connect the screw on the tripod to the tripod
1
mount on the back of the projector.
Turn the screw to the right to attach the
2
tripod to the projector.
Adjust the position of the tripod.
3
Adjust the position of the tripod.
•
Make sure the tripod is firmly attached
•
to the projector.
Specifications
Product name
Supported
interface
Dimensions
Weight
Power supply
Operating
temperature
Color
temperature
Screen
resolution
Brightness
21
Pico Projector
MHL or HDMI
60.4(W ) x 116(L) x 12.2(H)
108g
AC100 ~ 240V, 50/60Hz
-10 ~ +50
6,500 ~ 7,700K
640 X 360(nHD)
Up to 20 Lumen
(when connected to power
supply)
Depending on the device type and
usage, the actual time may vary.
FCC
This device complies with part 15 of the FCC Rules.
Operation is subject to the following two conditions:
(1) This device may not cause harmful interference,
and
(2) this device must accept any interference received,
including interference that may cause undesired
operation.
Users are not permitted to make changes or modify
the device in any way.
Changes or modifications not expressly approved by
Samsung will void the user’s authority to operate the
equipment.
Recycling Direct
To dispose electronics properly, follow the recycling
process regulated in your area or go to Samsung
website to find the nearest recycling location:
www.samsung.com/recyclingdirect
Or call, (877) 278 – 0799.
Samsung Telecommunications America, LLC
1301 E. Lookout Drive
Richardson, Texas 75082
Phone: 1-800-SAMSUNG
222019
Phone: 1-888-987-HELP (4357)
1817161513
 Loading...