

Page 1

* Some of the contents of this manual may differ from your phone,
depending on the software installed or your service provider.
World Wide Web
http://www.samsungmobile.com
Printed in Korea
Code No.:GH68-05386A
English. 07/2004. Rev 1. 1
Page 2

SGH-E310
User Guide
Page 3

Contents
Important Safety Precautions .......................... 7
Unpacking ..... ................................ ................... 9
Your Phone.............. ................ ....................... 10
Phone Layout...................... .............................. . 10
Display. .............................. ............................... 13
Service Lig h ts................... ..... .. ..... .. .. ..... .. ..... .. ... 16
Camera............................................................ . 16
Getting Started........... ................ .................... 17
Installing the SIM Card............ ............................ 17
Chargin g the Batte r y........................................... 19
Switching On or Off the Phone ........................ ..... 21
Call Functions................................................. 22
Making a Call.................... ................ ................. 22
Adjusting the Volume....................... ................... 27
Answeri n g a Call....................... .......................... 28
Viewing Missed Ca lls ... ........................................ 29
Quickly S witching t o Silent Mo de .............. ............ 31
Selecting Functions and Options..................... 32
Using the Soft Keys....................................... ..... 32
Selectin g Options ....... .............................. .......... 33
Entering Text.................................................. 34
Changing the Tex t I nput Mode ............................. 35
Using Alphabet Mo de .................................. ........ 36
Using T9 Mode....................... ............................ 37
Using Nu mber Mode.................. ................ .......... 39
Using Symbol Mode ............. ............................... 39
Options During a Call....... ............................... 40
Putting a Call on Ho l d.................. ........................ 40
Using the Menu Functions..................... ............... 41
Switching Off the Mi c rophone (Mute)................ ..... 42
Muting or Sendin g Key Tone s.......................... ..... 43
Sending a Sequen c e of DTMF T ones...................... 43
Searchin g for a Number in Co ntacts...................... 44
Call Wait ing...................... ................ ................. 45
Making a Multi-pa rty Call..................................... 45
3
Page 4

Contents
Using the Menus............................................. 48
Accessing a Menu Function by Scroll ing ............ ..... 48
Using Sh ortcuts............................. ..................... 49
List of Menu Funct io ns................. ........................ 50
Games & more................................................ 56
Saved applications......................... ..................... 56
More game s........ ..... .. ..... .. .. ..... .. ..... .. ..... .. ..... .. .. . 58
DNS settin g s......... ..... .. ..... .. ... .... ... .... .. ..... .. ..... .. . 59
Vodafone live! ...................................... .......... 60
Vodafon e live!........................................ ............ 60
Enter URL......................... ................................. 64
Bookma rks....................................... ................. 64
What’s n e w................ .............................. .......... 65
Games........................ ...................................... 65
Ringtones......................................... ................. 65
Pictures....... .............................. ........................ 66
News................... ................. ............................ 66
Browser s ettings ........................................... ..... 66
Clear cache......................................... ............... 68
Applications ............................... ................ .... 69
Vodafon e....... ................. .............................. ..... 69
Alarms........ .............................. ........................ 69
Calculator....................... .............................. ..... 71
To do lis t..................... ...................................... 72
Voice re c order.............. .............................. ........ 74
Currenc y convert er........................................ ..... 76
Messages.......... ............................... ............... 77
Create message....................................... .......... 77
Inbox...................................................... .......... 86
My mess ages..................................................... 91
Call voic email........... .............................. ............ 97
live! Stu dio............................ ............................ 98
Vodafon e mail.......................... .......................... 98
Vodafon e messeng er................. .......................... 98
Push mes sa ge s ........ .. ..... .. ..... .. ..... .. .. ..... .. ..... .. ... 99
Message settings.................................... ............ 99
Memory status.............................. ................... 103
Delete al l..... .............................. ...................... 104
4
Page 5

Contents
Camera......................................................... 105
Take pho to...................................................... 105
Record v ide o......... ... .... ... .... ... .. ..... .. .... ... .... ... ... 109
My photo s...................... ................ ................. 110
My vide o s.............................. .......................... 112
My items............................................. .......... 113
Pictures....... .............................. ...................... 113
Games........................ .................................... 114
Sounds ................................................. .......... 115
My vide o s.............................. .......................... 116
Templa tes .......... .............................. ............... 116
Memory status.............................. ................... 116
Calendar....................................................... 118
Consulti n g the Calendar .................................... 118
Writing a Memo............................................. ... 118
Viewing a Memo....................... ........................ 120
Contacts....................................................... 121
Contacts list........................................ ............. 121
Create contact ......................... ........................ 124
Group sea rc h............. ..... .. ..... .. .. ..... .. ..... .. ..... .. . 125
Group edit........................ .. ..... .. ..... .. ..... .. ..... .. . 126
Call log ..................... .............................. ........ 127
Speed di a l l i st ....... ................. .......................... 132
My numbers........................ ............................. 133
Memory status.............................. ................... 133
Settings........................................................ 134
Phone settings ......................... ........................ 134
Display set t ing s.......... .. ..... .. ..... .. ... .... .. ..... .. ..... . 138
Sound s ettings........... ...................................... 140
Call sett i n gs..................................................... 145
Time & date.................................................... . 152
Network s election............................................. 153
Security.................. .............................. .......... 154
5
Page 6

Contents
Solving Problems.......................................... 158
Access Codes................................... ............. 161
Phone Password.............................................. . 161
PIN............... ................. ................................. 162
PUK.............. ............................... ................... 162
PIN2......... .............................. ........................ 163
PUK2.................................................... .......... 163
Barring Pa ss w or d... ... .. ..... .. ..... .. ..... .. .. ..... .. ..... .. . 164
Health and Safety Information..................... 165
SAR Cer tification I n formation.......................... ... 165
Precauti o ns When Using Bat teries........ ............... 166
Road Safety........................ ............................. 168
Operatin g Environment ..................................... 168
Electron i c Devices..... .............................. .......... 169
Potentia lly Ex p lo siv e En vi ro nm en t s..................... 171
Emergency Calls........... .............................. ...... 172
Other Im portant Safety Information.................... 173
Care and Maintenance.................... ................... 174
Glossary ....................................................... 176
Index ........................................................... 181
Quick Reference Card ................................... 187
6
Page 7

Important Safety Precautions
Read these guidelines before using your wireless
phone. F ailur e to co mp ly w ith them may be
dangerous or illegal.
Road Safety at All Times
Do not use a hand-held phone while driving; park
the vehicle first.
Switching Off Whe n Re fuelling
Do not use the phone at a refuelling point (service
station) or near fuels or chemicals.
Switching Off in an Aircraft
Wireless phones can cause interference. Usin g them
in an aircraft is both illegal and dangerous.
Switching Off in Hospitals
Switch your phone off near medical equipment.
Follow any regulations or rules in force.
Interference
All wireless phones may be subject to interference,
which could affect their performance.
Special Regul at ions
Follow any special regulations in force in any area
and always switch your phone off whenever it is
forbidden to use it, or when it may cause
interference or danger (in a hospital for example).
7
Page 8

Important Safety Precautions
Sensible Use
Use only in the normal position (held to the ear).
Avoid unnecessary contact with the antenna when
the phone is switched on.
Emergency Call
Ensure the phone is switched on and in service. Key
in the emergency n umber for y our pres ent location,
then press the key. You m ust de activate any
unnecessary features before you can make an
emergency call. Give all the necessary information
as accurately as possible. Do not end the call until
given permission to do so.
Water Resistance
Your pho ne is not w ater-resistant. Keep it dry.
Accessories and Batteries
Use only Samsung-approved accesso ries and
batteries. Use of any unauthorised accessories
could damage your phone and may be dangerous.
Qualified Service
Only qualified service personnel may repair your
phone.
For more detailed safety information, see “Health
and Safety Information” on page 165.
CAUTION
RISK OF EXPLOSION IF A BATTER Y IS REPLACED
BY AN INCORRECT TYPE
.
DISPOSE OF USED BAT TERIES ACCORDING T O
THE INSTRUCTIONS.
8
Page 9
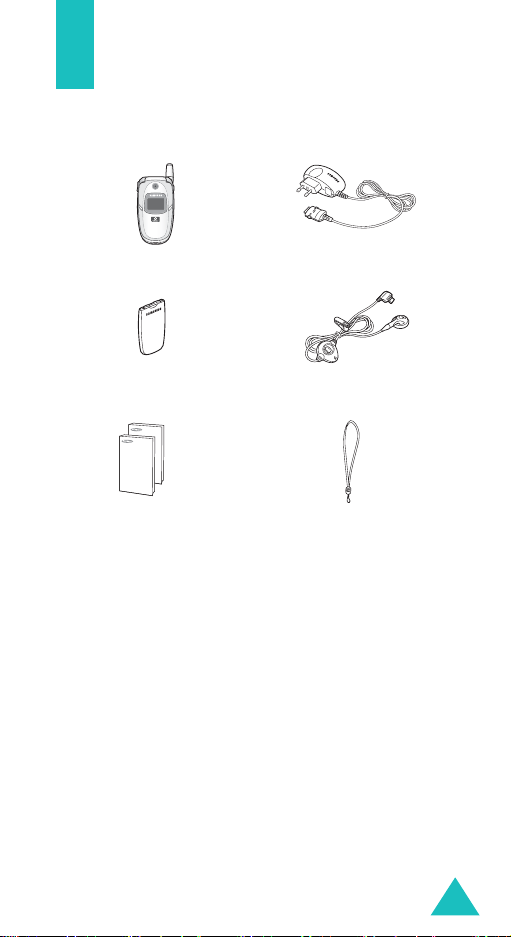
Unpacking
Your package contains the following items :
Handset
Battery
User’s Manuals
Note
: The items supplied with your phone may be
different, depending on your country or service
provider.
You can obtain the following accessories for your
phone from your local Samsung dealer:
• Standard/Extended battery • Hand strap
• Simple handsfree car kit • PC data link kit
• Battery charger • Travel adapter
Travel Adapter
Straight Headset
Hand Strap
9
Page 10
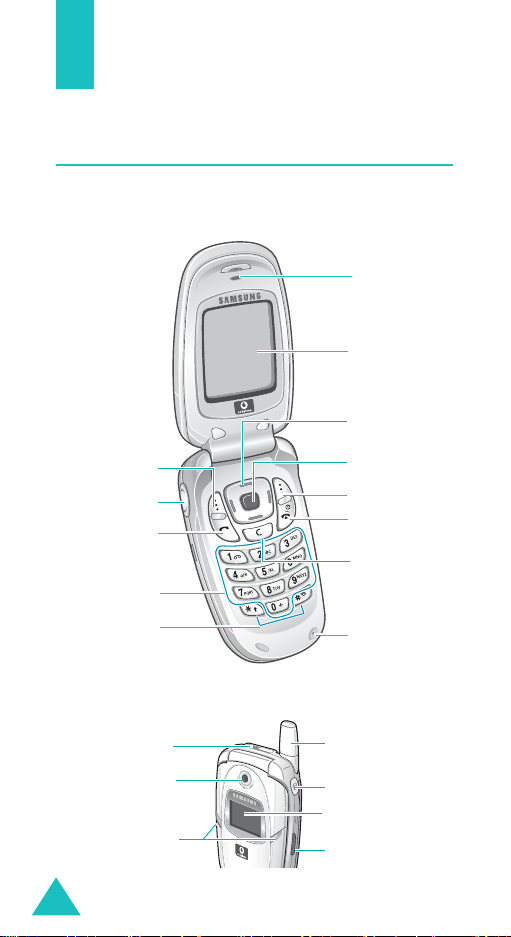
Your Phone
Phone Layout
The following illustrations show the main elements
of your phone:
Earpiece
Display
Navigation (Up/
Down/Left/Right)
keys
Menu access/
Soft key (left)
Volume/Menu
browse keys
Dial key
Alphanumeric
keys
Special
function keys
confirm (Centre)
key
Soft key (right)
Power on/off/
Menu exit key
Cancel/Correct
key
Microphone
10
Headset jack
Camera
Service lights
Antenna
Camera key
External display
IrDA port
Page 11

Key
(s)
(soft keys )
Your Phone
Description
In Menu mode, scrolls through the
menu options.
When entering text, mov es th e curso r
up and down, depending on the
direction of the key you pressed.
In Idle mode, allows you to access your
favourite menu options directly. For
further details about shortcuts, see
page 136.
When entering text, mov es th e curso r
to the left and right, depending on the
direction of the key you pressed.
In Idle mode, allows you to access your
favourite menu options directly. For
further details about shortcuts, see
page 136.
Performs the functions ind icated by the
text above them, on th e bo tto m line of
the display.
Enters Menu mode in Idle mode.
In Menu mode, selects the current
menu or option or confirms your input.
When there are options av ailable,
pressing this key selects the first option
immediately.
Deletes characters from the display.
In Menu mode, return s y ou to the
previous screen.
11
Page 12

Your Phone
Key
(s)
Description
(continued)
Makes or answers a call.
In Idle mode, recalls the last number
dialled, missed, or received when held
down.
Ends a call. Also switches on and off the
phone when held do wn .
In Menu mode, cancels your input and
returns the phone to Idle mode.
In Idle mode, accesses your voicemail
server when held down.
Enters numbers, letters, and some
special characters.
Enters special characters.
Performs various functions.
12
(on the right side of the phone)
In Idle mode, e n ters th e
Camera
menu. T u rns on the camer a when held
down.
In Capture mo de , take a photo.
(on the left side of the phone)
During a call, adjusts the earpiece
volume.
In Idle mode with the phone open,
adjusts the keypad tone volume. With
the phone closed, turns on the exte rnal
display when held down.
In Menu mode, scrolls through menu
options.
Page 13

Your Phone
Display
Display Layout
The display has three areas:
Icons
Text and
graphics area
Soft key function
indicators
Area Description
First line Displays various icons. See
Middle lines Displays messages, instructions,
Last line Shows the current functions
page 14.
and any information that you
enter, such as the number you are
dialling.
assigned to the two soft keys.
13
Page 14

Your Phone
Icons
Icon Description
Shows the received signal strength. The
greater the number of bars, the strong er
the signal.
Appears when the IrDA port is active. Fo r
details, see page 134.
Appears when you set an alarm to ring at a
specified time.
Appears when you are out of your home
area and have logged onto a different
network; for example, when travelling in
other countries.
Appears when a new SMS (Short Message
Service) message has been received.
Appears when a new voice mail message
has been received.
Appears when a new MMS (Multimedia
Message Service) message has been
received.
14
Appears when a call is in progress.
Appears when you are out of your service
area. When it displays, you cannot make or
receive a call.
Appears when you are connected to the
GPRS network.
Appears when you are in the Home Zone, if
you have registered for the service.
Page 15

Your Phone
Icon Description
(continued)
Appears when you are in the Office Z one, if
you have registered for the service.
Appears when you set incoming calls to be
diverted to another destination. When your
SIM card supports ALS (Alternate Line
Service), it may appears with the number
of the current line, such as , , and
.
Appears when Silent mode is active or
when you set the ph o ne to vibr a t e w hen
you receive a call. For further details, see
page 31 and page 141 respectively.
Appears when Mute mode is active.
Shows the level of your ba tte ry. The more
bars you see, the more pow er y o u ha v e
remaining.
Backlight
The backlight illuminates the display and the
keypad. When y o u press any key or open the
phone, the backlight comes on. It goes off when no
keys are pressed within a given period of time,
depending on your setting in the
The display turns off after one minute to conserve
battery power.
To specify the length o f time th e bac klight is activ e,
set the
Back light
menu. See page 139 for further
details.
Back light
menu.
15
Page 16

Your Phone
External Display
Your phone has an exte rnal display on the front of
the phone. It indicates when you have an incoming
call or a message. It also alerts you at a specified
time when you have set an alarm. The backlight
turns on and the corresponding icon appears on the
external display.
The external display turns off about 15 seconds after
you close the phone. To turn on the display, press
and hold either of the Volume keys.
With the phone closed, y o u can ta ke photos using
the external display by pressing and holding the
Camera key on the right side of the phone. See
page 109.
Service Lights
The service lights are on the front of the phon e. They
flash when services are available on the phone.
To activate or dea ctiv ate th e serv ice light s, set the
Service light
details.
menu. See page 139 for further
Camera
The camera module on the front of your ph one
allows you to take a photo and record a video while
on the move.
For further details about the Camer a feature, se e
page 105.
16
Page 17
Getting Started
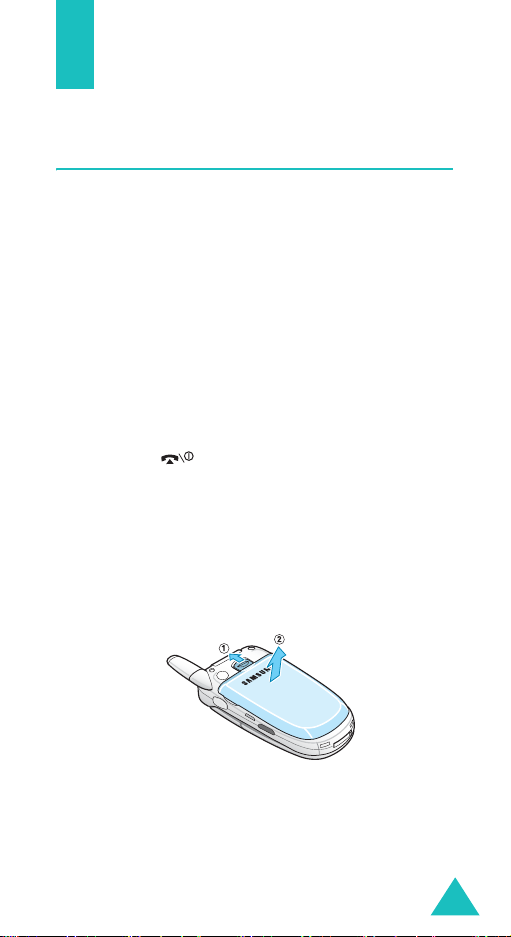
Installing the SIM Card
When you subscribe to a cellular network, you are
provided with a plug-in SIM card loaded with your
subscription details, such as your PIN, any optional
services available, and so on.
Important!
1. If necessary, switch off the phone by holding
down the k e y u ntil the po wer -o ff imag e
displays.
2. Remove the battery. To do so:
➀
➁
The plug-in SIM card and its contacts
can be easily damaged by scratches or
bending, so be careful when handling,
inserting, or removing the card.
Keep all SIM cards out of the reach of
small children.
Pull the battery lock toward the to p o f the
phone and hold it in that position.
Lift away the batte ry, as shown.
17
Page 18

Getting Started
3. Slide the SIM card into the SIM card socket, as
shown, so that the card locks into position.
Make sure that the metal conta cts of the ca rd
face into the phone.
Note
: When you need to re move the SIM card,
slide it upward, as shown, and take it out of
the socket.
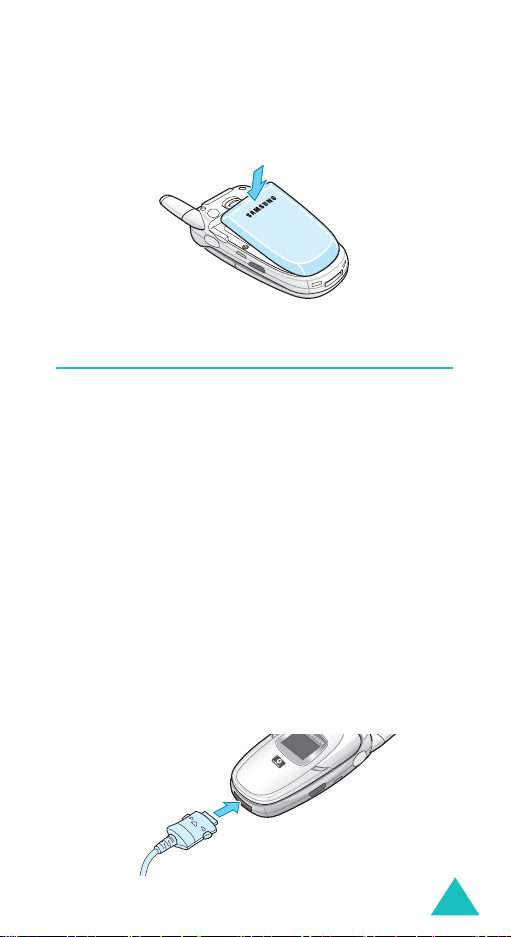
4. Replace the battery so that the tabs on the end
align with the slots at the bottom o f the ph o ne.
18
Page 19
Getting Started
5. Press the battery down until it clicks into place.
Make sure that the battery is properly installed
before switching on the power.
Charging the Battery
Your phone is powered by a rechargeable Li-ion
battery . A trav el adap ter comes w ith your phone for
charging the battery. Use only approved batteries
and chargers. Ask your local Samsung dealer for
further details.
The travel adapte r allows y ou to u se the p h one
while the battery is charging, but this causes th e
phone to charge more slowly.
Note
: You must fully charge the b att ery be fore usin g
your phone for the first time. A discharged
battery recharges fully in approximately
200 minutes.
1. With the battery in position on th e pho n e, p lug
the connector of the trave l adapt er into the jack
at the bottom of the pho ne.
19
Page 20

Getting Started
2. Plug the adapter into a standard AC w a ll outlet.
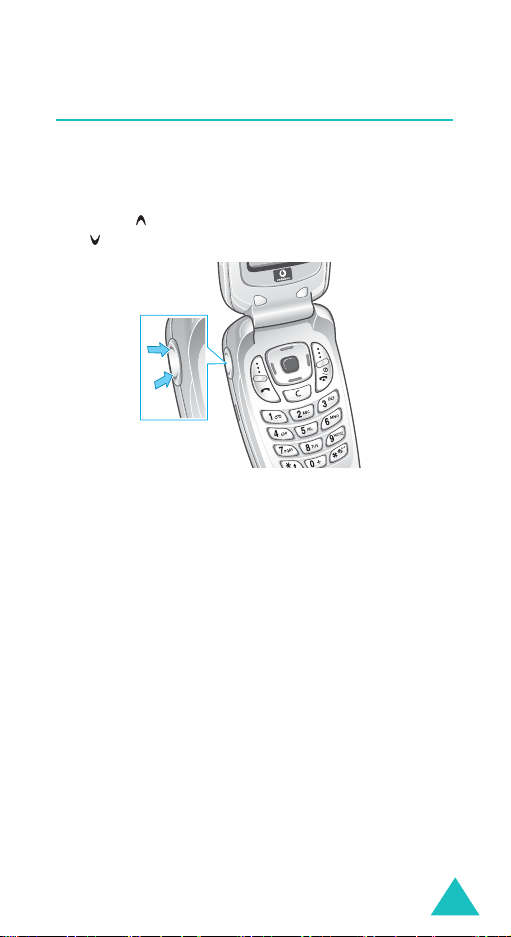
3. When charging is finished, unplug the adapter
from the power outlet, an d the n discon ne ct it
from the phone by pressing the buttons on both
sides of the connector and pulling the connector
out.
Note
: You must unplug the adap ter before removing
the battery from the phone during charging;
otherwise, the phone could be damaged.
Low Battery Indicator
When the battery is weak and only a few minutes of
talk time remain, a warn ing ton e soun d s and a
message repeats at regular interv als on the d isplay.
If this happens, your phone will turn off the
backlight to conserve the remaining battery power.
When the battery lev el beco mes to o low, the phone
automatically turns off.
20
Page 21

Getting Started
Switching On or Off the Phone
1. Open the phone.
2. Press and hold the key until the phone
switches on.
3. If the phone ask s you to enter a pa ssword, en ter
a password and press the
Centre key.
The phone password is preset to “00000000” at
the factory. For further details, see page 161.
Ok
soft key or the
4. If the phone asks for a PIN , enter th e PIN a nd
press the
further details, see page 162.
The phone searches for your network and, after
finding it, the idle screen appears on the display .
Now, you can make or receive a call.
Note
5. When you wish to switch off the phone, press
and hold the key until the power-off image
displays.
Ok
soft key or the Centre key. For
: The display language is preset to English at
the factory . To change the language, use
Language
the
see page 135.
menu. For further details,
21
Page 22

Call Functions
Making a Call
When the idle screen displays, en te r the area co de
and phone number, then press the key.
Note
: When you activate the
Extra settings
the
automatica lly redial up to ten times when the
person does not answer the call or is already on
the phone. See
Making an International Call
1. Press and hold the 0 key.
The
+
character appears.
2. Enter the country code, area code and phone
number and press the key .
Correcting the Number
To clear Press the
Auto redial
menu, the phone will
page 137
for further details.
option in
the last digit
displayed
any other digit in
the number
the whole display
22
C
key.
Left or Right key until the
cursor is immediately to the
right of the digit to be cleared
C
and press the
also insert a missing digit.
C
key and hold it for more
than one second.
key . You can
Page 23

Call Functions
Ending a Call
When you want to end your call, briefly press the
key or close the phone.
Redialling the Last Number
The phone stores the numbers of the calls you’ve
dialled, received, or missed, if the call recipient or
the caller is identified. See “Call log” on page 127
for further details.
To recall any of these numbers:
1. If you have typed characters on the display,
press the key to retu rn to Id le mo de .
2. Press the key to display a list of the most
recent numbers used in the order you dialled or
received them.
3. Use the Up and D own keys to scroll through th e
numbers until the number you want highlights.
T
oPress the
4.
dial the number key.
view the number in
Edit mode
delete the number
delete all of the
numbers on the
Call log list
Centre key, or press the
Options
select
Options
select
Options
select
details, see page 129.
soft key and
View
.
soft key and
Delete
.
soft key and
Delete all
. For
23
Page 24

Call Functions
Making a Call from the Con tact s Li st
You can store the phone numbers that you use
regularly on the SIM card or in the pho ne’s mem ory .
These entries are collectively called Contacts.
Once you have stored a number in Contacts, you
can dial it by pressing a few keys. You can also
assign your most frequently-used numbers to
number keys using the Speed Dial feature.
For further details about th e Co n tacts fea ture, see
page 121.
Storing a Number in Idle Mode
As soon as you start to enter a number,
appears above the left soft key to allow you to store
the number in Contacts.
1. Enter the number you want to store.
Note
: If you make a mistake while entering a
number, correct it using the
or the
C
key. For further details, see
page 22.
2. When you are sure that it is correct, press the
Save
soft key or the Centre key.
Save
Clear
soft key
3. Select an icon to identify the category in which
the number is to be stored. Three catego ries are
available:
• : Mobile phone number
• : Office number
• : Home number
To select the category, press the Left or Right
Select
key and press the
soft key or the Centre
key.
24
Page 25

Call Functions
4. Select a memory location, e ither
SIM
or
Phone
by pressing the Up or Down key and press the
Select
soft key or the Centre key.
Note
: When you change phones, any numbers
stored in your SIM card memory are
automatically available with the new phone,
whereas any numbers stored in the phone’s
memory will need to be reentered.
5. Enter a name and press the Ok soft key or the
Centre key.
For further details about how to enter
characters, see page 34.
6. If you do not want to save the number and
name in the suggested lo cation, press the
soft key or the
C
key to clear the location
Clear
number and enter another location by pressing
the numeric keys.
Ok
7. Press the
soft key or the Centre key to store
the name and number.
After storing, the phone displays the name and
number you just stored.
To Press the
8.
use the entry options
Options
soft key. For
further details, see
page 122.
dial the number Centre key or the
key.
return to the idle
key.
screen
,
25
Page 26

Call Functions
Dialling a Number from Contacts
Once you have stored phone numbers in Contacts,
you can dial them easily and quickly by using the
location numbers that were assigned to them in
Contacts.
Note
: If you can’t remember a location number, you
must go into the
Contacts list
menu to
search for the entry by name. See page 121.
To dial a number from the SIM card:
1. In Idle mode, enter the lo cation nu mb er for th e
phone number you want to dial and press the
key.
The list of the entries in the SIM card appears.
2. You can press the Up or Down key to find other
numbers on the list.
3. Press the
Dial
soft key, the key, or the
Centre key when you have selected the number
you want.
To dial a number from the phone’s mem ory :
0
1. In Idle mode , pre s s and h ol d th e
key. A +
appears.
2. Enter the location numb er for the phone number
you want to dial and press the key.
The list of the entries in the phone’s memory
appears.
3. You can press the Up or Down key to find other
numbers on the list.
Dial
4. Press the
soft key, the key, or the
Centre key when you have selected the number
you want.
26
Page 27
Call Functions
Adjusting the Volume
During a call, if you want to adjust the earpiece
volume, use the Volume keys on the left side of the
phone.
Press the key to increase the v olum e level and
the key to decrease the level.
In Idle mode, you can also adjust the keypad tone
volume using these keys.
27
Page 28

Call Functions
Answering a Call
When somebody calls you, the phone rings and
displays the incoming call image.
The caller’s phone number or name, if stored in
Contacts, displays.
1. If necessary, open the phone. Press the key
or the
Accept
call.
When the
settings
key to answer a call except for the key and
Reject
the
When
the
settings
call simply by op ening th e ph one. S ee page 137.
Note
: To reject the call , press and h old one of the
2. End the call by closing the phone or pressing
the key.
Note
: You can answer a call while using Contacts or
menu features. Afte r ending the call, the
display ret urn s to the fu nc tio n sc reen yo u w ere
using.
soft key to answer the incoming
Anykey answer
menu is activated, you can press any
soft key. See page 137.
Active folder
menu is activated, you can answer the
Volume keys before opening the phone, or
press the
Reject
option in the
option in the
soft key or
Extra
Extra
key.
28
Page 29
Call Functions
Viewing Missed Calls
When you are unable to answ er a call for any
reason, you can find out who called you so that you
can call the person back.
The number of calls you have missed displays on
the idle screen immediately after a call is missed.
To view a missed call immediately:
1. If the phone is closed, open it.
View
2. Press the
The number for the most recent missed call
displays, if available.
To Press the
3.
scroll through the
missed calls
call the number
displayed
edit or delete a missed
call number
soft key or the Centre key.
Up or Down key.
key.
Select
soft key or the
Centre key. See below.
Editing a Missed Call Number
Note
: When the number for the missed call is
unavailable, the
1. Press the Centre key.
You can also press the
then select the
Down key.
View
option doesn ’t d is play.
Options
View
option using the Up or
soft key and
29
Page 30

Call Functions
2. Press the
Select
soft key or the Centre key.
3. Change the number.
4.
To Press the
call the number key.
store the number
Save
soft key or the
Centre key, and enter a
name and a location
number. For further
details, see page 24.
Deleting a Missed Call
1. Press the
2. If necessary, press the Up or Down key to
highlight the
3. Press the
You can press the key at any time to exit the
Missed call feature.
Note
: You can access the Missed call feature at any
Options
Select
time by selecting the
soft key.
Delete
option.
soft key or the Centre key.
Missed calls
further deta ils, see page 127.
menu. For
30
Page 31

Call Functions
Quickly Switching to Silent Mode
Silent mode is convenient when you wish to stop
the phone from making noise, in a theatre for
example.
In Idle mode, press and hold the
“Silent mode” message and the Vibration icon ( )
display.
In Silent mode, your phone changes the sound
settings as follows:
Sound Items New Setting
Alert type Vibration
Keypad tone Off
SMS/MMS tone Light + Vibration
SMS-CB tone Light only
Folder tone Off
Power off tone Off
Extra tones Off
key until the
To exit and reactivate the pre vious so u nd settin gs,
press and hold the
mode” appears. The Vibration icon ( ) no longer
displays.
Notes
:
• When you turn off the phone, Silent mode is
automatic ally deactivated.
• Activating Silent mode will not turn off the camera
shutter sound.
key again until “Exit silent
31
Page 32

Selecting Functions and Options
Your phone o ffers a set of functions that allow you
to customise it. These functions are arranged in
menus and sub-menus, accessed using the tw o soft
keys, and . Each menu and sub-menu allows
you to view and alter the se tting s o f a part icular
function.
Using the Soft Keys
The roles of the soft keys vary, depending on the
function you are currently using; the labels on the
bottom line of the display just abo v e each k e y
indicate their current role.
Example
:
Service provider
07:30
Tue 09 Mar
Press the left soft
key to access the
Messages
32
menu.
Press the right soft key
to launch the WAP
(Wireless Application
Protocol) browser.
Page 33

Selecting Functions and Options
Selecting Options
To view the various functions and options available
and to select the one you want:
1. Press the appropriate soft key.
2.
To Press the
select the:
• function displayed
• option highlighted
view the next function
or highlight the next
option on a list
move back to the
previous function or
option on a list
move back up one
level in the menu
structure
exit the menu
structure without
changing the settings
Select
soft key or the
Centre key.
Down key or the
key on the left side of
the phone.
Up key or the key
on the left side of the
phone.
Back
soft key or the C
key.
key.
In some functions, you may be asked for a
password or PIN. Enter the code and press the
soft key or the Centre key.
Note
: When you access a list of options, your phone
highlights the currently active option. If,
however, there are only two options, such as
On/Off
or
highlights th e option that is n ot currently
Enable/Disable
active, so that you can select it directly.
, your phone
Ok
33
Page 34

Entering Text
When using your phone, you will often need to
enter text, such as when storing a name in
Contacts, writing a message, creating your personal
greeting, or scheduling events on yo ur calendar.
You can e nter alphanumeric characters by using the
phone’s keypad.
Your phone has the follow ing text input mo des:
• Alphabet mode
This mode allows you to enter letters b y pressing
the key labelled with the lette r you w a nt. P ress
the key once, twice, three, or four times until it
displays.
•T9 mode
This mode allows you to enter words with only
one keystroke per letter . Each key on the keypad
has more than one letter; for example, pressing
5
key once can enter, J, K, or L. T9 mode
the
automatically compares the series of keystrokes
you make with an internal linguistic dictionary to
determine the most likely word, thus requiring far
fewer keystrokes than the tr a d itional Alp ha be t
mode.
• Number mode
This mode allows you to enter numbers.
• Symbol mode
This mode allows you to enter various symbols
and special characters.
34
Page 35

Entering Text
Changing the Text Input Mode
When you are in a field that allows characters to be
entered, you will notice the text input m od e
indicator on the display.
Example
1. Press and hold the key to switch between
2. Press the key to switch to the following
: Writing an SMS (Short Message Service)
message
Create messa 918/1
Text input mode
indicators
Options Back
Alphabet mode and T9 mode.
In T9 mode, appears on the menu title bar.
In Alphabet mode, no indicator appears.
modes:
Mode Indicator
Initial Capital mode displays.
Capital Lock mode displays.
Lower Case mode displays.
Number mode displays.
Symbol mode displays.
Note
: Additional text input modes may be available,
depending on your country.
35
Page 36

Entering Text
Using Alphabet Mode
Use the 1 to 0 keys to enter your text.
1. Press the keys labelled with th e letter y o u want:
- Once for the first letter
- T wice fo r the seco nd lette r
- And so on
2. Select the other letters in the same w a y.
Note
: The cursor moves to th e right when you pr ess a
different key. When entering the same letter
twice or a diff er ent le tte r on th e same k ey, just
wait for a few seconds for the cursor to move to
the right automatically, and then select the
next letter.
Refer to the table below for further details about th e
available characters:
Key
Note
Characters in th e Order Displayed
Upper Case
Lower Case
: The characters available in Alphabet mode may
be different, depending on your country.
36
Page 37

Entering Text
• To insert a space, press the key.
• You can mov e the cursor by pressing the
Navigation keys. To delete letters, press the
Clear
soft key or the C key . Press and hold either
of them to clear the display.
Using T9 Mode
T9 is a predictive text input m ode that allows y ou to
enter any character using single keystrokes. This
text input mode is based on a built-in dictionary.
To enter a word in T9 mode:
1. When you are in T9 mode, start entering a word
by pressing the keys
once for each letter.
Example
The word that you are typing appears on the
display. I t may change with each key that y ou
press.
2. Enter the whole word befo re ed iting or de letin g
the keystrokes.
: To enter “Hello” in T9 mode,
press the
2
to 9. Press each key only
4, 3, 5, 5
, and 6 keys.
3. When the word displays correctly, go to step 4.
If the word doesn’t display correctly, press the
key , or the Up or Down key repeatedly to display
alternative word choices for the keys that you
have pressed.
Example
: Both “Of” and “Me” use the 6 and 3
keys. The phone displays the most
commonly used choice first.
0
37
Page 38

Entering Text
4. Put a space by pressing the key and start
entering the next word.
To add a new word into the T9 dictionary:
1. After pressing the keys corr esp ond ing to the
word you want to add, press the
0
or Down key
to display the alternative word s.
2. When there are no more alternative words, the
display shows
Add
soft key or the Centre key.
Add
on the bottom line. P ress the
3. If necessary , clear the word using the
key or the
C
key and ente r the w ord yo u w ant to
Clear
soft
add using Alphabet mode. See page 36.
4. Press the
Ok
soft key.
The word is added to the T9 dictionary and
becomes the first word for the associated
keypress series.
Note
: This feature may not be available for some
languages.
• To enter periods, hyphens, or ap ostrop hes, p ress
1
key. T9 mode applies grammar rules to
the
ensure that correct punctuation is used.
• You can mov e the cursor by using the Left and
Right keys. To delete letters, press the
C
key or the
key . Press and h old either of them to
Clear
soft
clear the display.
38
Page 39

Entering Text
Using Number Mode
Number mode enables y ou to en ter nu m bers into
an SMS message. Press the keys corresponding to
the digits you want to enter.
Using Symbol Mode
Symbol mode enables you to insert symbo ls into an
SMS message.
To Press the
select a symbol corresponding numeric
key.
display more symbols Up or Down key.
insert the symbol(s)
into your message
Ok
soft key or the Centre
key.
clear the symbol(s)
cancels your input and
exit Symbol mode.
Clear
soft key or the C
key. When the input field
is empty, pressing this
key returns the display to
the previous mode.
Back
soft key.
39
Page 40

Options During a Call
Your phone provides a number of control functions
that you can use during a call.
Putting a Call on Hold
You can place the current call on hold whenever you
want. You can make another call while you have a
call in progress if your network supports this
service.
Hold
To place a call on hold, simply press the
key . You can reactivate the call whenever y ou w ant,
by pressing the
To make a call while you have a call in progress:
1. Enter the phone num ber that you wis h to dial or
look it up in Contacts.
For details about searching for a number in
Contacts, see page 121.
2. Press the key to dial the second call.
The first call is automatically put on hold.
Alternatively,
Unhold
soft key.
soft
1. Put the current call on hold by pressing the
soft key.
2. Make the second call in the normal way.
40
Hold
Page 41

Options During a Call
When you have an active call and a call on hold, you
may switch between the two calls, changing t he one
on hold to active and placing the other on hold.
To switch between the two calls, simply press the
Swap
soft key.
The current call is placed on hold and the call on
hold is reactivated so that you can continue
conversing with that person.
When you want to finish, end each call normally by
pressing the key.
Using the Menu Functions
You can access the main menu functions during a
call.
1. Press the Centre key.
You can also press the
then press the
when the
2. Press the Up or Down key to scroll through the
menu list.
Ok
Menu
Options
soft key or the Centre key
option highlights.
soft key and
Note
: You cannot use some menus during a call.
They are deactivated on this list.
3. When the menu you want highlights, press the
Select
soft key or the Centre key.
4. If the selected menu has sub-options, repeat
steps 2 and 3.
For further details about available menu functions,
see the list on page 50.
41
Page 42

Options During a Call
Switching Off the Microphone (Mute)
You can temporarily switch your phone’s
microphone off so that the other person on the
phone cannot hear you.
Example
To switch off the microphone temporarily:
: You wish to say something to a person in
the room, but do not want the person on
the phone to hear you .
1. Press the
2. Press the Down key to hig hligh t the
option.
3. Press the
The other person can no longer hear you.
To switch back off the microphone:
1. Press the
2. If necessary , press the Down k ey to highlight the
Unmute
3. Press the
The other person can hear you again.
42
Options
Ok
Options
option.
Ok
soft key.
soft key or the Centre key.
soft key.
soft key or the Centre key.
Mute
Page 43

Options During a Call
Muting or Sending Key Tones
The
Mute keys
to turn the key tones off or on. If th e
option is selected, your phone d oes not transmit the
DTMF (Dual Tone Multi-Frequency) tones of the
keys, which allows you to press keys without
hearing annoying key tones during a call.
Note
: To communicate with answering machines or
computerised telepho n e s ystems, the
keys
and
Send keys
option must be selected.
options allow you
Mute keys
Send
Sending a Sequence of DTMF Tones
You can send the DTM F tones as a group after
entering the entire number you need to send.
This option is helpful for entering a password or an
account number when you call an automated
system, like a banking service.
To send the DTMF tones:
1. While connected to the t eleservice system, press
the
Options
soft key.
2. Press the Down key to highlight the
option.
3. Press the
4. Enter the number you want to send and press
the Centre key.
The tones are sent.
Ok
soft key or the Centre key.
Send DTMF
43
Page 44

Options During a Call
Searching for a Number in Contacts
You can search for a number in Contacts during a
call.
1. Press the
2. Press the Down key to hig hligh t the
option.
3. Press the
The Contacts entries are listed.
4. Enter the name that yo u w ish to find.
If you enter the first few letters of the name, the
Contacts entries are listed starting with th e first
entry matching your input.
5. To view the highlighted entry, press the
soft key or the Centre key.
For further details about th e Co n tacts fea ture, see
page 121.
Options
Ok
soft key.
soft key or the Centre key.
Contacts
View
44
Page 45

Options During a Call
Call Waiting
You can answer an incoming call while you have a
call in progress, if your network supports this
service and you have set the
Activate
incoming call by a call waiting tone.
To answer a call while you have a call in progress:
1. Press the key to answer the incoming call.
2. T o switch between the two calls, pres s the
; see page 148. You are notified of an
The first call is automatically put on hold.
soft key.
Call waiting
menu to
Swap
3. To end the call on hold, press the
key and select the
To end the current call, press the key.
End held call
Options
option.
soft
Making a Multi-party Call
A multi-party call is a network service that allows
up to six people to take part simultaneously in a
multi-party or conference call. For further details
about subscribing to this service, contact your
service provider.
Setting up a Multi-party Call
1. Call the first participant in the normal way.
2. Call the second participant in the normal way.
The first call is automatically put on hold.
45
Page 46

Options During a Call
3. To join the first participant to the m u lti-part y
call, press the
Join
option. Press the Ok soft key or the Centre
key.
4. To add a new person to the multi-party call, call
the new person in the normal way and press the
Options
press the
You can add incoming callers by answering the call,
pressing the
Join
option. Repe at a s req u ire d.
Options
soft key. Select the
Ok
soft key or the Centre key.
Options
soft key and select the
Join
soft key, and selecting the
option and
Having a Private Conversation with One
Participant
1. Press the
Select one
Centre key.
The list of call participants appears.
2. Highlight a person from the list by pressing
the Up or Down key and press the key.
3. When the
Ok
Now, you can talk privately to that person . The
other participants can still converse with each
other.
Options
Private
soft key or the Centre key.
soft key and choose the
option. Press the Ok soft key or the
option highlights, press the
4. To return to the multi-party call, press the
Options
Press the
All the multi-party call participants can now hear
each other.
46
soft key and select the
Ok
soft key or the Centre key.
Join
option.
Page 47

Dropping One Participant
Options During a Call
1. Press the
Select one
Options
soft key and choose the
option. Press the Ok soft key or the
Centre key.
The list of call participants appears.
2. Highlight a person from the list by pressing
the Up or Down key and press the key.
3. Press the Down key to select the
option and press the
Ok
soft key or the Centre
Remove
key.
The call with that participant ends, but yo u can
continue to talk to the others.
4. When you wan t to end the mu lti-party call, close
the phone or press the key.
47
Page 48

Using the Menus
The phone offers a range of functions that allow you
to tailor it to your needs. These functions are
arranged in menus and sub-menus.
The menus and sub-menus can be accessed by
scrolling using the Navigation keys or by using the
shortcuts.
Accessing a Menu Function by Scrolling
1. In Idle mode, press the Centre key to access
Menu mode.
2. Scroll using the Navigation keys to reach a main
menu,
Settings
soft key or the Centre k ey to enter th e menu.
3. Scroll using the Up or Down key to reach a
menu,
Phone settings
Select
soft key or the Centre key to en ter the
menu.
for example. Press the
for example. Press the
Select
4. If the menu contains sub-menus,
example, you can access them by scrolling using
the Up or Down key and pressing the
soft key or the Centre key.
If the menu that you have selected contains
further options, repeat this step .
To Press the
5.
scroll through the
menus
confirm the chosen
setting
48
Up or Down key, or use
the Volume keys.
Select
Centre key.
Language
soft key or the
Select
for
Page 49

Using the Menus
5.
To Press the
return to the previous
menu level
exit the menu without
changing the settings
Back
soft key or the C
key.
key.
Using Shortcuts
Menu items, such as menus, sub-menus and
options, can be accessed quickly by using their
shortcut numbers. For the main menus, you can
access any one of them by pressing the number
keys (
1
to 9) corresponding to their loca tion on the
screen.
Press the Centre key and en te r th e nu mb er o f the
menu you want.
Notes
:
• The numbers assigned to each menu are indicated
on the list on page 50.
0
• For menu numbers 10 and 11, use the
respectively.
Example: Accessing the
Language
and keys
menu.
1. Press the Centre key.
2. Press the
3. Press the
4. Press the
The languages available display.
9
key for
1
key for
3
key for
Settings
Phone settings
Language
.
.
.
49
Page 50

Using the Menus
List of Menu Functions
The following list shows the menu structure
available and indicates the number assigned to
each option and the page where you can find a
description of each feature.
1. Games & more
1.1 Saved applications
1.2 More games
1.3 DNS settings
2. Vodafone live!
2.1 Vodafone live !
2.2 Enter URL
2.3 Bookmarks
2.4 What’s new
2.5 Games
2.6 Ringtones
2.7 Pictures
2.8 News
2.9 Browser settings
2.10 Clear cache
3. Applications
3.1 Vodafone
3.2 Alarms
3.2.1 Once alarm
3.2.2 Daily alarm
3.2.3 Morning call
3.2.4 Remove all alarms
3.2.5 Autopower
3.3 Calculator
3.4 To do list
3.5 Voice recorder
3.5.1 Record
3.5.2 My sounds
3.5.3 Delete all
3.5.4 Memory status
3.6 Currency converter
50
(see page 56)
(see page 60)
(see page 69)
Page 51

Using the Menus
4. Messages
4.1 Create message
4.2 Inbox
4.3 My messages
4.4 Call voicemail
4.5 live! Studio
4.6 Vodafone mail
4.7 Vodafone messenger
4.8 Push messages
4.9 Message settings
4.10 Memory status
(see page 77)
4.1.1 MMS
4.1.2 SMS
4.1.3 MMS postcard
4.2.1 MMS
4.2.2 SMS
4.3.1 Drafts
4.3.1.1 MMS Drafts
4.3.1.2 SMS Drafts
4.3.1.3 MMS postcard
4.3.2 Outbox
4.3.2.1 MMS
4.3.2.2 MMS postcard
4.3.3 Templates
4.3.3.1 MMS templates
4.3.3.2 SMS templates
4.3.4 Cell broadcast
4.3.4.1 Read
4.3.4.2 Receive
4.3.4.3 Channel list
4.3.4.4 Language
4.4.1 Connect to voice server
4.4.2 Voice serv er n umber
4.8.1 Inbox
4.8.2 Receive
4.8.3 Delete all
4.9.1 MMS settings
4.9.2 MMS profiles
4.9.3 SMS settings
4.10.1 MMS
4.10.2 SMS
51
Page 52

Using the Menus
4. Messages
4.11 Delete all
5. Camera
(see page 105)
5.1 Take photo
5.2 Record video
5.3 My photos
5.4 My videos
6. My items
6.1 Pictures
6.2 Games
6.3 Sounds
6.4 My videos
6.5 Templates
6.6 Memory status
(continued)
4.11.1 MMS
4.11.2 SMS
4.11.3 MMS postcard
(see page 113)
6.1.1 My photos
6.1.2 Saved pictures
6.1.3 Download more
6.2.1 Saved games
6.2.2 Download more
6.3.1 My sounds
6.3.2 Saved sounds
6.3.3 Download more
6.5.1 MMS templates
6.5.2 SMS templates
6.6.1 Games
6.6.2 Sounds & images
6.6.3 Photos & videos
7. Calendar
52
(see page 118)
Page 53

Using the Menus
8. Contacts
8.1 Contacts list
8.2 Create contact
8.3 Group search
8.4 Group edit
8.5 Call log
8.6 Speed dial list
8.7 My numbers
8.8 Memory status
9. Settings
9.1 Phone settings
9.2 Display settings
(see page 121)
8.5.1 Missed calls
8.5.2 Received calls
8.5.3 Dialled calls
8.5.4 Delete all
8.5.5 Call time
8.5.6 Call costs
*
8.5.7 Data counter
(see page 134)
9.1.1 Activate infrared
9.1.2 Greeting message
9.1.3 Language
9.1.4 Shortcuts
9.1.4.1 Key up
9.1.4.2 Key down
9.1.4.3 Key right
9.1.4.4 Key left
9.1.5 Extra settings
9.1.6 Reset settings
9.2.1 Main display
9.2.1.1 Wallpaper
9.2.1.2 Text display
9.2.1.3 Text colour
9.2.2 Front LCD display
9.2.3 Menu style
9.2.4 Back light
9.2.5 Service light
9.2.6 Graphic logo
* Shows only if supported by your SIM card.
53
Page 54

Using the Menus
9. Settings
9.3 Sound settings
9.4 Call settings
(continued)
9.3.1 Ringtone
9.3.2 Ring volume
9.3.3 Alert type
9.3.4 Keypad tone
9.3.5 Message tone
9.3.5.1 SMS tone
9.3.5.2 SMS-CB tone
9.3.5.3 MMS tone
9.3.5.4 Repetition
9.3.6 Folder tone
9.3.7 Power on/off
9.3.8 Alert on call
9.3.9 Extra tones
9.4.1 Call diverting
9.4.1.1 Divert always
9.4.1.2 Busy
9.4.1.3 No reply
9.4.1.4 Unreachable
9.4.1.5 Cancel all
9.4.2 Call barring
9.4.2.1 All outgoing
9.4.2.2 International
9.4.2.3 International except
home
9.4.2.4 All incoming
9.4.2.5 Incoming while abroad
9.4.2.6 Cancel all
9.4.2.7 Change barring
password
9.4.3 Call waiting
9.4.4 Caller ID
9.4.4.1 Default
9.4.4.2 Hide number
9.4.4.3 Show number
54
Page 55

Using the Menus
9. Settings
9.5 Time & date
9.6 Network selection
9.7 Security
(continued)
9.4.5 Closed user group
9.4.5.1 Index list
9.4.5.2 Outside access
9.4.5.3 Default group
9.4.5.4 Deactivate
9.5.1 Set time
9.5.2 Set date
9.5.3 World time
9.5.4 Time format
9.5.5 Display options
9.6.1 Automatic
9.6.2 Manual
9.7.1 PIN check
9.7.2 Change PIN
9.7.3 Phone lock
9.7.4 Change password
9.7.5 Privacy
9.7.6 SIM lock
9.7.7 FDN mode
9.7.8 Change PIN2
**
**
*
* Shows when the closed user group feature is activated.
** Shows only if supported by your SIM card.
55
Page 56

Games & more
In this menu, you can:
• enjoy downloaded MIDlets (Java applications that
run on mobile phones).
• download applications from the web site provided
by your service provider.
• change the DNS (Domain name server) settings
required for accessing Java services, if necessary.
Saved applications
When you access this menu, the list of default
games appears. Once you have downloaded game s,
they are added to the list.
Launching a MIDlet
Note
: The procedure explained belo w are for the
default games. For downloaded games, the
procedure may be diffe rent.
1. Scroll to the MIDlet you want on the Games list
and press the Centre key.
2. On the startup screen of the MIDle t, scroll to an
option using the Navig ation k ey s or th e
8
keys.
and
The following options are available:
START GAME
•
•
CONTINUE
game you played, if you w e re interru pte d
during the game.
: starts a new game.
: allows you to continue the last
2, 4, 6
,
56
Page 57

Games & more
•
HIGH SCORE
: shows the high score table.
This option may not be available for some
games.
HOW TO PLAY
•
: shows how to play the game
and the key functions fo r the ga me.
•
OPTION
: allows you to switch on or off the
game sound.
3. Press the
5
key or the Centre key to confirm
your selection.
While you are playing a
Press the
game, to
adjust the sound volume Volume keys.
C
stop the game and return
key.
to the startup screen
exit the game key.
Viewing MIDlet Infor m ation
1. Scroll to the MIDlet y ou wan t and press the
soft key.
The display shows information about the MIDlet,
such as the file size, application version, its
vendor, and Java VM version. Y ou can also check
if the MIDlet can be deleted.
2. Press the Up or Down key to scroll through the
information screen.
3. Press the Left or Right key to scroll to other
MIDlet information.
Info
57
Page 58

Games & more
4. If you want to delete the M IDlet, p ress the
Delete
soft key and then press the
or the Centre key to conf irm the de le tion.
5. To exit and return to the Games list, press the
Back
soft key or the C key.
Yes
soft key
Entering Text
If you need to enter text while usin g a MIDlet , you
can use the following input modes:
Upper-case character mode (A
enter upper-case English characters.
Lower-case character mode (a
enter lower-case English char acters.
Number mode (1
Symbol mode (S
After highlighting a symbol by pressing the
Navigation keys, press the Centre k ey to insert it.
T9 mode (T9
characters by pressing one key per letter.
To change the text input mode, see page 35.
): allows you to enter numbers.
): allows you to enter symbols.
): allows you to enter English
): allows you to
): allows you to
More games
When you select this menu, you are ac cessed to the
web site preset by your service provider and you
can download more Java games.
Note
: Down loading J ava app lication s may not be
availa ble, depending on your service provider.
58
Page 59

Games & more
DNS settings
The DNS (Domain Name Server) is the server that
assigns the Java server domain name to an IP
address. The DNS setting is preset at the factory,
but sometimes you may need to change it at your
service provider’s instructions.
1. Enter the primary address u sing th e nu mber
keypad and press the
key.
Ok
soft key or the Centre
2. Enter the secondary address and press the
soft key or the Centre key.
Ok
59
Page 60

Vodafone live!
Your phone is equippe d with a WAP (Wireless
Application Protocol) browser to allow you to access
and navigate the Wireless Web using your phone.
Vodafone live!
Selecting this menu connects the phone to the
network and loads the homepage of the Wireless
Web service provid er. You can also press the
live!
soft key in Idle mode to launch the browser .
The contents of the WAP B rowser startup homepage
depends on your Wireless Web service provider. To
scroll through the screen, use the Up and Down
keys.
Note
: To go to the startup homepage from any other
screen in the WAP browser, use the
option. F or further deta ils about the WAP
Browser menus, see page 62.
Exiting the WAP Browser
To exit the browser at any time, simply press and
hold the key.
Home
60
Page 61

Vodafone live!
Navigating the WAP Browser
To Press the
scroll through and
select browser
items
return to the
previous page
use the Browser
menu options
Up or Down key and then
press the
the Centre key to confirm the
selection.
Back
seconds. For further details
about this option, see
page 62.
Select
soft key or
soft key or the C key.
key for more than 2
Entering Text in the WAP Browser
When you are prom pted to enter tex t, the currently
active text input mode is indica ted on the scree n .
To change the text input mode, press the Centre
key one or more times.
The following modes are available:
Upper-case character mode (A
enter upper-case English characters.
Lower-case character mode (a
enter lower-case English char acters.
Note
: You can enter symbols and punctuation marks
in Upper-case or Lower-case Character mode.
For details about available characters, see
page 36.
): allows you to
): allows you to
61
Page 62

Vodafone live!
T9 mode (T9
characters by pressing one key per letter. In this
mode, you can use only the
alternative words. To change case, press and hold
the key.
Number mode (1
): allows you to enter English
0
key to displa y
): allows you to enter numbers.
Selecting and Using Browser Menu
Options
Various menu options are a vailable when yo u are
using the WAP browser to navigate the Wireless
Web.
To access a menu option:
1. Press and hold the key.
A menu list displays.
2. Highlight a menu by pressing the Up or Down
key.
3. Select an option by pressing the
or the Centre key.
4. If necessary , select a secondary o ption using the
Up or Down keys, and press the
or the Centre key to confirm.
Note
: The menus may vary, depending on your
version of the WAP browser.
Select
Select
soft key
soft key
The following options are available:
Bookmarks
bookmark the current web page or access one of
bookmarked pages.
Reload
62
: shows the bookmarks list. You can
: reloads the current page.
Page 63

Vodafone live!
Home
: takes you back at any time to the home
page of the Wireless Web service provider.
Go to URL
: allows you to manually enter the URL
address of a Web page. After ente ring an address,
press the
Show URL
Ok
soft key to go there directly.
: displays the URL address of the Web
page to which you are currently connected. It also
enables you to set the current site as the startup
home page.
To Press the
set the current
page as your
Options
the
soft key and select
Save to home
option.
startup home page
set a bookmark for
the current page
Options
the
soft key and select
Save to bookmark
option.
Back
cancel your setting
soft key.
Clear cache
: deletes the information stored in the
cache. The cache stores the most recently accessed
Web pages.
Security info
: shows security information when
you access the wireless web with the secured W AP
setting activated.
Inbox
: allows you to read messages received from
a web server.
Show images
: shows the image on the current
web page.
63
Page 64

Vodafone live!
Enter URL
This menu allows you to manually enter the URL
address of a web site that you wish to access.
For further details about ho w to enter characters,
see page 34.
Ok
After entering the address, p ress the
access the web site.
soft key to
Bookmarks
This menu allows you to store the up to 13 URL
addresses of your favourite web sites. The first
bookmark item is a default link preset by your
service provider. You can change o r delete the item .
Note
: You can access this menu directly by pressing
and holding the
browser.
To store a URL address:
key while using the WAP
1. Select an empty location and press the
key.
2. Enter the address and press the
the Centre key.
For further details about how to enter
characters, see page 34.
3. Enter a name for the item and press the
key or the Centre key.
To access a web site of a bookmark, select a
bookmark item and press the Centre key.
64
Ok
soft key or
Edit
Ok
soft
soft
Page 65

Vodafone live!
After saving an item, you can access the following
options by pressing the
Go to URL
Edit
of the bookmark.
Delete
: takes you to the site.
: allows you to edit the addre ss a nd th e nam e
: deletes the bookmark.
Options
soft key:
What’s new
Selecting this menu loads the web site preset by
your service provider so that you can obtain
information about your service provider’s latest
offerings, such as downloads, pricing plans,
entertainment, technical help, and customer
services.
Games
Selecting this menu loads the web site preset by
your service provider so that you can obtain
information about the latest games and download a
variety of games.
Ringtones
Selecting this menu loads the web site preset by
your service provider so that you can download a
variety of ring tones and m elod ies.
Note
: You ma y not be able to download som e ring
tones if they are not in the co rrect file forma t.
65
Page 66

Vodafone live!
Pictures
Selecting this menu loads the web site preset by
your service provider so that you can download a
variety of pictures and animated images.
Note
: You may not be able to download some pictures
if they are not in the correct fi le format.
News
Selecting this menu loads the web site preset by
your service provider so that you can obtain latest
news or press releases on your service provider.
Browser settings
This menu allows you to set up four proxy servers
for the WAP browser. Contact your service provider
for details about your browser setting options.
Notes
:
• The last profile accessed is automatically selected for
connecting to the Wireless Web.
• Depending on your country, the availability of the
setting options may vary .
For each server, the following options are available:
Profile name
assign to the HTTP server.
Homepage URL
homepage. When the default homepage displays,
you can delete it using the
key and enter your own choice.
: enter a name that you wish to
: set the address of your startup
Clear
soft key or theC
66
Page 67

Vodafone live!
Security
Secure
access; otherwise, choose
Bearer
network address accessed;
preferred
When you select
: select a data transmission m ode. Choo se
to protect your data against unauthorised
Non-secure
.
: select a bearer to be used for each type of
GPRS, Data
, or
GPRS
.
GPRS preferred
, the phone
searches for a GPRS network first. If a GPRS
network is not av aila ble, th e p hon e use s a GSM
(Data) network.
The remaining options depend on the Bearer
setting.
When the bearer is set to
preferred
IP address
:
: enter the WAP g ateway address
GPRS or GPRS
required to connect to the Internet.
User name
: enter the User ID required to connect
to the GPRS netwo rk.
Password
: enter the password required to connect
to the GPRS netwo rk.
APN
: enter the access point name used for the
address of the GPRS ne two rk g a teway.
When the bearer is set to
IP address
: enter the WAP g ateway address
Data
:
required to connect to the Internet.
Login name
Password
Dial-up number
: enter the PPP server login ID .
: enter the PPP server password.
: enter the PPP server phone
number.
67
Page 68

Vodafone live!
Data call type
ISDN
or
Note
: The WAP browser settings may vary, depending
on the service provider. Contact your service
provider for further details.
: select a data call type;
.
Analogue
Clear cache
You can clear the information stored in the cache,
the phone’s temporary memory in which the most
recently accessed web pages are stored.
Press the
the deletion. Otherwise, press the
Yes
soft key or the Centre key to confirm
No
soft key.
68
Page 69

Applications
In this menu, you can use the various applications
which provides you with convenient features.
Vodafone
This menu is available if you use a SIM AT card that
provides additional services, such as news, weather,
sports, entertainment, a nd loca tion serv ices.
Available services may v a ry, depending on your
service provider’s service plans.
For further details, see your SIM card instructions
or contact your service provider.
Alarms
This feature allows you to:
• set the alarm to ring at a specific time.
• set the phone to switch o n automa tically and ring
the alarm even if the phone is switched off.
The following options are available:
Once alarm
deactivated.
Daily alarm
same time.
Morning call
the morning.
: the alarm rings only once and is then
: the alarm rings every day at the
: the alarm rings to wake you up in
69
Page 70

Applications
To set an alarm:
1. Choose the type o f alarm to be set and p ress the
Select
soft key or the Centre key.
2. Enter the time for the alarm to soun d .
Note
: Your p hone is preset to use a 24-hour
format. To change the format, see
page 152.
If you want to use the a larm op tion s , press the
Options
soft key. The following options are
available:
•
Set alarm
Remove alarm
•
: sets the alarm.
: deactivates the selected
alarm.
•
Alarm tone
: allows you to select an alarm
melody.
3. Press the Centre key.
4. If applicable, select
Select
soft key or the Centre key.
5. If you select
repeat option,
saturday
, and press the
AM
or PM and press the
Morning call
in step 1, choose the
Monday to friday
Select
or
Monday to
soft key or the
Centre key.
To stop the alarm when it rings, press any of the
Exit
soft key, the Volume keys, and the key. If
the photo is closed, press either of th e Volume
keys.
Remove all alarms
70
: deactivates all alarm settings.
Page 71

Applications
Autopower
alarm rings at the specified time, even if the phone
is switched off.
If the option is set to
switched off at the specified time, the alarm does
not ring.
: when this option is set to
Disable
and the phone is
Enable
, the
Calculator
With this feature, you can use the phone as a
calculator. The calculator provides basic arithmetic
functions; addition, subtraction, multiplication, and
division.
1. Enter the first number using the numeric keys.
Notes
:
• You can move the cursor by pressing the or
key.
• T o include a decimal point or a bracket, press the
left soft key until the symbol you want displays.
2. Enter the operation for your calculation by
pressing the Navigation k ey s , accord ing to the
image on the display
3. Enter the second number.
.
4. To view the result, press the Centre key.
5. Repeat steps 1 to 4 as many times as required.
71
Page 72

Applications
To do list
This feature allows you to:
• enter a list of tasks to be done.
• assign a priority and a deadline to each task.
• sort the tasks by priority and status.
Creating the To do list
1. Press the
2. Enter the first task.
Note
3. Press the Ok soft key or the Centre key.
4. Select a priority level of
using the Up and Down keys and press the
Select
5. Enter your deadline and press the Centre key.
If you don't want to set the deadline, press the
Skip
Add new
: For further details about how to enter
characters, see page 34.
soft key or the Centre key.
soft key.
soft key or the Centre key.
High, Normal
, or
Low
Editing the To do list
When you select the To do
tasks displays with a status mark, if a task has been
done, and priority level indicators; for High,
for Normal, and for Low.
Scroll to a task from the list and press the Centre
key to view the details for the task . You can scroll
through the tasks using the U p and Do w n k ey s, if
necessary.
list
menu, the list of
,
72
Page 73

Applications
T o change the status of a specific task as completed
as of the current time and date, p ress the key to
mark the task.
You can access the following options by pressing the
Options
View
Add new
Status
Select the appropriate status,
do
Edit
soft key:
: shows the details of a task.
: allows you to create a new ta sk.
: allows you to change the status of a task.
Completed
or
To
.
: allows you to edit a task. You can change the
text, priority, and/or deadline for the task .
Sort
: allows you to sort the existing tasks b y
priority or status. Select the sort criterion,
Low, Completed
Copy
: allows you to copy a task.
Copy to calendar
, or
To do
.
: allows you to copy a task to t he
High
,
calendar as a memo. Y ou can change the text and
deadline for the task and/or set an alarm.
Delete
: deletes a task.
Delete all
: allows you to delete all tasks.
73
Page 74

Applications
Voice recorder
You can record v o ice m em os . After reco rd ing, yo u
can send a memo to other people as a part of an
MMS message.
Record
This menu allows you to record a new memo. When
you select this menu, the display shows a 30second timer.
Record
1. To start recording, press the
the Centre key.
2. Record a memo by speaking into the
microphone.
soft key or
3. When you press the
key, or if the recording time expires, the
following options display:
•
Play
: plays back your memo.
Re-record
•
you to record another one.
•
Save
: allows you to save the memo.
4. To save the memo, choose
Select
soft key or the Centre key.
5. Press the
the default name, if necessary , and enter a
name for the memo.
For further details about how to enter
characters, see page 34.
74
Clear
Stop
soft key or the Centre
: discards the memo and enables
Save
and press the
soft key or the C key to clear
Page 75

Applications
6. Press the Ok soft key or the Centre key.
The memo is saved and then the display shows
the memo name and the time and date it was
saved.
7. Press the
Options
soft key to access the
following memo options:
•
Send MMS
: allows you to send the memo to
other people by using the MMS feature. See
page 77 for further details about sending a
message.
Rename
•
: allows you to change the memo’s
name.
•
Delete
: deletes the memo.
8. To exit, press the
Back
soft key or the key.
My sounds
This menu shows the list of saved voice memos.
Scroll to a memo and press the Centre key to play
the memo.
On the memo list, press the
Options
access the following options:
Play
: plays the memo.
Send MMS
: allows you to send the memo to other
people by using the MMS feature. See page 77 for
further details about sending a message.
Rename
Information
: allows you to change the memo name.
: displays detailed information about
the memo.
Delete
: allows you to delete the memo.
soft key to
75
Page 76

Applications
Delete all
In this menu, you can delete all of your voice
memos.
When the display asks for confirmation, press the
Yes
soft key or the Centre key one or more times.
Memory sta tus
You can check the amount of the memory being
used and the memory remaining for voice memos.
The display shows the Total, Free, and Used
memory amount, including the number of memos
you recorded and the total number of memos you
can record. Press the Up or Down key to scroll
through the screen.
Currency converter
Using this menu, you can figure out currency
conversions.
1. Enter the current exchange rate of your source
currency and press the
Centre key.
You can insert a decimal point by pressing
the key
2. Enter the amount to convert and press the
soft key or the Centre key.
The amount you entered and its equivalent
value display.
3. Press the
convertor.
76
.
Exit
soft key to exit the currency
Ok
soft key or the
Ok
Page 77

Messages
Using the
message features, such as:
• SMS (Short Message Service) messages
• MMS (Multimedia Message Service) messages
• MMS postcards
• voice mail
• cell broadcast messages
• WAP push messages
You can also access online album, mail and
messenger services given by your service pro vider.
Note
Messages
: You can quickly access this menu by pressing
the soft key in Idle mode.
menu, you can use various
Create message
This menu allows you to create a new message.
MMS
Multimedia Message Service (MMS) is a messaging
service that provides delivery of personal MMS
messages from phone to ph o ne o r from p ho ne to email.
In addition to the familiar text con tent o f SM S
messages, MMS messages can contain images,
graphics, voice, and audio clips. An MMS message is
a multimedia presentation in a single file entry . It is
not a text file with attachments.
77
Page 78

Messages
Using the MMS feature, your phone can receive and
send MMS messages that contain multimedia files,
such as your photos, sounds and images you
downloaded from the Internet, and voice memos
you recorded. This function is available only if it is
supported by your service provider.
Only phones that offer MMS messaging features can
receive and display MMS messages.
Creating and Sending an MMS Message
1. Enter the subject of your message.
For further details about how to entering
characters, see page 34.
By pressing the
Options
soft key, you can
access the following options:
•
Ok
: confirms the entered subject and
continues to the next step.
•
Input method
: allows you to change the text
input mode.
•
Input language
: allows you to change the
language to be used in T9 input mode.
2. Press the Centre key when you have finished
entering the subject.
3. When
Add here
highlights, press the
soft key or the Centre key and add the m essage
contents using one of the following options:
•
Add text
: allows you to enter the m essa g e
text. After entering text, press the Cen tre k ey.
•
Add photo:
allows you to add a photo taken
using the camera on your phone. You can take
a new photo or select one of the photos stored
in the phone’s mem o ry. For further details
about using the camer a, see pag e 105.
78
Options
Page 79

Messages
•
Add picture
stored in the
•
Add sound
: allows you to add a picture
Pictures
folder.
: allows you to add a sound file.
You can record a new voice m em o or select
one of voice memos or sounds stored in the
phone’s memory.
Send message
•
: allows you to send the
message. Skip to step 7.
•
Save
: saves the message in the
or
MMS templates
Settings
•
: allows you to change the message
box for later use.
MMS Drafts
settings. For further details about each setting
option, see page 99. After changing the
Back
settings, you need to press the
or the
C
key to go to back to the Options list.
Preview
•
Notes
: shows the entire message.
:
soft key
• You can add text, an image and a sound once for
each page.
• You may not be able to add downloaded images
or sounds if they are not in the co rr ec t fi le
format.
4. Repeat step 2 until you have finished creating
your message.
5. If you want to change the added items, press
the Up or Down key to high light o n e and p ress
the or
Options
soft key to display the Options
list.
Note
: The available opti ons are different
depending on whether the item you select
on the message screen is text, an image, a
sound or the Page field.
79
Page 80

Messages
The following options are available:
Edit text/photo/picture/sound
•
: allows you
to change the text or replace the im age or
sound with another one.
•
Add page
: allows you to add up to 5 pages.
After you add a page, the display shows you
the current page number and memory space
used for the page. You can move to each page
using the Left and Right keys on the message
screen.
Delete, Delete photo, Delete picture
•
Delete sound
: deletes the selected item from
your message.
•
Duration
: allows you to set when and how
long text, an image or a sound displays on the
message presentation screen. If the duration
you set is shorter than the content d ur a tion
(for example, the length of sound clip) for a
particular page, the content du r a tion is
automatically decreased.
Send message
•
: allows you to send the
message. Skip to step 7.
•
Save
: saves the message in the
MMS templates
or
•
Settings
: allows you to change the message
box for later use.
MMS Drafts
settings. For further details about each setting
option, see page 99.
Preview
•
: shows the entire message.
,
6. When you are finished creating the mes sage ,
choose
Send message
press the
Select
7. Select a destination type (
press the
80
Select
from the options and
soft key or the Centre key.
To, Cc
, or
Bcc
) and
soft key or the Centre key.
Page 81

Messages
8. Choose one of the following options and press
Select
the
•
Contacts list
soft key or the Centre key:
: allows you to retrieve a number
or an e-mail address from your Contacts list.
•
Phone number
: allows you to manually enter
the phone numbe r of the recipien t .
•
E-mail address
: allows you to manually enter
the e-mail address of the recipient.
9. Enter a number or an e-mail address, or select
a number from the Contacts list.
10. When the correct number or address displays,
press the
Ok
soft key or the Centre key.
11. To add a destination, press the
or the Centre key when
Select
Add contacts
soft key
highlights. Repeat from step 8.
If you want to edit the destinations, select one
and press the
Options
soft key or the Centre
key. You can change or delete it.
12. To enter ad ditional numbers or address es to the
other destination types, press the
C
key or the
key and repeat steps 7 through 11.
You can enter up to 10 destinations each for
Cc
, and
Bcc
.
Back
soft
To
13. When you have finished entering the
destinations, select
Select
the
soft key or the Centre key.
Send message
and press
Your phone sends the message.
,
81
Page 82

Messages
SMS
Short Message Service (SMS) allows you to send
and receive short SMS message s to and from o ther
GSM mobile ph o nes . In a d diti on, your phone
supports the Enhanced Messaging Service (EMS),
which enables you to include simple pictures,
melodies, and animated images in your messages.
To use this feature, you must subscribe to your
service provider’s message service.
Creating a Simple SMS Message
1. Create your message.
Note
: For further details about entering
characters, see page 34.
2. When you have finished entering the message,
press the
options are available:
Note
•
Send only
The message is deleted after sending.
•
Save and send
the message and then send the message. You
can read the message in the
•
Save only
that it can be sent later. Y ou can read the
message in the
• For further details about
Input method, Input language, Text
formatting
Add bookmark
Options
soft key. The following
: Pressing the Centre key on the message
screen directly selects
Send only
.
: allows you to send the message.
: allows you to save a copy of
SMS Drafts
box.
: allows you to save the message so
SMS Drafts
,
Add objects, Add contact
box.
SMS template
,
, and
options, see page 84.
82
Page 83

Messages
3. Select
the
Send only
Select
or
Save and send
soft key or the Centre key.
, and press
If you want to just save the message, select
Save only
. After saving the message, the p hone
returns to the Create message screen.
4. If you select a save option, choose the memory
location by pressing the Up and Down keys and
press the
5. Enter a destination number and press the
Ok
soft key or the Centre key.
Ok
soft key or the Centre key.
The message is sent.
Creating an SMS Message Using Options
1. Create a message.
2. Press the
Options
soft key.
3. Select one of the following options by using the
Select
Up and Down keys and pressing the
soft
key or the Centre key:
•
SMS template
: allows you to apply one of the
preset message templates to th e tex t. Se lect
one of five items stored in the
templates
menu. For further details, see
SMS
page 95.
•
Input method
: allows you to change the text
input mode.
•
Input language
: allows you to change the
language to be used in T9 input mode. Select
the language you want to use.
83
Page 84

Messages
•
Text formatting
: allows you to format the
style of the text.
For the
Small
For the
Strikethrough
Size
attribute,
Normal, Large
sizes are available.
Bold, Italic, Underline
attributes, select On or
and
, and
Off
These attributes can be combined.
•
Add objects
: allows you to add a sound,
melody, picture or animated image to the
message. Select the category of the object to
be added. In each category, you can select
from the various factory-set items or choose
an item received from other sources, such as
the Internet or other ph ones.
Add contact
•
: allows you to add a Contacts
entry to your message. Select one from the
list.
Add bookmark
•
: allows you to add a web
page’s address stored in your Bookmark s list.
Select one from the list.
4. Complete the message, and send or save it by
following the procedure from step 2 on page 82.
.
MMS postcard
In this menu, you can send photos stored in the
menu as a postcard along with a simple
photos
greeting. Your m essag e is sent to the MM S ce ntre,
where it is formatted, printed, and sent out as a
real postcard to the address of your choice.
Note
: This feature may not be available, depending
on your country. Please contact your service
provider for further details.
84
My
Page 85

Messages
1. Select the photo you want to send using the
Navigation key s and press the Centre key.
Note
: Use a photo i n maximum resol ution.
You can also select one of the following options
by pressing the
•
Select
•
View
: displays the photo on the full screen. T o
Options
: selects the photo.
soft key:
use the photo for sending a postcard, press
the
Select
soft key or the Centre key.
2. Enter a greeting message and press the Centre
key.
Note
: For further details about entering
characters, see page 34.
3. Scroll to the field using th e Up o r D o wn key and
press the Centre key to enter th e recipien t
information.
The following options are available:
•
Name
: enter the recipient’s nam e.
•
Additional information
: enter any additional
personal information.
•
Street
: enter the house number and street.
•
Zip & city
•
State/Province
•
Country
: enter the zip or postal code.
: enter the state or province.
: enter the country. This option may
not display, depending on your country.
Note
: If you don’t enter the name, street, and zip
code, your postcard cannot be sent.
85
Page 86

Messages
4. When you have finished, p ress the
key.
The following options are available:
•
Send
: sends the postcard.
•
Save
: saves the postcard in the
postcard
Note
5. Select
the Centre key.
Your postcard is sent.
Inbox
In this menu, you can access received messages.
folder in the
: If you press the
Name field is selected, the
options i s activated. Select ing this option
opens your Contacts list so that you can
retrieve a name from the list.
Send
and press the
Drafts
Options
Options
MMS
box.
soft key when t he
Contact list
Select
soft key or
soft
MMS
Viewing a Message When You Receive it
When a new MMS message comes in, the display
shows the MMS Message icon ( ) and a text
notification along with the send er’ s number.
1. Press the
information about the message, such as the
sender’s number, the message size, and the
subject.
If you want to view the m essag e later in the
Inbox, press the
86
View
soft key to view brief
Exit
soft key or the C key.
Page 87

Messages
2. T o scroll through the message information, press
the Up or Down key.
You can access the following options by pressing
the
•
View
Options
soft key:
: shows the information about the
message.
•
Retrieve
: retrieves the message from the
MMS server.
•
Delete
: deletes the message.
•
Properties
: shows the information about the
message.
Note
: If the
Auto download
settings
menu is switched on, your phone
option in the
MMS
automatically retrieves new messages from
the server. You can then immediately view
View
the new messages by pressing the
soft key. See page 100 for more about the
option.
3. To read the message, select
option list and press the
key.
Centre
Retrieve
Select
soft key or the
from the
Your phone retrieves the mes sage contents from
the server and displays it.
4. To scroll through the message, press the Up or
Down key.
5. When you are finished, press the k ey.
87
Page 88

Messages
Viewing a Message from the Inbox
When you access the
MMS
menu, the list of MMS
messages you have received displays along with the
subjects. The icons on the left tell you the status of
the messages:
• : Message notifications that have been opened.
• : Message notifications that have not been
opened.
• : You have se nt an en quiry to the M MS serv e r
requesting the message be sent to your
phone.
• : The MMS server is processing your request.
• : The MMS server is unable to send the
message to your phone.
• : Messages that have been opened.
• : Messages that have not been opened.
1. Select a message on the list and press the
Centre key.
The display presents the message and scro lls to
the next page, if it has one, after a specified
time.
2. Press the
Ok
soft key or the Centre key to go to
the message view screen.
Or, the display automatically switches to the
screen after a few seconds.
3. Press the Up or Down key to scroll through the
message.
If the message has more than one page, you
can scroll through the pages by using the Left
and Right keys .
88
Page 89

Messages
4. Press the or key to scroll to the previous
or next message.
While viewing a message, you can access the
message options by pressing the
Options
soft key .
If you are viewing a message notification, the
options are the same as when you view a message
at the time of its receipt. See page 87.
When you are reviewing a message retriev ed from
the MMS server, the following options are available:
View
: shows the message.
Reply
: allows you to send a reply to the sender.
Reply all
: allows you to send a reply to the sender
and all of the other recipients.
Delete
: deletes the message.
Call sender
Extract...
: allows you to call the sender back.
: allows you to extract the se n de r’ s
number or e-mail address and URL, e-mail
addresses, or phone numbers from the message
text.
Forward
: allows you to forward the message to
another person.
Save picture
the message into the
Save sound
message into the
Properties
: allows you to save an image from
Pictures
folder.
: allows you to save a sound from the
Sounds
folder.
: shows you detailed information about
the message.
89
Page 90

Messages
SMS
This message box is used to store messages that
you have received.
When you enter this menu, the list of messages in
the box displays with the sen d ers ’ pho ne n um b ers
or names, if available in your Contacts.
1. Select a message from the list and press the
Centre key.
2. Press the Up or Down key to scroll through the
message.
3. Press the or key to scroll to the previous
or next message.
While viewing a message, you can access the
following options by pressing the
Reply
: allows you to send a reply to the sender.
Delete
: allows you to delete the message.
Forward
: allows you to change and forward the
message.
Call sender
Extract...
: allows you to call the sender.
: allows you to extract the se n de r’ s
number and URL, e-mail addresses, or phone
numbers from the message text.
Move to phone
: allows you to move the message
from the SIM card to the phone’ s m emory. This
option is only available when you select a message
stored in the SIM card.
Options
soft key:
90
Page 91

Messages
Move to SIM
from the phone’s memory to the SIM card. This
option is only available when you select a message
stored in the phone’s memory.
Select objects
such as sounds or images, from the message into
your phone. You can use the objects when writing a
message. For details, see page 84.
: allows you to move the message
: allows you to save media objects,
My messages
In this menu, you can access messages you have
sent or saved for later retrieval. You can also read
cell broadcast messages from your service provider.
Drafts
This message box stores MMS messages and MMS
postcards you have saved as a draft before sending,
or SMS messages you have saved and/or sent.
When you press the key while creating a
message, you can also select to save the message
in this box.
MMS Drafts
When you select this menu, the list of the MMS
messages appears.
Scroll to the message you want to view and press
the Centre key.
While viewing the message, you can access the
following options by pressing the
Send
: allows you to send the message.
Edit
: allows you to change the message.
Options
soft key:
91
Page 92

Messages
Delete
: allows you to delete the message.
Extract...
: extracts the destination nu mbers or
addresses of the message and the URL, e-mail
addresses, and phone number from the message
text.
Properties
: shows the information about the
message.
SMS Drafts
When you select this menu, the list of the SMS
messages you have sent and/or saved appears.
Scroll to the message you want to view and press
the Centre key.
While viewing the message, you can access the
following options by pressing the
Edit
: allows you to change the message and then
Options
soft key.
send or save it.
Delete
: allows you to delete the message.
Extract...
: extracts the destination nu mbers or
addresses of the message and the URL, e-mail
addresses, and phone number from the message
text.
Move to SIM
: allows you to move the message
from the phone memory to the SIM card . This
option is only available when you select a message
stored in the phone’s memory.
Move to phone
: allows you to move the message
from the SIM card to the phone memory. This
option is only available when you select a message
stored in the SIM card.
92
Page 93

Messages
Select objects
: allows you to save media objects,
such as sounds or images, from the message into
your phone. You can use the objects when writing a
message. For details, see page 84.
MMS postcard
When you select this menu, the list of the MMS
postcards you have saved appears.
Scroll to the message you want to view and press
the Centre key.
While viewing the message, you can access the
following options by pressing the
Send
: allows you to send the postcard.
Edit
: allows you to change the postcard.
Delete
: allows you to delete the postcard.
Properties
: shows detailed information about the
Options
soft key:
postcard.
Outbox
In this menu, you can access MMS messages and
MMS postcards you have sent.
MMS
When you access this menu, the list of the MMS
messages you have sent displays. The icons on the
left tell you the status of the messages.
• : Messages currently being sent
• : Messages sent
• : Messages your phone couldn’t send
• : Messages to be sent
• : Messages deferred
93
Page 94

Messages
Select a message on the list and press the Centre
key.
While viewing the message, you can access the
following options by pressing the
Delete
: deletes the message.
Send
: allows you to send/resend the message.
Edit
: allows you to change the message contents,
Options
soft key:
such as sounds, pictures, or text.
Extract...
: allows you to extract the d estina tion
numbers or e-mail addresses and URL, e-mail
addresses or phone numbers from the message
text.
Properties
: shows you detailed information about
the message.
MMS postcard
When you access this menu, the list of the MMS
postcards you have sent displays.
Select a message on the list and press the Centre
key.
While viewing the message, you can access the
following options by pressing the
Delete
: allows you to delete the postcard.
Send
: allows you to send the postcard.
Edit
: allows you to change the postcard.
Properties
: shows detailed information about the
Options
soft key:
postcard.
94
Page 95

Messages
Templates
In this menu, you can use message templates to
easily and quickly create a new message.
MMS templates
This menu stores messages you have saved as
templates so that you can use them to make new
messages.
Your phone has three p rese t messag e te mplates.
Scroll through the temp late list using th e U p an d
Down keys. When the message template you want
highlights, press the Centre key.
Press the
the following options, or the display a utomatically
shows the options after a specified time:
Edit
and then send it.
Delete
You are asked to confirm the de letion by p ressing
the
templates, this option is not available.
Ok
soft key or the Centre key to access
: allows you to change the message template
: allows you to d elete the messa ge template.
Yes
soft key or the Centre key. For the preset
SMS templates
Using this menu, you can preset a maximum of five
messages that you use most frequently.
Select an empty location or the message temp late
you want and press the Centre key to enter a new
message.
Once you have preset a message template, you can
access the following options by pressing the
Options
Edit
soft key:
: allows you to edit the messag e template.
95
Page 96

Messages
Send
: allows you to write a new message using the
message template.
Delete
: allows you to d elete the messa ge template.
You are asked to confirm the de letion by p ressing
the
Yes
soft key or the Centre key.
Cell broadcast
This network service allows you to receive SMS
messages on various topics, such as the weather or
traffic. Cell Broadcast (CB) messages display as
soon as they are received, provided that:
• the phone is i n Idle m ode.
Receive
•the
• the message channel is currently active on the
channel list.
The following options are available:
Read
: lets you view the received message. The
Volatile
but loses its contents as soon as the phone is
switched off. Scroll through the message by using
the Up and Down keys.
You can save a CB message in the
later retrieval. When a text no tification ap pe ars,
press the
Save
select
Receive
reception of broad cas t me s sa ge s .
Channel list
from which you wish to receive broadcast
messages.
option is set to
Enable
.
box displays messages from the network,
Options
Archive
soft key or the Centre key and
box for
.
: allows you to enable or disable the
: allows you to indicate the channels
96
Page 97

Messages
The following options are available:
: use to enable or disable channels on the list
Select
by marking or unmarking them, respectively. A
check mark displays in front of each selected
channel.
Add channel
channel.
Delete
: use to change the ID and title of a n existin g
Edit
channel.
Language
language to display cell broadcast messages.
Please contact your service provider for further
details.
: use to enter the ID and title for a new
: use to remove a chann el from th e list.
: allows you to select your preferred
Call voicemail
This menu allows you to access your voicemail bo x,
if your network supports this service.
The following options are available:
Connect to voice server
mail feature, you must enter the v oice serv er
Number obtained from your service provide r. You
can then select this option and press the
key or the Centre key to listen to y our m e ssa ges.
You can quickly connect to the vo ice serv e r by
pressing and holding the
: before using the Voice
Ok
soft
1
key in Idle mode.
Voice server number
voice mail server number, if necessary.
Note
: Voice mai l is a netw ork feature. Please contact
your service provider for further details.
: allows you to change the
97
Page 98

Messages
live! Studio
From this menu, you can access the online media
album. Your online album allows you to store your
photos and compose MMS messages. You can also
access Vodafone contents and m essage te mp lates.
Please contact your service provider for more
information.
Vodafone mail
From this menu, you will find the Vodafone Mail
service offering you mobile access and
management of your e-mails, either by using your
Vodafone email account or by fetching your existing
email account. This service can be upgraded
offering you Unified Messaging
with all your voice mails, faxes, and e-mails.
Please contact your local service provider for more
information.
an integrated inbox
Vodafone messenger
With Vodafone Messenger, you can stay in touch
and have fun with friends through instant text
conversations. Y o u will know when y our friends are
available to chat and that they immed iately receive
your instant messages. When you first start using
Vodafone Messeng er, all you need to know is your
friend’s mobile number to build your Vodafone
Messenger contacts list.
Please contact your service provider for more
information.
98
Page 99

Messages
Push messages
In this menu, you can receive and access web
messages from the server.
The following options are available:
Inbox
: allows you to read the messages received
from the web server.
Receive
phone receives web messages. Select
receive web messages or
messages.
Delete all
messages.
: allows you to set whether or not your
Never
: allows you to delete all of the web
Always
to reject web
to
Message settings
In this menu, you can change the various settings
for the Messages feature.
MMS settings
You can change the default settings for sending or
receiving MMS messages.
The following options are available:
Delivery report
network informs you whether or not your message
has been delivered.
Read reply
phone sends a request for a reply along with your
message to the recipient.
: when this option is enabled, the
: when this option is enabled, your
99
Page 100

Messages
Auto download
: you can set whether or not your
phone retrieves new incoming messages from the
MMS server without no tificatio ns.
: you need to manually download new messages
Off
by using the
On
: the phone automatically retriev e s n ew
Retrieve
option.
messages from the server. As soon as you receive a
message you can use more options while you are
reading. See page 89 for details about the options.
Off when roaming
: the phone automatically
downloads new messages unless you are roaming
on another network or in another country .
Message acceptance
: you can specify the
category of messages you want to receiv e.
Hide ID
: when this option is enabled, you r pho n e
number does not display on the recipient’s phone.
Expiry per i o d
: you can select the length of time
your messages are stored at the message centre
after they are sent.
Delivery time
: you can set a time delay before the
phone sends your messages.
Priority
: you can select the priority level of your
messages.
Report allowed
: when this option is enabled, the
sender of an incoming message receives a delivery
report from the network.
Page duration
: you can set how long one page of
an outgoing message displays on the message
presentation screen. After a specified tim e, th e
display automatically scrolls to the nex t page.
100
 Loading...