

Page 1
Dishwasher
user manual
DW60H9970 Series
DW60H9950 Series
DW60J9970 Series
DW60J9960 Series
This manual is made with 100% recycled paper.
imagine the possibilities
Thank you for purchasing this Samsung product.
DD68-00159B-03
User Manual_DW9000H-Series-00159B-03_EN.indd 1
Page 2

Contents
SAFETY INSTRUCTIONS
3
SETTING UP YOUR DISHWASHER
10
10 Checking the parts and control panel
15 Cycle selector
15 Progress displays
16 Meeting the installation requirements
BEFORE USING THE PRODUCT
FOR THE FIRST TIME
18
18 Setting mode
20 Using dishwasher salt
21 Using detergent
LOADING YOUR DISHWASHER
22
22 Dishwashing guidelines
23 Adjusting the height of the upper rack
23 Removing the upper rack (for some
models)
24 Loading the lower rack
24 Loading the upper rack
25 Using the 3
models)
26 Using rinse aid
rd
(cutlery) rack (for some
TROUBLESHOOTING AND
INFORMATION CODES
30
30 Check these points if your dishwasher...
32 Information codes
PROGRAMME CHART
33
33 Programme chart
APPENDIX
34
34 Disposing the dishwasher and helping
the environment
34 Declaration of conformity
34 Specifi cations
FOR STANDARD TEST
35
PRODUCT FICHE
36
CLEANING AND MAINTAINING
YOUR DISHWASHER
27
27 Cleaning the exterior
27 Cleaning the wash cabinet
27 Cleaning the fi lters
28 Cleaning the nozzles
29 Storing your dishwasher
English - 2
User Manual_DW9000H-Series-00159B-03_EN.indd 2User Manual_DW9000H-Series-00159B-03_EN.indd 2 2015-03-24 5:22:212015-03-24 5:22:21
Page 3
Safety instructions
Congratulations on your new Samsung dishwasher. This manual contains important
information on the installation, use and care of your appliance. Please take time
to read this manual to take full advantage of your dishwasher’s many benefi ts and
features.
WHAT YOU NEED TO KNOW ABOUT SAFETY INSTRUCTIONS
Please read this manual thoroughly to ensure that you know how to safely and e ciently operate the
extensive features and functions of your new appliance and retain it at a safe place near the appliance for
your future reference. Use this appliance only for its intended purpose as described in this user manual.
Warning and important safety instructions in this manual do not cover all possible conditions and
situations that may occur. It is your responsibility to use common sense, caution, and care when installing,
maintaining, and operating your dishwasher.
Because the following operating instructions cover various models, the characteristics of your dishwasher
may di er slightly from those described in this manual and not all warning signs may be applicable. If you
have any questions or concerns, contact your nearest service center or fi nd help and information online at
www.samsung.com.
IMPORTANT SAFETY SYMBOLS AND PRECAUTIONS
Important safety symbols
Hazards or unsafe practices that may result in severe personal injury and/or property damage.
WARNING
Hazards or unsafe practices that may result in personal injury and/or property damage.
CAUTION
To reduce the risk of fi re, explosion, electric shock, or personal injury when using your
CAUTION
dishwasher, follow these basic safety precautions:
Do NOT attempt.
01 SAFETY INSTRUCTIONS
Do NOT disassemble.
Do NOT touch.
Follow directions explicitly.
Unplug the power plug from the wall socket.
Make sure the appliance is grounded to prevent electric shock.
Call the service centre for help.
Note
These warning symbols are here to prevent injury to you and others.
Please follow them explicitly.
Keep these instructions in a safe place and ensure that new users are familiar with the content. Pass them
on to any future owner.
English - 3
User Manual_DW9000H-Series-00159B-03_EN.indd 3User Manual_DW9000H-Series-00159B-03_EN.indd 3 2015-03-24 5:22:212015-03-24 5:22:21
Page 4
Safety instructions
Important safety precautions
This appliance conforms to current safety requirements. Inappropriate use can, however, lead to
personal injury and damage to property.
To avoid the risk of accidents and damage to the appliance, please read these instructions carefully
before using it for the fi rst time. They contain important information on its safety, use and maintenance.
As with any equipment using electricity and moving parts, potential hazards exist. To safely operate
this appliance, become familiar with its operation and exercise care when using it.
CAUTION
Do not let children (or pets) play on or in your dishwasher. The dishwasher door does not open easily
from the inside, and children may be seriously injured if trapped inside.
WARNING
Children should be supervised to ensure that they do not play with the appliance.
WARNING
If the plug (power supply cord) is damaged, it must be replaced by the manufacturer or its service
agent or a similarly qualifi ed person in order to avoid a hazard.
CAUTION
This appliance must be positioned to be accessible to the power plug after installation, the water
supply tabs and the drain pipes.
INSTRUCTION ABOUT THE WEEE MARK
Correct Disposal of This Product (Waste Electrical & Electronic Equipment)
(Applicable in countries with separate collection systems)
This marking on the product, accessories or literature indicates that the product and its electronic
accessories (e.g. charger, headset, USB cable) should not be disposed of with other household
waste at the end of their working life. To prevent possible harm to the environment or human
health from uncontrolled waste disposal, please separate these items from other types of waste and recycle
them responsibly to promote the sustainable reuse of material resources.
Household users should contact either the retailer where they purchased this product, or their local
government o ce, for details of where and how they can take these items for environmentally safe
recycling.
Business users should contact their supplier and check the terms and conditions of the purchase contract.
This product and its electronic accessories should not be mixed with other commercial wastes for disposal.
English - 4
User Manual_DW9000H-Series-00159B-03_EN.indd 4User Manual_DW9000H-Series-00159B-03_EN.indd 4 2015-03-24 5:22:212015-03-24 5:22:21
Page 5

To reduce the risk of fi re, electric shock, or injury to persons when using your appliance, follow basic
precautions, including the following:
WARNING
This appliance is not to be used by persons (including
children) with reduced physical, sensory or mental
capabilities, or lack of experience and knowledge, unless
they have been given supervision or instruction concerning
use of the appliance by a person responsible for their safety.
Children should be supervised to ensure that they do not
play with the appliance.
For use in Europe: This appliance can be used by children
aged from 8 years and above and persons with reduced
physical, sensory or mental capabilities or lack of experience
and knowledge if they have been given supervision or
instruction concerning use of the appliance in a safe way
and understand the hazards involved. Children shall not play
with the appliance. Cleaning and user maintenance shall not
be made by children without supervision.
If the supply cord is damaged, it must be replaced by the
manufacturer, its service agent or similarly qualifi ed persons
in order to avoid a hazard.
01 SAFETY INSTRUCTIONS
For appliances with ventilation openings in the base, that a
carpet must not obstruct the openings.
The new hose-sets supplied with the appliance are to be
used and that old hose-sets should not be reused.
CAUTION: In order to avoid a hazard due to inadvertent
resetting of the thermal cut-out, this appliance must not be
supplied through an external switching device, such as a
timer, or connected to a circuit that is regularly switched on
and o by the utility.
English - 5
User Manual_DW9000H-Series-00159B-03_EN.indd 5User Manual_DW9000H-Series-00159B-03_EN.indd 5 2015-03-24 5:22:212015-03-24 5:22:21
Page 6
Safety instructions
The door should not be left in the open position since this
could present a tripping hazard.
WARNING: Knives and other utensils with sharp points
must be loaded in the basket with their points down or
placed in a horizontal position.
This appliance is intended to be used in household and
similar applications such as:
• sta kitchen areas in shops, o ces and other working
environments;
• farm houses;
• by clients in hotels, motels and other residential type
environments;
• bed and breakfast type environments.
INSTRUCTIONS WHEN USING YOUR DISHWASHER
This dishwasher is not designed for commercial use. It is intended for use in domestic households and
in similar working and residential environments such as:
• Shops
• O ces and showrooms
and by residents in establishments such as:
• Hostels and guest houses.
It must only be used as a domestic appliance as specifi ed in these user manual, for cleaning domestic
crockery and cutlery.
Any other usage is not supported by the manufacturer and could be dangerous.
The manufacturer cannot be held liable for damage resulting from incorrect or improper use or
operation.
Do not use solvents in the dishwasher. Danger of explosion.
WARNING
Do not inhale or ingest dishwasher detergent. Dishwasher detergents contain irritant or corrosive
ingredients which can cause burning in the nose, mouth and throat if swallowed, or inhibit breathing.
WARNING
Consult a doctor immediately if detergent has been swallowed or inhaled.
Avoid leaving the door open unnecessarily, as you could trip over it.
CAUTION
Do not sit or lean on the opened door. This could cause the dishwasher to tip and be damaged, and
you could get injured.
CAUTION
Only use detergent and rinse aid formulated for domestic dishwashers. Do not use washing‐up liquid.
Do not use the strong acid cleaning agent.
CAUTION
English - 6
User Manual_DW9000H-Series-00159B-03_EN.indd 6User Manual_DW9000H-Series-00159B-03_EN.indd 6 2015-03-24 5:22:212015-03-24 5:22:21
Page 7

Do not fi ll the rinse aid reservoir with powder or liquid detergent. This will cause serious damage to the
reservoir.
Inadvertently fi lling the salt reservoir with powder or liquid dishwasher detergent will damage the water
softener. Make sure you have picked up the correct packet of dishwasher salt before fi lling the salt
CAUTION
reservoir.
Please only use special coarse grained dishwasher salt for reactivation, as other salts may contain
insoluble additives which can impair the functioning of the softener.
In an appliance with a cutlery basket (depending on model), cutlery is cleaned and dried more if placed
in e ciently the basket with the handles downwards. However, to avoid the risk of injury, place knives
CAUTION
and forks etc. with the handles upwards.
Plastic items which cannot withstand being washed in hot water, such as disposable plastic
containers, or plastic cutlery and crockery should not be cleaned in the dishwasher.
The high temperatures in the dishwasher may cause them to melt or lose shape.
On models with Delay Start function, make sure that the dispenser is dry before adding detergent.
Wipe dry if necessary. Detergent will clog if poured into a damp dispenser and may not be thoroughly
dispersed.
Knives and other utensils with sharp points must be loaded in the basket with their points down or
placed in a horizontal position.
WARNING
INSTRUCTIONS FOR PROTECTING YOUR CHILDREN
This appliance is not a toy! To avoid the risk of injury, keep children well away and do not allow them to
play in or around the dishwasher or to use the controls. They will not understand the potential dangers
WARNING
posed by it. They should be supervised whenever you are working in the kitchen.
There is also a danger that children playing might shut themselves in the dishwasher.
This appliance can be used by children aged from 8 years and above and persons with reduced
physical, sensory or mental capabilities or lack of experience and knowledge if they have been given
WARNING
supervision or instruction concerning use of the appliance in a safe way and understand the hazards
involved. Children shall not play with the appliance.
Cleaning and user maintenance shall not be made by children without supervision.
Older children may only use the dishwasher when its operation has been clearly explained to them and
they are able to use it safely, recognising the dangers of misuse.
WARNING
KEEP CHILDREN AWAY FROM DETERGENTS! Dishwasher detergents contain irritant and corrosive
ingredients which can cause burning in the mouth, nose and throat if swallowed, or inhibit breathing.
WARNING
Keep children away from the dishwasher when the door is open.
There could still be detergent residues in the cabinet.
Consult a doctor immediately if your child has swallowed or inhaled detergent.
01 SAFETY INSTRUCTIONS
English - 7
User Manual_DW9000H-Series-00159B-03_EN.indd 7User Manual_DW9000H-Series-00159B-03_EN.indd 7 2015-03-24 5:22:212015-03-24 5:22:21
Page 8
Safety instructions
INSTRUCTIONS FOR INSTALLING YOUR DISHWASHER
Before setting up the appliance, check it for any externally visible damage. Under no circumstances
should you use a damaged appliance. A damaged appliance could be dangerous.
WARNING
The dishwasher must only be plugged into the electricity supply via a suitable switched socket.
The electrical socket must be easily accessible after the dishwasher is installed so that it can be
CAUTION
disconnected from the electricity supply at any time. (Refer to the “Checking the parts and control
panel” section on page 10.)
There must be no electrical sockets behind the dishwasher. Danger of overheating and fi re risk if the
dishwasher were to be pushed up against a plug.
WARNING
The dishwasher must not be installed under a hob. The high radiant temperatures which are
sometimes generated by a hob could damage the dishwasher. For the same reason it should not be
WARNING
installed next to open fi res or other appliances which give o heat, such as heaters etc.
Do not connect the dishwasher to the mains supply until it has been fully installed and any adjustment
has been made to the door springs.
Before connecting the appliance, check that the connection data on the data plate (voltage and
connected load) match the mains electricity supply. If in any doubt, consult a qualifi ed electrician.
CAUTION
The electrical safety of this appliance can only be guaranteed when continuity is complete between it
and an e ective grounding system. It is most important that this basic safety requirement is present
and regularly tested and where there is any doubt the electrical system in the house should be
checked by a qualifi ed electrician.
The manufacturer cannot be held liable for the consequences of an inadequate grounding system (e.g.
electric shock).
Do not connect the appliance to the mains electricity supply by a multi‐socket unit or an extension
lead. These do not guarantee the required safety of the appliance (e.g. danger of overheating).
CAUTION
This appliance may only be installed in mobile installations such as ships if a risk assessment of the
installation has been carried out by a suitably qualifi ed engineer.
The plastic housing of the water connection contains an electrical component. The housing must not
be submerged in water.
CAUTION
There are electrical wires in the hose of Aqua-Stop. Never cut the water inlet hose, even if it is too long.
Installation, maintenance and repairs may only be carried out by a suitably qualifi ed and competent
person in strict accordance with current national and local safety regulations. Repairs and other work
by unqualifi ed persons can be dangerous. The manufacturer cannot be held liable for unauthorised
work.
The integrated waterproof system o ers protection from water damage, provided the following
conditions are met:
CAUTION
• The dishwasher is correctly installed and plumbed in.
• The dishwasher is properly maintained and parts are replaced where it can be seen that this is
necessary.
• The stopcock has been turned o when the appliance is not used for a longer period of time (e.g.
during holidays).
• The waterproof system will work even if the appliance is switched o . However, the appliance must
remain connected to the electricity supply.
A damaged appliance can be dangerous. If the dishwasher gets damaged, switch it o at the mains
and call your dealer or the service department.
WARNING
Unauthorised repairs could result in unforeseen dangers for the user, for which the manufacturer
cannot accept liability. Repairs should only be undertaken by an approved service technician.
English - 8
User Manual_DW9000H-Series-00159B-03_EN.indd 8User Manual_DW9000H-Series-00159B-03_EN.indd 8 2015-03-24 5:22:222015-03-24 5:22:22
Page 9

Faulty components must only be replaced by original spare parts. Only when these parts are fi tted can
the safety of the appliance can be guaranteed.
Always disconnect the dishwasher from the electrical supply for maintenance work (switch o at the
wall socket and remove the plug).
If the connection cable is damaged it must be replaced with a special cable, available from the
manufacturer. For safety reasons, this must only be fi tted by the service department or an authorised
CAUTION
service technician.
In countries where there are areas which may be subject to infestation by cockroaches or other
vermin, pay particular attention to keeping the appliance and its surroundings in a clean condition at all
WARNING
times. Any damage which may be caused by cockroaches or other vermin will not be covered by the
guarantee.
In the event of a fault or for cleaning purposes, the appliance is only completely isolated from the
electiricity supply when:
CAUTION
• it is switched o at the wall socket and the plug is withdrawn, or
• it is switched o at the mains, or
• the mains fuse is disconnected, or
• the screw-out fuse is removed (in countries where this is applicable).
Do not make any alterations to the appliance, unless authorised to do so by the manufacturer.
Never open the casing/housing of the appliance.
Tempering with electrical connections or components and mechanical parts is highly dangerous and
CAUTION
can cause operational faults or electric shock.
While the appliance is under guarantee, repairs should only be undertaken by a service technician
authorised by the manufacturer. Otherwise the guarantee will be invalidated.
When installing the product, make sure there is space at the top, left, right and back of the product to
ensure proper ventilation.
CAUTION
If there is insu cient space between the product and the sink, it may damage the sink or allow mold to
grow.
Make sure that your dishwasher’s hardness level setting is correct as your area. (Refer to the “Water
softener mode (Water hardness level setting)” section on page 18.)
01 SAFETY INSTRUCTIONS
English - 9
User Manual_DW9000H-Series-00159B-03_EN.indd 9User Manual_DW9000H-Series-00159B-03_EN.indd 9 2015-03-24 5:22:222015-03-24 5:22:22
Page 10
Setting up your dishwasher
Be sure to have your technician follow these instructions closely to ensure the safe
and normal operation of your new dishwasher.
CHECKING THE PARTS AND CONTROL PANEL
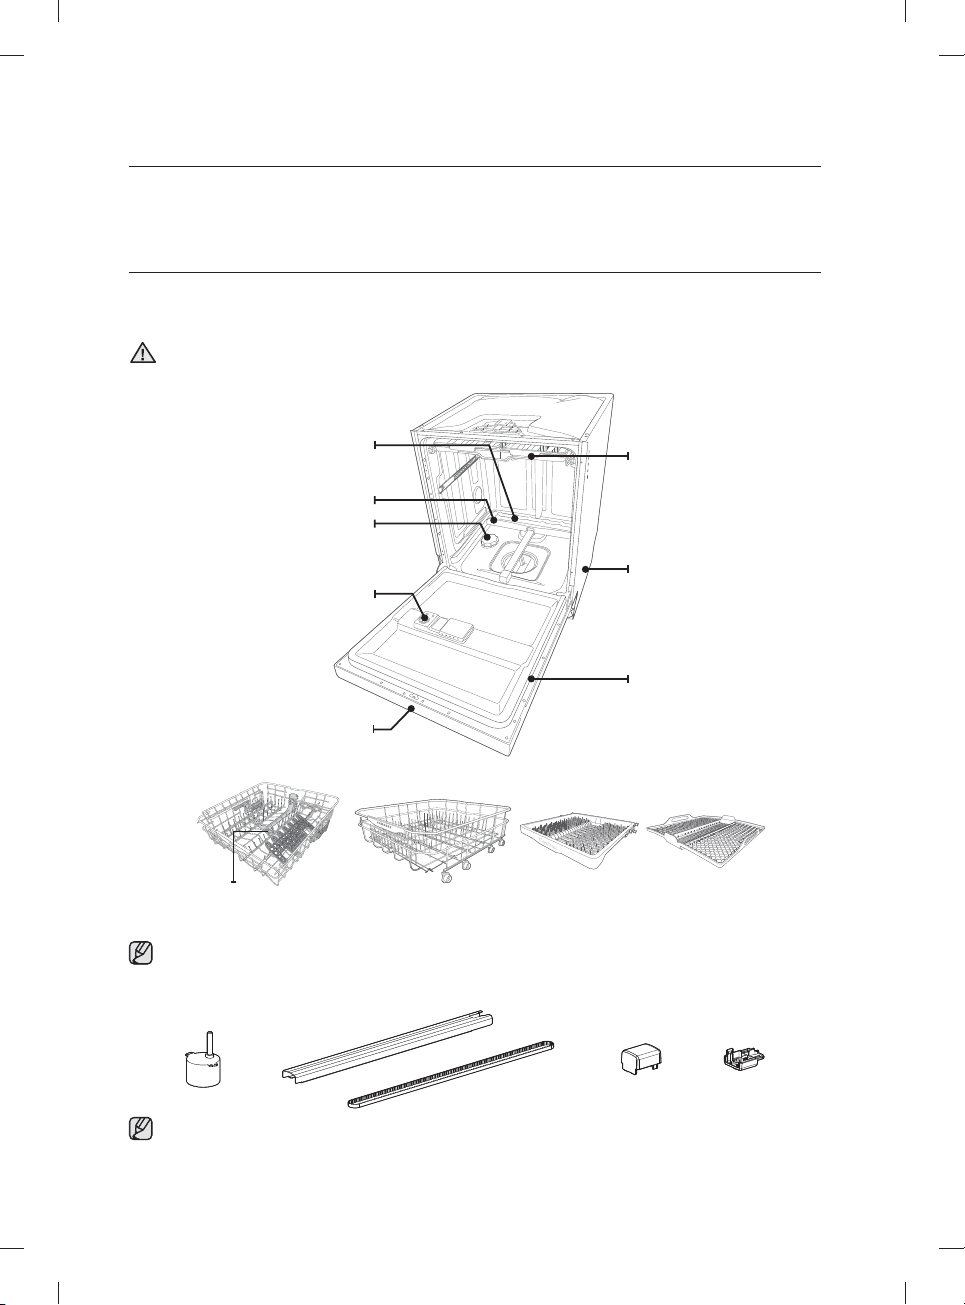
When your dishwasher has been unpacked, make sure that you’ve received all the parts shown below.
If your dishwasher was damaged during shipping, or if you do not have all the parts, contact Samsung
Customer Service or your Samsung dealer.
Keep the packaging out of the reach of children to ensure their safety, after unpacking your
dishwasher.
WARNING
Water refl ector
Control panel
Upper nozzle
Accessory parts -
Lower nozzle
Salt reservoir
Dispenser
3rd rack 3rd rack PADLower rackUpper rack
User manual, Holder Drain Hose, Kick Plate, 3rdRackPAD, Energy Label, Warranty
Card, Funnel (Refer to the “Filling the salt reservoir” section on page 20),
Custom panel fi xers (for some models)
.
Top nozzle
Base
Door
Linear Motion Part - Belt operating AC motor (Motor Geared), Rail, Belt V-Timing, Holder rail
User Manual_DW9000H-Series-00159B-03_EN.indd 10User Manual_DW9000H-Series-00159B-03_EN.indd 10 2015-03-24 5:22:232015-03-24 5:22:23
(Frontup, Front Low)
English - 10
Page 11
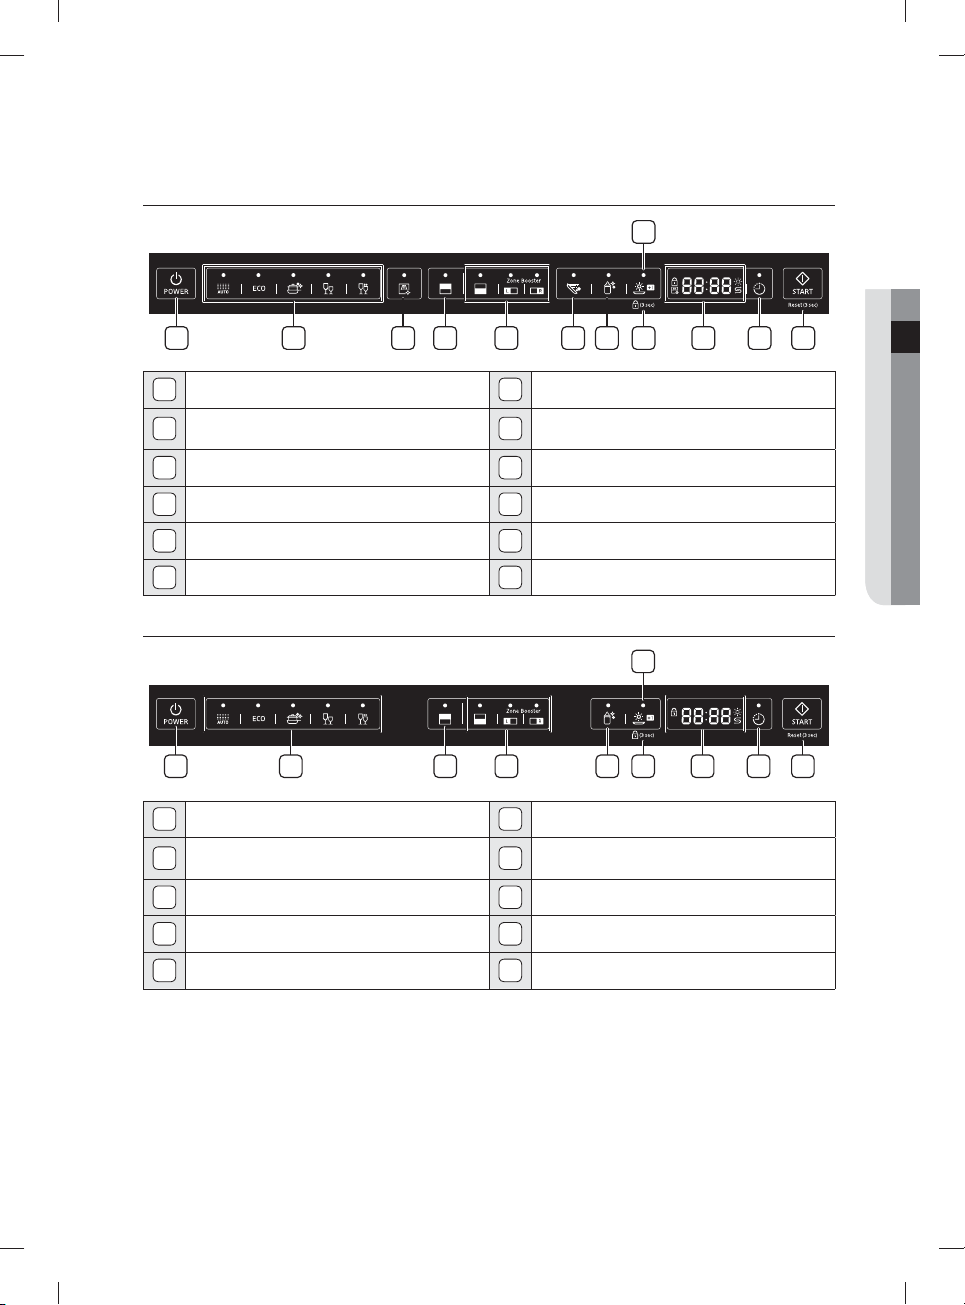
DW60H9970** / DW60J9970** Series
8
02 SETTING UP
1 643 7 9
1
Power Button
Cycle Selection Buttons
2
(Auto, ECO, Intensive, Delicate, Quick)
3
Self Clean Button
4
Upper Button
5
Lower (Zone Booster) Selection Buttons
6
Speed Booster Button
7
Sanitize Button
8
Dry+ Button
9
Child Lock
10
Display
11
Delay Start Button
12
Start (Reset) Button
DW60H9950** / DW60J9960** Series
1 3 5 7
1
Power Button
Cycle Selection Buttons
2
(Auto, ECO, Intensive, Delicate, Quick)
3
Upper Button
6
Dry+ Button
7
Child Lock
8
Display
1211102 5
6
1092 4 8
4
Lower (Zone Booster) Selection Buttons
5
Sanitize Button
9
Delay Start Button
10
Start (Reset) Button
English - 11
User Manual_DW9000H-Series-00159B-03_EN.indd 11User Manual_DW9000H-Series-00159B-03_EN.indd 11 2015-03-24 5:22:242015-03-24 5:22:24
Page 12
Setting up your dishwasher
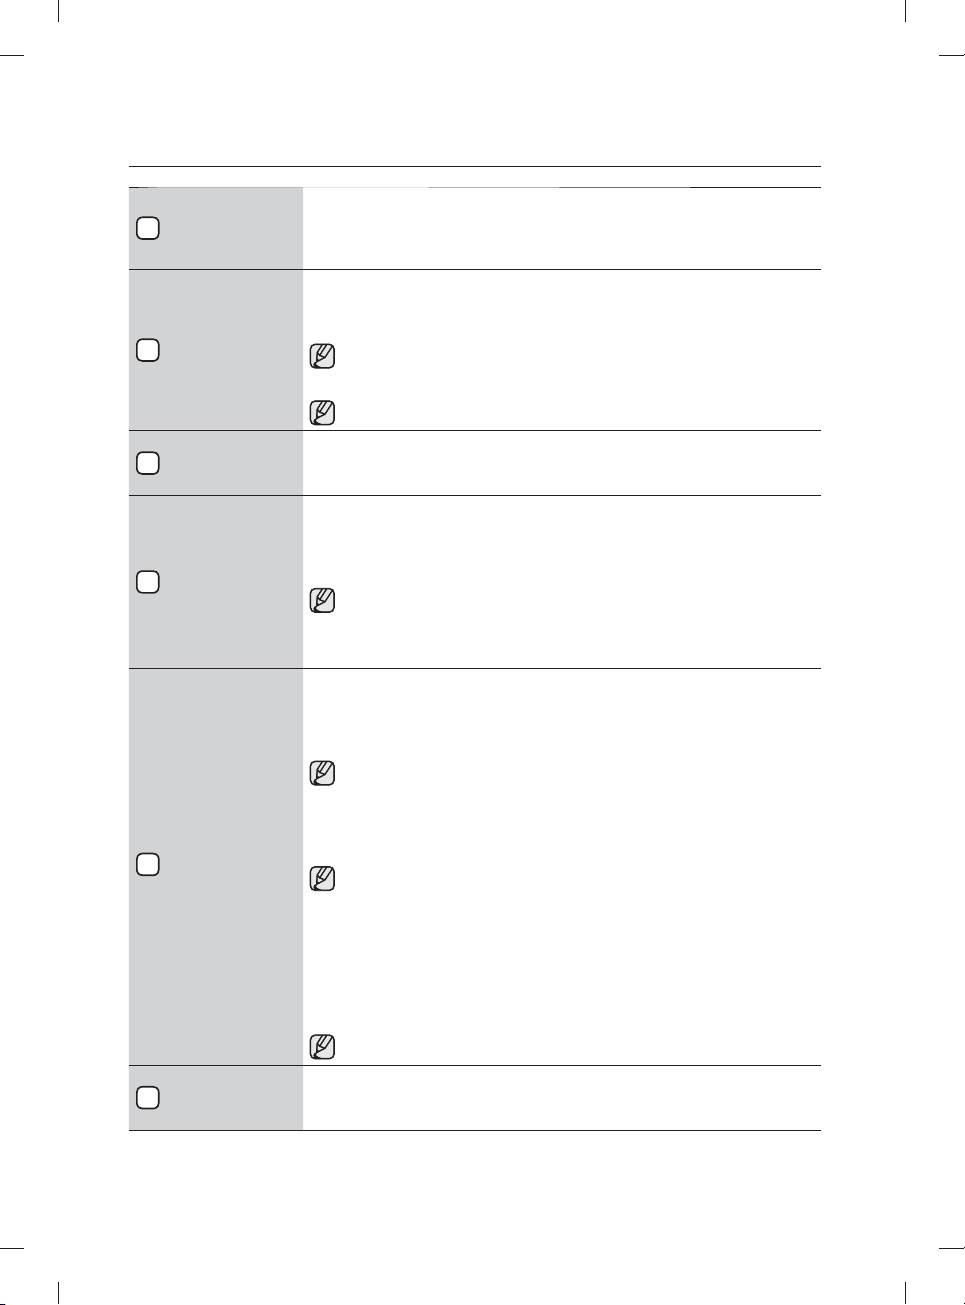
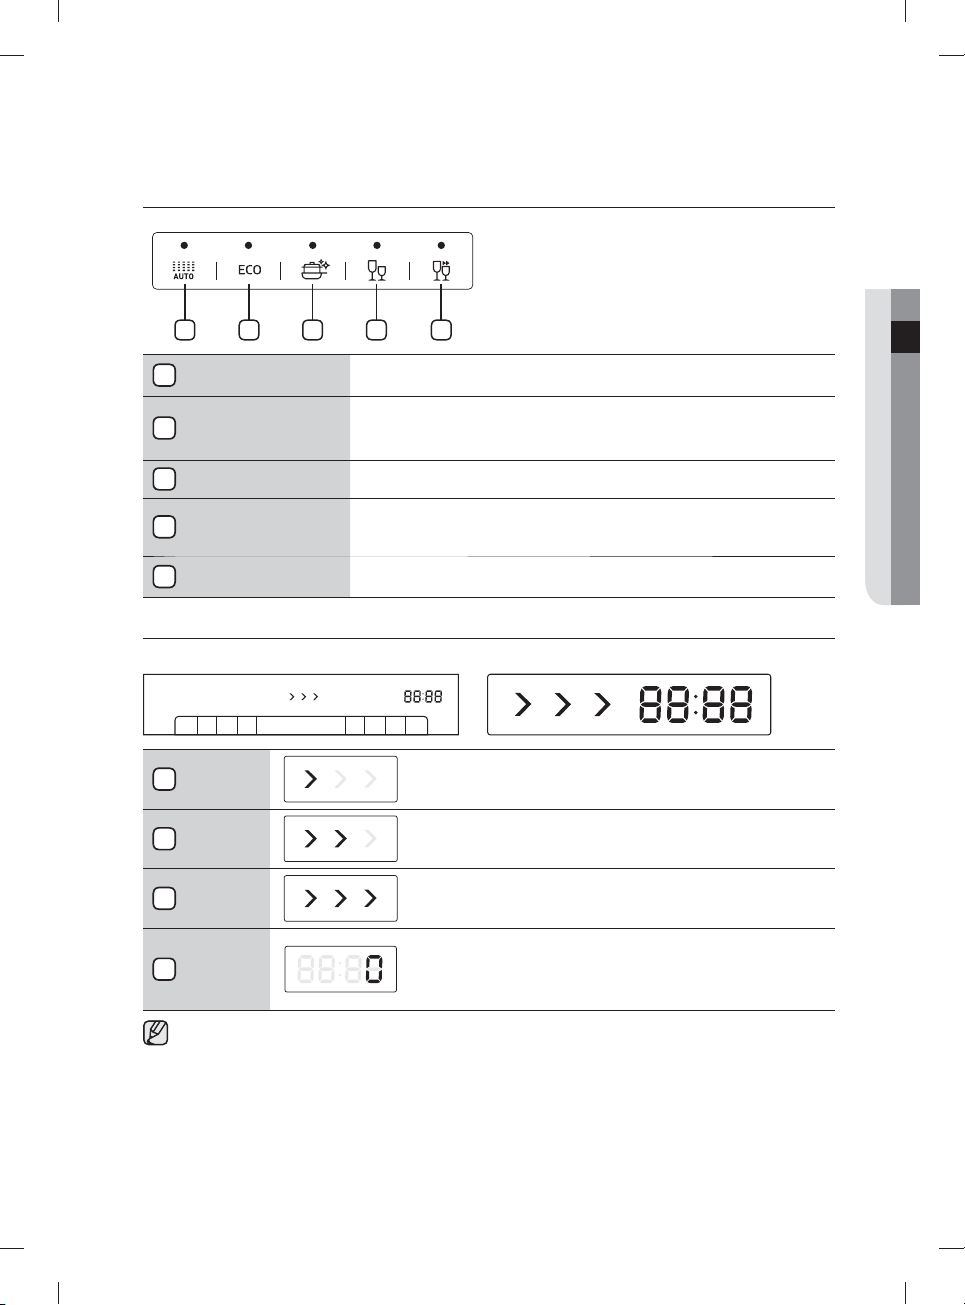
When you press the Power button, the light of the most recently fi nished cycle
1
Power
2
Cycle Selector
Self Clean
3
(for some
models)
Upper
4
(for some
models)
Lower
(forsomemodels)
5
/ Lower
Rack- Only
(forsomemodels)
Speed Booster
6
(for some
models)
turns on. When the cycle you selected has fi nished, all other indicator lights
are turned o and the “0” light is illuminated for some minutes.
Then, the Power turns o automatically.
Select the appropriate wash cycle depending on the soil level of your dishes.
After you select a cycle, the Cycle On light for that cycle lights. Also, the Upper
and Lower zone lights turn on by default.
If you want to change the cycle once it has started, press the Reset
button and turn o the dishwasher. Then, turn on the dishwasher again
and select a new cycle.
Default cycle is ECO.
Select this option to clean the dishwasher TUB. Run with the dishwasher
empty. The Upper and Lower options are turned o by default.
When you select Upper, only the upper rack nozzle is activated.
The lower nozzle will not operate.
Use this feature to wash a small load of dishes or glasses placed in the upper
rack.
When you select Upper, place dishes, glasses, etc. in the upper rack
only. The dishwasher will not wash items placed in the lower rack.
Selecting Upper reduces both the cycle time and the amount of electricity
consumed.
When you select Lower (Lower Rack - Only), only the lower rack nozzle is
activated. The upper nozzle will not operate.
Use this feature to wash a small load of dishes or glasses placed in the lower
rack.
When you select Lower (Lower Rack - Only), place items, glasses, etc.
in the lower rack only. The dishwasher will not wash items placed in the
upper rack.
Selecting Lower (Lower Rack - Only) reduces both the cycle time and the
amount of electricity consumed.
If you want to wash heavily soiled items such as pots and pans, select
the Zone Booster option. (This option consumes slightly more water and
energy.)
Select Zone Booster L option: Applies intensive washing power to the
left part of the lower rack.
Select Zone Booster R option: Applies intensive washing power to the
right part of the lower rack.
Select both Zone Booster L & R options: Applies intensive washing
power to the whole lower rack.
Selecting a Zone Booster option does not turn o the Upper Nozzle.
Select this option to wash with short cycle time.
(Auto, ECO, Intensive.)
English - 12
User Manual_DW9000H-Series-00159B-03_EN.indd 12User Manual_DW9000H-Series-00159B-03_EN.indd 12 2015-03-24 5:22:252015-03-24 5:22:25
Page 13

7
Sanitize
8
Dry+ (Child Lock)
9
Display
With the Sanitize option selected, the water temperature is increased to 70˚C
for high temperature sanitization.
You cannot select the Sanitize option if you select the Delicate cycle.
Use this option when you want to dry your dishes more completely.
The temperature rises to 65˚C in the fi nal rinse cycle and dry time is increased.
If you select the this option, electricity consumption is increased.
*Child Lock : This option allows you to lock the buttons on the control panel -
except the Power button - so children cannot accidently start the dishwasher
by pressing the buttons on the panel. Only the Power button remains active.
To lock or unlock the buttons on the control panel, press and hold the Dry+
(Child Lock) button for three (3) seconds.
• When the Power is On : Press and hold the “Dry+ (Child Lock)” button for
three (3)seconds.
• When the Power is O : Push the Power button fi rst, and then press and
hold the “Dry+ (Child Lock)” button for three (3) seconds.
• Child Lock remains active until you turn it o . You cannot select cycles or
options or start the dishwasher when Child Lock is on.
Displays cycle time and remaining hours and minutes, Delay Start hours, and
check messages.
If an problem occurs during an operation, an check message is displayed with
a warning sound.
Refer to the “Troubleshooting and information codes” section on page 32.
Child Lock indicator
-
Turns on if the Child Lock is set (or the dishwasher is in the standby or
pause modes).
- Turns o while the dishwasher is operating.
- When Child Lock is on, the Child Lock indicator blinks for several
seconds if any button except the Power button is pressed.
Self Clean indicator
- Turns on when the Self Clean option is enabled (or the dishwasher is
in the standby or pause modes), but turns o while the dishwasher is
operating.
- Blinks for 5 seconds every 20 to 22 cycles.
- The cycle counter disappears when the Self Clean operation is complete
or when the dishwasher reaches the 23rd cycle without the Self Clean
cycle being used. (The Reset or Self Clean operation is not counted by
the cycle counter.)
Rinse Refi ll indicator
- Turns on if the dishwasher runs out of rinse aid (or the dishwasher is in
the standby or pause modes).
- Turns o while the dishwasher is operating.
Lack of salt indicator (*applicable models only)
- Tu
rns on when the water softener runs out of salt. (or the dishwasher is
in the standby or pause modes.)
- Turns o while the dishwasher is operating.
02 SETTING UP
English - 13
User Manual_DW9000H-Series-00159B-03_EN.indd 13User Manual_DW9000H-Series-00159B-03_EN.indd 13 2015-03-24 5:22:252015-03-24 5:22:25
Page 14

Setting up your dishwasher
Delay a cycle for up to 24 hours in one-hour increments. To increase the delay
start time, press or hold the Delay Start button. The hour displayed indicates
the time at which the wash will be started.
10
Delay Start
11
Start
You can select options (Self Clean, Upper, Lower, Speed Booster, Sanitize, Dry+, Delay Start) before
starting a cycle. If you change the cycle after selecting an option, the original cycle is reset.
To prevent the touchpad from losing response sensitivity, follow these instructions:
• Touch the center of each keypad using one fi nger. Do not push.
• Clean the touch control’s surface regularly with a soft, damp cloth.
• Be careful not to touch more than one touch key pad at a time, except as directed.
- After setting the delay time, press the Start button, and then close the
door to start the cycle.
- If you want to change
press the Reset button and turn off the dishwasher. Then, turn on the
dishwasher again and select a new cycle with a new delay setting.
To start a cycle, press the Start button before closing the door.
*Reset : To cancel a currently running cycle and drain the dishwasher, press
and hold the Start button for three (3) seconds.
Once the dishwasher is reset, select a cycle and option, and then press Start
to restart the dishwasher.
the delay time once the dishwasher has started,
English - 14
User Manual_DW9000H-Series-00159B-03_EN.indd 14User Manual_DW9000H-Series-00159B-03_EN.indd 14 2015-03-24 5:22:252015-03-24 5:22:25
Page 15
CYCLE SELECTOR
1 2 3 4 5
02 SETTING UP
1
Auto
Light to heavily soiled daily used items, automatic detection of the
amount of soils.
Normally soiled daily used items, with reduced energy and water
2
ECO
consumption.
* The Speed Booster option will reduce the cycle time.
3
Intensive Heavily soiled items include pots and pans.
4
5
Delicate
Quick
Lightly soiled delicate items. You cannot select the Speed Booster,
Zone Booster or Sanitize option if you select this cycle.
Lightly soiled with very short cycle time. You cannot select the
Speed Booster, Zone Booster or Sanitize option if you select this cycle.
PROGRESS DISPLAYS
DW60H9970 series only
1
Wash
2
Rinse
3
Dry
4
Clean
When the dishwasher starts a cycle, the light that corresponds to the current operation turns on to
show the progress of the cycle.
When the dishwasher is in a wash portion of a cycle, the fi rst
arrow light is illuminated and the remaining time is displayed.
When the dishwasher is in a rinse portion of a cycle, the
second arrow light is illuminated and the remaining time is
displayed.
When the dishwasher is in a drying portion of a cycle, the third
arrow light is illuminated and the remaining time is displayed.
After the dishwasher has completed all portions of a cycle, all
other indicator lights are turned o .
The dishwasher chimes and “0” is displayed for several
minutes.
English - 15
User Manual_DW9000H-Series-00159B-03_EN.indd 15User Manual_DW9000H-Series-00159B-03_EN.indd 15 2015-03-24 5:22:252015-03-24 5:22:25
Page 16

Setting up your dishwasher
MEETING THE INSTALLATION REQUIREMENTS
Power supply and grounding
Do not use an extension cord.
Only use the power cord that came with the dishwasher.
WARNING
When preparing for the installation, ensure that your power supply o ers:
• An AC 220-240V / 50Hz fuse or a circuit breaker.
• An individual branch circuit serving your dishwasher.
Your dishwasher must be grounded. If your dishwasher malfunctions or breaks down, grounding will reduce
the risk of electric shock by providing a path of least resistance for the electric current.
Your dishwasher comes with a power cord and a grounded, three-prong plug that can be inserted into a
properly installed and grounded outlet.
Do not connect the ground wire to a plastic plumbing line, gas line, or hot water pipe.
WARNING
Improperly connecting the grounding conductor can result in electric shock.
Check with a qualifi ed electrician or technician if you are unsure whether your dishwasher has been properly
grounded.
Do not modify the plug provided with the dishwasher. If it does not fi t the outlet, have a proper outlet
installed by a qualifi ed electrician.
CAUTION
Water supply
Do not drink the water from inside the dishwasher.
WARNING
• The dishwasher may be connected to a cold or hot water supply, max 60˚C.
• A stopcock with a 3/4” male thread must be provided on tap.
• The water pressure must be between 0.05MPa and 0.8MPa. If the water pressure is to less, the water
supply valve may not operated properly causing the dishwasher to turn o . If the water pressure is too
high, a pressure reducer valve must be fi tted.
You can reduce the risk of leaks and water damage by:
CAUTION
• Making water taps easily accessible.
• Turning o the taps when the dishwasher is not in use.
• Periodically checking the fi ttings for leaks.
English - 16
User Manual_DW9000H-Series-00159B-03_EN.indd 16User Manual_DW9000H-Series-00159B-03_EN.indd 16 2015-03-24 5:22:262015-03-24 5:22:26
Page 17

Using Aqua-Stop
The Aqua-Stop was invented as the perfect leakage protection system.
It is attached to the water supply hose and automatically cuts o the water fl ow in the event of damage to
the hose.
Aqua-Stop is an electrical component.
CAUTION
• Take care that you do not damage the Aqua-Stop.
• Do not twist or bend the water supply hose connected to the Aqua-Stop.
If the Aqua-Stop has been damaged, shut o the water taps and pull out the power plug right away.
Once these steps have been taken, contact Samsung Customer Service or a qualifi ed technician.
CAUTION
Drain
If you are using a drain exclusively for the dishwasher, connect the drain hose to a drain that is between
30cm to 70cm o the ground.
Connecting the drain hose to a drain more than 80 cm o the ground can result the water in the dishwater
fl owing back or draining incompletely.
Flooring
For best performance, your dishwasher must be installed on a solid, even fl oor.
Wooden fl oors may need to be reinforced to minimize vibrations. Carpeting and soft tiles are contributing
factors to vibrations and may cause your dishwasher to move slightly while operating.
Never install your dishwasher on a platform or poorly supported structure.
CAUTION
Ambient temperature
Do not install your dishwasher in an area exposed to freezing temperatures. Your dishwasher always retains
some water in the water valve, pump and hose and if the water freezes in the machine or hoses, it may
damage the appliance and its components.
Test run
Make sure that you install your dishwasher correctly by running the Quick cycle after the installation is
complete.
02 SETTING UP
English - 17
User Manual_DW9000H-Series-00159B-03_EN.indd 17User Manual_DW9000H-Series-00159B-03_EN.indd 17 2015-03-24 5:22:262015-03-24 5:22:26
Page 18
Before using the product for
the fi rst time
SETTING MODE
Turn on the dishwasher, and hold down both the Sanitize and Delay Start buttons for 3 seconds to enter
Settings mode.
Pressing the Sanitize button changes the mode in this sequence:
Sound settings mode Brightness mode (for some models) Water refl ector mode
Water softener mode (for some models) Auto Door mode (for some models).
Sound settings mode
Press the Sanitize button until “U1” or “U0” is displayed. To change the setting, press the Delay Start
button. “U0” means that the sound is o for all cycles.
This setting is continue before changing again.
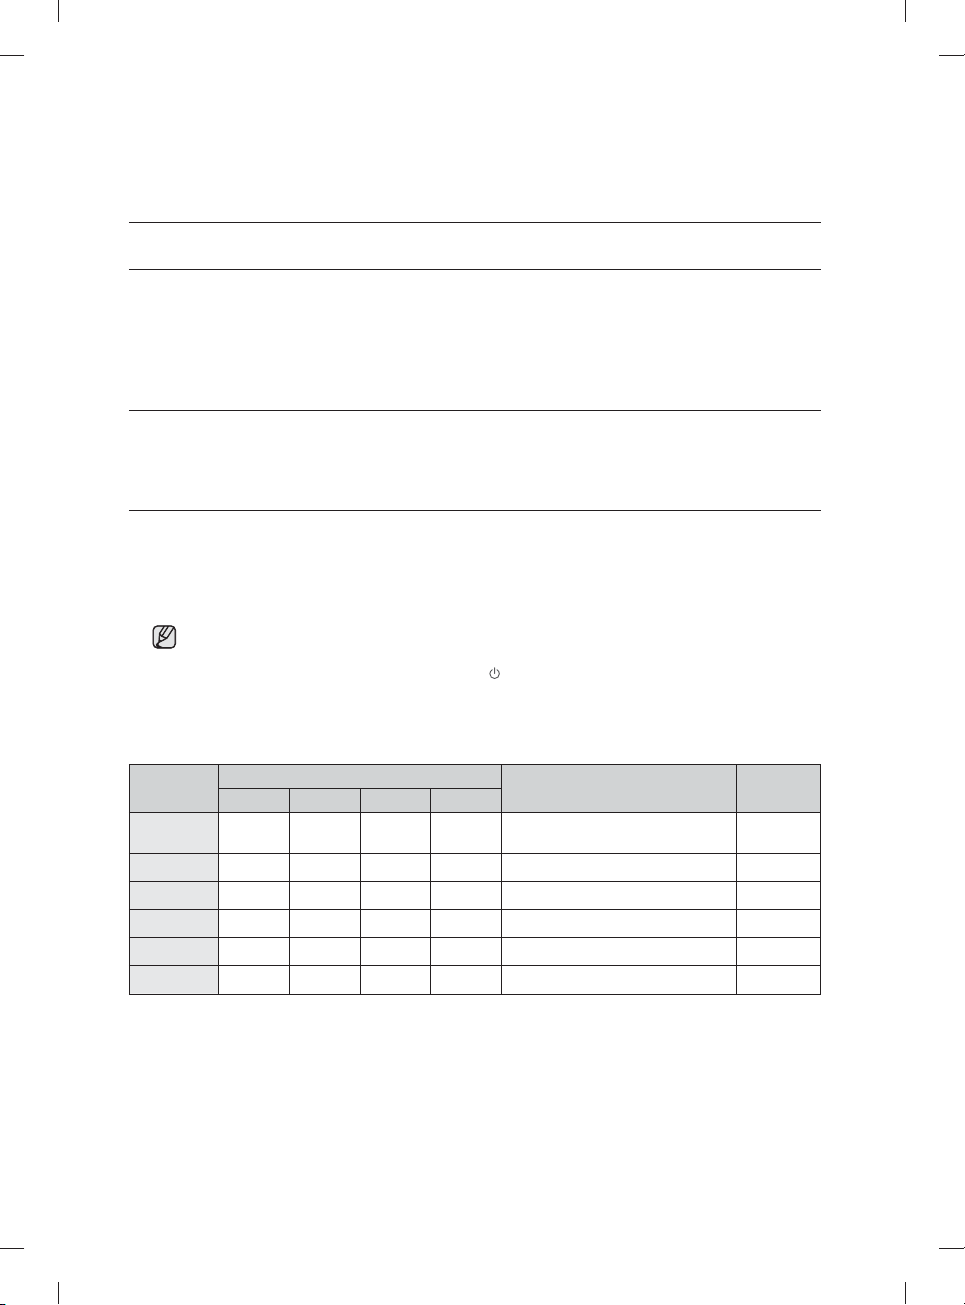
Water softener mode (Water hardness level setting)
1. Press the Sanitize button to enter Water softener mode (“L3” on the display indicates Water softener
mode).
2. Once you enter the setting for the water hardness, the current hardness level setting is displayed.
3. Use the Delay Start button to select the water hardness level from Level 0 to Level 5.
(Refer to the table below for the water hardness level setting in your area.)
If the water hardness level in your area is very low, you do not need to use dishwasher salt.
However, you need to set the water hardness setting for the dishwasher to 0.
4. To exit the water hardness setting, press the Power
Water hardness level chart
The water hardness is measured using German degrees (°dH), French degrees (°TH), or mmol/ℓ
(International unit for the water hardness).
Level
0 <6 <10 <1.0
1 6~14 10~25 1~2.5 1/8 Yes Yes
2 14~23 25~40 2.5~4.0 1/5 Yes Yes
3 23~31 40~55 4.0~5.5 1/3 Yes Yes
4 31~40 55~70 5.5~7.0 1/2 Yes Yes
5 >40 >70 >7.0 1/1 Yes Yes
ºdH ºTH mmol/ℓ Range
Water hardness
No
recycle
button.
Regeneration softening/
washing cycle (ECOprogram)
No No
Salt
injection
English - 18
User Manual_DW9000H-Series-00159B-03_EN.indd 18User Manual_DW9000H-Series-00159B-03_EN.indd 18 2015-03-24 5:22:262015-03-24 5:22:26
Page 19
Better washing results require the use of soft water.
Hard water contains impurities that can hinder the washing performance.
You will need to soften the water if the water supply is harder than 1.0mmol/ℓ (6°d – German scale).
To do this, you need:
• Dishwasher salt.
• Confi guration of the water hardness level according to your area.
For more information about the water hardness level in your area, contact your local water department.
If the hardness level of your water supply is unsteady, set the dishwasher to the highest measurement.
For example, if the water hardness reading ranges from 6.7mmol/ℓ to 9.0mmol/ℓ, set the dishwasher
to 9.0mmol/ℓ.
The dishwasher’s default water hardness level setting is 3 (4.0-5.5mmol/ℓ). If this setting matches the water
hardness level in your area, there is no need to change it.
Brightness mode (Pocket LED brightness setting)
Press the Sanitize button until “B0 ~ B5” is displayed. (The higher numbers is more bright).
To change setting press Delay Start button. (for some models)
Auto Door mode
The door opens automatically when the cycle is complete to improve drying performace.
The door opens immediately before a cycle fi nishes, and “0” will appear on the display 30 seconds after
that.
Press the Sanitize button to enter Auto Door mode. (“A1” on the display indicates Auto Door mode.)
Press the Delay Start button to enable or disable the Auto Door.
• A1 : Auto Door enabled.
• A0 : Auto Door disabled.
* Note that Auto Door will stay active throughout the ECO cycle with no option enabled.
* Once the door opens in Auto Door mode, the door cannot
be closed manually for the next 2 minutes.
* Auto Door will be disabled for the Quick cycle.
03 BEFORE USING
Changing “Auto Door mode” setting can infl uence drying result.
Select “A1” mode for better drying result.
English - 19
User Manual_DW9000H-Series-00159B-03_EN.indd 19User Manual_DW9000H-Series-00159B-03_EN.indd 19 2015-03-24 5:22:262015-03-24 5:22:26
Page 20

Before using the product for
the fi rst time
USING DISHWASHER SALT
Filling the salt reservoir
In order to use soft water, you need to fi ll the salt reservoir with dishwasher salt.
Use dishwasher salt only.
Do not use any other type of salt or solvent. This may damage the salt reservoir and the water
CAUTION
softening system.
Always fi ll the salt reservoir just before running one of complete washing programmes to prevent
corrosion due to the excess salt or salty water.
CAUTION
1. Open the door.
2. Open the salt reservoir cap by rotating it counterclockwise.
3. Fill the salt reservoir with water (only required when switching on the
appliance for the fi rst time)
4. Add the dishwasher salt.
The salt reservoir’s capacity is about 1kg. Do not overfi ll the salt
reservoir.
CAUTION
5. Remove excess salt from around the salt reservoir opening and cap seal.
If the excess salt is not removed, the salt reservoir cap may not
close properly and allow salt water fl ow out with negative impact to
CAUTION
the performance.
6. Rotate the salt reservoir cap clockwise until it is completely shut.
Recommended that if spilled a lot of salt or salty water to inside
Tub, run the Quick
Any remaining salt grain or salty water can occur corrosion.
Depending on the size of the salt grains, it may take a while for
the salt to dissolve and the “Lack of salt
to clean inside Tub.
” indicator to turn o .
Checking the Lack of salt indicator
If the “Lack of salt ” indicator is lit, add dishwasher salt as described above.
A lit “Lack of salt
switched on.
” indicator means that there remains salt for three more cycles from the fi rst
English - 20
User Manual_DW9000H-Series-00159B-03_EN.indd 20User Manual_DW9000H-Series-00159B-03_EN.indd 20 2015-03-24 5:22:272015-03-24 5:22:27
Page 21
USING DETERGENT
All dishwasher cycles require detergent in the detergent compartment.
Add the correct amount of detergent for the selected cycle to ensure the best performance.
Use dishwasher detergent only. Regular detergent produces too much foam, which may decrease the
dishwasher’s performance or cause it to malfunction.
CAUTION
Do not swallow dishwasher detergent. Avoid breathing in the fumes. Dishwasher detergent contains
irritants and caustic chemicals that can induce respiratory conditions. If you have swallowed
WARNING
dishwasher detergent or inhaled the fumes, seek medical attention immediately.
Keep dishwasher detergent out of the reach of children.
WARNING
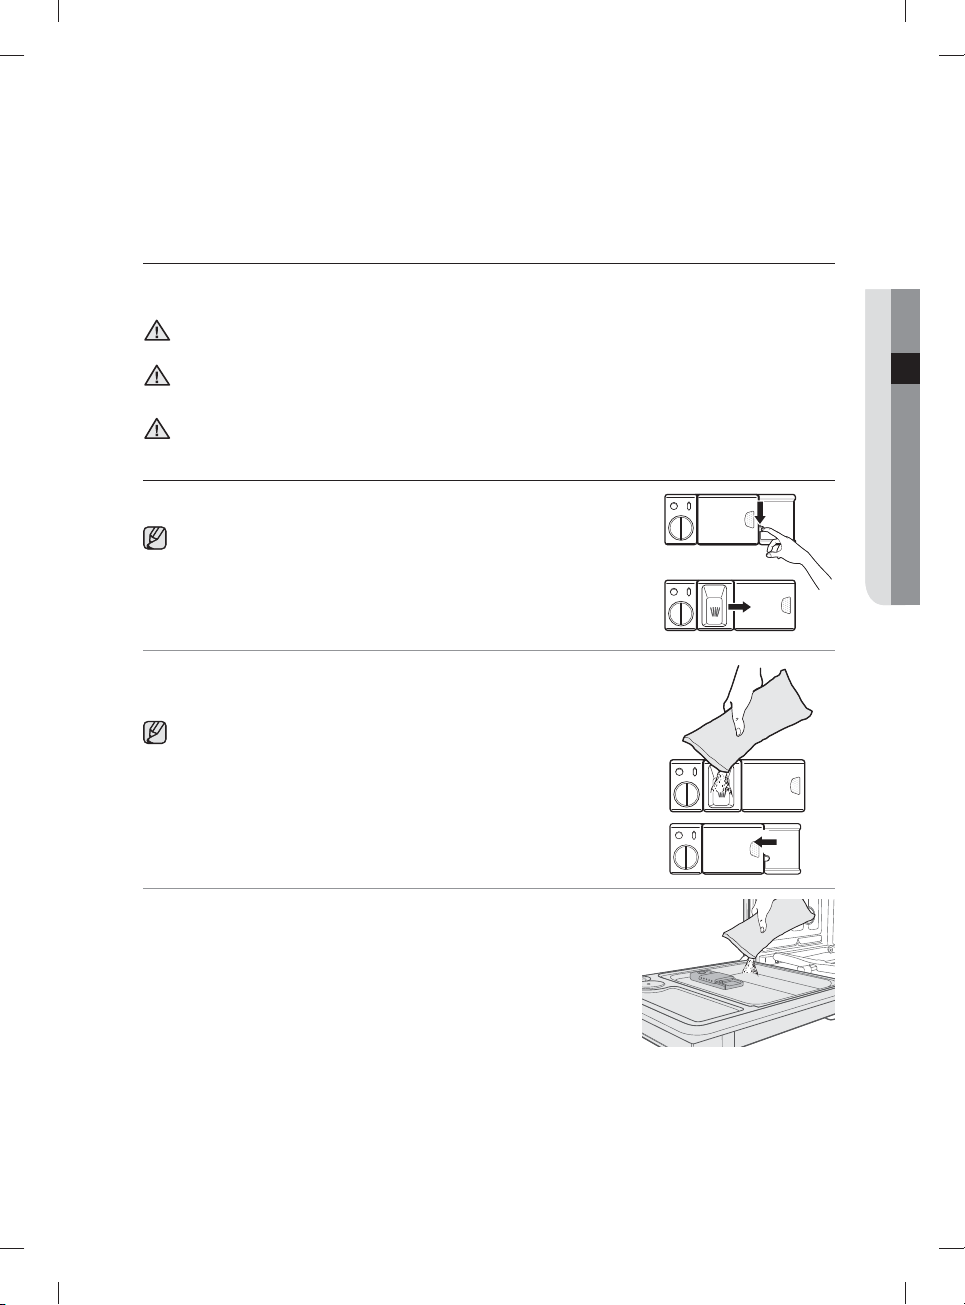
Filling the detergent dispenser
1. Open the detergent dispenser fl ap by pushing the detergent dispenser
release catch.
The fl ap is always open at the end of a dishwashing cycle.
2. Add the recommended amount of detergent to the main wash
detergent compartment.
3. Close the fl ap by sliding it to the left and then pressing it down.
There is no separate button that is specifi c to using tablet detergents.
03 BEFORE USING
4. For better cleaning result, especially if you have very dirt items, add
small amount (about 8 g) of detergent on the door. That will act in
prewash phase.
English - 21
User Manual_DW9000H-Series-00159B-03_EN.indd 21User Manual_DW9000H-Series-00159B-03_EN.indd 21 2015-03-24 5:22:282015-03-24 5:22:28
Page 22
Loading your dishwasher
DISHWASHING GUIDELINES
Follow these simple guidelines to get the best results and save energy.
Before loading dishes
Remove food remains such as bones, fruit seeds, etc. and waste such as toothpicks, paper napkins,
etc. from your dishes. Food remains and waste can damage your dishes, make noise and even result
CAUTION
in a product malfunction.
Do not wash items that are covered with ash, sand, wax, lubricating grease or paint.
These materials will damage the dishwasher and ash does not dissolve and will distribute in hole
WARNING
interior.
Items not suitable for the dishwasher
• Copper, brass, tin, ivory and aluminium items or with an adhesive
• Non-heat resistant plastics
• Craft items, antiques, valuable vases and decorative glassware
• Colours painted over a glaze
• Wooden cutlery and crockery or items with wooden parts
• Delicate glassware, or glassware containing lead crystal
Silverware that has been in contact with foods containing sulphur can become discoloured. These
include egg yolks, onions, mayonnaise, mustard, fi sh, fi sh brine and marinades.
• Clouding may occur on glasses after frequent washing. Do not wash delicate glassware, or glassware
containing lead crystal in the dishwasher.
Aluminium components (e.g. grease fi lters) must not be cleaned with caustic, alkaline cleaning agents.
These may damage the material, or in extreme cases, cause a severe chemical reaction. Use only
WARNING
items e. g. glasses, porcelain and cutlery which the manufacturer declare as dishwasher-proof.
English - 22
User Manual_DW9000H-Series-00159B-03_EN.indd 22User Manual_DW9000H-Series-00159B-03_EN.indd 22 2015-03-24 5:22:282015-03-24 5:22:28
Page 23
ADJUSTING THE HEIGHT OF THE UPPER RACK
You can adjust the height of the upper rack in your Samsung dishwasher so that the lower rack can
accommodate larger sized dishes. Depending on where you set the upper rack height, the lower rack can
accommodate plates up to 12 in. (30 cm) in diameter and the upper rack can accommodated plates up to
8 in. (20 cm) in diameter.
1. To lower the upper rack by 2 in. (5 cm), pull
the adjust handles located at the left and
right sides of the upper rack, and then push
the upper rack downwards slightly at the
same time.
2. To raise the upper rack, just pull the upper
rack upwards. The adjuster handle will latch
and the upper rack will move to the high
position.
We recommend adjusting the height of
the upper rack before loading dishes into
CAUTION
the rack. If you adjust the the rack after
loading the dishes, you may damage the
dishes. If you do not adjust with left and
right handle together, the dishwasher door may not close properly.
Pull out the upper rack from the tub until it is fully revealed before adjusting the upper rack.
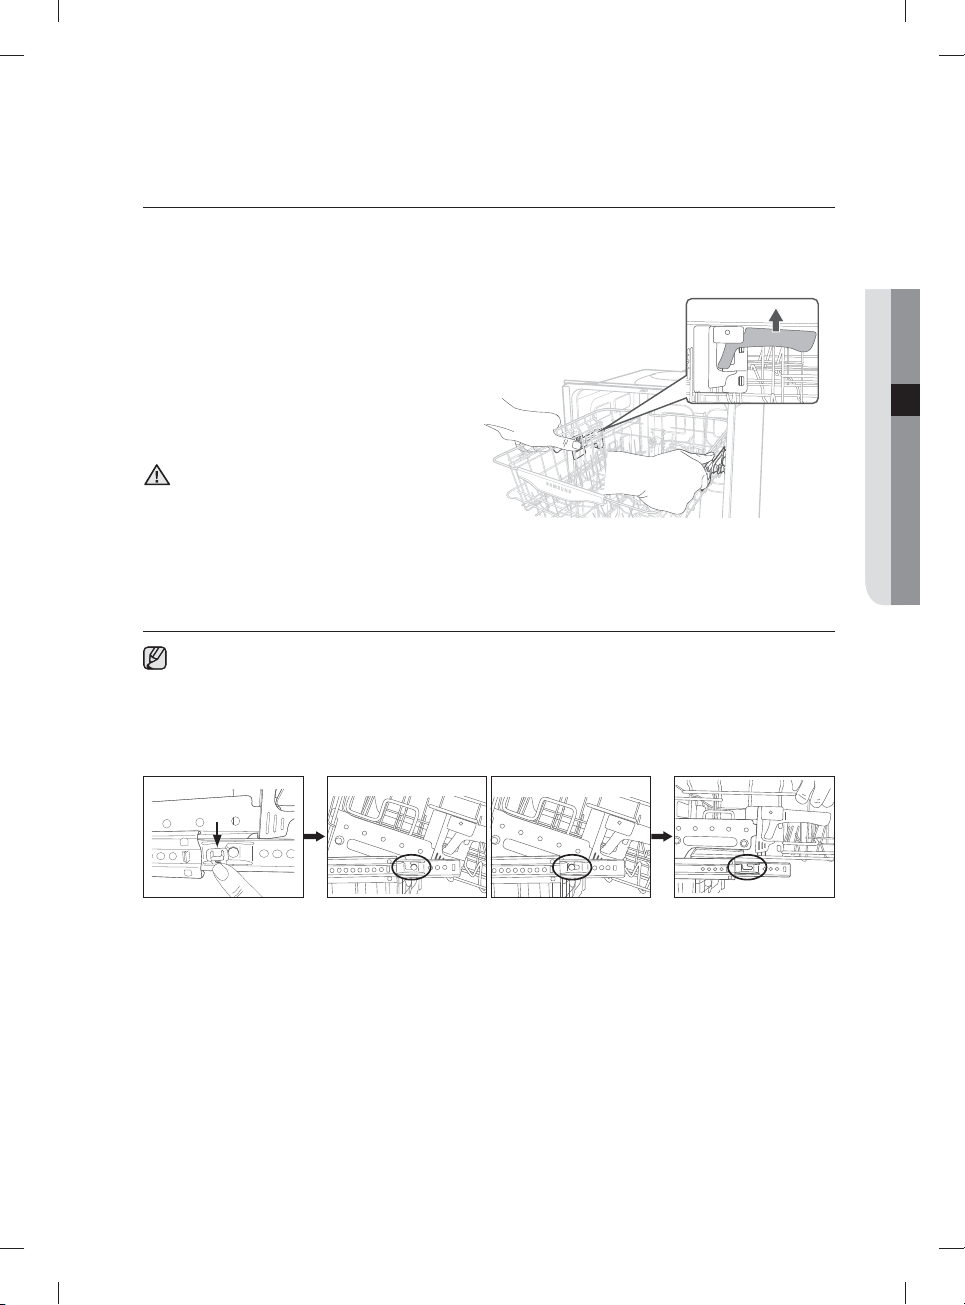
REMOVING THE UPPER RACK (FOR SOME MODELS)
You can remove the upper rack to accommodate extra large items in the bottom rack. Take care that
you do not lose the holder rails during this process.
To remove the upper rack from the slide rail, pull the upper rack out from the tub until it is fully extended.
Hold down the holder rails on both sides to release the upper rack. Slide the upper rack out to the end of
one holder rail, and then lift it up.
Repeat the steps above with the other holder rail.
04 LOADING
Step 1. Step 2. Step 3.
English - 23
User Manual_DW9000H-Series-00159B-03_EN.indd 23User Manual_DW9000H-Series-00159B-03_EN.indd 23 2015-03-24 5:22:292015-03-24 5:22:29
Page 24

Loading your dishwasher
LOADING THE LOWER RACK
Load cookware (pots, pans, etc.), up to 12 in. (30 cm) in
diameter into the lower rack. The lower rack has been especially
designed for dinner dishes, soup bowls, plates, pots, lids, and
casserole dishes.
We recommend loading cups, stemware, and small plates into
the upper rack. See the recommended loading patterns below.
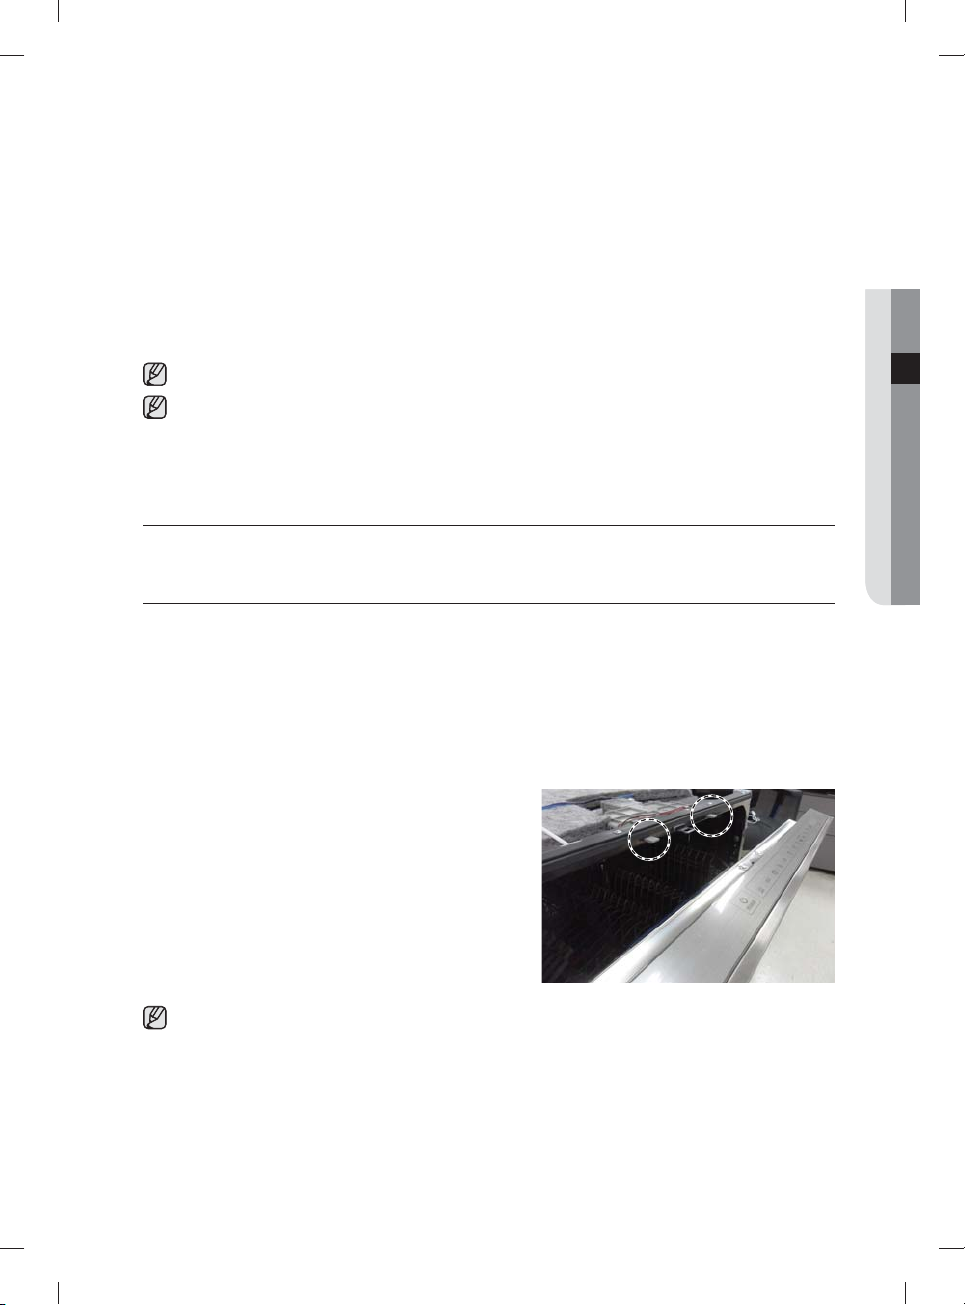
Loading large items into the zone booster areas
You can load large items such as pots and pans into the left and/or right
sides of the lower rack - the Zone Booster areas - for more e ective
cleaning. When you select the Zone Booster option, an additional,
powerful jet is activated and directed at items in the Zone Booster areas.
Make sure pot handles and other items do not interfere with the rotation of
the nozzles and the water refl ector.
LOADING THE UPPER RACK
The upper rack has been designed for small plates, mugs,
glasses, and plastic items marked “dishwasher safe”. Load your
plates into the dishwasher so that their top sides face each
other.
Make sure the loaded dishes do not interfere with the rotation
of the nozzle which is located at the bottom of the upper rack.
(Check this by rotating the nozzle by hand.)
When loading dishes, pull the upper rack out su ciently so you
can load it without striking the counter above.
Using the glass support
You can place cups, small items and long cooking utensils on the cup
selves. This is also a very convenient way to wash wine glasses.
Place wine glasses on the pegs of the cup selves. The cup selves can also
be folded back when not in use.
Do not adjust the level of the upper basket with the glass supports
propped up. This will make it impossible to push in the upper basket.
CAUTION
English - 24
User Manual_DW9000H-Series-00159B-03_EN.indd 24User Manual_DW9000H-Series-00159B-03_EN.indd 24 2015-03-24 5:22:292015-03-24 5:22:29
Page 25
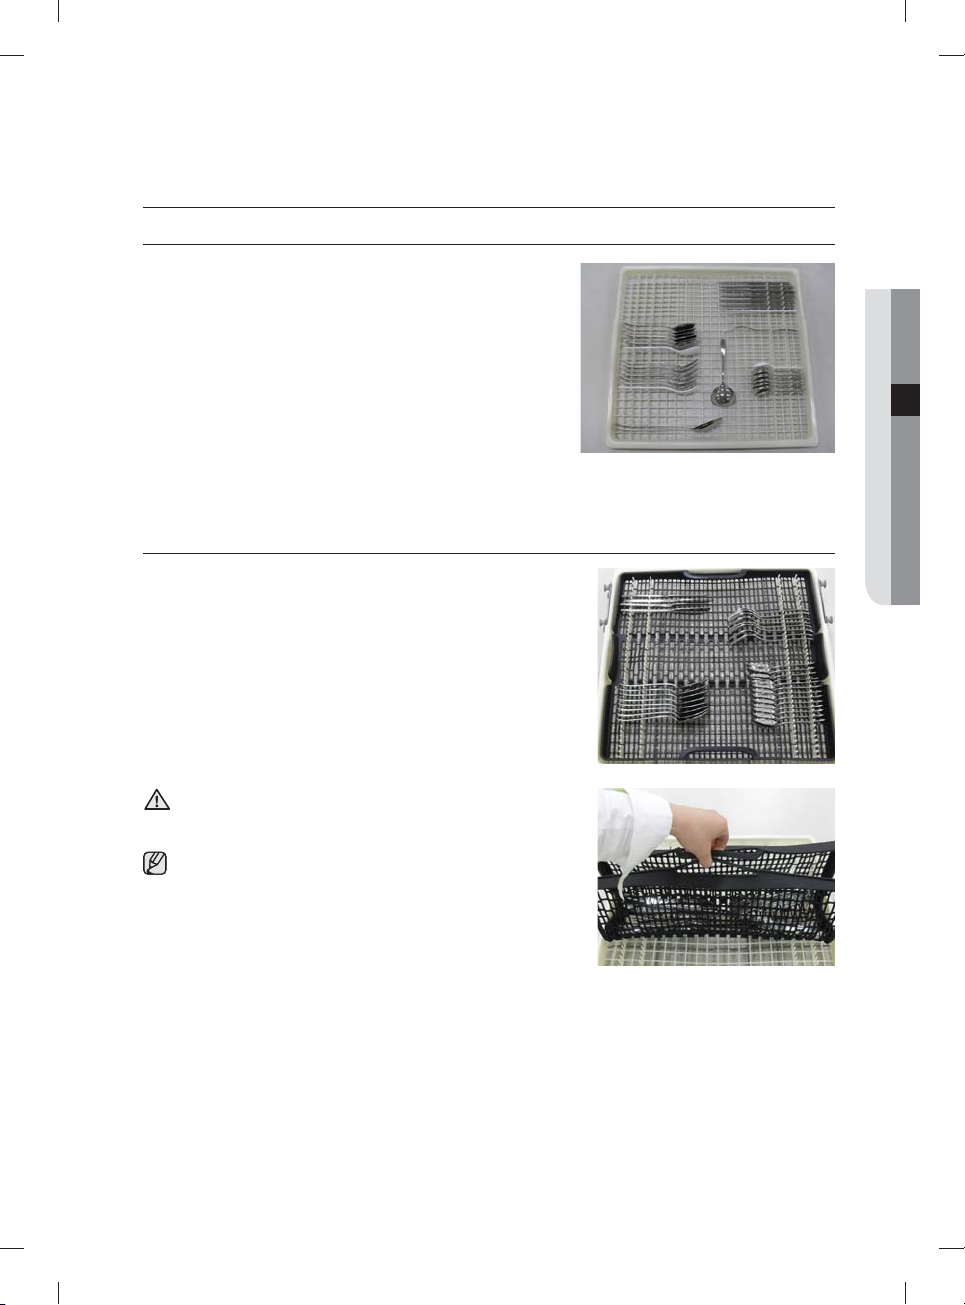
USING THE 3RD (CUTLERY) RACK (FOR SOME MODELS)
Loading the cutlery rack
In addition to the standard cutlery basket in the lower rack, some
models come with a cutlery rack.
The cutlery rack is best suited for fl atware and cooking or serving
utensils. You can place cutlery and utensils on the cutlery rack.
Removing the Cutlery Rack
The entire cutlery rack can be removed if more space is needed on the upper rack for larger items.
Loading the cutlery pad
Some models come with a removable, foldable cutlery pad
along with a cutlery rack. To use, place the pad on the cutlery
rack. and then place cutlery and serving and cooking utensils
on the pad in a random or regular fashion. After a wash cycle is
complete, and the cutlery and utensils are dry, you can fold the
pad and carry the cutlery and utensils in the pad to their storage
locations.
04 LOADING
Use caution when folding and moving the rack with a long
thin item inside the pad.
WARNING
The item may fall out in this process, causing physical injury.
It is advisable not to move the pad while it is wet.
Wait until the pad is dry.
The pad dries quickly after a wash cycle when exposed to
air for a few minutes.
* When loading the cutlery and utensils onto the cutlery rack,
make sure they do not interfere with the top nozzle of the rack. If
they interfere, remove the cutlery pad and try again.
English - 25
User Manual_DW9000H-Series-00159B-03_EN.indd 25User Manual_DW9000H-Series-00159B-03_EN.indd 25 2015-03-24 5:22:302015-03-24 5:22:30
Page 26
Loading your dishwasher
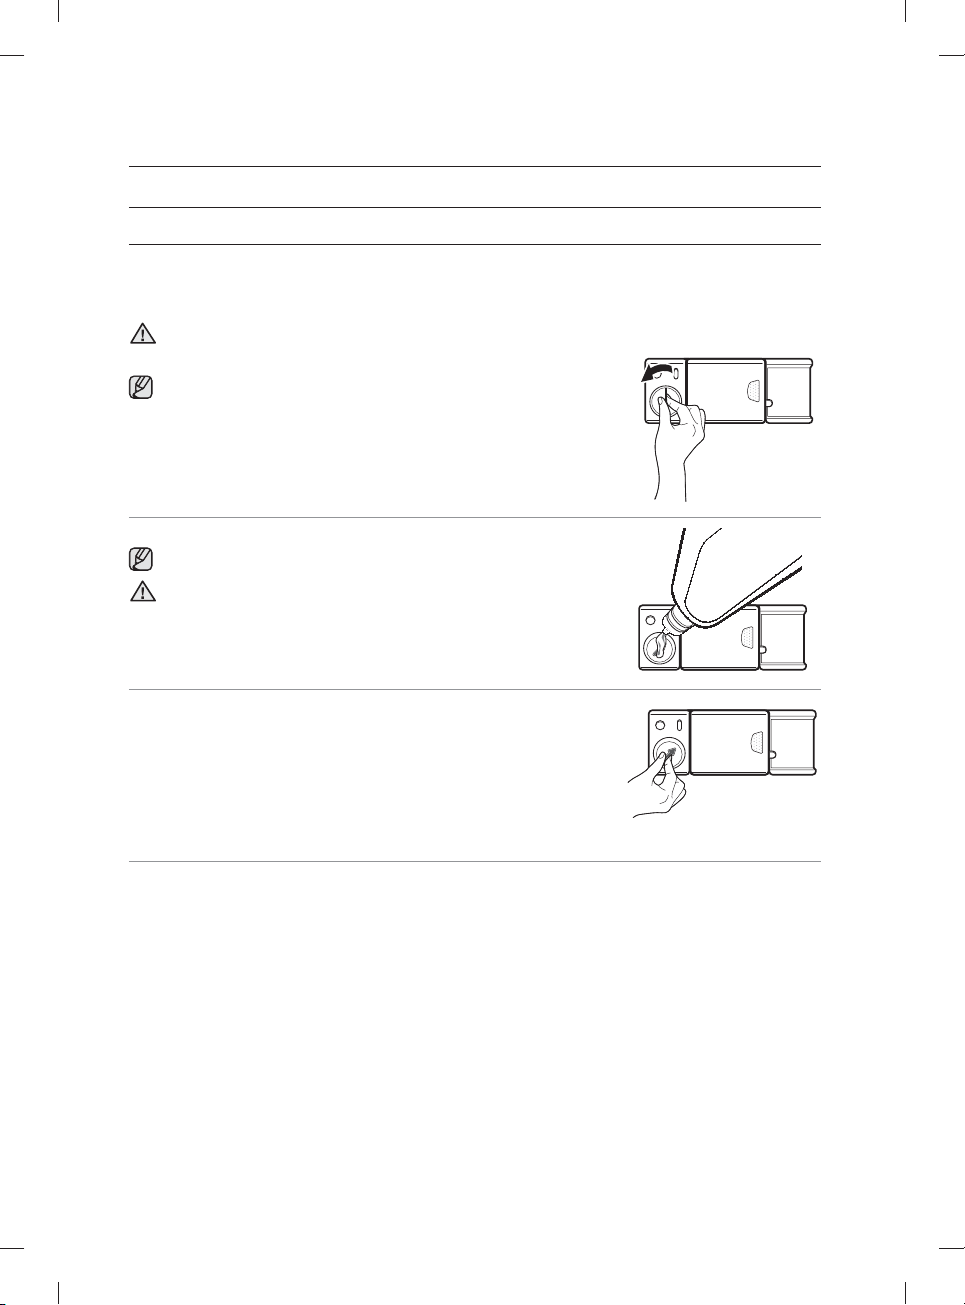
USING RINSE AID
Filling the rinse aid reservoir
When the Rinse Refi ll indicator lights up on the control panel, refi ll with rinse aid.
Your dishwasher has been designed to use liquid rinse aid only.
Using a powdered rinse aid will clog the reservoir opening and cause the dishwasher to malfunction.
Rinse aid improves the drying performance of the dishwasher.
Do not add regular detergent to the rinse aid reservoir.
CAUTION
1. Remove the rinse aid reservoir cap by rotating it counterclockwise.
Adding rinse aid to tablet detergents will improve drying performance.
2. Fill the rinse aid reservoir with rinse aid.
Use the viewing port when fi lling the rinse aid reservoir.
Do not fi ll the reservoir above the full level indicator.
Excess rinse aid can overfl ow during the wash cycle.
CAUTION
3. Turn the rinse aid indicator dial to a number between 1 and 6. The
higher the number, the more rinse aid the dishwasher uses. If you are
unable to rotate the rinse aid dial easily, try using a coin.
4. Close the rinse aid reservoir cap by rotating it clockwise.
English - 26
User Manual_DW9000H-Series-00159B-03_EN.indd 26User Manual_DW9000H-Series-00159B-03_EN.indd 26 2015-03-24 5:22:312015-03-24 5:22:31
Page 27
Cleaning and maintaining your
dishwasher
Keeping your dishwasher clean improves its performance, reduces unnecessary
repairs, and prolongs its life.
CLEANING THE EXTERIOR
It’s best to clean spills on the exterior of your dishwasher as they occur.
Use a soft, damp piece of cloth to gently wipe away spills and dust from the control panel.
Do not use benzene, wax, thinner, chlorine bleach, or alcohol. These chemicals may discolour the
inner walls of the dishwasher and cause stains.
CAUTION
Do not clean the dishwasher by sprinkling water over it. In particular, protect the electrical components
from coming into contact with water.
CAUTION
If your dishwasher has a stainless steel door panel, it can be cleaned with a stainless steel cleaner for
Home Appliances or similar product using a clean, soft cloth.
CLEANING THE WASH CABINET
If there are limescale or grease deposits in the cabinet, remove these by damp cloth or run a programme
which has highest rinsing temperature without any loading items after fi lling detergent dispenser with
dishwasher detergent.
Do not remove the front seal on the container. Removing the seal can cause the dishwasher to leak or
malfunction.
CAUTION
CLEANING THE FILTERS
1. Turn o the dishwasher.
2. Rotate the fi lter insert counterclockwise to unfasten and then detach the
fi lter insert.
05 CLEANING AND MAINTAINING
3. Remove the fi ne fi lter (fl at rectangular).
4. Disassemble the coarse fi lter and micro fi lter.
English - 27
User Manual_DW9000H-Series-00159B-03_EN.indd 27User Manual_DW9000H-Series-00159B-03_EN.indd 27 2015-03-24 5:22:312015-03-24 5:22:31
Page 28

Cleaning and maintaining your
dishwasher
5. Remove any dirt or other remains from the fi lters and rinse them under
running water.
6. Reassemble the fi lters in the reverse order of the dissasembly, replace
the fi lter insert, and rotate clockwise to the close arrow.
If the fi lter insert is not closed properly, the performance will be
decreased.
CAUTION
CLEANING THE NOZZLES
If your dishwasher does not seem to be cleaning adequately or the nozzles seem clogged, you can clean
each of the nozzles. When removing the nozzles, take care as they may break.
Upper nozzle
1. Pull the upper rack towards the front.
2. Check whether the nozzle holes are clogged by food
particles.
3. If cleaning is needed, remove the nozzle.
4. To remove the nozzle, unfasten and remove the nut,
and then remove the nozzle.
5. Clean the nozzle, re-insert it, and fasten the nut.
6. When fastening the nut, turn it fi rmly by hand.
7. Check whether the nozzle is engaged correctly by
rotating it by hand.
English - 28
User Manual_DW9000H-Series-00159B-03_EN.indd 28User Manual_DW9000H-Series-00159B-03_EN.indd 28 2015-03-24 5:22:312015-03-24 5:22:31
Page 29

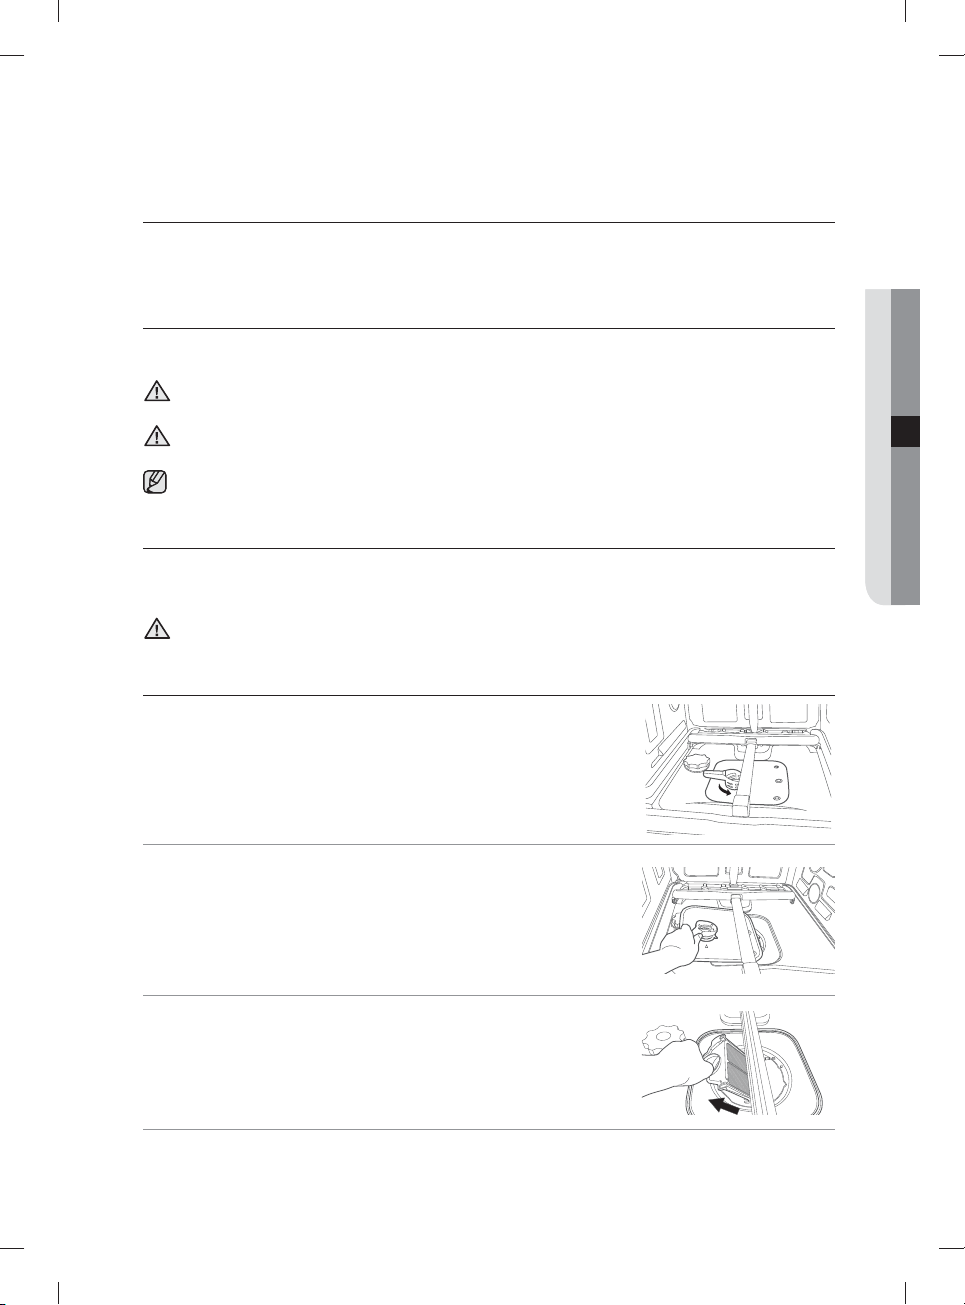
Top nozzle
1. Check whether the nozzle holes are clogged by food
particles.
2. If cleaning is needed, remove the nozzle.
3. To remove the nozzle, pull out the upper rack fi rst,
unfasten the nozzle cap by turning it counterclockwise,
1
2
and then remove the upper nozzle.
4. Clean the nozzle, re-insert it, and then fasten the
nozzle cap to the nozzle by turning the cap clockwise.
5. Check whether the nozzle is engaged correctly by
Cap nozzle
rotating it by hand.
STORING YOUR DISHWASHER
If you need to store your dishwasher for an extended period of time, fi rst drain the unit fully and then
disconnect the water hose.
Your dishwasher can become damaged if water is left in the hoses and internal components before storing
it. After draining and disconnecting the dishwasher, be sure to turn o the water supply valve and circuit
breaker.
05 CLEANING AND MAINTAINING
English - 29
User Manual_DW9000H-Series-00159B-03_EN.indd 29User Manual_DW9000H-Series-00159B-03_EN.indd 29 2015-03-24 5:22:322015-03-24 5:22:32
Page 30

Troubleshooting and
information codes
CHECK THESE POINTS IF YOUR DISHWASHER...
PROBLEM POSSIBLE CAUSE SOLUTION
Check if the door is latched and closed
completely. Check whether the Upper Rack is
properly joined with Duct Nozzle.
Also, Check imbalance assembly of the Upper
Rack.
The door is not closed
completely.
Will not start.
Has a bad odour.
Has water remaining
after the programme
has fi nished.
The Start (Reset) button is
not selected.
No programme is selected. Select a programme.
The power cord is not
connected.
There is no water supplied. Check that the water supply valve is open.
The control panel is locked.
There is water left over from the
last cycle.
The drain hose is folded or
clogged.
Check that the door is latched and closed
completely. Press the Start (Reset)
before closing the door.
Connect the power cord.
Deactivate the Child Lock function to unlock
the control panel.
Add detergent without loadingdishes and run
the Self Clean
dishwasher.
Straighten and unclog the hose.
programme to clean the
button
English - 30
User Manual_DW9000H-Series-00159B-03_EN.indd 30User Manual_DW9000H-Series-00159B-03_EN.indd 30 2015-03-24 5:22:322015-03-24 5:22:32
Page 31

PROBLEM POSSIBLE CAUSE SOLUTION
Has food particles
remaining on the
dishes.
Does not dry dishes
well.
An inappropriate programme
was been selected.
The fi lter is contaminated or not
correctly fasten.
No dishwasher detergent or not
enough detergent is being used.
The pressure of the supplied
water is low.
Spray arm jets are clogged. Clean the spray arms.
The dishes are improperly
loaded.
The water is too hard.
There is no rinse aid in the
dispenser or not enough rinse
aid was used.
Multi taps were used without
selecting the Dry+ function.
Glasses and cups with concave
bottoms hold water. This water
may spill onto other items when
you are unloading.
Select a programme according to the soil level
of the dishes as directed in this manual.
Clean the fi lter and make sure the fi lters are
fi tted properly.
Use an automatic dishwasher detergent or
use more detergent.
The water supply pressure must be between
0.05MPa and 0.8MPa.
Rearrange the dishes so they have good
water access and do not interfere with spray
arm and dispenser operation.
Check salt refi ll indicator and refi ll dishwasher
salt.
Check the dispenser and add rinse aid.
Check rinse aid setting.
Select the Dry+ function or use rinse aid.
After fi nishing the cycle, empty the lower rack
fi rst and then the upper, this will avoid water
dripping from the upper rack onto the dishes
in the lower rack.
The dishwasher beeps when the
dispenser cover is opened and
during the initial stage of draining
This is a normal operation.
the pump operation.
Is too noisy.
The dishwasher is not level. Ensure that the dishwasher is level.
There is a ‘chopping’ sound
because an arm is bumping
Rearrange the dishes.
against the dishes.
Leaves a yellow or
brown fi lm on cups or
dishes
Does not have any
indicators lit.
Does not have
smoothly rotating
arms.
Leaves a white
coating on cutlery
or crockery after
cleaning.
This can occurs from co ee and
tea soils.
The power cord is not
connected.
The arms are clogged with food
particles.
Hard water was used.
Use programme with higher temperature.
Connect the power cord.
Clean the arms.
Check the salt fi ll indicator and softener
setting is correct according to the water
hardness of your area.
Check salt reservoir cap is correctly fi tted.
06 TROUBLESHOOTING
English - 31
User Manual_DW9000H-Series-00159B-03_EN.indd 31User Manual_DW9000H-Series-00159B-03_EN.indd 31 2015-03-24 5:22:322015-03-24 5:22:32
Page 32

Troubleshooting and
information codes
INFORMATION CODES
The Control Panel displays information codes to help you understand what is occurring with your
dishwasher.
CODE SOLUTION
Over-level water check
OC
LC
4C
5C
HC
3C
For any codes not listed above, refer to the back of this manual and contact your Samsung Customer
Service centre.
• Functional check. Close the water supply valve and go to your house circuit
breaker panel, set the dishwasher’s circuit breaker switch to o , and then contact
an authorized Samsung service centre.
Leakage check
• If a water supply valve connection leak occurs, close the water supply valve and
go to your house circuit breaker panel, set the dishwasher’s circuit breaker switch
to o , and then contact the installer to fi x.
If the problem continues, contact an authorized Samsung service centre.
Water supply check
• Check if the water supply valve is closed, the water supply is suspended, or the
water inlet valve or line is frozen or clogged by foreign particles.
If the problem continues, close the water supply valve, and then contact an
authorized Samsung service centre.
Drain check
• After closing the water supply valve, check whether the drain hose is clogged
or folded. Also, check whether drain hole inside sump is clogged. If the problem
continues, contact an authorized Samsung service centre.
High temperature heating check
• Functional check. With the dishwasher empty, add detergent, and then run a
cycle.
If the problem continues, go to your house circuit breaker panel, set the
dishwasher’s circuit breaker switch to o , and then contact an authorized
Samsung service centre.
Pump operation check
• Functional check. Turn o the dishwasher and start it again.
If the problem continues, contact an authorized Samsung service centre.
English - 32
User Manual_DW9000H-Series-00159B-03_EN.indd 32User Manual_DW9000H-Series-00159B-03_EN.indd 32 2015-03-24 5:22:322015-03-24 5:22:32
Page 33

Programme chart
PROGRAMME CHART
Soil level Auto ECO Intensive Delicate Quick
Amount of food remains
Program sequence
Water consumption (L) 11.0 ~ 21.0 10.7 25.9 10.9 11.2
Energy consumption (kWh) 1.0 ~ 1.5 0.94 1.65 0.84 0.9
Program Time (min) 128 ~ 184 190 199 113 38
The wash time varies depending on the options you add, and on the pressure and temperature of the
supplied water.
Quick Cycle : This cycle doesn’t work AUTO DOOR. (without DRY course)
The power consumption depends on the water temperature and/or load.
When the Rinse Aid is empty, time and temperature can increase a little.
The water consumption and wash time depending on the steps or options you add, and on the
pressure and temperature of the supplied water.
Very light to
Heavy
Prewash
Mainwash
Rinse
Hot rinse
Dry
End
Normal Heavy Light Light
Prewash
Mainwash
Rinse
Hot rinse
Dry
End
Prewash
Mainwash
Rinse
Hot rinse
Dry
End
Prewash
Mainwash
Rinse
Hot rinse
Dry
End
Mainwash
Hot rinse
07 PROGRAMME CHART
Rinse
End
English - 33
User Manual_DW9000H-Series-00159B-03_EN.indd 33User Manual_DW9000H-Series-00159B-03_EN.indd 33 2015-03-24 5:22:322015-03-24 5:22:32
Page 34

Appendix
DISPOSING THE DISHWASHER AND HELPING THE ENVIRONMENT
Your dishwasher is manufactured from recyclable materials. If you decide to dispose of it, please observe
your local waste disposal regulations. Cut o the power cord so that the appliance cannot be connected to
a power source.
Remove the door so that animals and children cannot get trapped inside the appliance.
Do not exceed the detergent quantities recommended in the detergent manufacturers’ instructions.
DECLARATION OF CONFORMITY
This product complies with the requirements of these directives:
EMC-Directive 2004/108/EC
Low Voltage Directive 2006/95/EC
SPECIFICATIONS
BU (Built Under) FBI (Fully Built In)
MODEL
Power
Water pressure
Wash capacity
(place settings)
Rated power
Dimension (mm)
Weight
• Dimensions of the space to be provided for the appliance;
• Dimensions and position of the means for supporting and fi xing the appliance within this space;
• Minimum distances between the various parts of the appliance and the surrounding structure;
• Minimum dimensions of ventilating openings and their correct arrangement;
• Connection of the appliance to the supply mains and the interconnection of any separate components;
• Necessity to allow disconnection of the appliance from the supply after installation, unless the appliance
incorporates a switch complying with 24.3. The disconnection may be achieved by having the plug
accessible or by incorporating a switch in the fi xed wiring in accordance with the wiring rules.
• The instructions for fi xed appliances shall state how the appliance is to be fi xed to its support. The
method of fi xing stated is not to depend on the use of adhesives since they are not considered to be a
reliable fi xing means.
Unpacked
Packed
DW60H9970US
598 (W) x 817 (H) x 575 (D) 598 (W) x 817 (H) x 555 (D)
DW60H9950US
DW60H9950UW
DW60J9960US
AC 220 ~ 240 V / 50 Hz
0.05 ~ 0.8 Mpa
14
2000 ~ 2300 W
45.0 kg 44.0 kg
48.0 kg 47.0 kg
DW60J9970BB
English - 34
User Manual_DW9000H-Series-00159B-03_EN.indd 34User Manual_DW9000H-Series-00159B-03_EN.indd 34 2015-03-24 5:22:322015-03-24 5:22:32
Page 35

For standard test
The diagrams below show the proper way to load the baskets based on the European Standards
(EN50242).
3
3
3
44
14 place settings
1
555
5
9
88
6
10
14
12
17
6
17
7
6
17
• Washing capacity:
• Test standard: EN50242/IEC60436
• Position of upper basket: Low
• Programme: ECO
• Additional options: Upper only + Lower only (Default)
• Rinse aid setting: 6
• Dosage of the standard detergent
- 14 PS : 7 g + 28 g
• For the arrangement of the items, refer Figure A, B, C.
14 place settings
1
11
2
2
2
44444
5
55
9
13
15
09 FOR STANDARD TEST
1615
15
Place the Wire Folding left side.
Figure A-1: Lower basket Figure B-1: Upper basket Figure C-1: Cutlery tray
1
Soup plate : Oat fl ake
2
Dinner plate : Egg
3
Dinner plate : Meat
4
Dessert dish : Spinach
5
Dessert dish : Egg
6
Cup : Tea
7
Saucer : Tea
8
Glass : Milk
Small bowl, Middle bowl
9
: Spinash
10
Big bowl : Meat
11
Oval plate : Margarine
Without 3rd rack pad
12
Soup spoon : Oat fl ake
13
Fork : Egg
14
Knife
15
Dessert spoon
16
Tea spoon
17
Serving cutlery
English - 35
User Manual_DW9000H-Series-00159B-03_EN.indd 35User Manual_DW9000H-Series-00159B-03_EN.indd 35 2015-03-24 5:22:322015-03-24 5:22:32
Page 36

Product fi che
REGULATION (EU) No 1059/2010
“ * ” Asterisk(s) means variant model and can be varied (0-9) or (A-Z).
Supplier SAMSUNG
Model name DW60H9970U* DW60H9950U* DW60J9960U*
Rated Capacity (place setting) 14 14 14
Energy e ciency class A++ A++ A++
Eco label No No No
(W)
2)
) (Kwh)
t
1)
Annual energy consumption, (AE
) (kWh/year)
c
Standard cycle energy consumption, (E
Power consumption o mode, P
Power consumption left-on mode, P
Annual water consumption (AW
(W)
o
), (L)
c
l
Drying e ciency class AAA
Standard programme
3)
Programme time for the standard cycle 190 190 190
Duration of the left-on mode, (T
) (min)
l
Airborne acoustical noise emissions (dBA re 1pW) 41 44 41
Built-under Ye s Ye s Ye s
Installation
Free standing --Fully built in ---
1) Based on 280 standard cleaning cycles using cold water fi ll and the consumption of the low power
modes. Actual energy consumption will depend on how the appliance is used.
2) Based on 280 standard cleaning cycles. Actual water consumption will depend on how the appliance is
used.
3) ‘Standard programme’ is the standard cleaning cycle to which the information in the label and the
fi che relates, that this programme is suitable to clean normally soiled tableware, and that it is the most
e cient programme in terms of combined energy and water consumption.
266 266 266
0.936 0.936 0.936
0.45 0.45 0.45
555
2996 2996 2996
Eco Eco Eco
10 10 10
English - 36
User Manual_DW9000H-Series-00159B-03_EN.indd 36User Manual_DW9000H-Series-00159B-03_EN.indd 36 2015-03-24 5:22:342015-03-24 5:22:34
Page 37

REGULATION (EU) No 1059/2010
“ * ” Asterisk(s) means variant model and can be varied (0-9) or (A-Z).
Supplier SAMSUNG
Model name DW60H9970F* DW60H9950F* DW60J9970B*
Rated Capacity (place setting) 14 14 14
Energy e ciency class A++ A++ A++
Eco label No No No
Annual energy consumption, (AE
) (kWh/year)
c
Standard cycle energy consumption, (E
Power consumption o mode, P
Power consumption left-on mode, P
Annual water consumption (AW
(W)
o
), (L)
c
(W)
l
2)
) (Kwh)
t
1)
266 266 266
0.936 0.936 0.936
0.45 0.45 0.45
555
2996 2996 2996
Drying e ciency class AAA
Standard programme
3)
Eco Eco Eco
Programme time for the standard cycle 190 190 190
Duration of the left-on mode, (T
l
) (min)
10 10 10
Airborne acoustical noise emissions (dBA re 1pW) 41 44 41
Built-under ---
Installation
Free standing Yes Yes -
Fully built in
--
Ye s
1) Based on 280 standard cleaning cycles using cold water fi ll and the consumption of the low power
modes. Actual energy consumption will depend on how the appliance is used.
2) Based on 280 standard cleaning cycles. Actual water consumption will depend on how the appliance is
used.
3) ‘Standard programme’ is the standard cleaning cycle to which the information in the label and the
fi che relates, that this programme is suitable to clean normally soiled tableware, and that it is the most
e cient programme in terms of combined energy and water consumption.
10 PRODUCT FICHE
English - 37
User Manual_DW9000H-Series-00159B-03_EN.indd 37User Manual_DW9000H-Series-00159B-03_EN.indd 37 2015-03-24 5:22:342015-03-24 5:22:34
Page 38

Note
User Manual_DW9000H-Series-00159B-03_EN.indd 38User Manual_DW9000H-Series-00159B-03_EN.indd 38 2015-03-24 5:22:342015-03-24 5:22:34
Page 39

Note
User Manual_DW9000H-Series-00159B-03_EN.indd 39User Manual_DW9000H-Series-00159B-03_EN.indd 39 2015-03-24 5:22:342015-03-24 5:22:34
Page 40

QUESTIONS OR COMMENTS?
COUNTRY CALL OR VISIT US ONLINE AT
DENMARK 70 70 19 70 www.samsung.com/dk/support
FINLAND 030-6227 515 www.samsung.com/fi /support
NORWAY 815 56480 www.samsung.com/no/support
SWEDEN 0771 726 7864 (SAMSUNG) www.samsung.com/se/support
DD68-00159B-03
User Manual_DW9000H-Series-00159B-03_EN.indd 40User Manual_DW9000H-Series-00159B-03_EN.indd 40 2015-03-24 5:22:342015-03-24 5:22:34
Page 41

Diskmaskin
bruksanvisning
DW60H9970-serien
DW60H9950-serien
DW60J9970-serien
DW60J9960-serien
Bruksanvisningen är tillverkad av återvunnet papper till 100%.
imagine the possibilities
Tack för att du har valt att köpa den här produkten från Samsung.
User Manual_DW9000H-Series-00159B-03_SV.indd 1User Manual_DW9000H-Series-00159B-03_SV.indd 1 2015-03-24 5:19:572015-03-24 5:19:57
Page 42

Innehåll
SÄKERHETSINSTRUKTIONER
3
INSTALLERA DISKMASKINEN
10
10 Kontrollera delarna och kontrollpanelen
15 Val av diskprogram
15 Förloppsdisplay
16 Uppfylla installationskraven
INNAN DU ANVÄNDER
PRODUKTEN FÖR FÖRSTA
GÅNGEN
18
18 Inställningsläge
20 Använda disksalt
21 Använda diskmedel
FYLLA PÅ DISKMASKINEN
22
22 Riktlinjer för diskning
23 Justering av den övre hyllans höjd
23 Ta bort den övre hyllan
24 Sätta in disk på nedre hyllan
24 Sätta in disk på övre hyllan
25 Användning av 3:e hyllan (bestick) (för
vissa modeller)
26 Använda sköljglans
FELSÖKNING OCH
INFORMATIONSKODER
30
30 Kontrollera följande om diskmaskinen...
32 Informationskoder
PROGRAMTABELL
33
33 Programtabell
BILAGA
34
34 Kassera diskmaskinen och skona miljön
34 Deklaration om överensstämmelse
34 Specifi kationer
FÖR STANDARDTEST
35
PRODUKTINFORMATION
36
RENGÖRA OCH SKÖTA
DISKMASKINEN
27
27 Rengöra utsidan
27 Rengöra maskinen invändigt
27 Rengöra fi ltren
28 Rengöring av strilarna
29 Förvaring av diskmaskinen
Svenska - 2
User Manual_DW9000H-Series-00159B-03_SV.indd 2User Manual_DW9000H-Series-00159B-03_SV.indd 2 2015-03-24 5:20:002015-03-24 5:20:00
Page 43

Säkerhetsinstruktioner
Grattis till din nya diskmaskin från Samsung. I den här bruksanvisningen fi nns viktig
information om installation, användning och skötsel av din maskin. Ta dig tid att
läsa igenom den här bruksanviningen för att fullt ut utnyttja diskmaskinens många
egenskaper och funktioner.
DET DU BEHÖVER VETA OM SÄKERHETSINSTRUKTIONERNA
Läs den här bruksanvisningen noggrant för att säkerställa att du känner till hur du använder de utökade
egenskaperna och funktionerna på maskinen på ett säkert sätt och spara den på en säker plats för framtida
referens. Använd bara den här maskinen för det syfte som beskrivs i den här bruksanvisningen.
Varningar och viktiga säkerhetsinstruktioner i den här bruksanvisningen täcker inte alla möjliga förhållanden
och situationer som kan inträ a. Det är ditt ansvar att använda sunt förnuft och vara försiktig vid installation,
skötsel och användning av diskmaskinen.
Eftersom följande användningsinstruktioner gäller för fl era olika modeller kan utseendet hos din
diskmaskin variera något från det som beskrivs i den här bruksanvisningen och det är inte säkert att alla
varningssymboler är tillämpliga. Om du har frågor eller synpunkter kan du kontakta närmaste servicecenter
eller gå till hjälp- och informationsavsnittet online på adressen www.samsung.com.
VIKTIGA SÄKERHETSSYMBOLER OCH SÄKERHETSFÖRESKRIFTER
Viktiga säkerhetssymboler
Farliga eller osäkra åtgärder som kan leda till allvarlig personskada och/eller skada på egendom.
VARNING
Farliga eller osäkra åtgärder som kan leda till personskada och/eller skada på egendom.
FARA
För att minska risken för brand, explosion, elektrisk stöt och personskada när du använder
FARA
diskmaskinen ska du följa de här grundläggande säkerhetsföreskrifterna:
Gör INTE.
01 SÄKERHETSINSTRUKTIONER
Plocka INTE isär enheten.
Vidrör INTE.
Följ anvisningarna exakt.
Koppla ur strömkontakten ur vägguttaget.
Se till att maskinen är ansluten till jord för att förhindra elektrisk kortslutning.
Kontakta servicecentret för att få hjälp.
Obs
De här varningssymbolerna är till för att förhindra skada på dig och andra.
Följ dem exakt.
Förvara de här instruktionerna på en säker plats och se till att nya användare får kännedom om innehållet.
Lämna dem vidare till eventuella framtida ägare.
Svenska - 3
User Manual_DW9000H-Series-00159B-03_SV.indd 3User Manual_DW9000H-Series-00159B-03_SV.indd 3 2015-03-24 5:20:002015-03-24 5:20:00
Page 44

Säkerhetsinstruktioner
Viktiga säkerhetsföreskrifter
Den här enheten uppfyller gällande säkerhetskrav. Felaktig användning kan dock leda till person- och
egendomsskada.
För att undvika risk för olyckor och skada på enheten ska du läsa följande instruktioner noggrant innan
du använder den för första gången. De innehåller viktig information om säkerhet, användning och
skötsel.
I likhet med annan utrustning som drivs med el och innehåller rörliga delar fi nns det risk för olika faror.
För säker användning är det viktigt att lära sig hur den fungerar och hantera den med viss försiktighet.
FARA
Låt inte barn (och husdjur) leka på eller i diskmaskinen. Diskmaskinsluckan är svår att öppna från
insidan och barn kan blir allvarligt skadade om de fastnar i den.
VARNING
Barn ska övervakas för att säkerställa att de inte leker med enheten.
VARNING
Om kontakten (strömsladden) skadas måste den bytas av tillverkaren eller dess serviceombud eller en
liknande behörig person för att undvika skada.
FARA
Den här enheten måste placeras så att strömkontakten, vattentillförseldelarna och utloppsrören är
åtkomliga efter installationen.
INSTRUKTIONER FÖR WEEE-MÄRKNINGEN
Korrekt avfallshantering av produkten (elektriska och elektroniska produkter)
(Gäller i länder med separata insamlingssystem)
Denna symbol på produkten, tillbehören och i manualen anger att produkten och de elektroniska tillbehören
(t.ex. laddare, headset, USB-kabel) inte bör sorteras tillsammans med annat hushållsavfall när de kasseras.
Dessa föremål bör hanteras separat för ändamålsenlig återvinning av beståndsdelarna för att förhindra fara
för hälsa och miljö.
Hushållsanvändare bör kontakta återförsäljaren som sålt produkten eller kommunen för vidare information om var och
hur produkten och tillbehören kan återvinnas på ett miljösäkert sätt.
Företagsanvändare bör kontakta leverantören samt verifi era angivna villkor i köpekontraktet. Produkten och de
elektroniska tillbehören bör inte hanteras tillsammans med annat kommersiellt avfall.
Svenska - 4
User Manual_DW9000H-Series-00159B-03_SV.indd 4User Manual_DW9000H-Series-00159B-03_SV.indd 4 2015-03-24 5:20:002015-03-24 5:20:00
Page 45

För att minska riskerna för brand, elektriska stötar eller skador på personer under användning av
enheten ska du bland annat följa följande säkerhetsåtgärder.
VARNING
Den här enheten får inte användas av personer (inklusive
barn) som har nedsatt fysisk förmåga, känsel eller mental
hälsa, eller som saknar erfarenhet och kunskap, såvida inte
en person som ansvarar för deras säkerhet övervaka eller
har gett instruktioner avseende användning av enheten.
Barn ska övervakas för att säkerställa att de inte leker med
enheten.
För användning i Europa: Den här enheten får användas
av barn från 8 år och uppåt och personer med nedsatt
fysisk eller mental förmåga eller avsaknad av erfarenheter
och kunskaper om de övervakas eller har fått tillräckligt med
vägledning för att de ska använda enheten på ett säkert sätt
och förstår de risker som den medför. Barn får inte leka med
enheten. Rengöring och underhåll får inte utföras av barn
utan övervakning.
Om sladden skadas måste den bytas av tillverkaren, dess
serviceombud eller en liknande behörig person för att
undvika skada.
01 SÄKERHETSINSTRUKTIONER
För enheter som har en ventilationsöppning i botten får ingen
matta täppa till öppningarna.
De nya slanguppsättningarna med enheten ska användas,
och de gamla slanguppsättningarna bör inte användas.
FARA: För att undvika risker på grund av vårdslös montering
av värmepropparna får inte den här enheten drivas via
en extern växelenhet, t. ex. en timer, och får inte anslutas
till en krets som regelbundet aktiveras och inaktiveras av
fastigheten.
Svenska - 5
User Manual_DW9000H-Series-00159B-03_SV.indd 5User Manual_DW9000H-Series-00159B-03_SV.indd 5 2015-03-24 5:20:012015-03-24 5:20:01
Page 46

Säkerhetsinstruktioner
Dörren får inte lämnas öppen eftersom det ökar risken för att
någon ramlar över den.
VARNING: Knivar och andra vassa verktyg måste läggas i
korgarna med den vassa sidan nedåt eller läggas vågrätt.
Den här enheten är till för att användas i hushåll och liknande
platser som:
• personalkök i a ärer, kontor och andra arbetsplatser;
• villor,
• av kunder på hotell, motell och andra bostadsplatser,
• vandrarhem etc.
INSTRUKTIONER VID ANVÄNDNING AV DISKMASKINEN
Den här diskmaskinen är inte utformad för kommersiell användning. Den är avsedd att användas i
privata hushåll och liknande arbetsmiljöer och andra miljöer, såsom:
• Butiker
• Kontor och demonstrationslokaler
och av personer inom exempelvis följande områden:
• Vandrarhem.
Den får endast användas för hemmabruk enligt vad som anges i den här bruksanvisningen för
rengöring av porslin och bestick.
All annan användning är inte tillåten av tillverkaren och kan vara farlig.
Tillverkaren kan inte hållas ansvarig för skada till följd av felaktig eller olämplig användning eller drift.
Använd inte lösningsmedel i diskmaskinen. Risk för explosion.
VARNING
Andas inte in och drick inte maskindiskmedlet. Maskindiskmedel innehåller irriterande eller
korroderande beståndsdelar, som kan orsaka brännskador i näsa, mun och hals om det sväljs, eller
VARNING
hindra andningen. Kontakta en läkare omedelbart om diskmedlet har svalts eller andats in.
Lämna inte luckan öppen i onödan, eftersom du kan snubbla över den.
FARA
Sitt inte och luta dig inte mot den öppnade luckan. Det kan göra att diskmaskinen välter och skadas
samt du kan bli skadad.
FARA
Använd bara diskmedel och sköljmedel som är avsett för diskmaskiner för privat bruk. Använd inte
fl ytande diskmedel.
Använd inte rengöringsmedel som är sura.
FARA
Fyll inte på sköljglansbehållaren med fl ytande diskmedel eller pulverdiskmedel. Detta orsakar allvarlig
skada på behållaren.
Oavsiktlig påfyllning av saltbehållaren med pulverdiskmedel eller fl ytande diskmedel skadar
mjukgöraren. Se till att du har valt rätt paket med disksalt innan du fyller på saltbehållaren.
FARA
Använd bara speciellt, grovt disksalt för omaktivering, eftersom andra salter kan innehålla olösliga
tillsatser som kan göra att mjukgöraren inte fungerar korrekt.
Svenska - 6
User Manual_DW9000H-Series-00159B-03_SV.indd 6User Manual_DW9000H-Series-00159B-03_SV.indd 6 2015-03-24 5:20:012015-03-24 5:20:01
Page 47

I en maskin med bestickskorg (beroende på modell) diskas besticken e ektivare och torkar bättre om
de placeras med handtagen nedåt i korgen. För att undvika risk för skada ska dock knivar och ga ar
FARA
etc. placeras med handtagen uppåt.
Plastartiklar som inte klarar att diskas i hett vatten, exempelvis engångsbehållare i plast, eller
plastbestick och -tallrikar, ska inte diskas i diskmaskinen.
De höga temperaturerna i diskmaskinen kan göra att de smälter eller tappar formen.
På modeller med funktionen Senarelägg start ska du kontrollera att behållaren är torr innan du lägger
i diskmedel. Torka torrt vid behov. Diskmedlet klumpar sig om behållaren är fuktig och kan då inte
spridas ordentligt.
Knivar och andra vassa verktyg måste läggas i korgarna med den vassa sidan nedåt eller läggas
vågrätt.
VARNING
INSTRUKTIONER FÖR HUR DU SKYDDAR BARNEN
Den här enheten är ingen leksak! För att undvika risk för skador ska barn hållas på avstånd och de får
inte leka i eller runt diskmaskinen eller använda kontrollerna. De förstår inte de risker detta medför. De
VARNING
ska övervakas när du arbetar i köket.
Det fi nns också risk för att barn som leker kan stänga sig själva inne i diskmaskinen.
Den här enheten får användas av barn från 8 år och uppåt och personer med nedsatt fysisk eller
mental förmåga eller avsaknad av erfarenheter och kunskaper om de övervakas eller har fått tillräckligt
VARNING
med vägledning för att de ska använda enheten på ett säkert sätt och förstår de risker som den
medför. Barn får inte leka med enheten.
Rengöring och skötsel får inte utföras av barn utan övervakning.
Äldre barn får bara använda diskmaskinen när funktionen har förklarats ordentligt för dem och de kan
använda den på ett säkert sätt, med uppmärksamhet på riskerna med felaktig användning.
VARNING
HÅLL BARNEN BORTA FRÅN DISKMEDEL! Maskindiskmedel innehåller irriterande och korroderande
beståndsdelar som kan orsaka brännskador i munnen, näsan och halsen om det sväljs, eller hindra
VARNING
andningen.
Håll barn borta från diskmaskinen när luckan är öppen.
Det kan fortfarande fi nnas diskmedelsrester i behållaren.
Kontakta en läkare omedelbart om ditt barn har svalt eller andats in diskmedel.
01 SÄKERHETSINSTRUKTIONER
Svenska - 7
User Manual_DW9000H-Series-00159B-03_SV.indd 7User Manual_DW9000H-Series-00159B-03_SV.indd 7 2015-03-24 5:20:012015-03-24 5:20:01
Page 48

Säkerhetsinstruktioner
INSTRUKTIONER FÖR INSTALLATION AV DISKMASKINEN
Innan du installerar enheten ska du kontrollera att den inte har synliga skador. Du får under inga
omständigheter använda en skadad enhet. En skadad enhet kan vara farlig.
VARNING
Diskmaskinen får bara kopplas in till strömkällan med en kontakt av rätt jordningstyp. Eluttaget måste
vara lätt att komma åt efter att diskmaskinen har installerats så den går att koppla från strömkällan när
FARA
som helst. (Se ”Kontrollera delarna och kontrollpanelen” avsnittet på sidan 10.)
Det får inte fi nnas några eluttag bakom diskmaskinen. Det fi nns risk för överhettning och brand om
diskmaskinen skulle komma emot en kontakt.
VARNING
Diskmaskinen får inte installeras under en häll. De höga utstrålande temperaturerna som ibland
kommer från hällen kan skada diskmaskinen. Av samma orsak ska den inte installeras intill öppen eld
VARNING
eller andra enheter som avger hetta, såsom värmeaggregat etc.
Koppla inte ur diskmaskinen från strömkällan förrän den har installerats helt och alla justeringar har
gjorts av luckfjädrarna.
Innan du kopplar in enheten ska du kontrollera att anslutningsdata på märkplåten (spänning och
anslutningens e ekt) matchar strömkällan. Kontakta en elektriker om du har frågot.
FARA
Elsäkerheten för den här enheten kan bara garanteras när det fi nns kontinuitet mellan den och ett
e ektivt jordningssystem. Det viktigaste är att det här grundläggande säkerhetskravet är uppfyllt och
regelbundet testas och i fall där det råder tvekan ska en behörig elektriker kontrollera elsystemet i
huset.
Tillverkaren kan inte hållas ansvarig för konsekvenser av ett ofullständigt jordningssystem (t.ex. elektrisk
kortslutning).
Anslut inte enheten till strömkällan via en förgrenare eller förlängningssladd. Dessa garanterar inte
säkerheten för enheten (t.ex. fara vid överhettning).
FARA
Den här enheten får bara installeras mobilt, exempelvis på båtar, om en riskbedömning för
installationen har gjorts av en behörig tekniker.
Plastkåpan för vattenanslutningen innehåller en elkomponent. Kåpan får inte nedsänkas i vatten.
FARA
Det fi nns elektriska kablar i Aqua-Stop-slangen. Skär aldrig i vatteninloppsslangen, även om den är för
lång.
Installation, underhåll och reparationer får bara utföras av en behörig och kompetent person i strikt
enlighet med aktuella regler på nationell och lokal nivå. Reparationer och annat arbete som utförs av
obehöriga personer kan vara farligt. Tillverkaren kan inte hållas ansvarig för obehörigt arbete.
Det integrerade vattensäkerhetssystemet erbjuder skydd mot vattenskador, under förutsättning att
följande villkor uppfylls:
FARA
• Diskmaskinen är korrekt installerad och inkopplad.
• Diskmaskinen är väl skött och delarna utbytta där det kan verka nödvändigt.
• Stoppkranen har stängts av när enheten inte används under en längre tid (exempelvis under
semestern).
• Vattensäkerhetssystemet fungerar även om enheten är frånslagen. Däremot måste enheten
fortsätta vara inkopplad till en strömkälla.
En skadad enhet kan vara farlig. Om diskmaskinen blir skadad ska du slå av huvudströmmen och
kontakta återförsäljaren eller serviceavdelningen.
VARNING
Obehöriga reparationer kan resultera i oförutsedda skador för användaren, för vilka tillverkaren inte kan
ta ansvar. Reparationer ska bara genomföras av en godkänd servicetekniker.
Felaktiga komponenter får bara ersättas av originalreservdelar. Bara när dessa delar är monterade kan
säkerheten garanteras för enheten.
Svenska - 8
User Manual_DW9000H-Series-00159B-03_SV.indd 8User Manual_DW9000H-Series-00159B-03_SV.indd 8 2015-03-24 5:20:012015-03-24 5:20:01
Page 49

Koppla alltid ur diskmaskinen från strömkällan vid underhållsarbete (slå av brytaren och dra ut
kontakten).
Om anslutningskabeln är skadad måste den bytas mot en specialkabel, som fi nns att köpa hos
tillverkaren. Av säkerhetsskäl får denna bara monteras av serviceavdelningen eller en behörig
FARA
servicetekniker.
I länder där det fi nns områden som kan vara utsatta för angrepp av kackerlackor eller andra skadedjur
är det viktigt att lägga extra vikt vid att hela tiden hålla enheten och dess omgivningar rena. Skador
VARNING
orsakade av kackerlackor eller andra skadedjur täcks inte av garantin.
Om det förekommer fel eller i rengöringssyfte ska enheten vara helt strömisolerad i följande fall:
FARA
• den är urdragen ur väggutaget och avstängd, eller
• den är frånslagen från strömkällan, eller
• huvudsäkringen är frånkopplad, eller
• den urskruvade säkringen är borttagen (i länder där detta är tillämpligt).
Gör inga modifi eringar av enheten om det inte uttryckligen tillåts av tillverkaren.
Öppna aldrig kåpan på enheten.
Det är mycket farligt att modifi era de elektriska anslutningarna eller komponenterna och mekaniska
FARA
delarna, samt detta kan orsaka felaktigheter i driften eller elektrisk kortslutning.
När enheten omfattas av garantin ska reparationer bara genomföras av en servicetekniker som är
auktoriserad av tillverkaren. Annars blir garantin ogiltig.
När du installerar produkten ska du se till att det fi nns plats upptill, på vänster och höger sida och på
baksidan av produkten, för att säkerställa e ektiv ventilation.
FARA
Om det är för lite plats mellan produkten och avloppet, kan det skada avloppet eller göra att det bildas
mögel.
Se till att inställningen för hårdhetsnivån på diskmaskinen är rätt för ditt område.
(Se”Mjukgöringsläge (inställning av vattnets hårdhet)” avsnittet på sidan 18.)
01 SÄKERHETSINSTRUKTIONER
Svenska - 9
User Manual_DW9000H-Series-00159B-03_SV.indd 9User Manual_DW9000H-Series-00159B-03_SV.indd 9 2015-03-24 5:20:022015-03-24 5:20:02
Page 50

Installera diskmaskinen
Se till att din tekniker följer de här instruktionerna noggrant för att säkerställa säker
och normal användning av din nya diskmaskin.
KONTROLLERA DELARNA OCH KONTROLLPANELEN
När diskmaskinen har packats upp ska du se till att du har fått alla de delar som beskrivs nedan. Om
diskmaskinen skadades under transporten, eller om du inte har alla delar, ska du kontakta Samsungs
kundtjänst eller din återförsäljare för Samsung.
Håll förpackningsmaterialet på avstånd från barn för att garantera deras säkerhet, efter att du har
packat upp diskmaskinen.
VARNING
Nedre stril
Vattenavledare
Saltbehållare
Fack
Kontrollpanel
Övre stril
Nedre hyllanÖvre hyllan
Tillbehör - Användarmanual, Hasplåt, Hållare för utloppsslang, 3:e hyllans inlägg, Energietikett, Garantisedel,
Tratt (Se ”Fylla saltbehållaren” avsnittet på sidan 20), Installningsbara panelfasten (för vissa
modeller).
3:e hyllan 3:e hyllans
Övre stril
Botten
Dörr
inlägg
Linjära rörliga delar - Växelströmsmotor för bälte (växelmotor), Spår, Kilrem, Spårhållare (fram upp, fram låg)
Svenska - 10
User Manual_DW9000H-Series-00159B-03_SV.indd 10User Manual_DW9000H-Series-00159B-03_SV.indd 10 2015-03-24 5:20:022015-03-24 5:20:02
Page 51

DW60H9970** / DW60J9970**-serien
8
02 INSTALLATION
1 643 7 9
1
Strömförsörjning Knapp
Knappar för val av diskprogram
2
(Auto, EKO, Intensiv, Skonsam, Snabb)
3
Självrengöring Knapp
4
Övre Knapp
5
Nedre Valknappar för (Zonförstärkare)
6
Hastighetsökare Knapp
7
Desinfi cering Knapp
8
Dry+ Knapp
9
Barnlås
10
Display
11
Senarelägg start Knapp
12
Start (Återställ)-knapp
DW60H9950** / DW60J9960**-serien
1 3 5 7
1
Strömförsörjning Knapp
Knappar för val av diskprogram
2
(Auto, EKO, Intensiv, Skonsam, Snabb)
3
Övre Knapp
6
Dry+ Knapp
7
Barnlås
8
Display
1211102 5
6
1092 4 8
4
Nedre Valknappar för (Zonförstärkare)
5
Desinfi cering Knapp
9
Senarelägg start Knapp
10
Start (Återställ)-knapp
Svenska - 11
User Manual_DW9000H-Series-00159B-03_SV.indd 11User Manual_DW9000H-Series-00159B-03_SV.indd 11 2015-03-24 5:20:032015-03-24 5:20:03
Page 52

Installera diskmaskinen
När du trycker på knappen Strömförsörjning lyser lampan för det senast genomföra
1
Strömförsörjning
2
Val av diskprogram
Självrengöring
3
(för vissa modeller)
Övre
4
(för vissa modeller)
Nedre
(förvissamodeller)
5
/ Nedre
hyllan- Endast
(förvissamodeller)
Hastighetsökare
6
(för vissa modeller)
diskprogrammet. När det diskprogram som du har valt körs stängs alla andra
indikationslampor av, och lampan ”0” lyser i några minuter.
Sedan stängs strömmen av automatiskt.
Välj det program som passar beroende på hur smutsig disken är.
När du har valt diskprogram lyser lampan för programmet och visar att programmet
körs. Dessutom är zonlamporna Övre och Nedre är standardinställda på att lysa.
Om du vill byta diskprogram när det har startat trycker du på knappen Återställ
och stänger av diskmaskinen. Sätt sedan på diskmaskinen igen och välj ett nytt
diskprogram.
Standardprogrammet är EKO.
Välj det här alternativet om du vill rengöra diskmaskinens HUVUDENHET.
Kör programmet med diskmaskinen tom. Alternativen Övre och Nedre är
standardinställda på att stängas av.
När du väljer Övre aktiveras endast den övre hyllans stril.
Den nedre strilen kommer inte att aktiveras.
Använd den här funktionen om du vill diska små omgångar eller glas som placerats på
övre hyllan.
När du väljer Övre ska du endast placera t. ex. tallrikar och glas på den övre
hyllan. Diskmaskinen kommer inte att rengöra föremål som står på den nedre
hyllan.
Väljer du Övre minskar diskprogrammets tid och den förbrukade elektriciteten.
När du väljer Nedre (Endast nedre hyllan) aktiveras endast den nedre hyllans stril.
Den övre hyllans stril aktiveras inte.
Använd den här funktionen om du vill diska små omgångar eller glas som placerats på
nedre hyllan.
När du väljer Nedre (Endast nedre hyllan) ska du endast placera t. ex. föremål
och glas på den nedre hyllan. Diskmaskinen kommer inte att rengöra föremål som
står på den övre hyllan.
Väljer du Nedre (Endast nedre hyllan) minskar diskprogrammets tid och den
förbrukade elektriciteten.
Om du vill tvätta mycket nedsmutsade föremål, som kastruller och pannor, ska
du välja alternativet Zonförstärkare. (Med det här alternativet förbrukas något
mindre vatten och energi.)
Välj alternativet L för Zonförstärkare: Ger intensiv sköljning på den vänstra delen
av nedre hyllan.
Välj alternativet R för Zonförstärkare: Ger intensiv sköljning på den högra delen
av nedre hyllan.
Välj både L och R för Zonförstärkare: Ger intensiv sköljning på hela nedre hyllan.
Väljer du ett Zonförstärkare-alternativ stängs inte den övre strilen av.
Välj det här alternativet för att diska med ett kort diskprogram. (Auto, EKO, Intensiv.)
Svenska - 12
User Manual_DW9000H-Series-00159B-03_SV.indd 12User Manual_DW9000H-Series-00159B-03_SV.indd 12 2015-03-24 5:20:042015-03-24 5:20:04
Page 53

7
Desinfi cering
8
Dry+ (Barnlås)
9
Display
Om alternativet Desinfi cering väljs ökar vattentemperaturen till 70˚C för rengöring i
hög temperatur.
Det går inte att välja alternativet Desinfi cering om du väljer diskprogrammet
Skonsam.
Använd det här alternativet när du vill torka din disk mer utförligt.
Temperaturen stiger till 65˚C i slutsköljningen, och torktiden blir längre.
Om du väljer det här alternativet ökar elförbrukningen.
*Barnlås : Med det här alternativet kan du låsa knapparna på kontrollpanelen, förutom
knappen Strömförsörjning, så att barn inte av misstag kan starta diskmaskinen
genom att trycka på panelens knappar. Endast knappen Strömförsörjning är aktiv.
För att låsa eller låsa upp knapparna på kontrollpanelen ska du trycka och hålla in
knappen Dry+ (Barnlås) i tre (3) sekunder.
• När Strömmen är på: Tryck och håll in knappen ”Dry+ (Barnlås)” i tre (3) sekunder.
• När Strömmen är av: Tryck på knappen Strömförsörjning först och tryck sedan
och håll in knappen ”Dry+ (Barnlås)” i tre (3) sekunder.
• Barnlås är aktiv tills du stänger av den. Det går inte att välja några diskprogram,
alternativ eller starta diskmaskinen när Barnlås är på.
Visar programtiden och återstående timmar och minuter, tid för Senarelägg start samt
varningsmeddelanden.
Om ett problem uppstår när maskinen används visas ett varningsmeddelande, och ett
varningsljud hörs.
Se ”Felsökning och informationskoder” avsnittet på sidan 32.
Barnlås -indikator
- Sätts på om Barnlås är inställt (eller om diskmaskinen är i standby- eller
pausläge).
- Stängs av när diskmaskinen är igång.
- När Barnlås är på så blinkar indikatorn Barnlås i fl era sekunder om någon
knapp förutom Strömförsörjning trycks in.
Självrengöring -indikator
- Sätts på när alternativet Självrengöring aktiveras (eller om diskmaskinen är i
standby- eller viloläge) men stängs av när diskmaskinen är igång.
- Blinkar i 5 sekunder var 20:e till 22:a diskprogram.
- Programräknaren försvinner när funktionen Självrengöringhar slutförts
eller när diskmaskinen når sitt 23:e diskprogram utan att diskprogrammet
Självrengöring har använts. (Funktionen Återställ eller Självrengöring räknas
inte av programräknaren.)
Sköljglanspåfyllning -indikator
- Sätts på om diskmaskinens sköljglans tar slut (eller om diskmaskinen är i
standby- eller pausläge).
- Stängs av när diskmaskinen är igång.
Saltbrist -indikator (*endast tillämpliga modeller)
- Sätts på när mjukgörarens salt tar slut. (eller om diskmaskinen är i standbyeller pausläge.)
- Stängs av när diskmaskinen är igång.
02 INSTALLATION
Svenska - 13
User Manual_DW9000H-Series-00159B-03_SV.indd 13User Manual_DW9000H-Series-00159B-03_SV.indd 13 2015-03-24 5:20:042015-03-24 5:20:04
Page 54

Installera diskmaskinen
Senarelägg ett diskprogramm i upp till 24 timmar med i steg om en timme.
För att öka fördröjningen av programmets starttid trycker du och håller in knappen
Senarelägg start. Tiden som visas är tiden då diskprogrammet kommer att börja.
Senarelägg start
10
Start
11
Du kan välja alternativen (Självrengöring, Övre, Nedre, Hastighetsökare, Desinfi cering, Dry+ och
Senarelägg start) innan du startar ett diskprogram. Om du byter diskprogram efter att ha valt ett
alternativ återställs det ursprungliga diskprogrammet.
För att förhindra att pekplattans responskänslighet minskar bör följa de här anvisningarna:
• Peka i mitten på varje knappsats med ett fi nger. Tryck inte.
• Rengör regelbundet pekkontrollens yta med en mjuk och fuktig trasa.
• Var försiktig så att du inte rör mer än en pekknapp åt gången, förutom då det uppmanas.
- När du har ställt in den senarelagda tiden trycker du på knappen Start och
stänger sedan dörren så att diskprogrammet startar.
- Om du vill ändra
startat trycker du på knappen Återställ och stänger av diskmaskinen. Sätt
sedan på diskmaskinen igen och välj ett nytt diskprogram med en ny inställning
för senarelagt program.
För att starta ett diskprogram trycker du på knappen Start innan du stänger dörren.
*Återställ : För att avbryta ett aktivt diskprogram och tömma diskmaskinen på vatten
trycker du och håller in knappen Start i tre (3) sekunder.
När diskmaskinen har återställts väljer du ett diskprogram och alternativ och trycker
sedan på Start för att starta diskmaskinen på nytt.
tid för det senarelagda programmet när diskmaskinen har
Svenska - 14
User Manual_DW9000H-Series-00159B-03_SV.indd 14User Manual_DW9000H-Series-00159B-03_SV.indd 14 2015-03-24 5:20:042015-03-24 5:20:04
Page 55

VAL AV DISKPROGRAM
1 2 3 4 5
02 INSTALLATION
1
Auto
Lätt till kraftigt smutsig daglig disk, med automatisk identifi ering av
mängden smuts.
Normalt smutsad daglig disk, med reducerad energi- och
2
EKO
vattenförbrukning
* Alternativet Hastighetsökare minskar diskprogrammets tid.
3
Intensiv Kraftigt nedsmutsad disk, inklusive kastruller och stekpannor.
Lätt smutsade ömtåliga föremål. Det går inte att välja alternativet
4
Skonsam
Hastighetsökare, Zonförstärkare eller Desinfi cering om du väljer det
här diskprogrammet.
Lätt smutsad med mycket kort programtid. Det går inte att välja
5
Snabb
alternativet Hastighetsökare, Zonförstärkare eller Desinfi cering om du
väljer det här diskprogrammet.
FÖRLOPPSDISPLAY
Endast DW60H9970-serien
1
Disk
2
Sköljglans
3
Torka
4
Rengöring
När diskmaskinen påbörjar ett diskprogram sätts programmets motsvarande lampa på, så att
diskprogrammets förlopp visas.
När diskmaskinen är i en diskperiod i programmet lyser den
första pilen, och den återstående tiden visas.
När diskmaskinen är i en sköljningsperiod i programmet lyser
den andra pilen, och den återstående tiden visas.
När diskmaskinen är i en torkningsperiod i programmet lyser
den tredje pilen, och den återstående tiden visas.
När diskmaskinen har slutfört alla perioder i diskprogrammet
stängs alla andra indikatorer av.
Diskmaskinen piper, och ”0” visas i fl era minuter.
Svenska - 15
User Manual_DW9000H-Series-00159B-03_SV.indd 15User Manual_DW9000H-Series-00159B-03_SV.indd 15 2015-03-24 5:20:042015-03-24 5:20:04
Page 56

Installera diskmaskinen
UPPFYLLA INSTALLATIONSKRAVEN
Strömtillförsel och jordning
Använd inte en förlängningssladd.
Använd endast strömkabeln som levereras med diskmaskinen.
VARNING
Vid förberedelse av installationen ska du se till att strömkällan uppfyller följande:
• En AC 220-240V / 50Hz säkring eller kretsbrytare.
• En individuell kretsbrytare som är kopplad till diskmaskinen.
Diskmaskinen måste jordas. Om diskmaskinen inte fungerar eller går sönder, minskar jordningen risken för
elektrisk kortslutning genom att erbjuda en väg för minsta mostånd i den elektriska strömmen.
Diskmaskinen levereras med en strömkabel och en jordad kontakt med tre stift som kan sättas i ett rätt
installerat och jordat uttag.
Anslut inte den jordade kabeln till en VVS-kabel i plast, gaslinje eller ett varmvattenrör.
VARNING
Om den jordade ledaren ansluts felaktigt kan det resultera i elektrisk kortslutning.
Fråga en behörig elektriker eller tekniker om du är osäker på om diskmaskinen har jordats rätt.
Modifi era inte kontakten som levereras med diskmaskinen. Om den inte passar i uttaget ska du be att
få ett korrekt uttag installerat av en behörig elektriker.
FARA
Vattentillförsel
Drick inte vatten från diskmaskinen.
VARNING
• Diskmaskinen får anslutas till kallt eller varmt vatten som är högst 60˚C.
• En stoppkran med en 3/4" hane måste fi nnas på kranen.
• Vattentrycket måste ligga mellan 0,05MPa och 0,8MPa. Om vattentrycket är för lågt kanske
vatteninloppsventilen inte fungerar korrekt, vilket kan göra att diskmaskinen slås av. Om vattentrycket är
för högt måste en tryckreduceringsventil installeras.
Du kan minska risken för läckage och vattenskada genom att göra följande:
FARA
• Göra vattenkranarna lättare att komma åt.
• Stänga kranarna när diskmaskinen inte används.
• Kontrollera med jämna mellanrum att det inte fi nns några läckage på kopplingarna.
Svenska - 16
User Manual_DW9000H-Series-00159B-03_SV.indd 16User Manual_DW9000H-Series-00159B-03_SV.indd 16 2015-03-24 5:20:042015-03-24 5:20:04
Page 57

Använda Aqua-Stop
Aqua-Stop har utvecklats som det perfekta läckageskyddssystemet.
Det är kopplat till vattentillförselslangen och kapar automatiskt vattenfl ödet om slangen skadas.
Aqua-Stop är en elektrisk komponent.
FARA
• Var försiktig så att du inte skadar Aqua-Stop.
• Vrid eller böj inte vattentillförselslangen som är ansluten till Aqua-Stop.
Om Aqua-Stop skadas ska du stänga av vattenkranarna och dra ut strömkontakten direkt. Så fort de
här stegen har tagits ska du kontakta Samsungs kundtjänst eller en behörig tekniker.
FARA
Tömning
Om du använder en tömning som är unik för diskmaskinen ska du ansluta tömningsslangen till en tömning
som är mellan 30cm och 70cm från marken.
Om tömningsslangen ansluts till ett utlopp som är mer än 80 cm över jord kan det resultera i att vattnet i
diskmaskinen rinner tillbaka eller inte töms helt.
Golv
För bästa prestanda måste diskmaskinen installeras på ett plant, stabilt golv.
Trägolv kan behöva förstärkas för att minimera vibrationer. Mattor och mjuka dynor kan bidra till vibrationer
och kan orsaka att diskmaskinen fl yttar på sig under användning.
Installera aldrig diskmaskinen på en plattform eller en struktur som har svagt stöd.
FARA
Omgivande temperatur
Installera inte diskmaskinen i ett område som utsätts för frystemperaturer. Din diskmaskin har alltid kvar
vatten i vattenventilen, -pumpen och -slangen och om vattnet fryser i maskinen eller slangar, kan det skada
enheten och dess komponenter.
Testkörning
Se till att installera diskmaskinen på rätt sätt genom att köra programmet Snabb efter att installationen är klar.
02 INSTALLATION
Svenska - 17
User Manual_DW9000H-Series-00159B-03_SV.indd 17User Manual_DW9000H-Series-00159B-03_SV.indd 17 2015-03-24 5:20:052015-03-24 5:20:05
Page 58

Innan du använder produkten
för första gången
INSTÄLLNINGSLÄGE
Sätt på diskmaskinen och håll in både knappen Desinfi cering och knappen Senarelägg start i tre (3)
sekunder för att öppna inställningsläget.
Trycker du på knappen Desinfi cering ändras läget i den här ordningen:
Ljudinställningsläge Ljusstyrkeläge (för vissa modeller) Vattenavledarläge
Mjukgöringsläge (för vissa modeller) Autodörr-läge (för vissa modeller).
Ljudinställningsläge
Tryck på knappen Desinfi cering tills ”U1” eller ”U0” visas. För att ändra inställning trycker du på knappen
Senarelägg start . ”U0” innebär att ljudet för alla diskprogram är avstängt.
Den inställningen fortsätter om du inte ändrar inställning igen.
Mjukgöringsläge (inställning av vattnets hårdhet)
1. Tryck på knappen Desinfi cering för att öppna Mjukgöringsläget (”L3” på displayen betyder
Mjukgöringsläge).
2. När du anger inställningarna för vattnets hårdhet visas den aktuella inställningen för hårdhetsnivån.
3. Använd knappen Senarelägg start för att välja nivå på vattnets hårdhet från nivå 0 till nivå 5.
(Se tabellen nedan för inställning av nivå på vattnets hårdhet i ditt område.)
Om vattnets hårdhetsnivå i ditt område är mycket låg behöver du inte använda disksalt.
Du måste dock ställa in vattnets hårdhet för diskmaskinen till 0.
4. För att stänga inställningen för vattnets hårdhet trycker du på knappen Strömförsörjning
Tabell över vattnets hårdhet
Vattnets hårdhet mäts med tyska grader (°dH), franska grader (°TH), eller mmol/ℓ (internationell enhet för
vattnets hårdhet).
Nivå
0 <6 <10 <1,0 Ingen repris Nej Nej
1 6~14 10~25 1~2,5 1/8 Ja Ja
2 14~23 25~40 2,5~4,0 1/5 Ja Ja
3 23~31 40~55 4,0~5,5 1/3 Ja Ja
4 31~40 55~70 5,5~7,0 1/2 Ja Ja
5 >40 >70 >7,0 1/1 Ja Ja
ºdH ºTH mmol/ℓ Område
Vattnets hårdhet
Sköljglans-/diskprogram
(ECO-program)
.
Saltinjektion
Svenska - 18
User Manual_DW9000H-Series-00159B-03_SV.indd 18User Manual_DW9000H-Series-00159B-03_SV.indd 18 2015-03-24 5:20:052015-03-24 5:20:05
Page 59

För bättre diskresultat krävs användning av mjukt vatten.
Hårt vatten innehåller orenheter som kan hindra diskprestandan.
Du behöver göra vattnet mjukare om det ingående vattnet är hårdare än 1,0mmol/ℓ (6°d – tysk skala).
För att göra detta behöver du:
• Disksalt.
• Konfi guratonen för vattnets hårdhet enligt ditt område.
För mer information om vattnets hårdhet i ditt område, ska du kontakta ditt lokala vattenverk.
Om hårdheten för vattentillförseln är ojämn ska du ställa in diskmaskinen på det högsta måttet. Om
exempelvis vattnets hårdhet ligger i området 6,7mmol/ℓ till 9,0mmol/ℓ, ska du ställa in diskmaskinen
på 9,0mmol/ℓ.
Diskmaskinens standardinställning för vattnets hårdhet är 3 (4,0-5,5mmol/ℓ). Om den här inställningen
matchar vattnets hårdhetsnivå i ditt område fi nns det inget behov av att ändra den.
Ljusstyrkeläge (Inställning av ljusstyrka för fack-LED)
Tryck på knappen Desinfi cering tills ”B0 ~ B5” visas. (Ju högre nummer, desto starka ljus).
För att ändra inställning trycker du på knappen Senarelägg start. (för vissa modeller)
Autodörr-läge
Dörren öppnas automatiskt när diskprogrammet är klart, så att innehållet torkar bättre.
Dörren öppnas direkt innan ett diskprogram är klart, och ”0” visas på displayen i 30 sekunder efter det.
Tryck på knappen Desinfi cering för att öppna Autodörr-läget. (”A1” på displayen innebär Autodörr-läge.)
Tryck på knappen Senarelägg start för att aktivera eller inaktivera Autodörr-läget.
• A1 : Autodörr-läge är aktiverat.
• A0 : Autodörr-läge är inaktiverat.
* Observera att Autodörr-läget är aktivt genom diskprogrammet EKO utan några aktiva alternativ.
* När dörren öppnas i Autodörr-läget kan inte dörren stängas
manuellt under de följande 2 minuterna.
* Autodörr-läget inaktiveras för diskprogrammet Snabb.
03 FÖRE ANVÄNDNING
Ändrar du inställningen för ”Autodörr-läge” kan torkningen påverkas.
Välj läget ”A1” för bättre torkresultat.
Svenska - 19
User Manual_DW9000H-Series-00159B-03_SV.indd 19User Manual_DW9000H-Series-00159B-03_SV.indd 19 2015-03-24 5:20:052015-03-24 5:20:05
Page 60

Innan du använder produkten
för första gången
ANVÄNDA DISKSALT
Fylla saltbehållaren
Om du vill få mjukare vatten måste du fylla på saltbehållaren med disksalt.
Använd bara diskmaskinssalt.
Använd inte någon annan typ av salt eller lösningsmedel. Detta kan skada saltbehållaren och
FARA
vattenmjukgörarsystemet.
Fyll alltid saltbehållaren precis innan du kör ett av de fullständiga diskprogrammen för att förhindra
korrodering på grund av överskottssalt eller för hög salthalt i vattnet.
FARA
1. Öppna luckan.
2. Öppna saltbehållarlocket genom att vrida det moturs.
3. Fyll på saltbehållaren med vatten (behövs bara när enheten slås på för
första gången)
4. Tillsätt disksalt.
Saltbehållarens kapacitet är ungefär 1 kg. Fyll inte saltbehållaren för
mycket.
FARA
5. Avlägsna överskottssalt runt saltbehållarens öppning och lockets tätning.
Om överskottssaltet inte tas bort kan eventuellt inte saltbehållarens
lock stängas ordentligt och saltvatten kan rinna ut och påverka
FARA
prestandan negativt.
6. Snurra saltbehållarens lock medurs tills det är helt stängt.
Det som rekommenderas om det spills mycket salt eller om salt
vatten hamnar i huvudenheten är att du kör Snabb
rengöra inuti huvudenheten.
Kvarliggande saltkorn eller saltvatten kan orsaka frätning.
Beroende på storleken på saltkornen kan det ta en stund för
saltet att lösas upp och indikatorn för ”Saltbrist
för att
” stängs av.
Kontroll av indikatorn Saltbrist
Om indikatorn ”Saltbrist ” tänds ska du tillsätta disksalt enligt beskrivningen ovan.
En tänd indikator ”Saltbrist
första gången.
” betyder att det fi nns salt för tre program till från att lampan tänds för
Svenska - 20
User Manual_DW9000H-Series-00159B-03_SV.indd 20User Manual_DW9000H-Series-00159B-03_SV.indd 20 2015-03-24 5:20:062015-03-24 5:20:06
Page 61

ANVÄNDA DISKMEDEL
Alla diskprogram i diskmaskinen kräver diskmedel i diskmedelsfacket.
Tillsätt rätt mängd diskmedel för det valda diskprogrammet för att säkerställa bästa prestanda.
Använd bara maskindiskmedel. Vanligt diskmedel ger för mycket skumbildning, vilket kan minska
diskmaskinens prestanda eller göra att den inte fungerar som den ska.
FARA
Svälj inget maskindiskmedel. Undvik att andas in ångorna. Maskindiskmedel innehåller irriterande och
kaustiska kemikalier som kan påverka andningsförhållandena. Om du har svalt maskindiskmedel eller
VARNING
andats in ångorna ska du omedelbart uppsöka läkarvård.
Förvara maskindiskmedlet utom räckhåll för barn.
VARNING
Fylla på diskmedelsbehållaren
1. Öppna diskmedelsbehållarens lucka genom att trycka på frigöraren till
spärren.
Luckan öppnas alltid i slutet av diskprogrammet.
2. Tillsätt rekommenderad mängd diskmedel i diskmedelsfacket för
huvuddisk.
3. Stäng luckan genom att skjuta den åt vänster och sedan trycka nedåt.
Det fi nns ingen separat knapp som är specifi k för användning av
maskindisktabletter.
03 FÖRE ANVÄNDNING
4. För bättre diske ekt, speciellt om du har problem med ingrodd smuts,
kan du tillsätta små mängder diskmedel (omkring 8 g) på luckan.
Det här diskmedlet verkar under fördisken.
Svenska - 21
User Manual_DW9000H-Series-00159B-03_SV.indd 21User Manual_DW9000H-Series-00159B-03_SV.indd 21 2015-03-24 5:20:072015-03-24 5:20:07
Page 62

Fylla på diskmaskinen
RIKTLINJER FÖR DISKNING
Följ de här enkla riktlinjerna för att få bästa resultat och spara energi.
Innan du fyller på disk
Avlägsna matrester, såsom ben, kärnor etc. och avfall, såsom tandpetare, pappersnäsdukar etc.
från tallrikarna. Matrester och avfall kan skada disken, avge störande ljud och till och med leda till
FARA
produktfel.
Diska inte föremål som är täckta med aska, sand, vax, smörjfett eller olja.
Dessa material skadar diskmaskinen och askan löses inte upp utan fördelas i interiören.
VARNING
Föremål som inte är lämpliga för diskmaskinen
• Föremål i koppar, mässing, tenn, elfenben och aluminium, eller de som har en vidhäftning
• Icke värmeresistent plast
• Handgjorda föremål, antika föremål, värdefulla vaser och konstglas
• Färger målade över glasering
• Träföremål och fi nt porslin, samt föremål med delar i trä
• Fint glas, eller glas som innehåller kristall
Silver som har varit i kontakt med mat som innehåller sulfur kan bli missfärgat. Detta omfattar
äggula, lök, majonnäs, senap, fi sk, fi sk i saltlake och marinader.
• Det kan bildas en grå ton på glas efter många diskningar. Diska inte fi nt glas, eller glas som innehåller
kristall, i diskmaskinen.
Aluminiumkomponenter (t.ex. fettfi lter) får inte rengöras med kaustiksoda eller alkaliska
rengöringsmedel. Detta kan skada materialet, eller i extrema fall, orsaka en allvarlig kemisk reaktion.
VARNING
Använd bara artiklar, t.ex. glas, porslin och bestick, där tillverkaren har angett att de tål maskindisk.
Svenska - 22
User Manual_DW9000H-Series-00159B-03_SV.indd 22User Manual_DW9000H-Series-00159B-03_SV.indd 22 2015-03-24 5:20:072015-03-24 5:20:07
Page 63

JUSTERING AV DEN ÖVRE HYLLANS HÖJD
Du kan justera den övre hyllans höjd i din Samsung-diskmaskin, så att den nedre hyllan kan rymma större
föremål. Beroende på vilken höjd för den övre hyllan du ställer in kan den nedre hyllan rymma tallrikar med
en diameter på 30 cm, och den övre hyllan kan rymma tallrikar med 20 cm i diameter.
1. För att sänka den övre hyllan med 5 cm
drar du i justeringshandtagen som sitter till
vänster och höger om den övre hyllan, och
sedan trycker du den övre hyllan aningen
nedåt samtidigt.
2. För att höja den övre hyllan drar du den
övre hyllan uppåt. Justeringshandtaget
klickar till, och den övre hyllan fl yttas till en
högre plats.
Vi rekommenderar att du justerar höjden
på den övre hyllan innan du sätter in disk
FARA
på hyllan. Om du justerar hyllan när du har
satt in disk kan du skada disken.
Om du inte justerar med vänster och
höger handtag samtidigt kanske diskmaskinens dörr inte stängs ordentligt.
Dra ut den övre hyllan från huvudenheten tills den är helt synlig innan du justerar den övre hyllan.
TA BORT DEN ÖVRE HYLLAN (FÖR VISSA MODELLER)
Du kan ta bort den övre hyllan så att det får plats mer disk på den nedre hyllan.
Se till så hyllan inte lossnar från skenorna när du gör det.
För att ta bort den övre hyllan från skjutskenan drar du ut den övre hyllan från huvudenheten tills den är helt
utdragen.
Håll ner skenorna på båda sidorna för att släppa den övre hyllan. Skjut ut den övre hyllan till slutet på en
skena och lyft upp den.
Upprepa stegen ovan med den andra skenan.
04 FYLLA MASKINEN
Steg 1. Steg 2. Steg 3.
Svenska - 23
User Manual_DW9000H-Series-00159B-03_SV.indd 23User Manual_DW9000H-Series-00159B-03_SV.indd 23 2015-03-24 5:20:072015-03-24 5:20:07
Page 64

Fylla på diskmaskinen
SÄTTA IN DISK PÅ NEDRE HYLLAN
Sätt in matlagningsartiklar (t. ex. kastruller och pannor) med
upp till 30 cm i diameter på den nedre hyllan. Den nedre hyllan
är särskilt utformat för middagstallrikar, soppskålar, tallrikar,
kastruller, lock och grytor.
Vi rekommenderar att du sätter i koppar, glas med fot samt små
tallrikar på den övre hyllan. Se de rekommenderade mönstren
nedan.
Sätta i stora föremål i zonförstärkarområdena
Du kan sätta in stora föremål, som t. ex. kastruller och pannor
på den vänstra och/eller högra sidan på den nedre hyllan, dvs
Zonförstärkare-områdena, för mer e ektiv rengöring. När du väljer
alternativet zonförstärkning aktiveras ett kraftfullt munstycke till och riktas
mot föremål Zonförstärkare-områdena. Se till att kastrullhandtag och andra
föremål inte kommer i vägen för strilarnas rotation och vattenavledaren.
SÄTTA IN DISK PÅ ÖVRE HYLLAN
Den övre hyllan har utformats för små tallrikar, koppar, glas
och plastföremål mer markeringen "kan maskindiskas". Sätt
dina tallrikar i diskmaskinen så att deras ovansida är vänd mot
varandra.
Se till att tallrikarna inte kommer i vägen för den roterande strilen,
som sitter på den övre hyllans undersida. (Kontrollera detta
genom att rotera strilen för hand.)
När du sätter in disk ska du dra ut den övre hyllan tillräckligt, så
att du kan sätta in disken utan att slå i bänken ovanför.
Användning av glasstöd
Du kan placera muggar, små föremål och långa tillagningsverktyg på
mugghyllorna. Det är också ett mycket praktiskt sätt att diska vinglas på.
Placera vinglasen på mugghyllornas piggar. Mugghyllorna kan även fällas
tillbaka när de inte används.
Justera inte nivån för övre korgen med glasstöden uppfällda.
Detta gör det omöjligt att trycka in övre korgen.
FARA
Svenska - 24
User Manual_DW9000H-Series-00159B-03_SV.indd 24User Manual_DW9000H-Series-00159B-03_SV.indd 24 2015-03-24 5:20:082015-03-24 5:20:08
Page 65

ANVÄNDNING AV 3:E HYLLAN (BESTICK) (FÖR VISSA MODELLER)
Sätta in disk på bestickhyllan
Förutom den vanliga bestickkorgen på den nedre hyllan har vissa
modeller en bestickhylla.
Bestickhyllan passar bäst för matbestick och redskap
för matlagning och servering. Du kan placera bestick på
bestickhyllan.
Ta bort bestickhyllan
Hela bestickhyllan kan du ta bort om du behöver mer utrymme på den övre hyllan före större föremål.
Sätta in bestickhyllan inlägg
Vissa modeller har ett borttagningsbart och hopvikbart
bestickinlägg tillsammans med en bestickhylla. För att använda
det placerar du inlägget på bestickhyllan och placerar sedan
bestick och serverings- och matlagningsredskap på inlägget
slumpmässigt eller ordnat. När ett diskprogram är klart, och
besticken och de andra redskapen är torra, kan du vika ihop
inlägget och bära besticken och de andra redskapen i inlägget till
platsen där de förvaras.
04 FYLLA MASKINEN
Var försiktig när du viker och fl yttar hyllan när det ligger
långa, tunna föremål i inlägget.
VARNING
Föremålet kan falla ut och orsaka personskador.
Det rekommenderas att du inte fl yttar inlägget när det är vått.
Vänta tills inlägget är torrt.
Inlägget torkar snabbt efter ett diskprogram om det får
lufttorka i några minuter.
* När du sätter in bestick och liknande redskap på bestickhyllan
bör du se till att de inte kommer i vägen för hyllans stril. Om de
gör det ska du ta bort bestickhyllans inlägg och försöka igen.
Svenska - 25
User Manual_DW9000H-Series-00159B-03_SV.indd 25User Manual_DW9000H-Series-00159B-03_SV.indd 25 2015-03-24 5:20:082015-03-24 5:20:08
Page 66

Fylla på diskmaskinen
ANVÄNDA SKÖLJGLANS
Fylla på behållaren för sköljglans
När indikatorn Sköljglanspåfyllning tänds på kontrollpanelen ska du fylla på sköljglans.
Din diskmaskin har utformats för att endast använda fl ytande sköljglans.
Om du tillsätter sköljglans i pulverform sätter det igen behållarens öppning och orsakar att diskmaskinen
inte fungerar korrekt.
Sköljglansen gör att diskvattnet torkar bättre.
Tillsätt inte vanligt diskmedel i sköljglansbehållaren.
FARA
1. Avlägsna sköljglansbehållarlocket genom att vrida det moturs.
Om du tillsätter sköljglans till tablettdiskmedel torkar disken bättre.
2. Fyll sköljglansbehållaren med sköljglans.
Använd visningsporten vid påfyllning i sköljglansbehållaren.
Fyll inte behållaren mer än indikatorn för maxnivå visar.
För mycket sköljglans kan orsaka översvämning i diskprogrammet.
FARA
3. Vrid sköljglansens vred till ett nummer mellan 1 och 6. Ju högre
nummer, desto mer sköljglans kommer diskmaskinen att använda.
Om du inte kan rotera vredet för sköljglans med enkelhet kan du prova
att använda ett mynt.
4. Stäng sköljglansbehållarlocket genom att vrida det medurs.
Svenska - 26
User Manual_DW9000H-Series-00159B-03_SV.indd 26User Manual_DW9000H-Series-00159B-03_SV.indd 26 2015-03-24 5:20:092015-03-24 5:20:09
Page 67

Rengöra och sköta
diskmaskinen
Om du håller diskmaskinen ren blir prestandan bättre, antalet onödiga reparationer
minskar och livslängden förlängs.
RENGÖRA UTSIDAN
Vi rekommenderar att du rengör utsidan på diskmaskinen och avlägsnar matrester när sådana fi nns.
Använd en mjuk, torr trasa för att försiktigt torka bort matrester och damm från kontrollpanelen.
Använd inte bensen, vax, tinner, klorin eller alkohol. Sådana kemikalier kan missfärga innerväggarna på
diskmaskinen och orsaka fl äckar.
FARA
Rengör inte diskmaskinen genom att spraya vatten över den. I synnerhet är det viktigt att skydda
elektriska komponenter från att komma i kontakt med vatten.
FARA
Om din diskmaskin har en lucka i rostfritt stål kan den rengöras med ett rengöringsmedel för hushåll
eller liknande och en ren, mjuk trasa.
RENGÖRA MASKINEN INVÄNDIGT
Om det fi nns kalkavlagringar eller fettavlagringar i maskinen ska du avlägsna dessa med en fuktig trasa eller
köra ett program som har den högsta sköljtemperaturen utan att fylla på föremål efter att maskindiskmedlet
har fyllts på.
Avlägsna inte främre tätningen på behållaren. Om du avlägsnar tätningen kan det orsaka att
diskmaskinen börjar läcka eller inte fungerar som den ska.
FARA
RENGÖRA FILTREN
1. Slå av diskmaskinen.
2. Rotera fi lterinsatsen moturs för att lossa den och plocka sedan ur
fi lterinsatsen.
05 RENGÖRING OCH SKÖTSEL
3. Avlägsna det fi na fi ltret (platt, rektangulärt).
4. Plocka isär det grova fi ltret och mikrofi ltret.
Svenska - 27
User Manual_DW9000H-Series-00159B-03_SV.indd 27User Manual_DW9000H-Series-00159B-03_SV.indd 27 2015-03-24 5:20:092015-03-24 5:20:09
Page 68

Rengöra och sköta
diskmaskinen
5. Avlägsna eventuell smuts och andra rester från fi ltren och skölj dem
under rinnande vatten.
6. Sätt tillbaka fi ltren i omvänd ordning mot när du avlägsnade dem,
återplacera fi lterinsatsen och rotera medurs i stängningspilens riktning.
Om fi lterinsatsen inte är riktigt tillsluten minskar prestandan.
FARA
RENGÖRING AV STRILARNA
Om diskmaskinen inte verkar göra rent ordentligt eller om strilarna verkar tilltäppta kan du rengöra båda
strilarna. När du avlägsnar strilarna ska du vara försiktig, eftersom de kan gå sönder.
Övre stril
1. Dra fram den övre hyllan.
2. Kontrollera om strilens hål har täppts till av matrester.
3. Om du måste rengöra den tar du bort strilen.
4. För att ta bort strilen lossar du och tar bort muttern
och tar sedan bort strilen.
5. Rengör strilen, sätt in den igen och dra åt muttern.
6. När du sätter fast muttern ska du vrida åt den hårt för
hand.
7. Kontrollera om strilen sitter i ordentligt genom att rotera
den för hand.
Svenska - 28
User Manual_DW9000H-Series-00159B-03_SV.indd 28User Manual_DW9000H-Series-00159B-03_SV.indd 28 2015-03-24 5:20:102015-03-24 5:20:10
Page 69

Övre stril
1. Kontrollera om strilens hål har täppts till av matrester.
2. Om du måste rengöra den tar du bort strilen.
3. För att ta bort strilen drar du först ut den övre hyllan,
lossar strilens kapsel genom att vrida den motsols och
tar sedan bort den övre strilen.
1
2
4. Rengör strilen, sätt in den igen och sätt fast strilens
kapsel på strilen genom att vrida kapseln medsols.
5. Kontrollera om strilen sitter i ordentligt genom att rotera
den för hand.
Strilens
kapsel
FÖRVARING AV DISKMASKINEN
Om du behöver förvara diskmaskinen under en längre period ska du först tömma ur enheten helt och sedan
koppla ur vattenslangen.
Diskmaskinen kan skadas om vatten fi nns kvar i slangarna och de inbyggda komponenterna under
förvaring. Efter tömningen och urkopplingen av diskmaskinen ska du se till att slå av vatteninloppsventilen
och kretsbrytaren.
05 RENGÖRING OCH SKÖTSEL
Svenska - 29
User Manual_DW9000H-Series-00159B-03_SV.indd 29User Manual_DW9000H-Series-00159B-03_SV.indd 29 2015-03-24 5:20:102015-03-24 5:20:10
Page 70

Felsökning och
informationskoder
KONTROLLERA FÖLJANDE OM DISKMASKINEN...
PROBLEM MÖJLIG ORSAK LÖSNING
Kontrollera att luckan är helt stängd och låst.
Kontrollera att den övre hyllan är ordentligt
sammanfogad med kanalmunstycket.
Kontrollera även obalans i monteringen av den övre
hyllan.
Luckan stängs inte helt.
Startar inte.
Har dålig lukt.
Har vatten kvar efter
att programmet är
slut.
Knappen Start (Återställ) har
inte valts.
Inget program har valts. Välj ett program.
Strömsladden är inte ansluten. Anslut strömsladden.
Inget vatten kommer in. Kontrollera att vatteninloppsventilen är öppen.
Kontrollpanelen är låst.
Det fi nns vatten kvar från senaste
programmet.
Utloppsslangen är vikt eller igensatt. Räta ut och avlägsna stopp i slangen.
Kontrollera att luckan är låst och helt stängd. Tryck
på knappen Start (Återställ)
luckan.
Avaktivera funktionen Barnlås för att låsa upp
kontrollpanelen.
Tillsätt diskmedel utan att fylla på disk och kör
programmet Självrengöring för att rengöra
diskmaskinen.
innan du stänger
Svenska - 30
User Manual_DW9000H-Series-00159B-03_SV.indd 30User Manual_DW9000H-Series-00159B-03_SV.indd 30 2015-03-24 5:20:102015-03-24 5:20:10
Page 71

PROBLEM MÖJLIG ORSAK LÖSNING
Välj ett program anpassat efter smutsgraden
Ett felaktigt program valdes.
för disken enligt anvisningarna i den här
bruksanvisningen.
Har matrester kvar i
disken.
Filtret är igensatt eller sitter inte fast
ordentligt.
Inget diskmedel eller otillräckligt med
diskmedel används.
Trycket på ingående vatten är lågt.
Sprayarmsmunstyckena är
igensatta.
Rengör fi ltret och kontrollera att fi ltren är korrekt
monterade.
Använd ett automatiskt maskindiskmedel eller
använd mer diskmedel.
Det ingående vattentrycket måste ligga mellan
0,05MPa och 0,8MPa.
Rengöra sprayarmarna.
Ordna om disken så att vattnet kommer åt
Disken är inte rätt påfylld.
överallt och så att inget stör sprayarmen och
distribueringen.
Kontrollera saltpåfyllningsindikatorn och återfyllning
av disksalt.
Kontrollera behållaren och tillsätt sköljglans.
Kontrollera inställningen för sköljglans.
Välj funktionen Dry+ eller använd sköljglans.
Efter att ha slutfört diskprogrammet ska du först
tömma den nedre hyllan och sedan den övre. På
så sätt undviker du droppande vatten från den övre
hyllan på disken som står på den nedre hyllan.
Torkar inte disken
e ektivt.
Vattnet är för hårt.
Det fi nns ingen sköljglans i
behållaren eller så har inte tillräckligt
med sköljglans använts.
Universaltabletter har använts utan
att funktionen Dry+ har valts.
Det samlas vatten i glas och muggar
med konkav botten. Det vattnet kan
spillas ut på andra föremål när du
tömmer maskinen.
Diskmaskinen avger en signal
när behållarens lucka öppnas
och under första steget av
Det här är normalt.
pumptömningsarbetet.
Är för bullrig.
Diskmaskinen står inte balanserat. Se till att diskmaskinen står balanserat.
Det hörst ett ”hackande” ljud, på
grund av att en arm slår emot
Ordna om disken.
disken.
Efterlämnar en gul
eller brunaktig fi lm på
koppar och fat
Har inga indikatorer
tända.
Har inga mjukt
roterande armar.
Detta kan uppstå på grund av rester
av ka e och te.
Använd program med högre temperatur.
Strömsladden är inte ansluten. Anslut strömsladden.
Armarna är igensatta med matrester. Rengör armarna.
Kontrollera att inställningen för
Efterlämnar en vit
hinna på koppar och
fat efter diskningen.
Hårt vatten har använts.
saltpåfyllningsindikatorn och sköljglans är
anpassade efter vattnets hårdhet i ditt område.
Kontrollera att saltbehållarlocket sitter fast
ordentligt.
06 FELSÖKNING
Svenska - 31
User Manual_DW9000H-Series-00159B-03_SV.indd 31User Manual_DW9000H-Series-00159B-03_SV.indd 31 2015-03-24 5:20:102015-03-24 5:20:10
Page 72

Felsökning och
informationskoder
INFORMATIONSKODER
Kontrollpanelen visar informationskoder som hjälper dig att förstå vad som pågår med din diskmaskin.
KOD ÅTGÄRD
Översvämningskontroll
OC
LC
4C
5C
HC
3C
För alla koder som inte anges ovan, se baksidan på denna manual och kontakta ditt Samsungservicecenter.
• Funktionskontroll. Stäng ventilen för vattentillförsel och gå till strömbrytarpanelen
i din bostad, stäng av strömbrytaren för diskmaskinens krets och kontakta ett
behörigt Samsung-servicecenter.
Läckagekontroll
• Om det läcker i ventilen för vattentillförsel ska du stänga ventilen för vattentillförsel
och gå till strömbrytarpanelen i din bostad, stänga av strömbrytaren för
diskmaskinens krets och sedan kontakta en tekniker för att åtgärda problemet.
Om problemet kvarstår ska du kontakta ett behörigt Samsung-servicecenter.
Kontroll av vattennivå
• Kontrollera om ventilen för vattentillförsel är stängd, om vattentillförseln är indragen
eller om ventilen eller ledningen för vatteninlopp har fryst igen eller täppts till av
obehöriga partiklar.
Om problemet kvarstår ska du stänga ventilen för vattentillförsel och sedan
kontakta ett behörigt Samsung-servicecenter.
Utloppskontroll
• När du har stängt ventilen för vattentillförsel ska du kontrollera om utloppsslangen
har täppts till eller böjts. Kontrollera också om utloppshålet inuti har täppts till. Om
problemet kvarstår ska du kontakta ett behörigt Samsung-servicecenter.
Kontroll av stark överhettning
• Funktionskontroll. När diskmaskinen är tom ska du tillsätta diskmedel och köra ett
diskprogram.
Om problemet kvarstår går du till strömbrytarpanelen i din bostad, stänger av
strömbrytaren för diskmaskinens krets och kontaktar ett behörigt Samsungservicecenter.
Pumpfunktionskontroll
• Funktionskontroll. Stäng av diskmaskinen och slå på den igen.
Om problemet kvarstår ska du kontakta ett behörigt Samsung-servicecenter.
Svenska - 32
User Manual_DW9000H-Series-00159B-03_SV.indd 32User Manual_DW9000H-Series-00159B-03_SV.indd 32 2015-03-24 5:20:112015-03-24 5:20:11
Page 73

Programtabell
PROGRAMTABELL
Smutsgrad Auto EKO Intensiv Skonsam Snabb
Mängden matrester
Programsekvens
Vattenförbrukning (L) 11,0 ~ 21,0 10,7 25,9 10,9 11,2
Energiförbrukning (kWh) 1,0 ~ 1,5 0,94 1,65 0,84 0,9
Programtid (min) 128 ~ 184 190 199 113 38
Disktiden varierar beroende på alternativen du lägger till och på det använda vattnets tryck och
temperatur.
Snabb Diskprogram: Det här programmet saknar AUTODÖRR. (utan program för TORKNING)
Strömförbrukningen beror på vattnets temperatur och/eller mängden disk.
När sköljglans är tomt kan tiden och temperaturen öka något.
Vattenförbrukningen och disktiden beror på antalet steg eller alternativ som du lägger till och på det
använda vattnets tryck och temperatur.
Mycket lätt till kraftigt
smutsad
Fördisk
Huvuddisk
Sköljglans
Varmvattensköljning
Torka
Slut
Normal Kraftigt smutsad Lätt Lätt
Fördisk
Huvuddisk
Sköljglans
Varmvattensköljning
Torka
Slut
Fördisk
Huvuddisk
Sköljglans
Varmvattensköljning
Torka
Slut
Fördisk
Huvuddisk
Sköljglans
Varmvattensköljning
Torka
Slut
Huvuddisk
Sköljglans
Varmvattensköljning
07 PROGRAMTABELL
Slut
Svenska - 33
User Manual_DW9000H-Series-00159B-03_SV.indd 33User Manual_DW9000H-Series-00159B-03_SV.indd 33 2015-03-24 5:20:112015-03-24 5:20:11
Page 74

Bilaga
KASSERA DISKMASKINEN OCH SKONA MILJÖN
Diskmaskinen är tillverkad av återvinningsbara material. Om du bestämmer dig för att kassera den ska
du göra det i enlighet med lokala regler för avfallshantering. Kapa strömsladden så att enheten inte kan
anslutas till en strömkälla.
Avlägsna luckan så att barn och djur inte kan fastna i maskinen.
Överskrid inte diskmedelsvolymerna som rekommenderas i instruktionerna från diskmedelstillverkaren.
DEKLARATION OM ÖVERENSSTÄMMELSE
Den här produkten efterlever kraven enligt följande direktiv:
EMC-direktivet 2004/108/EC
Lågspänningsdirektivet 2006/95/EC
SPECIFIKATIONER
BU (byggd under) FBI (fullt inbyggd)
MODELL
Strömförsörjning AC220 ~ 240V / 50Hz
Vattentryck 0,05~0,8MPa
Diskkapacitet
(platsinställning)
Märke ekt 2000 ~ 2300W
Dimension (mm) 598 (B) x 817 (H) x 575 (D) 598 (W) x 817 (H) x 555 (D)
Vikt
• Dimensioner på utrymmet för enheten.
• Dimensioner och plats för utrustning som bär och fäster enheten på den ytan.
• Minimiavstånd mellan de olika enhetens olika delar och den omgivande strukturen.
• Minimidimensioner på ventilationsöppningar och deras korrekta uppsättning.
• Anslutning av enheten till strömkällor och sammankoppling med andra eventuella komponenter.
• Behov av frånkoppling av enheten från strömkällan efter installation, såvida enheten inte har en
strömknapp som uppfyller 24,3. Maskinen kan kopplas från genom att ha kontakten tillgänglig eller
genom att ha en strömknapp i det fasta kablaget i enlighet med reglerna för kabeldragning.
• Instruktionerna för fasta enheter ska ange hur enheten ska fästas till sitt stöd- Fästmetoden som anges
ska inte bero på häftande medel, eftersom de inte anses vara tillförlitliga fästmedel.
Opackad 45,0 kg 44,0 kg
Packad 48,0 kg 47,0 kg
DW60H9970US
DW60H9950US
DW60H9950UW
DW60J9960US
DW60J9970BB
14
Svenska - 34
User Manual_DW9000H-Series-00159B-03_SV.indd 34User Manual_DW9000H-Series-00159B-03_SV.indd 34 2015-03-24 5:20:112015-03-24 5:20:11
Page 75

För standardtest
I diagrammen nedan visas rätt påfyllningssätt för korgarna baserat på europeiska standarder (EN50242).
• Diskkapacitet:
• Teststandard: EN50242/IEC60436
• Placering av övre korgen: Låg
• Program: EKO
• Ytterligare tillval: Endast övre + Endast nedre (standard)
• Sköljglansinställning: 6
• Dosering av standarddiskmedel
- 14 PS : 7 g + 28 g
• För sortering av föremålen, se bild A, B, C.
14 platsinställningar
11
44444
9
14 platsinställningar
1
3
2
3
2
3
2
5
44
55
14
1
6
9
88
555
5
6
10
7
6
12
17
17
17
13
15
09 FÖR STANDARDTEST
1615
15
Placera sladdlindningen,
vänster sida.
Bild A-1: Nedre korg Bild B-1: Övre korg Bild C-1: Besticksbricka
1
Sopptallrik: Havregryn
2
Middagstallrik: Ägg
3
Middagstallrik: Kött
4
Desserttallrik: Spenat
5
Desserttallrik: Ägg
6
Kopp: Te
7
Tefat: Te
8
Glas: Mjölk
Liten skål, mellanstor
9
skål: Spenat
10
Stor skål: Kött
11
Oval tallrik: Margarin
Utan 3:e hyllans inlägg
12
Soppsked: Havregryn
13
Ga el: Ägg
14
Kniv
15
Dessertsked
16
Tesked
17
Serveringsfat
Svenska - 35
User Manual_DW9000H-Series-00159B-03_SV.indd 35User Manual_DW9000H-Series-00159B-03_SV.indd 35 2015-03-24 5:20:112015-03-24 5:20:11
Page 76

Produktinformation
FÖRORDNING (EU) Nr 1059/2010
” * ” Asterisk(er) innebär en variant av en modell och kan vara olika (0–9) eller (A–Z).
Leverantör SAMSUNG
Modellnamn
Märkkapacitet (platsinställningar)
Energiklass
Miljömärkning
Årlig energiförbrukning, (AEc) (kWh/år)
Standardenergiförbrukning per program, (Et) (Kwh)
Läge för avstängd strömförbrukning, Po (W)
Strömförbrukningsläge påslaget, Pl(W)
Årlig vattenförbrukning (AWc), (L)
Torke ektklass
Standardprogram
Programtid för standardprogram
Längd för påslaget läge, (Tl) (min)
Luftburna bullerutsläpp (dBA re 1pW)
Installation
1) Baserat på 280 standardprogram med kallt vatten och lägen för förbrukning med låga e ekter. Aktuell
energiförbrukning beror på hur enheten används.
2) Baserat på 280 standardprogram för rengöring. Aktuell vattenförbrukning beror på hur enheten används.
3) Standardprogram är standardrengöringscykeln, som informationen i etiketten och informationsbladet
hänvisar till, och är ett program som är lämpligt för att göra rent normalsmutsigt porslin och som är det
mest e ektiva programmet gällande kombination av energi- och vattenförbrukning.
3)
1)
2)
Byggd under
Fristående
Fullt inbyggd
DW60H9970U* DW60H9950U* DW60J9960U*
14 14 14
A++ A++ A++
No No No
266 266 266
0.936 0.936 0.936
0.45 0.45 0.45
555
2996 2996 2996
AAA
Eco Eco Eco
190 190 190
10 10 10
41 44 41
Ja Ja Ja
---
---
Svenska - 36
User Manual_DW9000H-Series-00159B-03_SV.indd 36User Manual_DW9000H-Series-00159B-03_SV.indd 36 2015-03-24 5:20:122015-03-24 5:20:12
Page 77

FÖRORDNING (EU) Nr 1059/2010
” * ” Asterisk(er) innebär en variant av en modell och kan vara olika (0–9) eller (A–Z).
Leverantör SAMSUNG
Modellnamn
Märkkapacitet (platsinställningar)
Energiklass
Miljömärkning
Årlig energiförbrukning, (AEc) (kWh/år)
1)
Standardenergiförbrukning per program, (Et) (Kwh)
Läge för avstängd strömförbrukning, Po (W)
Strömförbrukningsläge påslaget, Pl(W)
Årlig vattenförbrukning (AWc), (L)
2)
Torke ektklass
Standardprogram
3)
Programtid för standardprogram
Längd för påslaget läge, (Tl) (min)
Luftburna bullerutsläpp (dBA re 1pW)
Byggd under
Installation
Fristående
Fullt inbyggd
1) Baserat på 280 standardprogram med kallt vatten och lägen för förbrukning med låga e ekter. Aktuell
energiförbrukning beror på hur enheten används.
2) Baserat på 280 standardprogram för rengöring. Aktuell vattenförbrukning beror på hur enheten används.
3) Standardprogram är standardrengöringscykeln, som informationen i etiketten och informationsbladet
hänvisar till, och är ett program som är lämpligt för att göra rent normalsmutsigt porslin och som är det
mest e ektiva programmet gällande kombination av energi- och vattenförbrukning.
DW60H9970F* DW60H9950F* DW60J9970B*
14 14 14
A++ A++ A++
No No No
266 266 266
0.936 0.936 0.936
0.45 0.45 0.45
555
2996 2996 2996
AAA
Eco Eco Eco
190 190 190
10 10 10
41 44 41
---
Ja Ja -
--Ja
10 PRODUKTINFORMATION
Svenska - 37
User Manual_DW9000H-Series-00159B-03_SV.indd 37User Manual_DW9000H-Series-00159B-03_SV.indd 37 2015-03-24 5:20:132015-03-24 5:20:13
Page 78

Obs
User Manual_DW9000H-Series-00159B-03_SV.indd 38User Manual_DW9000H-Series-00159B-03_SV.indd 38 2015-03-24 5:20:132015-03-24 5:20:13
Page 79

Obs
User Manual_DW9000H-Series-00159B-03_SV.indd 39User Manual_DW9000H-Series-00159B-03_SV.indd 39 2015-03-24 5:20:132015-03-24 5:20:13
Page 80

FRÅGOR ELLER KOMMENTARER?
LAND RING ELLER BESÖK OSS ONLINE PÅ
DENMARK 70 70 19 70 www.samsung.com/dk/support
FINLAND 030-6227 515 www.samsung.com/fi /support
NORWAY 815 56480 www.samsung.com/no/support
SWEDEN 0771 726 7864 (SAMSUNG) www.samsung.com/se/support
DD68-00159B-03
User Manual_DW9000H-Series-00159B-03_SV.indd 40User Manual_DW9000H-Series-00159B-03_SV.indd 40 2015-03-24 5:20:132015-03-24 5:20:13
Page 81

Oppvaskmaskin
brukerhåndbok
Serie DW60H9970
Serie DW60H9950
Serie DW60J9970
Serie DW60J9960
Denne håndboken er laget av 100 % resirkulert papir.
tenk deg mulighetene
Takk for at du har kjøpt dette Samsung-produktet.
User Manual_DW9000H-Series-00159B-03_NO.indd 1User Manual_DW9000H-Series-00159B-03_NO.indd 1 2015-03-24 5:20:372015-03-24 5:20:37
Page 82

Innhold
SIKKERHETSINSTRUKSER
3
KONFIGURERE
OPPVASKMASKINEN
10
10 Kontrollere delene og kontrollpanelet
15 Syklusvelger
15 Viser fremdriften
16 Imøtekomme installasjonskravene
FØR DU BRUKER PRODUKTET
FOR FØRSTE GANG
18
18 Innstillingsmodus
20 Bruke oppvaskmaskinsalt
21 Bruke oppvaskmiddel
FYLLE OPP OPPVASKMASKINEN
22
22 Retningslinjer for oppvaskmaskinen
23 Justering av høyden til den øvre
stativsku en
23 Fjerning av den øvre sku en
for noen modeller)
24 Plassering av oppvask i den nedre
sku en
24 Plassering av oppvask i den øvre sku en
25 Bruk av sku nummer 3 (bestikksku for
noen modeller)
26 Bruk av skyllemiddel
(bestikksku
RENGJØRING OG VEDLIKEHOLD
AV OPPVASKMASKINEN
27
27 Utvendig rengjøring
27 Rengjøring av innsiden av
oppvaskmaskinen
27 Rengjøring av fi ltrene
28 Rengjøring av dysene
29 Hvordan lagre oppvaskmaskinen
FEILSØKING OG
INFORMASJONSKODER
30
30 Kontroller disse punktene hvis
oppvaskmaskinen ...
32 Informasjonskoder
PROGRAMTABELL
33
33 Programtabell
VEDLEGG
34
34 Avhending av oppvaskmaskinen og
støtting av miljøet
34 Samsvarserklæring
34 Spesifi kasjoner
FOR STANDARDTEST
35
PRODUKTKORT
36
Norsk - 2
User Manual_DW9000H-Series-00159B-03_NO.indd 2User Manual_DW9000H-Series-00159B-03_NO.indd 2 2015-03-24 5:20:402015-03-24 5:20:40
Page 83

Sikkerhetsinstrukser
Gratulerer med din nye oppvaskmaskin fra Samsung. Denne brukerhåndboken
inneholder viktig informasjon om installasjon, bruk og vedlikehold av apparatet.
Ta deg tid til å lese denne brukerhåndboken for å få fullt utbytte av
oppvaskmaskinens mange fordeler og funksjoner.
DET DU TRENGER Å VITE OM SIKKERHETSINSTRUKSJONER
Les denne håndboken nøye for å sikre at du vet hvordan du trygt og e ektivt skal bruke de omfattende
funksjonene til det nye apparatet, og ta vare på håndboken på et trygt sted i nærheten av apparatet
til fremtidig referanse. Bruk dette apparatet kun til sitt tiltenkte formål som beskrevet i denne
brukerhåndboken.
Advarsler og viktige sikkerhetsinstruksjoner i denne brukerhåndboken dekker ikke alle mulige
omstendigheter og situasjoner som kan oppstå. Det er ditt ansvar å bruke sunn fornuft og være varsom og
nøyaktig når du installerer, vedlikeholder og bruker oppvaskmaskinen.
Siden disse følgende bruksinstruksjonene dekker forskjellige modeller, kan kjennetegnene til din
oppvaskmaskin variere noe fra de som beskrives i denne håndboken, og det er ikke sikkert at alle
varseltegnene gjelder. Hvis du har spørsmål eller bekymringer, kontakter du ditt nærmeste servicesenter
eller fi nner hjelp og informasjon online på www.samsung.com.
VIKTIGE SIKKERHETSSYMBOLER OG FORHOLDSREGLER
Viktige sikkerhetssymboler
Farer eller utrygge vaner som kan føre til alvorlig personskade og/eller skade på eiendom.
ADVARSEL
Farer eller utrygge vaner som kan føre til personskade og/eller skade på eiendom.
FORSIKTIG
For å redusere risikoen for brann, eksplosjon, elektrisk støt eller personskade når du bruker
FORSIKTIG
oppvaskmaskinen, bør du følge disse grunnleggende sikkerhetsforholdsreglene:
IKKE forsøk.
01 SIKKERHETSINSTRUKSER
IKKE demonter.
IKKE berør.
Følg retningslinjene eksplisitt.
Dra ut støpselet fra veggkontakten.
Kontroller at apparatet er jordet for å hindre elektrisk støt.
Ring servicesenteret for å få hjelp.
Merk
Disse varselssymbolene er her for å hindre at du eller andre blir skadet.
Følg dem eksplisitt.
Ta vare på disse instruksjonene på et trygt sted og sørg for at nye brukere er kjent med innholdet.
Gi dem videre til en eventuell ny eier.
Norsk - 3
User Manual_DW9000H-Series-00159B-03_NO.indd 3User Manual_DW9000H-Series-00159B-03_NO.indd 3 2015-03-24 5:20:402015-03-24 5:20:40
Page 84

Sikkerhetsinstrukser
Viktige sikkerhetsforholdsregler
Dette apparatet oppfyller gjeldende sikkerhetskrav. Feil bruk kan føre til personskade og skade på
eiendom.
For å unngå ulykker og skader på apparatet, les disse instruksjonene nøye før du tar det i bruk for
første gang. De inneholder viktig informasjon om sikkerhet, bruk og vedlikehold.
Som for alt utstyr som bruker elektrisitet og har bevegelige deler, fi nnes det potensielle farer.
For å håndtere dette apparatet på en trygg måte må du gjøre deg kjent med dets funksjoner og utvise
FORSIKTIG
forsiktig når du bruker det.
Ikke la barn (eller kjæledyr) leke på eller i oppvaskmaskinen. Døren til oppvaskmaskinen er vanskelig å
åpne fra innsiden, og barn kan bli alvorlig skadet hvis de blir fanget inni den.
ADVARSEL
Barn må ha tilsyn for å sikre at de ikke leker med apparatet.
ADVARSEL
Hvis støpselet og/eller strømledningen er skadd, må det skiftes av produsenten eller dennes
servicerepresentant, eller en tilsvarende autorisert person for å unngå ulykker.
FORSIKTIG
Apparatet må installeres i nærheten av strømtilførsel, vanntilførselskraner og avløpsrør.
INSTRUKSJON OM WEEE-MERKET
Korrekt avhending av dette produktet (Avfall fra elektrisk og elektronisk utstyr)
(Gjelder i land med avfallssortering)
Denne merkingen som vises på produktet, dets tilbehør eller dokumentasjon, indikerer at
produktet eller det elektroniske tilbehøret (for eksempel lader, headset, USB-kabel) ikke skal
kastes sammen med annet husholdningsavfall ved slutten av levetiden. For å hindre potensiell
skade på miljøet eller helseskader grunnet ukontrollert avfallsavhending ber vi om at dette avfallet holdes
adskilt fra andre typer avfall og resirkuleres på ansvarlig måte for å fremme bærekraftig gjenbruk av
materielle ressurser.
Private forbrukere bør kontakte enten forhandleren de kjøpte produktet av, eller lokale myndigheter for
detaljer om hvor og hvordan disse artiklene kan resirkuleres på en miljøvennlig måte.
Forretningsbrukere bør kontakte sin leverandør og undersøke vilkårene i kjøpskontrakten. Dette produktet
og det elektroniske tilbehøret skal ikke blandes med annet kommersielt avfall som skal kastes.
Norsk - 4
User Manual_DW9000H-Series-00159B-03_NO.indd 4User Manual_DW9000H-Series-00159B-03_NO.indd 4 2015-03-24 5:20:402015-03-24 5:20:40
Page 85

For å redusere risiko for brann, elektrisk støt eller personskade ved bruk av apparatet bør det ta visse
grunnleggende forholdsregler, inkludert følgende:
ADVARSEL
Dette apparatet bør ikke håndteres av personer (barn
innbefattet) med reduserte fysiske, sensoriske eller mentale
evner, eller som mangler erfaring og kunnskap, med mindre
de har fått veiledning og opplæring av den som er ansvarlig
for deres sikkerhet.
Barn må ha tilsyn for å sikre at de ikke leker med apparatet.
For bruk i Europa: Dette apparatet kan håndteres av barn
over 8 år og av personer med reduserte fysiske, sanselige
eller mentale evner, eller som mangler erfaring og kunnskap,
hvis de har fått opplæring i hvordan apparatet kan brukes på
en trygg måte og er innforstått med de farene bruken kan
medføre. Barn skal ikke leke med apparatet. Rengjøring og
vedlikehold skal ikke utføres av barn uten tilsyn.
For å unngå ulykker, hvis strømledningen er skadet må den
skiftes ut av produsenten eller dennes servicerepresentant,
eller en annen autorisert person.
01 SIKKERHETSINSTRUKSER
Hvis vaskemaskinen har ventilasjonsåpninger i sokkelen er
det viktig at ikke tepper blokkerer åpningene.
De nye slangesettene som leveres med apparatet skal alltid
benyttes. Gamle slangesett må ikke gjenbrukes.
FORHOLDSREGLER: For å unngå farlige situasjoner
som følge av utilsiktet tilbakestilling av sikringen for
overoppvarming, må apparatet ikke kobles til en ekstern
forsyningsenhet f.eks. en timer eller til en krets som
regelmessig slås på og av automatisk.
Døren bør ikke stå i åpen da dette kan utgjøre en snublefare.
Norsk - 5
User Manual_DW9000H-Series-00159B-03_NO.indd 5User Manual_DW9000H-Series-00159B-03_NO.indd 5 2015-03-24 5:20:402015-03-24 5:20:40
Page 86

Sikkerhetsinstrukser
ADVARSEL: Kniver og annet skarpt kjøkkenutstyr skal
plasseres i oppvaskmaskinen med spissen ned eller legges i
horisontal posisjon.
Dette apparatet er beregnet for bruk i husholdninger og
lignende brukssteder som:
• Ansattes kjøkkenområder i butikker, kontorer og andre
arbeidsmiljøer;
• våningshus,
• og på hoteller, moteller og andre bomiljøer;
• f.eks. av typen bed and breakfast.
INSTRUKSJONER NÅR DU BRUKER OPPVASKMASKINEN
Denne oppvaskmaskinen er ikke laget for kommersiell bruk. Den er ment for bruk i private
husholdninger og i lignende arbeids- og bomiljøer, som:
• Butikker
• Kontorer og visningsrom
og av beboere i virksomheter som:
• Hosteller og gjestehus.
Oppvaskmaskinen skal kun benyttes som et husholdningsapparat til rengjøring av alminnelig stentøy
og bestikk, som spesifi sert i denne brukerhåndboken.
Enhver annen bruk er ikke støttet av produsenten og kan være farlig.
Produsenten kan ikke holdes ansvarlig for skader som oppstår som en følge av feil bruk.
Ikke bruk løsemidler i oppvaskmaskinen. Fare for eksplosjon.
ADVARSEL
Oppvaskmiddel må ikke inhaleres eller svelges. Oppvaskmiddel inneholder irriterende eller etsende
ingredienser som kan føre til brenning i nese, munn og hals hvis det svelges, eller hindre åndedrettet.
ADVARSEL
Oppsøk en lege øyeblikkelig dersom du svelger eller inhalerer oppvaskmiddel.
Unngå å la døren stå unødvendig åpen, da den kan utgjøre en snublefare.
FORSIKTIG
Ikke sitt på eller len deg mot en åpen dør. Dette kan føre til at oppvaskmaskinen tipper og blir skadet,
og du kan bli skadet.
FORSIKTIG
Bruk kun oppvaskmiddel og skyllemiddel som er beregnet for oppvaskmaskiner til husholdningsbruk.
Ikke bruk håndoppvaskmiddel.
Ikke bruk rengjøringsmiddel med sterke syrer.
FORSIKTIG
Ikke fyll skyllemiddelbeholderen med pulver eller fl ytende oppvaskmiddel. Dette vil føre til alvorlig skade
på beholderen.
Hvis du utilsiktet fyller saltbeholderen med pulver eller fl ytende oppvaskmiddel vil det skade
vannmykneren. Kontroller at du har valgt riktig pakke med oppvaskmaskinsalt før du fyller
FORSIKTIG
saltbeholderen.
Benytt kun grovkornet spesialsalt beregnet for oppvaskmaskiner, da andre salter kan inneholde
uoppløselige tilsetningssto er som kan svekke mykningsmiddelets e ekt.
Norsk - 6
User Manual_DW9000H-Series-00159B-03_NO.indd 6User Manual_DW9000H-Series-00159B-03_NO.indd 6 2015-03-24 5:20:402015-03-24 5:20:40
Page 87

I apparater med bestikkurv (avhengig av modellen) rengjøres og tørkes bestikket bedre hvis det
plasseres i kurven med håndtakene ned. For å unngå risiko for skader bør imidlertid kniver, gafl er o.l.
FORSIKTIG
plasseres med håndtakene oppover.
Plastgjenstander som ikke tåler vask i varmt vann må ikke rengjøres i oppvaskmaskinen, f.eks.
plastbeholdere til engangsbruk, plastbestikk og plasttallerkener.
Den høye temperaturen i oppvaskmaskinen kan føre til at slike gjenstander smelter eller blir deformerte.
For modeller som har funksjonen Forsinket start, pass på at dispenseren er tørr før oppvaskmiddel
tilsettes. Tørk den om nødvendig. Oppvaskmiddel klumper seg hvis det helles i en fuktig dispenser og
blir kanskje ikke skikkelig spredd ut.
Kniver og annet skarpt kjøkkenutstyr skal plasseres i oppvaskmaskinen med spissen ned eller legges i
horisontal posisjon.
ADVARSEL
INSTRUKSJONER FOR Å BESKYTTE BARN
Dette apparatet er ikke et leketøy! For å unngå risiko for skader må barn ikke oppholde seg i nærheten
av apparatet; de må ikke leke i eller rundt oppvaskmaskinen eller berøre kontrollene. Barn vil ikke forstå
ADVARSEL
de potensielle farene den utgjør. De må overvåkes når du arbeider på kjøkkenet.
Det er også fare for at barn som leker kan stenge seg selv inne i oppvaskmaskinen.
Dette apparatet kan håndteres av barn over 8 år og av personer med reduserte fysiske, sanselige eller
mentale evner, eller som mangler erfaring og kunnskap, hvis de har fått opplæring i hvordan apparatet
ADVARSEL
kan brukes på en trygg måte og er innforstått med de farene bruken kan medføre. Barn skal ikke leke
med apparatet.
Rengjøring og vedlikehold skal ikke utføres av barn uten tilsyn.
Eldre barn kan bruke oppvaskmaskinen dersom de har blitt grundig forklart hvordan den skal
håndteres og dersom de er i stand til å håndtere den på en trygg måte og er innforstått med farene
ADVARSEL
ved feil bruk.
HOLD BARN UNNA OPPVASKMIDLER! Oppvaskmiddel inneholder irriterende eller etsende
ingredienser som kan føre til brenning i nese, munn og hals hvis det svelges, eller hindre åndedrettet.
ADVARSEL
Hold barn unna oppvaskmaskinen når døren er åpen.
Det kan fremdeles være oppvaskmiddelrester i beholderen.
Oppsøk en lege øyeblikkelig dersom et barn har svelget eller inhalert oppvaskmiddel.
01 SIKKERHETSINSTRUKSER
Norsk - 7
User Manual_DW9000H-Series-00159B-03_NO.indd 7User Manual_DW9000H-Series-00159B-03_NO.indd 7 2015-03-24 5:20:412015-03-24 5:20:41
Page 88

Sikkerhetsinstrukser
INSTRUKSJONER FOR Å INSTALLERE OPPVASKMASKINEN
Før du konfi gurerer apparatet sjekk at det ikke har synlige utvendige skader. Du må ikke under noen
omstendigheter bruke et skadet apparat. Et skadet apparat kan være farlig.
ADVARSEL
Oppvaskmaskinen må kun kobles til strømforsyningen via en egnet stikkontakt. Stikkontakten må være
lett tilgjengelig etter at oppvaskmaskinen er installert slik at den kan kobles fra strømforsyningen når
FORSIKTIG
som helst. (Se avsnittet «Kontrollere delene og kontrollpanelet» på side 10.)
Det må ikke være stikkontakter bak oppvaskmaskinen. Det er fare for overoppheting og brann hvis
oppvaskmaskinen blir dyttet mot en kontakt.
ADVARSEL
Oppvaskmaskinen må ikke installeres under en komfyr/kokeplate. De høye temperaturene som noen
ganger genereres av en komfyr/kokeplate, kan skade oppvaskmaskinen. Av samme grunn skal
ADVARSEL
den ikke installeres ved siden av åpne fl ammer eller andre apparater som gir fra seg varme, som
varmeovner osv.
Ikke koble oppvaskmaskinen til strømnettet før den er fullstendig installert og eventuelle justeringer av
dørhengslene er gjort.
Før apparatet kobles til strømnettet må du kontrollere at tilkoblingsdataplaten (spenning og belastning)
samsvarer med hovedstrømforsyningen. Ved tvil, kontakt en kvalifi sert tekniker.
FORSIKTIG
Den elektriske sikkerheten til apparatet kan kun garanteres når alle koblingene er knyttet til et e ektivt
jordingssystem. Det er meget viktig at dette grunnleggende sikkerhetskravet oppfylles og blir jevnlig
testet, og ved tvil bør det elektriske systemet i boligen kontrolleres av en kvalifi sert elektriker.
Produsenten kan ikke holdes ansvarlig for konsekvensene av et utilstrekkelig jordingssystem (f.eks.
elektrisk støt).
Apparatet må ikke kobles til hovedstrømforsyningen via en stikkontakt med fl ere uttak eller en
skjøteledning. Disse garanterer ikke tilstrekkelig sikkerhet for apparatet (f.eks. er det fare for
FORSIKTIG
overoppheting).
Apparatet kan kun installeres i bevegelige installasjoner som f.eks. skip, dersom en risikovurdering av
installasjonen har blitt gjennomført av en kvalifi sert tekniker.
Plastrøret til vanntilkoblingen inneholder en elektrisk komponent. Røret må ikke senkes i vann.
FORSIKTIG
Det fi nnes elektriske ledninger i slangen til vannstopperen. Aldri forkort vanninntaksslangen, selv om
den er for lang.
Installasjon, vedlikehold og reparasjoner skal kun utføres av kvalifi serte og kompetente personer i
samsvar med gjeldende nasjonale og lokale sikkerhetsforskrifter. Reparasjoner og annet arbeid utført
av ukvalifi serte personer kan være farlig. Produsenten kan ikke holdes ansvarlig for uautorisert arbeid.
Det integrerte vannsikre systemet tilbyr beskyttelse mot vannskader, forutsatt at følgende vilkårene
overholdes:
FORSIKTIG
• Oppvaskmaskinen er riktig installert og plombert.
• Oppvaskmaskinen er riktig vedlikeholdt og deler er skiftet ut når det er nødvendig.
• Stoppekranen har blitt slått av når apparatet ikke er i bruk over lengre perioder (f.eks. i ferier).
• Det vannsikre systemet vil fungere selv om apparatet er slått av. Apparatet må imidlertid være
koblet til strømforsyningen.
Et skadet apparat kan være farlig. Hvis oppvaskmaskinen blir skadet, slår du den av på hovedsikringen
og ringer forhandleren eller serviceavdelingen.
ADVARSEL
Uautoriserte reparasjoner kan føre til uforutsette farer for brukeren som produsenten ikke kan holdes
ansvarlig for. Reparasjoner skal kun utføres av en godkjent servicetekniker.
Ødelagte komponenter må kun skiftes ut med originale reservedeler. Bare når disse delene er montert,
kan sikkerheten til apparatet garanteres.
Norsk - 8
User Manual_DW9000H-Series-00159B-03_NO.indd 8User Manual_DW9000H-Series-00159B-03_NO.indd 8 2015-03-24 5:20:412015-03-24 5:20:41
Page 89

Oppvaskmaskinen må alltid kobles fra strømforsyningen når vedlikeholdsarbeid skal utføres (slå den av
ved stikkontakten og trekk ut støpselet).
Hvis tilkoblingskabelen er skadet må den skiftes ut med en spesialkabel som kan fås fra produsenten.
Av sikkerhetsmessige årsaker må denne kun monteres av serviceavdelingen eller av en autorisert
FORSIKTIG
servicetekniker.
I land med områder hvor det kan fi nnes kakerlakker eller andre skadedyr, må man være spesielt
oppmerksom på å holde apparatet og området rundt det rent til enhver tid. Skader som er påført av
ADVARSEL
kakerlakker eller andre skadedyr vil ikke dekkes av garantien.
Ved feilsøking eller rengjøring vær klar over at apparatet kun er fullstendig isolert fra strømforsyningen
når:
FORSIKTIG
• Det er slått av ved stikkontakten og støpselet er tatt ut, eller
• strømnettet er slått av, eller
• hovedsikringen er koblet fra, eller
• sikringen som kan skrus ut er fjernet (i land hvor dette gjelder).
Ikke gjør endringer i apparatet med mindre du er autorisert av produsenten til dette.
Rammen/kassen til apparatet må aldri åpnes.
Det kan være meget farlig å tukle med elektriske koblinger eller komponenter og mekaniske deler da
FORSIKTIG
det kan føre til driftsfeil eller gi elektrisk støt.
Mens apparatet er underlagt garantien skal reparasjoner kun utføres av en servicetekniker som er
autorisert av produsenten. Ellers vil garantien ugyldiggjøres.
Når apparatet installeres må man sørge for at det er nok plass til ventilasjon, over apparatet, på begge
sidene av det (til høyre og til venstre), samt på baksiden.
FORSIKTIG
Hvis det er utilstrekkelig plass mellom apparatet og vasken kan det føre til skader på vasken eller
forårsake muggvekst.
Påse at oppvaskmaskinens innstilling for vannhardhet er riktig for ditt område.
(Se avsnittet «Vannmyknermodus (hardhetsinnstilling for vann)» på side 18.)
01 SIKKERHETSINSTRUKSER
Norsk - 9
User Manual_DW9000H-Series-00159B-03_NO.indd 9User Manual_DW9000H-Series-00159B-03_NO.indd 9 2015-03-24 5:20:412015-03-24 5:20:41
Page 90

Konfi gurere oppvaskmaskinen
Sørg for at du får teknikeren til å følge disse instruksjonene nøye for å sikre at den
nye oppvaskmaskinen er trygg og fungerer normalt.
KONTROLLERE DELENE OG KONTROLLPANELET
Etter å ha pakket ut oppvaskmaskinen, kontroller at du har mottatt alle delene som vises nedenfor. Dersom
oppvaskmaskinen har blitt skadet under transporten eller dersom du ikke har mottatt alle delene, ta kontakt
med Samsungs kundeservice eller Samsung-forhandleren din.
For å trygge barns sikkerhet, hold emballasjen utenfor rekkevidde etter at oppvaskmaskinen er pakket ut.
ADVARSEL
Nedre dyse
Vannavviser
Saltbeholder
Vaskemiddelsku
Kontrollpanel
Øvre dyse
Nedre stativsku Øvre stativsku
Tilbehør - Brukerhåndbok, holder for dreneringsslange, beskyttelsesplate, brett for en tredje hylle,
energietikett, garantikort, trakt (se avsnittet «Fylle saltbeholderen» på side 20),
Tilpassede panelfester (bestikksku for noen modeller).
Stativsku
nummer 3
Øvre dyse
Base
Dør
Bestikkbeholder
til stativsku
nummer 3
Del med lineær bevegelse - Beltedreven vekselstrømmotor (motordrevet), skinne, V-timingbelte,
holdeskinne (foran oppe, foran nede)
Norsk - 10
User Manual_DW9000H-Series-00159B-03_NO.indd 10User Manual_DW9000H-Series-00159B-03_NO.indd 10 2015-03-24 5:20:412015-03-24 5:20:41
Page 91

Serie DW60H9970** / DW60J9970**
8
02 KONFIGURERING
1 643 7 9
1
Strøm Knapp
7
Rense Knapp
Valgknapper for syklus
2
(Automatisk, ØKO, Intensiv, Finvask,
8
Ekstra tørking Knapp
Hurtigprogram)
3
Selvrensing Knapp
4
Øvre Knapp
5
Nedre (Ekstra intensiv vask) Valgknapper
6
Økt hastighet Knapp
9
Barnesikring
10
Display
11
Forsinket start Knapp
12
Start (Tilbakestill) Knapp
Serie DW60H9950** / DW60J9960**
1 3 5 7
1
Strøm Knapp
Valgknapper for syklus
2
(Automatisk, ØKO, Intensiv, Finvask,
Hurtigprogram)
3
Øvre Knapp
6
Ekstra tørking Knapp
7
Barnesikring
8
Display
1211102 5
6
1092 4 8
4
Nedre (Ekstra intensiv vask) Valgknapper
5
Rense Knapp
9
Forsinket start Knapp
10
Start (Tilbakestill) Knapp
Norsk - 11
User Manual_DW9000H-Series-00159B-03_NO.indd 11User Manual_DW9000H-Series-00159B-03_NO.indd 11 2015-03-24 5:20:432015-03-24 5:20:43
Page 92

Konfi gurere oppvaskmaskinen
Når du trykker på knappen Strøm vil det lyse ved sist avsluttede syklus. Når den
1
Strøm
2
Syklusvelger
valgte syklusen er ferdig blir alle andre indikatorlys slått av og «0» lyser i noen
minutter.
Deretter blir strømmen slått av automatisk.
Velg vaskesyklus avhengig av hvor skittent serviset er. Når du har valgt en syklus vil
lampen som indikerer aktiv syklus slås på. Også sonelysene for Øvre og Nedre slås
på som standardinnstilling.
Dersom du ønsker å endre syklusen etter at den har startet, trykk på knappen
Tilbakestill og slå av oppvaskmaskinen. Slå deretter oppvaskmaskinen på
igjen og velg en ny syklus.
Standard syklus er ØKO.
Selvrensing
3
(for enkelte modeller)
Øvre
4
(for enkelte modeller)
Nedre
(for enkelte modeller)
5
/ Kun nedre stativsku
(for enkelte modeller)
Økt hastighet (for
6
enkelte modeller)
7
Rense
Velg dette alternativet for å rengjøre trommelen til oppvaskmaskinen. Kjør en tom
oppvaskmaskin. Alternativene Øvre og Nedre er slått av som standardinnstilling.
Når du velger Øvre aktiveres kun dysen i det øvre stativet.
Den nedre dysen vil ikke være aktiv.
Bruk denne funksjonen til å vaske kun noen få tallerkener eller glass i den øvre
sku en.
Når du velger Øvre må tallerkener, glass o.l. kun plasseres i den øvre
stativsku en. Oppvaskmaskinen vil ikke vaske gjenstander som er plassert i
den nedre stativsku en.
Når du velger Øvre reduseres både syklustiden og strømforbruket.
Når du velger Nedre (kun nedre stativsku ) aktiveres kun dysen i den nedre
stativsku en. Den øvre dysen vil ikke være aktiv.
Bruk denne funksjonen til å vaske kun noen få tallerkener eller glass i den nedre
sku en.
Når du velger Nedre (kun nedre stativsku ), må tallerkener, glass o.l.
kun plasseres i den nedre stativsku en. Oppvaskmaskinen vil ikke vaske
gjenstander som er plassert i den øvre stativsku en.
Når du velger Nedre (kun nedre stativsku ) reduseres både syklustiden og
strømforbruket.
Hvis du ønsker å vaske meget skitne gjenstander som gryter og panner,
velgEkstra intensiv vask. (Dette alternativet bruker litt mer vann og energi.)
Valget Ekstra intensiv vask L: Vasker ekstra intensivt i den venstre delen av
den nedre sku en.
Valget Ekstra intensiv vask R: Vasker ekstra intensivt i den høyre delen av den
nedre sku en.
Valg av både Ekstra intensiv vask L & R: Vasker ekstra intensivt i hele den
nedre sku en.
Når Ekstra intensiv vask velges deaktiveres ikke den øvre dysen.
Velg dette alternativet for å vaske med kort syklustid. (Automatisk, ØKO, Intensiv.)
Hvis alternativet Rense velges vil vanntemperaturen øke til 70 ˚C for
høytemperatursrensing.
Du kan ikke velge Rense hvis du har valgt syklusen Finvask.
Norsk - 12
User Manual_DW9000H-Series-00159B-03_NO.indd 12User Manual_DW9000H-Series-00159B-03_NO.indd 12 2015-03-24 5:20:432015-03-24 5:20:43
Page 93

Ekstra tørking
8
(Barnesikring)
9
Display
Velg dette alternativet når du ønsker en tørrere oppvask.
Temperaturen stiger til 65 ˚C under siste skyllesyklus og tørketiden øker også.
Strømforbruket øker ved bruk av dette alternativet.
*Barnesikring: Med dette alternativet kan du kan låse knappene på kontrollpanelet
- unntatt knappen Strøm – dette er for at barn ikke skal kunne starte
oppvaskmaskinen utilsiktet ved å trykke på knappene på panelet. Kun knappen
Strømforblir aktiv.
For å deaktivere eller aktivere knappene på kontrollpanelet, trykk på knappen
Ekstra tørking (Barnesikring) og hold den nede i tre (3) sekunder.
• Når strømbryteren er påslått: Trykk på knappen «Ekstra tørking (Barnesikring)»
i tre (3)sekunder.
• Når strømbryteren er avslått: Trykk først på knappen Strøm, og trykk deretter på
knappen «Ekstra tørking (Barnesikring)» i tre (3) sekunder.
• Barnesikring forblir aktiv inntil du slår den av. Du kan ikke velge syklus eller starte
oppvaskmaskinen når Barnesikring er på.
Viser syklustiden og gjenstående timer og minutter, tid for Utsatt start og kontroller
meldinger.
Hvis det skulle oppstå et problem under en operasjon, vil det vises en kontroller
melding med en varsellyd.
Se avsnittet «Feilsøking og informasjonskoder» på side 32.
Barnesikring indikator
- Begynner å lyse dersom Barnesikring blir satt på (eller oppvaskmaskinen
blir satt i standby- eller pausemodus).
- Slår seg av når oppvaskmaskinen går.
- Når Barnesikring er på vil Barnesikring indikatoren blinke i fl ere sekunder
dersom man trykker på en annen knapp enn Strøm.
Selvrensing indikator
- Slår seg på når Selvrensing alternativet er aktivert (eller oppvaskmaskinen
er i standby- eller pausemodus), men slår seg av når oppvaskmaskinen
går.
- Blinker i 5 sekunder etter hver 20. til 22. syklus.
- Syklustelleren forsvinner når Selvrensing programmet er fullført eller
når vaskemaskinen når sin 23. syklus uten at Selvrensing-syklusen
har blitt brukt. (Tilbakestill eller Selvrensing-operasjoner blir ikke talt av
syklustelleren.)
Skyllemiddelpåfylling indikator
- Begynner å lyse dersom oppvaskmaskinen går tom for skyllemiddel (eller
dersom oppvaskmaskinen blir satt i standby- eller pausemodus).
- Slår seg av når oppvaskmaskinen går.
Mangler salt indikator (*kun relevante modeller)
- Slår seg på hvis vannmykneren går tom for salt. (eller dersom
oppvaskmaskinen blir satt i standby- eller pausemodus).
- Slår seg av når oppvaskmaskinen går.
02 KONFIGURERING
Norsk - 13
User Manual_DW9000H-Series-00159B-03_NO.indd 13User Manual_DW9000H-Series-00159B-03_NO.indd 13 2015-03-24 5:20:432015-03-24 5:20:43
Page 94

Konfi gurere oppvaskmaskinen
Utsetter en syklus i opptil 24 timer med en-times-intervaller. For å øke det forvalgte
starttidspunktet, trykk på knappen Forsinket start eller hold den nede. Tiden som
vises angir tidspunktet for når vasken vil starte.
Forsinket start
10
Start
11
Du kan velge innstilling (Selvrensing, Øvre, Nedre, Økt hastighet, Rense, Ekstra tørking, Forsinket start)
før du starter en syklus. Hvis du endrer syklus etter å ha valgt en innstilling blir den opprinnelige
syklusen tilbakestilt.
For å hindre at berøringsfl aten mister sensitivitet bør du følge disse instruksjonene:
• Trykk på midten av hver tast med én fi nger. Ikke press hardt.
• Rengjør overfl aten på berøringskontrollen regelmessig med en myk, fuktig klut.
• Pass på så du ikke trykker på mer enn én tast om gangen, bortsett fra når anvist.
- Etter å ha stilt inn starttiden, trykk på knappen Start og lukk deretter døren
for å starte syklusen.
- Hvis du ønsker å endre
har startet, trykk på knappen Tilbakestill og slå av oppvaskmaskinen.
Slå deretter oppvaskmaskinen på igjen og velg en ny syklus med et nytt
starttidspunkt
For å starte en syklus, trykk på knappen Start før du lukker døren.
*Tilbakestill : For å avbryte en syklus som er i gang og tømme oppvaskmaskinen
for vann, trykk på knappen Start og hold den inne i tre (3) sekunder.
Etter at oppvaskmaskinen er nullstilt, velg en syklus og en innstilling og trykk deretter
på Start for å starte oppvaskmaskinen.
det valgte starttidspunktet etter at oppvaskmaskinen
Norsk - 14
User Manual_DW9000H-Series-00159B-03_NO.indd 14User Manual_DW9000H-Series-00159B-03_NO.indd 14 2015-03-24 5:20:432015-03-24 5:20:43
Page 95

SYKLUSVELGER
1 2 3 4 5
02 KONFIGURERING
1
Automatisk
Litt skitne til veldig skitne gjenstander som er i daglig bruk – automatisk
registrering av mengde tilsmussing.
Normalt skitne gjenstander som er i daglig bruk – redusert strøm- og
2
ØKO
vannforbruk.
* Alternativet Økt hastighet vil redusere syklustiden.
3
Intensiv Meget skitne gjenstander som gryter og kjeler.
Litt skitne skjøre gjenstander. Du kan ikke velge alternativet
4
Finvask
Økt hastighet, Ekstra intensiv vask eller Rense hvis du velger denne
syklusen.
Litt skitne gjenstander – veldig kort syklus. Du kan ikke velge alternativet
5
Hurtigprogram
Økt hastighet, Ekstra intensiv vask eller Rense hvis du velger denne
syklusen.
VISER FREMDRIFTEN
Kun serien DW60H9970
1
Vask
2
Skylling
3
Tørking
4
Rengjøring
Når oppvaskmaskinen starter en syklus vil lampen som indikerer den aktuelle operasjonen slås på for å
vise fremdriften til syklusen.
Når oppvaskmaskinen er i vaskefasen av en syklus vil den
første pilen lyse og den gjenværende tiden vises.
Når oppvaskmaskinen er skyllefasen av en syklus vil den
tredje pilen lyse og den gjenværende tiden vises.
Når oppvaskmaskinen er i tørkefasen av en syklus vil den
tredje pilen lyse og den gjenværende tiden vises.
Når oppvaskmaskinen har fullført alle fasene av en syklus slås
indikatorlampene av.
Oppvaskmaskinen piper og «0» vises på displayet i noen
minutter.
Norsk - 15
User Manual_DW9000H-Series-00159B-03_NO.indd 15User Manual_DW9000H-Series-00159B-03_NO.indd 15 2015-03-24 5:20:442015-03-24 5:20:44
Page 96

Konfi gurere oppvaskmaskinen
IMØTEKOMME INSTALLASJONSKRAVENE
Strømforsyning og jording
Ikke bruk en skjøteledning.
Bruk kun strømledningen som fulgte med oppvaskmaskinen.
ADVARSEL
Når du forbereder installasjonen, kontroller at strømtilførselen har:
• En vekselstrømsikring på 220-240V / 50Hz eller en kretsbryter.
• En individuell grenledning som betjener oppvaskmaskinen.
Oppvaskmaskinen må være jordet. Hvis det oppstår feil på oppvaskmaskinen, vil jordingen redusere
risikoen for elektrisk støt ved å tilby strømmen minste motstands vei.
Oppvaskmaskinen er utstyrt med en strømledning og et jordet, tretannet støpsel som kan settes inn i en
skikkelig installert og jordet stikkontakt.
Ikke koble jordledningen til et avløpsrør i plast, en gassledning eller et varmtvannsrør.
ADVARSEL
Feil tilkobling til jordingsleder kan føre til elektrisk støt.
Kontakt en kvalifi sert elektriker eller tekniker hvis du er usikker på om oppvaskmaskinen din er skikkelig
jordet.
Ikke endre støpselet som følger med oppvaskmaskinen. Hvis det ikke passer i uttaket, får du et
skikkelig uttak installert av en kvalifi sert elektriker.
FORSIKTIG
Vannforsyning
Ikke drikk vannet som har vært i oppvaskmaskinen.
ADVARSEL
• Oppvaskmaskinen kan kobles til en kaldt- eller varmtvannsforsyning på maks 60 ˚C.
• En stoppekran med en 3/4 tomme lang gjenge må monteres på kranen.
• Vanntrykket må være mellom 0,05 MPa og 0,8 MPa. Dersom vanntrykket er for lavt kan det hende at
vannforsyningsventilen ikke fungerer som den skal slik at oppvaskmaskinen blir slått av. Hvis vanntrykket
er for høyt må det monteres en trykkreduksjonsventil.
Du kan redusere risikoen for lekkasjer og vannskader ved å:
FORSIKTIG
• Ha vannkraner lett tilgjengelig.
• Slå av kranene når oppvaskmaskinen ikke er i bruk.
• Jevnlig kontrollere delene for lekkasjer.
Norsk - 16
User Manual_DW9000H-Series-00159B-03_NO.indd 16User Manual_DW9000H-Series-00159B-03_NO.indd 16 2015-03-24 5:20:442015-03-24 5:20:44
Page 97

Bruke vannstopper
Vannstopperen ble funnet opp som det perfekte lekkasjebeskyttelsessystemet.
Den er koblet til vannforsyningsslangen og stopper vannstrømmen automatisk i tilfelle av skader på slangen.
Vannstopperen er en elektrisk komponent.
FORSIKTIG
• Pass på så du ikke skader vannstopperen.
• Ikke bøy eller vri vannforsyningsslangen som er koblet til vannstopperen.
Hvis vannstopperen har blitt skadet, steng vannkranene og dra ut støpselet snarest.
Når disse trinnene er gjennomført, kontakter du Samsungs kundeservice eller en kvalifi sert tekniker.
FORSIKTIG
Avløp
Hvis du bruker et avløp kun til oppvaskmaskinen, kobler du avløpsslangen til et avløp som er mellom 30cm
og 70cm over bakken.
Hvis du kobler avløpsslangen til et avløp som er mer enn 80 cm over bakken, kan det føre til at vannet i
oppvaskmaskinen renner tilbake eller ikke tømmes helt.
Gulvfeste
For best mulig ytelse må oppvaskmaskinen installeres på et solid og jevnt gulv.
Tregulv kan måtte forsterkes for å minimere vibrasjoner. Tepper og myke fl iser bidrar til vibrasjoner og kan
føre til at oppvaskmaskinen beveger litt på seg mens den er i bruk.
Oppvaskmaskinen må aldri installeres på en plattform eller en struktur med dårlig støtte.
FORSIKTIG
Romtemperatur
Ikke installer oppvaskmaskinen på et område som er utsatt for frysetemperaturer. Oppvaskmaskinen
beholder alltid litt vann i vannventilen, pumpen og slangen, og hvis vannet fryser i maskinen eller slangene,
kan det skade apparatet og komponentene.
Prøvekjøring
Sjekk at du har installert oppvaskmaskinen korrekt ved å kjøre syklusen Hurtigprogram etter at
installasjonen er fullført.
02 KONFIGURERING
Norsk - 17
User Manual_DW9000H-Series-00159B-03_NO.indd 17User Manual_DW9000H-Series-00159B-03_NO.indd 17 2015-03-24 5:20:442015-03-24 5:20:44
Page 98

Før du bruker produktet for
første gang
INNSTILLINGSMODUS
Slå på oppvaskmaskinen og hold nede både knappen Rense og knappen Forsinket start i 3 sekunder for
å aktivere innstillingsmodus.
Når du trykker på knappen Rense endres modusen i denne sekvensen:
Lydinnstillingsmodus Lysstyrkemodus (for enkelte modeller) Vannavisermodus
Vannmyknermodus (for enkelte modeller) Automatiskdørmodus (for enkelte modeller).
Lydinnstillingsmodus
Trykk på knappen Rense inntil «U1» eller «U0» vises. For å endre innstillingene, trykk på knappen
Forsinket start . «U0» betyr at lyden er avslått for alle sykluser.
Innstillingen forblir aktiv inntil du endrer den på nytt.
Vannmyknermodus (hardhetsinnstilling for vann)
1. Trykk på knappen Rense for å aktivere vannmyknermodus («L3» på displayet indikerer
vannmyknermodus.
2. Når du angir innstillingen for vannets hardhetsgrad, vises gjeldende hardhetsgradinnstilling.
3. Bruk knappen Forsinket start til å velge hardhetsgrad for vannet fra nivå 0 til nivå 5.
(Se tabellen nedenfor for å velge vannhardhetsinnstilling for ditt område.)
Dersom hardhetsgraden til vannet i området ditt er veldig lav, behøver du ikke å bruke
oppvaskmaskinsalt. I så fall må du stille inn vannets hardhetsgrad til 0 i oppvaskmaskinen.
4. For å gå ut av innstillingsalternativet for vannhardhetsgrad trykk på knappen Strøm
Tabell over vannets hardhetsgrad
Vannets hardhetsgrad måles med tyske grader (°dH), franske grader (°TH) eller mmol/ℓ (internasjonal enhet
for vannhardhetsgrad).
Nivå
0 <6 <10 <1,0
1 6~14 10~25 1~2,5 1~8 Ja Ja
2 14~23 25~40 2,5~4,0 1~5 Ja Ja
3 23~31 40~55 4,0~5,5 1~3 Ja Ja
4 31~40 55~70 5,5~7,0 1~2 Ja Ja
5 >40 >70 >7,0 1~1 Ja Ja
ºdH ºTH mmol/ℓ Område
Vannets hardhet
Ingen
resirkulering
Regenerering av mykner-/
vaskesyklus (ØKO-program)
Nei Nei
.
Saltinjeksjon
Norsk - 18
User Manual_DW9000H-Series-00159B-03_NO.indd 18User Manual_DW9000H-Series-00159B-03_NO.indd 18 2015-03-24 5:20:442015-03-24 5:20:44
Page 99

Bedre vaskeresultater krever bruk av mykt vann.
Hardt vann inneholder urenheter som kan hindre vaskeytelsen.
Du vil måtte mykne vannet hvis vannforsyningen har en hardhet på mer enn 1,0mmol/ℓ (6°d – tysk skala).
For å gjøre dette trenger du:
• Oppvaskmaskinsalt.
• Konfi gurasjon av vannets hardhetsgrad i henhold til ditt område.
For mer informasjon om vannets hardhetsgrad i området ditt ta kontakt med det lokale vannverket.
Hvis hardhetsgraden til vannforsyningen er ustabil bør du velge det høyeste nivået når du stiller inn
oppvaskmaskinen. Hvis for eksempel vannets hardhetsgrad varierer fra 6,7mmol/ℓ til 9,0mmol/ℓ,
børdu stille inn oppvaskmaskinen på 9,0mmol/ℓ.
Oppvaskmaskinens standardinnstilling for vannets hardhetsgrad er 3 (4,0-5,5mmol/ℓ). Hvis denne
innstillingen samsvarer med vannets hardhetsgrad i ditt område, trenger du ikke å endre den.
Lysstyrkemodus (innstilling for LED-lys)
Trykk på knappen Rense inntil «B0 ~ B5» vises. (Høyere tall gir mer lys).
For å endre innstillingene, trykk på knappen Forsinket start. (for enkelte modeller)
Automatiskdørmodus
Døren åpnes automatisk når syklusen er ferdig for å fremskynde tørkeprosessen.
Døren vil åpne rett før en syklus er ferdig og deretter vil «0» vises på displayet i 30 sekunder etterpå.
Trykk på knappen Rense for å aktivere automatiskdørmodus. («A1» på displayet indikerer
automatiskdørmodus.)
Trykk på knappen Forsinket start for å aktivere eller deaktivere automatiskdørmodus.
• A1: Automatiskdørmodus aktivert.
• A0: Automatiskdørmodus deaktivert.
* Merk at automatisk dør vil være aktivert for syklusen ØKO uten at annet valgalternativ er tilgjengelig.
* Når døren åpnes i automatiskdørmodus kan døren ikke
lukkes manuelt før det har gått 2 minutter.
* Automatisk dør vil være deaktivert for syklusen
Hurtigprogram.
03 FØR BRUK
Endring av innstillingen for «automatiskdørmodus» kan ha innvirkning på tørkeresultatet.
Velg modusen «A1» for best mulig tørkeresultat.
Norsk - 19
User Manual_DW9000H-Series-00159B-03_NO.indd 19User Manual_DW9000H-Series-00159B-03_NO.indd 19 2015-03-24 5:20:442015-03-24 5:20:44
Page 100

Før du bruker produktet for
første gang
BRUKE OPPVASKMASKINSALT
Fylle saltbeholderen
For å bruke mykt vann må du fylle saltbeholderen med oppvaskmaskinsalt.
Bruk kun oppvaskmaskinsalt.
Ikke bruk andre typer salt eller løsemidler. Dette kan skade saltbeholderen og vannmykningssystemet.
FORSIKTIG
For å hindre korrosjon på grunn av overfl ødig salt eller saltvann bør saltbeholderen alltid fylles rett før
du kjører ett av de fullstendige oppvaskprogrammene.
FORSIKTIG
1. Åpne døren.
2. Åpne saltbeholderhetten ved å rotere den mot klokken.
3. Fyll saltbeholderen med vann (kun nødvendig når apparatet slås på for
første gang).
4. Tilsett oppvaskmaskinsalt.
Saltbeholderens kapasitet er på ca 1 kg. Ikke overfyll
saltbeholderen.
FORSIKTIG
5. Fjern overfl ødig salt rundt saltbeholderåpningen og hetteforseglingen.
Hvis det overfl ødige saltet ikke fjernes kan det føre til at
saltbeholderhetten ikke lukkes skikkelig slik at saltet renner ut og
FORSIKTIG
reduserer ytelsen.
6. Roter saltbeholderhetten med klokken til den er helt stengt.
Ved større utslipp av salt eller saltvann inne i trommelen anbefales
det å kjøre Hurtigprogram
Gjenværende saltkorn eller saltvann kan forårsake korrosjon.
Avhengig av størrelsen på saltkornene kan det ta en stund før
saltet løser seg opp og indikatoren «Mangler salt
for å rengjøre trommelen innvendig.
» blir slått av.
Sjekk indikatoren for Mangler salt
Hvis indikatoren «Mangler salt » lyser må det fylles på mer oppvaskmaskinsalt som beskrevet ovenfor.
Når indikatoren «Mangler salt
» lyser betyr det at det er nok salt igjen til tre sykluser til fra neste start.
Norsk - 20
User Manual_DW9000H-Series-00159B-03_NO.indd 20User Manual_DW9000H-Series-00159B-03_NO.indd 20 2015-03-24 5:20:452015-03-24 5:20:45
 Loading...