

Page 1
Dishwasher
User manual
DW60A807*/DW60A806*/DW60A805*/
DW60A804* Series
DW8500AM_DW60A8070BB_ET_DD81-03206K-04_EN.indd 1 2023-06-27() 5:34:58
Page 2
Contents
Safety information 4
What you need to know about safety instructions 4
Contents
Important safety symbols 4
Instructions about the WEEE 5
Important safety precautions 6
Instructions when using your dishwasher 8
Instructions for protecting your children 9
Instructions for installing your dishwasher 10
Installation 13
What’s included 13
Installation requirements 16
Step-by-step installation 18
Skirting board 33
Info Light (DW60A80**BB, DW60A80**IB Series) 35
Kick plate (DW60A80**U* Series) 36
SmartThings (Applicable models only) 37
Open Source Announcement 41
Before you start 42
Dishwasher at a glance 42
Unsuitable items for the dishwasher 44
Basic use of racks 45
Detergent compartment 50
Rinse aid reservoir 52
Salt storage 53
Touchpad responsiveness 54
Setting mode 55
Operations 57
Control panel 57
Cycle overview 59
Simple steps to start 61
Salt storage 62
Delay Start 64
Control Lock 64
Maintenance 65
Cleaning 65
Long-term care 68
English2
DW8500AM_DW60A8070BB_ET_DD81-03206K-04_EN.indd 2 2023-06-27() 5:34:58
Page 3
Troubleshooting 69
Checkpoints 69
Information codes 72
Cycle chart 73
Appendix 77
Transportation/relocation 77
Protection against frost 77
Disposing the dishwasher and helping the environment 77
For more ecodesign information 77
Specications 78
For standard test 79
Contents
English 3
DW8500AM_DW60A8070BB_ET_DD81-03206K-04_EN.indd 3 2023-06-27() 5:34:58
Page 4
Safety information
Safety information
Congratulations on your new Samsung dishwasher. This manual contains important
information on the installation, use and care of your appliance. Please take time to read
this manual to take full advantage of your dishwasher’s many benets and features.
What you need to know about safety instructions
Please read this manual thoroughly to ensure that you know how to safely and efciently
operate the extensive features and functions of your new appliance and retain it at a safe
place near the appliance for your future reference. Use this appliance only for its intended
purpose as described in this user manual.
Warning and important safety instructions in this manual do not cover all possible
conditions and situations that may occur. It is your responsibility to use common sense,
caution, and care when installing, maintaining, and operating your dishwasher.
Because the following operating instructions cover various models, the characteristics
of your dishwasher may differ slightly from those described in this manual and not all
warning signs may be applicable. If you have any questions or concerns, contact your
nearest service center or nd help and information online at www.samsung.com.
Important safety symbols
What the icons and signs in this user manual mean:
WARNING
Hazards or unsafe practices that may result in severe personal injury, death and/or
property damage.
CAUTION
Hazards or unsafe practices that may result in personal injury and/or property damage.
NOTE
Indicates that a risk of personal injury or material damage exists.
These warning symbols are here to prevent injury to you and others. Please follow them
explicitly.
Keep these instructions in a safe place and ensure that new users are familiar with the
content. Pass them on to any future owner.
English4
DW8500AM_DW60A8070BB_ET_DD81-03206K-04_EN.indd 4 2023-06-27() 5:34:58
Page 5
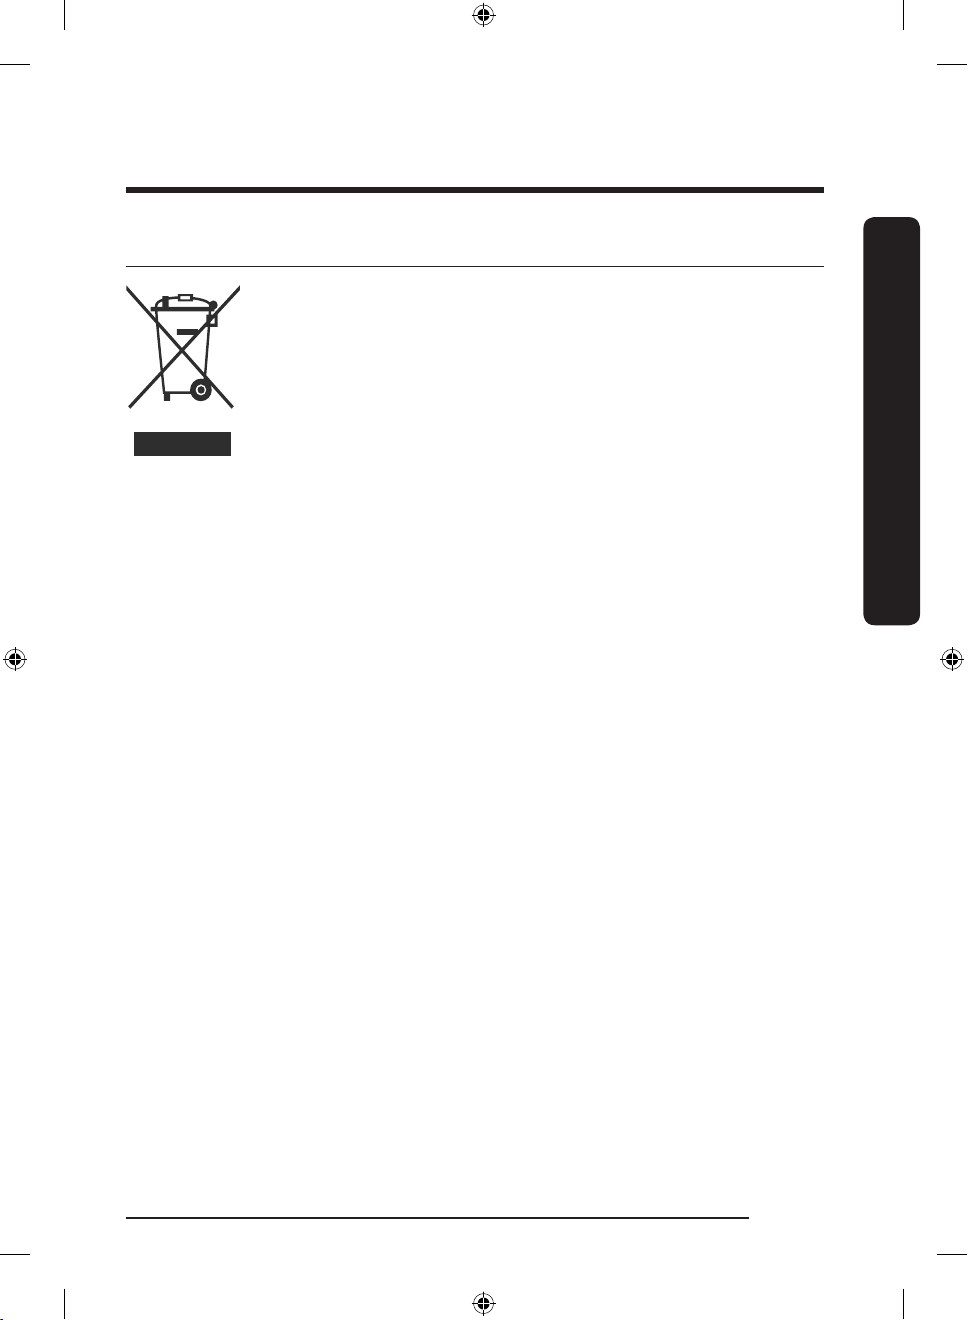
Instructions about the WEEE
Correct Disposal of This Product (Waste Electrical & Electronic
Equipment)
(Applicable in countries with separate collection systems)
This marking on the product, accessories or literature indicates that
the product and its electronic accessories (e.g. charger, headset, USB
cable) should not be disposed of with other household waste at the
end of their working life. To prevent possible harm to the environment
or human health from uncontrolled waste disposal, please separate
these items from other types of waste and recycle them responsibly to
promote the sustainable reuse of material resources.
Household users should contact either the retailer where they
purchased this product, or their local government ofce, for details of
where and how they can take these items for environmentally safe
recycling.
Business users should contact their supplier and check the terms and
conditions of the purchase contract. This product and its electronic
accessories should not be mixed with other commercial wastes for
disposal.
For information on Samsung’s environmental commitments and product specic regulatory
obligations e.g. REACH, WEEE, Batteries, visit our sustainability page available via
Samsung.com
Safety information
English 5
DW8500AM_DW60A8070BB_ET_DD81-03206K-04_EN.indd 5 2023-06-27() 5:34:58
Page 6
Safety information
Safety information
Important safety precautions
To reduce the risk of re, electric shock, or injury
to persons when using your appliance, follow basic
precautions, including the following:
1. This appliance is not to be used by persons (including
children) with reduced physical, sensory or mental
capabilities, or lack of experience and knowledge,
unless they have been given supervision or
instruction concerning use of the appliance by a
person responsible for their safety.
2. This appliance can be used by children aged from 8
years and above and persons with reduced physical,
sensory or mental capabilities or lack of experience
and knowledge if they have been given supervision
or instruction concerning use of the appliance in
a safe way and understand the hazards involved.
Children shall not play with the appliance. Cleaning
and user maintenance shall not be made by children
without supervision.
3. Children should be supervised to ensure that they do
not play with the appliance.
4. If the supply cord is damaged, it must be replaced
by the manufacturer, its service agent or similarly
qualied persons in order to avoid a hazard.
5. The new hose-sets supplied with the appliance are to
be used and old hose-sets should not be reused.
English6
DW8500AM_DW60A8070BB_ET_DD81-03206K-04_EN.indd 6 2023-06-27() 5:34:58
Page 7
6. For appliances with ventilation openings in the base,
a carpet must not obstruct the openings.
7. Children of less than 3 years should be kept away
unless continuously supervised.
8. CAUTION: In order to avoid a hazard due to
inadvertent resetting of the thermal cut-out, this
appliance must not be supplied through an external
switching device, such as a timer, or connected to a
circuit that is regularly switched on and off by the
utility.
9. WARNING: Knives and other utensils with sharp
points must be loaded in the basket with their points
down or placed in a horizontal position.
This appliance is intended to be used in household and
similar applications such as:
• staff kitchen areas in shops, ofces and other working
environments;
• farm houses;
• by clients in hotels, motels and other residential type
environments;
Safety information
• bed and breakfast type environments.
English 7
DW8500AM_DW60A8070BB_ET_DD81-03206K-04_EN.indd 7 2023-06-27() 5:34:58
Page 8
Safety information
Safety information
Instructions when using your dishwasher
This dishwasher is not designed for commercial use. It is intended for use in domestic
households and in similar working and residential environments such as:
• Shops
• Ofces and showrooms
and by residents in establishments such as:
• Hostels and guest houses.
It must only be used as a domestic appliance as specied in this user manual, for cleaning
domestic crockery and cutlery. Any other usage is not supported by the manufacturer and
could be dangerous.
The manufacturer cannot be held liable for damage resulting from incorrect or improper
use or operation.
Do not use solvents in the dishwasher. Danger of explosion.
Do not inhale or ingest dishwasher detergent. Dishwasher detergents contain irritant or
corrosive ingredients which can cause burning in the nose, mouth and throat if swallowed,
or inhibit breathing. Consult a doctor immediately if detergent has been swallowed or
inhaled.
Avoid leaving the door open unnecessarily, as you could trip over it.
Do not sit or lean on the opened door. This could cause the dishwasher to tip and be
damaged, and you could get injured.
Only use detergent and rinse aid formulated for domestic dishwashers. Do not use
washing-up liquid.
Do not use any strong acid cleaning agent.
Do not ll the rinse aid reservoir with powder or liquid detergent. This will cause serious
damage to the reservoir.
Inadvertently lling the salt reservoir with powder or liquid dishwasher detergent
will damage the water softener. Make sure you have picked up the correct packet of
dishwasher salt before lling the salt reservoir.
Please only use special coarse grained dishwasher salt for reactivation, as other salts may
contain insoluble additives which can impair the functioning of the softener.
In an appliance with a cutlery basket (depending on model), cutlery is cleaned and dried
more if placed in efciently the basket with the handles downwards. However, to avoid the
risk of injury, place knives and forks etc. with the handles upwards.
Plastic items which cannot withstand being washed in hot water, such as disposable plastic
containers, or plastic cutlery and crockery should not be cleaned in the dishwasher. The
high temperatures in the dishwasher may cause them to melt or lose shape.
On models with Delay Start function, make sure that the dispenser is dry before adding
detergent. Wipe dry if necessary. Detergent will clog if poured into a damp dispenser and
may not be thoroughly dispersed.
English8
DW8500AM_DW60A8070BB_ET_DD81-03206K-04_EN.indd 8 2023-06-27() 5:34:58
Page 9
Knives and other utensils with sharp points must be loaded in the basket with their points
down or placed in a horizontal position.
Instructions for protecting your children
This appliance is not a toy! To avoid the risk of injury, keep children well away and do
not allow them to play in or around the dishwasher or to use the controls. They will not
understand the potential dangers posed by it. They should be supervised whenever
you are working in the kitchen. There is also a danger that children playing might shut
themselves in the dishwasher.
This appliance can be used by children aged from 8 years and above and persons with
reduced physical, sensory or mental capabilities or lack of experience and knowledge if
they have been given supervision or instruction concerning use of the appliance in a safe
way and understand the hazards involved. Children shall not play with the appliance.
Cleaning and user maintenance shall not be made by children without supervision.
Older children may only use the dishwasher when its operation has been clearly explained
to them and they are able to use it safely, recognising the dangers of misuse.
KEEP CHILDREN AWAY FROM DETERGENTS!
Dishwasher detergents contain irritant and corrosive ingredients which can cause burning
in the mouth, nose and throat if swallowed, or inhibit breathing.
Keep children away from the dishwasher when the door is open. There could still be
detergent residues in the cabinet.
Consult a doctor immediately if your child has swallowed or inhaled detergent.
Safety information
English 9
DW8500AM_DW60A8070BB_ET_DD81-03206K-04_EN.indd 9 2023-06-27() 5:34:58
Page 10
Safety information
Safety information
Instructions for installing your dishwasher
Before setting up the appliance, check it for any externally visible damage. Under no
circumstances should you use a damaged appliance. A damaged appliance could be
dangerous.
The dishwasher must only be plugged into the electricity supply via a suitable switched
socket. The electrical socket must be easily accessible after the dishwasher is installed
so that it can be disconnected from the electricity supply at any time. (Refer to the
“Dishwasher at a glance” section on page 42.)
There must be no electrical sockets behind the dishwasher. Danger of overheating and re
risk if the dishwasher were to be pushed up against a plug.
The dishwasher must not be installed under a hob. The high radiant temperatures which
are sometimes generated by a hob could damage the dishwasher. For the same reason it
should not be installed next to open res or other appliances which give off heat, such as
heaters etc.
Do not connect the dishwasher to the mains supply until it has been fully installed and any
adjustment has been made to the door springs.
Before connecting the appliance, check that the connection data on the data plate (voltage
and connected load) match the mains electricity supply. If in any doubt, consult a qualied
electrician.
The electrical safety of this appliance can only be guaranteed when continuity is complete
between it and an effective grounding system. It is most important that this basic safety
requirement is present and regularly tested and where there is any doubt the electrical
system in the house should be checked by a qualied electrician.
The manufacturer cannot be held liable for the consequences of an inadequate grounding
system (e.g. electric shock).
Do not connect the appliance to the mains electricity supply by a multi-socket unit or an
extension lead. These do not guarantee the required safety of the appliance (e.g. danger of
overheating).
This appliance may only be installed in mobile installations such as ships if a risk
assessment of the installation has been carried out by a suitably qualied engineer.
English10
DW8500AM_DW60A8070BB_ET_DD81-03206K-04_EN.indd 10 2023-06-27() 5:34:58
Page 11
The plastic housing of the water connection contains an electrical component. The housing
must not be submerged in water.
There are electrical wires in the hose of Aqua-Stop. Never cut the water inlet hose, even if
it is too long.
Installation, maintenance and repairs may only be carried out by a suitably qualied and
competent person in strict accordance with current national and local safety regulations.
Repairs and other work by unqualied persons can be dangerous. The manufacturer cannot
be held liable for unauthorised work.
The integrated waterproof system offers protection from water damage, provided the
following conditions are met:
• The dishwasher is correctly installed and plumbed in.
• The dishwasher is properly maintained and parts are replaced where it can be seen that
this is necessary.
• The stopcock has been turned off when the appliance is not used for a longer period of
time (e.g. during holidays).
• The waterproof system will work even if the appliance is switched off. However, the
appliance must remain connected to the electricity supply.
A damaged appliance can be dangerous. If the dishwasher gets damaged, switch it off at
the mains and call your dealer or the service department.
Unauthorised repairs could result in unforeseen dangers for the user, for which the
manufacturer cannot accept liability. Repairs should only be undertaken by an approved
service technician.
Faulty components must only be replaced by original spare parts. Only when these parts
are tted can the safety of the appliance can be guaranteed.
Always disconnect the dishwasher from the electrical supply for maintenance work (switch
off at the wall socket and remove the plug).
If the connection cable is damaged it must be replaced with a special cable, available from
the manufacturer. For safety reasons, this must only be tted by the service department or
an authorised service technician.
In countries where there are areas which may be subject to infestation by cockroaches or
other vermin, pay particular attention to keeping the appliance and its surroundings in a
clean condition at all times. Any damage which may be caused by cockroaches or other
vermin will not be covered by the guarantee.
Safety information
English 11
DW8500AM_DW60A8070BB_ET_DD81-03206K-04_EN.indd 11 2023-06-27() 5:34:58
Page 12
Safety information
Safety information
In the event of a fault or for cleaning purposes, the appliance is only completely isolated
from the electricity supply when:
• it is switched off at the wall socket and the plug is withdrawn, or
• it is switched off at the mains, or
• the mains fuse is disconnected, or
• the screw-out fuse is removed (in countries where this is applicable).
Do not make any alterations to the appliance, unless authorised to do so by the
manufacturer.
Never open the casing/housing of the appliance. Tempering with electrical connections or
components and mechanical parts is highly dangerous and can cause operational faults or
electric shock.
While the appliance is under guarantee, repairs should only be undertaken by a service
technician authorised by the manufacturer. Otherwise the guarantee will be invalidated.
When installing the product, make sure there is space at the top, left, right and back of the
product to ensure proper ventilation. If there is insufcient space between the product and
the sink, it may damage the sink or allow mold to grow.
Make sure that your dishwasher’s hardness level setting is correct as your area. (Refer to
the “Salt storage” section on page 53.)
Please consult www.samsung.com/support for more information about materials and
repair.
English12
DW8500AM_DW60A8070BB_ET_DD81-03206K-04_EN.indd 12 2023-06-27() 5:34:58
Page 13
Installation
What’s included
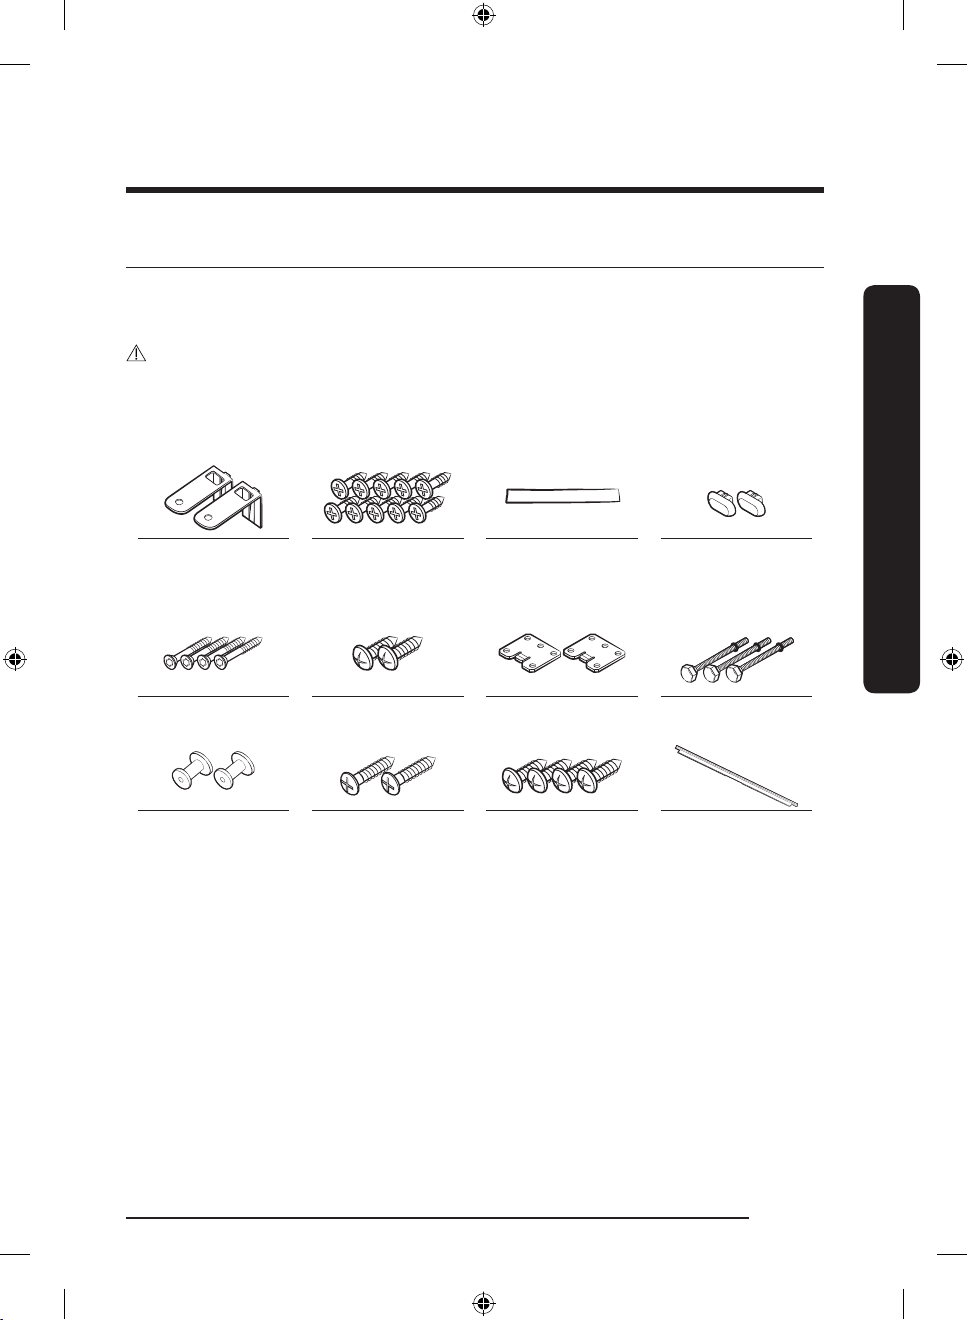
Make sure all the parts are included in the product package. If you have a question about
the dishwasher or the parts, contact a local Samsung customer centre or your retailer. The
actual appearance of the dishwasher may differ, depending on your model and country.
CAUTION
After unpacking the dishwasher, keep packaging materials out of children’s reach to ensure
their safety.
FBI (Fully Built-In, DW60A80**BB) models
Top bracket (2) Ø4 X 14 screw (10) Protective
Ø3.5 X 45 screw (4) Ø3.5 X 16 screw (2) Door bracket (2) Sub foot (3)
Custom panel
xer (wood panel
holders, 2)
Ø3.5 X 25 screw (2) Ø3.9 X 13 screw (4) Upper side trim (1)
condensation
sticker (1)
Plastic cap (2)
(DW60A804***,
DW60A805***)
Installation
English 13
DW8500AM_DW60A8070BB_ET_DD81-03206K-04_EN.indd 13 2023-06-27() 5:34:59
Page 14
Installation
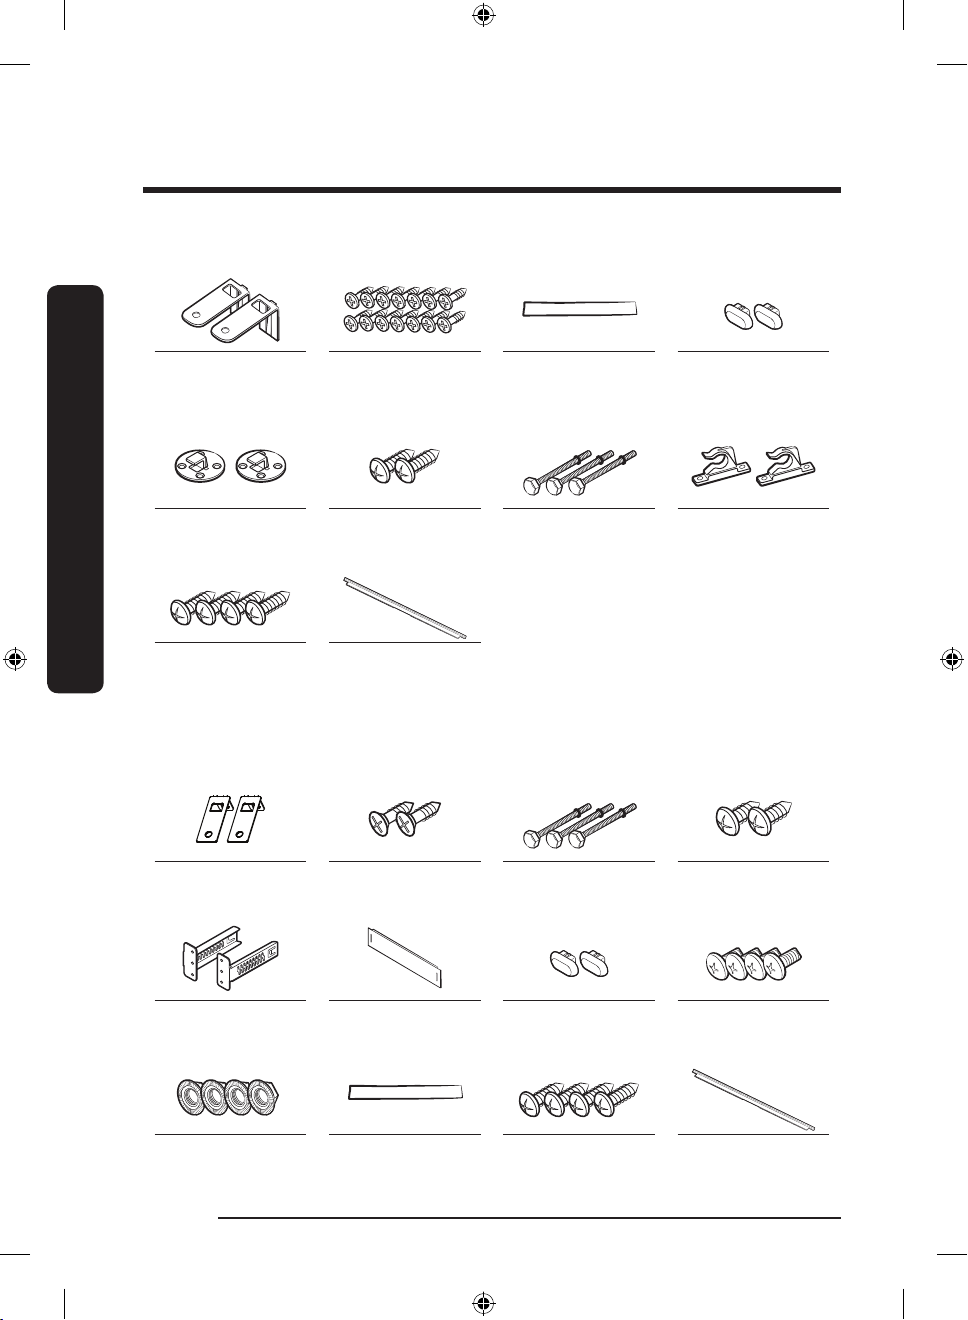
FBI (Sliding, DW60A80**IB) models
Installation
Top bracket (2) Ø4 X 14 screw (14) Protective
Custom panel xer
(2)
Ø3.9 X 13 screw (4) Upper side trim (1)
Ø3.5 X 16 screw (2) Sub foot (3) Custom panel xer
(DW60A804***,
DW60A805***)
condensation
sticker (1)
Plastic cap (2)
(2)
BU (Built Under, DW60A80**U*) models
Top brackets (2) Ø4 X 14 screws (2) Sub foot (3) Ø3.5 X 16 screws
(2)
Kick plate brackets
(2)
Kick plate nut (4) Protective sticker
English14
DW8500AM_DW60A8070BB_ET_DD81-03206K-04_EN.indd 14 2023-06-27() 5:35:00
Kick plate Plastic cap (2) Kick plate bolt (4)
(1)
Ø3.9 X 13 screw (4) Upper side trim (1)
(DW60A804***,
DW60A805***)
Page 15
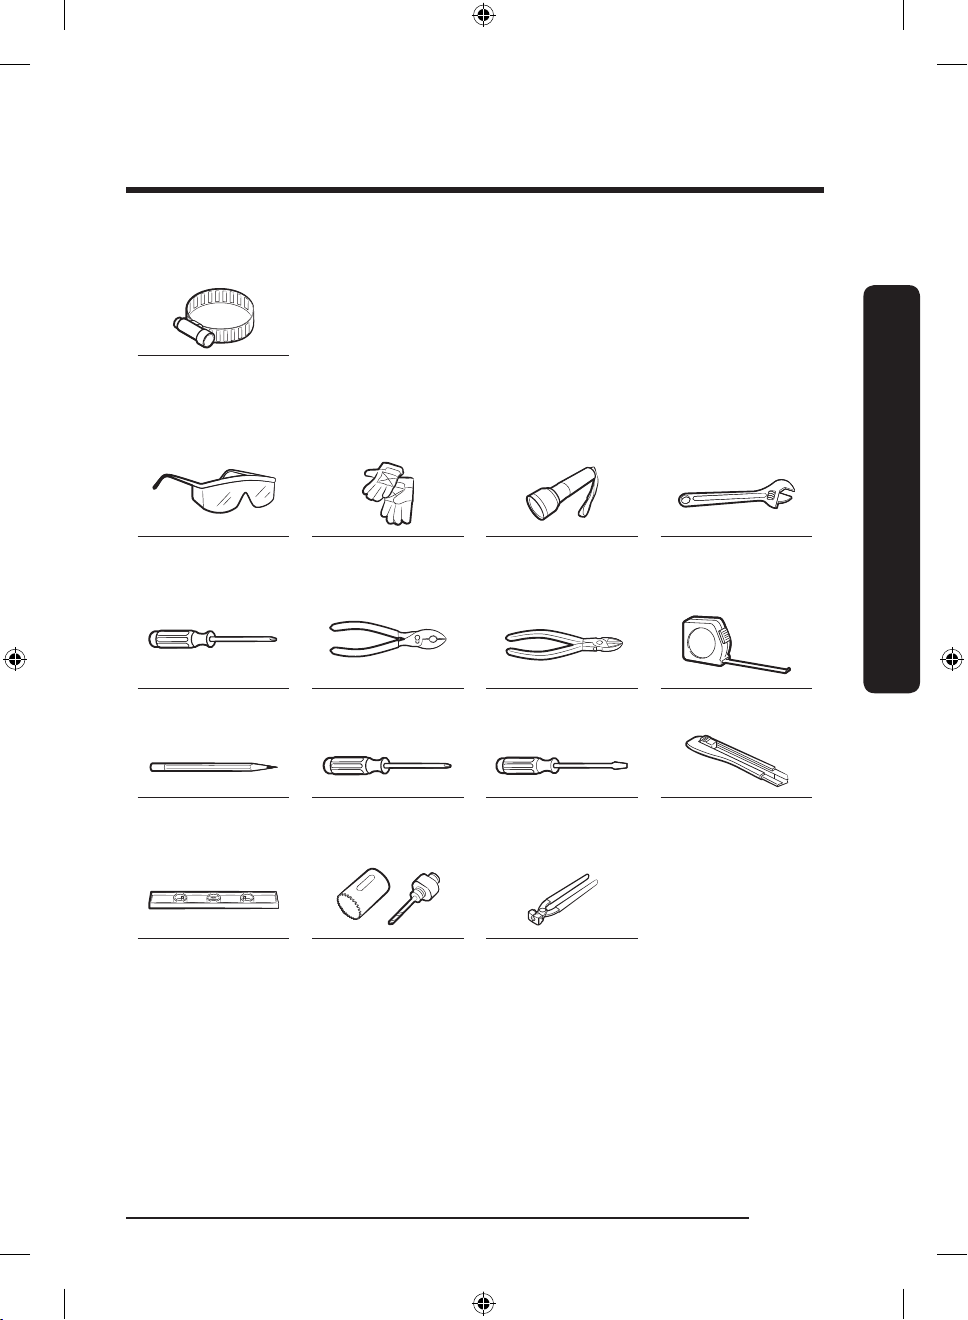
Installation kit (not provided)
Hose clamp
Tools required (not provided)
Safety glasses Gloves Flashlight Wrench (22 mm)
Torx T15 Pliers Nipper Tape measure
Pencil Phillips screwdriver Flat head
Level Hole saw
(80-100 mm)
screwdriver
Ear clamp plier
for the front foot
Cutting knife
Installation
English 15
DW8500AM_DW60A8070BB_ET_DD81-03206K-04_EN.indd 15 2023-06-27() 5:35:00
Page 16

Installation
Installation
Installation requirements
To prevent a risk of re, electric shock, or
personal injury, all wiring and grounding
must be done by a qualied technician.
Power supply
• An individual 220-240 V~, 50 Hz
branch circuit that is dedicated to the
dishwasher.
• Power outlet with a maximum allowable
current of 16 A (maximum 11 A for the
dishwasher)
WARNING
• Do not use an extension cord.
• Use only the power plug that comes
with the dishwasher.
• After installation is complete, make sure
the power plug is not bent or damaged.
Grounding
For permanent grounding, the dishwasher
must be properly grounded to a grounded
metal or permanent wiring system. The
grounding conductor must be run with
the circuit conductors and then connected
to the grounding terminal or lead on the
dishwasher.
WARNING
• Do not connect the ground wire to
plastic plumbing, gas lines, or hot water
pipes. Improperly connected grounding
conductors may cause electric shock.
• Do not modify the power plug of the
dishwasher. If the power plug does
not t the outlet, have a proper outlet
installed by a qualied electrician.
Water supply
• The water supply line must support
water pressures between 0.04 and
1 MPa.
• Water temperatures must be lower than
60 °C.
• A stopcock with a 3/4” male thread must
be installed on the water tap.
To reduce a risk of leaks:
• Make sure water taps are easily
accessible.
• Turn the water tap off when the
dishwasher is not in use.
• Check for any leaks at the water hose
ttings on a regular basis.
• To stop any leak, seal the water line
connections and joints using Teon tape
or sealing compound.
Aqua Stop
The Aqua Stop is an electrical component
that is designed to prevent water leaks. The
Aqua Stop is attached to the water hose
and automatically cuts off the water ow in
the event of damage to the hose.
CAUTION
• Handle the Aqua Stop with care.
• Do not kink or twist the water hose
connected to the Aqua Stop. If the Aqua
Stop is damaged, shut off the water taps
and unplug the power plug immediately.
Then, contact a local Samsung customer
centre or a qualied technician.
English16
DW8500AM_DW60A8070BB_ET_DD81-03206K-04_EN.indd 16 2023-06-27() 5:35:00
Page 17
Drain
If you are using a drain system dedicated
to the dishwasher, connect the drain hose
to a drain system that is between 30 cm
and 70 cm off the ground. Connecting the
drain hose to a drain system more than
80 cm off the ground can cause the drained
water to ow backward.
Ambient temperature
Do not install the dishwasher in an area
exposed to freezing temperatures. The
dishwasher always retains some water in
the water valve, pump, and hose. If the
water freezes in the dishwasher or hoses,
it may damage the dishwasher and its
components.
Flooring
For safety, the dishwasher must be
installed on a solidly constructed oor.
Wooden oors may need to be reinforced
to minimise vibrations. Avoid installing
on carpet or soft tile. Carpeting and soft
tile may cause vibrations and may cause
your dishwasher to move slightly while
operating.
WARNING
Do not install the dishwasher on a poorly
supported structure.
Test run
After installing the dishwasher, run the
Quick cycle to make sure the dishwasher is
installed correctly.
Installation
English 17
DW8500AM_DW60A8070BB_ET_DD81-03206K-04_EN.indd 17 2023-06-27() 5:35:00
Page 18
Installation
A
B
Installation
Step-by-step installation
The installation procedure may differ depending on the model.
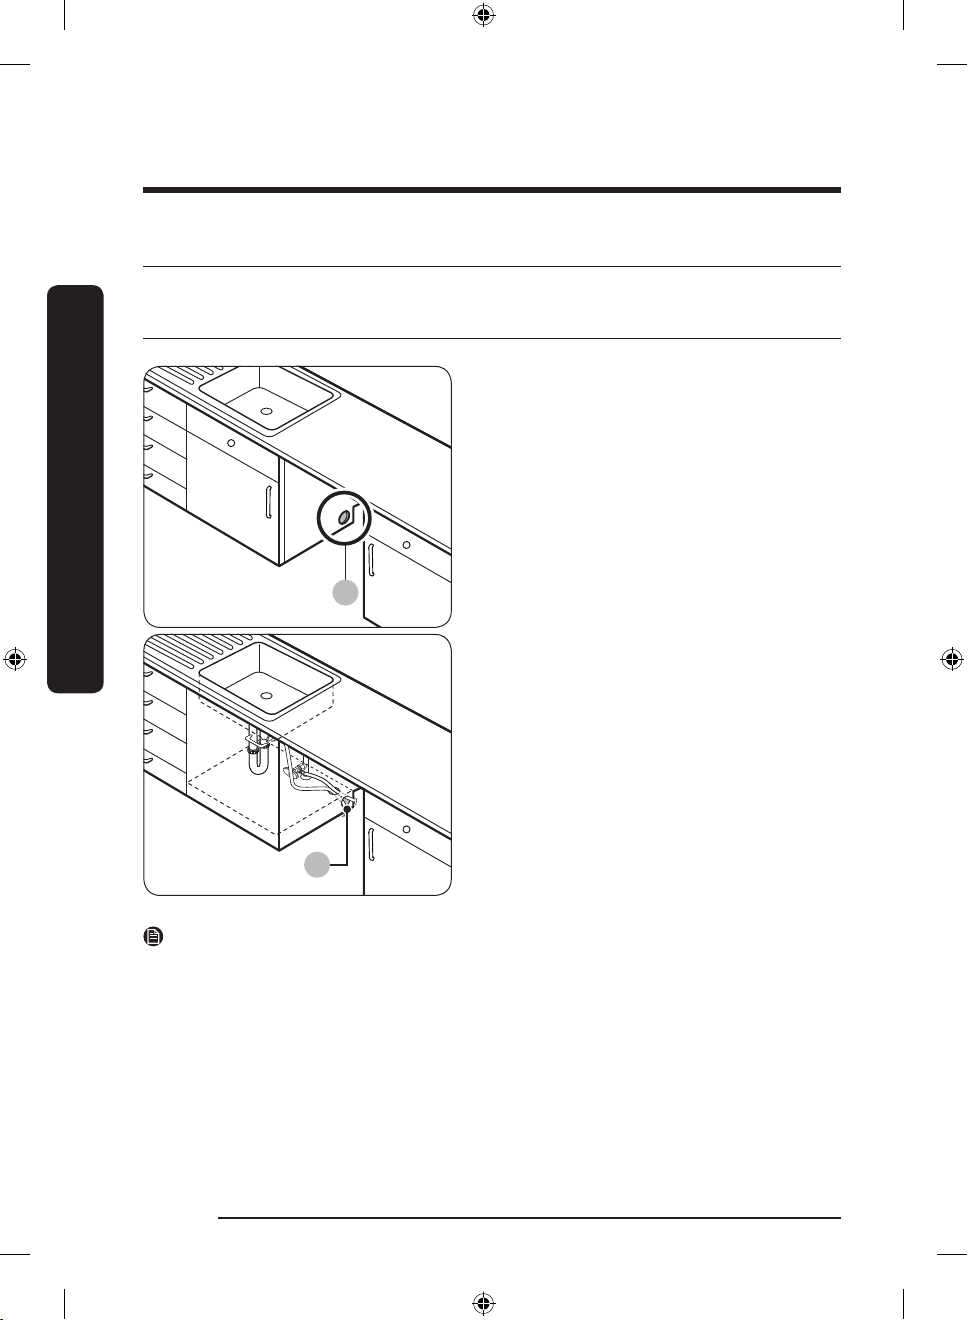
STEP 1 Select a location
Select a location that meets the following
conditions.
• The location must have a solid oor that
can support the weight of the dishwasher.
• The location must be near a sink with easy
access to the water supply, drain system,
and electrical outlet.
• The location must let you load dishes into
the dishwasher easily.
• The location must have sufcient space
for the dishwasher door to open easily
and provide enough space between the
dishwasher and the cabinet sides.
• The rear wall must be free of obstructions.
Installation in a new location
If you install the dishwasher in a new
location, follow these instructions before
installing the dishwasher.
1. Using a hole saw, cut a hole into the side
of the cabinet that holds the sink (A).
2. If the base inside the sink cabinet is raised
above the kitchen oor and is higher than
the connections on the dishwasher, make a
hole in the base inside the cabinet and in
the cabinet side (B).
NOTE
• If you are replacing an old dishwasher, check the existing connections for compatibility
with the new dishwasher and replace the connections as needed.
• You may need to cut a hole in the opposite side of the cabinet according to the location
of the electrical outlet.
English18
DW8500AM_DW60A8070BB_ET_DD81-03206K-04_EN.indd 18 2023-06-27() 5:35:00
Page 19
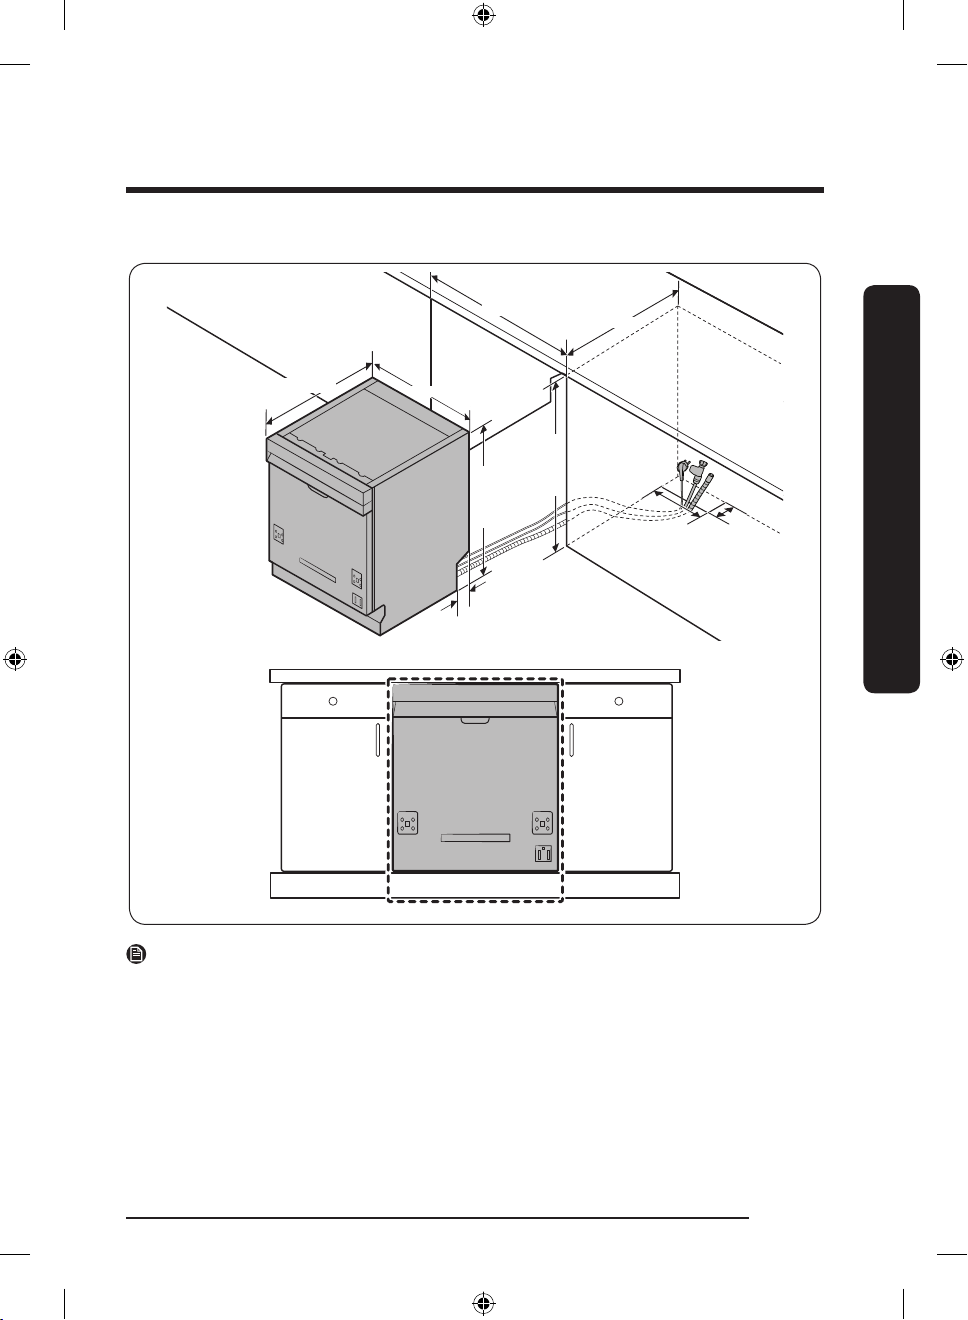
Cabinet dimensions
570 (Fully Built-in model)
598
45
600
815 - 845
820 - 880
575
100
Installation
50
NOTE
Check if the distance between the oor and the bottom of the worktop is more than
850 mm. If so, insert the sub foot included in the installation kit. For details, see the next
section. If the distance is less than 850 mm, skip to STEP 3.
English 19
DW8500AM_DW60A8070BB_ET_DD81-03206K-04_EN.indd 19 2023-06-27() 5:35:00
Page 20
Installation
Installation
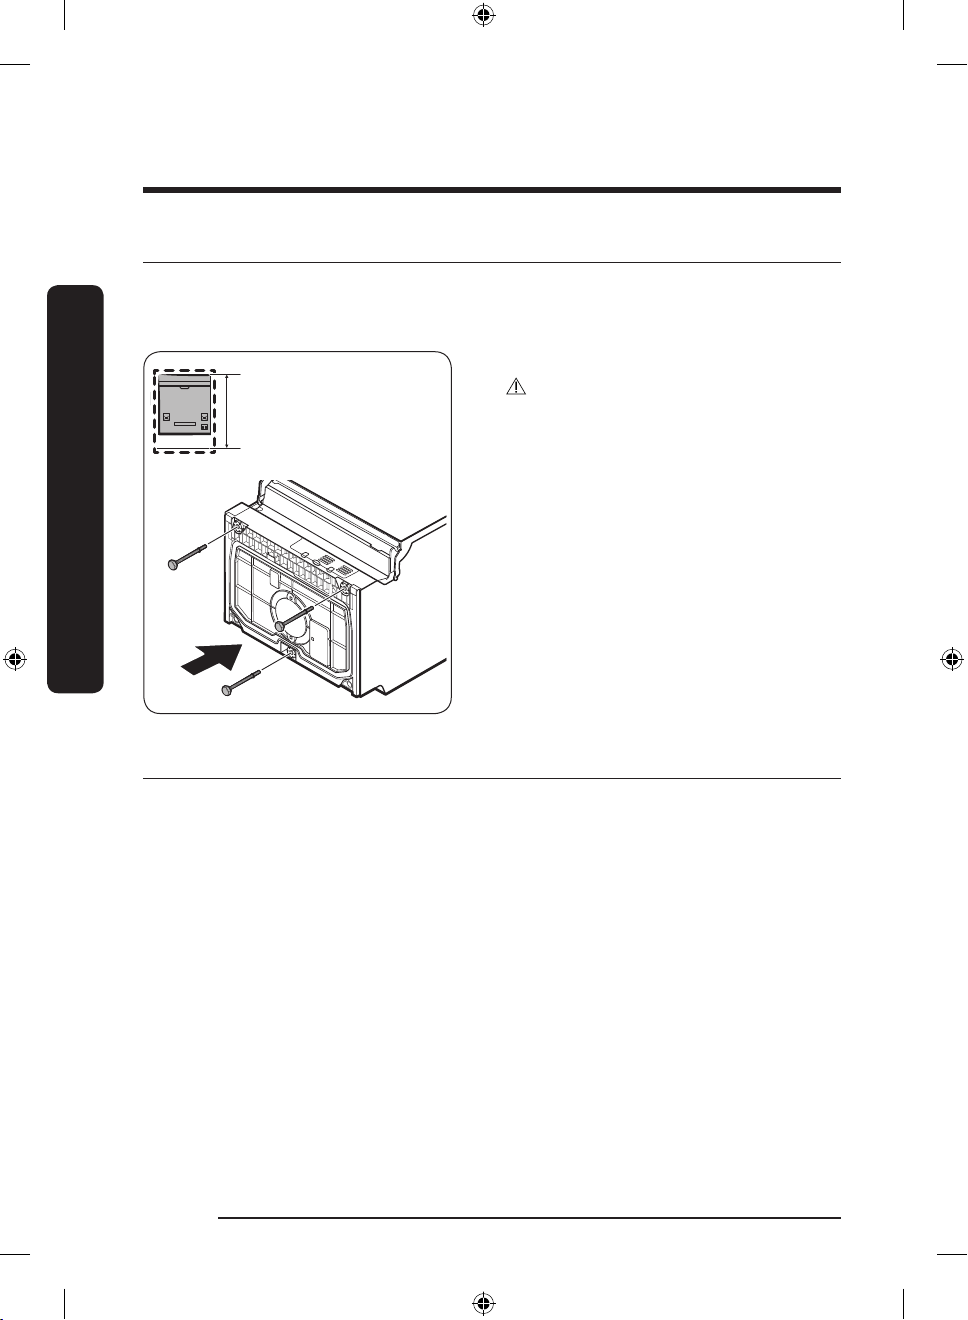
STEP 2 To insert the sub foot (Except Free Standing model)
If the distance between the oor and the bottom of the worktop is more than 850 mm,
insert the sub foot into the hole on the bottom of the dishwasher before you start the
installation.
1. Lay the dishwasher on its back.
CAUTION
850
~
Do not lay down the dishwasher on its side.
Water may leak.
2. Find the sub foot in the installation kit,
and then insert the sub foot into the
hole on the bottom of the dishwasher as
shown in the gure.
STEP 3 Check the water line
• The water line pressure must be between 0.04 and 1.0 MPa.
• Make sure that the water temperature does not exceed 60 °C. Hot water over 60 °C may
cause the dishwasher to malfunction.
• Make sure that the water supply valve is turned off before connecting the water supply
line to the dishwasher.
English20
DW8500AM_DW60A8070BB_ET_DD81-03206K-04_EN.indd 20 2023-06-27() 5:35:00
Page 21
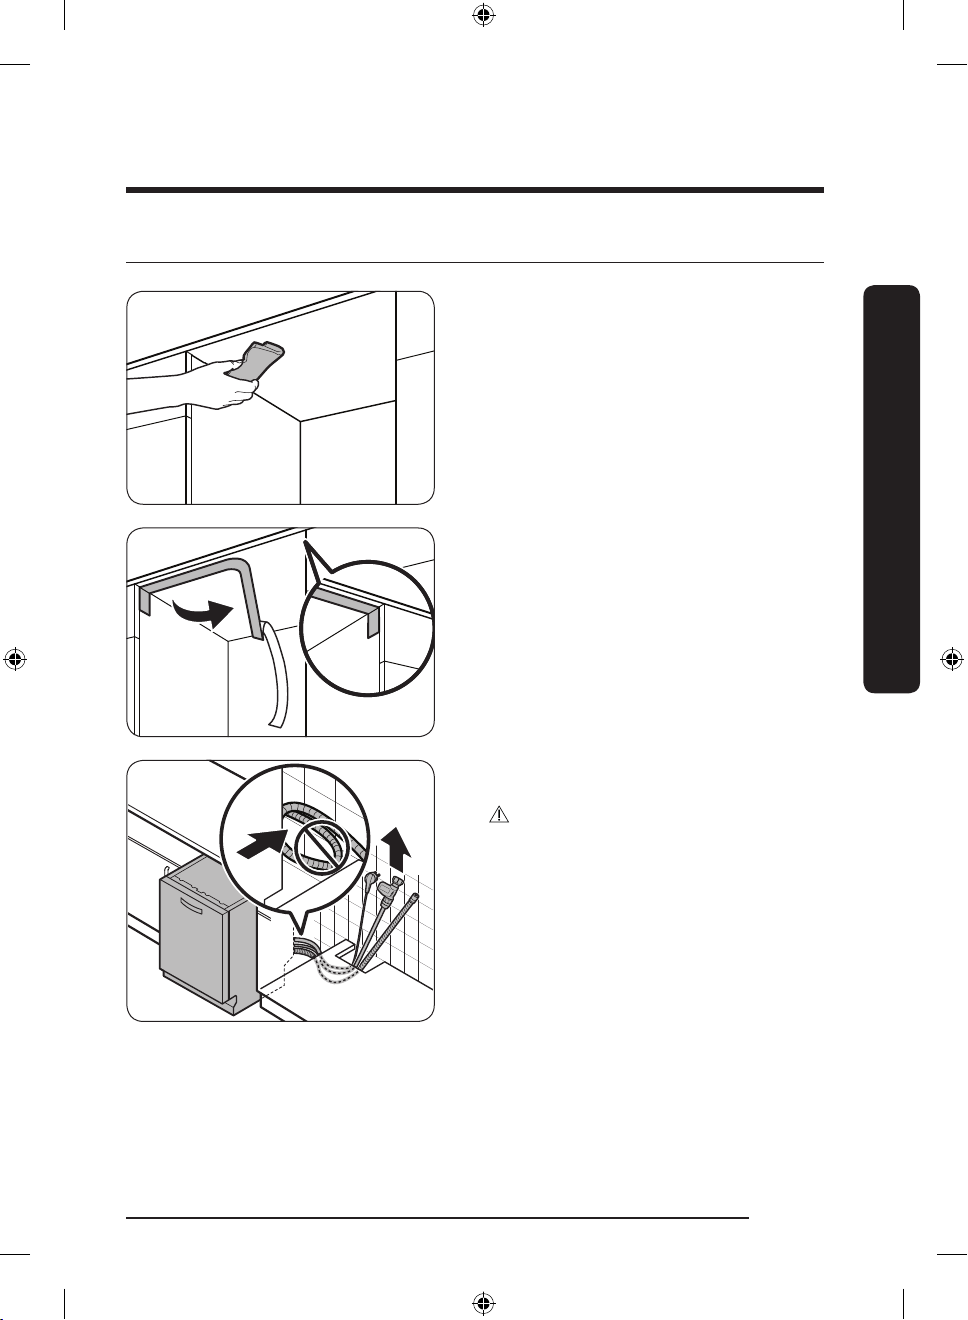
STEP 4 Arrange the hoses
1. Clean the bottom of the countertop.
Installation
2. Attach the protective sticker as shown.
3. Pull the power plug, the water hose, and
the drain hose through the sink hole.
CAUTION
• Use caution not to kink or step on the
power plug or the hoses.
• Do not remove the brown paper on the
back of the dishwasher. The paper is
used to keep the rear side clean against
the wall.
English 21
DW8500AM_DW60A8070BB_ET_DD81-03206K-04_EN.indd 21 2023-06-27() 5:35:01
Page 22
Installation
Installation
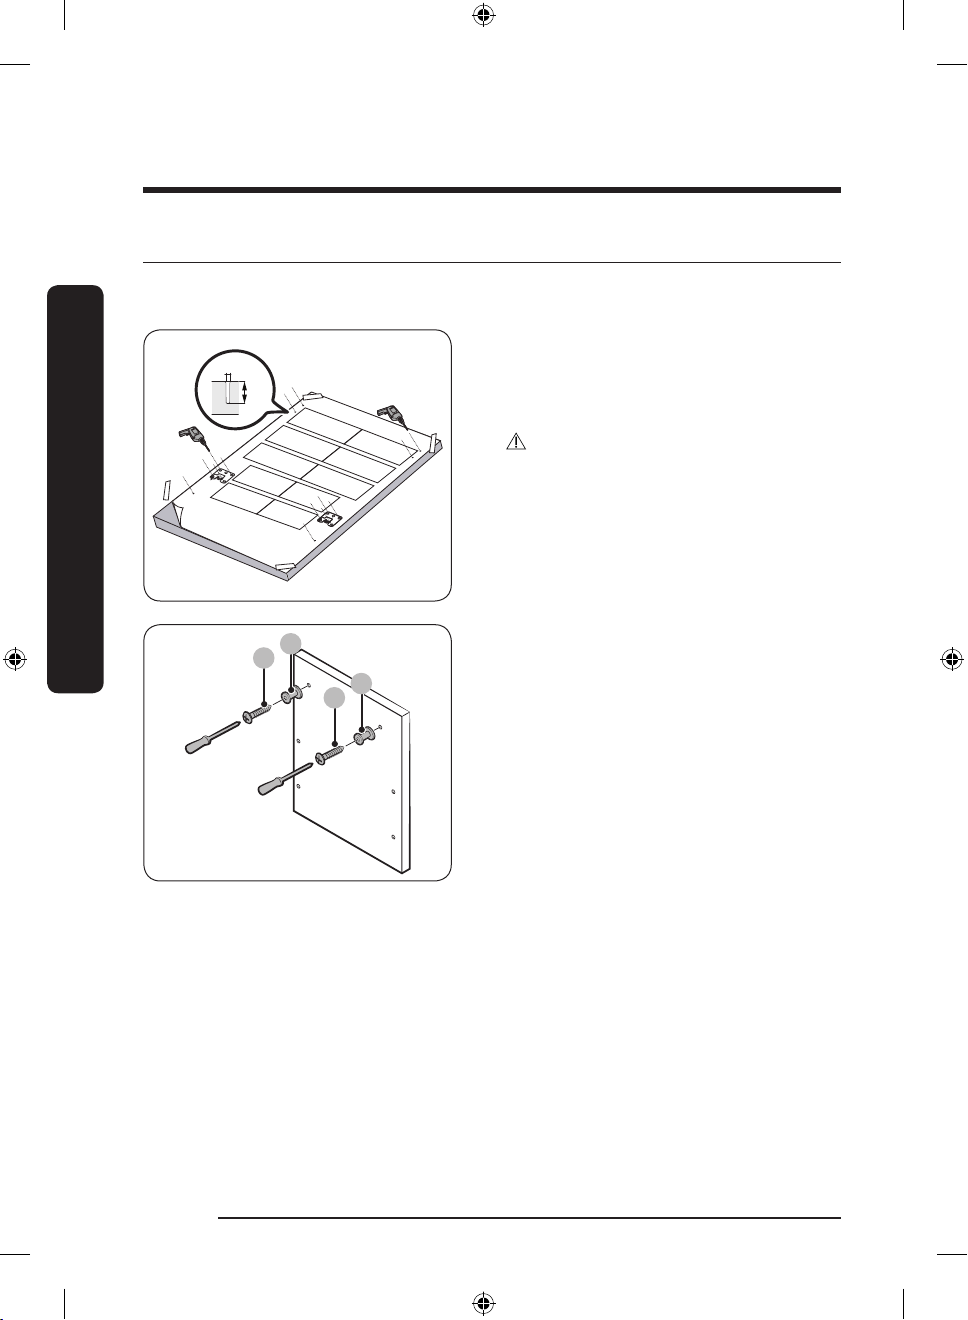
STEP 5 Install the custom panel (For Fully Built-In models)
FBI (Fully Built-In, DW60A80**BB) models
1. Put the installation template on the
Ø2
~8
back of the custom panel and x it
temporarily using transparent tape. Note
that the rear of the custom panel will be
attached to the dishwasher door.
CAUTION
• The top end of the custom panel must
be aligned with the top end of the
installation template.
• Use a custom panel between 3 kg and
7 kg.
2. Mark 14 points guided on the
installation template.
A
B
A
B
3. Remove the installation template, and
then tighten the custom panel xers (A)
with 2 screws (B, Ø3.5 X 25) as shown in
the gure.
English22
DW8500AM_DW60A8070BB_ET_DD81-03206K-04_EN.indd 22 2023-06-27() 5:35:01
Page 23
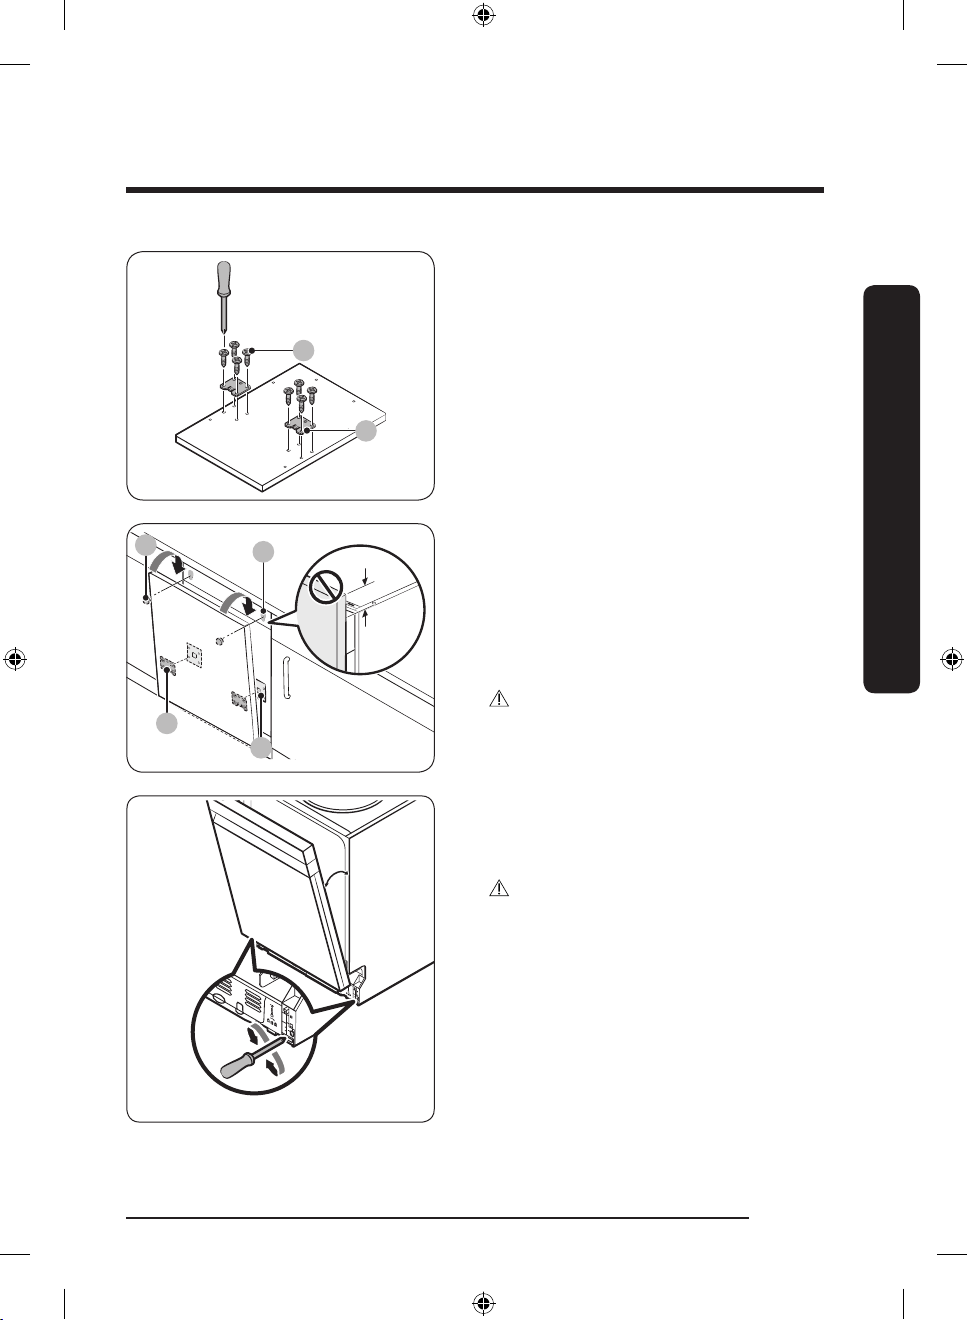
4. Tighten the door bracket (C) with
A
F
C
E
UP
D
O
W
N
8 screws (D, Ø4 X 14) as shown in the
gure.
D
30°
C
30 mm
Installation
5. Insert the door brackets (C) on the
custom panel to the holes (E) on the
dishwasher door to x the custom panel.
6. While holding the custom panel, attach
it to the door and insert the custom
panel xers (A) into the holes (F) as
shown in the gure.
7. Push the custom panel downward to x.
CAUTION
Do not let the custom panel extend
more than 30 mm from the top of the
dishwasher.
8. Adjust the spring level while the door
is approximately opened at 30 degrees.
The door should hold its position, and
should not fall open.
CAUTION
• Do not adjust the spring level while the
door is completely opened.
• If the custom panel weighs more than
7 kg, the door may fall open.
• Custom panels weighing more than 7 kg
are not recommended.
English 23
DW8500AM_DW60A8070BB_ET_DD81-03206K-04_EN.indd 23 2023-06-27() 5:35:01
Page 24
Installation
Installation
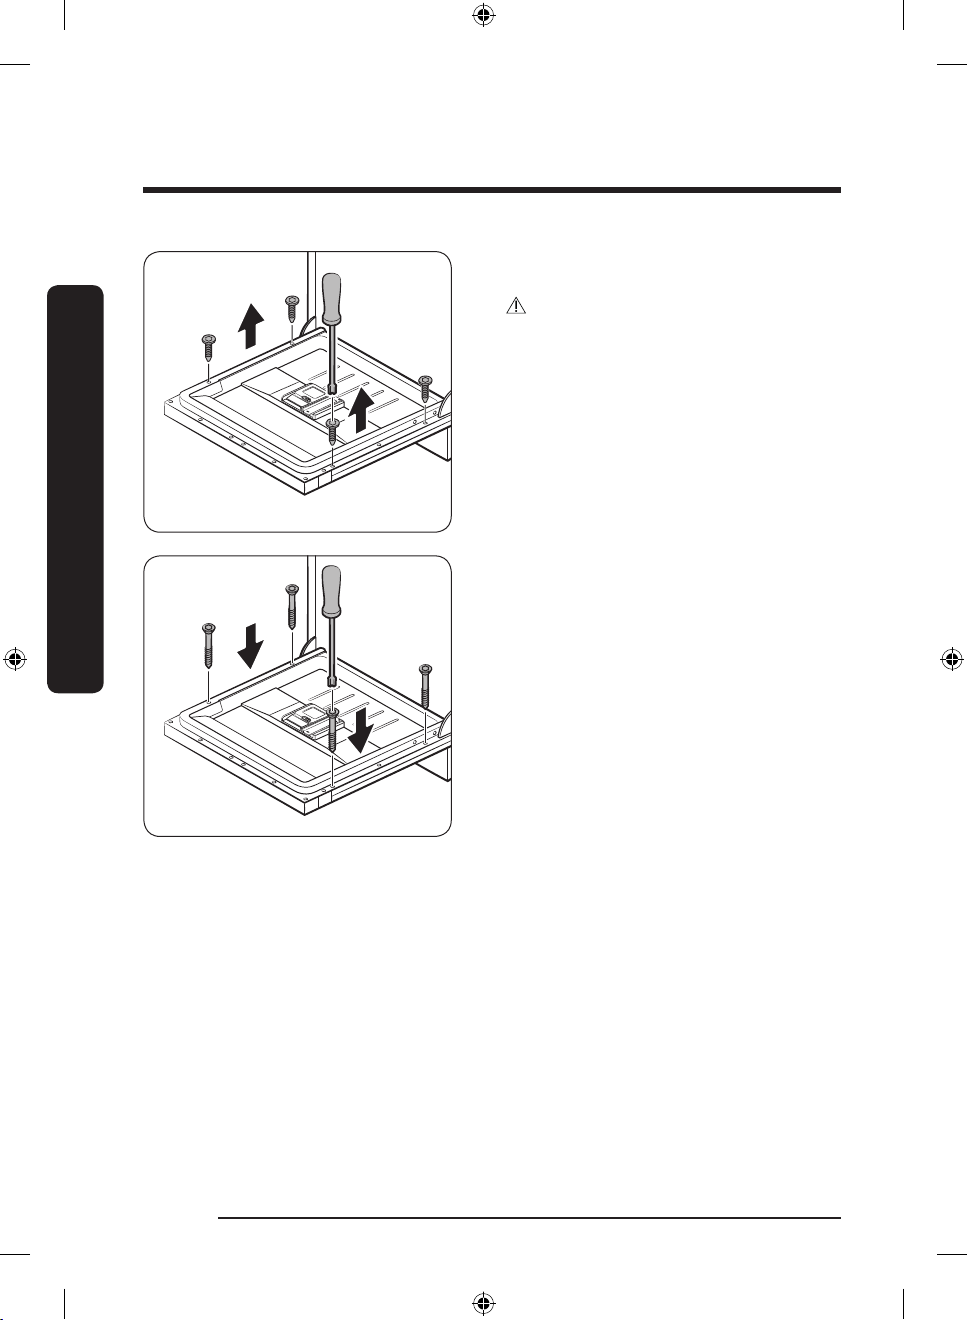
9. Open the dishwasher door and remove
the 4 screws.
CAUTION
Use caution when opening the door. The
door might open or close unexpectedly
if the spring level is not adjusted
appropriately, resulting in physical injury.
10. Secure the custom panel to the door by
fastening the 4 screws (3.5 X 45).
English24
DW8500AM_DW60A8070BB_ET_DD81-03206K-04_EN.indd 24 2023-06-27() 5:35:01
Page 25
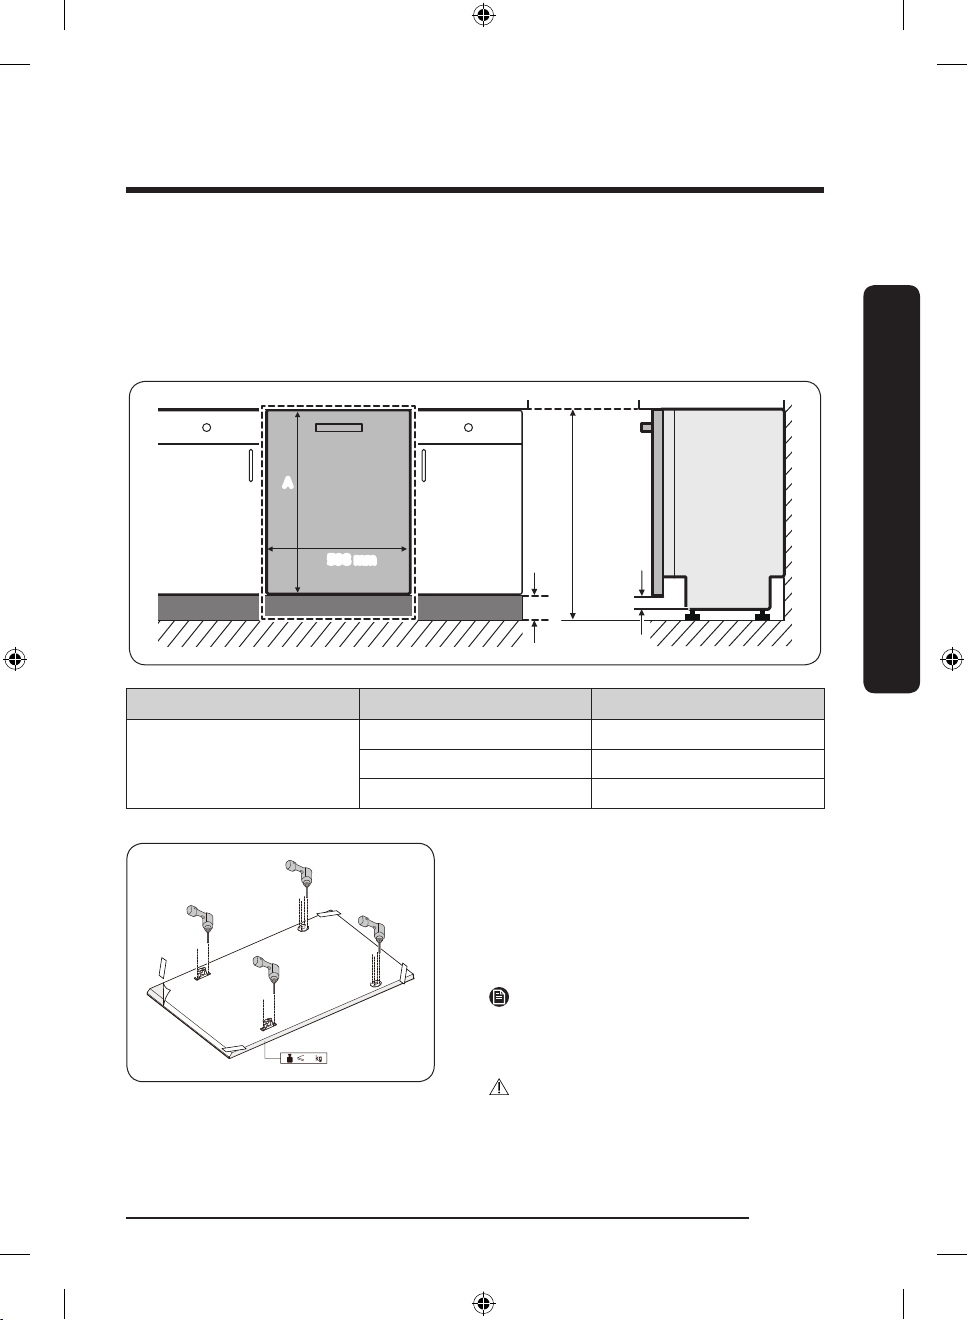
FBI (FBI Sliding, DW60A80**IB) models
This dishwasher model is equipped with an auto-balancing system in the door. It has a
sliding hinge, which is perfect for plinth-less kitchens or for installation above a small
cupboard. Custom panel’s height (A) can be between minimum 670 mm to maximum
800 mm depending on the installation environment. Custom panel’s weight must not
exceed 10 kg. Refer to the table for the height (C) in relation to the cabinet’s height (B), and
then determine the height of the custom panel.
A
B
598 mm
Min. 20
C
A B C
820 mm 20-150 mm
670-800 mm
850 mm 50-180 mm
880 mm 80-210 mm
Installation
1. Put the installation template on the
back of the custom panel and x it
temporarily using transparent tape. Note
that the rear of the custom panel will be
attached to the dishwasher door.
2. Mark 4 points guided on the installation
template.
NOTE
Custom panel’s height can be between
10
minimum 670 mm to 800 mm depending
on the installation environment.
CAUTION
Custom panel’s weight must not exceed
10 kg.
English 25
DW8500AM_DW60A8070BB_ET_DD81-03206K-04_EN.indd 25 2023-06-27() 5:35:01
Page 26
Installation
Installation
B
A
C
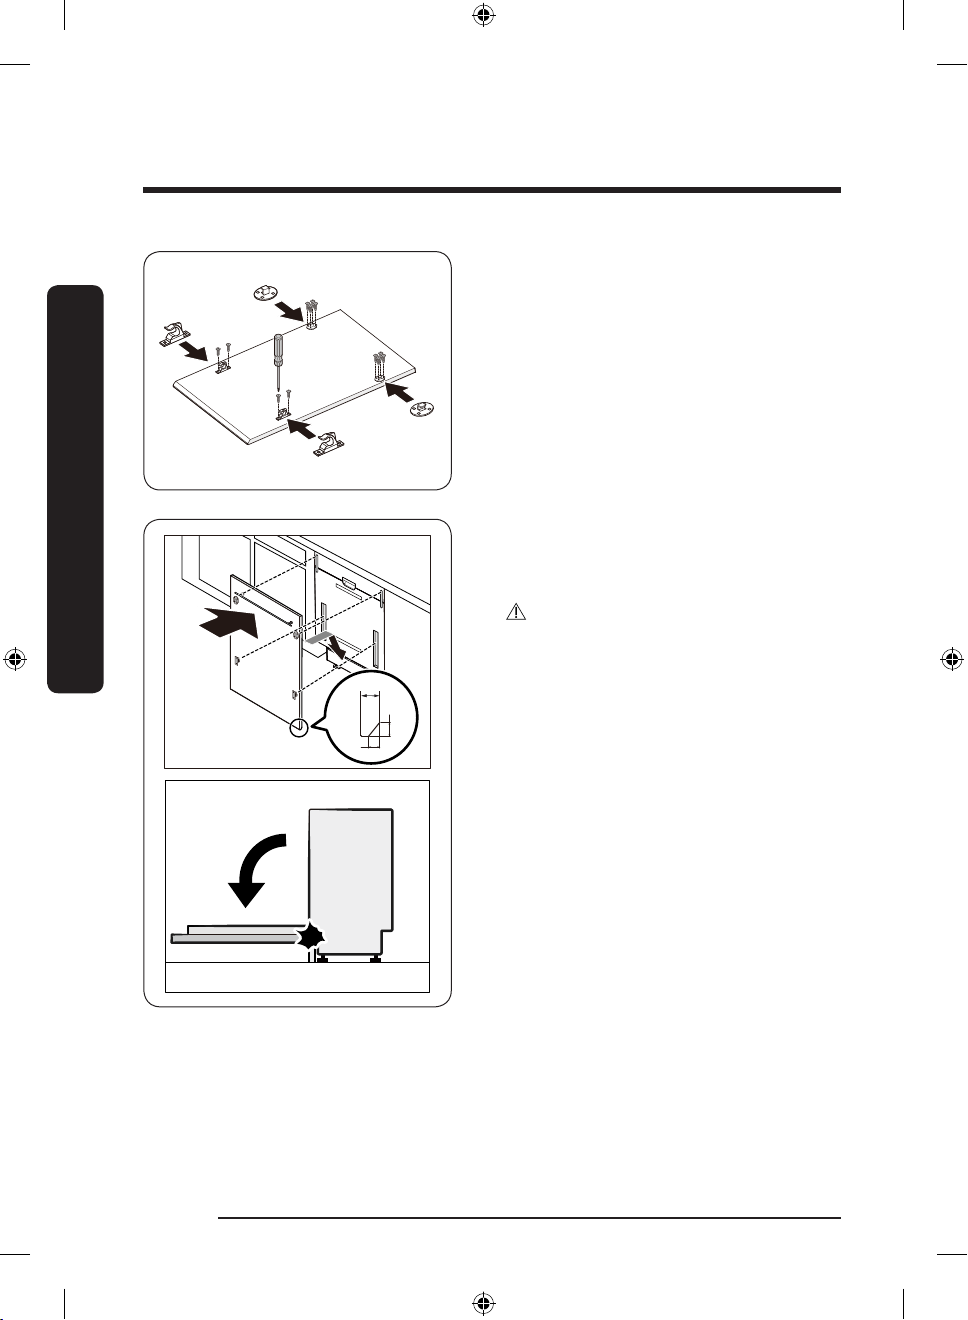
3. Remove the installation template, and
then tighten the Custom panel xers (B),
(C) with 12 screws (A) as shown in the
gure.
A
A
A
B
C
4. While holding the custom panel, attach
it to the door and insert the Custom
panel xers into the corresponding
holes at the door.
CAUTION
Use a custom panel between 4-10kg. Make
sure the skirting board does not interfere
20 (MAX)
15
12
with the dishwasher’s door fully opening
and closing.
English26
DW8500AM_DW60A8070BB_ET_DD81-03206K-04_EN.indd 26 2023-06-27() 5:35:01
Page 27
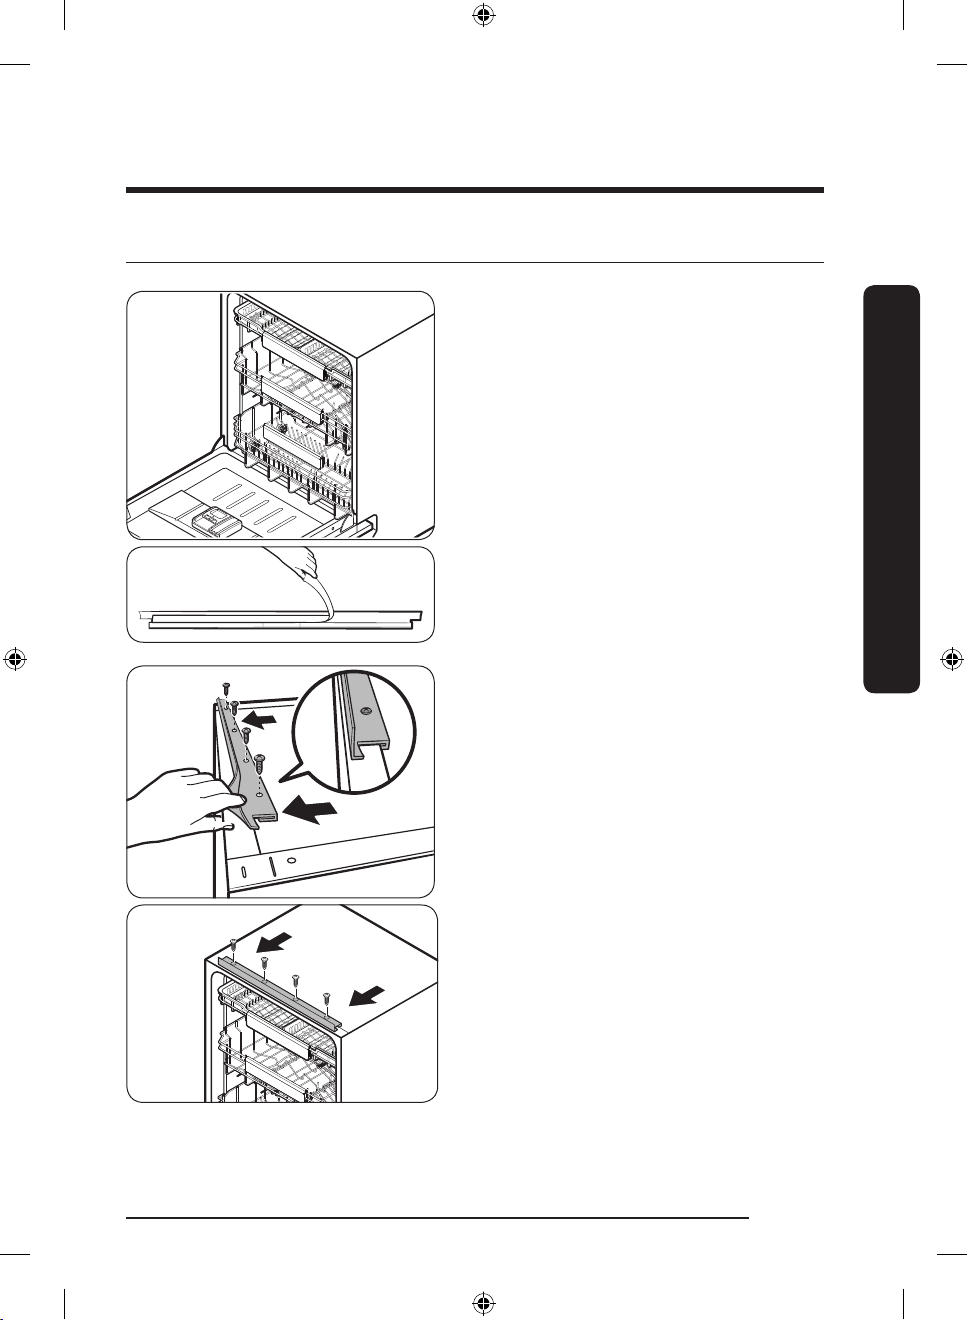
STEP 6 Install the trim
You can use the trim to reduce the noise
level.
1. To install the upper side trim, remove
the protective vinyl of double-side
adhesive tape on the back of the trim.
Installation
2. Insert the Hook shape of the trim to the
rear side of tub top bracket.
3. Fasten the provided screws to the four
holes.
English 27
DW8500AM_DW60A8070BB_ET_DD81-03206K-04_EN.indd 27 2023-06-27() 5:35:04
Page 28
Installation
Ƹ
ť
UĮǮĘ
Ƹť
UĮǮĘ
Installation
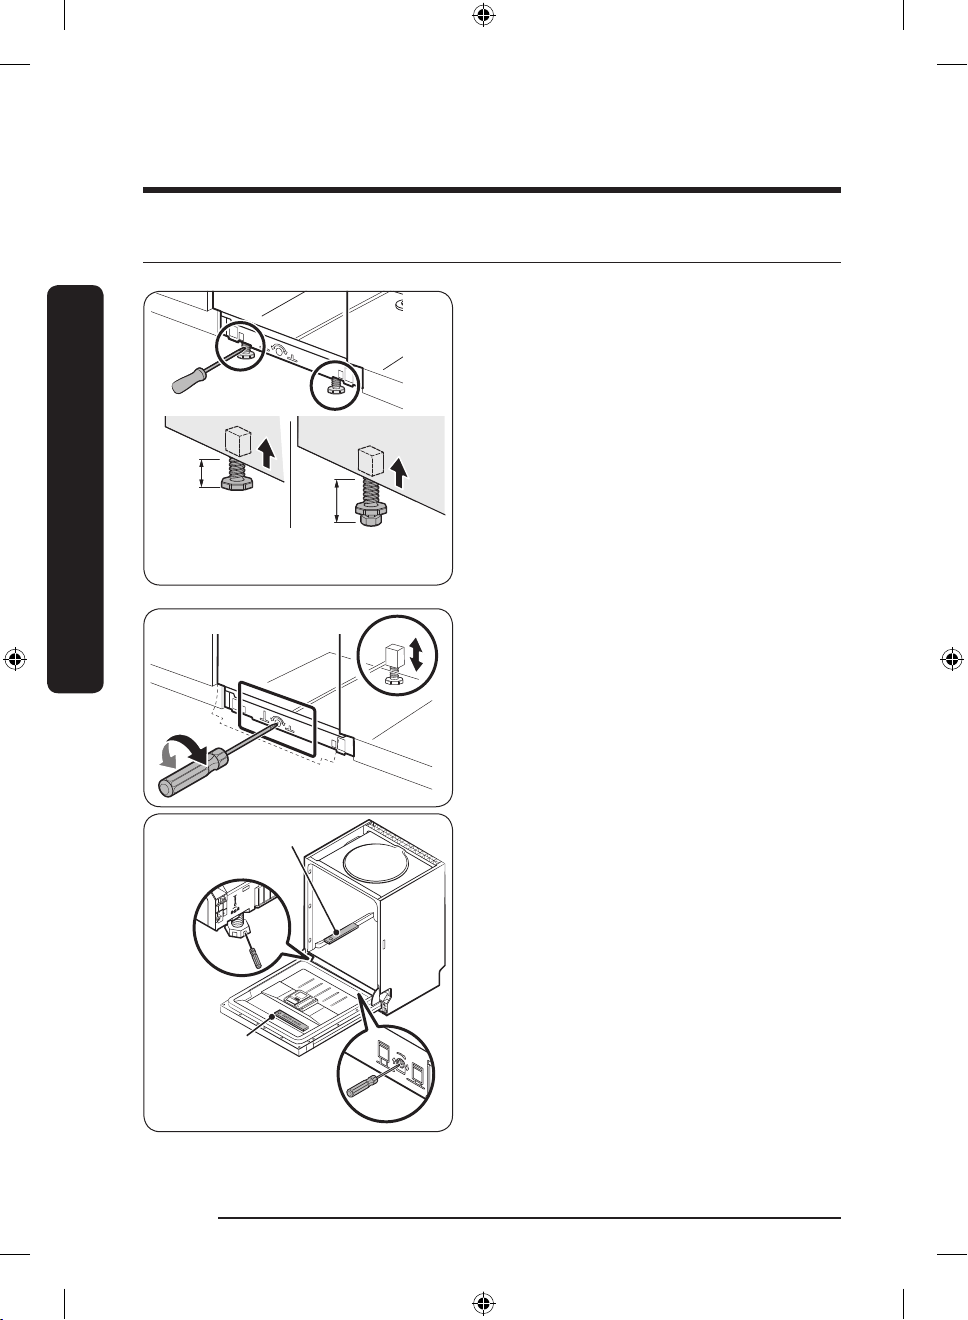
STEP 7 Level the dishwasher
0-30 mm
Normal Tall-kitchen (Insert the
0-60 mm
sub foot)
You can adjust the height of the dishwasher
to level it. Note that in these steps, the
dishwasher is currently inserted halfway.
1. Use the level to check if the dishwasher
is level.
2. To adjust the front height, use a at
head(-) screwdriver.
• To lower the height, turn the foot
counterclockwise.
• To raise the height, turn the foot
clockwise.
3. To adjust the rear height, insert a cross
head(+) screwdriver in the bottom
centre of the dishwasher.
• To lower the height, turn the
screwdriver clockwise.
• To raise the height, turn the screwdriver
counterclockwise.
• Place a spirit level on door and rack
track inside the tub as shown to check
that the dishwasher is level.
Check level front to back
Check level
side to side
English28
DW8500AM_DW60A8070BB_ET_DD81-03206K-04_EN.indd 28 2023-06-27() 5:35:05
Page 29
Min.
(5 mm)
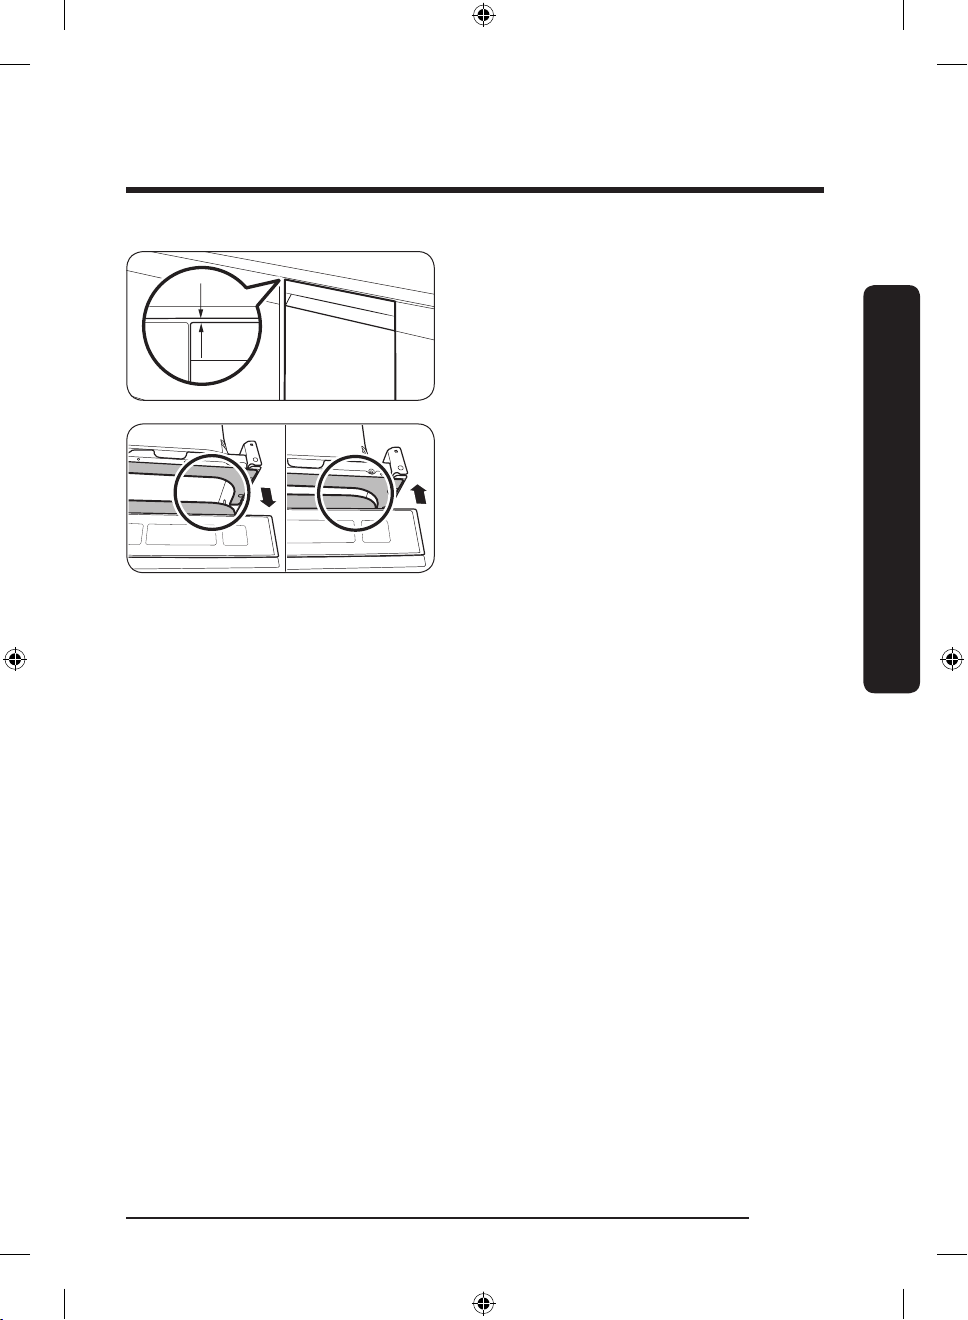
4. Leave at least a 5 mm space between
the top of the dishwasher and the
bottom of the countertop.
5. When levelling is complete, check if the
door opens and closes properly.
Installation
English 29
DW8500AM_DW60A8070BB_ET_DD81-03206K-04_EN.indd 29 2023-06-27() 5:35:05
Page 30
Installation
Installation
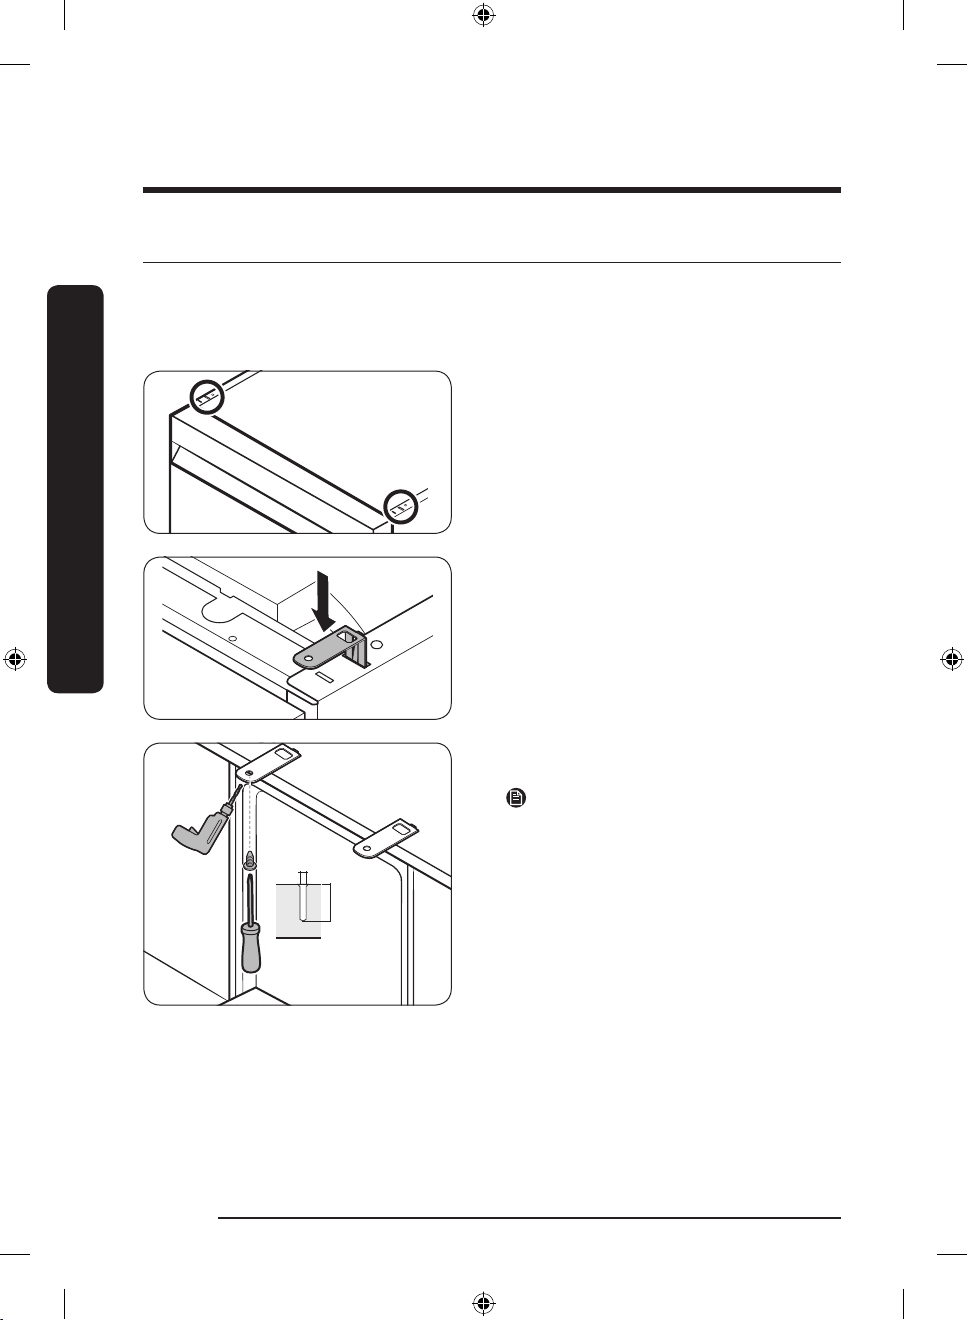
STEP 8 Secure the dishwasher
You can use the brackets to secure the dishwasher to the countertop. Alternatively, you can
drill the side holes to secure the dishwasher to the cabinet sides.
To the countertop using the brackets
1. Insert the provided brackets into the top
front holes of the dishwasher as shown.
2. Insert the dishwasher fully into place
under the countertop.
3. Tighten the 2 screws (Ø4 X 14) to x the
brackets.
NOTE
After xing the dishwasher to the
Ø 2
8
~
countertop, some screws remain. You can
simply discard these screws, or use them
to x the sides of the dishwasher to the
cabinet if you want to.
4. Connect the water hose, but do not
open the water tap until installation is
complete.
English30
DW8500AM_DW60A8070BB_ET_DD81-03206K-04_EN.indd 30 2023-06-27() 5:35:05
Page 31
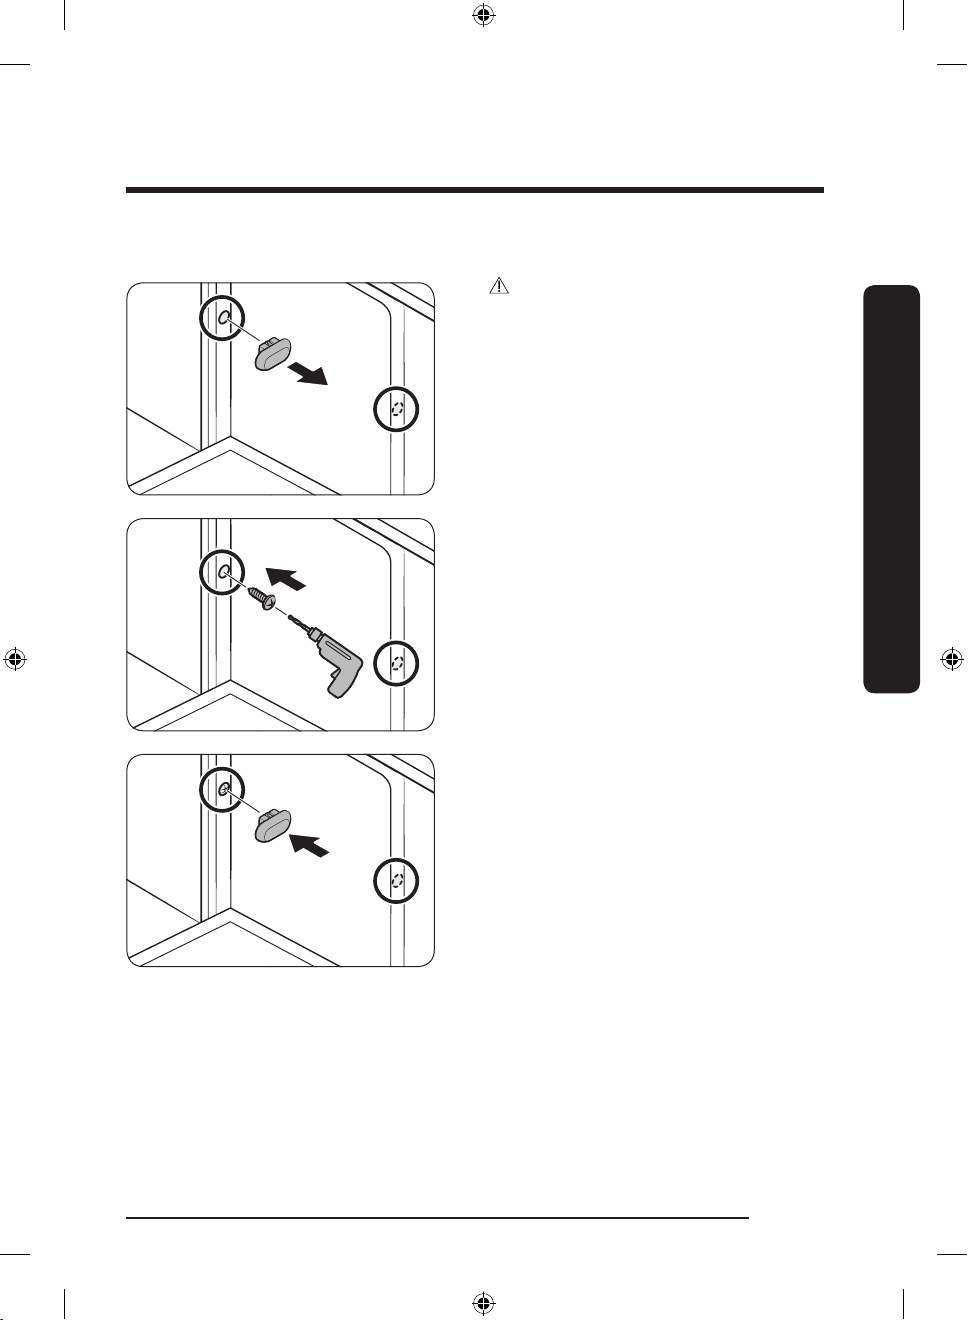
To the sides
CAUTION
If the plastic caps are not assembled, water
may leak and cause a re or electric shock.
1. Remove the plastic caps.
Installation
2. Tighten the 2 screws (Ø3.5 X 16) to the
2 places (marked on the illustration).
3. Insert the provided plastic caps to the
2 places where screws are fastened.
4. Connect the water hose, but do not
open the water tap until installation is
complete.
English 31
DW8500AM_DW60A8070BB_ET_DD81-03206K-04_EN.indd 31 2023-06-27() 5:35:05
Page 32
Installation
Installation
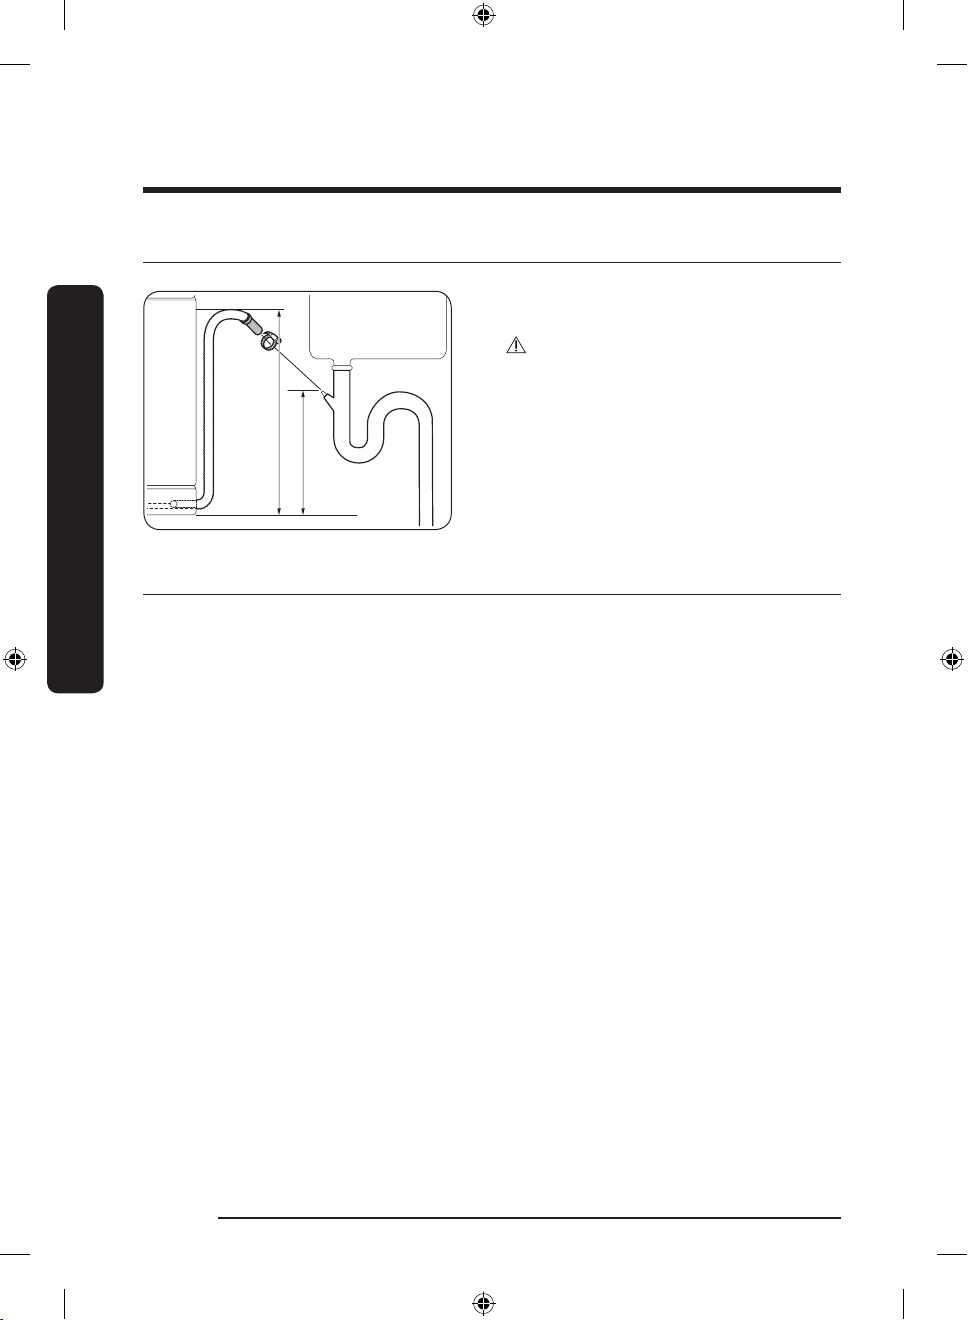
STEP 9 Connect the drain hose
1. Connect the drain hose to the drain
outlet.
CAUTION
• Install the drain system properly so that
the drain hose does not come out of the
drain outlet in the draining process.
• Make sure that the drain hose, supply
hose, and power cord is not kinked or
Min. 30 cm
Max. 80 cm
STEP 10 Final check
1. Remove all foam, paper packaging, and unnecessary parts from inside the dishwasher.
2. Turn the circuit breaker on.
3. Open the water supply valve to supply water to the dishwasher.
4. Plug in and turn the dishwasher on. Then, select and run the Quick cycle.
5. Check if the dishwasher turns on normally and if there are any water leaks while the
dishwasher is operating. Make sure to check for water leaks on both ends of the water
line and the drain hose connector.
folded.
English32
DW8500AM_DW60A8070BB_ET_DD81-03206K-04_EN.indd 32 2023-06-27() 5:35:05
Page 33
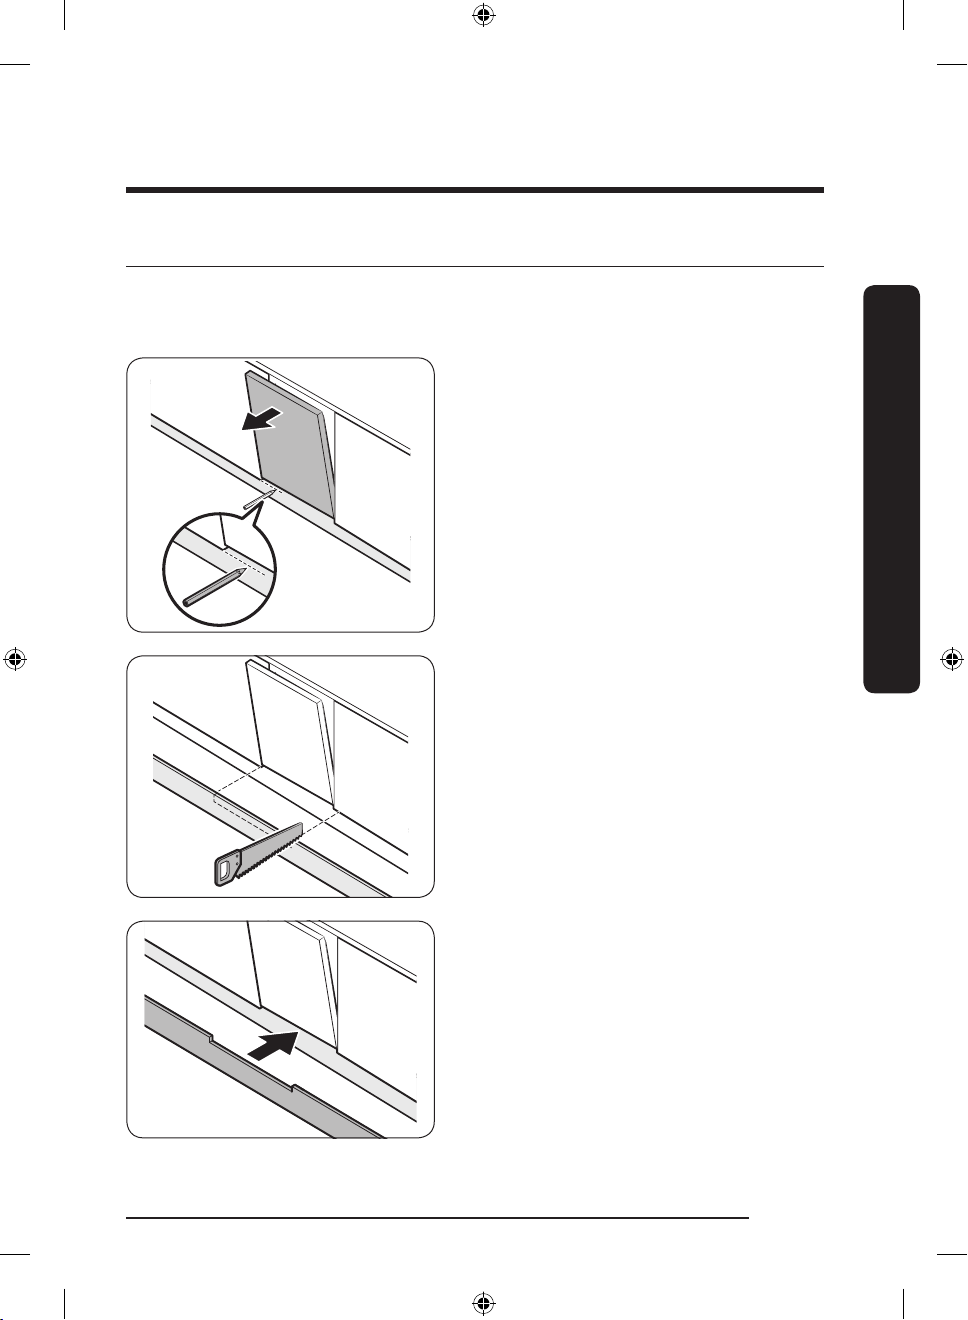
Skirting board
You can attach the skirting board according to the model or installation conditions.
Skirting board
1. Put the skirting board on the bottom of
the dishwasher.
2. Open the door of the dishwasher, and
draw a baseline on the skirting board
where it interferes with the door.
3. Follow the baseline and cut the skirting
board using a saw.
Installation
4. Attach the cut skirting board to the
bottom of the dishwasher. Make sure the
board does not interfere with the door
of the dishwasher.
English 33
DW8500AM_DW60A8070BB_ET_DD81-03206K-04_EN.indd 33 2023-06-27() 5:35:05
Page 34
Installation
Installation
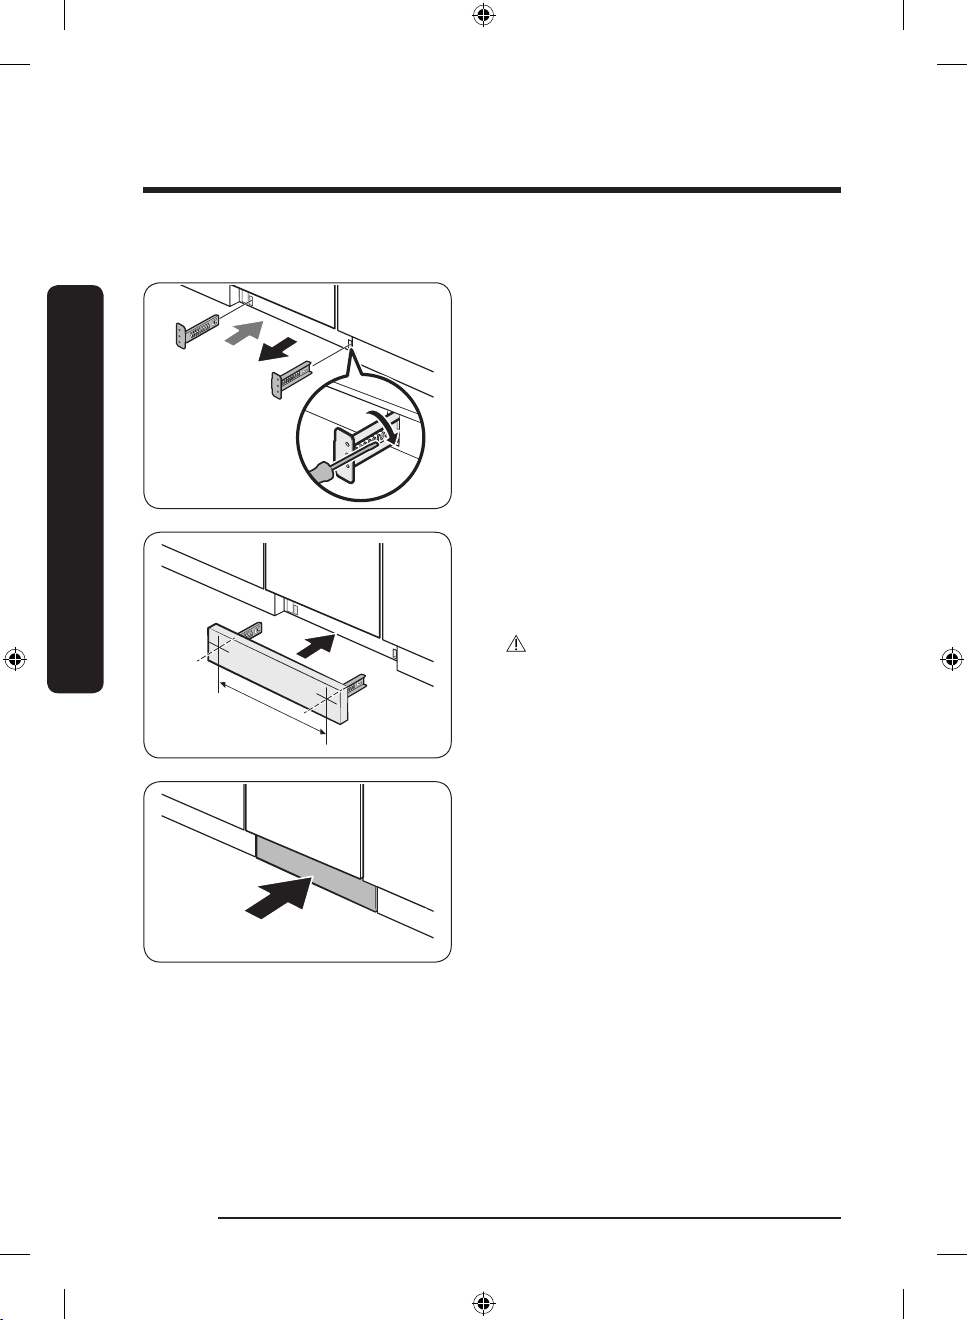
Pre-cut skirting board (DW60A80**U* Series)
1. Insert the provided brackets to the
• See the gure on the left for the correct
2. Insert the pre-cut skirting board into
Make sure the skirting board does not
interfere with the dishwasher’s door
545.4
opening and closing.
bottom of the dishwasher. Turn them
into position.
attaching sequence and place of the
brackets.
the brackets rst, and then tighten the
screws to x the board. See the gure
on the left and make sure the brackets
are positioned in the correct place.
CAUTION
3. Push the skirting board with the
brackets into the bottom of the
dishwasher as shown.
English34
DW8500AM_DW60A8070BB_ET_DD81-03206K-04_EN.indd 34 2023-06-27() 5:35:06
Page 35
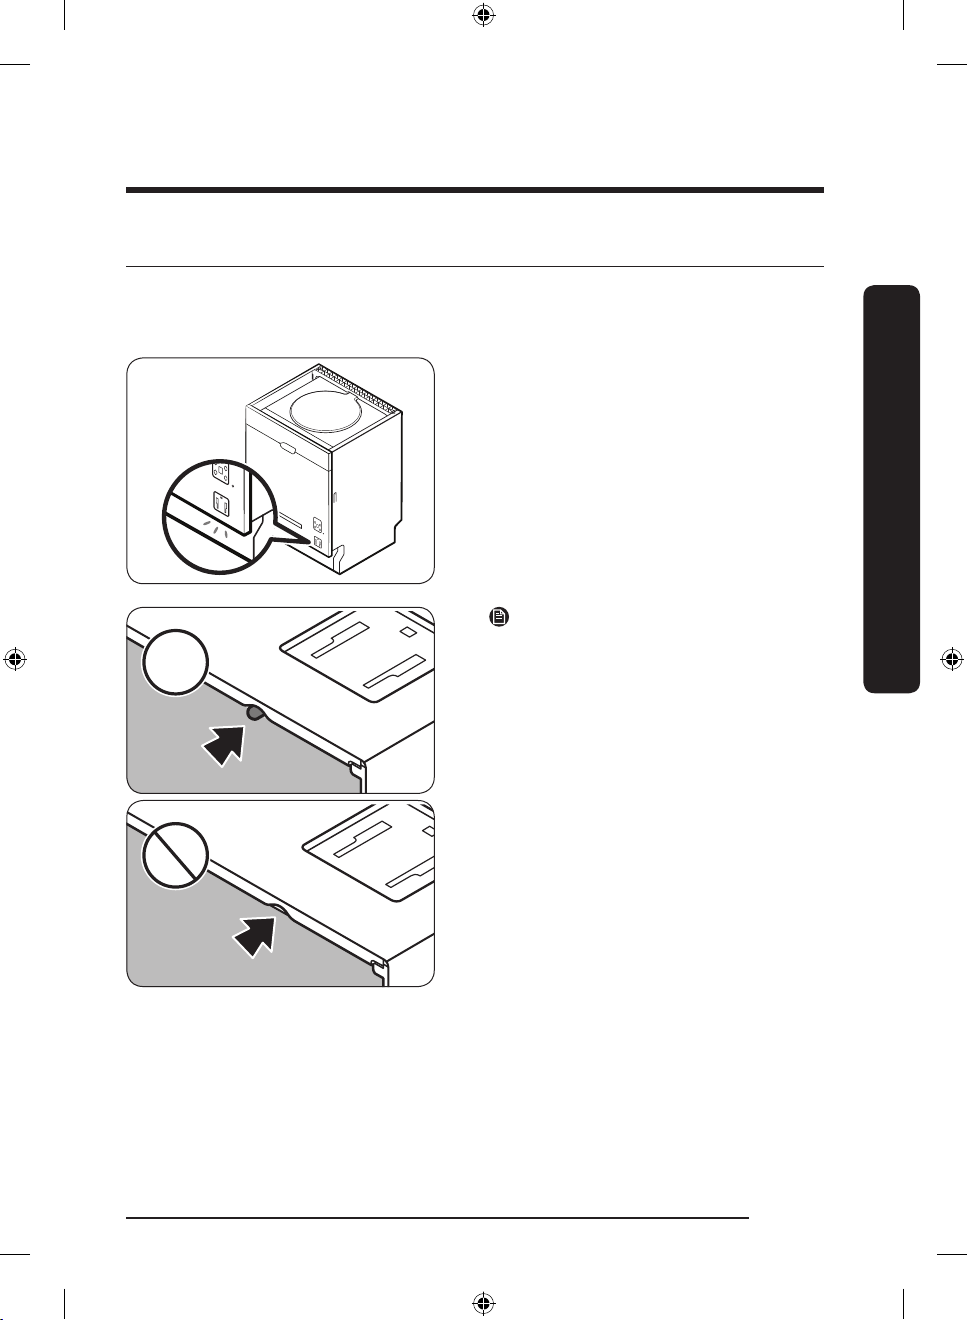
Info Light (DW60A80**BB, DW60A80**IB Series)
You can see the dishwasher’s operating status by checking the info light.
Info Light
When the dishwasher has operated, the
info light is on and shining toward the oor.
This tells you the dishwasher’s operating
status.
NOTE
Check whether the info light is covered by
the rubber skirt.
• The info light must be between the
rubber skirt and outer door.
• If the rubber skirt is covering the info
light, the info light will not be visible.
Installation
English 35
DW8500AM_DW60A8070BB_ET_DD81-03206K-04_EN.indd 35 2023-06-27() 5:35:06
Page 36
Installation
Installation
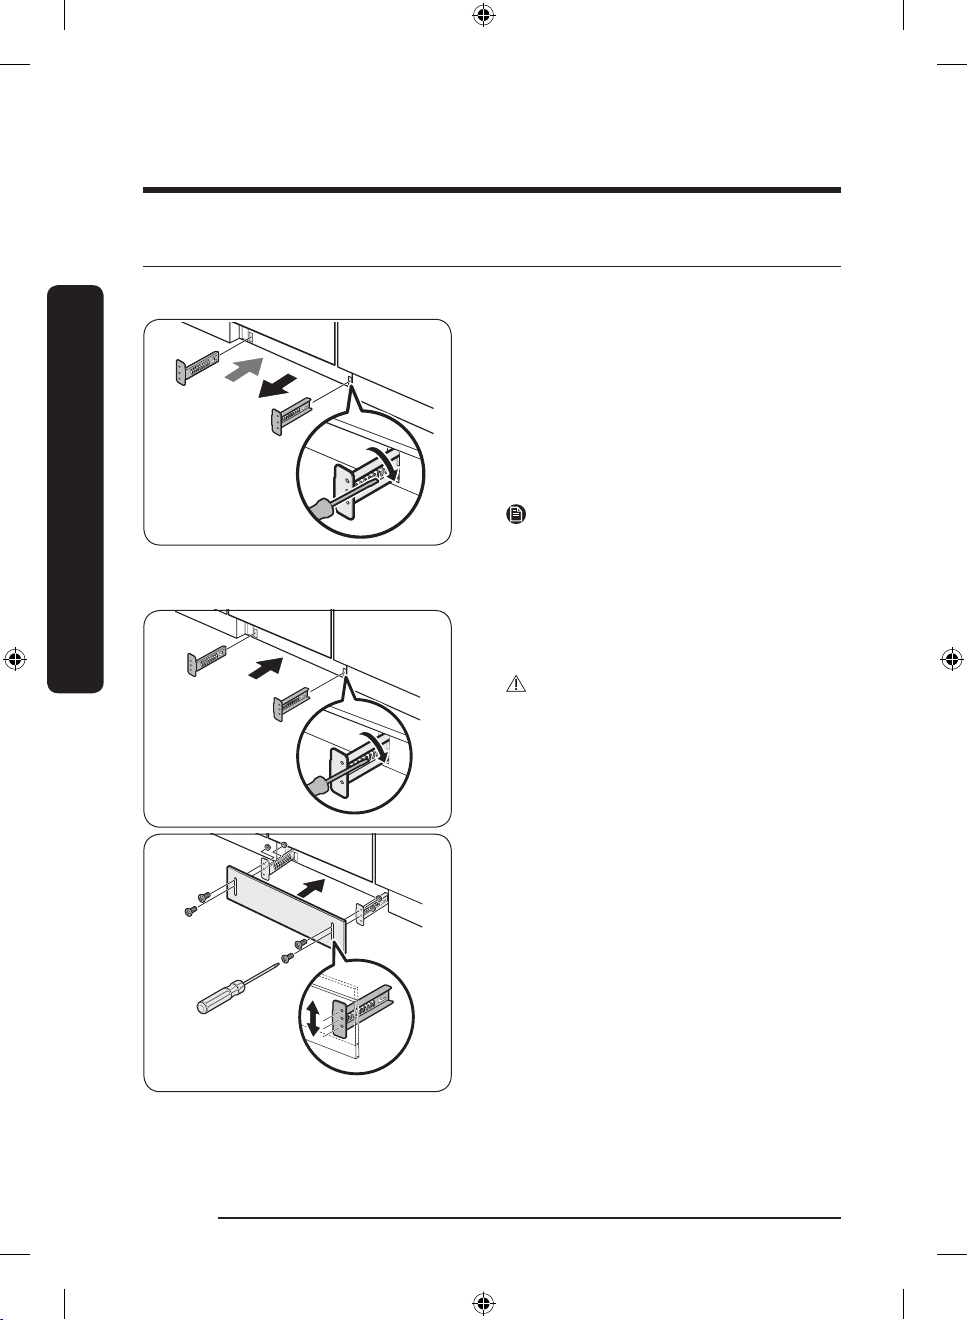
Kick plate (DW60A80**U* Series)
If you want to install the kick plate, follow these steps.
1. Insert the provided brackets to the
bottom of the dishwasher. Turn them
into position.
• See the gure on the left for the correct
attaching sequence and place of the
brackets.
2. Insert the kick plate into the brackets
rst, and then tighten the 4 kick plate
bolts and nuts to x the kick plate.
NOTE
If the dishwasher is raised by levelling the
foot, move kick plate down so that the kick
plate ts in bottom.
3. Push the kick plate with the brackets
into the bottom of the dishwasher as
shown.
CAUTION
Make sure the kick plate does not interfere
with the dishwasher’s door opening and
closing.
English36
DW8500AM_DW60A8070BB_ET_DD81-03206K-04_EN.indd 36 2023-06-27() 5:35:06
Page 37
SmartThings (Applicable models only)
Wi-Fi connection
On your smartphone, go to Settings and connect to your home Wi-Fi network.
Download
On an app market (Google Play Store, Apple App Store, Samsung Galaxy Apps), nd the
SmartThings app with a search term of “SmartThings”. Download and install the app on
your device.
Log in
You must rst log into SmartThings with your Samsung account. To create a new Samsung
account, follow the instructions on the app. You don’t need a separate app to create your
account.
NOTE
If you have a Samsung account, use the account to log in. A registered Samsung
smartphone user automatically logs in.
Wi-Fi Off
To manually turn the Wi-Fi off, press and hold ‘Speed boosting button’ and ‘Smart control
button’ for 3 seconds at same time.
To register your device to SmartThings
1. Make sure your smartphone is connected to a wireless network.
2. Select to run SmartThings on your smartphone.
3. When a message of “A new device is found.”, select Add.
4. If no message appears, select + and select your dishwasher in a list of devices available.
If your dishwasher is not listed, select Device Type > Specic Device Model, and then
add your dishwasher manually.
5. Follow the onscreen instructions to complete the connection process for your
dishwasher.
6. When the process is complete, your dishwasher will appear in the list of devices on
your SmartThings App.
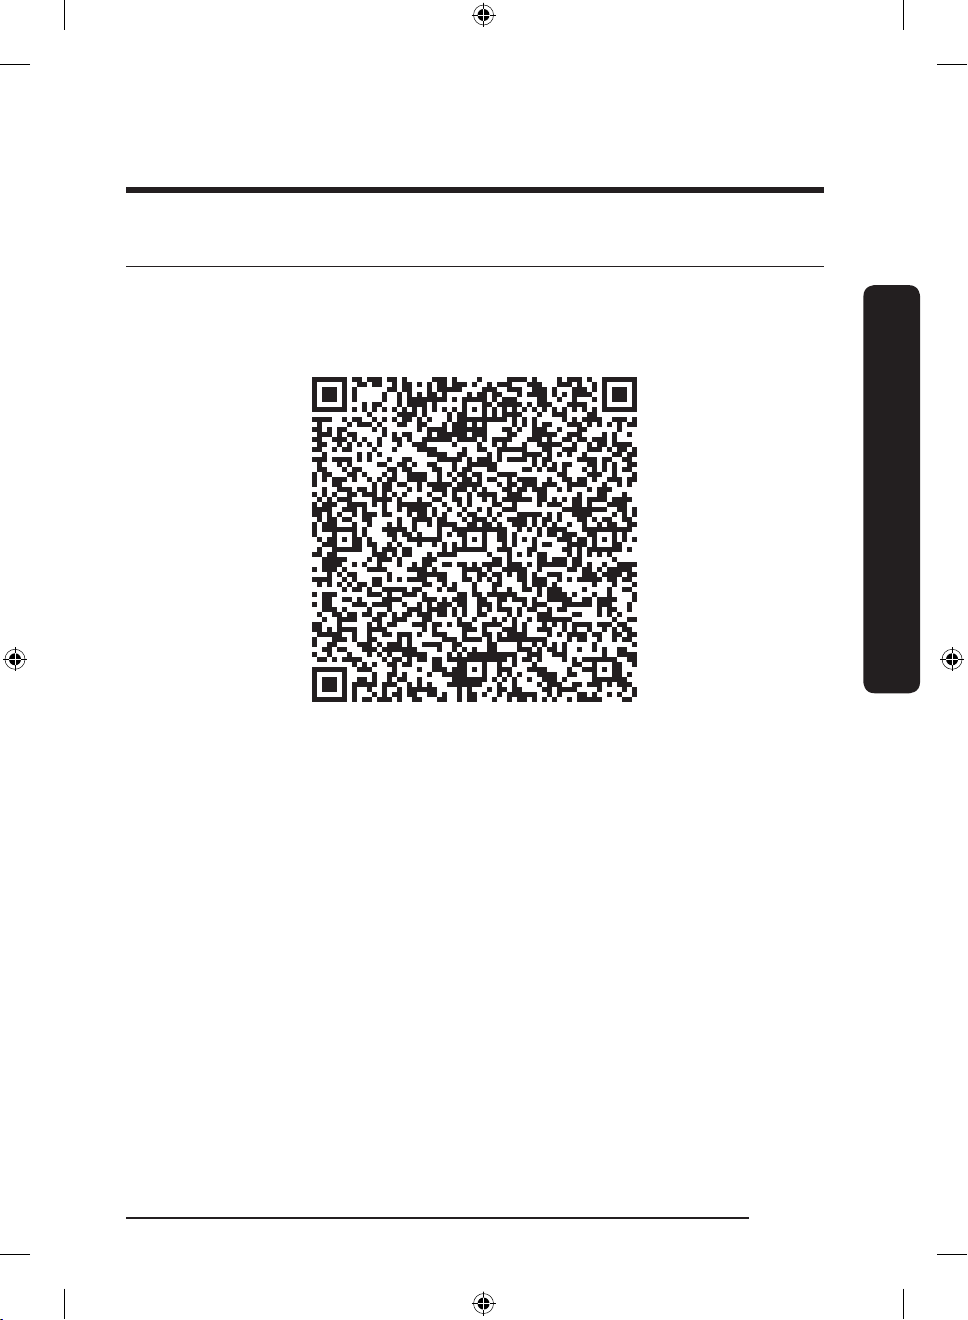
7. For iPhone users to access the SmartThings app, they need to scan the QR code or enter
the serial number provided below the QR code.
Installation
English 37
DW8500AM_DW60A8070BB_ET_DD81-03206K-04_EN.indd 37 2023-06-27() 5:35:06
Page 38
Installation
Installation
Dishwasher app
Integrated control: You can monitor and control your dishwasher both at home and on the
go.
• Select the dishwasher icon on SmartThings. The dishwasher page appears.
• Check the operation status or notications related to your dishwasher, and change
options or settings if necessary.
NOTE
• This device is designed for household use only (Class B), and can be used in all
residential areas.
• This device may cause wireless interference, and neither the manufacturer or the
installer of this device can provide a safety measure of any kind.
• Recommended encryption methods are WPA/TKIP and WPA2/AES. Newly developed
Wi-Fi protocols or unapproved Wi-Fi protocols are not supported.
• The reception sensitivity of a wireless network may be affected by surrounding wireless
environments.
• If your Internet provider has registered the MAC address of your PC or the modem
module for permanent use, your Samsung dishwasher fails to connect to the Internet. If
this is the case, contact your Internet provider.
• The Internet rewall may interrupt your Internet connection. If this happens, contact
your Internet provider.
• If Internet failure continues after following the measurement of your Internet provider,
contact a local Samsung retailer or service centre.
• For installing wired and wireless routers, refer to the user manual of the router you use.
• Samsung dishwasher supports the Wi-Fi 2.4 GHz protocols.
• Samsung dishwasher supports the IEEE802.11 b/g/n (2.4 GHz), Soft-AP protocols.
(IEEE802.11n is recommended)
• An unapproved wired/wireless router may fail to connect to Samsung dishwasher.
• The SmartThings app is available on third-party devices with Android OS 6.0
(Marshmallow) or higher, Samsung devices with Android OS 5.0 (Lollipop) or higher, and
iOS devices with iOS 10.0 or higher (For iPhones, it must be iPhone 6 or higher).
The app is optimised for Samsung smartphones (Galaxy S and Note series).
• Some functions of the app may operate differently on third-party devices.
• The app is subject to change without notice for improved performance.
• In addition, further updates on the app or the function in the app may stop due to
usability and security reasons, even if updates are currently supported on your OS.
• Your device uses non-harmonised frequency and is intended for use in all European
countries. The WLAN can be operated in the EU without restriction indoors, but cannot
be operated outdoors in France.
• You can easily install the SmartThings app or use the product with your smartphone by
scanning the QR code on the attached label.
English38
DW8500AM_DW60A8070BB_ET_DD81-03206K-04_EN.indd 38 2023-06-27() 5:35:06
Page 39
• Hereby, Samsung Electronics, declares that the radio equipment type appliance is in
compliance with Directive 2014/53/EU. The full text of the EU declaration of conformity
is available at the following internet address: The ofcial Declaration of conformity may
be found at http://www.samsung.com, go to Support > Search Product Support and enter
the model name.
• The overall standby power consumption is 2.0 W in which all network ports stay in “on”
condition.
• Data determined according to standard EN 50564 and Regulation (EC) No 1275/2008
Wi-Fi
Frequuency range Transmitter power (Max)
2412 MHz - 2472 MHz 20 dBm
SmartThings
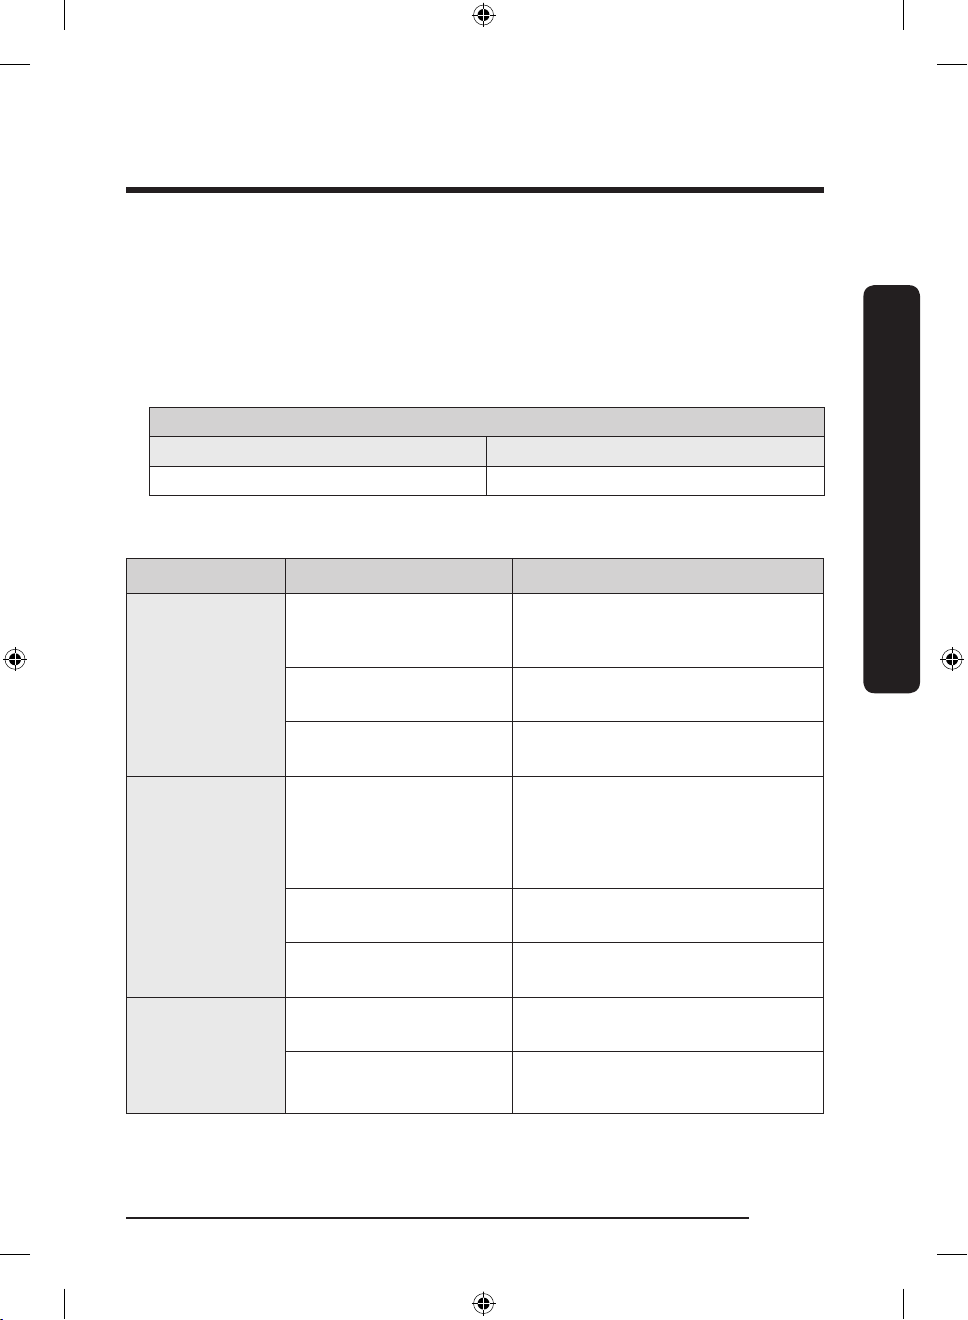
Category Checkpoint Description
You can check the current cycle and
its options, and the remaining cycle
time.
The Smart Control status is shown for
the dishwasher.
Use this to monitor the energy
consumption status.
Select a cycle and necessary options,
and then select Start/Pause/ Cancel
to start an operation, to stop
temporarily, or to cancel the current
operation.
Add frequently used cycles and
options to My Favorite for later use.
Set Delay Start to start the cycle at a
scheduled time (up to 24 hours).
Monitoring
Control
Washing status
Smart Control
Energy monitoring
Start/Pause/Cancel
My Favorite
Delay Start
Installation
Cycle completed
Noties you the current cycle is
complete.
Notication
Detergent
Noties you if the dishwasher is out
of salt or rinse aid.
English 39
DW8500AM_DW60A8070BB_ET_DD81-03206K-04_EN.indd 39 2023-06-27() 5:35:06
Page 40
Installation
Installation
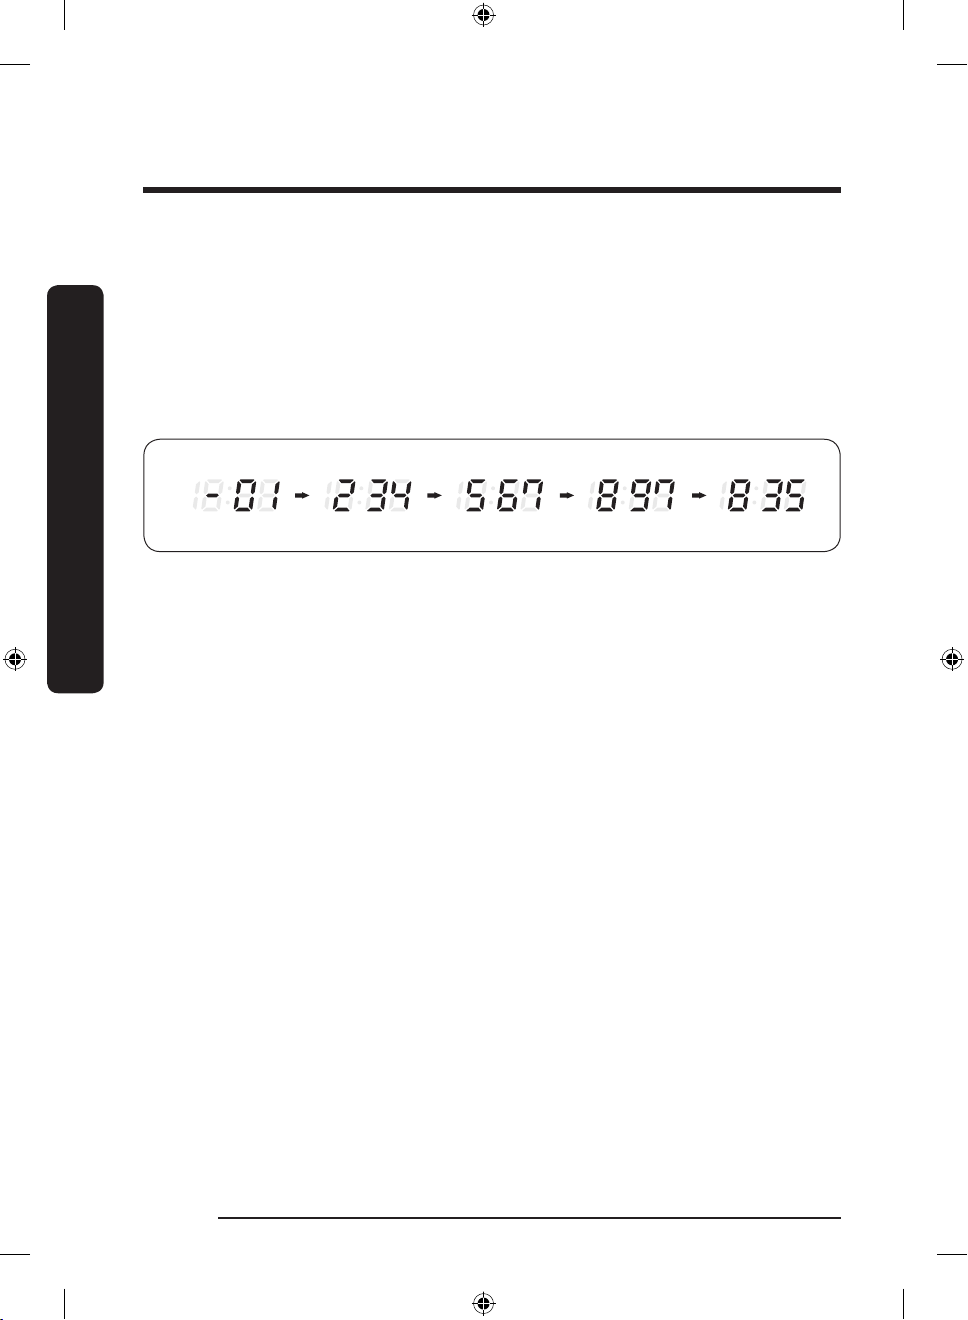
WSN
1. How to access: press and hold the Start button in AP mode. (To enter the AP mode, press
and hold the Smart Control button for 3 seconds.)
2. Display format
- After receiving WSN data from WiFi module, “-” + rst 2 digits are diplayed and next
3 digits are diplayed by every “start” button pressing.
- Beep is generated when the “start” button is pressed for displaying digits.
- Display example : “-” for the starting display
ex) WSN : “01234567897835”
English40
DW8500AM_DW60A8070BB_ET_DD81-03206K-04_EN.indd 40 2023-06-27() 5:35:07
Page 41
Open Source Announcement
The software included in this product contains open source software.
The following URL http://opensource.samsung.com/opensource/SMART_TP2_0/seq/0 leads
to open source license information as related to this product.
Installation
English 41
DW8500AM_DW60A8070BB_ET_DD81-03206K-04_EN.indd 41 2023-06-27() 5:35:07
Page 42
Before you start
Follow these instructions carefully to ensure proper installation of the dishwasher and to
prevent accidents when washing dishes.
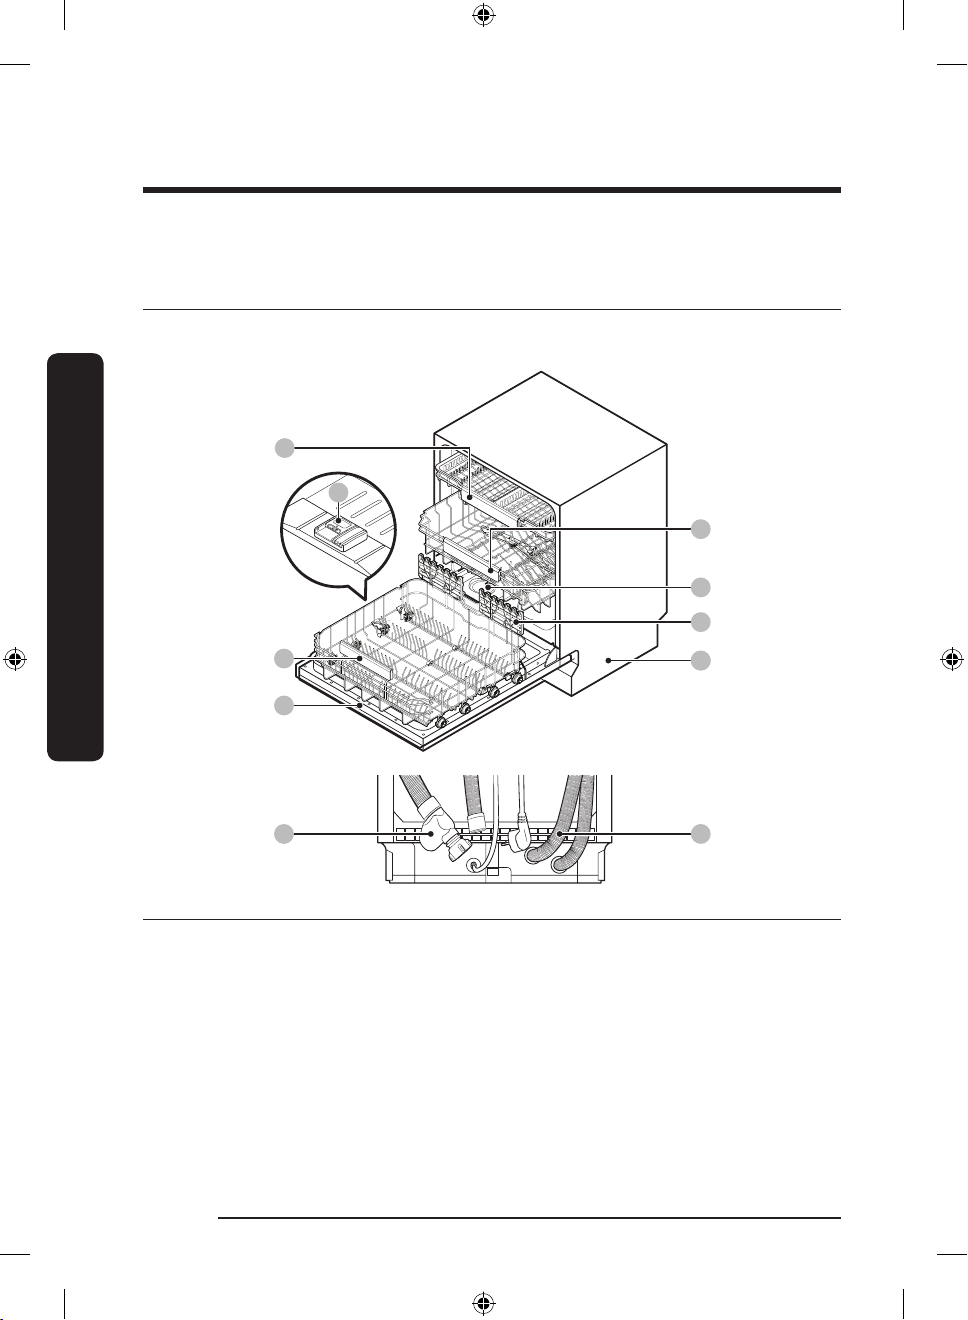
Dishwasher at a glance
DW60A807*/DW60A806*/DW60A805* models
01
Before you start
05
02
03
06
04
07
09
09
08
10
01 Cutlery rack 02 Upper rack 03 Salt storage
04 Lower rack 05 Dispenser 06 Glass support
07 Door 08 Base 09 Inlet hose
10 Drain hose
English42
DW8500AM_DW60A8070BB_ET_DD81-03206K-04_EN.indd 42 2023-06-27() 5:35:08
Page 43
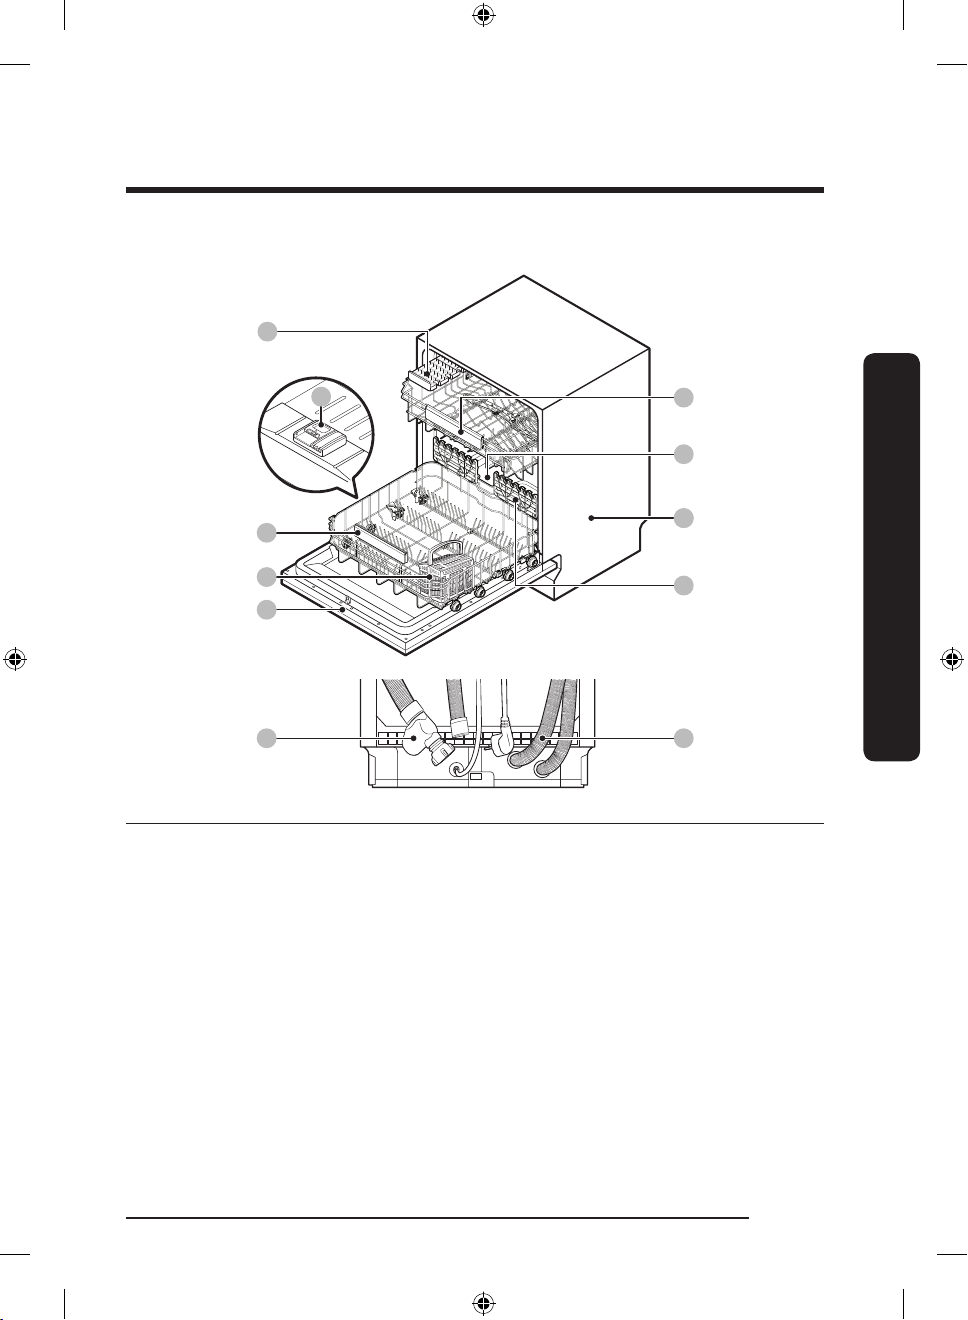
DW60A804* models
01
05
04
06
07
09
02
03
09
08
11
10
01 Knife rack 02 Upper rack 03 Salt storage
04 Lower rack 05 Dispenser 06 Cutlery basket
07 Door 08 Base 09 Inlet hose
10 Drain hose 11 Glass support
Before you start
English 43
DW8500AM_DW60A8070BB_ET_DD81-03206K-04_EN.indd 43 2023-06-27() 5:35:09
Page 44
Before you start
CAUTION
• Do not wash items that are covered with ash, sand, wax, lubricating grease, or paint.
These materials will damage the dishwasher. Ash does not dissolve and will spread
inside the dishwasher.
• Remove food remains such as bones, fruit seeds, etc. and waste such as toothpicks,
paper napkins, etc. from your dishes. Food remains and waste can make noise, cause the
dishwasher to malfunction, and damage your dishes and dishwasher.
Unsuitable items for the dishwasher
Before you start
WARNING
Wash only items such as glass, porcelain, and cutlery which the manufacturer declares as
dishwasher safe. Do not wash aluminium (e.g. grease lters). The dishwasher may damage
aluminium, or in extreme cases, cause a severe chemical reaction.
Do not wash the following items in the dishwasher.
• Copper, brass, tin, ivory, and aluminium items or items with adhesive
• Non-heat resistant plastics
• Craft items, antiques, valuable vases, and decorative glassware
• Pottery or glazed-ceramic items
• Wooden cutlery and crockery or items with wooden parts
• Delicate glassware or glassware containing lead crystal. Clouding may occur on the
glassware after frequent washing.
NOTE
Silverware that has contacted foods containing sulphur may become discoloured. Food
with sulphuric content include egg yolks, onions, mayonnaise, mustard, sh, sh brine, and
marinades.
English44
DW8500AM_DW60A8070BB_ET_DD81-03206K-04_EN.indd 44 2023-06-27() 5:35:09
Page 45
Basic use of racks
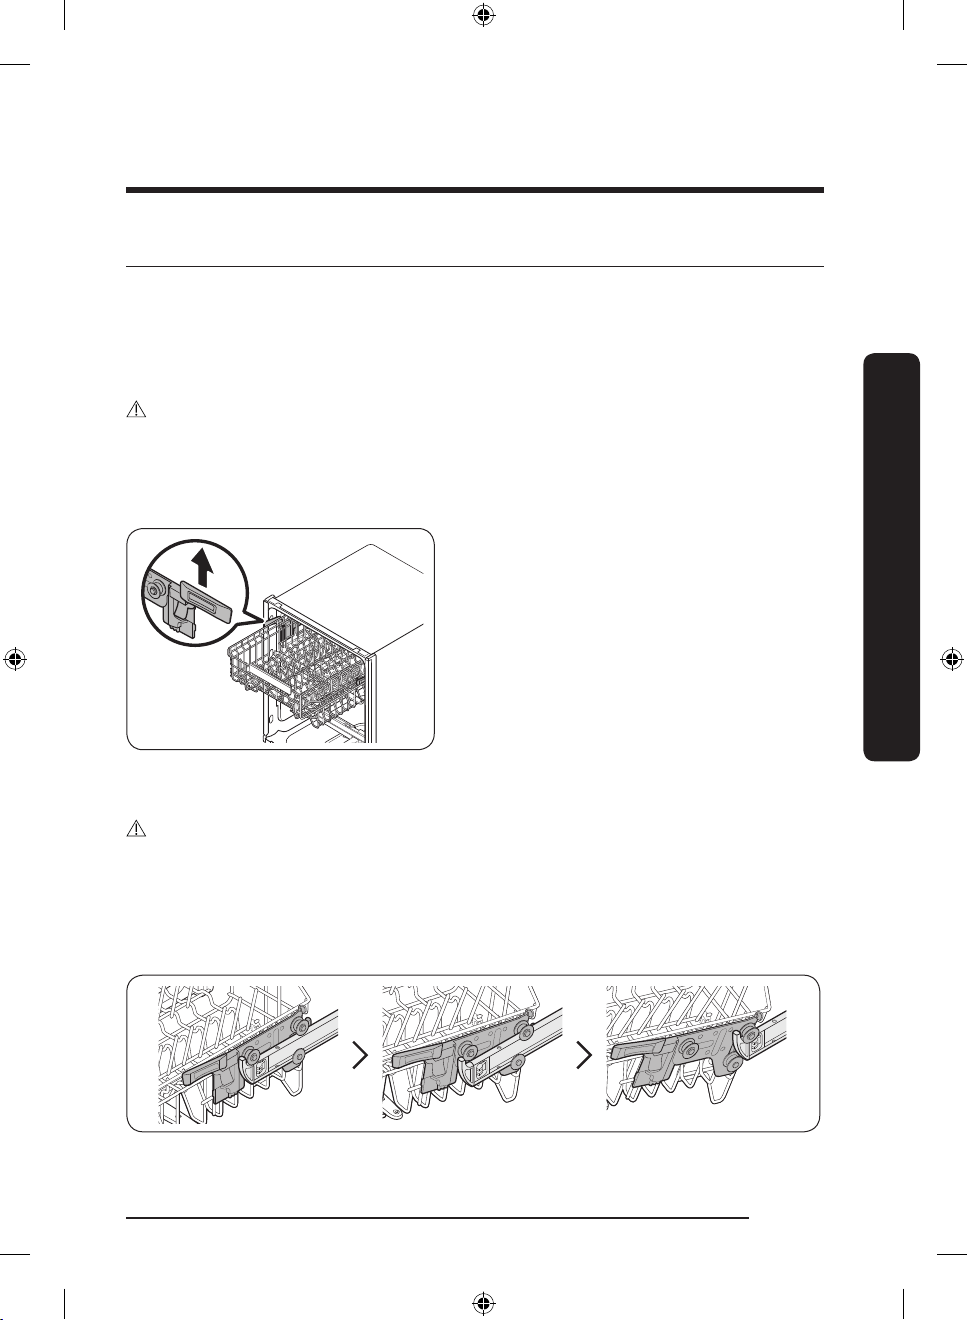
Height adjustment
You can adjust the height of the upper rack so that the lower rack can accommodate larger
sized dishes. Depending on the height of the upper rack, the lower rack can accommodate
plates up to 30 cm in diameter, and the upper rack can accommodate plates up to 18 cm
(with Cutlery rack) or 25 cm (without Cutlery rack) in diameter.
CAUTION
• Adjust the height of the upper rack before loading dishes into the rack. Adjusting the
rack after loading the dishes may damage the dishes.
• Make sure to hold both handles when adjusting, or the dishwasher door may not close
properly.
• To raise the upper rack, pull the upper
rack upwards. The adjustable handle will
latch, and the upper rack will raise.
• To lower the upper rack, hold both the
adjustable handles located at the left
and right sides of the upper rack, and
then evenly press down.
Upper rack removal
CAUTION
• Do not operate the dishwasher without the upper rack. Otherwise, noises occur and the
dishwasher does not operate properly.
• Because the upper rack is removable, insert the upper rack properly to ensure the
dishwasher operates normally.
Pull the upper rack to the front until it is fully extended, and then lift it slightly to remove.
See the following gures.
Before you start
English 45
DW8500AM_DW60A8070BB_ET_DD81-03206K-04_EN.indd 45 2023-06-27() 5:35:10
Page 46
Before you start
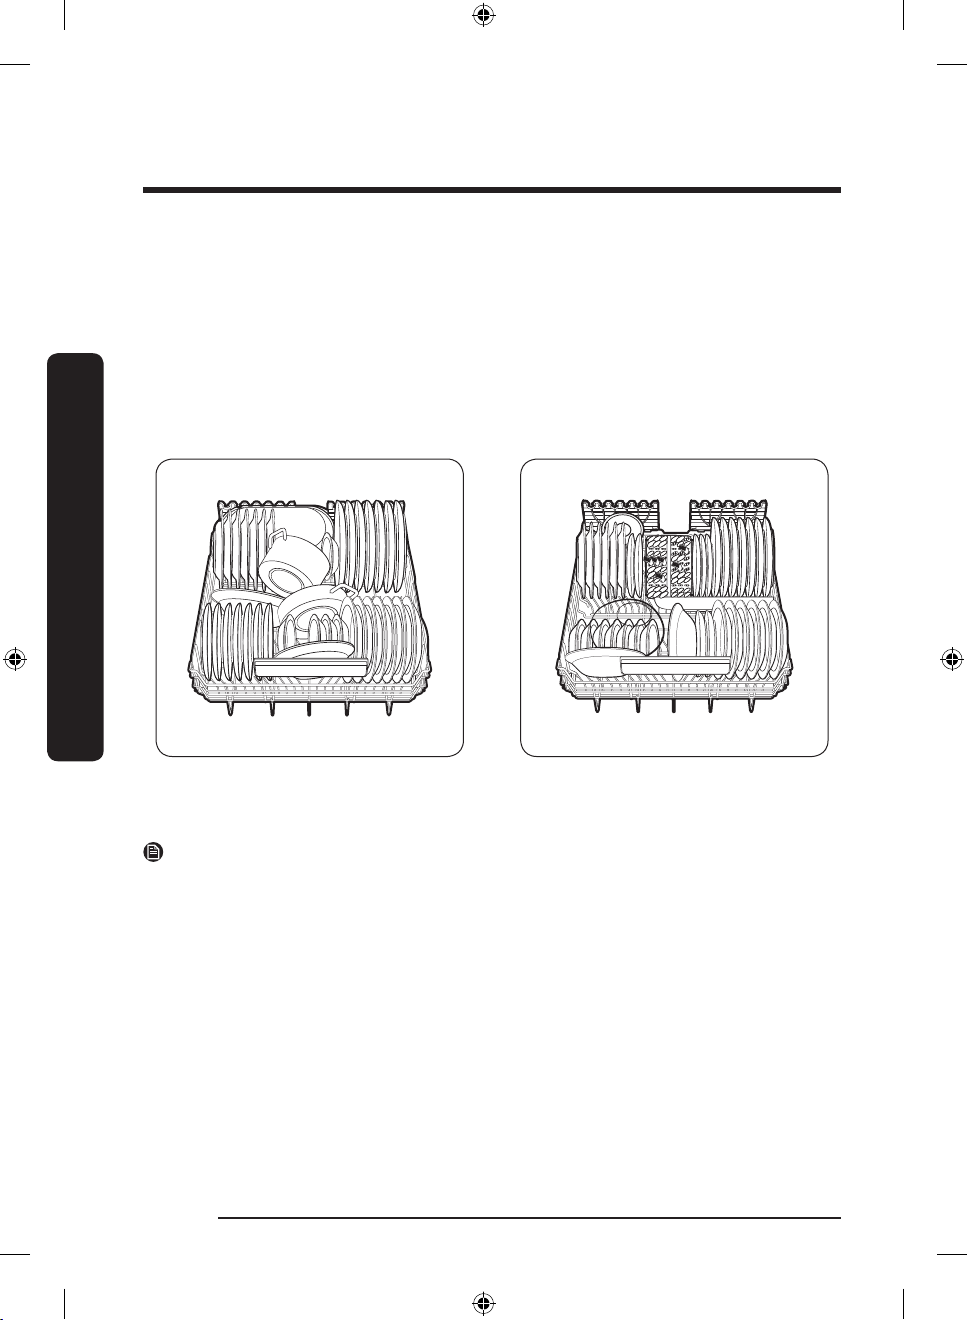
Loading dishes
Lower rack
We recommend that you place large items, that are difcult to clean (such as pots, pans,
lids, serving dishes and bowls), in to the lower rack.
It is preferable to place serving dishes and lids on the side of the racks in order to avoid
blocking the rotation of the upper nozzle. Pots, serving bowls, etc. must always be placed
top down.
Deep pots should be slanted to allow water to ow out.
The lower rack features folding tines to easily load larger pots and pans.
Before you start
DW60A807*/DW60A806*/DW60A805*
models
NOTE
Long items, serving cutlery, salad servers and big knives should be placed on the shelf so
that they do not obstruct the rotation of the nozzles.
English46
DW8500AM_DW60A8070BB_ET_DD81-03206K-04_EN.indd 46 2023-06-27() 5:35:10
DW60A804* models
Page 47
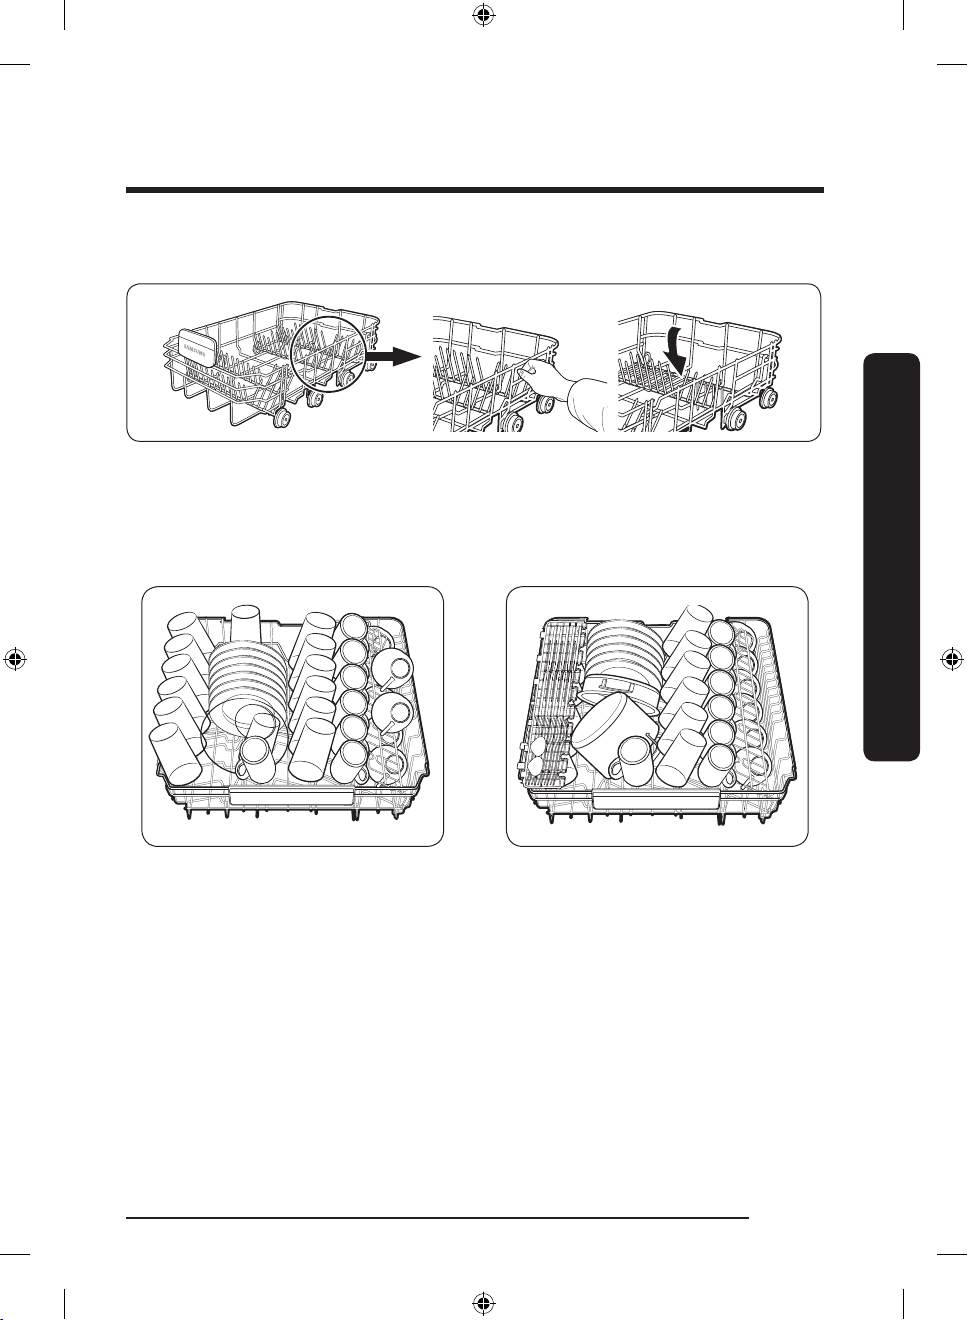
Using the folding tines
For better stacking of pots and pans, the tines can be folded down as show in the gure.
Upper rack
The upper rack is designed to hold more delicate and lighter dishware such as glasses,
coffee and tea cups and saucers, as well as plates, small bowls and shallow pans (as long as
they are not too dirty). Position the dishes and cookware so that they will not get moved
by the spray of water. Always place glasses, cups & bowls upside down.
DW60A807*/DW60A806*/DW60A805*
DW60A804* models
models
Before you start
English 47
DW8500AM_DW60A8070BB_ET_DD81-03206K-04_EN.indd 47 2023-06-27() 5:35:10
Page 48
Before you start
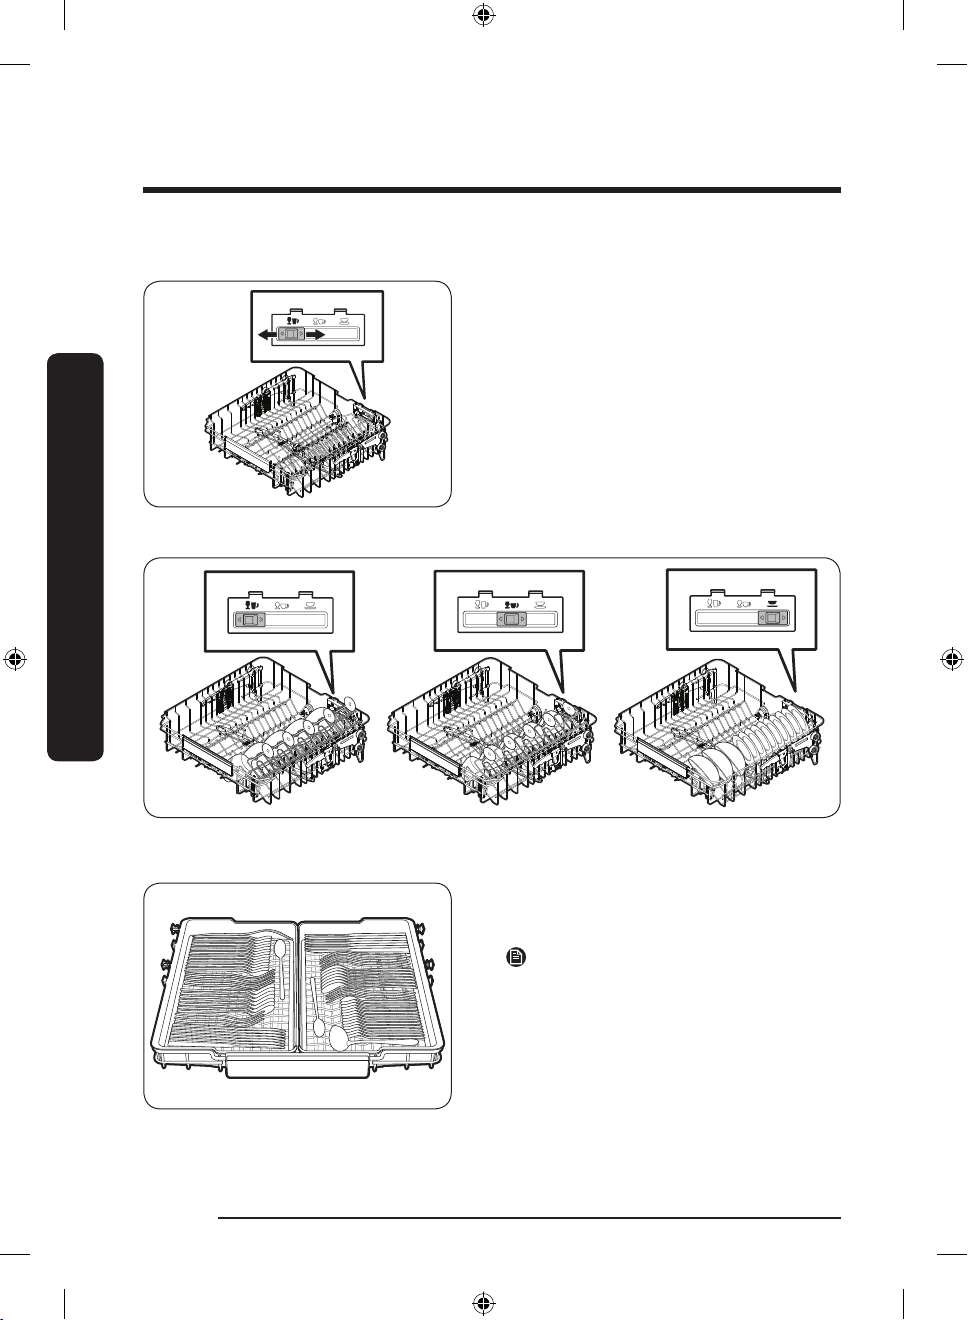
Guide Tines
You can load dishes into the central rack in
various ways by changing the guide tines.
If the guide button is moved to the left,
you can load standard wine glasses. If the
guide button is in the middle, you can load
shorter wine or brandy glasses. If the guide
button is on the right, you can load bowls
and plates.
Before you start
Upper rack
Cutlery rack (DW60A807*/DW60A806*/DW60A805* models)
The cutlery rack is best for atware and
cooking or serving utensils. Use the cutlery
rack to organize atware or utensils.
NOTE
The cutlery rack can be removed if you
need more space on the upper rack to clean
larger items.
English48
DW8500AM_DW60A8070BB_ET_DD81-03206K-04_EN.indd 48 2023-06-27() 5:35:13
Page 49
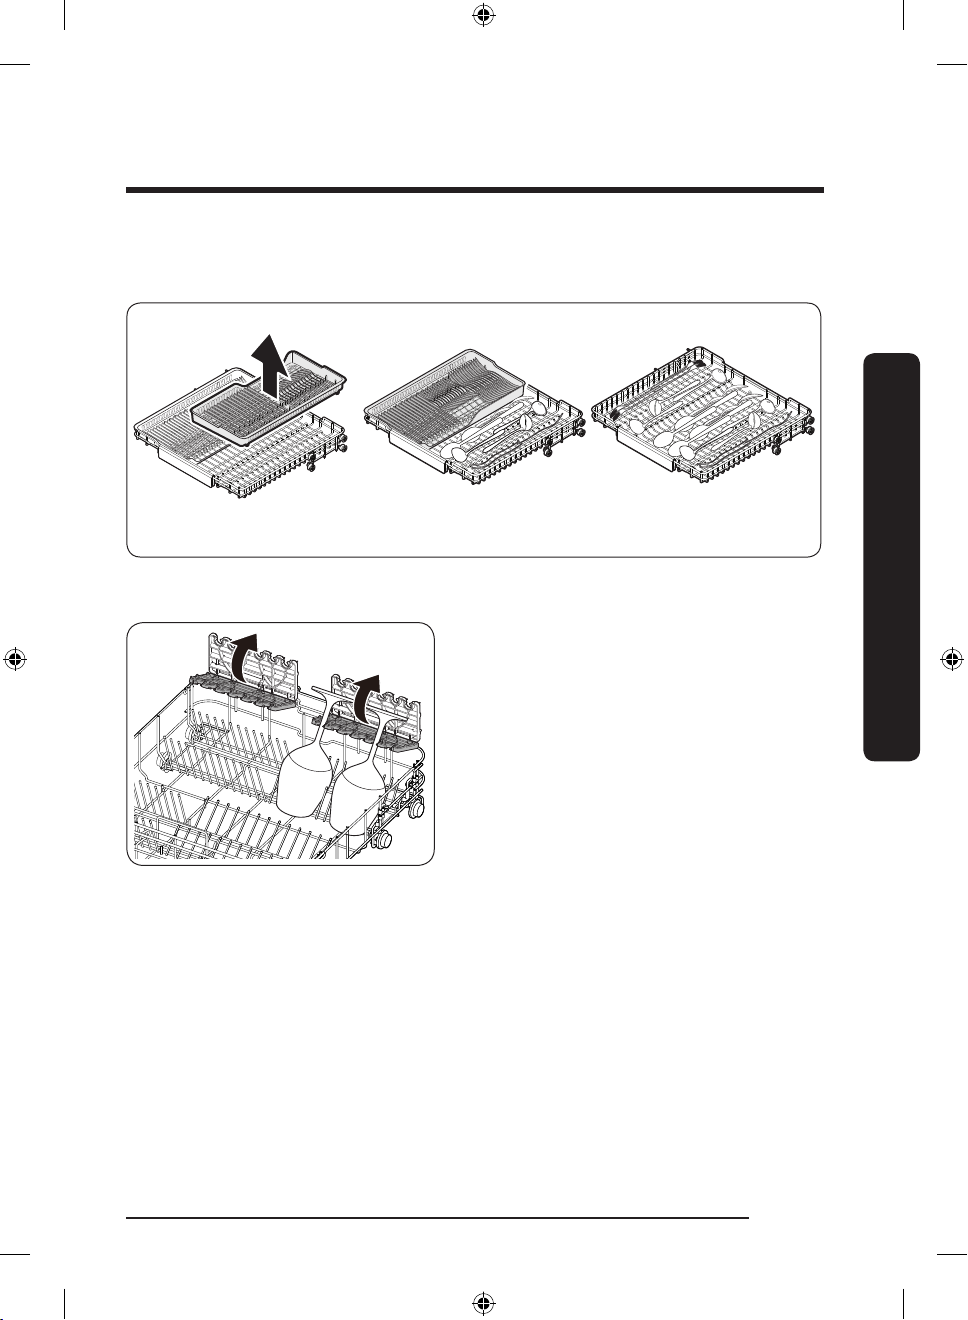
3rd Rack Tray
You can easily unload cutlery from a removable tray in the upper rack. You can also
remove the left or right tray to load relatively larger utensils. Both trays are removable.
Cutlery rack
Using the glass support
The glass support is especially suited for
wine glasses. Hang wine glasses onto the
pegs of the glass support. Fold the glass
support back when it is not being used.
Before you start
English 49
DW8500AM_DW60A8070BB_ET_DD81-03206K-04_EN.indd 49 2023-06-27() 5:35:14
Page 50
Before you start
Detergent compartment
All dishwasher cycles require detergent in the detergent compartment. Apply detergent as
recommended for the selected cycle to ensure best performance.
WARNING
• Do not place dishwasher detergent in your mouth. Avoid breathing in detergent
fumes. Dishwasher detergent contains irritants and caustic chemicals that can induce
respiratory conditions. If you have consumed dishwasher detergent or inhaled
detergent fumes, seek medical attention immediately.
• Keep dishwasher detergent out of children’s reach.
CAUTION
Before you start
Use dishwasher detergent only. Other types of detergent produce excessive foam, which
may decrease the dishwasher’s performance or cause it to malfunction.
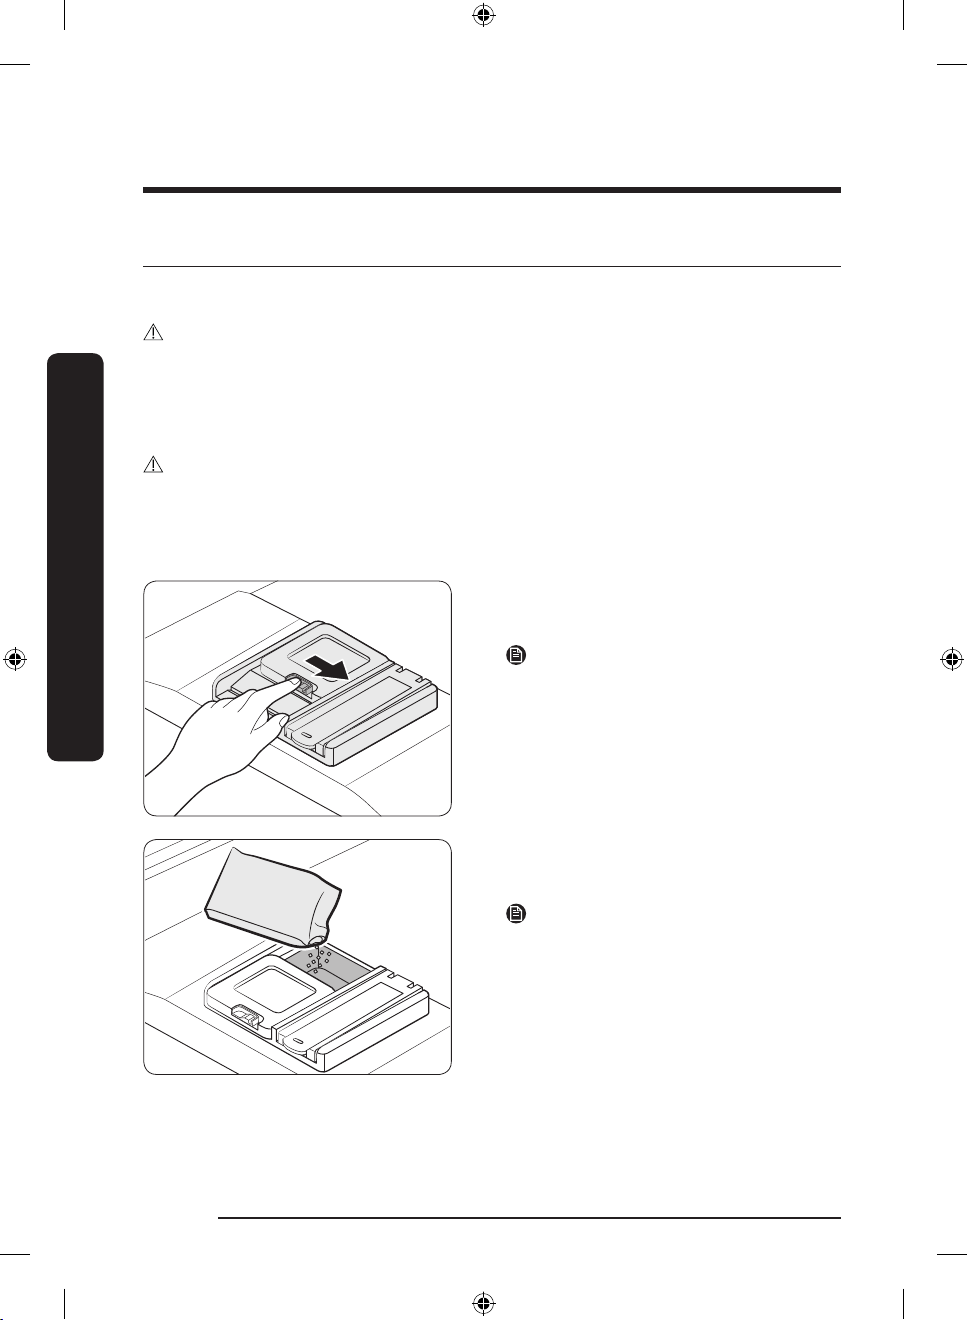
Filling the detergent
1. Open the detergent dispenser cap by
pushing the detergent dispenser catch
to the right.
NOTE
The cap remains open at the end of a cycle.
2. Add the recommended amount of
detergent to the main wash detergent
compartment.
NOTE
There is no separate button that is specic
to using tablet detergents.
English50
DW8500AM_DW60A8070BB_ET_DD81-03206K-04_EN.indd 50 2023-06-27() 5:35:15
Page 51
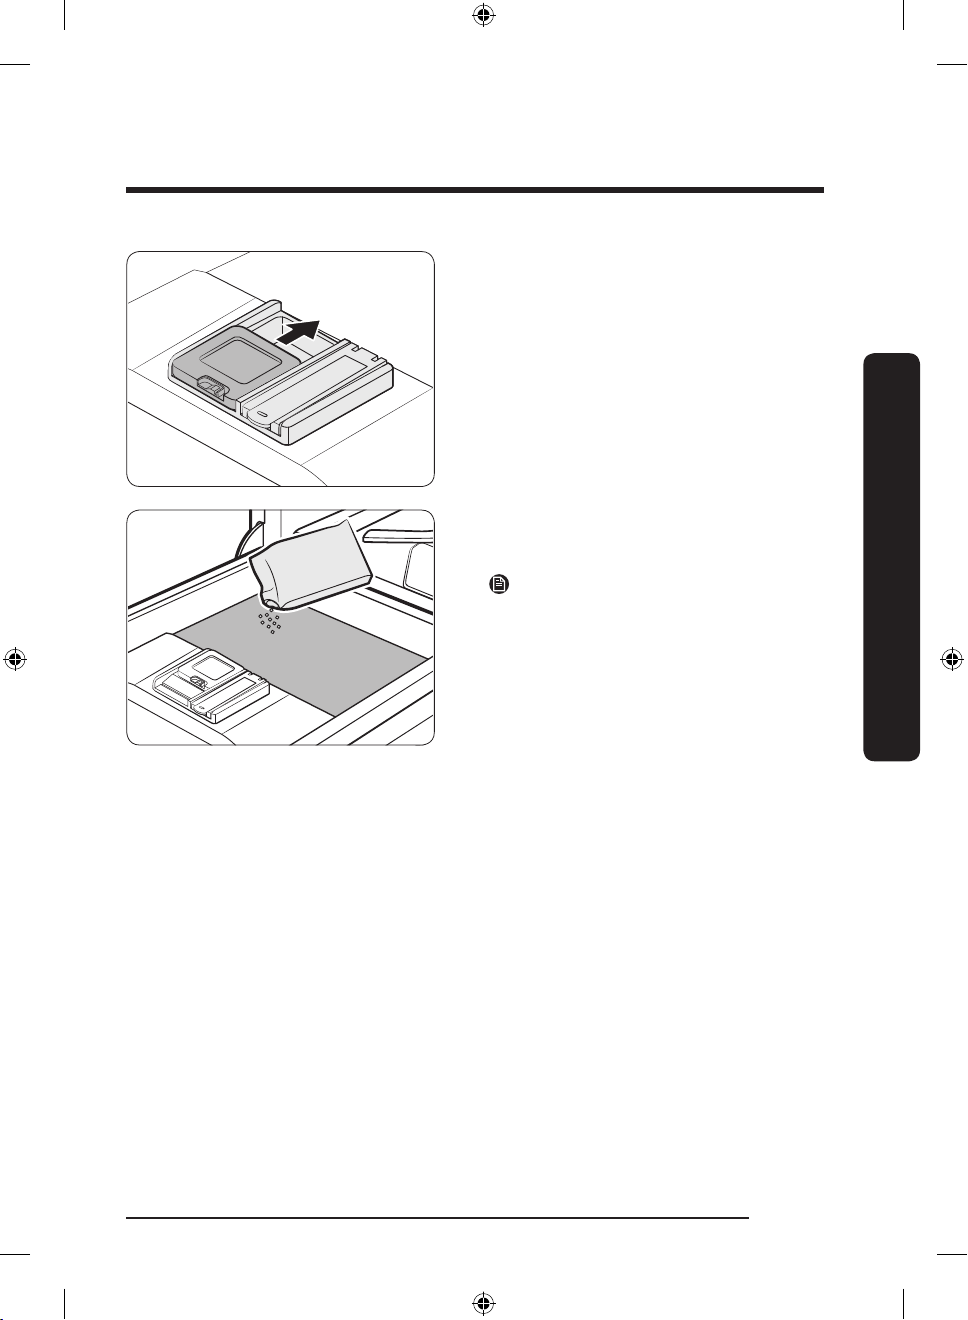
3. Close the lid by sliding it up.
4. If the items are heavily soiled, pour a
small amount of detergent onto the door
for better cleaning results.
NOTE
The additional detergent will activate
during the pre-wash process.
The cover opens automatically to dispense the detergent during the wash.
Before you start
English 51
DW8500AM_DW60A8070BB_ET_DD81-03206K-04_EN.indd 51 2023-06-27() 5:35:15
Page 52
Before you start
Rinse aid reservoir
Rinse aid improves the drying performance of the dishwasher. When the Rinse Rell
indicator lights up on the control panel, rell with rinse aid. Only use liquid rinse aid.
Powdered rinse aid will clog the reservoir opening and cause the dishwasher to
malfunction.
CAUTION
• Do not apply any type of detergent to the rinse aid reservoir.
• Do not excessively ll the reservoir. Excessive rinse aid may overow during a cycle.
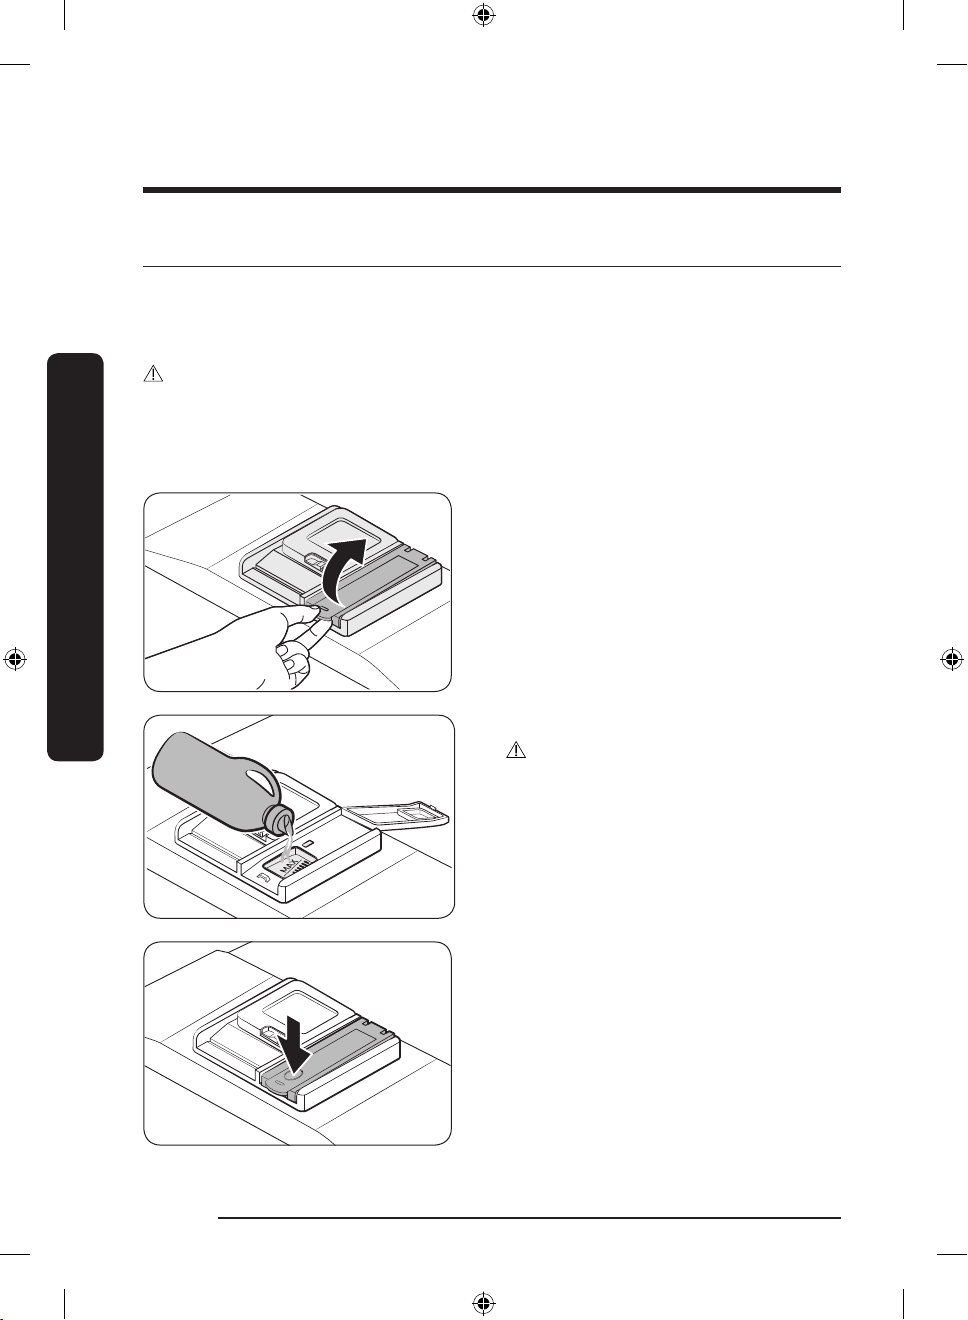
Filling the rinse aid
Before you start
1. Open the rinse aid reservoir cap.
2. Fill the rinse aid reservoir with rinse aid.
CAUTION
Do not ll the reservoir above the full level
indicator. Excess rinse aid can overow
during the wash cycle.
3. Close the rinse aid reservoir cap.
English52
DW8500AM_DW60A8070BB_ET_DD81-03206K-04_EN.indd 52 2023-06-27() 5:35:15
Page 53
Salt storage
CAUTION
• Use dishwasher-specic salt only. Do not use any other type of salt or solvent. This may
damage the salt storage and the water softening system.
• To prevent corrosion due to an excessive amount of salt or salty water, always ll the
salt storage before a washing cycle gets started.
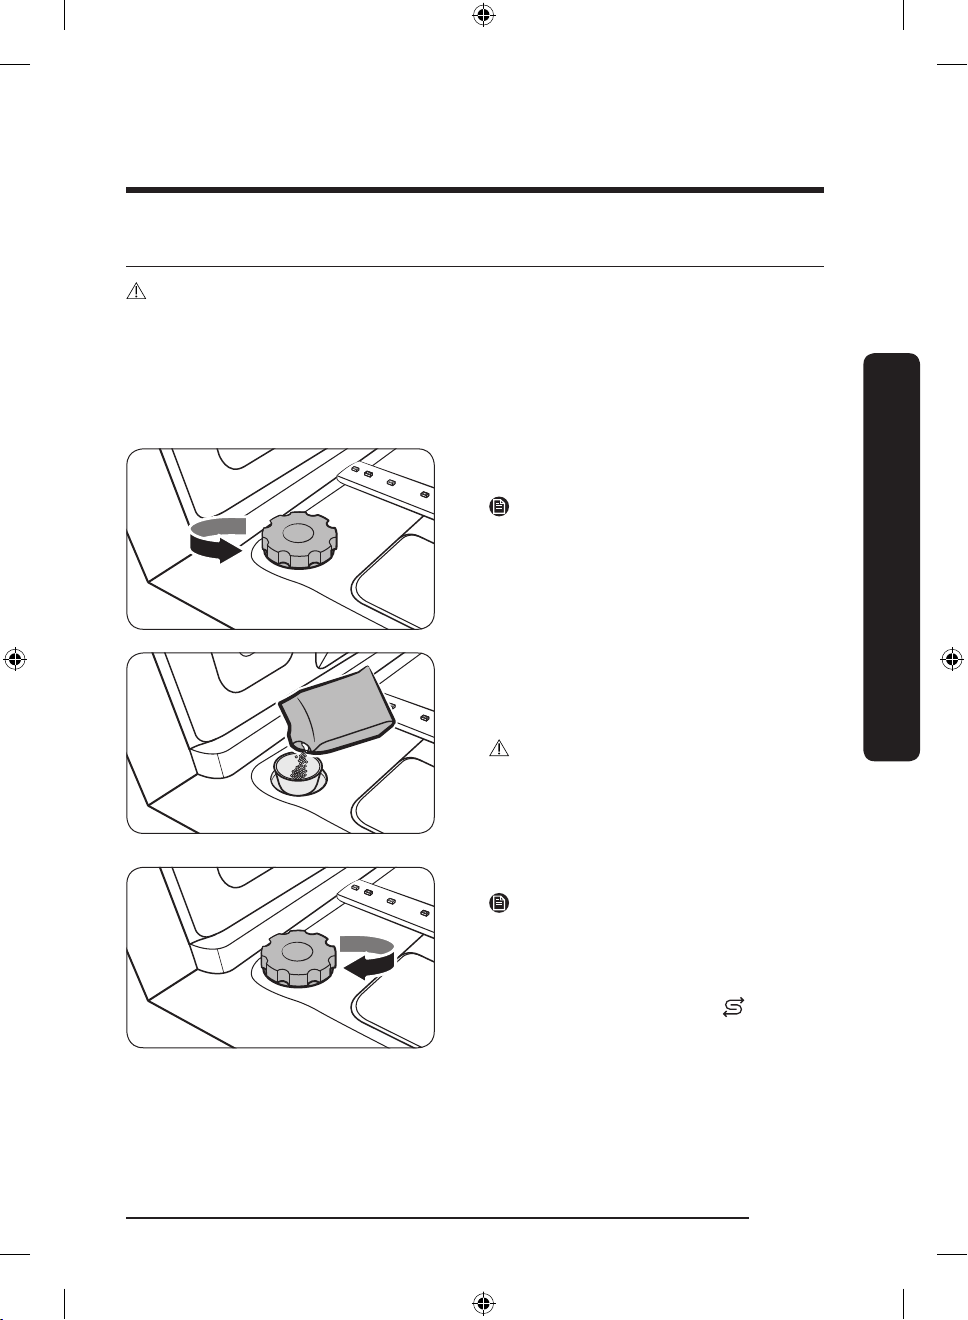
Filling the salt storage
1. Open the door.
2. Turn the cap counterclockwise to open.
NOTE
When you open the softener lid, clean
water stored for about one minute may run
out. Add salt to stop the water from leaking
out.
3. Fill the salt storage with water (only
required when using the dishwasher for
the rst time).
4. Apply dishwasher salt.
CAUTION
• The maximum capacity is about 1 kg. Do
not exceed the capacity.
• Exceeding the capacity may affect the
dishwasher performance.
Before you start
5. Turn the cap clockwise to close.
NOTE
• To clean salt or salt water from
dishwasher, run the Quick cycle.
• Depending on the size of the salt grains,
it may take a while for the salt to
dissolve and the indicator ( ) to turn
off.
English 53
DW8500AM_DW60A8070BB_ET_DD81-03206K-04_EN.indd 53 2023-06-27() 5:35:15
Page 54
Before you start
Salt indicator
The indicator ( ) turns on if there is not enough salt for the next several cycles.
Touchpad responsiveness
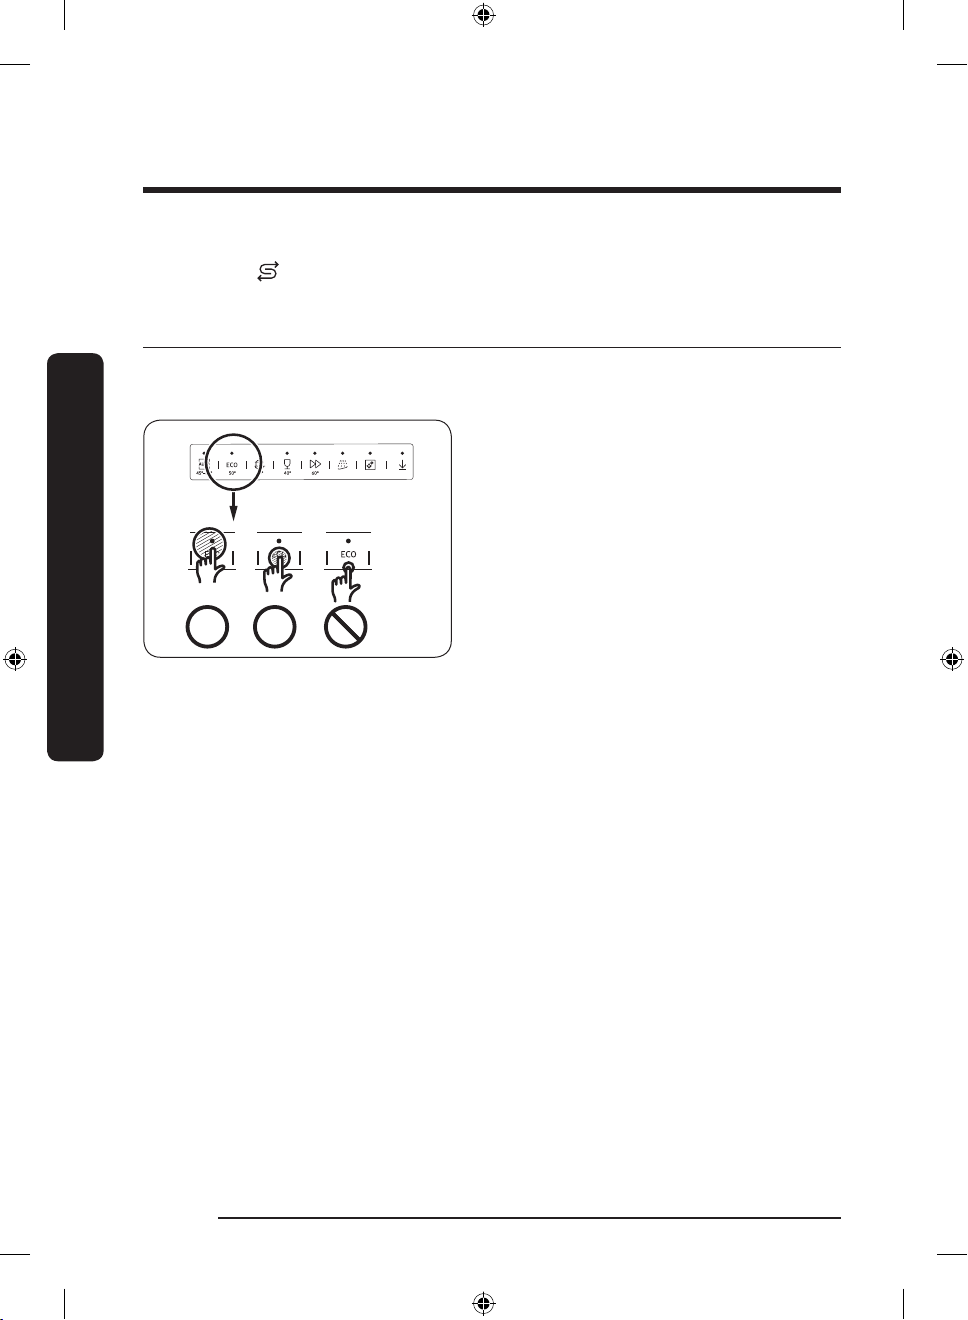
To prevent the touch-enabled controls from losing responsiveness, follow these
instructions.
• Touch the centre of each button with
one nger.
Before you start
• Do not touch more than one button at a
time, except as directed.
• Clean the surface of the control panel
regularly with a soft, damp cloth.
English54
DW8500AM_DW60A8070BB_ET_DD81-03206K-04_EN.indd 54 2023-06-27() 5:35:15
Page 55
Setting mode
You can change the sound, auto door open function, rinse aid level, and water hardness
settings to your preference.
Entering the Setting mode
1. Turn the dishwasher on.
2. Press and hold the AUTO cycle button for ve seconds within 60 seconds from turning
on the dishwasher.
- When you entered the Setting mode, the display will show “0:00”.
Sound setting
You can turn the sound on or off.
1. Press the Lower rack only button to select the sound setting menu.
- The display shows the current setting. (Default setting: “U1”)
2. Press the AUTO cycle button to change the setting.
- U0: Sound off
- U1: Sound on
3. Wait 5 seconds to save the setting.
Auto door open function setting
You can set the dishwasher to automatically open the door after each cycle for better
drying results.
1. Press the Speed Booster button to select the auto door open function setting menu.
- The display shows the current setting. (Default setting: “A1”)
2. Press the AUTO cycle button to change the setting.
- A0: Function disabled
- A1: Function enabled
3. Wait 5 seconds to save the setting.
Before you start
English 55
DW8500AM_DW60A8070BB_ET_DD81-03206K-04_EN.indd 55 2023-06-27() 5:35:15
Page 56
Before you start
Rinse aid level setting
You can change the amount of rinse aid applied during a cycle.
1. To select the rinse aid level setting menu. Select the “AUTO” key for 5 seconds, after the
beep followed by the reset of the “0:00” display, press the “Sanitize” key.
- The display shows the current setting. (Default setting: “F4”)
2. Press the AUTO cycle button to change the setting.
- You can select from F1 - F5 (minimum – maximum).
3. Wait 5 seconds to save the setting.
Water hardness level setting
You can change the water hardness level according to water hardness in your local area.
Before you start
Changing this setting will have effect on the salt consumption in the dishwasher’s salt
storage.
1. To select the water hardness level setting menu. Select the “AUTO” button for 5 seconds,
after the beep followed by the display reset: “0:00”, press the “Delay Start” button.
- The display shows the current setting. (Default setting: “H3”)
2. Press the AUTO cycle button to change the setting.
- You can select from H1 – H6 (soft – hard).
3. Wait 5 seconds to save the setting.
NOTE
• Change the setting according to the table in the “Adjusting salt consumption” section on
page 62.
• Default Setting: H3
• The dishwasher regenerates the water softener once every 3–4 cycles depending on the
setting. However, the dishwasher will regenerate the water softener on the rst cycle
after you change the setting.
• Regeneration will be operated in dry phase with an additional 2.0–2.5 l of water being
used and 4–10 minutes taken for the cycle.
• The energy used may be increased however this should be by an insignicant amount.
English56
DW8500AM_DW60A8070BB_ET_DD81-03206K-04_EN.indd 56 2023-06-27() 5:35:16
Page 57
Operations
01 02 0403 05 06 08
07
01 02 0403 05 06 08
07
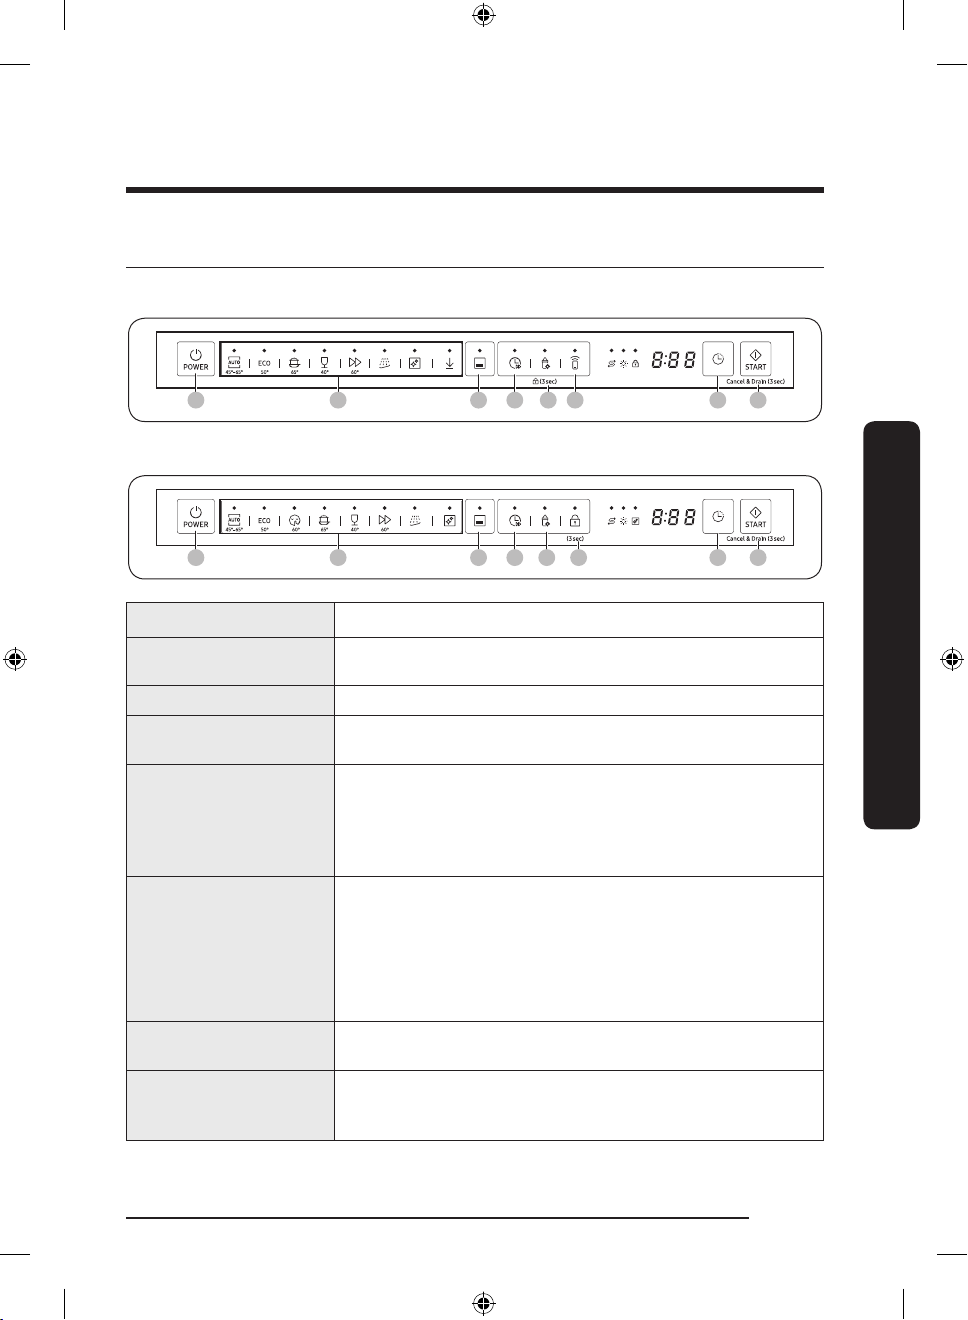
Control panel
DW60A807*/DW60A806*/DW60A805* models
DW60A804* models
01 POWER Press to turn the dishwasher on or off.
02 Cycle
03 Lower rack only Press to wash items using only the lower rack.
04 Speed Booster
05 Sanitize
06 Smart Control
(DW60A807*/
DW60A806*/
DW60A805* models)
Control Lock
(DW60A804* models)
07 Delay Start
08 START
(Cancel & Drain)
Press to select a desired wash cycle. For more information,
see the “Cycle overview” section on page 59.
Select this option to reduce the cycle time. This is available
only with the AUTO, ECO, and Delicate cycles.
Press to increase the water temperature up to 70 °C in the
nal rinse process for high temperature sanitization.
This option is not available with Delicate and Pre Wash.
To activate Control Lock, press and hold Sanitize for
3 seconds. (DW60A807*/DW60A806*/DW60A805* models)
You can check product operation remotely by using
Smart Control.
Control lock allows you to lock the buttons on the control
panel except for the POWER button. For more information,
see the “Control Lock” section on page 64.
You can delay the cycle starting time up to 24 hours. For
more information, see the “Delay Start” section on page 64.
Press START to start operation. Make sure the door is closed.
Cancel & Drain: To cancel the current cycle and drain the
dishwasher, press and hold START for 3 seconds.
Operations
English 57
DW8500AM_DW60A8070BB_ET_DD81-03206K-04_EN.indd 57 2023-06-27() 5:35:16
Page 58
Operations
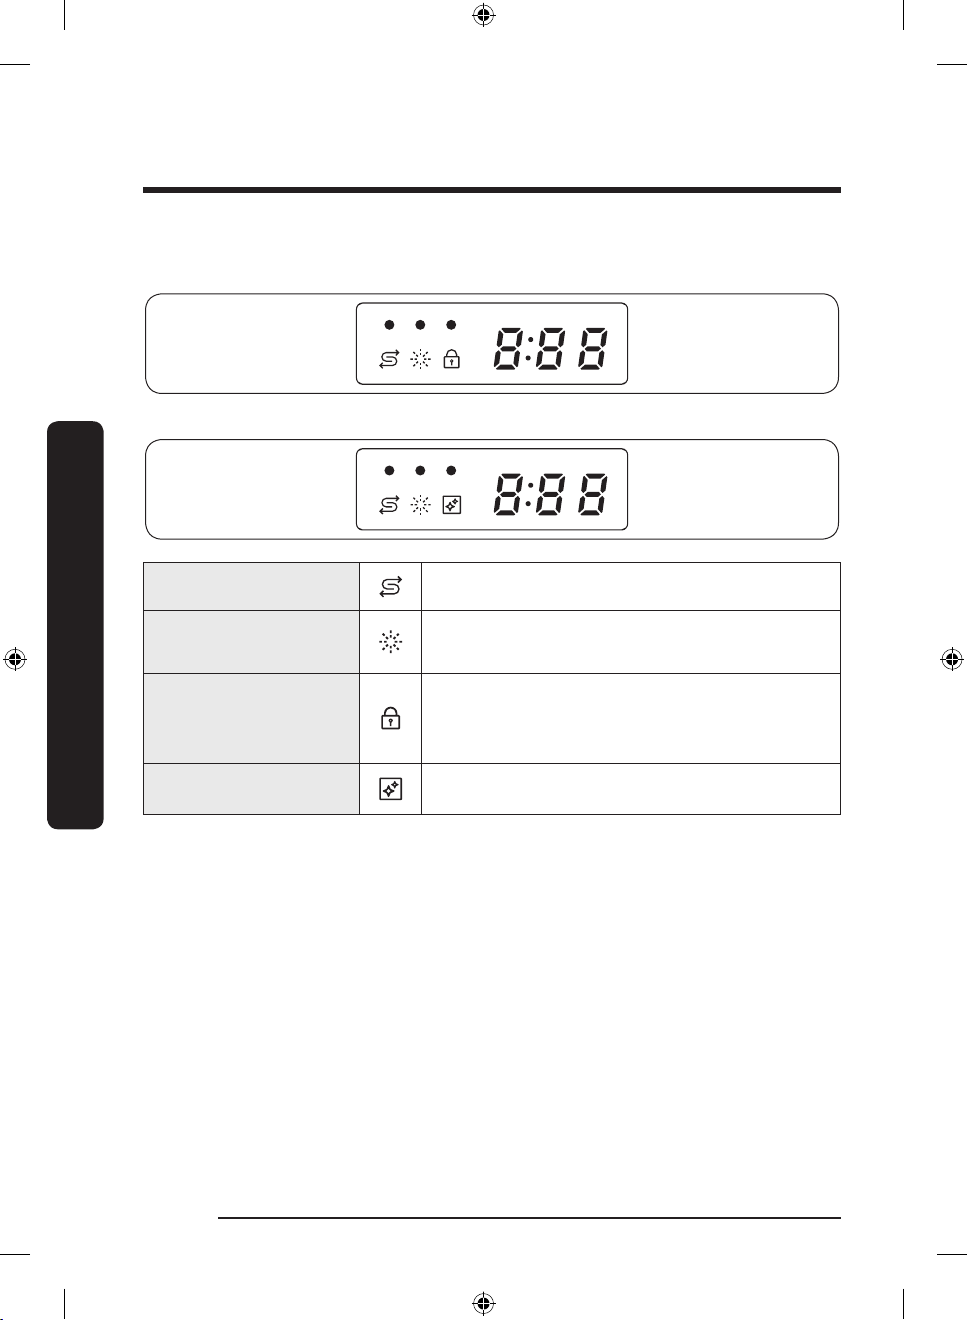
Indicators
DW60A807*/DW60A806*/DW60A805* models
DW60A804* models
Operations
No Salt indicator Lights up when the salt storage runs out of salt.
Rinse Rell indicator Lights up when the dishwasher runs out of rinse aid.
Control Lock indicator
(DW60A807*/
DW60A806*/
DW60A805* models)
Self Clean indicator
(DW60A804* models)
Lights up if Control Lock is activated.
Lights up if Self Clean is activated.
English58
DW8500AM_DW60A8070BB_ET_DD81-03206K-04_EN.indd 58 2023-06-27() 5:35:16
Page 59
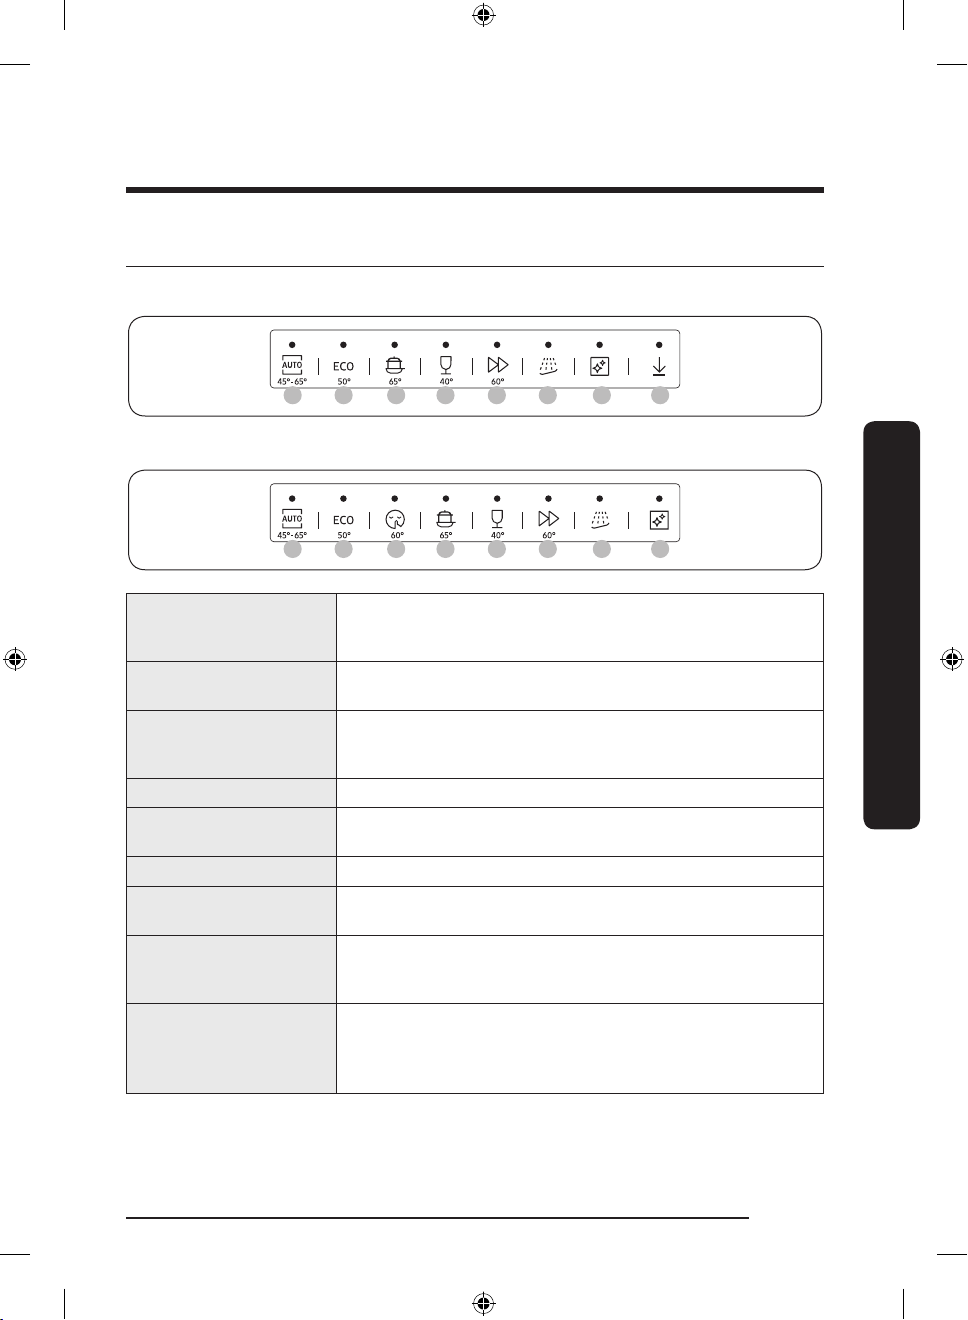
Cycle overview
01 02 04 05 06 07
08 09
01 02 03 04 05 06
07 08
DW60A807*/DW60A806*/DW60A805* models
DW60A804* models
01 AUTO
02 ECO
03 Extra Silence
(DW60A804* models)
04 Intensive Select this cycle for heavily soiled items.
05 Delicate
06 Express 60 Normally soiled daily using items, with short cycle time.
07 Pre Wash
08 Self Clean
09 Download Course
(DW60A807*/
DW60A806*/
DW60A805* models)
This cycle detects the level of soil and automatically initiates
the optimal cycle, which is appropriate for all levels of soiled
items.
This cycle reduces power and water consumption, which is
appropriate for normally soiled items.
Select this cycle for more smooth and quiet washing. This
cycle washes a little bit slower, but creates 2 decibels less
noise than the ECO program.
Select this cycle for lightly soiled, fragile items such as
glasses. Sanitize option is not available in this cycle.
Cold water rinse for removing dirt before running another
program.
Select this cycle to clean the inside of the dishwasher. Make
sure the dishwasher is empty. This cycle requires detergent
for proper operation.
Based on the Extra Silence course, you can download the
following additional courses:
• Extra Silence, Baby Care, Plastic, and Pots and Pans
courses
Operations
English 59
DW8500AM_DW60A8070BB_ET_DD81-03206K-04_EN.indd 59 2023-06-27() 5:35:17
Page 60
Operations
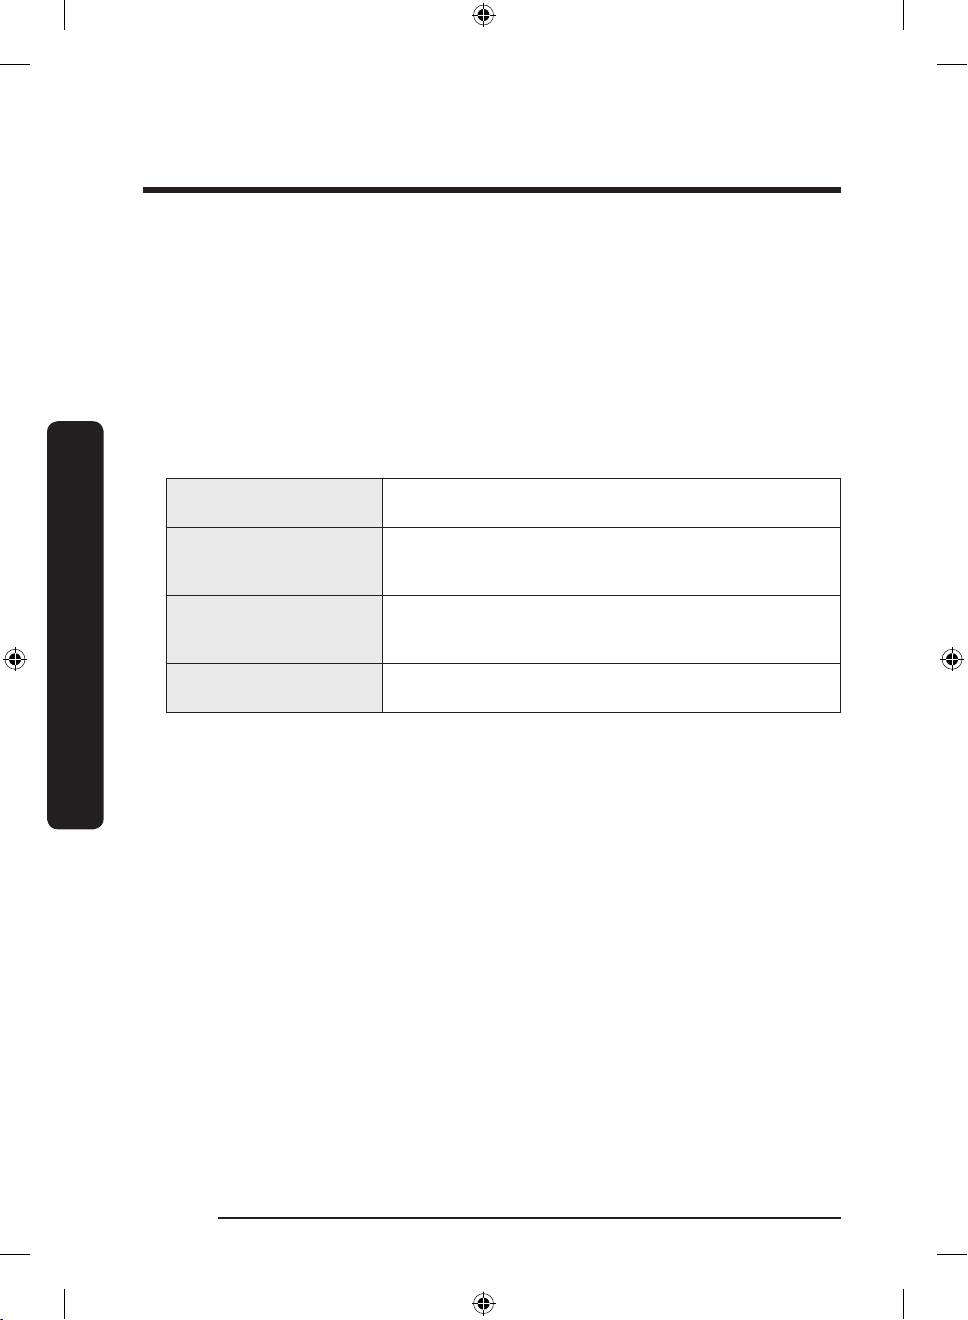
Download Course (DW60A807*/DW60A806*/DW60A805* models)
You can download and use courses other than those provided by default through your
smartphone.
1. Press the POWER button.
2. Select Download Course.
3. Select the downloadable course you want to use in your smartphone app.
Extra Silence, Pots and Pans, Plastic, and Baby Care courses are available.
- The default download course is the Extra Silence course.
- When you download via the smartphone app, you can keep using your saved
courses.
4. Press the START button and close the dishwasher door.
Operations
Extra Silence
Pots and Pans
Plastic
Baby Care
This course is used to quietly clean dishes after a typical
meal. It is longer but quieter than a standard course.
Choose to wash pots and pans. This course uses hotter
water and higher pressure than a standard course for
focused cleaning of pot and pans.
This course is used when washing plastic dishes. It
washes plastic at a safer temperature (60 °C) and dries
them better.
Suitable for rinsing/drying dishes at a high temperature
of 70 °C. Do not add detergent or rinse.
English60
DW8500AM_DW60A8070BB_ET_DD81-03206K-04_EN.indd 60 2023-06-27() 5:35:17
Page 61
Simple steps to start
1. Open the door, and then load the dishwasher. Make sure to remove food remains and
waste on the dishes.
2. Apply detergent to the detergent dispenser. For better results, add rinse aids.
3. Press POWER, and then select a cycle with necessary options (Lower rack only,
Speed Booster, Sanitize, and Delay Start). Some options may not be available depends
on the cycle.
NOTE
If you select Lower rack only, make sure the dishes are loaded in the lower rack.
4. Press START, and then close the door. The dishwasher starts the cycle after draining for
a few seconds.
NOTE
• To change the cycle after it has started, press and hold START for 3 seconds to cancel
the cycle. Then, select a new cycle.
• The default cycle is ECO.
• To resume after you have opened the door to stop the dishwasher while operating,
simply close the door.
Operations
English 61
DW8500AM_DW60A8070BB_ET_DD81-03206K-04_EN.indd 61 2023-06-27() 5:35:17
Page 62
Operations
Operations
Salt storage
The water softener is designed to remove minerals and salts from the water, which would
have a detrimental or adverse effect on the operation of the appliance. The higher the
content of these minerals and salts, the harder your water is. The softener should be
adjusted according to the hardness of the water in your area.
Your local Water Authority can advise you on the hardness of the water in your area.
Adjusting salt consumption
The dishwasher is designed to allow for adjusting the amount of salt consumed based on
the hardness of the water used. This is intended to optimise and customise the level of salt
consumption so that the salt consumption could be set proceed as follows:
1. Turn the dishwasher on.
2. Press and hold the AUTO cycle button for ve seconds within 60 seconds from turning
on the dishwasher.
- When you entered the Setting mode, the display will show “0:00”.
3. Press the Delay Start button to select the water hardness level setting menu.
- The display shows the current setting. (Default setting: “H3”)
4. Press the AUTO cycle button to change the setting.
- You can select from H1 – H6 (soft – hard).
5. Wait 5 seconds to save the setting.
NOTE
• It is recommended that adjustments should be made in accordance with the following
(or Manual) table.
• Default Setting: H3
English62
DW8500AM_DW60A8070BB_ET_DD81-03206K-04_EN.indd 62 2023-06-27() 5:35:17
Page 63
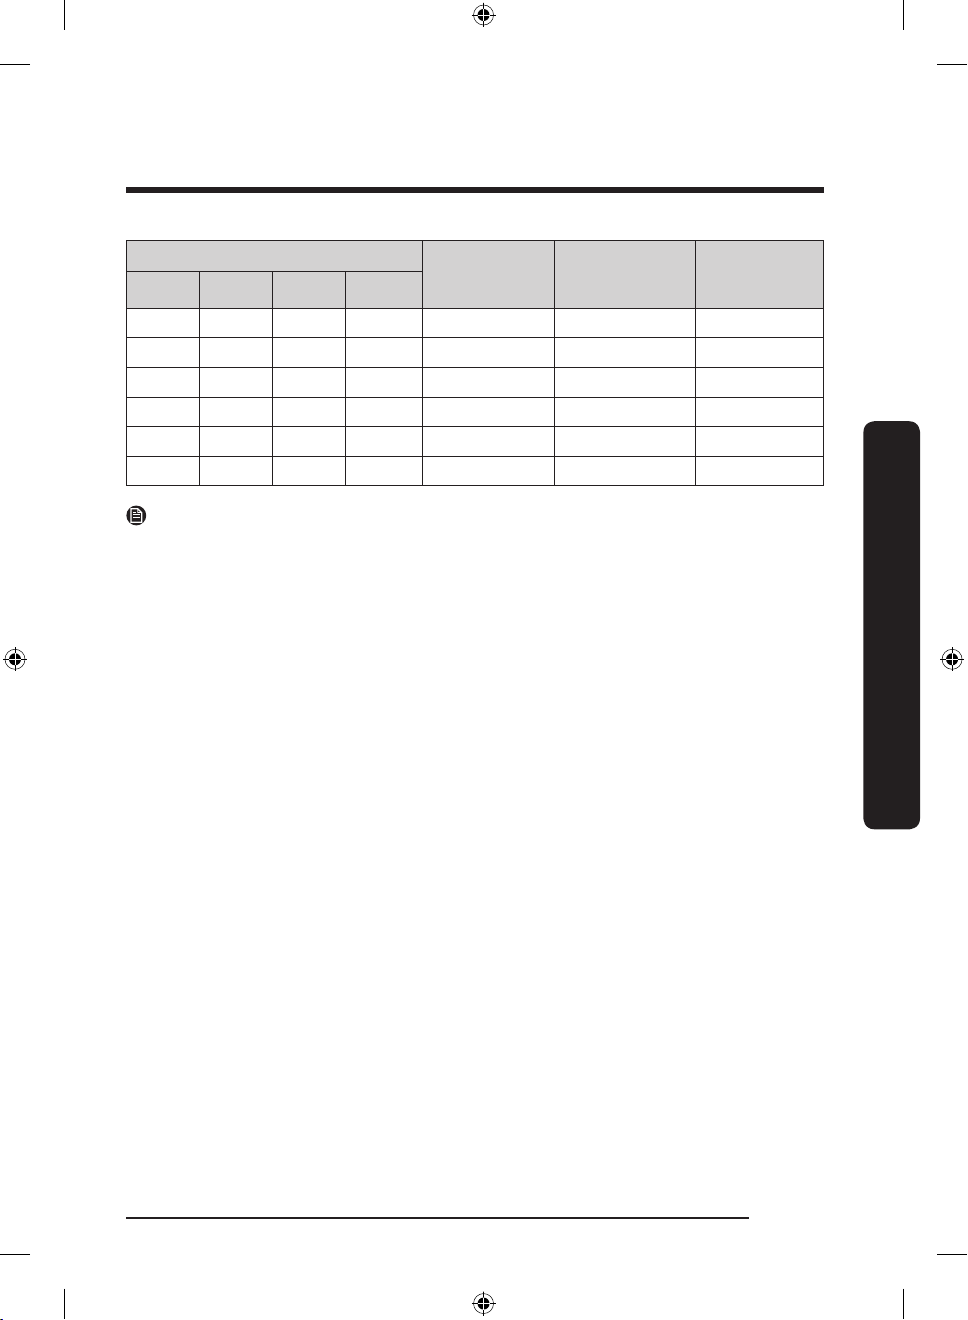
Water hardness
°dH °fH °Clark mmol/l
Water
hardness
setting
Salt
consumption
(gram/cycle)
Autonomy
(cycles/1 kgs)
0-5 0-9 0-6 0-0.94 H1 0 /
6-11 10-20 7-14 1.0-2.0 H2 20 60
12-17 21-30 15-21 2.1-3.0 H3 30 50
18-22 31-40 22-28 3.1-4.0 H4 40 40
23-34 41-60 29-42 4.1-6.0 H5 50 30
35-55 61-98 43-69 6.1-9.8 H6 60 20
NOTE
• 1 dH (German degree) = 0.178 mmol/l
• 1 Clark (British degree) = 0.143 mmol/l
• 1 fH (French degree) = 0.1 mmol/l
• Contact your local water board for information on the hardness of your water supply.
• WATER SOFTENER
The hardness of the water varies from place to place. If hard water is used in the
dishwasher, deposits may form on dishes and utensils. The appliance is equipped with
a special softener that uses a salt specically designed to eliminate lime and minerals
from the water.
Operations
English 63
DW8500AM_DW60A8070BB_ET_DD81-03206K-04_EN.indd 63 2023-06-27() 5:35:17
Page 64
Operations
Operations
Delay Start
You can delay the cycle starting time up to 24 hours in 1-hour increments. To increase the
delay time, press Delay Start. The hour displayed indicates the time at which the cycle will
start.
1. Open the door, and then load the dishwasher.
2. Press Delay Start to change the time in 1-hour increments.
- If you press and hold the button, the time will increase until you release the button.
3. Press START, and then close the door.
NOTE
To change the delay time once the dishwasher has started, press POWER and restart the
dishwasher.
Control Lock
To prevent children from playing with the dishwasher, Control Lock locks all button
controls except for POWER.
• To activate Control Lock, press and hold Control Lock for 3 seconds. With Control Lock
activated, you cannot select a cycle or option, or start an operation.
• To deactivate Control Lock, press and hold Control Lock again for 3 seconds.
• Control Lock remains active after the dishwasher restarts. To cancel Control Lock, you
must deactivate it rst.
English64
DW8500AM_DW60A8070BB_ET_DD81-03206K-04_EN.indd 64 2023-06-27() 5:35:17
Page 65
Maintenance
Cleaning
Keep the dishwasher clean to improve performance, reduce unnecessary repairs, and
lengthen the lifecycle.
Exterior
Clean spills on the surface of the dishwasher immediately. Use a soft, damp cloth on the
control panel to gently wipe away spills and dust.
CAUTION
• Do not use benzene, wax, thinner, chlorine bleach, alcohol, or other chemical substances.
These materials may discolour the surface of the dishwasher and cause stains.
• The dishwasher has electric parts inside. Do not spray water directly onto the
dishwasher. Protect electrical components from water.
• For a stainless-steel door panel, use a stainless steel cleaner for home appliances and a
clean, soft cloth.
Interior
Clean the interior of the dishwasher on a regular basis to remove any dirt or food particles.
Wipe inside the dishwasher and inside the door with a wet dishcloth.
CAUTION
• Do not remove the front seal (the long rubber seal enclosing the opening of the
dishwasher). The seal keeps the inner side of the dishwasher sealed.
• Use a damp cloth to remove lime scale or grease deposits inside the dishwasher.
Alternatively, apply some detergent, and then run an empty cycle using the highest
rinse temperature.
Maintenance
English 65
DW8500AM_DW60A8070BB_ET_DD81-03206K-04_EN.indd 65 2023-06-27() 5:35:17
Page 66
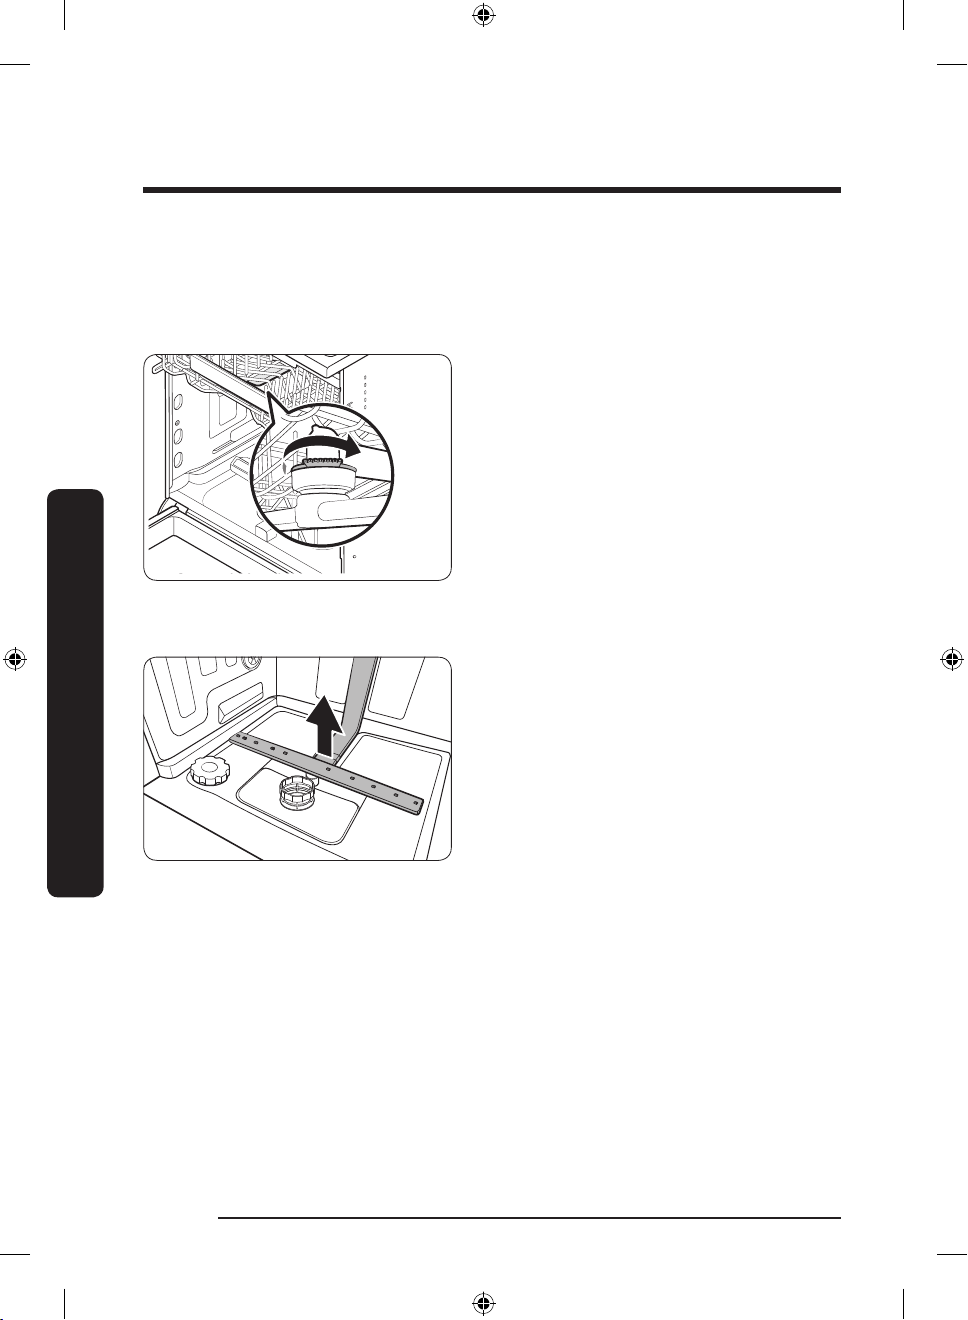
Maintenance
Nozzles
To prevent the nozzles from being clogged or if the nozzles are clogged, remove and clean
each nozzle. Use caution when removing the nozzles as they may break.
Upper nozzle
1. Open the door, and then pull out the
upper rack to reveal the upper nozzle.
2. Loosen and remove the nut, and then
remove the nozzle.
3. Unclog and clean the nozzle.
4. Reinsert the nozzle, and then tighten the
nut by hand.
5. Rotate the nozzle by hand to make sure
the nozzle is engaged correctly.
Maintenance
Lower nozzle
1. Open the door, and then pull out the
lower rack. The lower nozzle is visible
on the bottom.
2. Unclog and clean the nozzle.
3. Reinsert the nozzle.
4. Rotate the nozzle by hand to make sure
the nozzle is engaged correctly.
English66
DW8500AM_DW60A8070BB_ET_DD81-03206K-04_EN.indd 66 2023-06-27() 5:35:17
Page 67
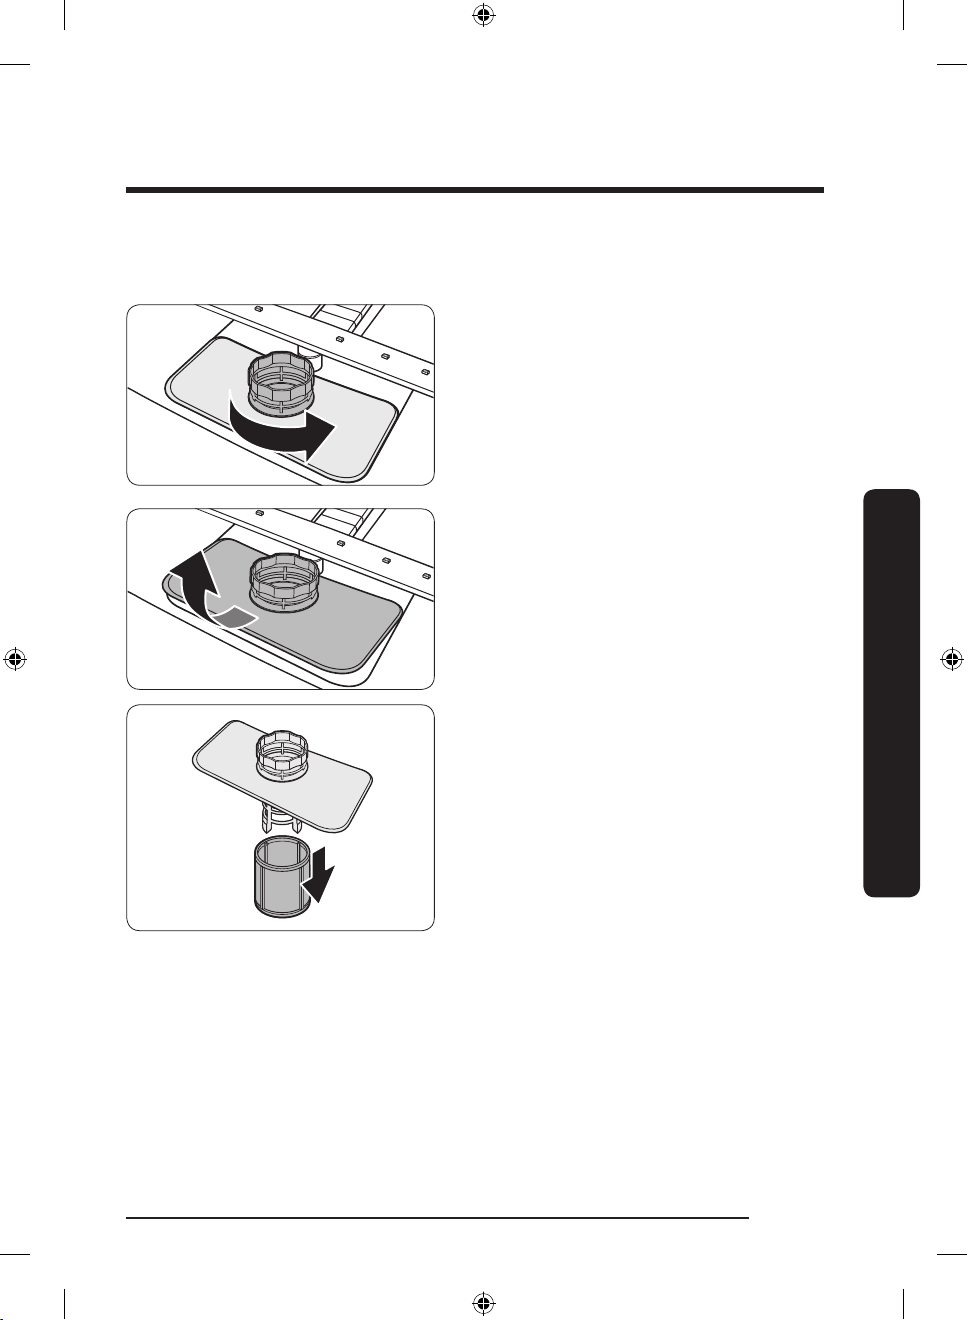
Filter
We recommend cleaning the lter every month.
1. Open the door, and then remove the
lower rack rst.
2. Turn the lter handle counterclockwise
to unlock the Coarse lter.
3. Remove the Coarse lter, and then the
cylindrical micro lter underneath.
Maintenance
English 67
DW8500AM_DW60A8070BB_ET_DD81-03206K-04_EN.indd 67 2023-06-27() 5:35:17
Page 68
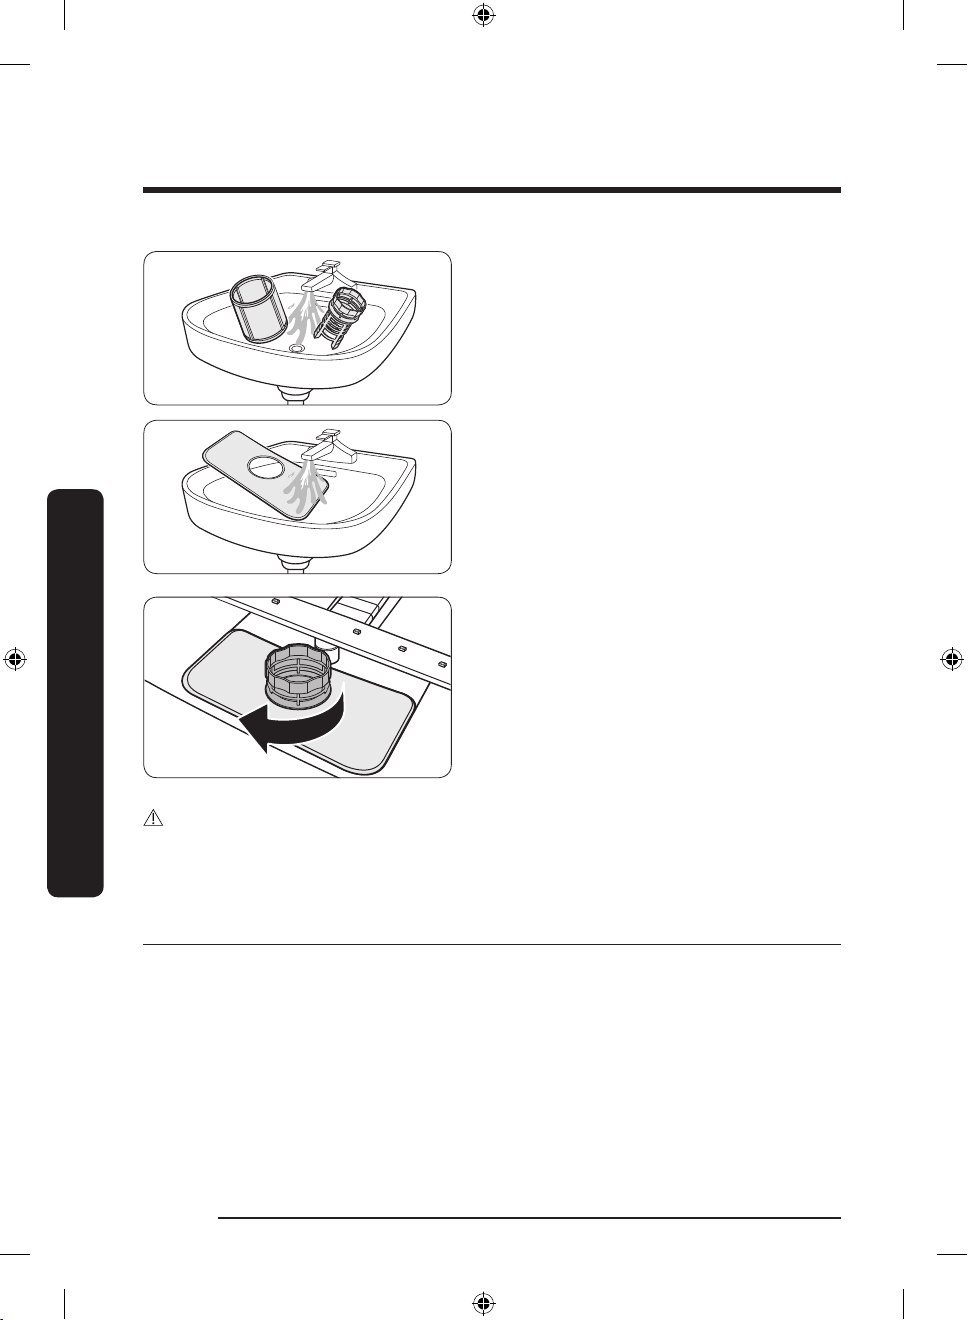
Maintenance
4. Remove any dirt and impurities from
the micro lter and the Coarse lter.
5. Rinse them with running water, and then
dry well.
6. Reinsert the lter, and then the Coarse
Maintenance
lter.
7. Turn the lter handle clockwise to lock.
CAUTION
Make sure the Coarse lter is closed properly. A loose cover can reduce the ltering
performance.
Long-term care
If you will not use the dishwasher for an extended period of time, rst drain the unit
completely, and then disconnect the water hose. Shut off the water supply valve and the
circuit breaker. Water remaining in the hoses or the internal components can damage the
dishwasher.
English68
DW8500AM_DW60A8070BB_ET_DD81-03206K-04_EN.indd 68 2023-06-27() 5:35:18
Page 69
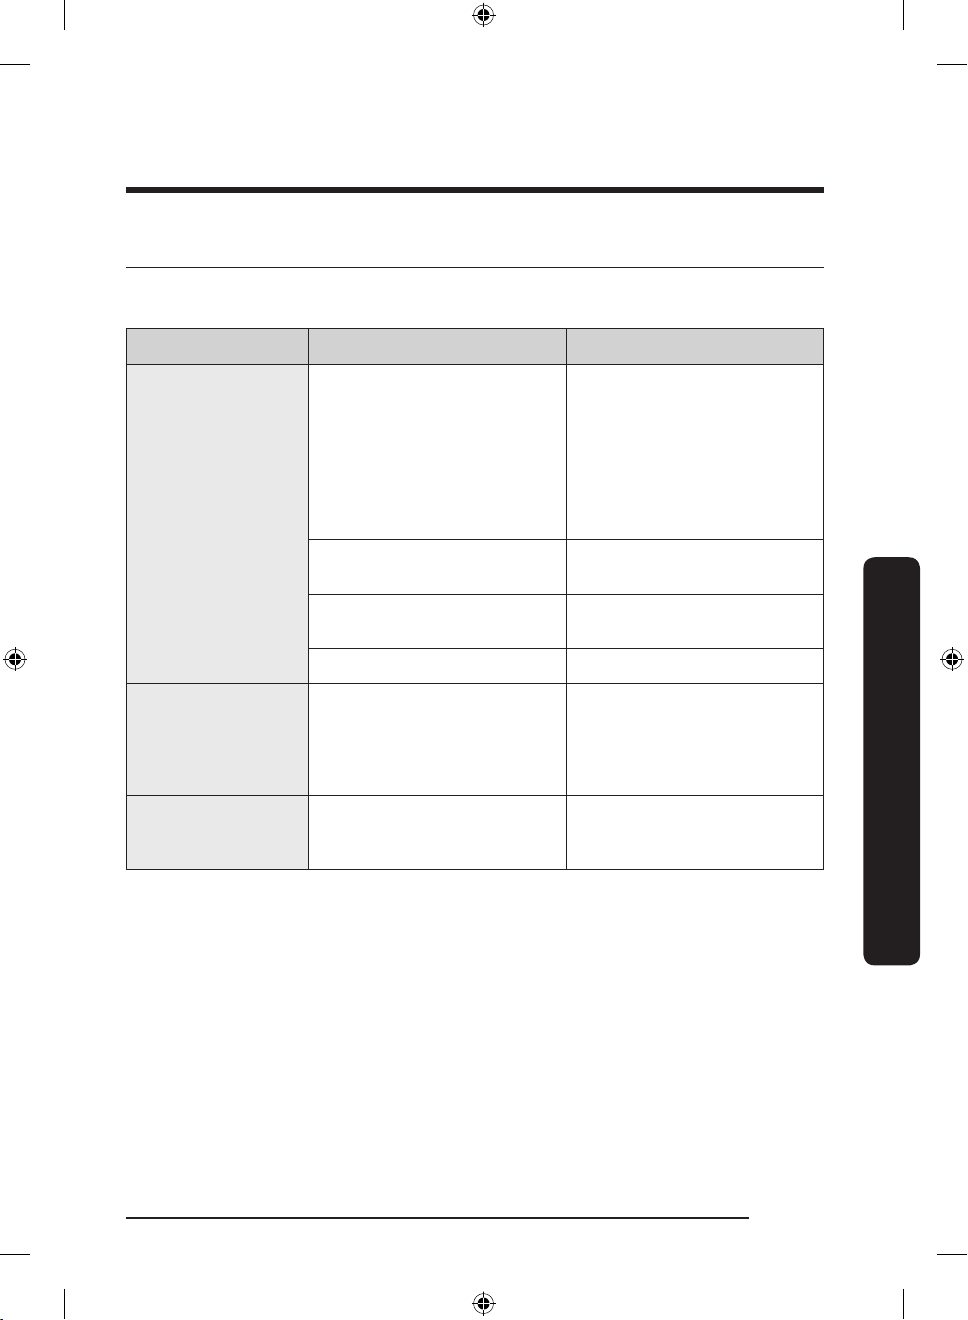
Troubleshooting
Checkpoints
If you encounter an issue with the dishwasher, rst check the table below and try the
suggestions.
Symptom Possible cause Action
• Make sure the door is
latched and completely
closed.
The door is not completely
closed.
The dishwasher does
not start.
The power cord is not
connected.
• Make sure the upper rack
is properly joined with the
nozzle.
• Make sure the upper rack is
properly assembled.
• Connect the power cord.
The dishwasher has
bad odours.
Water remains in the
dishwasher after a
cycle has nished.
Water is not being supplied.
The control panel is locked. • Deactivate the Control Lock.
Water remains from the
previous cycle.
The drain hose is folded or
clogged.
• Make sure the water supply
valve is open.
• With the dishwasher empty,
add detergent, and then
run the Quick cycle. This is
available only on applicable
models.
• Straighten and unclog the
hose.
Troubleshooting
English 69
DW8500AM_DW60A8070BB_ET_DD81-03206K-04_EN.indd 69 2023-06-27() 5:35:18
Page 70
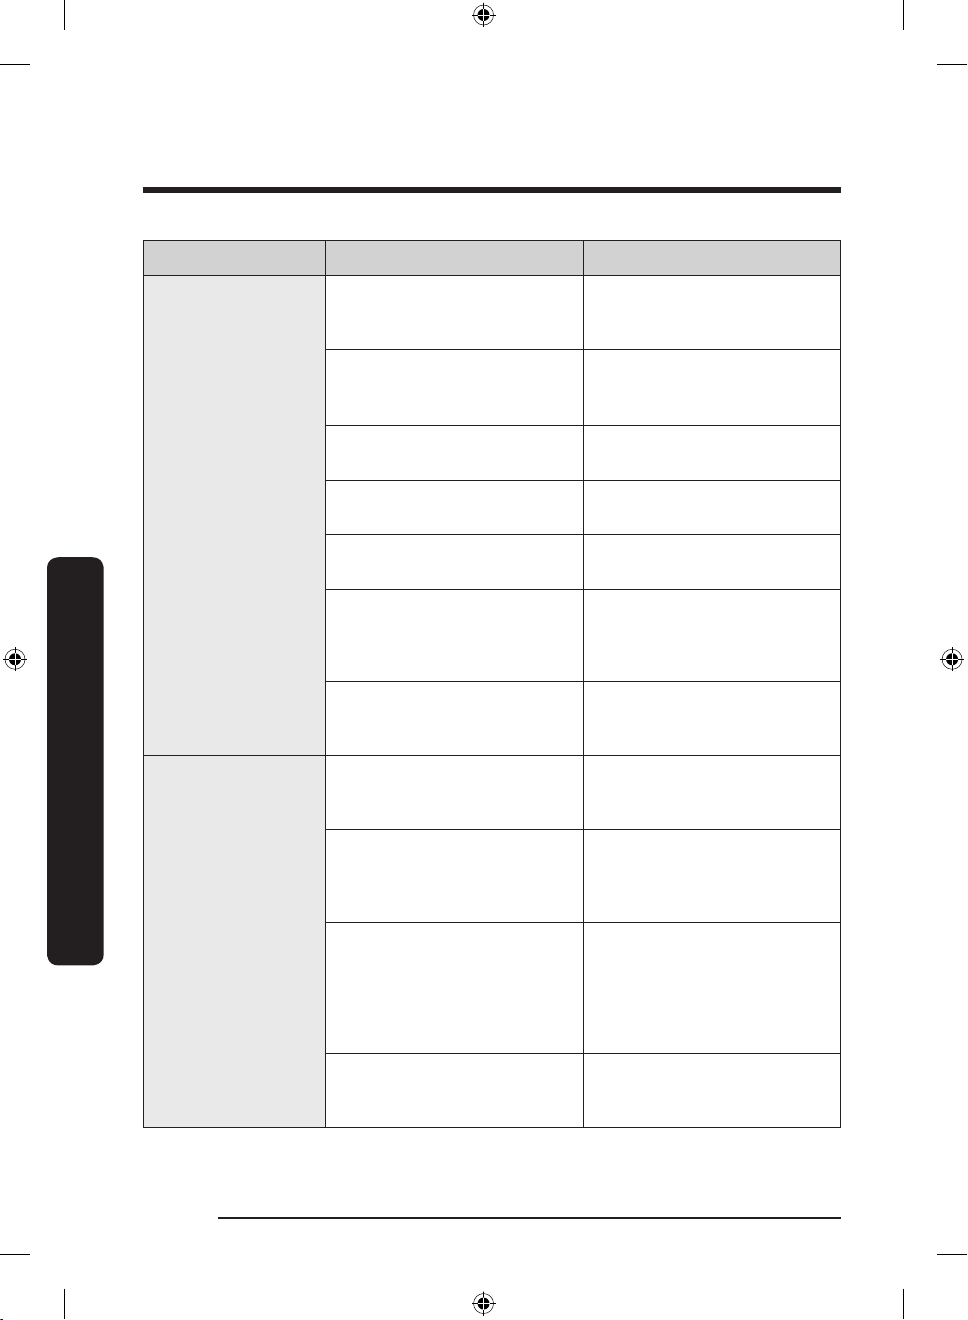
Troubleshooting
Symptom Possible cause Action
Troubleshooting
Food remains on
dishes.
Dishes are not dried
well.
An incorrect cycle was
selected.
The lters are clogged or not
correctly fastened.
An insufcient amount of
detergent was used.
The water pressure is low.
The nozzles are clogged.
Dishes improperly loaded or
overloaded.
The water is too hard.
There is no rinse aid in the
dispenser, or not enough rinse
aid was used.
Too many dishes are loaded.
Glasses and cups spilled water
onto other dishes while being
unloaded.
• Select a cycle according to
the soil level of the dishes
as instructed in this manual.
• Clean the lters.
• Make sure the lters are
correctly fastened.
• Use the correct amount of
detergent for each load.
• Make sure the pressure is
between 0.04-1.0 Mpa.
• Clean and unclog the
nozzles.
• Arrange the dishes so
they do not interfere with
the nozzles and/or the
detergent dispenser.
• Check the salt rell
indicator, and rell with
dishwasher salt.
• Add rinse aid.
• Check the rinse aid settings.
• Overloading may reduce
the drying performance.
Load your dishes as
recommended.
• Empty the lower rack
rst, and then the upper
rack. This will avoid water
dripping from the upper
rack onto the dishes in the
lower rack.
Multiple detergent tablets were
used without selecting the
Sanitize option.
English70
DW8500AM_DW60A8070BB_ET_DD81-03206K-04_EN.indd 70 2023-06-27() 5:35:18
• Select the Sanitize option or
use rinse aid.
Page 71
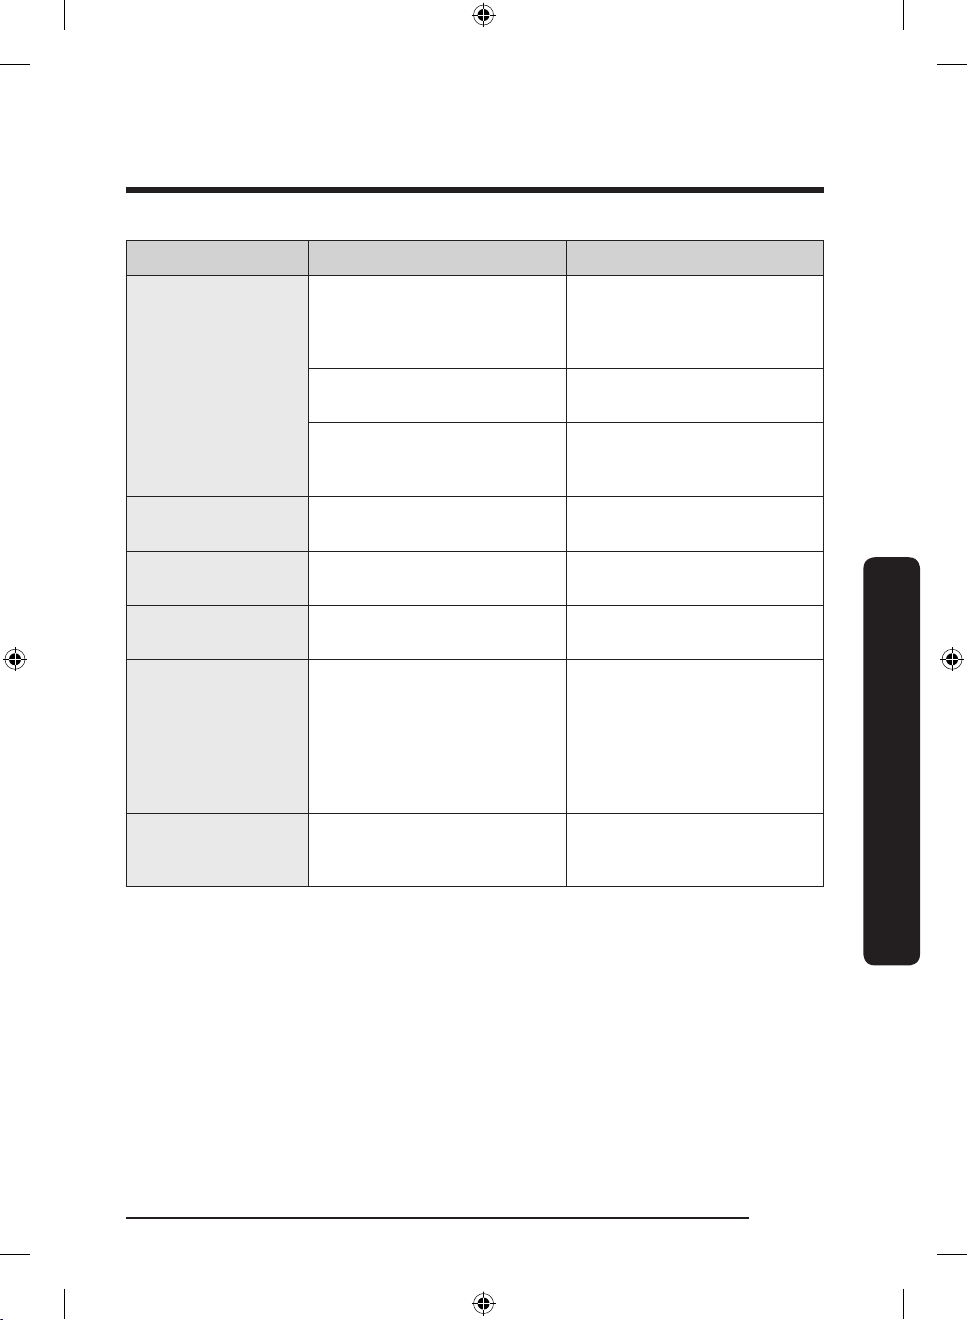
Symptom Possible cause Action
The dishwasher makes a sound
when the dispenser cover is
open and the drain pump is
• This is normal.
operating.
The dishwasher is
too noisy.
The dishwasher is not level.
• Make sure the dishwasher
is level.
The nozzle bumps against the
dishes, creating a chopping
• Rearrange the dishes.
sound.
Yellow or brown lm
remains on dishes.
Indicators do not
light up.
The nozzles do not
rotate smoothly.
A white coating
remains on dishes.
Air bubbles and
scratch marks are on
the control panel.
Coffee and tea soils.
The power cord is not
connected.
The nozzles are clogged with
food particles.
The water is too hard.
Air gets into the protective
lm, causing EPS marks to
remain.
• Use a cycle with a higher
temperature.
• Check power supply is
present.
• Clean the nozzles.
• Make sure the salt ll
indicator and softener
settings are correct
according to the water
hardness of your area.
• Make sure the salt storage
cap is correctly fastened.
• Remove the protective lm
from the control panel.
Troubleshooting
English 71
DW8500AM_DW60A8070BB_ET_DD81-03206K-04_EN.indd 71 2023-06-27() 5:35:18
Page 72
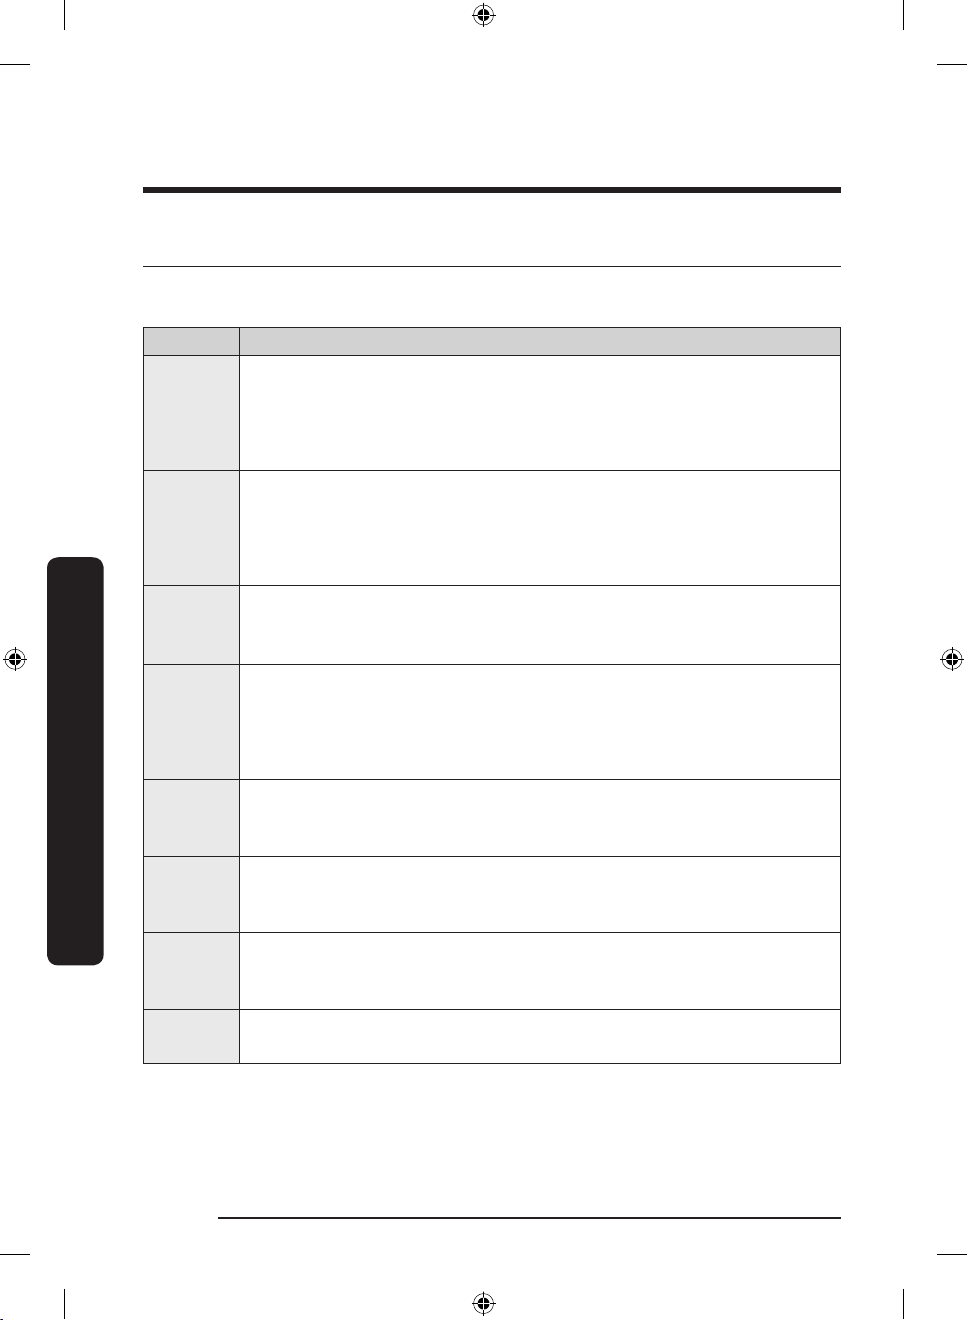
Troubleshooting
Information codes
If the dishwasher fails to operate, you may see an information code on the display. Check
the table below and try the suggestions.
Code Action
Leakage check
LC
4C
AC
• Close the water supply valve. Go to your home’s circuit breaker panel,
and set the dishwasher’s circuit breaker switch to off. Then, contact the
installer to repair. If the issue continues, contact a local Samsung service
center.
Water supply check
• Check if the water supply valve is closed, if the water supply is
suspended, or if the water inlet valve or line is frozen or clogged by
foreign particles. If the issue continues, contact a local Samsung service
center.
PCB communication check
• Abnormal communication between the main PCB and the sub PCB.
• If the problem continues, contact an authorised Samsung service center.
Troubleshooting
High temperature heating check
HC
tC
3C
PC
5C
If any information code keeps appearing on the screen, contact a local Samsung service
centre.
English72
• Functional check. With the dishwasher empty, add detergent, and then
run a cycle. If the issue continues, go to your home’s circuit breaker
panel, and set the dishwasher’s circuit breaker switch to off. Then,
contact a Samsung service center.
Thermistor check
• Temperature sensor is broken (short or open circuit). If the problem
continues, contact an authorised Samsung service center.
Washing pump check
• Abnormal working with washing pump. If the issue continues, contact a
local Samsung service center.
Distribution motor check
• Abnormal working with distribution motor assembly, or main PCB. If the
issue continues, contact a local Samsung service center.
Check lter and drain pipe. If it is jammed, clean it. If the issue continues,
contact a local Samsung service center.
DW8500AM_DW60A8070BB_ET_DD81-03206K-04_EN.indd 72 2023-06-27() 5:35:18
Page 73
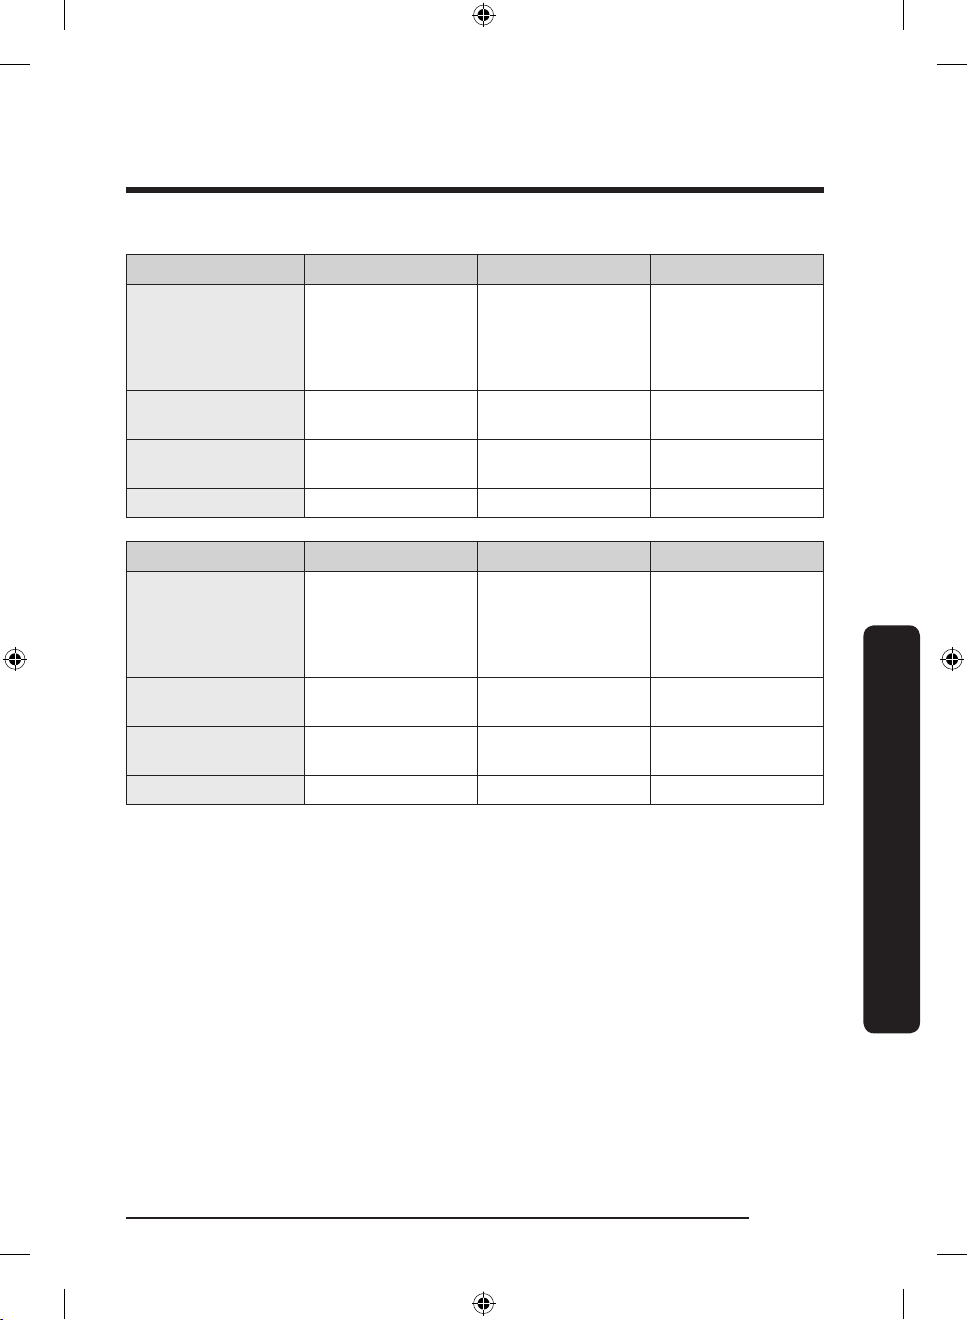
Cycle chart
8500AM – B grade (DW60A807*, DW60A806*)
Cycle AUTO ECO Intensive
Pre wash (45 °C)
Cycle sequence
Water consumption
(L)
Energy consumption
(kWh)
Cycle time (min.) 149 230 238
Cycle Delicate Express 60 * Pre Wash
Cycle sequence
Water consumption
(L)
Energy consumption
(kWh)
Cycle time (min.) 149 60 15
Main wash (55 °C-
65 °C) Rinse
Hot rinse (50 °C -
55 °C) Dry End
6.5-16.8 8.5 15.6
0.650-1.500 0.644 1.330
Pre wash (40 °C)
Main wash (50 °C)
Rinse
Hot rinse (50 °C)
Dry End
12 14.4 4.1
0.880 0.855 0.02
Pre wash
Main wash (48 °C)
Rinse
Hot rinse (41 °C)
Dry End
Pre wash (35 °C)
Main wash (60 °C)
Rinse (50 °C)
Hot rinse (50 °C)
Dry End
Pre wash (50 °C)
Main wash (65 °C)
Hot rinse (58 °C)
Pre wash End
Rinse
Dry End
Cycle chart
English 73
DW8500AM_DW60A8070BB_ET_DD81-03206K-04_EN.indd 73 2023-06-27() 5:35:18
Page 74
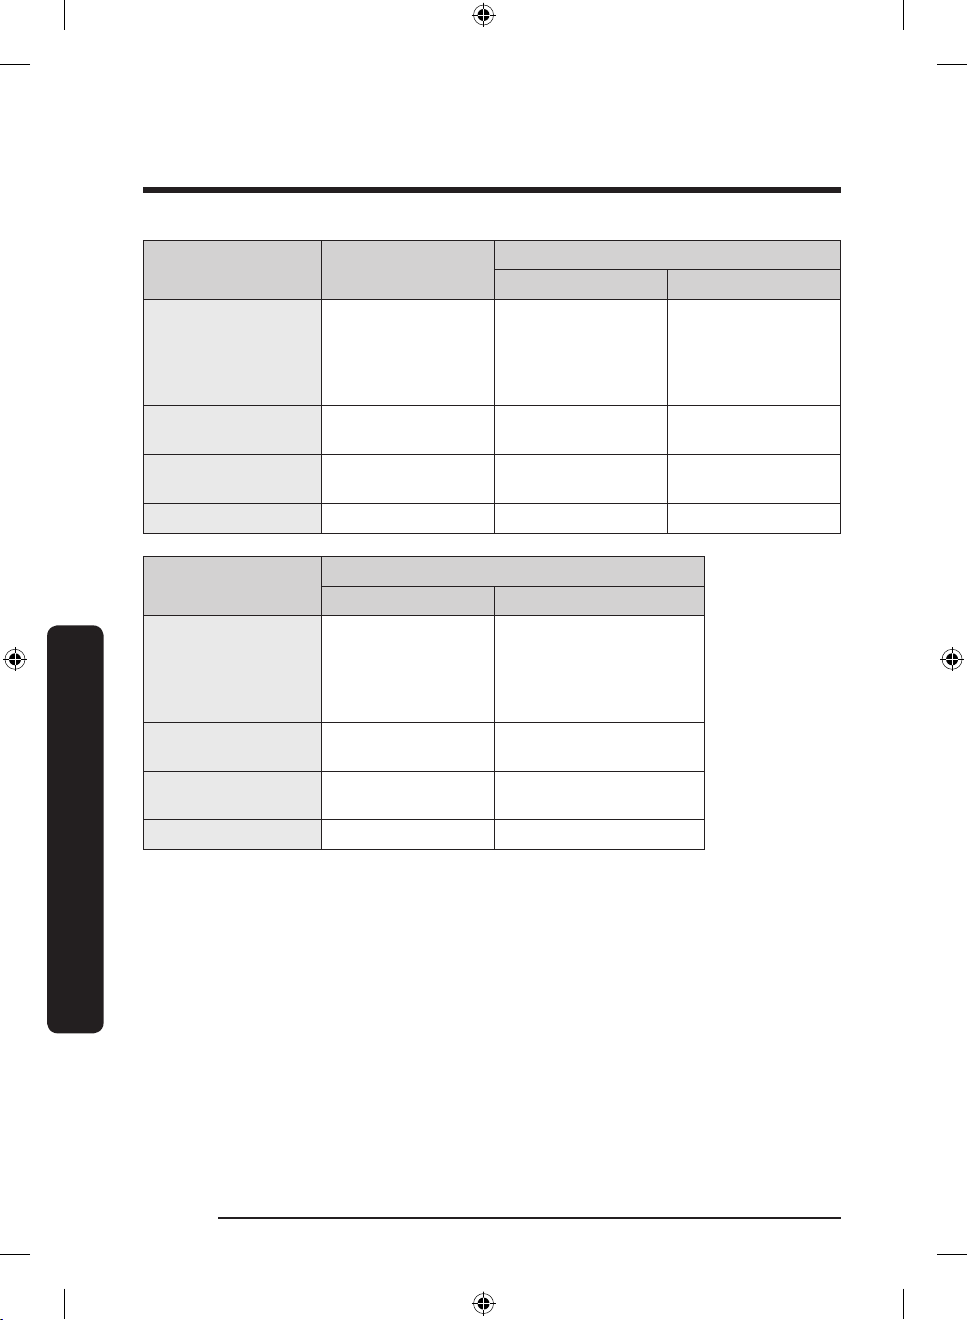
Cycle chart
Cycle Self Clean
Pre wash
Cycle sequence
Water consumption
Energy consumption
Water consumption
Cycle chart
Energy consumption
(L)
(kWh)
Cycle time (min.) 162 294 202
Cycle
Cycle sequence
(L)
(kWh)
Cycle time (min.) 70 155
Main wash (70 °C)
Rinse
Hot rinse (70 °C)
Dry End
13 11.8 20.5
1.200 1.220 1.840
Download cycle
Baby Care Plastic
Hot rinse (70 °C)
Dry End
6.2 13.1
0.855 1.110
Extra Silence Pots and Pans
Pre wash (35 °C)
Main wash (60 °C)
Hot rinse (55 °C)
Dry End
Main wash (60 °C)
Hot rinse (60 °C)
Download cycle
Rinse
Pre wash
Rinse
Dry End
Pre wash (50 °C)
Main wash (68 °C)
Rinse
Hot rinse (70 °C)
Dry End
English74
DW8500AM_DW60A8070BB_ET_DD81-03206K-04_EN.indd 74 2023-06-27() 5:35:18
Page 75
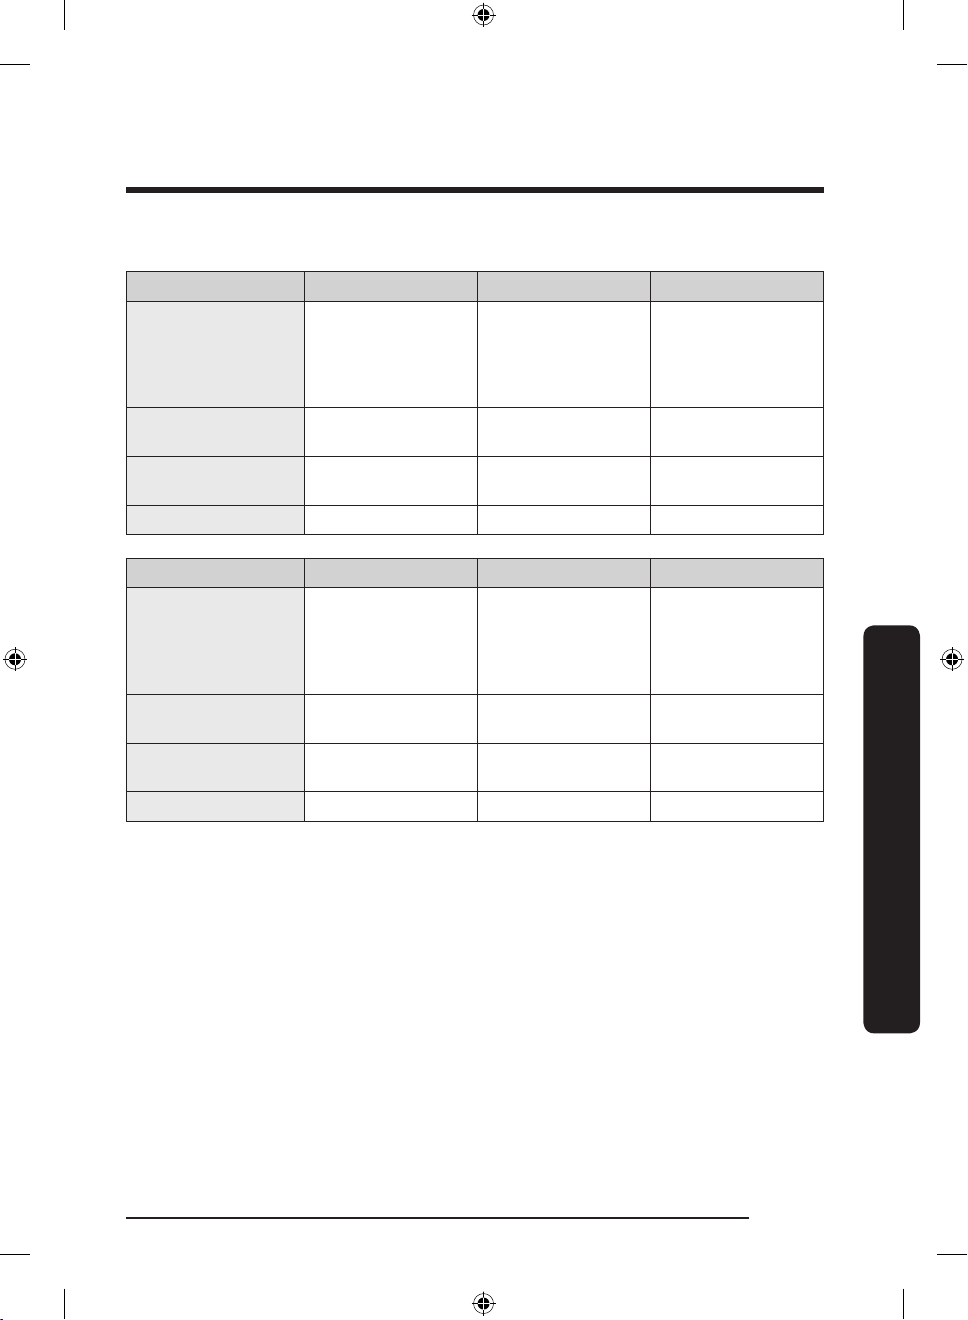
8500AM – C grade (DW60A805*, DW60A804*)
Cycle AUTO ECO Intensive
Pre wash (45 °C)
Main wash (55 °C-
Cycle sequence
65 °C) Rinse
Hot rinse (50 °C -
55 °C) Dry End
Water consumption
(L)
Energy consumption
(kWh)
8.5-18 9.8 16.6
0.850-1.550
Cycle time (min.) 149 210 205
Cycle Delicate Express 60 * Pre Wash
Pre wash (40 °C)
Main wash (50 °C)
Cycle sequence
Rinse (50 °C)
Hot rinse (50 °C)
Dry End
Water consumption
(L)
Energy consumption
(kWh)
13.5 15 4.1
0.950 0.950 0.020
Cycle time (min.) 120 60 15
Pre wash
Main wash (50 °C)
Rinse
Hot rinse (45 °C)
Dry End
0.746 (14 settings)/
0.735 (13 settings)
Pre wash (35 °C)
Main wash (60 °C)
Rinse (50 °C)
Hot rinse (50 °C)
Dry End
Pre wash (50 °C)
Main wash (65 °C)
Hot rinse (58 °C)
Pre wash End
Rinse
Dry End
1.500
Cycle chart
English 75
DW8500AM_DW60A8070BB_ET_DD81-03206K-04_EN.indd 75 2023-06-27() 5:35:18
Page 76
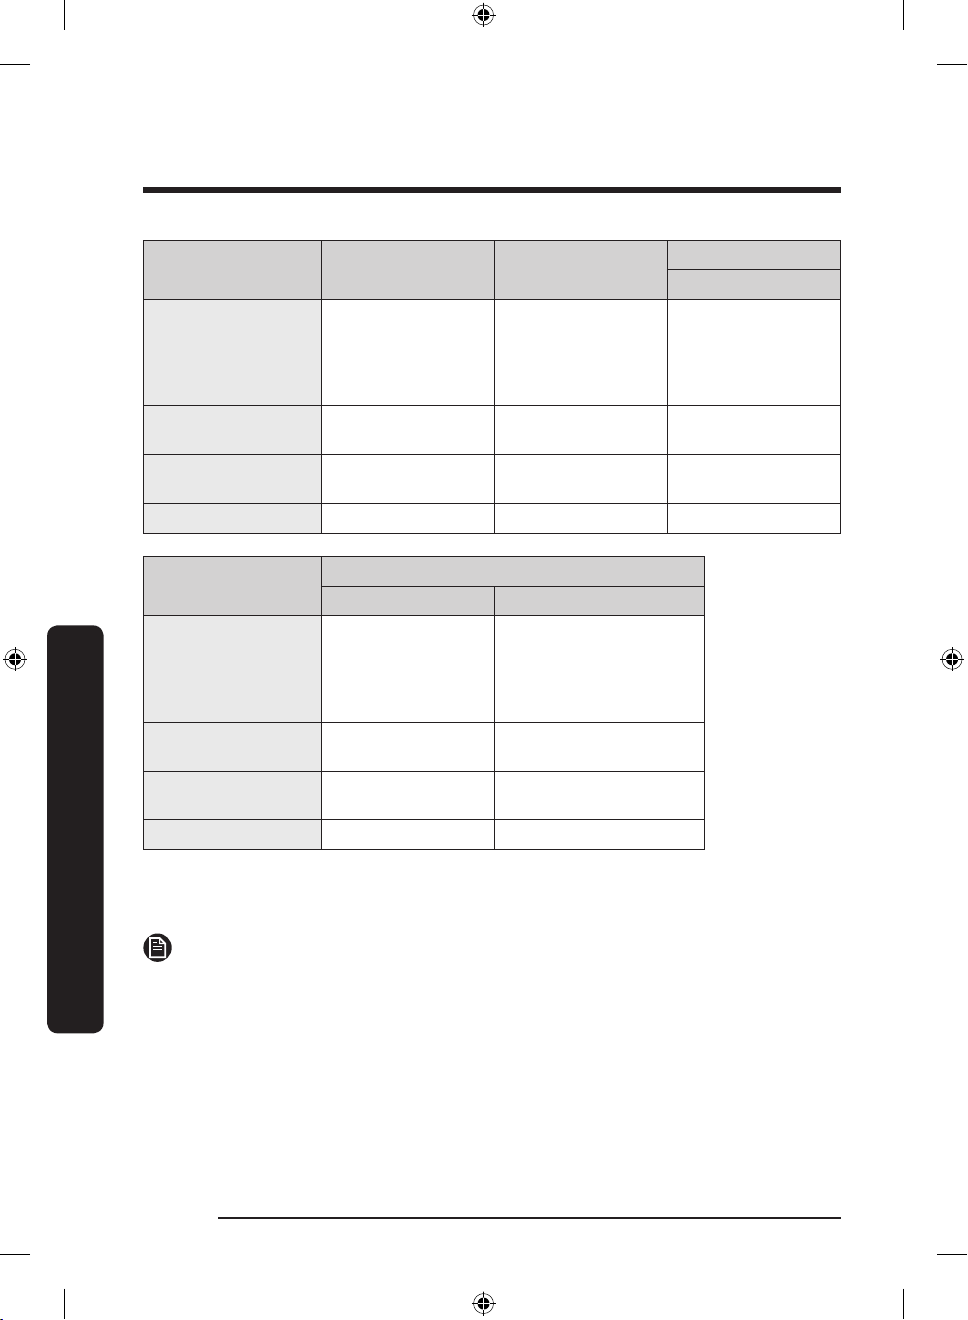
Cycle chart
Cycle Extra Silence Self Clean
Pre wash (35 °C)
Cycle sequence
Water consumption
Energy consumption
Water consumption
Cycle chart
Energy consumption
(L)
(kWh)
Cycle time (min.) 270 145 172
Cycle
Cycle sequence
(L)
(kWh)
Cycle time (min.) 71 129
Main wash (60 °C)
Rinse
Hot rinse (55 °C)
Dry End
13 15 21.8
1.200 1.250 1.860
Download cycle
Baby Care Plastic
Hot rinse (70 °C)
Dry End
3.8 14.4
0.855 1.125
Pre wash
Main wash (70 °C)
Rinse
Hot rinse (70 °C)
Dry End
Pre wash
Main wash (60 °C)
Rinse
Hot rinse (60 °C)
Dry End
Download cycle
Pots and Pans
Pre wash (50 °C)
Main wash (68 °C)
Rinse (50 °C)
Hot rinse (70 °C)
Dry End
* Pre Wash: This cycle does not activate the Auto Door function nor the drying process.
Continuous use of the Pre Wash cycle for an extended time is not recommended. This
may reduce the performance of the water softener.
NOTE
• The cycle time depends on the options you have added, and the pressure and
temperature of the supplied water.
• The dishwasher drains the remaining water inside automatically if it has not been used
for the last 5 days.
• The power consumption depends on the water temperature and/or load. When the rinse
aid reservoir is empty, time and temperature can increase a little.
• If no rinse aid is used, the cycle time and temperature may increase slightly.
English76
DW8500AM_DW60A8070BB_ET_DD81-03206K-04_EN.indd 76 2023-06-27() 5:35:18
Page 77
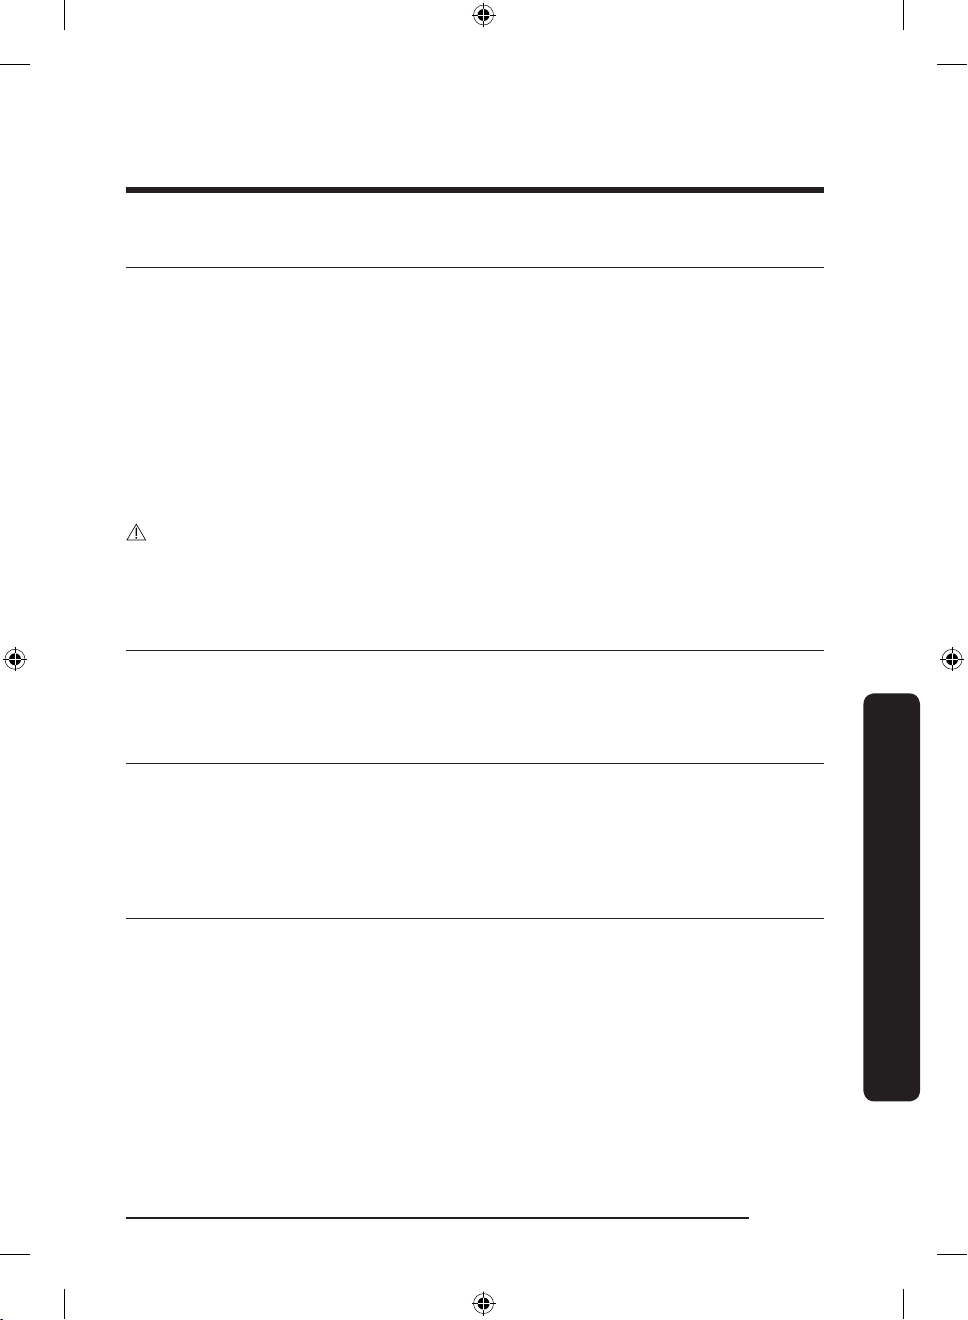
Appendix
Transportation/relocation
Make sure the dishwasher is empty with no loose parts. First, drain the dishwasher as
follows.
1. Open the door, and then turn the dishwasher on.
2. Select and run the ECO cycle.
3. Press START, and then close the door.
4. When the cycle is nished, open the door after 5 seconds.
5. Press and hold START for 3 seconds to drain water.
6. Close the door.
7. When the draining process is complete, open the door.
8. Turn the dishwasher off, and then shut the water valve off.
9. Disconnect the both the water hose and the drain hose.
CAUTION
Do not shake or sway the dishwasher while moving it. Residual water may drip from the
dishwasher.
Protection against frost
If you leave the dishwasher in a place with a risk of frost for an extended time, make sure
to empty the dishwasher. For details, see the “Transportation/relocation” section.
Disposing the dishwasher and helping the environment
Your dishwasher is manufactured from recyclable materials. If you decide to dispose of it,
please observe your local waste disposal regulations. Cut off the power cord so that the
appliance cannot be connected to a power source.
Remove the door so that animals and children cannot get trapped inside the appliance.
Appendix
For more ecodesign information
Ecodesign information can be found by going to user manual at www.samsung.com/
support.
English 77
DW8500AM_DW60A8070BB_ET_DD81-03206K-04_EN.indd 77 2023-06-27() 5:35:18
Page 78
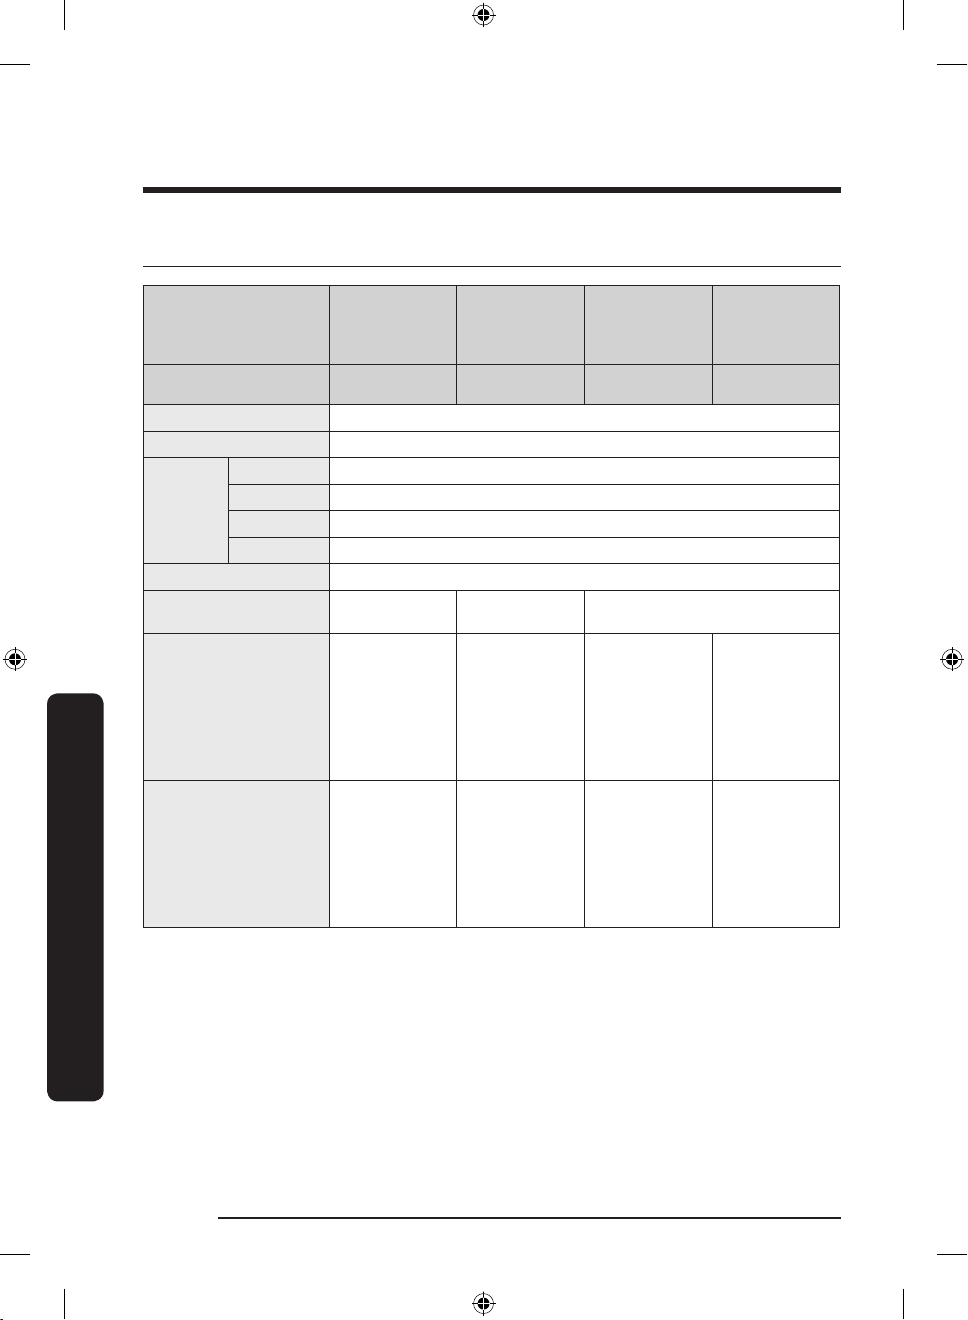
Appendix
Specications
Appendix
DW60A807*F*
MODEL
Type Free Standing Built Under Fully Built-in
Power 220-240 V~, 50 Hz
Water pressure 0.04-1.0 Mpa
DW60A807* 14 Place settings
Wash
capacity
(Width x Depth x Height)
Weight (Unpacked)
DW60A806* 14 Place settings
DW60A805* 14 Place settings
DW60A804* 13 Place settings
Rated power 1760-2100 W
Dimension
Weight (Packed)
DW60A806*F*
DW60A805*F*
DW60A804*F*
598×600×845 mm 598×570×815 mm 598×550×815 mm
52.5 kg
(806* models)
50.5 kg
(805* models)
51 kg
(804* models)
57 kg
(806* models)
55.5 kg
(805* models)
56.5 kg
(804* models)
DW60A807*U*
DW60A806*U*
DW60A805*U*
DW60A804*U*
44.5 kg
(807* models)
42.5 kg
(805* models)
51.5 kg
(807* models)
49 kg
(805* models)
DW60A807*BB
DW60A806*BB
DW60A805*BB
DW60A804*BB
43.5 kg
(807* models)
43 kg
(806* models)
40.5 kg
(805* models)
40 kg
(804* models)
49.5 kg
(807* models)
49.5 kg
(806* models)
47 kg
(805* models)
45.5 kg
(804* models)
DW60A807*IB
DW60A806*IB
DW60A805*IB
DW60A804*IB
Fully Built-in
(Sliding)
43.5 kg
(806* models)
40 kg
(804* models)
50 kg
(806* models)
46 kg
(804* models)
English78
DW8500AM_DW60A8070BB_ET_DD81-03206K-04_EN.indd 78 2023-06-27() 5:35:18
Page 79
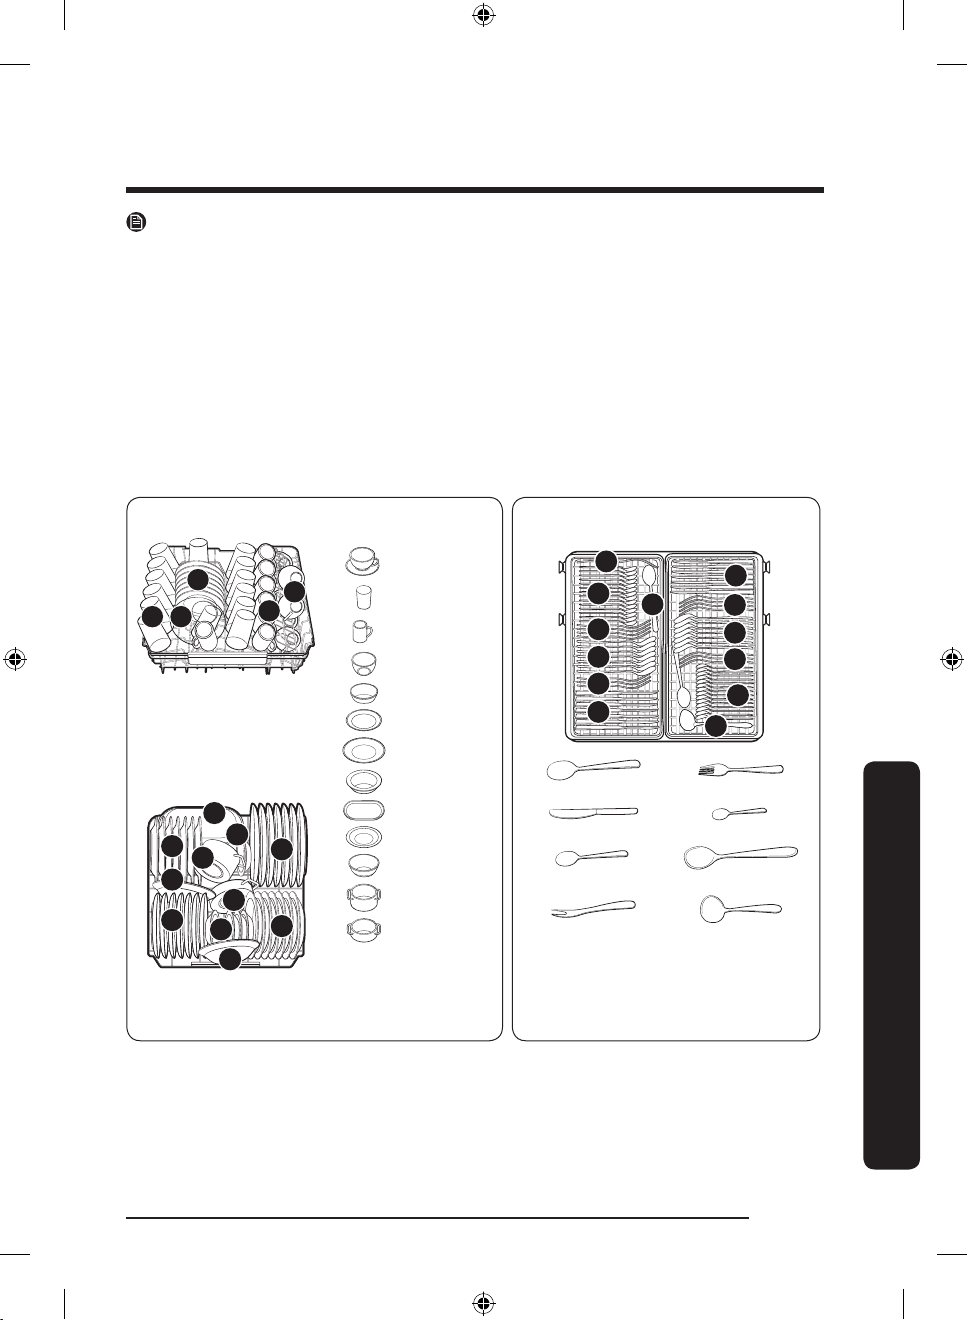
For standard test
NOTE
The information for comparability test as follows.
DW60A807*/DW60A806*/DW60A805* models
• Washing capacity: 14 place settings
• Test standard: EN 60436
• Position of upper rack: lower position
• Wash cycle: ECO
• Additional options: None
• Rinse aid level setting: F4
• Water hardness level setting: H3
• Dosage of the standard detergent: main-wash 22 g
• For the arrangement of the items, refer to the below gures
53
11
12
7
Upper rack
2
Lower rack
10
6
13
14
6
12
Cutlery rack
1. Cups
2. Saucers
1
4
8
9
3. Glasses
4. Mug cups
5. Glass bowls
6. Small serving
bowls
7. Dessert plates
8. Dinner plates
9. Soup plates
10. Oval platter
11. Melamine
dessert
12. Melamine bowl
13. Small pot
14. Oven pot
7
5
6
2
1
2
3
1. Soup spoons 2. Forks
3. Knives 4. Tea spoons
5. Dessert spoons 6. Serving spoons
7. Serving forks 8. Gravy ladles
3
2
1
2
6
4
8
For standard test
English 79
DW8500AM_DW60A8070BB_ET_DD81-03206K-04_EN.indd 79 2023-06-27() 5:35:19
Page 80
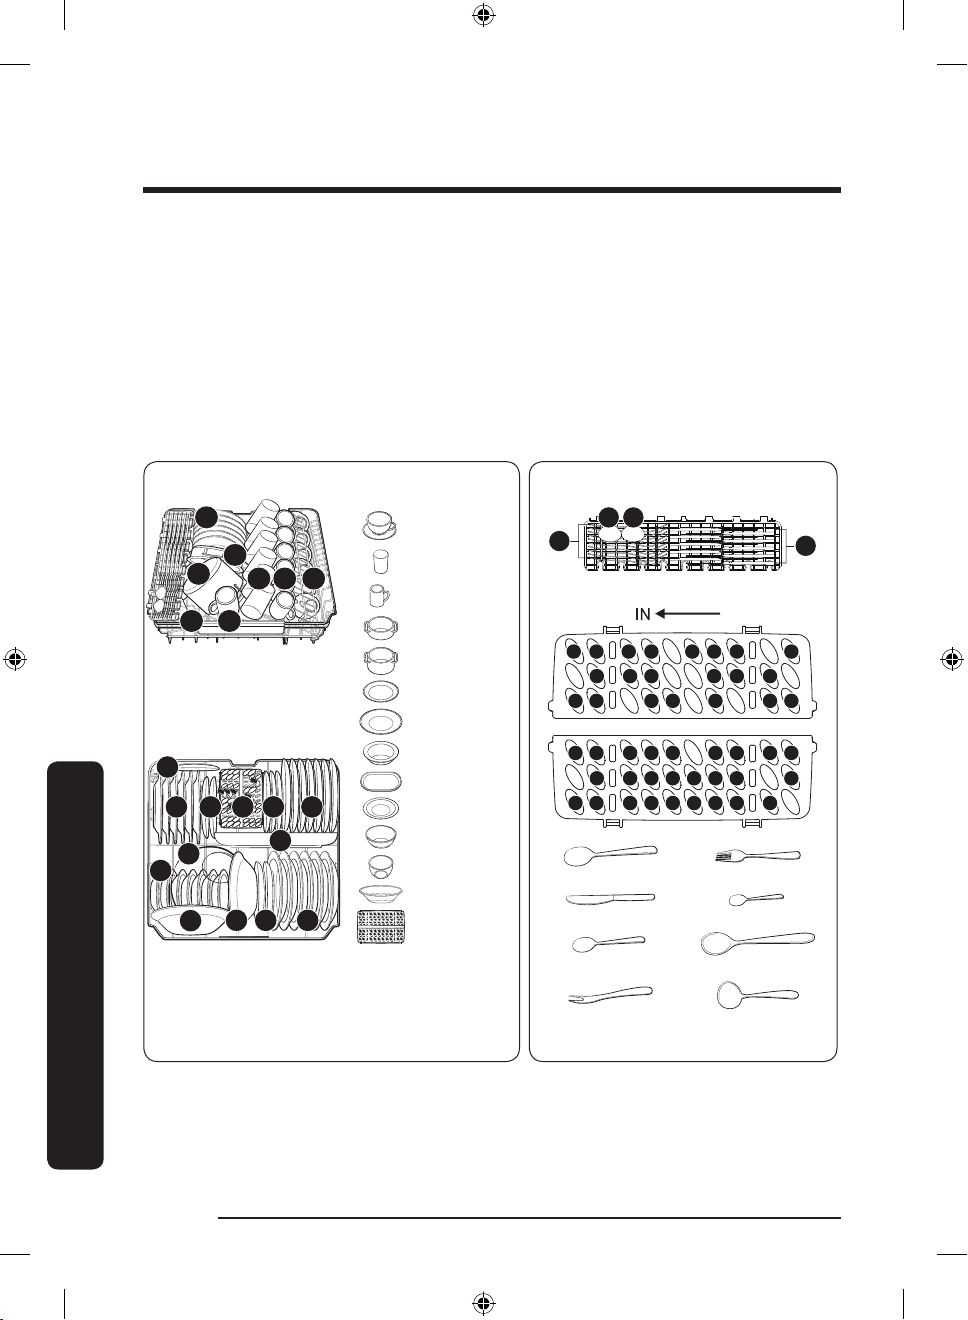
For standard test
3 4 1
43
6
5
2
DW60A804* models
• Washing capacity: 13 place settings
• Test standard: EN 60436
• Position of upper rack: lower position
• Wash cycle: ECO
• Additional options: None
• Rinse aid level setting: F4
• Water hardness level setting: H3
• Dosage of the standard detergent: main-wash 21 g
• For the arrangement of the items, refer below gures
Upper rack
1. Cups
2. Saucers
3. Glasses
4. Mug cups
5. Oven pot
6. Small pot
7. Dessert plates
8. Dinner plates
Lower rack
2
11 7 7 815
13
10
14
For standard test
12
9712
9. Soup plates
10. Oval platter
11. Melamine
dessert
12. Melamine bowl
13. Glass bowls
14. Dessert bowls
15. Cutlery basket
2
7
5 5 5
4 1 4 1 4 1 4 1 4
1. Soup spoons 2. Forks
5. Dessert spoons 6. Serving spoons
7. Serving forks 8. Gravy ladles
Cutlery rack
66
Cutlery basket
1414 14
1 8
5
1 5 2 2 2
5 5
4 1 4 1 4 1 4 4
3. Knives 4. Tea spoons
1
5 5 5 5 5 5
3 3
3
3
English80
DW8500AM_DW60A8070BB_ET_DD81-03206K-04_EN.indd 80 2023-06-27() 5:35:21
Page 81
Memo
DW8500AM_DW60A8070BB_ET_DD81-03206K-04_EN.indd 81 2023-06-27() 5:35:21
Page 82
Memo
DW8500AM_DW60A8070BB_ET_DD81-03206K-04_EN.indd 82 2023-06-27() 5:35:21
Page 83
Memo
DW8500AM_DW60A8070BB_ET_DD81-03206K-04_EN.indd 83 2023-06-27() 5:35:21
Page 84
QUESTIONS OR COMMENTS?
COUNTRY CALL OR VISIT US ONLINE AT
AUSTRIA 0800 72 67 864 (0800-SAMSUNG) www.samsung.com/at/support
BELGIUM 02-201-24-18
DENMARK 707 019 70 www.samsung.com/dk/support
FINLAND 030-6227 515 www.samsung.com//support
FRANCE 01 48 63 00 00 www.samsung.com/fr/support
GERMANY 06196 77 555 77 www.samsung.com/de/support
ITALIA 800-SAMSUNG (800.7267864) www.samsung.com/it/support
CYPRUS 8009 4000 only from landline, toll free www.samsung.com/gr/support
GREECE
LUXEMBURG 261 03 710 www.samsung.com/be_fr/support
NETHERLANDS 088 90 90 100 www.samsung.com/nl/support
NORWAY 21629099 www.samsung.com/no/support
PORTUGAL
SPAIN 91 175 00 15 www.samsung.com/es/support
SWEDEN 0771-400 300 www.samsung.com/se/support
SWITZERLAND 0800 726 786
UK 0333 000 0333 www.samsung.com/uk/support
IRELAND (EIRE) 0818 717100 www.samsung.com/ie/support
POLAND
80111-SAMSUNG (80111 726 7864) only
(+30) 210 6897691 from mobile and land line
from land line
Chamada para a rede xa nacional
* (opłata według taryfy operatora)
210 608 098
Dias úteis das 9h às 20h
801-172-678*
www.samsung.com/be/support (Dutch)
www.samsung.com/be_fr/support (French)
www.samsung.com/gr/support
www.samsung.com/pt/support
www.samsung.com/ch/support (German)
www.samsung.com/ch_fr/support (French)
http://www.samsung.com/pl/support/
DD81-03206K-04
DW8500AM_DW60A8070BB_ET_DD81-03206K-04_EN.indd 84 2023-06-27() 5:35:21
Page 85
Lavastoviglie
Manuale dell'utente
Serie DW60A807*/DW60A806*/DW60A805*/
DW60A804*
DW8500AM_DW60A8070BB_ET_DD81-03206K-04_IT.indd 1 2023-06-27() 5:35:40
Page 86
Sommario
Informazioni sulla sicurezza 4
Istruzioni di sicurezza - Cosa sapere. 4
Simboli di sicurezza importanti 4
Sommario
Informazioni sul simbolo WEEE (RAEE) 5
Importanti precauzioni di sicurezza 6
Istruzioni per l'uso della lavastoviglie 8
Protezione dei bambini 9
Istruzioni per l'installazione della lavastoviglie 10
Installazione 13
Contenuto della confezione 13
Requisiti di installazione 16
Installazione Passo dopo passo 18
Zoccolino 33
Spie informative (Serie DW60A80**BB, DW60A80**IB) 35
Battiscopa (Serie DW60A80**U*) 36
SmartThings (solo modelli che ne sono dotati) 37
Dichiarazione Open Source 41
Prima di iniziare 42
Panoramica della lavastoviglie 42
Stoviglie non idonee ad essere lavate nella lavastoviglie 44
Uso base dei cestelli 45
Comparto detersivo 50
Serbatoio brillantante 52
Serbatoio sale 53
Sensibilità della tastiera 54
Modalità Impostazione 55
Operazioni 57
Pannello di controllo 57
Panoramica programmi 59
Passaggi semplici per avviare la lavastoviglie 61
Serbatoio sale 62
Avvio ritardato 64
Blocco controlli 64
Manutenzione 65
Pulizia 65
Manutenzione a lungo termine 68
Italiano2
DW8500AM_DW60A8070BB_ET_DD81-03206K-04_IT.indd 2 2023-06-27() 5:35:40
Page 87
Risoluzione dei problemi 69
Checkpoint 69
Codici informativi 72
Diagramma dei cicli di lavaggio 73
Appendice 77
Trasporto/spostamento 77
Protezione anti gelo 77
Smaltimento della lavastoviglie e salvaguardia dell'ambiente 77
Per maggiori informazioni su ecodesign 77
Speciche 78
Per un test standard 79
Sommario
Italiano 3
DW8500AM_DW60A8070BB_ET_DD81-03206K-04_IT.indd 3 2023-06-27() 5:35:40
Page 88
Informazioni sulla sicurezza
Congratulazioni per l'acquisto della tua nuova lavastoviglie Samsung. Questo manuale contiene importanti
informazioni riguardanti l'installazione, l'uso e la manutenzione del tuo nuovo apparecchio. Ti consigliamo di
leggere le informazioni qui fornite per conoscere i vantaggi offerti dalle funzioni della tua nuova lavastoviglie.
Informazioni sulla sicurezza
Istruzioni di sicurezza - Cosa sapere.
Leggi attentamente questo manuale per apprendere l'uso sicuro ed efciente delle varie funzioni e
caratteristiche offerte da questa lavastoviglie, e tieni il manuale in un luogo sicuro vicino all'apparecchio per
poterlo consultare ogniqualvolta se ne presenti la necessità. Questo apparecchio deve essere utilizzato solo
per lo scopo per il quale è stato progettato, come qui descritto.
Le avvertenze e le importanti istruzioni di sicurezza riportate in questo manuale non coprono tutte le possibili
condizioni e situazioni che possono vericarsi. E' responsabilità dell'utente utilizzare l'apparecchio con
buonsenso, prestando la massima attenzione e cura in fase di installazione, manutenzione e funzionamento.
Poiché le istruzioni operative qui descritte coprono i vari modelli disponibili, le caratteristiche della
lavastoviglie acquistata possono differire leggermente da quelle descritte in questo manuale e non tutti i
simboli di avvertenza possono essere applicabili. In caso di domande o dubbi, rivolgiti al Centro assistenza
autorizzato di zona o visita il sito www.samsung.com per trovare le informazioni necessarie.
Simboli di sicurezza importanti
Signicato delle icone e dei simboli riportati in questo manuale dell'utente:
AVVERTENZA
Pericoli o pratiche non sicure che possono causare lesioni personali gravi, la morte e/o danni materiali.
ATTENZIONE
Pericoli o pratiche non sicure che possono causare lesioni personali e/o danni materiali.
NOTA
Indica che sussiste il rischio di lesioni personali o danni materiali.
La simbologia di avvertenza ha lo scopo di prevenire eventuali lesioni personali. Seguire le istruzioni
scrupolosamente.
Conservare queste istruzioni in un luogo sicuro e accertarsi che eventuali nuovi utenti familiarizzino con il loro
contenuto. In caso di cessione dell'apparecchio, consegnare le informazioni al nuovo acquirente.
Italiano4
DW8500AM_DW60A8070BB_ET_DD81-03206K-04_IT.indd 4 2023-06-27() 5:35:40
Page 89
Informazioni sul simbolo WEEE (RAEE)
Corretto smaltimento del prodotto (riuti elettrici ed elettronici)
(Applicabile nei Paesi con sistemi di raccolta differenziata)
Il simbolo riportato sul prodotto, sugli accessori o sulla documentazione (un
contenitore della spazzatura con ruote barrato da una croce con una banda nera sotto)
indica che il prodotto e i relativi accessori elettronici (quali caricabatterie, cufa e
cavo USB) non devono essere smaltiti come riuti urbani misti al termine del ciclo di
vita ma devono essere raccolti separatamente in modo da permetterne il riutilizzo,
il riciclaggio e altre forme di recupero in conformità alla normativa vigente. I riuti
derivanti da apparecchiature elettriche ed elettroniche possono, infatti, contenere
sostanze dannose e pericolose che, se non correttamente gestite, costituiscono un
pericolo per l’ambiente e la salute umana.
L’utente ha, quindi, un ruolo attivo nel ciclo di recupero e riciclaggio dei riuti di
apparecchiature elettriche ed elettroniche.
Al ne di evitare eventuali danni all’ambiente o alla salute causati da uno smaltimento
non corretto, si invita pertanto l’utente a separare il prodotto e i suddetti accessori da
altri tipi di riuti, conferendoli ai sistemi di ritiro e di raccolta autorizzati secondo le
normative locali.
Gli utenti domestici possono consegnare gratuitamente l’apparecchiatura che
desiderano smaltire al rivenditore, al momento dell’acquisto di una nuova
apparecchiatura di tipo equivalente. Presso i rivenditori di prodotti elettronici con
supercie di vendita di almeno 400 m2 è inoltre possibile consegnare gratuitamente,
senza obbligo di acquisto, i prodotti elettronici da smaltire con dimensioni inferiori a
25 cm.
Gli utenti professionali (imprese e professionisti) sono invitati a contattare il proprio
fornitore e vericare i termini e le condizioni del contratto di acquisto. Questo
prodotto e i relativi accessori elettronici non devono essere smaltiti unitamente ad
altri riuti commerciali.
Informazioni sulla sicurezza
Per ulteriori informazioni sull'impegno ambientale di Samsung e sugli obblighi normativi specici dei singoli
prodotti es. REACH, WEEE, Batterie, visitare la pagina sulla sostenibilità disponibile sul sito Samsung.com.
Italiano 5
DW8500AM_DW60A8070BB_ET_DD81-03206K-04_IT.indd 5 2023-06-27() 5:35:40
Page 90
Informazioni sulla sicurezza
Importanti precauzioni di sicurezza
Per evitare rischi di incendio, scariche elettriche o lesioni
Informazioni sulla sicurezza
personali durante l'uso dell'apparecchio, seguire queste importanti
precauzioni:
1. Questo prodotto non deve essere utilizzato da bambini e adulti
che abbiano ridotte capacità siche, sensoriali o mentali o siano
prive di esperienza o conoscenza, a meno che siano state fornite
loro istruzioni per l’uso da parte di una persona responsabile
della loro sicurezza o che sovrintenda all'uso dell'apparecchio.
2. Questo apparecchio può essere utilizzato da bambini di età
superiore agli 8 anni e da persone che abbiano ridotte capacità
siche, sensoriali o mentali o siano prive di esperienza o
conoscenza, sotto la supervisione di una persona responsabile
o nel caso in cui siano state fornite loro istruzioni per un uso
sicuro dell'apparecchio e dei pericoli che esso comporta. Non
consentire ai bambini di giocare con l'apparecchio. La pulizia e
la manutenzione dell'apparecchio non devono essere svolte da
bambini senza la supervisione di un adulto.
3. Controllare che i bambini non giochino con questo apparecchio.
4. Se il cavo di alimentazione è danneggiato, richiederne la
sostituzione al costruttore, a un tecnico dell’assistenza o a
personale qualicato.
5. Utilizzare il nuovo set di tubi in dotazione all’apparecchio senza
riutilizzare i tubi vecchi.
Italiano6
DW8500AM_DW60A8070BB_ET_DD81-03206K-04_IT.indd 6 2023-06-27() 5:35:40
Page 91
6. Vericare che tappeti o altri oggetti non ostruiscano le aperture
di ventilazione dell’apparecchio se queste sono poste alla base
del prodotto.
7. Senza una costante supervisione da parte di un adulto, i
bambini di età inferiore ai 3 anni devono essere tenuti lontani
dall'apparecchio.
8. ATTENZIONE: Per evitare i rischi connessi a un ripristino
involontario del fusibile termico, non alimentare l’apparecchio
attraverso un commutatore esterno, come ad esempio un timer,
né collegarlo a un circuito regolarmente attivato/disattivato
dalla utility.
9. AVVERTENZA: Coltelli e altri utensili appuntiti devono essere
posizionati nel cestello con le punte rivolte verso il basso o in
posizione orizzontale.
Questo apparecchio è destinato a un uso domestico o applicazioni
similari, ad esempio:
• aree adibite a cucina per il personale di negozi, ufci e altri
ambienti lavorativi;
Informazioni sulla sicurezza
• aziende agricole
• uso da parte del cliente in hotel, motel e altri ambienti
residenziali;
• bed and breakfast.
Italiano 7
DW8500AM_DW60A8070BB_ET_DD81-03206K-04_IT.indd 7 2023-06-27() 5:35:40
Page 92
Informazioni sulla sicurezza
Istruzioni per l'uso della lavastoviglie
Questa lavastoviglie non è progettata per un uso commerciale. E' intesa per un uso domestico o in ambienti
Informazioni sulla sicurezza
simili lavorativi e residenziali, quali:
• Negozi
• Ufci e showroom
e dai residenti di:
• Ostelli e guest house.
L'apparecchio deve essere usato come elettrodomestico per la pulizia di piatti e stoviglie, così come specicato
nel manuale dell'utente. Qualsiasi altro uso non è supportato dal costruttore e potrebbe risultare pericoloso.
Il produttore non può essere ritenuto responsabile per eventuali danni derivanti da un uso o un funzionamento
improprio o scorretto dell'apparecchio.
Non utilizzare solventi nella lavastoviglie. Pericolo di esplosione.
Non inalare o ingerire il detersivo per lavastoviglie. I detersivi per lavastoviglie contengono sostanze
irritanti o corrosive e, se ingeriti, possono causare ustioni a naso, bocca e gola; possono inoltre bloccare la
respirazione. Consultare immediatamente un medico in caso di ingestione o inalazione del detersivo.
Non lasciare lo sportello aperto se non strettamente necessario poiché può rappresentare un ostacolo sul quale
inciampare.
Non appoggiarsi o sedersi sullo sportello aperto. In caso contrario la lavastoviglie potrebbe inclinarsi e
danneggiarsi, e provocare lesioni personali.
Usare solo detersivo e brillantante per lavastoviglie per uso un domestico. Non usare detersivo liquido.
Non usare detergenti fortemente acidi
Non rabboccare il serbatoio del brillantante con detersivo liquido o in polvere. La mancata osservanza di
questa precauzione potrebbe danneggiare gravemente il serbatoio.
Un accidentale riempimento del serbatoio del sale con detersivo liquido o in polvere potrebbe danneggiare
l'addolcitore. Vericare di disporre del tipo corretto di sale per lavastoviglie prima di riempire il serbatoio del
sale.
Usare solo sale per lavastoviglie dal momento che altri tipi di sale possono contenere additivi insolubili che
possono danneggiare il funzionamento dell'addolcitore.
In un apparecchio dotato di cestello per le posate (incluso a seconda del modello), il processo di lavaggio e
asciugatura delle posate è più efcace se queste vengono collocate nel cestello in modo ottimale, con i manici
rivolti verso il basso. Tuttavia, per evitare il rischio di lesioni, è possibile collocare coltelli e forchette con i
manici rivolti verso l'alto.
Il vasellame e gli elementi in plastica non resistenti all'acqua bollente, quali ad esempio contenitori o posate
in plastica, non possono essere lavati in lavastoviglie. Le elevate temperature sviluppate all'interno della
lavastoviglie possono provocarne la deformazione o lo scioglimento.
Nei modelli dotati della funzione Avvio ritardato, vericare che il dispenser sia asciutto prima di aggiungere
il detersivo. Se necessario, asciugarlo. Se viene versato in un dispenser umido, il detersivo può raggrumarsi e
non essere quindi sparso uniformemente.
Coltelli e altri utensili appuntiti devono essere posizionati nel cestello con le punte rivolte verso il basso o in
posizione orizzontale.
Italiano8
DW8500AM_DW60A8070BB_ET_DD81-03206K-04_IT.indd 8 2023-06-27() 5:35:40
Page 93
Protezione dei bambini
Questo apparecchio non è un giocattolo! Per evitare il rischio di lesioni, tenere i bambini lontano
dall'apparecchio e non permettere loro di giocare vicino o all'interno dell'apparecchio o di azionarne i
comandi. I bambini non sono in grado di comprenderne i potenziali pericoli. Pertanto devono essere controllati
ogniqualvolta si lavori in cucina. Un bambino che gioca con la lavastoviglie potrebbe rimanervi chiuso dentro.
Questo apparecchio può essere utilizzato da bambini di età superiore agli 8 anni e da persone che abbiano
ridotte capacità siche, sensoriali o mentali o siano prive di esperienza o conoscenza, sotto la supervisione di
una persona responsabile o nel caso in cui siano state fornite loro istruzioni per un uso sicuro dell'apparecchio
e dei pericoli che esso comporta. Non consentire ai bambini di giocare con l'apparecchio. La pulizia e la
manutenzione dell'apparecchio non devono essere svolte da bambini senza la supervisione di un adulto.
I bambini più grandi possono utilizzare l'apparecchio solo se sono state fornite loro chiare istruzioni per l'uso
e siano in grado di utilizzarlo in sicurezza, riconoscendo i potenziali rischi derivanti da un uso improprio
dell'apparecchio.
TENERE I BAMBINI LONTANI DAI DETERSIVI!
I detersivi per lavastoviglie contengono sostanze irritanti e corrosive e, se ingeriti, possono causare ustioni a
naso, bocca e gola; possono inoltre bloccare la respirazione.
Tenere i bambini lontano dalla lavastoviglie quando lo sportello dell'apparecchio è aperto. All'interno
potrebbero esservi residui di detersivo.
Consultare immediatamente un medico se un bambino inala o ingerisce del detersivo.
Informazioni sulla sicurezza
Italiano 9
DW8500AM_DW60A8070BB_ET_DD81-03206K-04_IT.indd 9 2023-06-27() 5:35:41
Page 94
Informazioni sulla sicurezza
Istruzioni per l'installazione della lavastoviglie
Prima di impostare l'apparecchio, controllare che non vi sia alcun danno visibile. Non utilizzare mai un
Informazioni sulla sicurezza
apparecchio danneggiato. Un apparecchio danneggiato potrebbe rappresentare un pericolo.
La lavastoviglie deve essere collegata a una presa di corrente dotata di apposito interruttore. La presa
elettrica deve essere facilmente raggiungibile dopo l'installazione della lavastoviglie in modo che sia
possibile scollegare l'apparecchio rapidamente e in qualsiasi momento (vedere la sezione "Panoramica della
lavastoviglie" a pagina 42).
Dietro la lavastoviglie non devono essere presenti prese elettriche. Se il retro della lavastoviglie preme contro
una presa elettrica, questa potrebbe surriscaldarsi con il conseguente rischio di incendio.
La lavastoviglie non deve essere installata sotto un piano cottura. Le elevate temperature talvolta generate da
un piano cottura potrebbero danneggiare la lavastoviglie. Per la stessa ragione, non installarla vicina a amme
libere o altri apparecchi che possono irradiare calore, quali caloriferi ecc..
Collegare la lavastoviglie alla corrente elettrica solo una volta completata l'installazione e la regolazione dello
sportello.
Prima di collegare l'apparecchio, vericare che i dati elettrici riportati sulla targhetta (tensione e carico
collegato) corrispondano alla corrente erogata. In caso di dubbi, consultare un elettricista qualicato.
La sicurezza elettrica di questo apparecchio può essere garantita solo quando vi sia continuità tra
l'apparecchio e il sistema di messa a terra. E' della massima importanza che i requisiti base di sicurezza siano
presenti e regolarmente testati e in caso di dubbi sullo stato dell'impianto elettrico domestico questo deve
essere controllato da un elettricista qualicato.
Il costruttore non potrà essere ritenuto responsabile per eventuali conseguenze derivanti da un sistema di
messa a terra inappropriato (per es. scariche elettriche).
Non collegare l'apparecchio alla presa di corrente mediante una multipresa o una prolunga. Queste infatti non
garantiscono la sicurezza dell'apparecchio (per es. pericolo di surriscaldamento).
Questo apparecchio può essere installato in postazioni mobili, ad esempio su una nave, solo se è stata eseguita
da un tecnico qualicato una valutazione dei rischi associata a questo tipo di installazione.
Italiano10
DW8500AM_DW60A8070BB_ET_DD81-03206K-04_IT.indd 10 2023-06-27() 5:35:41
Page 95
L'alloggiamento in plastica del connettore alla presa dell'acqua contiene un componente elettrico. Non
immergere l'alloggiamento nell'acqua.
Nel tubo del sistema Aqua-Stop sono presenti li elettrici. Non tagliare mai il tubo di carico dell'acqua, anche
se troppo lungo.
L'installazione, la manutenzione ed eventuali riparazioni devono essere eseguite solo da personale qualicato
e competente in stretta osservanza delle normative locali e nazionali. Le riparazioni eseguite da personale non
qualicato possono rappresentare un pericolo. Il costruttore non potrà essere ritenuto responsabile del lavoro
eseguito da personale non autorizzato.
Il sistema impermeabile integrato offre protezione contro i danni provocati dall'acqua, a patto che siano
rispettate le seguenti condizioni:
• La lavastoviglie sia correttamente installata e collegata.
• Sia stata eseguita una corretta manutenzione e siano state sostituite le parti usurate laddove necessario.
• Il rubinetto sia stato chiuso in caso di inutilizzo dell'apparecchio per un lungo periodo di tempo (per es.
durante le vacanze).
• Il sistema impermeabile entra in funzione anche se l'apparecchio è spento. Tuttavia, l'apparecchio deve
essere collegato alla corrente elettrica.
Un apparecchio danneggiato può rappresentare un pericolo. Se la lavastoviglie si danneggia, scollegarla dalla
corrente elettrica e rivolgersi al rivenditore o ad un Centro di assistenza autorizzato.
Riparazioni non autorizzate possono causare pericoli imprevedibili per l'utente, per i quali il costruttore non
potrà essere ritenuto responsabile. Le riparazioni devono essere eseguite solo da un tecnico dell'assistenza
qualicato.
I componenti difettosi devono essere sostituiti solo con ricambi originali. La sicurezza dell'apparecchio può
essere garantita solo utilizzando ricambi originali.
Scollegare sempre la lavastoviglie dalla corrente elettrica per eseguirne la manutenzione (disattivare
l'interruttore della presa a parete ed estrarre le spina).
Se il cavo di collegamento è danneggiato, sostituirlo con uno idoneo disponibile presso il costruttore. Per
ragioni di sicurezza, il cavo può essere sostituito solo da un Centro di assistenza autorizzato o da un tecnico
qualicato.
In luoghi soggetti a infestazioni da scarafaggi o altri insetti, prestare particolare attenzione a mantenere la
lavastoviglie e l'ambiente circostante sempre puliti. Eventuali danni provocati da scarafaggi o altri insetti non
sono coperti da garanzia.
Informazioni sulla sicurezza
Italiano 11
DW8500AM_DW60A8070BB_ET_DD81-03206K-04_IT.indd 11 2023-06-27() 5:35:41
Page 96
Informazioni sulla sicurezza
In caso di guasto o ai ni della pulizia, l'apparecchio risulta totalmente isolato dalla corrente elettrica quando:
• l'interruttore della presa a parete è disattivato e la spina è estratta, oppure
• l'interruttore generale è disattivato, oppure
Informazioni sulla sicurezza
• il fusibile principale è disattivato, oppure
• Il fusibile a vite è stato rimosso (in paesi dove tale operazione è prevista).
Non modicare l'apparecchio, salvo previa autorizzazione del costruttore.
Non aprire mai il telaio/l'alloggiamento dell'apparecchio. Manomettere i collegamenti elettrici o i componenti e
le parti meccaniche è molto pericoloso e può causare malfunzionamenti o scariche elettriche.
Durante il periodo di garanzia dell'apparecchio, le riparazioni devono essere effettuate solo da un tecnico
dell'assistenza autorizzato dal costruttore. In caso contrario la garanzia sarà invalidata.
Durante l'installazione del prodotto, vericare che vi sia spazio sufciente sopra, ai lati e sul retro
dell'apparecchio per garantire una corretta ventilazione. Se lo spazio tra l'apparecchio e il lavello è
insufciente, quest'ultimo potrebbe subire danni o potrebbe presentarsi un problema di muffa.
Vericare che il livello di durezza dell'acqua impostato sulla lavastoviglie sia idoneo a quello della propria
zona (vedere la sezione "Serbatoio sale" a pagina 53).
Consultare www.samsung.com/support per ulteriori dettagli sui materiali e le riparazioni.
Italiano12
DW8500AM_DW60A8070BB_ET_DD81-03206K-04_IT.indd 12 2023-06-27() 5:35:41
Page 97
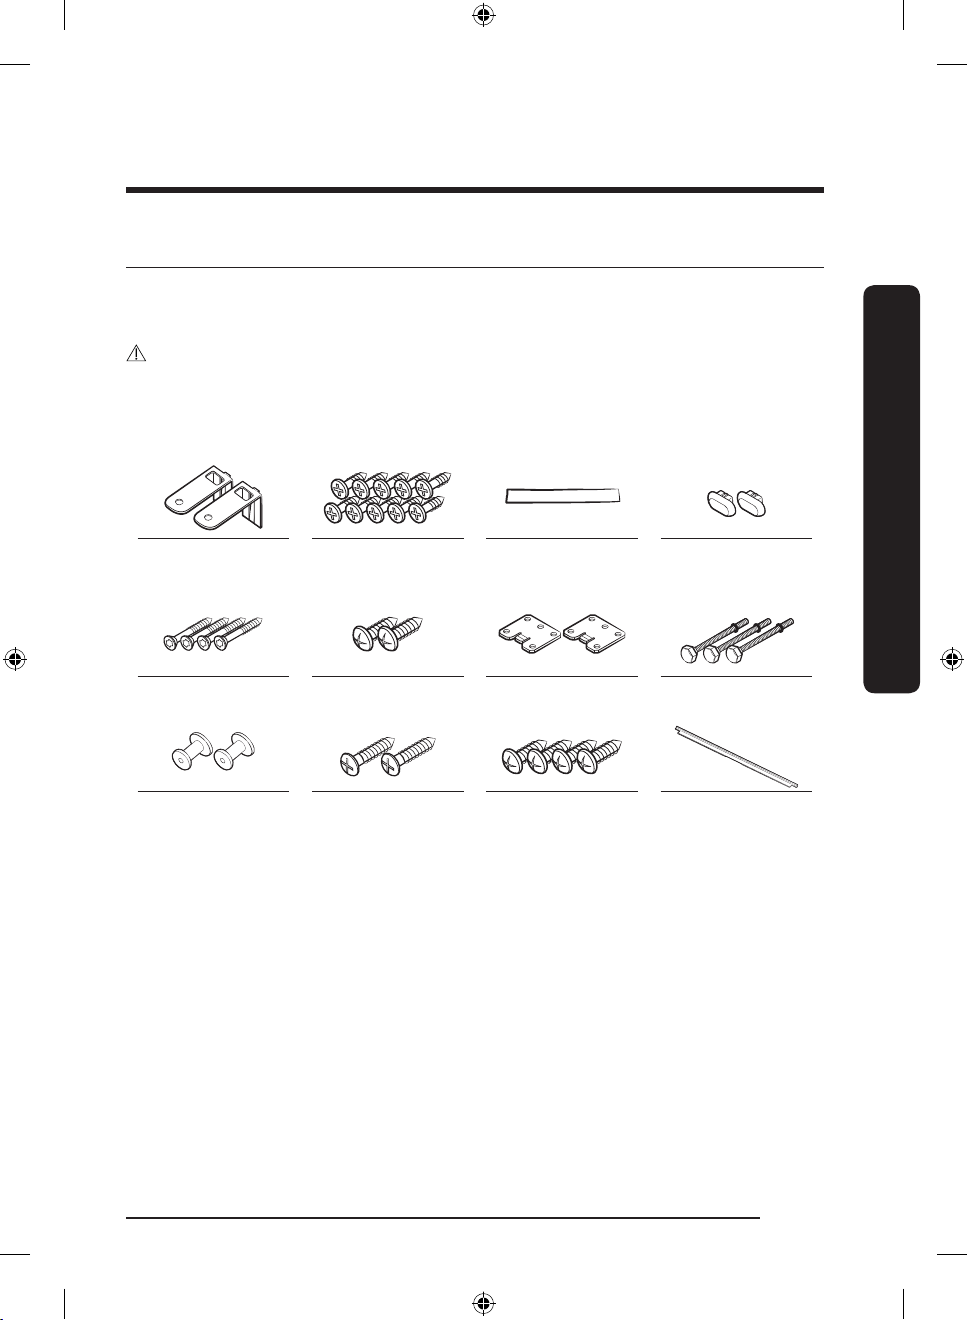
Installazione
Contenuto della confezione
Accertarsi che nella confezione siano presenti tutte le parti. In caso di domande relative alla lavastoviglie
o ad una delle sue parti, contattare un Centro di assistenza clienti Samsung locale o il rivenditore. L’aspetto
effettivo della lavastoviglie può variare in base al modello ed al paese di appartenenza.
ATTENZIONE
Una volta disimballata la lavastoviglie, conservare gli imballi fuori dalla portata dei bambini al ne di
garantirne la sicurezza.
Modelli FBI (Incasso, DW60A80**BB)
Staffa superiore (2 pz.) Viti Ø4 X 14 (10 pz.) Adesivo protettivo anti
Vite Ø3,5 X 45 (4 pz.) Vite Ø3,5 X 16 (2 pz.) Staffa sportello (2 pz.) Sotto piedino (3 pz.)
Fermi specici per
pannello (fermi per
pannelli in legno, 2 pz.)
Vite Ø3,5 X 25 (2 pz.) Vite Ø3,9 X 13 (4 pz.) Listello laterale
condensa (1 pz.)
Coperchio in plastica
(2 pz.)
superiore (1 pz.)
(DW60A804***,
DW60A805***)
Installazione
Italiano 13
DW8500AM_DW60A8070BB_ET_DD81-03206K-04_IT.indd 13 2023-06-27() 5:35:41
Page 98
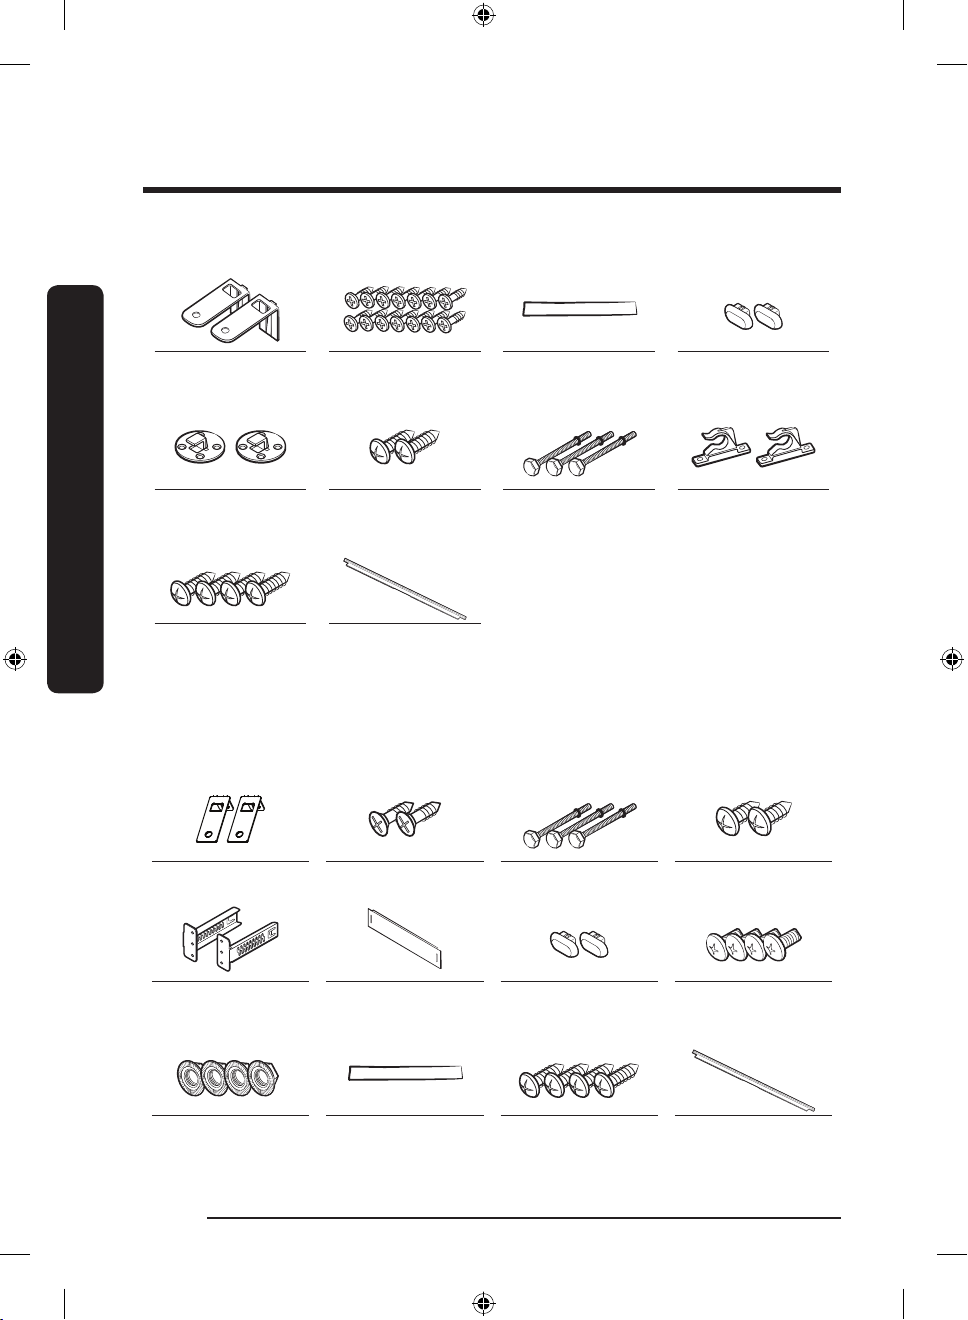
Installazione
Modelli FBI (Scorrimento, DW60A80**IB)
Installazione
Staffa superiore (2 pz.) Viti Ø4 X 14 (14 pz.) Adesivo protettivo anti
Fissaggi pannello
decorativo (2 pz.)
Vite Ø3,9 X 13 (4 pz.) Listello laterale
Vite Ø3,5 X 16 (2 pz.) Sotto piedino (3 pz.) Fissaggi pannello
superiore (1 pz.)
(DW60A804***,
DW60A805***)
condensa (1 pz.)
Coperchio in plastica
(2 pz.)
decorativo (2 pz.)
Modelli BU (Sottopiano, DW60A80**U*)
Staffa superiore (2 pz.) Viti Ø4 X 14 (2 pz.) Sotto piedino (3 pz.) Vite Ø3,5 X 16 (2 pz.)
Staffe battiscopa (2 pz.) Battiscopa Coperchio in plastica
Bullone battiscopa
(4 pz.)
Italiano14
DW8500AM_DW60A8070BB_ET_DD81-03206K-04_IT.indd 14 2023-06-27() 5:35:42
Adesivo protettivo
(1 pz.)
(2 pz.)
Vite Ø3,9 X 13 (4 pz.) Listello laterale
Dado battiscopa (4 pz.)
superiore (1 pz.)
(DW60A804***,
DW60A805***)
Page 99
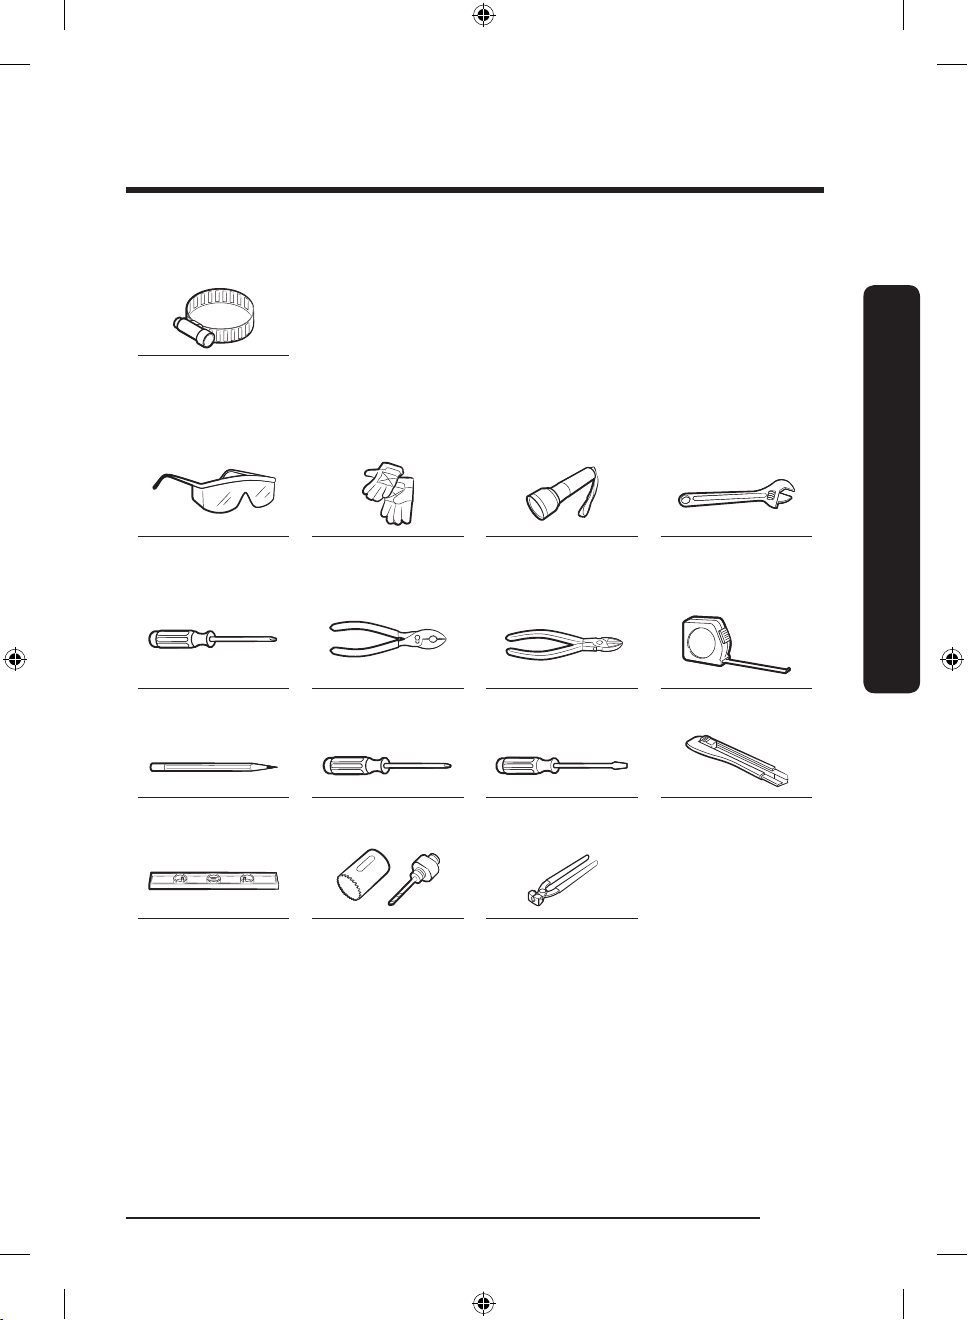
Kit di installazione (non in dotazione)
Fascetta stringitubo
Strumenti necessari (non in dotazione)
Occhiali di sicurezza Guanti Lampada Chiave inglese (22 mm)
Torx T15 Pinza Cesoie Metro
Matita Cacciavite a croce Cacciavite a testa piatta Taglierina
Livello Seghetto da traforo
(80-100 mm)
Tenaglia
per il piedino anteriore
Installazione
Italiano 15
DW8500AM_DW60A8070BB_ET_DD81-03206K-04_IT.indd 15 2023-06-27() 5:35:42
Page 100
Installazione
Installazione
Requisiti di installazione
Per prevenire eventuali rischi di incendio, scariche
elettriche o lesioni siche, tutti i cablaggi e la
messa a terra devono essere eseguiti da personale
qualicato.
Alimentazione
• È necessario un circuito di alimentazione da
220-240 V~, 50 Hz dedicato alla lavastoviglie.
• La presa di corrente deve avere un capacità
nominale di 16 A (max 11 A per la lavastoviglie)
AVVERTENZA
• Non utilizzare prolunghe.
• Usare solo il cavo di alimentazione in dotazione
alla lavastoviglie.
• Al termine dell'installazione, vericare che il cavo
di alimentazione non sia piegato o danneggiato.
Messa a terra
Per una messa a terra permanente, la lavastoviglie
deve essere collegata ad una parte metallica o ad un
sistema di messa a terra permanente. Il conduttore
della messa a terra deve essere collegato dai
conduttori del circuito al terminale di messa a terra
della lavastoviglie.
AVVERTENZA
• Non collegare il cavo di messa a terra a condotte
in plastica, tubazioni del gas o tubazioni
dell'acqua calda. Conduttori di messa a terra
collegati in maniera inappropriata possono
provocare scariche elettriche.
• Non alterare la spina elettrica in dotazione
all'apparecchio. Qualora la spina elettrica non
sia adeguata alla presa a parete, richiederne la
sostituzione a un elettricista specializzato.
Erogazione dell'acqua
• La mandata dell'acqua deve essere in grado di
sopportare una pressione dell'acqua in entrata
compresa tra 0,04 MPa e 1 MPa.
• La temperatura dell'acqua deve essere inferiore
a 60 °C.
• Sulla tubazione deve essere montato un rubinetto
con lettatura maschio da 3/4”.
Per ridurre eventuali rischi di perdite:
• Vericare che i rubinetti dell'acqua siano
facilmente accessibili.
• Chiudere il rubinetto di mandata dell'acqua in
caso di inutilizzo della lavastoviglie.
• Controllare regolarmente la presenza di eventuali
perdite dalle guarnizioni del tubo.
• Per fermare eventuali perdite, sigillare le
giunzioni delle tubazioni con nastro in teon o
sigillante idoneo.
Aqua Stop
Aqua Stop è un componente elettrico progettato
per prevenire perdite di acqua. Il dispositivo Aqua
Stop viene ssato al tubo di carico dell'acqua e
interrompe automaticamente l'erogazione in caso di
danni alla tubazione.
ATTENZIONE
• Maneggiare Aqua Stop con attenzione.
• Non sbattere o torcere il tubo collegato al
dispositivo Aqua Stop. Se il dispositivo Aqua
Stop risulta danneggiato, chiudere il rubinetto
di mandata dell'acqua ed estrarre la spina dalla
presa elettrica. Quindi contattare un Centro di
assistenza autorizzato locale Samsung o un
tecnico qualicato.
Italiano16
DW8500AM_DW60A8070BB_ET_DD81-03206K-04_IT.indd 16 2023-06-27() 5:35:43
 Loading...