

Page 1

truVision DVR 31 User Manual
P/N 1072981 • REV A • ISS 06MAR12
Page 2

Copyright © 2012 UTC Fire & Security. All rights reserved.
r
Trademarks and patents Interlogix, the truVision DVR 31 and the truVision Brand and logo are
trademarks of UTC Fire & Security.
Other trade names used in this document may be trademarks or
registered trademarks of the manufacturers or vendors of the respective
products.
Manufacture
Version This document applies to truVision DVR 31 version 00.20.
Certification
FCC compliance
Canada This Class A digital apparatus complies with Canadian ICES-003.
UTC Fire & Security Americas Corporation, Inc.
2955 Red Hill Avenue, Costa Mesa, CA 92626-5923, USA
Authorized EU manufacturing representative:
UTC Fire & Security B.V.
Kelvinstraat 7, 6003 DH Weert, Netherlands
N4131
Class A: This equipment has been tested and found to comply with the
limits for a Class A digital device, pursuant to part 15 of the FCC
Rules. These limits are designed to provide reasonable protection
against harmful interference when the equipment is operated in a
commercial environment. This equipment generates, uses, and can
radiate radio frequency energy and, if not installed and used in
accordance with the instruction manual, may cause harmful
interference to radio communications. Operation of this equipment in
a residential area is likely to cause harmful interference in which
case the user will be required to correct the interference at his own
expense.
Cet appareil numérique de la classe A est conforme à la norme NMB003 du Canada.
ACMA compliance Notice! This is a Class A product. In a domestic environment this
product may cause radio interference in which case the user may be
required to take adequate measures.
European Union directives 2004/108/EC (EMC directive): Hereby, UTC Fire & Security declares
that this device is in compliance with the essential requirements and
other relevant provisions of Directive 2004/108/EC
2002/96/EC (WEEE directive): Products marked with this symbol cannot
be disposed of as unsorted municipal waste in the European Union. For
proper recycling, return this product to your local supplier upon the
purchase of equivalent new equipment, or dispose of it at designated
collection points. For more information see: www.recyclethis.info.
Contact information
Customer support
www.utcfireandsecurity.com or www.interlogix.com
www.interlogix.com/customer-support
Page 3

Content
Chapter 1 Product Introduction 1
Product Overview 2
Chapter 2 Installation 3
Installation environment 4
Unpacking the DVR 31 and its accessories 4
HDD capacity 5
Back panel overview 6
Connecting devices to the unit 7
Chapter 3 Operating instructions 9
Control interfaces 10
Controlling the DVR 31 10
Front panel overview 11
Using the mouse 12
Using the IR remote control 15
Operating modes 17
Main menu overview 17
Chapter 4 Basic operation 23
Turning on the DVR 31 24
Live mode 24
Spot monitor 26
Logging on 27
Logging off 28
Controlling a PTZ camera 28
Playing back video 30
Archiving recorded files
36
Turning off the DVR 31 41
Chapter 5 Using the Web browser 43
Overview 44
Windows Vista and 7 users 45
Browser connections
46
Using the Web browser to configure the device 46
Searching and playing recorded video 47
Live dual streaming 47
Bandwidth throttle management 48
Controlling a PTZ camera in the Web browser 48
truVision DVR 31 User Manual i
Page 4

Chapter 6 Advanced setup 51
Managing users 53
Configuring cameras 57
Configuring recording and schedule settings 61
Alarm settings
66
Network settings
Display settings 73
Chapter 7 System settings 77
Overview 78
System date and time 79
Audio and remote 80
RS-485 settings 80
RS-232 settings 81
Mouse Sensitivity settings 81
Hard drive settings 81
Importing and exporting configuration settings 82
System log 82
Upgrading the firmware 85
69
Appendix A Specifications and Troubleshooting 87
Product specifications 88
Product specifications 88
HDMI Compatibility List* 89
HDMI Incompatibility List 89
Battery removal 90
Troubleshooting 90
Appendix B Factory defaults
91
Menu defaults 92
Network defaults 92
Appendix C Warranty and support
93
Warranty information 94
Contacting support 94
Appendix D KTD-405 keyboard mapping 95
DVR 31 to KTD-405 keyboard mapping 96
Index 97
ii truVision DVR 31 User Manual
Page 5

Chapter 1
Product Introduction
Summary
This chapter provides an overview of the DVR 31, including its features and
functions.
Content
Product overview 2
truVision DVR 31 User Manual 1
Page 6

Chapter 1: Product Introduction
Product Overview
This is the truVision DVR 31 User Manual for models:
• TVR-3108-1T
• TVR-3108-2T
• TVR-3116-2T
• TVR-3116-4T
• TVR-3116-6T
The truVision DVR 31 is a network digital video recorder developed for digital
surveillance. The truVision DVR 31 uses an embedded microcontroller unit
(MCU) and Linux operating system, combining the most advanced technology in
video and audio encoding/decoding, hard disk recording, and TCP/IP
communication. The DVR’s firmware is stored directly into the memory, making it
more stable and reliable.
The truVision DVR 31 is an integrated digital video recorder that combines the
features of a time-lapse audio/video recorder, a multiplexer, and a video server to
create a single security solution.
The DVR 31’s pentaplex operation enables users to view live video, search and
play back any recorded video by date and time or by event, and back up the
configuration and video data, without interrupting the ongoing DVR recording
process.
In addition to the new H.264 compression mode, the DVR’s graphical user
interface also optimizes the monitoring controls of the unit.
The DVR 31 comes with remote viewing and configuration software already
installed. This software includes a Web browser plug-in, allowing users to view
live or recorded video images, and enabling remote configuration. The remote
software is stored in the DVR 31 and deployed over a LAN, WAN, or Internet
connection to remote Windows-based computers. This simplifies the installation
and maintenance of the software components because all remote users are
using the same software, which comes from the unit.
2 truVision DVR 31 User Manual
Page 7

Chapter 2
Installation
Summary
This chapter provides information on how to install and connect peripherals to
your device.
Content
Installation environment 4
Unpacking the DVR 31 and its accessories 4
HDD capacity 5
Back panel overview 6
Connecting devices to the unit 7
Connecting required devices 8
Connecting external devices 8
truVision DVR 31 User Manual 3
Page 8

Chapter 2: Installation
Installation environment
When installing your product, consider these factors:
• Ventilation
• Temperature
• Moisture
• Chassis load
Ventilation: Do not block any ventilation openings. Install in accordance with the
manufacturer’s instructions. Ensure that the location planned for the installation
of the unit is well ventilated.
Temperature: Consider the DVR 31’s operating temperature (32 to 104°F, 0 to
40°C) and humidity specifications (10 to 90% relative, noncondensing) before
choosing an installation location. Extremes of heat or cold beyond the specified
operating temperature limits may reduce the life expectancy of the DVR 31. Do
not install the DVR 31 on top of other hot equipment. Leave 1.75 inches (44 mm)
of space between rack mounted DVR 31 units.
Moisture: Do not use the unit near water. Moisture can damage the internal
components. To reduce the risk of fire or electric shock, do not expose this unit to
rain or moisture.
Chassis: Equipment weighing less than 35 lbs (15.9 kg) may be placed on top of
the DVR 31 only if the DVR 31 is placed on a shelf and not rack mounted.
Be sure to power off the unit before making any connections. In order to prevent
the unit from losing data and system damage that may be caused by sudden
power, use of an uninterruptible power supply is highly recommended.
Note: Do not remove the rubber feet, and always leave a space for air ventilation
on the unit’s bottom side.
Unpacking the DVR 31 and its accessories
When you receive the product, check the package and contents for damage, and
verify that all items are included. There is an item list included in the package. If
any of the items are damaged or missing, please contact your local supplier.
Items shipped with the product include:
• truVision DVR 31
• IR (infrared) remote control
• Two AAA batteries for the remote control
4 truVision DVR 31 User Manual
Page 9

Chapter 2: Installation
• USB mouse
• Power cord
• Rack mount kit (left and right brackets, screws)
• Terminal blocks
• truVision DVR 31 Quick Start Guide
• truVision DVR 31 Quick Chart
The support CD includes the following items:
• truVision DVR 31 User Manual
• truVision DVR 31 Quick Start Guide
• truVision DVR 31 Quick Chart
• Video player application
• Record duration calculator
HDD capacity
Storage capacity for the truVision DVR 31 varies depending on the model. Refer
to Table 1 below for more information.
Table 1: truVision DVR 31 model types
Model Model number Description
8 channel model TVR-3108-1T truVision DVR Model 31, 8 ch, 1 TB
TVR-3108-2T truVision DVR Model 31, 8 ch, 2 TB
16 channel model TVR-3116-1T truVision DVR Model 31, 16ch, 1 TB
TVR-3116-2T truVision DVR Model 31, 16ch, 2 TB
TVR-3116-4T truVision DVR Model 31, 16ch, 4 TB
TVR-3116-6T truVision DVR Model 31, 16ch, 6 TB
truVision DVR 31 User Manual 5
Page 10
Chapter 2: Installation
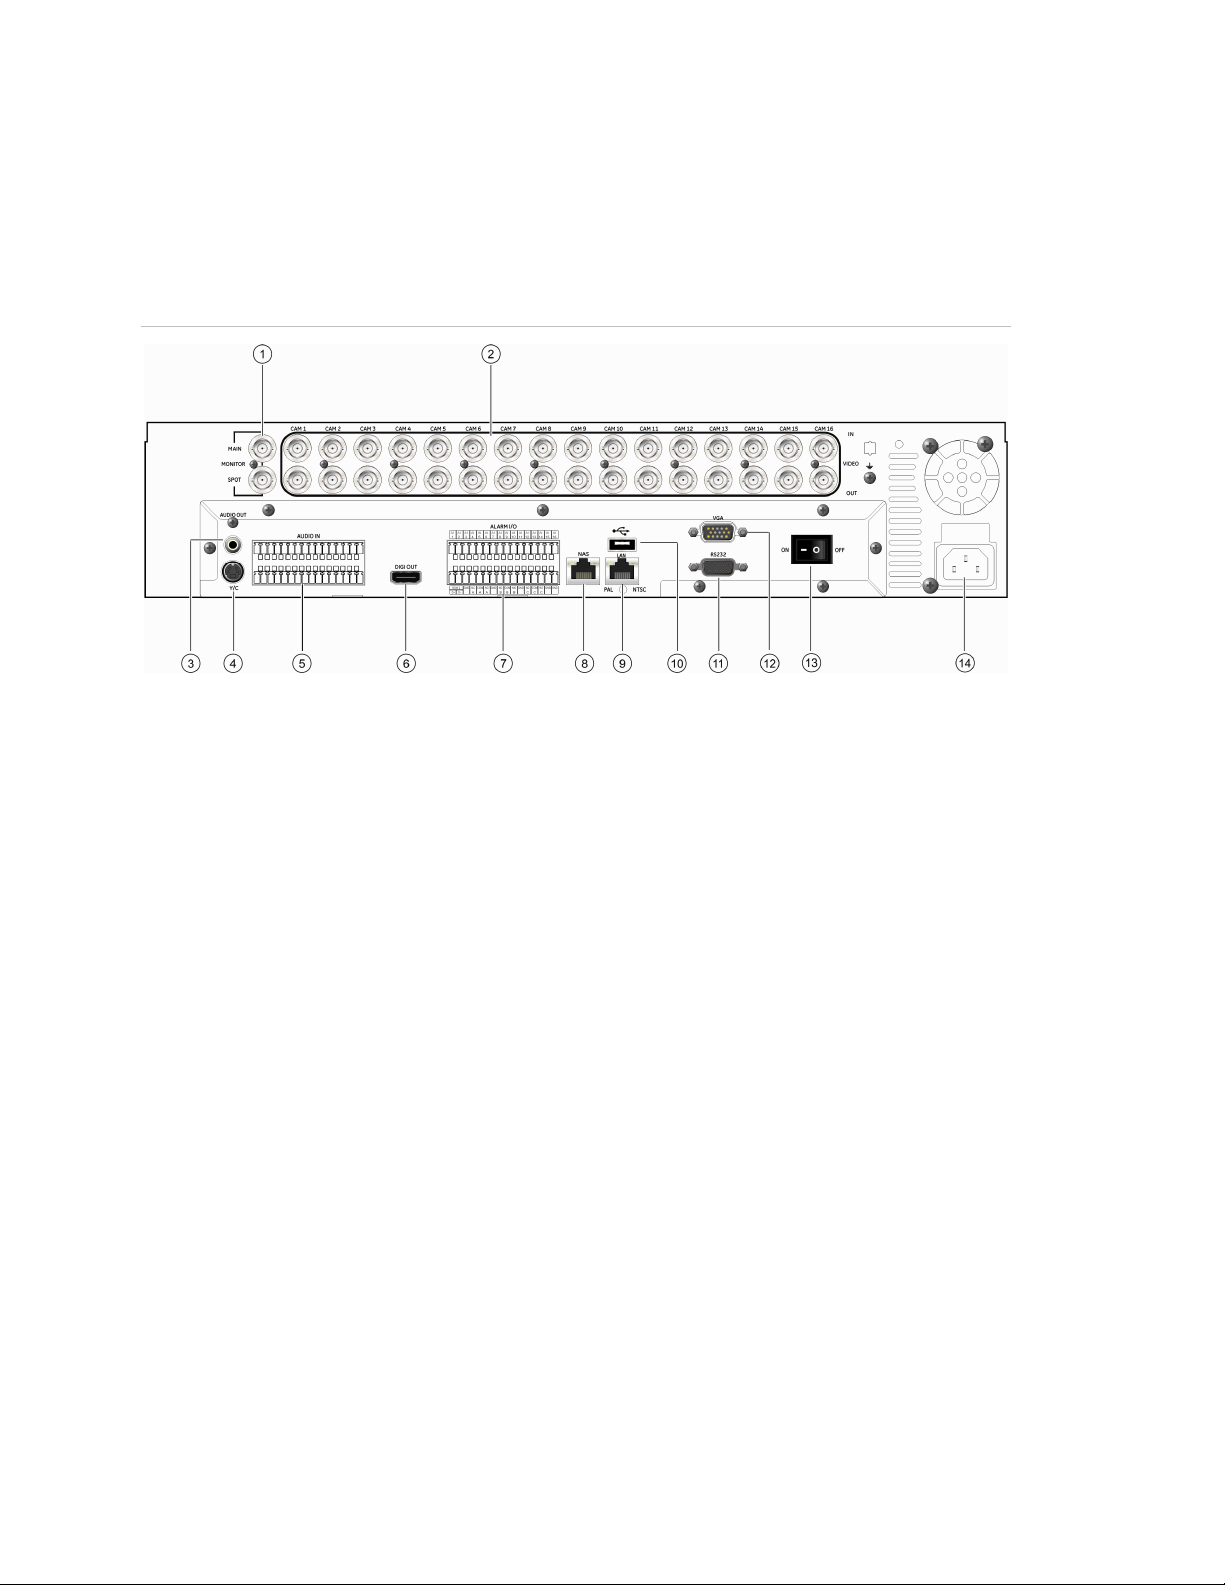
Back panel overview
Figure 1 below shows the back panel controls and connectors on a typical
truVision DVR 31.
Figure 1: DVR 31 back panel
1. Video out
2. Video in (top row, loop out bottom row)
3. Audio out
4. S-video port
5. Audio in
6. Digital video output
7. Alarm I/O and RS-485
8. Network Attached Storage (NAS) port (This device is
currently not supported.)
9. LAN port
10. USB port
11. RS-232 port
12. VGA output
13. Power switch
14. Power input
6 truVision DVR 31 User Manual
Page 11
Chapter 2: Installation
Connecting devices to the unit
Use Figure 2 below as a visual guide to connect the various peripherals to the
DVR 31.
Figure 2: Back panel connection diagram
1. Connect up to two CCTV monitors (main and spot)
and/or Y/C (S-video)
2. Connect up to 16 cameras
3. Connect to speakers for audio output
4. Connect to audio input (available for each camera)
5. Connect to a monitor that displays digital video
(HDMI)
6. Connect to a PTZ control
7. Alarm output
8. Connect to alarm input cables
9. Connect to a network attached storage (NAS) device
(This device is currently not supported)
10. Connect to a network
11. Connect to USB device
12. Connect to a point-of-sale (POS) device
13. Connect to VGA monitor
14. Connect to the power cord
Note: DVR 31 display options are: 800 x 600, 1024 x 768, 1280 x 1024, 720P,
and 1080P. If looping video, ensure that the Termination option (Main Menu
>Cameras > Adjust Video) is disabled.
truVision DVR 31 User Manual 7
Page 12

Chapter 2: Installation
Connecting required devices
Before powering up the unit, cameras and a main monitor should be connected
to the unit for basic operation. If needed, connect a spot monitor for displaying
full screen video of all installed cameras in sequence.
Note: You can attach an extension to the RS-485 port on the back panel.
Connecting external devices
When connecting external devices to include as part of the entire system, such
as a USB drive or any other USB devices, connect those devices only when the
unit displays live view. The DVR 31 recognizes external devices only after the
unit has gone through the initialization process.
8 truVision DVR 31 User Manual
Page 13

Chapter 3
Operating instructions
Summary
This chapter describes the how to control and navigate through the DVR 31’s
menus and options.
Content
Control interfaces 10
Controlling the DVR 31 10
Front panel overview 11
Status LEDs 12
Using the mouse 12
Mouse toolbar 13
Using the IR remote control 15
Controlling multiple DVRs with one remote control 16
Operating modes 17
Main menu overview
Main menu commands 18
Using the main menu 19
Navigating through dialog screens 19
Using the virtual keyboard 20
Exiting the main menu 21
17
truVision DVR 31 User Manual 9
Page 14

Chapter 3: Operating instructions
Control interfaces
The DVR 31 has three control interfaces:
• Built-in interface
• Display interface
• Web browser interface
Built-in interface. The built-in interface is displayed on the monitor output. It
consists of a main menu and several dialog screens that let you configure and
control the device. You can invoke the built-in interface using the front panel,
remote control, or mouse.
Display interface. The display interface consists of various toolboxes that
appear on top of the monitor image. These let you control live or playback video
while in PTZ or playback mode. You can invoke the display interface from the
built-in interface screens or from the mouse toolbar. The controls in any toolbox
can be operated using the front panel, remote control, and mouse.
Web browser. The Web browser interface uses Internet Explorer to simulate the
display and control functions of the VGA monitor on a remote PC. The Web
browser interface can only be accessed by a PC with Internet access. See
Chapter 5 “Using the Web browser” on page 43 for more information on the Web
browser interface.
Controlling the DVR 31
You can control the DVR 31 using:
• Front panel control
• IR remote control
• Mouse control
Front panel control. Use the directional arrow buttons to select a command,
option, or button on a screen. Use the Enter button to confirm a selection. Use
the Esc button to cancel a selection.
IR remote control. Use the directional arrow buttons to select a command,
option, or button on a screen. Use the OK button to confirm a selection. Use the
Esc button to cancel a selection.
Mouse. Move the pointer to a command, option, or button on a screen. Click
(with the left mouse button) to confirm a selection. Right-click to save and exit a
screen.
10 truVision DVR 31 User Manual
Page 15
Chapter 3: Operating instructions
You can use your preferred control method for any procedure, but in most cases
we describe procedures using mouse terminology. Optional control methods are
given only when they differ substantially from mouse control methods.
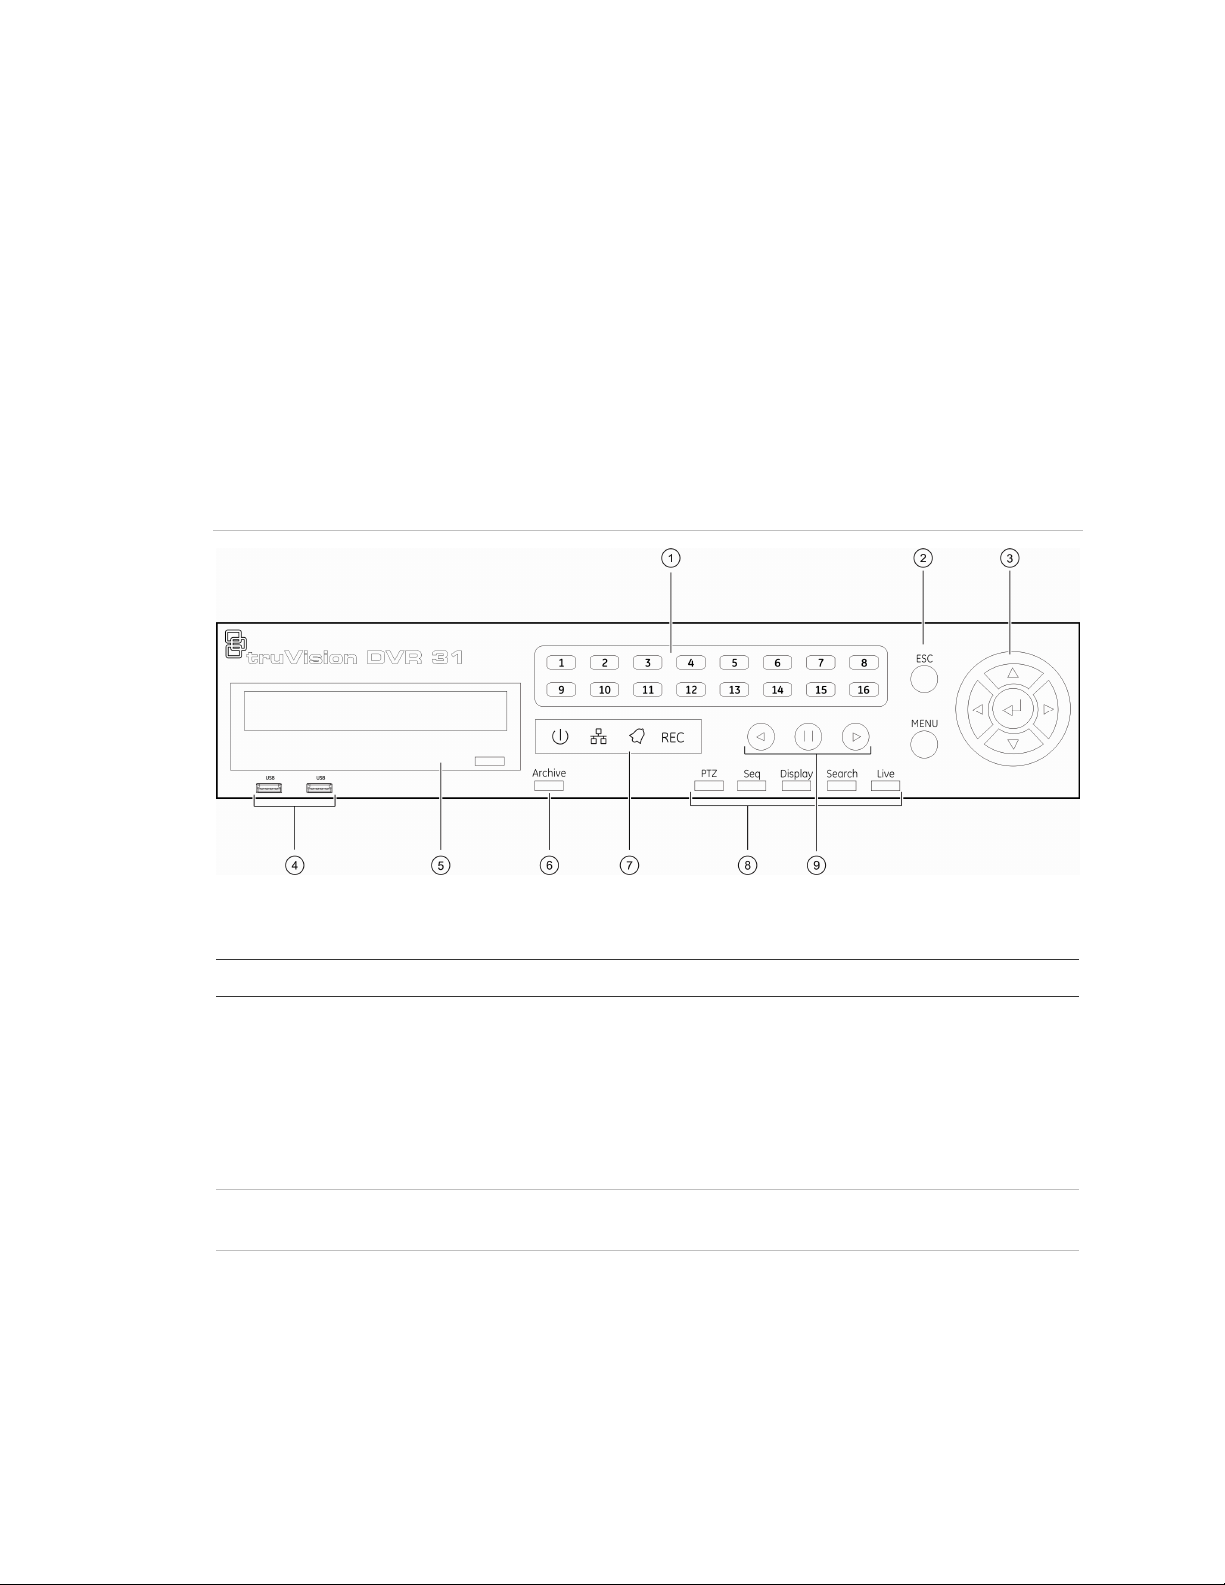
Front panel overview
The buttons on the front panel control all DVR 31 functions and set the
programmable functions. The LED indicators light up or flash to alert you of
various conditions.
Figure 3: Front panel
Table 2: Front panel button descriptions
Item Name Description
1 Numeric buttons Display the corresponding video in full screen while in
both live and playback mode. The number of the button
corresponds to the camera number. Press and hold a
numeric button for two seconds to display the
corresponding video on the spot monitor.
While in PTZ mode, press the 1 button to access the
Set/Go Preset menu.
2 Menu and Esc controls Press Esc to exit a screen or cancel a selection. Press
Menu to display the main menu.
3 Directional Controls And
Enter button
Use arrow buttons as directional keys in zoom mode.
While in a setup menu, use the Left or Right Arrow keys
to navigate through fields. Use the Up or Down Arrow
keys to change the value of a selected field. Press
Enter to confirm the selection or display additional
screens.
truVision DVR 31 User Manual 11
Page 16

Chapter 3: Operating instructions
Item Name Description
4 USB ports Connect USB devices.
5 CD/DVD drive Insert media for archiving.
6 Archive button Begin archiving or displays the Archive screen.
Press once to begin copying a video segment for export
while in playback mode. Press again to stop copying.
Archiving recorded files” on page 36 for more
See “
information.
7 Status LEDs Display device status and conditions. See “Status
LEDs”
8 Function buttons Change the DVR 31 operating mode. For example,
press PTZ to go into PTZ mode. See “
modes”
9 Playback controls Control video playback speed.
below for more information.
Operating
on page 17 for more information.
Status LEDs
The LEDs on the front panel of the DVR are described as follows.
Table 3: Status LED descriptions
LED Name Description
Power Steady indicates that the correct power is connected to the unit.
Network Blinking indicates that the DVR is connected to a network.
Alarm Steady indicates that an alarm is triggered.
REC
Record Blinking indicates that the DVR 31 is recording. Steady indicates
hard drive failure.
Using the mouse
Use the USB mouse provided with the DVR 31 to carry out the same operations
as the front panel and remote control. Connect the mouse to the DVR 31 by
plugging the mouse USB connector into one of the USB ports on the front panel.
The mouse is immediately operational and the pointer should appear.
Click the left mouse button to enter or confirm a selection. This is similar to
pressing Enter button on the front panel. Click the right mouse button to the exit
setup menus and save the settings. Use the scroll wheel to change values.
Mouse sensitivity can be adjusted in the Systems menu.
12 truVision DVR 31 User Manual
Page 17
Chapter 3: Operating instructions
Mouse toolbar
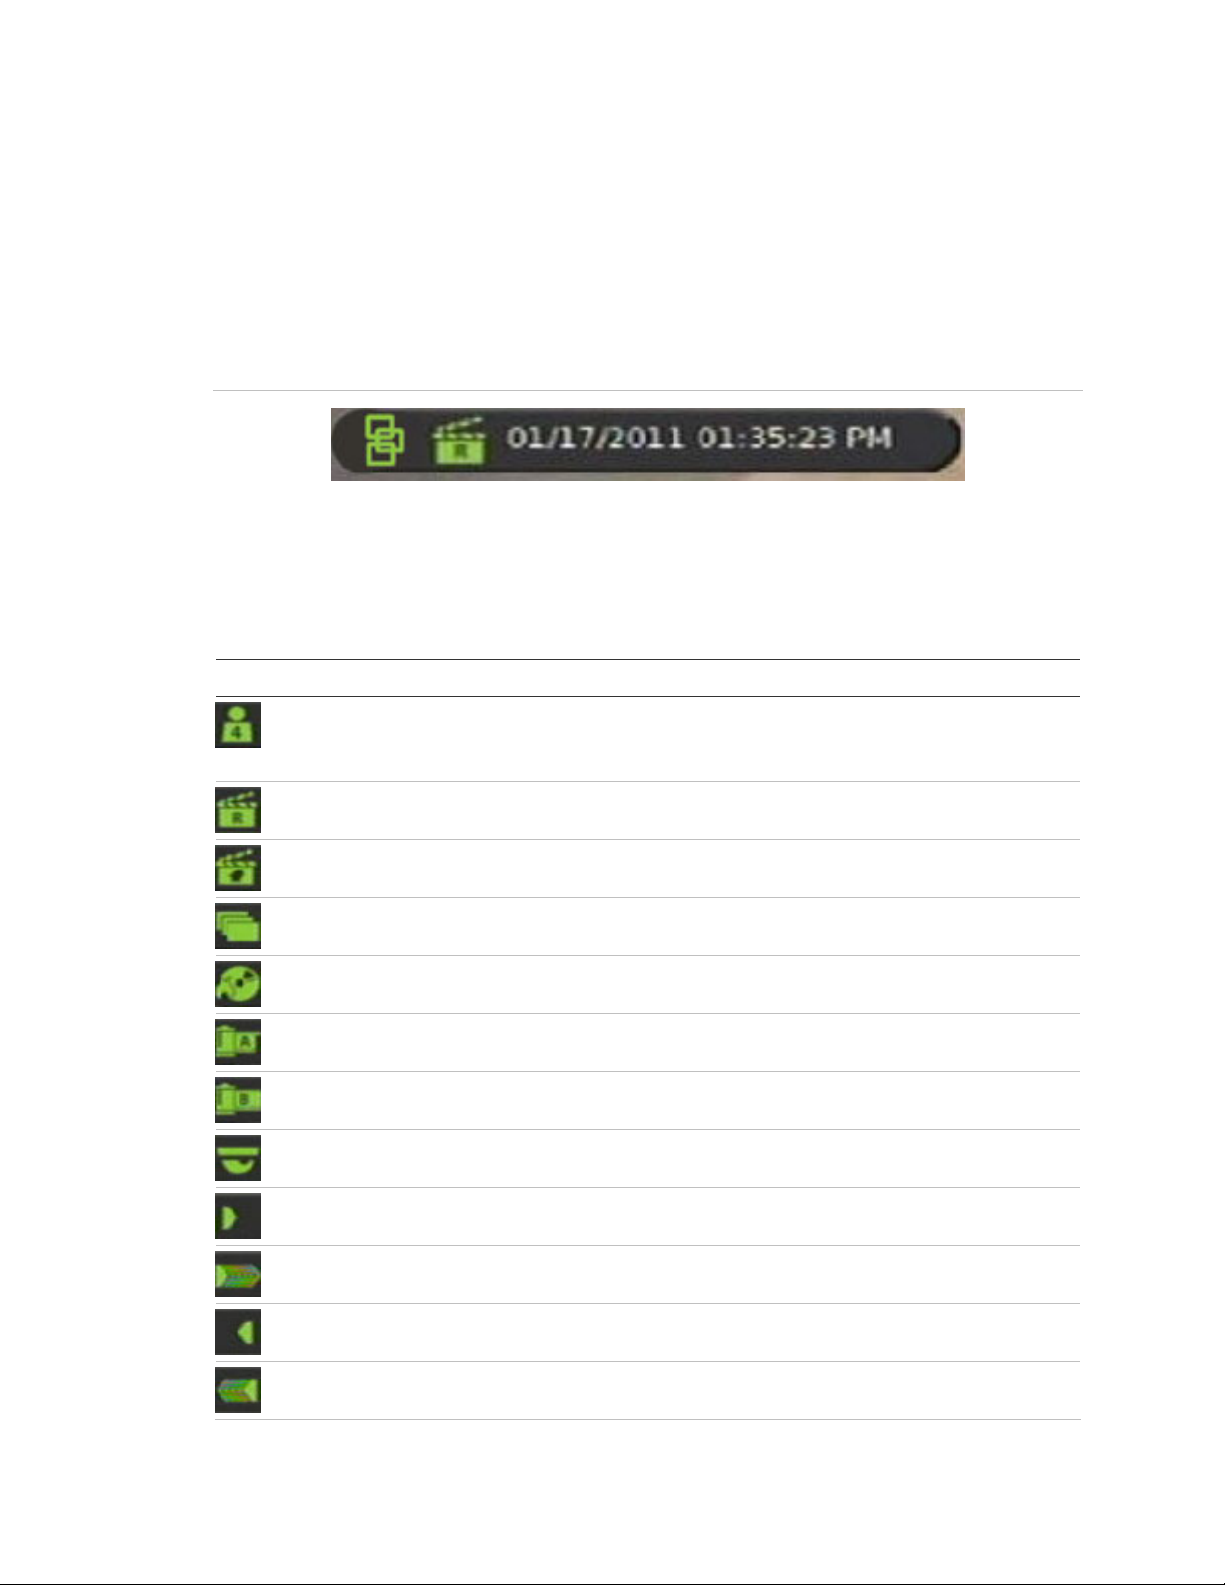
While in live, playback, or sequence mode, point to the date and time to display
the mouse toolbar, as shown in Figure 4 below.
Note: To move the mouse toolbar to a different position, click and drag the date
and time display.
Figure 4: Mouse toolbar
Mouse toolbar icons
Table 4 below describes the icons that appear on the mouse toolbar.
Table 4: Mouse toolbar icons
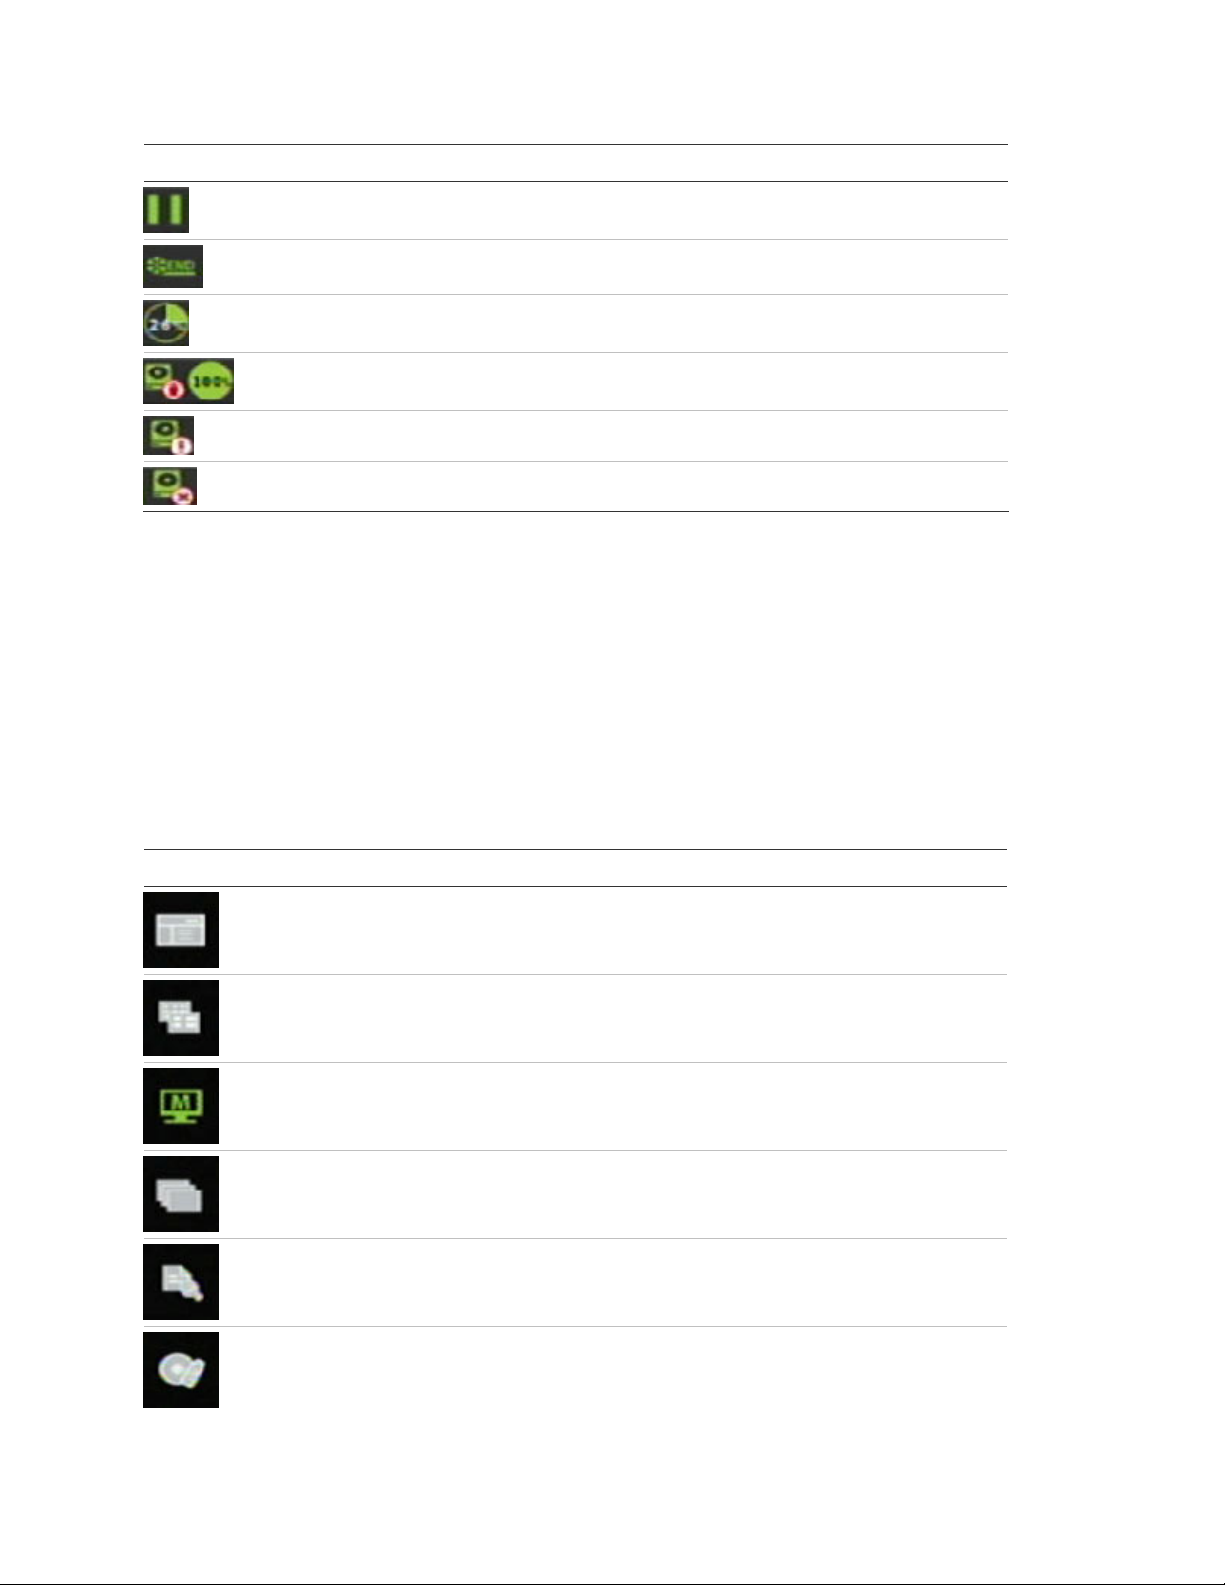
Icon Description
User is logged in. Numerical value indicates the user’s access level. User icon with
a G character indicates that the device requires logon credentials to access the
main menu.
The device is recording.
The device is recording an alarm event.
The device is in sequence mode.
The device is in archive mode.
Indicates the starting point of a video segment for archive while in playback mode.
Indicates the ending point of a video segment for archive while in playback mode.
The device is in PTZ mode.
The device is playing video forward.
The device is fast forwarding video playback.
The device is playing back video reverse.
The device is fast reversing video playback.
truVision DVR 31 User Manual 13
Page 18
Chapter 3: Operating instructions
Icon Description
Video playback is on pause.
Video playback has reached the end of a video segment.
Indicates the amount of available hard disk space left.
Indicates the hard disk is full.
Indicates a hard disk failure.
Indicates the hard disk is not recognized.
Camera commands
The camera commands appear when you point to Cameras on the mouse
toolbar. Click a camera number to display that camera in live mode.
Function commands
The function commands display when you point to Functions on the mouse
toolbar.
Table 5: Mouse toolbar function commands
Icon Name Function
Main menu Displays the main menu
Multiscreen Toggles through the available multiscreen displays including full
screen, four-screen, nine-screen, and 16-screen.
Monitor Toggles between main and spot monitor. M indicates the main
monitor is currently selected. S indicates the spot monitor is
Sequence Launches the sequence mode. Sequence mode refers to the
Search Displays the Search screen.
currently selected.
display of live video in programmed sequence of cameras.
Archive Lets you archive video. Archives the video being played back
while in playback mode. In Live mode, allows you to perform a
14 truVision DVR 31 User Manual
quick archive.
Page 19
Chapter 3: Operating instructions
Icon Name Function
PTZ Launches PTZ mode.
Play Plays back video instantly starting at one minute from the
current date and time.
Esc Hides the function commands.
Using the IR remote control
The IR remote control buttons are similar to those on the DVR 31 front panel.
You can use the remote control to perform any DVR 31 function.
Figure 5: IR remote control
1
2
3
4
5
Search
PTZ
Archive
Enter
ESC MENU
DVR ID
Camera
12
5678
9101112
13 14 15 16
Live
Seq
Display
34
6
7
truVision DVR 31 User Manual 15
Page 20

Chapter 3: Operating instructions
Table 6: IR remote control descriptions
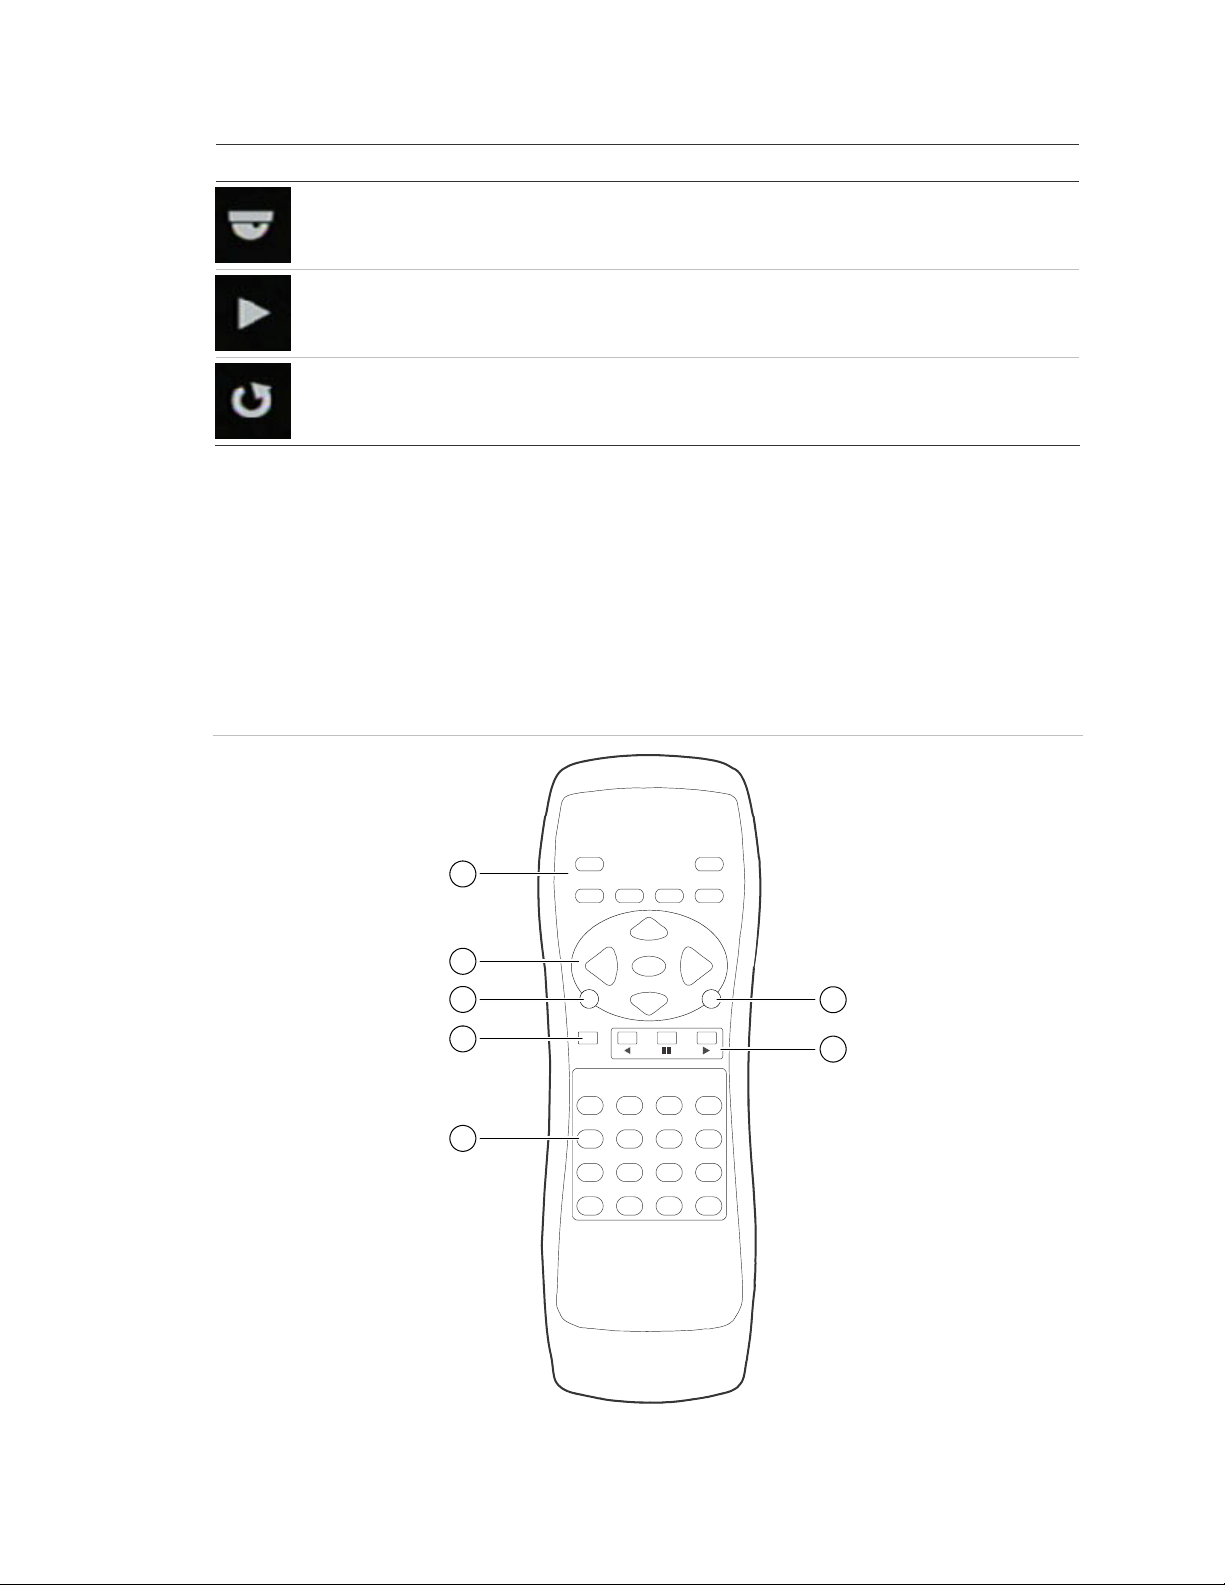
Item Name Description
1 Function buttons Change the DVR 31 operating mode. For example, press PTZ to go
into PTZ mode. See “Operating modes”
information.
on page 17 for more
2 Directional
controls and Enter
button
3 Esc Exit a screen or cancel a selection.
4 DVR ID Switch control between different DVR 31 units.
5 Numeric buttons In live mode, display the corresponding camera. In edit mode, enter
6 Menu Display the main menu.
7 Playback Control video playback speed.
In menu mode, navigate and select commands. In PTZ mode, use
for PTZ controls.
While in a setup menu, use the Left or Right Arrow keys to navigate
through fields. Use the Up or Down Arrow keys to change the value
of a selected field.
numeric characters.
To place batteries into the IR remote control:
1. Remove the battery cover.
2. Insert the batteries (AAA). Make sure that the positive and negative poles are
correctly placed.
3. Replace the battery cover.
To connect the remote control to the DVR 31:
1. Turn on the DVR 31 and wait for live video to appear.
2. On the remote control, press the DVR ID button, and then press the 1 button.
Note: The numeric button depends on the remote ID assigned to the DVR 31.
The remote ID assigned is 1 by default. See “Controlling multiple DVRs with
one remote control” below for more information.
3. The remote control is now operational.
Controlling multiple DVRs with one remote control
You can control up to 16 DVRs with one remote control. Each DVR must have a
unique remote ID assigned. To connect the remote control to a DVR, press the
DVR ID button on the remote control, and then press the numeric button with the
desired remote ID. For more information on assigning a remote ID to a DVR, see
“Audio and remote” on page 80.
16 truVision DVR 31 User Manual
Page 21

Chapter 3: Operating instructions
Operating modes
Table 7 below describes the various operating modes for the DVR 31.
Table 7: DVR 31 operating modes
Mode Description
Live Displays live video from a specific camera.
Sequence Displays live video in a programmed sequence of cameras.
Menu Displays menu options for configuration.
PTZ Displays live video from multiple cameras in a programmed sequence.
Playback Plays back recorded video.
Freeze Freezes live or playback video.
Spot On-screen display for spot monitor.
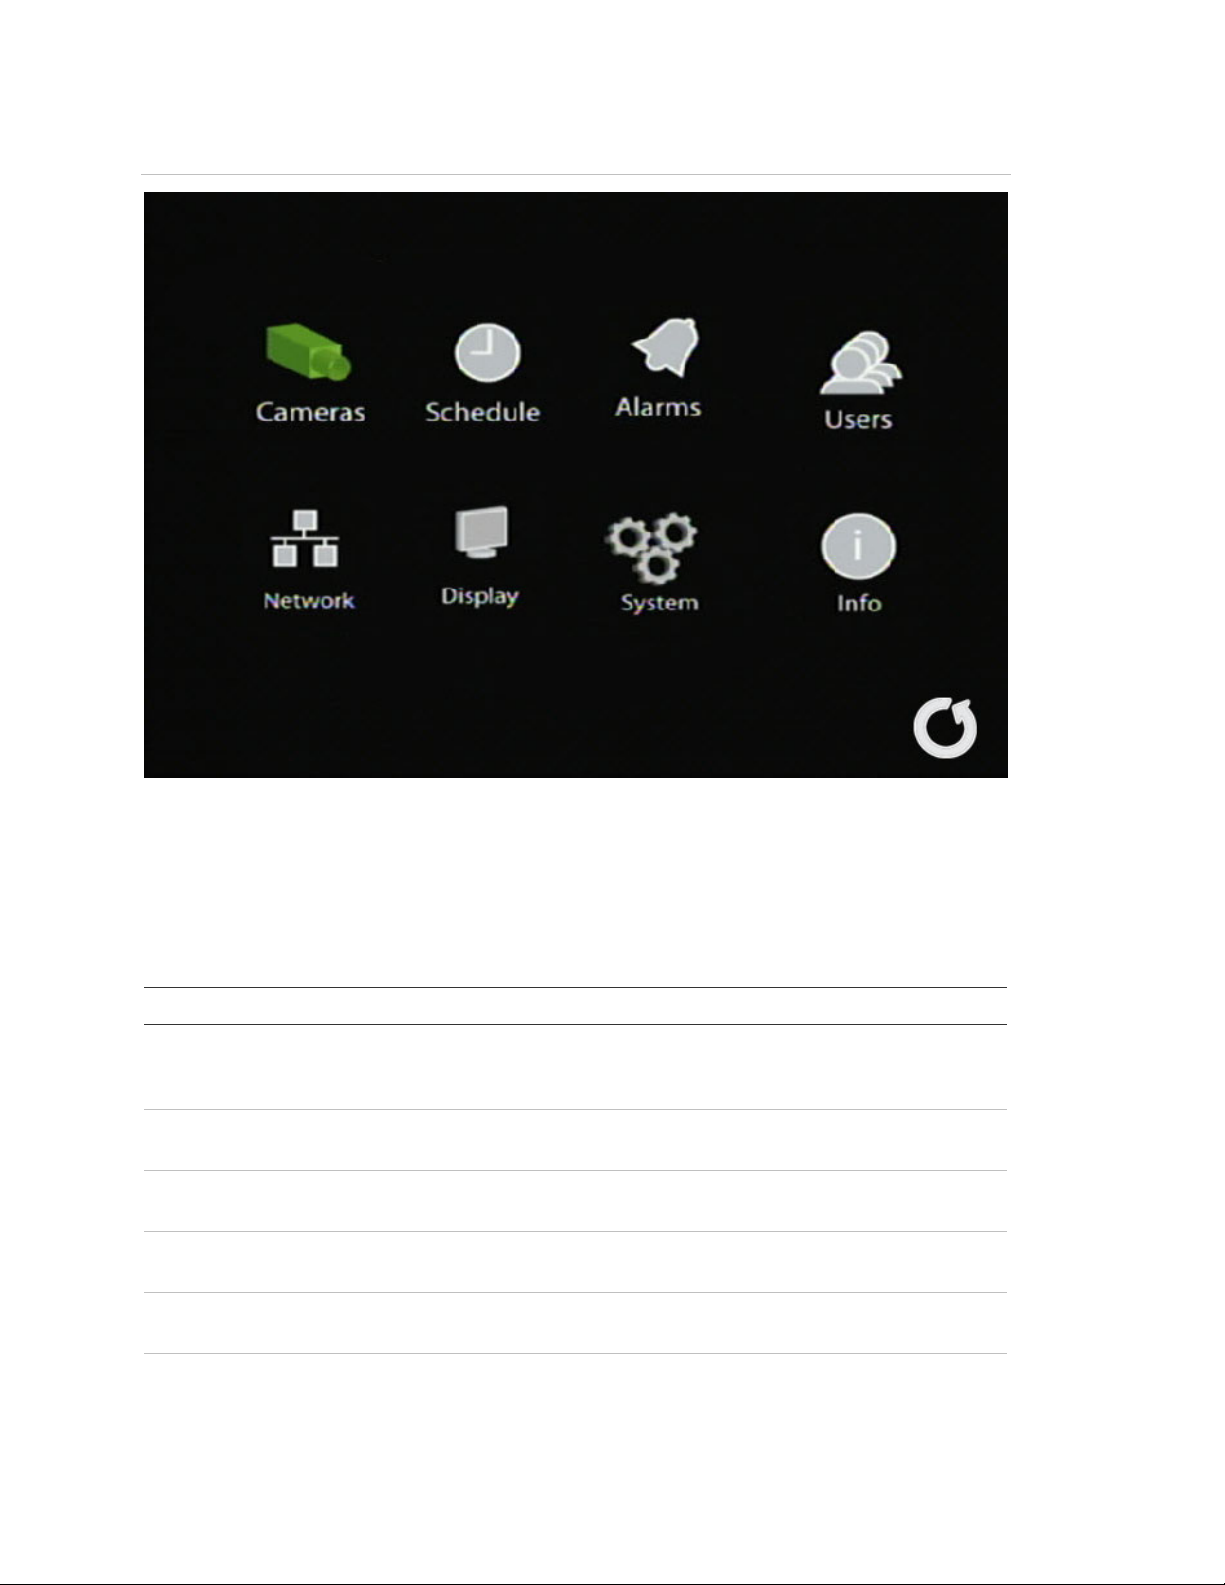
Main menu overview
The built-in interface of the DVR 31 includes a main menu screen with eight
command buttons. Each command displays a dialog screen that lets you edit a
group of DVR 31 settings. The main menu screen is shown in Figure 6 on page
18. Access to different option screens varies depending on your access
privileges. Most screens are available only to system administrators. The menu
icon is highlighted when selected.
truVision DVR 31 User Manual 17
Page 22
Chapter 3: Operating instructions
Figure 6: Main menu
Main menu commands
Table 8 below describes the commands available for each menu items.
Table 8: Main menu commands
Command Description
Cameras Configures camera settings including motion detection, PTZ, video
image adjustments, camera title, covert camera, audio off, and copy
settings to other cameras.
Schedule Configures recording and schedule settings including recording quality,
and schedule definitions.
Alarms Configures alarm settings including alarm input, relay output, video loss
detection, remote alert, prealarm, and post-alarm seconds.
Users Configures users, passwords, access privileges, and defines privilege
levels.
Network Configures standard network settings including IP address, e-mail
notifications, DDNS setup, and advanced network settings.
Display Configures display settings including sequence order, resolution, dwell
time, on-screen alerts, display formats, and transaction overlay.
18 truVision DVR 31 User Manual
Page 23

Chapter 3: Operating instructions
Command Description
System Configures system settings including system date and time, audio
output, device name, RS-485 settings, RS-232 settings, firmware
upgrade, hard drive settings, system log, and shutdown.
Info Displays the unit’s system information including model ID, network
address, firmware version, and MAC addresses.
Back Arrow icon Exits Main menu
Using the main menu
Use the mouse or directional arrow keys to navigate through the menu
commands and display the configuration screens. To display the main menu,
click the Menu button on the mouse toolbar or press the Menu button on the front
panel or remote control.
Navigating through dialog screens
Each dialog screen includes various options and buttons as seen in Figure 7 on
page 20. The frame surrounding an option or button indicates that this option (or
button) is currently selected.
Use the mouse to select any option or button on the screen. You can also use
the directional arrow buttons (Up, Down, Left, or Right) to navigate through the
options. Changes to screen settings can be entered in various ways as shown in
Table 9 on page 20.
Saving your changes
Closing a screen, either by clicking the X button at the top right corner or by rightclicking, automatically saves and applies your changes. You cannot cancel or
undo any changes you have entered in a dialog screen.
truVision DVR 31 User Manual 19
Page 24
Chapter 3: Operating instructions
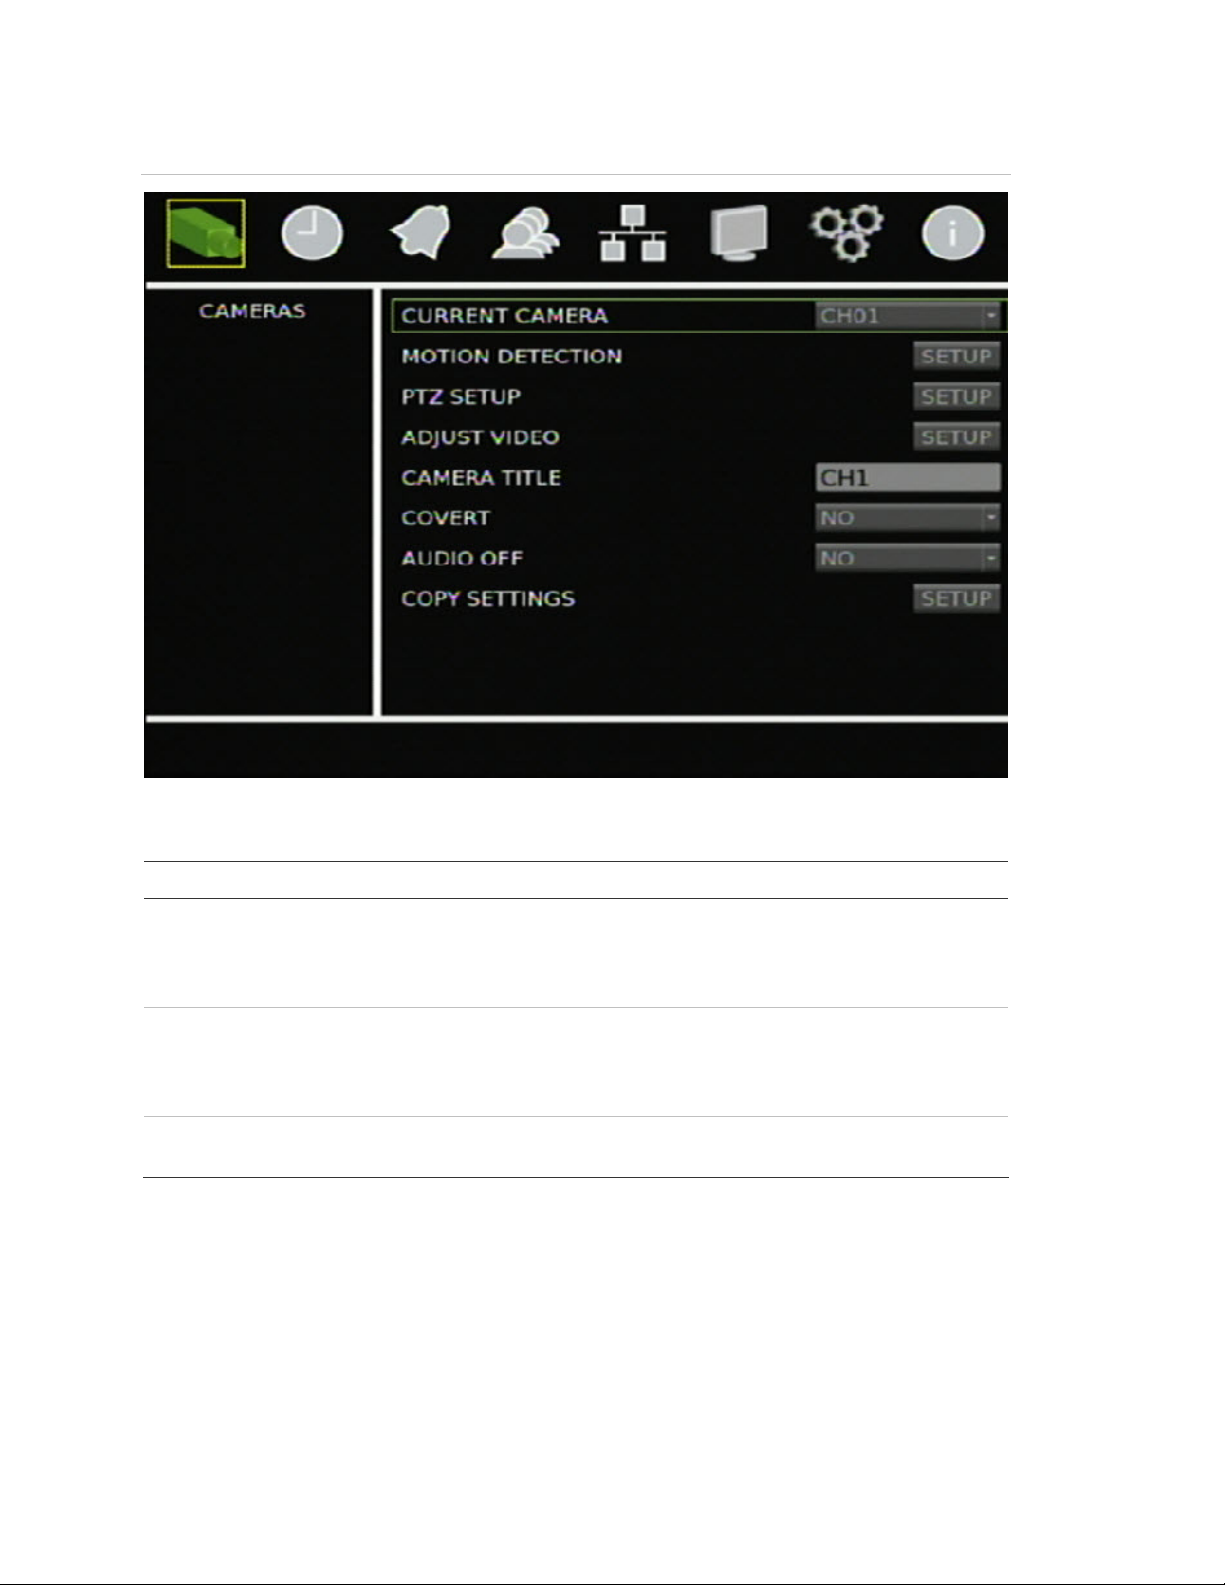
Figure 7: Cameras menu
Table 9: Field entry types
Type Description
List box Provides more than two values for the option. Only one of them can
be selected. Click the scroll arrows at the right-hand side of the box
to scroll through the possible values. You can also use the Up or
Down Arrow buttons to select a value.
Edit box Lets you to enter characters into the settings, such as camera
name. Enter characters into an edit box through the virtual
keyboard. See “
information.
Button Triggers a special function or allows you to display a new screen.
For example, click the Setup button to display the setup screen.
Using the virtual keyboard” below for more
Using the virtual keyboard
The virtual keyboard allows you to enter a full range of alphanumeric characters,
such as camera name, through a virtual keyboard as shown in Figure 8 on page
21. The virtual keyboard automatically displays when entering values in an edit
20 truVision DVR 31 User Manual
Page 25

Chapter 3: Operating instructions
box field. You can use the front panel, IR remote control, or USB mouse to enter
characters with the virtual keyboard.
Figure 8: Virtual keyboard
To enter characters in an edit box:
1. Highlight the edit box.
2. Click the mouse within the action frame (or press Enter in the front panel or
remote control) to display the virtual keyboard.
3. Select the characters required.
4. When finished, click OK on the virtual keyboard to close the keyboard.
Exiting the main menu
Click Esc on the mouse toolbar (or right-click) or press Esc on the front panel or
remote control to exit the main menu and return to live mode.
truVision DVR 31 User Manual 21
Page 26

Chapter 3: Operating instructions
22 truVision DVR 31 User Manual
Page 27

Chapter 4
Basic operation
Summary
This chapter describes the basic operation of the DVR 31 such as how to turn on
the unit, log on, control a PTZ camera, play back video, and archive recorded
video files.
Content
Turning on the DVR 31 24
Live mode 24
Right-click mouse menu 25
Viewing in full screen 25
Viewing in multiscreen 26
Spot monitor 26
Controlling the spot monitor 26
Logging on 27
Logging off 28
Controlling a PTZ camera 28
Accessing PTZ mode
PTZ control buttons 29
Calling up a preset PTZ point 30
Exiting the PTZ control mode 30
Playing back video 30
Instant video playback 31
Searching video for playback 31
Playback controls 35
Exiting playback mode 36
Archiving recorded files 36
Using Quick Archive in live mode 37
Using the Archive screen in live mode 37
Archiving a video segment in playback mode 39
Using the DVR player 39
Turning off the DVR 31 41
28
truVision DVR 31 User Manual 23
Page 28
Chapter 4: Basic operation
Turning on the DVR 31
Before turning the DVR 31 power on, connect at least one monitor to the main
video out or the VGA interface. Otherwise, you will not be able to see the user
interface and operate the device. Use the power switch on the back panel to turn
on the unit.
Live mode
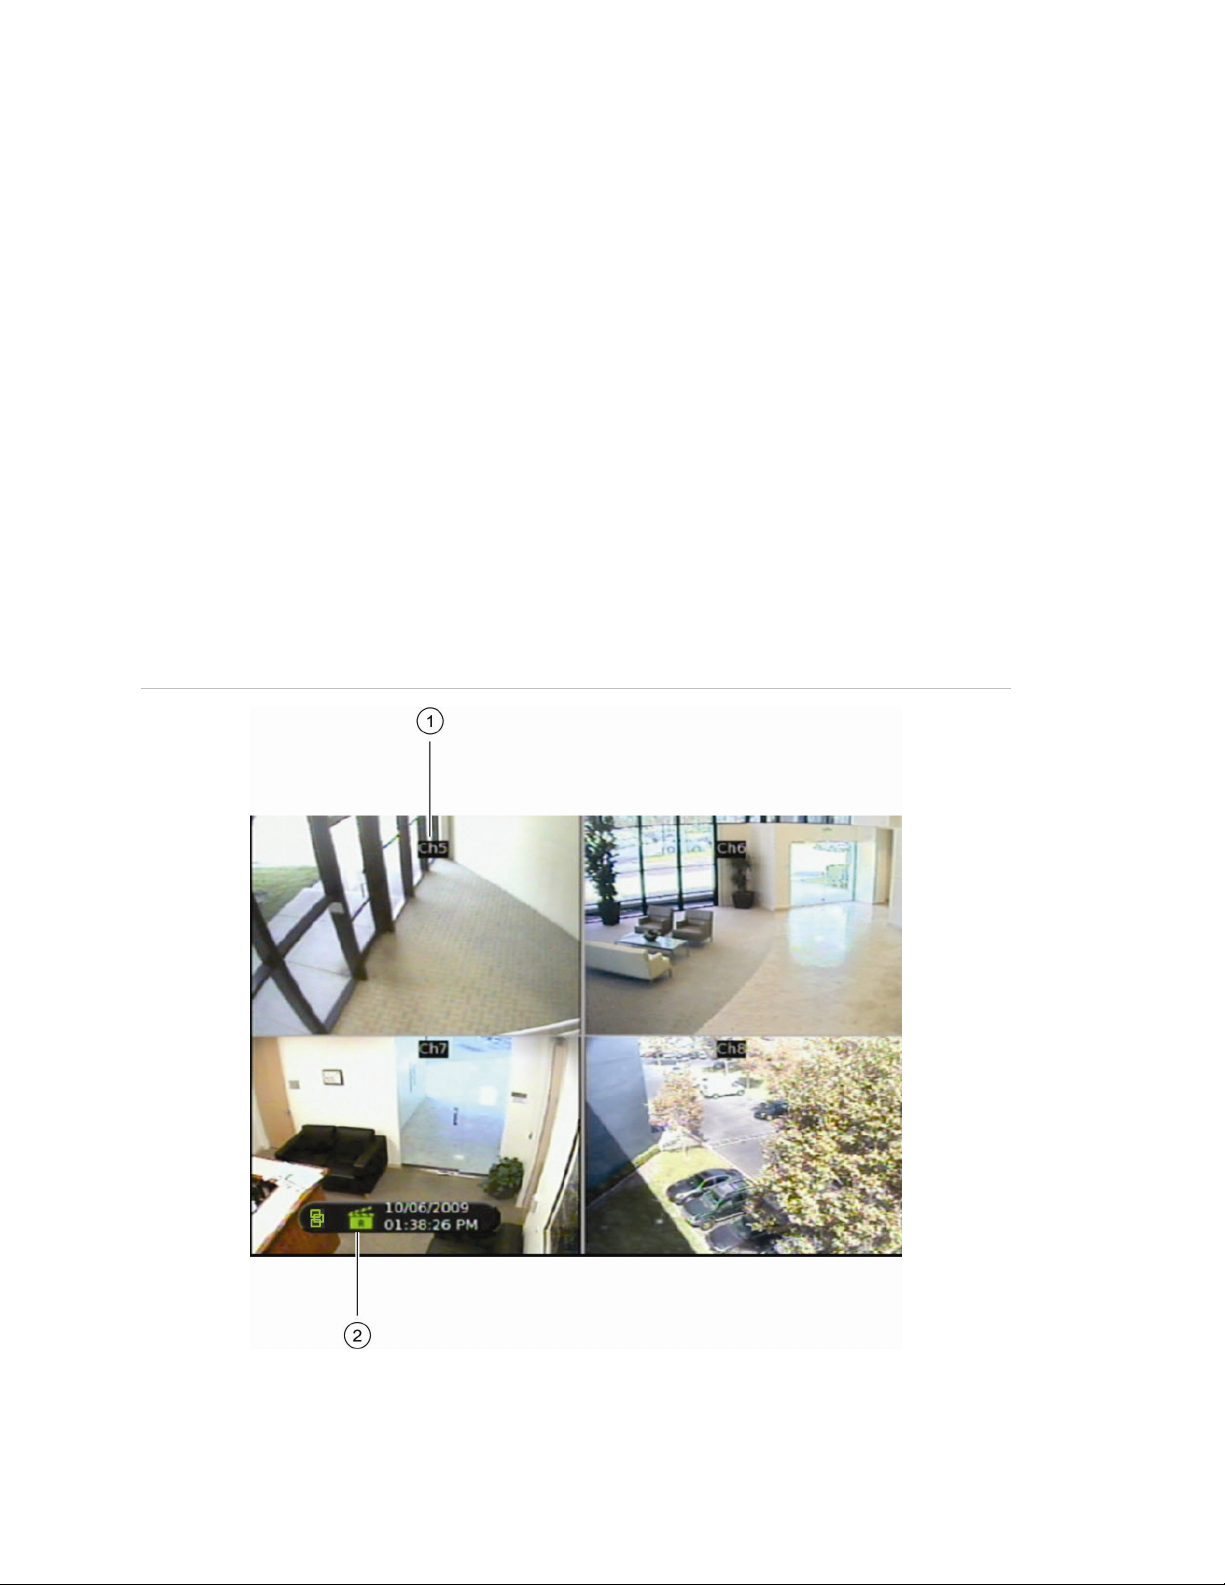
The DVR 31 automatically enters into live mode once powered on. Live mode
refers to the mode in which the DVR 31 displays live video from cameras. The
DVR 31 on-screen display presents information such as the camera title, the
current operating mode, and the date and time information as shown in Figure 9
below.
Figure 9: On screen display
1. Camera title
2. Mouse toolbar
24 truVision DVR 31 User Manual
Page 29

Chapter 4: Basic operation
Note: To move the camera title to a different position, left-click the mouse on the
date/time, and then select a new position while in live mode.
Right-click mouse menu
Right-click with the mouse to display the right-click mouse menu.
Figure 10: Right-click mouse menu
The follow options are available:
• Menu
• Display
• Live
• Sequence
• Search
• Archive
• PTZ
• Playback
• Escape
• Hide Panel
Viewing in full screen
Press a numeric button to switch to the corresponding camera display. For
example, press 2 to view camera 2.
truVision DVR 31 User Manual 25
Page 30

Chapter 4: Basic operation
3
3
3
3
Viewing in multiscreen
Use the Display button on the front panel to cycle through different display
formats. Figure 11 below displays the multiscreen formats available as defaults.
Figure 11: Display formats
1
13
15 16
2 x 2
Spot monitor
14
12
3
4
5
6
78
9
11 12
2 x 2 2 x 2 2 x 2
1
4
x
3
2
5
6
987
8910
11 12
14
13
1615
x
12
5
910
13
14
4 x 4
10
3
11 1 2
1615
4
876
To connect the spot monitor:
1. Connect the spot monitor to the Spot video out port on the back panel using a
composite cable.
2. While in live mode, press and hold a numeric key for two seconds on the front
panel or remote control.
3. The spot monitor displays the corresponding camera in full screen.
The spot monitor only supports full screen mode.
Note: Make sure that there is video signal input. Otherwise the spot monitor will
only show a blank screen.
Controlling the spot monitor
Press and hold a numeric button for two seconds to display the corresponding
camera in full screen. Additionally, press and hold the SEQ button (on the front
26 truVision DVR 31 User Manual
Page 31

Chapter 4: Basic operation
panel or remote control) to initiate sequence mode on the spot monitor.
Alternatively, click the Monitor button on the mouse toolbar to toggle to the spot
monitor function, and then click the Sequence button to begin sequence, as
shown in Figure 12 below.
Figure 12: Spot monitor function
Logging on
The DVR 31 is shipped with a predefined user for the system administrator. The
default system administrator logon uses “admin” as a user name with a password
of 1234. You can modify the admin password but not the admin user name. UTC
Fire & Security recommends that you change the admin password once you
have completed the installation and setup to protect against unauthorized
access. The seven predefined standard users are labeled User1 to User7 with a
default password of 4321 and level 4 access. The administrator can customize
these users and define their privileges. For more information, see “Managing
users”
To log on to the DVR 31 user interface:
1. Click Menu.
2. Select a user in the Account field.
3. Use the mouse or the Down Arrow button to select the Password field.
4. Enter the corresponding password.
5. Click Confirm to enter the main menu.
on page 53”.
truVision DVR 31 User Manual 27
Page 32

Chapter 4: Basic operation
Logging off
There are two ways to log off. You can:
• Log off manually by pressing Esc while in live mode
— or —
• Automatically log off from live or menu mode when no buttons are pressed for
five minutes
Controlling a PTZ camera
PTZ mode lets you to control the PTZ operation of the cameras using a DVR 31
PTZ interface. You can control PTZ cameras using the buttons on the front panel
and IR remote control or by using the PTZ control icons on the mouse toolbar. To
enter PTZ mode, you must have PTZ control access privileges.
Note: The DVR 31’s support for Digiplex (UTC RS-422) is limited. As a result,
you may not be able to control Digiplex domes with a multiplexer unless the
camera’s input connects to the output of a keypad.
Accessing PTZ mode
To access PTZ mode, select a camera using the numeric buttons (on the front
panel, remote control, or the mouse toolbar). Click PTZ in the mouse toolbar or
press the PTZ button on the front panel or remote control. The PTZ control
interface displays as shown in Figure 13 on page 29.
Note: You can only access the PTZ control interface while in live mode.
28 truVision DVR 31 User Manual
Page 33

Chapter 4: Basic operation
Figure 13: PTZ control interface
PTZ control buttons
When you enter PTZ mode, the PTZ control interface displays. In PTZ mode, the
numeric buttons control additional PTZ functions. Table 10 below lists the front
panel keys and their PTZ control functions.
Table 10: Front panel PTZ control function
Front panel key
8-channel 16-channel
8 8 Zooms out
5 16 Zooms in
4 15 Focuses near
7 7 Focuses far
6 6 Closes iris
3 14 Opens iris
PTZ control
Enter Enter Auto focus/iris
Esc Esc Exits PTZ mode
1 1 Enter Preset Dialog
truVision DVR 31 User Manual 29
Page 34

Chapter 4: Basic operation
Calling up a preset PTZ point
To call up a preset PTZ point:
1. Click on a camera in the mouse toolbar or use the numeric buttons to select a
camera.
2. Click the PTZ icon in the mouse toolbar or press the PTZ button to display the
PTZ control as shown in the figure below.
3. Click the Preset icon (or press 1 on the front panel or remote control) to
access the Set/Go Preset function as shown in the figure below.
4. Enter a preset number.
5. Click Go Preset. The selected camera adjusts to the settings of that preset
number.
6. You can also enter a number and click Run Tour (only supported by the UTC
RS-485 protocol).
Exiting the PTZ control mode
Press Esc to exit the PTZ control mode and return to live mode.
Playing back video
The DVR 31 allows you to play back recorded video. This section describes the
features and methods in playing back video.
There are several ways to play back recorded video:
30 truVision DVR 31 User Manual
Page 35

Chapter 4: Basic operation
Instant playback. Play back instantly, starting from the last recorded minute in
live mode.
Searched video playback. Play back video starting from a specific date and
time.
Instant video playback
To play back video instantly, press the Play button on the front panel, remote
control, or mouse toolbar. The DVR 31 plays back recorded video from the
selected camera starting from the last recorded minute in live mode.
Searching video for playback
The DVR 31 lets you search and play back recorded video based on the
following search criteria:
• Date and time
• Events
• Text (if a POS machine is connected)
While in live or playback mode, click Search to display the Search menu as
shown in Figure 14 below.
Figure 14: Search menu
truVision DVR 31 User Manual 31
Page 36

Chapter 4: Basic operation
To search for recorded video by date and time:
1. Click Search to display the Search screen.
2. Enter a start date and time in the Go To field.
3. Click Play Data. Recorded video will begin to play back starting from the
specified date and time.
To search for recorded video using the Calendar Mode:
1. Click Search to display the Search screen.
2. Click Calendar Mode. The Calendar Mode screen displays as shown in the
figure below.
3. Select a date from the Calendar.
Click on a date or use directional arrow keys to select a date. Dates that
appear in italics and underlined indicate recorded video available for that day.
Days highlighted in gray indicate that the days are within the start and end
time of the database. Days not highlighted indicate that the days are beyond
the start and end time of the database.
4. Select a start time using the timeline.
32 truVision DVR 31 User Manual
Page 37

Chapter 4: Basic operation
The timeline displays a 24-hour period for the specified date. Yellow areas
indicate normal recorded video. Red areas indicate events that occurred that
day. You can click anywhere in the timeline to specify a start time for the
video you want to play back. If you are using the front panel or remote control
keys, highlight the From/End option and press Enter to move the marker at
the start or end points of the video segment.
If using the front panel or the remote control to navigate through the Calendar
Mode, use the Select fields to specify a start date and time.
5. Click Play Data to begin playback.
To search for recorded video by events:
1. Click Search to display the Search screen.
2. In the Choose Camera box, select the cameras you want to use in your
search. You can select more than one camera or all cameras.
3. Click Event List to display the Event List screen.
4. Click an event from the Event List to play video.
Searching for recorded video by POS text
The DVR 31 lets you to search for video based on text data from a point-of-sale
(POS) device connected to the unit. You can search using any of these methods:
• By text
• By numeric value
• By date and time
• By camera
Text. When searching by text, you can search for video with data containing the
exception string defined using the setup menu. You can also enter two word
strings and search for video with data containing either one of the word strings or
both of the word strings. Alternatively, you can specify only one word string.
Value. When searching by value, you can enter two numeric values to specify a
range. You can search for videos with data containing values within or outside
the specified range. Additionally, you can enter a single value and search for
videos with data containing values less than, equal to, or greater than that value.
Date/Time. When searching for video based on POS data, you can narrow your
search by specifying a date and time range.
Camera. When searching for video based on POS data, you can narrow your
search by specifying a camera.
truVision DVR 31 User Manual 33
Page 38

Chapter 4: Basic operation
To search for recorded video by POS text:
1. Click Search to display the Search screen.
2. Click POS Data Search. The POS Data Search screen displays as shown in
the figure below.
3. Specify your search criteria.
Before entering any search criteria, highlight the search type field and specify
how you want the search criteria to be handled. For example, if searching for
data containing the text words “sale” and “charge,” highlight the Text Search
field and select the AND option. Then enter the search words in the Text
fields, one word for each field. When specifying a numeric value range, enter
the lower number in the Lower Bound field and the higher number in the
Upper Bound field.
4. Click POS Search Result to display your search results.
5. Click a search result to play back the resulting video.
Note: Make sure the Transaction Overlay (POS) box in the Display screen is
set to include playback.
34 truVision DVR 31 User Manual
Page 39

Chapter 4: Basic operation
Playback controls
When viewing recorded video, several options are available to control playback.
You can control playback using the front panel, the mouse toolbar (as shown in
Figure 15 below), or the remote control.
Note: Playback control on the mouse toolbar automatically hides if there is no
mouse activity for more than five seconds. The playback toolbar reappears when
you move the pointer over the toolbar.
Figure 15: Playback controls
Playback control options
Option Description
Play reverse Plays video backwards at a speed based on how many times you press
the key. Press once to play video 1x, twice for 2x, etc. Speeds include:
1x, 2x, 4x, 8x, 16x, and 32x.
Pause Pauses the video playback.
Play forward Plays video forward at a speed based on how many times you press the
key. Press once to play video 1x, twice for 2x, etc. Speeds include: 1x,
2x, 4x, 8x, 16x, and 32x.
truVision DVR 31 User Manual 35
Page 40

Chapter 4: Basic operation
When video is paused, use the left or right button to jump back to the previous
frame or forward to the next frame.
Exiting playback mode
To exit playback mode, press Live or click the Live button on the mouse toolbar.
Archiving recorded files
Archive recorded files using an external device. There are two ways to archive
recorded files:
Quick Archive. Quick archive lets you archive recorded files quickly by using the
Archive button on the front panel and remote control.
Archive screen. Use the Archive screen (shown in Figure 16 below) to specify
archiving settings such as date range, events, and data type.
Note: You can archive up to 8 GB with a USB drive that is formatted to FAT
32.
Figure 16: Archive screen
36 truVision DVR 31 User Manual
Page 41

Chapter 4: Basic operation
Using Quick Archive in live mode
To archive recorded video using Quick Archive while in live mode:
1. Insert the backup device.
If using a USB memory drive, insert the device into the USB port on the front
panel. If using a digital video disc (DVD), insert the disc into the DVD drive. If
both media are found in the DVR 31, the USB device takes precedence over
the DVD.
2. Press the Archive button on the front panel or the remote control. The Quick
Archive hint screen displays as shown in the figure below.
3. Click Quick Archive to begin archiving.
The DVR 31 archives the latest recorded video onto the backup device until
the medium is filled to its capacity or all video found in the unit have been
exported.
Using the Archive screen in live mode
To archive recorded video using the Archive screen in live mode:
1. Insert the backup device.
truVision DVR 31 User Manual 37
Page 42

Chapter 4: Basic operation
If using a USB memory drive, insert the device into the USB port on the front
panel. If using a digital video disc (DVD), insert the disc into the DVD drive. If
both media are found in the DVR 31, the USB device takes precedence over
the DVD.
2. Press the Archive button on the front panel, or remote control, or click Archive
in the mouse toolbar.
3. Press Enter to display the Archive screen.
4. Select the cameras you want for archive.
5. Specify a date and time range you want for archive.
6. Select a data type.
Use the Data Type option to select one of the following:
Normal. Archive normal video only.
Event. Archive event video only.
Both. Archive both normal and event video types.
7. Select the events you want to archive, if required.
a. Select the Choose Events option.
This option is only enabled if you select Event as the data type. A list of
events displays on the Event List screen.
b. Click an event in this screen to be archived.
You can click additional events you want to archive.
Note: When archiving a motion event, the DVR archives the motion event for
the selected camera as well as post-event video from all other cameras. The
duration of the post-event video is based on the value you specified on the
Post-Alarm Seconds option in the Alarms screen.
8. Select a file format.
Use the Format option to specify whether to export to an original, DRV or AVI
file type. Selecting the original format results in faster archiving of large
amounts of video compared to the DRV format.
Although selecting the original format results in faster archiving, you cannot
select which camera to archive. The system archives all the data in the DVR.
In addition, when specifying a time range to archive, selecting the original file
format results in the exporting of video clips that include the specified time
range, but may not be contained in a single file.
38 truVision DVR 31 User Manual
Page 43

Chapter 4: Basic operation
The DVR identifies a video clip when the clip reaches 20 MB in size. If you
select the original file format and specify a time range with both the start and
end times falling in the middle of two video files, both video files are archived.
9. Select Yes for the Begin Export option to start archiving.
Note: The Watermark box is always set to On.
Archiving a video segment in playback mode
While playing back recorded video, you can mark a video segment to archive.
To mark and archive a video segment:
1. Play back recorded video.
See “Playing back video” on page 30 for more information.
2. Press Archive to mark the start time of the video segment you want to
archive.
3. Press Archive again to mark the end time of the video segment you want to
archive.
This segment is then archived to the media.
Using the DVR player
Use the DVR player to view video clips archived from the DVR 31 on any PC.
The DVR player is automatically included when archiving data from the device.
When you insert the backup media into the PC, the DVR player automatically
runs.
Note: If your PC is running on Windows Vista or Windows 7, the DVR player may
not automatically launch. If so, open the backup media by double-clicking the
device drive letter, and then launching the DVR Player file located in the Player
folder.
truVision DVR 31 User Manual 39
Page 44

Chapter 4: Basic operation
Figure 17: DVR player
To view archived video using the DVR player:
1. Launch the DVR player.
2. Click Play to display the Data List dialog box.
The Data List dialog box displays a list of all archived video. If you don’t see a
list, click Open and browse for the folder containing your archived video.
3. Select an event, and then click Playback to display the Playback screen.
You can select the start time and cameras from which to play video.
4. Click OK to play back video.
To verify that the video has not been altered, select an event, and then click
Verify in the Data List dialog box. The Playback screen displays. If the Status Log
reports a value of Good Signature, then the video has not been altered.
To play back a local file previously saved from the DVR, click Local Playback in
the Playback screen, and then click Open to browse for the local file.
40 truVision DVR 31 User Manual
Page 45

Chapter 4: Basic operation
Turning off the DVR 31
To avoiding potentially damaging the DVR 31, use the proper method to turn off
the unit.
To turn off or restart the unit:
1. Display the main menu.
2. Select System to display the System screen.
3. Select Shutdown. The Shutdown screen displays.
4. Select Restart to restart the unit or Shutdown to turn off the unit.
truVision DVR 31 User Manual 41
Page 46

Page 47

Chapter 5
Using the Web browser
Summary
This chapter describes how you can use the Web browser interface to configure
the device, search and play back recorded video, and control a PTZ camera. You
can also specify settings on the Web browser interface to optimize video
playback and recording performance when operating in a low or limited
bandwidth environment.
Content
Overview 44
Windows Vista and 7 users 45
Browser connections 46
Using the Web browser to configure the device 46
Searching and playing recorded video 47
Using the mouse to zoom in or out 47
Live dual streaming
Bandwidth throttle management 48
Controlling a PTZ camera in the Web browser 48
Exporting Video Clips 49
To play the clip 50
47
truVision DVR 31 User Manual 43
Page 48

Chapter 5: Using the Web browser
Overview
The DVR 31 Web browser lets you view, record, and play back videos as well as
manage all aspects of the DVR 31 from any PC with Internet access. The
browser’s easy-to-use controls give you quick access to all DVR 31 functions.
To access the DVR 31, open a Web browser and enter the IP address assigned
to the DVR 31 as a Web address. In the log on screen, enter the default user ID
and password.
User ID: admin
Password: 1234
The Web browser uses HTTP Port 80.
Figure 18: Web browser interface
Table 11: Web browser interface features and controls
Item Name Description
1 Display and audio settings Enable audio. Record live video. Specify viewer layout.
2 Camera View video from the selected camera.
44 truVision DVR 31 User Manual
Page 49

Chapter 5: Using the Web browser
Item Name Description
3 Bandwidth control switch (Dual
Streaming)
4 PTZ controls Control PTZ for the currently selected camera. Only
5 Viewer View live or playback video.
6 Zoom Zoom in or out on video.
7 Download DVR player Download the DVR player.
8 Function Lets you do the following:
Toggle between Bandwidth settings and Live Dual
Streaming. By default the Bandwidth settings are
enabled. Bandwidth settings refer to the number of
video frames sent across the network. For example,
select High for all data or select Low for partial data.
Switching to Live Dual Streaming uses a second video
data stream (less data size) that is sent over the
network. This is ideal for lower bandwidth networks. For
more information, see “Live dual streaming”
47.
displays if PTZ control is available for the selected
camera (indicated by a PTZ icon). You can drag this
panel anywhere on the screen.
• View live video
• Play back video
on page
• Display the configuration screen
• Search for recorded video
• Take an image snapshot (saves image file to
Desktop)
• Set the aspect ratio
• Check the hard drive health status
Windows Vista and 7 users
Internet Explorer for Windows Vista and Windows 7 operating systems have
increased security measures to protect your PC from any malicious software
being installed. When using the DVR 31 Web browser interface, you can install
ActiveX controls to connect and view video using Internet Explorer. However, you
cannot download data, such as video, images, and the DVR player due to the
increased security measure.
To have complete functionality of the Web browser interface and the DVR player
with Windows Vista and Windows 7, do the following:
truVision DVR 31 User Manual 45
Page 50

Chapter 5: Using the Web browser
• Run the Browser interface and the DVR player application as an administrator
in your workstation
• Add the DVR’s IP address to your browser’s list of trusted sites
To add the DVR’s IP address to Internet Explorer’s list of trusted sites:
1. Open Internet Explorer.
2. Click Tools, and then Internet Options.
3. Click the Security tab, and then select the Trusted sites icon.
4. Click the Sites button.
5. Clear the “Require server verification (https:) for all sites in this zone” box.
6. Enter the IP address in the “Add this website to the zone” field.
7. Click Add, and then click Close.
8. Click OK in the Internet Options dialog screen.
9. Connect to the DVR 31 for full browser functionality.
Browser connections
The Web browser interface lets you connect to the DVR 31 up to five times
simultaneously. With each connection, you can view up to 16 cameras (streams).
You can only view video from one camera for any additional connection to the
device.
Using the Web browser to configure the device
Click the Configuration button to display the configuration screen. The
configuration screen lets you configure:
• Camera settings including motion detection, PTZ controls, video image,
covert camera, and camera title
• Recording settings including recording schedule and recording quality
• Alarm settings including alert notifications, audio alerts, prealarm, and postalarm seconds
• Display options including resolution and sequencing
46 truVision DVR 31 User Manual
Page 51

Chapter 5: Using the Web browser
• Network settings including bandwidth throttle, e-mail, DDNS, and UPnP setup
• System settings including system date and time, audio, unit name, RS-485,
RS-232, language, and hard drive setup
The configuration screen also lets you view the unit’s information.
Searching and playing recorded video
To search for and play back recorded video, click the Playback button. The
Playback screen displays. Select the camera, date and time from which you want
to play back video, and then click Start. Video is played back at the viewer. Use
the playback control bar to forward, reverse, or pause playback video.
You can also search for video by events or text. Click the Search button to
display the Event List screen. Select the appropriate tab and enter your search
criteria. The Event List screen also lets you download results to your PC as DRV
files.
Using the mouse to zoom in or out
During live or playback mode, you can use the mouse to quickly zoom in on a
video image. To zoom in, right-click on a video tile, then use the scroll wheel to
zoom in or out. When a video image is zoomed in, you can drag the video image
to pan out to different areas.
Live dual streaming
The Live Dual Streaming function lets you view video from up to 16 cameras on
the Web browser interface while on a lower bandwidth network. This feature
utilizes a second and smaller video data stream that is sent over the network.
Click on the Bandwidth Control Switch button (shown in Figure 19 on page 48) in
the Web browser interface and select the appropriate bandwidth setting to enable
dual streaming. Predefined bandwidth settings (for the second stream) in the
browser include:
• 768 kbps
• 576 kbps
• 384 kbps
• 192 kbps
truVision DVR 31 User Manual 47
Page 52

Chapter 5: Using the Web browser
Figure 19: Bandwidth control switch
Bandwidth throttle management
The Bandwidth Throttle Management function lets you throttle the amount of
network data sent from the DVR to a client. This function is helpful for networks
that have predefined bandwidth limits. This feature lets you control the DVR 31 in
a network-sensitive environment and prohibits the DVR 31 from sending a large
amount of network data that can potentially disrupt the network. To configure
bandwidth throttle, see “Advanced IP settings” on page 71.
Both live dual streaming and bandwidth throttle management can be used
simultaneously or individually. For example, if you display live video in the Web
browser with the bandwidth throttle management feature enabled, the video
update rate is lower, as network video data is sent in shorter, controlled amounts.
However, if live dual streaming is enabled, then the video quality increases, since
the second stream can be reduced to meet the bandwidth throttle settings, which
results in a higher video update rate.
Controlling a PTZ camera in the Web browser
The Web browser interface lets you control the PTZ functions of a camera.
Cameras with PTZ capabilities are marked with a PTZ icon (as shown in
Figure 20 on page 49). Click on a PTZ camera to display the PTZ controls.
48 truVision DVR 31 User Manual
Page 53

Chapter 5: Using the Web browser
Figure 20: PTZ camera in Web browser
Exporting Video Clips
This section explains how to export video using Internet Explorer. The videos
export as a .drv file type and the DVR Player must be used to view them. When
providing videos to law enforcement, the DVR Player will be provided on the CD
along with the video clip(s).
1. Establish the start and stop times of the video clip you wish to export, write
them down.
2. Re-open the playback window by clicking on the “playback” button, this time
choose “download”.
truVision DVR 31 User Manual 49
Page 54

Chapter 5: Using the Web browser
3. Name the file, select the camera(s), and set the start and stop times. Take
note of the file path.
4. Export the file, you should see a progress window that closes when the export
is complete.
5. Browse to the saved folder on your PC. There you will find a sub folder called
“DVR Player” as well as the .drv file that you exported.
6. Copy and paste the .drv file into the DVR Player folder, that way you will
always have a copy of the clip that won’t be overwritten on the DVR.
7. Open the DVR Player folder and make sure that the .drv file is there. You can
place multiple .drv files there if you wish.
8. Delete any other .drv files in that folder that you don’t want included on the
CD.
9. Go back one level to see the DVR Player folder as a single entity.
10. Insert a CD into the drive on your PC, don’t use the wizard that opens by
default.
11. Right click on the DVR Player folder, copy and paste it onto the CD drive.
12. A balloon pops up saying you have files waiting to be written to the CD, click
in the balloon.
13. Click on burn files to CD, click finish.
To play the clip
1. Open the DVR Player folder from the CD.
2. Double click the .exe file and the DVR Player opens.
3. Click the play button and the selection window opens.
4. Click “Open”, select the CD drive and the DVR Player folder, click OK, you
will see your clip highlighted in the window.
5. Click playback, then OK in the next window. The clip begins to play, you can
double click it to make it full screen.
50 truVision DVR 31 User Manual
Page 55

Chapter 6
Advanced setup
Summary
This chapter covers the advanced setup of your DVR 31. Advanced setup lets
you define your users and access privileges, specify display options, and network
configuration. Only users with appropriate access privileges can define and
modify advanced configurations.
Content
Managing users 53
Customizing a user 53
Enabling password 55
Defining access privileges 55
Configuring cameras 57
Motion detection alarm 58
Assigning PTZ protocol 59
Adjusting video image
Assigning a camera name 60
Configuring recording and schedule settings 61
Defining a recording schedule 62
Configuring recording compression 63
Defining recording quality 64
Rec wizard 64
Expert modes 65
Alarm settings 66
Configuring remote alert 67
Enabling the alarm buzzer 68
Camera alarm settings 68
Prealarm and post alarm seconds 68
Network settings 69
Ethernet settings 69
59
truVision DVR 31 User Manual 51
Page 56

Chapter 6: Advanced setup
Advanced IP settings 71
E-mail settings 71
DDNS settings 72
UPnP 73
Display settings
Display format
73
74
Camera title display 74
Unit name display 74
Dwell time 74
Sequence order 74
Event display 75
POS transaction display 75
52 truVision DVR 31 User Manual
Page 57

Chapter 6: Advanced setup
Managing users
The DVR 31 is shipped with one predefined user for the system administrator
and seven predefined standard users. The default system administrator logon
uses admin as the account name with a default password of 1234. You can
modify the admin password but not the admin user name. The seven predefined
standard users are labeled User1 to User7 with a default password of 4321 and
level 4 access. The administrator can customize the seven standard users and
define their privileges. Use the Users screen (shown in Figure 21 below) to
manage users.
Note: When accessing the main menu for the first time, the system lets you pick
either an admin user or a regular user (Level 4 privilege) by default. If you select
User 4, enter the initial default password of 4321.
Figure 21: Users screen
Customizing a user
Only the system administrator can customize a user. Customizing a user
includes changing the user name, password, and access privileges on the User
truVision DVR 31 User Manual 53
Page 58

Chapter 6: Advanced setup
screen (shown in Figure 22 below). All seven standard users can be customized
for the DVR 31.
Figure 22: User screen
To customize a user:
1. Select Users on the main menu to display the Users screen.
2. Click the User Setup button to display the User screen.
3. Select the user you want to customize in the Account box.
4. Click Mod in the Account box to display the virtual keyboard.
5. Enter a new user name and click OK to return to the User screen. User
names are case-sensitive.
6. Click Mod in the Password box to display the virtual keyboard as shown in the
figure below.
54 truVision DVR 31 User Manual
Page 59

Chapter 6: Advanced setup
7. Enter a new password for the account.
Note: You can only enter numerals for passwords.
8. Click OK to return to the User screen.
9. Select an access privilege for the user in the Privilege box.
10. Click Confirm to save your changes.
Enabling password
The Enable Password option determines whether or not users must enter their
passwords to display the main menu and functions. To enable this option, click
Users on the main menu to display the Users screen. Select On in the Enable
Password box.
Defining access privileges
The Privileges screen (shown in Figure 23 on page 56) lets you assign access
levels to various functions or privileges of the DVR 31. Access levels range from
level 1 (lowest) to level 8 (highest). Additionally, setting an access level to
"Anyone" allows anyone to access the function, regardless of their assigned
access privileges.
available in the DVR 31.
Note: You cannot change the access level of the admin account.
Table 12: Function or privilege descriptions
Privilege Description
Table 12 below provides a list of functions and privileges
PLAY/SEARCH Search and play back recorded video
COVERT
CAMERA
PTZ CONTROL Display and use the PTZ controls of a camera
SPOT MONITOR Access the spot monitor
ARCHIVE Archive recorded video
truVision DVR 31 User Manual 55
View and configure covert camera settings
Page 60

Chapter 6: Advanced setup
Privilege Description
MAIN MENU Display the main menu
CAMERA Configure camera settings
RECORDING Configure recording settings
EVENT Configure event settings
USERS Specify user settings
NETWORK Configure network settings
DISPLAY Configure display settings
SYSTEM Configure system settings
INFORMATION Display system information
Figure 23: Privileges screen
To assign access levels to privileges:
1. Click Users on the main menu to display the Users screen.
2. Click the Privileges Setup button to display the Privileges screen.
The Privileges screen displays a list of all privileges or operating functions for
the DVR 31 and the current access level of each.
3. Select an access level for each of the privilege using the drop-down list.
56 truVision DVR 31 User Manual
Page 61

Chapter 6: Advanced setup
Configuring cameras
This section describes how to configure your cameras using the Cameras screen
(shown in Figure 24 below). For each camera, you can configure the following
camera settings:
• Motion detection alarm
• PTZ controls
• Display properties
• Camera title (name)
• Covert Camera
• Audio On or OFF
Changes made in the Cameras screen apply only to the selected camera in the
Current Camera box. To copy a camera’s configuration settings to another
camera, click Copy Settings. Settings copied include motion, PTZ, and video
adjustment settings. Copied settings do not include the camera title and covert
camera.
Figure 24: Cameras screen
truVision DVR 31 User Manual 57
Page 62

Chapter 6: Advanced setup
Motion detection alarm
A motion detection alarm is an alarm that is triggered when a camera detects
motion. The DVR 31 can be configured to display an on-screen alert icon and
sound an alarm tone. The DVR 31 lets you define the area on screen where the
motion is detected, the level of sensitivity to motion, the schedule, and the target
size.
To define a motion detection alarm:
1. Click Cameras on the main menu to display the Cameras screen.
2. In the Current Camera box, select the camera for which you want to define a
motion detection alarm .
3. Click the Motion Detection Setup button to display the Motion Detection
screen.
4. In the Motion Detection box, select the schedule of when you want motion
detection to be enabled.
5. Click the Detection Area Setup button to define the motion detection area.
The system displays a grid covering the entire live view screen of the
currently selected camera as shown in the figure below. By default, motion
detection is set for the entire screen. Each green square represents a motion
detection area. Click on an area (or press Enter) to stop motion detection in
that area. When only the desired detection areas remain, right-click, and then
click Confirm to save your settings. Press Esc to return to the main menu.
Alternatively, you can select the entire area by right-clicking, and then clicking
Select All. A grid covers the entire display screen. Click Deselect All to clear
the screen from motion detection.
6. Select a sensitivity level in the Sensitivity box.
58 truVision DVR 31 User Manual
Page 63

Chapter 6: Advanced setup
Sensitivity level refers to the degree of pixel change in the specified area
before a motion detection alarm triggers.
Note: The Motion Detection screen also includes a motion sensitivity indicator
that lets you test (by making motions on the camera) how much motion is
required to trigger an alarm at the selected sensitivity level. A buzzer sounds
off when an alarm is triggered.
7. Select the target size in the Target Size box.
Target size refers to the minimum size of an area in which motion is detected
thus triggering a motion detection alarm.
Assigning PTZ protocol
Assign a PTZ protocol and ID to a camera to allow PTZ control of the camera
while in PTZ mode. The PTZ Setup screen lets you assign a PTZ protocol and ID
to a camera.
To assign PTZ protocol and ID to a camera:
1. Click Cameras on the main menu to display the Cameras screen.
2. Click the PTZ Setup button to display the PTZ Setup screen.
3. Select a protocol in the PTZ Protocol box.
Available protocol values include:
• None
• DSCP
• AD422
• Pelco D
• Pelco P
• JVC
• Panasonic C
• Panasonic N
• GE RS-485
• GE RS-422
• Hitron
4. Select an ID in the PTZ ID box.
Adjusting video image
In order to get the best image quality when capturing video, you may need to
adjust the video image settings, including brightness, contrast, saturation, and
hue. Use the Adjust Video screen (shown in Figure 25 on page 60) to modify
these settings.
truVision DVR 31 User Manual 59
Page 64

Chapter 6: Advanced setup
Figure 25: Adjust Video screen
To adjust video image:
1. Click Cameras on the main menu to display the Cameras screen.
2. Click the Adjust Video Setup button to display the Adjust Video screen.
3. Make the appropriate video image adjustments.
Adjust the video image’s brightness, contrast, saturation, and hue by
selecting a level in the corresponding box.
4. If video is going to be looped out of the device, set the Termination option to
Off to avoid a double terminated video signal.
Covert Camera
When a password is enabled on the DVR 31, the Covert Camera option will be
made available. When Covert Camera is selected for the camera, the camera's
video will not be viewed on the Main Monitor, Spot Monitor, or Browser, and
cannot be archived if the user does not have the proper privileges (see
on page 55). Instead there will be a gray screen displayed until a user with the
proper privileges has logged in.
Table 12
60 truVision DVR 31 User Manual
Page 65

Chapter 6: Advanced setup
Audio Off
Select Yes to disable a cameras audio recording or No to enable the audio. The
default setting is No (Audio enabled).
Assigning a camera name
Each camera can be assigned a unique camera name. If you do not assign a
camera name, a default, pre-numbered camera name is applied.
To assign a camera name:
1. Click Cameras on the main menu to display the Cameras screen.
2. Click the Camera Title edit box.
A virtual keyboard displays.
3. Enter the new camera name.
You can enter up to 11 characters.
4. Click OK to exit the virtual keyboard and return to the Cameras screen.
The new camera name is displayed.
Configuring recording and schedule settings
Use the Schedule screen (shown in Figure 26 on page 62) to define how and
when the DVR 31 records video. The following options can be configured:
• Recording schedule
• Video compression
• Recording quality
Note: If video loss is detected on a camera, the unit will stop recording from that
camera.
truVision DVR 31 User Manual 61
Page 66

Chapter 6: Advanced setup
Figure 26: Schedule screen
Defining a recording schedule
The Scheduling screen (shown in Figure 27 on page 63) lets you define the
elements of a schedule, such as the daytime, nighttime, and weekend ranges.
62 truVision DVR 31 User Manual
Page 67

Chapter 6: Advanced setup
Figure 27: Scheduling screen
To define schedule ranges:
1. Click Schedule on the main menu to display the Schedule screen.
2. Click Scheduling Setup to display the Scheduling screen.
3. Select the daytime range using the Daytime Begin and Daytime End boxes.
4. Select the nighttime range using the Nighttime Begin and Nighttime End
boxes.
5. Select On in the Weekend Schedule box to enable weekend schedule.
6. Select the weekend range using the Weekend Begin and Weekend End
boxes.
Note: Weekend schedule takes precedence if overlapping on a weekday.
Configuring recording compression
To configure recording compression:
1. Click Schedule on the main menu to display the Schedule screen.
2. Click Compression Setup to display the Compression screen.
truVision DVR 31 User Manual 63
Page 68

Chapter 6: Advanced setup
3. Select a resolution in the Resolution box.
4. Select a format in the Format box.
The resulting recording frame rate is automatically populated based on what
you selected in the Resolution and Format box in the Total Rec FPS box.
5. Close the screen to save your settings.
Defining recording quality
To define the quality of your recording, click Schedule on the main menu to
display the Schedule screen. Then select a recording quality in the Quality/FPS
box. The quality is set to Normal Quality by default. Each camera’s FPS is
calculated using the total PPS divided by the total number of cameras.
Recording quality values include:
• Expert Mode
• Best Quality
• Normal Quality
• Low Quality
• Rec Wizard
• 512K ADSL
• 256K ADSL
• 128K ADSL
• Event Only
Rec wizard
The Rec Wizard screen (show in Figure 28 on page 65) provides a faster method
of determining the recording resolution and quality based on the number of
recording days and the recording schedule. Alternatively, you can select the
recording resolution and quality to determine the recording schedule.
Note: The Record At Weekend command is unavailable if the Weekend
Schedule box in the Schedule screen is set to No.
64 truVision DVR 31 User Manual
Page 69

Chapter 6: Advanced setup
Figure 28: Rec Wizard screen
To use the Rec Wizard screen:
1. Click Schedule on the main menu to display the Schedule screen.
2. Select Rec Wizard in the Quality/FPS box.
The Rec Wizard command becomes available.
3. Click Rec Wizard to display the Rec Wizard screen.
4. Select your recording settings.
5. Close the screen to save your settings.
In the Rec Wizard screen, select the number of recording days in the Recording
Days box and whether to enable recording in daytime, nighttime, and weekends
in the corresponding boxes. The Average FPS and Average Quality boxes are
automatically populated based on the settings you specified and on the hard
drive capacity. You can also select a frame rate and recording quality at which
the screen automatically populates the number of recording days and scheduling
commands.
Expert modes
The Expert Modes screen (shown in Figure 29 on page 66) lets you customize
the resolution and recording quality based on the schedule and event conditions
on a per camera basis. You can set the resolution and recording quality in normal
and event conditions based on the recording schedule.
truVision DVR 31 User Manual 65
Page 70

Chapter 6: Advanced setup
Figure 29: Expert Mode screen
To use the Expert Modes screen:
1. Click Schedule on the main menu to display the Schedule screen.
2. Select Expert Mode in the Quality/FPS box. The Expert Mode command
becomes available.
3. Click Expert Mode to display the Expert Modes screen.
4. In the Current Camera box, select the camera you want to configure.
5. Select your recording settings in the corresponding boxes.
Use the Normal FPS and Normal Quality boxes to select the recording resolution
and quality under normal conditions. Use the Event FPS and Event Quality boxes
to select the recording resolution and quality under event conditions.
Alarm settings
Use the Alarms screen (shown in Figure 30 on page 67) to define how the DVR
31 handles alarms. Configurable settings include:
66 truVision DVR 31 User Manual
Page 71

Chapter 6: Advanced setup
• Remote alert
• Alarm buzzer
• Alarm input and output
• Prealarm and post-alarm seconds
Figure 30: Alarms screen
Configuring remote alert
The DVR 31 can send alarm notifications to a remote PC using compatible
monitoring software. Use the Remote Alert screen to define settings that allow
the DVR 31 to communicate with the remote PC and to enable this feature.
In addition, the DVR sends a signal to the remote PC every two minutes to
indicate that the DVR is still active.
To configure remote alert:
1. Click Alarms on the main menu to display the Alarms screen.
2. Click Remote Alert Setup to display the Remote Alert screen.
3. Select an alert set.
truVision DVR 31 User Manual 67
Page 72

Chapter 6: Advanced setup
4. Select On in the Alert Notification box to enable alert notification to the remote
PC.
5. Enter the PC’s IP address in the Alert IP edit box.
6. Enter the PC’s port in the Alert Port box.
Enabling the alarm buzzer
In the Alarms screen, select On in the Buzzer box to enable alarm buzzer. An
audible sound is emitted when an alarm is triggered.
Camera alarm settings
Use the Camera Setting screen to define camera alarm settings.
To define camera alarm settings:
1. Click Alarms on the main menu to display the Alarms screen.
2. Click Camera Setting Setup to display the Camera Setting screen.
3. Select a camera in the Current Camera box.
4. Select an alarm input in the Alarm Input box.
5. Select an output in the Relay Output box.
6. Select On in the Video Detection box to detect video loss.
7. Select an Event Trigger Preset for that camera (mapped in the PTZ menu).
8. You can also copy these settings to other cameras.
Prealarm and post alarm seconds
In the Prealarm box, enter the prealarm seconds. The prealarm option defines
the number of seconds recorded before a motion or external alarm is triggered
and includes the alarm data.
In the Post-Alarm box, enter the post alarm seconds. The post alarm option
defines the number of seconds recorded after a motion or external alarm is
triggered and includes the alarm data.
68 truVision DVR 31 User Manual
Page 73

Chapter 6: Advanced setup
Network settings
Accessing the DVR 31 remotely through a network requires that you define
certain network settings. Use the Network screen (shown in Figure 31 below) to
define the network settings of the DVR 31, including:
• Ethernet settings
• IP settings
• E-mail notification settings
• Syncing the DVR 31 time with the network
• DDNS settings (Dynamic Domain Name Service)
• UPnP settings (Universal Plug and Play)
Figure 31: Network screen
Ethernet settings
Use the Ethernet Setting screen (shown in Figure 32 on page 70) to configure
standard Ethernet settings. Click Ethernet Setting Setup in the Network screen to
access the Ethernet Setting screen.
truVision DVR 31 User Manual 69
Page 74

Chapter 6: Advanced setup
Figure 32: Ethernet Setting screen
To define Ethernet settings:
1. Click Network on the main menu to display the Network screen.
2. Click Ethernet Setting Setup to display the Ethernet Setting screen.
3. Select an Ethernet type.
4. Select On in the DHCP box to enable DHCP (Dynamic Host Configuration
Protocol) if the network automatically supplies an IP address. Otherwise,
select Off in the DHCP box and continue with steps 5 through 9.
5. Enter the network’s dynamic IP address in the IP edit box.
6. Enter the subnet mask in the Subnet Mask edit box.
7. Enter the gateway IP address in the Gateway edit box.
8. Enter the DNS IP address in the DNS edit box.
9. Enter the secondary DNS IP address box in the DNS2 edit box, if required.
70 truVision DVR 31 User Manual
Page 75

Chapter 6: Advanced setup
Advanced IP settings
Use the IP Advanced screen to define the connection port and bandwidth throttle
used for the Web browser. Bandwidth throttle lets you throttle the amount of
network data from the DVR to a client. Predefined bandwidth throttle settings
include:
• 192 kbps
• 384 kbps
• 768 kbps
• 960 kbps
For more information in Bandwidth Throttle Management, see “Bandwidth throttle
management” on page 48.
E-mail settings
The DVR 31 has the option to send e-mail notifications of alarm events through
the network. Use the Email Setting screen (shown in Figure 33 below) to
configure the e-mail settings.
Figure 33: Email Setting screen
To define e-mail settings:
1. Click Network on the main menu to display the Network screen.
2. Click Email Setting Setup to display the Email Setting screen.
truVision DVR 31 User Manual 71
Page 76

Chapter 6: Advanced setup
3. Enter the e-mail address to whom the notification is sent in the Email Address
edit box.
4. Enter the e-mail server of the e-mail account from whom the notification is
sent in the Email Server edit box.
5. Enter the e-mail port number of the e-mail account from whom the notification
is sent in the Email Port edit box.
6. Enter the e-mail address of the e-mail account from whom the notification is
sent in the Account edit box.
7. Enter the password of the e-mail account from whom the notification is sent in
the Password edit box.
8. Select On in the Use SSL Connection to enable the SSL connection.
9. Select On in the Event Notification to enable e-mail notification.
If this option is enabled, any motion, video loss, or alarm events will trigger an
e-mail notification of these events.
10. Select On in the Event Attachment to allow attachments in the e-mail
notification. Attachments will be an .avi video clip of the event.
DDNS settings
The DDNS function lets you define the device’s domain name for access through
a Web browser. Use the DDNS Setting screen to define the settings for the
DDNS function.
The domain name format is http://(DNS name).ddns-tvr.net.
To define the DDNS settings:
1. Click Network on the main menu to display the Network screen.
2. Click DDNS Setting Setup to display the DDNS Setting screen.
3. In the Use DDNS box, select On to enable the DDNS function .
4. Enter the host name. If you leave this box blank, the system generates a host
name for you.
5. Enter the port number.
6. In the Submit/Update box, select Yes to submit the DDNS information through
the network.
72 truVision DVR 31 User Manual
Page 77

Chapter 6: Advanced setup
UPnP
If enabled, the UPnP function (Universal Plug and Play) lets a PC connect to the
DVR 31 using the same local area network. To enable this function, select On in
the UPnP box in the Network screen.
Display settings
Use the Display screen to configure how information is displayed on-screen. The
following settings can be configured:
• Display format
• Camera title display
• Unit name display
• VGA resolution
• Dwell time
• Sequence order
• Event display
• POS transaction display
To access the Display screen, click Display on the main menu.
Figure 34: Display screen
truVision DVR 31 User Manual 73
Page 78

Chapter 6: Advanced setup
Display format
Select a display format in the Display Type box. The display format determines
how the date and time are displayed on-screen. You can select a format of one
row or two rows.
Camera title display
Select Yes in the Camera Title box to display the camera title (name) on-screen.
Unit name display
Select Yes in the Show DVR Name box to display the unit’s name on-screen.
VGA Resolution
Select from:
• 800 x 600
• 1024 x 768
• 1280 x 1024
• 720P
• 1080P
Dwell time
Dwell time refers to the amount of time a camera view is displayed before moving
into a different camera view. Select a dwell time for the main monitor in the Main
Dwell Time box. Select a dwell time for the spot monitor in the Spot Dwell Time
box.
Sequence order
The DVR 31 lets you configure the order of the cameras displayed in sequence
mode for both the main monitor and the spot monitor.
To configure the order of cameras:
1. Click Display on the main menu to open the Display screen.
2. Click Main Sequence Order to display the Main Sequence Order screen.
74 truVision DVR 31 User Manual
Page 79

Chapter 6: Advanced setup
The Main Sequence Order screen displays the sequence positions and a row
listing all cameras as shown in the figure below. By default, the system orders
the cameras by camera number. Click Back to clear the last sequence
position. Click Back repeatedly to clear all positions in the sequence.
Note: To configure the sequence order for the spot monitor, click Spot
Sequence Order. The Spot Sequence Order screen displays.
3. Click the camera you want to display first from the camera row. That camera
number displays in the first sequence position.
4. Continue clicking cameras in the order you want them displayed in sequence
mode until all sequence positions are filled.
Event display
Select On in the Event Indicator box to display any alarm events on-screen.
POS transaction display
Select an option in the Transaction Overlay box to configure the format of POS
transactions displayed on-screen.
truVision DVR 31 User Manual 75
Page 80

Chapter 6: Advanced setup
76 truVision DVR 31 User Manual
Page 81

Chapter 7
System settings
Summary
This chapter covers how to configure the system settings of your DVR 31.
System settings lets you define the system date and time, unit name, RS-485
and RS-232 settings, upgrade, and hard drive settings. Only users with
appropriate access privileges can define and modify advanced configurations.
Content
Overview 78
System date and time 79
Daylight Saving Time 79
Audio and remote 80
RS-485 settings 80
RS-232 settings 81
Hard drive settings 81
Importing and exporting configuration settings
System log 82
Upgrading the firmware 85
82
truVision DVR 31 User Manual 77
Page 82

Chapter 7: System settings
Overview
Use the System screen (shown in Figure 35 below) to configure the following
system settings:
• System date and time
• Audio output and key beep
• Unit name and display
• RS-485 settings
• RS-232 settings
• Mouse sensitivity settings
• Firmware upgrade
• Language selection
• Hard drive settings and health status
• Storing and uploading configuration settings
• System logs
• Shutting down the device
Click System on the main menu to access the System screen.
Figure 35: System screen
78 truVision DVR 31 User Manual
Page 83

Chapter 7: System settings
System date and time
Configure the DVR 31 system date and time in the Date/Time screen. This
screen also lets you enable Daylight Saving Time (DST) and format the date and
time displayed on-screen.
To configure the system date and time:
1. Click System on the main menu to display the System screen.
2. Click Date/Time Setup to display the Date/Time screen.
3. Enter the current date in the Date box.
4. Enter the current time in the Time box.
5. Select a time zone in the Time Zone box.
6. Select a date format in the Date Format box.
7. Select a time format in the Time Format box.
8. Click Daylight Saving Time to display the Daylight Saving Time screen.
This screens lets you enable and configure Daylight Saving Time. For more
information, see “Daylight Saving Time” below.
Daylight Saving Time
Use the Daylight Saving Time screen (shown in Figure 36 on page 80) to enable
and configure Daylight Saving Time. This screen lets you select when Daylight
Saving Time begins and ends.
truVision DVR 31 User Manual 79
Page 84

Chapter 7: System settings
Figure 36: Daylight Saving Time screen
Audio and remote
Use the Audio and Remote screen to define the audio output settings and specify
the remote ID for the device. To access the Audio and Remote screen, click
Audio and Remote Setup on the System screen.
Select Live/PB in the Audio Output box to play audio during live or playback
modes. Select On in the Key Beep box to allow front panel buttons to beep when
pressed.
Specifying a remote ID for the device lets you control up to 16 DVRs using a
single remote control. See “Controlling multiple DVRs with one remote control”
on page 16 for more information.
RS-485 settings
Use the RS-485 Setting screen to define the settings for the RS-485 ports.
Settings defined in this screen must match the PTZ settings of the camera
connected to the RS-485 port. To access the RS-485 Setting screen, click RS485 Setting on the System screen.
80 truVision DVR 31 User Manual
Page 85

Chapter 7: System settings
RS-232 settings
Use the Device Setting screen to define settings for the serial port. This port is
used to connect point-of-sale (POS) devices to the DVR 31. To access the RS232 Setting screen, click RS-232 Setting on the System screen.
Mouse Sensitivity settings
Use the Mouse Sensitivity Setting screen to define sensitivity settings for the
mouse.
Hard drive settings
Use the Hard Drives screen to define settings for the hard drive. Table 13 below
describes the commands and options available on this screen. To access the
Hard Drives screen, click Hard Drives on the System menu.
Figure 37: Hard Drives screen
Table 13: Hard Drives screen commands and options
Commands and options Descriptions
Auto Delete Selects the number of days when the system deletes data
automatically
Overwrite Select On to automatically overwrite data when the hard drive
reaches its capacity
Disk Drives Displays the Disk Drive screen. This screen lets you add, remove,
format, and repair disk drives installed in your device. [1]
Total Storage Displays the total hard drive space
Free Capacity Displays the amount of available space in the hard drive
[1] The Repair option under Disk Drives fixes file system errors.
truVision DVR 31 User Manual 81
Page 86

Chapter 7: System settings
Drive details and status
Click the Setup button on the Disk Drives menu to open the Setup Screen. Select
Yes under Details to view the hard drive details.
Figure 38: Hard Drives details screen
Importing and exporting configuration settings
Use the Configuration screen to import or export configuration settings. Click
Export Config to export the DVR 31’s configuration settings into a configuration
file. Click Import Config to import configuration settings from a file. This screen
also lets you restore the DVR 31 settings to factory defaults.
System log
The System Log screen displays your device’s information that is generated each
time your device boots up. A system log helps you diagnose your system in case
of problems. Click Archive to save the system log into a backup device.
82 truVision DVR 31 User Manual
Page 87

Chapter 7: System settings
Table 14 below describes the codes used in the system’s system log.
Table 14: System log code descriptions
Code Value Description
Shutdown AppExit Use <ESC> + <ENTER> + <CH1> to terminate the AP
Shutdown PwrOff PwrOff
Shutdown Reboot From menu reboot
Boot PwrOn Powered On
Boot PwtFail Booted up but DVR was unexpectedly powered off
Boot Reboot Powered on via reboot
Boot ForceRst AP force DVR reset
Boot WDogRst Watchdog Reset
Boot UnknowRst Unknown Reset
ChgDate Change system date
ChgTime Change system time
DstSwitch Change DST On/Off
DstStime Change DST start time
DstEtime Change DST end time
AdminPwd Change admin password
UserPwd Change user password
Upgrade Upgrade software
Upgrade Upgrade bootload
DiskAdd Add Disk to database
DiskDel Remove Disk from database
DiskChk Repair Disk
DiskFmt Format Disk
DiskIOER Disk I/O error.
OverHeat Overheat hdd detected
CoolDown HDD temperature back to normal from overheat state
PurgeDB Normal Purge normal
PurgeDB Event Purge Event
DayStime Change day schedule start time
DayEtime Change day schedule end time
NigStime Change night schedule start time
NigEtime Change night schedule end time
truVision DVR 31 User Manual 83
Page 88

Chapter 7: System settings
Code Value Description
WkdStime Change weekend schedule start time
WkdEtime Change weekend schedule end time
RecMode Change record mode
PresetCfg Change preset config
NormalPPS Change Normal PPS on per-channel config
NormalSiz Change Normal size on per-channel config
EventPPS Change Event PPS on per-channel config
EventSiz Change Event size on per-channel config
EventAct Change event active setting
SmtDayNum Change ezRecord day number
SmtRecDay ON/OFF Change ezRecord day schedule
SmtRecNig ON/OFF Change ezRecord night schedule
SmtRecWkd ON/OFF Change ezRecord weekend schedule
AudioRec ON/OFF Change audio record setting
Circular ON/OFF Change circular setting
EventPart Change event partition (no more available)
Export channel of data Export Record data of channel
Export_JPG channel of JPG Export JPEG Pic of channel
GUI
Playback Entry Start Playback
Playback CH XX Change Pb channel
S:XXXXXX XXXXXX Playback start time information
E:XXXXXX XXXXXX Playback stop time information
--MENU-- Menu text Log what menu user entry
--OPTION-- Option text Log what option user select
--ITEM-- Item text/Value Log what item value user change
AUTOSCAN INTDEVXX [1] Scandisk was performed
FAILSCAN INTDEVXX [1] Scandisk failed
DESELFMT INTDEVXX [1] Drive formatted
PASSSCAN INTDEVXX [1] Scandisk fixed file system errors
[1] The XX represents the SATA port number that the Hard Drive is connected to.
84 truVision DVR 31 User Manual
Page 89

Chapter 7: System settings
Upgrading the firmware
To upgrade the firmware using the built-in interface:
1. Display the System screen.
2. Click Upgrade to display the Upgrade screen as shown in the figure below.
3. Upgrade the unit’s firmware.
Click Upgrade Firmware to upgrade the firmware through a USB flash drive.
Click Firmware Download to connect the device to a network and download
the upgrade file.
4. Click Upgrade at the prompt to reboot the DVR 31 and begin the upgrade
process.
truVision DVR 31 User Manual 85
Page 90

Page 91

Appendix A
Specifications and
Troubleshooting
Summary
This appendix provides specifications and troubleshooting information for the
DVR 31.
Content
Product specifications 88
HDMI Compatibility List 89
HDMI Incompatibility List 89
Battery removal 90
Troubleshooting 90
Scandisk 90
truVision DVR 31 User Manual 87
Page 92

Appendix A: Specifications and Troubleshooting
Product specifications
Model DVR 31
Video compression H.264
Playback resolution D1/2CIF/CIF
Video input 16 channels, BNC (1.0 Vp-p on 75 Ω)
Main monitor 1 channel, BNC (1.0 Vp-p on 75 Ω), 1 digital display, S-
video
Spot monitor 1 channel, BNC (1.0 Vp-p on 75 Ω)
Frame rate (per channel) D1: 7.5 fps
2CIF: 15 fps
CIF: 30 fps
Audio compression ADPCM, G.726
Audio input 16 channels, line-in
Audio output 1 channel, line-out
Live Dual Streaming Yes
HDD interface 4 SATA interface, 1 DVD, 3 HDD
Communication interface 1 RJ45 10M/100M self-adaptive Ethernet Interface
1 RS-485 interface
1 RS-232 interface
USB interface 3 USB interfaces can support mouse and flash drive
VGA/HDMI interface 1 VGA interface can support resolution:
Up to 1280 x 600 pixels / HDMI supports 720P, 1080P
External alarm in 16
Relay output 4
Bi-directional audio Yes
Buzzer support Yes
Power supply 100 to 240 VAC
Power consumption 100 W
Operating temperature 32 to 104°F (0 to 40°C)
Relative humidity 10% to 90%
Dimensions (W x H x D) 17.3 x 3.54 x 16.3 in (440 x 90 x 413 mm)
Weight Approx. 15.42 lb. (7 kg) with 1 HDD and DVD-RW drive
88 truVision DVR 31 User Manual
Page 93

Appendix A: Specifications and Troubleshooting
HDMI Compatibility List*
Manufacturer Model
BenQ ET-0019-N
BenQ ET0036-B
BenQ VH374
BenQ SH3741
BenQ VH3243
Chimei TL-24V7000D
Chimei 24SH-L
Chimei DTL-637S200
Dell 2408WFPb
Haier HL19SLW2
LG 22LD350
LG 32LH30FD
LG 37LB7DF
Orion 17RTC
Panasonic TH-L37U20W
Panasonic TC-37MPK
Philips 42PFL363D/F7
Pioneer PDP-436PG
Samsung P2770FH
Samsung LN32A550P1R
Sony Bravia KDL-40S4100
Sony KLV-32U300A
Sony KLV-40W300A
ViewSonic VX2433WM
* Other monitors may have been added to the list since the release date of the manual. Call
Technical support for the current listing.
HDMI Incompatibility List
Manufacturer Model
Hannspree Monitor HF237
Toshiba 19AV600UZ 19AV600UZ
ViewSonic VT2230
truVision DVR 31 User Manual 89
Page 94

Appendix A: Specifications and Troubleshooting
Battery removal
The DVR 31 unit contains one 3 V Lithium battery. This battery can only be
removed by a recycling or service technician. The remote control comes with two
AAA alkaline batteries.
To remove the remote control batteries:
1. Detach the remote control’s back cover.
2. Replace the batteries with any standard AAA batteries.
3. Reattach the cover.
4. Dispose of the batteries as required by local ordinances or regulations.
Troubleshooting
Scandisk
Scandisk will run when the system detects file system errors and will run a
scandisk at boot up. This is run automatically when the firmware detects any
inconsistency in the file system or after five improper shutdowns during normal
operation.
The Scandisk operation may take 30 minutes or longer depending on the hard
disk drive configuration of your DVR 31. During this time the DVR 31 will not be
recording. If Scandisk is successful the DVR 31 will reboot and will begin
recording automatically. If Scandisk fails, you will have the option to format the
defective hard disk or call Technical Support for assistance.
The System Log on the DVR 31 will provide information of when Scandisk was
run. Please note if you see "PASSSCAN" message frequently please note this
maybe a symptom of the hard drive failing. You should archive your video data
and replace the hard drive(s).
S.M.A.R.T. Hard Drive information
SMART data can be viewed from the Disk Drive menu from the Front Panel and
Browser which can be archived. SMART data will include if the current hard drive
has a journal (confirming ext3 file system) and will display if the current hard
drive has allocated bad sectors. If the Offline Uncorrectable count starts
increasing, this may be a sign that the physical hard drive is failing.
90 truVision DVR 31 User Manual
Page 95

Appendix B
Factory defaults
Summary
This appendix provides the DVR 31’S factory defaults.
Content
Menu defaults 92
Network defaults 92
truVision DVR 31 User Manual 91
Page 96

Appendix B: Factory defaults
Menu defaults
Function Setting
Date format M/D/Y
Time format 12 HR
Normal record speed 30 frames per second (NTSC), 25 frames per second (PAL)
at CIF
Record quality/FPS Normal Quality
Menu timeout 5 minutes
Video standard NTSC
Disk overwrite mode Overwrite
Brightness 0
Contrast 0
Hue 0
Saturation 0
Daylight Saving Time Off
Network defaults
Function Setting
IP address 192.168.1.82
Subnet mask 255.255.255.0
Gateway address 192.168.1.1
Http port 80
92 truVision DVR 31 User Manual
Page 97

Appendix C
Warranty and support
Summary
This appendix provides information on warranty and support for the DVR 31.
Content
Warranty information 94
Contacting support 94
truVision DVR 31 User Manual 93
Page 98

Appendix C: Warranty and support
Warranty information
The warranty period for the DVR 31 is three years from the date of delivery.
Contacting support
Contact technical support if you encounter any difficulties during this installation.
Please make sure you have the requested diagnostic or log files ready before
you contact us by phone or go to www.interlogix.com/customer-support.
Technical Support
Europe, Middle East and Africa
W Select Contact Us at www.utcfssecurityproducts.eu
North America
T +1 855.286.8889
E techsupport@interlogix.com
Australia
E techsupport@interlogix.au
94 truVision DVR 31 User Manual
Page 99

Appendix D
KTD-405 keyboard
mapping
Summary
This appendix provides information on how to operate the DVR 31 using the
KTD-405 keyboard.
Content
DVR 31 to KTD-405 keyboard mapping 96
truVision DVR 31 User Manual 95
Page 100

Appendix D: KTD-405 keyboard mapping
DVR 31 to KTD-405 keyboard mapping
DVR 31 KTD-405
Up Joystick up or hold Esc, and then press the Up Arrow
Down Joystick down or hold Esc, and then press the Down Arrow
Left Joystick left or hold Esc, and then press the Left Arrow
Right Joystick right or hold Esc, and then press the Right Arrow
Esc Press Esc while in a menu
Menu Press Esc while in live mode
Enter Press Enter ( )
Changing a camera Press the camera number and Enter
Live Press Play ()
Zoom Press Zoom ( )
Search Press Search ( )
Display Press View and the 5 button (multiple times to switch between display
modes)
Sequence Press Seq
PTZ mode Press Stop ()
Archive Press Record ( ) in live and playback mode
Play Press Play ()
Pause Press Pause ()
Rewind Press Rewind ()
Fast Forward Press Fast Forward ()
Frame reverse While in playback, pause video, hold Esc, and then press the Left Arrow
Frame advance While in playback, pause video, hold Esc, and then press the Right
Arrow
96 truVision DVR 31 User Manual
 Loading...