

Page 1

DVD VIDEO RECORDER
Operating Instructions
Model No. DVP-R3000
Before connecting, operating or adjusting this product, please read
these instructions completely.
Please keep this manual for future reference.
D
D
This manual was printed with soy based ink.
This unit responds to the region number information on
DVD-Video. The unit can only play DVD-Video if the region number of the disc matches the region number of
this unit. See page 6 for details.
[For\U.S.A.]
The servicenter list and warranty can be
found on pages 103 and 105.
[For\Canada]
The warranty can be found on page 104.
En las páginas 106 y 107 hay una guía de referencia rápida en español.
Page 2

Dear customer
Thank you for purchasing this product. For optimum performance and safety, please read these instructions carefully.
CAUTION!
THIS PRODUCT UTILIZES A LASER.
USE OF CONTROLS OR ADJUSTMENTS OR PERFORMANCE OF PROCEDURES OTHER THAN THOSE SPECIFIED HEREIN MAY RESULT IN HAZARDOUS RADIATION
EXPOSURE.
DO NOT OPEN COVERS AND DO NOT REPAIR
YOURSELF. REFER SERVICING TO QUALIFIED
PERSONNEL.
WARNING:
TO REDUCE THE RISK OF FIRE, ELECTRIC
SHOCK OR PRODUCT DAMAGE, DO NOT EXPOSE THIS APPARATUS TO RAIN, MOISTURE, DRIPPING OR SPLASHING AND THAT
Getting started
NO OBJECTS FILLED WITH LIQUIDS, SUCH
AS VASES, SHALL BE PLACED ON THE APPARATUS.
CAUTION:
TO PREVENT ELECTRIC SHOCK MATCH
WIDE BLADE OF PLUG TO WIDE SLOT, FULLY INSERT.
THE FOLLOWING APPLIES ONLY IN THE U.S.A.
FCC Note:
This equipment has been tested and found to comply with the
limits for a Class B digital device, pursuant to Part 15 of the
FCC Rules. These limits are designed to provide reasonable
protection against harmful interference in a residential installation. This equipment generates, uses, and can radiate radio
frequency energy and, if not installed and used in accordance
with the instructions, may cause harmful interference to radio
communications. However, there is no guarantee that interference will not occur in a particular installation. If this equipment does cause harmful interference to radio or television
reception, which can be determined by turning the equipment
off and on, the user is encouraged to try to correct the interference by one or more of the following measures:
●
Reorient or relocate the receiving antenna.
●
Increase the separation between the equipment and
receiver.
●
Connect the equipment into an outlet on a circuit different
from that to which the receiver is connected.
●
Consult the dealer or an experienced radio/TV technician for
help.
FCC Caution: To assure continued compliance, follow the
attached installation instructions and use only shielded interface cables when connecting to peripheral devices.
Any changes or modifications not expressly approved by the
party responsible for compliance could void the user’s authority to operate this equipment.
This device complies with Part 15 of the FCC Rules. Operation is subject to the following two conditions: (1) This device
may not cause harmful interference, and (2) this device must
accept any interference received, including interference that
may cause undesired operation.
Do not disassemble.
Do not service.
Ne Pas D monter.
R serv Au Personnel Autoris .
Nicht auseinandernehmen.
Keine Reparatur oder
Wartung erlaubt.
2
RQT6035
Accessories
Please check and identify the supplied accessories. Use numbers indicated in parentheses when asking for replacement parts.
(Only for U.S.A.)
To order accessories contact 1-800-332-5368 or web site (http://www.panasonic.com/store).
(Only for Canada)
To order accessories, call the dealer from whom you have made your purchase.
■ Remote control . . . . . . . . . . . . . . . . 1
(N2QAKB000010)
■ Audio/Video cable . . . . . . . . . . . . . . 1
(VJA0788-D)
DANGER
ATTENTION
VORSICHT
VARNING
■ Batteries . . . . . . . . . . . . . . . . . . . . . . 2
for remote control
■ 75 Ω coaxial cable . . . . . . . . . . . . . . 1
(VJA1013)
VISIBLE OR INVISIBLE LASER RADIATION WHEN OPEN.
AVOID DIRECT EXPOSURE TO BEAM.
RAYONNEMENT LASER VISIBLE OU INVISIBLE EN CAS
D OUVERTURE. EXPOSITION DANGEREUSE AU FAISCEAU.
SICHTBARE ODER UNSICHTBARE LASERSTRAHLUNG,WENN
ABDECKUNG GE FFNET. NICHT DEM STRAHL AUSSETZEN.
SYNLIG ELLER OSYNLIG LASERSTR LNING N R DENNA
DEL R PPNAD. STR LEN R FARLIG.
(Inside of product)
■ AC power supply cord . . . . . . . . . . 1
(RJA0065-A)
Note
The included AC power supply cord is for
use with this unit only.
Do not use it with other equipment.
Page 3
IMPORTANT SAFETY INSTRUCTIONS
Read these operating instructions carefully before using the unit. Follow the safety instructions on the unit and the
applicable safety instructions listed below. Keep these operating instructions handy for future reference.
1) Read these instructions.
2) Keep these instructions.
3) Heed all warnings.
4) Follow all instructions.
5) Do not use this apparatus near water.
6) Clean only with dry cloth.
7) Do not block any ventilation openings. Install in accordance with the manufacturer’s instructions.
8) Do not install near any heat sources such as radiators, heat registers, stoves, or other apparatus
(including amplifiers) that produce heat.
9) Do not defeat the safety purpose of the polarized
or grounding-type plug. A polarized plug has two
blades with one wider than the other. A groundingtype plug has two blades and a third grounding
prong. The wide blade or the third prong are provided for your safety. If the provided plug does not
fit into your outlet, consult an electrician for replacement of the obsolete outlet.
10) Protect the power cord from being walked on or
pinched particularly at plugs, convenience receptacles, and the point where they exit from the
apparatus.
11) Only use attachments/accessories specified by the
manufacturer.
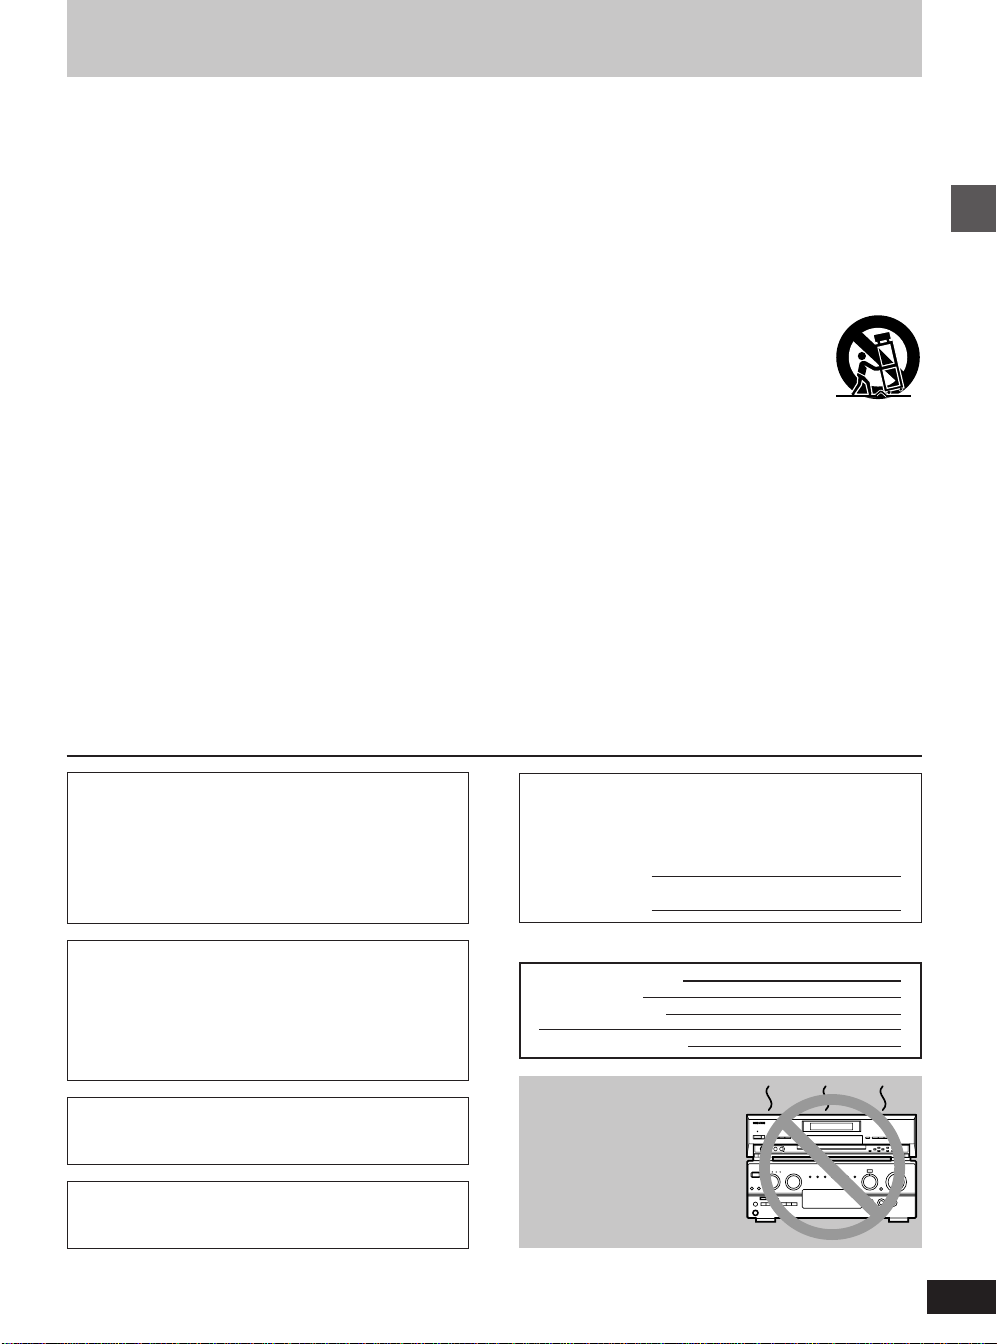
12) Use only with the cart, stand, tripod,
bracket, or table specified by the
manufacturer, or sold with the apparatus. When a cart is used, use caution when moving the cart/apparatus
combination to avoid injury from tipover.
13) Unplug this apparatus during lightning storms or
when unused for long periods of time.
14) Refer all servicing to qualified service personnel.
Servicing is required when the apparatus has been
damaged in any way, such as power-supply cord
or plug is damaged, liquid has been spilled or objects have fallen into the apparatus, the apparatus
has been exposed to rain or moisture, does not operate normally, or has been dropped.
Getting started
CAUTION!
DO NOT INSTALL, OR PLACE THIS UNIT, IN A BOOKCASE, BUILT-IN CABINET OR IN ANOTHER CONFINED
SPACE. ENSURE THE UNIT IS WELL VENTILATED. TO
PREVENT RISK OF ELECTRIC SHOCK OR FIRE HAZARD
DUE TO OVERHEATING, ENSURE THAT CURTAINS AND
ANY OTHER MATERIALS DO NOT OBSTRUCT THE VENTILATION VENTS.
THE FOLLOWING APPLIES ONLY IN THE U.S.A.
Note to CATV system installer:
This reminder is provided to call the CATV system installer’s
attention to Article 820-40 of the NEC that provides guidelines
for proper grounding and, in particular, specifies that the cable
ground shall be connected to the grounding system of the
building, as close to the point of cable entry as practical.
The model number and serial number of this product can be
found on either the back or the bottom of the unit.
Please note them in the space provided below and keep for
future reference.
MODEL NUMBER! DVP-R3000
SERIAL NUMBER
User memo:
DATE OF PURCHASE
DEALER NAME
DEALER ADDRESS
TELEPHONE NUMBER
Do not place the unit
DO NOT PLACE THIS APPARATUS INTO AN AUDIO
RACK, BOOK SHELF OR SIMILAR LOCATION BECAUSE
OF HEAT FROM THIS APPARATUS.
DO NOT BLOCK ANY OF THE VENTILATION OPENINGS.
INSTALL IN ACCORDANCE WITH THE MANUFACTURER’S INSTRUCTIONS.
(U.S.A. only)
Product Registration Card
Please complete and return the included product registration card, or register via the Internet at:
http://www.panasonic.com/host/consumer.html
on amplifiers or equipment that may become
hot.
The heat can damage the unit.
3
RQT6035
Page 4

Table of contents
Getting started
Accessories . . . . . . . . . . . . . . . . . . . . . . . . . . . . . 112
IMPORTANT SAFETY INSTRUCTIONS . . . . . . . 113
Features . . . . . . . . . . . . . . . . . . . . . . . . . . . . . . . 115
Discs. . . . . . . . . . . . . . . . . . . . . . . . . . . . . . . . . . 116
Control reference guide . . . . . . . . . . . . . . . . . . 118
Set up steps. . . . . . . . . . . . . . . . . . . . . . . . . . . . . 110
The remote control . . . . . . . . . . . . . . . . . . . . . . 112
Antenna and television connections. . . . . . . . 114
Plug-in Auto Tuning . . . . . . . . . . . . . . . . . . . . . . 016
Channel settings . . . . . . . . . . . . . . . . . . . . . . . . 118
Using the remote control to add and delete channels . . . . . . 018
VCR Plus + guide channel settings . . . . . . . . . . . . . . . . . . . . 019
Getting started
Selecting TV screen type . . . . . . . . . . . . . . . . . 121
Basic operations
Playing discs . . . . . . . . . . . . . . . . . . . . . . . . . . . 122
Starting play from where you stopped it
(Resume Function) . . . . . . . . . . . . . . . . . . . . . . . . . . . . . . 023
Fast forward and rewind—SEARCH. . . . . . . . . . . . . . . . . . . 024
Slow-motion play . . . . . . . . . . . . . . . . . . . . . . . . . . . . . . . . . . 024
Frame-by-frame viewing . . . . . . . . . . . . . . . . . . . . . . . . . . . . 024
Skipping. . . . . . . . . . . . . . . . . . . . . . . . . . . . . . . . . . . . . . . . . 025
Starting play from a selected program, title, chapter, or
track . . . . . . . . . . . . . . . . . . . . . . . . . . . . . . . . . . . . . . . . . . 025
Recording television programs . . . . . . . . . . . . 126
One Touch Recording—Specify a time to stop
recording . . . . . . . . . . . . . . . . . . . . . . . . . . . . . . . . . . . . . . 027
Using the direct navigator . . . . . . . . . . . . . . . . 156
Selecting programs to play . . . . . . . . . . . . . . . . . . . . . . . . . . 156
Erasing programs . . . . . . . . . . . . . . . . . . . . . . . . . . . . . . . . . 158
Entering and editing program titles . . . . . . . . . . . . . . . . . . . . 159
Protecting programs . . . . . . . . . . . . . . . . . . . . . . . . . . . . . . . 160
Releasing program protection . . . . . . . . . . . . . . . . . . . . . . . . 161
Checking program contents . . . . . . . . . . . . . . . . . . . . . . . . . 162
Erasing parts of a program—Shorten Segment . . . . . . . . . . 163
Using play lists to edit programs . . . . . . . . . . 165
Displaying play lists . . . . . . . . . . . . . . . . . . . . . . . . . . . . . . . . 165
Creating play lists . . . . . . . . . . . . . . . . . . . . . . . . . . . . . . . . . 166
Playing play lists . . . . . . . . . . . . . . . . . . . . . . . . . . . . . . . . . . 167
Playing play list scenes . . . . . . . . . . . . . . . . . . . . . . . . . . . . . 168
Editing play list scenes . . . . . . . . . . . . . . . . . . . . . . . . . . . . . 168
Copying play lists . . . . . . . . . . . . . . . . . . . . . . . . . . . . . . . . . 172
Erasing a play list . . . . . . . . . . . . . . . . . . . . . . . . . . . . . . . . . 172
Titling play lists . . . . . . . . . . . . . . . . . . . . . . . . . . . . . . . . . . . 173
Checking play list contents . . . . . . . . . . . . . . . . . . . . . . . . . . 174
Home Theater
Expanding your home theater system . . . . . . . 175
Connecting a cable TV box . . . . . . . . . . . . . . . . . . . . . . . . . . 176
Connecting a home satellite system (Dishnetwork/DSS) . . . 177
Connecting to a digital amplifier or system component . . . . . 178
Connecting an analog amplifier or system component . . . . . 178
Connecting a video cassette recorder . . . . . . . . . . . . . . . . . . 179
When you can’t directly connect the antenna you
disconnected from your television to the unit. . . . . . . . . . . 180
When you can’t directly connect the included 75 Ω coaxial
cable to the television . . . . . . . . . . . . . . . . . . . . . . . . . . . . 180
Operating other Panasonic DVD equipment with the remote
control . . . . . . . . . . . . . . . . . . . . . . . . . . . . . . . . . . . . . . . . 181
Advanced operations
Playing while you are recording . . . . . . . . . . . 128
Playing from the beginning of the program you are
recording—Chasing play . . . . . . . . . . . . . . . . . . . . . . . . . . 028
Simultaneous rec and play . . . . . . . . . . . . . . . . . . . . . . . . . . 028
Reviewing the recorded images while recording
(Time Slip) . . . . . . . . . . . . . . . . . . . . . . . . . . . . . . . . . . . . . 029
Using the top window . . . . . . . . . . . . . . . . . . . . 130
Convenient features . . . . . . . . . . . . . . . . . . . . . . 132
Skipping a minute forward—CM skip . . . . . . . . . . . . . . . . . . 132
Selecting an amount of time to skip—Time Slip . . . . . . . . . . 032
Repeat play . . . . . . . . . . . . . . . . . . . . . . . . . . . . . . . . . . . . . . 033
A-B repeat play . . . . . . . . . . . . . . . . . . . . . . . . . . . . . . . . . . . 033
Changing audio . . . . . . . . . . . . . . . . . . . . . . . . . . . . . . . . . . . 134
Marking places to play again—MARKER . . . . . . . . . . . . . . . 136
Program play . . . . . . . . . . . . . . . . . . . . . . . . . . . . . . . . . . . . . 138
Random play . . . . . . . . . . . . . . . . . . . . . . . . . . . . . . . . . . . . . 139
Enjoying virtual surround sound effects (V.S.S.) . . . . . . . . . . 039
Using on-screen menu icons . . . . . . . . . . . . . . . 140
Timer recording. . . . . . . . . . . . . . . . . . . . . . . . . 143
Using VCR Plus+ codes to make timer recording . . . . . . . . . 143
Manually programming the unit to make timer recording . . . 146
To delete a timer recording program . . . . . . . . . . . . . . . . . . . 147
To check programs . . . . . . . . . . . . . . . . . . . . . . . . . . . . . . . . 148
Releasing the unit from timer standby . . . . . . . . . . . . . . . . . . 148
Recording from a video cassette recorder . . . 149
Disc setting . . . . . . . . . . . . . . . . . . . . . . . . . . . . . 150
Enter Title . . . . . . . . . . . . . . . . . . . . . . . . . . . . . . . . . . . . . . . 150
Entering characters for titles . . . . . . . . . . . . . . . . . . . . . . . 151
Disc Protection . . . . . . . . . . . . . . . . . . . . . . . . . . . . . . . . . . . 152
Releasing disc protection . . . . . . . . . . . . . . . . . . . . . . . . . . . 153
Format . . . . . . . . . . . . . . . . . . . . . . . . . . . . . . . . . . . . . . . . . . 154
Finalize—Creating DVD-Video . . . . . . . . . . . . . . . . . . . . . . . 155
4
RQT6035
Initial settings
Changing the unit’s settings . . . . . . . . . . . . . . . 182
Summary of settings . . . . . . . . . . . . . . . . . . . . . . . . . . . . . . . 182
Common procedures. . . . . . . . . . . . . . . . . . . . . . . . . . . . . . . 185
Entering a password . . . . . . . . . . . . . . . . . . . . . . . . . . . . . . . 186
Digital output . . . . . . . . . . . . . . . . . . . . . . . . . . . . . . . . . . . . . 186
Clock Settings . . . . . . . . . . . . . . . . . . . . . . . . . . . . . . . . . . . . 187
Channel Settings . . . . . . . . . . . . . . . . . . . . . . . . . . . . . . . . . . 190
Reference
On-screen displays . . . . . . . . . . . . . . . . . . . . . . 194
Specifications . . . . . . . . . . . . . . . . . . . . . . . . . . 195
Glossary. . . . . . . . . . . . . . . . . . . . . . . . . . . . . . . 196
Maintenance . . . . . . . . . . . . . . . . . . . . . . . . . . . 197
Disc handling. . . . . . . . . . . . . . . . . . . . . . . . . . . 198
Self-diagnosis . . . . . . . . . . . . . . . . . . . . . . . . . . 198
Error messages . . . . . . . . . . . . . . . . . . . . . . . . . 199
Troubleshooting guide . . . . . . . . . . . . . . . . . . . 100
Product Service. . . . . . . . . . . . . . . . . . . . . . . . . 102
Limited Warranty (For U.S.A.) . . . . . . . . . . . . . 103
Limited Warranty (For CANADA) . . . . . . . . . . . 104
. . . . . . . . . . . . . . . . . . . . . . . . . . . . . . . . . . . . . . 105
Guía de referencia rápida en español . . . . . . . 106
(Spanish Quick Reference)
Index. . . . . . . . . . . . . . . . . . . . . . . . . . . . Back cover
Page 5

Features
This unit allows recording of high quality video on
DVD-RAM, the compact and durable digital media with
fast random access. This media also outdoes past tape
formats in ease of operation.
■ Watch a program while you are record-
ing it
Chasing play
You can watch a program from the start while you are still recording it
(➡ page 28).
Simultaneous rec and play
You can record a program while watching one you recorded previously (➡ page 28).
Time Slip
You can jump back 30 seconds to review a piece of action you
missed while recording by pressing the Time Slip button (can be set
between 1 minute and 360 minutes: ➡ page 29).
■ Maximum 12 hours on DVD-RAM
●
Using a double-sided, 9.4 GB DVD-RAM allows you to record a
maximum of 12 hours.
●
When using a 4.7 GB DVD-RAM or a DVD-R, you can get 1 hour
recording using the XP high picture quality mode, 2 hours with the
regular SP mode, 4 hours with the long LP mode, and 6 hours with
the extra long EP mode.
●
There is also the FR (flexible recording) mode you can use with
timer recording to fit recordings efficiently onto the available space
on the disc.
■ The Top Window shows you most of the
features you can use (➡ page 30)
The top window has most of the features and functions you are likely
to use regularly. Just select the icon for the operation you want to
perform.
■ Make your own DVD-Video
●
This unit records to DVD-R following the DVD-Video specifications
so you can make your own DVD-Video (➡ page 7).
●
The encoder system used for recording is called “Hybrid VBR”
which allows high quality recordings.
■ Exceptional picture and sound quality
when recording
●
Audio is recorded using Dolby Digital stereo, enabling high quality
sound recordings.
●
As well as being able to play DVD-Video movie software, this unit
can also play other types of discs including audio CDs and video
CDs. This means your recorder will be the center of your home entertainment, from high-end home theater through to CD play.
Symbols used in these operating
instructions
■ Top window
is used to indicate operations you can access from
the top window, such as the direct navigator and
TOP
play list screen.
■ Troubleshooting
!?
is used to indicate ways to fix potential problems.
■ Discs you can use
The features you can use with the different types of discs are
indicated as follows.
RAM DVD-R DVD-V CD VCD
DVD-RAM DVD-R DVD-Video Audio
For your reference
●
DVD-R indicates DVD-R that have not yet been finalized
(➡ pages 55 and 96) and can still be recorded on.
●
DVD-R that have been finalized can use the same features
as DVD-Video. (Refer to features indicated
Operation
These operating instructions describe operations mainly using the remote control. If the name of the button is the same,
the operation described can also be performed with the main
unit.
Displays
The displays shown in these instructions are examples only.
Actual displays depend on the disc and the operations you
are performing.
CDs
Video
CDs
DVD-V )
Getting started
Getting the most from the versatility of
DVD-RAM and DVD-R
■ Fast access to the program you want to
watch (➡ page 56)
Use the direct navigator to find a program you have recorded and
start play.
■ Edit scenes freely (➡ page 65) RAM
Use play lists to select your favorite scenes and rearrange them to
play in any order you like. Pick out scenes from a music or sports
show and create a collection of your favorite scenes, or take the images you have shot with a video camera and edit them into a movie
of your own creation.
VCR Plus + and PlusCode are registered trademarks of Gemstar Development Corporation. The VCR Plus + system is
manufactured under license from Gemstar Development Corporation.
Pats. 5,307,173; 5,335,079; 4,908,713; 4,751,578; and
4,706,121
Manufactured under license from Dolby Laboratories.
“Dolby”, “Pro Logic” and the double-D symbol are trademarks
of Dolby Laboratories.
“DTS”, “DTS Digital Surround” and “DTS Digital Out” are registered trademarks of Digital Theater Systems, Inc.
5
RQT6035
Page 6

Discs
Discs you can use for recording and play
!?
Logos for discs you can record on and play
DVD-RAM
[4.7 GB/9.4 GB, 12 cm (5″)]
[2.8 GB, 8 cm (3″)]
The manufacturer accepts no responsibility and offers no
compensation for loss of recorded or edited material due
to a problem with the unit or disc, and accepts no respon-
Getting started
sibility and offers no compensation for any subsequent
damage caused by such loss.
Examples of causes of such losses are
1. A disc recorded and edited with this unit is played in a
DVD recorder or computer disc drive manufactured by another company.
2. A disc used as described in 1 and then played again in this
unit.
3. A disc recorded and edited with a DVD recorder or computer disc drive manufactured by another company is played
in this unit.
DVD-R (➡ page 7)
[4.7 GB for General Ver. 2.0]
Play-only discs
Logos for discs you can play
DVD-Video Video CD Audio CD
This unit cannot record onto CD-R, CD-RW or authoring
DVD-R.
Note
●
Do not allow the disc to become dirty or scratched. Fingerprints,
dirt, dust, and scratches on the recording surface may make it impossible to use the disc for recording.
●
If you use DVD-RAM with cartridges, you can protect your recordings with the write-protect tab (➡ page 99). With the tab in the protect position, you cannot record to the disc, delete programs with
the direct navigator, edit with the play list screen, or format the disc.
●
This unit is compatible with both non-cartridge and cartridge
DVD-RAM, but cartridge-type discs give better protection to your
valuable recordings.
For your reference
●
DVD-RAM recorded on this unit cannot be played on
incompatible players (including players manufactured by
Panasonic).
●
Using a Panasonic DVD-RAM, you can record broadcasts that
allow you to make one copy, such as some CATV broadcasts.
●
See page 7 for more details about DVD-R.
!?
Playing CD-R and CD-RW
This unit can play CD-DA (digital audio) and Video CD format
audio CD-R and CD-RW that have been finalized
pletion of recording.
It may not be able to play some CD-R or CD-RW due to the
condition of the recording.
upon com-
6
RQT6035
Region Management Information
(DVD-Video only)
!?
This unit responds to the Region Management Information recorded on DVD-Video. This unit’s region number is “1”. You cannot play the disc if the
region number on the DVD-Video does not correspond to the region number on the unit.
You can play discs with labels containing the region
number “1” and “ALL”. Read the disc’s instructions
carefully.
Discs that cannot be played
●
DVD-Video with a region number other than “1” or “All”
●
Some DVD-R (➡ page 7)
●
DVD-RAM (2.6 GB/5.2 GB)
●
CD-ROM
●
SACD
●
CDV
●
MV-Disc
●
DVD-ROM
●
CD-G
●
PD
1
ALL
1
3
4
●
PAL discs
●
DVD-RW
●
Photo CD
●
Divx Video Disc, etc.
Note
The producer of the material can control how DVD-Video and Video
CDs are played. This means that you may not be able to control play
of a disc with some operations described in these operating instructions. Read the disc’s instructions carefully.
!?
●
DVD-Audio
●
CVD
●
+RW
●
SVCD
Page 7

DVD-R
!?
You can play DVD-R by finalizing (➡ pages 55 and 96) them on this unit, effectively making them into DVD-Video.
■ Before finalizing…
You can record onto the available space on the disc and perform editing functions, such as giving titles to discs and programs and erasing
programs.
●
You cannot record to or edit DVD-R with this unit if it was recorded with another unit, whether it is finalized or not.
●
You cannot record over parts that have been recorded.
●
Erasing programs will not increase the disc’s available time.
■ After finalizing…
The video and audio is recorded according to the DVD-Video specifications, and your very own DVD-Video is created.
●
The titles you entered with this unit appear as menus.
●
Programs longer than 5 minutes are divided into about five-minute chapters.
●
These DVD-R can no longer be recorded on or edited.
●
These DVD-R can be played on other DVD players, but this is not guaranteed.
Play may not be possible due to the player you are using, the DVD-R, or the condition of the recording. Use this unit to play the disc if the player
is unable.
Visit Panasonic’s homepage for more information about DVDs.
http://www.panasonic.com/playDVD-R
■ Recording to DVD-R
●
It takes about 30 seconds for the unit to complete recording management information after recording finishes.
●
To record on DVD-R, this unit optimizes the disc for each recording. Optimizing is carried out when you start recording after inserting the disc or
turning the unit on. Recording may become impossible after the disc is optimized more than 50 times.
●
The first 30 seconds of a program may not be recorded if you make successive timer recordings.
●
The video is recorded in a 4:3 aspect irrespective of the video signal input.
●
You cannot change audio type if a DVD-R is in the unit. Select the audio type (Main or SAP) before recording by going to “MTS Selection for DVDR Disc” in the Audio ACTION menu (➡ page 83).
●
Some broadcasts carry signals that allow you to make one copy, but you cannot record these broadcasts with DVD-R. Use DVD-RAM to record
these kinds of broadcast.
●
Play may be impossible in some cases due the condition of the recording.
●
We recommend using DVD-R manufactured by Panasonic as they have been tested to be compatible with this unit (➡ see below).
Discs manufactured by other companies may not be used to full capacity.
Getting started
Audio format logos
: Dolby Digital (➡ pages 75 and 96)
This unit can play Dolby Digital in stereo
(2 channels). Connect an amplifier with a built-in
Dolby Digital decoder to enjoy surround sound.
: DTS Digital Surround (➡ pages 75 and 96)
Connect this unit to equipment that has a DTS
decoder to enjoy DVDs with this mark.
Recommended DVD-RAM and DVD-R
●
DVD-RAM
9.4-GB, double-sided, type 4 cartridge: LM-AD240U
4.7-GB, single-sided, type 2 cartridge: LM-AB120U
4.7-GB, single-sided, non-cartridge: LM-AF120U
●
DVD-R
4.7-GB, single-sided, non-cartridge: LM-RF120U
(set of 3,
LM-AF120U3)
7
RQT6035
Page 8

Control reference guide
Getting started
Main unit
! POWER button ( /I, POWER) . . . . . . . . . . . . . . . . . . . . . . 16
Press to switch the unit from ON to STANDBY mode or vice versa.
In standby mode, the unit is still consuming a small amount of power.
@ Recording mode button (REC MODE) . . . . . . . . . . . . . . . . 26
# Channel buttons (ö, õ, CH) . . . . . . . . . . . . . . . . . . . . . . . 26
$ Recording button (●,
% Display . . . . . . . . . . . . . . . . . . . . . . . . . . . . . . . . . . . . . . . . . 09
^ Disc tray open/close button (û, OPEN/CLOSE) . . . . . . . . 22
& Stop button (■) . . . . . . . . . . . . . . . . . . . . . . . . . . . . . . . . . . 22
* Pause button (») . . . . . . . . . . . . . . . . . . . . . . . . . . . . . . . . . 22
( Play button ( ) . . . . . . . . . . . . . . . . . . . . . . . . . . . . . . . . . . . 22
) Time slip button and roller (TIME SLIP) . . . . . . . . . . . . . . 29
1 L2 input terminals (L2) . . . . . . . . . . . . . . . . . . . . . . . . . . . . 79
2 Disc tray . . . . . . . . . . . . . . . . . . . . . . . . . . . . . . . . . . . . . . . . 22
3 Top window button (TOP WINDOW) . . . . . . . . . . . . . . . . . 30
4 Cursor buttons (▲, ▼, œ, ) . . . . . . . . . . . . . . . . . . . . . . . . 19
5 Enter button (ENTER) . . . . . . . . . . . . . . . . . . . . . . . . . . . . . 16
6 Return button (RETURN) . . . . . . . . . . . . . . . . . . . . . . . . . . 16
7 Slow/search buttons (î, ï) . . . . . . . . . . . . . . . . . . . . . . 24
8 Skip buttons ( î, ï ) . . . . . . . . . . . . . . . . . . . . . . . . . . . 25
■ Opening the front panel
Open the front panel to access other controls and input terminals.
REC ) . . . . . . . . . . . . . . . . . . . . . . . . 26
8
RQT6035
Page
Buttons such as
as the controls on the unit.
ŒŒ
Πfunction the same
ŒŒ
Remote control
Page
9 TV channel buttons ( TV ,ö, õ, CH) . . . . . . . . . . . . . . . . . 13
0 TV power on/off button (
“ Television input mode selector (
‘ Top menu and Direct Navigator button
(TOP MENU, DIRECT NAVIGATOR) . . . . . . . . . . . . . . . 23, 56
+ Joystick (▲, ▼, œ,
= Manual programming and check button
(PROG/CHECK) . . . . . . . . . . . . . . . . . . . . . . . . . . . . . . . . . . 46
Q VCR Plus + button (VCR Plus +) . . . . . . . . . . . . . . . . . . . . 43
q Time slip button (TIME SLIP) . . . . . . . . . . . . . . . . . . . . . . . 29
W One-minute skip button (CM SKIP) . . . . . . . . . . . . . . . . . . 32
w Manual channel adding and deleting button
(ADD/DLT) . . . . . . . . . . . . . . . . . . . . . . . . . . . . . . . . . . . . . . 18
E DVD/TV switch (DVD, TV) . . . . . . . . . . . . . . . . . . . . . . . . . . 13
●
When selecting numbered items on this unit, be sure to
switch [DVD, TV] to “DVD”.
●
When selecting channels on the television, be sure to
switch [DVD, TV] to “TV”.
e Virtual Surround Sound button (V.S.S.) . . . . . . . . . . . . . . 39
R TV volume buttons (
r Display button (DISPLAY) . . . . . . . . . . . . . . . . . . . . . . . . . . 40
T Menu and Play List button (MENU, PLAY LIST) . . . . . 23, 65
t On-screen display button (STATUS) . . . . . . . . . . . . . . . . . 94
Y Frame advance and frame reverse buttons
(œ», » , FRAME) . . . . . . . . . . . . . . . . . . . . . . . . . . . . . . . . . 24
y Numbered buttons (1–0, 100) . . . . . . . . . . . . . . . . . . . . . . . 23
●
When selecting a title, chapter, track, program, or play list
Example: “5”: [0] ➡ [5]
Example: “15”: [1] ➡ [5]
●
When selecting a page of play list scene
Example: “5”: [0] ➡ [0] ➡ [5]
Example: “15”: [0] ➡ [1] ➡ [5]
●
When selecting a television channel
Example: “5”: [0] ➡ [5]
Example: “15”: [1] ➡ [5]
Example: “115”: [100] ➡ [1] ➡ [5]
U Cancel button (CANCEL) . . . . . . . . . . . . . . . . . . . . . . . . . . 37
u Last marker button (LAST MARKER) . . . . . . . . . . . . . . . . 23
I Audio button (AUDIO) . . . . . . . . . . . . . . . . . . . . . . . . . . . . . 34
i Marker write button (MARKER WRITE) . . . . . . . . . . . . . . . 36
O Action button (ACTION) . . . . . . . . . . . . . . . . . . . . . . . . 19, 85
o Input select button (INPUT SELECT) . . . . . . . . . . . . . . . . . 49
TV , POWER ) . . . . . . . . . . . . 13
TV , TV/AV) . . . . . . . . . . 13
)/Enter button (ENTER) . . . . . . . . . . . 16
!?
TV , +, -, VOL) . . . . . . . . . . . . . . . . . . 13
Page 9

The unit’s display
Center circle (e.g.: DVD-RAM)
Rotating (REC): recording
Stopped (REC): recording paused
ΠDisc type
DVD-RAM: DVD-RAM
DVD-R: DVD-R
DVD VIDEO: DVD-Video
VIDEO CD: Video CD
CD: Audio CD
´ Play mode
PGM: program play
RND: random play
A-B : A-B repeat play
: repeat play
PGM : program repeat play
ˇ Multi-angle (➡ page 41)
¨ Audio signal type
MLT.CH: a signal with 3 or more channels
ˆ DVD indicator
Flashes: when you press [ /I, POWER] to turn the unit off until
it actually turns off
Ø Timer recording display
On: when timer recording is on standby (➡ page 44, 47)
Flashes: when the unit couldn’t go to timer recording standby
(e.g., a disc isn’t loaded or a disc that can’t be recorded to is loaded ➡ page 48)
Recording mode (➡ pages 26, 44)
XP: High-quality mode
SP: Normal mode
LP: Long play mode
EP: Extra long play mode
XP SP LP EP (all on): FR (flexible recording) mode (only with
timer recording)
” Timer indicator
ON: the timer recording start time
OFF: the timer recording end time or One Touch Recording
end time
Rotating (REC, PLAY):
Chasing play or
simultaneous rec and
play is in progress
’ The display mode of the main display section
TITLE: title number is displayed
TRACK: track number is displayed
CHAP: chapter number is displayed
PG: program number is displayed
PL: play list number is displayed
˝ Volume level meter
Ô Channel
Main display section
Recording and play counter
Timer recording on and off times
Remaining disc time
Current time
Title, track, chapter, program and play list numbers, and other
miscellaneous messages
Rotating (PLAY): playing
Stopped (PLAY): play paused
“PLAY” flashes: the resume
function is
working
Getting started
9
RQT6035
Page 10

Set up steps
Follow these steps to connect and set-up this unit
1
Getting started
Prepare the remote control
■ Insert the batteries . . . . . . . . . . . . . . . . . . . . . . . . . . .12
■ Change the remote control code for television
operation . . . . . . . . . . . . . . . . . . . . . . . . . . . . . . . . . . 13
Antenna and television
connections
■ Basic connection . . . . . . . 14
■ When you need to rework
your antenna cable. . . . . . 80
2
3
Tune into television stations
■ Plug-in Auto Tuning . . . . . . . . . . . . . . . . . . . . . . . . . . 16
■ VCR Plus + guide channel settings . . . . . . . . . . . . . . 19
■ Change the settings to suit your television . . . . . . .21
10
RQT6035
Page 11

Ways to use this unit
Playing discs
■ Playing discs (➡ page 22)
■ Using the direct navigator (➡ page 56)
Recording and Playing
at the same time
■ Chasing play (➡ page 28)
■ Simultaneous rec and play
(➡ page 28)
■ Reviewing the recorded images while
recording (Time Slip) (➡ page 29)
Using DVD-R
■ DVD-R (➡ page 7)
■ Recording television programs
(➡ page 26)
■ Playing discs (➡ page 22)
■ Using the direct navigator (➡ page 56)
Recording from a video
cassette recorder
■ Recording from a video cassette
recorder (➡ page 49)
■ Connecting a video cassette recorder
(➡ page 79)
Recording programs
■ Recording television programs
(➡ page 26)
Editing recordings
■ Using play lists to edit programs
(➡ page 65)
Timer recording
■ Using VCR Plusr codes (➡ page 43)
■ Manual programming (➡ page 46)
Watching CATV broadcasts
■ Connecting a cable TV box
(➡ page 76)
Getting started
Changing the unit’s settings
■ Using on-screen menu icons
(➡ page 40)
■ Changing the unit’s settings
(➡ page 82)
Enjoying even better pictures
■ Connecting to a TV with S-video or
component video input terminals
(➡ page 15)
■ Selecting TV screen type
(➡ page 21)
Adjusting the picture
■ Using on-screen menu icons
(➡ page 40)
Enjoying surround sound
■ Enjoying virtual surround sound effects (V.S.S.) (➡ page 39)
■ Connecting an amplifier or system
component with built-in decoder
(➡ page 78)
■ Digital output (➡ page 86)
11
RQT6035
Page 12

The remote control
Getting started
Push in and down on the ( - ) end.
Remote control signal sensor
7 m (23 feet) directly
in front of the unit
Switch [DVD, TV] to “DVD”.
!?
Batteries
A
●
Insert so the poles (+ and -) match those in the remote control.
●
Do not use rechargeable type batteries.
Do not:
●
mix old and new batteries.
●
use different types at the same time.
●
heat or expose to flame.
●
take apart or short circuit.
●
attempt to recharge alkaline or manganese batteries.
●
use batteries if the covering has been peeled off.
Mishandling of batteries can cause electrolyte leakage which can
damage items the fluid contacts and may cause a fire.
If electrolyte leaks from the batteries, consult your dealer.
Wash thoroughly with water if electrolyte comes in contact with any
part of your body.
Remove if the remote control is not going to be used for a long period
of time. Store in a cool, dark place.
Replace if the unit does not respond to the remote control even when
held close to the front panel.
Note
After changing the batteries, the codes you entered (television
➡ page 13 and remote control ➡ page 81) are cleared. Reenter the
codes as necessary.
Use
B
Aim at the sensor, avoiding obstacles, at a maximum range of
7 m (23 feet) directly in front of the unit.
●
Keep the transmission window and the unit’s sensor free from dust.
●
Operation can be affected by strong light sources, such as direct
sunlight, and the glass doors on cabinets.
Do not:
●
put heavy objects on the remote control.
●
take the remote control apart.
●
spill liquids onto the remote control.
!?
!?
12
RQT6035
Page 13

The remote control
Television operation
You can control televisions by entering the remote control code.
Preparation
●
Turn on the television.
●
Switch [DVD, TV] to “TV”.
!?
1 Refer to the chart below for the code
for your television.
2 Press and hold [ TV , POWER ] and
enter the two-digit code with the numbered buttons.
●
For example: 01, press [0] ➡ [1].
●
Point the remote control at the television.
●
After entering the code, test the remote control by turning on
the television and changing channels.
Note
●
If there is more than one code, repeat the procedure until you find
the code that allows correct operation.
●
If your television brand is not listed or if the code listed for your
television does not allow control of your television, this remote control is not compatible with your television.
●
This remote control works with most recently manufactured
televisions, but may not be able to control all the functions on older
models. Use the remote control supplied with your television if this
is the case.
Code No.
01
02
03
04
05
06
07
08
09
10
11
12
13
14
15
16
17
18
■ Operation A
Video input mode
Manufacturer
Panasonic/National QUASAR
Panasonic/National QUASAR
MAGNAVOX SYLVANIA PHILIPS (RC-5)
ZENITH
THOMSON RCA GE
SHARP
SHARP
SONY
TOSHIBA
SANYO FISHER
JVC
HITACHI
MITSUBISHI
SAMSUNG
GOLDSTAR/LG
GOLDSTAR/LG
GOLDSTAR/LG
SAMSUNG
Operation
On and off
Channels
Volume
[ TV , POWER ]
[
Numbered buttons (➡ page 8)
Button
[ TV , TV/AV]
TV , ö, õ, CH]
[ TV , +, - , VOL]
Getting started
13
RQT6035
Page 14

Antenna and television connections
Preparation
●
Refer to the television’s operating instructions.
●
Turn the television off and disconnect its AC power supply cord.
Basic connection
Television
Getting started
Audio/Video cable (included)
This unit
75 Ω coaxial
cable (included)
Audio/Video cable (included)
Yellow (VIDEO)
White (L)
Red (R)
To the antenna
Outdoor antenna
Cable TV
Indoor antenna
or
Antenna cable
disconnected from the
television
●
If the antenna cable you
disconnected from your
television is not a coaxial
cable with a plug, you will
need to obtain a plug and
rework the cable
(➡ page 80).
!?
Cooling fan
!?
AC power supply cord
(included)
To household AC outlet
(AC 120 V, 60 Hz)
■ When you have finished connecting the unit
Change the unit’s settings to suit your television’s aspect ratio
(➡ “Selecting TV screen type”, page 21). You do not have to change
this setting if you have a television with a regular 4:3 aspect.
Connect Your Unit Directly To Your
Television.
Do not connect the unit through your video cassette recorder
when setting up your home entertainment system, because
the picture may not be played correctly due to the copy guard.
14
RQT6035
Conserving power
This unit consumes a small amount of power, even when it is turned
off (approx. 5 W ). To save power when the unit is not to be used for
a long time, unplug it from the household AC outlet.
■ Upgrading your system
To enjoy CATV broadcasts
See “Expanding your home theater system” on page 75.
(A contract with a cable TV company is required in most cases to
view these broadcasts.)
To enjoy sound through other audio equipment
You can output digital signals from this unit’s DIGITAL AUDIO OUT
terminal, enabling you to enjoy the powerful surround effects found
on discs recorded with Dolby Digital or DTS. Connect an amplifier
with built-in decoders. See page 78 for connection examples.
Page 15

Connecting to a TV with S-video or component video input terminals
Getting started
S-video cable
(not included)
Connect the audio cables as well (➡ pages 14 and 78).
S VIDEO OUT terminal
The S-video terminal achieves a more vivid picture than the VIDEO
OUT terminal by separating the chrominance (C) and luminance (Y)
signals. (Actual results depend on the television.)
For your reference
You do not have to connect anything to the VIDEO OUT terminal if
you have connected the unit to your television with the
COMPONENT VIDEO OUT or S VIDEO OUT terminals.
Video cable
(not included)
COMPONENT VIDEO OUT terminal
These terminals can provide a purer picture than the S-VIDEO OUT
terminal.
Connection using these terminals outputs the color difference sig-
B/PR) and luminance signal (Y) separately in order to achieve
nals (P
high fidelity in reproducing colors.
●
The description of the component video input terminals depends on
the television or monitor (e.g. Y/P
nect to terminals of the same color.
●
After making this connection, change the black level for a better
picture (➡ page 82, ACTION—Video—Black Level Control).
B/PR, Y/B-Y/R-Y, Y/CB/CR). Con-
15
RQT6035
Page 16

2·3
Auto Channel/Clock Setting
Connect antenna cable and if you use a
cable box, tune it to your local PBS CH
then...
Please push the ENTER key.
RETURN
ENTER
Auto Channel Setting
18CH
Auto Channel Setting
Proceeding. . .
RETURN
RETURN
Auto Clock Setting
Proceeding. . .
Please wait,
this may take several minutes.
Getting started
ADD/DLT
1
POWER
TV/AV
POWER
T
C
R
E
O
R
D
I
T
A
D
G
I
U
V
N
A
E
N
M
P
O
T
ENTER
PROG / CHECK
TOP WINDOW
FRAME
SKIP
STOP
PAUSE PLAY
123
456
789
VCR Plus+
REC
REC MODE
TIME SLIP CM SKIP
ADD/DLT
V.S.S.
TVDVD
TV
CH
OPEN/CLOSE
L
P
A
S
I
Y
SLOW/SEARCH
0
CANCEL
INPUT
SELECT
LAST
MARKER
ACTION
VOL
M
STATUS
100
AUDIO
MARKER
WRITE
E
N
U
RETURN
DVD
CH
P
L
A
Y
L
I
S
T
RETURN
Plug-in Auto Tuning
After you purchase the unit, plug it into your household AC outlet,
and turn it on for the first time, the unit automatically tunes in all the
channels it can receive and sets the clock.
Preparation
●
Confirm that the antenna is connected correctly.
●
Turn on the television and select the appropriate video input to suit
the connections to this unit.
1 Press [ , POWER] to turn the unit on.
2 Press [ENTER].
Plug-in Auto Tuning starts and the unit puts the stations it can
receive into channels.
1
POWER
2·3
ENTER
A
Please check antenna cable connection
ENTER
RETURN
B
Auto Clock Setting is incomplete.
16
RQT6035
ENTER
RETURN
Auto Channel Setting
No Channel found.
then...
Push the ENTER key again.
Auto Clock Setting
Press ENTER
to set clock manually.
The unit then proceeds with Auto Clock Setting unless the
clock has already been set.
The time is displayed when finished.
3 Press [ENTER].
■ If the channels couldn’t be tuned A
The illustrated screen appears. Press [ENTER] to start Plug-in Auto
Tuning again. Press [RETURN] to cancel.
If the channels still aren’t tuned, use [ADD/DLT] on the remote control to tune channels (➡ page 18).
■ If the clock couldn’t be set automatically B
The illustrated screen appears. Press [ENTER] to show the “Manual
Clock Setting” screen. Set the time manually (➡ page 88).
■ To stop Plug-in Auto Tuning
Press [RETURN].
Page 17

Plug-in Auto Tuning
Note
●
Plug-in Auto Tuning does not work if you turn the unit on by press-
ing [û, OPEN/CLOSE] or [ , PLAY].
●
After the unit sets the clock automatically, it then adjusts the clock
everyday.
●
If the unit sets the time incorrectly, use “Time Zone Adjust” to cor-
rect it (➡ page 89).
●
You can give the stations captions (➡ page 92).
●
If you connect the unit through a cable TV box or DSS receiver
(➡ page 76), tune to your local PBS station before starting auto
clock setting. Use manual clock setting (➡ page 88) if this does not
work.
●
If there is no local PBS channel in your area then Auto Clock Setting
may not work correctly. In this case the time must be set manually
(➡ page 88).
■ Channel plan
The unit automatically determines the type of transmission (airwave
or cable) and puts them into channels as follows.
●
TV Mode
Getting started
Band
VHF
UHF
●
CATV Mode
Band
VHF
CATV LOW BAND
CATV MID/SUPER BANDS
CATV HYPER BAND
ULTRA BAND
Stations received by airwaves
2–13
14–69
Stations received by cable
2–13
95–99
14–36
37–65
66–94
100–125
SPECIAL CATV CHANNEL
1
■ To start Plug-in Auto Tuning again (after moving
house, for example)
Main unit only
While the unit is on and stopped
1. Press and hold [ö, CH] and [õ, CH] for about five seconds.
●
The unit turns off.
2. Press [ /I, POWER] to turn the unit on.
The screen shown in step 1 on page 16 appears. Press [ENTER] to
start Plug-in Auto Tuning.
●
Antenna system, channel caption, and VCR Plus+ guide channel
settings all revert to the default values when you perform the above
procedure. Timer recording settings are also cleared.
17
RQT6035
Page 18

Getting started
CHANNEL 12 DELETED
Channel settings
Using the remote control to
add and delete channels
Remote control only
Use this function if:
●
Channels were not set correctly using automatic tuning.
●
A channel that should have been set wasn’t.
●
A channel’s reception is poor and you want to delete it.
Preparation
Switch [DVD, TV] to “DVD”.
1 Press the numbered buttons to select
a channel.
Example: “5”: [0] ➡ [5]
Example: “15”: [1] ➡ [5]
Example: “115”: [100] ➡ [1] ➡ [5]
●
You can also use [ DVD , ö, õ CH] when you are going to
delete a channel.
2 Press [ADD/DLT].
The channel is deleted if it was set or added if it was not set.
For example
Repeat steps 1 and 2 as necessary.
Note
This function does not work if:
●
A disc is playing.
●
You are recording.
●
Input is from an external unit.
18
RQT6035
Page 19

1
Set Up
TAB
SELECT
Off Timer
Remote Control Code
Clock Settings
Channel Settings
Re-initialize Setting
6 hr
Set Code 1
ACTION
ENTER RETURN
Set Up
SELECT
Off Timer
Remote Control Code
Clock Settings
Channel Settings
Re-initialize Setting
6 hr
Set Code 1
ACTION
ENTER RETURN
TAB
2·3
ACTION
POWER
TV/AV
POWER
T
C
R
E
O
R
D
I
T
A
D
G
I
U
V
N
A
E
N
M
P
O
T
ENTER
PROG / CHECK
TOP WINDOW
FRAME
SKIP
STOP
PAUSE PLAY
123
456
789
VCR Plus+
REC
REC MODE
TIME SLIP CM SKIP
ADD/DLT
V.S.S.
TVDVD
TV
CH
OPEN/CLOSE
L
P
A
S
I
Y
SLOW/SEARCH
0
CANCEL
INPUT
SELECT
LAST
MARKER
ACTION
VOL
M
STATUS
100
AUDIO
MARKER
WRITE
E
N
U
RETURN
DVD
CH
Channel settings
VCR Plus+ guide
P
L
A
Y
L
I
S
T
channel settings
Set these guide channels so you can use VCR Plus+ codes for timer
TOP
recording. Before starting the settings, prepare a chart showing the
channels, the station’s name, and the guide channel.
For example:
1
Channel number
04
15
20
Write down all the stations
you can receive
1 Press [ACTION].
Station name
CBS
HBO
Nickelodeon
Look up the guide channels for
the stations in a television guide
The ACTION screen appears.
!?
Guide channel
04
33
38
Getting started
2
ENTER
3
ENTER ENTER
2 Use the joystick [œ, ] to select the
Set Up tab.
3 Use the joystick [▲,▼] to select
“Channel Settings” and press
[ENTER].
(Continued on next page)
19
RQT6035
Page 20

Getting started
Antenna System
Auto Channel Setting
Preset Channel Caption
Channel Caption
Manual Channel Caption
VCR Plus+ CH Setting
CATV
ACTION
Set Up
Antenna System
Auto Channel Setting
Preset Caption
Manual Caption
VCR Plus Setting
TV
ACTION
VCR Plus+ CH Setting
Guide Channel
125
- - -
1
- - -
2
- - -
CATV Channel
RETURN
ENTER
SELECT
3
- - -
Channel Settings
SELECT
ENTER RETURN
Set Up
Antenna System
Auto Channel Setting
Preset Caption
Manual Caption
VCR Plus Setting
TV
ACTION
VCR Plus+ CH Setting
Guide Channel
4
- - -
5
- - -
6
- - -
7
- - -
CATV Channel
RETURN
ENTER
SELECT
8
- - -
Set Up
Antenna System
Auto Channel Setting
Preset Caption
Manual Caption
VCR Plus Setting
TV
ACTION
VCR Plus+ CH Setting
Guide Channel
4
- - -
5
- - -
6
7
- - -
CATV Channel
RETURN
ENTER
SELECT
- - -
8
- - -
Channel settings
4 Use the joystick [▲, ▼] to select “VCR
Plus+ CH Setting” and press
[ENTER].
For example, when the current antenna system is CATV.
When you press [ENTER]
5 ! Use the joystick [▲, ▼] to select
the guide channel you want to set
and use the joystick [ ].
20
RQT6035
●
The screen scrolls a page at a time if you hold the joy-
stick up or down.
@ Use the joystick [▲, ▼] to select
the channel corresponding to the
guide channel and use the joystick
[œ].
Repeat steps ! and @ as necessary.
6 Press [ENTER].
The screen shown in step 4 reappears.
Note
You do not need to change the settings if the channel and guide
channel numbers are the same.
■ To end the setting
Press [ACTION].
■ If you make a mistake
While the TV channel or CATV channel is highlighted, press
[CANCEL]. “---” is displayed. Repeat step 5-@.
Page 21

3·4·5
Set Up
TAB
SELECT
Off Timer
Remote Control Code
Clock Settings
Channel Settings
Re-initialize Setting
6 hr
Set Code 1
ACTION
ENTER RETURN
ENTER RETURN
4:3 TV Settings for
DVD-RAM
Letterbox
Pan&Scan
4:3 TV Settings for DVD-Video
TV Screen
4:3TV Aspect
ACTION
SELECT
TAB
ENTER RETURN
ACTION
SELECT
4:3
TV Aspect
16:9
DVD,TV
1
POWER
TV/AV
POWER
T
C
R
E
O
R
D
I
T
A
D
G
I
U
V
N
A
E
N
M
P
O
T
PROG / CHECK
TOP WINDOW
SKIP
STOP
PAUSE PLAY
123
456
789
VCR Plus+
REC
REC MODE
TIME SLIP CM SKIP
ADD/DLT
V.S.S.
TVDVD
TV
CH
OPEN/CLOSE
L
P
A
S
I
ENTER
FRAME
0
CANCEL
INPUT
SELECT
MARKER
ACTION
VOL
Y
M
E
N
U
RETURN
STATUS
SLOW/SEARCH
100
DVD
CH
LAST
AUDIO
MARKER
WRITE
Selecting TV screen
type
P
L
A
Y
L
I
S
T
RETURN
The aspect ratio is factory set to 4:3 for a regular television. You do
not have to change this setting if you have a regular 4:3 aspect television.
Preparation
●
Turn on the television and select the appropriate video input to suit
the connections to this unit.
●
Switch [DVD, TV] to “DVD”.
TOP
!?
1 Press [ , POWER] to turn this unit on.
2 Press [ACTION] to show the menus.
Getting started
2
3 Use the joystick [œ, ] to select the TV
Screen tab.
1
2
ACTION
3
ENTER
4·5
ENTER ENTER
POWER
4 Use the joystick [▲, ▼] to select
“TV Aspect” and press [ENTER].
5 Use the joystick [▲, ▼] to select the
TV aspect and press [ENTER].
●
4:3 (factory setting)
●
16:9
■ To return to the previous screen
Press [RETURN].
■ To end the setting
Press [ACTION].
For your reference
Apart from “TV Aspect”, other settings also affect how video appears
on your television. Check the following if video doesn’t appear correctly on your television.
●
“ACTION—TV Screen—4:3 TV Settings for DVD-Video” or “4:3 TV
Settings for DVD-RAM” (➡ page 83).
●
The video setting on the disc. How video appears is often specified
by the disc itself.
●
The video settings on your television.
21
RQT6035
Page 22

Basic operations
!?
Playing discs
RAM DVD-R DVD-V CD VCD
Preparation
Switch [DVD, TV] to “DVD”.
TOP
1 Press [ , POWER] to turn the unit on.
2 Press [û, OPEN/CLOSE] to open the
tray and insert a disc.
●
Insert inside the tray’s guides.
●
Insert one disc only.
3 Press [ , PLAY].
The disc tray closes and play begins.
(The unit takes some time to read the disc before play starts.)
●
If you insert a DVD-RAM with the write-protect tab set to
PROTECT (➡ page 99) and press [
starts automatically.
■ To stop play A
Press [■, STOP] (When “PLAY” flashes ➡ page 23, Starting play
from where you stopped it).
●
The screen saver at right may appear when
you stop play. Press [■, STOP] again and
you can use this unit’s tuner to watch
television.
This screen is also shown when you are
playing CDs.
■ To pause play
Press [», PAUSE].
Press again to restart play.
or
or
■ Auto power-off
The unit switches to standby after about 6 hours in the stop mode.
You can turn this feature off or change the time to 2 hours
(➡ page 82, ACTION—Set Up—Off Timer).
■ With non-cartridge discs
ûû
û, OPEN/CLOSE], play
ûû
22
RQT6035
Insert label-up. (With double-sided discs, load
so the label for the side you want to play is facing up.)
Insert label-up with the arrow
!?
facing in.
(With double-sided discs, load
so the label for the side you want
to play is facing up.)
e.g.: DVD-RAM
or
or
Guide for 12 cm
(5″) disc
Guide for 8 cm
(3″) disc
Page 23

A
B
1
TV
CH
VOL
POWER
TV/AV
OPEN/CLOSE
POWER
T
C
R
E
L
P
A
S
P
I
Y
O
R
D
I
Joystick
T
A
D
G
I
V
A
E
N
M
P
O
T
PROG / CHECK
TOP WINDOW
STOP
U
N
SKIP
ENTER
FRAME
SLOW/SEARCH
PAUSE PLAY
M
E
RETURN
STATUS
L
A
Y
MENUTOP MENU
L
I
S
T
N
U
RETURN
12
123
123
456
789
0
STOP
456
789
VCR Plus+
0
REC
REC MODE
CANCEL
INPUT
TIME SLIP CM SKIP
SELECT
LAST
ADD/DLT
V.S.S.
MARKER
TVDVD
ACTION
or
100
DVD
CH
AUDIO
MARKER
WRITE
ENTER
Numbered
buttons
LAST
MARKER
ENTER
Playing discs
When a menu screen appears on the
A
television
DVD-V VCD
Operate menus with the following operations. Actual operations depend on the disc.
Press the numbered buttons to select an item (➡ page 8), or
move the joystick [▲, ▼, œ, ] to select an item and press
[ENTER].
●
You can return to menus after you start play by
pressing [TOP MENU] or [MENU] (DVD-Video),
TOP
!?
or [RETURN] (Video CD).
Note
●
Discs continue to rotate while menus are displayed. Press
[■, STOP] when you have finished viewing to preserve the unit’s
motor and your television screen.
●
Volume may be lower when playing DVD-Video than when playing
other discs or during television broadcasts.
If you turn the volume up on the television or amplifier, ensure you
reduce the volume again before playing other sources or returning
to the television so that a sudden increase in output does not
occur.
For your reference
●
If “ ” appears on the television
The operation is prohibited by the unit or disc.
●
If a disc is loaded, the unit will come on and play will start when you
press [ , PLAY].
●
If you play a disc with video and then replace it with an audio-only
disc, the video from the previous disc may continue to be shown on
the television.
Starting play from where you
B
stopped it (Resume Function)
RAM DVD-R DVD-V CD VCD
TOP
1 During play
Press [■, STOP].
The unit remembers the position.
2 Press [ , PLAY] while “PLAY” is
flashing on the display.
Play starts from where you stopped it.
Basic operations
2
PLAY
■ To cancel the resume function
Press [■, STOP] until “PLAY” goes out.
(The position is also cleared when you turn the unit off.)
■ To start play from a memorized position after
turning the unit off
Press [LAST MARKER] during play.
(The message “Position Memorized” appears on the television.)
Now when you press [
and back on, play starts from the memorized position.
For your reference
●
If you press [■, STOP] before switching the unit to standby after
pressing [LAST MARKER] to memorize a position, play will resume
from the position you pressed [■, STOP] when you press
[
, PLAY].
●
The position memorized when you press [■, STOP] is cleared
when you switch the unit to standby or if the unit switches to standby automatically (➡ page 82, ACTION—Set Up—Off Timer).
DVD-R DVD-V CD VCD
●
The position is memorized when you press [■, STOP] or
[LAST MARKER] and cleared when you open the disc tray.
RAM
●
The last marker is written to the disc and remains intact until you
mark a different position.
You cannot mark positions if the disc is write-protected with DISC
SETTING (➡ page 52) or with the write-protect tab (➡ page 99).
Release the protection before marking another position.
, PLAY] after switching the unit to standby
23
RQT6035
Page 24

Playing discs
Fast forward and rewind—SEARCH
A
RAM DVD-R DVD-V CD VCD
During play
Press [î, SLOW/SEARCH] or [ï,
SLOW/SEARCH].
îî
[
î]: backward
îî
ïï
[
ï]: forward
ïï
●
There are five search speeds. Each press increases the search
speed.
●
The search speed is maintained when you release the button.
●
Press [ , PLAY] to restart play.
●
Audio is output during search with most discs, but only at forward
speed one with DVD-RAM (except during chasing play and simul-
taneous rec and play), DVD-R, DVD-Video, and Video CDs. You
can turn off the audio during search for DVD-RAM, DVD-R,
DVD-Video, and Video CDs (➡ page 83, ACTION—Audio—Audio
during Search).
Basic operations
Slow-motion play
B
RAM DVD-R DVD-V VCD
While paused
Press [î, SLOW/SEARCH] or [ï,
SLOW/SEARCH].
îî
[
î]: backward (does not work with Video CDs)
îî
ïï
[
ï]: forward
ïï
●
There are five slow-motion speeds. Each press increases the slow-
motion speed.
●
or
Search speed
The slow-motion speed is maintained when you release the button.
●
Press [ , PLAY] to restart play.
Frame-by-frame viewing
C
RAM DVD-R DVD-V VCD
Remote control only
While paused
Press [œ», FRAME] or [» , FRAME].
œ»œ»
[
œ»]: backward (does not work with Video CDs)
œ»œ»
» »
[
» ]: forward
» »
or
●
Each press shows the next frame.
●
Press [
, PLAY] to restart play.
24
RQT6035
Page 25

Playing discs
Skipping
A
RAM DVD-R DVD-V CD VCD
You can skip to the beginning of tracks (CD and Video CD
➡ page 97) and chapters (DVD-Video ➡ page 97) and restart play
from there.
On DVD-RAM and DVD-R, you can skip to the start of a program or
to a marker and start play from there.
During play or while paused
Press [ î, SKIP] or [ï , SKIP].
î î
[
î]: backward
î î
ï ï
[
ï ]: forward
ï ï
Each press increases the number of skips.
For your reference
●
After skipping, the unit returns to the previous state, play or pause.
Numbered
buttons
●
Pressing [î] or [
Video CDs (➡ page 97) is working may take you to a menu screen.
●
You can also mark positions to skip to (➡ page 36).
ïï
ï] while the playback control feature on
ïï
Basic operations
Starting play from a selected
B
program, title, chapter, or track
RAM DVD-R DVD-V CD VCD
Remote control only
Preparation
Switch [DVD, TV] to “DVD”.
During play or while stopped
Press the numbered buttons to select the
item.
or
For example, to enter 5, press [0] and [5].
To enter 15, press [1] and [5].
DVD-V CD VCD
Twice
Chapter/track Chapter/trackChapter/track
RAM DVD-R
Twice Once Once Twice
The program before
Play position
Once
Once
Play position
The program afterCurrent program
Twice
Marker
Three times
Note
●
This may not work with some discs.
●
This works only when stopped with some discs (the screen saver is
on the television).
25
RQT6035
Page 26

Basic operations
Numbered
buttons
Recording television
programs
RAM DVD-R
Preparation
●
Switch [DVD, TV] to “DVD”.
●
Use a disc that the unit can record to (➡ page 6) and that has
enough space available.
●
Ensure the disc is not write-protected with the write-protect tab
(➡ page 99).
●
Ensure the disc is not write-protected with DISC SETTING
(➡ page 52).
1 Press [ , POWER] to turn the unit on.
2 Press [û, OPEN/CLOSE] to open the
tray and insert a disc.
●
Insert one disc only within the tray’s guides.
●
ûû
Press [
û, OPEN/CLOSE] to close the tray.
ûû
●
When using a DVD-RAM for the first time with this unit, for-
mat it to ensure accurate recording (➡ page 54, “Format”).
Check the disc carefully to ensure it doesn’t contain programs you want to keep.
3 Press [ DVD , ö, õ, CH] to select the
channel.
4 Press [REC MODE] to select the
recording mode.
Select “XP”, “SP”, “LP”, or “EP” (➡ see below).
5 Press [●, REC] to start recording.
●
The program is recorded into the available space on the
disc.
■ To pause recording
or
Press [», PAUSE].
Press again to restart recording.
■ To stop recording
Press [■, STOP].
or
Insert label-up with the arrow
!?
facing in. (With double-sided
discs, load so the label for
the side you want to record is
facing up.)
e.g.: When you have selected
channel 4
or
■ To select channels with the numbered buttons
When “TV” is the antenna system: between 2 and 69
When “CATV” is the antenna system: between 1 and 125
Press the numbered buttons.
For example: Channel 5, press 0 ➡ 5
■ Convenient features
●
Chasing play—playing from the beginning of the program you are
recording (➡ page 28)
●
Simultaneous rec and play— watching a program you recorded
while recording another (➡ page 28)
●
Time Slip—checking the images you are recording (➡ page 29).
Channel 15, press 1 ➡ 5
Channel 115, press 100 ➡ 1 ➡ 5
■ Recording modes
For example, approximate recording times with a 4.7-GB
DVD-RAM
XP: 1 hour, high picture quality
SP: 2 hours, standard picture quality
LP: 4 hours, long play
EP: 6 hours, extra long play
■ Watching the television while recording
e.g.: When you have selected “XP”
or
or
! Switch [DVD, TV] to “TV”.
@ Press [ TV , TV/AV] to change the input mode to “TV”.
# Press [
You can also select the channel with the numbered buttons
(➡ page 8).
For your reference
●
You can also do this during timer recording.
●
The recording is unaffected.
öö
õõ
TV ,
ö,
õ, CH] to change channels.
öö
õõ
26
RQT6035
Page 27

Recording television programs
■ Re-inserting double-sided discs
Reverse
Front
You can get up to 12 hours
recording when you use
double-sided discs and use
the “EP” mode.
Turn over
■ To check the remaining time and the current
mode during recording A
Press [STATUS] several times.
For your reference
●
You can record up to 99 programs on one disc.
●
You cannot change the channel or recording mode during
recording. You can change them while recording is paused, but the
material is recorded as a separate program.
●
An error message appears if you try to start recording when a disc
is full; the remaining time will be shown as “0:00”. To continue
recording, erase unneeded programs (DVD-RAM only ➡ page 58,
Erasing programs) or use another disc.
●
There are limitations when recording to DVD-R (➡ page 7).
●
The message “Could not write to disc.” is displayed when recording
was not completed correctly. Check the discs for dirt or scratches.
Basic operations
Available recording time
Recording mode
or
Counter
The time remaining until recording finishes changes each time
you press the button.
Shows recording
will stop in
30 minutes
One Touch Recording—
B
Specify a time to stop recording
RAM DVD-R
This is a simple way of timer recording when you are in a hurry or
before you go to bed. You can set the time up to 4 hours in advance.
While recording
Press [●, REC] to select the recording
time.
The time increases as illustrated each time you press the button.
After selecting the time the display updates indicating the time remaining until the unit stops recording. You can change the time
again with the same operation.
When the time you set is reached, recording stops and the unit
switches to standby.
■ To cancel
During recording, press [●, REC] until the counter appears.
●
Recording continues.
■ To show the time remaining until recording fin-
ishes C
Press [STATUS].
For your reference
●
This does not work during timer recordings.
●
Recording stops and the set time is cleared if you press
[■, STOP].
●
The set time is cleared if you pause recording and cause another
program to be recorded (for example, change the recording mode
or channel).
27
RQT6035
Page 28

You are recording a sports
program (2) and you want to
watch it from the beginning.
Advanced operations
Do the above operation and…
For example:
while recording program 2 (sport)
Playing while you are
recording
Playing from the beginning of the
A
program you are recording—
Chasing play
RAM
You can start play from the beginning of a program while continuing
to record it.
Preparation
Switch [DVD, TV] to “DVD”.
During recording or timer recording
Press [ , PLAY].
Play starts from the beginning of the program being recorded.
■ To stop play and recording
! Press [■, STOP]. Play stops.
Wait 2 seconds.
@ Press [■, STOP]. Recording stops.
●
You cannot stop recording with [■, STOP] during timer recording.
To stop timer recording, press [ , POWER], then [■, STOP] within
5 seconds.
For your reference
●
The playback images are displayed during chasing play.
●
Sound is not output while fast-forwarding.
●
Play cannot be started until at least 2 seconds after recording
starts.
●
If you fast-forward and get to within a few seconds of the part being
recorded, the picture will change to show the images currently be-
ing played.
The same sports program is
recorded while you are
watching it.
You want to watch the movie
you recorded yesterday
(program 1)
Do the above operation and…
A sports program is
recorded while you watch a
movie.
For example:
while recording program 2 (sport)
Simultaneous rec and play
B
RAM
You can start play of the program you are recording or play a program previously recorded.
Preparation
Switch [DVD, TV] to “DVD”.
During recording or timer recording
1 Press [TOP MENU, DIRECT NAVI-
GATOR].
“●” is displayed in the direct navigator to indicate the program
is being recorded (➡ page 57).
2 Use the joystick […, †] to select a pro-
gram and press [ENTER].
■ To stop play and recording
! Press [■, STOP]. Play stops.
Wait 2 seconds.
@ Press [■, STOP]. Recording stops.
●
You cannot stop recording with [■, STOP] during timer recording.
To stop timer recording, press [ , POWER], then [■, STOP] within
5 seconds.
For your reference
●
During simultaneous rec and play, you cannot edit with the direct
navigator or use play lists.
●
If you start play while the unit is on timer recording standby, record-
ing starts when the time you set is reached.
●
The unit returns to recording standby when you stop play while it is
on timer recording standby.
28
RQT6035
Page 29

Current recording
Play images
(30 seconds
before)
Playing while you are recording
Reviewing the recorded images
while recording (Time Slip)
RAM
You can play the program being recorded to check that it is being
recorded correctly. You can also check parts that were recorded previously.
Preparation
Switch [DVD, TV] to “DVD”.
While recording or timer recording
Press [TIME SLIP].
Play starts from 30 seconds previous.
The play images are shown for 5 seconds as a picture-in-picture with
the recording images, then they are shown in full.
■ To continue to show both the recording and play
images
Press and hold [TIME SLIP] for about 3 seconds.
■ To change the part being played A
Main unit only
! Press [TIME SLIP] on the main unit within 5 seconds to enter the
time.
Play starts from the time you entered.
Note
You cannot change the position being played with the remote
control.
■ To stop play and recording
! Press [■, STOP]. Play stops.
Wait 2 seconds.
@ Press [■, STOP]. Recording stops.
●
You cannot stop recording with [■, STOP] during timer recording.
To stop timer recording, press [ , POWER], then [■, STOP] within
5 seconds.
For your reference
●
If you fast-forward, rewind, or skip during Time Slip, only the play
images are shown.
●
The sound for the images being played is heard during Time Slip.
●
The length of the recording determines the amount of time you can
select for time slip. As the recording progresses, the amount of time
you can time slip also increases.
Advanced operations
29
RQT6035
Page 30

Using the top window
About the top window
Most of the features and functions of this unit can also be controlled
with icons. The examples show the top window when a DVD-RAM is
being used. Actual menus depend on the type of disc being used.
Cartridge protection
“ON” is displayed if the disc is protected
Disc protection
“ON” is displayed if you have used Disc Protection
in DISC SETTING to protect the disc (➡ page 52).
Disc title
The disc’s title is displayed if one is recorded. You
can enter titles with Enter Title in DISC SETTING
(➡ page 50).
Disc type
with the write-protect tab (➡ page 99).
Advanced operations
TOP
WINDOW
N
S
SELECT
ENTER
DVD-RAM MY SELECTION
DISC PROTECTION OFF
CARTRIDGE PROTECT OFF
DISC SETTING
Date
Time
CH
TIMER RECORDING
RETURN
ACTION
N
S
DIRECT NAVIGATOR
RESUME PLAY
PLAY
CREATE PLAY LIST
Using the top window
RAM DVD-R DVD-V CD VCD
Preparation
Switch [DVD, TV] to “DVD”.
1 While stopped
Press [TOP WINDOW] to show the top
window.
PLAY LIST
30
RQT6035
2 Use the joystick [▲, ▼, œ, ] to select
an item.
Refer to the relevant pages for details.
3 Press [ENTER].
Your selection is entered and the top window disappears. If
the operation requires further selections, another screen
appears.
■ To clear the top window
Press [TOP WINDOW] or [RETURN].
Page 31
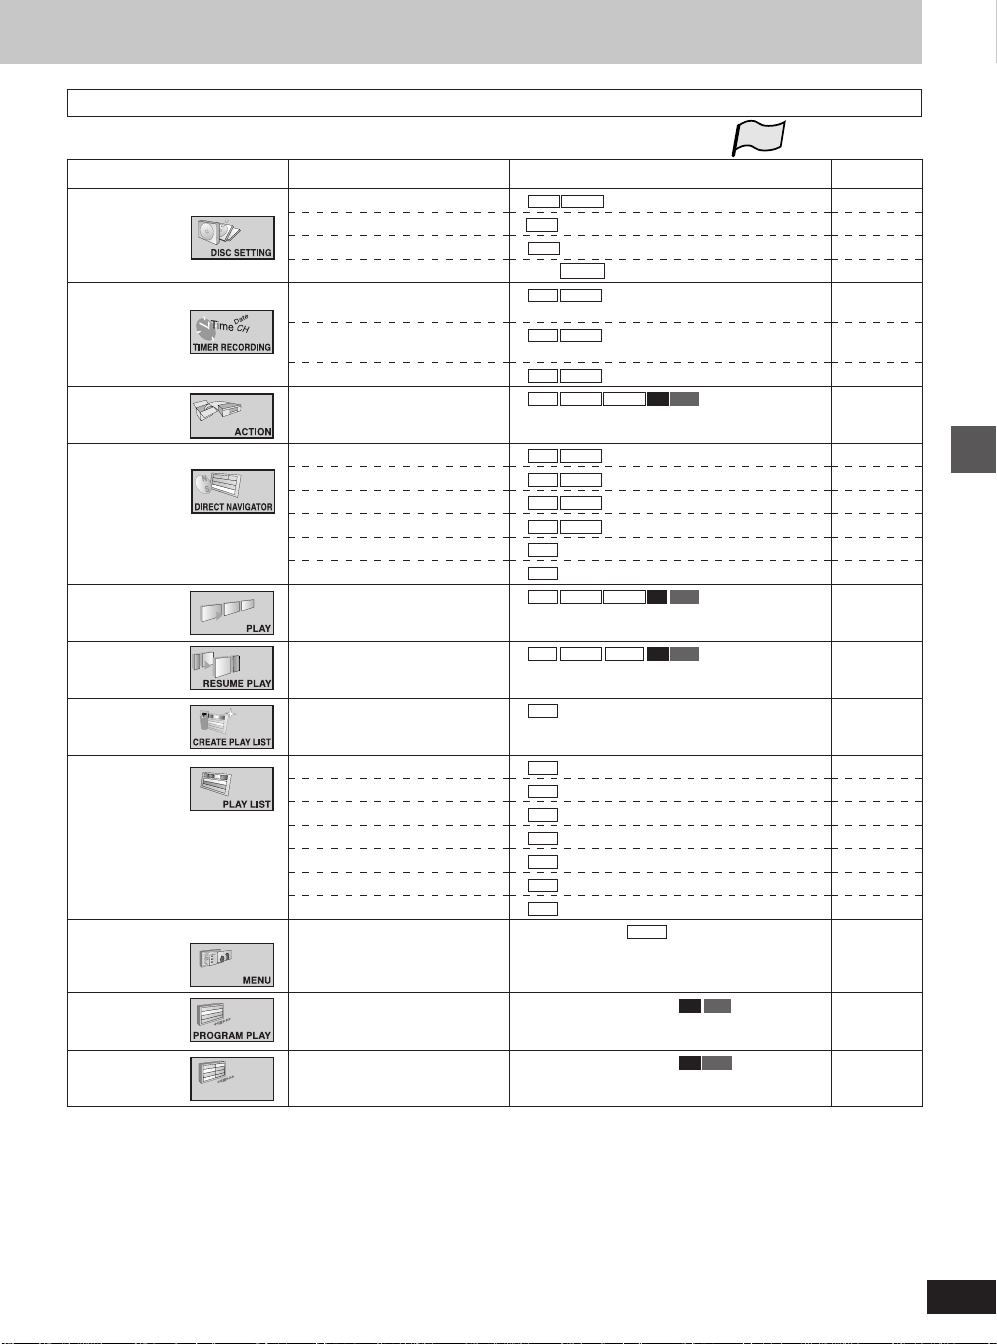
Top window icons
Features and functions described on other pages that can be controlled with the top window are indicated with .
DISC SETTING
TIMER
RECORDING
Icon
Enter Title
Disc Protection
Format
Finalize
Registering programs and making
corrections
Deleting a timer recording
Items
Discs
RAM DVD-R
RAM
RAM
[RAM] DVD-R
RAM DVD-R
RAM DVD-R
TOP
program
ACTION
Checking the timer programming
Settings for the unit and discs
RAM DVD-R
RAM DVD-R DVD-V CD VCD
Settings depend on the type of disc
DIRECT NAVIGATOR
PLAY
Play
Erase Program
Enter Title
Properties
Protection
Shorten Segment
Start play from the beginning of
RAM DVD-R
RAM DVD-R
RAM DVD-R
RAM DVD-R
RAM
RAM
RAM DVD-R DVD-V CD VCD
the disc
RESUME PLAY
Start play from the point you
RAM DVD-R DVD-V CD VCD
stopped play
CREATE PLAY
Creating play lists
RAM
LIST
Pages
50
52, 53
54
55
46
47
48
85
56
58
59
62
60, 61
63
22
23
66
Advanced operations
PLAY LIST
TOP MENU
Example
Playing play lists
Play Scenes
Edit Scenes
Copy Play List
Erase Play List
Enter Title
Properties
Display a disc’s menus
RAM
RAM
RAM
RAM
RAM
RAM
RAM
[RAM] [DVD-R] DVD-V
67
68
68
72
72
73
74
23
MENU
PROGRAM
Display the program play screen
[RAM] [DVD-R] [DVD-V] CD VCD
38
PLAY
RANDOM PLAY
RANDOM PLAY
Display the random play screen
[RAM] [DVD-R] [DVD-V] CD VCD
39
Some items will be greyed out and cannot be selected if the disc is write-protected. Release disc protection with DISC SETTING—Disc Protection
(➡ page 53) or release cartridge protection with the write-protect tab (➡ page 99).
31
RQT6035
Page 32
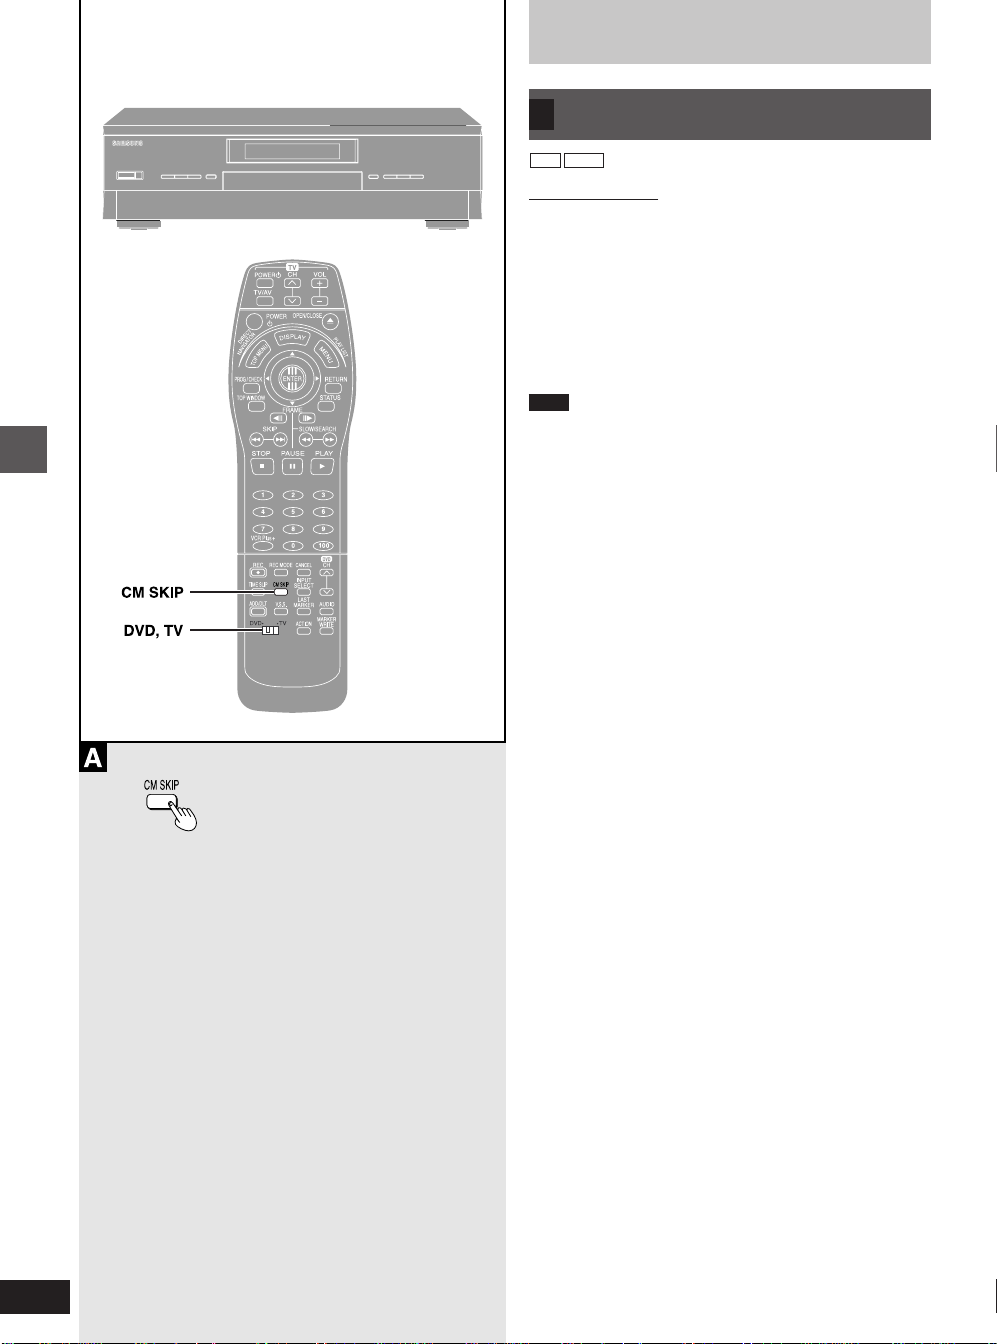
Convenient features
Skipping a minute forward—
A
CM skip
RAM DVD-R
Remote control only
Use this feature to skip past short parts of recordings, commercials,
for example.
Preparation
Switch [DVD, TV] to “DVD”.
During play
Press [CM SKIP].
Play restarts from approximately a minute later.
Note
●
If the start of the next program is within one minute of the point you
skipped from, play restarts from that program.
●
Since the length of each commercial will vary, this feature may not
always skip each commercial accurately. It is designed as an easy
way of skipping short periods of time.
Advanced operations
32
RQT6035
Page 33
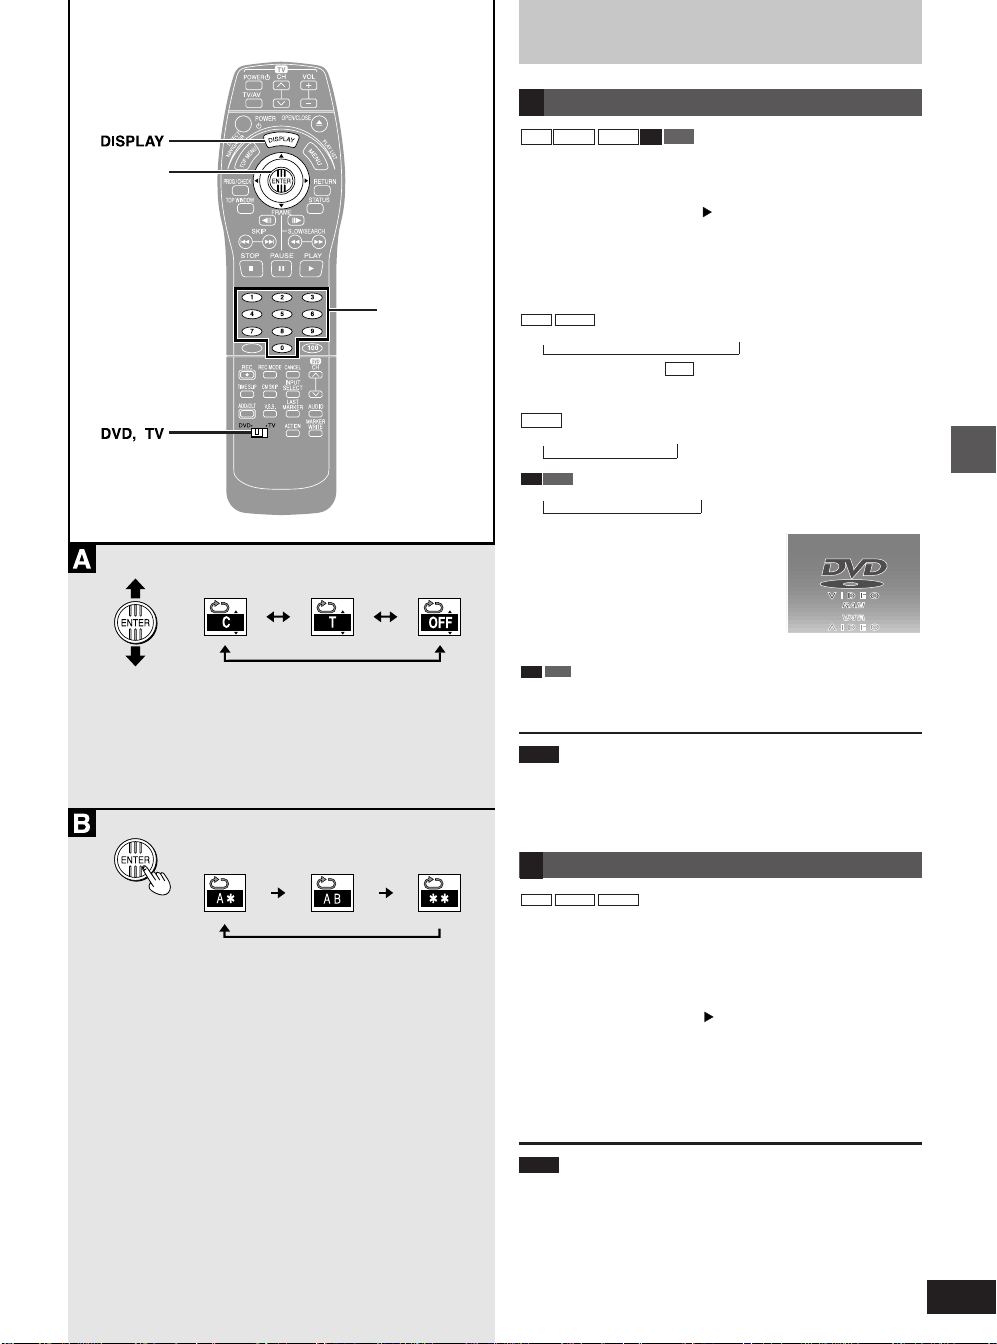
Joystick/
ENTER
e.g. DVD-Video
Numbered
buttons
Convenient features
Repeat play
A
RAM DVD-R DVD-V CD VCD
Preparation
●
Switch [DVD, TV] to “DVD”.
●
Press [DISPLAY] ➡ [DISPLAY] to display the on-screen menu
icons and use the joystick [ ] to highlight the repeat play icon
(➡ pages 40 and 42).
During play
Use the joystick [▲, ▼].
Each time you use the joystick, the display changes as illustrated.
RAM DVD-R
Program (PRG)↔Entire disc (A)↔OFF
While playing a play list
Play list (PL)↔OFF
DVD-V
Chapter (C)↔Title (T)↔OFF
CD VCD
Track (T)↔Entire disc (A)↔OFF
If the Video CD has playback control
! While stopped (the screen saver is on
the television), press the numbered buttons to select a track (➡ page 8).
@ Do the above operation.
RAM
■ To repeat only your favorite tracks
CD VCD
Advanced operations
! Program the tracks you want (➡ page 38).
@ Do the above operation.
Note
●
Repeat play may not work as desired with some discs.
●
Repeat play does not work if the disc’s elapsed play time is not
shown on the unit’s display.
●
You cannot use repeat play to repeat an entire DVD-Video.
Normal playSpecify point A Specify point B
A-B repeat play
B
RAM DVD-R DVD-V
You can repeat a section between points A and B within a program,
title or chapter.
Preparation
●
Switch [DVD, TV] to “DVD”.
●
Press [DISPLAY] ➡ [DISPLAY] to display the on-screen menu
icons and use the joystick [ ] to highlight the A-B repeat icon
(➡ pages 40 and 42).
During play
Press [ENTER].
Each time you press the button, the display changes as illustrated.
A-B repeat starts when you specify point B.
Note
●
A-B repeat does not work if the DVD’s elapsed play time is not
shown on the unit’s display.
●
The unit automatically determines the end of a program/title as
point B when the end of the program/title is reached.
●
Some subtitles recorded around point A or B may fail to appear.
●
This does not work while playing a play list.
33
RQT6035
Page 34
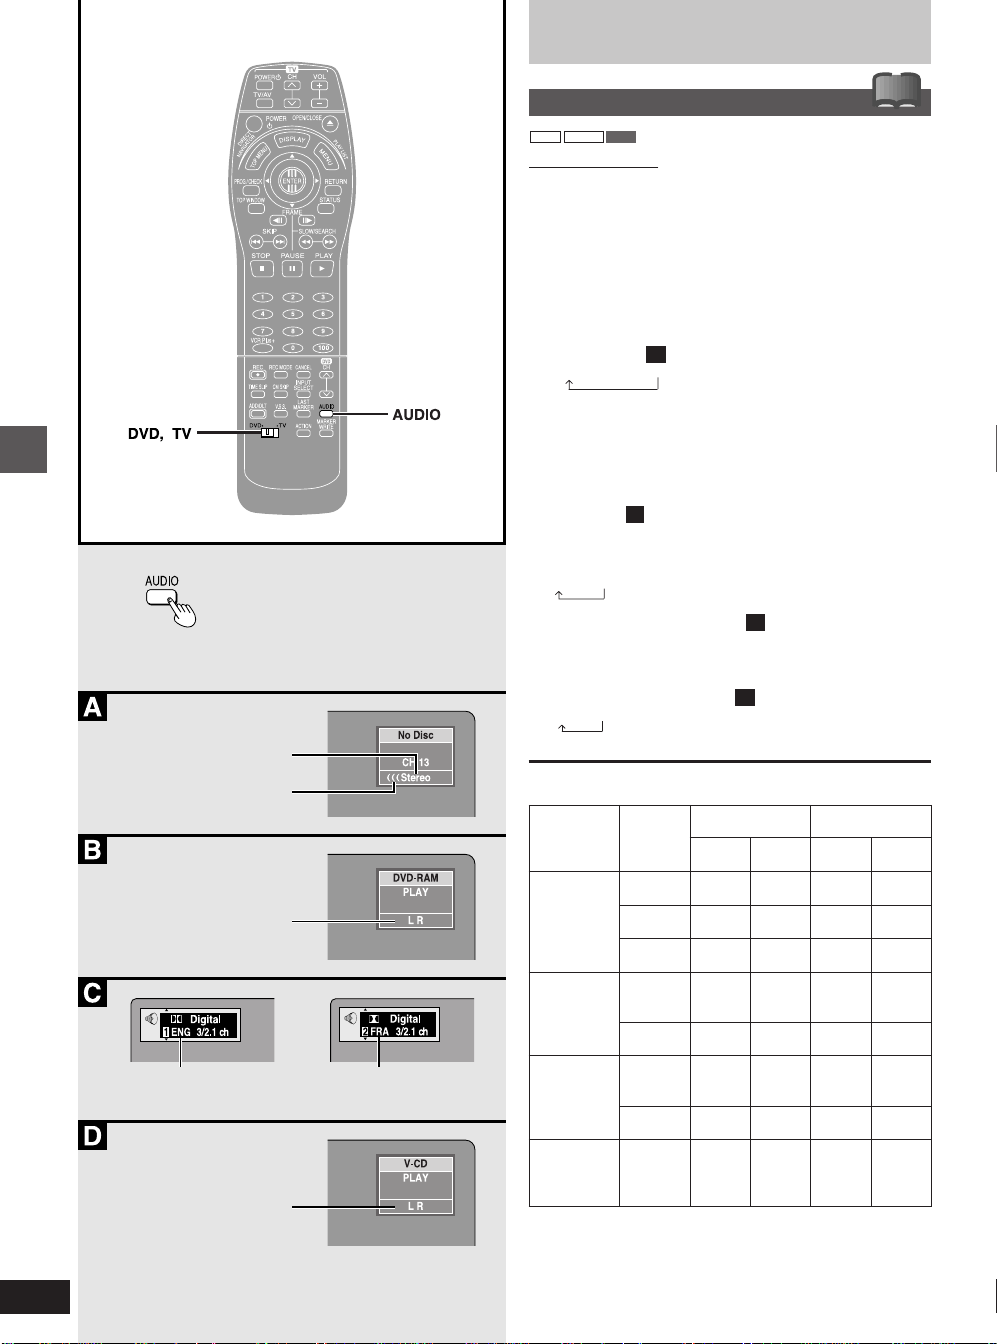
Convenient features
Advanced operations
Changing audio
RAM DVD-V VCD
Remote control only
You can change the audio being received or played with the following procedure.
Preparation
Switch [DVD, TV] to “DVD”.
!?
During reception or play
Press [AUDIO] to select the audio type.
How the type changes depends on when you press the button.
■ While receiving Multi-channel Television Sound
Stereo (MTS) A
Stereo➝SAP➝Mono
Stereo: To listen to the main audio (stereo)
●
Select “Mono” if reception is poor during a stereo
SAP: To listen to the secondary audio program.
Mono: To listen to a broadcast in monaural.
■ While playing a television program recorded on
DVD-RAM B
If it is a recording of an MTS broadcast
MAIN↔SAP
If it is a recording of a stereo broadcast
LR➝L➝R
■ While playing a DVD-Video C
You can change the audio channel number each time you press
the button. This allows you to change things like the soundtrack
language.
■ While playing a Video CD D
LR➝L➝R
broadcast.
34
RQT6035
e.g.: “Stereo” is selected
“(((” appears when the unit
is receiving the type of
audio you selected.
e.g.: “L R” is selected
e.g.: English is the selected
language
e.g.: “L R” is selected
The language is switched
to French
■ Audio during television reception
Television
broadcast
Stereo
+SAP
Mono
+SAP
Stereo
Mono
L=Left audio channel
R=Right audio channel
L+R=Left+Right audio channel
Setting
Stereo
SAP
Mono
Stereo
Mono
SAP
Stereo
SAP
Mono
Stereo
SAP
Mono
L
L
SAP
L+R
L+R
SAP
L
L+R
L+R
R
R
SAP
L+R
L+R
SAP
R
L+R
L+R
Audio recordedAudio output
L
L
L+R
L+R
L+R
L+R
L
L+R
L+R
R
R
SAP
L+R
L+R
SAP
R
L+R
L+R
Page 35
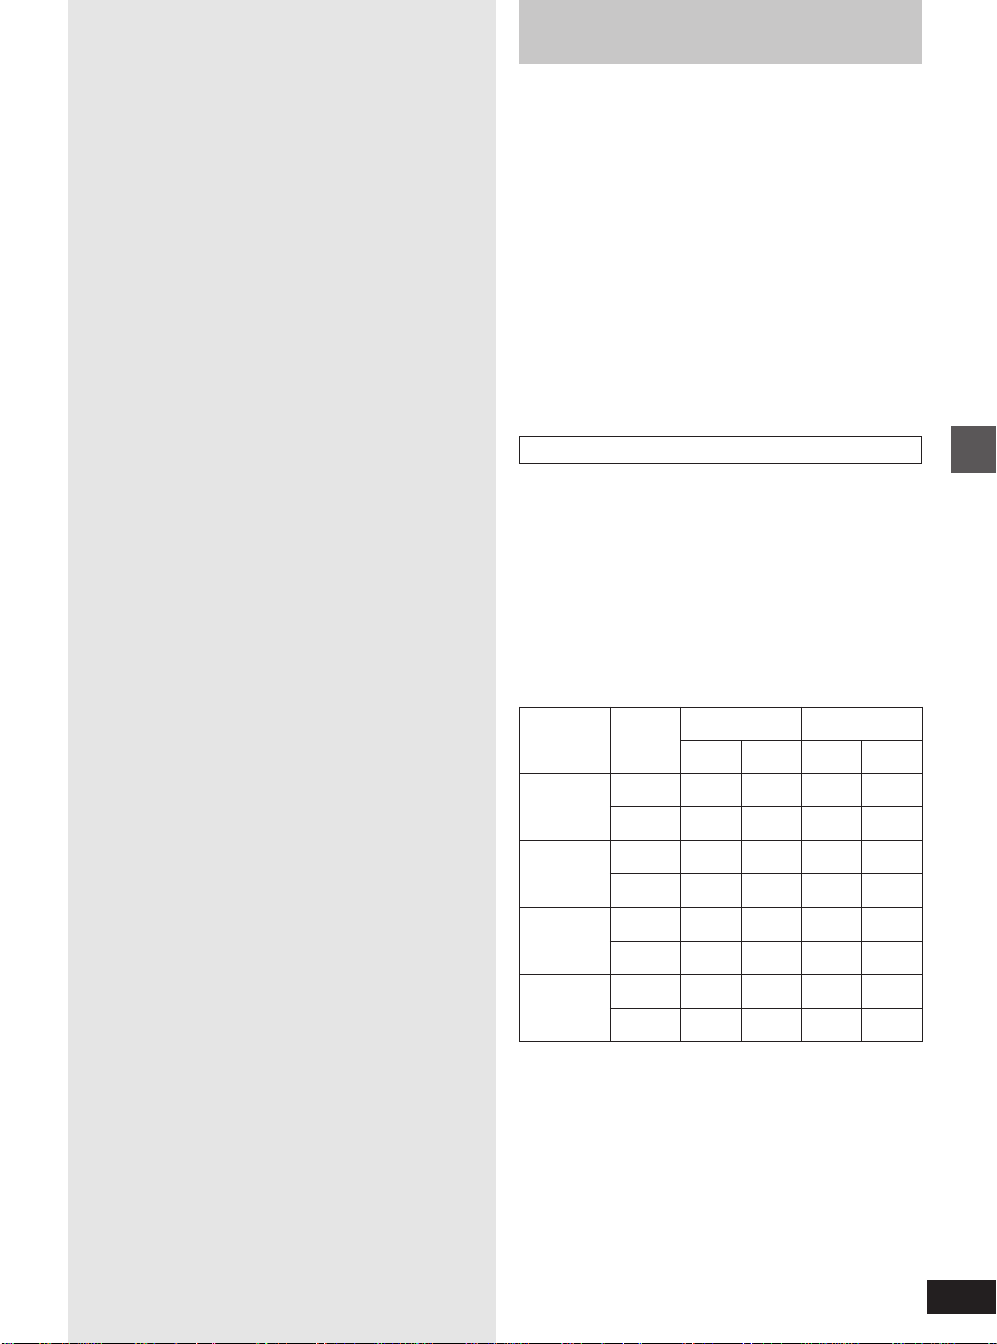
Convenient features
For your reference
●
You can also use the on-screen menu icons to change the audio
type.
●
You can change the audio for the images being played with simulta-
neous rec and play and Time Slip.
■ When you have connected the unit to other
equipment with an optical digital cable
You cannot change the audio type when you have used only an optical digital cable for connection in the following cases:
●
While playing stereo broadcasts recorded on DVD-RAM.
●
While playing MTS broadcasts recorded on DVD-RAM.
●
While playing something recorded from other equipment.
To change the audio type
●
Set “Dolby Digital” to “PCM” (➡ page 86).
Or
●
Connect to an amplifier with an audio/video cable and change the
input on the amplifier to suit the connection.
When using DVD-R
You cannot use [AUDIO] or the on-screen menu icons to change audio type while playing or recording with DVD-R.
●
While receiving SAP broadcasts
You can use the ACTION menus to select which audio type is
recorded, either “Main” or “SAP”. “Main” is the default setting
(➡ page 83, Audio—MTS Selection for DVD-R Disc).
●
During play
The audio type selected for recording is played. This is displayed as
“LR”.
■ Audio during television reception
Advanced operations
Television
broadcast
Stereo
+SAP
Mono
+SAP
Stereo
Mono
Setting
Main
SAP
Main
SAP
Main
SAP
Main
SAP
L
L
SAP
L+R
SAP
L
L
L+R
L+R
R
R
SAP
L+R
SAP
R
R
L+R
L+R
Audio recordedAudio output
L
L
SAP
L+R
SAP
L
L
L+R
L+R
R
R
SAP
L+R
SAP
R
R
L+R
L+R
35
RQT6035
Page 36
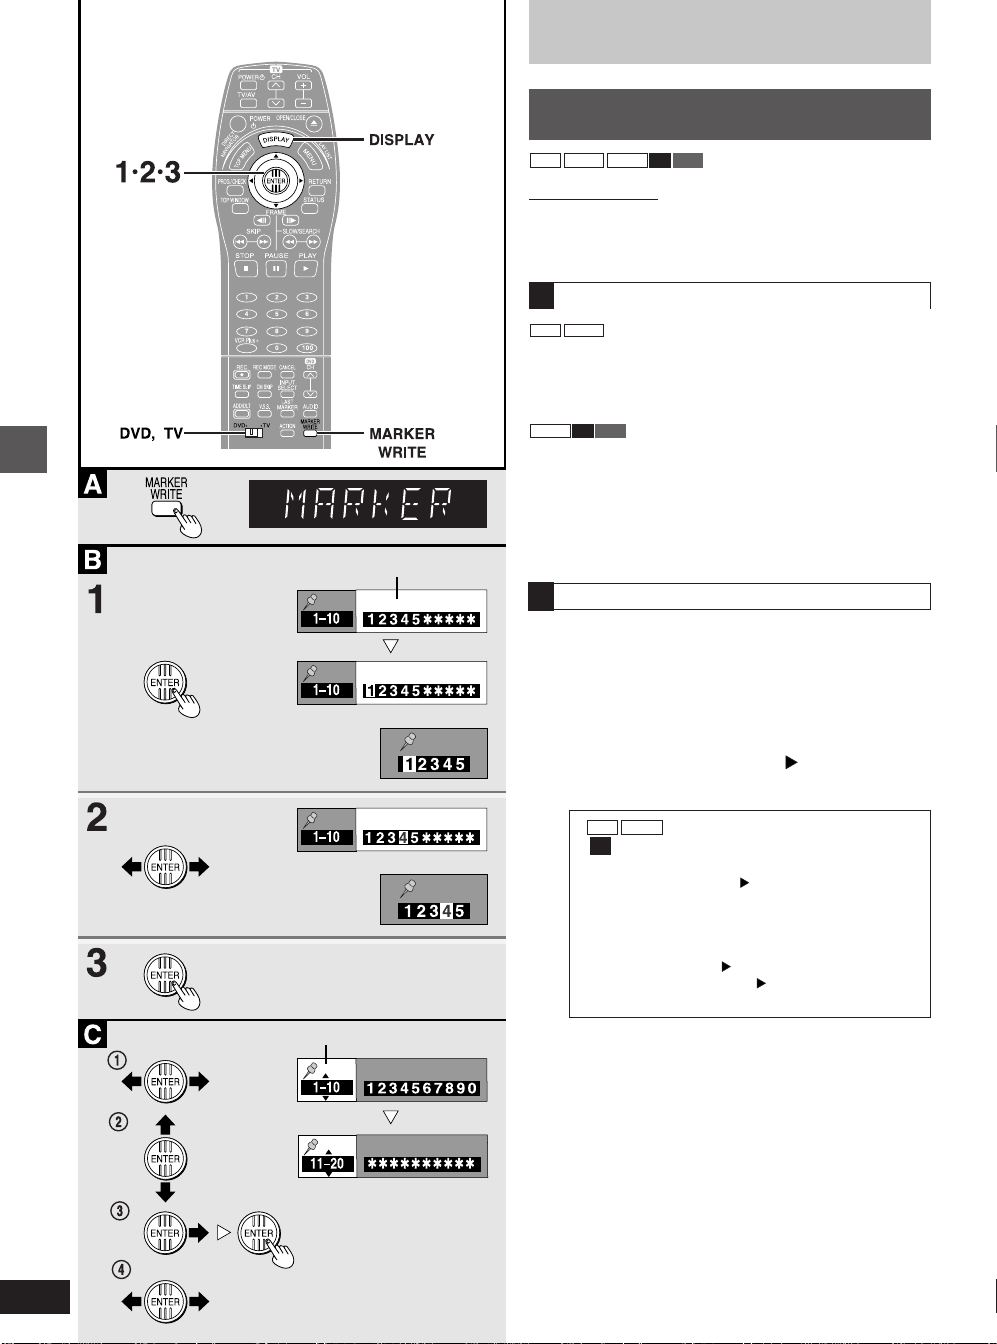
Advanced operations
Marker icon
Convenient features
Marking places to play again—
MARKER
RAM DVD-R DVD-V CD VCD
Remote control only
Preparation
Switch [DVD, TV] to “DVD”.
Marking places
A
RAM DVD-R
You can mark up to 999 points on a disc to return to later. These
marks are recorded directly onto DVD-RAM and DVD-R and remain
intact when the disc tray is opened. These marks are cleared when
you finalized DVD-R.
DVD-V CD VCD
You can mark up to 5 points on a disc to return to later. All the markers are cleared when the disc tray is opened.
During play
Press [MARKER WRITE] at the point you
want to mark.
To play from a marked position
B
Preparation
Press [DISPLAY] ➡ [DISPLAY] to display the on-screen menu icons
and use the joystick [√ ] to highlight the marker icon (➡ pages 40 and
42).
or
1 Press [ENTER].
You are now ready to recall markers.
2 Use the joystick [œ, ] to select a
marker number.
36
RQT6035
Marker pin icon
RAM DVD-R
or
C When selecting markers 11 and
above
! Use the joystick [œ, ] to highlight the marker
pin icon.
@ Use the joystick [▲, ▼] to select “11–20”.
You can select the next group of 10 when the current group is full.
# Use the joystick [ ] and press [ENTER].
$ Use the joystick [œ , ] to select a marker
number.
3 Press [ENTER].
Play starts from the marked position.
Page 37
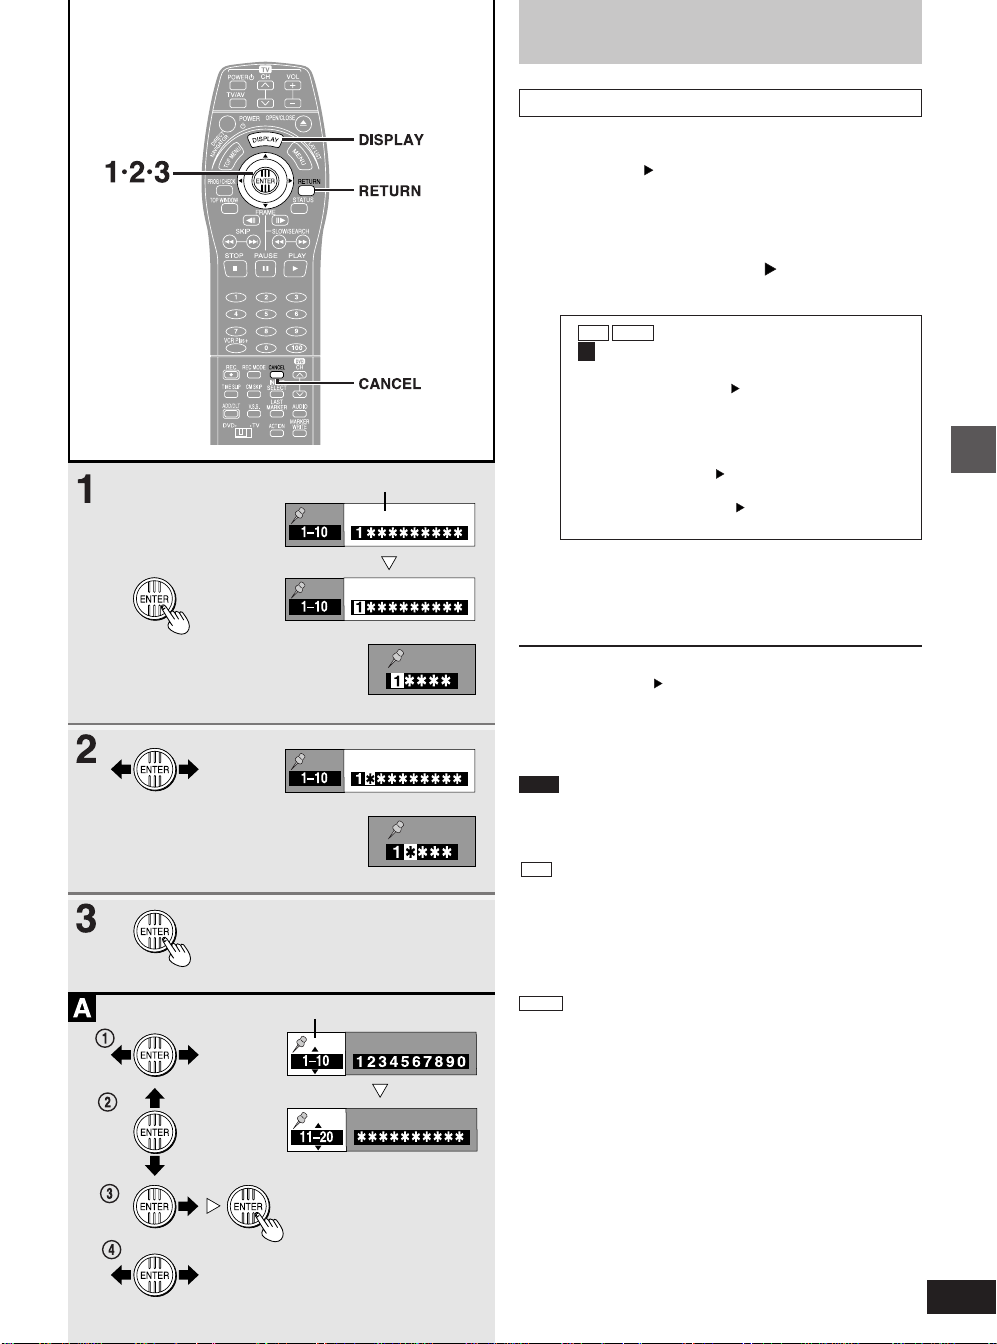
Marker icon
Marker pin icon
Convenient features
To mark points using the marker icon
Preparation
Press [DISPLAY] ➡ [DISPLAY] to display the on-screen menu icons
and use the joystick [ ] to highlight the marker icon (➡ pages 40 and
42).
1 Press [ENTER].
You are now ready to mark positions.
2 Use the joystick [œ, ] to select the
next asterisk (✳).
RAM DVD-R
A When marking positions 11 and
above
! Use the joystick [œ, ] to highlight the marker
pin icon.
@ Use the joystick [▲, ▼] to select “11–20”.
You can select the next group of 10 when the current group is full.
# Use the joystick [ ] and press [ENTER].
The first marker is selected.
$ Use the joystick [œ, ] to select an available
asterisk (✳).
3 Press [ENTER] at the point you want
to mark.
Repeat steps 2 and 3 to add other markers.
or
■ To clear a marker
œœ
Use the joystick [
[CANCEL].
œ,
] to select a marker number and press
œœ
■ To clear the on-screen icons
Press [RETURN] several times.
Note
●
or
This feature only works if the elapsed playing time of the disc is
shown on the unit’s display.
●
Some subtitles recorded around the marker may fail to appear.
RAM
●
This feature doesn’t work while using a play list.
●
The markers are ordered by time. This means that the marker num-
bers can change when you add and erase markers.
●
You cannot mark and clear points if you have write-protected the
disc, either with DISC SETTING (➡ page 52) or with the writeprotect tab (➡ page 99).
DVD-R
●
The markers are ordered by time. This means that the marker num-
bers can change when you add and erase numbers.
Advanced operations
37
RQT6035
Page 38
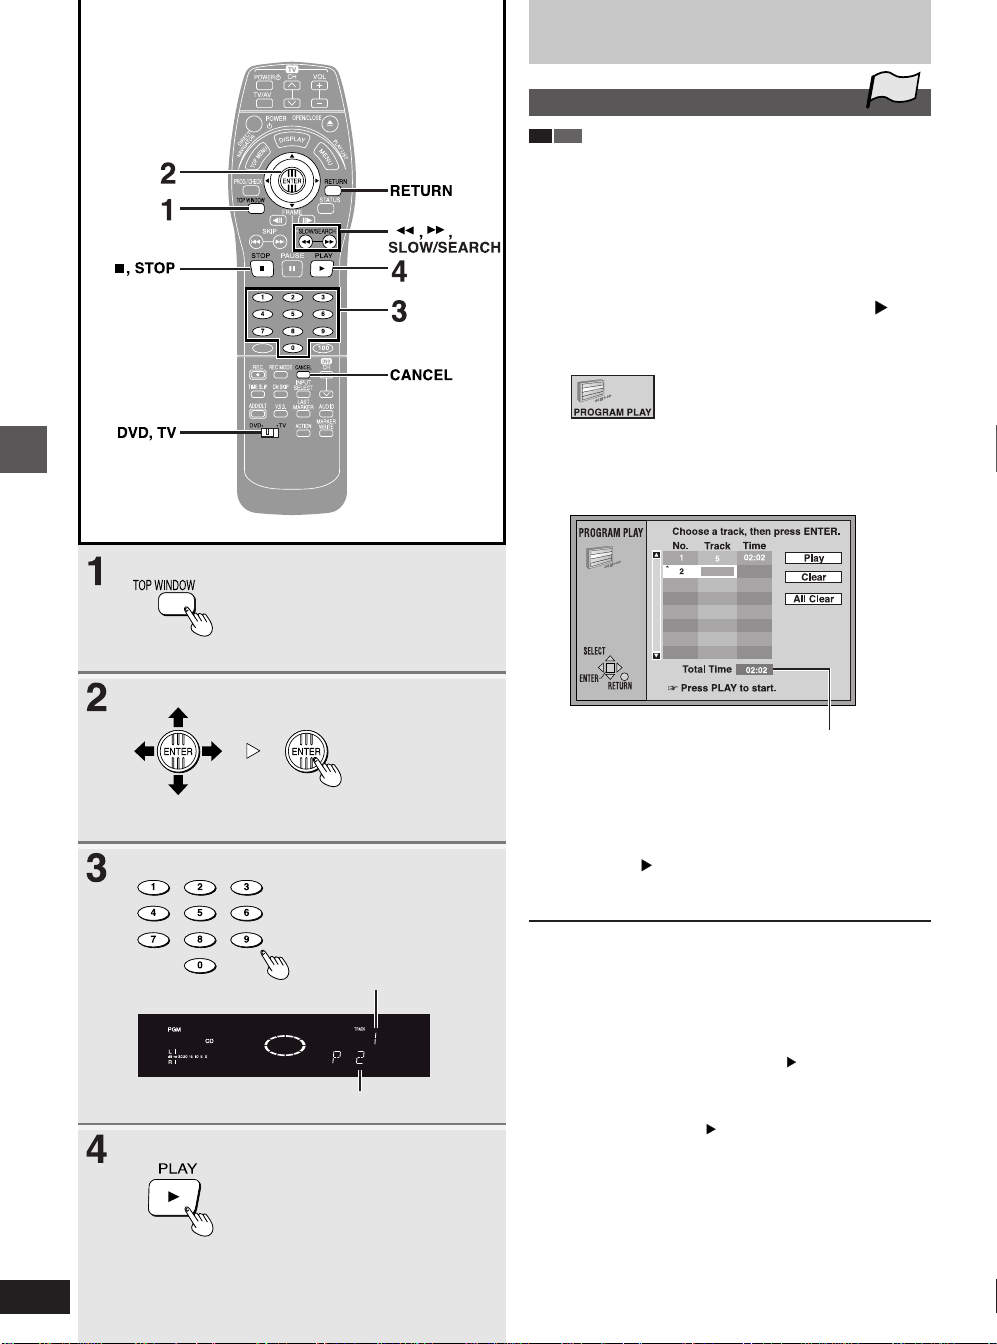
Convenient features
Advanced operations
Program play
CD VCD
You can select up to 100 tracks to play in the order you choose.
Preparation
Switch [DVD, TV] to “DVD”.
TOP
1 While stopped
Press [TOP WINDOW].
2 Use the joystick [▲, ▼, œ, ] to
select “PROGRAM PLAY” and press
[ENTER].
3 Press the numbered buttons to select
the track.
Example: “5”: [0] ➡ [5]
Example: “15”: [1] ➡ [5]
38
RQT6035
Track number
Program number
Total time of the program
Repeat step 3 to select other tracks.
●
You can also use the joystick to select tracks.
! Press [ENTER], then use the joystick [▲, ▼] to select the
track.
@ Press [ENTER].
4 Press [ , PLAY].
Play starts in the programmed sequence.
■ To move to the page before or after the one
shown
Press [î, SLOW/SEARCH] or [ï, SLOW/SEARCH].
■ To clear the programmed tracks one by one
1. Use the joystick [▲, ▼] to select the track you want to clear.
2. Press [CANCEL].
Alternatively, use the joystick [▲, ▼,
press [ENTER].
■ To clear the whole program
Use the joystick [▲, ▼,
[ENTER].
●
The whole program is also cleared when you turn the unit off or
open the disc tray.
œœ
œ,
œœ
■ To exit the program mode
1. Press [■ , STOP] during play until the program play screen is
displayed.
2. Press [TOP WINDOW] or [RETURN].
œœ
œ,
] to select “Clear” and
œœ
] to select “All Clear” and press
Page 39
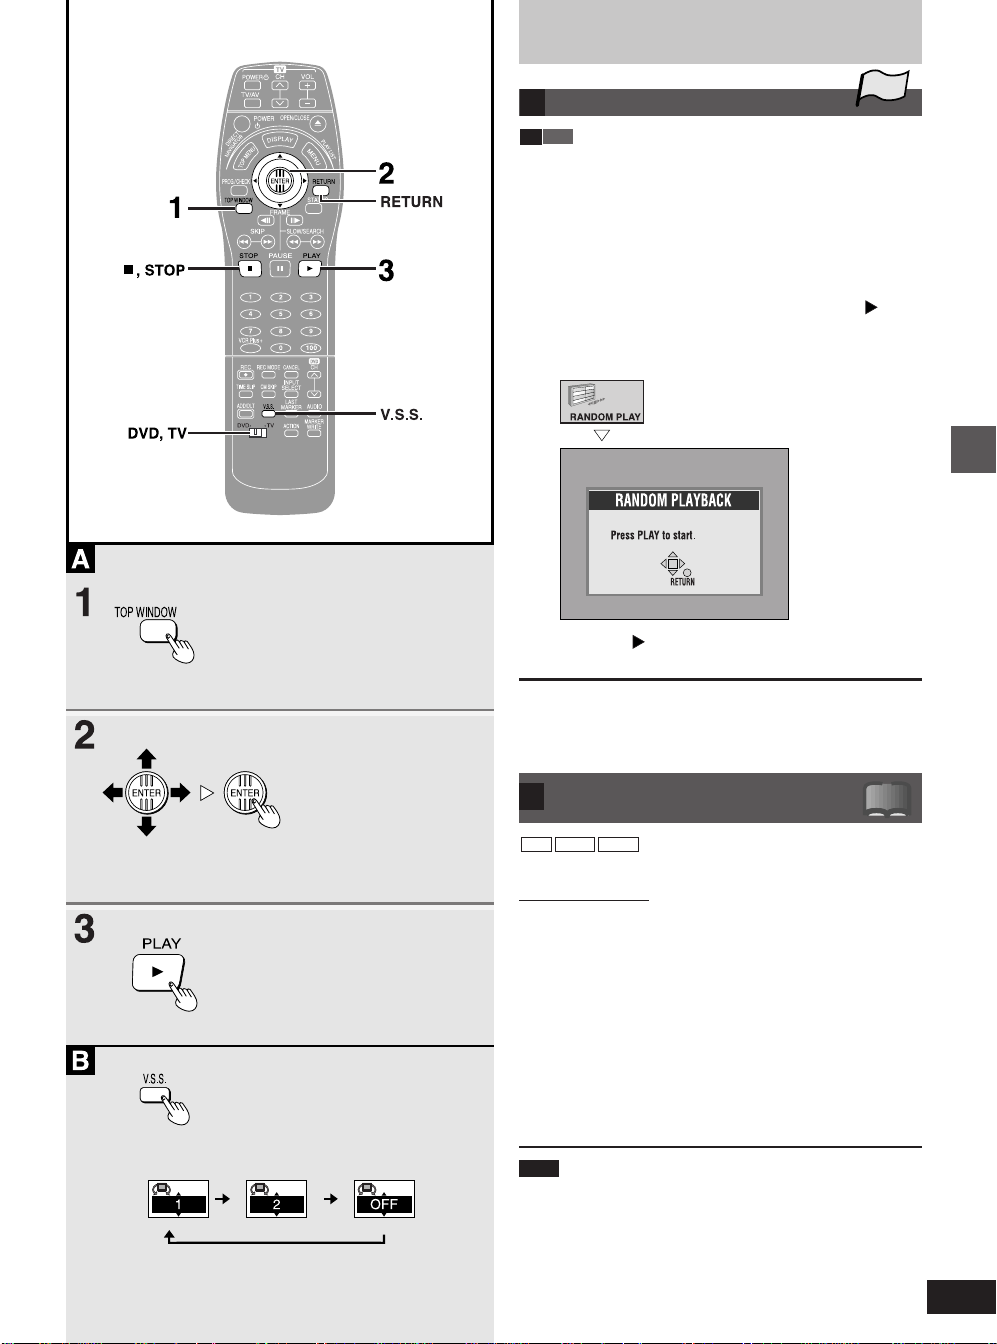
Convenient features
Random play
A
CD VCD
The unit plays the tracks on a disc in random order.
Preparation
Switch [DVD, TV] to “DVD”.
TOP
1 While stopped
Press [TOP WINDOW].
2 Use the joystick [▲, ▼, œ, ] to
select “RANDOM PLAY” and press
[ENTER].
When you press [ENTER]
3 Press [ , PLAY].
Advanced operations
Natural effect Emphasized effect Off
■ To cancel random play
1. Press [■ , STOP] until the random play screen appears.
2. Press [TOP WINDOW] or [RETURN].
Enjoying virtual surround
B
sound effects (V.S.S.)
RAM DVD-R DVD-V
(Only with Dolby Digital with 2 or more channels)
Remote control only
Enjoy a surround-like effect if you are using two front speakers only.
The effect is broadened and sound seems to come from virtual
speakers on either side if the disc has surround signals recorded on
it.
Preparation
●
Switch [DVD, TV] to “DVD”.
●
Turn off the surround effects on the other equipment.
During play
!?
Press [V.S.S.].
The mode changes as illustrated each time you press the button.
Note
●
V.S.S. will not work, or will have less effect, with some discs, even if
you select “1” or “2”.
●
Turn V.S.S. off if it causes distortion.
39
RQT6035
Page 40
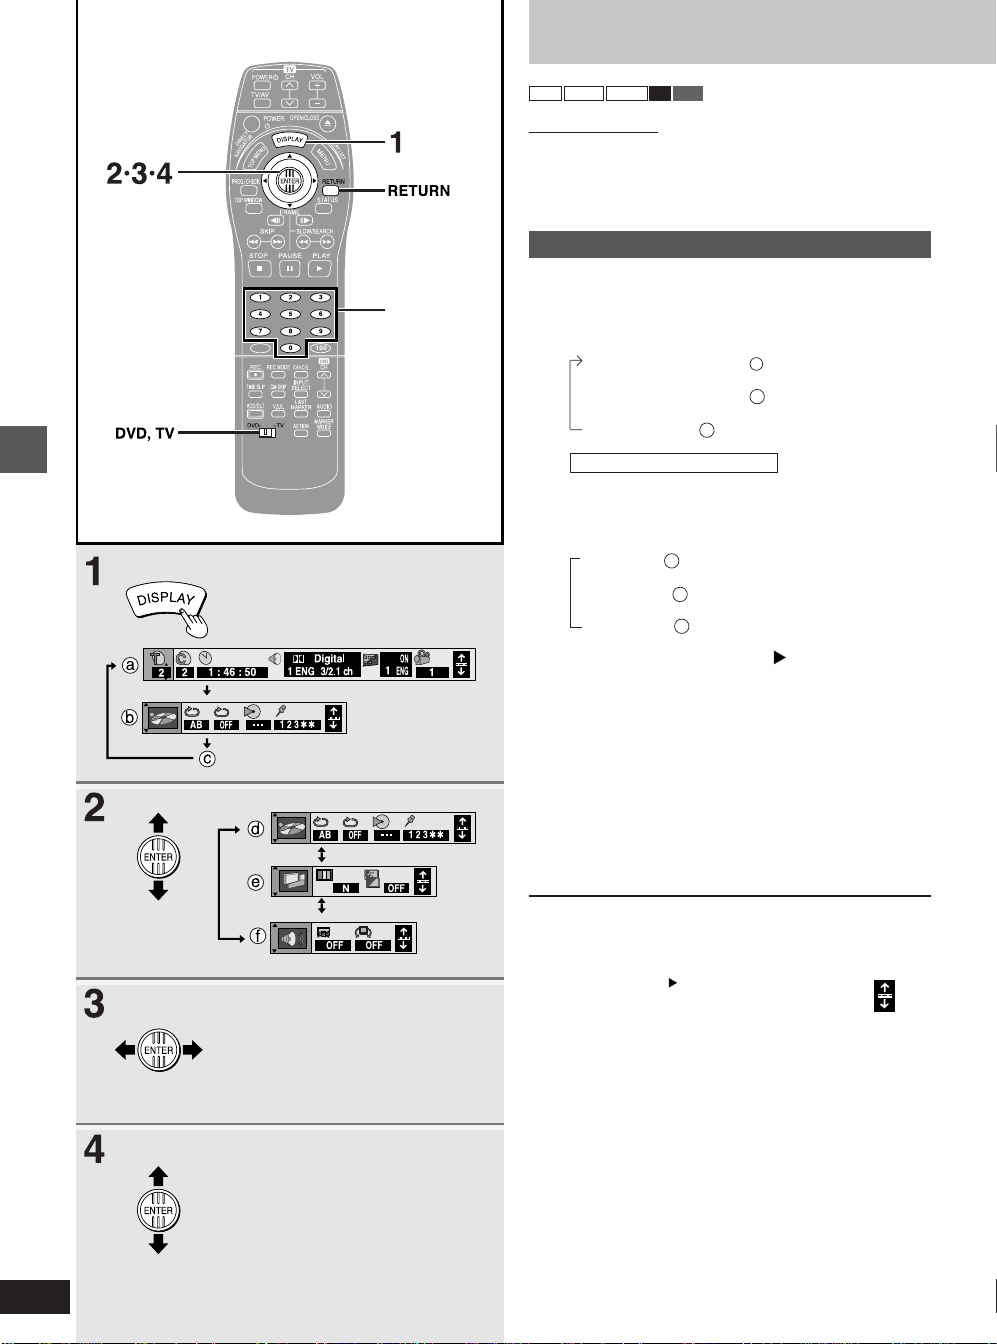
Advanced operations
e.g.: DVD-Video
Numbered
buttons
Using on-screen menu icons
RAM DVD-R DVD-V CD VCD
Remote control only
On-Screen Menu Icons are menus that contain information about the
disc or unit. These menus allow you to perform operations by changing this information.
Common procedures
Preparation
Switch [DVD, TV] to “DVD”.
1 Press [DISPLAY].
Each time you press the button:
Icons for disc information ( a )
↓
>Icons for unit information ( b )
↓
Original display ( c )
2 Icons for unit information only
While the leftmost icon is highlighted
Use the joystick [▲, ▼] to select the
menu.
Each time you move the joystick:
Play menu ( d )
↓↑
>Video menu ( e )
↓↑
Audio menu ( f )
3 Use the joystick [œ, ] to select the
item.
4 Use the joystick [▲, ▼] to select the
setting.
●
Press [ENTER] if the setting does not change after moving
the joystick [▲, ▼].
●
The numbered buttons can also be used (➡ page 8) to
change some items that use numbers (title and track numbers, for example).
●
Some items require different operations. Read the explana-
tions on the following pages.
40
RQT6035
■ To clear the icons
Press [RETURN] until the menus disappear.
■ To change the position of the icons
1. Use the joystick [œ, ] to select the rightmost icon.
2. Use the joystick [▲, ▼] to move the icons.
There are 5 positions to choose from.
For your reference
●
The screens depend on the disc contents.
●
Depending on the condition of the unit (playing, stopped, etc.) and
disc contents, there are some items that you cannot select or
change.
Page 41
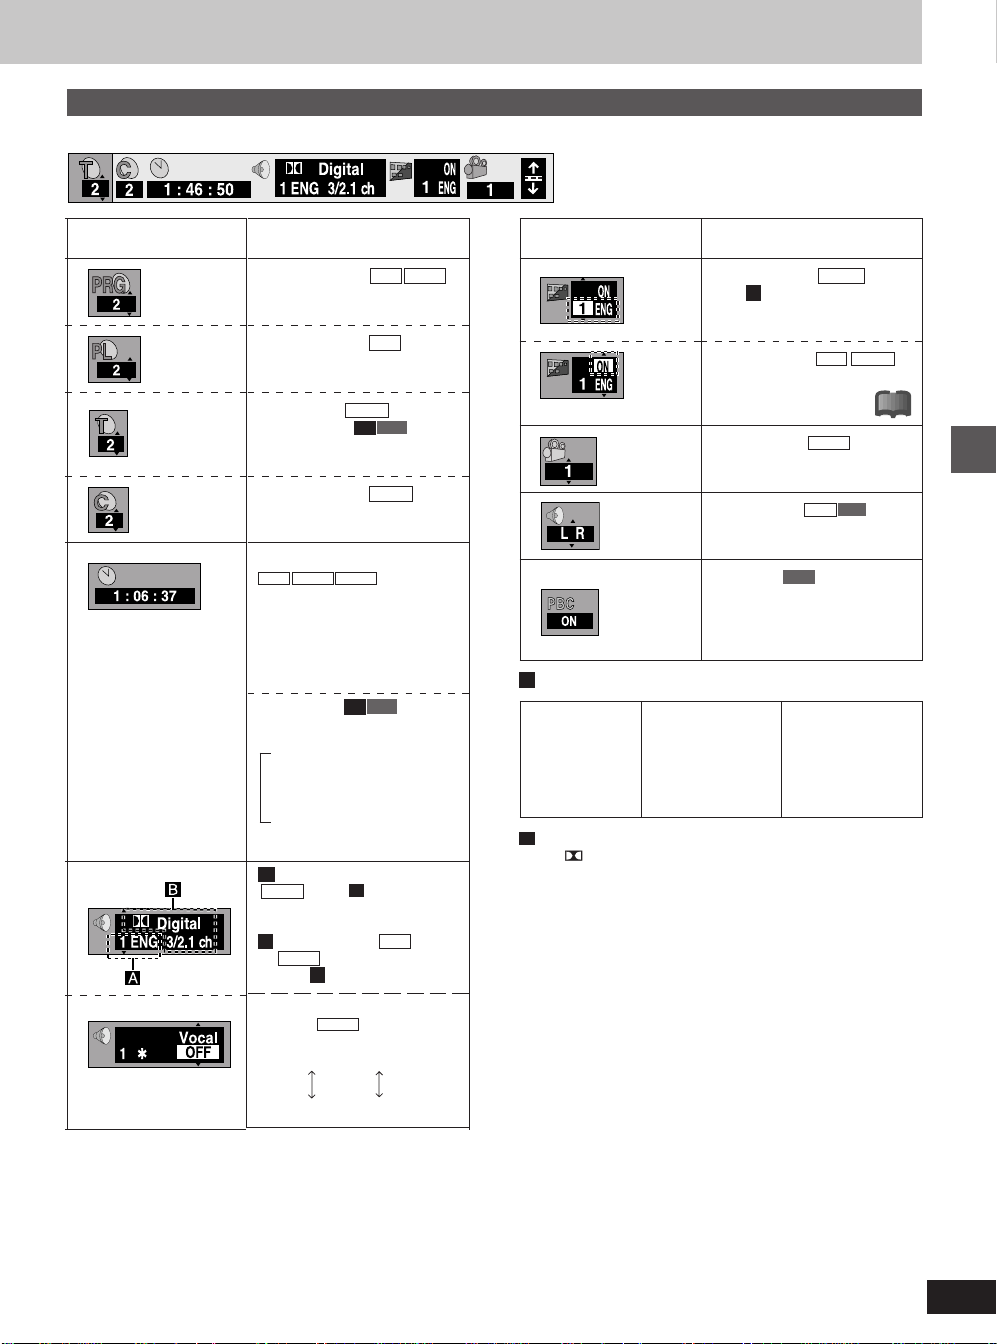
Icons for disc information
e.g. DVD-Video
Icon Content
Program number RAM DVD-R
Select the number and press
[ENTER].
Play list number
Select the number and press
[ENTER].
Title number
Track number CD VCD
Select the number and press
[ENTER].
Chapter number
Select the number and press
[ENTER].
Elapsed play time
RAM DVD-R DVD-V
Press the numbered buttons to
select a time to play from.
For example, to start play from
1 hour, 6 minutes and 37 seconds
Press [1]–[0]–[6]–[3]–[7], then
[ENTER].
Time display
Use the joystick [▲, ▼] to change
the information displayed.
Track elapsed time
↓↑
>Track remaining time
↓↑
Disc remaining time
A Soundtrack language
DVD-V (See A at right.)
Change the number to select a
soundtrack.
B Audio attribute RAM
DVD-V
(See B at right.)
Karaoke vocals, on and off
(Karaoke
Solo: ON ↔ OFF
Duet: OFF ↔ V1+V2
V2 ↔ V1
RAM
DVD-V
DVD-V
CD VCD
DVD-V only)
Icon
Content
Subtitle number DVD-V
(See A below.)
Change the number to select a
subtitle language.
Subtitles on/off
RAM DVD-V
Turn the subtitles on or off.
!?
Angle number DVD-V
Change the number to select an
angle.
Audio channel
Select the audio channel
(➡ page 34).
Menu play
(with playback control only)
Indicates whether menu play
(playback control) is on or off.
Cannot be changed here.
A Soundtrack/Subtitle language
ENG: English
FRA: French
DEU: German
ITA: Italian
ESP: Spanish
NLD: Dutch
B Audio attributes
SVE: Swedish
NOR: Norwegian
DAN: Danish
POR: Portuguese
RUS: Russian
JPN: Japanese
LPCM/ Digital/DTS/MPEG: Signal type
k (kHz): Sampling frequency
b (bit): Number of bits
ch (channel): Number of channels (➡ page 96)
For your reference
●
You can only select subtitles, soundtracks, and angles if they are
recorded on the disc.
●
Some discs allow changes to soundtracks, subtitles, and angles
only by using the disc’s menus.
●
Soundtrack and subtitle languages can be set before play
(➡ page 82, ACTION—Disc—Audio and Subtitle).
●
If the subtitles overlap closed captions recorded on discs, turn the
subtitles off.
RAM VCD
VCD
CHI: Chinese
KOR: Korean
MAL: Malay
VIE: Vietnamese
THA: Thai
✳: Others
Advanced operations
41
RQT6035
Page 42
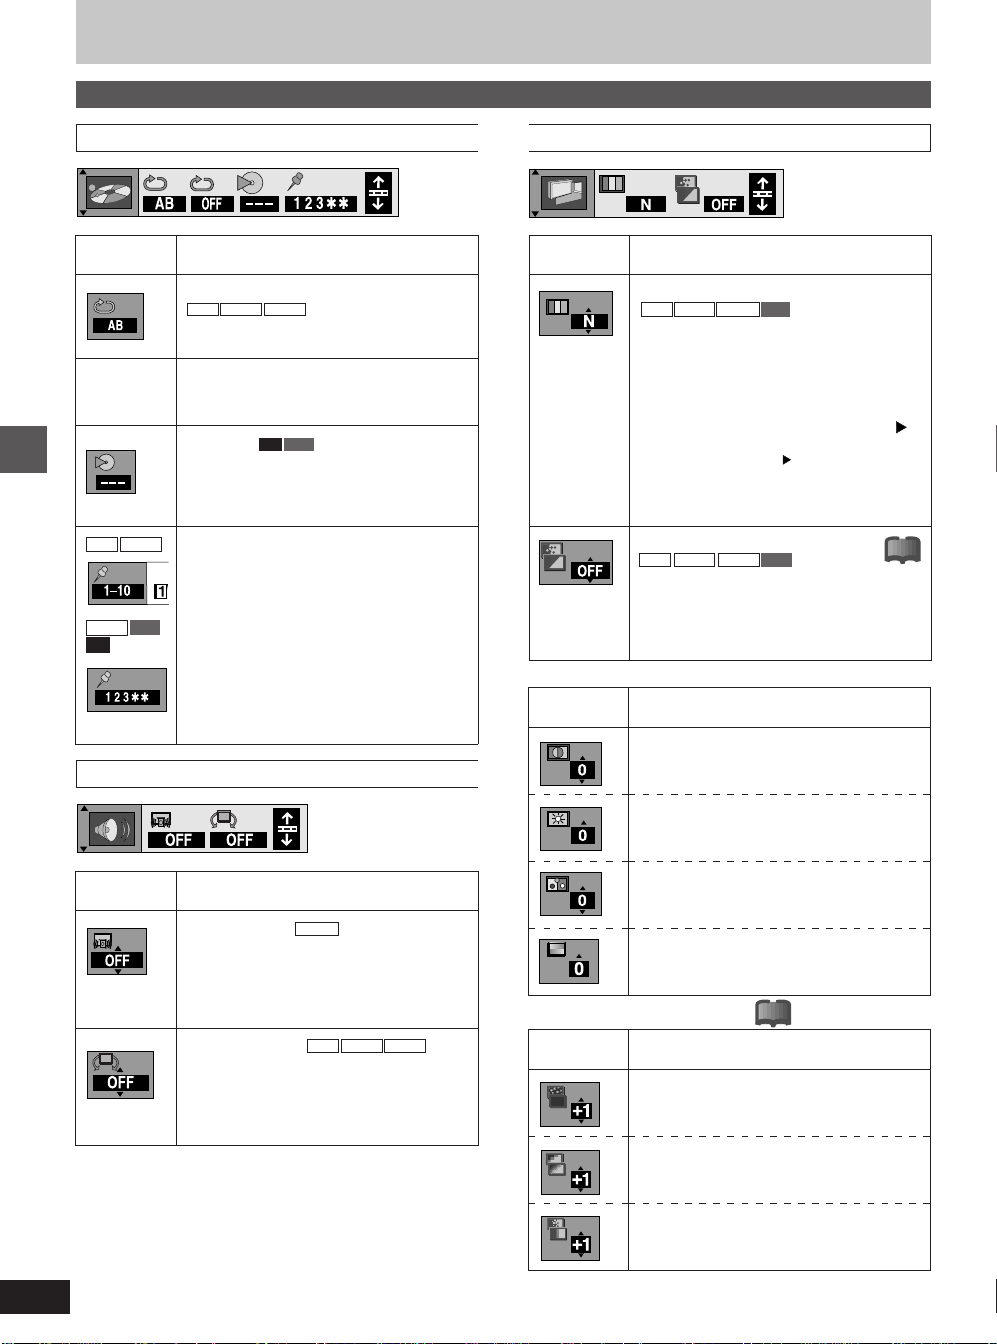
Using on-screen menu icons
Icons for unit information
Play menu
Icon
A-B repeat (➡ page 33)
RAM DVD-R DVD-V
You can repeat a section between points A and
B within a program, title or chapter.
Repeat play (➡ page 33)
You can play a program, play list, chapter, title,
or track repeatedly.
Play mode
Cannot be changed here.
---: Normal play
PGM: program play (➡ page 38)
RND: random play (➡ page 39)
RAM DVD-R
DVD-V VCD
CD
Advanced operations
Marker
You can mark points on a disc to return to later
(➡ page 36).
Content
CD VCD
Video menu
Icon Content
Digital picture mode
RAM DVD-R DVD-V VCD
To select the picture mode during play: [▲, ▼]
N: Normal mode
C: Cinema mode (mellows movie, enhances
detail in dark scenes.)
U1/U2: User mode
To change the user mode
Select User mode and move the joystick [ ].
1.
2. Use the joystick [▲, ▼] to select U1 or U2.
3. Use the joystick [œ, ] to select the item
you want to change.
4. Use the joystick [▲
setting.
MPEG DNR
RAM DVD-R DVD-V VCD
(Displayed when the picture mode is N or C.)
You can turn on and off the recommended
settings for 3D NR, block NR, and mosquito
NR.
ON ↔ OFF
■ U1: Common picture adjustment
Icon Content
,
▼] to change the
!?
42
RQT6035
Audio menu
Icon Content
Dialog Enhancer DVD-V
(Dolby Digital, 3-channel or over only, including
a center channel)
The volume of the center channel is raised to
make dialog easier to hear.
ON ↔ OFF
V.S.S. (➡ page 39)
Enjoy a surround-like effect if you are using
two front speakers only. The effect is
broadened and sound seems to come from
virtual speakers on either side if the disc has
surround signals recorded on it.
RAM DVD-R DVD-V
Contrast (-7 to +7)
Increases the contrast between light and dark
parts of the picture.
Brightness (0 to +15)
Brightens the picture.
Color (-7 to +7)
Adjusts the shade of the picture’s color.
Gamma (0 to +5)
Increases the brightness of the center ranges
to improve detail and contrast in dark scenes.
■ U2: Reducing picture noise
Icon Content
3D NR (0 to +4)
Reduces overall noise.
Block NR (0 to +3)
Smoothes block noise.
Mosquito NR (0 to +3)
Reduces the smudging that appears around
contrasting sections of the picture.
!?
Page 43
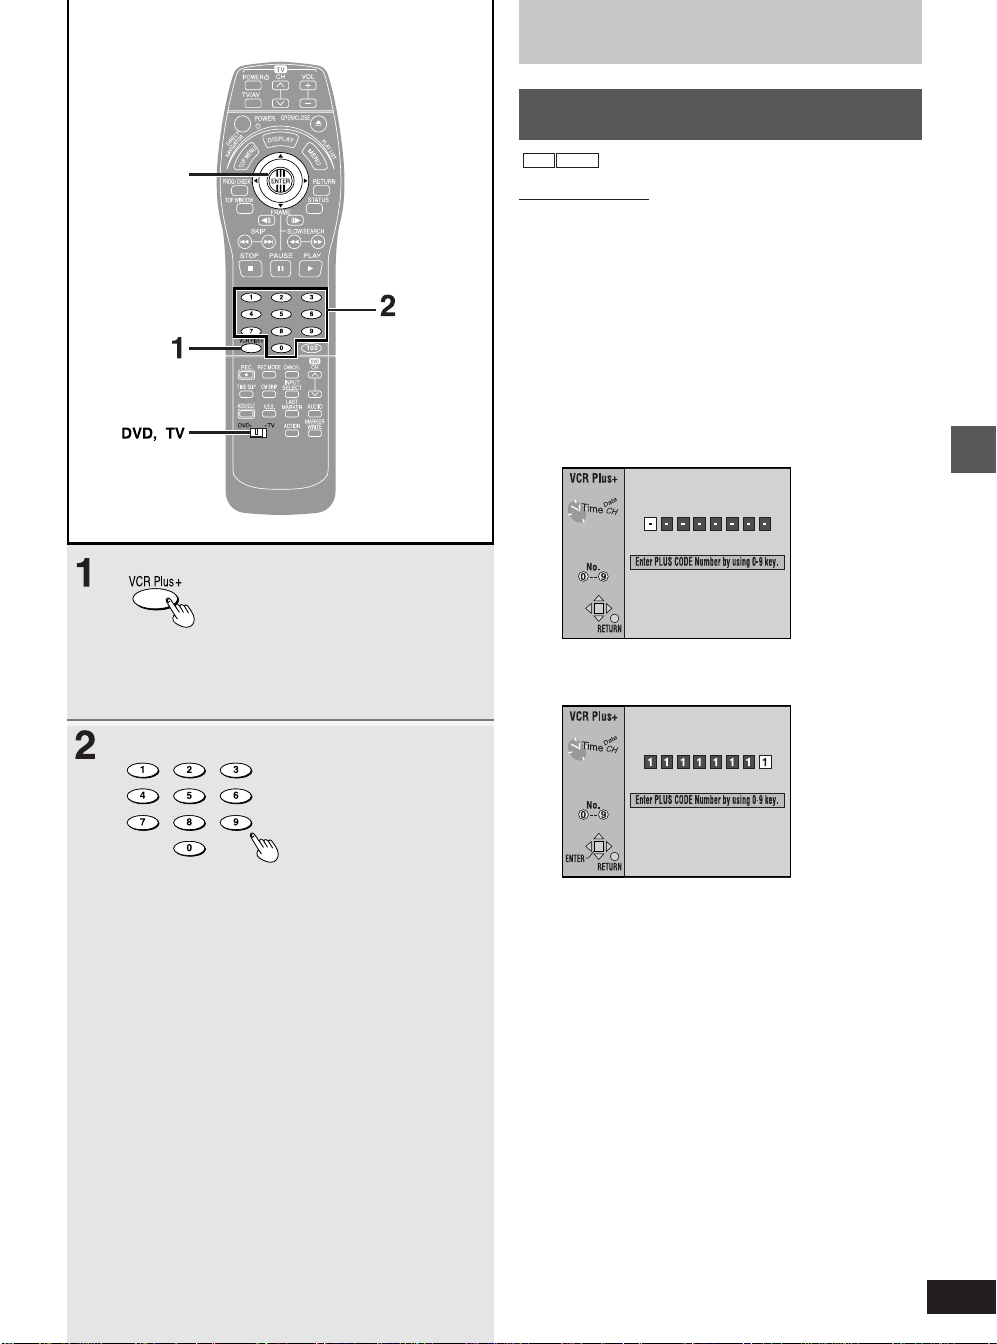
Joystick
Timer recording
Using VCR Plus+ codes to make
timer recording
RAM DVD-R
Remote control only
Entering VCR Plus+ codes is an easy way of programming the
timer for recording. You can find these codes in television sections of
newspapers and in television guides. You can enter up to
16 programs up to a month in advance. Each daily or weekly program is counted as one program.
Preparation
●
Switch [DVD, TV] to “DVD”.
●
Ensure that this unit’s clock and guide channels (➡ page 19) are set
correctly.
●
Insert a disc for recording (make sure there is enough room for the
program you are going to record plus a little extra).
1 Press [VCR Plus+].
2 Press the numbered buttons to enter
the VCR Plus+ code.
If you enter the wrong digit, use the joystick [œ] to move back
and enter the correct digit.
(Continued on next page)
Advanced operations
43
RQT6035
Page 44
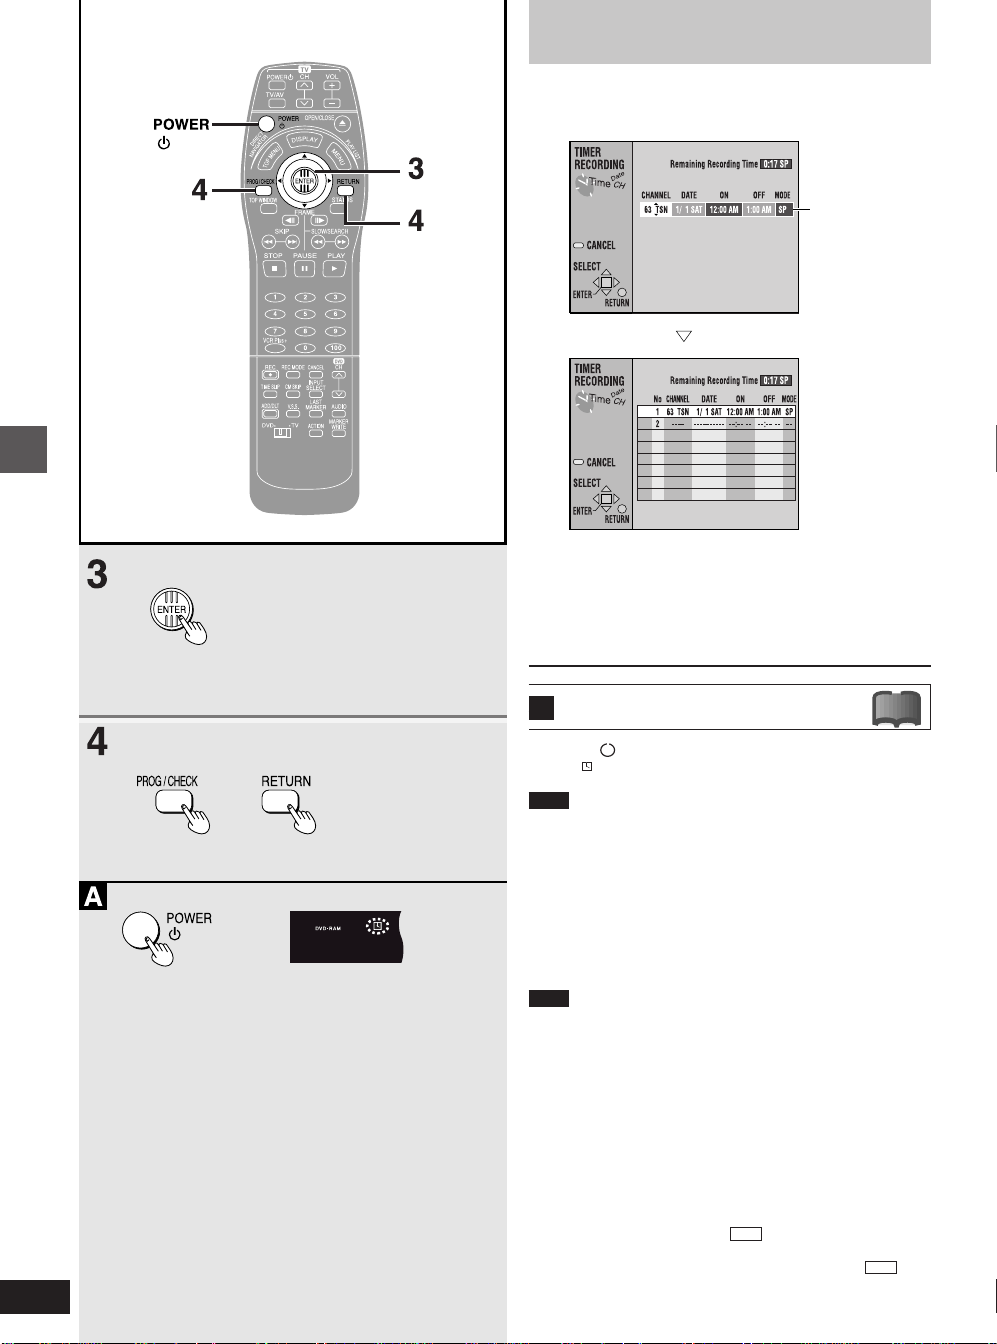
Advanced operations
Timer recording
3 Press [ENTER].
The timer recording setting screen appears which allows you
to confirm the program and make corrections if necessary.
The mode shown
on the unit’s
display is selected.
If the current mode
is XP, it switches to
FR to record the
best possible
picture quality.
To change the
mode ➡ page 45
After 14 seconds or
when you press [ENTER]
The timer
recording list
appears.
Repeat steps 1–3 to program other recordings.
4 Press [PROG/CHECK] or [RETURN].
The timer recording list disappears and the message “TURN
RECORDER OFF FOR TIMER RECORDING” is shown on
the television.
44
RQT6035
To put the unit on timer recording
A
standby
!?
Press [ , POWER].
Ensure “ ” lights on the unit’s display.
or
Note
If the disc is protected or full, the unit switches to standby but does
not go to timer recording standby. Check the disc carefully.
■ Flexible recording mode (FR)
●
The unit automatically selects a recording rate between “XP” and
“EP” that will enable the recording to fit in the available recording
time on the disc with the best possible recording quality.
●
You can use the mode only with timer recording.
●
It may not be possible to record to the finish of the program if the
remaining time doesn’t allow.
Note
●
The built-in clock employs 12-hour system.
●
The actual time recorded may be longer than the program itself
when television programs are recorded using VCR Plus+.
●
“Invalid Entry” is displayed when you enter the wrong code. Reenter
the code.
●
“All timer programs are occupied.” is displayed if there are already
16 items programmed. Clear unnecessary items (➡ page 47).
●
The remaining time displayed is calculated based on the current
recording mode.
●
Approximately 30 seconds at the beginning of subsequent programs is not recorded when you use timer recording to record multiple programs to a DVD-R.
●
Recording is not possible unless you set “Disc Protection” in “DISC
SETTING” to “Off” (➡ page 53).
●
You can not record to a disc if the disc is protected with the writeprotect tab. Release this before operation (➡ page 99).
●
Timer recording may not work as set when summer time switches
to winter time and vice versa (➡ page 88).
RAM
RAM
Page 45
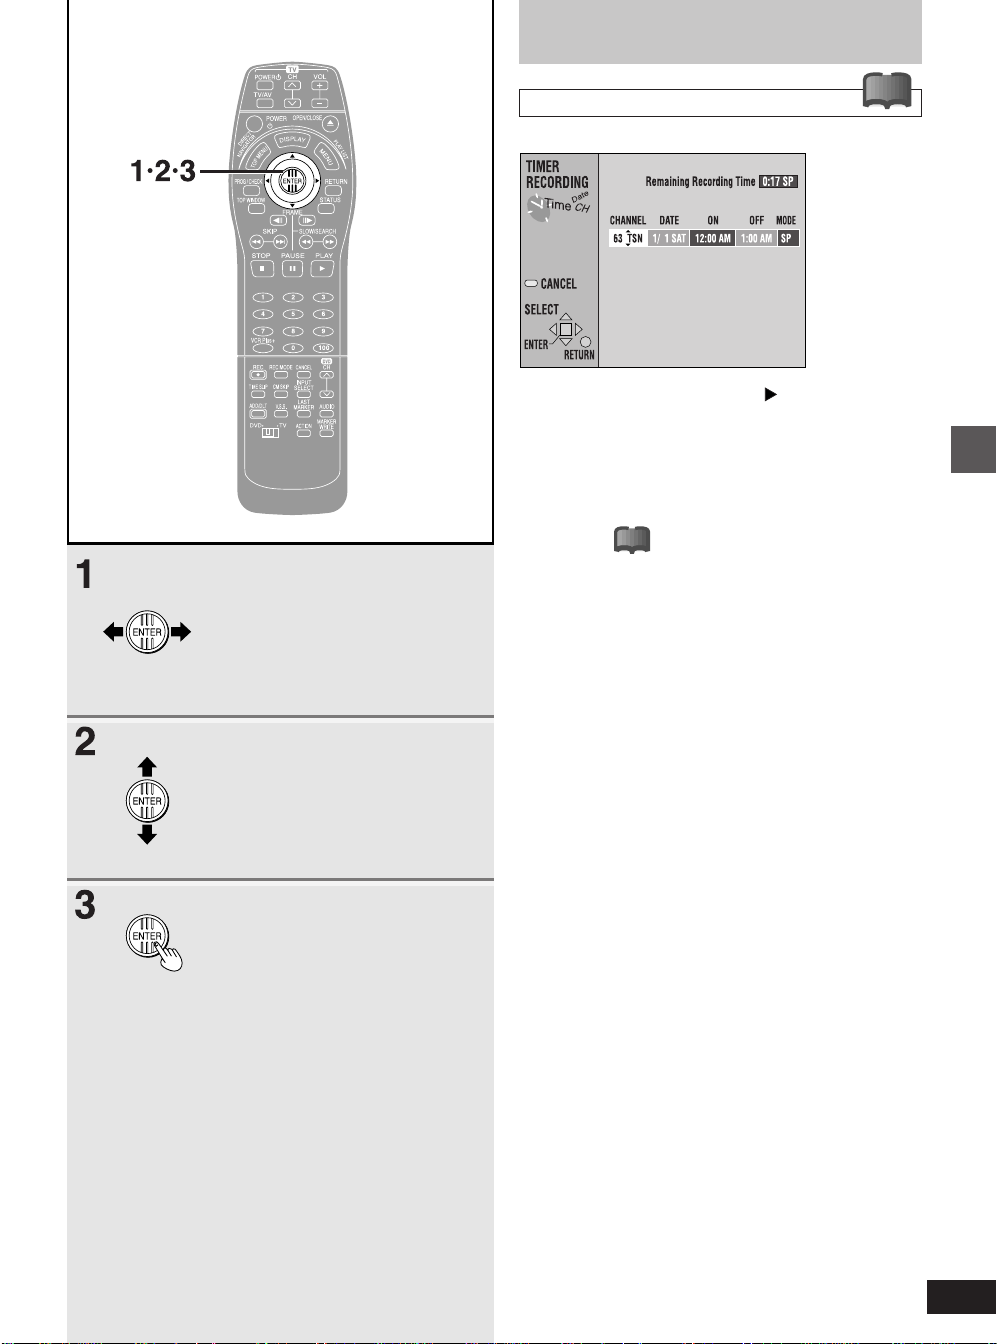
Timer recording
To change the timer recording program
Timer recording setting screen (from step 3 on page 44)
!?
1 Use the joystick [œ, ] to select the
item you want to change.
2 Use the joystick [▲, ▼] to change the
setting.
The items change as follows:
●
CHANNEL (Channel number and caption)
●
●
●
!?
DATE
Current date---➝the day before one month later➝
DAILY SUN-SAT➝DAILY MON-SAT➝DAILY MON-FRI➝
WEEKLY SUN---➝WEEKLY SAT
ON (Start time)/OFF (Finish time)
The time increases or decreases in 30-minute increments if
you hold the button.
MODE (Recording mode)
SP➝XP➝FR➝EP➝LP
(SP, XP, EP and LP ➡ page 26, FR ➡ page 44)
3 Press [ENTER] when you have
finished making changes.
The timer recording list appears.
Advanced operations
45
RQT6035
Page 46
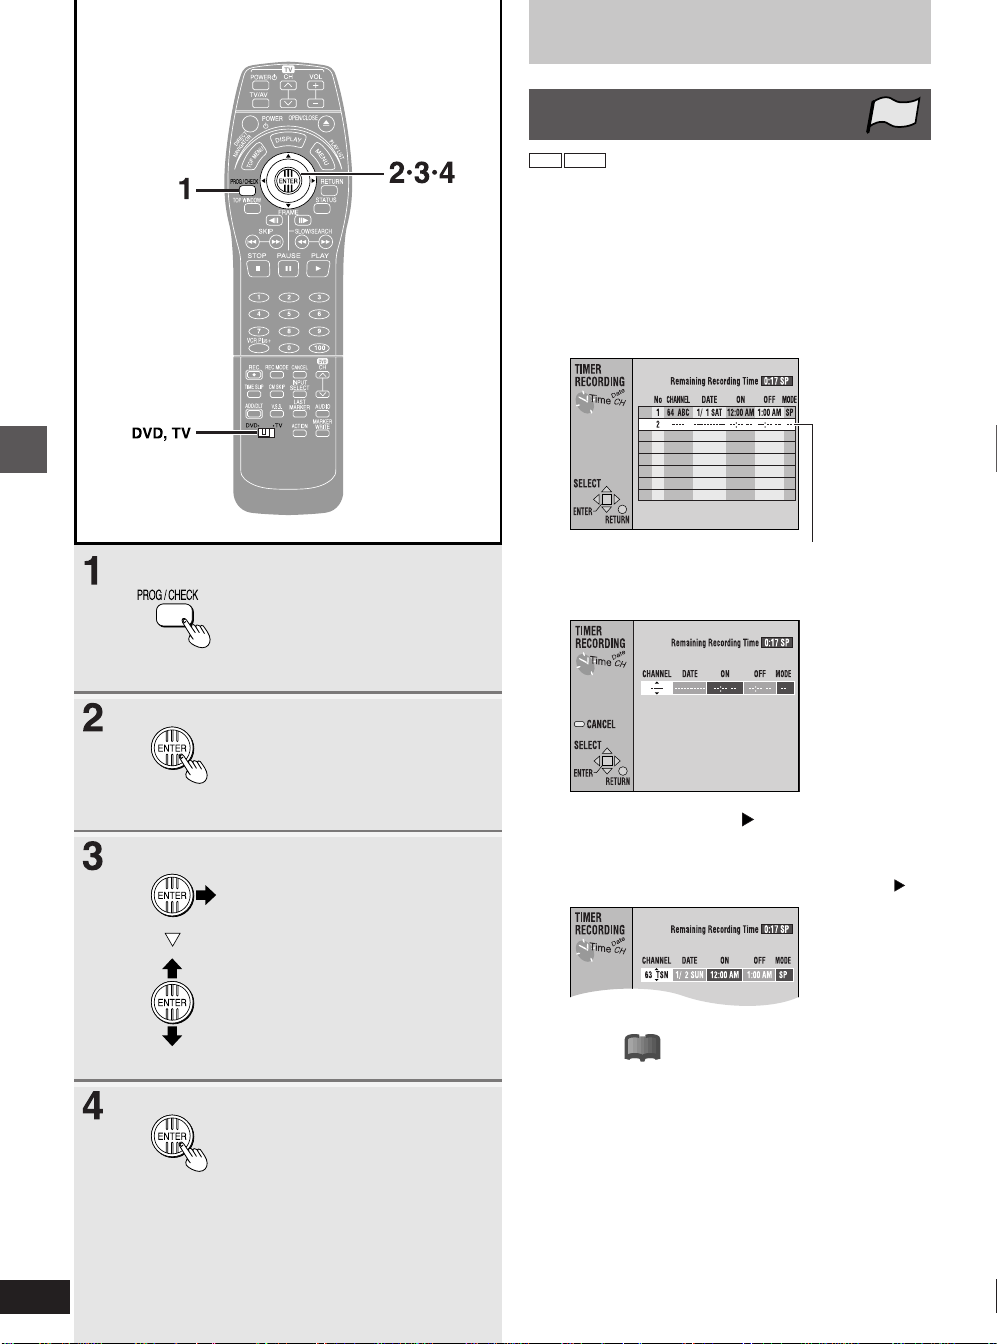
Timer recording
Advanced operations
Manually programming the
unit to make timer recording
RAM DVD-R
You can set your own programming conditions (up to 16 programs).
Preparation
●
Switch [DVD, TV] to “DVD”.
●
Ensure that this unit’s clock is set correctly.
●
Insert a disc for recording (make sure there is enough room for the
program you are going to record plus a little extra).
TOP
1 Press [PROG/CHECK].
The timer recording list appears.
A line that is ready for programming is highlighted.
2 Press [ENTER].
The timer recording setting screen appears.
46
RQT6035
3 Use the joystick [ ] to move through
the items and change the items with
the joystick [▲, ▼].
●
The current settings are shown each time you press [ ].
●
CHANNEL (Channel number and caption)
●
●
●
!?
DATE
Current date---➝the day before one month later➝
DAILY SUN-SAT➝DAILY MON-SAT➝DAILY MON-FRI➝
WEEKLY SUN---➝WEEKLY SAT
ON (Start time)/OFF (Finish time)
The time increases or decreases in 30-minute increments if
you hold the button.
MODE (Recording mode)
SP➝XP➝FR➝EP➝LP
(SP, XP, EP and LP ➡ page 26, FR ➡ page 47)
4 Press [ENTER] when you have
finished programming the timer.
The timer recording list reappears.
Page 47
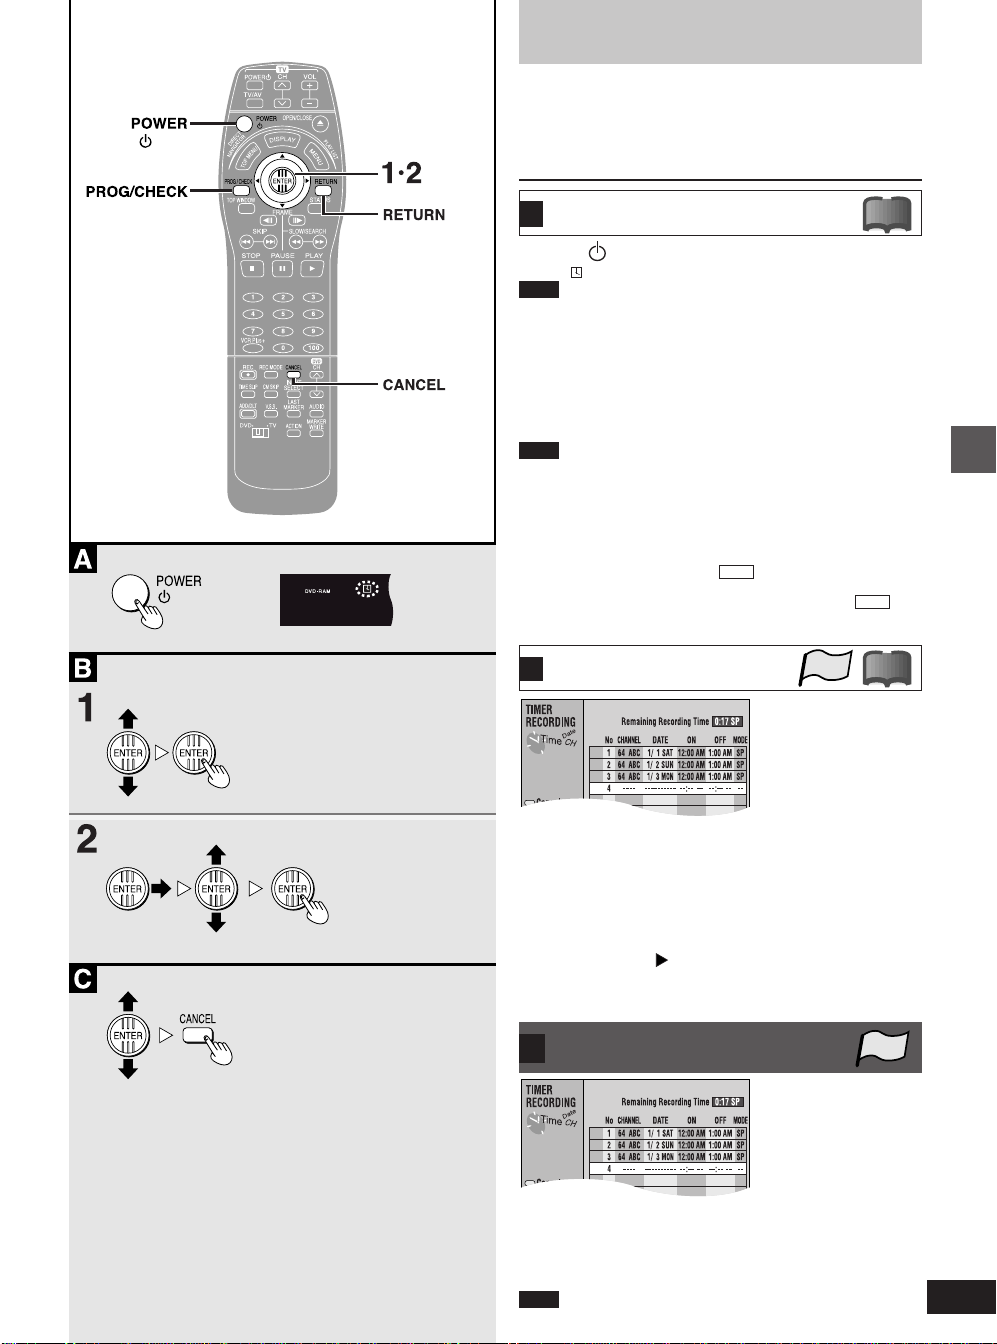
Timer recording
■ To continue programming
After selecting an available line, repeat steps 2, 3, and 4 on page 46.
■ To end programming
Press [PROG/CHECK] or [RETURN]. The timer recording list disappears and the message “TURN RECORDER OFF FOR TIMER
RECORDING” is shown on the television.
To put the unit on timer recording
A
standby
Press [ , POWER].
Ensure “ ” lights on the unit’s display.
Note
If the disc is protected or full, the unit switches to standby but does
not go for timer recording standby. Check the disc carefully.
■ Flexible recording mode (FR)
●
The unit automatically selects a recording rate between “XP” and
“EP” that will enable the timer recording to fit in the available recording time on the disc with the best possible recording quality.
●
You can use the mode only with timer recording.
●
It may not be possible to record to the finish of the program if the
remaining time doesn’t allow.
Note
●
The built-in clock employs 12-hour system.
●
The remaining time displayed is calculated based on the current
recording mode.
●
Approximately 30 seconds at the beginning of subsequent pro-
grams is not recorded when you used timer recording to record
multiple programs to a DVD-R.
●
Recording is not possible unless you set “Disc Protection” in “DISC
SETTING” to “Off” (➡ page 53).
●
You can not record to a disc if the disc is protected with the write-
protect tab. Release this before operation (➡ page 99).
●
Timer recording may not work as set when summer time switches
to winter time and vice versa (➡ page 88).
To change the timer recording
B
program
RAM
TOP
!?
RAM
!?
Advanced operations
1 While the timer recording list is being shown
Use the joystick [▲, ▼] to select the
program you want to change, and
press [ENTER].
The timer recording setting screen is shown.
2 Move through the items with the
joystick [ ] and change the settings
with the joystick [▲, ▼] and press
[ENTER].
To delete a timer recording
C
program
While the timer recording list is being shown
Use the joystick [▲, ▼] to select the
program you want to clear and press
[CANCEL].
Note
You cannot delete programs that are currently recording.
TOP
47
RQT6035
Page 48
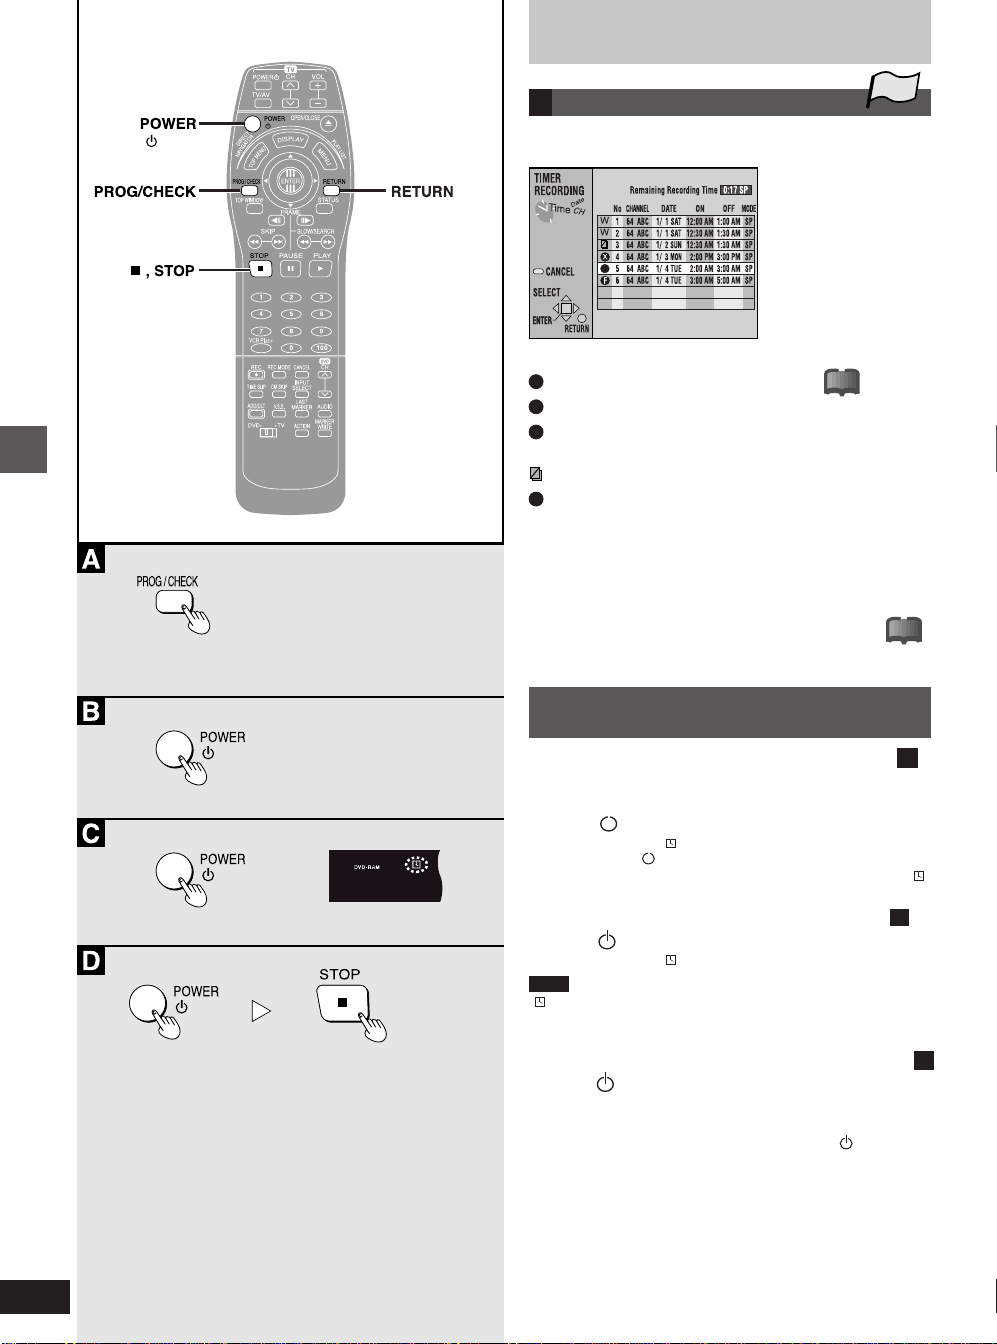
Timer recording
Advanced operations
To check programs
A
TOP
Press [PROG/CHECK].
The timer recording list appears.
Icon explanations
W The times overlap those in another program.
This program is currently recording.
F The disc was full or the maximum number of programs or scenes
was reached so the program failed to record.
The material was copy-guarded so the material failed to record.
X The program failed to record for some other reason.
■ To change the program
➡ page 47
■ To exit the timer recording list
Press [PROG/CHECK] or [RETURN]. (The television is shown.)
For your reference
Programs that failed to record are displayed gray. These
programs are deleted from the list at 4 a.m. the day after
tomorrow.
!?
!?
Releasing the unit from timer
standby
■ To release the unit from recording standby B
If you want to record something else before the program start time,
for example:
Press [ , POWER].
The unit turns on and “ ” goes out.
●
Be sure to press [ , POWER] before the program start time to put
the unit on timer recording standby. The program only works if “ ”
is on.
■ To put the unit on timer recording standby C
Press [ , POWER].
The unit turns off and “ ” lights on the unit’s display.
Note
“ ” flashes when the unit couldn’t go to timer recording standby
(e.g., a disc isn’t loaded, a disc that can’t be recorded to is loaded, or
the disc is protected). Check the disc carefully.
■ To stop recording while a program is working D
Press [ , POWER], then [ ■ , STOP] within
5 seconds.
Recording stops. Recording standby is also canceled if there are
other timer recording programs, so be sure to press [ , POWER] to
put the unit on timer recording standby.
48
RQT6035
Page 49
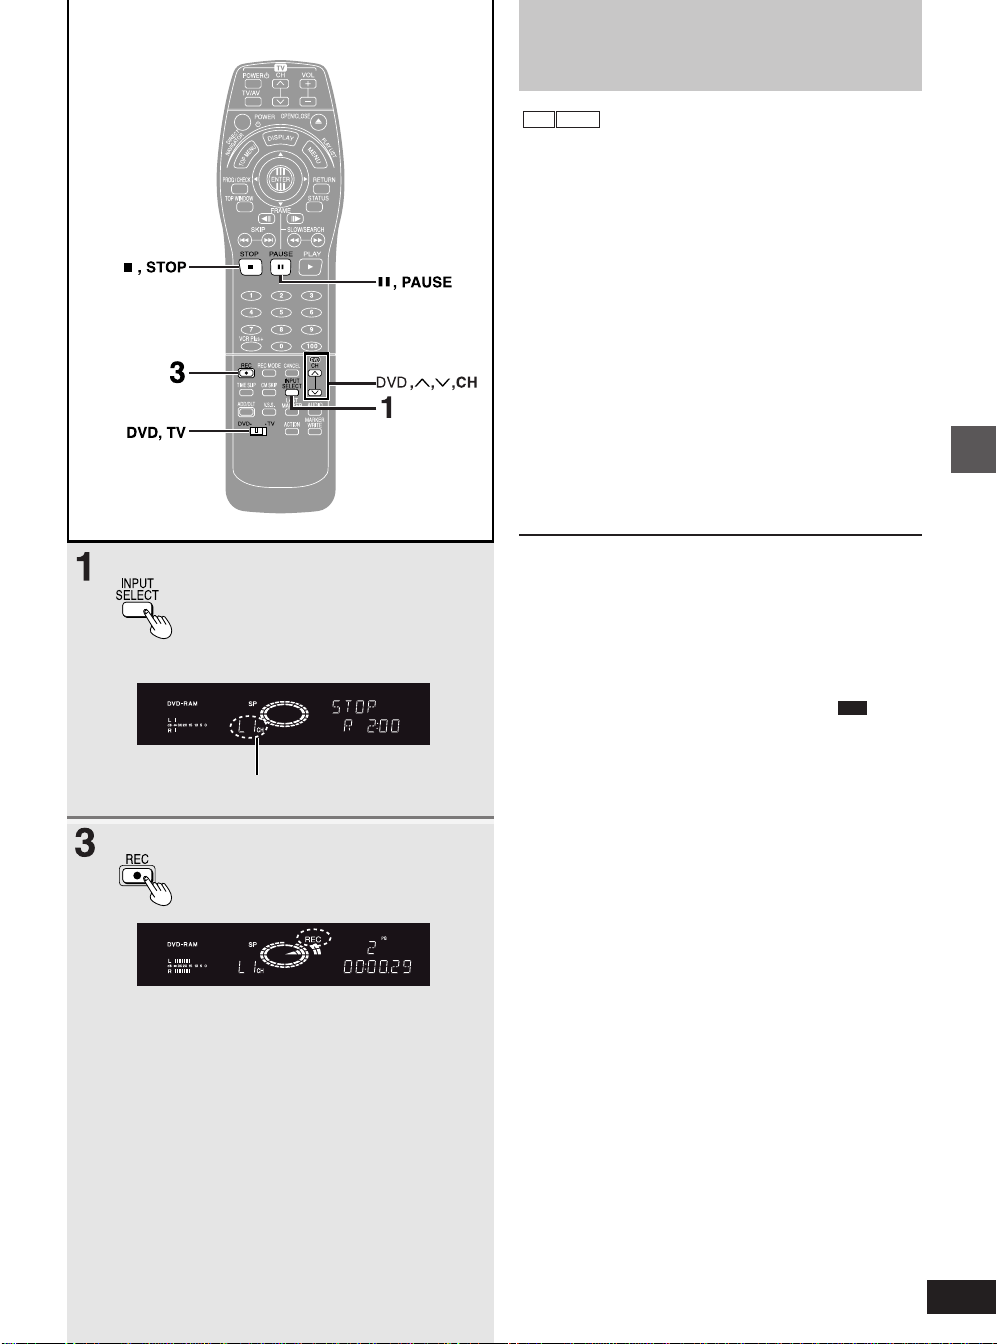
When you have selected “L1”
Recording from a video
cassette recorder
RAM DVD-R
You can record audio and video being played on a video cassette
recorder or video camera connected to the input terminals.
Preparation
●
Connect the other equipment to this unit’s input terminals
(➡ page 79).
●
Switch [DVD, TV] to “DVD”.
●
Insert a disc that can be recorded on.
●
Select the recording mode, XP, SP, LP, or EP (➡ page 26).
1 While stopped
Press [INPUT SELECT] to select the
input channel for the equipment you
have connected.
Select L1, L2, or L3.
2 Start play on the other equipment.
3 Press [●, REC] at the point you want
to start recording.
■ To skip unwanted parts
Press [», PAUSE] to pause recording.
Press again to restart recording.
■ To stop recording
Press [■, STOP].
Stop play on the other equipment as well.
For your reference
●
You can also select the input channel by pressing [ DVD , ö, õ,
CH] in step 1.
●
This unit complies with industry standards regarding the recording
and duplication of copy-protected material. This includes commercial videotapes and DVDs. Apart from infringing copyright laws,
copies of protected material are often of very poor quality.
Advanced operations
49
RQT6035
Page 50
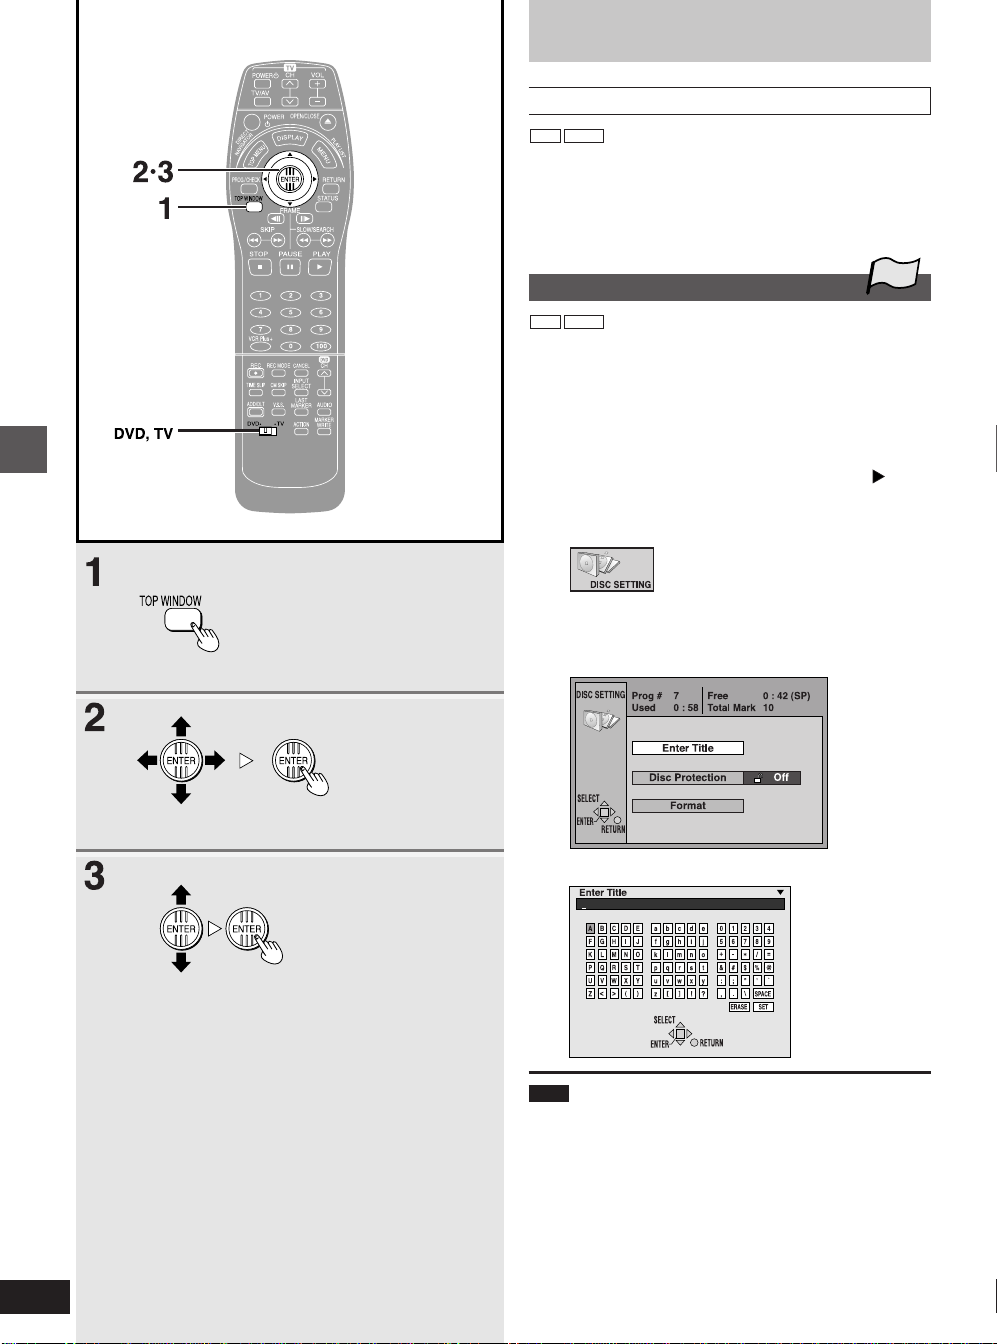
Disc setting
About DISC SETTING
RAM DVD-R
●
You can give discs titles—Enter Title
●
You can write-protect and write-enable DVD-RAM—Disc
Protection
●
You can format DVD-RAM—Format
●
You can finalize DVD-R—Finalize
Advanced operations
Enter Title
RAM DVD-R
Preparation
●
Switch [DVD, TV] to “DVD”.
●
Insert a disc you have recorded on.
TOP
1 While stopped
Press [TOP WINDOW].
2 Use the joystick [▲, ▼, œ, ] to
select “DISC SETTING” and press
[ENTER].
3 Use the joystick [▲, ▼] to select
“Enter Title” and press [ENTER].
e.g. DVD-RAM
50
RQT6035
4 Enter the title (➡ page 51).
Note
●
You can give DVD-RAM titles of up to 64 characters and DVD-R
titles of up to 40 characters.
●
You cannot give DVD-R titles once they have been finalized.
●
You cannot enter titles if the disc is protected with the write-protect
tab (➡ page 99).
●
You cannot enter titles if the disc is protected with DISC SETTING
(➡ page 52).
Page 51
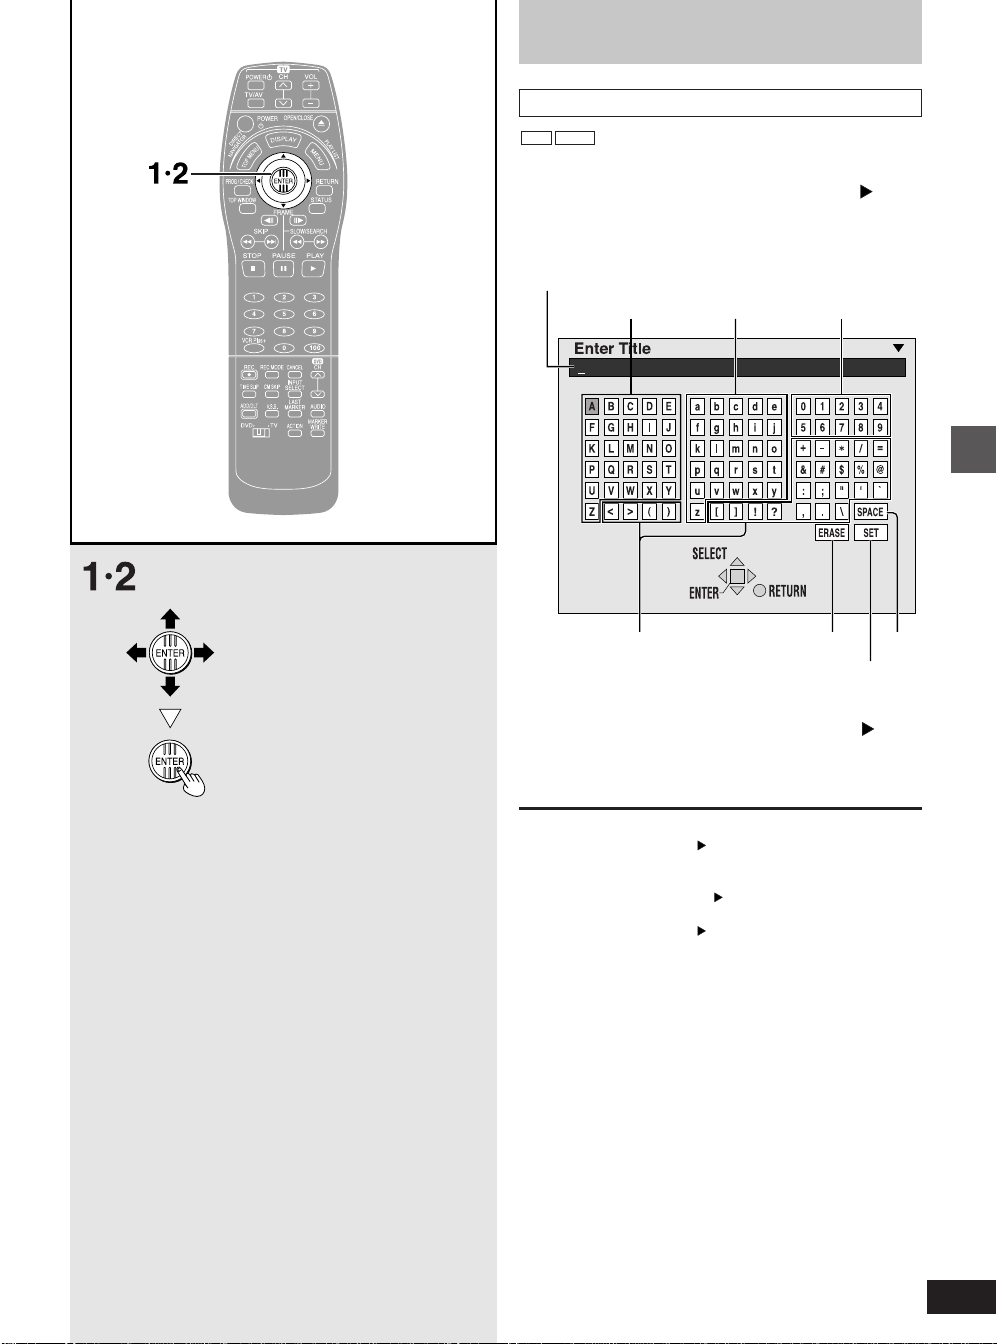
Disc setting
Entering characters for titles
RAM DVD-R
1 After the titling screen appears
Use the joystick [▲, ▼, œ, ] to
select the character you want to enter
and press [ENTER].
You can enter the following characters.
Title field: shows the text you have entered
Upper case Lower case Numbers
Symbols
SET (when you have finished entering text)
Repeat step 1 to enter other characters.
ERASE SPACE
2 Use the joystick [▲, ▼, œ, ] to
select “SET” and press [ENTER].
The title is entered and the screen disappears.
■ To correct a character
! Use the joystick [▲, ▼,
correct in the title field.
@ Use the joystick [▲, ▼ ] to move outside the title field.
# Use the joystick [▲, ▼,
[ENTER].
$ Use the joystick [▲, ▼,
press [ENTER].
œœ
œ,
] to select the character you want to
œœ
œœ
œ,
] to select “ERASE” and press
œœ
œœ
œ,
] to select the correct character and
œœ
Advanced operations
51
RQT6035
Page 52
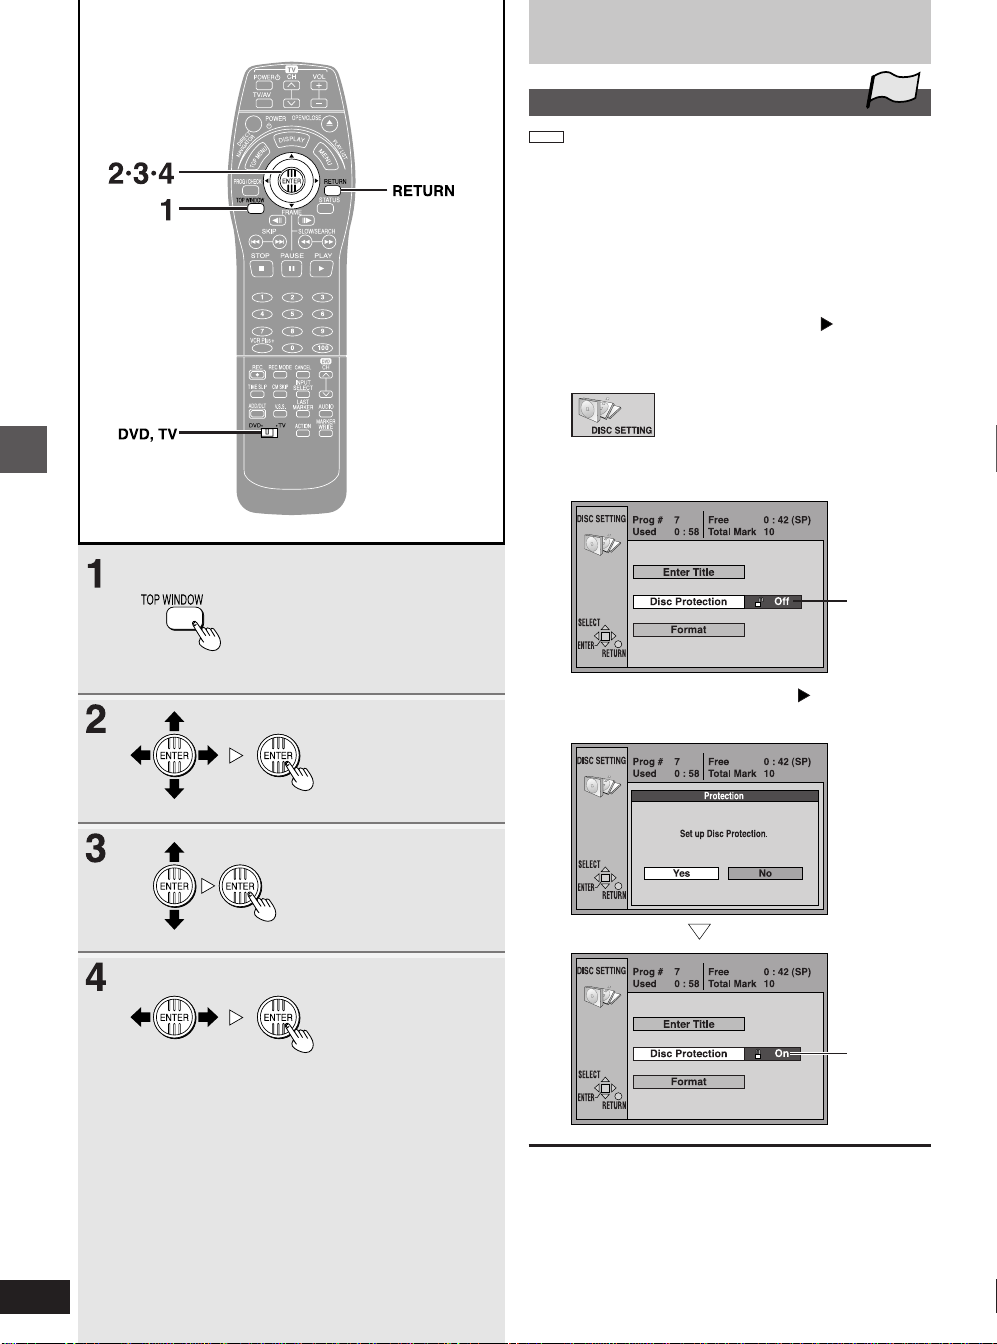
Disc setting
Advanced operations
Disc Protection
RAM
This allows you protect discs from accidental erasure.
Preparation
●
Switch [DVD, TV] to “DVD”.
●
Insert the disc you want to protect.
TOP
1 While stopped
Press [TOP WINDOW].
2 Use the joystick [▲, ▼, œ, ] to select
“DISC SETTING” and press
[ENTER].
3 Use the joystick [▲, ▼] to select “Disc
Protection” and press [ENTER].
Disc
protection is
Off.
4 Use the joystick [œ, ] to select
“Yes” and press [ENTER].
When you press [ENTER]
Disc
protection is
On.
■ To stop partway through
In step 4, either select “No” and press [ENTER] or press [RETURN].
52
RQT6035
Page 53
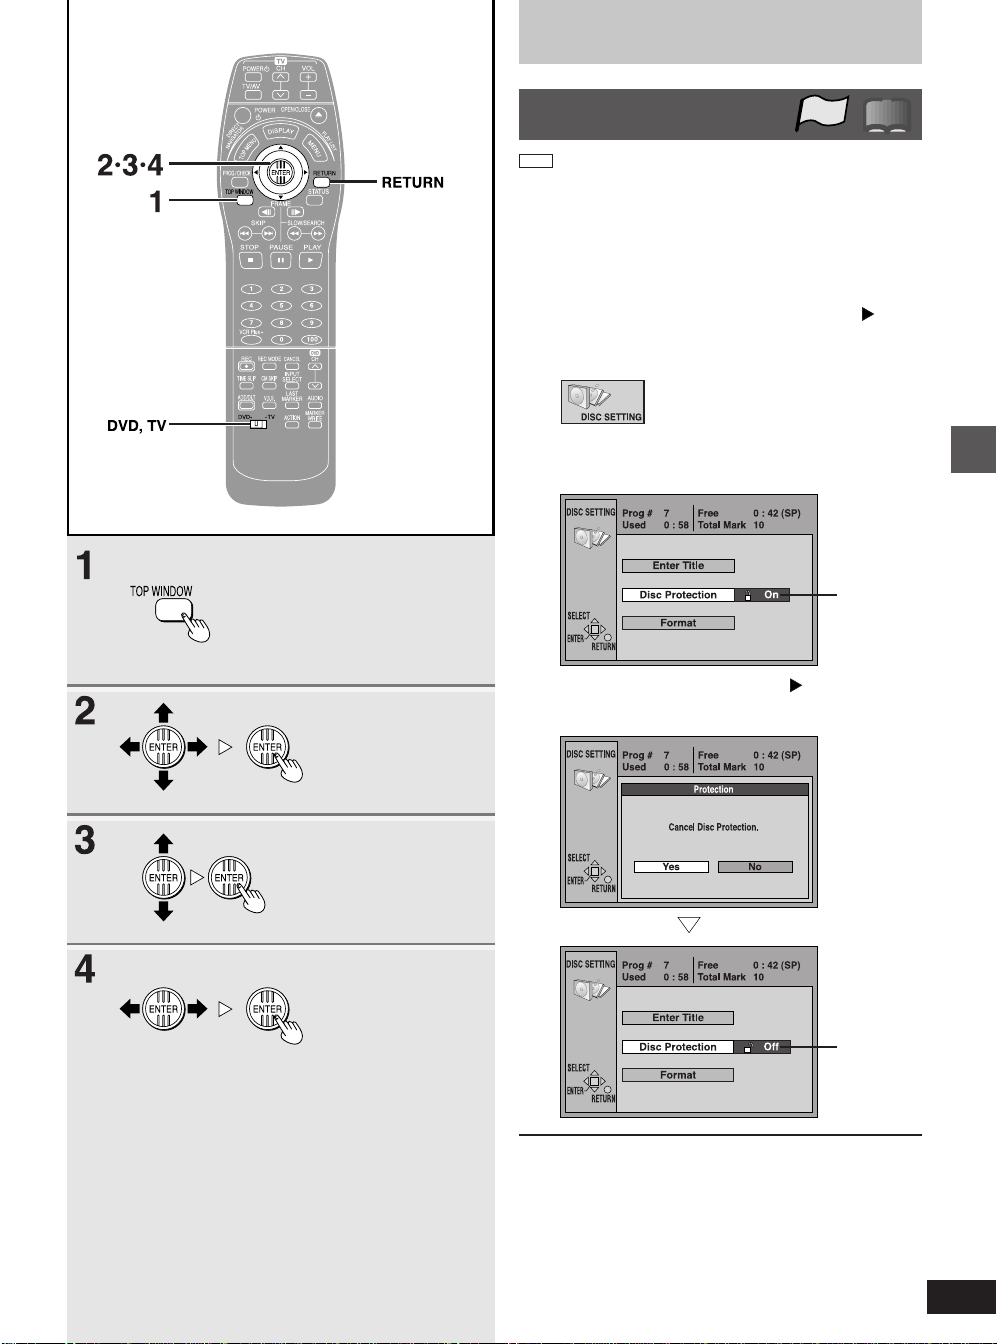
Disc setting
Releasing disc
protection
RAM
Preparation
●
Switch [DVD, TV] to “DVD”.
●
Insert the disc you want to release protection.
TOP
!?
1 While stopped
Press [TOP WINDOW].
2 Use the joystick [▲, ▼, œ, ] to
select “DISC SETTING” and press
[ENTER].
3 Use the joystick [▲, ▼] to select “Disc
Protection” and press [ENTER].
Disc
protection is
On.
Advanced operations
4 Use the joystick [œ, ] to select
“Yes” and press [ENTER].
When you press [ENTER]
Disc
protection is
Off.
■ To stop partway through
In step 4, either select “No” and press [ENTER] or press
[RETURN].
53
RQT6035
Page 54
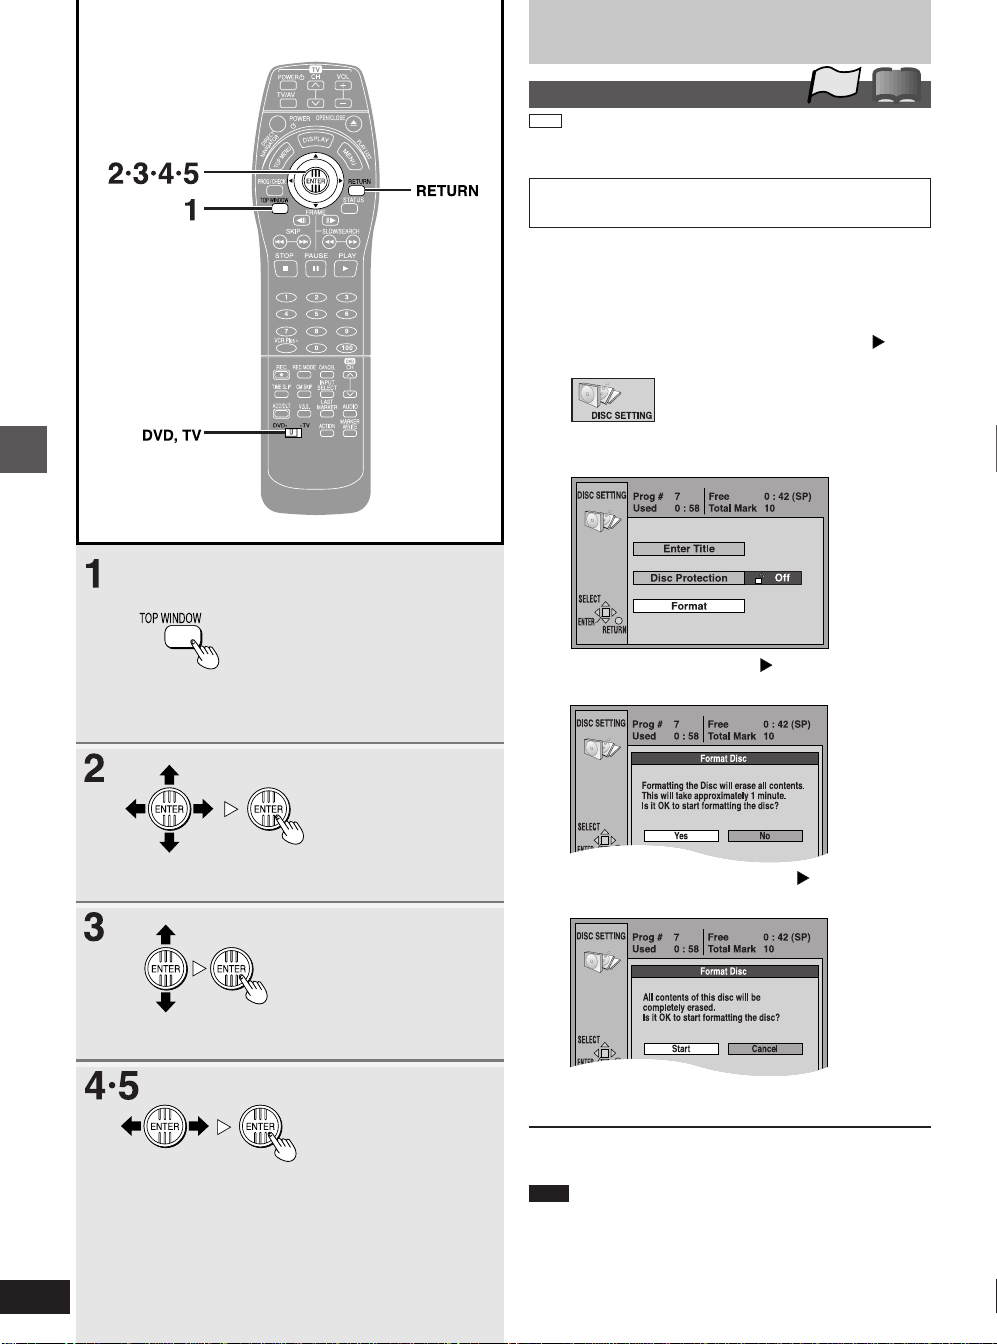
Disc setting
Advanced operations
Format
RAM
Some DVD-RAM are unformatted. You must format these discs before you can use them in this unit. Formatting also allows you to
erase the entire contents of a disc.
All recordings are irretrievably erased when a disc is formatted. Check the disc carefully before formatting to ensure it
doesn’t contain any programs you want to keep.
Preparation
●
Switch [DVD, TV] to “DVD”.
●
Insert the disc you want to format.
TOP
!?
1 While stopped
Press [TOP WINDOW].
2
Use the joystick [▲, ▼, œ, ] to
select “DISC SETTING” and press [ENTER].
3 Use the joystick [▲
“Format” and press [ENTER].
4 Use the joystick [œ
and press [ENTER].
,
▼] to select
,
] to select “Yes”
54
RQT6035
5 Use the joystick [œ
,
] to select
“Start” and press [ENTER].
Formatting starts.
The message “Formatting is completed” appears when formatting is finished.
■ To stop formatting
Press [RETURN] in steps 4 and 5, or select “No” in step 4, “Cancel”
in step 5 and press [ENTER].
Note
●
Do not turn the unit off or disconnect the AC power supply cord
while the message “Formatting the disc” is on the television.
This can render the disc unusable.
(Formatting takes up to 70 minutes. You can cancel formatting if it
takes more than 2 minutes by pressing [RETURN]. The disc must
be reformatted if you do this.)
●
All data on the disc is erased when it is formatted, including recordings
made with this unit. Data written to the disc by a computer is also erased.
Page 55
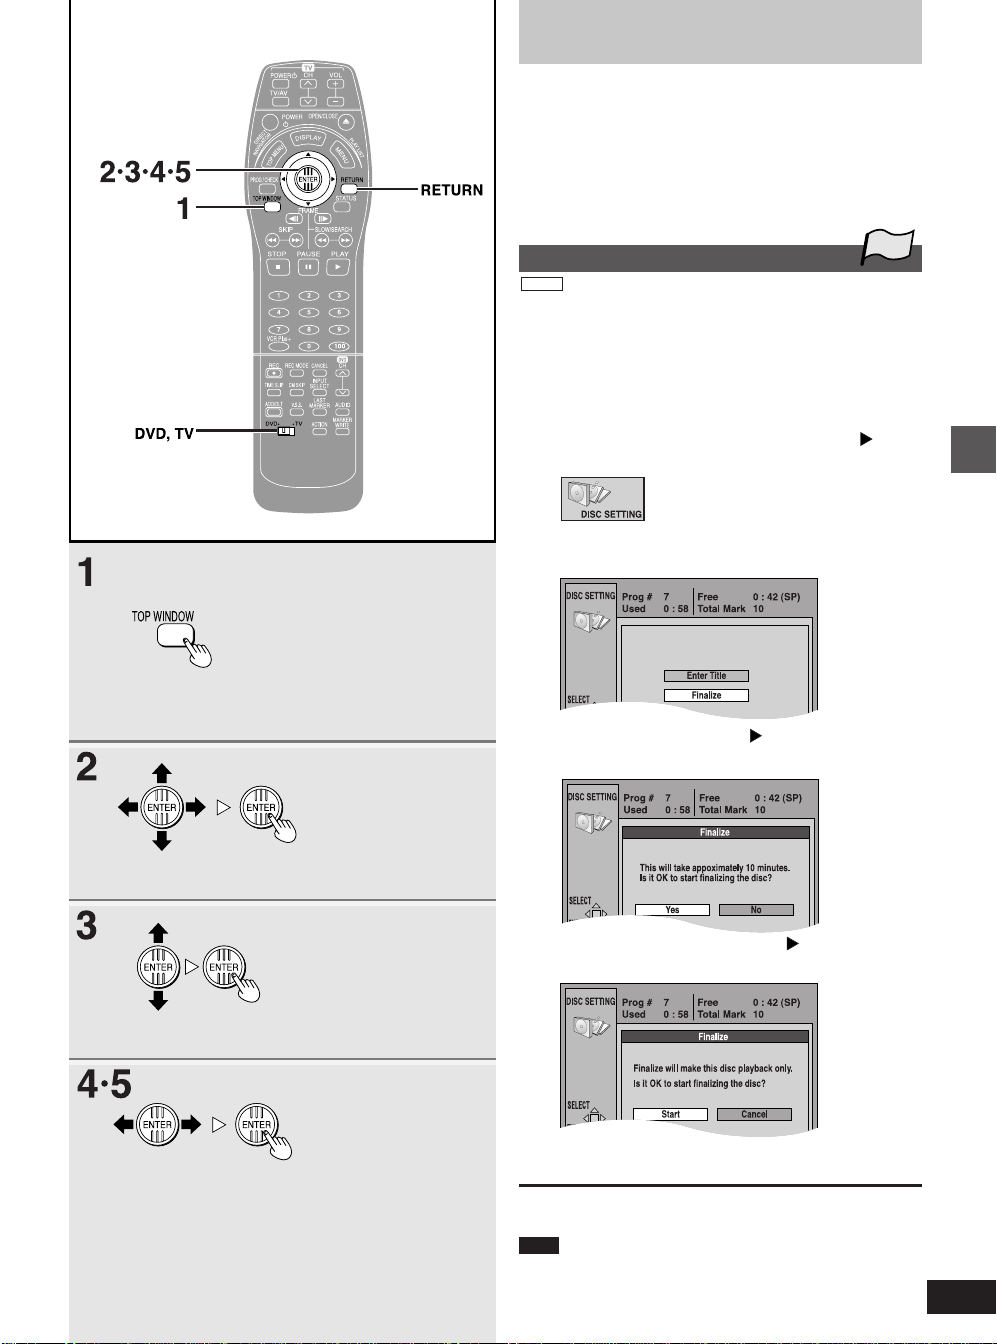
Disc setting
For your reference
●
The disc cannot be formatted if the disc is protected with the write-protect tab.
Release the protection to continue (➡ page 99).
●
Formatting cannot be performed on DVD-R or CD-R/RW.
●
The message “Unable to format” appears when you try to format discs this
unit cannot use.
●
If you have used the direct navigator to protect a program or DISC SETTING
to protect the disc, the message “Contents on the disc have been protect-
ed. Is it OK to start formatting the disc?” appears in step 5. Select “Start” if
you want to format the disc. The contents will be erased even if they have
been protected.
Finalize—Creating DVD-Video
DVD-R
You can play DVD-R on compatible DVD players by finalizing them on this
unit, effectively making them into DVD-Video.
The titles you entered with this unit appear as menus when you play the finalized disc.
Preparation
●
Switch [DVD, TV] to “DVD”.
●
Insert the disc you want to finalize.
TOP
1 While stopped
Press [TOP WINDOW].
2
Use the joystick [▲, ▼, œ, ] to
select “DISC SETTING” and press [ENTER].
3 Use the joystick [▲
“Finalize” and press [ENTER].
4 Use the joystick [œ
,
] to select “Yes”
and press [ENTER].
5 Use the joystick [œ
“Start” and press [ENTER].
,
▼] to select
,
] to select
Advanced operations
Finalizing starts.
The message “Finalizing is finished” appears when finalizing is finished.
■ To stop finalizing
Press [RETURN] in steps 4 and 5, or select “No” in step 4, “Cancel” in step 5
and press [ENTER].
Note
Do not turn the unit off or disconnect the AC power supply cord while the
message “Finalizing” is on the television.
This will render the disc unusable.
●
You can only finalize DVD-R that were recorded on this unit.
●
You cannot record on DVD-R that have been finalized.
●
The markers you entered (➡ page 36) will be lost.
●
Finalizing takes up to 15 minutes.
55
RQT6035
Page 56
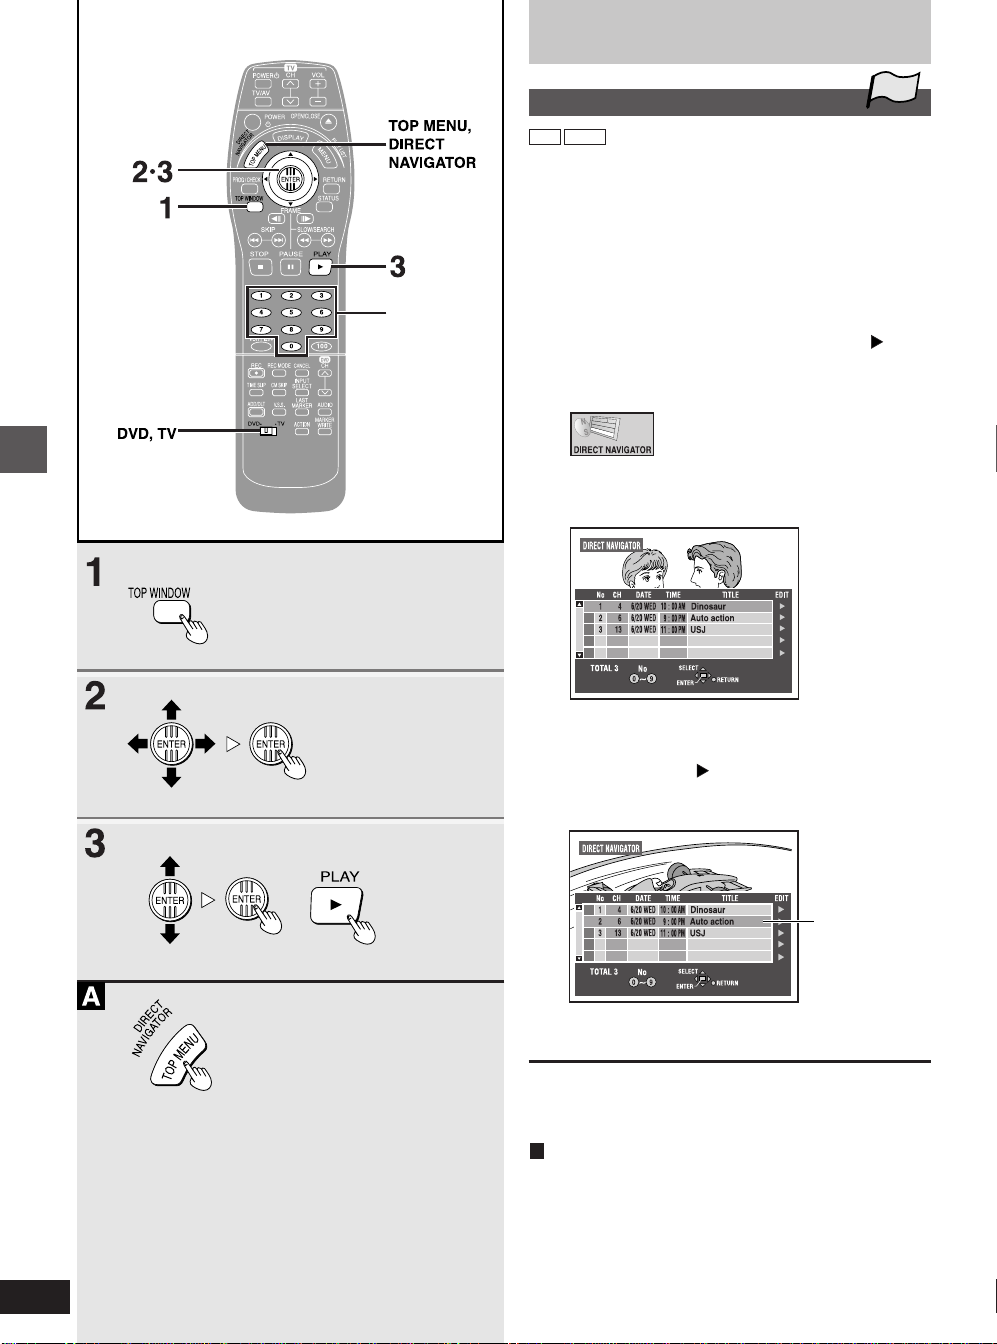
Using the direct navigator
Advanced operations
Numbered
buttons
Selecting programs to play
RAM DVD-R
A list of programs is created as you record them. You can use this list
to find the programs you want to watch.
Preparation
●
Switch [DVD, TV] to “DVD”.
●
Insert a disc you have recorded on.
TOP
1 While stopped
Press [TOP WINDOW].
2 Use the joystick [▲, ▼, œ, ] to
select “DIRECT NAVIGATOR” and
press [ENTER].
The program list appears.
The images for the currently highlighted list are played in the
background.
56
RQT6035
3 Use the joystick [▲, ▼] to select the
program you want to watch and press
[ENTER] or [ , PLAY].
Play of the images that were playing in the background continues.
or
●
Use the joystick [▼] to show program six and later.
■ To clear the program list
Press [TOP MENU, DIRECT NAVIGATOR].
For your reference
A You can also display the program list by pressing [TOP MENU,
DIRECT NAVIGATOR] in step 1.
●
The direct navigator works while recording (DVD-RAM), stopped or
playing.
●
You can also select programs from the list in step 3 by entering a 2digit number with the numbered buttons (➡ page 8) and pressing
[ENTER].
If you enter a number larger than the total number of programs, the
last program is selected.
●
Titles are only displayed if you have given the program a title.
For example,
when you select
program
number 2.
Page 57
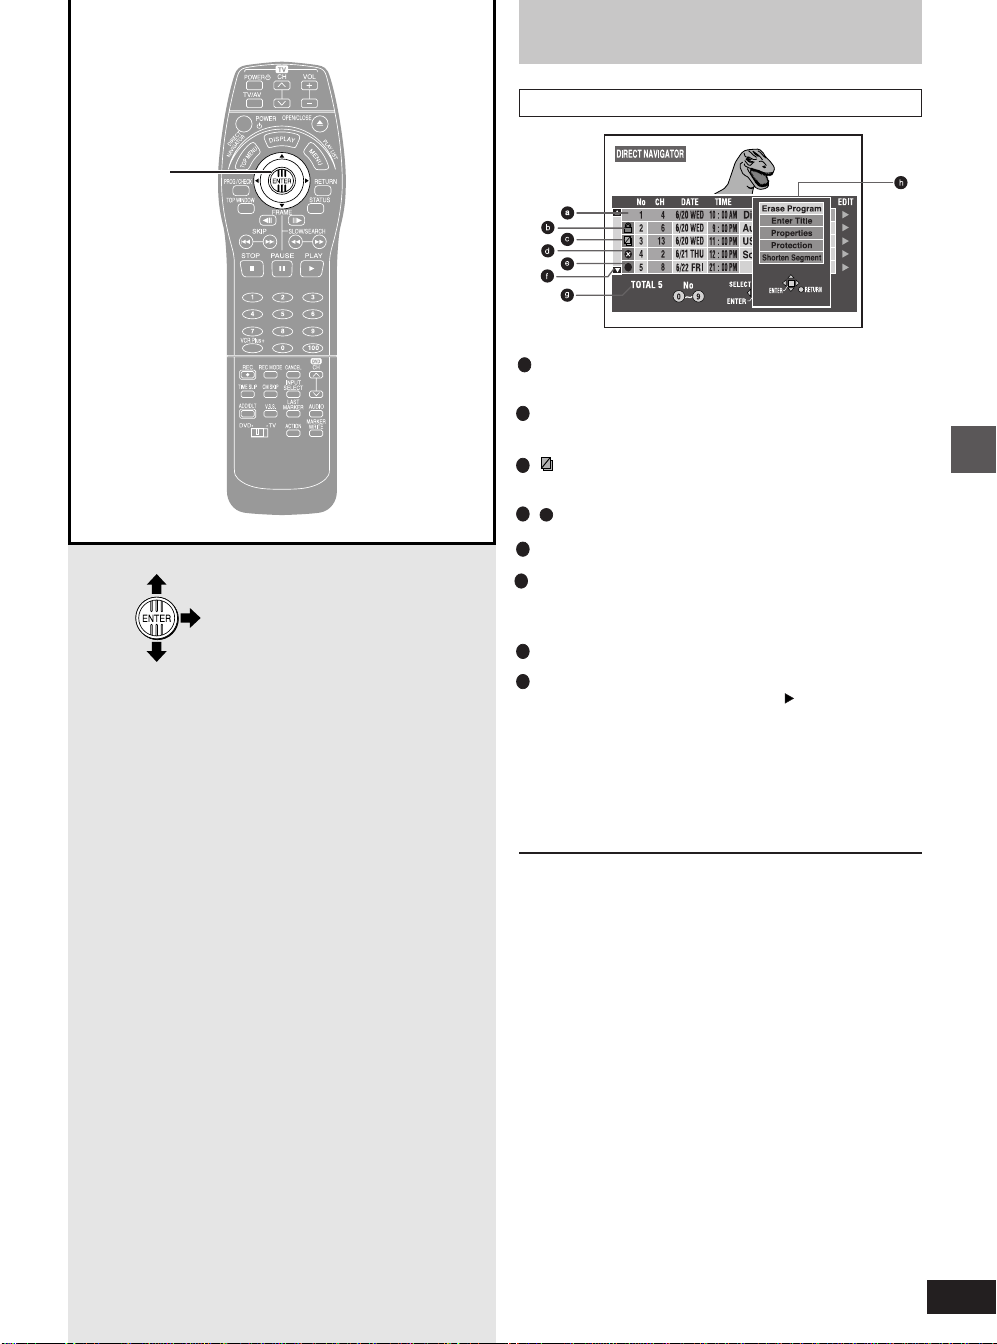
Joystick
Using the direct navigator
About the program list
a Program number, channel number (or caption), recording
date, time recording started, program title (if entered).
Program 1 is selected in the example.
b Write-protected
Displayed when you have protected the program. Program 2 has
been protected in the example.
c Copy-protected
Displayed when you have recorded a program that has copy protection, from CATV broadcasts, for example.
d x Unable to play
Displayed if you cannot play the program.
● Currently recording
e
Displayed when the program is being recorded.
f Scroll bar
If there are more than six programs, you can move down the list
by using the joystick [▲, ▼] and this bar shows your approximate
position in the list.
g Total number of programs
Shows the total number of programs.
h Submenu
Displayed when you use the joystick [ ]. (You can see this
during simultaneous rec and play but you are unable to perform
operations.)
●
Erase a program (➡ page 58).
●
Enter or edit a title (➡ page 59).
●
Check a program’s contents (➡ page 62).
●
Write-protect a program (➡ page 60).
●
Erase part of a program (➡ page 63).
Advanced operations
For your reference
●
The list can show up to 99 programs that you have recorded or
programmed to record.
●
The message “Maximum amount of programs are exceeded,
cannot record” is displayed if you try to start recording when there
are already 99 programs on a disc. Erase unneeded programs
(DVD-RAM only) or use a new disc to continue recording.
●
When using DVD-R, “Protection” and “Shorten Segment” are not
displayed in the submenu.
●
The contents of the list are recorded on the disc.
57
RQT6035
Page 58
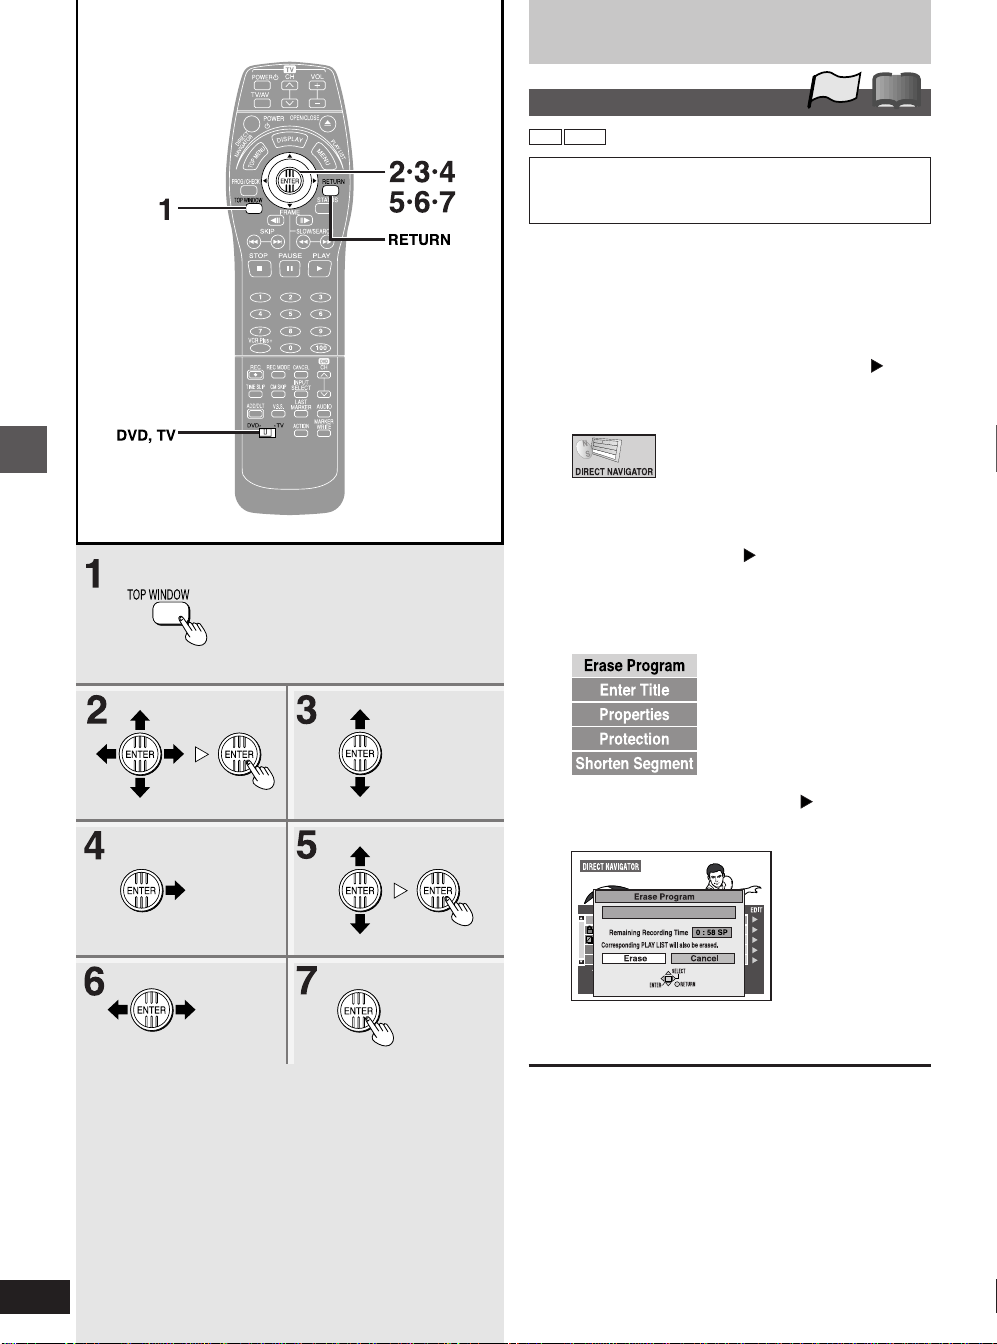
Using the direct navigator
Advanced operations
Erasing programs
RAM DVD-R
The program is erased completely when you use this procedure and cannot be retrieved. Check the program carefully
before erasing it to ensure it isn’t one you want to keep.
Preparation
●
Switch [DVD, TV] to “DVD”.
●
Insert a disc you have recorded on.
TOP
!?
1 While stopped
Press [TOP WINDOW].
2 Use the joystick [▲, ▼, œ, ] to
select “DIRECT NAVIGATOR” and
press [ENTER].
3 Use the joystick [▲, ▼] to select the
program you want to erase.
4 Use the joystick [ ] so the submenu
appears.
5 Use the joystick [▲, ▼] to select
“Erase Program” and press [ENTER].
58
RQT6035
6 Use the joystick [œ, ] to select
“Erase”.
7 Press [ENTER].
■ To stop partway through
In step 6, either select “Cancel” and press [ENTER] or press
[RETURN].
For your reference
●
The disc’s available recording time may not increase after erasing
short programs.
●
Computer data cannot be erased.
●
The available recording time on DVD-R does not increase when
you erase programs.
Page 59
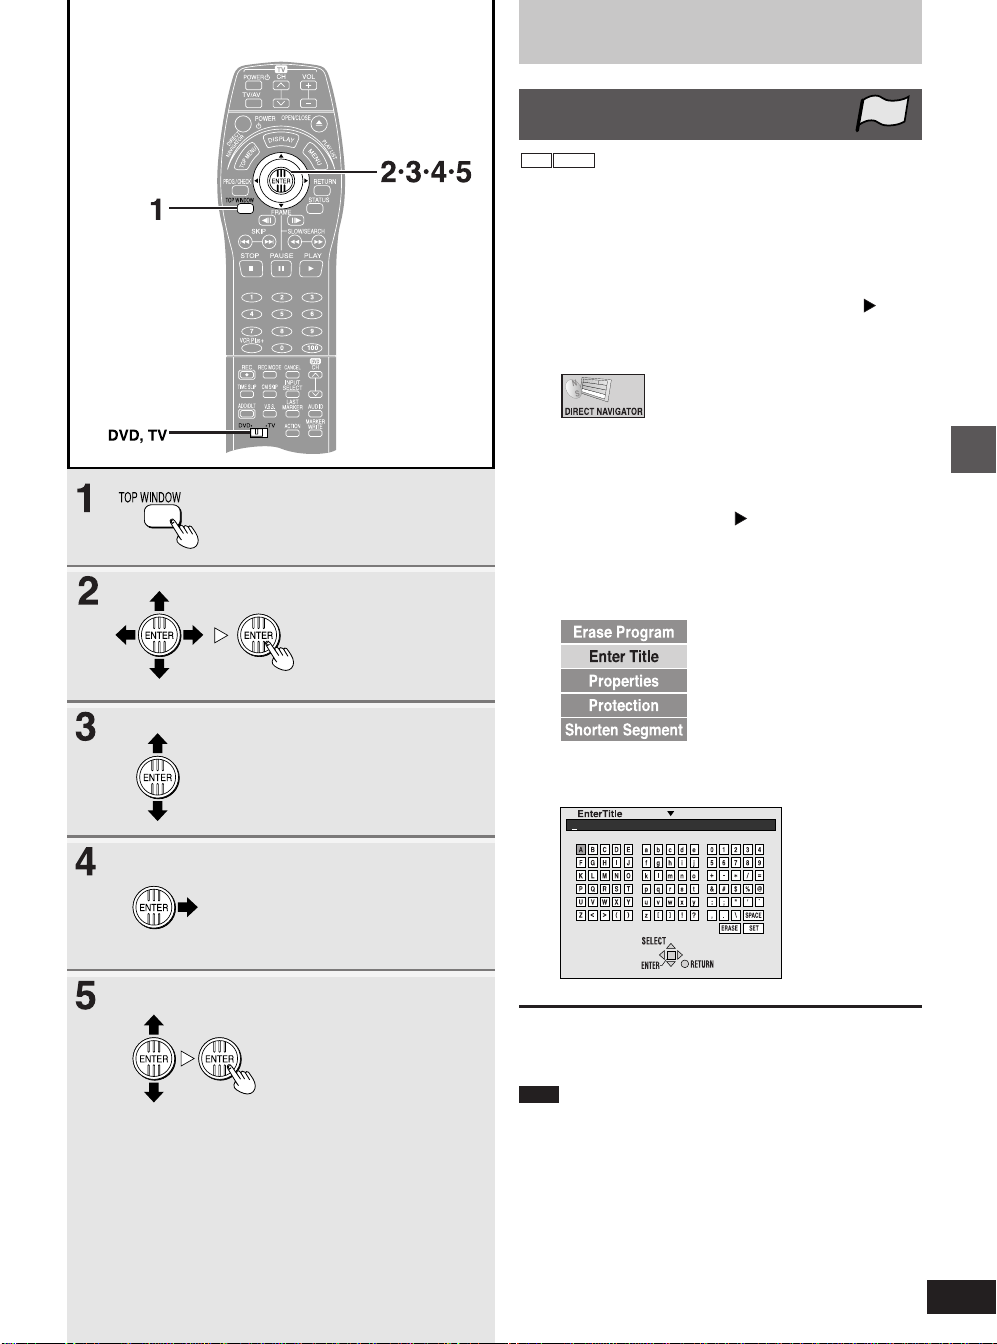
Using the direct navigator
Entering and editing program
titles
RAM DVD-R
Preparation
●
Switch [DVD, TV] to “DVD”.
●
Insert a disc you have recorded on.
TOP
1 While stopped
Press [TOP WINDOW].
2 Use the joystick [▲, ▼, œ, ] to
select “DIRECT NAVIGATOR” and
press [ENTER].
3 Use the joystick [▲, ▼] to select the
program whose title you want to enter
or edit.
4 Use the joystick [ ] so the submenu
appears.
5 Use the joystick [▲, ▼] to select
“Enter Title” and press [ENTER].
Advanced operations
6 Enter or edit the title.
Enter titles as with disc titling (➡ page 51).
For your reference
You can give the programs on DVD-RAM titles of up to 64 characters
and programs on DVD-R titles of up to 44 characters.
Note
●
You cannot enter titles if the disc is protected with the write-protect
tab (➡ page 99).
●
You cannot enter titles if the disc is protected with DISC SETTING
(➡ page 52).
●
You cannot enter titles if the program is protected with the direct
navigator (➡ page 60).
●
Even if you have entered up to the maximum number of characters,
characters you enter after the position marked with “
and the two characters immediately prior to the mark will be replaced
● ●
” when displayed in the direct navigator.
with “
†
” in the title field
59
RQT6035
Page 60
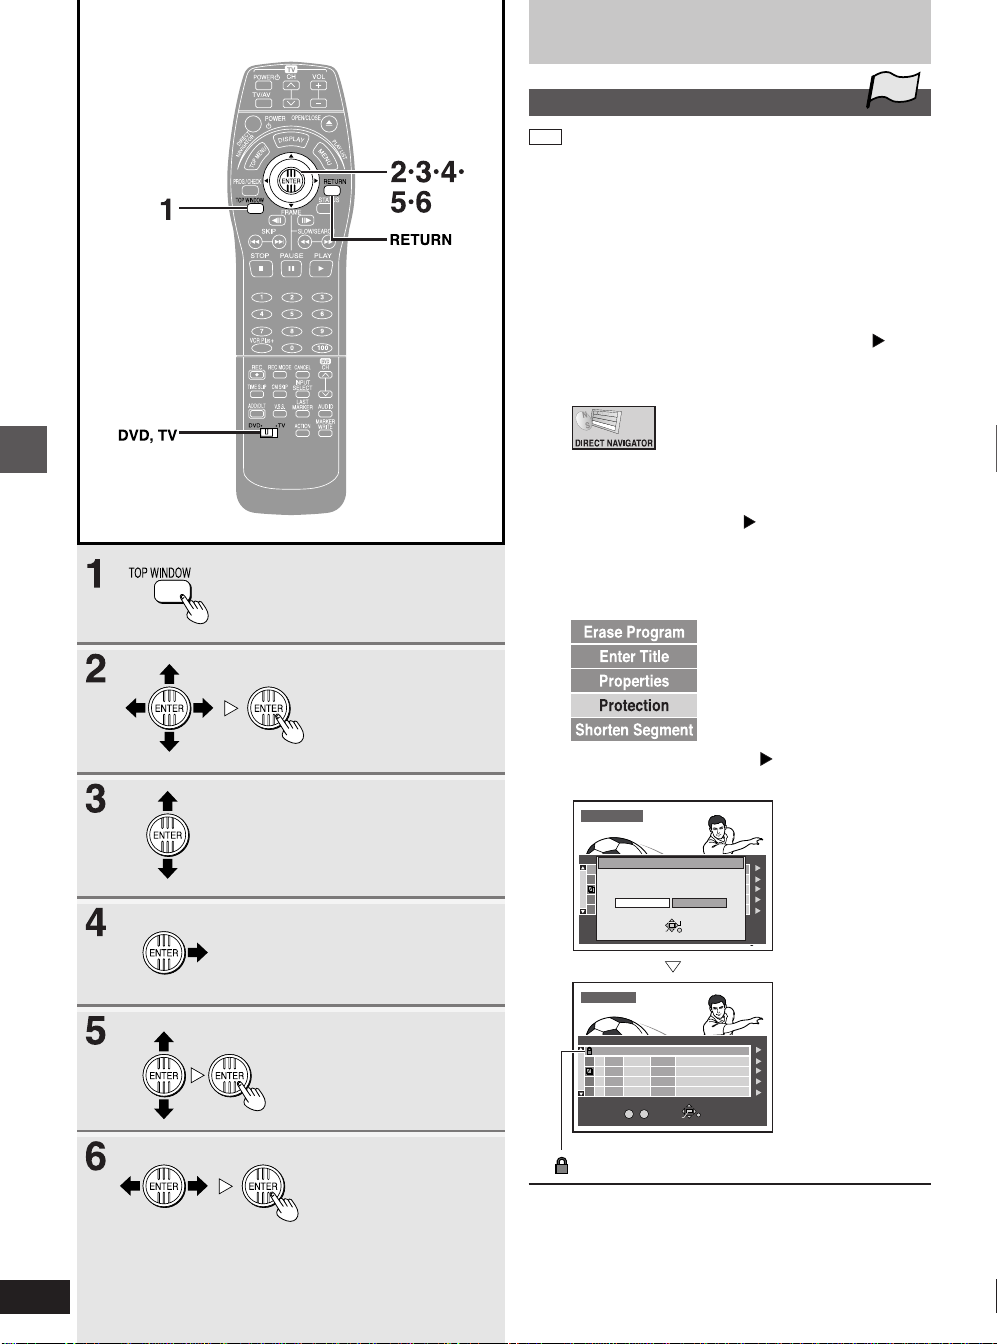
Using the direct navigator
Advanced operations
Protecting programs
RAM
TOP
You can prevent accidental erasure of programs by write-protecting
them.
Preparation
●
Switch [DVD, TV] to “DVD”.
●
Insert a disc you have recorded on.
1 While stopped
Press [TOP WINDOW].
2 Use the joystick [▲, ▼, œ, ] to
select “DIRECT NAVIGATOR” and
press [ENTER].
3 Use the joystick [▲, ▼] to select the
program you want to protect.
4 Use the joystick [ ] so the submenu
appears.
5 Use the joystick [▲, ▼] to select
“Protection” and press [ENTER].
60
RQT6035
6 Use the joystick [œ, ] to select “Yes”
and press [ENTER].
DIRECT NAVIGATOR
No DATE CH TIME EDITTITLE
Protection
1
10/21(SA)420F00
2
10/23(MO)619F00
Set Up Program Protection.
3
10/26(TH)
C13
16F00
USJ
Yes
No
SELECT
No
0 ~ 9
6/20 WED410F00 AM
6/20 WED
6
6/20 WED
13
No
0 ~ 9
SELECT
RETURN
ENTER
ENTER
RETURN
When you press [ENTER]
Soccer
Dinosaur
9
F
00 PM
USJ
F
00 PM
11
SELECT
RETURN
ENTER
TOTAL3
DIRECT NAVIGATOR
No DATECH TIME EDITTITLE
1
2
3
TOTAL 3
The padlock mark appears.
■ To stop partway through
In step 6, either select “No” and press [ENTER] or press [RETURN].
For your reference
Programs will be erased even if they are protected if you format the
disc with DISC SETTING (➡ page 54).
Page 61
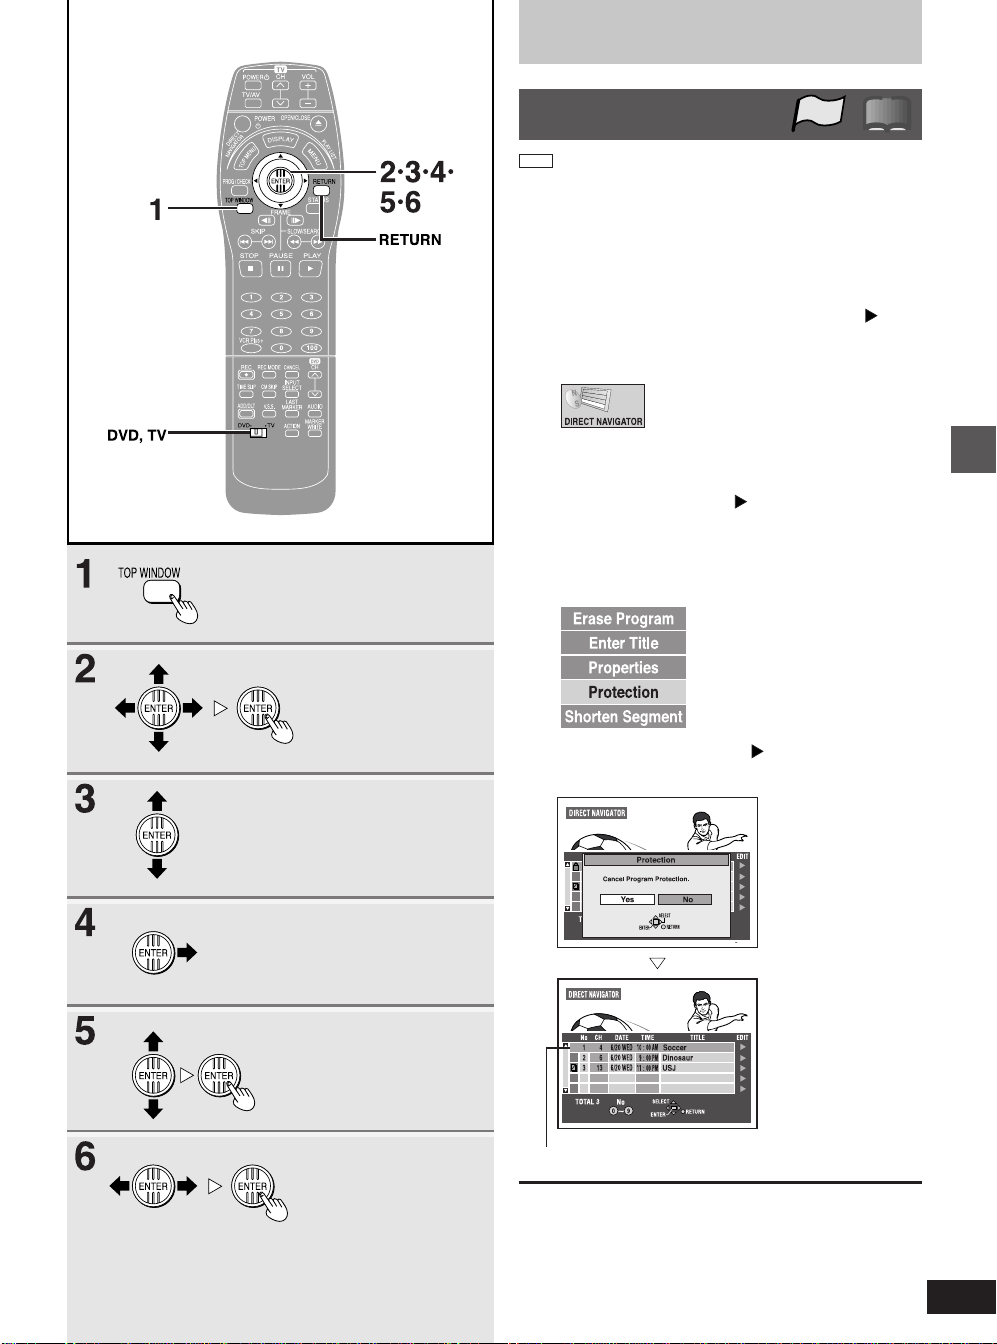
Using the direct navigator
Releasing program
protection
RAM
Preparation
●
Switch [DVD, TV] to “DVD”.
●
Insert a disc you have recorded on.
TOP
!?
1 While stopped
Press [TOP WINDOW].
2 Use the joystick [▲, ▼, œ, ] to
select “DIRECT NAVIGATOR” and
press [ENTER].
3 Use the joystick [▲, ▼] to select the
program you want to unprotect.
4 Use the joystick [ ] so the submenu
appears.
5 Use the joystick [▲, ▼] to select
“Protection” and press [ENTER].
Advanced operations
6 Use the joystick [œ, ] to select “Yes”
and press [ENTER].
When you press [ENTER]
The padlock mark disappears.
■ To stop partway through
In step 6, either select “No” and press [ENTER] or press [RETURN].
61
RQT6035
Page 62
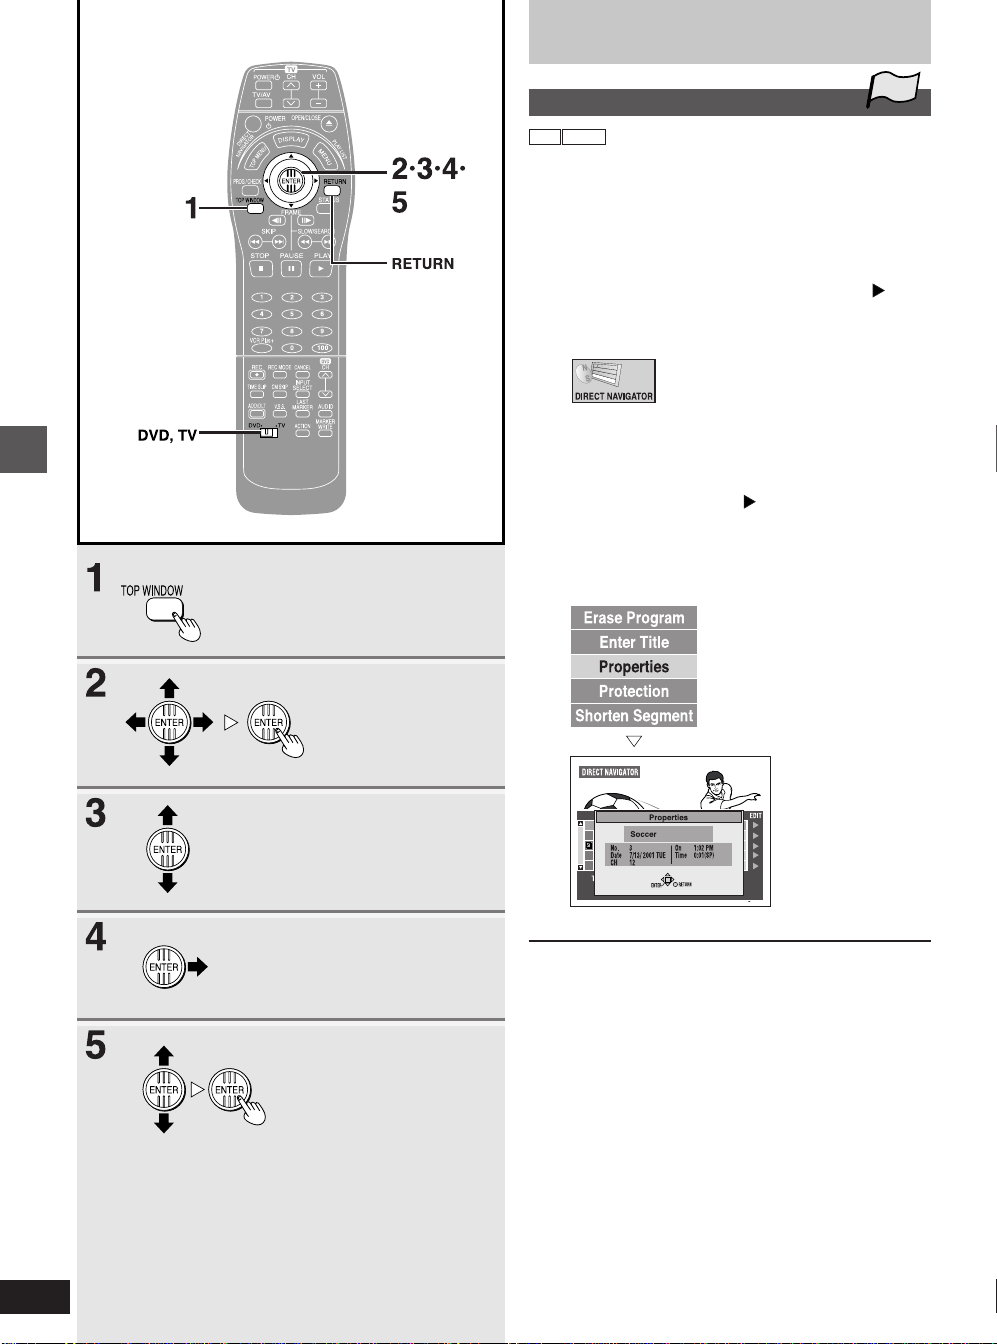
Using the direct navigator
Advanced operations
Checking program contents
RAM DVD-R
Preparation
●
Switch [DVD, TV] to “DVD”.
●
Insert a disc you have recorded on.
TOP
1 While stopped
Press [TOP WINDOW].
2 Use the joystick [▲, ▼, œ, ] to
select “DIRECT NAVIGATOR” and
press [ENTER].
3 Use the joystick [▲, ▼] to select the
program whose contents you want to
check.
4 Use the joystick [ ] so the submenu
appears.
5 Use the joystick [▲, ▼] to select
“Properties” and press [ENTER].
62
RQT6035
When you press [ENTER]
The contents of the
program are shown:
Program number,
recording date, channel,
recording start time,
length of recording and
recording mode.
■ To return to the previous screen
Press [RETURN].
Page 63
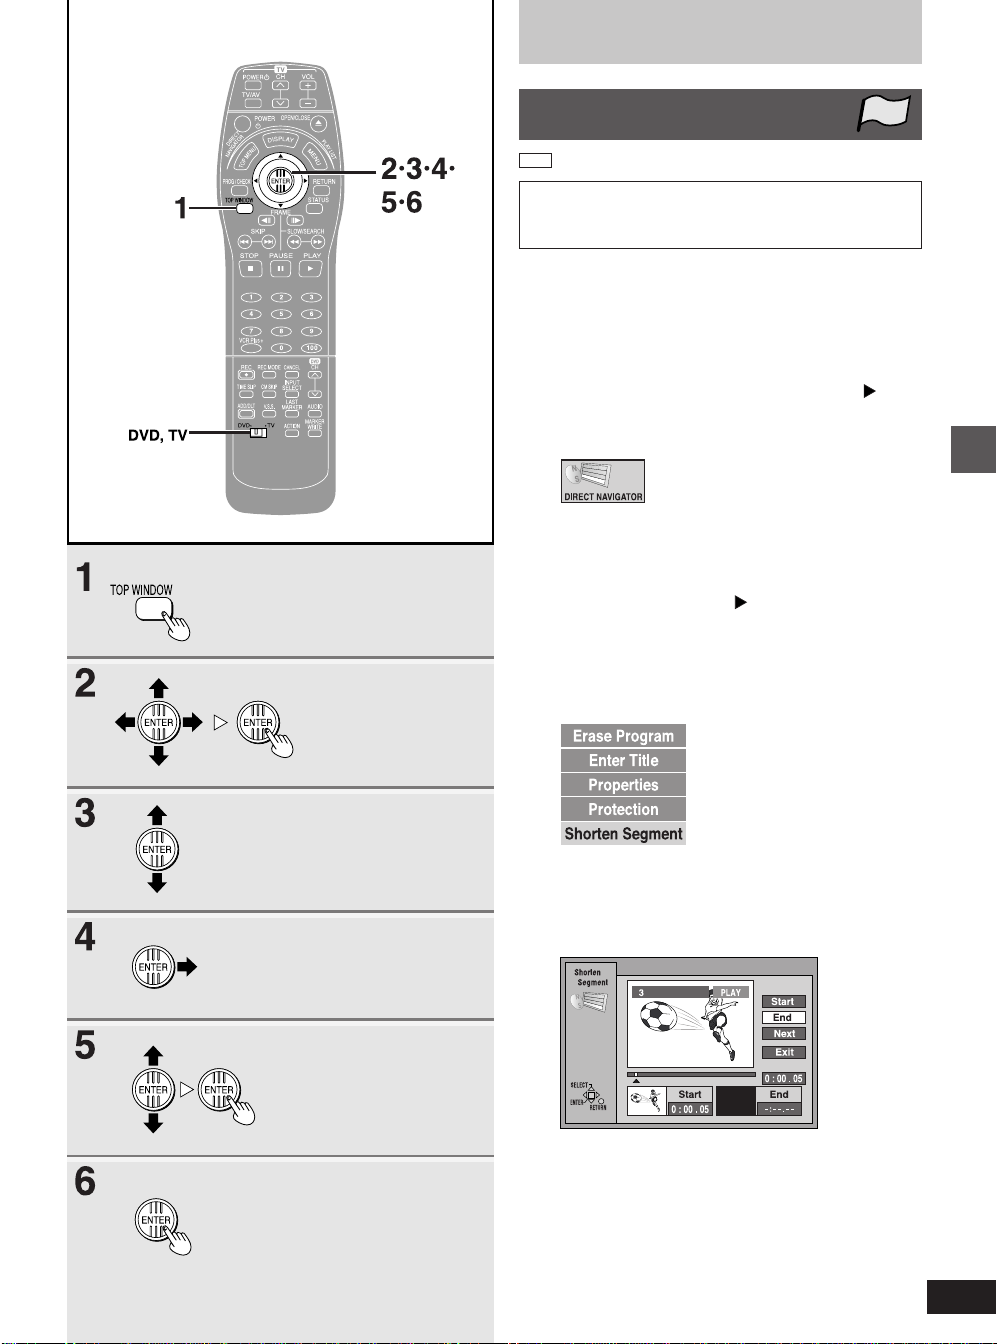
Using the direct navigator
Erasing parts of a program—
Shorten Segment
RAM
The specified parts of the program are erased completely
when you use this procedure and cannot be retrieved. Check
the program carefully to ensure it isn’t one you want to keep.
Preparation
●
Switch [DVD, TV] to “DVD”.
●
Insert a disc you have recorded on.
TOP
1 While stopped
Press [TOP WINDOW].
2 Use the joystick [▲, ▼, œ, ] to
select “DIRECT NAVIGATOR” and
press [ENTER].
3 Use the joystick [▲, ▼] to select the
program which contains the part you
want to erase.
4 Use the joystick [ ] so the submenu
appears.
5 Use the joystick [▲, ▼] to select
“Shorten Segment” and press
[ENTER].
Advanced operations
6 Use search functions such as fast-
forward and slow-motion to find the
start point of the part you want to
erase and press [ENTER].
(Continued on next page)
63
RQT6035
Page 64
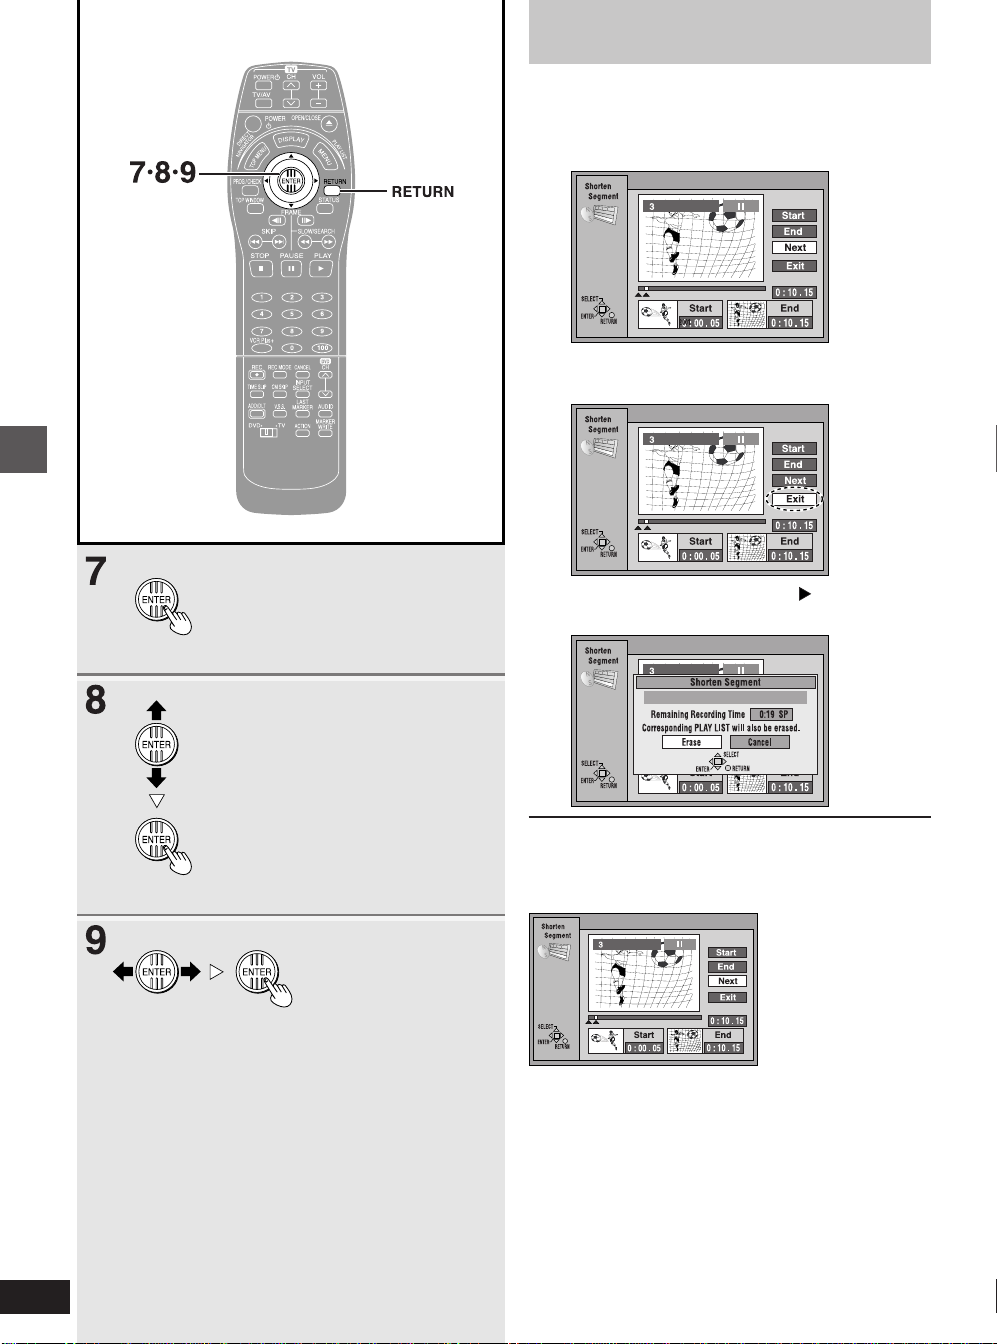
Advanced operations
Using the direct navigator
7 Use search functions such as fast-
forward and slow-motion to find the
end point of the part you want to erase
and press [ENTER].
8 Use the joystick [▲, ▼] to select “Exit”
and press [ENTER].
9 Use the joystick [œ, ] to select
“Erase” and press [ENTER].
64
RQT6035
■ To stop partway through
Press [RETURN] or select “Cancel” and press [ENTER] in step 9.
■ To erase another part of the same program
Select “Next” after step 7 and press [ENTER], then repeat steps 9,
6 and 7.
For your reference
●
You can respecify the start or end points. The points you specify
last are used.
●
You cannot specify an end point before a start point or a start point
after an end point.
●
You may not be able to specify start and end points within
3 seconds of each other.
●
You cannot specify start and end points if you have recorded still
pictures on other equipment.
●
The unit pauses play when the end of the program is reached during this procedure.
●
The disc’s available recording time may not increase after erasing
short parts of programs.
●
You cannot erase parts of protected programs.
●
Play lists created with the erased part are also erased.
Page 65
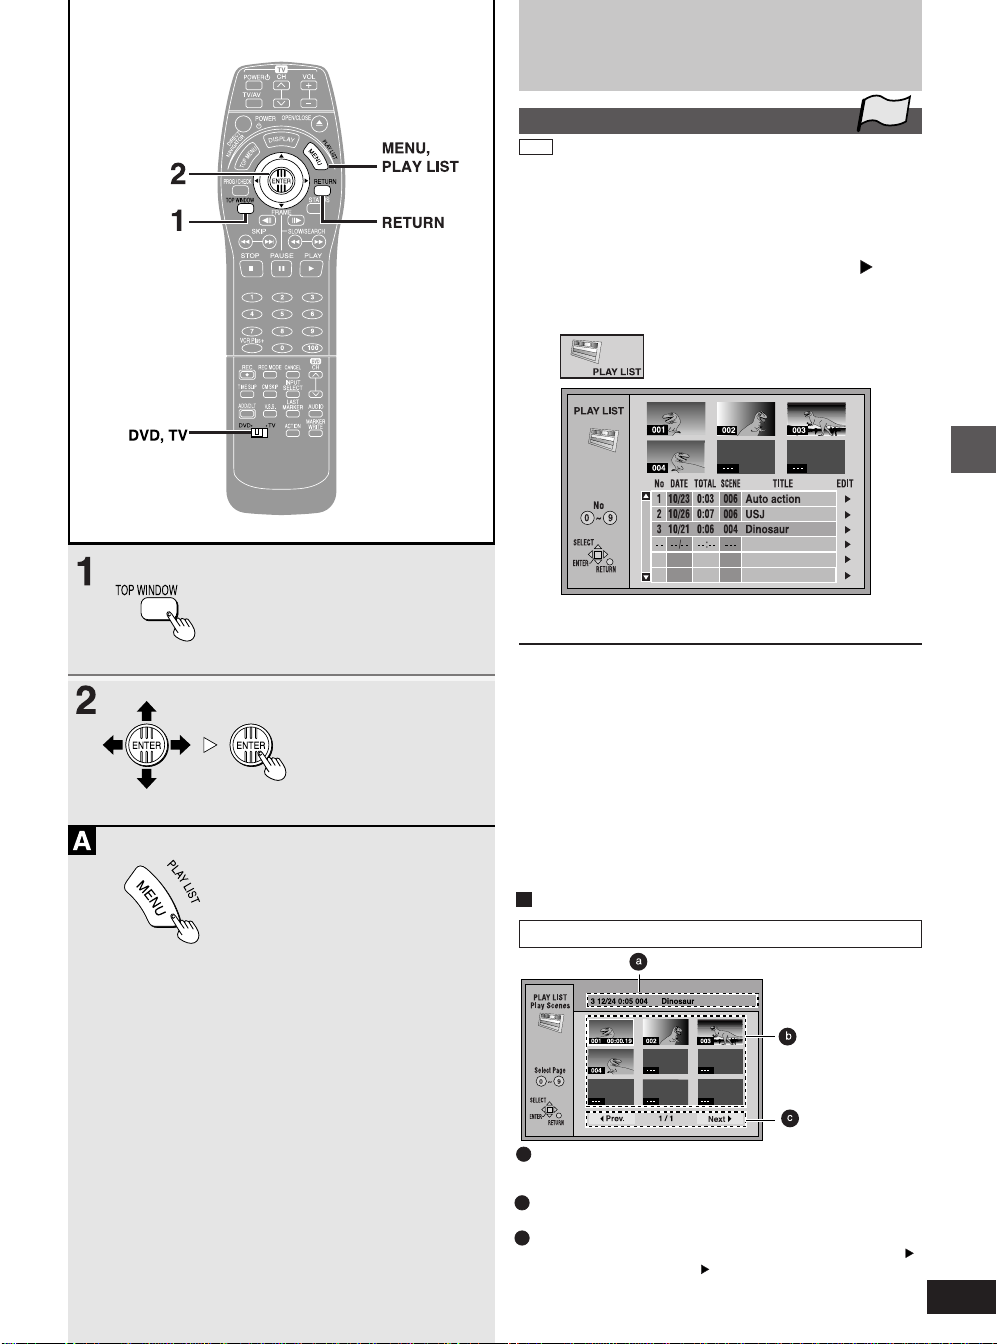
Using play lists to edit
programs
Displaying play lists
RAM
Preparation
●
Switch [DVD, TV] to “DVD”.
●
Insert a disc you have recorded on.
While stopped
1
TOP
Press [TOP WINDOW].
2 Use the joystick [▲, ▼, œ, ] to
select “PLAY LIST” and press
[ENTER].
The play list screen appears. Scenes are not displayed if you
have not yet created a play list with the disc.
■ To clear the play list screen
Press [MENU, PLAY LIST] or [RETURN].
The screen returns to the state it was in before you called up the play
list.
■ What you can do with the play list screen
●
Create play lists (➡ page 66)
●
Play play lists (➡ page 67)
●
Select a scene to play (➡ page 68)
●
Add, move, re-edit, and erase scenes (➡ pages 68–71)
●
Copy play lists (➡ page 72)
●
Erase play lists (➡ page 72)
●
Give play lists titles (➡ page 73)
●
Check a play list’s contents (➡ page 74)
For your reference
A You can also display the play list by pressing [MENU, PLAY LIST].
Advanced operations
About the play list scene screen
a Play list information
This shows the play list number, date of creation (month/date), total
play time, the number of scenes it contains, and title (if entered).
b Scenes
9 scenes can be shown on a page.
c Turning pages
If there are more than nine scenes, use the joystick [▲, ▼, œ, ]
to select “œ Prev.” or “Next ” and press [ENTER] to move to the
previous page or next page. You can also enter the three digits
with the numbered buttons (➡ page 8).
65
RQT6035
Page 66
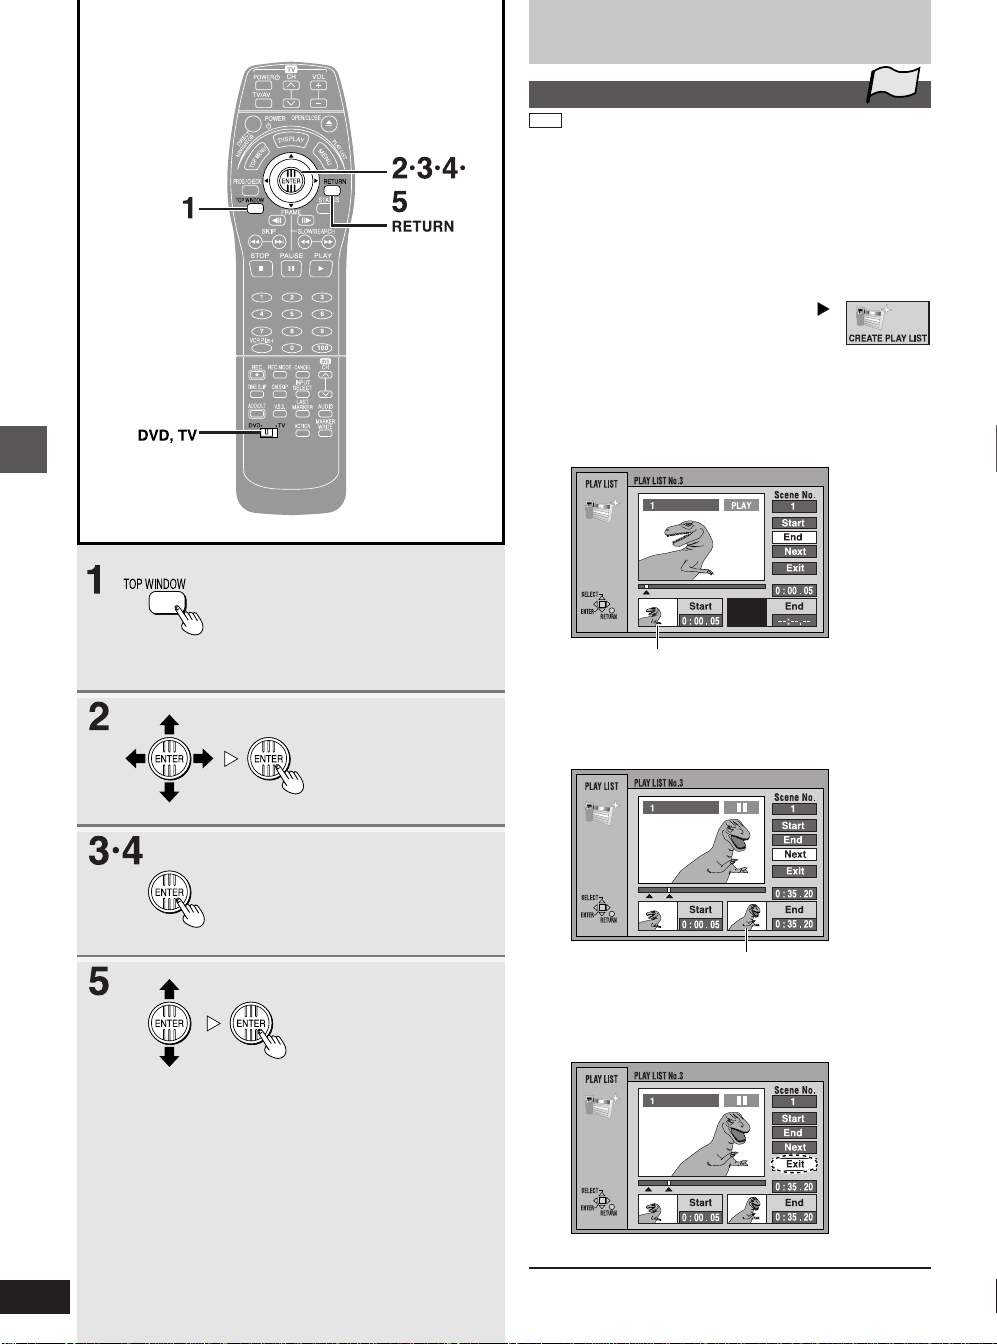
Using play lists to edit programs
Advanced operations
Creating play lists
RAM
You can specify start and end points to create a scene, then specify
the order in which these scenes are played. These scenes are not
recorded separately so this doesn’t use up much of the disc’s capacity.
Preparation
●
Switch [DVD, TV] to “DVD”.
●
Insert a disc you have recorded on.
TOP
1 While stopped
Press [TOP WINDOW].
2 Use the joystick [▲, ▼, œ, ]
to select “CREATE PLAY
LIST” and press [ENTER].
3 Use search functions such as
fast-forward and slow-motion to find
the start point of the scene and press
[ENTER].
A thumbnail image of the start point appears.
4 Use search functions such as
fast-forward and slow-motion to find
the end point of the scene and press
[ENTER].
66
RQT6035
A thumbnail image of the end point appears.
■ To specify another scene
Select “Next” and press [ENTER], then repeat steps 3 and 4.
5 Use the joystick [▲, ▼] to select “Exit”
and press [ENTER].
The play lists screen appears.
■ To stop partway through
Press [RETURN].
Page 67
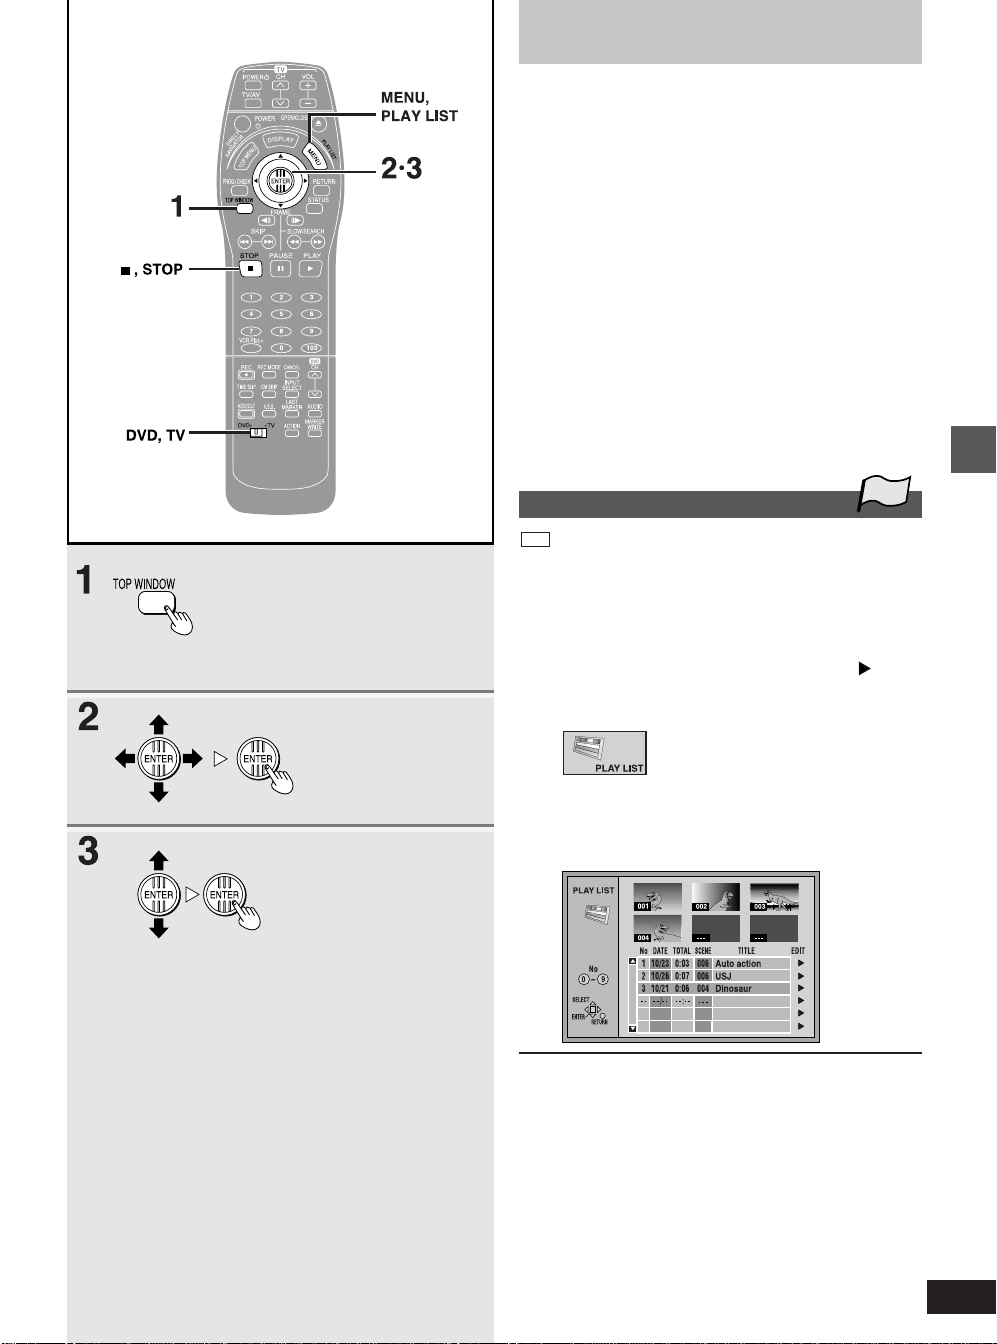
Using play lists to edit programs
■ To clear the play list screen
Press [MENU, PLAY LIST].
The screen returns to the state it was in before you called up the play
list.
For your reference
●
One disc can have a maximum of 99 play lists and 999 scenes.
These limits may be reduced under some conditions.
●
You can respecify the start or end points. The points you specify
last are used.
●
You cannot specify an end point before a start point or a start point
after an end point.
●
If you specify an end point but not a start point, the unit determines
the beginning of the program as the start point. Similarly, if you
specify a start point but not an end point, the unit determines the
end of the program as the end point.
●
You cannot specify start and end points if you have recorded still
pictures on other equipment.
●
The unit pauses play when the end of the last program on the disc is
reached during this procedure.
●
You cannot create or edit play lists if Disc Protection in DISC
SETTING is On (➡ page 52).
●
You can not create or edit play lists if the disc is protected with the
write-protect tab. Release this before operation (➡ page 99).
Playing play lists
RAM
Preparation
●
Switch [DVD, TV] to “DVD”.
●
Insert a disc you created play lists on.
TOP
1 While stopped
Press [TOP WINDOW].
2 Use the joystick [▲, ▼, œ, ] to
select “PLAY LIST” and press
[ENTER].
Advanced operations
3 Use the joystick [▲, ▼] to select the
play list you want to play and press
[ENTER].
All the scenes in the play list are played.
■ To stop play list play
Press [■, STOP].
The play list appears.
For your reference
●
You can also display the play list screen by pressing [MENU,
PLAY LIST] at step 1.
●
You can fast-forward, rewind, pause, and slow-motion while playing
scenes just as you can during normal play.
●
You can also select play lists from the list in step 3 by entering a
2-digit number with the numbered buttons (➡ page 8) and pressing
[ENTER].
If you enter a number larger than the total number of play lists, the
last play list is selected.
●
You can
display the
play lists after
the sixth one
by moving the
joystick [▼].
67
RQT6035
Page 68
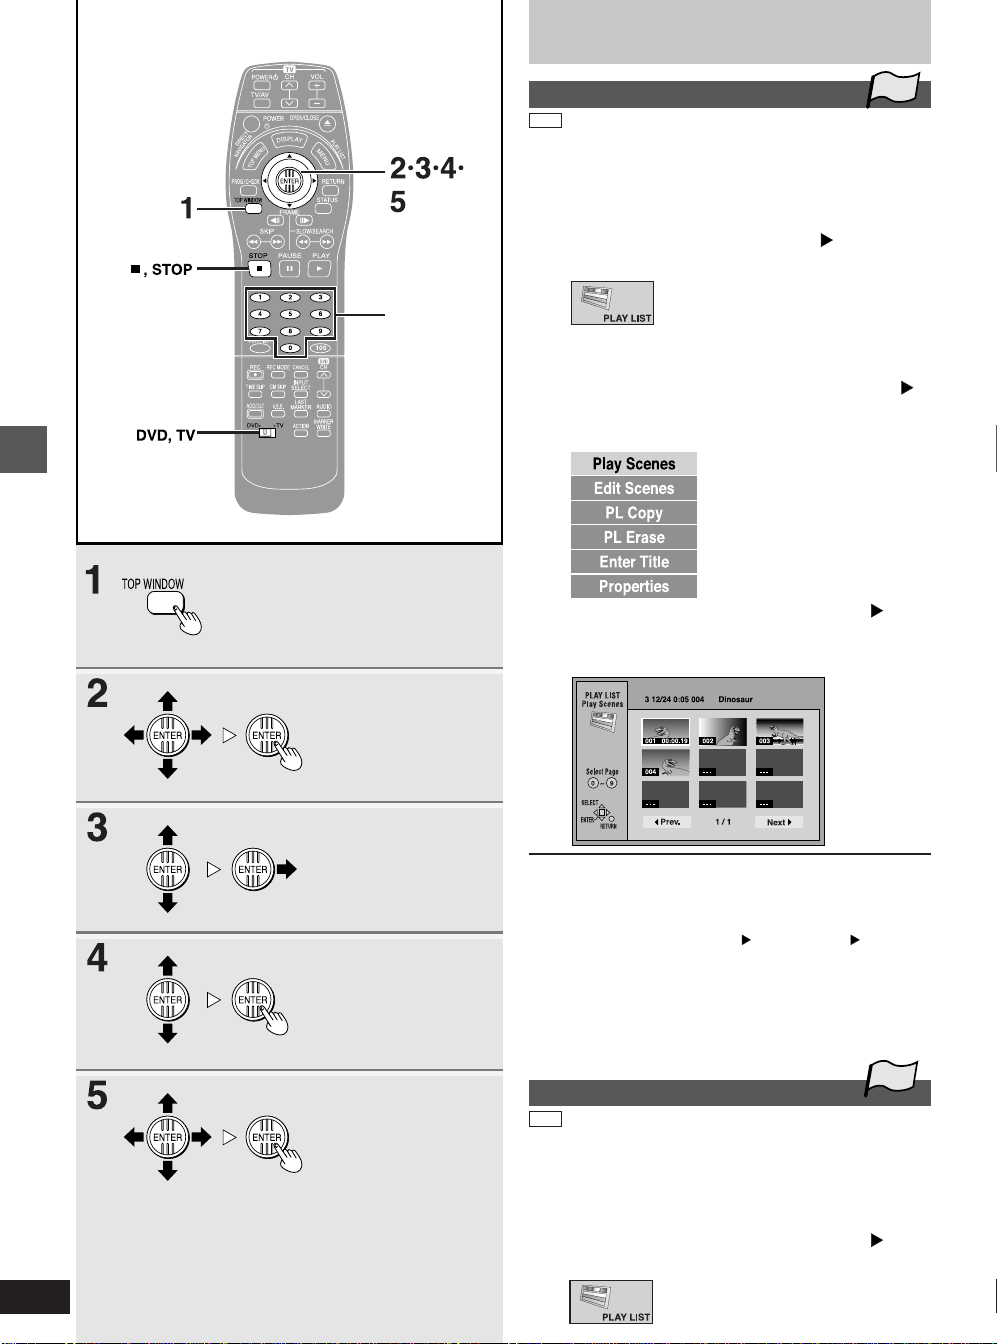
Using play lists to edit programs
Advanced operations
Numbered
buttons
Playing play list scenes
RAM
Preparation
●
Switch [DVD, TV] to “DVD”.
●
Insert a disc you created play lists on.
1 While stopped
Press [TOP WINDOW].
2
Use the joystick [▲, ▼, œ,
“PLAY LIST” and press [ENTER].
3 Use the joystick [▲
play list that contains the scene you
want to play and use the joystick [ ].
4 Use the joystick [▲
,
Scenes” and press [ENTER].
5 Use the joystick [▲
select the scene you want to play and
press [ENTER].
,
▼] to select the
▼] to select “Play
, ▼, œ,
●
TOP
] to select
] to
The scene you
select is
played.
68
RQT6035
■ To stop scene play
Press [■, STOP].
The scene list appears.
■ To show scene 10 and later
œœ
In step 5, use the joystick [▲, ▼
[ENTER].
For your reference
●
You can fast-forward, rewind, pause, and slow-motion while playing
scenes just as you can during normal play.
●
You can also select a page of scenes in step 5 by entering a 3-digit
number with the numbered buttons (➡ page 8) and pressing
[ENTER].
Editing play list scenes
RAM
Preparation
●
Switch [DVD, TV] to “DVD”.
●
Insert a disc you created play lists on.
,
,
œ
] to select “Next ” and press
œœ
TOP
1 While stopped
Press [TOP WINDOW].
2
Use the joystick [▲, ▼, œ, ] to
select “PLAY LIST” and press [ENTER].
(Continued on next page)
Page 69
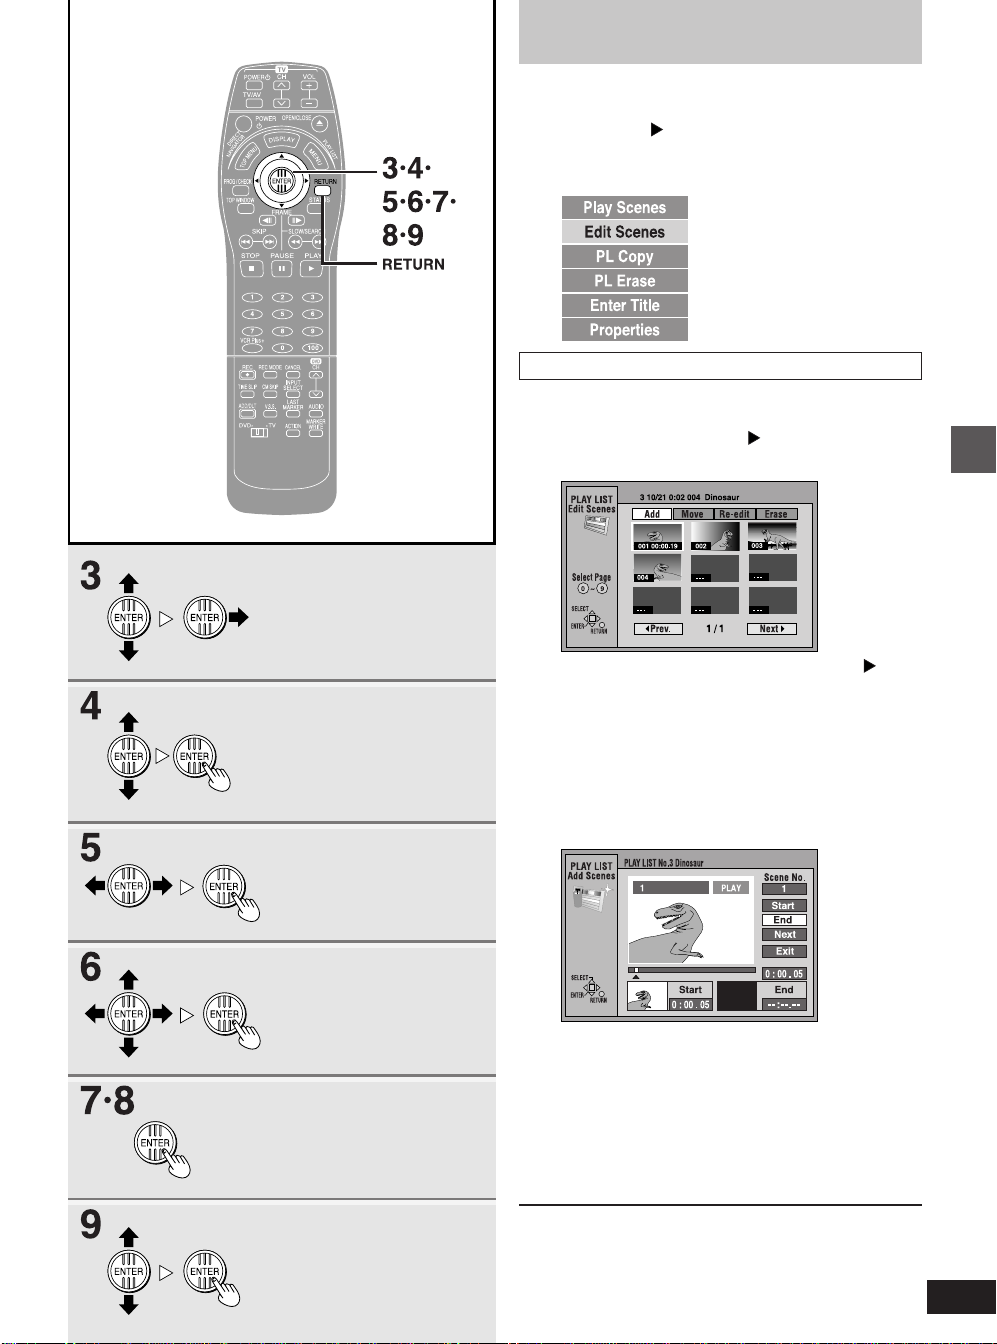
Using play lists to edit programs
3 Use the joystick [▲, ▼] to select the
play list you want to edit and use the
joystick [ ].
4 Use the joystick [▲, ▼] to select “Edit
Scenes” and press [ENTER].
Adding scenes to a play list
Preparation
Do steps 1 to 4 of “Editing play list scenes” (➡ page 68 and above).
5 Use the joystick [œ, ] to select “Add”
and press [ENTER].
6 Use the joystick [▲, ▼, œ, ] to
select the scene after the position you
want to add the scene and press
[ENTER].
7 Use search functions such as fast-
forward and slow-motion to find the
start point of the scene and press
[ENTER].
8 Use search functions such as fast-
forward and slow-motion to find the
end point of the scene and press
[ENTER].
9 Use the joystick [▲, ▼] to select “Exit”
and press [ENTER].
The screen from step 5 reappears.
■ To stop partway through
Press [RETURN].
■ To add other scenes
! Use the joystick [▲, ▼] after step 8 to select “Next” and press
[ENTER].
@ Repeat steps 7 and 8.
Advanced operations
69
RQT6035
Page 70
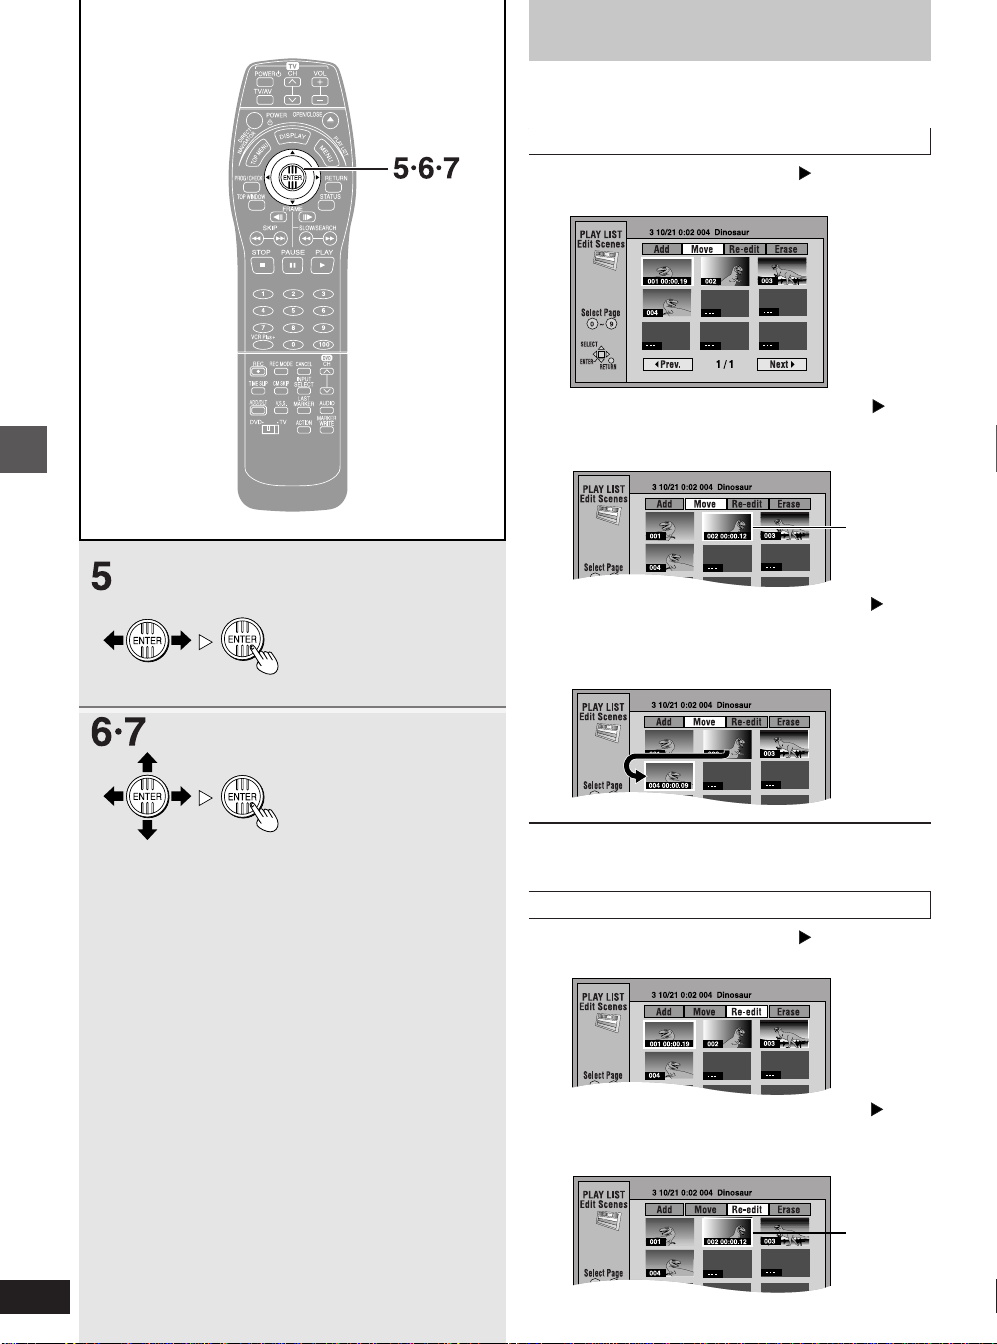
Advanced operations
Using play lists to edit programs
Preparation
Do steps 1 to 4 of “Editing play list scenes” (➡ pages 68 and 69).
Moving a scene
5 Use the joystick [œ, ] to select
“Move” and press [ENTER].
6 Use the joystick [▲, ▼, œ, ] to
select the scene you want to move
and press [ENTER].
Selected
scene
7 Use the joystick [▲, ▼, œ, ] to
select the scene currently in the position to which you want to move the
scene to and press [ENTER].
The scene you
selected in step
6 moves to the
position in front
of the scene
selected.
70
RQT6035
■ To move another scene
Repeat steps 6 and 7.
To re-edit a play list scene
5 Use the joystick [œ, ] to select
“Re-edit” and press [ENTER].
6 Use the joystick [▲, ▼, œ, ] to
select the scene you want to re-edit
and press [ENTER].
Selected
scene
(Continued on next page)
Page 71
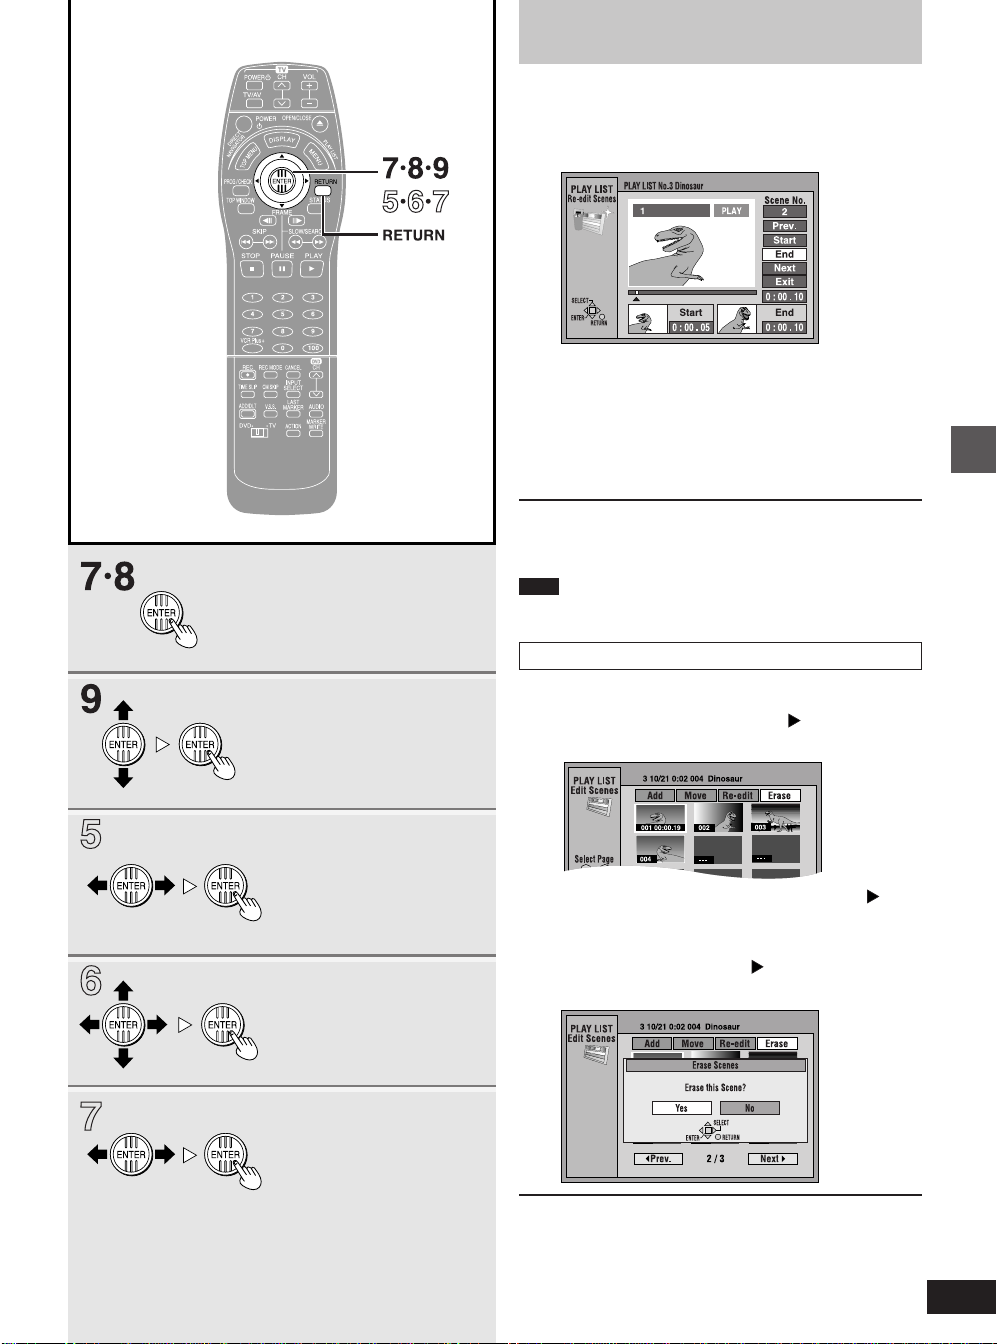
Using play lists to edit programs
7 Use search functions such as fast-
forward and slow-motion to find the
start point of the scene and press
[ENTER].
8 Use search functions such as fast-
forward and slow-motion to find the
end point of the scene and press
[ENTER].
9 Use the joystick [▲, ▼] to select “Exit”
and press [ENTER].
■ To re-edit another scene
! Use the joystick [▲, ▼] after step 8 to select “Prev.” or “Next” and
press [ENTER] until you find the scene you want to reedit.
@ Repeat steps 7 and 8 to continue re-editing other scenes.
Note
You cannot specify an end point before a start point or a start point
after an end point.
Erasing a scene from a play list
Preparation
Do steps 1 to 4 of “Editing play list scenes” (➡ pages 68 and 69).
55 Use the joystick [œ, ] to select
“Erase” and press [ENTER].
Advanced operations
66 Use the joystick [▲, ▼, œ, ] to
select the scene you want to erase
and press [ENTER].
77 Use the joystick [œ, ] to select “Yes”
and press [ENTER].
The selected
scene is erased
from the play
list.
■ To erase other scene
Repeat steps 6 and 7.
■ To stop partway through
In step 7, either select “No” and press [ENTER] or press [RETURN].
For your reference
The play list itself is erased if you erase all the scenes in it.
71
RQT6035
Page 72
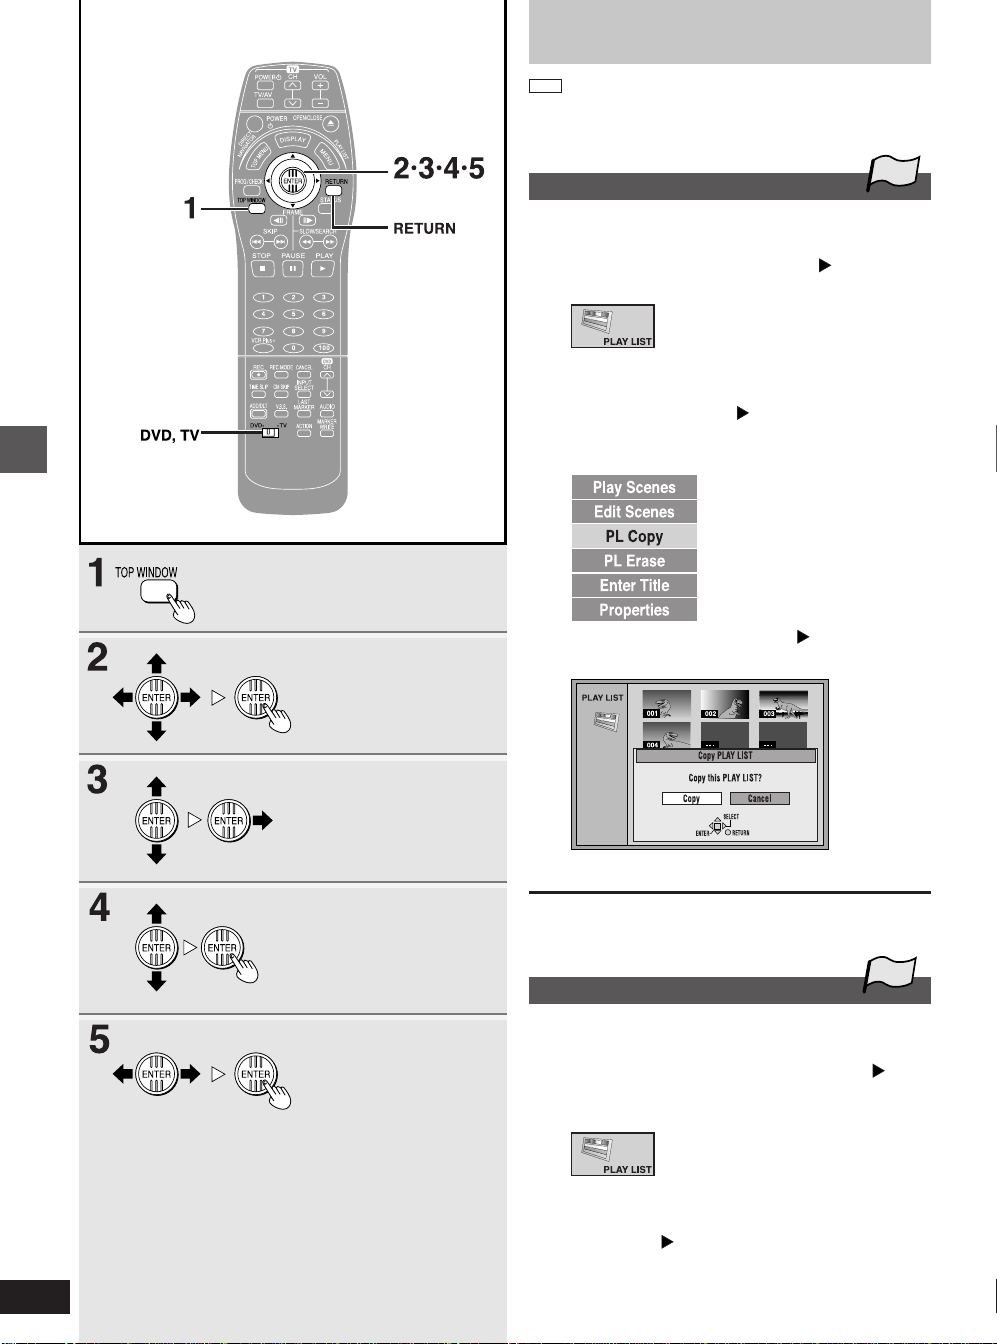
Using play lists to edit programs
RAM
Preparation
●
Switch [DVD, TV] to “DVD”.
●
Insert a disc you created play lists on.
Copying play lists
TOP
1 While stopped
Press [TOP WINDOW].
2 Use the joystick [▲, ▼, œ, ] to select
“PLAY LIST” and press [ENTER].
3 Use the joystick [▲, ▼] to select the
play list you want to copy and then
use the joystick [ ].
4 Use the joystick [▲, ▼] to select
“PL Copy” and press [ENTER].
Advanced operations
72
RQT6035
5 Use the joystick [œ, ] to select
“Copy” and press [ENTER].
The copied play list appears at the bottom of the list.
■ To stop partway through
Is step 5, either select “Cancel” and press [ENTER] or press
[RETURN].
TOP
Erasing a play list
1 While stopped
Press [TOP WINDOW].
2 Use the joystick [▲, ▼, œ, ] to
select “PLAY LIST” and press
[ENTER].
3 Use the joystick [▲, ▼] to select the
play list you want to erase and use the
joystick [ ].
(Continued on next page)
Page 73
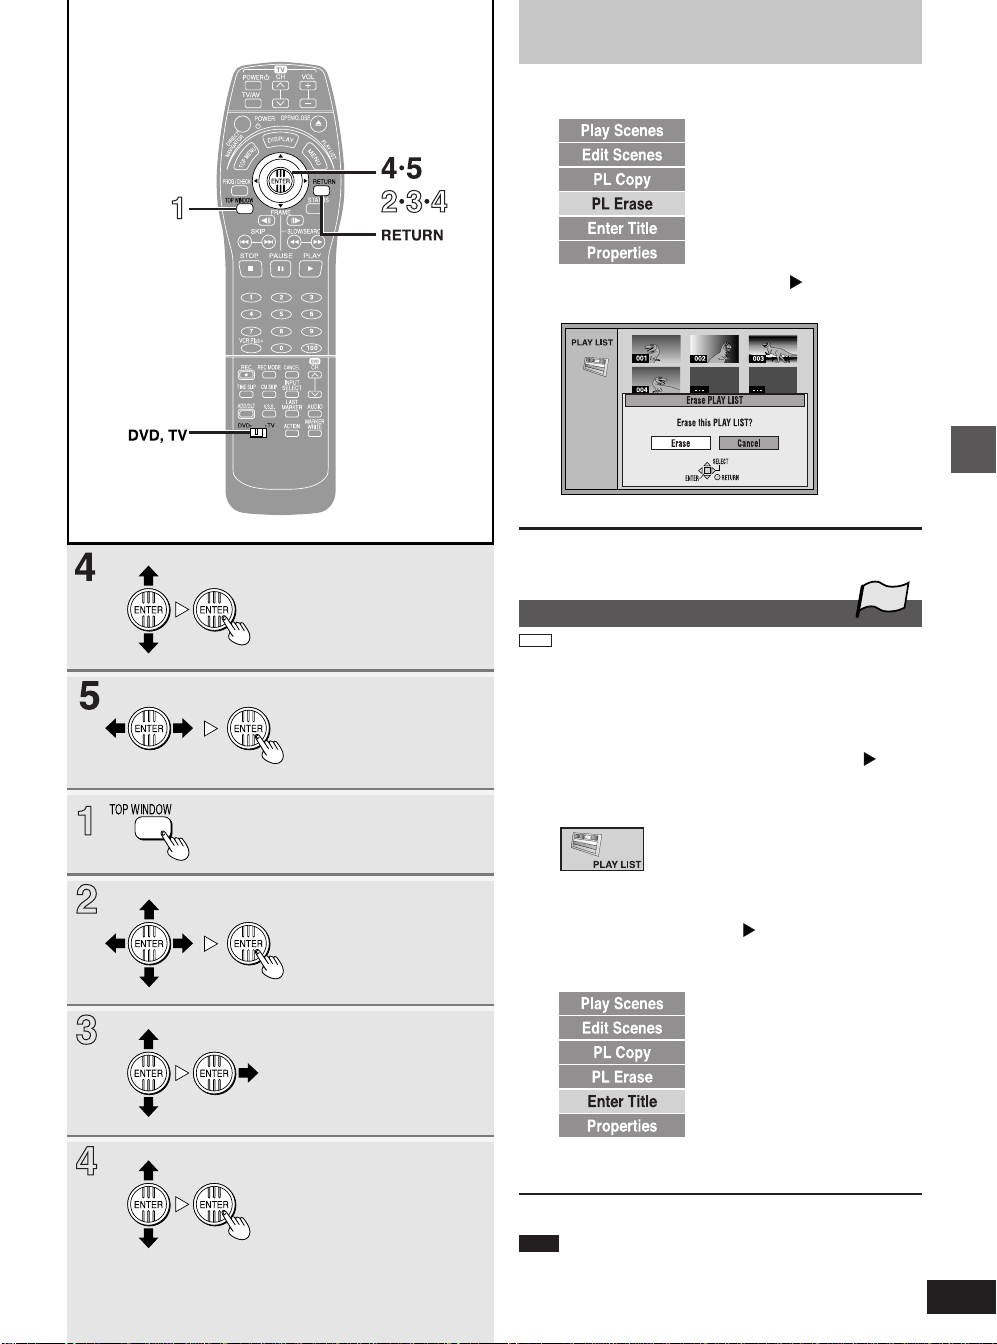
Using play lists to edit programs
4 Use the joystick [▲, ▼] to select
“PL Erase” and press [ENTER].
5 Use the joystick [œ, ] to select
“Erase” and press [ENTER].
The play list is erased.
■ To stop partway through
In step 5, either select “Cancel” and press [ENTER] or press
[RETURN].
Titling play lists
RAM
Preparation
●
Switch [DVD, TV] to “DVD”.
●
Insert a disc you created play lists on.
TOP
11 While stopped
Press [TOP WINDOW].
22 Use the joystick [▲, ▼, œ, ] to
select “PLAY LIST” and press
[ENTER].
Advanced operations
33 Use the joystick [▲, ▼] to select the
play list you want to title and then
move the joystick [ ].
44 Use the joystick [▲, ▼] to select
“Enter Title” and press [ENTER].
55 Enter the title.
Enter titles as with disc titling (➡ page 51).
For your reference
You can give play lists on DVD-RAM titles of up to 64 characters.
Note
Even if you have entered up to the maximum number of characters,
characters you enter after the position marked
field and the two characters immediately prior to the mark will be replaced with “
● ●
” when displayed in the play list screen.
with “▼” in th
e title
73
RQT6035
Page 74
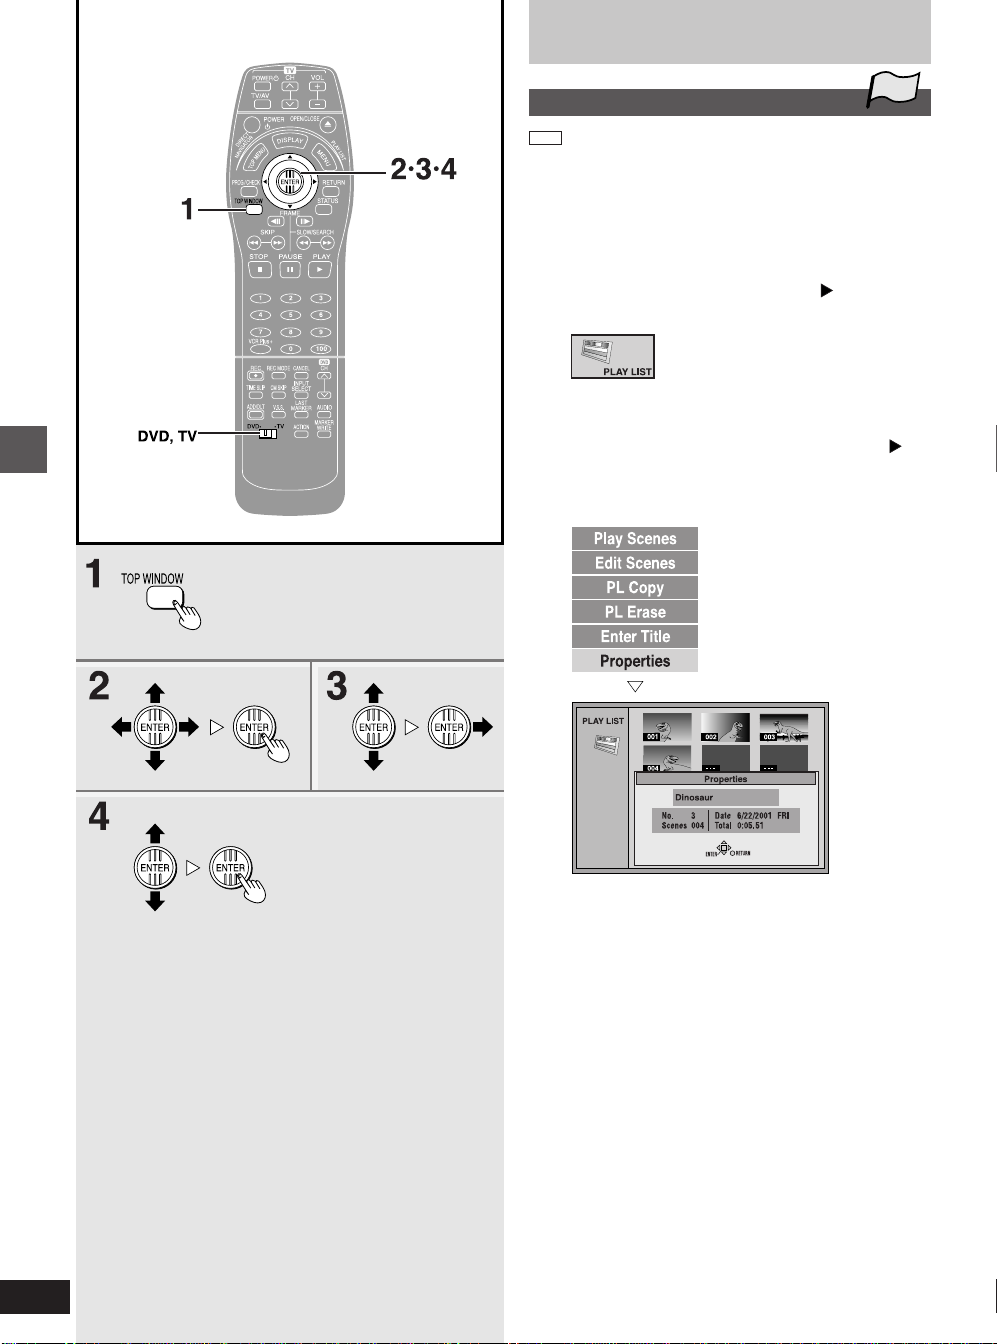
Using play lists to edit programs
Advanced operations
Checking play list contents
RAM
Preparation
●
Switch [DVD, TV] to “DVD”.
●
Insert a disc you created play lists on.
TOP
1 While stopped
Press [TOP WINDOW].
2 Use the joystick [▲, ▼, œ, ] to select
“PLAY LIST” and press [ENTER].
3 Use the joystick [▲, ▼] to select the
play list whose contents you want to
check and then use the joystick [ ].
4 Use the joystick [▲, ▼] to select
“Properties” and press [ENTER].
When you press [ENTER]
You can confirm the play list title (if entered), play list number,
date of creation, total number of scenes and total time.
74
RQT6035
Page 75
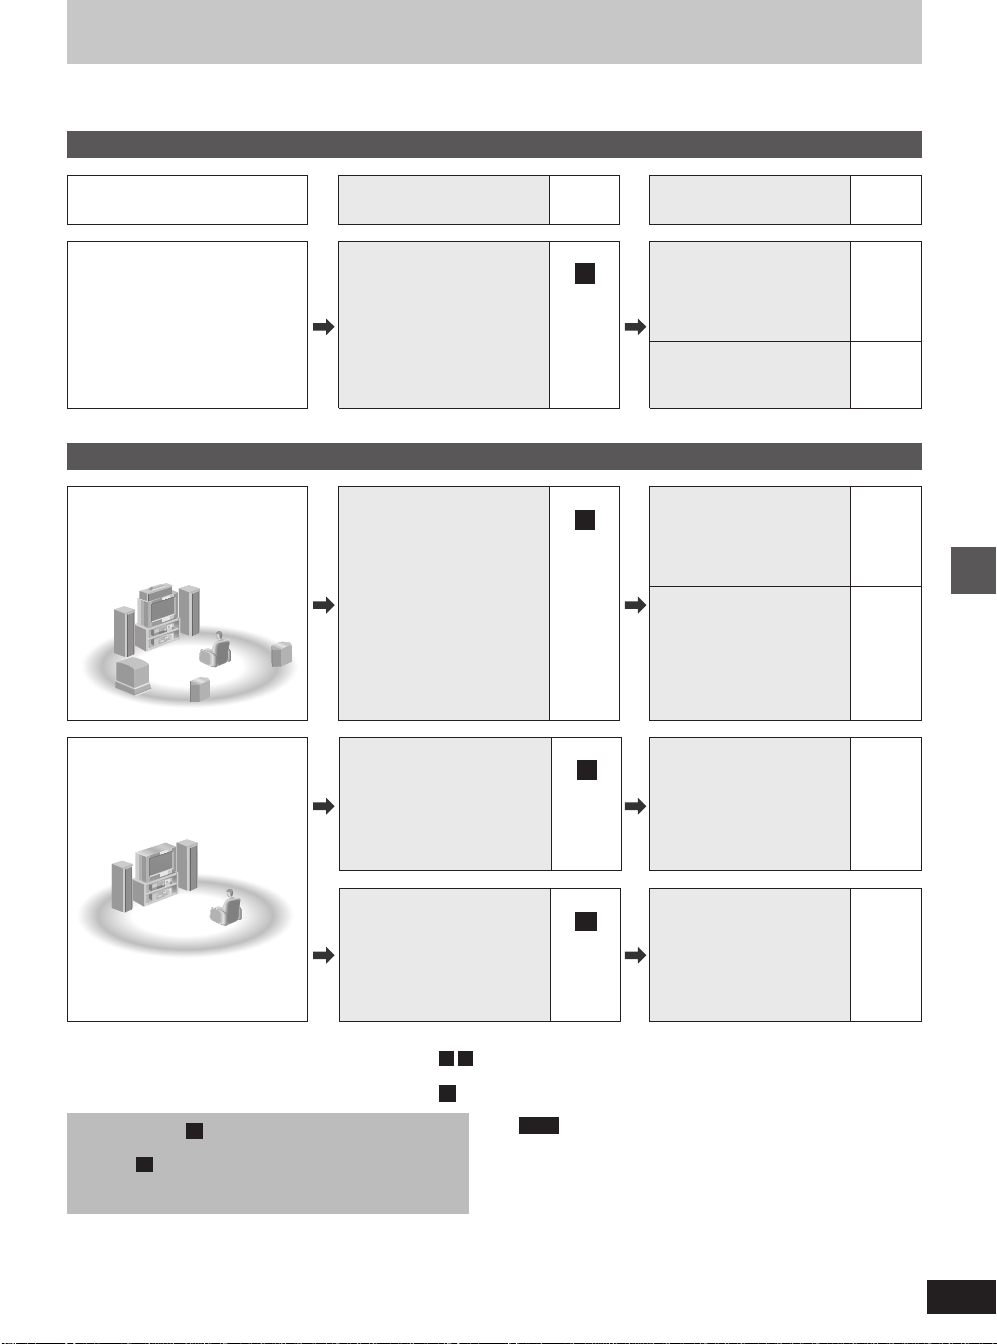
Expanding your home theater system
Refer to the relevant pages for details.
Enjoying CATV broadcasts
What you want to do
Enjoying CATV
broadcasts
Enjoying more powerful sound
Enjoying 5.1-channel
surround sound with
Dolby Digital and DTS
Enjoying stereo or
Dolby Pro Logic
How to do it
Connect a cable TV box. 76
Digital connection
Connect to an amplifier with
built-in decoders.
Analog connection
Connect to an analog amplifier
or system component.
Reference
pages
Settings
Tune to channels correctly.
Reference
pages
16, 18, 91
A
Change the necessary
settings on the equipment you
have connected.
78
B
ACTION settings—Audio
●
Set PCM Down Conversion
to On.
●
Set Dolby Digital and DTS
to suit the equipment.
Change speaker settings on
the amplifier.
—
86
—
Home Theater
78
C
ACTION settings—Audio
●
Set PCM Down Conversion
to Off.
86
Digital connection
Connect to a digital amplifier or
system component.
■ Other uses
Record to digital recording equipment or cassette deck ( B C
➡ page 78)
Record from a video cassette recorder (➡ pages 49 and 79 D )
Use connection C to enjoy discs recorded with a sampling
frequency of 96 kHz. Sound will not be output if you use connection B and set PCM Down Conversion to “Off” due to
copy protection.
(Convert the signal to 48 kHz to enjoy this type of audio.)
78
B
For your reference
●
The equipment connections described are examples.
●
Before connection, turn off all equipment and read the appropriate
operating instructions.
Note
You can enjoy Dolby Digital in stereo with this unit alone.
(This unit does not have a DTS decoder.)
ACTION settings—Audio
●
Set PCM Down Conversion
to On.
●
Set Dolby Digital to PCM.
●
Set DTS to Off.
86
75
RQT6035
Page 76
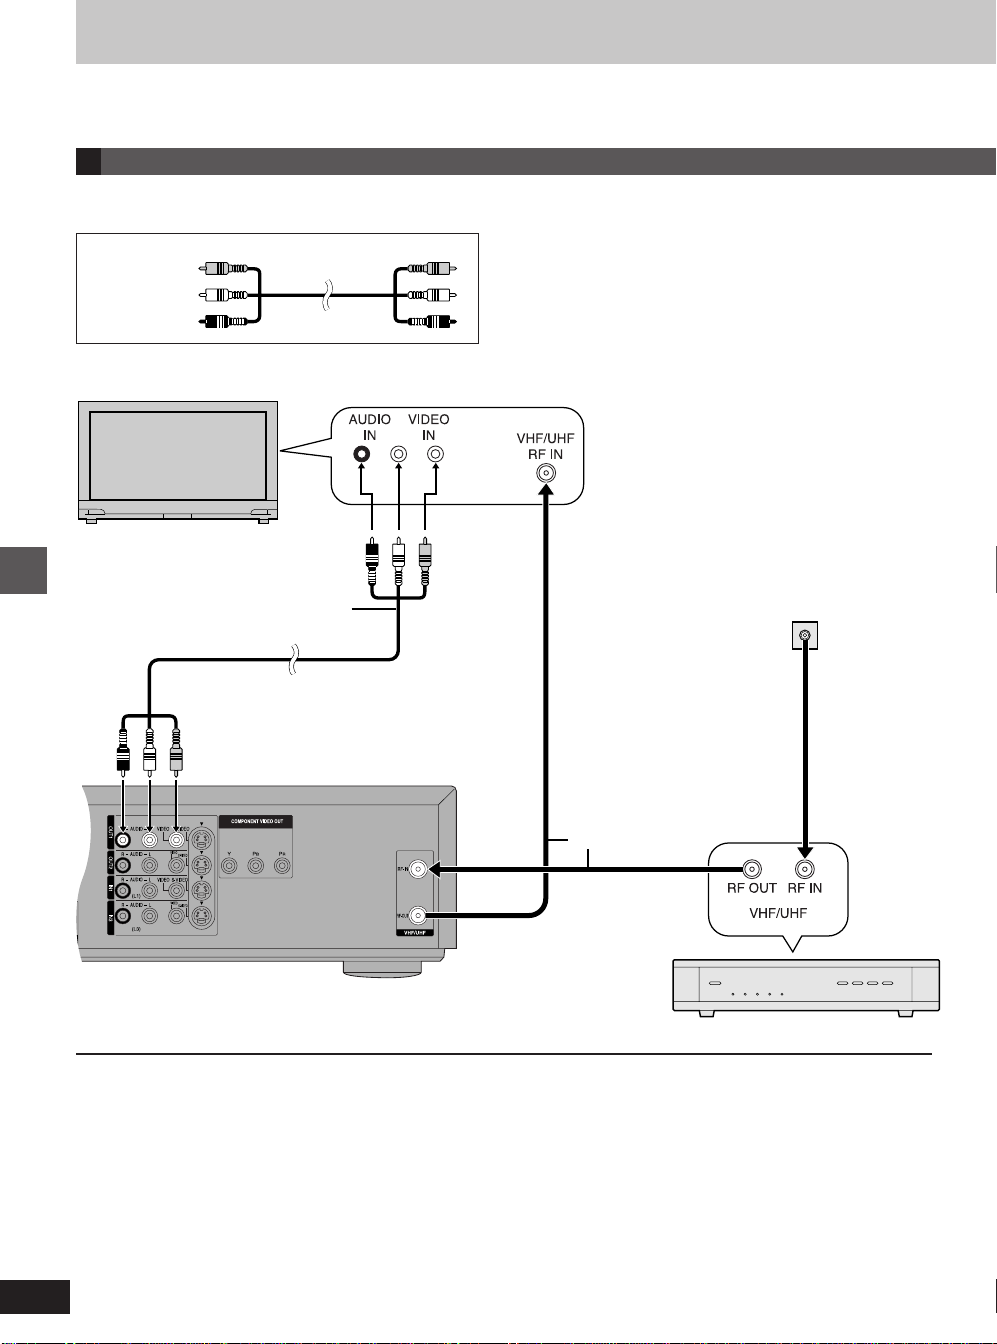
Expanding your home theater system
Select channel 3 or 4 to see the output from the cable TV box or DSS receiver. Select the appropriate video input if your television has more than
one.
Connecting a cable TV box
A
You need to have a cable TV box and a contract with a cable TV company to enjoy CATV broadcasts.
●
Consult your cable TV company for an appropriate cable TV box.
Audio/Video cable
Yellow (VIDEO)
White (L)
Red (R)
■ With a cable TV box
Television (not included)
To household
Audio/Video cable
(not included)
cable TV jack
Home Theater
Rear of this unit
You cannot
●
view channels other than the one selected when recording.
●
do a timer recording unless the channel is first selected on the cable TV box.
75 Ω coaxial cable
(not included)
Cable TV box
(not included)
76
RQT6035
Page 77
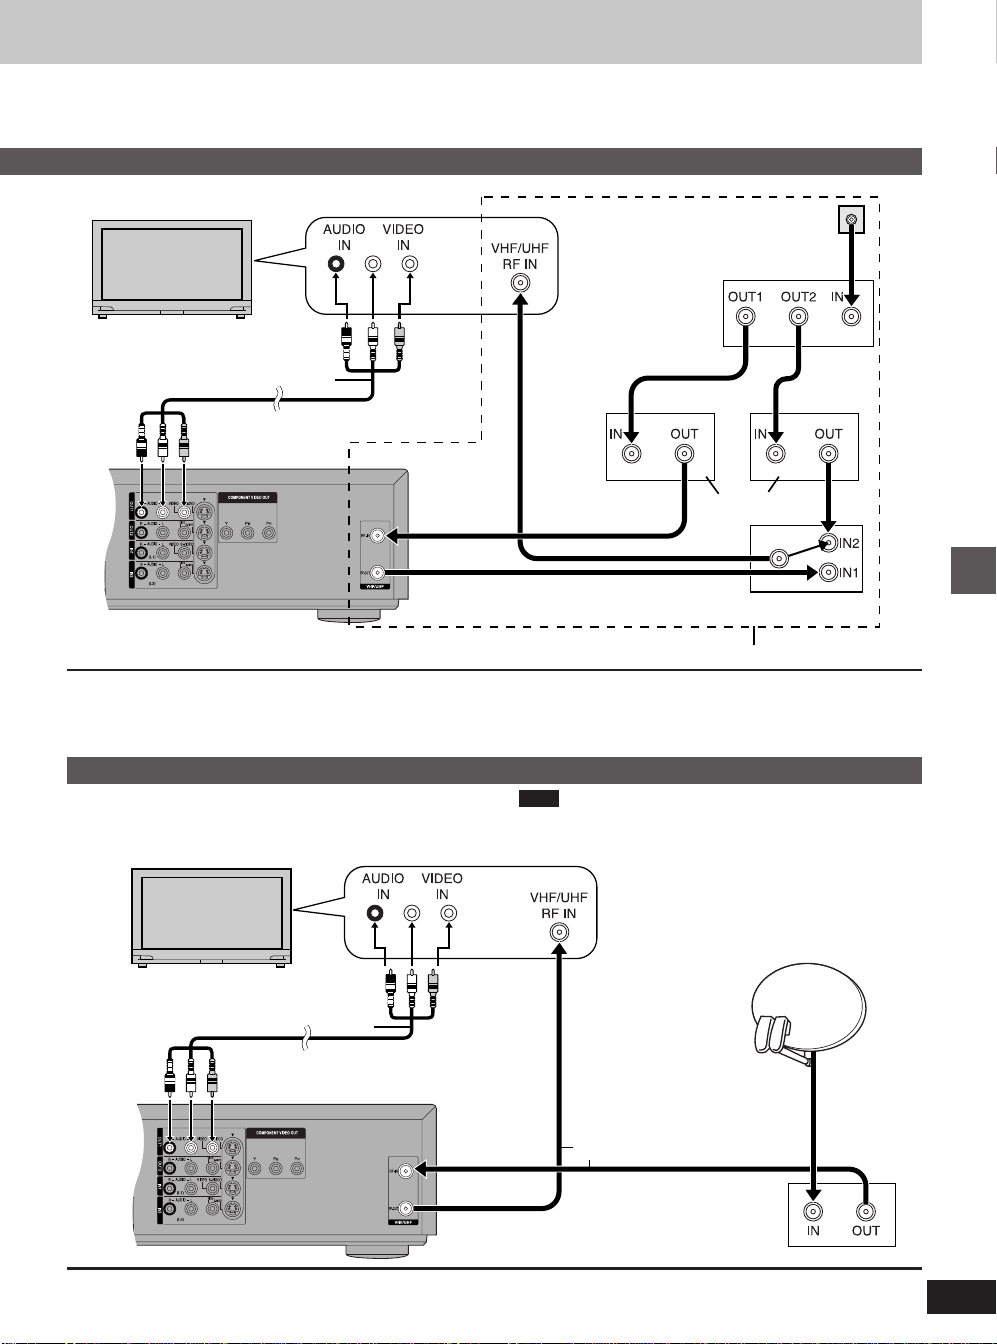
■ With two cable boxes
Television (not included)
Audio/Video cable (not included)
Rear of this unit
You can
●
record and view both scrambled and unscrambled channels if additional equipment is added. This connection requires: two cable TV
boxes, a switch box, and a 2-way splitter.
To household
cable TV jack
2-way splitter
(not included)
Cable TV box
(not included)
Switch box
(not included)
Connect with 75 Ω coaxial cables (not included)
You cannot
●
view channel other than the one selected when recording.
●
do a timer recording unless the channel is first selected on the cable
TV box.
Home Theater
Connecting a home satellite system (Dishnetwork/DSS)
Note
When a home satellite system (Dishnetwork/DSS) is connected,
auto channel program and auto time set may not operate properly.
Television (not included)
Audio/Video cable (not included)
Rear of this unit
You cannot
●
view channel other than the one selected when recording.
●
do a timer recording unless the channel is first selected on the DSS receiver.
Set the clock manually (➡ page 88).
Satellite TV
Dishnetwork/
DSS
75 Ω coaxial cable
(not included)
DSS receiver
(not included)
77
RQT6035
Page 78
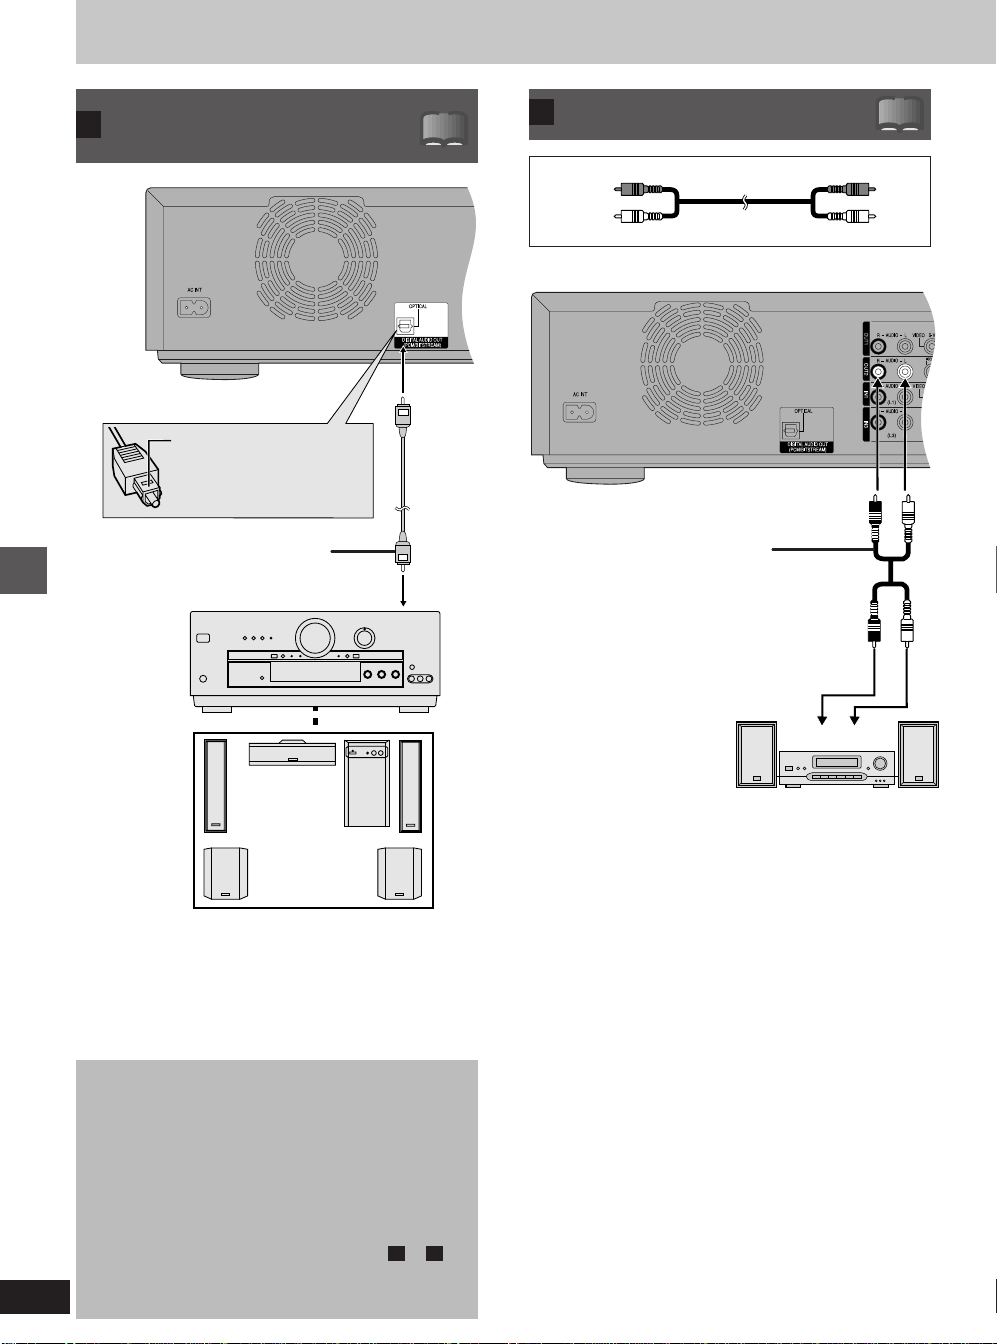
Expanding your home theater system
Connecting to a digital
A
amplifier or system
component
Rear of this unit
Amplifier or
system
component (with
or without
decoders)
(not included)
Home Theater
Speakers
(not included)
Example:
Six speakers
Insert fully, with this side facing
up. (Do not bend when
connecting.)
Optical digital audio cable
(not included)
To optical digital input
!?
Connecting an analog
C
amplifier or system component
Audio cable
Red (R)
White (L)
Rear panel of this unit
Audio cable
(not included)
2-channel analog amplifier or
system component
(not included)
!?
Audio input (L/R)
For your reference
●
Change the settings in the Audio ACTION menus (➡ page 83) to
suit the digital equipment you have connected.
If the equipment can decode Dolby Digital, set “Dolby Digital” to
“Bitstream” (factory setting).
If the equipment can decode DTS, set “DTS” to “Bitstream”.
●
The DTS decoder must be compatible with the signals recorded on
DVD.
You can record the digital signal directly onto digital recording
equipment.
The signals on DVDs will be converted to 48 kHz/16 bit linear
PCM.
When recording DVDs, ensure the following conditions are
met.
●
There is no copy guard recorded on the disc.
●
The recording equipment can handle a sampling frequency
of 48 kHz/16 bit.
If you want to use the synchro recording feature on your digital recording equipment and you use connection B or C to
record from CDs or video CDs, first pause at the point you
78
RQT6035
want to record from, activate the synchro feature, then restart
play on the unit.
■ To enjoy Dolby Pro Logic (➡ page 96)
You will also need to connect center and surround speakers in addition to the front speakers to enjoy surround sound. Read the instructions for the equipment for connection details. Turn V.S.S. off. Dolby
Pro Logic will not function correctly if V.S.S. is on.
Page 79
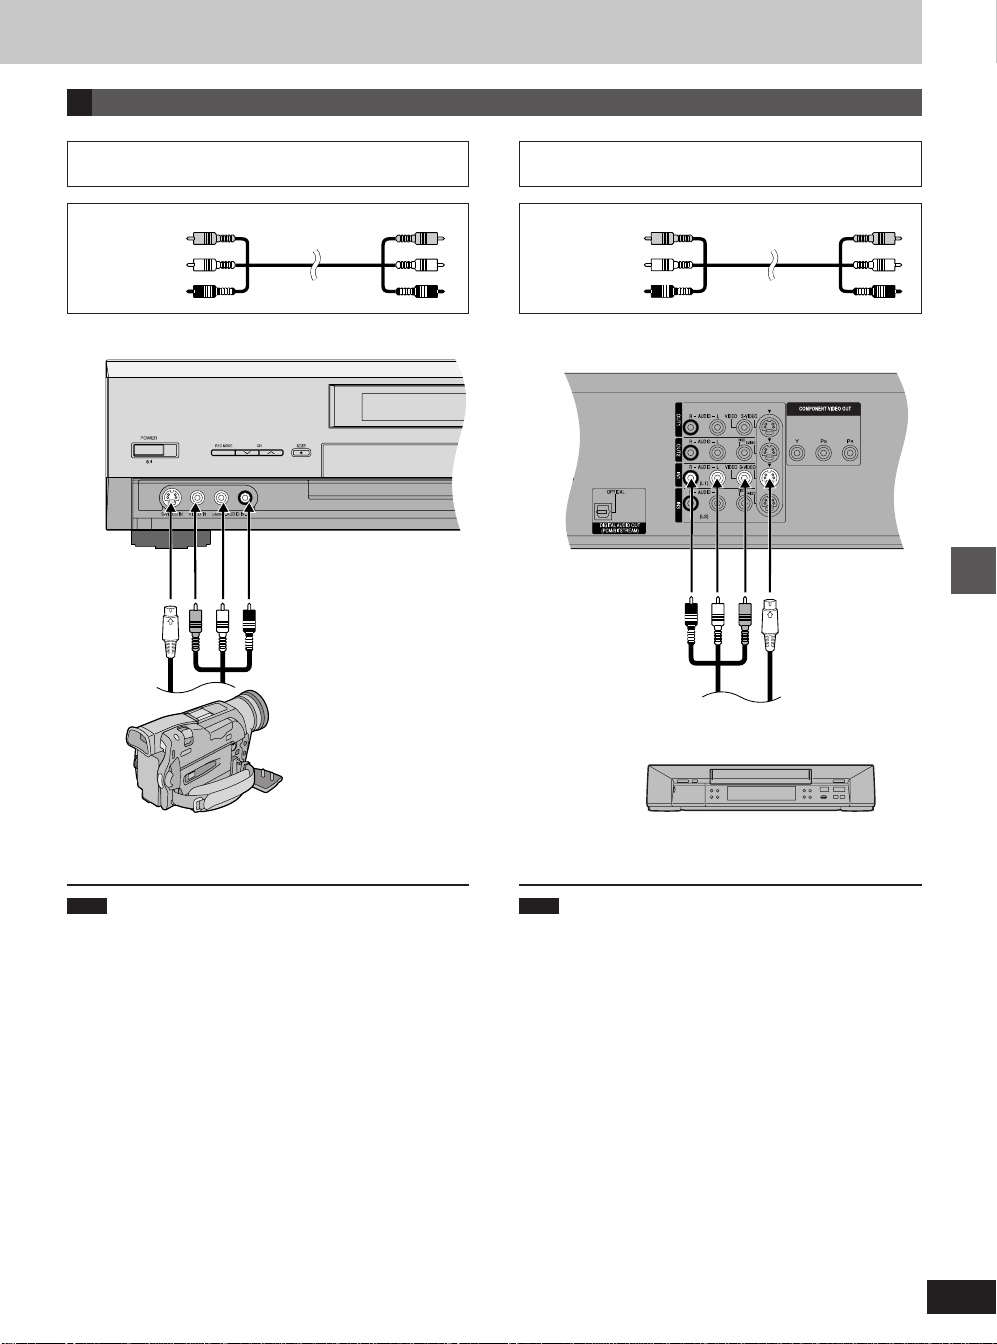
Connecting a video cassette recorder
D
When connecting to the L2 input terminals on
the front of the unit
Audio/Video cable
Yellow (VIDEO)
White (L)
Red (R)
S video cable
(not included)
Audio/Video cable
(not included)
Other playback equipment
Connect to the video and audio
output terminals.
When connecting to the input terminals on
the rear of the unit
Audio/Video cable
Yellow (VIDEO)
White (L)
Red (R)
Rear panel of this unit
Audio/Video cable
(not included)
Other playback equipment
Connect to the video and audio output terminals.
S video cable
(not included)
Home Theater
Note
If the audio output of the other equipment is monaural, connect to
L/MONO. (Both left and right channels are recorded when connected
through L/MONO.)
Note
If audio output on the other equipment is monaural, use a stereomonaural conversion cable (not included).
79
RQT6035
Page 80
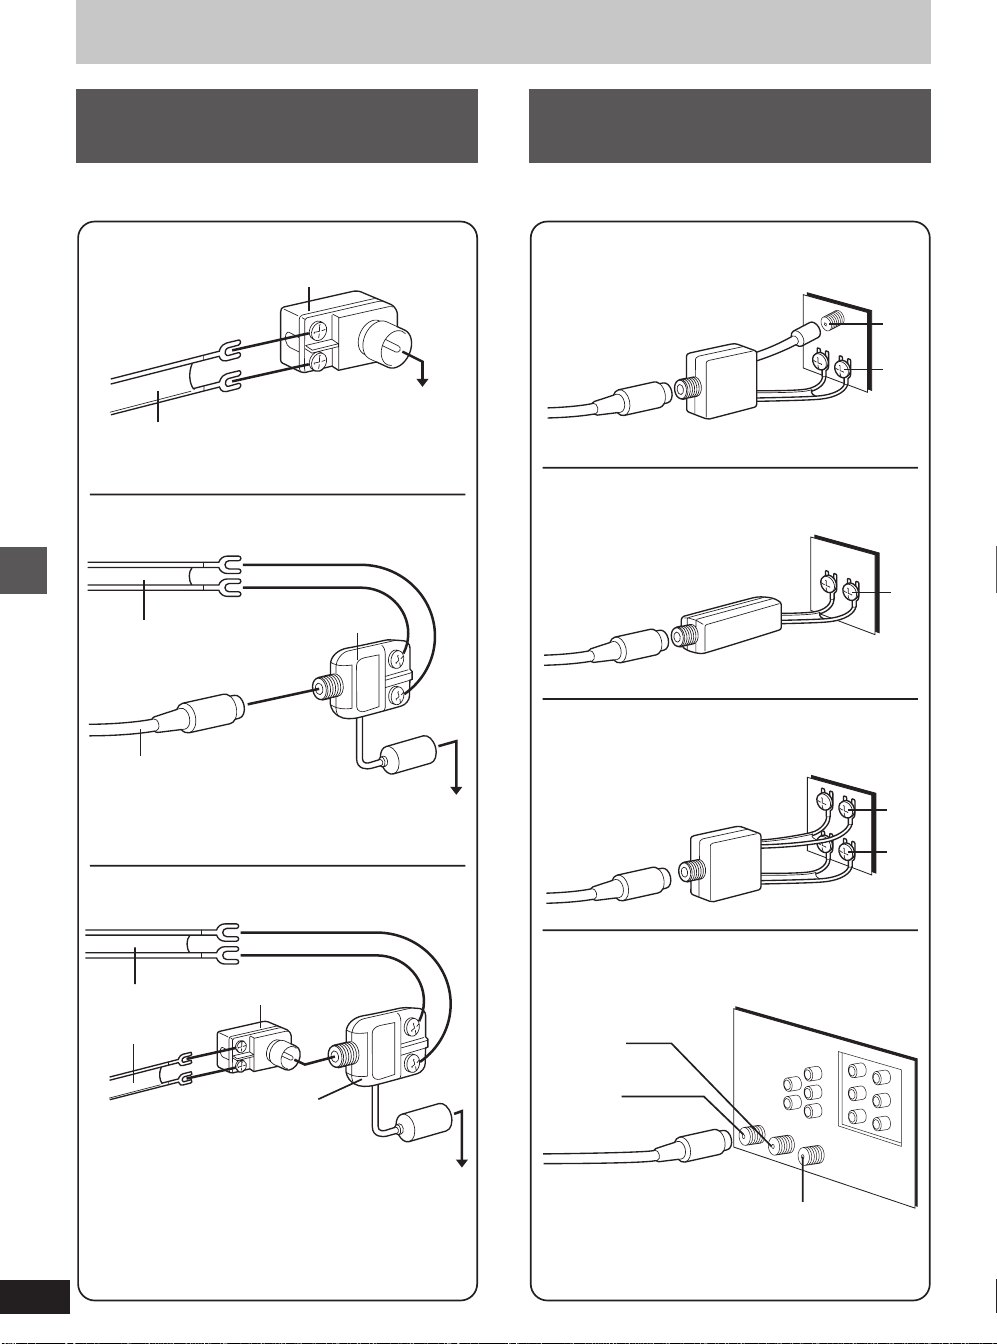
Expanding your home theater system
When you can’t directly connect
the antenna you disconnected from
your television to the unit
Check the type of antenna input on your television and make the
appropriate connection.
■ If it is a twin lead
300–75 Ω transformer
(not included)
from the antenna
To this unit’s
(Flat)
Twin lead
300 Ω cable
■ If there is a twin lead and a coaxial cable
from the antenna
(Flat)
Twin lead
300 Ω cable
VHF/UHF band mixer
(not included)
RF IN terminal
When you can’t directly connect
the included 75 Ω coaxial cable to
the television
Use the connection that suits the type of terminal.
■ If it is a screw & plug type terminal
VHF/UHF band separator
(not included)
75 Ω coaxial cable
■ If it is a screw type terminal
75–300 Ω transformer
(not included)
Television
VHF
UHF
Television
VHF
or
UHF
Home Theater
■ If there are two twin leads
from the antenna
●
If your television has both post and plug-type VHF
terminals, the post connection is recommended to minimize
signal loss.
80
RQT6035
(Round)
75 Ω coaxial cable
(Flat)
Twin lead
300 Ω cable
300–75 Ω transformer
(not included)
VHF/UHF band mixer
(not included)
To this unit’s
RF IN terminal
To this unit’s
RF IN terminal
■ If it is a double screw type terminal
Television
VHF/UHF band separator
(not included)
■ If it is a complex TV terminal
Television
Split out
ANT 1
ANT 2
●
Connect to one of the ANT terminals and select the same
antenna number on the television.
VHF
UHF
Page 81
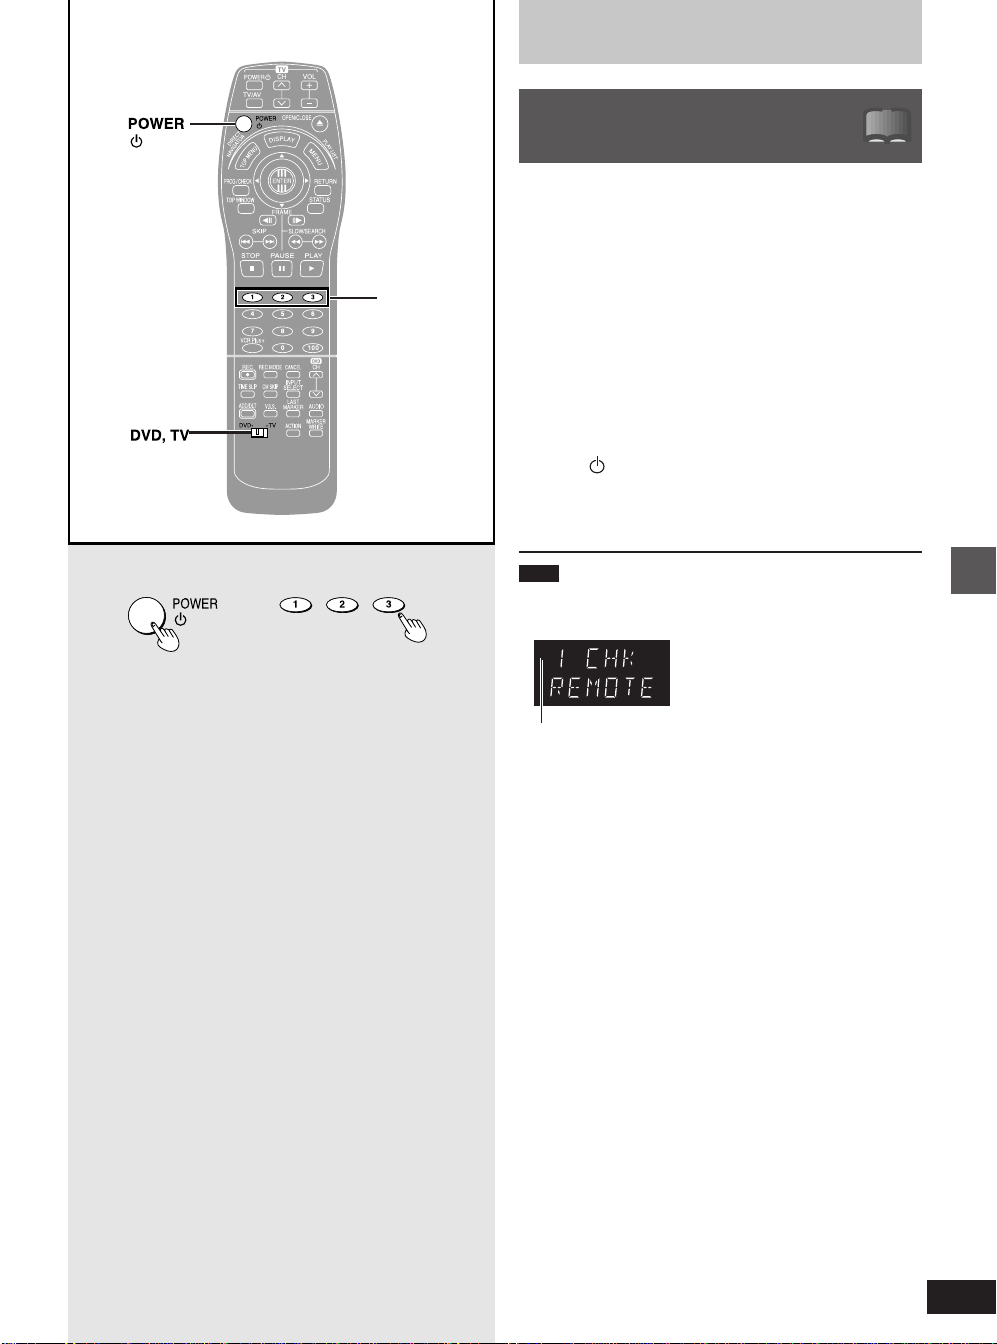
Expanding your home theater system
Numbered
buttons
Operating other Panasonic
DVD equipment with
!?
the remote control
By changing the remote control code, you can operate other DVD
recorders and players manufactured by Panasonic.
Most of the DVD recorders and players manufactured by Panasonic
use the same system for their remote controls, so if you operate
them in the same place, the controls can be confused by the different
pieces of equipment. Use the following procedure to change the
remote control code to solve this problem.
●
Use “1”, the factory set code, under normal circumstances.
Be sure to set the same remote control code on the main unit as you
did for the remote control itself (➡ page 82, ACTION— Set Up—
Remote Control Code).
Preparation
●
Switch [DVD, TV] to “DVD”.
●
Change the code on the main unit.
Press [ , POWER] and the numbered buttons corresponding to the code you want
to set, [1], [2], or [3], at the same time.
Note
●
The following display appears on the unit’s display if its code and
the remote control’s code are different. Change the remote control’s code to suit the unit.
The unit’s remote control code
●
The display disappears after about 5 seconds.
Home Theater
81
RQT6035
Page 82
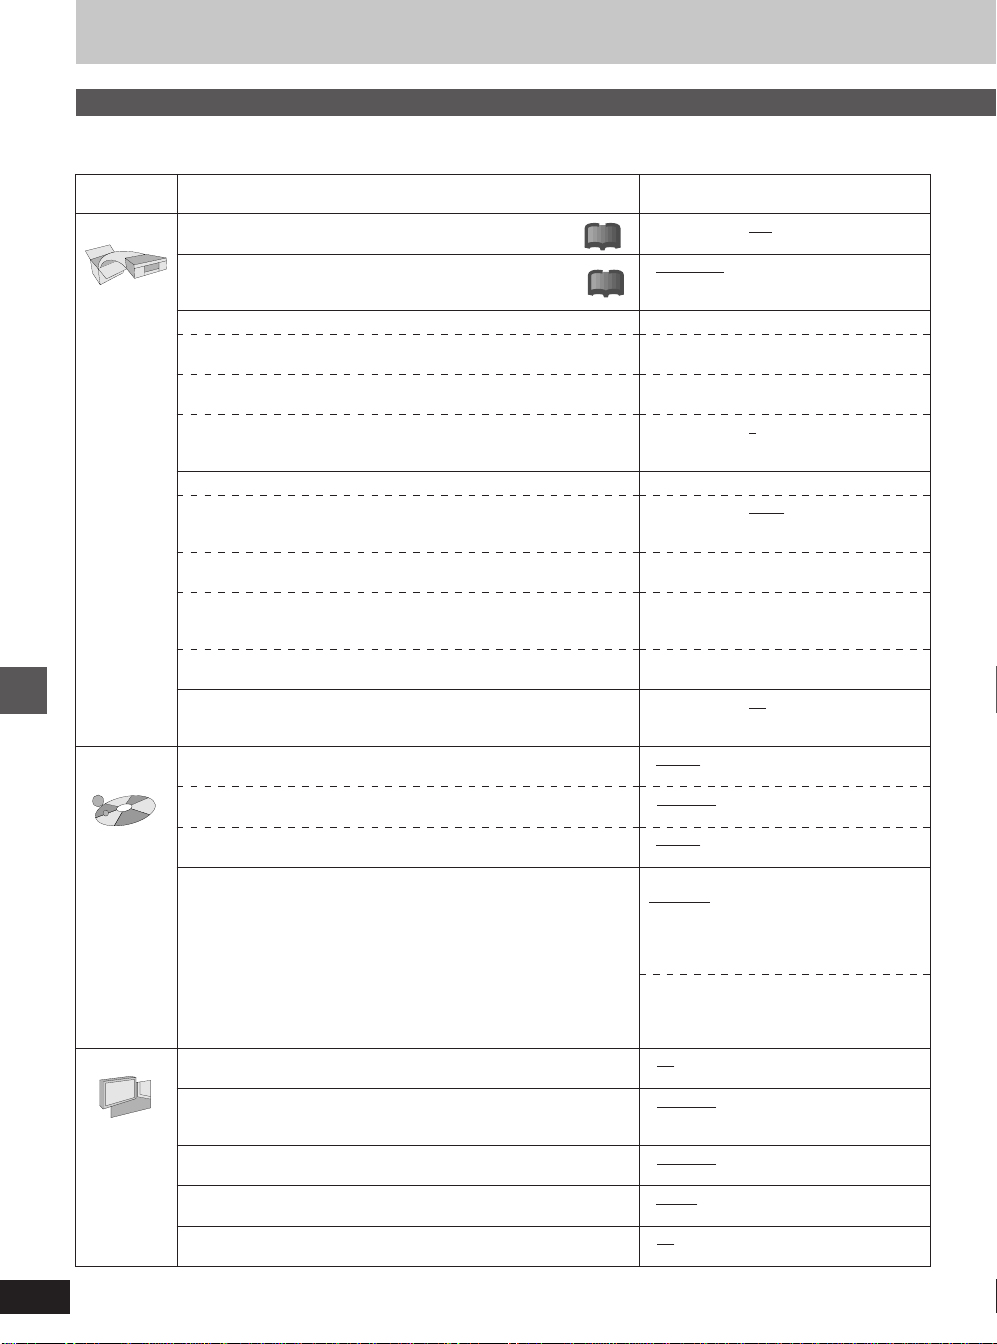
Changing the unit’s settings
Summary of settings
This chart shows the initial settings for this unit. See page 85 for details on menu operation.
●
Underlined items are the factory presets.
Main menus
Set Up
Disc
[DVD-V]
Initial settings
Video
Menus
Off Timer
Select how long the unit remains on when it is not being used.
Remote Control Code
Change the remote control code so you can use other Panasonic
DVD equipment at the same time.
Clock Settings
●
Auto Clock Setting (➡ page 87)
The unit adjusts the clock automatically.
●
Manual Clock Setting (➡ page 88)
You can adjust the clock.
●
Time Zone Adjust (➡ page 89)
Adjust the time zone if it was not set correctly after auto clock setting.
This appears only after auto clock setting is complete.
Channel Settings
●
Antenna System (➡ page 90)
Select to suit the type of antenna you are using. Channels are set
corresponding to the antenna system you select.
●
Auto Channel Setting (➡ page 91)
The unit sets the channels automatically.
●
Preset Channel Caption
●
Manual Channel Caption (➡ page 92)
Give captions to the channels.
●
VCR Plus+ CH Setting (➡ page 19)
Set the guide channels for use with VCR Plusi timer recording.
Re-initialize Setting
This returns all values in the ACTION menus, except for the clock,
channels, ratings level, and display language, to the default settings.
Audio (➡ page 84)
Choose the preferred audio language.
Subtitle (➡ page 84)
Choose the preferred subtitle language.
Menus (➡ page 84)
Choose the preferred language for disc menus.
Ratings (➡ page 86)
Set a ratings level to limit DVD-Video play.
3-D Y/C Separation (➡ page 84)
Turn 3-D Y/C separation on or off.
Hybrid VBR Resolution (➡ page 84)
Switch between automatic and fixed hybrid VBR resolution when
recording.
Still Mode (➡ page 84)
Select the type of picture shown when you pause play.
Black Level Control (➡ page 84)
Change the black level of the picture.
Seamless Play (➡ page 84)
Turn seamless play on or off on discs with play lists.
Options
●
!?
2 hr
●
Set Code 1● Set Code 2● Set Code 3
!?
●
-1
●
TV
●
Yes
●
English
●
Original
●
Automatic● English
●
Spanish
●
English
●
Other ✳✳✳✳
Setting ratings (When level 8 is selected)
8 No Limit: All DVD-Video can be played.
1 to 7: Prohibits play of DVD-Video with
0 Lock All: Prohibits play of all DVD-Video.
Changing ratings
(When level 0–7 is selected)
●
Unlock Recorder● Change Level
●
Change Password● Temporary Unlock
●
On
●
Automatic● Fixed
●
Automatic● Field
●
Lighter
●
On
●
6 hr
●
0
●
CATV
●
No
●
French
●
Other ✳✳✳✳
●
Other ✳✳✳✳
●
French
corresponding ratings recorded on
them.
●
Off
●
Darker
●
Off
●
Off
●
+1
●
Spanish
●
French
●
Spanish
●
Frame
82
RQT6035
Page 83
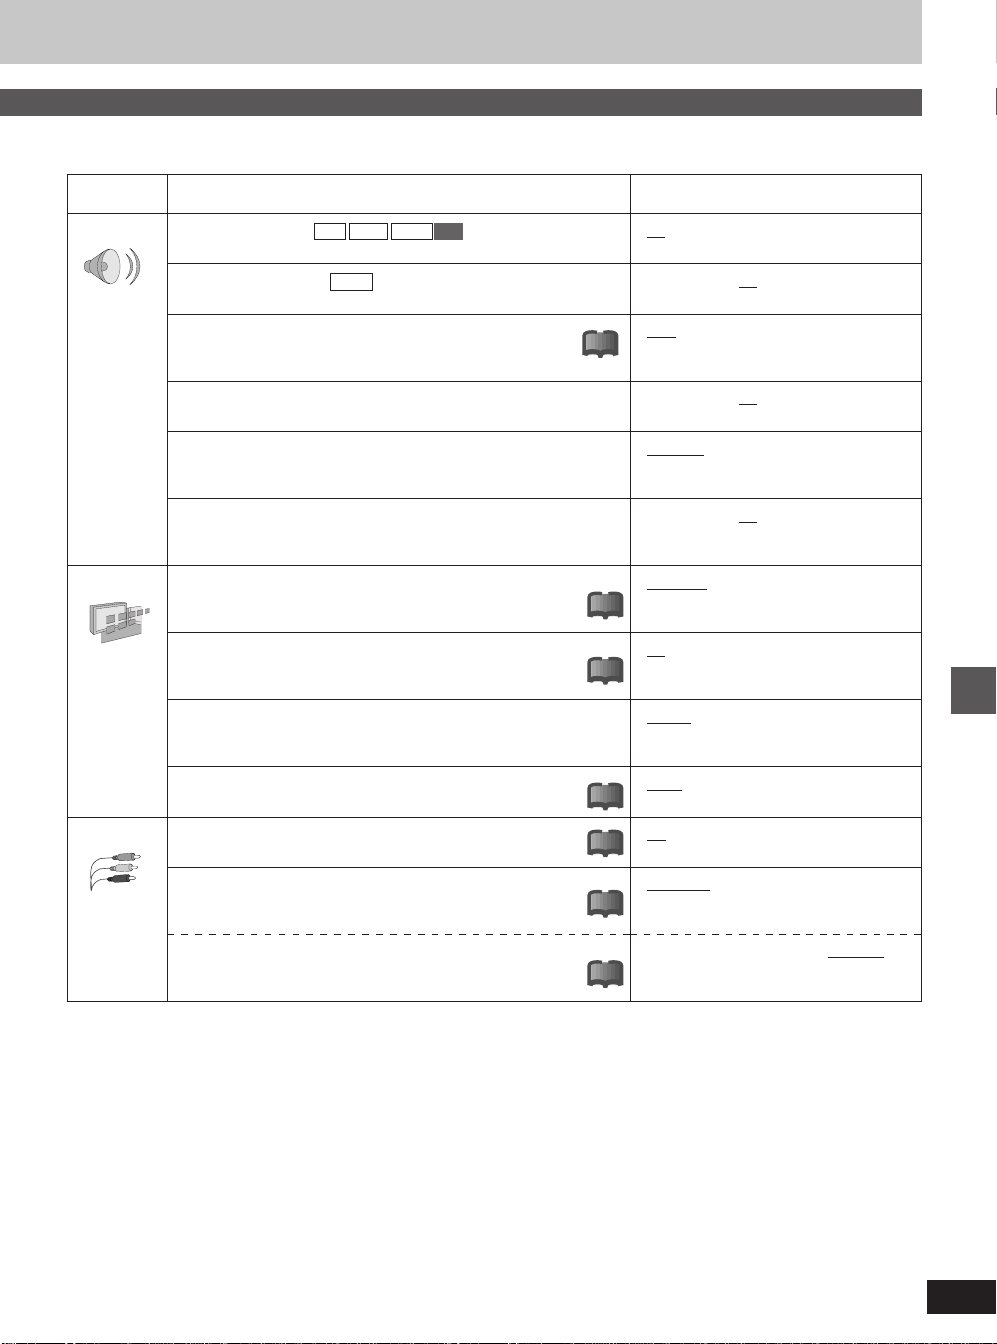
Main menus
Menus
Options
Audio
Display
TV Screen
Audio during Search RAM DVD-R DVD-V VCD
Choose whether to have sound during the first level of fast-forward.
D. Range Compression
DVD-V (Dolby Digital only)
Change the dynamic range for late night viewing.
MTS Selection for DVD-R Disc (➡ page 35)
Select whether to record the main or secondary audio type (SAP)
!?
to DVD-R.
PCM Down Conversion (➡ page 86)
Choose whether to convert 96-kHz LPCM signals to 48-kHz/16 bit.
Dolby Digital (➡ page 86)
Choose whether to output Dolby Digital bitstream signals for decoding on
other equipment or to convert them to PCM signals for 2-channel output.
DTS (➡ page 86)
Choose whether to output DTS bitstream signals for decoding on other
equipment or to not output signals at all.
Status Messages
Choose whether to show on-screen messages automatically
or not.
Blue Background
Select “Off” if you do not want to have the unit show the
blue background when reception is weak.
Language of Display Message
Choose the preferred language for these menus and the on-screen
messages.
FL Display (➡ page 84)
Changes the brightness of the unit’s display.
TV Aspect (➡ page 21)
Choose the setting to suit your television.
4:3 TV Settings for DVD-Video (➡ page 84)
Select how video from DVD-Video is shown on a 4:3
standard aspect television.
4:3 TV Settings for DVD-RAM (➡ page 84)
Select how video from DVD-RAM is shown on a 4:3
standard aspect television.
●
On
●
On
●
Main
●
On
●
Bitstream● PCM
●
Bitstream● Off
●
Automatic● Off
!?
●
On
!?
●
English
●
Bright
!?
●
Dim during DVD/VCD Play
●
4:3
!?
●
Pan&Scan● Letterbox
!?
●
4:3
!?
●
Off
●
Off
●
SAP
●
Off
●
Off
●
Français
●
Dim
●
16:9
●
Pan&Scan● Letterbox
Initial settings
83
RQT6035
Page 84
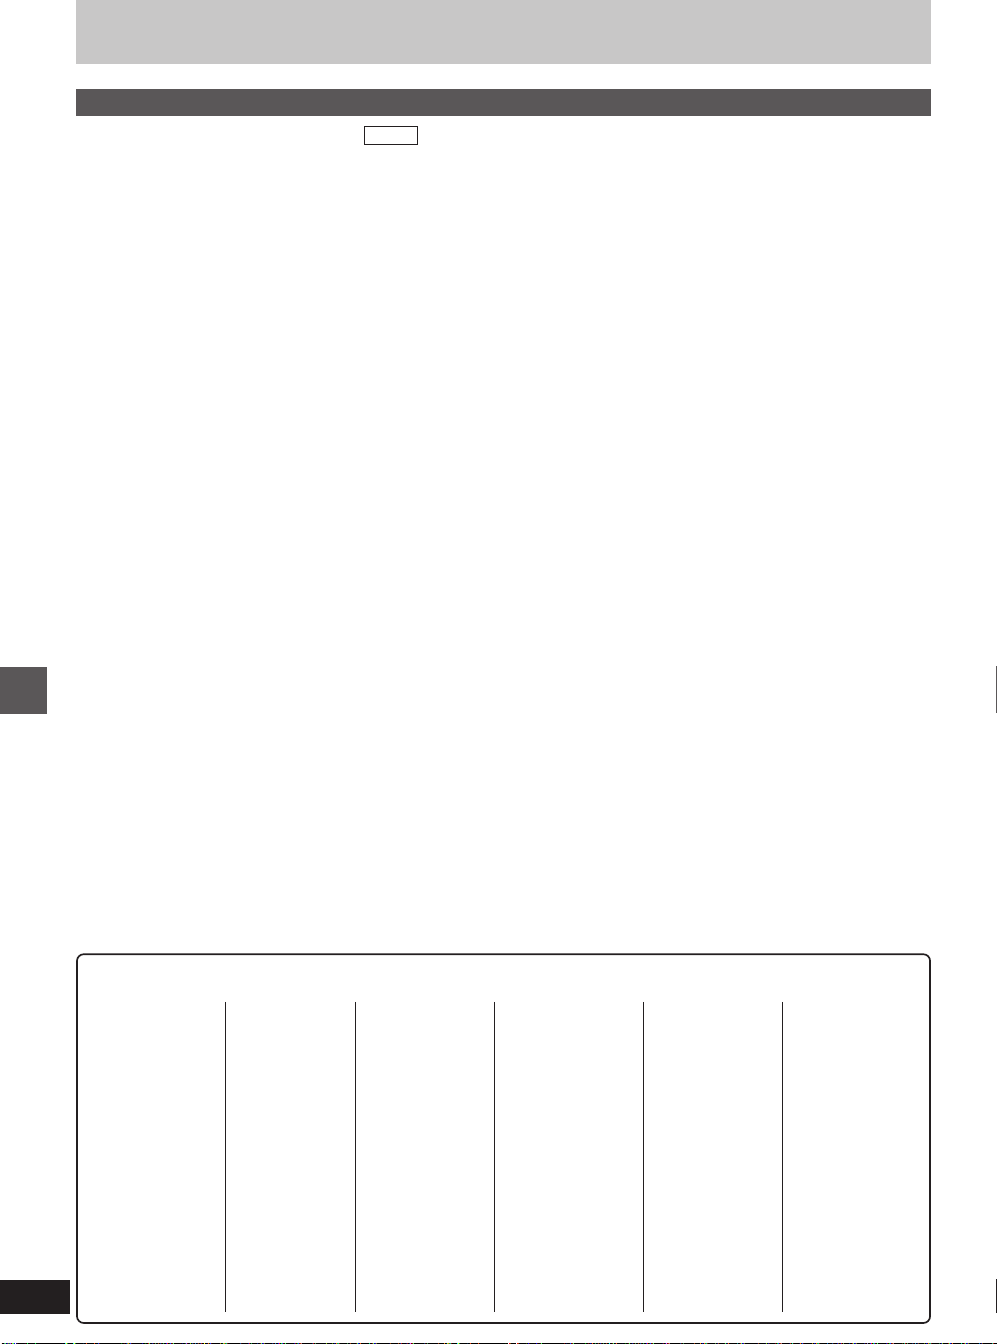
Changing the unit’s settings
Summary of settings
■ Disc—Audio, Subtitle and Menus DVD-V
Original: The original language of each disc will be selected.
Other ✳✳✳✳: Input a code number with the numbered buttons
Automatic: If the language selected for “Audio” is not available,
●
Some discs are designed to start in a certain language despite any
changes you make here.
■ Video—3-D Y/C Separation
On: Reduces noise for recording by separating the luminance (Y)
and color (C) signals received from the television station.
Off: Reduces the ghosting that occurs when recording fast moving
images.
■ Video—Hybrid VBR Resolution
Automatic: The unit automatically switches resolution rates during
Fixed: The resolution rate is fixed during recording. This en-
■ Video—Still Mode
Field: Less blurred field stills are shown. Select if jittering occurs
Frame: Sharper frame stills are shown. Select if small text or fine
(➡ see below).
subtitles of that language will automatically appear if
available on that disc.
recording. The unit reduces block noise, which occurs
during MPEG compression, by selecting the optimum
rate.
sures the resolution rate is not reduced.
when “Automatic” is selected.
patterns cannot be seen clearly when “Automatic” is
selected.
■ Video—Black Level Control
Lighter: when connected to a TV through the VIDEO OUT or S
Darker: when connected to a TV through the COMPONENT
VIDEO OUT terminal.
VIDEO OUT (Y/P
B/PR) terminals.
■ Video—Seamless Play
On: The scenes in play lists created with this unit are played seam-
lessly. This may cause shifting of the points where scenes
change. Some play lists cannot be played seamlessly.
Off: The points where scenes in play lists are played accurately, but
this may cause the picture to freeze for a moment when scenes
change.
■ Display—FL Display
Dim during DVD/VCD play: The unit’s display dims during play of
discs with video recorded. (The TIME
SLIP indicator is off while the display
is dimmed.)
■ TV Screen—4:3 TV Settings for DVD-Video
Pan&Scan: Video recorded for a widescreen is played with the
Letterbox: Video recorded for a widescreen is played in the letter-
sides cut off if the pan & scan was specified by the producer of the disc. 16:9 software prohibited from being
shown in the pan and scan style will appear in the letterbox style (with black bands above and below the
picture) despite the setting here.
box style.
■ TV Screen—4:3 TV Settings for DVD-RAM
4:3: Programs played as recorded.
Pan&Scan: Video recorded for a widescreen is played as pan &
Letterbox: Video recorded for a widescreen is played in the letter-
scan.
box style.
Initial settings
Language code list
Abkhazian: 6566
Afar: 6565
Afrikaans: 6570
Albanian: 8381
Ameharic: 6577
Arabic: 6582
Armenian: 7289
Assamese: 6583
Aymara: 6588
Azerbaijani: 6590
Bashkir: 6665
Basque: 6985
Bengali; Bangla: 6678
Bhutani: 6890
Bihari: 6672
Breton: 6682
Bulgarian: 6671
Burmese: 7789
Byelorussian: 6669
84
RQT6035
Cambodian: 7577
Catalan: 6765
Chinese: 9072
Corsican: 6779
Croatian: 7282
Czech: 6783
Danish: 6865
Dutch: 7876
English: 6978
Esperanto: 6979
Estonian: 6984
Faroese: 7079
Fiji: 7074
Finnish: 7073
French: 7082
Frisian: 7089
Galician: 7176
Georgian: 7565
German: 6869
Greek: 6976
Greenlandic: 7576
Guarani: 7178
Gujarati: 7185
Hausa: 7265
Hebrew: 7387
Hindi: 7273
Hungarian: 7285
Icelandic: 7383
Indonesian: 7378
Interlingua: 7365
Irish: 7165
Italian: 7384
Japanese: 7465
Javanese: 7487
Kannada: 7578
Kashmiri: 7583
Kazakh: 7575
Kirghiz: 7589
Korean: 7579
Kurdish: 7585
Laotian: 7679
Latin: 7665
Latvian, Lettish: 7686
Lingala: 7678
Lithuanian: 7684
Macedonian: 7775
Malagasy: 7771
Malay: 7783
Malayalam: 7776
Maltese: 7784
Maori: 7773
Marathi: 7782
Moldavian: 7779
Mongolian: 7778
Nauru: 7865
Nepali: 7869
Norwegian: 7879
Oriya: 7982
Pashto, Pushto: 8083
Persian: 7065
Polish: 8076
Portuguese: 8084
Punjabi: 8065
Quechua: 8185
Rhaeto-Romance: 8277
Romanian: 8279
Russian: 8285
Samoan: 8377
Sanskrit: 8365
Scots Gaelic: 7168
Serbian: 8382
Serbo-Croatian: 8372
Shona: 8378
Sindhi: 8368
Singhalese: 8373
Slovak: 8375
Slovenian: 8376
Somali: 8379
Spanish: 6983
Sundanese: 8385
Swahili: 8387
Swedish: 8386
Tagalog: 8476
Tajik: 8471
Tamil: 8465
Tatar: 8484
Telugu: 8469
Thai: 8472
Tibetan: 6679
Tigrinya: 8473
Tonga: 8479
Turkish: 8482
Turkmen: 8475
Twi: 8487
Ukrainian: 8575
Urdu: 8582
Uzbek: 8590
Vietnamese: 8673
Volapük: 8679
Welsh: 6789
Wolof: 8779
Xhosa: 8872
Yiddish: 7473
Yoruba: 8979
Zulu: 9085
Page 85
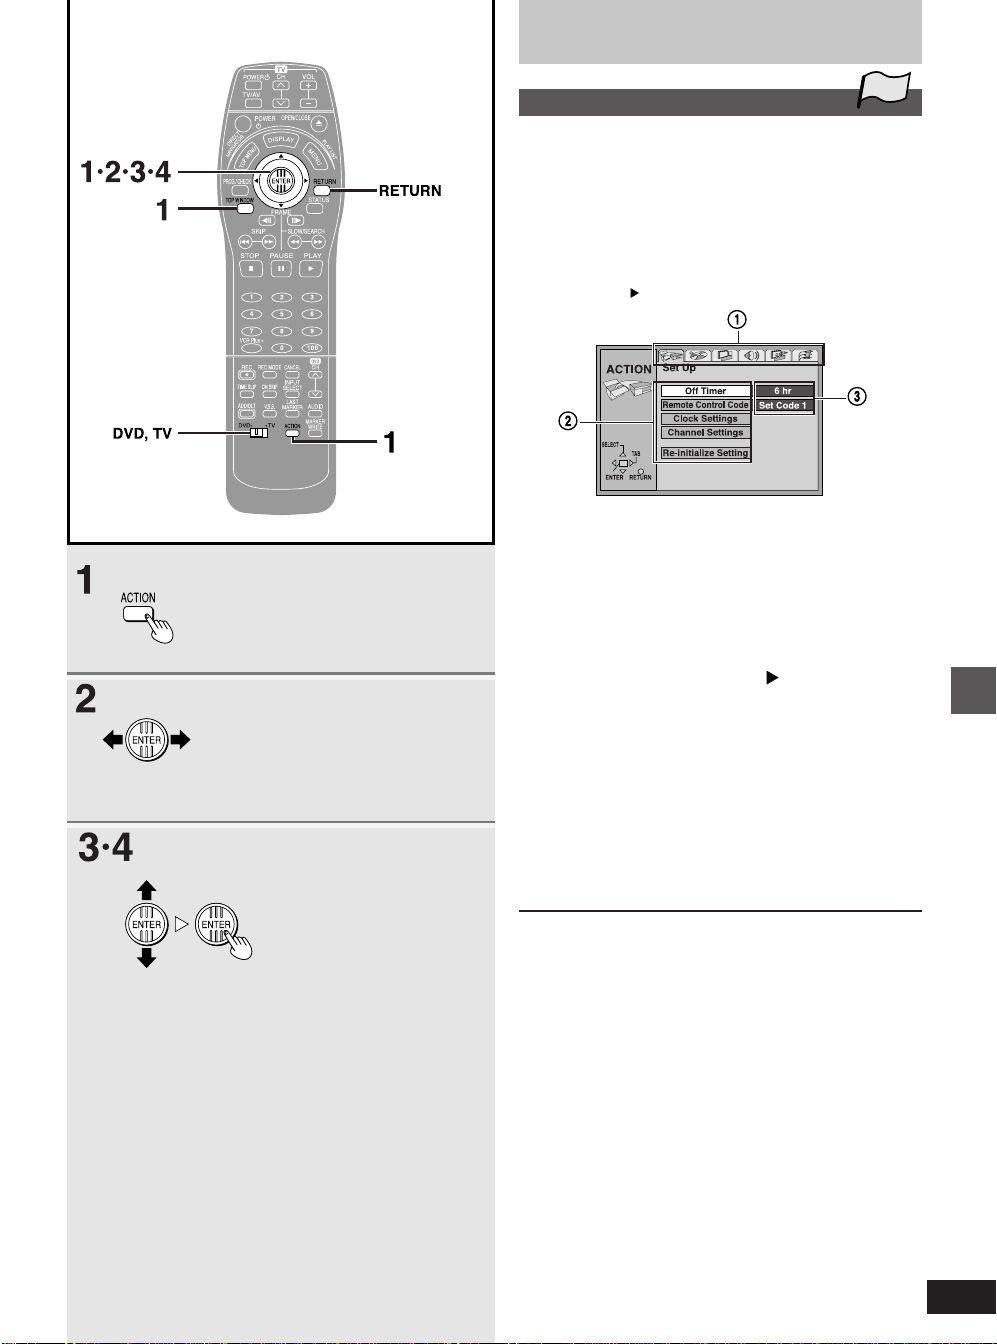
Changing the unit’s settings
Common procedures
Refer to the summary of settings table on page 82 and use the
following procedure to change the settings if necessary.
Preparation
Switch [DVD, TV] to “DVD”.
TOP
1 While stopped
Press [ACTION] to show the menus.
●
You can also press [TOP WINDOW] and use the joystick
[▲, ▼, œ, ] to select “ACTION” and press [ENTER].
! Menus
The Action menu is made up of six menus—Set Up, Disc,
Video, Audio, Display, and TV Screen. Select the menu’s
tab to display the items.
@ Items
A list of items in the menu you selected.
# Options
This shows the current settings. The options are shown
when you select an item.
2 Use the joystick [œ, ] to select the
menu’s tab.
3 Use the joystick [▲, ▼] to select the
item you want to change and press
[ENTER].
4 Use the joystick [▲, ▼] to select the
option and press [ENTER].
●
Some options require different operations. Follow the on-
screen instructions and the instructions described later.
Initial settings
■ To return to the previous screen
Press [RETURN]. Even if you have changed an option, the change is
not accepted unless you press [ENTER].
■ When you are finished
Press [ACTION].
For your reference
The unit retains these settings in its memory until you change them,
even if you turn it off.
85
RQT6035
Page 86
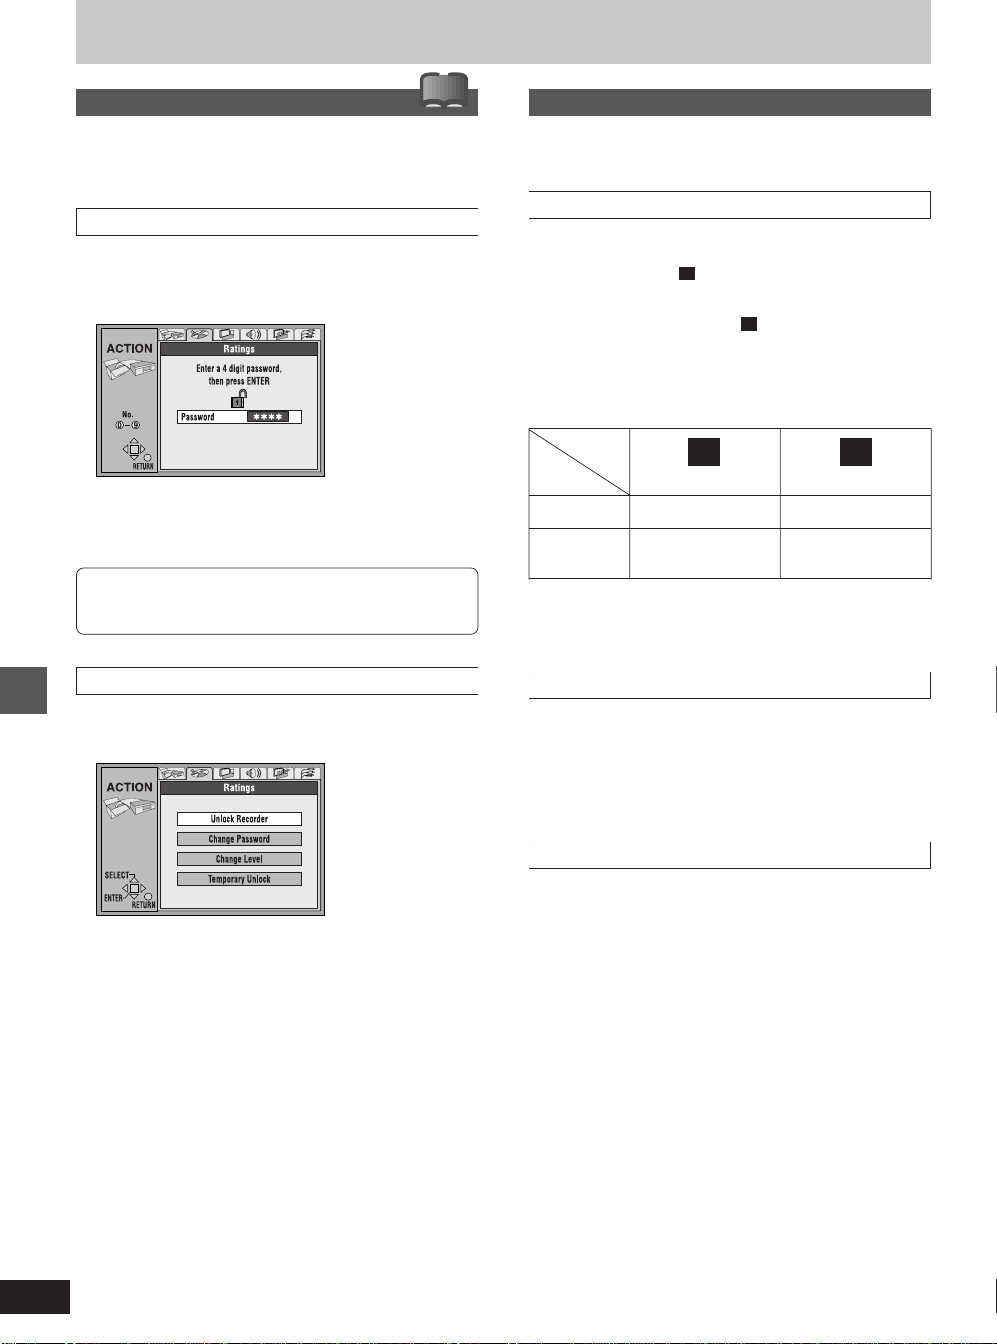
Changing the unit’s settings
Entering a password
You can limit play of DVDs unsuitable for some audiences. Play and
changes to the settings are not possible unless you enter a
password.
!?
When setting ratings
The password screen is shown when you select levels 0 to 7.
1. Input a 4-digit password with the numbered buttons.
●
If you enter a wrong number, press [CANCEL] to erase it before
you press [ENTER].
Do not forget your password.
2. Press [ENTER].
3. Press [ENTER].
The password is entered and the unit is locked.
Now, when you insert a DVD-Video that exceeds the ratings
limit you set, a message appears on the television.
Follow the on-screen instructions.
Digital output
Change these settings when you have connected equipment
through this unit’s OPTICAL DIGITAL AUDIO OUT terminal.
PCM Down Conversion
Off (factory setting):
When you have used audio cables to connect the unit to other equipment (analog connection
On:
When you have used an optical digital cable to connect the unit to
other equipment (digital connection
to 48 kHz/16 bit.
Output of audio with a sampling frequency of 96 kHz
Audio is output as follows in accordance with the connections and
settings you make.
Connection
Setting
Off
On
✳1
96 kHz audio is output if the DVD is unprotected, but the connected equipment must be able to handle such signals in order to play
them.
C ➡ page 78).
B ➡ page 78). Output is limited
B
(digital)
✳1
No output
Converted and output
as 48 kHz/16 bit
C
(analog)
Output as 96 kHz
Converted and output
as 48 kHz
When changing ratings
The password screen is shown when you select “Ratings”.
1. Input your 4-digit password with the numbered buttons and press
[ENTER].
Initial settings
Unlock Recorder: To unlock the unit and return the rating to 8
Change Password: To change your password
Change Level: To change the rating level
Temporary Unlock: To temporarily unlock the unit (the unit
locks again if you switch it to standby or
open the disc tray)
2. Select the item with the joystick [▲, ▼] and press [ENTER].
Actual screens depend on the operation. Follow the on-screen
instructions.
Dolby Digital
Bitstream (Factory preset):
When you have connected a unit with a built-in Dolby Digital
decoder.
PCM:
When you have connected a unit that doesn’t have a built-in Dolby
Digital decoder.
✳2
DTS
Off (Factory preset):
When you have connected a unit that doesn’t have a built-in DTS
✳2
decoder.
Bitstream:
When you have connected a unit with a built-in DTS decoder.
✳2
Set “Dolby Digital” to “PCM” and “DTS” to “Off” if the other equipment doesn’t have decoders. Incorrect settings can cause noise to
be output which can be harmful to your ears and speakers, and
audio will not be recorded properly to digital recording equipment.
86
RQT6035
Page 87
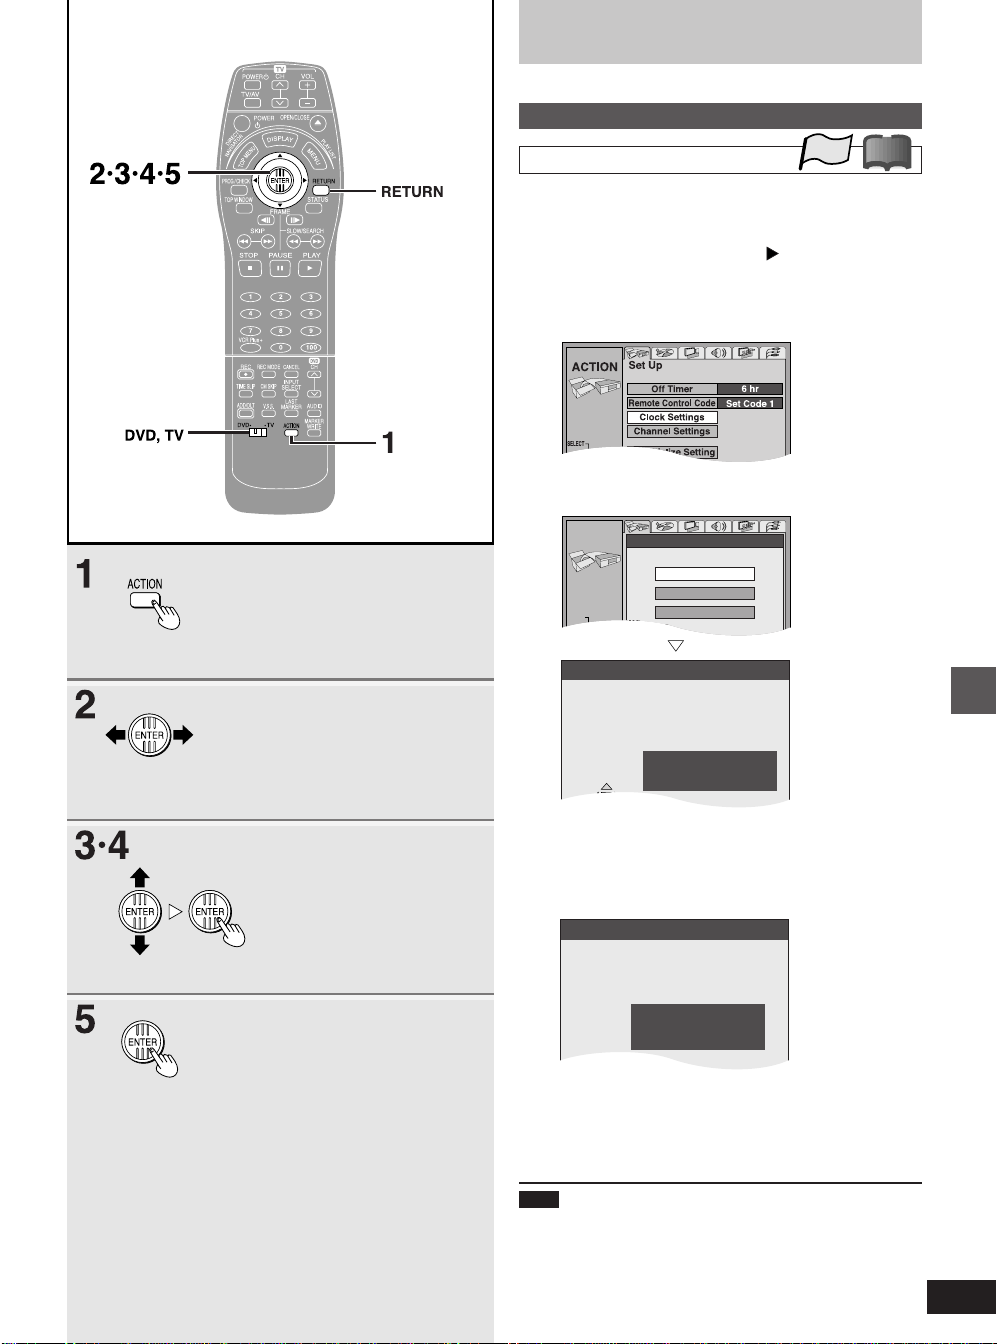
Changing the unit’s settings
Set Up
SELECT
Off Timer
Remote Control Code
Clock Setting
Channel Setting
Re-initialize Setting
6 hr
Set Code 1
ACTION
Clock Settings
Auto Clock Setting
Manual Clock Setting
Time Zone Adjust
Auto Clock Setting
Connect antenna cable and if you use a
cable box, tune it to your local PBS CH
then...
Please push the ENTER key.
Auto Clock Setting
12:15 AM
ON
6/7/2001
DST..............
TIME ZONE..... CST
Preparation
Switch [DVD, TV] to “DVD”.
Clock Settings
Auto Clock Setting
TOP
!?
1 While stopped
Press [ACTION].
The ACTION screen appears.
2 Use the joystick [œ, ] to select the
Set Up tab.
3 Use the joystick [▲, ▼] to select
“Clock Settings” and press [ENTER].
4
Use the joystick [
Clock Setting” and press [ENTER].
▲, ▼
] to select “Auto
When you press [ENTER]
If channel setting is complete, the “Auto Clock Setting” screen appears.
If you have not yet set channels, the “Auto Channel/Clock Setting” screen appears.
5 Press [ENTER].
Auto clock setting (or auto channel and auto clock setting) starts. This
can take some time, up to a few hours in some cases. The following
screen appears when setting is complete.
Auto Clock Setting is complete.
●
Check that the time was set correctly. If it was not, use manual clock
setting (➡ page 88) or time zone adjust (➡ page 89) to correct it.
●
If you connect the unit through a cable TV box or DSS receiver
(➡ page 76), tune to your local PBS station before starting auto clock
setting. Use manual clock setting (➡ page 88) if this does not work.
●
If there is no local PBS channel in your area, then auto clock setting
may not work correctly.
In this case the time must be set manually (➡ page 88).
Note
●
DST, Daylight Saving Time, shows the summertime setting (➡ page 88).
●
TIME ZONE shows the time difference from Greenwich meantime (GMT) (
EST=GMT -5, CST=GMT -6, MST=GMT -7, PST=GMT -8,
AST=GMT -9, HST=GMT -10.
For other areas: xx hr
●
When you change the time zone, the recording times for programs recorded before the time zone was changed also change to correspond to the new time zone.
■ To stop auto clock setting
Press [RETURN].
➡
page 88).
Initial settings
87
RQT6035
Page 88
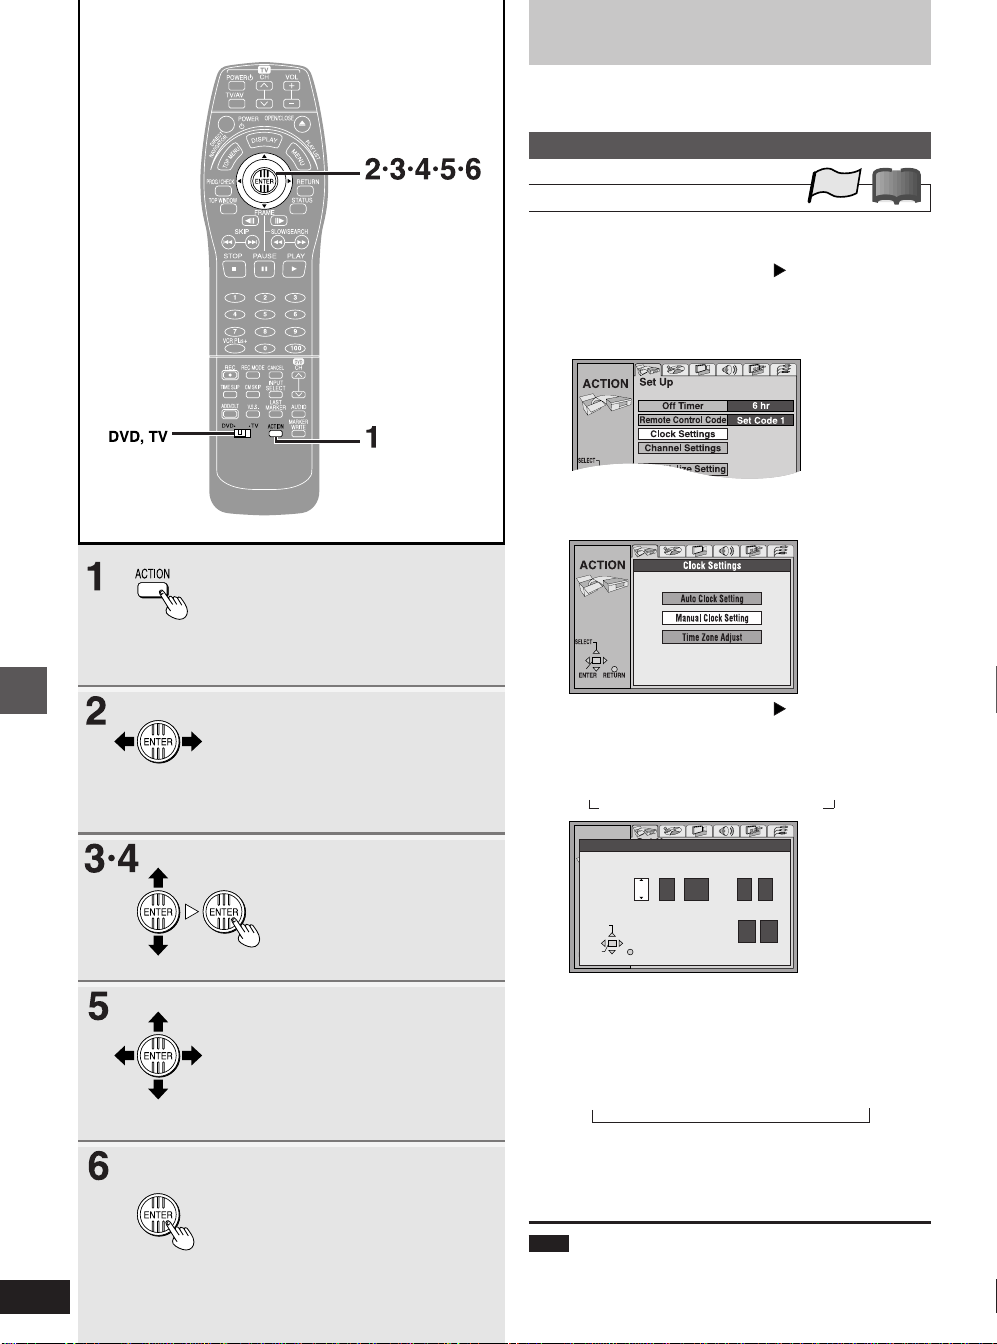
Changing the unit’s settings
Preparation
Switch [DVD, TV] to “DVD”.
Clock Settings
Initial settings
Manual Clock Setting
TOP
!?
1 Press [ACTION].
The ACTION screen appears.
2 Use the joystick [œ, ] to select the
Set Up tab.
3 Use the joystick [▲, ▼] to select
“Clock Settings” and press [ENTER].
4 Use the joystick [▲, ▼] to select “Man-
ual Clock Setting” and press [ENTER].
5 Use the joystick [œ, ] to select the
item you want to change and use the
joystick [▲, ▼] to change the setting.
The items change as follows:
MONTH ↔ DAY ↔ YEAR ↔ HOUR
TIME ZONE ↔ DST ↔ MINUTE
Set Up
ACTION
ENTER RETURN
HOUR: 12-hour display
DST (Daylight Saving Time): ON or OFF
TIME ZONE:
Repeat step 5 as necessary.
Manual Clock Setting
YEAR
2001 THU PM:17 36 75
6 hr
MINUTE
HOUR
Set Code 1
TIME ZONE
DST
OFF
CST
Off Timer
MONTH
DAY
Remote Control Code
---
---
Clock Setting
Channel Setting
Re-initialize Setting
SELECT
SELECT
ENTER
RETURN
If you select “ON”, the clock is advanced one hour starting
at 2 a.m. on the first Sunday in April and ending at 2 a.m. on
the last Sunday in October.
EST ↔ CST ↔ MST ↔ PST ↔ AST ↔ HST
(-5) (-6) (-7) (-8) (-9) (-10)
6 Press [ENTER].
The “Clock Settings” screen (➡ step 4) reappears and the
clock starts.
88
RQT6035
Note
●
When you change the time zone, the recording times for programs
recorded before the time zone was changed also change to correspond to the new time zone.
Page 89
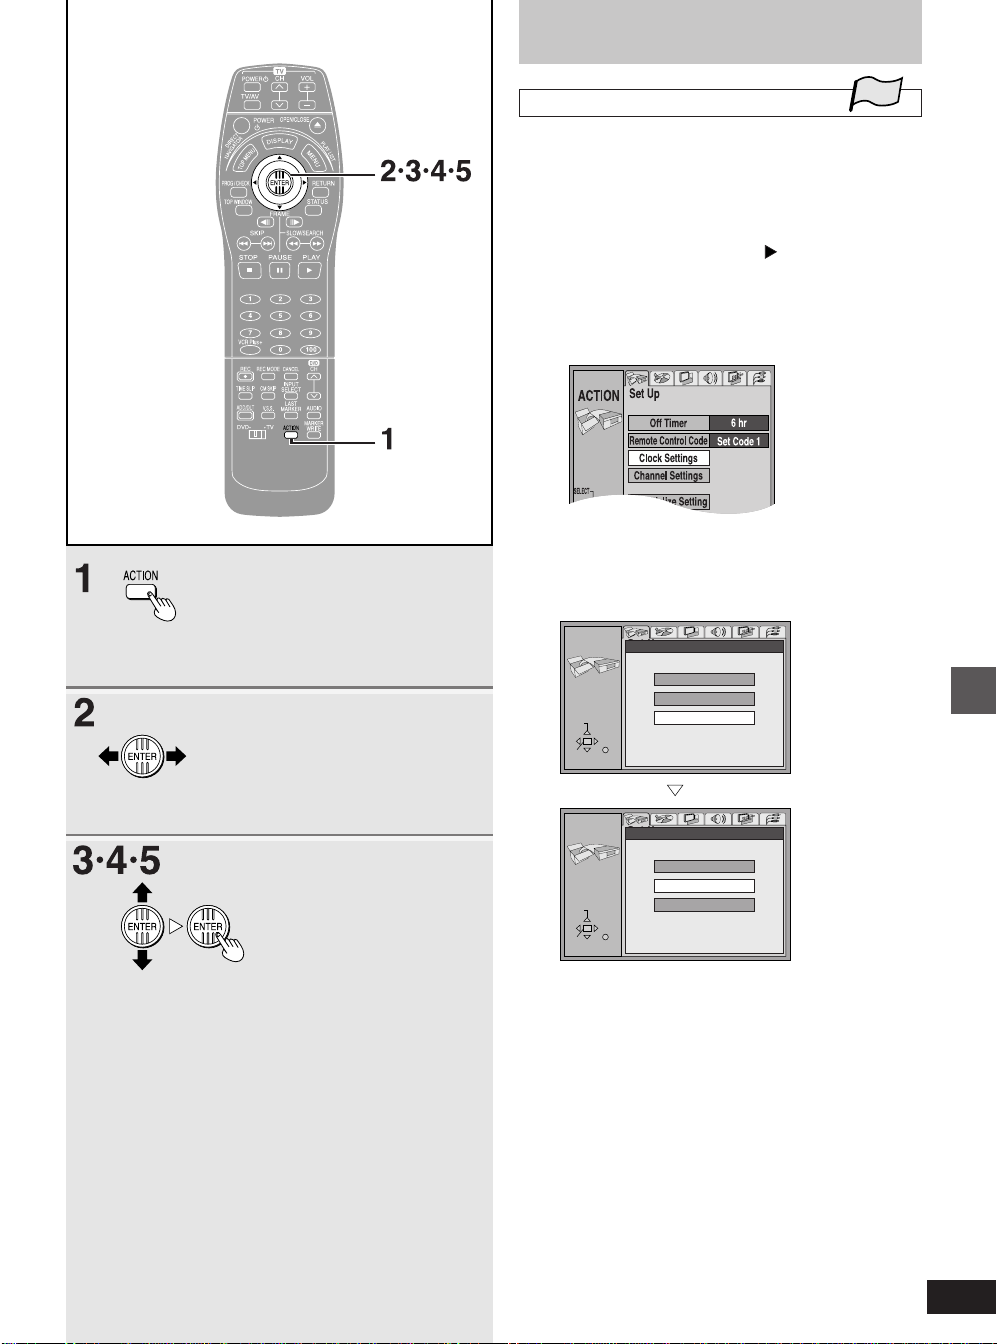
Changing the unit’s settings
Time Zone Adjust
Adjust the time zone (-1 or +1) if it was not set correctly with auto
clock setting.
You cannot change this setting if you set the clock manually.
TOP
1 Press [ACTION].
The ACTION screen appears.
2 Use the joystick [œ, ] to select the
Set Up tab.
3 Use the joystick [▲, ▼] to select
“Clock Settings” and press [ENTER].
4 Use the joystick [▲, ▼] to select “Time
Zone Adjust” and press
[ENTER].
Set Up
ACTION
SELECT
ENTER RETURN
Clock Settings
Off Timer
Auto Clock Setting
Remote Control Code
Clock Setting
Manual Clock Setting
Channel Setting
Time Zone Adjust
Re-initialize Setting
6 hr
Set Code 1
When you press [ENTER]
Set Up
ACTION
SELECT
ENTER RETURN
Time Zone Adjust
Off Timer
Clock Setting
-1
0
+1
Remote Control Code
Channel Setting
Re-initialize Setting
6 hr
Set Code 1
5 Use the joystick [▲, ▼] to select “-1”,
“0”, or “+1” and press
[ENTER].
The “Clock Settings” screen (➡ step 4) reappears.
Initial settings
89
RQT6035
Page 90
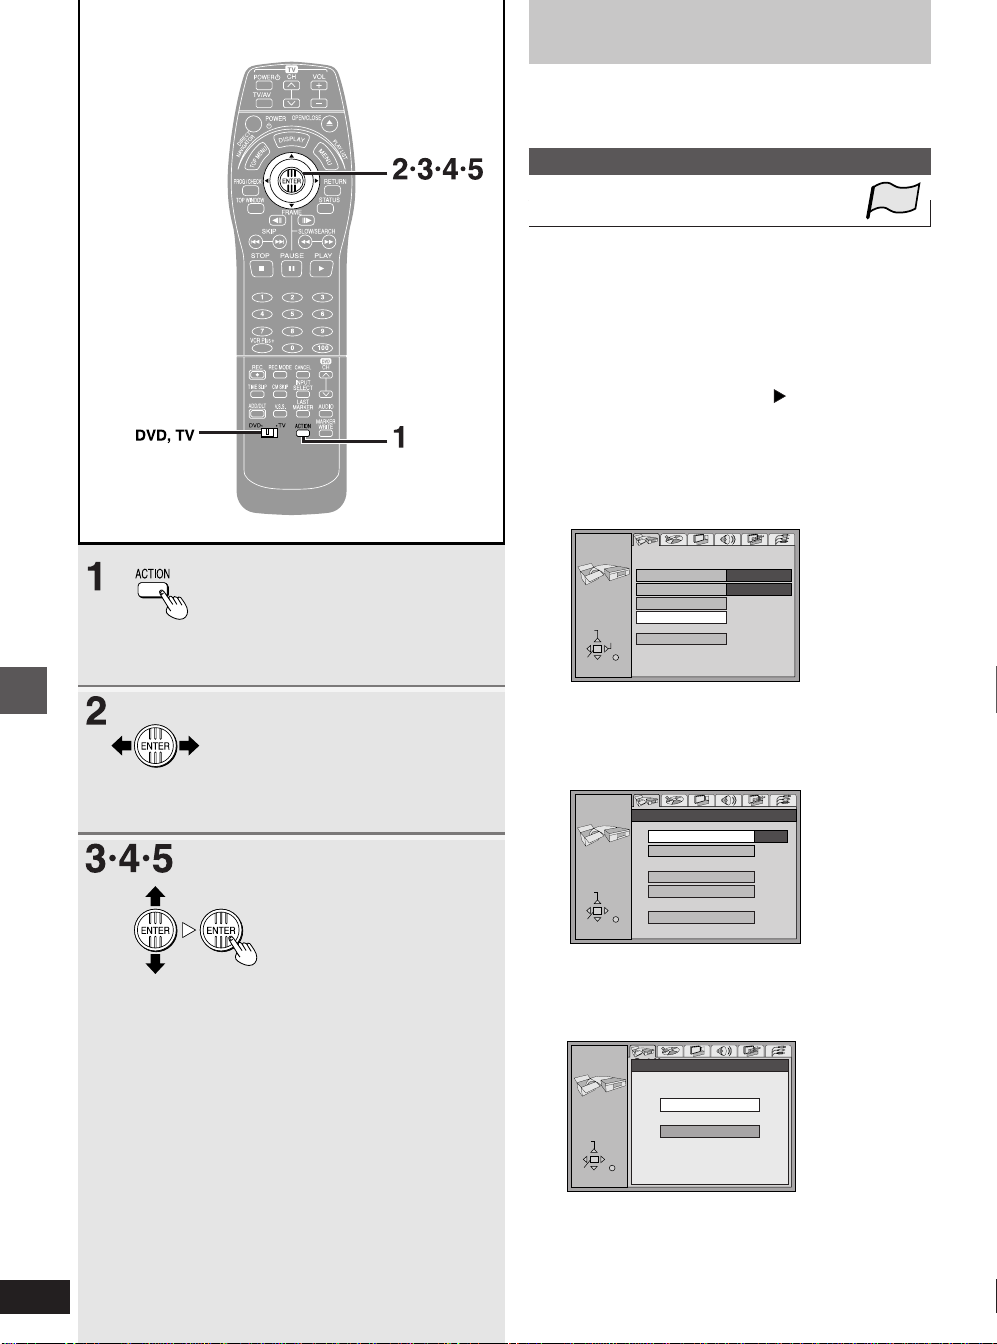
Changing the unit’s settings
Set Up
SELECT
Off Timer
Remote Control Code
Clock Settings
Channel Settings
Re-initialize Setting
6 hr
Set Code 1
ACTION
ENTER RETURN
TAB
Set Up
SELECT
Off Timer
Remote Control Code
Clock Setting
Channel Setting
Re-initialize Setting
6 hr
Set Code 1
ACTION
ENTER RETURN
Antenna System
TV
CATV
Preparation
Switch [DVD, TV] to “DVD”.
Channel Settings
Antenna System
TOP
The following settings must be reset when you change the antenna
system.
VCR Plusi guide channel settings (➡ page 19)
Auto channel setting (➡ page 91)
Channel captions (➡ page 92)
1 Press [ACTION].
The ACTION screen appears.
2 Use the joystick [œ, ] to select the
Set Up tab.
3 Use the joystick [▲, ▼] to select
“Channel Settings” and press
[ENTER].
4 Use the joystick [▲, ▼] to select
“Antenna System” and press
[ENTER].
Initial settings
90
RQT6035
ACTION
SELECT
ENTER RETURN
Channel Settings
Antenna System
Auto Channel Setting
Channel Caption
Preset Channel Caption
Manual Channel Caption
VCR Plus+ CH Setting
CATV
5 Use the joystick [▲, ▼] to select “TV”
or “CATV” and press [ENTER].
TV: TV broadcast (2CH–69CH)
CATV: CATV broadcast (1CH–125CH)
The screen shown in step 4 reappears.
Page 91
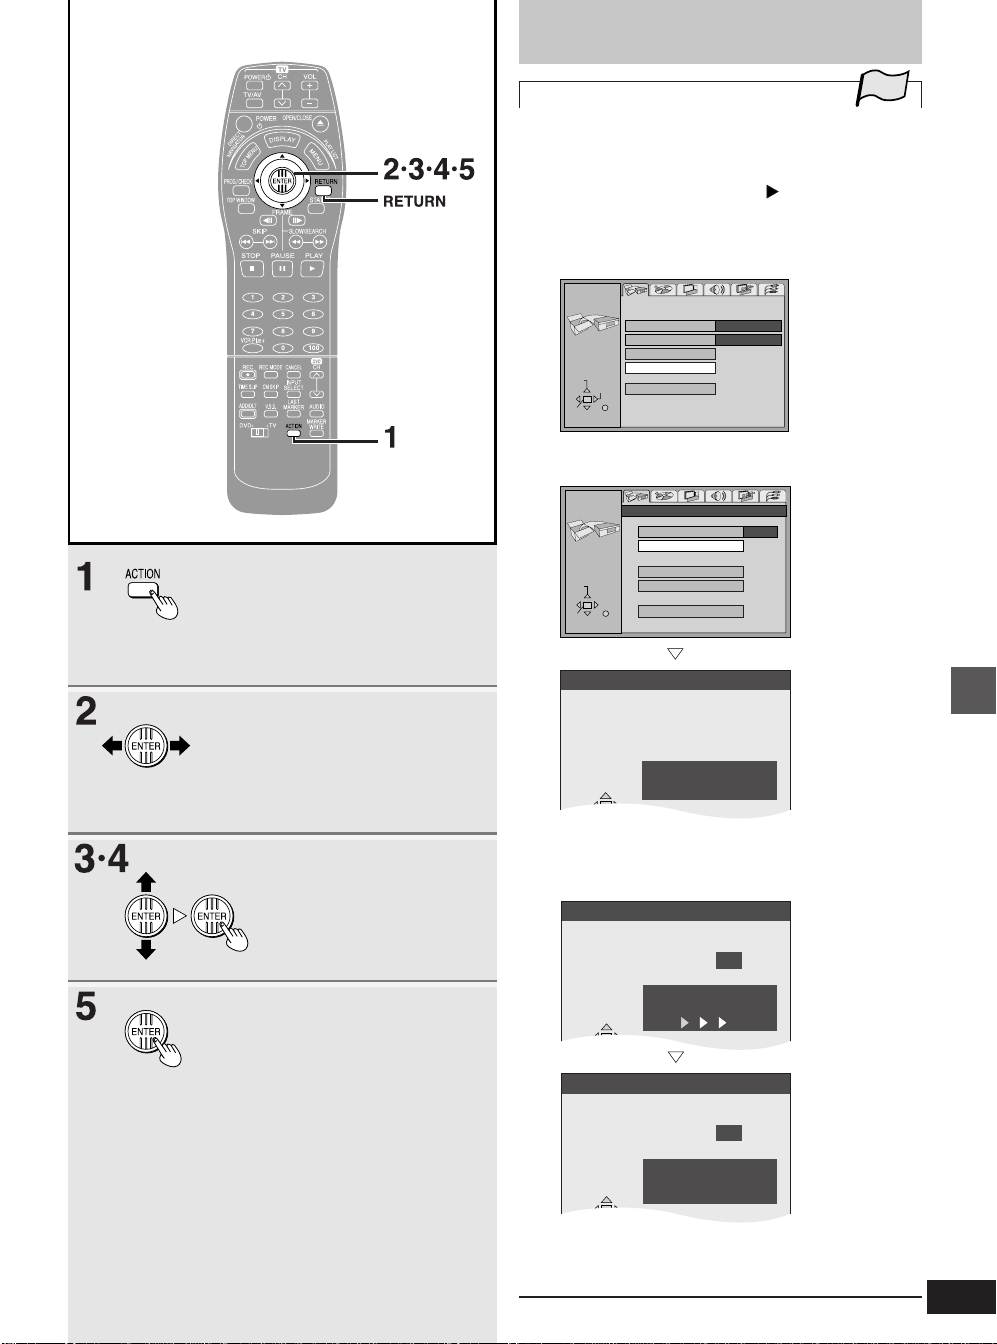
Auto Channel Setting
18CH
Auto Channel Setting
Proceeding. .
Auto Channel Setting
125CH
Changing the unit’s settings
Antenna System
Auto Channel Setting
Preset Channel Caption
Channel Caption
Manual Channel Caption
VCR Plus+ CH Setting
CATV
ACTION
Channel Settings
SELECT
ENTER RETURN
Auto Channel Setting
Connect antenna cable and if you use a
cable box, tune it to your local PBS CH
then. . .
Please push the ENTER key.
Set Up
SELECT
Off Timer
Remote Control Code
Clock Settings
Channel Settings
Re-initialize Setting
6 hr
Set Code 1
ACTION
ENTER RETURN
TAB
Auto Channel Setting
You can use the ACTION menus to start Auto Channel Setting if Plug-in Auto
Tuning (➡ page 16) fails for some reason.
1 Press [ACTION].
The ACTION screen appears.
TOP
2 Use the joystick [œ, ] to select the
Set Up tab.
3
Use the joystick [
nel Settings” and press [ENTER].
4
Use the joystick [
Channel Setting” and press [ENTER].
▲, ▼
] to select “Chan-
▲, ▼
] to select “Auto
Check the antenna
system. Automatic
setting is performed
based on the current
antenna system.
When you press [ENTER]
If clock setting is complete, the “Auto Channel Setting” screen appears.
If you have not yet set clock, the “Auto Channel/Clock Setting” screen appears.
5 Press [ENTER].
When finished
Auto Channel Setting
Complete
Auto channel setting (or auto channel and auto clock setting) starts. This takes
a few minutes. When finished, the Complete screen or time display is shown.
Press [ENTER].
●
The channels are set based on the currently selected antenna system.
■ To stop auto channel setting
Press [RETURN].
Initial settings
91
RQT6035
Page 92
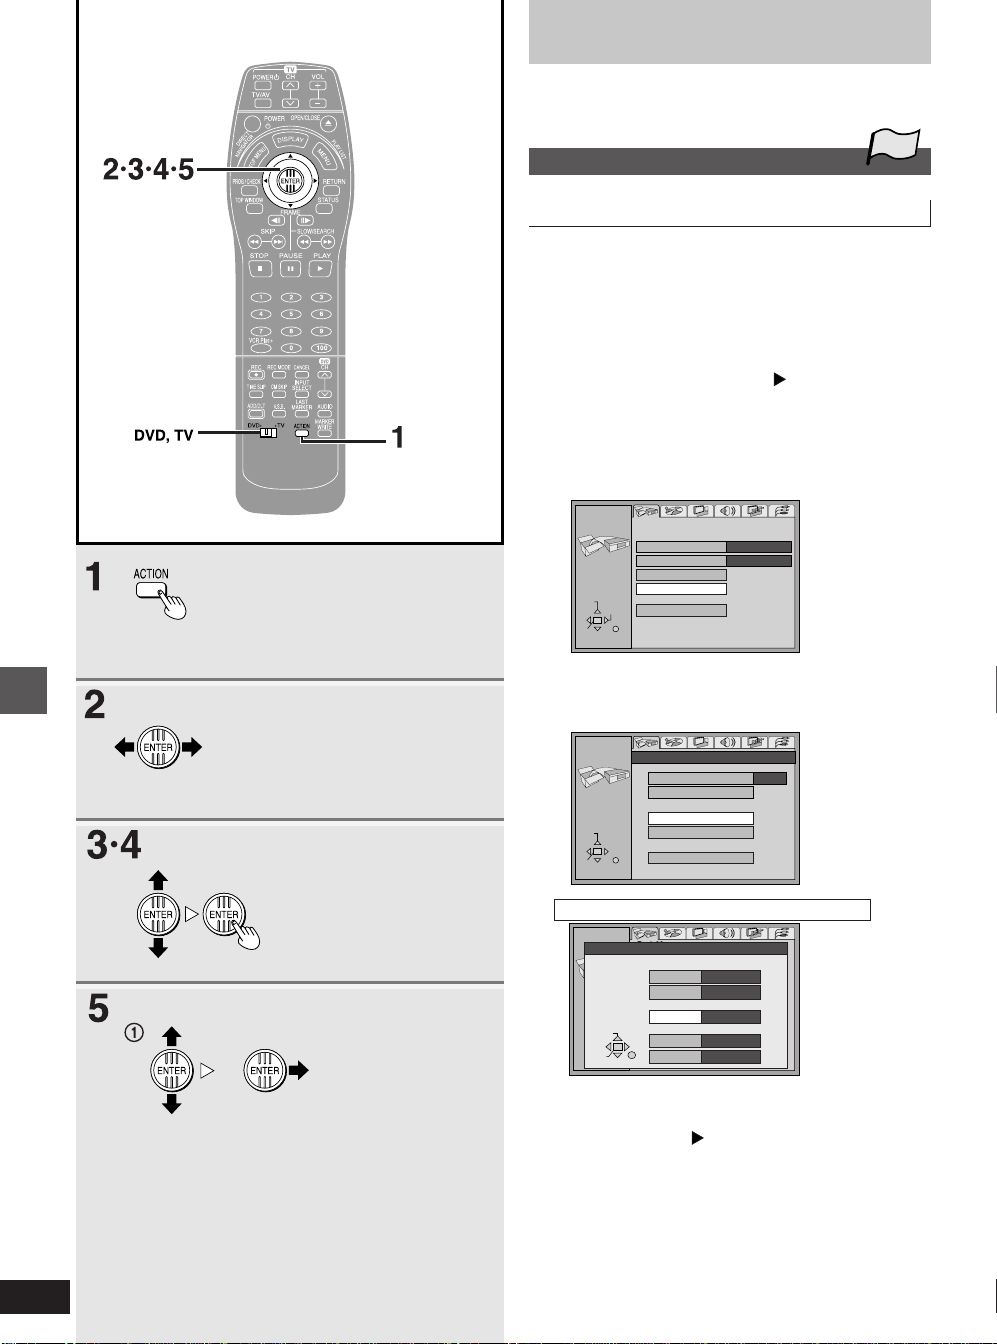
Changing the unit’s settings
Antenna System
Auto Channel Setting
Preset Channel Caption
Channel Caption
Manual Channel Caption
VCR Plus+ CH Setting
CATV
ACTION
Channel Settings
SELECT
ENTER RETURN
Set Up
SELECT
Off Timer
Remote Control Code
Clock Settings
Channel Settings
Re-initialize Setting
6 hr
Set Code 1
ACTION
ENTER RETURN
TAB
Preparation
Switch [DVD, TV] to “DVD”.
Channel Settings
TOP
Channel Caption
You can give stations captions. You can use the Preset Captions, or
manually enter new ones yourself.
The captions you enter are displayed when the channel is displayed
and in the direct navigator screen.
1 Press [ACTION].
The ACTION screen appears.
2 Use the joystick [œ, ] to select the
Set Up tab.
3 Use the joystick [▲, ▼] to select
“Channel Settings” and press
[ENTER].
4 Use the joystick [▲, ▼] to select
“Preset Channel Caption” or “Manual
Channel Caption” and press [ENTER].
Initial settings
92
RQT6035
5 If you selected “Preset Channel Caption”
Set Up
ACTION
SELECT
ENTER
! Use the joystick [▲, ▼] to select
Preset Caption
Channel Number
RETURN
Caption
Antenna System
GL08
Auto Channel Setting
Preset Caption
Manual Caption
ABC
VCR Plus Setting
PBS
CBS
TV
---
---
---
---
the caption and then move the
joystick [ ].
You can choose from the following captions.
ABC, PBS, CBS, CNN, FOX, ESPN, NBC, HBO, A&E,
AMC, FAM, MAX, MTV, SHOW, TBS, USA, TNT, CBC,
UPN, CTV, WB, TSN, DSC, GLOB
(Continued on next page)
Page 93
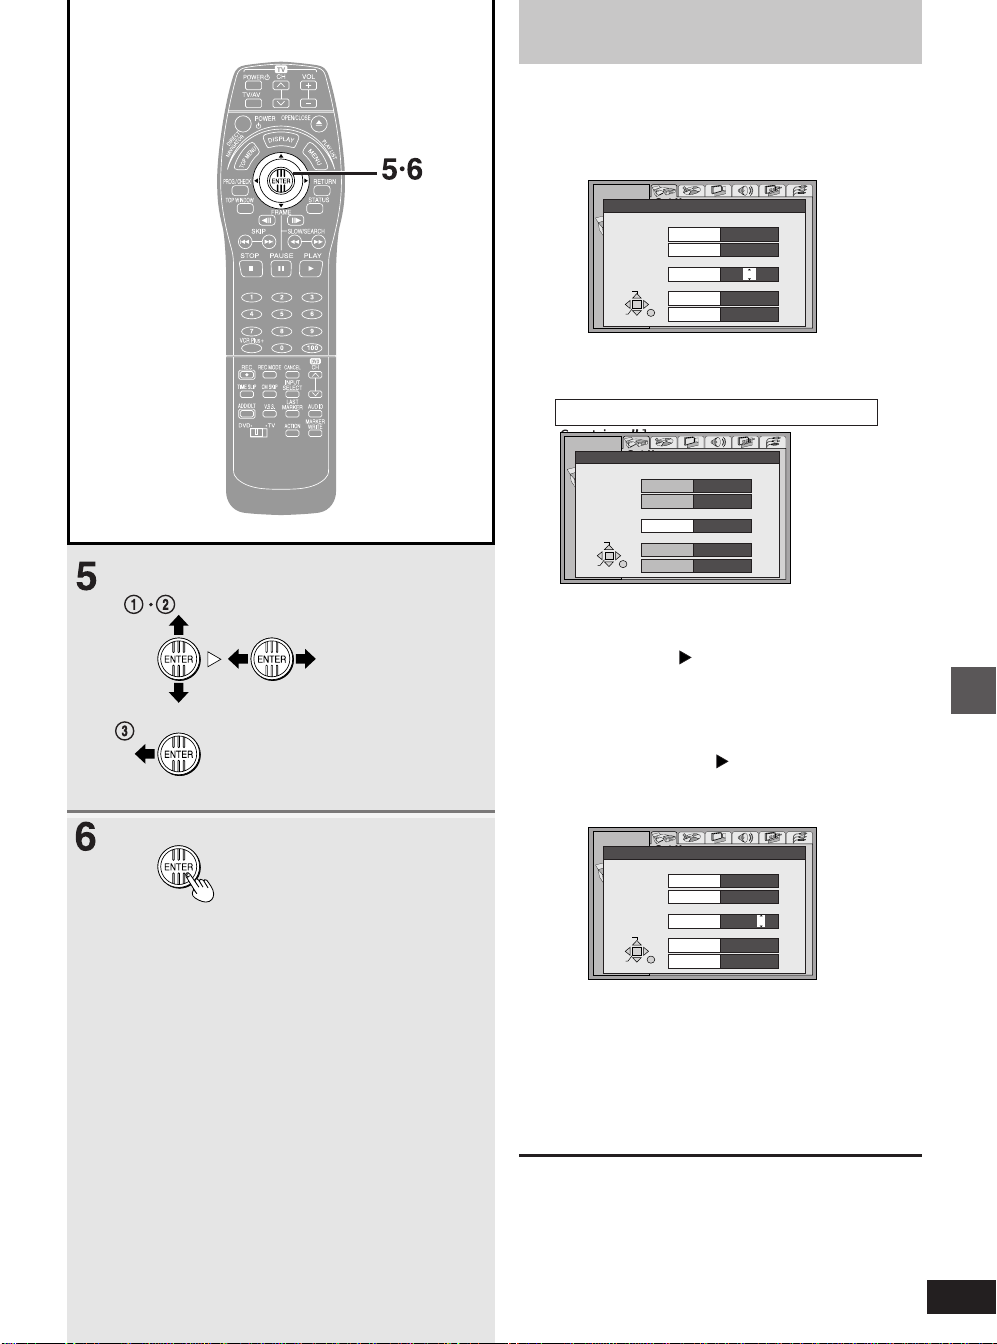
Changing the unit’s settings
Set Up
Antenna System
Auto Channel Setting
Preset Caption
Manual Caption
VCR Plus Setting
TV
ACTION
Preset Caption
CTV
WB
Caption
Channel Number
---
---
DSC
---
GL08
---
TSN
---
RETURN
ENTER
SELECT
Set Up
Antenna System
Auto Channel Setting
Preset Caption
Manual Caption
VCR Plus Setting
TV
ACTION
Manual Caption
Channel Number
Caption
10
12
23
8
RETURN
ENTER
SELECT
A A A A
----
----
----
@ Use the joystick [▲, ▼] to select
the channel corresponding to the
caption and then move the joystick
[œ].
●
Channels are not displayed if they do not contain a sta-
tion or if captions have been added manually.
Repeat steps ! and @ as necessary.
5 If you selected “Manual Channel Caption"
Caption”]
! Use the joystick [▲, ▼] to select
@ Use the joystick [▲, ▼] to select
Set Up
ACTION
SELECT
ENTER
RETURN
Manual Caption
Channel Number
Antenna System
124
Auto Channel Setting
Preset Caption
Manual Caption
8
VCR Plus Setting
10
12
Caption
----
----
----
----
TV
the channel and then move the
joystick [ ].
●
Channels are not displayed if they do not contain a sta-
tion or if preset captions have been added.
the first character and then move
the joystick [ ].
You can choose from the following characters:
A–Z, 0–9, -, &, !, /, (space)
Repeat this step to enter the other characters.
Initial settings
# Press [œ] to return to the Channel
Number column when you are
finished.
Repeat steps !,@, and # as necessary.
6 Press [ENTER].
The screen shown in step 4 reappears.
For your reference
In step 5-!, the screen scrolls a page at a time if you hold the joystick up or down before pressing [ENTER].
93
RQT6035
Page 94
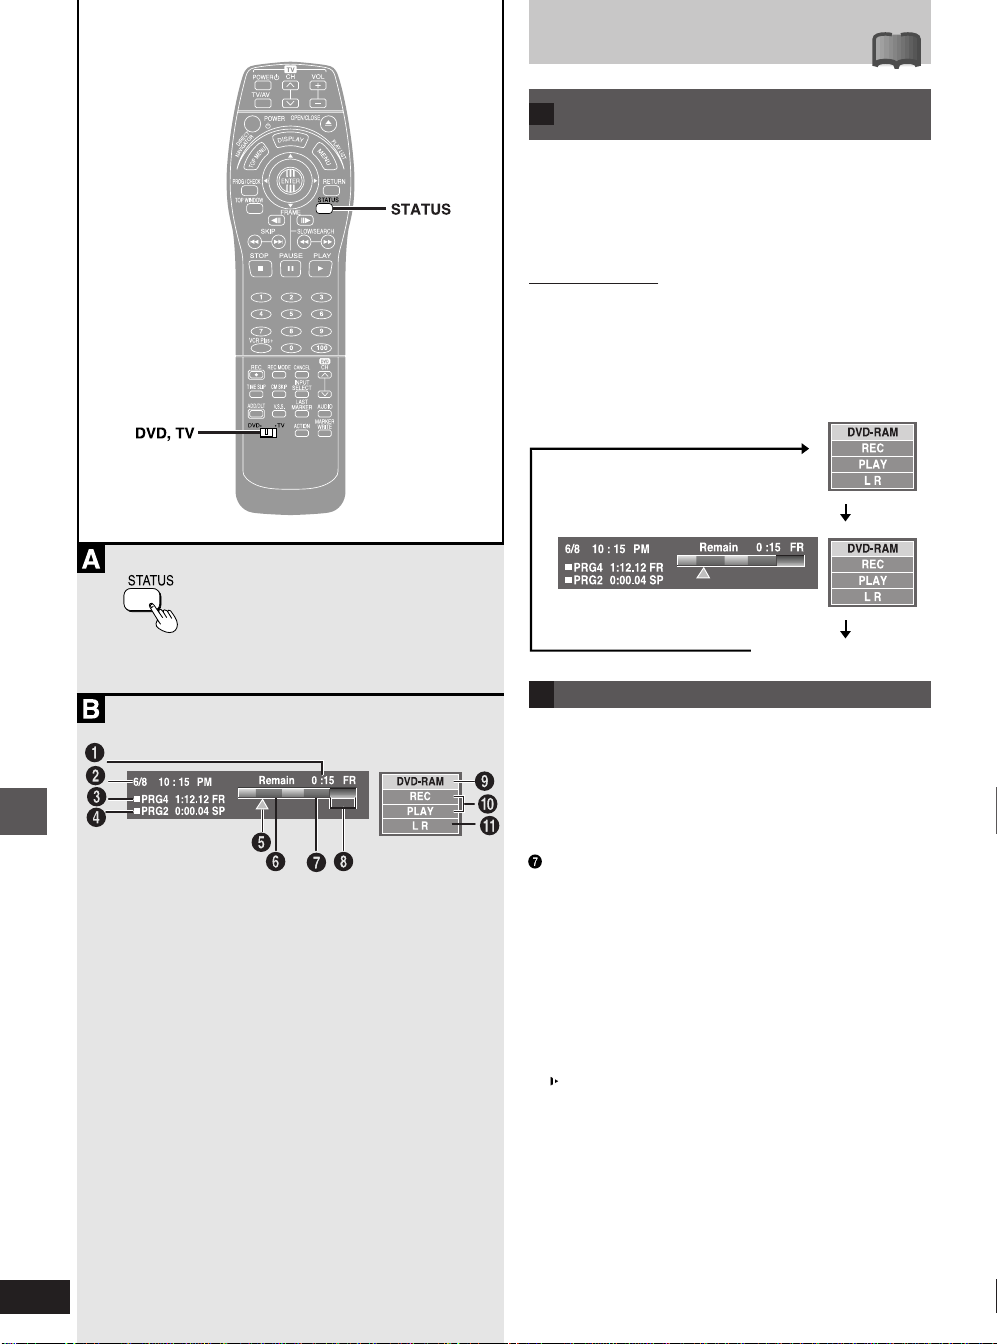
On-screen displays
Changing the information
A
displayed
Displays appear on the television when you operate the unit to let
you know what operation was performed and what condition the unit
is in.
●
You can change the setting in the ACTION menu so these displays
do not appear automatically (➡ page 83, Display—Status
Messages).
Remote control only
Preparation
Switch [DVD, TV] to “DVD”.
!?
Press [STATUS] to change the information
displayed.
The display changes each time you press the button.
For example, DVD-RAM
Reference
94
RQT6035
No display
Display examples
B
ΠAvailable recording time and recording mode
´ The current date and time
ˇ Recording information
Shows the program number, elapsed time, and recording mode.
¨ Play information
Shows the program number, elapsed time, and recording mode.
ˆ Play position
Ø Program being played (green)
Program being recorded (red)
” Available time on disc
’ Current media
˝ Current recording or play status/input channel and caption
(if entered)
Shows the current state of the unit or input channel and caption (if
entered).
REC: Recording
PAUSE: Recording paused
PLAY: Playing
»: Playing paused
î: Rewinding (5 speeds)
ï: Fast forwarding (5 speeds)
: Slow-motion (5 speeds)
œ: Reverse slow-motion (5 speeds)
Ô Audio type (➡ page 34)
Shows the selected audio type.
●
During reception
Stereo: Stereo is selected
Mono: Monaural is selected
SAP: Secondary audio program is selected
(“(((” appears when the type you have selected is actually being
received.)
●
During play
LR, R, L: a stereo program is recorded
MAIN, SAP: an MTS program is recorded
Page 95
Specifications
Power supply: AC 120 V, 60 Hz
Power consumption: 35 W
Recording system: DVD video recording standards
(DVD-RAM),
DVD video standards (DVD-R)
Optical pick-up: System with 1 lens, 2 integration units
(662 nm wavelength for DVDs,
790 nm wavelength for CDs)
Recordable discs: 12 cm 4.7 GB DVD-RAM discs
12 cm 9.4 GB DVD-RAM discs
8 cm 2.8 GB DVD-RAM discs
12 cm 4.7 GB DVD-R discs
(for General Ver. 2.0)
Recording time: Max. 6 hours (using 4.7 GB disc)
XP: 60 minutes
SP: 120 minutes
LP: 240 minutes
EP: 360 minutes
Discs played: 12 cm 4.7 GB DVD-RAM discs
12 cm 9.4 GB DVD-RAM discs
8 cm 2.8 GB DVD-RAM discs
12 cm 4.7 GB DVD-R discs
(for General Ver. 2.0)
DVD-VIDEO discs
CD-Audio discs (CD-DA)
Video CD discs
CD-R/CD-RW discs
(CD-DA, Video CD formatted discs)
Video system
TV system: NTSC system, 525 lines, 60 fields
Recording system: MPEG2 (Hybrid VBR)
Input: LINE (pin jack), 1.0 Vp-p; 75 Ω
S connector Y: 1.0 Vp-p; 75 Ω
C: 0.286 Vp-p; 75 Ω
Output: LINE (pin jack), 1.0 Vp-p; 75 Ω
S connector Y: 1.0 Vp-p; 75 Ω
C: 0.286 Vp-p; 75 Ω
Component video
output 525i: Y: 1.0 Vp-p; 75 Ω
B: 0.7 Vp-p; 75 Ω
P
R: 0.7 Vp-p; 75 Ω
P
Antenna reception
input: TV Channel: 2ch–69ch, 75 Ω
CATV Channel: 1ch–125ch, 75 Ω
Audio system
Recording system: Dolby Digital
Input: LINE (pin jack)
Reference input: 309 mVrms
FS: 2 Vrms (1 kHz, 0 dB)
Input impedance: 47 kΩ
Output: LINE (pin jack)
Reference output: 309 mVrms
FS: 2 Vrms (1 kHz, 0 dB)
Output impedance: 1 kΩ
(Load impedance: 10 kΩ)
Number of channels: Recording: 2 channels
Playback: 2 channels
Other input/output
connectors: Digital audio optical output connector
Dimensions: Approx. 430 (W)✕120 (H)✕351 (D) mm
[Approx. 16
13
7
/8″ (D)]
15
/16″ (W)✕43/4″ (H)✕
(excluding protrusions)
Mass: Approx. 5.6 kg (12.36 lbs)
Operating
temperature range: 5 °C–40 °C (41 °F–104 °F)
Operating
humidity range: 10 %–80 % RH (no condensation)
Clock unit: Quartz-controlled 12-hour digital display
LASER Specification
Class I LASER Product
Wave length: 775–815 nm 655–666 nm
Laser power: No hazardous radiation is emitted with
Power consumption in standby mode: approx. 5 W
Note
Specifications are subject to change without notice.
Mass and dimensions are approximate.
the safety protection.
95
RQT6035
Reference
Page 96
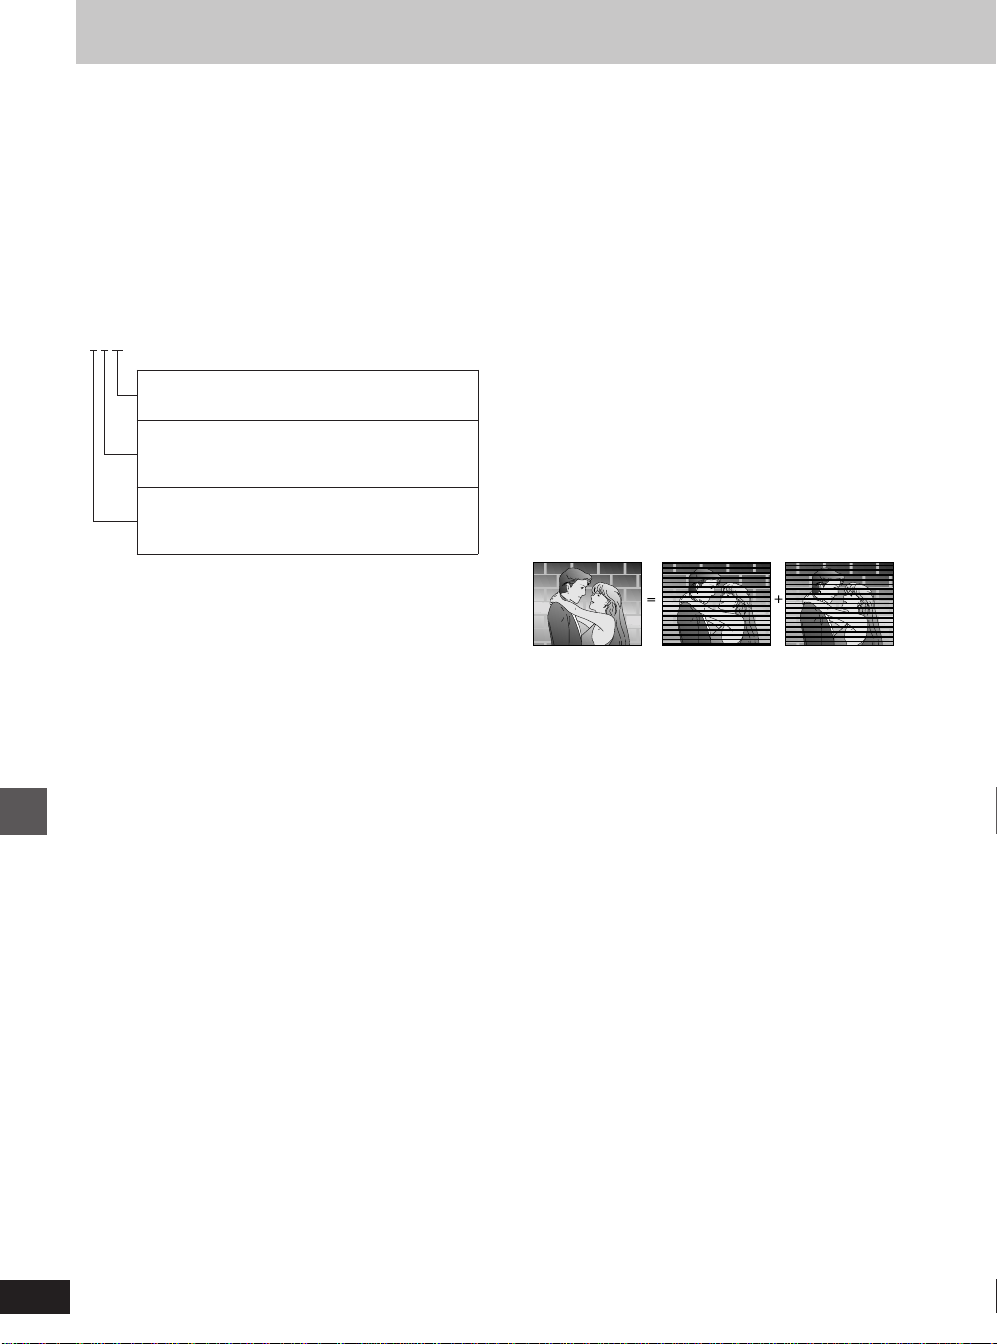
Glossary
Bitstream
This is the compressed form of digital signals. A decoder decodes
these signals into 5.1 surround and multi-channel signals.
Channel (when referring to DVD)
Sound is divided into channels based on the sound’s role.
For example, 5.1 channel
●
Front speakers—1 left channel and 1 right channel
●
Center speaker—1 channel
●
Surround speakers—1 left channel and 1 right channel
●
Subwoofer—1 channel ✕ 0.1 (the ratio of bass to the total amount
of sound output)
Examples as shown in the on-screen menus
3/2 .1ch
.1: Subwoofer signal
(not displayed if there is no subwoofer signal)
0: No surround
1: Mono surround
2: Stereo surround (left/right)
1: Center
2: Front left+Front right
3: Front left+Front right+Center
Component video output (Y, PB, PR)
The luminance (Y) and color difference (PB and PR) signals are separated for output so colors are reproduced faithfully. The output form
differs from that for 480P progressive output.
Decoder
A decoder restores the coded audio and video signals on DVDs to
normal. This is called decoding.
Direct navigator
This is a list of programs you have recorded. You can select programs from the list to view. The list also shows the date and time of
recording, the channel, and the titles of titled programs. The selected
program is played in the background, making selection even
simpler.
Dolby Pro Logic
A surround system where a 4-channel audio track is recorded as
2 channels and then is restored to 4 channels for play. The surround
channel is monaural.
DTS Digital Surround
This surround system is used in many movie theaters around the
world. The separation between channels is good and the compression ratio is low, so realistic sound effects are possible.
DTS soundtracks are produced with the assumption that all channels
will be used.
Dynamic range
Dynamic range is the difference between the lowest level of sound
that can be heard above the noise of the equipment and the highest
level of sound before distortion occurs.
Finalize
This process allows DVD-R to be played on compatible equipment.
Frame and field
Frames are the still pictures that go together to make a moving picture. A frame is made up of two fields.
Frame Field Field
●
A frame still is made up of two alternating fields, so the picture may
appear blurred, but overall quality is high.
●
A field still is not blurred, but it has only half the information of a
frame still so picture quality is lower.
Linear PCM
This is a form of signal that has been digitized without compressing
it. CDs are recorded with 44.1 kHz/16 bit PCM, while DVDs use PCM
between 48 kHz/16 bit and 96 kHz /24 bit, allowing reproduction of
greater quality sound.
The linear PCM signals output from the DIGITAL AUDIO OUT,
OPTICAL terminal are stereo (2 channel).
Dolby Digital
Reference
This is a method of coding digital signals developed by Dolby Laboratories. Apart from stereo (2-channel) audio, these signals can also
be 5.1-channel audio. A large amount of audio information can be
recorded on one disc using this method.
96
RQT6035
Page 97
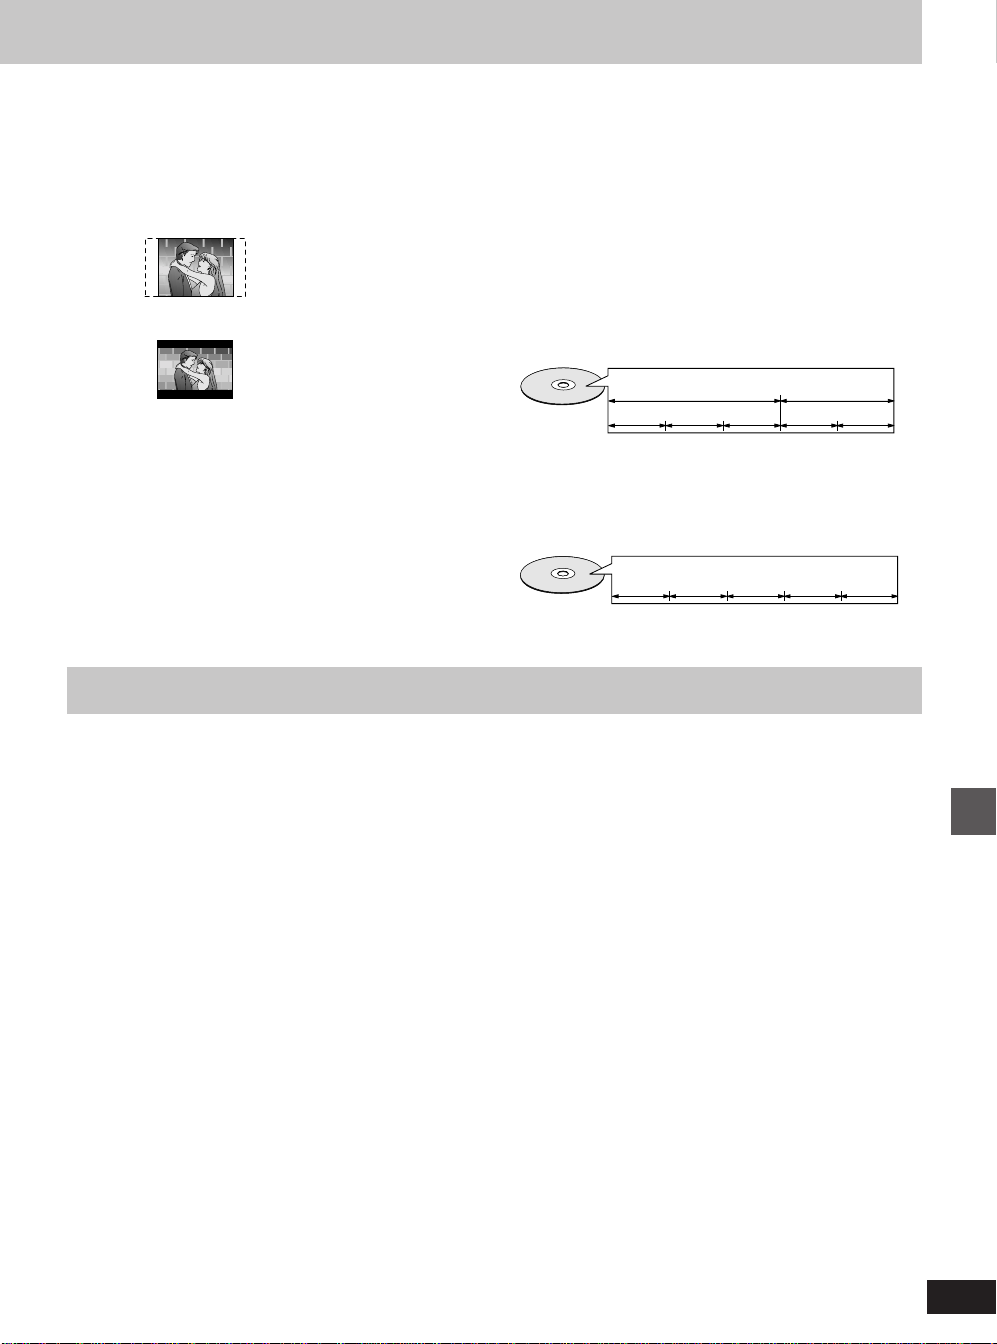
Pan&Scan/Letterbox
In general, DVD-Video are produced with the intention that they be
viewed on a widescreen television with an aspect ratio of 16:9. This
means you can view most material with the intended aspect ratio on
a widescreen television.
Material with this ratio will not fit onto a standard television with an
aspect ratio of 4:3. Two styles of picture, “Pan&Scan” and
“Letterbox”, deal with this problem.
Pan&Scan: The sides are cut off so the picture fills the screen.
Letterbox: Black bands appear at the top and bottom of the picture
so the picture itself appears in an aspect ratio of 16:9.
Sampling frequency
This is the number of samples of sound taken per second during
conversion to a digital signal. A high sampling frequency results in a
sound close to the original when played back.
S video output
The color (C) and luminance (Y) signals are separated before being
sent to the television, making for greater picture clarity.
Title/Chapter (DVD-Video)
DVD-Video are divided up into large sections, titles, and smaller sections, chapters. The numbers allocated to these sections are called
title numbers and chapter numbers.
Playback control (PBC)
This is a method of playing video CDs. You can select parts to play
Example
Chapter 1 Chapter 2 Chapter 3 Chapter 1 Chapter 2
Title 1 Title 2
by using menus recorded on the disc.
Track (Video CD/CD)
Play list
This is a collection of scenes. It enables you to play these scenes in
succession or to select specific ones to play.
Program (PRG)
The section between the point where recording is started and the
point where it is stopped.
This is the smallest division on CD and Video CD, and usually
equates to a single song.
Example
Track 1 Track 2 Track 3 Track 4 Track 5
Maintenance
The precision parts in this unit are readily affected by the environment, especially temperature, humidity, and dust.
Observe the following points to ensure continued listening and viewing pleasure.
To clean this unit, wipe with a soft, dry cloth.
●
Never use alcohol, paint thinner or benzine to clean this unit.
●
Before using chemically treated cloth, read the instructions that
came with the cloth carefully.
Dust and dirt may adhere to the unit’s lenses over time, possibly
making it impossible to record or play discs.
Use the recommended DVD-RAM/PD lens cleaner
(LF-K123LCA1) about once a year, depending on frequency of use
and the operating environment.
Read the lens cleaner’s instructions carefully before use.
●
The lens cleaner may make some sound during use but this does
not indicate a malfunction.
●
“U11” appears on the unit’s display when cleaning finishes.
Reference
97
RQT6035
Page 98
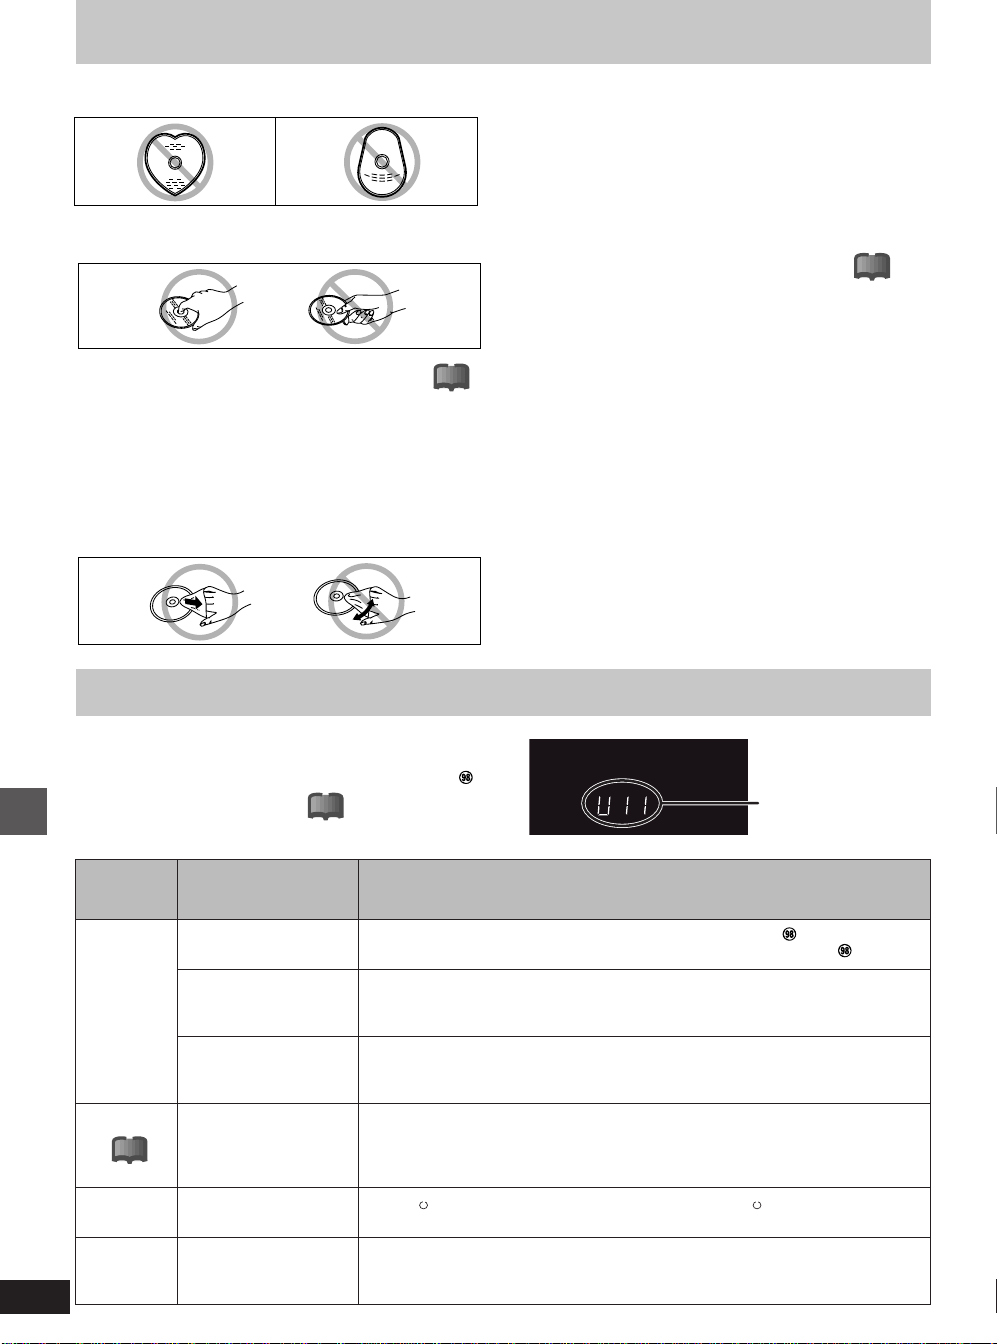
Disc handling
Do not use irregularly shaped discs, such as heart-shaped.
(These can damage the unit.)
■ How to hold a disc
Do not touch the recorded surface.
■ If there is dirt or condensation on the disc
Moisture may condense on discs after they are brought inside from
the cold.
DVD-RAM and DVD-R
Clean and dry only with the DVD-RAM/PD disc cleaner available as
an optional accessory, part number LF-K200DCA1. Do not use
cleaners or cloths for CDs to clean DVD-RAM and DVD-R.
DVD-Video, Video CD, CD
Wipe with a damp cloth and then wipe dry.
!?
■ Handling precautions
●
Do not write on the label side with a ball-point pen or other writing
instrument.
●
Do not use cleaning sprays, benzine, thinner, static electricity prevention liquids or any other solvent.
●
Do not attach labels or stickers to discs. (Do not use discs with
exposed adhesive from tape or left over peeled-off stickers.)
●
Do not use scratch-proof protectors or covers.
●
Do not use discs printed with label printers available on the
market.
●
Do not use discs that are badly warped or cracked.
!?
■ Do not place or store discs in the following
places
●
Locations exposed to direct sunlight
●
Humid or dusty locations
●
Locations directly exposed to a heat vent or heating appliance
Self-diagnosis
The service numbers (“U” followed by two digits) and messages
shown in the table appear.
Reference pages are shown as black circled numbers .
Possible solutions are indicated with “ ” on the relative pages in the operating instructions.
Service
number
Reference
U11
Unit status
The disc is dirty or badly
scratched.
You have inserted a disc
the unit cannot play or
record on.
The DVD-RAM/PD lens
cleaner has finished
cleaning.
U14
The unit is hot.
!?
!?
U99
CHK
REMOTE
98
RQT6035
The unit fails to operate
properly.
The remote control and
main unit are using
different codes.
Service number
Solutions
●
Follow the instructions in “Disc handling” to clean the disc if it is dirty.
●
The disc cannot be played if it is scratched and this display doesn’t disappear.
●
Insert a disc the unit can play or record on. ^
●
Take the cleaner out of the unit.
●
The unit switches to standby automatically for safety reasons and you cannot operate it.
Wait for about 30 minutes for the service number to disappear.
●
Select a position with good ventilation when installing the unit.
●
Do not block the cooling fan on the rear of the unit.
●
Press [ /I, POWER] to switch the unit to standby. Now press [ /I, POWER] again to turn
the unit on.
●
Change the code on the remote control or main unit. N, n
Page 99
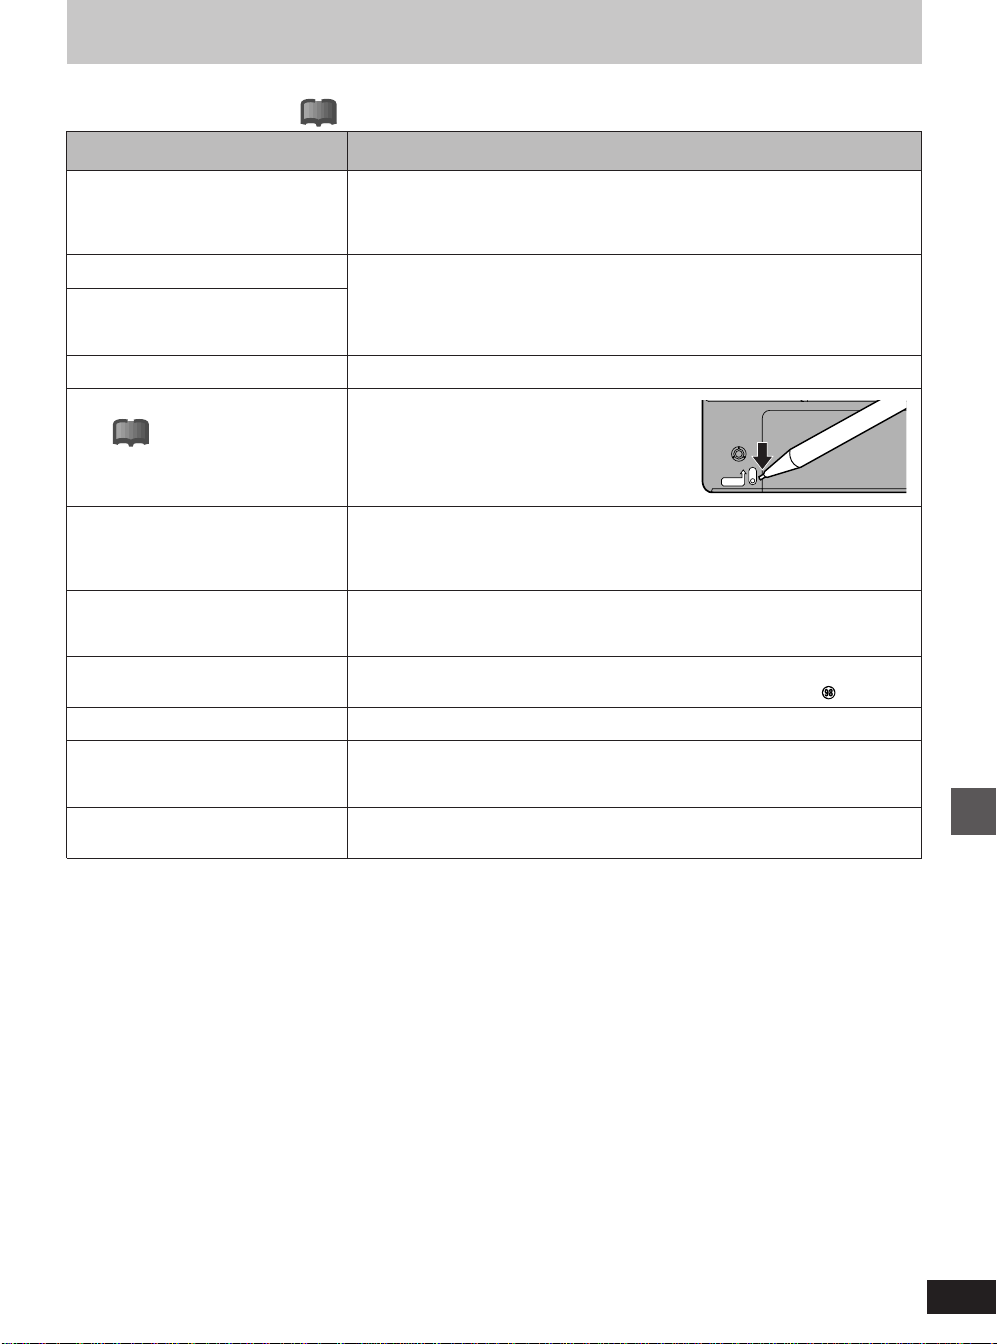
Error messages
Reference pages are shown as black circled numbers
Possible solutions are indicated with “ ” on the relative pages in the operating instructions.
!?
Error messages
No Disc.
●
You haven’t inserted a disc.
Correctly insert a disc that this unit can use. ‘ q
●
The disc is upside down.
‘‘
‘.
‘‘
Causes and solutions
If it is a single-sided disc, insert it so the label is facing up. ‘ q
This is non-recordable disc.
●
The unit cannot record on the disc you inserted. The unit cannot record onto finalized
DVD-R, DVD-Video, CDs, or video CDs.
This disc is not formatted properly.
Please format the disc in ‘DISC
SETTING’ to record.
This disc cannot be read.
Please check write protect tab on the
disc.
!?
Insert a DVD-RAM or unfinalized DVD-R. ^ &
●
You inserted an unformatted DVD-RAM.
Format the disc with this unit. d
●
You inserted an incompatible disc. Insert a compatible disc. ^
●
The write-protect tab on the cartridge is set to
PROTECT.
Use a ballpoint pen or similar to release the write
protection.
Contents of this disc are protected.
●
The program is write-protected.
Release the protection with the direct navigator. J
●
The disc is write-protected.
Release the protection with the Disc Protection of DISC SETTING. D
Cannot finish recording completely.
Cannot record on the disc.
Please set clock.
This disc may not be played in your
region.
●
The program was copy-guarded.
●
The disc is full.
●
Recording was not completed for some other reason.
●
The disc is scratched. Use another disc.
●
The disc is dirty. Clean the disc as described in these operating instructions.
●
The clock is not set correctly. Reset the clock using “Manual Clock Setting”. .
●
You tried to play a disc with a region number different from this unit’s region number. This
unit can only play discs with the region numbers compatible with this unit (1, All, or
including the number 1). ^
Your selection exceeds the recorder’s
rating limit.
●
A ratings level has been set for DVD-Video with this unit.
Temporarily unlock the unit with “Ratings” in the Disc ACTION menu. ,
PROTECT
99
RQT6035
Reference
Page 100
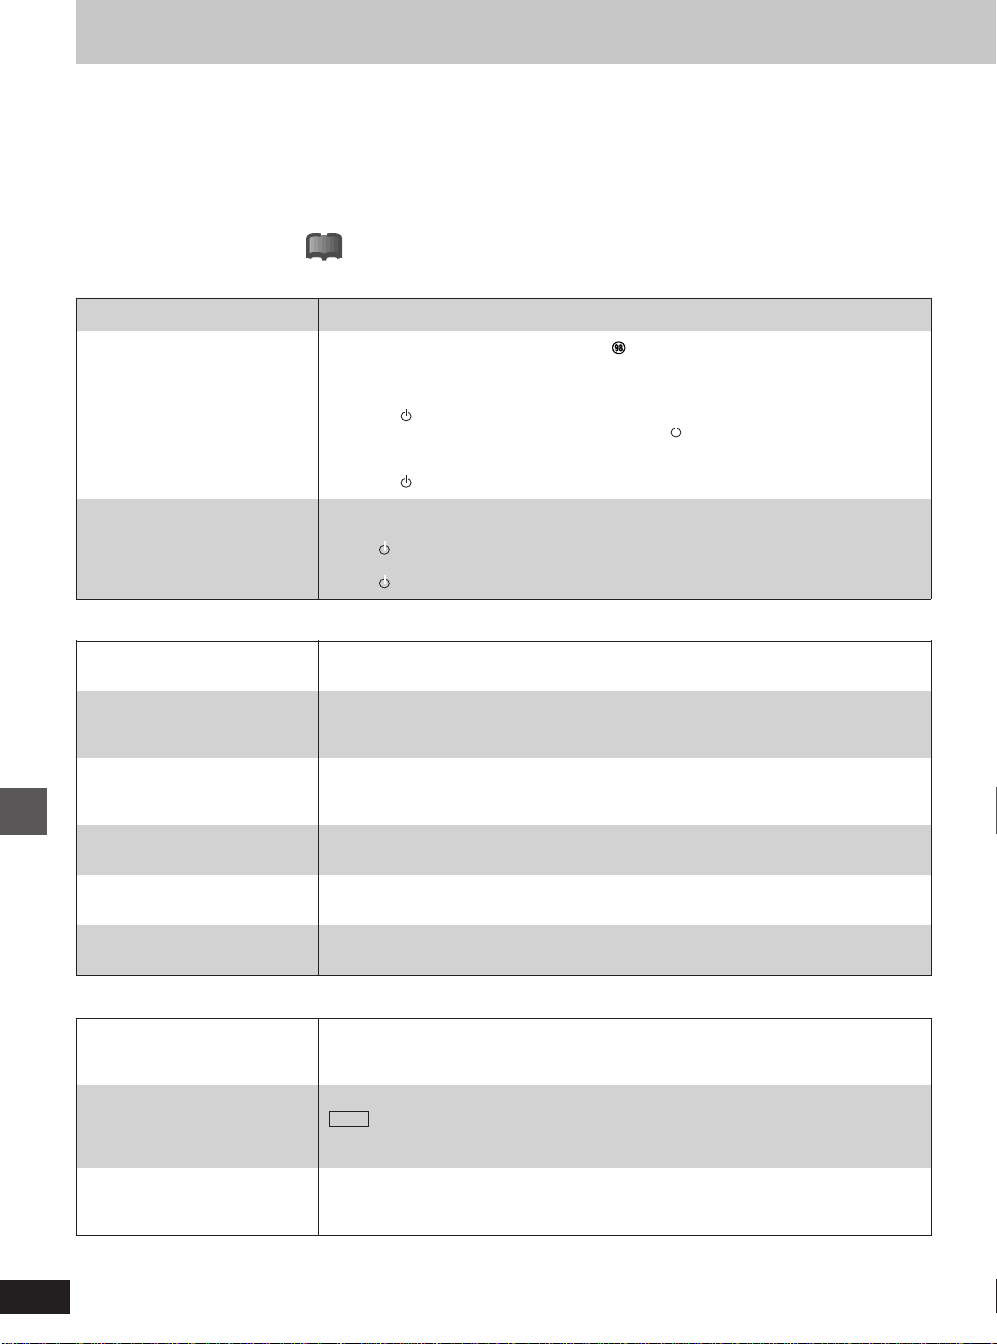
Troubleshooting guide
Before requesting service, make the below checks. If you are in doubt about some of the check points, or if the remedies indicated in the chart do
not solve the problem:
In the U.S.A., contact the Panasonic Customer Call Center at 1-800-211-7262, or e-mail [email protected], or
web site (http://www.panasonic.com).
In Canada, contact Panasonic Canada Inc. Customer Care Centre at 1-800-561-5505, web site (www. panasonic.ca), or an authorized
Servicentre closest to you.
Reference pages are shown as black circled numbers 4.
Possible solutions are indicated with “ ” on the relative pages in the operating instructions.
Power
!?
No power.
The unit is on but cannot be
operated.
The unit switches to standby
automatically.
Picture
The images from this unit do not
appear on the television.
Television reception worsens after
connecting the unit.
Screen size is wrong.
The picture flickers.
On-screen messages do not
appear.
Reference
The blue background does not
appear.
●
Insert the AC power supply cord securely into the household AC outlet.
●
The unit is hot (“U14” appears on the display).
Wait for “U14” to disappear.
●
One of the unit’s safety devices may have activated.
44
4
44
Reset the unit as follows:
1. Press [ /I, POWER] on the main unit to switch the unit to standby.
If the unit doesn’t switch to standby, press and hold [ /I, POWER] for about 10 seconds. The
unit is forcibly switched to standby.
Alternatively, disconnect the AC power supply cord, wait one minute, then reconnect it.
2. Press [ /I, POWER] to turn the unit on.
●
This is a power saving feature. You can turn it off if you would prefer (ACTION—Set Up—Off
Timer—Off). n
Press [ /I, POWER] to turn the unit on.
●
One of the unit’s safety devices may have activated.
Press [ /I, POWER] to turn the unit on.
●
Make sure the television’s input setting (e.g., VIDEO 1) is correct.
●
This can occur because the signals are being divided between the unit and the television.
It can be solved by using a signal booster, available from audio-visual suppliers.
Consult your dealer if reception does not improve.
●
Check the settings on your television.
●
Check the settings for “TV Aspect”, “4:3 TV Settings for DVD-Video” or “4:3 TV Settings for
DVD-RAM” in the TV Screen ACTION menus. “, M
●
Adjust the television’s vertical hold. Read the television’s operating instructions or consult your
dealer.
●
Go to Display in the ACTION menus and select “Automatic” for “Status Messages”. M
●
Press [STATUS] to show the on-screen messages constantly. ›
●
Go to Display in the ACTION menus and select “On” for “Blue Background”. M
Sound
No sound.
Low volume.
Distorted sound.
Cannot hear the desired audio
type.
Cannot switch audio during stereo
or MTS broadcasts.
100
RQT6035
●
Check the connections. 4, v
Check the input mode on the amplifier if you have connected one.
●
Turn V.S.S. off if it causes distortion. I
●
Press [AUDIO] on the remote control to select the desired audio type. t
DVD-R
●
Go to Audio in the ACTION menus and choose the correct setting with “MTS Selection for DVD-R
Disc”. M
●
You have used digital connection. Connect to other equipment using audio cables (analog
connection). 4, v
●
You cannot change the audio type when using DVD-R. Y
 Loading...