

Samsung DVD-VR300-XAA User Manual
Step Getting Connected
Step
Setup
Step Basic Operation
Quick Setup Guide
Step
Step Getting Connected
Select one of the following three types of connections:
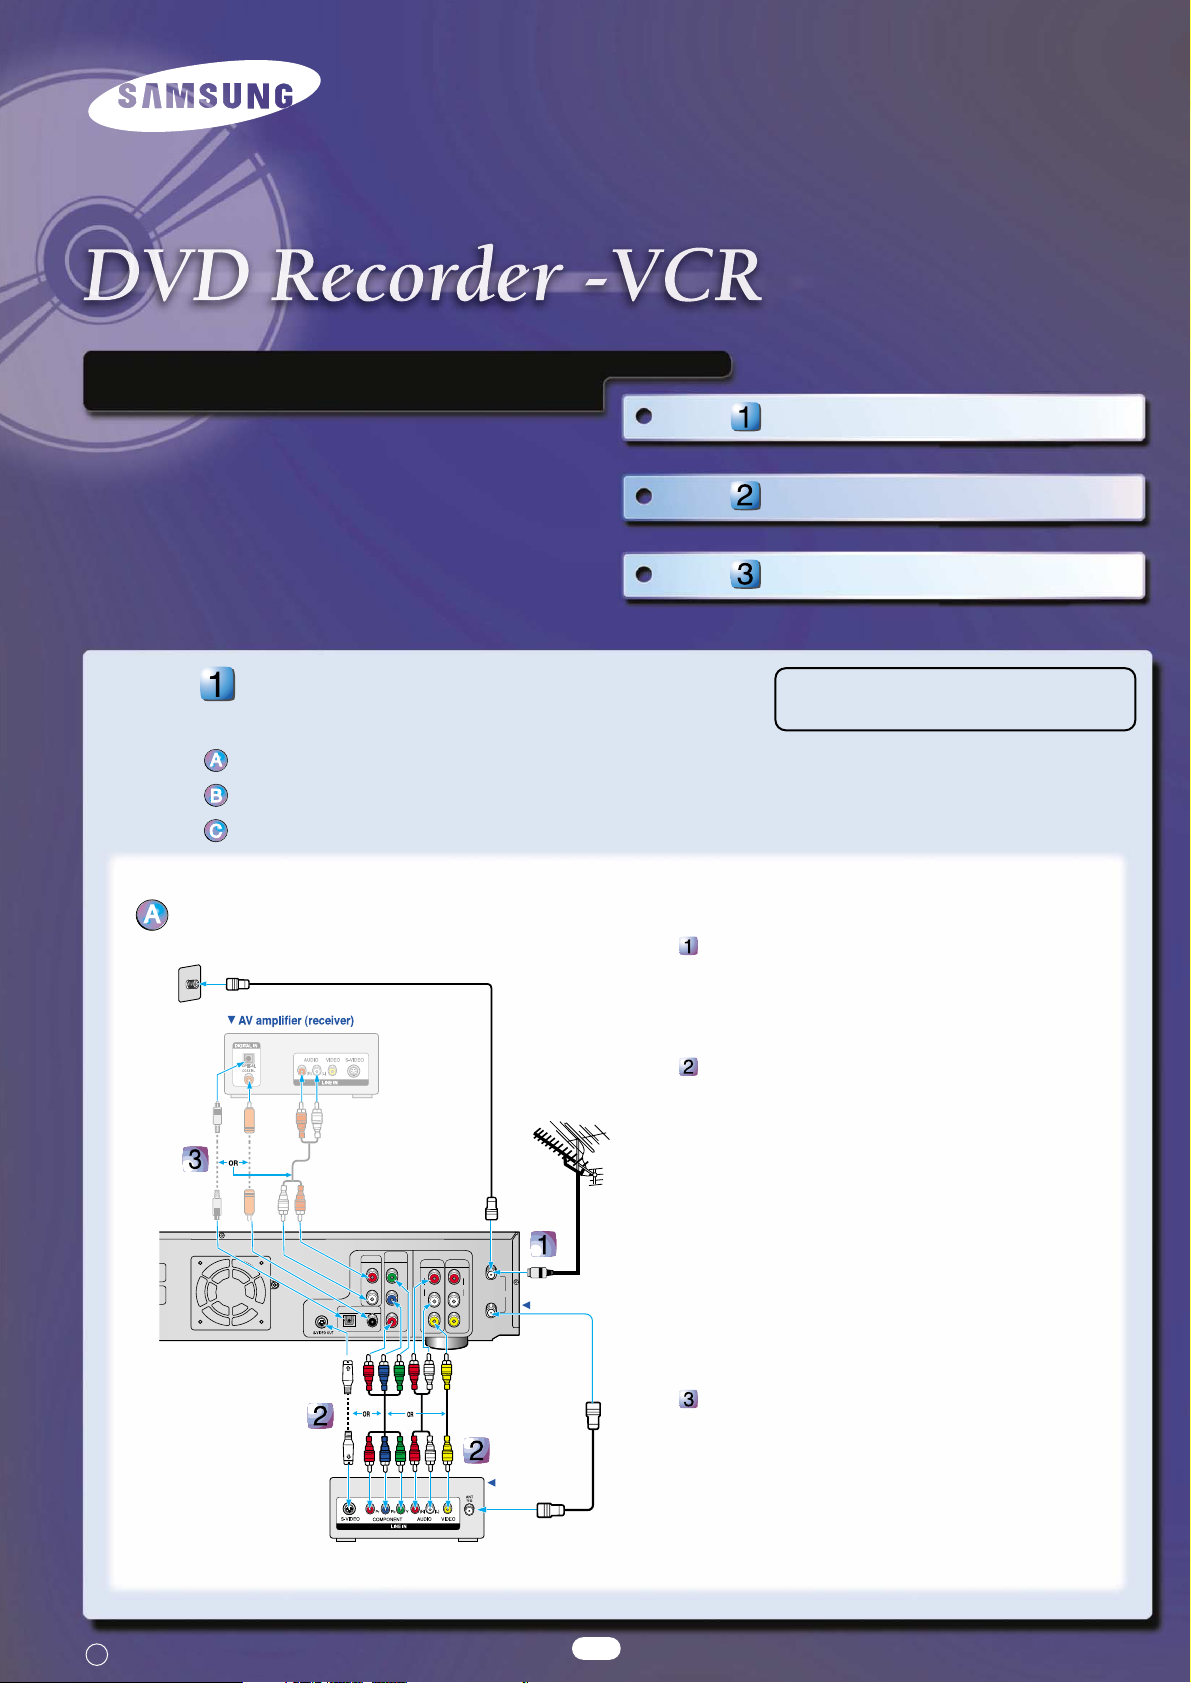
Antenna + DVD Recorder-VCR + TV : No Cable Box
Antenna + Set-Top Box + DVD Recorder-VCR + TV : No Cable Box
Antenna + Cable Box + DVD Recorder-VCR + TV
Antenna + DVD Recorder-VCR + TV : No Cable Box
OUT
RF
(TO TV)
DIGITAL AUDIO OUT
AUDIO OUT
COMPONENT
VIDEO OUT
OPTICAL
COAXIAL
RY
CB/P
B
CR/P
R
L
R
AUDIO AUDIO
LINE OUT LINE IN 1
VIDEO VIDEO
LRL
IN
(FROM ANT.)
OUT
RF
(TO TV)
RLR
L
TV
DVD Recorder-VCR
Connect the signal source to the DVD
Recorder-VCR
Use an antenna cable to connect the signal source coming from the antenna or wall to the VHF/UHF RF-IN jack
on the DVD Recorder-VCR.
Connect the DVD Recorder-VCR to the TV
Use the supplied RF cable to connect RF-OUT on the
DVD Recorder-VCR to the ANT jack on the TV. Then use
the Video/Audio Cable to connect ANALOG AUDIO
OUT(R/L)/VIDEO OUT jacks on the DVD Recorder-VCR to
the Audio & Video jacks on the TV.
● If your TV has an S-Video jack, you can use S-Video
cable instead of the yellow video connector on the
Video/Audio cable.
● If your TV has Component video jacks, you can use
component cables instead of the yellow video connector on the Video/Audio cable. Press the
Progressive out button on the front of your DVD
Recorder-VCR to 480p/480i video output mode. If
your TV supports progressive scan, select 480p.
If you have an AV amplifier
Connect either audio cables from the ANALOG AUDIO
OUT jacks on the DVD Recorder-VCR to the LINE IN jacks
on your AV amplifier, or a digital cable from the DIGITAL
AUDIO OUT (COAXIAL or OPTICAL) jack on the DVD
Recorder-VCR to the DIGITAL AUDIO IN jack on your AV
amplifier.
1
The Recorder will only record on
DVD-R, DVD-RW and DVD-RAM discs.
C Samsung Electronics Printed in Korea

Antenna + Set-Top Box + DVD Recorder-VCR + TV : No Cable Box
OUT
RF
(TO TV)
DIGITAL AUDIO OUT
AUDIO OUT
COMPONENT
VIDEO OUT
OPTICAL
COAXIAL
RY
CB/P
B
CR/P
R
L
R
AUDIO AUDIO
LINE OUT LINE IN 1
VIDEO VIDEO
LRL
IN
(FROM ANT.)
OUT
RF
(TO TV)
RLR
L
DVD Recorder-VCR
TV
Connect the signal source to the STB
Use an antenna cable to connect the signal source coming from
the antenna or wall to the VHF/UHF RF IN jack on the STB.
Connect the STB to the DVD Recorder-VCR
Use the Video/Audio Cable to connect the LINE Out jacks on the
STB to the AUDIO/VIDEO LINE 1 IN jacks on the DVD RecorderVCR.
● For better picture quality, if your STB has an S-Video jack,
you can use S-Video cable instead of the yellow video jack
on the Video/Audio cable.
Connect the DVD Recorder-VCR to the TV
Use the Video/Audio Cable to connect the ANALOG AUDIO
OUT(R/L)/VIDEO OUT jacks on the DVD Recorder-VCR to the
Audio & Video jacks on the TV.
● For better picture quality, if your TV has an S-Video jack, you
can use S-Video cable instead of the yellow video connector
on the Video/ Audio cable.
● For the best picture quality, if your TV has Component video
jacks, you can use Component cables instead of the yellow
video connector on the Video/Audio cable. Press the
Progressive button on the front of your DVD Recorder-VCR to
480p/480i video output mode. If your TV supports progressive scan, select 480p.
If you have an AV amplifier
Connect either audio cables from the ANALOG AUDIO OUT jacks
on the DVD Recorder-VCR to the LINE IN jacks on your AV amplifier, or a digital cable from the DIGITAL AUDIO OUT (COAXIAL
or OPTICAL) jack on the DVD Recorder-VCR to the DIGITAL
AUDIO IN jack on your AV amplifier.
Antenna + Cable Box + DVD Recorder-VCR + TV
OUT
RF
(TO TV)
DIGITAL AUDIO OUT
AUDIO OUT
COMPONENT
VIDEO OUT
OPTICAL
COAXIAL
RY
CB/P
B
CR/P
R
L
R
AUDIO AUDIO
LINE OUT LINE IN 1
VIDEO VIDEO
LRL
IN
(FROM ANT.)
OUT
RF
(TO TV)
RLR
L
DVD Recorder-VCR
TV
Connect the signal source to the Cable Box
Use an antenna cable to connect the signal source coming from
the wall to the RF IN jack on your Cable Box.
Connect your Cable Box to the DVD
Recorder
Use an antenna cable to connect the RF OUT jack on your Cable
Box to the RF-IN jack on your DVD Recorder-VCR.
Connect the DVD Recorder-VCR to the TV
Use the supplied RF cable to connect RF-OUT on the DVD
Recorder-VCR to the ANT jack on the TV. Then use the Video/
Audio Cable to connect the ANALOG AUDIO OUT(R/L)/VIDEO
OUT jacks on the DVD Recorder-VCR to the Audio & Video jacks
on the TV.
● For better picture quality, if your TV has an S-Video jack, you
can use S-Video cable instead of the yellow video connector
on the Video/Audio cable.
● For the best picture quality, if your TV has Component video
jacks, you can use component cables instead of the yellow
video connector on the Video/Audio cable. Press the
Progressive button on the front of your DVD Recorder-VCR
to 480p/480i video output mode. If your TV supports progressive scan, select 480p.
If you have an AV amplifier
Connect either audio cables from the ANALOG AUDIO OUT
jacks on the DVD Recorder-VCR to the LINE IN jacks on your AV
amplifier, or a digital cable from the DIGITAL AUDIO OUT
(COAXIAL or OPTICAL) jack on the DVD Recorder-VCR to the
DIGITAL AUDIO IN jack on your AV amplifier.
2
 Loading...