

Page 1

DVD Player
user manual
DVD-P490
AK68-01768A(01)
imagine the possibilities
Thanks you for purchasing this Samsung product.
To receive more complete service, please register your
product at
www.samsung.com/global/register
Page 2

precautions
1. Setting up
- Refer to the identification label located on
the rear of your player for its proper operating voltage.
- Install your player in a cabinet with adequate ventilation holes. (7~10cm) Do not
block ventilation holes on any of the components for air circulation.
- Do not push the disc tray in by hand.
- Do not stack components.
- Be sure to turn all components off before
moving the player.
- Before connecting other components to this
player, be sure to turn them off.
- Be sure to remove the disc and turn off the
player after use, especially if you don’t use
it for a long time.
- The mains plug is used as a disconnect
device and shall readily operable at any
time.
2. For your safety
- This product utilizes a laser. Use of controls
or adjustments or performance of procedures other than those specified herein may
result in hazardous radiation exposure.
- Do not open covers and do not repair yourself. Refer servicing to qualified personal.
3. Caution
- Your player is not intended for industrial use
but for domestic purposes. Use of this product is for personal use only.
- Apparatus shall not be expossed to dripping
or splashing and no objects filled with liquids, such as vases, shall be placed on the
apparatus.
- Exterior influences such as lightning and
static electricity can affect normal operation
of this player. If this occurs, turn the player
off and on again with the POWER button,
or disconnect and then reconnect the AC
power cord to the AC power outlet. The
player will operate normally.
- When condensation forms inside the player
due to sharp changes in temperature, the
player may not operate correctly. If this
occurs, leave the player at room temperature until the inside of the player becomes
dry and operational.
4. Disc
- Do not clean record-cleaning sprays, benzene, thinner, or other volatile solvents that
may cause damage to the disc surface.
- Do not touch the disc’s signal surface. Hold
by the edges or by one edge and the hole
in the center.
- Wipe the dirt away gently; never wipe a
cloth back and forth over the disc.
5. Environmental info
- The battery used in this product contains
chemicals that are harmful to the environ
ment.
- So, dispose of batteries in the proper man
ner, according to federal, state, and local
regulations.
The product unit accompanying this user manual
is licensed under certain intellectual property rights
of certain third parties. This license is limited to
private non-commercial use by end-user consumers for licensed contents. No rights are granted for
commercial use. The license does not cover any
product unit other than this product unit and the
license does not extend to any unlicensed product
unit or process conforming to ISO/OUR 11172-3 or
ISO/OUR 13818-3 used or sold in combination with
this product unit. The license only covers the use of
this product unit to encode and/or decode audio files
conforming to the ISO/OUR 11172-3 or ISO/OUR
13818-3. No rights are granted under this license for
product features or functions that do not conform to
the ISO/OUR 11172-3 or ISO/OUR 13818-3.
CAUTION: USE OF ANY CONTROLS,
ADJUSTMENTS, OR PROCEDURES OTHER
THAN SPECIFIED HEREIN MAY RESULT IN
HAZARDOUS RADIATION EXPOSURE.
2_ precautions
Page 3
Before You Start
Table of Content
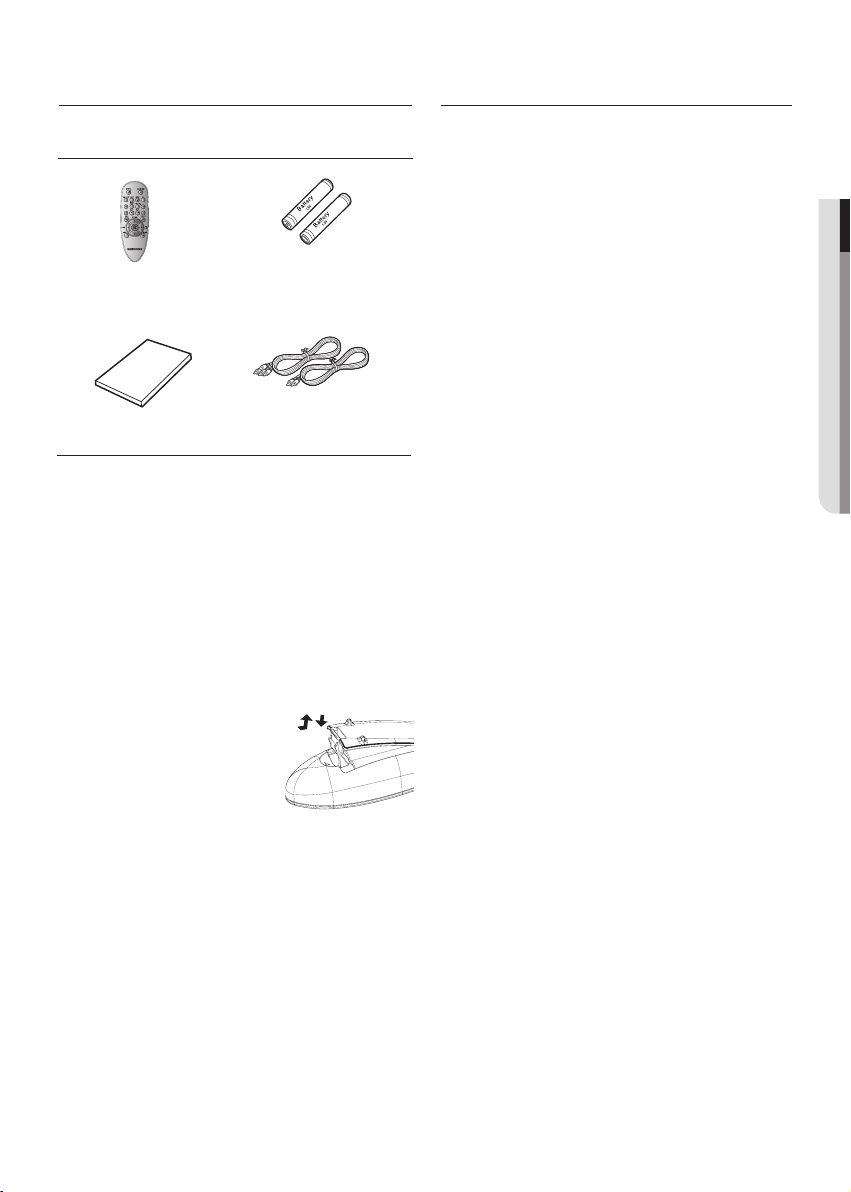
Accessories
Remote Control
User’s Manual
The accessories which are not supplied are:
•
Component Cable
•
Coaxial Cable.
Install Batteries in the Remote control
1. Open the battery cover on the back of the remote
control.
2. Insert two AAA batteries.
Make sure that the polarities (+ and -) are aligned
correctly.
3. Replace the battery cover.
If remote control doesn’t operate
properly:
- Check the polarity + - of the batteries (Dry-Cell)
- Check if the batteries are drained.
- Check if remote control sensor is blocked by
obstacles.
- Check if there is any fluorescent lighting nearby.
Batteries for Remote
Control (AAA Size)
Video/Audio
Cable
Precautions . . . . . . . . . . . . . . . . . . . . . . . . . . . . . . .2
Before you start . . . . . . . . . . . . . . . . . . . . . . . . . . . 3
Setup
General Features . . . . . . . . . . . . . . . . . . . . . . . . . .4
Disc Type and Characteristics
Description
Tour of the Remote Control
Connections
Choosing a Connection . . . . . . . . . . . . . . . . . . . . . 9
Basic Functions
Playing a Disc . . . . . . . . . . . . . . . . . . . . . . . . . . .15
Using the Search and Skip Functions
Using the Display Function
Using the Disc and Title Menu
Repeat Play
Slow Play
Advanced Functions
Adjusting the Aspect Ratio (EZ View) . . . . . . . . . .18
Selecting the Audio Language
Selecting the Subtitle Language
Changing the Camera Angle
Using the Bookmark Function
Using the Zoom Function
Clips Menu for MP3/WMA/JPEG/MPEG4/
CD Audio
Folder Selection
MP3/WMA/CD Audio Playback
MPEG4 Playback
Playing Media files Using the USB
Host feature
CD Ripping
Picture CD Playback
Changing Setup Menu
Using the Setup Menu . . . . . . . . . . . . . . . . . . . . . .26
Setting Up the Language Features
Setting Up the Audio Options
Setting Up the Display Options
Setting Up the Parental Control
Reference
Firmware upgrade . . . . . . . . . . . . . . . . . . . . . . . . .32
Troubleshooting . . . . . . . . . . . . . . . . . . . . . . . . . . .33
Specifications . . . . . . . . . . . . . . . . . . . . . . . . . . . .34
. . . . . . . . . . . . . . . . . . . . . . . . . . . . . . .6
. . . . . . . . . . . . . . . . . . . . . . . . . . . . .17
. . . . . . . . . . . . . . . . . . . . . . . . . . . . . . .17
. . . . . . . . . . . . . . . . . . . . . . . . . . . . . . . .20
. . . . . . . . . . . . . . . . . . . . . . . . . .21
. . . . . . . . . . . . . . . . . . . . . . . . .22
. . . . . . . . . . . . . . . . . . . . . . . . . . . . . .23
. . . . . . . . . . . . . . . . . . . . . . . . . . . . . .24
. . . . . . . . . . . . . . . . . . . . . . .24
. . . . . . . . . . . . . . . .5
. . . . . . . . . . . . . . . . . . .8
. . . . . . . . .16
. . . . . . . . . . . . . . . . .16
. . . . . . . . . . . . . . .17
. . . . . . . . . . . . . . .18
. . . . . . . . . . . . . .19
. . . . . . . . . . . . . . . . .19
. . . . . . . . . . . . . . . .19
. . . . . . . . . . . . . . . . . . .20
. . . . . . . . . . . . . . .21
. . . . . . . . . . . . 26
. . . . . . . . . . . . . . . .27
. . . . . . . . . . . . . . . 29
. . . . . . . . . . . . . .30
● SETUP
English _3
Page 4

setup
General Features
Excellent Sound
Dolby Digital, a technology developed by Dolby
Laboratories, provides crystal clear sound reproduction.
Screen
Both regular and widescreen(16:9) pictures can be
viewed.
Slow Motion
An important scene can be viewed in slow motion.
Parental Control (DVD)
The parental control allows users to set the level
necessary to prohibit children from viewing harmful
movies such as those with violence, adult subject
matter, etc.
Various On-Screen Menu Functions
You can select various languages (Audio/Subtitle)
and screen angles while enjoying movies.
Progressive Scan
Progressive scanning creates an improved picture
with double the scan lines of a conventional interlaced picture.
EZ VIEW (DVD)
Easy View enables picture adjustment to match
your TV's screen size (16:9 or 4:3).
Digital Photo Viewer (JPEG)
You can view Digital Photos on your TV.
Repeat
You can repeat a song or movie simply by pressing
the REPEAT button.
MP3/WMA
This unit can play discs created from MP3/WMA
files.
MPEG4
This unit can play MPEG4 formats within an avi file.
CD Ripping
This feature lets you to copy audio files from disc
to USB device into MP3 format (only audio CD
(CD DA)).
Note
- Discs which cannot be played with this
player.
• DVD-ROM • DVD-RAM
• CD-ROM • CDV
• CDI • CVD
• CDGs play audio only, not graphics.
- Ability to play back may depend on recording
conditions.
• DVD-R, +R
• CD-RW
• DVD+RW, -RW (V mode)
- The unit may not play certain CD-R, CD-RW
and DVD-R due to the disc type or recording
conditions.
COPY PROTECTION
Many DVD discs are encoded with copy protection.
Because of this, you should only connect your DVD
player directly to your TV, not to a VCR. Connecting
to a VCR results in a distorted picture from copyprotected DVD discs.
This product incorporates copyright protection
technology that is protected by methods claims of
certain U.S. patents and other intellectual property
rights owned by Macrovision Corporation and other
rights owners. Use of this copyright protection
technology must be auzthorized by Macrovision
Corporation, and is intended for home and other
limited viewing uses only unless otherwise autho
rized by Macrovision Corporation. Reverse engineering or disassembly is prohibited.
-
PROGRESSIVE SCAN OUTPUTS
(576p)
“CONSUMERS SHOULD NOTE THAT NOT ALL
HIGH DEFINITION TELEVISION SETS ARE FULLY
COMPATIBLE WITH THIS PRODUCT AND MAY
CAUSE ARTIFACTS TO BE DISPLAYED IN THE
PICTURE, IN CASE OF 576 PROGRESSIVE
SCAN PICTURE PROBLEMS, IT IS
RECOMMENDED THAT THE USER SWITCH THE
CONNECTION TO THE ‘STANDARD DEFINITION’
OUTPUT. IF THERE ARE QUESTIONS
REGARDING YOUR TV SET COMPATIBILITY
WITH THIS MODEL 576p DVD PLAYER, PLEASE
CONTACT SAMSUNG'S CUSTOMER SERVICE
CENTER.”
4_ setup
Page 5
Disc Type and Characteristics
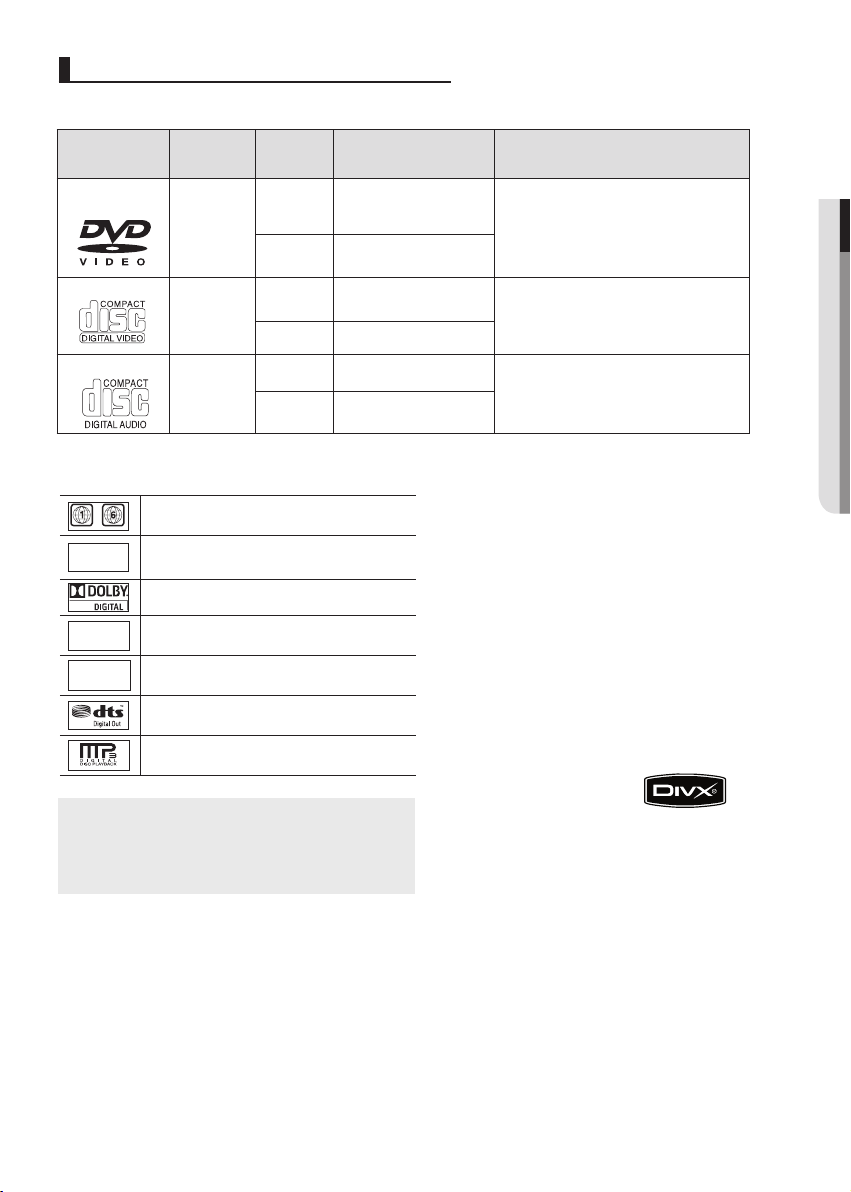
This DVD player is capable of playing the following types of discs with the corresponding logos:
Disc Types
(Logos)
DVD
VIDEO-CD
AUDIO-CD
Disc Markings
~
Play Region Number
PAL
STEREO
DIGITAL
SOUND
PAL broadcast system in U.K, France,
Germany, etc.
Dolby Digital disc
Stereo disc
Digital Audio disc
DTS disc
Recording
Types
Audio
+
Video
Audio
+
Video
Audio
Disc Size Max. Playing Time Characteristics
-
12 Cm
8 Cm
12 Cm
8 Cm 20 min.
12 Cm 74 min.
8 Cm 20 min.
Single-sided 240 min.
Double -sided 480 min
Single-sided 80 min.
Double -sided 160 min
74 min.
DVD contains excellent sound
and video due to Dolby Digital
.
and MPEG-2 system.
- Various screen and audio functions
can be easily selected through the
on screen menu.
.
- Video with CD sound, VHS quality &
MPEG-1 compression technology.
-
CD is recorded as a Digital Signal
with better audio quality, less
distortion and less deterioration of
audio quality over time
Region Number
Both the DVD player and the discs are coded
by region. These regional codes must match
in order for the disc to play. If the codes do not
match, the disc will not play.
The Region Number for this player is
described on the rear panel of the player.
● SETUP
MP3 disc
You must only insert one DVD disc at a time.
Inserting two or more discs will not allow to
play them back and it may cause damage to
the DVD player.
DivX Certification
DivX, DivX Certified,
and associated logos are trademarks of
DivXNetworks, Inc and are used under
license
English _5
Page 6
setup
Description
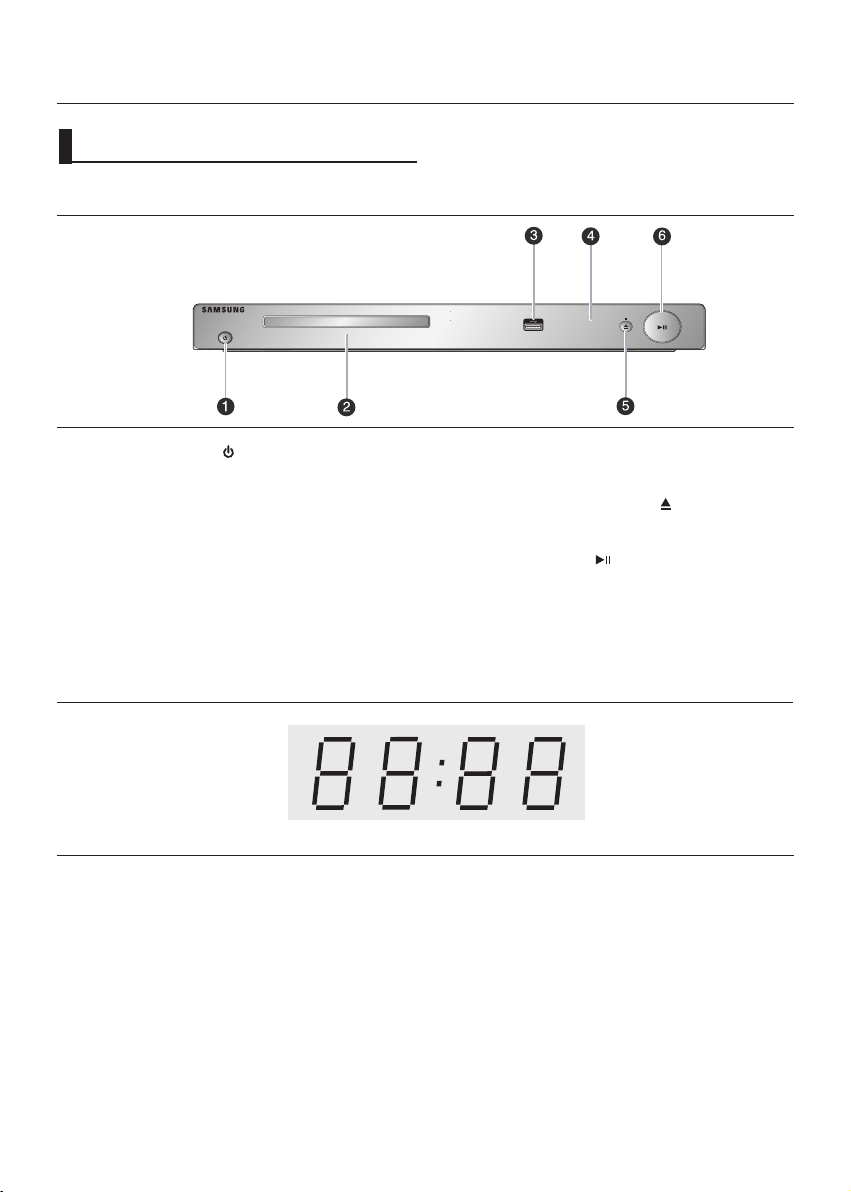
Front Panel Controls
1. STANDBY/ON ( )
When STANDBY/ON is pressed on, the player is turned
on.
2. DISC TRAY
Place the disc here.
3. USB Host
Connect digital still camera, MP3 player, memory stick,
Card reader, or another removable storage devices.
Front Panel Display
Total playing time/Displays various messages concerning operations such as PLAY,
STOP, LOAD ...
nodISC: No disc loaded.
OPEn: The disc tray is open.
LOAd: Player is loading disc information.
4. DISPLAY
Operation indicators are displayed here.
5. OPEN/CLOSE/ STOP (
Press to open and close the disc tray/Stops disc play.
6. PLAY/PAUSE ( )
Begin or pause disc play.
)
6_ setup
Page 7
Rear Panel
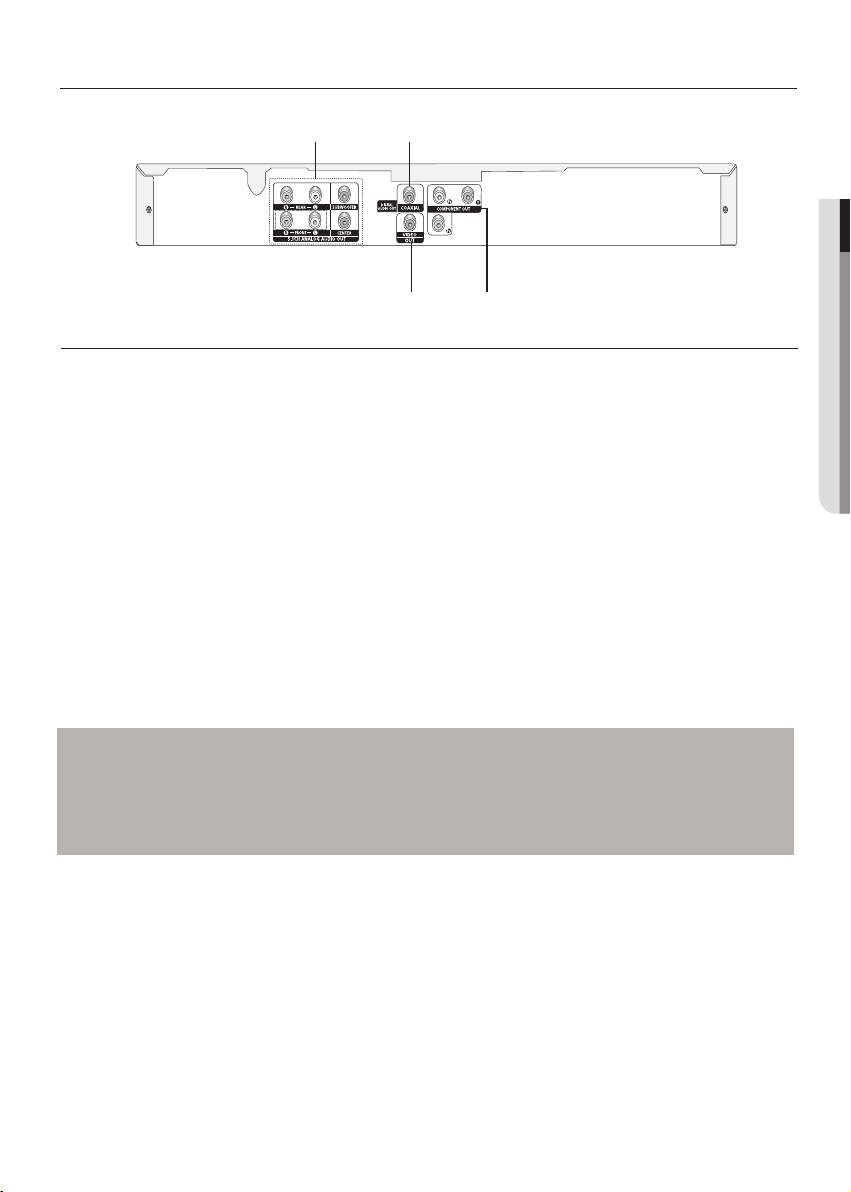
1 2
● SETUP
3 4
1. 5.1CH ANALOG AUDIO OUT
JACKS
- Connect to an amplifier with 5.1ch analog input
jacks.
2. DIGITAL AUDIO OUT JACKS
- Use a coaxial digital cable to connect to a
compatible Dolby Digital receiver.
- Use a coaxial digital cable to connect to an A/V
Amplifier that contains a Dolby Digital, MPEG2
or DTS decoder.
3. VIDEO OUT JACK
- Use a video cable to connect to the Video
input jack on your television.
- The Video Output in Setup Menu must be set
to Component(I-SCAN).
4. COMPONENT VIDEO OUT
JACKS
- Use these jacks if you have a TV with
Component Video in jacks. These jacks provide PR, PB and Y video.
- If Component(P-SCAN) Video Output is select
ed in Setup Menu, progressive scan mode will
work.
- If Component(I-SCAN) Video Output is select
ed in Setup Menu, interlaced scan mode will
work.
Note
- Consult your TV User’s Manual to find out if your TV supports Progressive Scan.
If Progressive Scan is supported, follow the TV User’s Manual regarding Progressive Scan
settings in the TV’s menu system.
- See pages 29 ~ 30 to get more information on how to use the setup menu.
-
-
English _7
Page 8
setup
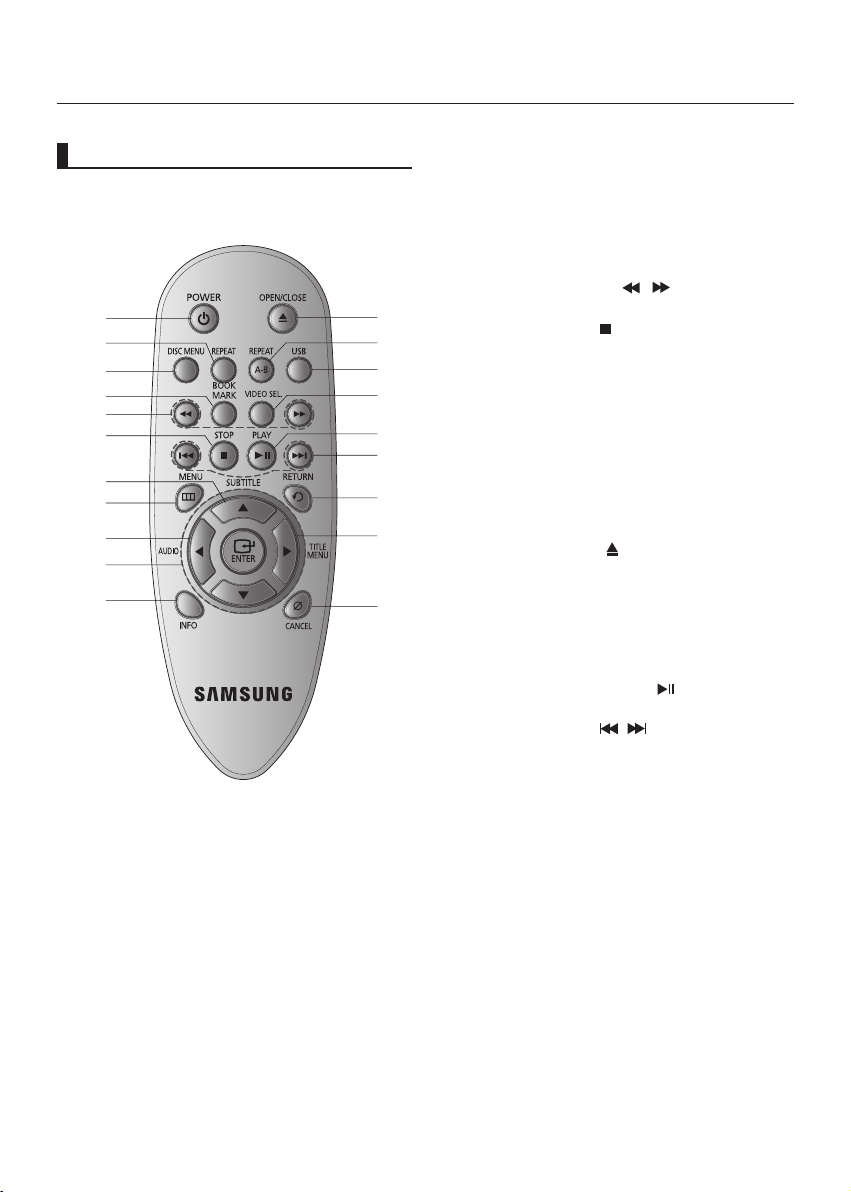
Tour of the Remote Control
1
2
3
4
5
6
7
8
9
10
11
1. DVD POWER Button
Turns the power on or off.
2. REPEAT Button
Allows you to repeat play a title, chapter, track, or disc.
3. DISC MENU Button
Brings up the Disc menu.
4. BOOKMARK Button
5. SEARCH Buttos (
Allow you to search forward/backward through a disc.
12
6. STOP Button ( )
13
Press to stop a disc.
7. SUBTITLE (π)Button
14
8. MENU Button
15
Brings up the DVD player’s menu.
9. AUDIO (√) Button
16
Use this button to access various audio functions on a disc.
17
10. ENTER/π/†,√/® Buttons
This button functions as a toggle switch.
18
11. INFO Button
Displays the current disc mode.
19
12. OPEN/CLOSE ( ) Button
To open and close the disc tray.
13. REPEAT A-B Button
20
Allows you to repeat A-B disc.
14. USB Button
15. VIDEO SEL. Button
Selects video output formats.
16. PLAY/PAUSE Button ( )
Begin/Pause disc play.
17. SKIP Buttons (
Use to skip the title, chapter or track.
18. RETURN Button
Returns to a previous menu.
19. TITLE MENU (®) Button
Bring up the Title menu.
20. CANCEL Button
Use to remove menus or status displays from the
screen.
/
)
/
)
8_ setup
Page 9
connections
Choosing a Connection
The following shows examples of connections commonly used to connect the DVD player with a TV and
other components.
Before Connecting the DVD Player
- Always turn off the DVD player, TV, and other components before you connect or disconnect any cables.
- Refer to the user’s manual of the additional components you are connecting for more information on those
particular components.
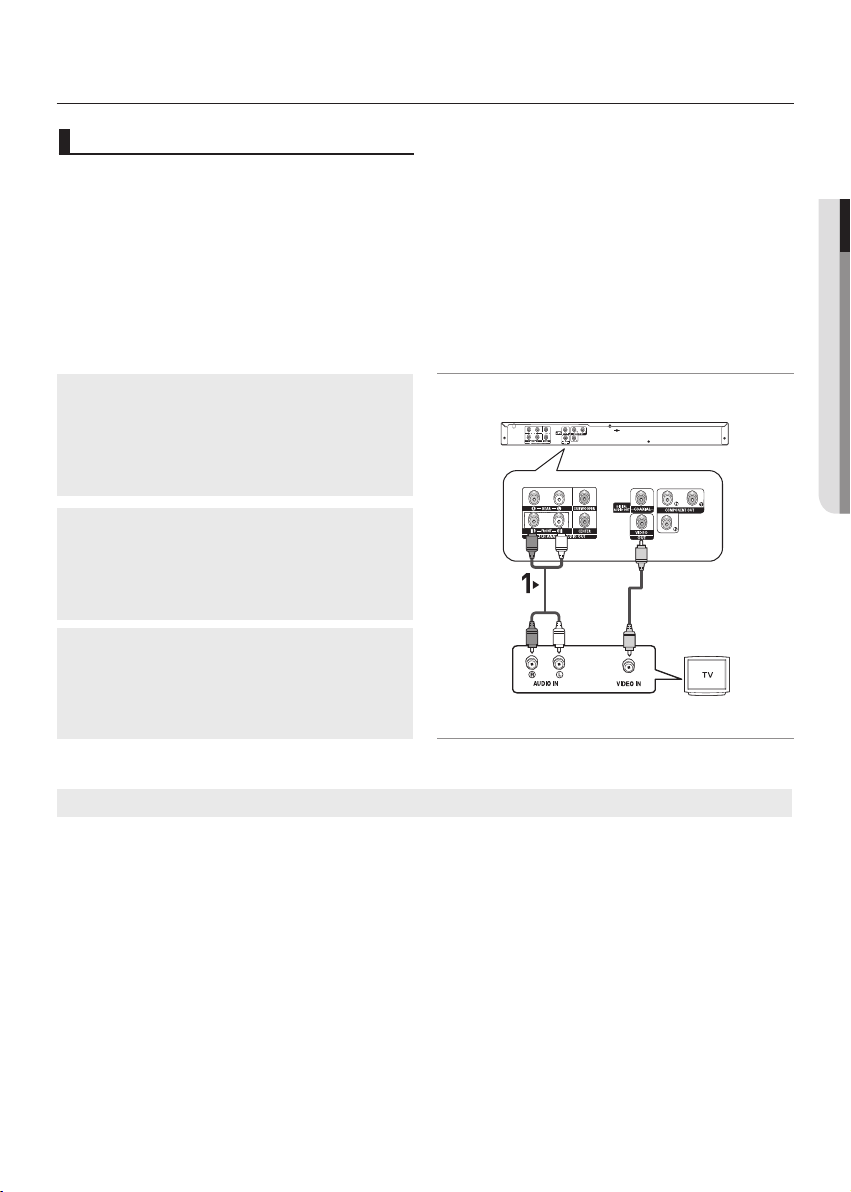
Connection to a TV (For Video)
1
Using video/audio cables, connect the VIDEO (yellow)/
AUDIO (red and white) OUT terminals of 5.1 CH (front
L-R) on the rear of the DVD player to the VIDEO (yellow)/
AUDIO (red and white) IN terminals of TV.
● connEcTionS
2
Turn on the DVD player and TV.
RED
RED
WHITE
Audio Cable
WHITE
YELLOW
Video Cable
YELLOW
3
Press the TV/VIDEO button on the TV's remote
control to select Video.
Note
- Noise may be generated if the audio cable is too close to the power cable.
- If you want to connect to an Amplifier, please refer to the Amplifier connection page. (See pages 12 to
14)
- The number and position of terminals can vary depending on your TV set. Please refer to the user's
manual of the TV.
- If there is one audio input terminal on the TV, connect it to the [AUDIO OUT][left] (white) terminal of the
DVD player.
- If you press the VIDEO SEL. button when DVD Player is in stop mode or no disc is inserted, the Video
Output mode changes in the following sequence:
I-SCAN ➝ P-SCAN
English _9
Page 10
connections
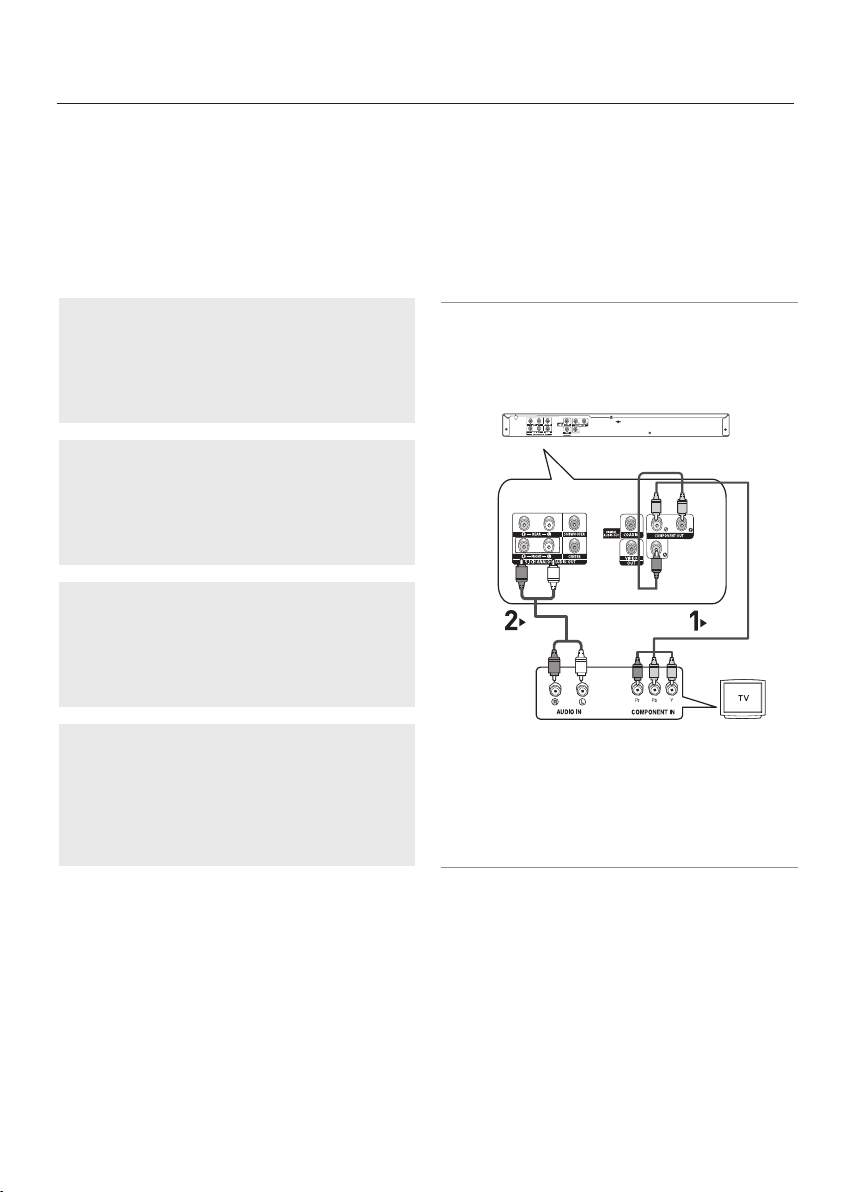
Connection to a TV (Interlace)
- Connecting to your TV using Component video cables.
- You will enjoy high quality and accurate color reproduction images. Component video separates the picture element into black and white(Y), blue(PB), red(PR) signals to present clear and clean images. (Audio
signals are delivered through the audio output.)
1
Using component video cables (not included), connect the
COMPONENT VIDEO OUT terminal on the rear of the
DVD player to the
COMPONENT IN terminal of TV.
2
GREEN
Using the audio cables, connect the AUDIO (red and
white) OUT terminals of 5.1 CH (Front L-R)on the rear of
the DVD player to the
of TV. Turn on the DVD player and TV.
AUDIO (red and white) IN terminals
3
Press the TV/VIDEO button on the TV's remote control to
Component or DVD.
select
RED
WHITE
Audio Cable
RED WHITE
BLUE
RED
Component cable
(not included)
BLUE
RED
GREEN
4
Set the Video Output to I-SCAN in the Display Setup
menu. (See pages 29 to 30)
Note
- If you want to connect to an Amplifier, please refer to the Amplifier connection page. (See pages 12 to 14)
- The component terminal of TV can be marked by “R-Y, B-Y, Y” or “Cr, Cb, Y” instead of “P
depending on the manufacturer. The number and position of terminals can vary depending on the TV set.
Please refer to the user's manual of the TV.
, PB, Y”
R
10_ connections
Page 11

Connection to a TV (Progressive)
- Connecting to your TV using Component video cables.
- You will enjoy high quality and accurate color reproduction images. Component video separates the picture element into black and white(Y), blue(PB), red(PR) signals to present clear and clean images. (Audio
signals are delivered through the audio output.)
1
Using component video cables (not included), connect the
COMPONENT VIDEO OUT terminal on the rear of the
DVD player to the
COMPONENT IN terminal of TV.
● connEcTionS
2
GREEN
Using the audio cables, connect the AUDIO (red and
white) OUT terminals of 5.1 CH (Front L-R)on the rear of
the DVD player to the
of TV. Turn on the DVD player and TV.
AUDIO (red and white) IN terminals
3
Press the input selector on your TV remote control until
the Component signal from the DVD player appears on the
TV screen.
RED
WHITE
Audio Cable
RED WHITE
BLUE
RED
Component cable
(not included)
BLUE
RED
GREEN
4
Set the Video Output to P-SCAN in the Display Setup
menu. (See pages 29 to 30)
You can use the VIDEO SEL. button to change the Video
Output mode. (See page 9)
To see the progressive video output,
You need a TV set supporting the progressive scan
- Consult your TV User’s Manual to find out if your TV supports Progressive Scan. If Progressive
input function. And you have to set up the TV menu
Scan is supported, follow the TV User’s Manual regarding Progressive Scan settings in the TV’s
to the progressive scan input.
menu system.
- Depending on your TV, the connection method may differ from the illustration above.
Note
- What is "Progressive Scan"?
Progressive scan has twice as many scanning lines as the interlace output method has. Progressive
scanning method can provide better and clearer picture quality.
English _11
Page 12
connections
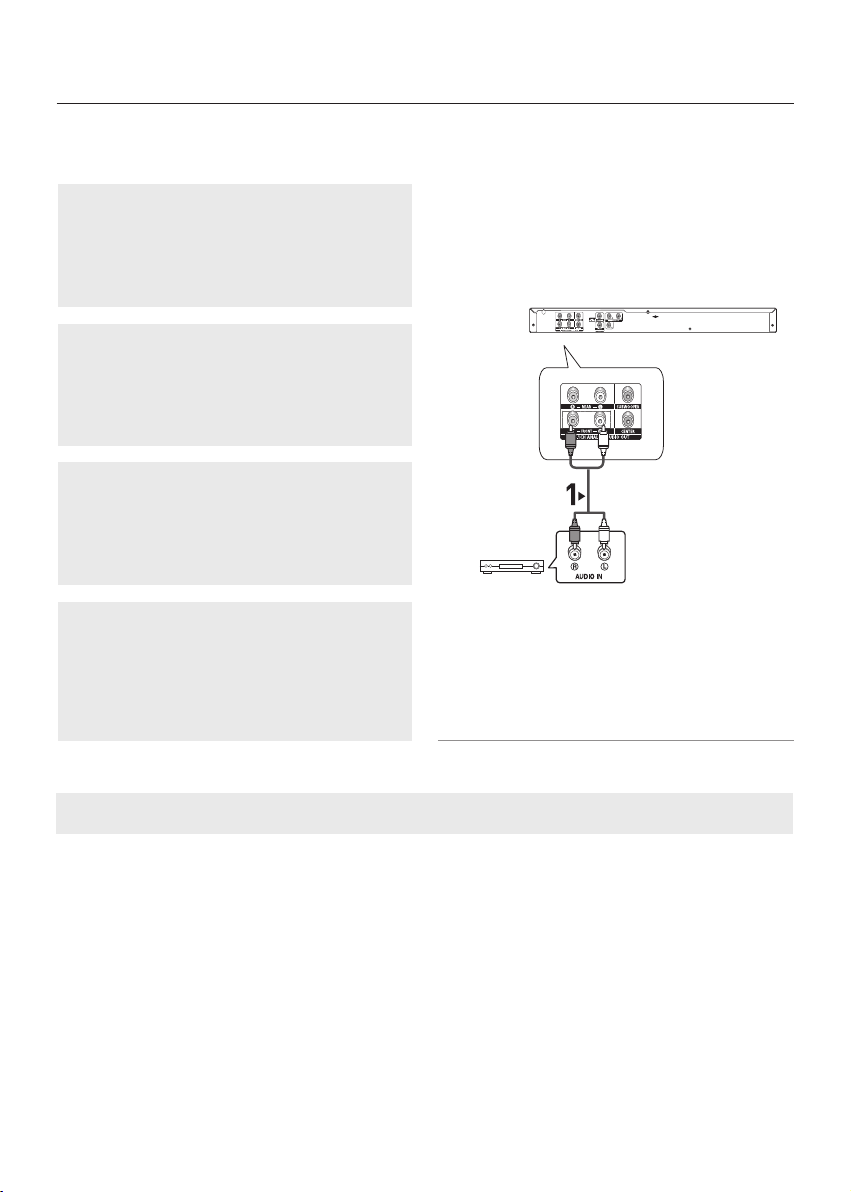
Connection to an Audio System (2 Channel Amplifier)
1
Using the audio cables, connect the AUDIO (red and
white) OUT terminals of 5.1 CH (Front L-R)on the rear of
the DVD player to the
nals of the Amplifier.
2
Using the video signal cable(s), connect the VIDEO or
COMPONENT OUT terminals on the rear of the DVD play-
VIDEO or COMPONENT IN terminal of your TV.
er to the
3
Turn on the DVD player, TV, and Amplifier.
4
Press the input select button of the Amplifier to select external input in order to hear sound from the DVD player.
AUDIO (red and white) IN termi-
RED WHITE
2-channel amplifier
Audio Cable
RED
WHITE
Note
- Please turn the volume down when you turn on the Amplifier. Sudden loud sound may cause
damage to the speakers and your ears.
- Please set the audio in the menu screen according to the Amplifier. (See pages 27 to 29)
- The position of terminals can vary depending on the Amplifier.
Please refer to the user's manual of the Amplifier.
12_ connections
Page 13
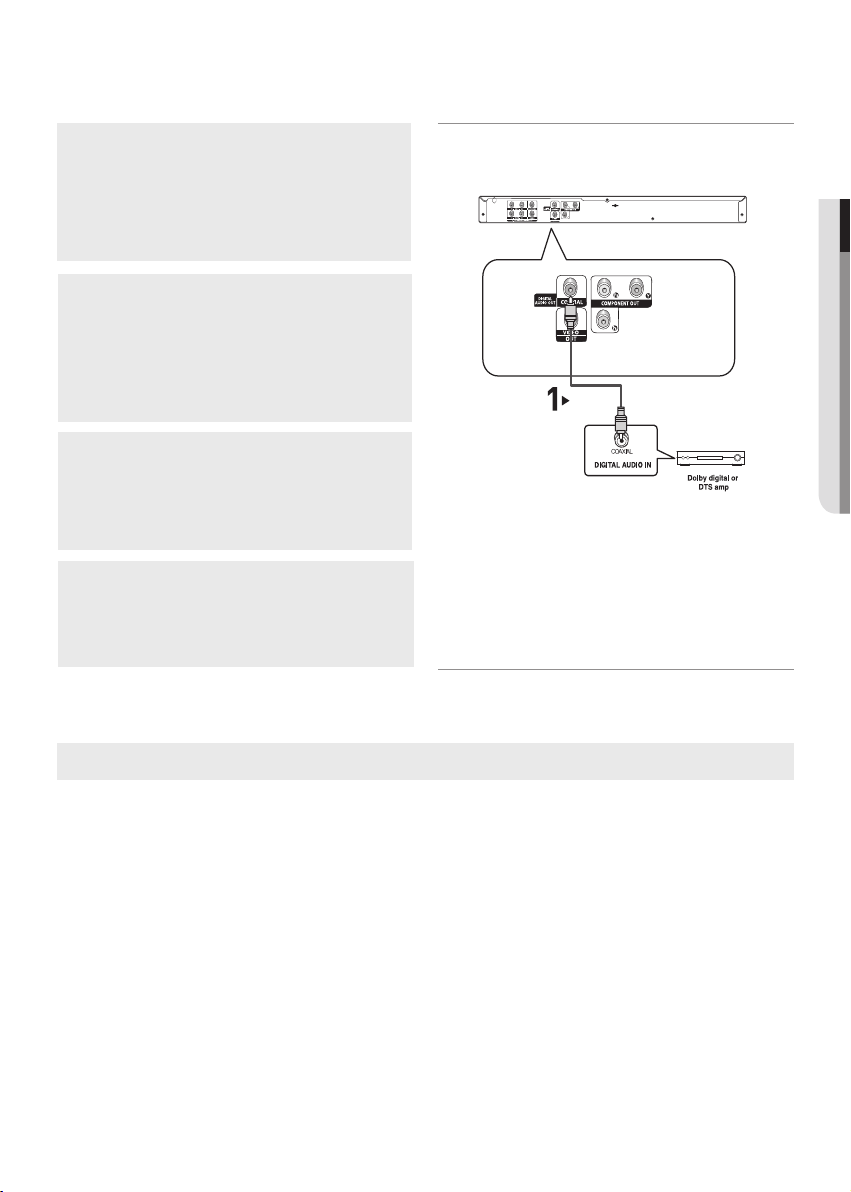
Connection to an Audio System (Dolby digital, MPEG2 or DTS Amplifier)
1
If using a coaxial cable (not included), connect the
DIGITAL AUDIO OUT (COAXIAL) terminal on the rear
of the DVD player to the
terminal of the Amplifier.
DIGITAL AUDIO IN (COAXIAL)
2
Using the video signal cable(s), connect the VIDEO or
COMPONENT OUT terminals on the rear of the DVD
player to the
VIDEO or COMPONENT IN terminal of TV.
Coaxial Cable
(not included)
3
Turn on the DVD player, TV, and Amplifier.
4
Press the input select button of the Amplifier to select
external input in order to hear sound from the DVD player.
● connEcTionS
Note
- Please turn the volume down when you turn on the Amplifier. Sudden loud sound may cause
damage to the speakers and your ears.
- Please set the audio in the menu screen according to the Amplifier. (See pages 27 to 29)
- The position of terminals can vary depending on the Amplifier.
Please refer to the user's manual of the Amplifier.
English _13
Page 14
connections
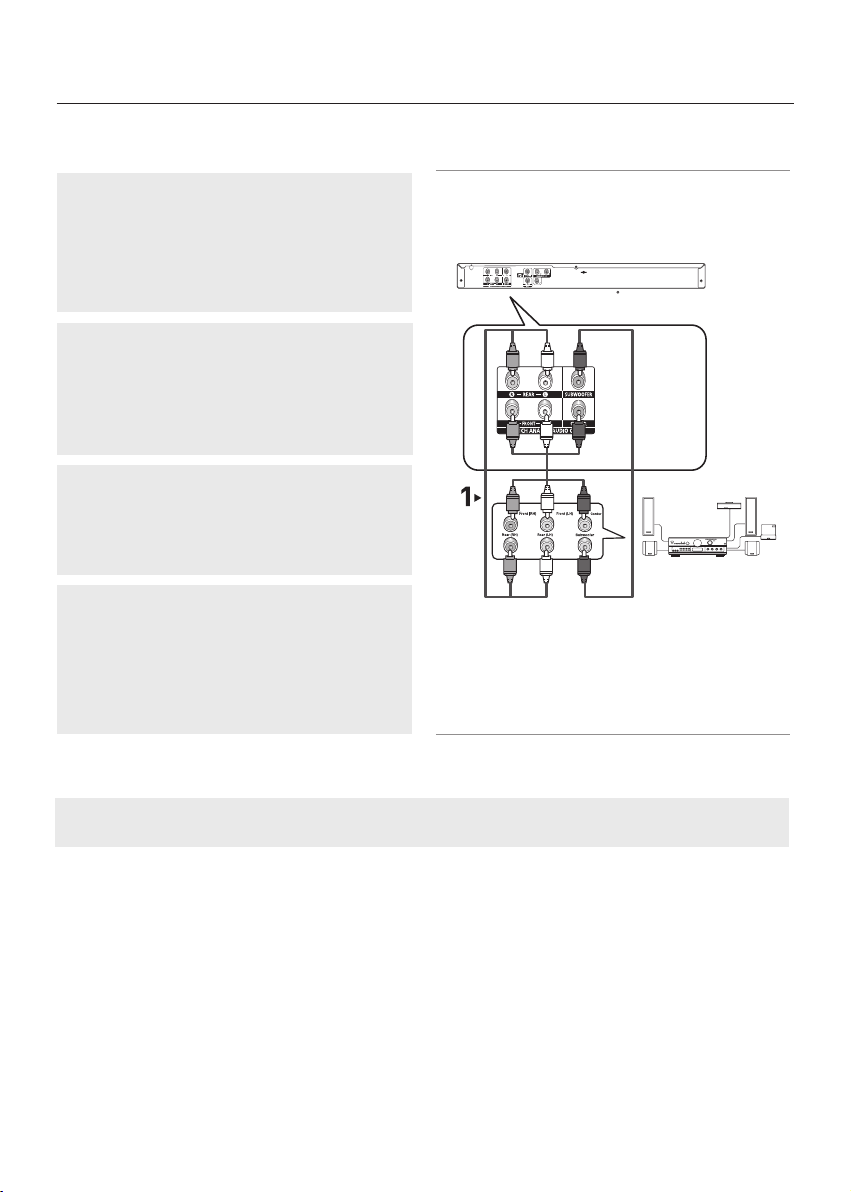
Connection to a 5.1CH Analog Amplifier
1
If using audio cables for 5.1 CH Analog Amplifier (not
included) connect the
nals on the rear of the DVD player to the
AUDIO IN terminals of the 5.1CH Analog Amplifier.
2
Using the video signal cable(s), connect the VIDEO or
COMPONENT terminals on the rear of the DVD player
VIDEO or COMPONENT terminals of your TV as
to the
described on pages 9 to 11.
3
Turn on the DVD player, TV, and Amplifier.
4
Press the input select button of the Amplifier to select external input in order to hear sound from the DVD player.
5.1CH ANALOG AUDIO OUT termi-
5.1CH ANALOG
BLACK
WHITE
RED
WHITE
RED
BLACK
5.1ch Analog
Amplifier
Note
- Please turn the volume down when you turn on the Amplifier. Sudden loud sound may cause
damage to the speakers and your ears.
- Please set the audio in the menu screen according to the Amplifier. (See pages 27 to 29)
- The position of terminals may vary depending on the Amplifier.
Please refer to the user's manual of the Amplifier.
14_ connections
Page 15
basic functions
Playing a Disc
Before Play
- Turn on your TV and set it to the correct Video
Input by pressing TV/VIDEO button on the TV
remote control.
- If you connected an external Audio System, turn
on your Audio System and set it to the correct
Audio Input.
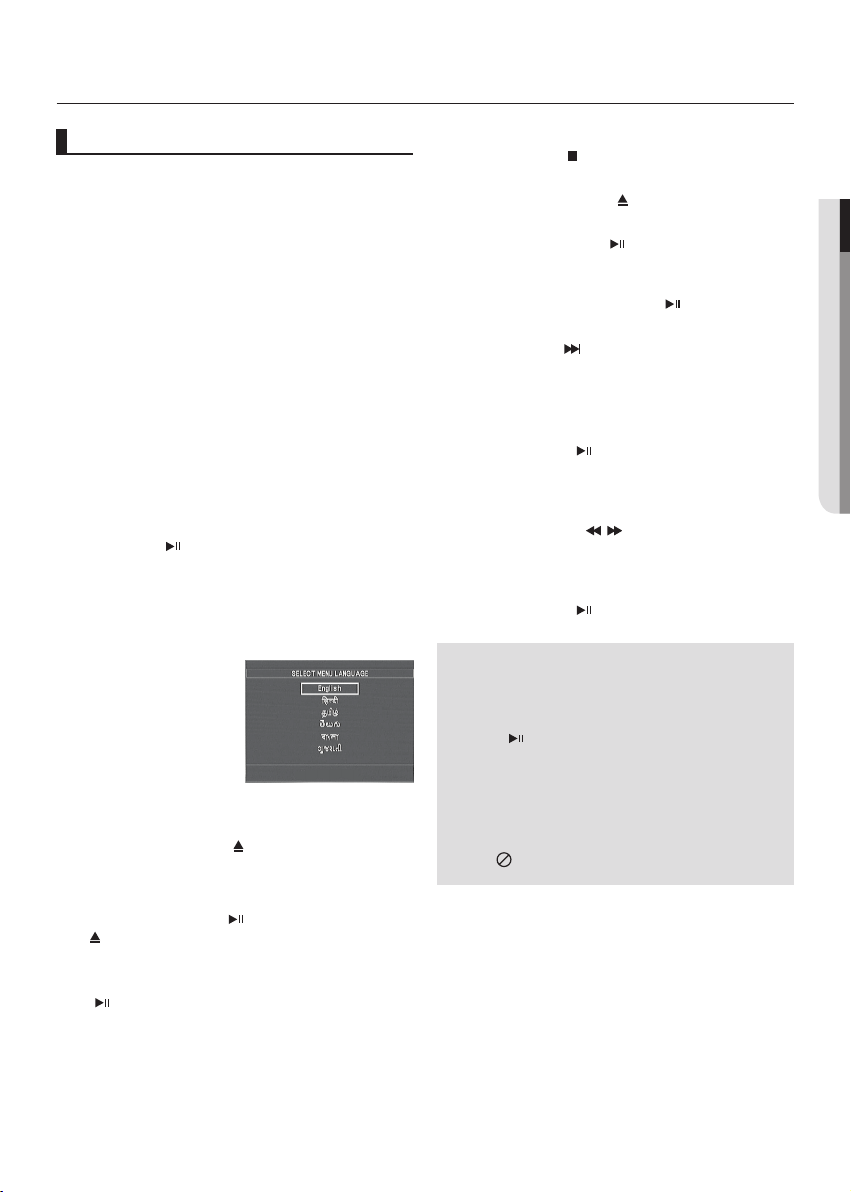
After plugging in the player, the first time you press the
POWER button, this screen comes up: If you want
DVD
to select a language, press a
ENTER button. (This screen will only appear when
the
you plug in the player for the first time.)
If the language for the startup screen is not set, the set
tings may change whenever you turn the power on or off.
Therefore, make sure that you select the language you
want to use.
Once you select a menu language, you can change it
by pressing the
for more than 5 seconds with no disc in the unit. Then
SELECT MENU LANGUAGE window appears again
the
where you can reset your preferred language.
button on the front panel of the unit
Playback
1. Press the OPEN/CLOSE ( ) button. The tray opens.
2. Place a disc gently into the tray with the disc’s label
facing up.
3. Press the
( ) button to close the disc tray.
where you stopped, so when you press PLAY/PAUSE
( ) button again, it will pick up where you left off.
PLAY/PAUSE ( ) button or OPEN/ CLOSE
When you stop disc play, the player remembers
π/†
button and then press
4. Stopping Play
Press the
5. Removing Disc
Press the
6. Pausing Play
Press the
- Screen stops, no sound.
7. Step Motion Play (Except CD)
Press the
during
- Each time the button is pressed, a new frame will
appear.
- No sound is heard during STEP mode.
-
- Press the PLAY (
- You can only perform step motion play in the
forward direction.
8. Slow Motion Play
Press the
- No sound is heard during slow mode.
- Press the PLAY (
STOP ( ) button during play.
OPEN/CLOSE ( ) button.
PLAY/PAUSE ( ) button on the remote control
during play.
To resume, press the PLAY/PAUSE ( )-button once again.
SKIP ( ) button on the remote control
PAUSE mode.
) button to resume normal play.
SEARCH (/) button to choose the
play speed between 1/2, 1/4 and1/8 of normal dur
ing-PAUSE mode.
) button to resume normal play.
Note
- If the player is left in the stop mode for more
than one minute without any user interaction, a
screen saver will be activated. Press the
PAUSE ( )
button to resume normal play.
- If the player is left in the stop mode for more than
about 30 minutes, the power will automatically
shut off.(Automatic Power-Off Function)
- If the player is left for about 5 minutes in pause
mode, it will stop.
- This ( ) icon indicates an invalid button press.
● baSic fUncTionS
-
PLAY/
English _15
Page 16
basic functions
Title
Chapter
Time
Audio
Subtitle
S hortcut
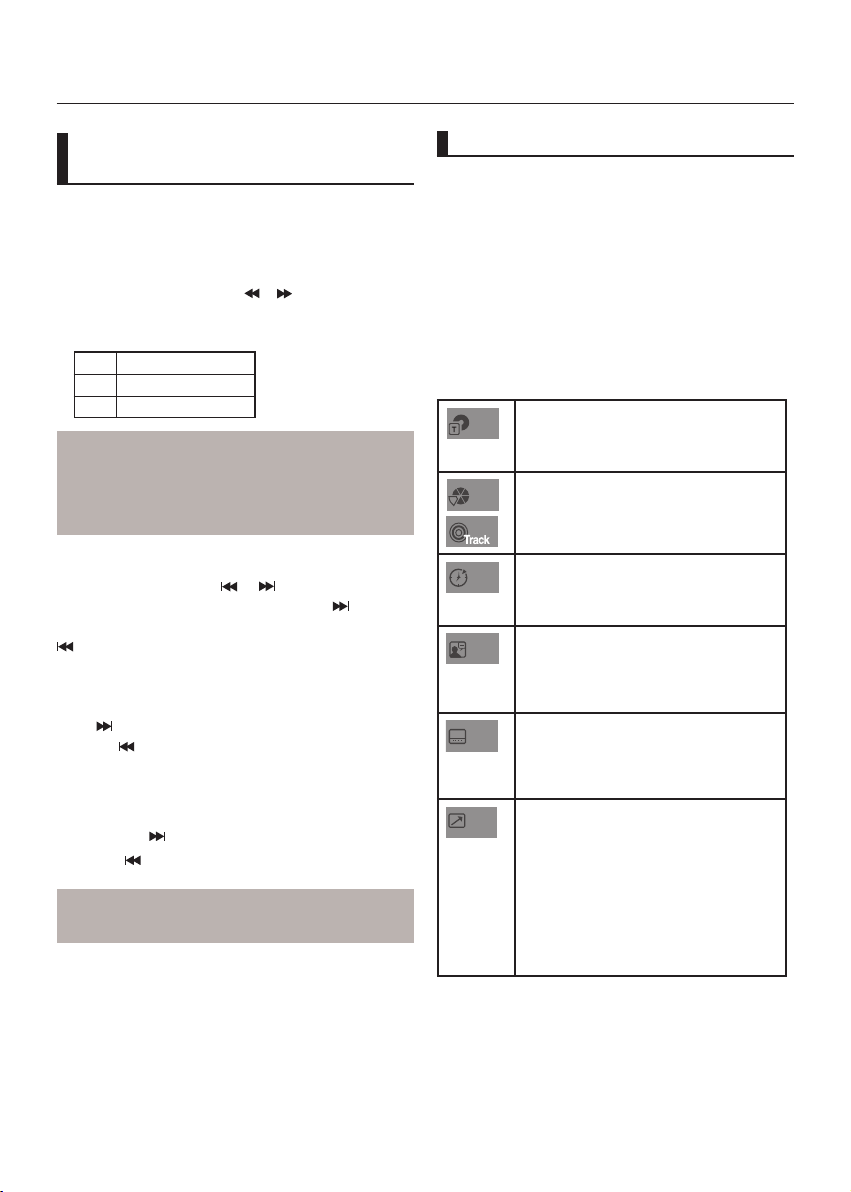
Using the Search and Skip Functions
During play, you can search quickly through a chapter or
track, and use the skip function to jump to the next selection.
Searching through a Chapter or
Track
During play, press the SEARCH ( or ) button on the
remote control for more than 1 second.
2X, 4X, 64X, 128X
DVD
4X, 8X
VCD
2X, 4X, 8X
CD
Note
- The speed marked in this function may be
different from the actual playback speed.
- No sound is hearing during search mode
(Except CD).
Skipping Tracks
During play, press the SKIP ( or ) button.
- When playing a DVD, if you press the SKIP ( ) button, it moves to the next chapter. If you press the SKIP (
) button, it moves to the beginning of the chapter. One
more press makes it move to the beginning of the previous
chapter.
- When playing a CD in Menu Off mode, if you press the
) button, it moves to the next track. If you press
SKIP (
the SKIP (
One more press makes it move to the beginning of the
previous track.
- If a track exceeds 15 minutes when playing a VCD and
you press the
press the
Note
When playing VCD, the Disc menu may not work.
) button, it moves to the beginning of the track.
button, it moves forward 5minutes. If you
button, it moves backward 5 minutes
Using the Display Function
When Playing a DVD/VCD/MPEG4
1. During play, press the INFO button on the remote control.
2. Press the
- When playing VCD, the Disc menu may not work.
3. Press the √/® buttons to make the desired setup and then
press the
tons of the remote control to directly access a title, chap
ter or to start the playback from a desired time.
4. To make the screen disappear, press the CANCEL button.
Note
π/† buttons to select the desired item.
ENTER button.
To access the desired title when there is
more than one in the disc. For example, if
there is more than one movie on a DVD,
each movie will be identified.
Most DVD discs are recorded in chapters
so that you can quickly find a specific pas
sage (similar to tracks on an video CD).
Allows playback of the film from a desired
time. You must enter the starting time as
a reference.The time search function does
not operate on some disc.
Refers to the language of the film
soundtrack. In the example, the
soundtrack is played in English 5.1CH. A
DVD disc can have up to eight different
soundtracks.
Refers to the subtitle languages available
in the disc. You will be able to choose the
subtitle languages or, if you prefer, turn
them off from the screen. A DVD disc can
have up to 32 different subtitles.
To access the desired Bookmark, Angle,
Zoom or EZ View function.
Some DVD discs are have more angle
function from any picture.
Bookmark function make you easily and
quickly to find a track or chapter from DVD
or VCD ( Menu Off).
The EZ View function is use for changing
the aspect ratio in DVD.
The Zoom function is use for Enlarge DVD
or VCD Picture.
You may use the number but
-
16_ basic functions
Page 17
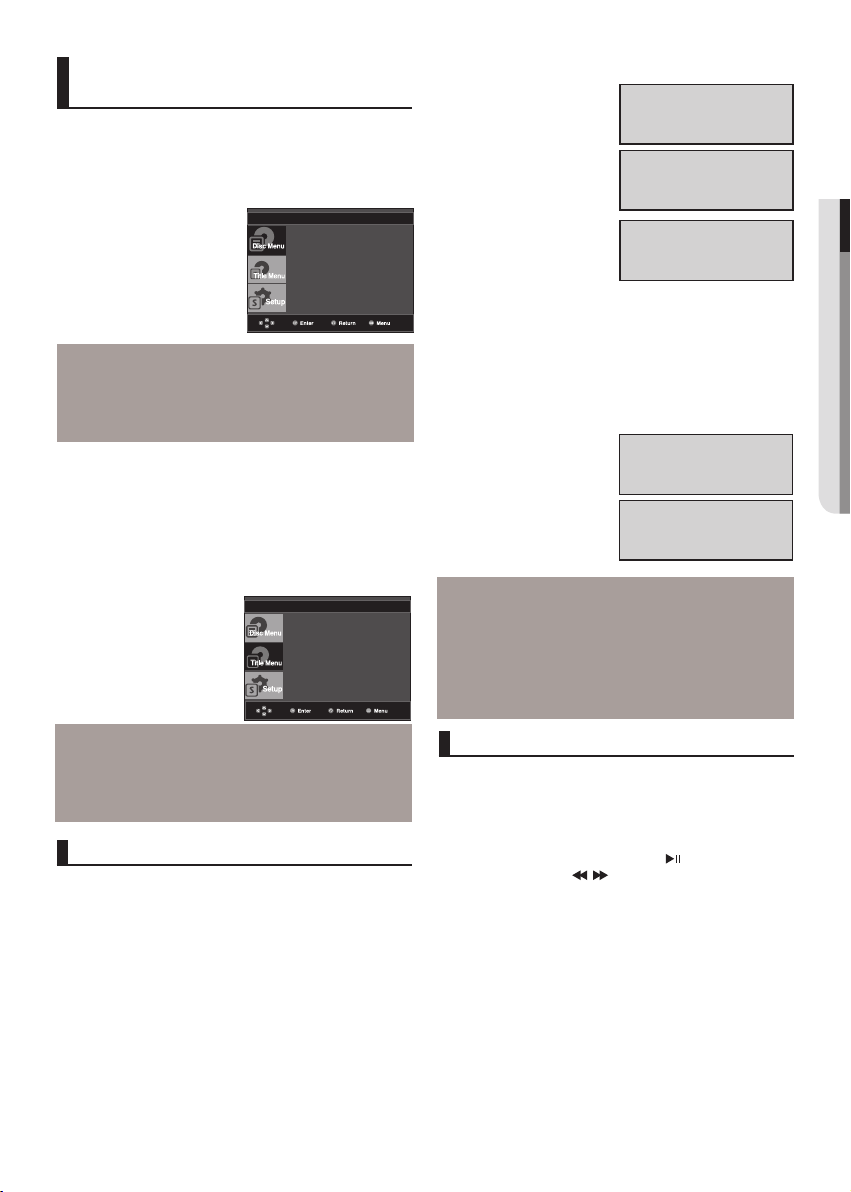
Using the Disc and Title Menu
Using the Disc Menu
1. During the playback of a DVD disc, press the-MENU button
on the remote control.
2. Press the
® or ENTER button.
Note
- Depending on a disc, the Disc Menu may not work.
- You can also use the Disc Menu, using the DISC
- When playing VCD, the Disc Menu may not work.
π/† buttons to select Disc Menu, then-press the
Press ENTER key
for Disc Menu
MENU button on the remote control.
DVD
Chapter
Title
Repeat : Off
Using the A-B Repeat function
1. Press the REPEAT A-B button at the point where you
want repeat play to start (A).
2. Press the
want the repeat play to stop (B).
- To return to normal play, press the
REPEAT A-B button at the point where you
CANCEL button.
DVD
Repeat : A-
● baSic fUncTionS
Using the Title Menu
1. During stop mode of a DVD disc, press the MENU button
on the remote control.
2. Press the
® or ENTER button.
π/† buttons to select Title Menu, then press the
Press ENTER key
for Title Menu
Note
- Depending on a disc, the Title Menu may not
work.
- Title Menu will only be displayed if there are at
least two titles in the disc.
Repeat Play
Press the REPEAT button to change playback
mode.
When playing a DVD
- DVD repeats play by chapter or title.
- Chapter : repeats the chapter that is playing.
- Title : repeats the title that is playing.
- Off
Repeat : A-B
Note
- A-B REPEAT allows you to set point (B) until at
least 5 seconds of play back time has elapsed
after point(A) has been set.
- Depending on a disc, the Repeat function may
not work.
Slow Play
This feature allows you slowly to repeat scenes con
taining sports, dancing, musical instruments being
played etc., so you can study them more closely.
When playing a DVD
1. During play, press the PLAY/PAUSE ( ) button.
2. Press the
speed between 1/2, 1/4 and 1/8 of normal during PAUSE
mode.
SEARCH (/) button to choose the play
-
English _17
Page 18
advance functions
Stereo
AUDIO
Adjusting the Aspect Ratio (EZ View)
To play back using aspect ratio
(DVD)
During play, press the INFO button on the remote
1.
control.
Press the
2.
Press the
3.
then-press ENTER button.
•
The screen size changes when the
The screen zoom mode operates differently
•
To ensure correct operation of the EZ VIEW
•
If you are using a 16:9 TV
For 16:9 aspect ratio discs
- NORMAL WIDE
Displays the content of the DVD title in 16:9 aspect ratio.
- SCREEN FIT
The top and bottom portions of the screen are cut off.
When playing a 2.35:1 aspect ratio disc, the black bars at
the top and bottom of the screen will disappear. The picture
will look vertically stretched. (Depending on a type of disc,
the black bars may not disappear completely.)
- ZOOM FIT
The top, bottom, left and right of the screen are cut off and
the central portion of the screen is enlarge
For 4:3 aspect ratio discs
- NORMAL SCREEN
Displays the content of the DVD title in 16:9 aspect ratio.
The picture will look horizontally stretched.
- SCREEN FIT
The top and bottom portions of the screen are cut off and
the full screen appears.
The picture will look vertically stretched.
- ZOOM FIT
The top, bottom, left and right portions of the screen are
cut off and the central portion of the screen is enlarged.
- VERTICAL FIT
When a 4:3 DVD is viewed on a 16:9 TV, black bars will
appear at the left and right of the screen in order to prevent
the picture from looking horizontally stretched.
▲ / ▼
buttons to select Shortcut.
√ / ®
buttons to select EZ View,
®
button is
pressed repeatedly.
depending on the screen setting in the Display
Setup menu.
button, you should set the correct aspect ratio in
the Display Setup menu. (See pages 29 to 30).
4:3 Letter Box
If you are using a 4:3 TV
For 16:9 aspect ratio discs
- 4:3 Letter Box
Displays the content of the DVD title in 16:9 aspect ratio. The
black bars will appear at the top and bottom of the screen.
4:3 Pan Scan
The left and right portions of the screen are cut off and the
central portion of the 16:9 screen is displayed.
- SCREEN FIT
The top and bottom portions of the screen are cut off and a
full screen appears. The picture will look vertically stretched.
- ZOOM FIT
The top, bottom, left and right of the screen are cut off and
the central portion of the screen is enlarged.
For 4:3 aspect ratio discs
- NORMAL SCREEN
Displays the content of the DVD title in 4:3 aspect ratio.
- SCREEN FIT
The top and bottom portions of the screen are cut off and the
full screen appears. The picture will look vertically stretched.
- ZOOM FIT
The top, bottom, left and right portions of the screen are cut
off and the central portion of the screen is enlarged.
Note
This function may behave differently depending on
the type of disc.
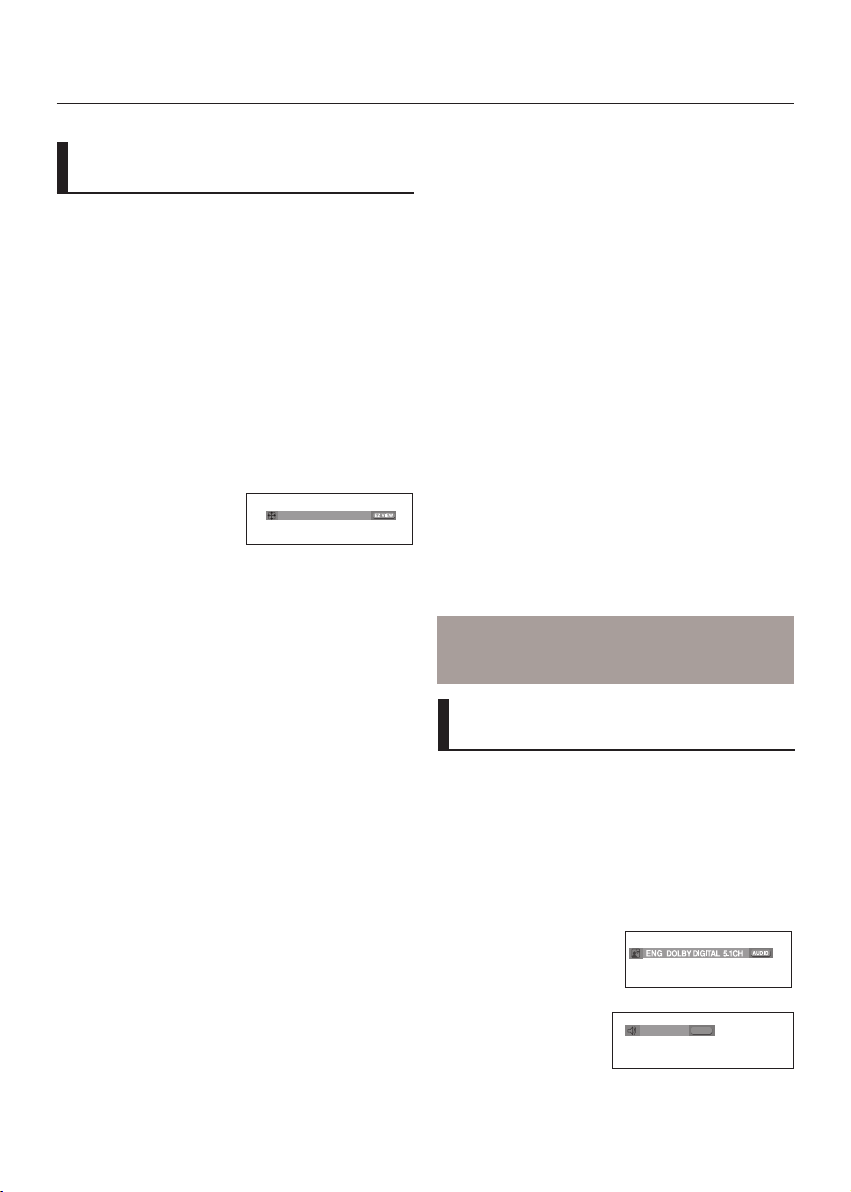
Selecting the Audio Language
You can select a desired audio language quickly and
easily with the AUDIO button.
Using the AUDIO/ √ button (DVD/
VCD/MPEG4)
1. Press the AUDIO/√ button. The Audio changes when the
button is pressed repeatedly.
The audio languages are
represented by abbreviations.
When playing a VCD you
can select among
Right or Left.
Stereo,
DVD
18_ advance functions
Page 19
Press Audio button at
ReturnEnter
Subtitle Selection
External Subtitle Off
readme.TXT
Non-standard fonts are not supported
Menu
Off
SUBTITLE
4/6
AUDIO
remocon repeatedly to
select the desired Audio
on MPEG4 then press
ENTER .
the
2. To remove the
button.
AUDIO icon, press the CANCEL or RETURN
MPEG4
PCM 1/2
Note
- This function depends on audio languages are
encoded on the disc and may not work.
- A DVD disc can contain up to 8 audio languages.
- To have the same audio language come up
whenever you play a DVD;
- Refer to “Using the Audio Language” on page 27.
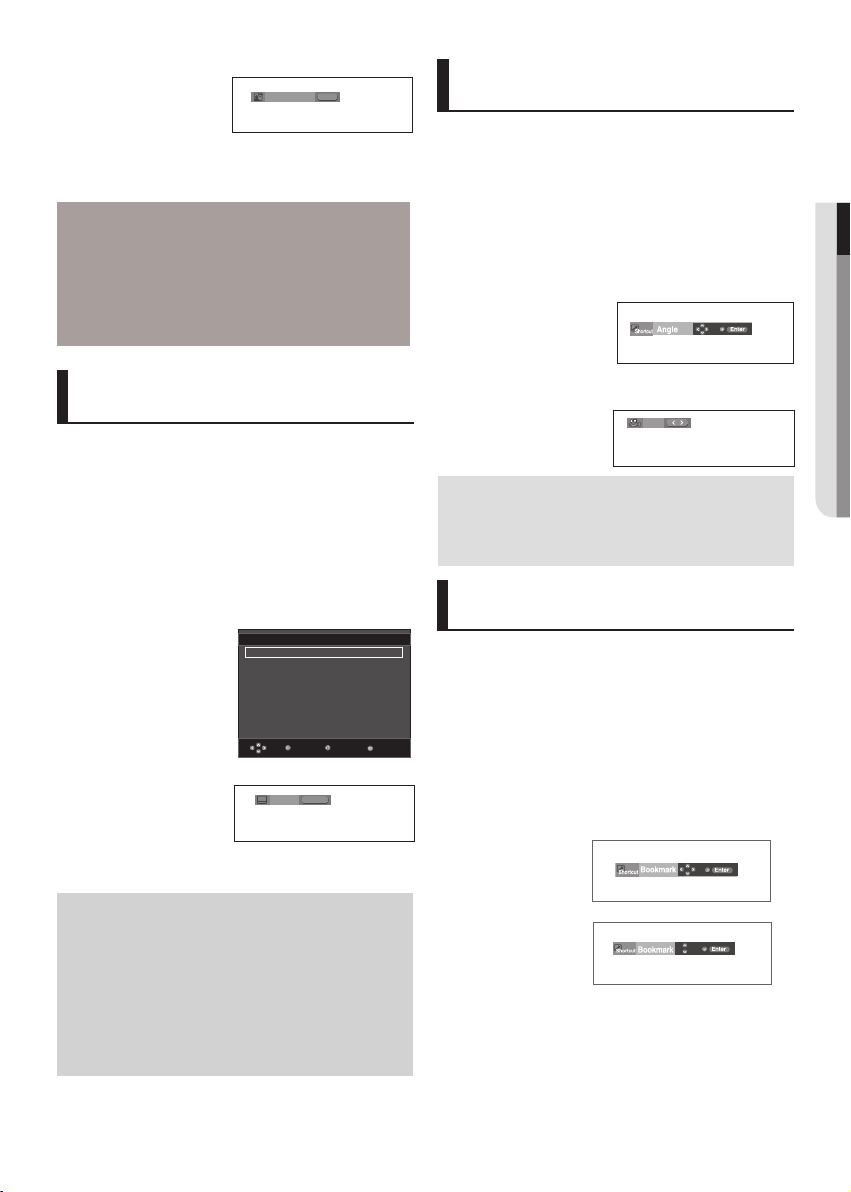
Changing the Camera Angle
When a DVD contains multiple angles of a particular
scene, you can use the ANGLE function.
Using the ANGLE button (DVD)
If the disc contains multiple angles, the ANGLE
appears on the screen.
1. During play, press the INFO button on the remote control.
2. Press the
3. Press the
ENTER button.
π/† buttons to select Shortcut.
√/®
buttons to select Angle, then -press the
● advancE fUncTionS
Selecting the Subtitle Language
You can select a desired subtitle quickly and
easily with the SUBTITLE/
Using the SUBTITLE/ π button
(DVD/MPEG4)
1. Press the SUBTITLE/ π button. The subtitle languages are
represented by abbreviations. The subtitle changes when
the button is pressed repeatedly.
External Subtitle option
will appear, depends on
the DivX disc.
SUBTITLE button
Press
at remocon repeatedly to
select the desired subtitle
language on a MPEG4
then press the
2. To remove the SUBTITLE icon, press the CANCEL or
RETURN button.
Note
- You have to change the desired subtitle in the
Disc Menu, according to discs. Press the DISC
MENU button.
- This function depends on what subtitles are
encoded on the disc and may not work on all DVDs.
- A DVD disc can contain up to 32 subtitle
languages.
- To have the same subtitle language come up
whenever you play a DVD; Refer to “Using the
Subtitle Language” on page 27.
ENTER .
π
MPEG4
MPEG4
button.
√/®
4. Press the
desired angle.
buttons on the remote control to select the
Note
- If the disc has only one angle, this feature won’t
work. Currently, very few discs have this feature.
- Depending on the disc, these functions may not
work.
Using the Bookmark Function
This feature lets you bookmark sections of a DVD or
VCD (Menu Off mode) so you can quickly find them
at a later time.
Using the Bookmark Function
(DVD/VCD)
1. During play, press the INFO button on the remote control.
2. Press the
π/† buttons to select Shortcut.
DVD
VCD
English _19
Page 20
advance functions
1 - -
1 2 3
1 2 3
3. Press the
then press the
4. When you reach the scene you want to mark, press-the
ENTER button. Up to three scenes may be marked at a time.
√/®
buttons to select Bookmark (except VCD),
ENTER button.
Note
-
Only Menu Off is available for VCD2.0. Each
press of the DISC MENU button toggles between
Menu-On and Menu Off.
- Depending on a disc, the Bookmark function may
not work.
Recalling a Marked Scene
1~3. The first 1~3 steps are the same as those for “Using the
Bookmark Function” on page 19.
4. Press the
5. Press the PLAY/PAUSE ( ) button to skip to the marked
scene.
√/®
buttons to select a marked scene.
Clearing a Bookmark
1~3. The first 1~3 steps are the same as those for “Using the
Bookmark Function” on page 19.
√/®
4. Press the
want to delete.
5. Press the
buttons to select the bookmark number you
CANCEL button to delete a bookmark number.
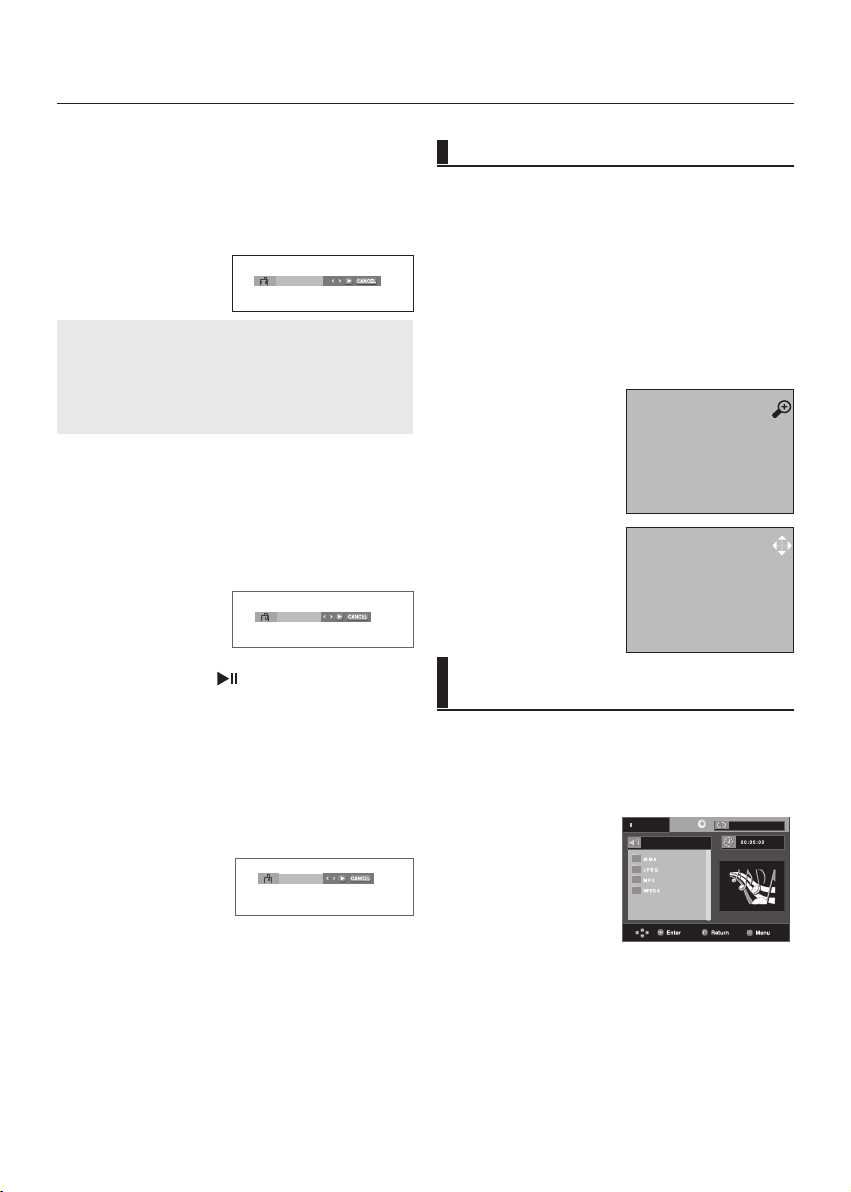
Using the Zoom Function
Using the Zoom Function (DVD/
VCD)
1. During play, press the INFO button on the remote control.
2. Press the
3. Press the
ENTER button.
- During DVD play, press ENTER to zoom in 2X/4X/2X/
Normal in order.
- During VCD play, press ENTER to zoom in
2X/4X/2X/Normal-in order.
π/† buttons to select Shortcut.
√/®
buttons to select Zoom, then press the
2X
Clips Menu for MP3/WMA/
JPEG/ MPEG4/CD Audio
CD Audio or discs with MP3/WMA/JPEG contain
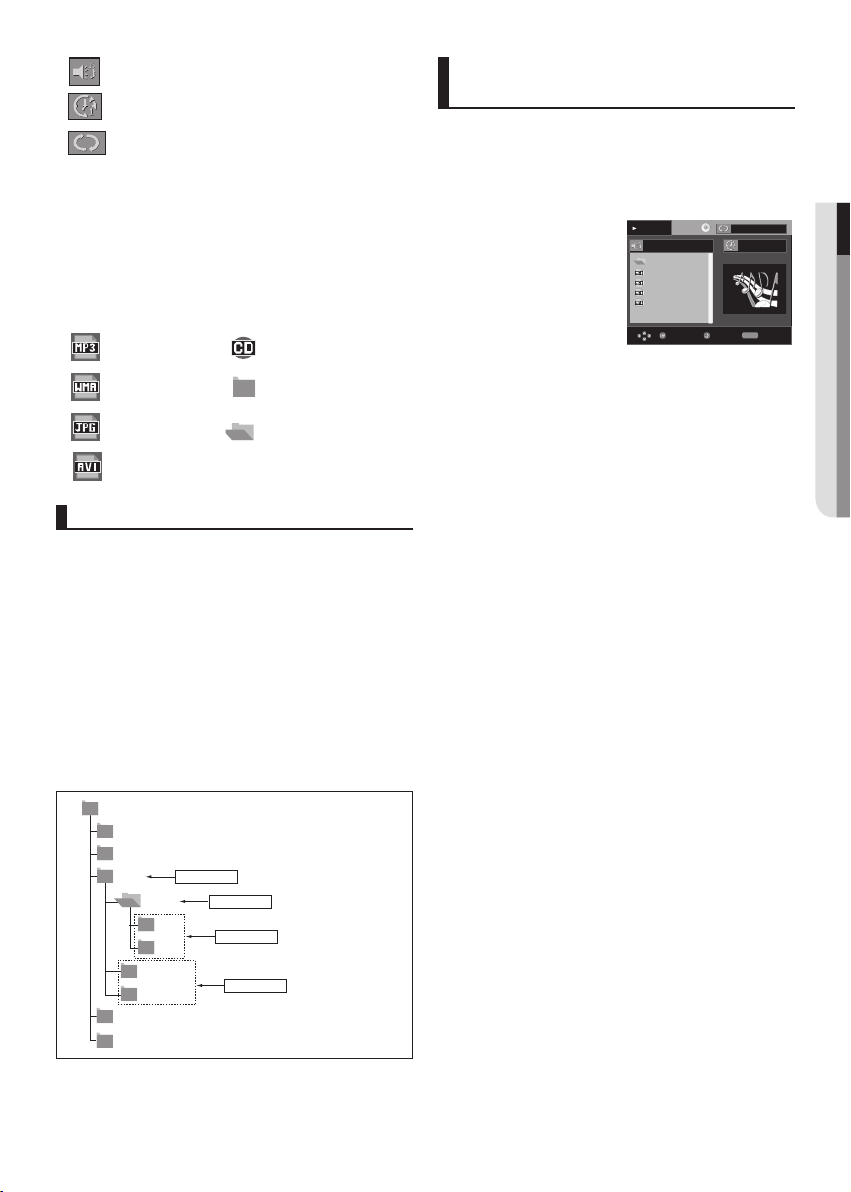
individual songs and/or pictures that can be organized into folders as shown below. They are similar
to how you use your computer to put files into different folders.
Open the disc tray.
Stop
Place the disc on the tray.
Close the tray.
The tray closes and this
screen displays.
Off
20_ advance functions
Page 21
-
Ro ot
WM A
JP EG
MP 3
SO NG FI LE 3
MP EG4 F IL ES
MU SIC
SO NG FI LE 1
SO NG FI LE 2
1s t
2n d
Pa ren t Fo ld er
Cu rre nt F ol de r
Su b-F ol de rs
Pe er Fo ld er s
.. .
Be c a us e Yo u
Ca c t us
Sa d Da y u
Wo n de r f u l
Be c a us e Yo u
00 :0 0 :2 3
REPEAT
ReturnEnter
Repeat
: Name of currently playing file.
-
: Current Playback Time.
-
: Current Playback Mode : There are four
modes. They can be selected in order by
pressing the REPEAT button.
- Off: Normal Playback
- Track: Repeats the current track.
- Folder: Repeats the current folder
- Random: Files in the disc will be played in
random order.
-
: MP3 file icon. -
-
: WMA file icon. -
-
: JPEG file icon -
-
: AVI file icon.
: CD Audio file icon.
: Folder icon.
: Current Folder icon.
Folder Selection
The folder can be selected in Stop or Play mode.
-
To select the Parent Folder
Press the RETURN button to go to parent folder,
or press the
ENTER to go to the parent folder.
-
To select the Peer Folder
Press the √/® buttons to highlight left window.
Press the
folder, then press ENTER.
-
To select the Sub-Folder
Press the √/® buttons to highlight right
window. Press the
desired folder,then press ENTER.
π/†
buttons to select “..” and press
▲ / ▼ buttons to select the desired
π/†
buttons to select the
MP3/WMA/CD Audio Playback
1. Open the disc tray. Place the disc on the tray. Close the tray.
- Only one kind of file is played back when a disc or a
folder contains both MP3 and WMA files.
2. Press the
- Press
π/†
or
√/®
buttons to select a song file.
ENTER to begin playback of the song file.
Play
Off
Repeat/Random playback
Press the REPEAT button to change the playback mode. There
are four modes, such as
Off, Track, Folder and Random.
- Off: Normal Playback
- Track: Repeats the current song file.
- Folder: Repeats the song files which have the same
extension in the current folder.
- Random: Song files which have the same extension will be
played in random order.
To resume normal play, press the
CANCEL button.
CD-R MP3/WMA file
When you record MP3 or WMA files on CD-R, please refer
to the following.
- Your MP3 or WMA files should be ISO 9660 or JOLIET
format.
ISO 9660 format and Joliet MP3 or WMA files are compatible
with Microsoft's DOS and Windows, and with Apple's Mac.
This format is the most widely used.
- When naming your MP3 or WMA files, do not exceed 8
characters, and enter “.mp3, .wma” as the file extension.
General name format : Title.mp3. or Title.wma. When com
posing your title, make sure that you use 8 characters or less,
have no spaces in the name, and avoid the use of special
characters including: (.,/,\,=,+).
- Use a decompression transfer rate of at least 128 Kbps
when recording MP3 files.
Sound quality with MP3 files basically depends on the rate
of compression/ decompression you choose. Getting CD
audio sound requires an analog/digital sampling rate, that
is conversion to MP3 format, of at least 128 Kbps and up to
160 Kbps. However, choosing higher rates, like 192 Kbps or
more, only rarely give better sound quality. Conversely, files
with decompression rates below 128 Kbps will not be played
properly.
- Use a decompression transfer rate of at least 64Kbps
when recording WMA files.
Sound quality with WMA files basically depends on the rate of
compression/decompression you choose.
Getting CD audio sound requires an analog/digital sampling
rate, that is conversion to WMA format, of at least 64Kbps
and up to 192Kbps. Conversely, files with decompression
rates below 64Kbps or over 192Kbps will not be played prop
erly.
English _21
● advancE fUncTionS
Page 22
advance functions
.. .
a0 1_ di v x5 1b -8
a0 2_ di v x5 05 b- 8
a0 3_ di v x5 02 sp - 8
a0 4_ di v x4 12 -8
/M PE G4
00 :00 :0 0
Enter
Return
T
T
Menu
- Do not try recording copyright protected MP3 files.
Certain "secured" files are encrypted and code protected
to prevent illegal copying. These files are of the following
types: Windows Media
Inc) and SDMI
TM
TM
(registered trade mark of Microsoft
(registered trade mark of The SDMI
Foundation). You cannot copy such files.
- Important:
The above recommendations cannot be taken as a
guarantee that the DVD player will play MP3 recordings,
or as an assurance of sound quality. You should note that
certain technologies and methods for MP3 file recording on
CD-Rs prevent optimal playback of these files on your DVD
player (degraded sound quality and in some cases, inability of
the player to read the files).
- This unit can play a maximum of 500 files and 500 folders
per disc.
MPEG4 Playback
MPEG4 Play Function
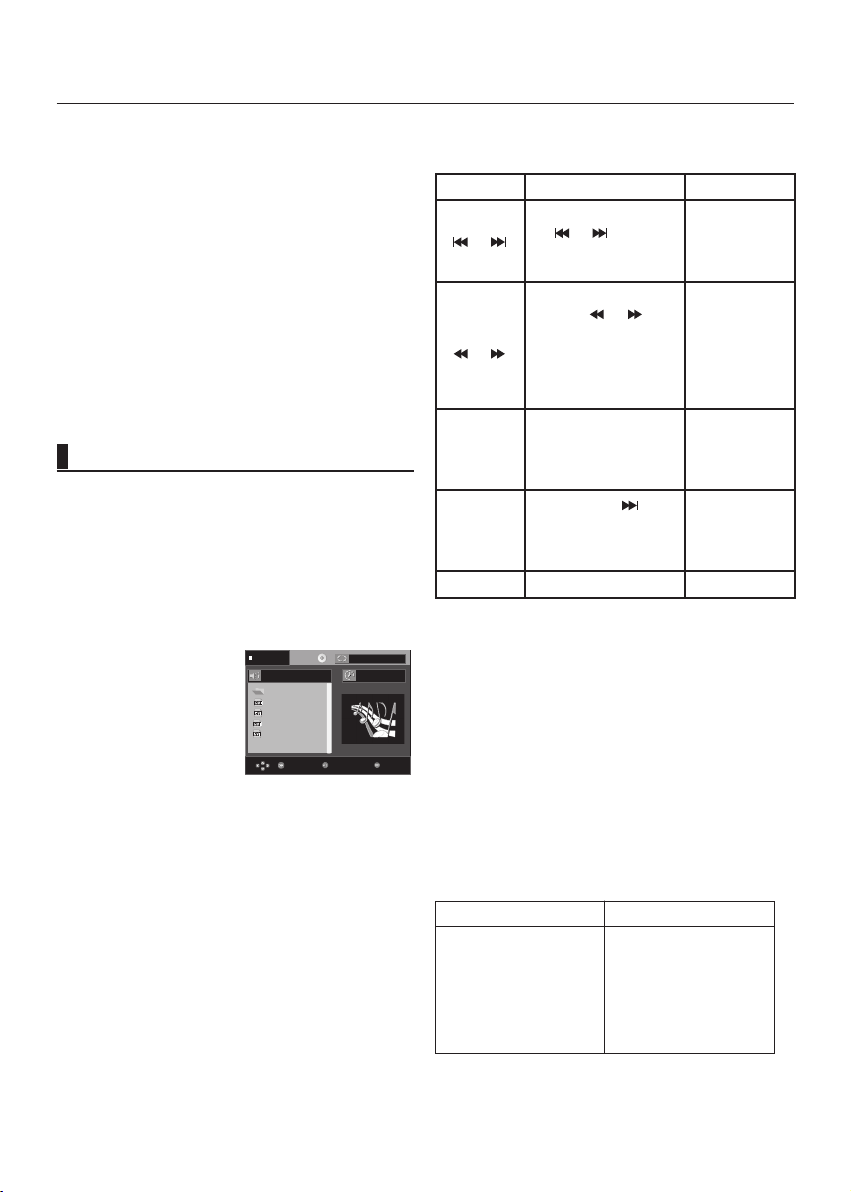
AVI files are used to contain the audio and video data. Only
AVI format files with the “.avi” extensions can be played.
1. Open the disc tray. Place the disc on the tray.
Close the tray.
π/†
or
√/®
2. Press the
(DivX/XviD) and then press
Repeat playback
Press the REPEAT button to change playback mode. There are
4 modes, such as Off, Folder, Title an A-B (a distance between
two points appointed by user)
- Folder : repeats the AVI files which have the same extension
in the current folder.
- Title : repeats the title that is playing.
buttons to select an avi file
ENTER button.
Stop Off
MPEG4 Function Description
Function Description Reference page
Skip
( or )
During play, press
the or
button, it moves forward or
-
backward 5 minutes.
During play, press the
-
SEARCH ( or ) but-
Search
( or )
ton and press again to search
at a faster speed.
Allows you
to search at a faster speed
in an AVI file. (2X, 4X, 8X)
Slow Motion
Play
Step Motion
Play
Allows you to search at a
slower speed in an AVI file.
(1/2X, 1/4X, 1/8X)
Press the SKIP (
) button on the remote control
during PAUSE mode, a
P 15
P 15
new frame will appear.
ZOOM 2X/4X/2X/Normal in order P 20
- These functions may not work depending on MPEG4
file.
CD-R AVI file
This unit can play the following video compression formats
within the AVI file format:
- DivX 3.11 contents
- DivX 4 contents (Based on MPEG-4 Simple Profile)
- DivX 5 contents (MPEG-4 simple profile plus additional
features such as bi-directional frames. Qpel and GMC are
also supported.)
- XviD MPEG-4 compliant Contents.
This unit supports all resolutions up to maximum below.
DivX3.11 & DivX4 & XviD DivX5
Bitrate may fluctuate:
Device may skip decoding
the high bitrate portions
720 x 480 @30fps
720 x 576 @25fps
: Maximum bitrate : 4Mbps
and begin decoding again
when Bitrate returns to
normal.
22_ advance functions
Page 23
Note
USB
Disc
• Some MPEG-4 files created on a personal computer
may not be play back. That is why Codec Type,
Version and Higher resolution over specification is
not supported.
• This unit supports CD-R/RW written in MPEG4 in
accordance with the “ISO9660 format”.
Playing Media Files Using the USB Host feature
You can enjoy the media files such as pictures, movies
and tunes saved in an MP3 player, USB memory or digital
camera in high audio by connecting the storage device to
the USB port of the DVD Player.
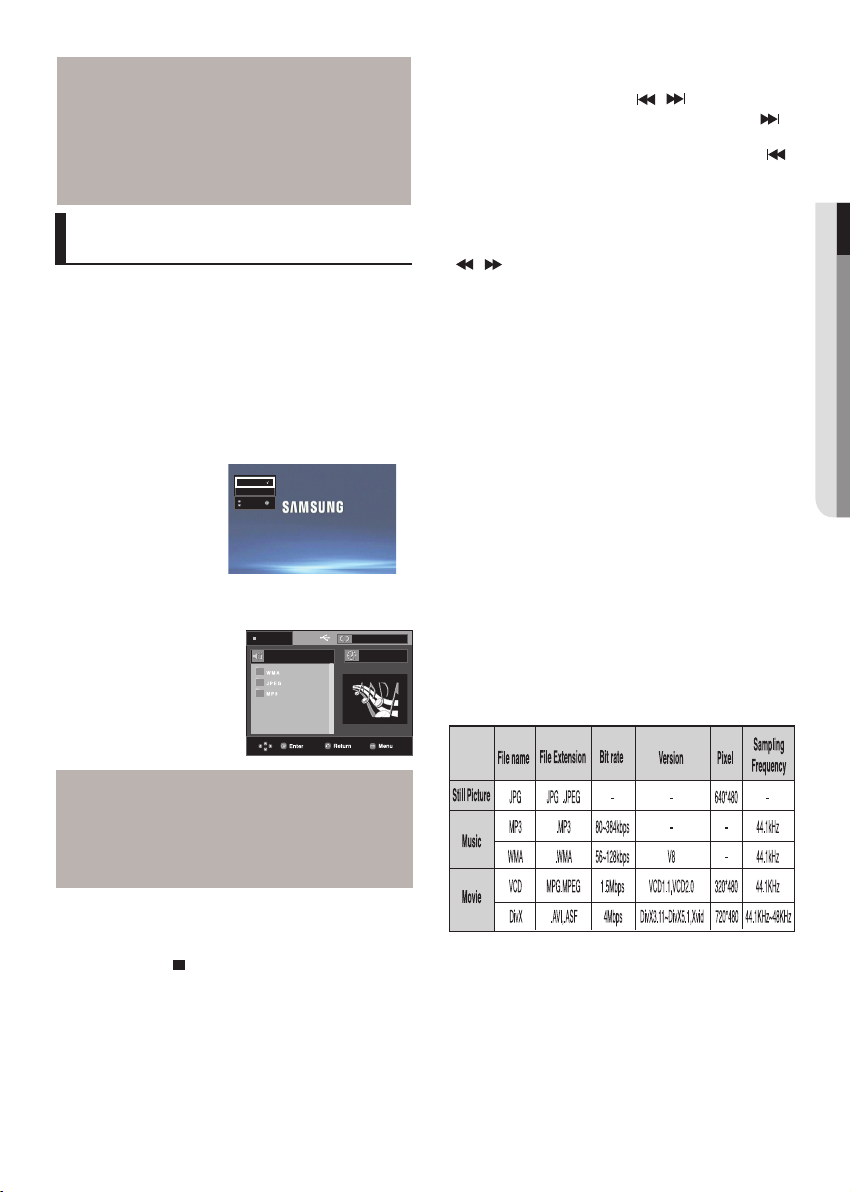
Using the USB HOST feature
1. Connect the USB device to the USB port on the front of the
unit.
2. If there is partision Of USB, Press the
the one of partision from USB, then Press OK.
3. Press the
USB. Press
π/†
or
√/®
OK to Open file.
buttons to select a file in
STOP
π/†
button to select
Off
00:00:00
Skip Forward/Back
During playback, press the
When there is more than one file, when you press the
•
button, the next file is selected.
When there is more than one file, when you press the
•
button, the previous file is selected
( / )
.
button.
Fast playback
To play back the disc at a faster speed, press
( / ) d
Each time you press either button, the playback speed will
•
change as follows:
2x
uring playback.
➞ 4x ➞ 8x.
Compatible Devices
1. USB devices that support USB Mass Storage v1.0.
(USB devices that operate as a removable disk in Windows
(2000 or later) without additional driver installation.)
2. MP3 Player: Flash type MP3 player.
3. Digital camera: Cameras that support USB Mass Storage v1.0.
• Cameras that operate as a removable disk in Windows
(2000 or later) without additional driver installation.
4. USB Flash Drive: Devices that support USB2.0 or USB1.1.
• You may experience a difference in playback quality when
you connect a USB1.1 device.
5. USB card Reader: One slot USB card reader and Multi slot
USB card reader
• Depending on the manufacturer. the USB card reader
may not be supported.
• If you install multiple memory devices into a multi card
reader, you may experience problems.
6. If you use a USB extension cable, the USB device might not
be recognized
Supported Formats
•
.
● advancE fUncTionS
Note
• Each time the USB button on the remote control is
pressed, a frame of the USB device selection will
appear.
USB” appears on the display screen.
•
“
USB MENU screen appears on the TV screen and the
•
saved file is played.
Safe USB Removal
To prevent damage to the memory stored in the USB device,
perform safe removal before disconnecting the USB cable.
- Press the STOP ( ) button
- Remove the USB cable.
English _23
Page 24
advance functions
00: 0 0 :0 0
Enter
T
T
Track 01
Track 02
Track 03
Track 04
Track 05
Track 06
Track 07
Track 08
Track 01
DEV : SELECT
START
REPEAT
Repeat
00: 0 0 :0 0
Enter
T
T
Menu
Track 01
Track 02
Track 03
Track 04
Track 05
Track 06
Track 07
Track 08
Track 01
DEV : SELECT
START
USB
Disc
00 :0 3 :1 5
Enter
T
T
Track 01
Track 02
Track 03
Track 04
Track 05
Track 06
Track 07
Track 01
DEV : USB 1
UNSELECT
START
CD Ripping START
Cancel Ripping
REPEAT
Repeat
CANCEL
ALBUM PHOTO: 1 /215
ENTER
ENTER RETURN
RETURN
CBI (Control/Bulk/Interrupt) is not supported.
•
Digital Cameras that use PTP protocol or require additional
•
program installation when connected to a PC are not
supported.
A device using NTFS file system is not supported.
•
(Only FAT 16/32 (File Allocation Table 16/32) file system is
supported.)
Some MP3 players, when connected to this product,may not
•
operate depending on the sector size of their file system.
The USB HOST function is not supported if a product that
•
transfers media files by its manufacturer-specific program is
connected.
Does not operate with Janus enabled MTP(Media Transfer
•
Protocol) devices.
CD Ripping
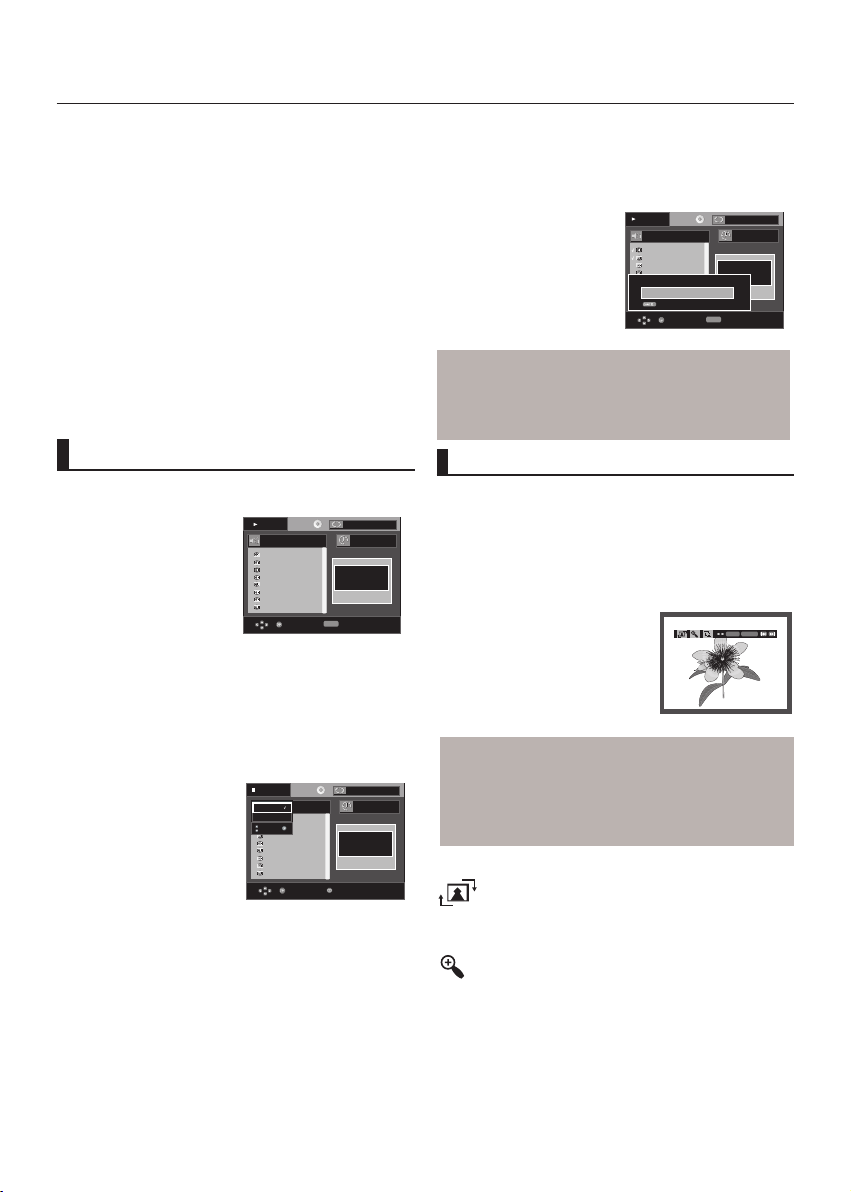
This feature lets you to copy audio files from disc to USB
device into MP3 format
Open the dics tray.
Place the Audio CD(CD DA) disc on
the tray, and close the tray.
Connect the USB device to the USB
port on the front of the unit.
This screen will displayed.
1. To Select DISC
With the unit in Stop mode, Press the
select
DISC.
To Select
Press the
DEV (storage media device)
®
device) menu, then press the
Press the
π/†
ENTER button
.
Play
π/†
Off
buttons to
button to select the DEV (storage media
ENTER button.
buttons to select USB, then press the
Stop
Off
3. Press the
ENTER button.
π/†
buttons to select START,-then-press the
File copy begins.
- To cancel the copying in progress, press the CANCEL but
ton.
Play
Off
Note
- When the CD ripping being processed the player
will automatic in play mode.
- Only the Audio CD(CD DA) dics can be ripping.
Picture CD Playback
1. Select the desired folder.
π/†
2. Press the
menu and then press the
3. Press the
menu you want to view and then press the
Note
- Press the STOP button to return to the clips
menu.
- When playing a Kodak Picture CD, the unit
displays the Photo directly, not the clips menu.
buttons to select a Picture file in the clips
ENTER button.
INFO button on the remote control to select the
ENTER button.
2. Press the
- To unmarked copying all files press the
again.(
- If you want to marked several files to be copying, press the
π/†
buttons to select SELECT, then press the
ENTER button to marked all files to be copying.
ENTER button
UNSELECT Menu)
√ button, then press the ENTER button on the selected
file.
24_ advance functions
Rotation
: Each time the ENTER button is pressed, the
picture rotates 90 degrees clockwise.
Zoom
: Press the
Press the
π/†
buttons to select the part of the
screen you want to zoom in on.
ENTER button. Each time the ENTER but-
ton is pressed, the picture is enlarged up to 2X.
Page 25
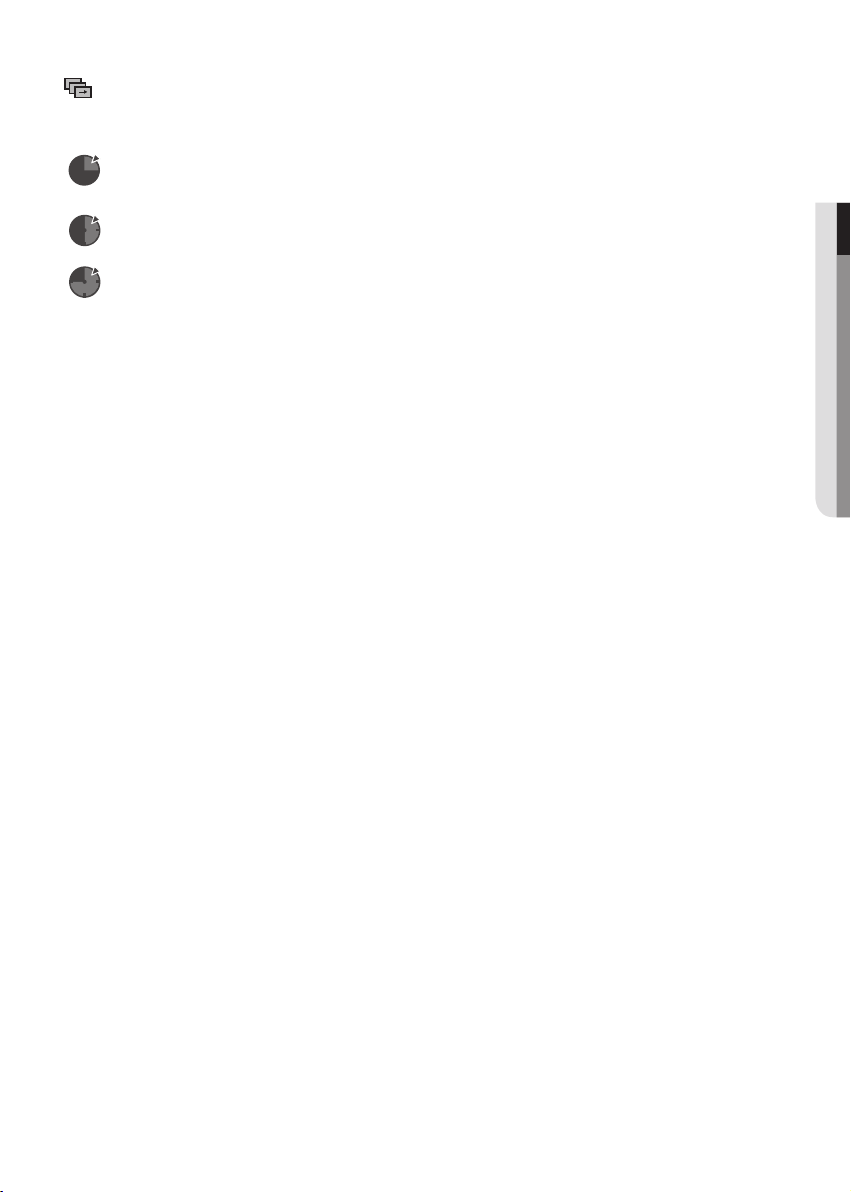
Slide Show
• : The unit enters slide show mode.
• Before beginning the Slide Show, the picture interval must
be set.
•
: When this icon is selected and ENTER is
pressed, the pictures change automatically
with about a 6 second interval.
•
: The pictures change automatically with
about a 12 second interval.
•
: The pictures change automatically with
about a 18 second interval.
CD-R JPEG Disc
- Only files with the “.jpg” and “.JPG” extensions can be played.
- If the disc is not closed, it will take longer to start playing and
not all of the recorded files may be played.
- Only CD-R discs with JPEG files in ISO 9660 or Joliet format
can be played.
- The name of the JPEG file may not be longer than 8
characters and should contain no blank spaces or special
characters (. / = +).
- Only a consecutively written multi-se ssion disc can be
played.If there is a blank segment in the multi-session disc,
the disc can be played only up to the blank segment.
- A maximum of 3000 images can be stored on a single CD.
- Kodak Picture CDs are recommended.
- When playing a Kodak Picture CD, only the JPEG files in the
pictures folder can be played.
- Kodak Picture CD: The JPEG files in the pictures folder can
be played automatically.
- Konica Picture CD: If you want to see the Picture, select the
JPEG files in the clips menu.
- Fuji Picture CD: If you want to see the Picture, select the
JPEG files in the clips menu.
- QSS Picture CD: The unit may not play QSS Picture CD.
- If the number of files in 1 Disc is over 500, only 500 JPEG
files can be played.
- If the number of folders in 1 Disc is over 500, only JPEG
files in 500 folders can be played
● advancE fUncTionS
English _25
Page 26
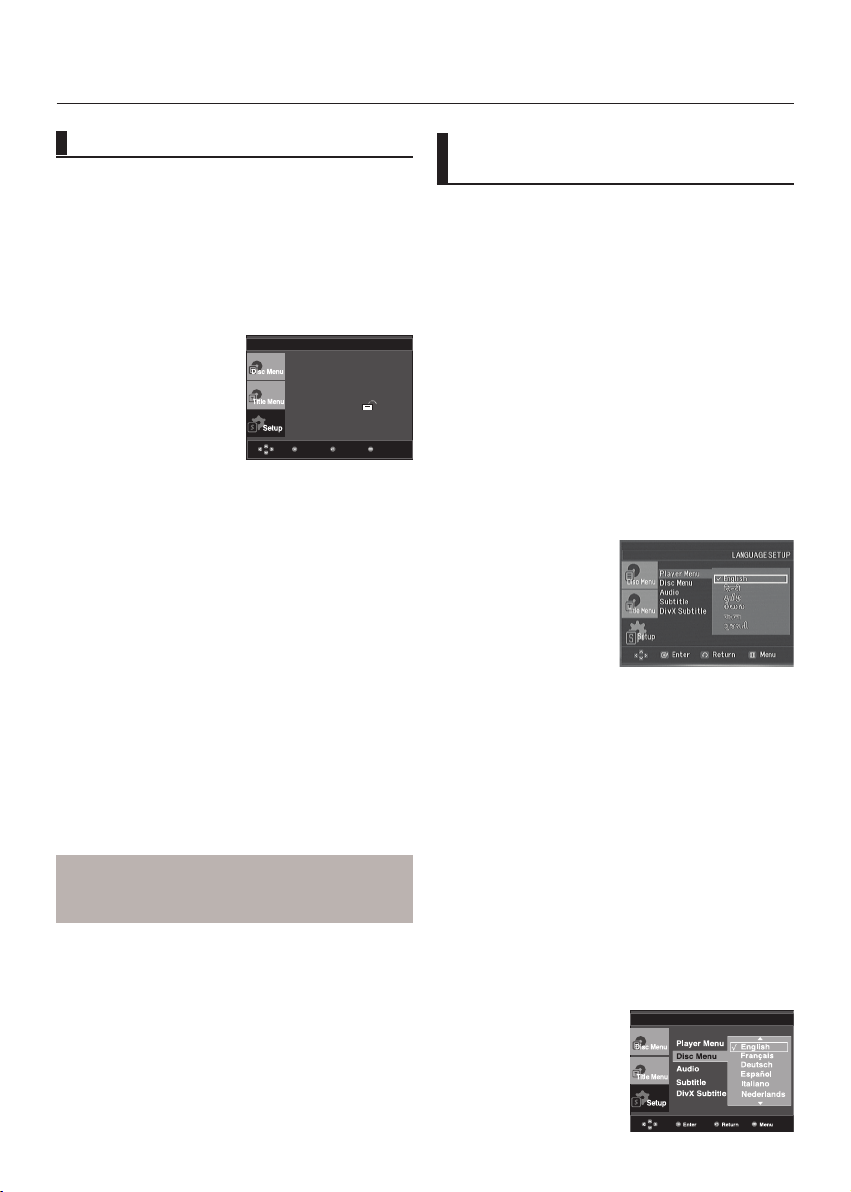
changing setup menu
MenuReturnEnter
Using the Setup Menu
The Setup menu lets you customize your DVD player by
allowing you to select various language preferences, set
up a parental level, even adjust the player to the type of
television screen you have.
1. With the unit in Stop mode, press the MENU button on the
π/†
remote control.Use the
press the
n
Language Setup: Setup of the Language.
n
n
Display Setup : Setup of the Display Options. Use to
select which type of screen you want to watch and sev
eral display options.
n
Parental Setup : Setup of the Parental Level. Allows
users to set the level necessary to prevent children from
viewing unsuitable movies such as those with violence,
adult subject matter, etc.
n
DivX(R) Registration : Please use the Registration code
to register this player with the DivX(R) Video On Demand
format.To learn more go to www.divx.com/vod.
2. Press the
Press the
3. To make the setup screen disappear after setting up, press
the
®
or ENTER button.
Audio Setup : Setup of the Audio Options.
π/†
buttons to access the different features.
®
or ENTER button to access the sub features.
MENU button again.
Note
Depending on the disc, some Setup Menu
selections may not work.
buttons to select Setup, then
Lang uage Setup ®
Audi o Set up ®
Disp lay S etup ®
Pare ntal Setup : ®
DivX (R) R egist ration ®
Setting Up the Language Features
If you set the player menu, disc menu, audio and subtitle
language in advance, they will come up automatically every
time you watch a movie.
Using the Player Menu Language
1. With the unit in Stop mode, press the MENU button.
2. Press the
or
3. Press the
press the
4. Press the
the
5. Press the
then press the
- The language is selected and the screen
returns to Language Setup menu.
- To make the setup menu disappear, press the MENU
button.
Using the Disc Menu Language
This function changes the text language only on the disc
menu screens.
1. With the unit in Stop mode, press the MENU button.
2. Press the
or
3. Press the
press the
4. Press the
the
5. Press the
then press the
If the selected language is not recorded on the disc,
the original pre-recorded language is selected.
The language is selected and the screen returns to
Language Setup menu.To make the setup menu disap
pear, press the
π/†
ENTER button.
®
ENTER button.
®
buttons to select Setup, then press the ®
π/†
buttons to select Language Setup, then
®
or ENTER button.
π/†
buttons to select Player Menu, then press
or ENTER button.
π/†
buttons to select the desired language,
®
π/†
buttons to select Setup, then press the ®
π/†
buttons to select Language Setup, then
®
or ENTER button.
π/†
or ENTER button.
π/†
buttons to select the desired language,
®
or ENTER button.
buttons to select Disc Menu, then press
or ENTER button.
MENU button.
LANGUAGE SETUP
26_ changing setup menu
Page 27
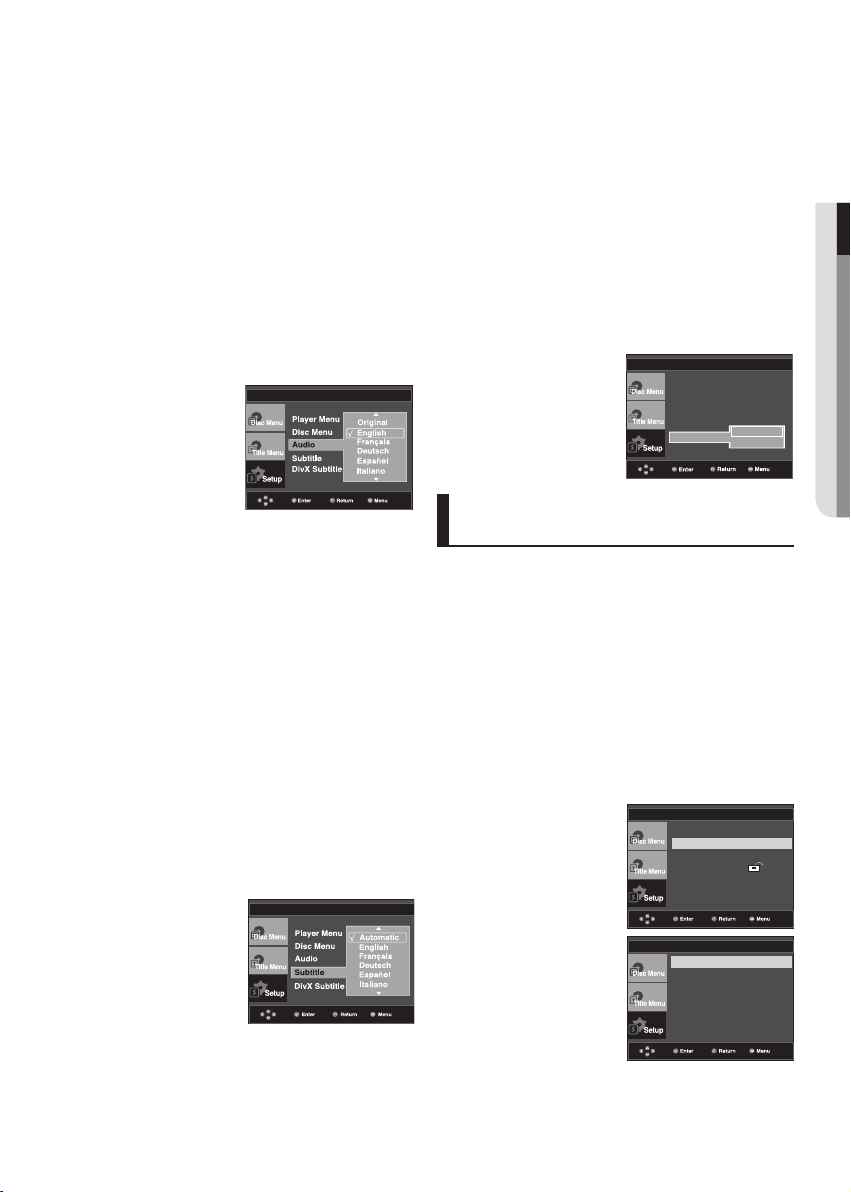
Using the Audio Language
1. With the unit in Stop mode, press the MENU button.
2. Press the
or
3. Press the
press the
4. Press the
or
5. Press the
press the
language to be the original language the disc is recorded
in.If the selected language is not recorded on the disc,the
original pre-recorded language is selected.The language
is selected and the screen returns to Language Setup
menu.To make the setup menu disappear, press the
MENU button.
π/†
buttons to select Setup, then press the ®
ENTER button.
π/†
buttons to select Language Setup, then
®
or ENTER button.
π/†
buttons to select Audio, then press the ®
ENTER button.
π/†
buttons to select the desired language, then
®
or ENTER button.
Select “Original” if you want the default soundtrack
LANGUAGE SETUP
Using the Subtitle Language
1. With the unit in Stop mode, press the MENU button.
2. Press the
or
3. Press the
press the
4. Press the
® or ENTER button.
5. Press the
then press the
- Select “Automatic” if you want the subtitle language
to be the same as the language selected as the audio
language.
- Some discs may not contain the language you select
as your initial language; in that case the disc will use its
original language setting.The language is selected and
the screen returns to setup menu.To make the setup
menu disappear, press the
π/†
ENTER button.
π/†
®
or ENTER button.
π/†
π/†
®
buttons to select Setup, then press the ®
buttons to select Language Setup,-then
buttons to select Subtitle, then press the
buttons to select the desired -language,
or ENTER button.
MENU button.
LANGUAGE SETUP
Using the DivX Subtitle Language
1. With the unit in Stop mode, press the MENU button.
2. Press the
or
3. Press the
press the
4. Press the
the
5. Press the
then press the
π/†
ENTER button.
π/†
®
or ENTER button.
π/†
®
or ENTER button.
π/†
®
buttons to select Setup, then press the ®
buttons to select Language Setup,-then
buttons to select DivX Subtitle, then press
buttons to select the desired -language,
or ENTER button.
The language is
selected and the screen returns to Language Setup
menu.To make the setup menu disappear, press the
MENU-button.
LANGUAGE SETUP
Player Menu : English
Disc Menu : English
Audio : English
Subtitle
DivX Subtitle
√ Unicode
Western
Setting Up the Audio Options
Audio Options allows you to setup the audio device
and sound status settings depending on the audio
system in use.
1. With the unit in Stop mode, press the MENU button.
2. Press the
or
3. Press the
the
4. Press the
press the
π/†
ENTER button.
π/†
®
or ENTER button.
π/†
®
or ENTER button.
buttons to select Setup, then press the ®
buttons to select Audio Setup, then press
buttons to select the desired item, then
Lang uage Setup ®
Audi o Set up ®
Disp lay S etup ®
Pare ntal Setup : ®
DivX (R) R egist ration ®
● changing SETUP mEnU
Dolby Digital Out : PCM
MPEG-2 Digital Out : PCM
Dynamic Compression : On
PCM Down Sampling : O n
Outp ut Ch annel : 2Ch
Spea ker s etup ®
Power On Music : O n
AUDIO SETUP
English _27
Page 28
changing setup menu
Se tup
Se tup
❶
Dolby Digital Out
- PCM : Converts to PCM(2CH) audio.
- Bitstream : Outputs Dolby Digital or DTS via the digital
output. Select Bitstream when connecting to a
Dolby Digital or DTS Decoder.
❷
MPEG-2 Digital Out
- PCM : Converts to PCM(2CH) audio.
- Bitstream : Converts to MPEG-2 Digital Bitstream (5.1CH
or 8CH). Select Bitstream when using the Digital Audio
Output.
❸
Dynamic Compression
- On : To select dynamic compression.
- Off : To select the standard range.
❹
PCM Down Sampling
- On : Select this when the Amplifier connected to the
player is not 96KHz compatible. In this case, the
96KHz signals will be down converted to 48KHZ.
- Off : Select this when the Amplifier connected to the
player is 96KHz compatible. In this case, all signals will be
output without any changes.
❺ Output Channel
2Ch : Select this when using 2 channel connection
•
only.
•
5.1 Ch : Select this when using 5.1 Channel
connection.
To make The Speaker Setup menu appear,
select output channel to 5.1 Ch.
➏
Speaker Setup
❼
Power On Music
This menu is used to activate or deactivate the opening
sound when you turn on the DVD player.
- On : To turn On Start up music.
- Off : To turn Off Start up music.
Note :
• Even when PCM Down sampling is Off
• Some discs will only output down sampled
audio through the digital outputs.
• To make the Setup menu disappear, press the
MENU button.
• There is no analog audio output when you play a
DTS sound disc.
Manufactured under license from Dolby
Laboratories. “Dolby” and the double-D symbol
are trademarks of Dolby Laboratories.
“DTS” and “DTS Digital Out” are trademarks of
Digital Theater Systems, Inc.
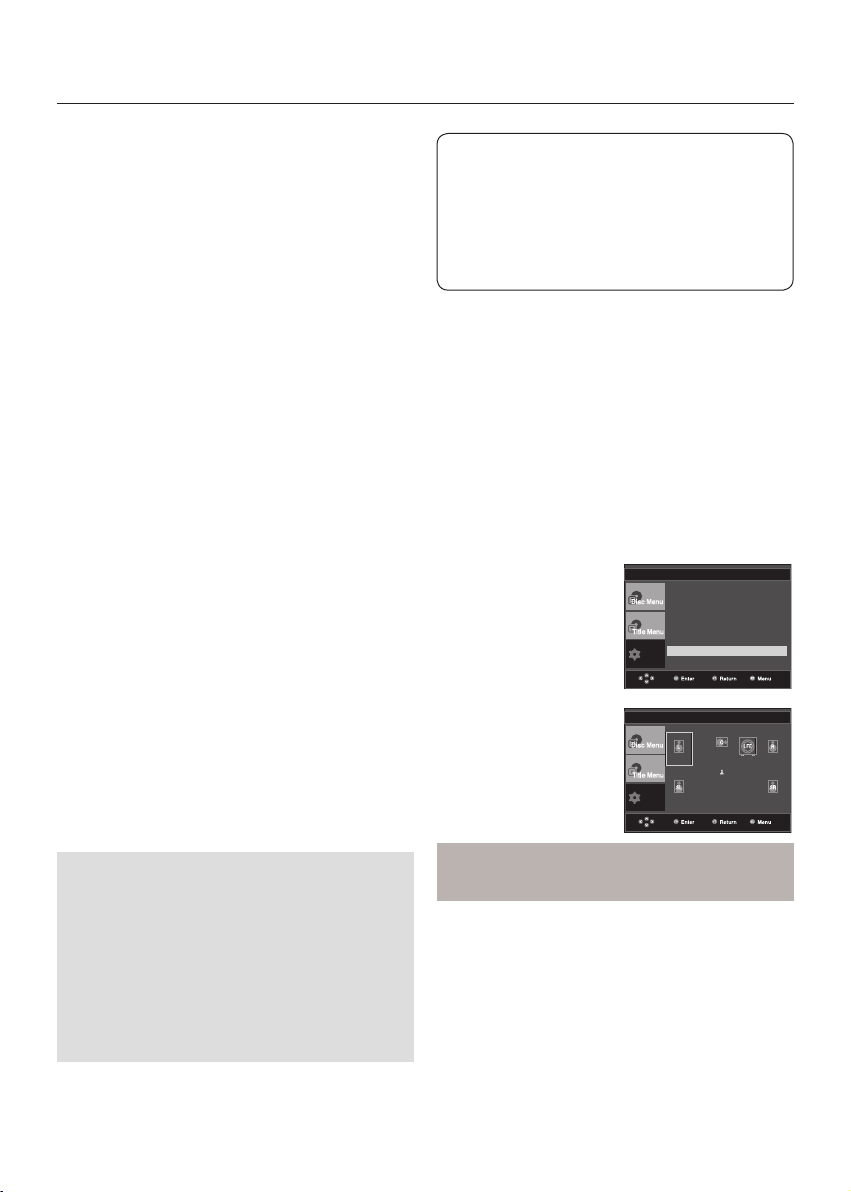
Surround Sound Speaker Setup
1. With the unit in Stop mode, press the MENU
button.
2. Press the
π/† buttons to select Setup, then
press the ® or ENTER button.
3. Press the
π/† buttons to select Audio Setup,
then press the ® or ENTER button.
4. Press the
π/† buttons to select Speaker Setup,
then press the ® or ENTER button.
5. Press the
π/†/√/® buttons to select the
desired item, then press the ENTER button to set
the speaker.
To make the setup menu disappear, press the MENU
button.
Note
To make the setup menu disappear, press the MENU
button.
Test
AUDIO SETUP
SPEAKER SETUP
Small
User
Dolby Digital Out : PCM
MPEG-2 Digital Out : PCM
Dynamic Compression : On
PCM Down Sampling : O n
Outp ut Ch annel : 5.1C h
Spea ker s etup ®
Power On Music : O n
Small
Small
Small
On
Small
28_ changing setup menu
Page 29
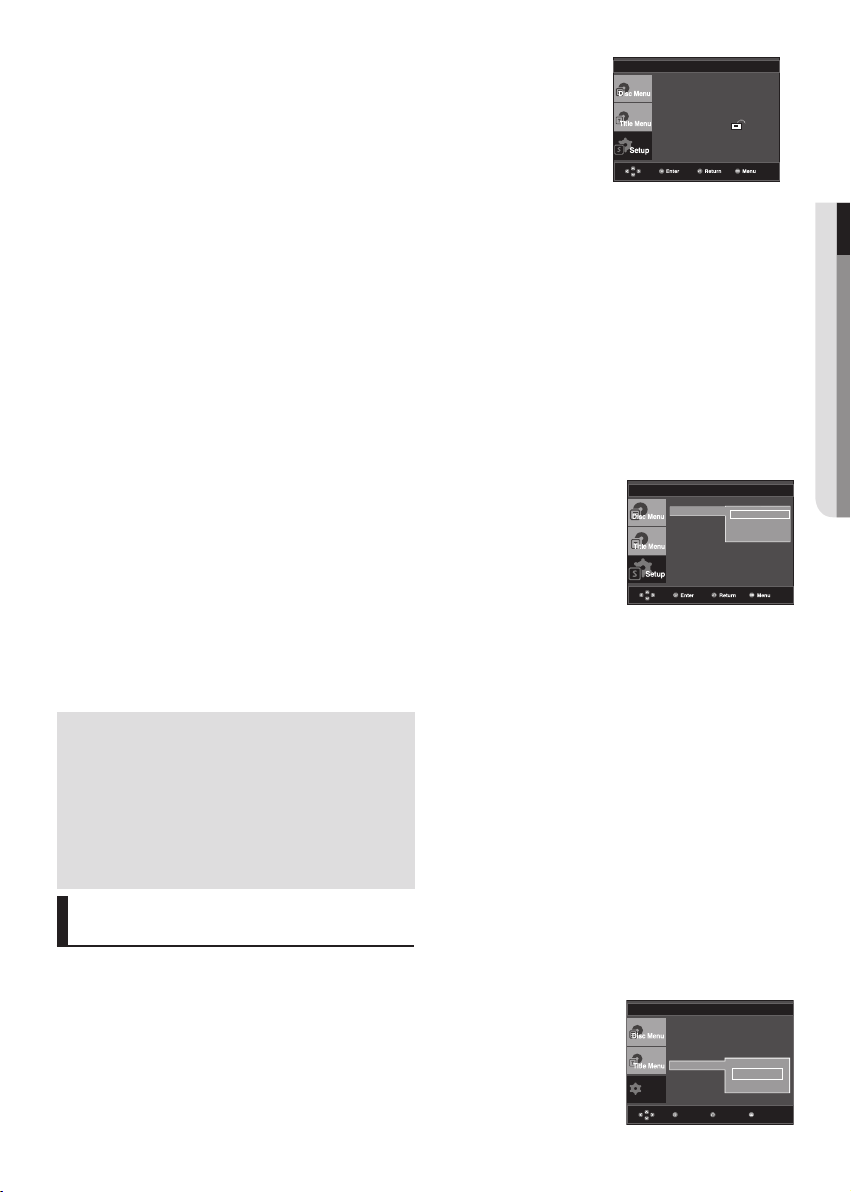
The default settings : FRONT L, R (Small),
Setup
MenuReturnEnter
TV System : PAL
CENTER (Small), SURROUND (Small).
Select the size of the speakers to be connected.
❶
Front (FL, FR)
- Large: Normally select this.
- Small: When the sound distorts or the suround sound
effects are difficult to hear, select this.
This activates the Dolby Digital bass redirec
tion circuitry and outputs the bass frequencies of
the speaker from the subwoofer.
❷
Center
- None: If you do not connect a center speaker,
select this.
- Large: Normally select this.
- Small: When the sound distorts, select this.
This activates the Dolby Digital bass redirection cir
cuitry and outputs the bass frequencies of the center
speaker from other speakers.
❸
Surround (SL, SR)
- None: If you do not connect a center speaker,
select this.
- Large (Rear/Side): Normally select either of
these according to the rear speaker’s position.
- Small (Rear/Side): When the sound ditorts or
the surround sound effects are dificult to hear,
select either of these according to the rear
speaker’s position.
This activates the Dolby Digital bass rediretion
circuitry and outputs the bass frequencies of
the rear speaker from other speakers.
Setting up Test
The test output signals come clockwise starting from the
Front Speaker (L). Adjust Channel Balance so that speakers output equally in your room.
FRONT(L) ➞ CENTER ➞ SUBWOOFER ➞ FRONT(R) ➞
SURROUND(R)
➞ SURROUND(L)
To make the Setup menu disappear or return to menu
screen during set up, press RETURN button.
• The subwoofer test output signal is lower
than the other speakers.
• The MPEG Multichannel logo is a trademark
registered by PHILIPS Corporation.
• If you set Front (L, R) “Small”, LFE
(Subwoofer) is set “On” automatically.
Setting Up the Display Options
Display options enable you to set various video functions of
the player.
1. With the unit in Stop mode, press the MENU button.
2. Press the
or
3. Press the
the
4. Press the
press the
π/†
ENTER button.
π/†
®
or ENTER button.
π/†
®
or ENTER button.
buttons to select Setup, then press the ®
buttons to select Display Setup, then press
buttons to select the desired item, then
Lang uage Setup ®
Audi o Set up ®
Disp lay S etup ®
Pare ntal Setup : ®
DivX (R) R egist ration ®
❶
TV Aspect
Depending on a type of television you have, you
may want to adjust the screen setting (aspect ratio).
- 4:3 Letter Box : Select when you want to see
the total 16:9 ratio screen DVD
supplies, even though you have a TV with a 4:3
-
ratio screen. Black bars will appear at the top
and bottom of the screen.
- 4:3 Pan&Scan : Select this for conventional
size TVs when you want to see the central portion of the 16:9 screen. (Extreme left and right
side of movie picture will be cut off.)
- 16:9 Wide : You can view the full 16:9
picture on your wide screen TV.
TV Aspect
Screen Message
Black Level
TV System : Auto
Video Output : I-SCAN
Screen Messages
❷
Use to turn on-screen messages On or Off.
Black Level
❸
Adjusts the brightness of the screen.(On or Off) It
does not function in PAL mode.
TV System
❹
- NTSC : In case of using NTSC disc
• If your TV system only has PAL-Video input, you
must choose “PAL”. When you choose “PAL”,
Interlace output format is PAL 60 Hz output.
• If your TV system only has NTSC, input you
must choose “NTSC ”.
- PAL : In case of using PAL disc
• If your TV system only has NTSC-Video input,
you must choose “NTSC”.
• If your TV system only has PAL input, you must
choose “PAL ”.
- Auto
TV Aspect : 4:3 L-Box
Screen Messages :
Black Level : Off
TV System
Video Output
DISPLAY SETUP
√ 4:3 Letter Box
4:3 Pan&Scan
16:9 Wide
DISPLAY SETUP
On
NTSC
√ PAL
Auto
English _29
● changing SETUP mEnU
Page 30
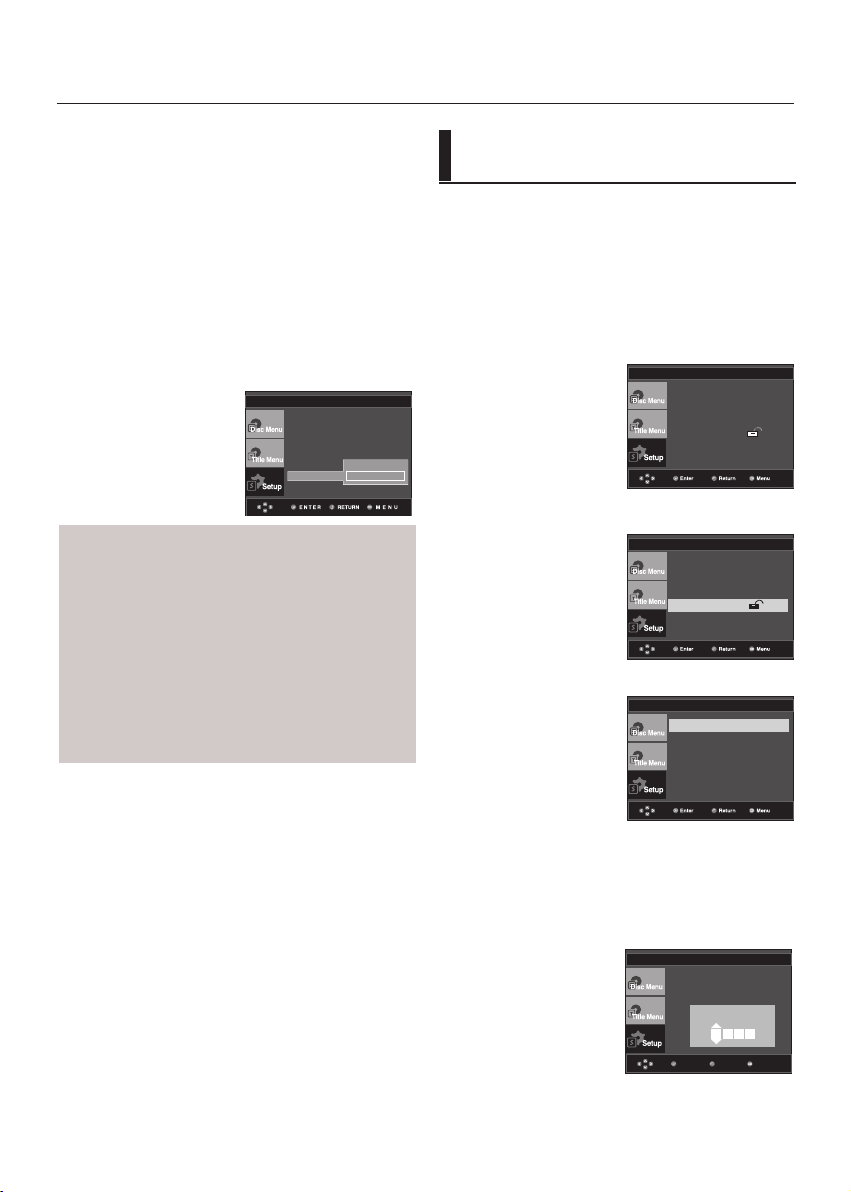
changing setup menu
MenuReturnEnter
Video Output
❺
Select Video Output.
- I-SCAN : Select when you want to use
Component Interlace Out.
- P-SCAN : Select when you want to
use Component Progressive Out.
• If you press the VIDEO SEL. button,
Video output mode is changed in regular
sequence in no disc mode.
(I-SCAN ➞ P-SCAN)
• If the Yes/No selection in the Display Setup sub
Menu is not made within 10 seconds, the screen
returns to the previous menu.
DISPLAY SETUP
TV Aspect : 4:3 L-Box
Screen Messages :
Black Level
TV System
I-SCAN
Video Output
√
P-SCAN
• Consult your TV User’s Manual to find
out if your TV supports Progressive Scan. If
Progressive Scan is supported, follow the TV User’s
Manual regarding Progressive Scan settings in the
TV’s menu system.
• If Video Output is set incorrectly, the screen may be
blocked.
• When the resolution is changed during playback,
it may take a few seconds for a normal image to
appear.
On
: Off
Setting Up the Parental Control
The Parental Control function works in conjunction
with DVDs that have been assigned a rating, which
helps you control the types of DVDs that your family
watches. There are up to 8 rating levels on a disc.
Setting Up the Rating Level
1. With the unit in Stop mode, press the MENU button.
2. Press the
or
3. Press the
press the
4. Press the
the
π/†
ENTER button.
π/†
®
or ENTER button.
π/†
®
or ENTER button.
buttons to select Setup, then press the ®
Lang uage Setup ®
Audi o Set up ®
Disp lay S etup ®
Pare ntal Setup : ®
DivX (R) R egist ration ®
buttons to select Parental Setup, then
Lang uage Setup ®
Audi o Set up ®
Disp lay S etup ®
Pare ntal Setup : ®
DivX (R) R egist ration ®
buttons to select Rating Level, then press
PARENTAL SETUP
Rating Level : Kids Safe
Change Password
30_ changing setup menu
5. Enter your password, Press the
π/†
button to fill the blank
box, then press the ENTER button to insert the number.
- By default, password-is set to 0000.
- Please Change password to other than 0000 to parental
control function activated.
PARENTAL SETUP
Rating Level : Kids Safe
Change Password
Enter Password
0
Page 31
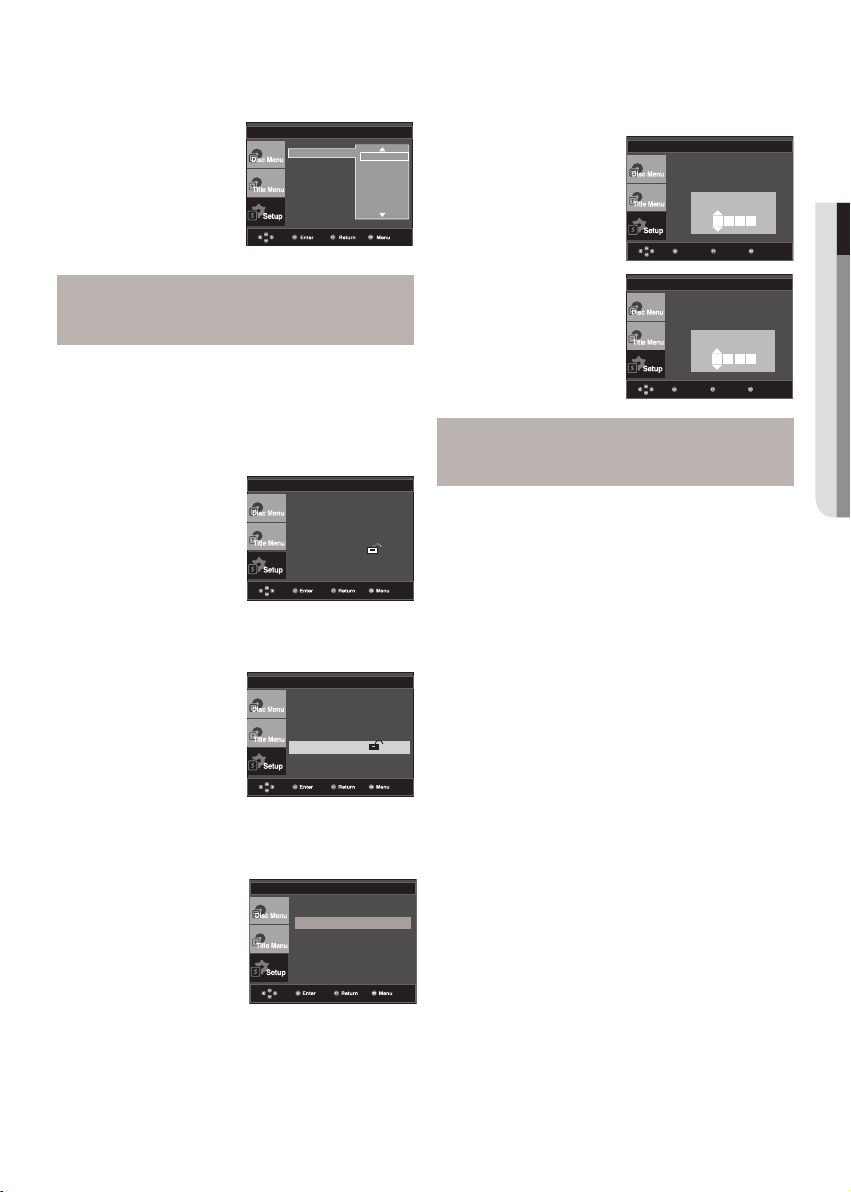
6. Press the
MenuReturnEnter
MenuReturnEnter
then press the
e.g) Setting up in
π/†
®
buttons to select the Rating Level you want,
or ENTER button.
Kids Safe.
PARENTAL SETUP
Rating Level
Change Passwor
√ Kids Safe
Level 2
Level 3
Level 4
Level 5
Level 6
5. Press the
π/†
button to fill the blank box, then press the
ENTER button to insert the number. Enter your new pass
word again.
PARENTAL SETUP
Rating Level :Kids Safe
Change Password
Ente r Pas sword
0
● changing SETUP mEnU
To make the setup menu disappear, press the MENU
button. For example, if you select up to Level 6, discs
that contain Level 7,8 will not play.
Changing the Password
1. With the unit in Stop mode, press the
π/†
2. Press the
ENTER button.
or
3. Press the
press the
buttons to select Setup, then press the ®
π/†
buttons to select Parental Setup, then
®
or ENTER button. The Enter Password screen
appears. Enter your password.
4. Press the
press the
π/†
button to select Change Password, then
®
or ENTER button. Enter your new password
again.
MENU button.
Lang uage Setup ®
Audi o Set up ®
Disp lay S etup ®
Pare ntal Setup : ®
DivX (R) R egist ration ®
Lang uage Setup ®
Audi o Set up ®
Disp lay S etup ®
Pare ntal Setup : ®
DivX (R) R egist ration ®
PARENTAL SETUP
Rating Level :Kids Safe
Change Password
PARENTAL SETUP
Rating Level :Kids Safe
Change Password
Enter New Password
0
Note
If you have forgotten your password, see
“Forgot Password” in the Troubleshooting Guide.
English _31
Page 32
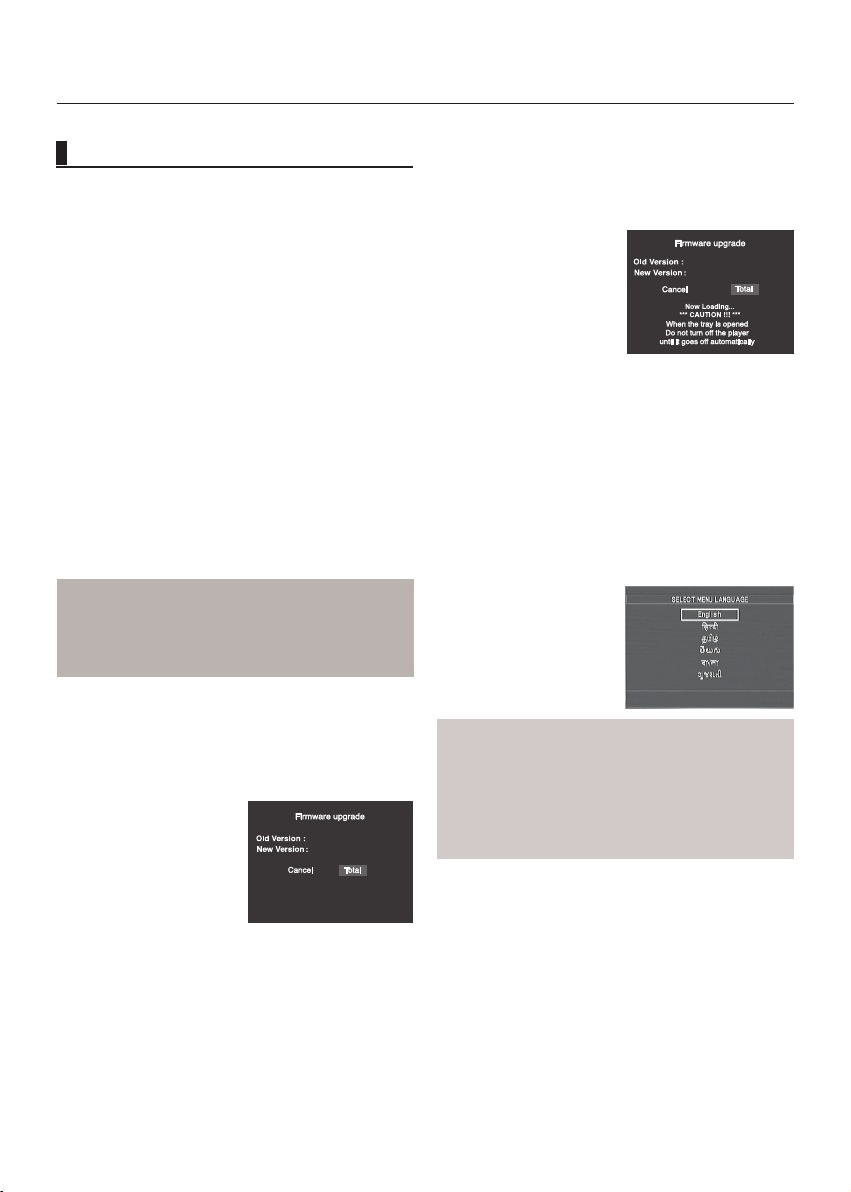
reference
0801023.VD.B.P480KXEG
071208.VD.B.P480KXEG
0801023.VD.B.P480KXEG
071208.VD.B.P480KXEG
Firmware upgrade
Introduction
Samsung will often support the software upgrade to
improve the performance of this unit to the latest status, through Samsung Internet Site (www.samsung.
com).
Because the specially new mpeg4 codec continues and
it is appearing. What improvements are made depends
on the upgrade software you are using as well as the
software that your DVD-player contained before the
upgrade.
How to make an upgrade disc
Write the downloaded file onto a blank CD-R or CDRW disc, using the following settings:
1. You have to download a new file through Download Center
of Samsung Internet Site (www.samsung.com).
2. Write the file to Disc using CD-RW of your computer.
Note
- File System CD-ROM ISO Level
- Character set ISO 9660
- Finalized, single session
- Write speed low
Upgrade procedure
1. Open the disc tray. Place the disc on the tray. Close the
tray. The Firmware upgrade screen appears.
2. Press the √/® buttons to select Total, then press the
ENTER button.
Firmware upgrade starts
- In the middle of the writing, the tray will open
automatically. After taking out the disc, please wait for
about 2 minutes.
- If the unit was succesfully updated, the unit will turn off
and on after closing the tray automatically. When the
unit turns on, this screen will display.
3. Press the π/† buttons to select the desired language, and
then press the ENTER button.
Note
- If the “Select Menu Language” doesn’t appear,
please contact to “Samsung Service Center”.
- Do not press any button and unplug the power
cord during upgrade.
- The upgrade procedure may change, refer to
the web site (www.samsung.com).
32_ reference
Firmware upgrade
appears on the display
Page 33
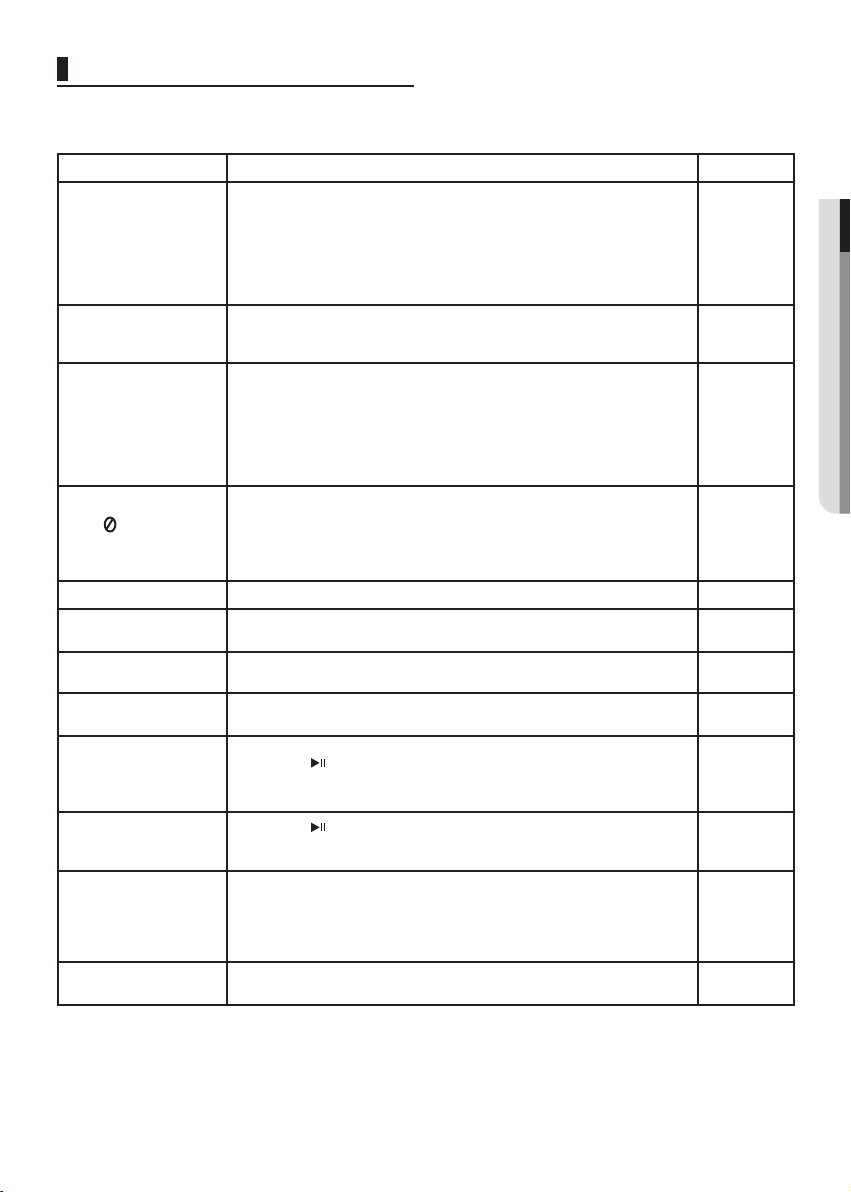
Troubleshooting
Before requesting service (troubleshooting), please check the following.
Problem Action Page
No operations can be
performed with the
remote control.
Disc does not play.
5.1 channel sound is
not being reproduced.
The icon appears
on screen.
Disc Menu doesn’t appear.
Play mode differs from
the Setup Menu selection.
The screen ratio
cannot be changed.
No audio
The screen is blocked
• Check the batteries in the remote control.
They may need replacing.
• Operate the remote control at a distance of no more than 20 feet.
• Remove batteries and hold down one or more buttons for several minutes
to drain the microprocessor inside the remote control to reset it. Reinstall
batteries and try to operate the remote control again.
• Ensure that the disc is installed with the label side facing up.
• Check the region number of the DVD.
• 5.1 channel sound is reproduced only when the following conditions
are met. :
1) The DVD player is connected with the proper Amplifier
2) The disc is recorded with 5.1 channel sound.
• Check whether the disc being played has the “5.1 ch” mark on the outside.
• Check if your audio system is connected and working properly.
• In a SETUP Menu, is the Audio Output set to Bitstream?
• The features or action cannot be completed at this time because:
1. The DVD’s software restricts it.
2. The DVD’s software doesn’t support the feature (e.g., angles).
3. The feature is not available at the moment.
4. You’ve requested a title or chapter number or search time that is out of range.
• Check if the disc has a Menu.
• Some of the functions selected in the Setup Menu may not work properly if
the disc is not encoded with the corresponding function.
• The Screen Ratio is fixed on your DVDs. P29~30
• Make sure you have selected the correct Digital Output in the Audio
Options Menu.
•
Press the
inside. All settings will revert to the factory settings.
button (in front panel) for more than 5 seconds under no disc
P3
P5
P12~14
P27~29
P26~31
P27~29
P15
● rEfErEncE
Forgot password
If you experience other
problems.
The picture is noisy or
distorted
• Press the
under no disc inside. All settings including the password will revert
to the factory settings. Don't use this unless absolutely necessary.
• Go to the contents and find the section of the instruction book that contains
the explanations regarding the current problem, and follow the procedure
once again.
• If the problem still cannot be solved, please contact your nearest authorized
service center.
Make sure that the disc is not dirty or scratched.
•
Clean the disc.
•
button (in front panel ) for more than 5 seconds
P30
P2
English _33
Page 34
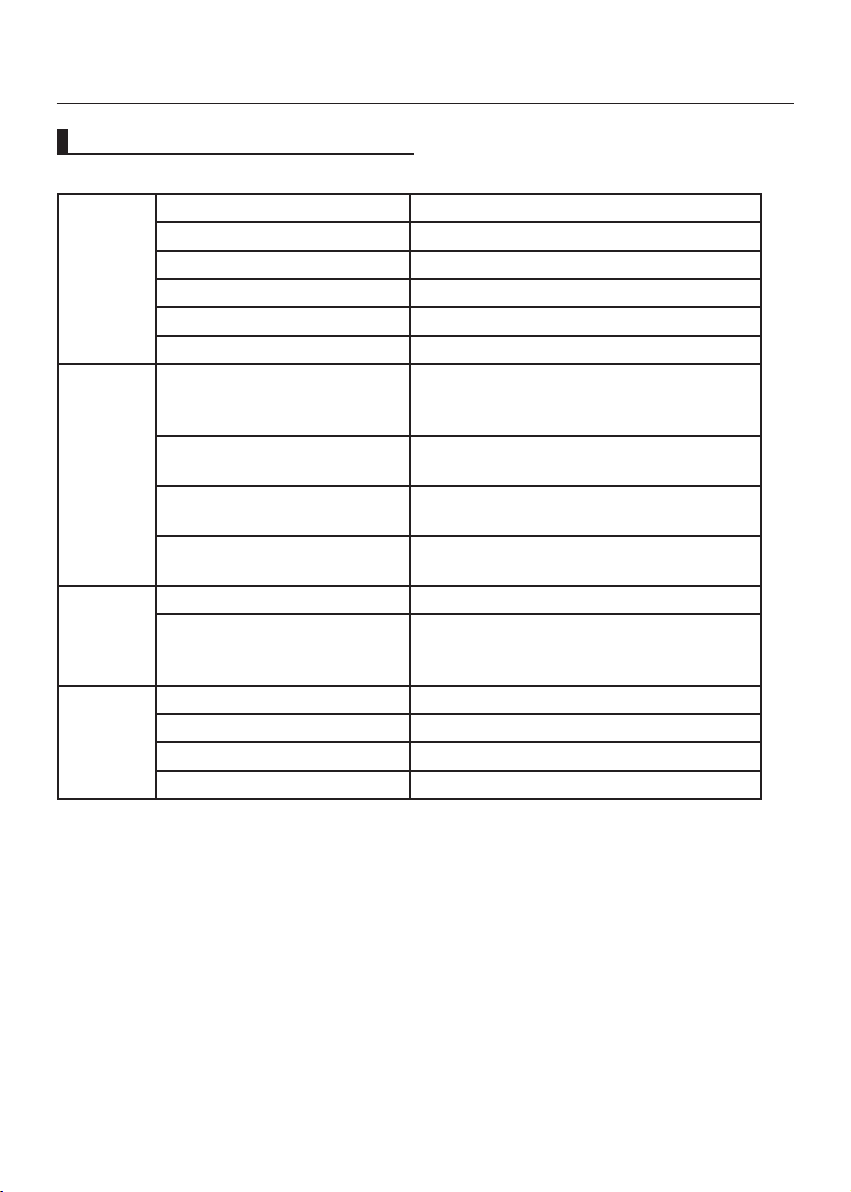
reference
Specifications
Power Requirements AC 110-240 V ~ 50/60 Hz
Power Consumption 8 W
General
Operating Temperature Range +5°C to +35°C
Operating Humidity Range 10 % to 75 %
(DIGITAL VERSATILE DISC)
Disc
Video
Output
Audio
Output
Weight 1.6 Kg
Dimensions 430mm (W) X 203mm (D) X 37mm (H)
CD : 12Cm
(COMPACT DISC)
CD : 8Cm
(COMPACT DISC)
VCD : 12Cm
Composite Video
Component Video
5.1 Channel F/L,F/R,R/L,R/R,CT,S/W
*Maximum Output level 2 Vrms
Digital Audio Output Coaxial (S/PDIF)
*Frequency Response 20Hz ~ 202kHz
DVD
Reading Speed : 3.49 ~ 4.06 m/sec.
Approx. Play Time
(Single Sided, Single Layer Disc) : 135 min.
Reading Speed : 4.8 ~ 5.6 m/sec.
Maximum Play Time : 74 min.
Reading Speed : 4.8 ~ 5.6 m/sec.
Maximum Play Time : 20 min.
Reading Speed : 4.8 ~ 5.6 m/sec.
Maximum Play Time : 74 min. (Video + Audio)
1 channel : 1.0 Vp-p (75 Ω load)
Y : 1.0 Vp-p (75 Ω load)
Pr : 0.70 Vp-p (75 Ω load)
Pb : 0.70 Vp-p (75 Ω load)
*: Nominal specification
- Samsung Electronics Co., Ltd reserves the right to change the specifications with out notice.
- Weight and dimensions are approximate.
34_ reference
Page 35
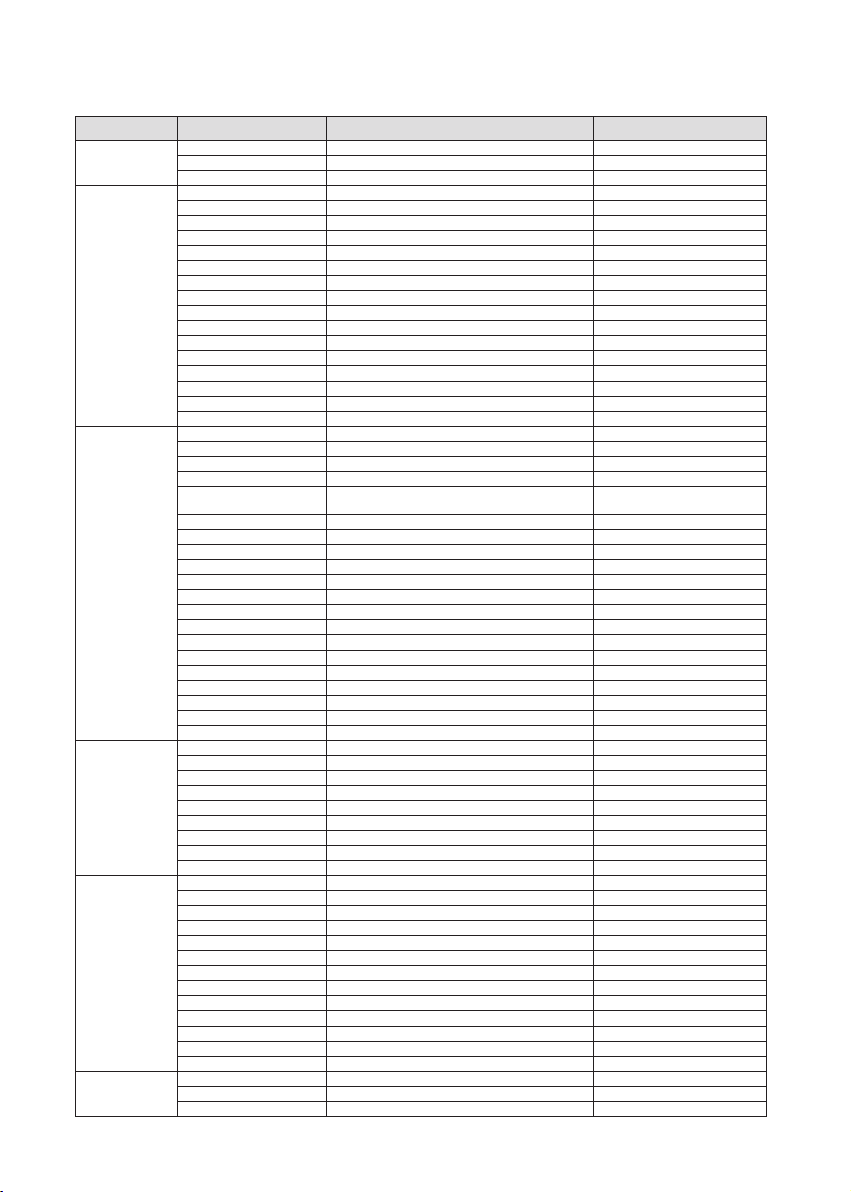
Contact SAMSUNG WORLD WIDE
If you have any questions or comments relating to Samsung products, please contact the SAMSUNG customer care center.
Region Country Contact Center Web Site
North America
CANADA 1-800-SAMSUNG(726-7864) www.samsung.com/ca
MEXICO 01-800-SAMSUNG(726-7864) www.samsung.com/mx
U.S.A 1-800-SAMSUNG(726-7864) www.samsung.com/us
Latin America
ARGENTINE 0800-333-3733 www.samsung.com/ar
BRAZIL 0800-124-421, 4004-0000 www.samsung.com/br
CHILE 800-SAMSUNG(726-7864) www.samsung.com/cl
NICARAGUA 00-1800-5077267 www.samsung.com/latin
HONDURAS 800-7919267 www.samsung.com/latin
COSTA RICA 0-800-507-7267 www.samsung.com/latin
ECUADOR 1-800-10-7267 www.samsung.com/latin
EL SALVADOR 800-6225 www.samsung.com/latin
GUATEMALA 1-800-299-0013 www.samsung.com/latin
JAMAICA 1-800-234-7267 www.samsung.com/latin
PANAMA 800-7267 www.samsung.com/latin
PUERTO RICO 1-800-682-3180 www.samsung.com/latin
REP. DOMINICA 1-800-751-2676 www.samsung.com/latin
TRINIDAD & TOBAGO 1-800-SAMSUNG(726-7864) www.samsung.com/latin
VENEZUELA 0-800-100-5303 www.samsung.com/latin
COLOMBIA 01-8000112112 www.samsung.com.co
Europe
BELGIUM 02 201 2418 www.samsung.com/be
CZECH REPUBLIC 800-726-786 (800 - SAMSUNG) www.samsung.com/cz
DENMARK 70 70 19 70 www.samsung.com/dk
FINLAND 030-6227 515 www.samsung.com/fi
FRANCE
3260 SAMSUNG (€ 0,15/Min)
08 25 08 65 65 (€ 0,15/Min)
www.samsung.com/fr
GERMANY 01805 - SAMSUNG(726-7864 € 0,14/Min) www.samsung.de
HUNGARY 06-80-SAMSUNG(726-7864) www.samsung.com/hu
ITALIA 800-SAMSUNG(726-7864) www.samsung.com/it
LUXEMBURG 02 261 03 710 www.samsung.com/lu
NETHERLANDS 0900-SAMSUNG (726-7864 € 0,10/Min) www.samsung.com/nl
NORWAY 815-56 480 www.samsung.com/no
POLAND 0 801 801 881, 022-607-93-33 www.samsung.com/pl
PORTUGAL 80820-SAMSUNG(726-7864) www.samsung.com/pt
SLOVAKIA 0800-SAMSUNG(726-7864) www.samsung.com/sk
SPAIN 902-1-SAMSU(72678) www.samsung.com/es
SWEDEN 0771-400 200 www.samsung.com/se
U.K 0845 SAMSUNG (7267864) www.samsung.com/uk
EIRE 0818 717 100 www.samsung.com/ie
AUSTRIA 0800-SAMSUNG(726-7864) www.samsung.com/at
SWITZERLAND 0800-SAMSUNG(726-7864) www.samsung.com/ch
CIS
RUSSIA 8-800-555-55-55 www.samsung.ru
KAZAKHSTAN 8-10-800-500-55-500 www.samsung.com/kz_ru
UZBEKISTAN 8-10-800-500-55-500 www.samsung.com/kz_ru
KYRGYZSTAN 00-800-500-55-500
TADJIKISTAN 8-10-800-500-55-500
UKRAINE 8-800-502-0000 www.samsung.ua
LITHUANIA 8-800-77777 www.samsung.lt
LATVIA 8000-7267 www.samsung.com/lv
ESTONIA 800-7267 www.samsung.ee
Asia Pacifi c
AUSTRALIA 1300 362 603 www.samsung.com/au
NEW ZEALAND 0800 SAMSUNG (0800 726 786) www.samsung.com/nz
CHINA 800-810-5858, 400-810-5858, 010-6475 1880 www.samsung.com/cn
HONG KONG 3698-4698 www.samsung.com/hk
INDIA 3030 8282, 1800 110011, 1-800-3000-8282 www.samsung.com/in
INDONESIA 0800-112-8888 www.samsung.com/id
JAPAN 0120-327-527 www.samsung.com/jp
MALAYSIA 1800-88-9999 www.samsung.com/my
PHILIPPINES 1800-10-SAMSUNG(726-7864) www.samsung.com/ph
SINGAPORE 1800-SAMSUNG(726-7864) www.samsung.com/sg
THAILAND 1800-29-3232, 02-689-3232 www.samsung.com/th
TAIWAN 0800-329-999 www.samsung.com/tw
VIETNAM 1 800 588 889 www.samsung.com/vn
Middle East &
Africa
TURKEY 444 77 11 www.samsung.com/tr
SOUTH AFRICA 0860-SAMSUNG(726-7864 ) www.samsung.com/za
U.A.E 800-SAMSUNG (726-7864), 8000-4726 www.samsung.com/ae
Page 36
ELECTRONICS
AK68-01768A(01)
Page 37

Page 38

 Loading...