

Page 1
ELECTRONICS
SAMSUNG ELECTRONICS AMERICA INC.
105 CHALLENGER ROAD, RIDGEFIELD
PARK, NJ 07660 U.S.A.
FOR YOUR NEAREST SAMSUNG
SERVICE CENTER
DIAL 1-800-SAMSUNG
AH68-00367A
Page 2
Safety Information
Gefahr eines elektrischen Schlags
Nicht öffnen
VORSICHT
Care & Maintenance
For trouble free operation, follow the instructions shown below.
TO REDUCE THE RISK OF ELECTRIC
SHOCK, DO NOT REMOVE THE
COVER(OR BACK).
NO USER-SERVICEABLE PARTS ARE
INSIDE. REFER SERVICING TO QUALIFIED SERVICE PERSONNEL.
This symbol indicates “dangerous voltage” inside the
product that presents a risk
of electric shock or personal injury.
This symbol indicates
important instructions
accompanying the product.
CAUTION:DVD PLAYERS USE AN INVISIBLE LASER BEAM WHICH CAN CAUSE
HAZARDOUS RADIATION EXPOSURE IF DIRECTED.
BE SURE TO OPERATE PLAYER CORRECTLY AS INSTRUCTED.
CAUTIONS
Caution:To prevent electric shock, match wide blade of plug to wide slot, fully insert.
Attention: Pour éviter les chocs électriques, introduíre la lame la plus large de la fiche
This product satisfies FCC regulations when shielded cables and connectors are used to
connect the unit to other equipment.To prevent electromagnetic interference with electric
appliances, such as radios and televisions, use shielded cables and connectors for connections.
dans la borne correspondante de la prise et pousser jusqu au fond.
FCC NOTE (for U.S.A):
This equipment has been tested and found to comply with the limits for a Class B digital
device, pursuant to Part 15 of the FCC rules.These limits are designed to provide reasonable protection against harmful interference in a residential installation.This equipment
generates, uses and can radiate radio frequency energy and, if not installed and used in
accordance with the instructions, may cause harmful interference to radio or television
reception, which can be determined by turning the equipment off and on, the user is
encouraged to try to correct the interference by one or more of the following measures.
• Reorient or relocate the receiving antenna.
• Increase the separation between the equipment and receiver.
• Connect this equipment into an outlet on a circuit different from that to which the receiver
is connected.
• Consult the dealer or an experienced radio/TV technician for help.
This class B digital apparatus meets all requirements of the Canadian Interference -Causing Equipment Regulations.
WARNING
To reduce the risk of fire or shock hazard, do not expose this DVD player to
rain or moisture.
CAUTION
THIS PRODUCT UTILIZES A
LASER. USE OF CONTROLS OR
ADJUSTMENTS OR PERFORMANCE OF PROCEDURES
OTHER THAN THOSE SPECIFIED
HEREIN MAY RESULT IN HAZARDOUS RADIATION EXPOSURE.
DO NOT OPEN COVER AND DO
NOT REPAIR YOURSELF. REFER
SERVICING TO QUALIFIED PERSONNEL.
Note:
• This unit can be used only where the
power supply is AC 120V, 60Hz. It
cannot be used elsewhere.
• This DVD player is designed and
manufactured to respond to the
Region Management Information. If
the Region number of a DVD disc
does not correspond to the Region
number of this DVD player, this DVD
player cannot play the disc.
• This device is protected by U.S.
patent numbers 4,631,603,
4,577,216 and 4,819,098 and other
intellectual property rights. The use
of Macrovision’s copy protection
technology in the device must be
authorized by Macrovision and is
intended for home and other limited
pay-per-view uses only, unless otherwise authorized in writing by
Macrovision. Reverse engineering or
disassembly is prohibited.
Handling Cautions
• Before connecting other components to this player, be sure to turn them all off.
• Do not move the player while a disc is being played, or the disc may be scratched or
broken, and the player’s internal parts may be damaged.
• Do not put a flower vase filled with water or any small metal objects on the player.
• Be careful not to put your hand into the disc tray.
• Do not place anything other than the disc in the disc tray.
• Exterior interference such as lightning and static electricity can affect normal operation of this player. If this occurs, turn the player off and on again with the POWER button, or disconnect and then reconnect the AC power cord to the AC power outlet.The
player will operate normally.
• Be sure to remove the disc and turn off the player after use.
• Disconnect the AC power cord from the AC outlet when you don’t intend to use the
player for long periods of time.
• Clean the disc by wiping in a straight line from the inside to the outside of the disc.
• Do not pull or push the disc tray forcibly.Doing so may cause malfunction of the player.When you move the player, first remove all discs in the tray.When “NO DISC” is
displayed on the front display, turn the power off.
Disc Storage
Be careful not to harm the disc because the data on these discs is highly vulnerable to
the environment.
• Do not keep under direct sunlight.
• Keep in a cool ventilated area.
• Store vertically.
• Keep in a clean protection jacket.
Maintenance of Cabinet
For safety reasons, be sure to disconnect the AC power cord from the AC outlet.
• Do not use benzene, thinner, or other solvents for cleaning.
• Wipe the cabinet with a soft cloth.
Formation of Condensation
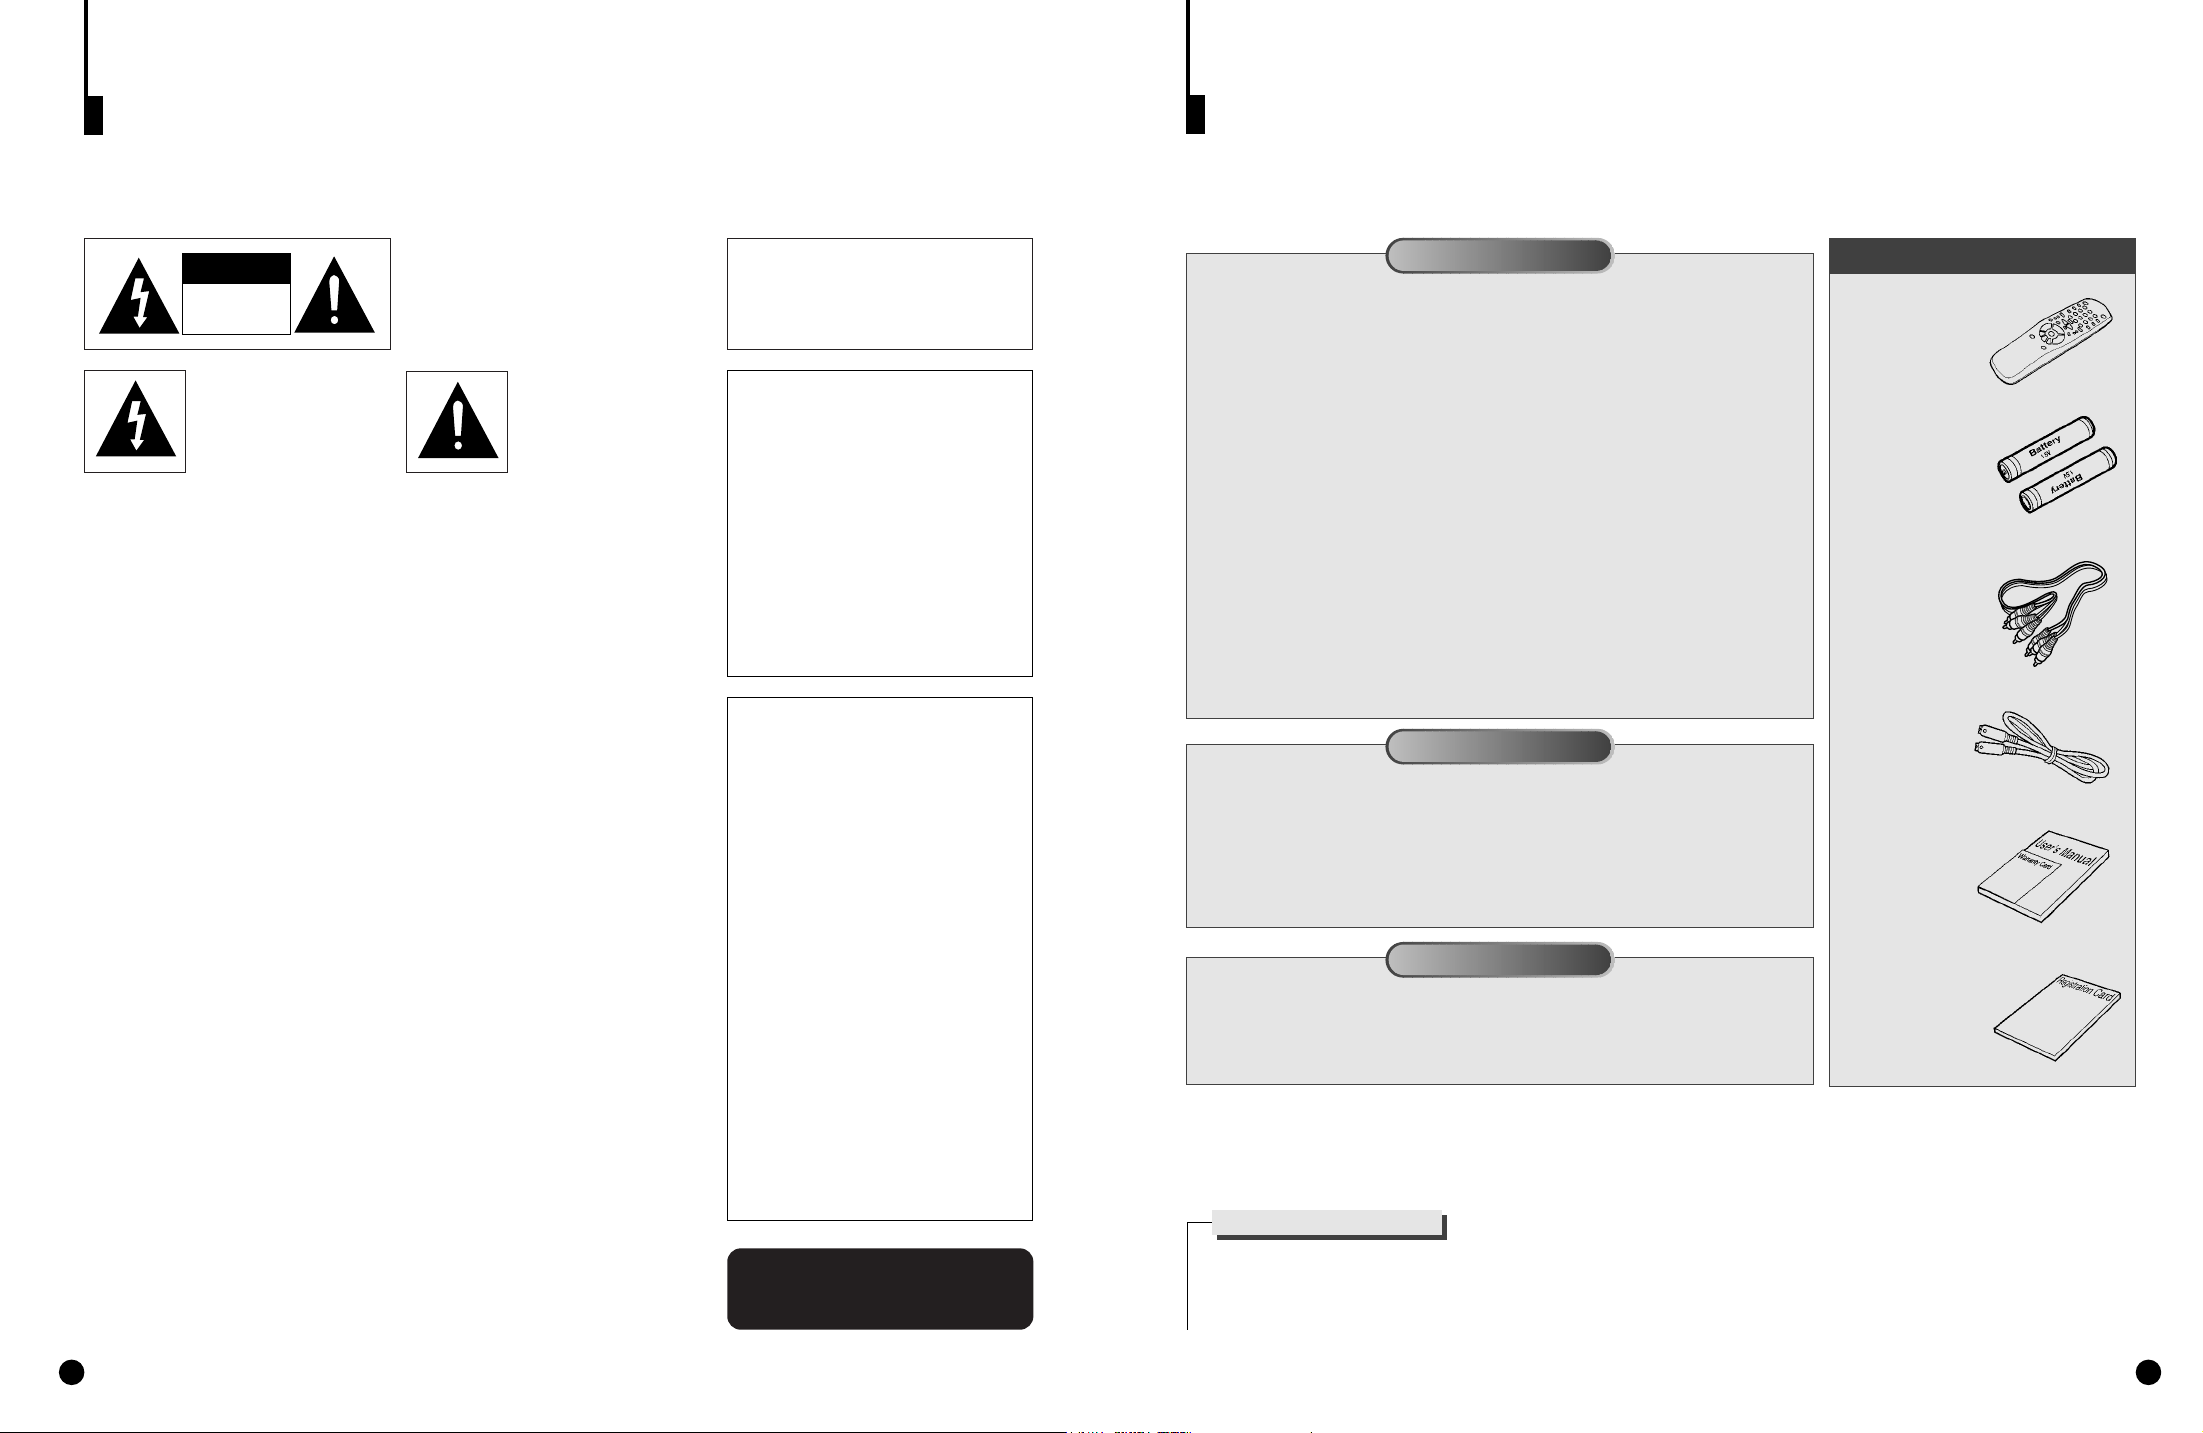
Accessories
Remote Control
Batteries for
Remote Control
(AA Size)
Video/Audio
Connection Cable
S-Video Cable
User’s Manual
Registration Card
2
CLASS 1 LASER PRODUCT
LUOKAN 1 LASER LAITE
KLASS 1 LASER APPARAT
Due to sharp changes in temperature and humidity, condensation may form if warm air comes in contact with any cold parts inside the player.
• When condensation forms inside the player, the player may not operate correctly. If this occurs, leave the player at room temperature until the
inside of the player becomes dry and operational.
• If condensation forms on a disc, wipe the disc with a soft and dry cloth by moving the cloth from the center hole toward the outer edge.
3
Page 3
General Features
TABLE OF CONTENTS
Disc Type and Characteristics
Description
• Front Panel
• Front Display
Choosing a Connection
• Connecting to a TV
....................................................
................................
..............................................................
..............................................................
..............................................................
........................................
..................................................
6
• Rear Panel (C700)
7
• Rear Panel (C600)
8
A Tour of the Remote Control
8
• DVD Function Buttons
9
• TV Function Buttons
14
• Connecting to an Audio System(C700)
• Connecting to an Audio System(C600)
14
....................................................
....................................................
..............................................
................................................
..............................
..........................
..........................
10
11
12
12
13
15
16
SETUP
SETUP
CONNECTIONS
CONNECTIONS
Playing a Disc
Operating the Disc Changer
Searching & Skipping through a Chapter or Track
Using the Display Function
Using the Disc View Function
Selecting Audio
Selecting the Subtitle Language
Using the Setup Menu
Setting Up the Language Features
Setting Up the Parental Control
Controlling a TV with the Remote
Troubleshooting Guide
......................................................
..................................
..................................
..............................
....................................................
..........................
..........................................
......................
............................
........................
..........................................
....
17
Repeat Play
19
Using the A-B Repeat Function
Program Playback in a Specific Order
20
21
Selecting the Desired Screen Angle
25
Using the Bookmark Function
26
Using the Zoom and 3D Sound Functions
27
Setting Up Audio Options
31
Surround Sound Speaker Setup (C700 only)
32
Setting Up Display Options
34
38
Specifications
39
Warranty
..........................................................
............................
..............................
....................................
..................................
........................................................
..............................................................
..................
....................
..........
........
22
23
24
28
29
30
35
36
37
40
41
FUNCTIONS
BASIC
FUNCTIONS
ADVANCED
SETUP MENU
SETUP MENU
CHANGING
CHANGING
REFERENCE
REFERENCE
54
Page 4

General Features
DIGITAL VIDEO
DVD / VIDEO-CD / CD PLAYER DVD-C700
DOLBY DIGITAL DECODER BUILT-IN
5
SPATIALIZER
N-2-2
DIGITAL VIDEO
DVD / VIDEO-CD / CD PLAYER DVD-C600
5
SPATIALIZER
N-2-2
Disc Type and Characteristics
This DVD player is capable of playing the following types of discs with the corresponding logos:
Excellent Sound
The Dolby Digital system developed by Dolby Labs
provides crystal clear sound reproduction.
Screen
Video with MPEG2 compression technology. Both
regular and widescreen(16:9) pictures can be
viewed.
Slow Motion
An important scene can be viewed in slow motion.
DVD Changer
The DVD Changer holds 5 discs and provides full
random play with fast disc changes.
Programmed Play
You can program tracks to play in desired order.
Parental Level Control
The parental level control allows users to set the
level necessary to prohibit children from viewing
harmful movies such as those with violence, adult
subject matter, etc.
Various On-Screen Menu Functions
You can select various languages(Audio/Subtitle)
and screen angles while enjoying movies.
Repeat
You can repeat a song or movie simply by pressing
the REPEAT button.
DVD-C700
Disc Types
DVD
VIDEO-CD
Logos
Recording
Types
Audio
+
Video
Audio
+
Video
Disc Size
5 inches
1/2 inches
3
5 inches
1/2 inches
3
AUDIO-CD
5 inches
Audio
1/2 inches
3
*DO NOT play CD-ROM, CD-I, CD-R and DVD-ROM in this player! (CDGs play audio only, not graphics.)
Max.
Playing
Time
Single-sided
240 min.
Double-sided
480 min.
Single-sided
80 min.
Double-sided
160 min.
74 min.
20 min.
74 min.
20 min.
• DVD contains excellent sound and
video due to Dolby Digital and
MPEG2 system.
• Var ious screen and audio functions
can be easily selected through the
on-screen menu.
• Video with CD sound, VHS quality
& MPEG1 compression technology.
• An LP is recorded as an analog signal with more distortion. CD is
recorded as a Digital Signal with
better audio quality, less distortion
and less deterioration of audio quality over time.
Characteristics
SETUP
Disc Markings
DVD-C600
DIGITAL
~
• Playback Region Number • NTSC broadcast
COPY PROTECTION
• Many DVD discs are encoded with copy protection. Because of this, you should only connect your DVD player directly to
your TV, not to a VCR.Connecting to a VCR results in a distorted picture from copy-protected DVD discs.
• This product incorporates copyright protection technology that is protected by methods claims of certain U.S. patents and other intellectual
property rights owned by Macrovision Corporation and other rights owners. Use of this copyright protection technology must be authorized by
Macrovision Corporation, and is intended for home and other limited viewing uses only unless otherwise authorized by Macrovision
Corporation. Reverse engineering or disassembly is prohibited.
6 7
Playback Region Number
Both the DVD player and the discs are coded by region.These regional codes must match in order for the disc to play. If the codes do not
match, the disc will not play.
The Region Number for this player is described on the rear panel of the player.
NTSC
system in U.S.A,
Canada, Korea,
Japan, etc.
• Dolby Digital
disc
SOUND
• Digital Audio
disc
STEREO
• Stereo disc • DTS disc
Page 5
Description-Front Panel Description-Front Display
DIGITAL VIDEO
5
SPATIALIZER
N-2-2
SETUP
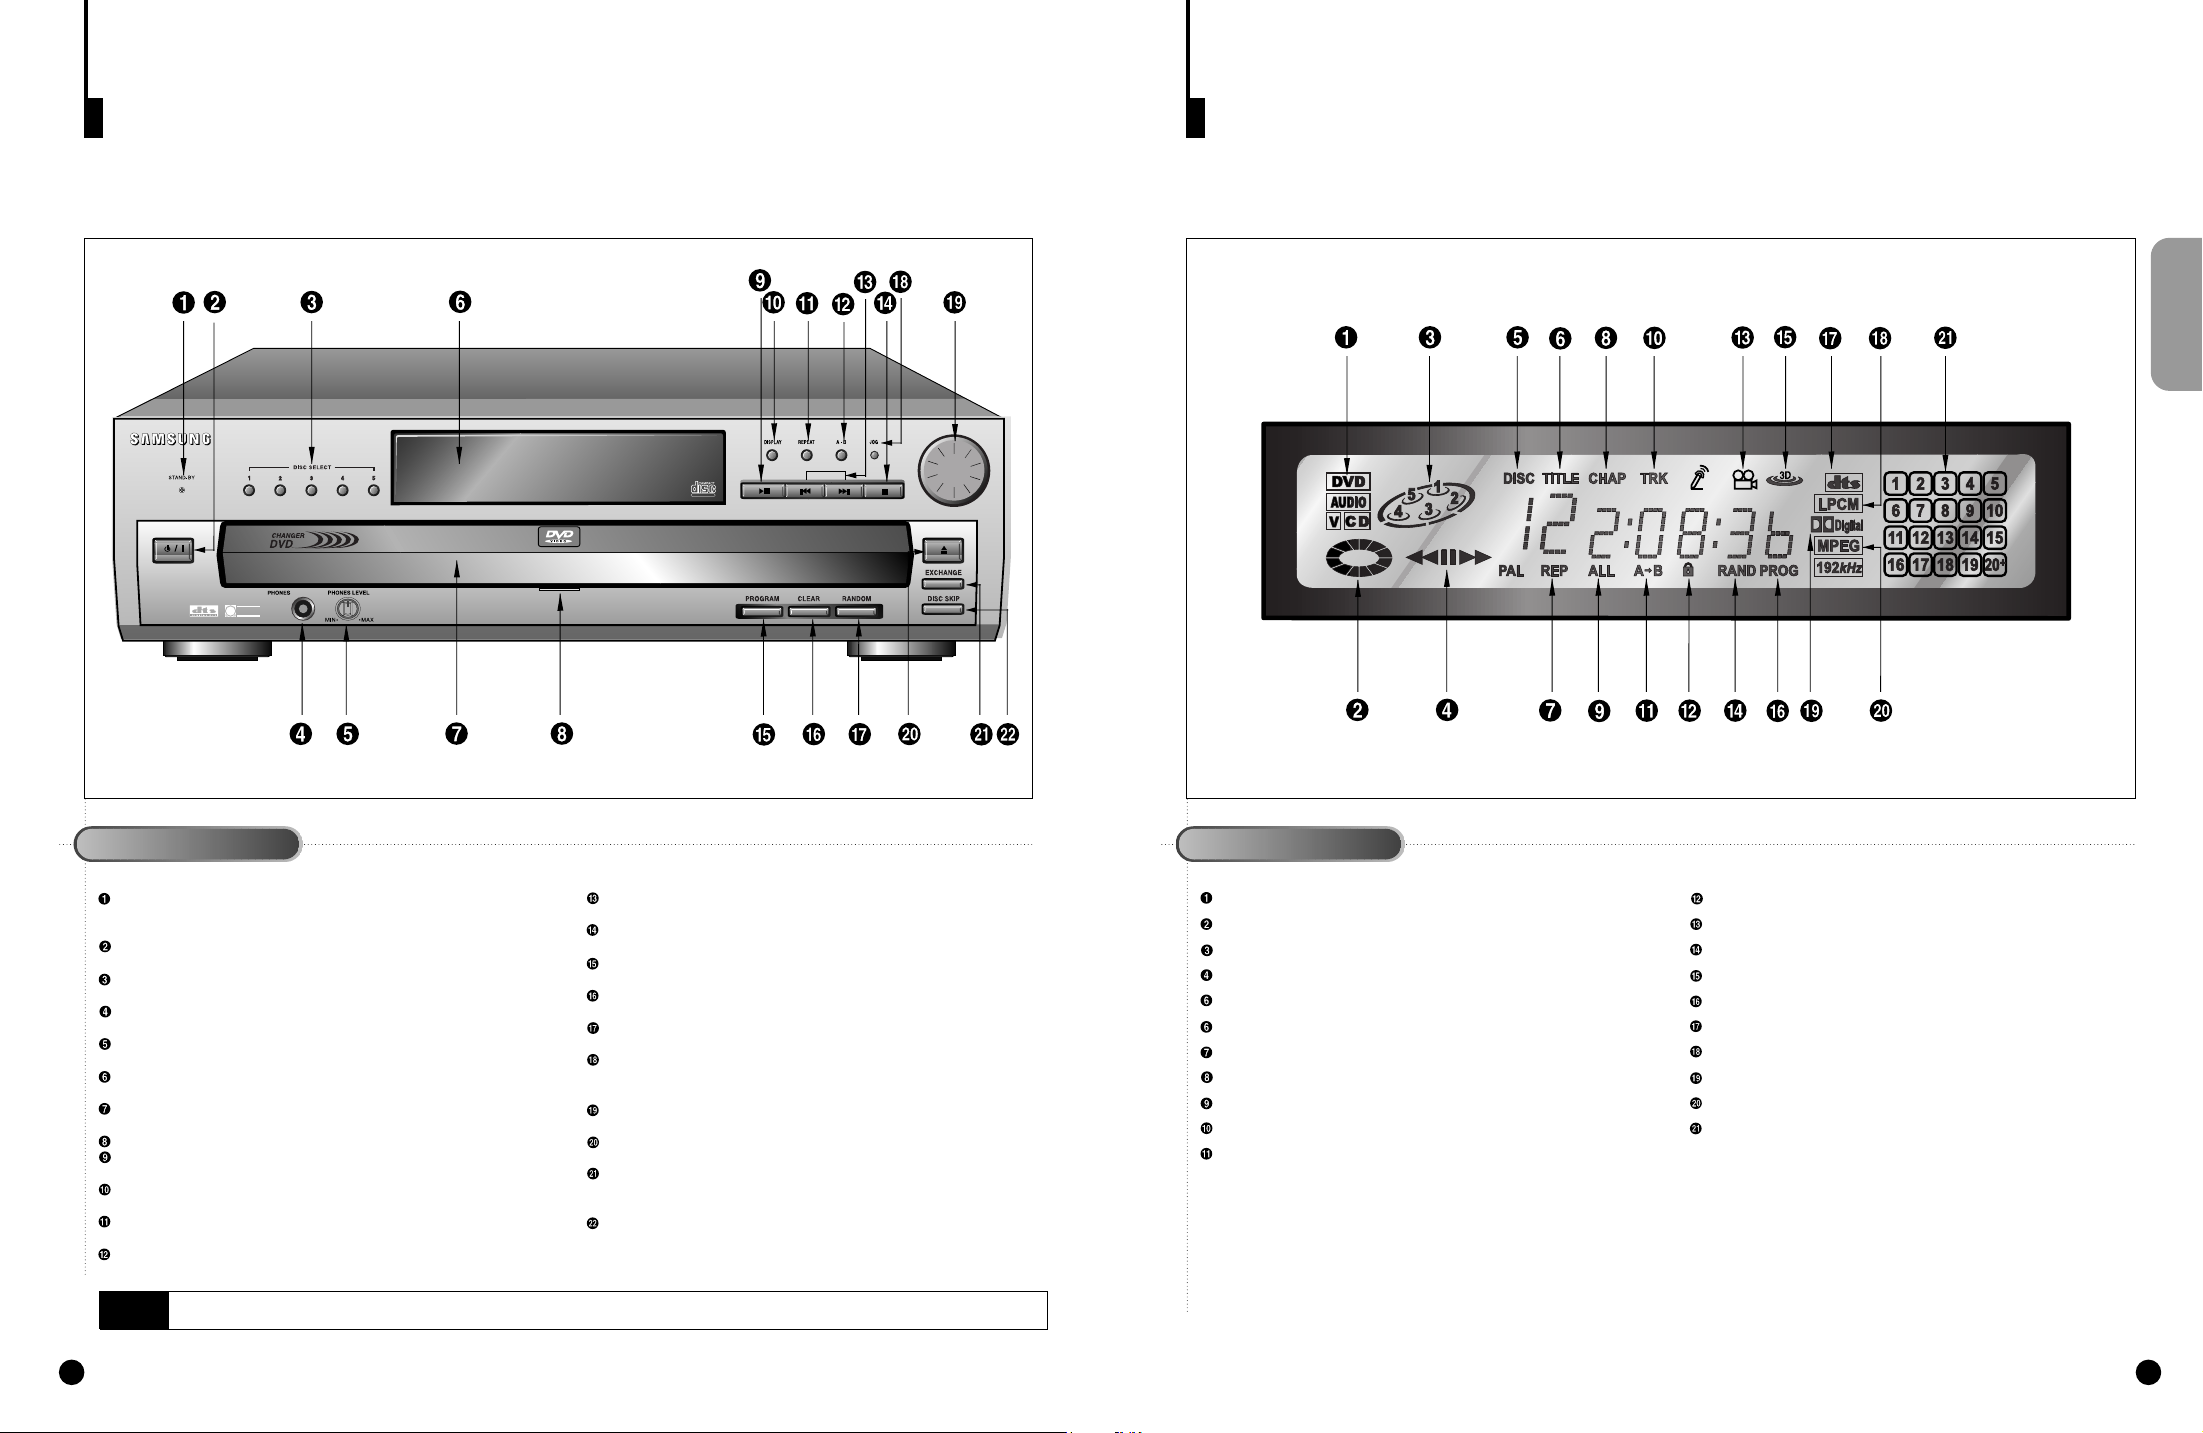
Front Panel Controls
STANDBY LAMP
• When the unit is first plugged in, the indicator lights.When power
is pressed on, the lamp goes out.
POWER ON/OFF
• Use to turn your player on and off (standby).
DISC SELECT
• Use to select the desired disc loaded in the DVD CHANGER.
HEADPHONES JACK
• You can attach headphones here for private listening.
HEADPHONES VOLUME
• Use to adjust headphones volume level.
FRONT DISPLAY
• Operation indicators are displayed here.
DVD CHANGER
• Press OPEN/CLOSE to open and close the disc changer.
GREEN LAMP
PLAY/PAUSE
• Begin or pause disc play.
DISPLAY
• Displays the current disc mode.
REPEAT
• Allows you to repeat play a title, chapter, track, or disc.
REPEAT A-B
• Allows you to repeat sections between point A and point B.
•
NOTE
To Connect Headphones (not included)
Turn the headphone volume down to the minimum setting before connecting.Adjust to your desired volume after connection.
8
SKIP/SEARCH
• Use to skip or search a scene or music.
STOP
• Stops disc play.
PROGRAM
• Use to play back a disc in programmed order.
CLEAR
• Use to remove menus or status displays from the screen.
RANDOM
• Use to play back a disc in random order.
JOG
• Press this button to activate the frame by frame advance feature.
Then turn the SHUTTLE dial to go from one frame to another.
SHUTTLE DIAL
• Performs fast or slow motion playback.
OPEN/CLOSE
• Press to open and close the disc tray.
EXCHANGE
• Press this button when you want to change a disc without stopping playback of the current disc.
DISC SKIP
• Use to skip a disc in order.
Front Display
DISC TYPE INDICA T OR
DISC OPERATION ROTARY INDICATOR
DVD CHANGER INDICATOR
OPERATION INDICATOR
DISC INDICATOR
TITLE INDICATOR
REPEAT INDICATOR
CHAPTER INDICATOR
ALL REPEAT INDICATOR
TRACK INDICATOR
A-B REPEAT INDICATOR
PARENTAL LEVEL INDICATOR
ANGLE INDICATOR
RANDOM INDICATOR
3D SOUND INDICATOR
PROGRAM PLAY INDICATOR
DTS INDICATOR
LINEAR PCM INDICATOR
DOLBY DIGITAL INDICATOR
MPEG INDICATOR
DISC INFORMATION INDICATOR
9
Page 6
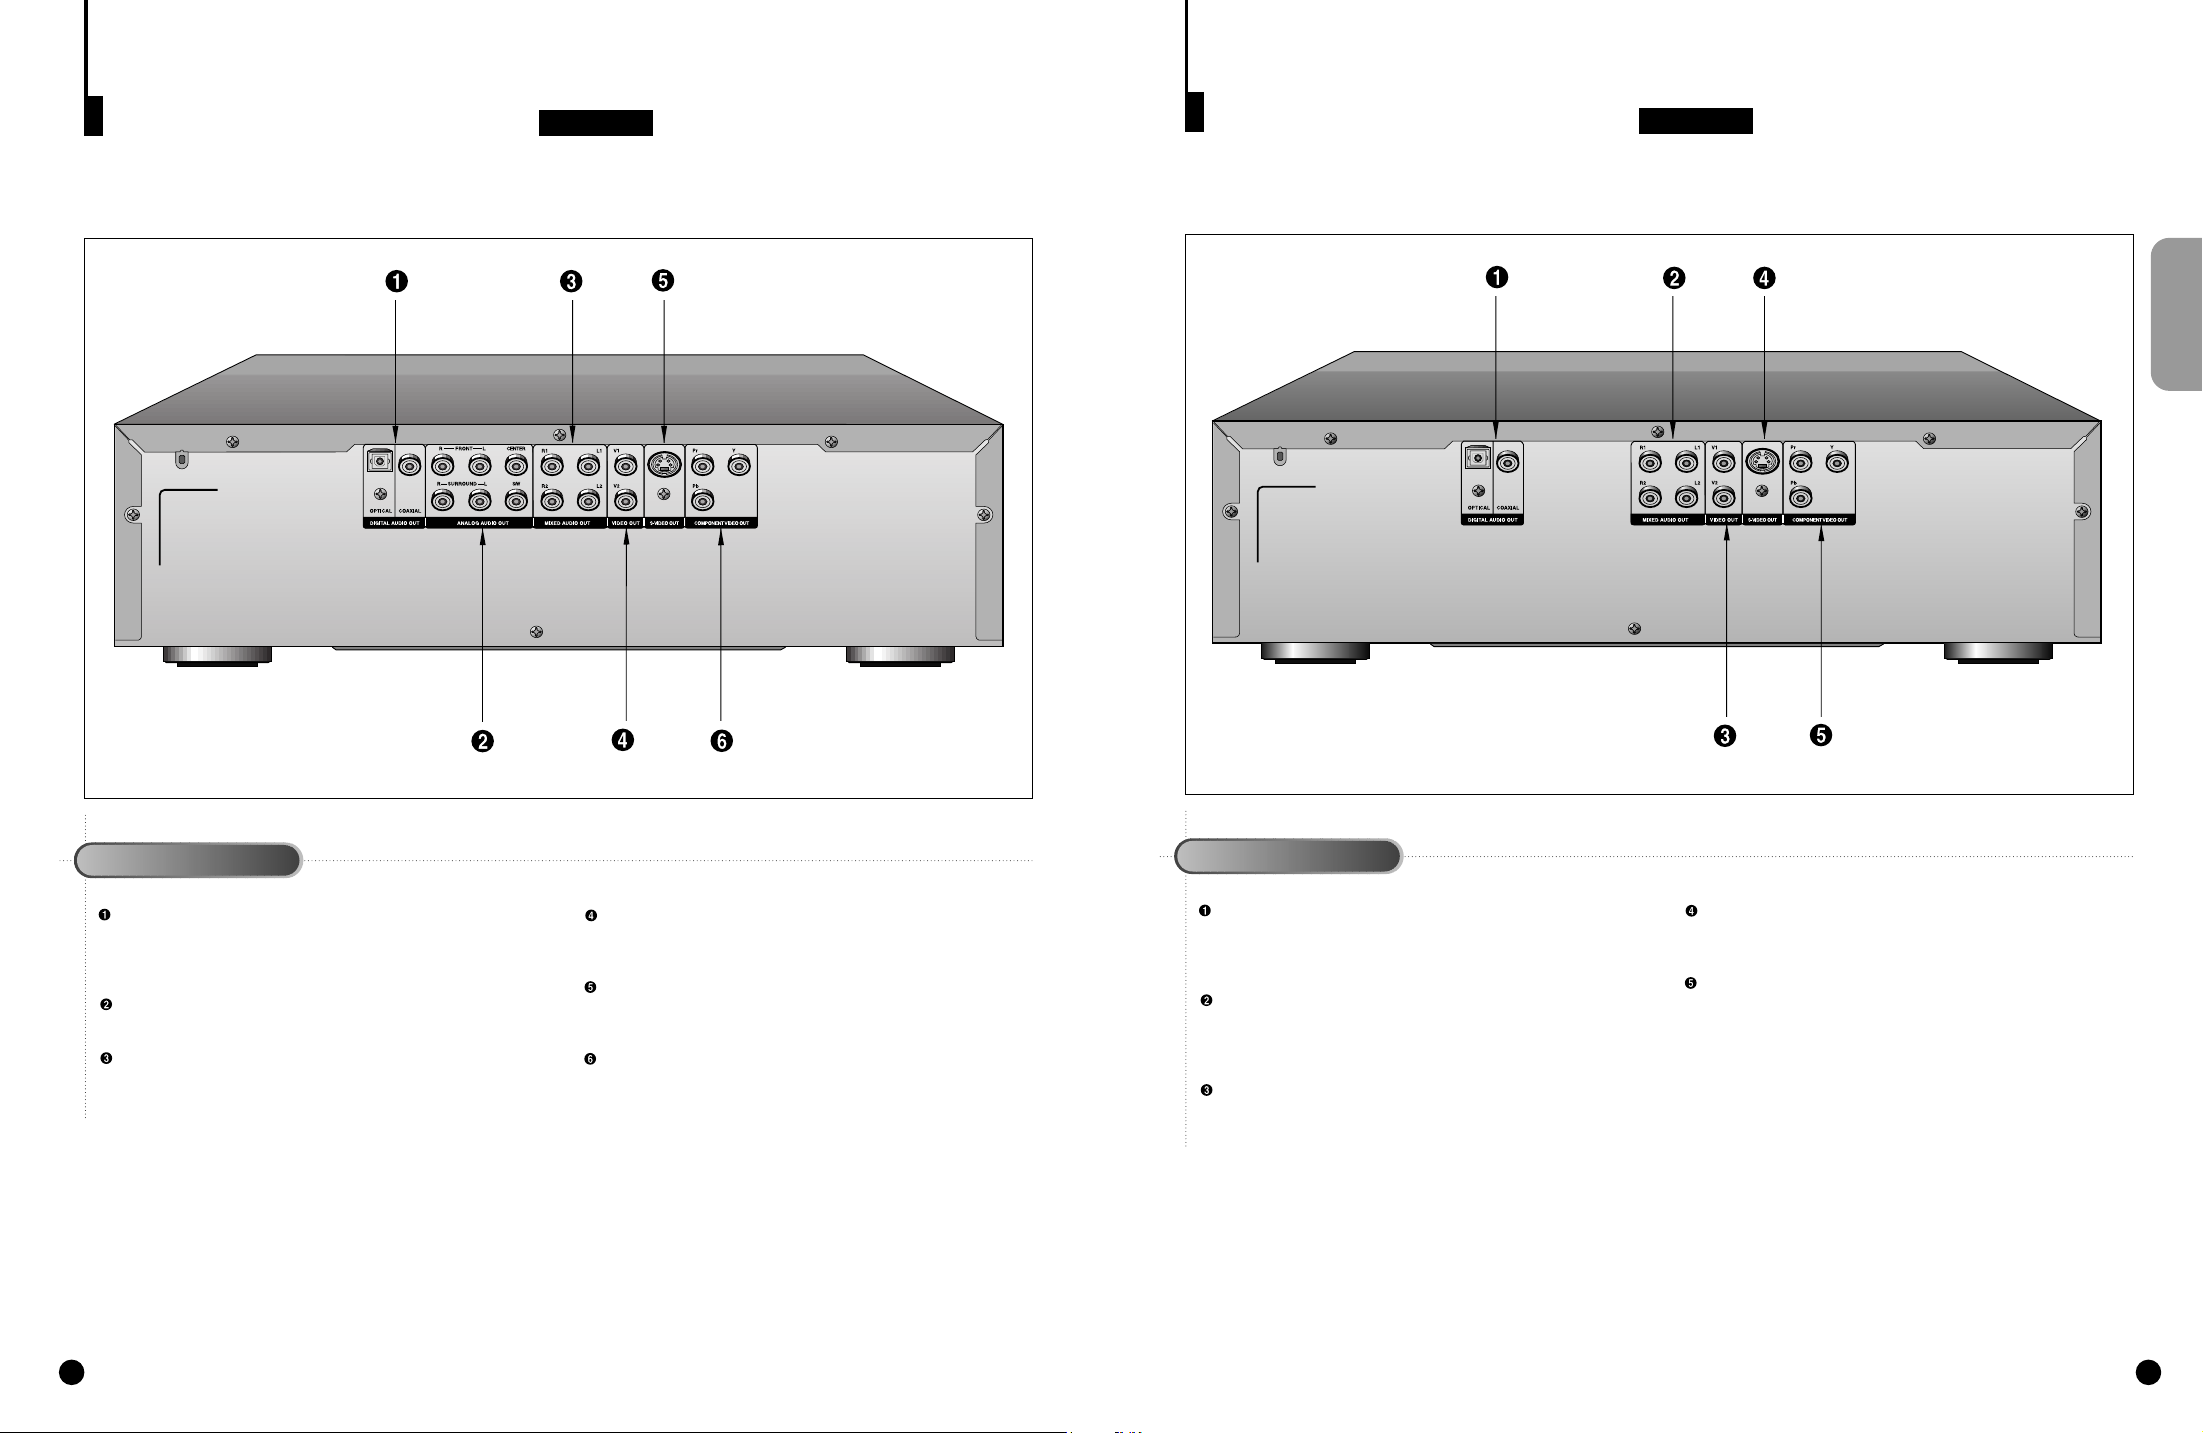
Description-Rear Panel
DVD-C700
Description-Rear Panel
DVD-C600
SETUP
Rear Panel
DIGITAL AUDIO OUT JACK
• Use either an optical or coaxial digital cable to connect to a
compatible Dolby Digital receiver. Use to connect to an A/V
Amplifier that contains a Dolby Digital decoder or DTS decoder.
5.1CH ANALOG AUDIO OUT JACKS
• Connect to an amplifier with 5.1ch analog input jacks.
MIXED AUDIO OUT JACKS
• Connect to the Audio input jacks of your television, audio/video
receiver, or VCR.
VIDEO OUT JACKS
• Use a video cable to connect one of these jacks to the Video
input on your television.
S-VIDEO OUT JACK
• Use the S-Video cable to connect this jack to the S-Video jack
on your television for a higher quality picture.
COMPONENT VIDEO OUT JACKS
• Use these jacks if you have a TV with Component Video in
jacks.These jacks provide Pr, Pb and Y video. Along with SVideo, Component Video provides the best picture quality.
Rear Panel
DIGITAL AUDIO OUT JACK
• Use either an optical or coaxial digital cable to connect to a
compatible Dolby Digital receiver. Use to connect to an A/V
Amplifier that contains a Dolby Digital decoder or DTS decoder.
MIXED AUDIO OUT JACKS
• Connect to the Audio input jacks of your television, audio/video
receiver, or VCR.
VIDEO OUT JACKS
• Use a video cable to connect one of these jacks to the Video
input on your television.
S-VIDEO OUT JACK
• Use the S-Video cable to connect this jack to the S-Video jack
on your television for a higher quality picture.
COMPONENT VIDEO OUT JACKS
• Use these jacks if you have a TV with Component Video in
jacks.These jacks provide Pr, Pb and Y video. Along with SVideo, Component Video provides the best picture quality.
1110
Page 7

A Tour of the Remote Control
A Tour of the Remote Control (ContÕd)
DVD Function Buttons
DVD POWER Button
NUMBER Buttons
OPEN/CLOSE Button
SETUP Button
• Brings up the DVD player’s Setup menu.
ZOOM Button
SEARCH Buttons
• Allows you to search forward/backward
through a disc.
STOP Button
STEP Button
• Advances playback one frame at a time.
RETURN Button
• Returns to a previous menu.
TOP MENU Button
• Access a title menu available on a disc.
AUDIO Button
• Use this button to access various audio
functions on a disc.
REPEAT Button
• Allows you to repeat play a title, chapter,
track, or disc.
TV POWER Button
• Use to set the remote to control a compati-
ble TV.
MODE Button
• Allows you to program a specific order.
3D SOUND Button
BOOKMARK Button
PLAY/PAUSE Button
• Begin/Pause disc play.
SKIP Buttons
• Use to skip the title, chapter, or track.
CLEAR Button
• Use to remove menus or status displays
from the screen.
DISC SKIP Button
• Use to skip a disc in order.
DISPLAY Button
• Displays the current disc mode.
MENU Button
• Brings up the Disc menu.
ENTER/DIRECTION Button
(UP/DOWN or LEFT/RIGHT Button)
• This button functions as a toggle switch.
ANGLE Button
• Use to access various camera angles on a
DVD.
SUBTITLE Button
A-B REPEAT Button
• Use to mark a segment to repeat between
A and B.
To Connect Headphones (not included)
Turn the headphone volume down to the minimum setting before connecting.
Adjust to your desired volume after connection.
NOTE
This icon indicates an invalid button press.
TV Function Buttons
TV POWER Button
TV/VIDEO Selection Button
CHANNEL UP/DOWN Buttons
VOLUME UP/DOWN Buttons
Install Batteries in the Remote
Open the battery cover on
1.
the back of the remote.
Insert two AA batteries.
2.
Make sure that the polarities (+ and -) are aligned
correctly.
Replace the battery cover.
3.
If remote doesn’t operate
properly:
• Check the polarity + - of the
batteries (Dry-Cell)
• Check if the batteries are
drained.
• Check if remote sensor is
blocked by obstacles.
• Check if there is any fluorescent lighting nearby.
SETUP
1312
Page 8
MIXED AUDIO OUT
R1
R2
L1
RL
L2
ANALOG AUDIO OUT
R FRONT L
R SURROUND L
CENTER
S/W
OPTICAL COAXIAL
OPTICAL COAXIAL
DIGITAL AUDIO OUT
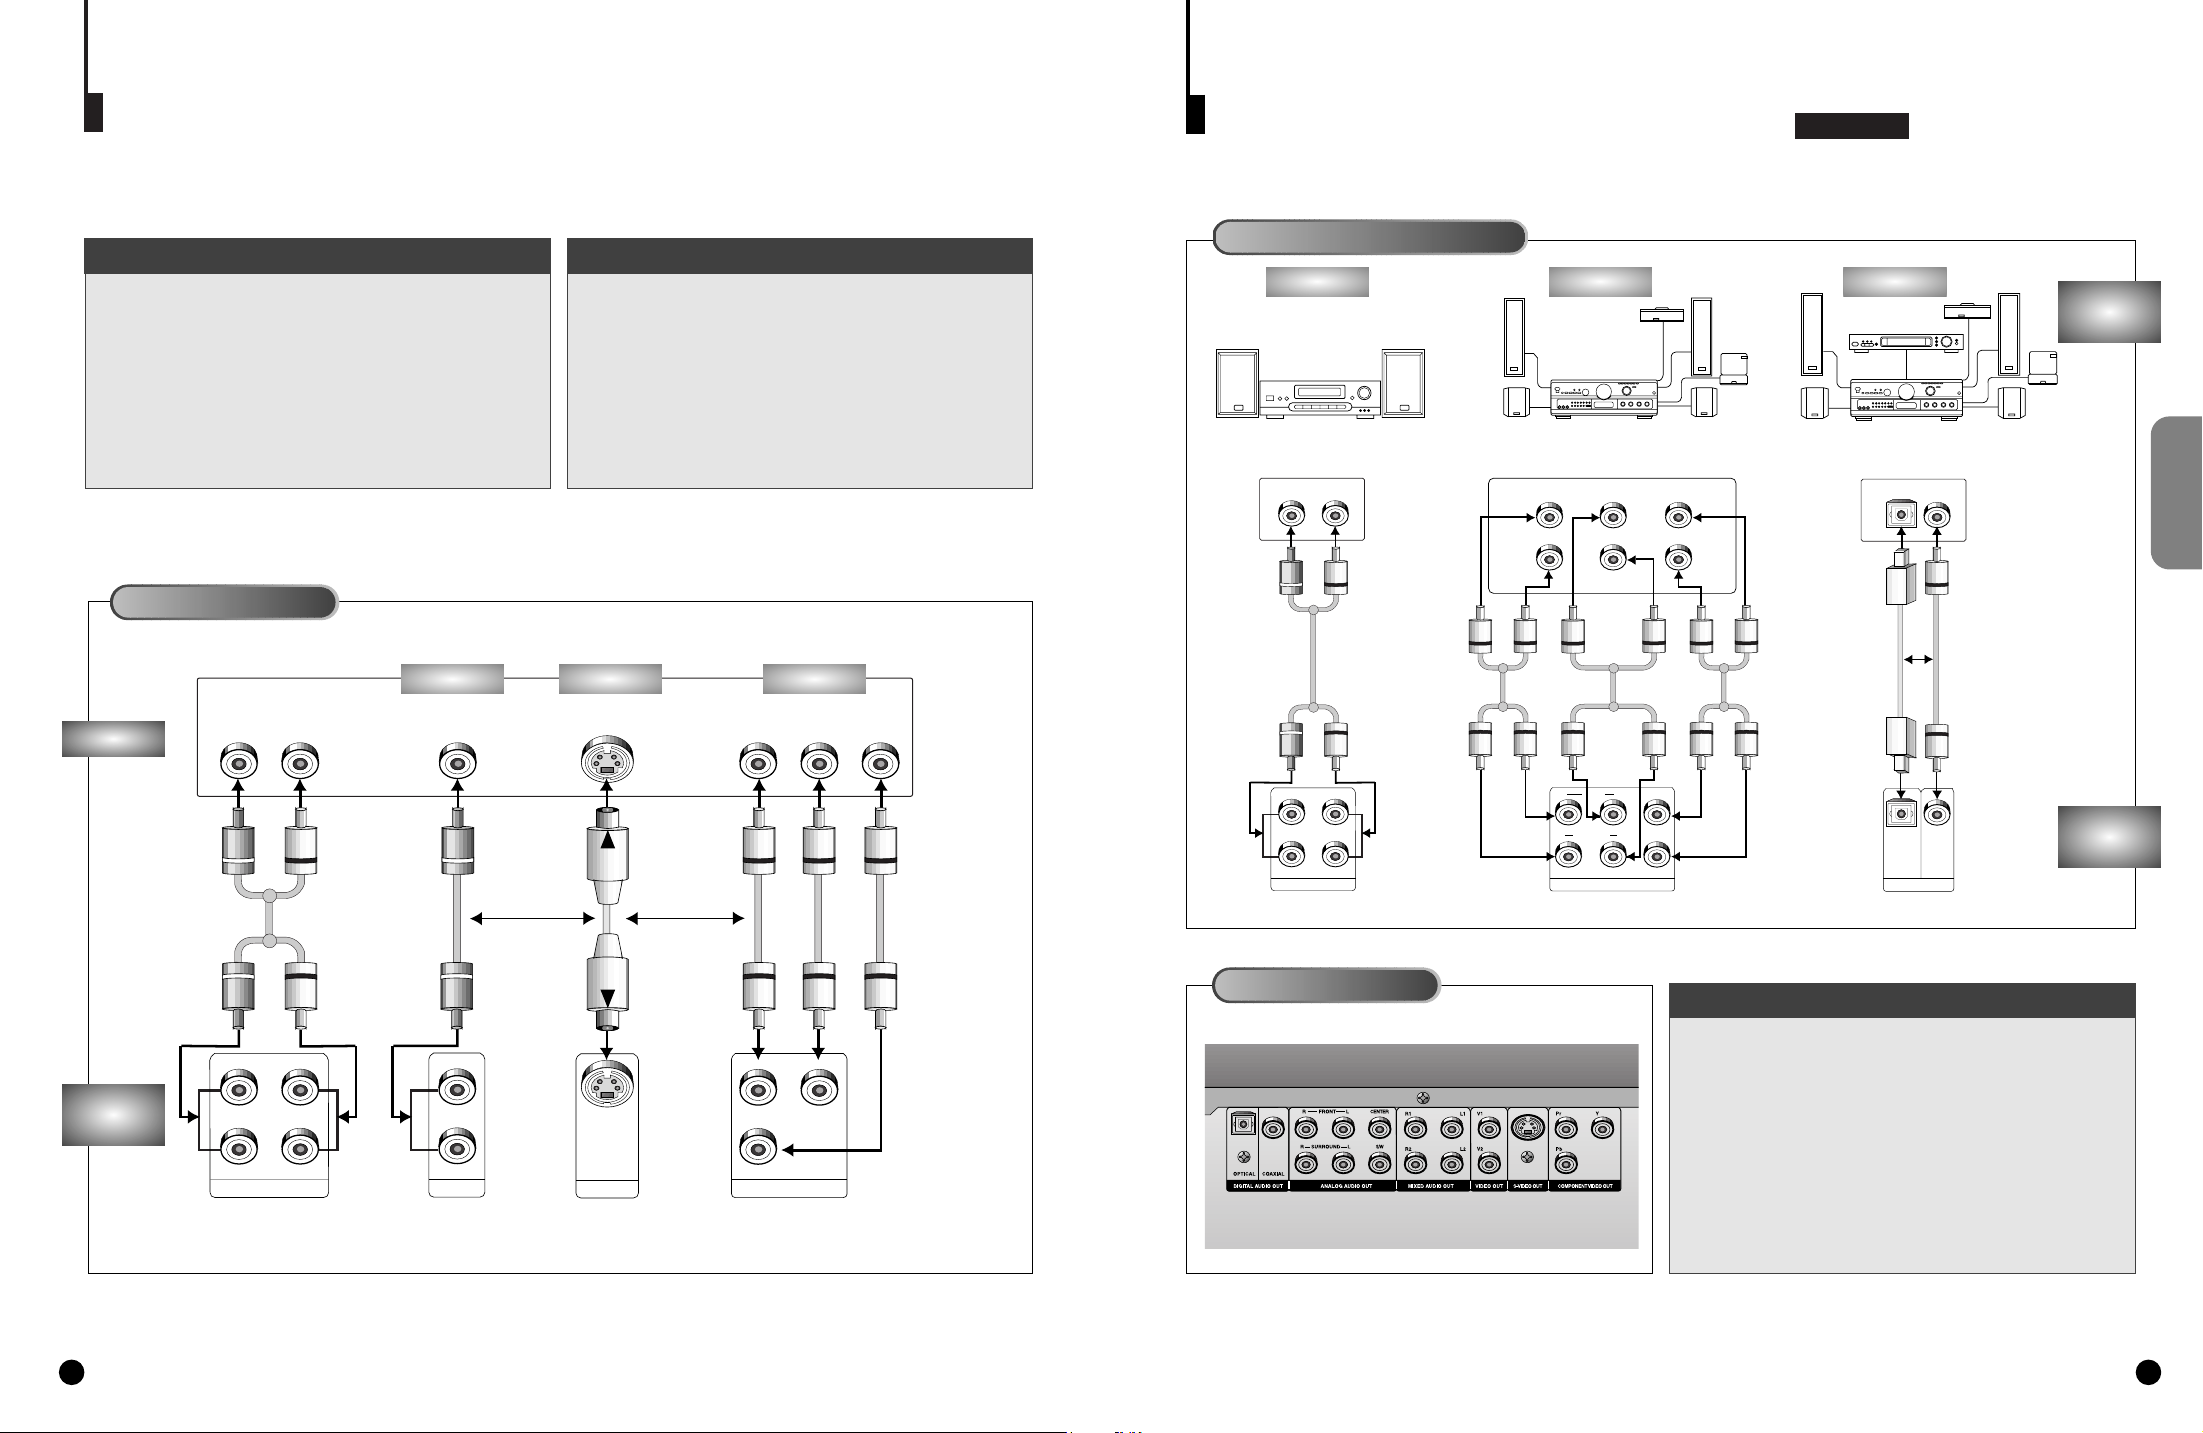
Choosing a Connection
MIXED AUDIO OUT
R1
R2
L1
RL
L2
COMPONENT VIDEO OUT
Y
Y
Pr
Pr
Pb
Pb
VIDEO OUT
S-VIDEO OUT
V1
V2
The following show examples of connections commonly used to connect the DVD player with a TV and other
components.
Choosing a Connection (ContÕd)
DVD-C700
Before Connecting the DVD Player Connecting to a TV (For Video)
• Always turn off the DVD player, TV, and other components before you connect or disconnect any
cables.
• Refer to owner’s manual of the components you
are connecting for more information on those particular components.
Connecting to a TV
TV (Normal, Widescreen, Projection, etc..)
Method 1 Method 2 Method 3
Audio Input Jacks
Video Input Jack S-Video Jack Component Video Jacks
TV
• Method 1
DVD Player + TV with Video Input Jack
• Method 2
DVD Player + TV with S-Video Input Jack
• Method 3
DVD Player + TV with Component Video Jacks
Connecting to an Audio System
Method 1 Method 2 Method 3
2ch Amplifier
5.1ch Analog Amplifier Dolby Digital Decoder
Audio Input JacksAudio Input Jacks
Front (RH)
Rear (RH)
Front (LH)
Rear (LH)
Center
Subwoofer
AUDIO
SYSTEM
CONNECTIONS
Digital Audio Input Jacks
OR
DVD
PLAYER
AV Cable
(included)
Good
pictureBasic Audio
S-Video
Cable
(included)
OR
Better
OR
picture Best picture
Video Cables
(not included)
Mixed Audio Out Analog Audio Out
Rear Panel
Connecting to an Audio System
Digital Audio Out
• Method 1
DVD Player + 2ch Stereo Amplifier or
Dolby Pro Logic Decoder
• Method 2
DVD Player + Amplifier with 5.1ch
Analog Input Jacks
• Method 3
DVD Player + Amplifier with Dolby
Digital Decoder/DTS Decoder
PLAYER
1514
DVD
Page 9
DDDDVVVVDDDD////VVVVCCCCDDDD////CCCCDD
MIXED AUDIO OUT
R1
R2
L1
RL
L2
OPTICAL COAXIAL
OPTICAL COAXIAL
DIGITAL AUDIO OUT
DD
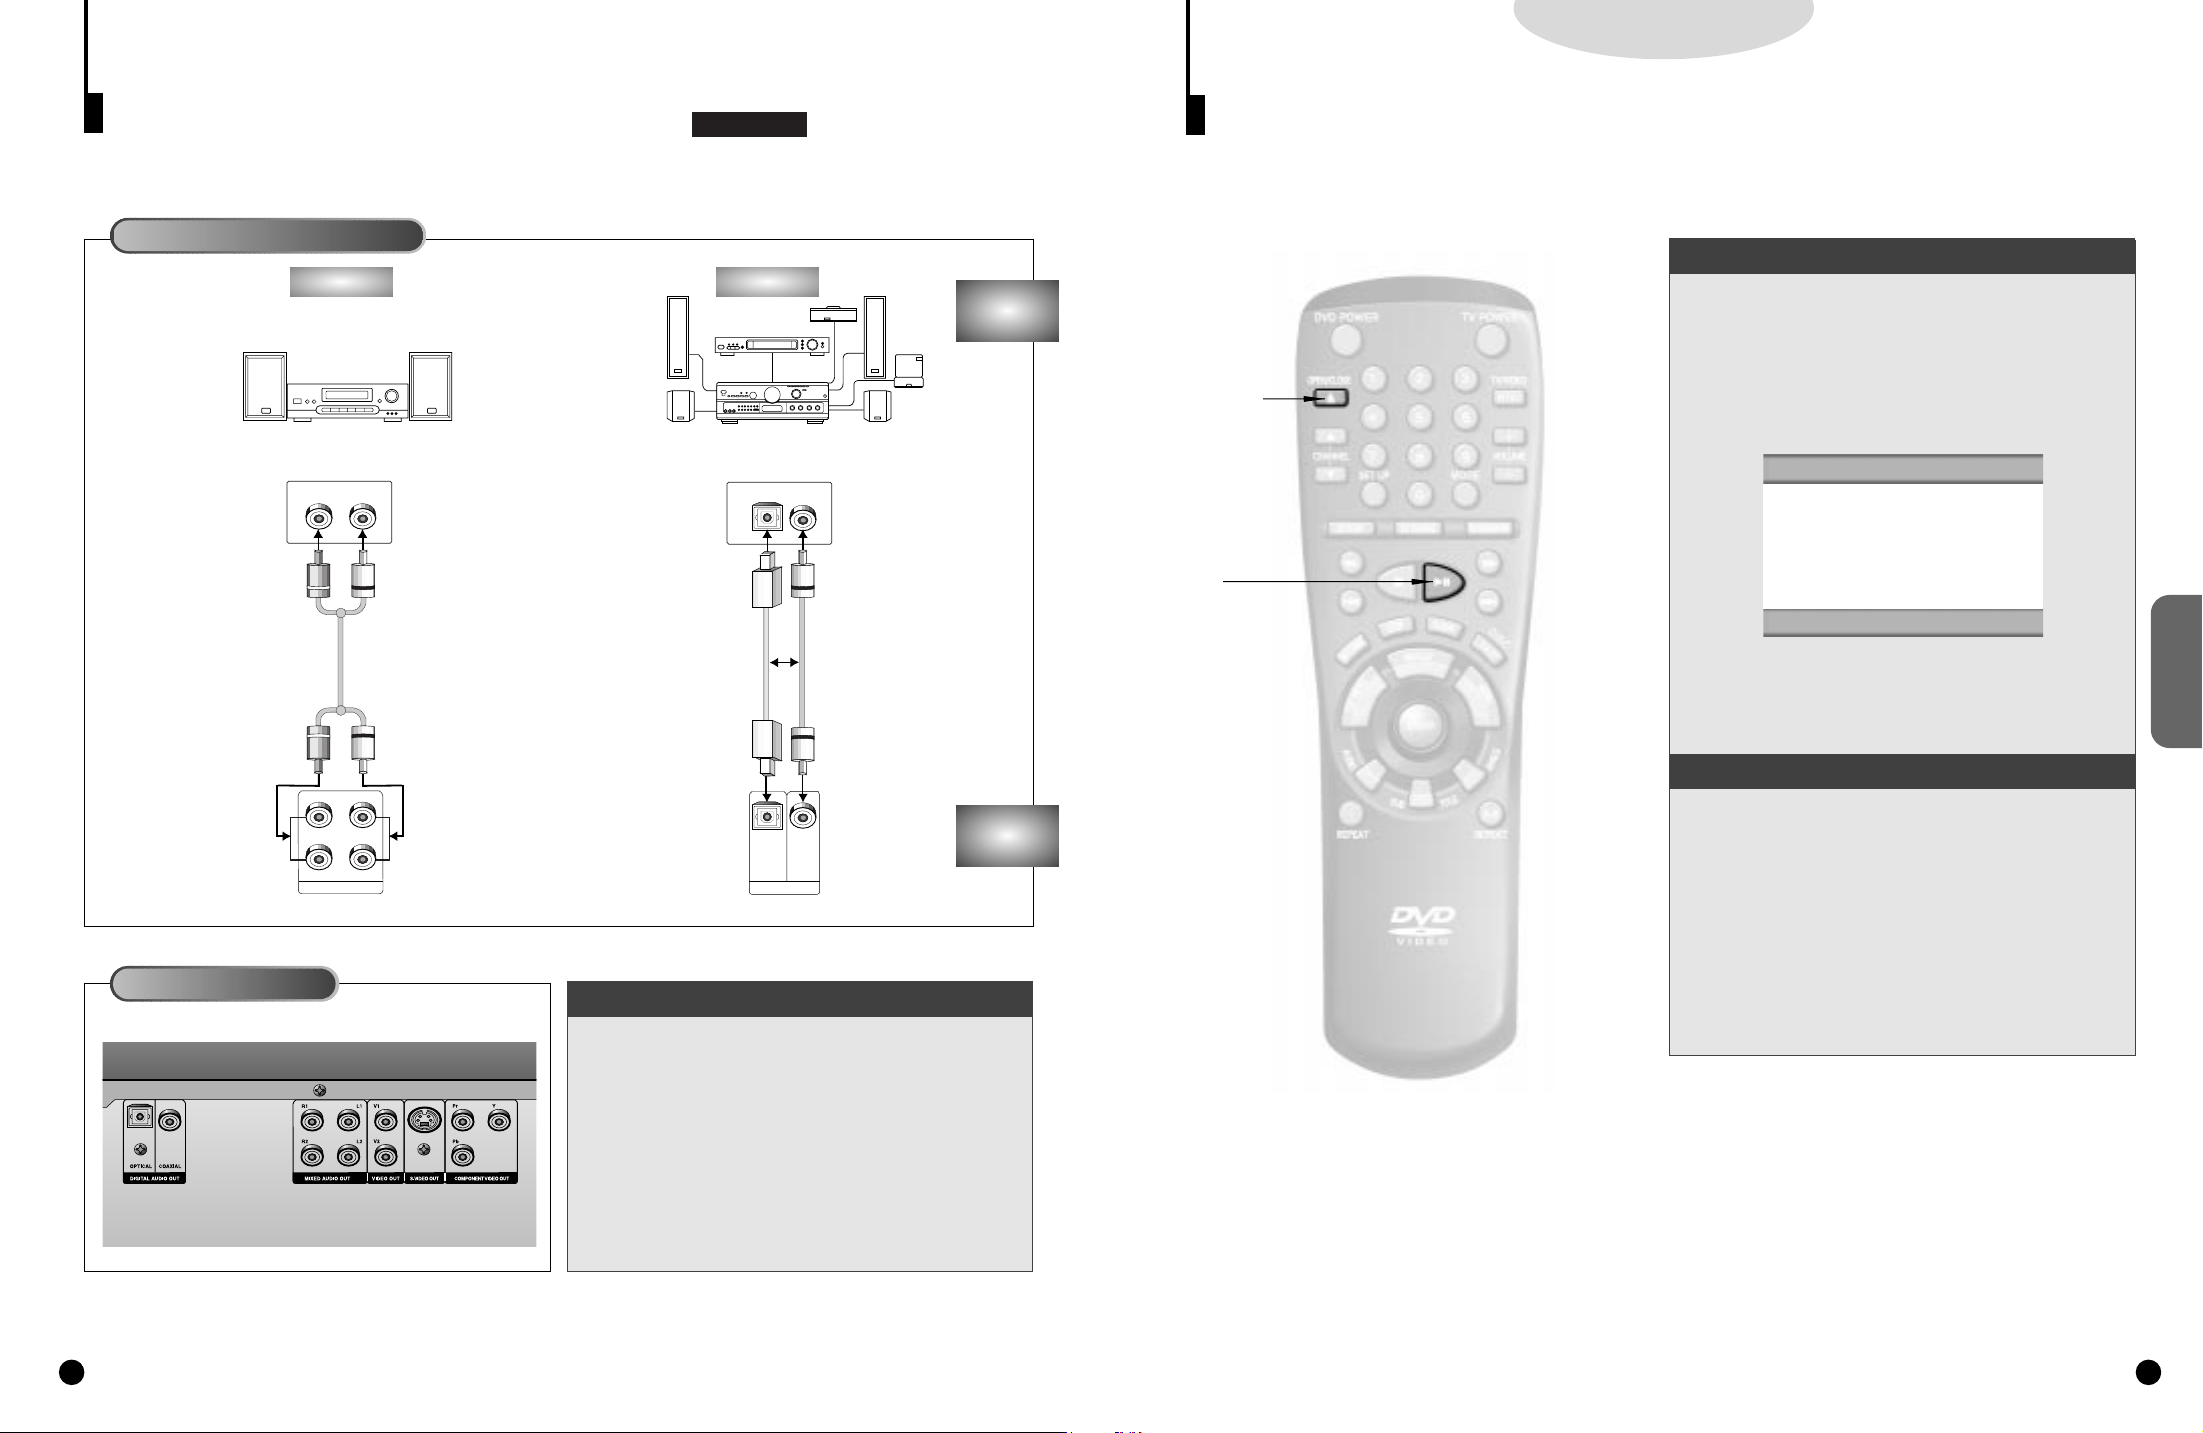
Choosing a Connection (ContÕd)
Connecting to an Audio System
Method 1 Method 3
2ch Amplifier
Audio Input Jacks
DVD-C600
Dolby Digital Decoder
Digital Audio Input Jacks
OR
AUDIO
SYSTEM
Playing a Disc
1,3
1,3
3
3
Before Playback
• Turn on a TV and press the TV/VIDEO button to select video
mode.
• Turn on your Audio System to select AUX, CD or DVD.
• Refer to your AUDIO Owner’s Manual.
After plugging in the player, the first time you press
the DVD POWER button, this screen comes up :
SELECT MENU LANGUAGE
PRESS 1 FOR ENGLISH
TOUCHE 2 POUR FRANCAIS
DRUCKEN 3 FUR DEUTSCH
PULSE 4 PARA ESPAÑOL
PREMERE 5 PER ITALIANO
TOETS 6 VOOR NEDERLANDS
FUNCTIONS
BASIC
If you want to select the language, press a NUMBER button. (This screen will only appear the very
first time you plug in the player.)
16
Rear Panel
Mixed Audio Out
Digital Audio Out
Connecting to an Audio System
• Method 1
DVD Player + 2ch Stereo Amplifier or
Dolby Pro Logic Decoder
• Method 2
DVD Player + Amplifier with Dolby
Digital Decoder/DTS Decoder
DVD
PLAYER
Playback
Press the OPEN/CLOSE button.
1.
1.
The STANDBY indicator light goes out and the tray opens.
Place a disc gently into slot in the tray with the
2.
disc’s label facing up.
2.
Press the PLAY/PAUSE button or
3.
OPEN/CLOSE button to close the disc tray.
3.
17
Page 10
DDDDVVVVDDDD////VVVVCCCCDDDD////CCCCDD
DD
DDDDVVVVDDDD////VVVVCCCCDDDD////CCCCDD
DD
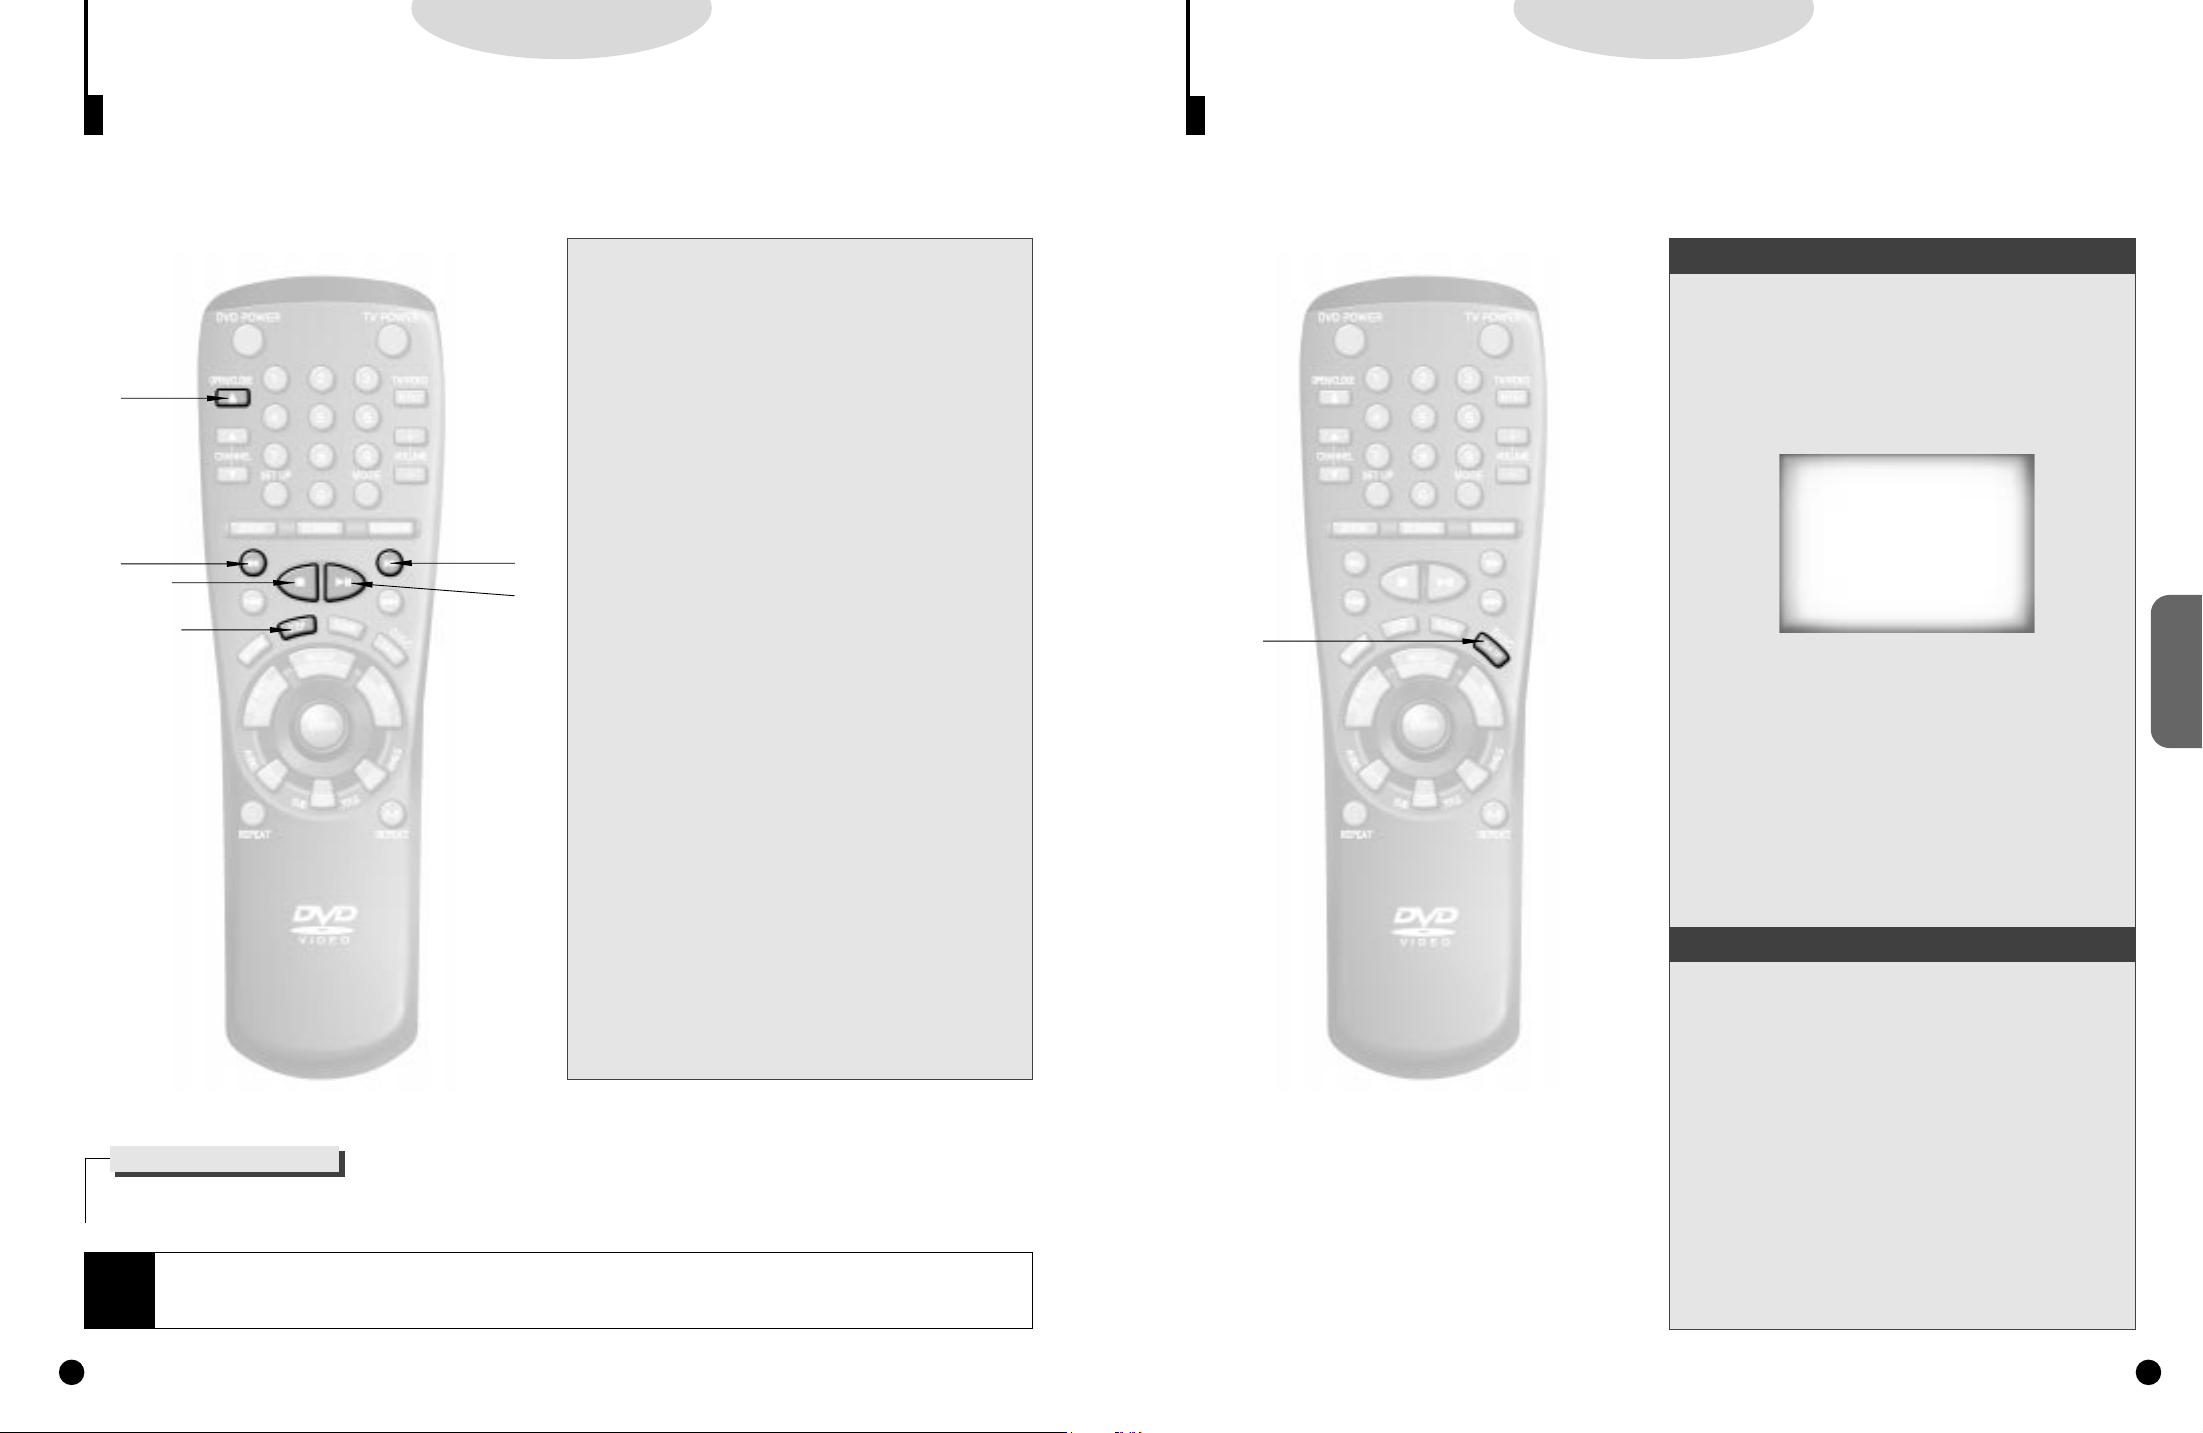
Playing a Disc (ContÕd)
Several options are available during DVD playback.
2
2
5
5
1
1
3,4,5
3,4,5
5
5
3
3
Stopping Playback
1.
1.
Press the STOP button in playback.
Removing Disc
2.
2.
Press the OPEN/CLOSE button.
Pausing Playback
3.
3.
Press the PLAY/PAUSE or STEP button on the remote
during playback.
- Screen stops, no sound.
- To resume again, press PLAY/PAUSE button once again.
Step Motion Playback (Except CD)
4.
4.
Press the STEP button on the remote or turn the SHUTTLE dial after pressing the JOG button(JOG button lights)
on the front of the player during playback.
- Each time the STEP button is pressed, a new frame will
appear.
- No sound is heard during STEP mode.
- Press PLAY/PAUSE to resume normal playback.
(It is only possible to go from one frame to the other in
forward mode.)
Slow Motion Playback (Except CD)
5.
5.
Press the FWD or REV SEARCH button on the remote or
turn the SHUTTLE dial on the front of the player during
PAUSE or STEP mode.
- By pressing or shuttling, you can select slow motion
playback for 1/2, 1/4 or 1/8 of normal speed.
- No sound is heard during slow mode.
- Press PLAY/PAUSE to resume normal playback.
- When playing a VCD, the reverse slow motion playback
will not work.
Operating the Disc Changer
The DVD Changer holds 5 discs and provides full random play with fast disc changes.
Exchanging Discs
Exchange allows you to change up to 4 discs
except the currently selected disc.
Press the EXCHANGE button on the front of
1.
the player when in the play mode.The tray
1.
opens with two slots available for you to load or
change discs.
DISC CHANGE
2,A
2,A
Press the DISC SKIP button on the remote or
2.
on the front of the player to turn the platter to
2.
the other two slots. Load or change the third
and fourth discs.
- To change all the discs, first press the STOP button, then
the OPEN/CLOSE and DISC SKIP buttons.
Press the EXCHANGE, OPEN/CLOSE or the
3.
desired number's DISC SELECT button on the
3.
front of the player to close the disc tray.
Using the DISC SKIP function
Use the Disc Skip function to change to another
of the discs currently in the disc platter.
While in play or stop mode, press the DISC
A.
SKIP button.The platter tur ns clockwise to the
A.
next available disc.
FUNCTIONS
BASIC
RESUME function
When you stop disc play, the player remembers where you stopped, so when you press PLAY again, it will pick up where you left off (unless the
disc is removed, the STOP button is pressed twice or the player is unplugged).
• If the player is left for 5 minutes in pause mode, it will stop.
NOTE
• The power is automatically turned off after approximately 30 minutes have elapsed in the stop mode (auto power-off feature).
• If the player is left in the stop mode for more than one minute without any user interaction, a screensaver will be activated, and the
TV screen will fade in and fade out repeatedly. Press PLAY button to resume normal play.
Or while in play or stop mode, press the
.
desired number of the DISC SELECT buttons
BB.
on the front of the unit to play back the disc in
the desired number's slot.
- Empty disc slots are automatically skipped during disc skip.
1918
Page 11
DDDDVVVVDDDD////VVVVCCCCDDDD////CCCCDD
DD
DDDDVVVVDDDD////VVVVCCCCDDDD////CCCCDD
DD
Searching & Skipping through a Chapter or Track
During playback, you can search quickly through a chapter or track or use the skip function to jump to the
next selection.
Searching through a Chapter or Track
Press the FWD or REV SEARCH button on the
1.
remote or turn the SHUTTLE dial on the front
1.
of the DVD player during play mode.
• Press the REVERSE or FORWARD SEARCH button on the
remote and press again to search at a faster
speed(2X/8X/16X/32X/normal speed, in order) on DVD.
• Press the REVERSE or FORWARD SEARCH button on the
remote and press again to search at a faster
speed(4X/8X/normal speed in order) on VCD and CD.
1
1
2
2
• To return to normal speed playback, press the PLAY/
1
1
2
2
PAUSE button.
Skipping T racks
Press the NEXT SKIP or BACK SKIP button
2.
on the remote or on the front of DVD player
2.
during playback.
• When playing a DVD, if you press the NEXT SKIP button,
it moves to next chapter. If you press the BACK SKIP button, it
moves to the beginning of the chapter. One more press makes
it move to the beginning of the previous chapter.
• When playing a VCD 2.0 in MENU OFF mode, a VCD 1.1
or a CD,
if you press NEXT SKIP button, it moves to next track. If you
press BACK SKIP button, it moves to the the beginning of the
track. One more press makes it move to the beginning of the
previous track.
• If a track exceeds 15 minutes when playing a VCD and you
press NEXT SKIP button, it moves forward 5 minutes. If you
press BACK SKIP button, it moves backward 5 minutes.
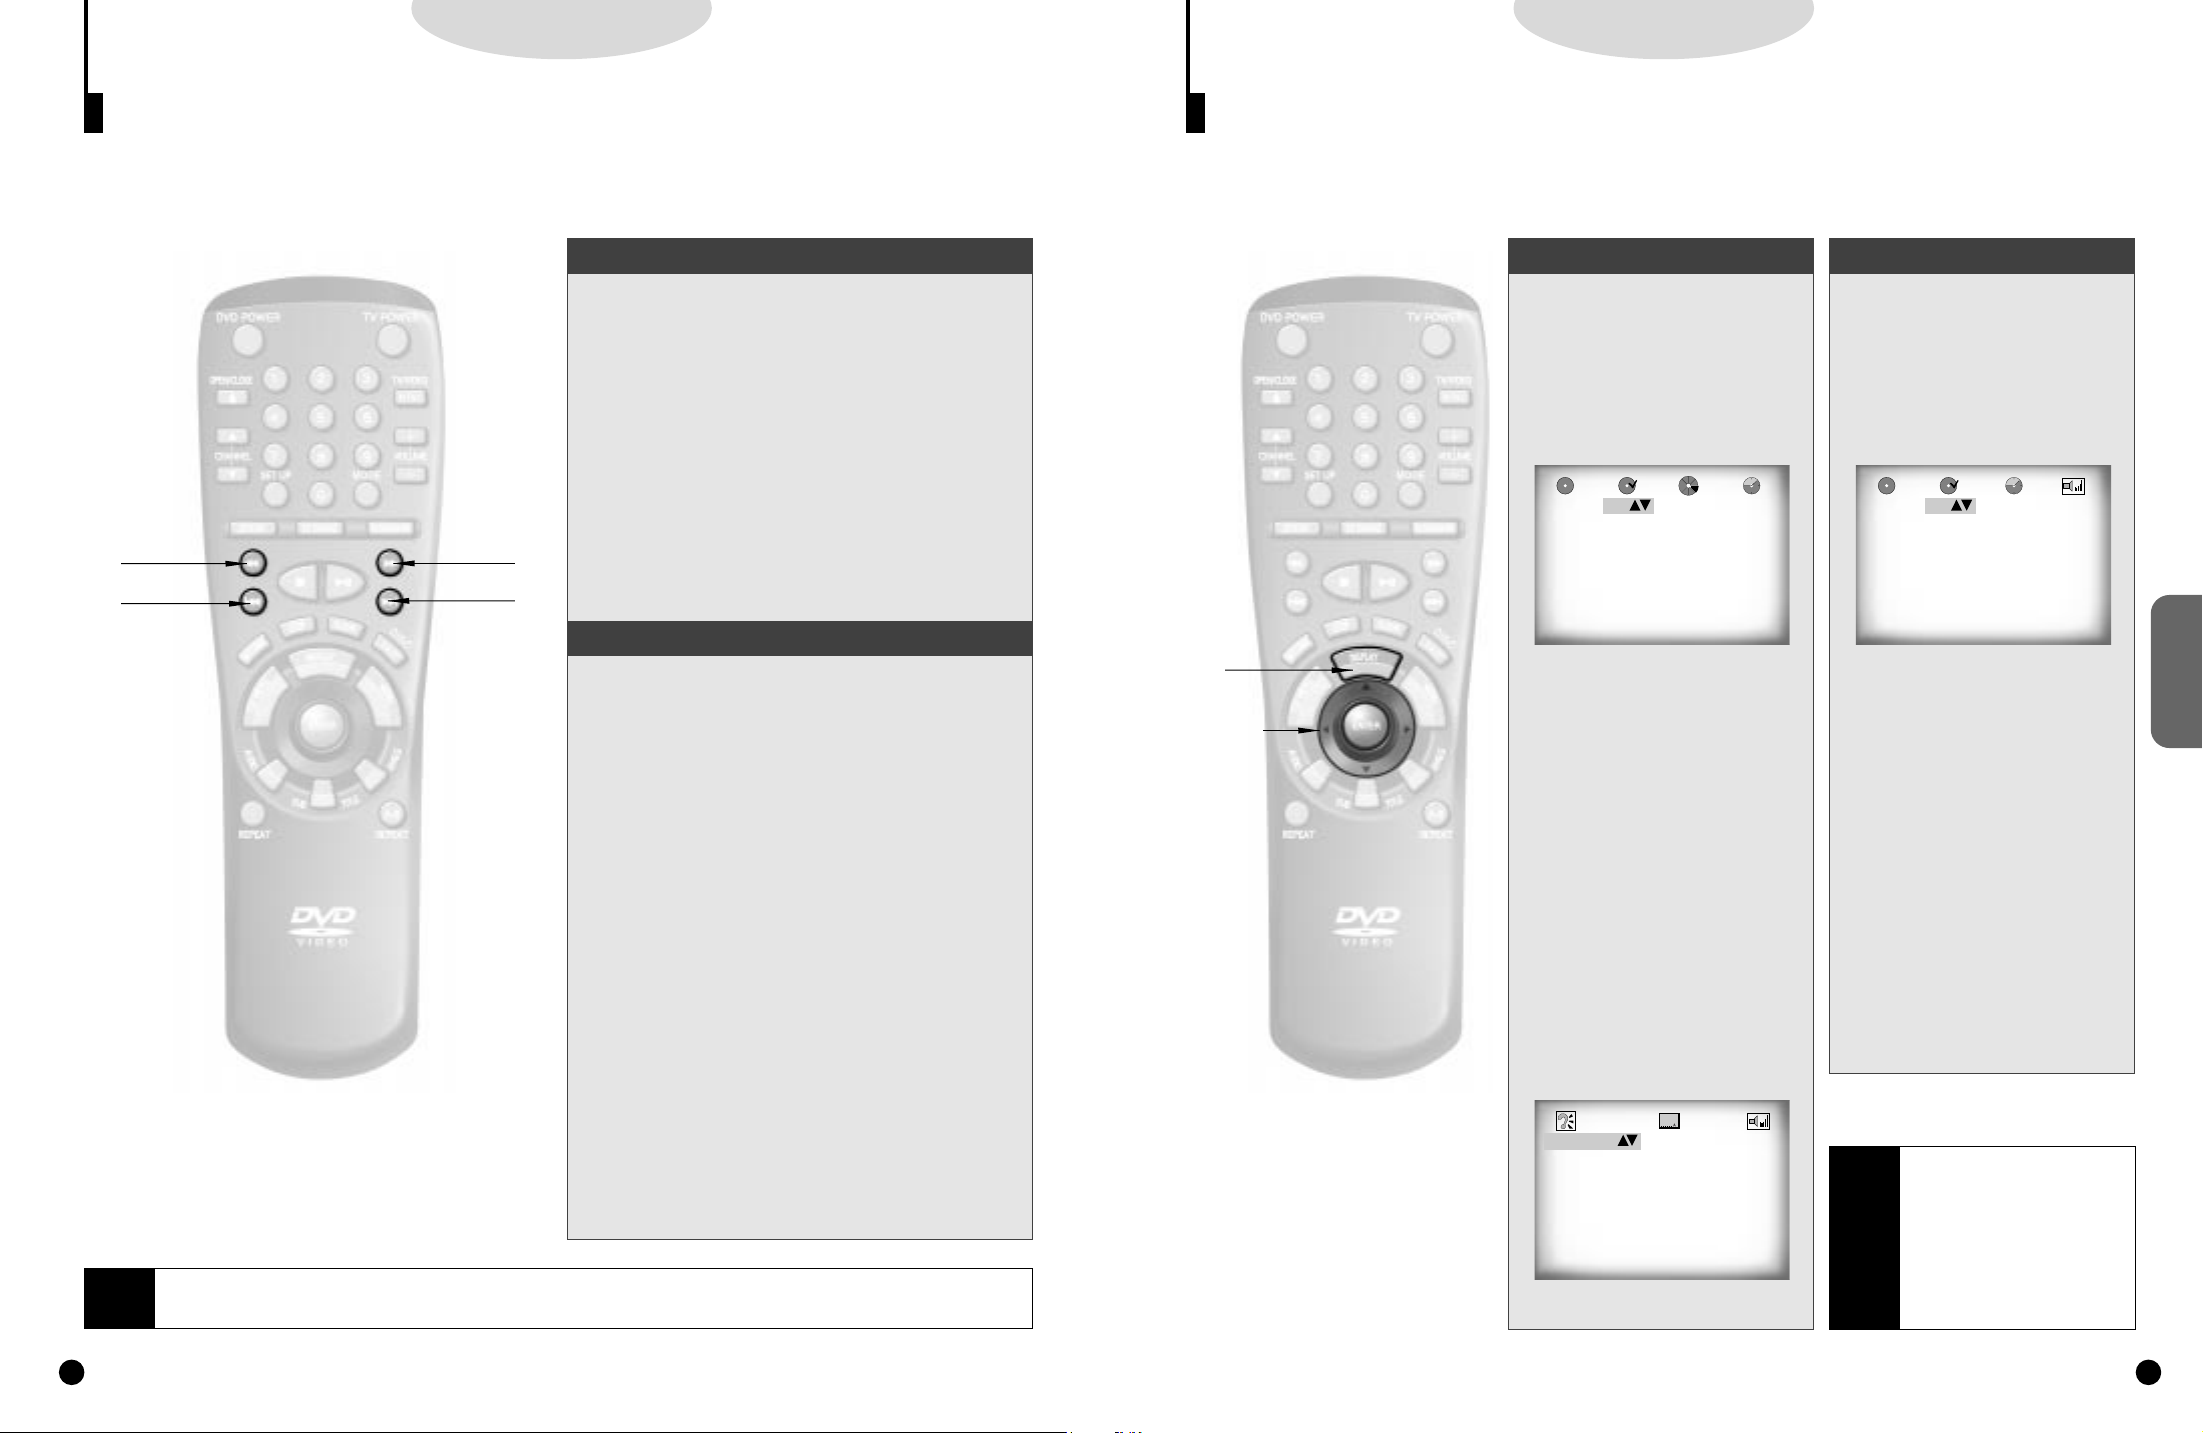
Using the Display Function
If you want to display the disc, title, chapter, time, audio and subtitle information on a DVD, press the DISPLAY button. If you want to display the track and time information on a VCD or CD, press the DISPLAY button.
1,A
1,A
2
2
1,A
1,A
When Playing a DVD
During playback, press the
1.
DISPLAY button on the
1.
remote or on the front of
DVD player.
- Current disc, title, chapter number
and elapsed time will be displayed.
2-DVD T:01 C:03 0:06:54
• Use the LEFT/RIGHT button to select
a title or a chapter number.
Use the UP/DOWN button or Number
buttons to enter a different title or
chapter number, then press the
ENTER button.
• To enter the time from which you
want to start, use the LEFT/RIGHT
button to select, then use the
Number buttons to enter the time.
Then press the ENTER button.
Press the DISPLAY button
2.
twice.
2.
- Current audio, subtitle and master
volume information will appear.
- To make the screen disappear, press
the DISPLAY button again.
When Playing a CD/VCD
During playback, press the
A.
DISPLAY button on the
A.
remote or on the front of
DVD player.
- Current track number, elapsed time
and master volume will be displayed.
1-CD T:01 0:06:54 99
• Use the LEFT/RIGHT button to select
a track. Use the UP/DOWN button or
Number buttons to enter a different
track number.
• To enter the time from which you
want to start, use the LEFT/RIGHT
button to select, then use the
Number buttons to enter the time and
then press the ENTER button.
• Use the LEFT/RIGHT button to select
a master volume.Use the UP/DOWN
button to select the desired volume
and then press the ENTER button.
FUNCTIONS
BASIC
NOTE
• When playing a VCD 2.0 in the MENU MODE or Track View
function,
if you press NEXT SKIP button, it moves to the next MENU or
the next Track View display. If you press BACK SKIP button, it
moves to the previous MENU or the previous Track View display. (Refer to page 25.)
• While in search (8X/16X/32X) on DVD or high-speed playback on VCD, no sound will be heard.
• Though 2X SCAN AUDIO is ON in SETUP MENU, no sound will be heard on discs which are recorded with LPCM, DTS or MPEG-2.
• Depending on the disc, audio may not be heard when a disc is in 2X playback mode.
ENG 5.1 CH ENG ON 99
NOTE
What is a Chapter?
Each Title on a DVD can be divided into chapters (similar to tracks
on an audio CD).
What is a Title?
A DVD may contain several different titles. : for example, if a disc
contains four different movies,
each might be considered a title.
2120
Page 12
DDDDVVVVDDDD////VVVVCCCCDDDD////CCCCDD
DD
DDDDVVVVDDDD////VVVVCCCCDDDD////CCCCDD
DD
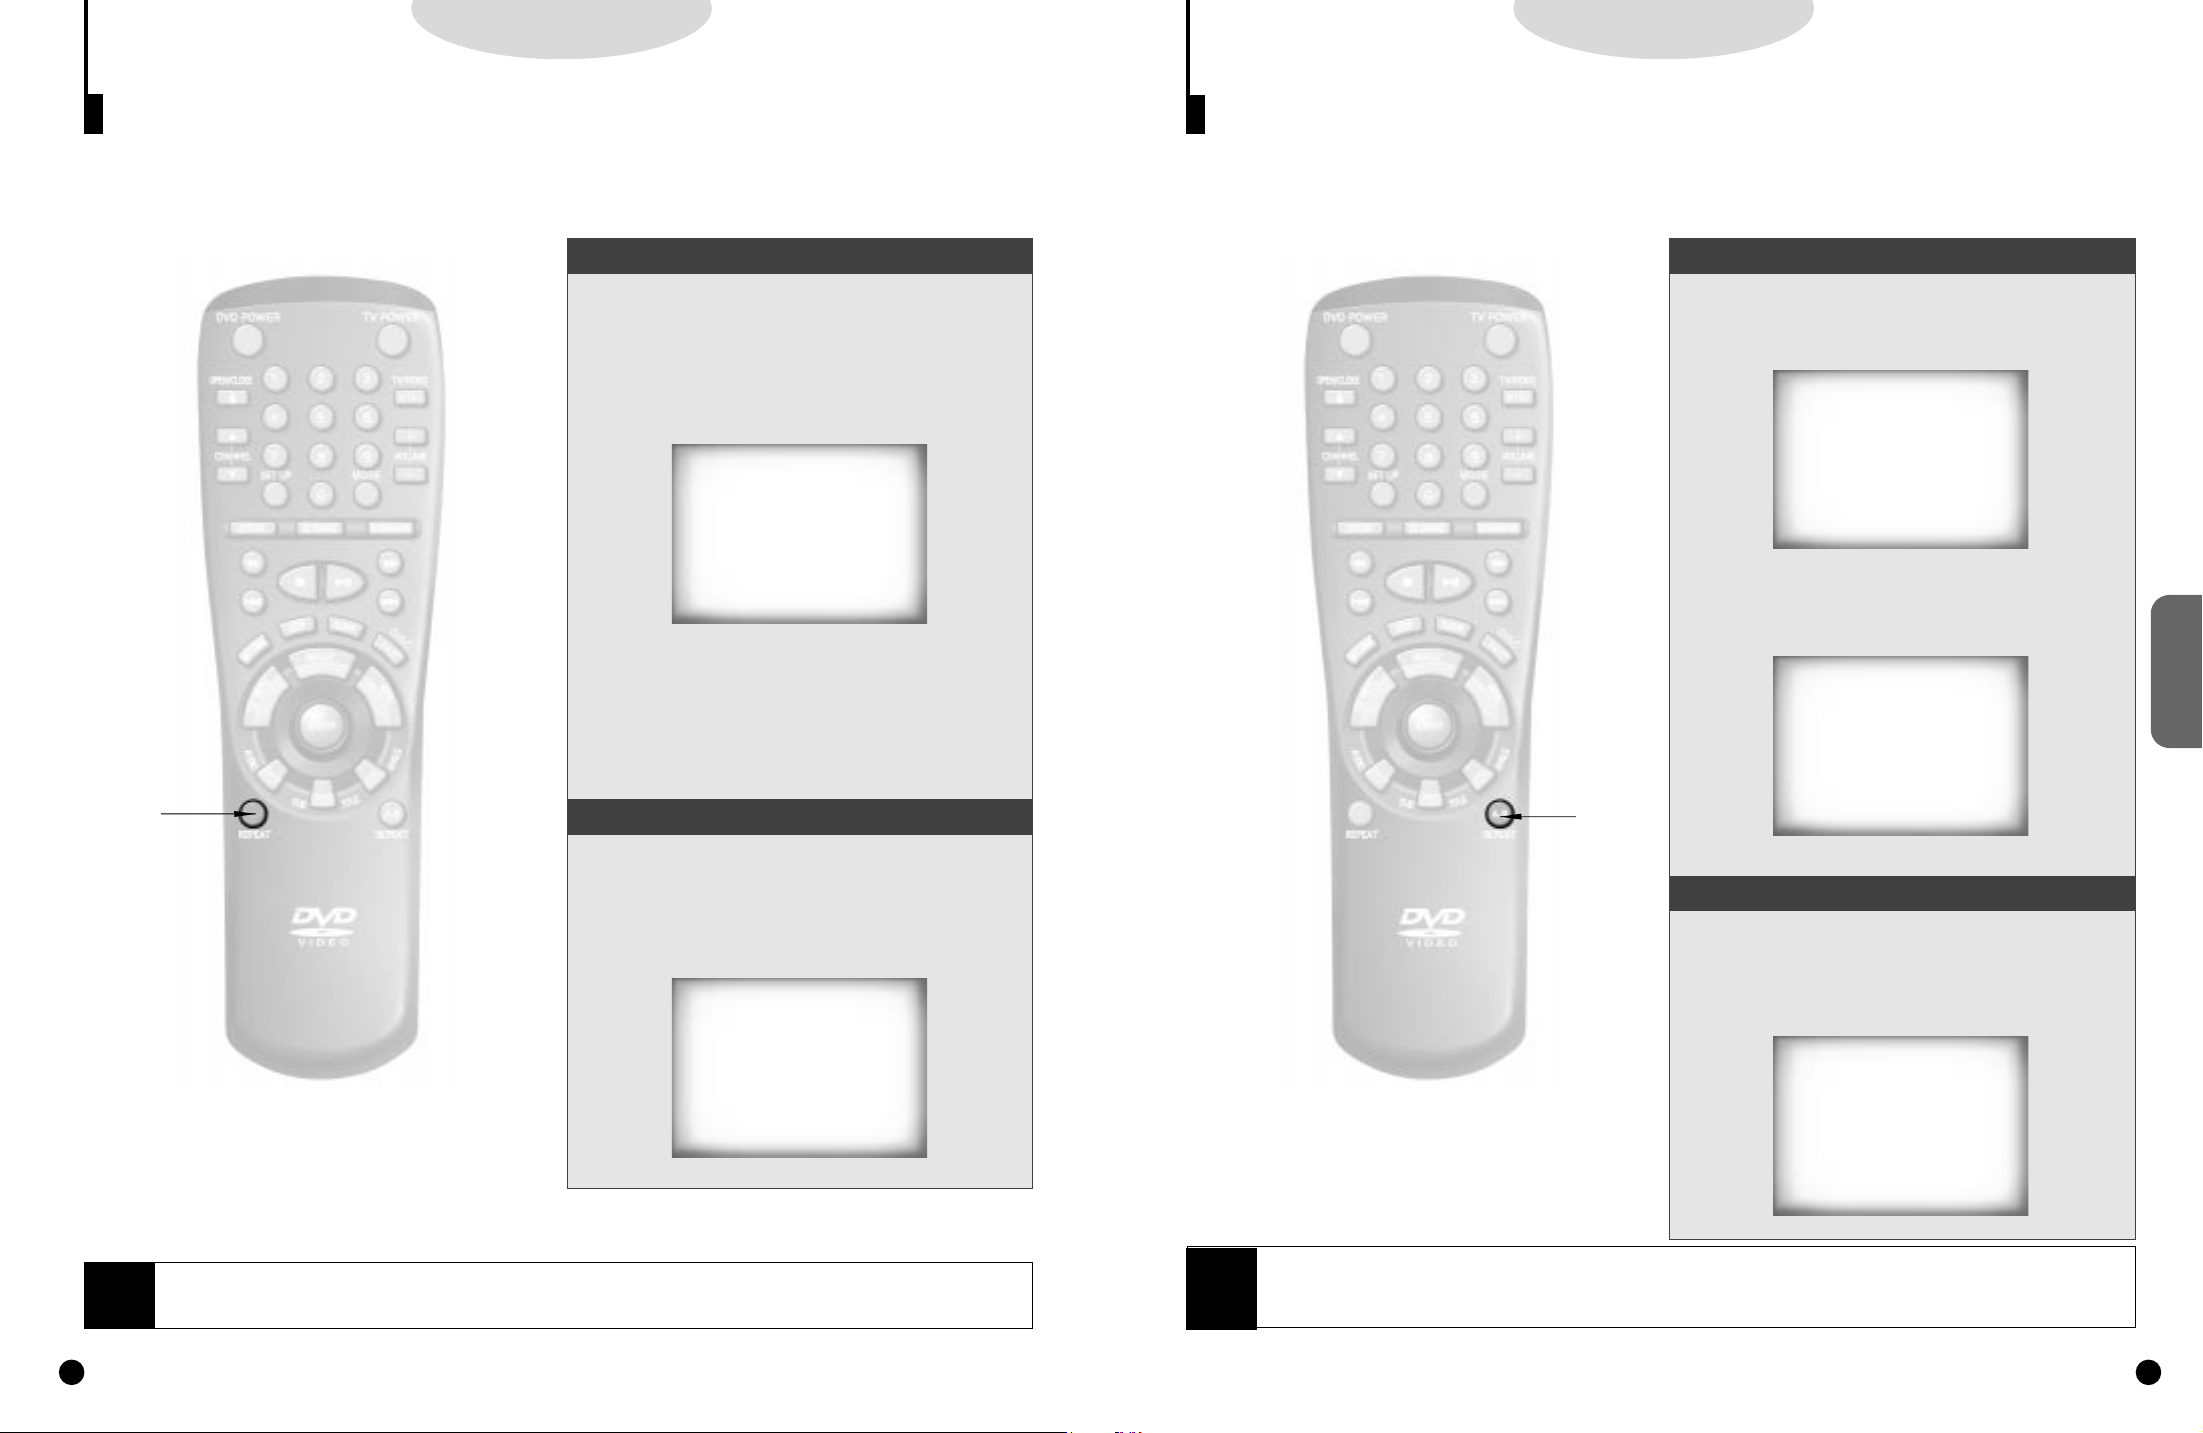
Repeat Play
Repeat the current track, chapter, title or all the discs.
To repeat a Title, Chapter (or Track)
While a disc is playing, press the REPEAT but-
1.
ton on the remote or on the front of the player.
1.
Select CHAPTER, TITLE or ALL DISCS using
2.
the REPEAT button. (or TRACK, DISC or ALL
2.
DISCS on VCD, CD)
REPEAT :TITLE
• CHAPTER : Repeats the chapter that is playing.
• TITLE :Repeats the title that is playing.
• TRACK : Repeats the track that is playing.
• DISC : Repeats all tracks contained on the disc.
• ALL DISCS : Repeats all discs in the tray.
Using the A-B Repeat Function
The A-B Repeat function lets you mark a section to repeat between the beginning (A) and the end (B) of the
section you want to review.
To set up A-B Repeat
Press the A-B REPEAT button on the remote
1.
or on the front of DVD player at the beginning
1.
(A) of the section you want to review.
REPEAT : A -
Press the A-B REPEAT button again at the
2.
end (B) of the section you want to review.The
2.
section will begin repeating.
REPEAT : A - B
FUNCTIONS
BASIC
1,2
1,2
A
A
NOTE
To clear the repeat function
To retur n to nor mal play, press REPEAT again
A.
until OFF is selected.
A.
- You can also press the CLEAR button to resume nor mal
playback.
REPEAT : OFF
• DVD repeats playback by chapter or title, CD and VCD repeat playback by disc or track.
• Depending on the disc, the Repeat function may not work.
• When in VCD 2.0 mode (MENU ON mode), this function does not work.
NOTE
1,2,
1,2,
A
A
To clear A-B Repeat
Press the A-B REPEAT button again.
A.
A.
- You can also press the CLEAR button to resume nor mal
playback.
REPEAT : OFF
• The A-B Repeat function works on the same title or track.
• If the title or track is completed before marking the end (B), the end of title or track becomes B automatically.
• Depending on the disc, the A-B REPEAT function may not work.
• When in VCD 2.0 mode (MENU ON mode), this function does not work.
2322
Page 13
DDDDVVVVDDDD////VVVVCCCCDDDD////CCCCDD
DD
DDDDVVVVDDDD////VVVVCCCCDDDD////CCCCDD
DD
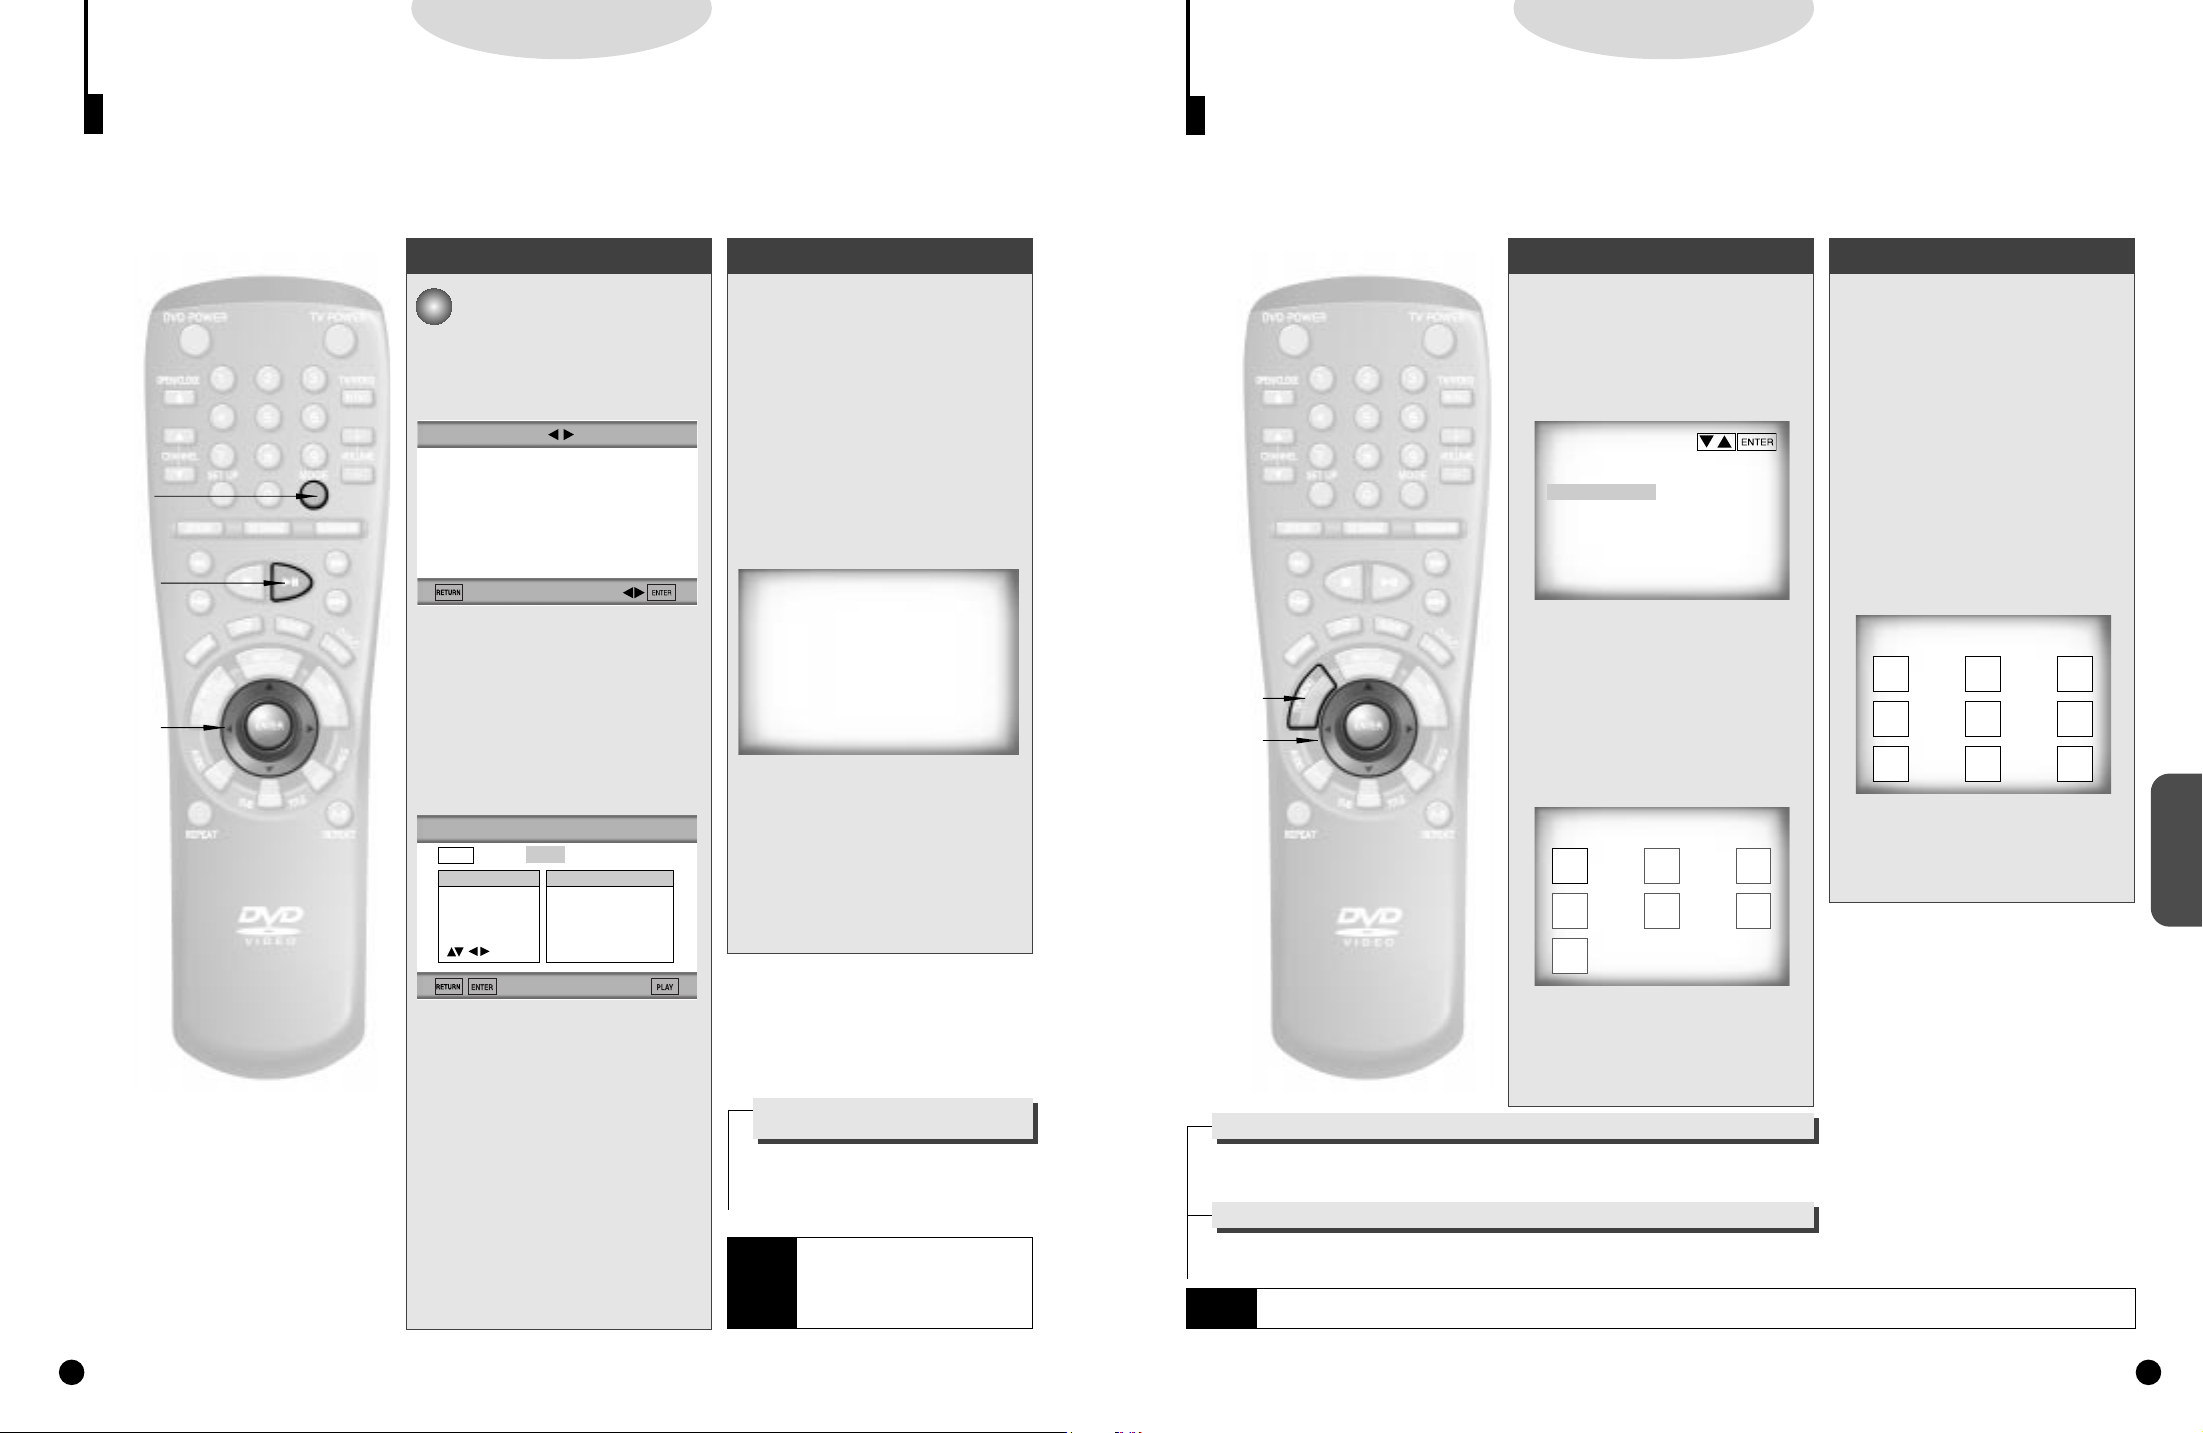
Program Playback in a Specific Order
Program playback lets you set up a specific order for playback of titles, chapters or tracks on a disc only. This function works in stop mode only.
1,A
1,A
4
4
2,3
2,3
A,B
A,B
To start PROGRAM playback
To program chapters 5 and 7 in
e.g
order on the 2nd Disc. (on DVD)
In stop mode, press the
1.
MODE button on the
1.
remote.
PROGRAM RANDOM
- The message, “READING DISC
INFORMATION, PLEASE WAIT”
appears.
- You can also use the PROGRAM button on the front of the player.
Use the LEFT/RIGHT but-
2.
ton to select PROGRAM.
2.
Press the ENTER button.
PROGRAM 02
DISC 1. CD 2. DVD 3. VCD 4. --- 5. ---
CHAP. (T:01)
**
(ALL)
01 02 03 04
05 06 07 08
09 10 11 12
ENTER
2. DVD
PROGRAM ORDER
2.05 2.07
-- -- -- -- --
-- -- -- -- --
-- -- -- -- --
-- -- --
To start RANDOM playback
Press the MODE button
A.
while in stop mode. Use
A.
the LEFT/RIGHT button to
select RANDOM and press
the ENTER button.
Press the RANDOM button
.
on the front of the player.
BB.
The random information will
appear.Select DISC, ALL
DISCS or OFF using the
UP/DOWN button.
RANDOM
1 DISC
2 ALL DISCS
3 OFF
The disc will be played
.
back in random order.
CC.
- The RANDOM function doesn’t work
on a DVD disc.
Using the Disc View Function
The desired music or video display can be accessed directly without using the menu function.
T rack View (VCD) Index View (VCD)
1,A
1,A
2,B
2,B
3,C
3,C
4,D
4,D
Displays the beginning view of
each track and the track number.
Press the TOP MENU but-
1.
ton during playback.
1.
DISC VIEW
1 TRACK VIEW
2 INDEX VIEW
Press the UP/DOWN button
2.
to select TRACK VIEW.
2.
Press the ENTER button.
Select the desired view by
3.
pressing the UP/DOWN or
3.
LEFT/RIGHT buttons.
TRACK VIEW
1
4
7
2
5
3
6
Displays the equally divided 9
views of the current playing track.
Press the TOP MENU but-
A.
ton during playback.
A.
Press UP/DOWN button to
.
select INDEX VIEW. Press
BB.
the ENTER button.
Select the desired view by
.
pressing UP/DOWN or
CC.
LEFT/RIGHT buttons.
INDEX VIEW
1
4
7
Press the ENTER button.
.
DD.
2
5
8
3
6
9
FUNCTIONS
ADVANCED
Select disc 2 and press the
3
.
ENTER button.
3
.
Use the LEFT/RIGHT or
4.
UP/DOWN button to select
4.
chapter 05 and press
ENTER.Then select chapter
07 and press ENTER again.
- Press the RETURN button to
select the another disc. Repeat
steps 3 and 4.
Press the PLAY/PAUSE but-
5.
ton.The disc will be played
5.
back in programmed order.
When you make a wrong selection
during programming
• Press the CLEAR button to delete the
last track (or chapter, or title) in the program order.
• Depending on the disc, the
Program Playback function may
NOTE
not work.
• To resume normal playback,
press the CLEAR button.
(An example of a Track View)
Press the ENTER button.
4.
4.
When you press the TOP MENU button during DVD playback
The disc’s TITLE MENU function will come up. A disc must have at least two titles for the TITLE MENU function to work.
When you press the TOP MENU button during CD playback
The unit enters the INTRO SCAN mode.INTRO SCAN lets you listen to the beginning of each track for about 10 seconds.If you hear a track
you like, press the PLAY button to star t playback.
NOTE
• When in VCD 1.1 & 2.0 mode (MENU OFF mode), this function works.
• In stop mode on VCD, press the TOP MENU button and the TRACK VIEW will be displayed directly.
2524
Page 14
DDDDVVVVDDDD////VVVVCCCCDDDD////CCCCDD
DD
DDDDVVVVDD
DD
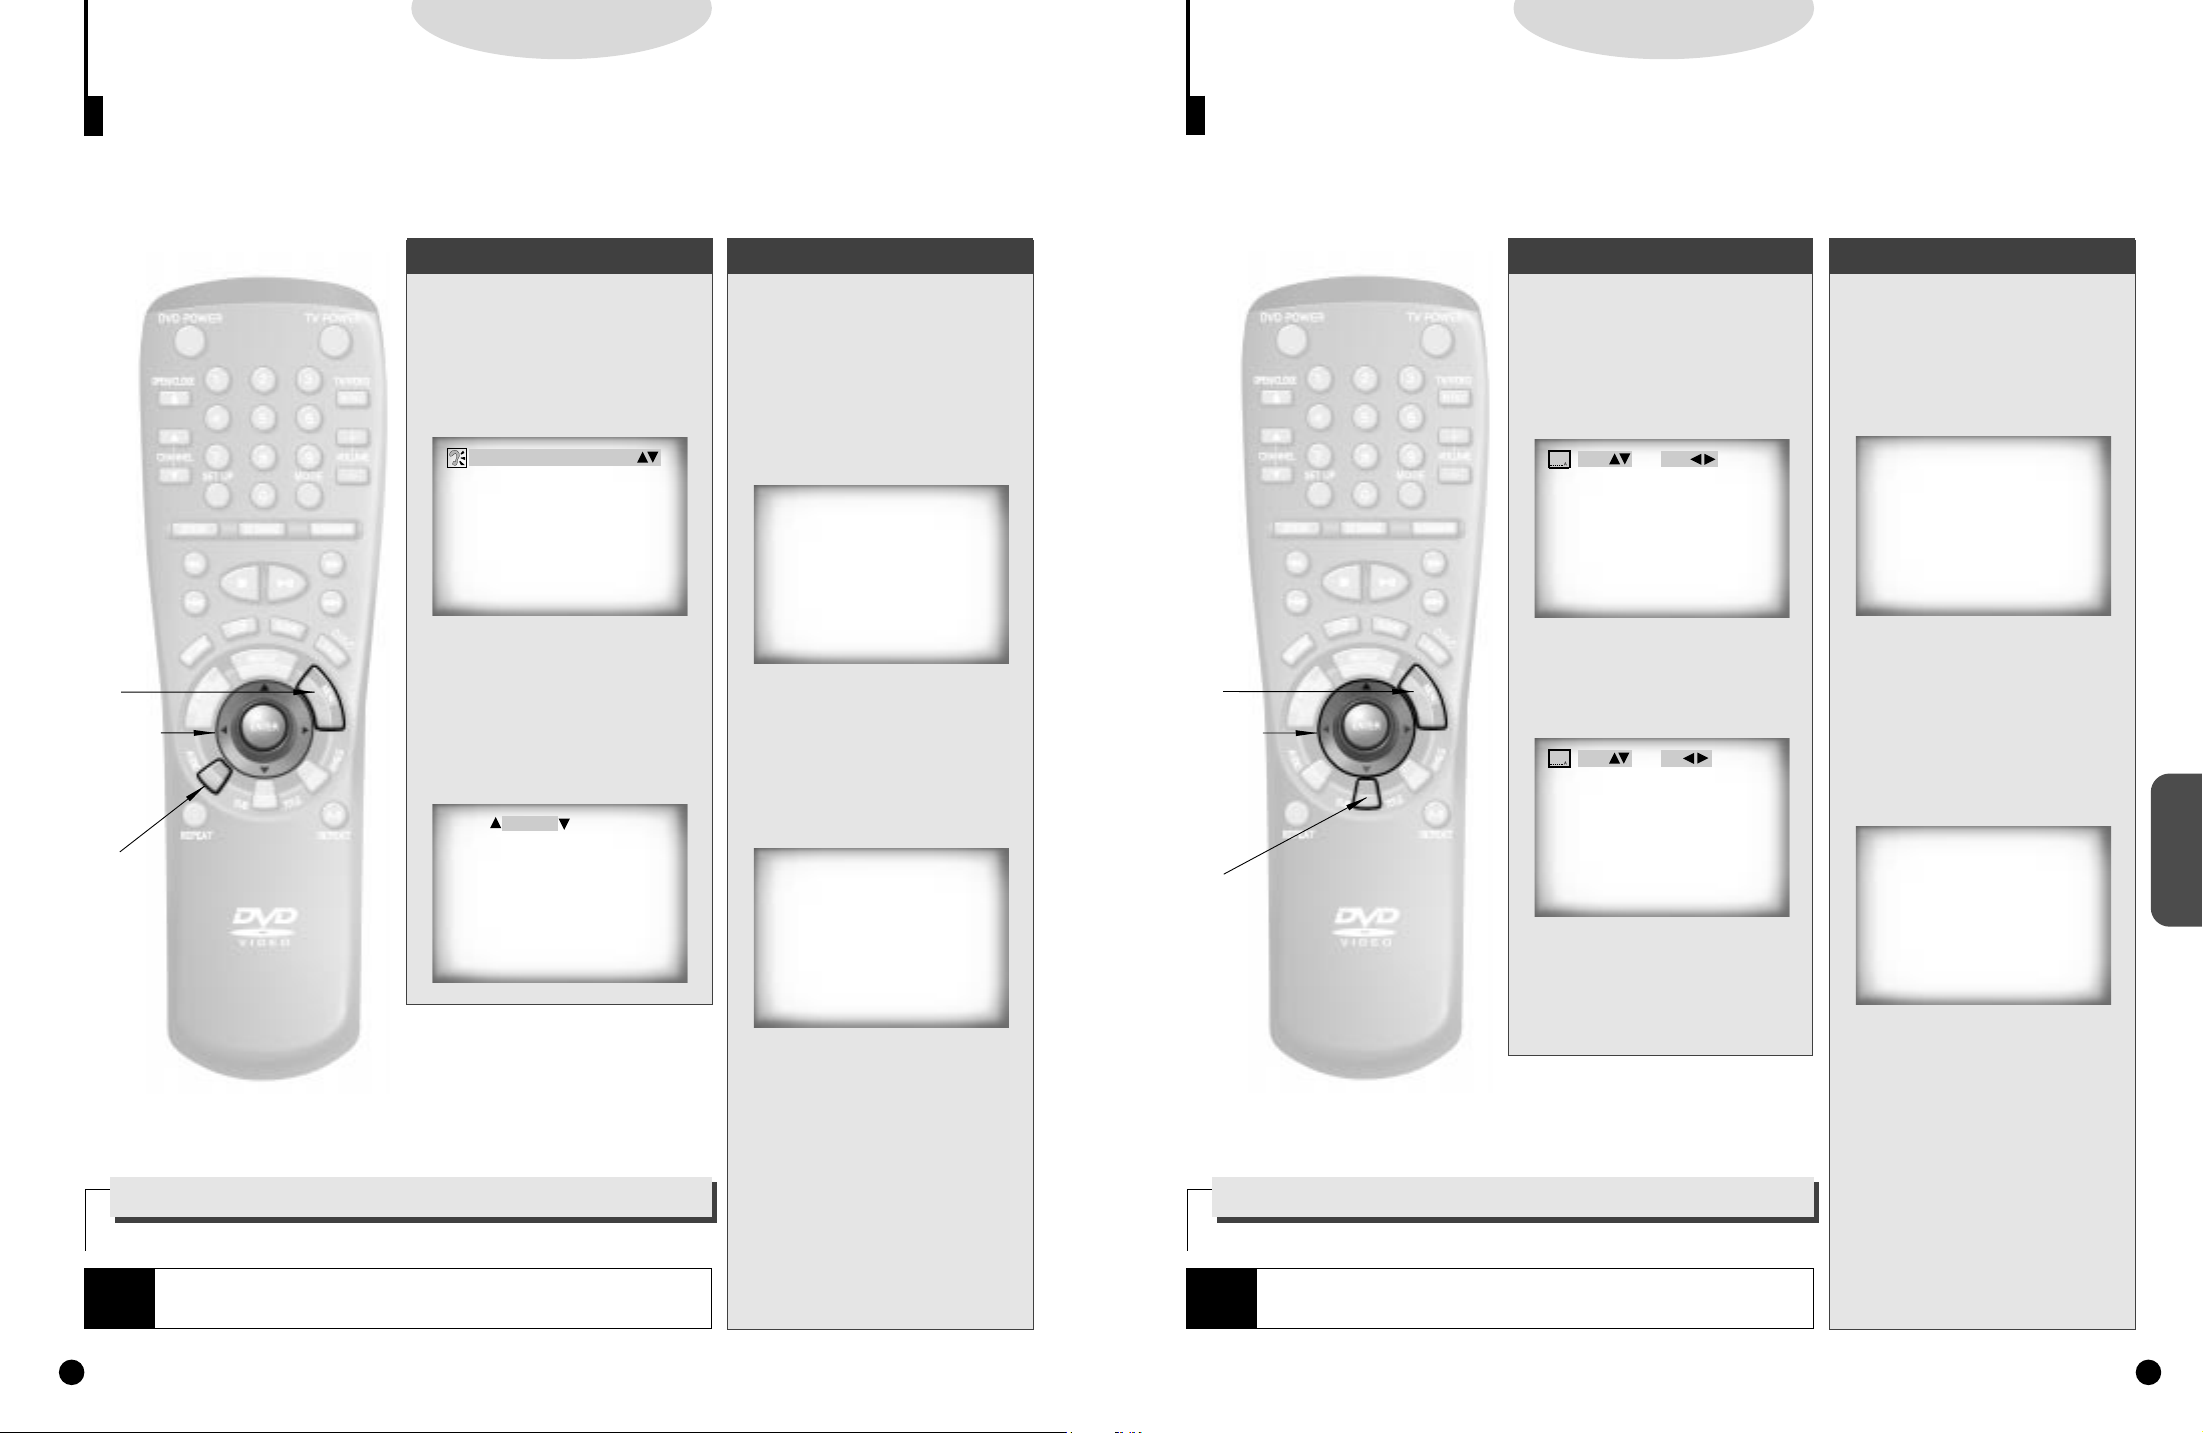
Selecting Audio
You can select a desired language quickly and easily with the AUDIO button.If a menu is encoded on the disc,
you can also select by using the MENU button.
Using the Menu ButtonUsing the Audio Button
A
A
2,B
2,B
3,C
3,C
,E
DD,E
Press the AUDIO button.
1.
1.
Use the UP/DOWN button
2.
to select the desired lan-
2.
guage on a DVD.
ENG DOLBY DIGITAL 5.1 CH
- The audio and subtitle languages are
represented by abbreviations.
Use the UP/DOWN button
3.
to select STEREO,
3.
R CHANNEL or L CHAN-
NEL. (On VCD/CD)
AUDIO: STEREO
When playing a DVD
Press the MENU button.
A.
A.
Use the UP/DOWN button
.
to select AUDIO informa-
BB.
tion.
1 AUDIO
2 SUBTITLE
(An example of a disc menu)
Press the ENTER button.
.
CC.
Use the UP/DOWN button
.
to select ‘ENGLISH’.
DD.
Selecting the Subtitle Language
When a DVD is recorded with subtitles, you can use the Subtitle feature to view the subtitles on-screen.
If a menu is encoded on the disc, you can also select by using the MENU button.
Using the MENU buttonUsing the SUBTITLE button
A
A
2,B
2,B
3,C
3,C
,E
DD,E
Press the SUBTITLE but-
1.
ton.
1.
Use the UP/DOWN button
2.
to select the desired subti-
2.
tle language.
ENG OFF
Use the LEFT/RIGHT but-
3.
ton to determine whether or
3.
not the subtitle will be displayed.
ENG ON
Press the MENU button.
A.
A.
Use the UP/DOWN button
.
to select SUBTITLE infor-
BB.
mation.
1 AUDIO
2 SUBTITLE
(An example of a disc menu)
Press the ENTER button.
.
CC.
Use the UP/DOWN button
.
to select the desired lan-
DD.
guage.
FUNCTIONS
ADVANCED
1
1
How to have the same audio language come up
Refer to “Setting Up the Language Features”on page 33.
• This function depends on what languages are encoded on the disc and may not
NOTE
work with all DVDs.
• A DVD disc can contain up to 8 audio languages.
whenever you play back a DVD.
1 ENGLISH
2 FRANCAIS
(An example of a disc menu)
Press the ENTER button.
E.
E.
When playing a VCD
In disc version 2.0, the MENU button
works as a conversion switch between
MENU ON and MENU OFF mode.
When playing a VCD 1.1 or CD, the
MENU button will not work.
1
1
How to have the same subtitle language come up
Refer to “Setting Up the Language Features”on page 33.
• This function depends on what languages are encoded on the disc and may not
NOTE
work with all DVDs.
• A DVD disc can contain up to 32 subtitle languages.
whenever you play back a DVD.
- Initially, the subtitling will not appear
on screen.
- The audio and subtitle languages are
represented by abbreviations.
1 ENGLISH
2 FRANCAIS
(An example of a disc menu)
Press the ENTER button.
E.
E.
When playing a VCD
In disc version 2.0, the MENU button
works as a conversion switch between
MENU ON and MENU OFF mode.
When playing a VCD 1.1 or CD, the
MENU button will not work.
2726
Page 15
DDDDVVVVDD
DD
DDDDVVVVDDDD////VVVVCCCCDD
DD
Selecting the Desired Screen Angle
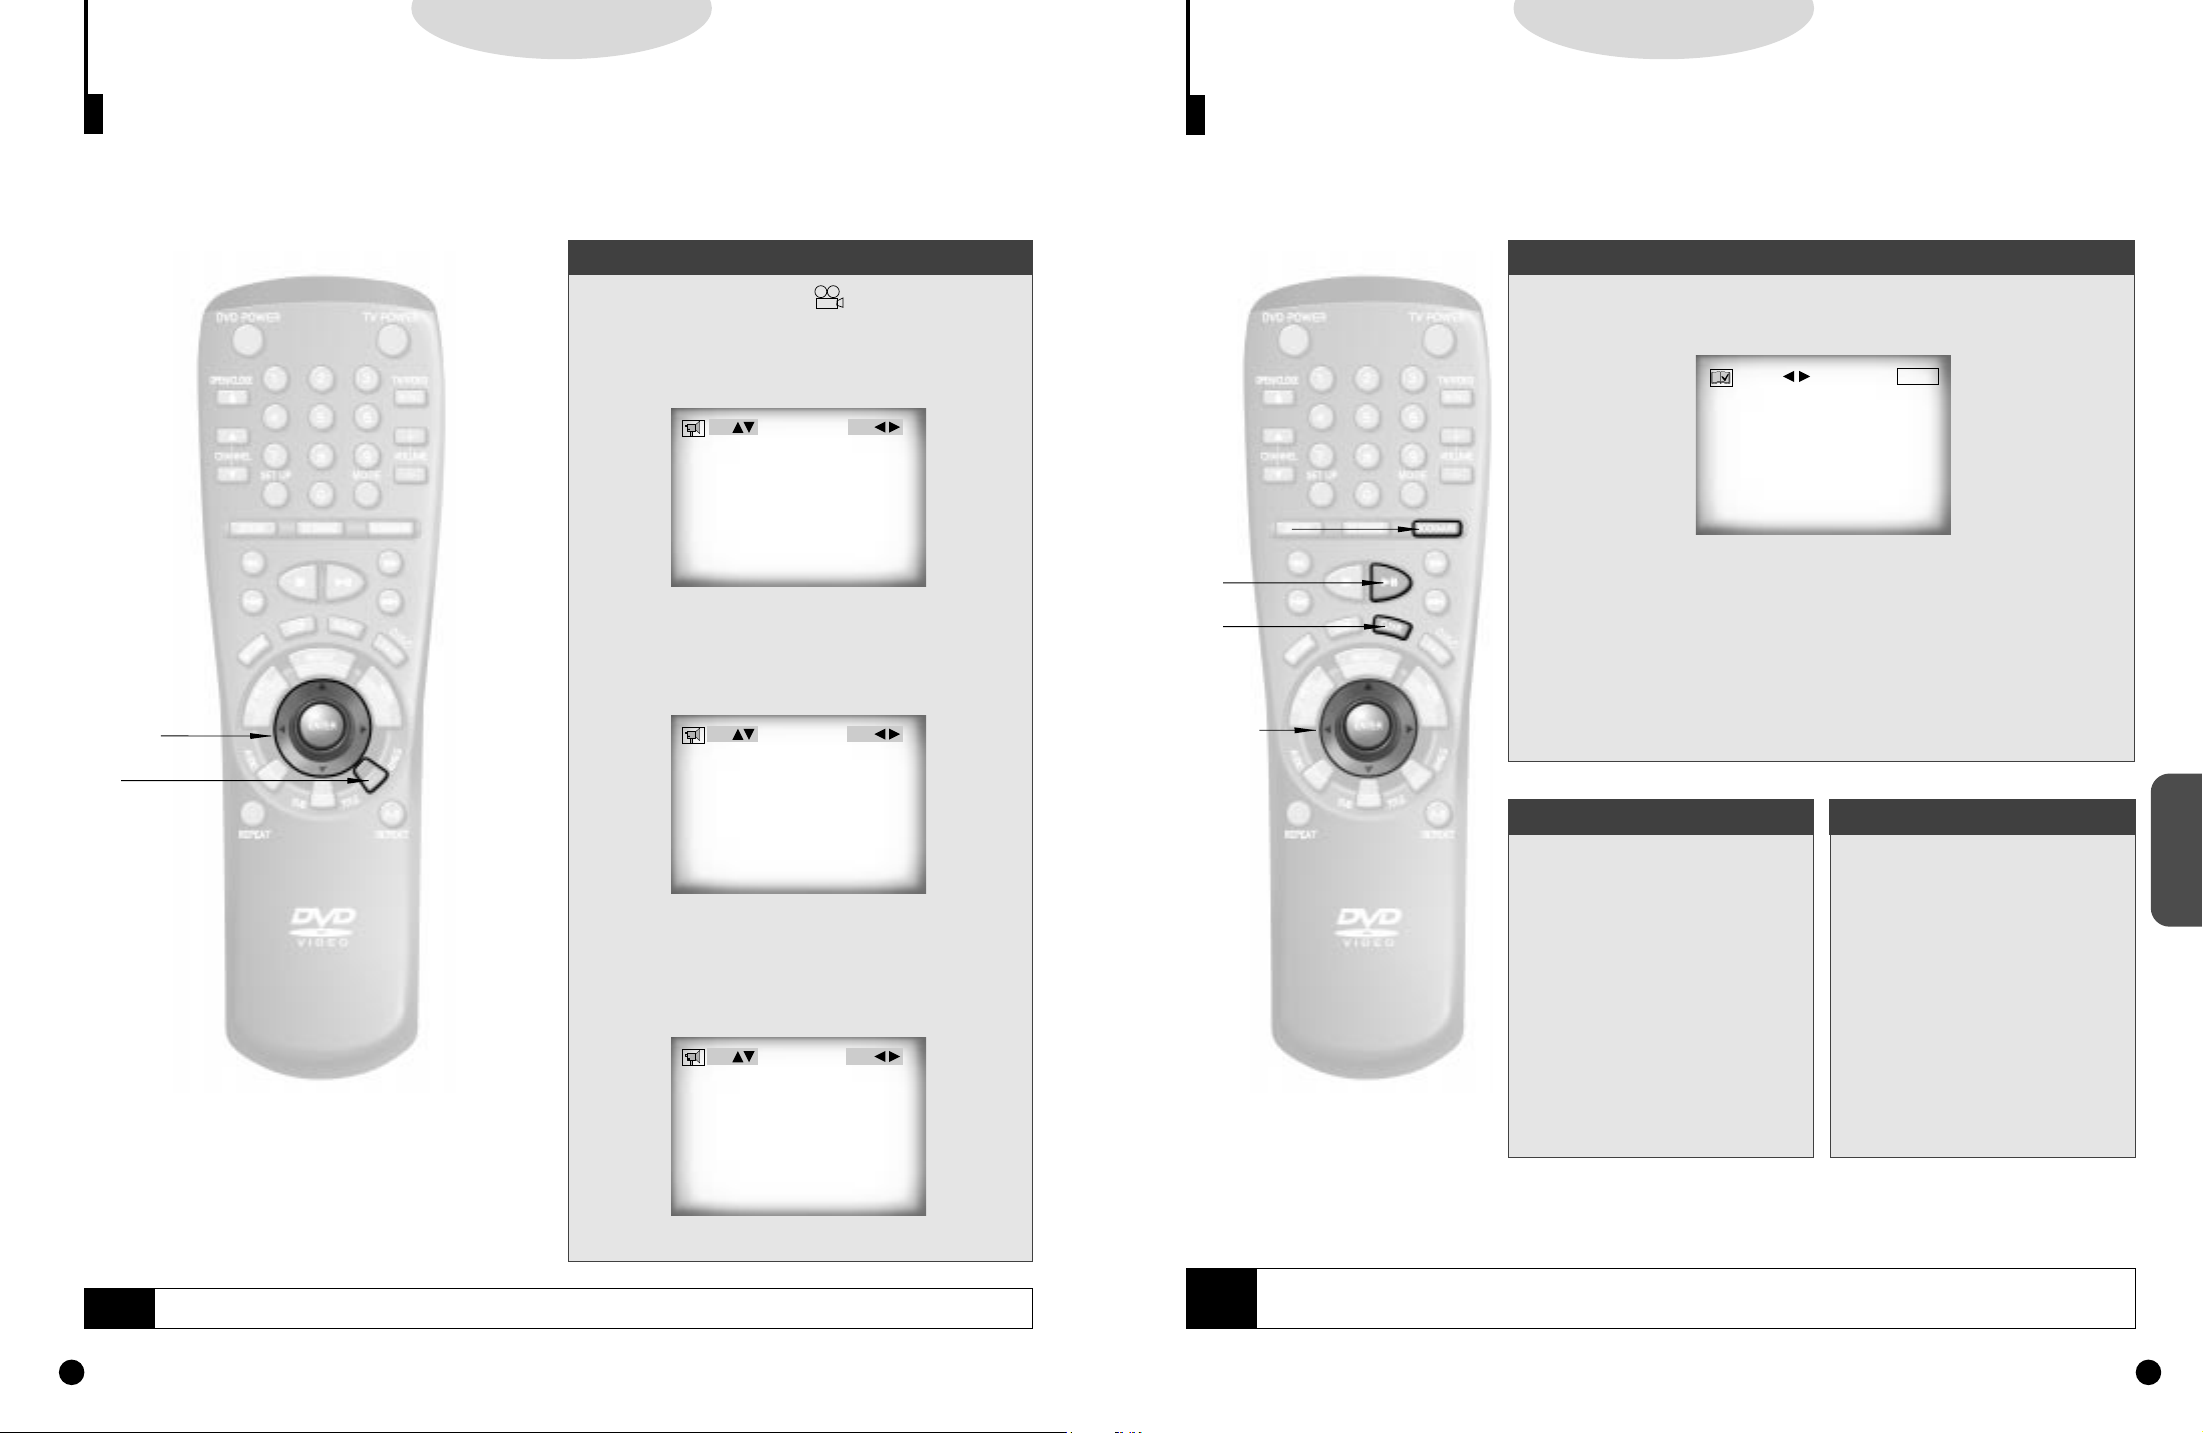
When a DVD contains multiple angles of a particular scene, you can select the Angle function.
Using the ANGLE button
Check to see if an ‘ANGLE ( )’ mark is present at
the upper right hand corner of the screen.
When an ‘ANGLE’mark is shown, press the
1.
ANGLE button.
1.
1/4 MARK: ON
(Angle information display example)
Use the UP/DOWN button to select the desired
2.
screen angle.Then press the ENTER button.
2.
2,3
2,3
1
1
3/4 MARK: ON
Using the Bookmark Function
The Bookmark function lets you select parts of a DVD or VCD (MENU OFF mode) so that you can quickly
find the section at a later time.
Using the Bookmark Function (DVD/VCD)
During playback, press the BOOKMARK button on the remote.
1.
1.
ENTER
MARK
Clearing a Bookmark
1,A,a
1,A,a
C
C
c
c
2,3,
2,3,
b
b
- - -
Use the LEFT/RIGHT button to move to the desired bookmark
2.
prompt.
2.
When you reach the scene you want to mark, press the ENTER
3.
button.The prompt will change to a number (1, 2, or 3).
3.
Press the BOOKMARK button to turn off the display.
4.
4.
Recalling a Marked Scene
FUNCTIONS
ADVANCED
NOTE
(Angle information display example)
Use the LEFT/RIGHT button to determine
3.
whether or not the ‘ANGLE’mark will be dis-
3.
played.
3/4 MARK: OFF
• This function is disc-dependent, and may not work with all DVDs.
• This function does not work when a DVD has not been recorded with a multi-camera angle system.
NOTE
During playback, press the
BOOKMARK button on the
A.
A.
remote.
Use the LEFT/RIGHT button to select a marked
.
BB.
scene.
Press the PLAY/PAUSE
button to skip to the
.
CC.
marked scene.
• Up to three scenes may be marked at the same time.
• When in VCD 2.0 mode (MENU ON mode), this function does not work.
• Depending on the disc, the Bookmark function may not work.
During playback, press the
BOOKMARK button on the
a.
a.
remote.
Use the LEFT/RIGHT but-
ton to select the bookmark
.
bb.
number you want to delete.
Press the CLEAR button to
delete a bookmark number.
c.
c.
Press the BOOKMARK
button to turn off display.
2928
Page 16
DDDDVVVVDDDD////VVVVCCCCDD
DD
DDDDVVVVDD
DD
Using the Zoom and 3D Sound
1.
1.
2.
2.
3.
3.
- During DVD playback, press ENTER to zoom in
1.
1.
2,3,B
2,3,B
Using the Master Volume Control Function
Press the DISPLAY button twice. Use the UP/DOWN button on
the remote or on the front of DVD player to select a suitable
volume.
• Master Volume Control function lets you adjust the volume of the
player’s output. This is useful for matching the player’s output level
to other equipment in your system.
• Master Volume Control function on CD titles with DTS will not wor k
under VOLUME :96 level.
• When the DIGITAL OUTPUT is set to BITSTREAM in the SETUP
MENU, the Volume Control function will not work.
• 3D Sound is possible only on discs recorded using DOLBY SURROUND or DOLBY DIGITAL. However, some of these discs do not
contain rear channel sound signals.
NOTE
• Depending on the disc, the Zoom and 3D Sound function may not work.
• Certain audio features of this product manufactured under a license from Desper Products, Inc., Spatializer®and circle-in-square are
trademarks owned by Desper Products Inc.
A
A
- During VCD playback, press ENTER to zoom in 2X/normal
The simulated surround effect (SPATIALIZER N-2-2)
depends on the disc contents. If you connect the
unit to your stereo system, you can enhance sound
quality and produce a greater surround effect.
This feature is useful when you are using the DVD
player with a two channel stereo through the analog
outputs.
(Discs which are recorded with LPCM or DTS will
A.
A.
BB.
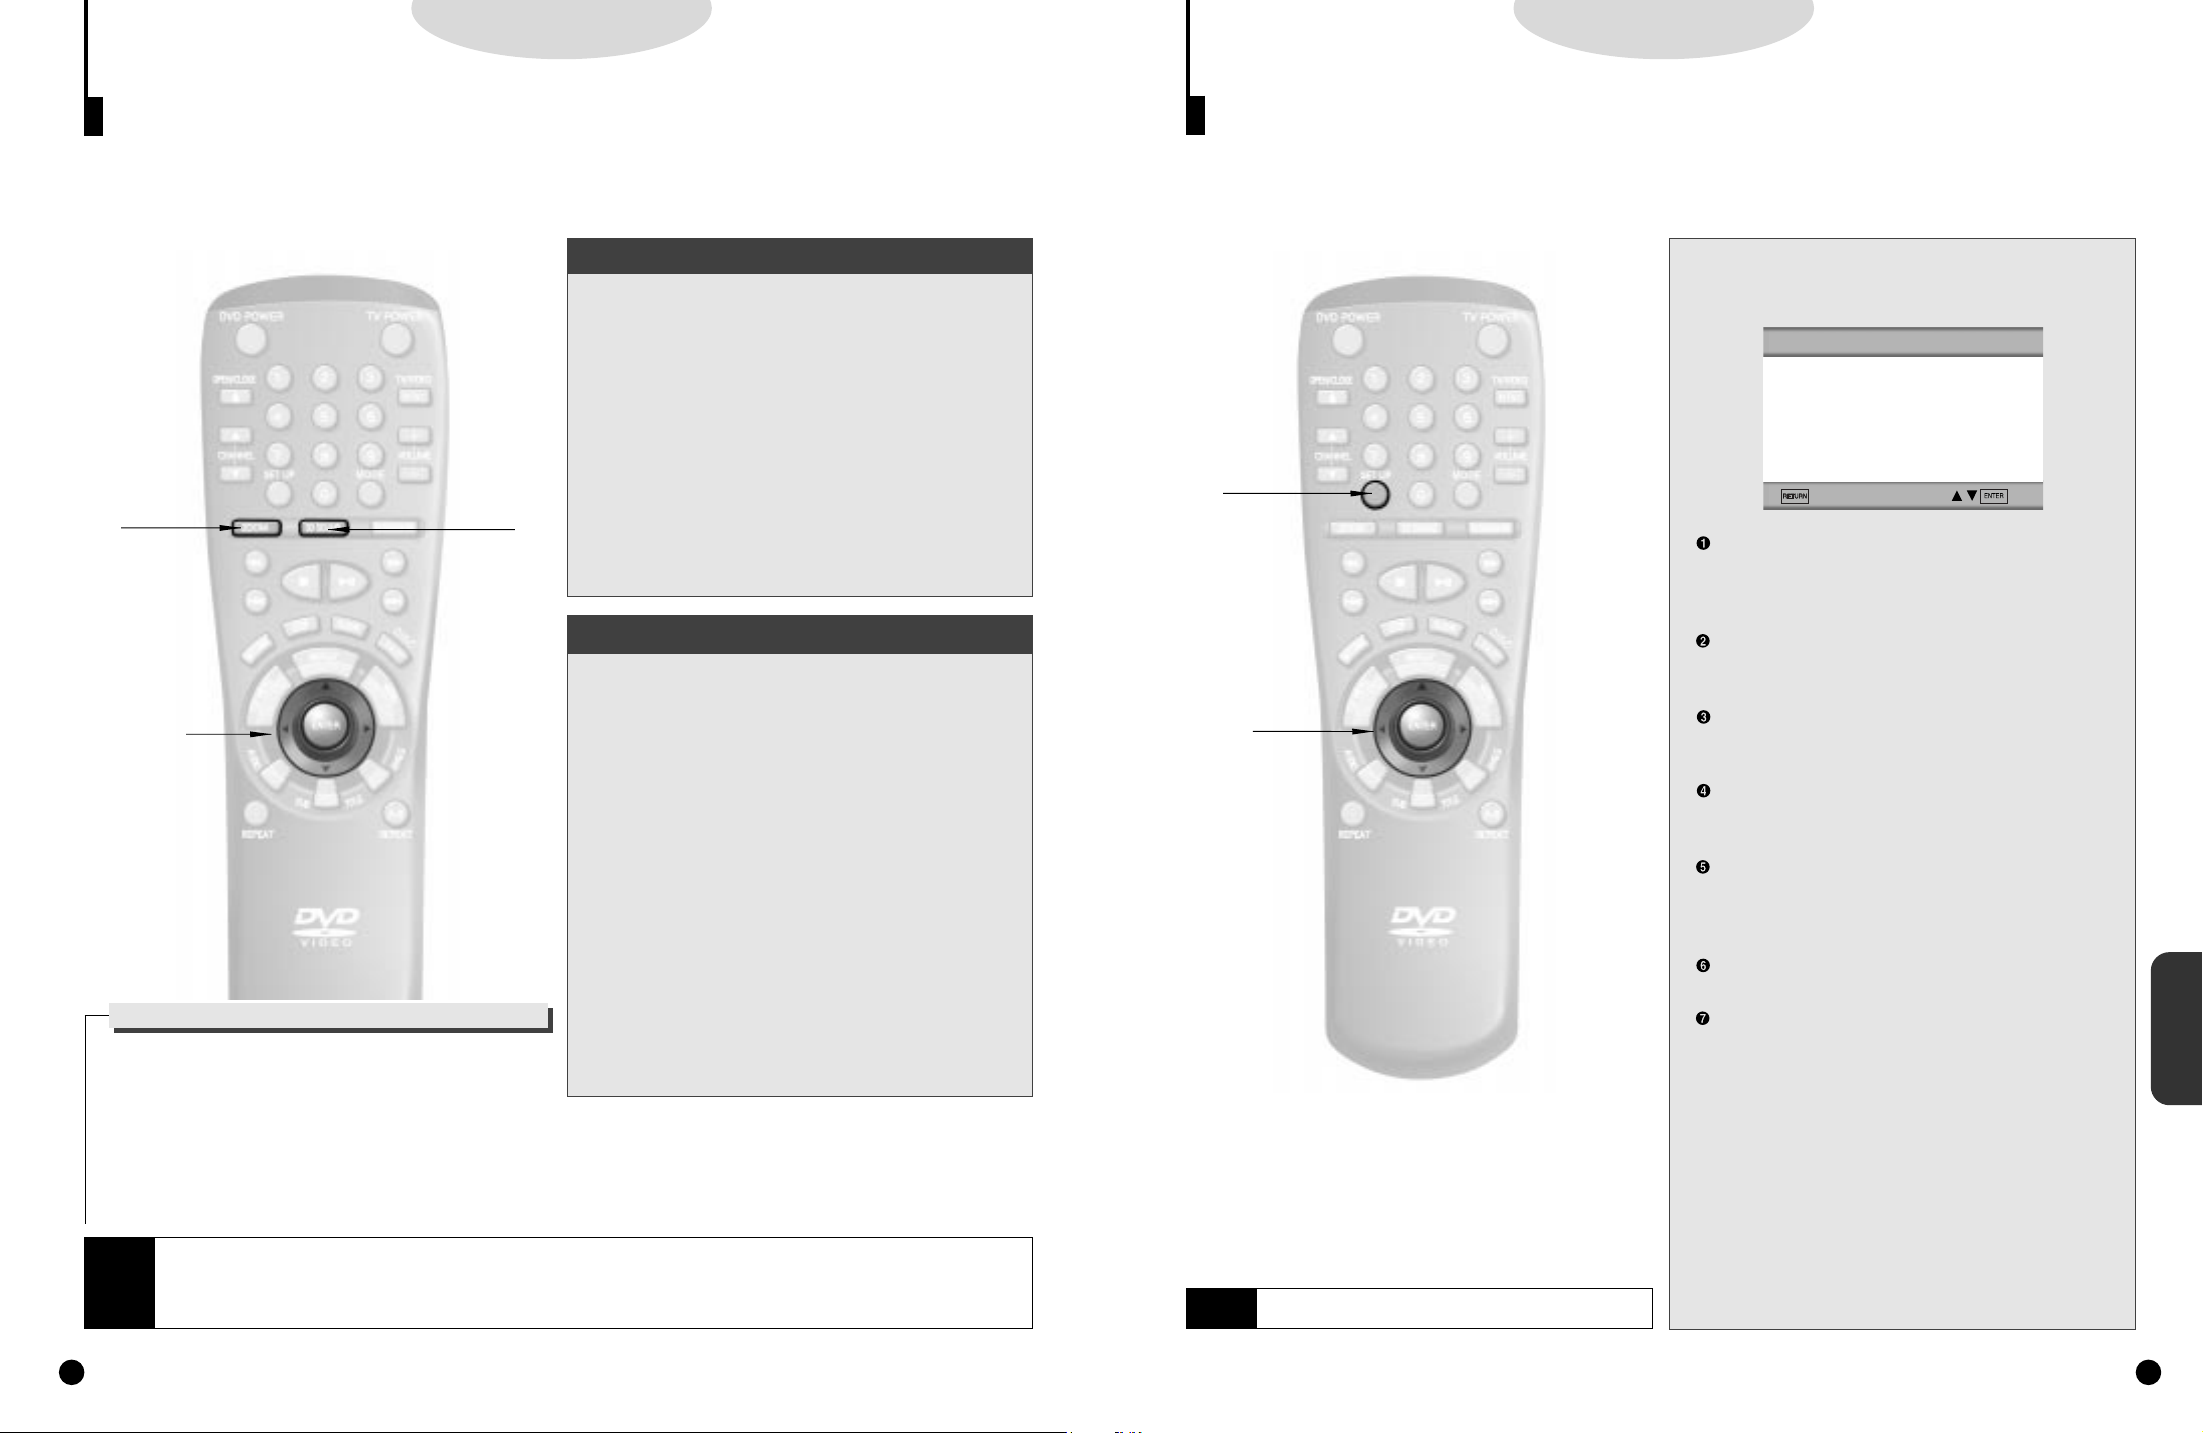
Using the Zoom Function (DVD/VCD)
During playback or pause mode, press the
ZOOM button on the remote.The zoom icon
will be displayed on screen.
Use the UP/DOWN or LEFT/RIGHT button to
select the part of the screen you want to zoom.
Press the ENTER button.
2X/4X/2X/normal in order.
in order.
Using the 3D Sound Function
not work.When the DIGITAL OUTPUT is set to
BITSTREAM in the SETUP MENU, the 3D Sound
function will not work.)
During playback, press the 3D SOUND button.
The 3D SOUND mark will be displayed on
screen. (Be sure the DIGITAL OUTPUT is set
to PCM.)
Press the LEFT/RIGHT button to turn the 3D
.
Sound feature on or off.
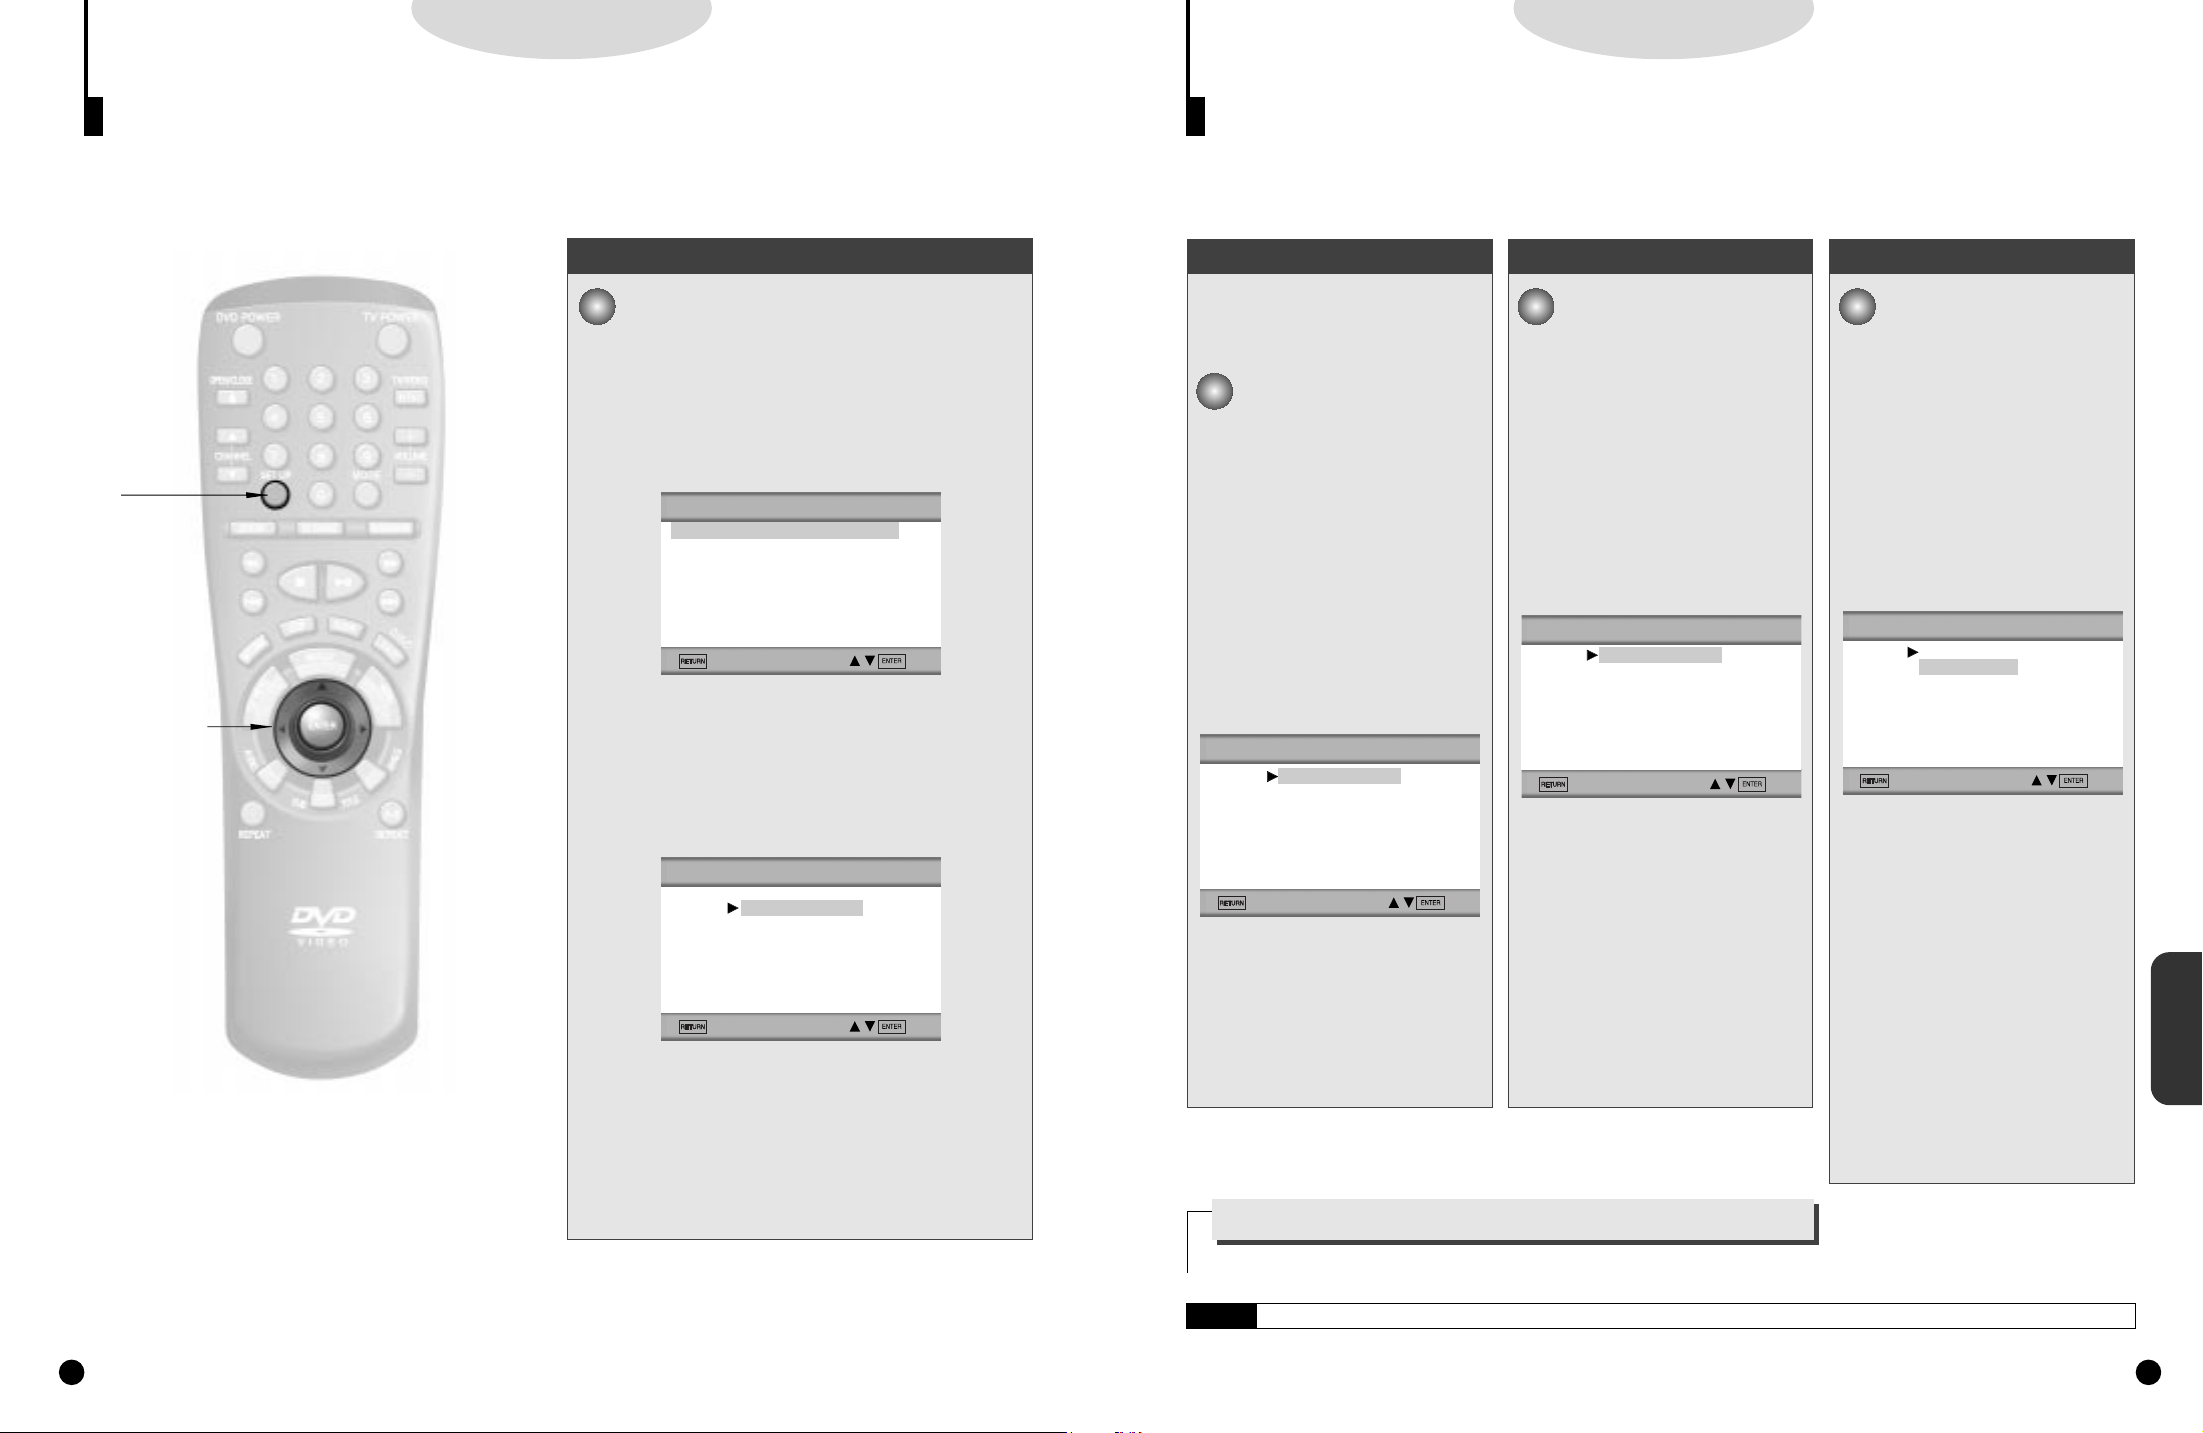
Using the Setup Menu
The Setup menu lets you customize your DVD player by allowing you to select various language
preferences, set up a parental level, even adjust the player to the type of television screen you have
(i.e. widescreen).
Press the SETUP button on the remote in the
1.
play or stop mode.
1.
SETUP MENU
1 PLAYER MENU ENGLISH
2 DISC MENU ENGLISH
3 AUDIO ENGLISH
4 SUBTITLE AUTOMATIC
5 PARENTAL UNLOCKED
6 AUDIO OPTIONS
7 DISPLAY OPTIONS
1
1
PLAYER MENU : Setup of the Display Language
(See P32)
Use the Player preference menu to select the language for
the player’s on-screen displays.
DISC MENU : Setup of the Menu Language (See P33)
Use the Menu preference menu to select the language
you want a DVD’s disc menu to be displayed in.
2,3
2,3
NOTE
Depending on the disc, some SETUP menu selections
may not work.
AUDIO : Setup of the Audio Language (See P33)
Use the Audio preference menu to select the soundtrack
language.
SUBTITLE : Setup of the Subtitle Language (See P33)
Use the Subtitle preference menu to select the language
the disc’s subtitles are to be displayed in.
PARENTAL : Setup of the Parental Control (See P34)
Allows users to set the level necessary to prevent children
from viewing unsuitable movies such as those with violence, X rating, etc.
AUDIO OPTIONS : Setup of the Audio Options (See P35)
Use to set up the audio options such as speaker setup.
DISPLAY OPTIONS : Setup of the Display Options
(See P37)
Use to select
and several display options.
Use the UP/DOWN button on the remote to
2.
access the different features.
2.
Press the ENTER button to access the sub
3.
features.
3.
To make the setup screen disappear after setting up, press
the SETUP button again.
which type of screen you want to watch
SETUP MENU
CHANGING
3130
Page 17
DDDDVVVVDD
DD
DDDDVVVVDD
DD
Setting Up the Language Features
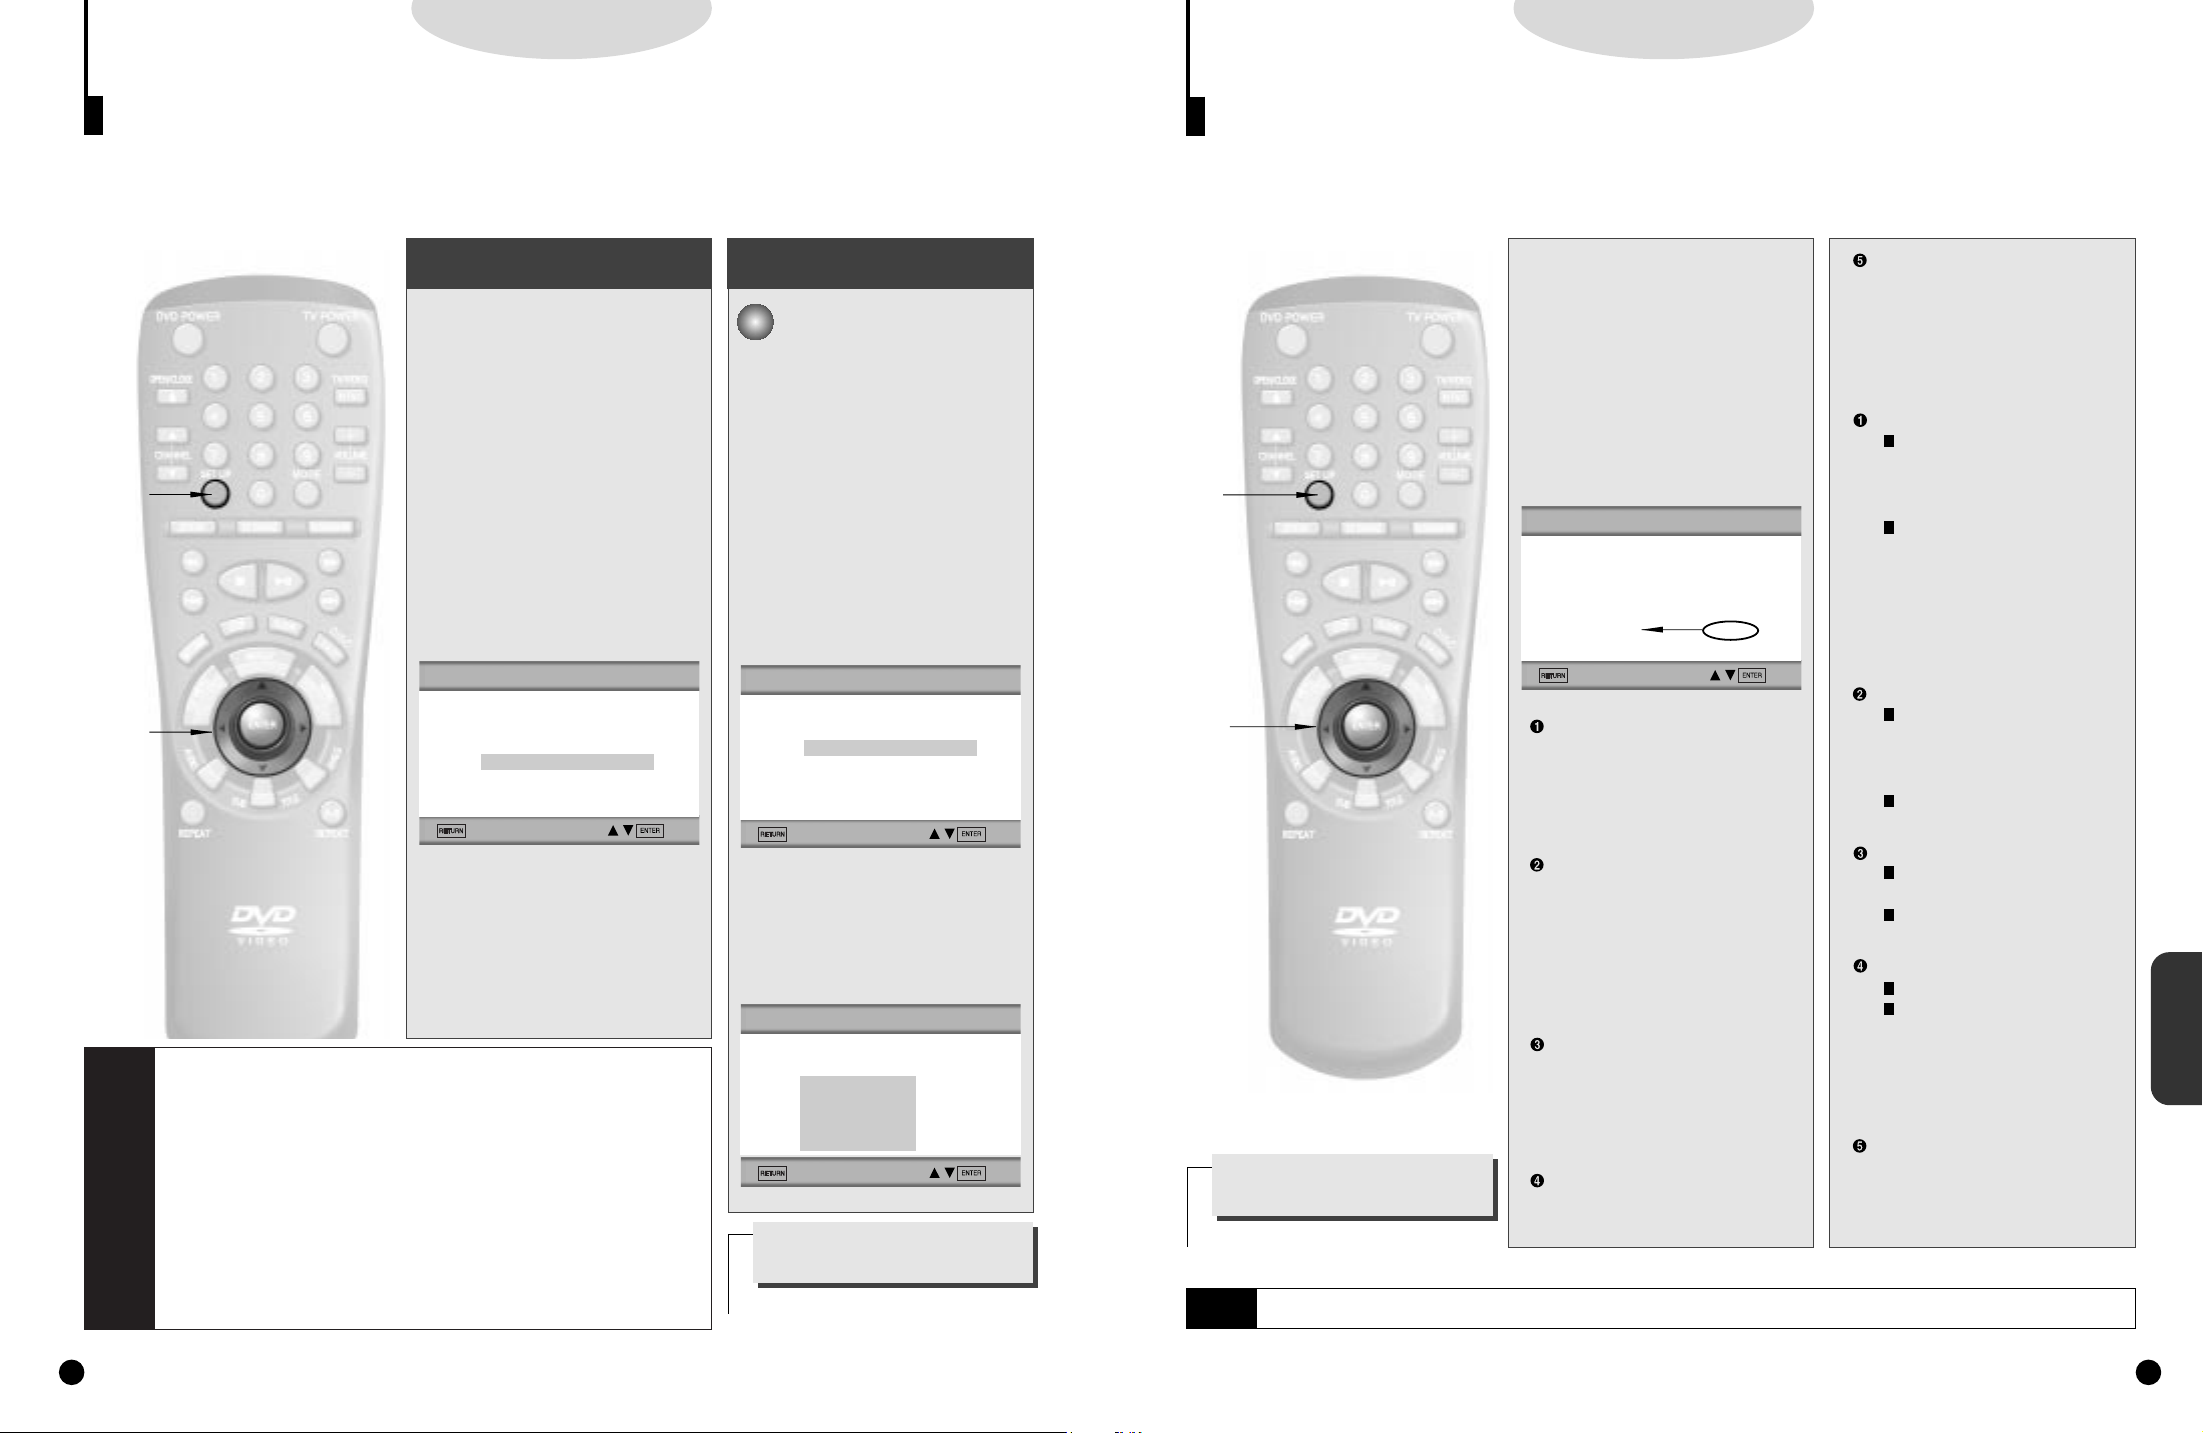
If you set the player menu, disc menu, audio and subtitle language in advance, it will come up automatically
every time you watch a movie.
Using the Player Menu
Setting up in ENGLISH.
e.g
Press the SETUP button when in play or stop
1.
mode.
1.
Use the UP/DOWN button to select the
2.
PLAYER MENU.
2.
1
1
2,3,4,5
2,3,4,5
1 PLAYER MENU ENGLISH
1 PLAYER MENU ENGLISH
2 DISC MENU ENGLISH
3 AUDIO ENGLISH
4 SUBTITLE AUTOMATIC
5 PARENTAL UNLOCKED
6 AUDIO OPTIONS
7 DISPLAY OPTIONS
Press the ENTER button.
3.
3.
Use the UP/DOWN button to select ‘ENGLISH’.
4.
4.
PLAYER MENU LANGUAGE
1 ENGLISH
1 ENGLISH
2 FRANCAIS
3 DEUTSCH
4 ESPAÑOL
5 ITALIANO
6 NEDERLANDS
Press the ENTER button.
5.
5.
- ENGLISH is selected and the screen returns to SETUP
MENU
- To make the SETUP MENU disappear, press the RETURN
button.
SETUP MENU
Setting Up the Language Features (ContÕd)
Using the Subtitle LanguageUsing the Disc Menu Language Using the Audio Language
This function changes the language only for the text on the
disc menu screens.
Setting up in ENGLISH.
e.g
Press the SETUP button
1.
when in play or stop mode.
1.
Use the UP/DOWN button
2.
to select DISC MENU.
2.
Press the ENTER button.
3.
3.
Use the UP/DOWN button
4.
to select ‘ENGLISH’.
4.
DISC MENU LANGUAGE
1 ENGLISH
1 ENGLISH
2 FRANCAIS
3 DEUTSCH
4 ESPAÑOL
5 ITALIANO
6 NEDERLANDS
7 OTHERS
- Select “OTHERS”if the language you
want is not listed.
Press the ENTER button.
5.
5.
- ENGLISH is selected and the screen
returns to SETUP MENU.
How to make the SETUP MENU disappear or
return to menu screen during set up.
Setting up in ENGLISH.
e.g
Press the SETUP button
A.
when in play or stop mode.
A.
Press the UP/DOWN but-
.
ton to move to AUDIO.
BB.
Press the ENTER button.
.
CC.
Press the UP/DOWN but-
.
ton to select ‘ENGLISH’.
DD.
AUDIO LANGUAGE
1 ENGLISH
1 ENGLISH
2 FRANCAIS
3 DEUTSCH
4 ESPAÑOL
5 ITALIANO
6 NEDERLANDS
7 ORIGINAL
8 OTHERS
- Select “ORIGINAL” if you want the
default soundtrack language to be
the original language the disc is
recorded in.
- Select “OTHERS”if the language you
want is not listed.
Press the ENTER button.
E.
E.
- ENGLISH is selected and the screen
returns to SETUP MENU.
Setting up in ENGLISH.
e.g
Press the SETUP button
a.
when in play or stop mode.
a.
Use the UP/DOWN button
.
to select SUBTITLE.
bb.
Press the ENTER button.
c.
c.
Use the UP/DOWN button
d.
to select ‘ENGLISH’.
d.
- Select “AUTOMATIC” if you want the
subtitle language to be the same as
the language selected as the audio
preference.
- Select “OTHERS”if the language you
want is not listed. Some discs may
not contain the language you
select as your initial language; in that
case the disc will use its original
language setting.
Press the ENTER button.
.
ee.
- ENGLISH is selected and the screen
returns to SETUP MENU.
SUBTITLE LANGUAGE
1 AUTOMATIC
2 ENGLISH
2 ENGLISH
3 FRANCAIS
4 DEUTSCH
5 ESPAÑOL
6 ITALIANO
7 NEDERLANDS
8 OTHERS
SETUP MENU
CHANGING
Press RETURN button.
NOTE
If the selected language is not recorded on the disc, the original pre-recorded language is selected.
3332
Page 18
DDDDVVVVDD
DD
DDDDVVVVDD
DD
Setting Up the Parental Control
The Parental Control function works in conjunction with DVDs that have been assigned a rating - which helps you
control the types of DVDs that your family watches.There are up to 8 rating levels on a disc.
SETTING THE
PARENTAL LEVEL
Setting up in LEVEL 6
Press the SETUP button
when in play or stop mode.
Press the UP/DOWN button
to select PARENTAL.
.
Press the ENTER button
and enter your 4-digit pass-
.
word by pressing the 0-9
button.
Move to the RATING
LEVEL by using the
.
UP/DOWN button and
press the ENTER button.
PARENTAL CONTROL
1 RATING LEVEL
1 RATING LEVEL
2 CHANGE PASSWORD
Move to LEVEL 6 by using
the UP/DOWN button and
press the ENTER button.
RATING LEVEL
UNLOCK
LOCK LEVEL 8 ADULT
LEVEL 7
LEVEL 6
LEVEL 6
LEVEL 5
LEVEL 5
LEVEL 4
LEVEL 4
LEVEL 3
LEVEL 3
LEVEL 2
LEVEL 2
LEVEL 1 KIDS SAFE
LEVEL 1 KIDS SAFE
How to make the SETUP MENU
disappear or return to
menu screen during set up.
1,A
1,A
2,B
2,B
3,C
3,C
4,D
4,D
5,E
5,E
NOTE
SETTING THE
P ASSWORD
Press the SETUP button
when in play or stop mode.
1.
1.
Press the UP/DOWN button to select PARENTAL.
2.
2.
Press the ENTER button
and enter your 4-digit pass-
3.
3.
word by pressing the 0-9
button.
- ‘7777’is the original password that
has been encrypted in the player.
Move to CHANGE PASSWORD by using the
4.
4.
UP/DOWN button and
press the ENTER button.
PARENTAL CONTROL
1 RATING LEVEL
2 CHANGE PASSWORD
2 CHANGE PASSWORD
Enter the new password.
5.
5.
- After entering the new password, re-
enter it one more times to make sure
the password works.
- The Parental Level function is com-
patible only with parental level
encoded discs.
• What if a DVD’s rating exceeds the player’s rating level?
The player alerts you when you try to play a DVD with a rating that exceeds the
level you’ve set.The message, “YOUR SELECTION EXCEEDS THE RATING
LIMIT FOR THIS PLAYER.” appears on screen. Some discs are authored with a
rating override feature included.When you play a disc with this feature, the message, “Your selection exceeds the rating level for this player.Override the level?”is
displayed.Select “Override” or “Cancel.”If you choose to override the rating level,
you will need to enter your 4-digit password to begin playback.
• If you have forgotten your password, follow this procedure:
Press power on from a cold start with no disc in the unit. Press the STOP and
PLAY buttons simultaneously on the front panel for three seconds.The Select
Menu Language display will appear.Select the desired language button.Press
the SETUP button on the remote control to select the Parental Mode.The
Parental Mode is now unlocked as indicated on the display.Press the DOWN button to select Parental.Press ENTER and the Password Check display will appear.
Enter the default password of “7777”.You can now set your rating level and
change your password to a new number.
e.g
A.
A.
BB.
CC.
DD.
E.
E.
- The disc which contains LEVEL 7 or
LEVEL 8 will now not play.
Press RETURN button.
Setting Up Audio Options
Press the SETUP button
1.
when in play or stop mode.
1.
Use the UP/DOWN button to
2.
select AUDIO OPTIONS.Then
2.
press the ENTER button.
Use the UP/DOWN button to
3.
select the desired item.Then
3.
press the ENTER button.
1
1
1 DIGITAL OUTPUT PCM
2 DTS OFF
3 DYNAMIC COMPRESSION ON
4 2X SCAN AUDIO OFF
5 SPEAKER
2
2
3,4
3,4
How to make the SETUP MENU
disappear or return to menu
screen during set up.
Press RETURN button.
NOTE
• Manufactured under license from Dolby Laboratories.“Dolby”, “Pro Logic”and the double-D symbol are trademarks of Dolby
Laboratories. Confidential unpublished works. ©1992-1997 Dolby Laboratories Inc. All r ights reser ved.
DIGITAL OUTPUT
A digital surround sound format
that is recorded by Dolby Digital.
Select the suitable output signal
type of digital audio output
(Bitstream/PCM) during playback.
DTS
This program features discrete 5.1
channel sound-track and must be
played through DTS-capable
equipment.When played through
DTS equipment, sound will be
heard from all five system speakers and a subwoofer.
DYNAMIC COMPRESSION
Compresses the dynamic range
(quietest to loudest sound) of a
disc’s soundtrack.This function is
disc-dependent, and may not work
with all DVDs.
2X SCAN AUDIO
Turns audio off or on when a disc
is in 2X playback mode.
AUDIO OPTIONS
C700 only
SPEAKER (C700 only)
To select the SPEAKER SETUP to
hear surround sound.
Use the UP/DOWN button to
4.
select the desired item.Then
4.
press the ENTER button.
DIGITAL OUTPUT
1
PCM : Converts to PCM(2CH)
48kHz/16Bit audio.Select PCM
when using the Analog Audio
Outputs.
2
BITSTREAM : Converts to Dolby
Digital BITSTREAM (5.1CH).
Select BITSTREAM when using
the Digital Audio Output.
NOTE : Be sure to select the
correct Digital Output or no
audio will be heard.
DTS
1
ON : Outputs DTS BITSTREAM
via digital output only.
Select DTS when connecting to a DTS DECODER.
2
OFF : Doesn’t output digital sig-
nal.
DYNAMIC COMPRESSION
1
ON :To select dynamic com-
pression.
2
OFF :To select the standard
range.
2X SCAN AUDIO
1
ON :Turns 2X audio on.
2
OFF :Turns 2X audio off.
Though 2X SCAN AUDIO is ON
in the SETUP MENU, no sound
will be heard on discs which are
recorded with LPCM, DTS or
MPEG-2.
SPEAKER (C700 only)
Refer to page 36.
SETUP MENU
CHANGING
3534
Page 19
DDDDVVVVDD
DD
DDDDVVVVDD
DD
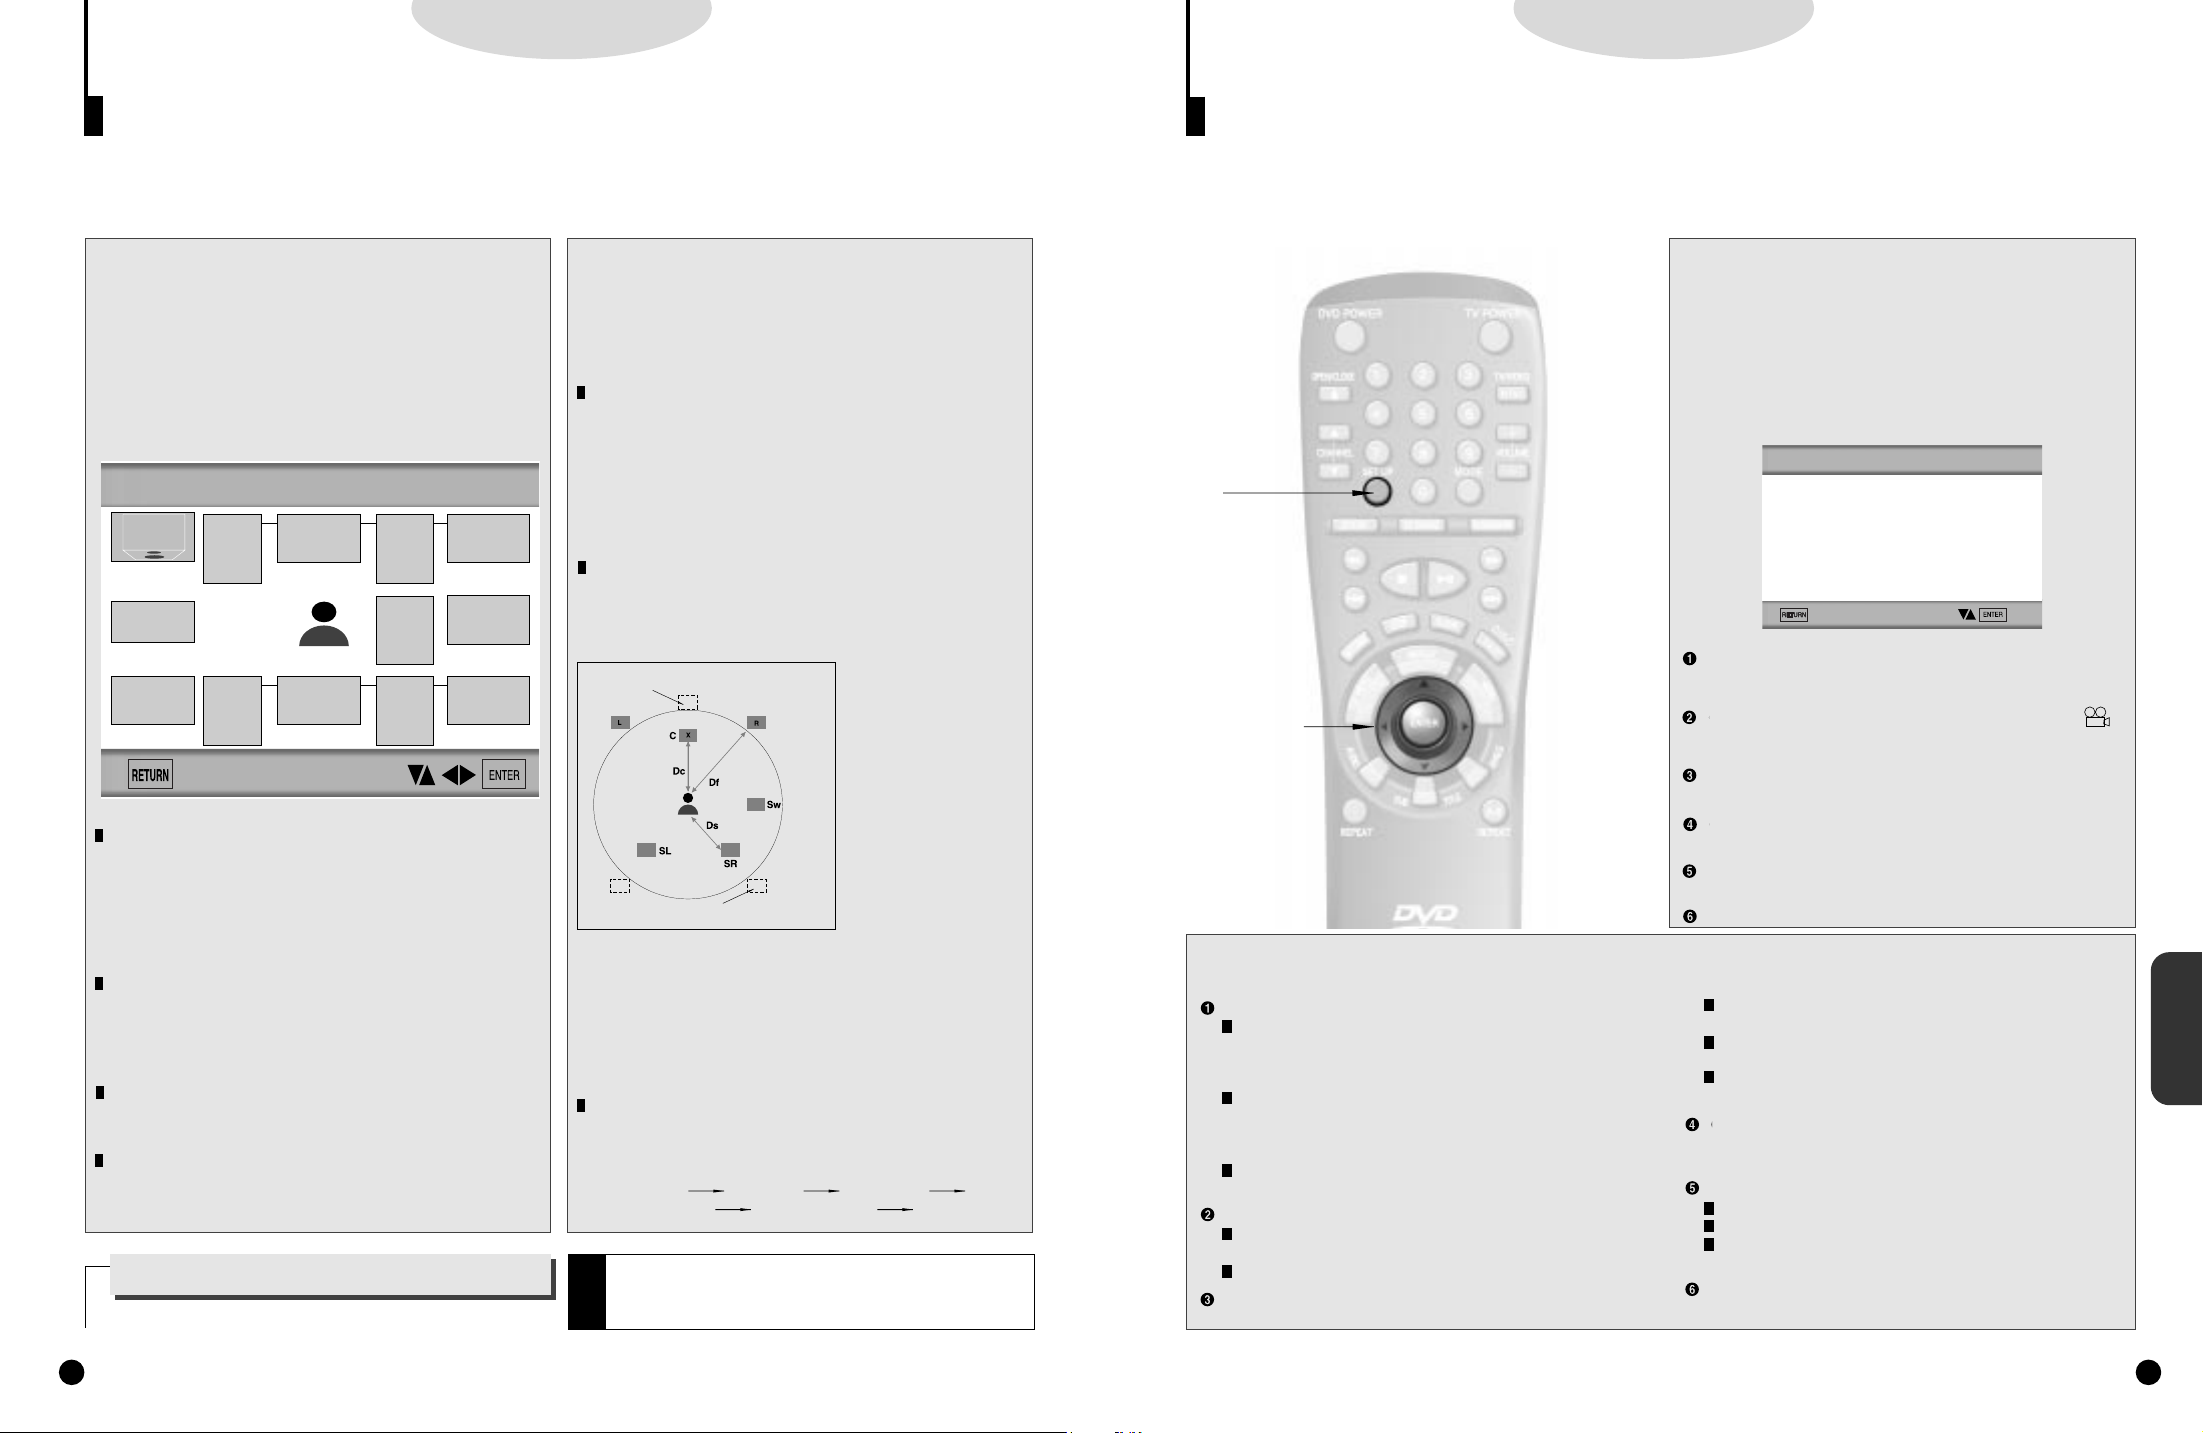
Surround Sound Speaker Setup (C700 only)
The DVD-C700 has a Speaker Setup feature that allows you to customize your surround sound setup.
Press the SETUP button in play or stop mode.
1.
1.
Press the UP/DOWN button to select AUDIO
OPTIONS.Then press the ENTER button.
2.
2.
Use the UP/DOWN button to select SPEAKER
SETUP.Then press the ENTER button.
3.
3.
SPEAKER SETUP
Speaker Mode
(Front L)
TEST
Speaker Mode
(Surround L)
SPEAKER MODE
You can set a mode in the system that’s currently used.
Initially it is set as follows:
• Front speaker (L/R) :Found (Large illustration)
• Center speaker : Not found (No illustration visible)
• Subwoofer : Not found (No illustration visible)
• Surround speaker (L/R) : Not found (No illustration visible)
DELA Y TIME
You can customize the sound to conform to the acoustics of
your room by adding a delay effect to the sound of the Center
and Surround Speakers.Initially it is set as “Oms (milliseconds)”.
TEST
Test signals memorized in the system are sent to each
speaker.
CHANNEL BALANCE
Adjust the output level of a speaker by using test signals that
are memorized in the system. Initially it is set as “OdB”.
How to make the SETUP MENU disappear or
Press RETURN button.
Channel
Balance
(Center)
OdB
Channel
Balance
(Surround L)
OdB
return to menu screen during set up.
Speaker Mode
(Center)
Delay Time
(Surround L/R)
Oms
Delay Time
(Center)
Oms
Channel
Balance
(Subwoofer)
OdB
Channel
Balance
(Surround R)
OdB
Speaker Mode
(Front R)
Speaker Mode
(Subwoofer)
Speaker Mode
(Surround R)
Use the UP/DOWN or LEFT/RIGHT button to
4.
select the desired item.Then press the ENTER
4.
button.
Use the UP/DOWN button to select speaker
5.
mode desired.Then press the ENTER button.
5.
Setting up SPEAKER MODE
• If you have connected the system to a speaker with low frequencies of 100Hz or below, select ‘Found(Large illustration)’.
• If you have connected the system to a speaker without low frequencies of 100Hz or below, select ‘Found(Small illustration)’.
If you don’t connect a subwoofer, always select ‘Found(Large
illustration)’ for the Front Speakers(L/R).
• When you don’t have a particular speaker connected, select
‘Not found(No illustration visible)’.
Setting up DELAY TIME
• When 5.1CH Surround Sound is played, you can enjoy the
best sound if the distance between you and each speaker is
the same.You can set Delay Time in the Center/Surround
Speaker to customize the sound to the acoustic of your room.
Ideal CENTER SPEAKER position
• Arrange all
speakers
within circle.
Ideal SURROUND SPEAKER position
• Setting SURROUND SPEAKERS
If the distance of Df is equal to the distance of Ds in the
above, set the mode as Oms.Otherwise, change the setting
according to the table on the right. (B) = Df - Ds
Setting up TEST
The test output signals come clockwise starting from the Front
Speaker(L). Adjust Channel Balance to match to the volume of
test signals memorized in the system.
FRONT(L) CENTER FRONT(R)
SUBWOOFER SURROUND(R) SURROUND(L)
• The subwoofer test output signal is lower than the other
N
speakers.
O
T
• The MPEG Multichannel logo is a trademark registered by
E
PHILIPS Corporation.
• Setting CENTER
SPEAKER
If the distance of Dc is
equal to or longer than the
distance of Df in the left
figure, set the mode as
Oms. Otherwise, change
the setting according to
the table below.
(A) = Df - Dc
Distance of (A)(in) Setting(ms)
1.64 1
3.28 2
4.92 3
6.56 5
Distance of (B)(in) Setting(ms)
6.56 5
13.12 10
19.68 15
Setting Up Display Options
Press the SETUP button in play or stop mode.
1.
1.
Use the UP/DOWN button to select DISPLAY
2.
OPTIONS.Then press the ENTER button.
2.
Use the UP/DOWN button to select the desired
3.
item.Then press the ENTER button.
3.
1
1
TV ASPECT : Depending on the type of television you have,
2,3,4
2,3,4
ANGLE MARK : Use to turn on or off the angle mark ( )
STILL MODE : Prevent picture shaking in still mode and dis-
SCREEN MESSAGES : Use to turn on-screen messages
FRONT DISPLAY
Adjust the brightness of the unit’s front panel display.
BLACK LEVEL
Use the UP/DOWN button to select the desired item.Then press the ENTER button.
4.
4.
TV ASPECT
1
4:3 LETTER BOX :
Select when you want to see the total 16:9 ratio screen DVD
supplies, even though you have a TV with a 4:3 ratio screen.
Black bars will appear at the top and bottom of the screen.
2
4:3 PAN-SCAN :
Select this for conventional size TVs when you want to see
the central portion of the 16:9 screen. (Extreme left and right
side of movie picture will be cut off.)
3
16:9 WIDE :
You can view the full 16:9 picture in your widescreen TV.
ANGLE MARK
1
ON : Displays ANGLE MARK in the upper right corner of
screen.
2
OFF : Doesn’t display it.
STILL MODE
1
2
3
SCREEN MESSAGES
FRONT DISPLAY
1
2
3
BLACK LEVEL
Adjust the brightness of screen.
1 TV ASPECT WIDE
2 ANGLE MARK ON
3 STILL MODE AUTO
4 SCREEN MESSAGES ON
5 FRONT DISPLAY AUTO
6 BLACK LEVEL OFF
you may want to adjust the screen setting
(aspect ratio).
play small text clearer.
FIELD : Select this feature when the screen shakes in the
AUTO mode.
FRAME : Select this feature when you want to see small let-
ters more clearly in the AUTO mode.
AUTO : When selecting AUTO, FIELD/FRAME mode will be
automatically converted.
Use this feature to turn the on-screen displays on or off that
appear in screen.
BRIGHT : It makes the Front Panel Display bright.
DIM : It makes the Front Panel Display dim.
AUTO DIM : It makes the Front Panel Display dim automati-
cally when playing a DVD.
DISPLAY OPTIONS
when the DVD plays multiple angles of a
particular scene.
on or off.
SETUP MENU
CHANGING
3736
Page 20
Controlling a TV with the Remote
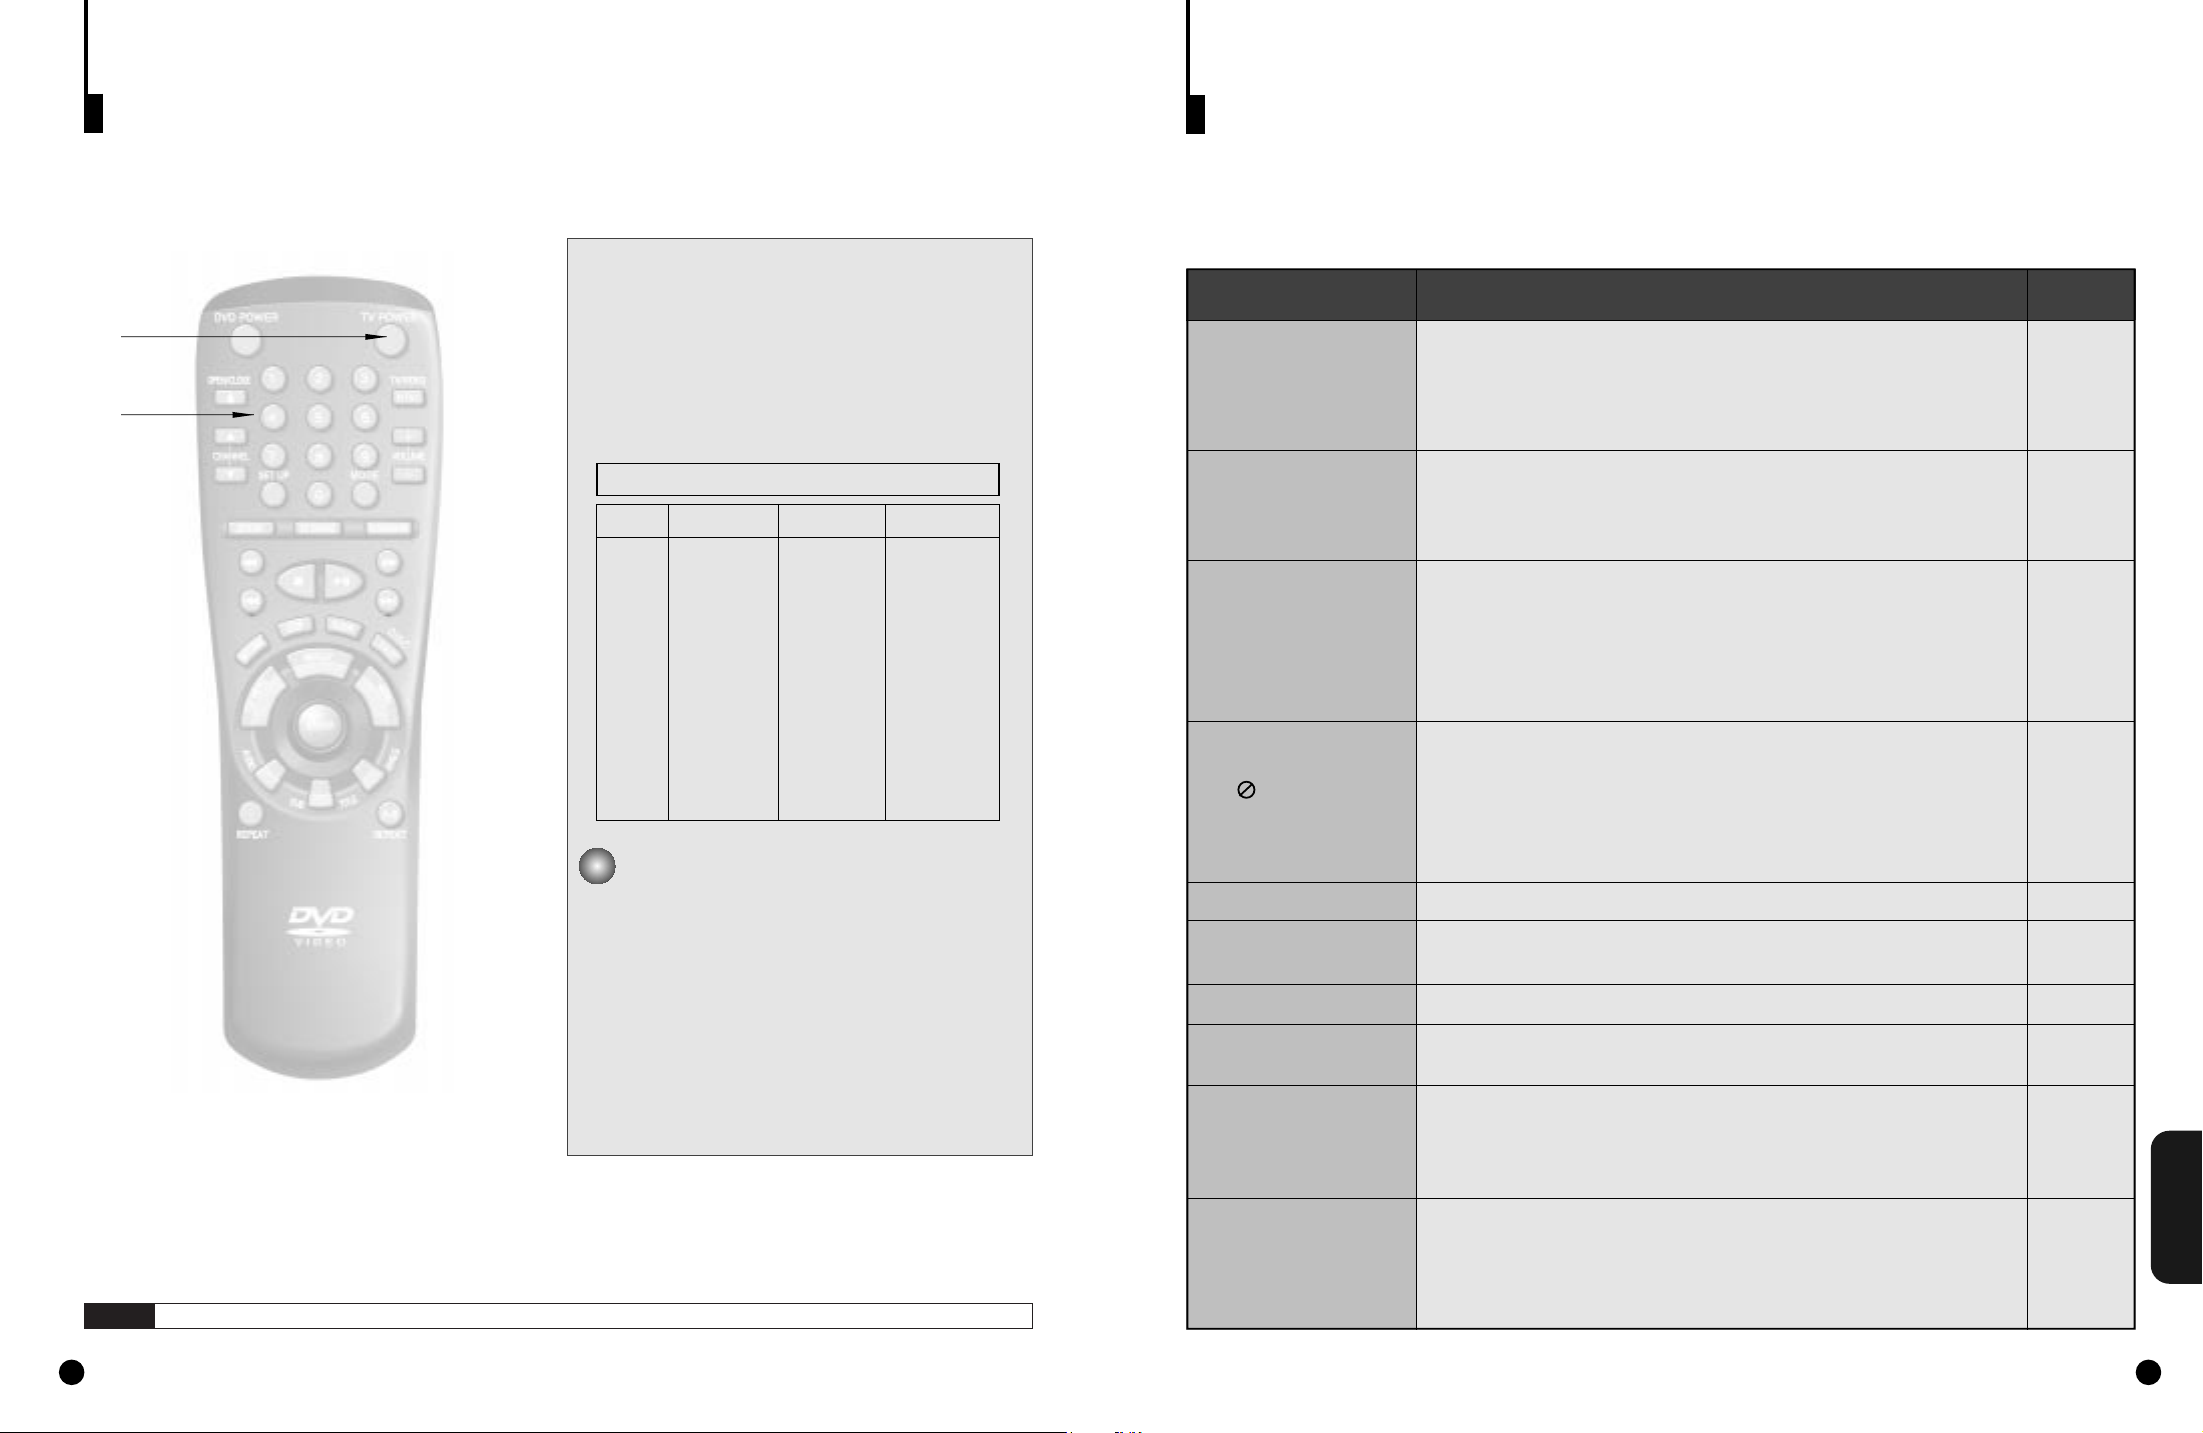
The remote can also be set up to control most TVs.To program the remote, use the code that corresponds to
your brand.
Tur n on the TV.
1.
1.
1
1
3
3
Point the DVD’s remote at the TV.
2.
2.
While holding the TV POWER button down,
3.
enter the code for your brand.
3.
Troubleshooting Guide
Proper function of your DVD player is mostly dependent on the discs you play.When some of the functions
indicated in the I/B do not work properly, it is highly probable that the disc is responsible.We strongly
recommend you review the instruction book before you start using the player. For your convenience, we
have enlisted some tips to help solve problems you might encounter while using the DVD player.
However, if the same problem occurs repeatedly, please contact your nearest service center.
Problem
No operations can be
performed with remote.
• Check the batteries in the remote. May need replacing.
• Operate the remote control at a distance of no more than 20 feet.
• Remove batteries and hold down one or more buttons for several minutes to drain the microprocessor inside the remote to reset it. Reinstall
batteries and try remote again.
Action
I/B
P 13
TV Codes
CODE
0
1
2
3
4
5
6
7
8
9
SETUP
DISPLAY
For Samsung A TVs
e.g
While holding down the TV button, enter 0.
If the TV turns off, setup is complete.
4.
4.
Enter other codes of the same brand if the first code does
not work.
To operate the TV, use the “TV Function
5.
Buttons” descr ibed on page 13.
5.
BRAND
SAMSUNG A
SHARP B
SONY
MAGNAVOX
SANYO A
LG B
RCA
LG A
TOSHIBA
HITACHI
JVC
PANASONIC A
CODE
OPEN/CLOSE
AUDIO
SUB TITLE
DVD POWER
ANGLE
TOP MENU
MENU
RETURN
REV SEARCH
REPEAT
FWD SEARCH
BACK SKIP
BRAND
MITSUBISHI
SAMSUNG B
SAMSUNG C
SHARP A
ZENITH
LG C
DAEWOO
SANYO B
EMERSON
SHARP C
SAMSUNG D
PANASONIC B
Disc does not play
5.1 channel sound is not
being reproduced.
The icon appears on
screen.
Disc Menu doesn’t appear.
Playback mode differs
from the Setup Menu
selection
The screen ratio cannot be
changed.
No audio
Forgot parental level
• Ensure that the disc is installed with the label side facing up.
• Check the region number of the DVD.
• This player cannot play CD-ROMs, DVD-ROMs, CD-R, etc. Inser t a
DVD, a VIDEO-CD or a CD.
• 5.1 channel sound is reproduced only when the following conditions
are met. : 1)The DVD player is connected with the proper amplifier
2)The disc is recorded with 5.1 channel sound.
• Check whether the disc being played has the “Dolby 5.1 ch” mark on
the outside.
• Check if your audio system is connected and working properly.
• The features or action cannot be completed at this time because:
1.The DVD’s software restricts it.
2.The DVD’s software doesn’t support the feature (e.g., angles).
3.The feature is not available at the moment.
4.You’ve requested a title or chapter number or search time that is out
of range.
• Check if the disc has a Menu.
• Some of the functions selected in the Setup Menu may not work properly if the disc is not encoded with the corresponding function.
• The Screen Ratio is fixed on your DVDs.
• Make sure you have selected the correct Digital Output in the Audio
Options Menu.
• With the power on, press and hold the STOP and PLAY/PAUSE button
on the player.This resets the password feature and all other settings to
the initial factory settings.You may be required to select a menu language.
P 7, 17, 18
P 7, 15,
35, 36
P 13,
P 21 ~ 30
P 26, 27
P 31 ~ 37
P 37
P 36
P34
REFERENCE
NOTE
The remote may not be able to control every model TV of the brands listed.
If you experience other
problems.
• Go to the contents and find the section of the instruction book that
contains the explanations regarding the current problem, and follow the
procedure once again.
• If the problem still cannot be solved, please contact your nearest
authorized service center or call 1-800-SAMSUNG.
3938
Page 21
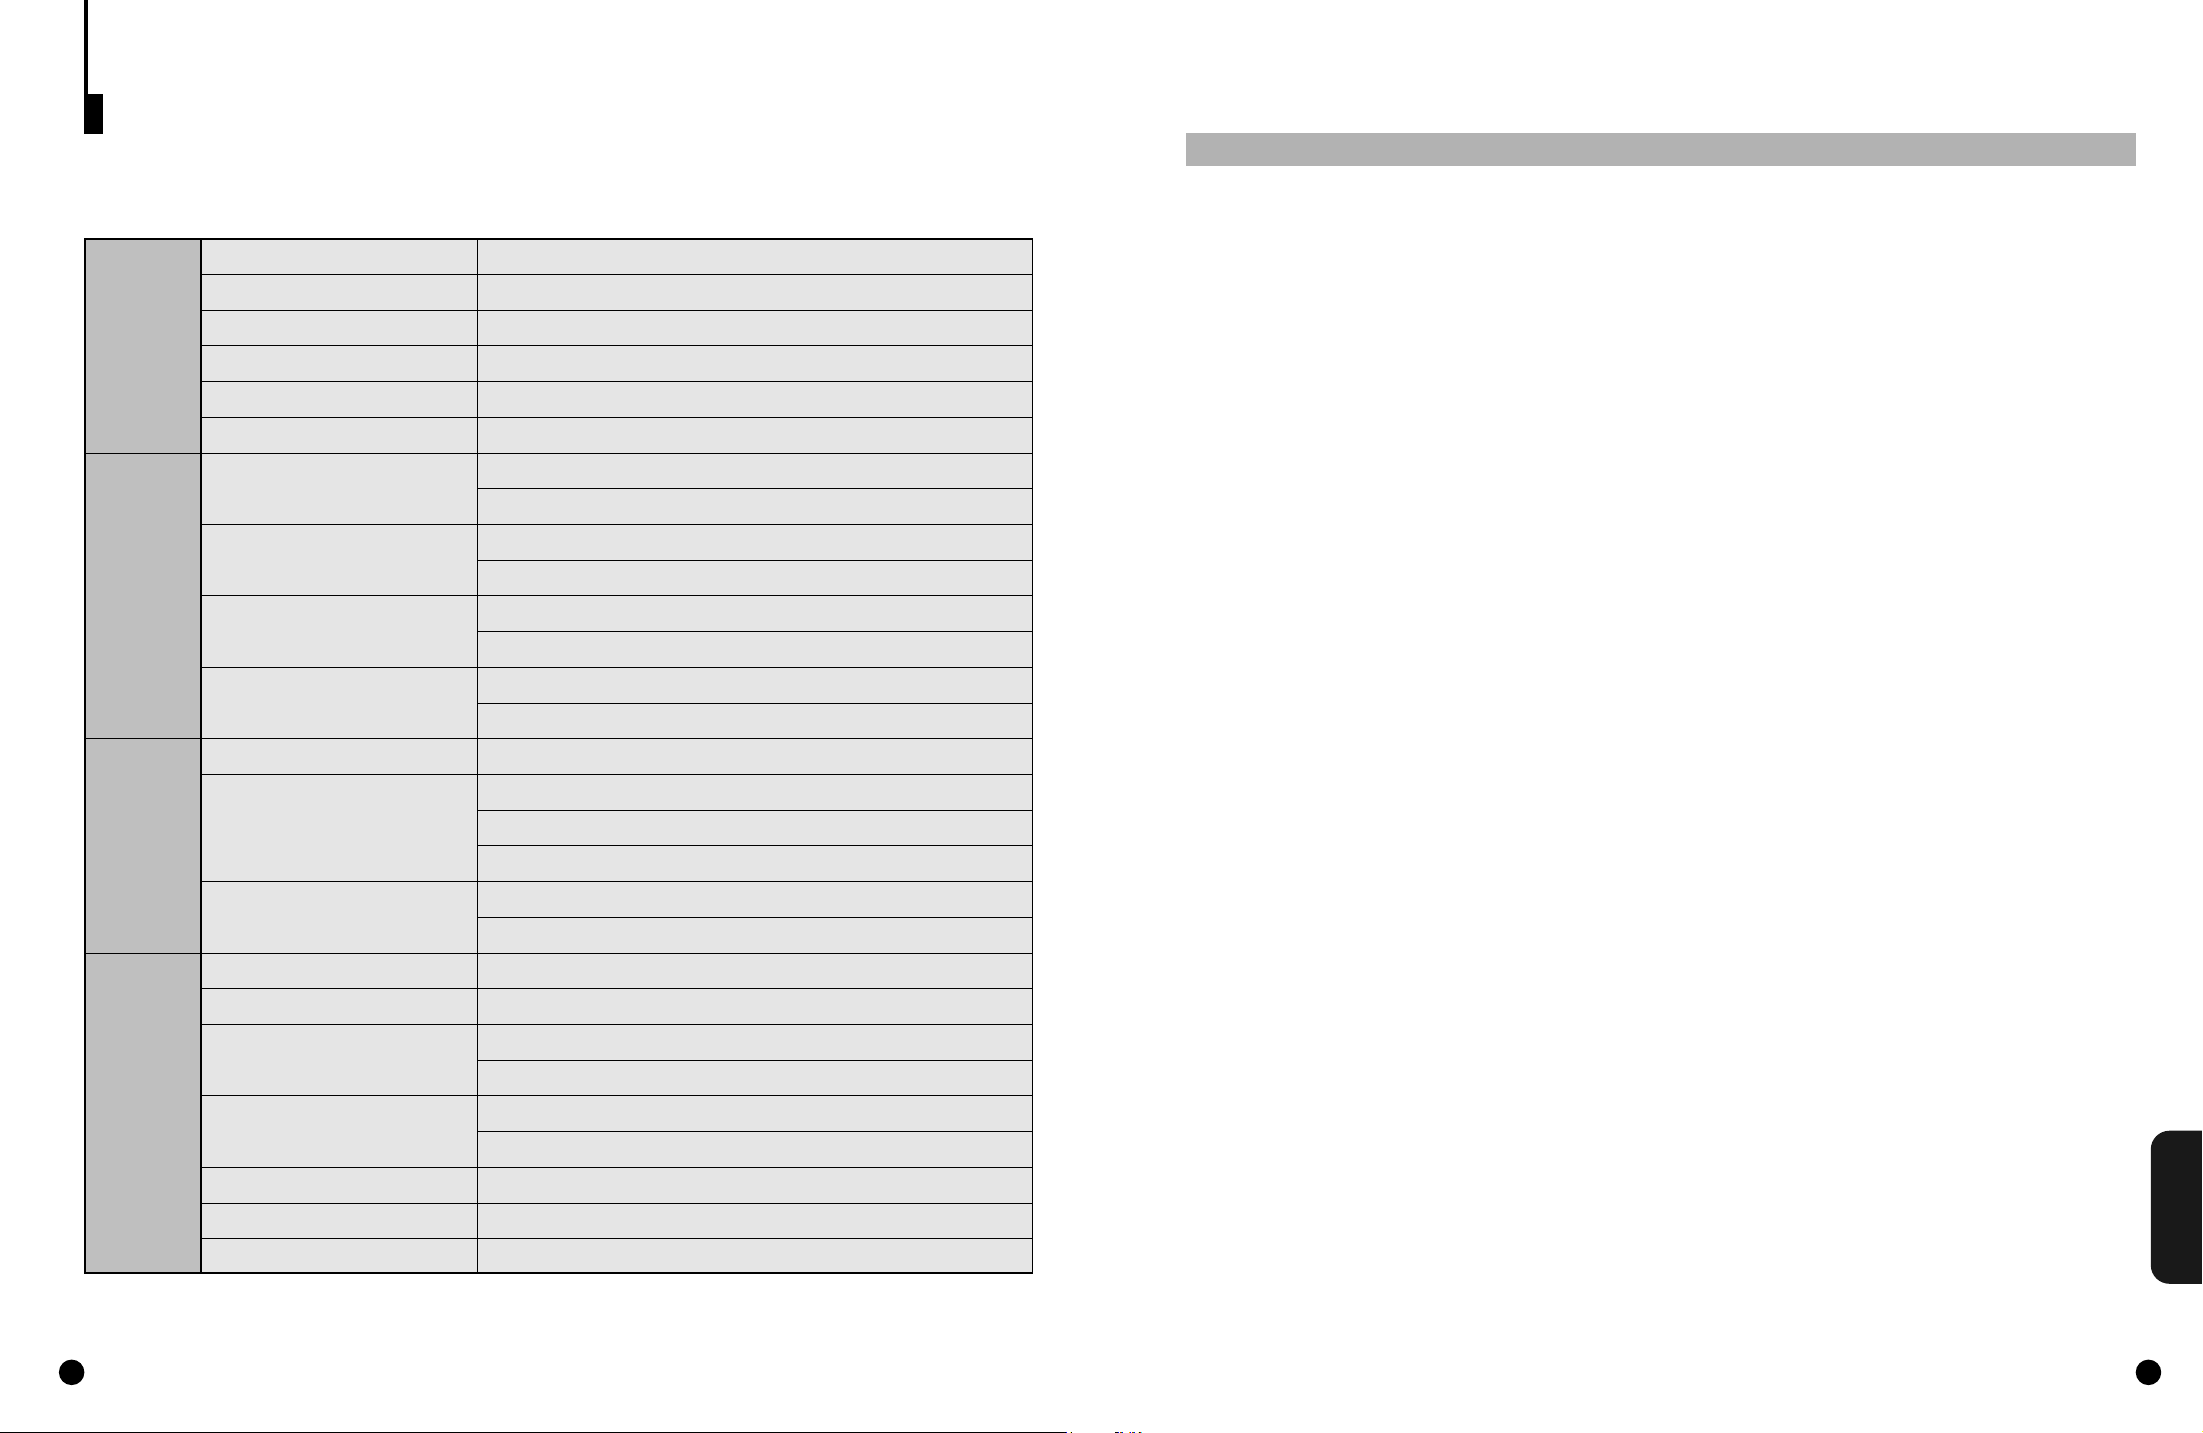
Specifications
Power Requirements
Power Consumption
General
Operating Temperature Range
Operating Humidity Range
(DIGITAL VERSATILE DISC)
Disc
Video
Output
Audio
Output
*Total Har monic Distor tion
Weight
Dimensions
DVD
CD : 5 inches
(COMPACT DISC)
CD : 3
1/2 inches
(COMPACT DISC)
VCD : 5 inches
Composite Video
Component Video
S-VIDEO
2 channel
5.1 channel
Output Level
*Frequency Response
*S/N Ratio
*Dynamic Range
AC 120 V, 60 Hz
20 W
15.4 lbs
W 10.2 in x D 16.3 in x H 4.4 in
+
41°F to +95°F
10 % to 75 %
Reading Speed : 11.45 ft/sec.
Approx. Play Time (Single Sided, Single Layer Disc) : 135 min.
Reading Speed : 3.9 to 4.6 ft/sec.
Maximum Play Time : 74 min.
Reading Speed : 3.9 to 4.6 ft/sec.
Maximum Play Time : 20 min.
Reading Speed : 3.9 to 4.6 ft/sec.
Maximum Play Time : 74 min. (Video + Audio)
2 channel : 1.0 Vp-p (75 Ω load)
Y : 1.0 Vp-p (75 Ω load)
Pr : 0.70 Vp-p (75 Ω load)
Pb : 0.70 Vp-p (75 Ω load)
Luminance Signal : 1.0 Vp-p (75 Ω load)
Color Signal : 0.286 Vp-p (75 Ω load)
L(1/L), R(2/R)
F/L, F/R, R/L, R/R, C/T, S/W
Analog : 2 Vrms (1 kHz)
Digital : 1.15 Vp-p
48 kHz Sampling : 4 Hz to 22 kHz
96 kHz Sampling : 4 Hz to 44 kHz
110 dB
96 dB
0.003 %
*: Nominal specification
Warranty (for USA users only)
LIMITED WARRANTY TO ORIGINAL PURCHASER
This SAMSUNG brand product, as supplied and distributed by SAMSUNG ELECTRONICS AMERICA, INC. (SAMSUNG) and
delivered new, in the original carton to the original consumer purchaser, is warranted by SAMSUNG against manufacturing defects
in materials and workmanship for the following limited warranty period:
One (1) Year Parts and Labor
This limited warranty begins on the original date of purchase, and is valid only on products purchased and used in the United
States, and does not include transportation, installation, removal or reinstallation. Warranty repairs must be performed by
SAMSUNG's authorized service center. To receive warranty service, the original dated bill of sale must be presented upon request
as proof of purchase to SAMSUNG or SAMSUNG's authorized service center. Transportation to and from the service center is the
responsibility of the purchaser.
SAMSUNG will repair or replace this product, at our option and at no charge with new or reconditioned parts, if found to be defective during the limited warranty period specified above. The product must be returned during the warranty period with transportation charges prepaid to SAMSUNG's designated service center. Prior to returning any product for warranty service, the purchaser
must contact SAMSUNG for problem determination and service procedures. SAMSUNG does not warrant uninterrupted or errorfree operation of the product. All replaced parts and products become the proper ty of SAMSUNG and must be returned to SAMSUNG. Replacement parts and products assume the remaining original warranty, or ninety (90) days, whichever is longer.
This limited warranty covers manufacturing defects in materials and workmanship encountered in normal, noncommercial use of
this product and shall not apply to the following, including, but not limited to:damage which occurs in shipment; applications and
uses for which this product was not intended; failures or problems which are caused by products or equipment not supplied by
SAMSUNG; accidents, misuse, abuse, neglect, misapplication, fire, water, lightning or other acts of nature; incorrect electrical line
voltage, fluctuations or surges; damage caused by improper or faulty installation; improper connection with any peripheral; product
alteration or modification; improper or unauthorized repair; cosmetic damage or exterior finish; product with altered serial numbers;
failure to follow operating instructions, customer adjustments, maintenance and environmental instructions that are covered and
prescribed in the instruction book; use of non-SAMSUNG or unauthorized par ts, supplies, accessories or equipment which damage
this product or result in service problems; failures or problems due to incompatibility with other equipment.
THERE ARE NO EXPRESS WARRANTIES OTHER THAN THOSE LISTED AND DESCRIBED ABOVE, AND NO WARRANTIES
WHETHER EXPRESS OR IMPLIED, INCLUDING, BUT NOT LIMITED TO, ANY IMPLIED WARRANTIES OF MERCHANTABILITY
OR FITNESS FOR A PARTICULAR PURPOSE, SHALL APPLY AFTER THE EXPRESS WARRANTY PERIODS STATED ABOVE,
AND NO OTHER EXPRESS WARRANTY OR GUARANTY GIVEN BY ANY PERSON, FIRM OR CORPORATION WITH
RESPECT TO THIS PRODUCT SHALL BE BINDING ON SAMSUNG. SAMSUNG SHALL NOT BE LIABLE FOR LOSS OF REVENUE OR PROFITS, FAILURE TO REALIZE SAVINGS OR OTHER BENEFITS, OR ANY OTHER SPECIAL, INCIDENTAL OR
CONSEQUENTIAL DAMAGES CAUSED BY THE USE, MISUSE OR INABILITY TO USE THIS PRODUCT, REGARDLESS OF
THE LEGAL THEORY ON WHICH THE CLAIM IS BASED, AND EVEN IF SAMSUNG HAS BEEN ADVISED OF THE POSSIBILITY OF SUCH DAMAGES. NOR SHALL RECOVERY OF ANY KIND AGAINST SAMSUNG BE GREATER IN AMOUNT THAN THE
PURCHASE PRICE OF THE PRODUCT SOLD BY SAMSUNG AND CAUSING THE ALLEGED DAMAGE. WITHOUT LIMITING
THE FOREGOING, PURCHASER ASSUMES ALL RISK AND LIABILITY FOR LOSS, DAMAGE OR INJURY TO PURCHASER
AND PURCHASER'S PROPERTY AND TO OTHERS AND THEIR PROPERTY ARISING OUT OF THE USE, MISUSE OR
INABILITY TO USE THIS PRODUCT SOLD BY SAMSUNG NOT CAUSED DIRECTLY BY THE NEGLIGENCE OF SAMSUNG.
THIS LIMITED WARRANTY SHALL NOT EXTEND TO ANYONE OTHER THAN THE ORIGINAL PURCHASER OF THIS PRODUCT, IS NONTRANSFERABLE AND STATES YOUR EXCLUSIVE REMEDY.
Some states do not allow limitations on how long an implied warranty lasts, or the exclusion or limitation of incidental or consequential damages, so the above limitations or exclusions may not apply to you. This warranty gives you specific legal rights, and
you may also have other rights which vary from state to state.
To obtain warranty service, please contact SAMSUNG at:
SAMSUNG ELECTRONICS AMERICA, INC. - CONSUMER ELECTRONICS CUSTOMER SERVICE
1 SAMSUNG PLACE, LEDGEWOOD, NJ 07852
Tel: 973-691-6200, Fax: 973-691-6201
1-800-SAMSUNG (1-800-726-7864)
www.sosimple.com
100899
REFERENCE
4140
Page 22
Warranty (for Canada users only)
LIMITED WARRANTY TO ORIGINAL PURCHASER
Samsung Electronics Canada Inc.(SECA), warrants that this product is free from defective material and workmanship.
SECA further warrants that if this product falls to operate properly within the specified warranty period and the failure is due to
improper workmanship or defective materials, SECA will repair or replace the product at its option.
All warranty repairs must be performed by a SECA Authorized Service Center. (The name and address of the location nearest you
can be obtained by calling toll free: 1- 800- SAMSUNG)
LABOR
One year (Carry- in)
On carry-in models, transportation to and from the service center is the customer’s responsibility.
The original dated sales receipt must be retained by the customer and is the only acceptable proof of purchase.It must be present-
ed to the authorized service center at the time service is requested.
PARTS
One year
EXCLUSIONS (WHAT IS NOT COVERED)
This warranty does not cover damage due to accident, fire, flood and/ or other acts of God;misuse, incorrect line voltage, improper
installation, improper or unauthorized repairs, commercial use or damage that occurs in shipping. Exter ior and inter ior finish,
lamps, glass are not covered under this warranty. Customer adjustments which are explained in the instruction manual are not covered under the terms of this warranty.This warranty will automatically be voided for any unit found with a missing or altered serial
number.This warranty is valid only on products purchased and used in Canada.
42
 Loading...