

Page 1
Heat Pump Dryer
User manual
DV9*M62****/DV8*M62****
Untitled-16 1 2019-06-28 7:58:05
Page 2

Contents
Contents
Safety information 4
What you need to know about the safety instructions 4
Important safety symbols 4
Important safety precautions 5
Critical installation warnings 7
Critical usage warnings 9
Usage cautions 11
Critical cleaning warnings 12
Instructions about the WEEE 13
Installation 14
What’s included 14
Installation requirements 16
Dryer 18
Drain hose (if necessary) 19
Installation checklist 22
Before using the dryer 22
Operations 23
Control panel 23
Getting started 28
Special features 32
Maintenance 33
Control panel 33
Exterior 33
Drum 33
Lint lter 33
Water tank 35
Heat exchanger 36
Troubleshooting 38
Checkpoints 38
Information codes 40
English2
Untitled-16 2 2019-06-28 7:58:05
Page 3

Appendix 41
Fabric care chart 41
Protecting the environment 42
Specication 43
Consumption data 44
Sheet of household tumble driers 45
Contents
English 3
Untitled-16 3 2019-06-28 7:58:06
Page 4
Safety information
Congratulations on your new Samsung dryer. This manual contains important information
on the installation, use, and care of your appliance. Please take the time to read this
manual to take full advantage of your dryer’s many benets and features.
What you need to know about the safety instructions
Warnings and Important Safety Instructions in this manual do not cover all possible
Safety information
conditions and situations that may occur. It is your responsibility to use common sense,
caution, and care when installing, maintaining, or operating your dryer.
Always contact your manufacturer about problems or conditions you do not understand.
Important safety symbols
What the icons and signs in this user manual mean:
WARNING
Hazards or unsafe practices that may result in severe personal injury, death and/or
property damage.
CAUTION
Hazards or unsafe practices that may result in personal injury and/or property damage.
NOTE
Indicates that a risk of personal injury or material damage exists.
Read the instructions
These warning signs are here to prevent injury to yourself and others.
Please follow them explicitly.
After reading this manual, store it in a safe place for future reference.
Read all instructions before using the appliance.
As with any equipment that uses electricity and moving parts, potential hazards exist.
To safely operate this appliance, familiarize yourself with its operation and exercise care
when using it.
WARNING - Risk of Fire
• Clothes dryer installation must be performed by a qualied technician.
• Install the clothes dryer according to the manufacturer’s instructions and local codes.
• To reduce the risk of severe injury or death, follow all installation instructions.
English4
Untitled-16 4 2019-06-28 7:58:06
Page 5
Important safety precautions
WARNING
To reduce the risk of re, electric shock, or injury to persons
when using your appliance, follow basic precautions, including the
following:
1. This appliance is not to be used by persons (including children)
with reduced physical, sensory or mental capabilities, or lack
of experience and knowledge, unless they have been given
supervision or instruction concerning use of the appliance by a
person responsible for their safety.
2. For use in Europe: This appliance can be used by children aged
from 8 years and above and persons with reduced physical,
sensory or mental capabilities or lack of experience and
knowledge if they have been given supervision or instruction
concerning use of the appliance in a safe way and understand
the hazards involved. Children shall not play with the appliance.
Cleaning and user maintenance shall not be made by children
without supervision.
3. Children should be supervised to ensure that they do not play
Safety information
with the appliance.
4. If the supply cord is damaged, it must be replaced by the
manufacturer, its service agent or similarly qualied persons in
order to avoid a hazard.
5. The new hose-sets supplied with the appliance are to be used and
that old hose-sets should not be reused.
6. For appliances with ventilation openings in the base, that a carpet
must not obstruct the openings.
English 5
Untitled-16 5 2019-06-28 7:58:06
Page 6

Safety information
7. For use in Europe: Children of less than 3 years should be kept
away unless continuously supervised.
8. CAUTION: In order to avoid a hazard due to inadvertent resetting
of the thermal cut-out, this appliance must not be supplied
Safety information
through an external switching device, such as a timer, or
connected to a circuit that is regularly switched on and off by the
utility.
9. The tumble dryer is not to be used if industrial chemicals have
been used for cleaning.
10. The lint trap has to be cleaned frequently, if applicable.
11. Lint must not to be allowed to accumulate around the tumble
dryer. (not applicable for appliances intended to be vented to the
exterior of the building)
12. Adequate ventilation has to be provided to avoid the back ow
of gases into the room from appliances burning other fuels,
including open res.
13. Do not dry unwashed items in the tumble dryer.
14. Items that have been soiled with substances such as cooking oil,
acetone, alcohol, petrol, kerosene, spot removers, turpentine,
waxes and wax removers should be washed in hot water with
an extra amount of detergent before being dried in the tumble
dryer.
15. Items such as foam rubber (latex foam), shower caps, waterproof
textiles, rubber backed articles and clothes or pillows tted with
foam rubber pads should not be dried in the tumble dryer.
16. Fabric softeners, or similar products, should be used as specied
by the fabric softener instructions.
English6
Untitled-16 6 2019-06-28 7:58:06
Page 7
17. The nal part of a tumble dryer cycle occurs without heat (cool
down cycle) to ensure that the items are left at a temperature
that ensures that the items will not be damaged.
18. Remove all objects from pockets such as lighters and matches.
19. WARNING: Never stop a tumble dryer before the end of the
drying cycle unless all items are quickly removed and spread out
so that the heat is dissipated.
20. Exhaust air must not be discharged into a ue which is used for
exhausting fumes from appliances burning gas or other fuels.
21. The appliance must not be installed behind a lockable door, a
sliding door or a door with a hinge on the opposite side to that of
the tumble dryer, in such a way that a full opening of the tumble
dryer door is restricted.
22. WARNING: The appliance must not be supplied through an
external switching device, such as a timer, or connected to a
circuit that is regularly switched on and off by a utility.
Heat pump model only: The instructions shall also include the
substance of the following:
WARNING: In the appliance enclosure or in the built-in structure,
Safety information
keep ventilation openings clear of obstruction.
WARNING: Do not damage the refrigerant circuit.
Critical installation warnings
WARNING
The installation of this appliance must be performed by a qualied technician or service
company.
• Failure to do so may result in electric shock, re, an explosion, problems with the
product, or injury.
English 7
Untitled-16 7 2019-06-28 7:58:07
Page 8

Safety information
Plug the power cord into a wall socket or higher and use the socket for this appliance
only. In addition, do not use an extension cord.
• Sharing a wall socket with other appliances using a power strip or extending the power
cord may result in electric shock or re.
• Ensure that the power voltage, frequency and current are the same as those of the
product specications. Failure to do so may result in electric shock or re. Failure Plug
Safety information
the power plug into the wall socket rmly.
Remove all foreign substances such as dust or water from the power plug terminals and
contact points using a dry cloth on a regular basis.
• Unplug the power plug and clean it with a dry cloth.
• Failure to do so may result in electric shock or re.
Keep all packaging materials well out of the reach of children, as packaging materials can
be dangerous to children.
• If a child places a bag over its head, it may result in suffocation.
This appliance must be properly grounded.
Do not ground the appliance to a gas pipe, plastic water pipe, or telephone line.
• This may result in electric shock, re, an explosion, or problems with the product
• Never plug the power cord into a socket that is not grounded correctly and make sure
that it is in accordance with local and national codes.
Do not install or keep the product exposed to the outdoor elements.
Do not use a damaged power plug, damaged power cord or loose wall socket.
• This may result in electric shock or re.
If the plug (power supply cord) is damaged, it must be replaced by the manufacturer or its
service agent or a similar qualied technician in order to avoid a hazard.
This appliance should be positioned to be accessible to the power plug after installation.
Do not pull or excessively bend the power cord.
Do not twist or tie the power cord.
Do not hook the power cord over a metal object, place a heavy object on the power cord,
insert the power cord between objects, or push the power cord into the space behind the
appliance.
• This may result in electric shock or re.
Do not pull the power cord, when unplugging the power plug.
• Unplug the power plug by holding the plug.
• Failure to do so may result in electric shock or re.
English8
Untitled-16 8 2019-06-28 7:58:07
Page 9
This appliance must be properly grounded. Never plug the power cord into a receptacle
that is not grounded adequately and in accordance with local and national codes. See
installation instructions for grounding this appliance.
Install this appliance in a location with solid, level oor.
• Failing to do so may result in abnormal vibrations, noise or problems with the product.
Since an ingredient in hair spray may degrade the hydrophile property of the heat
exchanger so that dew may appear on the outer surface of the appliance when the cooling
operation is running, do not install the appliance in a beauty salon.
This appliance should be positioned so that the power plug, the water supply taps, and the
drain pipes are accessible.
Critical usage warnings
WARNING
Do not let children or pets on or into the product. In addition, when disposing of this
product, disassemble the door lock (lever).
• This may result in children falling and injuring themselves.
• If children become locked in the product, there is a danger of suffocation.
Do not try to access the inside of the product when the drum is rotating.
Do not sit on the product or lean against the door.
• This may result in the product turning over and resulting in injury.
Dry the laundry only after it was spun by an appropriate washing machine.
Do not dry unwashed items in the tumble dryer.
Do not drink the condensed water.
Never stop a tumble dryer before the end of the drying cycle unless all items are quickly
removed and spread out so that the heat is dissipated.
Do not dry laundry contaminated by inammable materials such as gasoline, kerosene,
benzene, thinner, alcohol, etc.
• This may result in electric shock, re or explosion.
Safety information
Do not let pets chew or play with the dryer.
• This may result in electric shock or injury.
When disposing of the product, separate the door and the power cord before disposing of
the product.
• Failing to do so may result in damage to the power code or an injury.
Do not touch the power plug with wet hands.
• This may result in electric shock.
English 9
Untitled-16 9 2019-06-28 7:58:07
Page 10

Safety information
When gas (city gas, propane gas, LP gas) leaks, do not touch this appliance or the power
cord, ventilate immediately.
• At this time, do not use the ventilating fan.
• A spark may cause an explosion or re.
Do not repair, replace, or attempt to service any part of the appliance unless specically
Safety information
recommended in the user-repair instructions. You must also have the skills necessary to
service this appliance.
Do not attempt to repair, disassemble, or modify the appliance yourself.
• Do not use any fuse(such as cooper, steel wire, etc.) other than the standard fuse.
• When repairing or reinstalling the appliance is required, contact your nearest service
center.
• Failure to do so may result in electric shock, re, problems with the product, or injury.
The product you have purchased is designed for domestic use only.
The use for business purposes qualies as product misuse. In this case, the product will
not be covered by the standard warranty provided by Samsung and no responsibility can
be attributed to Samsung for malfunctions or damages resulting from such misuse.
If the product generates strange noise, smells of something burning, or generates smoke,
immediately cut-off the power and contact the service center.
• Otherwise, it may cause an electric shock or re as a result.
Do not let children (or pets) play in or on your product. The product door does not open
easily from the inside and children may be seriously injured if trapped inside.
English10
Untitled-16 10 2019-06-28 7:58:07
Page 11

Usage cautions
CAUTION
Do not stand on top of the appliance or place objects (such as laundry, lighted candles,
lighted cigarettes, dishes, chemicals, metal objects, etc.) on the appliance.
• This may result in electric shock, re, problems with the product, or injury.
Do not touch the glass door and inside of the drum during or just after drying as it is hot.
• This may result in burns.
The door glass becomes hot during washing and drying. Therefore, do not touch the door
glass.
Also, do not allow children to play around the washing machine or touch the door glass.
• This may result in burns.
Do not press the buttons using sharp objects such as pins, knifes, ngernails, etc.
• This may result in electric shock or injury.
Do not dry laundry containing forming rubber (latex) or similar rubber textures.
• If forming rubber is heated, it may start a re.
Do not dry laundry contaminated by vegetable oil or cooking oil as a large amount of the
oil will not be removed when washing the laundry. In addition, use the Cool Down cycle so
that the laundry is not heated.
• The oxidization heat of the oil may start a re.
Safety information
Make sure that the pockets of all clothing to be dryed are empty.
• Hard, sharp objects, such as coins, safety pins, nails, screws, or stones can cause
extensive damage to the appliance.
Do not dry clothing with large buckles, buttons, or other heavy metal (zippers, hooks and
eyelets, button-up covers).
If necessary, use the laundry net for small and lightweight laundry such as fabric tie belt ,
apron strings, and underwire bras which can dissolve or break during a cycle.
Dryer sheets are compatible with this model, and are recommended for better drying
performance.
Dryer sheets are also benecial in reducing the static electricity generated during a
drying cycle. Static electricity could lead to damage of laundry items and potentially the
appliance.
Do not use the dryer near dangerous powders such as coal dust, wheat our, etc.
• This may result in electric shock, re or an explosion.
Do not place inammable materials near the product.
English 11
Untitled-16 11 2019-06-28 7:58:07
Page 12
Safety information
• This may result in toxic gases from the product, damage to parts, electric shock, re or
an explosion.
• The appliance should not be placed behind lockable doors etc.
Do not touch the rear side of the appliance during or immediately after drying is
complete.
Safety information
• The appliance remains hot and may cause burns.
Contains uorinated greenhouse gases.
Hermetically sealed equipment.
Do not vent gases into the atmosphere.
Refrigerant (Type): R-134a (GWP = 1430)
Refrigerant (Charging): 0.37 kg, 0.529 tCO2e
Critical cleaning warnings
WARNING
Do not clean the appliance by spraying water directly onto it.
Do not use benzene, thinner or alcohol to clean the appliance.
• This may result in discoloration, deformation, damage, electric shock or re.
Before cleaning or performing maintenance, unplug the appliance from the wall socket.
• Failure to do so may result in electric shock or re.
Clean the lter case before and after using the dryer.
Clean the inside of the product on a regular basis by asking an authorized service
engineer.
Clean the Heat Exchanger with a soft brush or vacuum cleaner once a month, Do not touch
the heat exchanger with your hand. Otherwise, it may cause an injury.
The interior of the dryer should be cleaned periodically by qualied service personnel.
English12
Untitled-16 12 2019-06-28 7:58:07
Page 13
Instructions about the WEEE
Correct Disposal of This Product (Waste Electrical & Electronic
Equipment)
(Applicable in countries with separate collection systems)
This marking on the product, accessories or literature indicates
that the product and its electronic accessories (e.g. charger,
headset, USB cable) should not be disposed of with other
household waste at the end of their working life. To prevent
possible harm to the environment or human health from
uncontrolled waste disposal, please separate these items from
other types of waste and recycle them responsibly to promote the
sustainable reuse of material resources.
Household users should contact either the retailer where they
purchased this product, or their local government ofce, for details
of where and how they can take these items for environmentally
safe recycling.
Business users should contact their supplier and check the terms
and conditions of the purchase contract. This product and its
electronic accessories should not be mixed with other commercial
wastes for disposal.
For information on Samsung’s environmental commitments and product regulatory
obligations, e.g. REACH, WEEE or Batteries, visit our sustainability page available via
www.samsung.com
Safety information
English 13
Untitled-16 13 2019-06-28 7:58:07
Page 14
Installation
01
02
07
06
03
05
04
What’s included
Carefully unpack the dryer. Keep all packaging materials away from children. The parts
and location of parts shown below may differ from your dryer. Before installation, make
sure the dryer has all the parts listed here. If the dryer and/or parts are damaged or
missing, contact the nearest Samsung customer service center.
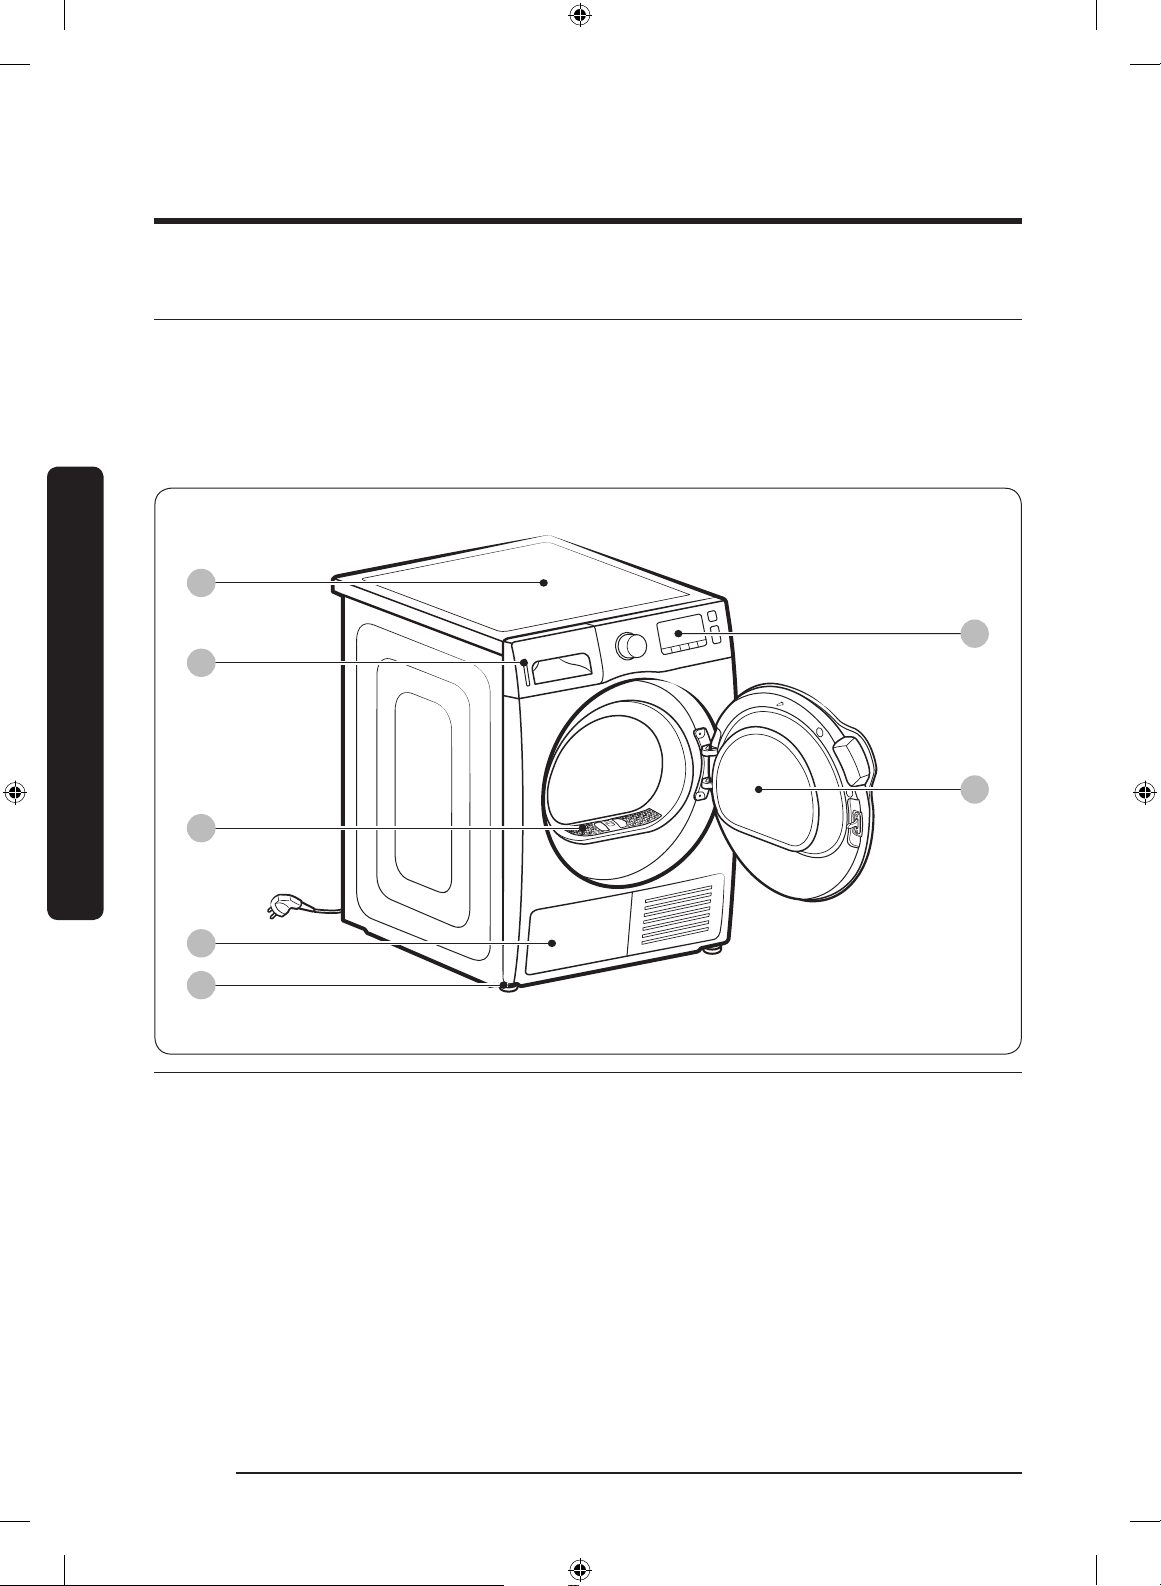
Dryer at a glance
Installation
01 Top cover 02 Water Tank
03 Lint lter 04 Heat exchanger
05 Levelling Leg 06 Door
07 Control Panel
Untitled-16 14 2019-06-28 7:58:08
English14
Page 15
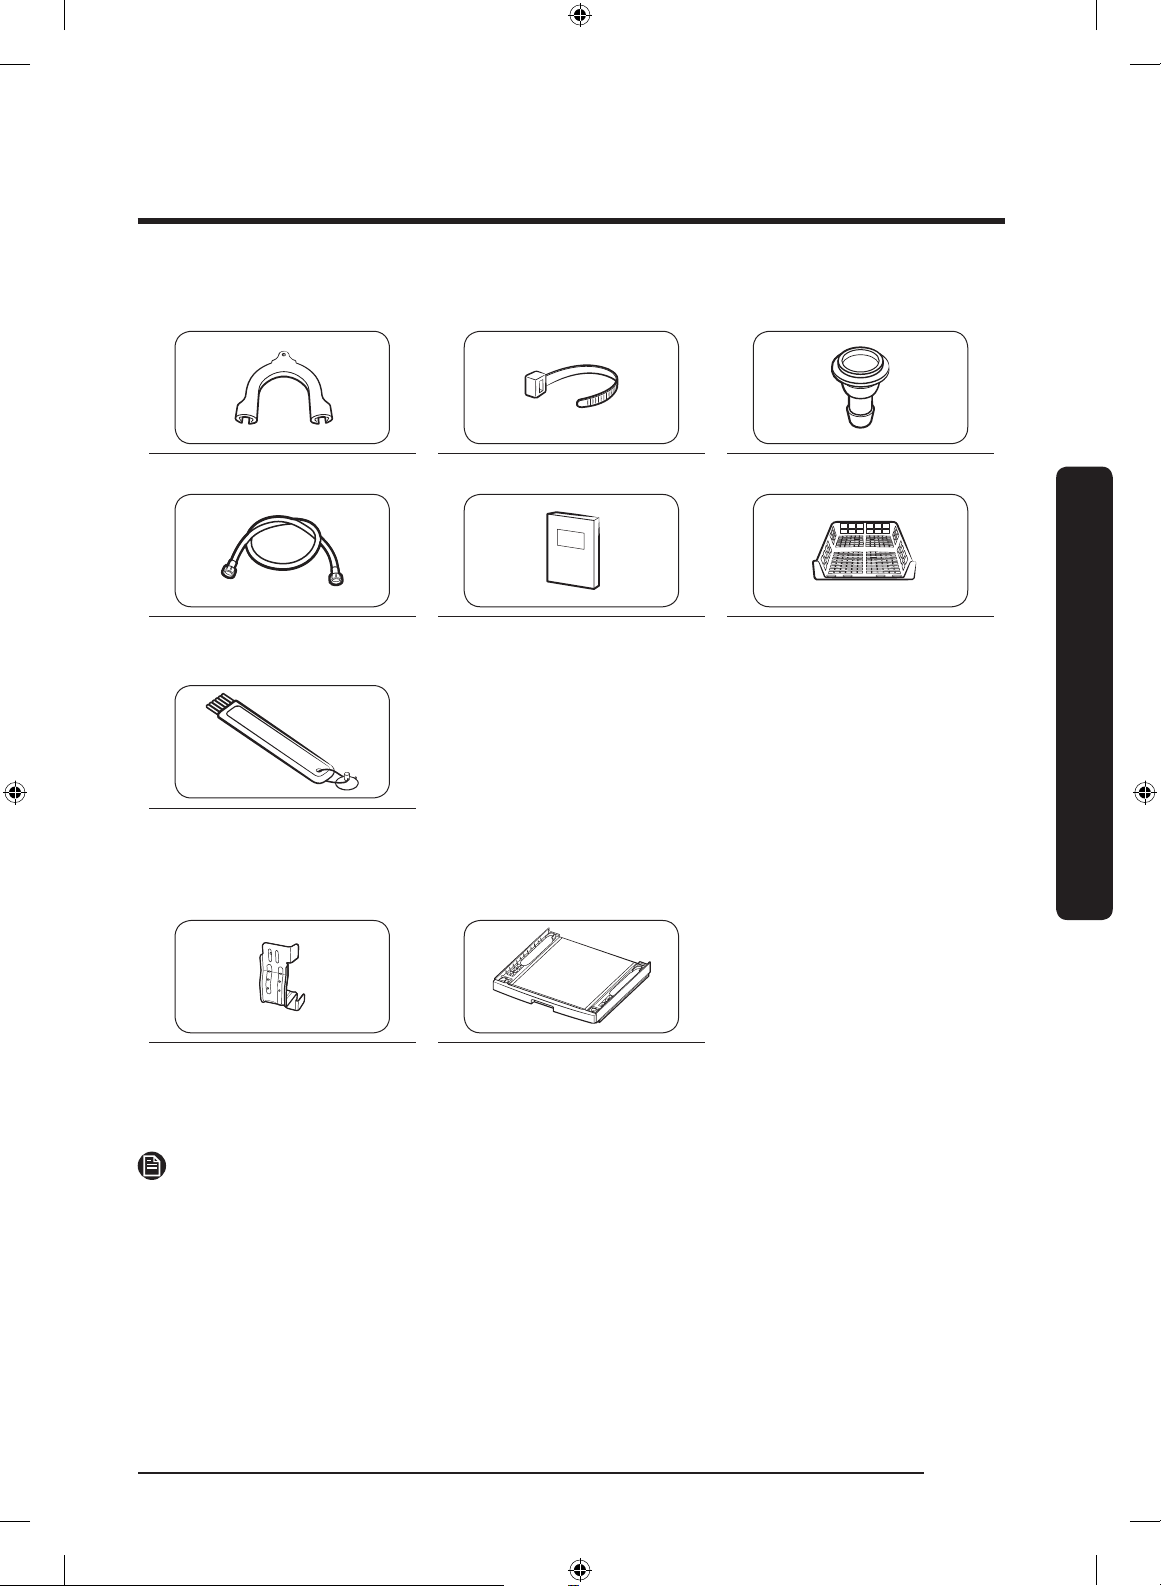
Accessories (supplied)
Hose guide Cable tie Hose connector
Long drain hose (2 m) User manual Rack Dry (applicable
models only)
Cleaning brush
Accessories (not supplied)
Bracket-Stacking kit
(Part # SK-DH; SK-DA; SKK-
DF)
NOTE
• The stacking kit allows the dryer to be stacked on top of a washer. Please note that the
stacking kit can only be used with Samsung washers and dryers. To purchase a stacking
kit (Part # SK-DH; SK-DA; SKK-DF), contact a Samsung service center or local appliance
retailer. The stacking kit differs with the model.
• For stacking instructions with the dryer, see the installation manual included in the
stacking kit.
• For information about model-specic availability of the stacking kit, see the installation
manual included in the stacking kit.
Stacking kit
(SKK-DD, SKK-DDX)
Installation
English 15
Untitled-16 15 2019-06-28 7:58:10
Page 16
Installation
Installation requirements
This dryer must be installed by a qualied installer. If service is required due to poor or
faulty installation, it is considered the owner’s responsibility and may void the warranty.
Keep these instructions for future reference.
• Do not plug the power cord into a wall outlet before the dryer is completely installed.
• Have two or more persons help move the dryer.
• Do not let children or pets play in, on, or around the dryer. Proper supervision is
Installation
• Keep all packaging materials away from children.
• Do not replace a damaged power cord or power plug yourself. Have Samsung or a
• Do not attempt to repair, disassemble, or modify the dryer. For any repairs, contact the
• Remove the door/lids from all discarded appliances to avoid children from suffocating.
• If the dryer generates a strange noise, burning smells, or smoke, unplug the power plug
• Do not unplug the dryer while it is operating.
• Do not place ammable objects near the dryer.
NOTE
WARNING
necessary at all times.
qualied service technician replace a damaged power cord or power plug.
nearest Samsung service center.
immediately and contact the nearest Samsung service center.
English16
Untitled-16 16 2019-06-28 7:58:10
Page 17
Location requirements
Select a level, well-constructed surface that will withstand vibrations. Select a location
where a grounded, 3-prong outlet is easily accessible.
WARNING
• Install the dryer indoors only.
• Do not install the dryer in areas exposed to the weather.
• Do not install the dryer where the temperature may fall below 5 °C or rise above 35 °C.
• Do not install the dryer where gas may leak.
• Do not block the cooling grill’s air inlet located at the dryer front.
Alcove or closet installation
For alcove or closet installation, the dryer requires the following minimum clearances:
Sides Top Front Rear
25 mm 25 mm 490 mm 51 mm
If installing the dryer with a washer, the front of the alcove or closet must have an
unobstructed air opening of at least 490 mm.
Electrical and grounding requirements
• The dryer requires an AC 220-240 V 50 Hz electrical supply.
• The dryer must be properly grounded. If the dryer malfunctions or breaks down,
grounding reduces the risk of electric shock by providing a path of least resistance for
the electric current. The dryer comes with a power cord that has a 3-prong grounding
plug. The plug must be plugged into an appropriate outlet that is properly installed and
grounded in accordance with all local codes and ordinances.
• If you have any questions regarding the electrical or grounding requirements, please
contact Samsung or a qualied electrician.
WARNING
• Plug into a grounded, 3-prong outlet.
• Do not use a damaged power plug, cord, or loose or damaged wall outlet.
• Do not use an adapter or an extension cord.
• Improper connection of the equipment-grounding conductor may result in electric
shock. If you are unsure if the dryer is properly grounded, check with a qualied
electrician.
• Do not modify the power plug, power cord, or power outlet in any way.
• Do not connect the ground wire to plastic plumbing lines, gas lines, or hot water pipes.
Installation
English 17
Untitled-16 17 2019-06-28 7:58:10
Page 18
Installation
A
B
C D
Dryer
Before you install the dryer, make sure you have read Installation requirements on
page 16. Please note that the following instructions are for installation without using a
drain hose. For instructions for using a drain hose, see the next section, Drain hose. For
convenience, consider installing the dryer next to your washer.
Installation
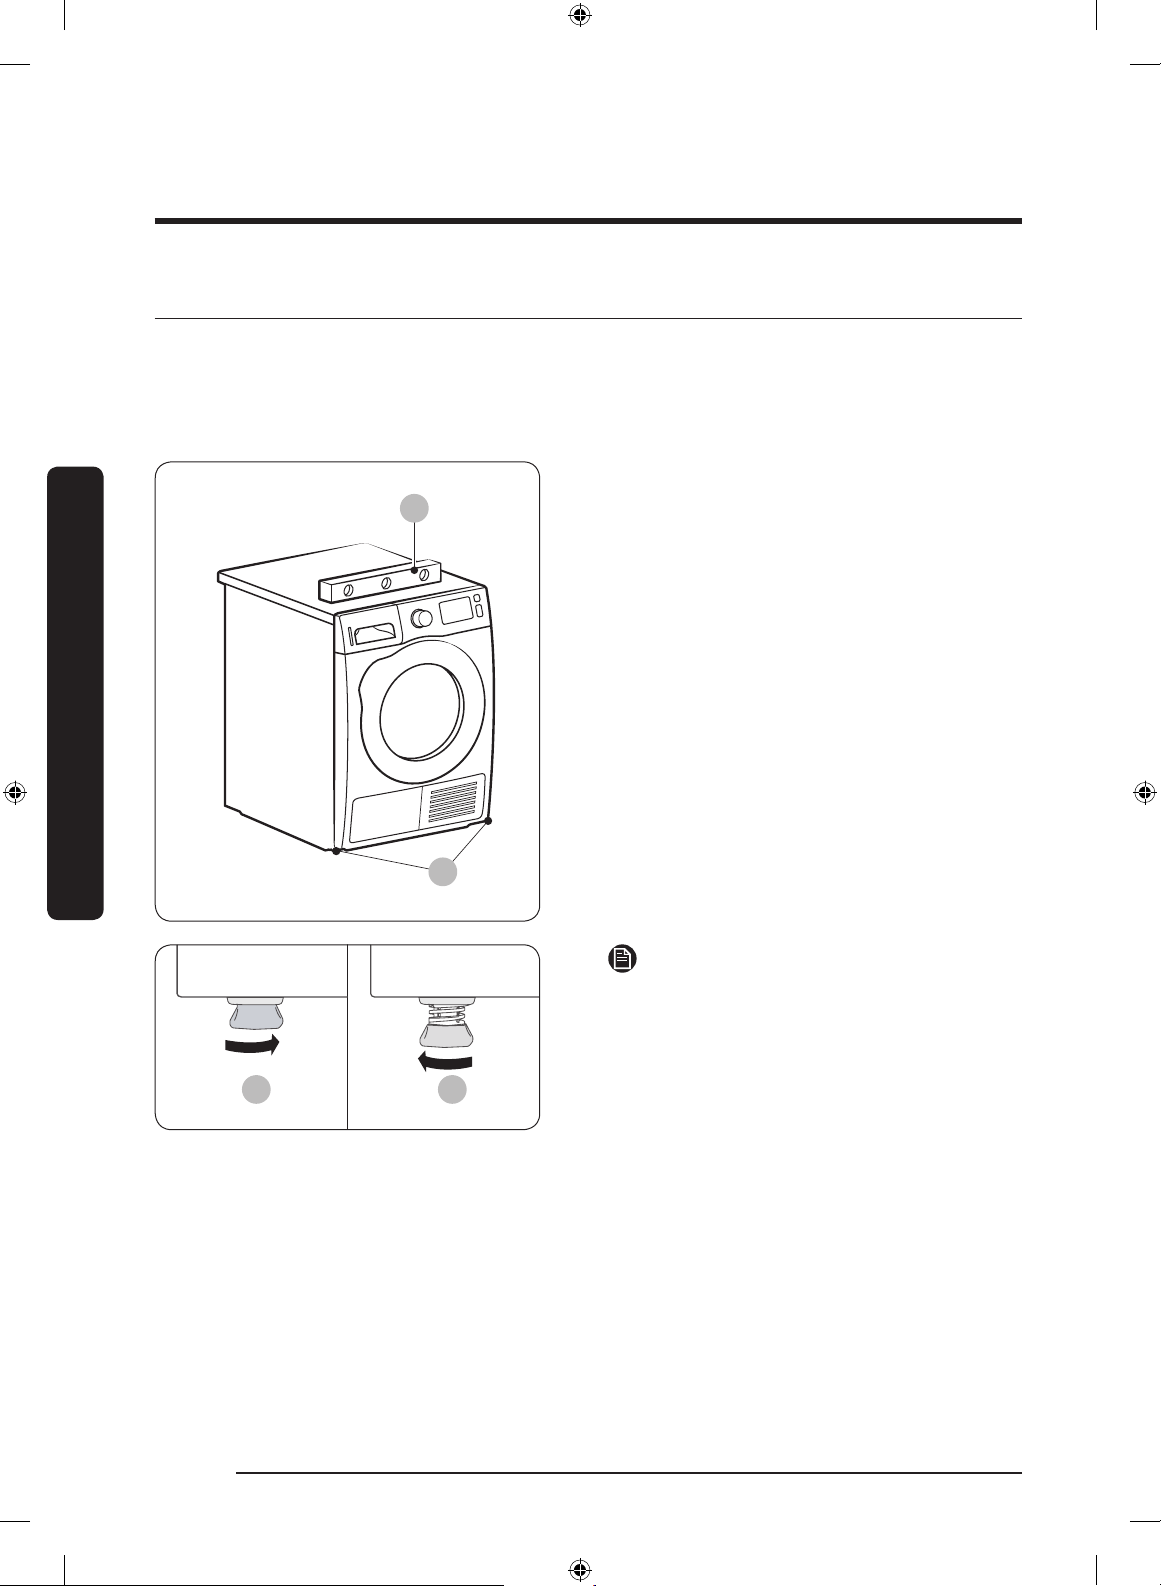
1. Gently slide the dryer into the desired
location.
2. Use a level (A) and check the levelness
of the dryer from side to side and front
to back.
3. If the dryer is not level, adjust the
levelling leg (B). Turning the leg
counter-clockwise retracts the leg.
Turning the leg clockwise extends the
leg.
4. Once the dryer is level, make sure the
dryer stands rmly on the oor.
5. Plug in the dryer.
NOTE
• To set the dryer to the same height as
the washer, fully retract (C) the levelling
legs by turning them counter clockwise,
then loosen (D) the legs by turning
them clockwise.
• Extend the levelling leg only as much
English18
Untitled-16 18 2019-06-28 7:58:11
as necessary. Extending the levelling
leg more than necessary can cause the
dryer to vibrate.
Page 19
Drain hose (if necessary)
A
B
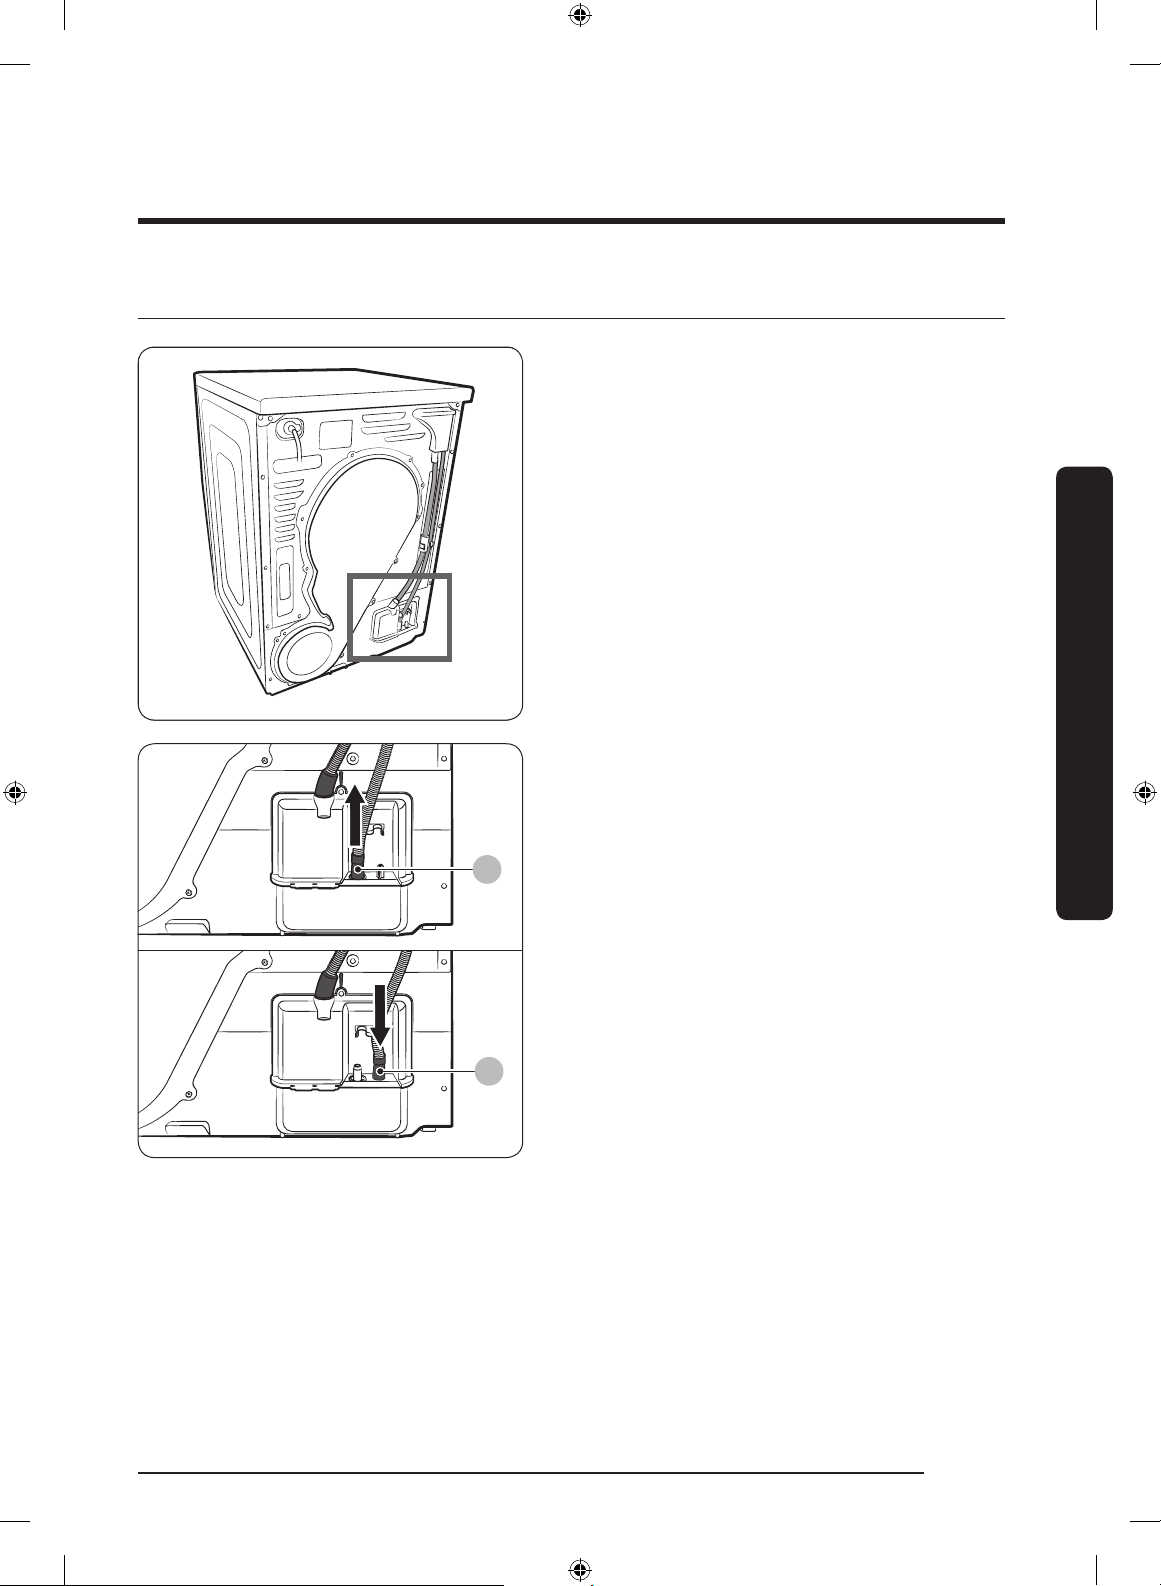
The dryer comes with a built-in water tank.
However, if you do not want to use the
water tank, you may install the drain hose.
The provided accessory hose (long drain
hose) can be used as an extension to the
drain hose.
Installation
1. Remove the drain hose from hole (A),
and insert it into hole (B).
English 19
Untitled-16 19 2019-06-28 7:58:11
Page 20
Installation
A
A
CB
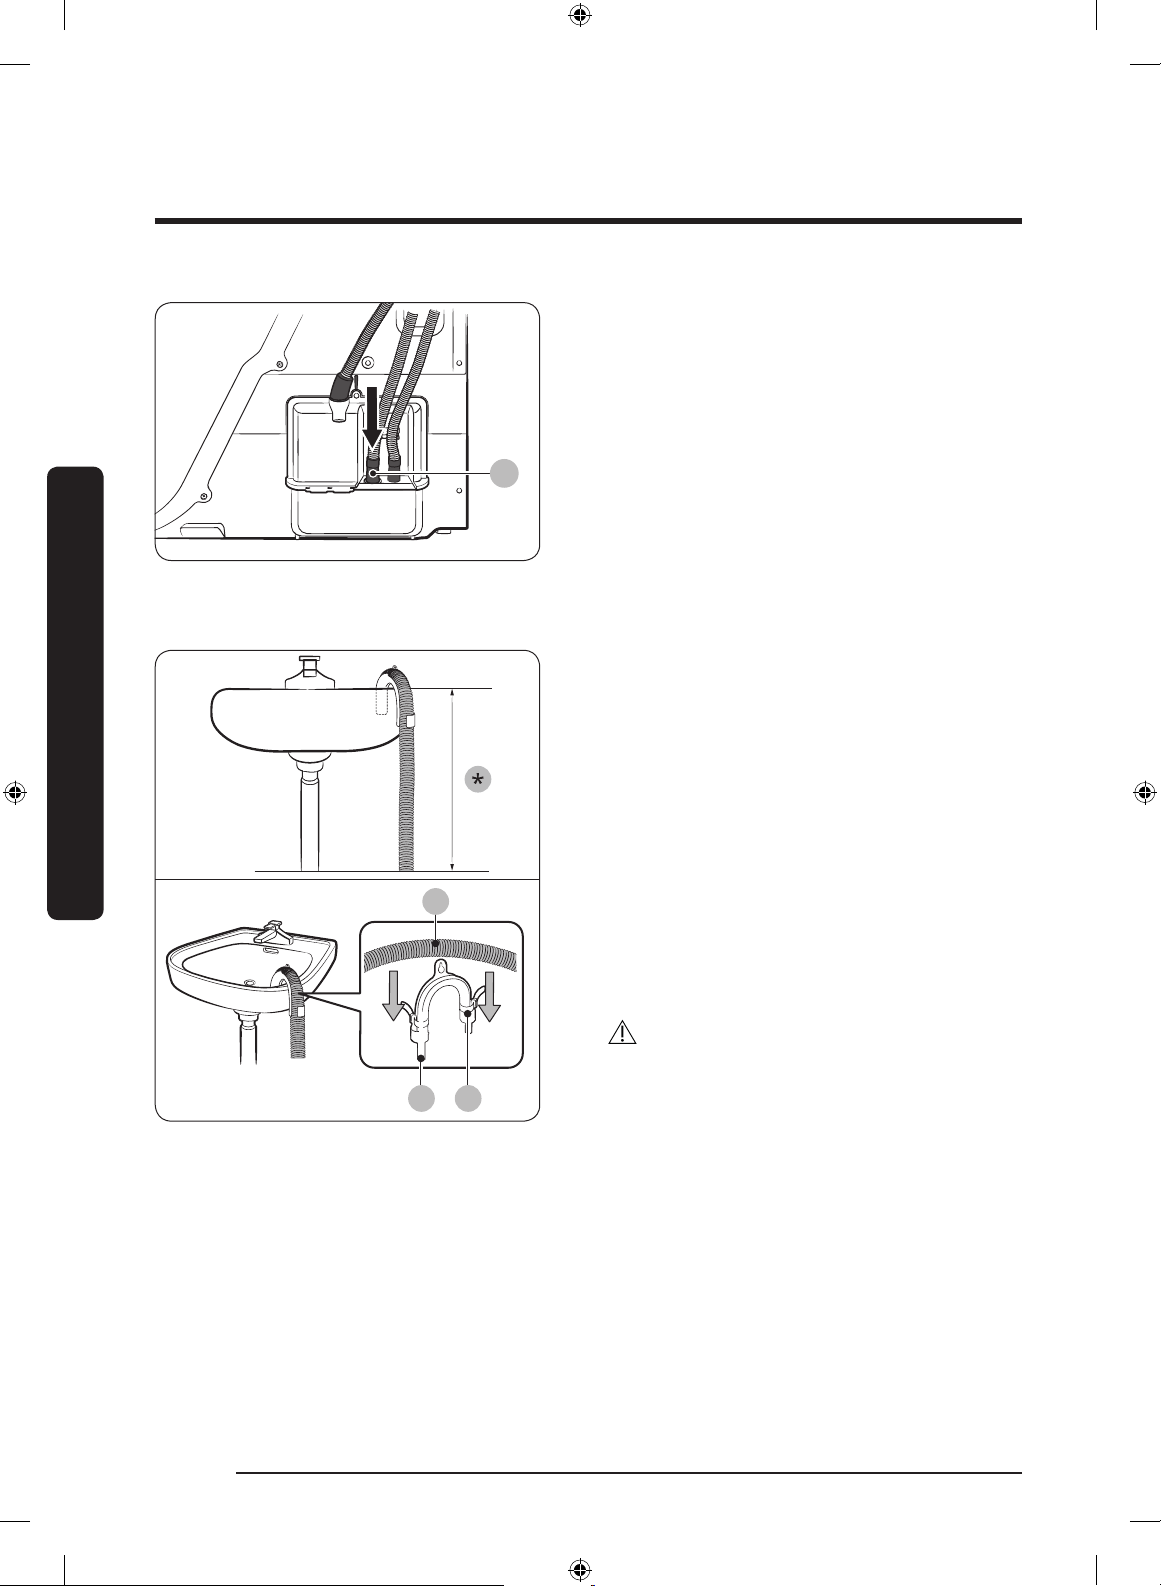
2. Insert one end of the accessory hose
(long drain hose) into hole (A).
3. Insert the other end (outlet) of the
accessory hose to the drainage system
in one of the following ways:
Installation
Over a wash basin:
1. Make sure to place the end of the
accessory hose lower than 90 cm (*)
from the bottom of dryer.
2. To bend some point of the accessory
hose, use the supplied plastic hose
guide (B) and secure the guide to the
wall with a hook or to the tap with a
piece of string. Assemble the drain hose
(A) and the hose guide (B) and x them
with the cable-tie (C).
3. You can drain the condensed water by
connecting the accessory hose (long
drain hose) to the drain-outlet directly.
CAUTION
Do not extend the drain hose. Water may
leak from the connected area. Use a long
drain hose.
English20
Untitled-16 20 2019-06-28 7:58:12
Page 21
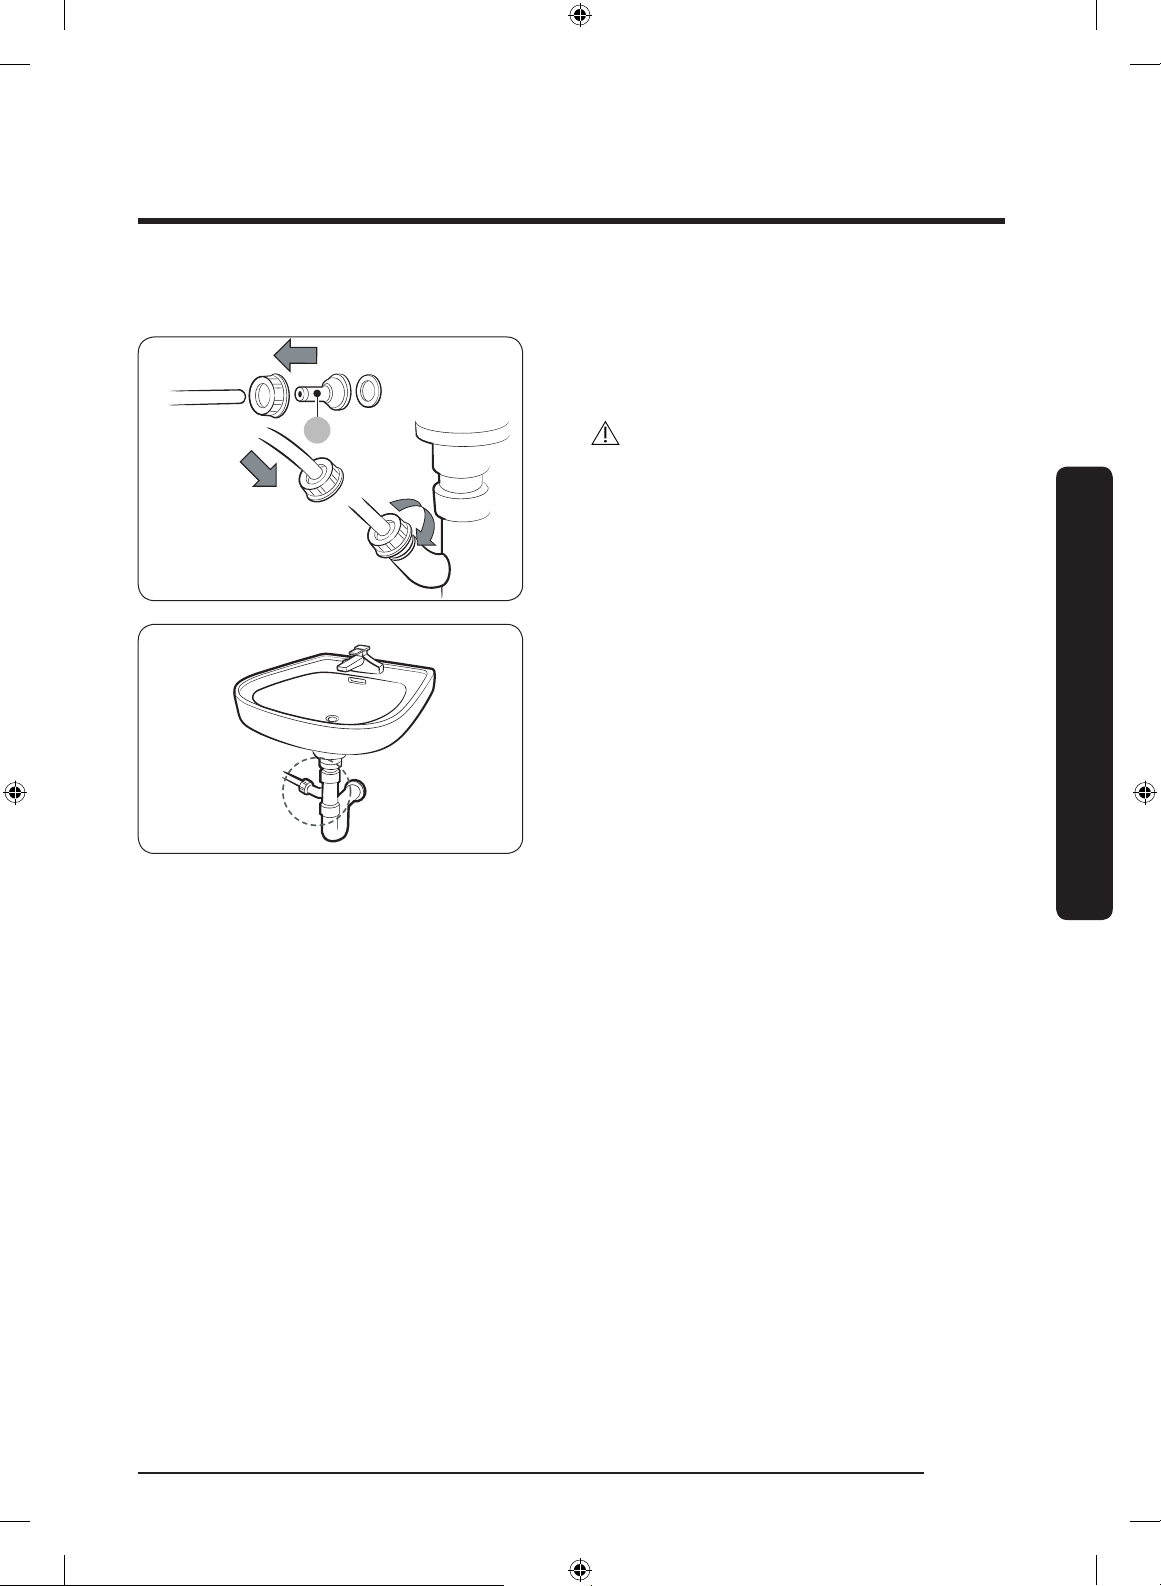
By using the drain pipe of the wash basin:
A
1. Assemble the hose connector (A), and
attach it to the end of the accessory
hose as shown.
CAUTION
To prevent water leak, make sure to
connect the hose and the connector rmly.
2. Connect the hose adapter directly to the
drain pipe of the wash basin.
Installation
English 21
Untitled-16 21 2019-06-28 7:58:13
Page 22
Installation
Installation checklist
• The dryer is plugged into a properly grounded outlet.
• All packaging material is completely removed and properly disposed.
• The dryer is level and standing rmly on the oor.
• Start the dryer to make sure that it runs, heats, and shuts off.
• Run a TIME DRY cycle for 20 minutes to see if the HC information code is displayed.
If this is the case, contact a local service center.
• After installation, we recommend that you wait at least 1 hour before using the dryer.
Before using the dryer
Installation
• Make sure no accessory remains inside the drum.
• Plug in the power cord just before operating the dryer.
• Do not block the air inlet hole of the cooling grill at the front of the dryer.
• Do not place inammable objects near the dryer and keep the surroundings clean.
• Keep the dryer level with the ground.
• Do not remove the adjustable levelling legs of the dryer. They are necessary to keep
the dryer level with the ground.
English22
Untitled-16 22 2019-06-28 7:58:13
Page 23
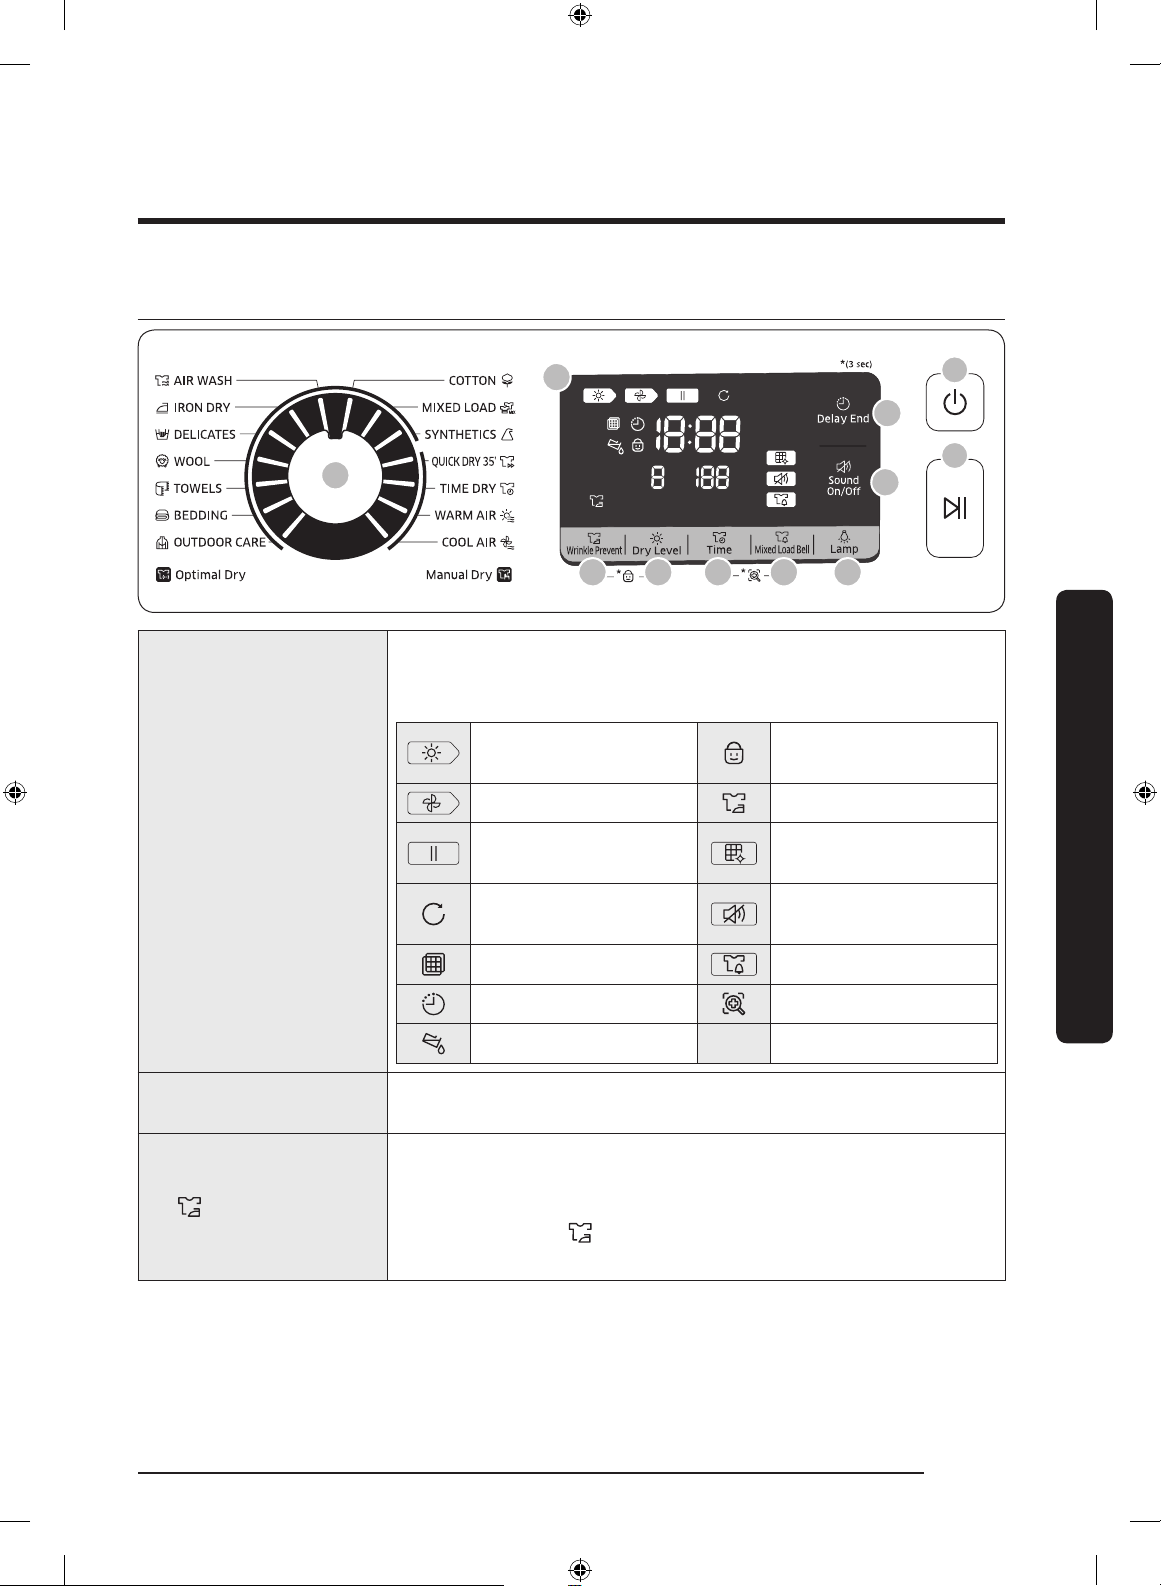
Operations
01
10
11
03 04 05 06 07
08
09
02
Control panel
Displays all cycle information, including cycle time,
information codes, and dryer status. See the table below for
status details.
01 Digital Graphic
Display
02 Cycle Selector
03 Wrinkle Prevent
Drying in progress
Child Lock activated/
deactivated
Cooling in progress Wrinkle Prevent
Stop
Wrinkle Prevent in
progress
Heat-exchanger clean
alarm
Sound on/off
Check lter Mixed Load Bell
Delay End Smart Check
Empty the water tank
Turn the dial to select a cycle. See the Cycle overview on page
25 for available cycles.
Adds approximately 2 hours of intermittent tumbling at the
end of the selected cycle to reduce wrinkles. A large circle
appears in display panel, and the drum rotates intermittently.
To activate, press Wrinkle Prevent. The corresponding
indicator lights up.
Operations
Untitled-16 23 2019-06-28 7:58:17
English 23
Page 24
Operations
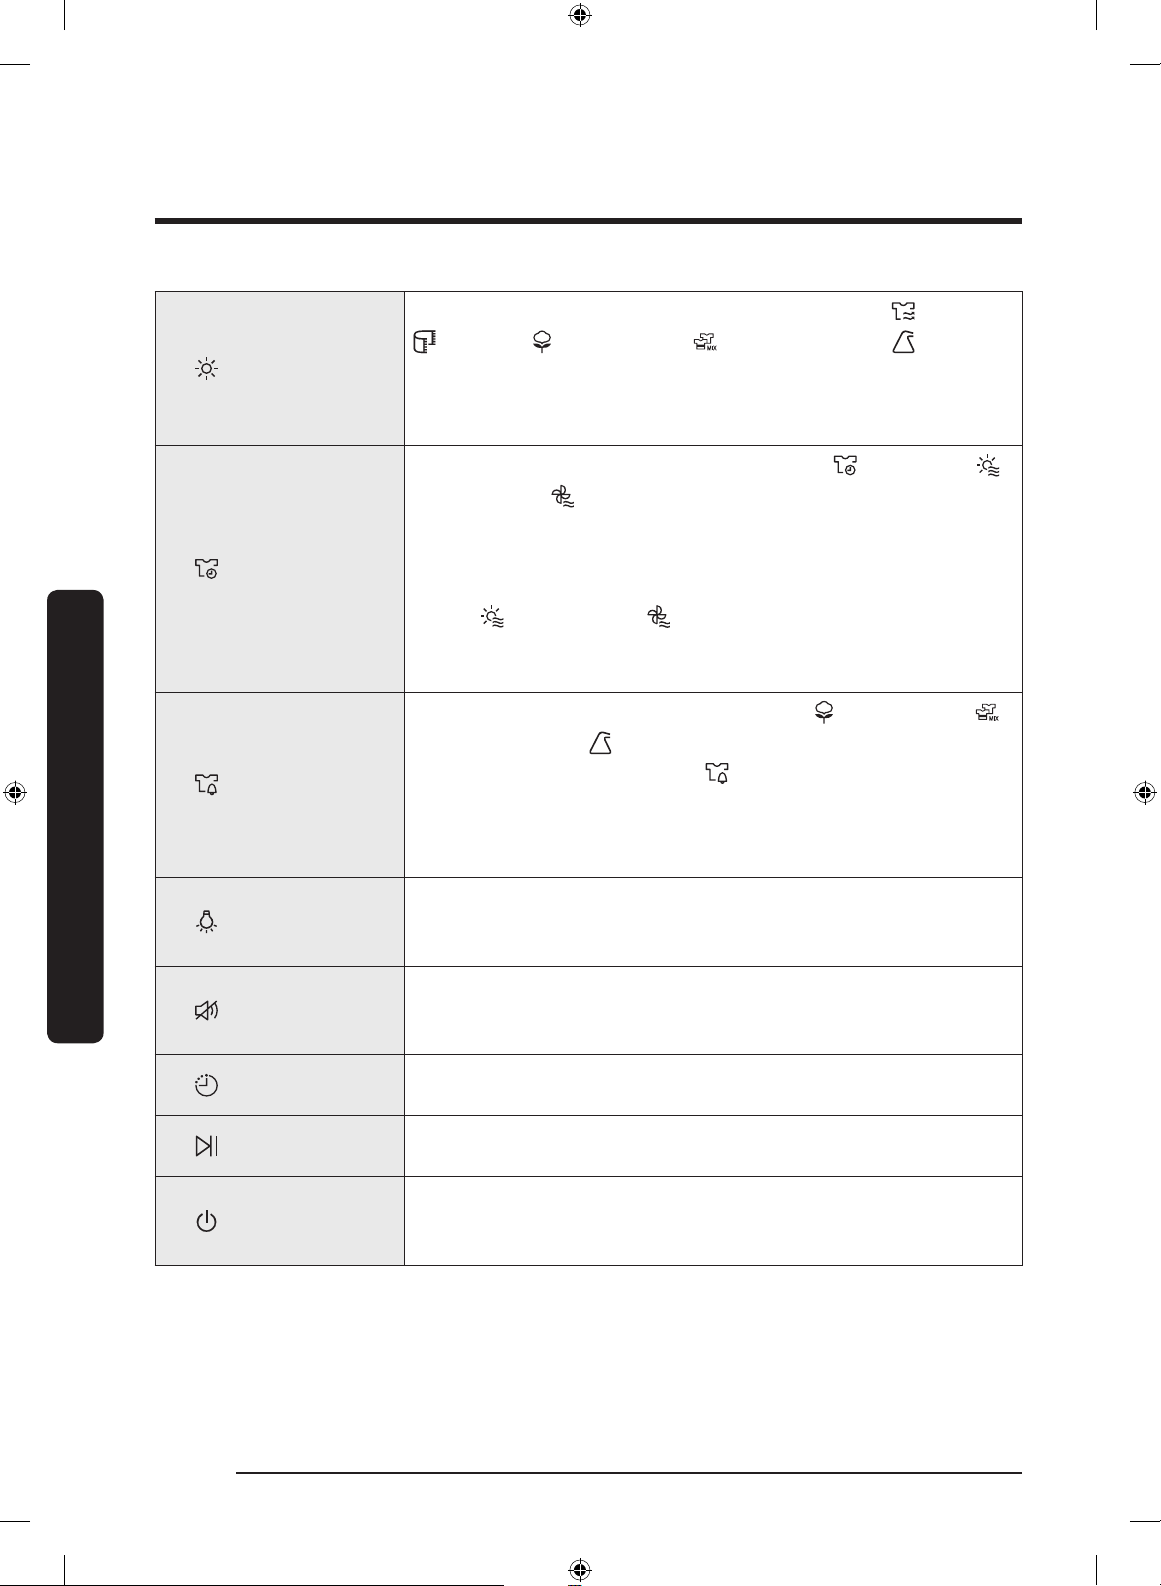
04 Dry Level
05 Time
Operations
06 Mixed Load Bell
07 Lamp
08 Sound On/Off
09 Delay End
10 Start/Pause
11 Power
Press to select the dryness level in the AIR WASH , TOWELS
, COTTON , MIXED LOAD , and SYNTHETICS cycles.
The dryness can be set in three levels (1-3). Level 1 is used to
partially dry items that lay at or hang to dry. Level 3 is the
strongest and is used to dry larger or bulk loads.
Press to adjust the cycle time for TIME DRY , WARM AIR ,
and COOL AIR cycles.
The following time options (unit: minute) are available: 30, 60,
90, 120, and 150.
• 120 minutes and 150 minutes are not available for WARM
AIR and COOL AIR cycles.
• The exact drying time differs depending on the humidity of
the load.
This alarm is available only with COTTON , MIXED LOAD
, and SYNTHETICS cycle. If a load contains mixed fabrics,
the Mixed Load Bell indicator ( ) blinks when the average
dryness of the item is 80 % dry. This lets you take items that
you don’t want fully dried or that dry quickly out of the dryer
early while letting others continue to dry.
Press to turn on or off the interior lamp. The lamp stays
lit for 5 minutes after it has turned on, and then turns off
automatically.
Press to mute/unmute the sound of the control panel. The
sound setting is retained when you turn the dryer off and turn
it on again.
You can adjust the nish time of the selected cycle in 1-hour
increments all the way up to 24 hours.
Press to start or pause a cycle. If the dryer is running, press
the button once to pause the dryer. Press again to resume.
Press to turn the dryer on/off. If the dryer turns on for
10 minutes without any button being pressed, the dryer
automatically turns off.
English24
Untitled-16 24 2019-06-28 7:58:20
Page 25
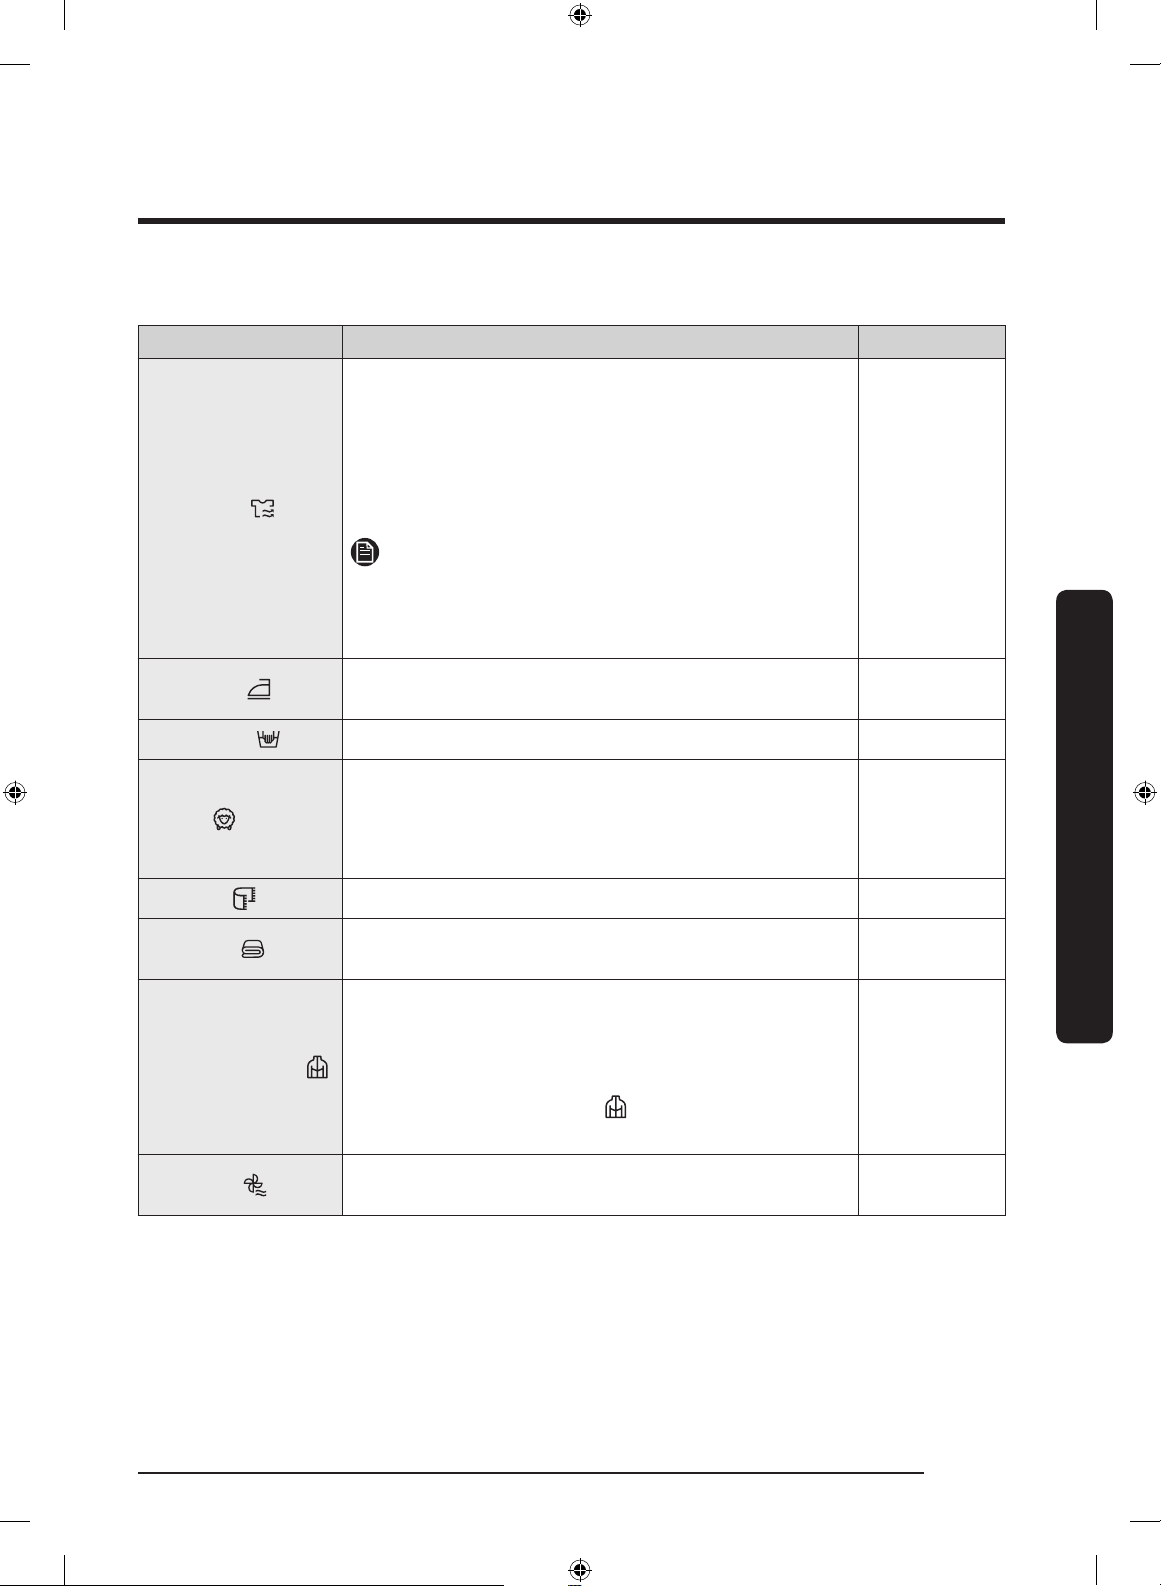
Cycle overview
Cycle Description Max load (kg)
AIR WASH
IRON DRY
Uses warm air to deodorize and refresh items. You
can select from 3 levels depending on the odor of
the items. This cycle is best to use for 1~2 items.
• Level 1: For light odors (default)
• Level 2: For normal odors
• Level 3: For strong odors
NOTE
To Maximize the deodorizing effect, dampen
the garments with a little water. Check the
colorfastness of the fabric before adding water.
This cycle nishes the drying process in a moist
state, which facilitates ironing.
1
4
DELICATES
WOOL
TOWELS
BEDDING
OUTDOOR CARE
COOL AIR
For items to be handled with care such as lingerie. 2
For machine washable and tumble dryable wool
only.
For best results, turn laundry inside out before
drying.
Use to dry loads such as bath towels. 6
For bulky items such as blankets, sheets,
comforters, and light duvets.
For outdoor wear such as skiwear and mountain
clothing, and also for fabrics such as spandex,
stretch, and microber. It is recommended to use
this cycle after you have washed your laundry
using the OUTDOOR CARE cycle with your
washing machine.
All types of fabric. For freshening up or airing items
of laundry that have not been worn for long.
Operations
2
2
2
-
English 25
Untitled-16 25 2019-06-28 7:58:21
Page 26
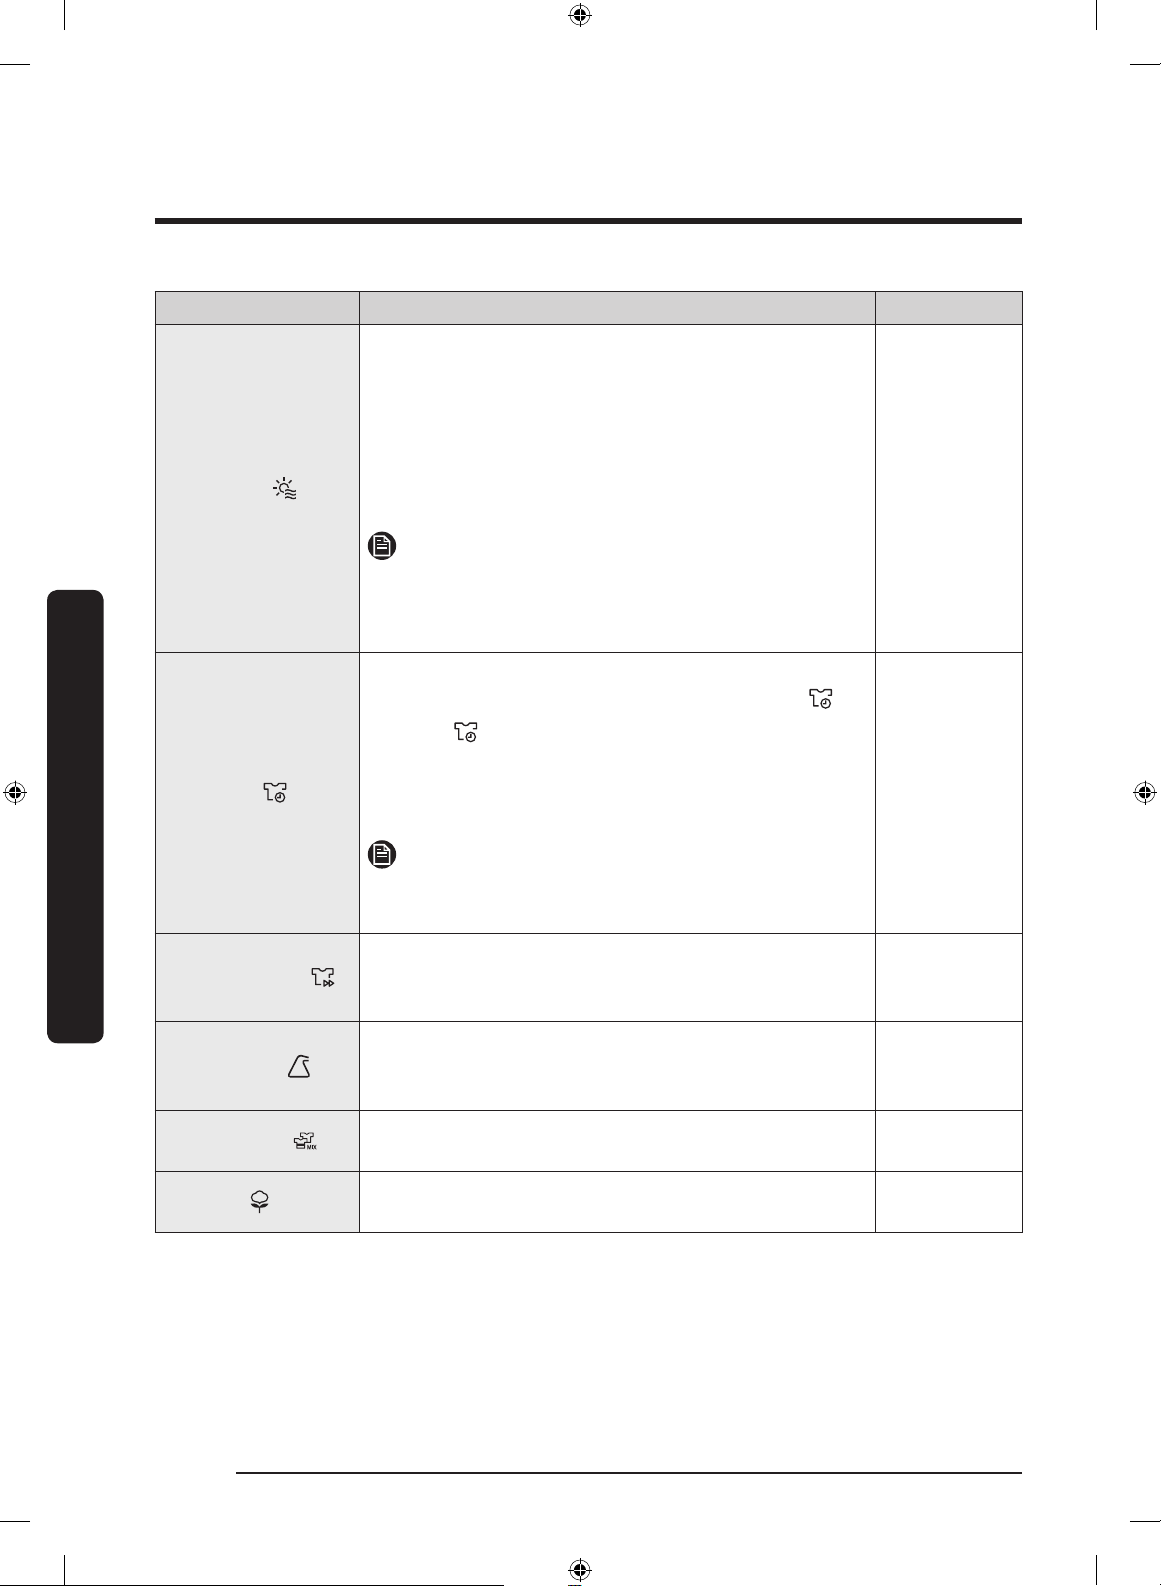
Operations
WARM AIR
Operations
TIME DRY
Cycle Description Max load (kg)
For small, pre-dried items. The dry time defaults to
30 minutes.
Timed cycle for all types of fabric except for wool
and silk. Dry laundry that is still slightly damp or
has already been pre-dried. Also suitable for the
subsequent drying of multi-layered, thick laundry
that does not dry readily.
NOTE
This cycle is suitable for drying individual woollen
fabrics, sports shoes and soft toys. Only dry these
using the basket for woollens.
Use to set a desired dry time.
1. Turn the Cycle Selector to select TIME DRY .
2. Press Time to set the drying time between 30
minutes and 150 minutes. Keep pressing Time
cycles through the available time options in
30-minute increments.
-
-
QUICK DRY 35'
SYNTHETICS
MIXED LOAD
COTTON
NOTE
The actual cycle time may differ depending on the
dryness of items.
For drying light cotton synthetics or items that
needs quick drying. The default dry time is 35
minutes.
For lightly soiled blouses, and shirts that are made
of polyester (Diolen, Trevira), polyamide (Perlon,
nylon), or other similar blends.
For mixed loads consisting of cotton and synthetic
fabrics.
For lightly cottons, bed linen, table linen,
underwear, towels, and shirts.
1
4
Max
Max
English26
Untitled-16 26 2019-06-28 7:58:22
Page 27
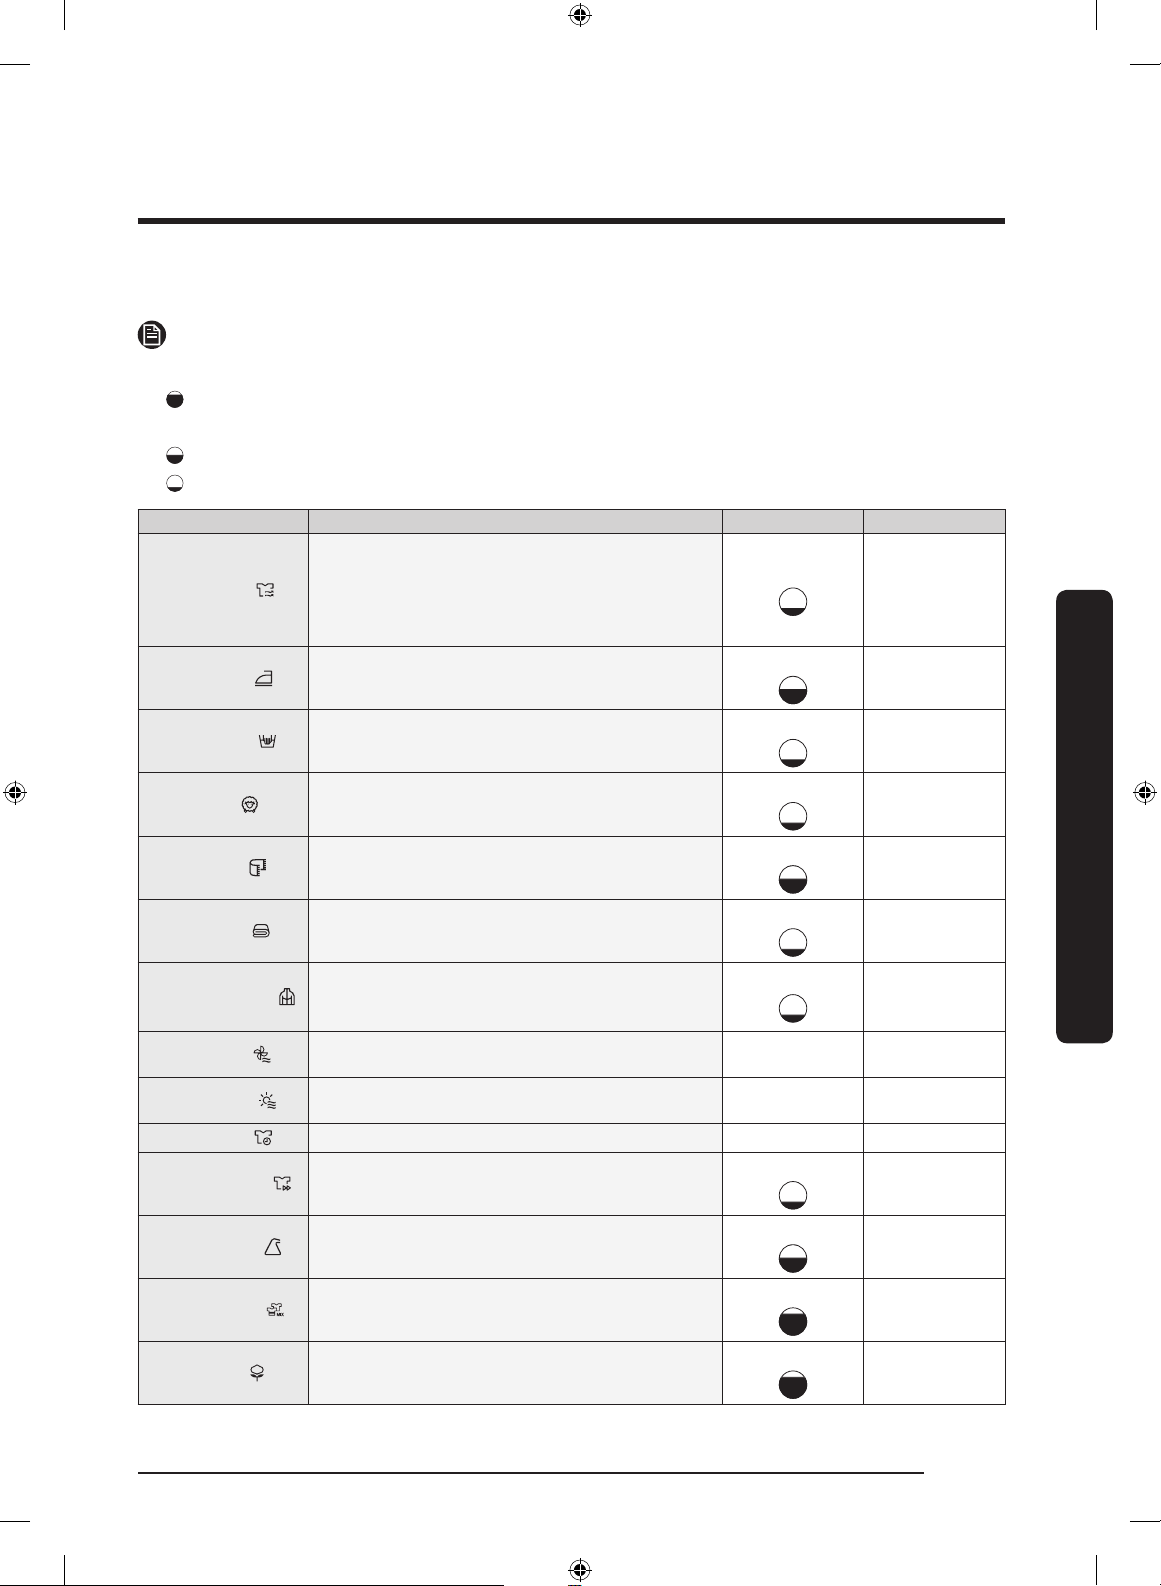
Cycle chart
NOTE
For best results, follow the load size recommendations for each dry cycle.
• Large load: Fill the drum to about ¾ full. Do not add items over this level as they
need to tumble freely.
• Medium load : Fill the drum to about ½ full.
• Small load : Fill the drum with 3-5 items, not more than ¼ full.
Cycle Recommended items Load size Dry Level
Clothes with excessive accessories (such as beads,
AIR WASH
IRON DRY
DELICATES
WOOL
TOWELS
spangles, lace, buttons etc.) may be damaged or
deformed. Do not use this cycle for fabrics (such as
wool, silk, leather, fur, velvet, printed t-shirts, etc.)
that can be easily damaged by heat.
This cycle nishes the drying process in a moist
state, which facilitates ironing.
Silk, ne fabrics and lingerie.
For machine washable and tumble dryable wool
only.
Use to dry loads such as bath towels.
1
Available
4
Unavailable
2
Unavailable
2
Unavailable
6
Available
Operations
BEDDING
OUTDOOR CARE
COOL AIR
WARM AIR
TIME DRY
QUICK DRY 35'
SYNTHETICS
MIXED LOAD
COTTON
For bulky items such as blankets, sheets, comforters,
and light duvets.
For outdoor wear such as skiwear and mountain
clothing, and also for fabrics such as spandex,
stretch, and microber.
All types of fabric. For freshening up or airing items
of laundry that have not been worn for long.
Small Items & damp clothing Everyday items
suitable for heat drying
All types of fabric; time programme. – Unavailable
Synthetics and light cottons
Synthetic or blended fabrics.
Mixed load consisting of cotton and synthetic
fabrics
For lightly cottons, bed linen, table linen, underwear,
towels, and shirts.
2
Unavailable
2
Unavailable
– Unavailable
– Unavailable
1
Unavailable
4
Available
7, 8, 9
Available
7, 8, 9
Available
English 27
Untitled-16 27 2019-06-28 7:58:23
Page 28
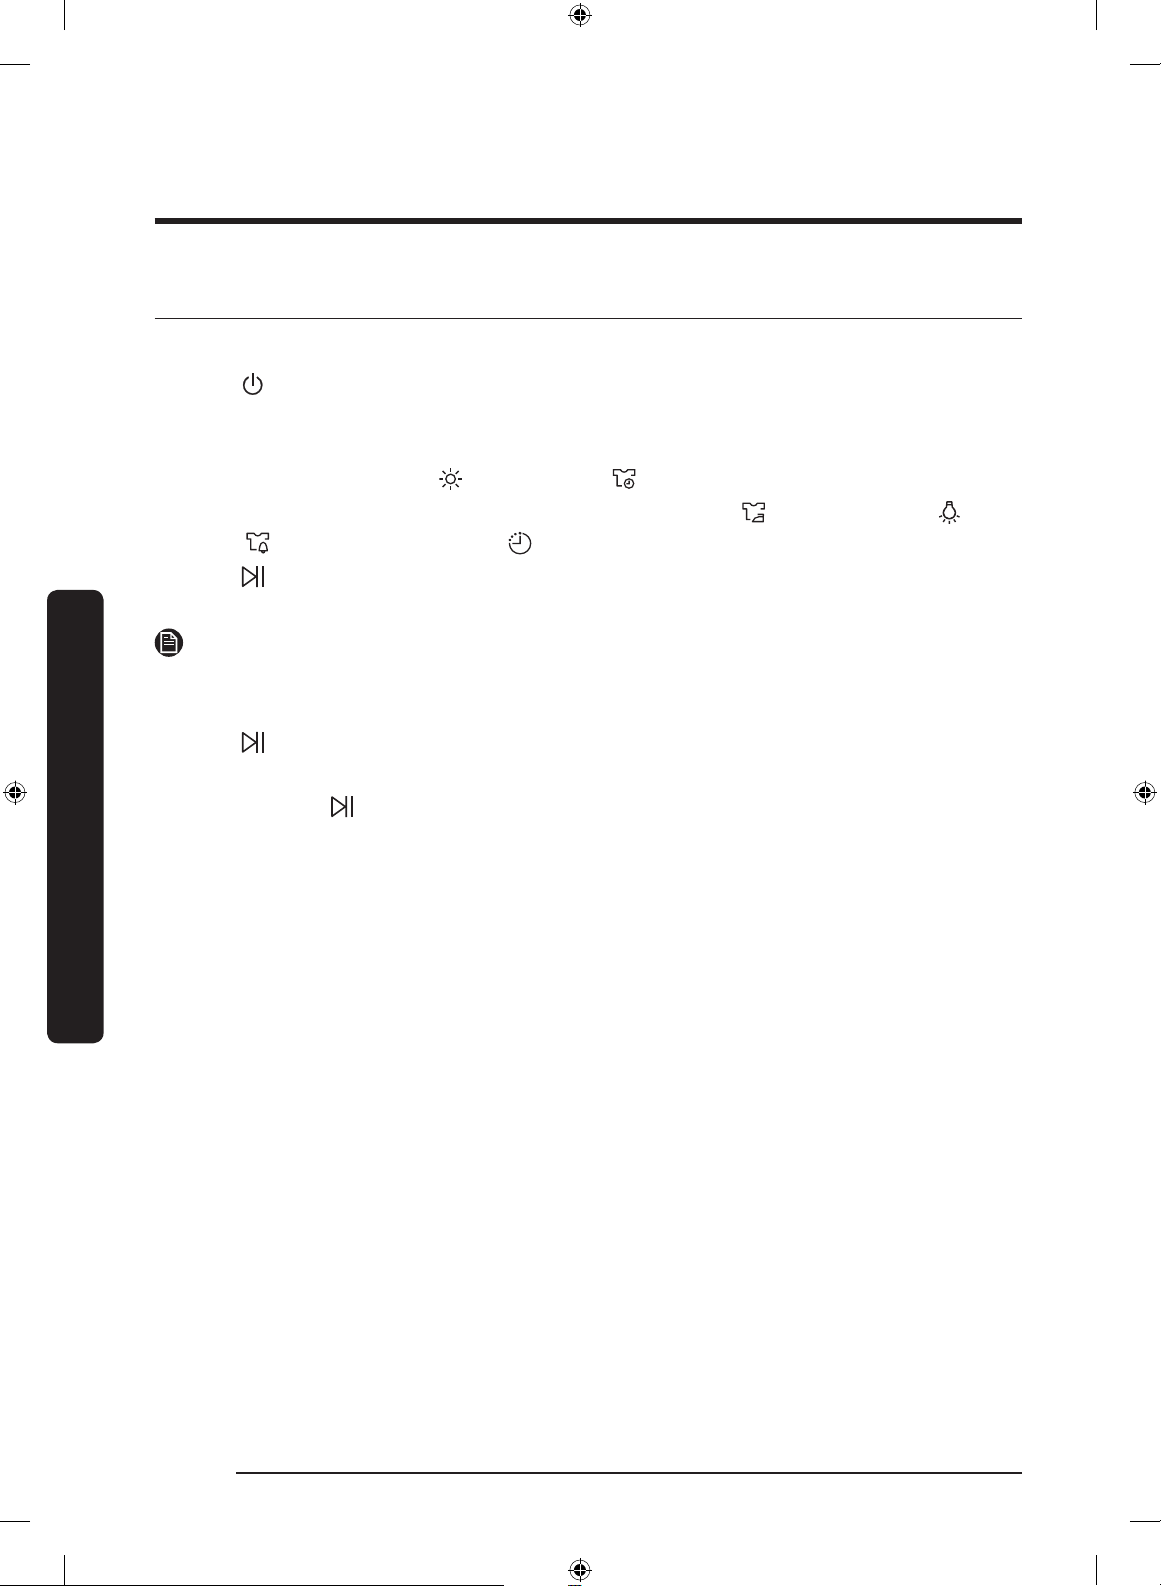
Operations
Getting started
Simple steps to start
1. Press Power to turn the dryer on.
2. Load the dryer and close the door.
3. Turn the Cycle Selector to select a cycle.
4. Change the cycle settings ( Dry Level, and Time) as necessary.
5. Select necessary settings and options to your preference. ( Wrinkle Prevent,
6. Press Start/Pause. The dryer indicator lights up, and the estimated cycle time
The number of available settings and options differs with the cycle.
To change the cycle during operation
Operations
1. Press Start/Pause to stop operation.
2. Select a different cycle.
3. Press and hold Start/Pause to start new cycle.
Lamp, Mixed Load Bell, and/or Delay End).
appears on the display.
NOTE
Sorting and loading
• Put only one wash load in the dryer at a time.
• Avoid mixing heavy and lightweight items together.
• To increase drying efciency when drying one or two items, add a dry towel to the
load.
• For best results, untangle items before inserting into the dryer.
• Overloading restricts the tumbling process, resulting in uneven drying and wrinkling.
• Unless recommended on the care label, avoid drying woolens or berglass items.
• Avoid drying unwashed items.
• Do not dry items soiled with oil, alcohol, gasoline, etc.
English28
Untitled-16 28 2019-06-28 7:58:23
Page 29
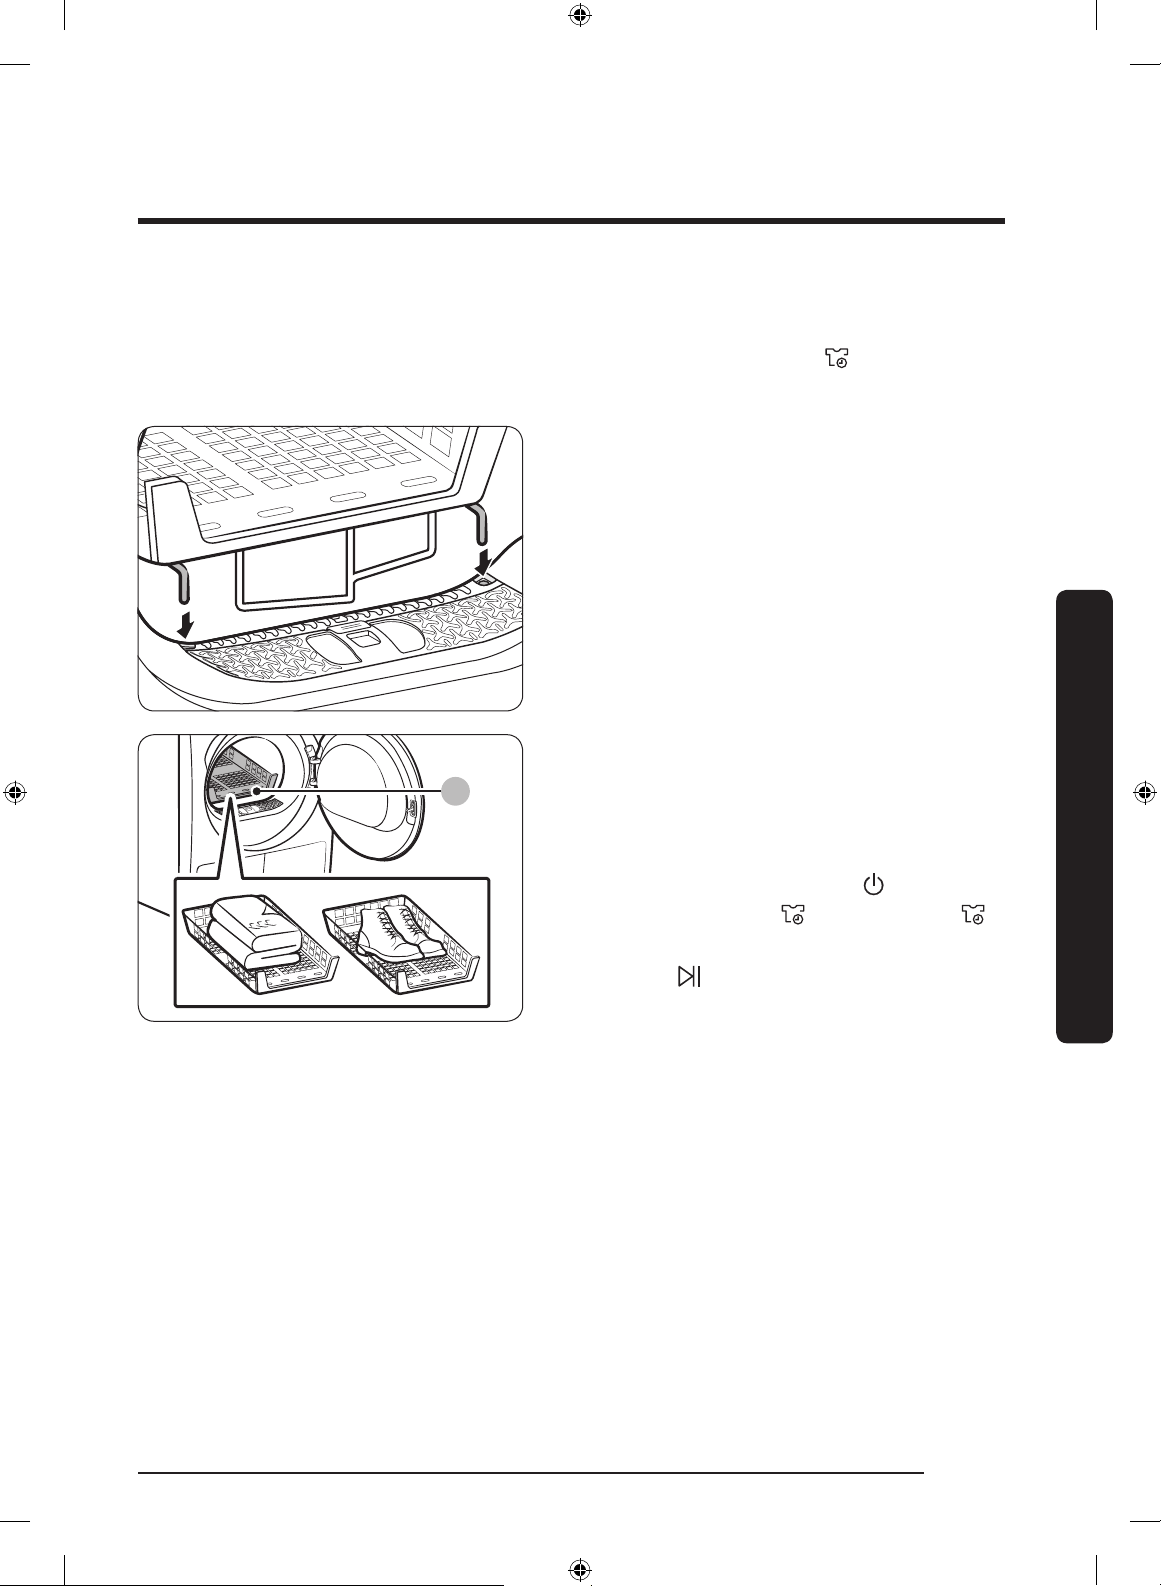
Rack Dry (applicable models only)
A
Set the drying time up to 150 minutes according to the moisture and weight of the
items to dry. When drying laundry using the drying rack, the TIME DRY cycle is
recommended.
1. Position the drying rack in the drum,
inserting the front lips of the rack into
the holes of the door diaphram.
A. Rack dry
2. Place items on the rack, leaving enough
space where air can circulate. For
clothing items, fold and place at on the
rack. For shoes, place shoes with their
soles facing down.
3. Close the door and press Power.
Select TIME DRY , and then press
Time to select the drying time.
4. Press Start/Pause.
Operations
English 29
Untitled-16 29 2019-06-28 7:58:24
Page 30
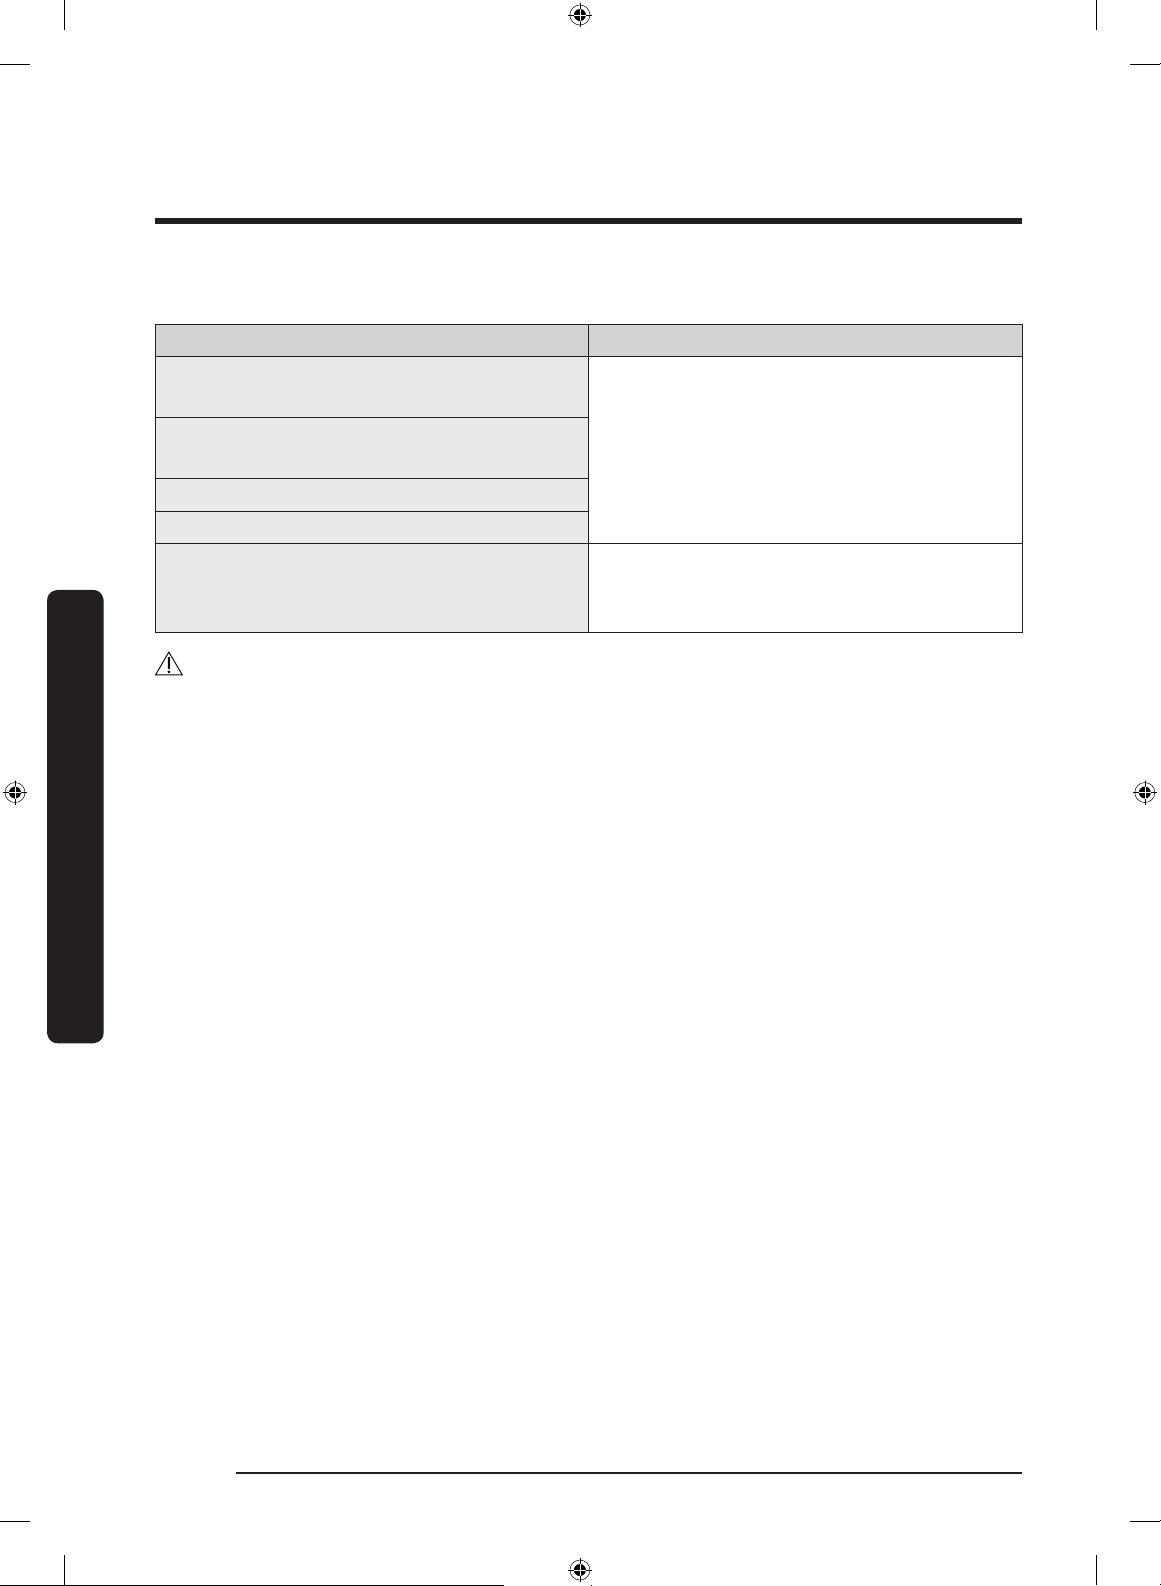
Operations
Drying suggestions
Washable sweaters (block to shape and lay
at on rack)
Stuffed toys (cotton or polyester ber
lled)
Stuffed toys (foam or rubber-lled)
Foam rubber pillows
Sneakers To dry sports shoes, place the shoes on
• Drying foam rubber, plastic, or rubber on a heat setting may cause damage to the
Operations
• To prevent damage to shoes, use Dry Rack.
Items (max 1.5 kg) Description
When drying the laundry using the rack,
fold and place the clothes on the rack
to prevent the clothing from becoming
wrinkled.
the rack so that the soles of the shoes are
facing downwards.
CAUTION
items and lead to a re hazard.
English30
Untitled-16 30 2019-06-28 7:58:24
Page 31
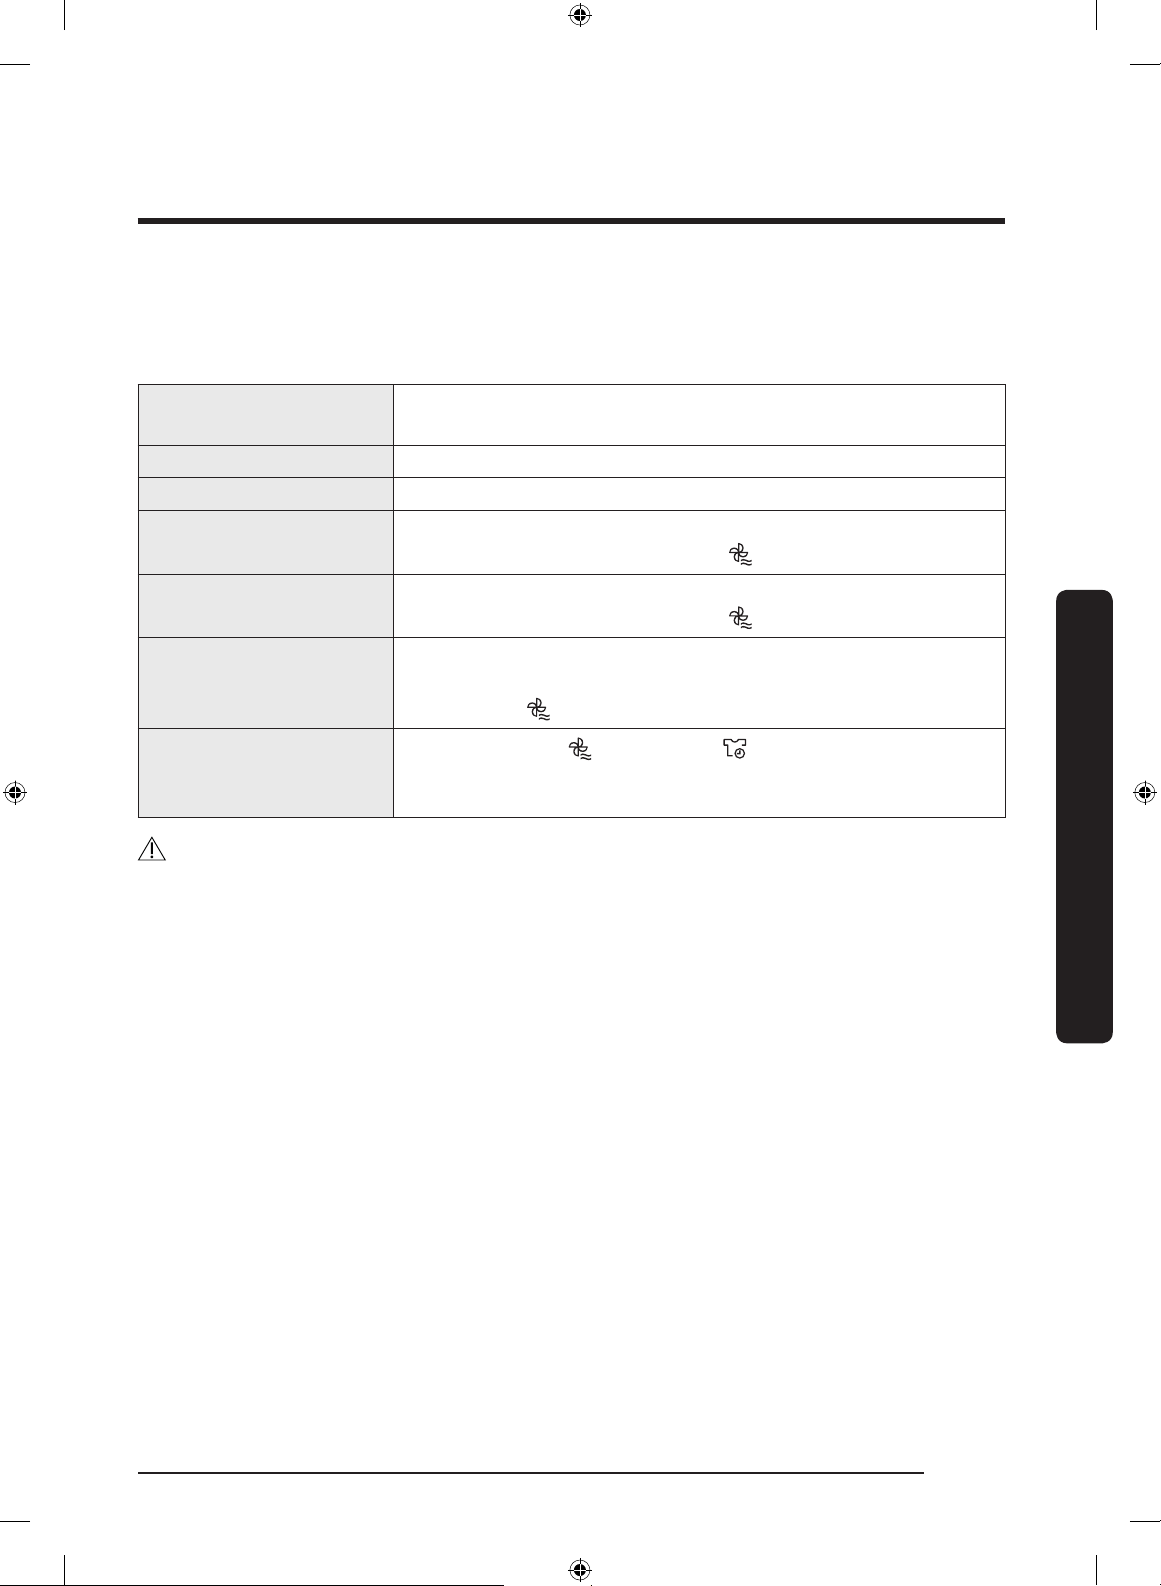
Cycle guide
Always follow the care label when drying. If care label instructions are not available, refer
to the following table.
Bedspreads and
• Use the High temperature settings.
comforters
Blankets • For best results, dry only one blanket at a time.
Cloth diapers • Use the High temperature settings.
Down-lled items • Do not dry on a heat setting. Doing so may cause a re
hazard. Only use the COOL AIR cycle.
Foam rubber (rug backs,
stuffed toys, etc.)
• Do not dry on a heat setting. Doing so may cause a re
hazard. Only use the COOL AIR cycle.
Pillows • Add a few dry towels to help tumble and uff items.
• Do not dry kapok or foam pillows with heat. Use only the
COOL AIR cycle.
Plastics (shower
curtains, outdoor
• Use COOL AIR or TIME DRY .
• Set the dry level to lower or the lowest.
furniture covers, etc)
CAUTION
Do not use the dryer to dry items that are not listed above.
Operations
English 31
Untitled-16 31 2019-06-28 7:58:24
Page 32
Operations
Special features
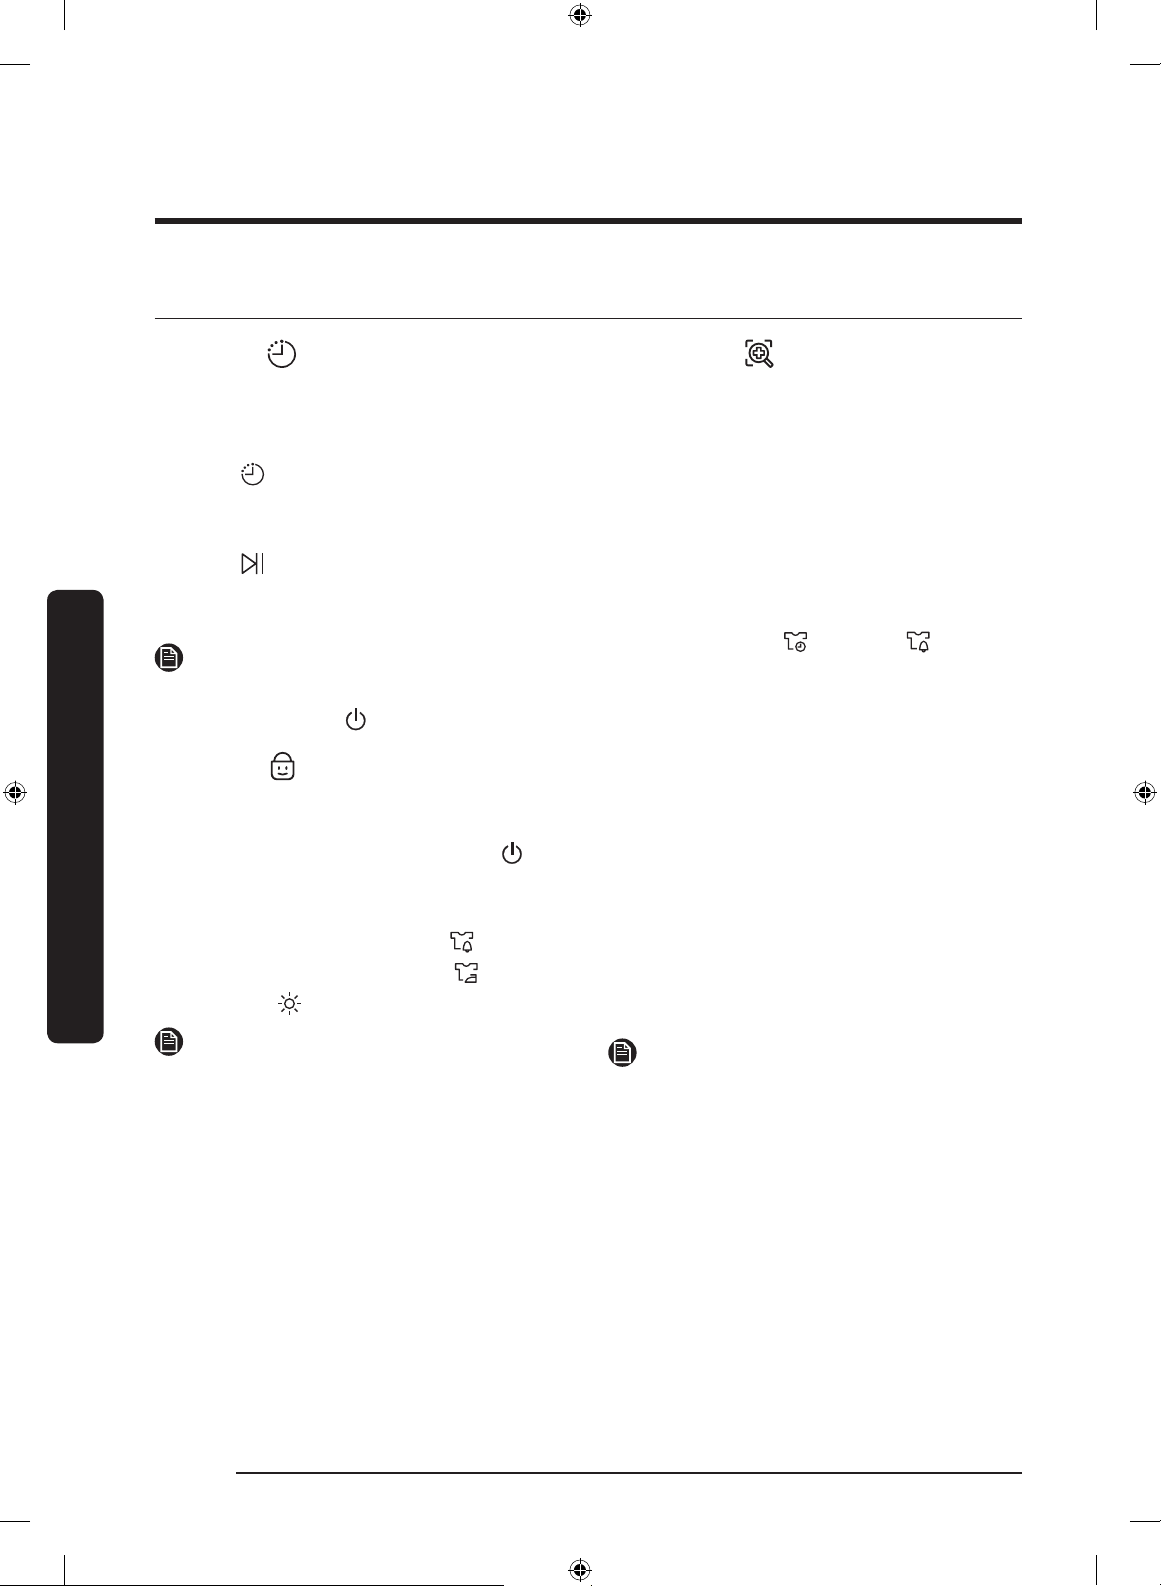
Delay End
You can set the dryer to complete a
selected cycle at your set time.
1. Select a cycle with necessary options.
2. Press Delay End repeatedly to set a
3. Press Start/Pause. The corresponding
To cancel the Delay End settings, restart
the dryer using the Power button.
Operations
Child Lock
Child Lock prevents children from playing
with the dryer. When Child Lock is
activated, all buttons except for the
Power button are disabled.
To activate/deactivate Child Lock,
simultaneously press and hold Mixed
Load Bell and Smart Control or Wrinkle
Prevent and Dry Level for 3 seconds.
If Child Lock is activated, and the dryer is
turned off and then on again, Child Lock
remains activated.
time between 1 hours and 24 hours in
1-hour increments.
indicator blinks, and the clock begins
counting down to the set time.
NOTE
NOTE
Smart Check
If the dryer has detected an issue, Smart
Check allows you to check the status of the
dryer using a smartphone. Please note that
Smart Check can only be used for Galaxy
and iPhone series smartphones.
To use Smart Check, make sure you have
downloaded the Samsung Smart Washer/
Dryer app, and then follow the steps
below.
1. Press and hold Time and Mixed
Load Bell for 3 seconds or press Smart
Check. The LED’s on the display panel
rotate, and the Smart Check code is
displayed.
2. On the smartphone, open the Samsung
Smart Washer/Dryer app and tap the
Smart Check button.
3. Focus the smartphone’s camera on the
Smart Check code shown on the display
panel.
4. If the information code is recognized,
the app provides detailed information
for the issue and further instructions.
NOTE
• If the dryer reects light on the display,
the smartphone may fail to recognize
the information code.
• If the smartphone fails to recognize the
code, manually enter the information
code into the smartphone.
English32
Untitled-16 32 2019-06-28 7:58:25
Page 33
Maintenance
WARNING
• Do not clean the dryer by directly spraying water onto the dryer.
• Do not clean the dryer with benzene, thinner, alcohol, or acetone. This may cause
discoloration, deformation, damage, electric shock, or re.
• Before cleaning the dryer, be sure to unplug the power cord.
Control panel
Clean with a soft, damp cloth. Do not use abrasive cleaners. Do not spray cleaners directly
on the panel. Immediately wipe up any spills or liquids from the control panel.
Exterior
Clean with a soft, damp cloth. Do not use abrasive cleaners. Avoid using or placing sharp
or heavy objects near/on the dryer. Keep detergent and laundry supplies on the pedestal
(sold separately) or in a separate storage container.
Drum
Clean with a damp cloth with a mild, non-abrasive cleaner suitable for stainless steel.
Wipe remaining residue with a clean, dry cloth.
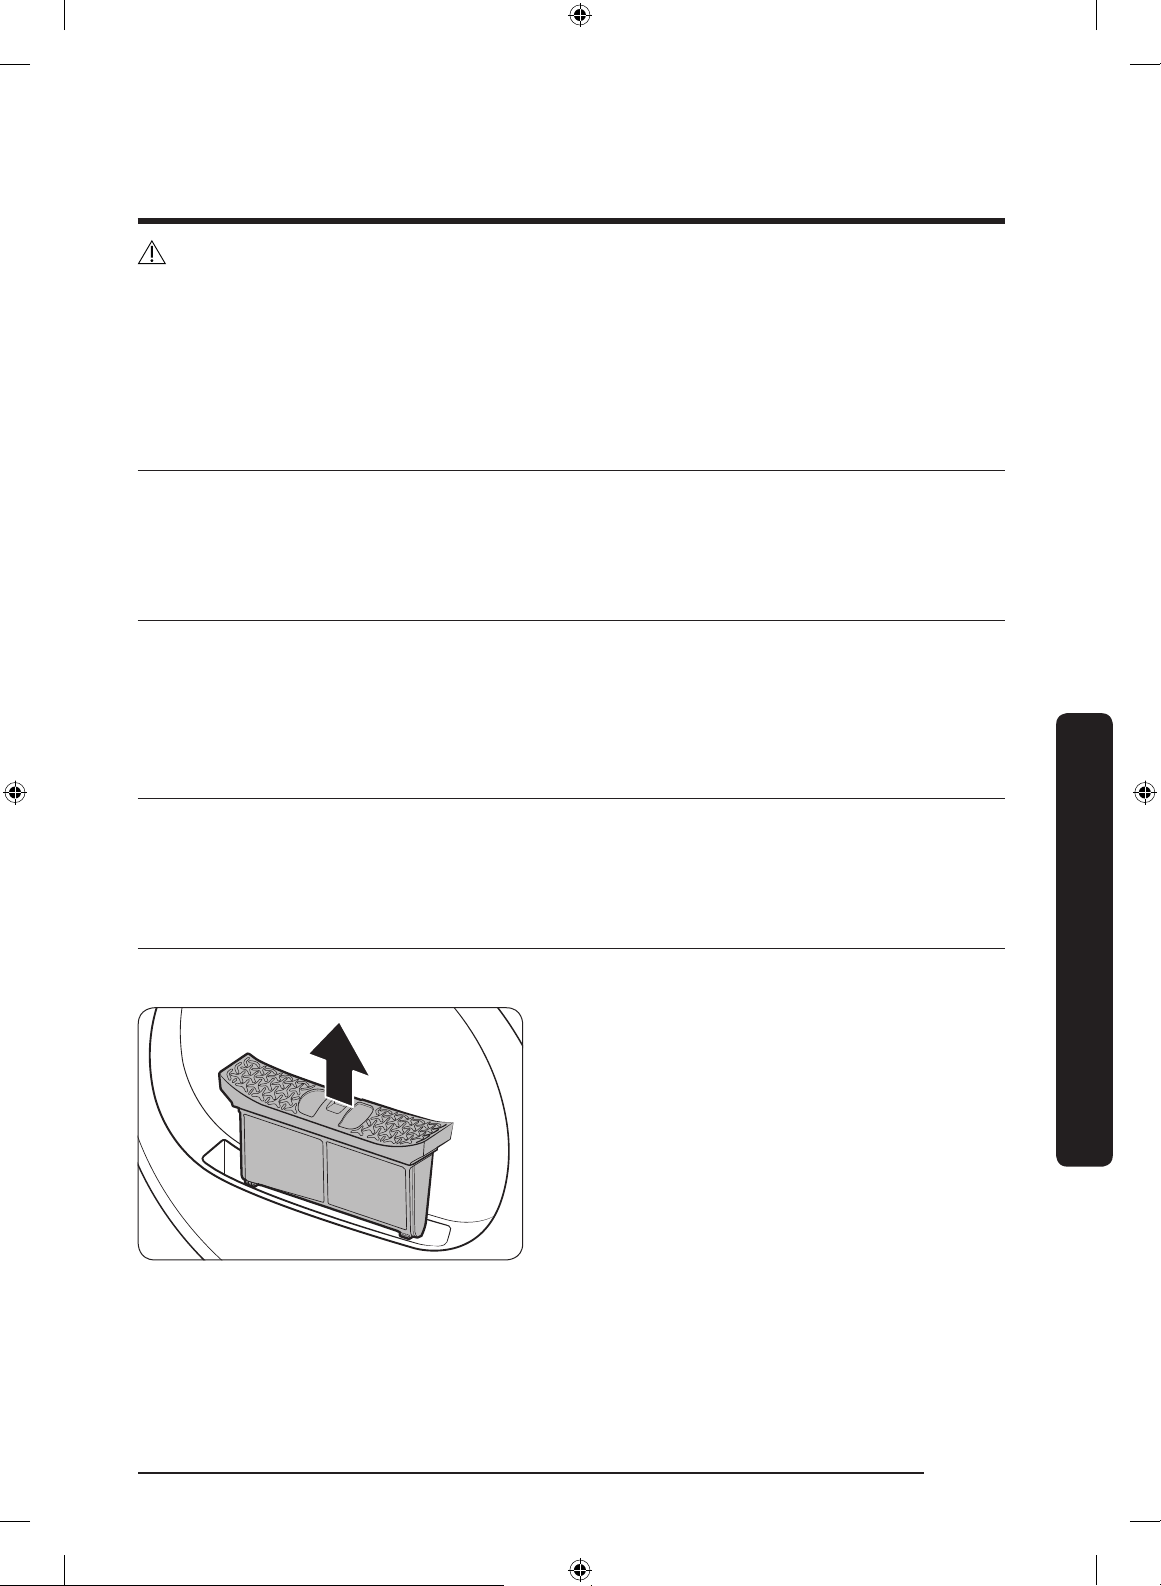
Lint lter
Clean the lint lter after each load.
1. Open the door and pull the lint lter
upward to remove.
Maintenance
English 33
Untitled-16 33 2019-06-28 7:58:26
Page 34
Maintenance
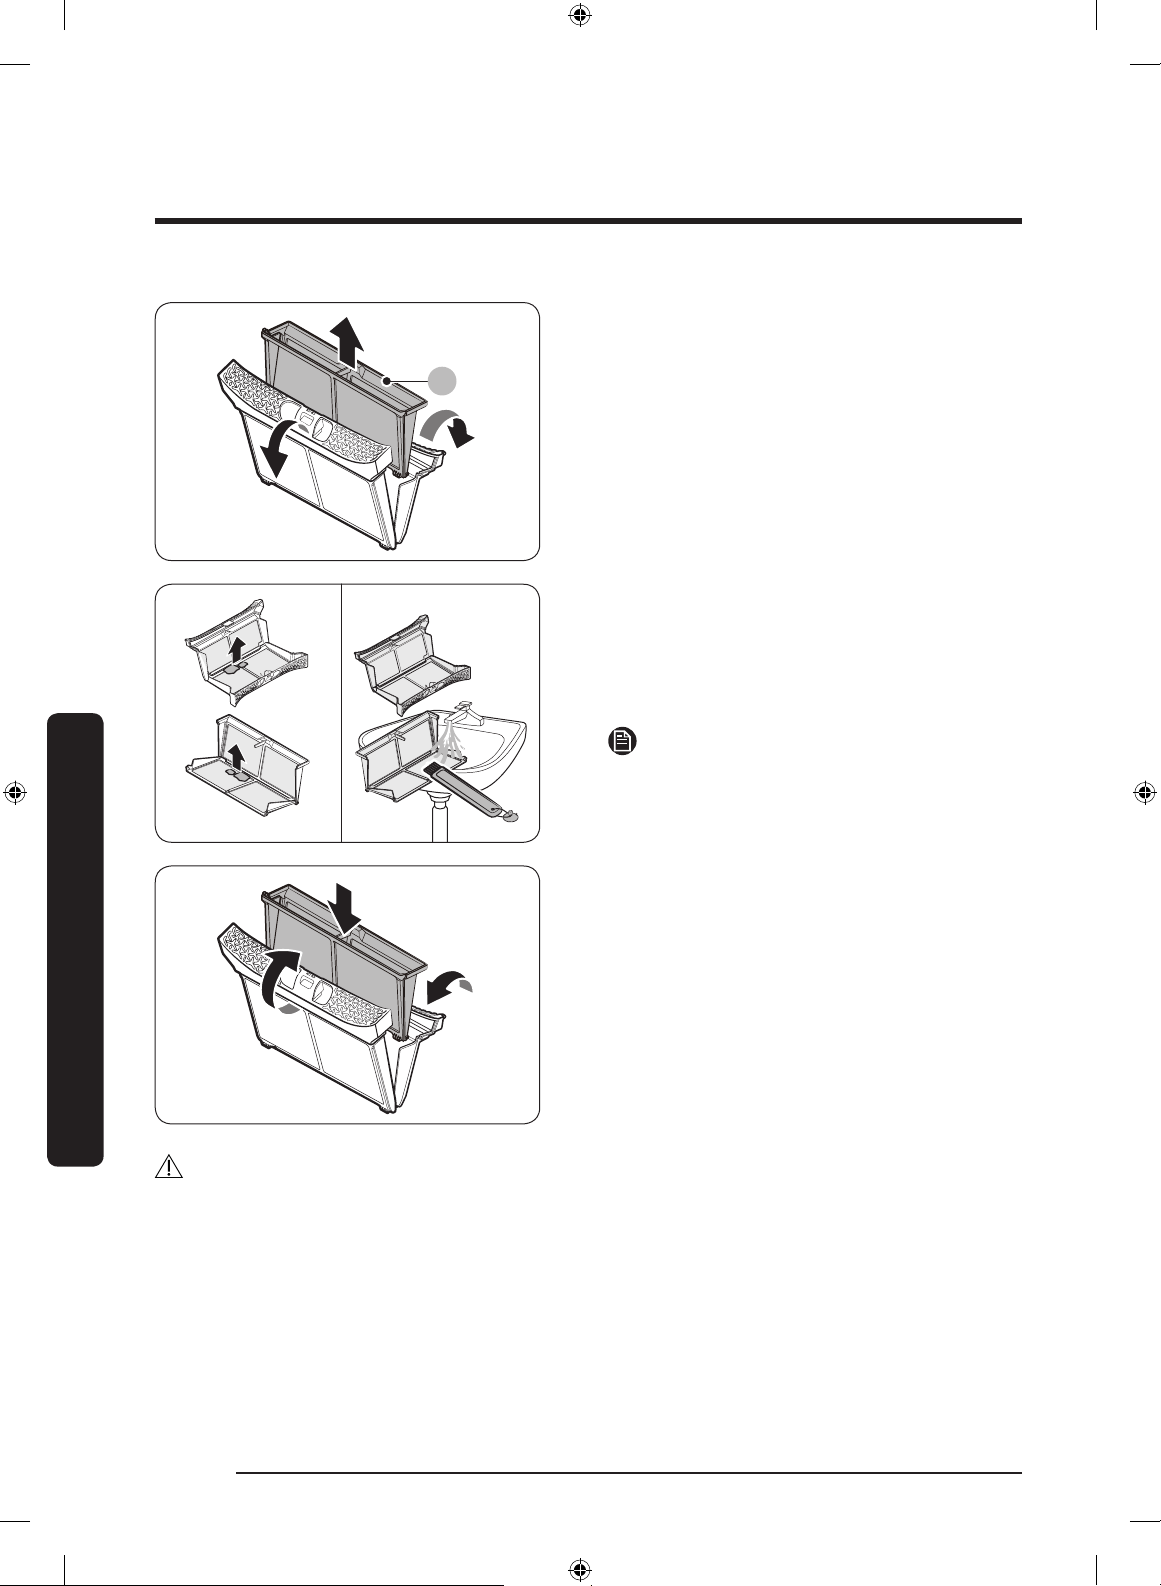
A
2. Open the outer lter and remove the
inner lter (A).
3. Unfold both the inner lter and the
outer lter.
4. Remove the lint from both lters, and
then clean the lters with the cleaning
brush.
NOTE
To clean the lters thoroughly, clean the
lters in running water, and then dry them
completely.
Maintenance
• Clean the lint lter after each load. Otherwise, the drying performance may decrease.
• Do not operate the dryer without the inner lter inside the outer lter.
• Using the dryer with a wet lint lter may cause mold, bad odors, or a decrease in
drying performance.
5. Put the inner lter into the outer lter,
and then reinsert the lint lter into the
original position.
CAUTION
English34
Untitled-16 34 2019-06-28 7:58:27
Page 35
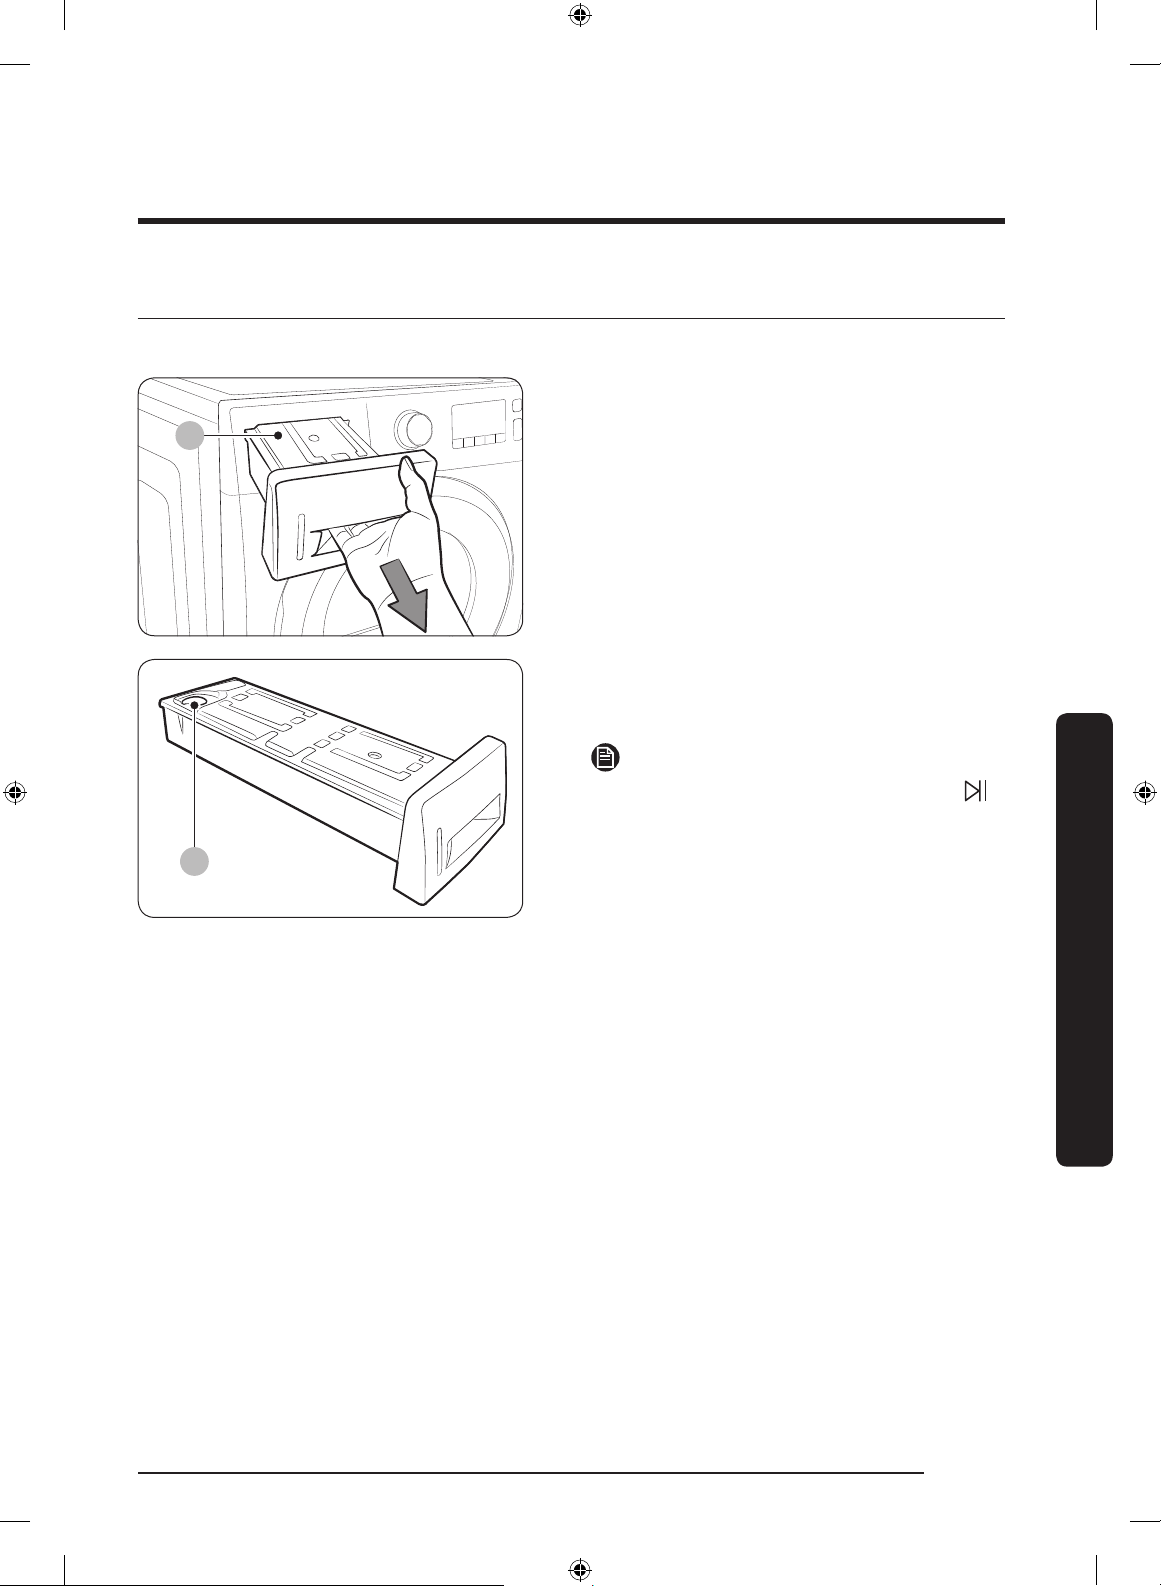
Water tank
A
B
To avoid leaks, empty the water tank after every load.
1. Using both hands, pull the water tank
(A) forward to remove.
2. Empty the water through the drain hole
(B) and place the water tank back into
place.
NOTE
If you empty the water tank and press
Start/Pause, the corresponding indicator
turns off.
Maintenance
English 35
Untitled-16 35 2019-06-28 7:58:27
Page 36
Maintenance
A
B
C
Heat exchanger
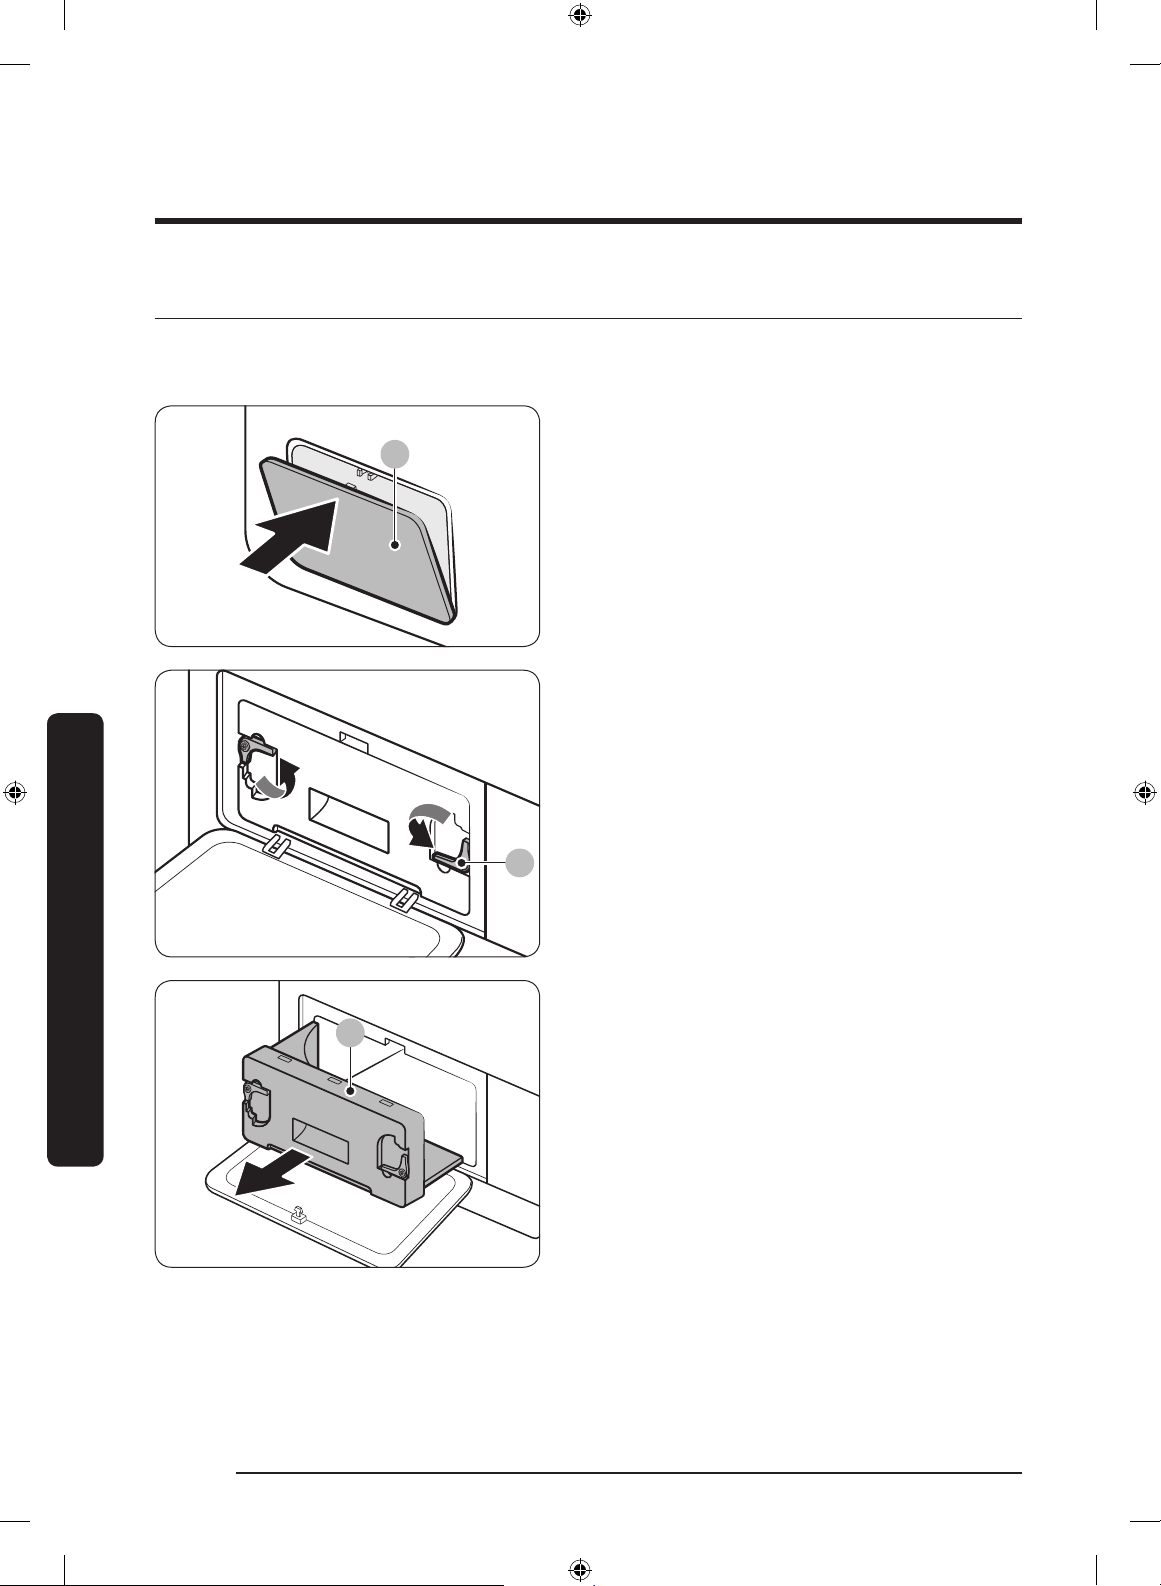
Clean the heat exchanger at least once a month. (or When the Buzzer rings and the heat
exchanger indicator lights up on the display.)
1. Gently press the top part of the outer
cover (A) to open.
2. Unlock the xers (B).
Maintenance
3. Remove the inner cover (C).
English36
Untitled-16 36 2019-06-28 7:58:28
Page 37
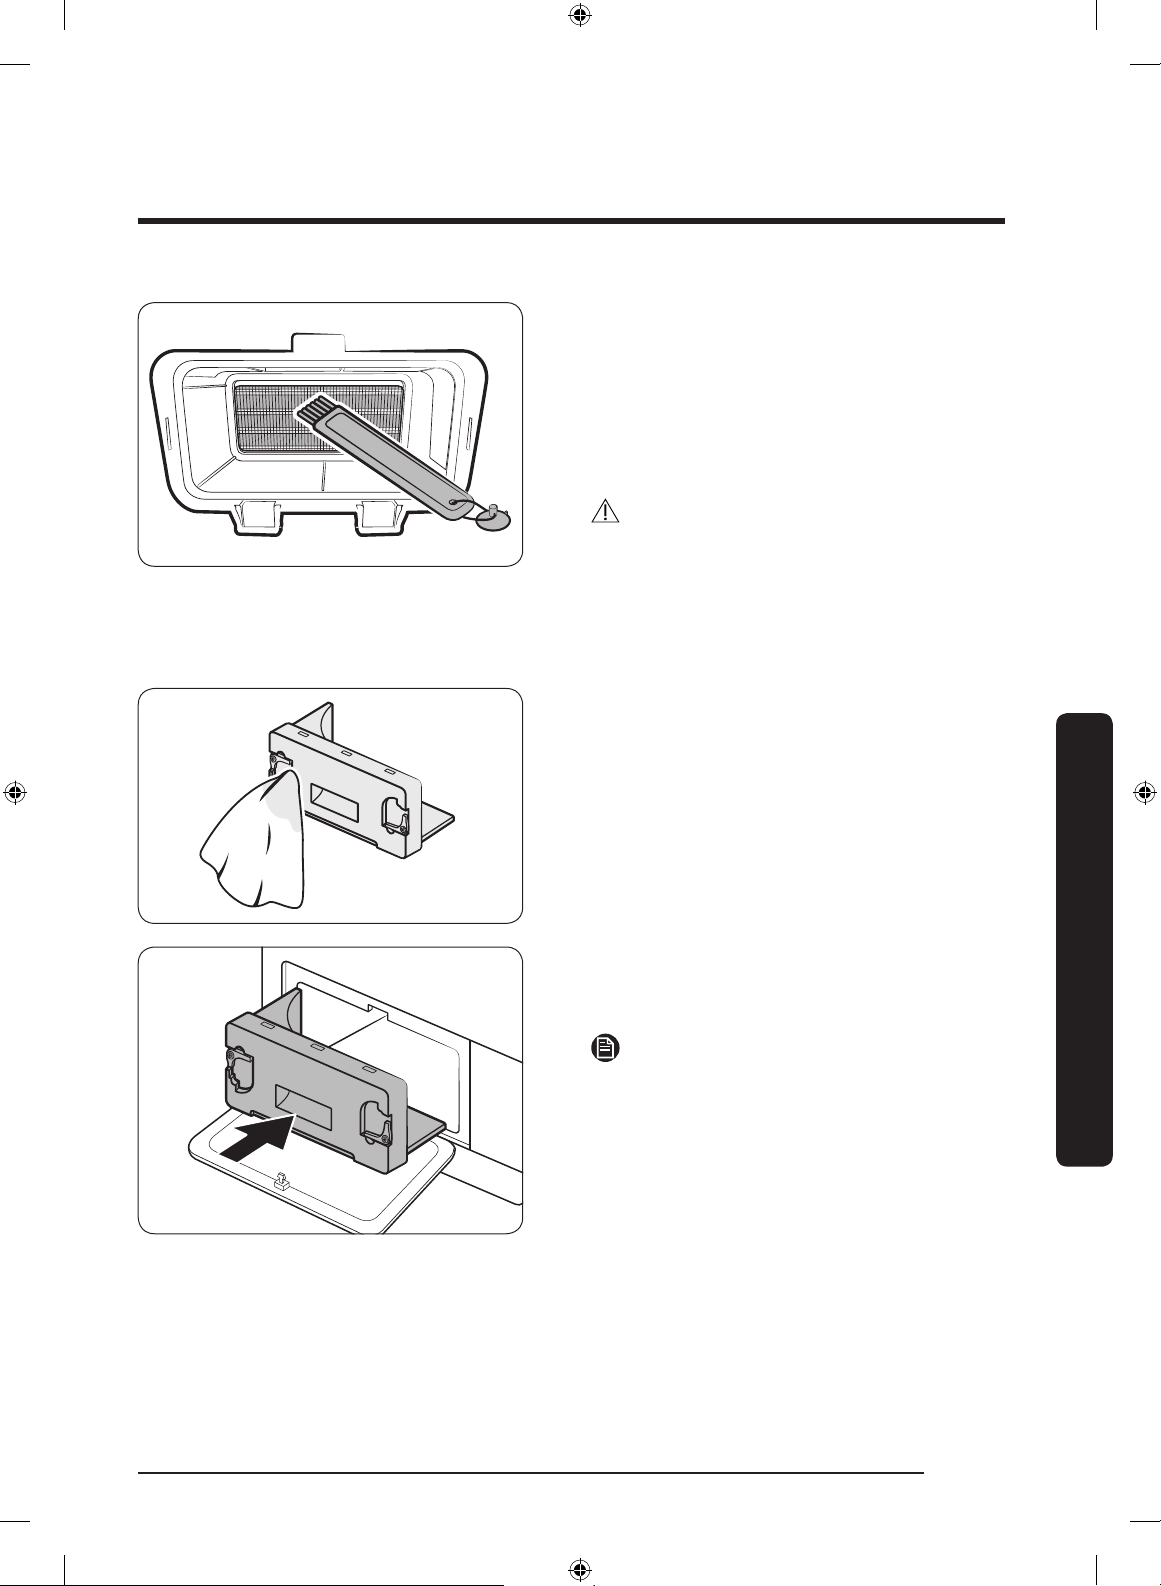
4. Clean the heat exchanger with the
provided cleaning brush or a vacuum
cleaner with a brush attachment.
Take care not to bend or damage the
heat exchanger ns when cleaning.
This may lead to a decrease in drying
performance.
CAUTION
• To avoid physical injury and burns, do
not touch or clean the heat exchanger
with bare hands.
• Do not use water to clean the heat
exchanger.
5. Clean the inner cover with a smooth,
damp cloth.
Maintenance
6. Reinsert the inner cover to its original
position, and then lock the xers.
7. Close the outer cover.
NOTE
After cleaning, make sure the xers are
locked.
English 37
Untitled-16 37 2019-06-28 7:58:29
Page 38
Troubleshooting
Checkpoints
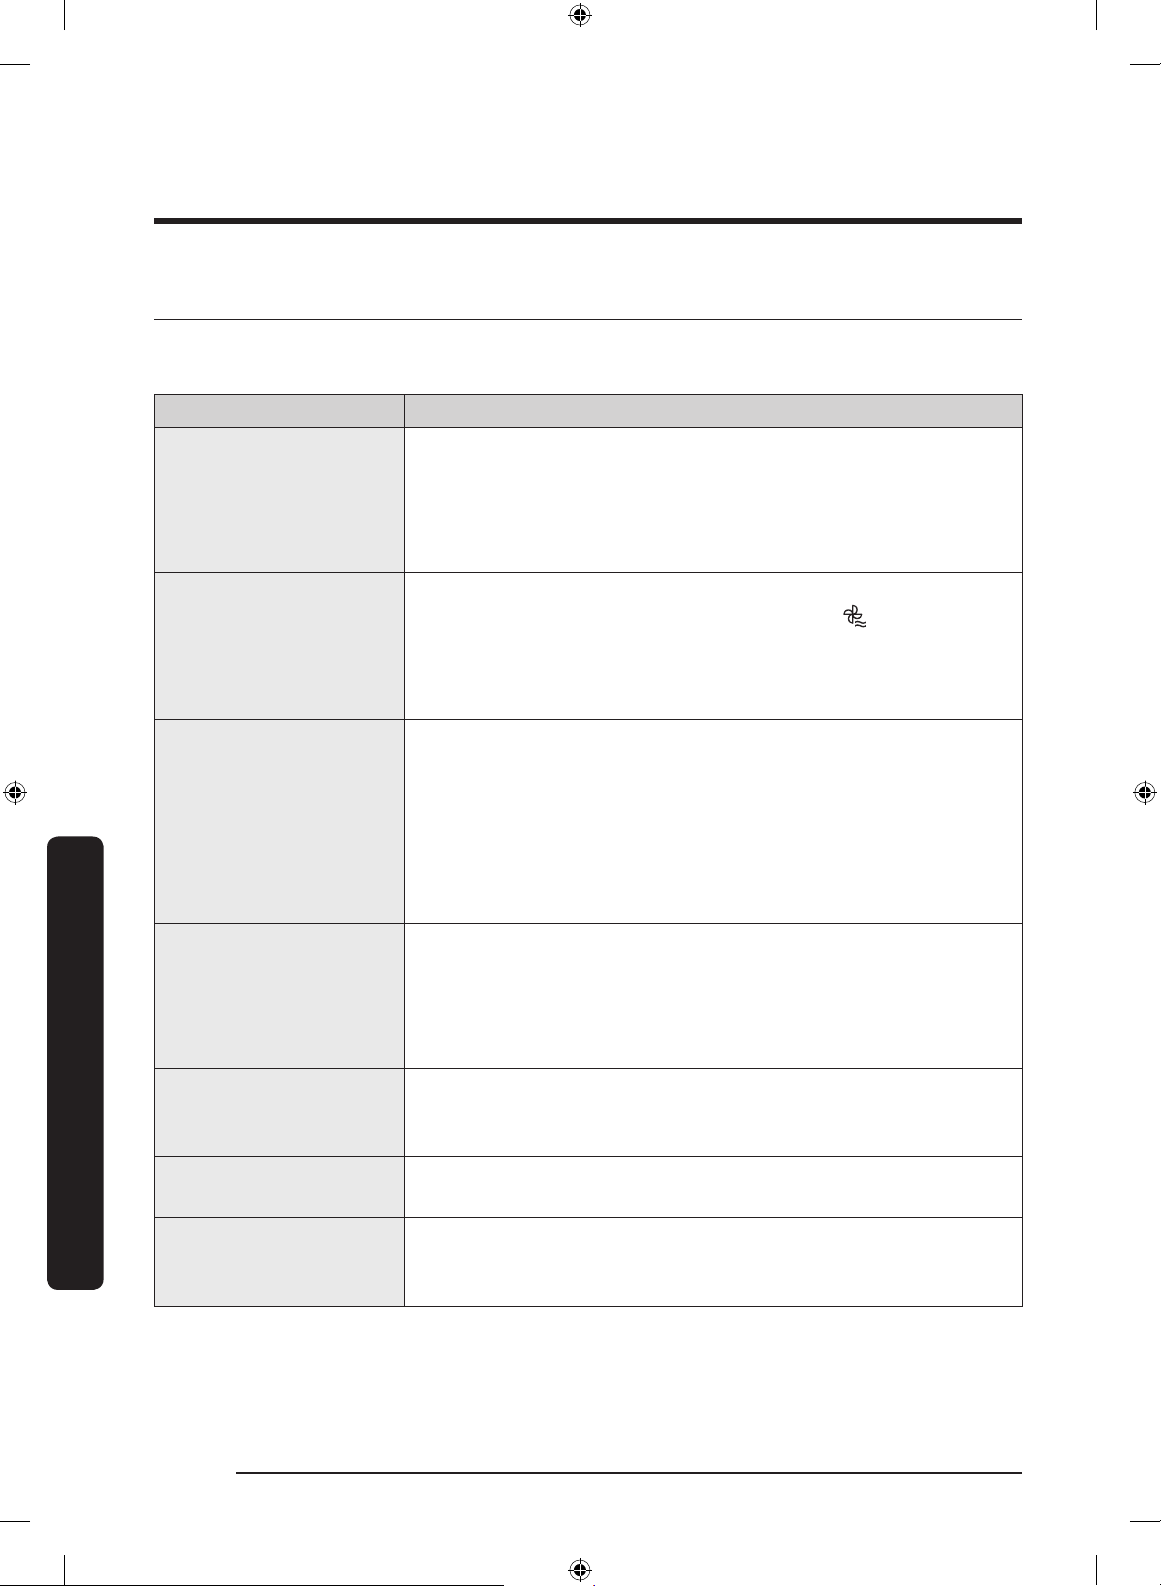
If you encounter an issue with the dryer, rst check the table below and try the
suggestions.
Dryer does not run
Dryer does not heat
Dryer does not dry
Troubleshooting
Dryer is noisy
Dries unevenly
Dryer emits an odor
Dryer turns off before
the load is dry
Symptom Action
• Make sure the door is completely closed.
• Make sure the power cord is plugged in.
• Check the home’s circuit breaker and fuses.
• Empty the water tank.
• Clean the lint lter.
• Check the home’s circuit breaker and fuses.
• Select a heat setting other than COOL AIR .
• Check the lint lter and heat exchanger lter. Clean them if
necessary.
• Dryer may be in the cool-down phase of the cycle.
Check the above, plus…
• Make sure the dryer is not overloaded.
• Sort light and heavy items separately.
• Reposition large, bulky items to ensure even drying.
• Check that the dryer is draining properly.
• For small loads, add a few dry towels.
• Clean the lint lter and heat exchanger lter.
• Check for coins, buttons, lighters, etc.
• Make sure the dryer is level and standing rmly on the
oor.
• The dryer may hum due to air moving through the drum
and fan. This is normal.
• Seams, pockets, and other parts of clothing are harder to
dry than others. This is normal.
• Sort heavy and light items separately.
• The dryer may draw household odors in from the
surrounding air and then exhaust them. This is normal.
• Dryer load is too small. Add more items and restart the
cycle.
• Dryer load is too large. Remove items and restart the cycle.
English38
Untitled-16 38 2019-06-28 7:58:29
Page 39
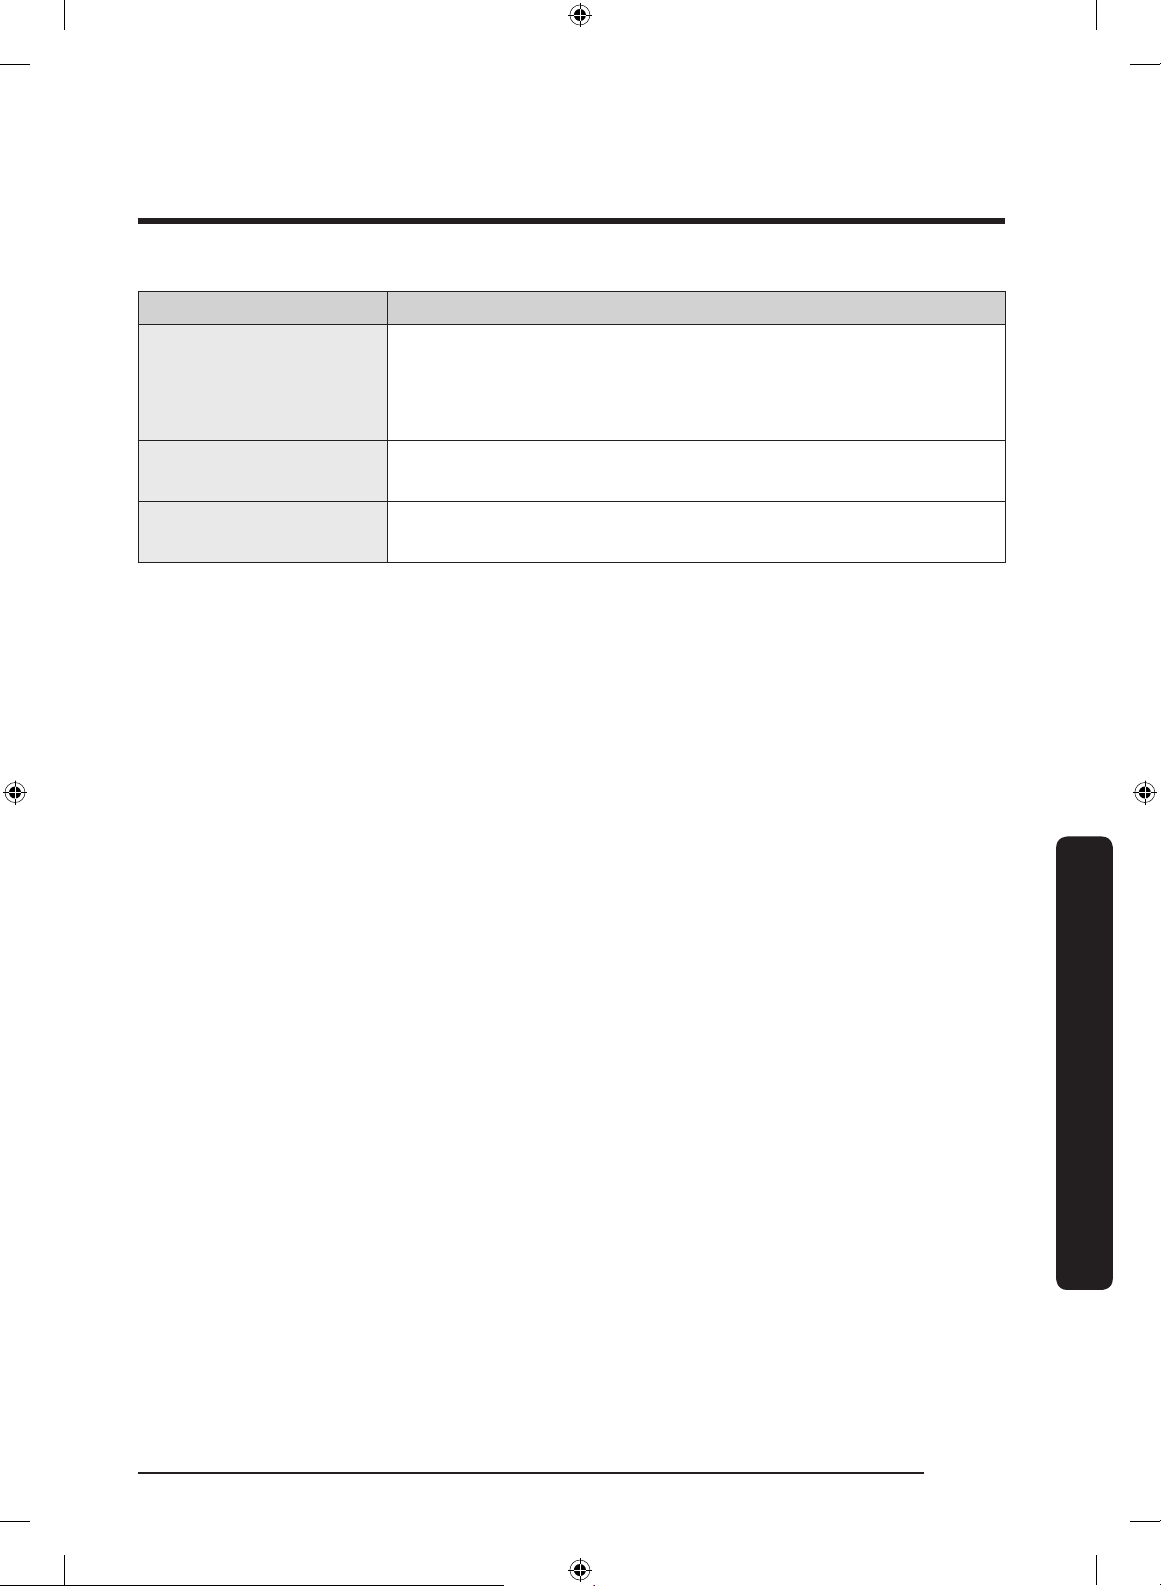
Symptom Action
Lint on clothes
Items still wrinkled
after Wrinkle Prevent
Odors remain in items
after Cool Air
• Make sure the lint lter is clean before every load.
• Dry lint-producing items (fuzzy towels) separate from lint
trappers, such as black linen pants.
• Divide larger loads into smaller loads.
• Small loads of 1-4 items work best.
• Load fewer items. Load similar type items.
• Make sure to thoroughly wash items with strong odors.
English 39
Troubleshooting
Untitled-16 39 2019-06-28 7:58:29
Page 40
Troubleshooting
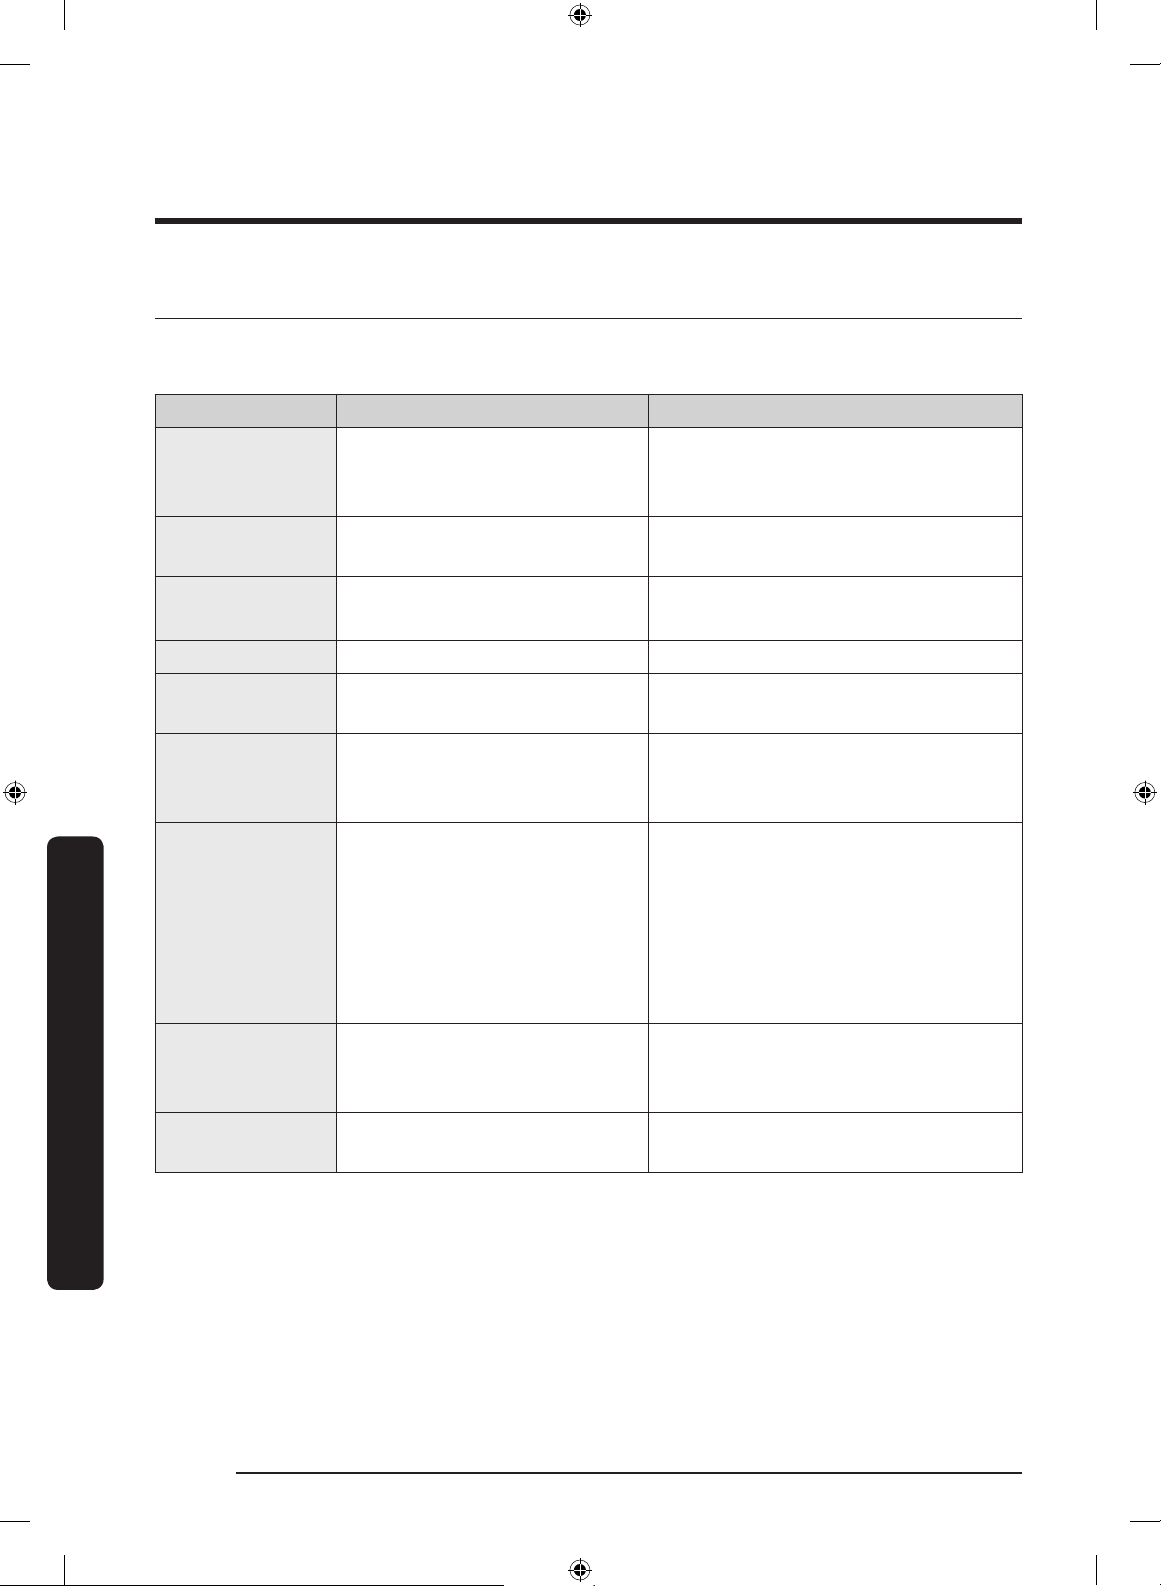
Information codes
If the dryer fails to operate, you may see an information code on the display. Check the
table below and try the suggestions.
Information code Meaning Action
tC Air temperature sensor issue
tC5
dC
HC Compressor overheat Call for service.
9C2 Low voltage detected
5C
AC6
Troubleshooting
3C Check the motor for operation.
FIL+tEr (Buzzer
rings)
Compressor temperature
sensor issue
Running the dryer with door
open
Water tank full
Drain pump is out of order
Check communications
between the main and the
inverter PBAs.
Heat exchanger needs to be
cleaned
Clean the lint lter and/or heat
exchanger lter. If this continues, call
for service.
Wait 2-3 minutes. Turn the power on
and restart.
Close the door and restart.
If this continues, call for service.
Check if the power cord is plugged
in. If this continues, call for service.
Empty the water tank, turn the
power on, and restart. If this
continues, call for service.
• Depending on the state, the dryer
may automatically returns to
normal operation.
• Turn the dryer off and turn it on
again. Then, restart the cycle.
• If the information code continues
to appear, call for service.
• Try restarting the cycle.
• If the information code continues
to appear, call for service.
Clean the heat exchanger.
For any codes not listed above, or if the information code continues to appear, call for
service.
English40
Untitled-16 40 2019-06-28 7:58:29
Page 41
Appendix
Fabric care chart
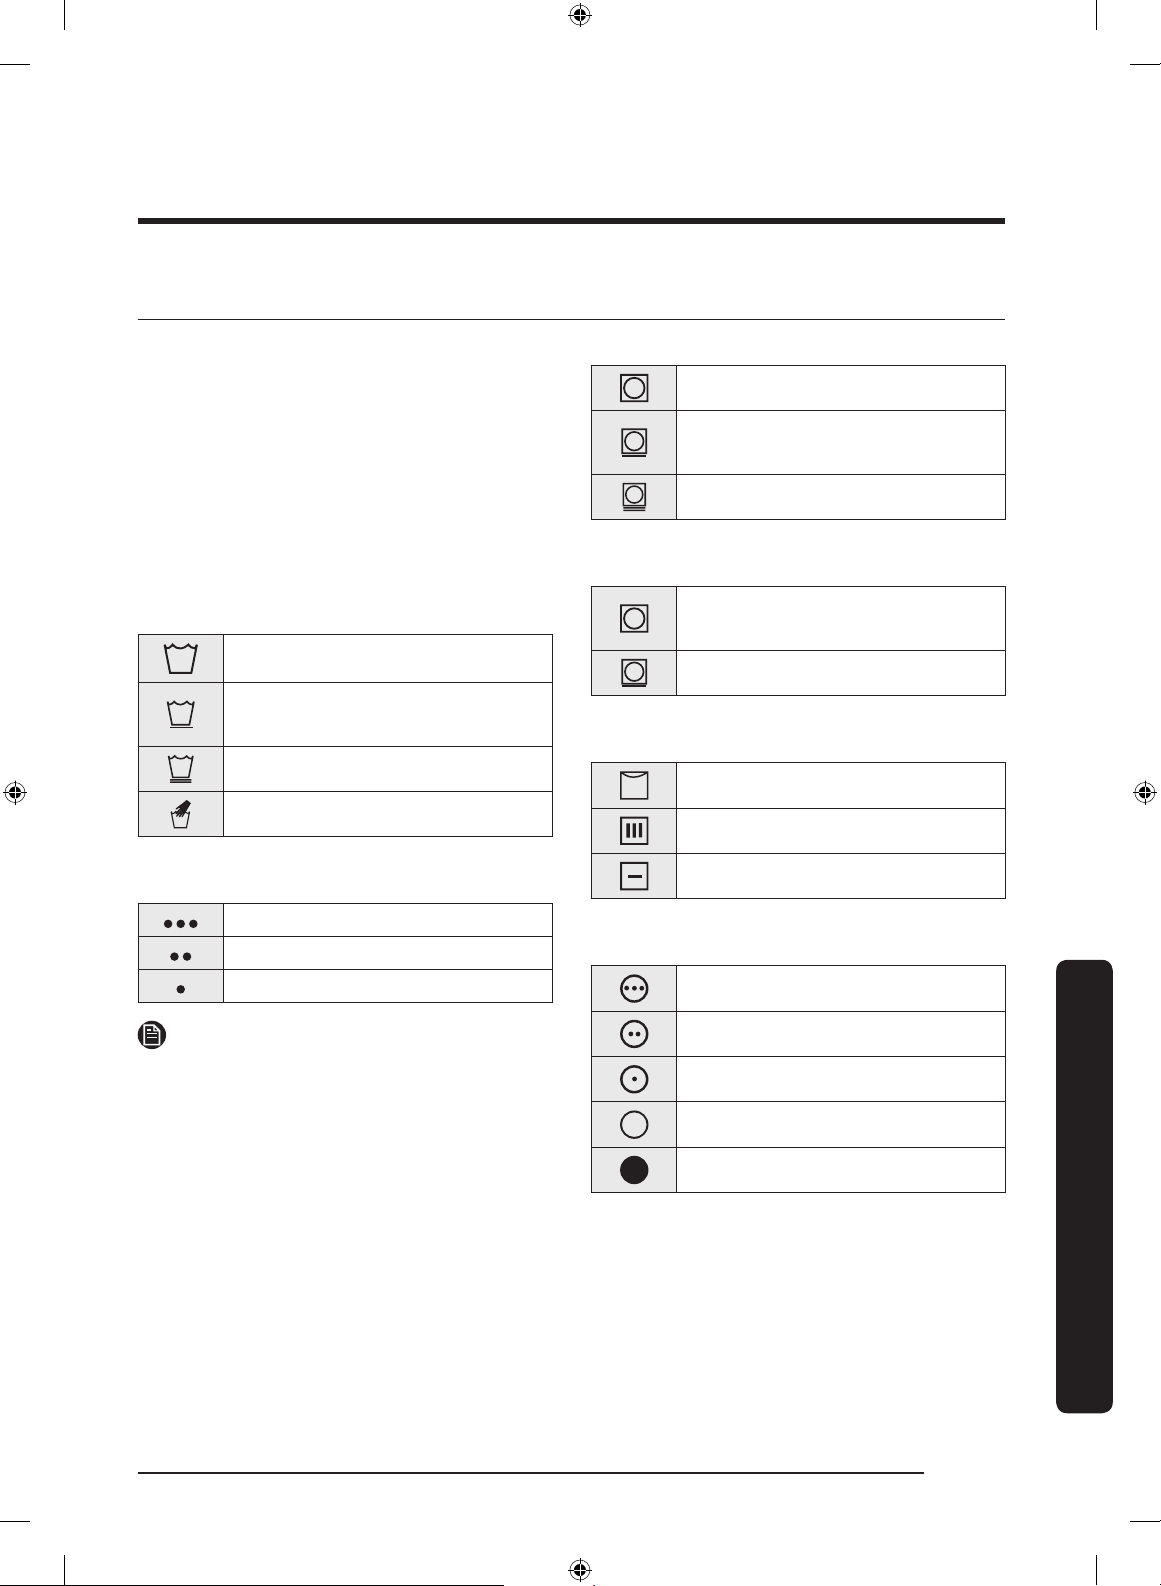
The following symbols provide garment
care direction. The Clothing care labels
include symbols for drying, bleaching,
drying and ironing, or dry cleaning when
necessary. The use of symbols ensures
consistency among garment manufacturers
of domestic and imported items. Follow
care label directions to maximize garment
life and reduce laundering problems.
Wash cycle
Normal
Permanent Press / Wrinkle
Resistant / Wrinkle Control
Gentle / Delicates
Hand Wash
Water Temperature**
Bleach
Any Bleach (when needed)
Only Non-Chlorine (color-safe)
Bleach (when needed)
Tumble Dry Cycle
Normal
Permanent Press / Wrinkle
Resistant / Wrinkle Control
Gentle/ Delicates
Special instructions
Line Dry / Hang to Dry
Drip Dry
Dry Flat
Hot
Warm
Cold
NOTE
** The dot symbols represent appropriate
wash water temperatures for various
items. The temperature range for Hot
is 41-52 °C, for Warm 29-41 °C and for
Cold 16-29 °C. (Wash water temperature
must be a minimum of 16 °C for detergent
activation and effective cleaning.)
Heat setting
High
Medium
Low
Any Heat
No Heat/Air
Appendix
English 41
Untitled-16 41 2019-06-28 7:58:33
Page 42
Appendix
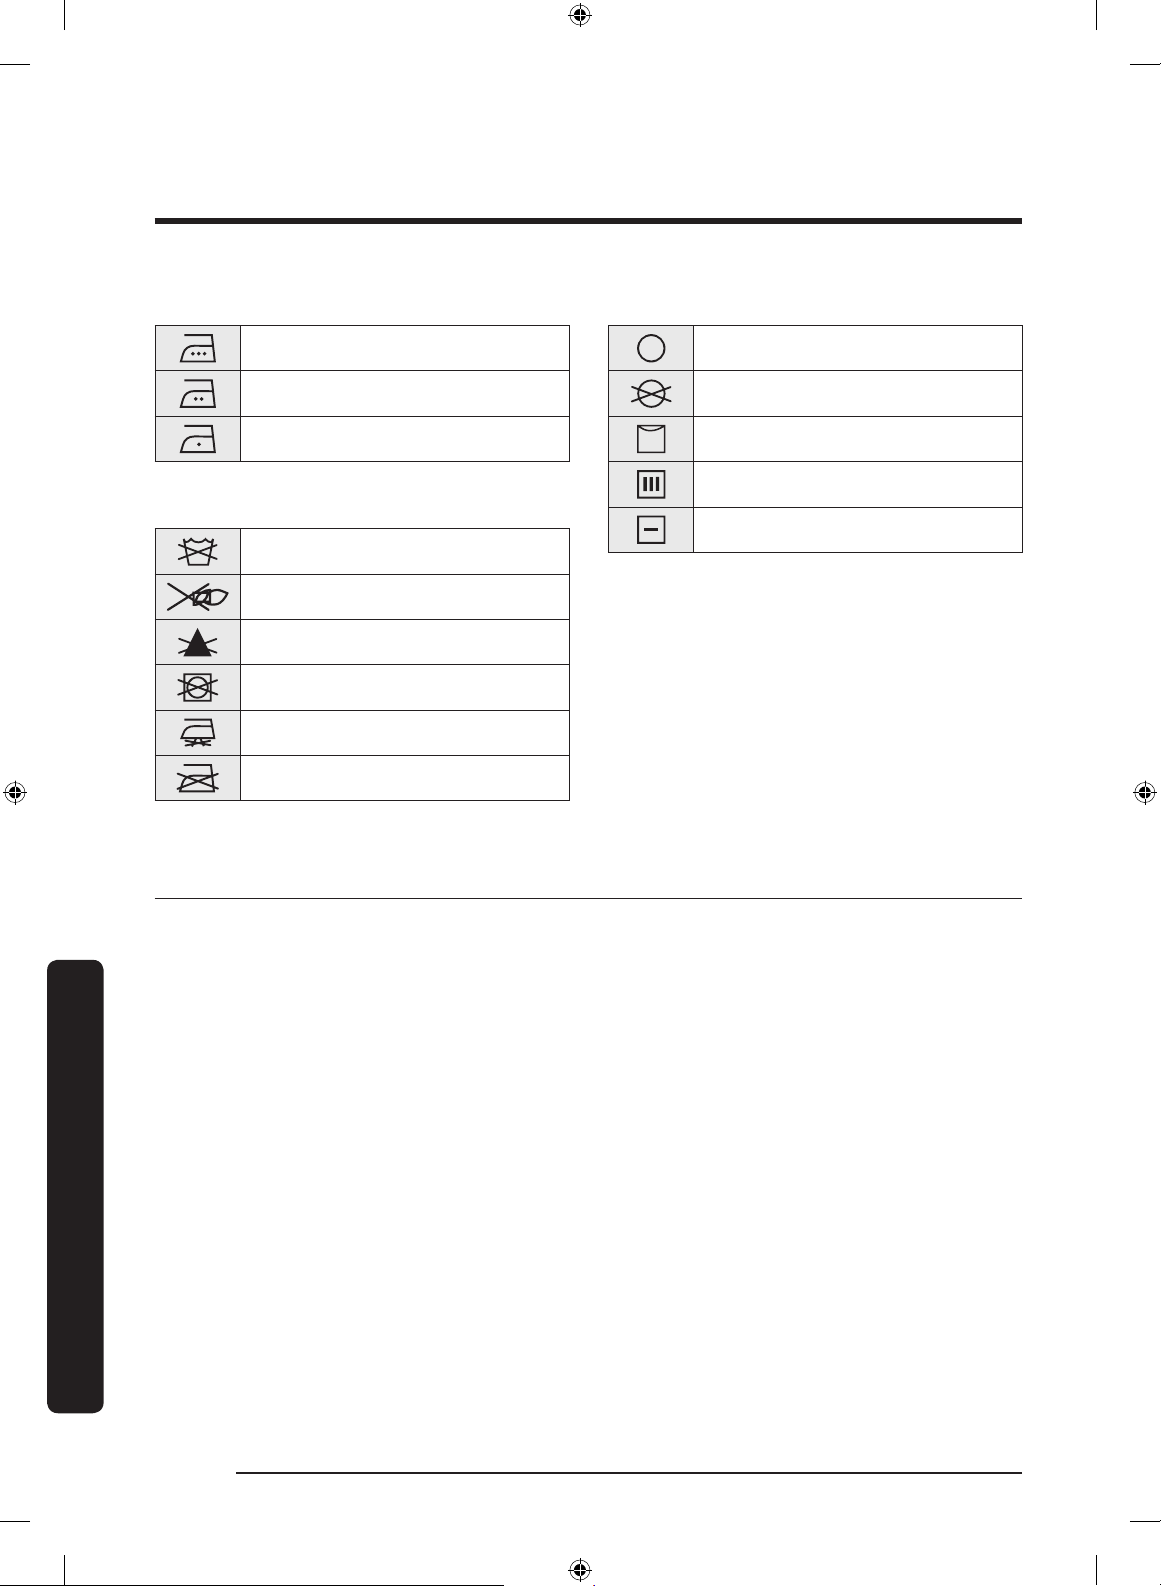
Iron dry or steam temperatures
High
Medium
Low
Warning symbols for laundering
Do Not Wash
Do Not Wring
Do Not Bleach
Do Not Tumble Dry
No Steam (added to iron)
Do Not Iron
Dry-clean
Dry-clean
Do Not dry-clean
Line Dry/ Hang to Dry
Drip Dry
Dry Flat
Protecting the environment
This appliance is manufactured from recyclable materials. If you decide to dispose of this
appliance, please observe local waste disposal regulations. Cut off the power cord so that
the appliance cannot be connected to a power source. Remove the door so that animals
and small children cannot get trapped inside the appliance.
Appendix
English42
Untitled-16 42 2019-06-28 7:58:36
Page 43
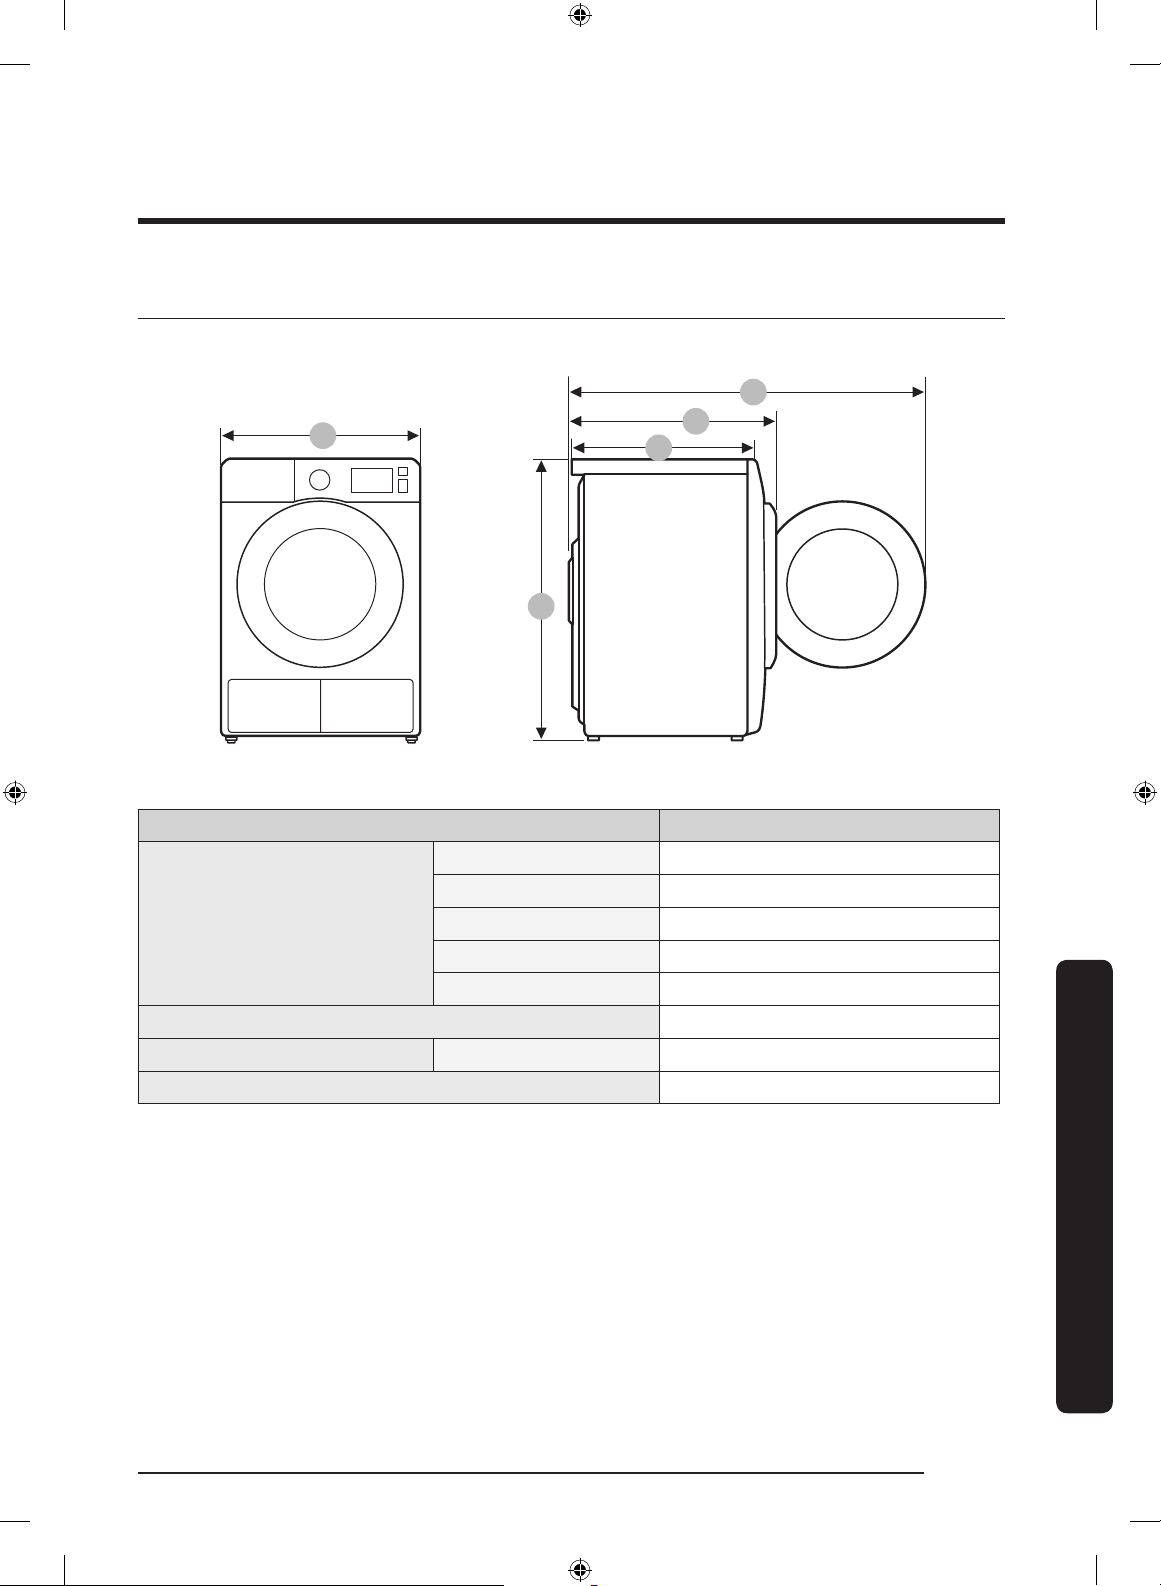
Specication
E
A
B
TYPE FRONT LOADING DRYER
A 600 mm
B 850 mm
DIMENSIONS
C 600 mm
D 650 mm
E 1095 mm
WEIGHT 50 kg
ELECTRICAL REQUIREMENTS 220-240 V / 50 Hz 550-600 W
ALLOWABLE TEMPERATURE 5-35 °C
D
C
English 43
Untitled-16 43 2019-06-28 7:58:37
Appendix
Page 44
Appendix
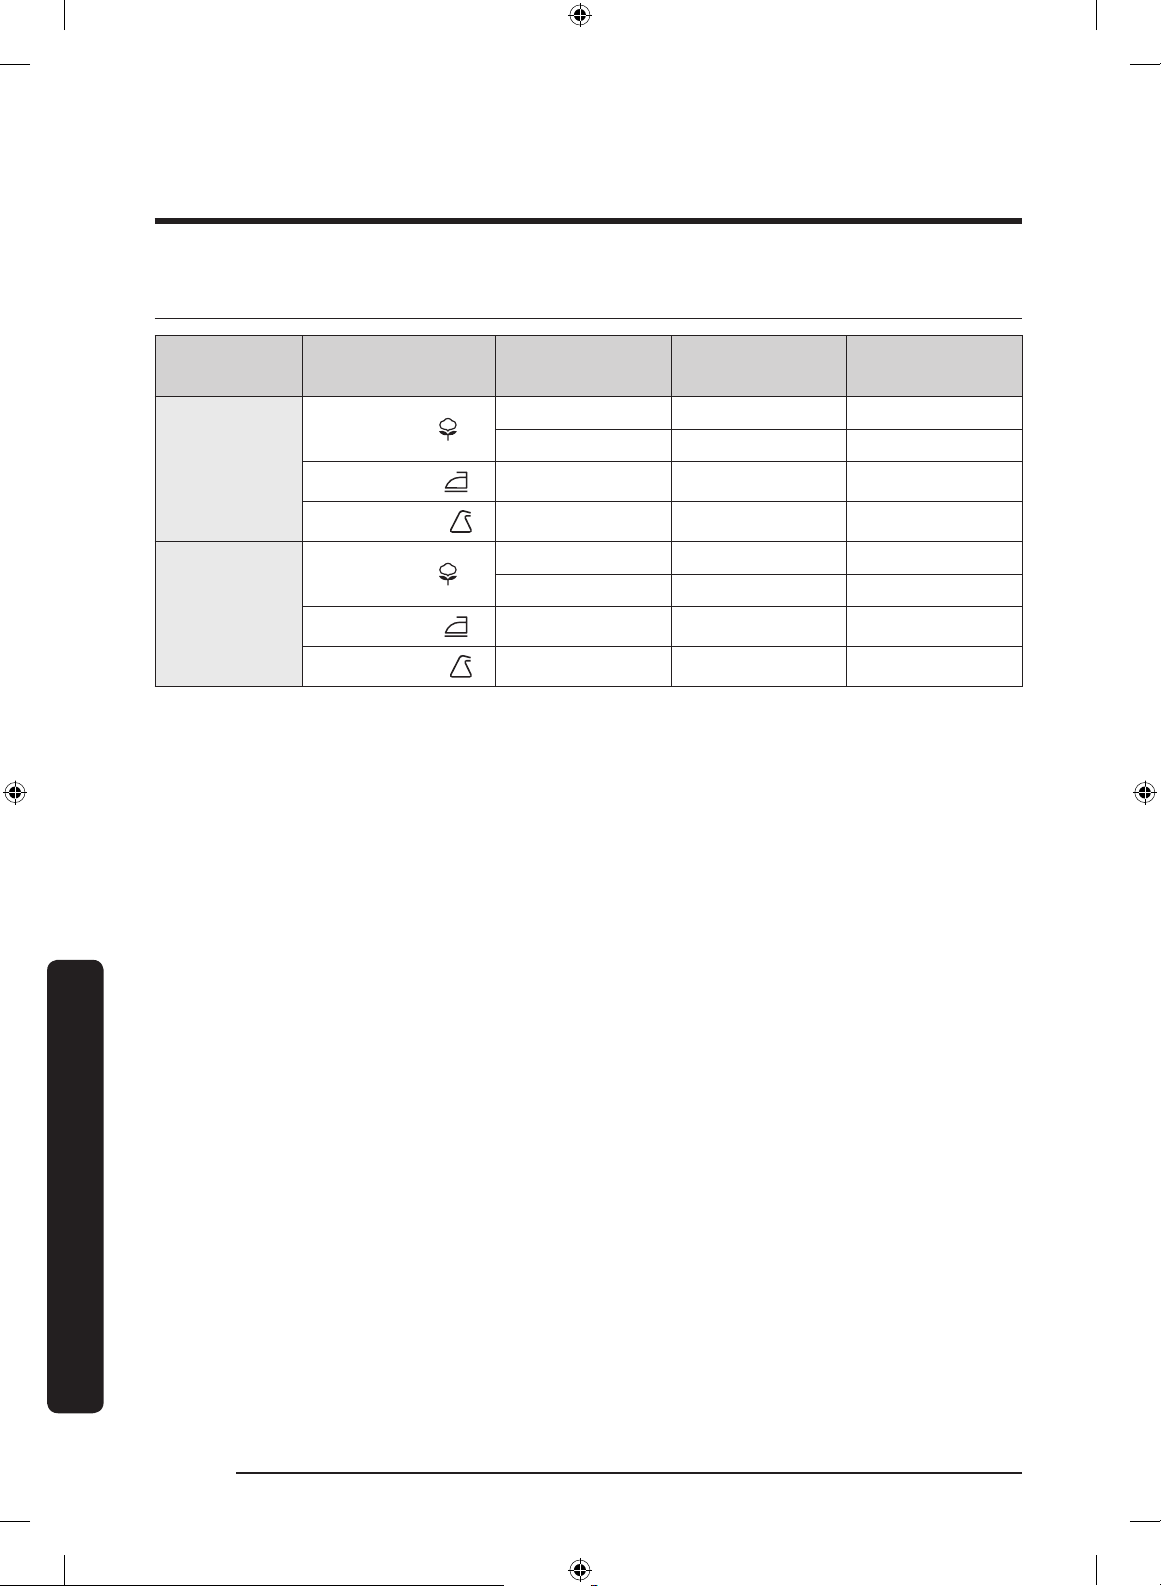
Consumption data
Model Program Load (kg)* Energy (kWh)
COTTON**
DV9*M62****
IRON DRY**
SYNTHETICS
COTTON**
DV8*M62****
IRON DRY**
SYNTHETICS
* : Weight of dry laundry
** : EN 61121:2013 test program
All data without a “star” against it was calculated using EN 61121:2013
Consumption data can vary from the nominal values given above depending in the size
of the load, types of textiles, residual moisture levels after spinning, uctuations in the
electricity supply and any extra options selected.
9 1.56 188
4.5 0.9 130
9 1.1 130
4.5 0.71 86
8 1.43 169
4 0.8 120
8 1.02 118
4 0.65 80
Max. Duration
(Minutes)
Appendix
English44
Untitled-16 44 2019-06-28 7:58:37
Page 45
Sheet of household tumble driers
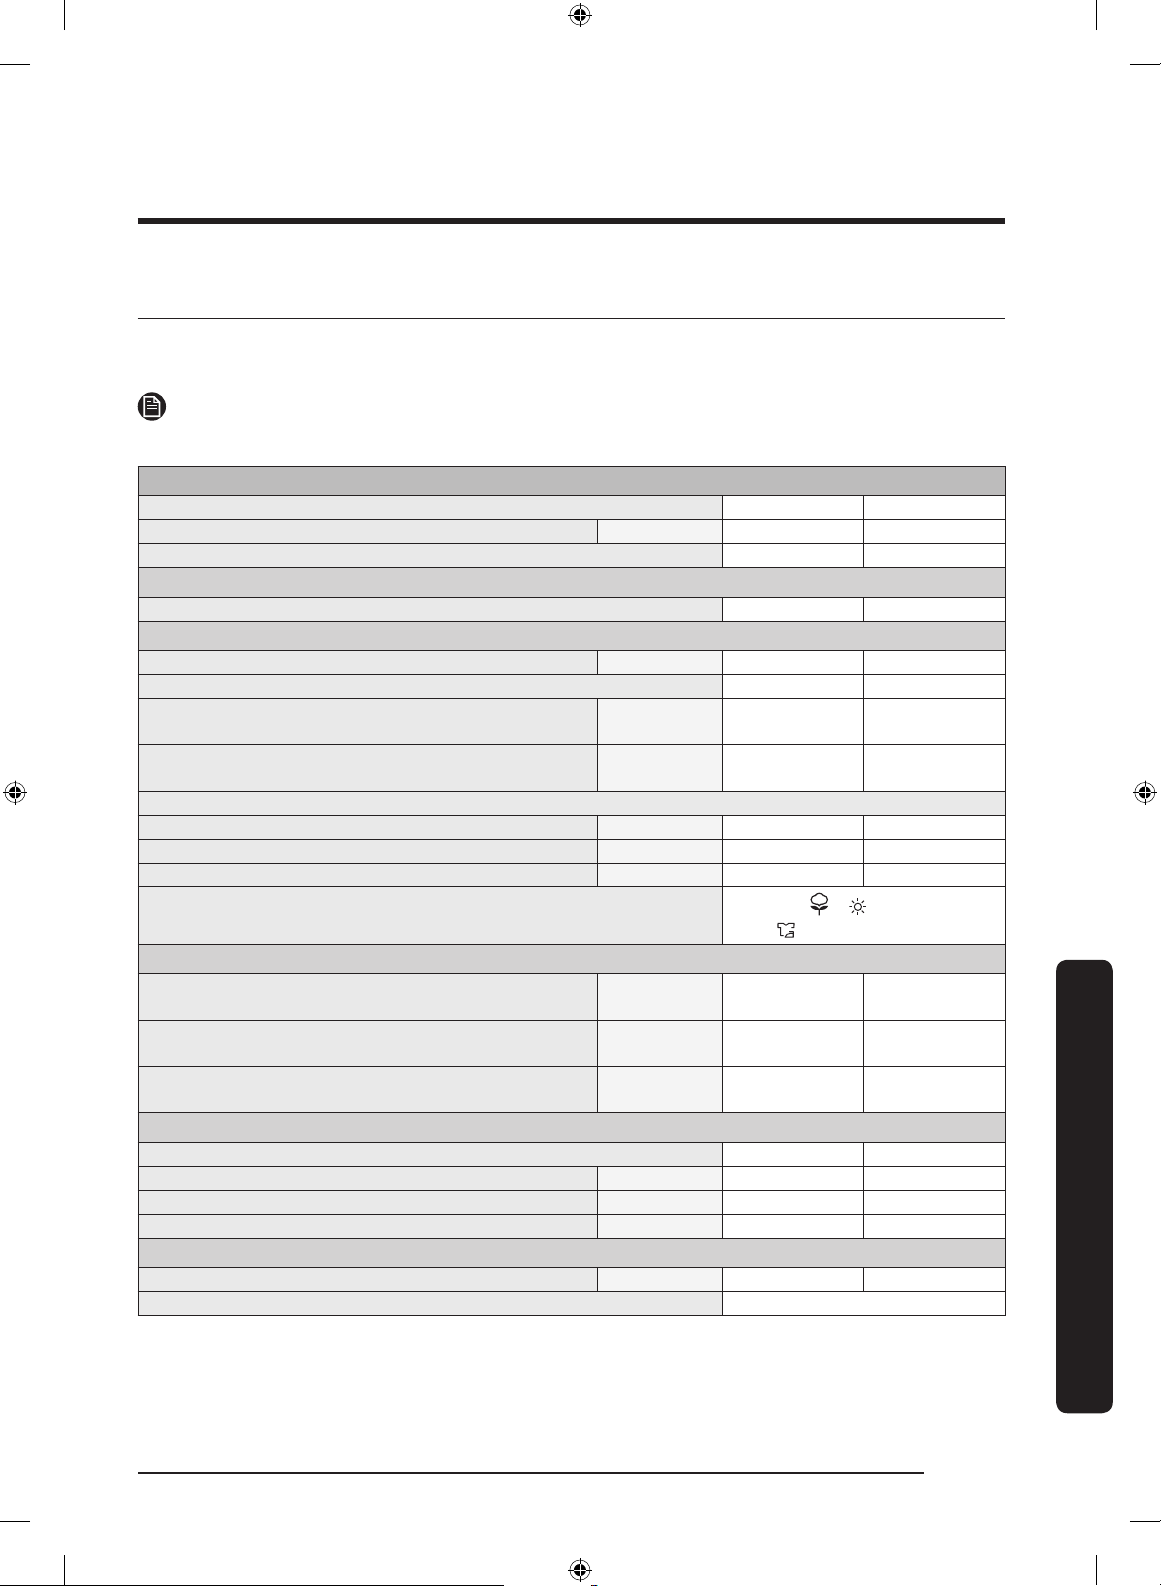
Data sheet for Domestic Tumble Driers
As detailed in EU regulation No. 392/2012
NOTE
“*” Asterisk(s) means variant model and can be varied (0-9) or (A-Z).
Samsung
Model Name DV8*M62**** DV9*M62****
Capacity kg 8 9
Type Condenser Condenser
Energy Efciency
A+++ (highest efciency) to D (least efcient) A+++ A+++
Energy Consumption
Annual Energy Consumption (AE_C)
Automatic tumble drier Yes Yes
Energy consumption (E_dry) standard cotton programme
at full load
Energy consumption (E_dry.1/2) standard cotton
programme at partial load
off mode and left-on mode
The power consumption off-mode (P_o) at full load W 0.50 0.50
The power consumption in left-on mode (P_l) at full load W 5.00 5.00
Duration of the left-on mode min 10 10
1)
kWh/yr 176.0 194.0
kWh 1.43 1.54
kWh 0.80 0.90
Programme to which the information on the label and the Sheet relate
programme duration of the standard program
Weighted Programme time standard cotton programme at
full load and partial load
Programme Time (T_dry) standard cotton programme at
full load
Programme Time (T_dry.1/2) standard cotton programme
with partial load
condensation efciency class
A (most efcient) to G (least efcient) B B
Average condensation efciency at full load % 81 81
Average condensation efciency at partial load % 81 81
Weighted condensation efciency % 81 81
Airborne noise emissions
Dry at full load dB (A) re 1 pW 65 65
Name of company Samsung Electronics Co., Ltd.
2)
min 141 155
min 169 188
min 120 130
Cotton + Dry Level 2 +
( Wrinkle Prevent off)
English 45
Appendix
Untitled-16 45 2019-06-28 7:58:37
Page 46

Appendix
NOTE
1. Energy consumption is measured as the annual 9 kg 258 kWh (8 kg 235 kWh) used per
year, based on 160 drying cycles of the standard cotton programme at full and partial
load, and the consumption of the low-power modes. Actual energy consumption per
cycle will depend on how the appliance is used.
2. ‘standard cotton programme’ used at full and partial load is the standard drying
programme to which the information in the label and the che relates, that this
programme is suitable for drying normal wet cotton laundry and that it is the most
efcient programme in terms of energy consumption for cotton. Consumption data can
vary from the nominal values given above depending in the size of the load, types of
textiles, residual moisture levels after spinning, uctuations in the electricity supply
and any extra options selected.
Appendix
English46
Untitled-16 46 2019-06-28 7:58:38
Page 47

Memo
Untitled-16 47 2019-06-28 7:58:38
Page 48
QUESTIONS OR COMMENTS?
COUNTRY CALL OR VISIT US ONLINE AT
*3000
BULGARIA
0800 111 31 ,
www.samsung.com/bg/support
CROATIA 072 726 786 www.samsung.com/hr/support
CZECH 800 - SAMSUNG (800-726786) www.samsung.com/cz/support
ESTONIA 800-7267 www.samsung.com/ee/support
HUNGARY 0680SAMSUNG (0680-726-7864) www.samsung.com/hu/support
LATVIA 8000-7267 www.samsung.com/lv/support
LITHUANIA 8-800-77777 www.samsung.com/lt/support
*8000 (apel in retea)
08008-726-78-64
(08008-SAMSUNG) Apel GRATUIT
ROMANIA
Atenţie: Dacă efectuaţi apelul din
www.samsung.com/ro/support
reţeaua Digi (RCS/RDS), vă rugăm
să ne contactaţi formând numărul
Telverde fără ultimele două cifre,
astfel: 0800872678.
SERBIA 011 321 6899 www.samsung.com/rs/support
SLOVAKIA
SLOVENIA
0800 - SAMSUNG
(0800-726 786)
080 697 267
(brezplačna številka)
www.samsung.com/sk/support
www.samsung.com/si/support
DC68-03791N-02
Untitled-16 48 2019-06-28 7:58:39
Page 49
Soojuspump-kuivati
Kasutusjuhend
DV9*M62****/DV8*M62****
Untitled-22 1 2019-07-05 6:51:46
Page 50

Sisukord
Sisukord
Ohutusteave 4
Mida peate teadma ohutussuuniste kohta 4
Olulised ohutussümbolid 4
Olulised ettevaatusabinõud 5
Olulised hoiatused paigaldamise kohta 7
Olulised hoiatused kasutamise kohta 8
Ettevaatusabinõud kasutamisel 10
Olulised hoiatused puhastamise kohta 11
Suunised elektri- ja elektroonikaseadmete romude kohta 12
Paigaldamine 13
Pakendi sisu 13
Paigaldusnõuded 15
Kuivati 17
Väljalaskevoolik (vajaduse korral) 18
Paigaldamise kontroll-loend 21
Enne kuivati kasutamist 21
Toimingud 22
Juhtpaneel 22
Alustamine 27
Erifunktsioonid 31
Hooldus 32
Juhtpaneel 32
Välispind 32
Trummel 32
Ebemelter 32
Veepaak 34
Soojusvaheti 35
Tõrkeotsing 37
Kontrollitavad punktid 37
Teabekoodid 39
Eesti2
Untitled-22 2 2019-07-05 6:51:46
Page 51

Lisa 40
Riiete hooldussiltide tabel 40
Keskkonnakaitse 41
Tehnilised andmed 42
Tarbimisandmed 43
Kodumajapidamistes kasutatavad trummelkuivatid 44
Sisukord
Eesti 3
Untitled-22 3 2019-07-05 6:51:46
Page 52
Ohutusteave
Õnnitleme teid uue Samsungi kuivati ostu puhul. Sellest kasutusjuhendist leiate vajalikku teavet oma
seadme paigaldamise, kasutamise ja hooldamise kohta. Leidke aega selle kasutusjuhendi lugemiseks, et
oma kuivati rohkeid võimalusi ja funktsioone maksimaalselt ära kasutada.
Mida peate teadma ohutussuuniste kohta
Hoiatused ja olulised ohutussuunised ei hõlma kõiki võimalikke tingimusi ja tekkida võivaid olukordi.
Kuivati paigaldamisel, hooldamisel ning kasutamisel tuleb olla mõistlik, ettevaatlik ja hoolikas.
Probleemide või olukordade puhul, mida te ei mõista, võtke alati ühendust tootjaga.
Ohutusteave
Olulised ohutussümbolid
Ikoonide ja märkide tähendused selles kasutusjuhendis
Ebaõige ja hoolimatu kasutamine, mis võib kaasa tuua raskeid kehavigastusi, surma ja/või vara
kahjustumist.
Ebaõige ja hoolimatu kasutamine, mis võib kaasa tuua kehavigastusi ja/või vara kahjustumist.
HOIATUS!
ETTEVAATUST!
MÄRKUS
Tähistab kehavigastuste või materiaalse kahju tekkimise ohtu.
Lugege suuniseid
Need hoiatusmärgid on siin selleks, et ära hoida võimalikke vigastusi teile ja teistele.
Järgige neid täpselt.
Pärast selle kasutusjuhendi lugemist hoidke see edaspidiseks kasutamiseks alles.
Enne seadme kasutamist lugege kõik suunised läbi.
Kõigi elektriseadmete ja liikuvate detailide kasutamine kätkeb endas võimalikke ohte. Seadme ohutuks
kasutamiseks tuleb selle tööpõhimõtted endale selgeks teha ning olla kasutamisel ettevaatlik.
HOIATUS – tuleoht
• Pesukuivati tohib paigaldada ainult kvalitseeritud tehnik.
• Paigaldage pesukuivati tootja suuniste ja kohalike määruste kohaselt.
• Tõsiste vigastuste või surmaohu vähendamiseks järgige kõiki paigaldussuuniseid.
Eesti4
Untitled-22 4 2019-07-05 6:51:47
Page 53
Olulised ettevaatusabinõud
HOIATUS!
Seadme kasutamisel tule-, elektrilöögi- või vigastusohu vältimiseks järgige
järgmisi põhilisi ohutussuuniseid.
1. Seade pole mõeldud kasutamiseks piiratud füüsiliste, sensoorsete või
vaimsete võimetega ega ka vähese kogemuse või väheste teadmistega
inimestele (sh lastele), kui neil puudub järelevalve või neid ei juhenda
inimene, kes vastutab nende ohutuse eest.
2. Kasutamisel Euroopas: lapsed alates kaheksandast eluaastast ning piiratud
füüsiliste, sensoorsete või vaimsete võimete või vähese kogemuse või
väheste teadmistega inimesed võivad kasutada seda seadet juhul, kui on
tagatud järelevalve või neid on seadme ohutu kasutamise osas juhendatud
ning nad mõistavad kaasnevaid ohte. Lapsed ei tohi seadmega mängida.
Lapsed ei tohi teostada puhastus- ja hooldustoiminguid ilma järelevalveta.
3. Jälgige, et lapsed ei mängiks seadmega.
Ohutusteave
4. Kui toitejuhe on katki, tuleb see ohutuse tagamiseks asendada tootja esindaja,
teenindustöötaja või sarnast kvalikatsiooni omava spetsialisti poolt.
5. Seadme ühendamisel tuleb kasutada kaasasolevaid uusi voolikukomplekte,
vanu komplekte ei tohi kasutada.
6. Ventileerimisavadega seadmete puhul tuleb jälgida, et põrandakate avasid
kinni ei kataks.
7. Kasutamisel Euroopas: alla kolmeaastaseid lapsi tuleb hoida seadmest eemal,
kui tagatud ei ole pidev järelevalve.
8. ETTEVAATUST! Termokaitsme tahtmatu lähtestamise tõttu tekkiva ohu
vältimiseks ei tohi seade olla varustatud vooluga välise lülitusseadme (nt
taimeri) kaudu või ühendatud vooluringiga, mida lülitatakse pidevalt sisse ja
välja.
Eesti 5
Untitled-22 5 2019-07-05 6:51:47
Page 54

Ohutusteave
9. Trummelkuivatust ei tohi kasutada, kui puhastamiseks on kasutatud
tööstuslikke kemikaale.
10. Ebemeltrit tuleb sageli puhastada (kui kohaldatav).
11. Ebemetel ei tohi lasta koguneda ümber trummelkuivati. (Ei kehti seadmete
puhul, mida ventileeritakse hoonest väljapoole.)
Ohutusteave
12. Tagada tuleb korralik ventilatsioon, et vältida gaaside tagasivoolu ruumi
13. Ärge kuivatage trummelkuivatis pesemata esemeid.
14. Küpsetusõli, atsetooni, alkoholi, bensiini, petrooleumi, plekieemaldaja,
15. Trummelkuivatis ei tohi kuivatada vahtkummi (lateksvahtkummi), dušimütse,
16. Pesupehmendajaid või sarnaseid tooteid tuleb kasutada vastavalt toote
17. Trummelkuivatuse tsükli viimane osa toimub ilma kuumuseta
18. Eemaldage taskutest kõik asjad, nt tulemasinad ja tikud.
muudel kütustel töötavate seadmete puhul (sh lahtine tuli).
tärpentini, vaha ja vahaeemaldajatega määrdunud esemeid tuleb pesta enne
kuivatamist kuumas vees suurema puhastusvahendi kogusega.
veekindlaid tekstiile, kummist siseküljega esemeid ja vahtkummist polstriga
riideid või patju.
suunistele.
(jahtumistsükkel), et tagada kuivatis temperatuur, mis ei kahjusta esemeid.
19. HOIATUS! Ärge peatage trummelkuivatit enne kuivatustsükli lõppu, välja
arvatud juhul, kui võtate esemed kuivatist kiiresti välja ja laotate need
jahtumiseks laiali.
20. Heitõhku ei tohi suunata lõõri, mida kasutatakse gaasil või muudel kütustel
töötavate seadmete heitgaaside väljalaskeks.
21. Seadet ei tohi paigaldada lukustatava ukse, lükandukse ega ukse, mille
hinged asuvad trummelkuivatist teisel pool, taha nii, et trummelkuivati ukse
avamine on piiratud.
Eesti6
Untitled-22 6 2019-07-05 6:51:47
Page 55
22. HOIATUS! Seadet ei tohi varustada vooluga välise lülitusseadme (nt taimeri)
kaudu ega ühendada vooluringiga, mida lülitatakse pidevalt sisse ja välja.
Ainult soojuspumbaga mudel: suunised hõlmavad järgmist.
HOIATUS! Hoidke seadme korpuses või sisseehitatud struktuuris olevad
ventileerimisavad takistustest vabana.
HOIATUS! Ärge kahjustage jahutusaine ahelat.
Olulised hoiatused paigaldamise kohta
HOIATUS!
Seadet tohib paigaldada ainult kvalitseeritud tehnik või teenindusettevõte.
• Selle nõude eiramise tagajärjeks võib olla elektrilöök, tulekahju, plahvatus, probleemid toote töös või
kehavigastused.
Ühendage toitejuhe pistikupessa ja kasutage seda pistikupesa ainult selle seadme jaoks. Ärge kasutage
pikendusjuhet.
• Teiste seadmete ühendamine sellesse pistikupessa pikendusjuhtme kaudu või lisajuhtmete
paigaldamise teel võib põhjustada elektrilöögi või tulekahju.
• Kindlustage, et toiteallika pinge, sagedus ja voolutugevus vastaksid toote tehnilistes andmetes
toodutele. Selle nõude eiramine võib põhjustada elektrilöögi või tulekahju. Ühendage toitepistik
korralikult pistikupesasse.
Eemaldage regulaarselt toitejuhtme pistiku harudelt ja kontaktidelt kuiva riidelappi kasutades võõrkehad,
nt tolm või vesi.
• Eemaldage toitepistik pesast ja puhastage seda kuiva riidelapiga.
• Selle nõude eiramine võib põhjustada elektrilöögi või tulekahju.
Ohutusteave
Hoidke kõik pakendi osad lastele kättesaamatus kohas, kuna need võivad lastele ohtlikud olla.
• Kui laps tõmbab endale koti pähe, võib ta lämbuda.
Seade peab olema õigesti maandatud.
Ärge maandage seadet gaasitoru, plastist veetoru või telefoniliini kaudu.
• Selle tagajärjeks võib olla elektrilöögi saamine, tulekahju, plahvatus või probleemid toote töös.
• Ärge kunagi ühendage toitejuhet nõuetekohaselt maandamata pistikupessa ja kindlustage, et süsteem
vastaks kohalikele ja riiklikele määrustele.
Ärge paigaldage ega jätke toodet kohta, kus see puutub kokku ilmastikunähtustega.
Ärge kasutage vigastatud toitepistikut, vigastatud toitejuhet või korralikult kinnitamata pistikupesa.
• See võib põhjustada elektrilöögi või tulekahju.
Eesti 7
Untitled-22 7 2019-07-05 6:51:47
Page 56
Ohutusteave
Kui pistik (toitejuhe) on katki, peab selle ohutuse tagamiseks asendama tootja esindaja, hooldustöötaja või
vastava kvalikatsiooniga tehnik.
Seade tuleb paigaldada nii, et toitepistik oleks juurdepääsetavas kohas.
Ärge sikutage ega painutage toitejuhet ülemäära.
Ärge väänake ega siduge toitejuhet sõlme.
Ärge riputage toitejuhet metalleseme kohale, asetage sellele raskeid esemeid, jätke seda esemete vahele
ega lükake seda seadme taha.
Ohutusteave
• See võib põhjustada elektrilöögi või tulekahju.
Ärge tõmmake toitepistikut pesast eemaldamiseks juhtmest.
• Toitepistiku eemaldamisel tuleb hoida pistikust.
• Selle nõude eiramine võib põhjustada elektrilöögi või tulekahju.
Seade peab olema õigesti maandatud. Ärge ühendage toitejuhet kunagi piisavalt maandamata pistikupessa
ning tagage, et süsteem vastaks kohalikele ja riiklikele määrustele. Vaadake teavet seadme maandamise
kohta paigaldussuunistest.
Paigaldage seade tugevale ja tasasele põrandale.
• Selle nõude eiramise tagajärjeks võib olla liigne vibratsioon, müra või probleemid toote töös.
Kuna juukselaki koostisained võivad kahjustada soojusvaheti vetthülgavaid omadusi, nii et seadme
välispinnale võib jahutustoimingu ajal tekkida niiskus, ärge paigaldage seadet ilusalongi.
Seade tuleb paigaldada nii, et toitepistik, veekraanid ja äravoolutorud on juurdepääsetavad.
Olulised hoiatused kasutamise kohta
HOIATUS!
Ärge laske lastel ega lemmikloomadel toote peale ega sisse ronida. Toote kasutuselt kõrvaldamisel
eemaldage ka luugi käepide (hoob).
• Lapsed võivad kukkuda ja ennast vigastada.
• Kui laps jääb toote sisse kinni, on tal oht lämbuda.
Ärge püüdke luuki avada, kui trummel pöörleb.
Ärge istuge tootele ega nõjatuge selle luugile.
• Toode võib ümber kukkuda ja vigastusi põhjustada.
Kuivatage pesu alles siis, kui seda on tsentrifuugitud sobivas pesumasinas.
Ärge kuivatage trummelkuivatis pesemata esemeid.
Ärge jooge kondensatsioonivett.
Ärge peatage trummelkuivatit enne kuivatustsükli lõppu, välja arvatud juhul, kui võtate esemed kuivatist
kiiresti välja ja laotate need jahtumiseks laiali.
Eesti8
Untitled-22 8 2019-07-05 6:51:48
Page 57

Ärge kuivatage süttivate ainetega, nagu bensiin, petrooleum, benseen, vedeldi, alkohol jne, saastunud
pesu.
• See võib põhjustada elektrilöögi, tulekahju või plahvatuse.
Ärge laske loomadel kuivatit närida ega sellega mängida.
• See võib põhjustada elektrilöögi või kehavigastusi.
Enne toote kasutuselt kõrvaldamist eemaldage selle luuk ja toitejuhe.
• Selle nõude eiramine võib kahjustada toitejuhet või tekitada kehavigastusi.
Ohutusteave
Ärge puudutage toitepistikut märgade kätega.
• See võib põhjustada elektrilöögi.
Gaasilekke (nt majapidamisgaas, propaan, veeldatud naftagaas vms) korral ärge puudutage seadet ega
toitejuhet ja õhutage kohe ruumi.
• Sel ajal ärge ventilaatorit kasutage.
• Säde võib põhjustada plahvatuse või tulekahju.
Ärge parandage, asendage ega püüdke hooldada ühtki seadme osa, kui seda pole kasutajale mõeldud
parandussuunistes spetsiaalselt soovitatud. Ühtlasi peavad teil olema seadme hooldamiseks vajalikud
oskused.
Ärge püüdke seadet ise parandada, osadeks võtta ega muuta.
• Ärge kasutage kaitsmena ühtegi muud detaili (nt look, metalltraat vms) peale standardkaitsme.
• Kui vajalik on seadme parandamine või uuesti paigaldamine, võtke ühendust lähima
klienditeenindusega.
• Selle nõude eiramine võib põhjustada elektrilöögi, tulekahju, probleeme toote töös või kehavigastusi.
Toode on mõeldud ainult kodumajapidamises kasutamiseks.
Toote kommertseesmärkidel kasutamist käsitatakse väärkasutamisena. Sellisel juhul ei kata toodet
Samsungi standardgarantii tingimused ning Samsung ei võta endale vastutust väärkasutusest tulenevate
rikete või kahjustuste eest.
Kui tootest tuleb veidrat müra, põlemislõhna või suitsu, tõmmake toitejuhe kohe seinakontaktist välja ja
võtke ühendust teeninduskeskusega.
• Vastasel juhul võib see põhjustada elektrilöögi või tulekahju.
Ärge lubage lastel (ega lemmikloomadel) toote sees või peal mängida. Toote luuki ei saa seestpoolt
kergesti avada ja lapsed võivad saada seadmesse kinni jäädes tõsiseid kehavigastusi.
Eesti 9
Untitled-22 9 2019-07-05 6:51:48
Page 58

Ohutusteave
Ettevaatusabinõud kasutamisel
Ärge seiske seadmel ega asetage seadmele esemeid (nt pesu, põlevaid küünlaid, põlevaid sigarette, nõusid,
kemikaale, metallesemeid vms).
• See võib põhjustada elektrilöögi, tulekahju, probleeme toote töös või kehavigastusi.
Ärge puudutage klaasluuki ega trumli sisemust kuivatamise ajal ega vahetult pärast seda, kuna need on
Ohutusteave
kuumad.
• See võib põhjustada põletusi.
Pesemise ja kuivatamise ajal ukseklaas kuumeneb. Ärge puudutage sel ajal ukseklaasi.
Ärge lubage lastel pesumasina läheduses mängida ja ukseklaasi puudutada.
• See võib põhjustada põletusi.
Ärge vajutage nuppe teravate esemetega, nt nõelad, noad, küüned vms.
• See võib põhjustada elektrilöögi või kehavigastusi.
Ärge kuivatage toorkummi (lateksit) või sarnaseid kummimaterjale sisaldavat pesu.
• Toorkummi kuumenemisel võib see süttida.
ETTEVAATUST!
Ärge kuivatage taime- või küpsetusõliga määrdunud rõivaid, kuna suurt õlihulka ei saa pesu pesemisel
eemaldada. Lisaks kasutage jahutustsüklit, et pesu ei kuumeneks.
• Õli oksüdeerumiskuumus võib põhjustada tulekahju.
Veenduge, et kõigi kuivatatavate esemete taskud oleksid tühjad.
• Kõvad ja teravad esemed, näiteks mündid, haaknõelad, naelad, kruvid või kivid, võivad seadet oluliselt
kahjustada.
Ärge kuivatage suurte metallpannalde, -nööpide või muude raskete metalldetailidega (lukud, haagid,
aasad, nööpidega katted) esemeid.
Vajaduse korral kasutage väikese ja kerge pesu (nt riidest vööd, põllepaelad ja traattugedega rinnahoidjad,
mis võivad tsükli käigus laguneda või puruneda) jaoks pesukotti.
Kuivatilehed ühilduvad selle seadmega ja nende kasutamine on soovitatav parema kuivatusjõudluse
saavutamiseks.
Kuivatilehed aitavad vähendada ka kuivatustsükli jooksul tekkinud staatilist elektrit. Staatiline elekter võib
pesu ja potentsiaalselt ka seadet kahjustada.
Ärge kasutage kuivatit ohtlike pulbrite, nt kivisöetolm, nisujahu jne, läheduses.
• See võib põhjustada elektrilöögi, tulekahju või plahvatuse.
Ärge asetage toote lähedusse süttivaid materjale.
• See võib põhjustada mürgiste gaaside teket, osade kahjustusi, elektrilöögi, tulekahju või plahvatuse.
• Seadet ei tohi paigutada lukustatavate uste jms taha.
Eesti10
Untitled-22 10 2019-07-05 6:51:48
Page 59
Ärge puudutage seadme tagumist külge kuivatamise ajal ega vahetult pärast seda.
• Seade on kuum ja võib tekitada põletusi.
Sisaldab uoritud kasvuhoonegaase.
Hermeetiliselt tihendatud seade.
Ärge ventileerige gaase atmosfääri.
Külmaaine (tüüp): R-134a (GWP = 1430)
Külmaaine (laadimine): 0,37 kg, 0,529 tCO
e
2
Olulised hoiatused puhastamise kohta
HOIATUS!
Ärge puhastage seadet, piserdades vett otse selle pinnale.
Ärge kasutage seadme puhastamiseks benseeni, lahustit või alkoholi.
• See võib põhjustada värvi tuhmumist või seadme pinna deformeerumist või kahjustusi ning
elektrilöögi- või tuleohtu.
Enne puhastamist või hooldust eemaldage toitepistik pistikupesast.
• Selle nõude eiramine võib põhjustada elektrilöögi või tulekahju.
Puhastage ltripesa enne ja pärast kuivati kasutamist.
Puhastage toote sisemust regulaarselt, paludes abi volitatud hooldustehnikult.
Puhastage soojusvahetit pehme harja või tolmuimeja abil kord kuus. Ärge puudutage soojusvahetit käega.
See võib teid vigastada.
Kuivati sisemust tuleb lasta kvalitseeritud hooldustöötajal regulaarselt puhastada.
Ohutusteave
Eesti 11
Untitled-22 11 2019-07-05 6:51:48
Page 60
Ohutusteave
Suunised elektri- ja elektroonikaseadmete romude kohta
Ohutusteave
Õige viis toote kasutuselt kõrvaldamiseks (elektriliste ja elektrooniliste
seadmete jäätmed)
(Kehtib riikides, kus jäätmed kogutakse sorteeritult)
Selline tähistus tootel või selle tarvikutel või dokumentidel näitab, et toodet
ega selle elektroonilisi tarvikuid (nt laadija, peakomplekt, USB-kaabel) ei
tohi kasutusaja lõppemisel käidelda koos muude olmejäätmetega. Selleks et
vältida jäätmete kontrollimatu käitlemisega seotud võimaliku kahju tekitamist
keskkonnale või inimeste tervisele ning edendada materiaalsete vahendite
säästvat taaskasutust, eraldage need esemed muudest jäätmetest ja suunake
need vastutustundlikult taasringlusse.
Kodukasutajad saavad teavet nende esemete keskkonnaohutu taaskasutamise
kohta kas toote müüjalt või keskkonnaametist.
Firmad peaksid võtma ühendust tarnijaga ning kontrollima ostulepingu
tingimusi ja sätteid. Toodet ega selle elektroonilisi tarvikuid ei tohi panna
muude hävitamiseks mõeldud kaubandusjäätmete hulka.
Samsungi keskkonnaalaste kohustuste ja toodetele kehtivate regulatiivsete kohustuste (nt REACH, WEEE
või akude) kohta teabe saamiseks külastage meie säästva arengu lehte, mis on saadaval veebisaidil www.
samsung.com
Eesti12
Untitled-22 12 2019-07-05 6:51:48
Page 61
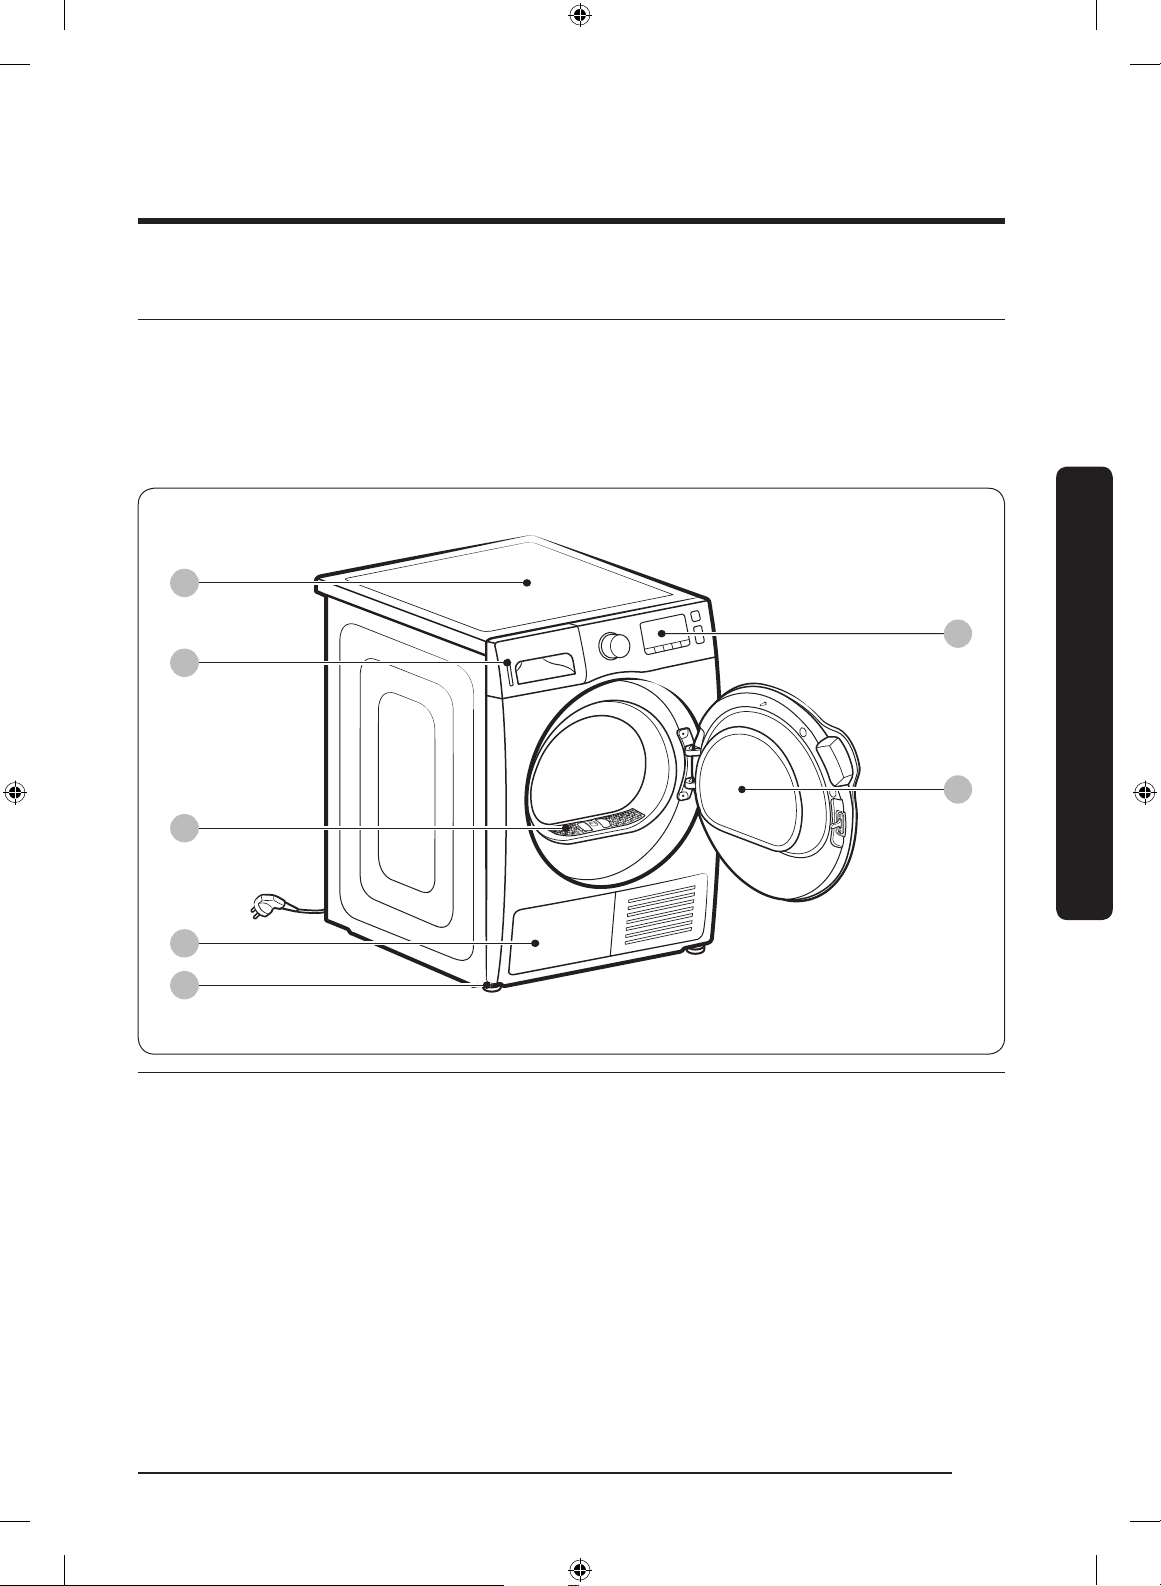
Paigaldamine
01
02
07
06
03
05
04
Pakendi sisu
Pakkige kuivati hoolikalt lahti. Hoidke pakkematerjale eemal laste käeulatusest. Allpool näidatud osad
ja nende asukohad võivad teie kuivati puhul erineda. Enne paigaldamist veenduge, et kuivatil oleksid
olemas kõik siin loetletud osad. Kui kuivati ja/või osad on kahjustunud või puuduvad, pöörduge lähimasse
Samsungi klienditeeninduskeskusesse.
Kuivati ülevaade
Paigaldamine
01 Ülakate 02 Veepaak
03 Ebemelter 04 Soojusvaheti
05 Tugijalg 06 Luuk
07 Juhtpaneel
Untitled-22 13 2019-07-05 6:51:48
Eesti 13
Page 62
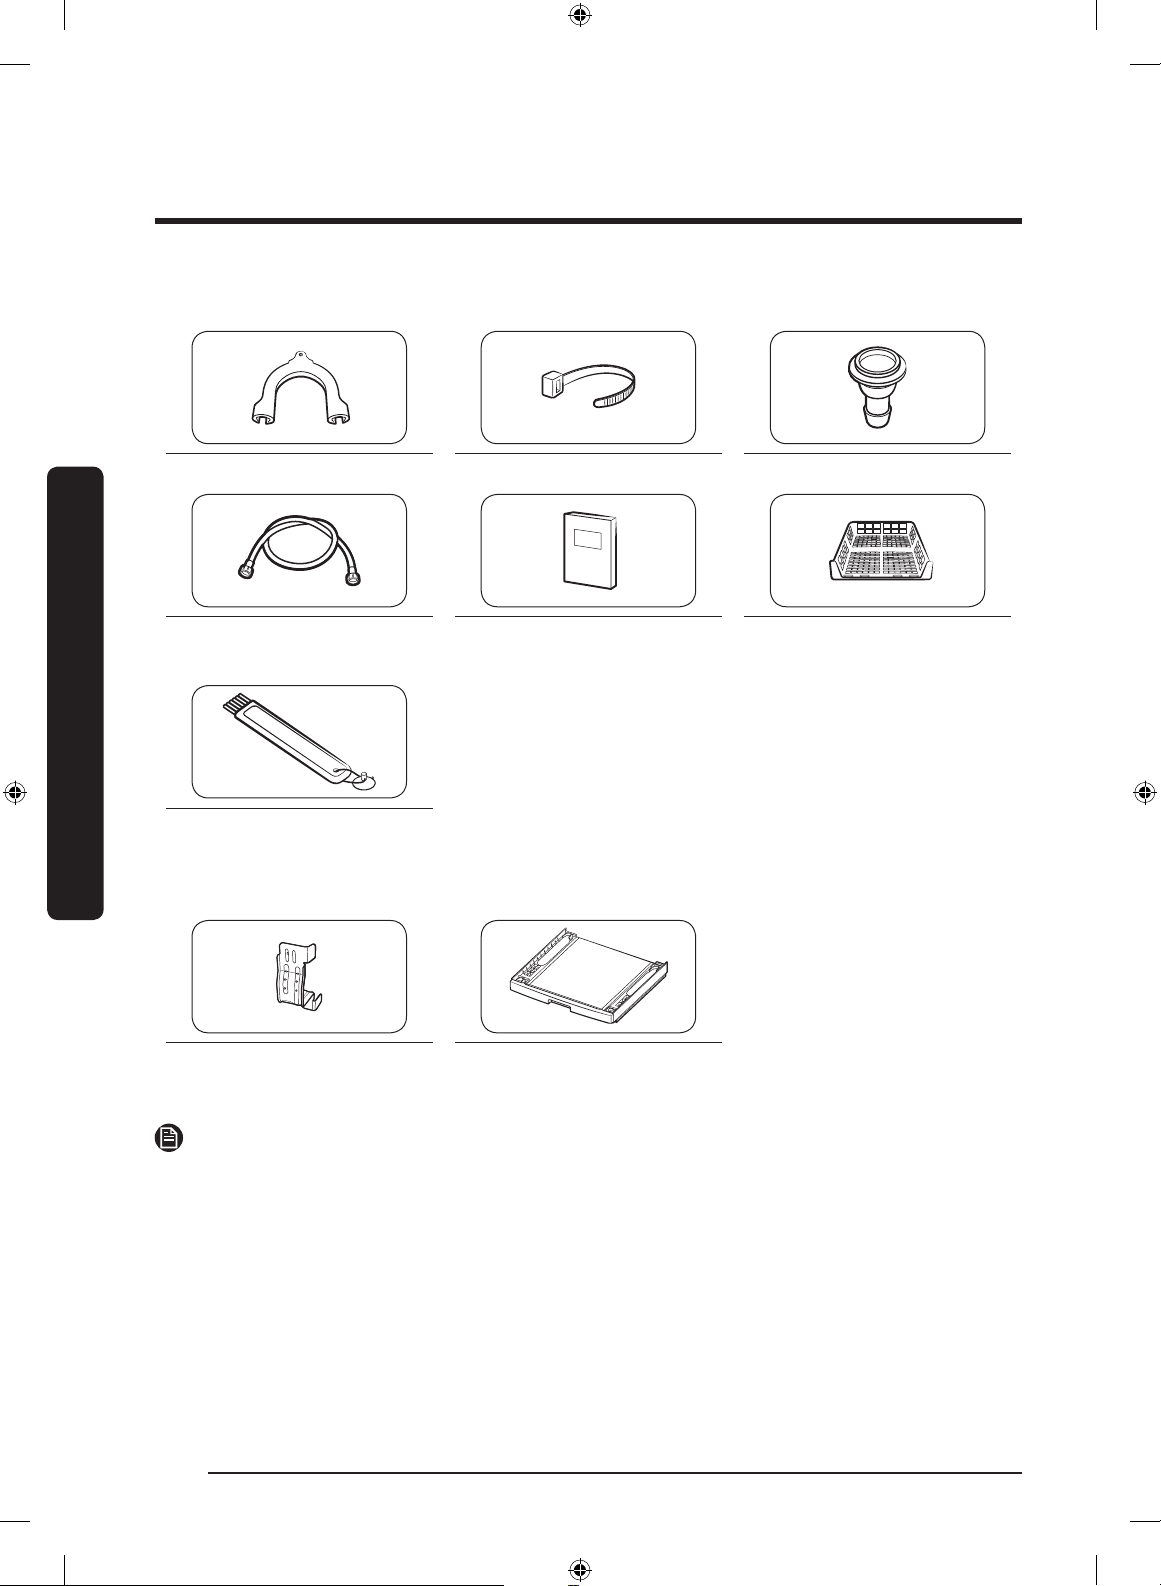
Paigaldamine
Lisatarvikud (kaasas)
Voolikujuhik Kaabliside Voolikuliitmik
Paigaldamine
Pikk väljalaskevoolik (2 m) Kasutusjuhend Kuivatusrest (ainult teatud
Lisatarvikud (pole kaasas)
(osa nr SK-DH; SK-DA; SKK-DF)
MÄRKUS
• Virnastamiskomplekt võimaldab paigaldada kuivati pesumasina peale. Pidage meeles,
et virnastamiskomplekti tohib kasutada ainult Samsungi pesumasinate ja kuivatitega.
Virnastamiskomplekti (osa nr SK-DH; SK-DA; SKK-DF) ostmiseks pöörduge Samsungi
teeninduskeskusesse või kohalikku kodumasinakauplusse. Virnastamiskomplekt erineb olenevalt
mudelist.
• Kuivati virnastamissuuniseid vaadake virnastamiskomplekti paigaldusjuhendist.
• Teavet virnastamiskomplekti kindla mudeli saadavuse kohta vaadake virnastamiskomplekti
paigaldusjuhendist.
Puhastushari
Virnastamiskronstein
mudelitel)
Virnastamiskomplekt
(SKK-DD, SKK-DDX)
Eesti14
Untitled-22 14 2019-07-05 6:51:50
Page 63
Paigaldusnõuded
MÄRKUS
Selle kuivati peab paigaldama kvalitseeritud paigaldaja. Kehvast või valest paigaldamisest tingitud
hooldusvajadus on omaniku vastutus ja võib garantii tühistada. Hoidke need suunised hilisemaks
kasutamiseks alles.
HOIATUS!
• Ärge ühendage toitejuhet vooluvõrku enne, kui kuivati on täielikult paigaldatud.
• Kuivati liigutamisel tuleb kasutada vähemalt kaht inimest.
• Ärge lubage lastel ega lemmikloomadel kuivati sees, peal ega ümber mängida. Tagatud peab olema
pidev järelevalve.
• Hoidke pakkematerjale eemal laste käeulatusest.
• Ärge asendage kahjustatud toitejuhet või toitepistikut ise. Laske kahjustatud toitejuhe või toitepistik
asendada Samsungil või kvalitseeritud hooldustehnikul.
• Ärge püüdke kuivatit ise parandada, osadeks võtta ega muuta. Mis tahes parandustööde tegemiseks
pöörduge lähimasse Samsungi teeninduskeskusesse.
• Eemaldage kõigilt utiliseeritud kodumasinatelt uks/kaaned, et vältida laste lämbumisohtu.
• Kui kuivatist kostub ebatavalisi helisid või eraldub põlemislõhna või suitsu, eemaldage toitepistik kohe
pistikupesast ja võtke ühendust lähima Samsungi teeninduskeskusega.
• Ärge lahutage kuivatit töötamise ajal vooluvõrgust.
• Ärge pange kuivati lähedusse süttivaid esemeid.
Paigaldamine
Eesti 15
Untitled-22 15 2019-07-05 6:51:51
Page 64
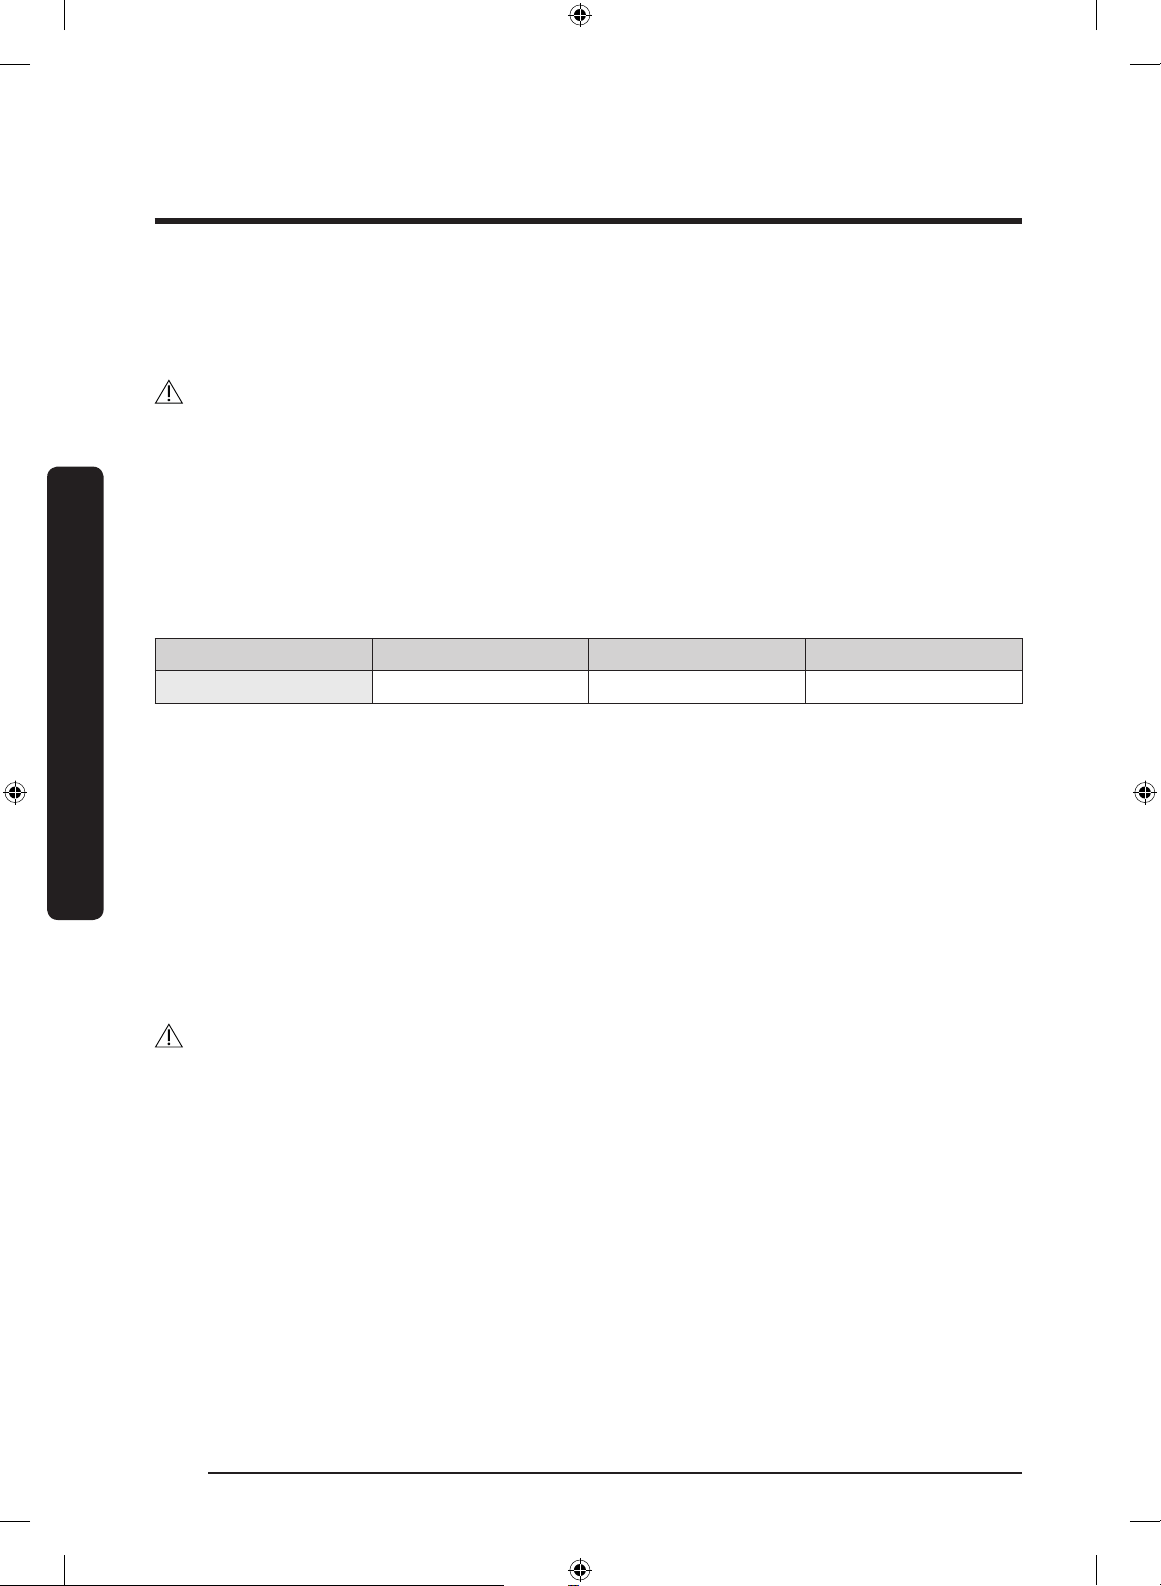
Paigaldamine
Nõuded asukohale
Valige loodis ja tugeva konstruktsiooniga pind, mis talub vibratsiooni. Valige asukoht, kus maandatud
kolmeviiguline pistikupesa on hõlpsasti ligipääsetav.
HOIATUS!
• Kuivati tohib paigaldada ainult siseruumi.
• Ärge paigaldage kuivatit ilmaoludele avatud kohta.
• Ärge paigaldage kuivatit kohta, kus temperatuur võib langeda alla 5 °C või tõusta üle 35 °C.
• Ärge paigaldage kuivatit kohta, kus gaas võib lekkida.
• Ärge blokeerige jahutusvõre õhu sisselaskeava, mis asub kuivati esiküljel.
Paigaldamine suletud asukohta
Paigaldamine
Kuivati paigaldamisel nišši või kappi tuleb tagada järgmised minimaalsed vahekaugused.
Kuivati paigaldamisel koos pesumasinaga peab niši või kapi esiosas olema vähemalt 490 mm suurune
takistusteta õhuava.
Külgedel Peal Ees Taga
25 mm 25 mm 490 mm 51 mm
Nõuded elektriühendusele ja maandusele
• Kuivati vajab 220–240 V, 50 Hz vahelduvvooluga elektrivarustust.
• Kuivati peab olema õigesti maandatud. Kui kuivati töös esineb tõrkeid või kui see läheb katki,
vähendab maandus elektrilöögiohtu, juhtides elektrivoolu ohutusse kanalisse. Kuivati on varustatud
kolmeviigulise maanduspistikuga toitejuhtmega. Pistik tuleb ühendada sobivasse ning õigesti
paigaldatud ja maandatud pistikupessa kooskõlas kõigi kohalike eeskirjade ja määrustega.
• Kui teil on elektri- või maandusnõuete kohta küsimusi, võtke ühendust Samsungi või kvalitseeritud
elektrikuga.
HOIATUS!
• Ühendage pistik maandatud kolmeviigulisse pistikupessa.
• Ärge kasutage kahjustatud toitepistikut ega -juhet või logisevat või kahjustunud pistikupesa.
• Ärge kasutage adapterit ega pikendusjuhet.
• Seadme maandusjuhi vale ühendamine võib põhjustada elektrilöögi. Kui te pole kindel, kas kuivati on
õigesti maandatud, pidage nõu kvalitseeritud elektrikuga.
• Ärge muutke toitepistikut, toitejuhet ega pistikupesa ühelgi viisil.
• Ärge ühendage maandusjuhet plasttorude, gaasitorude ega kuumaveetorude külge.
Eesti16
Untitled-22 16 2019-07-05 6:51:51
Page 65
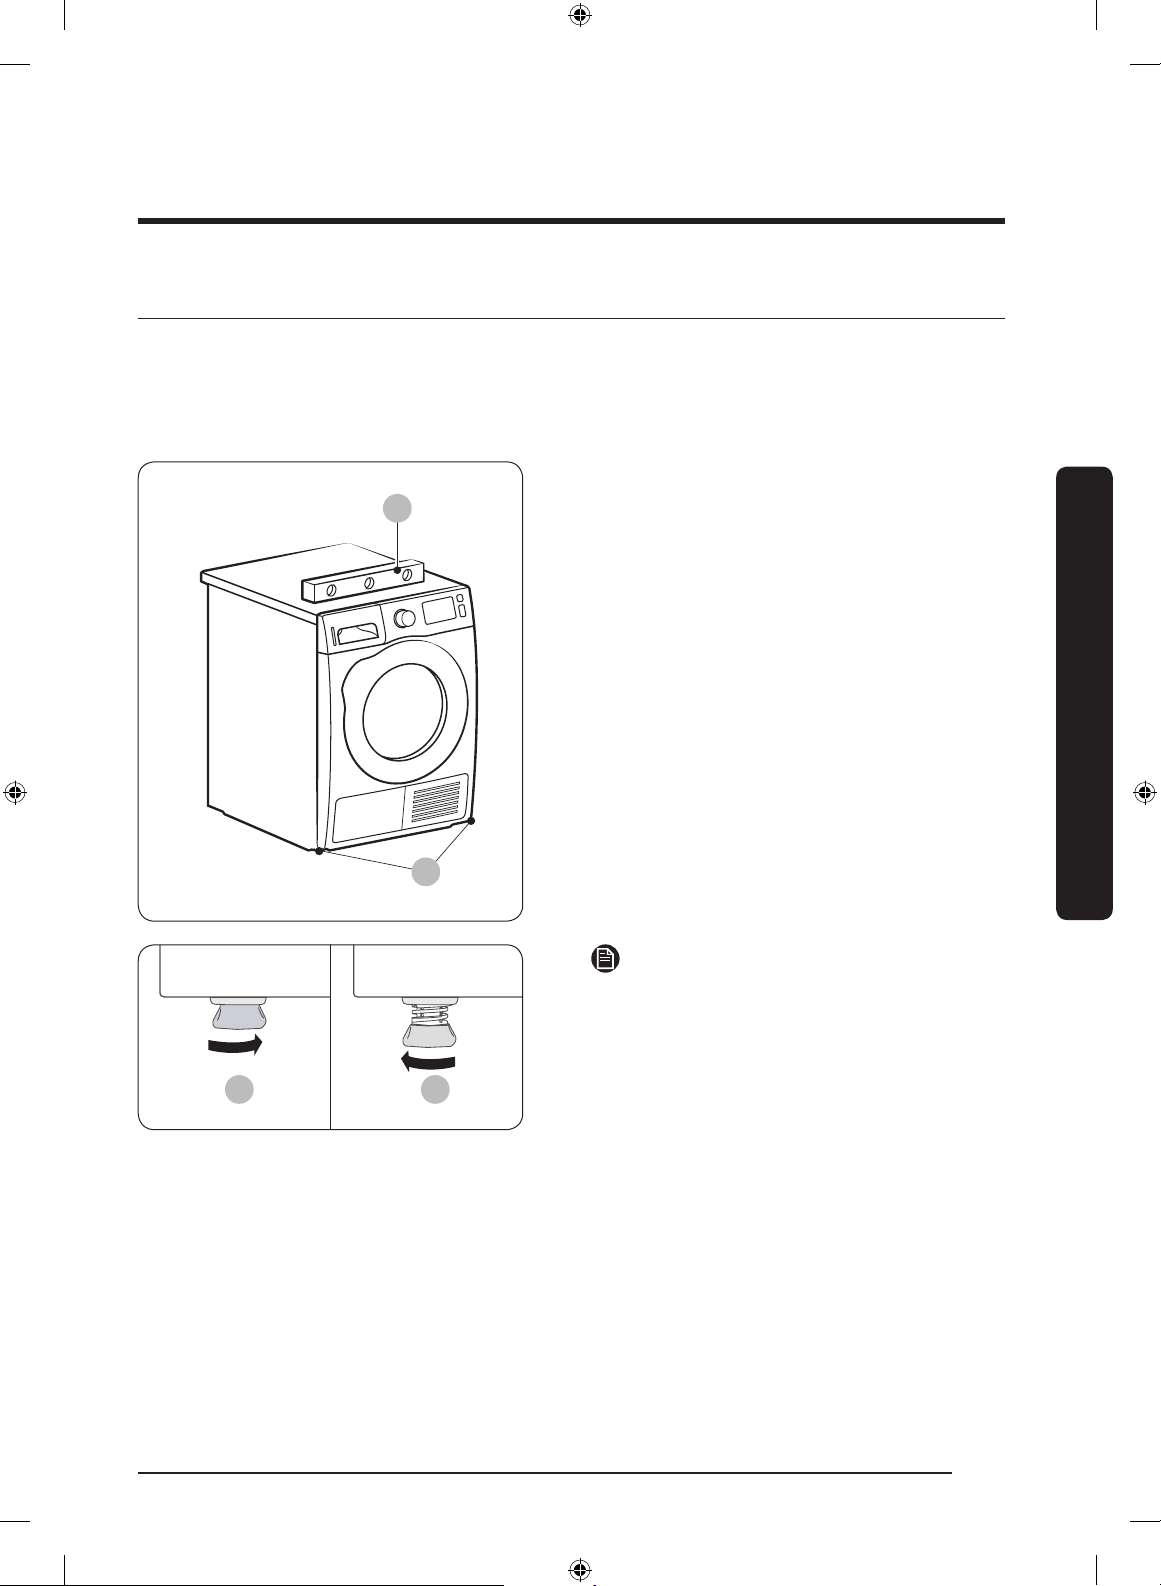
Kuivati
A
B
C D
Enne kuivati paigaldamist lugege kindlasti läbi jaotis „Paigaldusnõuded“ lk 15. Pange tähele, et järgmistes
suunistes käsitletakse paigaldamist ilma väljalaskevoolikuta. Suuniseid väljalaskevooliku kasutamise
kohta vaadake järgmisest jaotisest „Väljalaskevoolik“. Mugavuse tagamiseks kaaluge kuivati paigaldamist
pesumasina kõrvale.
1. Lükake kuivati ettevaatlikult soovitud kohta.
2. Kontrollige loodi (A) kasutades, kas kuivati on
küljelt küljele ja eest taha loodis.
3. Kui kuivati pole loodis, reguleerige tugijalga
(B). Tugijala keeramine vastupäeva lühendab
seda. Tugijala keeramine päripäeva pikendab
seda.
4. Kui kuivati on loodis, siis veenduge, et see
seisaks kindlalt põrandal.
5. Ühendage kuivati vooluvõrku.
Paigaldamine
MÄRKUS
• Kuivati seadmiseks pesumasinaga samale
kõrgusele keerake tugijalad täiesti sisse (C)
(vastupäeva), seejärel lõdvendage (D) neid
päripäeva keerates.
• Pikendage tugijalga ainult nii palju kui vaja.
Tugijala liigne väljakeeramine võib põhjustada
Untitled-22 17 2019-07-05 6:51:51
kuivati vibreerimist.
Eesti 17
Page 66
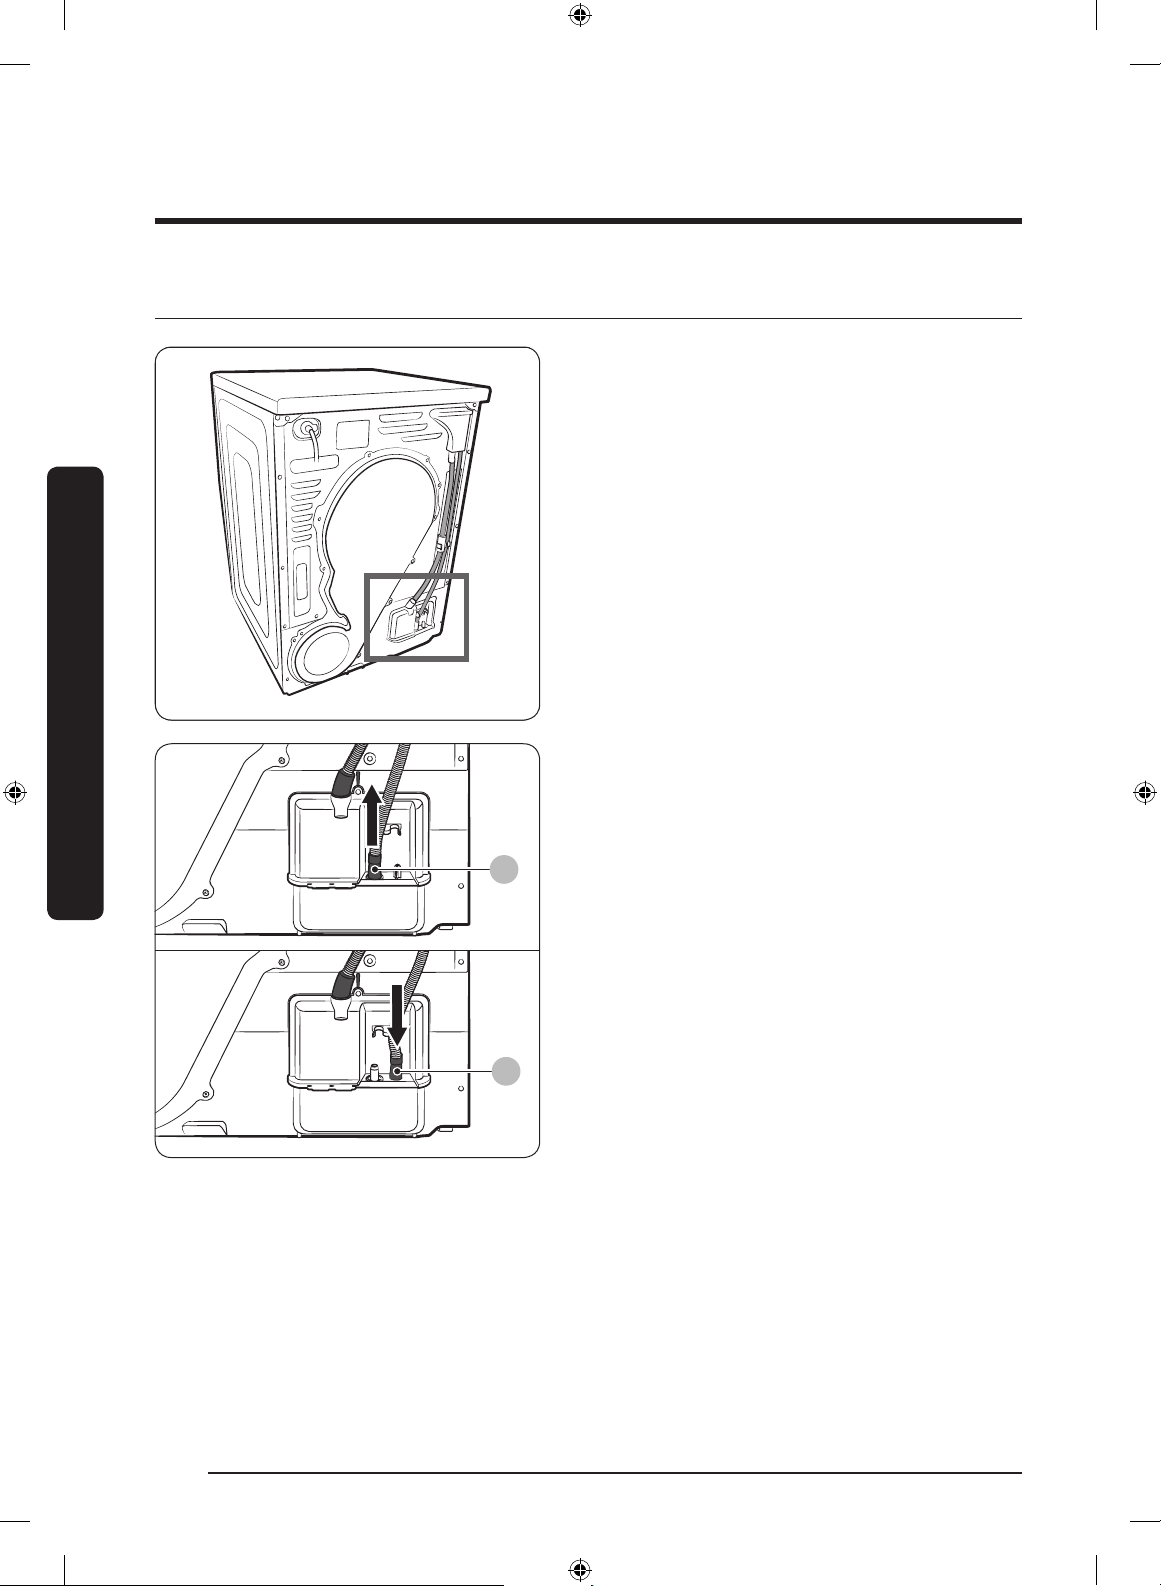
Paigaldamine
A
B
Väljalaskevoolik (vajaduse korral)
Paigaldamine
Kuivatil on sisseehitatud veepaak. Kui te ei
soovi veepaaki kasutada, võite paigaldada
väljalaskevooliku. Lisatarvikuna komplekti
kuuluvat voolikut (pikk väljalaskevoolik) saab
kasutada väljalaskevooliku pikendusena.
1. Eemaldage väljalaskevoolik avast (A) ja
sisestage see avasse (B).
Eesti18
Untitled-22 18 2019-07-05 6:51:52
Page 67
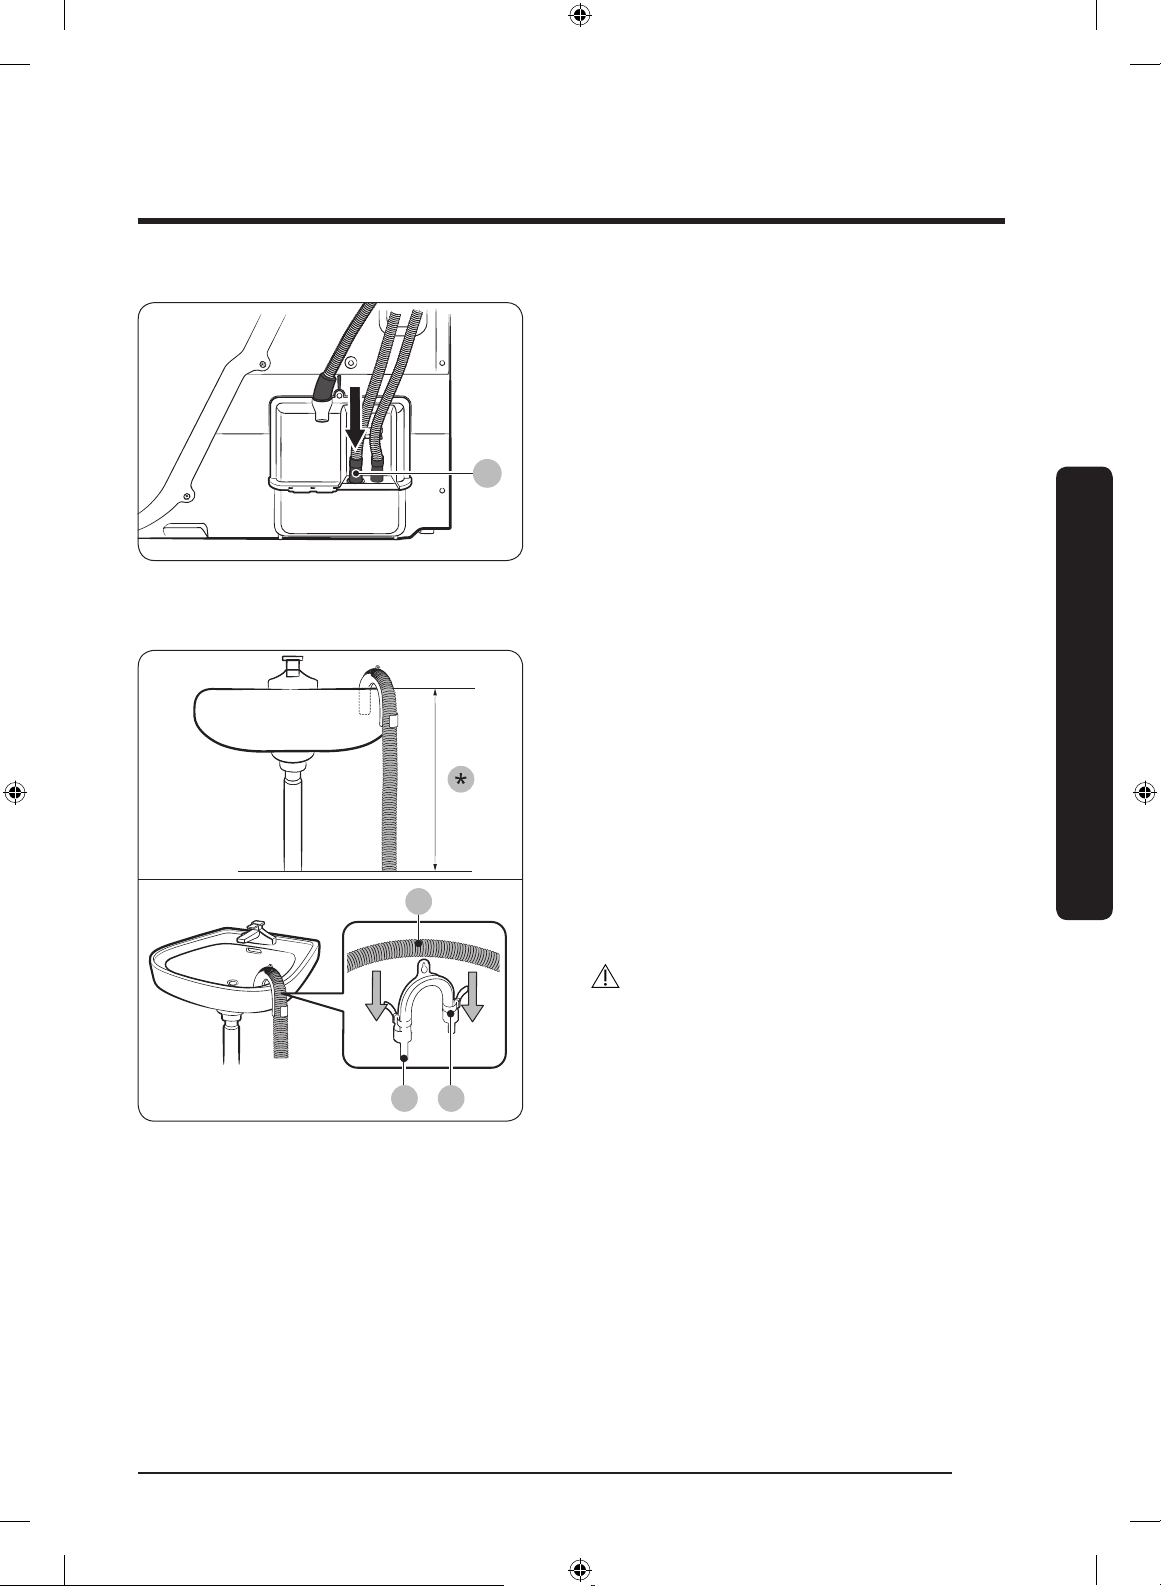
A
2. Sisestage lisavooliku (pika väljalaskevooliku)
A
CB
üks ots avasse (A).
3. Sisestage lisavooliku teine ots (väljalase)
äravoolusüsteemi, toimides ühel järgmistest
viisidest.
Üle valamuserva
Paigaldamine
1. Seadke lisavooliku ots kindlasti madalamale
kui 90 cm (*) kuivati põhjast.
2. Lisavooliku painutamiseks kasutage
kaasasolevat plastist voolikujuhikut (B) ja
kinnitage juhik konksuga seinale või nööriga
kraani külge. Ühendage väljalaskevoolik
(A) ja voolikujuhik (B) ning kinnitage need
kaablisidemega (C).
3. Kondensatsioonivee väljalaskmiseks ühendage
lisavoolik (pikk väljalaskevoolik) otse
äravooluavasse.
ETTEVAATUST!
Ärge pikendage väljalaskevoolikut. Ühendatud
kohast võib vesi lekkida. Kasutage pikka
väljalaskevoolikut.
Eesti 19
Untitled-22 19 2019-07-05 6:51:53
Page 68
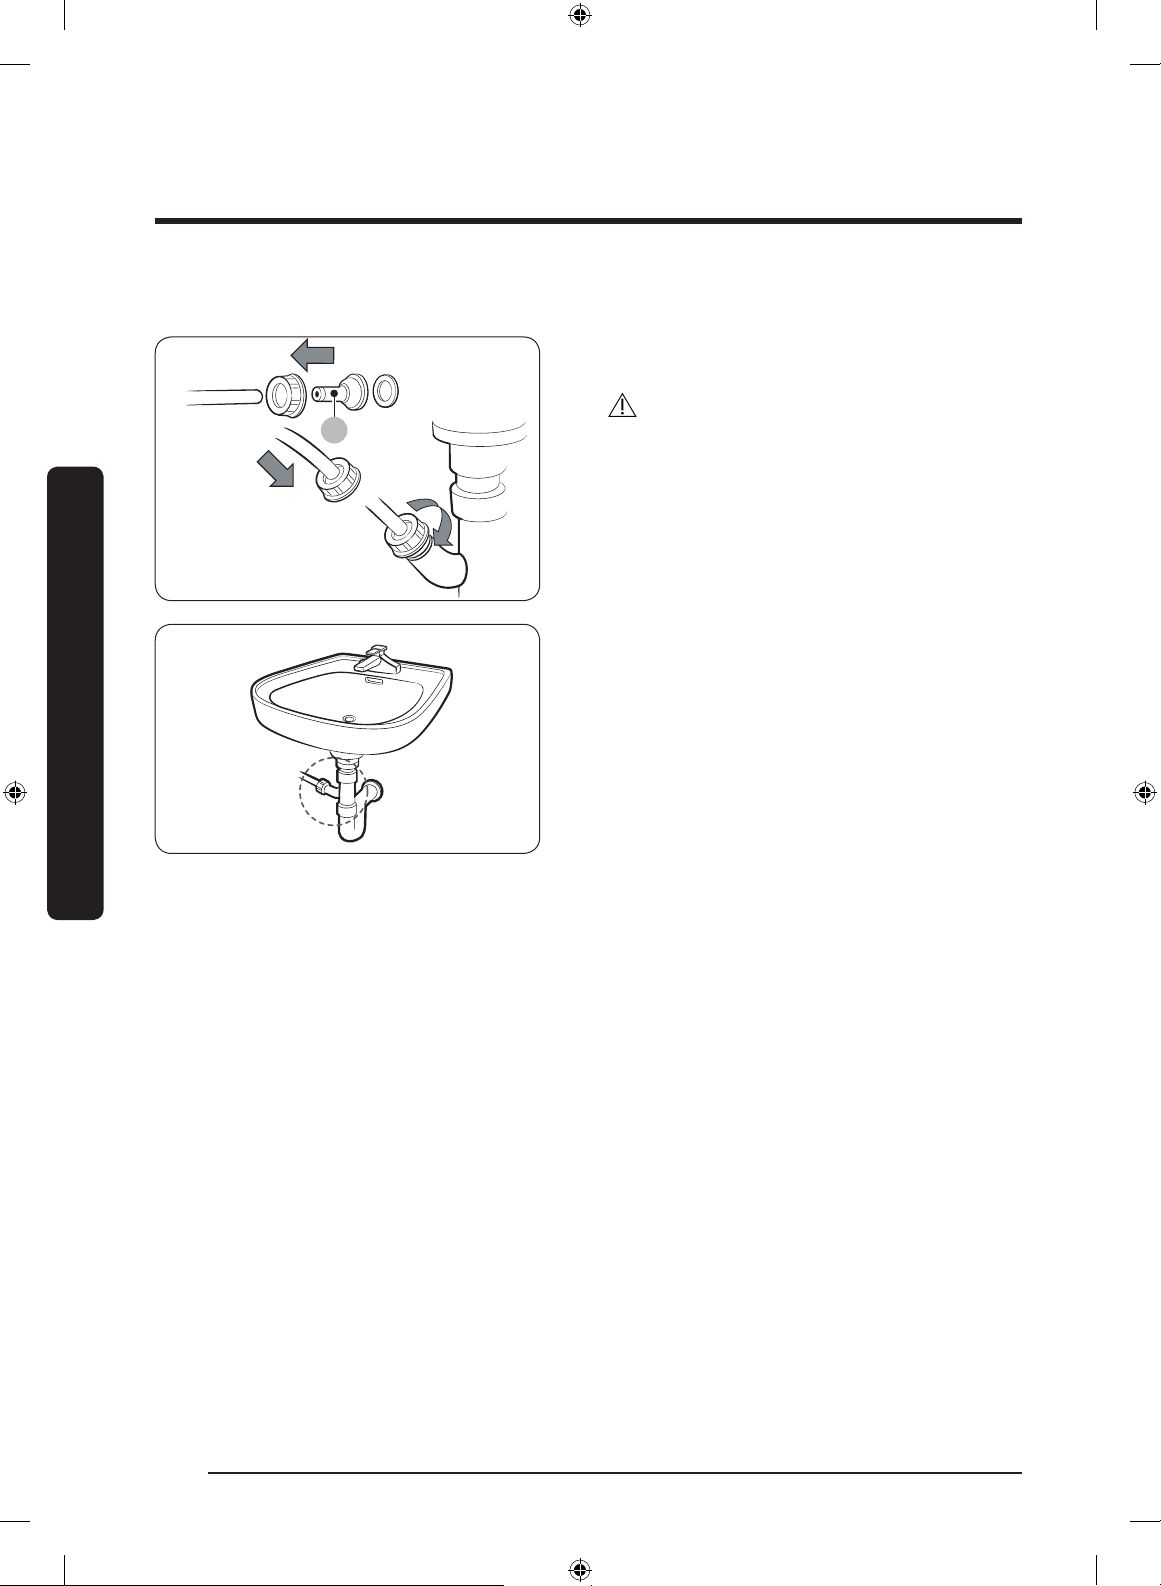
Paigaldamine
A
Valamu äravoolutoru kasutamine
1. Pange kokku voolikuliitmik (A) ja kinnitage see
näidatud viisil lisavooliku otsa.
ETTEVAATUST!
Vee lekkimise vältimiseks veenduge, et voolik ja
liitmik oleksid korralikult ühendatud.
Paigaldamine
2. Ühendage voolikuadapter otse valamu
äravoolutoruga.
Eesti20
Untitled-22 20 2019-07-05 6:51:53
Page 69
Paigaldamise kontroll-loend
• Kuivati on ühendatud õigesti maandatud pistikupessa.
• Kogu pakkematerjal on täielikult eemaldatud ja nõuetekohaselt ära visatud.
• Kuivati on loodis ja seisab kindlalt põrandal.
• Käivitage kuivati ning veenduge, et see töötaks, soojeneks ja lülituks välja.
• Käivitage tsükkel TIME DRY (AJASTATUD KUIVATAMINE) 20 minutiks ja kontrollige, kas kuvatakse
teabekood HC. Kui see on nii, siis võtke ühendust kohaliku teeninduskeskusega.
• Pärast paigaldamist soovitame teil enne kuivati kasutamist vähemalt üks tund oodata.
Enne kuivati kasutamist
• Veenduge, et trumlisse poleks jäänud ühtki tarvikut.
• Ühendage toitejuhe vooluvõrku vahetult enne kuivati kasutamist.
• Ärge katke kuivati esiküljel olevat jahutusvõre õhu sissevõtuava kinni.
• Ärge pange kuivati lähedale süttivaid esemeid ja hoidke ümbrus puhas.
• Hoidke kuivati põrandaga loodis.
• Ärge eemaldage kuivati reguleeritavaid tugijalgu. Need on vajalikud kuivati seadmiseks
põrandapinnaga loodi.
Paigaldamine
Eesti 21
Untitled-22 21 2019-07-05 6:51:54
Page 70
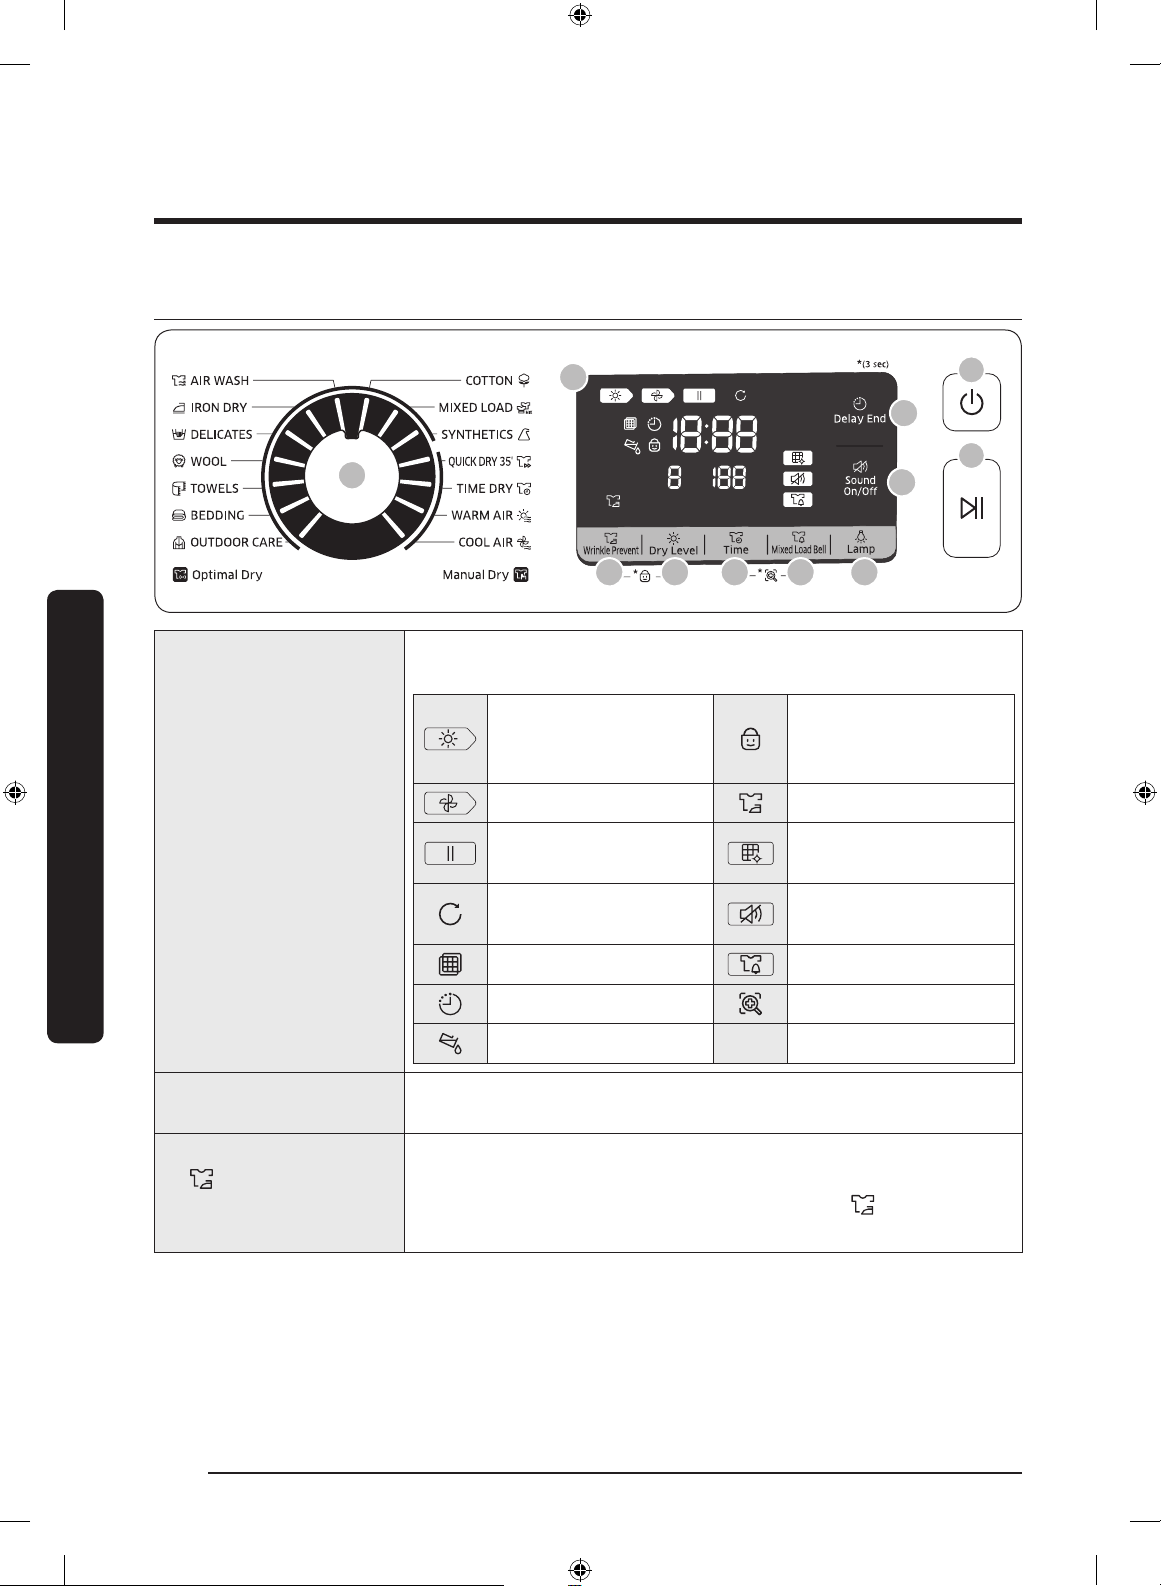
Toimingud
01
10
11
03 04 05 06 07
08
09
02
Juhtpaneel
Toimingud
Kuvab kogu tsükliteabe, sealhulgas tsükli kestus, teabekoodid ja kuivati
olek. Vaadake oleku üksikasju allolevast tabelist.
Lapselukk on
Kuivatamine on pooleli
aktiveeritud/
inaktiveeritud
01 Digitaalne näidikupaneel
02 Tsüklivalija
03 Wrinkle Prevent
(Kortsude ennetamine)
Jahutamine on pooleli Kortsude ennetamine
Peatatud
Kortsude ennetamine on
pooleli
Soojusvaheti puhastamise
alarm
Heli sisse-/väljalülitamine
Kontrollige ltrit Segapesu kell
Ajastatud lõpp Smart Check
Tühjendage veepaak
Keerake seda nuppu tsükli valimiseks. Teavet saadaolevate tsüklite kohta
vt jaotisest „Tsüklite ülevaade“ lk 24.
Lisab valitud tsükli lõppu kortsude vähendamiseks ligikaudu 2 tundi
vahelduvat trumlipöörlemist. Kuvapaneelile ilmub suur sõõr ja trummel
pöörleb vahelduvalt. Aktiveerimiseks vajutage nuppu Wrinkle Prevent
(Kortsude ennetamine). Süttib vastav näidik.
Eesti22
Untitled-22 22 2019-07-05 6:51:57
Page 71
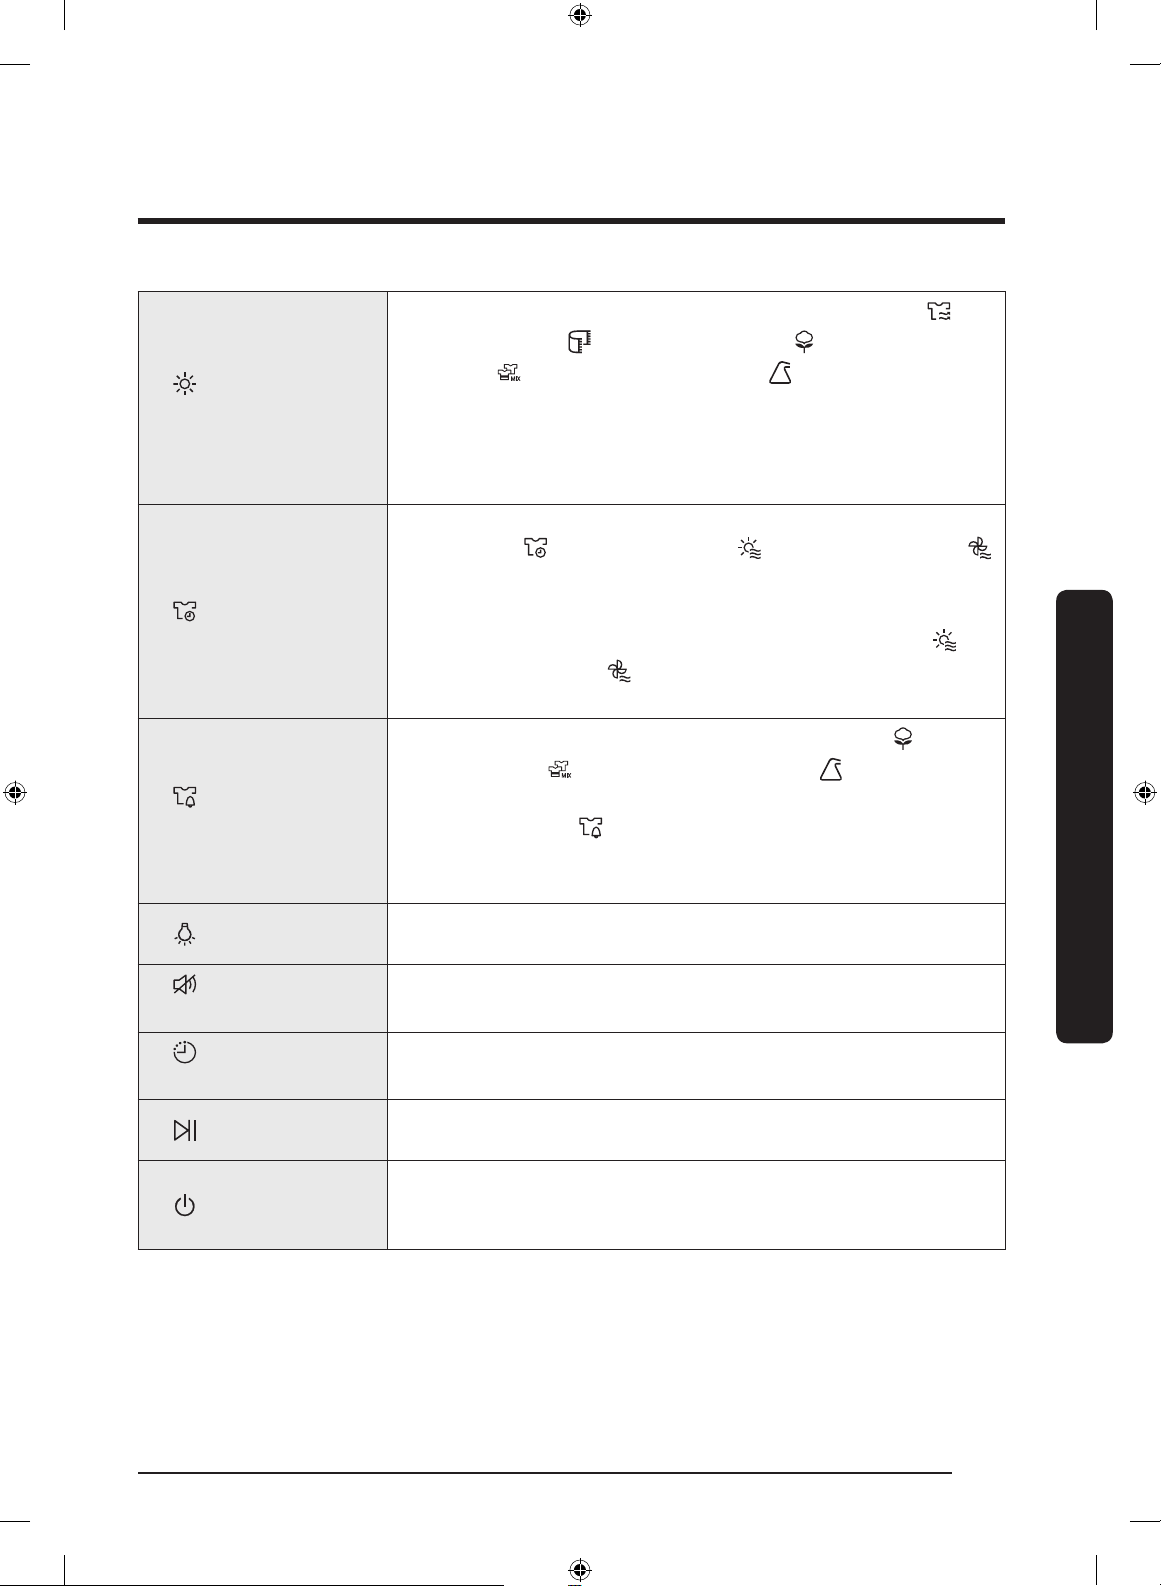
04 Dry Level
(Kuivustase)
05 Time (Aeg)
06 Mixed Load Bell
(Segapesu kell)
07 Lamp (Tuli)
Vajutage kuivustaseme valimiseks tsüklite AIR WASH (ÕHKPESU)
, TOWELS (RÄTIKUD) , COTTON (PUUVILLANE) , MIXED LOAD
(SEGAPESU) ja SYNTHETICS (SÜNTEETIKA) puhul. Kuivuse puhul
saab valida kolm taset (1–3). Taset 1 kasutatakse kuivatamiseks laiali
laotatavate või riputatavate esemete osaliseks kuivatamiseks. Tase 3
on tugevaim ja seda kasutatakse suuremate või raskemate esemete
kuivatamiseks.
Vajutage tsükli kestuse reguleerimiseks tsüklite TIME DRY (AJASTATUD
KUIVATAMINE) , WARM AIR (SOE ÕHK) ja COOL AIR (JAHE ÕHK)
puhul.
Saadaval on järgmised ajavalikud: 30, 60, 90, 120 ja 150 min.
• 120 minutit ja 150 minutit pole tsüklite WARM AIR (SOE ÕHK) ja
COOL AIR (JAHE ÕHK) puhul saadaval.
• Täpne kuivatusaeg erineb olenevalt pesu niiskusastmest.
See alarm on saadaval ainult tsüklite COTTON (PUUVILLANE) , MIXED
LOAD (SEGAPESU) ja SYNTHETICS (SÜNTEETIKA) puhul. Kui pesu
sisaldab segamaterjale ja eseme keskmine kuivusaste on 80%, vilgub
segapesu kella näidik ( ). Nii saate võtta kuivatist välja esemed, mida te
ei soovi täielikult kuivatada või mis kuivavad kiiresti, lastes teiste puhul
kuivatamist jätkata.
Vajutage seda nuppu sisetule sisse- või väljalülitamiseks. Tuli jääb pärast
sisselülitamist 5 minutiks põlema ning kustub seejärel automaatselt.
Toimingud
08 Sound On/Off (Heli
sisse-/väljalülitamine)
09 Delay End (Ajastatud
lõpp)
10 Käivitus/Peatamine
11 Toide
Vajutage juhtpaneeli heli vaigistamiseks/vaigistuse tühistamiseks.
Heliseade säilib kuivati välja- ja uuesti sisselülitamisel.
Saate reguleerida valitud tsükli lõpuaega ühetunniste sammudega kuni
24 tunni piires.
Vajutage tsükli käivitamiseks või peatamiseks. Nupu vajutamine kuivati
töötamise ajal peatab kuivati. Jätkamiseks vajutage nuppu uuesti.
Vajutage kuivati sisse-/väljalülitamiseks. Kui kuivati toide on jäetud sisse
rohkem kui 10 minutiks, ilma et selle aja jooksul ühtki nuppu vajutataks,
lülitub kuivati automaatselt välja.
Eesti 23
Untitled-22 23 2019-07-05 6:52:00
Page 72
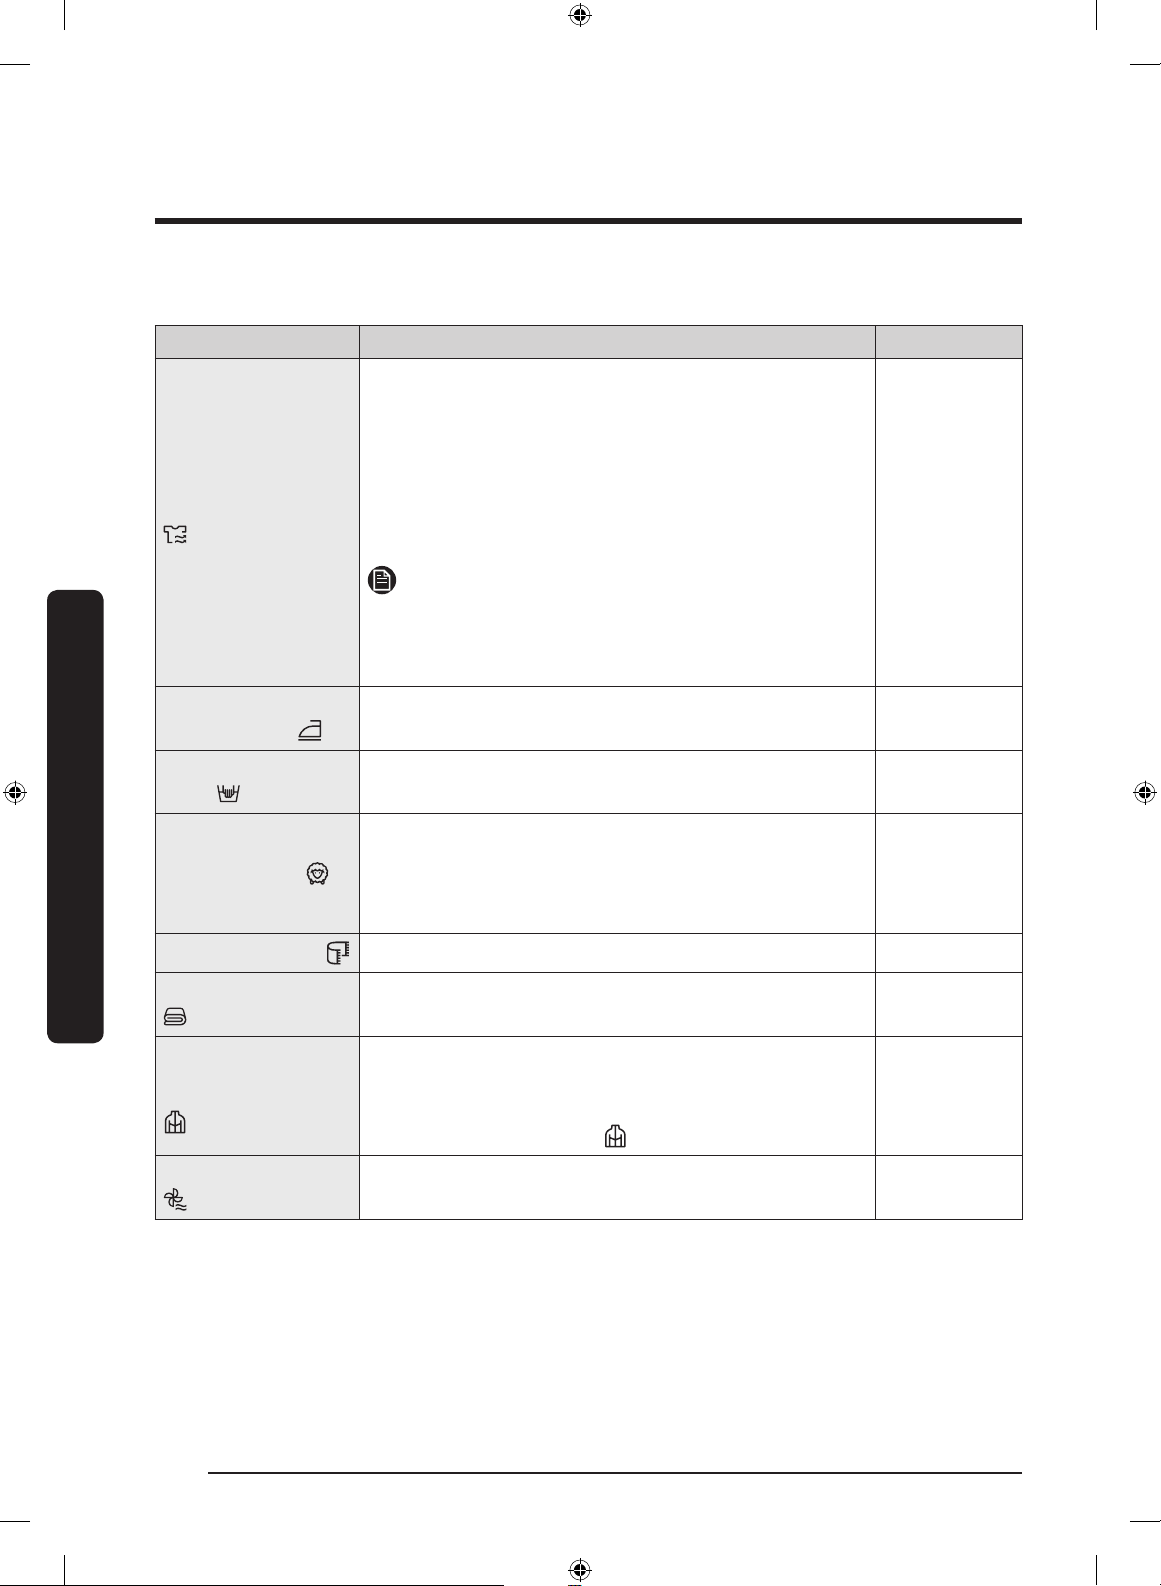
Toimingud
Tsüklite ülevaade
AIR WASH (ÕHKPESU)
IRON DRY
(TRIIKIMISKUIV)
Toimingud
DELICATES (ÕRN
PESU)
WOOL (VILLANE)
Tsükkel Kirjeldus Max kogus (kg)
Kasutab sooja õhku esemetelt lõhna eemaldamiseks ja nende
värskendamiseks. Saate valida kolm taset olenevalt sellest,
kui tugevalt esemed lõhnavad. Seda tsüklit on kõige parem
kasutada 1–2 eseme jaoks.
• Tase 1: kerge lõhna puhul (vaikimisi)
• Tase 2: keskmise tugevusega lõhna puhul
• Tase 3: tugeva lõhna puhul
MÄRKUS
Lõhnaeemaldusefekti maksimeerimiseks niisutage rõivaid
kergelt veega. Enne vee lisamist kontrollige kanga
värvikindlust.
See tsükkel lõpetab kuivatusprotsessi niiskes olekus, mis
hõlbustab triikimist.
Õrnalt käideldavatele esemetele, nagu aluspesu. 2
Ainult masinpesu ja trummelkuivatust taluvate villaste
esemete kuivatamiseks.
Parima tulemuse saavutamiseks keerake pesu enne
kuivatamist pahupidi.
1
4
2
TOWELS (RÄTIKUD)
BEDDING (VOODIPESU)
OUTDOOR CARE
(ÕUERIIETE HOOLDUS)
COOL AIR (JAHE ÕHK)
Eesti24
Näiteks vannilinade kuivatamiseks. 6
Suurtele esemetele, nagu voodikatted, linad, tekid ja kerged
vati-/suletekid.
Õueriietele, nagu suusa- ja matkarõivad, samuti elastaan-,
stretš- ja mikrokiudkangad. Soovitatav on kasutada seda
tsüklit pärast pesumasinas pesu pesemist tsükliga OUTDOOR
CARE (ÕUERIIETE HOOLDUS) .
Kõigi kangatüüpide jaoks. Esemete, mida pole kaua kantud,
värskendamiseks või õhutamiseks.
2
2
–
Untitled-22 24 2019-07-05 6:52:02
Page 73
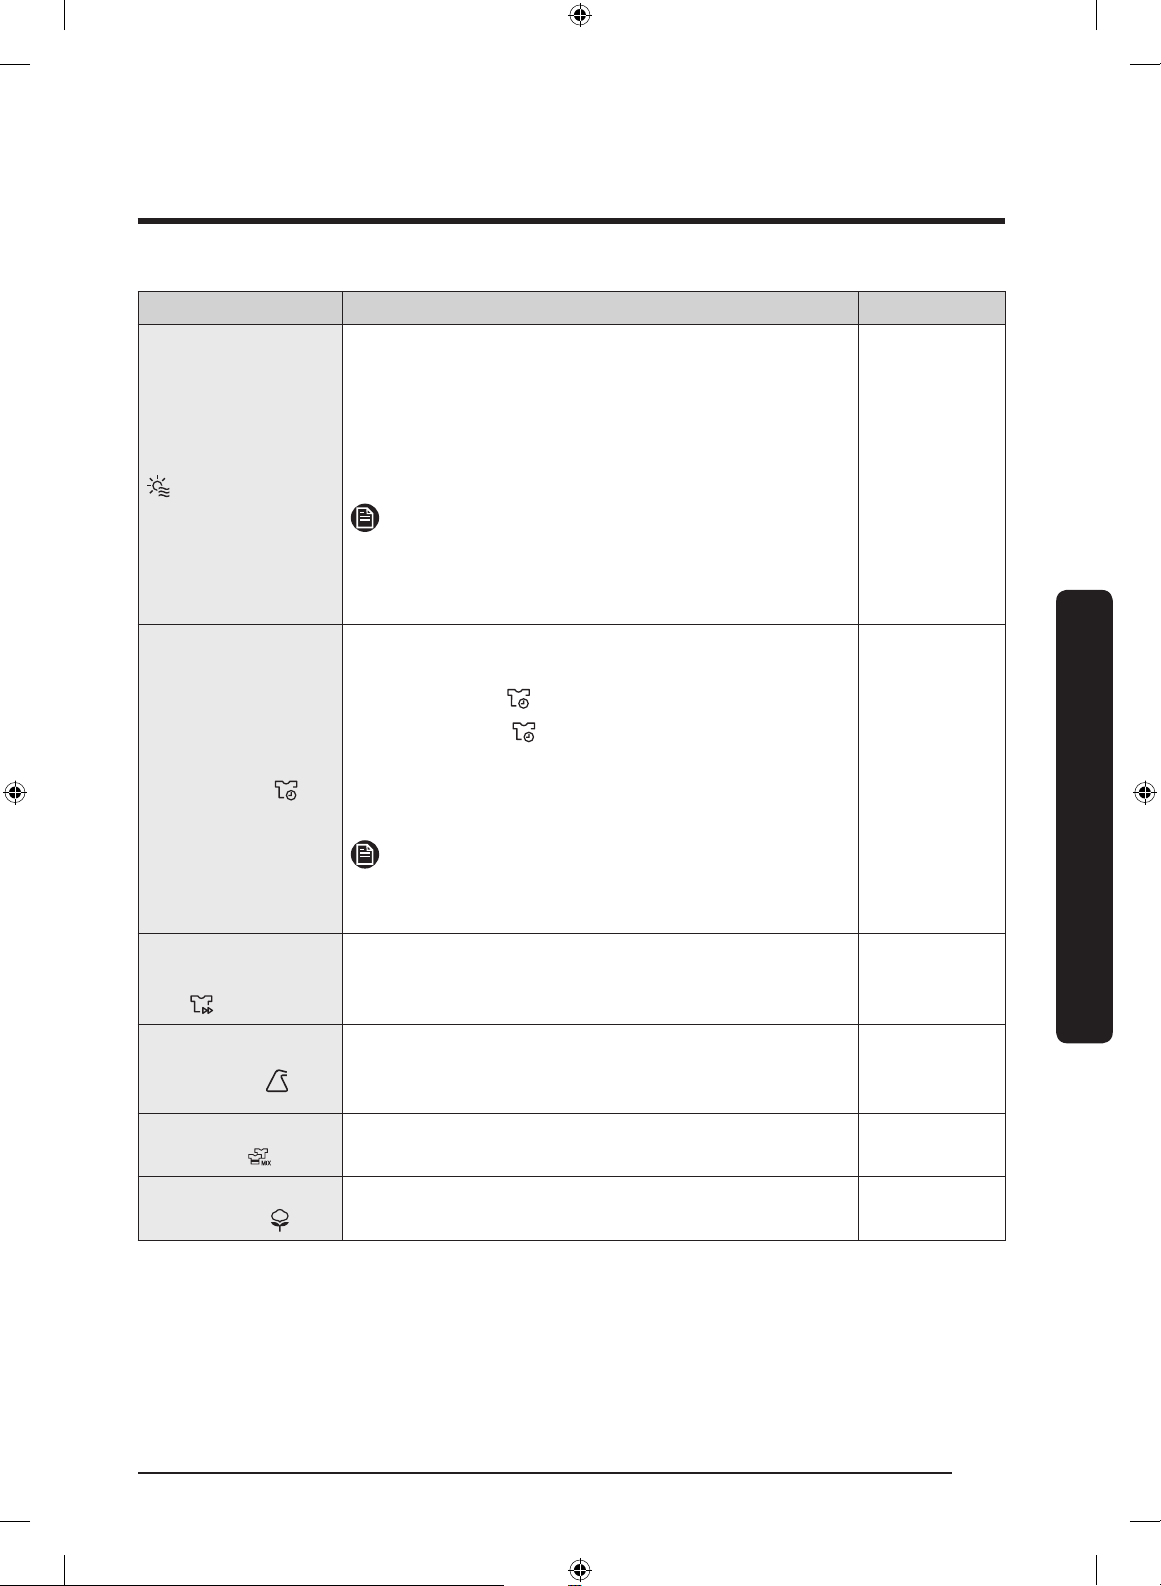
Tsükkel Kirjeldus Max kogus (kg)
WARM AIR (SOE ÕHK)
TIME DRY (AJASTATUD
KUIVATAMINE)
QUICK DRY 35'
(KIIRKUIVATUS 35
MIN)
SYNTHETICS
(SÜNTEETIKA)
MIXED LOAD
(SEGAPESU)
COTTON
(PUUVILLANE)
Väikeste eelkuivatatud esemete jaoks. Kuivatusaeg on
vaikimisi 30 minutit.
Ajastatud tsükkel kõigi kangatüüpide jaoks peale villase ja
siidi. Veidi niiske või juba eelkuivatatud kuiv pesu. Sobib
ka mitmekihilise paksu pesu, mis pole täielikult kuivanud,
lisakuivatamiseks.
–
MÄRKUS
See tsükkel sobib üksikute villaste esemete, spordijalatsite
ja pehmete mänguasjade kuivatamiseks. Kuivatage neid
esemeid ainult villastele esemetele mõeldud korvis.
Kasutage soovitud kuivatusaja määramiseks.
1. Keerake Tsüklivalija ja valige TIME DRY (AJASTATUD
KUIVATAMINE) .
2. Vajutage nuppu Time (Aeg), et määrata kuivatamise
kestus vahemikus 30 kuni 150 minutit. Nupu Aeg
korduval vajutamisel kuvatakse saadaolevad ajavalikud
–
üksteise järel 30-minutiliste sammudena.
MÄRKUS
Tsükli tegelik kestus võib erineda olenevalt esemete
kuivusastmest.
Kergete puuvillaste/sünteetiliste esemete või esemete, mis
vajavad kiiret kuivatust, kuivatamiseks. Kuivatusaeg on
1
vaikimisi 35 minutit.
Kergelt määrdunud pluusid ja särgid, mis on valmistatud
polüestrist (Diolen, Trevira), polüamiidist (Perlon, nailon) vms
4
segakiust.
Segapesu, mis sisaldab puuvillaseid ja sünteetilisi kangaid. Max
Kerged puuvillased esemed, voodipesu, laudlinad, aluspesu,
käterätikud ja särgid.
Max
Toimingud
Eesti 25
Untitled-22 25 2019-07-05 6:52:02
Page 74
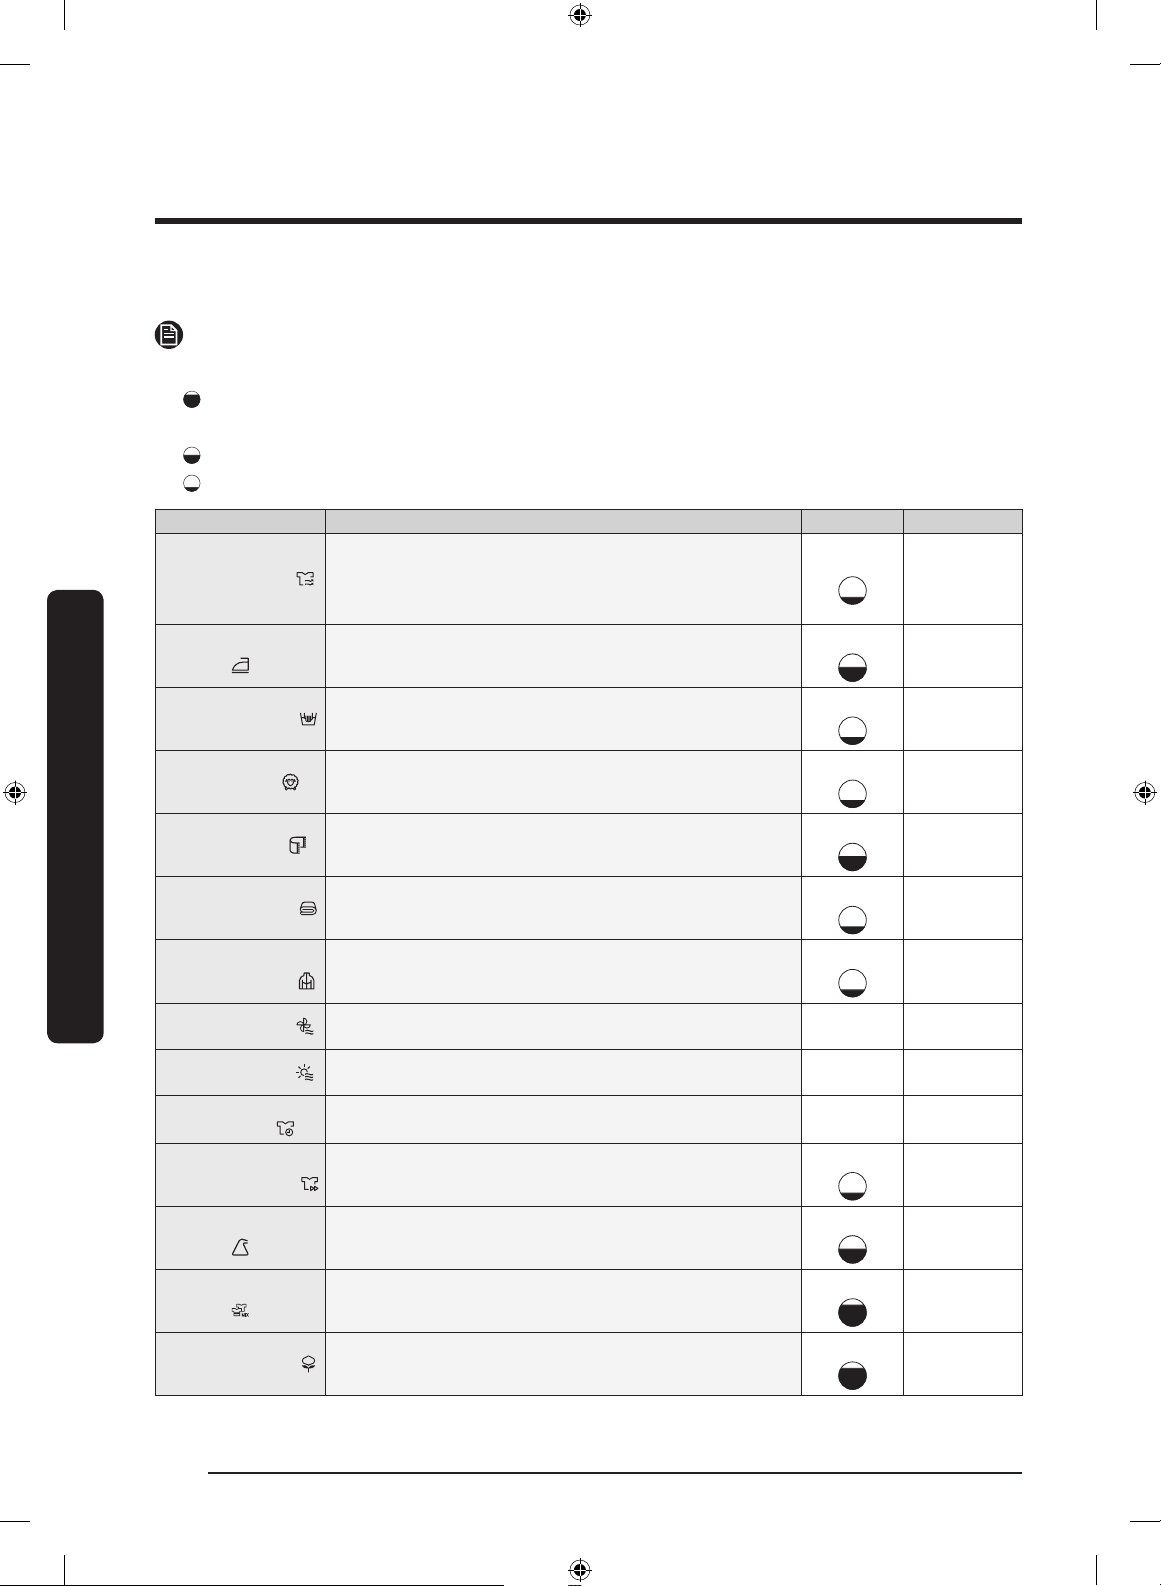
Toimingud
Tsüklitabel
MÄRKUS
Parimate tulemuste saavutamiseks järgige iga kuivatustsükli jaoks soovitatud pesukoguseid.
• Suur kogus: täitke trummel umbes ¾ ulatuseni mahust. Ärge lisage esemeid sellest rohkem, kuna sel
juhul ei pöörle need vabalt.
• Keskmine kogus: täitke trummel umbes ½ ulatuses mahust.
• Väike kogus: pange trumlisse 3–5 eset, kuid mitte rohkem kui ¼ ulatuses mahust.
Tsükkel Soovitatud esemed Pesukogus Kuivustase
AIR WASH (ÕHKPESU)
IRON DRY (TRIIKIMISKUIV)
Aksessuaaridega (pärlid, litrid, pits, nööbid jne) rõivad võivad kahjustuda
või deformeeruda. Ärge kasutage seda tsüklit kangaste puhul, mida kuumus
võib kahjustada (näiteks villane, siid, nahk, karusnahk, velvet, trükitud pildiga
T-särgid).
See tsükkel lõpetab kuivatusprotsessi niiskes olekus, mis hõlbustab triikimist.4Pole saadaval
1
Saadaval
DELICATES (ÕRN PESU)
Toimingud
BEDDING (VOODIPESU)
(ÕUERIIETE HOOLDUS)
COOL AIR (JAHE ÕHK)
(KIIRKUIVATUS 35 MIN)
SYNTHETICS (SÜNTEETIKA)
WOOL (VILLANE)
TOWELS (RÄTIKUD)
OUTDOOR CARE
WARM AIR (SOE ÕHK)
TIME DRY (AJASTATUD
KUIVATAMINE)
QUICK DRY 35'
Siid, õhuke kangas ja aluspesu.
Ainult masinpesu ja trummelkuivatust taluvate villaste esemete kuivatamiseks.2Pole saadaval
Näiteks vannilinade kuivatamiseks.
Suurtele esemetele, nagu voodikatted, linad, tekid ja kerged vati-/suletekid.2Pole saadaval
Õueriietele, nagu suusa- ja matkarõivad, samuti elastaan-, stretš- ja
mikrokiudkangad.
Kõigi kangatüüpide jaoks. Esemete, mida pole kaua kantud, värskendamiseks või
õhutamiseks.
Väikesed esemed ja niisked rõivad, igapäevaesemed, mis sobivad
kuumkuivatuseks.
Kõik kangatüübid, ajastatud programm. – Pole saadaval
Sünteetika ja kerged puuvillased esemed.
Sünteetika või segakangas.
2
Pole saadaval
6
Saadaval
2
Pole saadaval
– Pole saadaval
– Pole saadaval
1
Pole saadaval
4
Saadaval
MIXED LOAD (SEGAPESU)
COTTON (PUUVILLANE)
Segapesu, mis sisaldab puuvillaseid ja sünteetilisi kangaid.
Kerged puuvillased esemed, voodipesu, laudlinad, aluspesu, käterätikud ja
särgid.
7, 8, 9
Saadaval
7, 8, 9
Saadaval
Eesti26
Untitled-22 26 2019-07-05 6:52:03
Page 75
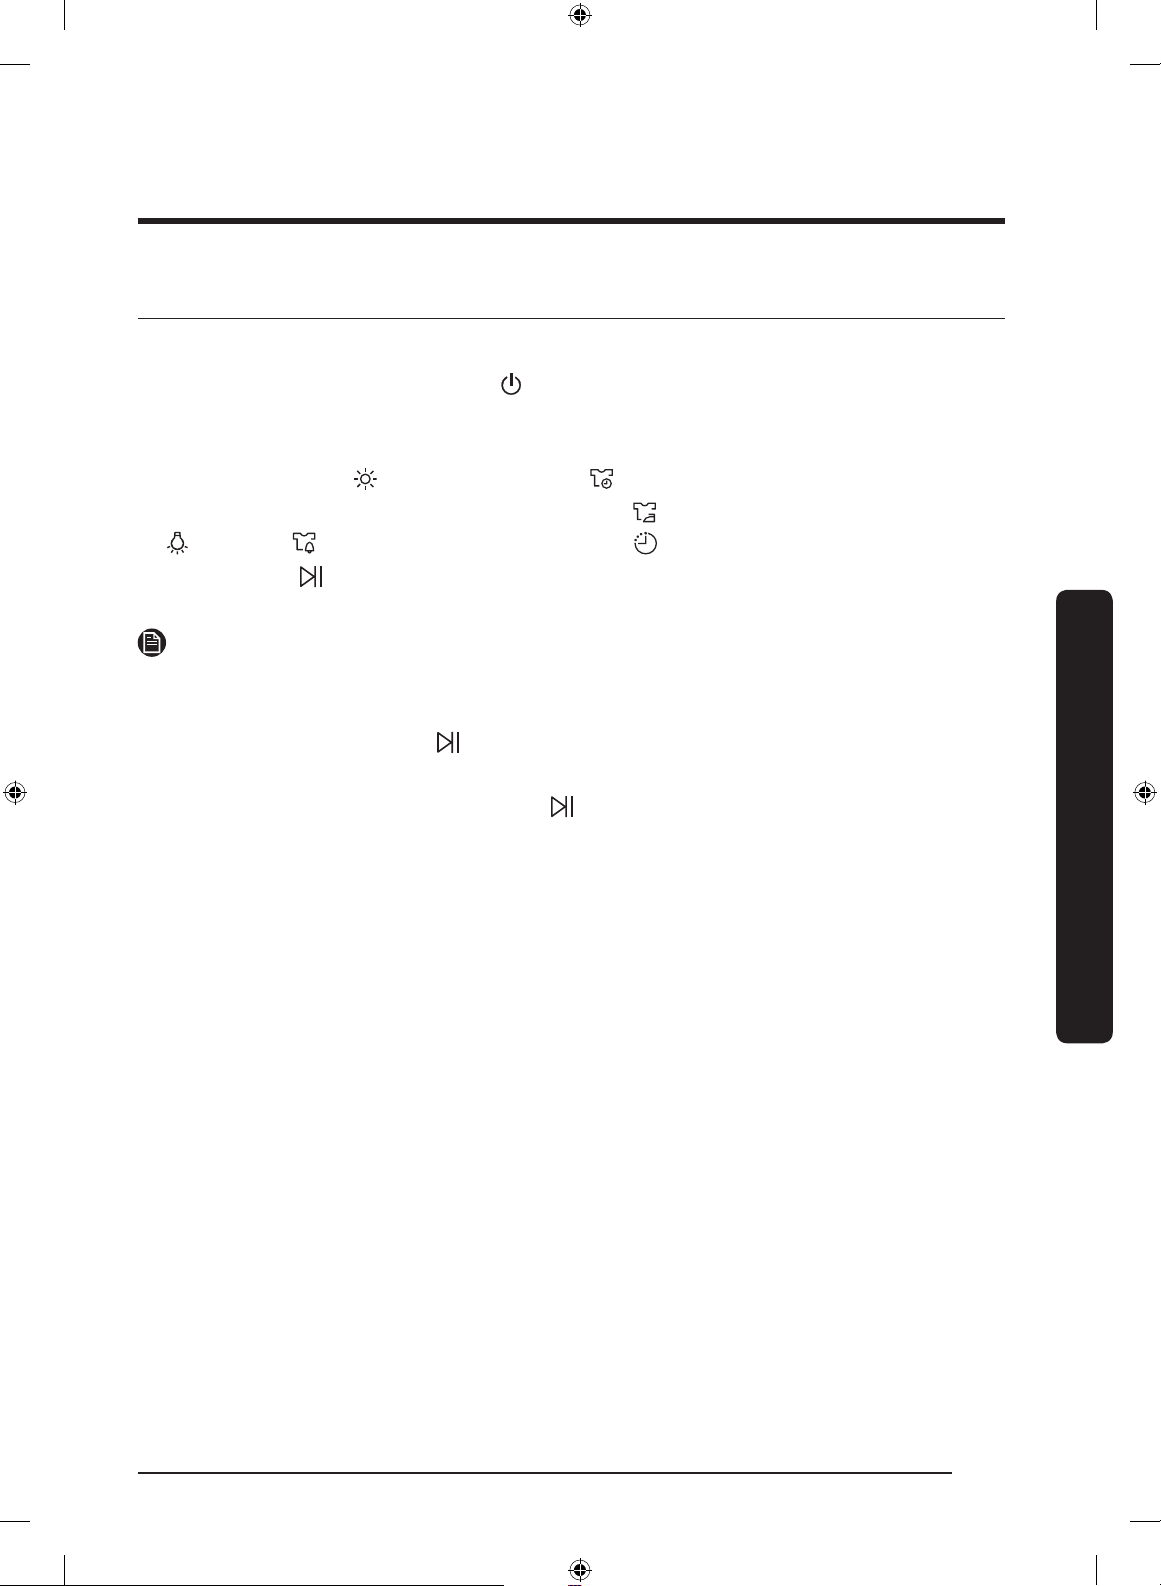
Alustamine
Lihtsad sammud alustamiseks
1. Vajutage kuivati sisselülitamiseks nuppu Toide.
2. Täitke kuivati ja sulgege luuk.
3. Keerake Tsüklivalija, et valida tsükkel.
4. Muutke tsükli seadeid ( Dry Level (Kuivustase) ja Time (Aeg)) vastavalt vajadusele.
5. Valige oma soovi kohaselt vajalikud seaded ja suvandid. ( Wrinkle Prevent (Kortsude ennetamine),
Lamp (Tuli), Mixed Load Bell (Segapesu kell) ja/või Delay End (Ajastatud lõpp)).
6. Vajutage nuppu Käivitus/Peatamine. Kuivati märgutuli süttib ja näidikul kuvatakse tsükli
hinnanguline kestus.
MÄRKUS
Saadaolevate seadete ja suvandite arv erineb olenevalt tsüklist.
Tsükli vahetamine töötamise ajal
1. Vajutage töö peatamiseks nuppu Käivitus/Peatamine.
2. Valige teine tsükkel.
3. Uue tsükli käivitamiseks vajutage pikalt nuppu Käivitus/Peatamine.
Sortimine ja masina täitmine
• Pange kuivatisse korraga ainult üks pesumasinatäis pesu.
• Vältige raskete ja kergete esemete korraga kuivatamist.
• Kuivatustõhususe parandamiseks ühe või kahe eseme kuivatamisel lisage masinasse ka kuiv rätik.
• Parimate tulemuste tagamiseks raputage esemed enne kuivatisse panemist lahti.
• Ülekoormamine takistab pöörlemisprotsessi, põhjustades ebaühtlast kuivatamist ja esemete kortsumist.
• Kui seda pole hooldussildil soovitatud, siis vältige villaste või klaaskiust esemete kuivatamist.
• Vältige pesemata esemete kuivatamist.
• Ärge kuivatage õli, alkoholi, bensiini või muu sellisega määrdunud esemeid.
Toimingud
Eesti 27
Untitled-22 27 2019-07-05 6:52:04
Page 76
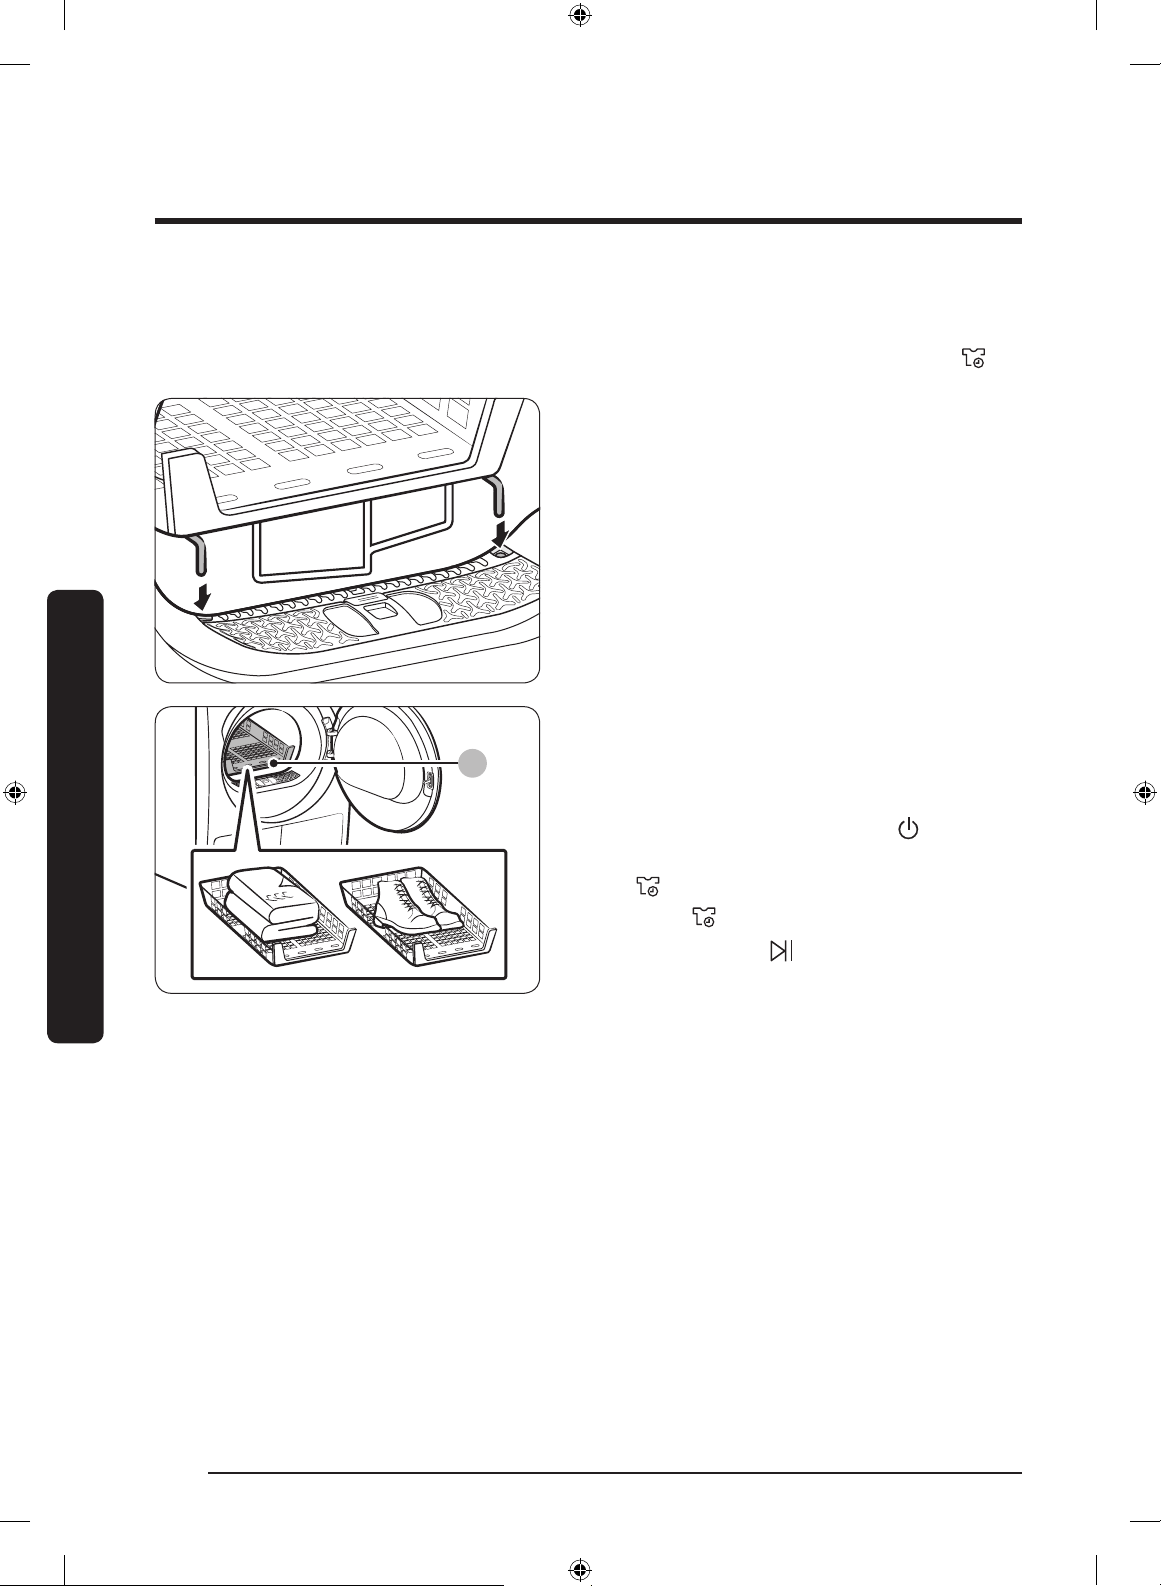
Toimingud
A
Kuivatusrest (ainult teatud mudelitel)
Seadke kuivatamisajaks kuni 150 minutit olenevalt kuivatatavate esemete niiskusastmest ja kaalust. Pesu
kuivatamisel kuivatusrestiga on soovitatav kasutada tsüklit TIME DRY (AJASTATUD KUIVATAMINE) .
Toimingud
1. Seadke kuivatusrest trumlisse, sisestades resti
esiserva uksemembraani avadesse.
2. Pange esemed restile, jättes õhu ringlemiseks
piisavalt ruumi. Rõivad voltige kokku ja pange
restile. Kingad pange restile nii, et tallad on
allpool.
3. Sulgege luuk ja vajutage nuppu Toide.
Valige TIME DRY (AJASTATUD KUIVATAMINE)
ja seejärel vajutage kuivatusaja valimiseks
nuppu Time (Aeg).
4. Vajutage nuppu Käivitus/Peatamine.
A. Restil kuivatamine
Eesti28
Untitled-22 28 2019-07-05 6:52:04
Page 77
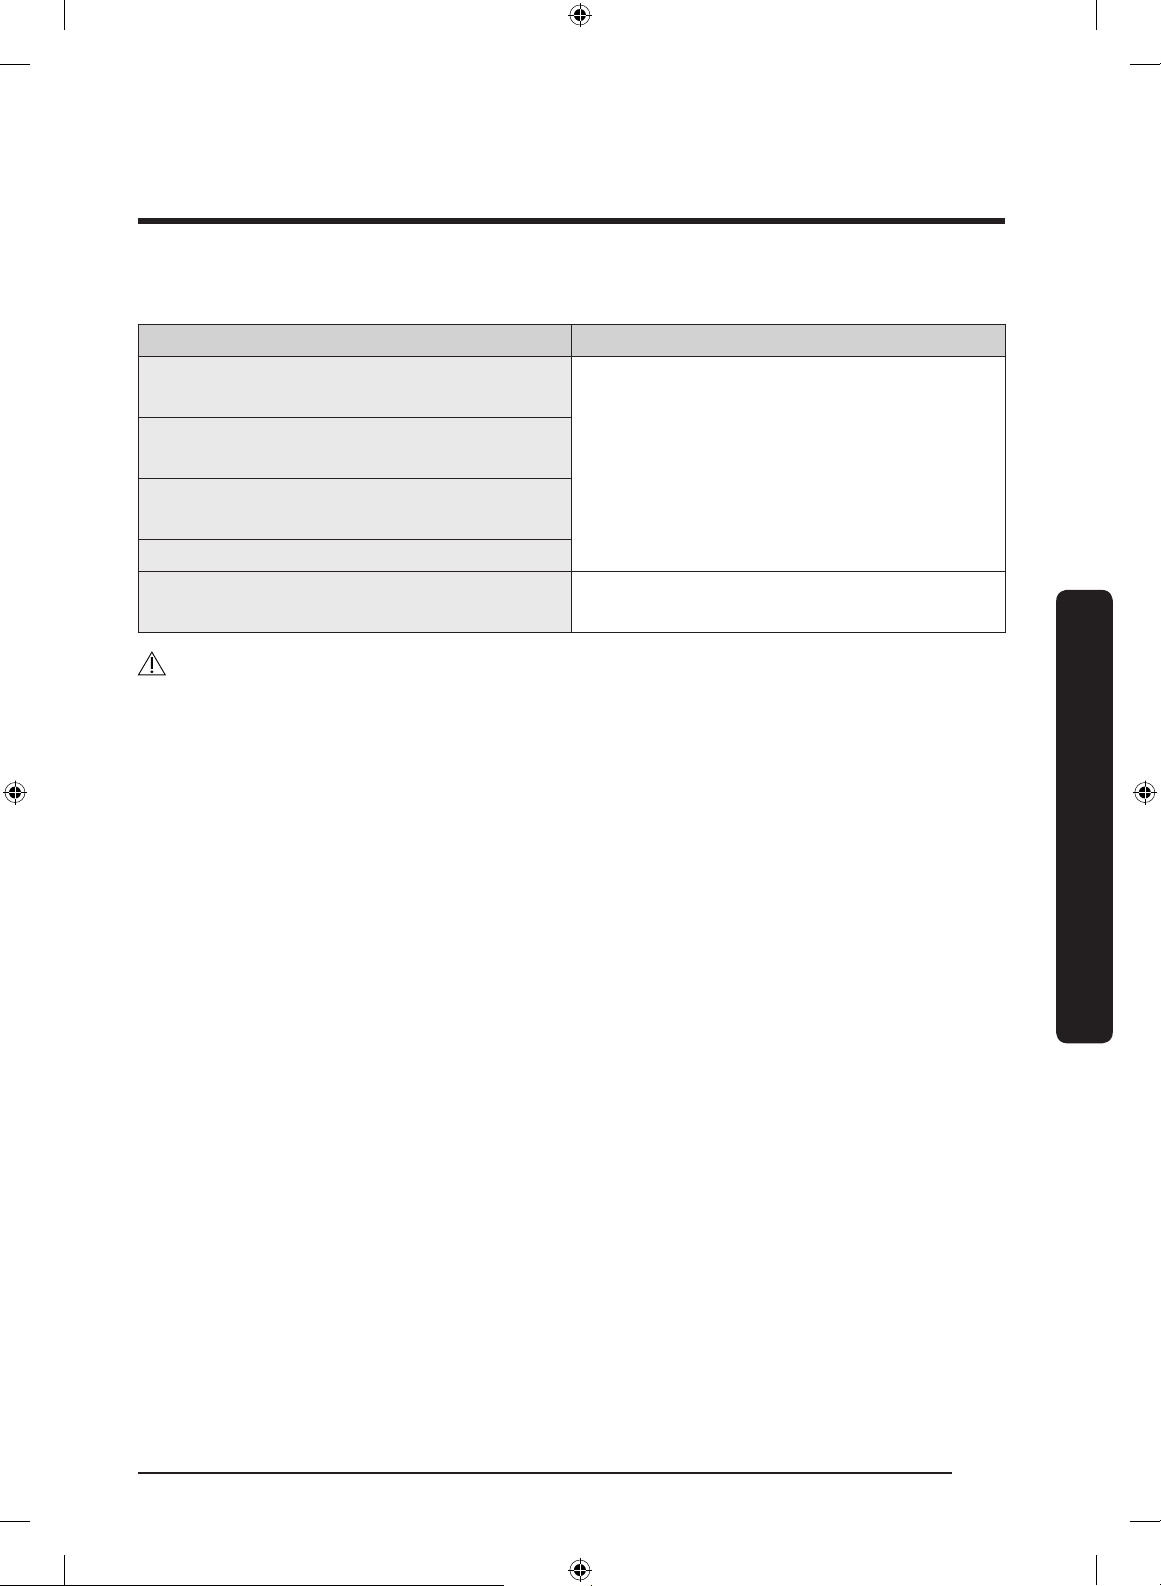
Soovitused kuivatamiseks
Esemed (kuni 1,5 kg) Kirjeldus
Pestavad kampsunid (sättige õigesse vormi ja
laotage restile)
Pehmed mänguasjad (puuvilla- või polüesterkiust
Pesu kuivatamisel restiga voltige rõivad enne
restile asetamist kokku, et vältida nende
kortsumist.
täidisega)
Pehmed mänguasjad (vahtmaterjalist või kummist
täidisega)
Vahtkummist padjad
Spordijalatsid Spordijalatsite kuivatamiseks asetage need restile,
nii et tallad on allpool.
ETTEVAATUST!
• Vahtkummi, plasti või kummi kuivatamine kuumusega võib esemeid kahjustada ja põhjustada
tulekahju.
• Jalatsite kahjustamise vältimiseks kasutage kuivatusresti.
Toimingud
Eesti 29
Untitled-22 29 2019-07-05 6:52:04
Page 78
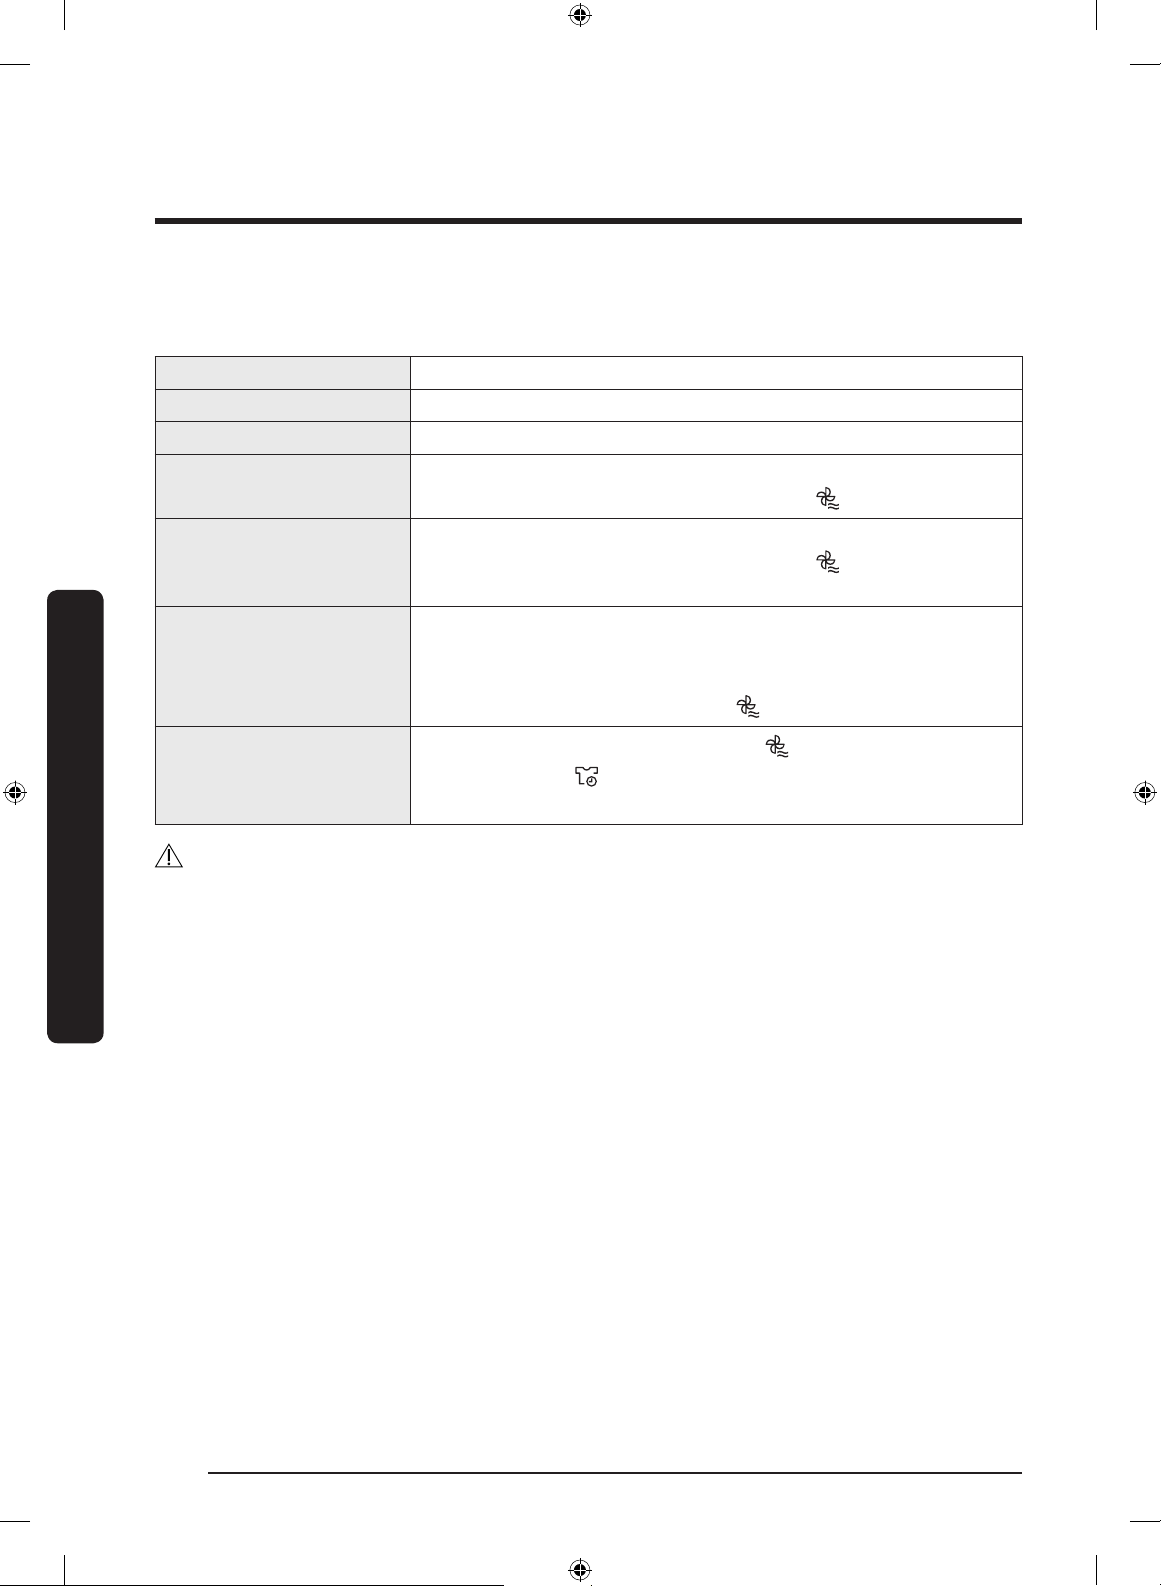
Toimingud
Tsüklijuhend
Järgige kuivatamisel alati hooldussilti. Kui hooldussildi suuniseid pole, vaadake järgmist tabelit.
Voodipesu ja tekid • Kasutage temperatuuriseadet Kõrge.
Tekid • Parimate tulemuste tagamiseks kuivatage korraga vaid üht tekki.
Riidest mähkmed • Kasutage temperatuuriseadet Kõrge.
Udusulgedega täidetud
esemed
Vahtkumm (vaipade
aluspinnad, pehmed
mänguasjad jne)
Padjad • Lisage kuivatamise hõlbustamiseks ja esemete kohevuse
Plast (dušikardinad,
Toimingud
õuemööblikatted jne)
• Ärge kasutage kuivatamisel kuumust. See võib põhjustada tuleohtu.
Kasutage ainult tsüklit COOL AIR (JAHE ÕHK) .
• Ärge kasutage kuivatamisel kuumust. See võib põhjustada tuleohtu.
Kasutage ainult tsüklit COOL AIR (JAHE ÕHK) .
säilitamiseks paar kuiva rätikut.
• Ärge kuivatage kapok- ega vahttäidisega patju kuumusega. Kasutage
ainult tsüklit COOL AIR (JAHE ÕHK) .
• Kasutage tsüklit COOL AIR (JAHE ÕHK) või TIME DRY (AJASTATUD
KUIVATAMINE) .
• Seadke kuivatus madalale või madalaimale tasemele.
ETTEVAATUST!
Ärge kasutage kuivatit selliste esemete kuivatamiseks, mida pole eespool nimetatud.
Eesti30
Untitled-22 30 2019-07-05 6:52:05
Page 79
Erifunktsioonid
Ajastatud lõpp
Saate seadistada kuivati lõpetama valitud tsükli
määratud ajal.
1. Valige tsükkel ja vajalikud suvandid.
2. Vajutage korduvalt nuppu Delay End
(Ajastatud lõpp), et määrata ühetunniste
sammudega aeg vahemikus 1 kuni 24 tundi.
3. Vajutage nuppu Käivitus/Peatamine. Vastav
näidik vilgub ja kell alustab pöördloendust
määratud ajani.
MÄRKUS
Funktsiooni Ajastatud lõpp seadete tühistamiseks
taaskäivitage kuivati nupuga Toide.
Lapselukk
Lapselukk takistab lastel kuivatiga mängimist. Kui
Lapselukk on aktiveeritud, on kõik nupud peale
nupu Toide keelatud.
Funktsiooni Lapselukk aktiveerimiseks/
inaktiveerimiseks vajutage korraga nuppe
Mixed Load Bell (Segapesu kell) ja Smart
Control (Nutikas juhtimine) või Wrinkle
Prevent (Kortsude ennetamine) ja Dry Level
(Kuivustase) ning hoidke neid 3 sekundit all.
MÄRKUS
Kui Lapselukk on aktiveeritud ning kuivati
lülitatakse välja ja uuesti sisse, jääb Lapselukk
aktiveerituks.
Smart Check
Kui kuivati tuvastab probleemi, võimaldab Smart
Check teil kontrollida kuivati olekut, kasutades
nutitelefoni. Pange tähele, et funktsiooni Smart
Check saab kasutada ainult Galaxy-seeria
nutitelefonide ja iPhone’ide puhul.
Funktsiooni Smart Check kasutamiseks peate
laadima alla rakenduse Samsung Smart Washer/
Dryer ja järgima alltoodud samme.
1. Vajutage nuppe Time (Aeg) ja Mixed
Load Bell (Segapesu kell) ning hoidke neid 3
sekundit all või vajutage nuppu Smart Check.
Kuvapaneeli LED-id pöörlevad ja kuvatakse
funktsiooni Smart Check kood.
2. Avage nutitelefonis rakendus Samsung Smart
Washer/Dryer ja puudutage nuppu Smart
Check.
3. Suunake oma nutitelefoni kaamera kuivati
ekraanil kuvatavale funktsiooni Smart Check
koodile.
4. Kui teabekood tuvastatakse, kuvab rakendus
probleemi kohta üksikasjaliku teabe koos
edasiste suunistega.
MÄRKUS
• Kui kuivati ekraan peegeldab valgust, ei pruugi
nutitelefon teabekoodi tuvastada.
• Kui nutitelefonil ei õnnestu koodi tuvastada,
sisestage teabekood käsitsi nutitelefoni.
Toimingud
Eesti 31
Untitled-22 31 2019-07-05 6:52:06
Page 80
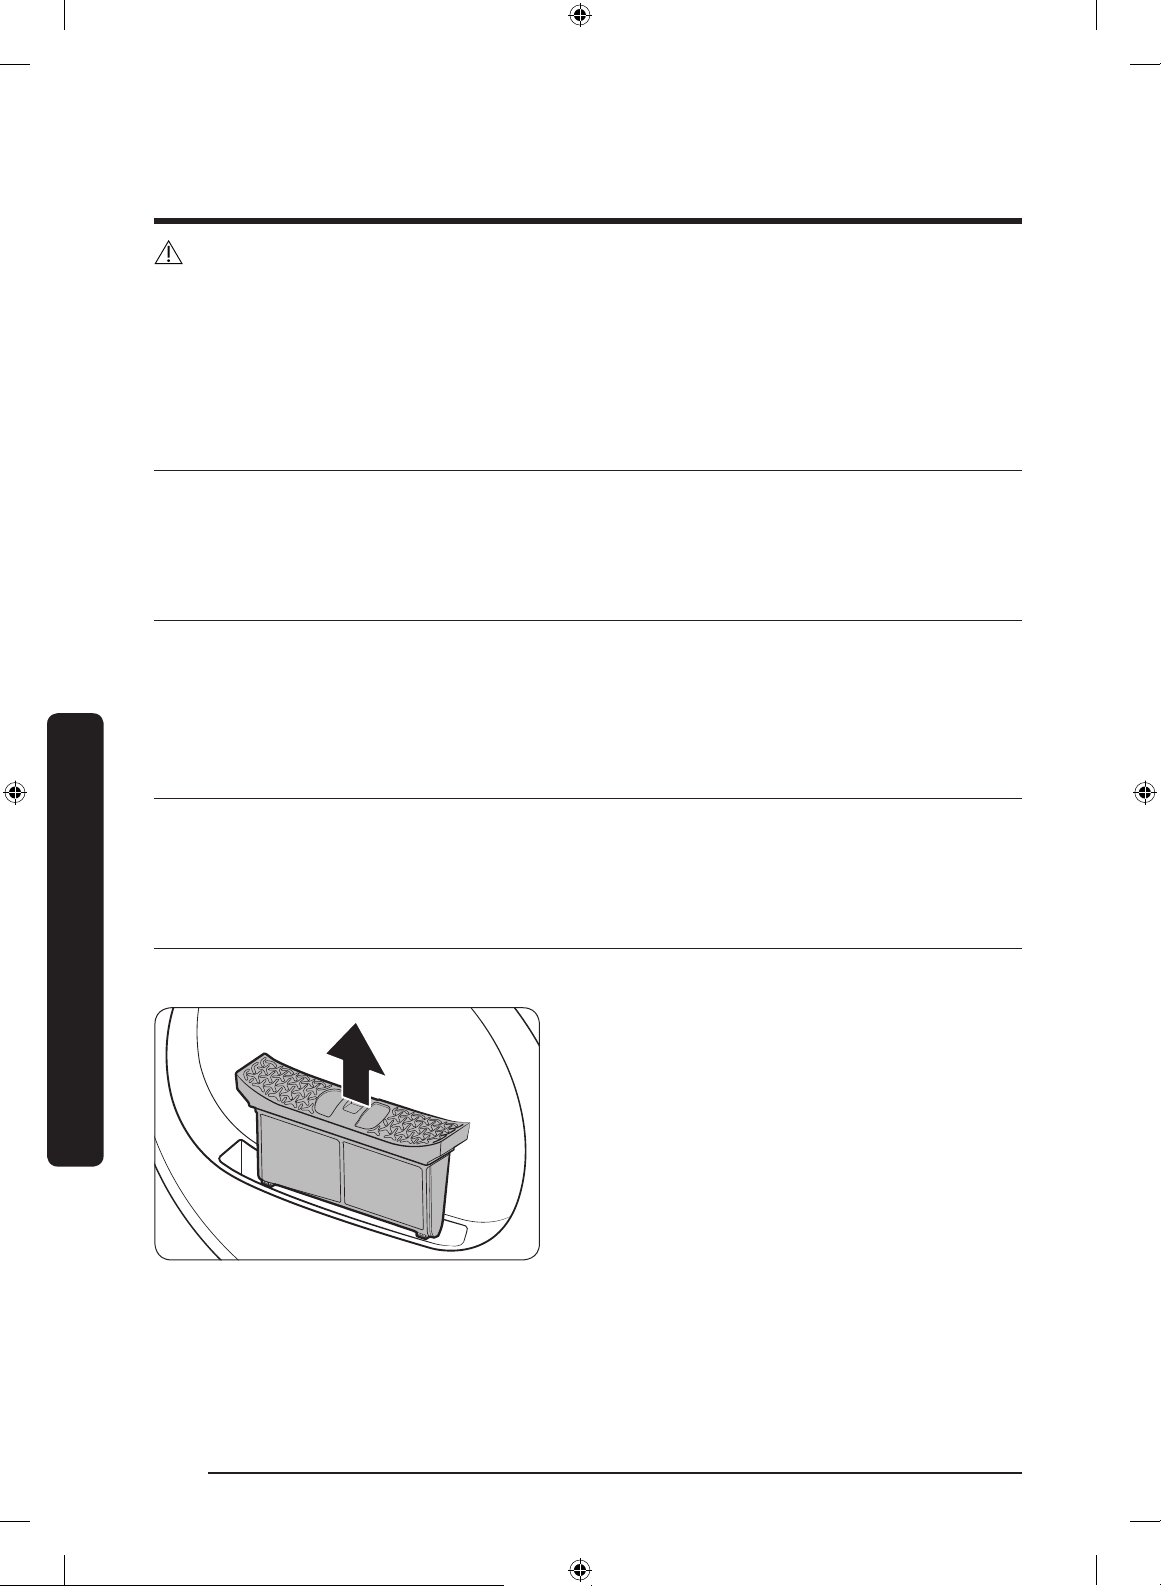
Hooldus
HOIATUS!
• Kuivati puhastamiseks ärge pihustage sellele otse vett.
• Ärge puhastage kuivatit benseeni, vedeldi, alkoholi ega atsetooniga. See võib põhjustada värvi
tuhmumist või seadme pinna deformeerumist või kahjustusi ning elektrilöögi- või tuleohtu.
• Enne kuivati puhastamist lahutage kindlasti toitejuhe vooluvõrgust.
Juhtpaneel
Puhastage seda pehme niiske lapiga. Ärge kasutage abrasiivseid puhastusvahendeid. Ärge pihustage
puhastusvahendit otse paneelile. Pühkige kõik tilgad või vedelikud juhtpaneelilt kohe ära.
Välispind
Puhastage seda pehme niiske lapiga. Ärge kasutage abrasiivseid puhastusvahendeid. Vältige teravate
või raskete esemete kasutamist kuivati peal või lähedal või nende kuivatile või selle lähedale asetamist.
Hoidke pesuvahendit ja pesutarvikuid alusel (müüakse eraldi) või eraldi hoiukastis.
Hooldus
Trummel
Puhastage niiske lapi ja õrnatoimelise mitteabrasiivse puhastusvahendiga, mis sobib roostevaba terase
puhastamiseks. Pühkige jäägid puhta kuiva lapiga ära.
Ebemelter
Puhastage ebemeltrit pärast iga täitmist.
1. Avage luuk ja tõmmake ebemeltrit
eemaldamiseks ülespoole.
Eesti32
Untitled-22 32 2019-07-05 6:52:06
Page 81
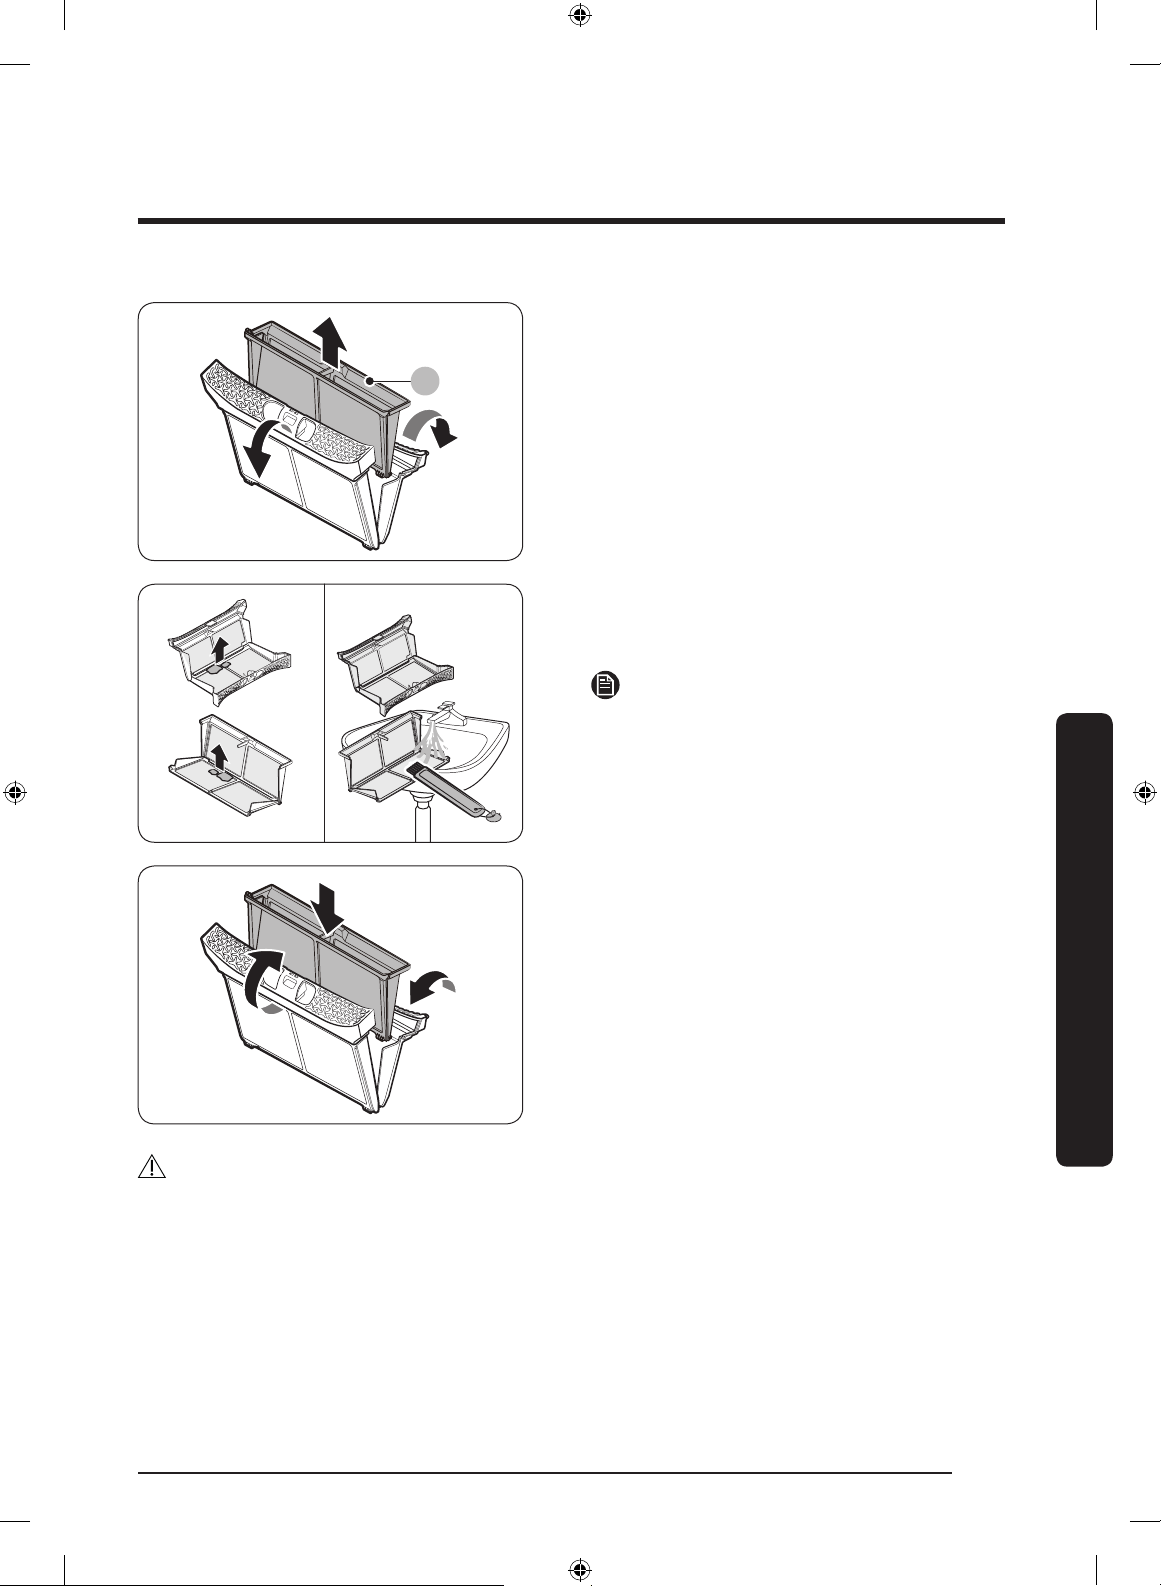
A
2. Avage väline lter ja eemaldage sisemine lter
(A).
3. Voltige lahti nii sisemine kui ka välimine lter.
4. Eemaldage mõlemalt ltrilt mustus ja seejärel
puhastage ltrid puhastusharjaga.
MÄRKUS
Filtrite põhjalikuks puhastamiseks peske neid
voolava vee all ja seejärel kuivatage täielikult.
5. Pange sisemine lter välimisse ltrisse ja
sisestage ebemelter algsesse asendisse.
Hooldus
ETTEVAATUST!
• Puhastage ebemeltrit pärast iga täitmist. Muidu võib kuivatusjõudlus väheneda.
• Ärge kasutage kuivatit, kui sisemine lter pole välimises ltris.
• Kuivati kasutamine märja ebemeltriga võib põhjustada hallitust või halba lõhna või vähendada
kuivatamisjõudlust.
Eesti 33
Untitled-22 33 2019-07-05 6:52:07
Page 82
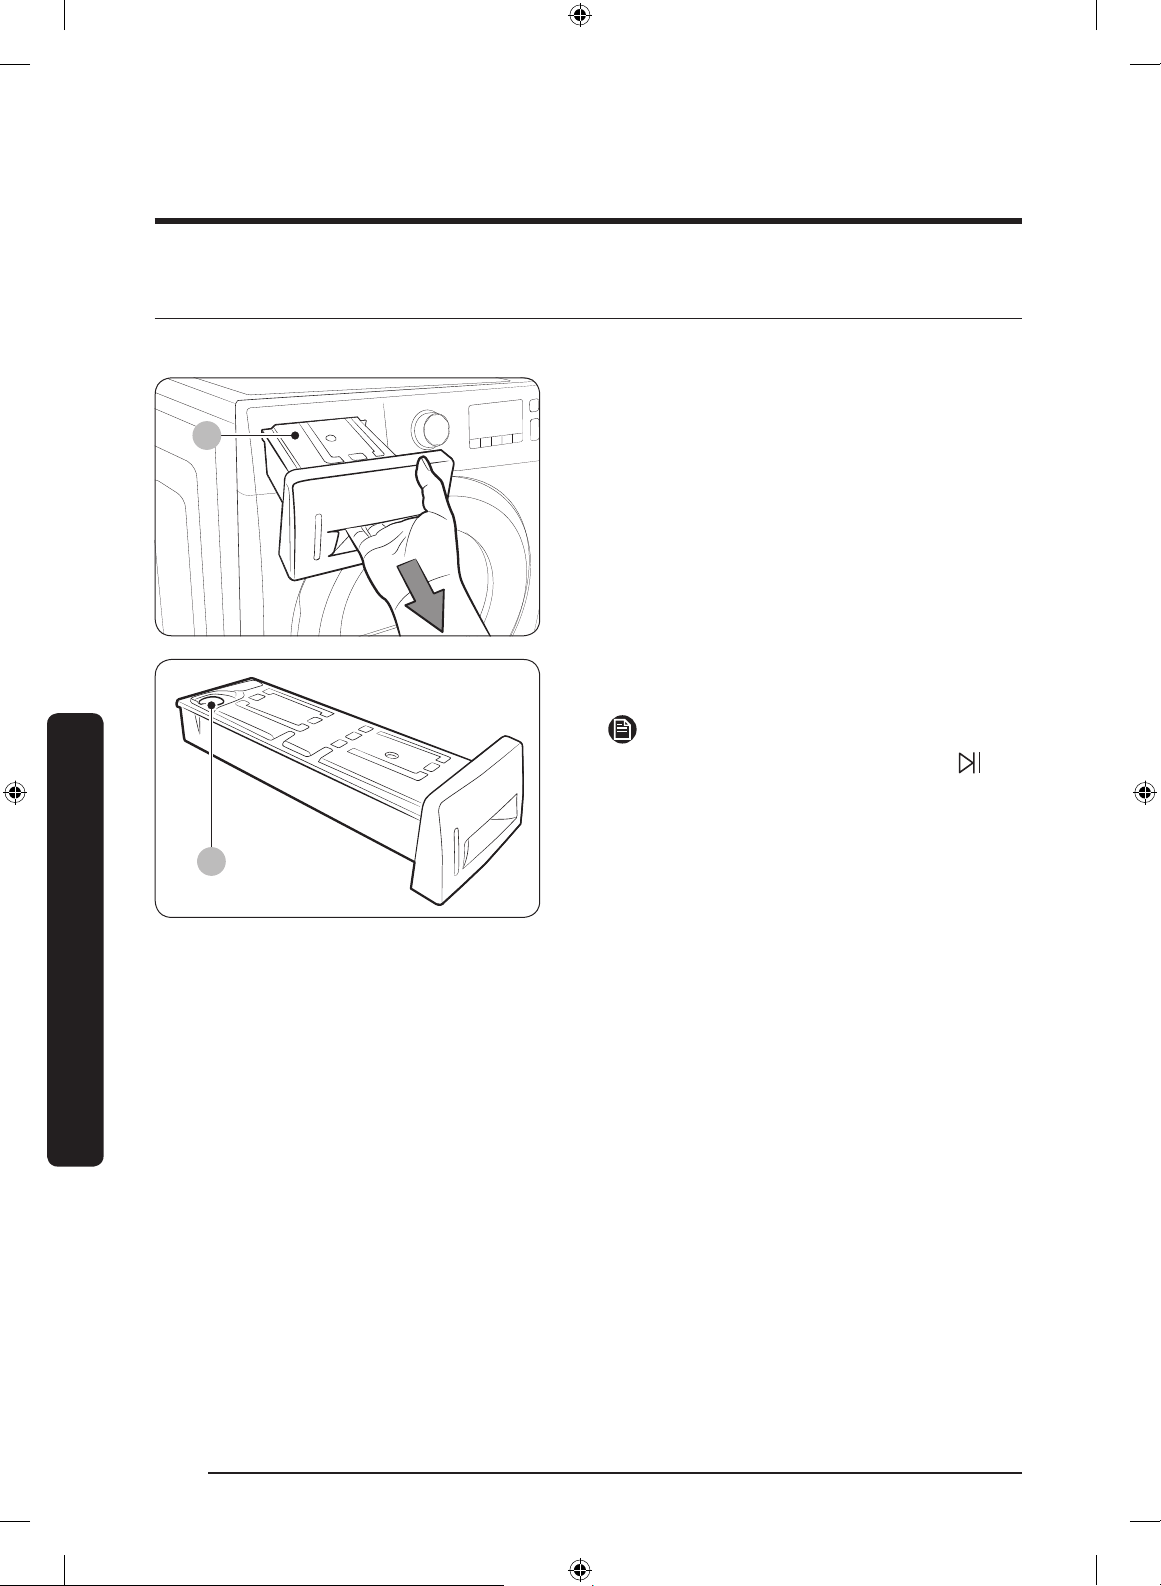
Hooldus
A
B
Veepaak
Lekete vältimiseks tühjendage veepaak pärast iga täitmist.
1. Tõmmake veepaaki (A) mõlema käega
2. Eemaldage vesi väljalaskeava (B) kaudu ja
Kui tühjendate veepaagi ja vajutate nuppu
Käivitus/Peatamine, kustub vastav näidik.
ettepoole ja eemaldage see.
pange veepaak oma kohale tagasi.
MÄRKUS
Hooldus
Eesti34
Untitled-22 34 2019-07-05 6:52:08
Page 83
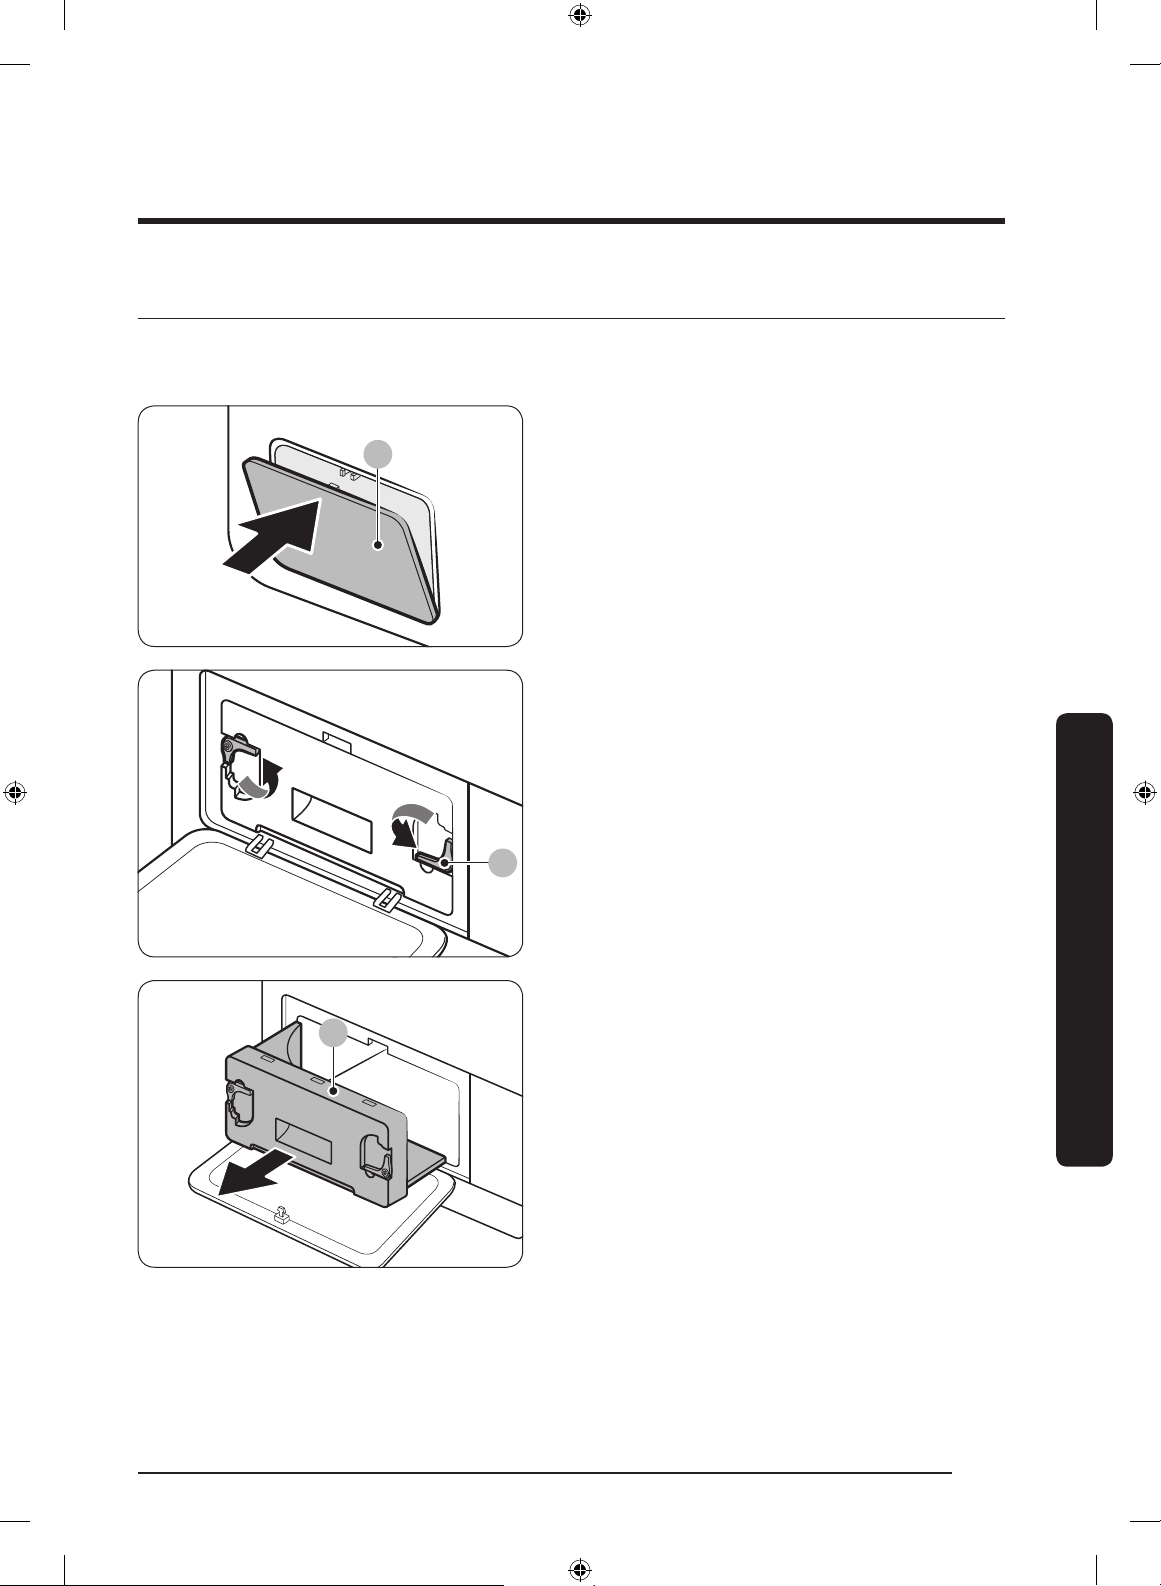
Soojusvaheti
A
B
C
Puhastage soojusvahetit vähemalt kord kuus. (või kui sumisti heliseb ja näidikul süttib soojusvaheti
indikaator.)
1. Avamiseks vajutage õrnalt välimise katte (A)
ülaosa.
2. Avage ksaatorid (B).
Hooldus
3. Eemaldage sisemine kate (C).
Eesti 35
Untitled-22 35 2019-07-05 6:52:08
Page 84
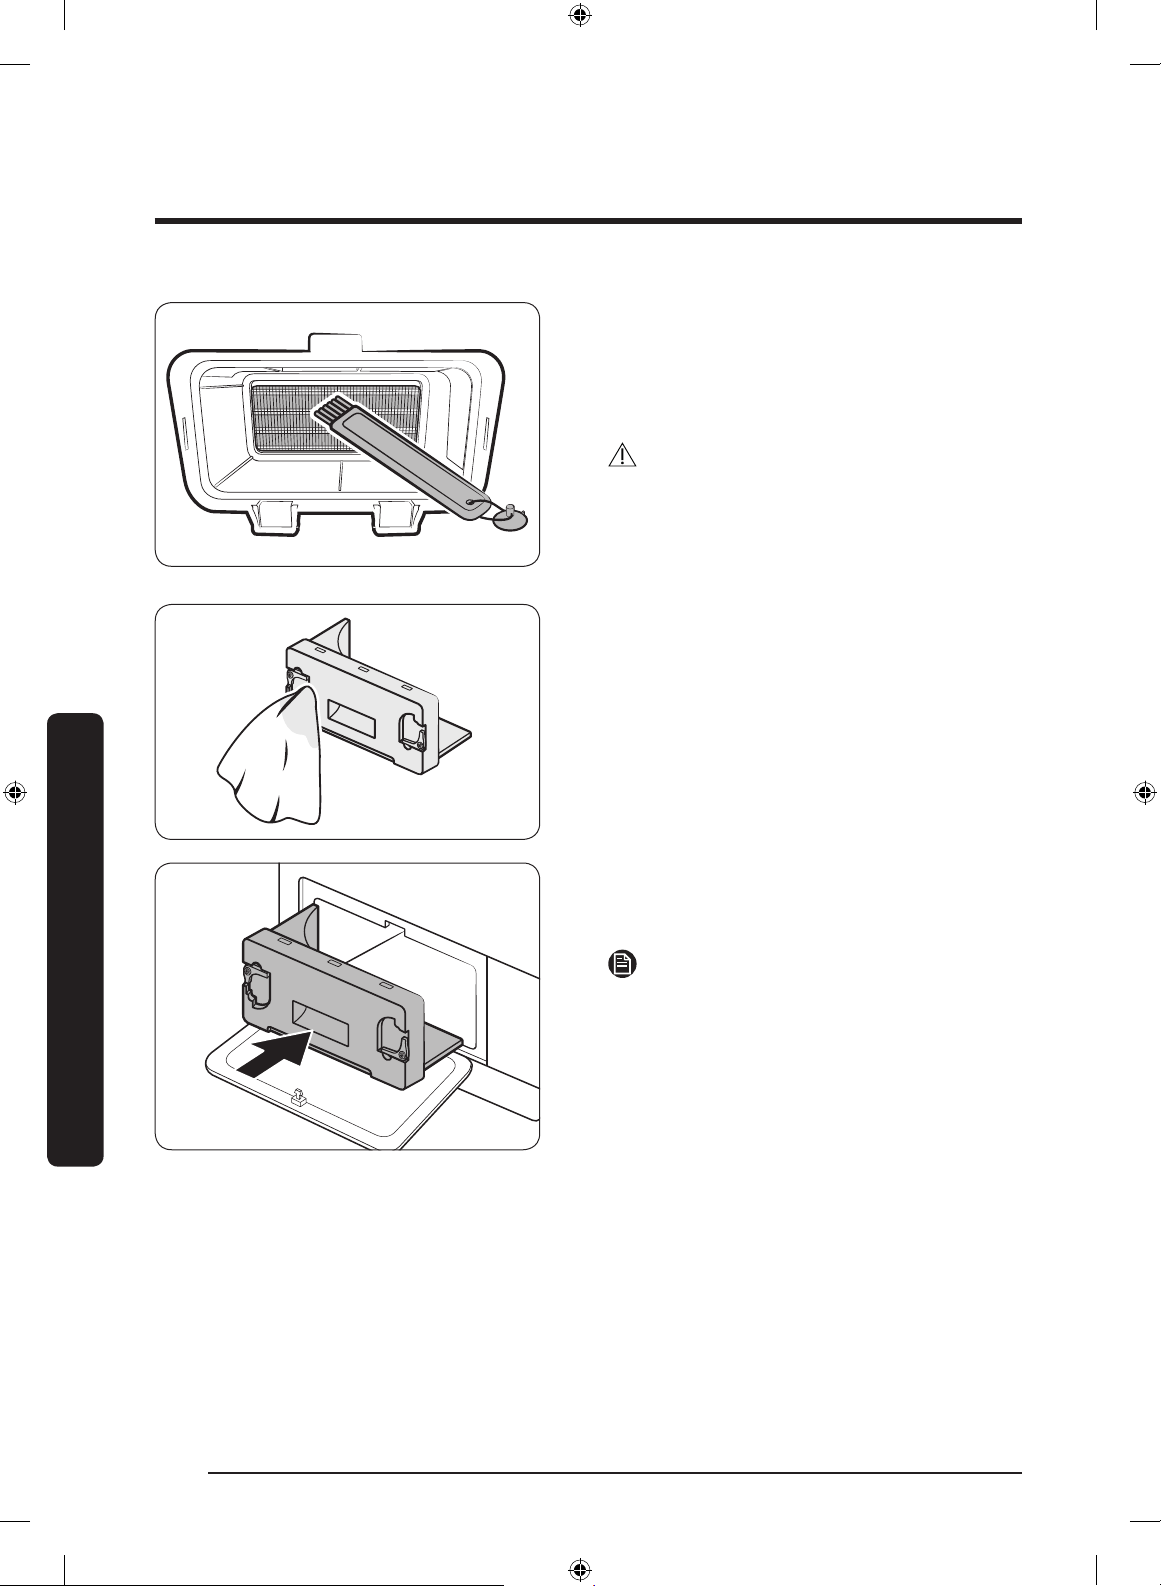
Hooldus
4. Puhastage soojusvahetit komplektis oleva
puhastusharja või hariotsikuga tolmuimejaga.
Puhastamise ajal jälgige hoolega, et te ei
painutaks ega kahjustaks soojusvaheti labasid.
See võib vähendada kuivatusjõudlust.
ETTEVAATUST!
• Kehavigastuste ja põletuste vältimiseks ärge
puudutage ega puhastage soojusvahetit
paljaste kätega.
• Ärge puhastage soojusvahetit veega.
5. Puhastage sisemist katet pehme niiske lapiga.
Hooldus
6. Sisestage sisemine kate algsesse asendisse ja
seejärel lukustage ksaatorid.
7. Sulgege välimine kate.
MÄRKUS
Pärast puhastamist veenduge, et ksaatorid
oleksid lukustatud.
Eesti36
Untitled-22 36 2019-07-05 6:52:09
Page 85
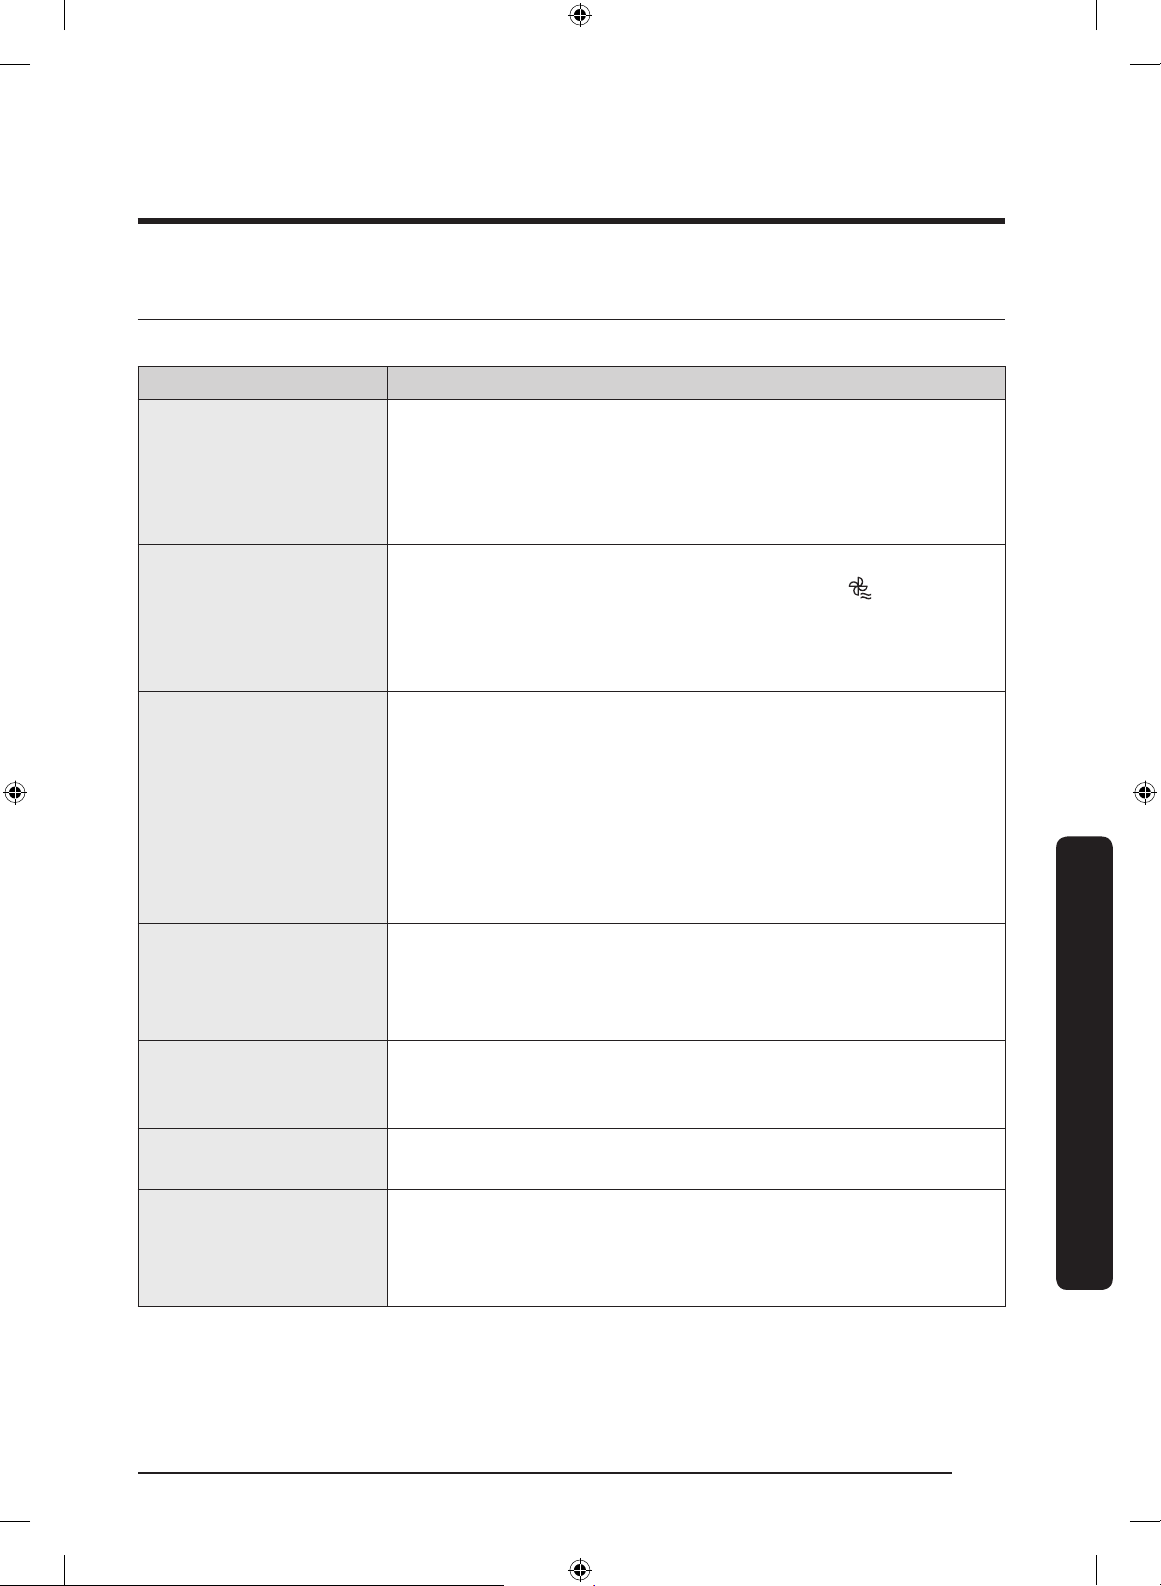
Tõrkeotsing
Kontrollitavad punktid
Kui teil tekib kuivatiga mõni probleem, vaadake esmalt allolevat tabelit ja järgige toodud soovitusi.
Sümptom Toiming
• Veenduge, et luuk oleks korralikult suletud.
• Veenduge, et toitejuhe oleks ühendatud.
Kuivati ei tööta
Kuivati ei kuumuta
Kuivati ei kuivata
Kuivati teeb müra
Kuivatab ebaühtlaselt
Kuivatist tuleb lõhna
Kuivati lülitub välja, enne
kui pesu on kuiv
• Kontrollige kodu elektrisüsteemi kaitsmeid.
• Tühjendage veepaak.
• Puhastage ebemelter.
• Kontrollige kodu elektrisüsteemi kaitsmeid.
• Valige muu kuumusseade kui COOL AIR (JAHE ÕHK) .
• Kontrollige ebemeltrit ja soojusvaheti ltrit. Vajaduse korral
puhastage neid.
• Kuivati võib olla tsükli jahutusetapis.
Kontrollige ülaltoodut, samuti…
• Veenduge, et kuivati poleks üle laaditud.
• Sortige kerged ja rasked esemed eraldi.
• Paigutage suured ja rasked esemed ümber, et tagada ühtlasem
kuivatamine.
• Veenduge, et kuivati väljutaks vett korralikult.
• Väikeste koguste puhul lisage mõni kuiv rätik.
• Puhastage ebemeltrit ja soojusvaheti ltrit.
• Veenduge, et selles poleks münte, nööpe, välgumihkleid jne.
• Veenduge, et kuivati oleks loodis ja seisaks kindlalt põrandal.
• Kuivati undamist võib põhjustada läbi trumli ja ventilaatori liikuv õhk.
See on normaalne.
• Õmblused, taskud ja muud rõivadetailid kuivavad kauem kui teised
osad. See on normaalne.
• Sortige rasked ja kerged esemed eraldi.
• Kuivati võib tõmmata ümbritsevast keskkonnast sisse
majapidamislõhnu ja need seejärel väljastada. See on normaalne.
• Pesukogus on kuivatis liiga väike. Lisage esemeid ja taaskäivitage
tsükkel.
• Pesukogus on kuivatis liiga suur. Eemaldage esemed ja taaskäivitage
tsükkel.
Tõrkeotsing
Eesti 37
Untitled-22 37 2019-07-05 6:52:09
Page 86
Tõrkeotsing
Sümptom Toiming
Rõivastel on ebemed
Esemed on pärast kortsude
ennetamise funktsiooni
kasutamist kortsus
Pärast jaheda õhu
funktsiooni kasutamist on
esemetel lõhn küljes
• Veenduge enne masina täitmist, et ebemelter oleks puhastatud.
• Kuivatage ebemeid eraldavaid esemeid (nt karvased rätikud) ebemeid
ligitõmbavatest esemetest (nt mustad linasest kangast püksid) eraldi.
• Jaotage suurem pesukogus mitmeks väiksemaks.
• Kõige paremini toimib see 1–4 eseme puhul.
• Sisestage vähem esemeid. Sisestage sarnast tüüpi esemed.
• Peske tugeva lõhnaga esemeid kindlasti korralikult.
Tõrkeotsing
Eesti38
Untitled-22 38 2019-07-05 6:52:09
Page 87
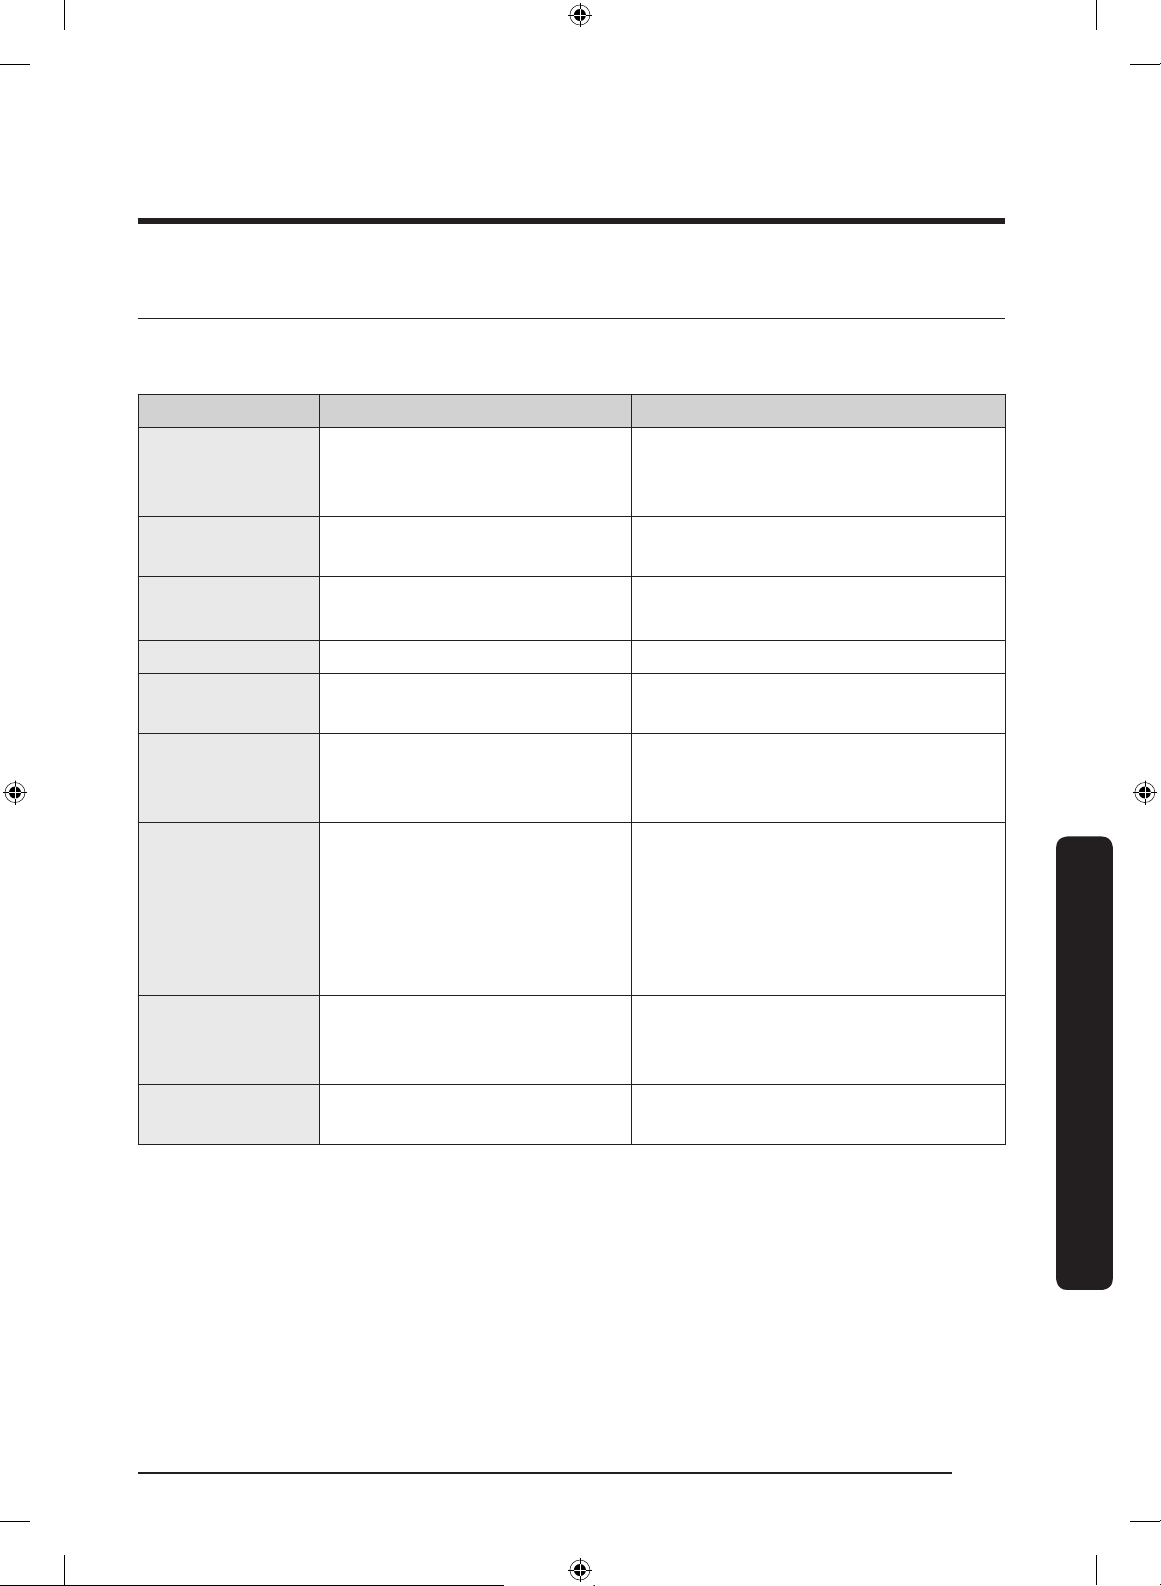
Teabekoodid
Kui kuivati ei tööta õigesti, võib kuvapaneelile ilmuda teabekood. Vaadake allolevat tabelit ja järgige
toodud soovitusi.
Teabekood Tähendus Toiming
Puhastage ebemeltrit ja/või soojusvaheti
tC Õhu temperatuurianduri probleem
tC5
Kompressori temperatuurianduri
probleem
dC Kuivati töötab avatud luugiga
HC Kompressori ülekuumenemine Helistage teenindusse.
9C2 Tuvastati madalpinge
5C
AC6
Veepaak on täis
Väljalaskepump pole töökorras
Kontrollige suhtlust peamise ja
inverteri PBA vahel
3C Kontrollige mootori tööd
FIL+tEr (sumisti
heliseb)
Soojusvaheti tuleb puhastada Puhastage soojusvaheti.
ltrit. Probleemi püsimisel helistage
teenindusse.
Oodake 2–3 minutit. Lülitage toide sisse ja
taaskäivitage.
Sulgege luuk ja taaskäivitage seade.
Probleemi püsimisel helistage teenindusse.
Kontrollige, kas toitejuhe on pistikupesas.
Probleemi jätkumisel helistage teenindusse.
Tühjendage veepaak, lülitage toide sisse ja
taaskäivitage seade. Probleemi püsimisel
helistage teenindusse.
• Olenevalt olekust võib kuivati
automaatselt normaalselt tööle hakata.
• Lülitage kuivati välja ja uuesti sisse.
Seejärel taaskäivitage tsükkel.
• Kui teabekood kuvatakse uuesti,
helistage teenindusse.
• Proovige tsükkel taaskäivitada.
• Kui teabekood kuvatakse uuesti,
helistage teenindusse.
Tõrkeotsing
Teabekoodide puhul, mida pole eespool nimetatud, või kui teabekood kuvatakse uuesti, helistage
teenindusse.
Eesti 39
Untitled-22 39 2019-07-05 6:52:09
Page 88
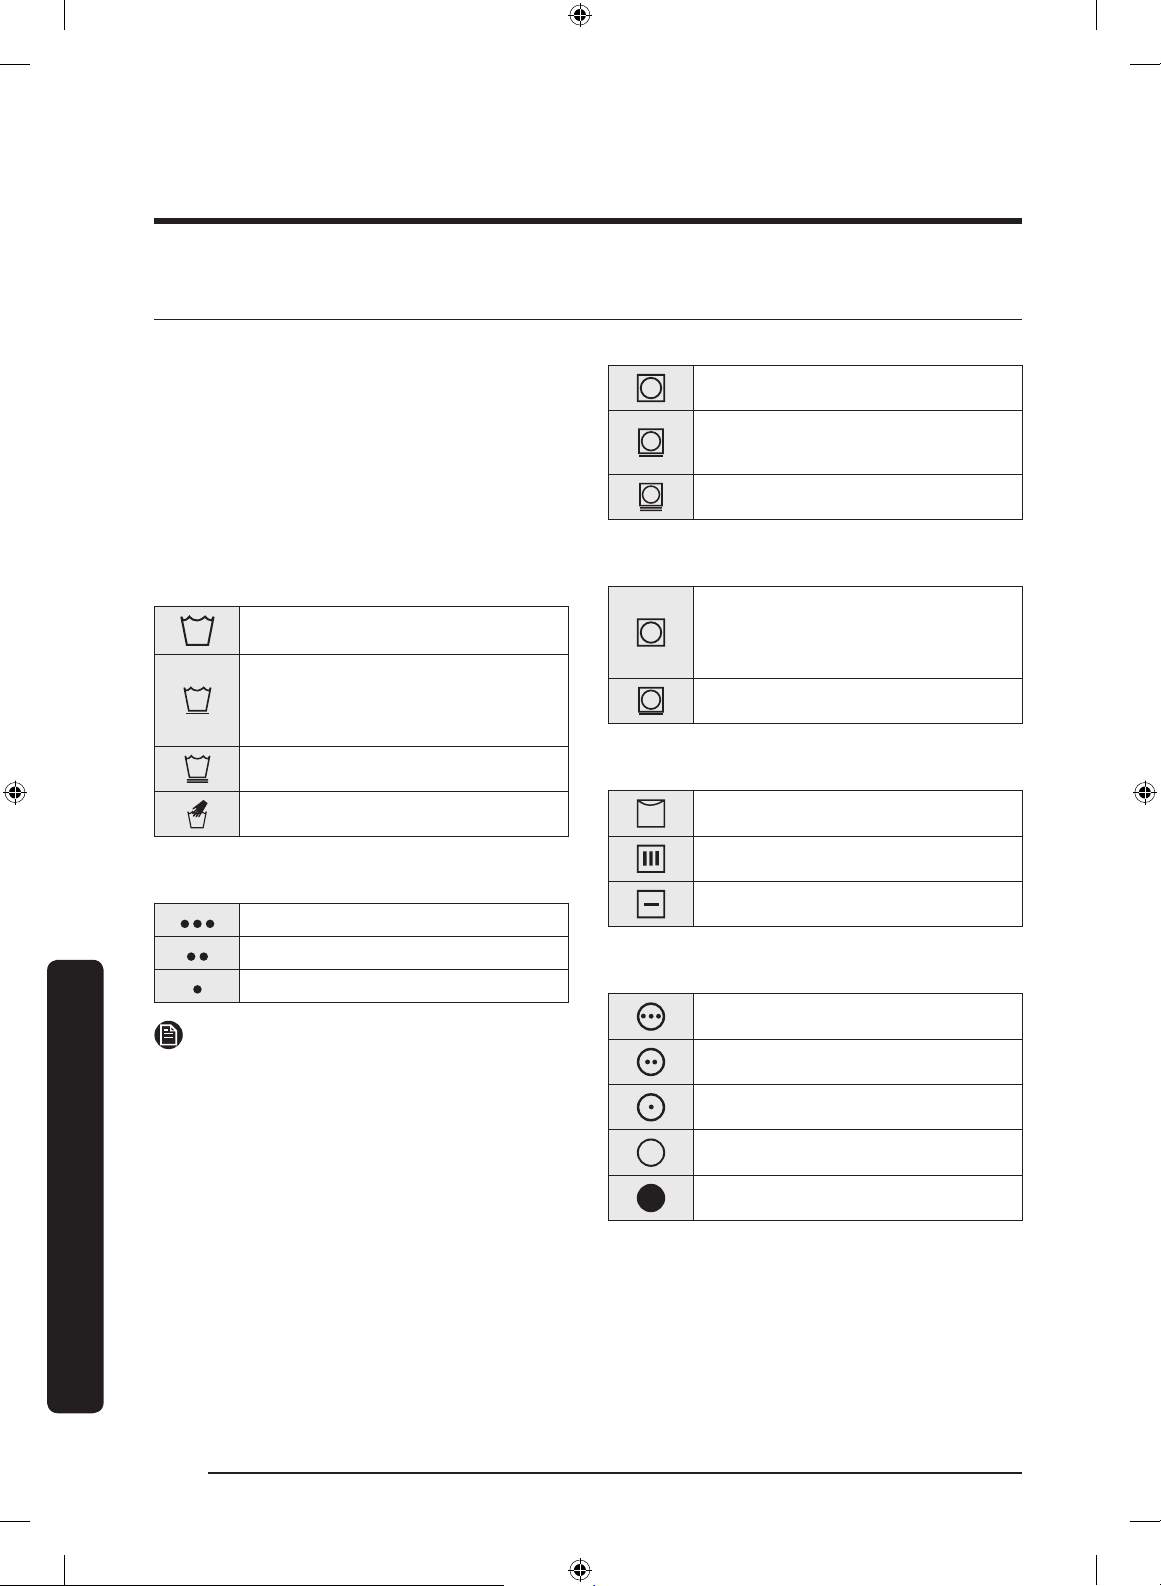
Lisa
Riiete hooldussiltide tabel
Lisa
Järgmised sümbolid annavad suuniseid riiete
hoolduseks. Riiete hooldussiltidel on sümbolid
kuivatamise, pleegitamise, triikimise või vajaduse
korral kuivpuhastuse kohta. Sümbolite kasutamine
tagab, et nii kodu- kui ka välismaised rõivatootjad
järgivad neid ühtmoodi. Järgige hooldussildi
suuniseid, et tagada rõivaste pikem eluiga ja
vähendada pesemisel tekkivaid probleeme.
Pesutsükkel
Tavaline
Kalandreeritud riie/kortsumiskindel/
kortse ennetava vahendiga töödeldud
riie
Õrn pesu
Käsitsipesu
Veetemperatuur**
Kuum
Soe
Külm
MÄRKUS
** Täpid tähistavad sobivat pesuvee temperatuuri
erinevate esemete puhul. Temperatuurivahemik
on kuuma puhul 41–52 °C, sooja puhul 29–41 °C,
jaheda puhul 16–29 °C. (Pesuvee temperatuur
peab olema puhastusvahendi aktiveerumiseks ja
tõhusaks puhastuseks vähemalt 16 °C.)
Pleegitus
Mis tahes pleegitus (vajaduse korral)
Ainult kloorivaba (värvidele ohutu)
Pleegitus (vajaduse korral)
Trummelkuivatuse tsükkel
Tavaline
Kalandreeritud riie/kortsumiskindel/
kortse ennetava vahendiga töödeldud
riie
Õrn pesu
Erisuunised
Kuivatada riputatult
Rippkuivatus ilma väänamata
Kuivatada tasapinnal
Kuumusseade
Kõrge
Keskmine
Madal
Iga kuumus
Ilma kuumuse/õhuta
Eesti40
Untitled-22 40 2019-07-05 6:52:13
Page 89
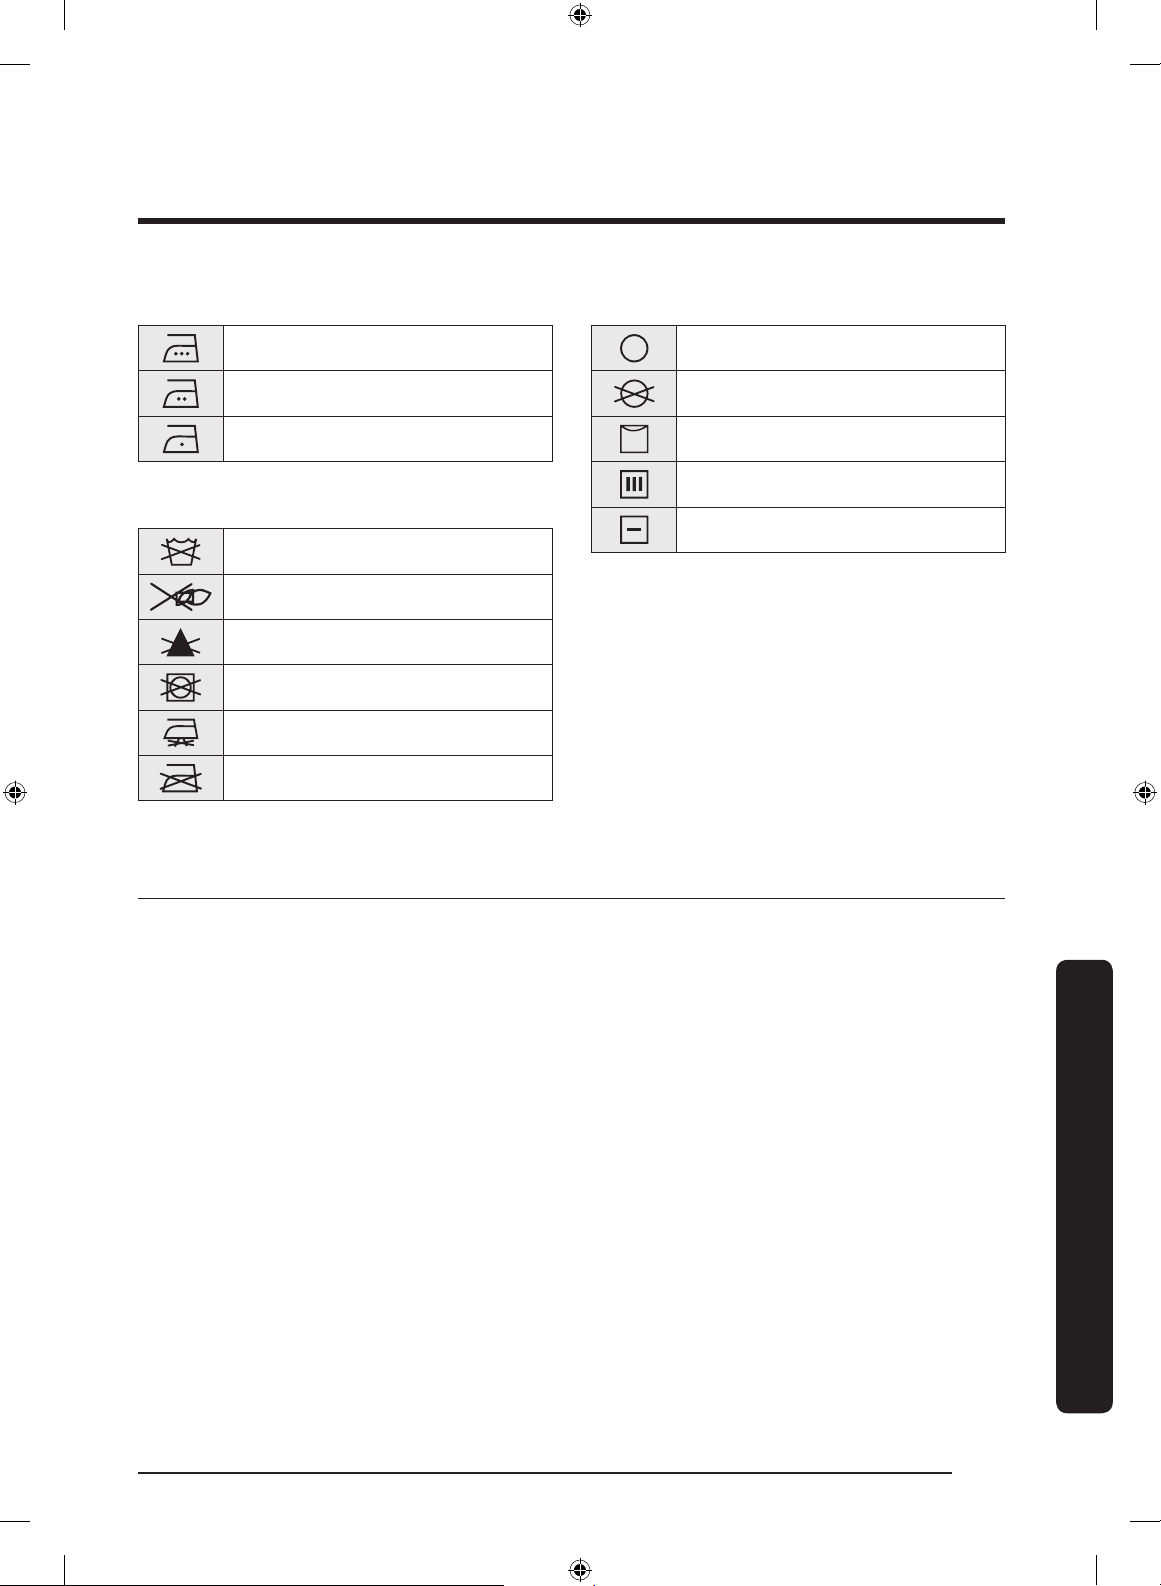
Triikimis- või aurutustemperatuurid
Keemiline puhastus
Kõrge
Keskmine
Madal
Keemiline puhastus
Ei tohi kasutada keemilist puhastust
Kuivatada riputatult
Rippkuivatus ilma väänamata
Pesupesemise hoiatussümbolid
Kuivatada tasapinnal
Mitte pesta
Mitte väänata
Mitte pleegitada
Mitte trummelkuivatada
Ilma auruta triikimine
Mitte triikida
Keskkonnakaitse
Seade on valmistatud ümbertöödeldavatest materjalidest. Kui otsustate seadmest vabaneda, uurige
kohalikke jäätmekäitlusnõudeid. Lõigake ära toitejuhe, et seadet ei saaks enam vooluvõrku ühendada.
Eemaldage luuk, et loomad ja väikesed lapsed ei saaks seadmesse kinni jääda.
Eesti 41
Untitled-22 41 2019-07-05 6:52:16
Lisa
Page 90
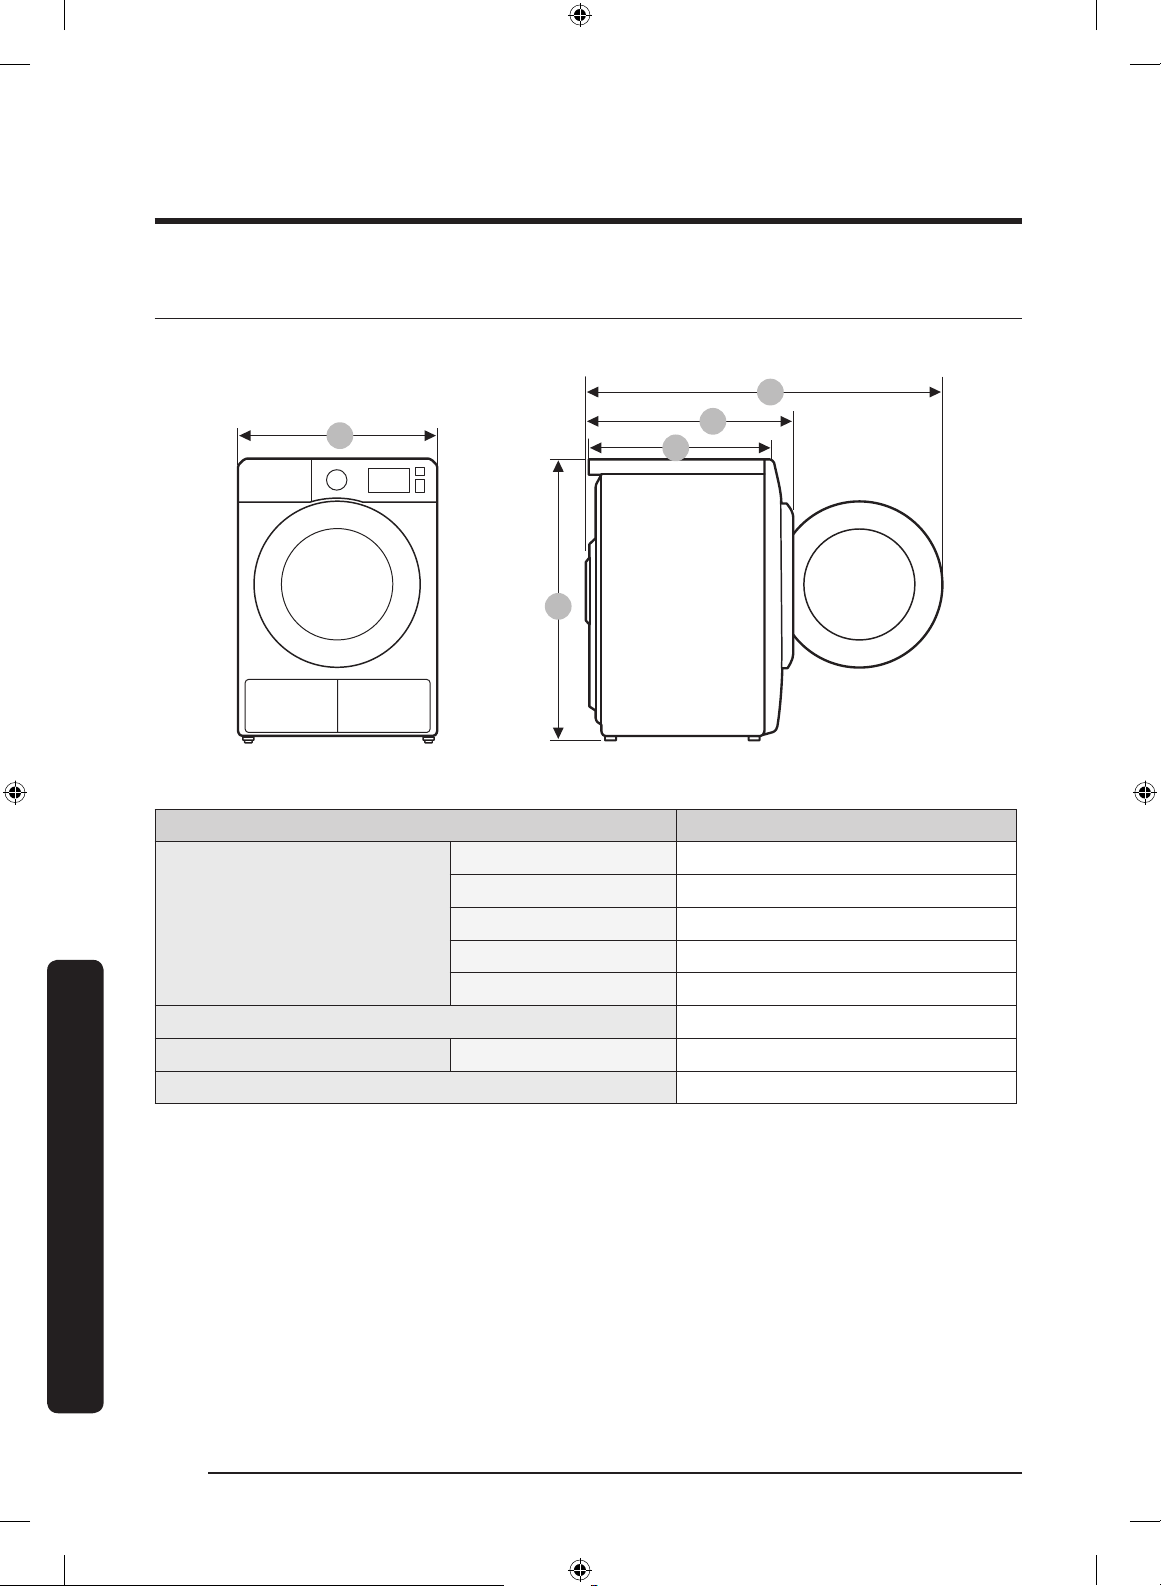
Lisa
Tehnilised andmed
A
E
D
C
B
Lisa
TÜÜP EESTLAADITAV KUIVATI
A 600 mm
B 850 mm
MÕÕTMED
C 600 mm
D 650 mm
E 1095 mm
MASS 50 kg
ELEKTRINÕUDED 220-240 V / 50 Hz 550–600 W
LUBATAV TEMPERATUUR 5–35 °C
Eesti42
Untitled-22 42 2019-07-05 6:52:17
Page 91
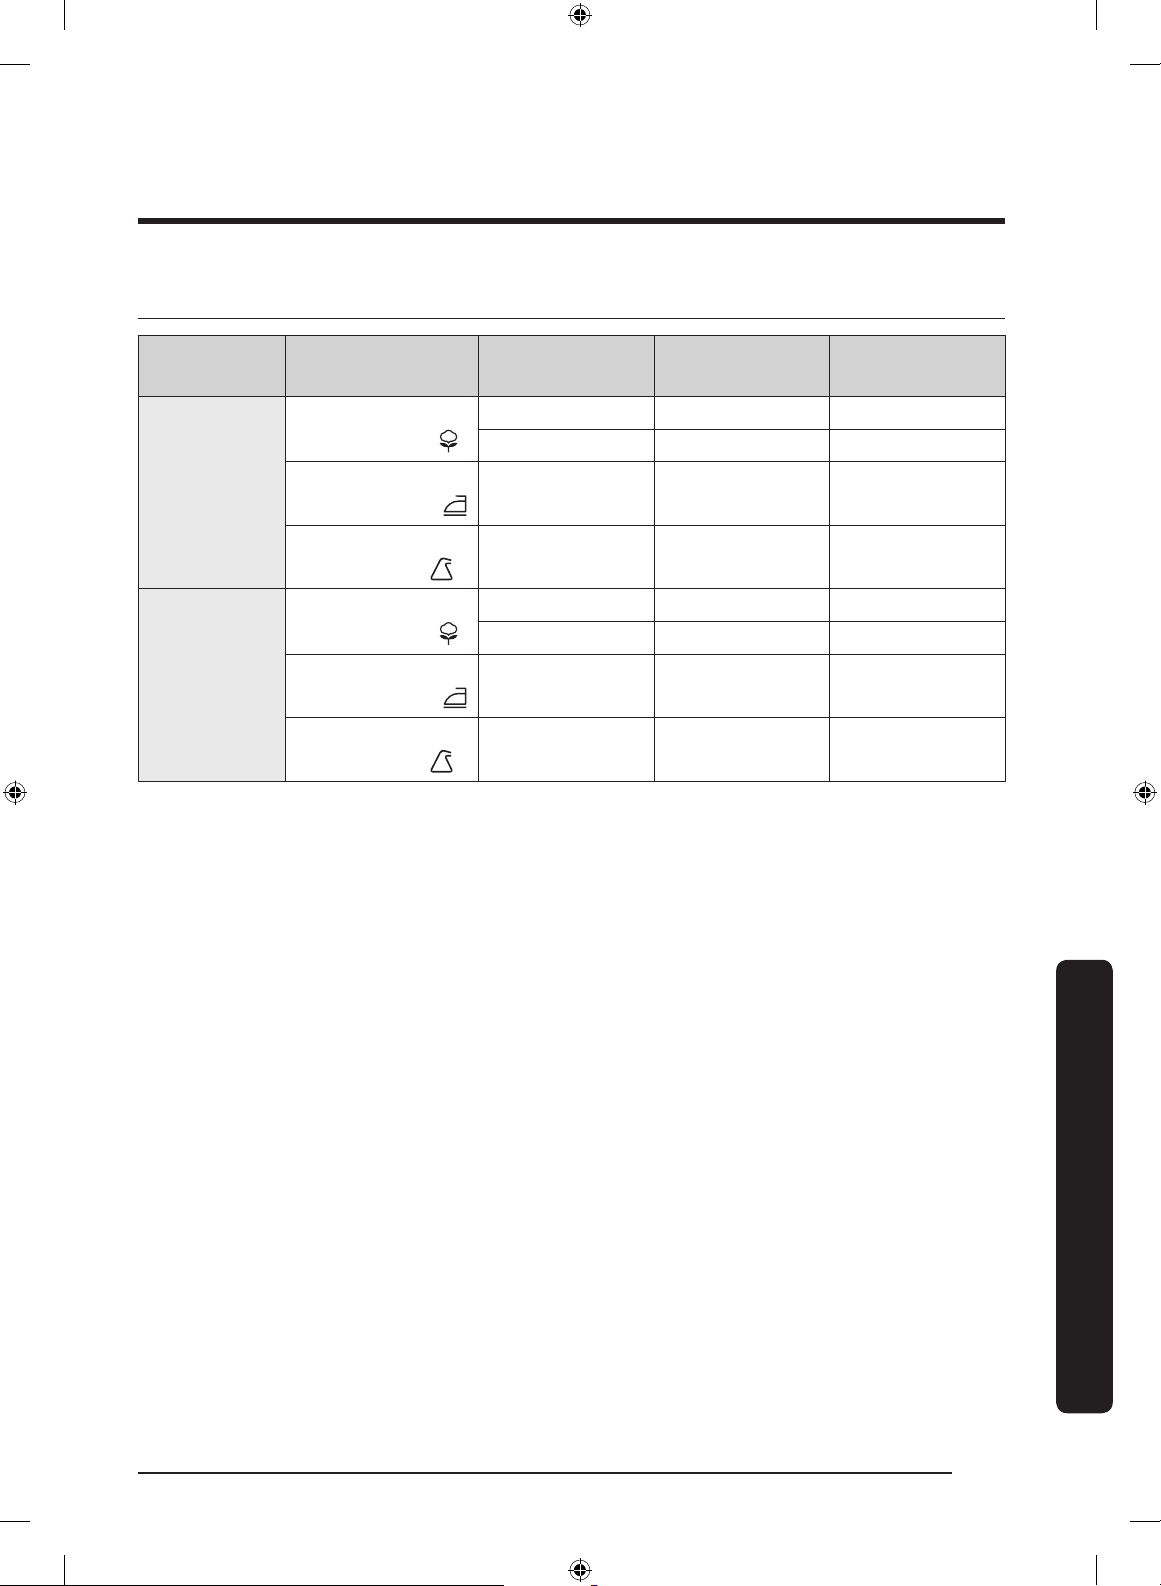
Tarbimisandmed
Mudel Programm Pesukogus (kg)* Energia (kWh)
9 1,56 188
4,5 0,9 130
9 1,1 130
4,5 0,71 86
8 1,43 169
4 0,8 120
8 1,02 118
4 0,65 80
DV9*M62****
DV8*M62****
COTTON
(PUUVILLANE)**
IRON DRY
(TRIIKIMISKUIV)**
SYNTHETICS
(SÜNTEETIKA)
COTTON
(PUUVILLANE)**
IRON DRY
(TRIIKIMISKUIV)**
SYNTHETICS
(SÜNTEETIKA)
Max kestus
(minutites)
*: kuiva pesu kaal
**: EN 61121: 2013 katseprogramm
Kõik tärniga tähistamata andmed on arvutatud standardi EN 61121:2013 alusel.
Tarbimisandmed võivad erineda eespool nimetatud nimiväärtustest olenevalt pesukogusest, kangaste
tüübist, jääkniiskuse tasemest pärast tsentrifuugimist, voolukõikumistest ja valitud lisasuvanditest.
Eesti 43
Untitled-22 43 2019-07-05 6:52:17
Lisa
Page 92
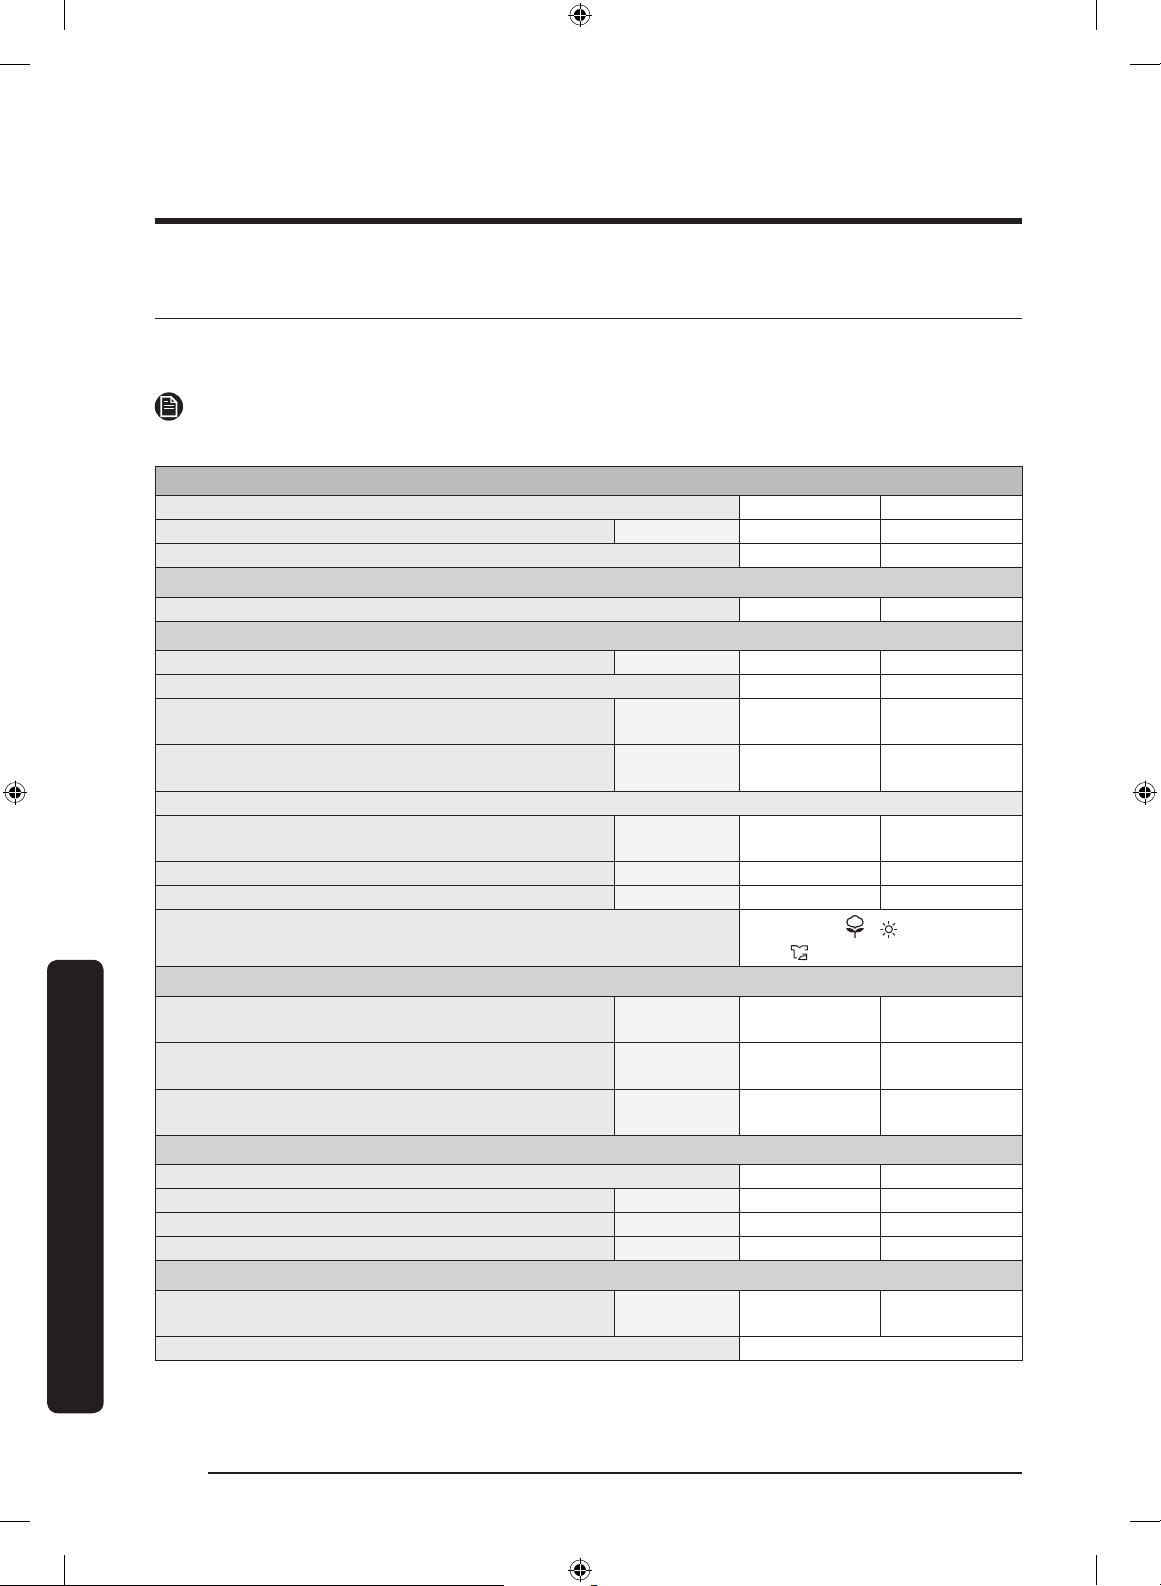
Lisa
Kodumajapidamistes kasutatavad trummelkuivatid
Kodumajapidamises kasutatavate trummelkuivatite andmeleht
Andmete aluseks on EL-i määrus nr 392/2012.
MÄRKUS
Tärnid (*) tähistavad mudelit ja võivad varieeruda vahemikus (0–9) või (A–Z).
Samsung
Mudeli nimi DV8*M62**** DV9*M62****
Mahutavus kg 8 9
Tüüp Kondensaator Kondensaator
Energiatõhusus
A+++ (kõige tõhusam) kuni D (kõige ebatõhusam) A+++ A+++
Energiatarve
Aastane energiatarve (AE_C)
Automaatne trummelkuivati Jah Jah
Energiatarve (E_dry) standardse puuvillaprogrammi ja maksimaalselt täidetud
masina korral
Energiatarve (E_dry.1/2) standardse puuvillaprogrammi ja osaliselt täidetud
masina korral
Väljalülitatud ja ooterežiim
Energiatarve väljalülitatud režiimis (P_o) maksimaalselt täidetud masina
korral
Energiatarve ooterežiimis (P_I) maksimaalselt täidetud masina korral W 5,00 5,00
Ooterežiimi kestus min 10 10
1)
kWh/a 176,0 194,0
kWh 1,43 1,54
kWh 0,80 0,90
W 0,50 0,50
Lisa
Programmid, mida sildil ja lehel olev teave hõlmab
Standardprogrammi kestus
Kaalutud programmiaeg standardse puuvillaprogrammi ning maksimaalselt ja
osaliselt täidetud masina korral
Programmiaeg (T_dry) standardse puuvillaprogrammi ja maksimaalselt
täidetud masina korral
Programmiaeg (T_dry.1/2) standardse puuvillaprogrammi ja osaliselt täidetud
masina korral
Kondenseerimistõhususe klass
A (kõige tõhusam) kuni G (kõige ebatõhusam) B B
Keskmine kondenseerimistõhusus maksimaalselt täidetud masina korral % 81 81
Keskmine kondenseerimistõhusus osaliselt täidetud masina korral % 81 81
Kaalutud kondenseerimistõhusus % 81 81
Õhus edasikanduv müraemissioon
Kuivatus maksimaalselt täidetud masina korral
Ettevõtte nimi Samsung Electronics Co., Ltd.
2)
min 141 155
min 169 188
min 120 130
dB (A), viitena 1
pW-le
Puuvillane + Kuivustase 2 +
( Kortsude ennetamine väljas)
65 65
Eesti44
Untitled-22 44 2019-07-05 6:52:18
Page 93

MÄRKUS
1. Mõõdetud aastane energiatarve 9 kg / 258 kWh (8 kg / 235 kWh) põhineb 160 kuivatustsüklil
standardse puuvillaprogrammi ning maksimaalselt ja osaliselt täidetud masina korral ning madala
energiatarbega režiime kasutades. Tegelik energiatarve tsükli kohta sõltub seadme kasutamisest.
2. Maksimaalselt ja osaliselt täidetud masina korral kasutatav „standardne puuvillaprogramm“ on
tavaline kuivatusprogramm, millele viitab sildil ja tehnilistes andmetes olev teave ning mis sobib
keskmiselt märja puuvillase pesu kuivatamiseks ja mis on puuvilla energiatarbe mõistes kõige
säästlikum programm. Tarbimisandmed võivad erineda eespool nimetatud nimiväärtustest olenevalt
pesukogusest, kangaste tüübist, jääkniiskuse tasemest pärast tsentrifuugimist, voolukõikumistest ja
valitud lisasuvanditest.
Eesti 45
Untitled-22 45 2019-07-05 6:52:18
Lisa
Page 94

Meelespea
Untitled-22 46 2019-07-05 6:52:18
Page 95

Meelespea
Untitled-22 47 2019-07-05 6:52:18
Page 96
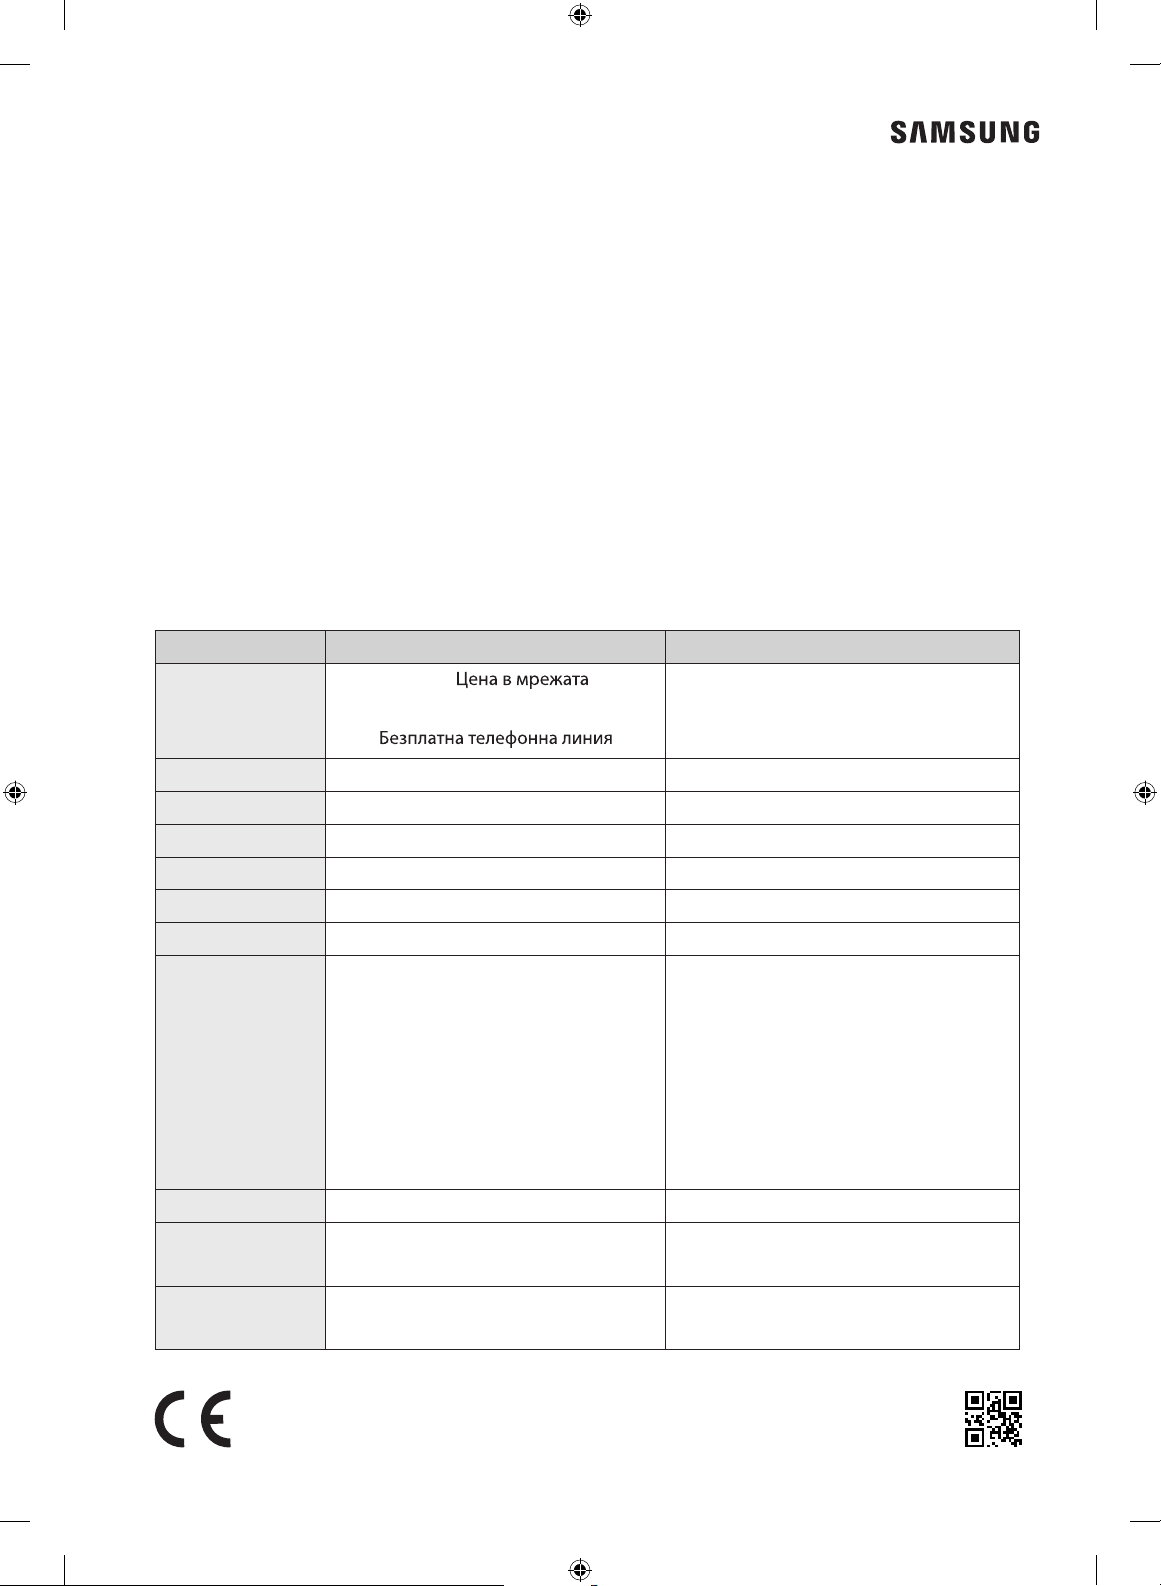
KAS TEIL ON KÜSIMUSI VÕI KOMMENTAARE?
RIIK HELISTAGE VÕI KÜLASTAGE MEID AADRESSIL
*3000
BULGARIA
0800 111 31 ,
www.samsung.com/bg/support
CROATIA 072 726 786 www.samsung.com/hr/support
CZECH 800 - SAMSUNG (800-726786) www.samsung.com/cz/support
ESTONIA 800-7267 www.samsung.com/ee/support
HUNGARY 0680SAMSUNG (0680-726-7864) www.samsung.com/hu/support
LATVIA 8000-7267 www.samsung.com/lv/support
LITHUANIA 8-800-77777 www.samsung.com/lt/support
*8000 (apel in retea)
08008-726-78-64 (08008-SAMSUNG)
Apel GRATUIT
ROMANIA
Atenţie: Dacă efectuaţi apelul din
www.samsung.com/ro/support
reţeaua Digi (RCS/RDS), vă rugăm
să ne contactaţi formând numărul
Telverde fără ultimele două cifre, astfel:
0800872678.
SERBIA 011 321 6899 www.samsung.com/rs/support
SLOVAKIA
SLOVENIA
0800 - SAMSUNG
(0800-726 786)
080 697 267
(brezplačna številka)
www.samsung.com/sk/support
www.samsung.com/si/support
DC68-03791N-02
Untitled-22 48 2019-07-05 6:52:19
Page 97
Hőszivattyús szárítógép
Használati útmutató
DV9*M62****/DV8*M62****
Untitled-25 1 2019-07-05 7:08:54
Page 98

Tartalom
Tartalom
Biztonsági tudnivalók 4
Amit a biztonsági előírásokról tudnia kell 4
Fontos biztonsági jelzések 4
Fontos biztonsági óvintézkedések 5
Az üzembe helyezéssel kapcsolatos fontos gyelmeztetések 7
A használatra vonatkozó fontos gyelmeztetések 9
A használatra vonatkozó gyelmeztetések 10
A tisztításra vonatkozó fontos gyelmeztetések 11
A WEEE-jelzéssel kapcsolatos utasítások 12
Üzembe helyezés 13
A csomag tartalma 13
Üzembe helyezés követelményei 15
Szárítógép 17
Kifolyótömlő (ha szükséges) 18
Üzembe helyezési ellenőrzőlista 21
A szárítógép használata előtt 21
Használat 22
Vezérlőpanel 22
Az első lépések 28
Speciális funkciók 32
Karbantartás 33
Vezérlőpanel 33
Burkolat 33
Dob 33
Piheszűrő 33
Víztartály 35
Hőcserélő 36
Hibaelhárítás 38
Ellenőrzési pontok 38
Információkódok 40
Magyar2
Untitled-25 2 2019-07-05 7:08:54
Page 99

Függelék 41
Anyagkezelési táblázat 41
Környezetvédelem 42
Műszaki adatok 43
Fogyasztási adatok 44
A háztartási szárítógépek adatai 45
Tartalom
Magyar 3
Untitled-25 3 2019-07-05 7:08:54
Page 100
Biztonsági tudnivalók
Gratulálunk új Samsung szárítógépéhez. A használati útmutató fontos információt tartalmaz új
berendezésének üzembe helyezésével, használatával és karbantartásával kapcsolatban. Kérjük, gyelmesen
olvassa el az útmutatót, hogy teljes mértékben kihasználhassa a szárítógép számos előnyét és funkcióját.
Amit a biztonsági előírásokról tudnia kell
Az útmutatóban olvasható Figyelmeztetések és Biztonsági utasítások nem térnek ki minden lehetséges
Biztonsági tudnivalók
helyzetre. A szárítógép üzembe helyezése, karbantartása és működtetése során a felhasználó felelőssége,
hogy ésszerűen, körültekintően és elővigyázatosan járjon el.
Ha nincs teljesen tisztában a felmerülő problémákkal és a körülményekkel, forduljon a gyártóhoz.
Fontos biztonsági jelzések
A használati útmutatóban található ikonok és jelzések jelentése:
FIGYELMEZTETÉS
Veszélyes vagy nem biztonságos üzemeltetés, mely súlyos személyi sérülést, halált és/vagy vagyoni kárt
okozhat.
VIGYÁZAT
Veszélyes vagy nem biztonságos üzemeltetés, mely személyi sérülést és/vagy vagyoni kárt okozhat.
MEGJEGYZÉS
Személyi sérülés, illetve vagyoni kár fennállásának veszélyére gyelmeztet.
Olvassa el az utasításokat
Ezek a gyelmeztető jelzések a személyi sérülések elkerülése érdekében szerepelnek az útmutatóban.
Pontosan kövesse a gyelmeztetésekben leírtakat.
Miután elolvasta ezt az útmutatót, tartsa biztonságos helyen, hogy mindig kéznél legyen, ha szükség van rá.
A berendezés használata előtt olvassa el az összes utasítást.
Az elektromossággal működő, mozgó alkatrészeket tartalmazó berendezések mindegyikénél fennáll a sérülés
veszélye. A berendezés biztonságos működtetéséhez ismerje meg a berendezés működését, és használata
során kellő óvatossággal járjon el.
FIGYELEM – Tűz kialakulásának veszélye
• A ruhaszárító üzembe helyezését szakképzett szerelőnek kell elvégeznie.
• A szárítógép üzembe helyezését a gyártó utasításainak és a helyi előírásoknak megfelelően kell
elvégezni.
• A súlyos és halálos kimenetelű sérülések kockázatának csökkentése érdekében be kell tartani az üzembe
helyezésre vonatkozó utasításokat.
Magyar4
Untitled-25 4 2019-07-05 7:08:55
 Loading...