

Page 1
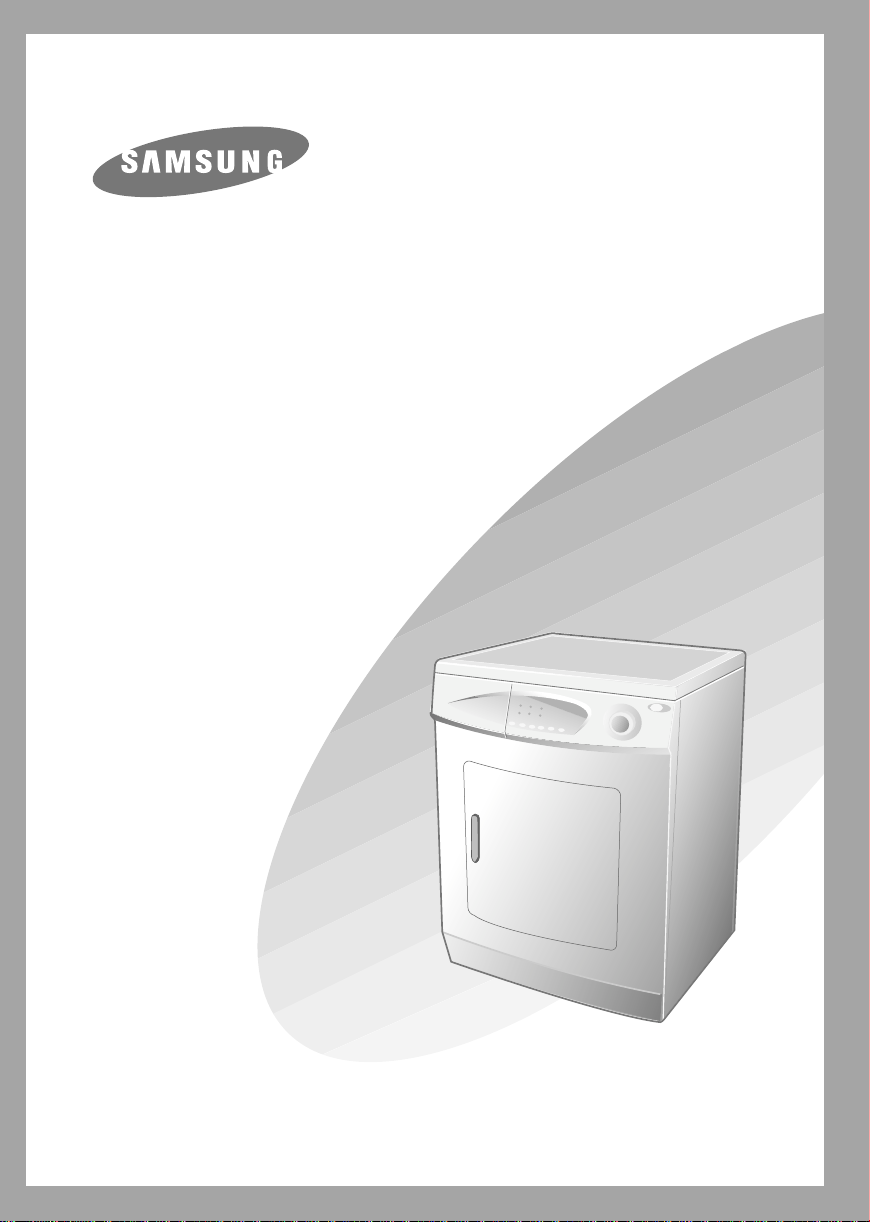
Clothes Dryers
Owner’s Instructions
DV5008J
DV5006
DV5004J
DV5002
Page 2
Table of Contents
Safety Instructions
Installation Instructions
Ducting Installation instructions 5
Duct length calculations 6
Exhaust directions 6
Special accessory 6
Special installation requirements
Electrical power supply 7
Operating Instructions, Tips
Control panel(DV5008J) 8
Control panel(DV5006)
Control panel(DV5004J) 10
Control panel(DV5002) 11
Loading clothes 12
Polyester Knits & Permanent Press Drying Tips
Program selecting guide
Program chart 14
Drying times 14
Care and Cleaning
Cleaning the filter 15
Dryer Exterior
Dryer Vent
Inside the dryer cabinet 16
3,4
7
9
12
13
15
16
Problem Solver
Questions? Use this problem solver 17
Specification
2
SAMSUNG Clothes Dryers Owner’s Instructions
17
17
Page 3
Safety Instructions
Read all instructions before using this appliance
Warning - It is extremely important that you read and adhere to the following
•Use this appliance only for its intended purpose as described in this
Owner’s Manual. This dryer must be:
- Properly installed and located in accordance with the Installation Instructions
before it is used.
- Properly grounded to conform with Local Codes. Follow details in Installation
Instructions.
- Located where the temperature is above 50°F(10°C) for satisfactory
operation of the dryer control system. Do not install or store the dryer
where it will be exposed to the weather.
- Connected to a properly rated, protected and sized power supply circuit
to avoid electrical overload.
- Vented to the outside to prevent large amounts of moisture and lint from
being blown into the room.
Carefully follow the venting details in the Installation Instructions.
Do not repair or replace any part of the appliance or attempt any servicing
unless specifically recommended in this Owner’s Manual.
When disconnecting this appliance pull by the plug rather than the cord to
avoid damage to the cord or junction of cord and plug. Make sure that the
cord is located so that it will not be stepped on, tripped over or otherwise
subjected to damage or stress.
To Minimize the Possibility of a Fire Hazard
• Do not use heat to dry articles containing rubber, plastic, or similar materials (such as
padded bras, tennis shoes, galoshes, bath mats, rugs, bibs, pillows, baby pants, plastic
bags, etc.) as these materials may melt or burn. Also, some rubber materials, when
heated, can under certain circumstances produce fire by spontaneous combustion.
• Do not store items that may burn or melt (such as clothing, paper material, plastics or
plastic containers, etc.) on top of the dryer during operation.
• Garments labeled “Dry Away from Heat” must not be put in your dryer.
• Do not wash or dry articles that have been cleaned in, washed in, soaked in, or spotted
with combustible or explosive substances (such as wax, paint, gasoline degreasers,
dry-cleaning solvents, kerosene, etc.) which may ignite or explode.
Do not add these substances to the wash water. Do not use these substances around your
washer and/or dryer during operation.
• Any article on which you have used a cleaning solvent, or which contains
flammable materials (such as cleaning cloths, mops, towels used in beauty salons,
restaurants or barber shops, etc.) must not be placed in or near the dryer until all
traces of these flammable liquids or solids and their fumes have been removed.
There are many highly flammable items used in homes such as: acetone,
de-natured alcohol, gasoline, kerosene, some household cleaners, some spot removers,
turpentines, waxes, wax removers and products containing petroleum distillates.
instructions. Failure to do so could result in bodily injuries and/or
property damage due to fire.
SAMSUNG Clothes Dryers Owner’s Instructions
3
Page 4

Safety Instructions
• Clean the lint filter before each load to prevent lint accumulation inside the dryer or in
the room. DO NOT OPERATE THE DRYER WITHOUT LINTFILTER IN PLACE.
• Keep the area around the exhaust opening, and around and underneath your appliances
free from the accumulation of combustible materials, such as lint, paper, rags,
chemicals, etc.
• Regularly inspect the vent duct to ensure it has not been crushed or otherwise restricted.
• The interior of the dryer cabinet and the exhaust duct connection inside the dryer should
be cleaned every 2 to 3 years, or more often if needed, by a qualified service person.
To Minimize the Possibility of Injury
• Never reach into the dryer while the drum is moving. Before loading, unloaing or
adding clothes, wait until the drum has completely stopped.
• Do not dry fiberglass articles in your dryer. Skin irritation could result from the remaining glass particles that may be picked up by clothing during subsequent dryer uses.
• The laundry process can reduce the flame retardance of some fabrics. To avoid such a
result, the garment manufacturer’s care instructions should be followed very carefully.
• Close supervision is necessary if this appliance is used in reach of or near children. Do
not allow children to play inside, on, or with this appliance or any discarded appliance.
Dispose of discarded appliances and shipping or packing materials properly. Before
discarding a dryer, or removing from service, remove the door of the dryer
compartment.
• Keep all laundry aids (such as detergents, bleaches, fabric softeners, etc.) out of the
reach of children, preferably in a locked cabinet. Observe all warnings on container
labels to avoid personal injury.
• Keep the floor around your appliances clean and dry to reduce the possibility of
slipping.
• To minimize the possibility of electric shock, unplug this appliance from the power
supply before attempting any maintenance or cleaning (except the removal and
cleaning of the lint filter).
• Do not tamper with the controls.
• Do not operate this appliance if it is damaged, malfunctioning, partially disassembled,
or has missing or broken parts, including a damaged cord or plug.
• Never climb on or stand on the dryer.
• DO NOTplace items exposed to cooking oils in your dryer. Items contaminaed with
cooking oils may contribute to a chemical reaction that could cause a clothes load to
catch fire.
4
SAMSUNG Clothes Dryers Owner’s Instructions
SAVE THESE INSTRUCTIONS
Page 5
Installation Instructions
DUCTING INSTALLATION INSTRUCTIONS
Installation and service must be performed by a qualified installer or service agency.
IMPORTANT: Have your dryer installed properly.
NOTE: The WARNINGand IMPORTANT instructions appearing in this manual are
not meant to cover all possible conditions and situations that may occur. It must
be understood that common sense, caution, and carefulness are factors that CAN-
NOT be built into the dryer. These factors MUSTBE supplied by the person(s)
Failure to install, maintain, and/or operate this machine according to the manufacturer’s
instructions may result in conditions which can result in bodily injury and/or damage
to property.
This dryer comes ready for rear
venting.
WARNINGS
• Never use flexible duct inside the dryer.
• Do not terminate ducting in a chimney,
range hood, gas vent, floor or attic
space. The combination of lint and
grease could create a fire hazard or
cause damage.
• Provide an access for inspection and
cleaning the exhaust system at least
once a year.
EXHAUST LENGTH
The MAXIMUM ALLOWABLElength
of the ducting depends upon the type
of duct, number of turns, the type of
external venting point, and all conditions
noted below. The maximum allowable
length for both rigid and flexible metal
ducting is shown in table 1 (next page).
More than four 90°turns is not
recommended.
VENTING CHECK LIST - HOOD
or WALL CAP
• Terminate ducting in a manner to
prevent back drafts, entry of birds or
other wildlife.
• Termination should present minimal
resistance to the exhaust air flow and
should require little or no maintenance
to prevent clogging.
• Wall caps must be installed at least 300
mm (12”) above ground level or any
other obstruction with the opening
pointed down.
• If roof vents or louvered plenums are
used, they must be equivalent to a 100
mm (4”) wall cap with damper, in
regard to resistance to air flow,
prevention of back drafts and
maintenance required to prevent
clogging.
installing, maintaining, or operating the dryer.
SEPARATION OF TURNS
Separate all turns by at least 1m(3ft.) of
straight duct, including distance between
last turn and dampered wall cap. If two
turns must be closer than 1 m (3 ft.)
deduct 3 m (10 ft.) from the maximum
lengths shown in the table for each occurrence.
TURNS OTHER THAN 90°
• One turn of 45° or less may be ignored.
• Two 45° turns should be treated as one
90°.
• Each turn over 45° should be treated as
one 90°.
SEALING OF JOINTS
• All joints should be tight to avoid leaks.
The male end of each section of duct
must point away from the dryer.
• Do not assemble the duct work with
fasteners that extend into the duct. They
will serve as a collection point for lint.
• Duct joints can be made air and
moisture-tight by wrapping the
overlapped joints with duct tape.
INSULATION
• Duct work which runs through an
unheated area or is near an air conditioning duct, should be insulated to
reduce condensation and lint build up
and be sloped down toward outdoors.
NOTE: Never install screen inside exhaust duct.
WARNING: THE DRYER MUST
VENT TO THE OUTDOORS.
TO PREVENT LARGE AMOUNTS
OF LINTAND MOISTURE FROM
ACCUMULA TING AND TO
MAINTAIN DRYING EFFICIENCY,
THIS MACHINE MUST BE
VENTED OUTDOORS.
SAMSUNG Clothes Dryers Owner’s Instructions
5
Page 6
Installation Instructions
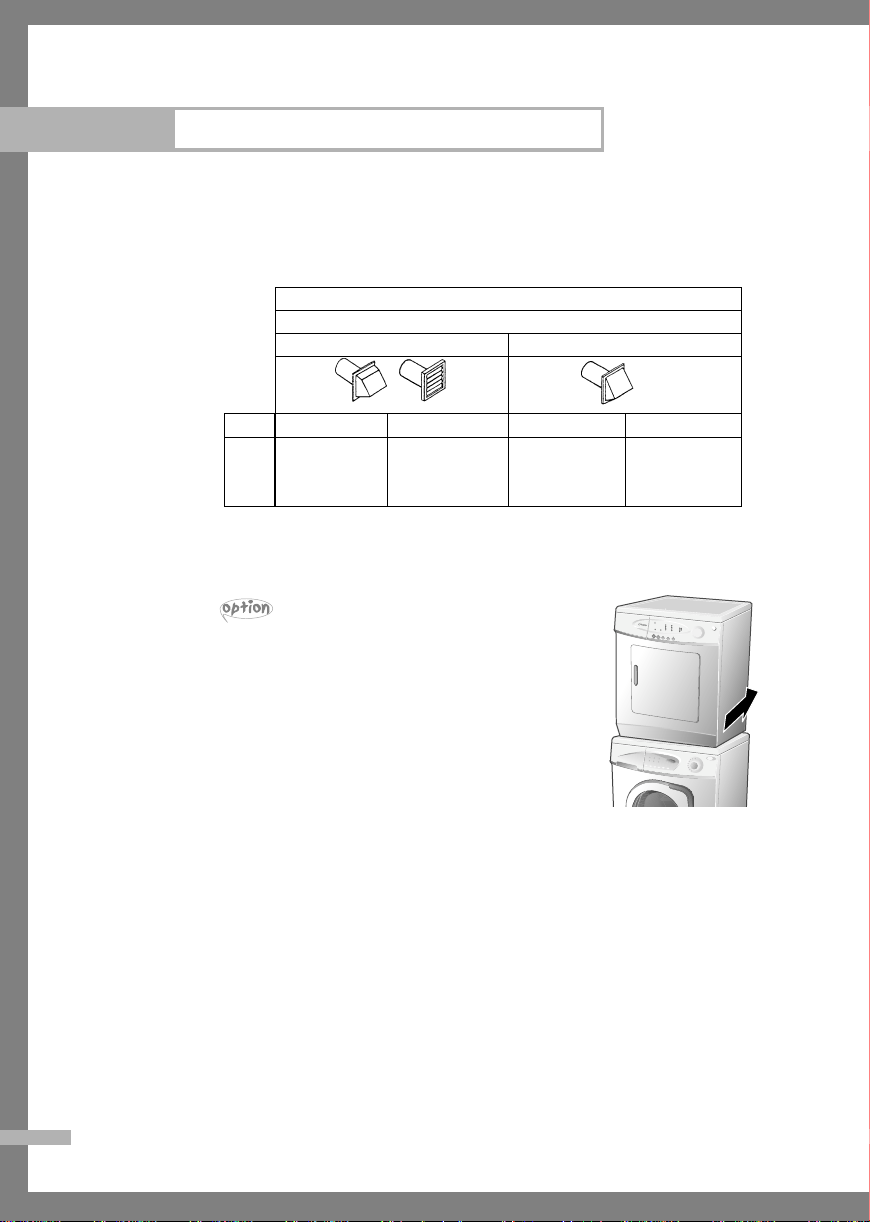
DUCT LENGTH CALCULATION
Table 1: RECOMMENDED MAXIMUM LENGTH
ELECTRIC DRYERS
Weather Hood Type
Recommended Use only for short run installations
No. of 90°
elbows
0
1
2
3
↔4”(10.16cm) ↔2 1/2”(6.35cm)
Rigid Metallic Flexible* Rigid Metallic Flexible*
14m(46ft.) 9m(30ft.) 11m(37ft.) 7m(24ft.)
11m(38ft.) 7.5m(25ft.) 9m(30ft.) 6m(20ft.)
9m(31ft.) 6m(20ft.) 6.5m(22ft.) 4m(14ft.)
7m(24ft.) 5m(16ft.) 4.5m(15ft.) 3m(10ft.)
* Do not use non metallic flexible duct.
SPECIAL ACCESSORY
Stacking kit(Model no:SK-2)
You can obtain the stacking kit from your retailer.
With this kit you can combine your dryer with a Samsung
automatic washing machine to create a washing/drying column.
The appliances are stacked in a space-economizing manner in
this arrangement, the washing machine at the button and the
dryer at the top!
6
SAMSUNG Clothes Dryers Owner’s Instructions
Page 7

Installation Instructions
SPECIAL INSTALLATION REQUIREMENTS
ALCOVE OR CLOSET INSTALLATION
• WARNING: To reduce the risk of fire, this dryer MUST BE VENTED TO THE
OUTDOORS. See the VENTING INFORMATION section.
• The minimum clearances between dryer cabinet and adjacent walls or other surfaces are :
0” either side 1” front and rear
• The minimum vertical space from floor to overhead cabinets, ceilings, etc. is 52”(132cm).
• The closet door must be louvered or otherwise ventilated and must contain a minimum of
60 sq. in. of open area equally distributed. If this closet contains both a washer and a
dryer, doors must contain a minimum of 120 sq. in. of open area equally distributed.
MINIMUM CLEARANCES OTHER THAN ALCOVE OR CLOSET INSTALLATIONS.
• Minimum clearances to combustible surfaces: 0 clearance both sides and 25 mm (1”) rear.
NOTE: CONSIDERATION MUST BE GIVEN TO INSTALLING AND SERVICING THE
APPLIANCE.
ELECTRICAL POWER SUPPLY
CAUTION: NEVER USE AN EXTENSION CORD WITH THIS APPLIANCE.
• This dryer must be connected to an individual circuit identical to the one specified on the
rating plate of the loading port, protected by fuses or circuit breaker conforming to local
codes. THIS APPLIANCE MUST BE PROPERLY GROUNDED.
GROUNDING INSTRUCTIONS
• This appliance must be grounded. In the event of malfunction or breakdown, grounding will
reduce the risk of electric shock by providing a path of least resistance for electric current.
The plug must be plugged into an appropriate outlet that is properly installed and grounded
in accordance with all local codes and ordinances.
WARNING:
• Improper connection of the equipment grounding conductor can result in a risk of electric
shock. Check with a qualified electrician or serviceman if you are in doubt as to whether the
appliance is properly grounded.
• Do not modify the plug provided with the appliance - if it will not fit the outlet, have a
proper outlet installed by a qualified electrician.
SAMSUNG Clothes Dryers Owner’s Instructions
7
Page 8
Operating Instructions, Tips
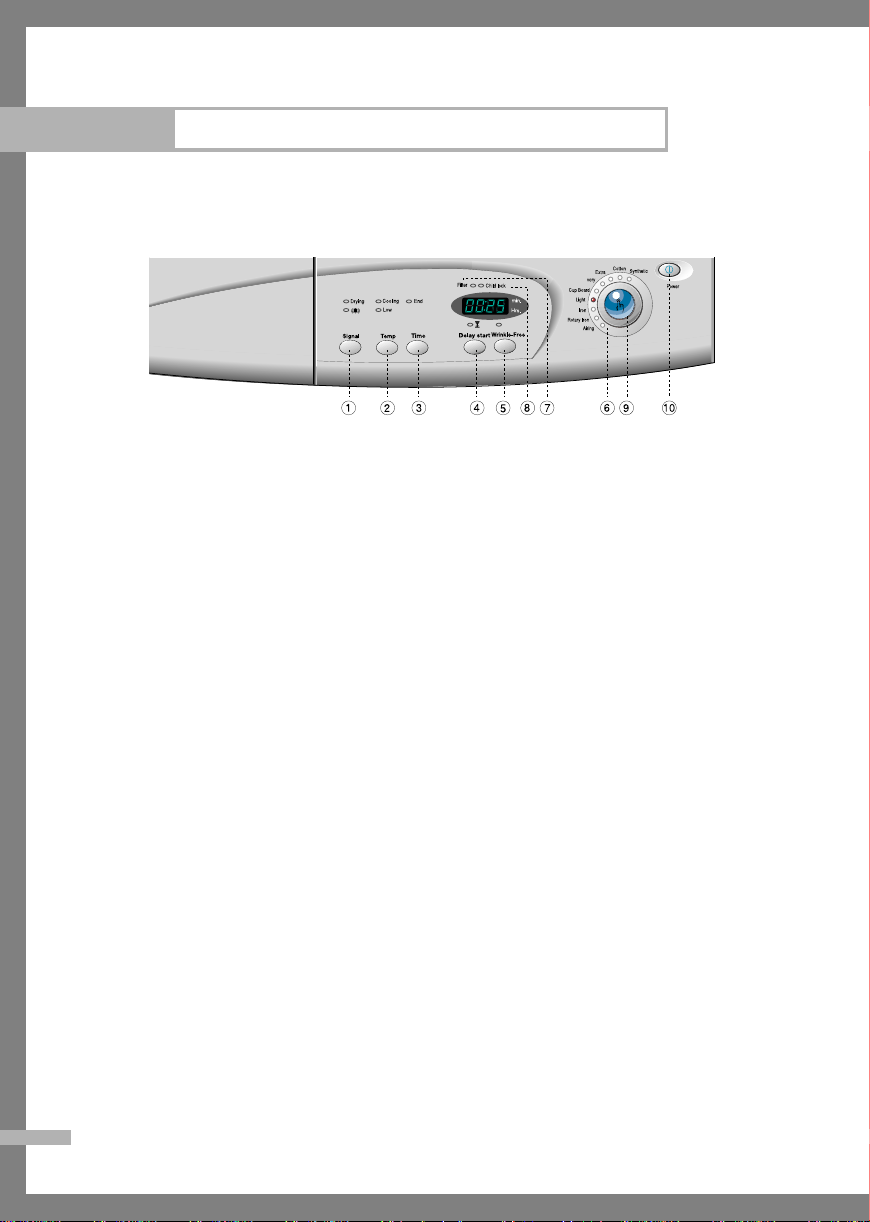
Control panel (DV5008J)
1. The SIGNALbutton
Set to OFF at the factory. When switched on, a buzzer sounds when the current program has finished.
Push the SIGNALbutton once to turn on and again to turn off. The indicator labelled with a bell
symbol will light when this feature is switched on.
2. The TEMPERATURE button
Set to OFF at the factory. Used to switch the drying temperature from high to low. Push the button once
to set to low and again to set back to high. The LOW lamp will illuminate when switched on.
3. The TIME button
When pressed, the timer displays 90(1:30) minutes. By pressing the button, you can reduce the setting
by 10 minutes with each press to a minimum of 20 minutes when the time returns to 90 mins.
(1:30 61:20 61:10 61:00 ..............30 620 61:30)
4. The DELAYSTARTbutton (and on/off indicator)
This allows you to delay the start of the selected dryer program in increments of 1 hour for each press.
(1 hour62 hours63hours624 hours6Cancel.)
5. The Wrinkle-Free button (and on/off indicator)
Pushing the Wrinkle-Free button, ends the drying program and switches the machine to the COOL
DOWN program. This reduces the drying temperature over 10 minutes and then runs for 10 mins at air
temperature.
6. Pre-programmed drying times selection
This allows the user to select from a number of pre-set commonly used drying programs. Rotate the
selector knob to illuminate the lamp next to the required program insuring that the Synthetic or Cotton
lamp is also lit, depending on the type of fabric to be dryer. Please refer to the Program Chart on page 14
of this details manual for more on Loads, temperature and drying times for each program.
7. The FILTER indicator
At switch on, the filter indicator will flash 3 times. When a drying cycle is finished , this indicator will
light to remind you that you should clean the filter after each use. Please refer to the Filter cleaning
instruction.
8. The CHILD LOCK indicator
With this feature switched on, all the function buttons on the front panel are disabled. To enable, you
have to press the WRINKLE-FREE and DELAY STARTbuttons in order. To indicate the CHILD
LOCK is set, the indicator will light. To switch it off again, push the DELAY START button and WRINKLE-FREE buttons in order, the indicator will be extinguished when disabled.
9. The STAR T/PAUSE button
Pressing the blue button in the centre of the program selection knob starts and pauses the dryer.If you
open the door the machine is paused and you must press this button to continue the program.
10. The POWER button
This button is used to switch the unit on and off. If the dryer is left on for more than 10 minutes without
any key-presses or programs running, it will automatically power the unit down.
8
SAMSUNG Clothes Dryers Owner’s Instructions
Page 9
Operating Instructions, Tips
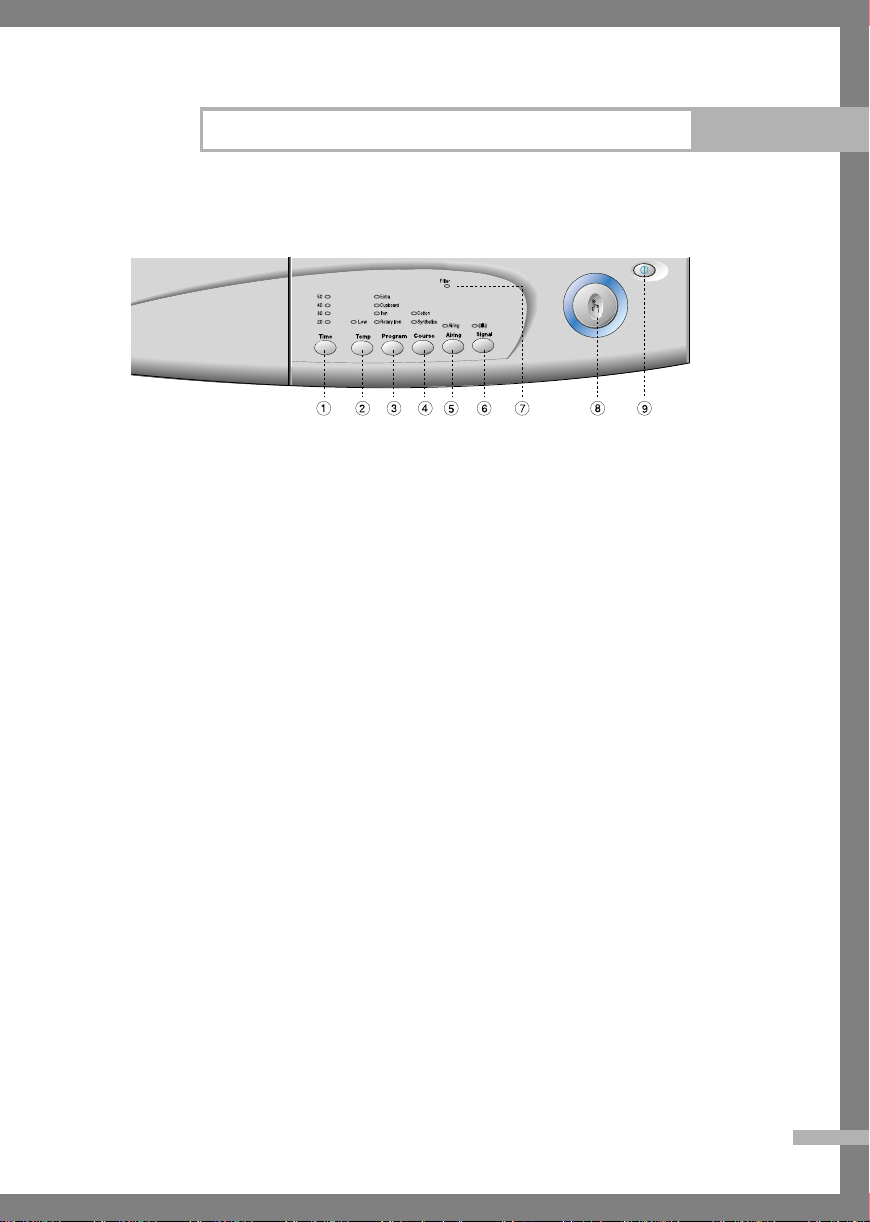
Control panel (DV5006)
1. The TIME button
When pressed, indicators light up to indicate the running time. Initially the 50 indicator is
lit up, then with each press time reduces by 10 mins and the indicators light
(eg: 50 minutes640 minutes 630 minutes 620 minutes 650 minutes.)
2. The TEMPERATURE button
Set to OFF at the factory. Used to switch the drying temperature from high to low. Push the button
once to set to low and again to set back to high. The LOW lamp will illuminate when switched on.
3. The PROGRAM button
This allows the user to select from a number of pre-set commonly used drying programs. When first
pressed, the CUPBOARD setting is selected, pushing the PROGRAM button change the selection
as follows: Cupboard6Iron 6RotaryIron 6Extra6Cupboard
4. The COURSE button
When first switched on, the COTTON setting is selected. Pushing the button toggles the setting
as follows: Cotton6Synthetic6Cotton
5. The AIRING button
When pressed, not only is the airing feature enabled but the 50 minute time light is illuminated.
This is because the feature runs the dryer in cool mode (no heat) for 50 minutes. The running time can
be altered by pressing the time button. Each press changes the time setting as follows:
50 minutes640 minutes 630 minutes620 minutes 650 minutes
6. The SIGNALbutton
Set to OFF at the factory. When switched on, a buzzer sounds when the current program has finished.
Push the SIGNAL button once to turn on and again to turn off. The indicator labelled with a bell
symbol will light when this feature is switched on.
7. FILTER lamp
At switch on, the filter indicator will flash 3 times. When a drying cycle is finished , this indicator will
light to remind you that you should clean the filter after each use. Please refer to the Filter cleaning
instruction.
8. START/PAUSE button
Pressing the blue button in the centre of the program selection knob starts and pauses the dryer.
If you open the door the machine is paused and you must press this button to continue the program.
9. POWER button
This button is used to switch the unit on and off. If the dryer is left on for more than 10 minutes
without any key-presses or programs running, it will automatically power the unit down.
SAMSUNG Clothes Dryers Owner’s Instructions
9
Page 10
Operating Instructions, Tips
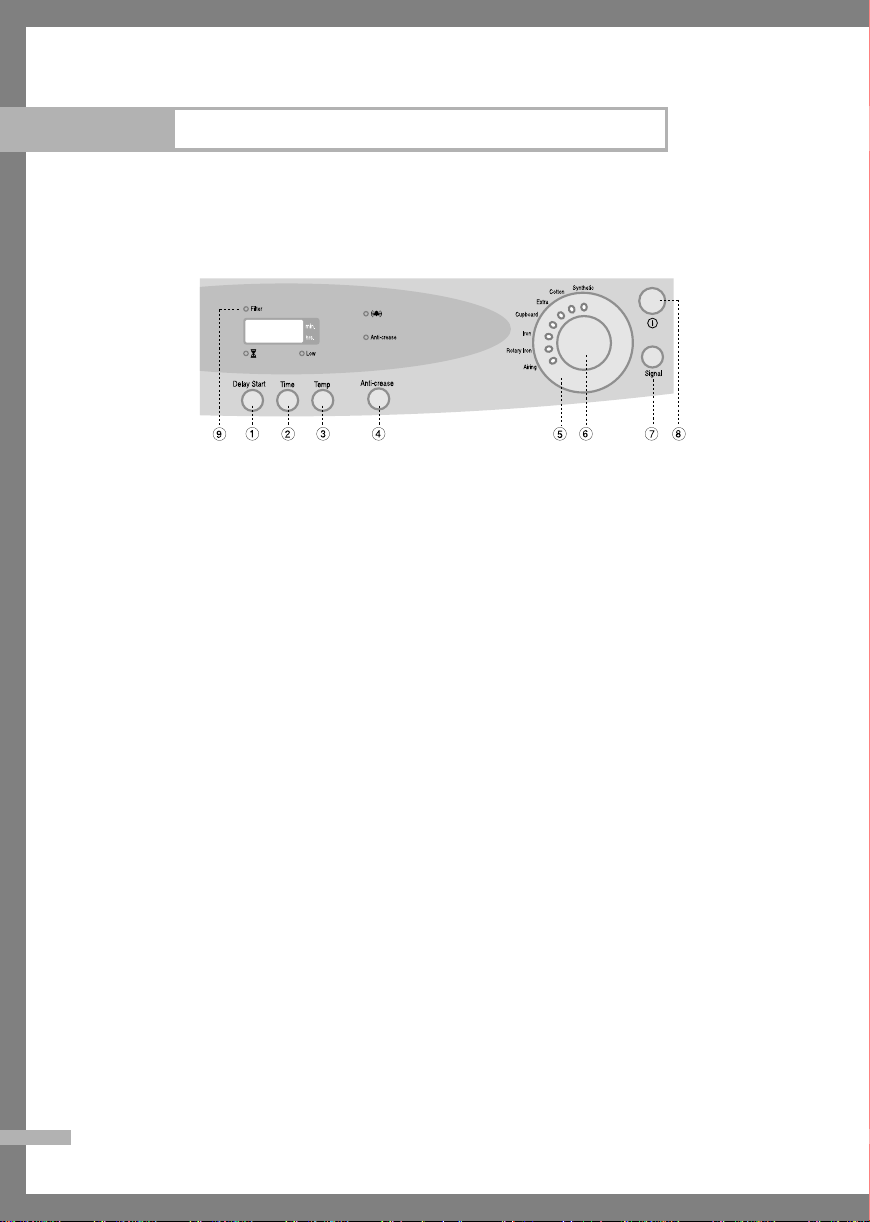
Control panel (DV5004J)
1.The DELAY STARTbutton (and on/off indicator)
This allows you to delay the start of the selected dryer program in increments of 1 hour for each
press. (1 hour626hours 63 hours ... 624 hours 6Cancel.)
2.The TIME button
When pressed, the timer displays 50 minutes. By pressing the button, you can reduce the setting
to a minimum of 20 minutes when the time jumps to 100(1:40) mins and steps down to 50 mins.
3.The TEMPERATURE button
Set to OFF at the factory. Used to switch the drying temperature from high to low. Push the button once to set to low and again to set back to high. The LOW lamp will illuminate when
switched on.
4.The ANTI-CREASE button
Pushing the ANTI-CREASE button, ends the drying program and switches the machine to the
COOL DOWN program. This reduces the drying temperature over 15 minutes and then runs for
10 mins at air temperature.
5. Pre-programmed drying times selection
This allows the user to select from a number of pre-set commonly used drying programs.
Rotate the seletor knob to illuminate the lamp next to the required program insuring that the
Synthetic or Cotton lamp is also lit , depending on the type of fabric to be dryer. Please refer to
the Program Chart on page 14 of this manual for more details on Loads, temperature and drying
times for each program.
6. The STAR T/PAUSE button
Pressing the blue button in the centre of the program selection knob starts and pauses the dryer.
If you open the door the machine is paused and you must press this button to continue the program.
7.The SIGNAL button
Set to OFF at the factory. When switched on, a buzzer sounds when the current program
has finished. Push the SIGNAL button once to turn on and again to turn off. The indicator
labelled with a bell symbol will light when this feature is switched on.
8.The Power button
This button is used to switch the unit on and off. If the dryer is left on for more than 10 minutes
without any key-presses or programs running, it will automatically power the unit down.
9.The FILTER indicator
At switch on, the filter indicator will flash 3 times. When a drying cycle is finished , this indicator will light to remind you that you should clean the filter after each use. Please refer to the
Filter cleaning instruction.
10
SAMSUNG Clothes Dryers Owner’s Instructions
Page 11
Operating Instructions, Tips
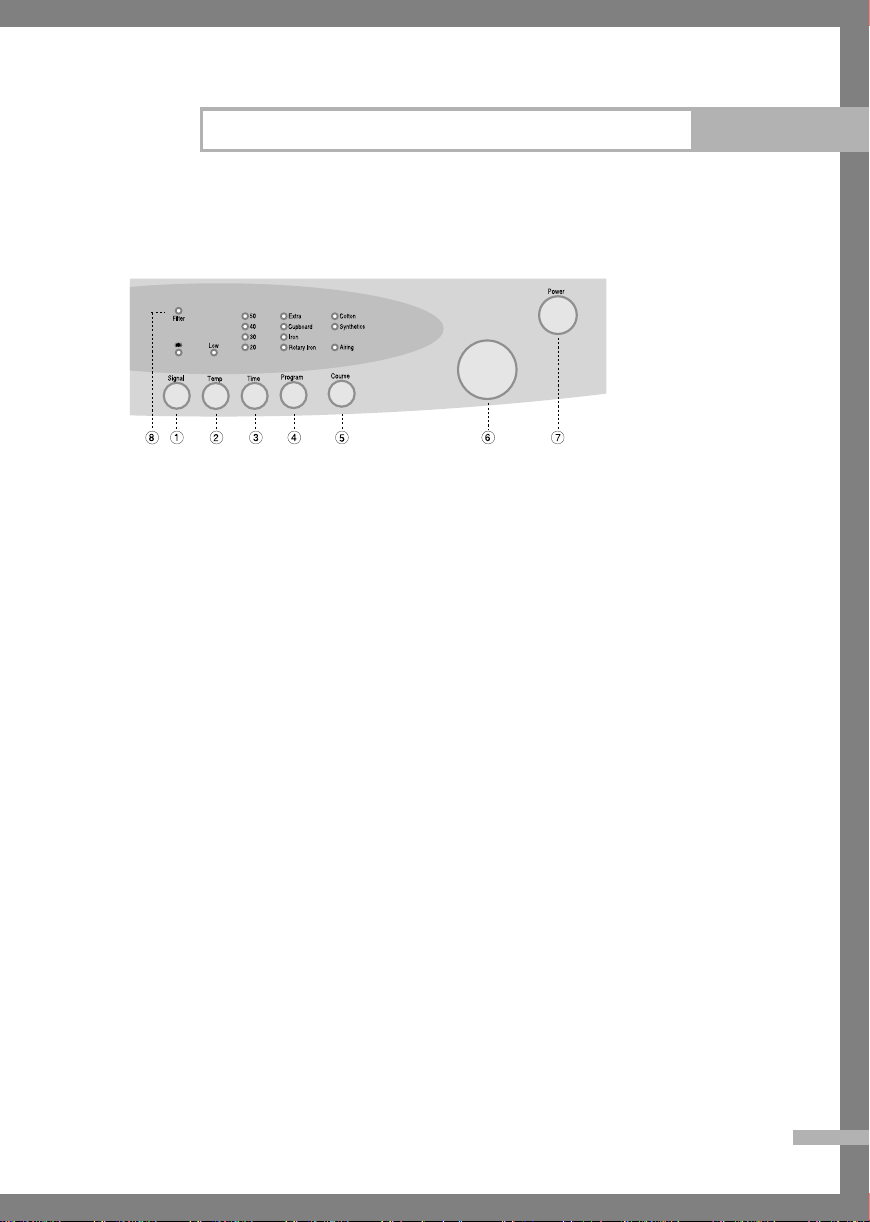
Control panel (DV5002)
1.The SIGNALbutton
Set to OFF at the factory. When switched on, a buzzer sounds when the current program
has finished. Push the SIGNAL button once to turn on and again to turn off. The indicator
labelled with a bell symbol will light when this feature is switched on.
2.The TEMPERATURE button
Set to OFF at the factory. Used to switch the drying temperature from high to low. Push the
button once to set to low and again to set back to high. The LOW lamp will illuminate
when switched on.
3.TIME button
When pressed, indicators light up to indicate the running time. Initially the 50 indicator is
lit up, then with each press the time reduces by 10 mins and the corresponding indicators
light (eg: 50 minutes 6 40 minutes 6 30 minutes 6 20 minutes 6Cancelled650 minutes.)
4.PROGRAM button
This allows the user to select from a number of pre-set commonly used drying programs.
When first pressed, the EXTRA setting is selected, pushing the PROGRAM button change
the selection as follows: ( EXTRA6CUPBOARD6IRON 6ROTARYIRON)
5.COURSE button
When first switched on, the COTTON setting is selected. Pushing the button toggles the
setting as follows: (COTTON6SYNTHETIC 6AIRING) The COURSE button is used in
conjunction with the PROGRAM button to select the required pre-set drying program. With
AIRING selected, the 50 minute time light is illuminated. This is because the feature runs
the dryer in cool mode (no heat) for 50 minutes. The running time can be altered by pressing the time button. Each press changes the time setting as follows:
( 50 minutes 6 40 minutes 6 30 minutes 6 20 minutes)
6.Start/Pause button
Pressing the blue button in the centre of the program selection knob starts and pauses the
dryer. If you open the door the machine is paused and you must press this button to
continue the program.
7. Power button
This button is used to switch the unit on and off. If the dryer is left on for more than 10
minutes without any key-presses or programs running, it will automatically power the unit
down.
8.FILTER lamp
FILTER lamp turns ON to display cleaning of the filter. Open door or turn the system OFF
to turn FILTER lamp OFF.
SAMSUNG Clothes Dryers Owner’s Instructions
11
Page 12
12
Operating Instructions, Tips
LOADING CLOTHES
• Preparing Laundry
Check that all fastenings are closed and that pockets are empty.
Place laundry loosely in the drum to make sure that they don’t get tangled.
• Sort laundry as follows (Examples)
As a general rule, sort clothes by surface texture, fabric, color and weight,
as you would for your washer.
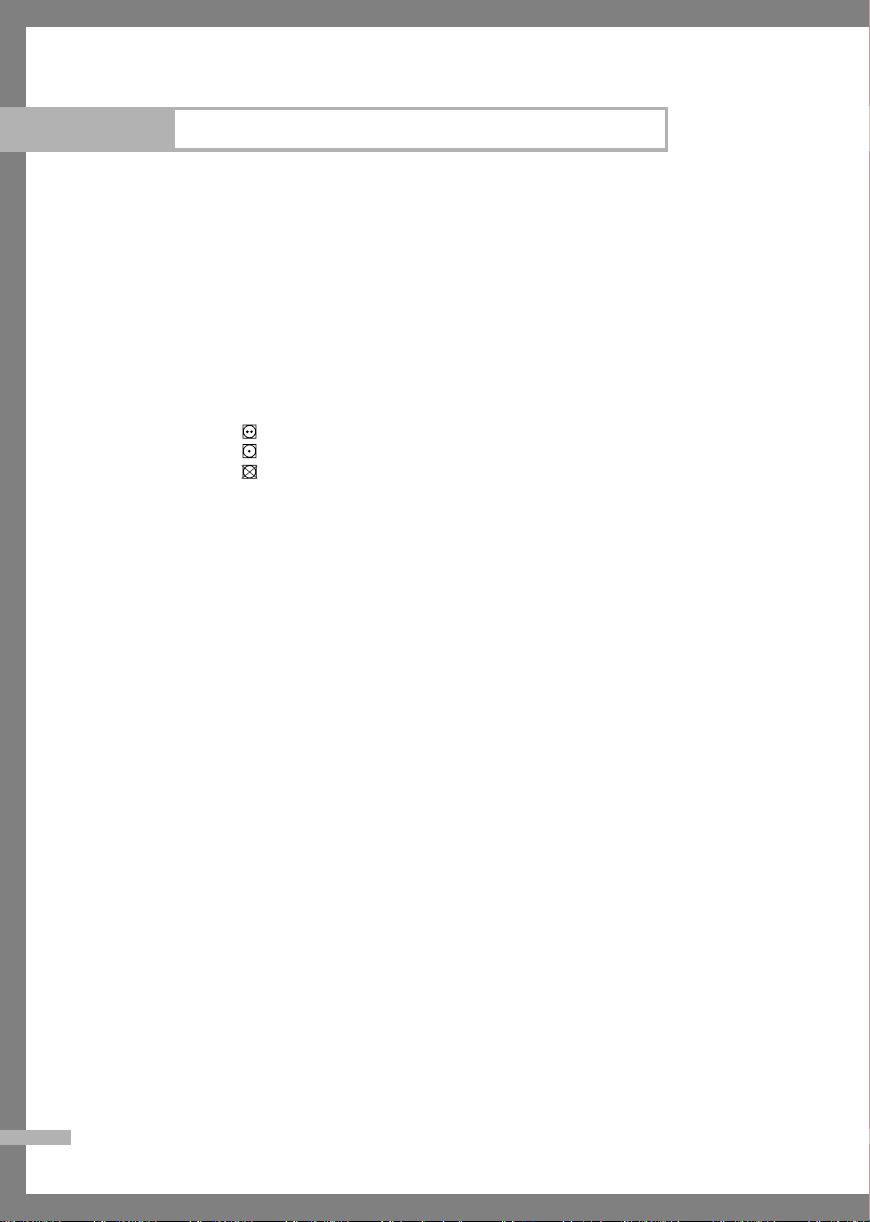
By care symbols
Suitable for tumble drying
Tumble drying at low temperature only
Do not tumble dry
By amount and weight
Lightweight fabrics dry faster than heavyweight fabrics. If mixed loads are
dried together(such as sheets and towels), remove the lighter weight fabrics to
prevent over drying and wrinkling.
Whenever the load is bigger than the dryer capacity, separate laundry according to weight.(ex, towels from thin underwear)
By type of fabrics
Cotton/Linen : Made of cotton or linen
Synthetics : Made of polyester or polyamide as well as for cotton/synthetic
mixes.
Delicates : Sensitive fabrics
By drying level
Extra dry, cupboard dry, iron dry, etc.
• Do not tumble dry the following items :
woolens, silk, delicate fabrics, nylon stocking, delicate embroidery, fiberglass
items, rubber-coated items, plastics, items with plastic trim, foam-filled items,
items with metallic decorations and bulky items such as sleeping bags, etc
- Clothing with metallic components may damage the drum interior during
drying.
• Do not overload.
Excessive loads don’t dry efficiently and cause wrinkling.
• Do not add fabric softener sheets once the load has become warm.
Polyester Knits & Permanent Press Drying Tips
• DO NOT OVERLOAD- Garments being dried or de-wrinkled should tumble
freely.
• REMOVE CLOTHES PROMPTLY- To help prevent wrinkling, remove clothes
from the dryer promptly at the end of the drying cycles.
• PLACE ON HANGERS- Permanent press and polyester knit garments look best
if placed on hangers after drying.
PROGRAM SELECTING GUIDE
SAMSUNG Clothes Dryers Owner’s Instructions
Page 13
Operating Instructions, Tips
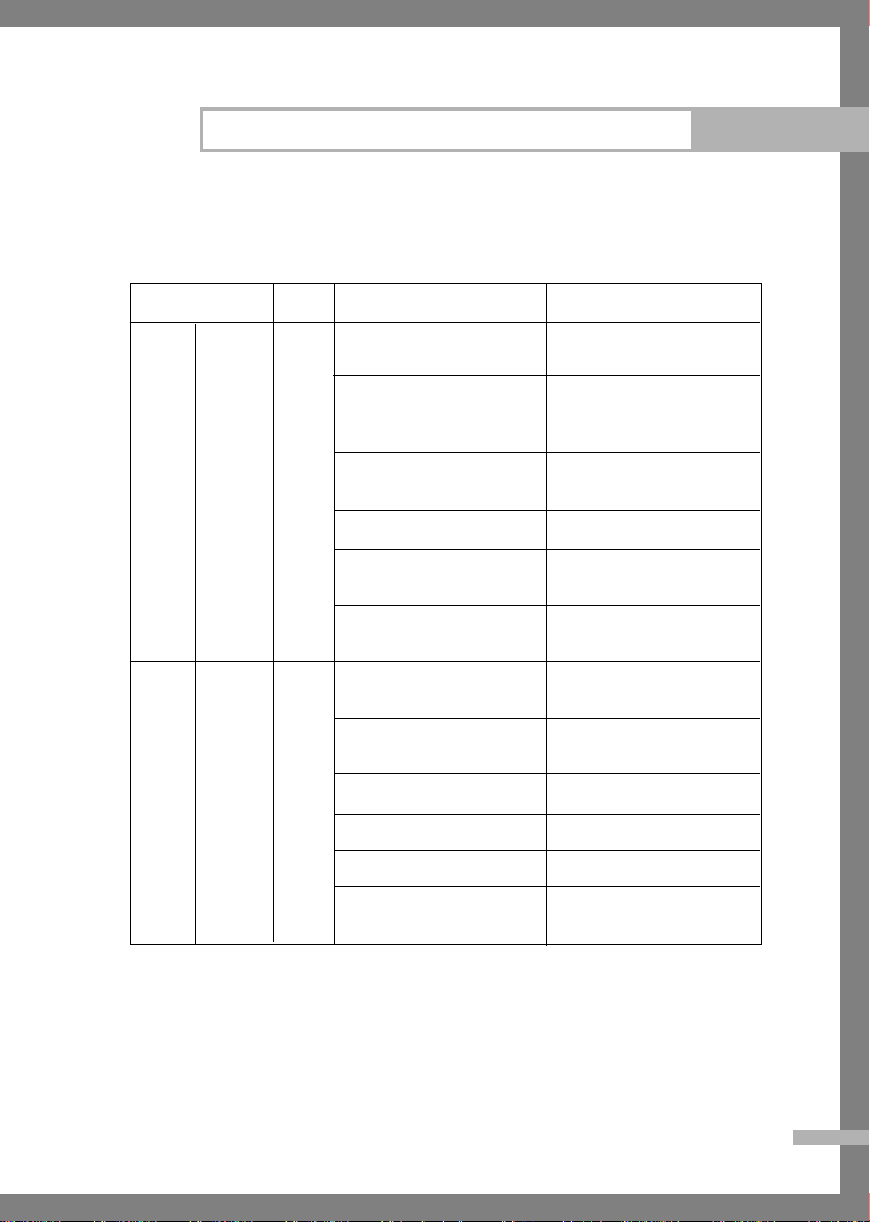
Programs Max. Laundry Type Example for
Cotton
Synthetic
Extra
Very
Cupboard
Light
Iron
Rotary Iron
Extra
Very
Cupboard
Light
Iron
Load
5kg
2.5kg
Heavy weight or mult-layered Track suits, Towelling
fabrics materials, bath robes
Fabrics of medium weight, Jeans, Towel laundry,
articles not made up hand towels
of mult-layers
Normal cotton and linen Sheets, and pillowcase,
articles tablecloths, cotton trousers
lightweight materials Cotton shirt and underwear
Cotton and linen articles to be Tablecloths and shirts
ironed.
For leaving items partially Cotton underwear
damp
Heavyweight or mult_layered Sweatshirts, bed linen
fabrics and table linen
Fabrics of medium weight Easycare fabric shirts,
baby clothes and wool
Normal synthetic fabrics Delicate dresses, skirts, shirts
Lightweight materials Blouses, dress shirts
Very delicate fabrics Easy care fabric and blouses
Rotary Iron
For leaving items partially Delicate underwear
damp
SAMSUNG Clothes Dryers Owner’s Instructions
13
Page 14

Operating Instructions, Tips
PROGRAM CHART
Programs Max. Low Temp Delay Heating Control Estimated Remark
Cotton
Synthetic
Wrinkle-Free
Time Dry
Aring
Extra
Very
Cupboard
Light
Iron
Rotary Iron
Extra
Very
Cupboard
Light
Iron
Rotary Iron
Load Select Start (Heater Turn Off) Time(3.6kg)
5kg
2.5kg
2.5kg
5kg
5kg
5kg
High/Low
Low
High/Low
o
50 ± 5˚C
o
48 ± 5˚C
o
47 ± 5˚C
o
45 ± 5˚C
o
43 ± 5˚C
o
39 ± 5˚C
o
47 ± 5˚C
o
46 ± 5˚C
o
41 ± 5˚C
o
40 ± 5˚C
o
49 ± 5˚C
o
38 ± 5˚C
x
x
x
x
x
35 ± 5˚C
50 ± 5˚C
No Heating
1 : 50
1 : 45
1 : 40
1 : 35
1 : 10
1 : 00
1 : 20
1 : 15
1 : 10
1 : 05
1 : 00
50
20
1: 30 ~ 20
50 ~ 20
50 ~ 20
DV5008J
DV5008J
DV5008J
DV5008J
DV5008J
DV5006
Drying Times
It is impossible to give exact drying times. Conditions from home to home vary and
directly affect drying times. The length of time it takes to dry loads will depend on
several things.
•
Load Size
•
Type of fabric, washer, and spin speed will determine moisture in the fabric.
•
Heat and moisture in the room. Damp air coming into the dryer will increase drying
time.
•
Installation (Length of exhaust duct, etc)
•
Electric voltage.
If you select an automatic cycle, the machine will determine the time needed for drying.
During the DRYcycle, the remaining time may be increased or decreased in order to
optimize dryness.
14
SAMSUNG Clothes Dryers Owner’s Instructions
Page 15
Care and Cleaning
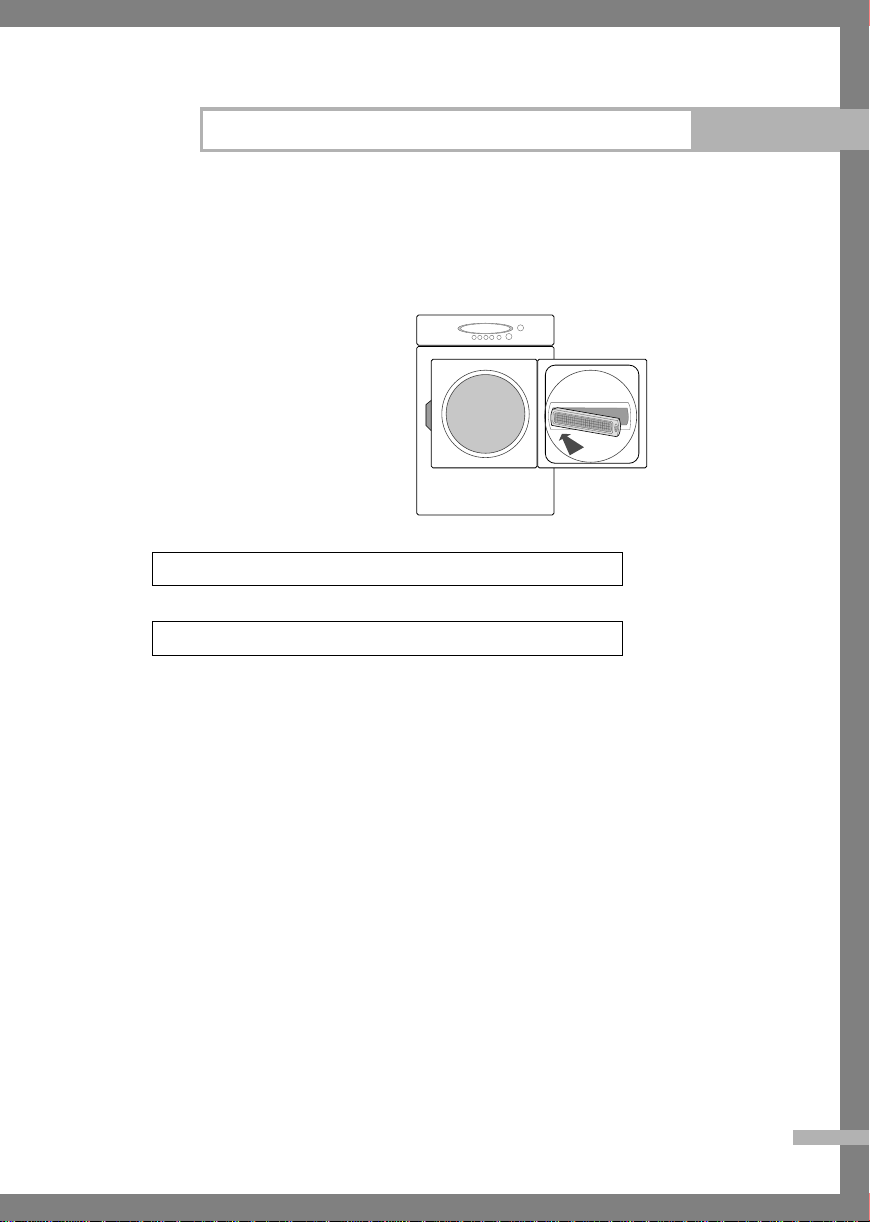
Cleaning the filter
Clean the filter before every use
Slide the grid out as shown
Clean the lint filter.
Put your moistened fingers at one corner
of the filter and wipe in a sideways
motion all the way across to the
other corner.
CLEAN LINT FILTER
AFTER EACH CYCLE
Do not operate the dryer without the grid in place.
Do not operate the dryer without the filter in place.
Periodically, remove the lint filter (it snaps in and out) and insert the suction
hose adapter from your vacuum cleaner into the opening.
Do the same through the rectangular opening at top or bottom of the door and at
the louvers on the cabinet front.
PULL
Dryer Exterior
Wipe off any spills or washing compounds. Wipe or dust with a damp cloth.
Try not to strike the surface with sharp objects.
Dryer control panel and finishes may be damaged by some laundry
pre-treatment soil and stain removing products. If such products are sprayed
on or have directcontact with the dryer, wipe the surface with a damp cloth.
Apply these pre-treatment products away from the dryer. The fabric may then be
washed and dried normally. Damage to your dryer caused by pre-treatment
products is not covered by your warranty.
SAMSUNG Clothes Dryers Owner’s Instructions
15
Page 16
Care and Cleaning
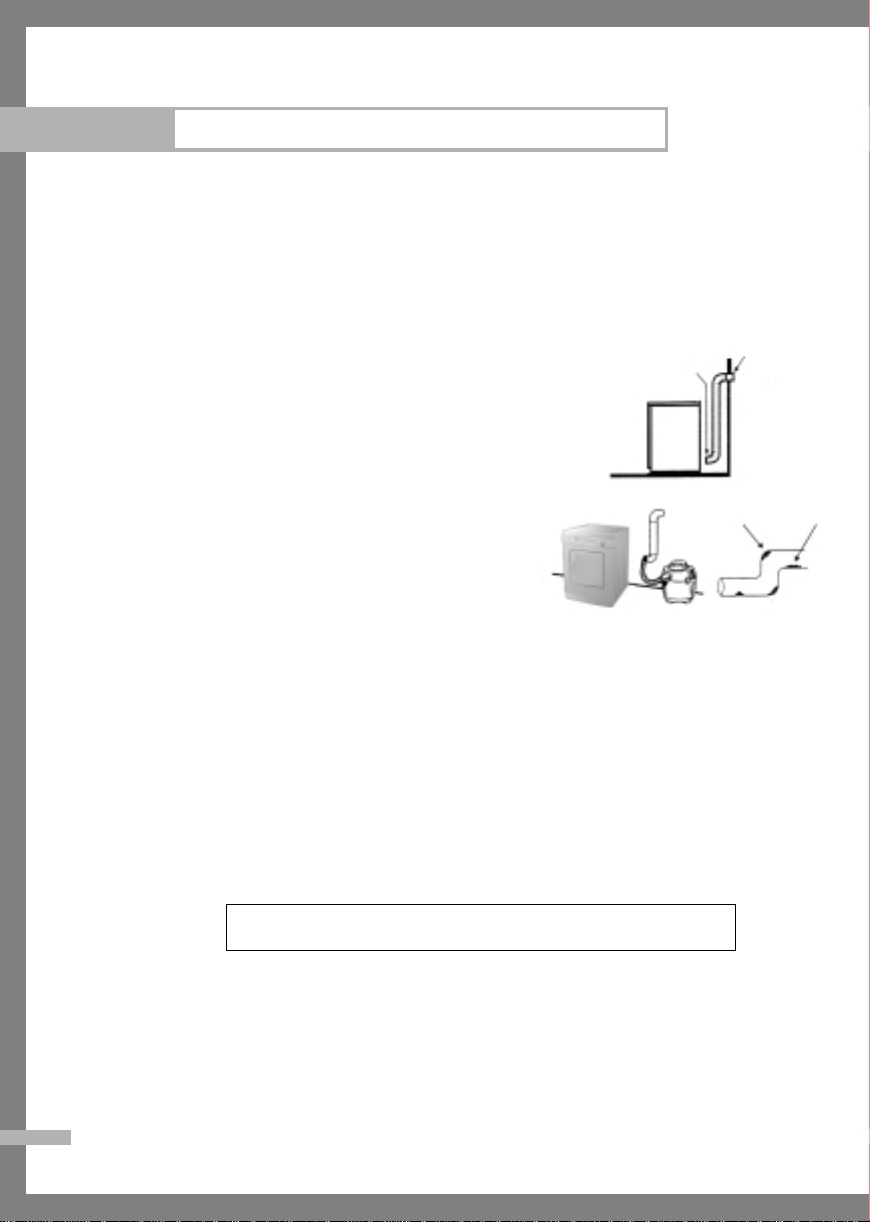
DRYER Vent
MAXIMIZE YOUR DRYER EFFICIENCYBY KEEPING THE
DUCTING CLEAN.
1. Disconnect or Turn off the electrical power.
2. Disconnect the ducting from the dryer.
3. Clean the ducting from the end where the
dryer is connected using:
• the hose attachment of your vacuum cleaner
• a duster attached to a pole (for straight
stretches) or to a drain cleaning wire (for less
accessible areas).
4. Inspect the wall vent and check that there is
sufficient possible air flow. Check that:
• the flap can move freely (use a mirror if
difficult to see)
• the flap is fully open when the dryer is running
• no wildlife (birds, insects,...) have nested inside the ducting.
CONNECTED
TO DRYER
Check turns in the exhaust
duct for any collected lint.
INSIDE THE DRYER CABINET
CLEANING LINT FROM YOUR DRYER
Combustible lint may collect on the inside of the dryer cabinet.
CLEAN EVERY2 TO 3 YEARS OR MORE OFTEN DEPENDING ON USAGE.
Cleaning should only be undertaken by a qualified service person.
EXHAUST HOOD
16
SAMSUNG Clothes Dryers Owner’s Instructions
ALWAYS VERIFY PROPER OPERATION AFTER SERVICING
Page 17

PROBLEM SOLVER
PROBLEM
DRYER WON’T
STAR T
CLOTHES
TAKE TOO
LONG TO DRY
SHRINKAGE,
GENERAL
WRINKLING
TO REMOVE
WRINKLES
POSSIBLE CAUSE
• Dryer unplugged. Make sure power cord is plugged in.
• No power to dryer. Check fuses and circuit breakers to make sure dryer is getting current.
Most electric dryers have two fuses so make sure you check both.
• Controls improperly set. Make sure the controls are set correctly and that the Start button is pressed.
Opening the door during operation stops the dryer. To restart, close the door and push the Start button.
• Dryer door is open. Close door securely - dryer will not run with the door open.
• Circuit is overloaded. Do not operate other appliances on the same electrical outlet or circuit
while the dryer is in use.
• Controls improperly set. Check all controls to make sure they are correctly set for the load you want to
dry. See the How to Operate Your Dryer section. as well as the Care and Cleaning section.
• Clogged lint filter. Clean the filter before every load. Periodically remove lint filter and clean area under
it with vacuum cleaner.
• Improper ducting. Make sure dryer is ducted in accordance with the Installation Instructions.
• Obstruction in exhaust ducting. Make sure ducting is clean and free of obstruction; make sure that the
flap on the outside wall operates easily. If flexible ducting is used, be sure it is not kinked and is
properly installed according to the Installation Instructions.
• Blown fuses or tripped circuit breakers. Check household fuses or circuit breakers. Most electric dryers
have two fuses. It is possible for one to be blown or tripped and the dryer still tumbles but with no heat.
• Mixed loads. Do not mix heavy or hard-to-dry items with lightweight articles.
• Large loads of moisture-holding fabrics, such as beach towels, can take a long time to dry.
• Too many items in dryer. Dry only one washer load at a time. Do not combine loads.
• Too few items in dryer. If drying only one article, add two more similar articles, even if dry, to ensure
proper tumbling.
• Some fabrics will shrink whether machine washed and tumble dried or washed by hand and
drip dried; others may be safely washed but will shrink in a dryer. Follow Garment
Manufacturers’Care Labels exactly. If in doubt, do not machine wash or tumble dry.
• Leaving clothes in dryer after tumbling stops. Remove clothes promptly and hang them
immediately.
• Improper loads. Avoid laundering heavy Permanent Press items, such as work clothes, with
lighter Permanent Press items, such as shirts or blouses. Do not wash or dry Permanent Press
with regular laundry.
• Failure to use fabric softener. Proper use of fabric softener will minimize wrinkling.
Try one or more of these suggestions
• If unsuccessful, re-tumble on high heat for 10-12 minutes and hang immediately
• Iron carefully
• Send to dry cleaners for pressing
• Some wrinkles may remain which cannot be removed.*
IF DRYER STILLDOES NOTOPERATE, call for Service. GIVE THE MODELAND
SERIALNUMBERS AND DESCRIBE THE SYMPTOMS OF THE DRYER.
SPECIFICATION
Type Tumble Dryer (Vented Dryer)
Dimension W598 x D550 x H844 mm
Weight 35kg
Heater Rating 2000W (240V)
Power Consumption 220V~240V(50Hz) 1900W~2200W
SAMSUNG Clothes Dryers Owner’s Instructions
17
Page 18
IN CASE THE NEED FOR
SERVICING ARISES
-Don't hesitate to call any AS center nearby
with your name, address and telephone
number when anything wrong with your
product occurs.
DC68-00711A-03
 Loading...