

Dryer
User manual
DV22K6800**
DV22K6800-03650A-00_EN (US)_151211.indd 1 2015-12-11 7:15:41
Before installation
English 9
Before installation
Read through the following instructions before installing the dryer, and keep this manual
for future reference.
WARNING
The control board and inlet valve are intentionally not grounded and may present a risk of
electric shock only during servicing.
Service personnel - Do not contact these parts while the appliance is energized.
Key installation requirements
• A grounded electrical outlet.
• A power cord for electric dryers (except
in Canada).
• An exhaust system made of rigid metal
or exible stiff-walled metal exhaust
ducting.
WARNING
Remove the door from all discarded
appliances to prevent a child from
suffocating.
Location considerations
• Adequate clearances between the dryer
and adjacent walls or other surfaces.
• Adequate air circulation for ventilation.
• Away from water and weather.
WARNING
• Make sure to exhaust the dryer
outdoors to reduce the risk of re.
• Keep the dryer area clear of
combustible materials, gasoline, and
other ammable vapors and liquids.
• Do not install other fuel-burning
appliances around or in the same place
as the dryer.
Alcove or closet installation
Minimum clearances between the dryer
and adjacent walls or other surfaces are:
3” (76mm) in front, 17” (432 mm) on top,
0”(0mm) on either side, and 3’’ (76mm) in
the back.
The closet front must have two
unobstructed air openings for a combined
minimum total area of 72 in² (465 cm²)
with 3” (7.6 cm) minimum clearance on
the top and bottom. A louvered door with
equivalent space clearance is acceptable.
DV22K6800-03650A-00_EN (US)_151211.indd 9 2015-12-11 7:15:42
Before installation
Before installation
English10
5.5”
(140 mm)
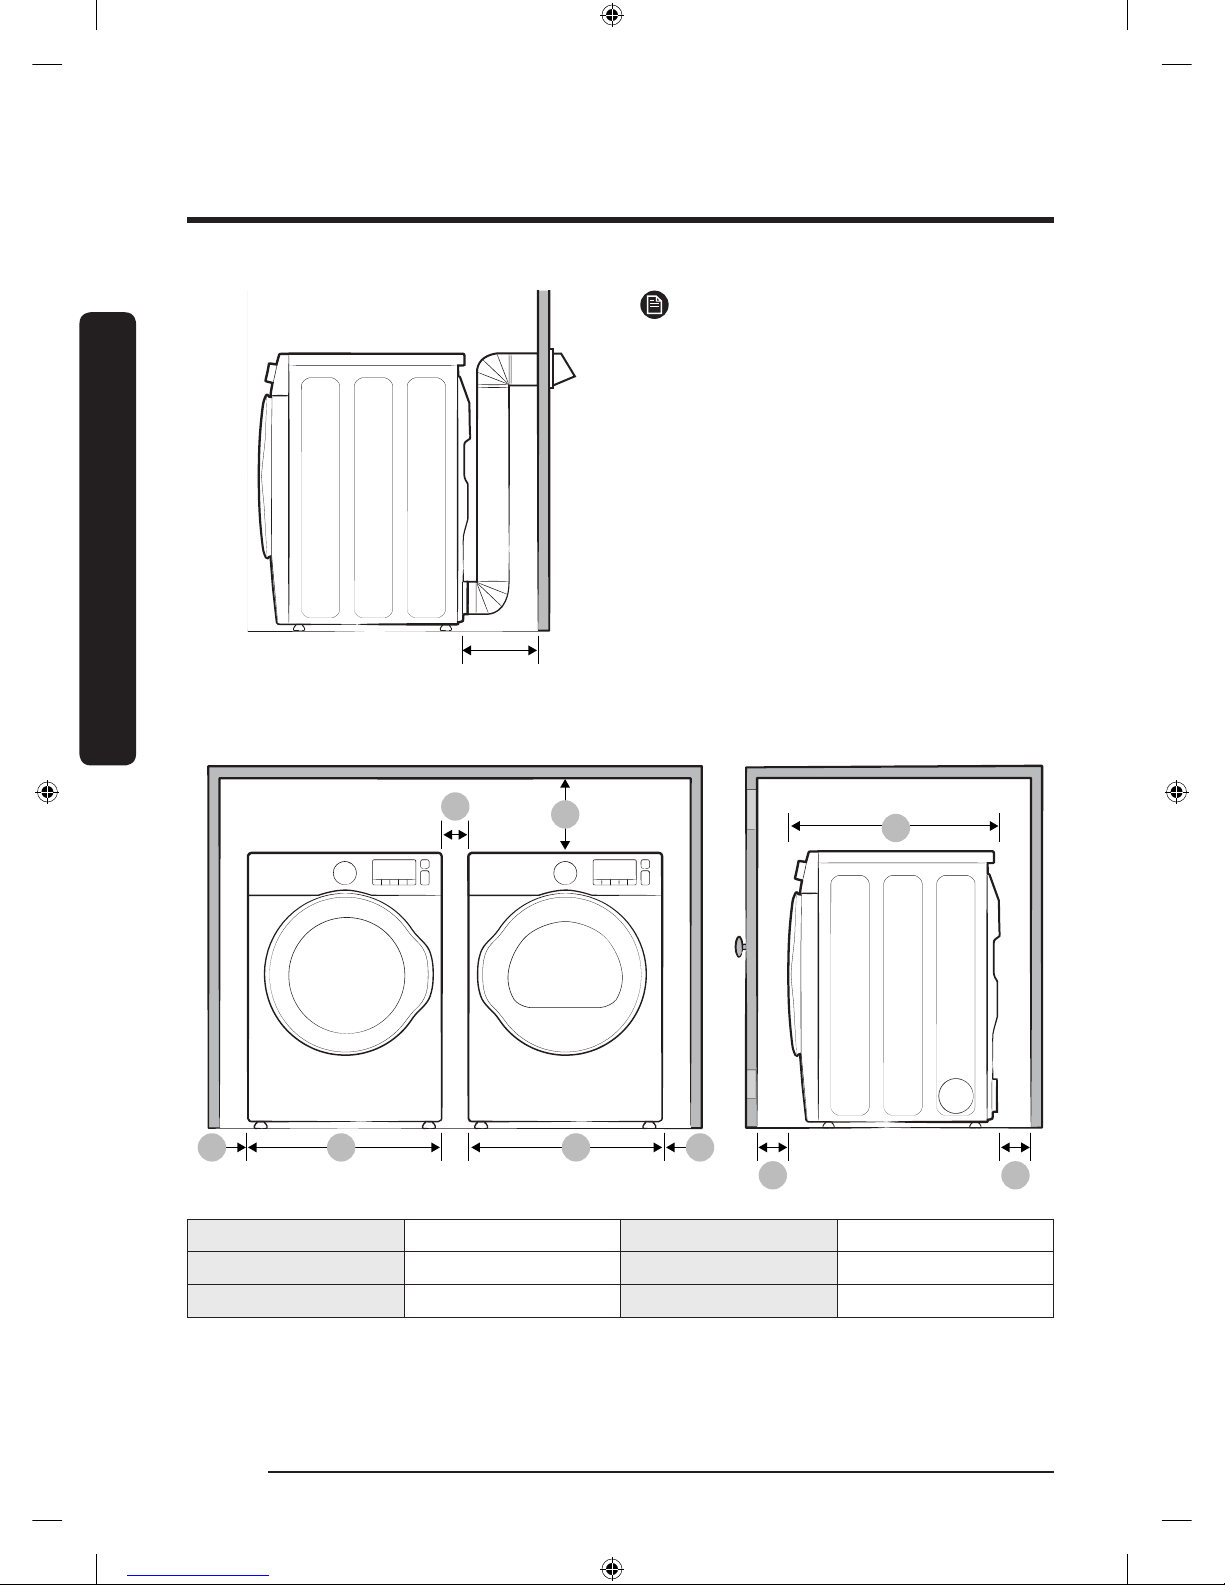
NOTE
When the exhaust duct is installed at the
rear of the dryer, the rear must have at
least 5.5 inch (140 mm) clearance.
Side by side installation
A
E
A
A
C
B B
F
D
A* 1 in. (25 mm) D 25.8 in. (655 mm)
B 23.6 in. (600 mm) E 3 in. (76mm)
C 17 in. (432 mm) F 3 in. (76mm)
*Disregard this minimum clearance if the dryer is installed alone.
DV22K6800-03650A-00_EN (US)_151211.indd 10 2015-12-11 7:15:42
Before installation
English 11
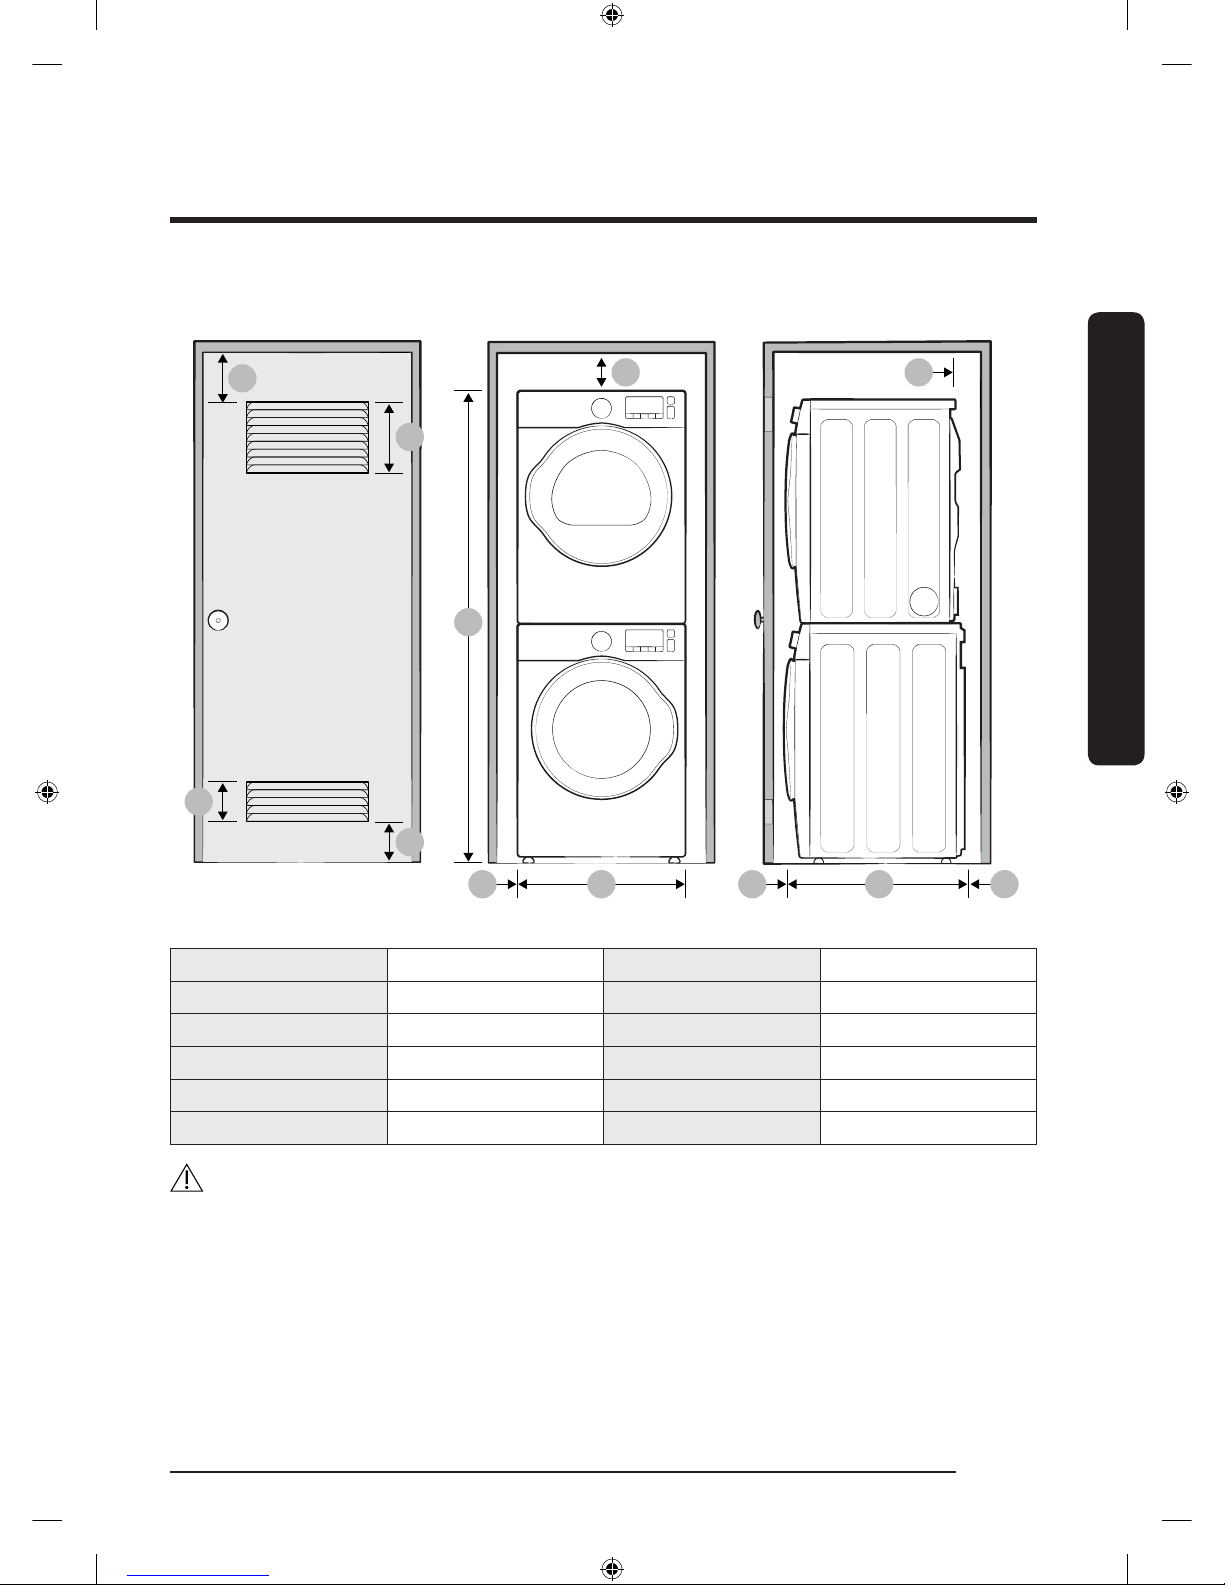
Stacked installation (Model: SK-DH)
A
LG
C
D
B
F
H J K
I
E
A 3 in. (76 mm) G 1 in. (25 mm)
B 48 in². (310 mm²) H 23.6 in. (600 mm)
C 24 in². (155 mm²) I 5.5 in. (140 mm)
D 3 in. (76 mm) J 3 in.(76 mm)
E 6 in. (152 mm) K 26.6 in. (676 mm)
F 67 in. (1702 mm) L 4.75 in. (120 mm)
WARNING
Samsung’s washers and dryers can be stacked to maximize usable space.
You can purchase an optional stacking kit from your Samsung retailer.
DV22K6800-03650A-00_EN (US)_151211.indd 11 2015-12-11 7:15:42
Before installation
Before installation
English12
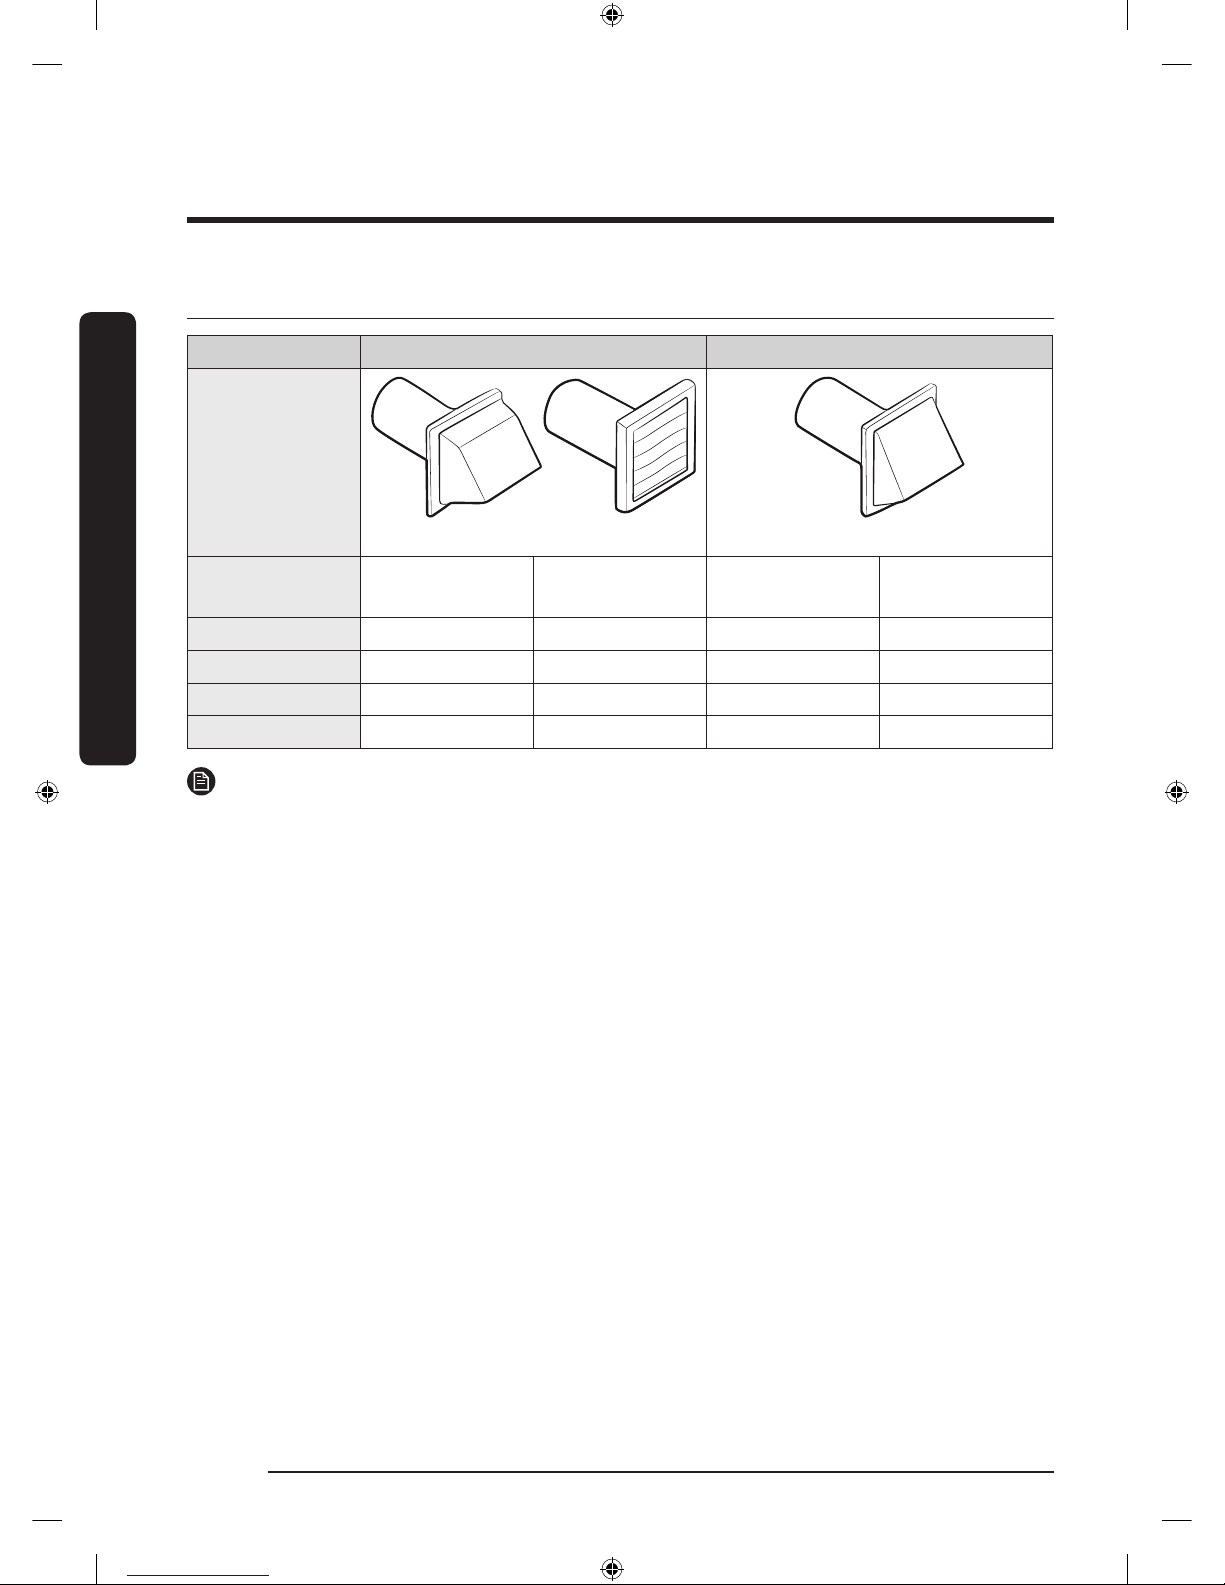
Ducting requirements
Recommended Use only for short-run installation
Weather hood
type
4” (10.2 cm)
2.5” (6.4 cm)
No. of 90°
elbows
Rigid
Metallic
exible*
Rigid
Metallic
exible*
0 80 ft. (24.2 m) 40 ft. (12.2 m) 60 ft. (28.3 m) 30 ft. (9.1 m)
1 60 ft. (28.3 m) 35 ft. (10.7 m) 45 ft. (13.7 m) 22 ft. (6.7 m)
2 45 ft. (13.7 m) 25 ft. (7.6 m) 35 ft. (10.7 m) 17 ft. (5.2 m)
3 35 ft. (10.7 m) 20 ft. (6.1 m) 25 ft. (7.6 m) 12 ft. (3.7 m)
NOTE
* Use a 4-inch (10.2 cm) diameter rigid aluminum or galvanized steel duct.
If you integrate the dryer’s vent system with an existing exhaust system:
• Make sure the exhaust system meets all applicable local, state, and national regulations.
• Verify you are not using exible plastic duct.
• Make sure to check for and remove all lint buildup from inside the existing ducts.
• Conrm the duct is not kinked or crushed.
• Make sure the exhaust hood damper opens and closes freely.
Manometer measurements
The static pressure in any exhaust system must not exceed 0.83 inches of water column
or be less than 0. Note that these values are measured with the dryer running with a
manometer presented to the exhaust duct that connects to the dryer. The dryer tumbler
must be empty and lint lter clean.
DV22K6800-03650A-00_EN (US)_151211.indd 12 2015-12-11 7:15:42
Before installation
English 13
Exhausting requirements
The dryer must not be exhausted into a
chimney, a wall, a ceiling, an attic, a crawl
space, or a concealed space of a building.
Exhausting the dryer to the outside will
prevent large amounts of lint and moisture
from being blown into the room.
In the United States and Canada
• All dryers must be exhausted to the
outside.
• The required exhaust duct is 4 inches
(10.2 cm) in diameter.
• See “Ducting requirements” in the
“Installation” section for the maximum
duct length and number of bends that
can be used.
• The total length of exible metal duct
must not exceed 7’ 10½” (2.4 m).
• Do not assemble the duct with screws
or other fasteners that extend into the
duct and can catch lint.
• For the United States only: Use only
those foil-type exible ducts, if any,
specically identied for use with the
appliance by the manufacturer and that
comply with the Outline for Clothes
Dryer Transition Duct. Use Subject
2158A.
• For Canada only: Use only those foil-
type exible ducts, if any, specically
identied for use with the appliance by
the manufacturer.
Outside the United States and Canada
• Refer to the local codes.
WARNING
• You must exhaust the dryer to the
outside to reduce the risk of re when
you install the dryer in an alcove or
closet.
• Do not use a plastic or non-metal
exible duct.
• If your existing ductwork is plastic, nonmetal, or combustible, replace it with
metal.
• Use only a metal exhaust duct that is
non-ammable to ensure containment
of exhaust air, heat, and lint.
DV22K6800-03650A-00_EN (US)_151211.indd 13 2015-12-11 7:15:43

Before installation
Before installation
English14
Electrical requirements
The wiring diagram is located on the plate
under the control panel or rear frame.
WARNING
• Improperly connecting the equipment
grounding conductor can result in a
risk of electric shock. Check with a
qualied electrician or serviceman if
you are in doubt as to whether your
dryer is properly grounded. Do not
modify the plug provided with your
dryer – if it doesn’t t the outlet, have
a proper outlet installed by a qualied
electrician.
• To prevent unnecessary risk of re,
electrical shock, or personal injury, all
wiring and grounding must be done in
accordance with local codes, or in the
absence of local codes, in accordance
with the National Electrical Code, ANSI/
NFPA No. 70-Latest Revision (for the
U.S.) or the Canadian Electrical Code CSA
C22.1 – Latest Revisions and local codes
and ordinances. It is your responsibility
to provide adequate electrical service
for your dryer.
Grounding
This dryer must be grounded. In the event
of a malfunction or breakdown, the ground
will reduce the risk of electrical shock by
providing a path of least resistance for the
electrical current.
WARNING
• Your dryer has an optional cord with
an equipment-grounding conductor
and a grounding plug. This cord is sold
separately.
• The plug must be plugged into an
appropriate outlet that is properly
installed and grounded in accordance
with all local codes and ordinances.
• Do not modify the plug provided with
your dryer – if it doesn’t t the outlet,
have a proper outlet installed by a
qualied electrician.
• If a power cord is not used and the
electric dryer is to be permanently
wired, the dryer must be connected to
a permanently grounded metal wiring
system, or an equipment grounding
conductor must be run with the circuit
conductors and connected to the
equipment grounding terminal or lead
on the dryer.
Electrical connections
Before operating or testing, follow all
grounding instructions in the “Grounding”
section. An individual branch (or separate)
circuit serving only your dryer is
recommended.
Do not use an extension cord.
DV22K6800-03650A-00_EN (US)_151211.indd 14 2015-12-11 7:15:43

Before installation
English 15
U.S. only
Most U.S. dryers require a 120 / 240 volt,
60 Hz AC approved electrical service.
Some require 120 / 208 volt, 60 Hz
approved electrical service. The electric
service requirements can be found on
the data label located behind the door.
A 30-ampere fuse or circuit breaker on
both sides of the line is required.
• If a power cord is used, the cord
should be plugged into a 30-ampere
receptacle.
• The power cord is not provided with
U.S. electric model dryers. This cord is
sold separately.
WARNING
Risk of Electric Shock
When local codes allow, you can connect
the dryer’s electrical supply with a new
power supply cord kit, marked for use with
a dryer, that is U.L. listed and rated at a
minimum of 120/240 volts, 30-amperes
with three No. 10 copper wire conductors
terminated with closed loop terminals,
open-end spade lugs with turned up ends,
or with tinned leads.
• Do not reuse a power supply cord from
an old dryer. The power cord electric
supply wiring must be supported at the
dryer cabinet by a suitable UL-listed
strain relief.
• Grounding through the neutral
conductor is prohibited for (1) new
branch-circuit installations, (2) mobile
homes, (3) recreational vehicles, and
(4) areas where local codes prohibit
grounding through the neutral
conductor. (Use a 4-prong plug for a
4 wire receptacle, NEMA type 14-30R.)
Canada Only
• A 120 / 240 volt, 60 Hz AC approved
electrical service fused through a
30-ampere fuse or circuit breaker on
both sides of the line is required.
• All Canadian models are shipped
with the power cord attached. The
power cord should be plugged into a
30-ampere receptacle.
NOTE
In Canada, you may not convert a dryer to
208 volts.
DV22K6800-03650A-00_EN (US)_151211.indd 15 2015-12-11 7:15:43
 Loading...