

Samsung NP930X2K-K01US, DP700A7K-K01US Product manual

User Manual
www.samsung.com

•
This user manual describes procedures for using the touchpad
About this manual
•
This user manual is specially designed to detail the computer’s
functions and features.
•
The user manual supplied with the computer may vary
depending on the model.
•
Please read this manual before using the computer to ensure
safe and proper use.
•
Optional items, some devices and software referred to in the
user manual may not be provided or subject to upgrades.
Note that the computer environment referred in the user
manual may not be the same as your environment.
•
Descriptions are based on the computer’s default settings
and Windows 8.1 operating system. Available features and
additional services may vary by computer or operating
system.
and mouse. Instructions for using the touch screen are for
models with the touch screen feature.
•
Images and screenshots are those of the representative model
of the series and may differ in appearance from the actual
product.
•
Content may differ from the final product and is subject to
change without prior notice. For the latest version of the
manual, refer to the Samsung website,
www.samsung.com
.
2

About this manual
Instructional icons and
expressions
Warning: situations that could cause injury to yourself or
others
Caution: situations that could cause damage to the
computer or other equipment
Note: notes, usage tips, or additional information
The order of options or menus you must select to perform
a step. For example, select the
(represents select the
Select Click or touch. For example, when using a mouse or
touchpad, select
Settings
Settings
Settings
charm and then
means click
charm →
Settings
Power
Power
. When
Copyright
© 2014 Samsung Electronics Co., Ltd.
This manual is protected under international copyright laws.
No part of this manual may be reproduced, distributed, translated,
or transmitted in any form or by any means, electronic or
mechanical, including photocopying, recording, or storing in any
information storage and retrieval system, without the prior written
permission of Samsung Electronics.
Computer specifications or the contents of this manual may
be changed without prior notice due to an upgrade of the
computer’s functions.
).
using a touch screen, it means touch
Settings
.
3
About this manual
Trademarks
HDMI, the HDMI logo, and the
term High Definition Multimedia
•
Samsung and the Samsung logo are trademarks or registered
trademarks of Samsung Electronics.
•
Intel and Core are trademarks or registered trademarks of the
Intel Corporation.
•
Microsoft, MS-DOS, and Windows are trademarks or registered
trademarks of the Microsoft Corporation.
•
Bluetooth® is a registered trademark of Bluetooth SIG, Inc.
worldwide.
•
Wi-Fi®, Wi-Fi Protected Setup™, Wi-Fi Direct™, Wi-Fi
CERTIFIED
the Wi-Fi Alliance.
, and the Wi-Fi logo are registered trademarks of
™
Interface are trademarks or
registered trademarks of HDMI
Licensing LLC.
As an ENERGY STAR® Partner,
Samsung has determined that this
product meets the ENERGY STAR
guidelines for energy efficiency.
•
The ENERGY STAR Program has reduced greenhouse gas
emissions and saved energy through voluntary labeling.
•
Power management setting of this product have been
enabled by default, and have various timing settings from
1 minute to 5 hours.
•
The product can wake with a button press on the chassis from
sleep mode.
®
•
All other trademarks and copyrights are the property of their
respective owners.
4

About this manual
Caution for the data
Samsung Electronics shall not be liable for any data loss. Please
take care to avoid losing any important data and back up your
data to prevent any such data loss.
Operating system and software
support
If you change the product’s factory OS (Operating System) to
another OS or if you install software which is not supported by the
product’s original factory OS, you will not receive any technical
support, product exchange or refund, and a fee will be charged
when requesting a service.
Please use your computer with the original factory OS. If you
install an OS other than the factory OS, data may be deleted or the
Product capacity representation
Storage capacity representation
The capacity of the storage device (HDD, SSD) of the manufacturer
is calculated assuming that 1KB=1,000 Bytes.
However, the operating system (Windows) calculates the storage
device capacity assuming that 1KB=1,024 Bytes, and therefore the
capacity representation of the HDD in Windows is smaller than
the actual capacity due to the difference in capacity calculation.
For example, for an 80GB HDD, Windows represents the capacity
as 74.5GB, 80x1,000x1,000x1,000 byte/(1,024x1,024x1,024)byte =
74.505GB.
In addition, the capacity representation in Windows may be even
smaller because some programs such as Recovery may reside in a
hidden area of the HDD.
computer may not start.
Recommended screen resolutions
The recommended screen resolution for Windows is “FHD”
(1,920x1,080) and for Windows 8.1 is “QHD+” (3,200x1,800).
If you set the resolution higher than the recommended value, it
may result in problems with some applications, due to limitations
of the operating system.
Memory capacity representation
The memory capacity reported in Windows is less than the actual
capacity of memory. This is because BIOS or a video adapter uses
a portion of memory or claims it for further use. For example,
for 1GB(=1,024MB) memory installed, Windows may report the
capacity as 1,022MB or less.
5

Table of contents
Getting started
7 Layout
12 Turning the computer on
and off
14 Unlocking the screen
15 Windows
Basics
16 Using a wired keyboard/
mouse (Optional)
18 Using a wireless keyboard/
mouse (Optional)
26 LCD brightness
28 Volume
29 Using the product as a
monitor (Optional)
30 Playing music from
smartphones directly
through the computer
speakers (Optional)
33 Using the TV (Optional)
37 Using the Remote Control
(Optional)
40 Setup utility (BIOS)
Network & Internet
45 Wired LAN
48 Wireless LAN
Applications
51 Using applications
52 Settings
53 Software Update
54 Support Center
55 ATIV Help (Self-help
application solutions)
56 Quick Starter
56 Samsung Link (Optional)
External devices
59 Memory card
62 External display
63 Using the Security Slot
Troubleshooting
64 Recover/Backup
70 Windows recovery
function
70 Q&A
Appendix
75 Product specifications
76 Ergonomic tips
80 Safety precautions
93 Important safety
information
96 Replacement parts and
accessories
98 Regulatory compliance
statements
115 WEEE symbol information
117 Samsung package Take-
Back program
6
Getting started
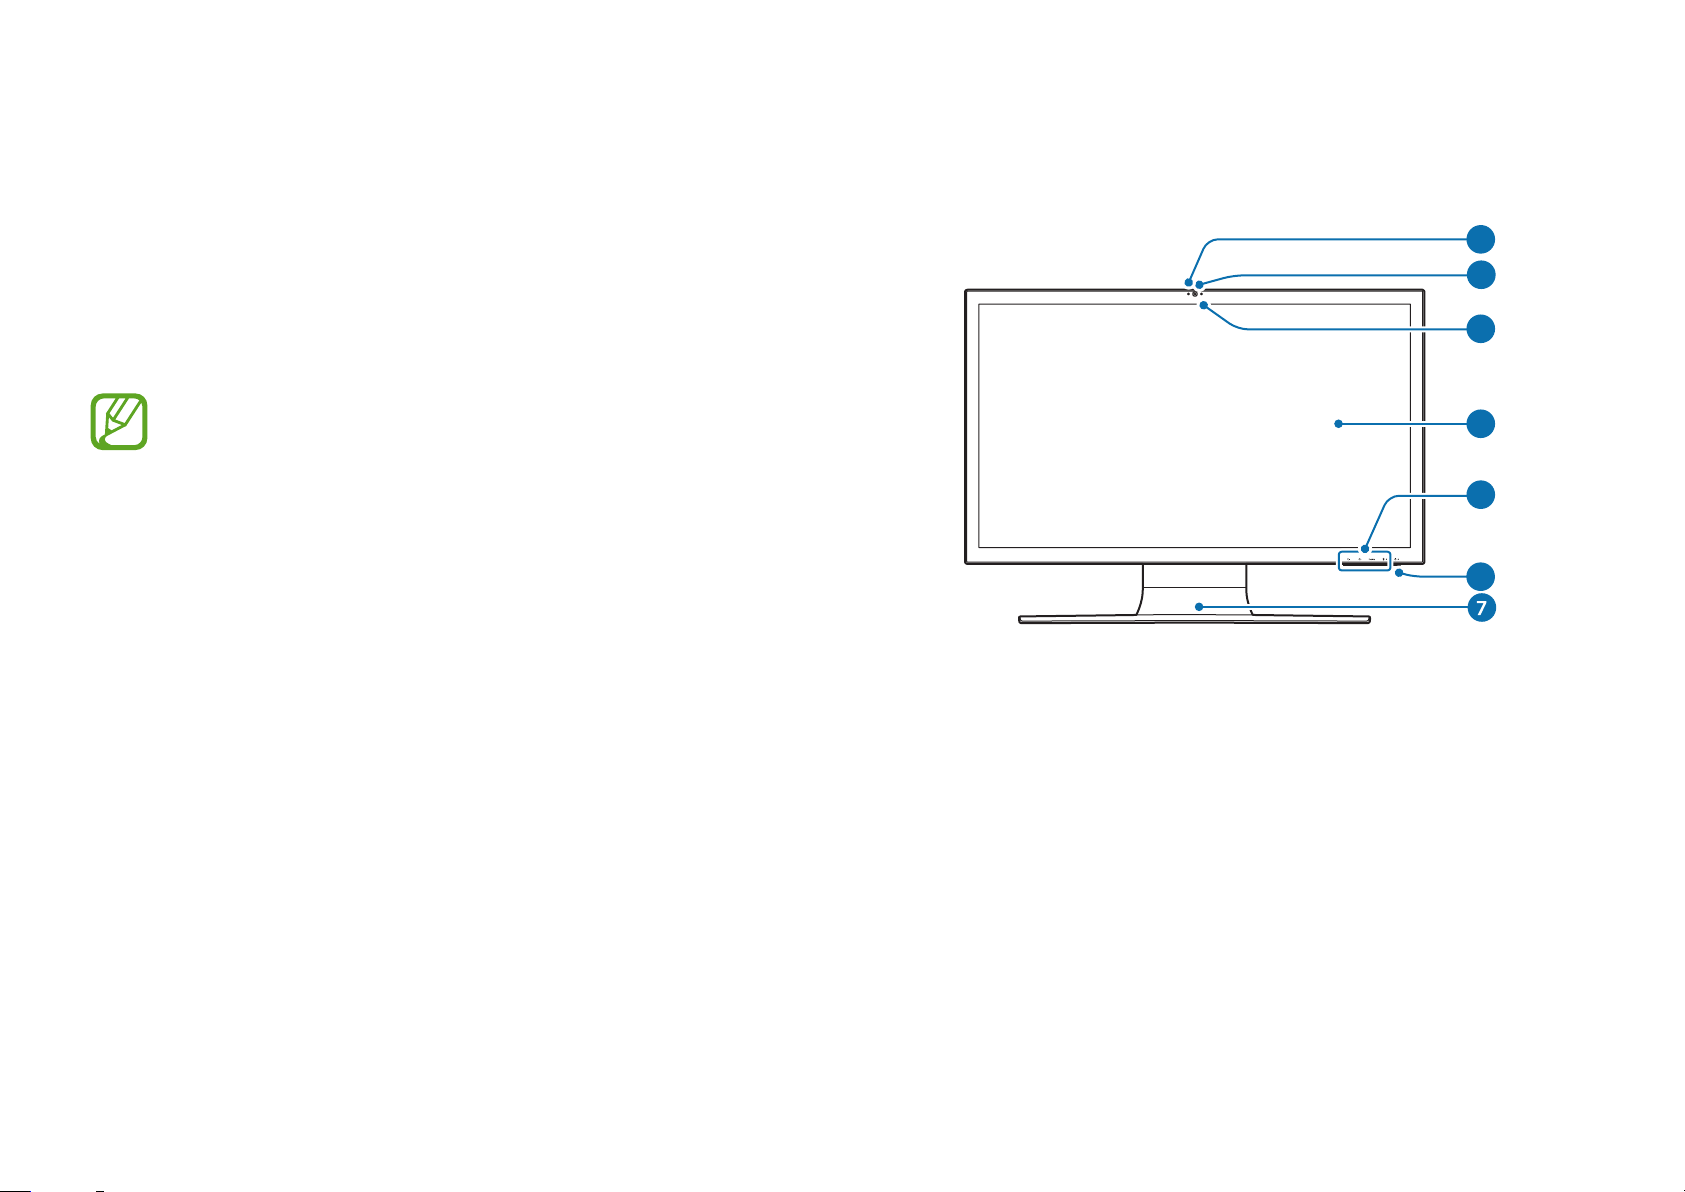
Front view
1
2
Layout
•
Features or options may differ depending on the model.
•
The items marked as optional may not be provided or
may be provided in different locations.
3
4
5
6
7
Getting started
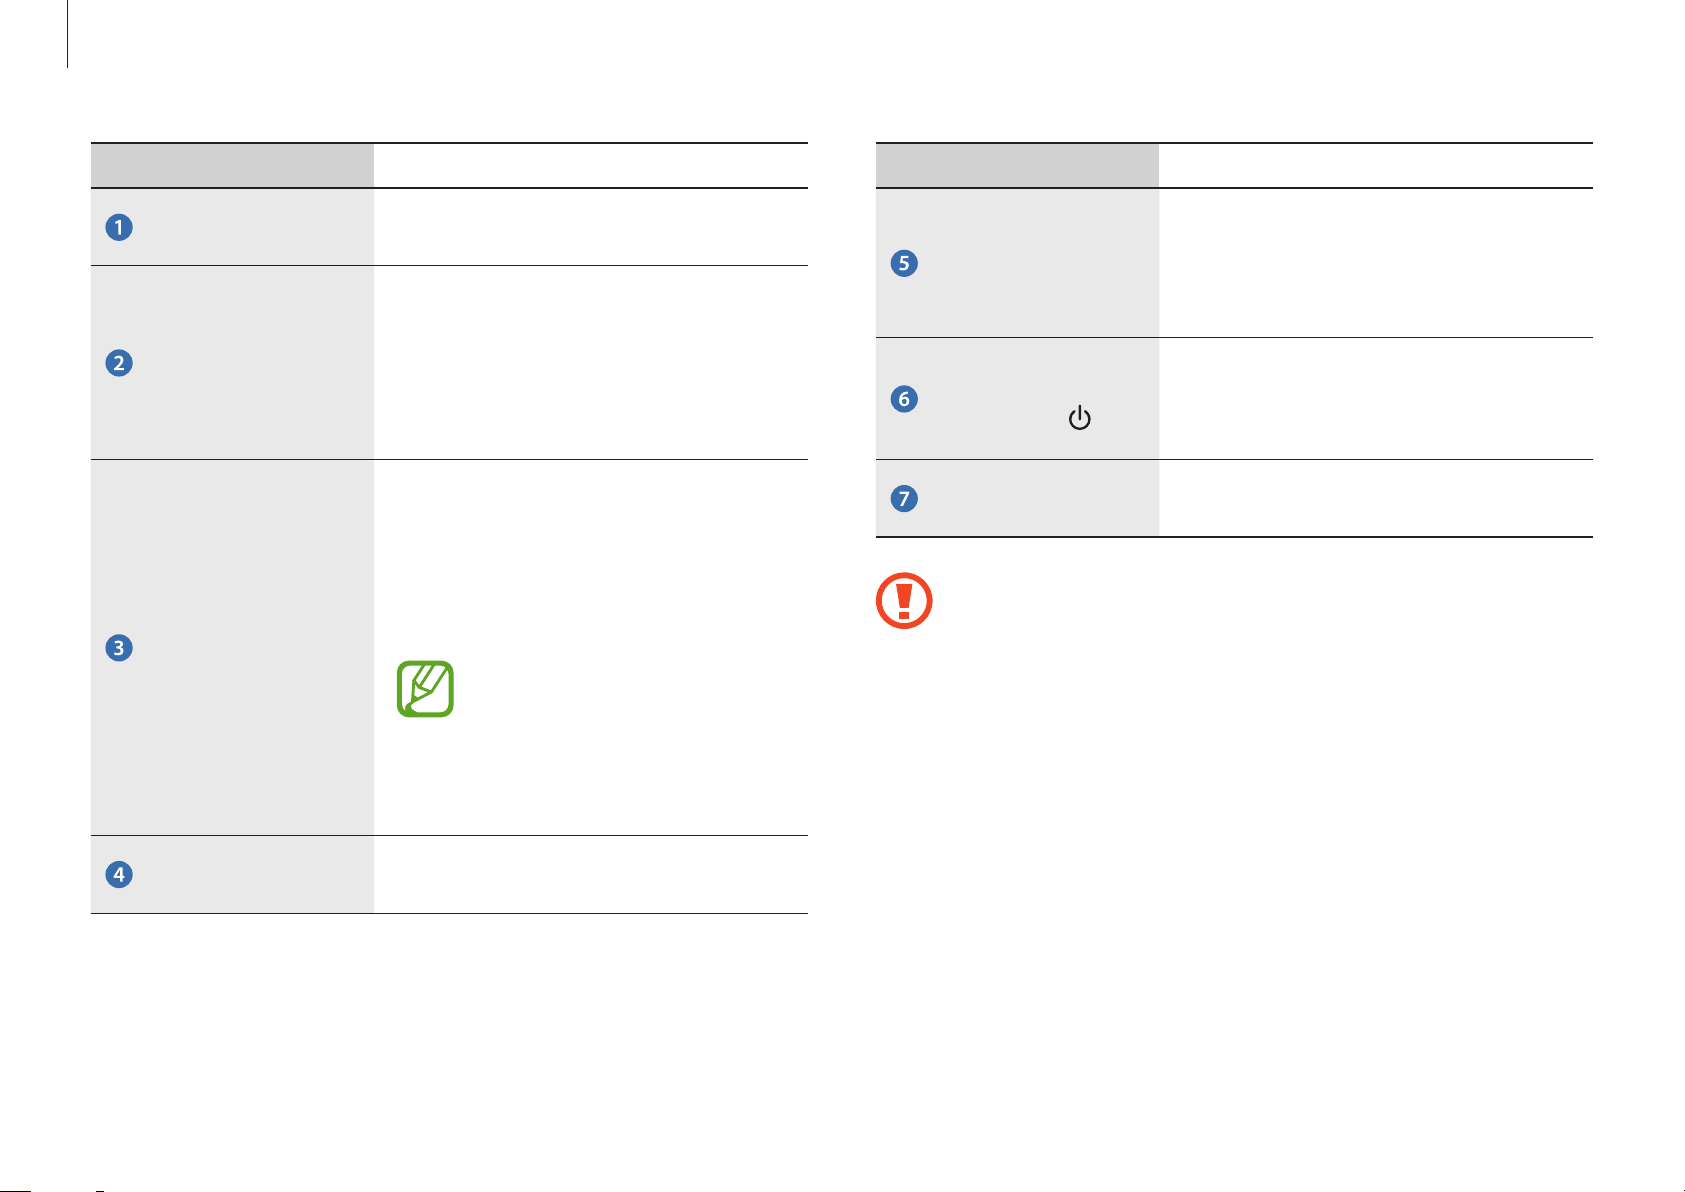
Number/Name Description
Camera indicator
light
Camera
Remote Control
Sensor (Optional)
•
This indicates the camera
operating status.
•
Using this camera, you can take
still pictures and record video.
•
You can take a picture or make a
movie using the
→
Camera
•
If a user presses a button on the
remote control, the sensor detects
the signal from the remote control
and the computer performs the
corresponding action.
When using the remote
control, take care not to block
the sensor. If the sensor is
.
Charms
→
Start
Number/Name Description
Control
buttons (for
corresponding
models only)
Power Button/
Power LED
Stand
•
Do not place your hand between the stand and the
back of the monitor. It may result in a hand injury.
•
To change the angle of the display, hold the display’s
edges and adjust it to the desired angle.
•
Do not apply downward force to the product when it is
•
You can adjust various functions
by pressing the control buttons at
the bottom of the monitor.
•
Turns the computer on and off.
•
When the computer is on, the
power LED is lit.
•
This is the stand supporting the
computer.
LCD
blocked, the remote control
will not function.
•
The screen images are displayed
here.
placed face down. It may damage the LCD.
8
Getting started
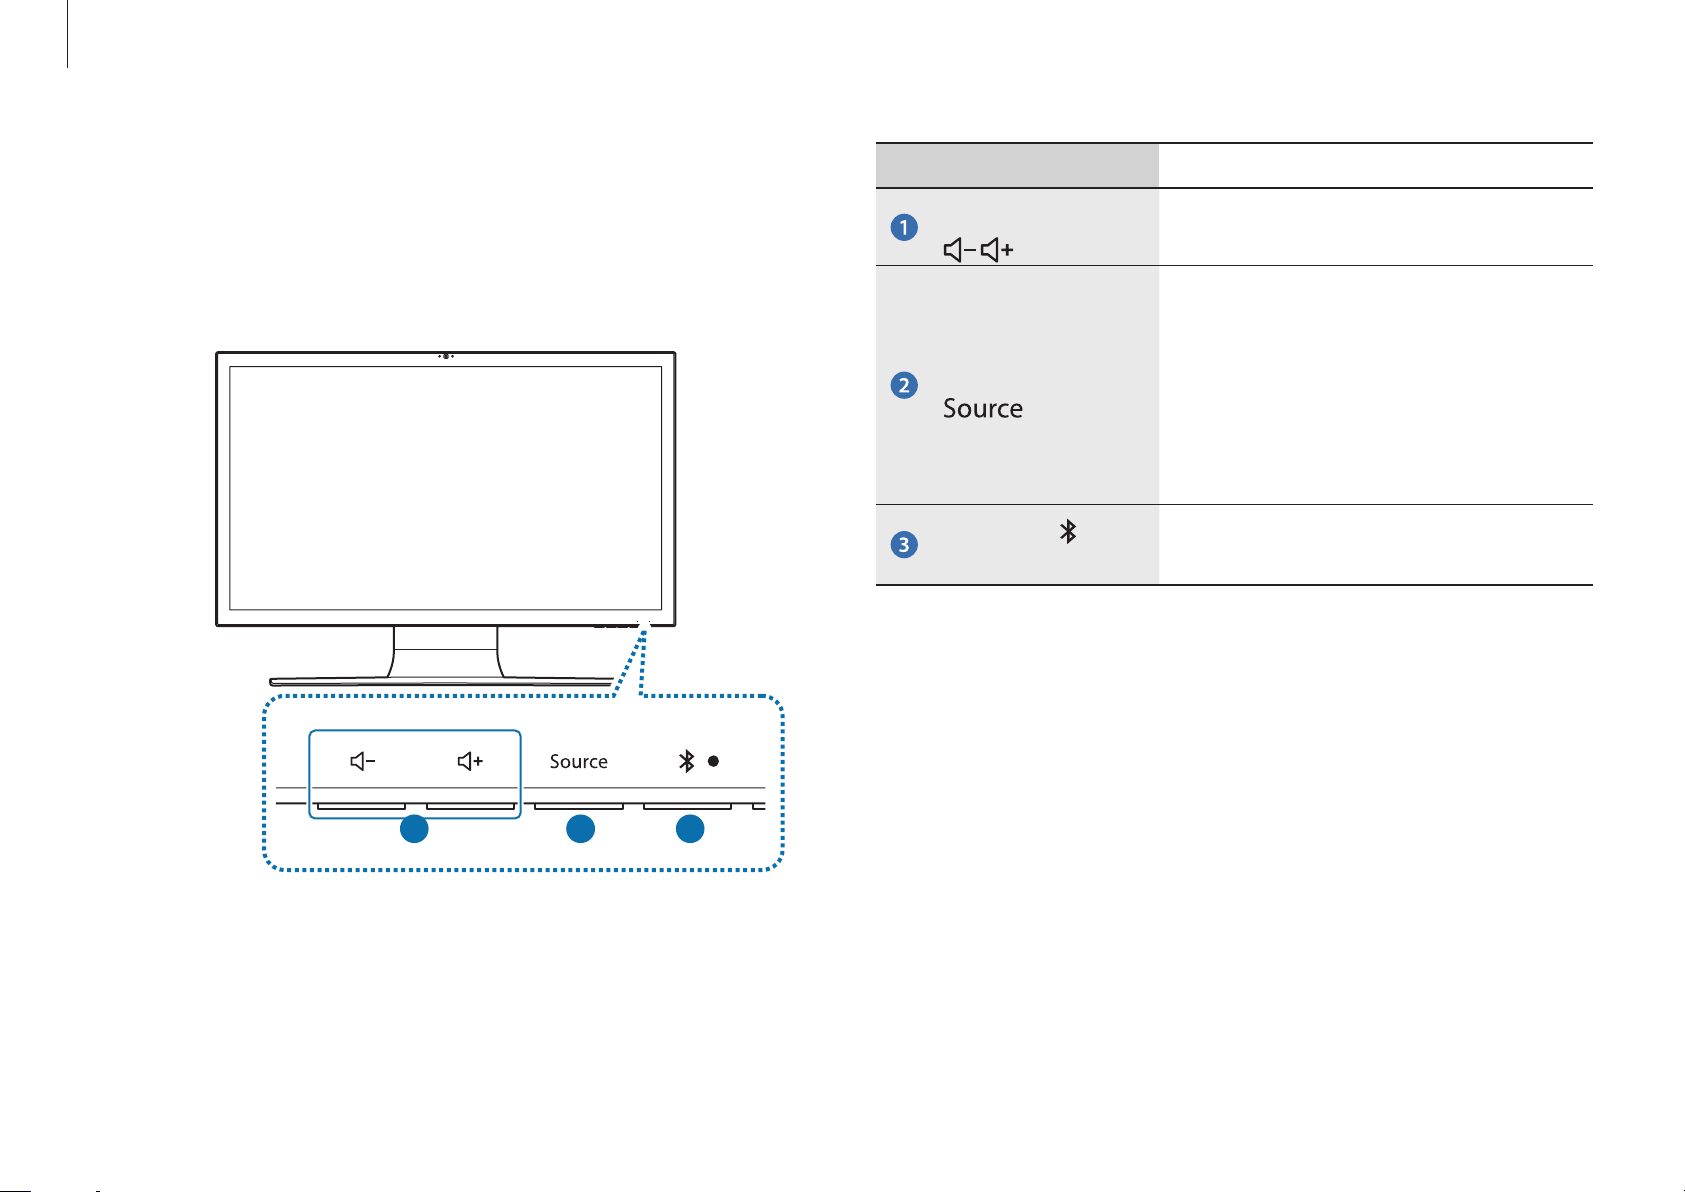
Control buttons (for corresponding models
only)
Use the buttons at the bottom of the monitor to control various
functions.
Number/Name Description
Volume Control
Mode Selection
Bluetooth
(Optional)
•
Adjust the volume.
•
Switches between the
and the
•
PC mode
normally as a computer.
•
Monitor mode
functions as a monitor.
•
Activate or deactivate Bluetooth
pairing.
monitor mode
PC mode
.
: the computer operates
: the computer
1
2
3
9

Getting started
Rear view
Number/Name Description
Microphone
1
Security Slot
•
You can use the built-in microphone.
•
You can secure the computer by
connecting a lock and cable to the
Security Slot.
USB 2.0 Port
•
This port is used as a USB port or
chargeable USB port.
•
Using a chargeable USB 3.0 port, you
USB 3.0 Port
2
or
Chargeable
3
4
5
6
USB 3.0 Port
(Optional)
can access or charge a USB device.
You can tell the ports apart
using the figures printed on the
ports or by the colors (
or
).
•
•
USB port
Chargeable USB 3.0 Port
7
8
9
10
Getting started
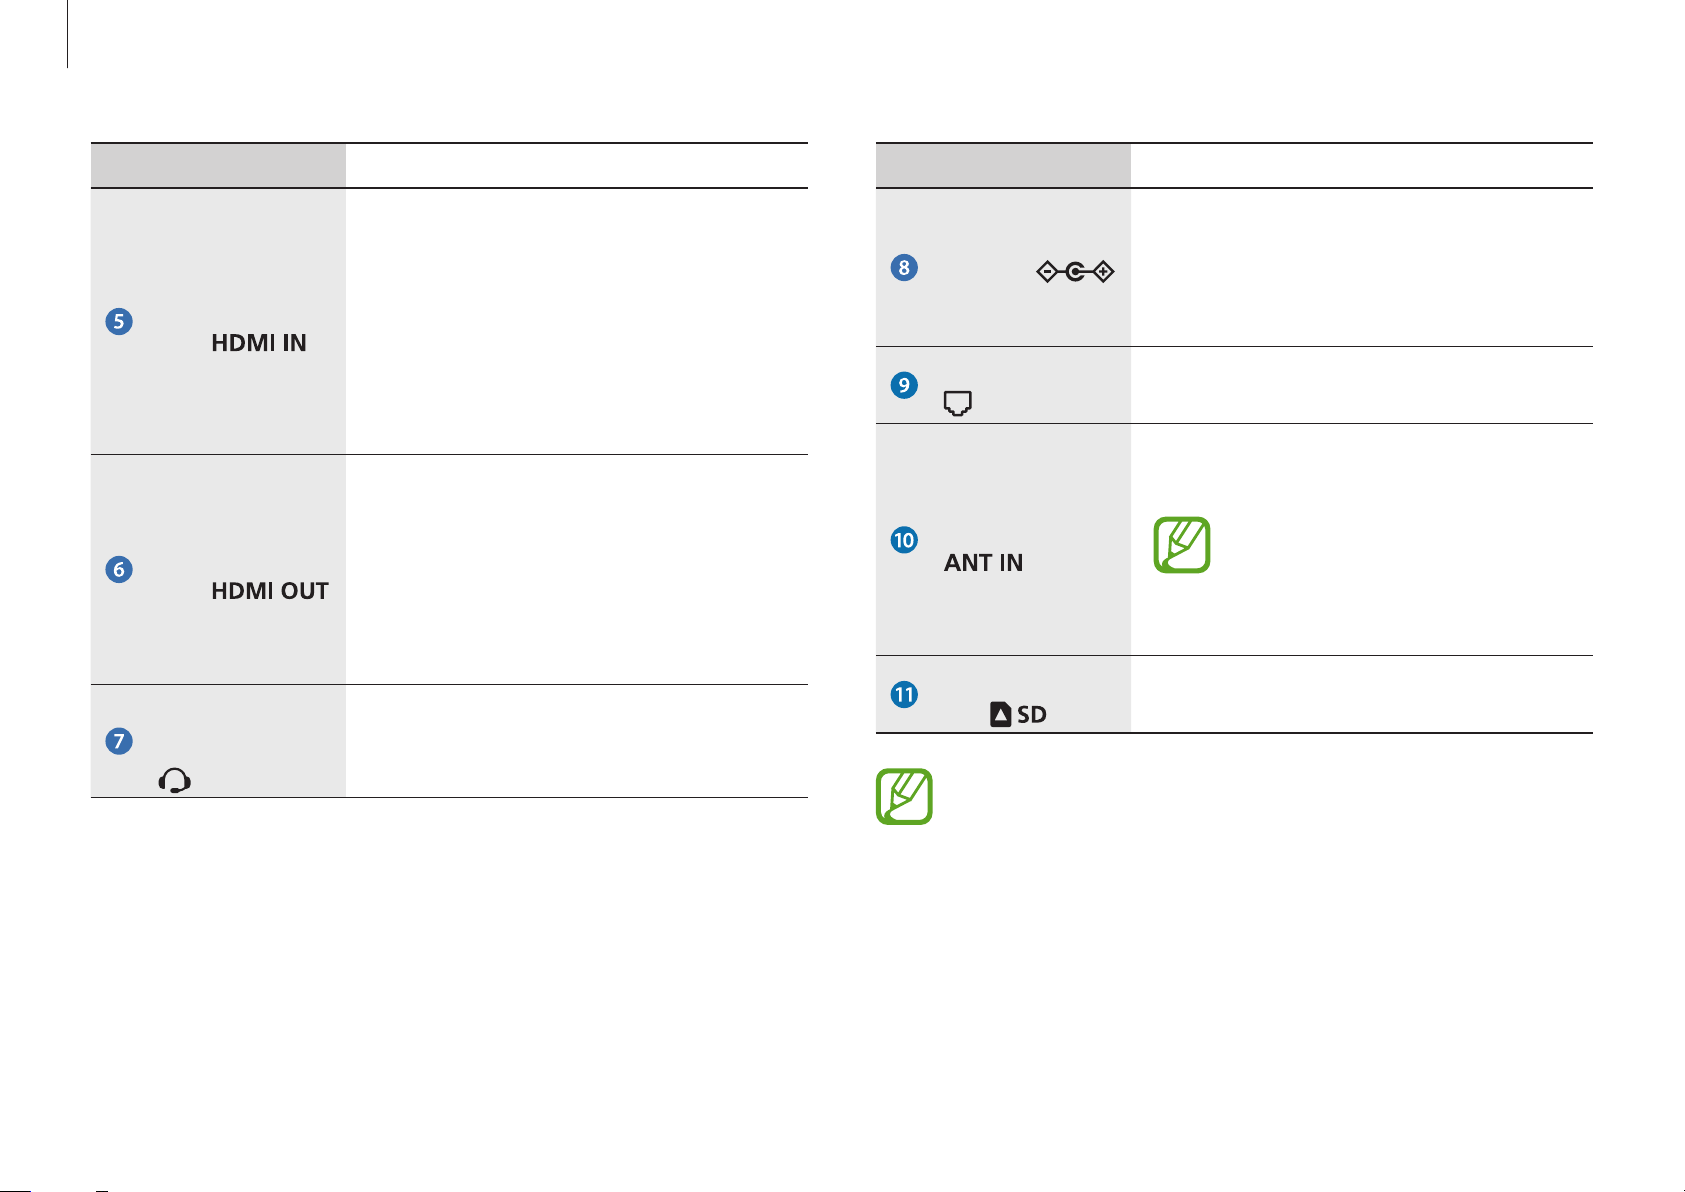
Number/Name Description
•
Used to connect an HDMI cable from
an external device.
•
HDMI input
port
HDMI output
port
Ear-set /
headset Jack
Connect an HDMI cable to the
HDMI output port of an external
device to display the digital source
(video/voice) from the device on the
computer screen.
•
Used to connect an HDMI cable to
an external device.
•
Connect an HDMI cable to the HDMI
input port of an external device to
display the digital source (voice/
video) on the external device.
•
This is the jack for connecting an earset or headset.
Number/Name Description
•
A jack to connect the AC adapter
that supplies power to the computer.
DC Jack
Wired LAN Port
TV Antenna
Input Port
(Optional)
Memory card
slot
About the chargeable USB 3.0 port
•
The appearance and size of the jack
may differ depending on the model.
•
Connect the Ethernet cable to this
port.
•
You can watch TV by connecting the
antenna cable.
Only for models with a TV
tuner card. The shape of the
port may differ depending
on the country.
•
Insert a memory card into the slot.
11
•
It may take longer to charge the battery when charging
a USB device.
•
The charging status of the USB device is not displayed
on the computer.
•
This feature may not be available with some USB
devices.
Getting started
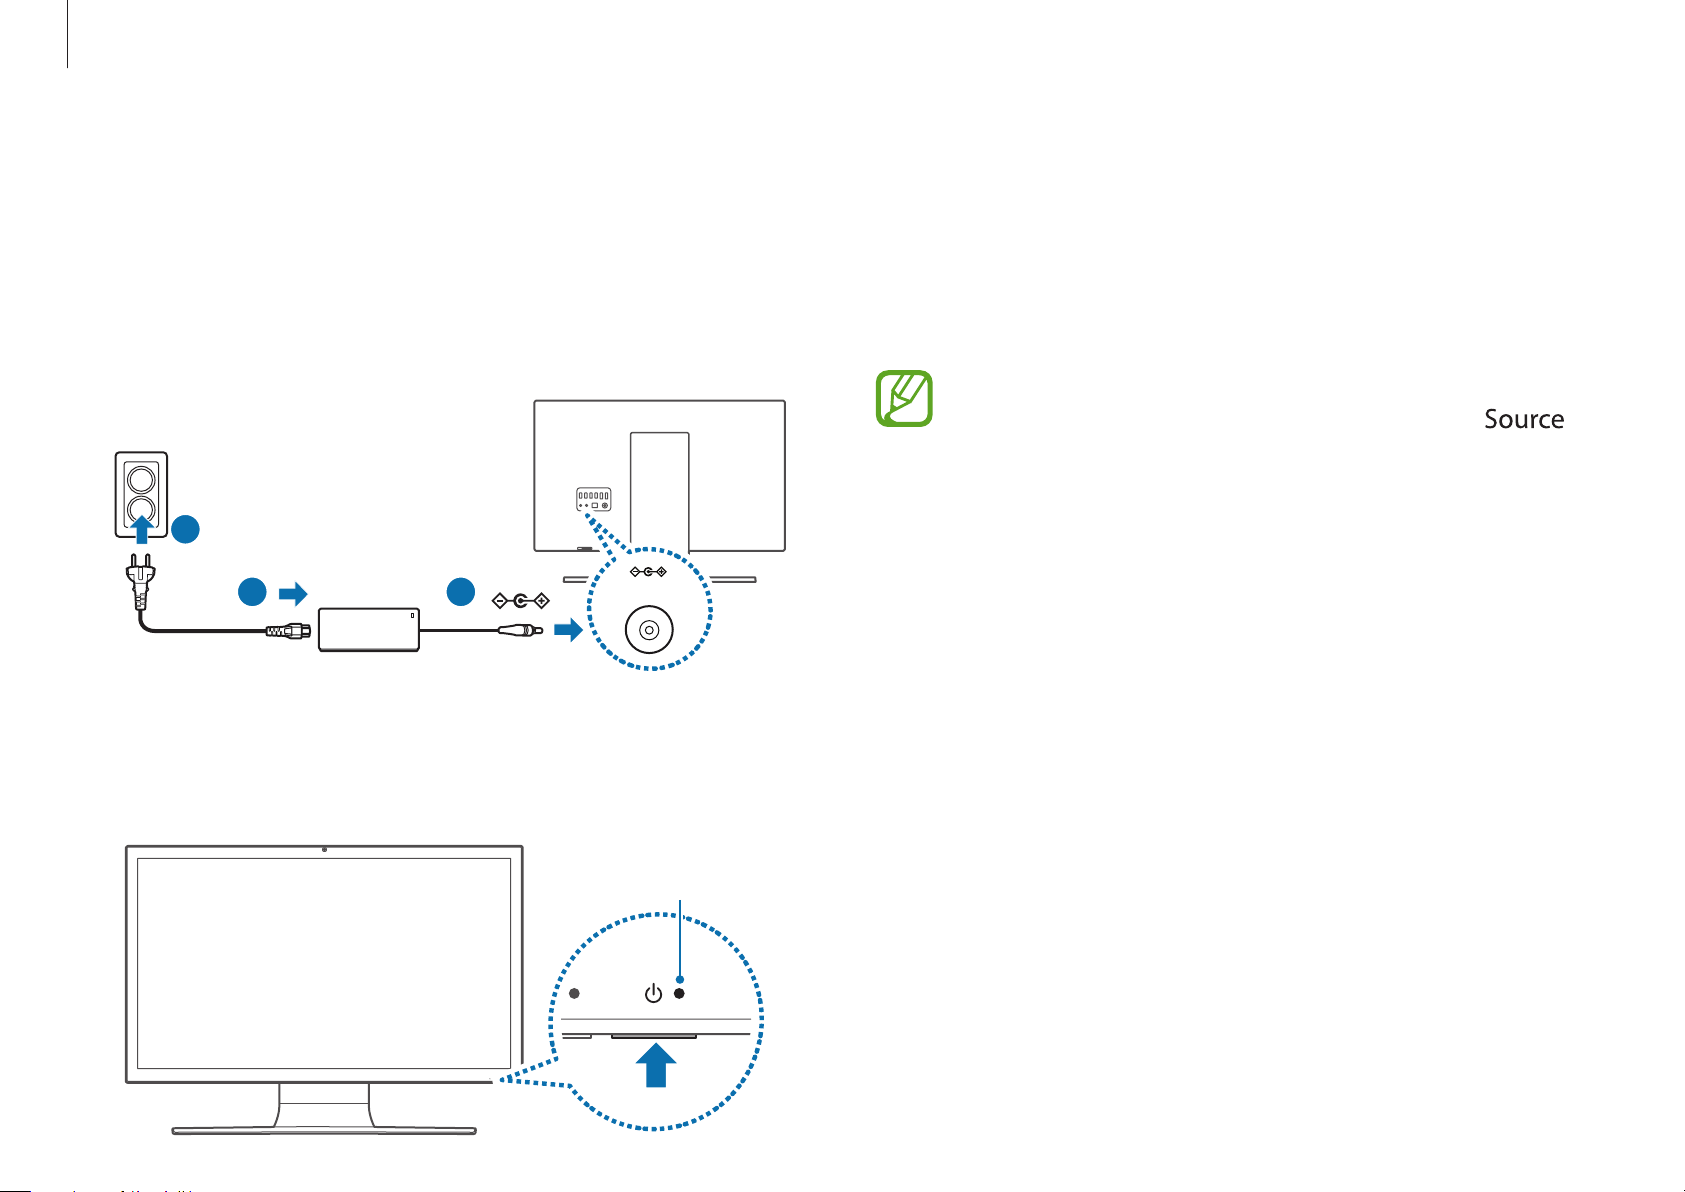
Turning the computer on and off
Turning on
Connect the
1
Press the
2
3
AC adapter
1
Power button
.
2
to turn the computer on.
About Windows Activation
When you turn the computer on for the first time, the Windows
activation screen appears.
Follow the activation procedures according to the instructions on
the screen to use the computer.
If there is no display but a message of “HDMI” on the
screen after you turn on the computer, press the
button to change the picture mode. (
mode)
monitor
mode → PC
Power LED
is lit while the computer is turned on.
Power LED
12
Getting started
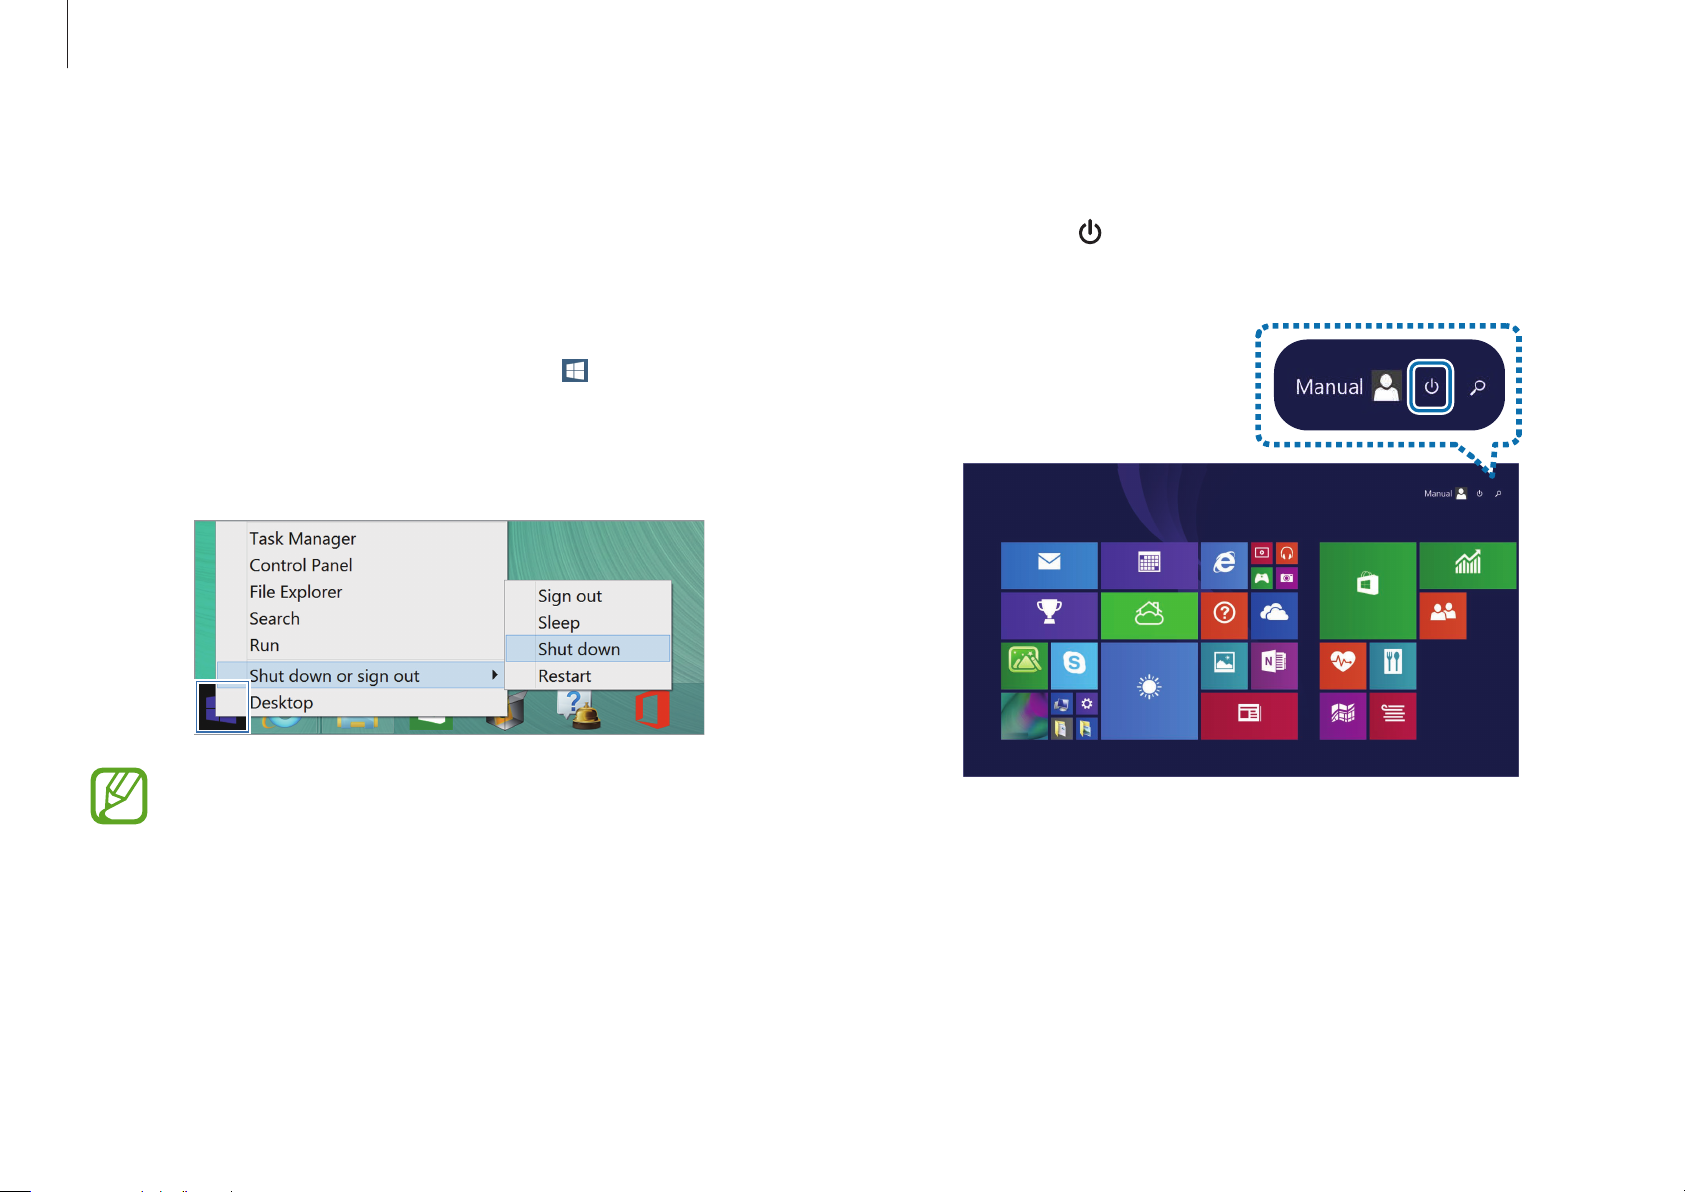
Turning off
Turning off on the desktop
To select the Start button, do one of the following:
1
•
2
Mouse
edge of the desktop.
Select
: Right-click the Start button ( ) at the lower-left
Shut down or sign out → Shut down
Turning off on the Start screen
Select
1
screen.
.
Power
Start
( ) at the upper-right corner of the
Start
•
Save all the data before turning off the computer.
•
Since the procedures to turn the computer off may
differ depending on the installed operating system,
please turn the computer off according to the
procedures for the purchased operating system.
13
2
Select
Shut down
.
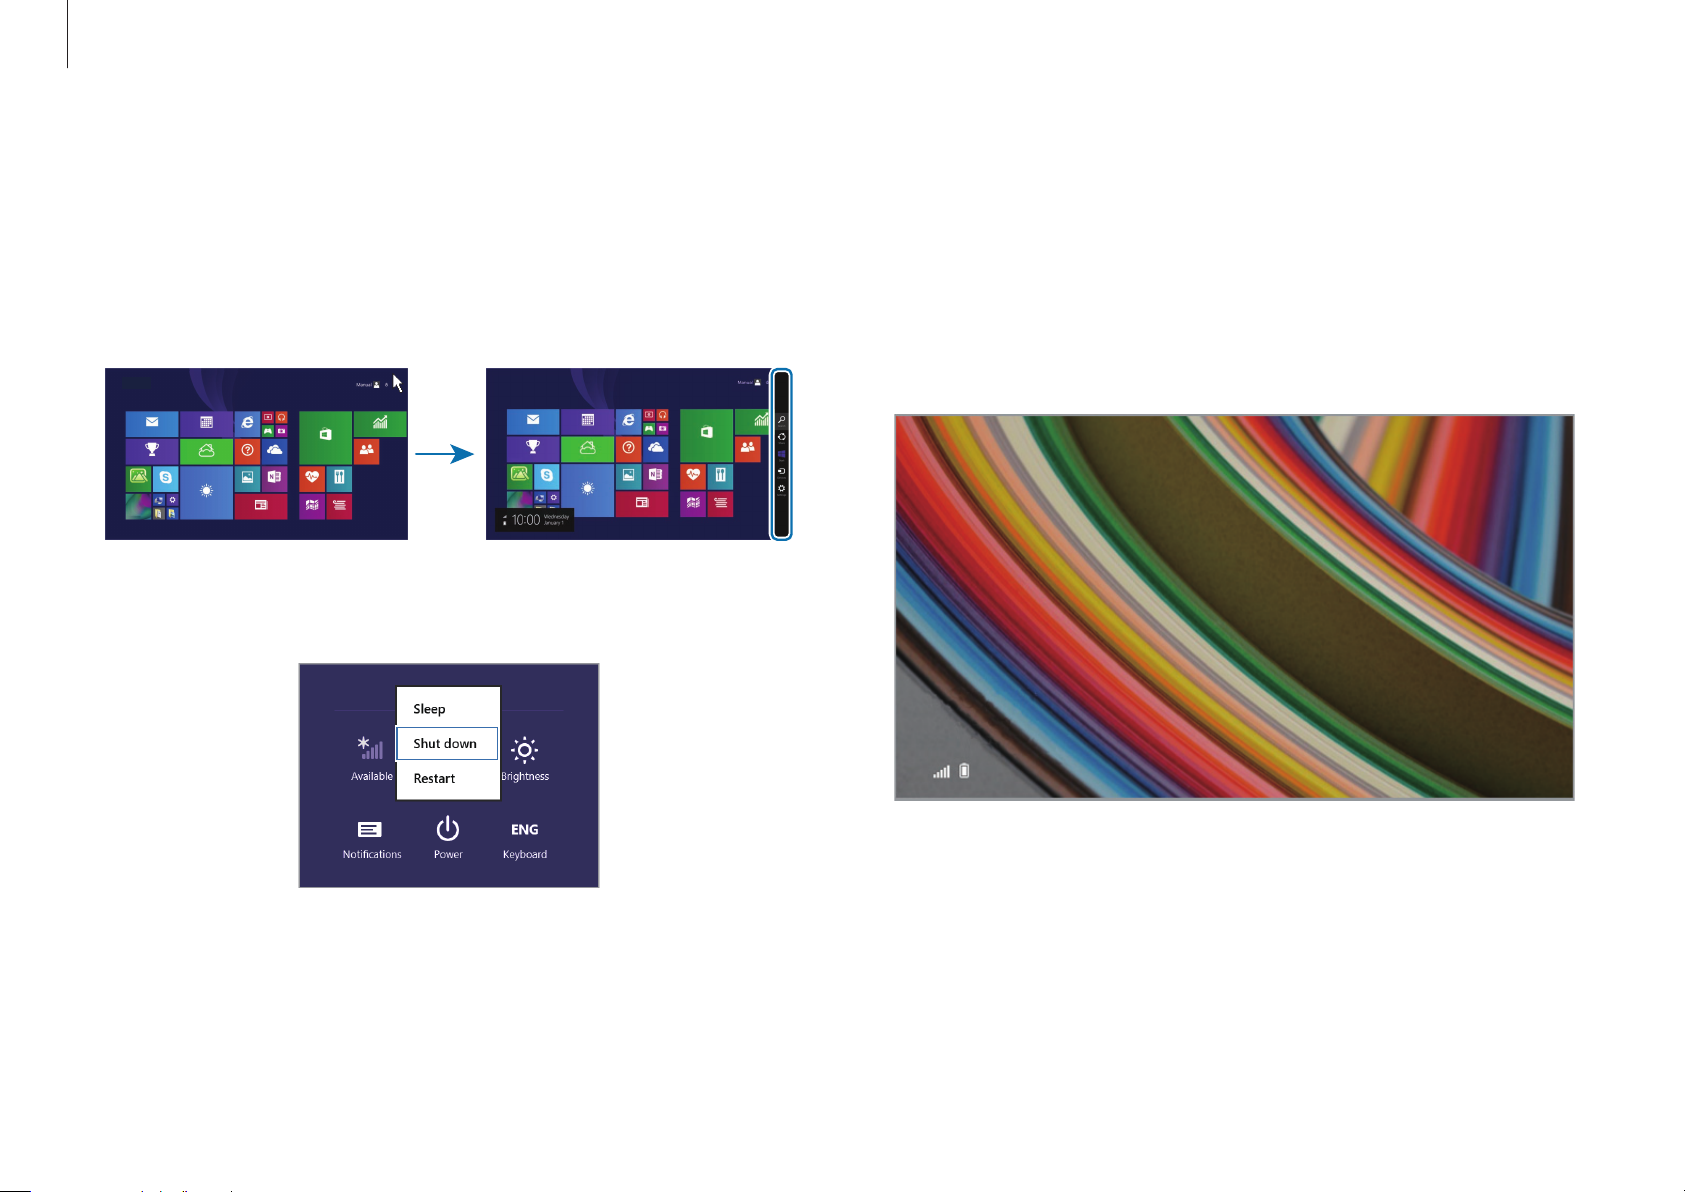
Getting started
Turning off on the Charms
To open the Charms, do one of the following:
1
•
Start
Select the
2
Touchpad/Mouse
right edge of the screen.
Settings
: Move the cursor to the upper- or lower-
Start
charm →
Power
→
Shut down
Unlocking the screen
To unlock the lock screen, do one of the following:
•
Mouse
•
Keyboard
•
Touchpad
.
: Click the lock screen.
: Press any key.
: Tap the touchpad.
10:00
Wednesday, January 1
If the account has a password, enter the password to log in after
unlocking the screen.
14
Getting started
Windows
Microsoft Windows is an operating system that is used to control
a computer. For optimal use of the computer, learn how to use the
operating system properly. It is best to learn how to use Windows
by using
Windows Help and Support
•
Images and available features may differ depending on
the model and operating system.
•
This manual is designed for Windows 8.1 and content
may differ depending on the OS version.
•
The image displayed on the desktop screen may differ
between models and OS versions.
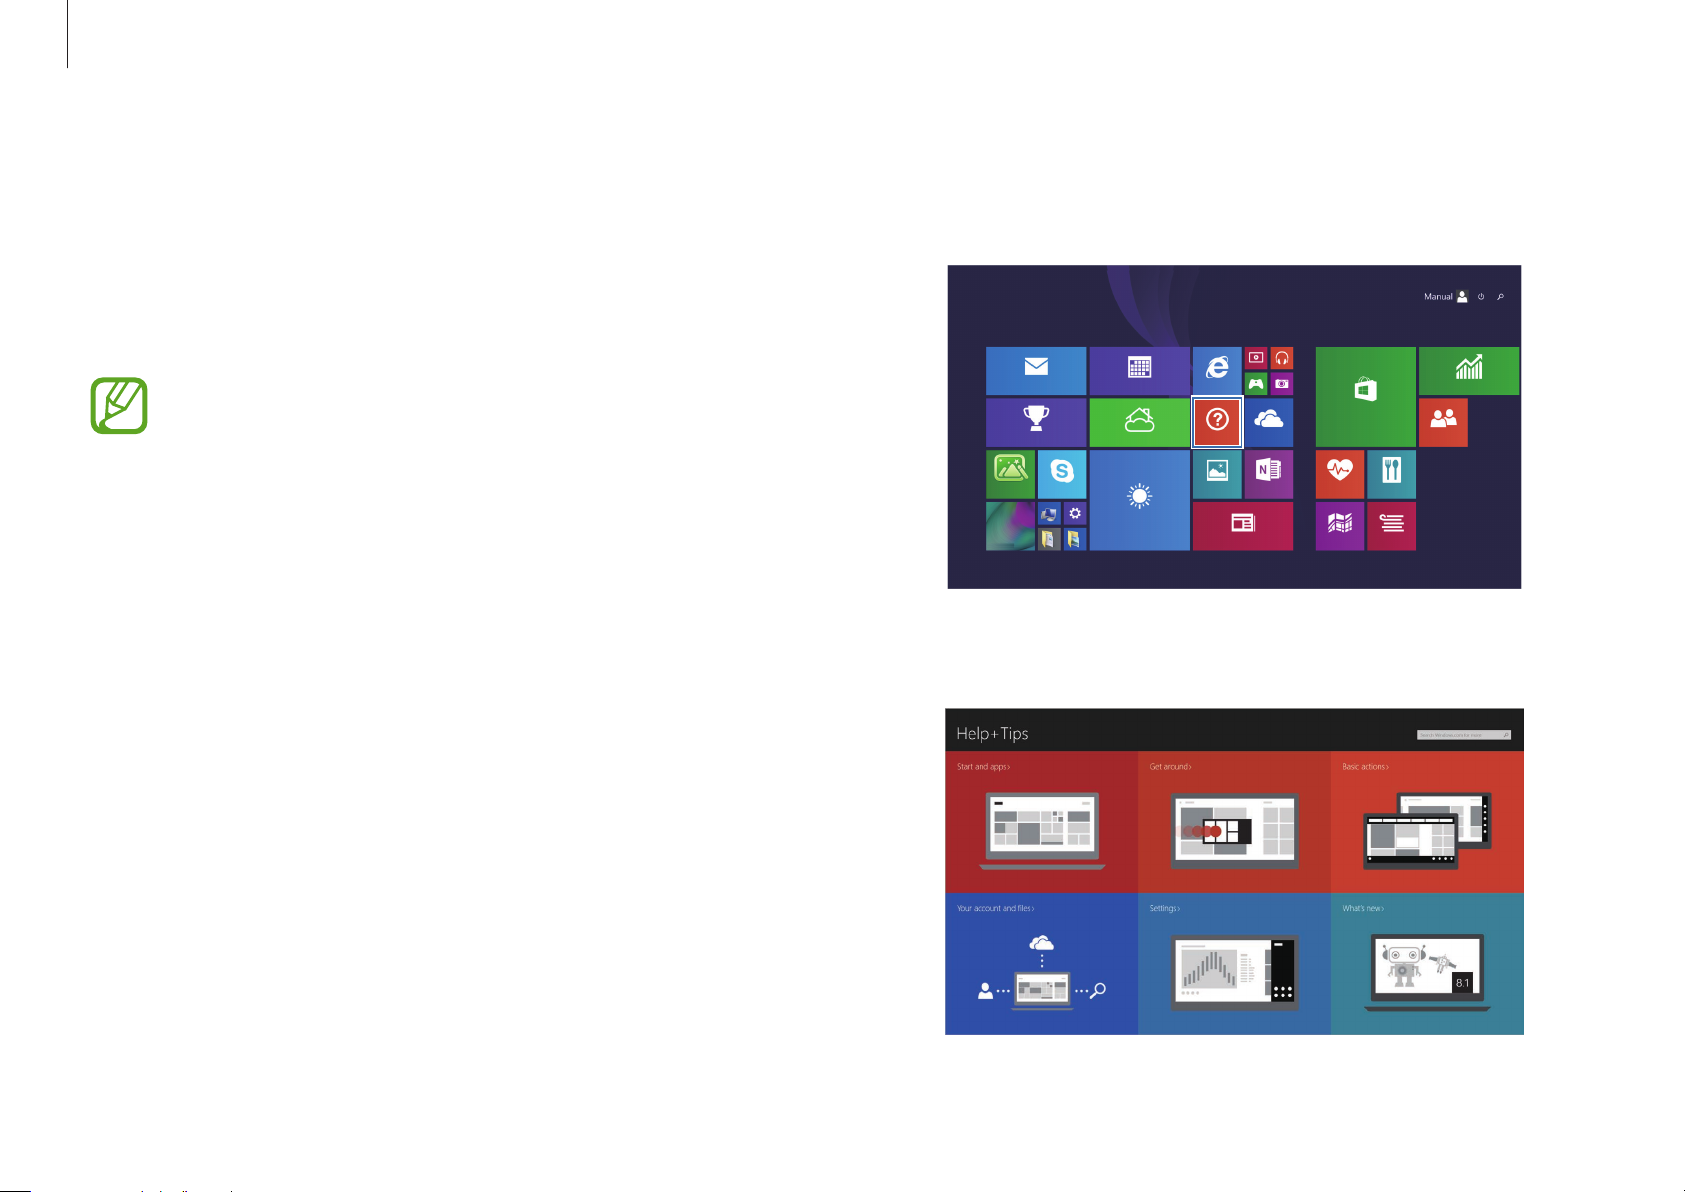
Help
To access the help, do one of the following:
, and
Help+Tips
.
Help+Tips
On the
You can control Windows menus with the mouse or with gestures.
Start
screen, select
Start
Help+Tips
.
•
Keyboard
•
Mouse
the screen to open the Charms and select the
→
Help
: Press the F1 key.
: Move the cursor to the upper- or lower-right edge of
.
Settings
charm
15
Basics
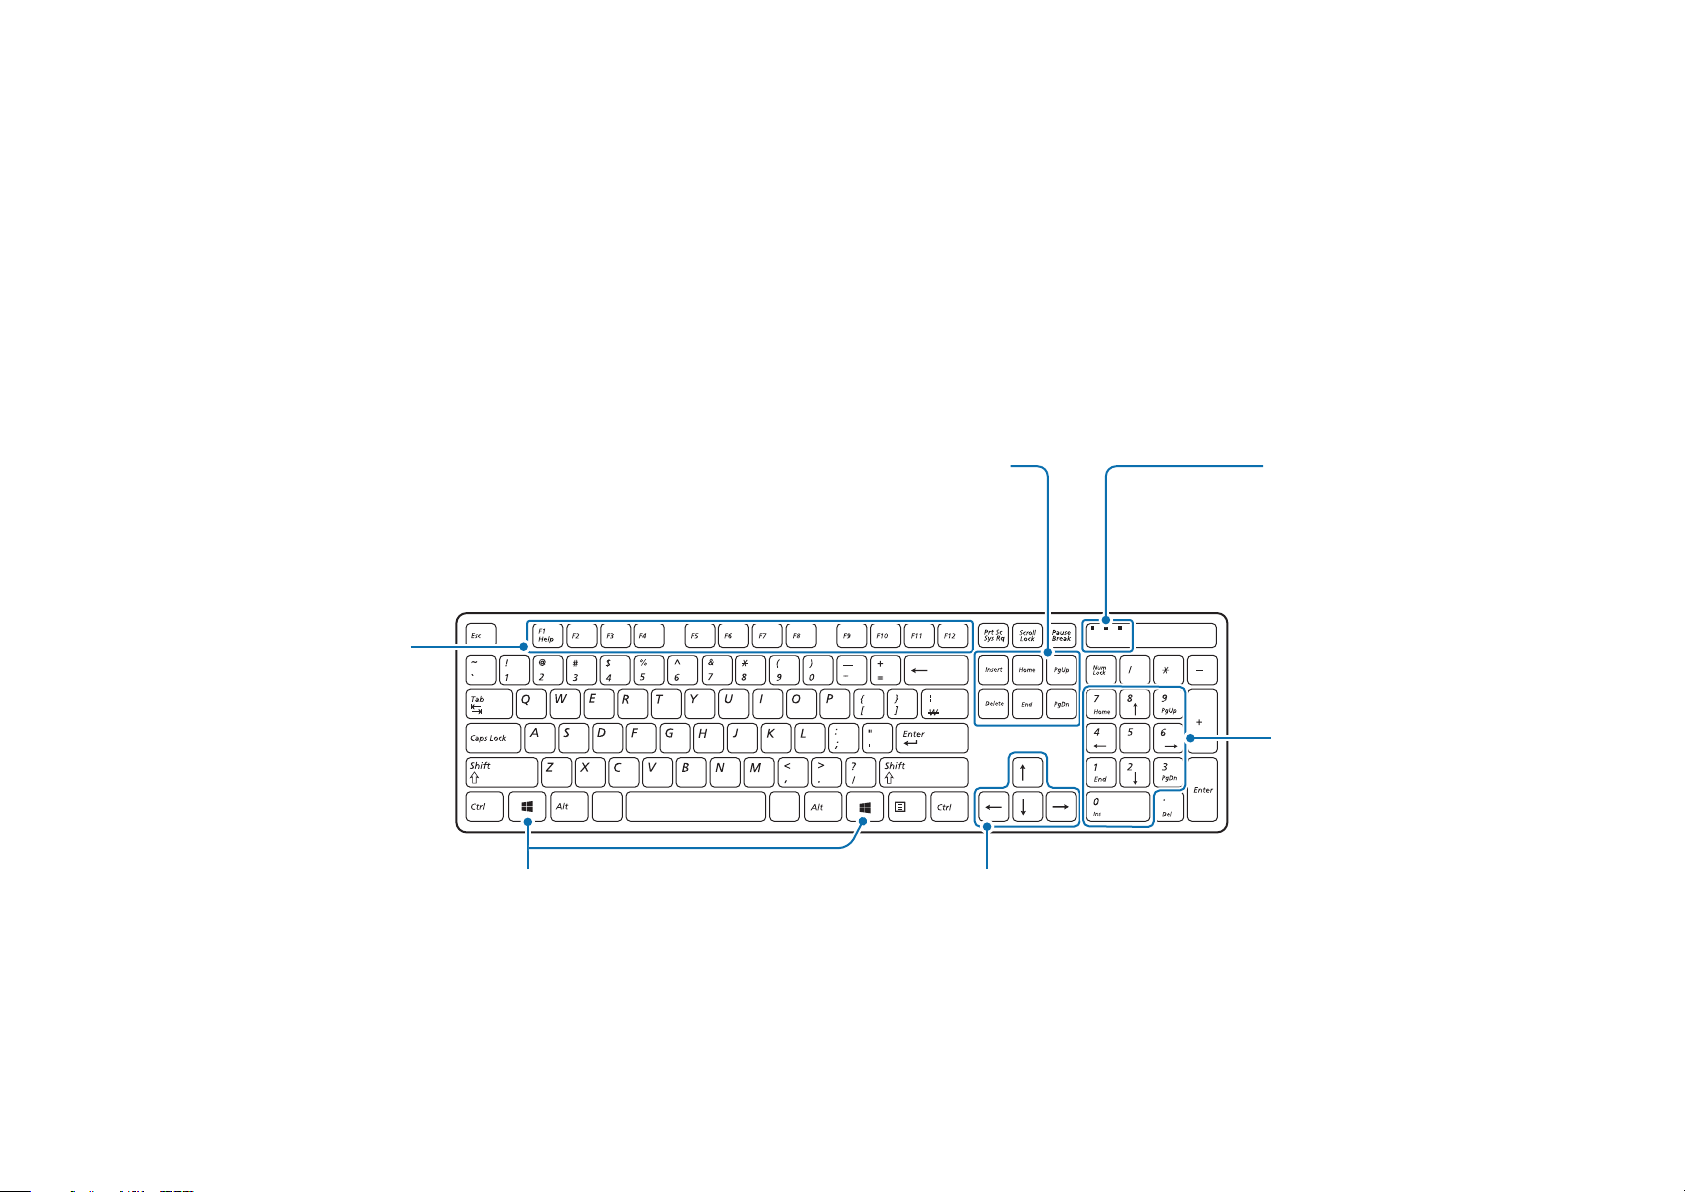
Using a wired keyboard/mouse (Optional)
Use the keyboard to enter characters and perform various functions.
Function keys
Performs specic software
functions. The functions
may dier depending on
the program.
Delete or insert text, move the cursor to the
beginning or the end of the line, or scroll up
Windows Key
The Start screen appears.
Special keys
or down the page.
Directional keys
Moves the cursor up,
down, left or right.
Indicator light
Indicates if the Num Lock,
Caps Lock, and Scroll Lock
keys are activated.
Number keys
The numeric keypad can be
used when the Num Lock key
is pressed.
16
Basics
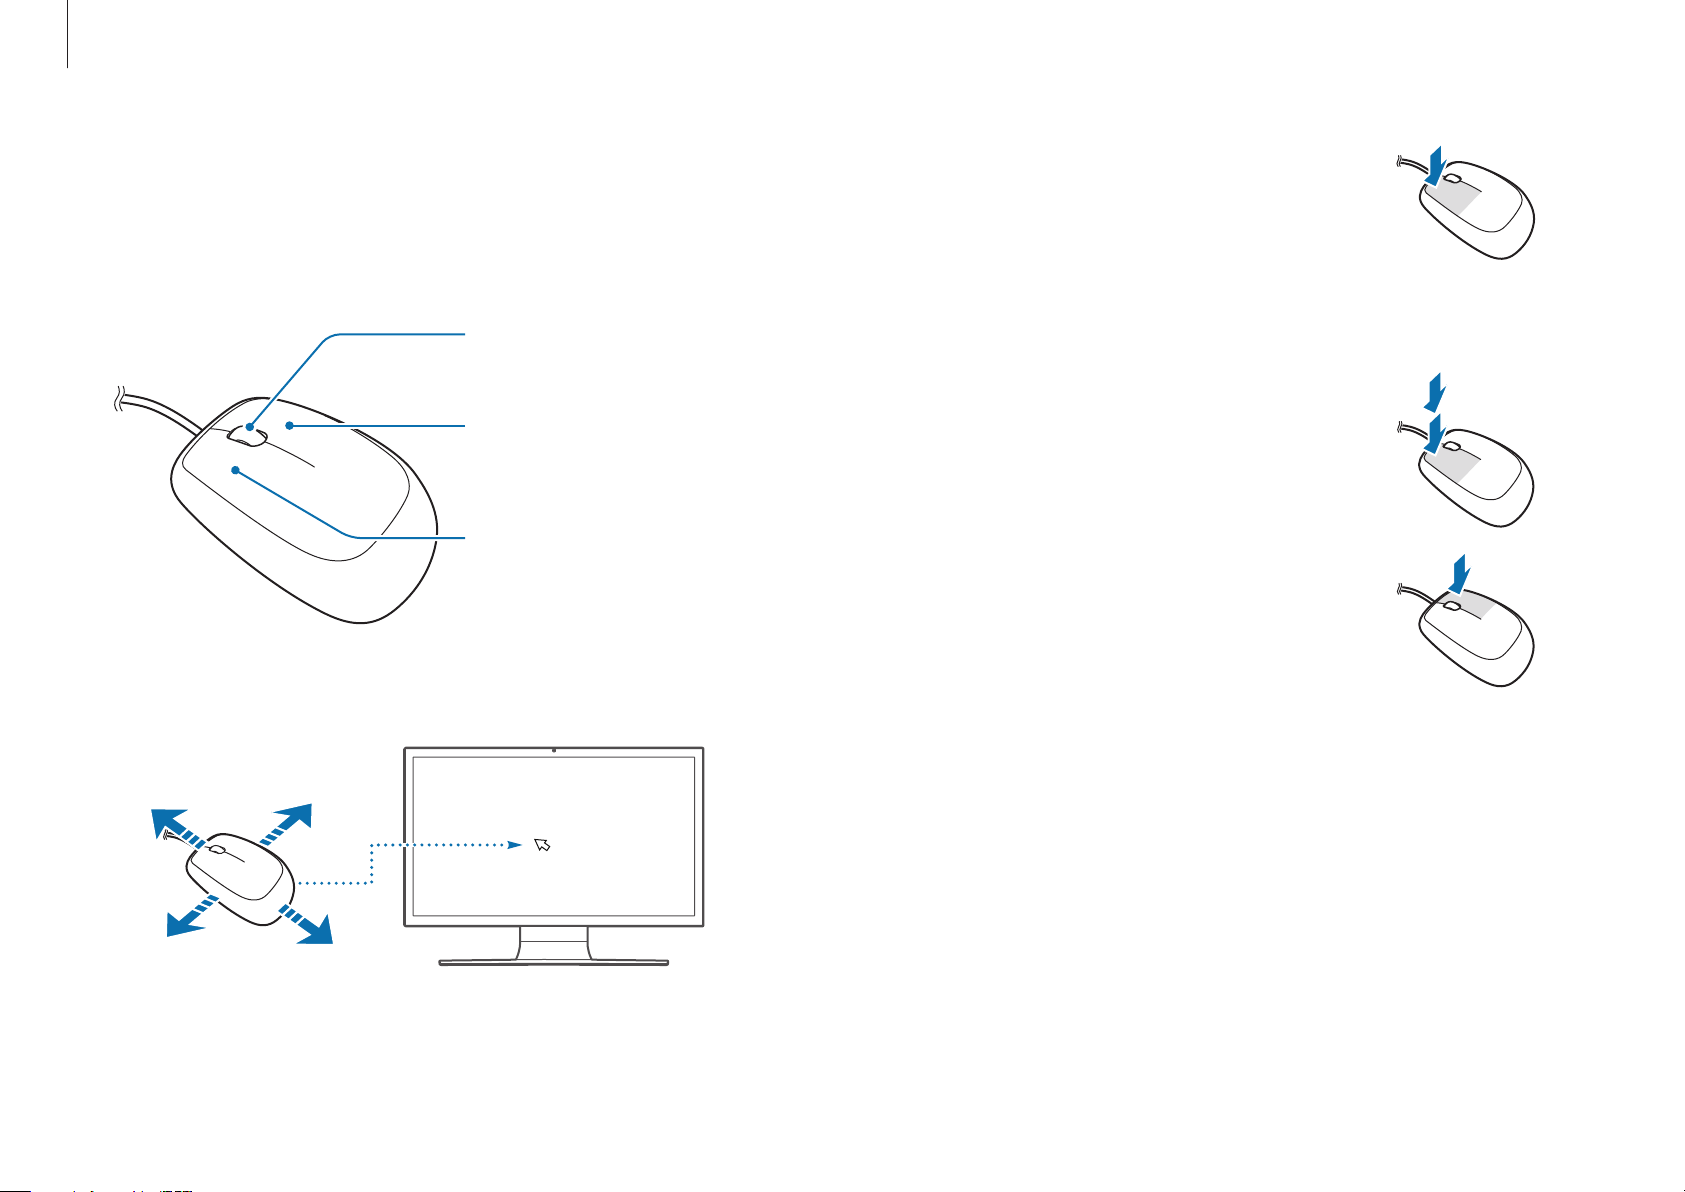
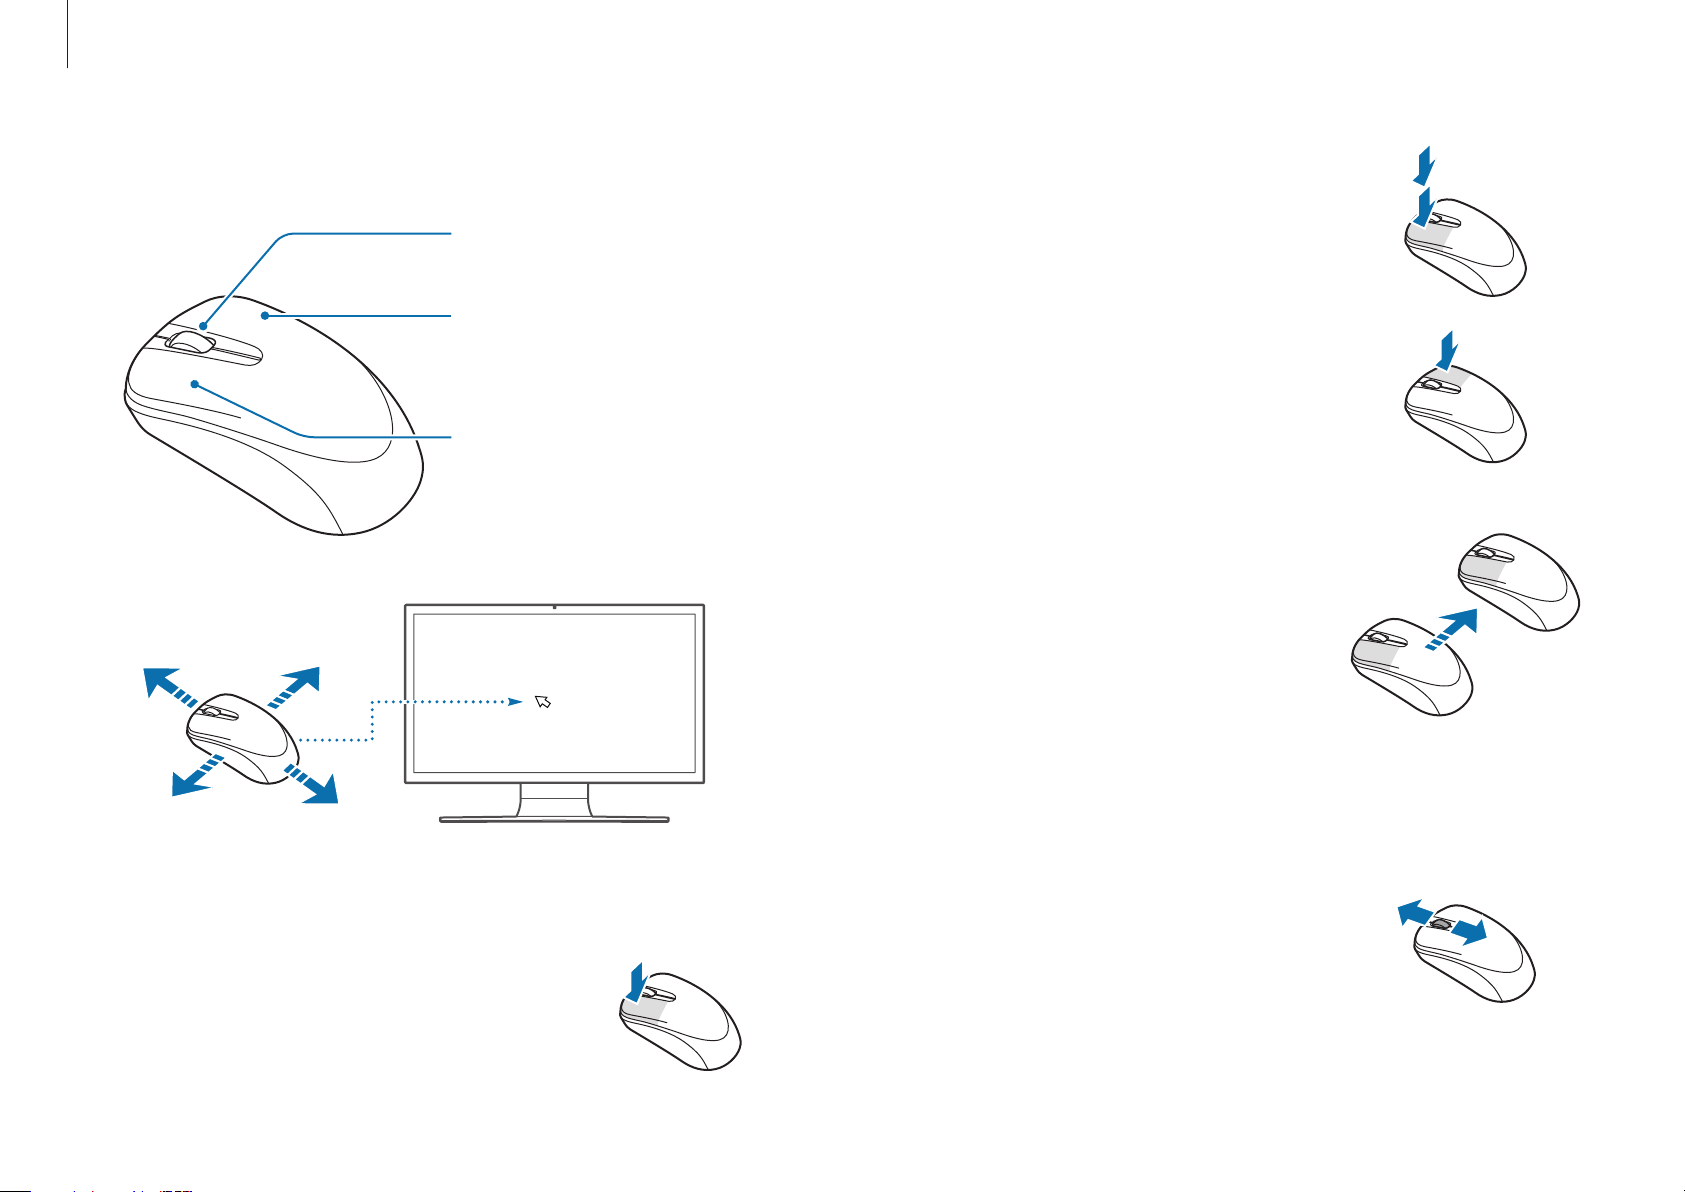
Wheel button
A mouse is a device that controls the cursor or pointer on the
screen.
The appearance and the color of the provided mouse may differ
depending on the model.
Moves the pointer up and down.
Right button
Shows the context-sensitive
menus of programs.
Left button
Selects and launches an item.
Click function
Briefly press the left mouse button once.
If you click this mouse button once, the
corresponding program is selected.
Double-click function
Quickly press the left mouse button twice.
The corresponding program is launched.
Right click function
If you click this mouse button once, the
context-sensitive menu of the current
program appears.
If you move the mouse, the pointer on the screen moves in the
same direction.
17
Basics
CONNECT button
Drag function
Dragging refers to clicking an item and
moving the item to another position while
holding the mouse button down.
Click the left mouse button over an item to
be dragged and move the item to the new
position while holding the mouse button
down.
Scroll function
If you turn the wheel button up or down,
the screen moves up or down accordingly.
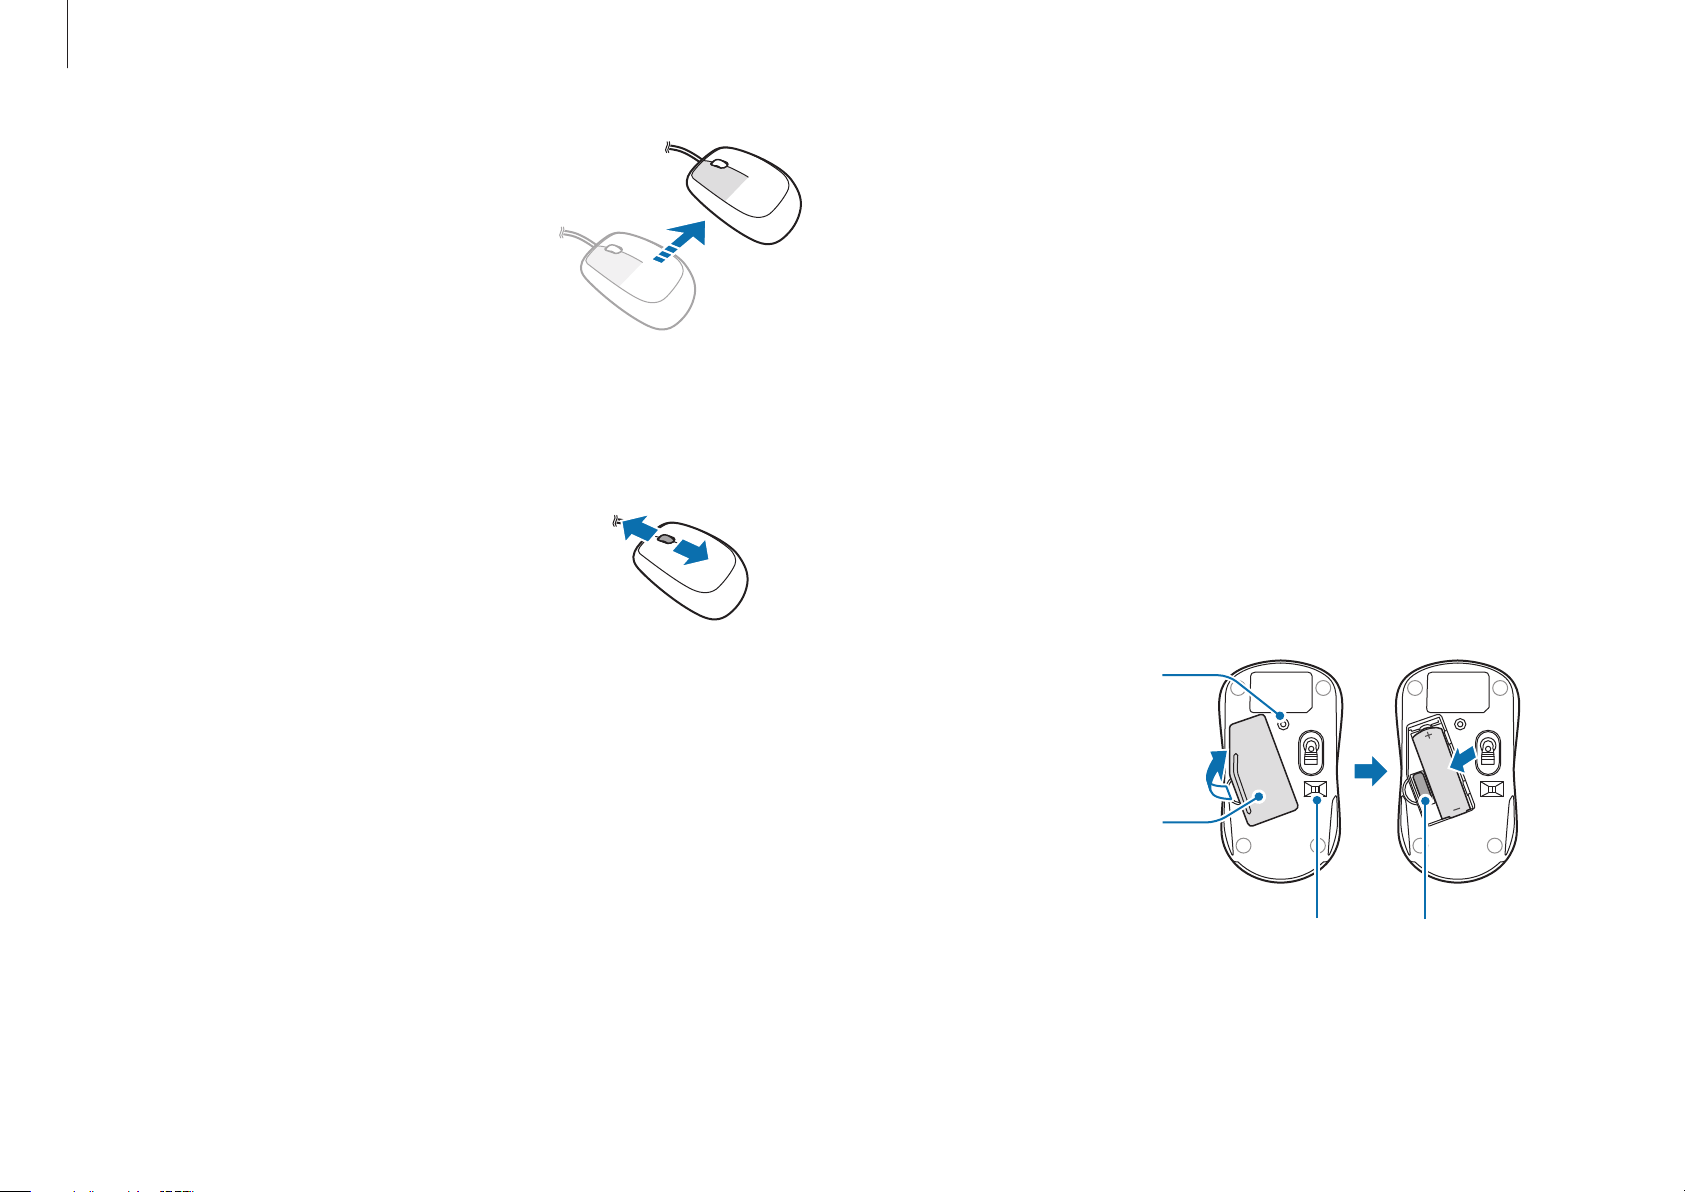
Using a wireless keyboard/mouse (Optional)
The wireless keyboard and mouse are optional and the
appearance and the color of the provided keyboard and mouse
may differ depending on the model.
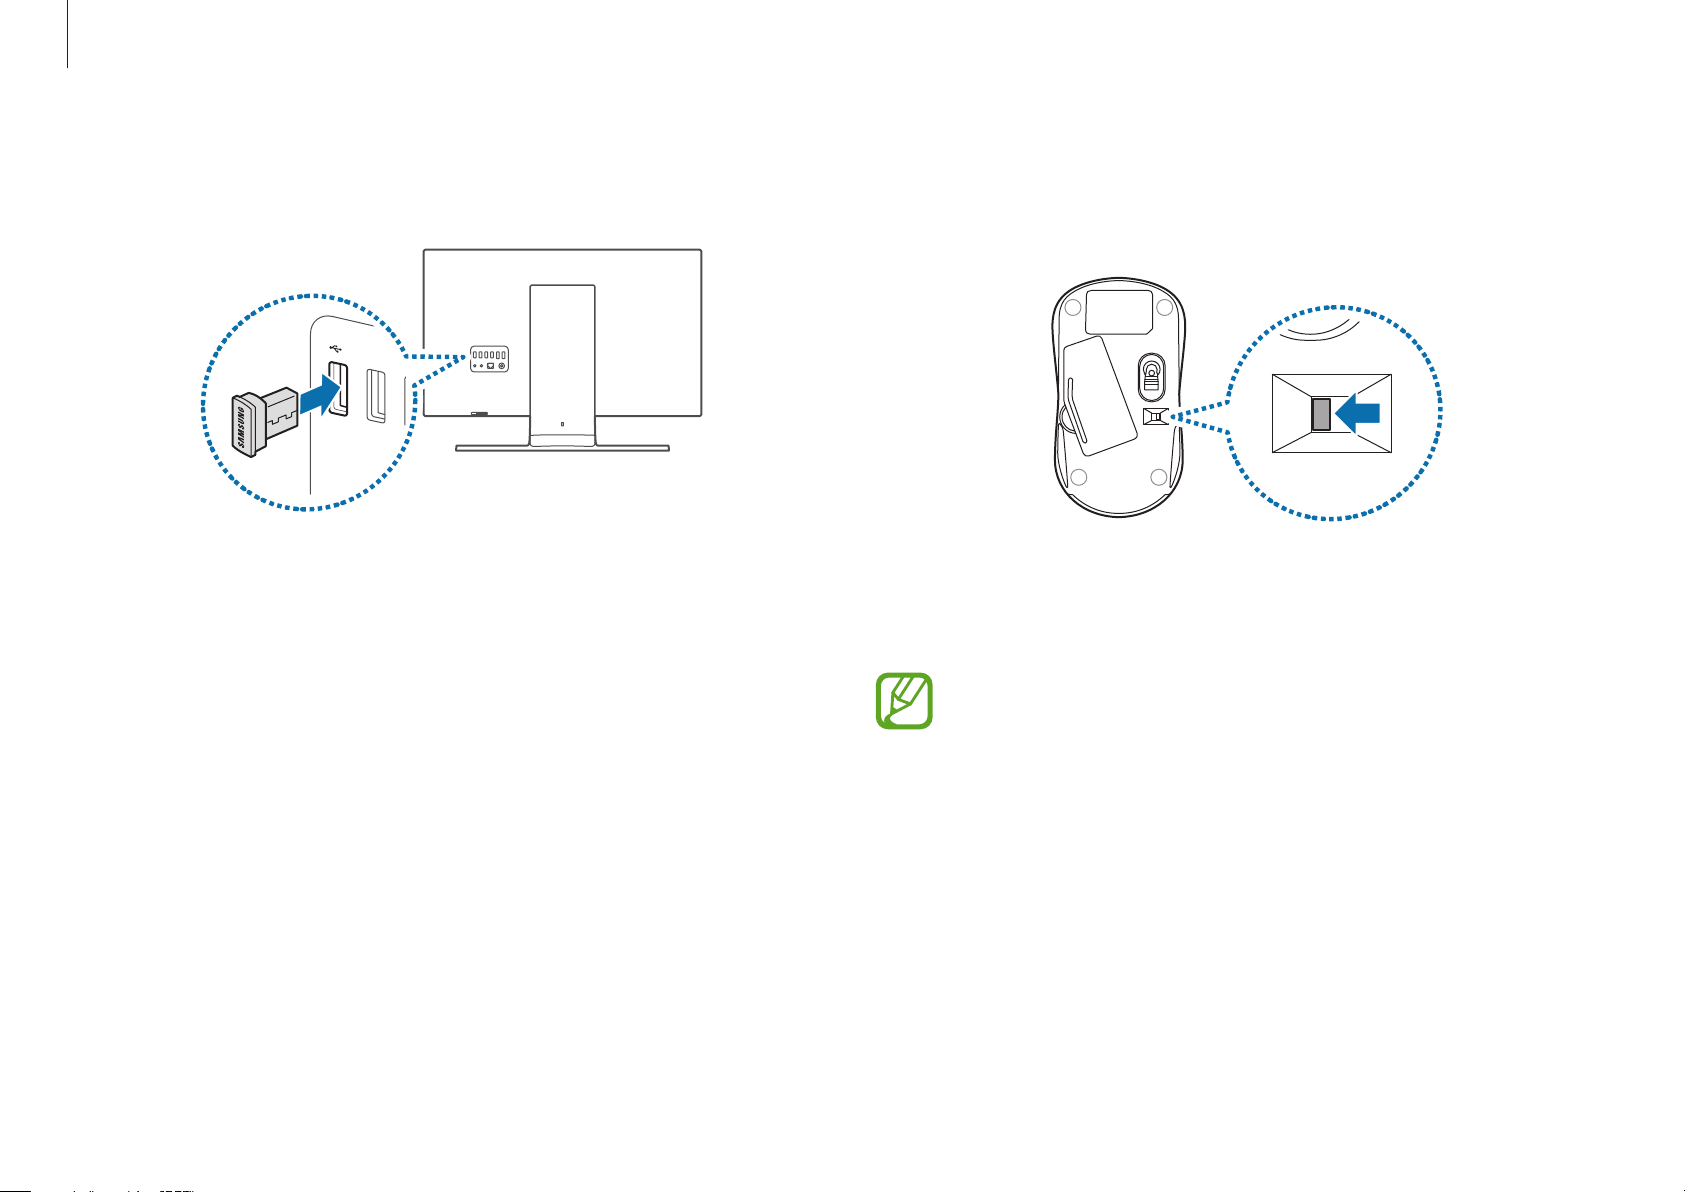
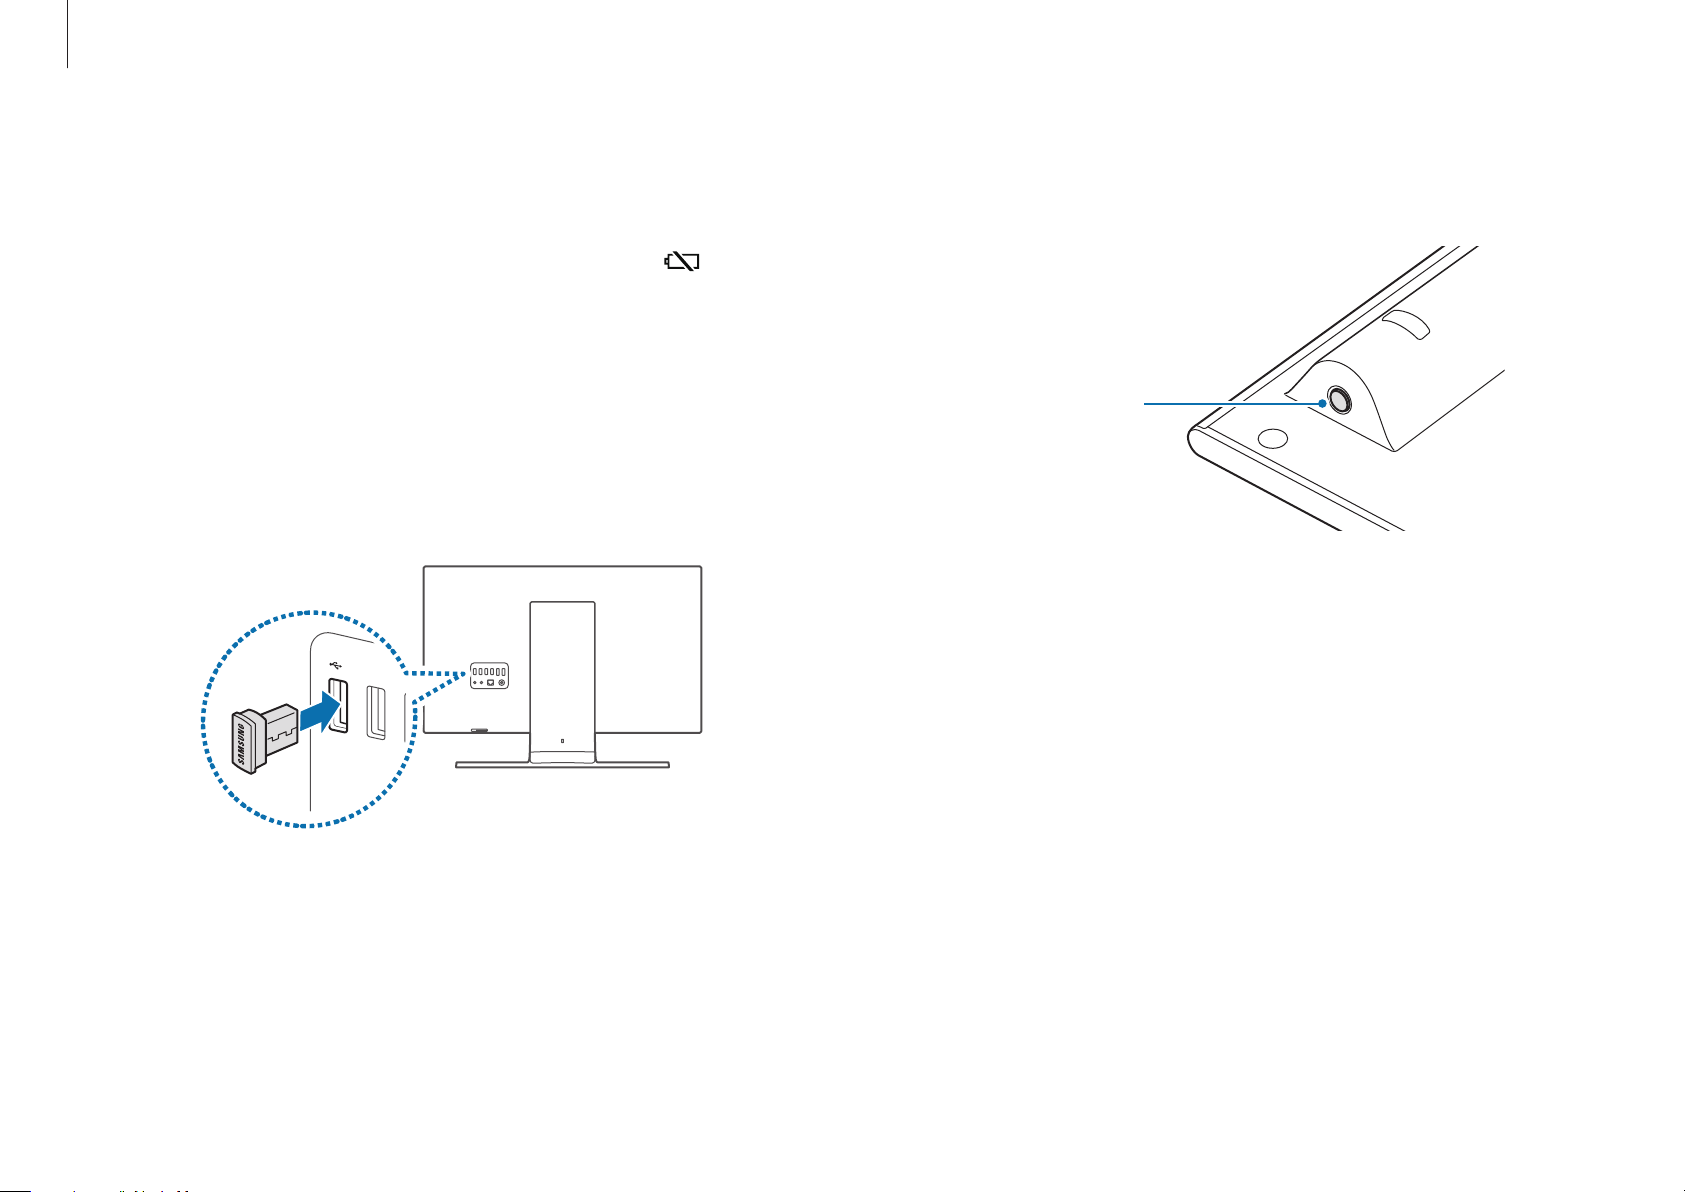
Installing the wireless receiver
Open the Battery Cover at the bottom and insert the battery
1
in the right
Example) Wireless mouse
Press the connect button
to activate the wireless
polarity
receiver.
Battery Cover
(+,-).
18
Power switch
If you set this switch to the OFF position
when not using the mouse, you can save
battery power.
Wireless signal
receiver
Basics
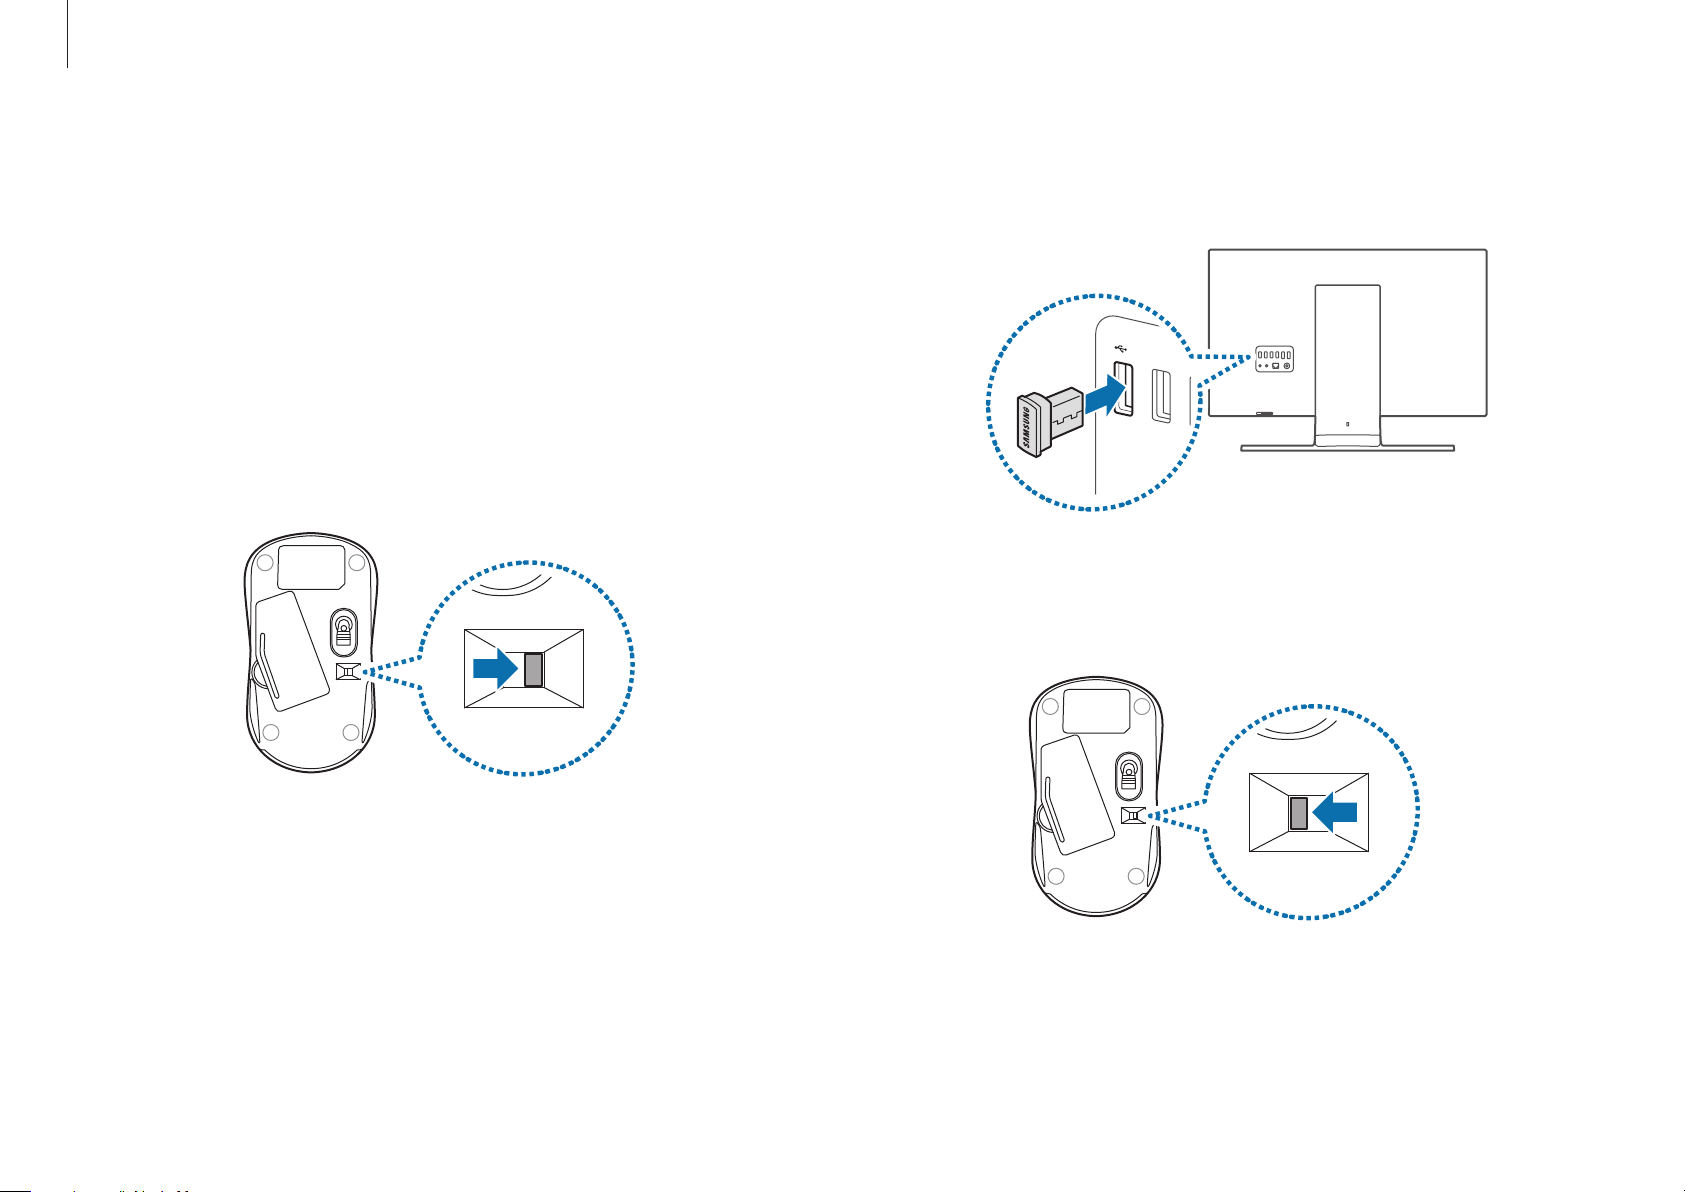
Insert the wireless signal receiver into the
2
back of the computer.
USB port
at the
Slide the power switch at the bottom of the mouse to the ON
3
position.
Example) Wireless mouse
You can use the wireless keyboard and the mouse without
4
additional settings.
•
You can use the wireless keyboard and the wireless
mouse within a 5m distance of the wireless signal
19
sensor.
•
The distance is subject to the surroundings and if there
is interference nearby, in particular a wireless LAN AP,
the distance may be decreased.
Basics
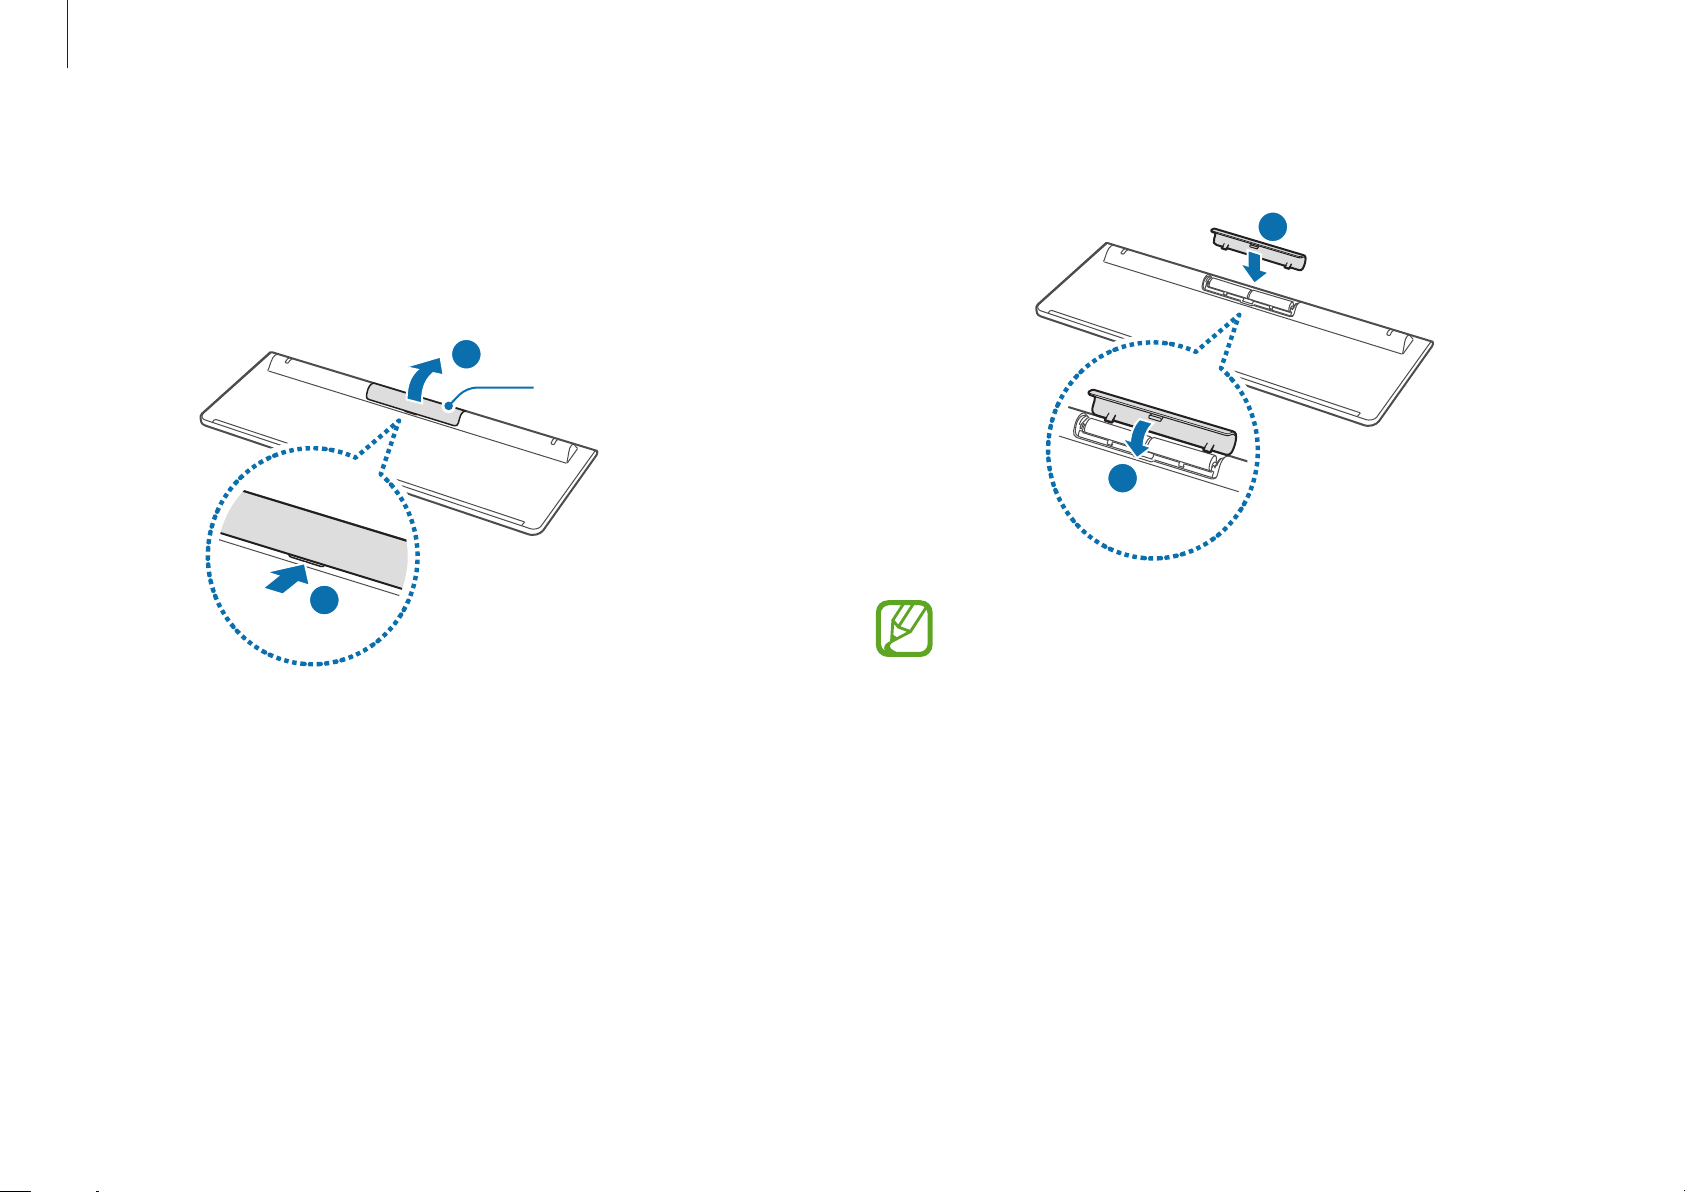
Wireless keyboard
Insert the batteries and then close the battery cover.
2
Locate the
1
Use your fingers to push the cover up.
battery cover
1
at the bottom back of the keyboard.
1
2
Battery cover
2
•
Be sure to confirm that the polarities (+ / -) of the
batteries are correct.
•
Do not recharge the batteries (AAA type) supplied with
the product.
20
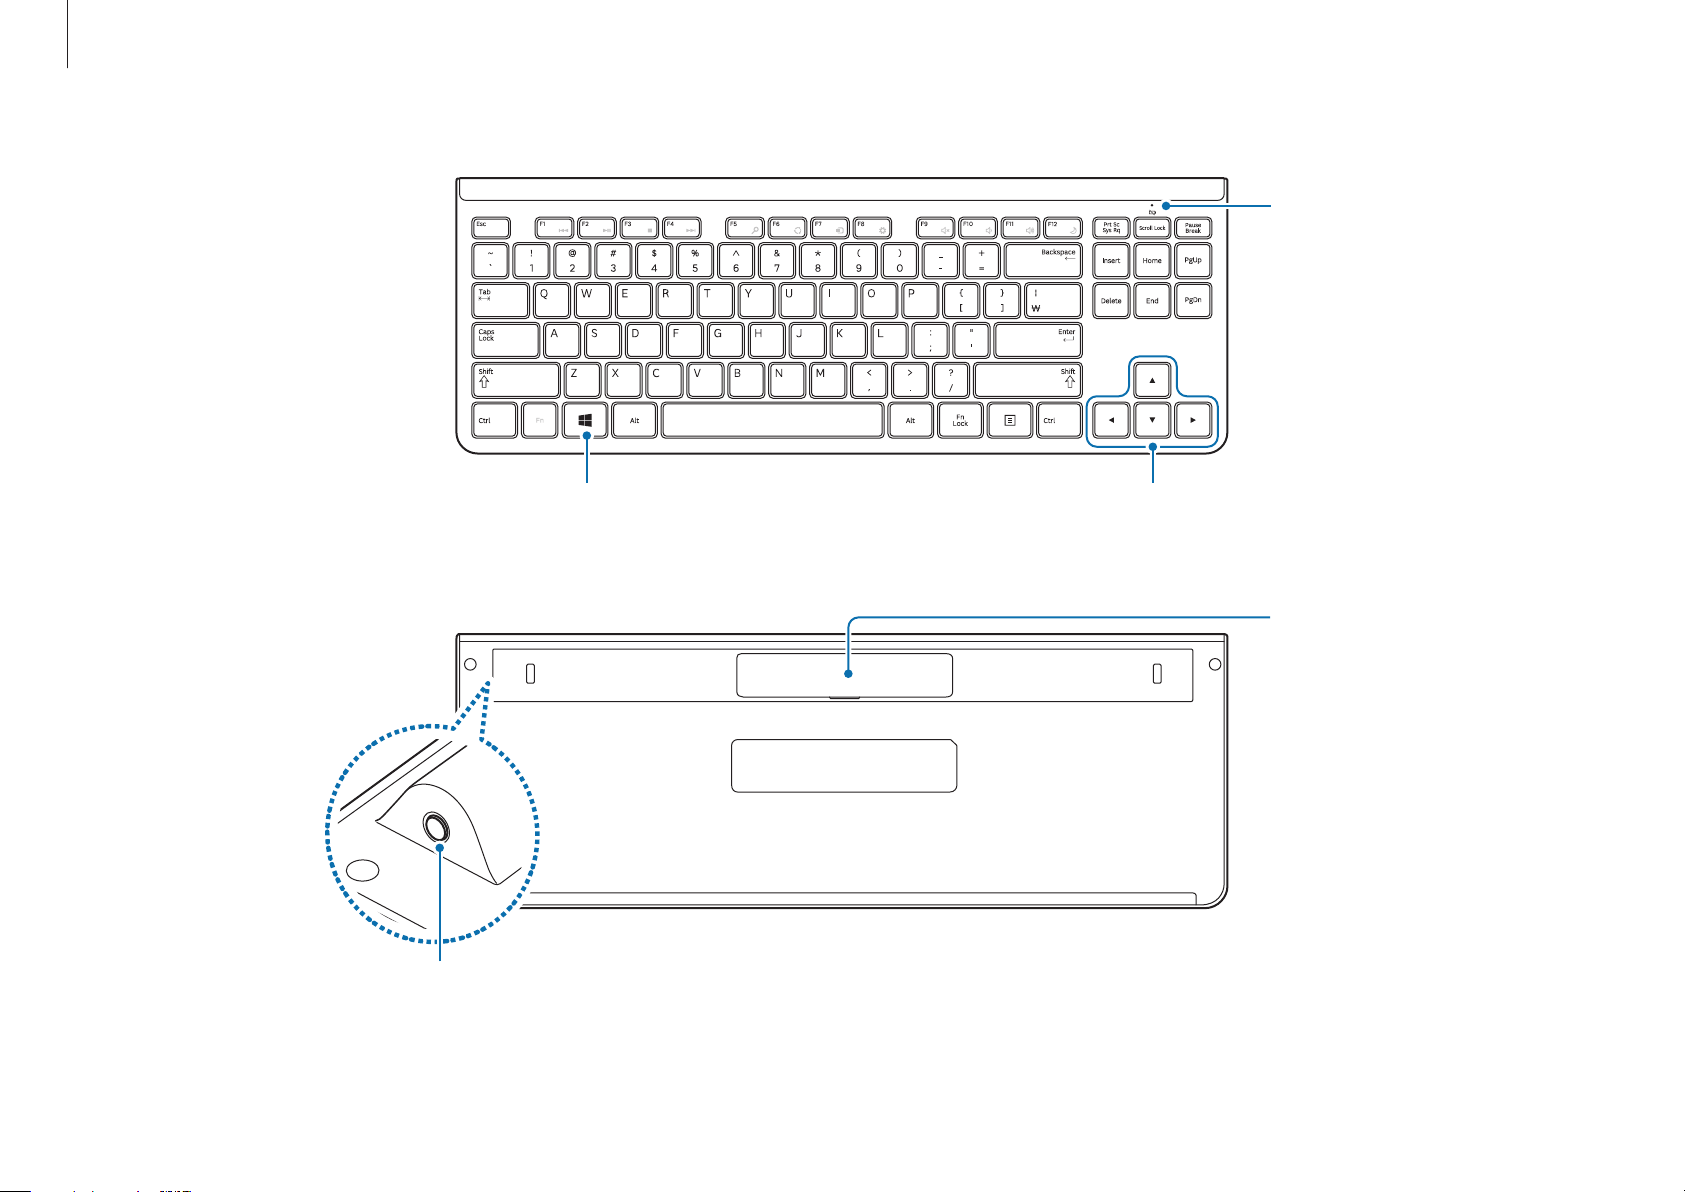
Basics
Battery replacement LED
This indicates when it is time
to replace the battery.
If the LED blinks, replace the
batteries.
Windows Key
The Start screen appears.
CONNECT button
Press the connect button to connect to the wireless signal receiver.
Directional keys
Moves the cursor up, down, left or right.
Battery cover
21
Basics
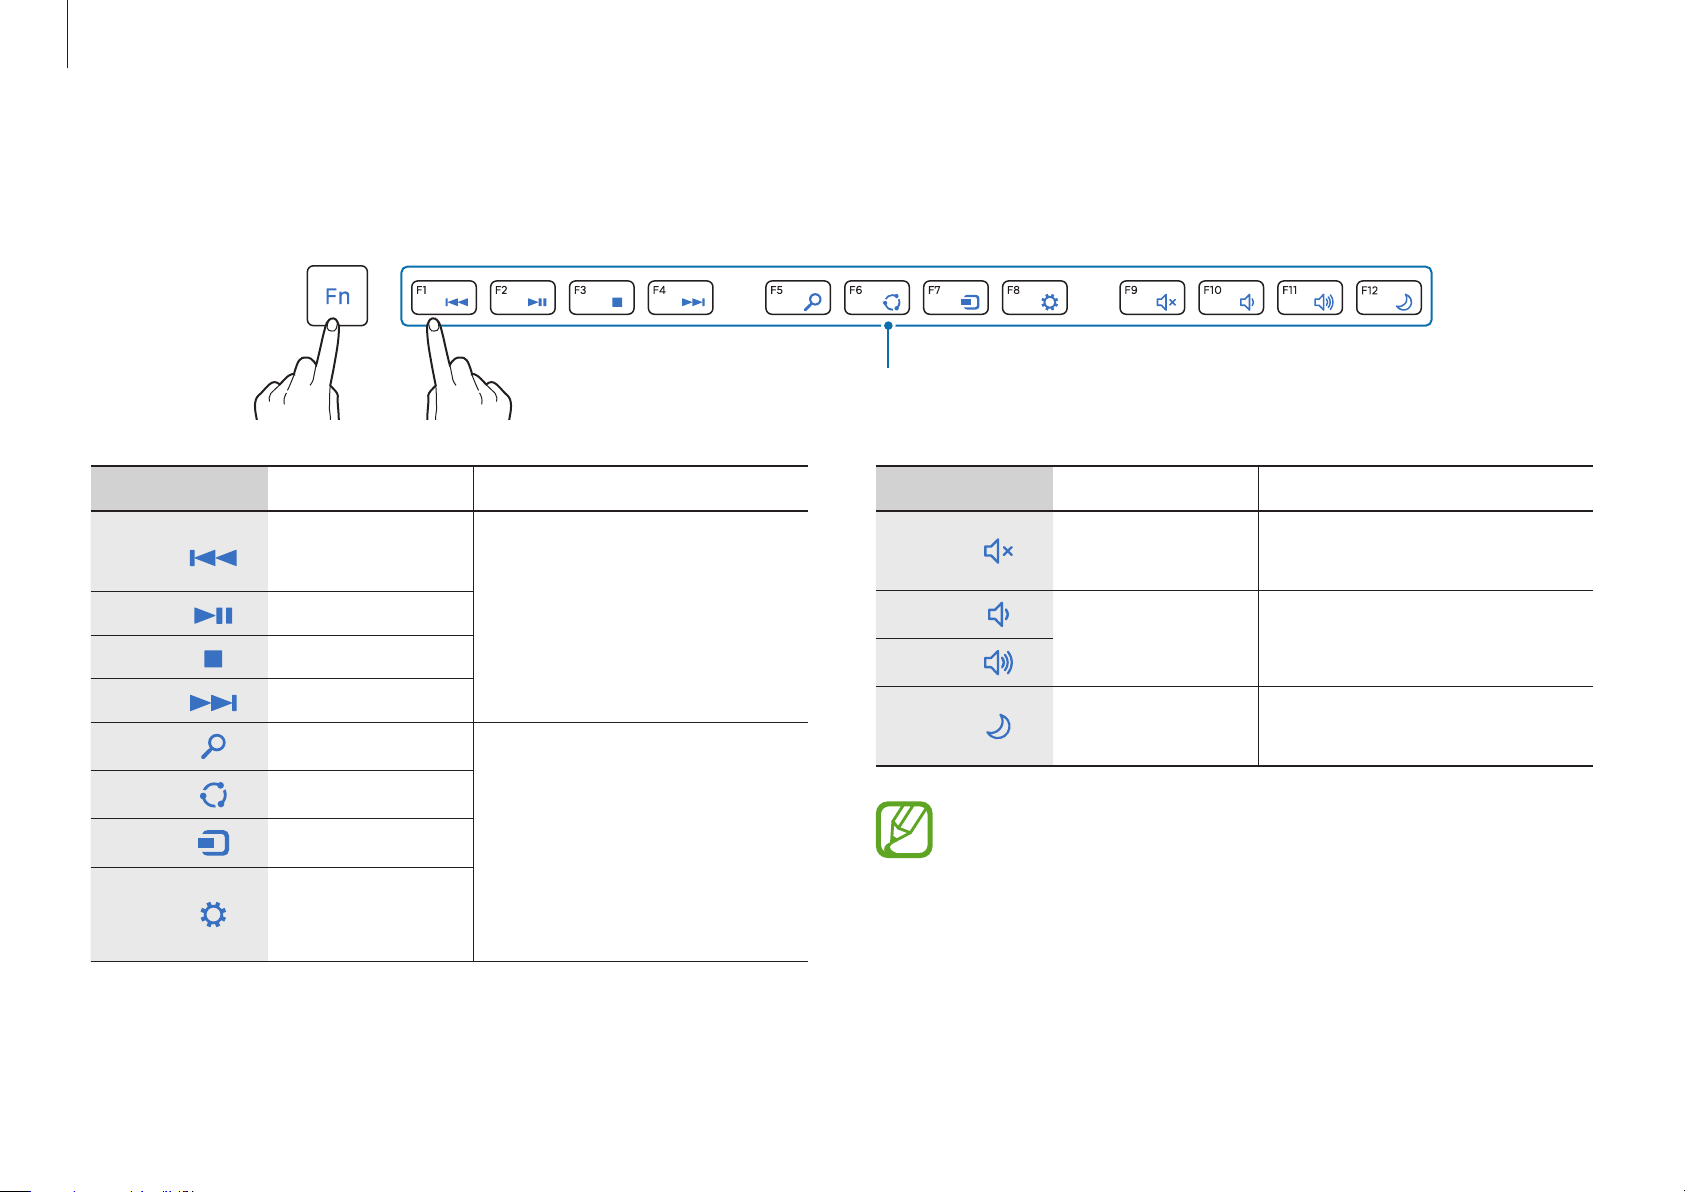
Shortcut Keys
While pressing and holding the Fn key, press a
+
Shortcut keys Function Description
F1
F2
F3
F4
F5
F6
F7
F8
Play the
previous file
Play/Pause
Stop
Play the next file
Search
Share
Device
Setup
Play the media file
These are Windows menu
keys.
Each menu item will be
activated as appropriate.
*
This is not available on
Windows 7.
shorcut keys
.
Shortcut Keys
Shortcut keys Function Description
F9
F10
F11
F12
Mute
Volume control
Power saving
mode
The wireless keyboard automatically enters power-saving
mode if there is no key input for a pre-determined period
of time. Press any key to resume using the keyboard in
power-saving mode.
However, a function to turn the keyboard off is not
Toggle the sound on and
off.
Adjust the volume.
Switch to power saving
mode.
22
supported.
Basics
Wheel button
Wireless Mouse
Moves the pointer up and down.
Right button
Shows the contextsensitive
menus of programs.
Left button
Selects and
launches an item.
Double-click function
Quickly press the left mouse button twice.
The corresponding program is launched.
Right click function
If you click this mouse button once, the
context-sensitive menu of the current
program appears.
Drag function
Dragging refers to clicking an item and
moving the item to another position while
holding the mouse button down.
Click the left mouse button over an item to
If you move the mouse, the pointer on the screen moves in the
same direction.
Click function
Briefly press the left mouse button once.
If you click this mouse button once, the
corresponding program is selected.
be dragged and move the item to the new
position while holding the mouse button
down.
Scroll function
If you turn the wheel button up or down,
the screen moves up or down accordingly.
23
Basics
If the wireless keyboard does not work
► Check if it is out of battery.
Within 30 seconds of reconnecting the receiver, press and
2
hold the
CONNECT
button for 1 seconds near the receiver.
For the keyboard, check if the
top right blinks.
If the indicator blinks, you need to replace the battery.
► Check the status of the wireless signal receiver.
Disconnect the wireless receiver from the main body and then
1
reconnect it.
battery low indicator
at the
CONNECT button
Check if the device works properly.
3
24
Basics
If the wireless mouse does not work
► When the power switch at the bottom of the mouse is in
the
OFF
position, the mouse does not work.
ON
Turn the switch to the
► Check if it is out of battery.
► Check the status of the wireless signal receiver.
position.
Disconnect and then reconnect the wireless signal receiver to
2
the main body.
Set the power switch at the bottom of the mouse to the
1
position.
OFF
Set the power switch at the bottom of the mouse to the ON
3
position.
25

Basics
Within 30 seconds of reconnecting the receiver, press and
4
hold the
Check if the device works properly.
5
CONNECT
button for 1 seconds near the receiver.
LCD brightness
Adjust the LCD brightness to reduce eye strain and save power.
Controlling with Charms
Open the Charms, select the
slider.
Settings
charm → , and drag the
26
Basics
Changing display mode
Set the optimal conditions for the screen, based on the activity.
Some options may not be available depending on the
model.
1
2
3
On the
Select
Select
•
•
•
Start
screen, select .
Settings
Display
Adapt Display
currently running program.
Standard
convenient for most situations.
Photo Editing
.
→
Display Color
: Optimizes the screen automatically for the
: Appropriate for normal environments and
: Appropriate for editing photos.
→ an option.
Samsung Computer’s Defective LCD pixel management
standard
Although Samsung Electronics, Co., Ltd. observes
strict quality and confidence specifications for LCD
manufacturing, the company must inevitably allow a few
defective cells in panels due to a technological limitation
of the manufacturing process.
Therefore Samsung observes and manages the following
dot principles:
•
Bright dot : 2 or less
•
Black dot : 4 or less
•
Combination of Bright and Dark : 4 or less
Instructions for Cleaning the LCD
Clean the LCD panel with a soft cloth lightly moistened
with computer cleansing detergent moving in one
•
Reading mode
: Appropriate for reading documents.
direction.
Cleaning the LCD panel with excessive force can damage
the LCD.
27
Basics
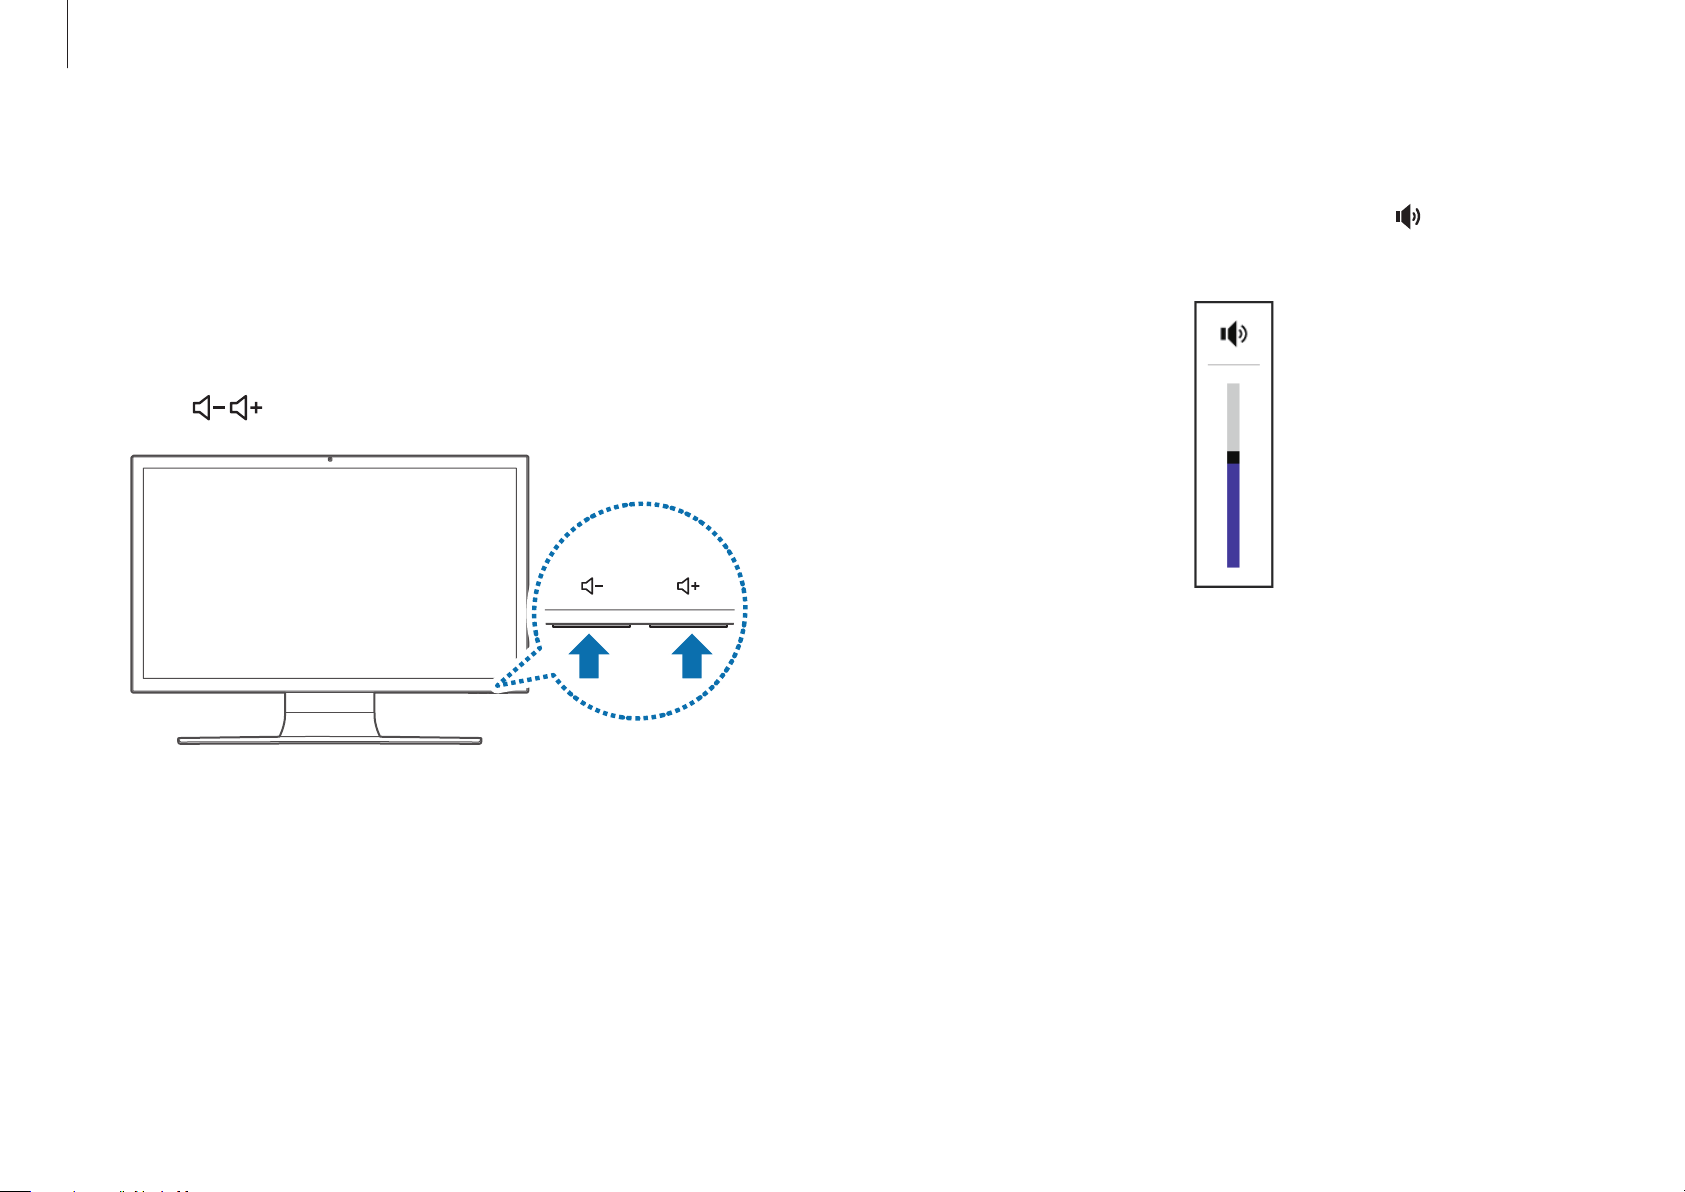
Volume
Adjust the system volume or sound volume when playing music
or video.
Using the control button
Press the
button to control the volume.
Controlling with Charms
Open the Charms, select the
slider.
Settings
charm → , and drag the
28
Basics
Dolby Digital Plus
Use
Dolby Digital Plus
This feature enhances sound elements by analyzing and adjusting
sound levels automatically.
This feature may not be available depending on the model
and operating system.
On the desktop, open the Charms and select the
1
→
charm
Digital Plus Home Theater
Click and select a play mode.
2
Movie, music, game, and voice optimization modes are
provided by default, and you can add custom modes.
Control Panel
to optimize your audio experience.
Settings
→
Hardware and Sound
.
→
Dolby
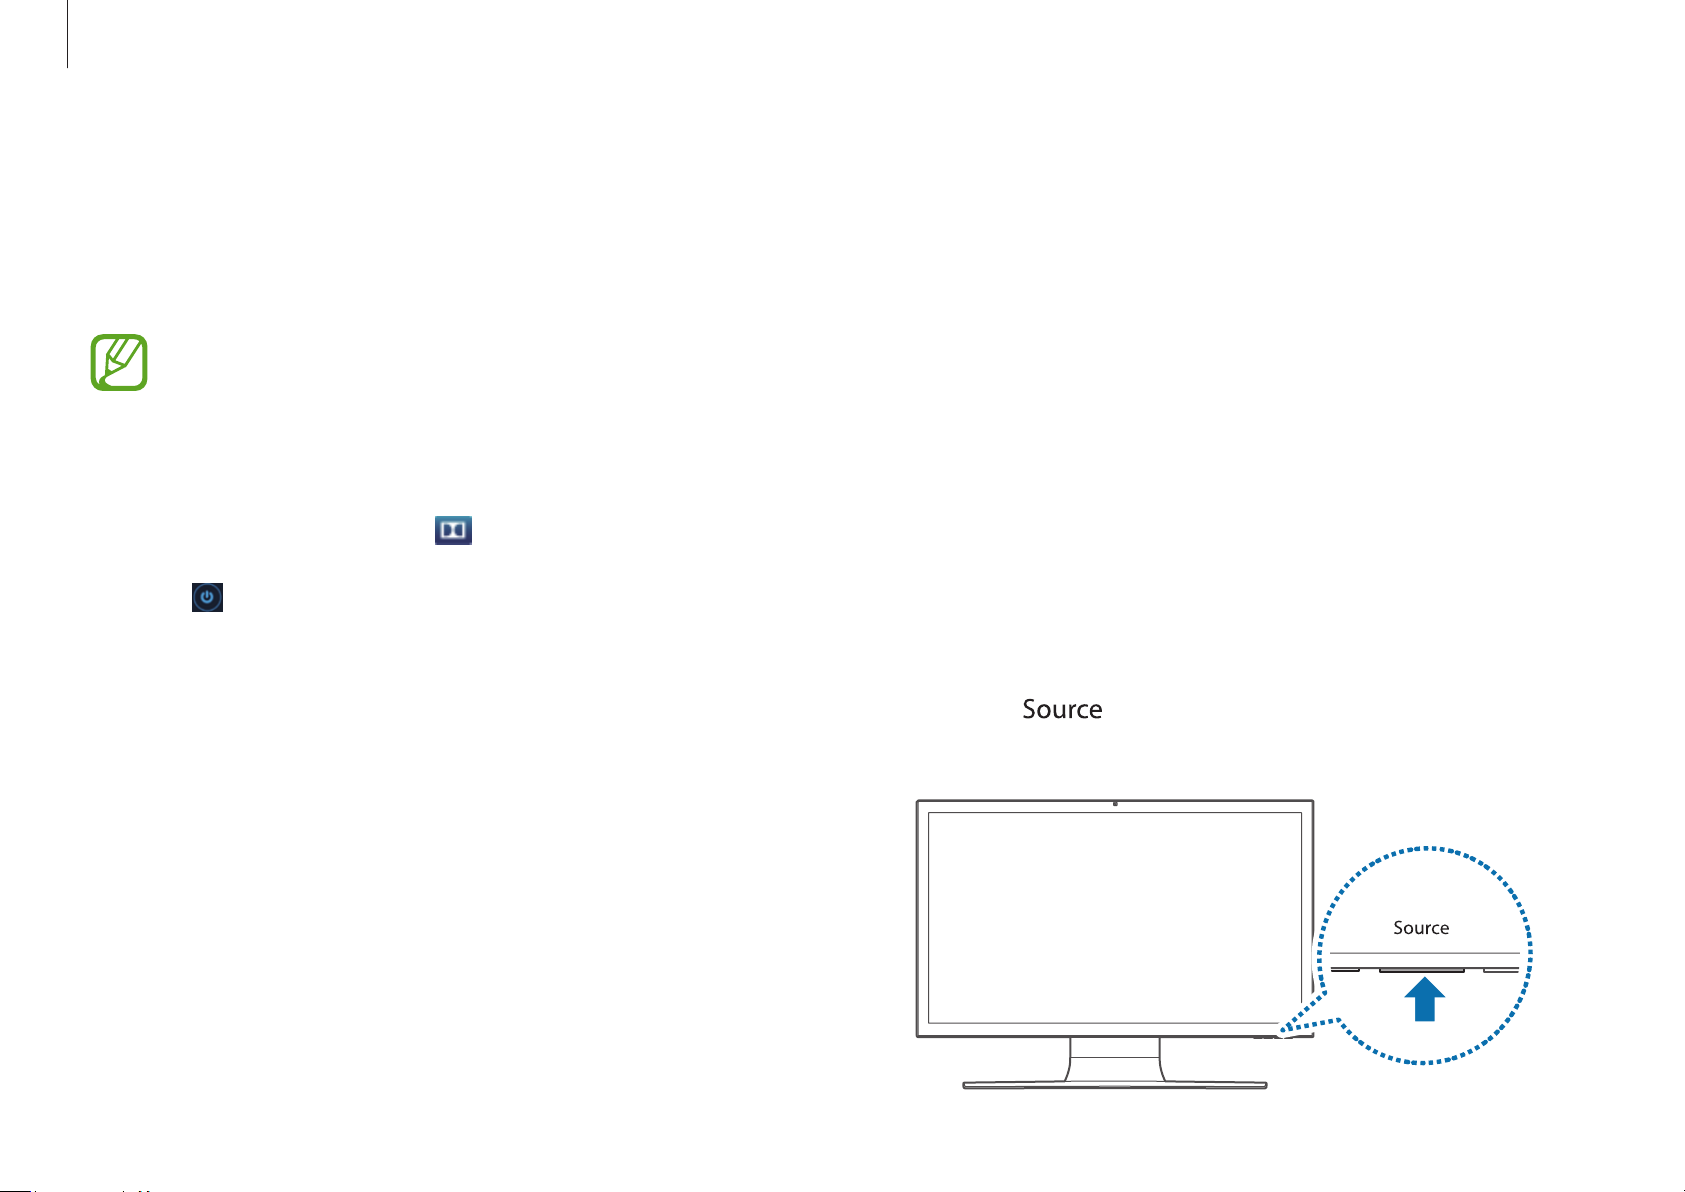
Using the product as a monitor (Optional)
The LCD screen of this product can be used as a monitor using the
Digital Video/Audio Input Port (HDMI-IN).
Try using this product as a monitor by connecting an HDMI device
such as a computer, gaming console, DVD player and so on.
Using the product as a monitor
Connect the external device (HDMI output port) and this
1
product (digital video/audio input port (HDMI-IN)) with the
HDMI cable.
2
Press the
mode
.
button
to switch this product to
monitor
29
Basics
You can only use monitor mode by connecting the Digital
Video/Audio Input Port (HDMI-IN). The Digital Video/Audio
Playing music from smartphones
Out Port (HDMI-OUT) is for output only.
•
As long as the power cord is connected, you can use the
LCD of the product as a monitor even when the product
is off.
•
Even if the product is switched to monitor mode by
pressing the
operating system is not terminated. Press the
button again to return to PC mode.
•
If the product is switched to monitor mode, the audio is
also switched accordingly.
•
If no picture is displayed on the LCD screen when the
product is switched to monitor mode, disconnect and
then reconnect the HDMI port.
•
To use the computer in the monitor mode after the
computer enters the power saving mode or shuts
down, press the LCD On/Off button.
button during an operation, the
directly through the computer
speakers (Optional)
Use Bluetooth pairing to play music from smartphones or tablets
(hereinafter “smartphones”) through the computer speakers.
Pair the smartphone to the computer, and quickly access music.
Pairing the computer to the smartphone
Pair the computer to the smartphone for the initial settings.
•
This is available only with Bluetooth-compliant
smartphones.
•
Keep a certain distance from the computer.
•
The screen and user interface depend on the model
and driver version.
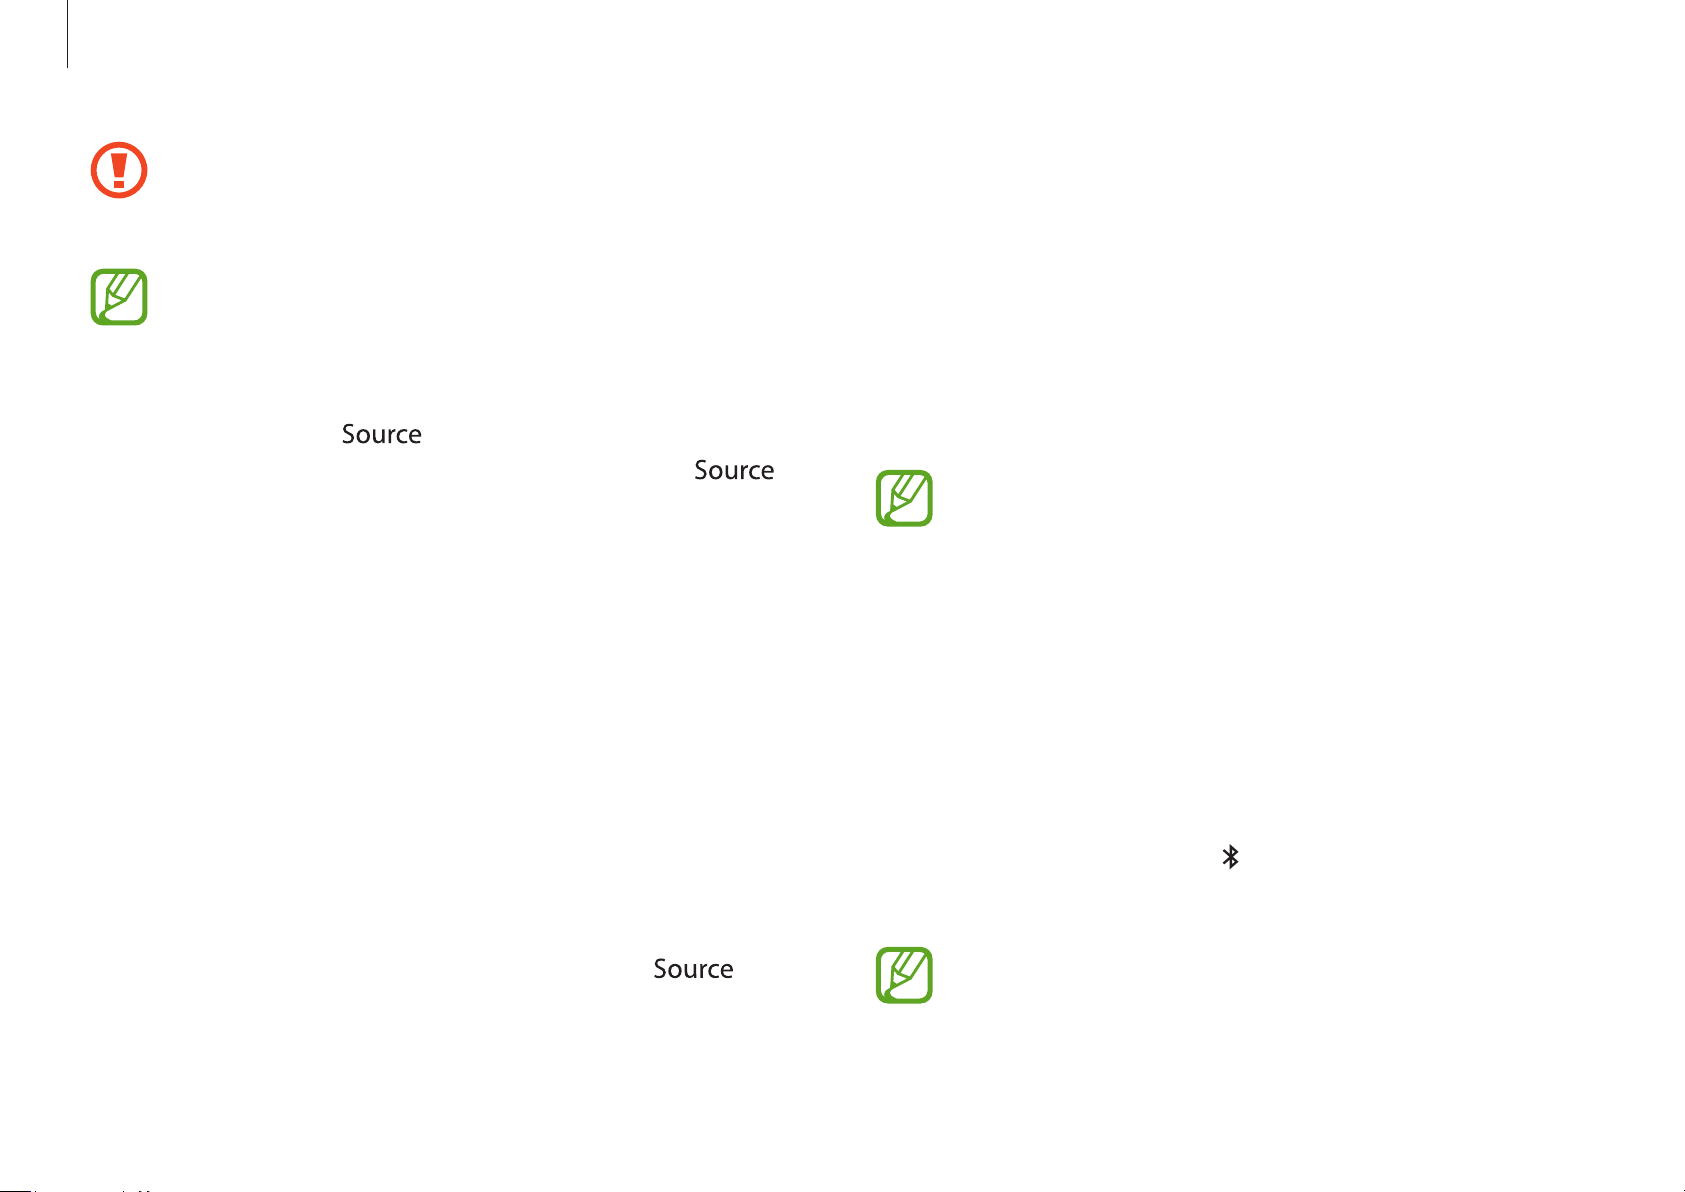
Returning to PC mode
To return to PC mode from monitor mode, press the
button.
Press the
1
The indicator blinks with a message of
30
To regain pairing, press and hold the button for 3 seconds
or more.
Bluetooth
button on the computer.
Pairing
on the screen.
 Loading...