

Page 1

DigiStudio
DigiStudio
DigiStudioDigiStudio
DigiStudio
DigiStudio
DigiStudioDigiStudio
Avatar
Avatar
AvatarAvatar
Avatar
Avatar
AvatarAvatar
Ⅰ
Ⅰ. 3
. 3D technology introduction
ⅠⅠ
Ⅱ
Ⅱ. Avatar &
ⅡⅡ
Ⅲ
Ⅲ.
ⅢⅢ
Ⅳ
Ⅳ. How to use Avatar
ⅣⅣ
Ⅴ. FAQs
D technology introduction
. 3. 3
D technology introductionD technology introduction
. Avatar & DigiStudio
. Avatar & . Avatar &
. DigiStudio
DigiStudio installation
. .
DigiStudio DigiStudio
. How to use Avatar
. How to use Avatar. How to use Avatar
3D
3D
3D 3D
3D
3D
3D 3D
DigiStudio introduction
DigiStudio DigiStudio
installation
installationinstallation
introduction
introductionintroduction
Page 2

Ⅰ
Ⅰ. 3
. 3D TECHNOLOGY INTRODUCTION
ⅠⅠ
D TECHNOLOGY INTRODUCTION
. 3. 3
D TECHNOLOGY INTRODUCTIOND TECHNOLOGY INTRODUCTION
1.1 3D TECHNOLOGY DEFINITION
1.1 3D TECHNOLOGY DEFINITION
1.1 3D TECHNOLOGY DEFINITION1.1 3D TECHNOLOGY DEFINITION
1.2 3D TECHNOLOGY COMPARISON
1.2 3D TECHNOLOGY COMPARISON
1.2 3D TECHNOLOGY COMPARISON1.2 3D TECHNOLOGY COMPARISON
1.3 DirectX 3D TECHNOLOGY
1.3 DirectX 3D TECHNOLOGY
1.3 DirectX 3D TECHNOLOGY1.3 DirectX 3D TECHNOLOGY
Page 3
1111
----
1. 3
1. 3
1. 31. 3
1111
----
1. 3
1. 3
1. 31. 3
DEFINITION
DEFINITION
DEFINITIONDEFINITION
DEFINITION
DEFINITION
DEFINITIONDEFINITION
3333D, which stands for 3
D, which stands for 3----Dimension, is
D, which stands for 3D, which stands for 3
pictures on the monitor.
pictures on the monitor.
pictures on the monitor. pictures on the monitor.
While 2D is composed of the information (the position of dot and
While 2D is composed of the information (the position of dot and its color) on the pictures on the
While 2D is composed of the information (the position of dot andWhile 2D is composed of the information (the position of dot and
current screen, 3D is made up of three
current screen, 3D is made up of three----dimensional information on the image which enables you
current screen, 3D is made up of threecurrent screen, 3D is made up of three
to see the picture from all directions and to produce pictures s
to see the picture from all directions and to produce pictures similar to the original object..
to see the picture from all directions and to produce pictures sto see the picture from all directions and to produce pictures s
Thus, 3D is high technology which is much more precious and has
Thus, 3D is high technology which is much more precious and has various functions than 2D.
Thus, 3D is high technology which is much more precious and has Thus, 3D is high technology which is much more precious and has
D TECHNOLOGY
D TECHNOLOGY
D TECHNOLOGY D TECHNOLOGY
D TECHNOLOGY
D TECHNOLOGY
D TECHNOLOGY D TECHNOLOGY
Dimension, is technolgy
Dimension, is Dimension, is
technolgy to be used to enlarge, reduce, revolve and move
technolgytechnolgy
dimensional information on the image which enables you
dimensional information on the image which enables you dimensional information on the image which enables you
to be used to enlarge, reduce, revolve and move
to be used to enlarge, reduce, revolve and move to be used to enlarge, reduce, revolve and move
its color) on the pictures on the
its color) on the pictures on the its color) on the pictures on the
imilar to the original object..
imilar to the original object..imilar to the original object..
various functions than 2D.
various functions than 2D.various functions than 2D.
3333
DDDD
3333
2222
D
D
!"
!"
D D
!"!"
2222
D
D
!"
!"
D D
!"!"
2222
D
D
#$
#$
D D
#$#$
2222
D
D
#$
#$
D D
#$#$
DDDD
Page 4
1111
1111
----
2. 3
2. 3
2. 32. 3
----
2. 3
2. 3
2. 32. 3
D TECHNOLOGY COMPARISON
D TECHNOLOGY COMPARISON
D TECHNOLOGY COMPARISOND TECHNOLOGY COMPARISON
D TECHNOLOGY COMPARISON
D TECHNOLOGY COMPARISON
D TECHNOLOGY COMPARISOND TECHNOLOGY COMPARISON
FORM
FORM
FORMFORM
FILE
FILE
FILE FILE
CAPACITY
CAPACITY
CAPACITYCAPACITY
EXPRES
EXPRES
EXPRESEXPRES
SION
SION
SIONSION
FILE
FILE
FILE FILE
TYPE
TYPE
TYPETYPE
Composed of one or several
Composed of one or several
Composed of one or several Composed of one or several
consecutive images
consecutive images
consecutive imagesconsecutive images
Composed of small data (file) in
Composed of small data (file) in
Composed of small data (file) in Composed of small data (file) in
comparison with Moving
comparison with Moving
comparison with Moving comparison with Moving
pictures and 3D
pictures and 3D
pictures and 3Dpictures and 3D
Cannot see images from various
Cannot see images from various
Cannot see images from variousCannot see images from various
angIes
angIes such as from the side.
angIesangIes
JPG, BMP, GIF and etc.
JPG, BMP, GIF and etc.JPG, BMP, GIF and etc.
such as from the side.
such as from the side.such as from the side.
MOVING PICTURES2222DDDD
MOVING PICTURESMOVING PICTURES
Composed of several or dozens
Composed of several or dozens
Composed of several or dozens Composed of several or dozens
of 2D images per second
of 2D images per second
of 2D images per secondof 2D images per second
Data(file) volume increases in
Data(file) volume increases in
Data(file) volume increases in Data(file) volume increases in
proportion to play time
proportion to play time
proportion to play timeproportion to play time
Only Limited expressions are
Only Limited expressions are
Only Limited expressions are Only Limited expressions are
possible like 2D
possible like 2D
possible like 2Dpossible like 2D
AVI, MPEG, MOV and etc.
AVI, MPEG, MOV and etc.JPG, BMP, GIF and etc.
AVI, MPEG, MOV and etc.AVI, MPEG, MOV and etc.
3333DDDDMOVING PICTURES
Composed of information on the
Composed of information on the
Composed of information on the Composed of information on the
XYZ 3D position and color of
XYZ 3D position and color of
XYZ 3D position and color of XYZ 3D position and color of
images.
images.
images.images.
Composed of large
Composed of large capaicty
Composed of largeComposed of large
(file) compared with 2D which
(file) compared with 2D which
(file) compared with 2D which (file) compared with 2D which
contains 3D data
contains 3D data
contains 3D datacontains 3D data
Possible to enlarge/reduce/rotate
Possible to enlarge/reduce/rotate
Possible to enlarge/reduce/rotate Possible to enlarge/reduce/rotate
/move at your will, and can convey
/move at your will, and can convey
/move at your will, and can convey /move at your will, and can convey
various touches and expressions
various touches and expressions
various touches and expressions various touches and expressions
which are not possible with 2D and
which are not possible with 2D and
which are not possible with 2D and which are not possible with 2D and
moving pictures
moving pictures
moving picturesmoving pictures
Various including MAX, MB, MA
Various including MAX, MB, MA
Various including MAX, MB, MA Various including MAX, MB, MA
depending on programs
depending on programs
depending on programsdepending on programs
capaicty of data
capaictycapaicty
of data
of data of data
VIEWER
VIEWER
VIEWERVIEWER
Possible to see on the Web or
Possible to see on the Web or
Possible to see on the Web or Possible to see on the Web or
PC without a special viewer
PC without a special viewer
PC without a special viewerPC without a special viewer
Possible to see from the Media
Possible to see from the Media
Possible to see from the Media Possible to see from the Media
Player or specific programs
Player or specific programs
Player or specific programsPlayer or specific programs
Need to install specific programs to
Need to install specific programs to
Need to install specific programs to Need to install specific programs to
see on the Web or PC
see on the Web or PC
see on the Web or PCsee on the Web or PC
Page 5

1111
----
3.
3.
DirectX 3D TECHNOLOGY
DirectX 3D TECHNOLOGY
3. 3.
1111
----
To implement 3D on the Microsoft Windows OS installed computer,
To implement 3D on the Microsoft Windows OS installed computer, DirectX or
To implement 3D on the Microsoft Windows OS installed computer, To implement 3D on the Microsoft Windows OS installed computer,
used, and most 3D games and programs uses DirectX with generali
used, and most 3D games and programs uses DirectX with generality.
used, and most 3D games and programs uses DirectX with generaliused, and most 3D games and programs uses DirectX with generali
DirectX is basically installed when installing OS from Windows95
DirectX is basically installed when installing OS from Windows95. As technology advances, upgraded
DirectX is basically installed when installing OS from Windows95DirectX is basically installed when installing OS from Windows95
versions are being released and new version of DirectX can be in
versions are being released and new version of DirectX can be installed
versions are being released and new version of DirectX can be inversions are being released and new version of DirectX can be in
Like most 3D games or programs , to use
Like most 3D games or programs , to use DigiStudio
Like most 3D games or programs , to useLike most 3D games or programs , to use
installed basically. When
installed basically. When DigiStudio
installed basically. When installed basically. When
installed, users will be informed and DirectX
installed, users will be informed and DirectX ver
installed, users will be informed and DirectXinstalled, users will be informed and DirectX
Windows 98 SE
Windows 98 SEWindows 98 SE
DirectX 3D TECHNOLOGYDirectX 3D TECHNOLOGY
3.
3.
DirectX 3D TECHNOLOGY
DirectX 3D TECHNOLOGY
3. 3.
DirectX 3D TECHNOLOGYDirectX 3D TECHNOLOGY
DigiStudio 3D Avatar program, DirectX
DigiStudioDigiStudio
OS
OS
OSOS
OS
OS
OSOS
Windows 98
Windows 98Windows 98
DigiStudio is installed first, this will be automatically checked and if it
DigiStudio DigiStudio
DirectX version
DirectX version
DirectX versionDirectX version
DirectX version
DirectX version
DirectX versionDirectX version
Ver
Ver 5.0
5.0Windows 98
VerVer
5.05.0
Ver
Ver 6.1
6.1Windows 98 SE
VerVer
6.16.1
is installed first, this will be automatically checked and if it is not
is installed first, this will be automatically checked and if itis installed first, this will be automatically checked and if it
ver 8.1 and 3D Avatar program will be installed.
ver ver
Tips
Tips
TipsTips
Tips
Tips
TipsTips
For Popular 3D games such as
For Popular 3D games such as Warcraft
For Popular 3D games such asFor Popular 3D games such as
Lineage DirectX 8.1 should be installed, and most
Lineage DirectX 8.1 should be installed, and most
Lineage DirectX 8.1 should be installed, and mostLineage DirectX 8.1 should be installed, and most
coputer
coputer game rooms have DirectX
coputercoputer
installed.
installed.
installed.installed.
DirectX or OpnGL
DirectX orDirectX or
ty.
ty.ty.
. As technology advances, upgraded
. As technology advances, upgraded . As technology advances, upgraded
stalled independantly
stalledstalled
3D Avatar program, DirectX Ver
3D Avatar program, DirectX 3D Avatar program, DirectX
8.1 and 3D Avatar program will be installed.
8.1 and 3D Avatar program will be installed.8.1 and 3D Avatar program will be installed.
Tips
Tips
TipsTips
game rooms have DirectX Ver
game rooms have DirectXgame rooms have DirectX
independantly....
independantlyindependantly
OpnGL technology is
OpnGLOpnGL
Warcraft 3, and
Warcraft Warcraft
Ver 8.1 or later
VerVer
technology is
technology is technology is
Ver 8.1 should be
8.1 should be
VerVer
8.1 should be 8.1 should be
3, and
3, and 3, and
8.1 or later
8.1 or later 8.1 or later
is not
is not is not
Windows 2000
Windows 2000 Windows 2000
Windows ME
Windows MEWindows ME
Windows XP
Windows XPWindows XP
Ver
Ver 7.0
7.0Windows 2000
VerVer
7.07.0
Ver
Ver 7.1
7.1Windows ME
VerVer
7.17.1
Ver
Ver 8.1
8.1Windows XP
VerVer
8.18.1
For DirectX, be sure to reboot the computer after
For DirectX, be sure to reboot the computer after
For DirectX, be sure to reboot the computer after For DirectX, be sure to reboot the computer after
installation.
installation.
installation.installation.
As per computers where DirectX 8.1 is not installed,
As per computers where DirectX 8.1 is not installed,
As per computers where DirectX 8.1 is not installed, As per computers where DirectX 8.1 is not installed,
Program installation will be terminated in the middle
Program installation will be terminated in the middle
Program installation will be terminated in the middle Program installation will be terminated in the middle
if you do not agree to DirectX 8.1 installation
if you do not agree to DirectX 8.1 installation
if you do not agree to DirectX 8.1 installation if you do not agree to DirectX 8.1 installation
during the installation process.
during the installation process.
during the installation process. during the installation process.
Page 6

Ⅱ
Ⅱ.
. AVATOR &
ⅡⅡ
AVATOR & DigiStudio
. .
AVATOR &AVATOR &
DigiStudio INTRODUCTION
DigiStudioDigiStudio
2.1
2.1 Avatar DEFINIOTN
2.1 2.1
2.2 WHAT IS 3D Avatar?
2.2 WHAT IS 3D Avatar?
2.2 WHAT IS 3D Avatar?2.2 WHAT IS 3D Avatar?
2.3
2.3 DigiStudio
2.32.3
2.4
2.4 DigiStudio
2.42.4
2.5
2.5 DigiStudio
2.52.5
Avatar DEFINIOTN
Avatar DEFINIOTNAvatar DEFINIOTN
DigiStudio 3D Avatar
DigiStudioDigiStudio
DigiStudio MAIN FUNCTIONS
DigiStudioDigiStudio
DigiStudio USAGE EXAPLES
DigiStudioDigiStudio
3D Avatar
3D Avatar3D Avatar
MAIN FUNCTIONS
MAIN FUNCTIONSMAIN FUNCTIONS
USAGE EXAPLES
USAGE EXAPLESUSAGE EXAPLES
INTRODUCTION
INTRODUCTIONINTRODUCTION
Page 7
2222
----
1.
1.
Avatar DEFINITION
Avatar DEFINITION
1. 1.
2222
----
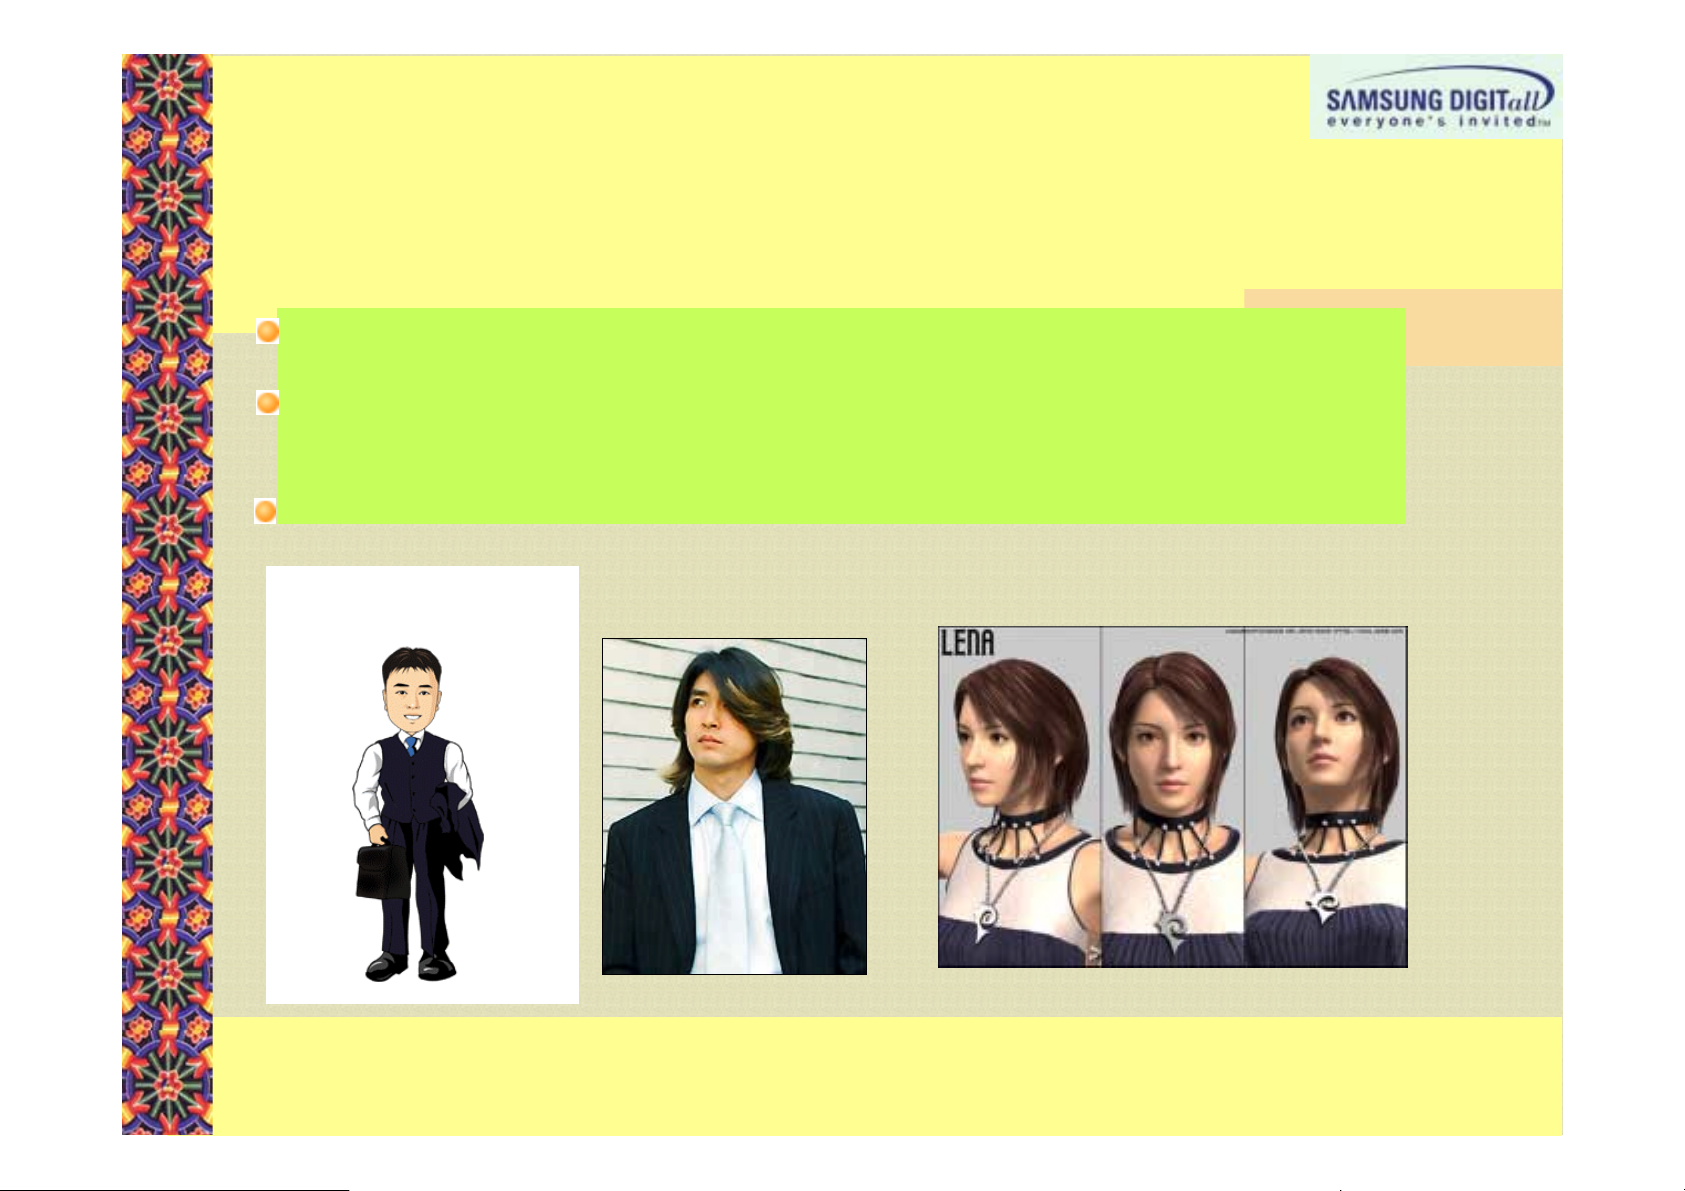
Avatar which means
Avatar which means ‘incarnation
Avatar which means Avatar which means
shirts, pants, accessories, and hairstyles as the user wishes.
shirts, pants, accessories, and hairstyles as the user wishes.
shirts, pants, accessories, and hairstyles as the user wishes.shirts, pants, accessories, and hairstyles as the user wishes.
Internet users have used ID for a long time to represent themsel
Internet users have used ID for a long time to represent themselves, but they wanted new methods to
Internet users have used ID for a long time to represent themselInternet users have used ID for a long time to represent themsel
express themselves when they have to be exposed to other people
express themselves when they have to be exposed to other people such as on the notice, chatting
express themselves when they have to be exposed to other people express themselves when they have to be exposed to other people
room.
room.
room. room.
Avatar provides thousands of items of hairstyle, fashion style,
Avatar provides thousands of items of hairstyle, fashion style, and accessories. By configuring them,
Avatar provides thousands of items of hairstyle, fashion style, Avatar provides thousands of items of hairstyle, fashion style,
you can create your own unique image and express yourself. There
you can create your own unique image and express yourself. Therefore, Avatar gained a lot of
you can create your own unique image and express yourself. Thereyou can create your own unique image and express yourself. There
popularity among
popularity among teemagers
popularity amongpopularity among
Avatar is developed and serviced first in Korea, a highly wired
Avatar is developed and serviced first in Korea, a highly wired country, and is rapidly spreading
Avatar is developed and serviced first in Korea, a highly wired Avatar is developed and serviced first in Korea, a highly wired
throughout the world thanks to the high
throughout the world thanks to the high----speed internet.
throughout the world thanks to the highthroughout the world thanks to the high
Avatar DEFINITIONAvatar DEFINITION
1.
1.
Avatar DEFINITION
Avatar DEFINITION
1. 1.
Avatar DEFINITIONAvatar DEFINITION
incarnation’ in
incarnationincarnation
teemagers and people in their twenties.
teemagersteemagers
in Sanscrit
inin
and people in their twenties.
and people in their twenties. and people in their twenties.
Sanscrit, is online image configured with various items such as
SanscritSanscrit
, is online image configured with various items such as
, is online image configured with various items such as , is online image configured with various items such as
ves, but they wanted new methods to
ves, but they wanted new methods to ves, but they wanted new methods to
such as on the notice, chatting
such as on the notice, chatting such as on the notice, chatting
and accessories. By configuring them,
and accessories. By configuring them, and accessories. By configuring them,
fore, Avatar gained a lot of
fore, Avatar gained a lot of fore, Avatar gained a lot of
country, and is rapidly spreading
country, and is rapidly spreading country, and is rapidly spreading
speed internet.
speed internet.speed internet.
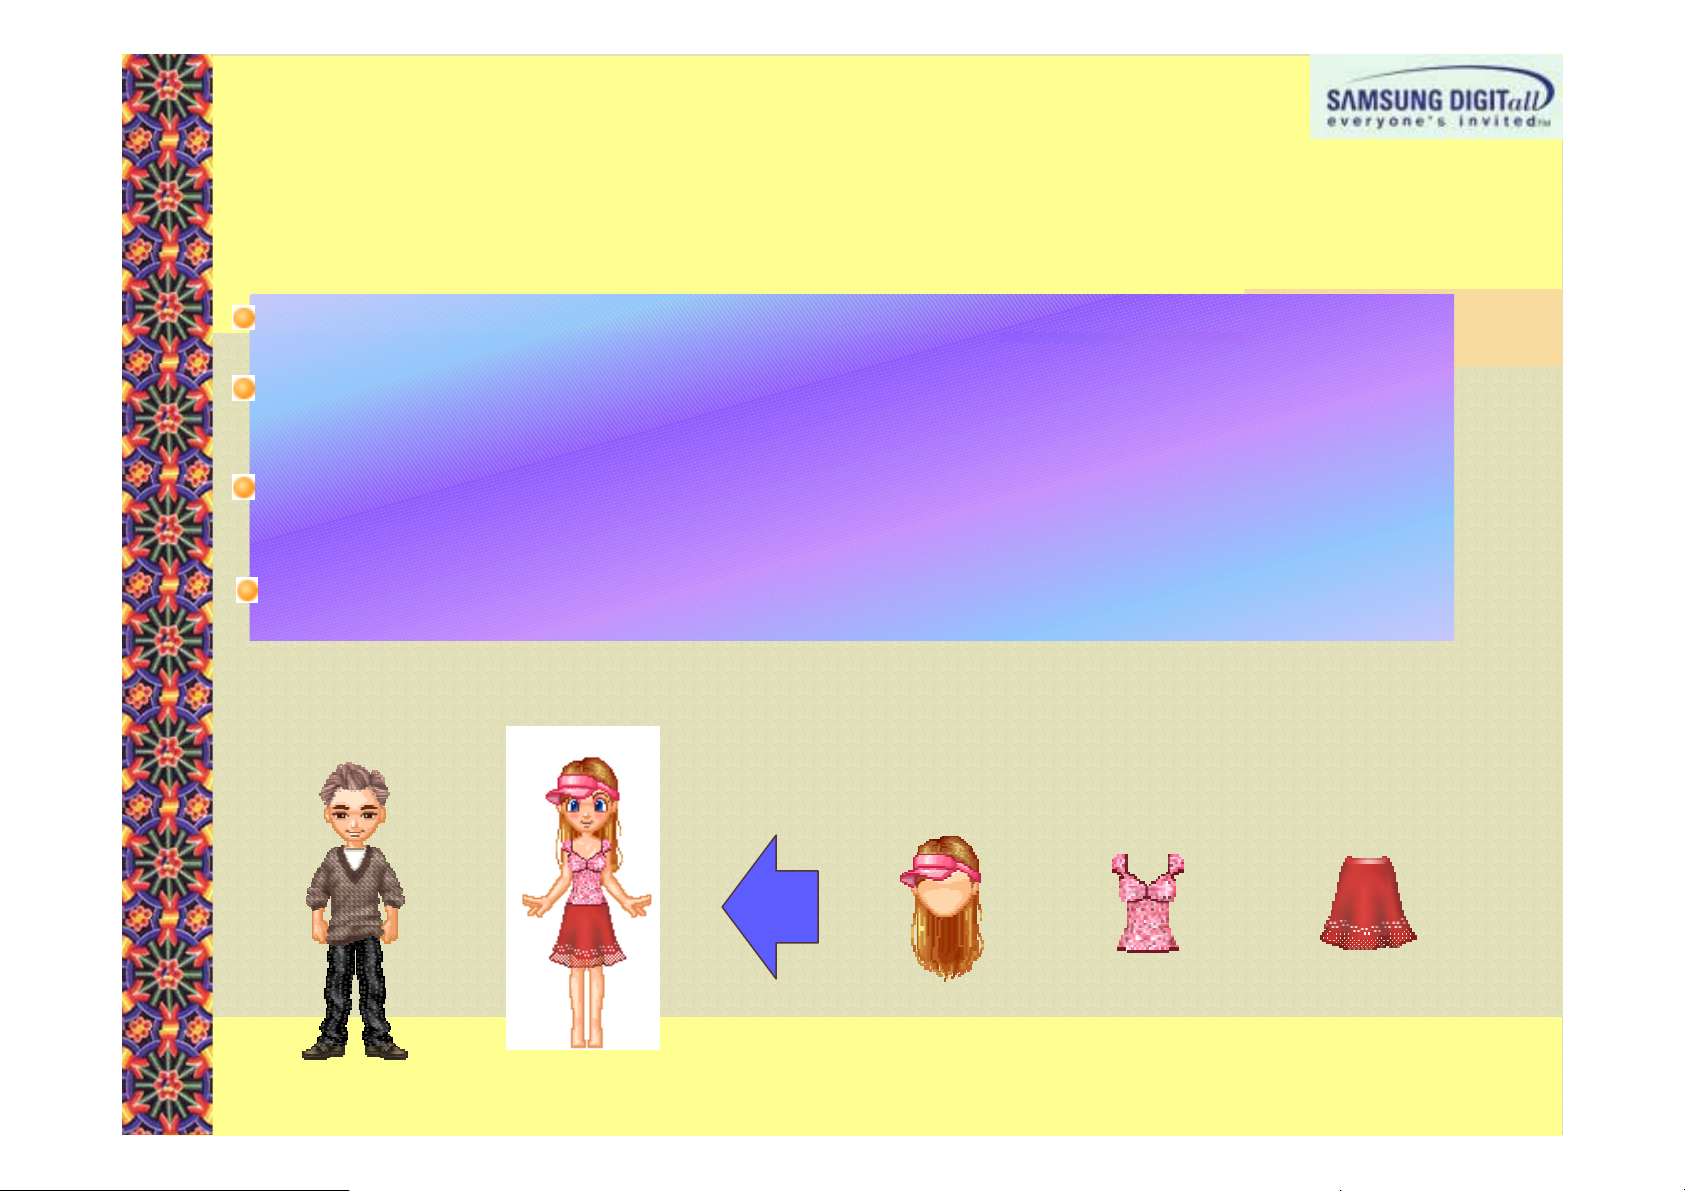
Configurated
Configurated 2222DAvatar
Configurated Configurated
DAvatar
DAvatarDAvatar
Haristyle
Haristyle item
HaristyleHaristyle
item Blouse item
itemitem
+
++
++
Blouse item Skirt item
Blouse itemBlouse item
+
++
Skirt item
Skirt itemSkirt item
Page 8
2222
----
2. 3
2. 3
2. 32. 3
2222
----
2. 3
2. 3
2. 32. 3
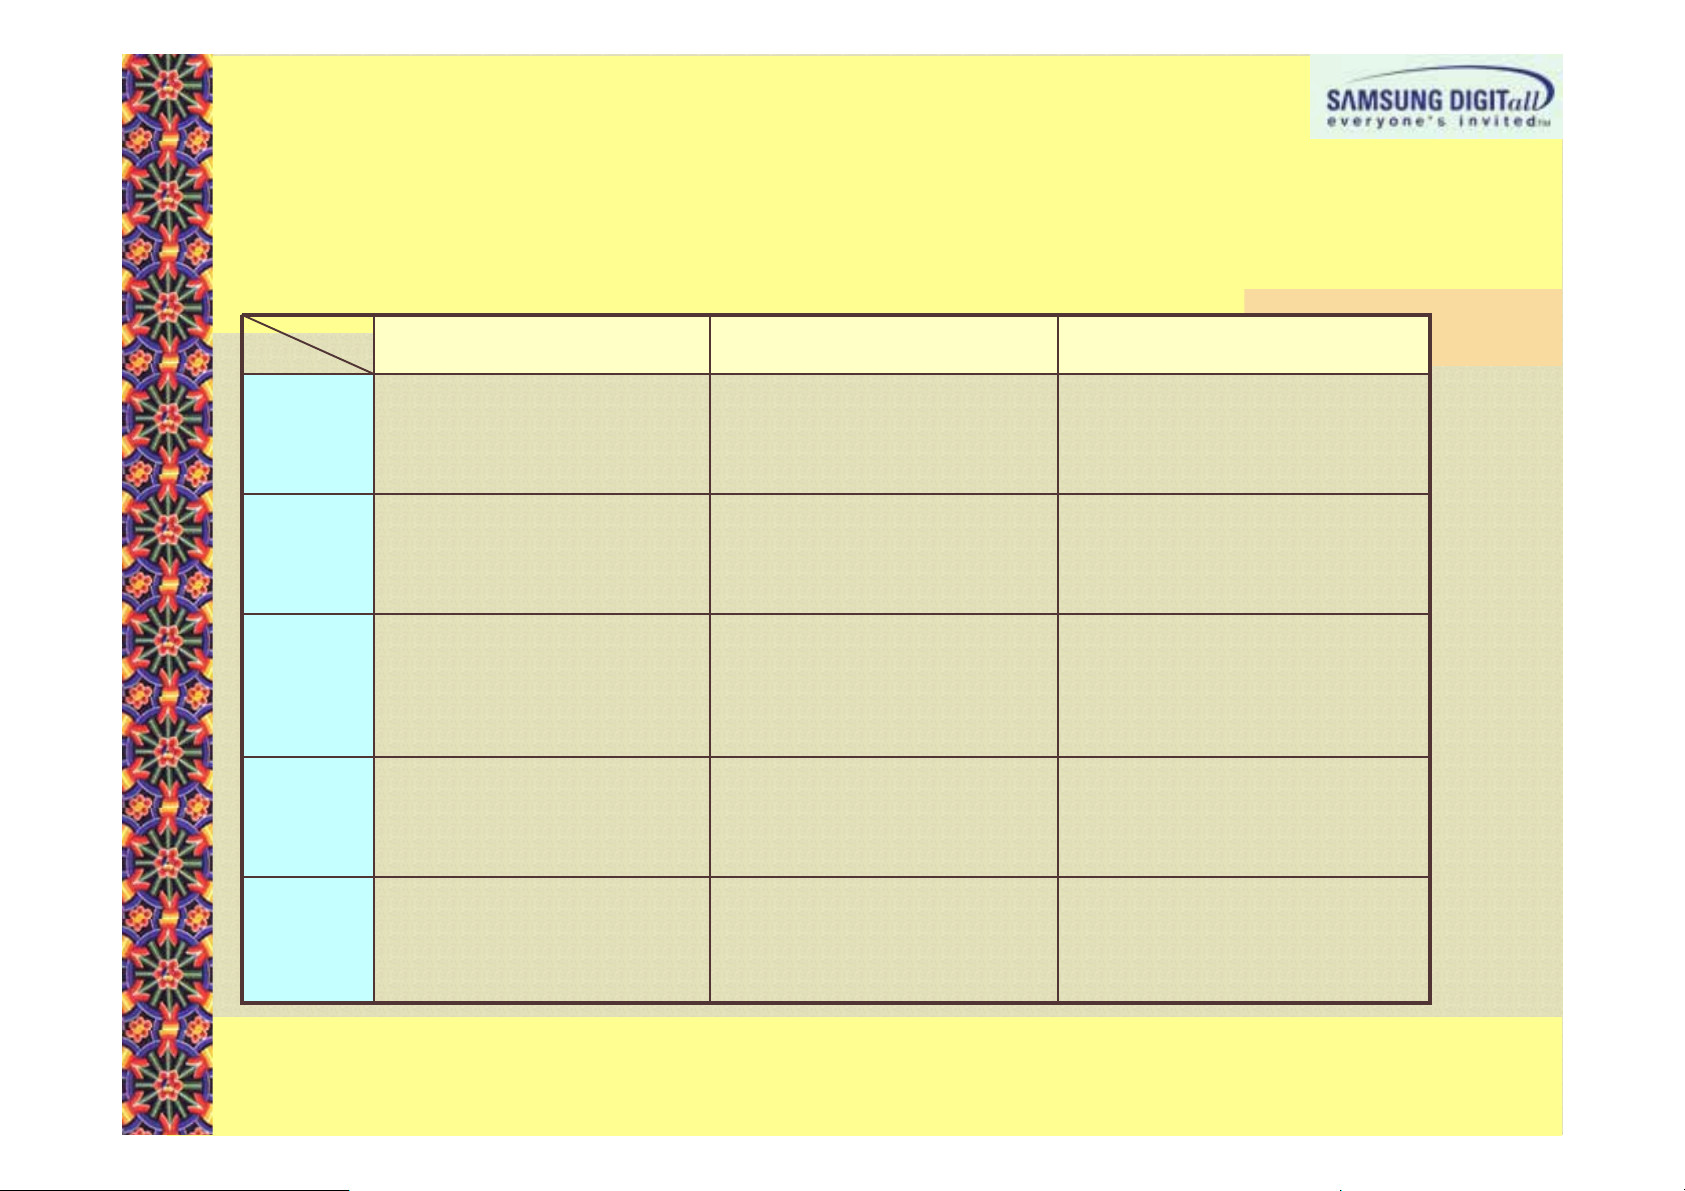
Avatar services provided on most current websites are services w
Avatar services provided on most current websites are services which configure items and create avatar
Avatar services provided on most current websites are services wAvatar services provided on most current websites are services w
similar to the real person.
similar to the real person.
similar to the real person.similar to the real person.
2D avatar
2D avatar sevice
2D avatar2D avatar
expression limits.
expression limits.
expression limits.expression limits.
3D Avatar is high
3D Avatar is high----quality next generation avatar service and provides various func
3D Avatar is high3D Avatar is high
existing 2D avatar cannot provide.
existing 2D avatar cannot provide.
existing 2D avatar cannot provide.existing 2D avatar cannot provide.
merits
merits
meritsmerits
merits
merits
meritsmerits
D WHAT IS Avatar?
D WHAT IS Avatar?
D WHAT IS Avatar?D WHAT IS Avatar?
D WHAT IS Avatar?
D WHAT IS Avatar?
D WHAT IS Avatar?D WHAT IS Avatar?
hich configure items and create avatar
hich configure items and create avatar hich configure items and create avatar
sevice provides many items and create your own unique avatar, but cann
sevicesevice
provides many items and create your own unique avatar, but cannot get over 2D
provides many items and create your own unique avatar, but cannprovides many items and create your own unique avatar, but cann
quality next generation avatar service and provides various functions which the
quality next generation avatar service and provides various funcquality next generation avatar service and provides various func
2222
D avatar
D avatar
D avatarD avatar
2222
D avatar
D avatar
D avatarD avatar
Possible to use on PC or online without
Possible to use on PC or online without
Possible to use on PC or online without Possible to use on PC or online without
installing additional programs
installing additional programs
installing additional programsinstalling additional programs
can easily create various items at low cost
can easily create various items at low cost
can easily create various items at low cost can easily create various items at low cost
3333
D avatar
D avatar
D avatarD avatar
3333
D avatar
D avatar
D avatarD avatar
Can express realistically and dynamically which is
Can express realistically and dynamically which is
Can express realistically and dynamically which isCan express realistically and dynamically which is
theadvantage
theadvantage of 3D.
theadvantagetheadvantage
Possible to enlarge/reduce/rotate /move the avatar at
Possible to enlarge/reduce/rotate /move the avatar at
Possible to enlarge/reduce/rotate /move the avatar at Possible to enlarge/reduce/rotate /move the avatar at
your will
your will....
your willyour will
2D
2D =>?8
=>?8 @AB
2D 2D
=>?8=>?8
PQR
PQR,
, S;R
PQRPQR
, ,
of 3D.
of 3D.of 3D.
@AB CCCCDE
@AB@AB
S;R RT
S;RS;R
RT,
RTRT
DE,
, FG
DEDE
, ,
, UV
UV W;R
W;R RT
, ,
UVUV
W;RW;R
FG #HI
FGFG
tions which the
tions which the tions which the
#HI JK
#HI#HI
RT X+
RTRT
ot get over 2D
ot get over 2D ot get over 2D
JK LMNO
LMNO @@@@
JKJK
LMNOLMNO
X+ 8T;<
8T;<....
X+X+
8T;<8T;<
demerits
demerits
demeritsdemerits
demerits
demerits
demeritsdemerits
System
System
SystemSystem
System
System
SystemSystem
specs
specs
specsspecs
specs
specs
specsspecs
There are expression limits because of 2D
There are expression limits because of 2D
There are expression limits because of 2D There are expression limits because of 2D
limits
limits
limitslimits
As a lot of similar services appeared, lack of
As a lot of similar services appeared, lack of
As a lot of similar services appeared, lack of As a lot of similar services appeared, lack of
scarcity.
scarcity.
scarcity. scarcity.
Hardly affected by computer hardware
Hardly affected by computer hardware
Hardly affected by computer hardware Hardly affected by computer hardware
specifications
specifications
specificationsspecifications
PC
PC%%%% &'()*
&'()* +,-
PCPC
&'()*&'()*
;<
;<....
;<;<
High
High----level of programming development skill is needed
level of programming development skill is needed
HighHigh
level of programming development skill is needed level of programming development skill is needed
in comparison with 2D avatar
in comparison with 2D avatar
in comparison with 2D avatarin comparison with 2D avatar
Takes a lot of time and cost to create 3Ditem
Takes a lot of time and cost to create 3Ditem
Takes a lot of time and cost to create 3DitemTakes a lot of time and cost to create 3Ditem
Depending the quality of provided functions and 3D data,
Depending the quality of provided functions and 3D data,
Depending the quality of provided functions and 3D data, Depending the quality of provided functions and 3D data,
it requires a specific
it requires a specific----level of computer
it requires a specificit requires a specific
+,- ./
+,-+,-
./ 012
012 34!5
././
012012
level of computer hardward
level of computerlevel of computer
34!5 678
34!534!5
678 9:
678678
hardward....
hardwardhardward
9:
9:9:
Page 9

2222
----
3.
3.
DigiStudio
DigiStudio
3. 3.
2222
----
DigiStudio
DigiStudio
DigiStudioDigiStudio
DigiStudio
DigiStudio
DigiStudioDigiStudio
DigiStudio
DigiStudio uses a frontal face view picture taken by a digital camera and
DigiStudioDigiStudio
manipulating you can create an avatar with a 3D face which is si
manipulating you can create an avatar with a 3D face which is similar to the user
manipulating you can create an avatar with a 3D face which is simanipulating you can create an avatar with a 3D face which is si
DigiStudio
DigiStudio
DigiStudioDigiStudio
DigiStudio
DigiStudio
DigiStudioDigiStudio
By using
By using DigiStudio
By usingBy using
recorded by digital camera UCA
recorded by digital camera UCA----1 made by Samsung
recorded by digital camera UCArecorded by digital camera UCA
You can make interesting moving pictures with 3D avatar
You can make interesting moving pictures with 3D avatar simliar
You can make interesting moving pictures with 3D avatarYou can make interesting moving pictures with 3D avatar
The created moving pictures can be saved on the digital camera U
The created moving pictures can be saved on the digital camera UCA
The created moving pictures can be saved on the digital camera UThe created moving pictures can be saved on the digital camera U
screen when
screen when turing
screen whenscreen when
DigiStudioDigiStudio
3.
3.
DigiStudio
DigiStudio
3. 3.
DigiStudioDigiStudio
is a program which creates 3D avatar with one frontal face view
is a program which creates 3D avatar with one frontal face view
is a program which creates 3D avatar with one frontal face viewis a program which creates 3D avatar with one frontal face view
is a program which creates 3D avatar with one frontal face view
is a program which creates 3D avatar with one frontal face view
is a program which creates 3D avatar with one frontal face viewis a program which creates 3D avatar with one frontal face view
uses a frontal face view picture taken by a digital camera and by simply
uses a frontal face view picture taken by a digital camera and uses a frontal face view picture taken by a digital camera and
enables you to create various moving pictures of 3D avatar.
enables you to create various moving pictures of 3D avatar.
enables you to create various moving pictures of 3D avatar.enables you to create various moving pictures of 3D avatar.
enables you to create various moving pictures of 3D avatar.
enables you to create various moving pictures of 3D avatar.
enables you to create various moving pictures of 3D avatar.enables you to create various moving pictures of 3D avatar.
DigiStudio, you can create 3D avatar similar to the real user and also add
DigiStudioDigiStudio
turing on, or enjoy on PC.
turingturing
, you can create 3D avatar similar to the real user and also add voice message
, you can create 3D avatar similar to the real user and also add, you can create 3D avatar similar to the real user and also add
on, or enjoy on PC.
on, or enjoy on PC.on, or enjoy on PC.
3D Avatar
3D Avatar
3D Avatar3D Avatar
3D Avatar
3D Avatar
3D Avatar3D Avatar
1 made by Samsung techwin
1 made by Samsung1 made by Samsung
milar to the user’s face.
milar to the usermilar to the user
techwin....
techwintechwin
simliar to the real user dancing to music.
simliarsimliar
to the real user dancing to music.
to the real user dancing to music.to the real user dancing to music.
CA----1 and be used as a starting
CACA
picture.
picture.
picture.picture.
picture.
picture.
picture.picture.
by simply
by simply by simply
s face.
s face.s face.
voice message
voice message voice message
1 and be used as a starting
1 and be used as a starting 1 and be used as a starting
Passport
Passport
Passport Passport
Passport
Passport
Passport Passport
picture
picture
picturepicture
picture
picture
picturepicture
3333
D avatar
D avatar
D avatarD avatar
3333
D avatar
D avatar
D avatarD avatar
Page 10
2222
2222
----
----
4.
4.
DigiStudio
DigiStudio
4. 4.
DigiStudioDigiStudio
4.
4.
DigiStudio
DigiStudio
4. 4.
DigiStudioDigiStudio
Face creation/
Face creation/
shaping
shaping
race/gender selection
race/gender selection
Motion composition
Motion composition
MAIN FUNCTIONS
MAIN FUNCTIONS
MAIN FUNCTIONSMAIN FUNCTIONS
MAIN FUNCTIONS
MAIN FUNCTIONS
MAIN FUNCTIONSMAIN FUNCTIONS
Using one frontal face picture, create a 3D face similar to the
Using one frontal face picture, create a 3D face similar to the real and shape chin
Using one frontal face picture, create a 3D face similar to the Using one frontal face picture, create a 3D face similar to the
line/ears/nose
line/ears/nose
line/ears/noseline/ears/nose
Fashion
Fashion
composition
composition
Background music
Background music
compostion
compostion
real and shape chin
real and shape chin real and shape chin
Can select race between Asian and African, and provide various f
Can select race between Asian and African, and provide various female/male
Can select race between Asian and African, and provide various fCan select race between Asian and African, and provide various f
models
models
models models
Configure the created 3D face with dress / shirt /
Configure the created 3D face with dress / shirt / pnats
Configure the created 3D face with dress / shirt /Configure the created 3D face with dress / shirt /
Function to combine up
Function to combine up----to
Function to combine upFunction to combine up
quality motion capture device
quality motion capture device
quality motion capture devicequality motion capture device
Function to use as background music by composing MP3 music of th
Function to use as background music by composing MP3 music of the user
Function to use as background music by composing MP3 music of thFunction to use as background music by composing MP3 music of th
to----date dance or interesting gestures created by High
date dance or interesting gestures created by High----
toto
date dance or interesting gestures created by Highdate dance or interesting gestures created by High
pnats / accessories
/ accessories
pnatspnats
/ accessories/ accessories
emale/male
emale/male emale/male
e user
e usere user
Voice
Voice
composition
composition
Moving pictures
Moving pictures
composition
composition
Function to make 3D avatar speak using voice file recorded by di
Function to make 3D avatar speak using voice file recorded by digital cameras
Function to make 3D avatar speak using voice file recorded by diFunction to make 3D avatar speak using voice file recorded by di
Can enjoy on digital
Can enjoy on digital camers
Can enjoy on digitalCan enjoy on digital
moving pictures
moving pictures
moving picturesmoving pictures
camers or PC through the output of 3D avatar contents into
camerscamers
or PC through the output of 3D avatar contents into
or PC through the output of 3D avatar contents into or PC through the output of 3D avatar contents into
gital cameras
gital camerasgital cameras
Page 11
2222
----
5.
5.
5. 5.
2222
----
5.
5.
5. 5.
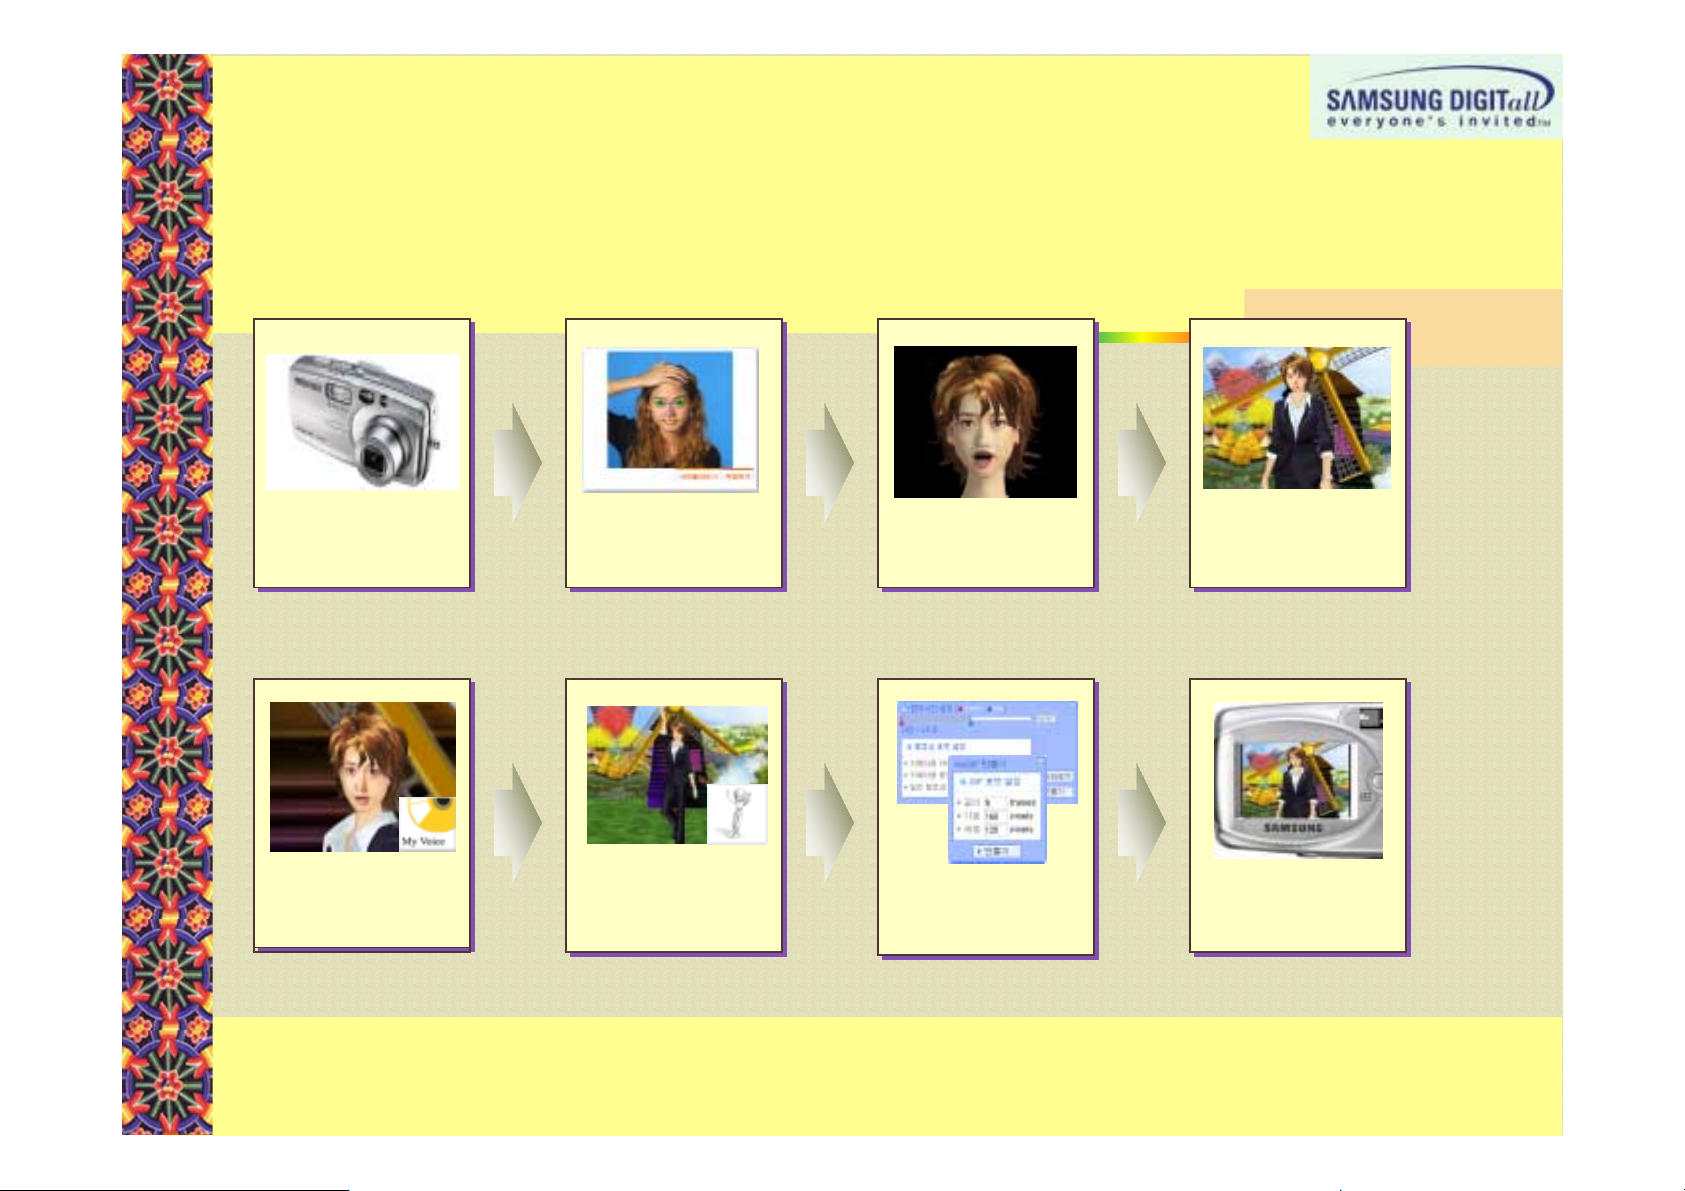
YYYY Take pictures
Take pictures
Take pictures Take pictures
from the front
from the front
from the front from the front
and record voice
and record voice
and record voice and record voice
message
message
messagemessage
DigiStudio
DigiStudio
DigiStudioDigiStudio
DigiStudio
DigiStudio
DigiStudioDigiStudio
USAGE EXPAMELS
USAGE EXPAMELS
USAGE EXPAMELSUSAGE EXPAMELS
USAGE EXPAMELS
USAGE EXPAMELS
USAGE EXPAMELSUSAGE EXPAMELS
ZZZZ Load the
Load the
Load the Load the
frontal face view
frontal face view
frontal face view frontal face view
picture
picture
picturepicture
[[[[ Create a 3D face
Create a 3D face
Create a 3D faceCreate a 3D face
\\\\ configure 3D items
configure 3D items
configure 3D items configure 3D items
(fashion/background/
(fashion/background/
(fashion/background/ (fashion/background/
accessories)
accessories)
accessories)accessories)
]]]] Load voice
Load voice
Load voice Load voice
message and
message and
message and message and
background music
background music
background musicbackground music
bbbb dance/motion
dance/motion
dance/motion dance/motion
configuration
configuration
configurationconfiguration
\\\\ ^_`a
^_`a
^_`a^_`a
cccc create moving
create moving
create moving create moving
pictures
pictures
picturespictures
dddd Watch on the
Watch on the
Watch on the Watch on the
camera or PC
camera or PC
camera or PCcamera or PC
Page 12

Ⅲ
Ⅲ.
. DigiStudio
ⅢⅢ
DigiStudio INSTALLATION
. .
DigiStudio DigiStudio
3.1
3.1 SYSTEM REQUIREMENTS
3.1 3.1
3.2 INSTALLATION PROCESS
3.2 INSTALLATION PROCESS
3.2 INSTALLATION PROCESS3.2 INSTALLATION PROCESS
3.3 TIPS FOR INSTALLATION
3.3 TIPS FOR INSTALLATION
3.3 TIPS FOR INSTALLATION3.3 TIPS FOR INSTALLATION
3.4 TIPS ON GRAPHIC CARDS
3.4 TIPS ON GRAPHIC CARDS
3.4 TIPS ON GRAPHIC CARDS3.4 TIPS ON GRAPHIC CARDS
3.5 Execution process
3.5 Execution process
3.5 Execution process3.5 Execution process
SYSTEM REQUIREMENTS
SYSTEM REQUIREMENTSSYSTEM REQUIREMENTS
INSTALLATION
INSTALLATIONINSTALLATION
Page 13
3333
----
1.
1.
SYSTEM REQUIREMENTS
SYSTEM REQUIREMENTS
1. 1.
3333
----
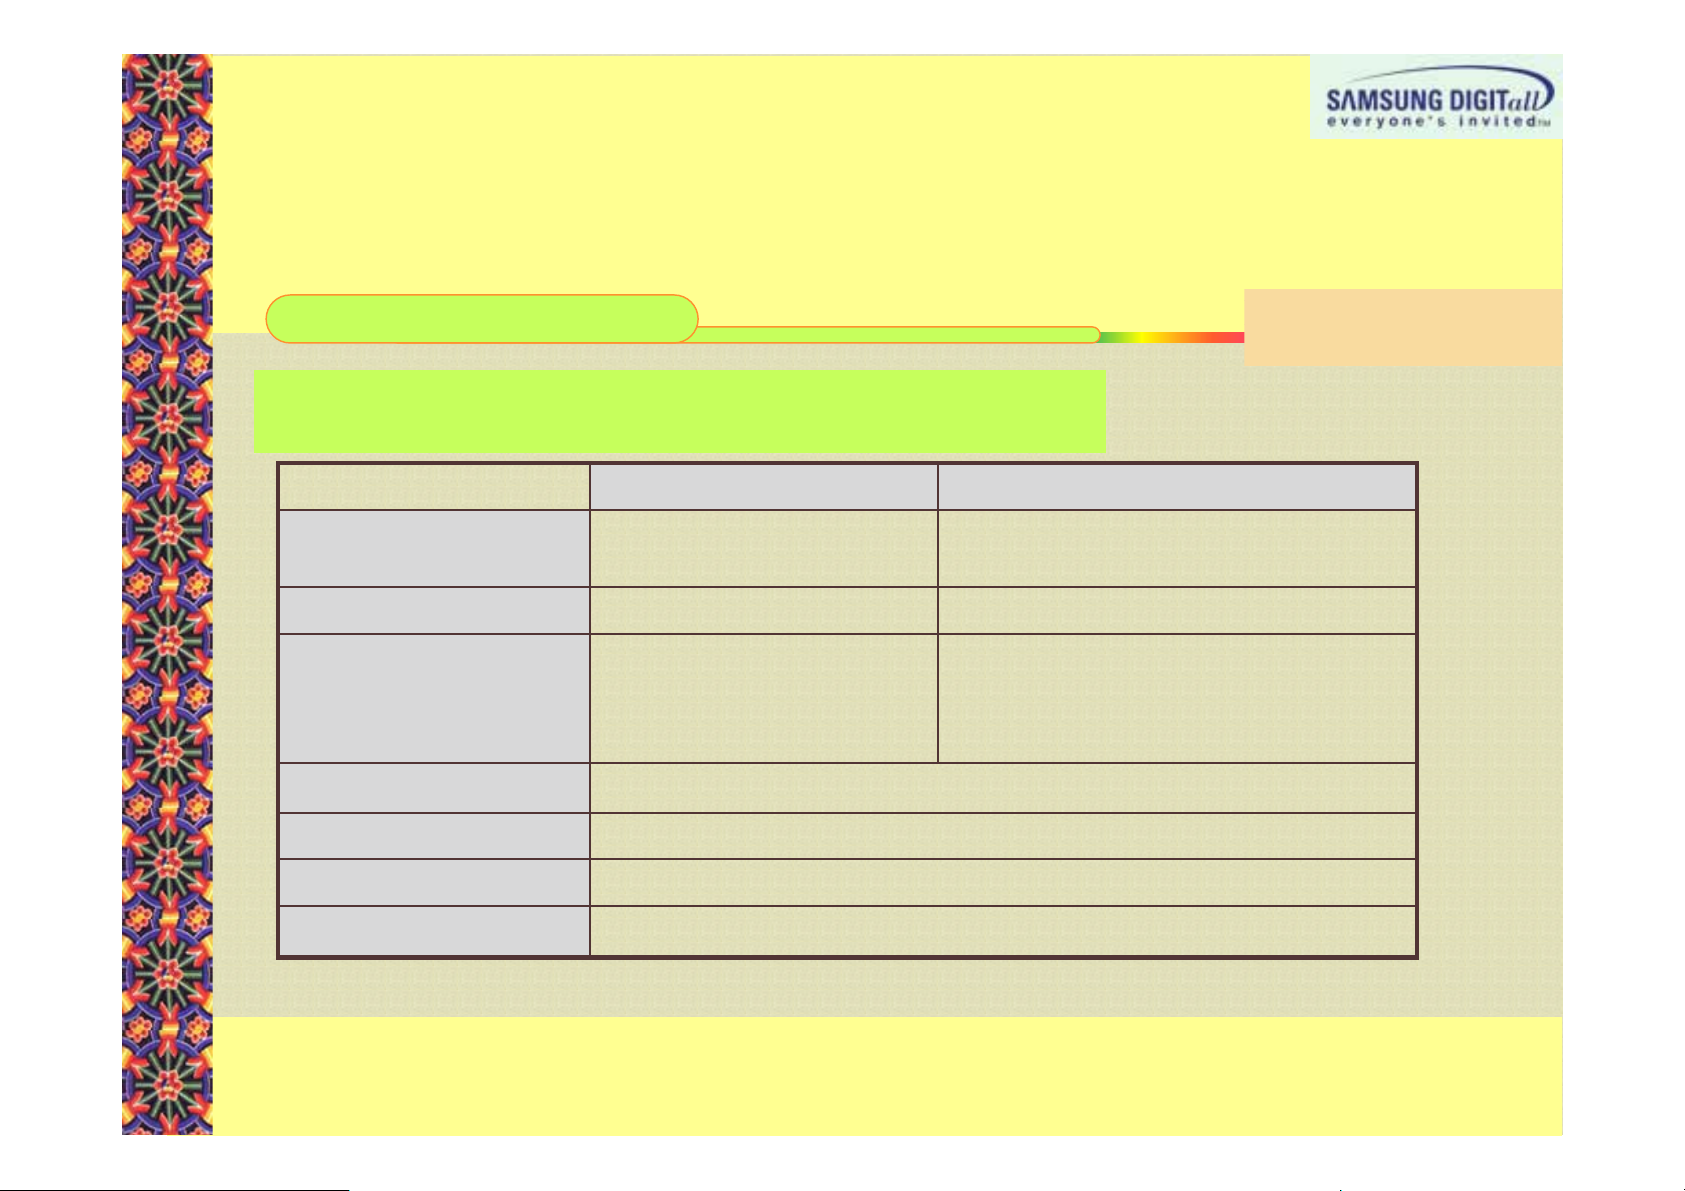
DigiStudio
DigiStudio system requirements
DigiStudio DigiStudio
For smooth 3D graphic expression of
For smooth 3D graphic expression of DigiStudio
For smooth 3D graphic expression ofFor smooth 3D graphic expression of
PC requirements are needed.
PC requirements are needed.
PC requirements are needed.PC requirements are needed.
If these are not met, installment will not be executed with a me
If these are not met, installment will not be executed with a message.
If these are not met, installment will not be executed with a meIf these are not met, installment will not be executed with a me
MAIN PROCESS
MAIN PROCESS
MAIN PROCESSMAIN PROCESS
(CPU)
(CPU)
(CPU)(CPU)
SYSTEM REQUIREMENTSSYSTEM REQUIREMENTS
1.
1.
SYSTEM REQUIREMENTS
SYSTEM REQUIREMENTS
1. 1.
SYSTEM REQUIREMENTSSYSTEM REQUIREMENTS
system requirements
system requirementssystem requirements
DigiStudio, at least the following
DigiStudioDigiStudio
, at least the following
, at least the following , at least the following
ssage.
ssage.ssage.
RecommendedMinimum Requirements
Intel Pentium3 - 500 MhzIntel Pentium2 - 400 Mhz
RAM)
RAM)RAM)
VIDEO CARD
VIDEO CARD
VIDEO CARDVIDEO CARD
(VGA)
(VGA)
(VGA)(VGA)
SOUND CARD (Sound)
SOUND CARD (Sound)SOUND CARD (Sound)
HARD DISK (HDD)
HARD DISK (HDD)HARD DISK (HDD)
OPERATING SYSTEM
OPERATING SYSTEM
OPERATING SYSTEM OPERATING SYSTEM
WEB BROWSER (IE)
WEB BROWSER (IE)WEB BROWSER (IE)
(OS)
(OS)
(OS)(OS)
DirectX 8.1 3D Acceleration
supported graphic card with
at least 8 MB of Video
Memory
16-bit Stereo Sound CardSOUND CARD (Sound)
Capacity with more than 150MBHARD DISK (HDD)
Microsoft Windows 98(SE) / 2000 / ME / XP
Microsoft Internet Explorer Ver 5.0 or higherWEB BROWSER (IE)
At least 128 MBAt least 64 MB((((RAM)
DirectX 8.1 3D Acceleration supported
graphic card with at least 16 MB of
Video Memory
Page 14
Page 15
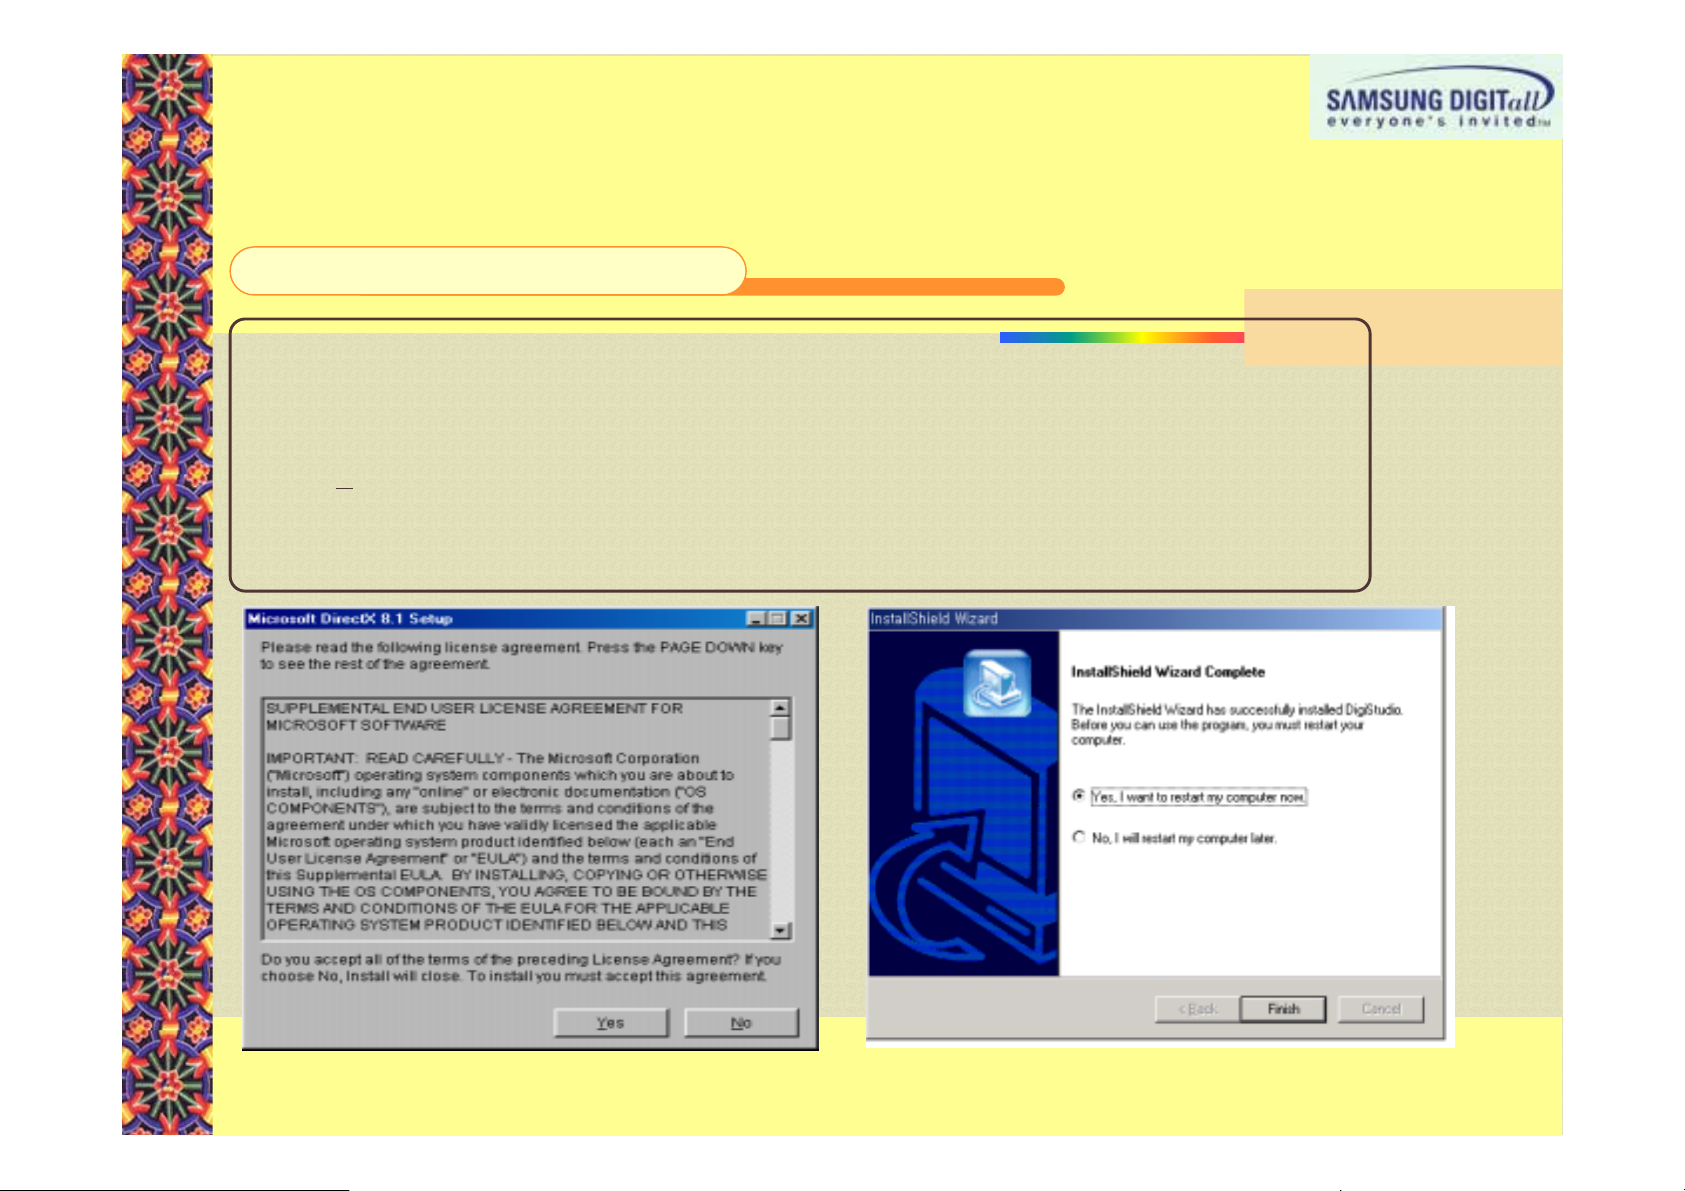
DirectX 8.1 installment requirements
DirectX 8.1 installment requirements
DirectX 8.1 installment requirementsDirectX 8.1 installment requirements
1. In order to use 3D function from PCs, DirectX ( version 8.1 or later) should be installed. If
not, please follow the instructions to install DirectX.
2. When a window requiring Direct X installation is activated while installing DigiStudio, click
‘Next’.
3. If DirectX is installed, rebooting is asked at the end of installation.
After finishing installing
After finishing installing DigiStudio
After finishing installingAfter finishing installing
DigiStudio, make sure to restart the computer..
DigiStudioDigiStudio
, make sure to restart the computer..
, make sure to restart the computer.., make sure to restart the computer..
Page 16
Quicktime
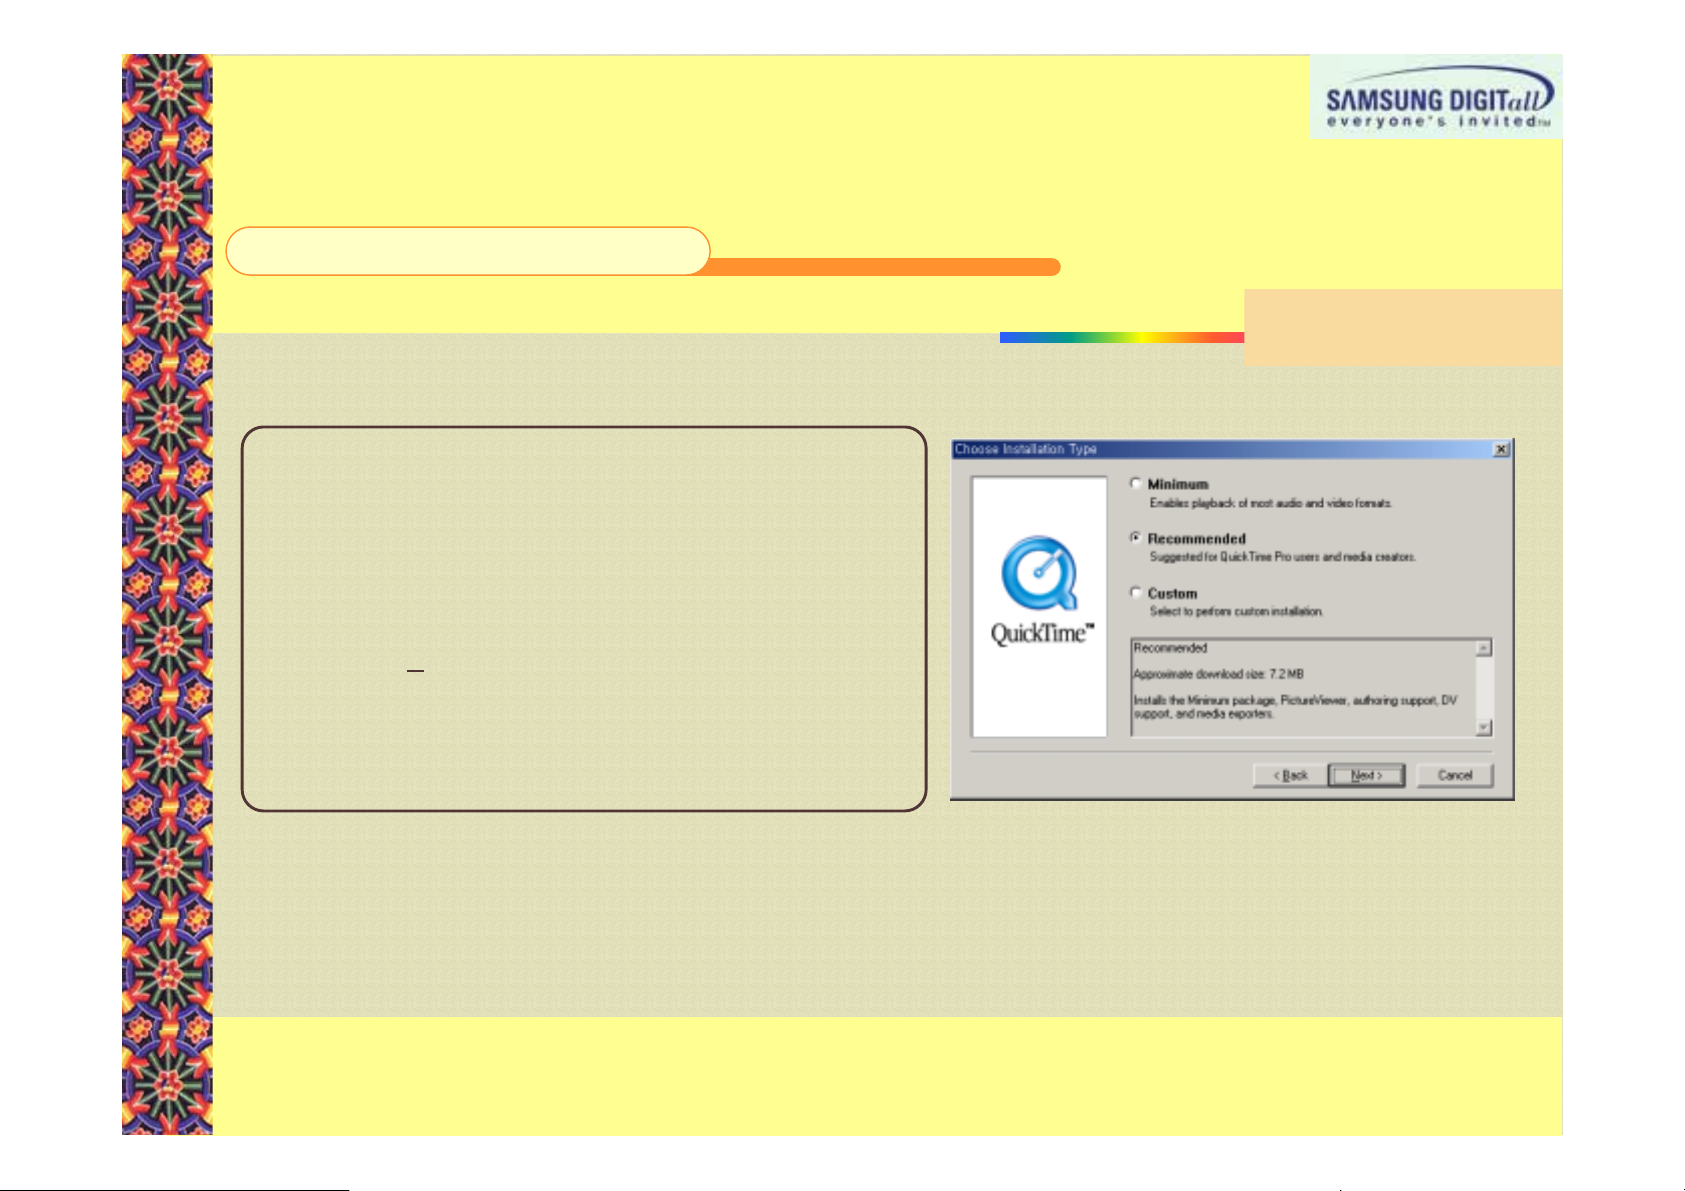
Quicktime installment requirements
Quicktime Quicktime
1. To watch 3D avatar made from DigiStudio in the form
2., When a windown which requires Quicktime
installment requirements
installment requirementsinstallment requirements
of moving pictures (MOV), Quicktime plalyer
(version 6.0 or later) should be installed as
instructed during the installation.
installation appears while installing DigiStudio,
click ‘Next’.
3. Select ‘Recommended
Recommended’ from the “Choose Installation
RecommendedRecommended
Type”.
Quicktime player installation window
Page 17
Advices on
Advices on Graphiccard
Advices onAdvices on
DigiStudio
DigiStudio will not be installed if a computer with 8MB video RAM or
DigiStudioDigiStudio
below dose not support 3D.
below dose not support 3D.
below dose not support 3D.below dose not support 3D.
When using
When using DigiStduio
When usingWhen using
installation guidance
installation guidance’ window appears.
installation guidanceinstallation guidance
Graphiccard(VGA)
GraphiccardGraphiccard
will not be installed if a computer with 8MB video RAM or
will not be installed if a computer with 8MB video RAM or will not be installed if a computer with 8MB video RAM or
DigiStduio, check the following if
DigiStduioDigiStduio
, check the following if ‘Graphic card
, check the following if , check the following if
window appears.
window appears.window appears.
Step 1
Step 1
Step 1Step 1
Step 1
Step 1
Step 1Step 1
Go to [
Go to [MyComputer
Go to [Go to [
and check the type and color of graphic cards.
and check the type and color of graphic cards.
and check the type and color of graphic cards.and check the type and color of graphic cards.
Step 2
Step 2
Step 2Step 2
Step 2
Step 2
Step 2Step 2
(VGA)
(VGA)(VGA)
Graphic card
Graphic card Graphic card
MyComputer]]]]eeee[control Panel]
MyComputerMyComputer
[control Panel]eeee[Display]
[control Panel][control Panel]
[Display]eeee[Configure]
[Display][Display]
[Configure]
[Configure] [Configure]
Configure the color to high-color(16 bit) or true-color(32 bit).
f
If your graphic card is either 3dfx voodoo3 or s3inc savage4, configure to high-color 16bit.
Page 18
Step 3
Step 3
Step 3Step 3
Step 3
Step 3
Step 3Step 3
Graphic cards without DirectX 3D Acceleration Support..
Graphic cards without DirectX 3D Acceleration Support..
Graphic cards without DirectX 3D Acceleration Support.. Graphic cards without DirectX 3D Acceleration Support..
(1) ATI 3D (Charger / Pro Turbo / Xpression) / All in wonder pro
(2) ATI Rage (g/ iic) / Rage 3D(LT Pro / Pro) / Xpert (98 / @play)
(3) nVidia Riva 128
(4) 3dfx Voodoo 2
(5) SiS (6215A0 / 6125B0 / 6215C / 5598 / 530 / 620 / 540)
(6) Intel i740 graphics chip
(7) Hercules Terminator Beast
(8) Trident 3D / Blade / CyberBlade
(9) Diamond Multimedia FireGL 1000 Pro
(10) Number 9 SR9
f Depending on the type of graphic cards, avatar may not be supported smoothly.
Step 4
Step 4
Step 4Step 4
Step 4
Step 4
Step 4Step 4
If the graphic card is set to
If the graphic card is set to ‘standard PCI graphic adaptor (VGA)
If the graphic card is set to If the graphic card is set to
refer to the
refer to the ‘graphic card installation guidance
refer to the refer to the
graphic card driver.
graphic card driver.
graphic card driver.graphic card driver.
graphic card installation guidance’ and install the latest
graphic card installation guidancegraphic card installation guidance
standard PCI graphic adaptor (VGA)’,
standard PCI graphic adaptor (VGA)standard PCI graphic adaptor (VGA)
and install the latest
and install the latest and install the latest
,
, ,
Page 19

Graphic card installation guidance window
Page 20

3333
3333
----
----
2.
2.
INSTALLATION PROCESS
INSTALLATION PROCESS
2. 2.
INSTALLATION PROCESSINSTALLATION PROCESS
2.
2.
INSTALLATION PROCESS
INSTALLATION PROCESS
2. 2.
INSTALLATION PROCESSINSTALLATION PROCESS
Start
Are the minimum specifications met?
Yes
Select language (Korean or English)
Is DirectX 8.1 installed?
Yes
Do you agree to user License?
Yes
Select folder where Main Program is installed
Do you want to install?
If you instert CD in the tray, the installation process will automatically start.
If you want install manually, execute Setup.exe.
No
No
Error message pop-up
Do you want to install DirectX 8.1
Yes
No
No
Install DirectX 8.1
Is is properly installed?
Yes
No
If DirectX 8.1 is not
installed on the computer,
Main Program can not be
operated.
Among graphic cards
which don’t support 3D
acclerlation, there are
No
Installation completion (or failure)
some computers from
which Direct X8.1 can not
be installed.
Yes
Install
Finish
*
* If DirectX 8.1 is installed, restart the computer.
If DirectX 8.1 is installed, restart the computer.
* *
If DirectX 8.1 is installed, restart the computer. If DirectX 8.1 is installed, restart the computer.
Page 21

DigiStudio
DigiStudio installation
DigiStudio DigiStudio
Y installation start
installation
installationinstallation
If you insert DigiStudio CD into CD-ROM driver or doubleclick Setup.exe, installation will start.
Page 22

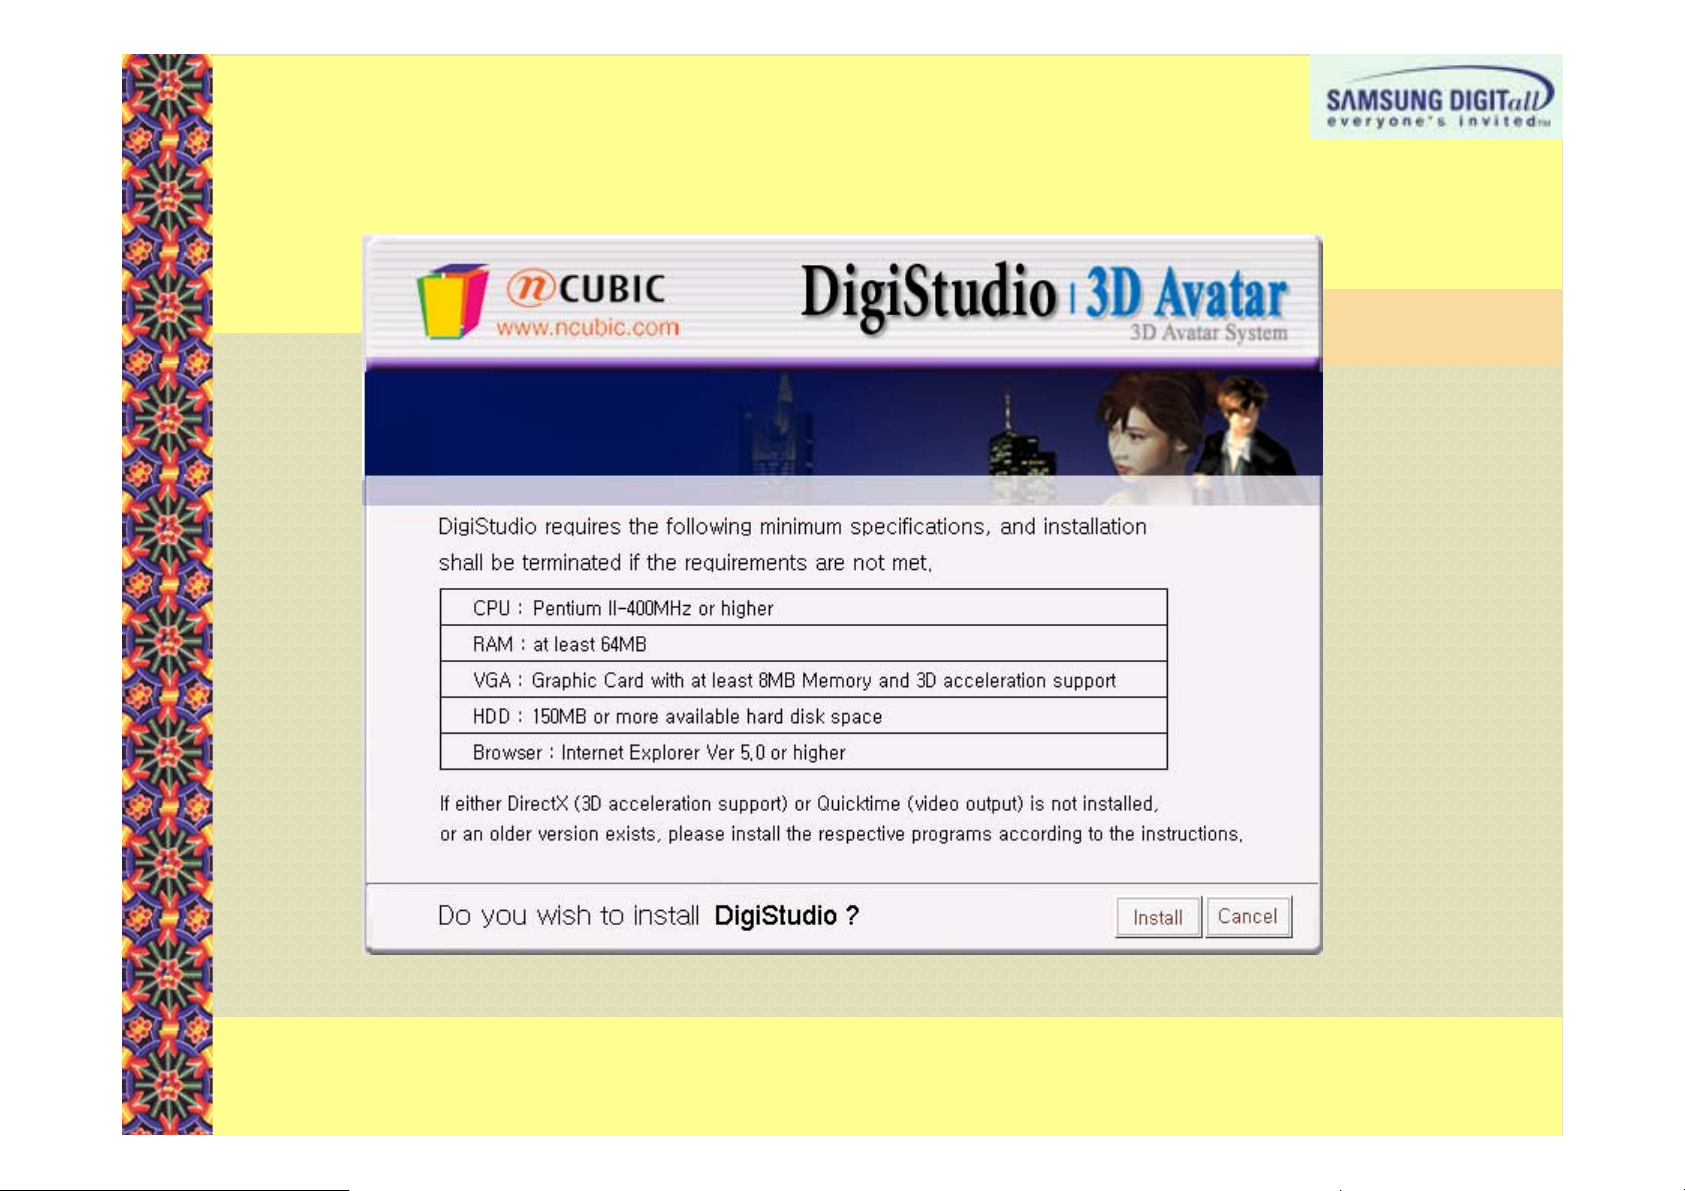
Z minimum requirements
If you click ‘installation’, DigiStudio automatically check the Hardware specifications of PC.
If the requirements are not met, installation will stop with an information message.
Page 23

[ installation wizard
\ language selection
If installshied Wizard is activated, click ‘Next’.
Select language you want between ‘English’ and ‘korean’ and click
‘N
ext’.
Page 24

]]]] Quicktime
Quicktime player installation
Quicktime Quicktime
player installation
player installationplayer installation
bbbb DirectX 8.1 installation
DirectX 8.1 installation
DirectX 8.1 installationDirectX 8.1 installation
When Quicktime player installation guidance window
appears, click , ‘N
If Quicktime player (version 6.0 or later) is installed on the
computer, the above message will not appear.
ext’ and install ‘Recommended’ option.
When DirectX 8.1 installation guidance message appears,
click ‘N
If DirectX (version 8.1 or later) is installed on the computer,
the above message will not appear.
ext’.
Page 25

c End user license agreement
d installation folder selection
Read the software license agreement well and click ‘Yes’.
Select a folder where DigiStudio is to be installed and click
‘N
ext’.
Page 26

h computer restart agreement
i installation completion
When DirectX 8.1 is successfully installed, a window
which asks to agree to restart computer appears..
After storing all the work you are doing, click
After storing all the work you are doing, click “Finish
After storing all the work you are doing, click After storing all the work you are doing, click
make sure to restart the computer.
make sure to restart the computer.
make sure to restart the computer.make sure to restart the computer.
Finish” and
FinishFinish
and
and and
If DigiStudio is successfully installed, click ‘Finish’.
Page 27

3333
----
3.
3.
TIPS FOR INSTALLATION
TIPS FOR INSTALLATION
3. 3.
3333
----
You can check CPU and RAM currently installed on the computer, a
You can check CPU and RAM currently installed on the computer, and to check sound card, go to [My
You can check CPU and RAM currently installed on the computer, aYou can check CPU and RAM currently installed on the computer, a
computer]
computer]---->[control board]
computer]computer]
Windows98 with high
Windows98 with high ----spec CPU such as Pentium 4 installed, the type and speed may no
Windows98 with high Windows98 with high
correctly indicated. So after restarting the computer, you
correctly indicated. So after restarting the computer, you’d better check CPU and RAM information
correctly indicated. So after restarting the computer, youcorrectly indicated. So after restarting the computer, you
after restarting the computer.
after restarting the computer.
after restarting the computer.after restarting the computer.
If you want to check the current version of current Windows, cli
If you want to check the current version of current Windows, click the window start button and you
If you want to check the current version of current Windows, cliIf you want to check the current version of current Windows, cli
can see it on the left.
can see it on the left.
can see it on the left.can see it on the left.
The version of DirectX currently installed in the Windows can be
The version of DirectX currently installed in the Windows can be checked if you go to [start]
The version of DirectX currently installed in the Windows can beThe version of DirectX currently installed in the Windows can be
>[execution]
>[execution]---->[
>[execution]>[execution]
If DirectX 5.1 is installed in Windows98, it
If DirectX 5.1 is installed in Windows98, it’s impossible for
If DirectX 5.1 is installed in Windows98, itIf DirectX 5.1 is installed in Windows98, it
RAM at the installation. Although installation can be carried ou
RAM at the installation. Although installation can be carried out if other specifications are met, Video
RAM at the installation. Although installation can be carried ouRAM at the installation. Although installation can be carried ou
RAM is checked again when first executing
RAM is checked again when first executing Digistudio
RAM is checked again when first executingRAM is checked again when first executing
the guide page.
the guide page.
the guide page.the guide page.
TIPS FOR INSTALLATIONTIPS FOR INSTALLATION
3.
3.
3. 3.
TIPS FOR INSTALLATION
TIPS FOR INSTALLATION
TIPS FOR INSTALLATIONTIPS FOR INSTALLATION
>[control board]---->[system]
>[control board]>[control board]
spec CPU such as Pentium 4 installed, the type and speed may not be
spec CPU such as Pentium 4 installed, the type and speed may nospec CPU such as Pentium 4 installed, the type and speed may no
>[dxdiag
dxdiag] input
>[>[
dxdiagdxdiag
] input ---->[DirectX version].
] input ] input
>[system]---->[registry]
>[system]>[system]
>[DirectX version].
>[DirectX version].>[DirectX version].
>[registry]---->[general]. But in case of old OS such as
>[registry]>[registry]
s impossible for DigiStudio
s impossible fors impossible for
Digistudio. If it is below 8MB, it will automatically move to
DigistudioDigistudio
nd to check sound card, go to [My
nd to check sound card, go to [My nd to check sound card, go to [My
>[general]. But in case of old OS such as
>[general]. But in case of old OS such as >[general]. But in case of old OS such as
t be
t be t be
d better check CPU and RAM information
d better check CPU and RAM information d better check CPU and RAM information
ck the window start button and you
ck the window start button and you ck the window start button and you
checked if you go to [start]----
checked if you go to [start]checked if you go to [start]
DigiStudio to check the capacity of Video
DigiStudioDigiStudio
t if other specifications are met, Video
t if other specifications are met, Video t if other specifications are met, Video
. If it is below 8MB, it will automatically move to
. If it is below 8MB, it will automatically move to . If it is below 8MB, it will automatically move to
to check the capacity of Video
to check the capacity of Video to check the capacity of Video
Page 28

3333
----
4.
4.
TIPS ON GRAPHIC CARDS
TIPS ON GRAPHIC CARDS
4. 4.
3333
----
If your graphic card has any
If your graphic card has any problesms
If your graphic card has anyIf your graphic card has any
Then just follow the directions.
Then just follow the directions.
Then just follow the directions.Then just follow the directions.
TIPS ON GRAPHIC CARDSTIPS ON GRAPHIC CARDS
4.
4.
TIPS ON GRAPHIC CARDS
TIPS ON GRAPHIC CARDS
4. 4.
TIPS ON GRAPHIC CARDSTIPS ON GRAPHIC CARDS
problesms, the following message appears when operating
problesmsproblesms
, the following message appears when operating DigiStudio
, the following message appears when operating , the following message appears when operating
DigiStudio.
DigiStudioDigiStudio
.
. .
Page 29

3333
----
5.
5.
Execution process
Execution process
5.5.
3333
----
Check if DirectX 8.1 is installed
Execution processExecution process
5.
5.
Execution process
Execution process
5.5.
Execution processExecution process
execution
Already installed?
yes
koba.ocx
(3D Viewer Component)
check if installed
Already installed?
yes
Initialize the entire Web Page
or Koba.ocx
Error while initialization
no
no
A dialogue appears
no
and asks
‘ Do you want to install? ‘
yes
yes
no
Move to the DirectX 8.1 installation
page suitable to the operating system
(OS is divided into two ; 98,ME / 2000,XP ))
After notice, execute installation file
Install DirectX 8.1
rebooting (mandatory)
Move to FAQ page
ffffErrors at initialization
Errors at initialization
Errors at initializationErrors at initialization
1.Problems with graphic card setting
(ex. When using 32bit mode
Voodoo3 or 24 bit mode Matrox)
2.When VGA driver which supports
DirectX 8.1 is not installed
(ex. When using Riva TNT2 card, XP
or 2000, install the latest driver not
Window basic driver)
Improper use of program
Improper use of program
Improper use of programImproper use of program
Improper use of program
(3D Viewer is marked with X
and can’t see anything)
Link to the solutions on the above
Link to the solutions on the above
Link to the solutions on the above Link to the solutions on the above
errors or relevant file
errors or relevant file
errors or relevant fileerrors or relevant file
Page 30

Ⅳ
Ⅳ.
. HOW TO USE
ⅣⅣ
HOW TO USE DigiStudio
. .
HOW TO USEHOW TO USE
DigiStudio
DigiStudioDigiStudio
Page 31

DigiStudio
DigiStudio Execution
DigiStudio DigiStudio
DigiStudio
DigiStudio is a program which creates
DigiStudio DigiStudio
3D faces similar to the real using
pictures taken by digital cameras, makes
3D avatar with various items , and thus
enables to see on PC or Digital camers.
This can be used from Microsoft
Windows OS.
Execution
ExecutionExecution
To execute this program, go to [Start]
>[Program(
>[Program(PPPP)]
>[Program(>[Program(
[[[[DigiStudio
DigiStudio]
DigiStudioDigiStudio
shortcut on the desktop.
)] ----> [
> [nCubic
)] )]
> [> [
] ----> [
> [DigiStudio
] ]
DigiStudio]
> [> [
DigiStudioDigiStudio
nCubic]
nCubicnCubic
[Start] ----
[Start] [Start]
] ---->
>
] ]
> >
] or click a
] ]
Page 32

3333D avatar creation
(1)
(1)
j&
j&
(1) (1)
j&j&
(1)
(1)
j&
j&
(1) (1)
j&j&
[[[[3
3D Avatar view
D Avatar view
33
D Avatar viewD Avatar view
\\\\ Camera manipulation
Camera manipulation
Camera manipulationCamera manipulation
cccc Avata
Avata management
management
Avata Avata
managementmanagement
dddd Create Video
Create Video
Create VideoCreate Video
D avatar creation
D avatar creationD avatar creation
kl
kl
klkl
kl
kl
klkl
bbbb Volume control
Volume control
Volume controlVolume control
YYYYItem selection menu
Item selection menu
Item selection menuItem selection menu
ZZZZItem selection Window
Item selection Window
Item selection WindowItem selection Window
Y Item selection menu : Select the item group from which you wish to select items.
Z Item selection Window : Select the items you wish to decorate your avatar with.
[ 3D Avatar Viewer : The window where you can see your avatar.
\ Camera Manipulation : Toggle between Face/Torso/Full-body views.
] Screen size : View your avatar on a separate, larger screen.
b Volume control : Increase or decrease the volume of sounds.
c Avatar Management : Load or save avatar information.
]]]] Screen size
Screen size
Screen sizeScreen size
Pan the camera to different angles with your mouse.
Which the “Waedrobe” button or “Default(Strip Down)” button.
Managing your avatar is a cinch.
d Create Video : Save your avatar in either AVI or MOV video formats or Animated GIF image
format to enjoy with friends.
Page 33

(2)
(2)
Item selection menu
Item selection menu
(2) (2)
Item selection menu Item selection menu
(2)
(2)
Item selection menu
Item selection menu
(2) (2)
Item selection menu Item selection menu
Go to Samsung Techwin Homepage.
You can see help on DigiStudio.
Select the movement or dance of avatar.
Select words of avatar.
Select sound.
Select 3D or 2D background, and frame.
Select accessaries such as shoes and gloves.
Select the clothes of your avatar.
Select the hair style of your avatar.
Select the face of your avatar.
Page 34

(3)
(3)
item selection screen
item selection screen
(3) (3)
item selection screenitem selection screen
(3)
(3)
item selection screen
item selection screen
(3) (3)
item selection screenitem selection screen
To select items, click ‘Icon image
As in the following example, if you click the image outlined in red, the item will be
applied to the avatar on the 3D avatar viewer.
Icon image’ or ‘Text
Icon imageIcon image
Text’.
TextText
Page 35

(4)
(4)
wardrobe
wardrobe
(4) (4)
wardrobewardrobe
(4)
(4)
wardrobe
wardrobe
(4) (4)
wardrobewardrobe
If you click ‘wardrobe
Unlike ‘Default (Strip down)
‘Wardrobe
Wardrobe’.
WardrobeWardrobe
As shown in the following example if you click flying broom from ‘Wardrobe
3D avatar viewer.
wardrobe’, it moves to the wardrobe which shows the items that your avatar is wearing.
wardrobewardrobe
Default (Strip down)’,
Default (Strip down)Default (Strip down)
, you can put on or take off items that your avatar is currently wearing form
, ,
Wardrobe’,
WardrobeWardrobe
, the broom will disappear on the
, ,
Ex) When taking off flying broom from ‘Wardrobe’
Page 36

(5) 3
(5) 3
(5) 3(5) 3
(5) 3
(5) 3
(5) 3(5) 3
D Avatar Large Screen
D Avatar Large Screen
D Avatar Large ScreenD Avatar Large Screen
D Avatar Large Screen
D Avatar Large Screen
D Avatar Large ScreenD Avatar Large Screen
If you
If you clik
If youIf you
clik “Enlarge
Enlarge”,
clikclik
EnlargeEnlarge
, a popup screen appears and you can enjoy your avatar on a larger screen.
, ,
ZOOM IN/OUT
ROTATE
FACE/TORSO/FULL-BODY Focus
4:3 / 16:9 Aspect Ratio Toggle
Set Screen size
Play / Pause / Stop
Volume control
Page 37

(6)
(6)
MOUSE CONTROL
MOUSE CONTROL
(6) (6)
MOUSE CONTROLMOUSE CONTROL
(6)
(6)
MOUSE CONTROL
MOUSE CONTROL
(6) (6)
MOUSE CONTROLMOUSE CONTROL
Place the mouse cursor in the Avatar Viewer window,
and press the left button while moving the mouse around
to rotate your avatar.
Place the mouse cursor in the Avatar Viewer window,
and press the right button while moving the mouse
around to dolly in or out.
Place the mouse cursor in the Avatar Viewer window,
and press the both buttons while moving the mouse
around to translate, or move about freely, your avatar.
Page 38

(7)
(7)
Making a 3D face from a facial image.
Making a 3D face from a facial image.
(7) (7)
Making a 3D face from a facial image.Making a 3D face from a facial image.
(7)
(7)
Making a 3D face from a facial image.
Making a 3D face from a facial image.
(7) (7)
Making a 3D face from a facial image.Making a 3D face from a facial image.
Y Refer to “Selecting race and gender” to select
race and gender.
Z Select face e photo from item selection menu.
[ Click “Open Image” and I,port a JPG or BMP
format facial portrait from the Digital Camera or PC.
\ Using the mouse button, position the eye and
mouth markers over their respective features.
Tips! : How to make better pictures
Tips! : How to make better pictures
Tips! : How to make better picturesTips! : How to make better pictures
YYYY Use pictures of a full face.
Use pictures of a full face.
Use pictures of a full face.Use pictures of a full face.
ZZZZ Use a large pixel of pictures which is fill the
Use a large pixel of pictures which is fill the
Use a large pixel of pictures which is fill the Use a large pixel of pictures which is fill the
screen with the face.
screen with the face.
screen with the face.screen with the face.
[[[[ Use pictures of faces with a blank look.
Use pictures of faces with a blank look.
Use pictures of faces with a blank look. Use pictures of faces with a blank look.
\\\\ The quality of 3D faces depends on the
The quality of 3D faces depends on the
The quality of 3D faces depends on theThe quality of 3D faces depends on the
postions
postions of eyes and a mouth, so first locate
postionspostions
theirs
theirs posions
theirstheirs
looking 3D face by changing the positions little
looking 3D face by changing the positions little
looking 3D face by changing the positions little looking 3D face by changing the positions little
by little.
by little.
by little.by little.
of eyes and a mouth, so first locate
of eyes and a mouth, so first locate of eyes and a mouth, so first locate
posions correctly. And select the best
posionsposions
correctly. And select the best----
correctly. And select the bestcorrectly. And select the best
] Click “Save” to created a 3D face.
Page 39

(8)
(8)
Selecting race and gender
Selecting race and gender
(8) (8)
Selecting race and genderSelecting race and gender
(8)
(8)
Selecting race and gender
Selecting race and gender
(8) (8)
Selecting race and genderSelecting race and gender
(9)
(9) Using MP3 as background music.
Using MP3 as background music.
(9) (9)
Using MP3 as background music.Using MP3 as background music.
Y When the program runs for the first time, an Asian
woman id the default avatar.
Z After clicking either the male or female button on
the top-right hand of the item selection windows,
selecting an item of the respective gender will change
your avatar’s gender.
[ Selecting either Asian or African in the facial sample
selection window will change the race of your avatar.
Y Select “Sound” e “Music” from the item selection menu.
Z Click open and select a song that is in a local folder.
Page 40

(10)
(10) Using a recorded voice session as a voice message.
(10) (10)
Using a recorded voice session as a voice message.
Using a recorded voice session as a voice message.Using a recorded voice session as a voice message.
Y Select “Voiceover” from the item selection menu.
Z Click open to import an mp3 or wave file with a voice
recording from either your hard driver or a digital camera.
[ Your 3D avatar will mouth along to your words.
Tips!
Tips!
Tips!Tips!
Y A one-piece dress cannot be deleted in coordination with
Top/Bottom/Shoes/Gloves.
Z 3D backgrounds and 2D backgrounds cannot used simultaneously.
[ Music and sound effects cannot be used simultaneously.
\ Dancr and gestures cannot be used simultaneously.
Page 41

Uno
Uno pq;R
UnoUno
(1)
(1)
Using the video output window
Using the video output window
(1) (1)
Using the video output windowUsing the video output window
(1)
(1)
Using the video output window
Using the video output window
(1) (1)
Using the video output windowUsing the video output window
pq;R
pq;Rpq;R
Y Select the format in which you would like to create your video.
Start
Start----up Image Avatar (MOV, Time Limit)
up Image Avatar (MOV, Time Limit)
StartStart
up Image Avatar (MOV, Time Limit)up Image Avatar (MOV, Time Limit)
Outputting to a format wiewable on the U-CA3 screen while powering on.
Video
Video filw
filw (MOV, Played on Camera)
Video Video
A 3D avatar will be created in MOV format which can be saved and viewed on
the PC or the U-CA3 camera.
Video file (AVI, For e
Video file (AVI, For e----Mail)
Video file (AVI, For eVideo file (AVI, For e
A 3D avatar is created in AVI format which can be saved on the PC. This can not
be played on U-CA3 camera.
(MOV, Played on Camera)
filw filw
(MOV, Played on Camera)(MOV, Played on Camera)
Mail)
Mail)Mail)
Z Configure duration of capture by dragging red blue arrow with your mouse.
[ You can view the video in advance from the 3D avatar viewer window by pressing ‘Preview’.
\ Click “Create” and select the folder you wish to save it to. The video will be created.
m To output MOV video, you must install Quicktime ver 6.0 or higher and choose Recommended
options when prompted for installation type. Please, close DigiStudio before installing QuickTime.
Page 42

(2)
(2)
Using the
Using the
(2) (2)
Using the Using the
(2)
(2)
Using the
Using the
(2) (2)
Using the Using the
5.
5.
Save avatar
Save avatar
5. 5.
Save avatarSave avatar
5.
5.
Save avatar
Save avatar
5. 5.
Save avatarSave avatar
AniGIF
AniGIF
AniGIF AniGIF
AniGIF
AniGIF
AniGIF AniGIF
Output window.
Output window.
Output window.Output window.
Output window.
Output window.
Output window.Output window.
Y Enter the height, width (in pixels), and duration (Length in
frames) of the GIF image.
Z Click created and select the folder you wish save it to; and the
3D avatar animation playing in the viewer window will be saved to
a Animated GIF format image.
If you click ‘Avatar store
the 3Davatar configuration you select.
Click
Click ‘avatar save
Click Click
and file name where
and file name where 3D avatar will be
and file name where and file name where
saved and then click ‘save’.
avatar save’ and select the location
avatar saveavatar save
Avatar store’, you can save
Avatar storeAvatar store
and select the location
and select the location and select the location
Page 43

6.
6.
Open avatar
Open avatar
6. 6.
Open avatarOpen avatar
6.
6.
Open avatar
Open avatar
6. 6.
Open avatarOpen avatar
If you click
If you click ‘open avatar
If you click If you click
can open a saved 3D
can open a saved 3D
can open a saved 3D can open a saved 3D
configuration.
configuration.
configuration.configuration.
After clicking
After clicking ‘Open Avatar
After clicking After clicking
and select 3D avatar file from
and select 3D avatar file from
and select 3D avatar file from and select 3D avatar file from
the search window and
the search window and clike
the search window andthe search window and
‘open
open’.
openopen
open avatar’, you
open avataropen avatar
Open Avatar’
Open AvatarOpen Avatar
, you
, you , you
clike
clike clike
Page 44

7.
7.
Save to the camera
Save to the camera
7. 7.
Save to the cameraSave to the camera
7.
7.
Save to the camera
Save to the camera
7. 7.
Save to the cameraSave to the camera
Avatar for start
Avatar for start----up screen (MOV, time
Avatar for startAvatar for start
output 3D avatar as a format which can be seen on LCD when
the digital camera is turned on/off. The maximun length of MOV
for cameras is 5 seconds.
Video file (MOV format, can play on the camera)
Video file (MOV format, can play on the camera)
Video file (MOV format, can play on the camera) Video file (MOV format, can play on the camera)
output 3D avatar as MOV format whcich can be saved on digital
camera memory
Video file (AVI, for E
Video file (AVI, for E----MAIL)
Video file (AVI, for EVideo file (AVI, for E
output 3D avatar as AVI format whcich can be saved on PC
Y Select an avatar for start-up (MOV, time limit) (impossible to adjust time)
Z Using ‘Preview’button, you can see moving picture to be output on the 3D avatar viewer
(Be sure to turn the camera off at all modes except voice recording.)
[[[[
After connecting the camera to PC and turning it on, the follow
After connecting the camera to PC and turning it on, the follow
After connecting the camera to PC and turning it on, the followAfter connecting the camera to PC and turning it on, the follow
[[[[
After connecting the camera to PC and turning it on, the follow
After connecting the camera to PC and turning it on, the follow
After connecting the camera to PC and turning it on, the followAfter connecting the camera to PC and turning it on, the follow
screen appears when clicking
screen appears when clicking
screen appears when clicking screen appears when clicking
screen appears when clicking
screen appears when clicking
screen appears when clicking screen appears when clicking
‘
create
create
‘
createcreate
create
create
createcreate
’
button.
button.
’
button.button.
button.
button.
button.button.
up screen (MOV, time limite
up screen (MOV, timeup screen (MOV, time
MAIL)
MAIL)MAIL)
ing
ing
ing ing
ing
ing
ing ing
limite)
limitelimite
)
) )
\ If you click ‘YES
YES’,
YESYES
, it will be saved to the camera.
, ,
Page 45

If you click ‘No’ or if the camera
is not connected, the following
“Save As” screen appears and
will be saved on the computer.
Page 46

8.
8.
Setting start screen of a camera
Setting start screen of a camera
8. 8.
Setting start screen of a cameraSetting start screen of a camera
8.
8.
Setting start screen of a camera
Setting start screen of a camera
8. 8.
Setting start screen of a cameraSetting start screen of a camera
After turning on your camera, select MYCAM by pressing
After turning on your camera, select MYCAM by pressing
After turning on your camera, select MYCAM by pressing After turning on your camera, select MYCAM by pressing
the menu key.
the menu key.
the menu key.the menu key.
. Select your avatar by using up/down button and enter.
. Select your avatar by using up/down button and enter.
. Select your avatar by using up/down button and enter.. Select your avatar by using up/down button and enter.
. Select submenu by using up/down button.
. Select submenu by using up/down button.
. Select submenu by using up/down button.. Select submenu by using up/down button.
---- Selection : You can see a screen where you can select avatar
Selection : You can see a screen where you can select avatar
Selection : You can see a screen where you can select avatarSelection : You can see a screen where you can select avatar
---- Turn off : will not use avatar as a starting screen.
Turn off : will not use avatar as a starting screen.
Turn off : will not use avatar as a starting screen. Turn off : will not use avatar as a starting screen.
Page 47

Ⅴ. FAQs
Page 48

r)
r)
Checkpoints before installing AVATAR
Checkpoints before installing AVATAR
YYYY SYSTEM requirements
SYSTEM requirements
SYSTEM requirementsSYSTEM requirements
----. OPERATING SYSTEM.
. OPERATING SYSTEM.
. OPERATING SYSTEM.. OPERATING SYSTEM.
----. CPU LEVEL.
. CPU LEVEL.
. CPU LEVEL.. CPU LEVEL.
----. SYSTEM RAM capacity.
. SYSTEM RAM capacity.
. SYSTEM RAM capacity.. SYSTEM RAM capacity.
----. INTERNET EXPLORER VERSION.
. INTERNET EXPLORER VERSION.
. INTERNET EXPLORER VERSION.. INTERNET EXPLORER VERSION.
----. Available room of H.D.D
. Available room of H.D.D
. Available room of H.D.D . Available room of H.D.D
Page 49

r)
r)
ssss automatically installed.
r) when CPU is below 400MHz
r) when CPU is below 400MHz
r) when CPU is below 400MHz r) when CPU is below 400MHz
2) when system RAM is below 64M
2) when system RAM is below 64M
2) when system RAM is below 64M2) when system RAM is below 64M
3) When graphic memory is below 8M
3) When graphic memory is below 8M
3) When graphic memory is below 8M 3) When graphic memory is below 8M
4) when Explorer is below 5.0
4) when Explorer is below 5.0
4) when Explorer is below 5.0 4) when Explorer is below 5.0
When trying to install on a computer with lower
When trying to install on a computer with lower
specifications than the minimum requirements.
specifications than the minimum requirements.
If you try to install this program on a computer with lower spec
If you try to install this program on a computer with lower specifications
If you try to install this program on a computer with lower specIf you try to install this program on a computer with lower spec
than the indicated minimum requirements, a warning in the form o
than the indicated minimum requirements, a warning in the form of a
than the indicated minimum requirements, a warning in the form othan the indicated minimum requirements, a warning in the form o
message
message
messagemessage
box will be issued and the installation process will terminate.
box will be issued and the installation process will terminate.
box will be issued and the installation process will terminate.box will be issued and the installation process will terminate.
The message box will state the reason for termination (e.g. "Not
The message box will state the reason for termination (e.g. "Not enough
The message box will state the reason for termination (e.g. "NotThe message box will state the reason for termination (e.g. "Not
memory"), and the installation program will stop the process.
memory"), and the installation program will stop the process.
memory"), and the installation program will stop the process.memory"), and the installation program will stop the process.
automatically installed.
automatically installed.automatically installed.
ifications
ificationsifications
f a
f a f a
enough
enoughenough
5) When available room of HDD is
5) When available room of HDD is
5) When available room of HDD is 5) When available room of HDD is
below 200MB
below 200MB
below 200MB below 200MB
Page 50

2)
2)
When DirectX 8.r has not been installed.
When DirectX 8.r has not been installed.
If DirectX 8.r is not detected on your computer, the install
If DirectX 8.r is not detected on your computer, the install
If DirectX 8.r is not detected on your computer, the install If DirectX 8.r is not detected on your computer, the install
wizard will install DirectX 8.r and, when completed, will
wizard will install DirectX 8.r and, when completed, will
wizard will install DirectX 8.r and, when completed, will wizard will install DirectX 8.r and, when completed, will
reboot.
reboot.
reboot.reboot.
Page 51

(3)
(3)
When QuickTime 6.3 has not been installed.
When QuickTime 6.3 has not been installed.
The program will operate normally, but you will not be able to create MOV
files when you press the 'Create Video' button. To create MOV files, close
the program, install QuickTime 6.3, and run the program once more.
When installation guidance screen of
Quicktime player appears, click ‘N
and select ‘Recommended’ as an options.
If Quicktime player(version 6.0 or
later) is installed on the computer,
this screen will not appear.
ext’
Page 52

(4)
(4)
When the screen does not display correctly,
When the screen does not display correctly,
even though DirectX 8.1 has been installed.
even though DirectX 8.1 has been installed.
YYYY In this case, programs will not start properly and move to the p
In this case, programs will not start properly and move to the page where you can download the
In this case, programs will not start properly and move to the pIn this case, programs will not start properly and move to the p
latest graphic cards. Download specific graphic cards
latest graphic cards. Download specific graphic cards depenign
latest graphic cards. Download specific graphic cardslatest graphic cards. Download specific graphic cards
problem will be solved.
problem will be solved.
problem will be solved. problem will be solved.
ZZZZ To check the manufacture of graphic cards, click the right butt
To check the manufacture of graphic cards, click the right button of your mouse on the desktop
To check the manufacture of graphic cards, click the right buttTo check the manufacture of graphic cards, click the right butt
and go to
and go to ’display properties'
and go to and go to
of the screen.
of the screen.
of the screen. of the screen.
display properties' tttt’setting
display properties' display properties'
setting’. Then you can check from the Display in the middle
settingsetting
. Then you can check from the Display in the middle
. Then you can check from the Display in the middle . Then you can check from the Display in the middle
depenign on the manufacturers and the
depenigndepenign
age where you can download the
age where you can download the age where you can download the
on the manufacturers and the
on the manufacturers and the on the manufacturers and the
on of your mouse on the desktop
on of your mouse on the desktop on of your mouse on the desktop
Page 53

(5)
(5)
---- When DirectX 8.r has been installed.
When DirectX 8.r has been installed.
When DirectX 8.r has been installed.When DirectX 8.r has been installed.
If your operating system is Windows 2000 or XP, click 'Start
If your operating system is Windows 2000 or XP, click 'Start ----> Run', type
If your operating system is Windows 2000 or XP, click 'Start If your operating system is Windows 2000 or XP, click 'Start
and press enter.
and press enter.
and press enter.and press enter.
System properties will be displayed including data about CPU and
System properties will be displayed including data about CPU and RAM.
System properties will be displayed including data about CPU andSystem properties will be displayed including data about CPU and
If your operating system is Windows 98SE or ME, open a DOS termi
If your operating system is Windows 98SE or ME, open a DOS terminal, type in 'c:
If your operating system is Windows 98SE or ME, open a DOS termiIf your operating system is Windows 98SE or ME, open a DOS termi
at the prompt, and press enter. System properties will be displ
at the prompt, and press enter. System properties will be displayed including data about CPU and RAM.
at the prompt, and press enter. System properties will be displat the prompt, and press enter. System properties will be displ
When I wish to know CPU or RAM data.
When I wish to know CPU or RAM data.
> Run', type 'dxdiag'
> Run', type> Run', type
RAM.
RAM.RAM.
nal, type in 'c:uuuuwindows
nal, type in 'c:nal, type in 'c:
ayed including data about CPU and RAM.
ayed including data about CPU and RAM.ayed including data about CPU and RAM.
'dxdiag' in the text box,
'dxdiag''dxdiag'
in the text box,
in the text box,in the text box,
windowsuuuusystem
windowswindows
systemuuuudxdiag
systemsystem
dxdiag.exe
dxdiagdxdiag
.exe
.exe.exe
‘
Page 54

(5)
(5)
When I wish to know CPU or RAM data.
When I wish to know CPU or RAM data.
---- When DirectX 8.r has not been installed (or this program has not
When DirectX 8.r has not been installed (or this program has not been installed)
When DirectX 8.r has not been installed (or this program has notWhen DirectX 8.r has not been installed (or this program has not
You can find RAM information in 'Control Panel
You can find RAM information in 'Control Panel ----> System
You can find RAM information in 'Control Panel You can find RAM information in 'Control Panel
displayed when the computer is turned on.
displayed when the computer is turned on.
displayed when the computer is turned on.displayed when the computer is turned on.
> System ----> General'. CPU information is
> System > System
> General'. CPU information is
> General'. CPU information is > General'. CPU information is
been installed)
been installed)been installed)
Page 55

(6)
(6)
In case you can
In case you can
file after installing QuickTime 6.3.
file after installing QuickTime 6.3.
As QuickTime Installation Type is set to
As QuickTime Installation Type is set to Minimum,
As QuickTime Installation Type is set to As QuickTime Installation Type is set to
creation file. Uninstall
creation file. Uninstall QuickTime and reinstall the version in the provided
creation file. Uninstall creation file. Uninstall
DigiiStudio
DigiiStudio CD.
DigiiStudioDigiiStudio
ffff When installing it, be sure to set to
When installing it, be sure to set to [Recommended].
When installing it, be sure to set to When installing it, be sure to set to
CD.
CD.CD.
’
t make moving picture creation
’
t make moving picture creation
Minimum, you can
Minimum,Minimum,
QuickTime and reinstall the version in the provided
QuickTime and reinstall the version in the providedQuickTime and reinstall the version in the provided
[Recommended].
[Recommended].[Recommended].
you can’t make moving picture
you canyou can
t make moving picture
t make moving picture t make moving picture
ssss Minimum
Minimumv4
MinimumMinimum
v4 Install
v4v4
InstallwE
InstallInstall
wEMOV
MOV xy
wEwE
MOV MOV
xy z{
xyxy
z{ |}
z{z{
|}.... ssss Install
|}|}
Installwwww~•w
InstallInstall
Install
Install /€}
Install Install
~•w Recommended Type
~•w~•w
/€}....
/€}/€}
Recommended Type v4
Recommended TypeRecommended Type
v4
v4v4
Page 56

(7)
(7)
When you can
When you can
’
t make moving picture creation file, after
’
t make moving picture creation file, after
uninstalling QuickTime and
uninstalling QuickTime and
instructed.
instructed.
ssss When Uninstalling, you have to select
When Uninstalling, you have to select
When Uninstalling, you have to select When Uninstalling, you have to select
[Uninstall Everything] to remove all of the
[Uninstall Everything] to remove all of the
[Uninstall Everything] to remove all of the [Uninstall Everything] to remove all of the
existing files.
existing files.
existing files.existing files.
ssss If you
If you selecte
If youIf you
created system will be used.
created system will be used.
created system will be used. created system will be used.
selecte “Uninstall
selecteselecte
Uninstall”, the already
UninstallUninstall
, the already
, the already , the already
restalling
restalling
ssss Make sure to select
Make sure to select Recommended Type
Make sure to select Make sure to select
when
when nstalling
whenwhen
nstalling....
nstallingnstalling
the version as
the version as
Recommended Type
Recommended TypeRecommended Type
Page 57

(8)
(8)
When the following message appears and
When the following message appears and
exeution
exeution
is terminated while executing
is terminated while executing
ssss Error Message
Error Message
Error MessageError Message
ssss If the
If the secreen
If theIf the
1024*768, this happens.
1024*768, this happens.
1024*768, this happens.1024*768, this happens.
ssss Go to [
Go to [ desktop
Go to [ Go to [
on the mouse
on the mouse eeee registry
on the mouse on the mouse
select screen resolution
select screen resolution 1024 X 768
select screen resolution select screen resolution
secreen resolution is set to below
secreensecreen
desktop eeee click the right button
desktop desktop
resolution is set to below
resolution is set to below resolution is set to below
click the right button
click the right button click the right button
registry eeee setting ] and
registry registry
setting ] and
setting ] and setting ] and
1024 X 768....
1024 X 7681024 X 768
DigiStudio??
DigiStudio
ssss Be sure to set the screen resolution to
Be sure to set the screen resolution to
Be sure to set the screen resolution to Be sure to set the screen resolution to
1024 X 768 or higher.
1024 X 768 or higher.
1024 X 768 or higher.1024 X 768 or higher.
Page 58

(9)
(9)
How to check your graphic card
How to check your graphic card
ssss Go to [
Go to [ Start
Go to [Go to [
press Enter key.
press Enter key.
press Enter key.press Enter key.
Starteeee Run ], write
StartStart
Run ], write “dxdiag
Run ], write Run ], write
compatibilily??
compatibilily
dxdiag” and
dxdiagdxdiag
and
and and
Page 59

(9)
(9)
How to check your graphic card
How to check your graphic card
ssss After selecting Display Menu, click Test Direct 3D button and te
After selecting Display Menu, click Test Direct 3D button and test 3D.
After selecting Display Menu, click Test Direct 3D button and teAfter selecting Display Menu, click Test Direct 3D button and te
compatibilily??
compatibilily
st 3D.
st 3D.st 3D.
Page 60

THANK YOU FOR
THANK YOU FOR
YOUR ATTENTION !!
YOUR ATTENTION !!
 Loading...