

Page 1
Samsung Electronics
11-1
11. Operating Instructions
POWER
W
T
ENGLISH
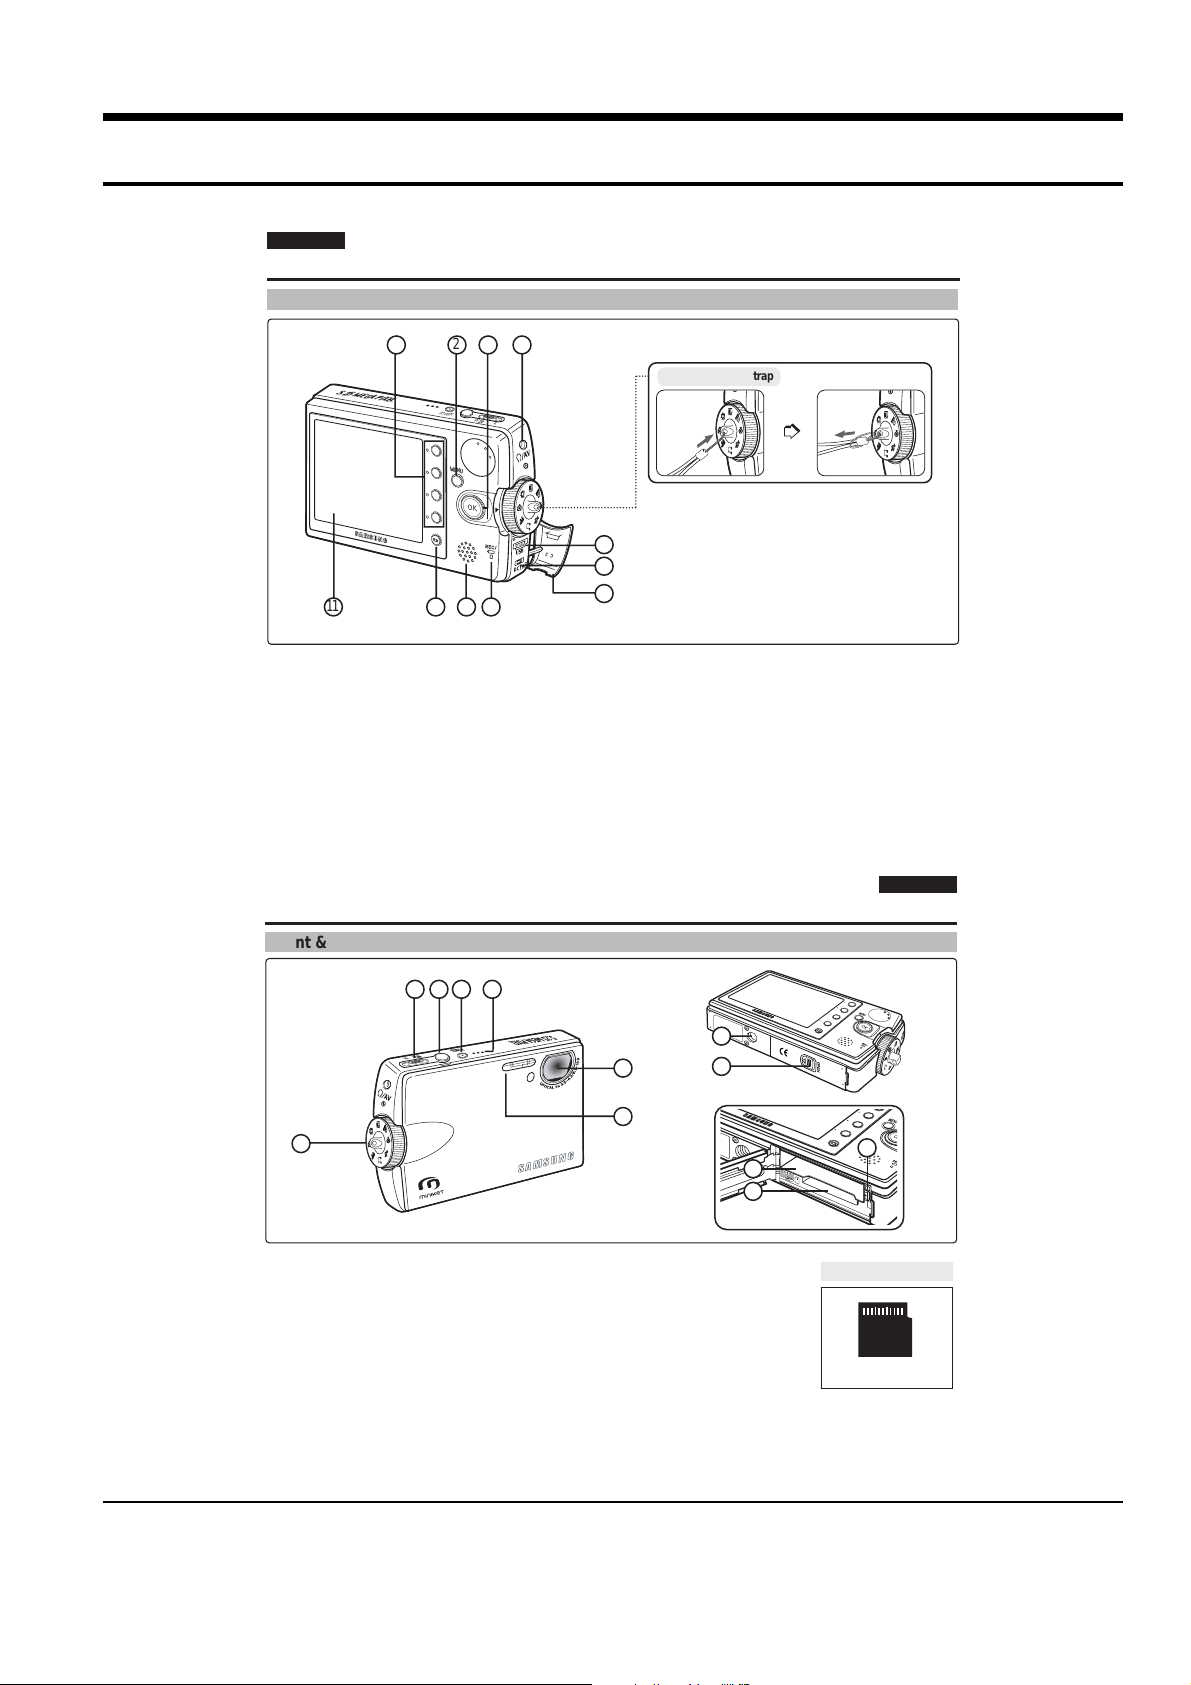
Name of Each Part
Rear & Left View
1
2
11 10 9 8
1. Shortcut Buttons
2. MENU button
3. Joystick (Up, Down, Left, Right, OK)
4. Earphones and AV jack
5. USB port
6. DC IN jack
1414
Name of Each Part
Front & Bottom View
3 4
Fastening Hand strap
5
6
7
7. Connector Cover
8. Recording / charging Indicator
9. Built-in Speaker
10. Display Button
11. LCD Monitor
ENGLISH
2 3 4 5
8
6
9
7
1
12
10
11
1. Mode Dial
2. [W/T] Zoom Switch
3. Record / Stop Button
4. Power Button
5. Built-in Microphone
6. Lens
7. Flash
8. Tripod Receptacle
9. OPEN Switch
(Battery / mini SD card Slot)
10. Battery Slot
11. Mini SD card slot
12. Battery Lock Switch
Usable mini SD card
mini SD card
1515
Page 2
Operating Instructions
11-2
Samsung Electronics
OFF
4 Min
12:00 2005.01.01
F
All Play
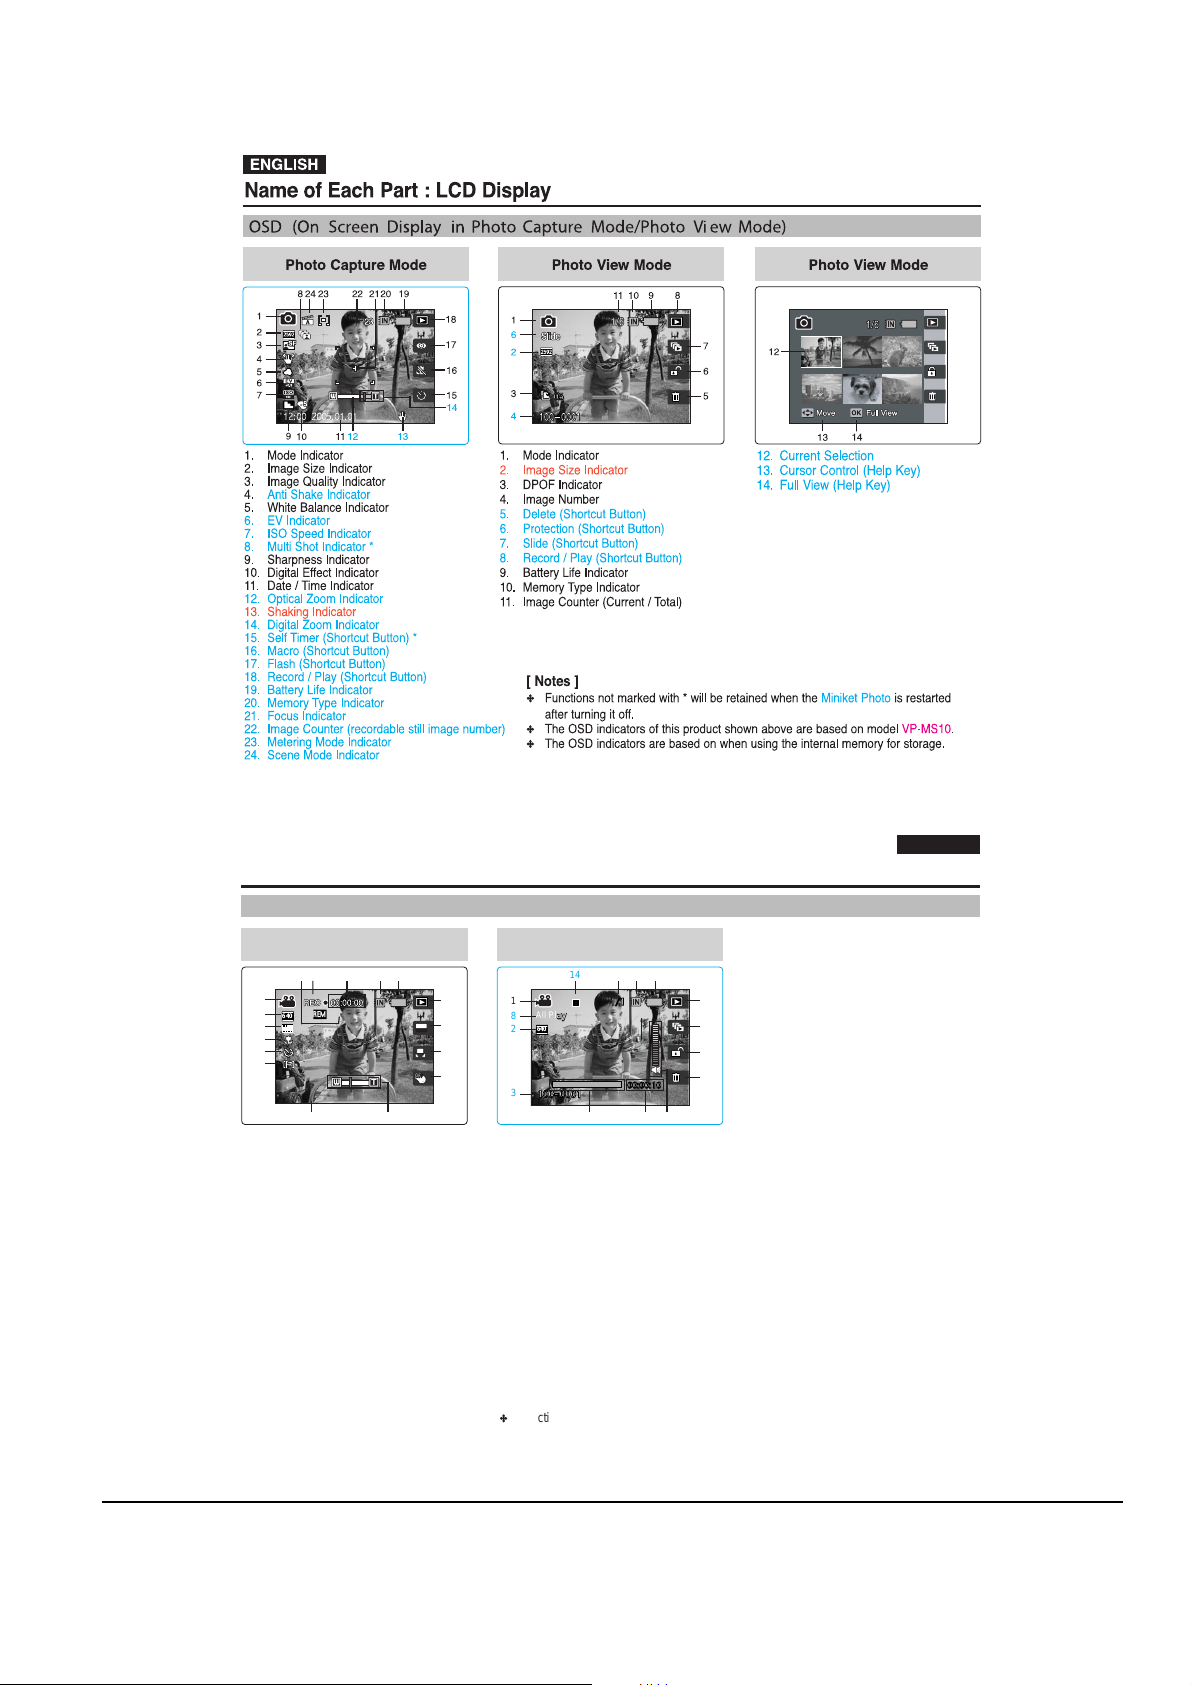
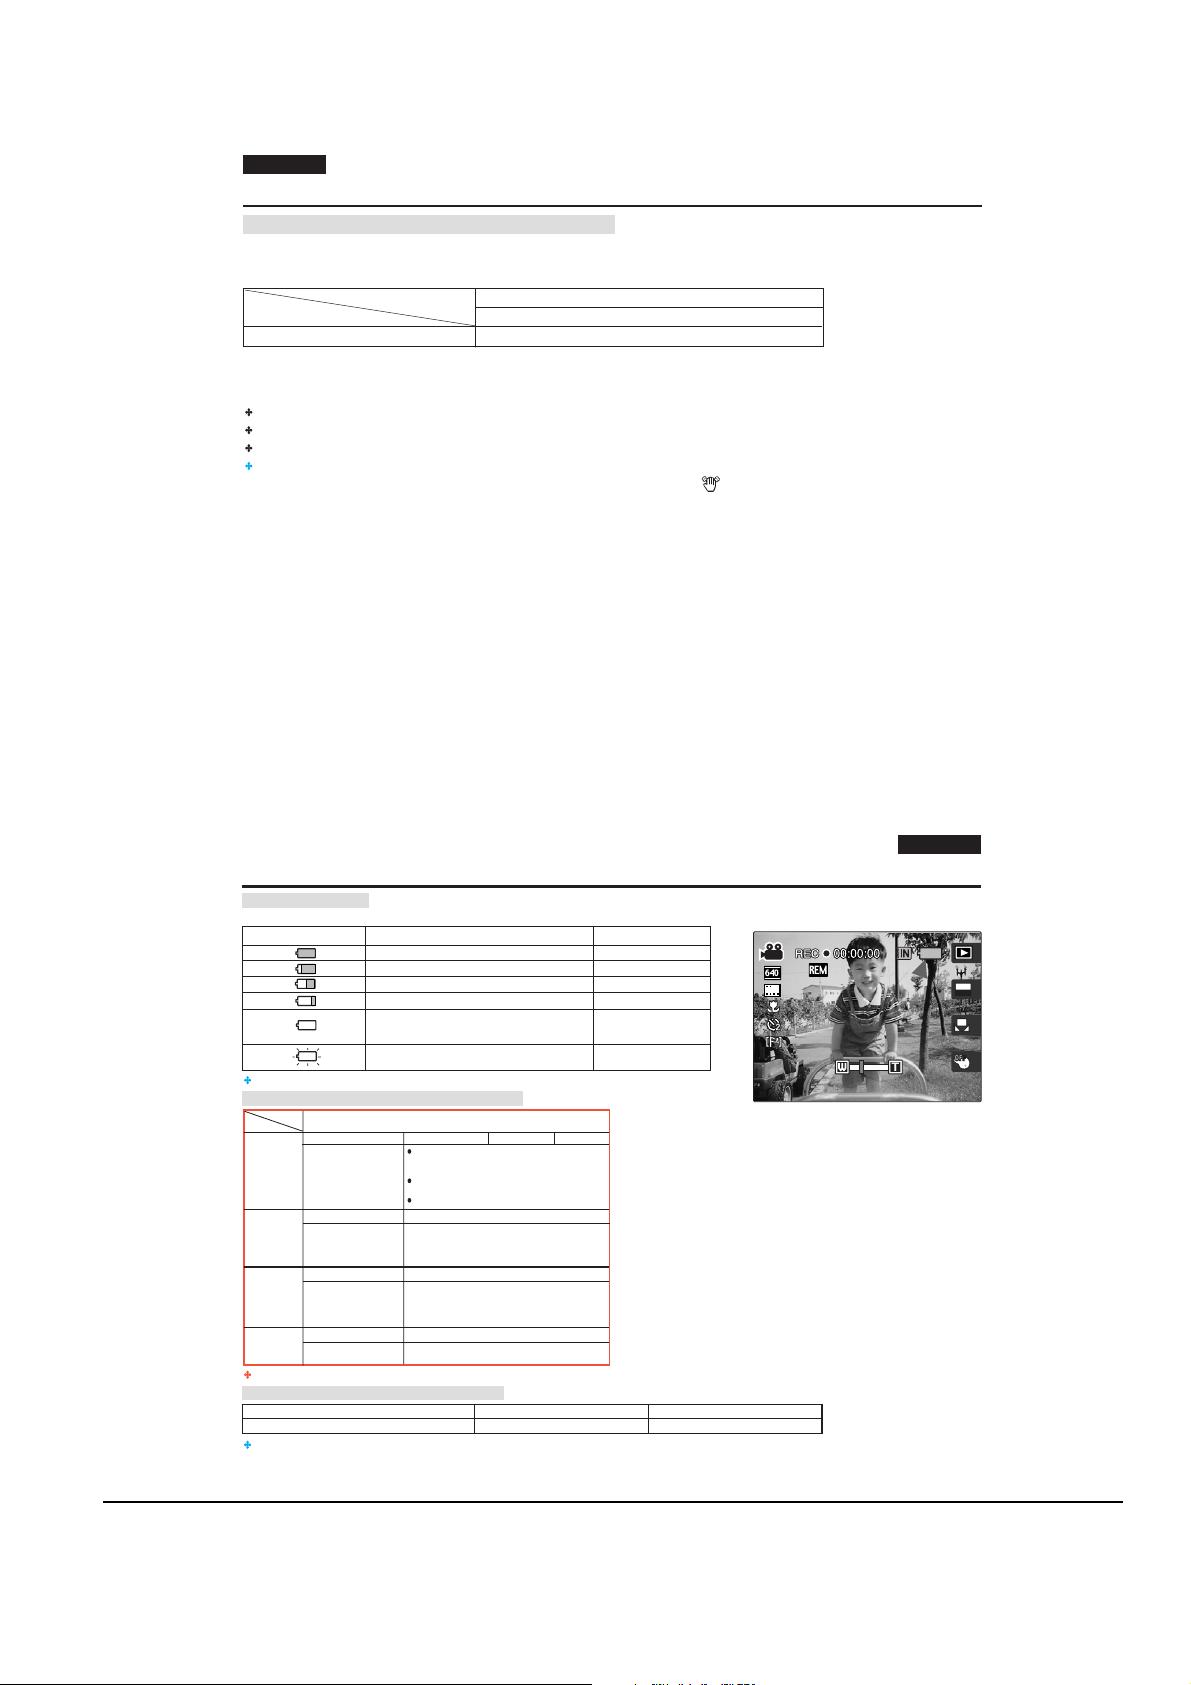
Name of Each Part : LCD Display
OSD (On Screen Display in Movie Record Mode/Movie Play Mode)
Movie Record Mode
13
14151617
1
REM
22
3
4
5
6
4 Min
640
F
12:00 2005.01.01
7 4 58 6
T
12
AE
11
AUTO
A
10
OFF
1. Mode Indicator
2. Image Size Indicator
3. Image Quality Indicator
4. Macro Indicator
5. Self Timer Indicator *
6. Windcut Indicator
7. Date / Time Indicator
8. Zoom In / Out Indicator
9. Digital Effect (Shortcut Button)
10. White Balance (Shortcut Button)
11. Program AE (Shortcut Button)
12. Record / Play (Shortcut Button)
13. Battery Life Indicator
14. Memory Type Indicator
15. Counter (Elapsed Time)
16. Record / Stop Indicator
17. Remaining Time Indicator
9
Movie Play Mode
14
13 12 11
1
8
2
3
All Play
640
100-0001
00:00:10
10
9
8
7
1. Mode Indicator
2. Image Size Indicator
3. Image Number
4. Playback Progress Bar
5. Counter (Elapsed Time)
6. Volume Indicator
7. Delete (Shortcut Button)
8. Protection (Shortcut Button)
9. All Play (Shortcut Button)
10. Record / Play (Shortcut Button)
11. Battery Life Indicator
12. Memory Type Indicator
13. Image Counter (Current / Total)
14. Stop / Play / Pause Indicator
[ Note ]
Functions not marked with * will be retained when the Miniket Photo is restarted after
turning it off.
ENGLISH
1717
Page 3
Operating Instructions
11-3
Samsung Electronics
ENGLISH
Move
Folder
Play
Search
Search
Pause
Move
Select
Settings
Name of Each Part : LCD Display
OSD (On Screen Display in Music Mode)
Music Mode
1
2
00:50/03:00
3
Search
VolumeVolume
654
1. File Property
2. Progress Bar
3. Counter (Elapsed Time / File Length)
4. Search (Help Key)
5. Play / Pause (Help Key)
6. Volume Control (Help Key)
7. Equaliser (Shortcut Button)
8. Volume Indicator
1818
Music Mode
9
10
Music1
11
8
7
12
Move
Folder
13
14
9. Mode Indicator
10. Current Folder Name
11. Title Name
12. Protection Indicator
13. Move (Help Key)
14. Folder (Help Key)
15. Play (Help Key)
16. Delete (Shortcut Button)
17. Hold (Shortcut Button)
18. Repeat (Shortcut Button)
19. File List Display (Shortcut Button)
20. Battery Life Indicator
21. Memory Type Indicator
22. File Number (Current / Total)
202122
19
18
17
16
Play
15
Name of Each Part : LCD Display
OSD (On Screen Display in Voice Record / Voice Play /Settings Mode)
Voice Record Mode
78
1
SWAV0001.WAVSWAV0001.WAV
2
3
4
8KHz
Mono
00:00:00/02:10:0000:00:00/02:10:00
5
64Kbps
1. Mode Indicator
2. File Name
3. Current File Information
4. Standby / Record Indicator
5. Counter (Elapsed Time /
Remaining Time)
6. Record / Play (Shortcut Button)
7. Battery Life Indicator
8. Memory Type Indicator
6
Voice Play Mode
12
Volume
Volume
65
11
10
9
8
7
1
2
3
4
SWAV0004.WAVSWAV0002.WAV
8KHz
Mono
00:00:16/00:00:20
00:00:16/00:00:20
Search
64Kbps
Pause
1. File Number (Current / Total)
2. Progress Bar
3. Counter (Elapsed Time /
Remaining Time)
4. Search (Help Key)
5. Play / Pause (Help Key)
6. Volume Control (Help Key)
7. Volume Indicator
8. Delete (Shortcut Button)
9. Repeat (Shortcut Button)
10. File List Display (Shortcut Button)
11. Record / Play (Shortcut Button)
12. Protection Indicator
1
2
3
4
1. Mode Indicator
2. Menu Tab
3. Setup Items
4. Move (Help Key)
5. Select (Help Key)
Settings Mode
Settings
TYPE
Memory TypeMemory Type
Int. Memory
Memory Card
Move
Select
5
ENGLISH
1919
Page 4
Operating Instructions
11-4
Samsung Electronics
M
E
N
U
O
PEN
@
!
M
E
N
U
M
E
N
U
ENGLISH
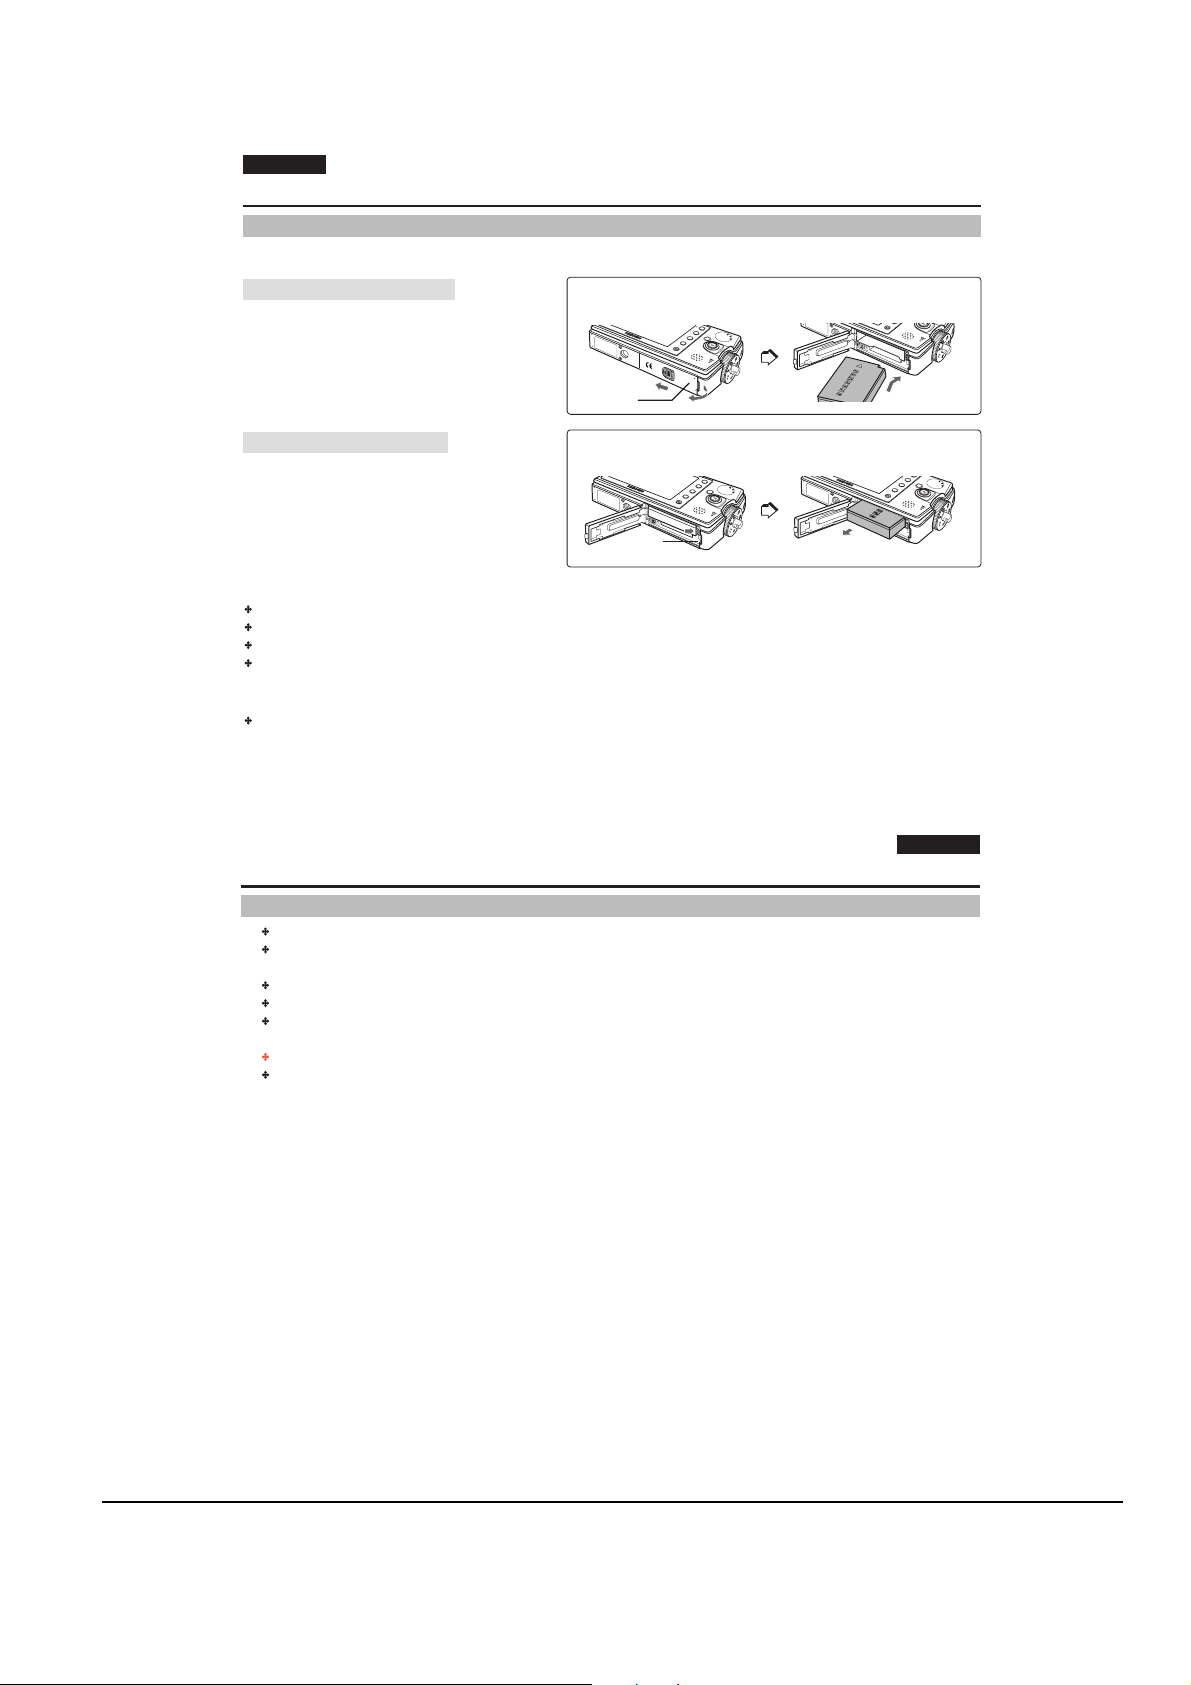
How to Use the Battery Pack
Battery Pack Installation / Ejection
It is recommended to purchase one or more additional Battery Packs to allow continuous use of your Miniket Photo.
To insert the Battery Pack
1. Push the [OPEN] switch on the bottom side of the set
in the direction of ! as shown in the diagram and
open the lid.@
2. Insert the Battery Pack into the battery slot until it
softly clicks.
Make sure that the SAMSUNG logo is facing up while
the set is placed as shown in the diagram.
To eject the Battery Pack
1. Push the [Battery Lock Switch] in the direction as
shown in the diagram to pop the Battery Pack out.
2. Pull the ejected Battery Pack out in the direction as
shown in the diagram.
<Inserting the Battery Pack>
Cover
<Ejecting the Battery Pack>
Battery
Lock Switch
[ Notes ]
Clean the terminals to remove any foreign substances before inserting the Battery Pack.
If the Miniket Photo will not be in use for a while, remove the Battery Pack from the Miniket Photo.
It is recommended to prepare fully charged additional Battery Packs for outdoor use.
Additional Battery Packs are available at your local Samsung dealer and service centre.
[ Warning ]
When you eject the Battery Pack from the Miniket Photo, hold the Battery Pack so as not to drop it.
2020
How to Use the Battery Pack
ENGLISH
Maintaining the Battery Pack
The Battery Pack should only be recharged in an environment between 32¡F (0¡C) and 104¡F (40¡C).
The life and capacity of the Battery Pack will be reduced if it is used in temperatures below 32¡F (0¡C) or left in
temperatures above 104¡F (40¡C) for a long period.
Do not put the Battery Pack near any heat sources (fire or flames, for example).
Do not disassemble, process, press, or heat the Battery Pack.
Do not allow the + and - terminals of the Battery Pack to be short-circuited. It may cause leakage, heat generation, fire, or
overheating.
If Miniket Photo fails to work when you turn on the power or the battery life indicator flickers, replace the Battery Pack.
It is recommended to use original Battery Pack that is available at SAMSUNG service centre.
2121
Page 5
Operating Instructions
11-5
Samsung Electronics
ENGLISH
A
640
REM
T
OFFOFF
AE
AUTO
4 Min
4 Min
12:00 2005.01.01
12:00 2005.01.01
F
F
How to Use the Battery Pack
Continuous Recording Time Based on Battery Type
The continuous recording times (for video recording) given in the table below are approximations.
Actual recording time depends on usage.
Battery Model
SB-LH82 (820 mAh)
Time
Continuous Recording Time
LCD On
Approx. 85 Minutes
[ Notes ]
It is recommended to prepare fully-charged additional Battery Packs for outdoor use.
Contact the retailer where you purchased this Miniket Photo to obtain a new Battery Pack.
If you zoom in or out, the recording time becomes shorter.
Continuous Recording Time indicates the time that you neither use zooming function
nor play movie files and record the movie file continuously when the
Anti Shake
2222
How to Use the Battery Pack
Battery Level Display
The Battery Level Display shows the amount of battery power remaining in the Battery Pack.
Battery Level Indicator
The Miniket Photo will soon turn off. Change the
Battery Pack as soon as possible.
The Miniket Photo will be forced to turn off soon.
It is recommended to fully charge the Battery Pack before use.
Using Time / Image Capacity According To Modes
Battery
Mode
Using Time Approx. 85 minutes
Conditions
Photo
Continuous Recording
Conditions
Movie
Continuous Playback time
Conditions
Music
Continuous Recording
Voice
Conditions
Approx. 80 minutes
Fully charged battery / Room temperature
30 fps frame rate
320x240 Image Size
No zooming
Approx. 4 hours
Fully charged battery / Room temperature
LCD display turned off
44.1 KHz / 128 Kbps / 4MB / Default equaliser / Use
earphones / Mid-level volume
Approx. 4 hours
Fully charged battery / Room temperature
Mono / 64 Kbps / Use earphones / Mid-level volume
Figures shown above are measured under Samsungs test environment, and may differ from users and conditions.
Charging time according to charging methods
Battery
SB-LH82 (820 mAh)
You may charge your Miniket Photo by connecting it to a PC with the USB cable.
State
Fully charged
25 ~ 50% is used
50 ~ 70% is used
75 ~ 95% is used
Over 95% is used
(flickers)
SB-LH82 (820 mAh)
Fully charged battery / Room temperature / 5M image
size / Super Fine / Pictures captured at 20 sec interval /
zoom in or out after each capturing
Power off and on after each 8 captures / Default LCD
brightness (14)
3 non-flash use / 1 flash use capturing
Image Capacity Approx. 230
Using AC Adapter
Approx. 1 hr 40 min More than. 3 hr
Low battery
Message
-
-
-
-
-
( ) function is off.
ENGLISH
Using USB Charging
2323
Page 6
Operating Instructions
11-6
Samsung Electronics
NU
2424
ENGLISH
How to Use the Battery Pack
Charging the Battery Pack
You can charge the Battery Pack using AC Power Adapter and USB cable.
1. Turn off the Miniket Photo by pressing the [POWER]
button.
Charging will begin only when the Miniket Photo is turned off (using
AC Power Adapter or USB cable).
2. Insert the Battery Pack to the Miniket Photo.
3. Open the Connector Cover of the set.
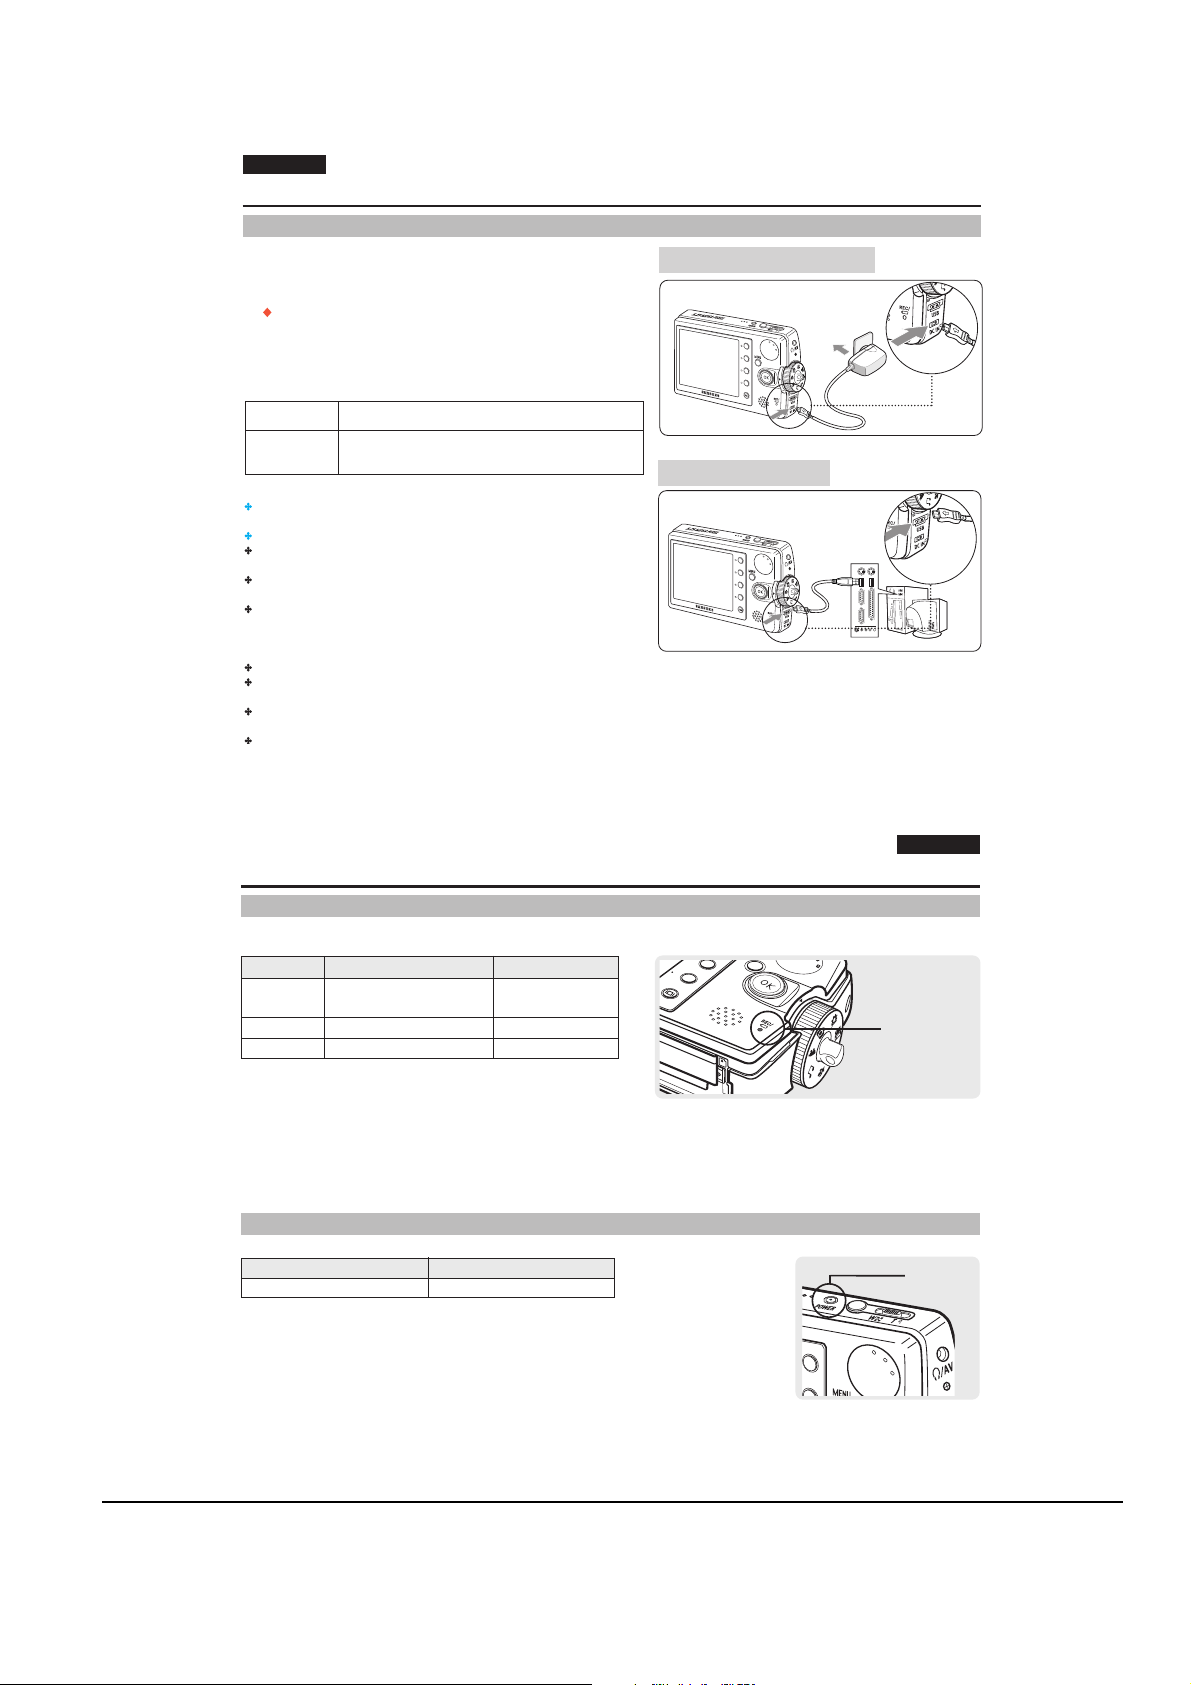
4. Charge the Miniket Photo.
AC Power Adapter Connect the AC Power Adapter with the Miniket Photo properly
Cable Connect the USB Cable with the Miniket Photo properly and
[ Notes ]
The provided AC Power Adapter supports both 110V and 220V power
source.
For 110V power source, attach the 110V plug adapter.
You can charge the Battery Pack while using the Miniket Photo, but it
takes a relatively longer time.
You may use the Miniket Photo powered by the AC Power Adapter
indoors where available.
You may charge your Miniket Photo by connecting it to a PC with the USB
cable.
[ Warning ]
It is recommended to fully charge the Battery Pack before use.
You should only charge the battery in an environment between 10¡C ~
30¡C or 0¡F ~ 40¡F.
Ambient temperature may affect charging the Battery Pack; too low
temperature may result in longer charge time / incomplete charging.
Before connecting the cable, make sure that you don t have any foreign
substances between connectors.
and plug the AC Power Adapter to the wall outlet.
connect the other side to a USB port of a PC. USB Charging will
charge the Battery Pack up to 85%.
Connecting the AC Power Adapter
DC Power Jack
4
Connecting the USB Cable
USB Port
4
Getting Started
Recording / Charging Indicator
The colour of the LED indicates the state of power or charging.
LED Colour
Red
Orange
Green
During Recording
<Movie and Voice Mode>
Power Indicator
LED Colour
Blue
Recording
-
-
During Charging
-
Charging
Fully
Charged
Power
On
ENGLISH
Recording /
Charging Indicator
Power
Indicator
2525
Page 7

Operating Instructions
11-7
Samsung Electronics
ENGLISH
Getting Started
Using the Mode Dial
The Mode Dial is used to change the Miiniket Photo mode. Available modes are Photo, Movie, Music, Voice, PC Cam,
PictBridge, Storage, and Settings.
Setting the Mode
Turn the desired mode by turning the Mode Dial.
Within 1 ~ 2 seconds, the Miniket Photo switches to the designated mode.
Functions of Each Mode
Photo Mode
You can take / view photos.
Web cam Mode
You can use the Miniket Photo as a Web cam for
video chatting and other Web cam applications.
Movie Mode
You can record / play back video.
Music Mode
You can play back music files (music).
Voice Mode
You can record / play back voice clips.
2626
Getting Started
Using the DISPLAY Button
1. If you press the [DISPLAY] button once, only Shortcut Button
icons and focus indicator will appear on the screen.
2. If you press the [DISPLAY] button twice, only focus indicator
will appear on the screen.
3. If you press the [DISPLAY] button 3 times, it switches to the
initial (normal) display screen.
[ Notes ]
Above description applies to the Photo and Movie mode.
In Music and Voice modes, the [DISPLAY] button will not operate. The LCD screen
goes off automatically after 30 seconds if there was no button operation. In that
case, press any button to turn on the LCD monitor.
PictBridge Mode
When you connect the Miniket Photo to a
PictBridge-supported printer with a USB cable, you
can print your stored pictures without a PC.
Storage Mode
Connecting the Miniket Photo to a PC with a USB
cable allows you to store various files in the
Miniket Photo.
SettingsMode
Using this mode, you can set / adjust settings
regarding the LCD display, Date / Time, Reset, and
Memory management.
ENGLISH
[DISPLAY] Button
Using the MENU Button
1. Change the desired mode by setting the Mode Dial.
2. Press the [MENU] button.
3. Move the cursor by moving the joystick (up / down / left /
right) to select desired menu item, and then press the
joystick (OK) to confirm.
4. Press the [MENU] button to finish.
POWER
W T
MENU Button
Mode Dial
Joystick
2727
Page 8

Operating Instructions
11-8
Samsung Electronics
PI
X
E
L
ENGLISH
Getting Started
Using the Shortcut Buttons
For Photo, Movie, Music, Voice and PictBridge modes, icons that represent the most frequently accessed functions according to
the selected mode are displayed on the LCD monitor to allow easier access. Using these buttons, you may directly access the
functions.
1. Turn the Mode Dial to set the desired mode.
2. Press the [POWER] button to turn on the Miniket Photo.
3. On the LCD monitor, the function icon of shortcut button is
displayed.
Press the shortcut button to access the function directly.
In Photo Mode, the icons of 4 shortcut buttons will be :
< >-< >-< >-< >
2828
Getting Started
Using the Joystick
The joystick is used to make a selection, move the cursor, select functions, and exit from the menu.
POWER
M
ENU
W
T
[Power] Button
Shortcut button
Mode Dial
Icons of
Shortcut button
functions
ENGLISH
1. Move the cursor right / left by pressing the joystick.
M
E
N
2. Move the cursor up / down by pressing the joystick.
U
You can adjust the volume by moving the joystick (up / down) in Movie /
Music / Voice playback modes.
Joystick
3. Confirm your selection by pressing the joystick (OK).
Move Up
Move
left Move right
Move down
Confirm selection
Menu Selection
Move Upwards
Move Downwards
Move Left
Move Right
Confirm Selection
While Playing Back
Increase Volume
Decrease Volume
-
-
-
2929
Page 9
Operating Instructions
11-9
Samsung Electronics
#'
%
"&
$
"
$"
$"
!
Getting Started
Recording Time and Capacity
Photo Capacity
Image Quality
Image Size
5M
4M
3M
2M
1M
VGA
64M
128M
512M
64M
128M
512M
64M
128M
512M
64M
128M
512M
64M
128M
512M
64M
128M
512M
Approx. 23
Approx. 47
Approx. 190
Approx. 30
Approx. 61
Approx. 244
Approx. 37
Approx. 75
Approx. 303
Approx. 60
Approx. 120
Approx. 481
Approx. 136
Approx. 273
Approx. 1092
Approx. 292
Approx. 585
Approx. 2340
Movie Recording Time
Image Size
[ Notes ]
Image Quality
Approx. 2
64M
Approx. 4
640 x 480
320 x 240
Voice Recording Time
64M
128M
512M
Super Fine, Fine and Normal represent the compression ratio, and Super Fine has the highest image quality.
5M, 4M, 3M, 2M, 1M and VGA represent the image resolution, and 5M has the biggest image size.
The recording time and the number of images shown above are approximation figures only when using the respective function.
In actual use, using more than one function will reduce the capacity of each.
Recording movie files on a mini SD card may have un-recordable fragment which may result shorter recording time / photo capacity.
Recording time may vary depending on the compression ratio which results from the subject recorded.
Movie file may not record / playback normally when using a mini SD card bigger than 1GB.
128M
512M
64M
128M
512M
Recording Time
Approx. 136 min
Approx. 273 min
Approx. 1092 min
Approx. 17
Approx. 4
Approx. 8
Approx. 34
Music capacity (for 4MB)
64M
128M
512M
Approx. 51
Approx. 102
Approx. 409
Approx. 66
Approx. 132
Approx. 528
Approx. 81
Approx. 163
Approx. 655
Approx. 128
Approx. 256
Approx. 1024
Approx. 292
Approx. 585
Approx. 2340
Approx. 512
Approx. 1024
Approx. 4096
Approx. 4
Approx. 8
Approx. 34
Approx. 8
Approx. 17
Approx. 68
Music file
Approx. 16 files
Approx. 32 files
Approx. 128 files
Approx. 97
Approx. 195
Approx. 780
Approx. 128
Approx. 256
Approx. 1024
Approx. 157
Approx. 315
Approx. 1260
Approx. 227
Approx. 455
Approx. 1820
Approx. 512
Approx. 1024
Approx. 4096
Approx. 682
Approx. 1365
Approx. 5461
Approx. 8
Approx. 17
Approx. 68
Approx. 17
Approx. 34
Approx. 136
Recording time based on the Miniket Photo set to mono / 64kbps transfer rate.
Voice recording time shown above is an estimation and is subject to recording conditions.
Approximately 16 music files can be stored (when using 4MB memory space / 192kb sampling),
depending on the music file size and quality.
Based on 128Kbps sampling / 4MB size.
Capacity may vary depending on file size.
ENGLISH
3131
Page 10

Operating Instructions
11-10
Samsung Electronics
OPEN
@
!
M
E
N
U
3232
ENGLISH
Getting Started
Using a mini SD card (Optional Accessory)
Only mini SD cards are supported.
Turning the power off / ejecting the mini SD card during the memory operation such as formatting, deleting, recording, and
playback may damage the data.
You may modify the name of a file / folder stored in the mini SD card using a PC. Miniket Photo may not recognise modified
files.
It is recommended that you power off before inserting or ejecting the mini SD card to avoid losing data.
It is not guaranteed that you may use a memory card formatted on other devices. Be sure to format your mini SD card using
the Miniket Photo.
Save important files separately on other media, such as floppy disk, hard disk, or CD.
You have to format newly-purchased mini SD cards, mini SD cards with data on it that Miniket Photo cannot recognise or the
cards that have data saved by other Miniket Photos.
A mini SD card has a certain life span. If you use it for a long time, you cannot record new data. In this case, you have to
purchase a new mini SD card.
A mini SD card is a precision electronic equipment. Do not bend it, drop it, or cause it to suffer a strong impact.
Do not use or store in a place that has high temperature and humidity or dusty environment.
Do not allow foreign substances on the mini SD card terminals. Use a soft dry cloth to clean the terminals if required.
It is recommended to use a mini SD card case to avoid losing data from moving and static electricity.
After a period of use, the mini SD card may get warm. This is normal, not a malfunction.
Damaged data may not be recovered, and SAMSUNG is not responsible for the lost data. Make sure to back up important
files separately on a PC.
Name of Each Part: mini SD card
This Miniket Photo only supports the mini SD card.
A mini SD card adapter is not supported by this Miniket Photo. The mini SD
Memory Card Adapter is used for other devices that supports only SD Memory
Card.
A mini SD card adapter supports a mechanical write protection switch. Setting
the switch prevents accidental erasure of files recorded on the mini SD card.
To enable writing, move the switch up to the direction of terminals. To set write
protection, move the switch down.
[ Note ]
A mini SD card is an optional accessory.
T erminals
mini SD card mini SD card adapter
Writeprotect
Switch
Getting Started
Inserting / Ejecting a mini SD card (Optional Accessory)
This product is equipped with a internal memory and the mini SD card is an optional accessory which is not
provided with the package.
Inserting a mini SD card
1. Open Cover by sliding the [OPEN] switch on the bottom side.
Slide the [OPEN] switch in the direction of (1) as shown in the figure until it stops.
Then open the lid.(2)
2. Insert a mini SD card into the slot until it softly clicks in the direction of
the arrow shown in the figure.
The mini SD card terminals will face down while the LCD monitor faces up.
Ejecting a mini SD card
1. Slightly push the mini SD card inwards to pop it out.
2. Pull the mini SD card out of the slot and close the Cover.
[ Note ]
Make sure to format a new mini SD card using the Miniket Photo.
Cover
Cover
ENGLISH
3333
Page 11

Operating Instructions
11-11
Samsung Electronics
ENGLISH
!
MoveMove
Memory Card inserted.
Change into the card?
Yes No
SelectSelect
23 23
#'
Getting Started
Selecting the Memory Type
You can set the storage to the internal memory or mini SD card (Optional Accessory).
The OSD indicator are based on internal memory by default.
1. Press the [POWER] button to turn on the Miniket Photo.
2. Initially, the memory type is set to <Int. Memory> by default.
3. Insert a mini SD card into the mini SD card slot (refer to page 33).
The message Memory Card inserted. Change into the card? appears on the screen.
4. Select the desired setting by moving the joystick left / right and press
the joystick (OK).
Yes: Photo, movie, music and voice files will be stored in the inserted mini SD card.
No: Photo, movie, music and voice files will be stored in the internal memory.
[ Notes ]
If there is no mini SD card inserted, only the <Int. Memory> option will be available.
When you insert the mini SD card in Setting Mode, the pop-up message will not display.
Selected memory will be used for all modes.
3434
Getting Started
2
3
ENGLISH
Before You Start Operating the Miniket Photo
Before using the Miniket Photo, read this page thoroughly for easy operation. Amini SD card is an optional accessory and not
included in the package.
1. Insert the Battery Pack and insert a mini SD card into the mini SD card slot. (Refer to page 33)
2. Charge the Battery Pack by directly connecting the AC Power Adapter to the Miniket Photo.
(Refer to page 24)
3. Press the [POWER] button to turn on the Miniket Photo.
4. Select the desired mode by setting the [Mode Dial].
5. Press the [Record / Stop] button to take a picture, start recording video / voice.
To set focus, press the [Record / Stop] button halfway down.
6. When finished, press the [POWER] button to turn the Miniket Photo off.
3535
Page 12

Operating Instructions
11-12
Samsung Electronics
Int. Memory
Memory Card
MoveMove SelectSelect
6;2-
Memory TypeMemory Type
SettingsSettings
6;2-
Memory TypeMemory Type
Int. Memory
Memory Card
MoveMove SelectSelect
SettingsSettings
F
il
e
N
o
.
File No.
MoveMove SelectSelect
SettingsSettings
Reset
Series
F
i
le
N
o
.
F
ile
N
o.
File No.
MoveMove SelectSelect
SettingsSettings
Reset
Series
F
ile
N
o
.
ENGLISH
Setting the Miniket Photo : Setting Memory
Selecting the Memory Type
You can set the storage to the internal memory or mini SD card (Optional Accessory).
1. Turn the Mode Dial to the Settings mode.
2. Press the [POWER] button to turn on the Miniket Photo.
3
The <Settings> menu appears.
3. Select <Memory Type> by moving the joystick left / right.
4. Select the desired option by moving the joystick up / down and then press
the joystick (OK).
<Int. Memory>: Photo, movie, music and voice files are stored in the internal memory.
<Memory Card>: Photo, movie, music and voice files are stored in the external memory
(mini SD Card).
4
5. After you finish setting, turn the Mode Dial to the desired mode.
[ Notes ]
If you insert a mini SD card when the Miniket Photo is on, the pop-up message will prompt you
automatically to select the storage type except when in the Settings mode.
If there is no mini SD card inserted, only the <Int. Memory> option will be available.
Actual storage capacity may differ from the printed memory capacity.
The maximum recording time and image capacity is subject to change depending on the media used
(refer to page 31).
You can set this option in Photo, Movie, Music, Voice, and Settings modes using the MENU.
ENGLISH
Setting the Miniket Photo : Setting Memory
Setting the File No. Function
You can set the file numbers so that they reset each time the mini SD card is formatted, or so
that they count up continuously.
3737
1. Turn the Mode Dial to the Settings mode.
2. Press the [POWER] button to turn on the Miniket Photo.
The <Settings> menu appears.
3. Select <File No.> by moving the joystick left / right.
4. Select the desired option by moving the joystick up / down and then press
the joystick (OK).
<Reset>: When the storage memory is formatted, the file number goes back to its
default value (100-0001).
<Series>: Numbering is continuous between the mini SD cards, so that the first file
number assigned on a new mini SD card is 1 more than the last file number assigned on
the previous mini SD card.
5. After you finish setting, turn the Mode Dial to the desired mode.
[ Note ]
When you set <File No.> to <Series>, each file is assigned with a different number so as to avoid
duplicating file names. It is convenient when you want to manage your files on a PC.
3838
3
4
Page 13

Operating Instructions
11-13
Samsung Electronics
Setting the Miniket Photo : Setting Memory
FormatFormat
Int. Memory
Memory Card
MoveMove SelectSelect
SettingsSettings
OK
Memory Card
MoveMove SelectSelect
All files are deleted!
Do you want to format? Do you want to format?
Yes No
!
OK
FormatFormat
Int. Memory
Memory Card
MoveMove SelectSelect
SettingsSettings
SettingsSettings
Memory SpaceMemory Space
MoveMove
Internal Memory
4MB/58MB
Formatting the Memory
You can format the internal memory and the mini SD card to erase all files.
ENGLISH
1. Turn the Mode Dial to the Settings mode.
3
2. Press the [POWER] button to turn on the Miniket Photo.
The <Settings> menu appears.
3. Select <Format> by moving the joystick left / right.
4. Select the desired option by moving the joystick up / down and then press
the joystick (OK).
<Int. Memory>: Format the internal memory.
<Memory Card>: Format the external memory.
When the joystick (OK) is pressed, the message All files are deleted! Do you want to
format? appears. Select <Yes> or <No> by moving the joystick left / right and then press
the joystick (OK).
4
5. After you finish formatting, turn the Mode Dial to the desired mode.
[ Warning ]
Previous information can not be restored after formatting.
[ Notes ]
There is no guarantee on the operation of a mini SD card which has not been formatted on
the Miniket Photo. Make sure to format any mini SD card on the Miniket Photo.
If there is no mini SD card inserted, only the <Int. Memory> option will be available.
ENGLISH
Setting the Miniket Photo : Setting Memory
3939
Viewing Memory Space
You can check used memory space and total memory space of the Miniket Photo.
1. Turn the Mode Dial to the Settings mode.
2. Press the [POWER] button to turn on the Miniket Photo.
The <Settings> menu appears.
3. Select <Memory Space> by moving the joystick left / right.
4. The used memory space and total memory space are displayed.
5. After you finish, turn the Mode Dial to the desired mode.
[ Note ]
System requires a small portion of memory space, actual storage capacity may differ from the printed
memory capacity.
4040
3
Page 14

Operating Instructions
11-14
Samsung Electronics
14
MoveMove SelectSelect
SettingsSettings
LCD BrightnessLCD Brightness
OK
10
MoveMove SelectSelect
SettingsSettings
LCD BrightnessLCD Brightness
OK
SettingsSettings
Date&Time SetDate&Time Set
MoveMove SelectSelect
------ --
--
:
--
OK
SettingsSettings
Date&Time SetDate&Time Set
MoveMove SelectSelect
OK
ENGLISH
Setting the Miniket Photo : Adjusting the LCD Monitor
Adjusting the LCD Brightness
You can adjust the brightness of the LCD monitor to compensate for ambient lighting conditions.
1 Turn the Mode Dial to the Settings mode.
2. Press the [POWER] button to turn on the Miniket Photo.
The <Settings> menu appears.
3. Select <LCD Brightness> by moving the joystick left / right.
4. Adjust the brightness by moving the joystick up / down then press the
joystick(OK).
Moving the joystick upwards will brighten the screen whereas moving it downwards will
darken the screen.
Brightness range: You can adjust the brightness between 00 ~ 31 steps.
5. After you finish adjusting, turn the Mode Dial to the desired mode.
[ Notes ]
A Brighter LCD screen setting consumes more battery power.
Adjust the LCD brightness when the ambient lighting is too bright and the monitor is hard to see.
LCD Brightness does not affect the brightness of images to be stored.
ENGLISH
Setting the Miniket Photo : Setting Date / Time
3
4
4141
Setting Date / Time
The built-in clock creates the time stamp. You can adjust the time using this menu.
1. Turn the Mode Dial to the Settings mode.
2. Press the [POWER] button to turn on the Miniket Photo.
The <Settings> menu appears.
3. Select <Date & Time Set> by moving the joystick left / right and then
press the joystick (OK).
4. Set the desired value by moving the joystick up / down.
5. Move to the next item by moving the joystick left / right, and then set values
by moving the joystick up / down.
Items are displayed in the order of the date format
By default, it appears in the order of Year, Month, Date, Hour and Minute
6. After setting the last item, press the Joystick(OK) to finish the setting.
[ Notes ]
You can display <Date &Time Set> on the LCD monitor by setting the <Date/Time> option
other than to <Off>. Refer to page 40
If the <Date & Time> display option is set to display before setting the time, it will appear as
12:00 2005.01.01 .
You can set the year up to 2037.
4242
3
4
Page 15

Operating Instructions
11-15
Samsung Electronics
Setting the Miniket Photo : Setting Date / Time
SettingsSettings
Date FormatDate Format
YYYY/MM/DD
DD/MM/YYYY
MM/DD/YYYY
MoveMove SelectSelect
SettingsSettings
Date FormatDate Format
YYYY/MM/DD
DD/MM/YYYY
MM/DD/YYYY
MoveMove SelectSelect
SettingsSettings
Date/TimeDate/Time
Off
Date
Time
Date&Time
MoveMove SelectSelect
SettingsSettings
Date/TimeDate/Time
Off
Date
Time
Date&Time
MoveMove SelectSelect
IN
#'
5050
12:00 2005.01.01
12:00 2005.01.01
Setting Date Format
You can select the date format to display.
ENGLISH
1. Turn the Mode Dial to the Settings mode.
3
2. Press the [POWER] button to turn on the Miniket Photo.
The <Settings> menu appears.
3. Select <Date Format> by moving the joystick left / right.
4. Turn the format by moving the joystick up / down, and then press the joystick
4
(OK).
<YYYY/MM/DD>: The date is displayed in the order of Year / Month / Date.
<DD/MM/YYYY>: The date is displayed in the order of Date / Month / Year.
<MM/DD/YYYY>: The date is displayed in the order of Month / Date / Year.
5. After you finish setting, turn the Mode Dial to the desired mode.
[ Note ]
Date and time information is displayed on the LCD screen in Photo capturing and Movie
recording
modes. In movie / photo playback modes, date and time information is not
displayed on the LCD screen.
ENGLISH
Setting the Miniket Photo : Setting Date / Time
4343
Setting Date / Time Display
You can set to display date and time on the LCD monitor.
1. Turn the Mode Dial to the Settings mode.
2. Press the [POWER] button to turn on the Miniket Photo.
3. Select <Date/Time> by moving the joystick left / right.
4. Turn the display option by moving the joystick up / down, and then press
the joystick (OK).
<Off>: Date and Time are not displayed.
<Date>: The date is displayed.
<Time>: The time is displayed.
<Date & Time>: The date and time are displayed.
5. After you finish setting, turn the Mode Dial to the desired mode.
The selected Date/Time is displayed in Movie Record or Photo Capture mode.
4444
3
4
5
Page 16

Operating Instructions
11-16
Samsung Electronics
SettingsSettings
NTSC/PNTSC/P
MoveMove SelectSelect
SettingsSettings
NTSC/PAL
NTSC/P
MoveMove SelectSelect
SettingsSettings
Beep SoundBeep Sound
Off
On
MoveMove SelectSelect
SettingsSettings
Beep SoundBeep Sound
Off
On
MoveMove SelectSelect
ENGLISH
Setting the Miniket Photo : Setting the System
Setting the NTSC / PAL
You can view your movie files using the built-in LCD monitor. However, to view your recordings on a television set or to copy it
to a video cassette recorder (VCR), the television set or the VCR must comply with the TV standards and have the appropriate
Audio / Video ports. Otherwise, you may need to use a separate Video Format Transcoder.
You can set the TV standard of the Miniket Photos video output.
1. Turn the Mode Dial to the Settings mode.
3
2. Press the [POWER] button to turn on the Miniket Photo.
The <Settings> menu appears.
3. Select <NTSC / PAL> by moving the joystick left / right.
4. Select the desired option by moving the joystick up / down and then press
4
the joystick (OK).
<PAL>: Sets to PALstandard.
<NTSC>: Sets to NTSC standard.
Refer to page 146
5. After you finish, turn the Mode Dial to the desired mode.
[ Warning ]
Recording and playback settings should be identical. NTSC recordings are properly played back in NTSC mode.
If recording and playback settings are different, displayed video may not be perfect.
When using a TV, be sure to set the same output setting. Playback on a TV is not available if the video format is different
than that of Miniket Photo. For example, Miniket Photo is set to PALand the TV video format is NTSC, then video playback
on the TV is not available.
ENGLISH
Setting the Miniket Photo : Setting the System
Setting the Beep Sound
You can set the beep sound to on/off. When on, a beep will sound every time a button is pressed.
4545
1. Turn the Mode Dial to the Settings mode.
2. Press the [POWER] button to turn on the Miniket Photo.
The <Settings> menu appears.
3. Select <Beep Sound> by moving the joystick left / right.
4. Select the desired option by moving the joystick up / down and then press the
joystick (OK).
<Off>: Turn the beep sound off.
<On>: Turn the beep sound on.
5. After you finish setting, turn the Mode Dial to the desired mode.
[ Note ]
When the earphones or Audio / Video cable is connected to the Miniket Photo, the <Beep Sound> function
will not operate.
4646
3
4
Page 17

Operating Instructions
11-17
Samsung Electronics
Setting the Miniket Photo : Setting the System
SettingsSettings
Off
On
Shutter SoundShutter Sound
MoveMove SelectSelect
SettingsSettings
Off
On
Shutter SoundShutter Sound
MoveMove SelectSelect
6;2-
English
Espa ol
Fran ais
SettingsSettings
MoveMove SelectSelect
OK
6;2-
English
OK
Espa ol
Fran ais
Setting the Shutter Sound
You can set the shutter sound to on / off.
ENGLISH
1. Turn the Mode Dial to the Settings mode.
2. Press the [POWER] button to turn on the Miniket Photo.
The <Settings> menu appears.
3. Select <Shutter Sound> by moving the joystick left / right.
4. Select the desired option by moving the joystick up / down and then
press the joystick (OK).
<Off>: Turn the shutter sound off.
<On>: Turn the shutter sound on.
5. After you finish setting, turn the Mode Dial to the desired mode.
ENGLISH
Setting the Miniket Photo : Setting the System
3
4
4747
Selecting Language
You can select the language of the Miniket Photo.
1. Turn the Mode Dial to the Settings mode.
2. Press the [POWER] button to turn on the Miniket Photo.
The <Settings> menu appears.
3. Select <Language> by moving the joystick left / right.
4. Select the desired Language by moving the joystick up / down and then
press the joystick (OK).
English / /
/
PЫТТНЛИ
/ / Magyar /
5. After you finish, turn the Mode Dial to the desired mode.
4848
/ Fran ais / Portugus / Deutsch / Italiano / Nederlands / Polski
Espa ol
‰
¬
/ / Svenska
3
4
Page 18

Operating Instructions
11-18
Samsung Electronics
6;2-
SettingsSettings
Mode DisplayMode Display
Off
On
MoveMove SelectSelect
OK
6;2-
SettingsSettings
Mode DisplayMode Display
Off
On
MoveMove SelectSelect
OK
Settings
6;2-
SettingsSettings
Auto Shut OffAuto Shut Off
Off
3min
5min
MoveMove SelectSelect
6;2-
SettingsSettings
Auto Shut OffAuto Shut Off
Off
3min
5min
MoveMove SelectSelect
Setting the Miniket Photo : Setting the System
Setting the Mode Display
You can set to display the mode transition when you use the Mode Dial.
If it is set to <On>, the mode screen is displayed on the LCD monitor when you turn the Mode
Dial and then switches to selected mode.
1. Turn the Mode Dial to the Settings mode.
2. Press the [POWER] button to turn on the Miniket Photo.
The <Settings> menu appears.
3. Select <Mode Display> by moving the joystick left / right.
4. Select the desired option by moving the joystick up / down and then press
the joystick (OK).
<Off>: Turns the <Mode Display> off.
<On>: Turns the <Mode Display> on.
5. After you finish, turn the Mode Dial to the desired mode.
[ Note ]
Turning on the Miniket Photo when the Mode Dial is not set to the proper mode position, only the
Samsung logo will appear. Turn the Mode Dial to a exact mode position.
3
4
ENGLISH
ENGLISH
Setting the Miniket Photo : Setting the System
Setting the Auto Shut Off
To save battery power, you can set the Auto Shut Off function which turns off the Miniket Photo if there is no operation for a certain period of time.
1. Turn the Mode Dial to the Settings mode.
2. Press the [POWER] button to turn on the Miniket Photo.
The <Settings> menu appears.
3. Select <Auto Shut Off> by moving the joystick left / right.
4. Select the desired option by moving the joystick up / down and then press the joystick
(OK).
<Off>: Cancel the Auto Shut Off function.
<3min>: Automatically turns off after 3 minutes.
<5min>: Automatically turns off after 5 minutes.
5. After you finish setting, turn the Mode Dial to the desired mode.
[ Notes ]
The <Auto Shut Off> will not function when you connect the AC Power Adapter to the Miniket Photo.
The <Auto Shut Off> functions when the Battery Pack is the only power source.
The Auto Shut Off will not function when you transfer data between the Miniket Photo and a PC.
<Auto Shut Off> will only function when you set this function in Settings mode.
Press the [POWER] button to revive the Miniket Photo.
<Power Save LCD> will reduce the brightness of the LCD screen to save power.
Press any key to revive the LCD screen when the <LCD Off> turned off the LCD screen.
<Auto Shut Off>, <Power Save LCD> and <LCD Off> operations according to modes
Auto Shut Off 3 Minutes / 5 Minutes
Enters power save mode after 30 seconds without a button operation
Not available
Enters power save mode after 30 seconds without a button
operation
Not available
LCD screen will turn off after 30 seconds since the playback
LCD screen will turn off after 30 seconds since the recording
Not available
Not available
Not available
Not available
Enters power save mode after 30 seconds without a button operation
Photo Mode
Movie Mode
Music Mode
Voice Mode
PC Cam Mode
Storage Mode
PictBridge
Settings Mode
Capturing
After 3 minutes / 5 minutes without a button operation
Viewing
Not available
After 3 minutes / 5 minutes without a button operation
Recording
Not activated while recording
Playback
Not available
After 3 minutes / 5 minutes without a button operation
Not activated while playback
After 3 minutes / 5 minutes without a button operation
Recording
Not activated while recording
Playback
Not available
After 3 minutes / 5 minutes without USB activity
After 3 minutes / 5 minutes without USB activity
After 3 minutes / 5 minutes without USB activity
After 3 minutes / 5 minutes without a button operation
5050
3
4
Power Save LCD / LCD Off
4949
Page 19

Operating Instructions
11-19
Samsung Electronics
Setting the Miniket Photo : Setting the System
!
MoveMove SelectSelect
Reset?
Yes No
OK
6;2-
SettingsSettings
ResetReset
Start
MoveMove SelectSelect
OK
Resetting the Miniket Photo
You can reset the Miniket Photo to load default (factory) settings.
ENGLISH
1. Turn the Mode Dial to the Settings mode.
3
2. Press the [POWER] button to turn on the Miniket Photo.
The <Settings> menu appears.
3. Select <Reset> by moving the joystick left / right.
4. Press the joystick (OK). Select an option by moving the joystick left / right
and then press the joystick (OK).
<Yes>: Starts the reset function.
<No>: Cancel the reset function.
[ Warning ]
If you reset the Miniket Photo, all functions you set are initialised to the default (factory) settings.
[ Notes ]
User settings and date / time information are initialised when you reset.
After resetting the Miniket Photo, set date / time (refer to page 42).
4
5151
ENGLISH
PC Cam Mode: Using the PC Cam Function
Using the PC Cam Function
You can record movie files onto the connected PC directly in real-time. Using this function, you can use it as a PC Cam for
Video chatting. USB data streaming requires a DV Driver, Video CODEC, and DirectX 9.0 or higher installed on the PC prior to
use (refer to page 137).
1. Connect the Miniket Photo to the PC with the provided
USB cable as shown in the figure.
2. Turn on your PC.
3. Turn the Mode Dial to PC CAM
4. Press the [POWER] button to turn on the Miniket Photo.
Run a video chatting application such as Windows
Messenger and enjoy the video utilisation.
Various applications take advantage of the PC Cam function. Refer to respective product documentation for further
details.
5. When finished, disconnect the cable.
[ Notes ]
The product does not support audio transfer. Please use separate microphone for audio transfer.
You must install the DV Driver (refer to page 137).
When the USB Port connection changed, it may require DV Driver re-installation.
It is recommended to use an AC Power Adapter during data transfer to avoid unintended power outages.
Microsoft Windows 98 SE or later operating systems support the PC Cam function.
130130
Page 20

Operating Instructions
11-20
Samsung Electronics
ENGLISH
PictBridge Mode: Printing with PictBridge
Printing with PictBridge
Wihth the provided USB cable and a PictBridge-supporting printer, you can print your photo images directly
without connecting to a PC.
1. Connect the Miniket photo and the PictBridge supporting
printer with a USB cable.
2. Turn on the printer.
3. Press the [POWER] button to turn on the
If the USB connection is not made, the message Connect USB Cable!
appears.
4. Press the [Shortcut 2] button to set the date / time imprint
option.
Each press of the [Shortcut 2] button cycles through
Off< >-Date < >-Time < >-Date & Time< >.
5. [Shortcut 3] button will increase the number of copies, while
the [Shortcut 4] button will decrease the number of copies.
Range of possibilities: 1 ~ 99
Pressing the [Shortcut 3] button on 99 will set to 1.
Pressing the [Shortcut 4] button on 1 will set to 99.
6. Press the [Shortcut 1] button to begin printing.
To cancel printing, press the [Shortcut 1] button again.
7. When finished, disconnect the cable.
[ Warning ]
This function works only with printers that support PictBridge.
[ Notes ]
Number of copies and imprint options can be set in the menu. Press the [MENU] button to access the function.
For printing information, refer to printer s product information.
Depending on the printer, printing failure may occur. In this case, try to print from a PC after copying images onto the PC.
Depending on the printer, date and time imprint option may not be supported. In this case, date and time menu will not be
displayed.
Miniket Photo.
ENGLISH
Storage Mode: Using as a Mass Storage Device
Using as a Mass Storage Device
You can use your Miniket Photo as a USB mass storage device.
1. Connect the Miniket Photo to the PC with the
provided USB cable as shown in the figure.
2. Turn on your PC.
Turn the Mode Dial to Storage.
3.
4. Press the [POWER] button to turn on the
Photo.
5. Set the desired memory type on the PC.
Windows XP: Dialog windows may pop up overlapped.
Locate the <Miniket> or <Removable Storage Device>
recognised by the PC and then double-click it.
Other than Windows XP: It appears to have two instances
of Removable Disk . If it displays D and E drives as removable disks, D is the mini SD Memory Card and E is the
internal memory.
6. Copy files into the destination folder.
In Windows XP
Internal Memory: <Miniket> - <MISC>
External Memory (mini SD Card): <Removable Disk> - <MISC>
7. When finished, disconnect the cable.
[ Warning ]
You cannot create a new folder on your Miniket Photo set.
If you create a new folder on your mini SD card using a PC, it will not appear on the set.
[ Notes ]
Disconnecting the USB cable while the data transfer will stop the data transfer and might damage the data stored.
Multiple USB devices connected to a PC or using USB hubs may cause communication / installation errors with the Miniket Photo.
Pop up dialogs will appear differently whether the memory has files or not.
134134
Miniket
Page 21

Operating Instructions
11-21
Samsung Electronics
ENGLISH
Miscellaneous Information : Connecting to a PC
Supported USB Speed according to Operating System
The USB driver supports High Speed USB 2.0 communication only under the Microsoft Windows and Apple Mac OSX,
operating systems.
Windows 98SE/ME: Full Speed USB
Window 2000 SP4: High Speed USB only with the Service
Pack4 Installed
Recommended System Requirements
Windows Environment Macintosh Environment
Minimum Recommended
CPU
OS
Memory
Free space
on the hard disk
Display Resolution
USB
Pentium III / 800MHz
Windows 98SE/ME
256MB
1.2 GB or above
1024 x 768 dots
24bit colour
USB 1.1
[ Notes ]
Movie playback or movie editing may be difficult on a slower-than-recommended PC. .
Multiple USB devices connected to a PC or using USB hubs may cause communication / installation errors with the Miniket Photo.
Disconnecting the USB cable during the data transfer will stop the communication and may damage data stored in the memory.
Pentium IV / 2GHz
Windows 2000 SP4/XP
512MB or above
2GB or above
1024x768 dots
24-bit colour
USB 2.0 High Speed
Windows XP: High Speed USB only with the Service Pack1
Installed
Mac OS X: High Speed USB on 10.3 or later
Minimum Recommended
G3 / 500MHz
Mac OS 10.2
128MB
1 GB or above
800x600 dots
16-bit colour
USB 1.1
G4 Processor
Mac OS 10.3
512MB or above
2GB or above
1024x768 dots
24-bit colour
USB 2.0 High Speed
136136
Miscellaneous Information : Installing Software
Installing DV Media Pro 1.0
You need to install DV Media Pro 1.0 to play back recorded movie files or the transferred data from the camera with the USB
cable on your PC.
1. Turn on your PC. Exit all other applications running.
2. Insert the provided CD into the CD-ROM drive.
The setup screen appears automatically soon after the CD was inserted. If the setup screen does not appear, click on the
Start on the bottom left corner and select Run to display a dialog. Type D:\autorun.exe and then press ENTER, if
your CD-ROM drive is mapped to D:\ .
3. Click on V ideo Codec on the Setup screen.
CODEC is required to play movie files recorded by Miniket Photo on a PC.
4. DV Driver is a software driver that is required to support establishing connection to a PC.
(If it is not installed, some functions will not be supported.)
5. Click on DV Driver on the Setup screen.
Driver software required is installed automatically. Following drivers will
be installed:
- USB Removable storage device driver (Windows 98SE only)
- USB PC-CAMERA driver
6. Click on <Confirm> to finish driver installation.
Windows 98 users need to restart the PC.
7. Click on DirectX 9.0 on the Setup screen.
DirectX 9.0 is basic software that is required by CODEC utilisation.
Problems
may occur if it is not installed.
ENGLISH
137137
Page 22

Operating Instructions
11-22
Samsung Electronics
ENGLISH
Miscellaneous Information : Installing Software
Installing DV Media Pro 1.0 / Video Studio
Application Installation — Photo Express
1. Click Photo Express on the Setup screen.
It is a photo editing tool that allows users to edit images.
Application Installation — QuickTime
1. Click QuickTime on the Setup screen.
QuickTime is Apple’s technology for handling video, sound, animation, graphics, text, music, and even 360-degree virtual
reality (VR) scenes.
Installing Video Studio
1. Insert the CD.
Setup screen displays automatically. Follow the instruction to start installation.
It is a video editing tool that allows users to edit movie files.
[ Notes ]
For photo editing, use Photo Express.
For video editing, use the Video Studio from the second CD provided.
Install in the order of: DV Driver — DirectX 9.0 — Video Codec.
It is required to install software for movie playback on a PC in this order: Video CODEC DV driver, and DirectX 9.0 .
For PC Cam use, It is required to install the DV Driver.
Compatibility warning pop-up dialogs may appear depending on PC manufacturers. Click on Continue to proceed following instruc tions.
You have to install DV Driver , Video Codec and DirectX 9.0 to run DV Media Pro 1.0 properly.
Regarding detailed instructions on software setup, refer to the software user s manual under the <help> folder of DV Media Pro 1.0 CD.
Install Acrobat Reader from the DV Media Pro 1.0 CD to view software users manual (install.pdf) in the <help> folder.
(The Acrobat Reader is a freeware product of Adobe Systems. Inc.)
138138
ENGLISH
Miscellaneous Information : Connecting To Other Devices
Connecting to a PC Using USB Cable
Connect to a PC with the provided USB cable. You can view your movies / photos on your PC.
Connecting to a PC — Playing Movie Files
1. Connect the Miniket Photo to the PC with the provided USB
cable as shown in the figure.
2. Turn on your PC.
3. Press the [POWER] button to turn on the
4.
Set the desired memory type on the PC.
Windows XP: Dialog windows may pop up overlapped.
Locate the <Miniket> or <Removable Storage Device>
recognised by the PC and then double-click it.
Other than Windows XP: It appears to have two instances of
Removable Disk . If it displays D and E drives as removable
disks, D is the mini SD Memory Card and E is the internal memory.
5. Copy the movie file to your PC.
It is recommended to copy the movie file onto the PC and playback on the PC for better performance.
Internal Memory & mini SD: <MSAMSUNG>-<SSMOV>.
6. Double-click on the copied movie file name.
It starts to play back.
Disconnecting from a PC
1. Click on the Safely remove hardware tray icon on the bottom right side of the desktop.
Select the device and click on the Stop button.
2. When the message saying that it is safe to remove the hardware appears, unplug the cable from the PC.
[ Warning ]
When data communication is disrupted due to static electricity, magnetic field or other reason, restart the programme or try to disconnect /
connect the communication cable again.
Audio transfer is not supported, use a separate audio cable for audio transfer.
[ Notes ]
Multiple USB devices connected to a PC or using USB hubs may cause communication / installation errors with the Miniket Photo.
In Windows XP, be informed that dialog windows may pop up overlapped.
Pop up dialogs will appear differently whether the memory has files or not.
Refer to page 130 for PC recommendations on USB use. Some PCs meeting the requirements may not support proper USB operation due
to various reasons. Please refer to the product documentation of the PC for further details.
Miniket Photo.
USB cable
139139
Page 23

Operating Instructions
11-23
Samsung Electronics
ENGLISH
Miscellaneous Information : Connecting To Other Devices
Connecting to a TV Monitor
You can connect your Miniket Photo directly to a TV set. Set the video format (NTSC / PAL) of the TV properly
(refer to page 42). Insert the Battery Pack.
1. Connect the provided AV cable to the [Earphones
and AV jack] of the Miniket Photo.
2. Connect the other end of the cable to the TV set
by matching the colours of the terminals.
3. Turn on the TV and set the <Source> to the
external input
<Source> may be represented as <Line In>, <Input>,
<AV>, etc. depending on the manufacturer.
Movie Record mode is displayed on the TV screen.
source you connected the cable.
4. Turn the Mode Dial to Movie mode.
5. Press the [Shortcut 1] button to switch to Movie view mode.
Select a movie file to play.
6. Move the joystick left / right to select a movie and then press the joystick (OK).
It begins playback.
To pause playback, press the joystick (OK).
To stop playback, hold down the joystick (OK) for more than 3 seconds
[ Notes ]
You can play back photo files as well as movie files.
When connected to other devices with the AV cable, no screen is displayed on the LCD monitor.
AV equipments other than TV may not properly receive AV signal.
140140
Line Input
VIDEO AUDIO
(L) (R)
Miscellaneous Information : Connecting To Other Devices
Connecting to a VCR
You can connect your Miniket Photo to a TV set through a VCR.
1. Connect the provided AV cable to the [Earphones and AV jack] of the Miniket Photo.
2. Connect the other end of the cable to the VCR
set by matching the colours of the terminals.
3. Connect the Audio/Video Cable from TV s Audio
/ Video In to the VCR s Audio / Video Out.
4. Turn on the TV and set the <Source> to the
external input source to the VCR.
5. Turn on the VCR and set the <Source> to the
external input source where you connected the
M
iniket Photo.
[ Notes ]
You can play back photo files as well as the movie files.
When connected to other devices with the AV cable, no screen is displayed on the LCD monitor.
If TV and VCR are connected using a coaxial cable, try channel 3 or 4 to set the input source of TV to the VCR. Refer to the products
document for further details.
VIDEO AUDIO
(L) (R)
Line Input
ENGLISH
Video Output
Terminals
TV Input
Terminals
141141
Page 24

Operating Instructions
11-24
Samsung Electronics
ENGLISH
Miscellaneous Information : Printing Photos
Printing with DPOF
DPOF (Digital Printing Order Format) defines the print information for each photo on the mini SD card. You can easily make
prints using a DPOF-compatible printer or order copies from commercial digital image developers.
Printing DPOF files in the mini SD card
1. Turn the DPOF information for the photo you want to print. (Refer to page 87)
2. Insert a mini SD card into the DPOF- supporting printer.
3. Follow the steps of the printer to print out photos.
[ Notes ]
For further details about printing photos, refer to the printer s user’s manual.
Printing may not be performed depending on types of printers.
In this case, download JPEG files directly to the PC and print them.
142142
ENGLISH
Miscellaneous Information : Cleaning and Maintenance
After Using the Miniket Photo
For the safekeeping of the Miniket Photo, follow these steps.
Turn the Miniket Photo off.
Remove the battery pack (refer to page 20).
Remove the mini SD card (refer to page 33).
To prevent any damage to the LCD monitor, do not apply excessive force to its moving parts.
Do not drop or in any way shock the Miniket Photo.
For prolonged use of the Miniket Photo, avoid using it in places subject to excessive humidity or dust.
Do not leave the Miniket Photo in places subject to:
Excessive humidity, steam, soot, or dust.
Excessive shock or vibration.
Extremely high (over 50¡C or 122¡F) or extremely low (under 0¡C or 32¡F) temperatures .
Strong electromagnetic fields.
Direct sunlight or in a closed car on a hot day.
For the safe use of the battery pack, follow these guidelines:
To conserve battery power, be sure to turn off the Miniket Photowhen not in use.
Battery consumption may vary depending on the condition of use. Recording with many starts and stops, frequent
zooming, and recording in low temperatures will shorten actual recording times.
Dispose of used battery packs promptly. Do not dispose of Battery Packs by burning them.
The battery pack will become warm during charging and use. This is not a malfunction.
The battery pack has a limited service life. If the period of use becomes noticeably shorter with a normal charge, the
battery pack is at the end of its service life. Replace it with a new battery pack.
For the safe use of the mini SD card, follow these guidelines:
The mini SD card should be stored away from heaters and other heat sources. Avoid storing mini SD cards under direct
sunlight and avoid electromagnetic fields.
Do not power off any devices while transferring data, as this may destroy the data.
Back up your image data often to a hard disk or other permanent storage media.
Format the mini SD card periodically.
When formatting the mini SD card, format in the Miniket Photo.
143143
Page 25

Operating Instructions
11-25
Samsung Electronics
ENGLISH
Miscellaneous Information : Cleaning and Maintenance
Cleaning the Body
To Clean the Exterior of the Miniket Photo
To clean the exterior, use a soft dry cloth. Wipe the body gently.
Do not apply excessive force when cleaning, gently rub the surface.
The LCD monitor surface should not be pressed. Use a soft dry cloth to clean the surface.
To clean the lens, use an optional air blower to blow out dirt and other small objects. Do not wipe the lens with a cloth or
your fingers. If necessary, use lens cleaning paper.
Do not use thinner, alcohol, or benzene for cleaning. Otherwise, the finish may be damaged.
Cleaning should be done only after the battery pack has been removed, and other power sources have been
disconnected.
[ Note ]
If the lens looks dimmer, turn off the Miniket Photo and leave it for about 1 hour.
144144
Miscellaneous Information : Cleaning and Maintenance
Regarding the Battery
Battery Pack performance decreases when the
surrounding temperature is 10¡C (50¡F) or below,
and shortens the battery life. In that case, do one of
the following so that the durability of the battery life
can be extended for a longer period of time.
- Put the battery pack in a pocket to warm it up,
and insert it in your
Miniket Photo immediately
prior to use.
- Use a large capacity battery pack (Optional).
Be sure to set the switch to OFF when not recording
or playing back. The battery power is also consumed
in standby, playback, and pause modes.
Have your battery packs ready for two to three times
the expected recording time, and make trial
recordings before make the actual recording.
Do not expose the battery pack to water.
The battery pack is not water resistant.
Keep the battery out of reach of children. If it is
swallowed, seek medical assistance immediately.
Do not short the battery or dispose of the battery in
fire.
Do not disassemble the battery. The battery could
explode or catch fire.
Use only recommended batteries and accessories.
Use of batteries not expressly recommended for this
equipment may cause an explosion or leakage,
resulting in fire, injury, or damage to the
surroundings.
Insert the battery according to the instructions.
Improperly installed batteries can cause damage to
the
Miniket Photo.
When you do not use the Miniket Photo for a long
time, remove the battery pack. Otherwise, the
battery may leak. To avoid damage to the product,
be sure to remove the battery when no charge
remains.
ENGLISH
Wipe the battery with a clean dry cloth to ensure
proper contact.
Do not pick up the battery using metal tools as this
may cause a short circuit.
145145
Page 26

Operating Instructions
11-26
Samsung Electronics
ENGLISH
Miscellaneous Information : Cleaning and Maintenance
Using Abroad
Each country or region has its own electric system and TV standards (NTSC / PAL / SECAM)
Before using the Miniket Photo abroad, check the following items:
Power Sources
You can use the Miniket Photo in any country or area with the supplied AC Power Adapter where the power input range is 100V -
240V, 50/60Hz.
Use a commercially available AC plug adapter if necessary, depending on the design of the local wall outlets.
TV Standards
You can view your movie files using the built-in LCD monitor. However, to view your recordings on a television set or to copy it to a
video cassette recorder (VCR), the television set or the VCR must comply with the TV standard and have the appropriate Audio /
Video ports. Otherwise, you may need to use a separate Video Format Transcoder (PAL-NTSC format Converter). You can set the
TV standard of the Miniket Photo for its video output.
PAL-Compatible Countries / Regions
Australia, Austria, Belgium, Bulgaria, China, CIS, Czech Republic, Denmark, Egypt, Finland, France, Germany, Greece, Great Britain,
Holland, Hong Kong, Hungary, India, Iran, Iraq, Kuwait, Libya, Malaysia, Mauritius, Norway, Romania, Saudi Arabia, Singapore, Slovak
Republic, Spain, Sweden, Switzerland, Syria, Thailand, Tunisia, etc.
NTSC-Compatible Countries / Regions
Bahamas, Canada, Central America, Japan, Mexico, Philippines, Korea, Taiwan, United States of America, etc.
146146
Page 27

Operating Instructions
11-27
Samsung Electronics
ENGLISH
Troubleshooting : Self-Diagnosis Display
Symptom Possible Causes Measure
Images on the LCD monitor appear dark.
Play, rewind, and fast forward do not work.
Mini SD card cannot play back (Photo Mode)
No
picture is taken when [Record / Stop]
button is fully pressed.
Built-in flash will not go off
Cannot record a movie
LCD monitor turns off automatically.
Maximum recording time and photo capacity
is different than the specifications.
Audio and Video does not play back.
No audio plays when viewing photos.
Movie plays with mosaic and / or blockshaped noise.
Data copied from a PC will not play.
MPEG4 movie taken will not play on a PC
Music files will not play on the camera.
Audio / Video will not play when connected to
a TV / VCR.
OSD will not appear on the TV monitor.
Ambient light is too bright.
Ambient temperature is too low.
Photo Mode is selected.
Movie Mode is selected.
Not enough free memory space.
Mini SD card was formatted using another device.
Flash mode is set to Off
Movie Mode is selected.
Photo Mode is selected.
To save power consumption, the LCD monitor and
the
Miniket photo goes down if there is no button
operation for a certain period of time (depending on
the operation mode), which is not a malfunction.
Recording / lighting conditions may affect the size
of the recordings.
Damaged data file.
Photo viewing does not support audio.
Subject is moving fast.
By the nature of MPEG4 playback.
Data file does not comply with the supported file
format.
Required driver / application software are not
properly installed.
Data file does not comply with a supported file
format.
Cable connection was done improperly.
The <Source> of the TV is set improperly.
Mode is set to Recording mode.
TV set may not support on -creen text display
depending on manufacturer.
Adjust the LCD brightness, page 37.
Low temperature may produce a dark LCD screen. It is normal,
not a malfunction.
Select Movie Mode and press the [Shortcut 1] button.
Select Photo Mode and press the [Shortcut 1] button.
Empty the
mini SD card to make free memory space.
Format the
mini SD card.
Select different flash mode, page 75.
Flash will not work in Movie Mode.
Select Movie Mode.
Pressing any button will turn the
Miniket Photo back on.
Pressing the button once again will operate its original function.
It is normal, not a malfunction.
Static electricity and strong magnetic fields may damage the
data stored in the
mini SD card. Be careful with handling the
mini SD card. Damaged data cannot be recovered.
It is normal, not a malfunction.
It is normal. It is not malfunction. When you play back the movie
on a PC, it plays back properly.
Non-supported file formats will not play. It is normal, not a
malfunction.
Install the required driver / application software, including the
CODEC from the provided CD, page 131.
The encoding format of the music file may not comply with a
supported file format. Check the music file.
Check the cable connections, page 136.
Set the proper channel of <Source> of connected
Miniket Photo.
Set the mode to Movie play by pressing the [Shortcut1] button,
page 136.
Set the mode to Movie view, page 136.
It is normal, not a malfunction.
Page 28

Operating Instructions
11-28
Samsung Electronics
MEMO
 Loading...