


COLOUR
TELEVISION
721A/761A/823A/893A
727A/767A
Owner’s Instructions
Before operating the unit,
please read this manual thoroughly,
and retain it for future reference.
REMOTE CONTROL
MENU CONTROL
TELETEXT FUNCTION(OPTION)
PICTURE IN PICTURE(OPTION)
ENG
ENG
!
!
Feature
13
13
21~24
The number on this symbol represents the
reference page.
Mutual responsive dialogic picture
By adopting dialogic method (if you select
one menu, another picture is displayed)
everybody can easily execute the next
operation and verify optional conditions.
One method makes every operation easy
By identifying operating methods of the
remote control, if you learn one method,
you can learn another method naturally.
Various pictures and sound functions
With various pictures and sound functions,
you can adjust the condition of picture
and sound to your taste.
• You can select one of five picture
modes (Custom, Standard, Dynamic,
Movie, Mild) you want to view.
• You can select one of five sound modes
(Custom, Standard, Music, Movie,
Speech) you want to hear.
25~26
27
28~29
Time saving function
You can use this TV set with the function
of automatic turning on or off to the time
you set.
Extra Function
You can easily adjust the menu.
They are as follows;
• Language
• Blue screen
• Noise Reducer
• Low noise AMP
• Demonstration
• Tilt
Picture in Picture (PIP) Operation
With this advanced digital feature,
you can use your VCR to enjoy a movie
while still keeping up with the latest news.
You actually see two sources at the same
time: one on the main screen, the other
inset on a subscreen.
Main and subscreen images may be
interchanged instantly, and the subscreen
image can be shifted to any position of the
main screen by remote control.
Caution
CAUTION
RISK OF ELECTRIC SHOCK.
DO NOT OPEN.
CAUTION :
TO REDUCE THE RISK OF ELECTRIC SHOCK,
DO NOT REMOVE REAR COVER, NO USER
SERVICEABLE PARTS INSIDE. REFER SERVICING TO
QUALIFIED SERVICE PERSONNEL.
The main voltage is indicated on the rear of
☛
the TV set and the frequency is 50 or 60Hz.
Mode System
CB PAL-B/G
CI PAL-I
CX PAL-B/G, SECAM-B/G
CK PAL-B/G, D/K, SECAM-B/G, DK
CII PAL-I (WITH VHF BAND)
CW PAL-B/G, D/K, SECAM-B/G, D/K, NT4.43MHz
CF PAL-B/G, SECAM-B/G, SECAM-L/L’
CS PAL-B/G, I, D/K, SECAM-B/G, D/K, NT4.43/3.58MHz
Beware High Voltage. Live parts are
accessible when the rear cabinet is removed.
Do not remove this rear cover.
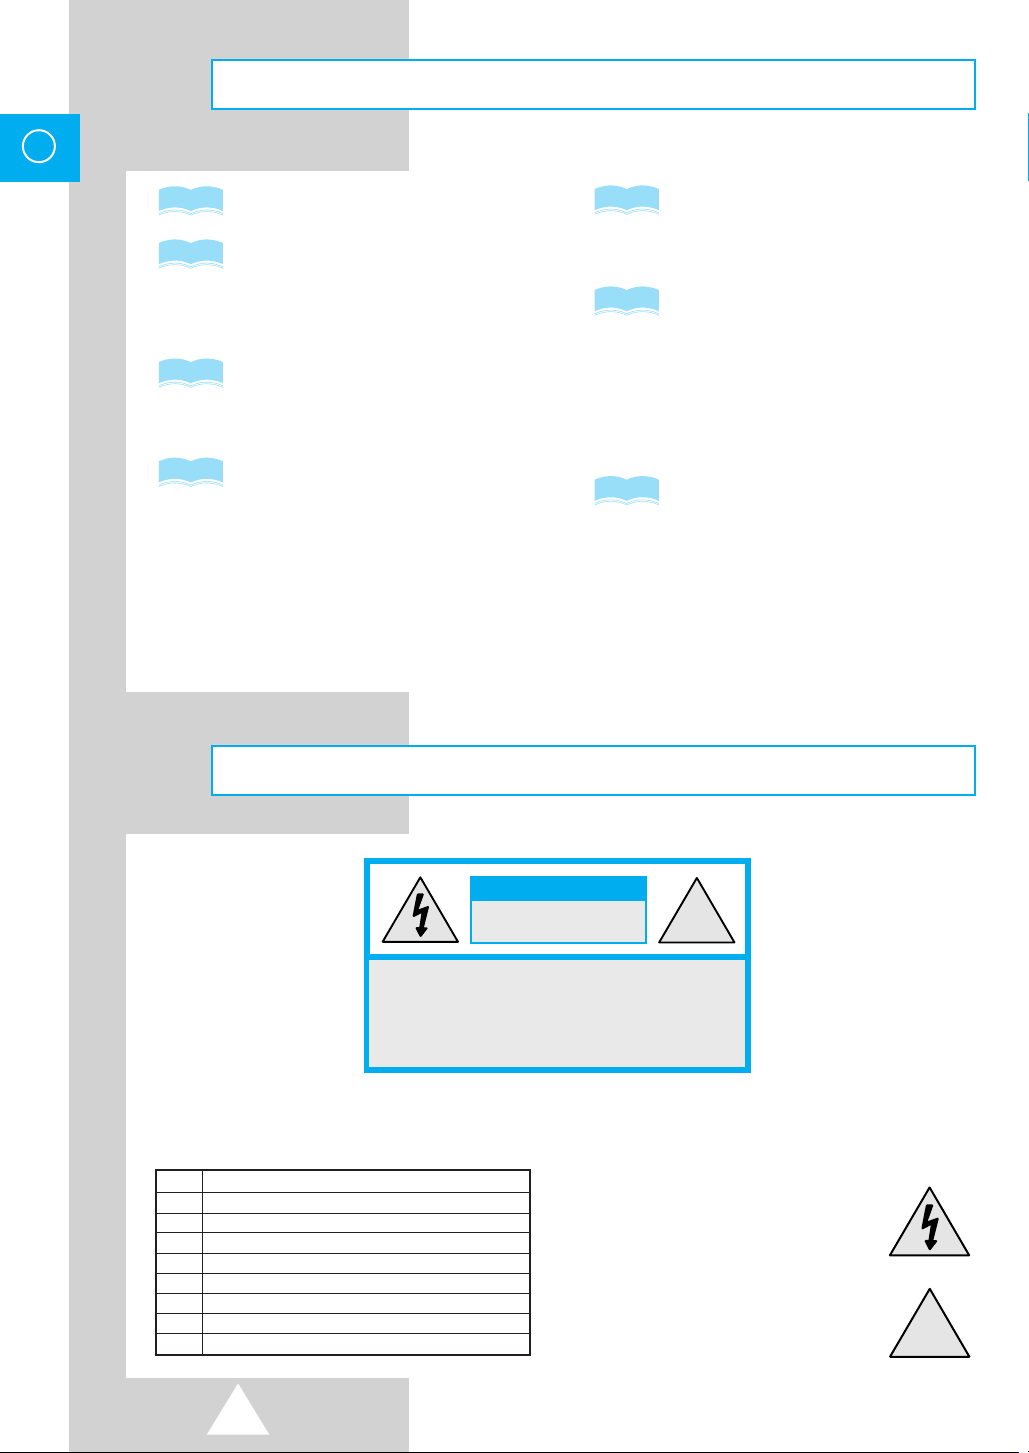
The lightning flash and arrow head
within the triangle is a warning
sign alerting you of “dangerous
voltage” inside the product.
The exclamation point within the
triangle is a warning sign alerting
you of important instruction
accompanying the product.
2
You have just purchased
a SAMSUNG television.
Please take the time to read these instructions,
as they will enable you to set up your
television easily.
Contents
◆ CONNECTING AND PREPARING YOUR TELEVISION
■
Feature........................................................................................................................ 2
■
Caution........................................................................................................................ 2
■
Safety Instructions....................................................................................................... 4
■
Inserting the Batteries in the Remote Control ............................................................. 5
■
Connecting the Aerial (or Cable Television Network) ................................................. 5
■
How to Use this Manual .............................................................................................. 6
■
Quick reference guide for your TV set ........................................................................ 6
■
Antenna Connections.................................................................................................. 7
■
Video Connections ...................................................................................................... 8
■
S-VHS Connections .................................................................................................... 9
■
Camcorder Connections ............................................................................................. 10
■
Audio Connections ...................................................................................................... 10
■
Front Control ............................................................................................................... 11
■
Side Connection.......................................................................................................... 11
■
Remote Controls ......................................................................................................... 12
■
Switching your Television On and Off ......................................................................... 13
■
Remote Control ........................................................................................................... 13
ENG
◆ USING YOUR TELEVISION
■
Tuning Procedure (Auto store).................................................................................... 14
■
Tuning Procedure (Manual store) ............................................................................... 16
■
Tuning Procedure (Channel skip) ............................................................................... 18
■
Tuning Procedure (Fine tune) ..................................................................................... 19
■
Tuning Procedure (Sort).............................................................................................. 20
■
Picture Adjustment ...................................................................................................... 21
■
Sound Adjustment....................................................................................................... 23
■
Sound Adjustment (Surround)..................................................................................... 24
■
Stereo Mode Functions ............................................................................................... 24
■
Setting the Timer......................................................................................................... 25
■
Setting the Clock ......................................................................................................... 25
■
Setting the On/Off Timer ............................................................................................. 26
■
Extra Functions ........................................................................................................... 27
■
Picture in Picture (Option) ........................................................................................... 28
■
Teletext Operation (Option)......................................................................................... 30
◆ RECOMMENDATIONS FOR USE
■
Trouble Shooting......................................................................................................... 33
■
Cleaning the TV .......................................................................................................... 33
■
Specification................................................................................................................ 34
Symbols
☛
Press Push Important Note
➢
3
ENG
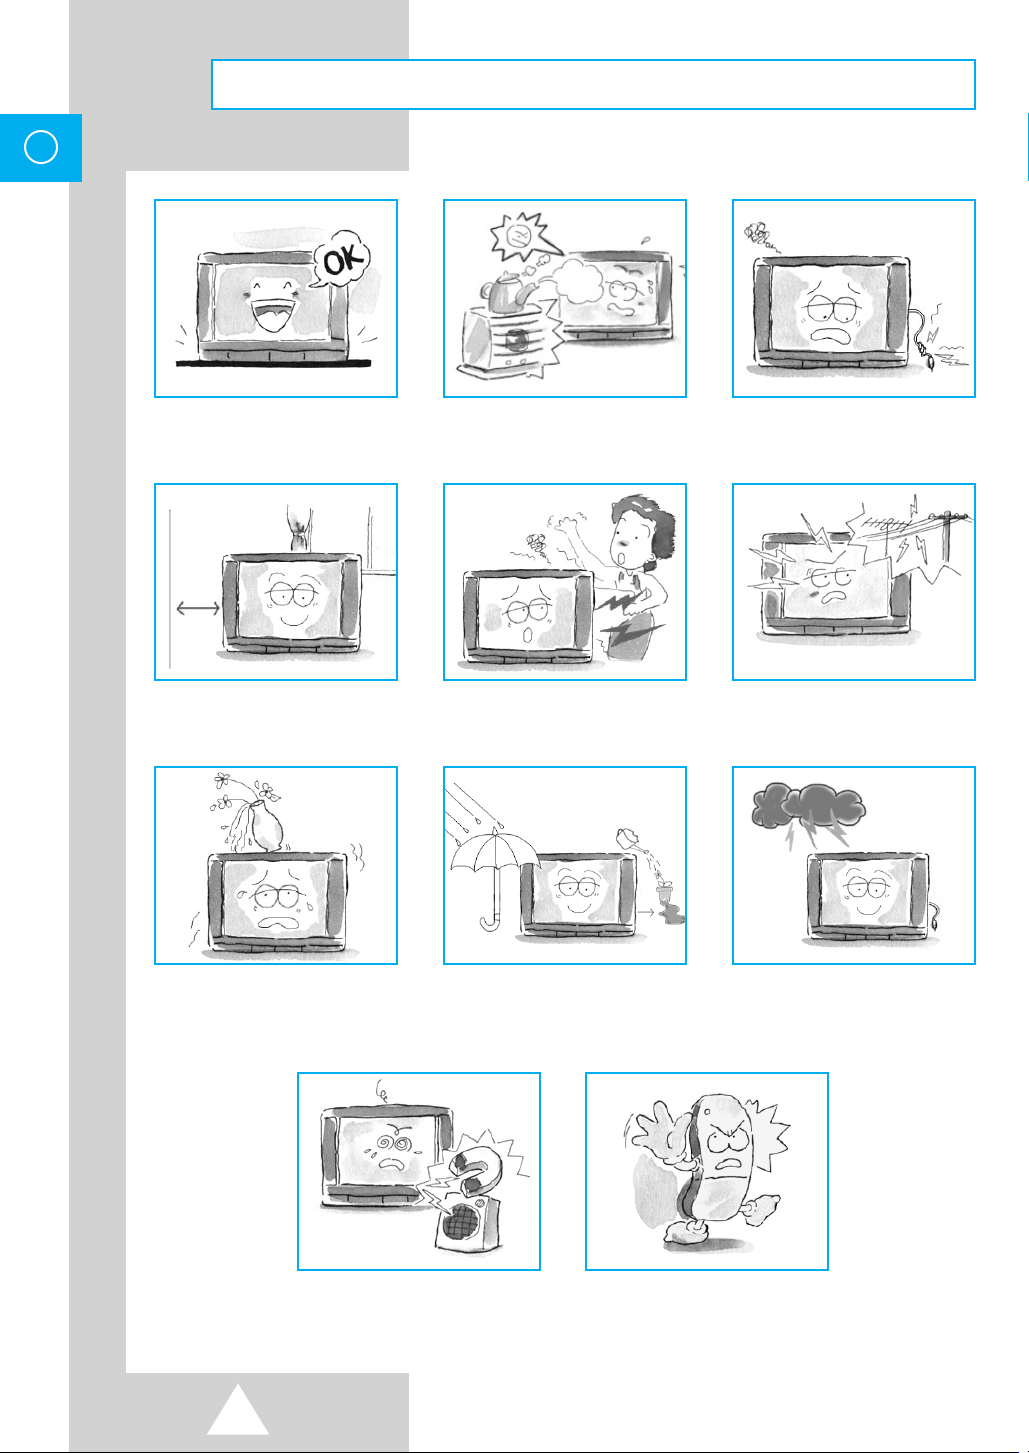
Safety Instructions
Place this TV on a stable stand or
table.
Adequate ventilation is essential
to prevent failure of electrical
components.
Never put objects of any kind
into the TV set, and do not place
a water-containing vessel on the
set.
Avoid exposing the TV set to
direct sunlight and other sources
of heat.
Do not attempt to disassemble
this TV set yourself.
To prevent damage which may
result in fire or shock hazard, do
not expose this TV set to rain or
excessive moisture.
Do not step on or twist the
power cord.
Do not overload wall outlets or
extension cords as this can result
in a risk of fire or electric shock.
If it is not being used for a long
time or if there is a lightning
storm, unplug the TV set.
Keep the vacuum cleaner, etc.
away from the TV as far as
possible.
4
Avoid dropping the remote
control.
Inserting the Batteries in the Remote Control
You must insert or replace the batteries in the remote control when
you :
◆ Purchase the television.
◆ Find that the remote control is no longer operating
correctly.
1 Remove the cover on the underside of the remote control by sliding it off
with your thumb.
2 Insert two AAA or equivalent batteries placing the “–” end of the batteries
against the springs in the remote control.
3 Replace the cover by aligning it with the remote control and sliding it until it
clicks into place.
If the remote control is not operating, check the list below.
➣
1. Check the polarity of the batteries.
2. Check if the batteries are weak.
3. Check for interruption of electric power.
4. Check if the power plug is connected to the electrical
outlet of the television set.
ENG
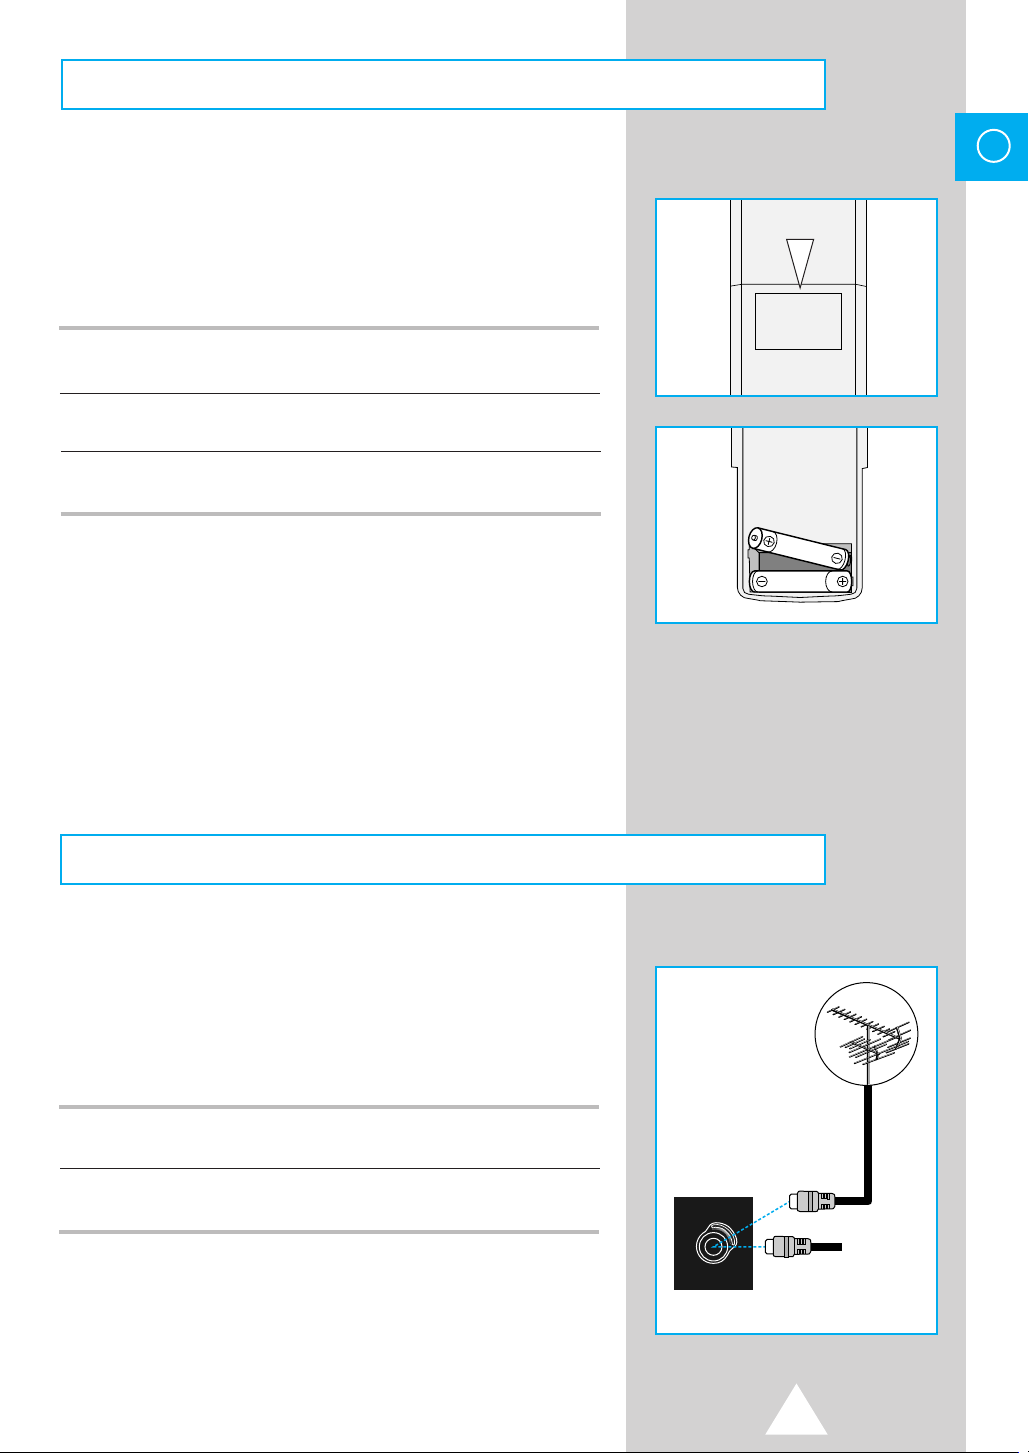
Connecting the Aerial (or Cable Television Network)
To view television channels correctly, a signal must be received
by the set from one of the following sources:
◆ An outdoor aerial
◆ An indoor aerial
◆ A cable television network
1 Plug the aerial or cable network input cable into the socket at the bottom of
the television’s rear panel.
2 If you are using an indoor aerial, insert the bottom of the aerial into the
support bracket on the top of the television.
75Ω
VHF/UHF
Rear of TV
Cable
Television
Network
5
ENG
How to Use this Manual
1 Check the Model Number of your TV set; the Model Number is shown on
the rear cover name plate on the set. Use the table below to confirm which
features your particular Model is equipped with. This will help you to know
which sections of the manual apply to your set.
2 Check the Part Number on the rear of your Remote Control handpiece,
and note the functions available, as shown on the following pages.
Quick reference guide for your TV set
Please check the model number of your TV set.
This Manual applies to several Models and there are slight
differences among them.
Please check the table below to see what your TV is equipped with
before you begin using these Operating Instructions. Instructions
are given for all functions, please disregard those which do not
apply to your TV.
MODEL NAME TUNER PIP NICAM TTX
PF 2 O O O
NP 2 O O X
727A PT(R) 2 O X O
767A P 2 O X X
721A NT 1 O O O
761A N 1 O O X
823A T 1 O X O
893A WP 1 O X X
W1 XXX
WT 1 X X O
Function available refer to:
➣
TELETEXT
STEREO
PIP
30~32
24
28~29
6
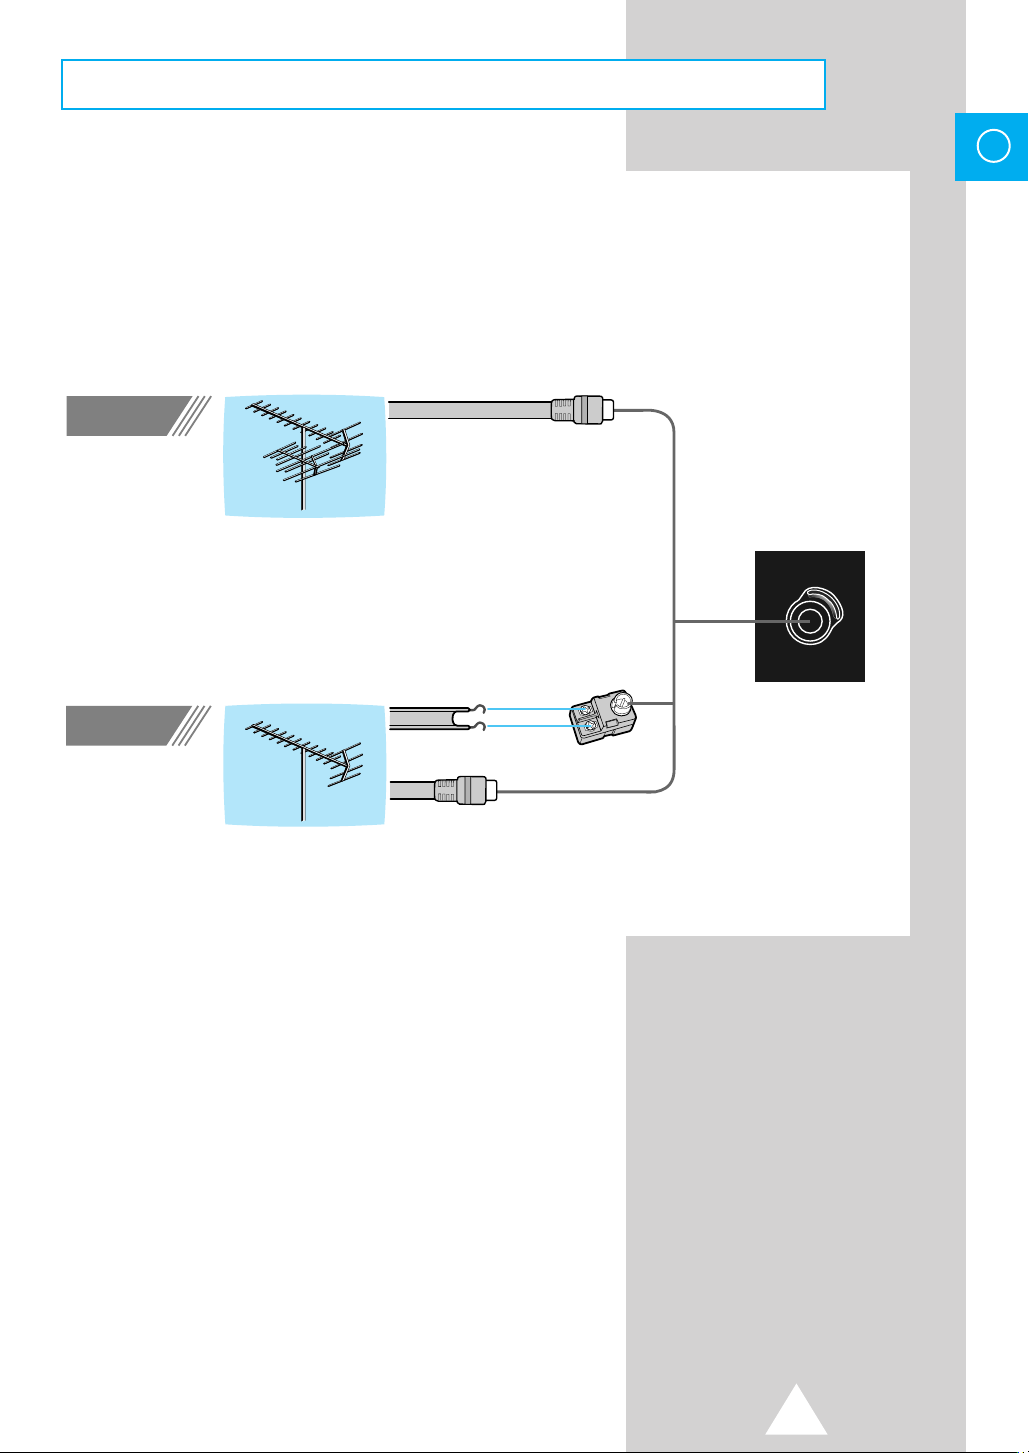
Antenna Connections
Outdoor Antenna Connections
ENG
VHF/UHF Antenna
Method 1
VHF Antenna
Method 2
Round 75-ohm coaxial cable
Flat 300-ohm twin lead cable
Round 75-ohm coaxial cable
75Ω
VHF/UHF
Rear of TV
7
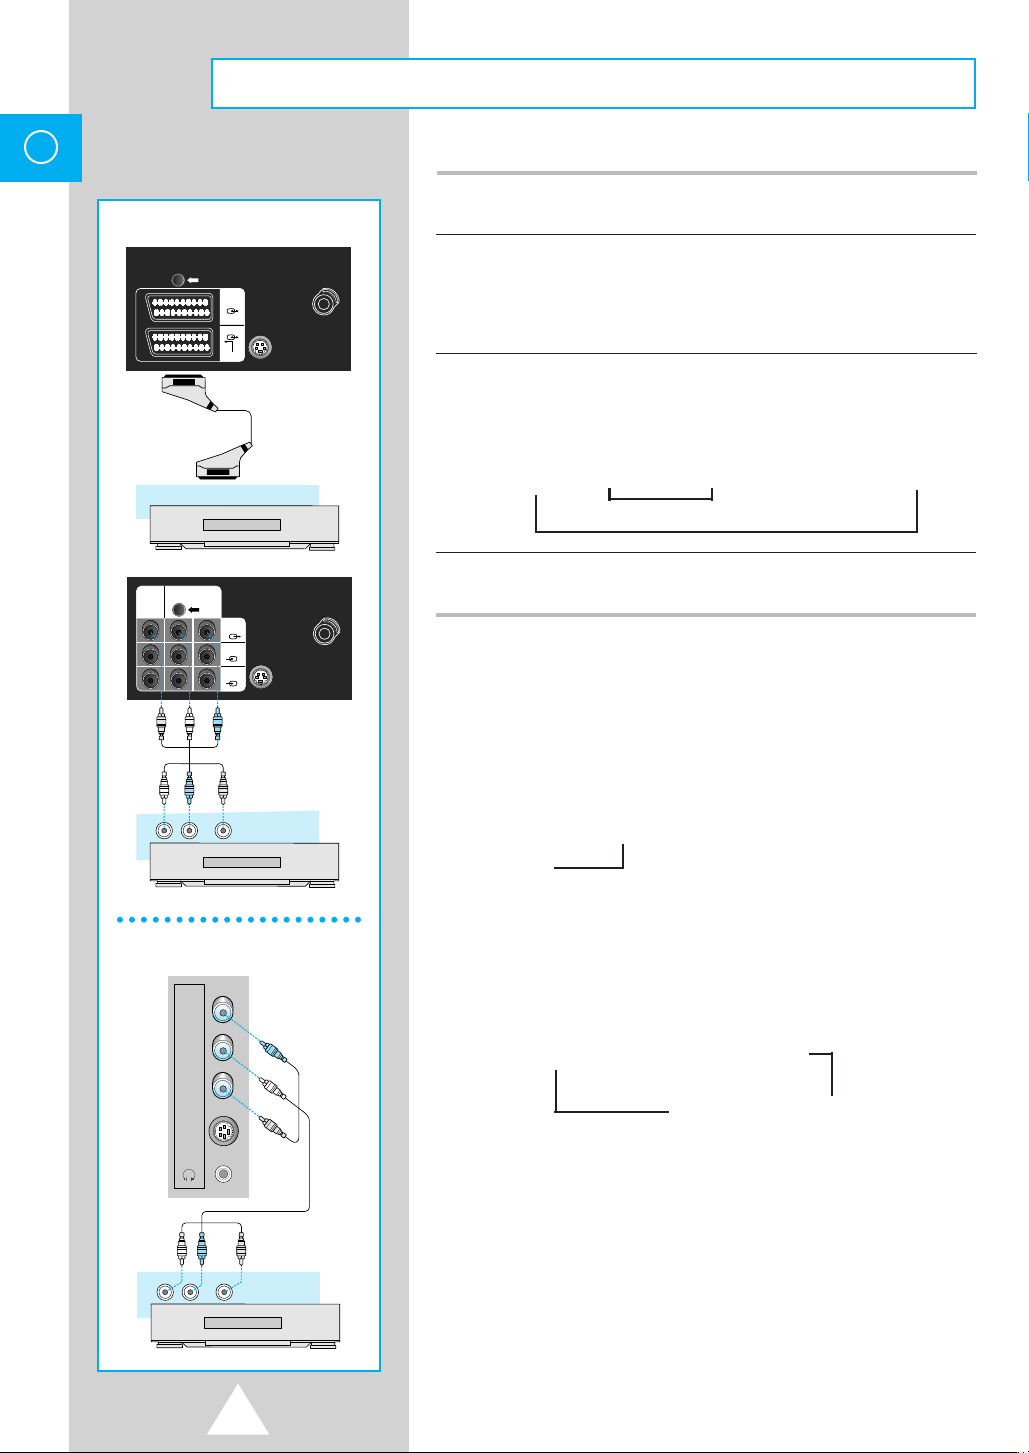
ENG
R
I
AUDIO
I
L
(MONO)
VIDEO3
INPUT
S-VIDEO2
INPUT
VCR
AUDIO OUT
(R)
(L)
VIDEO OUT
S-VIDEO1
VHF/UHF
75Ω
S-VIDEO1
VHF/UHF
75Ω
VCR
MONITOR
-OUT
AV-2
VIDEO
AV-1
(
MONO
)
L-AUDIO-R
AV-2
AV-1
RGB
VCR
AUDIO OUT
(R)
(L)
VIDEO OUT
Video Connections
Rear of TV (Option)
1 Connect an optional AUDIO/VIDEO cable from the VIDEO OUT jack on
the rear of the VCR to the VIDEO IN jack on the rear of the TV.
2 Connect another optional audio/video cable from the AUDIO OUT jacks on
the rear of the VCR to the AUDIO IN jacks on the rear of the TV.
◆ If you have a VCR with 21 pin scart jack, connect scart cable to the
rear of TV (Option).
3 Press the TV/VIDEO button to select “AV”.
◆ As you press the button, TV, AV1, AV2, AV3, S-VIDEO1, and
S-VIDEO2 are repeated alternately.
TV ➞S-VIDEO1 ➞S-VIDEO2 ➞AV1 ➞AV2 ➞AV3
➞
if connected
4 Playback a tape in the VCR.
(See owner’s Manual for VCR)
Self Checkup Function
☛
◆
When all front and rear jack of this TV are
disconnected, the video mode changes as below.
TV
➞
AV3
(When only AV1 Jack is connected)
TV
➞
Side of TV
TV/Video Selection
☛
◆
Press the TV/VIDEO button repeatedly to select the
desired input.
◆
Whenever the TV/VIDEO button is pressed, the mode
changes as below.
➣
TV
(when all input jacks are connected)
◆
When video mode is selected and that AV mode has no
input picture signal, the background colour of the TV
screen will change to blue regardless of whether the
BLUE-SCREEN function is set.
◆
Teletext displays on screen will not be output at the
Monitor output terminal and Scart output terminal.
◆ AV mode isn’t selected when VCR wasn’t operating, so you
8
must check VCR status before selecting AV mode.
AV1
➞
➞
S-VIDEO1 ➞ S-VIDEO2
➞
AV3 AV2 AV1
➞
➞➞
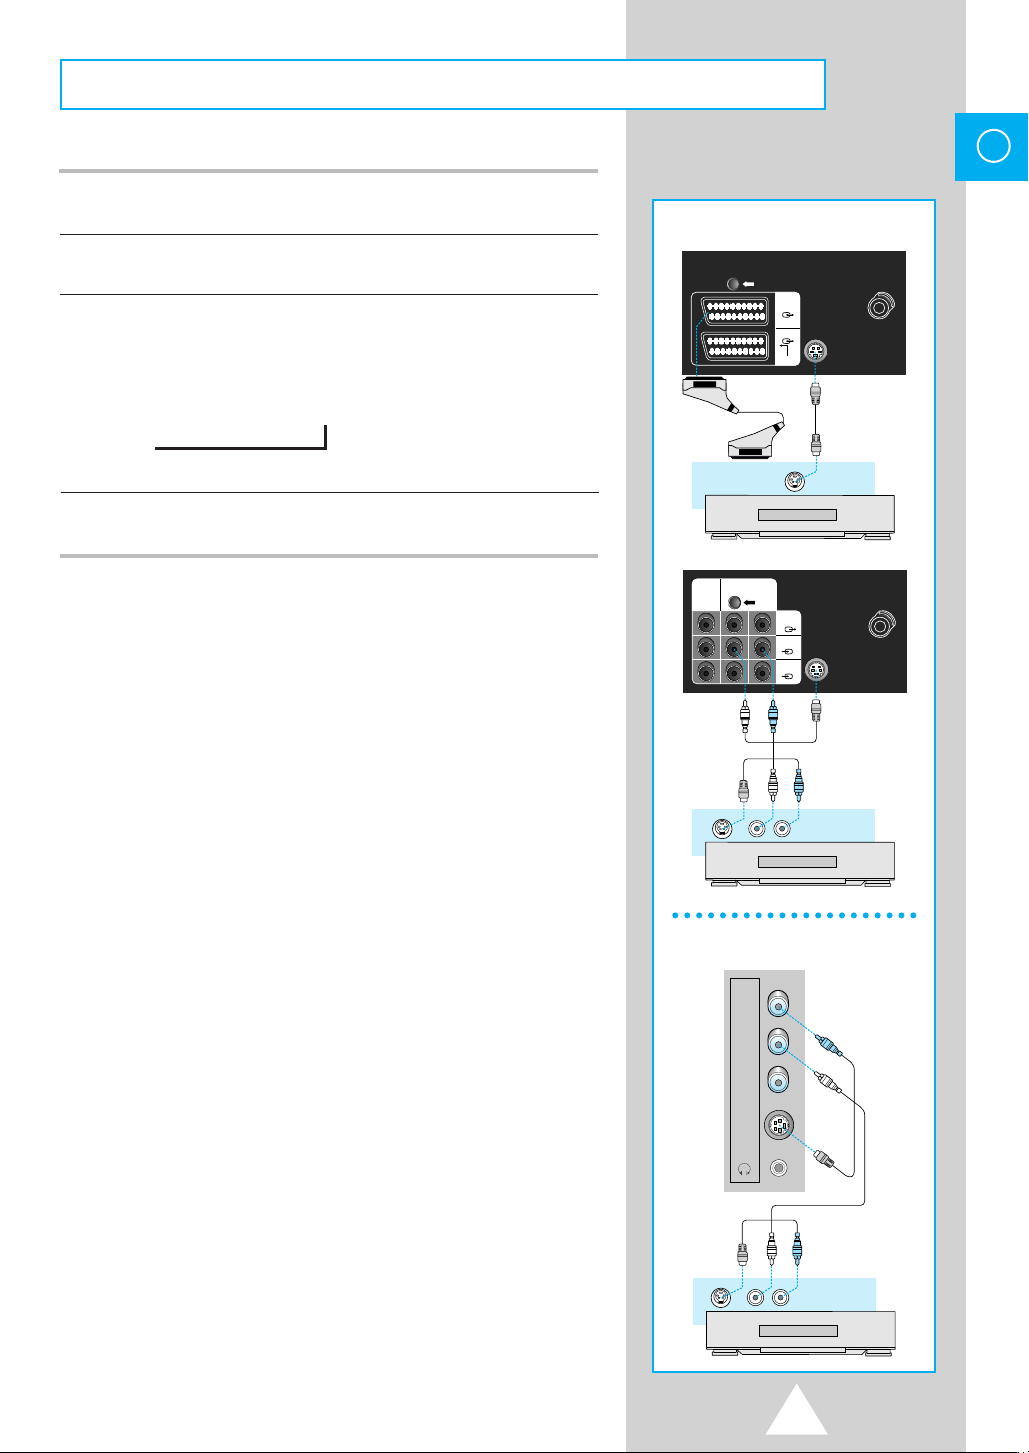
R
I
AUDIO
I
L
(MONO)
VIDEO3
INPUT
S-VIDEO2
INPUT
VCR
AUDIO OUT
(R)
(L)
S-VIDEO OUT
S-VIDEO1
VHF/UHF
75Ω
S-VIDEO1
VHF/UHF
75Ω
MONITOR
-OUT
AV-2
VIDEO
AV-1
(
MONO)
L-AUDIO-R
AV-2
AV-1
RGB
VCR
AUDIO OUT
(R)
(L)
S-VIDEO OUT
VCR
S-VIDEO OUT
S-VHS Connections
1 Connect an optional S-VHS cable from the S-VHS OUT jack on the rear of
the VCR to the S-VHS IN jack on the rear of the TV.
2 Connect an optional AUDIO/VIDEO cable from the AUDIO OUT jacks on
the rear of the VCR to the AUDIO IN jacks on the rear of the TV.
3 Press the TV/VIDEO button to select “S-VIDEO”.
◆ As you press the button, TV, S-VIDEO1 and S-VIDEO2 are repeated
alternately.
TV ➞S-VIDEO1➞S-VIDEO2
➞
(if all S-VIDEO inputs are connected)
4 Playback a tape in the VCR.
(See owner’s Manual for VCR)
◆ You can enjoy a more clear and distinct picture if you
➣
connect cable to S-VHS Jack in case of playing high
quality Video.
ENG
Rear of TV (Option)
◆ For video signal in Colour System SECAM, connect to
the video terminal because there is no standard on
S-Video terminal.
Side of TV
9
ENG
S-VIDEO1
VHF/UHF
75Ω
MONITOR
-OUT
AV-2
VIDEO
AV-1
(
MONO)
L-AUDIO-R
AUDIO
(AUX IN)
(R)
(L)
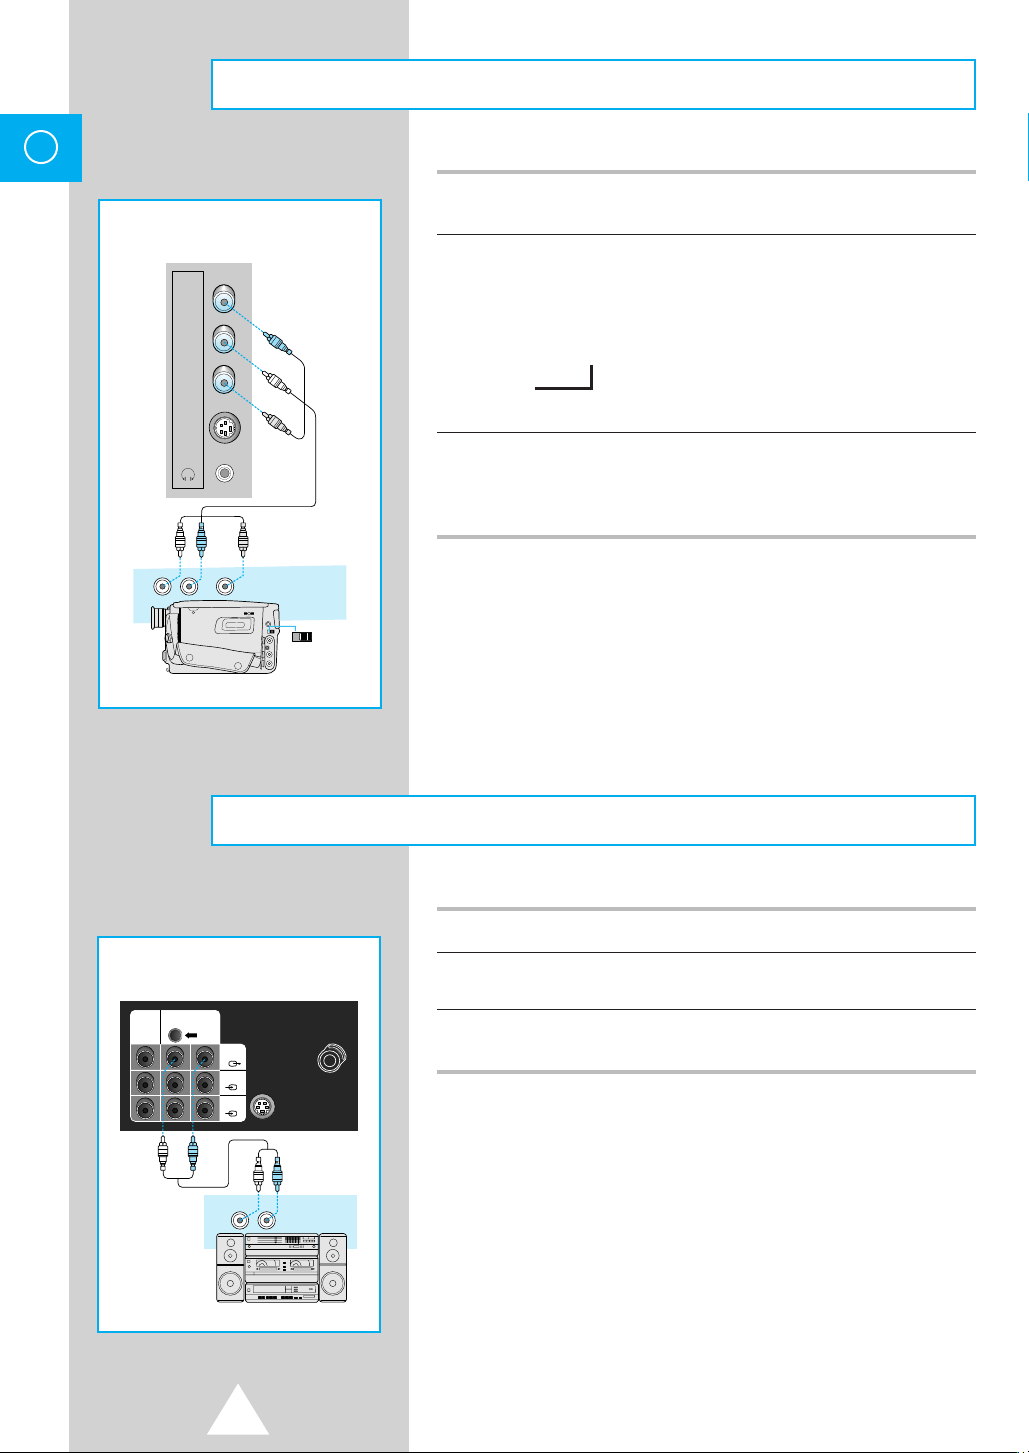
Camcorder Connections
1 Connect an optional audio/video cable from the VIDEO OUT jack on the
camcorder to the VIDEO IN jack on the front of the TV.
Side of TV
2 Press the TV/VIDEO button to select “AV3”.
(L)
AUDIO
(MONO)
VIDEO3
INPUT
S-VIDEO2
INPUT
AUDIO OUT
R
I
I
L
VIDEO OUT
(R)
CAMCORDER
IN
OUT
IN OUT
Audio Connections
◆ As you press the button TV, AV1, AV2 (S-VIDEO) and AV3 are
repeated alternately.
TV ➞AV3
➞
if, only AV3 input was connected.
3 Slide the VIDEO IN/OUT switch to OUT.
◆ Play back a tape in the camcorder.
(see owner’s manual for camcorder.)
Rear of TV (Option)
10
1 Adjust the volume of the TV to minimum.
2 Connect an optional audio/video cable from the Audio out jacks on the rear
of the TV to the AUDIO IN jacks on the AUDIO.
3 Position the INPUT SELECTION switch on the audio to AUX and adjust
the volume.
◆ You can hear a more vivid stereo sound through an
➣
audio system.
◆ It may be convenient for you, if you connect together
the jacks using the following colour code.
(Video:Yellow, Audio(left): White, Audio(right): Red)
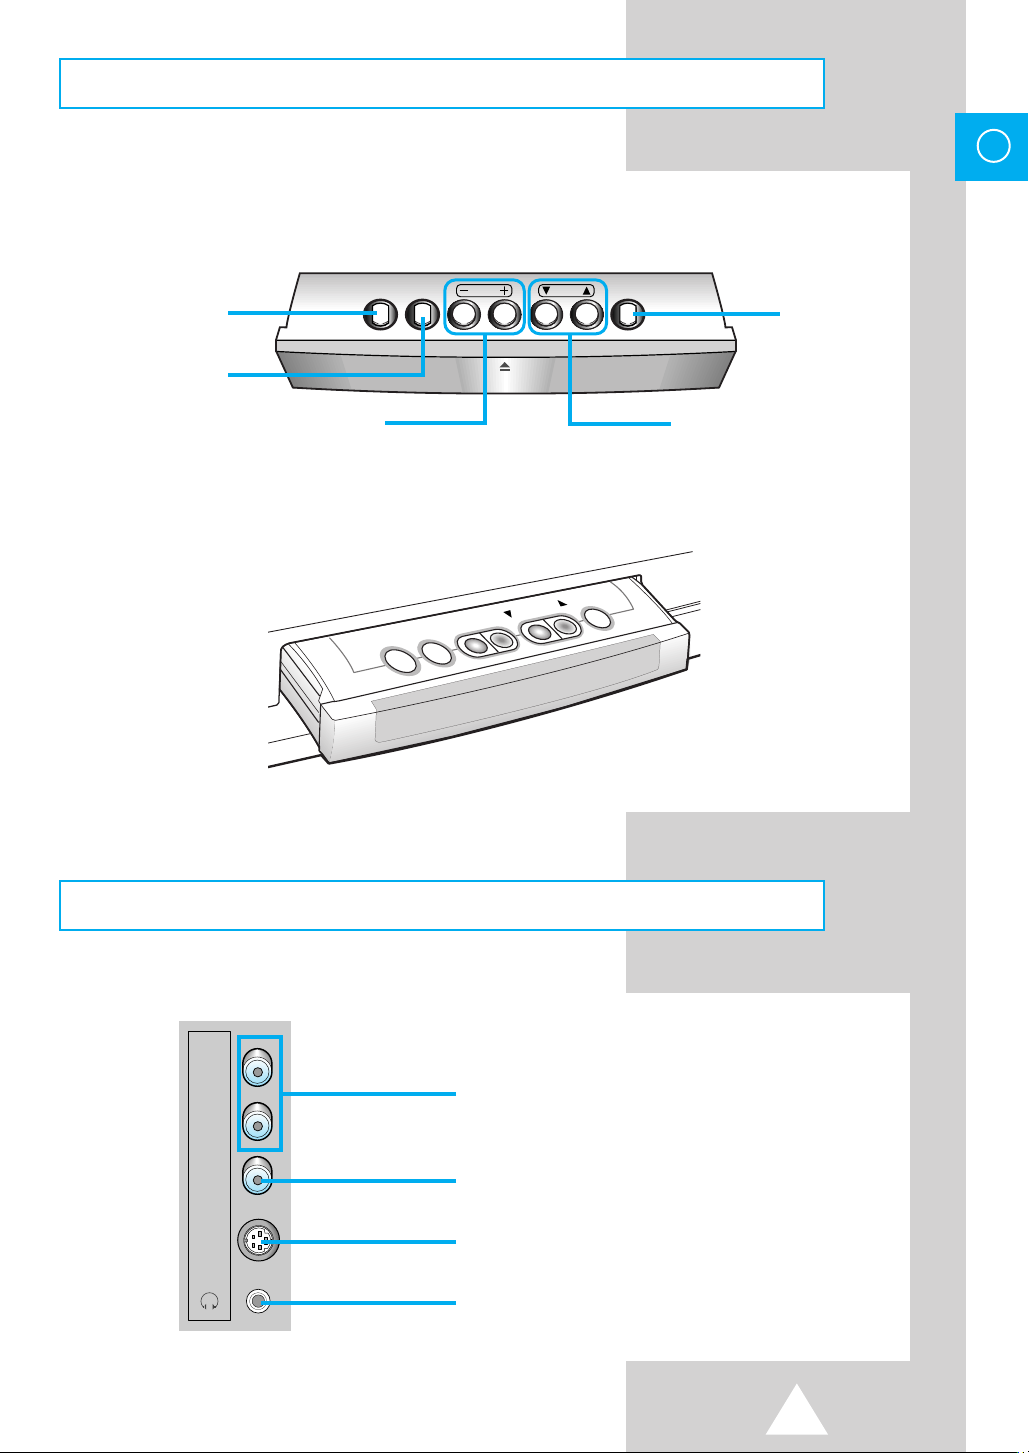
Front Control
TV/VIDEO
MUTE
-VOLUME+
CHANNEL
MENU
TV/Video Selection
Button
Mute Button
Volume Up/Down Button Channel Up/Down Button
ENG
727A/767A
CH MENUMUTETV/VIDEO VOL
Menu Button
721A/761A/823A/893A
Side Connection
R
I
AUDIO
I
L
(MONO)
VIDEO3
INPUT
S-VIDEO2
INPUT
Audio InputTerminal
Video Input Terminal
S-VIDEO2 Terminal
Headphone Jack
11

ENG
Remote Controls
Power button
TV/VIDEO button
Sleep button
POWER
TV/VIDEO SLEEP DISPLAY MUTE
+
31 2
Mute button
Display button
Sound Standard button
Picture Standard button
Channel Up/Down button
Volume Up/Down button
TTX buttons (Option)
64 5
7 8
-/--
S.STD SURROUND S.MODE
P.STD P.SIZE MENU
CH
ON
SWAP CH SCAN STILL
LIST/FLOF MIX INDEX TV/TEXT
CANCEL STORE SUBPAGE
F/T/B HOLD PAGEREVEAL
T e l e t e x t
9
P/C
0
VOLVOL
ROTATEMULTIPIP
i
?
Direct Channel Selection buttons
Surround button
Stereo mode button
Menu button
Picture Size button
PIP buttons (Option)
The Control Range of Transmitter.
➣
◆ You can control the TV set remotely with this transmitter anywhere up to 7~10 meters away
from the TV set with in the range of 60˚, right and left.
It is possible that the transmitter range will be reduced if a bright light is turned on around the TV
➣
set.
12

S.STD SURROUND S.MODE
Switching your Television On and Off
The mains lead is attached to the rear of the television.
1 Plug the mains lead into an appropriate wall socket.
◆ Use a wall socket with a:
- Voltage of between 100 and 250 volts.
- Frequency of either 50 or 60 Hz.
2 Press the POWER button on the front panel to switch the television on.
◆ If you have already stored channels, the channel selected when you
last switched your television off appears on the screen.
◆ If you have not yet stored any channels; no clear picture appears.
Refer to “Auto store” on page 14, 15 or “Manual store” on page 16, 17.
3 Press the POWER button on the front panel to switch the television off.
You can execute every operation by pressing CH▲ or
➣
CH
▼ buttons and VOL+ or VOL– buttons alternately
because of identified operation method, if you learn one
method, you can easily operate another function by
viewing the picture.
ENG
Remote Control
Pressing these buttons alternately makes every operation easy.
Picture change Press VOL+ or VOL– buttons to change picture
Function Input by inputting selected function.
MOVE Press CH▲ or CH▼ buttons to move your desired Menu.
P.STD P.SIZE MENU
CH
ON
VOLVOL
ROTATEMULTIPIP
13

ENG
S.STD SURROUND S.MODE
Tuning Procedure (Auto store)
The Auto Store function makes channel storage easier and faster
than manual store.
P.STD P.SIZE MENU
CH
ON
VOLVOL
ROTATEMULTIPIP
This Auto Store can memorise on-air channels from present
channels in numerical order.
1 If the TV is in stand-by mode (red light on), press the “POWER” button on the
remote control. Press the “MENU” button and press CH ▲ or CH ▼ button to
place on the “Setup” option.
2 Press VOL+ or VOL– buttons then the “Setup” menu is displayed and
press CH ▲ or CH ▼ buttons to place on the “Auto store” option.
Menu
Picture
Sound
Time
Setup
Function
PinP
Sel. Enter
Setup
Auto store
Manual store
Channel skip
Fine tune
Sort
Sel. Enter
Asia/W. Europe
CIS/E. Europe
China
Hongkong/UK
Australia
NZ/Indonesia
South Africa
America
Sel. Set
3 Press VOL+ or VOL– buttons and press CH ▲ or CH ▼ buttons to place
on the area where you live.
If you want start Auto store program number 20, before pressing
☛
MENU, select program number 19 by pressing CH▲ or CH▼ buttons
or direct channel selection buttons (0~9).
4 Press the VOL+ or VOL–buttons.
◆ The Television scans the VHF L, VHF H and UHF frequency bands in
turn and stores the available channels:
◆ The progress of the scan is indicated by a horizontal bar & percentage.
◆ The number of the channel currently being searched for and the
frequency being scanned are displayed.
◆ When channel broadcasted is memorised, horizontal bar turns yellow.
◆ After every channel broadcasted is memorised, “Sort” menu is
displayed.
◆ At this point you can view real picture through Sub picture.
5 Press “MENU” button repeatedly until the menus disappear.
Programme mode (P)
➣
◆ When completing Auto Store, the broadcasting stations
in your area have been assigned to position number
from P00 to max P99. You can select a channel by
entering the position number in this mode.
Real Channel mode (C)
◆ You can select a channel by the assigned number to
each air broadcasting station in this mode.
* Searching *
P27
450MHz
50%
CATV channel mode (S)
◆ You can select a channel by entering the assigned
number for each cable channel in this mode.
Exit
14

Tuning Procedure (Auto store)
Area Select by Country
(cont.)
ENG
AREA
Asia/W. Europe
CIS/E. Europe
China
Hongkong/UK
Australia
NZ/Indonesia
South Africa
America
TV Channel selection mode
➣
B/G,H: West European TV Standard
D/K: East European TV Standard
D/K: China TV Standard
I: British TV Standard (UHF Only)
B/G,H: Australian TV Standard
B/G,H: W. European TV
I: British TV Standand (VHF/UHF)
M: American TV Standard
TV SYSTEM
Asia; India, Malaysia, Singapore, Thailand,... etc
Middle East Asia; Iran, Iraq, Jordan, Kuwait, Oman,
Africa; Egypt, Libya, Sudan, etc
W. Europe; Germany, Spain, Croatia, Slovenia,... etc
CIS, Czech, Hungary, Poland, Rumania,... etc
China, Mongolia
Hongkong, United Kingdom
Australia
Indonesia, New Zealand
Standard (1-11)
South Africa
Canada, Chile, Colombia, Mexico, Philippines, Taiwan,
U.S.A,... etc
If you press the P/C button repeatedly, the display mode changes cyclicly.
Program mode
➞
➞ Real CH mode ➞ Cable CH mode
COUNTRY
Saudi Arabia, Yemen,... etc
15

ENG
S.STD SURROUND S.MODE
Tuning Procedure (Manual store)
P.STD P.SIZE MENU
VOLVOL
CH
ON
Setup
Auto store
Manual store
Channel skip
Fine tune
Sort
Sel. Enter
* Manual store *
Area : Asia/W. Europe
Colour : Auto
Sound : B/G
Ch. No. : C21
Search : 471MHz
Pr. No. : P 0
Store : ?
Sel. Search
ROTATEMULTIPIP
◆ Whether or not to store each of the channels found.
◆ The number by which you wish to identify each stored
channel.
Method 1: To memorise channels by searching channels.
1 Press the MENU button on the TV set.
◆ Move to “Setup” option by pressing CH▲ or CH▼ buttons and press
the VOL+ or VOL– buttons.
2 Move to “Manual store” option by pressing CH▲ or CH▼ buttons and
press the VOL+ or VOL– buttons.
◆ Place on “Ch. No” option and press VOL+ or VOL– buttons.
3 On this mode, channel is increased or decreased by pressing VOL+ or
VOL– buttons and where real channel is broadcasted, it stops.
◆ While searching, the frequency corresponding to the channel is
displayed at the same time, sub picture is disappeared.
◆ In “ Manual store” mode, sub picture is displayed, automatically, sub
picture’s channel number is corresponding to indicated “Pr. No.” option.
4 When you find the channel which you want, move to “Pr. No” option and
designate the number which you want to store by VOL+ or VOL– buttons.
5 Move to “Store” option and press VOL+ or VOL– buttons to store.
“Store : OK” indicates that storage is done.
6 When you have finished manual storage, press menu repeatedly until the
menus disappear.
* Manual store *
Area : Asia/W. Europe
Colour : Auto
Sound : B/G
Ch. No. : C67
Search : 839MHz
Pr. No. : P 0
Store : ?
Sel. No. set
* Manual store *
Area : Asia/W. Europe
Colour : Auto
Sound : B/G
Ch. No. : C67
Search : 839MHz
Pr. No. : P 1
Store : OK
Sel. Set
16
◆ You can also select a CATV channel mode by pressing
➣
the P/C button on the transmitter.
◆ If you wish to view broadcasts from neighbouring
countries, you can change “Area” by VOL+ or VOL–
buttons.
Asia/W. Europe ➞ CIS/E. Europe ➞ China ➞ Hongkong/UK
➞
America South Africa NZ/Indonesia Australia
If the colour is abnormal, move to “Colour” option and set
☛
➞➞
the colour until the colour becomes normal.
Colour
Auto
➞
PAL ➞SECAM ➞NTSC 4.43 ➞NTSC 3.58
➞
Sound
B/G
➞I ➞
➞
D/K ➞M
➞

S.STD SURROUND S.MODE
Tuning Procedure (Manual store)
Method 2 : To memorise channels by searching frequency.
(cont.)
ENG
1 Press the MENU button on the TV set.
◆ Move to “Setup” option by pressing CH▲ or CH▼ buttons and press
the VOL+ or VOL– buttons.
2 Move to “Manual store” option by pressing CH▲ or CH▼ buttons and
press the VOL+ or VOL– buttons.
◆ Place “Search” option and press VOL+ or VOL– buttons.
3 On this mode, frequency is increased or decreased by pressing VOL+ or
VOL – buttons and where real channel is broadcasted, it stops.
4 When you find the frequency of channel which you want, move to “Pr. No”
option and designate the number which you want by VOL+ or VOL–
buttons.
5 Move to “Store” option and press VOL+ or VOL– buttons to Store. “Store :
OK” indicates that storage is done.
6 When you have finished manual storage, press “MENU” repeatedly until
the menus disappear.
◆ If you wish to view broadcasts from neighbouring
➣
countries, you can change “Area” by VOL+ or VOL–
buttons.
Asia/W. Europe ➞ CIS/E. Europe ➞ China ➞ Hongkong/UK
➞
America South Africa NZ/Indonesia Australia
➞➞
➞
P.STD P.SIZE MENU
VOLVOL
CH
ON
Setup
Auto store
Manual store
Channel skip
Fine tune
Sort
Sel. Enter
* Manual store *
Area : Asia/W. Europe
Colour : Auto
Sound : B/G
Ch. No. : C21
Search : 471MHz
Pr. No. : P 0
Store : ?
Sel. Search
ROTATEMULTIPIP
◆ PAL, SECAM and NTSC 3.58 are different colour signal
broadcast transmission systems applicable to differing
countries. NTSC 4.43 is a trick playback mode used in
special VCR’s to playback NTSC recorded video tapes
through PAL television equipement.
* Manual store *
Area : Asia/W. Europe
Colour : Auto
Sound : B/G
Ch. No. : C67
Search : 839MHz
Pr. No. : P 0
Store : ?
Sel. No. set
* Manual store *
Area : Asia/W. Europe
Colour : Auto
Sound : B/G
Ch. No. : C67
Search : 839MHz
Pr. No. : P 1
Store : OK
Sel. Set
17

ENG
S.STD SURROUND S.MODE
Tuning Procedure (Channel skip)
You can exclude the channels of your choice from the channel scan
operation. When you scan through the stored channels, those you
P.STD P.SIZE MENU
have chosen to skip are not displayed.
CH
ON
Menu
Picture
Sound
Time
Setup
Function
PinP
Sel. Enter
Setup
Auto store
Manual store
Channel skip
Fine tune
Sort
Sel. Enter
VOLVOL
ROTATEMULTIPIP
1 Press the MENU button on the TV set.
◆ Move to “Setup” option by pressing CH▲ or CH▼ buttons and press
the VOL+ or VOL– buttons.
2 Move to “Channel skip” option by pressing CH▲ or CH▼ buttons.
◆ To set the Channel skip press the VOL+ or VOL– buttons.
3 Use the CH▲ or CH▼ buttons to select the channel of your choice.
◆ Add or Erase the desired channel by pressing VOL+ or VOL– button.
◆ At this point, selected channel is displayed on the Sub picture.
4 When you have finished adding and erasing channels, press Menu
repeatedly until the menus disappear.
Programme Number Selection
☛
e.g. To select programme number ‘24’ (two digit).
(When the CHANNEL SELECTION buttons(0~9) are
used.)
e.g. To select programme number ‘7’ (one digit).
◆ Press the DISPLAY button.
◆ The programme number, Colour system, picture mode
and Sound system, and Sound mode, etc are displayed.
* Channel skip *
P 0 : Erased
P 1 : Added
P 2 : Added
P 3 : Added
P 4 : Added
Sel. Set
18

S.STD SURROUND S.MODE
Tuning Procedure (Fine tune)
If the reception is clear, you do not have to fine-tune the channel,
as this is done automatically during the search and store operation.
If however the signal is weak or distorted, you may have to finetune the channel manually.
1 Press the MENU button on the TV set.
◆
Move to “Setup” option by pressing CH▲ or CH▼ buttons and press
the VOL+ or VOL– buttons.
2 Move to “Fine tune” option by pressing CH▲ or CH▼ buttons.
◆
To enter the “Fine tune” press the VOL+ or VOL– button.
3 Use VOL+ or VOL– buttons until you obtain a sharp and clear picture and
good sound quality.
◆
Select “Store” option by VOL+ or VOL– buttons if you wish to memorise
adjusted picture or sound.
Select “Erase” option by VOL+ or VOL– buttons if you wish to erase.
4 When you have finished press Menu repeatedly until the menus disappear.
P.STD P.SIZE MENU
CH
ON
Menu
Picture
Sound
Time
Setup
Function
PinP
Sel. Enter
ENG
VOLVOL
ROTATEMULTIPIP
◆ After you execute “Fine tune” store, the “*” symbol
➣
appears to the left of the program No. and Real CH. No
and then changes colour to red.
P12
C10
green
white
*
*
P12
C10
◆ This tells you that the set’s Automatic Fine Tuning has
been disabled for that program Number.
red
Setup
Auto store
Manual store
Channel skip
Fine tune
Sort
Sel. Enter
* Fine tune *
Tune: – +
Store: ?
Erase: ?
Sel. Adjust
19

ENG
S.STD SURROUND S.MODE
Tuning Procedure (Sort)
P.STD P.SIZE MENU
VOLVOL
CH
You can exchange the numbers of two channels, in order to:
◆ Modify the numeric order in which the channels have been
automatically stored.
◆ Give easily remembered numbers to the channels that you
watch most often.
ON
Menu
Picture
Sound
Time
Setup
Function
PinP
Sel. Enter
Setup
Auto store
Manual store
Channel skip
Fine tune
Sort
Sel. Enter
* Sort *
From : P 1
To : P 3
Store : ?
ROTATEMULTIPIP
◆
Press VOL + or VOL– buttons to display “Setup” menu.
2 Move to “Sort” option and press VOL+ or VOL– buttons to display “Sort”
1 Press the MENU button and move to “Setup” option.
menu. Then “Sort” menu is displayed on the “From” option.
3 Press VOL+ or VOL– buttons until the channel number that you wish to
change is displayed. Then the selected channel’s picture is displayed on
sub picture.
4 Press CH▲ or CH▼ buttons to place on “To” option.
◆
Press VOL+ and VOL– buttons until the new number by which you
wish to identify the channel is displayed. Then the selected channel is
exchanged with the one previously stored to the chosen number.
5 Here’s an example.
◆
If you select “1” for the “From” option and “3” for the “To” option :
- Channel 1 becomes channel 3.
- Channel 3 becomes channel 1.
6 Move to Store line with the CH▲ or CH▼ button. Press the VOL+ or VOL–
buttons.
◆
“OK” is displayed on the store line.
7 Move the channel to the programme number you desire by repeating the
process from No.3 to No.5.
8 When you have finished adding and erasing channels.
Press MENU repeatedly until the menus disappear.
Sel. No. Set
* Sort *
From : P 1
To : P 3
Store : ?
Sel. No. Set
20
◆ If you change the programme number on the “From”
➣
line after storing, the programme number on the “To”
line automatically increases by 1.
◆ The existing channels of the programme number
displayed on “To” disappears when performing above
functions.

Picture Adjustment
By pressing the P.STD button, you can sequentially select any one
of the five possible preferred analogue picture presets.
1 Press the P.STD button.
◆
Whenever this button is pressed, the mode will be changed as follows.
➞
Custom➞ Standard➞ Dynamic➞ Movie➞ Mild
Custom
◆
Select this mode to view the adjusted picture you want.
Standard
◆
Select this mode to view the factory-preset standard picture.
Dynamic
◆
Select this mode to view a powerful and clear picture.
◆
For watching in brighter (day light) environments.
Movie
◆
Select this mode to enjoy the atmosphere as if you were in a movie
theatre.
-/--
0
S.STD SURROUND S.MODE
P.STD P.SIZE MENU
CH
Custom
ENG
P/C
VOLVOL
Mild
◆
Select this mode
- To emphasize mildness.
- When the surrounding are dark.
- To decrease eye fatigue.
21

ENG
Picture Adjustment
-/--
S.STD SURROUND S.MODE
P.STD P.SIZE MENU
P/C
0
(cont.)
You can sequentially select and adjust one of five picture levels.
◆ Contrast, Brightness, Colour, Sharpness or Tint (NTSC only)
e.g. Contrast Adjustment.
CH
Menu
Picture
Sound
Time
Setup
Function
PinP
Sel. Enter
Picture
100 Contrast
50 Brightness
50 Sharpness
50 Colour
Sel. Adjust
VOLVOL
CH▼ buttons and press the VOL+ or VOL– buttons.
2 Move to “Contrast” by pressing the CH▲ or CH▼ buttons and press the
1 Press the MENU button. Move to “Picture” option by pressing the CH▲ or
VOL+ or VOL– buttons.
3 Adjust 100 “Contrast” by VOL+ or VOL– buttons.
4 When you have finished contrast adjustment, press Menu repeatedly until
the menus disappear.
In the circumstances of colour broadcasting, the colour
➣
does not disappear completely even if you minimize the
colour control level.
Picture Size Adjustment ( )
Press this button to change picture size.
◆
Plus ➞ Normal ➞ 16:9 ➞ Zoom
( Normal ➞ 16:9 ➞ Zoom ; 34”, 37” )
Plus
Normal
P.SIZEP.SIZE
Normal ➞ Plus mode (extra 1 inch)
Aspect ratio 4:3
Contrast 100
22
16:9
Zoom
◆ In Zoom mode, the picture display will temporary revert
➣
Normal ➞ 16:9 size
16:9 ➞ Normal size
to Normal mode for OSD display. The picture display
returns to the Zoom mode when the OSD disappears
(MENU, PIP, DISPLAY, TTX).
◆ Guide sentence reads “Not available”.
Each press of the “P.SIZE” button for change the picture
size in status of “PIP ON”.
◆ When we watch the TV, pictures can be cut on is left or
right or left & right side according to the signal from
broadcasting station. Then we ought to watch on
“Normal” size by using “P.SIZE” button.

S.STD SURROUND S.MODE
Sound Adjustment
There is a choice of four audio settings. By pressing the S.STD
button any one of the five settings can be in the sequence
illustrated.
1 Press the S.STD button.
◆
whenever this button is pressed, the mode will be changed as follows.
➞ Custom ➞ Standard ➞ Music ➞ Movie ➞ Speech
Custom
◆
Select this mode to hear the adjusted sound you want.
Standard
◆
Select this mode to hear the factory-preset standard sound.
Music
◆
Select this mode to hear the music.
CH
P/C
0
VOLVOL
-/--
S.STD SURROUND S.MODE
P.STD P.SIZE MENU
ENG
Movie
◆
Select this mode to view the movie.
Speech
◆
Select this mode to hear the voice clearly.
Sound Cutoff
➣
◆ Press the MUTE button to turn off the sound
◆ To restore sound, press it again.
You can sequentially select and adjust one of six sound levels (Bass,
Treble, Balance, Volume, Bass AMP, Surround).
e.g. Treble Adjustment
1 Press the MENU button.
Move to “Sound” option by pressing the CH▲ or CH▼ buttons.
2 Press the VOL+ or VOL– buttons.
Move to “Treble” option by pressing the CH▲ or CH▼ buttons.
3 Press the VOL+ or VOL– buttons.
◆
The sound level is adjusted.
You can enjoy more powerful bass sound.
➣
◆ Press the menu button.
Move to “Sound” option by pressing the CH
buttons.
◆ Press the VOL+ or VOL– buttons to set “Bass AMP : ON”.
Move to Bass AMP option by pressing the CH▲ or CH▼
buttons.
▲ or CH▼
Custom
P.STD P.SIZE MENU
CH
ON
Menu
Picture
Sound
Time
Setup
Function
PinP
Sel. Enter
Sound
50 Bass
50 Treble
00 Balance
50 Volume
Bass AMP : Off
Surround : Off
VOLVOL
ROTATEMULTIPIP
Sel. Adjust
23

ENG
Off
Picture Adjustment (Surround)
1 Press the “SURROUND” button.
-/--
S.STD SURROUND S.MODE
P.STD P.SIZE MENU
P/C
0
◆
As you press it repeatedly it changes in the order of Mono, Concert,
Stadium and Off.
Off
You cannot hear stereophonic sound.
CH
VOLVOL
Mono
Concert
Stadium
◆ For stereophonic effect, functions of “Stadium” and
➣
Select this mode to hear normal mono signal in
stereophonic sound.
Select this mode to hear music similar to a performance
in a concert hall (available for stereo broadcasting).
Select this mode to hear a vivid sound, like in a stadium
when watching sports broadcasts.
“Concert” are available for stereo broadcast.
◆ What is stereophony?
It is lively sound that you hear at the concert or stadium.
Stereo Mode Functions
By pressing the S. MODE button, you can determine the way in which the audio signal is produced at the
loudspeakers and AV output.
Type
NICAM
STEREO
(OPTION)
Regular Broadcast
(Standard Audio)
Regular+
NICAM MONO
NICAM STEREO
NICAM DUAL I/II
On-Screen indication RemarkType of broadcast
NICAM
NICAM
Dual-I
NICAM
Dual-II
NICAM
NORMAL USE
NICAM
MONO
NICAM
STEREO
Dual-I Dual-II
MONO
MONO
Regular Broadcast
(Standard Audio)
A2 STEREO
1. When the power is switched ON, the mode is automatically preset at either “DUAL-I” or “STEREO”,
➣
BILINGUAL or
DUAL I/II Mode
STEREO
Dual-I Dual-II
NORMAL USE
Dual-I Dual-II
STEREO
FORCED MONO
depending on the current transmission.
2. When the receiving conditions deteriorate, listening will be easier if the mode is set to the “FORCED
MONO” position using the Stereo/Bilingual Sound selection button.
◆ If the stereo signal is weak or the receiving conditions are poor or if STEREO: MONO automatic
switching occurs, it is recommended that you to switch to the “Forced Mono” Mode.
24

S.STD SURROUND S.MODE
Setting the Timer
You can select a time period of between 15 and 180 minutes after
which the television automatically switches to standby mode.
ENG
1 Press the SLEEP button.
◆
Whenever this button is pressed, the time will be changed.
Off ➞15 ➞30 ➞45 ➞60 ➞90 ➞120 ➞150 ➞180
◆
During the last minute before switching to stand-by mode, a clock
symbol and the indication
To cancel the sleep timer function, press SLEEP repeatedly
➣
until the word
” Off
”1 Off”
are displayed.
” is displayed.
➞
Setting the Clock
You can set the television’s clock so that the current time will be
displayed when you press the DISPLAY button on the remote
control.
◆ You must set the current time before you can set the
automatic On/Off timer.
e.g. To enter a time of 12:00
Off
POWER
TV/VIDEO SLEEP DISPLAY MUTE
+
31 2
P.STD P.SIZE MENU
VOLVOL
CH
1 Press the MENU button and move to “Time” option by CH▲ or CH▼
buttons.
◆
Press VOL+ or VOL– button and press it again.
2 Adjust “Hour” by CH▲ or CH▼ buttons.
◆
Whenever these buttons are pressed, the hour increases or decreases
by 1.
3 Press VOL+ button and adjust “Minute” by CH▲ or CH▼ buttons.
◆
Whenever these buttons are pressed, the minute increases or
decreases by 1.
4 Press the MENU button to return to the main menu.
NOISE TIMER Mode
➣
If the set is not switched off when the TV station stops
broadcasting, it will automatically go to Stand-by Mode
after 15 minutes.
This function will not operate when the Television set is in
AV Mode or TELETEXT mode.
ON
Menu
Picture
Sound
Time
Setup
Function
PinP
Sel. Enter
Time
Clock : 12 : 00
Timer: Off
Move
Adjust
25
white
red
ROTATEMULTIPIP

ENG
S.STD SURROUND S.MODE
Setting the On/Off Timer
P.STD P.SIZE MENU
VOLVOL
CH
ON
ROTATEMULTIPIP
By setting the ON/OFF time, the set carries out alarm and
automatic off function.
1 Press the MENU button.
◆
The “Menu” picture is displayed on the screen.
2 Move “Time” option by pressing the CH▲ or CH▼ buttons and press the
VOL+ or VOL– buttons.
◆
“Time” picture is displayed on the screen.
Menu
Picture
Sound
Time
Setup
Function
PinP
Sel. Enter
Time
Clock : 7 : 30
Timer : On
On time : – – :– –
Off time : – – :– –
Sel. Set
Time
Clock : 7 : 30
Timer : On
On time : 7 : 30
Off time : – – :– –
3 Move to “Timer” option by CH▲ or CH▼ buttons and press VOL+ or VOL–
buttons to set “Timer” on.
4 Move to “On time” by CH▲ or CH▼ and press VOL+ or VOL– buttons to
set time. (refer to page 25.)
5 Move to “Off time” by CH▲ or CH▼ and press VOL+ or VOL– buttons to
set time. (refer to page 25.)
6 Press the MENU buttonto return to the main menu.
◆ If you have not yet set the television’s clock,
➣
the message “Set clock first” is displayed.
◆ If this happens, refer to “Clock” on the previous page.
Move
Time
Clock : 7 : 30
Timer : On
On time : 7 : 30
Off time : 12 :00
Move
Adjust
Adjust
26

Function
Language : English
Blue screen : Off
Noise Reducer : Off
Low noise AMP: Off
Demonstration
Tilt : 0
Function
Language : English
Blue screen : On
Noise Reducer : Off
Low noise AMP: Off
Demonstration
Tilt : 0
Function
Language : English
Blue screen : Off
Noise Reducer : On
Low noise AMP: Off
Demonstration
Tilt : 0
Function
Language : English
Blue screen : Off
Noise Reducer : Off
Low noise AMP: On
Demonstration
Tilt : 0
Blue screen : Off
Noise Reducer : Off
Low noise AMP: Off
Demonstration
Tilt : 0
Sel. Adjust
Blue screen : Off
Noise Reducer : Off
Low noise AMP: Off
Demonstration
Tilt : 0
Sel. Enter
Extra Functions
Press the MENU button. Move to a function by pressing the CH▲or
CH
▼
button. Adjust it by pressing the VOL+ or VOL– button.
ENG
Language
Blue screen ◆
Noise Reducer ◆
Low noise AMP ◆
Demonstration ◆
Tilt ◆
◆
To view the “MENU” mode with the language spoken
in your Area.
When no picture signal is input, or the signal is weak,
the screen reverts to a blue background colour.
To continue viewing very weak signals disable this
feature.
To prevent Noise on the picture caused by the weak
broadcasting signal or an external interference signal.
Blue screen menu isn’t display when in AV mode.
To amplify not Noise but TV signal in the weak signal
Area.
◆
This function is working only weak signal condition,
and that is memorized on current program number,
additionally.
All the menu pages appear repeatedly in sequence.
To stop demonstration, press any button.
Tilt correction (Terrestrial Magnetic Compensatopn).
Use VOL+ or VOL– button to compensate for picture
Tilt, depending on TV set installation.
27

ENG
PinP
Pinp : On
Sel.: TV
Pr. No.: P67
Size
Sel. Set
Picture in Picture (Option)
With this function you can display a “PIP screen”
(small picture) within the main picture of TV program or video
input. In this way you can watch or monitor TV program or the
video input from any connected equipment while watching TV or
other video input. For information about connection of other
equipment, see page 7-10.
1 Press the MENU button and move to “Pinp” option by CH▲ or CH▼
buttons. Press the VOL+ or VOL- buttons to set “Pinp : On”.
PinP
Pinp : On
Sel.: TV
Pr. No.: P67
Size
Sel. Set
PinP
Pinp : On
Sel.: TV
Pr. No.: P27
Size
Sel. No. Set
PinP
Pinp : On
Sel.: TV
Pr. No.: P67
Size
Sel. Enter
2 Move to “ Sel.” option by pressing the CH▲ or CH▼ buttons and press
the VOL+ or VOL- buttons to set “ Sel. : TV”.
◆
Choose this function to convert source memorised on Sub Picture.
◆
If set to “TV”, you can view on-air broadcasting through Sub Picture.
If set to “VIDEO”, you can view video tape recorded by VCR through
Sub Picture.
◆
If set to “VIDEO”, “Pr. No.” option is not selected.
3 Move to “Pr. No.” option by pressing the CH▲ or CH▼ buttons and press
the VOL+ or VOL- buttons to select the channel that you want to view
through Sub Picture.
4 Move to “Size” option by pressing the CH▲ or CH▼ buttons and press the
VOL+ or VOL- buttons to adjust the type of Sub Picture.
◆
If you wish to choose this function, you must select a “TV” mode on the
“ Sel.” option.
5 Move to “Size” option by pressing the CH▲ or CH▼ buttons and press the
VOL+ or VOL- buttons to adjust the size of Sub Picture to big size or small
one.
◆
If you wish to choose this function, you must select a “AV” mode on the
“ Sel.” option ; 1, 2, 3, S 1, S 2
Sel.
PinP
Pinp : On
Sel.: 1
Pr. No.: P67
Size :
Sel. Enter
28

PR 3
PR 2
PR 6PR 5PR 4PR 3PR 9
PR 7
PR 8
PR 6
PR 1
PR 1
PR 15PR 14PR 13 PR 16
PR 11PR 10PR 9 PR 12
PR 22
PR 19PR 18
PR 23
PR 20
PR 17PR 16
PR 21
PR 30
PR 25PR 24
PR 31
PR 27
PR 23
PR 26 PR 28
PR 29
PR 2PR 1
Picture in Picture (Option)
Preference : Concerning the functions of “PinP : On”.
➣
PIP ON/OFF button ◆
Press this button to operate ON/OFF function of
PinP on the remote control directly.
(cont.)
ENG
VOLVOL
CH
CH▲ / ▼button ◆
MULTI button ◆
ROTATE button ◆
SWAP button ◆
SCAN button ◆
STILL button ◆
Press this button to select the channel of Sub
picture.
Press the MULTI button to view memorized
channels to a maximum of 9 on the Sub picture
spontaneously.
Press this button to move the Sub picture
counterclockwise.
Press this button to interchange the Main picture
and the Sub picture.
When the Main picture is in the Video
➣
mode and the Sub picture is in the TV
mode, you might not hear the sound of
Main picture when pressing the SWAP
button after changing the Sub picture
channel. At this time, reselect the Main
picture channel.
Press the SCAN button to scan every
memorized channel in order. Press it again to
stop scanning.
Press this button to still the Sub picture, so that
the edges of Sub picture turn RED.
Press this button again to cancel, so that the
edges of Sub picture revert to GRAY.
ON
SWAP CH SCAN STILL
ROTATEMULTIPIP
◆ On the condition of Multi PIP it is impossible to execute
➣
Swap and Still.
◆ Everytime the “MULTI” button is pressed, the Program
number and the location of the Sub picture are changed.
(See figures below)
29

ENG
Teletext Operation (Option)
LIST/FLOF MIX INDEX TV/TEXT
CANCEL STORE SUBPAGE
F/T/B HOLD PAGEREVEAL
i
?
T e l e t e x t
Teletext is additional information that is broadcast by the TV station
along with the TV programme.
The built-in Teletext decoder of your set enables you to display this
additional information on the screen.
Teletext is transmitted in the form of texts or graphic representations,
or as subtitles to the TV programme.
The latter is intended to help the hard of hearing. Teletext is
transmitted page by page. The pages are numbered and may be
selected by remote control.
TV/TEXT button
() ◆
SUBPAGE button
()
P100 VGE SUN 12 MAY 12:23/41
840 860 880 100
820
◆
To view a particular subpage, after pressing the key, the subpage number with the numeric keys.
Press the “SUBPAGE” button again to restore the initial time status Z****(S****).
Z**** VGE SUN 12 MAY 12:23/41
826 711 100
100
L
INDEX button
i
()
◆
With the teletext index button, you can select any page from the index on page 100.
This remains stored at all times.
FLOF TELETEXT MODE :
When the index key is pressed the current subpage changes to the upper subpage.
LIST TELETEXT MODE :
When the “INDEX” button is pressed the current page changes to the first memorised page.
◆
Press this button to change from TV to teletext mode.
Press again this button to change back to TV mode.
S**** VGE SUN 12 MAY 12:23/41
826 711 100
100
L
CANCEL Button
()
30
◆
While the search is in progress for a selected page, the normal TV picture can be viewed by
pushing this button. When the page has been found, its number will be displayed in the left corner
of the top line. To view the selected page press “CANCEL” button.

Teletext Operation (Option)
(cont.)
ENG
F/T/B button
()
P100 VGE SUN 12 MAY 12:23/41
100
NUMERIC button
PAGE UP button
()
PAGE DOWN button
()
◆
This function is used when the characters on the TV screen are hard to read. Pushing it the 1st
time expands the TOP half of the display only. Pushing it the 2nd time expands the bottom half
of the display only. Pushing it the 3rd time returns the display to its original size.
826 711 860
◆
Press these buttons to select the “TELETEXT” page required.
◆
Press this button to display the next TTX page.
P100 VGE SUN 12 MAY 12:23/41
◆
Press this button to display the previous page.
P100 VGE SUN 12 MAY 12:23/41
➞
826 711 860
100
P100 VGE SUN 12
MAY 12:23/41
P101 VGE SUN 12 MAY 12:23/41
P899 VGE SUN 12 MAY 12:23/41
➞➞
826 711 860
102
100 826 711 860
MIX button
()
HOLD (HALT) button
()
REVEAL button
?
()
◆
➣
In the teletext mode press MIX button to have text superimposed over the normal programme picture.
◆
Press TTX button to return to TELETEXT mode.
826 711 860
100
◆
Press this button in TTX mode to display TTX and TV screen simultaneously.
To revert back to theTV programme alone, press the TV button.
◆
VGE SUN 12 MAY 12:23/41
826 711 860
100
◆
Press this button to reveal concealed information. (e.g. the solution to a riddle or a puzzle.)
Press again to conceal information.
When TELETEXT information exceeds more than
one page, the display changes automatically to the
next page. To hold a particular page, press this
button. This display will remain until the hold button
is pressed again.
826 711 860
100
31

ENG
100 826 711 860L
RED
CYAN
YELLOW
GREEN
100 826 711 860
Teletext Operation (Option)
How to store textpages (list mode)
➣
(cont.)
LIST/FLOF MIX INDEX TV/TEXT
CANCEL STORE SUBPAGE
F/T/B HOLD PAGEREVEAL
i
?
T e l e t e x t
List mode is a convenient way of accessing some teletext
pages without the need to enter page numbers. In this mode,
4 page numbers can be preset for each programme number 0
to 59.
A maximum of 240 pages can be programmed.
(e.g. 4 pages X 60 programme numbers) Any one of these 4
pages can be displayed instantly by pushing the
corresponding “colour-coded” button on the remote control.
1 (Teletext must be selected first.)
LIST mode FLOF mode
Select the “list” mode by pushing the
LIST/FLOF button ( ).
Pushing this button will switch between the
“LIST and FLOF” modes.
2 To select a memory position, press one of the “colour-coded” buttons.
3 Enter the page number of the desired teletext page by using buttons “0” to “9”.
4 Press the TTX STORE button
()
until the background colour changes to white.
P100 VGE SUN 12 MAY 12:23/41
L
826 711 860
100
5 Subsequently pressing any one of the coloured buttons will display the page stored against it.
32

Trouble Shooting
ENG
No picture.
No sound.
Normal picture.
No sound.
No colour.
Normal sound.
Interference on screen.
Distorted sound.
Multiple image.
Snowy picture.
Distorted sound.
Remote control malfunctions or
reduction in operating distance.
Cleaning the TV
◆
Not plugged into A.C. supply.
◆
Not switched on.
◆
Check contrast, brightness and volume settings.
◆
Check volume level.
◆
Check sound mute button on remote control.
◆
Check system
◆
Check colour level.
◆
Check system
◆
Electrical appliances, cars, motorcycles, fluorescent light.
◆
Direction, location and or aerial connection.
◆
Replace batteries.
◆
Clean indicator window.
◆
Check battery terminals.
1 Wipe the outside of this TV set with a soft, dry cloth.
◆
Do not use solutions containing benzol, petroleum or a chemical cloth.
2 Wipe the speaker of this TV set with a soft cloth moistended with water.
33

ENG
Specification
AREA RECEIVE CHANNEL
CH. ASIA/ CIS/
DISPLAY
W.EUROPE
00 – – – – 0–––––
01 – 1 1 – 1 1 – – 01 01
02 2 2 2 – 2 2 – 2 02 02
03 3 3 3 – 3 3 – 3 03 03
04 4 4 4 – 4 4 4 4 04 04
05 5 5 5 – 5 5 5 5 05 05
06 6 6 6 – 6 6 6 6 06 06
07 7 7 7 – 7 7 7 7 07 07
08 8 8 8 – 8 8 8 8 08 08
09 9 9 9 – 9 9 9 9 09 09
10 10 10 10 – 10 10 10 10 10 10
11 11 11 11 – 11 11 11 11 11 11
12 12 12 12 – 5A – – 12 12 12
13 – – 13 – – – 13 13 13 13
14 – – 14 – – – – 14 14 14
15 – – 15 – – – – 15 15 15
16 – – 16 – – – – 16 16 16
17 – – 17 – – – – 17 17 17
18 – – 18 – – – – 18 18 18
19 – – 19 – – – – 19 19 19
20 – – 20 – – – – 20 20 20
21 21 21 21 21 – 21 21 21 21 21
22 22 22 22 22 – 22 22 22 22 22
23 23 23 23 23 – 23 23 23 23 23
24 24 24 24 24 – 24 24 24 24 24
25 25 25 25 25 – 25 25 25 25 25
26 26 26 26 26 – 26 26 26 26 26
27 27 27 27 27 – 27 27 27 27 27
28 28 28 28 28 28 28 28 28 28 28
29 29 29 29 29 29 29 29 29 29 29
30 30 30 30 30 30 30 30 30 30 30
31 31 31 31 31 31 31 31 31 31 31
32 32 32 32 32 32 32 32 32 32 32
33 33 33 33 33 33 33 33 33 33 33
34 34 34 34 34 34 34 34 34 34 34
E.EUROPE
CHINA HK/UK
AUSTR- NZ/IN- SOUTH
ALIA DONESIA AFRICA
AMERICA
CABLE
OTHERS AMERICA
For cable channels in “America” area the actual channel may be different from that shown in the table.
➣
34

Specification
AREA RECEIVE CHANNEL
CH. ASIA/ CIS/
DISPLAY
W.EUROPE
35 35 35 35 35 35 35 35 35 35 35
36 36 36 36 36 36 36 36 36 36 36
37 37 37 37 37 37 37 37 37 37 37
38 38 38 38 38 38 38 38 38 38 38
39 39 39 39 39 39 39 39 39 39 39
40 40 40 40 40 40 40 40 40 40 40
41 41 41 41 41 41 41 41 41 41 41
42 42 42 42 42 42 42 42 42 – 42
43 43 43 43 43 43 43 43 43 – 43
44 44 44 44 44 44 44 44 44 – 44
45 45 45 45 45 45 45 45 45 – 45
46 46 46 46 46 46 46 46 46 – 46
47 47 47 47 47 47 47 47 47 – 47
48 48 48 48 48 48 48 48 48 – 48
49 49 49 49 49 49 49 49 49 – 49
50 50 50 50 50 50 50 50 50 – 50
51 51 51 51 51 51 51 51 51 – 51
52 52 52 52 52 52 52 52 52 – 52
53 53 53 53 53 53 53 53 53 – 53
54 54 54 54 54 54 54 54 54 – 54
55 55 55 55 55 55 55 55 55 – 55
56 56 56 56 56 56 56 56 56 – 56
57 57 57 57 57 57 57 57 57 – 57
58 58 58 – 58 58 58 58 58 – 58
59 59 59 – 59 59 59 59 59 – 59
60 60 60 – 60 60 60 60 60 – 60
61 61 61 – 61 61 61 61 61 – 61
62 62 62 – 62 62 62 62 62 – 62
63 63 63 – 63 63 63 63 63 – 63
64 64 64 – 64 64 64 64 64 – 64
65 65 65 – 65 65 65 65 65 – 65
66 66 66 – 66 66 66 66 66 – 66
67 67 67 – 67 67 67 67 67 – 67
68 68 68 – 68 68 68 68 68 – 68
69 69 69 – 69 69 69 69 69 – 69
(cont.)
E.EUROPE
CHINA HK/UK
AUSTR- NZ/IN- SOUTH
ALIA DONESIA AFRICA
AMERICA
CABLE
OTHERS AMERICA
ENG
For cable channels in “America” area the actual channel may be different from that shown in the table.
➣
35

–
AFTER SALES SERVICE
–
Do not hesitate to contact your retailer or service agent
if a change in the performance of your product indicates
that a fault condition may be present.
ELECTRONICS
AA68-11068A(3) ENG
 Loading...