

Page 1

User guide.
Page 2

MOBILE PHONE
User Manual
Please read this manual before operating your device
and keep it for future reference.
Page 3

Legal Notices
Legal Notices
WARNING!This product contains chemicals known to
the State of California to cause cancer, birth defects, or
other reproductive harm. For more information, please
call 1-800-SAMSUNG (726-7864).
Intellectual Property
All Intellectual Property, as defined below, owned by
or which is otherwise the property of Samsung or its
respective suppliers relating to the SAMSUNG Phone,
including but not limited to, accessories, parts, or
software relating there to (the “Phone System”), is
proprietary to Samsung and protected under federal
laws, state laws, and international treaty provisions.
Intellectual Property includes, but is not limited to,
inventions (patentable or unpatentable), patents, trade
secrets, copyrights, software, computer programs, and
related documentation and other works of authorship.
You may not infringe or otherwise violate the rights
secured by the Intellectual Property. Moreover,
you agree that you will not (and will not attempt to)
modify, prepare derivative works of, reverse engineer,
decompile, disassemble, or otherwise attempt to
create source code from the software. No title to or
ownership in the Intellectual Property is transferred to
you. All applicable rights of the Intellectual Property
shall remain with SAMSUNG and its suppliers.
Open Source Software
Some software components of this product, including
but not limited to ‘PowerTOP’ and ‘e2fsprogs’,
incorporate source code covered under GNU General
Public License (GPL), GNU Lesser General Public
License (LGPL), OpenSSL License, BSD License and
other open source licenses. To obtain the source code
covered under the open source licenses, please visit:
opensource.samsung.com
i
VZW_B690V_EN_UM_TN_PB5_032916_FINAL
Page 4

Legal Notices
Exclusion of Liability
EXCEPT AS SET FORTH IN THE EXPRESS
WARRANTY CONTAINED ON THE WARRANTY
PAGE ENCLOSED WITH THE PRODUCT, THE
PURCHASER TAKES THE PRODUCT “AS IS”, AND
SAMSUNG MAKES NO EXPRESS OR IMPLIED
WARRANTY OF ANY KIND WHATSOEVER WITH
RESPECT TO THE PRODUCT, INCLUDING BUT
NOT LIMITED TO THE MERCHANTABILITY OF THE
PRODUCT OR ITS FITNESS FOR ANY PARTICULAR
PURPOSE OR USE; THE DESIGN, CONDITION OR
QUALITY OF THE PRODUCT; THE PERFORMANCE
OF THE PRODUCT; THE WORKMANSHIP OF THE
PRODUCT OR THE COMPONENTS CONTAINED
THEREIN; OR COMPLIANCE OF THE PRODUCT
WITH THE REQUIREMENTS OF ANY LAW, RULE,
SPECIFICATION OR CONTRACT PERTAINING
THERETO. NOTHING CONTAINED IN THE
INSTRUCTION MANUAL SHALL BE CONSTRUED
TO CREATE AN EXPRESS OR IMPLIED WARRANTY
OF ANY KIND WHATSOEVER WITH RESPECT TO
THE PRODUCT. IN ADDITION, SAMSUNG SHALL
NOT BE LIABLE FOR ANY DAMAGES OF ANY KIND
RESULTING FROM THE PURCHASE OR USE OF THE
Disclaimer of Warranties;
PRODUCT OR ARISING FROM THE BREACH OF THE
EXPRESS WARRANTY, INCLUDING INCIDENTAL,
SPECIAL OR CONSEQUENTIAL DAMAGES, OR LOSS
OF ANTICIPATED PROFITS OR BENEFITS.
Modification of Software
SAMSUNG IS NOT LIABLE FOR PERFORMANCE
ISSUES OR INCOMPATIBILITIES CAUSED BY YOUR
EDITING OF REGISTRY SETTINGS, OR YOUR
MODIFICATION OF OPERATING SYSTEM SOFTWARE.
USING CUSTOM OPERATING SYSTEM SOFTWARE
MAY CAUSE YOUR DEVICE AND APPLICATIONS
TO WORK IMPROPERLY. YOUR CARRIER MAY
NOT PERMIT USERS TO DOWNLOAD CERTAIN
SOFTWARE, SUCH AS CUSTOM OS.
IF YOUR CARRIER PROHIBITS THIS, IF YOU
ATTEMPT TO DOWNLOAD SOFTWARE ONTO THE
DEVICE WITHOUT AUTHORIZATION, YOU WILL
BE NOTIFIED ON THE SCREEN THAT THE PHONE
WILL NO LONGER OPERATE AND BE INSTRUCTED
TO POWER DOWN THE DEVICE. YOU MUST THEN
CONTACT YOUR CARRIER TO RESTORE THE DEVICE
TO THE CARRIER AUTHORIZED SETTINGS.
ii
Page 5

Legal Notices
Samsung Electronics America
(SEA), Inc.
Address:
85 Challenger Road
Ridgefield Park,
New Jersey 07660
Phone:
1-800-SAMSUNG (726-7864)
Internet Address:
samsung.com
©2016 Samsung Electronics America, Inc. Samsung
is a registered trademark of SamsungElectronics Co.,
Ltd.
Other marks are the property of their respective
owners.
Note: Screen images are simulated. Appearance of
device may vary.
Do you have questions about your
Samsung Mobile Device?
For 24 hour information and assistance, we offer a
new FAQ/ARS System (Automated Response System)
at: samsung.com/us/support
The actual available capacity of the internal memory is
less than the specified capacity because the operating
system and default applications occupy part of the
memory. The available capacity may change when you
upgrade the device.
iii
Page 6

Legal Notices
Legal Information
Important legal information can be accessed in writing
at samsung.com
READ THIS INFORMATION BEFORE USING YOUR
MOBILE DEVICE.
Samsung Limited Warranty - This product is
covered under the applicable Samsung Limited
Warranty INCLUDING ITS DISPUTE RESOLUTION
PROCEDURE and your right to opt out of arbitration
within 30 calendar days of the first consumer
purchase. You may opt out by either sending
an email to optout@sea.samsung.com with the
subject line “Arbitration Opt-Out” or by calling
1-800-SAMSUNG (726-7864) . For more detailed
procedures, please refer to the “Dispute Resolution
Procedures and Arbitration and Opt-Out” section of
the Limited Warranty.
The online version of the Health/Safety and Warranty
guide for your device can be found at:
English
samsung.com/us/Legal/Phone-HSGuide
Spanish
samsung.com/us/Legal/Phone-HSGuide-SP
The online version of the End User License
Agreement (EULA) for your device can be
foundonline at:
samsung.com/us/Legal/SamsungLegal-EULA
iv
Page 7

Table of Contents
Table of Contents
Getting Started........................................................... 1
Front View.........................................................................2
Side View .......................................................................... 4
Open View ........................................................................6
Assemble Your Device ................................................... 8
Set Up Your Device.......................................................13
Know Your Device.................................................. 16
Home Screen .................................................................17
Status Bar.......................................................................19
Navigation .......................................................................20
Enter Text........................................................................29
Calling............................................................................36
Make and Answer Calls ...............................................37
Push to Talk (PTT) (Coming Soon) ............................43
Main Menu ..................................................................53
Contacts..........................................................................54
Messaging ......................................................................70
Recent Calls ...................................................................84
Internet ............................................................................86
Media Center..................................................................87
Tools.............................................................................. 101
Apps.............................................................................. 113
VZ Navigator................................................................ 114
Settings ........................................................................ 115
v
Page 8

Getting Started
Learn about your mobile
device hardware, assembly
procedures, and how to get
started using your new device.
Page 9

Getting Started
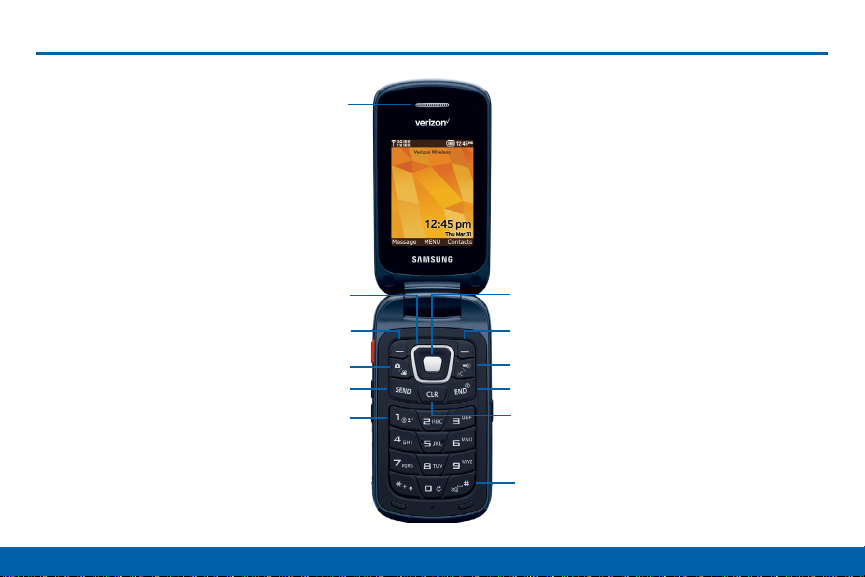
Front View
Flashlight Camera
Rewind Fast Forward
Play/Pause
Speakers
2
Front View
Page 10

Getting Started
Here are some key features on the front of your device.
Camera: Take pictures and record videos.
•
Fast forward: When the phone is closed, press to
•
Lock or Unlock external keys (press Fast Forward
key, then press and hold the Rewind key to unlock
external keys). During music playback, press and
hold to fast forward music. Press to go to the next
song.
Play/Pause: During music playback, press to
•
play/pause music. When the phone is closed,
presstoaccess an external menu of applications.
Speakers: Play music and other sounds.
•
Rewind: During music playback, press and hold to
•
rewind music, or press to go to the previous song.
Flashlight: Illuminate subjects in low-light
•
environments when taking a photo or recording
video, or use as a flashlight.
3
Front View
Page 11

Getting Started
Side View
Shortcut/PTT key
Volume key
Memory
card slot
Headset jack
Speakerphone
USB charger/
Accessory port
4
Side View
Page 12

Getting Started
Here are some key features on the sides of your device.
Headset jack: Plug in an optional 3.5 mm headset
•
(not included) for safe, convenient conversations.
Speakerphone: When the phone is closed, press
•
and hold to turn Driving Mode on or off. When the
phone is open, press to turn Speakerphone on
oroff.
USB charger/Accessory port: Connect the USB
•
charger (included) and other optional accessories
(not included).
Memory card slot: Install an optional memory card
•
(not included) for storage of files.
Volume key: Press to adjust master volume or voice
•
volume during a call. Press to mute an incoming
call ringtone. Press and hold down to activate
Sound Off mode or press and hold up to return to
the Master Volume level. When using the external
menu, press to navigate lists. With the phone
closed, press down four times to initiate the Fake
Call feature.
Shortcut/PTT key: Press and hold to launch a
•
shortcut menu. When PTT (Push To Talk) mode is
turned on, press to initiate PTT.
5
Side View
Page 13
Getting Started
Open View
Earpiece
Directional keys Center select key
Left soft key Right soft key
Camera/Camcorder
Send End/Power
Voicemail
Voice commands/Flashlight
Clear
Vibration mode
6
Open View
Page 14

Getting Started
Here are some key features found on the opened phone.
Center select key: Press to select the highlighted
•
item.
Right soft key: Press to select the lower right menu
•
item on the display.
Voice commands/Flashlight: With the flip open,
•
press to launch Voice Commands, or press and
hold to turn the Flashlight on or off.
End/Power: Press to end a call. Press and hold
•
to turn the phone On or Off. Press to send an
incoming call to voicemail.
Clear: Press to delete a character or to go back.
•
Press and hold to delete the previous word. When
navigating menus and pages, press to go back to
the previous screen.
Vibration mode: With the flip open, press and hold
•
to switch between Vibrate Mode and Master Volume
level.
Voicemail: Press and hold to dial voicemail.
•
Send: Press to dial a call. From the Home screen,
•
press to view Recent Calls.
Camera/Camcorder: Press to launch the camera,
•
or press and hold to launch the camcorder.
Left soft key: Press to select the lower left menu
•
item on the display.
Directional keys: Press to scroll phone menus.
•
Earpiece: Hear call sounds, including the caller.
•
7
Open View
Page 15

Getting Started
Assemble Your Device
This section helps you to assemble
your device.
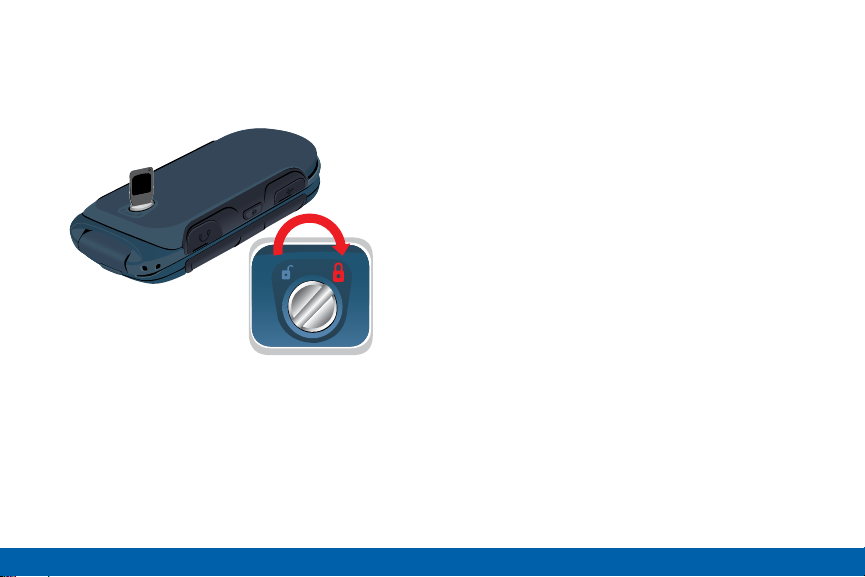
Remove the Back Cover
Warning: Do not bend or twist the back cover
excessively. Doing so may damage the cover.
1. Insert the battery cover removal tool into the slot
on the back cover and turn it counter clockwise to
open the battery cover.
Included
2. Insert the tool in the groove at the top of the cover
to lift the cover up and remove.
8
Assemble Your Device
Page 16

Getting Started
Install the Battery
1. Insert the battery into the opening on the back of
the phone, making sure the connectors align.
2. Gently press down to secure the battery.
Install the SIM Card
When you subscribe to a cellular network, you are
provided with a plug-in SIM card. During activation,
your SIM card is loaded with your subscription details,
such as your Personal Identification Number (PIN),
available optional services, and other features.
Warning: Please be careful when handling the SIMcard
to avoid damaging it. Keep all SIM cards outof reach of
small children.
► Carefully slide the SIM card into the SIM card slot.
Make sure that the card’s gold contacts face
•
into the device and that the angled corner of the
card is positioned as shown.
Caution: If the SIM card is not inserted correctly, the
device cannot detect it. Reorient the SIM card and place
it back into the slot if it is notdetected.
9
Assemble Your Device
Page 17
Getting Started
Replace the Back Cover
1. Place the cover over the back of the phone, then
press down along the edges to secure the cover.
Included
2. Use the battery cover removal tool to turn the dial
clockwise until the cover is locked.
Note: When placing the cover back on the phone, press
down firmly along the edges to ensure that the cover
is flush with the phone. This ensures that the battery
compartment is pressurized.
Charge the Battery
Your device is powered by a rechargeable, standard
Li-Ion battery. A USB Charger (charging head and
USB cable) is included with the device for charging
the battery from any standard outlet.
The battery comes partially charged. A fully
discharged battery requires up to four hours of charge
time. You can use the device while charging.
Note: It is recommended you fully charge the battery
before using your device for the first time.
Caution: Use only charging devices and batteries
approved by Samsung
are designed to maximize battery life. Using other
accessories may invalidate your warranty and may
cause damage.
™
. Samsung accessories
10
Assemble Your Device
Page 18

Getting Started
1. Open the side slot and insert the USB cable into
the port.
2. Connect the USB cable to the charging head, and
then plug the charging head into a standard outlet.
Charging Head
USB Cable
3. When charging is complete, unplug the charging
head from the outlet and remove the USB cable
from the device.
Caution: Failure to unplug the wall charger before you
remove the battery can cause damage to the device.
11
Assemble Your Device
Page 19
Getting Started
When to Charge the Battery
When the battery is low and only a few minutes of
operation remain, the battery icon blinks and the
device sounds a warning tone at regular intervals.
In this condition, your device conserves its remaining
battery power by dimming the screen.
When the battery level becomes too low, the device
automatically turns off.
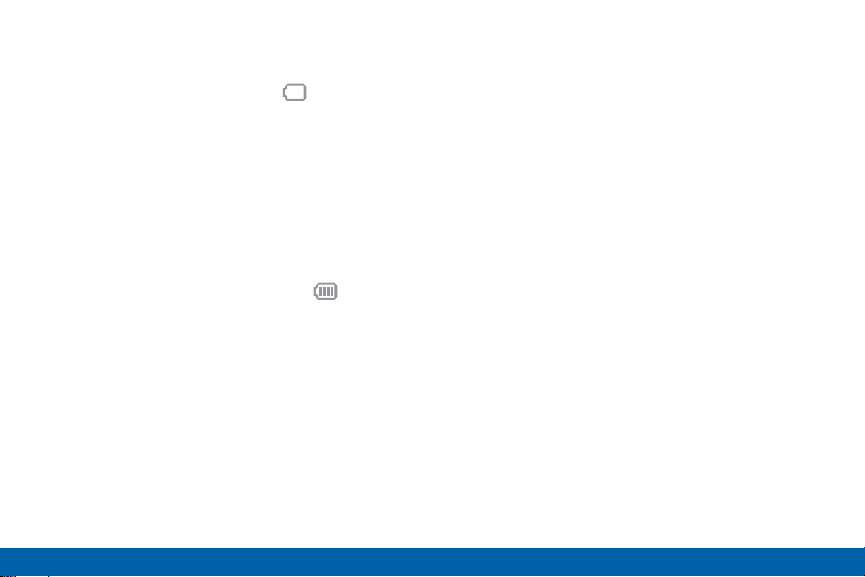
For a quick check of your battery level,
► View the battery charge indicator located in the
Statusbar of the display. Four bars
a full charge.
( )
(
indicates
)
12
Assemble Your Device
Page 20
Getting Started
Set Up Your Device
Turn the Phone On or Off
1. Open the phone.
2. Press and hold End/Power until the phone
power-on screen displays.
Note: Do not turn on the phone when mobile phone use
is prohibited.
3. If the phone requests a password, enter it and
press OK or the Center key. For more
information, see
The Home screen displays while the phone
searches for your network. After the phone finds
your network and displays adequate signal strength
bars, you can make or receive calls.
Note: The display language is preset to Automatic
at the factory. To change the language, use the
Languagemenu. For more information, see
“Language” onpage133.
4. When you want to switch off the phone, press
and hold
displays.
“Security” onpage134.
End/Power until the power-off image
Initial Setup
The first time you turn on your phone, Set-up Wizard
prompts you to configure basic preferences so you
can quickly get started using your phone.
You can also access Set-up Wizard at any time in
Settings.
1. From the Home screen, press
Settings > Set-up Wizard.
2. Use Preview, Skip, and Next or Set to
follow the prompts and set preferences:
Font style: Choose a font style for the dial,
•
menus, and messaging.
Font size: Choose a font size for the dial, menus,
•
and messaging.
Volume key control: When enabled, you can
•
adjust the display’s font size by pressing the
Volume Key.
13
Menu >
Set Up Your Device
Page 21

Getting Started
Front screen menu: View information about the
•
menu available on the Front Screen when the
phone is closed.
Call sounds: Choose how your phone alerts you
•
to incoming calls.
Display themes: Choose the look of your
•
phone’s screen.
Menu layout: Choose the look of the Mainmenu.
•
Main clock: Select a format for the clock on the
•
Home screen.
Front clock: Select a format for the clock on the
•
external display when the phone is closed.
Set Up Your Voicemail
Note: If your service provider did not preconfigure your
voicemail server number, store the voicemail server
number before accessing the server. Your service
provider can give you the number.
Setting Up Your Personal Options
To set up your personal options:
1. Open the phone to access the keypad.
2. From the Home screen, press and hold One.
3. Follow the voicemail prompts. If you need additional
help setting up your voicemail, contact your service
provider.
14
Set Up Your Device
Page 22
Getting Started
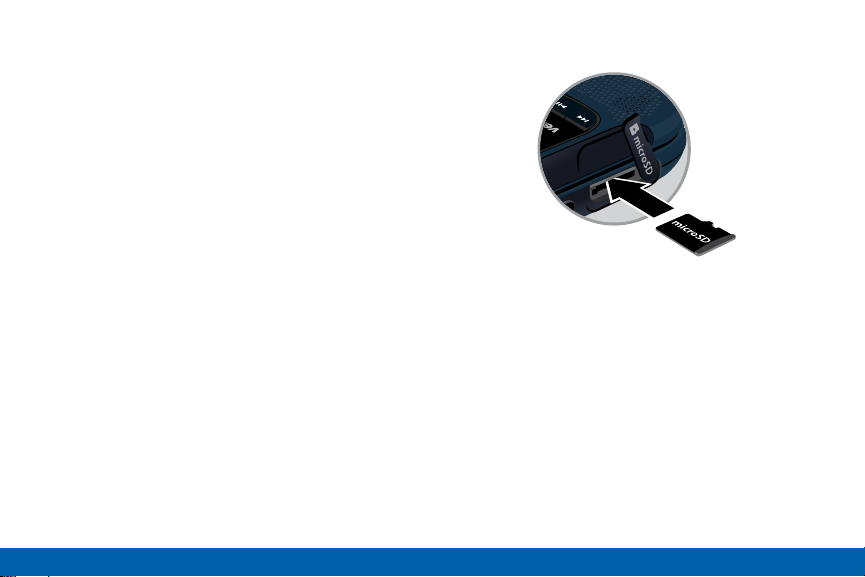
Install an Optional
MemoryCard
You can install an optional microSD™ or microSDHC
memory card (not included) to expand available
memory space.
Note: A memory card can be installed at any time; it is
not necessary to install it prior to using the device.
To add additional memory to your phone, you can
insert a microSD card into the memory card slot on
the side of the phone.
Use the following instructions and illustrations to
properly install a microSD card.
Note: Your phone supports microSD cards to a
maximum size of 32 GB.
1. Lift the memory card cover out and turn it to
expose the card slot.
2. With the gold contacts facing down, carefully push
the memory card into the slot until it “clicks” into
place.
™
3. Replace the memory card cover.
To remove a microSD card:
1. Lift the memory card cover out and turn it to
expose the card slot.
2. Push the memory card inward to release and
carefully slide the card out of the memory card slot.
3. Replace the memory card cover.
15
Set Up Your Device
Page 23

Know Your Device
Learn some of the key
features of your mobile
device, including the screens
and icons, as well as how to
navigate the device and enter
text using the keyboard.
Page 24
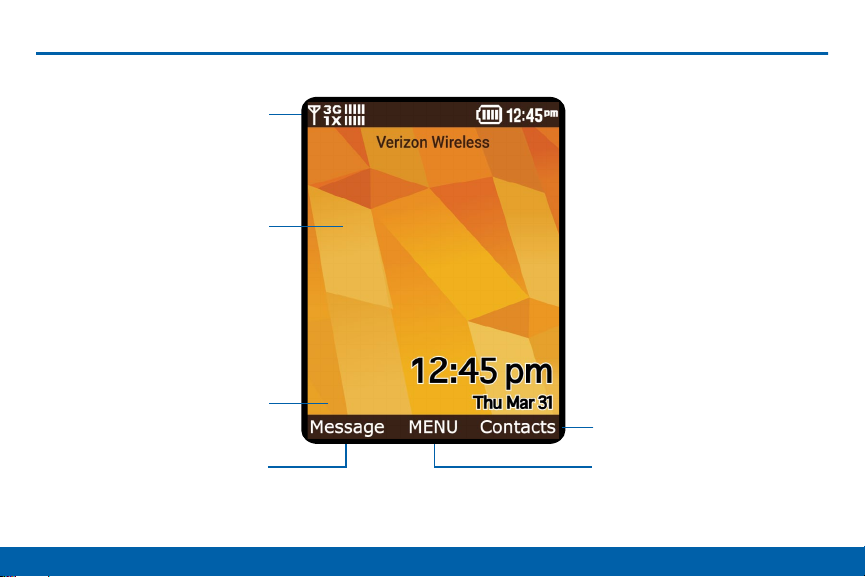
Home Screen
Status bar
Home screen
Event status
(appears when there
is a notification)
Message shortcut Menu shortcut
Contacts shortcut
17
Home Screen
Page 25

Know Your Device
The Home screen is the starting
point for using your device. Here are
some features of the Homescreen.
Contacts shortcut: Opens the Contacts
•
application.
Menu shortcut: Opens the Menu screen.
•
Message shortcut: Opens the Messaging or
•
Messages application.
Event status: Displays icons to indicate active
•
alerts, reminders, and alarms.
Home screen: Displays Wallpaper, Banners,
•
andClock.
Status bar: Displays icons to show network status,
•
battery power, and connection details.
Change Display Appearance
You can change and customize several features of
the Main and Cover display. See “Display Settings”
onpage123 for more details.
18
Home Screen
Page 26

Status Bar
The Status bar at the top of the Main
display provides device information
(such as network status, battery
charge, and time) and message
notifications.
Icon Glossary
The Icon Glossary is a list of all icons used on your
phone.
► From the Home screen, press Menu >
Settings > Phone info > Icon glossary.
Know Your Device
19
Status Bar
Page 27
Navigation
Command Keys
There are several command keys that you can use
to navigate your phone. These keys are referenced
throughout this user manual.
Soft Keys
There are two soft keys: the Left soft key and
the Right soft key. The roles of the soft keys vary
depending on the function you are currently using.
The labels on the bottom line of the display, just above
each soft key, indicate the current function of the
corresponding key.
Left Soft Key
Some functions of the Left soft key are:
On a Home screen, press the Left soft key to
•
launch Messages.
Right Soft Key
Some functions of the Right soft key are:
In a Home screen, press the Right soft key to
•
launch Contacts List.
20
Navigation
Page 28

Know Your Device
Directional Key
Press the Directional key up, down, left, or right to
browse menus and lists or to launch applications from
the Home screen with Directional Key Shortcuts.
While navigating, you can also press the number key
corresponding to a menu item to launch the item.
Directional Key Shortcuts
From the Home screen, press the Directional key to
launch favorite applications.
Customize Directional Key Shortcuts with Set
Shortcuts under Phone Settings. For details, see
“Set My Shortcuts” onpage131.
Up
Left Right
Down
21
My pictures
My shortcuts
1. Alarm clock
2. Phone search
3. Bluetooth On/Off
4. Calendar
New text
message
Navigation
Page 29

Know Your Device
Navigation Keypad
Use the directional keys on the Navigation keypad to
browse menus, sub-menus, and lists. Press the Up or
Down Navigation keys when browsing the web to jump
highlighted links on the web page.
Note: The Center Navigation key can often be used
instead of the Select soft key.
Clear Key
Use the Clear key for the following functions:
•
•
•
If you enter an incorrect character, briefly press it to
backspace and delete the character.
Press and hold it to erase an entire sentence.
Briefly press it to back up one menu level.
Center Select Key
Press the Center select key to select a highlighted
item or perform the highlighted action.
For example, from the Home screen, press
to launch the Menu.
Menu
End/Power Key
Use the End/Power key for the following functions:
•
•
•
•
•
22
Press and hold it to turn your phone on or off.
Press it once to disconnect a call.
Press it to return to the Home screen from
anymenu.
Press it to cancel the last input.
Press it to send an incoming call directly to
Voicemail.
Navigation
Page 30

Know Your Device
Send Key
Use the Send key for the following functions:
•
•
•
•
•
•
Press it once to answer calls.
Enter a number and briefly press it to make a call.
Briefly press it in the Home screen to display a list
of recent calls to and from your phone.
Press it twice in standby mode to call the most
recent number.
Press it to pick up a waiting call.
Press and hold it to turn on your phone when the
phone is off.
Camera/Camcorder Key
Use the Camera/Camcorder key to:
•
•
•
•
Launch the camera.
While in camera mode, press the Camera/
Camcorder key to take a photo.
Press and hold Camera/Camcorder key to launch
the camcorder.
While in camcorder mode, press the Camera/
Camcorder key to begin recording a video.
Voice Commands/Flashlight Key
Use the Voice commands/Flashlight key for the
following functions:
•
•
Press it once to turn the Flashlight on or off.
Press and hold it to launch Voice Commands.
Voicemail Key
Press and hold One to call Voicemail.
23
Navigation
Page 31

Know Your Device
Shortcut Key
Use the Shortcut key for the following:
Press the Shortcut key to launch an application. For
•
information about selecting an application for the
Shortcut key, see “Set Side Key” onpage132.
Speakerphone Key
Use the Speakerphone key to:
During a call, press and hold the Speakerphone
•
key to switch call audio from the Earpiece to the
Speakers.
To answer an incoming call in Speakerphone mode,
•
press and hold the Speakerphone key.
With the flip closed, press and hold the
•
Speakerphone key to turn Driving Mode on or off.
Volume Key
Use the Volume key for the following:
Press the Volume key to set Master Volume.
•
Press and hold the Volume key down to activate
•
Sound Off mode.
During calls, press the Volume key to adjust voice
•
volume.
During music playback, press the Volume key to
•
adjust audio volume.
Press the Volume key to silence the ringtone of an
•
incoming call.
With the phone closed, press the Volume key down
•
4 times to initiate a Fake Call. For more information
about Fake Calls, see “Fake Call” onpage41.
With the phone closed, press the Volume key to
•
navigate the external menu.
When navigating menus with the phone open,
•
press the Volume key to change the font size of the
menus.
24
Navigation
Page 32

Know Your Device
Vibration Key
Use the Vibration key to:
•
Press and hold the Vibration key to switch between
the current volume setting and Vibrate Only mode.
Front Keys
When the phone is closed, use the front keys as soft
keys to navigate a special menu.
With the phone closed, press Play/Pause to launch
the special Menu. Press the Volume keys to navigate
the menu:
Message: View messages and reply using Quick
•
Text.
My music: Play music.
•
Voice commands: Open Voice Commands.
•
Full readout: Read numbers, menus, alerts, and
•
messages aloud.
Today’s schedule: List events scheduled fortoday.
•
Take picture: Launch the camera.
•
Record video: Launch the camcorder.
•
Bluetooth: Turn Bluetooth® on or off.
•
In this menu, Play functions as a select key and
Rewind functions as a back key, which can be used to
return to the previous menu.
Lock or Unlock the Front Keys
The front keys can be locked or disabled, preventing
them from being pressed accidentally.
To lock (disable) the front keys:
► Press Fastforward.
To unlock (enable) the front keys:
► Press Fastforward, then press and hold
ind.
Rew
25
Navigation
Page 33

Know Your Device
Menu Navigation
Menus and sub-menus can be accessed by scrolling
through them using the Navigation keys or by using
the shortcut keys.
Accessing a menu by scrolling.
1. From the Home screen, press Menu.
2. Scroll using the Navigation keys to reach a main
menu item, such as Settings. Press OK to
display the menu.
If the menu contains sub-menus, you can access
•
them by first highlighting the option and then
pressing OK.
To return to the previous menu level, press
•
Clear.
To exit the menu without changing the settings,
•
press End/Power.
Use Shortcut Numbers
Numbered menu items, such as menus, sub-menus,
and options can be quickly accessed by using their
shortcut numbers.
In Menu mode, Main Menus can be accessed by
pressing the number keys (1 to 9) corresponding to
their location on the screen.
26
Navigation
Page 34

Know Your Device
Shortcuts
Your phone offers shortcuts from Idle mode that can
be customized for your ease and specific needs. The
shortcuts menu is accessed by pressing the Right
navigation key when on a Home screen. Upto four
shortcuts can be configured.
To see the shortcuts that can be added, from Idle
mode, press Menu > Settings > Phone settings
> Set Shortcuts > Set my shortcuts > Edit. The
following shortcuts are available:
Alarm clock: Set and edit alarms.
•
Advanced voice command: Access the voice
•
commands menu.
Apps: Access the Apps menu.
•
Backup assistant: Access the Backup Assistant
•
menu.
Bluetooth menu: Access the Bluetooth menu.
•
Bluetooth On/Off: Enable or disable Bluetooth.
•
Calculator: Access the Calculator.
•
Calendar: Access the Calendar app.
•
Call settings: Access the call settings menu.
•
Display settings: Access the display
•
settingsmenu.
Driving mode: Access the Driving Mode page.
•
Fake call: Access the Fake Call settings page.
•
Internet: Open the Internet browser.
•
Media center: Access the Media Center menu.
•
Messaging inbox: View and write messages.
•
Music & tones: Access the Music & Tones menu.
•
My music: View music stored on your phone.
•
My pictures: View pictures stored on your phone.
•
My ringtones: View ringtones.
•
My sounds: View sounds stored on your phone.
•
My Verizon: Access your Verizon account.
•
My videos: View videos stored on your phone.
•
New contact: Add a new contact.
•
New message: Compose a new message.
•
Notepad: Access the Notepad.
•
Phone search: Search your phone for files.
•
Phone settings: Access the Phone Settings menu.
•
27
Navigation
Page 35

Know Your Device
Picture & video: Access the Picture & Video menu.
•
Play all songs: Start playing all songs.
•
Settings: Access the Settings menu.
•
Social networks: Access social network apps.
•
Sounds settings: Access the Sounds Settings
•
menu.
Stopwatch: Access the Stopwatch.
•
Tip calculator: Access the Tip Calculator.
•
Tools: Access the Tools menu.
•
USB mass storage: Set the USB connection to
•
Mass Storage.
VZ Navigator: Access the VZ Navigator app.
•
World clock: Access the World Clock.
•
Select Options
To view the various functions and options available
and to select the one you want:
► Press the appropriate soft key.
To select the function displayed or the option
highlighted:
Press Select.
►
To view the next function or highlight the next option
on a list:
► Press the Down Navigation key.
To move back to the previous function or option on a
list:
► Press the Up Navigation key.
To move back up one level in the menu structure:
► Press
To exit the menu structure without changing the
settings:
► Press End/Power.
Clear.
28
Navigation
Page 36

Enter Text
Learn how to select the desired
text input method when entering
text and characters. This section
also describes how to use the T9
predictive text system to reduce the
key strokes required to enter text.
Change the Text Entry Mode
You can change the entry mode to your preference.
1. While entering text, press the Left soft key to
display a list of entry modes.
2. Highlight an entry mode, then press OK.
Use XT9 Word to Enter Text
XT9™ Word is a predictive text entry mode that
recognizes common English words matching the
sequence of your key presses and inserts the most
common word into your text. XT9 Word requires only
one key press per letter of the word, and is much
faster than traditional text entry.
To switch to XT9 Word mode:
► Press the
29
Left soft key, then press XT9 word.
Enter Text
Page 37

Know Your Device
While entering text:
Press the key for each letter only once.
•
Enter the entire word before editing or deleting
•
characters. Press Clear to backspace and clear
one character or press and hold to clear an entire
word.
If XT9 Word inserts the wrong word, press Zero
•
to toggle between other matching words.
Press to switch between Type (initial case), type
•
(lower case) and TYPE (upper case).
To enter a space, press .
•
Press once to enter a period.
•
Press and hold any key to enter the number on
•
thekey.
Use XT9 Palabra to Enter Text
XT9 Palabra is a predictive text entry mode for
Spanish that recognizes common words matching the
sequence of your key presses and inserts the most
common word into your text. XT9 Palabra requires
only one key press per letter of the word, and is much
faster than traditional text entry.
To switch to XT9 Palabra mode:
► Press the Left soft key, then press XT9
palabr
a.
30
Enter Text
Page 38

Know Your Device
While entering text:
Press the key for each letter only once.
•
Enter the entire word before editing or deleting
•
characters. Press Clear to backspace and clear
one character or press and hold to clear an entire
word.
If XT9 Palabra inserts the wrong word, press to
•
toggle between other matching words.
Press to switch between Type (initial case), type
•
(lower case) and TYPE (upper case).
To enter a space, press .
•
Press once to enter a period.
•
Press and hold any key to enter the number on
•
thekey.
Use Abc Mode to Enter Text
Abc Mode is standard text entry mode for mobile
telephones.
► To switch to Abc mode, press the Left soft key,
then pres
s Abc.
While entering text:
Press the appropriate key once for the first letter on
•
the key, twice for the second letter, three times for
the third letter, and four times for the fourth letter.
When the correct letter displays, pause briefly to
•
advance to the next letter or press another key.
Press Clear to backspace and clear one
•
character or press and hold to clear an entire word.
Press to switch between Abc (initial case) ,
•
abc(lower case) and ABC (upper case).
To enter a space, press .
•
Press once to enter a period, twice for an “at”
•
symbol (@),three times for a question mark (?), four
times for an exclamation mark (!), five times for a
hyphen (-), six times for a comma, seven times for
an ampersand (&), eight times for a colon (:), nine
times for an apostrophe (’), and ten times for a
slash (/).
Press and hold any key to enter the number on
•
thekey.
31
Enter Text
Page 39

Know Your Device
Enter Numbers
Use 123 mode to enter numbers into a text field.
► To switch to 123 mode, press the Left soft key,
then press
While entering numbers:
Press the appropriate key for each number.
•
Press Clear to backspace to clear one number.
•
Press and hold to clear multiple numbers in a
string.
123.
Enter Symbols
Use Symbols mode to enter common symbols into a
text field.
► To switch to Symbols mode, press the Left soft
key, then press Symbols.
To enter symbols:
There are three pages of symbols. Press Prev
•
to move to the previous page or Next to move to
the next page of symbols.
Use the Directional key to highlight a symbol,
•
then press the OK key to insert it.
– or –
Press the key for the number corresponding to a
symbol.
32
Enter Text
Page 40

Know Your Device
Enter Smileys
Use Smileys mode to enter common symbols into a
text field.
To switch to Smileys mode:
► Press the
To enter smileys:
► Use the Directional key to highlight a smiley,
and then pr
– or –
Press the key for the number corresponding to a
smiley.
Left soft key, then press Smileys.
ess OK to insertit.
To switch to Quick Text mode:
► Press the Left soft key, then select Quick text.
To insert a phrase:
► Use the Directional key to highlight a phrase,
ess OK to insert it.
then pr
– or –
Press the key for the number corresponding to a
Quick Text phrase.
To erase a Quick Text phrase:
► Use the
then pr
Directional key to highlight a phrase,
ess Erase.
Enter Quick Text
Use Quick Text mode to insert preloaded messages
into a text message or to create and insert your own
Quick Text phrases.
For additional options:
► Press Options. The following options display:
New: Create a new phrase.
•
Edit: Modify the highlighted phrase.
•
Move: Change the order of the phrases.
•
33
Enter Text
Page 41

Know Your Device
Enter Domain Extensions
Use Domain Extensions to insert common Internet
symbols or phrases, such as @ or .com.
Note: Domain Extensions mode is only available in
fields where you enter addresses, such as in Contacts,
or when creating a recipient list in a message.
To switch to Domain Extensions mode:
► Press the
extensions
To insert a Domain Extensions item:
► Use the Directional key to highlight a phrase,
then pres
– or –
Press the key for the number corresponding to a
Domain Extensions item.
Left soft key, then press Domain
.
s OK to insertit.
To erase a Domain Extension:
Directional key to highlight a phrase,
► Use the
then press Erase.
To create a new Domain Extension:
► Press New.
34
Enter Text
Page 42

Know Your Device
Keys
The following chart lists the keys and the characters
associated with each key. English and Spanish letters
are shown:
W w X x Y y Z z 9
* +
. @ ¿ ? ¡ ! - , & : ’ / 1
A a B b C c Á á Ã ã Ç ç 2
D d E e F f É é 3
G g H h I i Í í 4
J j K k L l 5
M m N n O o Ó ó Ñ ñ 6
P p Q q R r S s 7
T t U u V v Ú ú Ü ü 8
35
0
(space), #
Enter Text
Page 43

Calling
Make telephone calls using a
variety of calling features and
services.
Page 44

Calling
Make and Answer Calls
Learn how to make or answer a call.
Explore features and functionality
associated with making or answering
a call.
Make a Call
1. Open the phone.
2. Using the keypad, enter the phone number, then
press Send.
Note: To make a call using a speed dial, enter the
speed dial digits, holding down the last digit until the
phone dials the stored telephone number. For more
information about assigning Speed Dials, see
“Speed Dials” onpage64.
Make an International Call
1. Press and hold Star. The plus (+) character
displays.
2. Enter the local country exit code, the destination
country code, area code, and phone number
3. Press Send.
Answer Calls
You can answer a call or send the caller to voicemail.
If the phone is closed, open the flip to answer the
•
call automatically.
If the phone is open, press Send.
•
Note: These are default answer options. You can choose
other options for answering calls. For more information,
see “Answer Options” onpage141.
37
Make and Answer Calls
Page 45

Calling
Send a Call to Voicemail
To send a call to voicemail:
Press Ignore to send the call to voicemail.
•
To send the call to voicemail and send a reply
•
message to the caller, press Txt, then select a
message.
Note: To silence the ringtone for an incoming call,
press Quiet.
Answer Call-Waiting Calls
When you receive a call while on a call:
Press Send to answer the new call. The original
•
call is placed on hold.
Press Send again to return to your original call.
•
Call In-Progress Options
While on a call, you can answer an incoming call or
access other features.
While in a call, press Mute to mute the
•
microphone so the other party cannot hear your
voice.
While in a call, press Options for these options:
•
Messaging: Launch Messaging, to create a new
-
message or view messages.
Contact list: Open the Contact list.
-
Recent calls: Display recent received, missed
-
and dialed calls.
Bluetooth menu: Display the Bluetooth menu.
-
Main menu: Display the Main menu.
-
Notepad: Open the Notepad.
-
Voice privacy: Improve the security of a
-
voicecall.
38
Make and Answer Calls
Page 46

Calling
Whisper mode: Increase the microphone to
-
maximum volume level, to make your voice
easier to hear for the other party.
Noise cancellation: Reduce external noise on
-
the call.
Hold: Place the current call on hold.
-
Unhold: Reactivate the call on hold.
-
End held call: End a call that is on hold.
-
Swap: Place the current call on hold and then
-
activate the previous call.
Join: Combine all of the established calls (both
-
active and on hold).
Transfer: Transfer the call to another phone.
-
Select one: Select a held call to reactivate.
-
End a Call
When you want to end your call, press End/Power
or close the phone.
Recent Calls
Recent Calls contains a record of calls to and from
your phone.
1. With the phone open, press Send.
2. All Calls display by date, time, and contact name
or phone number, plus an icon to show the type
ofcall:
Missed call: Calls you did not answer.
Received call: Calls you answered.
Dialed call: Calls made from your phone.
3. Use the Directional key to scroll right or left to
view Calls filtered by type.
4. Highlight a call to use these options:
Press Message to create a new message
•
addressed to the phone number.
Press Open to view call details.
•
39
Make and Answer Calls
Page 47

Calling
Press Options for these options:
•
Save to contacts/details: Save the number
-
to Contacts (only available if the number
is not already saved) or view the contact’s
information.
Erase: Delete the call record.
-
Lock/Unlock: Enable or remove protection.
-
Locked call records cannot be deleted.
Erase all: Delete all recent call records.
-
View timers: View call statistics.
-
Use Recent Calls to Make a Call
1. With the flip open, press Send.
2. Use the Directional key to highlight a call, then
press Send.
Use Recent Calls to Create or Update
Contacts
1. With the flip open, press Send.
Use the Directional key to highlight a call, then
2.
press Options > Save to contacts
3. Use the Directional key to highlight an option,
then press OK:
Add new contact
•
Update existing
•
4. Continue entering contact information, as desired.
40
Make and Answer Calls
Page 48

Calling
Delete Recent Call Records
1. With the flip open, press Send.
2. Use the Directional key to highlight a call, then
press Options.
3. Select Erase or Erase all, then follow the prompts
to erase records.
Fake Call
Use Fake Call to have your phone ring with a fake call
when you press the Volume key down four times in
arow.
Set Up Fake Calls
Enable and choose options for Fake Calls.
►
From the Home screen, press
> Call settings > Fake call.
Menu > Settings
Initiate a Fake Call
► From Idle mode with the phone closed and the
external keys unlocked, press the Volume key
down four times.
After the Fake Call Timer period elapses, your phone
rings to notify you of the fake call. If you entered Fake
contact Info, it appears on the screen. Otherwise the
screen displays “Restricted.”
When you answer the Fake Call, you hear the Fake
Call Voice, if you selected it in Fake Call settings.
41
Make and Answer Calls
Page 49

Calling
Driving Mode
When Driving Mode is enabled, your phone uses
sounds to alert you to notifications, regardless of other
phone or call settings.
For example, when you receive a call or message, your
phone reads out the caller’s (or sender’s) name and
number, and Call Alert sounds play, even if you have
set Master volume to Sounds off or Vibrate only.
Enable Driving Mode with
Voice Commands
1. With the flip open, press and hold Voice
commands/Flashlight key.
2. At the audio prompt, say “Turn driving mode on.”
Enable Driving Mode in Settings
1. From the Home screen, press Menu >
Settings> Sounds settings > Drivingmode.
2. Choose a setting:
Caller ID only: Reads Caller ID for incoming
•
calls and messages.
ID & message: Reads Caller ID and the
•
message content for incoming messages.
Off: Disable Driving Mode.
•
42
Make and Answer Calls
Page 50

Calling
Push to Talk (PTT) (Coming Soon)
Push one button to contact other
Verizon Wireless™ Push to Talk (PTT)
customers.
A Barge call automatically connects, while an Alert call
sends a tone, which gives the recipient the option to
either answer or ignore the call.
For complete details, go to verizonwireless.com/ptt.
Turn PTT On/Off
1. Press Menu > Settings > PTT settings >
PTTmode.
2. Select On/Off, then press OK.
Recent PTT Calls
Recent Calls contains a record of PPT calls to and
from your phone.
1. With the phone open, press Send.
2. All Calls display by date, time, and contact name
or phone number, plus an icon to show the type
ofcall:
PTT missed call: PTT calls you did not
.
answer
PTT individual incoming: PTT calls you
answered.
PTT group incoming: PTT group calls you
ed.
answer
PTT individual outgoing: PTT calls made
from your phone.
PTT group outgoing: PTT group calls
made from your phone.
43
Push to Talk (PTT) (Coming Soon)
Page 51

Calling
Use Recent Calls to Create or
Update PTT Contacts
1. With the flip open, press Send.
2. Use the Directional key to highlight a call, then
press Options > Save to PTT contacts
3. Use the Directional key to highlight an option,
then press OK:
Add new contact
•
Update existing
•
4. Continue entering contact information, as desired.
Barge Calls
To make a Barge call:
1. Press PTT to access your PTT Contact List
and use the Directional key to highlight the entry
you want to call.
– or –
Enter the 10-digit number of the Verizon Wireless
PTT subscriber.
2. Press and hold
message “Connecting to” appears on the display.
When connected, “Talking to” appears on the
display. Speak while pressing PTT.
3. Release PTT when you have finished speaking.
This allows the called party to reply.
4. Press End/Power to end the call.
PTT. Listen for the tone. The
44
Push to Talk (PTT) (Coming Soon)
Page 52

Calling
To receive a Barge call:
1. When your phone receives a Barge call, the
Barge tone plays. You then hear the calling party
speaking through the speaker phone. The calling
party’s wireless number or saved contact name
appears on your display.
2. Press and hold PTT to talk.
3. Release PTT to let another party talk.
4. Press End/Power to end the call.
Alert Call
To make an Alert call:
1. Press PTT to access your PTT Contact List
and use the Directional key to highlight the
entry you want to call.
2. Press Alert.
3. Press and release the PTT key to alert the
selected individual. The PTT Outgoing Alert tone
sounds and “Alerting...” appears on the display.
4. If the called party answers the alert, “Listeningto”
appears on the display and you can hear the called
party speaking. If the called party chooses to
ignore the alert or if the phone is unavailable, an
Unavailable message appears on your display.
5. When the called party is finished speaking, you
hear the Floor Available tone and the Connected
screen appears on your display.
6. Press and hold PTT to talk.
7. Release PTT when finished speaking. This
allows the called party to reply.
8. Press End/Power to end the call.
45
Push to Talk (PTT) (Coming Soon)
Page 53

Calling
To receive an Alert call:
1. When your phone receives an alert, the PTTAlert
tone plays. The message Incoming alert is
displayed with the phone number or contact name
of the calling party. The PTT Alert tone repeats
every 2 seconds until it is answered or ignored, or
until 20 seconds have passed. If you do not answer
within 20 seconds, the PTT call is automatically
disconnected.
2. To answer the alert, press and hold PTT and
begin talking. To ignore the alert, press Ignore.
3. Release the PTT Key to let another partytalk.
4. Press End/Power to end the call.
PTT Contacts
Note: PTT mode must be activated in order to see the
PTT contact list.
1. From the Home screen, press Menu >
Contacts > PTT contact list.
Press the Directional key up or down to scroll
2.
through your contact list.
3. Press Options to select one of the following:
New PTT contact, Copy to contacts, Temp PTT
group, Erase, Edit, Do not disturb-on, Do not
disturb list, Call, New message, Sort.
4. Press Alert.
5. Press and release the PTT key to alert the
selected individual.
46
Push to Talk (PTT) (Coming Soon)
Page 54

Calling
Add PTT Contacts
You can create PTT contacts to make finding and
contacting them easier. A contact’s mobile telephone
number may be their PTT number, if they are also
subscribed to PTT service.
Note: PTT contact options are only available when PTT
mode is On.
1. From the Home screen, press
Contacts > New PTT contact.
2. Press Options > New contact.
3. In the Name field, use the keypad to enter a name
for the contact.
4. Use the Directional keys to highlight the PTT
number field to enter the contact’s PTTnumber.
5. Use the Directional keys to highlight the PTT
group field, then press Add to assign the PTT
contact to a PTT group (optional).
6. Press Save when you are finished.
Menu >
Add a PTT Contact from RecentCalls
Save a telephone number from a recent call record as
a contact.
1. From the Home screen, press Send to display
recent calls.
2. Use the Directional keys to highlight a
recentcall.
3. Press Options > SavetoPTT contacts > Add
new contact.
4. Use the Directional keys to highlight Mobile1,
Mobile 2, Home, Business, or Fax, then press
OK.
5. Enter a name for the contact in the Name field.
6. Continue adding information or press Save.
47
Push to Talk (PTT) (Coming Soon)
Page 55

Calling
Copy a Contact to PTT Contacts
You may have some contacts that you want to save as
a regular contact and also as a PTT contact.
1. From the Home screen, press Contacts.
2. Highlight a contact, then press Options > Copy
to PTT contacts.
3. Press Save when you are finished.
Edit a PTT Contact
Make changes to an existing PTT contact.
1. From the Home screen, press
Contacts > PTT contact list.
2. Highlight a PTT contact, then press Edit.
3. Use the Directional keys to move to fields to
modify or add information for the contact.
4. Press Save when you are finished.
Menu >
Edit a PTT Contact from RecentCalls
Save a telephone number from a recent call record to
a contact.
1. From the Home screen, press Send to display
recent calls.
Use the Directional keys to highlight a
2.
recentcall.
3. Press Options > SavetoPTT contacts >
Update existing.
4. Enter a name for the contact in the Name field and
assign the contact to a group, if desired.
5. Press Save when you are finished.
48
Push to Talk (PTT) (Coming Soon)
Page 56

Calling
PTT Groups
You can assign PTT contacts to Groups, to make
searching your contacts faster, or to quickly make a
PTT Group call.
Add Contacts to Groups
1. From the Home screen, press Menu >
Contacts > Groups.
2. Use the Directional keys to highlight a group.
3. Press Options > Add.
4. Highlight contacts and press Mark to place a
checkmark beside each contact.
5. Press Done to save the group.
Note: You can also assign a contact to a group when
you create or edit the contact record.
Create a PTT Group
1. From the Home screen, press Menu >
Contacts > PTT Groups.
2. Press New.
3. At the prompt, enter a name for the new group,
then press Save.
49
Push to Talk (PTT) (Coming Soon)
Page 57

Calling
Change a Contact’s PTT Group
Assignment
Change a contact’s PTT Group assignment by
removing it from one group and adding it to another.
1. From the Home screen, press Menu >
Contacts > PTT Groups.
2. Use the Directional keys to highlight the
PTTgroup containing the PTT contact, then press
View.
3. Press Remove, then highlight contacts and
press Mark to mark or unmark groups for
assignment.
4. Press Done to remove the contact from the
group.
PTT Settings
Configure your phone’s PTT feature, and set the
functionality of the PT T key.
The PTT feature uses the PTT key. When PTT mode is
On, pressing the Side key initiates PTT mode.
When PTT mode is disabled, the
a shortcut key.
PTT Mode
Turn PTT mode On to use the PTT feature.
1. From the Home screen, press
Settings > PTT settings > PT T mode.
2. Press On to enable PTT mode or Off to disable.
PTT key acts as
Menu >
50
Push to Talk (PTT) (Coming Soon)
Page 58

Calling
PTT Alert
When PTT mode is On, use PTT Alert to set your
phone’s alerts for new PTT events.
1. From the Home screen, press Menu >
Settings > PTT settings > PT T alert.
2. Configure these settings, then press Set
to save:
Alert tone: Select from a list of preloaded tones.
•
Alert vibrate: Press On to have the phone
•
vibrate for PTT alerts.
PTT Speaker Notice
When PTT Speaker Notice is On, you are asked before
the phone turns off the PTT Speaker.
1. From the Home screen, press Menu >
Settings > PTT settings > PT T speaker notice.
2. Press Yes to enable PTT Speaker Notice or press
No to disable it.
PTT alert: (Available when PTT mode is On.)
•
Choose an Alert tone and/or Alert vibrate for
PTT Alerts.
PTT Missed Call
When PTT mode is On, use the PTT Missed Call
setting to set your phone’s notifications for missed
PTT calls.
1. From the Home screen, press Menu >
Settings > PTT settings > PT T missed call.
2. Press On to enable PTT Missed Call alerts or Off
to disable.
PTT Missed Call
Set your PTT missed call notification.
1. From the Home screen, press Menu >
Settings > Call settings > PTT missed call.
2. Highlight On or Off and press Set.
51
Push to Talk (PTT) (Coming Soon)
Page 59

Calling
PTT Mode
Turn PTT mode On or Off.
1. From the Home screen, press Menu >
Settings > Call settings > PTT mode.
2. Highlight On or Off, then press OK.
Note: You can also set PTT mode from Settings > PTT
settings > PTT mode.
52
Push to Talk (PTT) (Coming Soon)
Page 60

Main Menu
The Menu screen displays all
applications installed on your
device. Learn how to use and
arrange your apps.
Page 61

Main Menu
Contacts
Store information about your daily
contacts in Contacts, to make calling
and messaging easier.
Your phone supports both normal phone contacts and
PTT contacts. A contact record can be copied to a
PTT contact.
Note: PTT (Push to Talk) mode must be enabled to see
PTT contacts and PT T groups.
To quickly access the Contacts list:
► From the Home screen, press
To access Contacts for all features:
► From the Home screen, press Menu >
Contacts.
Contacts.
Add a Contact
To add a contact to the Contact List:
1. From the Home screen, press
2. Press Options > New contact.
3. In the Name field, use the keypad to enter a name
for the contact.
4. Use the Directional keys to highlight fields to
enter information for the contact, including at least
one phone number or email.
5. Press Save when you are finished.
54
Contacts.
Contacts
Page 62

Main Menu
Add a Contact from the Keypad
Enter a telephone number with the keypad, then save
it as a Contact.
1. From the Home screen, use the keypad to enter a
telephone number.
2. Press Save > Add new contact.
3. Use the Directional keys to highlight Mobile1,
Mobile2, Home, Business, or Fax, then press
OK.
4. In the Name field, use the keypad to enter a name
for the contact.
5. Use the Directional keys to highlight fields to
enter information for the contact.
6. Press Save when you are finished.
Add a Contact from Recent Calls
Save a telephone number from a recent call record as
a contact.
1. With the flip open, press Send to display
Recent calls.
2. Use the Directional keys to highlight a
recentcall.
3. Press Options > Save to contacts > Add new
contact.
4. Use the Directional keys to highlight Mobile1,
Mobile 2, Home, Business, or Fax, then press
OK.
5. In the Name field, use the keypad to enter a name
for the contact.
6. Use the Directional keys to highlight fields to
enter information for the contact.
7. Press Save when you are finished.
55
Contacts
Page 63

Main Menu
Erase Contacts
To remove contacts from your contact list:
1. From the Home screen, press Contacts.
2. Press Options > Manage contacts > Erase.
3. Highlight a contact and press Mark to mark
it for erasure, or press Options > Mark all to
mark all contacts.
4. Press Done, then follow the prompts to confirm
the erasure.
5. At the prompt, enter the Lock code. By default, the
Lock Code is the last four digits of your telephone
number.
Edit a Contact
To make changes to an existing contact:
1. From the Home screen, press Contacts.
2. Highlight a contact, then press Edit.
3. Use the Directional keys to move to fields to
modify or add information for the contact.
4. Press Save when you are finished.
56
Contacts
Page 64

Main Menu
Edit a Contact from the Keypad
Enter a telephone number with the keypad, then save
it to an existing contact.
1. From the Home screen, use the keypad to enter a
telephone number.
2. If PTT mode is On, press Options > Save >
Update existing.
– or –
If PTT mode is Off, press Save > Update
existing.
3. Use the Directional keys to highlight a contact,
then press OK.
4. Use the Directional keys to highlight Mobile1,
Mobile 2, Home, Business, or Fax, then press
OK.
5. Use the Directional keys to move to fields to
modify or add information for the contact.
6. Press Save when you are finished.
Edit a Contact from Recent Calls
Save a telephone number from a recent call record to
a contact.
1. With the flip open, press Send to display recent
calls.
2. Use the Directional keys to highlight a
recentcall.
3. Press Options > Saveto contacts > Update
existing.
4. Use the Directional keys to highlight a contact,
then press OK.
5. Use the Directional keys to highlight Mobile1,
Mobile 2, Home, Business, or Fax, then press
OK.
6. Enter a name for the contact in the Name field.
7. Continue adding information to fields or press
Save.
57
Contacts
Page 65

Main Menu
Manage Contacts
Use Manage contacts to perform actions such as
erasing, locking, or unlocking multiple contacts at one
time.
1. From the Home screen, press Contacts.
2. Press Options > Manage contacts.
3. Choose an option:
Erase: Mark multiple contacts for deletion.
•
Lock: Mark multiple contacts to lock. Locked
•
contacts cannot be deleted.
Unlock: Mark multiple contacts to unlock.
•
Copy to card: Copy contacts to an optional
•
installed memory card (available if a card is
installed).
4. Find contacts by pressing the Directional keys
to browse the list.
5. Highlight contacts, then press Mark for each
contact or press Options > Mark all to mark all
contacts.
6.
Press D
the changes.
one, then follow the prompts to confirm
58
Contacts
Page 66

Main Menu
Add Pauses or Waits
Calls to automated systems can require you to enter
numbers to navigate menus or to enter a password or
account number. You can store phone numbers with
special pause or wait characters to make entering
these numbers easier.
1. From the Home screen, press Contacts.
2. Create a new contact or edit an existing contact.
3. Enter the phone number up to the pause or wait,
then press Options to select an option:
Add 2-Sec pause: Stops the dialing sequence
•
for two seconds, then automatically dials the
remaining digits. A “P” displays in the field to
indicate the pause.
Add wait: Stops the dialing sequence, waiting
•
for input from you. A “W” displays in the field to
indicate the wait.
4. Press Save when you are finished.
Note: Entering multiple pauses extends the length of a
pause, and each pause counts as a digit. For example,
two consecutive pauses create a total pause of four
seconds and count as two digits.
Find Contacts
1. From the Home screen, press Contacts. The
Contact List displays, with the cursor in the Go to
field.
2. In the Go to field, enter the first few characters of
the Contact name to see matching entries.
3. Use the Directional keys to highlight a contact,
then use these options:
Send: Call the contact.
•
iew: Open the contact entry.
V
•
Edit: Edit the contact entry.
•
Options: List contacts options.
•
59
Contacts
Page 67

Main Menu
Use Contacts
Use Contacts to Make Calls
1. From the Home screen, press Contacts.
2. Highlight a contact, then press Send to call the
contact.
Use Contacts to Send Messages
1. From the Home screen, press Contacts.
2. Highlight a contact, then press Options > New
message to type your text message.
Backup Assistant
Backup Assistant is a wireless service that saves a
copy of your phone’s address book to a secure web
site. If your phone is lost, stolen, or damaged, Backup
Assistant can restore your saved address book to a
new phone - wirelessly. Schedule daily backups to
save your information manually or automatically. Log
in to your web account for full access to your contacts
for viewing, printing, adding, deleting, and editing.
Visit verizonwireless.com/backupassistant or contact
Verizon Wireless for more information.
Note: Standard TXT messaging rates apply. Backup
Assistant is free for My Verizon subscribers.
► From the Home screen, press
Contacts > Backup assistant.
Menu >
60
Contacts
Page 68

Main Menu
Favorites
Set contacts as Favorites to quickly find contacts to
view, send a message, or call the contact.
Assign Favorites
1. From the Home screen, press Menu >
Contacts > Favorites.
2. Use the Directional keys to highlight an empty
Favorite.
3. Press Add, then choose an option:
From contacts: Highlight and mark contacts
•
to assign as favorites. You can mark multiple
contacts at once to create a Favorite for each.
From groups: Choose a group to assign as a
•
Favorite. Highlight and mark the group.
4. Press Done to create the favorites.
Remove Favorites
1. From the Home screen, press Menu >
Contacts > Favorites.
2. Highlight a Favorite and press Options.
3. Choose an option:
New message: Send a new message to the
•
contact.
Remove: Erase the selected contact from the
•
Favorites list.
Remove all: Erase all favorites from the list.
•
4. Press OK
61
Contacts
Page 69

Main Menu
Use Favorites
Use Favorites to quickly view a favorite’s contact
record, send a message to a favorite, or view
messages to and from the favorite.
1. From the Home screen, press Menu >
Contacts > Favorites.
2. Highlight a favorite contact to use these options:
To send a message, press Options > New
•
message.
To view the favorite’s contact record, press
•
View.
To call the favorite, press Send.
•
To view all messages to and from the favorite,
•
press Messages.
Groups
You can assign contacts to categories, called Groups,
to make searching your contacts faster, or to quickly
send messages to group members.
Add Contacts to Groups
1. From the Home screen, press Menu >
Contacts > Groups.
2. Use the Directional keys to highlight a group.
3. Press Options > Add.
4. Highlight contacts and press Mark to place a
checkmark beside each contact.
5. Press Done to add the contacts to the group.
Note: You can also assign a contact to a group when
you create or edit the contact record.
62
Contacts
Page 70

Main Menu
Change a Contact’s Group
Assignment
1. From the Home screen, press Contacts.
2. Use the Directional keys to highlight the
contact you want to reassign.
Press Edit.
3.
4. Highlight the Group field, then press Edit.
5. Highlight groups and press Mark to mark or
unmark groups for assignment.
6. Press Done.
Press Save to save the new group assignments.
7.
Create a New Group
In addition to the default groups, you can create
additional groups.
1. From the Home screen, press Menu >
Contacts > Groups.
2. Press New.
3. At the prompt, enter a name for the new group.
4. Press Save to save the new group.
63
Contacts
Page 71

Main Menu
Send a Message to Group Members
Send a message to all members of a group at once.
Note: Messaging availability varies when roaming
outside the Verizon Wireless Network.
1. From the Home screen, press
Contacts > Groups.
2. Use the Directional keys to highlight a group,
then press View to view it.
3. Press Options > New message.
4. Create the new message, then press Send.
Menu >
Speed Dials
Speed dial numbers are 1-, 2-, or 3-digit shortcuts
assigned to contacts, which allows you to quickly call
the contacts.
The following Speed Dials are reserved by default and
cannot be reassigned:
Speed Dial 1 is reserved for Voicemail.
•
Speed Dial 96 is reserved for Data Usage inquiries
•
(#DATA ) .
Speed Dial 97 is reserved for Balance inquiries
•
(#BAL).
Speed Dial 98 is reserved for Minute Usage (#MIN).
•
Speed Dial 99 is reserved for Payment information
•
(#PMT).
Speed Dial 211 is reserved for health and human
•
services.
Speed Dial 311 is reserved for non-emergency
•
municipal services.
Speed Dial 411 is reserved for directory assistance.
•
Speed Dial 611 is reserved for customer service
•
access.
Speed Dial 911 is reserved for emergency calls.
•
64
Contacts
Page 72

Main Menu
Assign Speed Dials
1. From the Home screen, press Menu >
Contacts > Speed dials.
2. Use the Directional keys to highlight a speed
dial.
– or –
Enter a speed dial in the Go to field.
3. Press
4. Use the Directional keys to highlight a contact.
– or –
Enter the first field characters in the Go to field.
5. Press OK.
6. At the prompt, confirm the assignment.
Set.
Emergency Contacts
Set up to 3 emergency contacts, plus enter personal
information that may be helpful to others using your
phone in an emergency.
Note: Emergency contacts display in red in Contacts.
Assign Emergency Contacts
1. From the Home screen, press Contacts.
In case of emergency is highlighted
•
automatically.
2. Press View to set emergency contacts.
3. Highlight Contact 1, Contact 2, or Contact 3 and
press Add.
4. At the Add Contact screen, highlight an option and
press OK:
From contacts: Choose an existing contact from
•
Contacts List.
New contact: Enter a new contact.
•
65
Contacts
Page 73

Main Menu
5. At the prompt, use the Directional keys to
highlight a contact or enter the first field characters
in the Go to field.
6. Press OK.
Re-assign or Unassign an Emergency
Contact
1. From the Home screen, press Contacts.
In case of emergency is highlighted automatically.
2. Press View to display emergency contacts.
3. Highlight a contact, then press Options for
these options:
Re-assign: Choose another contact from
•
Contacts List or create a new contact for this
assignment.
Unassign: Remove the contact from this
•
emergency contact.
Enter Personal Information
Enter up to 3 notes containing information that
might be helpful to others using your phone in an
emergency.
1. From the Home screen, press Contacts.
In case of emergency is highlighted automatically.
iew to display emergency contacts.
2.
Press
3. Pres
4. Highlight Note 1, Note 2, or Note 3, then press
5. Enter your personal information, then press
V
s Personal info, then press View.
Add.
Save to save the note.
66
Contacts
Page 74

Main Menu
My Name Card
My name card is your personal contact entry in
Contacts, which you can send to recipients as a virtual
business card (vCard) attached to a message or
through Bluetooth.
Edit My Name Card
By default, My name card contains your mobile
telephone number. You can edit My name card to
include other information.
1. From the Home screen, press Menu >
Contacts > My name card.
2. Press Edit.
3. Use the Directional keys to move to fields to
modify or add information.
4. Press Save when you are finished.
Send My Name Card (vCard) by
Message
Send your contact information, as My Name Card, as
an attachment to a message.
1. From the Home screen, press Menu >
Contacts > My name card.
2. Press Options > Sendvia message and press
OK.
3. Press Add to select contacts.
4. Press OK and enter your message text.
Continue creating the new message, then press
5.
Send.
67
Contacts
Page 75

Main Menu
Send My Name Card (vCard) by
Bluetooth
Send your contact information, as My name card, to
Bluetooth devices that support vCards.
1. From the Home screen, press Menu >
Contacts > My name card.
2. Press Options > SendviaBluetooth and press
OK.
3. At the Choose Device screen, use the
Directional keys to highlight an option, then
press OK.
Add new device: Searches for a new Bluetooth
•
device for pairing.
<Device name>: Sends My Name Card to a
•
previously-paired Bluetooth device.
4. Continue with the Bluetooth transfer.
Share Contacts
You can share contacts as Name Cards (vCards) in a
message or through Bluetooth.
Send Name Cards (vCards)
byBluetooth
Send individual contacts or your entire contact list to
Bluetooth devices that support vCards.
Not all Bluetooth devices accept a name card and not
all devices support transfers of multiple name cards.
Check your target device’s documentation.
1. From the Home screen, press
2. Press Options, then press Send name card.
At the Send Name Card screen, highlight Bluetooth
3.
and press OK.
Contacts.
68
Contacts
Page 76

Main Menu
4. At the Send Via Bluetooth screen, highlight
contacts individually and press
Options > Mark all, then press Done.
5. At the Choose Device screen, highlight an option,
then press OK:
Add new device: Search for a new Bluetooth
•
device for pairing.
<Device name>: Send to a previously-paired
•
Bluetooth device.
6. Continue with the Bluetooth transfer.
Mark or press
Send Name Cards (vCard)
by Message
Send a contact record or your entire contact list as
attachments to a message.
1. From the Home screen, press Contacts.
2. Press Options, then press Send name card.
3. At the Send Name Card screen, highlight Message
and press OK.
4. At the Send With Message screen, highlight
contacts individually and press Mark, then
press Done.
5. Continue creating the new message, then press
Send.
69
Contacts
Page 77

Main Menu
Messaging
This section explains how to send
and receive messages, and other
features and functionality related to
messaging.
Types of Messages
Your phone can send and receive:
Text Messages
•
Multimedia Messages
•
Social Networks
•
Text Messages are simple messages containing
text, which can be sent to another mobile phone.
Your phone also supports long text messages. Text
messaging is also known as SMS (Simple Messaging
Service).
Multimedia Messages contain text, as well as
attachments such as sounds, graphics, animations,
and name cards. Multimedia messaging is also known
as MMS (Multimedia Messaging Service.
Create and Send Messages
1. From the Home screen, press Message > New
message.
2. At the New Text Msg screen, enter recipients in the
To fields:
Use the keypad to enter a recipient’s phone
•
number, contact name, or email address.
Press Add to select recipients From
•
contacts, Recent calls, Favorites, or Groups.
– or –
Choose To contacts or To PTT contacts to save
a number you enter as a contact.
70
Messaging
Page 78

Main Menu
As you enter characters, matching contacts
•
display in a list. Use the Directional keys to
highlight a contact, then press OK to select it, or
press Add to save the number you entered
To contacts or ToPTT contacts.
3. Use the Directional keys to move to the Tex t
field to compose your message.
4. While entering text, press Options for the
following options:
View recipients: View each recipient. This
•
option will only appear if there are multiple
recipients.
Attach: Add an attachment to the message.
•
Group conversation: Make the message a
•
group conversation, where replies will go to
every recipient. This option will only appear if
there are multiple recipients.
Save as draft: Save a copy of the message in
•
the Drafts folder.
Insert quick text: Insert a preloaded phrase.
•
Copy: Select and copy text, for pasting into
•
another field. Use the Directional keys to
highlight text in the field, then press Done.
Paste: If you have copied text, paste the
•
copiedtext.
Add subject: Add subject text.
•
Priority level: Set the urgency of the message,
•
to High or Normal.
Callback #: Include a callback number
•
with the message. By default, this is your
mobile telephone number, or you can enter a
differentnumber.
Cancel message: Cancel the message, with the
•
option to save it in the Drafts folder.
5. Press Send or the Send key to send
themessage.
Note: Multimedia messages are only available within
Verizon Wireless Enhanced Services Area.
71
Messaging
Page 79

Main Menu
Add Attachments
Adding an attachment converts the text message
to a multimedia message. Blank slides are created
for additional attachments, making it easy to add
additional attachments.
Note: Videos cannot be added to messages containing
pictures or sound.
1. Use the
Tex t field. Press Options > Attach. Adding
an attachment converts the text message to a
multimedia message.
Attachment options are:
Picture: Select a picture from your phone or
•
optional memory card.
Take picture: Take a new picture using the
•
camera.
Video: Select a video from your phone or
•
optional memory card.
Record Video: Record a new video using the
•
camcorder.
Directional keys to move to the
Sound: Select a sound recording from your
•
phone or optional memory card.
Record sound: Create a new sound recording
•
using the microphone.
Name card: Attach your Name Card or Name
•
Cards for your Contacts.
Calendar event: Select or create a new
•
Calendar Event.
2. Use the Directional keys to highlight the
attachment, then press Options for these
options:
Attach: Add an attachment to the message.
•
Preview: View the message before sending.
•
Save as draft: Save a copy of the message in
•
the Drafts folder.
Add slide: Insert a second slide to the message.
•
Priority level: Set the urgency of the message,
•
to High or Normal.
Remove picture/Video/Sound/Name card/
•
Calendar event: Removes the attachment.
72
Messaging
Page 80

Main Menu
Remove slide: Delete the current slide (available
•
if more than one slide is attached).
Cancel message: Cancel the message, with the
•
option to save it in the Drafts folder.
3. Press Send or the Send key to send
themessage.
Message Settings
This menu allows you to define settings for messages
sent or received on your phone. To access your
message settings, use the following steps:
1. From the Home screen, press
Messaging.
2. Press Settings for these options:
Inbox view: Set the default message view. Press
•
Time to display messages by time received
or Contact to display messages by name or
number (also known as threaded view).
Menu >
Entry mode: Choose a default text entry
•
mode, from Abc, ABC, 123, XT9 word, XT9
palabra, Chinese, Korean, Vietnamese, or
XT9Vietnamese.
Auto save sent: Choose the save mode for
•
messages you send. Press On to save all sent
messages, Off to discard sent messages,
or Prompt to have the phone prompt you
eachtime.
Auto erase inbox: Press On to automatically
•
replace the oldest message of the same type
when the Inbox exceeds the maximum number
of messages of that type. For example, when
the Inbox exceeds 300 text messages, the
oldest text message is replaced with a new one.
Picture and video messages are replaced when
the phone’s memory is full. Press Off to disable
automatic erasures.
Messaging font size: Set the default size for
•
message text, Normal or Large.
TXT auto view: Press On to automatically
•
display text messages when they arrive, or Off to
have the phone prompt you.
73
Messaging
Page 81

Main Menu
Multimedia auto receive: Press On to
•
automatically accept new multimedia messages.
Press Off to have the phone prompt you to
download new multimedia messages.
Group messaging: Configure default settings
•
for messages sent to multiple contacts. Press
Individual messages to allow recipients to only
reply to you (not the group), or press Group
conversation to allow recipients to reply to the
whole group.
Domain extensions: Create and manage a list
•
of web and Email extensions for the Domain
Extensions entry mode. Press Erase to
delete extensions. Press New to create new
extensions. To modify an extension, highlight the
extension and press Edit.
Quick text: Create and manage preloaded
•
phrases to add to messages. Press Erase to
delete phrases. Press Options > New to add
new phrases. To modify a phrase, highlight the
phrase and press Edit.
Emergency alerts: This device is designed
•
to receive Wireless Emergency Alerts from
the Commercial Mobile Alert Service (CMAS),
including Presidential Alerts, Imminent Alerts
(Severe or Extreme), and Amber Alerts (missing
persons). You may choose not to receive
Imminent and Amber alerts, but Presidential
Alerts cannot be disabled.
Voicemail #: Enter a new Voicemail speed dial.
•
The default is *86.
Callback #: Press On to add a callback phone
•
number to your messages and set the phone
number. Press Off to omit a callback number
(you can manually add a callback number to
individual messages).
Signature: Press Custom to add a signature
•
to all messages, then use the Directional
keys to move to the signature field to create the
signature. Press None to disable signatures.
74
Messaging
Page 82

Main Menu
Delivery receipt: Choose whether you are
•
notified when a message you send is delivered.
Press On to be notified for every message or Off
to disable notification (you can set an optional
delivery receipt for individual messages when
you create them).
Social networks: Select your preferred social
•
network as the default. Press Facebook, Twitter,
or Let me choose.
Receive Messages
When you receive a message, you can choose to:
View now: Open the message for viewing.
•
View later: Dismiss the alert and save the message
•
in the Messages folders.
Reject: If you have disabled the Multimedia Auto
•
Receive setting, reject the message. The message
is not saved to Messages.
Note: If you want to control when you download
multimedia content, you can disable Multimedia Auto
Receive.
View Text Messages
When you receive a text message, the alert sounds
(unless turned off) and New text message displays on
the screen.
1. At the New Text Message prompt, press OK to
View now.
2. Press Reply to respond to the message with a
new Text, Picture, Video or Voice message.
3. Press Erase to delete themessage.
4. While viewing the message, press Options for
these message options:
Forward: Send the message to another
•
recipient.
Reply w. copy: Reply to the sender, plus other
•
recipients, if desired, and include a copy of the
original message.
Save as Quick text: Save the message text to
•
the Quick Text list.
75
Messaging
Page 83

Main Menu
Lock/Unlock: Lock or unlock the message to
•
prevent deletion.
Add to contacts: Save the number of the sender
•
to Contacts as a new entry or update to an
existing entry.
Add to PTT contacts: Save the number of the
•
sender to Contacts as a new PTT Contacts entry.
Messaging font size: Select the font size,
•
Normal or Large.
Extract addresses: Display all Contact
•
Numbers, Email Addresses, and URLs extracted
from the message, to call, send an email, or
open the web page.
Message info: Display details about the
•
message.
View Multimedia Messages
When you receive a multimedia message, an alert
sounds (unless turned off) and New multimedia
message displays on the screen.
Note: This procedure describes default behavior. If you
make changes to Message Settings, options or steps
may be different.
1. At the New Message prompt, press
Viewnow.
2. After loading, the attachment (and text, if any)
displays. Use the Directional keys to scroll to
see the entire message, if necessary.
3. Press Reply to respond to the message with a
new Text, Picture, Video or Voice message.
4. Press Erase to delete the message.
OK to
76
Messaging
Page 84

Main Menu
5. While viewing the message, press Options for
these message options:
Play again: Play the attached video or sound
•
again.
Forward: Send the message to another
•
recipient.
Reply w. copy: Reply to the sender, plus other
•
recipients, if desired, and include a copy of the
original message.
Erase: (Voice or Picture message with attached
•
Sound) Delete the message.
Save picture: (Picture messages only) Save the
•
attached picture to My Pictures.
Save video: (Video messages only) Save the
•
attached video to My Videos.
Save sound: (Voice or Picture message with
•
attached Sound) Save the attached sound to My
Sounds.
Save as ringtone: (Voice or Picture message
•
with attached Sound) Save the attached sound
as a ringtone.
View name card: (If Name card is attached)
•
Display the attached name card.
Save name card: (If Name card is attached)
•
Save the attached name card to Contacts.
Set as: Assign the attached picture as Wallpaper
•
or Picture ID.
Save as Quick text: Save the message text to
•
the Quick Text list.
Lock/Unlock: Lock or unlock the message to
•
prevent deletion.
Add to contacts/Add to PTT contacts: Save
•
the number of the sender to Contacts as a new
entry or addition to an existing entry, or as a new
PTT Contact.
Extract addresses: Display all Contact
•
Numbers, Email Addresses, and URLs extracted
from the message, to call, send an email, or
open the web page.
Message info: Display details about the
•
message.
77
Messaging
Page 85

Main Menu
Emergency Alerts
Emergency Alerts allows customers to receive
geographically-targeted Wireless Emergency Alerts.
Alerts alert customers of imminent threats to their
safety within their area. There is no charge for
receiving an Emergency Alert.
There are three types of Emergency Alerts:
Presidential
•
Imminent (Severe or Extreme)
•
Amber Alerts (missing person alert)
•
Customers may choose not to receive Imminent Alerts
and Amber Alerts.
Note: Presidential Alerts can not be disabled.
To disable Imminent Threat Alerts (Extreme and
Severe) and Amber Alerts, follow these instructions:
1. From the Home screen, press
Messaging.
2. Press Settings > Emergency alerts for the
following options:
Receive alerts: All alerts are enabled by default
•
(checkmark showing).
To disable alerts, highlight an alert and press
Unmark, then press Done.
Alert reminder: Set alerts to repeat Once,
•
Every 2 minutes, Every 15 minutes, or
Off(norepeats).
Alert vibrate: Press On to have the phone
•
vibrate when new messages arrive. Press Off to
disable this feature.
Menu >
78
Messaging
Page 86

Main Menu
Message Folders
Messages are stored in the message folders. You can
choose how messages appear with the Inbox View
setting in Message Settings.
Note: To scroll through all messages in the Messages,
Sent or Drafts folder, open one message, then press the
Directional keys left or right to scroll through the
folders.
View Messages by Contact
By default, the Inbox View setting is set to Contact.
All incoming and sent messages are stored in the
Messages folder, grouped by contact name (if the
sender/recipient is stored as a contact), or phone
number, to provide a threaded view of the message
exchange.
1. From the Home screen, press
The most recent message from each contact
•
displays. The icon shows whether the message
is new or already opened, and a number to the
right indicates the number of unread messages
from this contact/number.
Message.
2. Highlight New message to create a new message.
3. To view a message thread, use the Directional
keys to highlight a contact/number, then press
Open.
4. To send a reply message, press Reply.
5. While viewing the list of contacts/messages,
use the Directional keys to highlight a
contact/number, then press Options for these
options:
Erase: Delete the highlighted message thread.
•
Add to contacts: Save the sender or recipient’s
•
number to a contact record (available If the
number is not already saved).
New message: Create a new message
•
addressed to the contact/number.
79
Messaging
Page 87

Main Menu
Manage messages: Perform actions on multiple
•
messages, including Erase, Lock, Unlock, Mark
as Read, Mark as Unread, and Copy to Card
(available if the memory card is inserted) .
Sort alphabetically: Display message threads
•
by contact/phone number.
Messaging menu: Return to the Messaging
•
menu.
Social networks: Update your networks by
•
message.
View Messages by Time
When the Inbox View setting is set to Time, incoming
messages are stored in the Inbox and sent messages
are stored in the Sent folder, sorted by time.
Note: The Inbox folder is only present when the Inbox
View setting is set to Time.
Inbox Folder
1. From the Home screen, press Message >
Inbox.
2. Use the Directional keys to scroll the list
of messages. Highlight a message, then press
Erase to delete the message, or press
Open to view the message.
3. Highlight a message, then press Options for
message options:
Reply: Reply to the sender with a new message.
•
Reply w. copy: Reply to the sender, plus other
•
recipients, if desired, and include the first
100 characters of the original message in the
Textfield.
Forward: Send the message to another
•
recipient.
Add to contacts: Save the number of the sender
•
to Contacts as a new entry or additional to an
existing entry (available if the number is not
already saved).
80
Messaging
Page 88

Main Menu
Extract addresses: Display numbers, Email
•
Addresses, and URLs from the message, to call,
send an email, or open the web page.
Message info: Display details about the
•
highlighted message.
Manage inbox: Perform actions on multiple
•
messages, including Erase, Lock, Unlock,
Markas read, Mark as unread, and Copyto
card (available if the memory card is inserted) .
Sort by sender: List all messages in the Inbox
•
by Sender.
Sort by size: List all messages in the Inbox by
•
Size.
Sent Folder
When the Inbox View setting is set to Time, outgoing
messages are stored in the Sent folder by date and
time.
Note: The Sent folder is only present when the Inbox
View setting is set to Time.
1. From the Home screen, press
Message > Sent.
2. Use the Directional keys to scroll the list of
messages. Highlight a message, then use these
options:
Press Erase to delete the message.
•
Press Open to view the message.
•
Press Options for message options:
•
Forward: Send the message to another
-
recipient.
Resend: Send the message again, to the
-
original recipients, plus new recipients if
desired.
Add to contacts: Save the number of
-
the sender to Contacts as a new entry or
additional to an existing entry (available if the
number is not already saved).
Add to PTT contacts: Save the number of
-
the sender to Contacts as a new entry or
additional to an existing entry (available if the
number is not already saved and PTT mode
is On).
Message info: Display details about the
-
highlighted message.
81
Messaging
Page 89

Main Menu
Manage sent: Perform actions on multiple
-
messages, including Erase, Lock, Unlock, and
Copy to Card (available if the memory card is
inserted).
Sort by recipient: List messages by the first
-
addressee.
Sort by time/type: List messages by type
-
(Text, Picture, Video or Voice) or by time
received.
Drafts Folder
Drafts are messages you have created, but have not
yet sent. You can review, edit or send a draft message.
1. From the Home screen, press Menu >
Messaging > Drafts.
2. Use the Directional keys to scroll the list of
messages. While viewing the list of messages,
press Options for message options:
Send: Send the message, as-is, to the listed
•
recipients.
Add to contacts: Save the number of the sender
•
to Contacts as a new entry or additional to an
existing entry (available if the number is not
already saved).
Manage drafts: Perform actions on multiple
•
messages, including Erase, Lock, Unlock, and
Copy to card (available if the memory card is
inserted).
Sort by recipient: List all messages by the first
•
addressee.
Sort by time/type: List messages by type (Text,
•
Picture, Video or Voice) or by time created.
3. Highlight a message, then press Erase to delete
the message or press Edit to edit the message
before sending.
82
Messaging
Page 90

Main Menu
Voicemail
From the Messaging menu, you can view the total of
new voicemail messages, clear the voicemail counter,
and call voicemail to check messages.
1. From the Home screen, press Menu >
Messaging > Voicemail.
2. On the Voicemail screen, view the number of new
messages. Press Call to dial voicemail to check
messages, or press Clear to clear the voicemail
counter.
Social Networks
Update your social networking sites from your phone.
After setting up your accounts on your phone, you can
update your status and upload media right from your
phone.
Note: You must add your phone number to your social
networking accounts before accessing them with your
phone. For more information, press
1. From the Home screen, press Menu >
Messaging > Social networks.
2. Use the Directional keys to highlight anoption:
Update status: Enter text, then press Send
•
to select sites to update.
Facebook: Access options for updating and
•
accessing your account.
Twitter: Access options for updating and
•
accessing your account.
Help.
83
Messaging
Page 91

Main Menu
Recent Calls
Recent Calls shows you all calls
received, dialed, and missed, as well
as call timers.
To access the Recent Calls category:
► From the Home screen, press Menu >
Recent calls.
The following pages are available:
Missed: View all missed calls.
•
Received: View all received calls.
•
Dialed: View all calls dialed from your phone.
•
All: View all calls from all categories.
•
View timers: View a variety of timers for calls made
•
to and from your phone, as well as data usage.
Call History Options
1. When viewing calls in Recent Calls, use the
Directional keys to highlight a call.
2. Press Message to compose a text message to
send to the highlighted number.
3. Press Options for the following options:
Save to contacts: Save the number as a contact
•
if it is not already saved to your phone.
– or –
Details: View contact details if the number is
saved in your phone.
Erase: Remove the call entry.
•
Lock: Prevent the call entry from being erased.
•
Erase all: Remove all call entries.
•
View timers: Open the View Timers page to see
•
all call timers.
84
Recent Calls
Page 92

Main Menu
Reset Call Timers
Call timers can be reset individually or all at once as
follows:
1. From the Home screen, press Menu >
Recent calls > View timers.
2. Use the Directional keys to highlight a timer.
3. Press Reset to reset the timer to zero.
– or –
Press
Reset all to reset all call timers.
85
Recent Calls
Page 93

Main Menu
Internet
Internet is your access to the World
Wide Web.
To launch Internet:
1. From the Home screen, press Menu >
Internet.
2. Use the Left soft key, Center select key,
and Right soft key to browse the Internet.
Note: By default, you can use a Directional key shortcut
to launch Internet from the Home screen by pressing the
Left Directional key.
86
Internet
Page 94

Main Menu
Media Center
Media Center includes applications
for downloading, creating, viewing,
and managing multimedia content,
right on your phone.
Important: If your service plan does not include an
unlimited data feature, you incur either airtime charges,
if you exceed your minutes bundle, or megabyte(MB)
charges at applicable rates for downloading and/or
using applications.
Apps
Browse and download applications to your phone,
from the Apps store.
1. From the Home screen, press Menu >
Mediacenter > Apps.
2. Use the Left soft key, Center select key,
and Right soft key to browse and download
applications.
Note: For more information about Apps, press
Options > Help.
87
Media Center
Page 95

Main Menu
Internet
Use the Internet Browser to browse the World
WideWeb.
1. From the Home screen, press Menu >
Mediacenter > Internet.
2. Use the Left soft key, Center select key,
and Right soft key to browse the Internet.
Note: By default, you can use a Directional key shortcut
to launch Internet from the Home screen by pressing the
Left Directional key.
Music and Tones
Create and manage music and sounds on your phone.
1. From the Home screen, press Menu >
Mediacenter > Music & tones.
2. Select an option:
My ringtones: Set tones on your phone for
•
incoming call Ringtone, as a ringtone for Contact
ID, and Alert Sounds.
My music: Manage music you have loaded on
•
your phone.
My sounds: Record and manage sounds for use
•
as alerts for calls and messages.
My Music
Play music that you transfer from your PC or from an
optional installed memory card. You can play music
with the phone open or closed.
1. From the Home screen, press Menu >
Mediacenter > Music & tones > My music.
2. At the My Music screen, you have these options:
Play all songs: Play all songs stored on your
•
phone and installed memory card.
All songs: Display all songs stored on your
•
phone and memory card, to choose songs to
play and manage your music.
88
Media Center
Page 96

Main Menu
Playlists: Display and manage playlists. Highlight
•
a playlist, then press View to display it or
press Play to play it. Press Options
to create a new playlist, erase or rename
the highlighted playlist, or change the input
language.
Artists: Display songs by artist. Highlight an
•
artist, then press View to display songs by
the artist or press Play to play the songs.
Genres: Display songs by music type. Highlight
•
a genre, then press View to display songs
from the genre or press Play to play the
songs.
Albums: Display songs by album title. Highlight
•
an album, then press View to display
songs from the album or press Play to play
thesongs.
Manage my music: Erase songs, lock or unlock
•
songs, or move music between your phone’s
memory and an optional installed memory card.
Music settings:
•
Repeat: Choose a playback mode, from
-
Repeat All, Repeat All, Repeat One, or Off.
Shuffle: Choose On to play songs in random
-
order or Off to play them in the order they
appear.
Music only mode: When On, all wireless
-
communications, including calls, are disabled,
and the phone acts as a music player only.
Play Music
1. From the Home screen, press Menu >
Mediacenter > Music & tones > My music.
2. Select an option, then press Play to play the
selection.
3. Use the Center select key and Directional
key to control playback:
Press the Center select key to Pause
•
playback. Press the Center select key again
to Play.
89
Media Center
Page 97

Main Menu
Press the Directional key left for
•
Rewind or to go to the previous song, or
press and hold to scan backward through the
song.
Press the Directional key right for
•
Forward or to go to the next song, or press
and hold to scan forward through the song.
Press the Directional key up to choose
•
playback modes from Shuffle,
Repeat track, or Repeat all.
Press the Directional key down to Stop
•
playback.
4. During playback, press Mute to mute the
playback.
5. During playback, press Options for these
options:
Library: Continue playback and return to the
•
Library.
Audio to phone/device: Switch the audio output
•
to phone or Bluetooth headset. This option
is only available when a Bluetooth headset is
connected to the phone.
Exit player: Stop playback and close My Music.
•
Add to playlist: Add the current song to a
•
playlist.
Sound effect: Choose an effect to add to the
•
music.
Skin: Choose a theme for the music player.
•
Song info: View details about the current song.
•
Memory info: View the amount of memory
•
available, used and total for the Phone and Card
memory.
Music settings: Choose Repeat mode, Shuffle
•
mode, or Music Only mode. In Music Only mode,
access to the wireless networks is disabled and
you cannot send or receive calls or messages.
90
Media Center
Page 98

Main Menu
Create a Playlist
1. From the Home screen, press Menu >
Mediacenter > Music & tones > My music >
Playlists.
2. Highlight Yes and press OK to create the first
playlist.
– or –
Press Options > Create new to create
additional lists.
3. Enter a name for the playlist, then press OK.
Add Songs to a Playlist
1. From the Home screen, press Menu >
Mediacenter > Music & tones > My music >
Playlists.
2. Press Add to open the playlist, then highlight
songs and press Mark to select them.
3. Press Done.
Note: To add songs to playlists while playing music,
press Options > Add to playlist, then select a playlist.
Play Music with the Phone Closed
1. With the phone closed, press Play/Pause.
2. Use the Volume key to highlight My Music and
press Play/Pause.
3. Use Fast forward, Play/Pause, and
Rewind to control playback.
Note: To stop playback and close My Music, open the
phone and press End/Power.
91
Media Center
Page 99

Main Menu
Picture and Video
Manage pictures and videos on your phone.
My Pictures
View and manage pictures preloaded on your phone
or downloaded and stored on your phone or optional
memory card.
Note: Copyright-protected pictures cannot be uploaded
or sent as a message attachment. This includes pictures
that are preloaded on your phone.
1. From the Home screen, press
Mediacenter > Picture & video > My pictures.
2. Use the Directional keys to browse picture
thumbnails. Highlight a thumbnail, and then use
these options:
Press View to display the picture larger.
•
Press List to return to thumbnails.
Press Erase to delete the highlighted picture.
•
Menu >
While viewing thumbnails, press Options for
•
these options:
Send: Attach the picture to a new Picture
-
Message, send it through Bluetooth, or post it
to Blogs or Facebook.
Set as: Set the picture as the Main Wallpaper,
-
Front Wallpaper or Picture ID for a contact.
Take picture: Launch the Camera to take new
-
pictures or video.
Manage pictures: Erase pictures, Lock (or
-
Unlock) pictures to prevent deletion, or move
pictures to the phone’s memory or optional
memory card.
Rename: Change the name of the highlighted
-
picture.
Full view: Display the picture full-screen.
-
Slide show: Set the duration, then play a
-
slideshow of all pictures in My Pictures.
File info: View details about the picture.
-
3. To view a picture, highlight a thumbnail and
press View. While viewing the picture, press
Options for options to modify the picture.
92
Media Center
Page 100

Main Menu
Create a Slide Show
View all the pictures in My pictures as a slide show,
where you choose the duration of each slide.
1. From the Home screen, press Menu >
Mediacenter > Picture & video > My pictures.
2. Press Options > Slide show.
3. Press the Directional key right or left to choose
a duration for each slide, then press Play.
4. While viewing the slide show, use the Left soft
key, Center select key, and Right soft key
to control playback.
View and Modify a Picture
My pictures offers powerful tools for modifying
pictures.
1. From the Home screen, press Menu >
Mediacenter > Picture & video > My pictures.
2. Use the Directional key to browse picture
thumbnails. To view a picture, highlight a thumbnail
and press View.
3. While viewing the picture, press Options for
these options:
Send: Attach the picture to a new Picture
•
Message, send it through Bluetooth, or post it to
Blogs or Facebook.
Set as: Set the picture as the Main Wallpaper,
•
Front Wallpaper or Picture ID for a contact.
Take picture: Launch the Camera to take new
•
pictures or video.
Zoom/Rotate: Change the zoom level or
•
orientation of the picture.
93
Media Center
 Loading...