

Page 1
Samsung Electronics 6-3
7. Troubleshooting
PRECAUTION
1. CHECK GROUNDING BEFORE CHECKING FOR TROUBLE.
2. BE CAREFUL OF THE HIGH VOLTAGE CIRCUIT.
3. DISCHARGE THE HIGH VOLTAGE CAPACITOR.
4. WHEN CHECKING THE CONTINUITY OF THE SWITCHES OR TRANSFORMER, DISCONNECT ONE LEAD WIRE FROM THESE
PARTS AND THEN CHECK CONTINUITY WITHOUT THE POWER SOURCE ON. TO DO OTHERWISE MAY RESULT IN A FALSE
READING OR DAMAGE TO YOUR METER.
5. DO NOT TOUCH ANY PART OF THE CIRCUIT OR THE CONTROL CIRCUIT BOARD, SINCE STATIC DISCHARGE MAY DAMAGE IT.
ALWAYS TOUCH GROUND WHILE WORKING ON IT TO DISCHARGE ANY STATIC CHARGE BUILT UP.
7-1-1 Specification of weight sensor
-Range of weight measurement......in cooking: 0 - apprx. 2000g(Weight of over round dish)
(Specification of weight sensor: 0-apprx. 4000g)
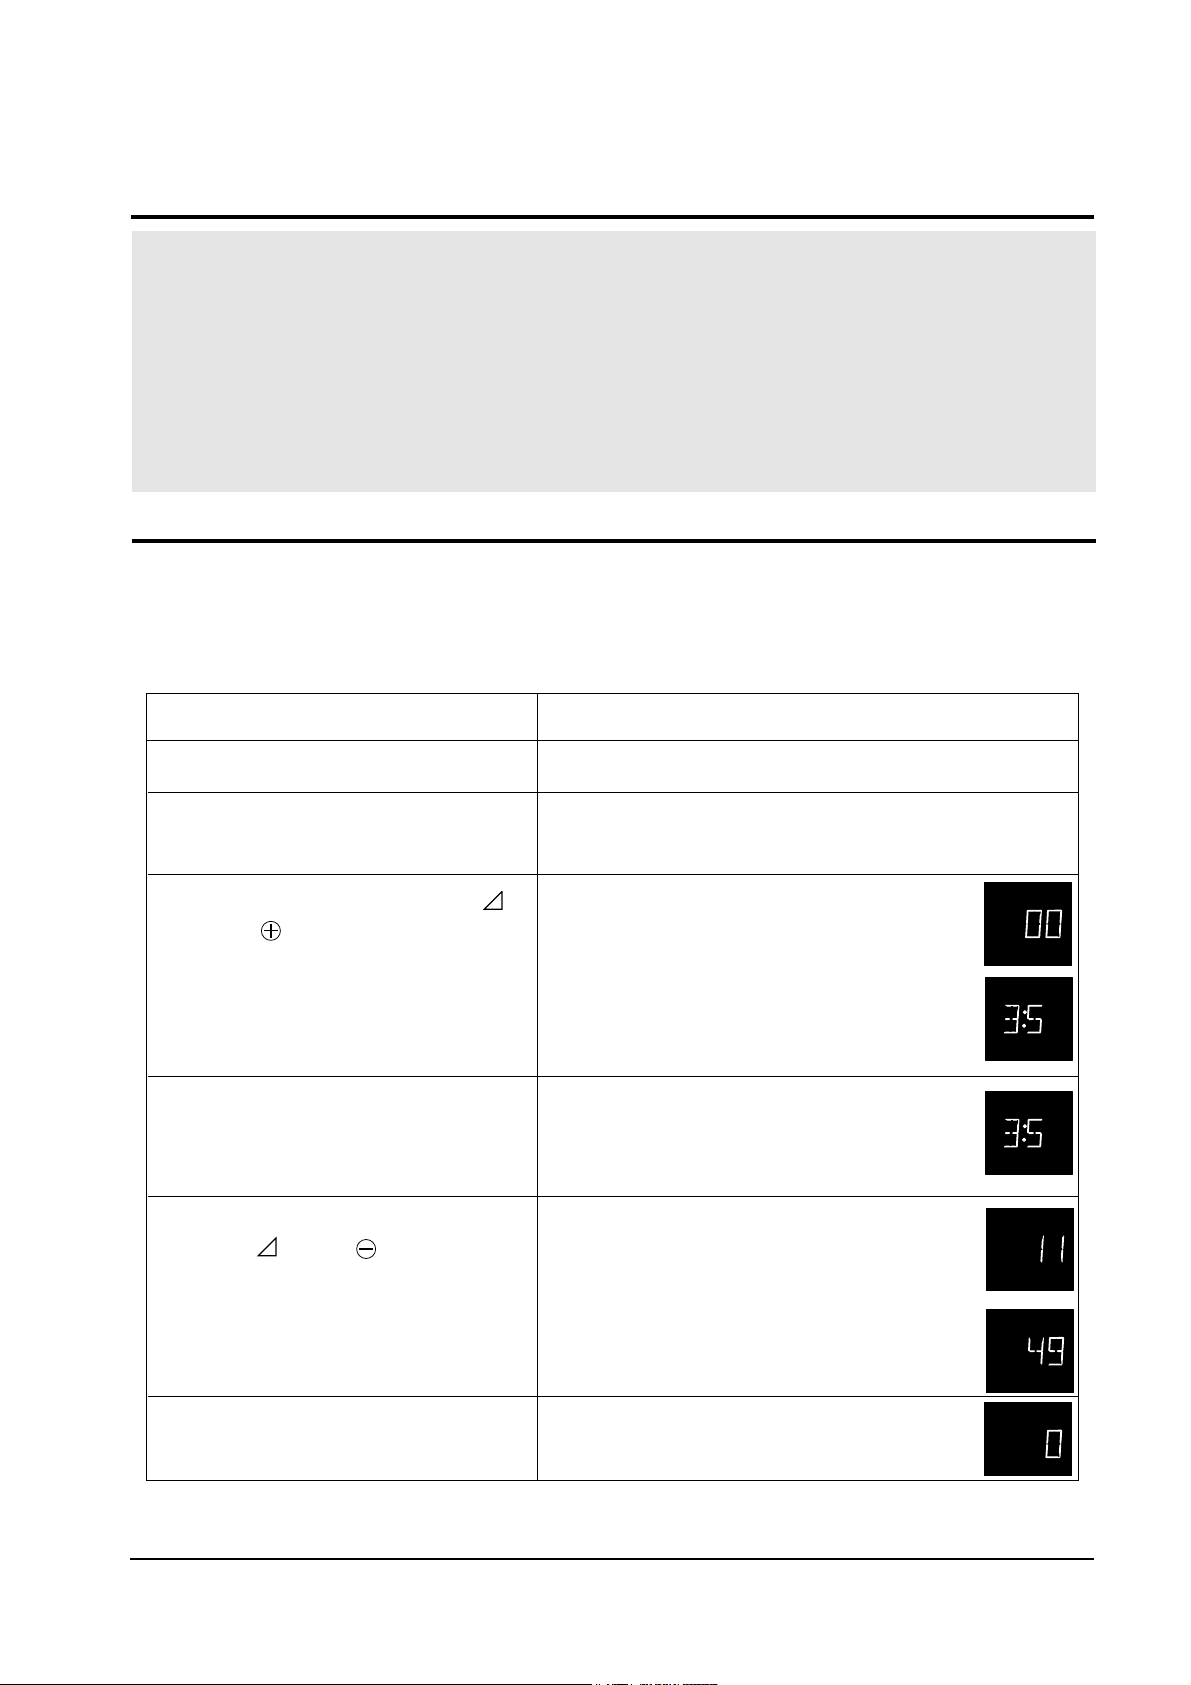
7-1-2 Method of adjusting 0 point.
Operation Display in operation
1. Plug in the cord.
2. Open the door to put rotating
plate and round dish into range.
3. Close the door and press the "P/L ( )"
key and "( )" key simultaneously.
4. Open the door to put a weight of balance
of 1kg(or two of 500g) on the center of
round dish(Note 1).
5. Close the door and press simultaneously
the "P/L ( )" and "( ) keys.
6. Press the "Cancel" key.
7-1 Weight sensor
1. All the displays of display unit get on.
1. As above.
1. "00" display lights up. (Lamp in range turns on
and round dish rotates).
2. "285-335" light up after about 12 second.
1. Same as 3-2.
1. "11" display lights up. "11" gets out after about
12 seconds.
2. After about 3 seconds after "11" is out,
"35-65" light up.
1. "0" display lights up. (The inside lamp turns off
and rotation of the round dish stops).
(Note1) Substitute the weight of balance with a beaker of 1kg total weight filled with tap water).
Page 2
Samsung Electronics6-4
Troubleshooting
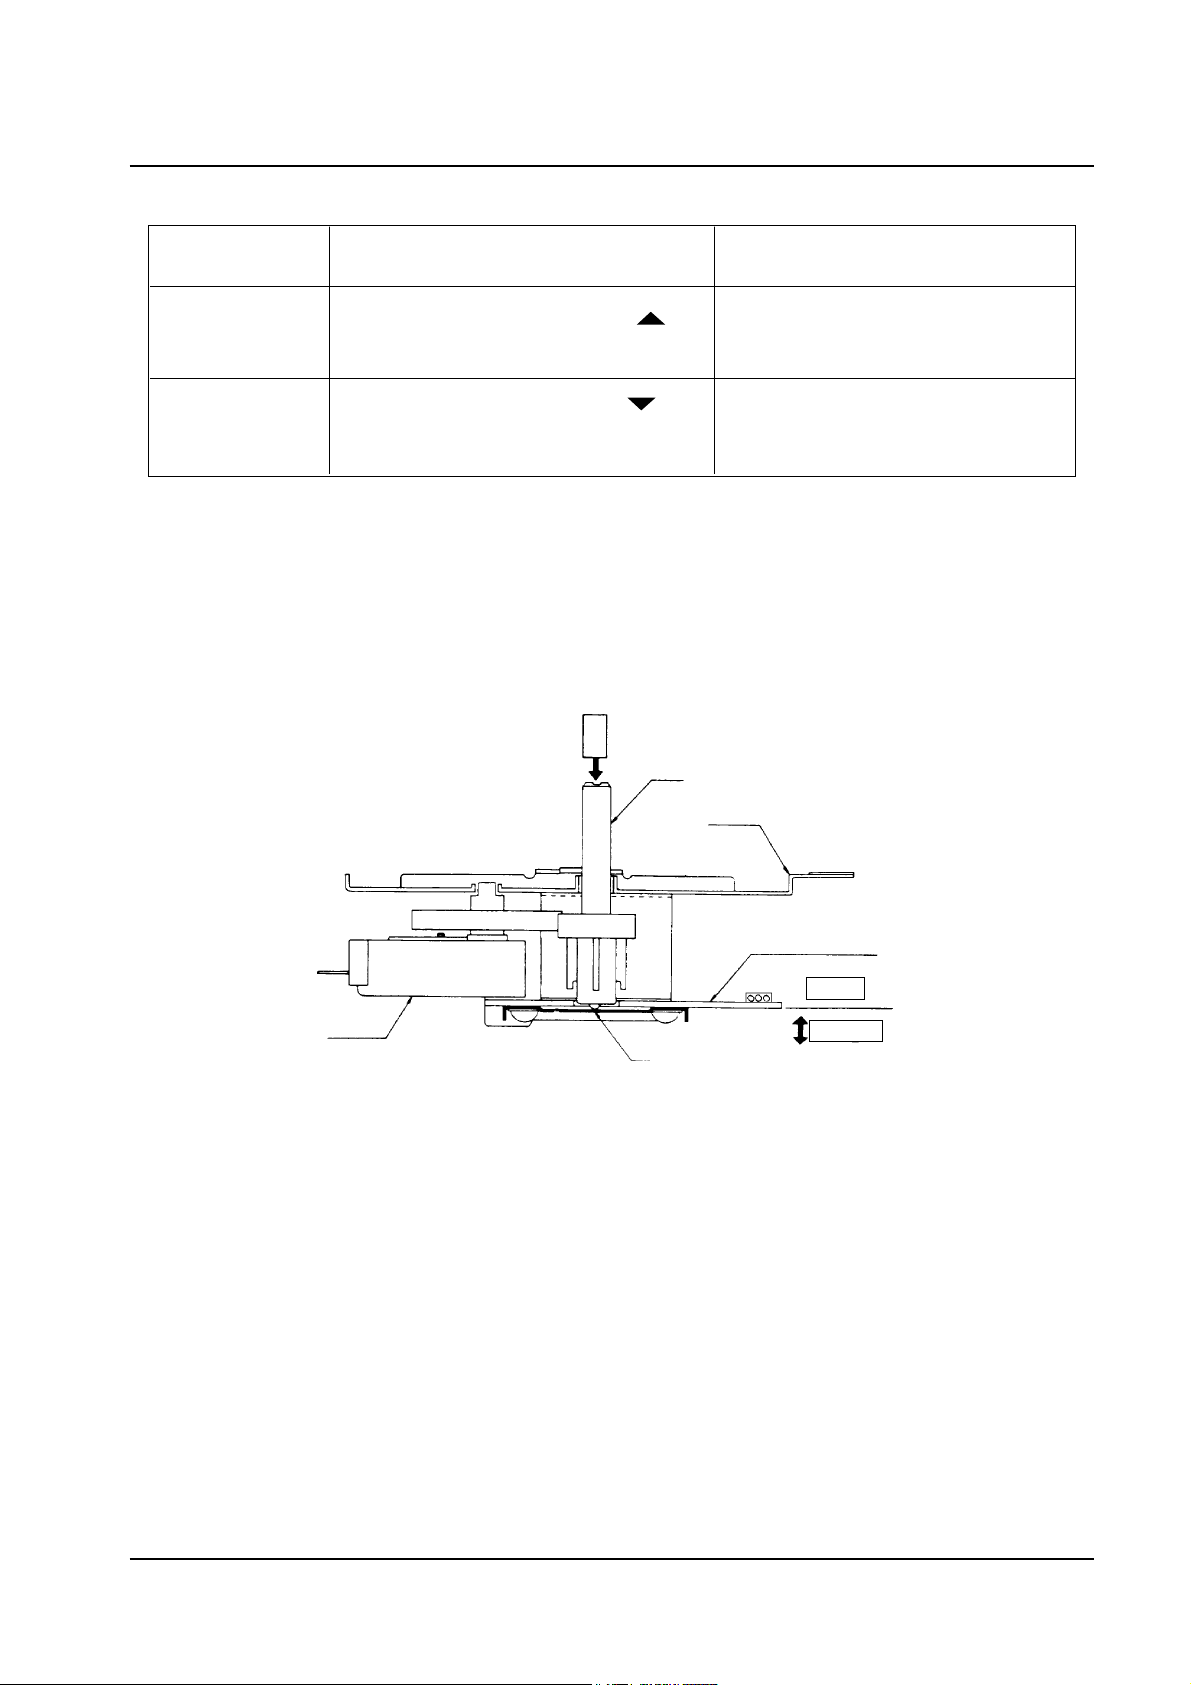
7-1-4-1. What is the weight sensor
1. The weight sensor detects weights of objects such as assembly to set automatically optimum heating
time according to the weight determined, contributing to improvement of operation.
7-1-4-2. Features
a. Configuration of plate-spring :
Onto the structure comprising electric pole on PC board and plate spring(sensor plate),assembly the
driving axle, and let the axle to move, with the action of spring, to move the spring to measure
weight.
b. Condenser measuring type :
This is a method to measure weight asthat, when a load is exerted on axle the plate spring(sensor
plate) on driving axle will come down to enlarge the gap away from the sensor electric pole on the
fixed PC board and thus the electrostatic capacity will be changed, by which the oscillation of weight
sensor PC board changed, and it allows to measure the weight by.
7-1-4 Details of functions of Weight Sensor
L
o
a
d
axle
PC(Sensor pole)
Fixed axle
Driving axle
Frame
Panel(Sensor Panel)
RT motor
7-1-3 Method for checking 0 point
Items to check: Confirmation key Confirmation
Value at 0 point Regulation for CANCEL + MORE ( ) key, Display of previous regulated value at 0
simultaneously pressed. point, for example: 315
Value of inclination Regulation for CANCEL + LESS ( ) key, Display of previous regulated value
simultaneously pressed. of declination, for example: 49
Page 3
7-1Samsung Electronics
7-1-4-3. Description of functions performance
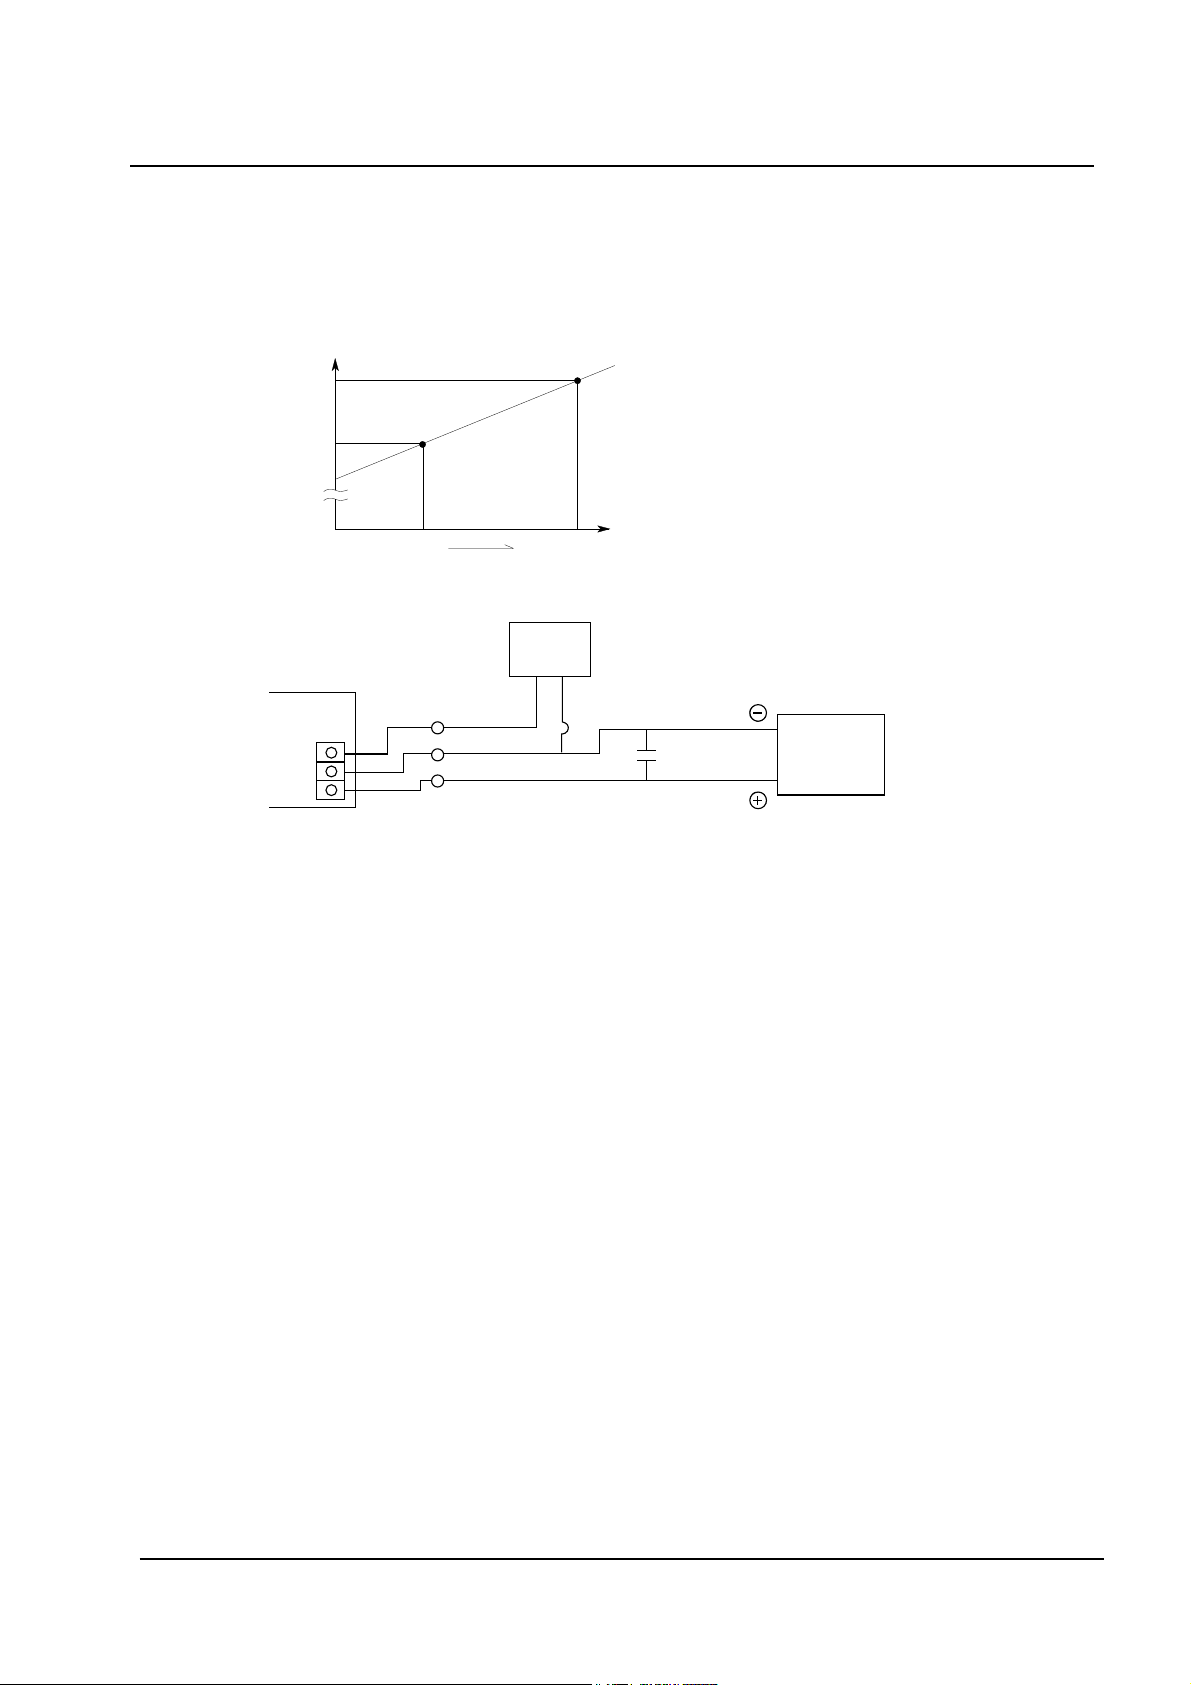
a. Functions of weight sensor PC plate(oscillator)
a-1. Frequency of oscillation
-. Adjusting "0" point ----- appr.31 kHz
-. Loading 1000g on round plate ----- appr. 5kHz(indicating increment of 5kHZ from adjusting 0.)
a-2. Load exerted on axle and oscillating frequency(kHz)
7-1-4-4. Wiring diagram for measuring frequency
1. Do not apply heavy load or pressure on the rotating dish
(The weight sensor directly contact the rotating dish).
Putting food that exceeds 4kg(Total) can damage the weight sensor.
2. Use only genuine replacements that fit the model(C.E., rotating dish and supporter).
Frequency
(kHz)
0
0 V
-5 V
100pF
1000g
36
g Load
At "0" point
Oscillation
board K
Power
Frequency
counter
Vcc
Vss
Ws
7-1-5 Precautions
Troubleshooting
Page 4

Troubleshooting
7-2 Simple Troubleshooting Chart
7-2-1. Simple troubleshooting
Item Checking Procedure
Inspection of a. Put about 200cc of tap water (water temperature 10-18°) on
microwave oven cooking the rotating dish.
b. Do the following :.
Microwave oven high ¡time setting 5 minute ¡start cooking
c. The water temperature should be about 80°
Inspection of grill cooking a. Put the applicable " cooker" for grill cooking inside
b. Do the following
grill ¡time setting
5 minutes ¡start cooking.
c. Normal : The seatheheater is red.
Inspection of convection a. Put the applicable "cooker" for convection cooking inside.
cooking b. Do the fellowing
Convection ¡temp. setting 250°C ¡time setting 5 minute.
c. Normal : The upper-heater and lower cavity emit heat.
Do not directly touch the Upper-Heater, Lower-Heater and plate, that become hot during or
remain hot after heating.
7-2-2. Error codes
Error indication Cause of occurrence Management method Remarks
E0 Gas sensor open/short Check the connection and Automatic
(sensor value cooking reheating reheating
between 6 and 211) Put the power switch again and
and use it after 10 minutes.
E1 Exceeds of T1 time limit First press the cancel key and Automatic
(gas sensor) check if the food is positiotes reheating
E3 Thermister open/short. Check the wire connection.
E4 Problem with the weight Exchange the weight sensor
sensor (Output frequency=0Hz) Check the wire connection
E10 Problen with the EEPROM Replace the PCB assy
C1 No tray (Occurs if oven is Install the rotating dish
operated without the rotating
dish.)
Samsung Electronics7-2
Page 5

7-2-3. Hidden key
1. Check the gas sensor : Press the P/L( ) and MORE( ) keys simultaneosly.
(Display : Between 6 and 211).
2. Child lock function : Press the CANCEL and keys simultaneosly.( )
3. Cooking completion remind function : If the food is not removed after cooking,
the buzzer sounds every minute.
4. Sound ON/OFF function : Press the CANCEL and keys simultaneosly.
7-2-4. Reparing Parts
1. Discharge the capacitor for about 5 to 6 minutes after cutting the power, and then continue the work.
2. Do not damage the coating on the wires.
3. When removing the wire the terminal, hold the positive lock case with the finger and assemble it.
Otherwise use a tool (such as long nose pliers)
4. If you remove the tie during servicing, do not damage the wire. Adjust and arrange the wire and
tie(heat proof onsulated tie) after the repairs have been completed.
7-3-1Operation in manual mode of microwave
The manual mode of MWO comprises 10 power level modes : one is that the magnetron works in full
time at 600W output in manual operation which is the "range high" and another is that the magnetron
repeats On-Off operation at 600W output which is the "range low" (equivalent to 200W).
Samsung Electronics 7-3
Troubleshooting
7-3 Explanation of the Automatic operation
Cooking: Magnetron works Max. time limit Min. adjustable range
Range high 30 minutes0 0-4 minutes: 10 seconds as unit.
(600W) 4-15 minutes: 30 seconds.
15-30 minutes: 1 minute as unit.
Range Low 1 hour and 30minutes 0-10 minutes: 30 seconds as unit.
(200W) 10-40 minutes: 1 minute as unit.
40-90 minutes: 5 minute as unit.
(600W)
(600W)
ON OFF
7sec 23sec
ON
Page 6

7-3-2 Operation in automatic operation of the microwave
The magnetron is controlled by a micro computer program based on the data gained by the weight
sensor which detects the weight of foods, gas sensor which detects gas emitted from the foods.
7-3-2-1 Oscillation of gas sensor in cooking: [Sensor reheat] [Peeled potatoes] [Fresh vegetables]
[Fresh fish] [Rice]
-. Magnetron is controlled corresponding to amount of steam emitted from foods.
-. Remained cooking time is displayed on the panel during cooking operation.
-. Make well the cooking by adjusting the "Regulation for completion" more and less keys(buttons).
7-3-2-2 Oscillation of weight sensor in cooking: [Sensor defrost].
-. Magnetron is controlled according to the weight after deducting that of container.
-. After weight is checked, remained cooking time is displayed on the panel.
-. Make well the cooking by adjusting the "Regulation for completion" high and low keys(buttons).
7-3-3 Operation of automatic cooking by heating with heater
The heater is controlled by micro computer program according to the data from a temperature
sensor(thermostat) measuring the temperature in oven and a weight sensor which measures
weight of food.
7-3-3-1 Operation of temperature sensor(thermostat) for cooking: [Pizza] [Cake].
-. Make a cooking at an optimum temperature which is controlled by thermostat according to
variety of foods as well as in optimum cooking time.
-. Cooking state can be regulated with the "Regulation for completion" more and less keys.
-. When this process begins, the remained time is displayed on panel.
7-3-4 Operation of automatic cooking by heating mutually between heater and microwave
Magnetron and heater are controlled by a micro computer arogram which operates based on the
data of temperature sensor in oven(thermostat).
7-3-4-1 Operation of temperature sensor(thermostat) for cooking : [Chicken pieces] [Roast chicten]
[Roast beet] [Roast pork]
-. Make a cooking at an optimum temperature which is controlled by thermostat according to
variety of foods as well as in optimum cooking time.
-. Cooking state can be regulated with the "Regulation for completion" high and low keys.
-. When this process begins, the remained time is displayed on panel.
7-3-5 The function of preventing from forgetting to take foods out
For prevention of forgetting to take food out, buzzer sounds "Pee" every one time in interval of 1
minute for total ten minutes after completion of cooking.
-. Buzzer sounding will stop when pressing cancel key.
Samsung Electronics7-4
Troubleshooting
Page 7

Samsung Electronics 7-5
Troubleshooting
7-4 Electrical Malfunction
SYMPTOM CAUSE CORRECTIONS
Oven is dead. 1. Open or loose lead wire harness Check fan motor when thermal cutout is defective.
Fuse is OK. 2. Open thermal cutout (Magnetron)
No display and no operation at all. 3. Open low voltage transformer Check Ass'y PCB when LVT is defective.
4. Defective Ass'y PCB
No display and no operation at all. 1. Shorted lead wire harness Check adjustment of primary, interlock monitor,
Fuse is blown. 2. Defective primary latch switch (NOTE 1) secondary switch.
3. Defective monitor switch (NOTE1)
4. Shorted HVCapacitor
5. Shorted HVTransformer (NOTE2)
NOTE 1: All of these switches must be replaced at the same time.
(refer to adjustment instructions)
Check continuity of power relay contacts and if it has continuity, replace power
relay also.
NOTE 2: When HVTransformer is replaced, check diode and magnetron also.
Oven does not accept 1. Key input is not in-Sequence Refer to operation procedure.
key input (Program) 2. Open or loose connection of
sub-PCB to main PCB.
3. Squeeted buttons
4. Defective Ass'y PCB Replace PCB main.
1. Off-alignment of latch switches Adjust door and latch switches.
2. Open or loose connection of high voltage
circuit especially magnetron filament
circuit
NOTE: Large contact resistance will bring
lower magnetron filament voltage and
Timer starts countdown but no cause magnetron to lower output and/or
microwave oscillation. intermittent oscillation.
(No heat while oven lamp and 3. Defective high voltage components Check high voltage component according to
fan motor turn on.) H.V.Transformer component test procedure and replace if it is
H.V.Capacitor defective.
H.V.Diode
Magnetron
4. Open or loose wiring of power relay
5. Defective primary latch switch
6. Defective power relay or Ass'y PCB Replace PCB main.
Page 8

Samsung Electronics7-6
Troubleshooting
SYMPTOM CAUSE CORRECTIONS
Oven can program but timer 1. Open or loose wiring of primary Adjust door and interlock switches.
does not start. interlock switch
2. Off-alignment of primary interlock
3. Defective primary interlock S/W
Microwave output is low;. 1. Decrease in power source voltage. Consult electrician.
Oven takes longer time to 2. Open or loose wiring of magnetron
cook food. filament circuit. (Intermittent oscillation))
3. Aging of magnetron
Oven does not operate and return Defective Ass'y PCB Replace PCB main.
to the plugged in mode.
Loud buzzing noise can be heard. 1. Loose fan and fan motor Tighten screws of fan motor.
2. Loose screws on H.V.Transformer Tighten screws of H.V.Transformer.
3. Shorted H.V.Diode Replace H.V.Diode.
Turntable motor does not rotate. 1. Open or loose wiring of turntable motor. Check the wire of turntable motor.
2. Defective turntable motor. Replace turntable motor.
Fan motor does not rotate 1. Defective fan motor Replace fan motor
2. Defective fan motor or ass'y PCB Replace PCB main
Oven stops operation during cooking 1. Open or loose wiring of primary Adjust door and latch switches.
interlock switch
2. Operation of thermal cutout(Magnetron)
Sparks 1. Metallic ware or cooking dishes Inform the customer.
touching on the oven wall.
2. Ceramic ware trimmed with gold or Do not use any type of cookware with
silver powder also causes sparks. metallic trimming.
Uneven cooking Uneven intensity of microwave due to Wrap thinner parts of the food with
its characteristics. aluminum foil.
Use plastic wrap or cover with a lid.
Stir once or twice while cooking
foods such as soup, cocoa, or milk.
Noise from the turntable motor Noise may result from the motor. Replace turntable motor.
when it starts to operate.
Poor defrosting 1. Open or loose wiring of weight sensor Check the connections to weight
sensor
2. Point not adjusted Readjust the "0" point
7-4 Electrical Malfunction(continued)
Page 9

Samsung Electronics 7-7
Troubleshooting
7-5 After-Repair Check List
No Check item Checking and judging method Remarks
1 Insulation resistance When measuring the insulation resistance between DC 500V Megatester
the power plug and the grounding wire(with the
power plug disconnected from the socket and the
door closed) the resistance should be greater than
1§ or above. When to check :
a. When the electric field parts are exchanged
b. If the MWO is used in a very humid envir qwment
c. Unit is older than 5 years
2 Safety switch Check that the safety switch is Primary switch
operation operating correctly when opening and Monitor switch
closing the door Secondary switch
3 Applicability of parts Check that exact replacement parts are being used AC 230V
4 Placement of Check for looseness, jamming or terminal insertion
lead wire of the lead wire. (check that there are no shorts to
ground.
5 Connection of Check the connection between he screw and bolt.
screw and bolt
6 Alien substance Check for a cut line within the equipment,
insertion check combustible foreign matter, or loose hardware.
7 Power cord check Check that there is no damage to the cord, plug,
socket etc.
Also check that power rating is adequate.
8 Grounding check Check that the main body is grounded to the For the PCB ground
PCB. wire and power cord
ground wire,
Explain to the customer that he following are Check the continuity
dancerous hazards : to ground.
a. Connection to the gas pipe
b. Connection to the vinyl water pipe
c. Connection to the telephone line.
 Loading...