

Sprint
Personal
Communication
Services
TM
User
Guide
QUALCOMM QCP-2700/2700F
Sony CM-B1201SPR

Sprint PCS.
SM
It’s not just a better phone.
(LIT048 JUL97)
80-68295-1, Rev-
It’s a better connection.
SM

This phone will work only with service from Sprint PCS, which must be
purchased separately. See Terms and Conditions of Services.
©1997 Sprint Spectrum L.P. All rights reserved. No reproduction in whole or in
part without prior written approval. Sprint and the diamond logo are registered
trademarks of Sprint Communications Company L.P. Sprint PCS and Sprint
Personal Communication Services are trademarks of Sprint Communications
Company L.P., used under license. Sony is a registered trademark of Sony
Corporation. QUALCOMM and Digital by QUALCOMM are registered trademarks
and QCP - 2700F and QCP 2700 are trademarks of QUALCOMM Incorporated. All
other trademarks are the property of their respective owners.
First things first:
Call us to get activated.
Before you can use your new Sprint PCS Phone,™you need to
open your Sprint PCS Account – in other words, activate your
phone. You do that by calling 1-888-715-4588 (in Southern
California, call 1-800-PCS-6699) from any phone other than
your new Sprint PCS Phone. This call is toll-free.
Note: If a Sprint PCS Sales Representative has already activated
your phone, then there’s no need to place this call. Instead, see
“How to unlock your phone” on the next page.
What you shuld know before you call.
þ The call may take up to 30 minutes.
þ A credit check will be run.
þ Your Sprint PCS Phone will be ready for use about an hour
after this call is finished.
What you should have handy.
þ Your new Sprint PCS Phone
þ The original packaging for your new phone
þ Your billing address
þ Your social security number or tax ID number
Printed in the U.S.A.
1

þ Your driver’s license number
How to get help.
þ Pen and paper to write down your new
Sprint PCS Phone Number
During this call, a Sprint PCS Customer Advocate will collect your
information as well as help you select your Sprint PCS Service
Features and a calling plan. Once you’ve made all your selections,
the advocate will guide you through the activation process.
How to unlock your phone.
If you received your phone in the mail, you need to unlock it
before you can begin making calls. Just follow these simple steps:
1. Turn on your phone.
2. Press the dial to select “UNLOCK.”
3. Enter your four-digit lock code. (This code typically is the last
four digits of your Sprint PCS Phone Number or the last four
digits of your social security number.)
If you need help with this or anything else, we hope you’ll
call Sprint PCS Customer Care at 1-888-211-4PCS (4727).
In Southern California, call 1-800-455-4551. You also can press
from your activated Sprint PCS Phone
(in Southern California, press
). A Sprint PCS Customer Advocate will answer (24 hours
a day) and be happy to assist you.
Our services are provided to you under certain terms and
conditions – all of which are listed in the brochures included
in the box your phone came in.
2
3

Table of Contents
First things first: Call us to get activated. 1
What you should know before you call. 1
What you should have handy. 1
How to unlock your phone. 2
How to get help. 3
Introduction. 9
Getting to know your phone. 10
Function keys. 14
Display indicators. 16
Using the battery. 18
Installing and removing the battery. 18
Charging the battery. 18
Charging with the AC adapter. 20
Turning your phone on and off. 21
Standby status. 21
Power Save mode. 22
Basic functions. 23
Making a call. 23
Correcting dialing mistakes. 24
Answering calls. 24
Where you can use your phone. 24
What you’ll see. 25
Calling experience. 26
Using Caller ID. 27
Responding to Call Waiting. 28
Using Three-Way Calling. 29
4
5

Using Call Forwarding. 29
Redialing calls. 30
Getting your own phone number. 30
Adjusting volume. 31
Locking the keypad. 31
Advanced phone book features. 45
Using the pause feature. 45
Linking memory locations. 46
Viewing a number. 47
Restricting a stored phone number. 47
Emergency dialing. 32
Calling 911. 32
Saving and editing emergency numbers. 32
Dialing other emergency numbers. 33
Dialing Sprint PCS Directory Assistance. 33
Dialing Sprint PCS Operator Services. 33
Setting up your voicemail. 34
Finding out you have a message. 35
The phone book. 36
Saving numbers to the phone book. 36
Punctuating names. 37
Changing case during name entry. 38
Retrieving numbers from the phone book. 38
Reviewing all memory locations. 38
Finding a number using a memory location. 39
Finding a number using a person’s name. 39
Finding a number when you know at least three digits. 40
Changing your phone book. 41
Erasing a stored number. 41
Editing a stored number. 42
Dialing numbers from your phone book. 43
Using Speed Dial. 43
One-Touch/Two-Touch Dialing. 43
Dialing from a memory list. 44
Dialing from a phone book memory location. 44
6
The recent calls list. 49
Placing a call from the calls list. 50
Calls list options. 50
Features menu. 51
Switching between short and long menus. 51
To change to the long menu: 51
Long menu. 52
Short menu. 52
Long menu item descriptions. 53
Sounds (Menu 1): 53
Call Timers/Counters (Menu 2): 54
Directory (Menu 3): 55
Extras (Menu 4): 56
Security (Menu 5): 57
Display (Menu 6): 58
Network (Menu 7): 59
Usage guidelines:
All about performance and safety. 60
Keeping tabs on signal strength. 60
Understanding Power Save mode. 60
Understanding how your phone operates. 61
Radio frequency safety. 61
Maintaining your phone’s peak performance. 62
Protecting your battery. 63
Using your phone while driving. 64
Disposal of Lithium Ion batteries. 65
7

Following safety guidelines. 65
Using your phone near other electronic devices. 65
Turn off your phone before flying. 66
Restricting children’s access to your phone. 66
Turn off your phone in dangerous areas. 67
Cautions. 68
FCC notice. 68
Introduction.
Congratulations on your purchase of a Sprint PCS Phone. This
phone is quite versatile because it lets you make and receive
calls in so many places:
þ Anywhere within the nationwide Sprint PCS Network
þ On other select PCS CDMA networks
þ On analog cellular networks (that’s the old
cellular technology)
And although it comes standard with many exciting features,
like voicemail, an internal phone book and Call Waiting, it’s still
so easy to use. Just follow the simple steps described inside.
Of course, you can always call us if you need any help. Just press
from your Sprint PCS Phone and we’ll
be happy to help. (In Southern California, press
.)
Thanks for choosing Sprint PCS.
8
9
Getting to know
your phone.
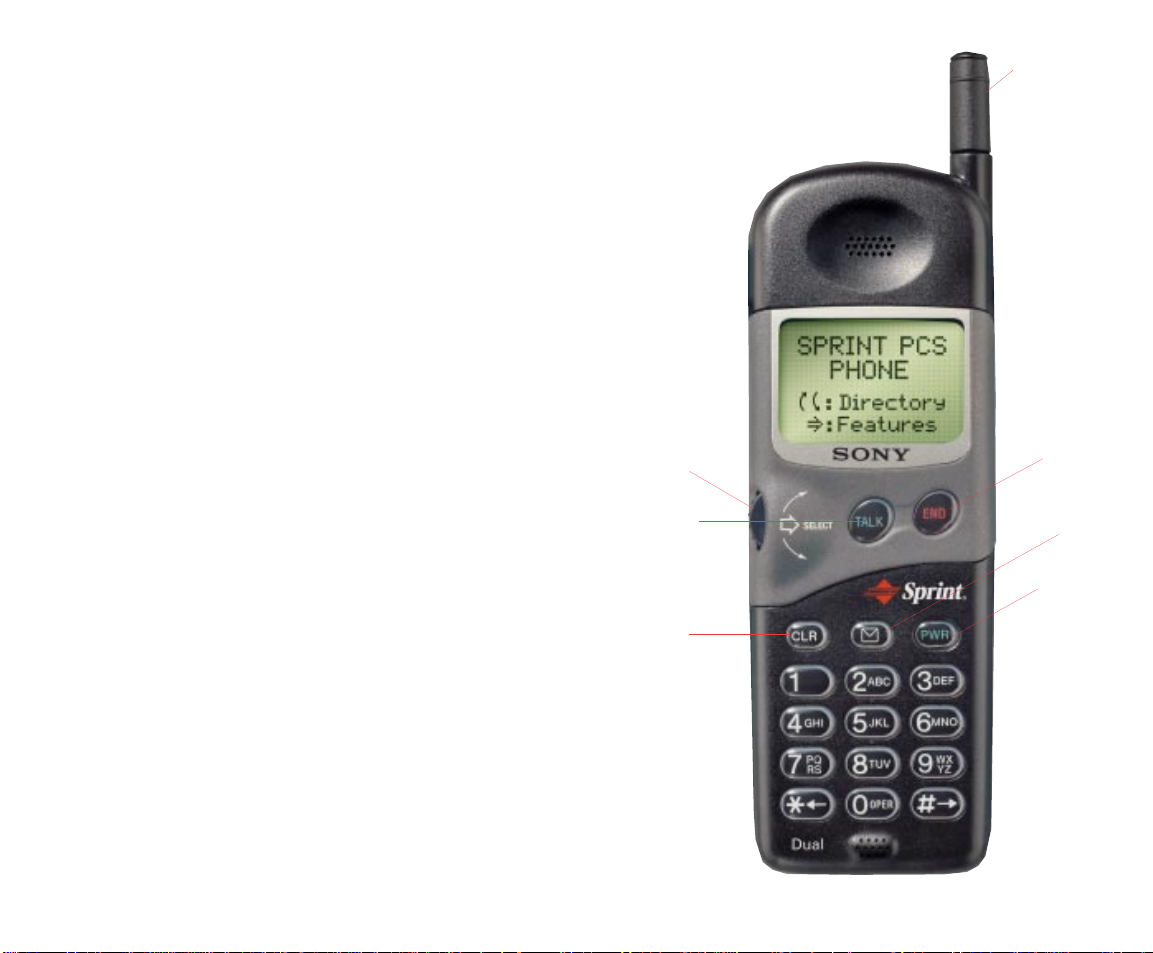
1. Dial: Lets you select menu options and features. Also lets you
adjust the volume during a call.
2. TALK: Lets you place and receive calls.
3. CLR: Allows you to clear characters from the screen or back up
menu levels.
4. Antenna: Makes the voice on the other end sound clearest when
it’s all the way up.
5. END: Lets you disconnect a call and return to standby mode.
6. Message Key: Lets you access your voicemail box and listen to
your messages.
7. PWR: Turns the phone on and off.
1. Dial
4. Antenna
5. END
10
2. TALK
3. CLR
FPO
CM-B1201SPR
6. Message
Key
7. PWR
11
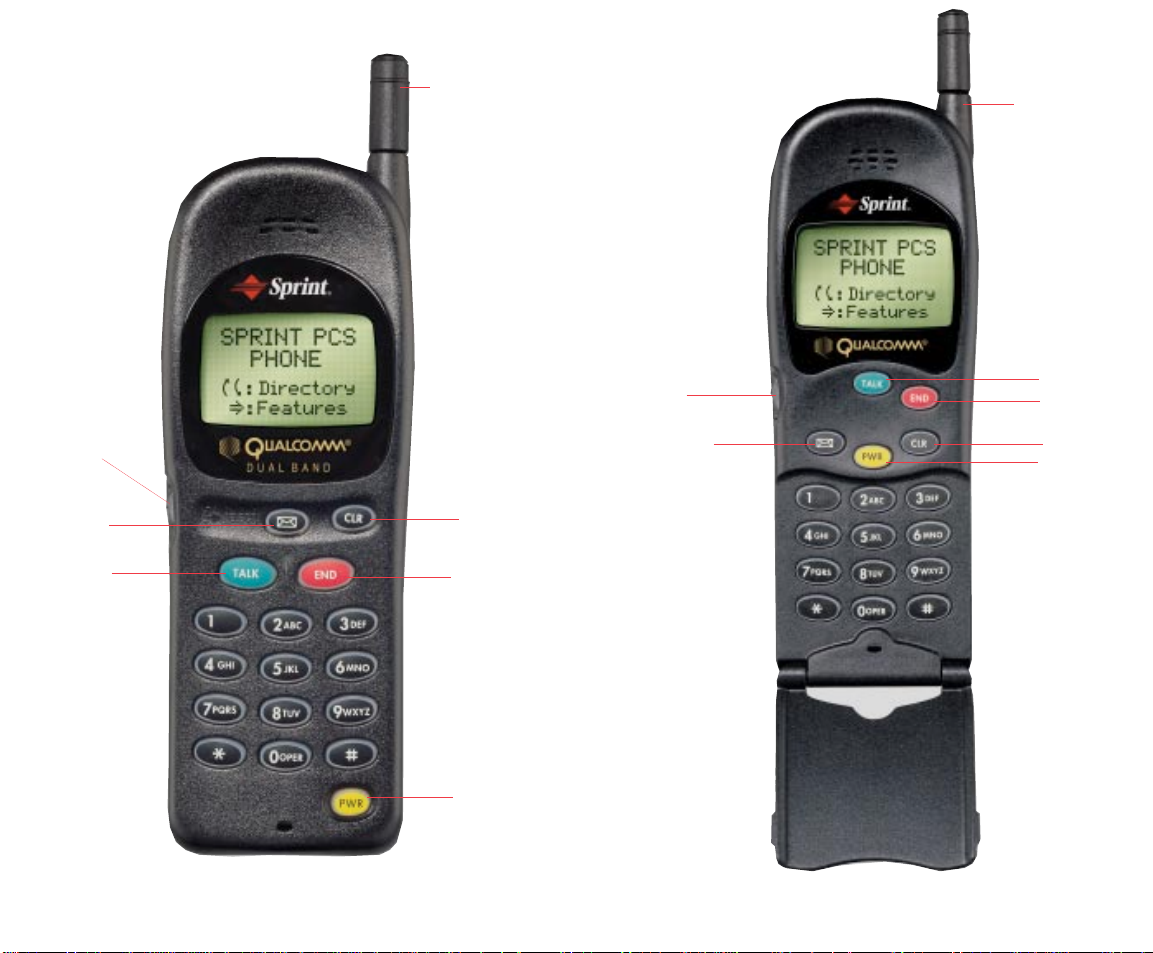
4. Antenna
4. Antenna
1. Dial
6. Message
Key
2. TALK
12
FPO
QCP2700
3. CLR
5. END
7. PWR
1. Dial
6. Message
Key
2. TALK
5. END
3. CLR
7. PWR
FPO
QCP2700F
13

Function keys.
The following keys perform these functions when pressed during
most procedures.
Use the dial to select options and perform actions
indicated on the display. It can be scrolled up or
down, or pressed in like a computer’s mouse.
The dial also provides quick access to features
like the internal phone book.
The message key lets you easily access
voicemail messages.
This key lets you do lots of things:
þ To erase one character from the display screen,
briefly press it once.
þ To erase all of them, hold it down for one second.
Press this key to place and receive calls, to access a
second incoming call (from Call Waiting) or to
initiate Three-Way Calling.
Press this key to disconnect a call. You also can
press it to exit out of a menu and return to the
phone’s standby display.
14
þ To back up one menu level when you’re accessing
menu options, press it once.
þ To revert to the standby display, hold it down for
one second.
15
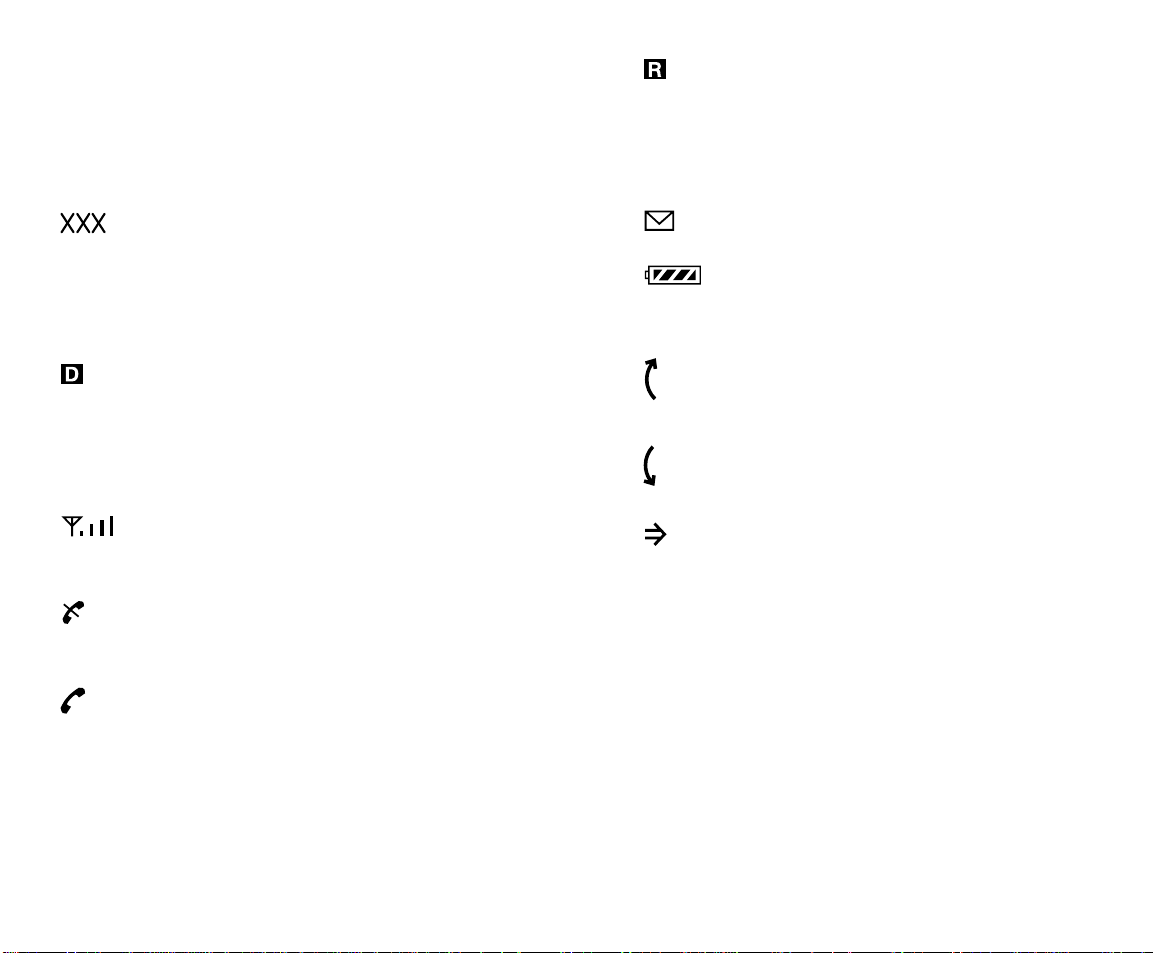
Display indicators.
Different indicators are displayed based on the phone’s
operating mode.
If this indicator is not displayed, you are in the
Sprint PCS Network. If it is displayed (it may or
may not be flashing), you are on another service
provider’s network.
The three characters in the upper-left corner indicate
the phone book memory location number (for example, L01), recent calls list number (for example, C07)
and feature menu number (for example, F01).
Indicates that your Sprint PCS Phone is operating
in digital mode. If this indicator is not displayed,
either your phone is operating in analog mode or
no service is available.
Measures your current signal strength. More lines
means more signal strength.
This means the phone is outside service areas.
When this is displayed, you cannot use your phone.
Tells you a call is in progress.
Indicates when you have messages waiting.
Shows the level of your battery charge. The more
black you see, the greater the charge.
You can move the dial up to scroll through
menu options.
You can move the dial shuttle down to scroll through
menu items.
Push the dial in to select menu items and features.
16
17

Using the battery.
Your Sprint PCS Phone comes with a rechargeable battery
pack. Remember to fully charge your battery as soon as the
charge becomes low in order to maximize your talk time
and standby time.
Installing and removing the battery.
The battery pack snaps easily onto the back of the phone (bottom
end first) for quick installation and removal. Make sure to turn
the power off before removing the battery. Otherwise, you could
lose stored numbers and messages.
Charging the battery.
You can tell whether or not your battery needs to be recharged
just by checking the upper-right corner of your phone’s display.
When the battery charge level gets low, the battery sensor will let
you know by displaying the screen icon and sounding a tone. If
the battery level gets too low, the phone will turn off automatically.
If this happens, unfortunately, you’ll lose whatever you were just
doing. So watch that indicator and make sure your level is okay.
To charge your battery, you should use the standard AC adapter,
or the optional dual port desktop charger, travel charger or rapid
charging cigarette lighter adapter. Using unauthorized ones could
cause damage. (The AC adapter is described in the next section.
For more informa tio n o n th e de sk top ch arg er, travel charger
and rapid charging cigarette lighter adapter, see the product
user guide for each.)
18
19

Charging with the AC adapter.
Turning your phone on and off.
Only use manufacturer-approved chargers and adapters with
your Sprint PCS Phone. Using an unauthorized one could
cause damage.
1. Plug the adapter into a wall outlet.
2. Plug the other end into the bottom of your Sprint PCS Phone,
with the battery attached.
Charging a completely discharged standard Lithium Ion battery
takes up to five hours.
If your phone is turned on, you’ll see “CH” in the upper-left
corner of the display. It’s telling you that the battery is being
charged. When the battery is fully charged, “FCH” will be
displayed in the upper-left corner.
If your phone is turned off, the display will show charging status.
“Battery is Charging” or “Charging is Complete” will be displayed.
When you’re ready to turn your Sprint PCS Phone on, check to
see that the charged battery has been installed on the back of the
phone or that you have external power (meaning the rapid
charging cigarette lighter adapter, hands-free car kit, travel charger
or AC adapter). Press for a few seconds until you see
“Looking for service” on the screen.
To turn your phone off, press for a few seconds until
“Powering Off ” is displayed. Then release . When your
phone is turned off, nothing is displayed on the screen (unless
you are charging your battery).
Note: If is pressed for less than one second, the phone
will not turn off. This keeps your phone from being turned
off accidentally.
Standby status.
Standby is the most basic state of the phone. The phone goes into
standby status soon after you turn it on or whenever you press
. When your phone is in standby status, you will typically
see the banner (that’s the message that’s displayed when you turn
on your phone). You’ll also have access to the phone’s directory
and features.
20
21

Power Save mode.
Your Sprint PCS Phone comes with a Power Save feature that will
be activated automatically if your phone hasn’t been able to find a
signal after 15 minutes of searching. While this feature is active,
the phone’s battery charge is conserved. The phone will automatically recheck for a signal periodically. To manually force the
phone to recheck for a signal, press any key. A message on the
display will let you know when the phone is operating in Power
Save mode.
Basic functions.
Making a call.
Whenever you make a call, follow these simple steps:
1. First, check to see that your phone is on. If you see the display
indicators on the screen, that means the power is on.
2. Enter a phone number.
3. To place the call, you can either press or press the
dial in twice. (If the phone is locked, the number is restricted
or there is another problem, you will see a help message.)
4. When you’re finished with your call, just press to
disconnect.
You can also make calls from your internal phone book (see
page 36) or from your recent calls list (see page 49).
22
23

Correcting dialing mistakes.
If you make a mistake while dialing a phone number, press
to erase one digit at a time. You can delete the entire
number at once by pressing and holding it down for at
least one second.
Answering calls.
roaming. If you’re roaming in areas where Sprint PCS has
agreements in place with other PCS CDMA service providers, you
will be charged the travel rate. If you’re roaming in areas where
Sprint PCS has agreements in place with conventional analog
cellular providers, you will pay airtime plus long-distance charges,
where they apply.
Your phone must be turned on before you can receive calls.
When your phone rings, press to answer. You can adjust
the ringer volume when you have an incoming call by turning the
dial either direction. To disconnect the call when you’re through,
press .
Where you can use your phone.
Your Sprint PCS Phone is dual band, which means you can use it
to make and receive calls in many places:
þ In any city where Sprint PCS provides service
þ On select PCS CDMA networks (like the Sprint PCS Network)
from other providers
þ On conventional analog cellular networks
When you use your phone in any Sprint PCS Service Area outside
your home service area, it’s called traveling. You are charged a
simple, flat rate for all travel calls you make and receive. When
you use your phone outside the Sprint PCS Network, it’s called
24
Note: In areas where Sprint PCS does not have roaming
agreements in place, you will still be able to make emergency
calls to 911 and calls billed to a credit card.
What you’ll see.
You should always check your phone’s display because it will let
you know when you’re outside the Sprint PCS Network and whether
your phone is operating in digital mode. The chart below indicates
what you will see, depending on where you’re using your phone.
D (Digital Indicator) R (Roaming Indicator)
Sprint PCS Network X
Other PCS CDMA Networks X X
Analog Cellular X
Analog Roam” displayed)
(“
Regardless of whether you’re using your phone on or off the
Sprint PCS Network, you should always dial numbers using 11
digits (1 + area code + number) when you make calls outside
your Sprint PCS Home Service Area
SM
. (This does not necessarily
mean you’ll be charged a long-distance rate.)
25

Calling experience.
When you use your phone on other PCS CDMA networks, your
calling experience will be quite similar to what you experience
when making calls from within the Sprint PCS Network. Although
certain calling features may not be available, your phone calls are
still private and secure, and in general, your call quality should
be similar to what you experience with the Sprint PCS Network.
When you use your phone on analog cellular networks, your
experience will be much different. Cellular roaming will be of the
same quality provided by cellular carriers today. Although you will
still have the convenience of being able to make and receive calls,
here are some differences you can expect:
þ You are more likely to experience static, cross-talk, fade-out
and dropped calls.
þ Some calling features that are standard within the Sprint PCS
Network will be unavailable.
þ You will experience the same security and privacy risks
(eavesdropping and cloning) that exist with conventional
cellular services today.
If you are on the phone when you leave a Sprint PCS Service Area
and enter an area where roaming is available (whether PCS
CDMA or analog cellular), your call will be dropped. If your call
is dropped in an area where you think Sprint PCS provides
service, turn your phone off and then on again to speed acquisition
of the Sprint PCS Network.
If you need customer service for any reason while using your
phone outside the Sprint PCS Network, just dial
from your Sprint PCS Phone. However, because
you’re outside the Sprint PCS Network, you may reach the local
service provider’s customer service instead of Sprint PCS
Customer Care. To be sure that you reach Sprint PCS Customer
Care, dial 1-888-211-4PCS (4727).
Using Caller ID.
This feature tells you who is calling you on your Sprint PCS Phone
by displaying their number when the phone rings. If a caller’s
name and number are stored in your internal phone book, the
corresponding name is also displayed. If you call someone who
has this feature, your Sprint PCS Phone Number will be displayed
on their phone.
þ Battery life will be shorter when you use your phone for
cellular roaming than when you use it on a CDMA network.
26
To block your Sprint PCS Number from being displayed for a
particular outgoing call, just follow these steps:
1. Press .
27

2. Dial the outgoing phone number and press .
To block your Sprint PCS Phone Number from being displayed
on all of your outgoing calls, just call Sprint PCS Customer Care
by pressing (in Southern California,
press ). Once you have
permanently blocked your number, you can release the block
for a particular call. To do that, follow these steps:
1. Press .
2. Dial the phone number and press .
Responding to Call Waiting.
If you’re in the middle of a call and you hear a beep, that means
you have another call coming in. If you don’t answer the call
within 10 seconds, you will be reminded of the incoming call with
a second beep. To put the first caller on hold and answer the
second call, press and then . Press
again to switch back to the first call.
) to call Sprint PCS
Customer Care and have Call Waiting deactivated.
Using Three-Way Calling.
Three-Way Calling lets you talk with two different people at the
same time. Simply dial your first number and press .
When you have connected, press to put the first caller on
hold. Next, dial the second number and press . When
you’re connected, press again to begin your three-way
call. When you use this feature, you will be charged normal
airtime rates for each of the two calls you make.
Using Call Forwarding.
With Call Forwarding, you can have all of your incoming calls
forwarded to another phone number – even if your Sprint PCS
Phone is turned off. When Call Forwarding is activated, you can
still make calls from your Sprint PCS Phone. To activate Call
Forwarding, follow these steps:
1. Press .
If you don’t want to be interrupted during a particular call, you
can temporarily disable Call Waiting. Just press
before dialing the number. Once you end that call, Call
Waiting will be reactivated automatically. If you don’t want to be
interrupted during any of your calls, before making any more,
press (in Southern California, press
28
2. Enter the area code and seven-digit phone number to which
your calls should be forwarded.
3. Then press . You will hear a tone that confirms you’ve
activated Call Forwarding.
To deactivate Call Forwarding, press
29

. Once again, you’ll hear a tone to confirm
the deactivation.
Redialing calls.
To redial the last call you made from your Sprint PCS Phone,
press . When the number is displayed, press
again. You also can redial any of your last 10 calls using your
recent calls list (see page 49).
Getting your own phone number.
You probably don’t call your own Sprint PCS Phone Number very
often, so you may forget it. If you do, here’s an easy way to get it:
1. Select “Features.”
Adjusting volume.
You can adjust the volume during a call by turning the dial. You
can adjust the default setting for your phone’s ringer, key beep
and earpiece volume using the “SOUNDS” menu.
Locking the keypad.
To avoid accidental key presses, you can lock the keypad.
However, you’ll still receive incoming calls and messages.
(This feature can be activated only when the phone is in
standby mode.)
To lock your keypad, press and hold down the dial until you see
the message that the keypad is guarded. To unlock your keypad,
press .
2. Scroll and select “Directory.”
3. Scroll and select “My Number.”
Note: If the short features menu is active, then simply select
“Features” and then “My Number” to get your phone number.
30
Note: If you have an incoming call, pressing or
will answer the call and unlock
the keypad.
31

Emergency dialing.
You can place calls to 911, or one of the other three emergency
numbers that are in your emergency number list, even if your
phone is locked. (For information on locking your phone, see page
31.) As long as you’re within a service area (check your signal
strength indicator), these numbers can be dialed.
lock code, see page 57.)
4. Scroll and select “EMERGENCY #.”
5. Select “EDIT” to edit or enter the first emergency number, or
scroll to other emergency numbers.
6. Select “SAVE” to save the entered number.
Calling 911.
1. Dial .
2. Press .
Note: Even if your account is restricted, you can still dial 911
(as long as you’re within a service area) but no other
emergency numbers.
Saving and editing emergency numbers.
You can save three phone numbers (in addition to 911) that can
be dialed even if your phone has been locked. To save emergency
numbers, follow the steps below:
1. Select “Features.”
2. Scroll and select “Security.”
3. Enter your lock code. (The default code typically consists of
the last four digits of your phone number. To change your
32
Dialing other emergency numbers.
If there’s an emergency, you can still make calls to your stored
emergency numbers even when your phone is locked.
1. Dial one of the other three emergency numbers stored in your
emergency list. Your emergency numbers must be dialed
exactly as stored – with or without the area code.
2. Press .
Dialing Sprint PCS Directory Assistance.
Dial to obtain residential,
business and government listings; to get help completing local or
long-distance calls; or to obtain movie listings, hotel, restaurant
and shopping information, and major local event information.
Dialing Sprint PCS Operator Services.
Dial to obtain assistance in placing collect calls or calls
billed to a local telephone calling card or a third party.
33

Setting up your voicemail.
Finding out you have a message.
To set up your voicemail, press and hold for at least
one second. Then enter “SPRINT” (777468) as your temporary
pass code. We suggest you do this soon after you activate your
Sprint PCS Account.
After entering that code, the voicemail system will prompt you
to do these things:
þ Create your own personal pass code. Make sure you pick a
number that you will remember.
þ Create the greeting that people will hear when they call you.
þ Record your name announcement.
þ Choose whether to activate One-Touch Access.
After you’ve set up your voicemail, it will automatically record
messages whenever someone calls and you don’t answer.
Whenever you need to call your voicemail from another phone,
dial your Sprint PCS Phone Number. When you hear your greeting,
press and enter your pass code.
Your Sprint PCS Phone alerts you when you have a new voicemail
message in several ways: by displaying a message on the screen,
by sounding five short beeps (if the ringer is turned on), by a
flashing backlight, and by displaying at the top of your
screen. Your phone will continue to display until you save
or erase your new messages. You can have up to 30 new or saved
messages and each can be stored for up to 30 days.
34
35

The phone book.
Your Sprint PCS Phone lets you store up to 99 names and phone
numbers. Each entry can contain up to 32 digits, with an associated
name of up to 12 characters. You can access your phone book in
two different ways.
þ When the phone is in standby mode, select “Phone List,” then
“Phone Book.”
þ Regardless of whether a call is in progress, select “Features,”
then “Directory,” then “Phone Book.”
Saving numbers to the phone book.
You can save numbers in your internal phone book in two ways:
while your phone is in standby mode or by accessing the “PHONE
BOOK” menu. Follow the steps described below. (If you’re starting from standby mode, start with step 4.) Memory locations 1
through 9 should be used for One-Touch Dialing or your most
commonly used phone numbers.
1. Select “Features.”
2. Scroll and select “Directory.”
3. Select “Save.”
5. Select “Options.”
6. Select “Save.”
7. Enter a name to go with the number (up to 12 characters).
To enter a name, press the key labeled with the letter you want.
Pressing a key repeatedly will change the letter or number in
the flashing cursor position on the screen. (For example, press
2 once for “A.”Press 2 twice for “B.”) When you have the
correct letter or number in position on the screen, the cursor
automatically advances one space. Press to correct any
mistakes. Turning the dial will move the cursor forward and
backwards.
8. Select “Save” to store the name.
9. Select “Save” at the “Save in location. . .” prompt to store
the number in the first available memory location. Or you can
scroll to select a custom store location and follow the
remaining “Save” prompts.
Punctuating names.
When storing or editing phone book memory locations, you can
use any of the nine punctuation characters. Press 1 until you see
the appropriate character. Punctuation characters are - “ . ‘ , &
( ) and :
4. Enter the phone number you want to save.
36
37

Changing case during name entry.
Finding a number using a memory location.
When entering a name in a memory location, you can use both
uppercase and lowercase letters. Press the appropriate number
key until you see the letter and case you need. Lowercase follows
uppercase.
Retrieving numbers from the phone book.
You can access the numbers in your internal phone book in
several ways. When your phone is in standby, follow the steps
described on the next page. (You can return the phone to standby
by pressing .)
Reviewing all memory locations.
Once you have stored numbers in your phone book, you can
review all those numbers. To display the location number, name
and phone number, follow these steps:
1. From standby, select “Phone List.”
2. Scroll and select “Phone Book.”
1. Enter the one- or two-digit memory location of the number
you want to find.
2. Select “Options.”
3. Scroll and select “Recall Loc #.”
Finding a number using a person’s name.
1. From standby, select “Phone List.”
2. Select “Find Name.”
3. Enter the name of the person whose name you want to find.
You can enter two or more consecutive letters from the name if
you don’t want to enter the whole name.
4. Select “Find.” The phone searches for names containing those
consecutive letters and displays a list of matches.
5. Scroll through the list.
3. Scroll through the entries one at a time using the dial.
4. Select “Options” to see more information and the available
options for that location.
5. To call the displayed number, press .
38
6. Select “Options” to see more information on a particular
number or press to make a call.
39

Finding a number when you know at least
three digits.
You can look for a phone number if you know at least three consecutive digits.
Changing your
phone book.
Erasing a stored number.
1. Enter any three sequential digits from the phone number.
2. Select “Options.”
3. Scroll and select “Find Number.”
4. When the list of matching numbers is displayed, scroll to the
one you’re looking for.
5. Select “Options” to see more information on a particular
number or press to make a call.
You have two options for erasing a number from your phone
book. (For information on how to erase the entire phone book,
see page 58.)
When you have the phone book number displayed that you want
to erase, do the following:
1. Select “Options.”
2. Scroll and select “Erase.”
3. Confirm that you want to erase.
From the standby display:
1. Select “Features.”
2. Select “Directory.”
3. Select “Erase.”
40
4. Scroll to find the entry you want to erase or enter its
memory location.
5. Confirm that you want to erase.
41

Editing a stored number.
1. Select “Features.”
2. Select “Directory.”
3. Scroll and select “Edit.”
4. Scroll to find the correct number, or enter its memory
location number.
Dialing numbers from
your phone book.
You can make a call using any memory location, either by OneTouch/Two-Touch Dialing or by pressing while reviewing
the full contents of the memory location.
Using Speed Dial.
5. Select “Edit” to edit the entry.
6. You can edit the name, phone number or memory location.
þ Select “Name.” To edit the name, use the digit keys to enter
letters and to delete letters. Use ,
or turn the dial to move the cursor.
þ Select “Phone #.” To edit the phone number, overwrite the
numbers or use to delete numbers. (If necessary,
select “Options.”)
þ Select “Location #.” To edit the memory location, overwrite
the numbers or scroll using the dial to choose a new
memory location.
7. If necessary, select “Options.”
8. Select “Save.”
42
You can dial numbers that are saved in your internal phone book
by simply pressing a couple of keys. Just follow these steps:
1. Press the key(s) that correspond to the numeric memory
location. For example, for memory location 10, press
.
2. Press . The phone will find the number in the internal
phone book, display it on the screen and place the call.
One-Touch/Two-Touch Dialing.
This feature enables you to dial phone book entries through one
key press (for locations 1 to 9) or two key presses (for locations
10 to 99). You can turn on One-Touch Dialing through the
“Touch Dial” item under the “Extras” menu (see page 56).
43

For memory locations 1 to 9:
Press and hold the appropriate key for 1.5 seconds. The display
will confirm that the number has been dialed when it shows
“CONNECTING . . . .”
Advanced phone book
features.
Using the pause feature.
For locations 10 to 99:
1. Press the first digit.
2. Press and hold the key for the second digit for 1.5 seconds.
Dialing from a memory list.
1. From standby, select “Phone List.”
2. Scroll to and select “Phone Book.”
3. Scroll to select the phone book memory location you want.
4. Press .
Dialing from a phone book memory location.
While reviewing any memory location, press or press the
dial in twice.
When you call automated systems (like voicemail or credit card
calling), you are often required to enter a password or calling
card number. Instead of entering the numbers manually each
time, you can store the numbers in your phone book, separated
by special characters called pauses. Then when you dial the
stored numbers, you’ll have to press the dial in to release the
pause. (The screen will prompt you.) To insert pauses:
1. Enter the number to be dialed.
2. Select “Options.”
3. Scroll and select “Enter Pause.” (Pauses are represented on
the phone’s display by “P.”)
4. Enter the number tones to be released after the pause (for
example, a password or credit card number).
5. Dial or save the entered number.
44
45

Linking memory locations.
Viewing a number.
Linking is an extension of the pause feature. It allows you to
release a series of numbers (such as calling card numbers or
passwords). You can link multiple phone book memory locations
together when a number is too long to be stored with pauses in a
single location (a maximum of 32 digits can be stored in any single location). While dialing the number, you’ll have to press the
dial in to release the numbers in the linked memory location.
To insert links:
1. Enter the number to be dialed.
2. Select “Options.”
3. Scroll and select “Enter Link.” (Link dialing is represented on
the phone’s display by “L.”)
4. Enter a one- or two-digit number corresponding to a phone
book memory location. For example, enter “10” to release all
of the numbers stored in memory location number.
If a phone book entry is too long to be displayed in its entirety
on the phone’s display, you can view all 32 digits by doing the
following:
1. Recall a phone book memory.
2. Select “Options.”
3. Scroll and select “View Number.”
Restricting a stored phone number.
You can restrict a stored phone number so that it can’t be displayed, dialed or erased unless you enter your lock code. To
restrict a number, follow these steps:
1. Select “Features.”
2. Scroll and select “Security.”
3. Enter your four-digit lock code.
5. Dial or save the number that you have entered.
46
4. Scroll and select “Restrict #.”
5. Enter the memory location of the number you want to restrict,
or scroll to the appropriate location.
47

6. Select “Restrict.”
To unrestrict a number, follow the same sequence.
Note: To restrict the entire phone book, select “Restrict All” in
step five above.
The recent calls list.
Your Sprint PCS Phone maintains a list of the last 10 numbers for
calls you made, accepted, missed or added. This recent calls list
makes it easy for you to redial. Old entries will be bumped off the
bottom of the list as new ones are added to the beginning of the
list. You have two ways to access the calls list:
þ In standby, select “Phone List,” then “Calls List.”
þ During a call or in standby, select “Features,” then “Directory,”
then “Calls List.”
Depending on the operating mode and available features, each
entry on the calls list may contain the phone number, name,
length of the call and time stamp (when the call occurred). You
may see one of the following entries when reviewing a calls list
entry:
48
þ MISSED CALL: Indicates an unanswered incoming call if Caller
ID is available.
þ CALL FROM: Indicates a call you received and answered if
Caller ID is available.
þ CALL TO: Indicates a call you placed.
49

þ ADDED: Indicates that the number was added using the
scratch pad feature.
Features menu.
Placing a call from the calls list.
When the calls list is displayed, you can place a call by pressing
or by pressing the dial in twice.
Calls list options.
When reviewing a particular call, select “Options” for additional
information or options. You can select:
þ “Save” to store the number in the phone book
þ “Talk” to place a call
þ “Duration” to find out the length of the call
þ “View number” to see the complete phone number
þ “Time/Date” to see the time and date of the call
þ “Send Tones” to send/play the sounds associated with each
entered number (for automated systems, such as credit card
billing systems and voicemail systems).
Two different features menus let you check or change the different features and settings of your Sprint PCS Phone. The long
menu includes every possible menu option. The short menu
includes only the most frequently used and most important menu
items. When the long features menu is active, the flashing number
at the top left corner of the screen indicates the menu number.
Switching between short and long menus.
The menu trees on the next page indicate the content and structures of the short and long menu. To change to the short menu,
just follow these steps:
1. Select “Features.”
2. Scroll and select “Display.”
3. Scroll and select “Menu Length.”
4. Scroll and select “Short.”
To change to the long menu:
50
1. Select “Features.”
2. Scroll down to “Long Menu” (the last item in the list).
3. Select “Long Menu.”
51

Long menu.
You can access all menu items using either the dial or the keypad. The blinking number in the upper-left corner indicates the
menu number. The overall structure looks like this:
Long menu item
descriptions.
Sounds (Menu 1):
11: Ringer Volume
12: Mute/Unmute
13: Key Beep Volume
14: Earpiece (Speaker) Volume
15: Ringer Type
16: Key Tone/Click
17: Key Beep Length
18. Message Ring
31: My Number
32: Store an Entry
33: Erase an Old Entry
34: Edit an Entry
35: Retrieve by Name
36: Recall Phone Book
37: Recall Calls List
51: Lock Phone
52: Change Lock Code
53: Restrict a Book Entry
54: Restrict All Book Entries
56: Erase All Phone Book
57: Erase Calls List
58: Emergency Numbers
71: Roam Alert
72: Drop Alert
73: Voice Privacy Alert
21: All Calls Timer/Counter
22: Recent Calls Timer/Counter
23: Minute Alert
24: Auto Power Off
41: Keyguard
42: One/Two-Touch Dial
43: Auto Retry
44: Scratchpad
61: Standby Mode Banner
62: Backlight Settings
63: Autohyphen
64: Sort Book (ABC/123)
65: Short/Long Menu
Features
1: Sounds
2: Call Timers
3: Directory
4: Extra Features
5: Security
6: Display
7: Network
Short menu.
With the short menu, you must use the dial to access any menu
item. Shortcut keypad entries don’t work with the short menu.
The short menu structure looks like this:
Ringer Volume
Features
My Number
Phone List
Lock Phone
Long Menu
Phone Book
Find Name
Calls List
This menu lets you adjust any sound-related feature on your
Sprint PCS Phone.
þ RINGER VOLUME (Menu 11): Adjust incoming call
ringer and new message alert volume with or . The
“escalating” setting starts out quietly and gradually gets
louder with each ring.
þ MUTE/UNMUTE (Menu 12): Switch the microphone on
and off during a call. When the microphone is off, the other
party can’t hear you.
þ KEY BEEP VOLUME (Menu 13): Adjust the volume that
the keys make when you press them.
þ EARPIECE VOLUME (Menu 14): Adjust the earpiece volume.
Turning the dial during a call will adjust this setting as well.
þ RINGER TYPE (Menu 15): Indicate how you want the
ringer to sound by choosing from one of five options.
þ KEY SOUND (Menu 16): Select either beep tones or click
sounds.
52
53

þ BEEP LENGTH (Menu 17): Choose key beep tone length
(the length of the beeps you hear when you press a key).
The “long” setting may be necessary for older answering
machines or automated systems that require long key press
tones to function properly.
þ MESSAGE RING (Menu 18): Adjust audible alert for
message notifications. Set this to “on” so your phone will
beep five times whenever it receives a new message. Select
“+ Reminder” if you want your phone to beep every two
minutes until you acknowledge the new message. “Off”
means you will only receive an alert message on your
phone’s display.
Call Timers/Counters (Menu 2):
These features help you keep track of your airtime usage and
make the most of your battery life.
þ ALL CALLS (Menu 21): Displays length of all calls during
the lifetime of the phone (in minutes and seconds) and the
number of calls made. This information cannot be reset.
þ AUTO-OFF (Menu 24): Enables you to set the phone to
automatically turn off after a specified time.
Directory (Menu 3):
This menu provides access to the phone number storage capabilities of the phone, including the phone book, recent calls list and
your phone’s own number.
þ MY NUMBER (Menu 31): Display your Sprint PCS Phone
Number (see page 30).
þ SAVE (Menu 32): Save entries to the phone’s memory
locations (see pages 36–37).
þ ERASE (Menu 33): Erase entries from memory locations
(see page 41).
þ EDIT (Menu 34): Edit entries in memory locations
(see page 46).
þ FIND NAME (Menu 35): Find stored numbers by entering
in letters of the name (see page 39).
þ RECENT CALLS (Menu 22): Displays length of all calls
(in minutes and seconds) and number of calls. This
information can be reset.
þ MINUTE ALERT (Menu 23): Produces an audible alert
10 seconds before the end of each minute during a call.
þ PHONE BOOK (Menu 36): Find either a specific phone
book entry or the entire list of phone book entries (see
pages 38–39).
5554

þ CALLS LIST (Menu 37): Access the last ten calls made,
received, missed or added. Also shows the duration and
time/date of a call (see page 49).
Extras (Menu 4):
Security (Menu 5):
Before you can access the settings on this menu, you must enter
your four-digit lock code (typically the last four digits of your
phone number).
This menu lets you access various miscellaneous features.
þ KEY GUARD (Menu 41): Lock the keypad so you won’t
accidentally press the keys (see page 31).
þ TOUCH DIAL (Menu 42): Dial stored phone numbers by
pressing and holding digit keys (see page 43).
þ AUTO-RETRY (Menu 43): Set length of time that the
phone waits before automatically redialing a number when
a call attempt has failed. Busy-line tones through the earpiece speaker are not necessarily considered call failures (if
the call actually made it through the network only to
encounter the called party’s busy line).
þ SCRATCH PAD (Menu 44): Enter a phone number and
save it to the calls list.
þ LOCK PHONE (Menu 51): When you use this option to
lock your phone, only emergency calls can be made. When
your phone is locked, “Unlock” is displayed.
þ NEW CODE (Menu 52): Enter a new four-digit lock code.
If you decide to change your lock code and then forget it,
you will have to take your phone to the nearest Sprint PCS
Center for assistance.
þ RESTRICT # (Menu 53): Restrict (or unrestrict) a phone
book entry so that it can’t be displayed, searched for,
dialed, erased or edited unless your phone’s lock code is
entered first.
þ RESTRICT ALL (Menu 54): Restrict (or unrestrict) all
stored phone book entries from display and dialing, as
described above under menu 53. You can still manually
enter and dial numbers.
þ MASTER RESET (Menu 55): Reset all user settings back
to the factory defaults, with the exception of the phone book
and calls list.
56
57

þ ERASE BOOK (Menu 56): Clear all phone book entries.
þ ERASE CALLS (Menu 57): Clear all calls list entries.
þ EMERGENCY # (Menu 58): Lets you enter three phone
numbers that can be dialed even when the phone is locked.
þ SORT BOOK (Menu 64): Determines the order of your
phone book memory entries. The “BY LOC #” setting will
sort numbers sequentially (by their phone book location
number) and the “alphabetic” setting will sort the entries
alphabetically.
Display (Menu 6):
These options let you customize how things will be displayed on
your phone’s display screen.
þ BANNER (Menu 61): This option lets you customize text
that is displayed on the first line of your phone’s display
screen when your phone is in standby.
þ BACKLIGHT (Menu 62): Choose the time period setting of
the display and keypad backlighting after any keypress is
made.
þ AUTO-HYPHEN (Menu 63): When you select this option,
your phone automatically inserts hyphens so your numbers
look like normal U.S. phone numbers (for example,
“619-123-4567”).
þ MENU LENGTH (Menu 65): Select either the long or
short features menu. The short menu only includes a few
often-used items, while the long menu includes all of the
many features of the phone. See page 52 for menu layout.
Network (Menu 7):
This menu lets you set network features.
þ ROAM ALERT (Menu 71): Sounds an audible alert when
roaming conditions occur.
þ DROP ALERT (Menu 72): Displays text and sounds an
audible alert when a call is dropped due to a signal fade.
(This happens when you leave a service area.)
þ PRIVACY ALERT (Menu 73): Displays text and sounds
an alert when enhanced voice privacy is lost or regained
during a call.
58
59

Usage guidelines:
All about performance
and safety.
Keeping tabs on signal strength.
First of all, the voice quality of your Sprint PCS Phone will always
be at its best when the antenna is fully raised. If you’re inside a
building, reception may be better near a window.
The quality of each call you make or receive depends on the
signal strength in your area. Your phone will inform you of the
current strength by displaying a number of bars next to the signal
strength icon. The more bars displayed, the stronger the signal.
(See page 16 for an illustration of the signal strength indicators.)
Understanding Power Save mode.
If you’re trying to use your phone in an area where the signal is
too weak, the Power Save feature will automatically activate to
conserve battery power when you’ve been unable to pick up a
signal for 15 minutes. If your phone is on, it will periodically
recheck service availability, or you can do so yourself manually
by pressing any key. A message will be displayed on the screen
any time Power Save has been activated.
Understanding how your phone operates.
Your Sprint PCS Phone is basically a radio transmitter and
receiver. When it’s turned on, it receives and transmits radio
frequency (RF) signals. Your phone operates in the frequency
range of 1.9 GHz and 800 MHz. When your phone is in use,
the system handling your call controls the power level.
Radio frequency safety.
In 1991–1992, the Institute of Electrical and Electronics
Engineers (IEEE) and the American National Standards Institute
(ANSI) joined in updating ANSI’s 1982 standard for safety levels
with respect to human exposure to RF signals. More than 120
scientists, engineers and physicians from universities, government
health agencies and industries developed this updated standard
after reviewing the available body of research. In 1993, the
Federal Communications Commission (FCC) adopted this
updated standard in a regulation. In August 1996, the FCC
adopted a hybrid standard consisting of the existing ANSI/IEEE
standard and the guidelines published by the National Council of
Radiation Protection and Measurements (NCRP).
The design of the Sprint PCS Phone complies with these updated
standards. Of course, if you want to limit RF exposure even
further than the updated standard, you can choose to control
the duration of your calls and operate your phone in the most
power-efficient manner.
60
61

Maintaining your phone’s peak performance.
Protecting your battery.
To operate your phone properly – that is, to maintain safe and
satisfactory service – you should follow these rules:
þ For best reception, extend the antenna fully.
þ Hold the phone with the antenna up and over your shoulder.
þ Do not hold the phone antenna at any time.
þ Do not use the phone with a damaged antenna.
þ Speak directly into the mouthpiece.
Avoid exposing your phone and accessories to rain or liquid
spills. If your phone does get wet, turn the power off immediately
and remove the battery pack. If it is inoperable, you should
return it to a Sprint PCS Center or call Sprint PCS Customer Care
for service.
Only authorized personnel should service your phone and its
accessories. Faulty service may invalidate the warranty.
For best battery performance, you should follow these guidelines:
þ Only use approved battery packs (model numbers TXBAT0121
and TXBAT0123 for Qualcomm models QCP-2700 and QCP2700F; model numbers QN-S004BPLS and QN-S003BPLH for
Sony model CM-B1201SPR) and desktop and travel chargers
(model number TXDTCO11O for desktop charger; model
number TXTVLO1O4 for travel charger). These chargers are
designed to maximize battery life. Using other batteries or
chargers will invalidate your warranty and may cause
damage as well.
þ To avoid damage, charge the battery pack only in temperatures
that range from 32°F to 104°F (0°C to 40°C).
þ Do not use the battery charger in direct sunlight or in high
humidity areas, such as the bathroom.
þ Never dispose of the battery pack by incineration.
þ Keep the metal contacts at the top of the battery pack clean.
62
þ Do not attempt to disassemble or short-circuit the
battery pack.
þ You may need to recharge the battery pack if it has not been
used for a long period of time.
63

þ Replace the battery pack when it no longer provides
acceptable performance. It can be recharged hundreds
of times before it will need to be replaced.
þ Do not store the battery pack in high temperature areas for
long periods of time. Follow these storage rules:
Less than one month: -4°F to 140°F (-20°C to 60°C)
More than one month: -4°F to 113°F (-20°C to 45°C)
Disposal of Lithium Ion batteries.
You can return your unwanted Lithium Ion batteries. For the Sony
Service Center nearest you, call 1-800-222-SONY. For the
Qualcomm Service Center nearest you, call 1-619-651-4028.
Note: In some areas, the disposal of Lithium Ion batteries in
household or business trash may be prohibited.
Following safety guidelines.
Using your phone while driving.
Talking on the phone while you’re driving may divert your
attention from the road. Besides that, it is illegal in some states.
Remember, safety comes first.
When using your Sprint PCS Phone in the car:
þ Focus on driving, not talking.
þ Use your hands-free car kit.
If you must use the phone while driving, please use One-Touch
Dialing and Speed Dial.
FAILURE TO FOLLOW THESE INSTRUCTIONS MAY LEAD TO
SERIOUS PERSONAL INJURY AND POSSIBLE PROPERTY DAMAGE.
64
To operate your phone safely and efficiently, you should always
follow any special regulations in a given area, and turn your
phone off in areas where use is forbidden or when it may cause
interference or danger.
Using your phone near other electronic devices.
Most modern electronic equipment is shielded from radio
frequency (RF) signals. However, RF signals from PCS telephones
may affect inadequately shielded electronic equipment.
RF signals may affect improperly installed or inadequately
shielded electronic operating and entertainment systems in
motor vehicles. Check with the manufacturer or its representative
to determine if these systems are adequately shielded from
external RF signals. You should also check with the manufacturer
regarding any equipment that has been added to your vehicle.
65

Consult the manufacturer of any personal medical devices
(such as pacemakers and hearing aids) to determine if they
are adequately shielded from external RF signals.
Turn off the phone in healthcare facilities and request permission
before using the phone near medical equipment.
Turn off your phone in dangerous areas.
To avoid interfering with blasting operations, you should turn off
your phone when in a blasting area or in other areas with signs
indicating that two-way radios should be turned off. Construction
crews often use remote-control RF devices to set off explosives.
Turn off your phone before flying.
You should turn off your Sprint PCS Phone before boarding
any aircraft. To prevent possible interference with aircraft
systems, U.S. Federal Aviation Administration (FAA) regulations
require you to have permission from a crew member to use
your phone while the plane is on the ground. To prevent any risk
of interference, FCC regulations prohibit using your phone while
the plane is in the air.
Restricting children’s access to your phone.
Your PCS phone is not a toy, and should not be played with by
children. They could hurt themselves and others, damage the
phone or make calls that increase your telephone bills.
Turn off your phone when you are in any area with a potentially
explosive atmosphere. It is rare, but your phone or its accessories
could generate sparks. Sparks could cause an explosion or a fire
resulting in bodily injury or even death.
Areas with a potentially explosive atmosphere are often, but not
always, clearly marked. They include fueling areas such as gas
stations; below deck on boats; fuel or chemical transfer or storage
facilities; areas where the air contains chemicals or particles such
as grain, dust or metal powders; and any other area where you
would normally be advised to turn off your vehicle engine.
Do not transport or store flammable gas, liquid or explosives
in the compartment of your vehicle that contains your phone
or accessories.
66
67

Cautions.
Any changes or modifications to your Sprint PCS Phone not
expressly approved in this document could void your warranty for
this equipment and void your authority to operate this equipment.
Only use approved batteries, antennas and chargers. The use of
any other type will invalidate the warranty.
FCC notice.
The phone may cause TV or radio interference if used in close
proximity to receiving equipment. The FCC can require you to stop
using the telephone if such interference cannot be eliminated. If
you need assistance, contact Sprint PCS Customer Care.
And last, but certainly not least, vehicles using liquefied petroleum gas (such as propane or butane) must comply with the
National Fire Protection Standard (NFPA-58). For a copy of this
standard, contact the National Fire Protection Association,
One Batterymarch Park, Quincy, MA 02269, Attn: Publication
Sales Division.
68
The products and equipment described in the attached documentation are manufactured under
one or more of the following U.S. patents:
4,901,307,
5,056,109,
5,099,204,
5,101,501,
5,103,459,
5,107,225,
5,109,390,
5,193,094,
5,228,054,
5,257,283,
5,265,119,
5,267,261,
5,267,262,
5,280,472,
5,283,536,
5,289,527,
5,307,405,
5,309,474,
5,337,338,
5,339,046,
5,341,456,
5,383,219,
5,392,287,
5,396,516,
D356,560,
5,408,697,
5,414,728,
5,414,796,
5,416,797,
5,426,392,
5,437,055,
D361,065,
5,442,322,
5,442,627,
5,452,473,
5,461,639,
5,469,115,
5,469,471,
5,471,497,
5,475,870,
5,479,475,
5,483,696,
5,485,486,
5,487,175,
5,490,165,
5,497,395,
5,499,280,
5,504,773,
5,506,865,
5,509,015,
5,509,035,
5,511,067,
5,511,073,
5,513,176,
5,515,177,
5,517,323,
5,519,761.
Other patents
pending.
69

Index
, 17
, 17
, 17
, 17, 18–19, 20
, 16
, 16
, 17, 35
, 10, 11, 12, 13,
14, 34
, 16
, 17, 25
, 16, 60
A
AC adapter, 19, 20
activation, 1–3
ADDED field (recent calls list), 50
airlines, phone use prohibited by, 66
airtime usage, 50, 54–55
alerts. See beeps; tones
All calls option (Call
70
Timers/Counters menu), 54
American National Standards
Institute (ANSI), 61
analog cellular networks, 24, 25,
26–27
analog mode, 16
answering calls, 10, 11, 12, 13,
15, 24
antenna, 10, 11, 12, 13, 60, 62
arrow indicators, 17
Auto-hyphen option (Display
menu), 58
automatic shutoff
low battery causes, 19
Power Save mode and, 22
Auto-off, 55
Auto-off option (Call
Timers/Counters menu), 55
Auto-retry option (Extras menu), 56
B
backlight flashing, 35
Backlight option (Display menu), 58
Banner option (Display menu),
21, 58
battery, 18–22
approved, 63
charge indicator, 17, 18–19, 20
charging, 18–20, 63, 64
disposing of, 63, 65
installing, 18
liquid spills and, 62
maximizing life of, 63–64
power off caution, 18
rain exposure and, 62
removing, 18
storing, 64
Beep length option (Sounds
menu), for keys, 54
beeps
as dropped call alert, 59
as low battery indicator, 19
as message indicator, 35, 54
as minute alert, 54
as privacy alert, 59
as roaming alert, 59
See also tones
beep volume option (Sounds
menu), for keys, 53
blasting areas, phone not used in, 67
blocking Caller ID, 27–28
buildings, reception inside, 60
butane regulations, 68
C
Caller ID, 27–28
Call Forwarding, 29–30
CALL FROM field (recent calls
list), 49
calling areas, 9, 16, 24–25
calling card calls, 34, 45–46
outside Sprint PCS Network, 25
sending tones during, 50
call in progress indicator, 16
calls
answering, 10, 11, 12, 13, 15, 24
disconnecting, 10, 11, 12, 13,
15, 21, 23, 24
duration of, 50, 54–55
emergency, 25, 32
making, 10, 11, 12, 13, 15,
23–24, 43–44, 50
misdialing, 14, 24
number of, 54
outside Sprint PCS Network,
24–27
recent calls list, 16, 49–50, 56
Recent calls option (Call
Timers/Counters menu), 54
redialing, 30, 49–50
redialing automatically, 56
restricting outgoing, 47–48, 57
See also dialing
Calls list option (Directory menu),
49, 56
Call Timers/Counters menu, 54–55
CALL TO field (recent calls list), 49
Call Waiting, 28–29
case of names in phone book, 38
CDMA networks, other PCS, 24,
25–27
cellular networks. See analog
cellular networks
characters, erasing, 14, 24
charge indicator, 17, 18–19, 20
charging battery, 18–20, 63, 64
chemical storage areas, phone not
used in, 67
children, protecting phone from, 66
cigarette lighter adapter, 19
CLEAR key, 10, 11, 12, 13, 14, 24
cloning, analog cellular networks
and, 26
CLR key. SeeCLEAR key
collect calls, 34
Counters menu, 54–55
credit card calls, 34, 45–46
outside Sprint PCS Network, 25
71

sending tones during, 50
cross-talk, 26
customer service, 3
outside Sprint PCS Network, 27
See also servicing phone
D
date/time of calls, 50
defaults
lock code, 33
resetting to factory, 57
sounds, 31
deleting. See erasing
desktop charger, 19, 63
dial
adjusting volume, 10, 11, 12,
13, 24, 31
making calls, 21
selecting menu options, 10, 14,
17, 52
dial indicator, 17
dialing
from memory, 44
One-Touch/Two-Touch, 43–44
from phone book, 43–44
from recent calls list, 50
redialing, 30, 49, 50
redialing automatically, 56
speed dial, 43
See also calls
digital mode indicator, 16, 25
directory, internal. Seephone book
directory assistance, 33
Directory menu, 55–56
disconnecting, 10, 11, 12, 13, 15,
21, 23, 24
display indicators, 16–17, 25. See
72
also icons at beginning of index
Display menu, 58–59
down arrow indicator, 17
driving, using phone while, 64
Drop alert option (Network
menu), 59
dropped calls, 26, 27, 59
dual band feature, 24–25
duration of calls, 50, 54–55
E
earpiece, 11, 12, 13, 53
Earpiece volume option (Sounds
menu), 53
eavesdropping, analog cellular
networks and, 26
editing
emergency phone numbers,
33, 58
lock code, 57
numbers in phone book, 42, 55
settings, 51
See also erasing
Edit option (Directory menu), 55
electronic devices, using phone
near other, 65–66
Emergency # option (Security
menu), 32–33, 58
emergency phone numbers
calling, 32
calling outside Sprint PCS
Network, 25
saving and editing numbers,
32–33, 58
END key, 10, 11, 12, 13, 15, 21,
23, 24
Erase option (Directory menu),
41, 55
erasing
characters, 14, 24
numbers from phone book, 41,
55, 58
exiting menus, 15
explosive atmospheres, phone not
used in, 67
Extras menu, 56
F
factory defaults. See defaults
fade-out, 26
features, 9–22
Features menu, 16, 51–52, 59
Federal Aviation Administration
(FAA), 66
Federal Communications
Commission (FCC), 61, 68
finding numbers, 38–40
Find name option, 39, 55
flashing backlight, 35
flying, phone use prohibited
while, 66
fueling areas, phone not used in,
67. See also liquefied petroleum
gas regulations
function keys. See keys
H
Hands-Free Car Kit, 64
hearing aids, 66
help, 3
outside Sprint PCS Network, 27
home service area, dialing out-
side, 24
hotel information, 33
hyphenation, automatic, 58
I
icons. See icons at beginning of
index
information (directory assistance),
33
installing battery, 18
Institute of Electrical and
Electronics Engineers (IEEE), 61
internal phone book. See phone
book
K
key beep length option (Sounds
menu), 54
Key beep volume option (Sounds
menu), 53
Key guard option (Extras menu), 56
keypad
locking, 31, 56
selecting menu options via, 52
keys, 10–15
CLEAR, 10, 11, 12, 13, 14, 24
END, 10, 11, 13, 19, 21, 22
message, 10, 11, 12, 13, 14, 34
POWER, 10, 11, 12, 13, 21
scroll, 11, 12, 13, 14, 17
TALK, 10, 11, 12, 13, 15, 23,
24
See also dial
Key sound option (Sounds menu), 53
L
length of calls, 50, 54–55
linking memory locations, 46
73

liquefied petroleum gas regulations,
68
liquid spills, exposure to, 62
local event information, 33
local service area, dialing outside, 24
lock code
changing, 57
default, 32–33
and restricting numbers in
phone book, 47–48
See also unlocking phone
locking keypad, 31, 56
Lock phone option (Security
menu), 57
long-distance calls, 25, 33
long Features menu, 51–52, 59
long numbers, viewing, 47
M
main menu. See Features menu
Master reset option (Security
menu), 57
medical devices, 66
memory
dialing from, 44
linking locations, 46
memory location indicator, 16
Menu length option (Display
menu), 51, 59
menus
backing up a level, 10, 11, 12,
13
Call Timers/Counters menu,
54–55
Directory menu, 55–56
Display menu, 58–59
exiting, 15
74
Extras menu, 56
Features menu (main menu),
16, 51–52, 59
menu number indicator, 16, 51
Network menu, 59
Phone Book menu, 36–37
scroll indicator, 17
scrolling, 11, 12, 13, 14, 17
Security menu, 57–58
selecting options, 10, 14, 17,
52
Sounds menu, 31, 53–54
switching between short and
long, 51, 59
message indicator, 17, 35
message key, 10, 11, 12, 13, 14, 34
message reception. See voicemail
Message ring option (Sounds
menu), 54
microphone, switching on/off, 53
Minute alert option (Call
Timers/Counters menu), 54
misdialing, 14, 24
MISSED CALL field (recent calls
list), 49
mouse, dial functions as, 14
movie listings, 33
Mute/unmute option (Sounds
menu), 53
My number option (Directory
menu), 30, 55
N
names
entering, 36–38
searching for, 39, 55
National Council of Radiation
Protection and Measurements
(NCRP), 61
National Fire Protection Standard
(NFPA-60), 68
network indicator, 17, 25
Network menu, 59
networks
dialing outside Sprint PCS
Network, 24–27
See also roaming
New code option (Security menu), 57
number of calls made, 54
O
One-Touch/Two-Touch Dialing,
43–44
opening account, 1–3
operator services, 34
outside service areas indicator, 16
P
pacemakers, 66
pass code (voicemail), 34
pauses, 45–46
PCS CDMA networks, other, 24,
25–27
performance, maximizing, 10, 60, 62
phone book, 37–48
accessing, 14, 36
advanced features, 45–48
automatic hyphenation of
numbers in, 58
described, 36
dialing numbers from, 43–44
editing numbers in, 42, 55
erasing all numbers from, 58
erasing a number from, 41, 55
linking memory locations, 46
maximum length of entries, 36
maximum number of entries, 36
memory location indicator, 16
names in, 36–38, 39, 55
pause feature, 45–46
restricting numbers in, 47–48, 57
retrieving numbers from, 38–40
retrieving your own number
from, 30, 55
saving numbers and names to,
36–38, 55
saving numbers from recent
calls list to, 50
sorting, 59
viewing long numbers from, 47
See also emergency phone
numbers
Phone Book menu, 36–37
Phone book option (Directory
menu), 55
phone number
activating your, 1–3
for help, 3
for help outside Sprint PCS
Network, 27
looking up your own, 30, 55
of Qualcomm Service Centers, 65
of Sony Service Centers, 65
storing numbers. See phone
book
See also emergency phone
numbers
75

powering phone on/off, 10, 11,
12, 13, 21
automatically, 55
low battery and automatic shutoff, 19
Power Save mode and automatic
shutoff, 22, 60
Power Save mode, 22, 60
Privacy alert option (Network
menu), 59
privacy outside Sprint PCS
Network, 26
propane regulations, 68
PWR key, 10, 11, 12, 13, 21
Q
Qualcomm Service Center, locating
nearest, 65
R
radio frequency interference,
65–66, 68
radio frequency range, 61
radio frequency safety, 61, 65–66
rain, exposure to, 62
receiving calls, 10, 11, 12, 13, 15, 24
recent calls list, 49–50, 56
recent calls list indicator, 16
Recent calls option (Call
Timers/Counters menu), 54
reception, maximizing, 60, 62
redialing, 30, 49, 50
automatically, 56
red light, 11, 12, 13, 20
reset option (Security menu), 57
restaurant information, 33
76
Restrict # option (Security menu),
47–48, 57
Restrict All option (Security
menu), 57
restricted accounts, emergency
number dialing and, 32
restricting children’s access to
phone, 66
restricting numbers in phone
book, 47–48, 57
right arrow indicator, 17
Ringer type option (Sounds
menu), 53
ringer volume adjustment, 24, 53
Ringer volume option (Sounds
menu), 53
Roam alert option (Network
menu), 59
roaming, 24–25, 26–27, 59
roaming indicator, 17, 25
S
safety, 61–68
Save option (Directory menu),
36–37, 55
saving
emergency phone numbers,
32–33
numbers to phone book,
36–37, 55
Scratch pad option (Extras
menu), 56
scroll indicator, 17
scroll key, 11, 12, 13, 14, 17
searching, 38–40, 55
Security menu, 57–58
security outside Sprint PCS
Network, 26
selecting menu options, 10, 14,
17, 52
service areas, 9, 16, 24–25
servicing phone, 62, 65. See also
customer service
setting up your voicemail, 34
shopping information, 33
short Features menu, 51, 52, 59
signal strength, 16, 60
Sony Service Center, locating
nearest, 65
Sort book option (Display menu), 59
Sounds menu, 31, 53–54. See
also beeps
Speed Dial, 43
spills, exposure to, 62
Sprint PCS Account, opening, 1–3
Sprint PCS Customer Care, 3
outside Sprint PCS Network, 27
Sprint PCS Directory Assistance, 33
Sprint PCS Network indicator, 17
Sprint PCS Operator Services, 34
standby mode
described, 21
returning to, 10, 11, 12, 13,
14, 15, 21
static, 26
storing battery, 64
T
TALK key
answering calls, 10, 11, 12, 13,
15, 24
making calls, 10, 11, 12, 13,
15, 23
technical support. See customer
service
telephone book. See phone book
telephone number. See phone
number
third-party calls, 34
Three-Way Calling, 29
time/date of calls, 50
tones, sending, 50. See also beeps
Touch dial option (Extras menu),
43, 56
travel charger, 19, 63
traveling, 24, 25
turning phone on/off, 10, 11, 12,
13, 21
automatically, 55
low battery and automatic
shutoff, 19
Power Save mode and automatic
shutoff, 22
TV interference, 68
Two-Touch dialing, 43–44
U
unlocking phone, 2
Unmute option (Sounds menu), 53
up arrow indicator, 17
77

V
voicemail
accessing, 10, 11, 12, 13, 14
accessing from another phone, 34
audible alert, 56
calling other, 45–46, 50
maximum number of messages,
35
message indicator, 17, 35
pass code, 34
pause feature and, 45–46
sending tones to, 50
setting up, 34
voice quality. See performance
volume, 10, 11, 12, 13, 24, 31, 53
W
warranty, voiding, 62, 63, 68
78
 Loading...