

Samsung Chromebook User Manual

www.samsung.com
User Manual

2
Getting started
3 About this manual
7 Layout
13 Turning the computer on
and off
Basics
16 Using the computer as a
tablet
17 Using the touch screen
20 Using the keyboard
22 Using the touchpad
24 Memory card
26 Wireless LAN
Chrome OS
27 Using applications
27 All about Chrome OS
29 Get on the web
32 Discover web apps
33 Using Play Store
34 FAQ
34 Recovery (optional)
Settings & Upgrade
36 LCD brightness
37 Volume
38 Battery
Appendix
40 Product specifications
41 Ergonomic tips
45 Safety precautions
55 Important safety
information
58 Replacement parts and
accessories
61 Regulatory compliance
statements
71 WEEE symbol information
73 Samsung package Take-
Back program
Table of contents

3
Getting started
About this manual
•
This user manual is specially designed to detail the computer’s
functions and features.
•
The user manual supplied with the computer may vary
depending on the model.
•
Please read this manual before using the computer to ensure
safe and proper use.
•
Optional accessories, some devices, and software referred to
in this manual may not be provided or may not be subject to
upgrades. Note that the computer environment referred in
the user manual may not be the same as your environment.
•
Available features and additional services may vary
depending on the computer or operating system.
•
This user manual describes procedures for using the
touchpad, mouse and touch screen. Instructions for using the
touch screen are for models with the touch screen feature.
•
Images and screenshots are those of the representative model
of the series and may differ in appearance from the actual
product.
•
Content may differ from the final product and is subject to
change without prior notice. For the latest version of the
manual, refer to the Samsung website, www.samsung.com.
Instructional icons and expressions
Warning
: situations that could cause injury to yourself or
others
Caution
: situations that could cause damage to the
computer or other equipment
Note
: notes, usage tips, or additional information
The path you should follow to carry out an instruction. For
example, “select
Settings
→
Devices
” indicates that you
should select
Settings
and then
Devices
.
Select Click the mouse or tap the touchpad or touch screen.

Getting started
4
Copyright
Copyright © 2016 Samsung Electronics
This manual is protected under international copyright laws.
No part of this manual may be reproduced, distributed, translated,
or transmitted in any form or by any means, electronic or
mechanical, including photocopying, recording, or storing in any
information storage and retrieval system, without the prior written
permission of Samsung Electronics.
Computer specifications or the contents of this manual may
be changed without prior notice due to an upgrade of the
computer’s functions.
To service your computer
For inquiries about the Chrome operating system or applications,
visit www.google.com/support/chromeos.
If you have a problem while using the Chromebook hardware,
please contact our Customer Care Center below or visit
www.samsung.com/sec/support/guarantee.do.
If you replace or upgrade the hardware yourself, the Chrome
operating system will not be automatically updated and the
product will not work properly.
Getting started
5
Chrome OS Software License
The software included in this product contains copyrighted
software that is licensed under the GPL/LGPL.
You may obtain the complete Corresponding Source code from
website: http://git.chromium.org/gitweb/
This offer is valid to anyone in receipt of this information.
As an ENERGY STAR
®
Partner,
Samsung has determined that this
product meets the ENERGY STAR
®
guidelines for energy efficiency.
•
The ENERGY STAR Program has reduced greenhouse gas
emissions and saved energy through voluntary labeling.
•
Power management setting of this product has been enabled
by default, and has various timing settings from 1 minute to
5 hours.
•
The product can wake with a button press on the chassis from
sleep mode.
Trademarks
•
Samsung and the Samsung logo are trademarks or registered
trademarks of Samsung Electronics.
•
Bluetooth® is a registered trademark of Bluetooth SIG, Inc.
worldwide.
•
Wi-Fi®, Wi-Fi Protected Setup™, Wi-Fi Direct™, Wi-Fi
CERTIFIED
™
, and the Wi-Fi logo are registered trademarks of
the Wi-Fi Alliance.
•
All other trademarks and copyrights are the property of their
respective owners.

Getting started
6
About the Product Capacity Representation
Standard
About Memory Capacity Representation
The memory capacity reported in the Chrome OS is less than the
actual capacity of memory.
This is because BIOS or a video adapter uses a portion of memory
or claims it for further use.
(E.g. For 1 GB(=1,024 MB) memory installed, OS(Windows, Chrome,
etc.) may report the capacity as 1,022 MB or less)
Precautions for Operating System Support
If a problem occurs because of the reinstallation of other
operating systems(OS) or a previous version of an OS pre-installed
on this computer, or a software that does not support the OS, the
company will not provide technical support, a replacement or
refund, and if our service engineer visits you due to this problem, a
service charge will be applied.
Performance Restrictions
Online games and some games(3D, 2D) may not be supported
and Full HD video and some high bit rate HD video playback may
be slow and stutter on this computer.

Getting started
7
Number/Name Description
Camera indicator
light
•
This indicates the camera
operating status.
Camera
•
Using this camera, you can take
still pictures and record video.
LCD/Touch screen
•
The screen’s images are displayed
here.
•
Recognizes touch interactions
(only for touch screen models).
Microphone
•
You can use the built-in
microphone.
Keyboard
•
Enter text or control computer
functions.
Touchpad
•
Moves the cursor and selects
options.
•
Functions as a mouse.
Layout
•
Features or options may differ depending on the model.
•
The items marked as optional may not be provided or
may be provided in different locations.
•
Since some storage space is reserved for system
recovery and operations, the available storage space
may be less than the actual capacity.
Front view
1
2
3
5
6
4

Getting started
8
Number/Name Description
USB-C™ port
•
The USB-C™ port can be used to
connect and charge a USB-C
™
device, or connect to an external
display device.
Purchase an adapter
separately to connect to an
external display.
PEN
•
Remove the PEN from the slot
and perform touch actions on the
screen.
Right view
2
1 3
4
Number/Name Description
Volume button
/
•
Adjusts the volume level.
Power button /
Power LED
•
Turns the computer on and off.
•
Shows the operating status of the
computer.
–
Red
: Charging
–
Green
: Fully charged
–
Blue
: Turned on
Getting started
9
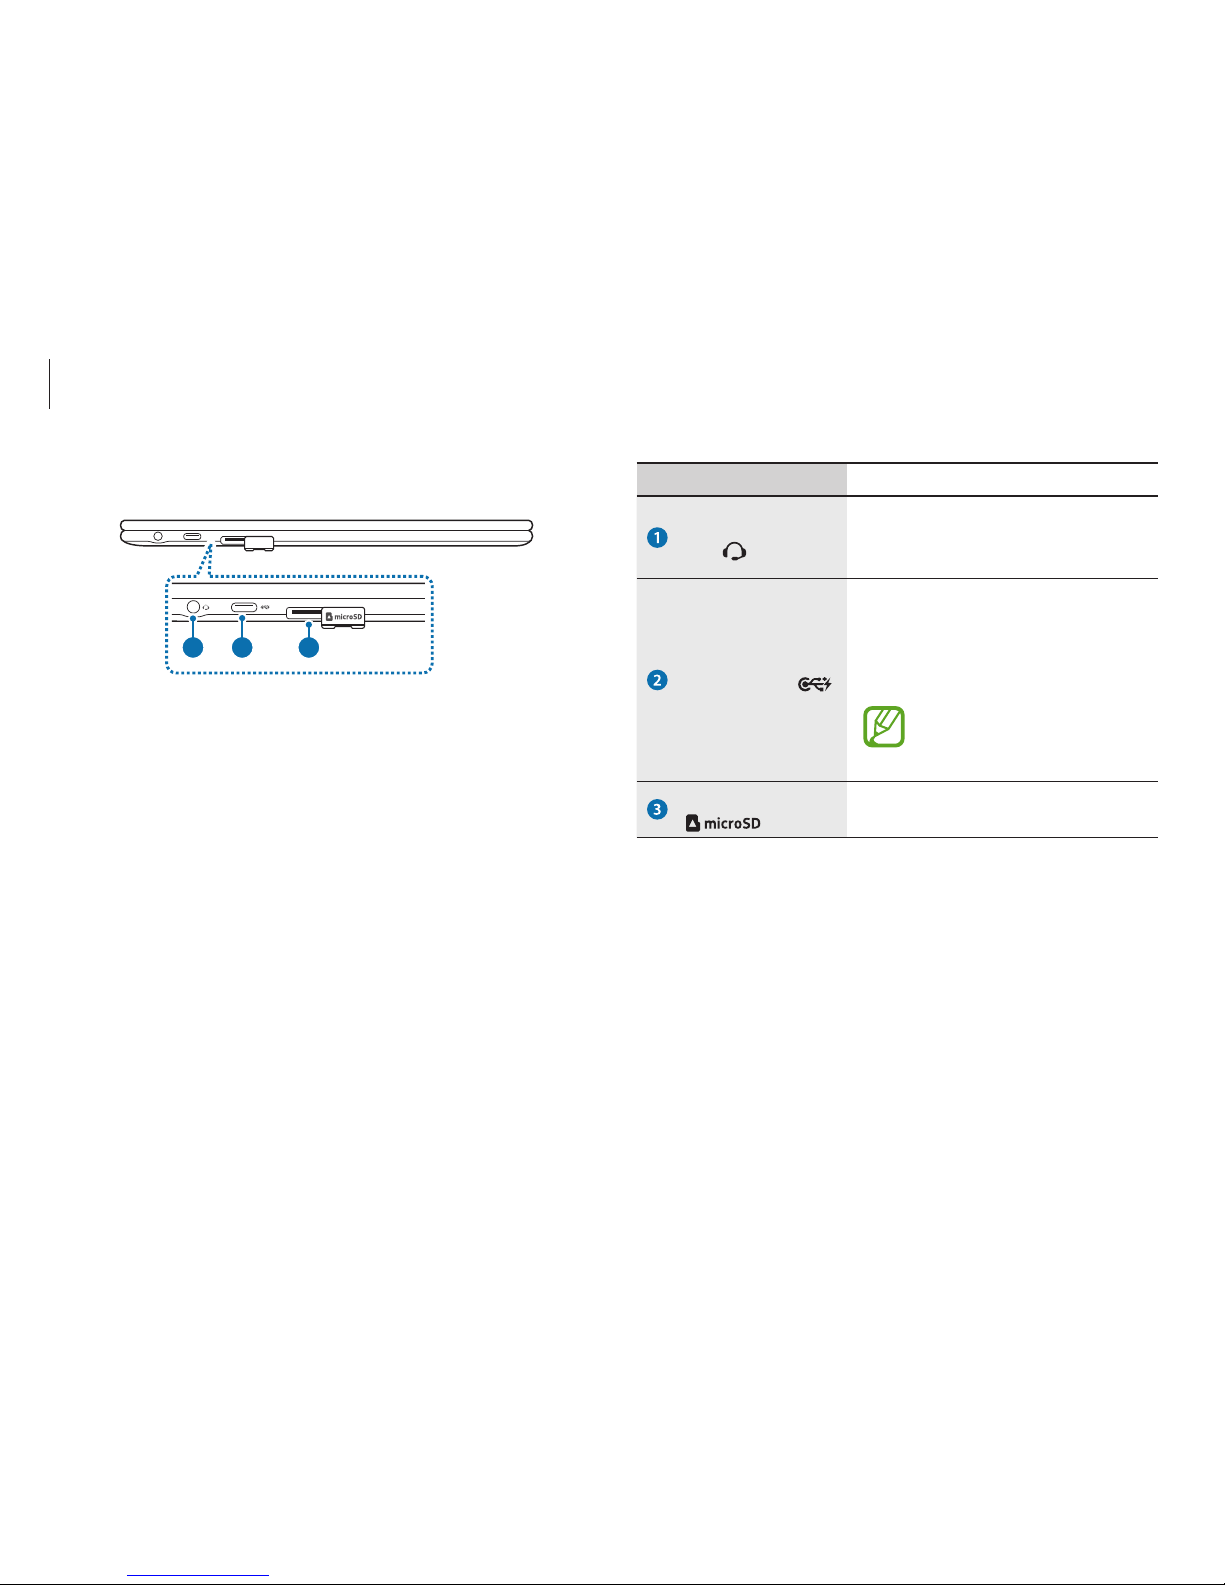
Number/Name Description
Earpiece/Headset
jack
•
Connect an earpiece or a headset
to the computer to listen to
audio.
USB-C™ port
•
The USB-C™ port can be used to
connect and charge a USB-C
™
device, or connect to an external
display device.
Purchase an adapter
separately to connect to an
external display.
Memory card slot
•
Insert a memory card into the
slot.
Left view
1 2 3
About the chargeable USB port
•
It may take longer to charge the battery when charging a USB
device.
•
The battery power level may be reduced when charging a USB
device while the computer is powered by the battery.
•
The charging status of the USB device is not displayed on the
computer.
•
This feature may not be available on some USB devices.
•
When the computer is turned off, the device connected to the
USB port is not charged.

Getting started
10
Number/Name Description
Internal battery
•
Provides power to the computer
when not connected to an AC
adapter.
•
To remove or replace the internal
battery, take it to a Samsung Service
Center. You will be charged for this
service.
Speaker
•
Sound is emitted from the speakers.
If the bottom of the computer is replaced, the model
name, serial number, and some logos will no longer be
present. For more information, contact the Samsung
Service Center to request assistance.
Bottom view
1
22

Getting started
11
Detaching the PEN
Press the end of the PEN to disengage it. Then, pull the PEN from
the slot. To store the PEN, push it back into the slot until you hear it
click.
2
1
PEN
1
2
Number/Name Description
PEN nib
•
Use the PEN to write, draw, or
perform touch actions on the screen.
Tweezers
•
Remove the PEN nib with the
tweezers when replacing the nib.

Getting started
12
Be careful not to pinch your fingers with the tweezers.
•
Do not reuse old nibs. Doing so may cause the PEN to
malfunction.
•
Do not press the nib excessively when inserting the nib
into the PEN.
•
Do not insert the round end of the nib into the PEN.
Doing so may cause damage to the PEN or your device.
•
Do not bend or apply excessive pressure with the PEN
while using it. The PEN may be damaged or the nib may
be deformed.
•
If you use the PEN at sharp angles on the screen, the
device may not recognise the PEN actions.
•
For more information about the PEN, visit the Samsung
website.
•
If the PEN is not working properly, take it to a Samsung
Service Center.
Replacing the PEN nib
If the nib is dull, replace it with a new one.
1
Firmly hold the nib with the tweezers and remove it.
2
Insert a new nib into the PEN.
Getting started
13
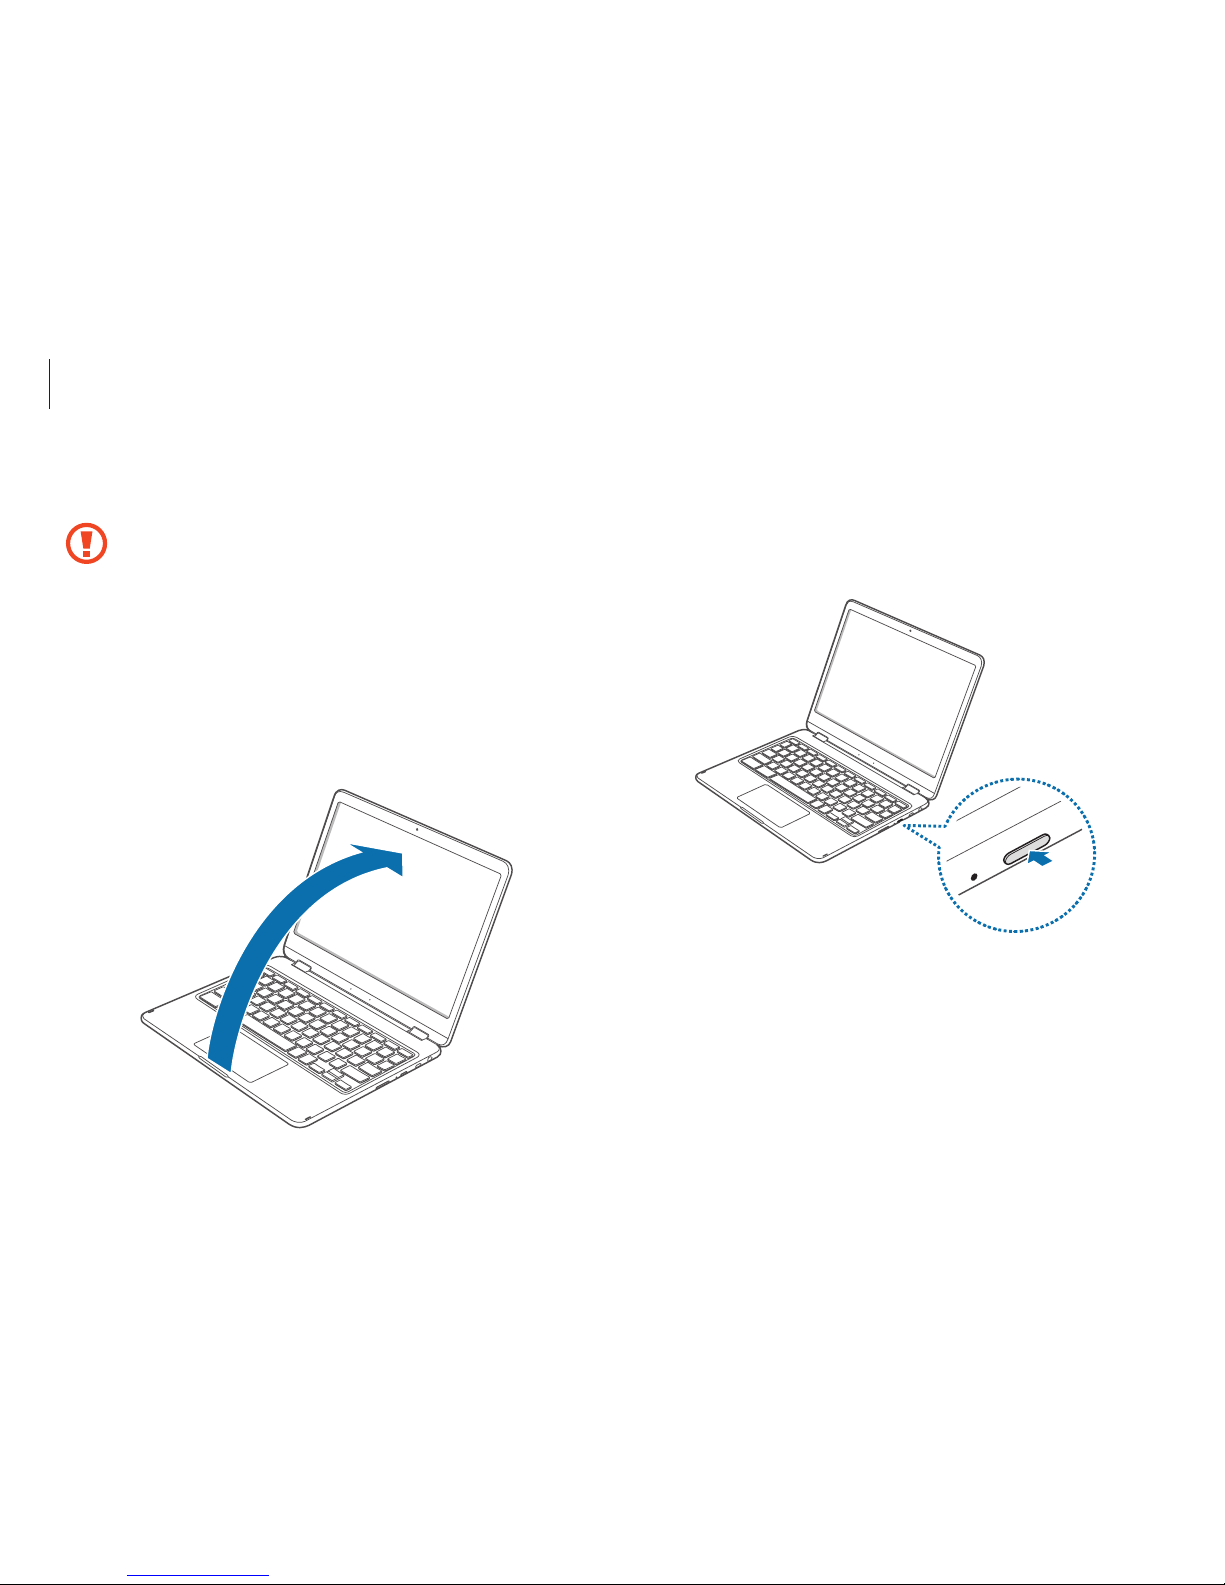
3
The computer turns on automatically when the LCD panel is
opened.
If the computer does not turn on automatically, press the
Power button.
Turning the computer on and off
Fully charge the battery using the AC adapter before using
the computer
for the first time
.
Turning the computer on
1
Before turning on the computer, check that the battery is
charged and charge it if necessary.
2
Open the LCD panel.
Getting started
14
Using the Power button
Press and hold the Power button for about 8 seconds to shut
down the Chromebook.
Press and hold the Power button for about 2 seconds to enter
power saving mode.
In this lock state, press and hold the Power button for about
2 seconds to shut down the Chromebook.
To shut down the Chromebook when the system has frozen
unexpectedly, press and hold the Power button for at least
8 seconds.
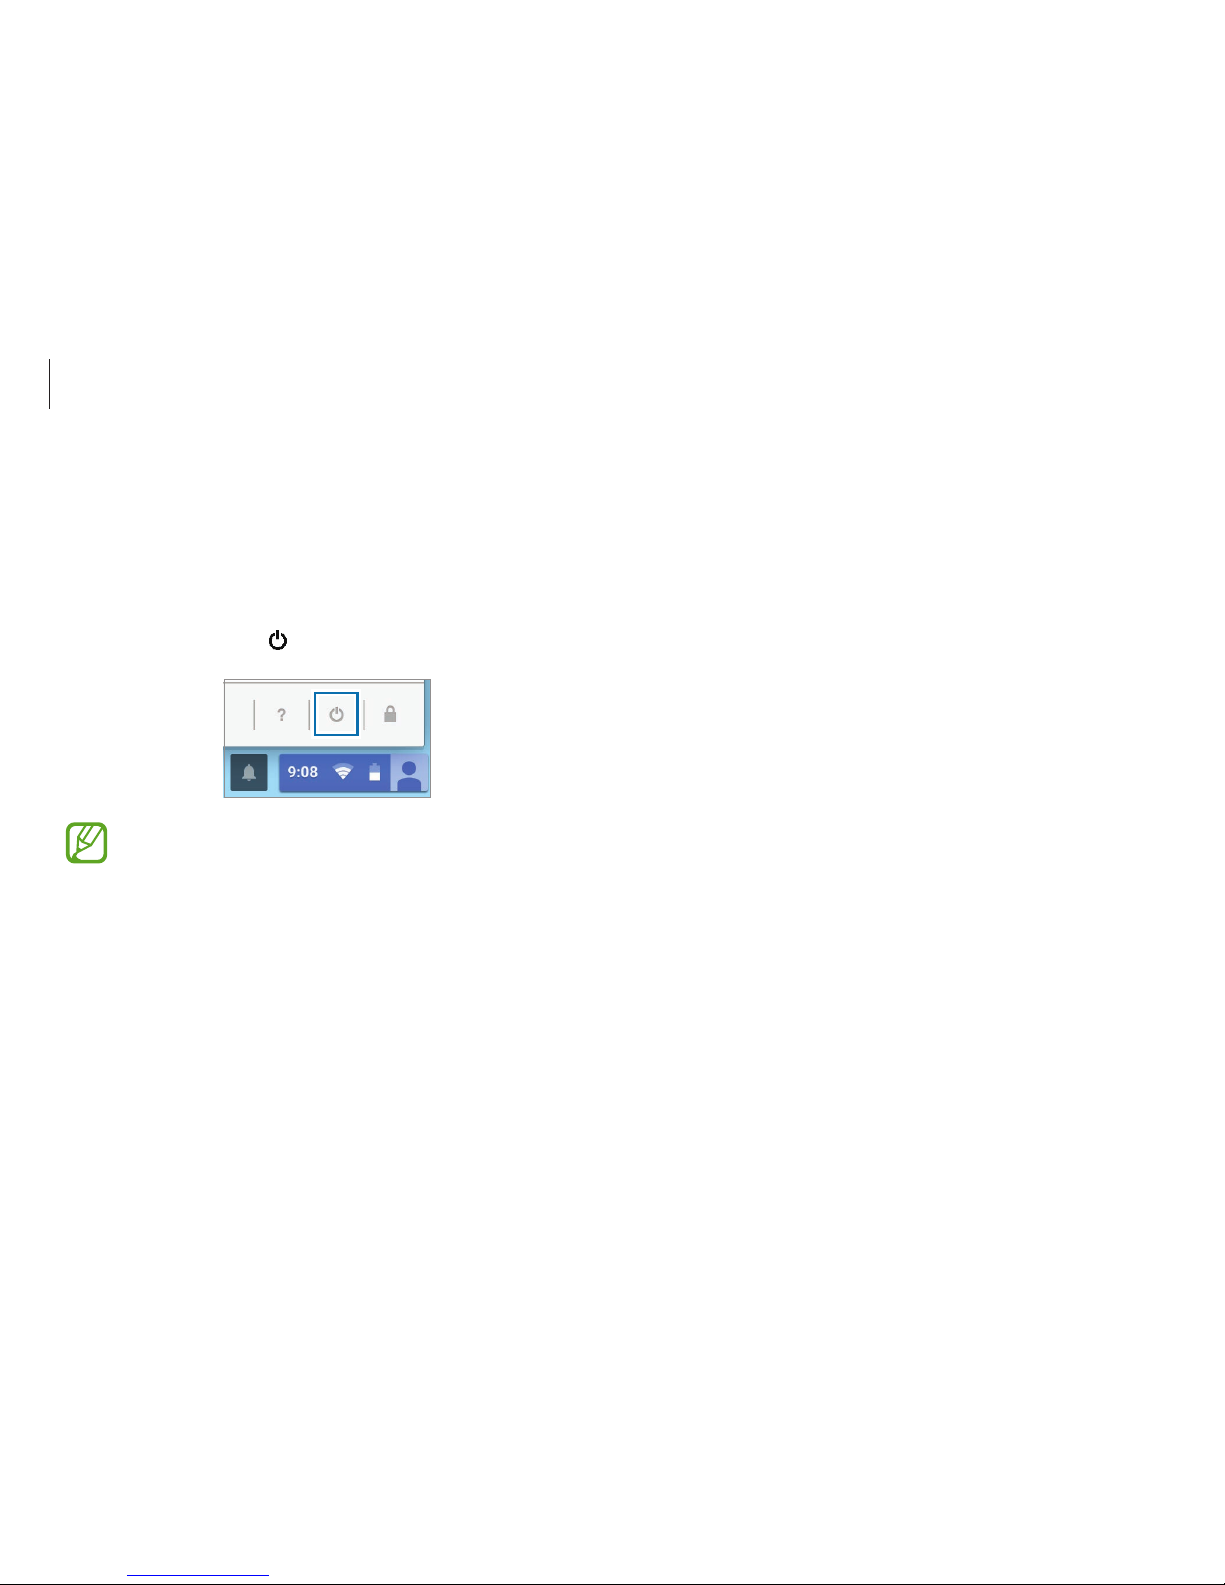
Turning the computer off
Using screen buttons
1
Select the account icon on the taskbar.
2
Select Power button ( ).
•
Save all data before turning off the computer.
•
If the screen is locked in power saving mode
Click on the screen, tap the touchpad, or press any key
to unlock the screen.

Getting started
15
Controlling the power of the Chromebook
If the LCD is
closed
When there is
no input for a
predetermined
period of time
If the Power
button is
pressed
Signed-in
state
Enters power
saving mode
Enters power
saving mode
The state
changes to the
sign out state
Signed-out
state
The
computer is
turned off
The computer
is turned off
The computer
is turned off
Press any key or swipe the touchpad to unlock the screen.
16
•
When the LCD panel is tilted past the transition point
The keyboard and touchpad will automatically be
locked and will not function.
The display will rotate automatically depending on the
computer’s orientation.
•
When the screen is turned off while using the computer
as a tablet, press the Volume button to unlock the
screen. When the computer is in power saving mode,
press the Power button to unlock the screen.
When storing the computer in a bag or carrying it, close
the LCD panel to protect the computer.
Basics
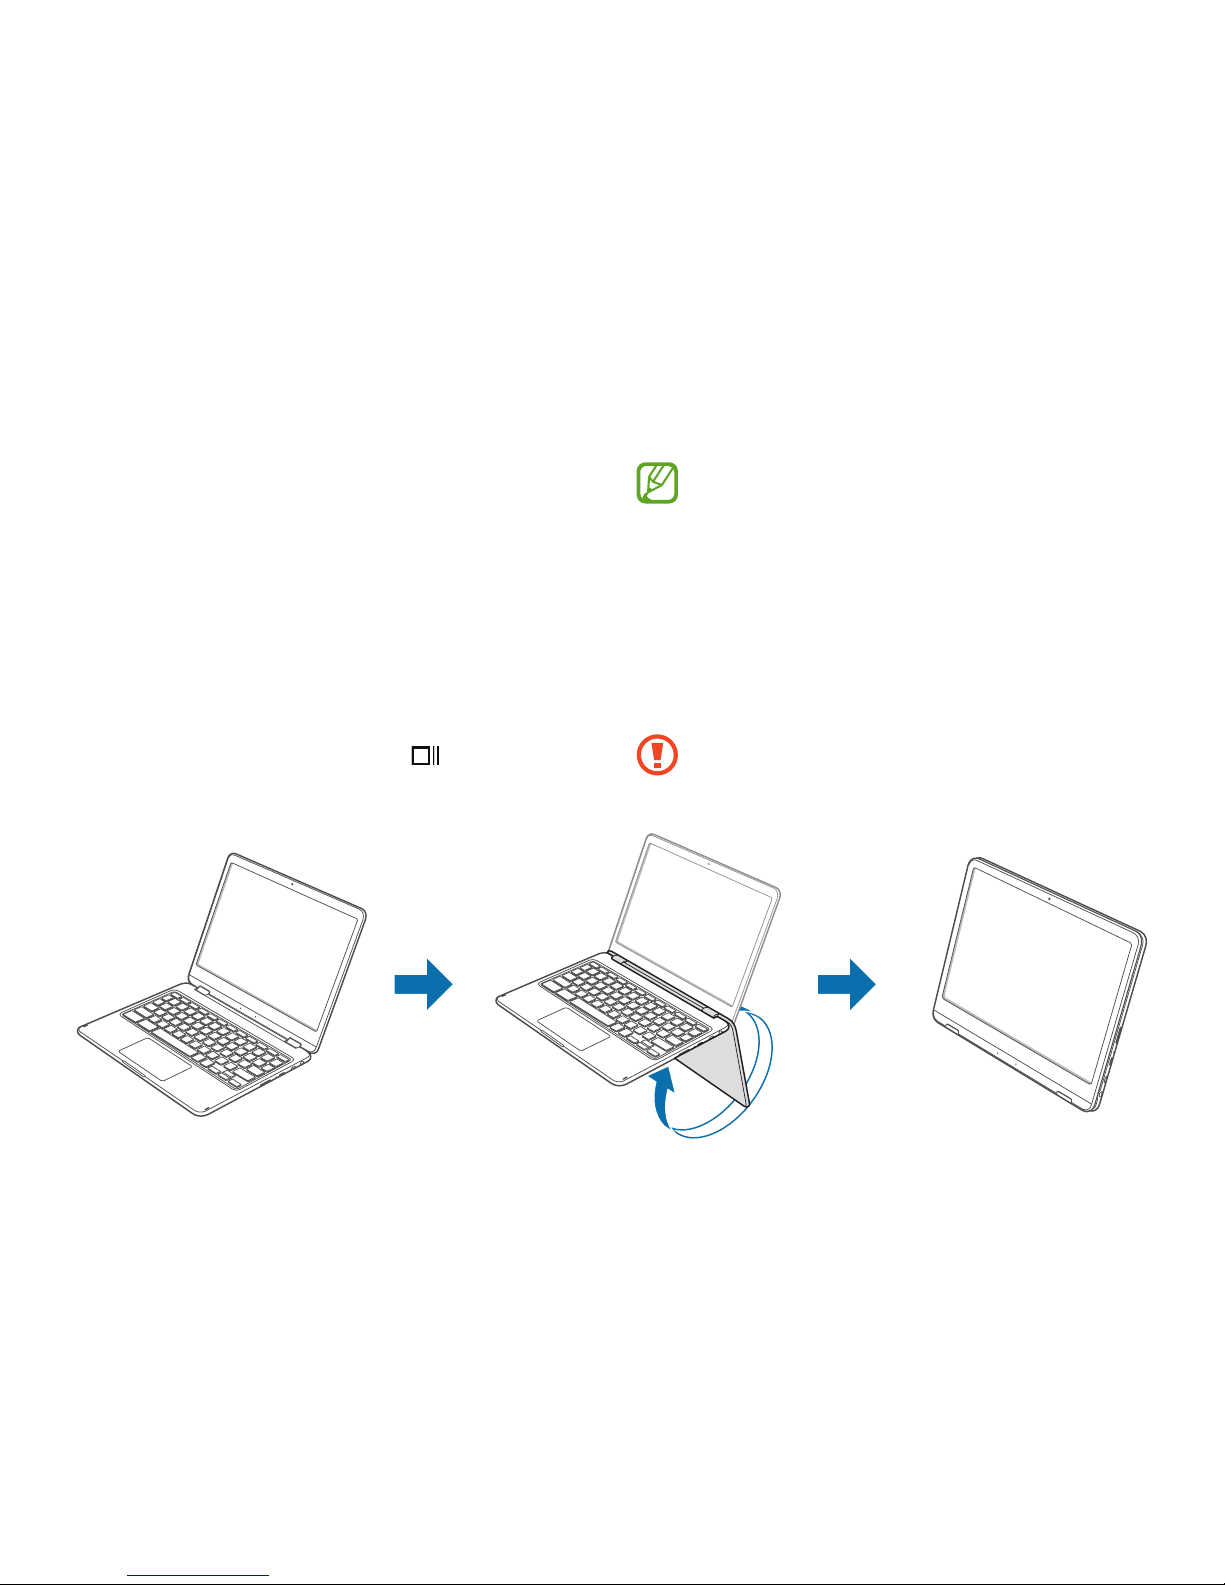
Using the computer as a tablet
You can use the computer as a tablet by folding the LCD panel
behind the keyboard.
Open the LCD panel and rotate it away from the keyboard until it
touches the bottom side of the computer.
When using the computer as the tablet, tap
on the taskbar to
view the currently running apps.

Basics
17
Tapping and holding (right-clicking)
To use additional options of an item, tap and hold it on the touch
screen.
Dragging
To move an item to another location, tap and hold it, and then
drag it on the touch screen to the desired location.
Using the touch screen
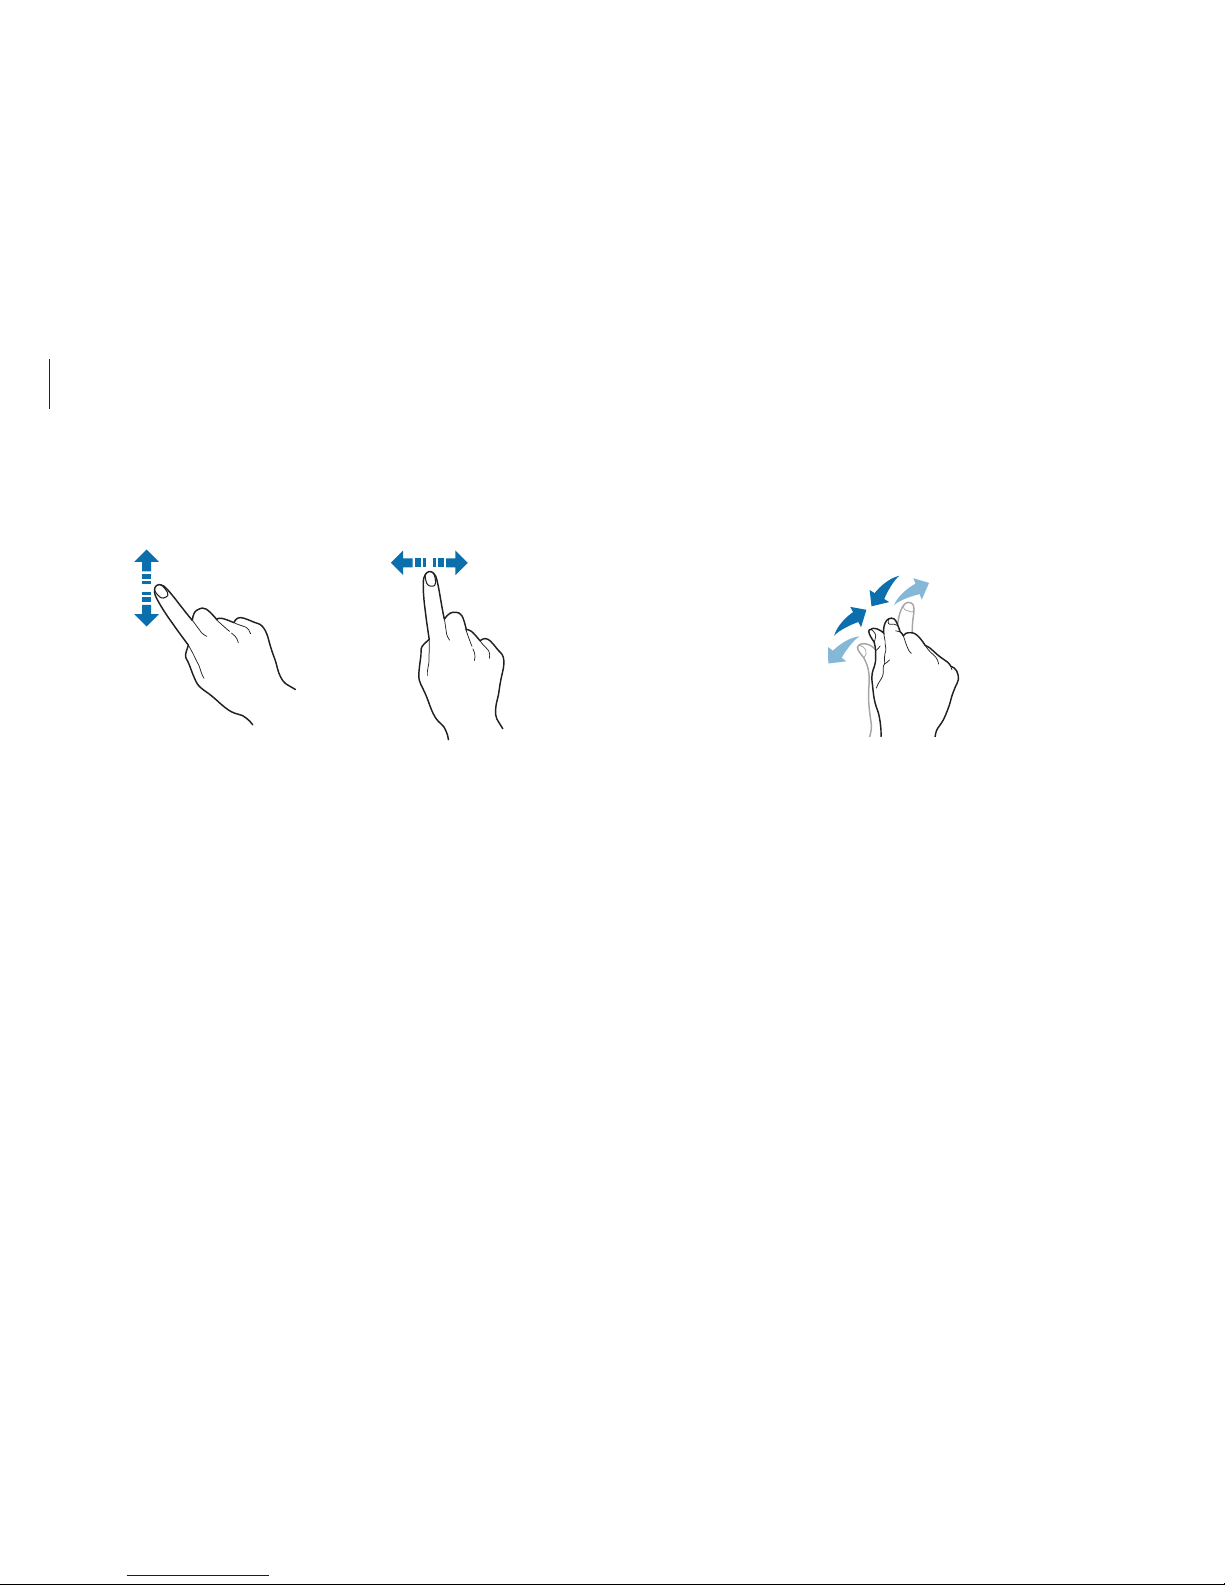
Use your fingers on the touch screen to perform actions.
Touch screen gestures
Tapping
To select menus, options, or applications, tap the touch screen.
Double-tapping
To open files or items, double-tap the touch screen.
Basics
18
Scrolling
To scroll up, down, left, or right, swipe on the touch screen.
or
Spreading and pinching
To zoom in, spread two fingers apart on an image or text. Pinch to
zoom out.

Basics
19
•
Leaving the touch screen idle for extended periods
may result in afterimages (screen burn-in) or ghosting.
Turn off the touch screen when you are not using the
computer.
•
Make sure your hands are clean and dry before using
the touch screen. Remove any moisture from your
hands before using the touch screen.
•
Do not expose the computer to foreign substances.
Doing so may cause the touch screen to malfunction.
•
Very light touches on the touch screen may not be
recognized.
•
Precisely tap items on the touch screen for the best
results.
•
The touch screen sensors are located on the edges of
the touch screen. Therefore, do not cover the edges of
the touch screen with protective covers or accessories.
•
Touch screen gestures are available for touch screen
models running Windows and work only with some
applications.
•
Do not subject the touch screen to severe impacts or
press it with sharp objects. Doing so may damage the
touch screen.
•
Do not allow the touch screen to come into contact
with other electrical devices. Electrostatic discharges
can cause the touch screen to malfunction.
•
Do not expose the touch screen to water. The touch
screen may malfunction in humid conditions or when
exposed to water.
•
Do not spray liquid cleansing solutions directly onto
the touch screen. The solution may enter the touch
screen or cause undesired operation. To clean the
screen, dampen a cloth with solution and gently wipe
the screen. Do not use solutions or cloths that contain
abrasive materials, as they may damage the touch
screen.
•
Do not damage the edges of the touch screen. Doing so
may damage the touch screen.

Basics
20
Shortcut Keys Description
•
Enter Overview mode, which shows all
windows.
•
Decrease screen brightness.
•
Increase screen brightness.
•
Mutes the sound.
In Mute mode, press the
key to
cancel the Mute function.
•
Decrease the volume.
•
Increase the volume.
•
Press and hold this key to lock the
computer.
Using the keyboard
Shortcut key functions and procedures are discussed in the
following sections.
•
The keyboard image may differ from the actual
keyboard.
•
The keyboard may differ depending on your country.
The following mainly describes the shortcut keys.
Shortcut Keys
Here is an overview of the shortcut keys on the top row of the
keyboard.
Shortcut Keys Description
•
Go to the previous page in your browser
history.
•
Go to the next page in your browser
history.
•
Reload your current page.
•
Hide the tabs in full-screen Immersive
mode.

Basics
21
Shift key
Hold the
Shift
key down to enter upper case letters.
Hot key function
Press the following keys at the same time.
You can check the hot keys in Chrome OS.
Search key
Where you’d find the
Caps Lock
key on a traditional keyboard,
we’ve put the
Search
key.
Press the
Search
key to run the Launcher.
If you really need
Caps Lock
, go to the Settings page to make the
Search
key behave like a
Caps Lock
key.
System Reset
If computer is frozen and unresponsive, press the following keys at
the same time.
Basics
22
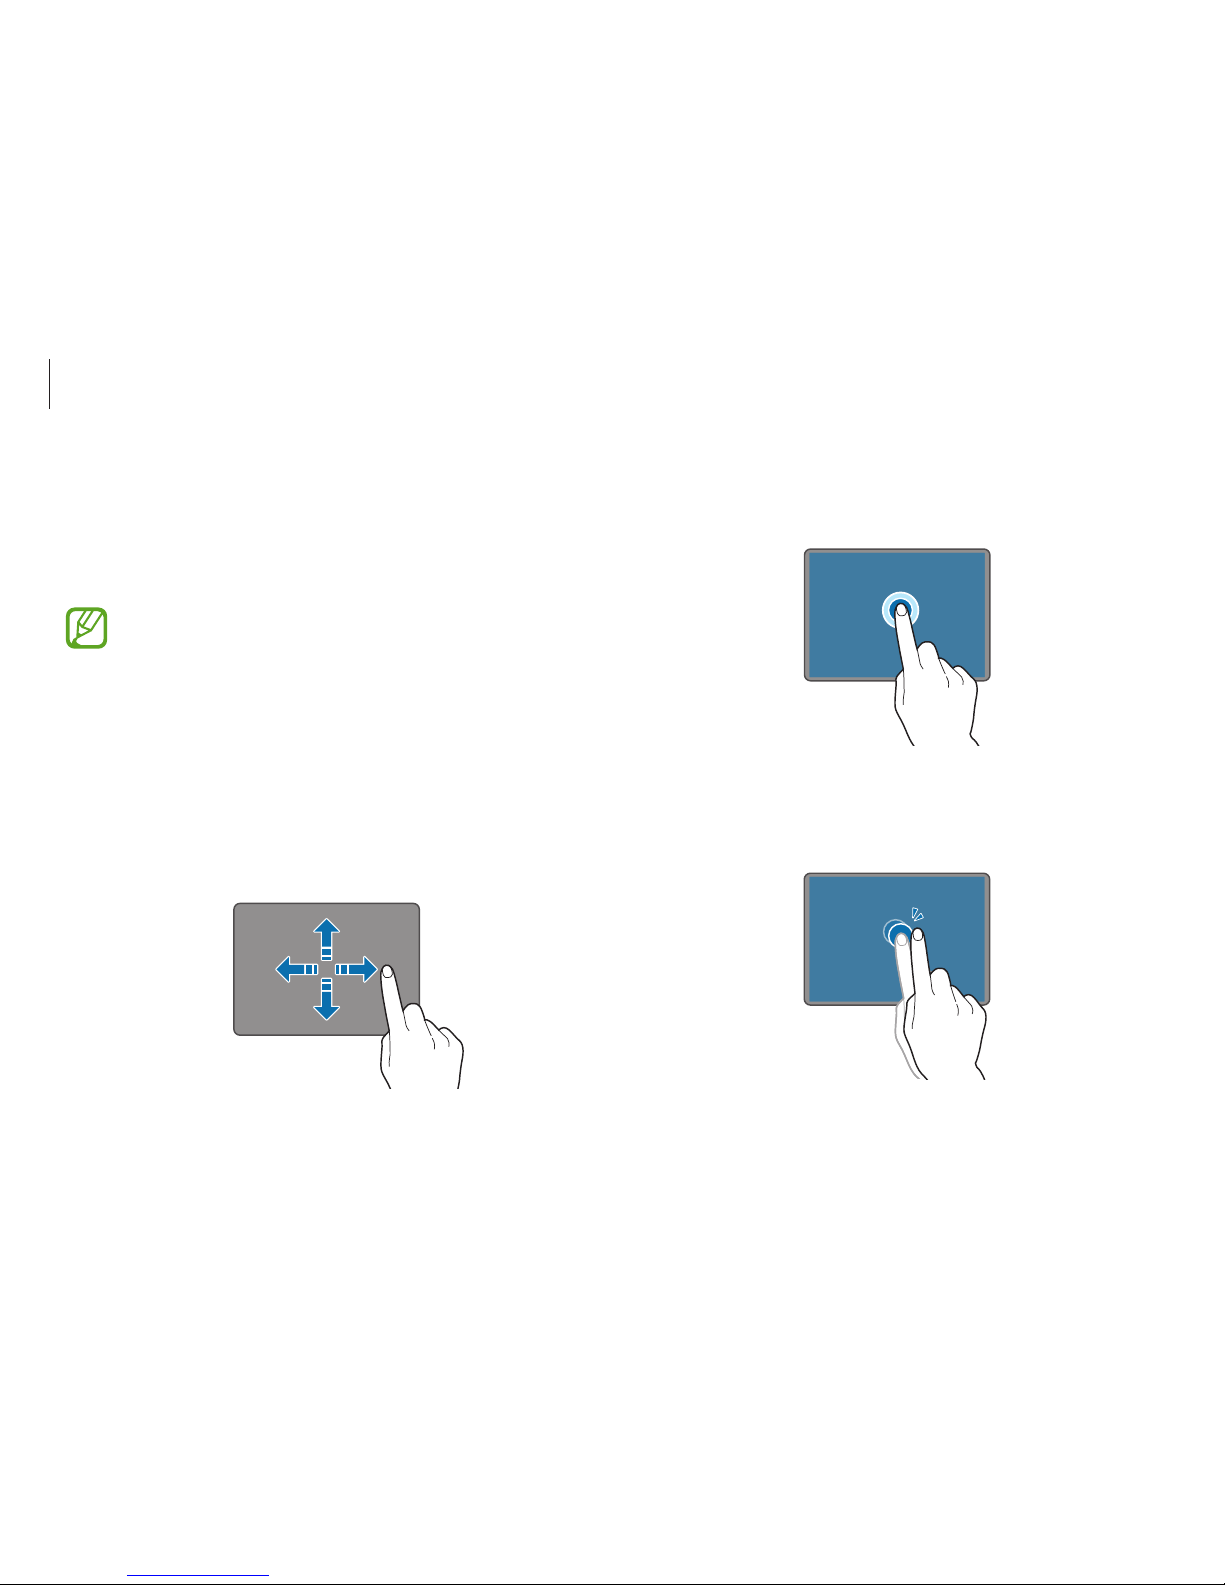
Using the touchpad
Use the touchpad to move the cursor or select an item. The left
and right buttons of the touchpad act the same as the left and
right buttons of a mouse.
•
Use the touchpad only with fingers. The touchpad will
not recognize actions of other objects.
•
Images and the touchpad layout may differ depending
on the model.
Basic touchpad functions
Moving
To move the cursor, move a finger on the touchpad.
Clicking
Tap the touchpad.
Tap
Double-clicking
Double-tap the touchpad.
Tap-tap

Basics
23
Right-clicking
To right-click, place two fingers on the touch area and tap once.
Tap
Dragging
To move an icon or an app tile to a desired location, press and hold
it and then drag it to the target position.
Press and hold the
left touchpad
Move
Adjusting your Touchpad Settings
If your touchpad is too sensitive, you can adjust your settings by
following these steps:
1
Click the list icon on the top-right corner of your browser.
2
Select
Settings
.
3
Go to
Device
→
Touchpad speed
, and change the settings as
appropriate.
 Loading...