

Samsung CE1350L Owner's Instructions And Cooking Manual
Code No.: DE68-02931L
MICROWAVE OVEN
Owner’s Instructions and Cooking Guide
CE1350L
“Quick” Look-up Guide ............................................................................... 2
Using the Steam Cleaning .......................................................................... 2
Control Panel ............................................................................................. 3
Oven ........................................................................................................... 3
Accessories ................................................................................................ 3
Using this Instruction Booklet .....................................................................4
Safety Precautions ..................................................................................... 5
Installing Your Microwave Oven .................................................................6
Setting the Time .........................................................................................6
How a Microwave Oven Works ..................................................................7
Checking that Your Oven is Operating Correctly ........................................ 7
What to Do if You are in Doubt or You have a Problem .............................8
Cooking/Reheating .....................................................................................8
Power Levels and Time Variations .............................................................9
Stopping the Cooking .................................................................................9
Adjusting the Cooking Time ........................................................................ 9
Using the Steam Cook Feature ................................................................ 10
Using the Indian Recipes Feature ............................................................ 10
Using the Auto Defrost Feature ................................................................13
Using the Junior/Snacks Feature ............................................................. 14
Using the Auto Steam Feature .................................................................15
Using the Fermentation Feature ............................................................... 17
Fermentation Settings ..............................................................................17
Using Crust Plate ......................................................................................18
Using the Square metal tray and Rack ..................................................... 18
Multistage Cooking ................................................................................... 20
Fast Preheating the Oven ......................................................................... 20
Cooking by Convection .............................................................................21
Grilling ...................................................................................................... 21
Choosing the Heating Element Position ...................................................22
Choosing the Accessories ........................................................................22
Spit-Roasting ............................................................................................22
Using The Vertical Multi-Spit .................................................................... 23
Combining Microwaves and Grill ..............................................................23
Combining Microwaves and Convection .................................................. 24
Combining Convection and Grill ...............................................................24
Using the Deodorization Feature ..............................................................25
Manual Stop Turntable Function ..............................................................25
Safety-locking Your Microwave Oven ....................................................... 25
Switching the Beeper Off .......................................................................... 25
Cookware Guide ....................................................................................... 26
Cooking Guide .......................................................................................... 27
Cleaning Your Microwave Oven ...............................................................37
Storing and Repairing Your Microwave Oven .......................................... 38
Technical Specifications ...........................................................................38
jlXZ\Ws{sTWY`ZXsluUGGwGXGG~SGqGXYSGYWW]GG`a[XGht
2
EN
“Quick” Look-up Guide
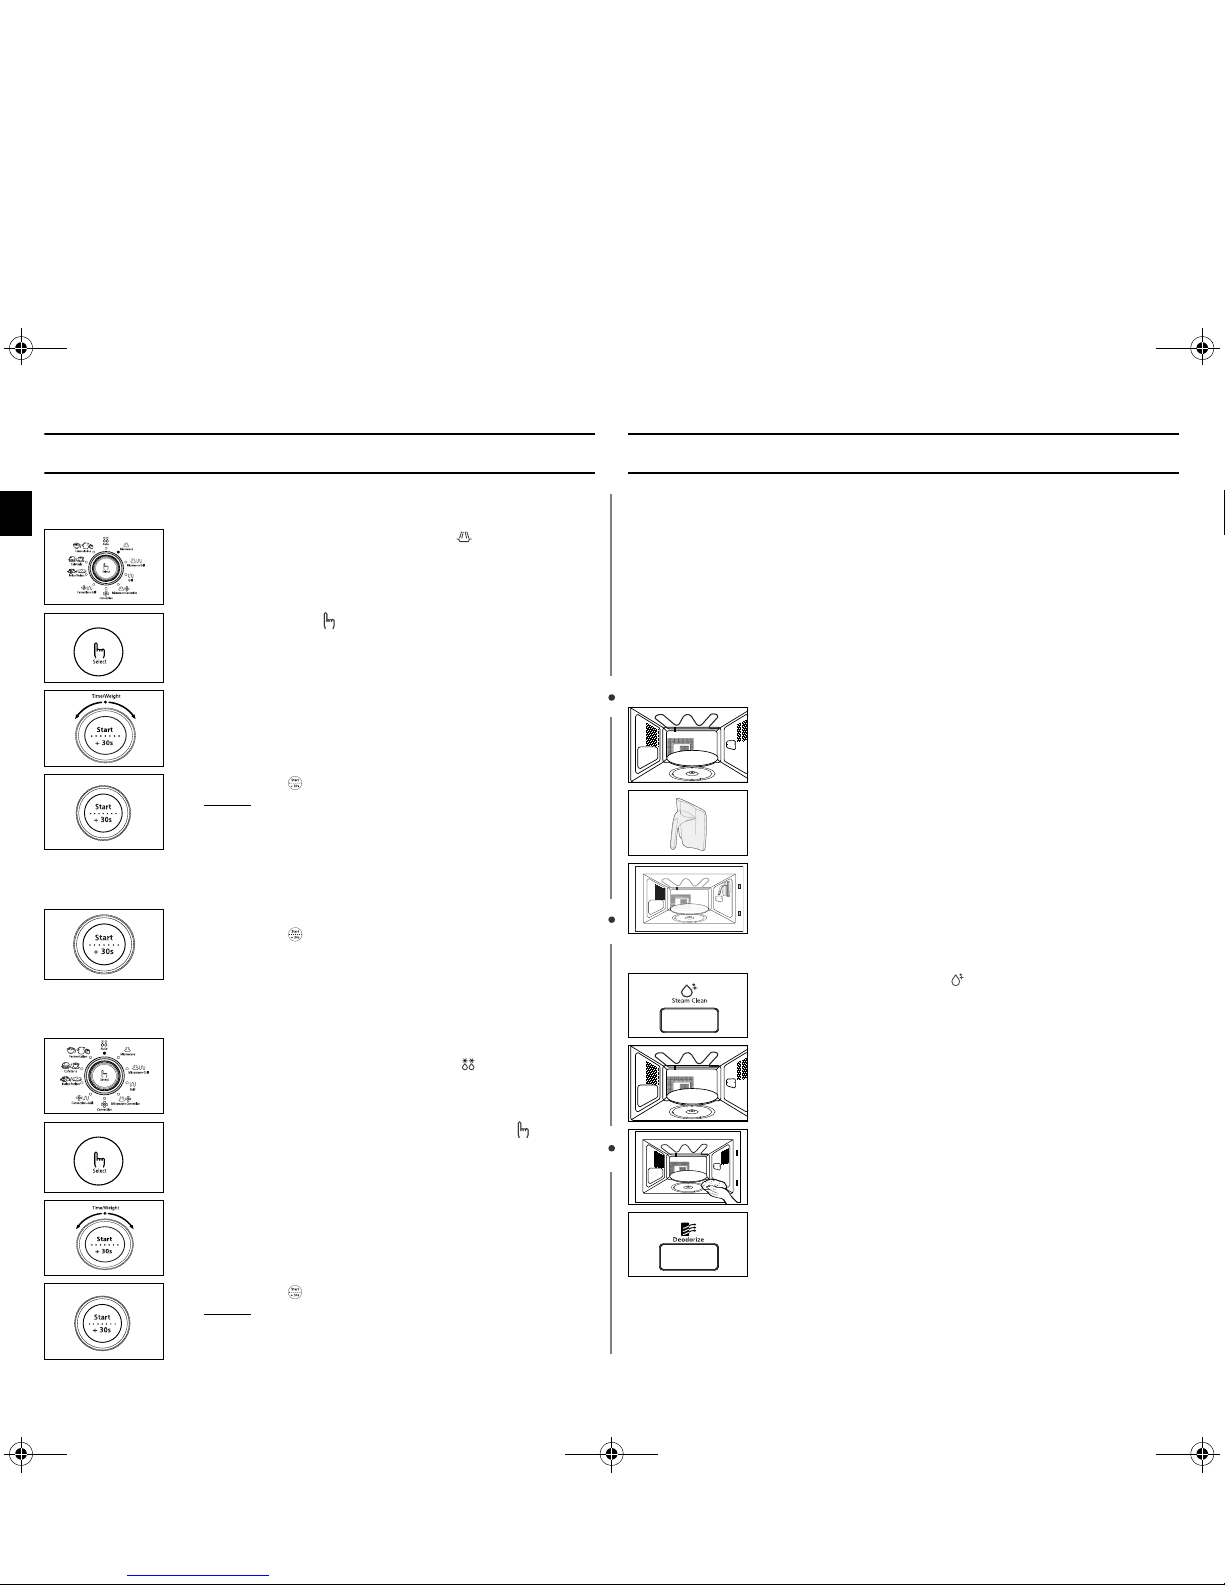
I want to cook some food
I want to add an extra 30 seconds
I want to Auto defrost some food
Using the Steam Cleaning
The steam provided by steam clean system will soak the cavity surface.
After using steam clean function, you can easily clean the cavity of
oven.
☛
Use this function only after the oven has completely cooled. (Room
temperature)
☛
Use normal water only,and no distilled water.
☛
It will be more better if you do a deodorization function after using Steam
cleaning.
☛
If the door is opened during this operation “E7” will be displayed.
(The water in the oven will be very hot due to the steam cleaning
function.)
Warning!
• Water Bowl only can be use during “
Steam Clean
” mode.
• When cooking non-liquid items, remove water bowl because It will damage and
cause fire to the microwave oven.
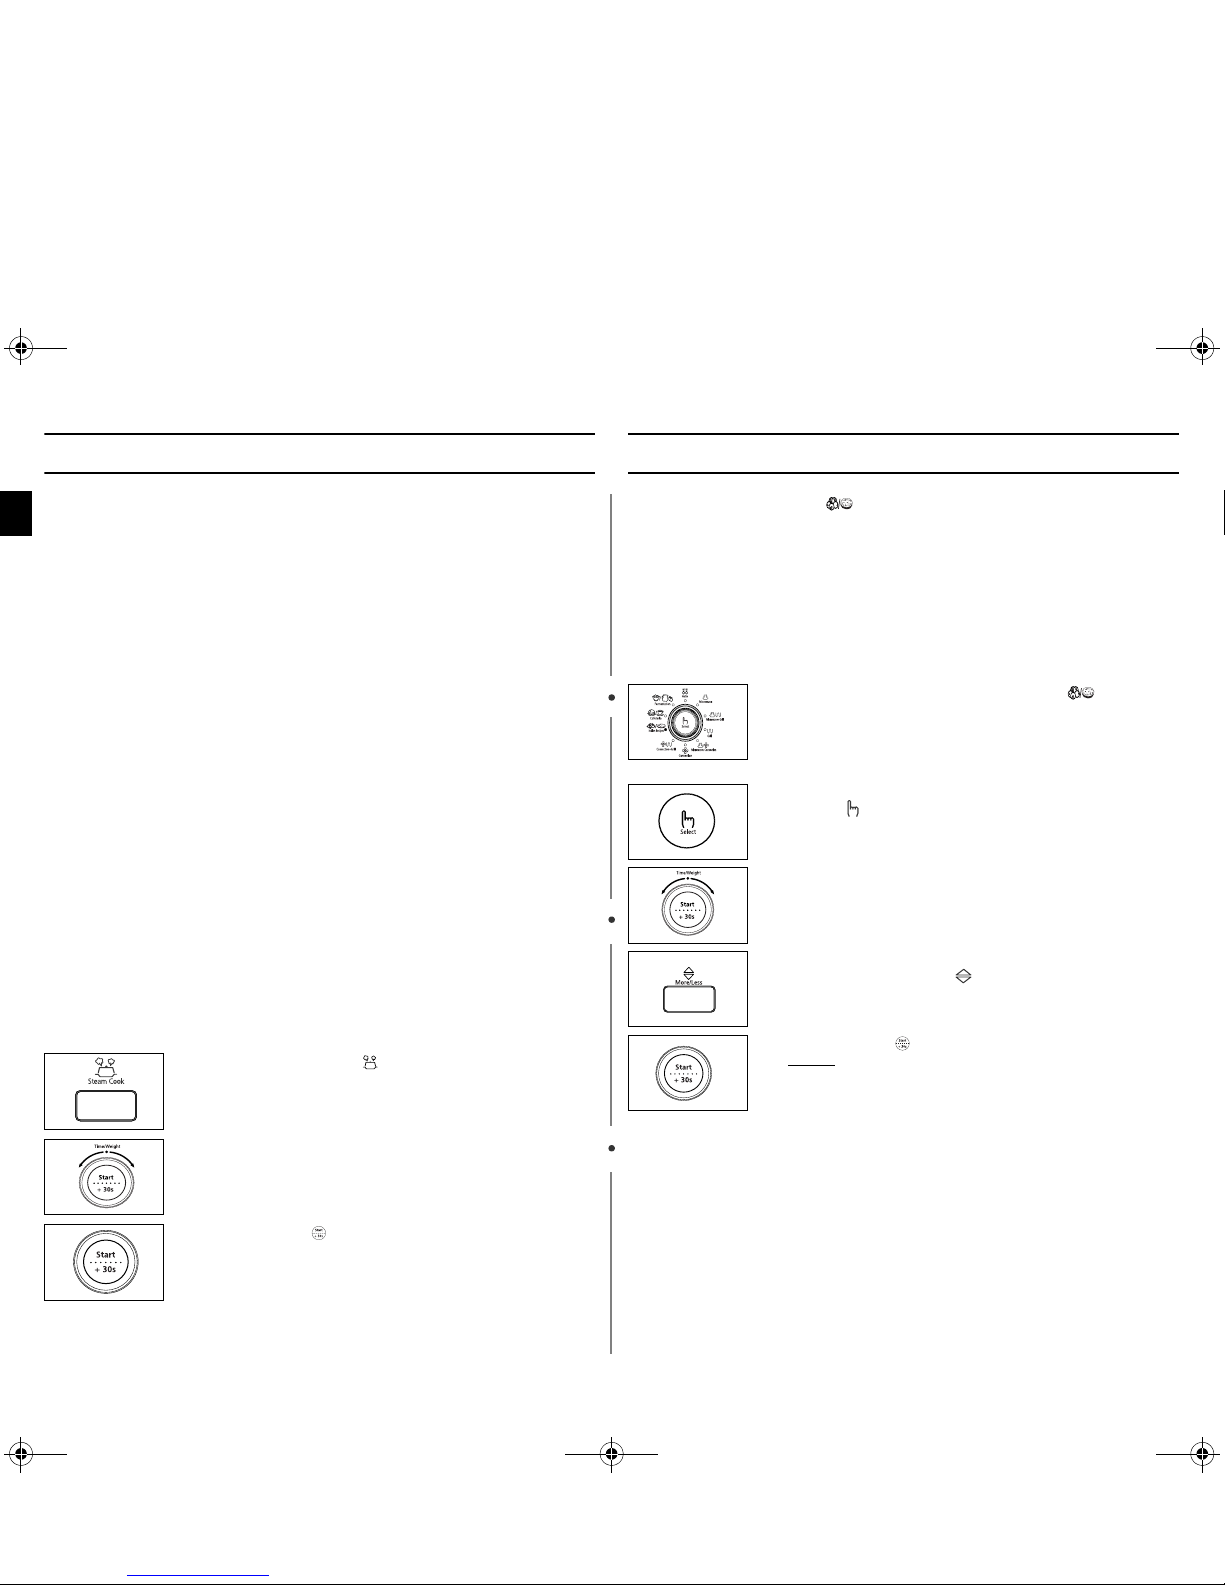
1. Turn the Set dial to the Microwave ( ) symbol.
2.
Press the
Select
( ) button until the appropriate power level
is displayed.
3.
Select the cooking time by turning the
Jog Dial
as required.
4.
Press
Start
( ) button.
Result: Cooking starts
◆
When cooking has finished, the oven will beep
and flash “0” four times. The oven will then
beep one time per minute.
Leave the food in the oven.
Press
+30s
( ) button one or more times for each extra 30
seconds that you wish to add.
1. Place the frozen food in the oven.
Turn the
Set dial
to the
Auto Defrost
() symbol.
2.
Select the food category by pressing the
Select
( ) button,
until the desired food category is selected.
3.
Select the weight by turning the
Jog Dial
as required.
4.
Press
Start
( ) button.
Result: Defrosting starts
◆
When cooking has finished, the oven will beep
and flash “ENJOY MEAL” four times. The oven
will then beep one time per minute.
1. Open the Door.
2.
Fill with water following guide line inside the water bowl.
O
The line is about 30ml.)
3.
Please attach the water bowl in right side of the oven
4.
Close the door.
5.
Press the
Steam clean
( ) button.
(Bulb does work during Steam cleaning time.)
6.
Open the Door.
7.
Please clean cavity of oven with dried dishtowel.
Remove the turntable and only under rack with kitchen paper.
8.
After wiping the cavity we recommend to use the ventilation
function in order to (fully) dry to oven finally.
jlXZ\Ws{sTWY`ZXsluUGGwGYGG~SGqGXYSGYWW]GG`a[XGht
3
EN
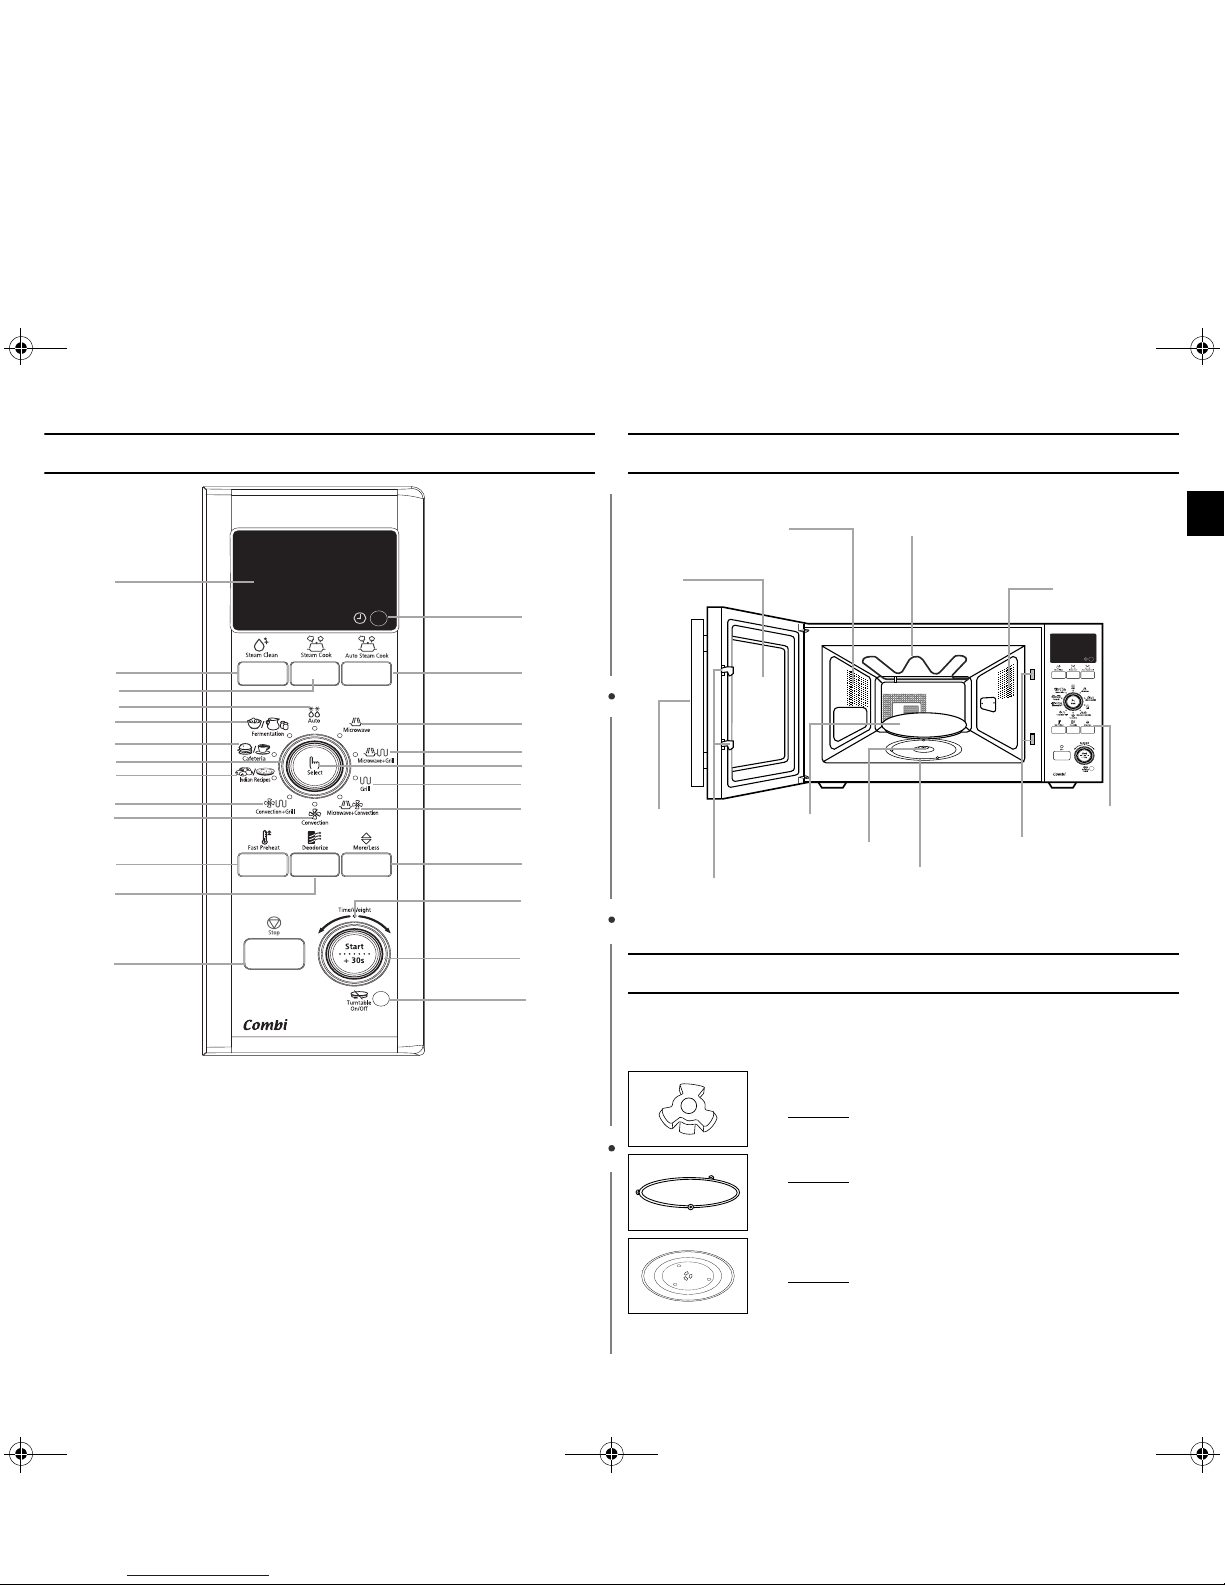
Control Panel Oven
Accessories
Depending on the model that you have purchased, you are supplied
with several accessories that can be used in a variety of ways.
1
2
3
4
5
16
6
24
17
18
21
7
8
10
11
12
15
22
13
14
23
1. DISPLAY
2.
STEAM CLEAN BUTTON
3.
STEAM COOK BUTTON
4.
AUTO DEFROST FEATURE MODE
5.
FERMENTATION MODE
6.
CAFETERIA MODE
7.
SET DIAL
8.
INDIAN RECIPES FEATURE
BUTTON
9.
COMBINED MODE
(CONVECTION+GRILL)
10.
CONVECTION MODE
11.
FAST PREHEAT SELECTION
12.
DEODORIZATION BUTTON
13.
STOP / CANCEL BUTTON
14.
CLOCK SETTING BUTTON
15.
AUTO STEAM COOK BUTTON
16.
MICROWAVE MODE
17.
COMBINED MODE
(MICROWAVE+GRILL)
18.
SELECT BUTTON
19.
GRILL MODE
20.
COMBINED MODE
(MICROWAVE+CONVECTION)
21.
MORE/LESS BUTTON
22.
JOG DIAL
23.
START BUTTON
24.
TURNTABLE ON/OFF BUTTON
20
9
19
1. Coupler, to be placed correctly over the motor shaft in the
base of the oven.
Purpose:
The coupler rotates the turntable.
2. Roller ring
, to be placed in the center of the oven.
Purpose: The roller ring supports the turntable.
3. Turntable
, to be placed on the roller ring with the center
fitting on to the coupler.
Purpose: The turntable serves as the main cooking
surface; it can be easily removed for cleaning.
VENTILATION HOLES
DOOR LATCHES
DOOR
TURNTABLE
COUPLER
ROLLER RING
SAFETY
INTERLOCK
HOLES
VENTILATION
HOLES
HEATING ELEMENT
CONTROL PANEL
DOOR
HANDLE
jlXZ\Ws{sTWY`ZXsluUGGwGZGG~SGqGXYSGYWW]GG`a[XGht
4
EN
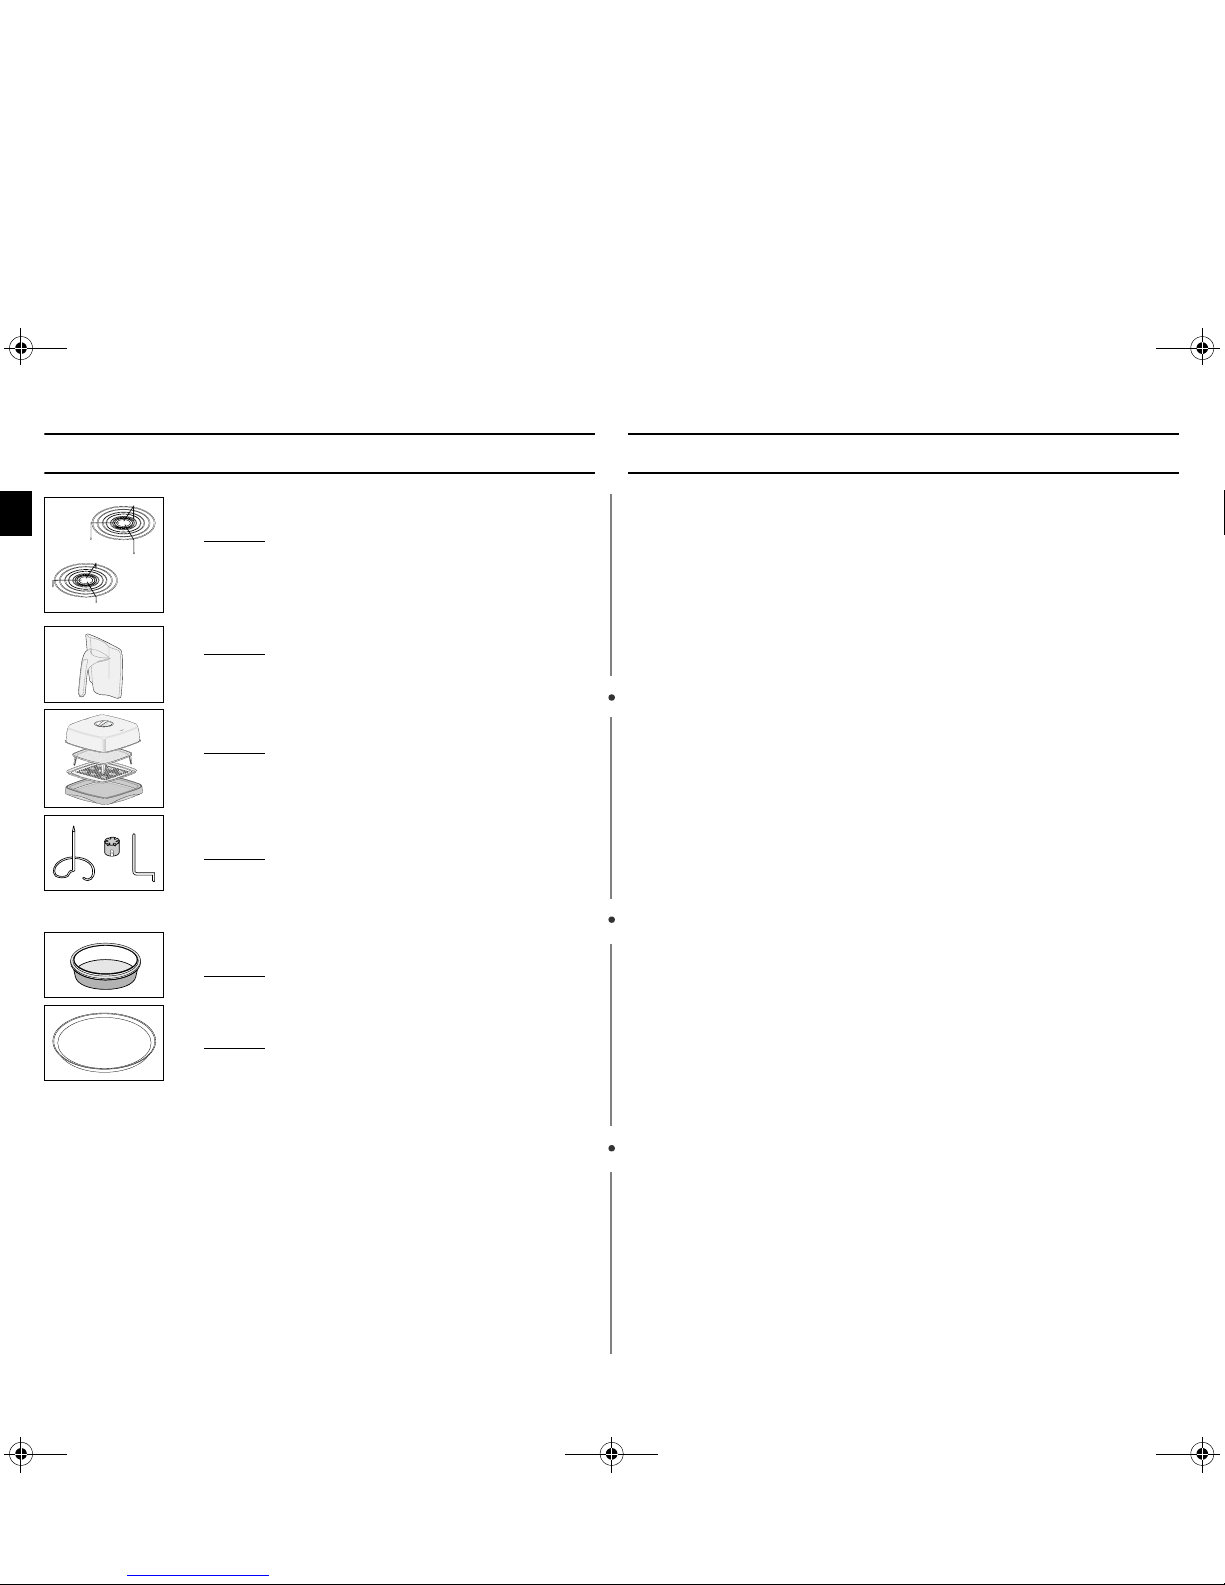
Accessories (continued)
caution!!
• Never use this steamer with a different product or model.
It may cause a fire or fatal damage to the product.
• When you use this steamer, pour at least 200ml of water before use.
If the amount of water is less than 200ml, it may cause incomplete cooking, or may
cause a fire or fatal damage to the product. (“LACK OF WATER” will be displayed
during cooking.
• Take care when you take out the steamer after cooking time. There is a danger of
scalding.
• The steamer should be used only in the mode of
“steam cook
" manual and
"
Auto steam cook
".
• When you use the Steamer, the steam cover and steam plate should be set
perfectly right. (Please refer to the instruction)
The eggs or the chestnuts would be explode without setting the steam cover and
steam plate as instructed on the Instruction book.
Using this Instruction Booklet
Thank you for purchasing a SAMSUNG microwave oven. Your
Owner’s Instructions contains much valuable information on cooking
with your new microwave oven:
• Safety precautions
• Accessories and cookware
• Useful cooking tips
Inside the cover you will find a quick look-up guide explaining three
basic cooking operations:
• Cooking (microwave mode)
• Defrosting
• Adding an extra 30 seconds, if the dish is inadequately cooked or
requires additional reheating
At the end of the booklet you will find illustrations of the oven, and
more importantly the control panel, so that you can find the buttons
more easily.
The illustrations in the step-by-step procedures use two different
symbols.
PRECAUTIONS TO AVOID POSSIBLE EXPOSURE TO
EXCESSIVE MICROWAVE ENERGY
Failure to observe the following safety precautions may result in harmful exposure to
microwave energy.
(a) Under no circumstances should any attempt be made to operate the oven with
the door open or to tamper with the safety interlocks (door latches) or to insert
anything into the safety interlock holes.
(b) Do not place any object between the oven door and front face, or allow food or
cleaner residues to accumulate on sealing surfaces. Ensure that the door and
door sealing surfaces are kept clean by wiping after use with first a damp cloth
and then a final wipe with a soft dry cloth.
(c) Do not operate the oven if it is damaged until it has been repaired by a
qualified microwave service technician trained by the manufacturer.
It is particularly important that the oven door closes properly and that there is no
damage to the:
(1) Door, door seals and sealing surfaces
(2) Door hinges (broken or loose)
(3) Power cable
(d) The oven should not be adjusted or repaired by anyone other than a properly
qualified microwave service technician trained by the manufacturer.
4. Metal racks
(High rack, Low rack), to be placed on the
turntable.
Purpose: The metal racks can be used to cook two
dishes at the same time. A small dish may be
placed on the turntable and a second dish on
the rack. The metal racks can be used in
grill, convection and combination cooking.
5. Clean water bowl,
to be placed in the right side of the oven.
Purpose: The water bowl can be used to clean.
6. Steam water bowl, Steam plate, Steam rack,
Steam Cover
to be placed on the table.
Purpose: The steamer can be used to steam cook.
7. Roasting spit, Coupler barbecue and Skewer
, to be
placed in the glass bowl (CE1352M/CE1353F only).
Purpose: The roasting spit is a convenient way of
barbecuing a chicken, as the meat does not
have to be turned over. It can be used for grill
combination cooking.
8. Glass bowl
, to be placed on the turntable (CE1352M/
CE1353F only).
Purpose: Roasting stand is placed on the glass bowl.
9. Crust plate
, to be placed on the turntable (CE1351T/
CE1353F only).
Purpose: The crust plate is used to brown food better in
the microwave or grill combination cooking
modes and to keep pastry and pizza dough
crisp.
☛✉
Important Note
jlXZ\Ws{sTWY`ZXsluUGGwG[GG~SGqGXYSGYWW]GG`a[XGht

5
EN
Safety Precautions
IMPORTANT SAFETY INSTRUCTIONS.
READ CAREFULLY AND KEEP FOR FUTURE REFERENCE.
Before cooking food or liquids in your microwave oven, please check
that the following safety precautions are taken.
1. DO NOT use any metallic cookware in the microwave oven:
• Metallic containers
• Dinnerware with gold or silver trimmings
• Skewers, forks, etc.
Reason:
Electric arcing or sparking may occur and may damage the oven.
2. DO NOT
heat:
• Airtight or vacuum-sealed bottles, jars, containers. Ex) Baby food jars
• Airtight food. Ex) Eggs, nuts in shells, tomatoes
Reason:
The increase in pressure may cause them to explode.
Tip:
Remove lids and pierce skins, bags, etc.
3. DO NOT
operate the microwave oven when it is empty.
Reason:
The oven walls may be damaged.
Tip:
Leave a glass of water inside the oven at all times. The water will absorb
the microwaves if you accidentally set the oven going when it is empty.
4. DO NOT
cover the rear ventilation slots with cloths or paper.
Reason:
The cloths or paper may catch fire as hot air is evacuated from the oven.
5. ALWAYS
use oven gloves when removing a dish from the oven.
Reason:
Some dishes absorb microwaves and heat is always transferred from
the food to the dish. The dishes are therefore hot
.
6. DO NOT
touch heating elements or interior oven walls.
Reason:
These walls may be hot enough to burn skin even after cooking is
finished, oven though they do not appear to be so. Keep away from hot
spot. Do not allow inflammable materials to come into contact with any
interior area of the oven. Let the oven cool down first.
7.
To reduce the risk of fire in the oven cavity
• Do not store flammable materials in the oven
• Remove wire twist ties from paper or plastic bags
• Do not use your microwave oven to dry newspapers
• If smoke is observed, keep the oven door closed and switch off or disconnect the
oven from the power supply.
8.
Take particular care when heating liquids and baby foods.
• ALWAYS allow a standing time of at least 20 seconds after the oven has been
switched off to allow the temperature to equalize.
• Stir during heating if necessary and ALWAYS stir after heating.
• To prevent eruptive boiling and possible scalding, you should stir before, during,
and after heating.
• In the event of scalding, follow these FIRST AID instructions :
* Immerse hand in cold water for at least 10 minutes.
* Cover with clean, dry dressing.
* Do not apply any creams, oils or lotions.
•
NEVER
fill the container to the top and choose a container that is wider at the top
than at the bottom to prevent the liquid from boiling over. Bottles with narrow necks
may also explode if overheated.
•
ALWAYS
check the temperature of baby food or milk before giving it to the baby.
•
NEVER
heat a baby's bottle with the teat on, as the bottle may explode if
overheated.
• During microwave heating of beverages, there are results in delayed eruptive
boiling, therefore care has to be taken when handling the container.
9.
Be careful not to damage the power cable.
• Do not immerse power cable or plug in water and keep power cable away from
heated surfaces.
• Do not operate this appliance if it has a damaged power cable or plug.
10.
Stand at arm’s length from the oven when opening the door.
Reason:
The hot air or steam released may cause scalding.
11.
Keep the inside of the oven clean.
• Clean the inside of the oven right after each use with a mild detergent solution, but
let the microwave oven cool down before cleaning in order to avoid injury.
Reason:
Food particles or spattered oils stuck to oven walls or floor can cause
the damage of painting and reduce the efficiency of the oven.
12.
“Clicking” sound might be noticed while operating, especially in defrosting mode.
Reason:
When the power output is changing electrically, you may hear that
sound. This is normal.
13.
If the microwave oven is operating without any load, the power will cut off
automatically for safety. After standing for over 30 min, you can operate the oven
normally.
• Do not worry is the oven continues to work after cooking has finished.
Reason:
This product is designed to fan for some minutes, not operating
microwave oven(MWO), to cool down the inner electronic parts
when the stop button is pressed or the door is opened after finishing
cooking in case that the oven operates for some minutes in
cooking(MWO, GRILL, CONVECTION, MWO+GRILL, MWO+
CONVECTION). When cooking has finished, the oven will beep and
flash “0” four times. The oven will then beep one time per minute.
IMPORTANT SAFETY INSTRUCTIONS
During cooking, you should look into the oven from time to time when food is being heated or
cooked in disposable containers of plastic paper or other combustible material.
WARNING:
Do not use the door or door seals are damaged, the oven must not be operated until it has
been repaired by a competent person.
WARNING:
It is hazardous for anyone other than a comperent person to carry out any service or repair
operation which involves the removal of a cover which gives protection against exposure to
microwave energy.
WARNING:
Liquids and other foods must not be heated in sealed containers since they are liable to
explode.
WARNING:
Only allow children to use the oven without supervicion when adequate instructions have
been given so that the child is able to use the oven in a safe way and understands the
hazards of improper use.
WARNING:
Oven casing and door will get hot during convection and combination cooking.
☛ DO NOT
operate the microwave oven without the coupler, roller ring and
turntable.
jlXZ\Ws{sTWY`ZXsluUGGwG\GG~SGqGXYSGYWW]GG`a[XGht
6
EN
Installing Your Microwave Oven
This microwave oven can be placed almost anywhere (kitchen work
surface or shelf, movable trolley, table).
☛ Never
block the air vents as the oven may overheat and automatically
switch itself off. It will remain inoperable until it has cooled sufficiently.
☛
For your personal safety, plug the cable into a 3-pin, 230 Volt, 50Hz, AC
earthed socket. If the power cable of this appliance is damaged, it must be
replaced by the manufacturer or its service agent or a similarly qualified
person in order to avoid a hazard.
☛ Do not
install the microwave oven in hot or damp surroundings like next
to a traditional oven or radiator. The power supply specifications of the
oven must be respected and any extension cable used must be of the
same standard as the power cable supplied with the oven. Wipe the
interior and the door seal with a damp cloth before using your microwave
oven for the first time.
Setting the Time
Your microwave oven has an inbuilt clock. The time can be displayed
in either the 12-hour or 24-hour notation. You must set the clock:
• When you first install your microwave oven
• After a power failure
✉ Do not forget to reset the clock when you switch to and from summer
or winter time.
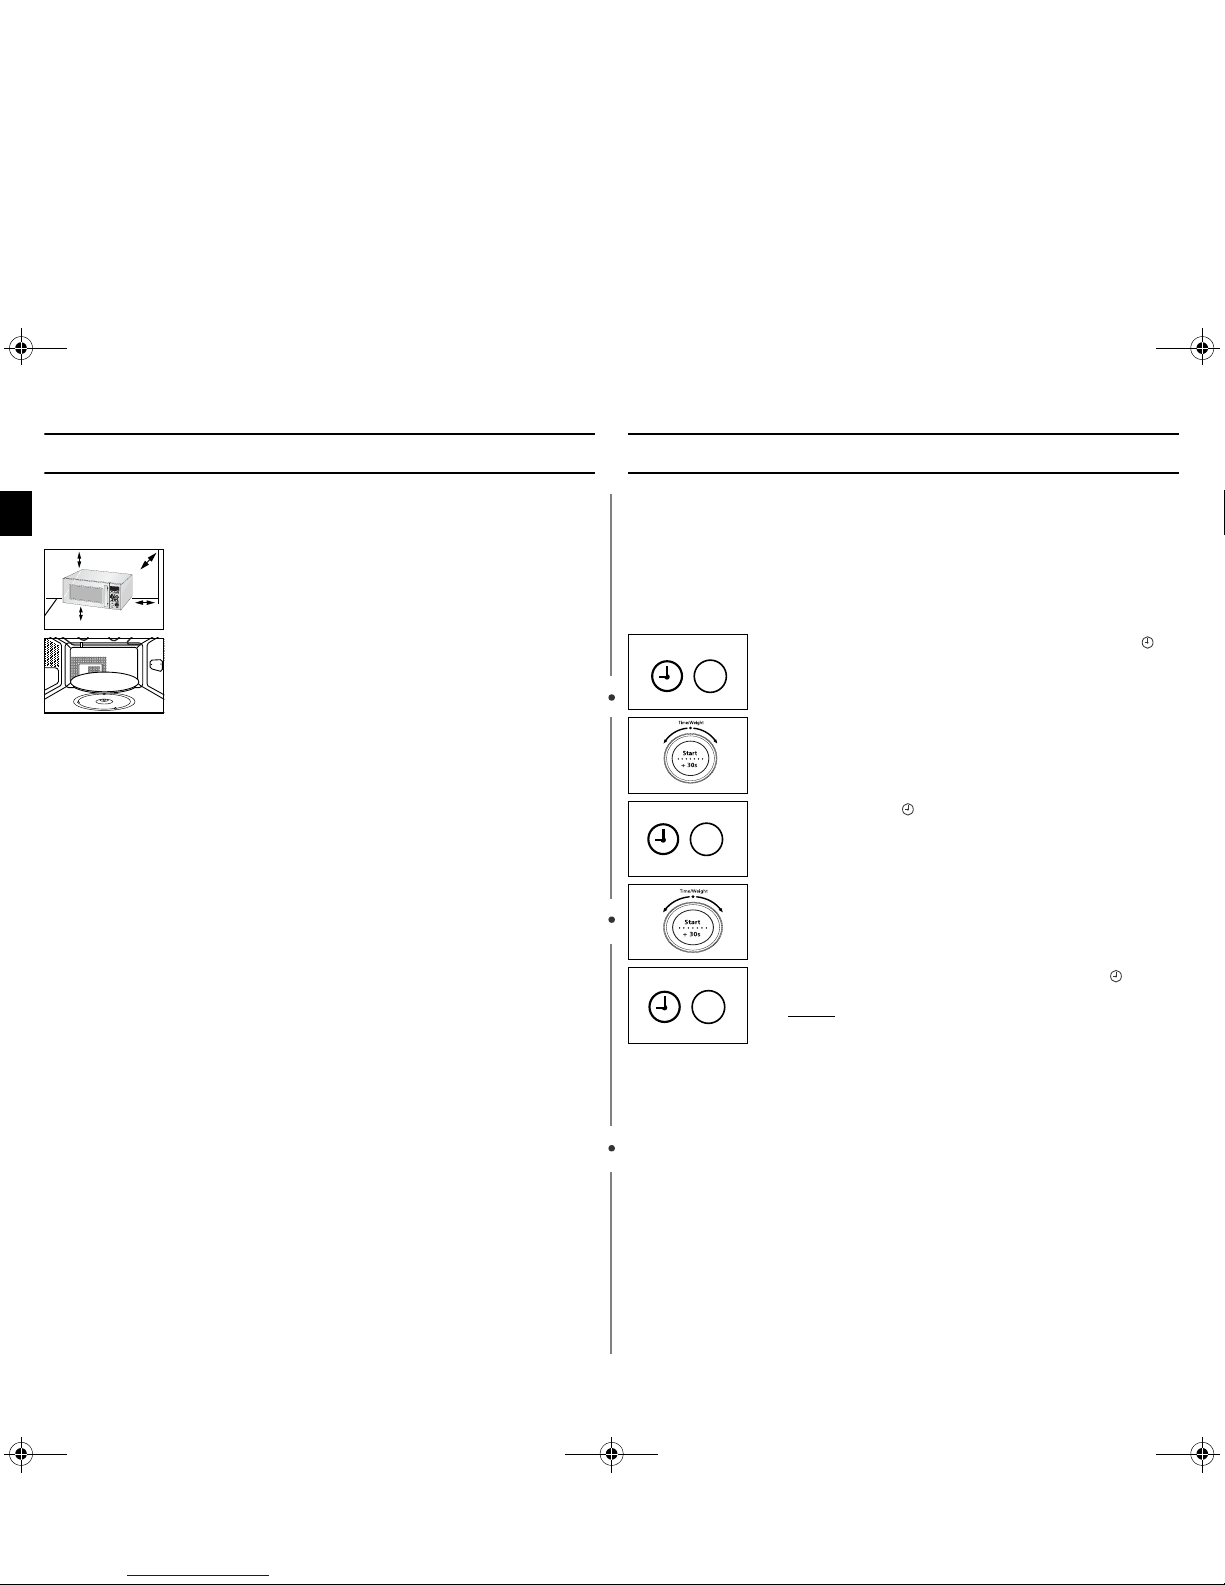
1. When you install your oven, make sure there is adequate
ventilation for your oven by leaving at least 10 cm
(4 inches) of space behind, and on the sides of the oven
and 20 cm (8 inches) of space above the oven and 85 cm
(33 inches) of the floor.
2.
Remove all packing materials inside the oven.
Install the roller ring and turntable.
Check that the turntable rotates freely.
3.
This microwave oven has to be positioned so that plug is
accessible.
20cm
above
10cm
behind
10cm on
the side
85 cm
of the floor
1. To display the time in Then press the Clock( )
the... button...
12-hour notation Once
24-hour notation Twice
2.
Turn the
Jog Dial
to set the hour.
3.
Press the
Clock
( ) button.
4.
Turn the
Jog Dial
to set the minute.
5.
When the right time is displayed, press the
Clock
( ) button
to start the clock.
Result: The time is displayed whenever you are not
using the microwave oven.
jlXZ\Ws{sTWY`ZXsluUGGwG]GG~SGqGXYSGYWW]GG`a[XGht
7
EN
How a Microwave Oven Works
Microwaves are high-frequency electromagnetic waves; the energy
released enables food to be cooked or reheated without changing either
the form or the colour.
You can use your microwave oven to:
• Defrost
•Reheat
•Cook
Cooking Principle
☛
As the centre of the food is cooked by heat dissipation, cooking continues
even when you have taken the food out of the oven. Standing times
specified in recipes and in this booklet must therefore be respected to
ensure:
• Even cooking of the food right to the centre
• The same temperature throughout the food
Checking that Your Oven is Operating Correctly
The following simple procedure enables you to check that your oven is
working correctly at all times. If you are in doubt, refer to the section
entitled “What to Do if You are in Doubt or Have a Problem” next the
page.
✉ The oven must be plugged into an appropriate wall socket. The
turntable must be in position in the oven. If a power level other than
the maximum (100% - 900 W) is used, the water takes longer to boil.
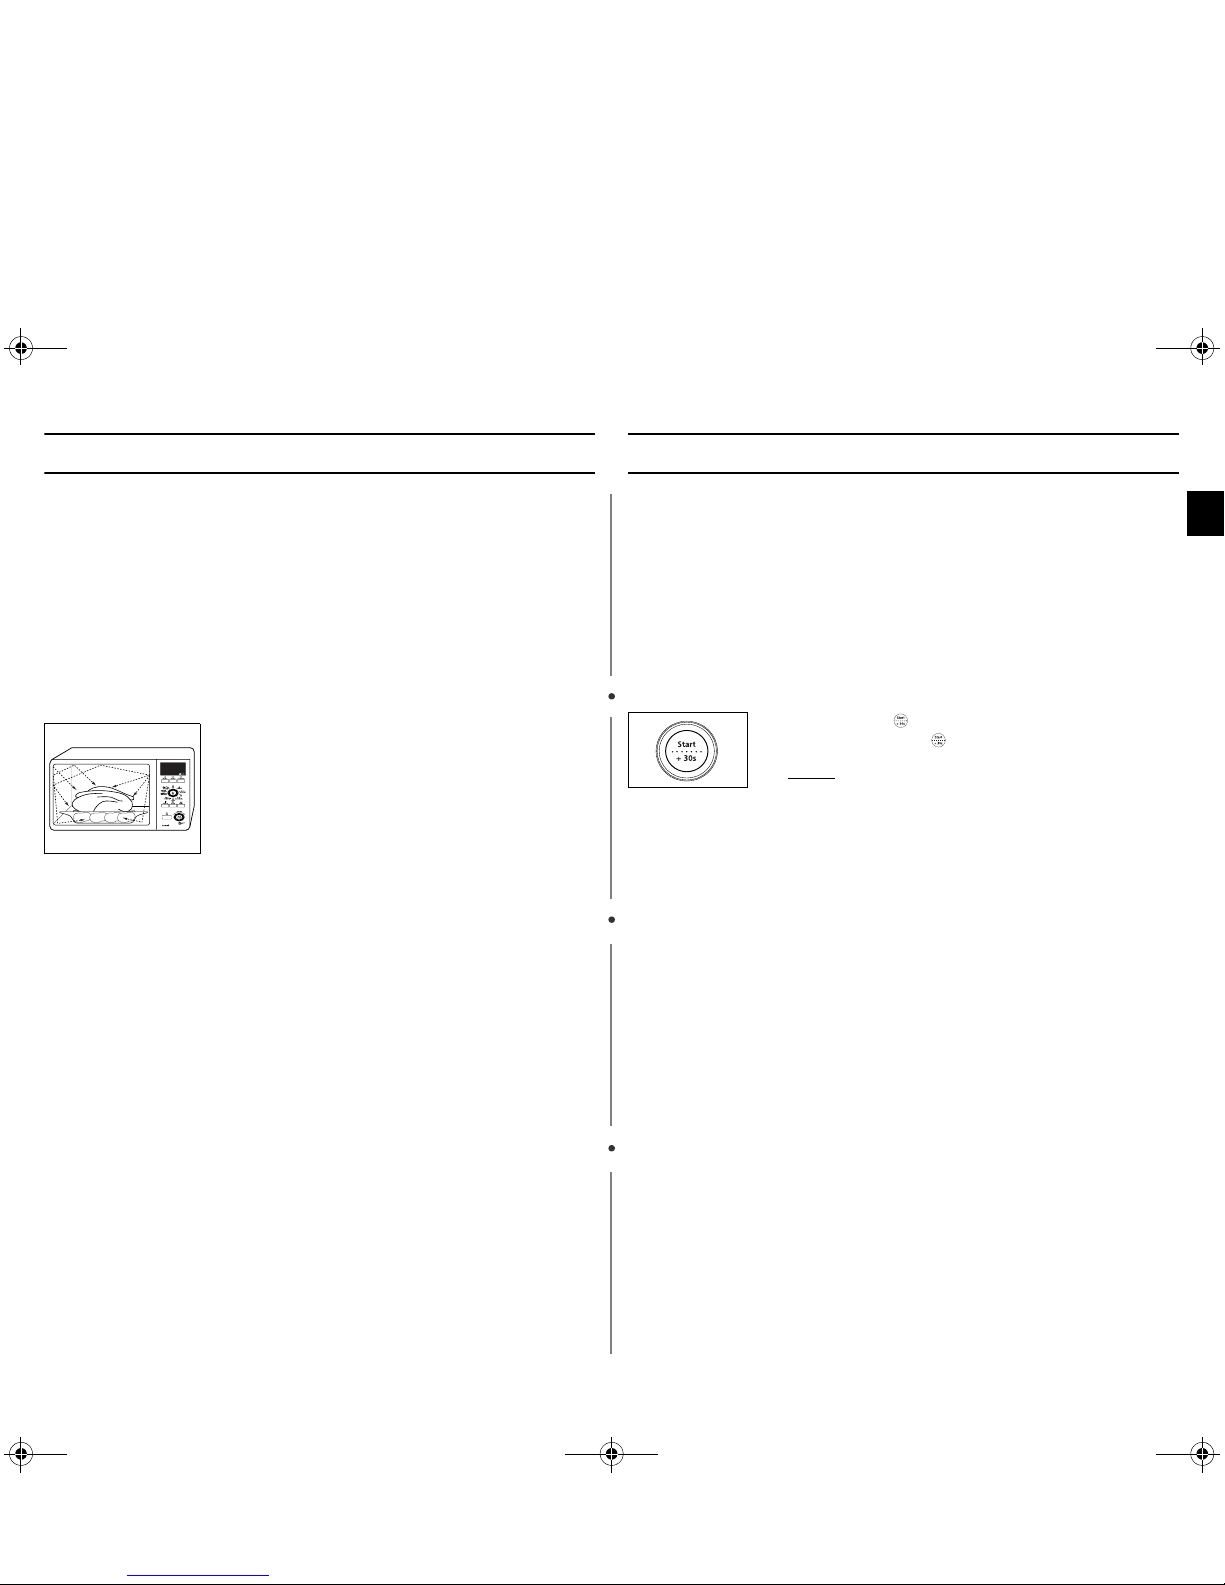
Open the oven door by pulling the handle on the right side of the door.
Place a glass of water on the turntable. Close the door.
1. The microwaves generated by the magnetron
reflected at cavity and are distributed uniformly as
the food rotates on the turntable. The food is thus
cooked evenly.
2.
The microwaves are absorbed by the food up to a depth
of about 1 inch (2.5 cm). Cooking then continues as the
heat is dissipated within the food.
3.
Cooking times vary according to the container used and
the properties of the food:
• Quantity and density
• Water content
• Initial temperature (refrigerated or not)
Press the
start
( ) button and set the time to 4 or 5 minutes,
by pressing the
start
( ) button the appropriate number of
times.
Result: The oven heats the water for 4 or 5 minutes.
The water should then be boiling.
jlXZ\Ws{sTWY`ZXsluUGGwG^GG~SGqGXYSGYWW]GG`a[XGht
8
EN
What to Do if You are in Doubt or You have a
Problem
Becoming familiar with a new appliance always takes a little time. If
you have any of the problems listed below, try the solutions given. They
may save you the time and inconvenience of an unnecessary service
call.
◆ The following are normal occurrences.
• Condensation inside the oven
• Air flow around the door and outer casing
• Light reflection around the door and outer casing
• Steam escaping from around the door or vents
◆ The food is not cooked at all
• Have you set the timer correctly and pressed the
Start
( ) button?
• Is the door closed?
• Have you overloaded the electric circuit and caused a fuse to blow or a breaker to
be triggered.
◆ The food is either overcooked or undercooked
• Was the appropriate cooking length set for the type of food?
• Was an appropriate power level chosen?
◆ Sparking and cracking occur inside the oven (arcing)
• Have you used a dish with metal trimmings?
• Have you left a fork or other metal utensil inside the oven?
• Is aluminium foil too close to the inside walls?
◆ The oven causes interference with radios or televisions
• Slight interference may be observed on televisions or radios when the oven is
operating. This is normal.
* Solution: Install the oven away from televisions, radios and aerials.
• If interference is detected by the oven’s microprocessor, the display may be reset.
* Solution: Disconnect the power plug and reconnect it. Reset the time.
◆ “E3" message indicates
• The "E3" message is automatically activated prior to the microwave oven
overheating. Should the "E3" message be activated, then depress the " " key to
utilize the initialization mode.
Cooking/Reheating
The following procedure explains how to cook or reheat food.
☛
ALWAYS check your cooking settings before leaving the oven
unattended.
Open the door. Place the food in the centre of the turntable. Close the
door. Never switch the microwave oven on when it is empty.
Quick Start:
✉ If you wish to heat a dish for a short period of time at maximum power
(900W), you can also simply press the +30s ( ) button once for
each 30 seconds of cooking time. The oven starts immediately.
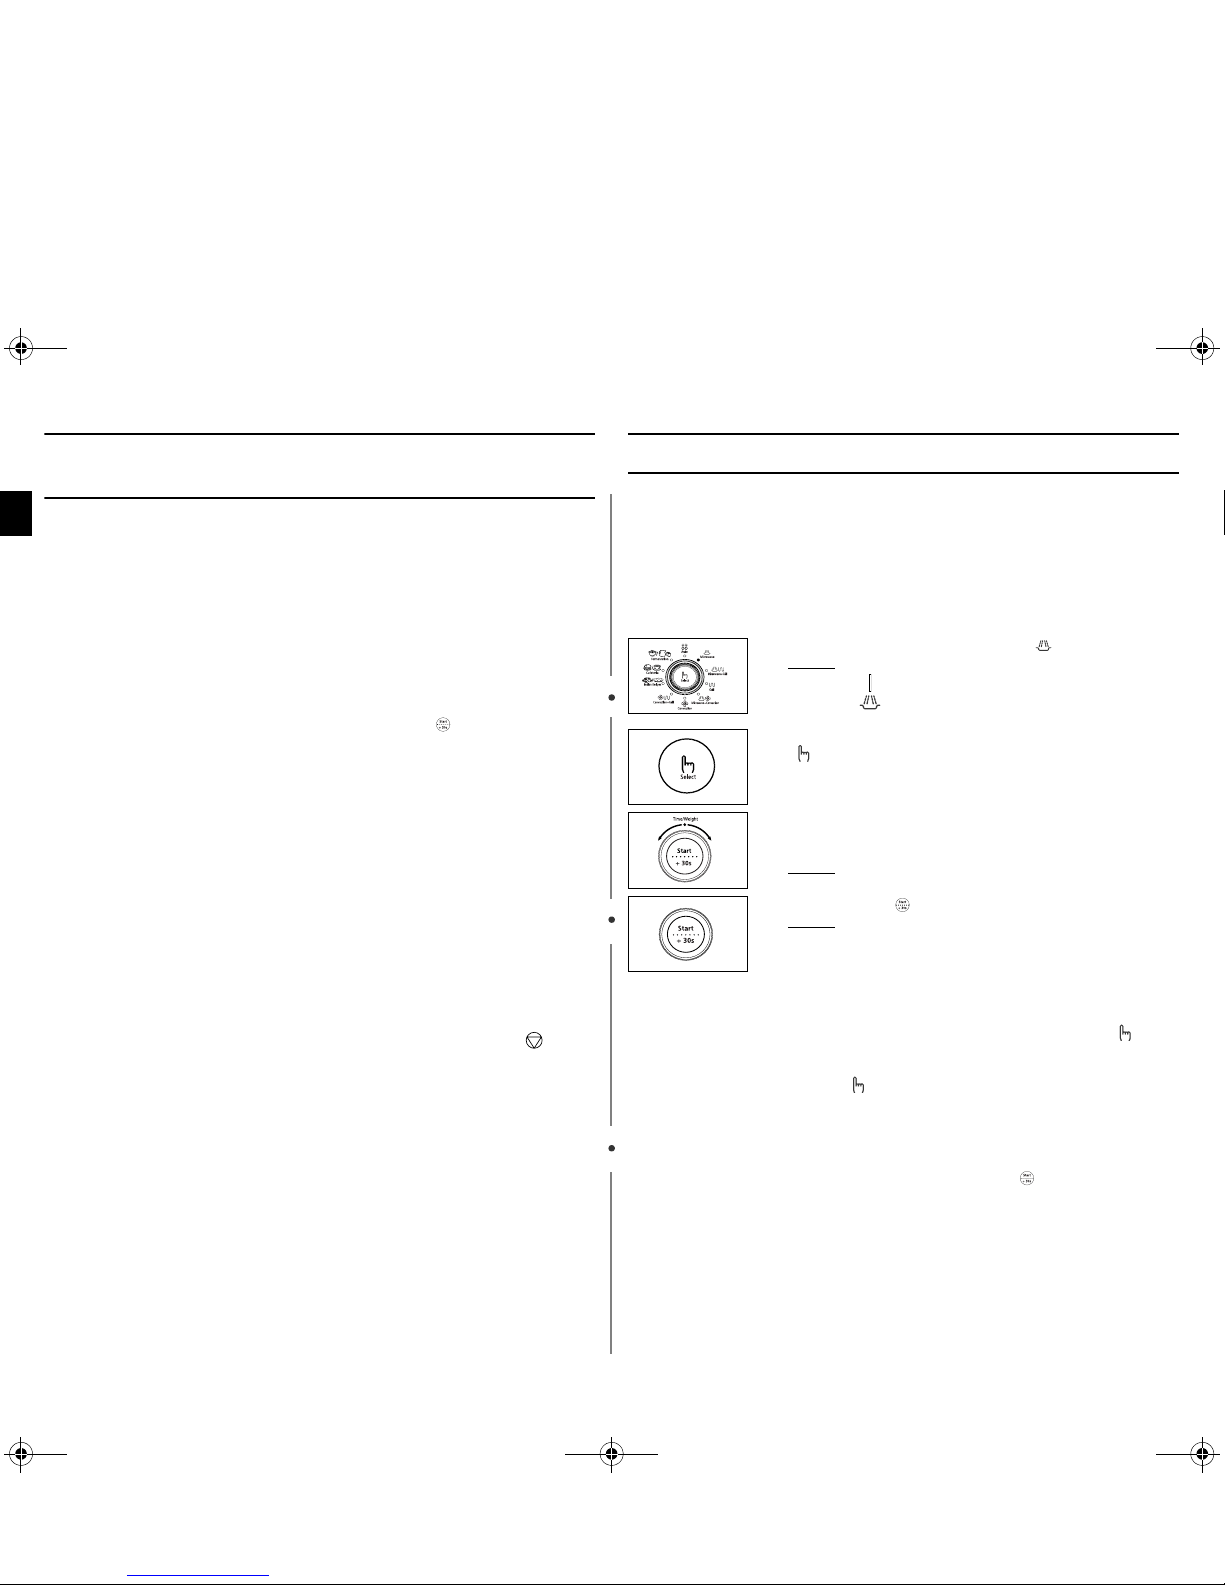
1. Turn the Set dial to the Microwave( ) symbol.
Result:
The following indications are displayed:
(one-stage cooking)
(microwave mode)
2.
Select the appropriate power level by pressing the
Select
( ) button again until the corresponding output power is
displayed. Refer to the power level table below for further
details.
3.
Set the cooking time by turning the
Jog Dial
.
• Example: For a cooking time of 3 minutes, 30 seconds, turn
the jog dial to the right to set 3:30.
Result: The cooking time is displayed.
4.
Press the
Start
( ) button.
Result: The oven light comes on and the turntable starts
rotating. Cooking starts and when it has
finished:
◆
The oven will beep and flash “0” four times.
The oven will then beep one time per minute.
✉ If you would like to know the current Power
Level of the oven cavity, press
Select
()
button once. If you would like to change the
power level during cooking, press the
Select
()
button twice or more times to select the
desired power level.
jlXZ\Ws{sTWY`ZXsluUGGwG_GG~SGqGXYSGYWW]GG`a[XGht
9
EN
Power Levels and Time Variations
The power level function enables you to adapt the amount of energy
dissipated and thus the time required to cook or reheat your food,
according to its type and quantity. You can choose between six power
levels.
The cooking times given in recipes and in this booklet correspond to
the specific power level indicated.
Stopping the Cooking
You can stop cooking at any time so that you can:
• Check the food
• Turn the food over or stir it
• Leave it to stand
Adjusting the Cooking Time
Like traditional cooking, you may find that, depending on the food’s
characteristics or your tastes, you have to adjust the cooking times
slightly. You can:
• Check how cooking is progressing at any time simply by opening
the door
• Increase or decrease the remaining cooking time
Power Level Percentage Output
HIGH
MEDIUM HIGH
MEDIUM
MEDIUM LOW
DEFROST
LOW
100 %
67 %
50 %
33 %
20 %
11 %
900 W
600 W
450 W
300 W
180 W
100 W
If you select a... Then the cooking time must be...
Higher power level
Lower power level
Decreased
Increased
To stop the cooking... Then...
Temporarily
Open the door.
Result: Cooking stops.
To resume cooking, close the door again and press the
Start
( ) button.
Completely
Press the
Stop
( ) button.
Result: Cooking stops.
If you wish to cancel the cooking settings, press the
Stop
( ) button again.
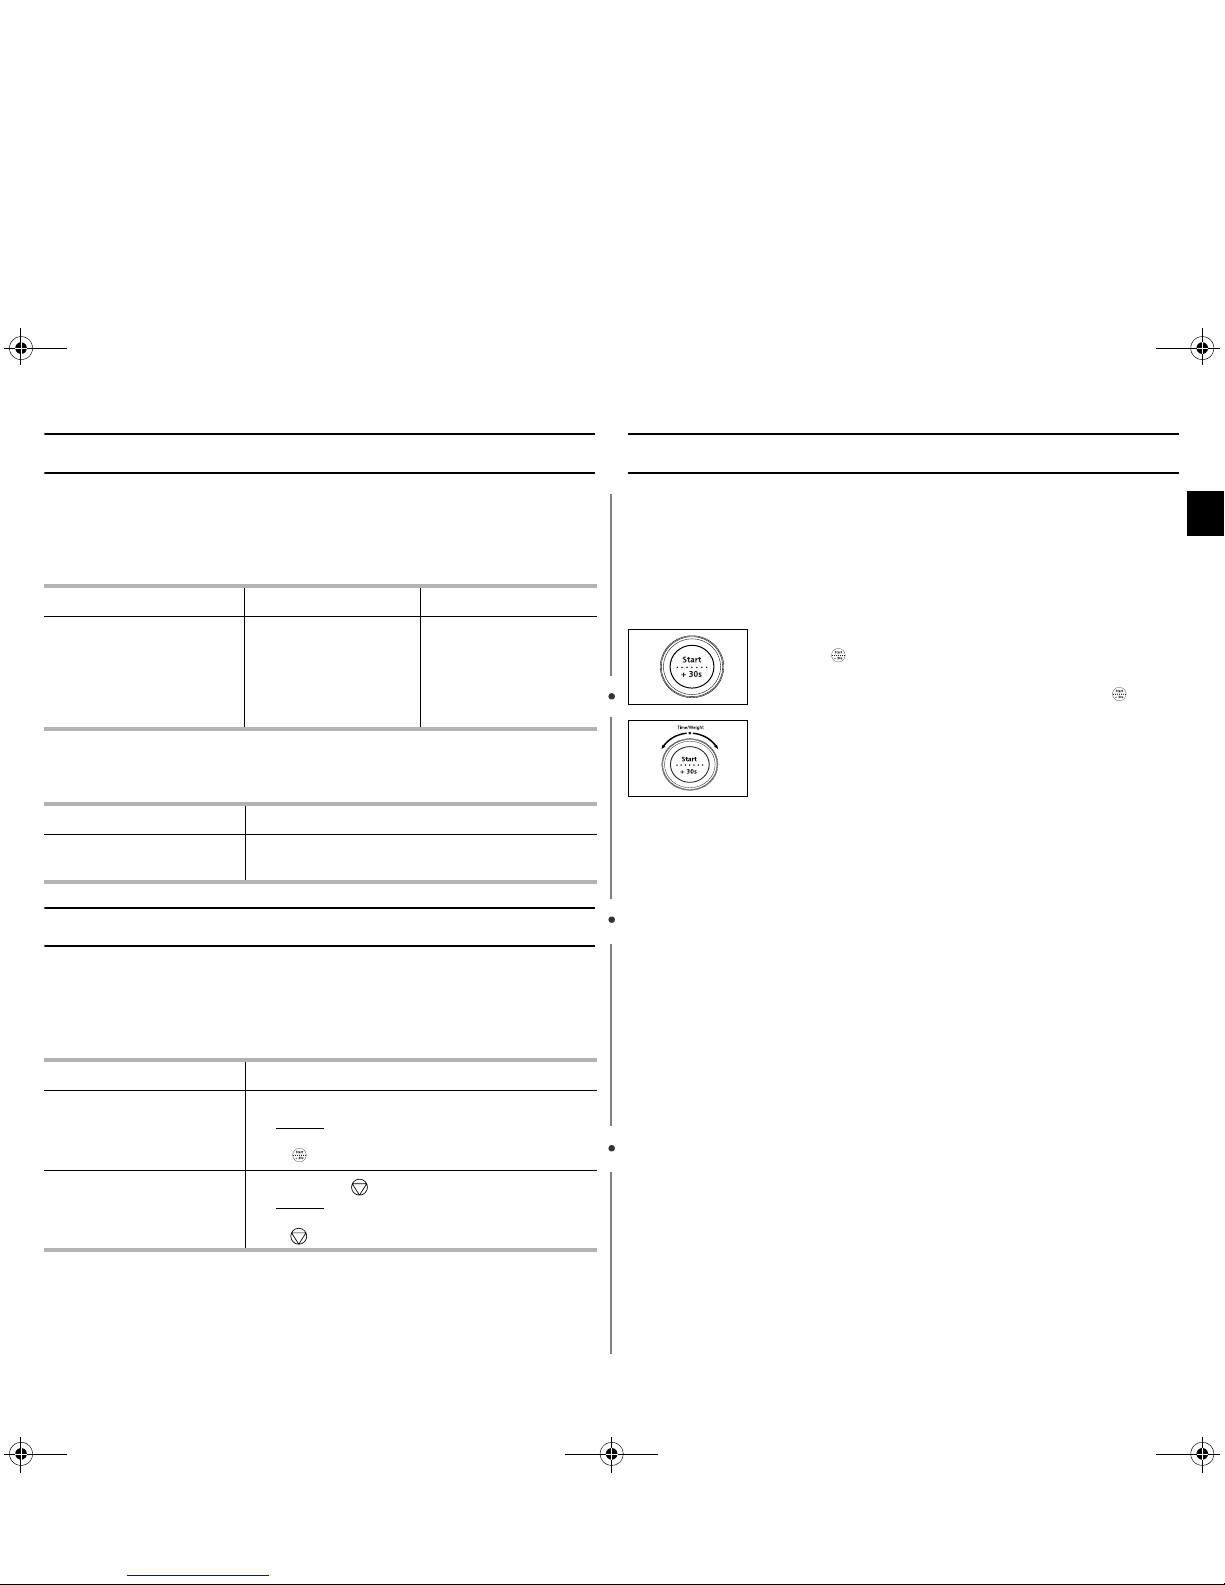
1. To increase the cooking time of your food, press the
+30s( ) button once for each 30 seconds that you wish
to add.
• Example: To add three minutes, press the
+30s
( ) button
six times.
2.
During the cooking, to increase or decrease the cooking time
of your food, turn the
Jog Dial
right or left.
jlXZ\Ws{sTWY`ZXsluUGGwG`GG~SGqGXYSGYWW]GG`a[XGht
10
EN
Using the Steam Cook Feature
The following procedure explains how to cook food.
☛
ALWAYS check your cooking settings before leaving the oven
unattended.
caution
HH
• Never use this steamer with a product of different model.
It may cause a fire or fatal damage to the product.
• When you use this steamer, pour at least 200ml water before use.
If the amount of water is less than 200ml, it may cause incomplete cooking, or may
cause a fire or fatal damage to the product. (“LACK OF WATER” will be displayed
during cooking.
• Take care when you take out the steamer after cooking time. There is a danger of
scald.
• The steamer should be used only in the mode of "
steam cook
"manual and "
Auto
steam cook
".
• When you use the Steamer, the steam cover and steam plate should be set pefectly
right. (Please refer to the instruction)
The egges or the chasenut would be exploding without setting the steam cover and
steam plaste instructed on the Instruction book.
Using the Indian Recipes Feature
The
five
Indian Recipes( )
features include/provide preprogrammed cooking times. You do not need to set either the
cooking times or the power level.
You can adjust the size of the serving by turning the Jog Dial.
☛
Use only recipients that are microwave-safe.
Open the door. Place the food in the centre of the turntable. Close the
door.
1. Pour about 500ml water into the steam water bowl.
2.
Place the steam plate on the steam water bowl completely,
and put food on the steam plate.
3.
Cover with the steam cover, and open the door.
4.
Place the steamer in the center of the turntable.
Close the door.
5.
Press the
Steam Cook
( ) button.
6.
Set the cooking time by turning the
Jog Dial
.
The maximum time is 60 minutes.
7.
Press the
Start
( ) button.
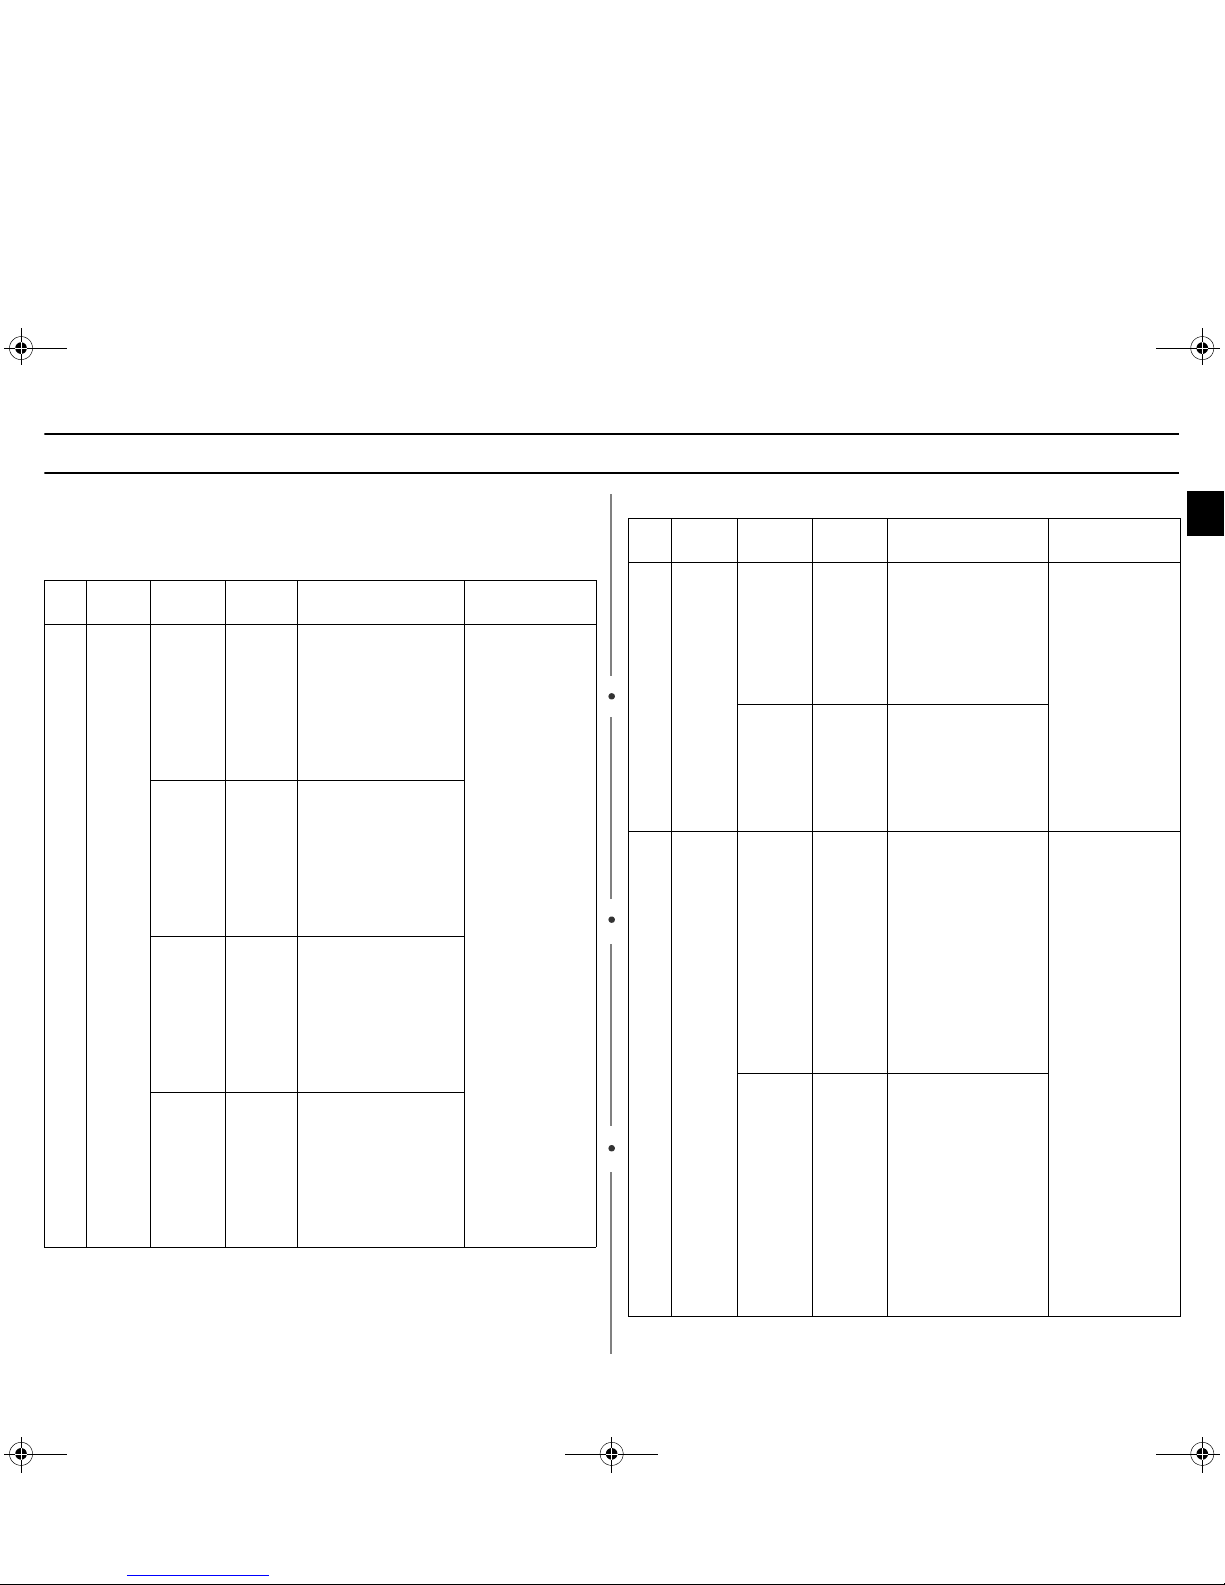
1. Turn the Set Dial to the Indian Recipes( ) symbol.
2.
Select the type of food that you are cooking by pressing the
Select
( ) button. Refer to the table on the following page
for a description of the various pre-programmed settings.
3.
Select the size of the serving by turning the
Jog Dial
.
4.
Increase or decrease the cooking time, if necessary, by
pressing the
More/Less
( ) button respectively.
5.
Press the
Start
( ) button.
Result: The food is cooked according to the pre-
programmed setting selected.
◆
When cooking has finished, the oven will beep
and flash “ENJOY MEAL” four times. The oven
will then beep one time per minute.
jlXZ\Ws{sTWY`ZXsluUGGwGXWGG~SGqGXYSGYWW]GG`a[XGht
11
EN
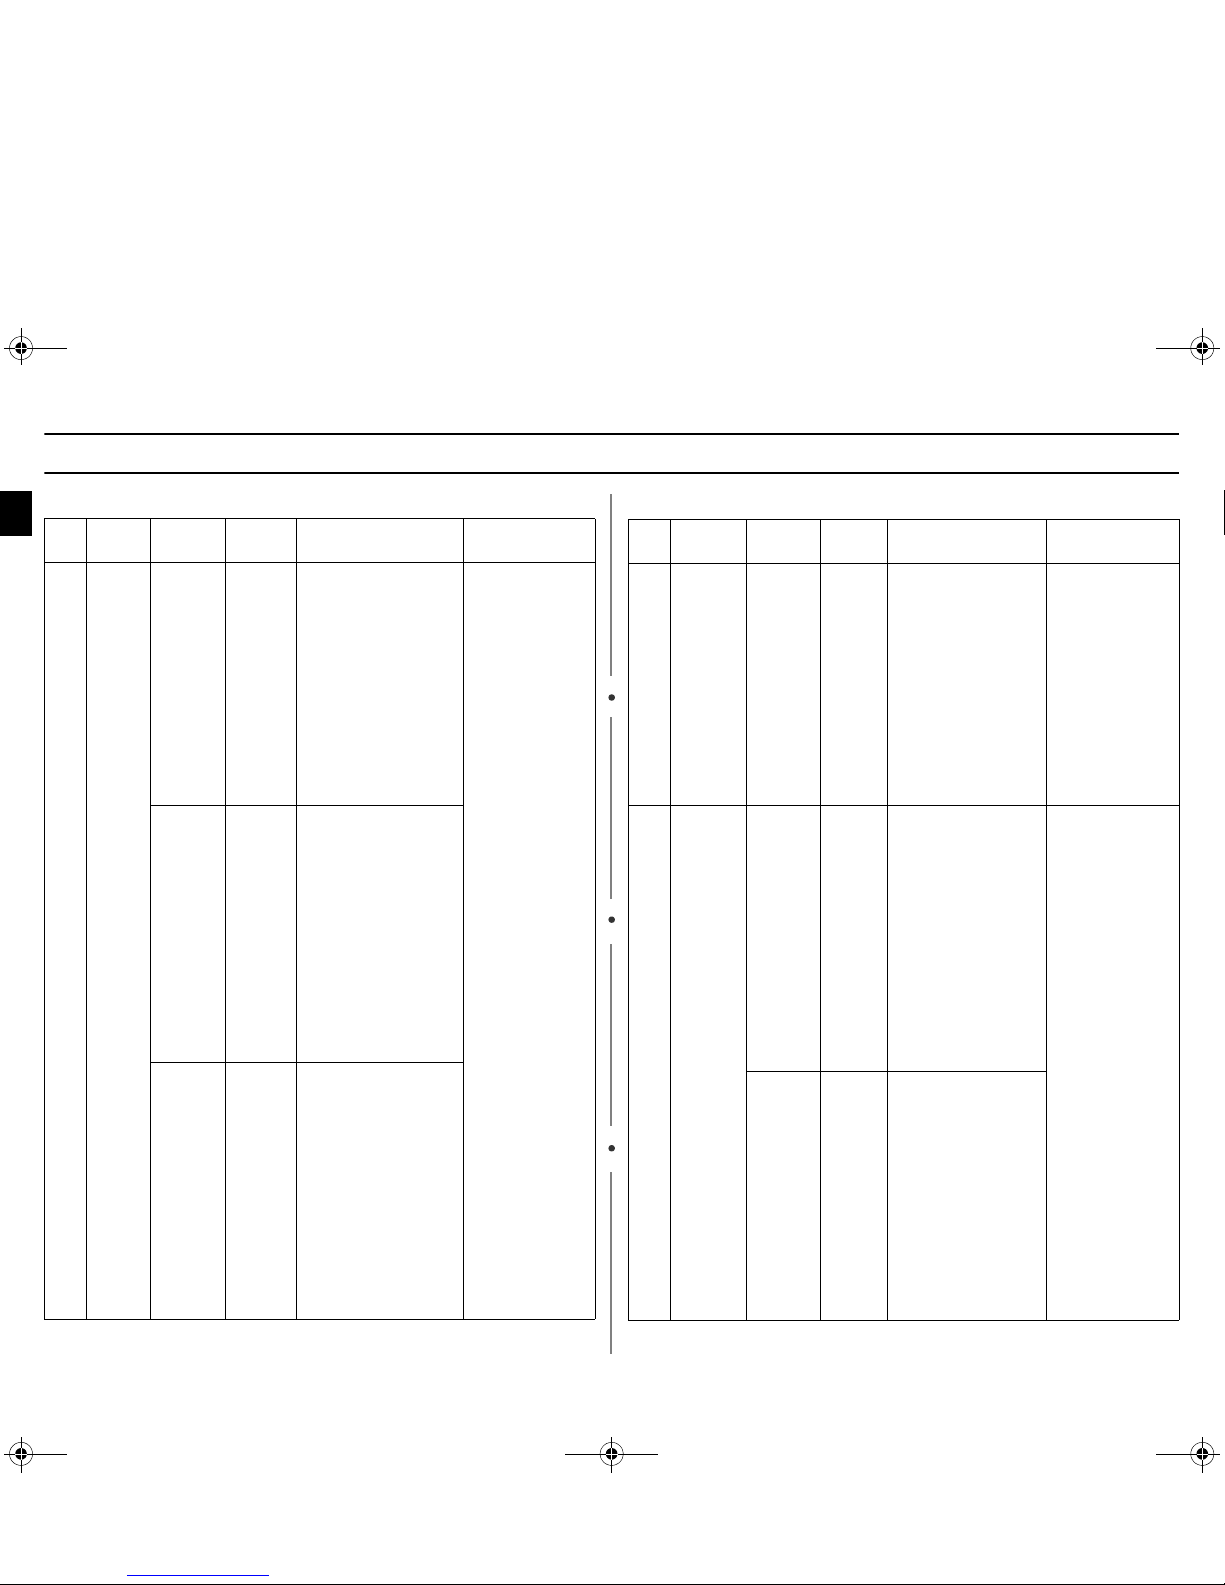
Using the Indian Recipes Feature(continued)
The following table presents the various Indian Recipes Programmes,
quantities, standing times and appropriate recommendations.
Programmes are running with microwave energy only.
Code
Food
Serving
Size
Standing
Time
Ingredients Recommendations
1.
Veg.
Pulao
50 g 2 min.
Rice (1/2 cup-washed &
soaked in 1 cup of water
for 1 hrs), Veg (1/4 cup
peas,beans,tomato,etc),
Oil (1/2 Tsp), Salt (1/2
Tsp), Red chill powder (1/
2 Tsp Optional),Clove (2-
3),Cinnamom (1/2),
Bayleaf (1), Black peeper
Com (2-3)
Add rice, water, oil,
salt, all vegetables &
whole spices in a
microwave safe
bowl with lid or
cover with clingfilm.
100 g 2 min.
Rice (1 cup-washed &
soaked in 2 cup of water
for 1 hrs), Veg (1/2 cup
peas,beans,tomato,etc),
Oil (1 Tsp), Salt (1 Tsp),
Red chill powder (1 Tsp
Optional),Clove (3-
4),Cinnamom (1), Bayleaf
(2), Black peeper Com (3-
4)
150 g 2 min.
Rice (1*1/2 cup-washed &
soaked in 3 cup of water
for 1 hrs), Veg (3/4 cup
peas,beans,tomato,etc),
Oil (1*1/2 Tsp), Salt (1*1/2
Tsp), Red chill powder
(1*1/2 Tsp Optional),Clove
(4-5),Cinnamom (1*1/2),
Bayleaf (3), Black peeper
Com (4-5)
200 g 2 min.
Rice (2 cup-washed &
soaked in 4 cup of water
for 1 hrs), Veg (1 cup
peas,beans,tomato,etc),
Oil (2 Tsp), Salt (2 Tsp),
Red chill powder (2 Tsp
Optional),Clove (5-
6),Cinnamom (2), Bayleaf
(4), Black peeper Com (5-
6)
Code
Food
Serving
Size
Standing
Time
Ingredients Recommendations
2.
Instant
Idli
4 pcs 3 min.
Rawa Sooji(1/2 cup),
Curd (1/2 cup),Heeng (1/
2 pinch), Eno salt (1/2
Tsp), Lemon juice (1/2
Tsp), Roasted/Fried
Moongfali (optional),
Roasted Channa Dal
(optional), Green chillies
(1no)
Mix sooji, curd, salt,
heeng ,lemon juice,
Green chilli, Nut or
dal(roasted). Add
Eno salt last of all &
pour into microwave
safe bowls (katories)
or idli maker.
8 pcs 3 min.
Rawa Sooji(1 cup), Curd
(1 cup),Heeng (1 pinch),
Eno salt (3/4 Tsp),
Lemon juice (1 Tsp),
Roasted/Fried Moongfali
(optional), Roasted
Channa Dal (optional),
Green chillies (1no)
3.
Kadhai
Paneer
150-200 g 3 min.
Paneer(200g), Capsicum
(3/4 cut julliens), Fresh
Tomato (3/4 Choppedmedium), Tomato puree
(2-3 Tsp),Salt (3/4 Tsp) ,
Sugar (1 Tsp), Red Chille
wole (1-2), Red chilli
powder (1/3 Tsp), Ginger
(3/4 Shreded), Garlic (3/4
Tsp paste), Garam
Masala (3/4 Tsp),
Dhaniya Powder (1 Tsp),
Kastoori Methi (Dry
fenugreek 1*1/2 Tsp),
Green Dhaniya (For
garnishing), Oil (3/4 Tsp)
Mix all the
ingredients in a
microwave safe
bowl.
200-250 g 3 min.
Paneer(250g), Capsicum
(1 cut julliens), Fresh
Tomato (1 Choppedmedium), Tomato puree
(3-4 Tsp),Salt (1 Tsp) ,
Sugar (1*1/2 Tsp), Red
Chille wole (2-3), Red
chilli powder (1/2 Tsp),
Ginger (1 Shreded),
Garlic (1 Tsp paste),
Garam Masala (1 Tsp),
Dhaniya Powder(1*1/2
Tsp), Kastoori Methi
(Dry fenugreek-2 Tsp),
Green Dhaniya (For
garnishing), Oil (1 Tsp)
jlXZ\Ws{sTWY`ZXsluUGGwGXXGG~SGqGXYSGYWW]GG`a[XGht
12
EN
Using the Indian Recipes Feature(continued)
Code
Food
Serving
Size
Standing
Time
Ingredients Recommendations
3.
Kadhai
Paneer
250-300 g 3 min.
Paneer(300g), Capsicum
(1*1/4 cut julliens), Fresh
Tomato (1*1/4 Choppedmedium), Tomato puree
(4-5 Tsp),Salt (1*1/4 Tsp) ,
Sugar (1*1/3 Tsp), Red
Chille wole (3-4), Red chilli
powder (3/4 Tsp), Ginger
(1*1/4 Shreded), Garlic
(1*1/4 Tsp paste), Garam
Masala (1*1/4 Tsp),
Dhaniya Powder(1*1/3
Tsp), Kastoori Methi (Dry
fenugreek-3 Tsp), Green
Dhaniya (For garnishing),
Oil (1*1/4 Tsp)
Mix all the
ingredients in a
microwave safe
bowl.
300-350 g 3 min.
Paneer(350g), Capsicum
(1*1/2 cut julliens), Fresh
Tomato (1*1/2 Choppedmedium), Tomato puree
(5-6 Tsp),Salt (1*1/2 Tsp) ,
Sugar (1*3/4 Tsp), Red
Chille wole (4-5), Red chilli
powder (1 Tsp), Ginger
(1*1/2 Shreded), Garlic
(1*1/2 Tsp paste), Garam
Masala (1*1/2 Tsp),
Dhaniya Powder(1*3/4
Tsp), Kastoori Methi (Dry
fenugreek-3*1/2 Tsp),
Green Dhaniya (For
garnishing), Oil (1*1/3
Tsp)
350-400 g 3 min.
Paneer(400g), Capsicum
(1*2/3 cut julliens), Fresh
Tomato (1*2/3 Choppedmedium), Tomato puree
(6-7 Tsp),Salt (1*2/3 Tsp) ,
Sugar (2 Tsp), Red Chille
wole (5-6), Red chilli
powder (1*1/3 Tsp),
Ginger (1*2/3 Shreded),
Garlic (1*2/3 Tsp paste),
Garam Masala (1*2/3
Tsp),Dhaniya Powder(2
Tsp), Kastoori Methi (Dry
fenugreek-3*2/3 Tsp),
Green Dhaniya (For
garnishing), Oil (1*1/2
Tsp)
Code
Food
Serving
Size
Standing
Time
Ingredients Recommendations
3.
Kadhai
Paneer
400-450 g 3 min.
Paneer(450g), Capsicum
(2 cut julliens), Fresh
Tomato (2 Choppedmedium), Tomato puree
(7-8 Tsp),Salt (2 Tsp) ,
Sugar (3 Tsp), Red
Chille wole (6-7), Red
chilli powder (1 Tsp),
Ginger (2 Shreded),
Garlic (2 Tsp paste),
Garam Masala (2 Tsp),
Dhaniya Powder (3 Tsp),
Kastoori Methi (Dry
fenugreek-4 Tsp), Green
Dhaniya (For
garnishing), Oil (2 Tsp)
Mix all the
ingredients in a
microwave safe
bowl.
4. Instant
Dhokla
4 pcs 3 min. Sooji (1/8 cup), Baisan
( 3/8 cup), Curd (1/2
cup), Salt (1/2 tsp),
Sugar (1 Tsp), Lemon
juice(1/2Tsp), Haldi(1/4
Tsp), Oil (1/2 Tsp), Eno
salt (3/8 Tsp)
Mix basin, sooji,
curd,
salt,sugar,lemon
juice, Haldi,oil & Eno
salt in the last. Pour
into microwave safe
greased bowls
( Katories) or idli
maker with cover or
lid.
8 pcs 3 min. Sooji (1/4 cup), Baisan
( 3/4 cup), Curd (1 cup),
Salt (1 tsp),Sugar (2
Tsp), Lemon
juice(1Tsp), Haldi(1/2
Tsp), Oil (1 Tsp), Eno
salt (3/4 Tsp)
jlXZ\Ws{sTWY`ZXsluUGGwGXYGG~SGqGXYSGYWW]GG`a[XGht
 Loading...