


Built-in Oven
user manual
BT621 Series
imagine the possibilities
Thank you for purchasing this Samsung product.
Please register your product at
www.samsung.com/global/register
using this manual
Thank you for choosing a SAMSUNG Built-In Oven.
This Owner’s Manual contains important information on safety and instructions intended to
assist you in the operation and maintenance of your appliance.
Please take the time to read this Owner’s Manual before using your oven and keep this
book for future reference.
The following symbols are used in the text of this Owner’s Manual:
WARNING or CAUTION Important Note
safety instructions
Installation of this oven must be performed only by a licensed electrician. The installer is
responsible for connecting the appliance to the mains power supply in observance of the
relevant safety recommendations.
ELECTRICAL SAFETY
If the oven has been damaged in transport, do not connect it.
• This appliance must be connected to the mains power supply only by a specially licensed
electrician.
• In the event of a fault or damage to the appliance, do not attempt to operate it.
• Repairs should be performed by a licensed technician only. Improper repair may result in
considerable danger to you and others. If your oven needs repair, contact a SAMSUNG Service
Centre or your dealer.
• If the supply cord is defective, it must be replaced by a special cord or assembly available from
the manufacturer or an authorised service agent.
• Electrical leads and cables should not be allowed to touch the oven.
• The oven should be connected to the mains power supply by means of an approved circuit
breaker or fuse. Never use multiple plug adapters or extension leads.
• The rating plate is located on the right side of the door.
• The power supply of the appliance should be turned off when it is being repaired or cleaned.
• Take care when connecting electrical appliances to sockets near the oven.
• This appliance is not intended for use by persons (including children) with reduced physical,
sensory or mental capabilities, or lack of experience and knowledge, unless they have been
given supervision or instruction concerning use of the appliance by a person responsible for
their safety.
WARNING: Accessible parts may become hot during use. To avoid burns young children
should be kept away.
WARNING: The appliance should be powered down before replacing the lamp to avoid the
possibility of electric shock. During oven operation, the interior surfaces become very hot.
2_using this manual

safety instructions_3
SAFETY DURING OPERATION
SAFETY INSTRUCTIONS
• This oven has been designed only for the cooking of household foods.
During use, the oven interior surfaces become hot enough to cause burns. Do not touch
•
heating elements or interior surfaces of the oven until they have had time to cool.
• Never store flammable materials in the oven.
• The oven surfaces become hot when the appliance is operated at a high temperature for an
extended period of time.
When cooking, take care when opening the oven door as hot air and steam can escape rapidly.
•
• When cooking dishes that contain alcohol, the alcohol may evaporate due to the high
temperatures and the vapour can catch fire if it comes into contact with a hot part of the oven.
• For your safety, do not use high - pressure water cleaners or steam jet cleaners.
• Children should be kept at a safe distance when the oven is in use.
• Frozen foods such as pizzas should be cooked on the Big grid. If the baking tray is used, it may
become deformed due to the great variation in temperatures.
• Do not pour water into the oven bottom when it is hot. This could cause damage to the enamel
surface.
• The oven door must be closed during cooking.
• Take care when opening the door before the end of the steam cleaning procedure; the water on
the bottom is hot.
• Do not line the oven bottom with aluminium foil and do not place any baking trays or tins on
it. The aluminium foil blocks the heat, which may result in damage to the enamel surfaces and
cause poor cooking results.
• Fruit juices will leave stains, which can become indelible on the enamel surfaces of the oven.
When cooking very moist cakes, use the deep pan.
• Do not rest bakeware on the open oven door.
• This appliance is not intended for use by young children or infirm persons without the adequate
supervision of a responsible person ensuring that they are using the appliance safely.
• Young children should be supervised to ensure that they do not play with the appliance.
• Small amounts of food require shorter cooking or heating time. If normal times are allowed they
may overheat and burn.
DISPOSAL INSTRUCTIONS
Disposing of the packaging material
• The material used to package this appliance is recyclable.
• Dispose of the packaging materials in the appropriate container at your local waste disposal
facility.
Disposing of old appliances
Before disposing of old appliances, make them inoperable so that they cannot be a source of
danger.
To do this, disconnect the appliance from the mains supply and remove the mains lead.
To protect the environment, it is important that old appliances are disposed of in the correct
manner.
• The appliance must not be disposed of with household rubbish.
• You can obtain information about collection dates and public refuse disposal sites from your
local refuse department or council.
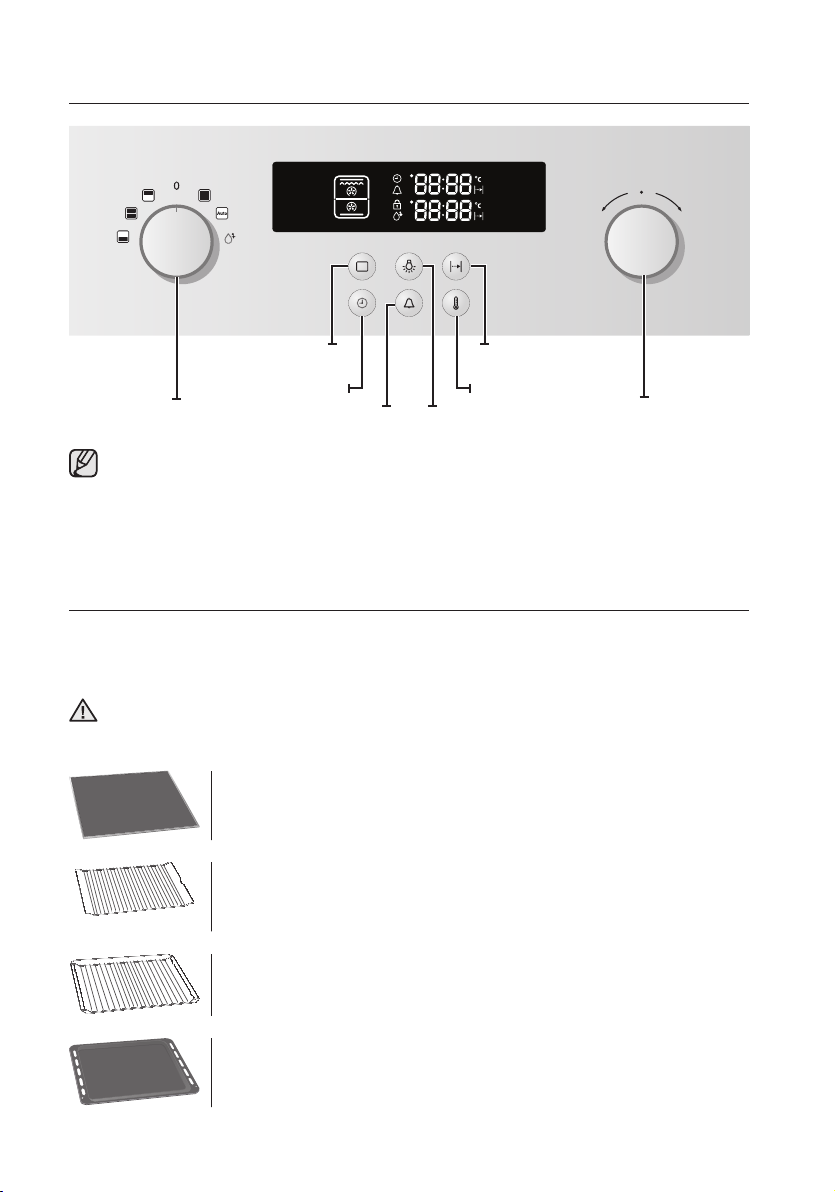
oven controls
Function Cooking time
Time Temperature
Operation knob Selector knob
Front design
The front panel is available in various material and color options including stainless steel,
white, black and glass. For purposes of quality improvement, the appearance may be subject
to change.
Alarm Illumination
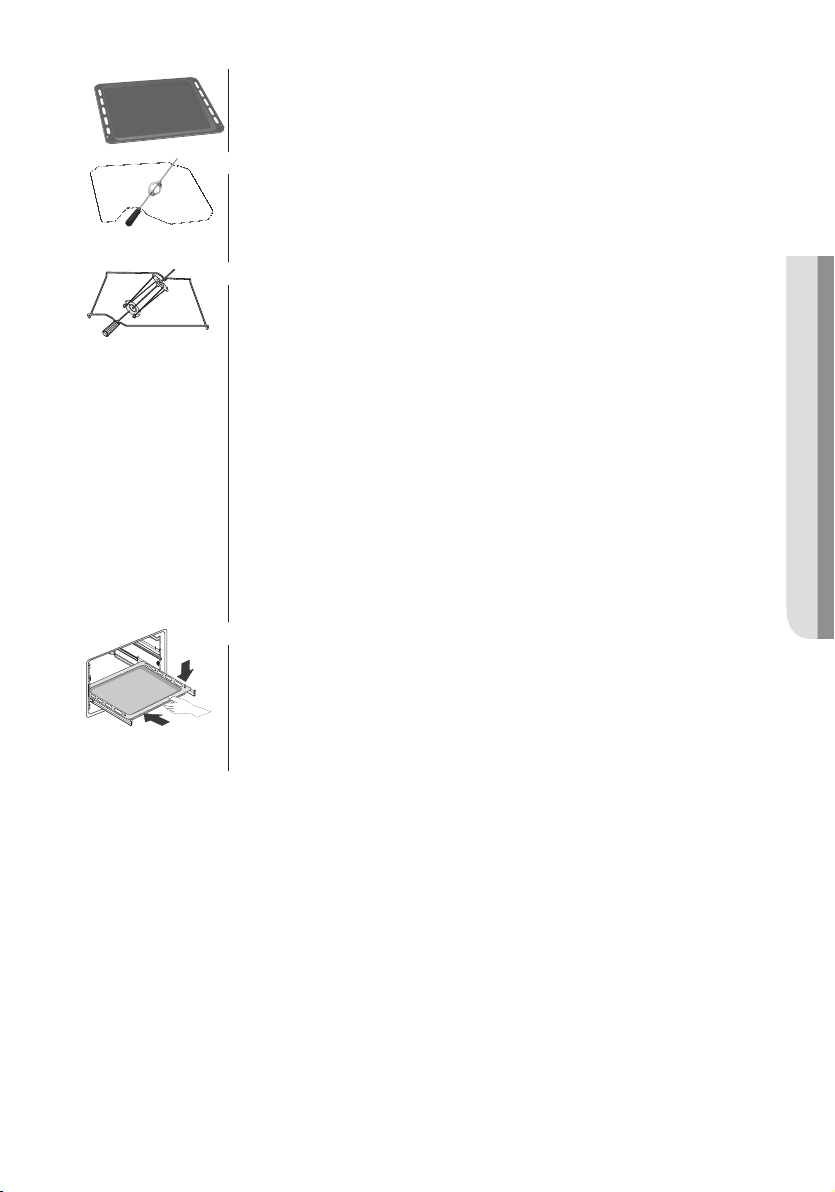
accessory
Your new Samsung oven comes with a lot of accessories that should become very helpful
during the preparation of different meals. It includes the divider for the unique twin cooking
mode, trays, grids and a grill spit.
CAUTION: Be sure to attach the accessory correctly to the racks. Trays need to have at
least 2 cm space towards the bottom of the oven, otherwise the enamel surface could be
damaged.
Divider
The divider needs to be applied if you want to use the ovens twin cooking
mode. It separates the upper and lower compartment and must be used in
rack 3.
Small grid
The small grid should be used for grilling and roasting meals. It can be used
in combination with the dripping tray to prevent liquids from dropping onto
the bottom of the oven.
4_oven controls
Big grid
The big grid should be used for grilling and roasting meals. You could use it
with casseroles and other baking pots.
Dripping tray
The (deep) dripping tray is good for roasting. It can be used in combination
with the small grid to prevent liquids from dropping onto the bottom of the
oven.
accessory_5
Baking tray
ACCESSORY
The (flat) baking tray could be used for the preparation of cakes, cookies
and other pastries.
Grill spit (Optional)
The grill spit could be used for grilling fowls such as chicken. The grill spit
can only be used in single mode on rack 3, because its spit has to be
attached to an adapter on the back plane. Remove black handle while
cooking.
Rotisserie spit and Shasilik (Optional)
To use it :
• Place the deep pan (no trivet) at level 1 to collect the cooking juices or
on the bottom of the oven if the piece of meat to be roasted is too big.
• Slide one of the forks onto the spit; put the piece of meat to be roasted
onto the spit;
•
Parboiled potatoes and vegetables can be placed around the edge of
the deep pan to roast at the same time.
Place the cradle on the middle shelf and position with the “v” shape at
•
the front.
• To help insert the spit, the handle can be screwed onto the blunt end.
•
Rest the spit onto the cradle with the pointed end towards the back and
gently push until the tip of the spit entres the turning mechanism at the
back of the oven. The blunt end of the spit must rest on the “v” shape.
(The spit has two lugs which should be nearest to the oven door so to
stop the spit going forward, the lugs also act as a grip for the handle.)
•
Before cooking unscrew the handle. After cooking screw the handle
back on to help remove the spit from the cradle.
Telescopic slide guide (Optional)
• To insert the grid, baking or roasting pan, first slide out the telescopic
guides for one particular level.
• Place the tray or pan on the guides and push them back completely into
the oven.
Close the oven door only after you have pushed the telescopic guides
into the oven

test dishes
According to standard EN 60350
Baking
The recommendations for baking refer to preheated oven.
Type of Food Dish & Notes
Small Cake
Fatless
Sponge Cake
Apple Pie
Grilling
Preheat empty oven for 5 minutes using the Large Grill function set to Max.
Type of Food Dish & Notes
White Bread
Toast
Beef Burgers Small grid + Dripping
Baking Tray 3 Conventional 160-180 15-25
Dripping tray + Baking
tray
Baking tin on Big grid
(Dark coated, ø 26
cm)
Big grid + Baking tray
+ 2 Springform cake
tins (Dark coated, ø
20 cm)
Big grid + 2
Springform cake tins
(Dark coated, ø 20
cm)
Big grid 5 Large Grill Max. 1st: 1-2
tray (to catch
drippings)
Shelf
level
1 + 4 Convection 150-170 20-30
2 Conventional 160-180 20-30
1 + 3 Convection 170-190 80-100
1 Placed
diagonally
Shelf
level
4/3 Large Grill Max. 1st: 7-10
Cooking
Mode
Conventional 170-190 70-80
Cooking
Mode
Temp.
(°C)
Temp.
(°C)
Cooking
time (min.)
Cooking
time (min.)
2nd: 1-1 1/2
2nd: 6-9
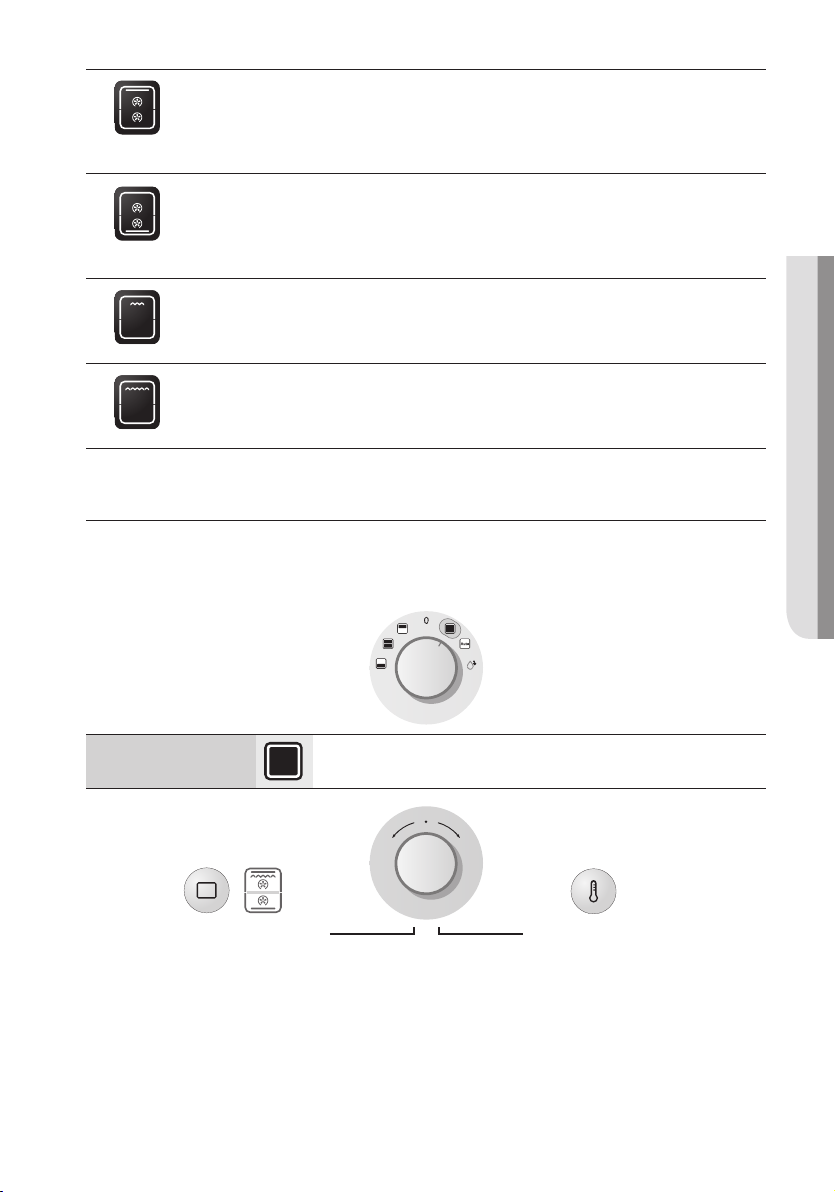
functions
This oven offers six different functions. Depending on which operation mode you run the
oven, twin cooking or single mode, you can choose between these functions:
Conventional
Heat is emitted from the top and bottom heating system. This function should be
used for standard baking and roasting of almost any type of dishes.
Suggested temperature : 200 °C
Convection
The heat generated by the convection is shared evenly in the oven by fans. This
function should be used for frozen dishes and baking.
Suggested temperature : 170°C
6_test dishes
single mode_7
Top Heat + Convection
SINGLE MODE
The heat generated by the top heating system and the convection is shared
evenly in the oven by fans. This function should be used for roasting crusty
dishes like meat.
Suggested temperature : 190 °C
Bottom Heat + Convection
The heat generated by the bottom heating system and the convection is shared
evenly in the oven by fans. This function should be used for pizzas, bread and
cakes.
Suggested temperature : 190°C
Small grill
Heat is emitted from the small area grill. This function should be used for smaller
dishes that need less heat, like fish and filled baguettes.
Suggested temperature : 240°C
Large grill
Heat is emitted from the large area grill. This function should be used for
scalloped dishes like lasagne and grilling meat.
Suggested temperature : 240°C
single mode
In single mode, the oven operates like a traditional oven. Use this mode for larger amounts
of food or if you need special accessories such as the spit grill. In single mode you can
use all oven functions.
Select Single mode | 01
Remove divider from the oven to
use Single mode.
SINGLE MODE
Set function | 02
Remove divider from the
oven to use Single mode.
With the Single mode, you can
choose from all oven functions.
All functions are available with single mode.
The single mode allows the traditional usage of the oven.
Turn Selector knob, apply
specific setting.
03 | Set temperature
Press Temperature key,
temperature figure will blink.

twin cooking
This oven features the unique twin cooking system. It allows you to prepare two
different meals at the same time using two different temperatures in the upper and lower
compartment. Or you decide to cook either in the upper or lower compartment, which
saves time and energy.
Select Twin cooking mode | 01
Inserted divider in rack 3 to use
UPPER MODE
TWIN COOKING
LOWER MODE
NOTE: Use steps 02/03 for upper mode and steps 04/05 for lower mode only.
Set upper function | 02
Press Function key, upper
function figure will blink.
Set lower function | 04
Press Function key, lower
function figure will blink.
twin cooking.
Convection | Top Heat + Convection | Large & small grill
The upper mode saves time and energy while cooking smaller
amounts of food.
Upper and lower function in either compartment
Twin cooking allows you to cook two meals at different
functions and temperature settings.
Convection | Bottom Heat + Convection
The lower mode saves time and energy while cooking smaller
amounts of food.
Turn Selector knob, apply
specific setting.
Depending on the selected twin
cooking mode, you can choose
from these functions:
| Set upper temperature
03
Press Temperature key,
upper temperature figure
will blink.
05 | Set lower temperature
Press Temperature key,
lower temperature figure will
blink.
8_twin cooking
 Loading...