

Page 1
GH68-36252A_Printed in USA
PORTABLE ALL DIGITAL
MOBILE PHONE
User Manual
Please read this manual before operating your
phone and keep it for future reference.
Page 2

VZW_SCH-U380l_UM_English_EK04C_CH_020912_F5
Intellectual Property
All Intellectual Property, as defined below, owned by or which is otherwise the property of Samsung or its respective suppliers relating to
the SAMSUNG Phone, including but not limited to, accessories, parts, or software relating there to (the “Phone System”), is proprietary to
Samsung and protected under federal laws, state laws, and international treaty provisions. Intellectual Property includes, but is not limited
to, inventions (patentable or unpatentable), patents, trade secrets, copyrights, software, computer programs, and related documentation
and other works of authorship. You may not infringe or otherwise violate the rights secured by the Intellectual Property. Moreover, you
agree that you will not (and will not attempt to) modify, prepare derivative works of, reverse engineer, decompile, disassemble, or
otherwise attempt to create source code from the software. No title to or ownership in the Intellectual Property is transferred to you. All
applicable rights of the Intellectual Property shall remain with SAMSUNG and its suppliers.
Open Source Software
Some software components of this product incorporate source code covered under GNU General Public License (GPL), GNU Lesser General
Public License (LGPL), OpenSSL License, BSD License and other open source licenses. To obtain the source code covered under the open
source licenses, please visit:
http://opensource.samsung.com
.
Disclaimer of Warranties; Exclusion of Liability,
EXCEPT AS SET FORTH IN THE EXPRESS WARRANTY CONTAINED ON THE WARRANTY PAGE ENCLOSED WITH THE PRODUCT, THE
PURCHASER TAKES THE PRODUCT "AS IS", AND SAMSUNG MAKES NO EXPRESS OR IMPLIED WARRANTY OF ANY KIND WHATSOEVER
WITH RESPECT TO THE PRODUCT, INCLUDING BUT NOT LIMITED TO THE MERCHANTABILITY OF THE PRODUCT OR ITS FITNESS FOR ANY
PARTICULAR PURPOSE OR USE; THE DESIGN, CONDITION OR QUALITY OF THE PRODUCT; THE PERFORMANCE OF THE PRODUCT; THE
WORKMANSHIP OF THE PRODUCT OR THE COMPONENTS CONTAINED THEREIN; OR COMPLIANCE OF THE PRODUCT WITH THE
REQUIREMENTS OF ANY LAW, RULE, SPECIFICATION OR CONTRACT PERTAINING THERETO. NOTHING CONTAINED IN THE INSTRUCTION
MANUAL SHALL BE CONSTRUED TO CREATE AN EXPRESS OR IMPLIED WARRANTY OF ANY KIND WHATSOEVER WITH RESPECT TO THE
PRODUCT. IN ADDITION, SAMSUNG SHALL NOT BE LIABLE FOR ANY DAMAGES OF ANY KIND RESULTING FROM THE PURCHASE OR USE OF
Page 3

THE PRODUCT OR ARISING FROM THE BREACH OF THE EXPRESS WARRANTY, INCLUDING INCIDENTAL, SPECIAL OR CONSEQUENTIAL
DAMAGES, OR LOSS OF ANTICIPATED PROFITS OR BENEFITS.
SAMSUNG IS NOT LIABLE FOR PERFORMANCE ISSUES OR INCOMPATIBILITIES CAUSED BY YOUR EDITING OF REGISTRY SETTINGS, OR
YOUR MODIFICATION OF OPERATING SYSTEM SOFTWARE.
USING CUSTOM OPERATING SYSTEM SOFTWARE MAY CAUSE YOUR DEVICE AND APPLICATIONS TO WORK IMPROPERLY.
Samsung Telecommunications America (STA), LLC
©
2012 Samsung Telecommunications America, LLC. Samsung is a registered trademark of Samsung Electronics Co., Ltd.
Do you have questions about your Samsung Mobile Phone?
For 24 hour information and assistance, we offer a new FAQ/ARS System (Automated Response System) at:
www.samsung.com/us/support
Headquarters:
1301 E. Lookout Drive
Richardson, TX 75082
Customer Care Center:
1000 Klein Rd.
Plano, TX 75074
Toll Free Tel: 1.888.987.HELP (4357)
Internet Address:
http://www samsung com
Page 4

Nuance®, VSuite™, T9® Text Input, and the Nuance logo are trademarks or registered trademarks of Nuance Communications, Inc., or its
affiliates in the United States and/or other countries.
The Bluetooth® word mark, figure mark (stylized “B Design”), and combination mark (Bluetooth word mark and “B Design”) are registered
trademarks and are wholly owned by the Bluetooth SIG.
microSDTM, microSDHCTM and the microSD logo are Trademarks of the SD Card Association.
©Verizon Wireless. Verizon Wireless and the Verizon Wireless logos are trademarks of Verizon Trademark Services LLC. All company
names, trademarks, logos and copyrights not property of Verizon Wireless are the property of their respective owners.
©
2012 Samsung Telecommunications America, LLC (“Samsung”). Samsung is a registered trademark of Samsung Electronics Co., Ltd. All
product and brand names are trademarks or registered trademarks of their respective companies. Screen images simulated. Appearance
of the phone may vary.
©
2012 Verizon Wireless. Verizon Wireless, the Verizon Wireless logos, and Brightside are trademarks of Verizon Trademark Services LLC.
All company names, trademarks, logos and copyrights not property of Verizon Wireless are the property of their respective owners.
Page 5

1
Table of Contents
Section 1: Getting Started ..............................................4
Understanding this User Manual . . . . . . . . . . . . . . . . . . . . . . . . 4
Activating your Phone . . . . . . . . . . . . . . . . . . . . . . . . . . . . . . . . 4
Displaying Your Telephone Number . . . . . . . . . . . . . . . . . . . . . 4
Battery . . . . . . . . . . . . . . . . . . . . . . . . . . . . . . . . . . . . . . . . . . .5
Turning Your Phone On and Off . . . . . . . . . . . . . . . . . . . . . . . . . 8
Set-Up Wizard . . . . . . . . . . . . . . . . . . . . . . . . . . . . . . . . . . . . .8
Locking and Unlocking . . . . . . . . . . . . . . . . . . . . . . . . . . . . . . . 9
Voicemail . . . . . . . . . . . . . . . . . . . . . . . . . . . . . . . . . . . . . . . . 10
Memory Card . . . . . . . . . . . . . . . . . . . . . . . . . . . . . . . . . . . . . 11
Section 2: Understanding Your Phone .........................12
Features of Your Phone . . . . . . . . . . . . . . . . . . . . . . . . . . . . . . 12
Front View of Your Phone . . . . . . . . . . . . . . . . . . . . . . . . . . . . 13
Back View of Your Phone . . . . . . . . . . . . . . . . . . . . . . . . . . . . 14
Side View of Your Phone . . . . . . . . . . . . . . . . . . . . . . . . . . . . . 15
Open View of Your Phone . . . . . . . . . . . . . . . . . . . . . . . . . . . . 16
Home Screen . . . . . . . . . . . . . . . . . . . . . . . . . . . . . . . . . . . . . 17
Event Status Bar . . . . . . . . . . . . . . . . . . . . . . . . . . . . . . . . . . . 22
Section 3: Navigation ...................................................25
Touch Screen Navigation . . . . . . . . . . . . . . . . . . . . . . . . . . . . 25
Keyboard Navigation . . . . . . . . . . . . . . . . . . . . . . . . . . . . . . . . 25
Section 4: Call Functions .............................................26
Making a Call . . . . . . . . . . . . . . . . . . . . . . . . . . . . . . . . . . . . .26
Ending a Call . . . . . . . . . . . . . . . . . . . . . . . . . . . . . . . . . . . . . 27
Answering a Call . . . . . . . . . . . . . . . . . . . . . . . . . . . . . . . . . . 28
Call-In-Progress Options . . . . . . . . . . . . . . . . . . . . . . . . . . . . 28
Three-way Calling . . . . . . . . . . . . . . . . . . . . . . . . . . . . . . . . . 28
Recent Calls . . . . . . . . . . . . . . . . . . . . . . . . . . . . . . . . . . . . . . 29
Voice Recognition . . . . . . . . . . . . . . . . . . . . . . . . . . . . . . . . . . 30
Driving Mode . . . . . . . . . . . . . . . . . . . . . . . . . . . . . . . . . . . . . 31
Roaming . . . . . . . . . . . . . . . . . . . . . . . . . . . . . . . . . . . . . . . . 32
TTY Mode . . . . . . . . . . . . . . . . . . . . . . . . . . . . . . . . . . . . . . . . 32
Section 5: Contacts ...................................................... 33
Adding a New Contact . . . . . . . . . . . . . . . . . . . . . . . . . . . . . . 33
Editing a Contact . . . . . . . . . . . . . . . . . . . . . . . . . . . . . . . . . . 34
Adding Pauses or Waits . . . . . . . . . . . . . . . . . . . . . . . . . . . . . 35
Sending a Name Card . . . . . . . . . . . . . . . . . . . . . . . . . . . . . . 35
Finding a Contact . . . . . . . . . . . . . . . . . . . . . . . . . . . . . . . . . . 35
Deleting a Contact . . . . . . . . . . . . . . . . . . . . . . . . . . . . . . . . . 36
Backup Assistant . . . . . . . . . . . . . . . . . . . . . . . . . . . . . . . . . . 36
Groups . . . . . . . . . . . . . . . . . . . . . . . . . . . . . . . . . . . . . . . . . . 36
Favorites . . . . . . . . . . . . . . . . . . . . . . . . . . . . . . . . . . . . . . . . 38
Speed Dials . . . . . . . . . . . . . . . . . . . . . . . . . . . . . . . . . . . . . . 38
Copy To Card . . . . . . . . . . . . . . . . . . . . . . . . . . . . . . . . . . . . . 38
Locking a Contact . . . . . . . . . . . . . . . . . . . . . . . . . . . . . . . . . 39
In Case of Emergency (ICE) . . . . . . . . . . . . . . . . . . . . . . . . . . 39
Page 6

2
Section 6: Entering Text ...............................................41
Entering Text Using the QWERTY Keyboard . . . . . . . . . . . . . . 41
Entering Text using the Touch Screen . . . . . . . . . . . . . . . . . . 42
Section 7: Messaging ...................................................45
Types of Messages . . . . . . . . . . . . . . . . . . . . . . . . . . . . . . . . 45
Creating and Sending Text Messages . . . . . . . . . . . . . . . . . . . 45
Creating and Sending Multimedia Messages . . . . . . . . . . . . . 46
Receiving Messages . . . . . . . . . . . . . . . . . . . . . . . . . . . . . . . 47
Viewing Text Messages . . . . . . . . . . . . . . . . . . . . . . . . . . . . . 48
Viewing Multimedia Messages . . . . . . . . . . . . . . . . . . . . . . . . 48
Erase Messages . . . . . . . . . . . . . . . . . . . . . . . . . . . . . . . . . . . 49
Locking and Unlocking a Message . . . . . . . . . . . . . . . . . . . . . 49
Sorting Messages . . . . . . . . . . . . . . . . . . . . . . . . . . . . . . . . . 49
Drafts . . . . . . . . . . . . . . . . . . . . . . . . . . . . . . . . . . . . . . . . . . . 49
Quick Text . . . . . . . . . . . . . . . . . . . . . . . . . . . . . . . . . . . . . . . 50
Copy to Card . . . . . . . . . . . . . . . . . . . . . . . . . . . . . . . . . . . . . 51
Quick Reply . . . . . . . . . . . . . . . . . . . . . . . . . . . . . . . . . . . . . . 51
Voicemail . . . . . . . . . . . . . . . . . . . . . . . . . . . . . . . . . . . . . . . . 51
Message Folders . . . . . . . . . . . . . . . . . . . . . . . . . . . . . . . . . . 51
Email . . . . . . . . . . . . . . . . . . . . . . . . . . . . . . . . . . . . . . . . . . . 52
Message Settings . . . . . . . . . . . . . . . . . . . . . . . . . . . . . . . . . 53
Emergency Alerts . . . . . . . . . . . . . . . . . . . . . . . . . . . . . . . . . . 54
Section 8: Settings .......................................................55
Airplane Mode . . . . . . . . . . . . . . . . . . . . . . . . . . . . . . . . . . . . 55
Bluetooth Menu . . . . . . . . . . . . . . . . . . . . . . . . . . . . . . . . . . . 55
Sounds Settings . . . . . . . . . . . . . . . . . . . . . . . . . . . . . . . . . . . 57
Display Settings . . . . . . . . . . . . . . . . . . . . . . . . . . . . . . . . . . . 60
Touch Settings . . . . . . . . . . . . . . . . . . . . . . . . . . . . . . . . . . . 62
Phone Settings . . . . . . . . . . . . . . . . . . . . . . . . . . . . . . . . . . . 63
Call Settings . . . . . . . . . . . . . . . . . . . . . . . . . . . . . . . . . . . . . 67
Memory . . . . . . . . . . . . . . . . . . . . . . . . . . . . . . . . . . . . . . . . . 69
USB Mode . . . . . . . . . . . . . . . . . . . . . . . . . . . . . . . . . . . . . . . 71
Phone Info . . . . . . . . . . . . . . . . . . . . . . . . . . . . . . . . . . . . . . . 71
Easy Set-Up . . . . . . . . . . . . . . . . . . . . . . . . . . . . . . . . . . . . . . 72
Set-Up Wizard . . . . . . . . . . . . . . . . . . . . . . . . . . . . . . . . . . . . 72
Section 9: Media Center ............................................... 73
Apps . . . . . . . . . . . . . . . . . . . . . . . . . . . . . . . . . . . . . . . . . . . 73
Mobile Web . . . . . . . . . . . . . . . . . . . . . . . . . . . . . . . . . . . . . . 73
Music & Tones . . . . . . . . . . . . . . . . . . . . . . . . . . . . . . . . . . . . 73
Picture & Video . . . . . . . . . . . . . . . . . . . . . . . . . . . . . . . . . . . 74
Section 10: Music & Tones ......................................... 76
Music & Tones . . . . . . . . . . . . . . . . . . . . . . . . . . . . . . . . . . . . 76
Music Player . . . . . . . . . . . . . . . . . . . . . . . . . . . . . . . . . . . . . 76
Song Information . . . . . . . . . . . . . . . . . . . . . . . . . . . . . . . . . . 79
Manage My Music . . . . . . . . . . . . . . . . . . . . . . . . . . . . . . . . . 79
Music Only Mode . . . . . . . . . . . . . . . . . . . . . . . . . . . . . . . . . . 80
Section 11: Pictures and Video .................................... 81
Using the Camera . . . . . . . . . . . . . . . . . . . . . . . . . . . . . . . . . 81
My Pictures . . . . . . . . . . . . . . . . . . . . . . . . . . . . . . . . . . . . . . 84
Using the Camcorder . . . . . . . . . . . . . . . . . . . . . . . . . . . . . . . 85
My Videos . . . . . . . . . . . . . . . . . . . . . . . . . . . . . . . . . . . . . . . 88
Page 7

3
Section 12: Applications and Tools .............................89
My Verizon . . . . . . . . . . . . . . . . . . . . . . . . . . . . . . . . . . . . . . . 89
Tools . . . . . . . . . . . . . . . . . . . . . . . . . . . . . . . . . . . . . . . . . . . 89
Voice Commands . . . . . . . . . . . . . . . . . . . . . . . . . . . . . . . . . . 89
Calculator . . . . . . . . . . . . . . . . . . . . . . . . . . . . . . . . . . . . . . . . 89
Calendar . . . . . . . . . . . . . . . . . . . . . . . . . . . . . . . . . . . . . . . . . 90
Alarm Clock . . . . . . . . . . . . . . . . . . . . . . . . . . . . . . . . . . . . . . 91
Stop Watch . . . . . . . . . . . . . . . . . . . . . . . . . . . . . . . . . . . . . . . 92
World Clock . . . . . . . . . . . . . . . . . . . . . . . . . . . . . . . . . . . . . . 92
Notepad . . . . . . . . . . . . . . . . . . . . . . . . . . . . . . . . . . . . . . . . . 92
USB Mass Storage . . . . . . . . . . . . . . . . . . . . . . . . . . . . . . . . . 93
Document Viewer . . . . . . . . . . . . . . . . . . . . . . . . . . . . . . . . . . 93
Phone Search . . . . . . . . . . . . . . . . . . . . . . . . . . . . . . . . . . . . . 94
VZ Navigator . . . . . . . . . . . . . . . . . . . . . . . . . . . . . . . . . . . . . . 95
Section 13: Web and Social Networking Applications 96
Mobile Web . . . . . . . . . . . . . . . . . . . . . . . . . . . . . . . . . . . . . .96
Section 14: Health and Safety Information ...............100
Exposure to Radio Frequency (RF) Signals . . . . . . . . . . . . . . 100
Specific Absorption Rate (SAR) Certification Information . . . .104
FCC Part 15 Information to User . . . . . . . . . . . . . . . . . . . . . . 105
Commercial Mobile Alerting System (CMAS) . . . . . . . . . . . . . 106
Smart Practices While Driving . . . . . . . . . . . . . . . . . . . . . . . . 106
Battery Use and Safety . . . . . . . . . . . . . . . . . . . . . . . . . . . . .107
Samsung Mobile Products and Recycling . . . . . . . . . . . . . . . 109
UL Certified Travel Charger . . . . . . . . . . . . . . . . . . . . . . . . . . 110
Display / Touch-Screen . . . . . . . . . . . . . . . . . . . . . . . . . . . .110
GPS & AGPS . . . . . . . . . . . . . . . . . . . . . . . . . . . . . . . . . . . . . 111
Emergency Calls . . . . . . . . . . . . . . . . . . . . . . . . . . . . . . . . . 112
Care and Maintenance . . . . . . . . . . . . . . . . . . . . . . . . . . . . . 112
Responsible Listening . . . . . . . . . . . . . . . . . . . . . . . . . . . . . 113
Operating Environment . . . . . . . . . . . . . . . . . . . . . . . . . . . . . 115
FCC Hearing Aid Compatibility (HAC) Regulations for Wireless
Devices . . . . . . . . . . . . . . . . . . . . . . . . . . . . . . . . . . . . . . 117
Restricting Children's Access to Your Mobile Device . . . . . . . 118
FCC Notice and Cautions . . . . . . . . . . . . . . . . . . . . . . . . . . . 119
Other Important Safety Information . . . . . . . . . . . . . . . . . . . . 119
Section 15: Warranty Information ............................. 121
Standard Limited Warranty . . . . . . . . . . . . . . . . . . . . . . . . . . 121
End User License Agreement for Software . . . . . . . . . . . . . . 125
Index ............................................................................ 130
Page 8

Getting Started 4
Section 1: Getting Started
This section allows you to quickly start using your phone by
installing and charging the battery, activating your service,
setting up your voicemail, contacting customer support.
Understanding this User Manual
The chapters of this manual generally follow the same order as
the menus and sub-menus in your phone. A robust index for
quick reference to features begins on page 130.
Also included is important safety information that you should
know before using your phone. Most of this information is near
the back of the guide, beginning on page 100.
Notes and Tips
Throughout this guide are icons and text that are set apart from
the rest. These are intended to point out important information,
quick methods for activating features, to define terms, and more.
The definitions for these methods are as follows:
•
Note
: Explains alternative options within the current feature, menu, or
sub-menu.
•
Tip
: Provides quick or innovative methods for performing functions
related to the subject at hand.
•
Important!
: Points out information about the current feature that could
affect performance, or even damage your phone.
Note:
All screen images in this manual are simulated. Actual displays may
vary. Instructions to perform tasks in this manual may change
depending on the software version on your phone.
Note:
Unless otherwise specified, all instructions to perform tasks in this
manual assume that you are starting from a Home screen. To get to a
Home screen, you may need to unlock the phone or display. For more
information, see “Locking and Unlocking” on page 9.
Activating your Phone
If you purchased your phone at a Verizon Wireless store, it is
activated and ready to use. If received a new phone by mail, it
may need to be activated before you can use it.
To activate your phone, choose from the following:
•
Visit a Verizon Wireless store
•
Contact Verizon Wireless customer support.
•
Visit www.verizonwireless.com to manage your account online.
Displaying Your Telephone Number
My Number
displays the ten-digit telephone number assigned to
your phone.
• From a Home screen, touch
Settings ➔ Phone Info
➔
My
Number
.
Page 9
5
Battery
Your phone is powered by a rechargeable, standard Li-Ion
battery, and comes with a wall charger for charging.
Note:
The battery comes partially charged. You must fully charge the battery
before using your phone for the first time. A fully discharged battery
requires up to 4 hours of charge time.
After the first charge, you can use the phone while charging.
Warning!:
Use only Samsung-approved charging devices and batteries.
Samsung accessories are designed to maximize battery life. Using
other accessories may invalidate your warranty and may cause
damage.
Battery Indicator
The battery icon in the upper-right corner of the display shows
battery power level, with four bars indicating a full charge.
Two to three minutes before the battery becomes too low to
operate, a blinking empty battery icon appears and a tone
sounds. If you continue to operate the phone without charging, it
will shut down.
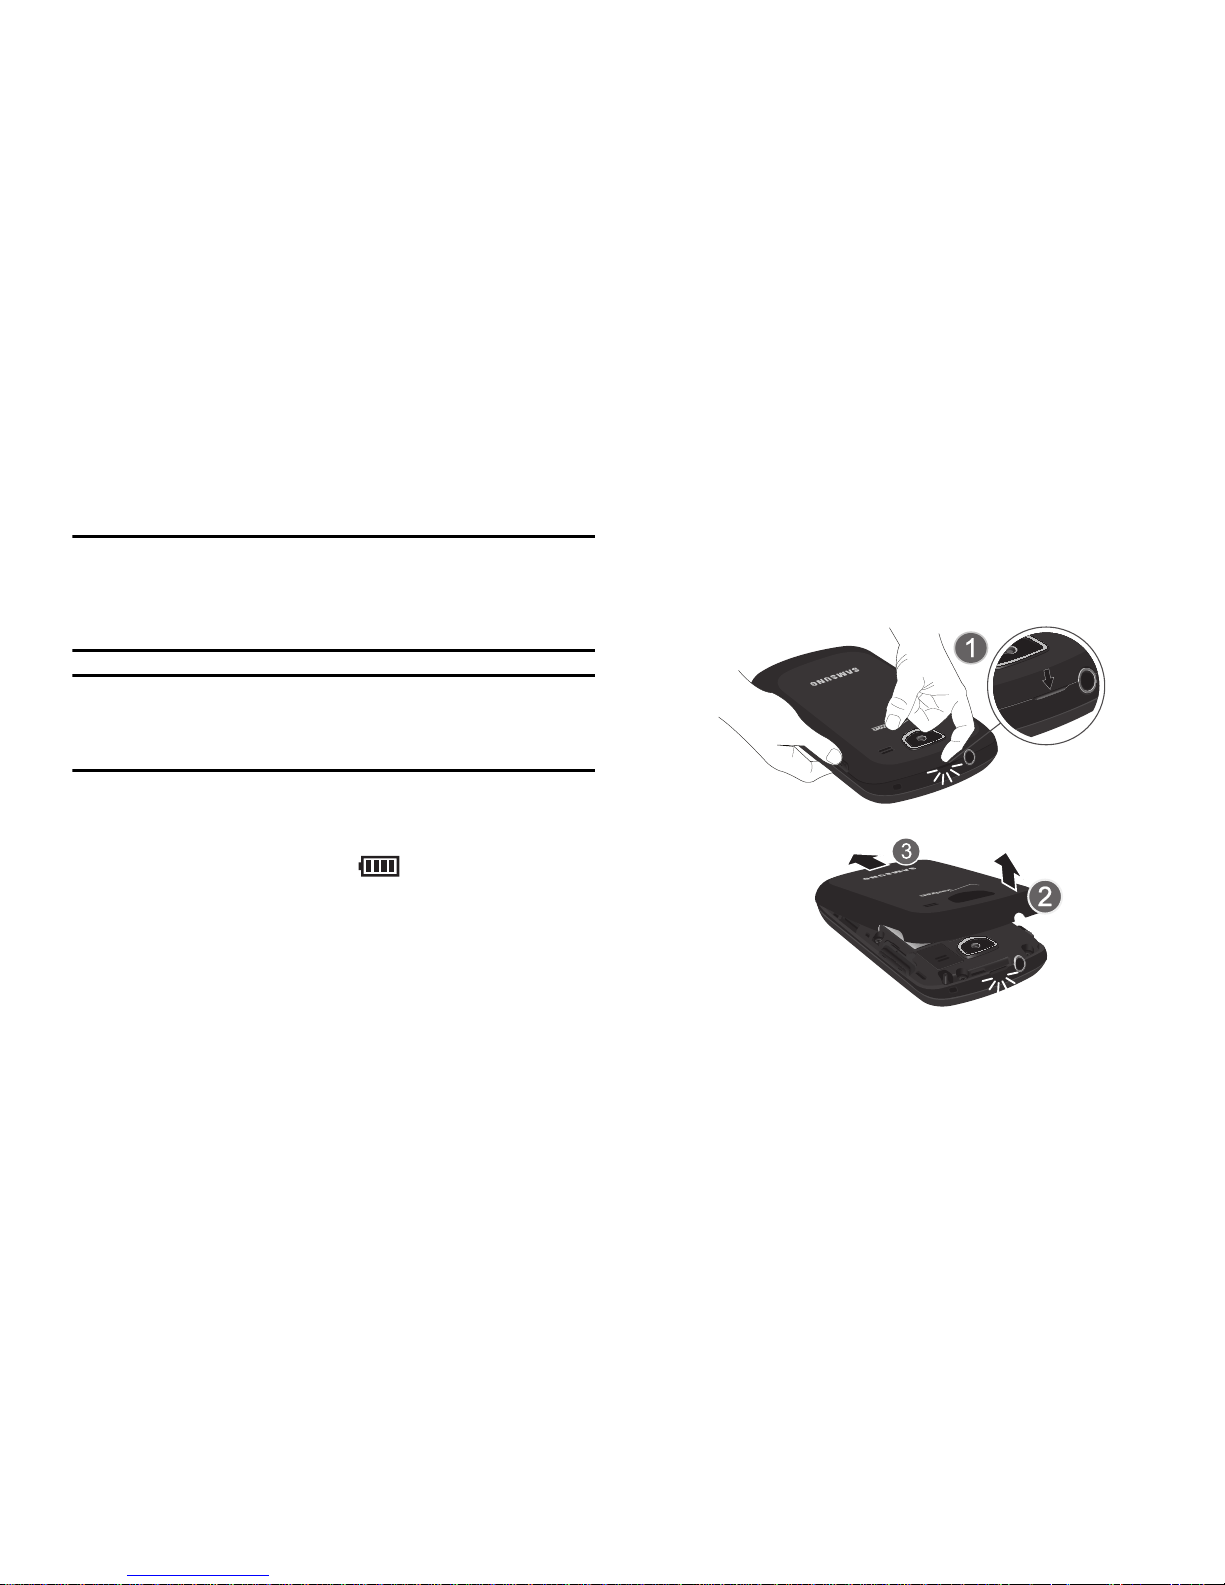
Battery Cover
Your phone has a removable battery cover, covering the battery
and a tab for attaching a strap.
Removing the Cover
䊳
Grasp the phone with both hands. Pull up on the slot provided,
while lifting the cover up and off the phone.
Installing the Cover
䊳
Align the cover and press it firmly into place, being sure it
snaps into place at the corners.
Page 10
Getting Started 6
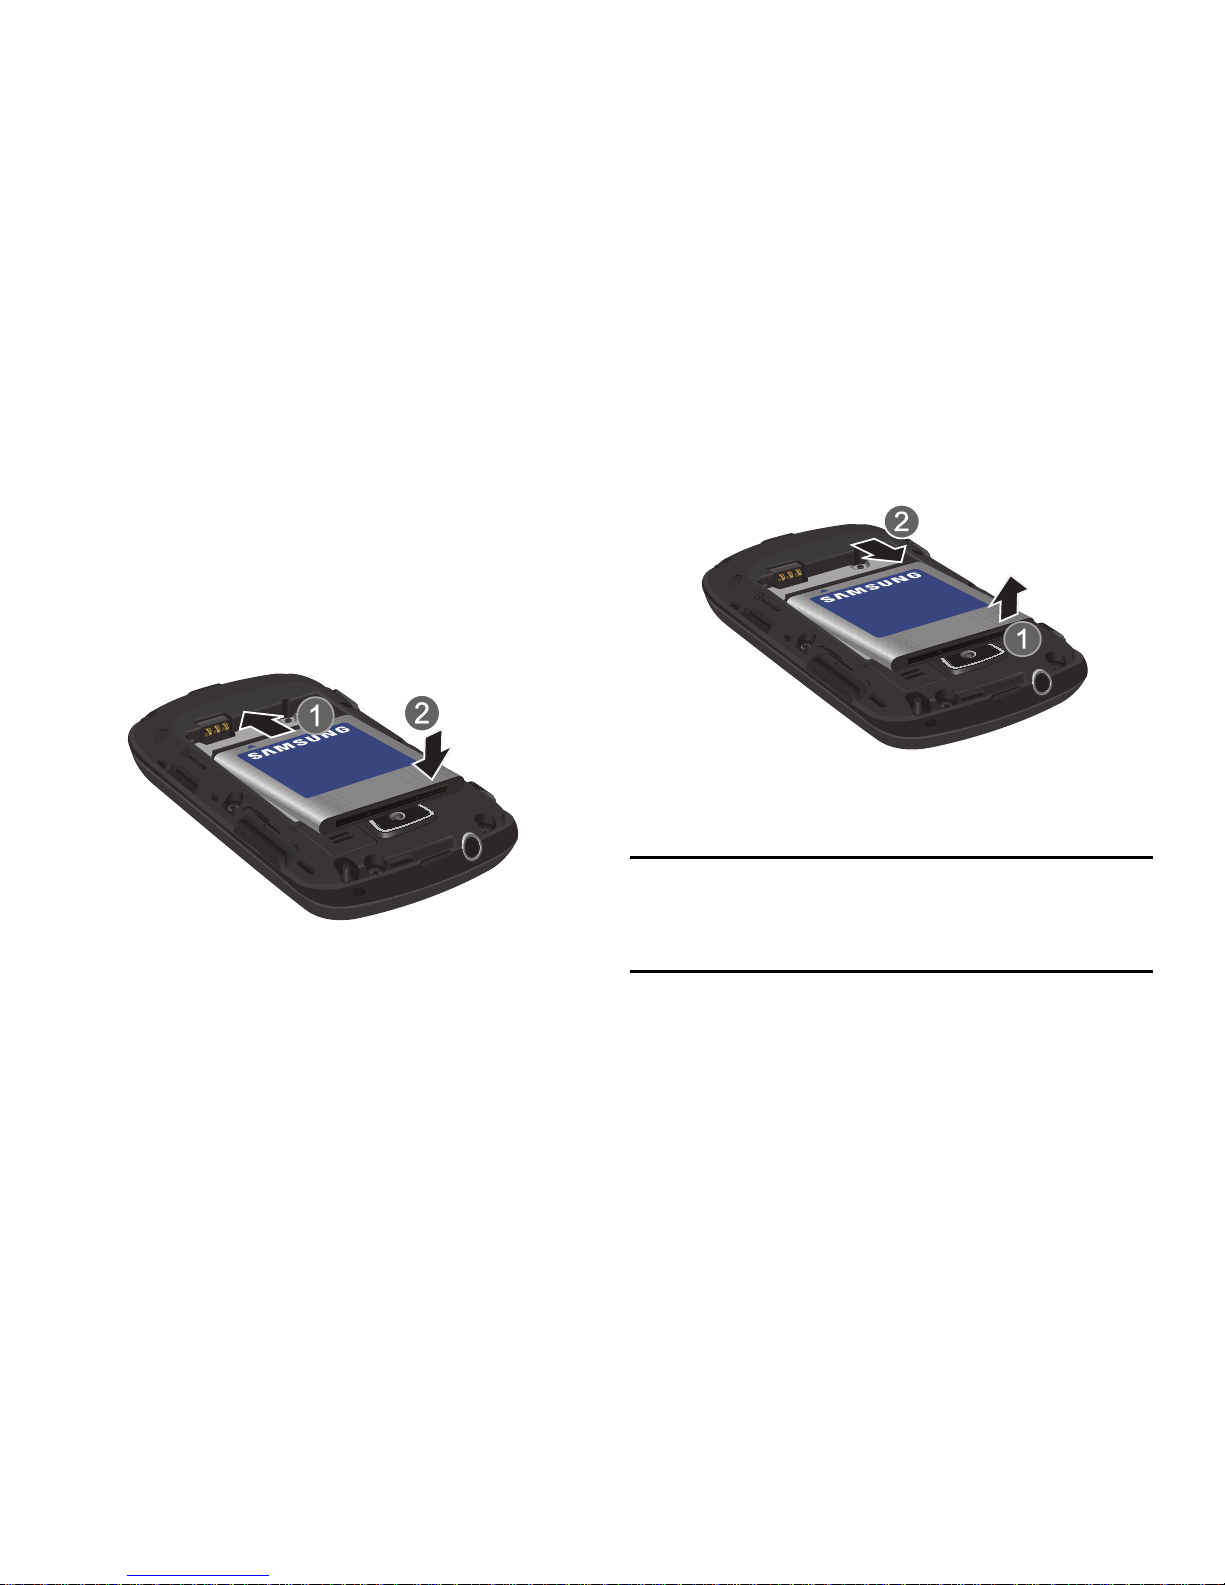
Installing the Batter y
1. Remove the battery cover. For more information, see
“Battery Cover” on page 5.
2. Insert the top end of the battery into the phone housing,
aligning the gold contacts on the top of the battery with the
gold contacts on the phone. Push down on the bottom of
the battery until it snaps into place.
3. Snap the battery cover back into place.
Removing the Battery
1. Remove the battery cover. For more information, refer to
“Battery Cover” on page 5.
2. Grasp the bottom of the battery using the slots provided,
then lift the battery up and out of the phone.
3. Snap the battery cover back into place.
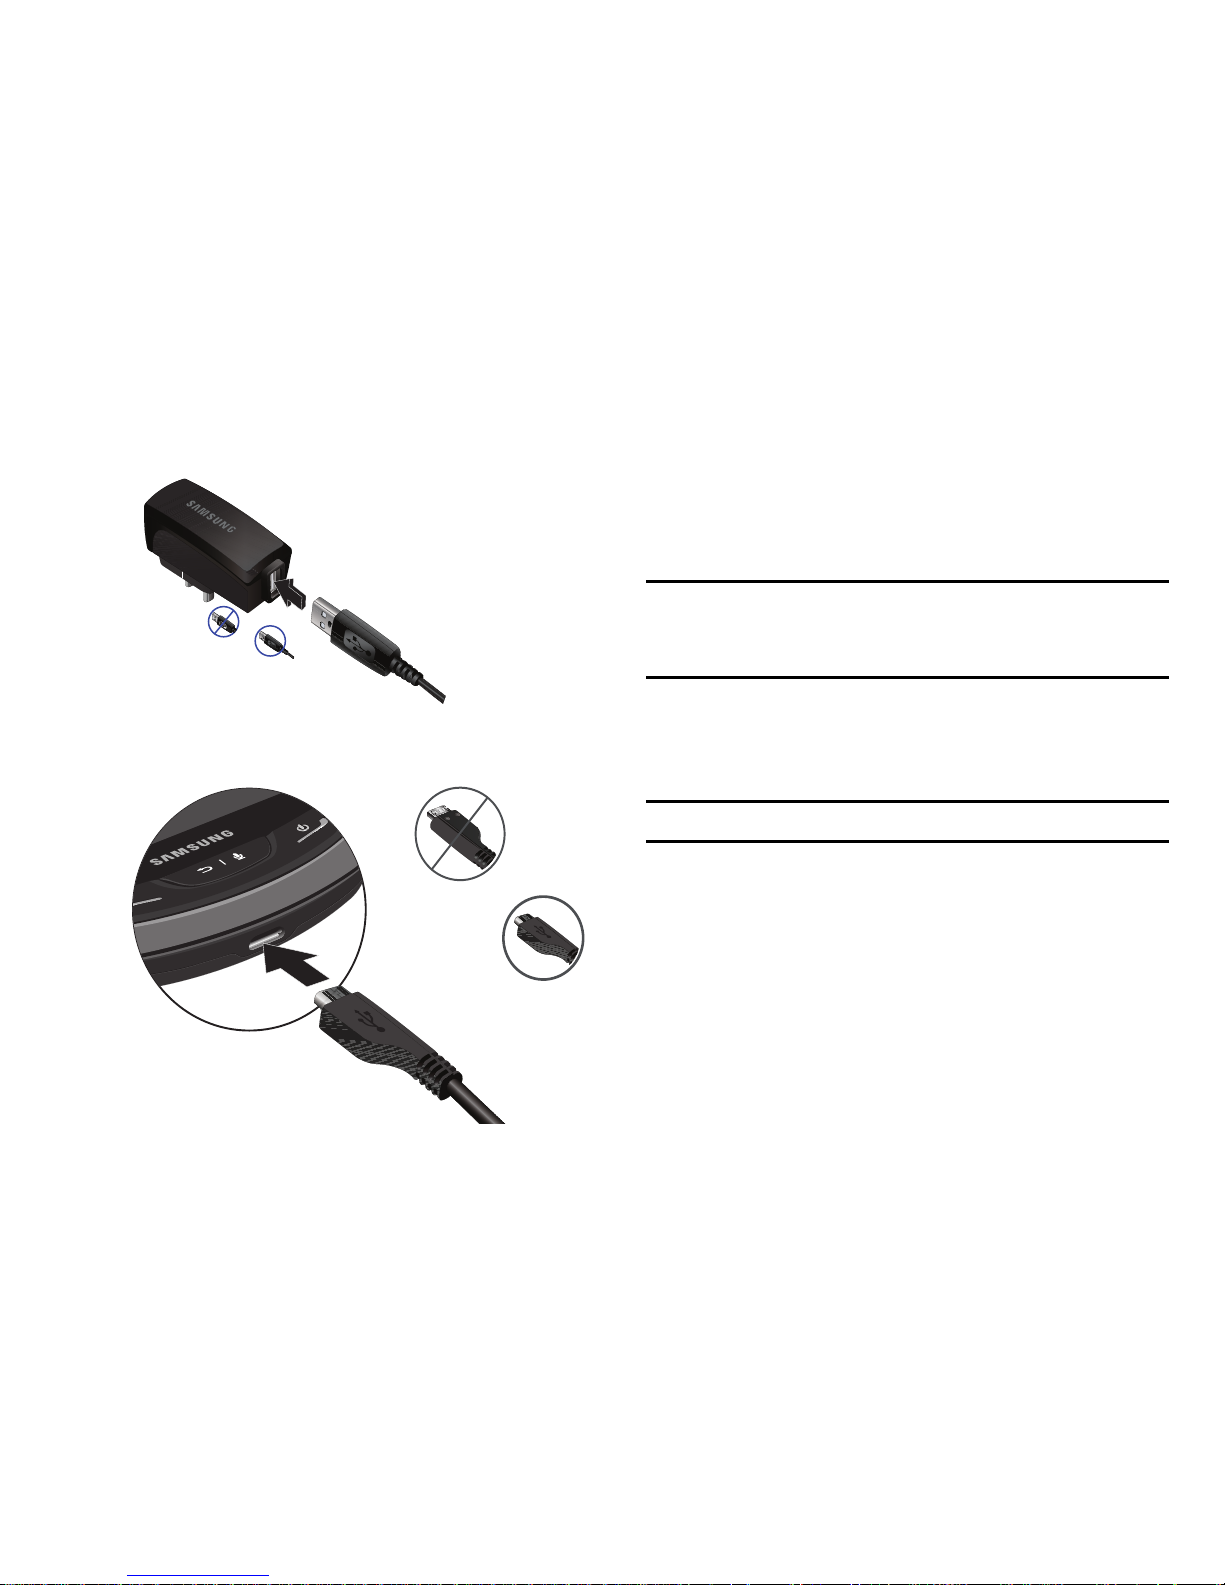
Charging the Battery
Note:
The battery comes partially charged. You must fully charge the battery
before using your phone for the first time. A fully discharged battery
requires up to 4 hours of charge time.
After the first charge, you can use the phone while charging.
Page 11
7
1.
Connect the USB cable to the charging head.
2. Insert the USB cable into the phone’s power/accessory
port.
3. Plug the charging head into a standard AC power outlet.
4. When the charging is complete, the indicator on the
charging head turns green. Unplug the charger from the
power outlet and remove the USB cable from the phone.
Warning!:
Use only Samsung-approved charging accessories to charge your
phone. Improper handling of the power/accessory port, as well as
the use of a non-approved charger, may cause damage to your
phone and void the warranty.
Non-Supported Batteries
Samsung handsets do not support the use of a non-approved
battery.
Important!:
Using a non-supported battery may damage your phone.
When using a non-supported battery, you will hear a series of
beeps and you will see a warning message that indicates:
“
NON-SUPPORTED BATTERY. SEE USER GUIDE.
”
If you receive this warning, battery charging has been disabled.
Samsung charging accessories, such as the travel adapter and
cigarette lighter adapter, will only charge a Samsung-approved
battery.
Charging Head
Co e t
nco ect
USB Cabe
Incorrect
Correct
Page 12
Getting Started 8
Note:
When using a non-supported battery the phone can only be used for
the duration of the life of the battery. The non-supported battery
cannot be charged.
Turning Your Phone On and Off
䊳
Press and hold the
End/Power
key to turn the phone’s
power on or off.
While powering on, the phone connects with the home
network, then displays the Home screen and active alerts.
Set-Up Wizard
The Set-Up Wizard helps you set 7 basic parameters to get
started using your phone quickly.
1. From a Home screen, touch
Settings ➔ Easy Set-Up
➔
Set-Up Wizard
.
2. Follow instructions on the screen to set preferences:
• Tone Level
: Touch the plus sign to increase the tone volume, or
press the minus sign to decrease the tone volume.
• Call Sounds
: Choose how incoming calls are announced.
• Wallpaper
: Choose an image for the home screen.
•Display Theme
: Select either the Orange or the Green background
theme.
• Menu Layout
: Choose how the Menu displays, either as a Grid
Menu or a Shortcut Menu.
• Menu Font
: Set the font type used on menus.
•Clock Format
: Choose a style for the main clock. Options: Digital
12, Analog, Large Analog, Digital 24, Dual Clock, or OFF.
3. Touch
Skip
to skip any setting.
4. Touch
Done
when finished.
5. Touch or
Exit
to return to the menu.
Page 13

9
Locking and Unlocking
Your phone offers two lock functions: locking the display, or
locking the phone. Because this is a touch screen phone, the
display prevents unintentional key presses and can minimize
unnecessary battery drainage. Locking the phone can prevent
unauthorized access to the information on your phone, while
allowing access to the Keypad for call functions.
Locking and unlocking the phone
You can lock the phone to prevent unauthorized access to
information on the phone, but allow dialing with the Keypad.
Locking and unlocking requires the Lock Code.
Locking the phone:
1. From a Home screen, touch
Settings ➔ Phone
Settings ➔ Security
.
Enter the lock code when prompted.
Tip:
The default lock code is the last four digits of your telephone number.
2. Touch
Lock Phone Now
. The Home screen displays.
Unlocking the phone:
䊳
Enter the lock code at the prompt.
Note:
You may choose to lock the phone automatically when powered on. For
more information, see “Phone Lock Setting” on page 65.
Locking and unlocking the display
By default, the display locks when the backlight goes off. To
change this setting, see “Touch Settings” on page 62.
Locking the display:
䊳
Press the
Lock
key on the right side of the phone.
Unlocking the display
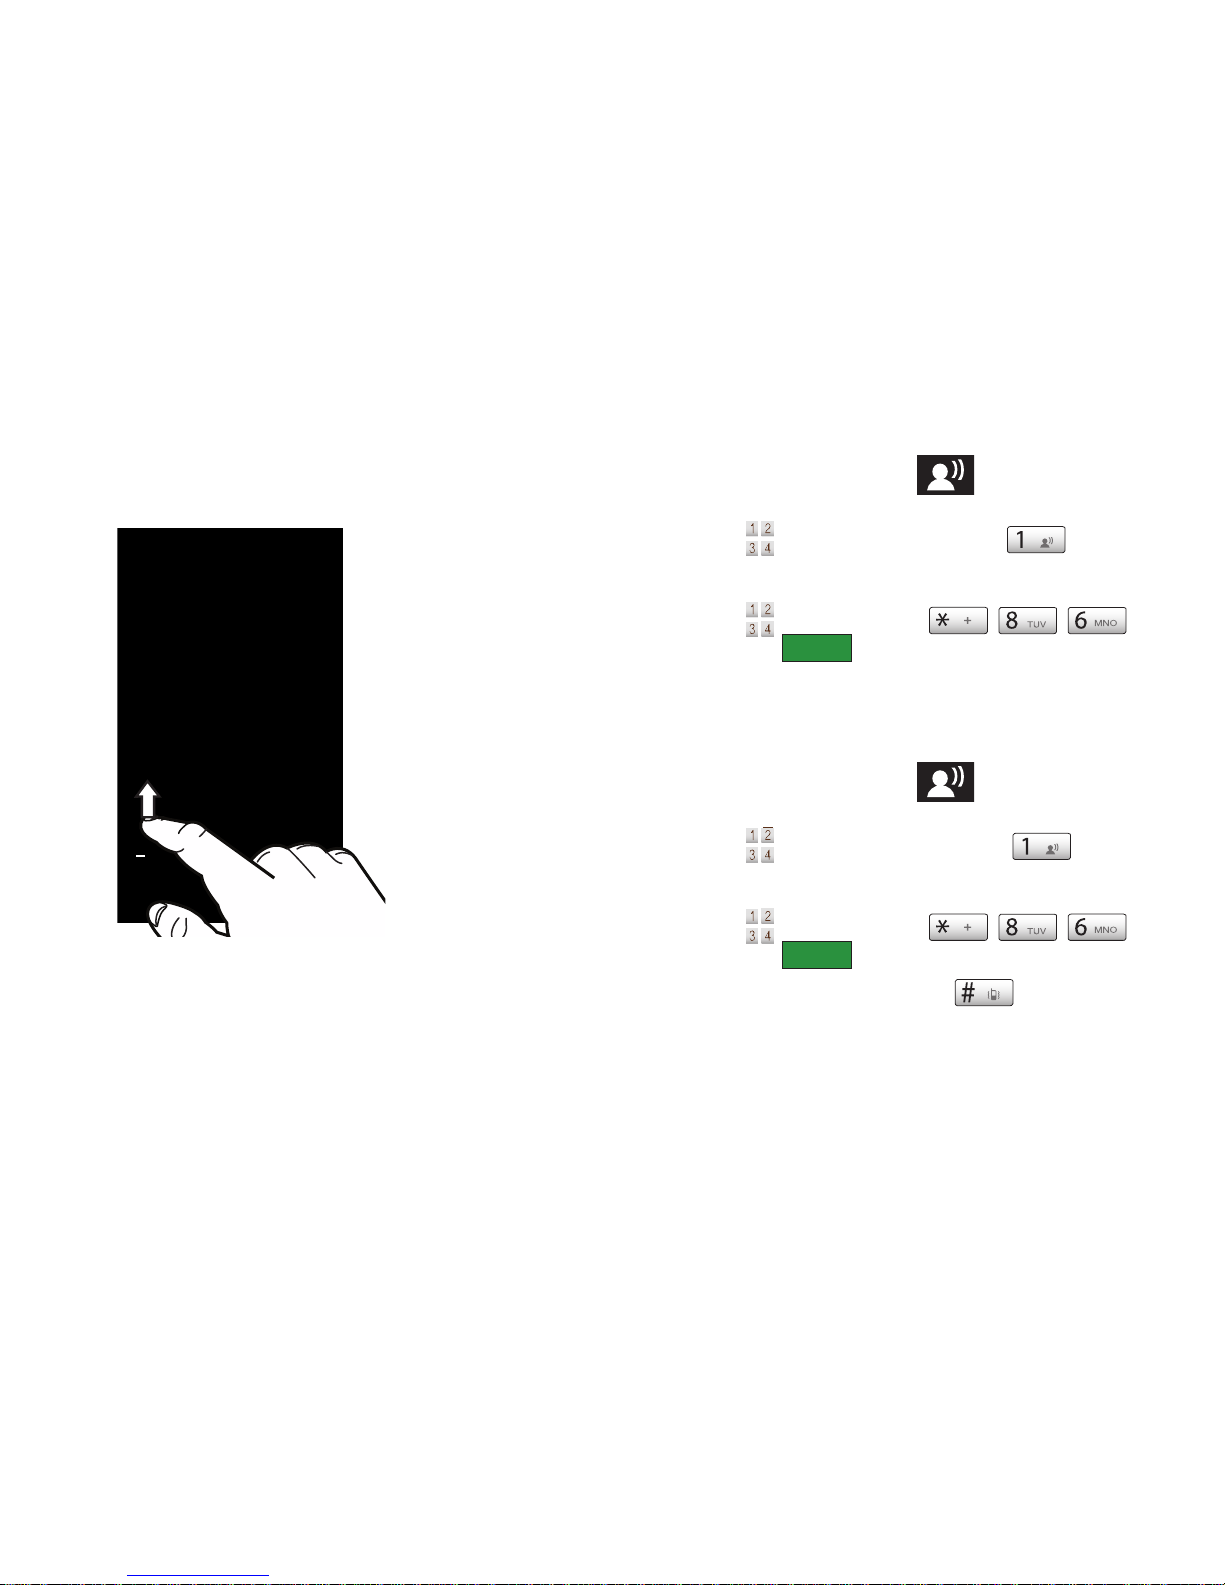
1. Press the
Lock
key once to wake up the display.
Note:
You can change the settings to allow you to press any key to activate
the backlight. For more information, see “Touch Settings” on page 62.
Page 14
Getting Started 10
2.
Starting at the edge of the display, drag your finger upward
and across the display in any direction. The lock screen
animates and clears from the display.
Voicemail
All unanswered calls to your phone are sent to voicemail, even if
your phone is turned off, so you’ll want to set up your voicemail
and personal greeting as soon as you activate your phone.
Setting up Voicemail
1. From a Home screen, touch .
– or –
Touch
Keypad
. and touch and hold .
– or –
Touch
Keypad
and touch ,
then press
CALL
.
2. Follow the automated instructions to set up your new
password and record a greeting.
Checking Voicemail
1. From a Home screen, touch .
– or –
Touch
Keypad
, then touch and hold .
– or –
Touch
Keypad
and touch ,
then press
CALL
.
2. Enter your password, then touch .
3. Follow the recorded prompts to listen to messages and
manage your voicemail.
CALL
CALL
Page 15
11
Tip:
You can also access voice mail by dialing your phone number from any
touch-tone phone.
Memory Card
Your phone supports the use of an optional, removable
microSD™ memory card of up to 32GB capacity. You can store
music or pictures you download or transfer to your phone, and
other files, on the memory card.
Note:
You can only store music files that you own (from a CD or purchased) to
the memory card.
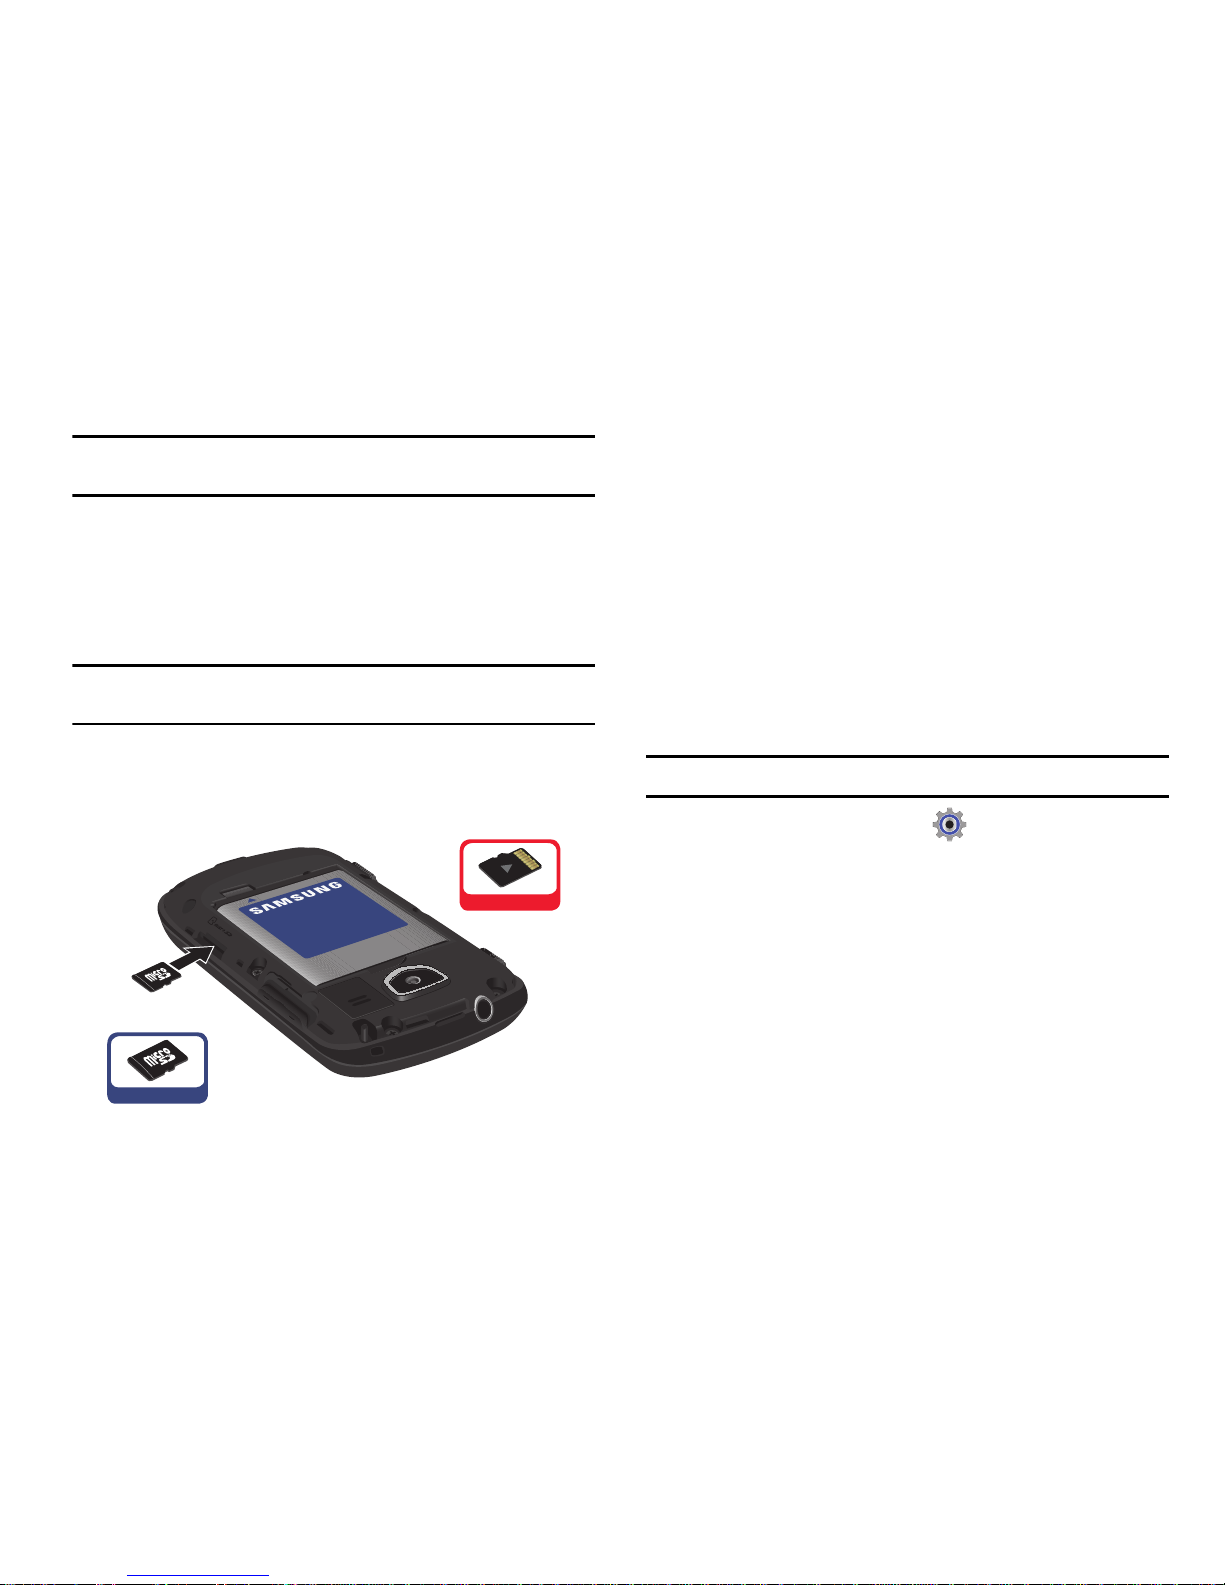
Installing the Memory Card
1. Pull the microSD card cover out and turn it to expose the
card slot.
2. Push the microSD card into the slot until it locks into place.
Removing the Memory Card
1. Pull the microSD card cover out and turn to expose the
card slot.
2. Push in on the memory card to release the lock and
remove memory card from the memory card slot.
Formatting the memory card
Formatting erases any content on the memory card, and
prepares it for use with your phone.
Warning!:
Repeated formatting will shorten the life of the memory card.
1. From a Home screen, touch
Settings ➔ Memory
➔
Card Memory
.
2. Touch
Format Card
. At the
Format Card?
prompt, touch
Yes
.
Incorrect
Correct
Page 16

Understanding Your Phone 12
Section 2: Understanding Your Phone
This section outlines key features of your phone. It also displays
the screen and the icons that are displayed on the phone.
Features of Your Phone
•
Full color 3.1” QVGA Touch Screen
•
Slide-out QWERTY keyboard
•
High Speed Data (1x-EVDO REV 0 Capable Technology)
•
Global Positioning (GPS) Technology with VZ Navigator
®
•
V CAST Videos
•
Social Networking through the Social Networks application
•
Messaging Services
–
Standard and Enhanced Text Messaging
–
Picture Messaging
–
Video Messaging
–
Threaded message display, by contact
–
Voicemail
–
Email Messaging, including mobile and corporate Email
•
Personal Tools, including Calculator, Calendar, Alarm Clock, Stop
Watch, World Clock, and Notepad
•
3.2 Megapixel CMOS Camera and Camcorder
•
Advanced Nuance® Voice Recognition technology, for no-training voice
commands for dialing and other features
•
Speakerphone
•
microSD™ Memory Card Slot (up to 32GB capacity)
•
Advanced photo features and functionalities (photo editor, panoramic
photos)
•
Phone Search
•
Document Viewer
•
Bluetooth® 2.1 + EDR Wireless Technology. For more information, see
“Bluetooth Menu”
on page 55.
•
USB Mass Storage
•
Driving Mode
Page 17
13
Front View of Your Phone
Functions
1.
LCD Touch Screen
: Displays all the information needed to
operate your phone.
2.
Send key
: Press to answer an incoming call or to dial a
number. From the Home screen, press to open the KEYPAD
screen.
3.
Clear key
: Press to return to the previous screen. Press and
hold to return to the Home screen.
4.
Earpiece
: Allows you to hear callers.
5.
Proximity and Light Sensors:
Detects the presence of
nearby objects to control screen display, such as when you
hold the phone to your ear during a phone call. Detects
ambient light to determine screen brightness when the
Automatic brightness setting is enabled, and when taking
pictures.
6.
End/Power key
: Press and hold to power the phone On or
Off. Press to end a call or to end any application from any
menu, sub-menu or options menu.
7.
Microphone
: Allows the other caller to hear you clearly
when you are speaking to them.
1
2
3
4
5
6
7
Page 18

Understanding Your Phone 14
Back View of Your Phone
Features
1.
3.5mm Headset Jack
: Plug in standard music headphones
(for listening to music only) or an optional headset for safe
and convenient conversations.
2.
Camera/Camcorder Lens
: The lens of the built-in camera/
camcorder.
3.
Speaker
: Music, ringtones, speakerphone, and sounds play
through the speaker.
1
3
2
Page 19

15
Side View of Your Phone
1.
Strap attachment
: Attach a strap (not included).
2.
Volume key
: In idle mode, press to adjust master volume,
or press and hold to activate Sound Off/Normal mode.
Press to adjust voice volume during calls, adjust audio
volume, or mute an incoming call ringer. When browsing
web with music playing, press to bring up Music Player.
3.
Lock key
: Locks/unlocks display. Press to lock display.
When backlight is off, press once to activate backlight, or
press and hold to unlock the display in one step.
4.
Camera/Camcorder key
: Press to activate the camera.
1
2
3
4
Page 20
Understanding Your Phone 16
Open View of Your Phone
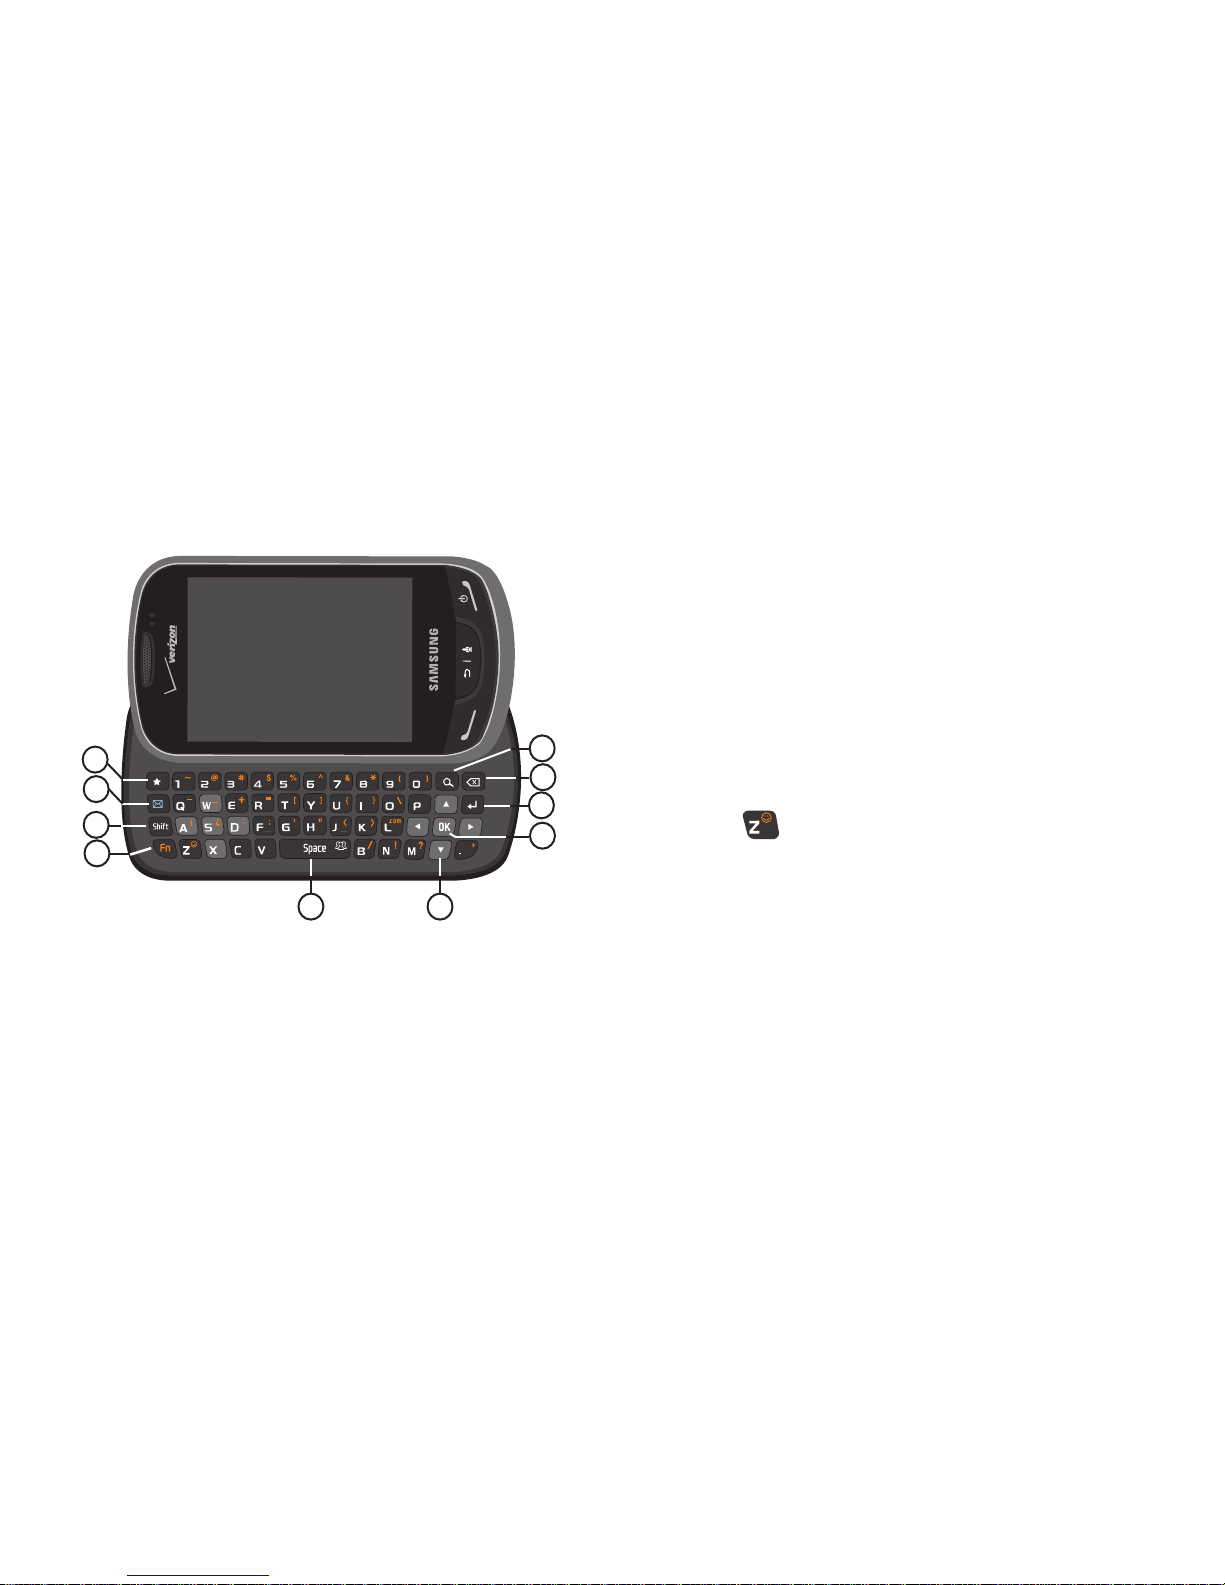
This touch screen phone also offers the convenience of a slideout QWERTY keyboard. To access the keyboard, rotate the phone
and slide the phone open.
When you slide the phone open, the display automatically rotates
from portrait mode to landscape mode.
QWERTY Keyboard Features
1.
Favorites key
: From a Home screen, press to view the
Favorites screen. You can add up to 12 contacts or groups.
2.
Message key
: From a Home screen, press to open a new
Text Message composer.
3.
Shift key
: Toggles the case for alphabet characters,
between mixed case, uppercase and lowercase.
4.
Function key
: Press to toggle access to the orange symbols
on the QWERTY keyboard. From the Home screen, press
the Function key and Z key to access Smiley symbols.
5.
Space key
: Add spaces between words and characters.
Press to choose Smileys.
6.
Directional keys
: Navigate through phone menus and
screens.
7.
OK key
: When navigating through a menu or screen, press
to accept the highlighted choice, or to select Go when
surfing the web.
8.
Return key
: Press to go to the next line when entering text.
9
8
7
5 6
2
3
4
1
10
Page 21
17
9.
Backspace key
: Delete characters from the display when
entering text, or go back when surfing the web or viewing
pictures.
10.
Search key
: From a Home screen, press to search the
phone.
Home Screen
The Home screen is your starting point for using the features of
your phone. The Home screen displays menus in either a grid or
shortcut format. You can customize home screens by placing
Applications. You can also customize the Lock screens wallpaper.
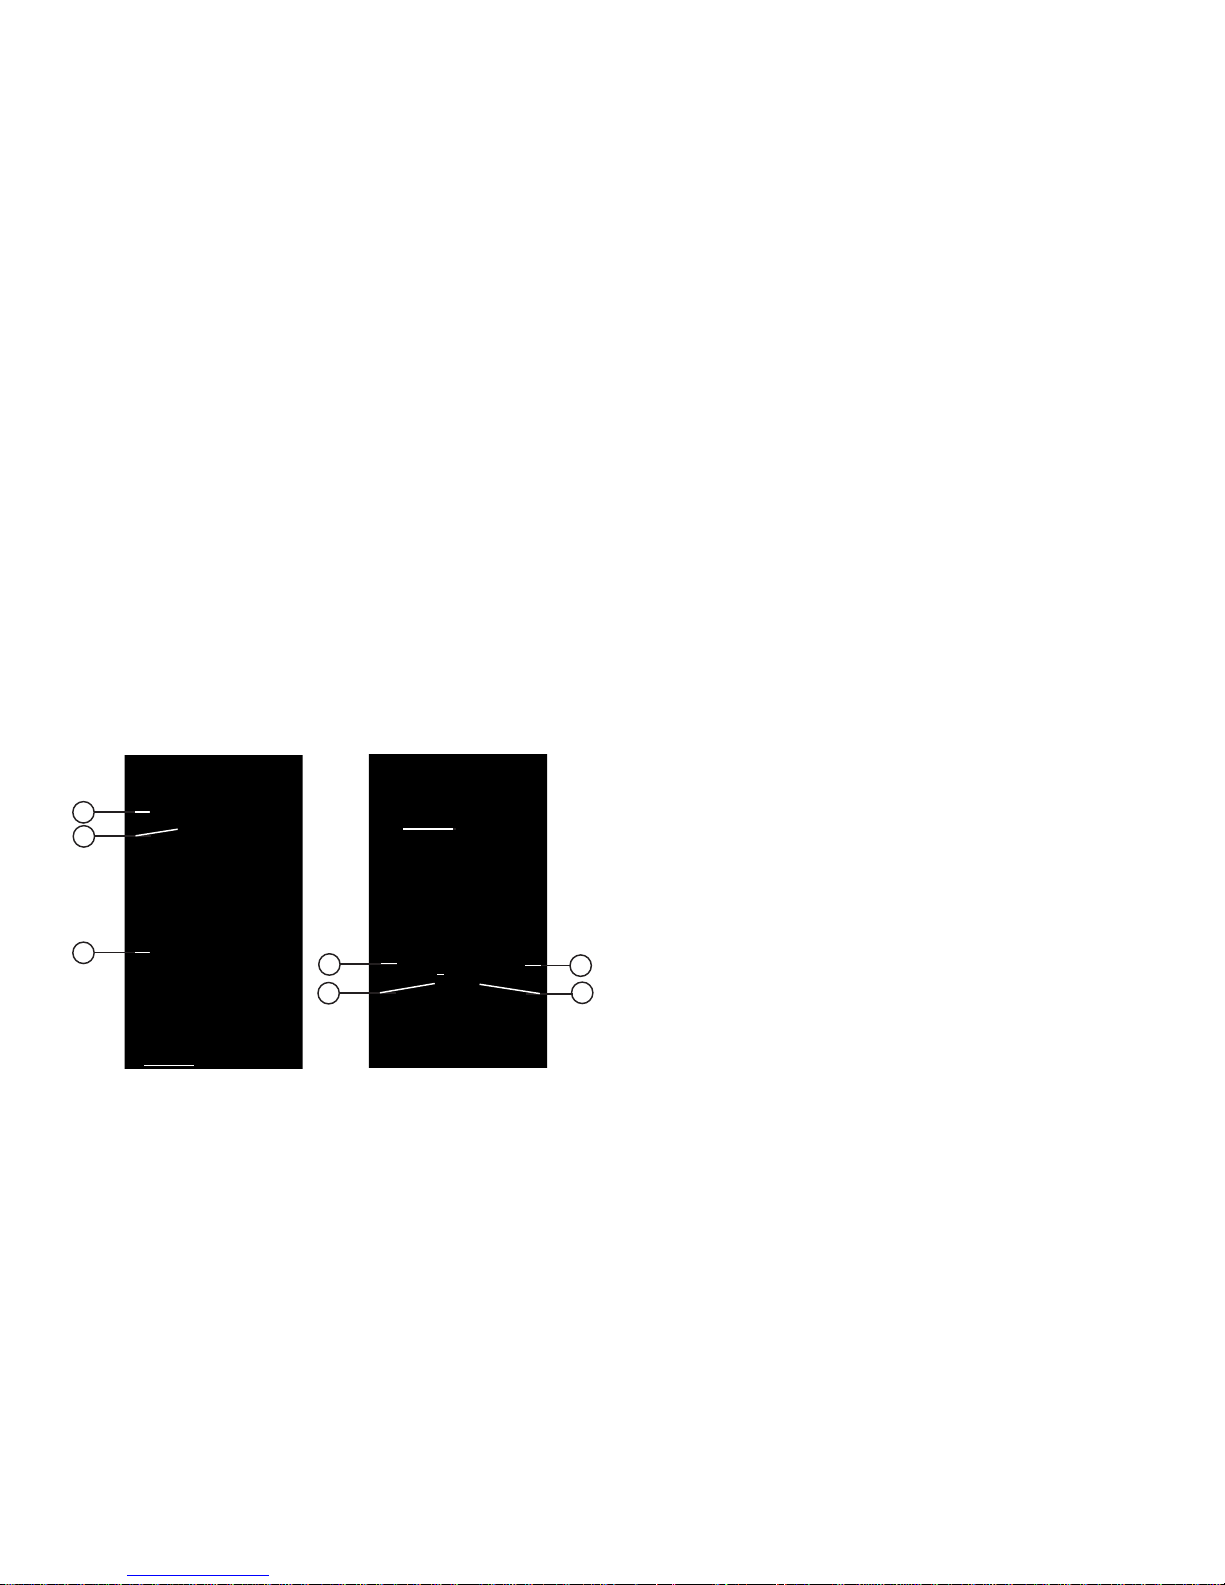
Understanding the Lock and Home Screen
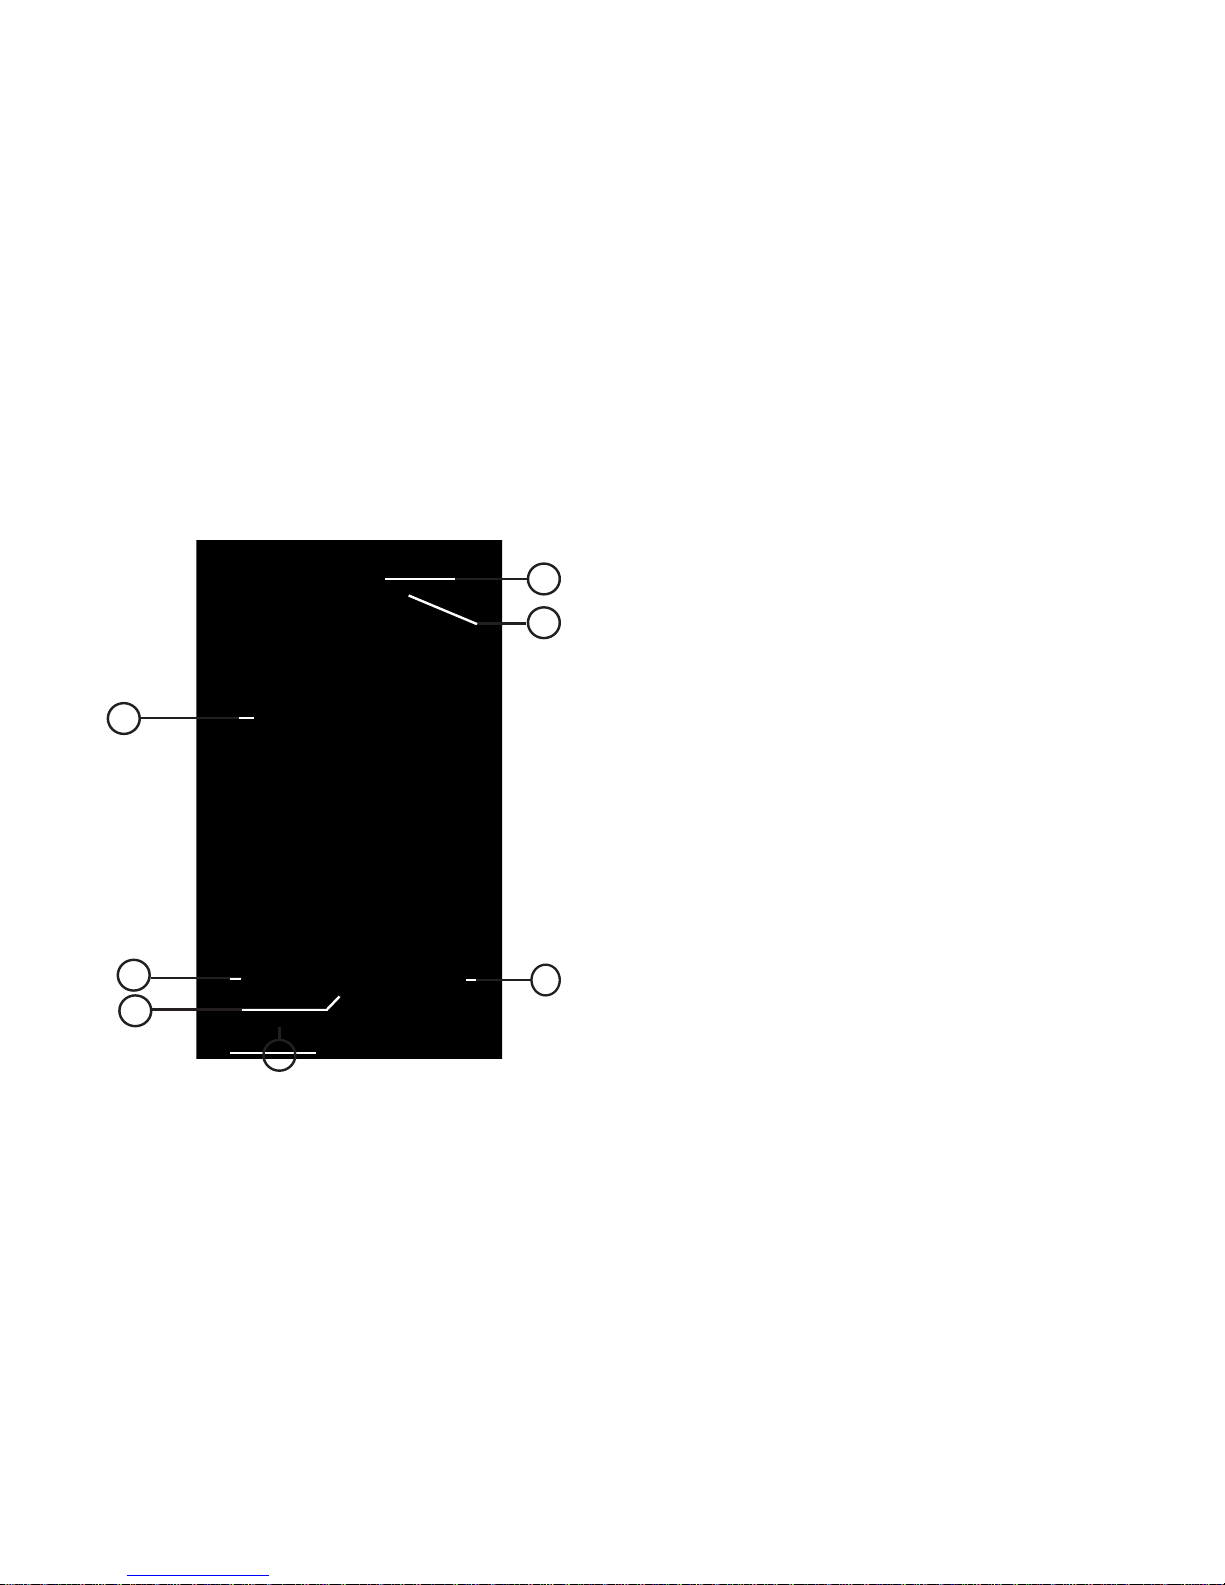
1.
Annunciator Line
: Icons indicate network status, battery
power, signal strength, connection type and more. You can
view a list of all icons used on your phone in the Icon
Glossary; for more information see “Phone Info” on
page 71.
2.
ERI banner
: Displayed on the Lock screen (shown)
indicates current network, if ERI Banner is enabled. For
more information, see “ERI Banner” on page 61.
3.
Event Status Bar
: Icons light up to indicate recent events or
status changes. Touch icons to access the Event Manager
screen. See “Event Status Bar” on page 22.
4.
Voicemail
button: Dials the voicemail inbox.
5.
Recent
button: Displays All, Missed, Received, and Dialed
calls.
6.
Keypad
button: Opens the
Keypad
dialer.
7.
Contacts
button: Opens
Contacts
.
1
3
2
4
5
7
6
Page 22

Understanding Your Phone 18
Customizing the Lock and Home Screen
The lock Screen has a fixed menu selection, however, you can
customize the screen by changing the wallpaper, personal
banner, and ERI banner. You can also cahnge the layout of the
Main menu, themes, and fonts. You can also choose to display a
clock on the screen.
䊳
Touch an item to open the application, feature or menu.
Customizing the Main Menu
You can customize the Main Menu by adding or rearranging icons
to your favorite applications.
1. From a Home screen, touch
Settings ➔ Display
Settings
➔
Main Menu Settings
.
2. To
Position Menu Items
, touch and drag an item to a new
grid position.
3. To
Replace Menu Items
, touch the item, then choose
another item to replace it.
4. To
Change Menu Layout
, Select
Grid Menu
or
Shortcut
Menu
.
5. Touch
Reset Menu Settings
, then select the item to reset to
default:
• Menu items and Position
: resets the menu items to the default
items and positions them in the default position.
• Menu Layout
: repositions the items in the menu to the default
layout.
•All
: resets all menu items, position, and layout to the default
settings.
6. Touch
Yes
to confirm your selection and perform the reset.
Menu Items
Default
These items appear on the Menu by default.
My Verizon
: Launches a Verizon Wireless mobile web
site, to check your account details and status.
Tools
: Opens the Tools menu. See “Applications and
Tools ” on page 89.
Settings
: Opens Settings. For more information, see
“Settings” on page 55.
Email
: Opens the Email menu. For more information,
see “Email” on page 52.
Messaging
: Opens the Messaging menu. For more
information, see “Messaging” on page 45.
Page 23
19
Optional
You can customize the Menu to include these optional items:
For more information on how to Replace Menu Items with one of
the following, see “Customizing the Lock and Home Screen” on
page 18.
Mobile Web
: Launches the Browser. For more
information, see “Mobile Web” on page 96.
Media Center
: Opens the Media Center menu. For
more information, see “Media Center” on page 73.
Social Networks
: Sets up your phone to access
Facebook, and Twitter feeds. See “Social Networks”
on page 98.
VZ Navigator
: Launches VZ Navigator®. For more
information, see “VZ Navigator” on page 95.
Apps
: Allows you to download and display purchased
or preloaded applications.
Alarm
: Launches an Alarm. see “Alarm Clock” on
page 91.
My Pictures
: Launches My Pictures. For more
information, see “My Pictures” on page 84.
Voicemail
: Launches voicemail to configure the
mailbox, or retrieve me ssages. For more information,
refer to “Voicemail” on page 10.
Recent
: Opens the Recent Calls menu. For more
information, see “Recent Calls” on page 29.
Keypad
: Opens the dialpad to enter the digits of the
telephone or speed dial number.
Contacts
: Opens the Contacts menu. For more
information, see “Contacts” on page 33.
Backup Assistant
Is a wireless service that saves a
copy of your phone's address book to a secure web
site. For more information, refer to “Backup
Assistant” on page 36.
Bluetooth Menu
: Opens the Bluetooth Menu. For more
information, see “Bluetooth Menu” on page 55.
Bluetooth On/Off
: Turns Bluetooth On or Off. See
“Turning Bluetooth On or Off” on page 56.
Page 24
Understanding Your Phone 20
Calculator
: Launches the Calculator. For more
information, see “Calculator” on page 89.
Calendar
: Launches the Calendar. For more
information, see “Calendar” on page 90.
Call Settings
: Allows you to select options related to
call functions. For more information, refer to “Call
Settings” on page 67.
CityID
: Displays the city and state of incoming calls.
Daily Scoop
: Provides free content, discounts and
offers from restaurants and retailers in your area. You
receive exclusive discounts on products and services
that are useful to you at the most useful time and
location.
Display Settings
: Customizes the phone’s display
screens. For more information, refer to “Display
Settings” on page 60.
Driving Mode
: Enables your phone to use sounds to
alert you to notifications, regardless of other phone or
call settings. For more information, refer to “Driving
Mode” on page 31.
Messaging Inbox
: Allows you to view all the messages
by time received, or by contact (also known as a
threaded view). For more information, refer to
“Message Folders” on page 51.
Music & Tones
: Allows you to access the music and
other tones. For more information, refer to “Music &
Tones” on page 73.
My Music
: Launches Music Player. For more
information, see “Music Player” on page 76.
My Ringtones
: Launches My Ringtones. For more
information, see “My Ringtones” on page 73.
My Sounds
: Accesses sounds downloaded, recorded
using your phone, or saved from a Picture message
with Sound attached. For more information, refer to
“My Sounds” on page 74.
My Videos
: Accesses video Clips saved from a Video
message, downloaded via “Media Center”, or taken
using Camcorder. For more information, refer to “My
Videos” on page 88.
Page 25
21
New Contact
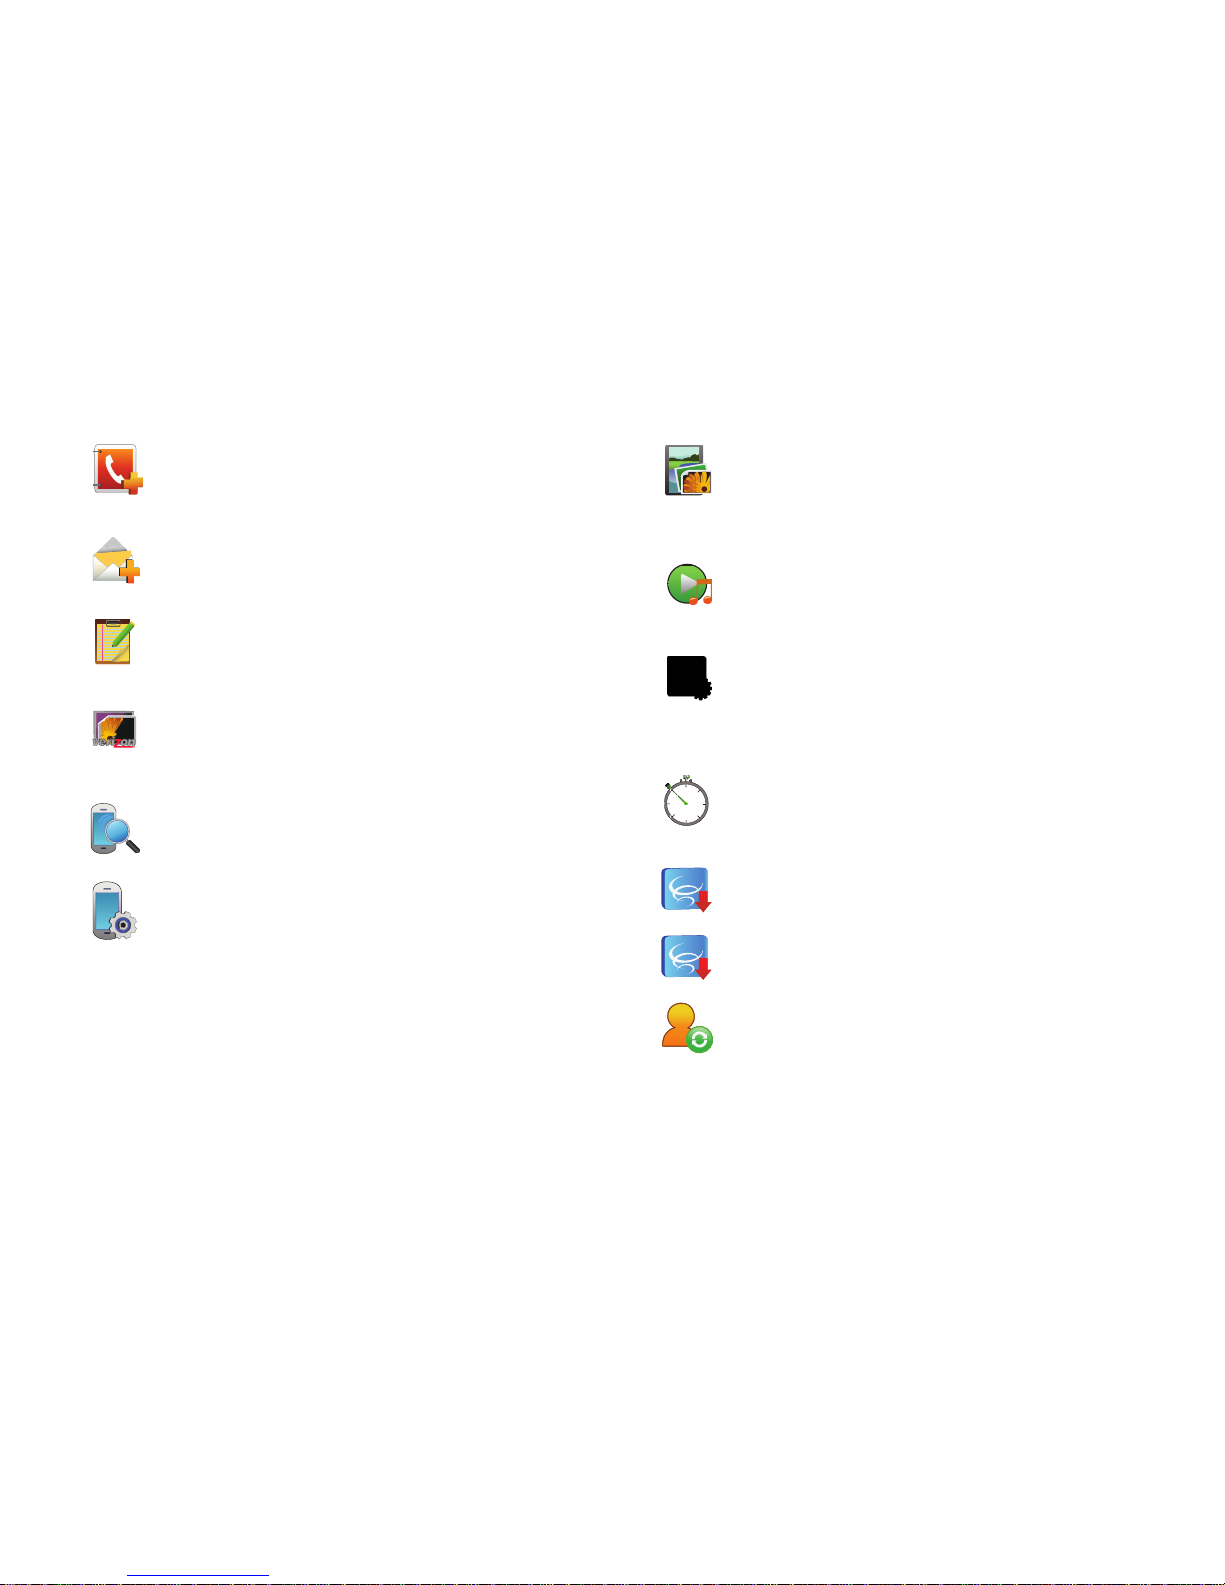
: Creates a new contact entry. For more
information, refer to “Adding a New Contact” on
page 33.
New message
: Creates a new text message. See
“Creating and Sending Text Messages” on page 45.
Notepad
: Allows you to create, read, edit and erase
text notes. For more information, refer to “Notepad”
on page 92.
Online Album
: Store pictures and videos to your
Verizon Wireless Online Album. For more information,
refer to “Online Album” on page 75.
Phone Search
: Launches Device Search. For more
information, see “Phone Search” on page 94.
Phone Settings
: Choose settings for Voice
Commands, Language, and Location, for phone
operation. Secure the phone, set data roaming
access an d restrictions. Also set the primary NAM,
and choose QWERTY keyboard preferences. For more
information, refer to “Phone Settings” on page 63.
Picture & Video
: phone to create, download and
manage your image and video files. For more
information, refer to “Pictures and Video” on
page 81.
Play All Songs
: Uses the music player to play all songs
in the music library. For more information, refer to
“Playing Music” on page 76.
Sounds Settings
: Customizes your phone’s sounds for
incoming calls and messages, alerts, and other
phone features. For more information, refer to
“Sounds Settings” on page 57.
StopWatch
: Measure lap times and total elapsed time.
For more information, refer to “Stop Watch” on
page 92.
Tetri s
: Play this popular mobile game.
Uno
: Play this popular mobile card game.
Update Status
: Updates your social networking sites
and media. For more information, refer to “Social
Networks” on page 98.
Page 26
Understanding Your Phone 22
Event Status Bar
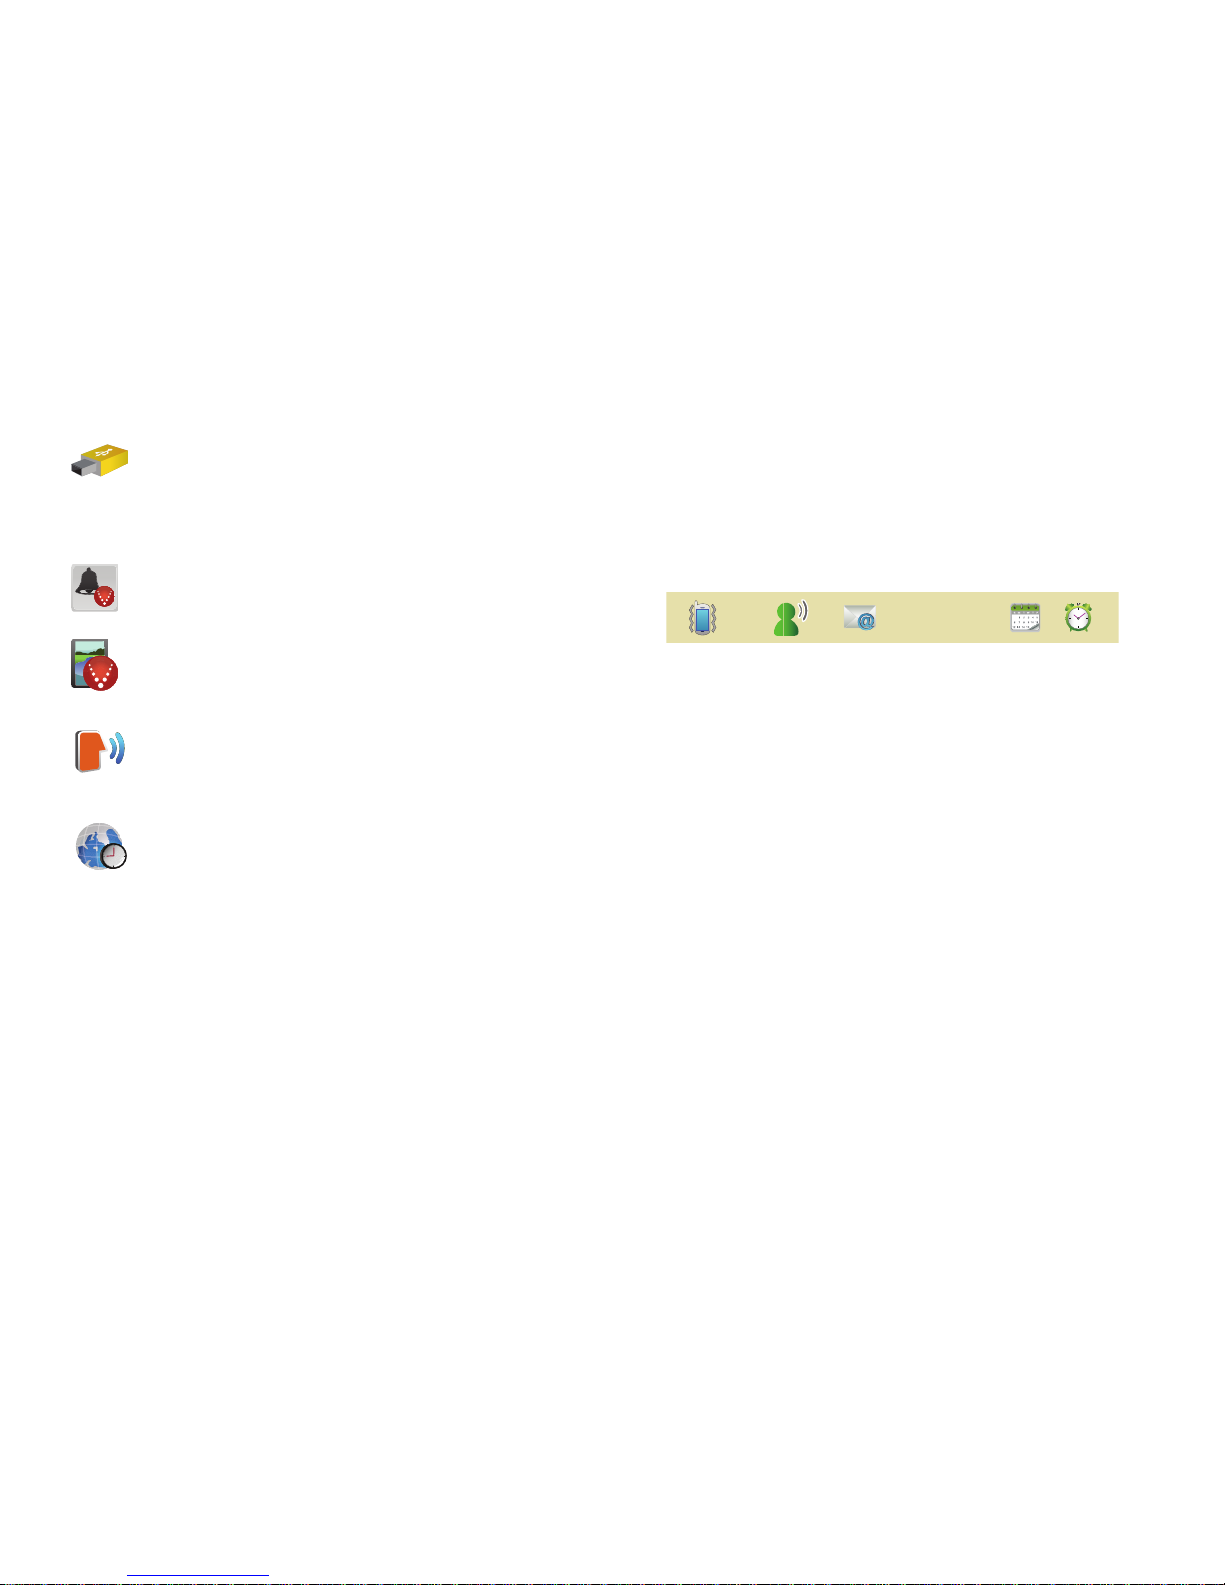
The Event Status Bar appears on the Home screen to alert you to
calendar events, missed calls, new messages, or special Master
Volume modes. The Event Status Bar does not display when
there are no active alerts.
Touch an event in the Event Status bar to launch the Event
Manager.
Event Status Bar
The Event Status bar appears near the bottom of the Home
screen.
An icon illuminated in color indicates an alert. Touching an icon
on the bar opens the Event Manager menu.
Shortcuts
Touch an empty space within the status bar to display the
following list of shortcuts:
•
Master Volume
: Adjust the Master Volume settings.
•
New Message
: View new messages.
•
Voicemail
: Call Voicemail or Clear the Counter.
•
Email
: View Mobile Email.
•
Missed Call
: View all Missed calls and view the Timers.
•
Calendar Event
: View calendar events.
•
Speaker Phone
: Activate the speakerphone by touching ON, or touch
OFF
to deactivate this feature.
•
Alarm
: View a list of alarms or Add a new alarm.
USB Mass Storage
: Connect your phone to a PC with
a USB cable to transfer files, such as music or
pictures, to your phone. For more information, refer to
“USB Mass Storage” on page 93.
VCAST Tones
: Downloads ringtones and ringback
tones.
VCAST Video
: Provides access to vibrant, full-color
video-on-demand. For more information, refer to
“VCAST Video” on page 74.
Voice Commands
: Use Voice Commands to operate
your phone by speaking commands. For more
information, refer to “Voice Commands” on page 89.
World Clock
: World Clock allows you to view the
current time in your location, and anywhere in the
world. For more information, refer to “World Clock”
on page 92.
Page 27
23
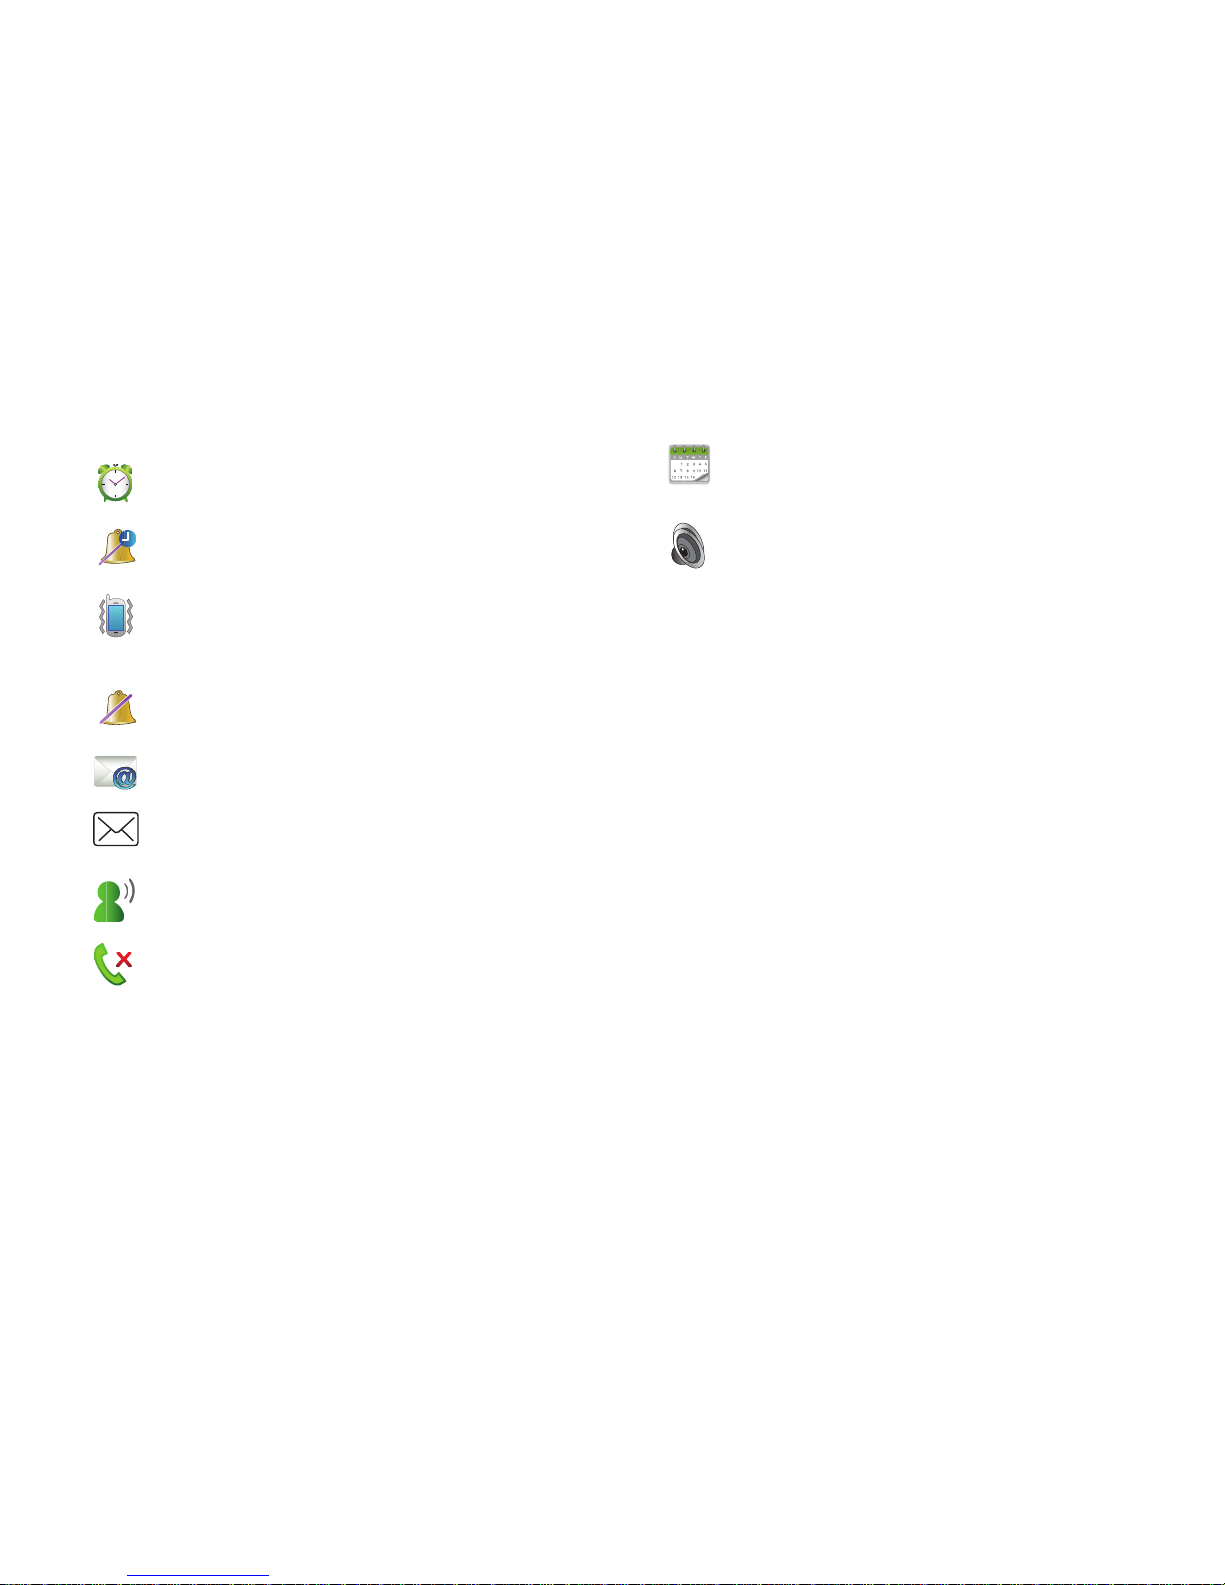
Event Status Icons
Event Manager
The Event Manager offers easy access to common events and
features.
1. Touch the Event Status bar on the Home screen.
2. Touch any Event to launch the associated feature.
Alarm
: An alarm is set.
Alarm Only
: Master Volume is set to Alarm Only. Your phone
will only ring when the set alarm sounds.
Vibrate Only
: Master Volume is set to Vibrate Only. Your
phone vibrates upon receiving a call, a new message or
voicemail, or when an alarm has been set.
All Sounds Off
: Master Volume is set to All Sounds Off. No
sounds will play.
Email
: Illuminates when you receive a new Email message.
New Message
: Illuminates when you receive a new
message.
New Voicemail
: Illuminates when you receive a voicemail
message. (Available on the Verizon Wireless Network.)
Missed Call
: Illuminates when you have one or more
missed calls.
Calendar Event
: Illuminates when events are scheduled in
the next 24 hours.
Speaker
: Illuminates when Speakerphone is on.
Page 28
25
Section 3: Navigation
This section explains navigation for your phone. It also includes
an outline of all menus available on your phone.
Note:
Instructions in this User Manual apply to
Touch Screen Navigation
,
except where noted.
Touch Screen Navigation
Warning!:
If your handset has a touch screen display, please note that a
touch screen responds best to a light touch from the pad of your
finger or a non-metallic stylus. Using excessive force or a metallic
object when pressing on the touch screen may damage the
tempered glass surface and void the warranty. For more
information, see “Warranty Information” on page 121.
Touch
Touch icons or menu items onscreen to select or launch them.
Examples of touch actions include:
•
Entering characters with the Keypad.
•
Selecting an item from a menu or list
•
Launching an application from the main Menu.
Keyboard Navigation
To access menus and options using the slide-out QWERTY
keyboard:
Press the corresponding number key:
.
Press the directional keys
Left
,
Right
, Up
and
Down
to scroll in a menu or long text screen.
To accept the highlighted option or launch the selected
application, press .
Lock Key
Press the
Lock
key at any time to lock the display.
Clear/CLR Key
Press the
Clear
key when navig ating a menu, to return to the
previous screen. Press and hold the
Clear
key at any time to
return to the Home screen.
Page 29
Call Functions 26
Section 4: Call Functions
This section describes how to make, answer and end a call. It
also includes information about the Recent Calls log and voice
dialing with Voice Commands.
Making a Call
Your phone offers multiple ways to make calls:
•
Use the touchscreen Keypad to enter a telephone or speed dial
number.
•
Use the QWERTY keyboard to enter a telephone or speed dial number.
•
Call a contact from Contacts, or from the Favorites .
•
Return a call, or call a recent caller via Recent.
•
Voice dial using Voice Commands.
Touch Screen Keypad
To access the Keypad:
䊳
From a Home screen, touch
Keypad
.
– or –
From a Home screen press
Send
.
Making a Call using the Keypad
1. From a Home screen, touch
Keypad
.
2. Touch the digits of the
telephone or speed dial
number.
•
Touch to call a contact.
•
To uc h
More
to send a message,
add a 2-second pause, add a
wait, or for Assisted Dialing.
•
To uc h
Save
to save the entered
number to add a new contact,
update an existing contact, or
save the number to the Notepad.
•
Touch to delete digits if
you enter an incorrect number.
3. Press
Call
or
Send
to dial the call.
Tip:
As you touch numbers, matching contacts display on screen. You can
continue dialing, or touch the contact to dial their default number.
CALL
CALL
Page 30
27
Making a Call using the QWERTY keyboard
1. Slide open the phone.
2. From a Home screen, touch
Keypad
.
3. Press the digits of the telephone or speed dial number on
the QWERTY keypad.
•
Touch to call a contact.
•
Touch
More
to send a message, add a 2-second pause, add a
wait, or for Assisted Dialing.
•
Touch
Save
to save the entered number to add a new contact,
update an existing contact, or save the number to the Notepad.
•
Touch to delete digits if you enter an incorrect number.
Tip:
As you press numbers, matching contacts display on screen, with the
number of potential matches (4, in the example above). You can
continue dialing, touch the contact to dial their number, or touch the
number to display all potential matches.
4. Press
Call
or
Send
to dial the call.
Note:
When using the QWERTY keyboard, calls are automatically made in
Speakerphone mode.
Making a Call using Contacts
A contact is an entry that you have created to store the name,
numbers, and other information for people or groups of interest.
For more information, refer to “Contacts” on page 33.
1. From a Home screen, touch
Contacts
.
2. Find the contact and touch
Call
on the entry to dial the
default number for the Contact.
– or –
Touch the
Contact
to open the entry, then touch any
number to dial the number.
Ending a Call
䊳
Press the
End/Power
key.
CALL
CALL
Page 31
Call Functions 28
Answering a Call
When you receive an incoming call, you have the option to
answer the call, or to send calls directly to voicemail. You can
also send the caller a text message response, while sending their
call to voicemail.
To answer an incoming call:
•
Press
Send
to answer the call.
– or –
Touch
ANSWER
after unlocking the phone.
Tip:
You can quickly silence the ringer for an incoming call by pressing the
Volume
key or with the phone unlocked touch
QUIET
.
Answering Call-Waiting Calls
When you receive a call while on a call:
•
Touch
to answer the incoming call. The original call is
placed on hold.
•
Touch to return to the original call.
Sending Calls to Voicemail
•
Touch to send the call to voicemail.
•
Touch and select
Message
to send the call to voicemail
and send a text message to the caller.
Call-In-Progress Options
While in a call, touch an icon for the following options:
Three-way Calling
Using your phone, you can merge two calls to set up three-way
calling between you and two other parties.
1. Establish a call, either by dialing or answering an incoming
call.
HOLD CALL ANDHOLD CALL AND
ANSWER INCOMINGANSWER INCOMING
Swap Calls
Swap Calls
IGNOREIGNORE
IGNOREIGNORE
End
: Disconnect the call.
Keypad
: Display the Keypad.
Bluetooth
: Access Bluetooth functionality.
Home
: Displays the Home (Main Menu) screen.
Speaker
: Activate the speakerphone.
Mute
: Turn off all speech during the call.
Whisper Mode
: Boost the volume of your voice when
the caller cannot hear you clearly.
Return to Call
: Returns to the Call screen.
End
Keypad
Bluetooth
Home
Speaker
Mute
Whisper
Mode
Return to Ca l
Page 32
29
2.
While the call is in-progress with the first participant, dial
the second phone number and touch
Call
. The first
call is placed on hold.
3. When the second party answers, touch . The
call becomes active with three parties.
Recent Calls
Recent
saves information about all calls.
1. From a Home screen, touch
Recent
.
2. Touch a call type tab:
•All
: All missed, received, and dialed calls.
•Missed
: Calls you did not answer.
• Received
: Answered calls.
• Dialed
: Outgoing calls.
3. Calls display by date, with the contact name or phone
number, date, and time.
4. Touch the contact number to display statistics about the
call.
5. Touch
More
to Erase the selected number or to View
Timers.
6. Touch
Sort by
to sort the calls by Date & Time or Name.
Note:
You can also access Recent calls from a Home screen by touching
Recent
.
Recent Calls Icons
In Recent, the icon indicates the type of call.
Making Calls Using Recent
1. From a Home screen, press
Send
➔
.
– or –
From a Home screen, touch
Recent
.
2. Find a call from
All, Missed, Received
, or
Dialed
.
3. Touch to dial the call.
CALL
Merge Calls
Merge Calls
Received Calls
: Answered calls.
Dialed Calls
: Outgoing calls you dialed.
Missed Calls
: Calls you did not answer.
RECENT CALLSRECENT CALLS
Page 33
Call Functions 30
Creating/Updating a Contact using Recent
Create a contact, or update an existing contact, from a Recent
calls log.
1. From a Home screen, press
Send
➔
.
– or –
From a Home screen, touch
Recent
.
2. Find a call from
All, Missed, Received
, or
Dialed
, and touch
the call.
3. Touch .
4. At the
Save to Contacts
prompt, choose
Add New Contact
or
Update Existing
. Continue entering contact information.
Send a Message using Recent
1. From a Home screen, press
Send
➔
.
– or –
From a Home screen, touch
Recent
.
2. Find a call from
All, Missed, Received
, or
Dialed
, and touch
the call.
3. Touch . and enter your message text. For more
information about creating and sending messages, see
“Messaging“ on page 45.
Voice Recognition
Your phone includes
Nuance Voice Recognition
, advanced speech
recognition software that allows you to use your voice to look up
contacts, make phone calls, and get calendar information.
There is no need to “train” Voice Commands, it is designed to
recognize natural speech.
䊳
From a Home screen, press and hold the
Voice
Commands
key.
The following is a list of functions you can perform using Voice
Commands speech recognition on your phone.
•
Call <Name or #>
: Dial a call by saying a contact name or number of
the person you would like to call, saying voicemail, or last number.
•
Send Message <Name or #>
: Send a message by saying a contact
name, group name, or number of message recipient.
•
Go To <Menu>:
Open any application installed on your device by
saying the application name or menu item to open.
•
Check <Item>
: View details of your phone information including
Status, Voicemail, Messages, Missed Calls, Time, Signal Strength,
Battery Level, Volume, Balance, Minutes, Payment, or My Number.
RECENT CALLS
RECENT CALLS
Save to ContactsSave to Contacts
RECENT CALLS
RECENT CALLS
Send Message
Send Message
Page 34

31
•
Contacts <Name>
: Displays contact commands including Call,
Readout, Create New, Modify, or Erase.
•
Redial
: Dials the last number called.
•
Play <All Songs/Playlist/Name>
: Opens the My Music menu, plays
songs in a playlist or all songs.
•
Driving Mode On
: Activates Driving Mode for alert notifications.
•
My Verizon
: Accesses information about your Verizon account (for
example balance, minutes, usage, and payment information).
•
Help
: Provides a helpful tutorial on using Voice Commands.
Voice Commands Settings
1. From a Home screen, press and hold the
Voice
Commands
key.
2. Touch
Settings
to configure these settings:
• Confirm Choices
: Control when the system asks you to confirm a
name or number, from
Automatic, Always Confirm
, or
Never
Confirm
.
• Sensitivity
: Choose the sensitivity of the speech recognition.
Choose from
More Sensitive, Automatic
, or
Less Sensitive
.
• Adapt Voice
: Optimize speech recognition to your voice to improve
results. Touch
Adapt Voice
, then follow the prompts.
•Prompts
: Choose the type of prompts Voice Commands gives you.
–
Mode
: Choose the type of prompts, from
Prompts
(voice prompts), or
Tones Only
(plays back only tones).
–
Audio Playback
: Set playback location, Speakerphone or Earpiece.
–
Timeout
: Choose how long the system listens for a command before
timing out Choose 5 seconds or 10 seconds.
•TXT Msg Readout
: When enabled, the phone reads text messages
as playback.
• Key Setting
: Choose how to launch Voice Commands,
Voice Key
Only
(press the Voice Commands key on side of phone), or
Voice
Key/Headset
(Press the Voice commands key, or insert a headset.)
• About
: View information about Voice Commands.
Driving Mode
When Driving Mode is enabled, your phone uses sounds to alert
you to notifications, regardless of other phone or call settings.
For example, when you receive a call or message, your phone
reads out the caller’s (or sender’s) name and number, and Call
Alert sounds will play, even if you have set Master Volume to
Sounds Off or Vibrate Only.
Page 35

Call Functions 32
Enable Driving Mode with a Voice Command
1. From a Home screen, press the
Voice
Commands
key.
2. At the audio prompt, say “
Driving Mode On
”. Driving Mode
is activated and set to Caller ID only.
Enable Driving Mode in Settings
1. From a Home screen, press the
Settings ➔ Sounds
Settings
.
2. Touch
Driving Mode
and select:
• Caller ID Only
: Reads Caller ID for incoming calls and messages.
• ID & Message
: Reads Caller ID and the message content for
incoming messages.
•Off
: Disable Driving Mode.
Roaming
What is Roaming?
When you travel outside your home network’s coverage area,
your phone can roam to acquire service on other compatible
digital networks. When roaming is active, the roaming icon
appears in the Annunciator line.
During roaming, some services may not be available. Depending
on your coverage area and service plan, extra charges may apply
when making or receiving calls.
Note:
Contact Verizon Wireless for more information about your coverage
area and service plan.
You can choose settings for system selection and roaming. For
more information, see “System Select“ on page 67.
TTY Mode
Your phone is TTY-compatible, allowing you to connect TTY
equipment to the phone’s headset jack. For more information
about TTY settings, see “TTY Mode“ on page 68.
Page 36
33
Section 5: Contacts
This section describes how to manage your daily contacts by
saving contact information for your friends, colleagues or
business acquaintances.
To access
Contacts
:
1. From a Home screen, touch
Contacts
.
The default view displays the alphabetic keypad.
2. Tap a letter of the alphabet that corresponds to the
contacts name. All names that begin with this letter
display.
Adding a New Contact
1. From a Home screen, touch
Contacts
➔ .
2. Touch the image and assign a picture to the new entry
from
My Pictures
, or choose
Take Picture
to take a new
picture with the Camera.
3. Touch fields to enter the contact information, then touch
to save each field.
4. When you’re finished, touch to save the contact.
Adding a new Contact from the Keypad
You can quickly add a new contact by entering the number into
the Keypad, then following the prompts to complete the process.
1. From a Home screen, touch
Keypad
.
2. Enter the phone number using the touch keypad or
QWERTY keyboard, then touch ➔
Add New Contact
.
3. Touch a field to save the number:
Mobile 1, Mobile 2, Home
,
Business
, or
Fax
.
4. You can save the contact now, or continue entering fields.
5. When you’re finished, touch to save the contact.
Adding a new Contact from Recent Calls
1. From a Home screen, touch
Recent
.
– or –
From a Home screen, press
Send
➔
.
2. Scroll through the list of calls and touch the number.
3. Touch ➔
Add New Contact
.
New
Contact
Done
Save
Save
Save
RECENT CALLSRECENT CALLS
Save to Contacts
Save to Contacts
Page 37
Contacts 34
4.
Touch a field to save the number:
Mobile 1, Mobile 2, Home
,
Business
, or
Fax
.
5. You can save the contact now, or continue entering fields.
6. When you’re finished, touch to save the contact.
Editing a Contact
1. From a Home screen, touch
Contacts
.
2. Touch an existing contact, then touch
Edit
.
3. Touch fields to enter the contact information, then touch
to save each field.
4. When you’re finished, touch to save the contact.
Editing a Contact from the Keypad
You can add a new number to a contact by entering the number
into the Keypad, then following prompts to complete the process.
1. From a Home screen, touch
Keypad
.
2. Enter the phone number, then touch ➔
Update
Existing
.
3. Touch the first letter of the contact name, or close the
alphabetic tab and scroll to locate the contact.
4. Touch a field to save the number:
Mobile 1, Mobile 2, Home
,
Business
, or
Fax
.
5. You can save the contact now, or continue entering fields.
6. When you’re finished, touch to save the contact.
Editing a contact from Recent Calls
1. From a Home screen, touch
Recent
.
– or –
From a Home screen, press
Send
➔ .
2. Find a call from
All, Missed, Received
, or
Dialed
, and touch
the call.
3. Touch ➔
Update Existing
.
4. Touch an existing contact, then touch a field to save the
number:
Mobile 1, Mobile 2, Home, Business
, or
Fax
.
5. You can save the contact now, or continue entering fields.
6. When you’re finished, touch to save the contact.
Save
Done
Save
Save
Save
RECENT CALLS
Save to ContactsSave to Contacts
Save
Page 38
35
Adding Pauses or Waits
Calls to automated systems can require entry of a password or
account number. You can store the numbers to a Contacts entry,
along with special pause and wait characters.
1. From a Home screen, touch
Contacts
.
2. Touch a contact, then touch
Edit
.
3. While entering a phone number in a contact entry, enter
the phone number up to the pause or wait, then touch
.
4. Touch an option:
• Add 2-Sec Pause
: Stops the dialing sequence for two
seconds, then automatically sends the remaining digits.
A “p” appears in the telephone number.
• Add Wait
: Stops the dialing sequence, waiting for further
input from you. A “w” appears in the telephone number.
5. After your entry, touch to save the contact entry.
Note:
Entering multiple pauses extends the length of a pause. For example,
two consecutive pauses equal a total pause of four seconds.
Remember that each pause counts as a digit towards the 48-digit
maximum for telephone numbers.
Sending a Name Card
1. From a Home screen, touch
Contacts
.
2. Touch a contact, then touch
SEND NAME CARD
.
3. Select a sending method:
• Send via Bluetooth
: Sends the name card to a selected device.
• Send via Message
: Sends the name card in a message.
4. Touch
Send
to send the name card.
Finding a Contact
Finding a contact in landscape mode
1. From a Home screen, touch
Contacts
.
2. The cursor appears in the
Search
field. Enter part or all of
the Contact name to see matching entries.
Tip:
You can also find a Contact with
Device Search
. For more information,
see “Phone Search” on page 94.
nser
InsertInsert
Done
Page 39
Contacts 36
Deleting a Contact
1. From a Home screen, touch
Contacts
.
2. Touch the desired contact list entry.
3. Touch .
4. At the prompt, touch
Yes
to delete the entry.
Backup Assistant
Backup Assistant
is a wireless service that saves a copy of your
Contacts to a secure web site. If your phone is lost, stolen or
damaged, Backup Assistant can restore your saved contacts to a
new phone, wirelessly. You can schedule backups to save your
information manually or automatically. Log in to your web
account for full access to your contacts for viewing, printing,
adding, deleting and editing.
Visit
http://www.verizonwireless.com/backupassistant
, or contact
Verizon Wireless for more information.
䊳
From a Home screen, touch
Contacts
➔ ➔
Backup Assistant
.
Groups
You can place Contact entries into
Groups
, to make searching
your Contacts faster, to quickly send messages to one or more
group members, and more.
Note:
By default, new entries to your Contacts are placed into the No Group
category unless a specific group category is selected.
Viewing Groups
1. From a Home screen, touch
Contacts
➔ ➔
Groups
. Default groups include:
•Business
• Colleague
•Family
• Friends
Adding Contacts to a Group
After selecting the desired group, you can add up to 10 Contacts
from your Contact List to the group.
1. From a Home screen, touch
Contacts
➔ ➔
Groups
.
2. Touch a Group, then touch .
Erase
More
More
More
Add
Members
Page 40

37
3.
From the Contacts list, touch contact(s) to mark them for
addition, then touch .
Removing a Contact from a Group
1. From a Home screen, touch
Contacts
➔ ➔
Groups
.
2. Touch a Group, then touch .
3. Touch contacts to mark them for removal, then touch
. Touch
Yes
at the prompt to confirm.
Moving a Contact to Another Group
1. From a Home screen, touch
Contacts
.
2. Touch a contact, then touch ➔
Group
.
3. Touch the old group to uncheck it, then touch a new group.
Touch to return to the contact entry.
4. Touch to save the contact entry.
Creating a New Group
In addition to the default groups already in your phone, you can
create new groups, up to a total of 30 groups.
1. From a Home screen, touch
Contacts
➔ ➔
Groups
.
2. Touch then enter a group name, up to 32
characters.
3. Touch
Next
➔ .
Sending a Message to Members of a Group
Use this feature to send a text, picture, video, or voice message
to some or all members of a group.
1. From a Home screen, touch
Contacts
➔ ➔
Groups
.
2. Touch a group, then touch
More
➔
Send Message
.
3. Touch contact name(s), or touch
Mark All
to select all
contacts. A check mark appears beside selected contacts.
4. Touch . The new message displays, with your
selections entered as recipients.
5. Type a message then touch .
6. Touch to send the message.
Done
More
Remove
Contacts
Done
Edit
Done
Save
More
New Group
Done
More
Done
Done
Send
Page 41

Contacts 38
Favorites
Favorites
are shortcuts to contacts or groups. For each Favorite,
you can set a one-touch action for the phone to perform when
you select a favorite.
After creating a Favorite use the following to access it:
䊳
From a Home screen, touch
Contacts
➔ .
To create a Favorite:
1. From a Home screen, touch
Contacts
➔ .
2. Touch then touch
contact name(s) and touch
.
3. To modify the Favorite choose
Always Call, Always Message
,
Always Ask
, or
View Details
to
set the one-touch action.
4. Touch
➔ Reorder
Favorites
to change the order
of Favorites.
5. Touch next to the selection to move the
Favorite then touch .
Speed Dials
Speed Dials
are 1- or 2-digit shortcuts you assign to contact
entries, to allow you to quickly dial a contact.
Assigning a Speed Dial Number
1. From a Home screen, touch
Contacts
➔
➔
Speed Dials
.
2. Touch an Unassigned speed dial number.
3. Touch a contact to assign to the speed dial number. At the
prompt, touch
Yes
to confirm the setting.
Copy To Card
1. From a Home screen, touch
Contacts
➔ ➔
Copy To Card
.
2. Touch a contact name(s) to copy to the card then
touch .
3. Touch
Yes
to copy the contact to the card.
Favorites
Favorites
Add
Done
More
Done
More
More
Copy
Page 42

39
Locking a Contact
1. From a Home screen, touch
Contacts
➔ ➔
Lock / Unlock
.
2. Touch a contact name(s) to lock. The lock symbol displays
and the contact information is locked (secured so you
cannot modify the information or remove the contact).
3. Touch .
In Case of Emergency (ICE)
In Case of Emergency (ICE)
allows you to set up to 3 emergency
contacts, plus enter personal information that may be helpful to
others using your phone in an emergency.
Note:
ICE contacts are displayed in red in the Contacts list.
Assigning an emergency contact
1. From a Home screen, touch
Contacts
➔
In Case of
Emergency
.
2. Touch and select a
contact.
Unassigning or reassigning an
emergency contact
1. From a Home screen, touch
Contacts
➔
In Case of
Emergency
.
2. Touch the emergency Contact.
3. Touch to choose another ICE contact.
– or –
Touch to remove the contact and leave the ICE
contact empty.
More
Done
Add Contact
Reassign
Unassign
Page 43
Contacts 40
Entering personal information
1. From a Home screen, touch
Contacts
➔
In Case of
Emergency
.
2. Touch .
3. Touch
Note 1, Note 2
or
Note 3
to enter up to three items of
personal information.
Tip:
You can enter information such as illnesses, allergies, and other medical
details in
Personal Information
.
Sending a Name Card by Message
Send individual contact entries, including My Name Card, to
recipient(s) as an attachment to a message.
1. From a Home screen, touch
Contacts
➔ ➔
Send Name Card
.
2. Touch contact name(s) to mark them, then touch
to add the contacts to the To: list of the message.
3. Touch
Send via Message
.
4. Continue creating the message. See “Messaging” on
page 45.
Sending a Name Card by Bluetooth
Send individual contacts, including My Name Card, to Bluetooth
devices that support vCards.
Note:
For more information, see “Bluetooth Menu” on page 55.
1. From a Home screen, touch
Contacts
➔ ➔
Send Name Card
.
2. Touch contact name(s) to mark them, then touch
to add the contacts to the To: list of the message.
3. Touch
Send via Bluetooth
then touch the destination device.
Note:
If your phone is not already paired with the destination device, follow
the Bluetooth Search instructions on page 57.
4. If Auto Pairing is enabled, the devices pair automatically
and the transfer continues. If Auto Pairing is disabled, enter
a passkey when prompted, then enter the same passkey
on the destination device at its prompt.
5. Follow the prompts to complete and confirm the transfer.
Note:
All information is transferred except for group name, ringtone, and
Emergency contact reference.
Personal InfoPersonal Info
More
Done
More
Done
Page 44
41
Section 6: Entering Text
Your phone provides convenient ways to enter words, letters,
punctuation, and numbers when you need to enter text.
This section describes selecting the text input mode and entering
characters, using the built-in QWERTY keyboard or the touch
keypad.
Entering Text Using the QWERTY Keyboard
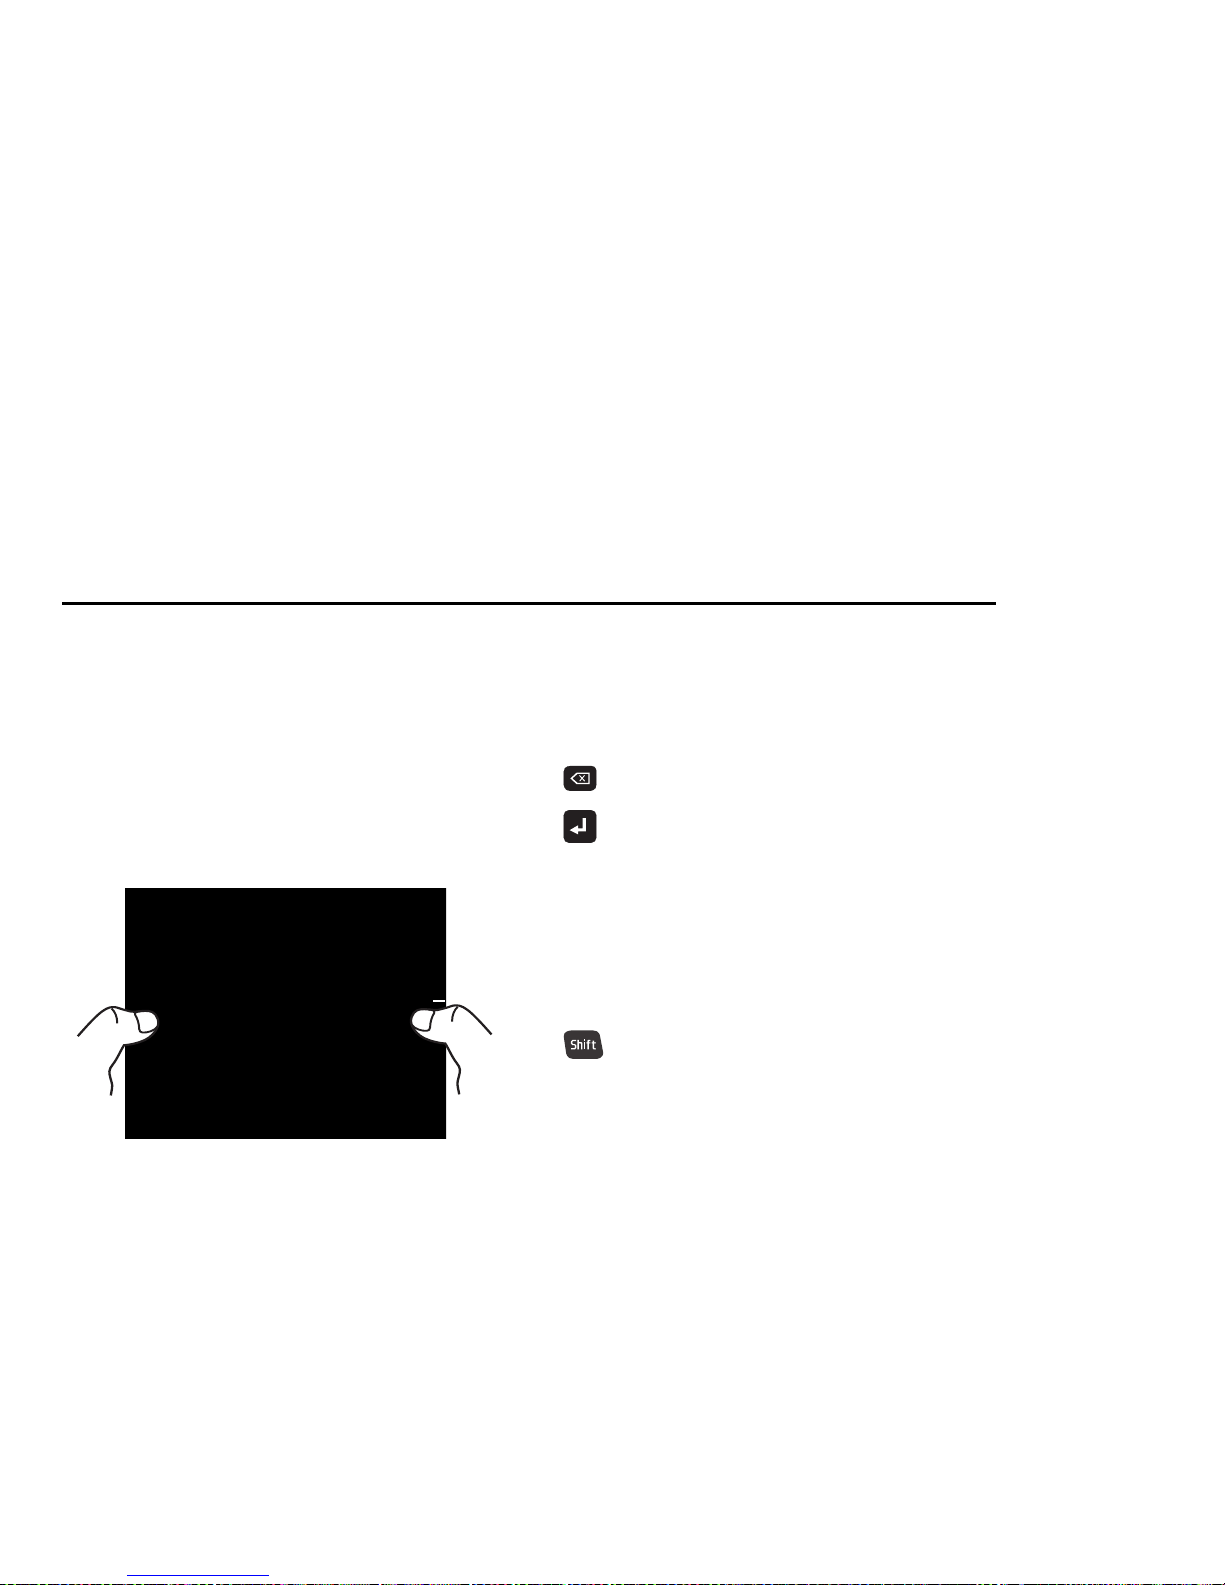
The built-in QWERTY keyboard provides quick and easy text
input, similar to a computer keyboard.
䊳
To access the keyboard, rotate the phone and slide it open, as
shown.
Entering Characters
Enter text by pressing the appropriate keys on the QWERTY
keyboard.
Press the Backspace or Return key to position the insertion point
in the text field.
Entering Numbers
Press the number keys on the top row of the QWERTY keyboard.
Entering Upper and Lower Case
Enter upper and lower case alphabet letters by pressing the Shift
key to toggle the case, before pressing the character key:
Backspace
: Deletes the previous character.
Return
: Moves the insertion point to the next line.
• Press once to toggle from Abc to ABC.
• Press twice to toggle from ABC to abc.
• Press three times to toggle from abc to Abc.
Page 45
Entering Text 42
Entering Symbols
Enter symbols by pressing the Function key before a key, to
access the orange special character on the key. You can also lock
the keyboard in Function mode, to enter multiple symbols.
Entering Smileys
Smileys communicate feelings such as pleasure, approval or
humor.
1. Press ➔ .
2. The
Smileys
menu displays.
Touch the number of the smiley.
Entering Text using the Touch Screen
The touch screen keypad provides quick and easy text input,
using standard text entry for phone keypads.
䊳
When you touch a text entry field in portrait mode, the touch
screen keypad appears for text entry.
Changing Text Input Mode
When entering text with the touch screen keypad, you can
change the text input mode to your preference.
Tip:
You can set a default Text Entry Mode. For more information, see
“Message Settings” on page 53.
1. On the onscreen keypad, touch the
Text Input Mode
button.
Select a text input
mode:
•
T9 Word
•
Shift/
SHIFT
•
Symbols
•
Numeric
•
Initial case
•
Upper case
• Press once to turn on Fn mode. When Function is
ON, appears in the annunciator line.
• Press twice to lock the keyboard in Fn mode.
When Function is LOCKED, appears in the
annunciator line.
• Press once more to return to Abc mode.
Text Input
Mode
T9Word
T9Word
SymSym
123123
AbcAbc
ABCABC
Page 46

43
Touch Screen Text Input Buttons Using T9 Word
T9 Word is a predictive text input mode that recognizes common
words matching the sequence of your key presses and inserts
the most common word into your text. T9 Word requires only one
key press per letter of the word and is much faster than
traditional text entry.
䊳
Touch the Text Input Mode button, then select .
When entering text:
•
Press the key for each letter only once.
•
Enter the entire word before editing or deleting.
•
By default, the first letter of an entry is capitalized and consecutive
letters are lower case. Touch to change between T9 Word
(initial case), and T9 word (lower case), and T9 WORD (upper case).
•
Touch to enter a space.
Using Abc Mode
To use Abc mode, use the corresponding keys to enter your text.
䊳
Touch the Text Input Mode button, then select .
When entering text:
•
Touch each key once for the first letter, twice for the second letter,
and so on.
•
When the correct letter appears, pause briefly to advance to the
next letter, or touch another key.
Backspace
: Delete the previous character, or go back
to the previous field.
Shift
: Temporarily change the case for alphabet
characters, without changing text input mode. Touch
once to change case for one character, or touch twice
quickly to lock the case until you press Shift again.
Sym
: Displays symbols page 1 of symbols.
Sym
1/6: Displays symbols pages 2 through 6 of
symbols.
123
: Displays the set of numbers from 1 to 0, plus *
and other keys.
Space
: Add spaces between words and characters.
SymSym
1/6
1/6
123
123
T9Word
T9Word
Abc
Abc
Page 47

Entering Text 44
•
Touch to enter a space.
•
By default, the first letter of an entry is capitalized and consecutive
letters are lower case. Touch to change between Abc
(initial case), abc (lower case), and ABC (upper case).
Using 123 Mode
Use 123 mode to enter numbers into a text message.
䊳
Touch the Text Input Mode button, then select .
When entering numbers:
•
Touch a key to enter the associated number.
•
Touch to enter a space.
Using Symbols
Use Symbol mode to insert symbols and punctuation marks into
text.
䊳
Touch the Text Input Mode button, then select .
The first of 6 symbol pages displays. When entering symbols:
•
Touch a key to enter the associated symbol.
•
To display more symbols, touch to scroll through 6 pages
of symbols.
123123
SymSym
1/61/6
Page 48
45
Section 7: Messaging
This section explains how to send and receive messages, and
other features and functionality associated with messaging.
Types of Messages
Your phone can send and receive:
•
Text Mess ages
•
Multimedia Messages
•
Voice Messages
•
Email, including Exchange Email
Tip:
Procedures are described using the QWERTY keyboard, unless otherwise
noted.
Creating and Sending Text Messages
Text Messages
are simple messages containing text, which can
be sent to another mobile phone, or to an Email address.
Text messages are also known as SMS (Simple Messaging
Service) messages.
1. Open your device in Landscape mode.
2. From the Home screen, press the
Message key
() on
the QWERTY keypad.
3. Enter a phone number or email address using the QWERTY
keypad.
– or –
From the bottom of the screen, touch
Add
and select an
option:
Note:
As you enter the phone number or email address, matching contacts
display onscreen. Touch an available matching recipient or continue
entering the phone number or email address.
•
Touch to select from the Contacts List.
•
Touch to select from Favorites.
•
Touch to select from Recent Calls.
•
Touch to select from the Groups List.
•
Touch to add a new Domain.
4. Touch
Done
to enter your selection.
5. To add a domain, enter the portion of the domain that
precedes the extension, then select
Add Domain
, select an
extension and enter the rest of the domain name
(ex: [email protected]).
From ContactsFrom Contacts
From FavoritesFrom Favorites
From RecentFrom Recent
CallsCalls
GroupsGroups
Add Domain...Add Domain...
Page 49
Messaging 46
6.
After entering a Contact, touch for these options:
• Attach
: Attach a Picture, Take Picture, Vid eo, R ecor d Vid eo, S ound ,
Record Sound, Namecard, or Calendar.
• Add Subject
: Converts to a multimedia message and adds a
Subject line.
• Priority Level
: Select Normal or High as the priority level.
• Callback #
: Turn ON the Callback # to display your phone number
as the callback number.
7. Touch the
Add Text
field and compose your message.
While entering text, touch for these options:
• Insert Quick Text
: Choose from 19 pre-loaded phrases.
• Language
: Choose a language in which to compose the message.
8. Touch to send your message.
Creating and Sending Multimedia Messages
With multimedia messaging (MMS), you can send and receive
multimedia messages that contain text, pictures, video, sound,
name cards or calender events.
Note:
Multimedia messaging is only available in the Verizon Wireless
Enhanced Services Area.
1. Open your device in Landscape mode.
2. From the Home screen, press the
Message key
() on
the QWERTY keypad.
3. Enter a phone number or email address using the QWERTY
keypad.
Note:
As you enter the phone number or email address, matching contacts
display onscreen. Touch an available matching recipient or continue
entering the phone number or email address.
– or –
From the bottom of the screen, touch
Add
and select an
option:
•
Touch to select from the Contacts List.
•
Touch to select from Favorites.
•
Touch to select from Recent Calls.
•
Touch to select from the Groups List.
•
Touch to add a new Domain.
4. To add a domain, enter the portion of the domain that
precedes the extension, then select
Add Domain
, select an
extension and enter the rest of the domain name (ex:
[email protected]).
More
More
Send
From Contacts
From Contacts
From Favorites
From Favorites
From Recent
From Recent
Calls
Calls
Groups
Groups
Add Domain...
Add Domain...
Page 50

47
5.
Touch the
Add Text
field and compose your message.
While entering text, touch for these options:
• Attach
: Attach a Picture, Take Picture, Video, Record Video, Sound,
Record Sound, Name Card, or Calendar.
• Save As Draft
: Saves the message in the Drafts folder.
• Add Subject
: Converts to a multimedia message and adds a
Subject line.
• Insert Quick Text
: Choose from 19 pre-loaded phrases.
• Priority Level
: Choose High or Normal priority for sending.
• Callback #
: Turn ON the Callback # to display your phone number
as the callback number.
• Language
: Choose a language in which to compose the message.
6. Touch
Done
when finished.
7. Touch ➔
Attach
, then select a multimedia
attachment type:
•Picture
: To select and attach a picture from the Pictures folder to
this message.
•Take Picture
. To take a photo and attach the picture to this
message.
•Video
: To select and attach a video from the Videos folder
• Record Video
: To record a video and attach the video to this
message.
• Sound
: To select a sound file to attach to this message.
• Record Sound
: Record a sound to attach to this message.
Note:
Once you take or select a photo, video, or sound file, the message
automatically converts to a Multimedia Message.
•Name Card
: To attach a name card to this message.
•Calendar
: To select a calendar event to attach to this message.
8. Touch and select one of the following options:
•Preview
: Display the message before sending.
• Save As Draft
: Save a copy of the message in the Drafts folder.
• Priority Level
: Choose High or Normal priority for sending.
• Add Slide
: Add a new slide for another picture.
9. Touch
Send
to send the message.
Receiving Messages
When you receive a message, you can choose to:
•
View Now
: Open the message for viewing.
•
View Later
: Dismiss the alert. The message can be viewed later in
Messages. For more information about viewing messages, see
“Message Folders”
on page 51.
•
Reject
: Rejects the received Multimedia message.
If you have disabled the Multimedia Msg Auto Receive setting and
press Reject, the message is deleted.
More
More
More
Page 51

Messaging 48
Viewing Text Messages
1. Touch a message to view its details.
2. Touch to respond to the message with a new TXT,
Picture, Video or Sound Message.
3. Touch
to delete the message.
4. While viewing a message touch to display
available options:
•Reply w. Copy
: Reply to the sender, plus other recipients if desired,
and include a copy of the original message.
•Save Quick Text
: Save the message text to the Quick Text list.
•Lock/Unlock
: Lock or unlock the message to prevent deletion.
• Mark as Unread
: Marks this message as unread.
• Message Info
: Display details, including From (also provides the
date and time the message was received), Callback #, Priority, Size,
Type, and method of Transport.
• Messaging Font Size
: Select the font size of the message,
Normal or Large.
5. Touch to forward this message to another
recipient.
Viewing Multimedia Messages
1. Touch
View Now
to view the message now.
– or –
Touch
View Later
to open the message later from the Inbox.
2. After loading, the attachment (and text if any) contained in
the message displays. Scroll the screen up to view the
entire picture or message if necessary.
3. Touch a message to view its details, then touch
and select one of these options:
•Forward
: Forward this message to another recipient.
•Reply w. Copy
: Reply to the sender, plus other recipients if desired,
and include a copy of the original message.
•Save Picture
: (Picture and Video messages) Save the attached
picture to My Pictures.
•Save Video
: (Picture and Video messages) Save the attached video
to My Videos.
• Save As Ringtone
: (Video, Voice, or Picture messages with
attached sound) Save the attached sound as a ringtone.
•Save Sound
: (Video, Voice, or Picture messages with attached
sound) Save the attached sound to My Sounds.
•Save Quick Text
: Save the attached Quick Text.
•Lock
: Locks the message to prevent deletion.
Reply
Erase
More
Forward
More
Page 52

49
• Mark as Unread
: Marks this message as unread.
•Message Info
: Displays information about this message.
4. Touch to forward this message to another
recipient.
Erase Messages
You can erase unlocked messages in your Inbox, Drafts folder, or
Sent folder. Locked messages are not erased.
To erase messages:
1. From a Home screen, touch
Messaging
➔
Erase
.
2. Touch each message check box to erase or touch
Mark All
to erase all messages then touch
Erase
.
Erasing All Messages
1. From a Home screen, touch
Messaging
.
All message types display.
2. Touch ➔
Erase All Message
.
3. At the prompt, select
All (Read and Unread) Messages
or
Only Read Messages
.
All selected message types erase.
Locking and Unlocking a Message
1. From a Home screen, touch
Messaging
.
All message types display.
2. Touch a message to lock or unlock.
3. Touch ➔
Lock / Unlock
.
4. After selecting the lock image to the left of the message,
touch .
The message locks or unlocks, depending on the current
status of the file.
Sorting Messages
1. From a Home screen, touch
Messaging
.
All message types display.
2. Touch ➔
Sort by
and select
Time
or
Alphabetically
.
Drafts
Drafts are messages that have been created, but have not yet
been sent. You can return to the Drafts folder at any time to view,
edit, or send a draft message.
1. From a Home screen, touch
Messaging
➔
New
Message
.
Forward
More
More
Done
More
Page 53
Messaging 50
2.
Touch
Add Recipient
and select:
•
Touch to select from the Contacts List.
•
Touch to select from Favorites.
•
Touch to select from Recent Calls.
•
Touch to enter a new phone number.
•
Touch to select from the Groups List.
Tip:
As you enter the characters of a contact’s name, matching contacts
display. Touch the desired contact to add it to the field.
3. Touch ➔
Save As Draft
.
The message saves as a draft and does not send.
View and Edit Draft Messages
1. From a Home screen, touch
Messaging
➔ ➔
Draft
.
2. Touch the message you wish to view.
3. While viewing a message, touch the
Add Recipient
field to
add a recipient, or touch the text field to edit the text.
4. While viewing a message, touch for these options:
• Attach
: Attaches a Picture, Take Picture, Video, Record Video, Sound,
Record Sound, Namecard, or Calendar to the message.
•Preview
: Displays a preview of the message.
• Save as Draft
: Save a copy of the message in the Drafts folder.
• Add Subject
: Add a subject line to the message.
• Priority Level
: Choose High or Normal priority for sending.
• Callback #
: Attaches your Callback # to the message (if set to ON).
Quick Text
Use the Quick Text feature to insert any one of 19 pre-loaded
phrases into a message, or you can create your own Quick Text.
1. From a Home screen, touch
Messaging
➔
New
Message
.
2. Touch
Add Recipient
and select:
•
Touch to select from the Contacts List.
•
Touch to select from Favorites.
•
Touch to select from Recent Calls.
•
Touch to enter a new phone number.
•
Touch to select from the Groups List.
Tip:
As you enter the characters of a contact’s name, matching contacts
display. Touch the desired contact to add it to the field.
From ContactsFrom Contacts
From FavoritesFrom Favorites
From RecentFrom Recent
CallsCalls
Enter NumberEnter Number
GroupsGroups
More
More
More
From Contacts
From Contacts
From Favorites
From Favorites
From Recent
From Recent
Calls
Calls
Enter Number
Enter Number
Groups
Groups
Page 54
51
3.
Touch
Add text
➔ ➔
Insert Quick Text
.
– or –
Touch
Add text
➔ ➔
Insert Quick Text
➔
New
.
•
Compose the new Quick Text message, then touch .
4. Touch one of the pre-defined messages or the new Quick
Text, then touch .
5. Touch to send the Quick Text message.
Copy to Card
You can copy contact information to a VCard. For more
information, refer to “Copy To Card” on page 38.
Quick Reply
Use Quick Reply to send a simple text message when viewing
messages in landscape mode. Just begin entering characters,
and the text field will appear.
Voicemail
Note:
Standard Text Messaging charges do not apply when checking
voicemail.
1. From a Home screen, touch .
– or –
Touch
Keypad
. and touch .
For more information about setting up and checking Voicemail,
see “Voicemail” on page 10.
Message Folders
Messages are stored in the message folders, depending on your
selections for Inbox View in Message Settings.
Viewing Messages by Contact
When the Inbox View setting is set to Contact, all incoming and
sent messages are stored in the Messages folder, grouped by
contact (the sender/recipient of the message), to provide a
threaded view of the message exchange.
Note:
For more information about the Inbox View setting, see “Message
Settings” on page 53.
1. From a Home screen, touch
Messaging
.
2. The most recent message from each contact displays.
Touch a contact to view the message thread.
3. Tou ch
➔
Sort by
and select
Alphabetically
.
4. To mark messages for deletion, touch to erase the
selected message.
5. While viewing a thread, touch a message to view the
message detail.
More
More
Save
Done
Send
More
Erase
Page 55

Messaging 52
For more information about viewing Text Messages, and
available options, see “Viewing Text Messages” on
page 48.
For more information about viewing Picture, Video and
Sound Messages, and available options, see “Viewing
Multimedia Messages” on page 48.
Viewing Messages by Time
When the Inbox View setting is set to Time, incoming messages
are stored in the Inbox, and sent messages are stored in the Sent
folder, sorted by time.
Note:
For more information about the Inbox View setting, see “Message
Settings” on page 53.
Inbox
When the Inbox View setting is set to Time, incoming messages
are stored in the Inbox message folder by date and time.
1. From a Home screen, touch
Messaging
.
2. The most recent message from each contact displays.
Touch a contact to view the message thread.
3. Touc h
➔
Sort by
and select
Time
.
4. To mark messages for deletion, touch to erase the
selected message.
5. While viewing a thread, touch a message to view the
message detail.
For more information about viewing Text Messages, and
available options, see “Viewing Text Messages” on
page 48.
For more information about viewing Picture, Video and
Sound Messages, and available options, see “Viewing
Multimedia Messages” on page 48.
Email
Send, receive and view Email using Yahoo!®, Windows Live®
Hotmail®, Gmail, Verizon.net, and Microsoft® Exchange.
Important!:
If you have a data package priced $9.99 or higher, Mobile E-mail
subscription is included.
If you do not have a data package you can try Mobile E-mail for
10 uses (opening the application 10 times). After the trial period
you must subscribe to Mobile E-mail to use the application.
More
Erase
Page 56

53
Mobile Email
1. From a Home screen,
Email
.
2. Touch
Buy
if you have a data package or touch
Tr y
if you
are within the trial period.
3. Follow the onscreen prompts for subscribing to or trying
Mobile Email.
Note:
Subscription rates apply for Mobile Email.
4. Touch to an Email provider:
• Microsoft® Exchange
•Yahoo!®
• Windows Live® Hotmail®
•Gmail
• AOL Mail
• Verizon.net
•Other
5. Use the onscreen application specific functions and
options to use the Email applications.
Message Settings
Define settings for messages sent and received on your phone.
To access your message settings, use the following steps:
䊳
From a Home screen, touch From a Home screen, touch
Messaging
➔ ➔
Settings
. Configure these settings:
• Inbox View
: Set the default message view. Choose Time to display
messages by time of receipt, or Contact to display messages by
name or number (also known as threaded view).
• Language
: Set the current language to English or Español.
• Entry Mode: Set the default text entry mode when using the
touchscreen keypad. Choose from T9 Word, Abc, ABC or 123, or
T9 Palabra. Choose the default save mode for sent messages.
• Auto Save Sent: Choose On to save all sent messages,
Off
to
discard sent messages, or Prompt to have the phone prompt you
each time you send a message.
• Auto Erase Inbox: Choose On to automatically replace the oldest
message of the same type when the maximum number of received
messages of that type is exceeded. For example, when the Inbox
exceeds 100 text messages, the first message in the list is replaced
with the next incoming message.
•TXT Auto View: Choose On to automatically display text messages
when they arrive
.
• Group Messaging
: Set the default setting for messages to multiple
contacts. Select Group Conversation or Individual Messages.
More
Page 57

Messaging 54
• Multimedia Msg Auto Receive: Choose On to automatically
accept new multimedia messages. Choose Off to be prompted to
download new multimedia messages.
• Voicemail #
: Enter a new Voicemail dial sequence. The default
sequence is *86.
• Callback #: Select On to add a callback number to your
messages, and set the callback number. The default callback
number is your phone number.
• Signature: Choose On to add a signature to all messages, and
create a signature.
• Messaging Font Size
: Picture messages are replaced when the
phone’s memory is full. Set the default size for message text.
• Emergency Alerts
: Your phone supports CMAS (Commercial
Mobile Alert Service) emergency broadcast alerts, including
Extreme Threat to Life and Property, Severe Threat to Life and
Property, Amber Alerts, Alert Reminder, and Alert Vibrate. You may
choose whether to receive alerts, except Presidential Alerts which
cannot be disabled. All alerts are enabled by default. For more
information about Emergency Alerts, press Help, or see
“Emergency Alerts” on page 54.
• Delivery Receipt:
Choose On to request delivery confirmation for
messages.
Emergency Alerts
This device is designed to receive wireless emergency alerts
from the Commercial Mobile Alerting System ("CMAS"; which
may also be known as the Personal Localized Alerting Network
("PLAN")). If your wireless provider has chosen to participate in
CMAS/PLAN, alerts are available while in the provider's coverage
area. If you travel outside your provider's coverage area, wireless
emergency alerts may not be available.
For more information, please contact your wireless provider.
Emergency Alerts allows customers to receive geographically-
targeted messages. Alert messages are provided by the US
Department of Homeland Security and will alert customers of
imminent threats to their safety within their area. There is no
charge for receiving an Emergency Alert message.
There are three types of Emergency Alerts:
•
Alerts issued by the President
•
Alerts involving extreme or severe threats to safety of life and property
•
AMBER Alerts (missing child alert)
Customers may choose not to receive Imminent Threat and
AMBER Alerts. Alerts issued by the President can not be disabled.
To disable Imminent Threat Alerts (Extreme and Severe) and
AMBER Alerts, follow these instructions:
1. From a Home screen, touch
Messaging
.
2. Touch
➔ Settings ➔ Emergency Alerts
.
3. All alerts are enabled by default (set to
ON
). To disable
alerts, touch
OFF
.
More
Page 58

55
Section 8: Settings
This section explains Settings for customizing your phone to your
needs, and Tools for personal productivity.
Airplane Mode
When
Airplane Mode
is activated, all wireless functions of the
phone are disabled, and you cannot send or receive calls or
messages, but you can use the other
features of your phone.
1. From a Home screen, touch
Settings
➔
Airplane
Mode
.
2. Touch
ON
to activate Airplane Mode, or
OFF
to deactivate.
Bluetooth Menu
About Bluetooth
Bluetooth is a short-range wireless communications technology
for exchanging information over a distance of about 30 feet,
without requiring a physical connection.
You don't need to line up the devices to beam information with
Bluetooth. If the devices are in range, you can exchange
information between them, even if they are in different rooms.
Tip:
When using many Bluetooth headsets, you can press the multi-function
key on the headset to use the
Voice Commands
feature. Bluetooth
Profiles.
Bluetooth profiles are specifications for services supported by
individual devices. Profiles improve the ability of different devices
to work together.
Tip:
You can find a list of supported profiles on your phone. Touch
Settings ➔ Bluetooth Settings
➔ ➔ .
Your phone supports these Bluetooth profiles:
•
Headset
: HSP profile supports use of a compatible Bluetooth headset
for mono voice (see Note).
•
Handsfree
: HFP profile supports Bluetooth headsets, and may also
support other installed compatible Bluetooth devices with
speakerphone capabilities (see Note).
•
Dial Up Networking
: DUN profile allows the phone to be used as a
data modem with a compatible Bluetooth device, such as a laptop or
PDA.
•
Stereo
: A2DP, AVRCP, GAVDP, AVDTP and AVCTP profiles support
delivery of stereo audio to a compatible Bluetooth device.
Settings
Supported Proles
Page 59

Settings 56
•
Phonebook Access
: PBAP profile allows sharing of your name card
and phonebook entries with a compatible Bluetooth device.
•
Basic Printing
: BPP profile allows printing of JPEG files to a Bluetooth-
enabled printer.
•
Basic Imaging
: BIP profile allows sending of non-protected images for
storing and printing.
•
Object Push
: OPP profile allows sending and receiving of contact
name cards (vCard) and calendar events (vCalendar) between devices.
•
Serial Port
: SPP profile allows a remote Bluetooth device to act as a
virtual serial port.
Note:
This phone does not support all Bluetooth profiles. For vehicle/
accessory compatibility, contact Verizon Wireless.
Turning Bluetooth On or Off
When Bluetooth is turned on, you can use Bluetooth features.
When Bluetooth is turned off, you cannot send or receive.
To save battery life, or in situations where use of wireless devices
is prohibited, such as airline travel, you can turn off Bluetooth.
1. From a Home screen, touch
Settings
➔
Bluetooth.
2. Touch
ON
or
OFF
. When
Bluetooth is on, the Bluetooth
icon appears in the top line
of the display.
Bluetooth Settings
Bluetooth settings allow you to view
and change the phone’s name,
display supported profiles, and set
visibility and pairing.
1. From a Home screen, touch
Settings ➔ Bluetooth Settings
.
These settings display:
• Bluetooth Radio
: Enables you to pair with other Bluetooth
devices.
• Add New Device
: Allows you to add a new Bluetooth-enabled
device to the list. You can select a device from this list when you
want to connect to another device.
2. Tap and select one of the following:
•My Phone Name
: Displays the default name, and allows you to
enter a new name.
Settings
Page 60

57
• Discovery Mode
: Select On to allow other devices to detect your
phone, or
Off
for no visibility. After setting Discovery Mode to On,
your phone is visible for one minute, after which Discovery Mode
automatically turns
Off
.
• Auto Pairing
: Select On to allow your phone to pair with other
Bluetooth devices without entering a passkey, or
Off
(default) to
prevent automatic pairing.
•My Phone Info
: Displays information about the phone’s
Bluetooth connection.
•Search Setting
: Allows you to search all the current settings
including Headset, PC, Phone, and Printer.
Pairing a Bluetooth Device
1. From a Home screen, touch
Settings ➔ Bluetooth
Settings
.
2. Touch
ON
from the Bluetooth Radio field.
3. Touch
Add New Device
and place the device you are paring
with in discoverable mode and touch
Next
to search.
4. Touch
Search Again
if the list does not display the
discovered device.
5. Select the appropriate Bluetooth accessory from the list.
6. Enter your PIN number.
Once a Bluetooth accessory pairs with the device you can start
using Bluetooth to send or transfer information.
Tip:
Once paired you do not have to re-pair to use the device again.
Sounds Settings
Customize your phone’s sounds for incoming calls and
messages, alerts, and other phone features.
Master Volume
Set the level for all sounds made by your phone.
1. From a Home screen, touch
Settings ➔ Sounds
Settings
.
2. Touch the + or - sign until you achieve the desired volume
level. Available levels are:
•Off
: No sounds are played.
• Alarm Only
: Sounds are played for alarms, but not for ringtones or
other alerts.
• Vibrate Only
: No sounds are played, but the phone vibrates for
incoming calls and messages, alarms and other alerts.
•Low
: All sounds are played at low volume.
• Medium Low
: All sounds are played at medium low volume.
•Medium
: All sounds are played at medium volume.
Page 61

Settings 58
•Medium High:
All sounds are played at medium high volume.
•High:
All sounds are played at high volume.
Call Sounds
Set sounds for incoming calls.
1. From a Home screen, touch
Settings ➔ Sounds
Settings
.
2. From the
Call Sounds
field, touch
Ringtone
and select a
ringtone from the
Change to:
field.
3. Touch
ON or OFF
from the
Vibrate
field to activate or
deactivate vibration for incoming calls.
4. Touch the
Caller ID Readout
field to choose caller ID
notification on incoming calls. Choose from
Ring Only
,
Caller ID + Ring
, or
Name Repeat
.
5. Touch
Driving Mode
and select:
•Off
: Disable Driving Mode.
• Caller ID Only
: Reads Caller ID for incoming calls and messages.
• ID & Message
: Reads Caller ID and the message content for
incoming messages.
Alert Sounds
Choose sounds for incoming message alerts, emergency tone,
missed calls and device connection.
1. From a Home screen, touch
Settings ➔ Sounds
Settings
➔
Alert Sounds
.
• TXT Message
: Choose a Tone for incoming text messages.
• Multimedia Message
: Choose a Tone for incoming picture and
video messages.
• Voicemail
: Choose a Tone for new voicemail messages.
• Missed Call
: Set a notification for missed calls.
•Emergency Tone
: Set the alert for emergency dialing.
–
Off: Phone will not play the Emergency Tone or vibrate.
–
Alert
: Phone plays the Emergency Dialing tone except when the
Master Volume setting is Vibrate or All Sounds Off.
Note:
If Emergency Tone is set to
Alert
and Master Volume is set to
Vibrate
,
the handset will vibrate after emergency dialing.
If Emergency Tone is set to
Alert
and the Master Volume is set to
All
Sounds Off
, the handset will not sound after emergency dialing.
–
Vibrate
: Phone only vbrates.
Note:
If Emergency Tone is set to
Vibrate
and Master Volume is set to
All
Sounds Off
, the handset will not sound after emergency dialing.
Page 62

59
Alert Vibrate
• TXT Message
: Touch
ON/OFF
to activate/deactivate the alert when
a text message is received.SamSam
• Multimedia Message
: Touch
ON/OFF
to activate/deactivate the
alert when a text message is received.
•Voicemail
: Touch
ON/OFF
to activate/deactivate the alert when a
text message is received.
•Missed Call
: Touch
ON/OFF
to activate/deactivate the alert when a
text message is received.
• Device Connect
: Touch
ON/OFF
to activate/deactivate the alert
when a text message is received.
Alert Reminder
•TXT Message
: Alerts with vibration when a text message is
received. Selections are: Once, Every 2 Minutes, Every 15 Minutes,
or Off.
• Multimedia Message
: Alerts with vibration when a multimedia
message is received. Selections are: Once, Every 2 Minutes, Every
15 Minutes, or Off.
•Voicemail
: Alerts with vibration when a voicemail message is
received. Selections are: Once, Every 2 Minutes, Every 15 Minutes,
or Off.
• Missed Call
: Alerts with vibration when you missed a call.
Selections are: Once, Every 2 Minutes, Every 15 Minutes, or Off.
Keypad Volume
Set the volume for sounds played for keypad touches.
1. From a Home screen, touch
Settings ➔ Sounds
Settings
➔
Touch & Keypad Volume
.
2. Touch the keypad volume level for keypad touches, from
Off, Low, Medium Low, Medium, Medium High, or High
.
3. Touch
Set
to save your selection and return to the menu.
Digit Dial Readout
Enable or disable readout of numbers as you dial.
1. From a Home screen, touch
Settings ➔ Sounds
Settings
2. From the
Digit Dial Readout
field, touch ON so the phone
will read the numbers as you dial in the Keypad, or
OFF
to
cancel.
Page 63

Settings 60
Service Alerts
Enable or disable sounds to alert you to system or service status.
1. From a Home screen, touch
Settings ➔ Sounds
Settings
➔
Service Alerts
.
2. Choose
ON
or
OFF
for these Service Alerts:
•ERI
: Sounds an alert when you enter and exit your coverage areas.
• Minute Beep
: While on a call, beeps after every minute of usage.
• Call Connect
: An alert sounds when a call connects and ends.
• Software Update
: An alert sounds when update is complete.
Power On/Off
Enable or disable the playing of sounds when you power the
phone on and off.
1. From a Home screen, touch
Settings ➔ Sounds
Settings
➔
Power On/Off
.
2. Set to
Power On
or
Power Off
to control the sounds played
at Power On and Power Off.
Display Settings
Customize the phone’s display screens.
Wallpaper
Select a background image for the Lock Screen and Home
screens.
1. From a Home screen, touch
Settings ➔ Display
Settings
➔
Wallpaper
.
2. Touch one of the available wallpapers.
•
A lock icon represents wallpapers that are locked.
•
A memory card icon represents wallpapers that reside on the
memory card.
•
A film strip icon represents a video.
3. Touch an image to select it, then touch
Set
to set it as a
wallpaper.
4. Touch
Tak e Pi ctur e
to take a picture for a custom wallpaper
then touch
Set
to set the image as wallpaper, or touch
Back
to return to the previous screen.
For more information, see “Using the Camera” on page 81.
Page 64

61
Banner
Create a personal greeting to appear on the Home screen, or
display network status.
Personal Banner
1. From a Home screen, touch
Settings ➔ Display
Settings
➔
Personal Banner
.
2. Enter up to 18 characters, then touch to save
changes and return to the menu.
Note:
When you create a Personal Banner, it automatically appears on the
Home screen.
ERI Banner
Enable or disable and customize, a banner to show network
status.
1. From a Home screen, touch
Settings ➔ Display
Setting
s.
2. From the ERI field, touch
On
or
Off
to control display of an
ERI banner containing network information on the Home
screen.
3. Touch
Banner Color
to select a font color for the ERI banner.
Main Menu Settings
Customize the features and applications available on the Main
Menu. For more information about customizing the Menu, see
“Customizing the Main Menu” on page 18.
䊳
From a Home screen, touch
Settings ➔ Display Settings
➔
Main Menu Settings
.
Backlight
Set the backlight for the display or touch keypad to remain on for
a specified period of time.
Note:
Prolonged backlight use drains the battery. The backlight setting also
determines how long the screen is illuminated before locking.
1. From a Home screen, touch
Settings ➔ Display
Settings
.
2. Touch the field to change the following settings:
• Backlight Timer
:
30 seconds, 45 seconds, 1 Minute, 1 1/2 Minute,
or
2 Minutes
.
• Backlight Brightness: Auto Brightness
(predefined setting/ON) or
Manual (customized setting/OFF). For
Manual
, touch and drag the
Level slider to choose a brightness level from
1-5
.
• Display Themes
: View the current theme or change the theme to
Orange
or
Green
, then touch
Set as Display Theme
to change it.
Save
Page 65

Settings 62
Fonts
Set the size of fonts in the Keypad, and the font style for menus.
1. From a Home screen, touch
Settings ➔ Display
Settings
.
2. Touch the
Style
field and select a font type as the
Dial Font
or
Menu Font
.
3. Touch
Size
field and select the
Dial Font
and
Messaging
Font
size.
Clock Format
Set the format for the Clock widget.
1. From a Home screen, touch
Settings ➔ Display
Settings
➔
Clock Format
.
2. Touch the desired Clock Format (
Analog, Large Analog
,
Digital 12, Digital 24, Dual Clock, Off
).
3. Touch
Off
if you do not want the clock to display.
Transition Effect
Activate or deactivate the default animation effect during
transitions between menu/options pages.
1. From a Home screen, touch
Settings ➔ Display
Settings
➔
Transition Effect
.
2. Touch
ON
(activate) or
OFF
(deactivate).
Touch Settings
Touch Settings let you set options for: Auto Lock, and Unlock
Screen.
1. From a Home screen, touch
Settings ➔ Touch
Settings
.
2. Make selections for these settings:
•Auto Lock
: Control whether the display automatically locks when
the backlight turns off.
• Unlock Screen
: Change the method that unlocks the screen.
Selections are:
Lock Key Only, Lock Key and End Key
, or
Any Key
.
Page 66

63
Phone Settings
Voice Commands
Choose settings for the Voice Commands feature of your phone.
1. From a Home screen, touch
Settings ➔ Phone
Settings ➔Voice Command
.
2. Make these selections:
• Confirm Choices
: Control when the system asks you to confirm a
name or number, from
Automatic, Always Confirm
, or
Never
Confirm
.
• Sensitivity
: Choose the sensitivity of the speech recognition.
Choose from
More Sensitive, Automatic
, or
Less Sensitive
.
• Adapt Voice
: Optimize speech recognition to your voice to improve
results. Touch
Adapt Voice
, then follow the prompts.
•Prompts
: Choose the type of prompts Voice Commands gives you.
–
Mode
: Choose the type of prompts, from
Prompts
(voice prompts), or
Ton es On ly
(plays back only tones).
–
Audio Playback
: Set playback location, Speakerphone or Earpiece.
–
Timeout
: Choose how long the system listens for a command before
timing out Choose 5 seconds or 10 seconds.
•TXT Msg Readout
: When enabled, the phone reads text messages
as playback.
• Key Setting
: Choose how to launch Voice Commands,
Voice Key
Only
(press the Voice Commands key on side of phone), or
Voice
Key/Headset
(Press the Voice commands key, or insert a headset.)
• About
: View information about Voice Commands.
Language
Choose the language for the phone’s operation and displays.
1. From a Home screen, touch
Settings ➔ Phone
Settings ➔ Language
.
2. Touch
English
or
Español
.
Location
Note:
Location service is only available on the Verizon Wireless network. It is
not available when roaming.
The Location setting determines whether your phone’s GPS
(Global Positioning System) location is available to the network at
all times, or only when you’ve dialed 911.
1. From a Home screen, touch
Settings ➔ Phone
Settings ➔ Location
.
2. Select a setting:
• E911 Only
: GPS location available only when you dial 911.
•Location On
: GPS location is available to the network.
Page 67

Settings 64
Current Country
Select your current location.
1. From a Home screen, touch
Settings ➔ Phone
Settings
➔
Current Country
.
2. Touch the country name. If your current location is not
highlighted, touch the first letter of the country’s name.
Scroll to locate your country, then touch the country’s
name to automatically enter it into the Current Country
field.
3. Touch if you cannot locate your country.
Security
Lock your phone, set restrictions, and other security options.
Note:
Access to all Security settings requires the lock lode. By default, the
Lock Code is the last four digits of your phone number.
Important!:
For security reasons, your phone does not display the lock code.
If you change the lock code, be sure to record the new code for
future reference.
䊳
From a Home screen, touch
Settings ➔ Phone Settings
➔
Security
.
Edit Codes
Set a new lock code of your preference.
1. From a Home screen, touch
Settings ➔ Phone
Settings
➔
Security
.
Enter the lock code when prompted.
Tip:
The default lock code is the last four digits of your telephone number.
2. Touch
Edit Codes
to select a lock code:
• Phone Only
: For unlocking the handset only.
• Calls & Services
: For access to Calls & Services.
3. Enter the new lock code at the “
Enter New Code
” prompt.
4. Enter the new lock code again at the “
Re-Enter New Code
”
prompt.
Restrictions
You can set restrictions for receiving calls, messages and the use
of your phone as a modem.
1. From a Home screen, touch
Settings ➔ Phone
Settings ➔ Security
.
Enter the lock code when prompted.
Help
Page 68

65
Tip:
The default lock code is the last four digits of your telephone number.
2. Touch
Restrictions
.
Enter the Calls and Services Code when prompted.
Tip:
The Calls and Services Code is the last four digits of your telephone
number.
3. Make the following selections:
•Location
: Options are Lock Setting and Unlock Setting.
•Calls
: Choose whether to restrict Incoming Calls and Outgoing
Calls. Choose to
Allow All
, accept or dial calls from
Contacts Only
,
or
Block All
.
•Messages
: choose whether to restrict Incoming Messages and
Outgoing Messages. Choose to
Allow All
, or
Block All
.
• Dial-Up Modem: Allow
or
Block
use of the phone as a dial-up
modem.
Phone Lock Setting
Set the default locking behavior of your phone.
1. From a Home screen, touch
Settings ➔ Phone
Settings ➔ Security
.
Enter the lock code when prompted.
Tip:
The default lock code is the last four digits of your telephone number.
2. Touch
Phone Lock Setting
to select:
•Unlocked
: The phone is unlocked by default.
•On Power Up
: The phone is automatically locked when you turn it
on. You can make phone calls, but the lock code is required to
access other features.
Lock Phone Now
Manually lock your phone.
1. From a Home screen, touch
Settings ➔ Phone
Settings ➔ Security
.
Enter the lock code when prompted.
Tip:
The default lock code is the last four digits of your telephone number.
2. Touch
Lock Phone Now
.
The Home screen displays.
3. Enter the lock code at the prompt to unlock the phone.
Page 69

Settings 66
Restore Phone
Return all settings to factory defaults and erase all user data.
Warning!:
Choosing
Restore Phone
will return your phone to the default
settings and permanently erase all user data, including pictures,
videos, music, messages, contacts and downloaded applications
stored on the phone.
Note:
After your phone powers back on, you must enter *228 and press
to re-program your phone.
1. From a Home screen, touch
Settings ➔ Phone
Settings ➔ Security
.
Enter the lock code when prompted.
Tip:
The default lock code is the last four digits of your telephone number.
2. Touch
Restore Phone
.
3. At the prompt, touch
Ye s
to erase all user data and reset
settings to the factory default settings. Or touch No to
return to the Security menu.
Reset Settings
Return all settings to factory defaults. This setting does not erase
user data such as pictures, videos, music, messages, contacts or
downloaded applications stored on the phone.
1. From a Home screen, touch
Settings ➔ Phone
Settings ➔ Security
.
Enter the lock code when prompted.
Tip:
The default lock code is the last four digits of your telephone number.
2. Touch
Reset Settings
.
3. At the prompt, touch
Ye s
to reset settings and keep the
user data, or touch
No
to return to the Security menu.
Global Data Roaming
Set the system for data roaming access. For more information
about roaming, see “Roaming” on page 32.
1. From a Home screen, touch
Settings ➔ Phone
Settings ➔ Global Data Roaming
.
2. Choose the type of data roaming access:
• Deny Access
: Does not allow data roaming when outside the
coverage area.
Page 70

67
• Allow for All Trips
: Sets the phone to always allow data roaming on
all trips outside the coverage area.
• Allow Only for This Trip
: Allows data roaming outside the coverage
area for only this trip and then the setting terminates.
3. Touch for more information about this feature.
System Select
Set system selections for roaming. For more information about
roaming, see “Roaming” on page 32.
Note:
Contact Verizon Wireless for more information about your coverage
area and service plan.
1. From a Home screen, touch
Settings ➔ Phone
Settings ➔ System Select
.
2. Choose a system selection setting:
•Automatic
: Your phone automatically acquires service wherever
available, using on Verizon Wireless’ network and roaming
partners.
•Home Only
: Your phone is only active in your home network’s
coverage area. When outside the coverage area, your phone will
not roam, and call functions and other features will not be available.
NAM Select
Select the primary NAM (Number Assignment Module).
1. From a Home screen, touch
Settings ➔ Phone
Settings
➔
NAM Select
.
2. Touch
NAM1
or
NAM2
.
QWERTY Action
QWERTY Action
allows you to choose how the phone will react
when you begin entering characters at the landscape Home
screen.
1. From a Home screen, touch
Settings ➔ Phone
Settings ➔ QWERTY Action
.
2. Choose the launch action:
•Off
: No action is taken.
• New Message
: Create a new message.
•Notepad
: Launch Notepad to create a new note.
• Phone Search
: Launch the Phone Search feature.
•Contacts
: Open Contacts to find a contact.
Call Settings
Select options related to call functions.
Help
Page 71

Settings 68
Answer Options
Select methods for answering incoming calls.
1. From a Home screen, touch
Settings ➔ Call Settings
.
2. Choose a setting:
• Slide Open to Answer
: Answer calls by opening the slide.
• Any Key to Answer
: When slide is open, answer calls by pressing
any key on the QWERTY keyboard.
• Auto Answer with Handsfree
: When using a handsfree device,
answer calls automatically after a 5 second delay.
•Auto Retry
: Selects automatic retry settings for calls. See “Auto
Retry” on page 68.
• TTY Mode
: Enables or disables the TTY (teletypewriter) function.
See “TTY Mode” on page 68.
• Voice Privacy
: Encrypts your voice signal in order to maintain voice
privacy. See “Voice Privacy” on page 68.
Auto Retry
Select automatic retry settings for calls.
1. From a Home screen, touch
Settings
➔
Call Settings ➔ Auto Retry
.
2. Choose a retry setting:
• 10 Seconds
• 30 Seconds
• 60 Seconds
•Off
TTY Mode
Before using your phone with a TTY device, you’ll need to enable
the TTY functions.
1. From a Home screen, touch
Settings
➔
Call Settings
➔
TTY Mode
.
2. At the prompt “
Enabling TTY will disable headset audio.
Continue?
”, touch
Yes
to proceed to
TTY Mode
.
3. Touch a TTY mode:
•TTY Full
• TTY + Talk (VCO)
•TTY + Hear (HCO)
•TTY Off
Voice Privacy
Note:
This feature is only available on the Verizon Wireless network.
Enable or disable advanced voice encryption.
1. From a Home screen, touch
Settings ➔ Call Settings
➔
Voice Privacy
.
Page 72

69
2.
Touch On to enable voice privacy, or
Off
to disable voice
privacy.
Data Settings
Use these settings to select a port for connections to the phone,
port speed, and whether or not you want DTMF (Dual-Tone MultiFrequency) tones to sound when you dial.
1. From a Home screen, touch
Settings ➔ Call Settings
and scroll to the
Data Settings
field.
2. Select one of the following data settings:
•Select Port
: Choose
NULL
to allow no connections,
USB
to allow
connections to the USB port, or
BLUETOOTH
to allow connections
via Bluetooth.
• Port Speed
: Determines the data port speed. Options are:
115200
,
19200, 57600, 230400
, or
460800
.
•DTMF Tones
: Select a
Normal
(transmits all tones the same
amount of time) or
Long
(transmits a beep as long as you press the
button) DTMF tone.
Assisted Dialing
Activating the phone for this feature ensures that the phone will
insert the proper country code as a prefix for international dialing.
1. From a Home screen, touch
Settings ➔ Call Settings
and scroll to the
Assisted Dialing
field.
2. Touch
ON
to enable the Assisted Dialing feature, or touch
OFF
to disable the feature.
When you activate Assisted Dialing the Reference Country
field displays.
3. Touch the
Reference Country
field and enter a country if the
desired country is not listed in the
Current Reference
Country:
field.
Memory
Manage memory settings for saving pictures, videos, music,
sounds, and ringtones to your phone’s memory and optional
microSD™ memory card.
Note:
Your phone does not include a microSD™ memory card. You can
purchase a microSD card as an accessory. Consult your service
provider for more information.
䊳
From a Home screen, touch
Settings
➔
Memory
.
Page 73

Settings 70
Save Options
Choose the default location for pictures, videos and sounds.
1. From a Home screen, touch
Settings ➔ Memory
.
2. Select a save location for
Pictures: Phone Memory
or
optional
Card Memory
.
3. Select a save location for
Videos: Phone Memory
or optional
Card Memory
.
4. Select a save location for
Sounds: Phone Memory
or
optional
Card Memory
.
Phone Memory
View memory usage on the phone’s memory.
1. From a Home screen, touch
Settings ➔ Memory
➔
Phone Memory
.
2. Touch a setting:
• Phone Memory Usage
: View Available, Used and Total memory,
and current memory usage for My Pictures, My Videos, My
Ringtones, My Music, My Sounds and My Contacts.
•My Pictures
: Pictures saved from a Picture message, downloaded
via “Media Center”, or taken using Camera.
•My Videos
: Video Clips saved from a Video message, downloaded
via “Media Center”, or taken using your phone.
• My Ringtones
: Ringtones you have downloaded via “Media
Center”.
•My Music
: Music downloaded or transferred from your PC using
Sync Music.
• My Sounds
: Sounds you have downloaded, recorded using your
phone, or saved from a Picture message with Sound attached.
•My Contacts
: Contacts saved on your phone.
• Move All to Card
: Move all movable files to an optional card. The card
must be inserted for this option to appear.
Card Memor y
View the memory usage on the optional microSD™ memory
card. This menu will only appear if a card is inserted.
1. From a Home screen, touch
Settings ➔ Memory
➔
Card Memory
.
2. Touch a setting:
•Card Memory Usage
: View Available, Used and Total memory, and
current memory usage for My Pictures, My Videos, My Ringtones,
My Music, My Sounds and My Contacts.
• My Pictures
: Pictures saved from a Picture message, downloaded
via “Media Center”, or taken using Camera.
•My Videos
: Video Clips saved from a Video message, downloaded
via “Media Center”, or taken using Camcorder.
• My Ringtones
: Ringtones downloaded via “Media Center”.
Page 74

71
• My Music
: Music downloaded or transferred from your PC using
Sync Music.
• My Sounds
: Sounds downloaded, recorded using your phone, or
saved from a Picture message with Sound attached.
•My Contacts
: Contacts saved on your phone.
•My Documents
: Displays a list of documents saved to the phone
memory.
• Move All To Phone
: Move all movable files to phone memory.
•Format Card
: Erase all files from the memory card.
Warning!:
Repeated formatting will shorten the life of the card.
USB Mode
Your phone will automatically detect connection of a Samsung
USB data cable from your computer to the phone. USB Mode
settings allow you to set the default behavior when a USB data
cable is connected.
1. From a Home screen, touch
Settings ➔ USB Mode
.
2. Touch a setting to activate it:
•Ask On Plug
: You will be asked to select the USB mode each time
the USB data cable is connected from your phone to the USB port of
your computer.
• USB Mass Storage
: When a USB data cable is connected, your
device is ready to sync media like music, pictures, and videos from
your PC to the microSD memory card inserted in your phone.
Note:
USB Mass Storage will not appear as an option if you do not have a
memory card inserted in your phone's microSD card slot.
•Modem Mode
: Allows the use of the Verizon Wireless Mobile Office
kit to utilize your handset as a modem for your computer. This may
require additional service activation available through Verizon
Wireless.
Phone Info
View software and hardware information, your assigned
telephone number, an icon glossary, and manage software
updates.
1. From a Home screen, touch
Settings ➔ Phone Info
.
2. Touch
My Number
to display the Mobile Device and the
Mobile Identification (your telephone number) numbers.
3. Touch
SW/HW Version
to view the Software Version, PRL
Version, ERI Version, Browser Version, OTADM Version,
Touch UI Version, Hardware Version, ESN, MEID, WDC, or
Brew Mobile Platform.
4. Touch
Icon Glossary
to view Annunciator line icons and
descriptions.
Page 75

Settings 72
5.
Touch
Software Update
to check the status of your phone’s
software and to check for new software updates for
download to your phone.
Easy Set-Up
View your phone number, software and hardware information,
view a glossary of icons used on the phone, or perform a
software update all from one, easy-to-use menu.
䊳
From a Home screen, touch
Settings ➔ Easy Set-Up
.
Set-Up Wizard
Set nine basic parameters, to start using your phone quickly.
1. From a Home screen, touch
Settings ➔ Easy Set-Up
➔
Set-Up Wizard
.
2. Follow instructions on the screen to set preferences:
• Tone Level
: Touch the plus sign to increase the tone volume, or
press the minus sign to decrease the tone volume.
• Call Sounds
: Choose how incoming calls are announced.
• Wallpaper
: Choose an image for the home screen.
•Display Theme
: Select either the
Orange
or the
Green
background
theme.
• Menu Layout
: Choose how the Menu displays, either as a Grid
Menu or a
Shortcut Menu
.
• Menu Font
: Set the size of menu displays.
•Clock Format
: Choose a style for the main clock. Options:
Digital
12, Analog, Large Analog, Digital 24, Dual Clock
, or
OFF
.
3. Touch
Skip
to skip to the next setting then touch
Done
.
Page 76

73
Section 9: Media Center
Media Center includes applications for creating, viewing and
managing multimedia content, right on your phone.
You can also view memory info to see how much space you’ve
used (and have left) for stored media.
䊳
From a Home screen, touch
Media Center
.
Note:
Before downloading any music, tones, pictures, videos, games, etc.,
check the available memory. For more information, see “Memory” on
page 69.
Apps
The Apps menu allows you to download and display purchased
and preloaded applications.
1. From a Home screen, touch
Media Center ➔ Apps
.
2. Touch a category or application and follow the prompts to
download or use an application.
Mobile Web
The Mobile Web application launches the Browser. For more
information, see “Mobile Web” on page 96.
Music & Tones
Music & Tones
offers features and applications for managing
songs, tones and sounds.
My Ringtones
1. From a Home screen, touch
Media Center
➔ Music &
Ton es ➔ My Ringtones.
2. Touch a ringtone for these options:
• Set as Ringtone
: Set the tone as a
Ringtone.
• Set as Contact ID
: Set the tone as a
Contact ID
.
• Set as Alert Sound
: Set the tone as an
Alert Tone
.
•File Info
: View
information about the tone.
Use the onscreen buttons to preview tones:
–
Touch to play the tone.
–
To stop playback, touch .
My Music
Use
My Music
to launch Music Player to play music files. For
more information, see “Music Player” on page 76.
䊳
From a Home screen, touch
Media Center ➔ My Music
.
Page 77
Media Center 74
My Sounds
Use
My Sounds
to record and manage sounds on your phone.
1. From a Home screen, touch
Media Center
➔ Music &
Ton es ➔ My Sounds.
2. Touch a sound for these options:
•Send: Send the sound in a message.
• Set as Ringtone
: Set the sound as a
Ringtone
.
• Set as Contact ID
: Set the sound as a Contact ID.
• Set as Alert Sound
: Set the sound as an alert.
• File Info
: Displays information about the selected sound.
Use the onscreen buttons to preview sounds:
–
Touch to play the sound.
–
To stop playback, touch .
Recording a Sound
1. From a Home screen, touch
Media Center
➔ Music &
Ton es ➔ My Sounds.
2. Touch Record New, then touch .
3. Record a sound then press when finished.
4. Use the onscreen buttons to control recording:
–
Touch to start recording.
–
Touch to pause during recording.
5. Touch to play the recording before saving.
6. Press to record another sound.
7. Press to attaching this recording to a multimedia
message. For more information, refer to “Creating and
Sending Multimedia Messages” on page 46.
8. Press to set the current recording time limit.
Picture & Video
VCAST Video
VCAST Video
provides access to vibrant, full-color video-on-
demand from some of the biggest names in entertainment.
Note:
This application is added to the Home screen by replacing a current
application. For more information, refer to “Customizing the Lock and
Home Screen” on page 18.
Sign up for VCAST Video
1. From a Home screen, touch
VCAST Video
.
2. Read the subscription terms, then touch the desired
subscription fee and touch OK.
3. Touch
Accept
to accept the Terms and Conditions then
touch OK.
Record
Pause
Play
Record Again
Add to Message
Record ng T me
Page 78
75
4.
Touch OK to acknowledge that you are signed up for
VCAST.
Download Videos
1. From a Home screen, touch
VCAST Video
.
2. Touch a category and get started downloading and
enjoying videos.
My Pictures
Use
My Pictures
to view, edit and manage images stored on your
phone. For more information, see “My Pictures” on page 84.
䊳
From a Home screen, touch
Media Center ➔ Picture &
Video ➔ My Pictures
.
My Videos
Use
My Videos
to view and manage videos stored on your phone.
For more information, see “My Videos” on page 88.
䊳
From a Home screen, touch
Media Center ➔ Picture &
Video
➔
My Videos
.
Take P i c ture
Take pictures with your phone’s built-in 3.2 mega pixel camera.
For more information, see “Using the Camera” on page 81.
䊳
From a Home screen, touch
Media Center ➔ Picture &
Video
➔
Take Picture
.
Record Video
Use the built-in Camcorder to record videos. For more
information, see “Using the Camcorder” on page 85.
䊳
From a Home screen, touch
Media Center ➔ Picture &
Video
➔
Record Video
.
Online Album
Store pictures and videos to your Verizon Wireless Online Album.
Note:
Before using Online Album, set up your account by visiting the Verizon
Wireless website at www.verizonwireless.com.
1. From a Home screen, touch
Media Center ➔ Picture &
Video ➔ Online Album
.
The Browser launches, displaying the Online Album login
screen.
2. Enter your login credentials and touch
Sign In
.
Page 79

Music & Tones 76
Section 10: Music & Tones
This section describes how to use the music features of your
phone to play, download, and manage your music files.
Music & Tones
Music & Tones allows you to store and view personalized
ringtones, music, and sounds.
You can copy music files from your personal computer and store
them on your optional memory card.
Copy music from your PC
You can transfer music from your phone to your PC or from the
PC to the phone.
1. Set your USB Mode to
USB Mass Storage
.
2. Plug the Samsung USB cable into your phone and connect
it to a USB port on your PC.
Calls are disabled while your device is plugged into the PC.
Tip:
You can set a default USB Mode in Settings. For more information, see
“USB Mode” on page 71.
3. At the prompt on the PC, select
Open folder to view files
.
4. Drag and drop files from the PC to your phone or vice
versa.
Music Player
Use
Music Player
to play music files that you have transferred
from your PC. You can play music with the slide open or closed.
䊳
From a Home screen, touch
Media Center ➔ Music &
Tone s ➔ My Music
.
Playing Music
1. From a Home screen, touch
Media Center ➔ Music &
Tone s ➔ My Music
. Each time you open Music Player, it
checks your phone memory, and optional memory card, if
installed, for music files to update your music library.
2. Touch
All Songs, Playlists, Artists, Genres
, or
Albums
, then
select a song from one of those categories.
3. Touch
Play All Songs
, or touch
next to the individual
song to play.
Page 80
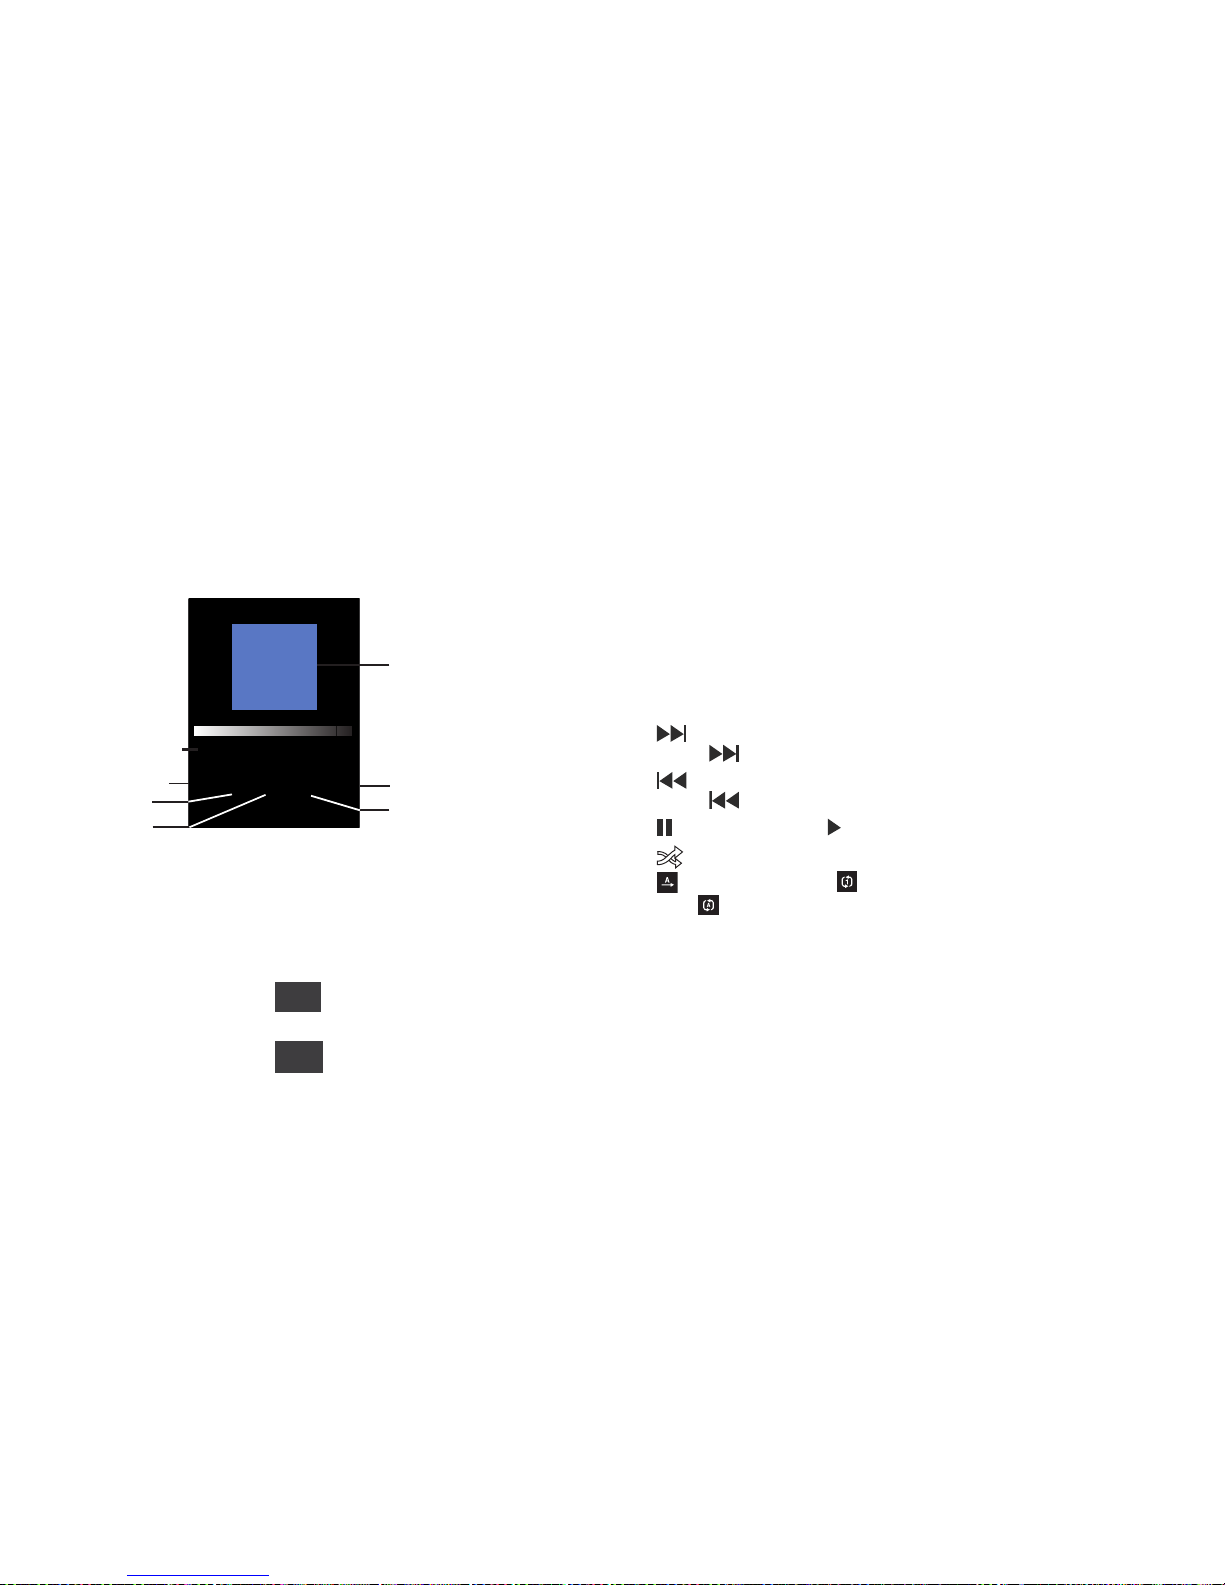
77
4.
During playback, use the sound and playlist controls:
•Advance
: Touch to touch to play a song or slide to advance the
song.
• Shuffle
: Touch to play songs in random order.
• Repeat
: Touch to repeat all songs, or to repeat the current song.
5. During playback, touch to access playlists. For
more information, see “Playlists” on page 78.
6. During playback, touch
for these options:
• Sound Effect
: Choose a sound effect preset for music playback.
Select from: Normal, Auto, Pop, Rock, Jazz, Dance, Classic, Live,
Custom, Wide, Concert Hall, Music Clarity, Bass Enhancement,
Externalization, or 5.1 Channel (surround sound).
•Skin
: Choose a style for the Music Player interface, from Simple,
Album Artwork, Visualizer or Lyrics.
• Song Info
: Display information about the current music file.
•Memory Info
: View statistics for the phone’s memory and the
optional installed memory card.
7. Use these buttons to control playback:
•
Touch to advance to the next song in the playlist.
Touch and hold to scan forward through the current song.
•
Touch to skip to the previous song in the playlist.
Touch and hold to scan backward through the current song.
•
Touch to pause playback. Touch to resume playback.
•
Touch to shuffle the songs.
•
Touch to play all the songs once, to repeat the
current song, to repeat all songs.
Shue
Repeat
Now Playing
Back
Advance
Play
Forward
Symphony No. 1 (Milton)
Symphony No. 1 (M lton)
Add
To Playlist
More
Page 81

Music & Tones 78
My Music
My Music provides access to all the songs stored on your phone,
and on an optional installed memory card.
1. From a Home screen, touch
Media Center ➔ Music &
Ton es ➔ My Music
.
2. Touch a category from the
displayed list:
• All Songs
• Playlists
•Artists
•Genres
•Albums
• Manage My Music
• Music Only Mode
Playlists
Accessing playlists
䊳
From a Home screen, touch
Media Center ➔ Music &
Tone s ➔ My Music ➔ Playlists
.
Creating a playlist
From My Music:
1. From a Home screen, touch
Media Center ➔ Music &
Tone s ➔ My Music ➔ Playlists
.
2. Touch , then enter a name for the playlist and touch
Next
.
3. Touch to add all songs to the playlist, or touch the
checkbox next to each song to include.
4. Touch to save the playlist.
Add Songs to a Playlist
1. From a Home screen, touch
Media Center ➔ Music &
Tone s ➔ My Music ➔ All Songs
.
2. Touch a music file (not the arrow to the right of the file),
then touch
Add to Playlist
.
3. Touch a Playlist name.
The song is added to the selected playlist.
New
Mark All
Done
Page 82

79
Add Songs to a Playlist During Playback
1. From a Home screen, touch
Media Center ➔ Music &
Ton es ➔ My Music
.
2. Touch
All Songs
then touch
next a song to play.
3. During playback, touch and touch the playlist in
which to add the song.
Deleting a playlist
Note:
This operation erases the playlist only. It does not erase the songs in
the playlist.
1. From a Home screen, touch
Media Center ➔ Music &
Ton es ➔ My Music ➔ Playlists
.
2. Touch , then touch the playlist to delete.
3. Touch .
4. At the
ERASE PLAYLIST(S)?
prompt, touch
Yes
to continue,
or No to cancel.
Song Information
Quickly view all the related information to a selected song such
as the title, artist, album, genre, year the song was created, and
more.
1. From a Home screen, touch
Media Center ➔ Music &
Ton es ➔ My Music ➔ All Songs
.
2. Touch a music file (not the arrow to the right of the file),
then touch
Song Info
.
All the related song information displays onscreen.
Manage My Music
You can move music files from My Music to your memory card, or
erase songs in order to free memory.
Move Music to the Memory Card
1. From a Home screen, touch
Media Center ➔ Music &
Ton es ➔ My Music
.
2. Touch
Manage My Music ➔ Move to Card
.
3. Touch to move all music to the card, or touch the
checkbox next to each music file to move, then touch
.
Add
To Playlist
Erase
Done
Mark All
Done
Page 83

Music & Tones 80
Move Music to the Phone Memory
1. From a Home screen, touch
Media Center ➔ Music &
Ton es ➔ My Music
.
2. Touch
Manage My Music ➔ Move to Phone
.
3. Touch to move all music to the card, or touch the
checkbox next to each music file to move, then touch
.
Erase Songs
1. From a Home screen, touch
Media Center ➔ Music &
Ton es ➔ My Music
.
2. Touch
Erase Songs
, then touch the checkbox next to each
song to erase.
3. Touch .
Music Only Mode
When using Music Only Mode your phone acts as a music player
and disables all wireless communications.
1. From a Home screen, touch
Media Center ➔ Music &
Tone s ➔ My Music
.
2. Touch
ON
from the Music Only Mode field.
3. At the
‘DISABLE ALL WIRELESS COMMUNICATIONS?’
prompt,
touch
Ye s
to enable, or No to cancel.
Mark All
Done
Done
Page 84
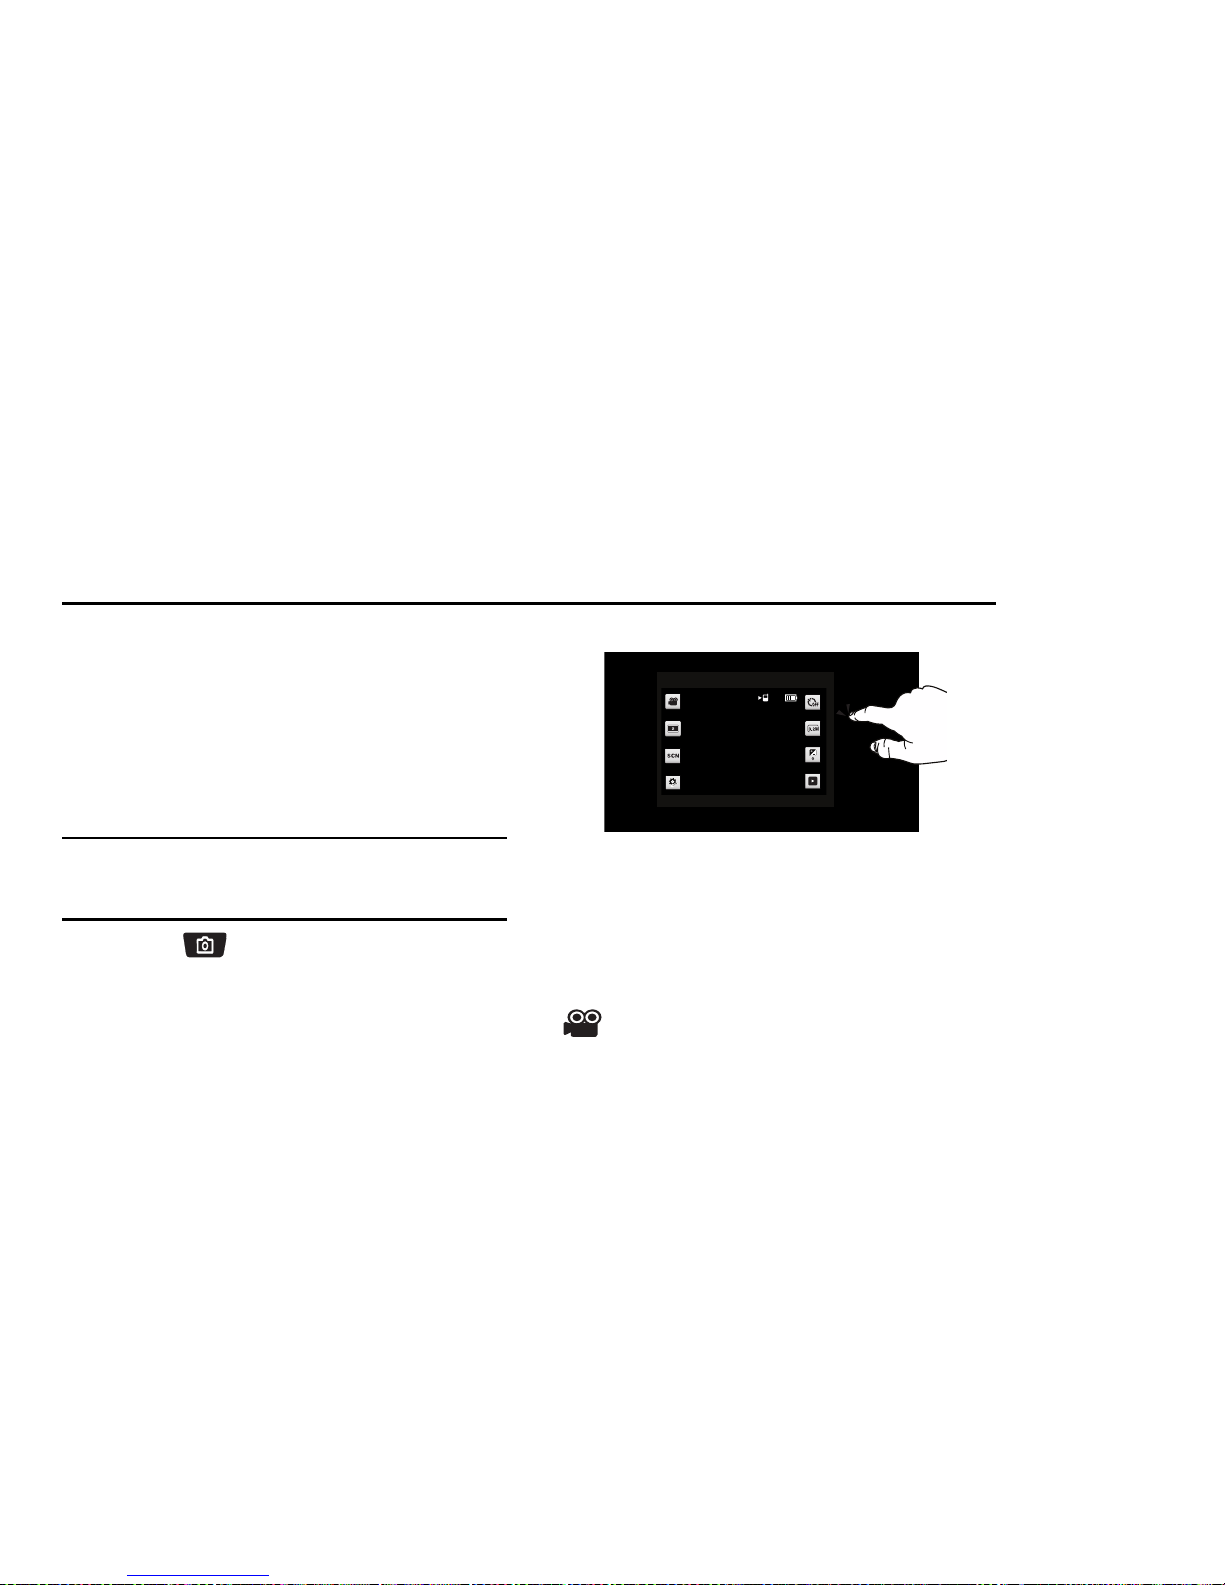
81
Section 11: Pictures and Video
This section describes how to use the picture and video features
of your phone to create, download and manage your image and
video files.
Using the Camera
Taking pictures with your phone’s built-in 3.2 megapixel camera
is as simple as choosing a subject, pointing the camera, and
pressing the camera key. The camera produces photos in JPEG
format.
Important!:
Do not take photos of people without their permission.
Do not take photos in places where cameras are not allowed.
Do not take photos in places where you may interfere with
another person’s privacy.
1. Press the
Camera/Camcorder
key. The camera is
always opened in landscape mode, with Camera Options
displayed.
2. Set Camera options, or tap the screen to hide Options. For
more information about Camera Options, see “Camera
Options” on page 81.
3. Using the display screen as a viewfinder, compose your
picture by aiming the lens at the subject.
4. Press the
Camera/Camcorder
key to take the picture.
Camera Options
Use Camera Options to customize your photos. Camera options
appear on screen when you launch the Camera, or can be
displayed at any time by touching the screen.
Mode
: Switch to camcorder mode.
Page 85

Pictures and Video 82
Shooting mode
: Set the shooting mode. Options are:
•
Single
: Take a single photo.
•
Continuous
: Take 3, 5, or 8 continuous photos.
•
Panorama
: Take multiple photos to combine into one
photo.
•
Mosaic
: Choose one of 18 templates to combine 18
photos into a mosaic.
•
Frame
: Choose one of 18 custom frame borders for
your image.
Scene Mode
: Select a camera setting for image capture
under different lighting environments.
Selections are:
Normal
(default),
Landscape, Sports, Party
,
Beach, Sunset, Dawn, Fall, Night, Backlight, Fire
, and
Candle
.
Settings
➔
Camera
•
Autoshot
: Takes the photo, after an initial press of the
Camera key.
•
Quality
: Set image quality.
•
Effects
: Choose an effect to add to the photo.
•
White Balance
: Choose a setting for light source.
•
ISO
: Choose a shutter speed.
•
Metering
: Set how the camera finds the light source.
•
Contrast
: Set the contrast for the photo.
•
Saturation
: Set the saturation for the photo.
•
Sharpness
: Set the sharpness of the photo.
Page 86
83
Settings
➔
Settings
•
Guideline
: Enable or disable onscreen grid to aid in
photo composition.
•
Review
: Enable or disable the instant review feature,
to display images immediately after taking for review.
•
Shutter Sound
: Select a tone to play when the
camera’s shutter opens and closes.
•
Memory
: Choose the default storage location for
images/videos, to Phone or optional Card (if installed).
Timer
: Set a timer for a delay between pressing the
Camera/Camcorder key and the taking of the photo.
Resolution
: Set the image size.
Brightness
: Adjust the brightness level.
Quick view
: Displays a quick (thumbnail or list) view of
photos in the Pictures folder. Selecting a photo from this
view provides the following options:
•
Send
: Send the photo as a
Picture Message, To Online
Album, Via Email, Via Bluetooth, To Facebook,
or
To My Space
.
•
Set as
: Set the photo as
Wallpaper
, or as
Picture ID
for
a contact.
•
More: Move to Card, Lock, Erase, Camera, Play Slide
Show
, or view
File Info
.
•
Zoom
: Zooms in to show the largest picture.
•
Edit
: Modify your photo with an
Effect, Revision
,
change
Resolution
, or
Rotate/Flip
the picture.
Page 87

Pictures and Video 84
My Pictures
Use
My Pictures
to view, edit and manage images stored on your
phone.
1. From a Home screen, touch
Media Center ➔ Picture &
Video ➔ My Pictures
.
2. Pictures display in a grid format (default).
3. Touch
List
, or
Thumbnails
view.
4. While viewing a list of pictures, touch for these
options:
• Move to Card
: Select photos to move to the memory card.
• Move to Phone
: Select photos to move to the phone’s memory.
• Play Slide Show:
Play a Slide Show.
•Lock/Unlock
: Lock to prevent deletion or moving.
• Print via Bluetooth: Print selected photos via Bluetooth.
•Erase
: Mark files for deletion.
5. Touch a photo to view it. While viewing a photo, you have
these options.
•Send
: Send the photo in a
Picture Message, To Online Album,
Via Email, Via Bluetooth, To Facebook
, or
To My Space
.
•Set as
: Set the photo as
Wallpaper
, or as
Picture ID
for a contact.
•More: Move to Card, Lock/Unlock, Erase, Camera, Play Slide
Show, or File Info
.
• Zoom
: Zooms out to display the largest view of the photo.
•Edit
:
(For pictures you have taken) Modify the picture.
Take a Picture
1. From a Home screen, touch
Media Center ➔ Picture &
Video ➔ Take Picture
.
More
Page 88

85
2.
Set Camera options, or tap the screen to hide Options. For
more information about Camera Options, see “Camera
Options” on page 81.
3. Using the display screen as a viewfinder, compose your
picture by aiming the lens at the subject.
4. Press the
Camera/Camcorder
key to take the
picture.
Assigning an Image to Contact
1. From a Home screen, touch
Media Center ➔ Picture &
Video ➔ My Pictures
.
2. Touch the image you would like to assign.
3. Touch
Set as
➔
Picture ID
.
4. Touch
Adjust Picture
(to resize the photo) or
Fit to Screen
.
5. Touch a Contact name from the Contact list in which to
assign this Picture ID.
6. Touch
Set
to set the selected image as a Picture ID.
Setting an Image as a Wallpaper
1. From a Home screen, touch
Media Center ➔ Picture &
Video ➔ My Pictures
.
2. Touch the image you would like to assign.
3. Touch
Set as
➔
Wallpaper
.
4. Touch
Adjust Picture
(to resize the photo) or
Fit to Screen
.
The pictures assigns as a wallpaper.
5. Touch
Set
to set the selected picture as wallpaper.
Playing a Slide Show
Create a slide show with 4 to 12 photos.
1. From a Home screen, touch
Media Center ➔ Picture &
Video ➔ My Pictures
.
2. To make a slide show of the pictures, touch ➔
Play Slide Show
.
A slideshow displays all the pictures in this folder.
Using the Camcorder
In addition to taking photos, the camera also functions as a
camcorder to record, view, and send videos.
Important!:
Do not take videos of people without their permission.
Do not take videos in places where cameras are not allowed.
Do not take videos in places where you may interfere with
another person’s privacy.
1. Press and hold the
Camera/Camcorder
key. The
More
Page 89
Pictures and Video 86
Camcorder is always opened in landscape mode, with
Camera Options displayed.
2. Set Camcorder options, or tap the screen to hide Options.
For more information about Camcorder Options, see
“Camcorder Options” on page 86.
3. Using the phone’s main display screen as a viewfinder,
adjust the image by aiming the lens at the subject.
4. Press the
Camera/Camcorder
key to begin
recording video.
5. Touch the
Camera/Camcorder
key to stop the
recording.
Note:
Open the phone immediately after taking a photo to create a new video
message with the new photo attached.
Record a Video
1. From a Home screen, touch
Media Center ➔ Picture &
Video ➔ Record Video
.
2. Set Camcorder options, or tap the screen to hide Options.
For more information about Camcorder Options, see
“Camcorder Options” on page 86.
3. Using the phone’s main display screen as a viewfinder,
adjust the image by aiming the lens at the subject.
4. Press the
Camera/Camcorder
key to begin
recording video. For more information, refer to “Using the
Camcorder” on page 85.
5. Touch the
Camera/Camcorder
key to stop the
recording.
Camcorder Options
Use Camcorder Options to customize your videos. Camcorder
options appear on screen when you launch the Camcorder, or
can be displayed at any time by touching the screen.
Mode
: Switch to camera mode.
Recording mode
:
•
For Send
: Set an appropriate resolution for sending.
•
For Save
: Set an appropriate resolution for saving.
Scene mode
: Unavailable in Camcorder or video mode.
Page 90
87
Settings
➔
Camcorder
•
Quality
: This field is not adjustable in Camcorder
mode.
•
Effects
: Choose an effect to add to the photo.
•
White Balance
: Choose a setting for light source.
Settings
➔
Settings
•
Review
: Enable or disable the instant review feature,
to display videos immediately after recording for
review.
•
Start Sound
: Select a sound to play when you press
the Camera/Camcorder key.
•
End Sound
: Select a tone to play when recording
stops.
•
Audio Recording
: Enable or disable recording of sound
with videos.
•
Memory
: Choose the default storage location for
images/videos, to Phone or optional Card (if installed).
Timer
: Set a timer for a delay between pressing the
Camera/Camcorder key and the start of recording.
Resolution
: Resolution is fixed for recording videos.
Brightness
: Adjust the brightness level.
Quick view
: Displays a quick view (thumbnail or list) of
videos in the Videos folder. Scroll through videos, and
choose options for a selected video.
•
Send
: Sends the selected video as a Video Message. To
Online Album, Via Email, To Facebook, or To My Space.
•
More
:
-
Lock/Unlock
: Lock to prevent deletion or moving.
-
Erase
: Erase the selected video.
-
Camcorder
: Changes the mode to Camera mode.
-
File Info: View details about the video,
including size, date and resolution.
•
Move to Card
: Select videos to move to the memory card.
Page 91

Pictures and Video 88
My Videos
Use
My Videos
to view and manage videos stored on your phone.
1. From a Home screen, touch
Media Center ➔ Picture &
Video
➔
My Videos
.
2. Touch
Thumbnails
or
List
view.
3. While viewing a list of videos, touch for these
options:
• Move to Card
: Moves this video to the memory card.
• Move to Phone
Moves this video to the phone’s memory.
•Lock/Unlock
: Lock to prevent deletion or moving.
•Erase
: Erase the selected video.
4. Touch a video to select it.
5. Touch play, touch the play button in the middle of the video
file. Use the onscreen buttons for these operations:
•More
:
–
Send
: Send as a Video Message, to Online Album, Via Email, to
Facebook. or to My Space.
–
Move to Card/Phone
: Moves the selected video from the Card to the
Phone or from the Phone to the card, depending on the current location.
–
Lock
: Lock to prevent deletion or moving.
–
Erase
: Erase the selected video.
–
Camcorder
: Displays in Camcorder mode.
–
File Info
: Displays information about the video file.
•
: Touch to skip backward through the video. Touch and hold
to scan backward through the video.
•
: Touch to play the video, or to pause a playing video.
•
: Touch to skip forward to the next video. Touch and hold to
scan forward through the video
•
: Switch to Camera Mode.
More
Page 92

89
Section 12: Applications and Tools
The topics covered in this section allow you to schedule
appointments, view the calendar, set an alarm, view time zones,
take notes, and perform simple math calculations.
My Verizon
My Verizon connects to Verizon Wireless Mobile Web, where you
can set up Favorites, choose available applications, and other
services.
䊳
From a Home screen, touch
My Verizon
.
Note:
You can also access My Verizon by touching
My Verizon
on the Menu or
the
My Verizon
shortcut.
Tools
The Tools menu provides personal productivity and information
applications.
Voice Commands
Use Voice Commands to operate your phone by speaking
commands.
䊳
From a Home screen, press .
– or –
From a Home screen, touch
Tools
➔ Voice Commands.
For more information, refer to “Voice Recognition” on page 30.
Calculator
The Calculator menu provides a mathematical Calculator, a Tip
Calculator, and a Converter.
Normal
Perform simple mathematical calculations.
䊳
From a Home screen, touch
Tools
➔
Calculator
➔
Normal.
Tip
Calculate the tip and how much each person should pay.
Note:
The following steps outline tip calculations using the touch keypad.
1. From a Home screen, touch
Too ls
➔
Calculator
➔
Tip.
2. Touch each field to populate:
• Bill
: Enter the amount of the bill
.
•Tip
: Enter the tip percentage.
• Split
: Enter the number of people.
Page 93

Applications and Tools 90
3.
The calculator will display the tip, total bill including the tip,
and the share of the bill for each person.
Converter
Convert values you enter into selected units.
1. From a Home screen, touch
Tools
➔
Calculator
➔
Converter.
2. Choose a conversion type:
3. Enter the value to be converted, and select conversion
units.
Calendar
Record events, set reminders, your appointments, and use and
your phone to manage.
Note:
Any event scheduled within the next 24 hours will cause the Calendar
icon to be illuminated on the Event Status bar, and will appear on the
Event Manager screen.
Add a new event
1. From a Home screen, touch
Tools
➔
Calendar
.
The calendar displays the current date.
2. Touch to choose:
• Go to Date
: Enter a date to view.
•Go to Today
: View today’s events.
•Send
: Send an event in a Message or to a Bluetooth device.
•Erase All
: Delete all events in your calendar.
• Erase All Old
: Delete all past events.
•Search
: Search events by name.
3. At the calendar display, touch to add a new event.
4. Enter details about the event:
• Subject
: Enter a name for the event.
• Start Date
: Enter the start date for the event.
•Start Time
: Enter the start time for the event.
• End Date
: Enter the end date for the event.
• End Time
: Enter the end time for the event.
• Recurrence
: Select the frequency of the event.
•Alerts
: Set an alert for the event.
• Reminder
: Set a repetitive reminder for the event.
•Alert Tone
: Choose the type of alert tone.
•
Tem pe ra tu re
•
Area
•
Length
•
Volume
•
Weight
•
Currency
More
New
Page 94
91
•Vibrate
: Enable or disable vibration alert.
5. Touch . The event is saved.
View an event
1. From a Home screen, touch
Too ls
➔
Calendar
.
The calendar displays in either Weekly View or Monthly
View.
2. Touch to select the date containing the event that you wish
to view. The events for that day are displayed.
3. Touch an event you to display its information.
4. To edit the event, touch .
5. Make all of the necessary edits by touching the desired
fields, then touch .
Alarm Clock
Set up to three alarms, to go off once, or recur periodically at a
specific time. Once set, alarms are easy to change or turn off.
Note:
Alarms scheduled within the next 24 hours will illuminate the Calendar
icon on the Event Status bar and appear in Event Manager.
Creating an Alarm
1. From a Home screen, touch
Too ls
➔ Alarm Clock.
2. Touch , enter the required information and
touch to save the alarm.
– or –
1. From a Home screen, touch Alarm.
2. Touch , enter the required information and
touch to save the alarm.
Setting an Alarm
1. From a Home screen, touch
Too ls
➔ Alarm Clock.
2. Touch ON to enable an alarm.
3. Tap the alarm to configure:
•
Tou ch the
Time
field to enter the alarm time using the touch keypad
and tap
Done
.
•
Tou c h
Repeat
to set the repeat of the alarm alert.
•
Tou c h
Snooze
to set a snooze setting:
Every 2 Minutes, Every 5
Minutes, or Every 15 Minutes
.
•
If you select
Ringtone
, you can set a tone for the alert ringer.
Verizon Airwaves is the default tone. Touch a ringer option to select
a tone.
4. Touch to save your settings.
Save
Edit
Save
Add
Save
Add
Save
Save
Page 95
Applications and Tools 92
Disabling an Alarm
1. From a Home screen, touch
Tools
➔ Alarm Clock.
2. Touch
OFF
for the alarm you wish to disable. The alarm
remains configured, but will not cause an alert to ring.
Erasing all Alarms
1. From a Home screen, touch
Tools
➔ Alarm Clock.
2. Touch
Erase
. All alarms are deleted.
Stop Watch
Measure lap times and total elapsed time.
1. From a Home screen, touch
Tools
➔ Stop Watch.
2. Touch to start the stopwatch.
3. Touch to record lap times.
4. Touch to stop timing.
5. Touch to erase recorded stopwatch time.
World Clock
World Clock allows you to view the time in your location, and up
to 4 additional locations around the world.
1. From a Home screen, touch
Tools
➔ World Clock.
Based on location, the Current Time displays automatically.
2. Touch to add a world clock. Touch and drag the
map to find the desired time zone. Touch a city from the
desired area to highlight it in red.
•
To uc h
to save this location as a world clock.
•
Touch then select a city from the displayed list or enter a
city using the keypad.
3. Touch to choose:
•DST On
to enable or disable Daylight Savings time offset to this
location.
•
To uc h
Set as 2nd Clock
to set this location as the second location
for the World Clock display.
Notepad
Create, read, edit and erase text notes.
1. From a Home screen, touch
Tools
➔ Notepad.
If you have any stored notes, they appear in the display. If
this is your first time in Notepad, No Notes displays.
2. Touch then enter the note using the touch keypad
or the QWERTY keyboard.
3. When you’re finished entering note text, touch .
StartStart
LapLap
pStop
Reset
Add
Save
Cities
More
Add
Done
Page 96
93
Reviewing and Editing Notes
1. From a Home screen, touch
Too ls
➔ Notepad.
2. Touch a note in the list to edit the note.
3. Touch to make changes. Make your changes to the
note and touch .
Erasing Notes
1. From a Home screen, touch
Too ls
➔ Notepad.
2. Touch to erase all notes.
– or –
Touch then touch
Ye s
at the prompt.
– or –
3. Touch a note then touch to erase the selected
note.
4. Touch
Ye s
at the prompt to delete this note.
USB Mass Storage
Use your phone to connect to your PC, to access an optional
installed memory card.
1. Insert your optional memory card (purchased separately)
into the microSD slot.
2. Plug the USB cable into your phone and connect it to a USB
port on your PC.
3. From a Home screen, touch
Too ls
➔
USB Mass
Storage
.
Note:
You cannot make or receive calls when using USB Mass Storage.
4. On your PC, you should see a Removable Disk pop-up
window. Select the desired action and click OK.
5. After performing the desired action, touch
DISCONNECT
on
the phone to resume phone service, and touch
Yes
to
confirm.
Document Viewer
View files in various formats on an optional microSD card.
Note:
The size of files that can be viewed is limited to available phone
memory. Also, since this is a simple file viewer, it may be difficult to
view complex files, like spreadsheets or documents with multiple
pages.
1. Insert your storage card (purchased separately) into the
microSD slot.
Edit
Done
Erase All
Erase
Page 97
Applications and Tools 94
2.
From a Home screen, touch
Tools
➔
Document
Viewer
.
3. Touch the desired file to view the file.
4. Touch ➔
Erase
to erase the selected file.
5. While viewing a file, touch to view these options:
• Go to page
: Enter the page number to view (for pdf file types).
• Scale to
: Select the desired page viewing size.
•Send
: Send this file as a Message or Email.
•Erase
: Erase the selected file.
•Lock/Unlock
: Lock to prevent deletion or moving.
• File Info
: Displays the Name and Size of the file. Press Ok to return
to the file viewer.
6. Touch
Zoom
to fit the document to screen. Press Next to
see the next page if there is more than one page in the file.
7. Touch
Search
to jump to the first page with the text in the search
box.
Phone Search
Phone Search
is an easy way to locate items on your phone. After
searching, touch a search result to go directly to the content.
Tip:
Phone Search can only find items stored in your phone’s memory. To find
items on an optional installed memory card, see “Document Viewer” on
page 93.
1. From a Home screen, touch
Tools
➔
Phone Search
.
2. Enter up to 12 characters as
criteria for searching.
3. Touch
to start
searching. Results display
on the screen.
4. Touch any search result to
go to the item or launch the
application or feature.
More
More
Done
Page 98

95
VZ Navigator
VZ Navigator® uses GPS positioning to tell you where you are,
what’s nearby, and to give you directions - quickly and easily.
With audible turn-by-turn directions, you can locate points of
interest in the U.S., including landmarks, restaurants, and even
ATMs.
Note:
VZ Navigator requires service activation. Contact Verizon Wireless for
more information.
䊳
From a Home screen, touch
VZ Navigator
.
The first time you start VZ Navigator, you’ll be prompted to
download and install the application, and to agree to the terms of
service.
Tip:
To use the VZ Navigator, you must have Location On setting enabled. For
more information, see “Location” on page 63.
Page 99
Web and Social Networking Applications 96
Section 13: Web and Social Networking Applications
Mobile Web
Your phone is equipped with a full HTML Browser, which allows
you to access the Internet. This section explains how to access
the browser and navigate web pages.
䊳
From a Home screen, touch
Mobile Web
.
Changing the Screen Orientation
The default view is a portrait screen layout. Slide open the
keyboard to view a landscape view.
Navigating the Browser
Navigate the Browser screen by touching points on the screen,
and using onscreen tools.
Too l s
While viewing a web page, touch to display the onscreen
tools, then touch the desired tool.
Selecting items
䊳
Touch an onscreen item or hyperlink to select it.
Back
: Return to the previous page.
Forward
: Advances to the next page.
Menu
: Displays bookmarks
Favorites
: View or add bookmarks for web pages
Options
: Displays a list of web options.
•
Find on Page
: Search for content on the page.
•
History
: View a list of recently-visited pages.
•
Settings
: Select settings for Browser sessions.
•
Send Screen
: Capture and send a screen via
Email or text message, or to My Pictures.
•
Share URL
: Share this URL.
•
Exit
: Exits the current screen or menu.
Reload
: Refresh the current page from the source.
Fullscreen View / Toolbar View
: Indicates full-screen
view. Touch to switch to Grid View.
Page 100

97
Entering text in a field
䊳
Touch the onscreen text field until the keyboard displays then
enter your text.
Browser Settings
1. From a Home screen, touch
Mobile Web
.
2. Touch ➔
Settings
to configure these settings:
• Display Mode
: On regular web sites (sites that are not specifically
designed for mobile phones), choose Page View, Detail View, or
Mobile View.
• Security
: Activate Cookies, and Remember Password, and view
the Current Certificate details.
•Manage Memory
: Clear All, Clear Cookies, Clear History, or Clear
Passwords.
• Restore Defaults
: Restore All, Display Mode, Security, or Font Size
default Home Page, Display Mode, and/or Security settings, or
settings.
• Information
: View information about the current Web Page, or the
Browser.
•Font Size
: Set the default font size. Select: Small, Medium, or
Large.
Entering a URL
1. From a Home screen, touch
Mobile Web
.
2. Touch the URL address field at the top of the screen where
the
http://
prefix is entered for you, and enter the web
address.
3. Touch
Go
to launch the web page.
Using Favorites
While browsing the web, you can bookmark a page to quickly
and easily access it in the future.
Accessing Favorites
You can access Favorites directly from the Home page or from
the Favorites page.
From the Home page:
1. From a Home screen, touch
Mobile Web
.
2. Touch
Favorites
.
From the Favorites page:
1. From a Home screen, touch
Mobile Web
.
2. Touch
Favorites
.
3. Touch a favorite to launch the page.
 Loading...