

Page 1

Installation and Operating Instructions
Built-In Oven
BF62CBST
Owner’s Manual
Page 2

Page 3

Contents
Using This Manual . . . . . . . . . . . . . . . . . . . . . . . . . . . . . . . . . . . . . . . . . . . . . . . . . . 2
Safety Instructions . . . . . . . . . . . . . . . . . . . . . . . . . . . . . . . . . . . . . . . . . . . . . . . . . . 2
Electrical safety . . . . . . . . . . . . . . . . . . . . . . . . . . . . . . . . . . . . . . . . . . . . . . . . . . . . . . . 2
Safety during operation . . . . . . . . . . . . . . . . . . . . . . . . . . . . . . . . . . . . . . . . . . . . . . . . . 3
Disposal Instructions . . . . . . . . . . . . . . . . . . . . . . . . . . . . . . . . . . . . . . . . . . . . . . . . 3
Installing the Oven . . . . . . . . . . . . . . . . . . . . . . . . . . . . . . . . . . . . . . . . . . . . . . . . . . 4
Safety instructions for the installer . . . . . . . . . . . . . . . . . . . . . . . . . . . . . . . . . . . . . . . . . 4
Installing into a low cabinet . . . . . . . . . . . . . . . . . . . . . . . . . . . . . . . . . . . . . . . . . . . . . . 4
Connecting to the mains power supply . . . . . . . . . . . . . . . . . . . . . . . . . . . . . . . . . . . . . . 5
Installing into a high cabinet . . . . . . . . . . . . . . . . . . . . . . . . . . . . . . . . . . . . . . . . . . . . . 6
Parts and Features . . . . . . . . . . . . . . . . . . . . . . . . . . . . . . . . . . . . . . . . . . . . . . . . . . 7
Oven . . . . . . . . . . . . . . . . . . . . . . . . . . . . . . . . . . . . . . . . . . . . . . . . . . . . . . . . . . . . . . . . 7
Oven controls . . . . . . . . . . . . . . . . . . . . . . . . . . . . . . . . . . . . . . . . . . . . . . . . . . . . . . . . . 8
Accessories . . . . . . . . . . . . . . . . . . . . . . . . . . . . . . . . . . . . . . . . . . . . . . . . . . . . . . . . . . 9
Using the accessories . . . . . . . . . . . . . . . . . . . . . . . . . . . . . . . . . . . . . . . . . . . . . . . . . 10
Safety shutoff . . . . . . . . . . . . . . . . . . . . . . . . . . . . . . . . . . . . . . . . . . . . . . . . . . . . . . . . 10
Cooling fan . . . . . . . . . . . . . . . . . . . . . . . . . . . . . . . . . . . . . . . . . . . . . . . . . . . . . . . . . . 10
Before You Begin . . . . . . . . . . . . . . . . . . . . . . . . . . . . . . . . . . . . . . . . . . . . . . . . . . 11
Setting the clock . . . . . . . . . . . . . . . . . . . . . . . . . . . . . . . . . . . . . . . . . . . . . . . . . . . . . . 11
Initial cleaning . . . . . . . . . . . . . . . . . . . . . . . . . . . . . . . . . . . . . . . . . . . . . . . . . . . . . . . . 12
Oven Use . . . . . . . . . . . . . . . . . . . . . . . . . . . . . . . . . . . . . . . . . . . . . . . . . . . . . . . . . 13
Setting the Cooking Function mode . . . . . . . . . . . . . . . . . . . . . . . . . . . . . . . . . . . . . . . 13
Setting the oven temperature . . . . . . . . . . . . . . . . . . . . . . . . . . . . . . . . . . . . . . . . . . . . 14
Switching the oven off . . . . . . . . . . . . . . . . . . . . . . . . . . . . . . . . . . . . . . . . . . . . . . . . . 15
End time . . . . . . . . . . . . . . . . . . . . . . . . . . . . . . . . . . . . . . . . . . . . . . . . . . . . . . . . . . . . 15
Cook time . . . . . . . . . . . . . . . . . . . . . . . . . . . . . . . . . . . . . . . . . . . . . . . . . . . . . . . . . . . 16
Delayed start . . . . . . . . . . . . . . . . . . . . . . . . . . . . . . . . . . . . . . . . . . . . . . . . . . . . . . . . 17
Kitchen timer . . . . . . . . . . . . . . . . . . . . . . . . . . . . . . . . . . . . . . . . . . . . . . . . . . . . . . . . . 19
Auto Cook . . . . . . . . . . . . . . . . . . . . . . . . . . . . . . . . . . . . . . . . . . . . . . . . . . . . . . . . . . . 20
Oven lamp on / off . . . . . . . . . . . . . . . . . . . . . . . . . . . . . . . . . . . . . . . . . . . . . . . . . . . . . 21
Child safety function . . . . . . . . . . . . . . . . . . . . . . . . . . . . . . . . . . . . . . . . . . . . . . . . . . . 22
Switching the beeper off . . . . . . . . . . . . . . . . . . . . . . . . . . . . . . . . . . . . . . . . . . . . . . . . 22
Oven functions . . . . . . . . . . . . . . . . . . . . . . . . . . . . . . . . . . . . . . . . . . . . . . . . . . . . . . . 23
Test dishes . . . . . . . . . . . . . . . . . . . . . . . . . . . . . . . . . . . . . . . . . . . . . . . . . . . . . . . . . . 32
Cleaning and Care . . . . . . . . . . . . . . . . . . . . . . . . . . . . . . . . . . . . . . . . . . . . . . . . . 33
Catalytic enamel surface . . . . . . . . . . . . . . . . . . . . . . . . . . . . . . . . . . . . . . . . . . . . . . . 34
Cleaning the oven door . . . . . . . . . . . . . . . . . . . . . . . . . . . . . . . . . . . . . . . . . . . . . . . . 35
Cleaning the top heater . . . . . . . . . . . . . . . . . . . . . . . . . . . . . . . . . . . . . . . . . . . . . . . . 38
Changing the lamp . . . . . . . . . . . . . . . . . . . . . . . . . . . . . . . . . . . . . . . . . . . . . . . . . . . . 39
Warranty & Service . . . . . . . . . . . . . . . . . . . . . . . . . . . . . . . . . . . . . . . . . . . . . . . . . 40
FAQs and Troubleshooting . . . . . . . . . . . . . . . . . . . . . . . . . . . . . . . . . . . . . . . . . . . . . . 40
Technical data . . . . . . . . . . . . . . . . . . . . . . . . . . . . . . . . . . . . . . . . . . . . . . . . . . . . . 42
1
Page 4

Using This Manual
Thank you for choosing a SAMSUNG Built - In Oven.
EN
This Owner’s Manual contains important information on safety and instructions intended to
assist you in the operation and maintenance of your appliance.
Please take the time to read this Owner’s Manual before using your oven and keep this book
for future reference.
The following symbols are used in the text of this Owner’s Manual.
Important Note
Safety Instructions
Installation of this oven must be performed only by a licensed electrician. The installer is
responsible for connecting the appliance to the mains power supply in observance of the
relevant safety recommendations.
Electrical safety
If the oven has been damaged in transport, do not connect it.
● This appliance must be connected to the mains power supply only by a specially licensed
electrician.
● In the event of a fault or damage to the appliance, do not attempt to operate it.
● Repairs should be performed by a licensed technician only. Improper repair may result
in considerable danger to you and others. If your oven needs repair, contact a SAMSUNG
Service Centre or your dealer.
● If the supply cord is defective, it must be replaced by a special cord or assembly available
from the manufacturer or an authorised service agent.
● Electrical leads and cables should not be allowed to touch the oven.
● The oven should be connected to the mains power supply by means of an approved circuit
breaker or fuse. Never use multiple plug adapters or extension leads.
● The rating plate is located on the right side of the door.
● The power supply of the appliance should be turned off when it is being repaired or
cleaned.
● Take care when connecting electrical appliances to sockets near the oven.
WARNING
The appliance should be powered down before replacing the lamp to avoid the possibility of
electric shock. During oven operation, the interior surfaces become very hot.
2
Page 5

3
EN
Safety Instructions (Continued)
Safety during operation
● This oven has been designed only for the cooking of household foods.
● During use, the oven interior surfaces become hot enough to cause burns. Do not touch
heating elements or interior surfaces of the oven until they have had time to cool.
● Never store flammable materials in the oven.
● The oven surfaces become hot when the appliance is operated at a high temperature for
an extended period of time.
●
When cooking, take care when opening the oven door as hot air and steam can escape rapidly.
● When cooking dishes that contain alcohol, the alcohol may evaporate due to the high tem-
peratures and the vapour can catch fire if it comes into contact with a hot part of the oven.
● For your safety, do not use high-pressure water cleaners or steam jet cleaners.
● Children should be kept at a safe distance when the oven is in use.
● Frozen foods such as pizzas should be cooked on the wire grill. If the baking tray is used, it
may become deformed due to the great variation in temperatures.
● Do not pour water into the oven bottom when it is hot. This could cause damage to the
enamel surface.
● The oven door must be closed during cooking.
● Do not line the oven bottom with aluminium foil and do not place any baking trays or tins on
it. The aluminium foil blocks the heat, which may result in damage to the enamel surfaces
and cause poor cooking results.
● Fruit juices will leave stains, which can become indelible on the enamel surfaces of the
oven. When cooking very moist cakes, use the deep pan.
● Do not rest bakeware on the open oven door.
●
This appliance is not intended for use by young children or infirm persons without the adequate
supervision of a responsible person ensuring that they are using the appliance safely.
● Young children should be supervised to ensure that they do not play with the appliance.
Disposal Instructions
Disposing of the packaging material
● The material used to package this appliance is recyclable.
● Dispose of the packaging materials in the appropriate container at your local waste dis-
posal facility.
Disposing of old appliances
WARNING
Before disposing of old appliances, make them inoperable so that they cannot be a source of danger.
To do this, disconnect the appliance from the mains supply and remove the mains lead.
To protect the environment, it is important that old appliances are disposed of in the correct manner.
● The appliance must not be disposed of with household rubbish.
● You can obtain information about collection dates and public refuse disposal sites from
your local refuse department or council.
Page 6
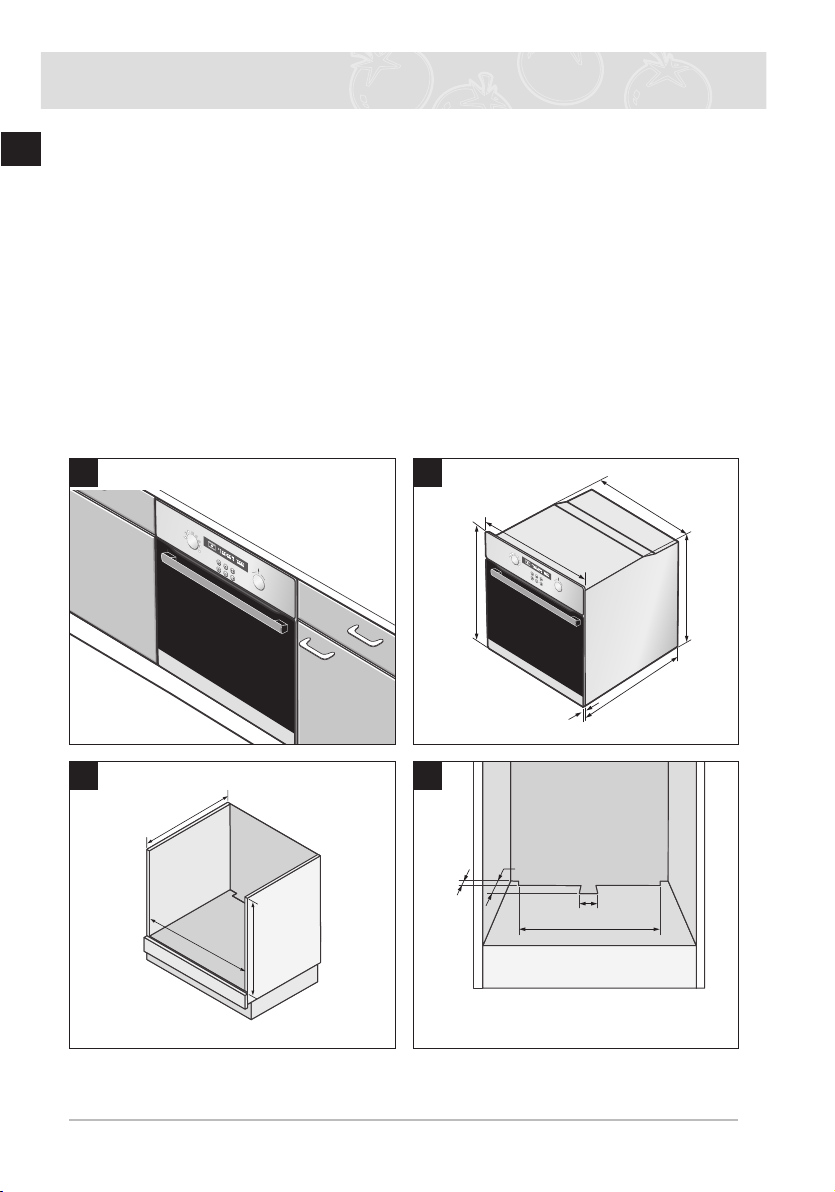
Installing the Oven
560
572
595
21
595
545
min.550
min.560
min.600
50
460
min.50
min.20
EN
Electrical installation of this appliance must be performed only by a licensed electri-
cian.
The oven must be installed according to the instructions supplied.
Remove the protective vinyl from the door after installation.
Safety instructions for the installer
● Installation must guarantee protection against exposure to electrically live parts.
● The unit in which the appliance is fitted must satisfy the requirements of DIN 68930 in
respect of stability.
Installing into a low cabinet
● Observe minimum clearance requirements.
● Secure oven into place with screws on either side of the oven.
1
2
3
4
4
Page 7

5
EN
Installing the Oven (Continued)
Live Earth
Neutral
min.5
min.5
5
Connecting the oven to the power supply
(H05VV-F, H05RR-F, Min 1.5m, 1.5~2.5mm²)
Connecting to the mains power supply
Electrical connections must be made as per the connection plate fixed to the back of the appliance by an electrical fitter who must ensure that the appliance has been connected up in
accordance with fitting instructions and local regulations.
Where the appliance is not connected to the mains electricity supply by a plug, an omni polar
cutout device (with a contacts gap of at least 3 mm) must be fitted on the supply side of the
connection to meet safety requirements.
When power is connected, the electronics of the oven are initialised; this neutralizes
the lighting for a few seconds. The electric cable (H05 RR-F or H05 VV-F, Min 1.5m,
1.5~2.5mm²) must be long enough for it to be connected to the built-in oven standing on the floor in front of its unit.
Open the back cover of the oven at the bottom (using a flat-bladed screwdriver)
and completely unscrew the connection screw and the cable clamp before fitting
conducting wires into the appropriate terminals.
The earth wire must be connected to the ( ) terminal of the oven.
If the oven is connected to the power supply by a plug, this must remain accessible once the
oven has been fitted.
We cannot accept any liability in the event of an accident resulting from non-existent or faulty
earthing.
6
7
Page 8

Installing the Oven (Continued)
560
572
595
21
595
545
min.550
min.590~max.600
min.560
50
Live Earth
Neutral
Installing into a high cabinet
EN
● Observe minimum clearance requirements.
● The oven should be slid into place at the proper angle of alignment.
1
3 4
2
5
Connecting the oven to the power supply
(H05VV-F, H05RR-F, Min 1.5m, 1.5~2.5mm²)
6
Page 9
7
EN
Parts and Features
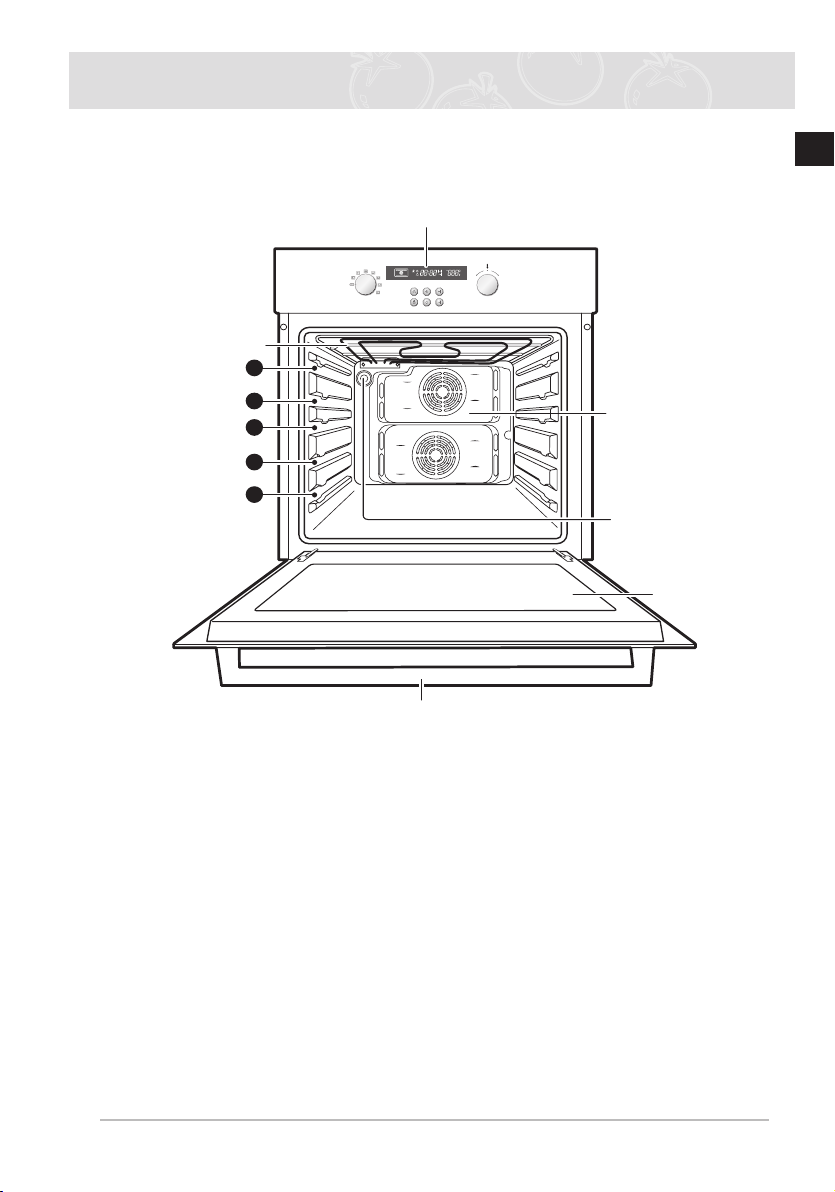
Glass door
Top heating elements
Level
Level
Level
Level
Level
Oven light
Catalytic enameled
cover casing
Door handle
Control panel
5
4
3
2
1
Oven
Shelf levels are numbered from the bottom up.
Levels 4 and 5 are used mainly for the grill function.
Please refer to the cooking guides provided throughout this manual to determine
appropriate shelf levels for your dishes.
Page 10

EN
1
2
456
789
3
Parts and Features (Continued)
Oven controls
1. Cooking Function Select Knob
2. Window Display
3. Time / Temp Control Knob
4. Lamp Button
5. Child Lock Button
6. Clock Button
7. Kitchen Timer Button
8. Cook Time Button
9. End Time Button
The Cooking Function Select Knob and the Time / Temp Control Knob are pop
- up knobs. Simply push to turn.
8
Page 11
9
EN
Parts and Features (Continued)
Front
Front
Accessories
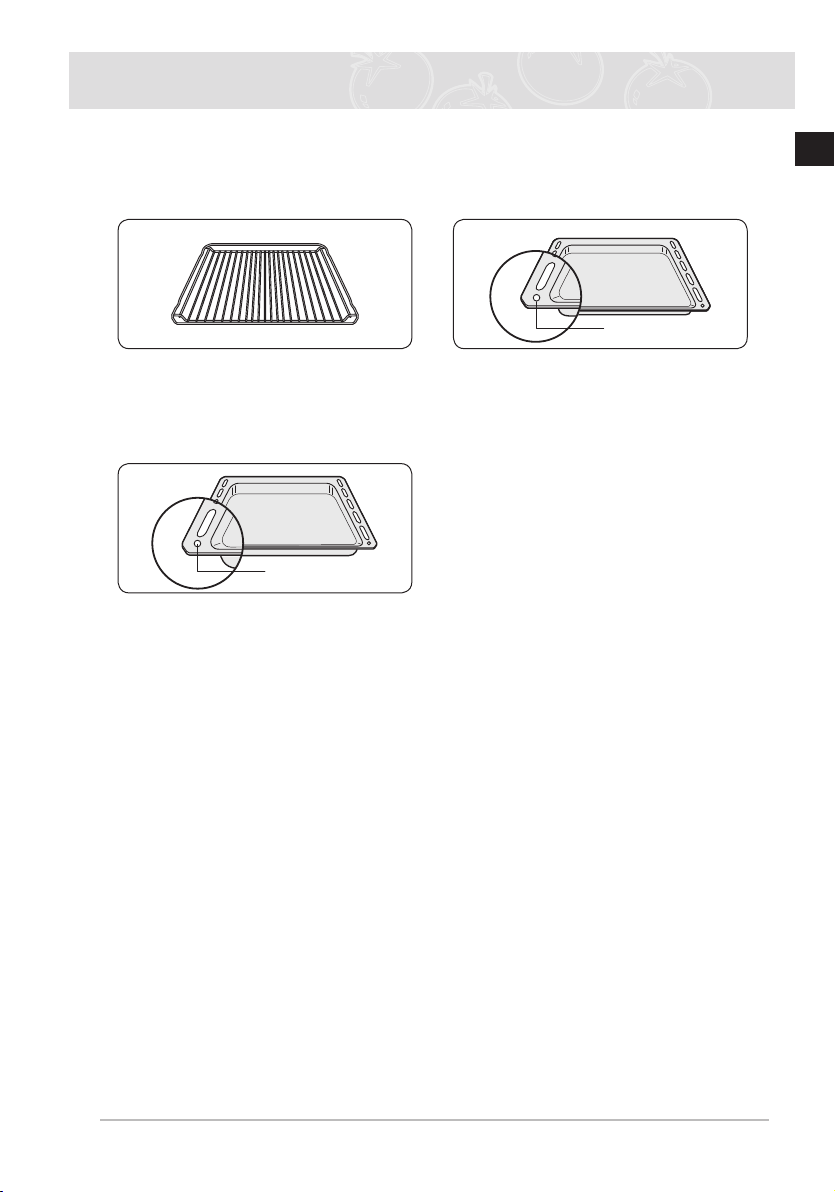
The following accessories are provided with your oven.
Wire grill, for dishes, cake tins, roast-
1
ing and grilling trays.
Deep pan, for roasting or collecting
3
meat juices or fat drippings.
2
Baking tray, for cakes and biscuits.
Page 12
Parts and Features (Continued)
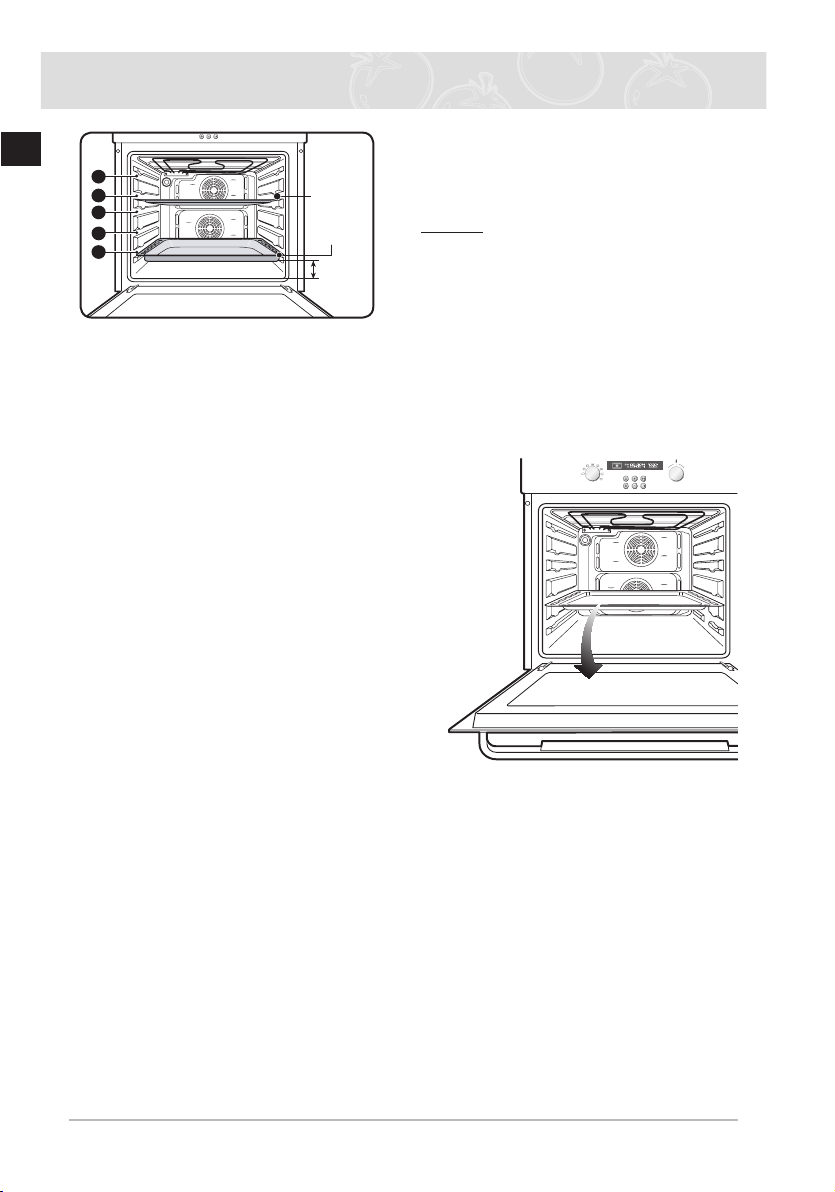
gap 2cm
4
3
2
1
5
Baking tray
Deep pan
EN
When using the deep pan or the baking tray to collect drippings from cooking foods,
ensure that the pan or tray is properly placed in the side runners. Allowing these
accessories to contact the bottom surface of the oven can damage the enamel of
the surface. Trays and pans placed on level 1 should clear the bottom surface of the
oven by at least 2 cm.
Using the accessories
Wire grill, baking tray and deep pan
Positioning the wire grill
Insert the wire grill at any desired level.
Positioning the baking tray or deep pan
Insert the baking tray and/or the deep pan at any desired level.
Safety shutoff
●
If a cooking time is not entered, the oven will shut itself
off after the lengths of time indicated below.
Shutoff times for va
Under 105 °C 16 hours
From 105 °C to 240 °C 8 hours
From 245 °C to 300 °C 4 hours
●
This oven’s electrical circuitry features a thermal shutoff system. If the oven heats to abnor-
mally high temperatures, the system will shut off the power supply to the heating elements
for a period of time.
rious temperature settings
The baking tray, deep pan and wire grill should
be inserted correctly into the side runners.
When taking out the cooked foods from the
oven, be careful of hot utensils and surfaces.
Example Level 1: Deep pan
Level 4: Baking tray
Cooling fan
During cooking, it is normal for the vent to release hot air from the front of the oven.
●
The cooling fan will also continue to operate after the oven has been in use. It will turn off
when the internal cabinet temperature has dropped to 60 °C or after 25 minutes.
10
Page 13
11
EN
Before You Begin
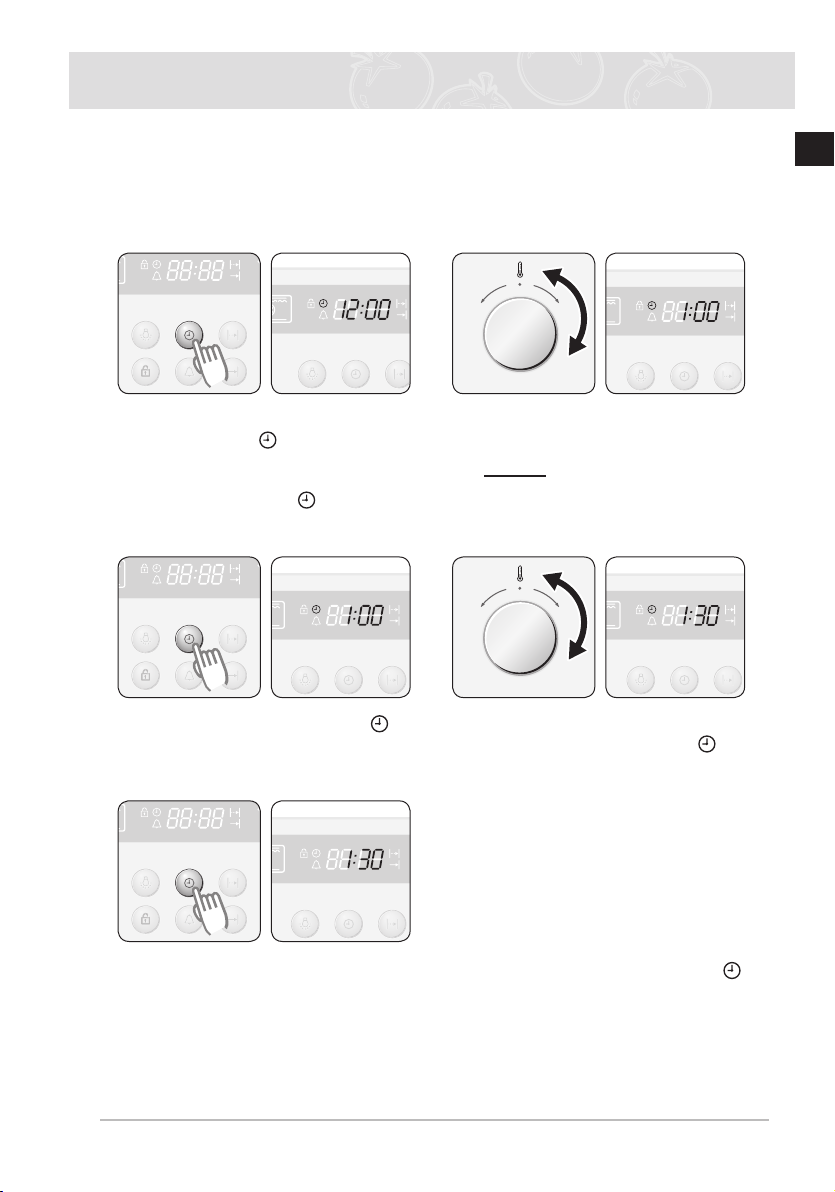
Setting the clock
When power is first supplied to the oven, the display on the control panel will light briefly.
After 3 seconds, an icon of a clock and 12:00 will begin blinking in the display. The oven
cannot be operated until the clock is set.
The oven is inoperable until the clock
1
has been set. “ ” and “12:00” will
blink in the display when power is first
supplied to the appliance. Press the
Clock Button. The “ ” and “12: ”
will blink.
Turn the Time / Temp Control Knob
2
to set the hour of the day.
Example To set 1:30
Press the Clock Button. The “ ”
3
and “ :00” will blink.
Press the Clock Button to finish setting the clock or wait for about 10 seconds. “ ”
5
will disappear and “30” will stop blinking. The display shows the time of day. The appliance is now ready to use.
Turn the Time / Temp Control Knob
4
to set the minute of the time. “ ” will
blink.
Page 14

Before You Begin (Continued)
Initial cleaning
EN
Clean the oven thoroughly before using for the first time.
Do not use sharp or abrasive cleaning materials. These could damage the oven
surface. For ovens with enamel fronts, use commercially available cleaning agents.
To clean the oven
1. Open the door. The oven light comes on.
2. Clean all oven trays, accessories and side runners with warm water or washing - up liquid
and polish dry with a soft clean cloth.
3. Wash the oven interior in the same way.
4. Wipe the front of the appliance with a damp cloth.
Check that the clock is set correctly. Remove accessories and operate the oven at the convec
tion setting at 200 °C for 1 hour before using. There will be a distinctive odor; this is normal,
but ensure your kitchen is well ventilated during this conditioning period.
-
12
Page 15
13
EN
Oven Use
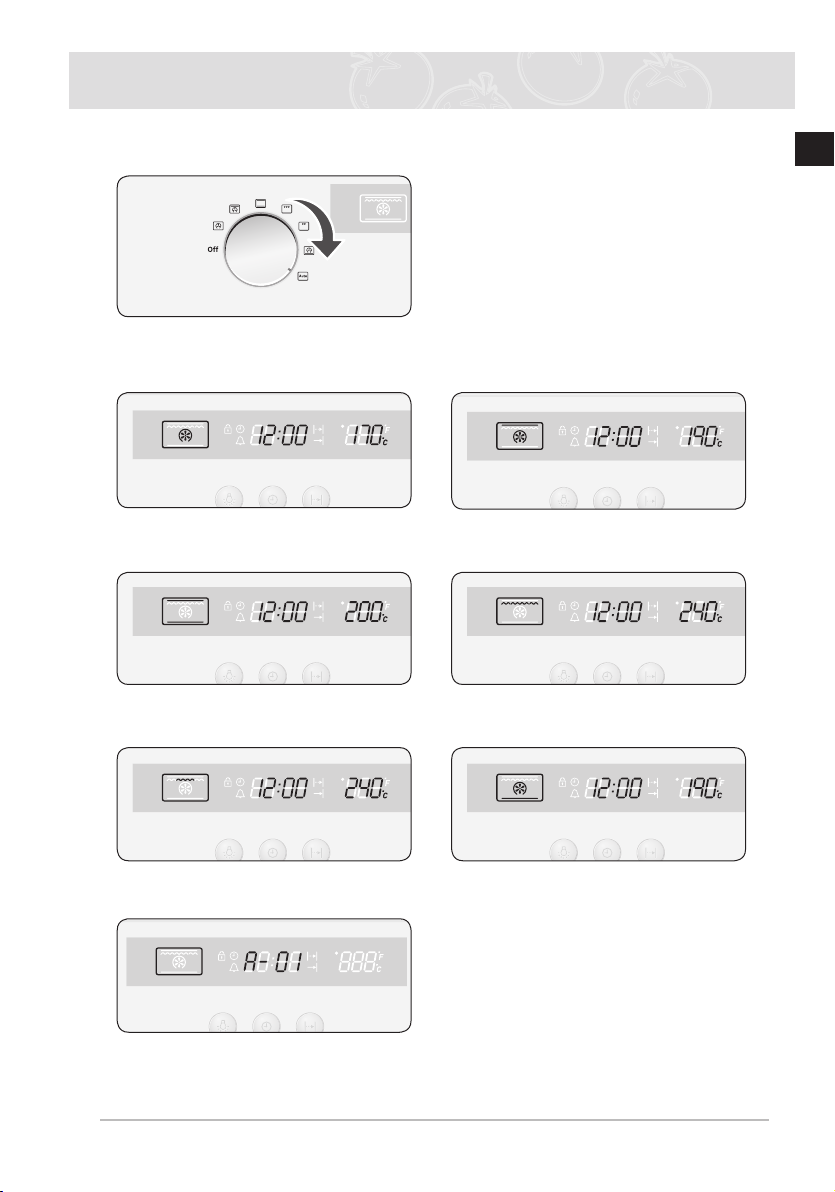
Setting the Cooking Function mode
Turn the Cooking Function Select Knob to select the desired oven function.
1
Convection Top Heat + Convection
Conventional Large Grill
Small Grill
Auto Cook
Bottom Heat + Convection
Page 16
Oven Use (Continued)
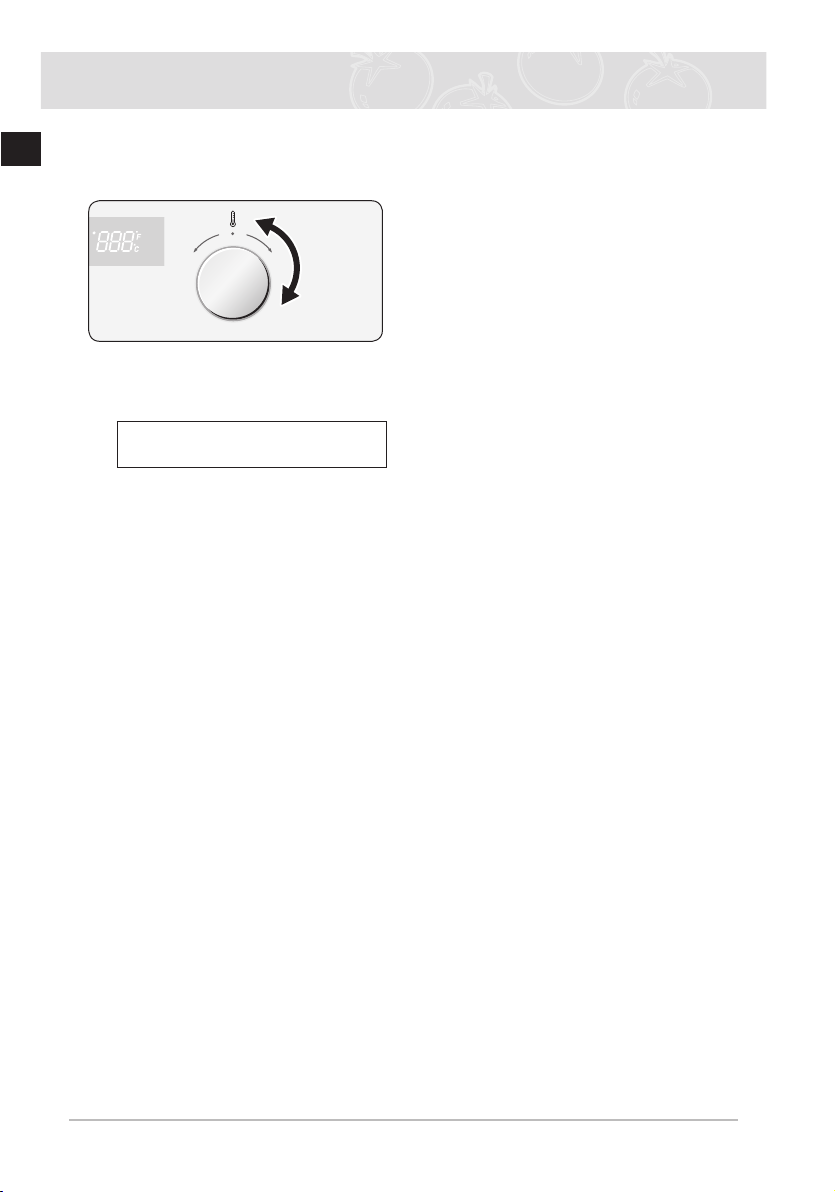
Setting the oven temperature
EN
Turn the Time / Temp Control Knob
1
to adjust the temperature in increments of 5 °C.
40 °C – 250 °C
40 °C – 300 °C (Large & Small Grill)
The temperature may be adjusted during cooking.
14
Page 17
15
EN
Oven Use (Continued)
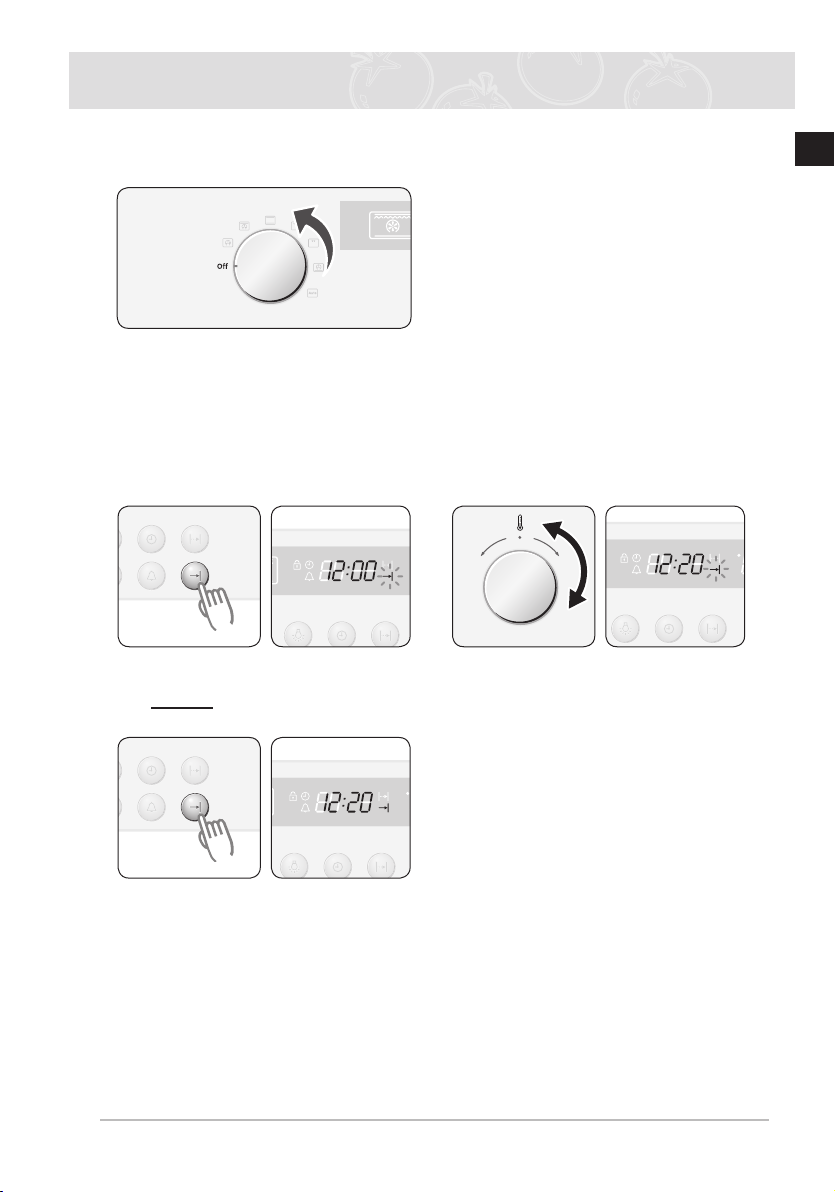
Switching the oven off
End time
You can set the end time during cooking.
Press the End Time Button.
1
Example Current time is 12:00
To switch the oven off, turn the Cooking
Function Select Knob to the “Off” position.
Turn the Time / Temp Control Knob
2
to set the desired end time.
Press the End Time Button.
3
The oven operates with the selected end time
automatically unless the End Time Button is
pressed within 5 seconds.
During cooking, you can adjust the previously set end time with the Time / Temp
Control Knob for better results.
Page 18
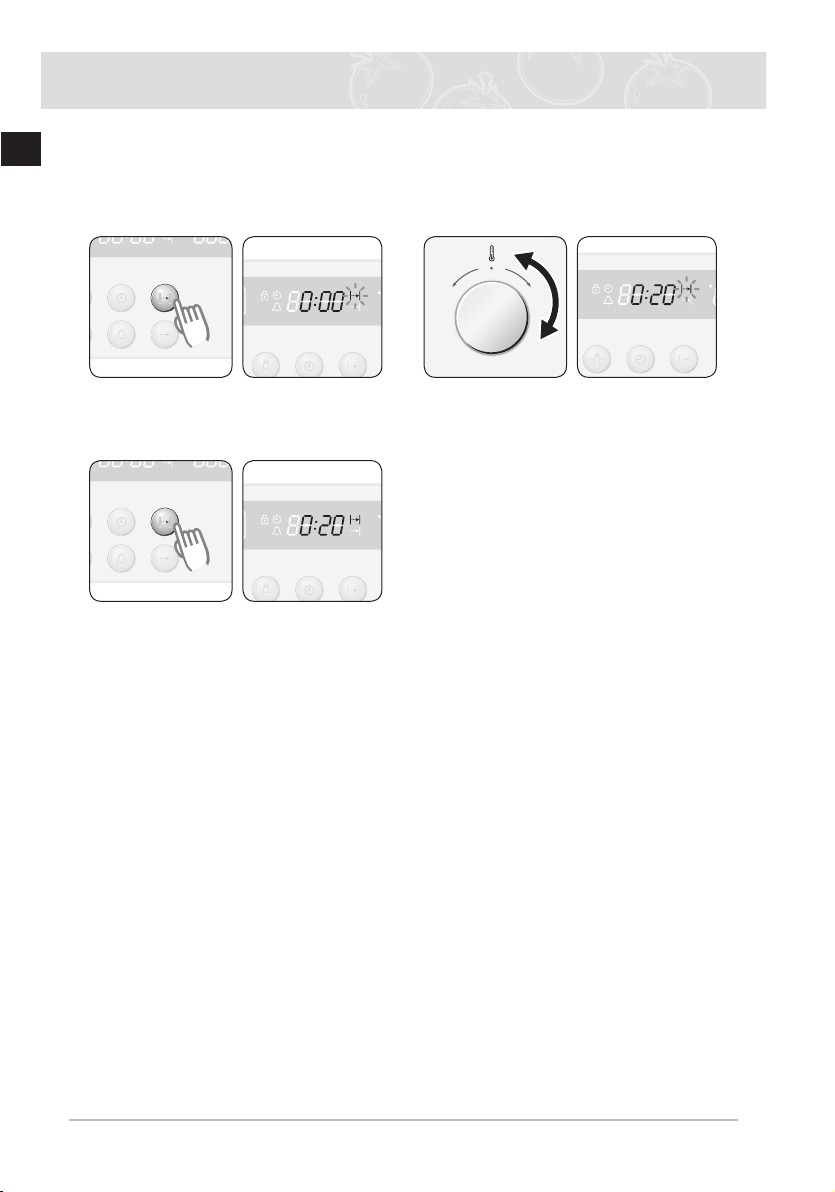
Oven Use (Continued)
Cook time
EN
You can set the cook time during cooking.
Press the Cook Time Button.
1
Press the Cook Time Button.
3
The oven operates with the selected
cook time unless the Cook Time But-
ton is pressed within 5 seconds.
During cooking, you can adjust the previously set cook time with the Time / Temp
Control Knob for better results.
Turn the Time / Temp Control Knob
2
to set the desired cook time.
16
Page 19
17
EN
Oven Use (Continued)
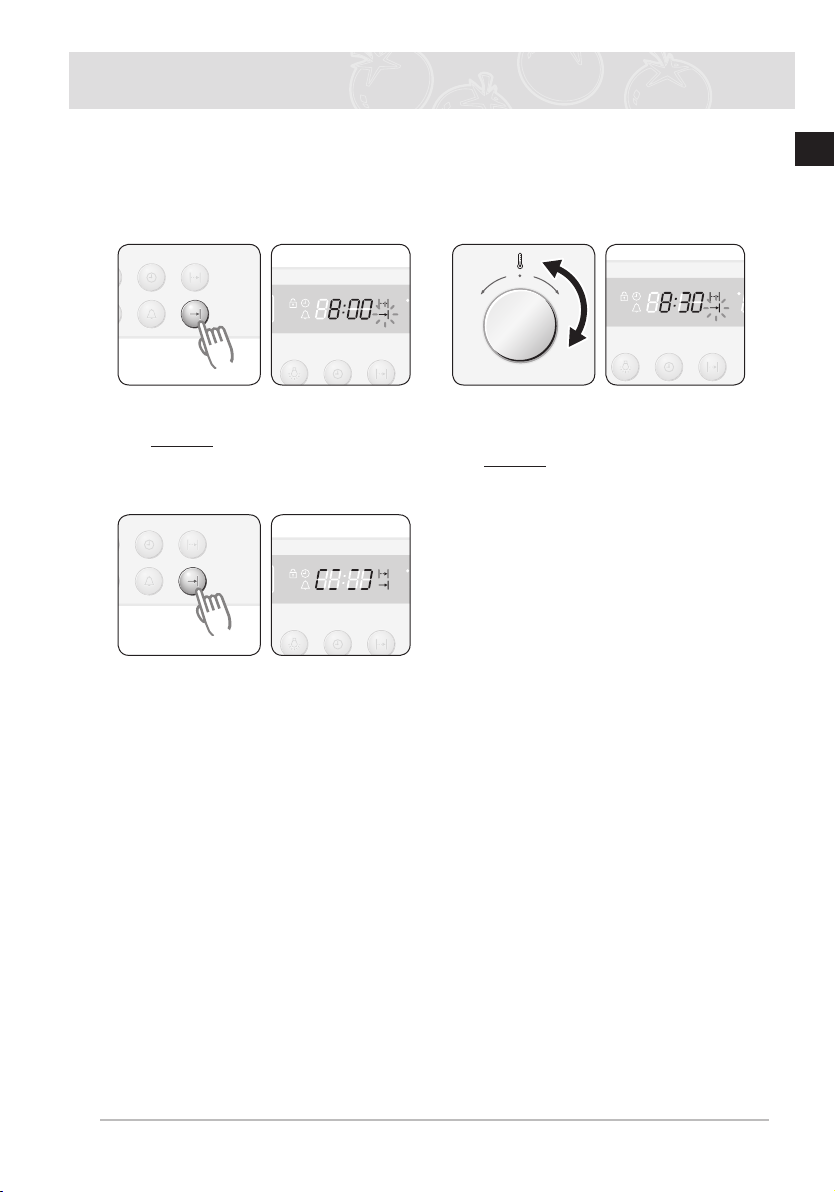
Delayed start
Case 1 - Cook time is entered first
If the end time is entered after the cook time has already been set, the cook time and the end
time are calculated and if necessary the oven sets a delayed start point.
Press the End Time Button.
1
Example Current time is 3:00 and
Press the End Time Button. A
3
“Ready” symbol appears until the
delayed start point.
the desired cook time is
5 hours.
Turn the Time/Temp Control Knob to
2
set the end time.
Example You want to cook for 5
hours and finish at 8:30.
Page 20
Oven Use (Continued)
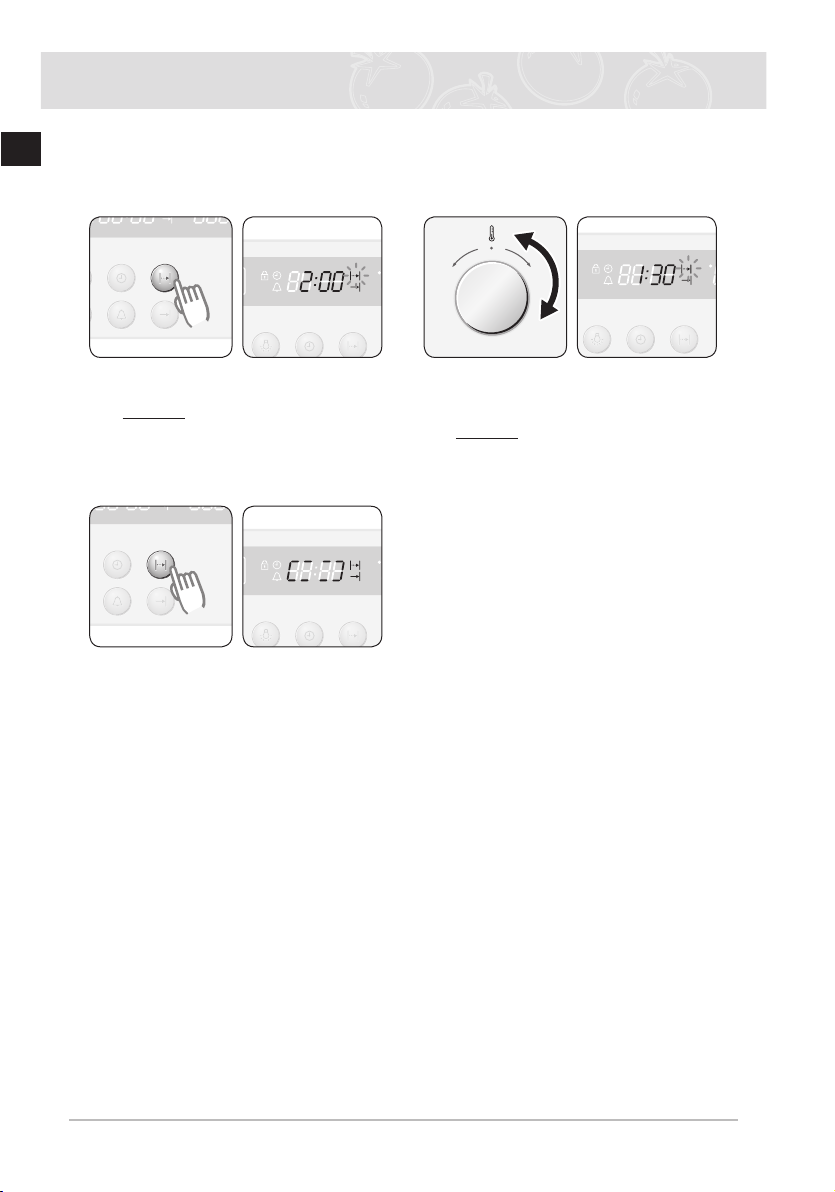
Case 2 - End time is entered first
EN
If the cook time is entered after the end time has already been set, the cook time and the end
time are calculated and if necessary the oven sets a delayed start point.
Press the Cook Time Button.
1
Example Current time is 3:00 and
Press the Cook Time Button. A
3
“Ready” symbol appears until the
delayed start point.
the desired end time is
5:00.
Turn the Time / Temp Control Knob
2
to set the cook time.
Example You want to cook for 1
hour and 30 minutes
and end by 5:00.
18
Page 21
19
EN
Oven Use (Continued)
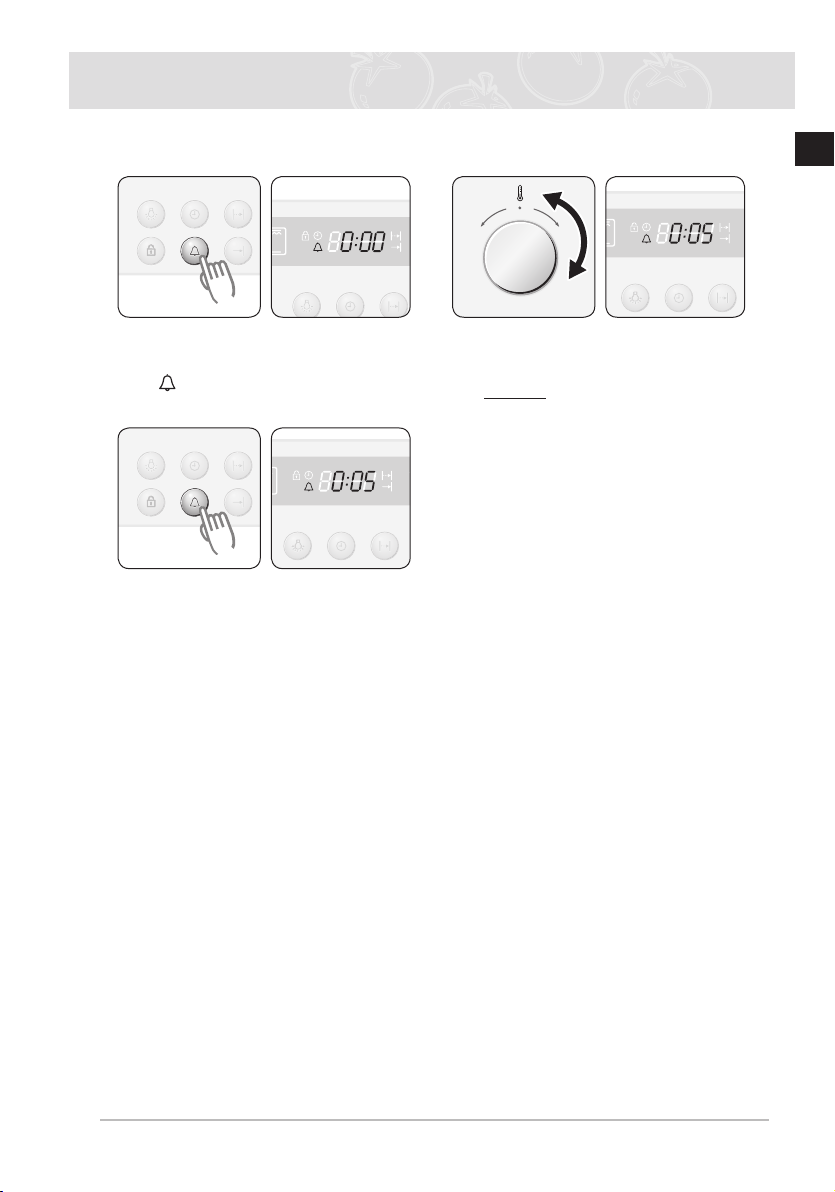
Kitchen timer
Press the Kitchen Timer Button
1
once.
“
” flashes.
Press the Kitchen Timer Button to
3
start the kitchen timer. When the set
time has elapsed, an audible signal
sounds.
Press and hold the Kitchen Timer Button for 2 seconds each to cancel the timer.
Turn the Time / Temp Control Knob
2
to set the desired time.
Example 5 minutes
Page 22
EN
Oven Use (Continued)
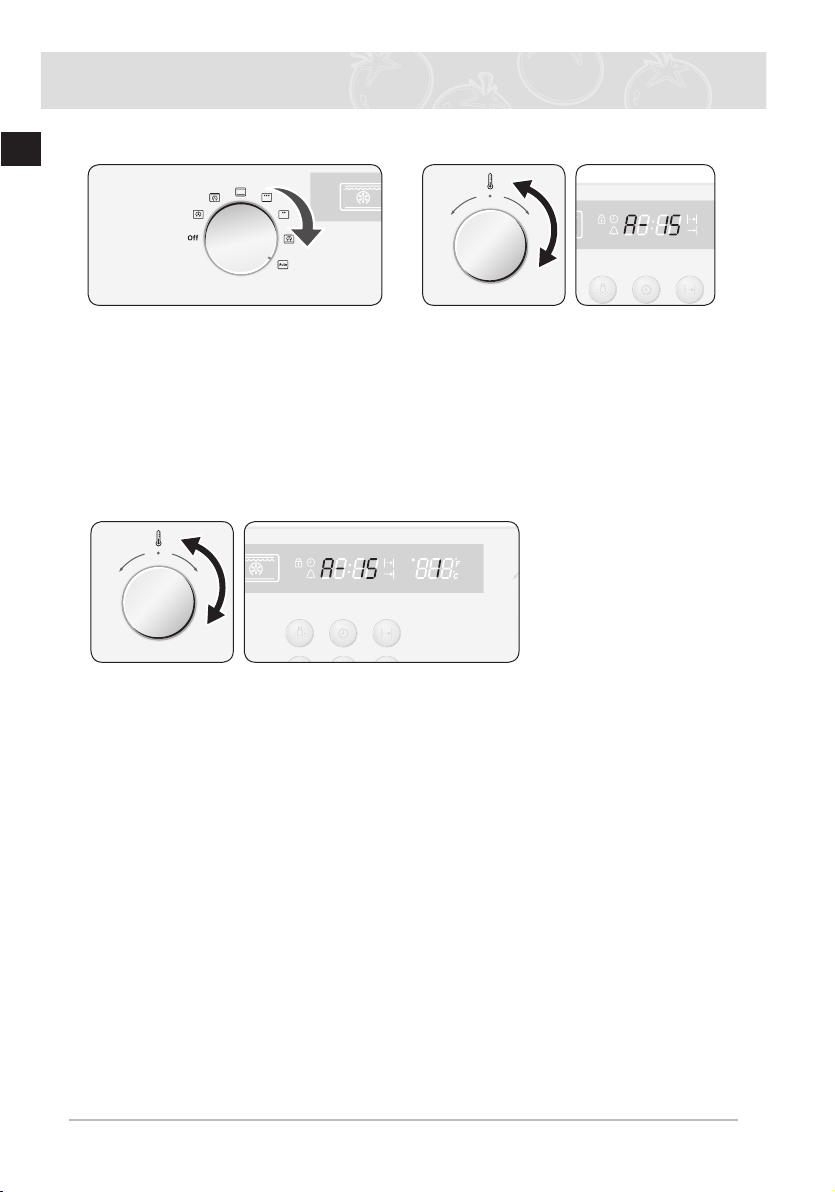
Auto Cook
Turn the Cooking Function Knob to
1
Auto Cook.
Select the desired weight by turning the Time/Temp control knob to the right and
3
left. Preheating time(min:sec) is displayed, and countdown starts 5 seconds after the
weight is selected. For a recipe without preheating, remaining cooking time(hr:min) is
displayed.
Preheat countdown completed
Upon completion of preheating, the oven beeps and the remaining cooking time(hr:min)
is displayed. Keep “Preheat condition” until food is inserted into the oven, and Cook Time
Button is pressed.
Select the desired recipe by turning
2
the Time/Temp control knob to the
right and left. Wait to select weight 5
seconds after selecting a recipe. For a
recipe with weight fixed, start cooking
immediately.
20
Page 23
21
EN
Oven Use (Continued)
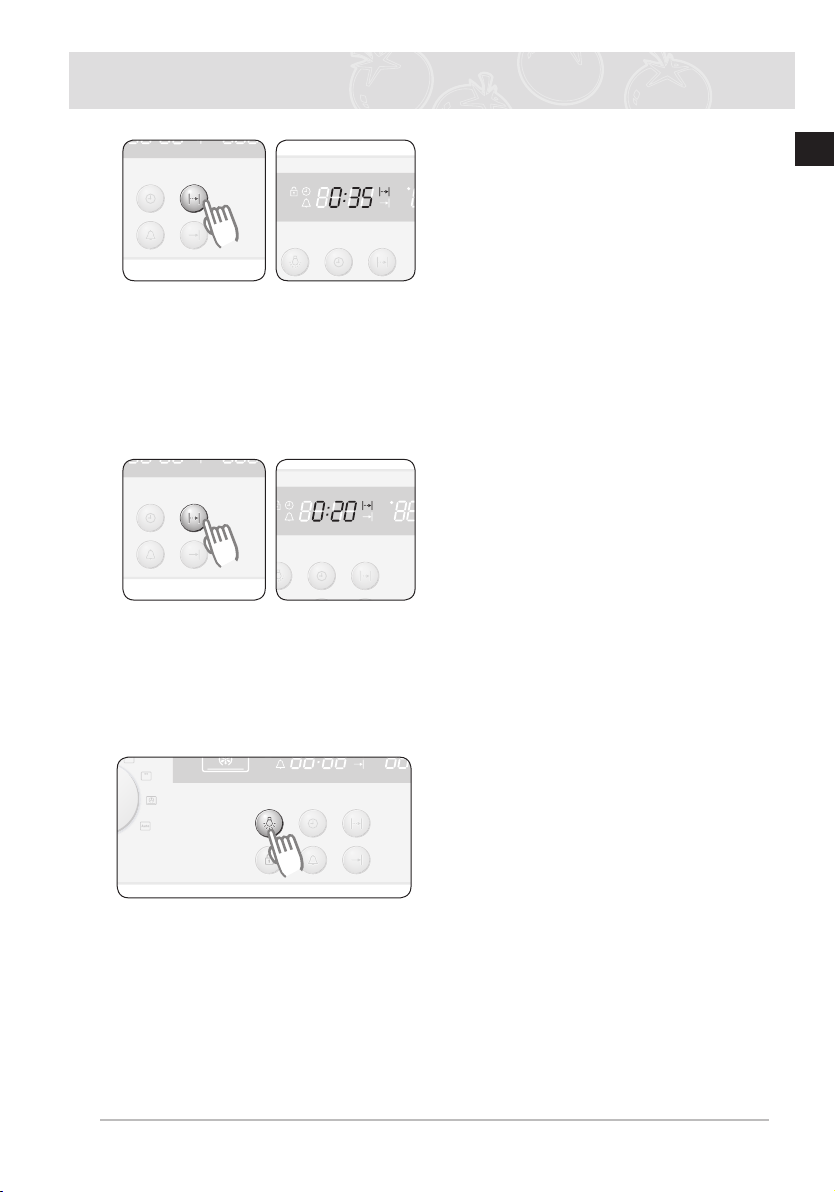
Press Cook Time Button. Cook time
4
countdown is displayed. Stage-1 of
cooking starts.
When it reaches the time for “Turn Over/Around”
It beeps to inform the time for “Turn Over/Turn Around”. After “Turn Over/Turn Around”, stop
cooking and wait until Cook Time Button is pressed.
Press Cook Time Button. It stops
5
beeping, and the cooking restarts.
Oven lamp on / off
Press the Lamp Button.
1
1st Off
2nd On
The lamp automatically turns off after 5 minutes.
Page 24
Oven Use (Continued)
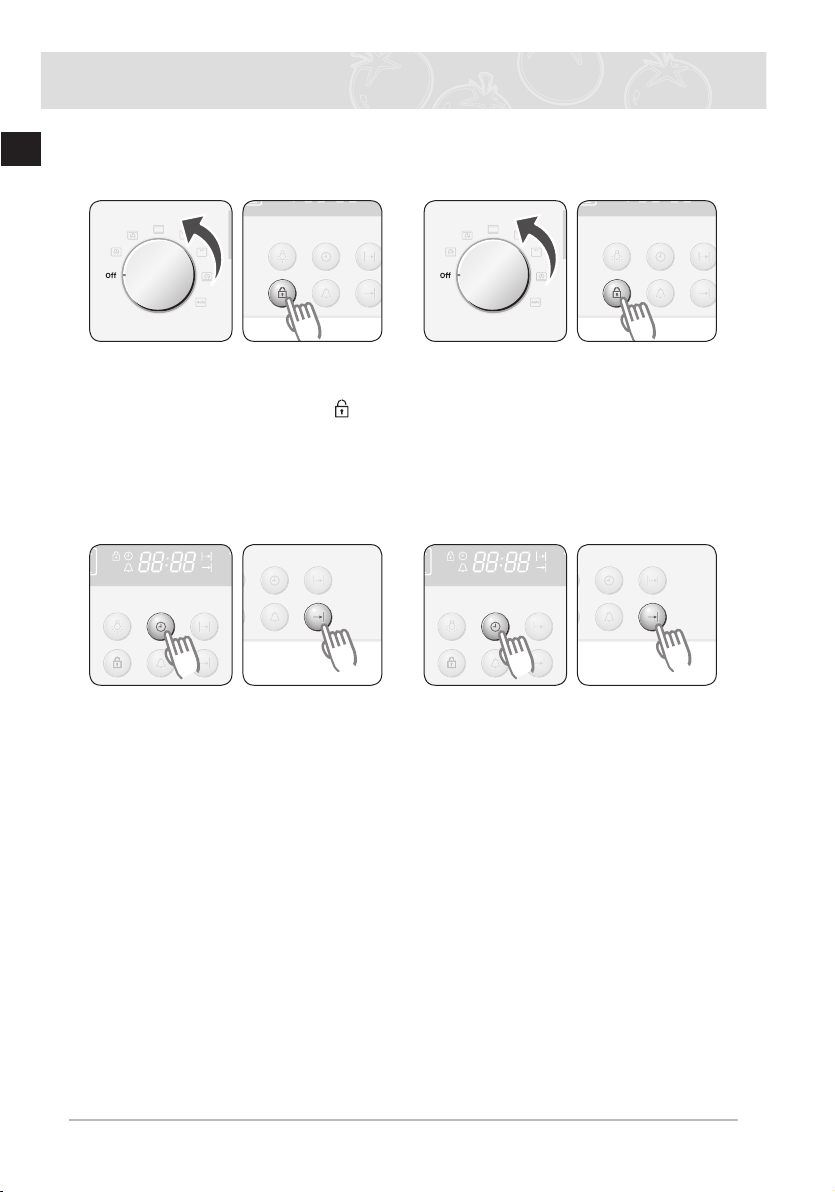
Child safety function
EN
You can use child lock function in stand-by status.
Turn Cook Function Select Knob to
1
“Off” position. Press the Child Lock
Buttons hold for 3 seconds. (
appear in the display field.
If locked, buttons and dials except unlock function button fail to operate.
Switching the beeper off
To turn the beeper off, press the
1
Clock and End Time Buttons at the
same time and hold for 3 seconds.
) will
Turn Cook Function Select Knob to
2
“Off” position. Press the Child Lock
Buttons hold for 3 seconds again to
unlock.
To turn the beeper back on, press
2
the Clock and End Time Buttons
again at the same time and hold for 3
seconds.
22
Page 25
23
EN
Oven Use (Continued)
Oven functions
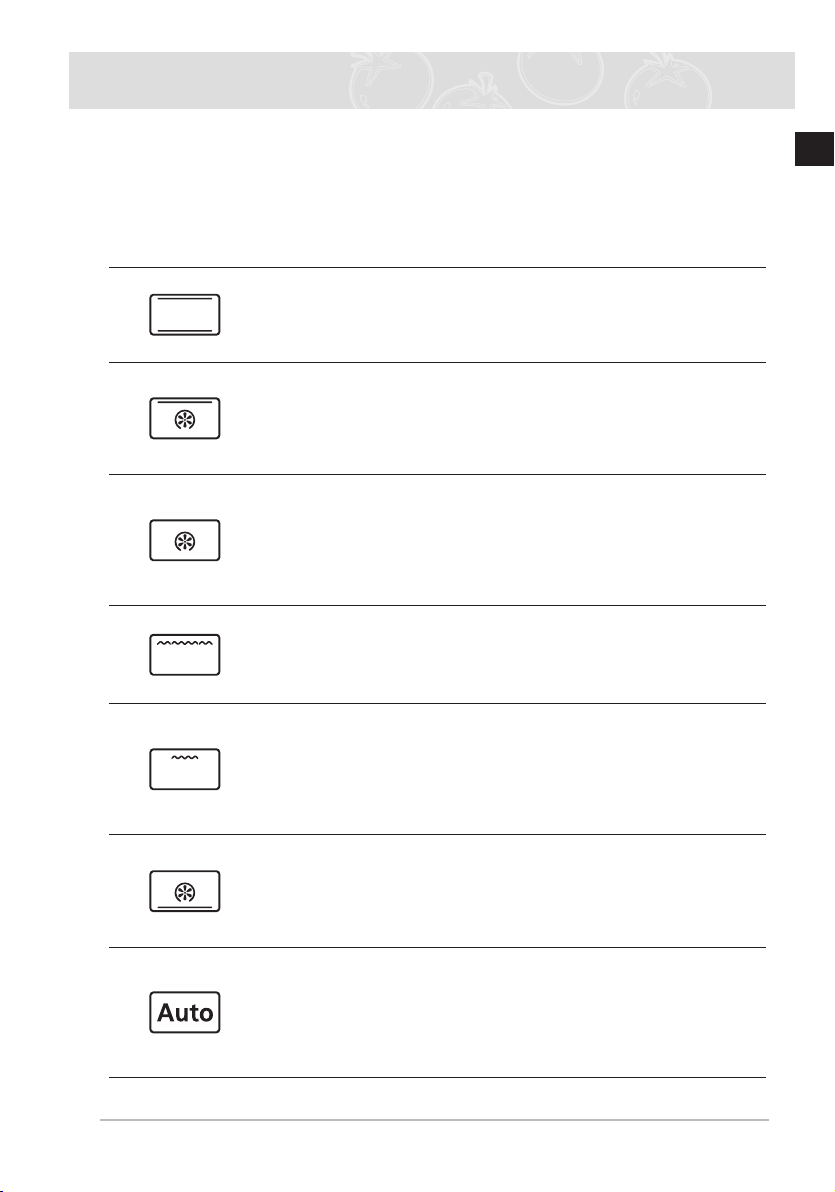
The features of this oven include the following functions
Oven Modes
The following table represents the various oven modes and settings of your oven.
Use the cooking guide tables for these modes in the following pages as guidelines for cooking.
Conventional
Food is heated by top and bottom heating elements. This setting is
suitable for baking and roasting.
Top Heat + Convection
We recommend this mode when roasting meat. The top heating ele
ment is in operation and the fans operate to circulate the hot air coming from top and back wall heating element.
Convection
Food is heated by the hot air from the heating element in the back and
circulated by two fans. This setting provides uniform heating and is
ideal for frozen convenience food as well as cake and croissants.
This mode can be used for baking on two levels.
Large Grill
Food is heated by the top heating elements. We recommend this
mode for grilling steaks and sausages as well as cheese toasts.
Small Grill
This mode is ideal for grilling small amounts of foods, such as baguettes, cheese or fish fillets.
Place the food in the middle of the wire grill, as only the smaller heating element in the centre is operating.
-
Bottom Heat + Convection
The bottom heating element and back wall heating element provide
hot air which is circulated by the fans. This mode is ideal for baking
food such as quiches, pizza, bread and cheesecakes.
Auto Menu Programmes
You can select 15 auto menu programmes for baking, roasting and
cooking. The mode, cooking time and temperatures are pre- pro
grammed for your convenience. You simply select the item and ap
propriate serving option.
-
-
Page 26
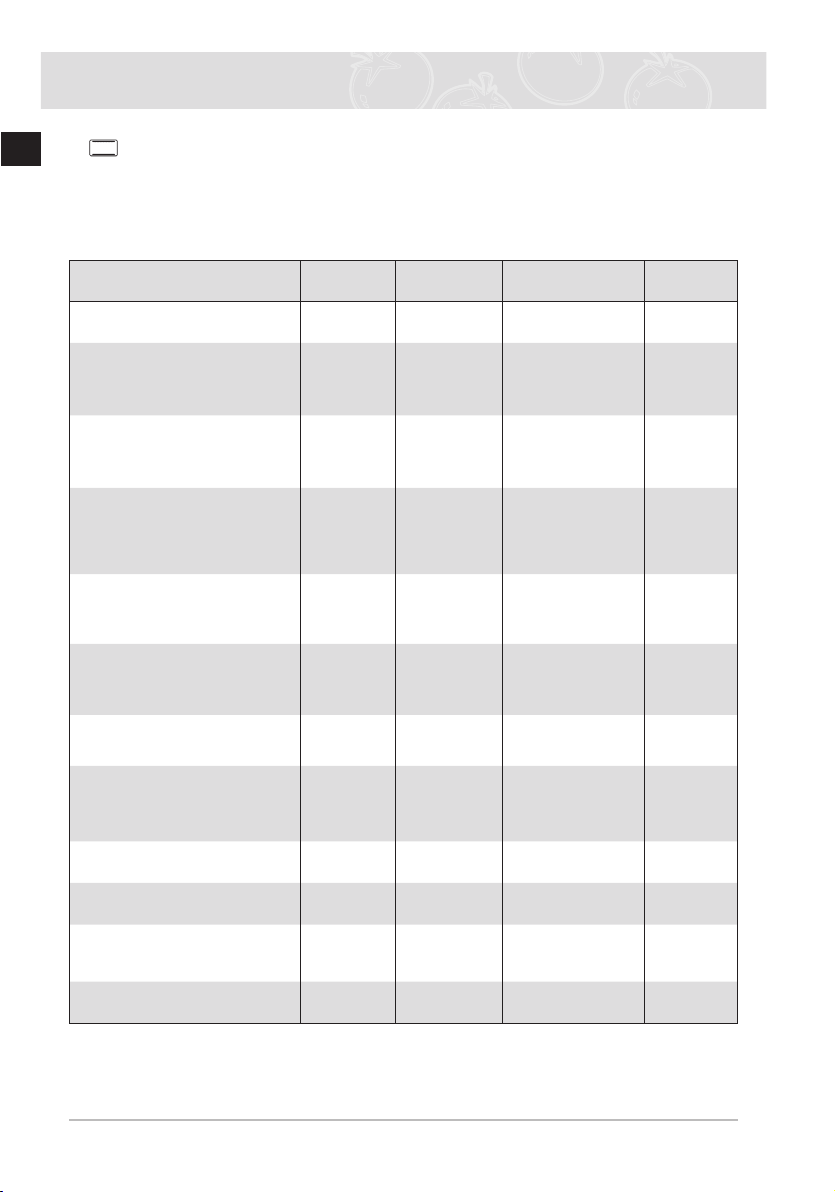
Oven Use (Continued)
1. Conventional
EN
Suggested temperature: 200 °C
The conventional function is ideal for baking and roasting foods arranged on one rack. Both
the top and bottom heating elements operate to maintain the oven temperature.
We recommend to preheat the oven in conventional mode.
Food Item Shelf Level Accessory
Frozen Lasagne
(500-1000g)
Whole Fish (e.g. Dorade)
(300-1000g)
3-4 cut on each side
DROP OIL
Fish filets
(500-1000g)
3-4 cut on each side
DROP OIL
Frozen cutlets
(350-1000g)
minced meat & with ham,
cheese or mushroom filing
DROP OIL
Frozen cutlets from minced,
carrot, beetroot or potato
(350-1000g)
DROP OIL
Pork on bone cutlets
(500-1000g)
DROP OIL, ADD SALT &
PEPPER
Baked potato(cut in half)
(500-1000g)
Frozen Meat roll
with mushrooms filing
(500-1000g)
DROP OIL
Sponge Cake
(250-500g)
Marble Cake
(500-1000g)
Yeast Cake on Tray
with fruit & crumbles topping
(1000-1500g)
Muffins
(500-800 g)
Temperature
3 Wire grill 180-200 40-50
3 / 2 Wire grill /
3 Baking tray 200 13-20
3 Baking tray 200 25-35
3 Baking tray 200 20-30
3 / 2 Wire grill /
3 Baking tray 180-200 30-45
3 Baking tray 180-200 40-50
2 Wire Grill 160 - 180 20 - 30
2 Wire Grill 170 - 190 40 - 50
2 Baking tray 160 - 180 25 - 35
2 Wire Grill 190 - 200 25 - 30
Deep Pan
Deep Pan
(°C)
240 15-20
200 40-50
Time (min)
24
Page 27
25
EN
Oven Use (Continued)
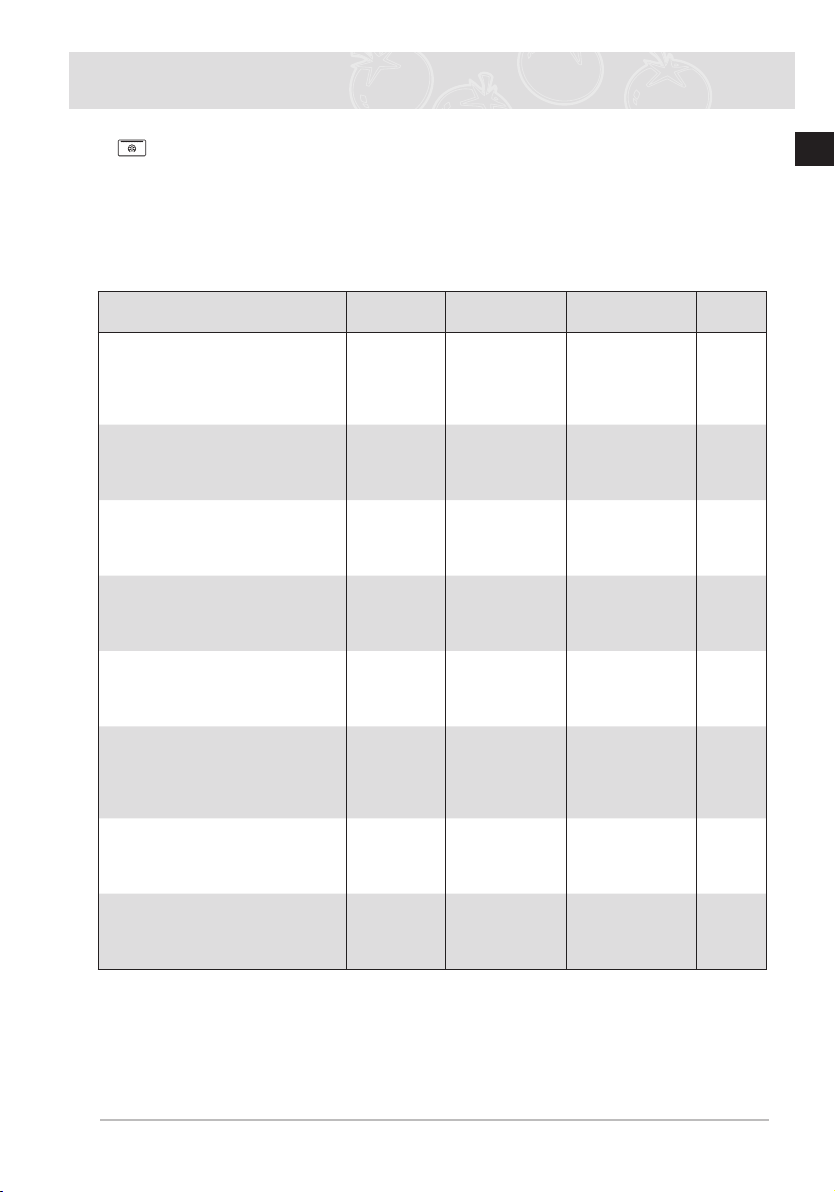
2.
Top Heat + Convection
Suggested temperature: 190 °C
The top heating element is in operation and the fan operates to constantly circulate the hot
air.
We recommend to preheat the oven with Top Heat + Convection mode.
Food Item Shelf Level Accessory Temperature (°C)
Pork on bone
(1000g)
BRUSH WITH OIL&SPICES
Pork shoulder in foil
(1000-1500g)
MARINATE
Whole chicken
(800-1300g)
BRUSH WITH OIL & SPICES
Meat or fish steaks
(400-800g)
DROP OIL, ADD SALT & PEPPER
Chicken Pieces
(500-1000g)
BRUSH WITH OIL&SPICES
Roast Fish
(500g-1000g)
use ovenproof dish
BRUSH WITH OIL
Roast Beef
(800-1200g)
BRUSH WITH OIL&SPICES
3 / 2 Wire grill /
2
2 / 1
3
4 / 3
2 Wire Grill 180-200 30 - 40
2 / 1
Deep Pan
Baking tray 180-230 80 - 120
Wire Grill/
Deep Pan
Wire Grill/
Deep pan
Wire Grill /
Deep Pan
Wire Grill/
Deep Pan
Add 1 cup water
180-200 50-65
190-200 40-65
180-200 15-35
200-220 25 - 35
200-220 45 - 60
Time
(min)
Duck Breast
(300-500g)
4 / 3
Add 1 cup water
Wire Grill/
Deep Pan
180-200 25 - 35
Page 28
Oven Use (Continued)
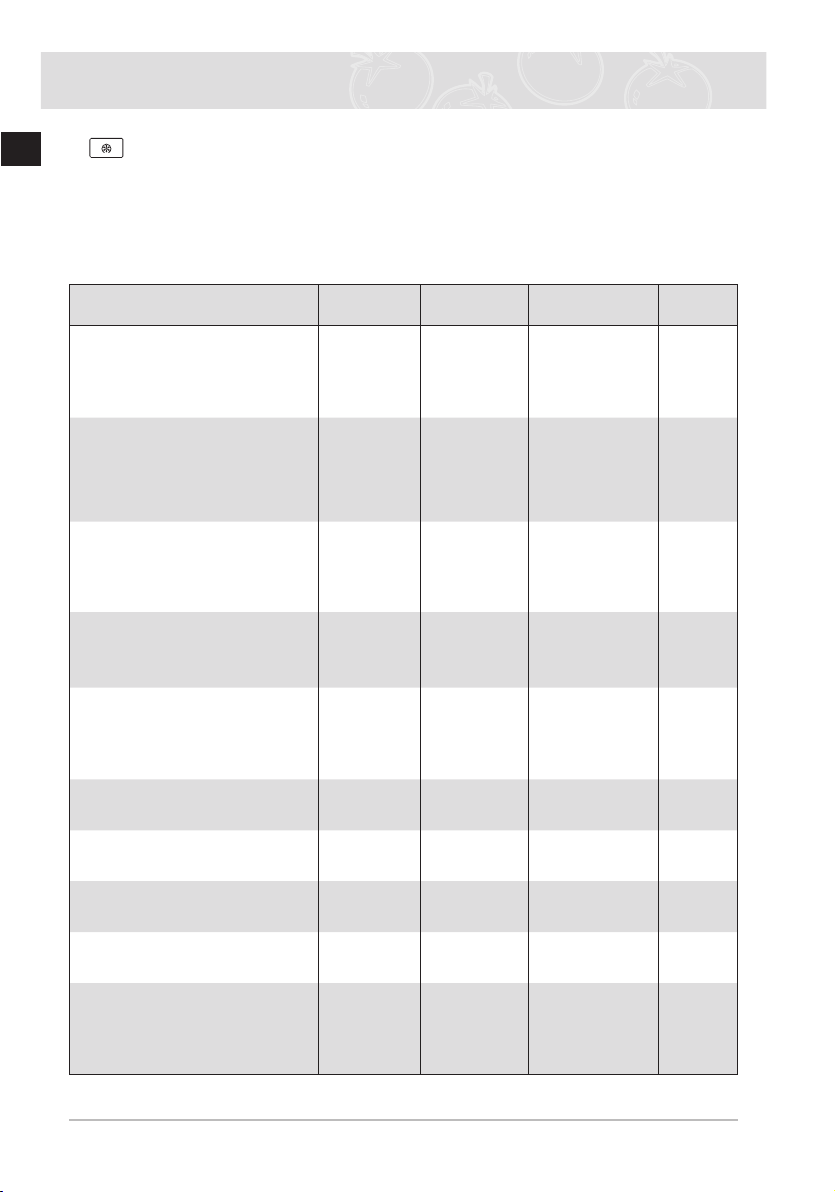
3. Convection
EN
Suggested temperature: 170 °C
This function bakes foods placed on up to three shelves and is also appropriate for roasting.
Cooking is achieved by the heating element on the rear wall and the fan distributes the heat.
We recommend to preheat the oven in convection mode.
Food Item Shelf Level Accessory Temperature (°C)
Lamb rack
(350-700g) ,
BRUSH WITH OIL & SPICES
Baked Bananas
(3-5 pcs), cut with knife on top,
add10-15g chocolate, 5-10g nuts
into cuts, drop sugar water, wrap
in aluminium foil.
Baked apples
5-8pcs each 150-200g
Take out the hearts, add raisins
and jam. Use ovenproof dish.
Cutlets from minced meat
(300-600g)
DROP OIL
Minced Meat roll with filling
,Russian style’
(500g-1000g)
BRUSH WITH OIL
Frozen Croquettes
(500-1000g)
Frozen Oven Chips
(300-700g)
Time
(min)
3 / 2 Wire grill /
Deep pan
3 Wire grill 220-240 15-25
3 Wire grill 200-220 15-25
3 Baking tray 190 - 200 18-25
3 Baking tray 180-200 50-65
2 Baking tray 180-200 25 - 35
2 Baking tray 180-200 20 - 30
190-200 40-50
Frozen Pizza
(300-1000g)
Apple & Almond Cake
(500-1000 g)
Fresh Croissant
(200-400g)
(ready-dough)
2 Wire Grill 200 - 220 15 - 25
2 Wire Grill 170 - 190 35 - 45
2 Baking tray 180 - 200 15 - 25
26
Page 29
27
EN
Oven Use (Continued)
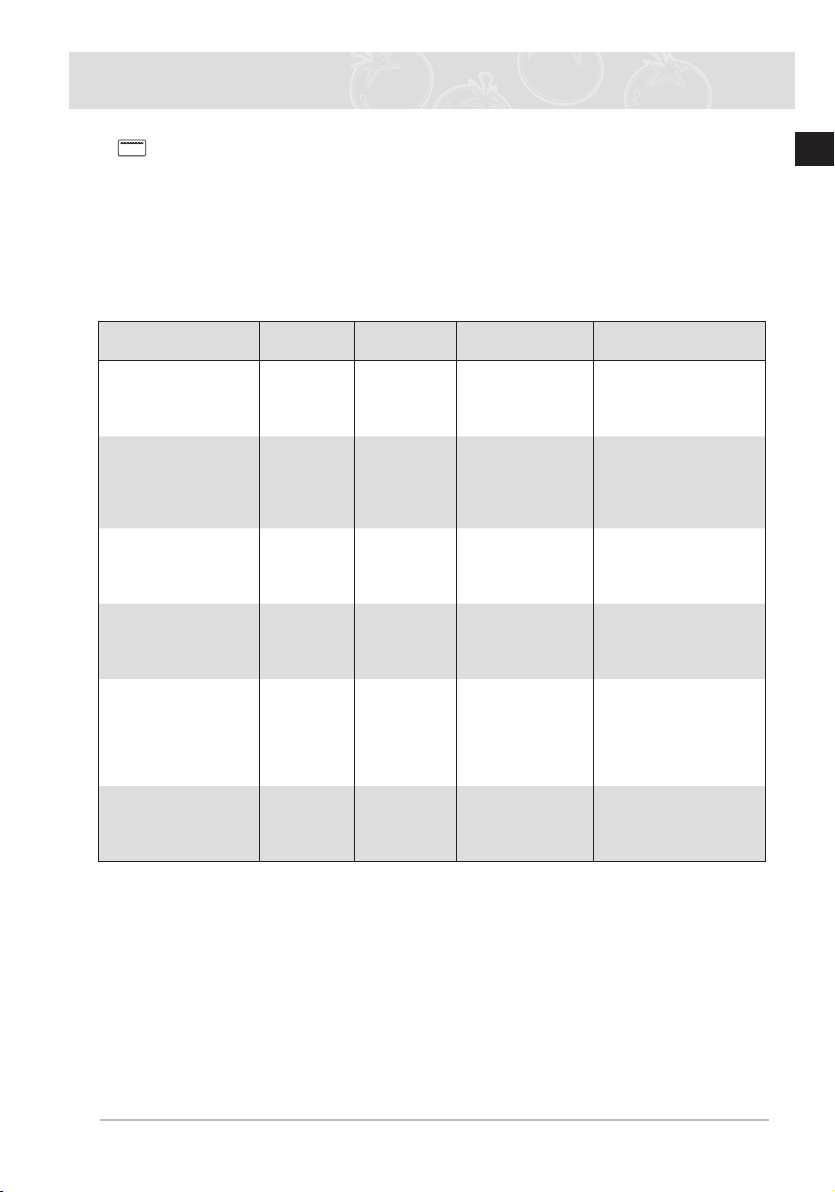
4. Large Grill
Suggested temperature: 240 °C
The large grill function grills large quantities of flat foods, such as steaks, schnitzels and
fish. It is also suitable for toasting. Both the top heating element and the grill are on in this
mode.
We recommend to preheat the oven using Large Grill mode.
Food Item Shelf Level Accessory Temperature (°C) Time (min)
Sausages (thick)
5-10pcs
Sausages (thin)
8-12pcs
Toasts
5-10pcs
Cheese Toasts
4-6 pcs
Frozen Pancakes
with filling
,Russian Style’
(200- 500g)
4 / 3
4 / 3 Wire grill /
5 Wire grill 240
4 / 3
3 Baking tray 200
Wire grill /
Deep Pan
Deep Pan
Wire grill /
Baking Tray
220
220 4 - 6
200 4 - 8
5 - 8
turnover
5 - 8
turnover
4 - 6
1 - 2
turnover
1 - 2
20 - 30
Beef Steaks
(400-800 g)
4 / 3
Wire grill/
Deep Pan
240
8 - 10
turnover
5-7
Page 30
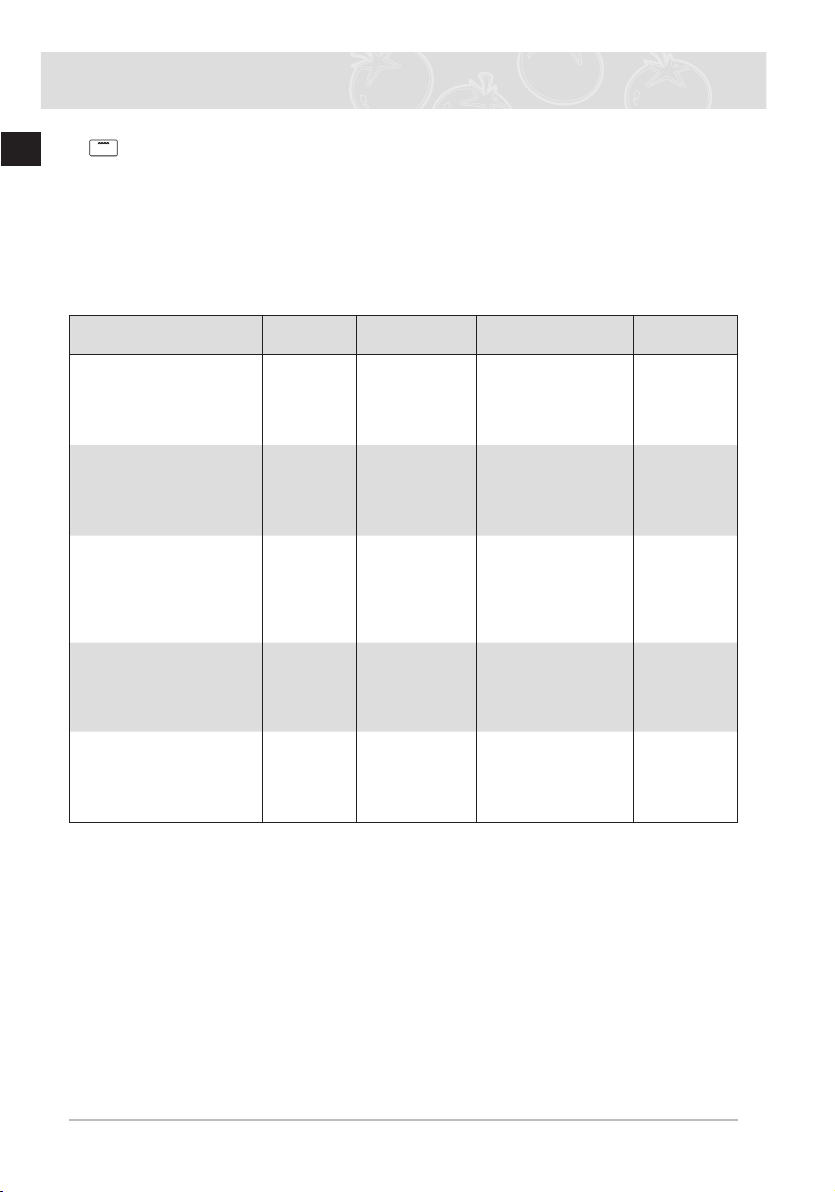
Oven Use (Continued)
5. Small Grill
EN
Suggested temperature: 240 °C
This setting is for grilling smaller amounts of flat foods, such as steaks, schnitzels, fish and
toast, placed in the middle of the tray. Only the top element is in operation.
We recommend to preheat the oven using Small Grill mode.
Put food in the centre of accessory.
Food Item Shelf Level Accessory Temperature (°C) Time (min)
Frozen Oven Camembert
(2 – 4 each 75g)
PUT IN COLD OVEN
(before preheat)
Frozen Baguettes
with topping
(Tomato-Mozzarella or
Ham & Cheese)
Frozen Fish fingers
(300-700g)
PUT IN COLD OVEN ,
(before preheat)
DROP OIL
Frozen Fish burger
(300- 600g)
PUT IN COLD OVEN,
DROP OIL
Frozen Pizza
(300-500g)
PUT IN COLD OVEN
(before preheat)
3 Wire grill 200 10-12
3 / 2 Wire grill /
Baking tray
3 / 2 Wire grill /
Baking tray
3 Baking tray 180-200 20-35
3 / 2 Wire grill /
Baking tray
200 15-20
200 15-25
180-200 23-30
28
Page 31
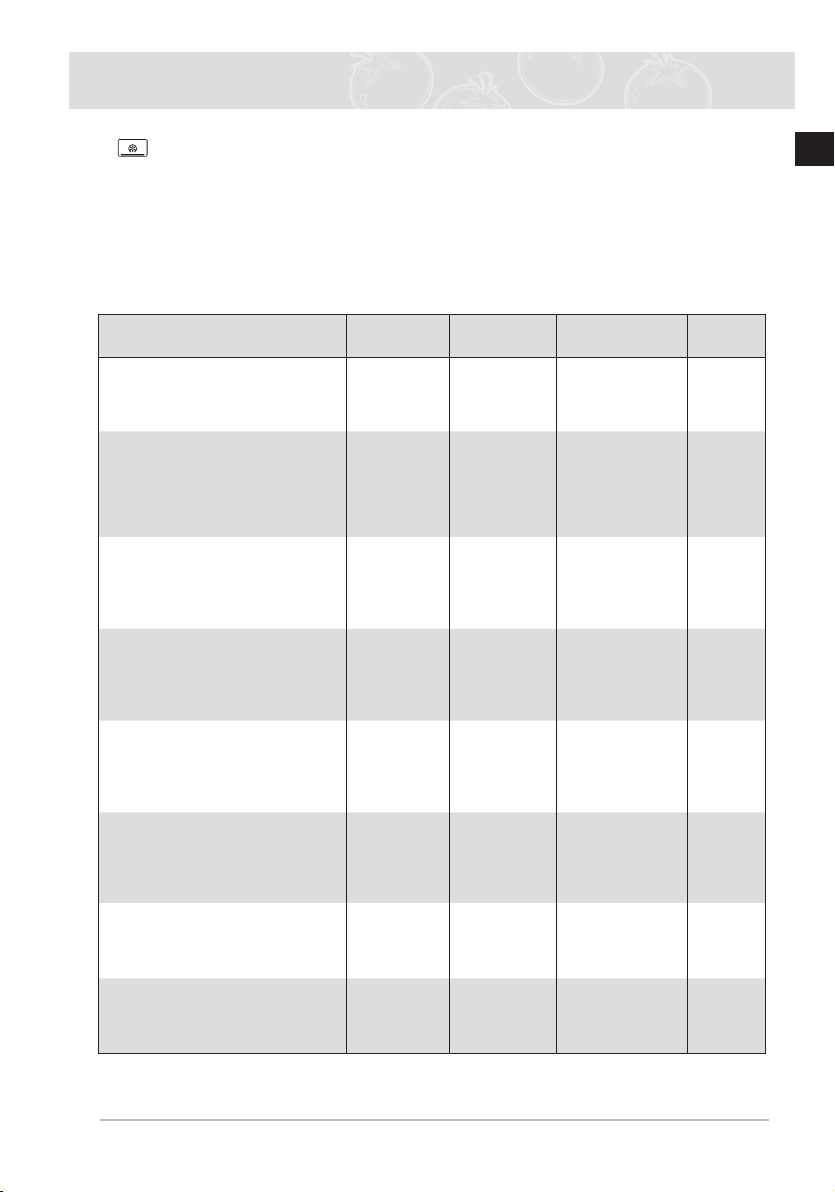
29
EN
Oven Use (Continued)
6. Bottom Heat + Convection
Suggested temperature: 190 °C
The Bottom Heat + Convection mode is for recipes calling for a moist topping and a crisp
base, as with foods like pizzas, quiches lorraine, German-style open fruitcakes and cheesecakes.
We recommend to preheat the oven in Bottom Heat + Convection mode.
Food Item Shelf Level Accessory
Yeast dough pie with apple fro
zen (350-700g)
Puff pastry small pies with filling
frozen (300-600g)
BRUSH EGG YOLK, PUT IN
COLD OVEN
(before preheat),
Meat balls in sauce
(250-500g)
use ovenproof dish
Puff pastry fans
(500-1000g)
BRUSH EGG YOLK
-
Temperature
(°C)
3 Wire grill 180-200 15-20
3 Baking tray 180-200 20-25
3 Wire grill 180-200 25-35
3 Baking tray 180 15-23
Time
(min)
Cannelloni in sauce
(250-500g)
use ovenproof dish
Yeast dough pies with filling
(600-1000g)
BRUSH EGG YOLK
Homemade Pizza
(500-1000g)
Homemade Bread
(700-900g)
3 Wire grill 180 22-30
3 Baking tray 180-200 20-30
2 Baking tray 200 - 220 15-25
2 Wire Grill
170 - 180 45-55
Page 32
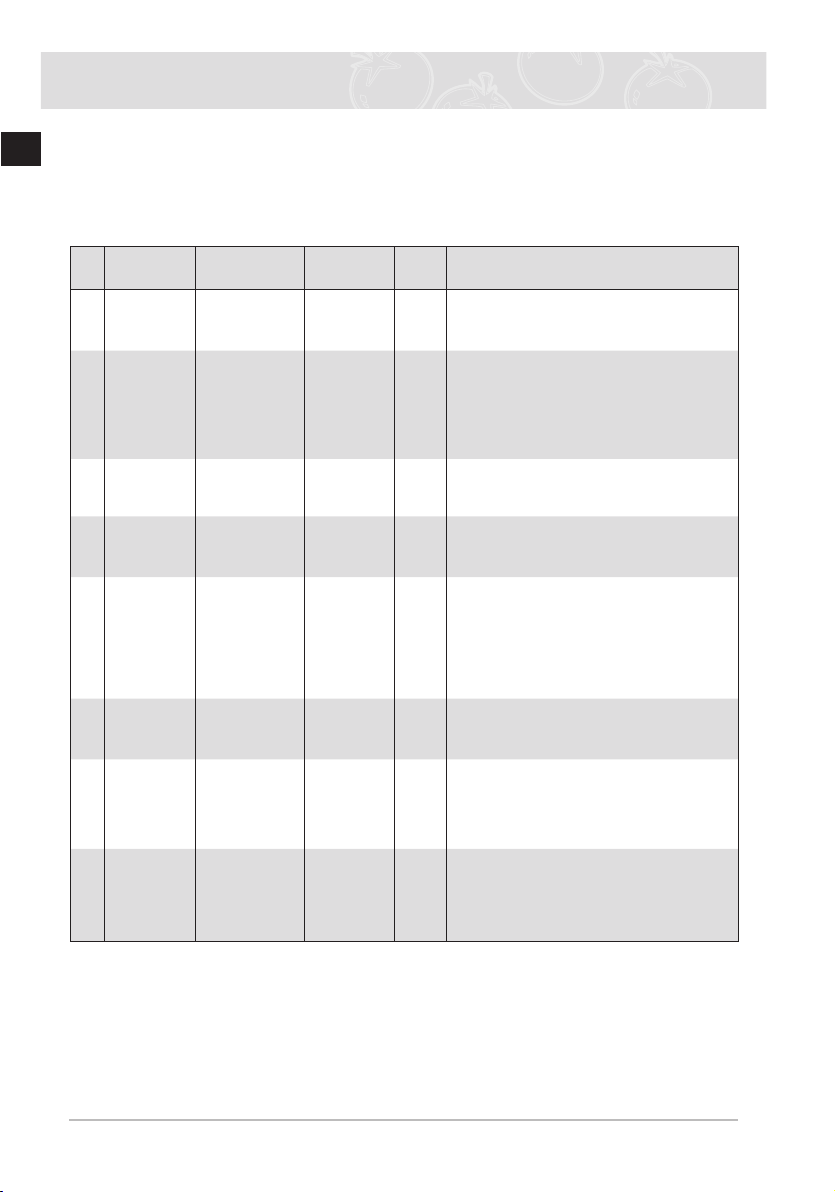
Oven Use (Continued)
7. Auto Menu Programmes
EN
The following table presents 15 Auto Programmes for Cooking, Roasting and Baking.
It contains its quantities, weight ranges and appropriate recommendations.
Cooking Modes and times have been pre-programmed for your convenience.
You can refer to these guide lines for cooking. Always insert food in cold oven.
No Food Item Weight/kg Accessory Shelf
1 Frozen
Pizza
2 Frozen
Oven
Chips
3 Frozen
Croquettes
4 Fresh
Lasagne
5 Steamed
Fish
6 Roast
Chicken
7 Beef
Steaks
8 Roast Beef 1- 0.6 - 0.8
1- 0.3 - 0.6
2- 0.7 - 1.0
1- 0.3 - 0.5
2- 0.5 - 0.7
1- 0.3 - 0.6
2- 0.7 - 1.0
1- 0.3 - 0.5
2- 0.8 - 1.0
1- 0.2 - 0.4
2- 0.5 - 0.7
3- 0.8 - 1.0
1- 0.8 - 1.0
2- 1.1 - 1.3
1- 0.3 - 0.6
2- 0.6 - 0.8
2- 0.9 - 1.1
3- 1.2 - 1.4
Wire grill 2
Baking tray 2
Baking tray 2
Wire Grill 3
Wire Grill 2
Wire Grill
Deep pan21
Wire Grill
Deep pan43
Wire Grill
Deep pan 21
Level
Recommendation
Put frozen Pizza in the centre of wire grill.
We recommend 0.3-0.6 kg setting for thin piz
zas, 0.7-1.0 kg for pizzas with thick topping.
Distribute frozen Oven Chips on baking tray.
The first setting is recommended for thin French
fries, the second setting is recommended for
thick oven chips. Use baking paper.
We recommend to turn over after 2/3 of cooking
time.
Put frozen potato croquettes evenly on baking
tray. We recommend to turnover after 2/3 of
cooking time.
Use ovenproof glassware. Put chilled or
homemade lasagne in the middle of oven on
wire rack.
Put prepared fresh fish (e.g. trout, haddock,
codfish) in a suitable sized ovenproof glassware
with lid. Add liquid until bottom of dish is cov
ered e.g. 3-4 tbsp. lemon juice, white wine or
water and cover with lid. Put dish on wire grill.
If you prefer roasted appearance, brush skin of
fish with olive oil and do not cover.
Brush chilled chicken with oil and spices and
put breast-side-up on the wire grill.
Put 2-6 beef steaks side by side evenly on
wire grill. The first setting is for thin steaks, the
second setting is for thick steaks. Turn over
after beep sounds. Press COOK TIME button to
continue automatic cooking.
Marinate Roast Beef and put on wire grill.
Add 1 cup of water into deep pan. Turn over
after beep sounds.
After cooking wrap in aluminium foil and let
stand for 5-10 min.
-
-
30
Page 33
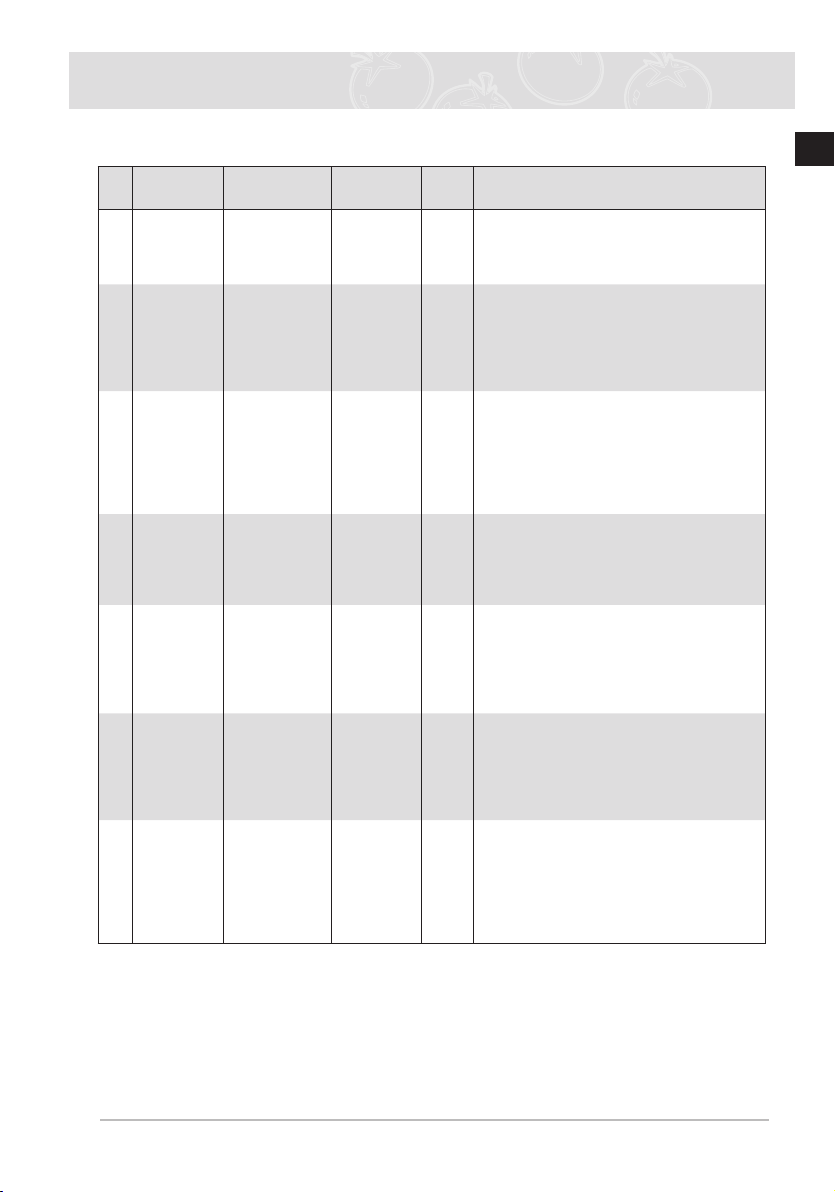
31
EN
Oven Use (Continued)
7. Auto Menu Programmes
No Food Item Weight/kg Accessory Shelf
9 Cake 1- 0.5 - 0.6
Wire grill 2
2- 0.7 - 0.8
3- 0.9 - 1.0
10 Muffins 1- 0.5 - 0.6
Wire Grill 2
2- 0.7 - 0.8
11 Dough
Fermentation
12 White
1- pizza dough
Wire grill 2
2- yeast dough
3- leaven
1- 0.75-0.85 Wire grill 2
Bread
13 Wholemeal
1- 0.75-0.85 Wire grill 2
Bread
14 Bread
Rolls/
1- 0.2 - 0.4
2- 0.6 - 0.8
Baking tray 3
Ciabatta
15 Homemade
Pizza
1- 0.2 - 0.6
2- 0.8 - 1.2
Baking tray 2
Level
Recommendation
Put dough into suitable sized deep round baking pan for bundt cake/ ring cake.
This programme is suitable for batter such as
marble cake, lemon cake and hazelnut cake.
Put muffin dough in metal muffin dish, suitable
for 12 muffins. Set dish on rack.
0.5 -0.6 kg weight range is recommended for
muffins of each 45g, 0.7-0.8 kg weight range
is recommended for medium sized muffins of
each 65g.
The first setting is to rise yeast dough for pizza,
cake, or to pre-rise bread dough.
Put into a big round dish and cover with cling
film. Setting 2 is for bread dough like yeast
dough or sour dough. Setting 3 is for leaven.
Knead pre-rised dough manual, put into baking
dish and cover with cling film.
This programme is suitable for bread mixtures
using 500 g wheat flour. Follow instruction on
package. Put yeast dough into rectangular baking dish. Brush top of dough with water.
Cut length with a knife.
This programme is suitable for bread mixtures
using 500 g wheat and rye flour.
Follow instruction on package. Put leaven (sour
dough) into suitable rectangular baking dish.
Brush top of dough with water. Cut length with
a knife.
The first setting in suitable for dough used
for small pieces such as bread rolls or fresh
dough for croissants (4-8 pcs).
Setting 2 is suitable for dough used for homemade ciabatta breads or baguettes (2-6 pcs).
Use baking paper.
The first setting is suitable for Pizza Snacks
(7-9 pcs). Setting 2 is suitable for one round
or tray sized Pizza. The weight ranges are
including topping such as sauce, vegetables,
ham and cheese. If you prefer strong crust, we
recommend to preheat oven with bottom heat
plus convection mode for 5 min.
Page 34
Oven Use (Continued)
Test dishes
EN
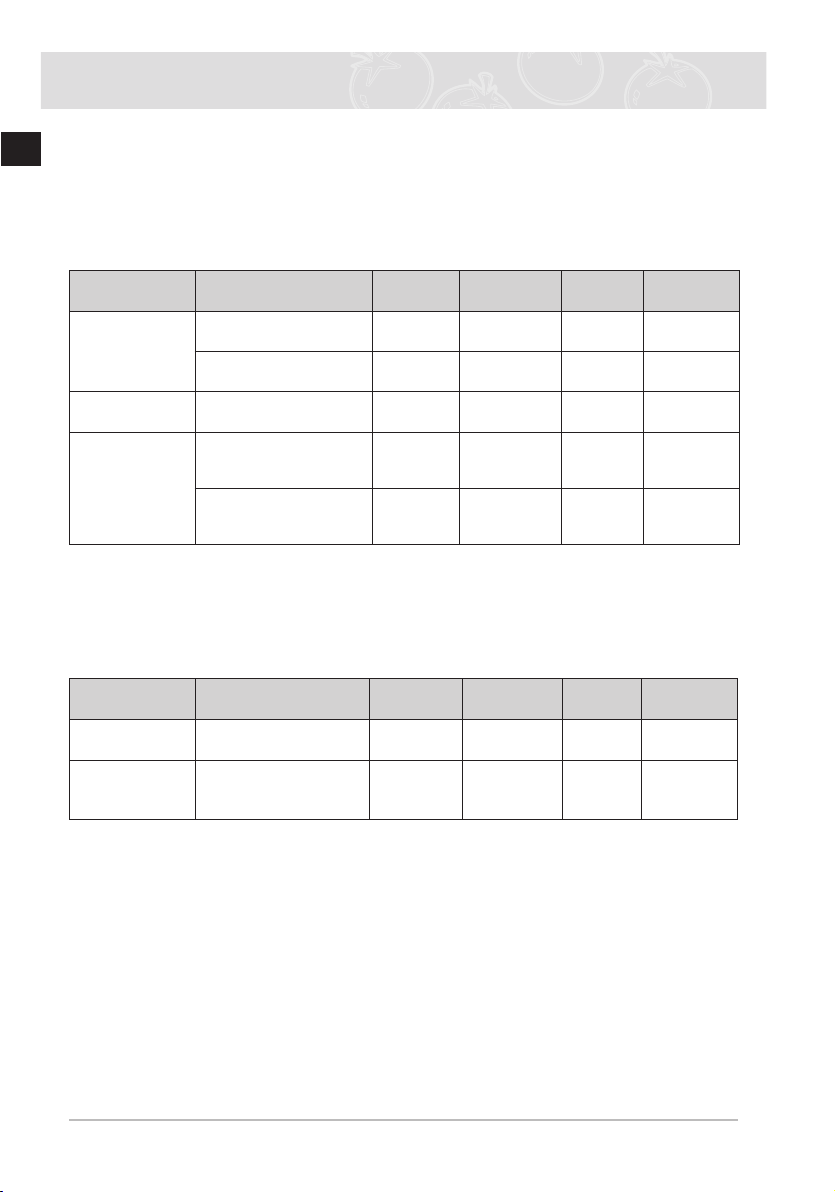
According to standard EN 60350
1. Baking
The recommendations for baking refer to preheated oven.
Type of Food Dish & Notes Shelf level
Small Cakes
Fatless Sponge
Cake
Apple Pie
Baking tray 2 Conventional 170-190 15-25
Deep pan + Baking tray 1+4 Convection 150-170 20-30
Baking tin on Wire grill
(Dark coated, ø 26 cm)
Wire grill + Baking tray
+ 2 Springform cake tins
(Dark coated, ø 20 cm)
Wire grill + 2 Springform
cake tins
(Dark coated, ø 20 cm)
1 Conventional 160-180 25-35
1+3 Convection 170-190 80-100
1
Placed
diagonally
Cooking
Mode
Conventional 180-200 75-90
2. Grilling
Preheat the empty oven for 5 minutes using Large Grill function.
Use this function with the maximum temperature setting of 300°C.
Type of Food Dish & Notes Shelf level
White Bread
Toasts
Beef Burgers
Wire grill 5 Large Grill 300 1st 1-2
Wire grill
Deep pan
(to catch drippings)
4
3
Cooking
Mode
Large Grill 300 1
Temp. °C
Temp. °C
Cooking
time min
Cooking
time min
2nd 1-1 1/2
st
7-10
2nd 5-8
32
Page 35

33
EN
Cleaning and Care
Oven exterior
●
For cleaning both the interior and exterior of the oven, use a cloth and a mild cleaning
agent or warm soapy water.
●
Dry with kitchen paper or a dry towel.
●
Do not use scourers, caustic cleaners or abrasive products.
Stainless steel oven fronts
●
Do not use steel wool, scouring pads or abrasives. They may damage the finish.
Aluminium oven fronts
●
Wipe the plate gently with a soft cloth or microfiber cloth and a mild window cleaning deter-
gent.
WARNING
Make sure the oven is cool before cleaning.
Oven interior
●
Do not hand - clean the door seal.
●
Do not use coarse scouring pads or cleaning sponges.
●
To avoid damaging the enameled oven surfaces, use commercially available oven clean-
ers.
●
To remove stubborn soil, use a special oven cleaner.
Accessories
Wash all bakeware and accessories after each use and dry with a kitchen towel.
To clean easily, soak in warm soapy water for about 30 minutes.
Page 36
Cleaning and Care (continued)
Catalytic enamel surface
EN
The cover casing is coated with a dark gray catalytic enamel that can become coated with
oil and fat distributed by circulating air during convection heating. These deposits will burn
off at oven temperatures of 200 °C and higher, for example, when baking or roasting. Higher
temperatures will result in faster burning.
The oven and accessories should be cleaned after each use. Otherwise further baking and
roasting will cause the deposits to bake on even harder and cleaning may become difficult and
in extreme cases impossible.
Cleaning by hand
Make sure the oven is cool before cleaning.
●
The catalytic enameled cover casing should be cleaned using a solution of hot water and
washing-up liquid applied with a soft nylon brush.
Do not use abrasive cleaning agents, hard brushes, scouring pads or cloths, steel wool, knives
or other abrasive materials. Do not use oven spray on catalytic enamel as the chemicals used
in oven sprays will damage catalytic enamel and render it ineffective.
If using oven sprays on the interior oven surfaces, Please spray it taking care to not
spray the catalytic enamel cover casing.
Cleaning with high temperatures
Before cleaning the catalytic cover casing with high temperatures, make sure that all interior
oven surfaces have been cleaned as described above. Otherwise, the high temperatures
can bake deposits onto the interior oven surfaces and make them impossible to remove.
If, after manual cleaning, the oven is still heavily soiled, heating it to a high temperature will
help remove soiling caused by oil and grease splashes.
Note that deposits of spices, syrups and similar substances are not removed by this process.
These should be removed by hand with a mild solution of hot water and washing-up liquid applied with a soft brush.
●
Remove all accessories from the oven.
●
Set the oven to conventional function.
●
Set the heat to 250 °C.
●
Run the oven for approximately 1 hour. The length of time will depend on the degree of
soiling.
It is a good idea to set the finish time for the process using the end time setting, in case you
forget to switch the oven off at the end.
Any remaining soil will gradually disappear with each subsequent use of the oven at high
temperatures.
34
Page 37
35
EN
Cleaning and Care (Continued)
70
2
1
Cleaning the oven door
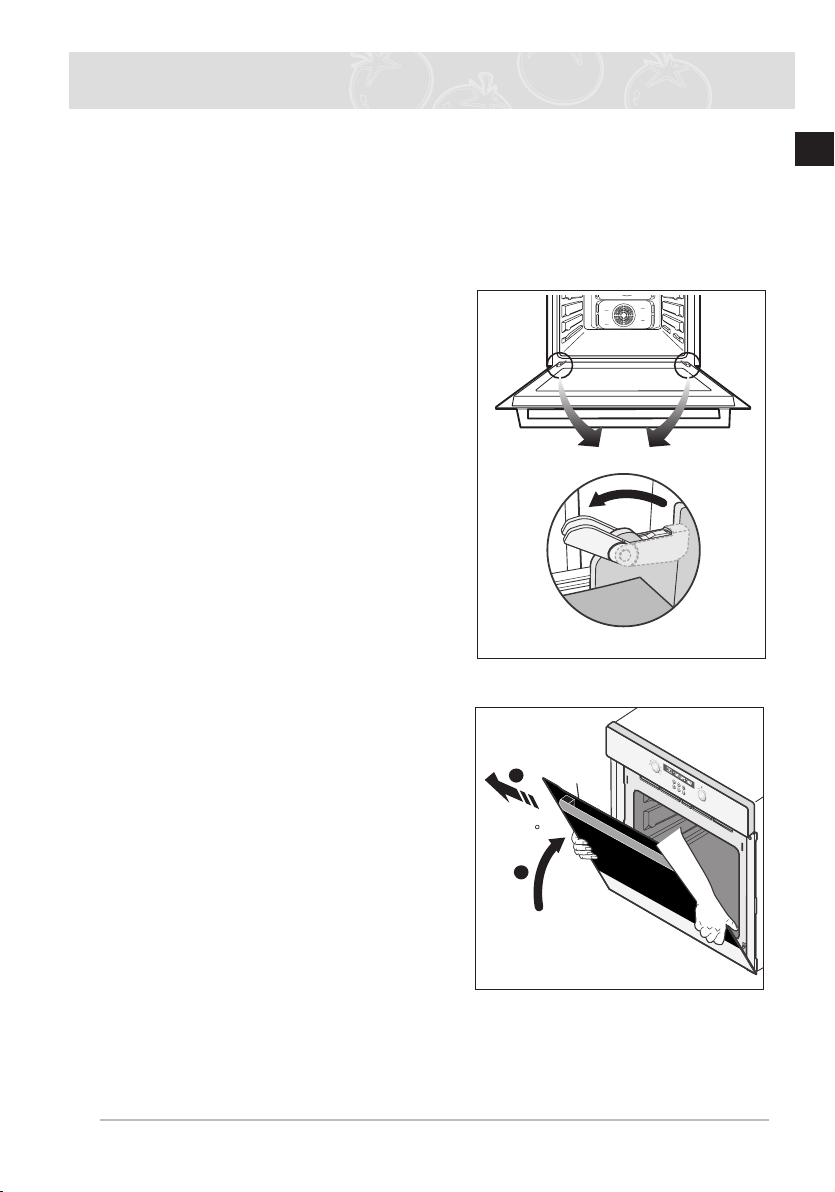
For normal use, the oven door should not be removed but if removal is necessary, for example, for cleaning, follow these instructions. The oven door is heavy.
Removing the door
1. Flip open the clips at both hinges.
2. With both hands, grasp the sides of the oven
door at its middle.
3. Rotate the door by approximately 70 ° until the
hinges can be taken out completely from the
hinge holes.
Page 38
Cleaning and Care (Continued)
70
The hinge is
normally inserted.
Hinge
Hinge
hole
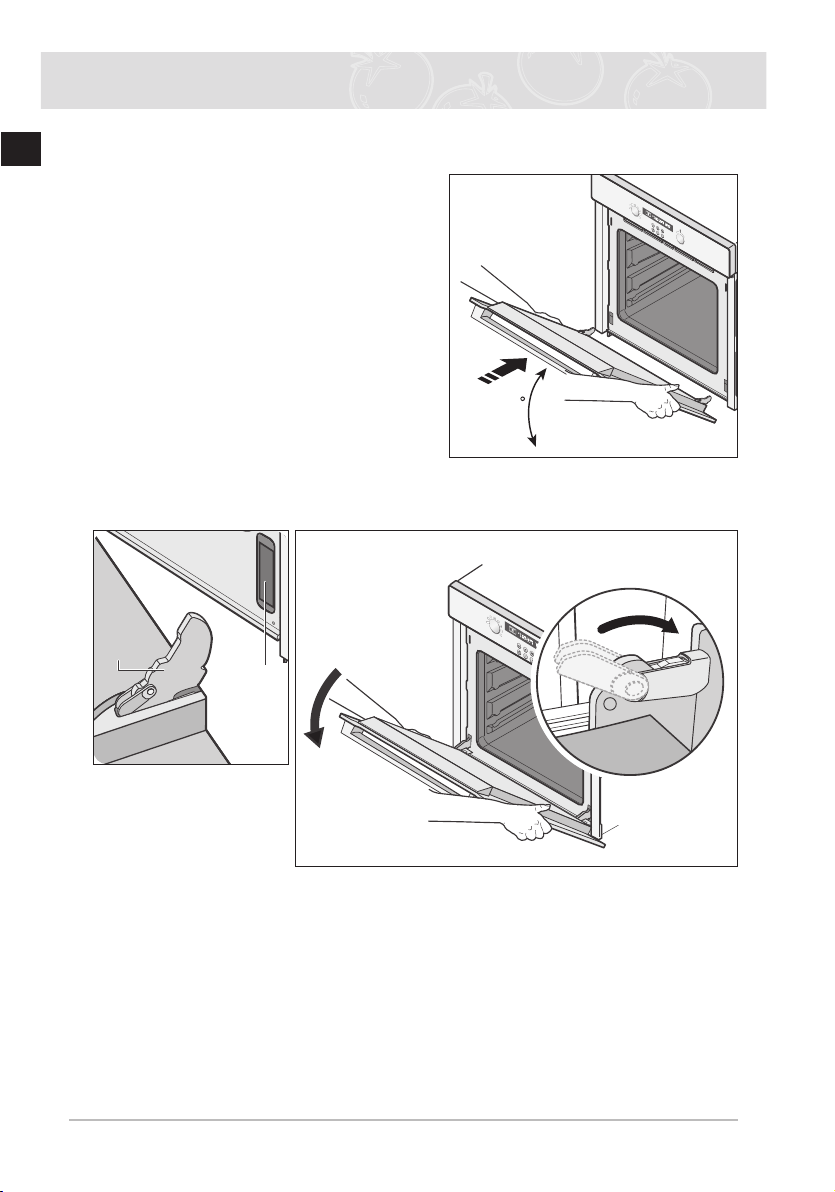
Attaching the door
EN
1. With the clips still flipped open, align the door
hinges into the hinge holes.
2. Rotate the door toward the horizontal line and flip the clips closed.
36
Page 39
37
EN
Cleaning and Care (Continued)
Door bracket
Glass #1
Glass #3
Door bracket
Holder glass inner
Spring bracket
Glass #1
(Right and Left)
Glass #2
Glass #3
Glass #2
Oven door glass
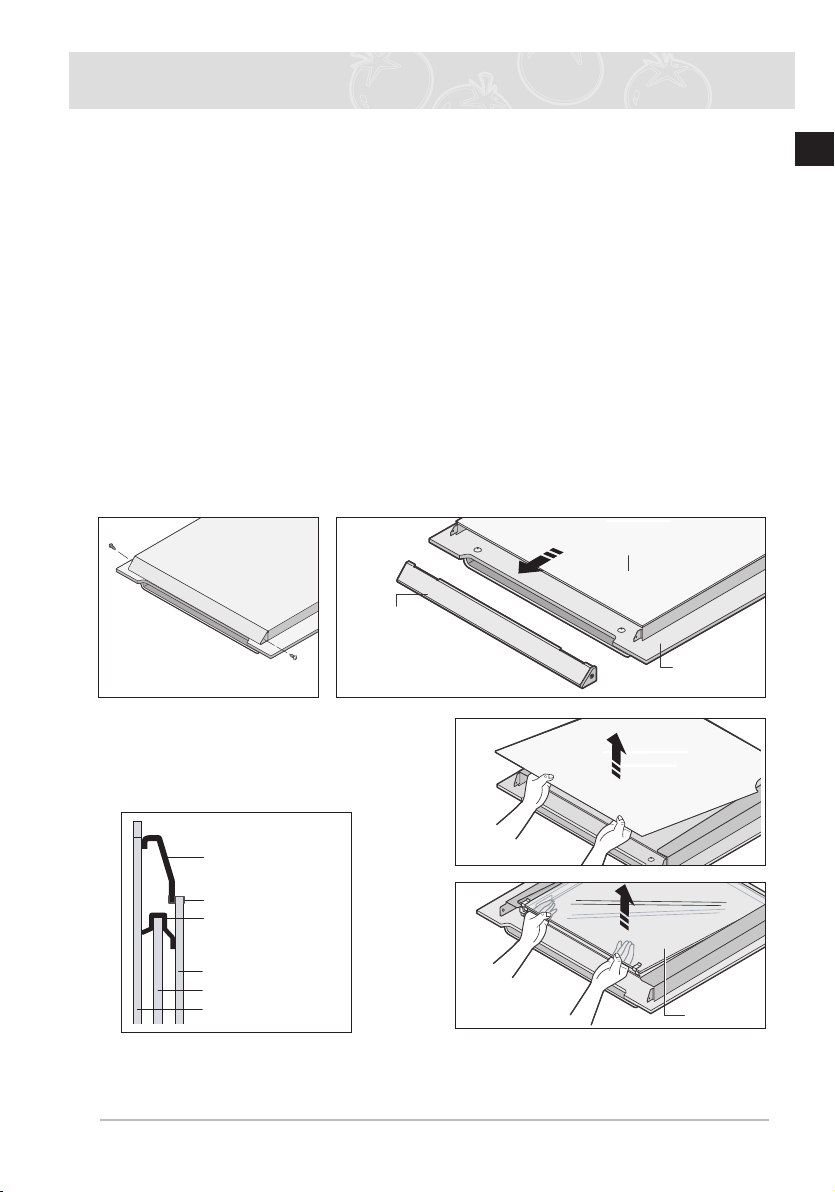
The oven door is equipped with three sheets of glass placed against each other. The inner &
middle sheets can be removed for cleaning.
WARNING
● Whenever the door is separated from the oven, the clips should be flipped open.
● Do not use harsh abrasive cleaners or metal scrapers to clean the oven door; they ca
scratch the surface, which may cause the glass to shatter.
● When the door is mounted, removing some of the parts (the door glass or some other part)
from the door may result in injury.
Attention
The glass may break if you use excessive force especially at the edges of the front sheet.
Disassembling the door
1. Remove the two screws on the left and right sides of the door.
2.
Remove the two supports and the door bracket and remove the two screws attaching the handle.
3. Detach the inner sheet, glass #1,
from the door.
4. Lift glass #2 and remove the two
spring-brackets from the top of the sheet.
Clean the sheets with warm water or washing-up liquid and polish dry with a soft
clean cloth.
Page 40
Cleaning and Care (Continued)
Assembling the door
EN
1. Clean the glass and interior parts with warm
soapy water.
Do not use abrasive cleaners or pan
scourers. Use a sponge with liquid
detergent or warm soapy water.
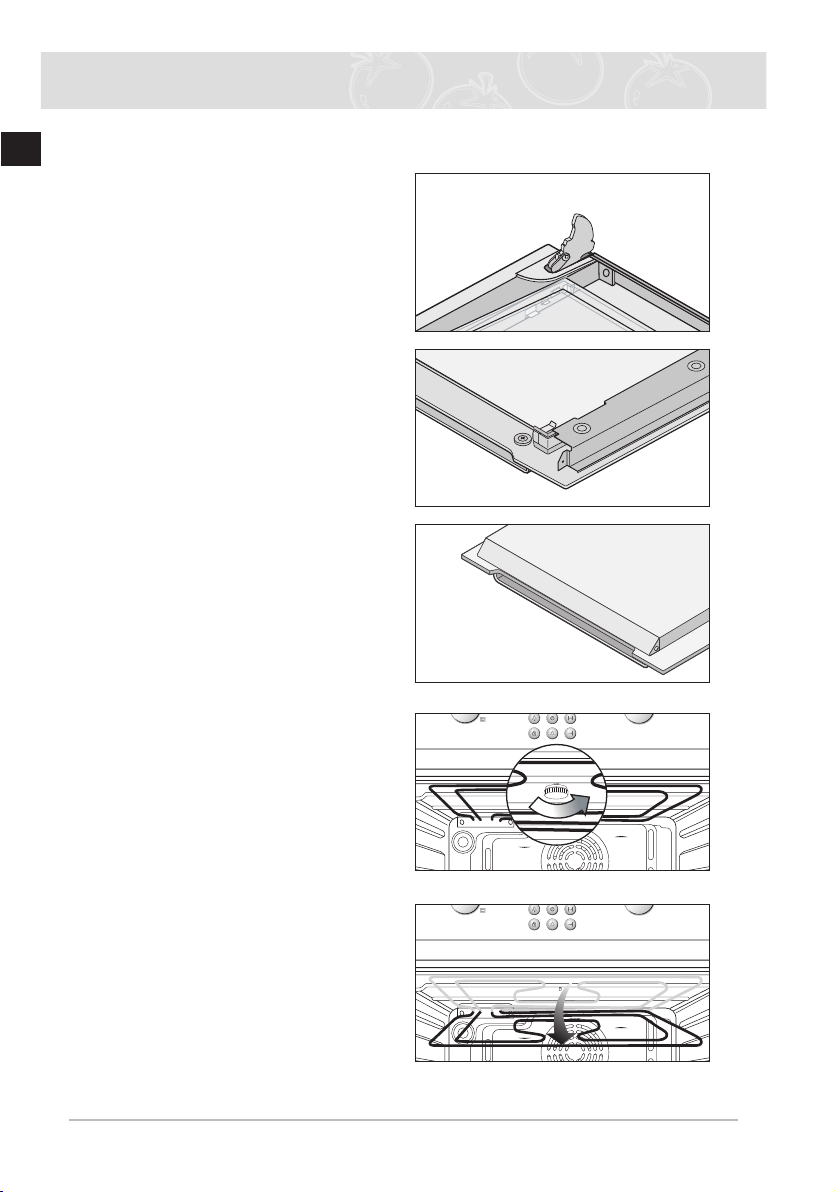
2. Attach the two spring brackets at the top of
glass #2 and place glass #2 into position.
3. Attach glass #1, the door bracket and the
supports to the door.
4. Secure the two screws at both sides of the
door.
Cleaning the top heater
1. Remove the upper nut circular by turning it
anti-clockwise while holding the top of the
heater.
The front of the top heater inclines downwards.
38
Page 41
39
EN
Cleaning and Care (Continued)
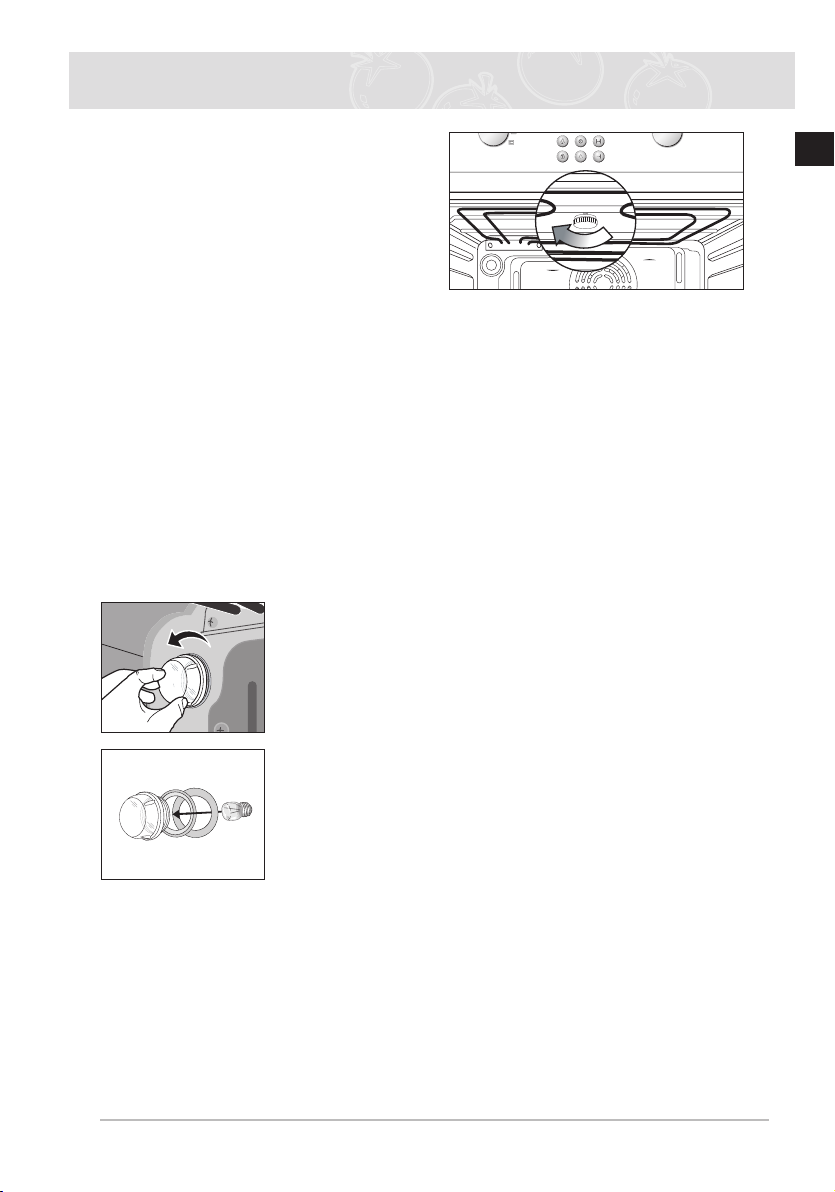
2. When cleaning has been done, lift the top of
the heater back to its original level and turn
the nut circular clockwise.
Changing the lamp
Danger of electric shock!
Before replacing the oven light bulb, take the following steps:
● Switch off the oven;
● Disconnect the oven from the mains supply; and
● Protect the oven light bulb and the glass cap by laying a cloth on the bottom of the
oven.
You can buy a lamp at SAMSUNG service centre.
Replacing the rear oven lamp and cleaning the glass cap
1. Take off the cap by turning counterclockwise.
2. Remove the metal ring and the sheet ring and clean the glass
cap.
3. If necessary, replace the bulb with a 25 watt, 230 V, 300 °C heat
- resistant oven light bulb.
4. Fit the metal and the sheet ring to the glass cap.
5. Replace the glass cap.
Page 42

Warranty & Service
FAQs and Troubleshooting
EN
What should I do if the oven doesn’t heat up?
Check to see if one of the following actions resolves the issue:
●
The oven may not be switched on. Switch the oven on.
●
The clock may not be set. Set the clock (see section “Setting the clock”).
●
Check to see if the required settings have been applied.
●
A household fuse may have blown or a circuit breaker may have tripped. Replace the fuses
or reset the circuit. If this happens repeatedly, call an authorised electrician.
What should I do if, even though the oven function and temperature have been set, the oven
does not heat up?
There may be problems with the internal electrical connections. Call your local service centre.
What should I do if an error code appears and the oven does not heat up?
There is a fault in the internal electrical circuit connection. Call your local service centre.
What should I do if the time display is blinking?
There was a power failure. Set the clock (see section “Setting the clock”).
What should I do if the oven light doesn’t illuminate?
The oven light is faulty. Replace the oven light bulb (see section “Changing the lamp”).
What should I do if the oven’s fan is running without having been set?
Following use, the oven’s fan runs until the oven has cooled down. Call your local service
centre if the fan continues to run after the oven has cooled down.
40
Page 43
41
EN
Warranty & Service (Continued)
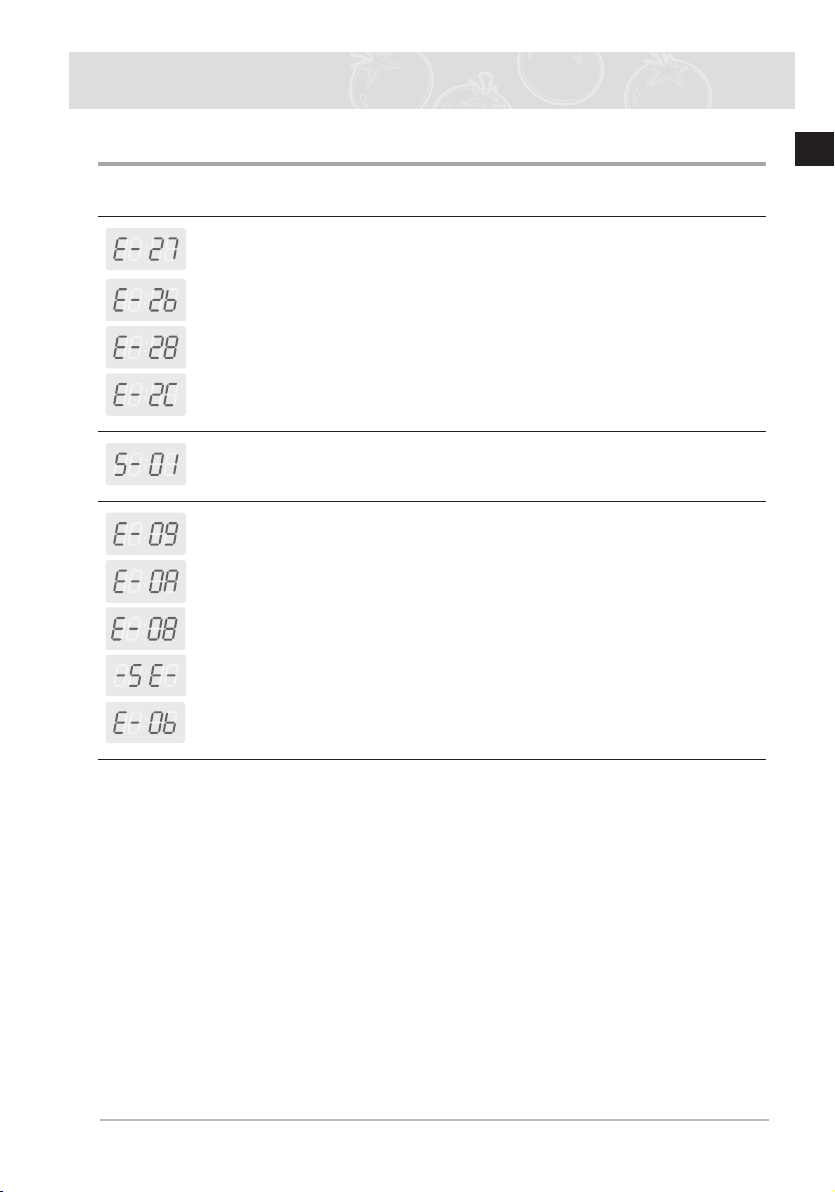
Error and Safety codes
Error and
Safety codes
TEMP SENSOR ERROR Call local SAMSUNG service
SAFETY SHUTOFF
Oven has continued operating at set
temperature for prolonged time.
An error of the oven may cause low performance and problems in safety. Stop
using the oven immediately.
General Functions Solution
centre.
Turn oven off and remove
food. Allow oven to cool
before using again.
Call local Samsung service
centre.
Page 44
Technical data
EN
Power Source 230V ~ 50Hz
Volume (usable capacity)
Output Power MAX 3,400 W
Weight
Net
Shipping
Dimensions (W x H x D)
Outside
Oven Cavity
65 L
40 kg approx
44 kg approx
595 x 595 x 566 mm
440 x 365 x 405 mm
42
Code No. DG68-00091E
 Loading...