

Page 1
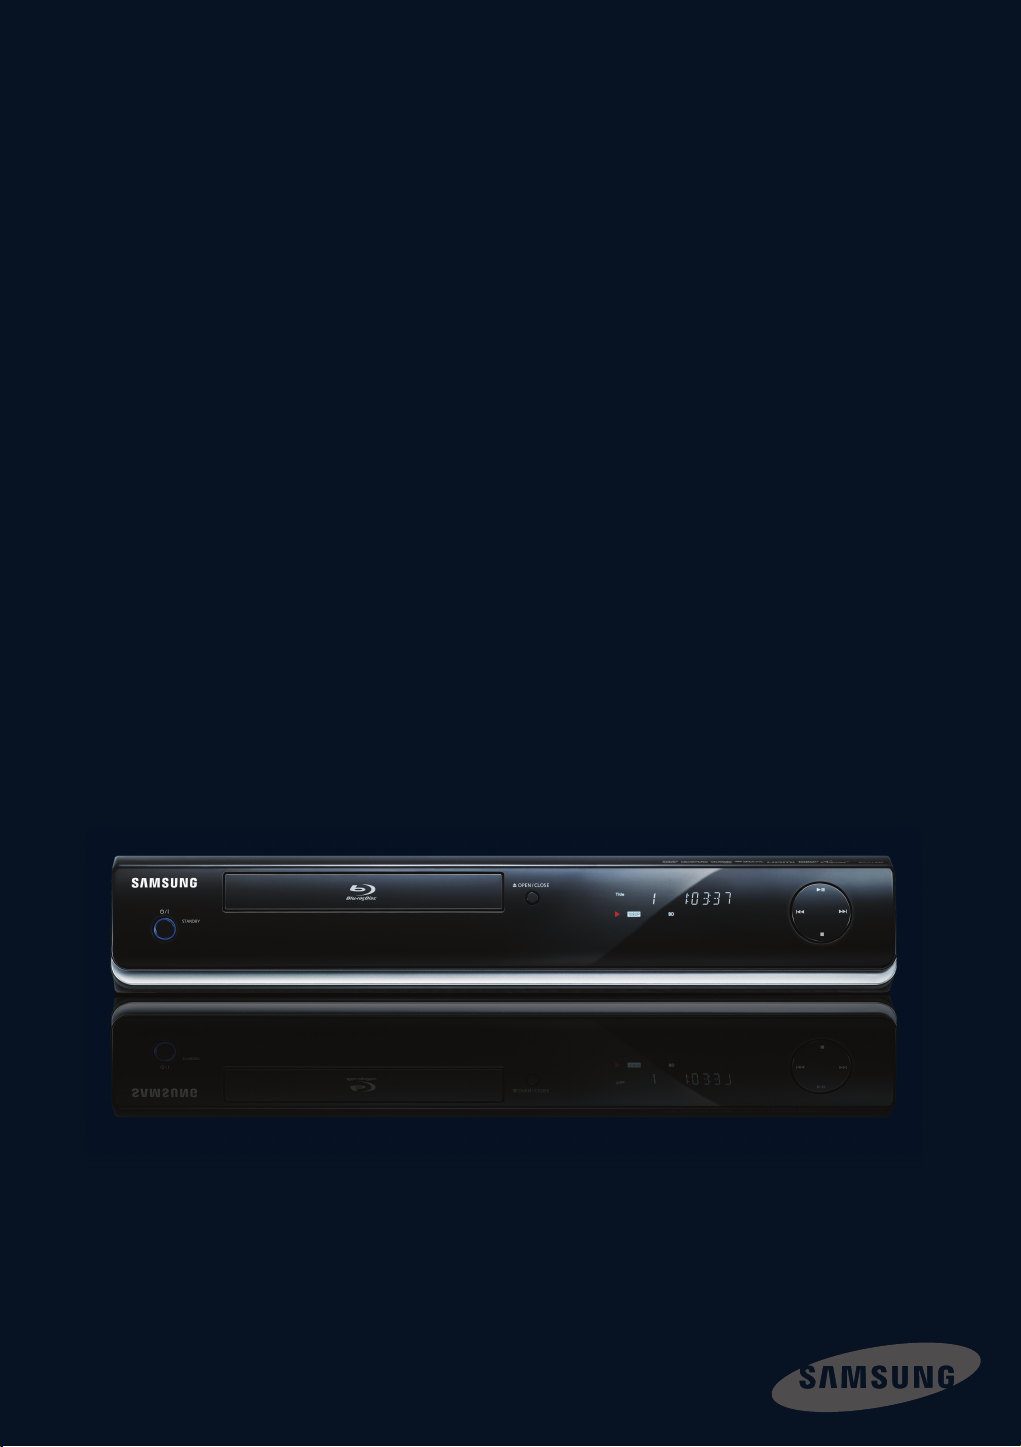
Blu-ray Disc Player
User’s Manual
BD-P1400
Page 2

Page 3
key features of your new Blu-ray Disc Player
Player Features
Digital Photo Viewer (JPEG)
You can enjoy digital photos on your TV.
MP3 Playback
This unit can play mp3 fi les from CD-R/-RW, DVD-R/-RW discs.
HDMI (High Defi nition Multimedia Interface)
HDMI reduces picture noise by allowing a pure digital video/audio signal path from the player to your TV.
Simplay HD
Simplay HD guarantees that this player
has been tested according to specifi cations
aimed at maximizing the delivery of HD content.
Blu-ray Disc Features
Blu-ray Discs can store 25 GB (single layer) or 50 GB (dual layer) on a single sided disc - about 5 to 10 times the
capacity of a DVD. Blu-ray Discs also support the highest quality HD video available in the industry (up to 1920 x
1080 at 40 Mbit/sec) - Large capacity means no compromise on video quality. Furthermore, a Blu-ray Disc has the
same familiar size and look as DVD.
* The following Blu-ray Disc features are disc dependant and will vary.
Appearance and navigation of features will also vary from disc to disc.
Not all discs will have the features described below.
Video highlights
The BD-ROM format for movie distribution supports three highly advanced video codecs, including AVC,
VC-1, and MPEG-2.
HD video resolutions are also available:
1920 x 1080 HD
•
•
1280 x 720 HD
For High-Defi nition Playback
To view high-defi nition contents in BD discs, an HDTV (High Defi nition Television) is required. Some discs may
require using the player's HDMI OUT to view high-defi nition content. The ability to view high-defi nition content on
BD discs may be limited depending on the resolution of your TV.
2_ English
Page 4
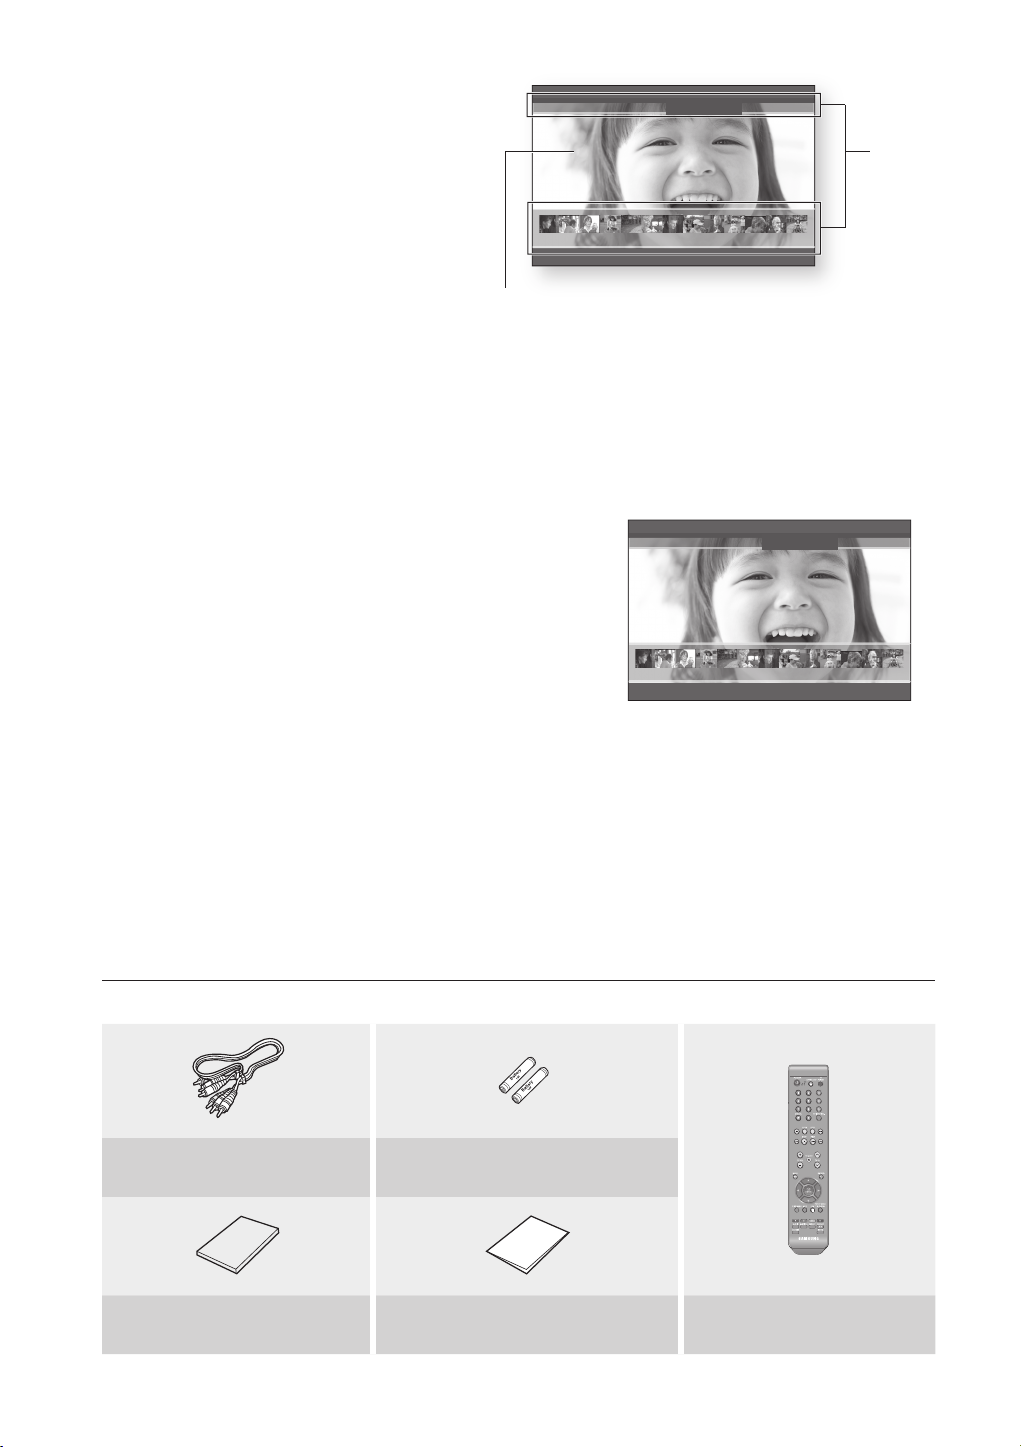
Graphic planes
Two individual, full HD resolution (1920x1080) video
layers are available, on top of the HD video layer.
One layer is assigned to video-related graphics (like
subtitles), and the other layer is assigned to
interactive elements, such as buttons or menus.
Various wipes, fades and scroll effects may be
available on both layers.
PLAY MOVIE LANGUAGES SCENE SELECTIONS PREVIEWS
Graphic
Planes
▼
3 4 5 6 7 8 9 10 11 12 13 14 15
HD Video
Menu graphics
Support 256 full color resolution graphics and animation, thereby greatly surpassing the capabilities of DVD-Video.
Unlike DVD, Menus can be accessed during video playback.
Menu sounds
When you highlight or select a menu option on a Blu-ray Disc, sounds can be heard such as button clicks or a
voice-over explaining the highlighted menu choice.
Multi-page/PopUp Menus
With DVD-Video, playback is interrupted each time a new menu
PLAY MOVIE LANGUAGES SCENE SELECTIONS PREVIEWS
screen is accessed. Due to Blu-ray Disc's ability to preload data from
the disc without interrupting playback, a menu may consist of several
pages.
You can browse through the menu pages or select different menu
paths, while the audio and video remain playing in the background.
▼
3 4 5 6 7 8 9 10 11 12 13 14 15
Interactivity
Certain Blu-ray Discs may contain Animated menus and Trivia games.
User Browsable Slideshows
With Blu-ray Discs, you can browse through various still pictures while the audio remains playing.
Subtitles
Depending on what is contained on the Blu-ray Disc, you may be able to select different font styles, sizes and colors
for the subtitles, Subtitles may also be animated, scrolled or faded in and out.
WHAT’S INCLUDED
Check for the supplied accessories below.
Composite (Video), Audio L/R Cable
(MF39-00274A)
User Manual
(AK68-01454A)
Batteries for Remote Control (AAA Size)
(4301-001035)
Quick Guide
(AK68-01455A)
Remote Control
(AK59-00070A)
English _3
Page 5
safety information
WARNING
TO REDUCE THE RISK OF ELECTRIC SHOCK, DO NOT REMOVE THE COVER(OR BACK).
NO USER-SERVICEABLE PARTS ARE INSIDE. REFER SERVICING TO QUALIFIED SERVICE PERSONNEL.
CAUTION
RISK OF ELECTRIC SHOCK
DO NOT OPEN
The lighting fl ash and Arrowhead within
Triangle Is a warning sign alerting you of
dangerous voltage Inside the product
WARNING
To reduce the risk of fi re or electric shock, do not expose this appliance to rain or moisture.
•
•
To prevent injury, this apparatus must be securely attached to the fl oor/wall in accordance with the installation instructions.
•
If this power supply is used at 240V ac, a suitable plug adapter should be used.
Note to CATV system installer
This reminder is provided to call CATV system installer’s attention to Article 820-40 of the National Electrical Code (Section
54 of Canadian Electrical Code, Part I) that provides guidelines for proper grounding and, in particular, specifi es that the
cable ground shall be connected to the grounding system of the building as close to the point of cable entry as practical.
FCC NOTE (for U.S.A):
This equipment has been tested and found to comply with the limits for a Class B digital device, pursuant to Part 15
of the FCC rules. These limits are designed to provide reasonable protection against harmful interference in a
residential installation. This equipment generates, uses and can radiate radio frequency energy and, if not installed
and used in accordance with the instructions, may cause harmful interference to radio or television reception, which
can be determined by turning the equipment off and on.
The user is encouraged to try to correct the interference by one or more of the following measures.
•
Reorient or relocate the receiving antenna.
•
Increase the separation between the equipment and receiver.
•
Connect this equipment into an outlet on a circuit different from that to which the receiver is connected.
•
Consult the dealer or an experienced radio/TV technician for help.
This class B digital apparatus meets all requirements of the Canadian Interference - Causing Equipment
Regulations.
CAUTION: TO REDUCE THE RISK OF ELECTRIC
SHOCK, DO NOT REMOVE COVER (OR BACK) NO
USER SERVICEABLE PARTS INSIDE. REFER
SERVICING TO QULAIFIED SERVICE PERSONNEL.
The explanation point within the triangle
is a warning sign alerting you of
important instructions accompanying
the product.
CLASS 1 LASER PRODUCT
KLASSE 1 LASER PRODUKT
LUOKAN 1 LASER LAITE
KLASS 1 LASER APPARAT
PRODUCTO LÁSER CLASE 1
CLASS 1 LASER PRODUCT
Use of controls, adjustments or performance of procedures other than those specifi ed herein may result in
hazardous radiation exposure.
CAUTION
THIS PRODUCT UTILIZES A LASER. USE OF CONTROLS OR ADJUSTMENTS OR PERFORMANCE OF
PROCEDURES OTHER THAN THOSE SPECIFIED HEREIN MAY RESULT IN HAZARDOUS RADIATION EXPOSURE.
DO NOT OPEN COVER AND DO NOT REPAIR YOURSELF. REFER SERVICING TO QUALIFIED PERSONNEL.
4_ safety information
Page 6

Note:
This unit can be used only where the power supply is AC 120V, 60Hz. It cannot be used elsewhere.
•
This Blu-ray Disc Player is designed and manufactured to respond to the Region Management Information.
•
If the Region number of a BD/DVD disc does not correspond to the Region number of this Blu-ray Disc Player, the
Blu-ray Disc Player cannot play the disc.
PRECAUTIONS
Important Safety Instructions
Read these operating instructions carefully before using the unit. Follow all the safety instructions listed below.
these operating instructions handy for future reference.
1)
Read these instructions.
2)
Keep these instructions.
3)
Heed all warnings.
4)
Follow all instructions.
5)
Do not use this apparatus near water.
6)
Clean only with dry cloth.
7)
Do not block any ventilation openings, Install in accordance with the manufacturer's instructions.
8)
Do not install near any heat sources such as radiators, heat registers, or other apparatus (including amplifi ers)
that produce heat.
9)
Do not defeat the safety purpose of the polarized or grounding- type plug. A polarized plug has two blades with
one wider than the other. A grounding type plug has two blades and a third grounding prong. The wide blade
or the third prong are provided for your safety. If the provided plug does not fi t into your outlet, consult an
electrician for replacement of the obsolete outlet.
10)
Protect the power cord from being walked on or pinched particularly at plugs, convenience receptacles, and
the point where they exit from the apparatus.
11)
Only use attachments/accessories specifi ed by the manufacturer.
12)
Use only with the cart, stand, tripod, bracket, or table specifi ed by the manufacturer,
or sold with the apparatus. When a cart is used, use caution when moving the cart/
apparatus combination to avoid injury from tip-over.
13)
Unplug this apparatus during lightning storms or when unused for long periods of
time.
14)
Refer all servicing to qualifi ed service personnel. Servicing is required when the apparatus has been damaged
in any way, such as power-supply cord or plug is damaged, liquid has been spilled or objects have fallen into
the apparatus, the apparatus has been exposed to rain or moisture, does not operate normally, or has been
dropped.
Keep
English _5
Page 7

safety information
Handling Cautions
Before connecting other components to this Blu-ray Disc Player, be sure to turn them all off.
•
Do not move the Blu-ray Disc Player while a disc is being played, or the disc may be scratched or broken, the Blu-
•
ray Disc Player internal parts may be damaged.
Do not put a fl ower vase fi lled with water or any small metal objects on the Blu-ray Disc Player.
•
Be careful not to put your hand into the disc tray.
•
Do not place anything other than the disc in the disc tray.
•
Exterior interference such as lightning and static electricity can affect normal operation of this Blu-ray Disc Player.
•
If this occurs, turn the Blu-ray Disc Player off and on again with the POWER button, or disconnect and then
reconnect the AC power cord to the AC power outlet. The Blu-ray Disc Player will operate normally.
Be sure to remove the disc and turn off the Blu-ray Disc Player after use.
•
Disconnect the AC power cord from the AC outlet when you don’t intend to use the Blu-ray Disc Player for long
•
periods of time.
Clean the disc by wiping in a straight line from the inside to the outside of the disc.
•
Do not expose the player to dripping or splashing liquids.
•
When the AC plug is connected to a wall outlet, the player will still draw power (standby mode) when it is turned
•
off.
Maintenance of Cabinet
For safety reasons, be sure to disconnect the AC power cord from the AC outlet.
•
Do not use benzene, thinner, or other solvents for cleaning.
•
Wipe the cabinet with a soft cloth.
Restrictions on Playback
•
This player may not respond to all operating commands because some BD, DVD or CD discs allow specifi c or
limited operation and features during playback.
Please note that this is not a defect in the player.
•
Samsung cannot assure that this player will play every disc bearing the BD, DVD and CD logos because disc
formats may evolve, and problems and errors can occur during the creation of BD, DVD and CD software and/or
the manufacture of discs.
This player also operates differently than a standard DVD player or other AV equipment. Please contact the
SAMSUNG customer care center if you have questions or encounter diffi culty in playing BD, DVD or CD discs in
this player. Also, refer to the rest of this Manual for additional information on playback restrictions.
6_ safety information
Page 8

contents
KEY FEATURES OF YOUR
NEW BLU-RAY DISC PLAYER
2
SAFETY INFORMATION
4
GETTING STARTED
9
DESCRIPTION
14
REMOTE CONTROL
16
3 What’s included
4 Warning
5 Precautions
9 Before Reading the User’s Manual
10 Disc Type and Characteristics
13 Disc Storage & Management
14 Front Panel
14 Front Panel Display
15 Rear Panel
16 Tour of the Remote Control
18 Setting the Remote Control
18 REGARDING THE BATTERY
19 Controllable TV Codes
CONNECTIONS
20
BASIC FUNCTIONS OF YOUR
BLU-RAY DISC PLAYER
31
20 Connecting to a TV with HDMI Cable
21 HDMI Auto Detection Function
22 Connecting to a TV with DVI Cable
23 Connecting to a TV (Component)
24 Connecting to a TV (S-Video)
25 Connecting to a TV(Video)
26 Connecting to an Audio System (2 Channel
Amplifi er)
27 Connecting to an Audio System (5.1
Channel Amplifi er)
28 Connecting to an Audio System (Dolby
Digital, DTS Amplifi er)
29 Connecting to an Audio System (HDMI
supported Amplifi er)
30 Connecting to Samsung's FTP/Internet site
for Software Upgrades
31 Before Playing
32 On-Screen Menu Navigation
32 Playing a Disc
33 Using the Search and Skip Functions
33 Slow Motion Play/Step Motion Play
English _7
Page 9

contents
SYSTEM SETUP
34
SYSTEM UPGRADE
45
WATCHING A MOVIE
49
LISTENING TO MUSIC
55
34 Setting up the Language Options
35 Setting up the Audio Options
37 Setting up the Speaker Options
38 Setting up the Video display/output Options
41 Setting up the HDMI setup options
43 Setting up the Parental Lock
45 Firmware Upgrade
47 System Information
47 Network Setup
49 Using the Display Function
50 Using the Disc Menu & Popup/Title Menu
51 Repeat Play
51 Selecting the Audio Language
52 Selecting the Subtitle Language
53 Changing the Camera Angle
53 Using the Bookmark Function
55 Playing an Audio CD(CD-DA)
55 Playing an MP3
55 Audio CD(CD-DA)/MP3 Screen Elements
56 Buttons on the Remote Control used for
Audio CD(CD-DA)/ MP3 disc playback
56 Repeat Audio CD(CD-DA) & MP3
8_ contents
VIEWING A PICTURE
58
TROUBLESHOOTING
60
APPENDIX
62
58 Viewing a Picture
58 Slide Show
58 Rotate
59 Zoom
59 Go To Photo List
60 Troubleshooting
62 Specifi cations
64 Warranty (for USA users only)
Page 10
getting started
BEFORE READING THE USER’S MANUAL
Make sure to check the following terms before reading the user manual.
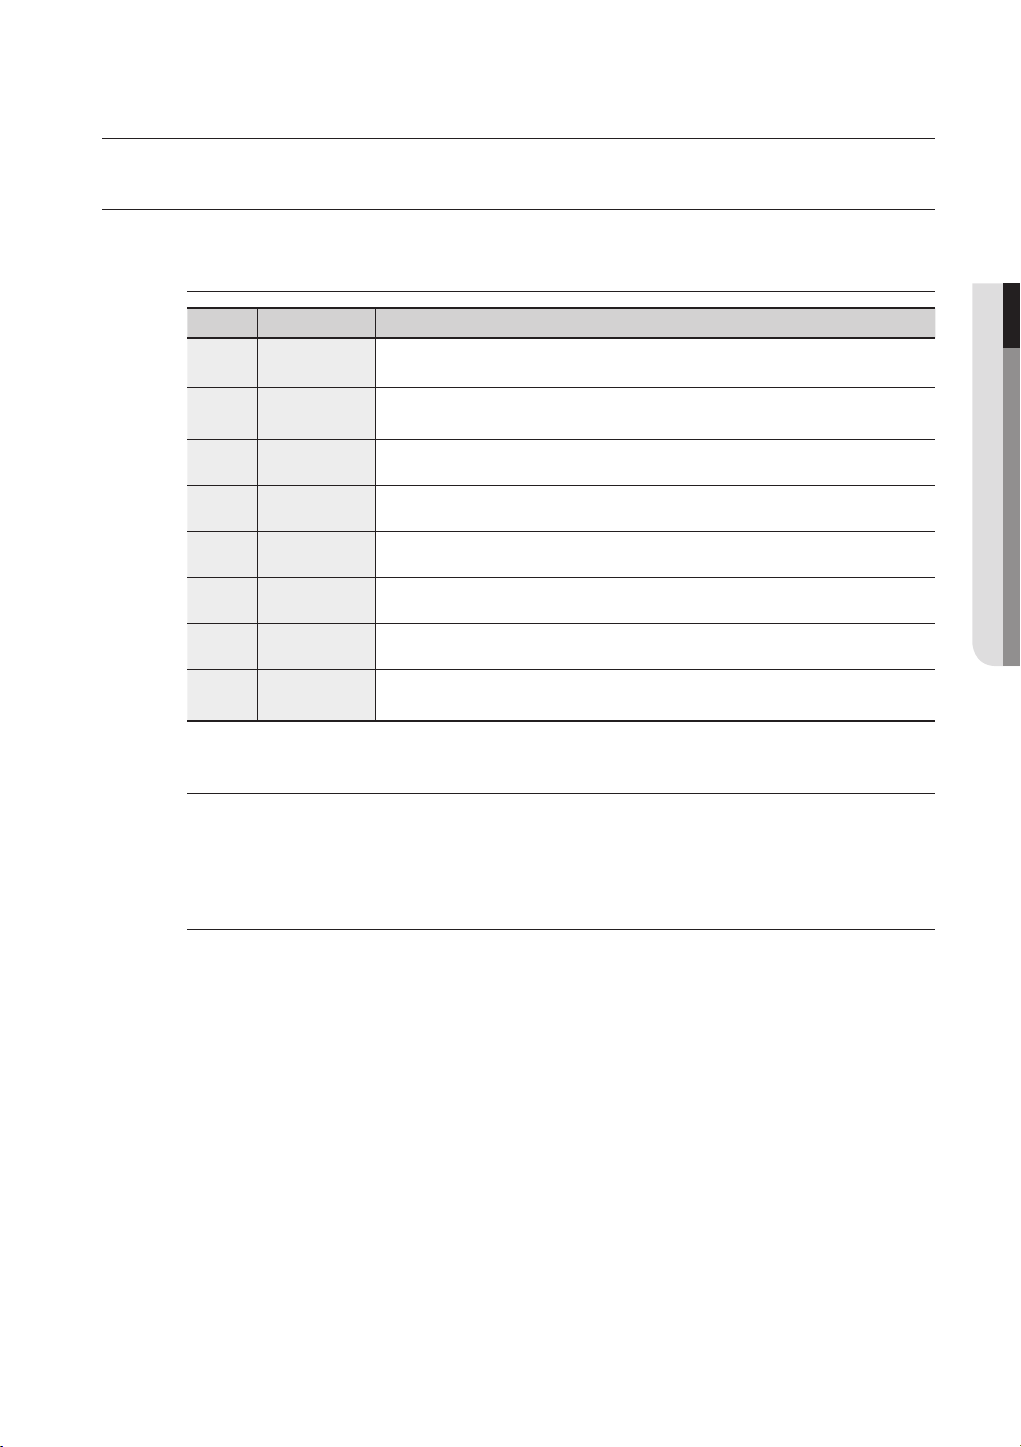
Icons that will be used in manual
Icon Term Defi nition
h
Z
C
V
B
G
A
M
About the use of this user’s manual
1)
2)
BD-ROM This involves a function available on a BD-ROM.
DVD-VIDEO
DVD-RW This involves a function available on DVD-RW. (V mode and fi nalized only)
DVD-R This involves a function available on DVD-R. (V mode and fi nalized only)
Audio CD This involves a function available on a data CD (CD-R or CD-RW).
JPEG This involves a function available on CD-R/-RW, DVD-R/-RW discs.
MP3 This involves a function available on CD-R/-RW, DVD-R/-RW discs.
Note
Be sure to be familiar with Safety Instructions before using this product. (See pages 4~6)
If a problem occurs, check the Troubleshooting. (See pages 60~61)
This involves a function available on DVD-Video or DVD-R/DVD-RW discs
that have been recorded and fi nalized in Video Mode.
This involves tips or instructions on the page that help each function
operate.
● GETTING STARTED
Copyright
©2007 Samsung Electronics Co.,Ltd.
All rights reserved; No part or whole of this user’s manual may be reproduced or copied without the
prior written permission of Samsung Electronics Co.,Ltd.
English _9
Page 11
getting started
DISC TYPE AND CHARACTERISTICS
Disc types that can be played
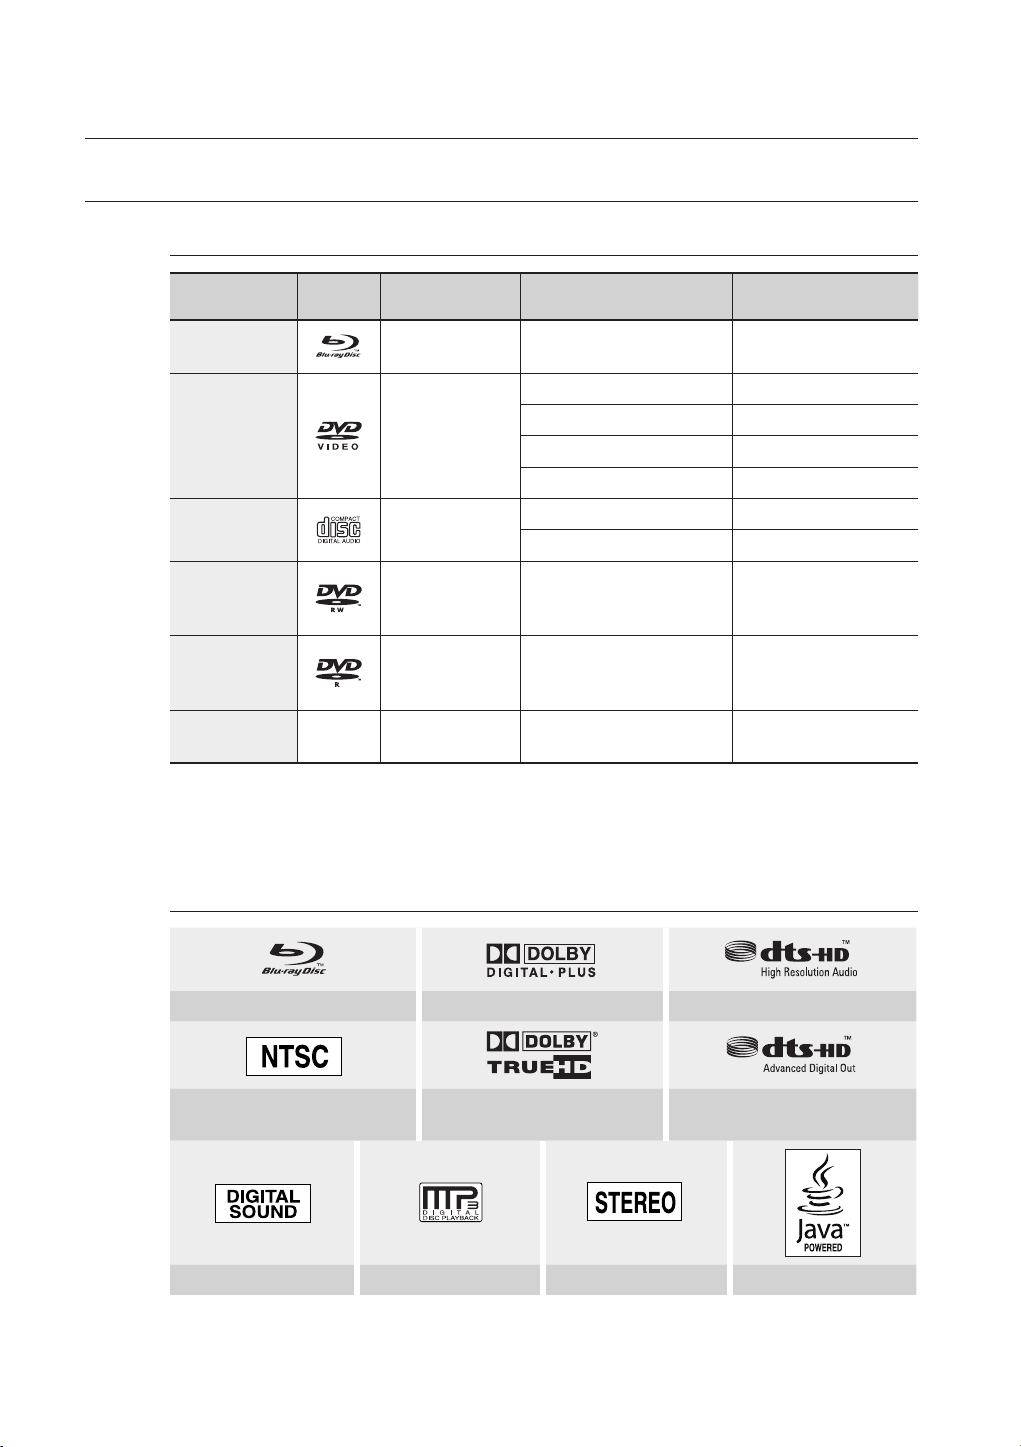
Disc Types Disc Logo Recorded content Disc Shape Max. Playing minute
BD-ROM
DVD-VIDEO
AUDIO-CD
DVD-RW
(V mode and
fi nalized only)
DVD-R
(V mode and
fi nalized only)
CD-R/-RW
DVD-RW/-R
•
This player is compatible with the NTSC color system only.
•
PAL discs will not play.
AUDIO + VIDEO Single sided (25GB/50GB)
Single sided(5 inches) 240
AUDIO + VIDEO
AUDIO
AUDIO + VIDEO 5 inches (4.7GB)
AUDIO + VIDEO 5 inches (4.7GB)
JPEG
MP3
Double sided(5 inches) 480
Single sided(3 1/2 inches) 80
Double sided(3 1/2 inches) 160
Single sided(5 inches) 74
Single sided(3 1/2 inches) 20
Logos of Discs that can be played
Playing time depends
on the Title
480
(EX : Extended Play)
480
(EX : Extended Play)
––
NTSC broadcast system in U.S.A,
Canada, Korea, Japan
Digital Audio MP3 Stereo Java
10_ getting started
Blu-ray Disc Dolby Digital Plus DTS-HD High Resolution Audio
Dolby TrueHD DTS-HD Advanced Digital Out
Page 12
Discs that cannot be played
Blu-ray Discs with a region code other than "Region A".
•
BD-R, BD-RE
•
HD DVD Disc
•
DVD-Video with a region number other than “1” or “ALL”
•
DVD-RAM
•
3.9 GB DVD-R Disc for Authoring.
•
DVD-RW(VR mode)
•
DVD-ROM/PD/MV-Disc, etc
•
CVD/CD-ROM/CDV/CD-G/CD-I/LD
•
[Note]
Some commercial discs and DVD discs purchased outside your region may not be playable with this
•
product. When these discs are played, either “No disc.” or “Please check the regional code of the
disc.” will be displayed.
If a DVD-R/-RW disc has not been recorded properly in DVD video format, it will not be playable.
•
The unit cannot play CD-R/-RW and DVD-RW/-R recorded content such as divx, avi, mpg, mov,
•
wma.
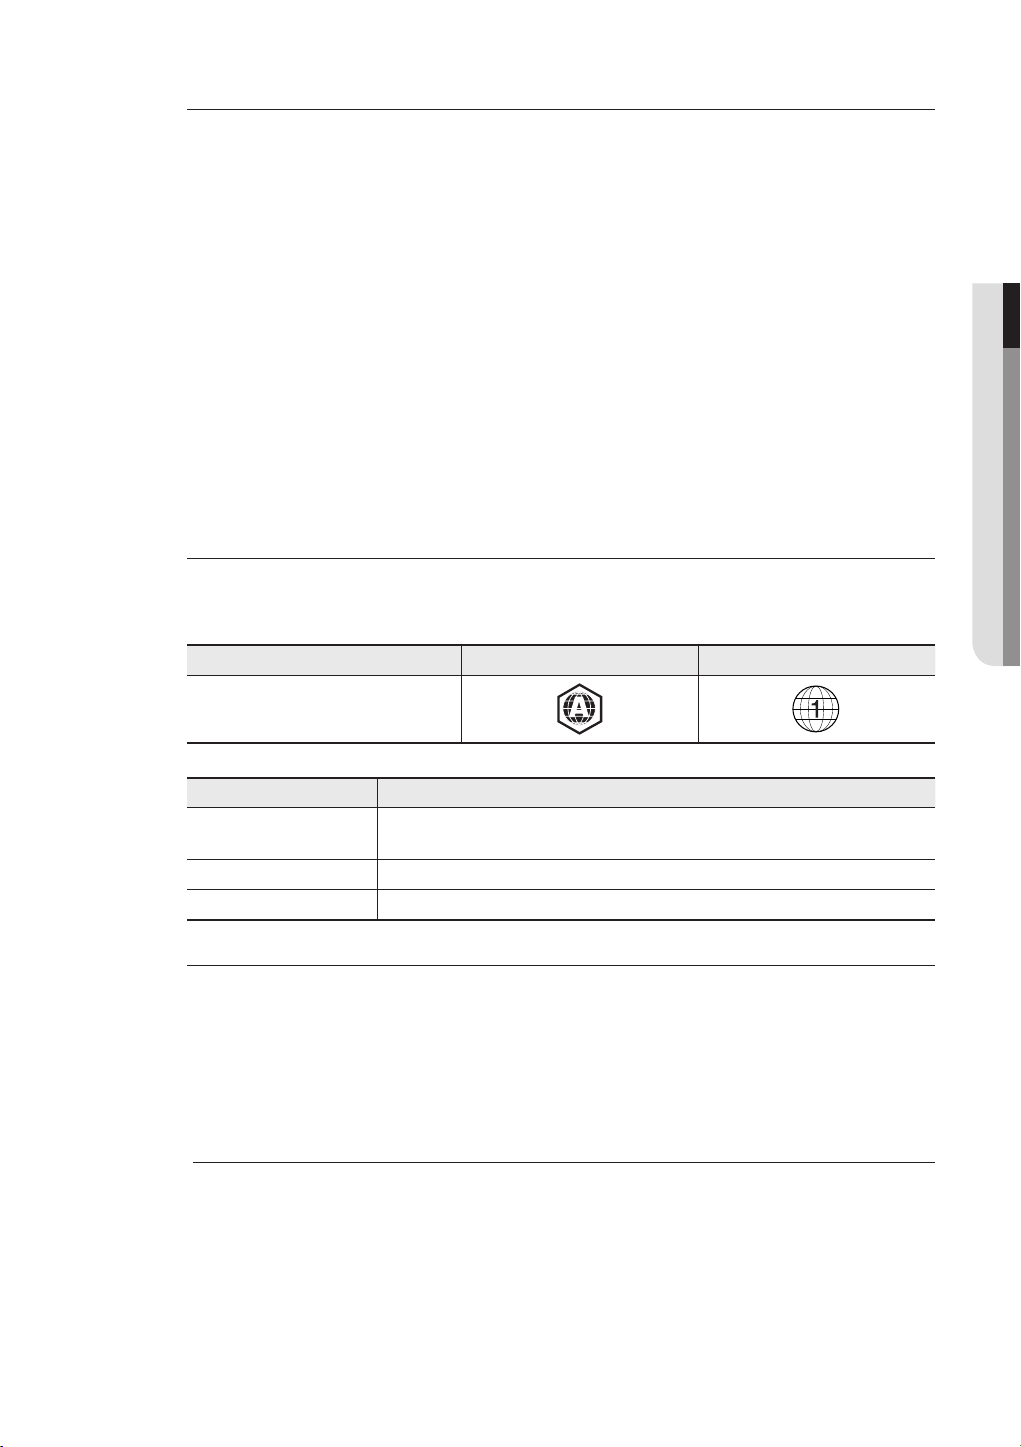
Region code
Both the Blu-ray Disc Player and the discs are coded by region. These regional codes must match in
order to play the disc. If the codes do not match, the disc will not play.
The Region Number for this Blu-ray Disc Player is described on the rear panel of the Blu-ray Disc Player.
Disc Type Blu-ray DVD-Video
● GETTING STARTED
Region code
BD Region Code Area
A
B Europe, Greenland, French territories, Middle East, Africa, Australia and New Zealand.
C India, China, Russia, Central and South Asia.
North America, Central America, South America, Korea, Japan, Taiwan, Hong Kong and
South East Asia.
Blu-ray Disc Compatibility
Blu-ray Disc is a new and evolving format. Accordingly, disc compatibility issues are possible. Not all
discs are compatible and not every disc will play back. For additional information, refer to the
Compliance and Compatibility Notice section of this Manual. If you encounter compatibility problems,
please contact the SAMSUNG customer care center. This Samsung Blu-ray Disc Player (BD-P1400)
supports only the BD-ROM Profi le 1 version 1.0 specifi cation. If you want to play later version discs, you
may need to update player's fi rmware. Please refer to http://www.samsung.com/us or contact
SAMSUNG customer care center at 1-800 SAMSUNG.
Playback may not work for some types of discs, or when specifi c operations, such as angle change and aspect
M
ratio adjustment, are being performed. Information about the discs is written in detail on the box. Please refer
to this if necessary.
Do not allow the disc to become dirty or scratched. Finger prints, dirt, dust, scratches or deposits of cigarette
smoke on the recording surface may make it impossible to use the disc for playback.
Discs with PAL programs recorded on them cannot be played using this product.
When a BD-Java title is played, loading may take longer than a normal title, or some functions may perform slowly.
English _11
Page 13

getting started
Disc Types
BD-ROM
❖
Blu-ray Disc Read Only Memory. A BD-ROM disc contains pre-recorded data. Although a BD-ROM
may contain any form of data, most BD-ROM discs will contain movies in High Defi nition format, for
playback on Blu-ray Disc Players. This unit can play back pre-recorded commercial BD-ROM discs.
❖
DVD-Video
A digital versatile disc (DVD) can contain up to 135-minutes of images, 8 audio languages and 32
•
subtitle languages. It is equipped with MPEG-2 picture compression and Dolby Digital surround,
allowing you to enjoy vivid and clear theatre quality images.
When switching from the fi rst layer to the second layer of a dual-layered DVD Video disc, there may be
•
momentary distortion in the image and sound. This is not a malfunction of the unit.
Once a DVD-RW/-R recorded in Video Mode is fi nalized, it becomes DVD-Video. Pre-recorded (pre-
•
stamped) commercial DVDs with movies are also referred to as DVD-Videos. This unit can play back
pre-recorded commercial DVD discs (DVD-Video discs) with movies.
Audio CD
❖
An audio disc on which 44.1kHz PCM Audio is recorded.
•
This unit can play back CD-DA format audio CD-R and CD-RW discs.
•
The unit may not be able to play some CD-R or CD-RW discs due to the condition of the recording.
•
CD-R/-RW
❖
Use a 700MB(80 minutes) CD-R/-RW disc. If possible, do not use a 800MB(90 minutes) or above
•
disc, as the disc may not play back.
If the CD-R/-RW disc was not recorded as a closed session, you may experience delays when playing
•
back the beginning of the disc or all recorded fi les may not play.
Some CD-R/-RW discs may not be playable with this unit, depending on the device which was used
•
to burn them. For contents recorded on CD-R/-RW media from CDs for your personal use, playability
may vary depending on contents and discs.
DVD-R Disc Playback
❖
Once a DVD-R recorded in Video Mode is fi nalized, it becomes DVD-Video.
•
This unit can play back DVD-R discs recorded and fi nalized with a Samsung DVD video recorder. It
•
may not be able to play some DVD-R discs depending on the disc and the condition of the recording.
DVD-RW Disc Playback
❖
Playback can be performed with DVD-RW discs in the Video Mode and fi nalized only.
•
Once a DVD-RW recorded in Video Mode is fi nalized, it becomes DVD-Video. Ability to play back may
•
depend on recording conditions.
Disc Format
Using MP3 disc
❖
CD-R/-RW, DVD-RW/-R recorded with UDF, ISO9660 or JOLIET format can be played back.
•
Only MP3 fi les with the “.mp3” or “.MP3” extension can be played.
•
Playable bit-rate range is from 56 Kbps to 320 Kbps.
•
Playable sample-rate is 16KHz to 48KHz.
•
The unit can handle a maximum of 1500 fi les and folders under a parent folder. For MP3 fi les recorded
•
with a VBR(Variable Bit Rates), the sound may cut in and out.
12_ getting started
Page 14
❖
Using JPEG disc
•
CD-R/-RW, DVD-RW/-R recorded with UDF, ISO9660 or JOLIET format can be played back.
•
Only JPEG fi les with the ".jpg", ".JPG", ".jpeg" or "JPEG" extension can be displayed.
•
Progressive JPEG is supported.
DVD-RW/-R (V)
❖
This is a format that is used for recording data on a DVD-RW or DVD-R disc. The disc can be played
•
by this Blu-ray Disc Player once it has been fi nalized.
If a disc that has been recorded in Video Mode by a different maker’s recorder but has not been
•
fi nalized, it cannot be played by this Blu-ray Disc Player.
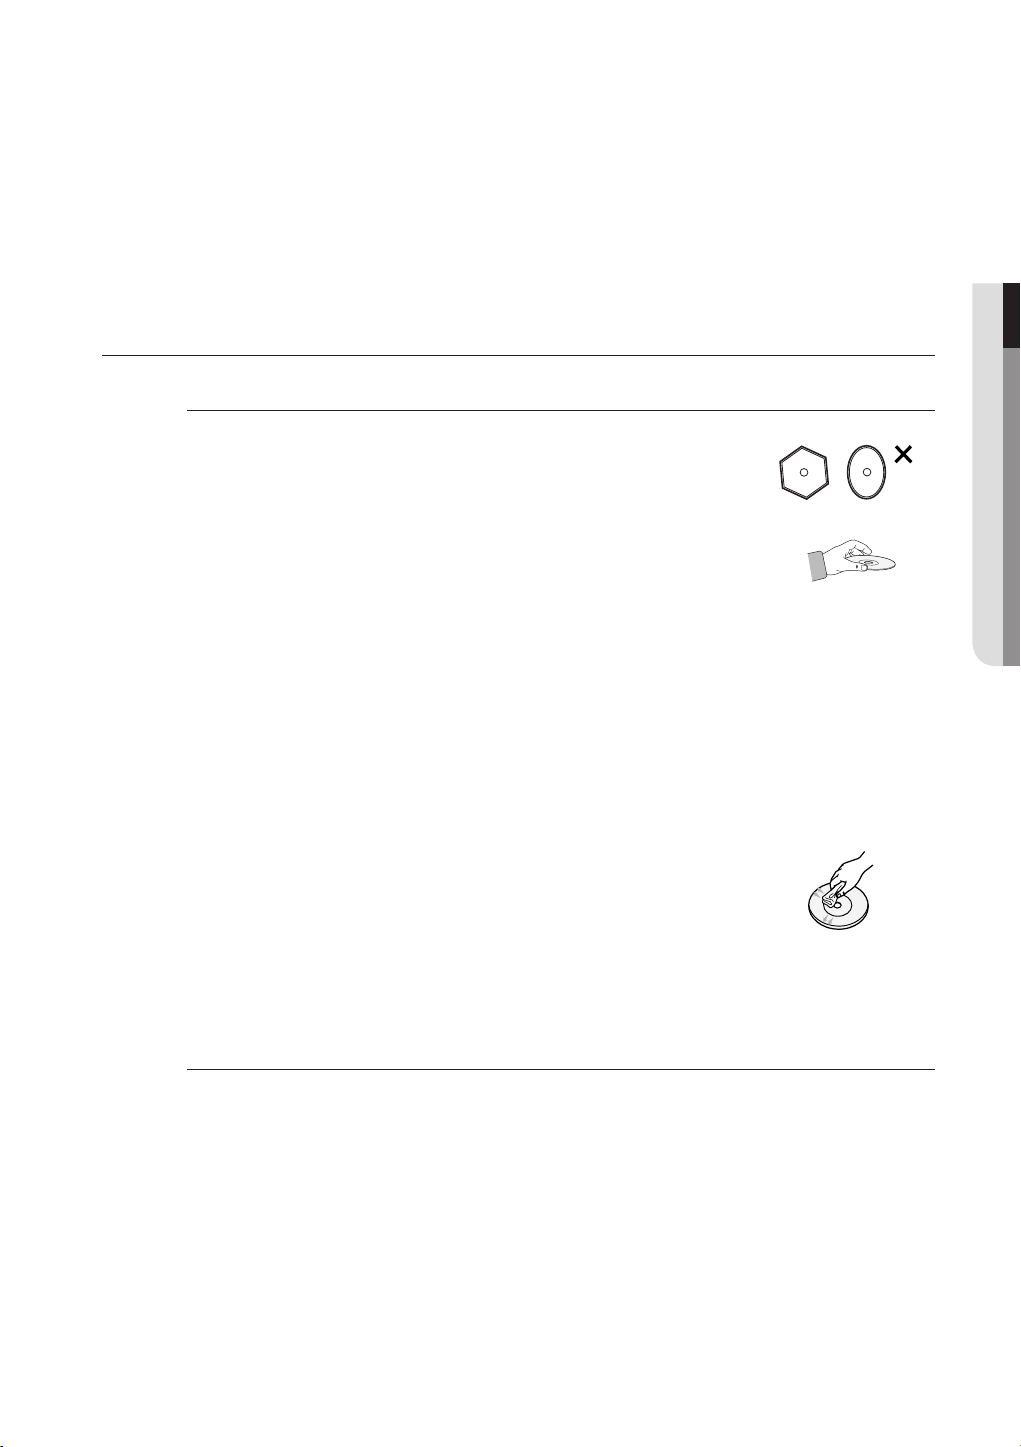
DISC STORAGE & MANAGEMENT
Disc Handling
•
Use discs with regular shapes. If an irregular disc (a disc with a special shape)
is used, this Blu-ray Disc Player may be damaged.
Holding discs
❖
Avoid touching the surface of a disc where recording is performed.
•
Blu-ray Discs
❖
If the player is not used for a long period of time, remove the Blu-ray Disc
•
from the player and store it in its case.
Be careful not to leave fi ngerprints or scratches on the surface of the Blu-ray Disc.
•
● GETTING STARTED
DVD-RW and DVD-R
❖
Clean with an optional PD disc cleaner (LF-K200DCA1 where available). Do not use cleaners or
•
cloths for CDs to clean DVD-RW/-R discs.
DVD-Video, Audio-CD
❖
Wipe off dirt or contamination on the disc with a soft cloth.
•
Cautions on handling discs
❖
Do not write on the printed side with a ball-point pen or pencil.
•
Do not use record cleaning sprays or antistatic. Also, do not use volatile
•
chemicals, such as benzene or thinner.
•
Do not apply labels or stickers to discs. (Do not use discs fi xed with exposed
tape adhesive or leftover peeled-off stickers.)
Do not use scratch-proof protectors or covers.
•
Do not use discs printed with label printers available on the market.
•
•
Do not load warped or cracked discs.
Disc Storage
Be careful not to harm the disc because the data on these discs is highly vulnerable to the environment.
•
Do not keep under direct sunlight.
•
Keep in a cool ventilated area.
•
Store vertically.
•
Keep in a clean protection jacket.
•
If you move your Blu-ray Disc Player suddenly from a cold place to a warm place, condensation may
generate on the operating parts and lens and cause abnormal disc playback. If this occurs, do not
connect the plug to the power outlet and wait for two hours. Then insert the disc and try to play back
again.
English _13
Page 15

description
FRONT PANEL
DISC TRAY
OPEN/CLOSE BUTTON
Remote Control Sensor
PLAY/PAUSE BUTTON
STOP BUTTON
SEARCH/SKIP BUTTONS
DISPLAY
STANDBY INDICATOR
POWER BUTTON
FRONT PANEL DISPLAY
Opens to accept a disc.
Opens and closes the disc tray.
Plays a disc or pauses playback.
Stops disc playback.
Goes to the next title/chapter/track or goes back to the previous title/chapter/track.
Displays the playing status, time, etc.
When the unit is fi rst plugged in, this indicator lights.
Turns the Blu-ray Disc Player on and off.
Title/PlayList/Track indicator.
Playing time/clock/current status
indicator.
Disc type indicators.
Video output resolution indicator.
14_ description
Pause indicator.
Playback indicator.
Page 16
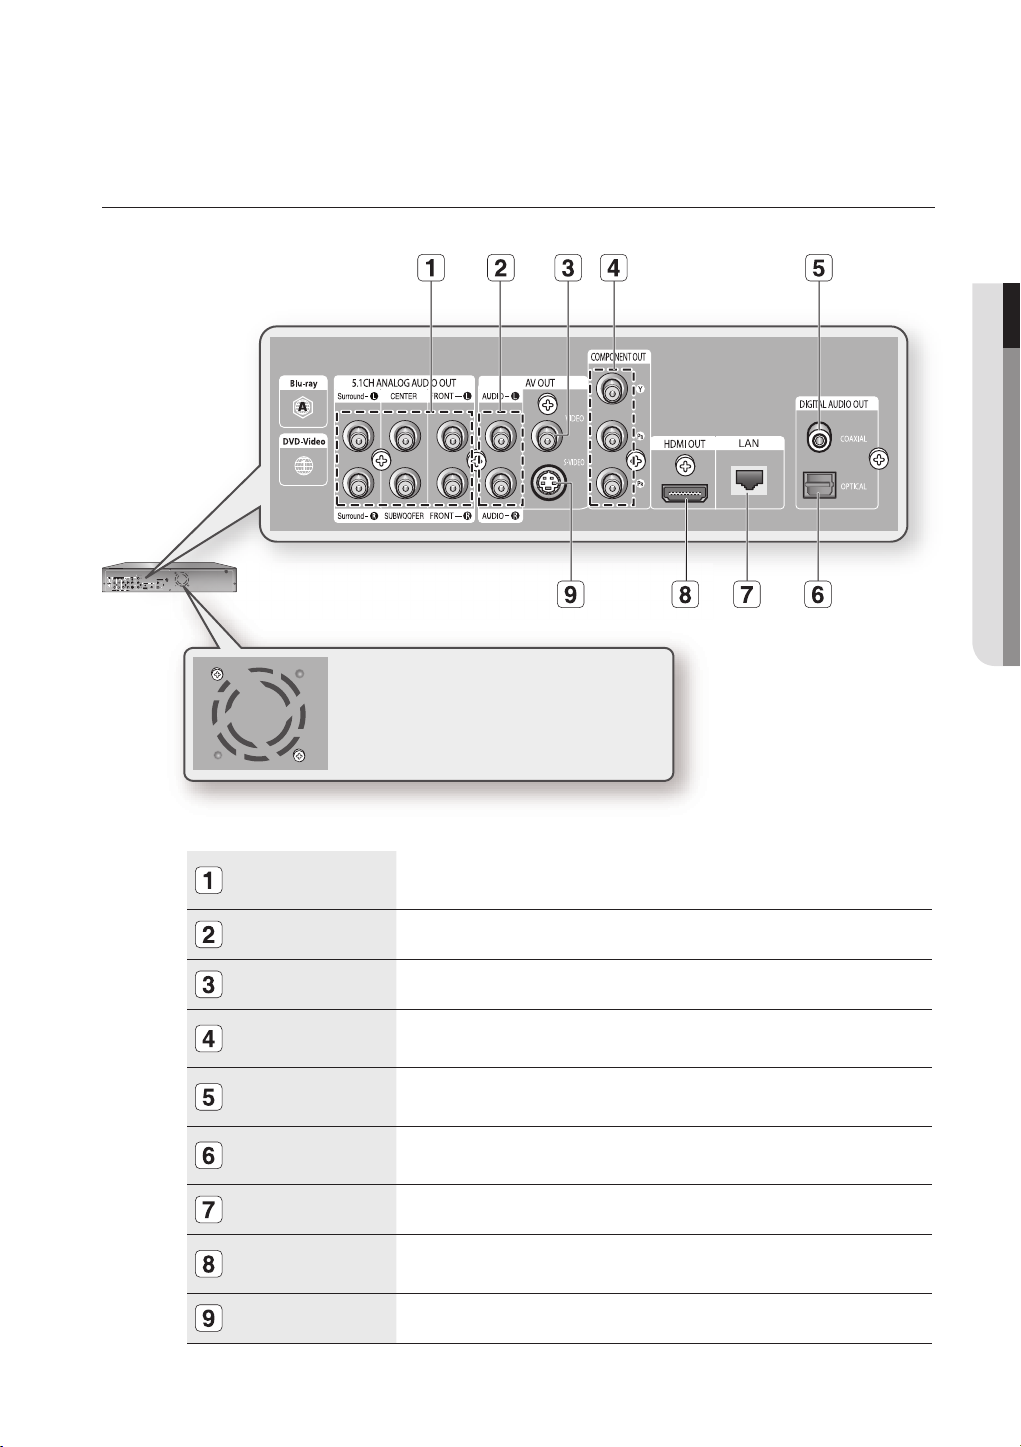
REAR PANEL
● DESCRIPTION
Fan
The fan always revolves when the power is on.
Ensure a minimum of 4 inches of clear space on
all sides of the fan when installing the product.
5.1CH ANALOG
AUDIO OUT
AUDIO OUT
VIDEO OUT
COMPONENT
VIDEO OUT
DIGITAL AUDIO OUT
(COAXIAL)
DIGITAL AUDIO OUT
(OPTICAL)
LAN
HDMI OUT
S-VIDEO OUT
Connect to a 5.1CH analog input on an A/V amplifi er
Connects to the audio input of external equipment using audio cables.
Connects the input of external equipment using a video cable.
Connects to equipment having Component video input.
Connects to an amplifi er having a digital coaxial audio input jack.
Connects to an amplifi er having a digital optical audio input jack.
Connect this LAN terminal to the LAN terminal on your modem for software upgrades.
Use the HDMI cable, connect this HDMI output terminal to the HDMI input terminal on
your TV for the best quality picture.
Connects the input of external equipment using an S-Video cable.
English _15
Page 17
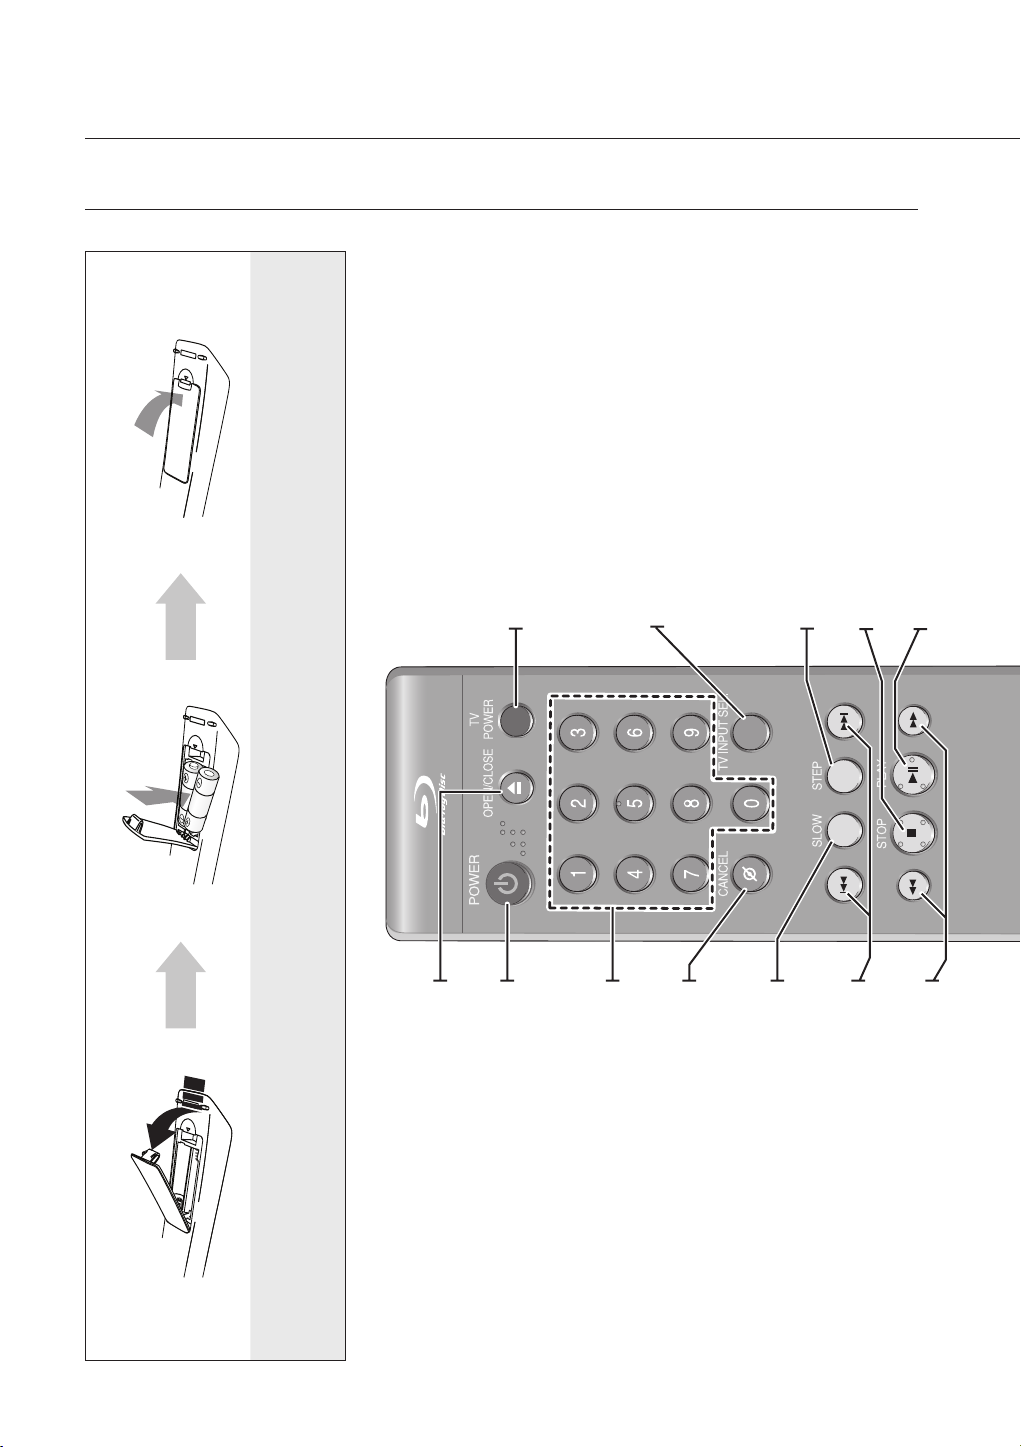
remote control
TOUR OF THE REMOTE CONTROL
Assuming typical TV usage, the batteries
last for about one year.
3. Replace the cover.
TV POWER Button
TV INPUT SEL. Button
After setup, allows you to set the input source on your TV.
When the TV INPUT SEL. button is selected on the remote
control, the DIRECTION(up/down/left/right) and ENTER
buttons operate your TV's menu screen, but not the
player. To enable the button operation for the player, press
the RETURN button.
STEP Button
Each time this button is pressed, a new frame will appear.
PLAY/PAUSE Button
STOP Button
Press to play/pause a disc.
Press to stop a disc.
Make sure to match the “+” and “–” ends
of the batteries with the diagram inside
the compartment.
2. Install two AAA size batteries.
OPEN/CLOSE Buttons
To open and close the disc tray.
remote control upward as shown.
Installing batteries in the Remote Control
1. Lift the cover at the back of the
16_ remote control
POWER Button
NUMBER Buttons
SLOW Button
CANCEL Button
Each time this button is pressed, the disc will play slowly.
Press to skip backwards or forwards.
REVERSE/FORWARD SKIP Buttons
Press to search a disc backwards or forwards.
REVERSE/FORWARD SEARCH Buttons
Page 18
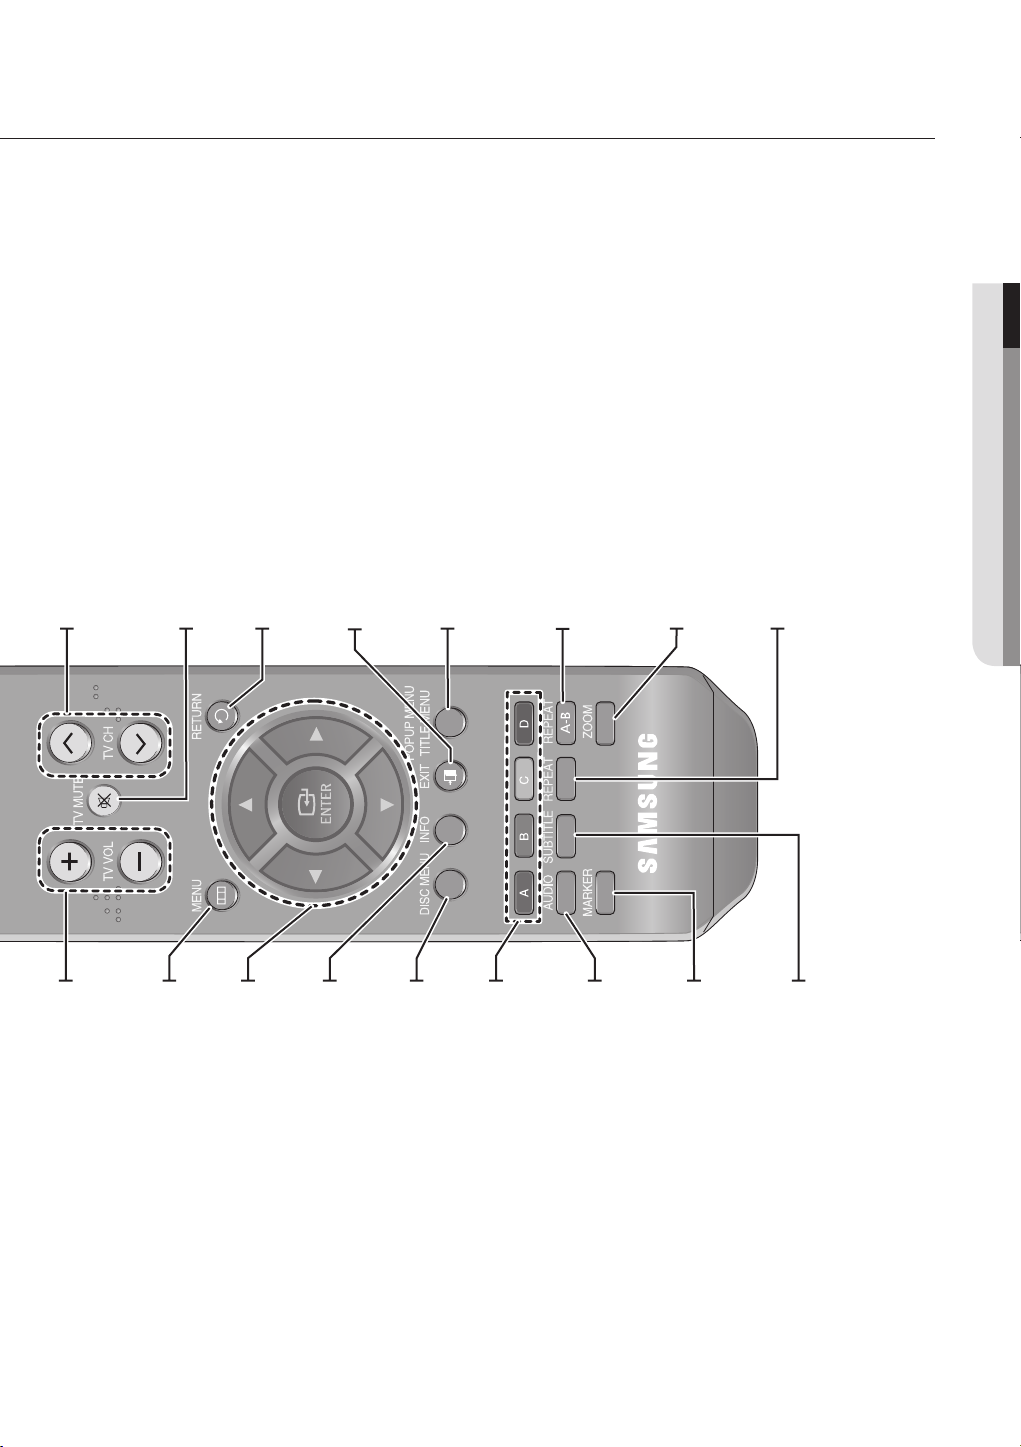
● REMOTE CONTROL
TV CH Button
Use this to select a TV program.
TV MUTE Button
Mutes the speakers of your TV.
MENU Button
TV VOL Buttons
TV volume adjustment
RETURN Button
EXIT Button
INFO Button
(▲▼◄► Buttons)
POPUP MENU/TITLE MENU Button
Use this to enter the popup menu/title menu.
REPEAT A-B Button
Allows you to repeat playback of a certain section.
(BD/DVD).
AUDIO Button
DISC MENU Button
YELLOW(C), BLUE(D)
Use this to enter the disc menu.
ZOOM Button
Enlarges photos on JPEG discs.
MARKER Button
REPEAT Button
Allows you to repeat a title, chapter, track or disc.
SUBTITLE Button
ENTER/DIRECTION Buttons
Brings up the Blu-ray Disc Player’s setup menu.
Displays current setting or disc status.
Player such as the Music or Photo List.
Allow access to common functions of the Blu-ray Disc
Use this to access various audio functions on a disc
Use this to bookmark a position while playing a disc.
COLOR Buttons : RED(A), GREEN (B),
Press this to switch the BD/DVD’s subtitle language.
English _17
Page 19

remote control
SETTING THE REMOTE CONTROL
You can control certain functions of your TV with this remote control.
Control function buttons include : TV POWER, TV CH ,., TV VOL + –, TV MUTE, TV INPUT SEL..
To determine whether your television is compatible, follow the instructions below.
Switch your television on.
1.
Point the remote control towards the television.
2.
Press and hold the TV POWER button and enter the two-fi gure code corresponding to the brand of
3.
your television, by pressing the appropriate number buttons. (see the next page for the code list).
If your television is compatible with the remote control, it will switch off.
It is now programmed to operate with the remote control.
If several codes are indicated for your television brand, try each one in turn until you fi nd one that works.
M
If you replace the remote control's batteries, you must set the brand code again.
You can then control the television using the following buttons after pressing the TV button.
Button Function
TV POWER Used to switch the television on and off.
TV INPUT SEL. Used to select an external source.
TV VOL (+ –) Used to adjust the volume of the television.
,.
TV CH (
TV MUTE Used to toggle the sound on and off.
) Used to select the desired channel.
The functions listed above will not necessarily work on all televisions. If you encounter problems, operate the
M
television directly.
REGARDING THE BATTERY
If the remote does not operate properly:
Check the polarity + – of the batteries (Dry-Cell)
•
Check if the batteries are drained.
•
Check if remote sensor is blocked by obstacles.
•
Check if there is any fl uorescent lighting nearby.
•
Dispose of batteries according to local environmental
regulations. Do not put them in the household trash.
18_ remote control
Page 20

CONTROLLABLE TV CODES
Brand
SAMSUNG
AIWA
ANAM
BANG & OLUFSEN
BLAUPUNKT
BRANDT
BRIONVEGA
CGE
CONTINENTAL EDISON
DAEWOO
EMERSON
FERGUSON
FINLUX
FORMENTI
FUJITSU
GRADIENTE
GRUNDIG
HITACHI
IMPERIAL
JVC
LG
LOEWE
LOEWE OPTA
MAGNAVOX
METZ
MITSUBISHI
MIVAR
NEC
NEWSAN
NOBLEX
NOKIA
NORDMENDE
PANASONIC
PHILIPS
PHONOLA
PIONEER
RADIOLA
RADIOMARELLI
RCA
REX
SABA
SALORA
SANYO
SCHNEIDER
SELECO
SHARP
SIEMENS
SINGER
SINUDYNE
SONY
TELEAVA
TELEFUNKEN
THOMSON
THOMSON ASIA
TOSHIBA
WEGA
YOKO
ZENITH
Code
TV POWER+01, +02, +03, +04, +05, +06, +07, +08, +09
TV POWER+82
TV POWER+10, +11, +12, +13, +14, +15, +16, +17, +18
TV POWER+57
TV POWER+71
TV POWER+73
TV POWER+57
TV POWER+52
TV POWER+75
TV POWER+19, +20, +23, +24, +25, +26, +27, +28, +29, +30, +31, +32, +33, +34
TV POWER+64
TV POWER+73
TV POWER+06, +49, +57
TV POWER+57
TV POWER+84
TV POWER+70
TV POWER+49, +52, +71
TV POWER+60, +72, +73, +75
TV POWER+52
TV POWER+61, +79
TV POWER+06, +19, +20, +21, +22, +78
TV POWER+06, +69
TV POWER+06, +57
TV POWER+40
TV POWER+57
TV POWER+06, +48, +62, +65
TV POWER+52, +77
TV POWER+83
TV POWER+68
TV POWER+66
TV POWER+74
TV POWER+72, +73, +75
TV POWER+53, +54, +74, +75
TV POWER+06, +55, +56, +57
TV POWER+06, +56, +57
TV POWER+58, +59, +73, +74
TV POWER+06, +56
TV POWER+57
TV POWER+45, +46
TV POWER+74
TV POWER+57, +72, +73, +74, +75
TV POWER+74
TV POWER+41, +42, +43, +44, +48
TV POWER+06
TV POWER+74
TV POWER+36, +37, +38, +39, +48
TV POWER+71
TV POWER+57
TV POWER+57
TV POWER+35, +48
TV POWER+73
TV POWER+67, +73, +75, +76
TV POWER+72, +73, +75
TV POWER+80, +81
TV POWER+47, +48, +49, +50, +51, +52
TV POWER+57
TV POWER+06
TV POWER+63
● REMOTE CONTROL
English _19
Page 21
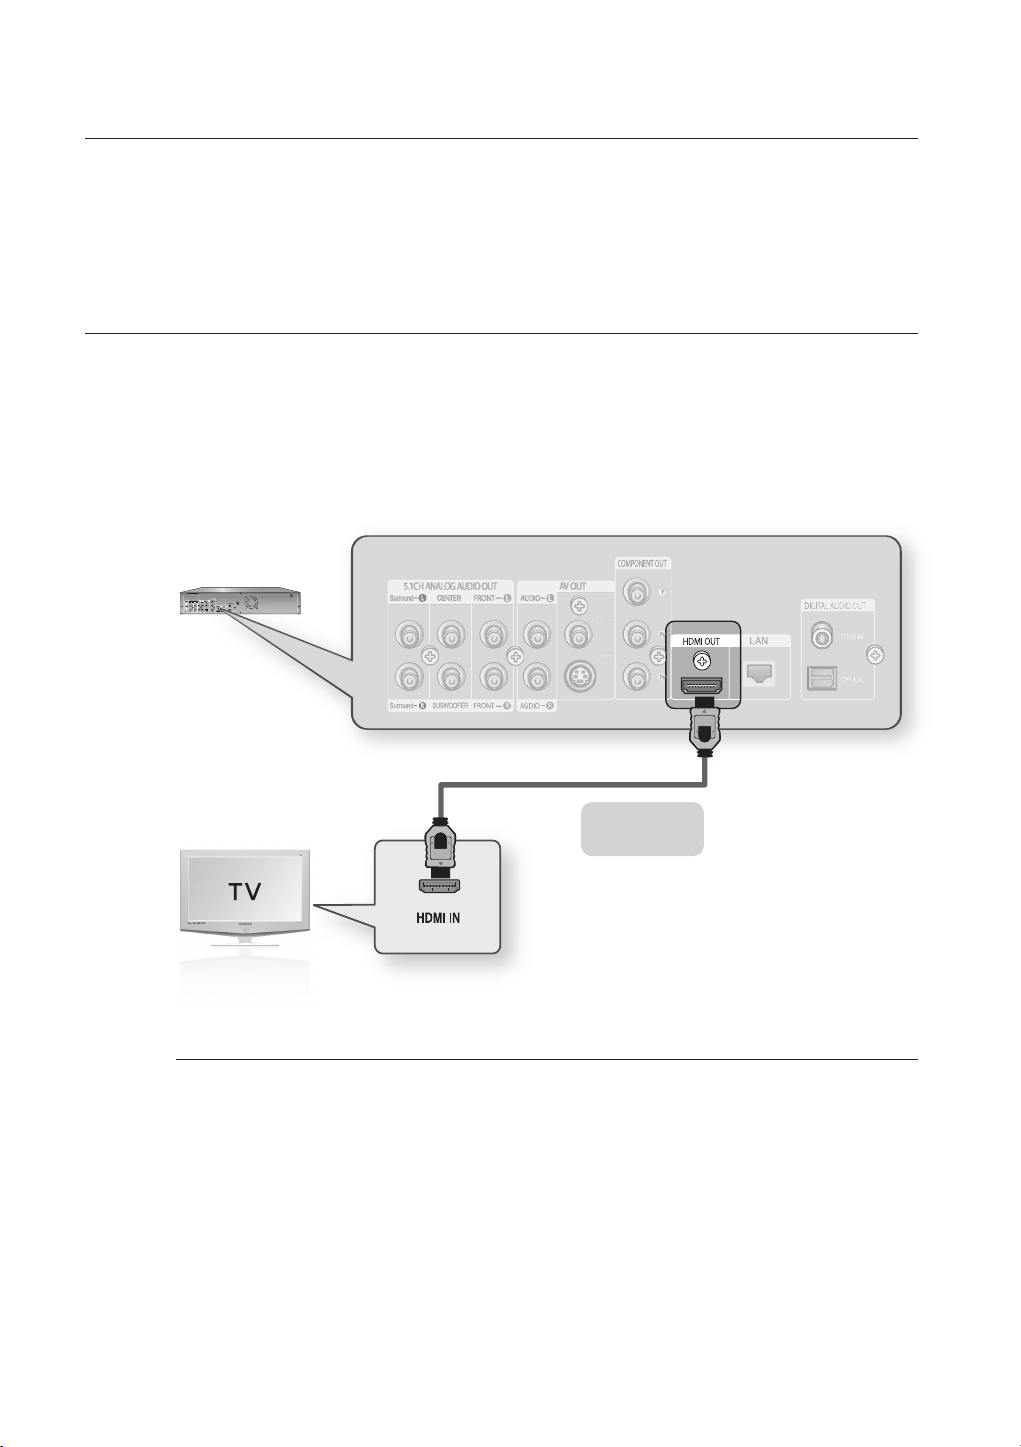
connections
This section involves various methods of connecting the Blu-ray Disc Player to other
external components.
CONNECTING TO A TV WITH AN HDMI CABLE
Using an HDMI-HDMI cable (not included) connect the HDMI OUT terminal on the rear of the Blu-ray Disc Player
1.
to the HDMI IN terminal of your TV.
Press the input selector on your TV remote control until the HDMI signal from the Blu-ray Disc Player appears on
2.
your TV screen.
If you have set the remote control to properly operate with your TV (see pages 18~19), press the TV INPUT
•
SEL. button on the remote control and select HDMI as the external source of the TV.
M
20_ connections
HDMI cable
(not included)
If the HDMI cable is connected or removed during playback of a CDDA, MP3 or JPEG fi le, the player will stop
playing.
Page 22

HDMI AUTO DETECTION FUNCTION
The player's video output will automatically change to HDMI mode when connecting an HDMI cable while power is
on (see page 40).
Depending on your TV, certain HDMI output resolutions may not work.
M
Please refer to the user's manual of your TV.
If an HDMI or HDMI-DVI cable is connected from the player to a TV, the Blu-ray Disc Player’s output is set to
HDMI/DVI automatically within 10 seconds.
If Component and HDMI are both connected, HDMI mode is automatically selected. (See page 40)
When you connect the player to the TV using the HDMI cable for the fi rst time or to a new TV, the HDMI output
resolution will be automatically set to the highest provided by the TV.
If you connect a Samsung TV to the Blu-ray Disc Player using an HDMI cable, the player can be easily operated
using the TV remote control. (This is only available with Samsung TVs that support the Anynet+ feature.) (See
pages 41~42)
HDMI (High Defi nition Multimedia Interface)
•
HDMI is an interface that enables the digital transmission of video and audio data with just a single
connector.
Using HDMI, the Blu-ray Disc Player transmits a digital video and audio signal and displays a vivid
picture on a TV having an HDMI input jack.
HDMI connection description
•
HDMI connector - Supports video and digital audio data (LPCM or Bitstream).
- HDMI outputs only a pure digital signal to the TV.
- If your TV does not support HDCP (High-bandwidth Digital Content Protection), random noise
appears on the screen.
Why does Samsung use HDMI?
•
Analog TVs require an analog video/audio signal. However, when playing a BD/DVD, the data
transmitted to a TV is digital. Therefore either a digital-to-analog converter (in the Blu-ray Disc Player)
or an analog-to-digital converter (in the TV) is required. During this conversion, the picture quality is
degraded due to noise and signal loss. HDMI technology is superior because it requires no D/A
conversion and is a pure digital signal from the player to your TV.
What is the HDCP?
•
HDCP (High-band width Digital Content Protection) is a system for protecting BD/DVD content
outputted via HDMI from being copied. It provides a secure digital link between a video source (PC,
DVD. etc) and a display device (TV, projector. etc). Content is encrypted at the source device to
prevent unauthorized copies from being made.
What is Anynet+?
•
Anynet+ is a convenient function that offers linked operation of this unit through Samsung TVs with the
Anynet+ feature.
- If your Samsung TV has an
- If you turn on the player and insert a disc, the player will start playing the disc, and the TV will turn on
automatically and switch to HDMI mode.
- If you turn on the player and press the Play button with a disc already inserted, the TV will
immediately turn on and switch to HDMI mode.
logo, then it supports Anynet+ function.
● CONNECTIONS
English _21
Page 23
connections
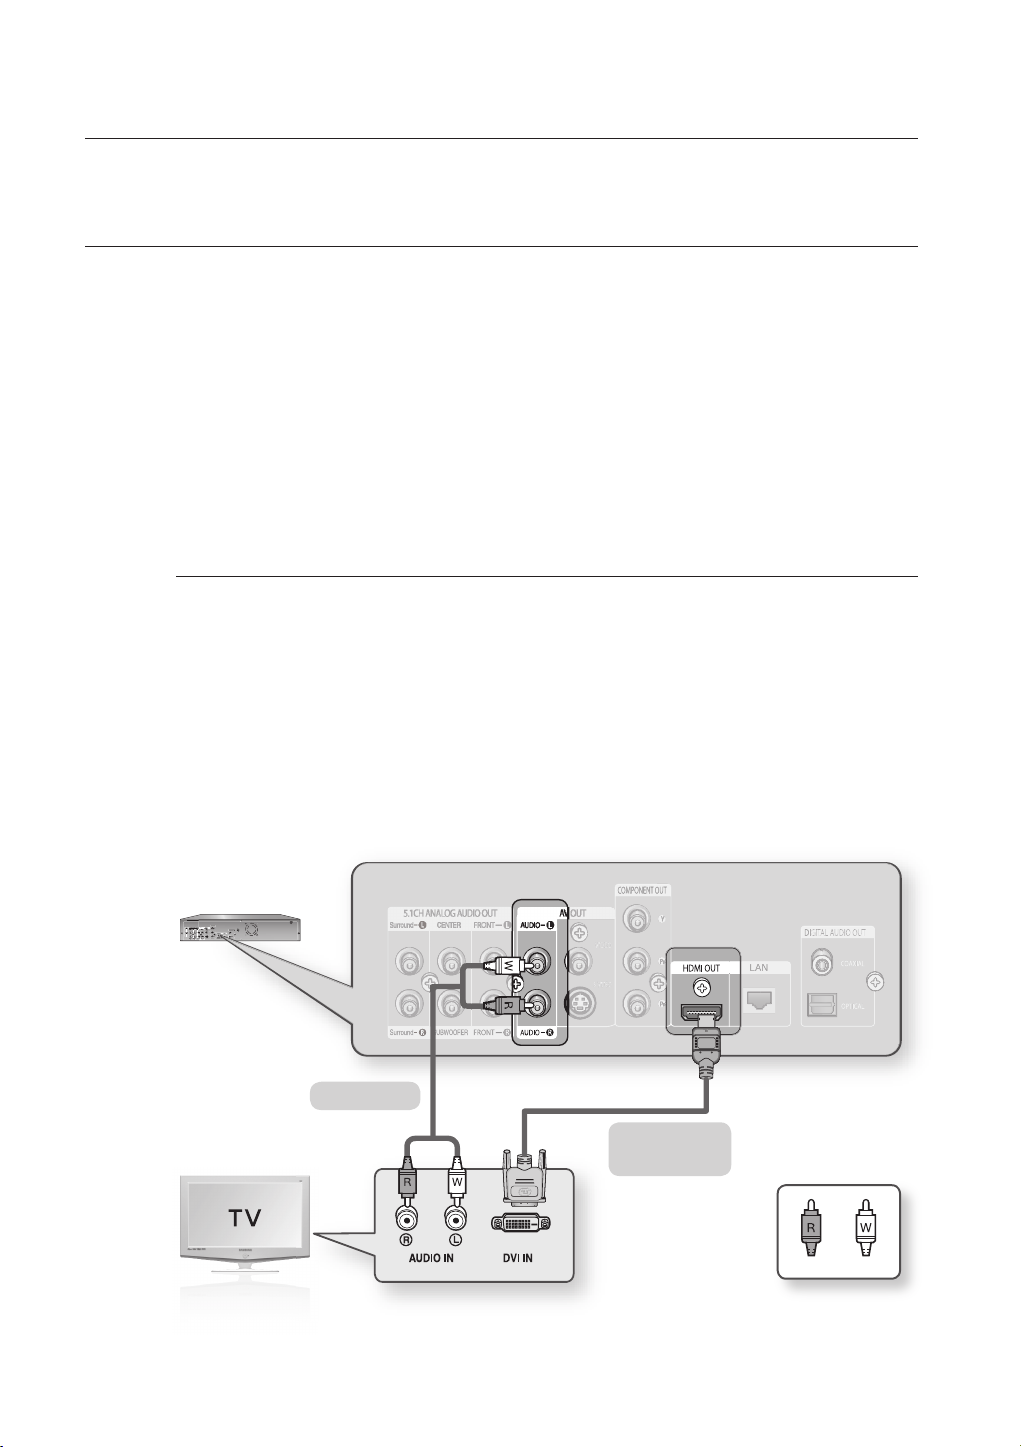
CONNECTING TO A TV WITH DVI CABLE
1.
Using the HDMI-DVI cable (not included), connect the HDMI OUT terminal on the rear of the Blu-ray Disc Player
to the DVI IN terminal of your TV.
2.
Using the audio cables, connect the AUDIO (red and white) OUT terminals on the rear of the Blu-ray Disc
Player to the AUDIO (red and white) IN terminals of your TV.
Turn on the Blu-ray Disc Player and TV.
3.
Press the input selector on your TV remote control until the DVI signal from the Blu-ray Disc Player appears on
your TV screen.
•
If you have set the remote control to properly operate with your TV (see pages 18~19), press the TV INPUT
SEL. button on the remote control and select HDMI as the external source of the TV.
Connecting the HDMI cable while the Blu-ray player's power is on, the player's video output will automatically
change to HDMI mode (see page 40).
Depending on your TV, certain HDMI output resolutions may not work.
M
Please refer to the user's manual of your TV.
If an HDMI or HDMI-DVI cable is plugged into TV, the Blu-ray Disc Player’s output is set to HDMI/DVI
automatically within 10 seconds.
If Component and HDMI are both connected, HDMI mode is automatically selected. (See page 40)
When you connect the player to the TV using the HDMI cable for the fi rst time or to a new TV, the HDMI output
resolution will be automatically set to the highest provided by the TV
If the HDMI cable is connected or removed during playback of a CDDA, MP3 or JPEG fi le, the player will stop
playing.
22_ connections
Audio Cable
HDMI-DVI cable
(not included)
WhiteRed
Page 24
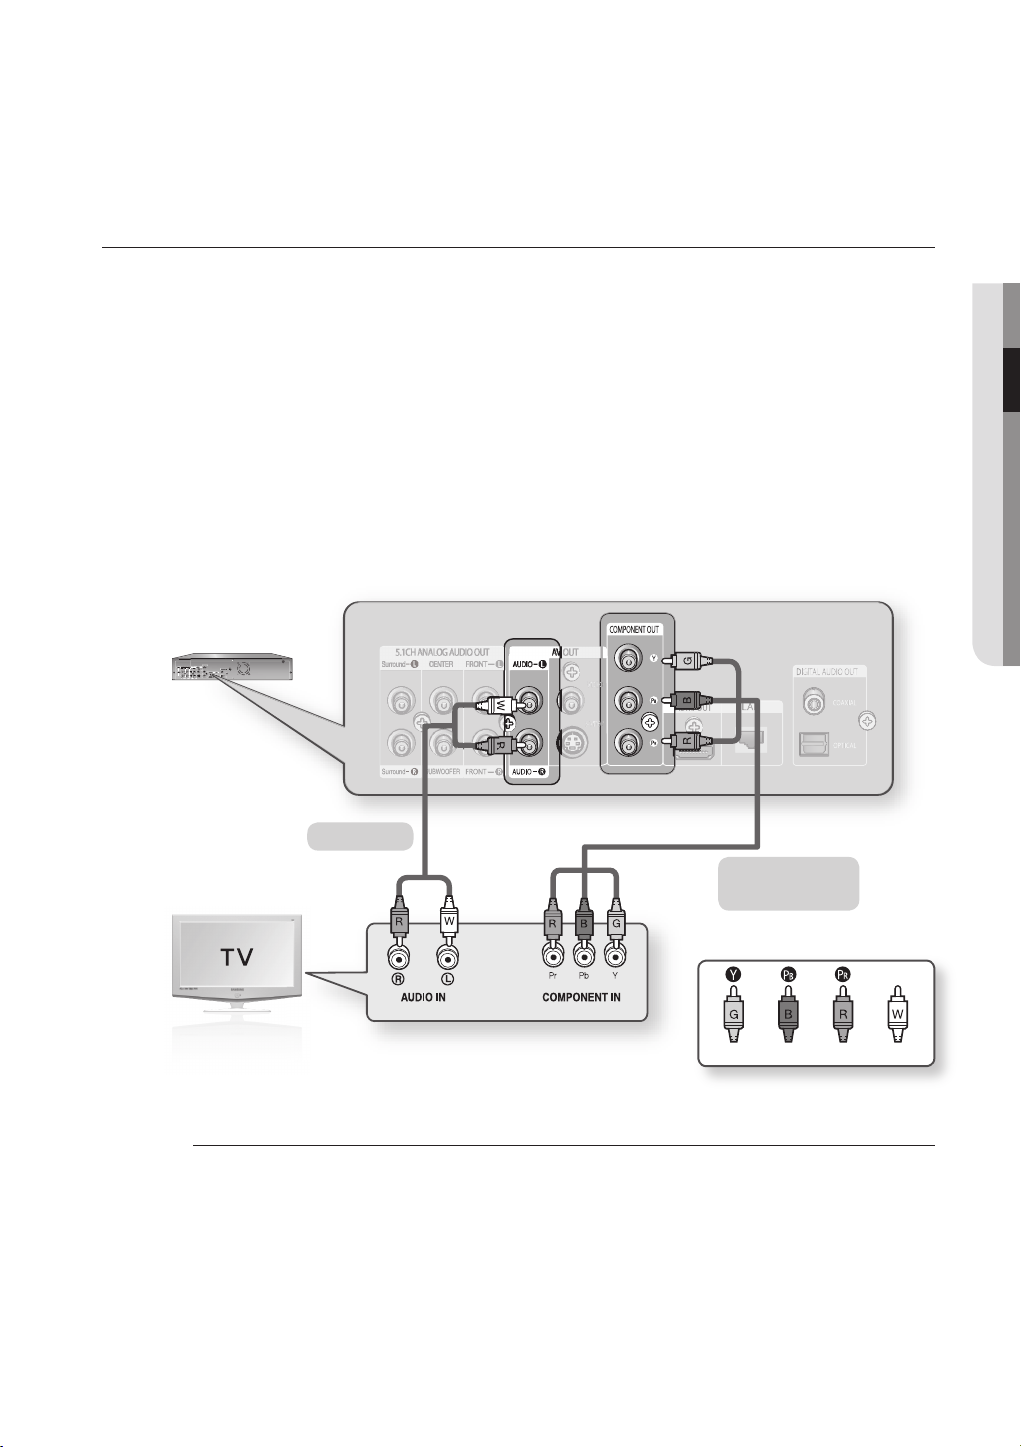
CONNECTING TO A TV (COMPONENT)
Connecting to your TV using Component video cables.
You will enjoy high quality and accurate color reproduction images. Component video separates the picture element
into black and white(Y), blue(PB), red(PR) signals to present clear and clean images. (Audio signals are delivered
through the audio output.)
1.
Using component video cables (not included), connect the COMPONENT VIDEO OUT terminals on the rear of
the Blu-ray Disc Player to the COMPONENT IN terminals of your TV.
2.
Using the audio cables (not included), connect the AUDIO (red and white) OUT terminals on the rear of the
Blu-ray Disc Player to the AUDIO (red and white) IN terminals of your TV. Turn on the Blu-ray Disc Player and
TV.
3.
Press the input selector on your TV remote control until the Component signal from the Blu-ray Disc Player
appears on the TV screen.
•
If you have set the remote control to properly operate with your TV (see pages 18~19), press the TV INPUT
SEL. button on the remote control and select COMPONENT as the external source of the TV.
Audio Cable
● CONNECTIONS
M
Component cable
(not included)
Green Blue Red White
Depending on the manufacturer, the component terminals on your TV may be marked “R-Y, B-Y, Y” or “Cr,
Cb, Y” instead of “Pr, Pb, Y”. The number and position of terminals may vary depending on the TV set. Please
refer to the user's manual of your TV.
You can select from a variety of resolution settings such as 1080i, 720p, 480p and 480i, depending on the
disc type. (See page 40)
The actual resolution may differ from the setting in the SETUP menu if both Component and HDMI cables are
connected. The resolution may also be different depending on the disc. (See page 40)
English _23
Page 25
connections
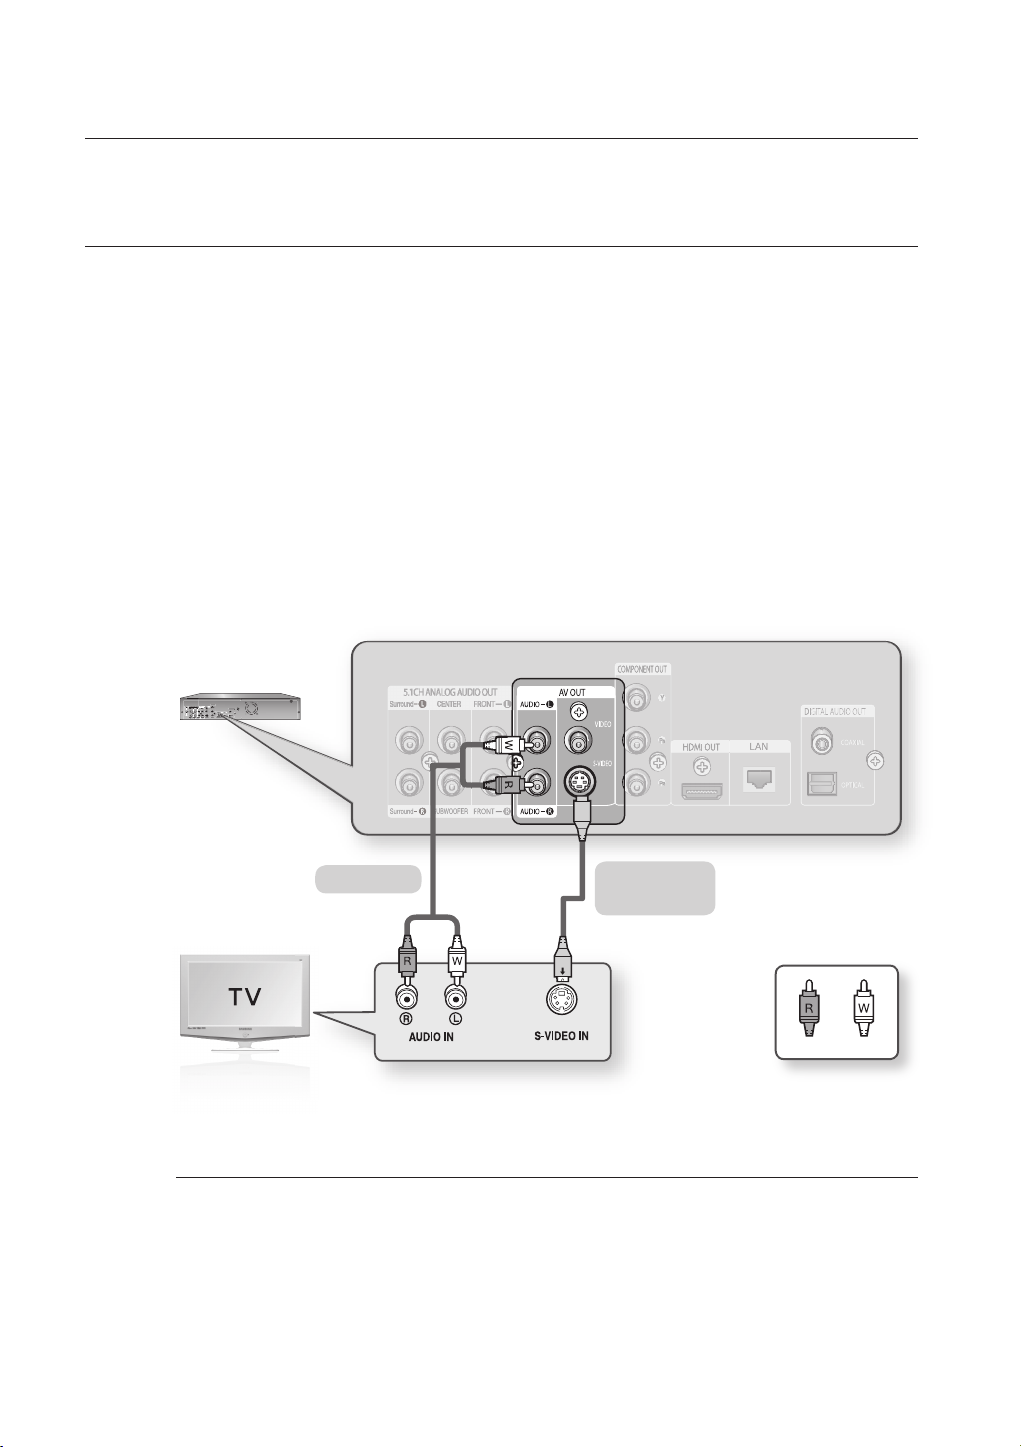
CONNECTING TO A TV (S-VIDEO)
Connecting to your TV using an S-Video cable.
You will enjoy high quality images. S-Video separates the picture element into black and white(Y) and color(C)
signals to present clearer images than regular video input mode.
(Audio signals are delivered through the audio output.)
Using an S-Video cable (not included), connect the S-VIDEO OUT terminal on the rear of the Blu-ray Disc Player
1.
to the S-VIDEO IN terminal of your TV.
Using the audio cables, connect the AUDIO (red and white) OUT terminals on the rear of the Blu-ray Disc
2.
Player to the AUDIO (red and white) IN terminals of your TV. Turn on the Blu-ray Disc Player and TV.
Press the input selector on your TV remote control until the S-Video signal from the Blu-ray Disc Player appears
3.
on your TV screen.
If you have set the remote control to properly operate with your TV (see pages 18~19), press the TV INPUT
•
SEL. button on the remote control and select S-VIDEO as the external source of the TV.
M
24_ connections
Audio Cable
The S-VIDEO source is always output in 480i resolution regardless of the set resolution in the SETUP menu.
(See page 40)
S-Video Cable
(not included)
WhiteRed
Page 26
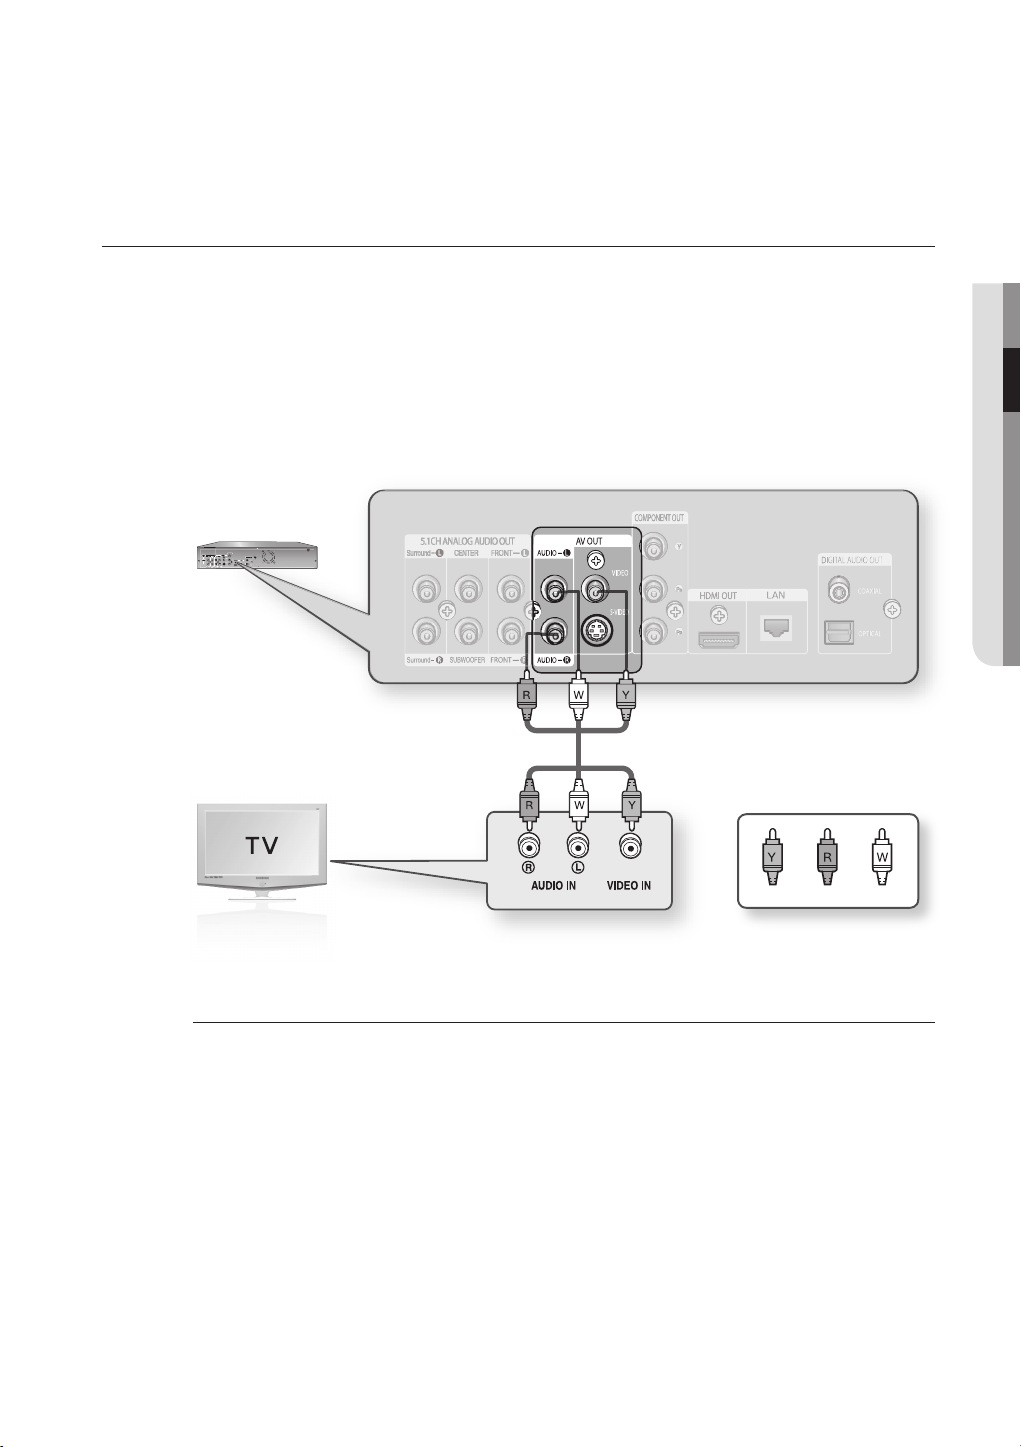
CONNECTING TO A TV(VIDEO)
1.
Using video/audio cables, connect the VIDEO (yellow) / AUDIO (red and white) OUT terminals on the rear of
the Blu-ray Disc Player to the VIDEO (yellow) / AUDIO (red and white) IN terminals of your TV.
2.
Turn on the Blu-ray Disc Player and TV.
3.
Press the input selector on your TV remote control until the Video signal from the Blu-ray Disc Player appears on
the TV screen.
•
If you have set the remote control to properly operate with your TV (see pages 18~19), press the TV INPUT
SEL. button on the remote control and select VIDEO as the external source of the TV.
● CONNECTIONS
M
RedYellow White
Noise may be generated if the audio cable placed too close to the power cable.
If you want to connect to an Amplifi er, please refer to the Amplifi er connection pages. (See pages 26~29)
The number and position of terminals may vary depending on your TV set. Please refer to the user's manual of
your TV.
If there is one audio input terminal on the TV, connect it to the [AUDIO OUT][left] (white) terminal of
the Blu-ray Disc Player.
The VIDEO source is always output in 480i resolution regardless of the set resolution in the SETUP menu.
(See page 40)
English _25
Page 27
connections
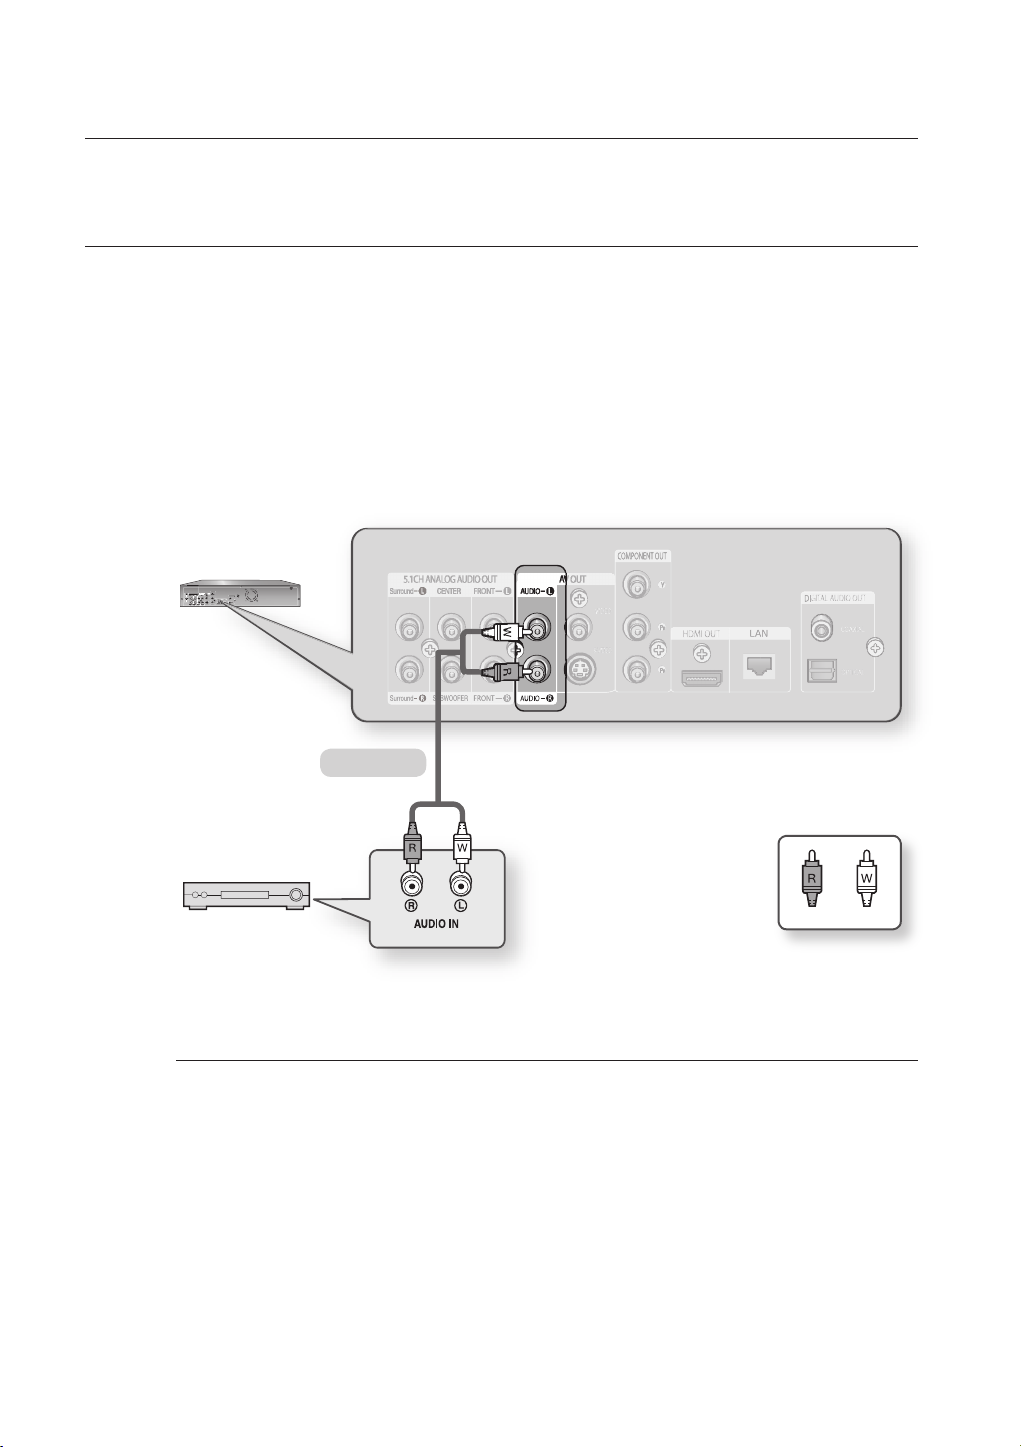
CONNECTING TO AN AUDIO SYSTEM (2 CHANNEL AMPLIFIER)
1.
Using the audio cables, connect the AUDIO (red and white) OUT terminals on the rear of the Blu-ray Disc
Player to the AUDIO (red and white) IN terminals of your Amplifi er.
2.
Using the video signal cable(s), connect the HDMI, COMPONENT, S-VIDEO, or VIDEO OUT terminals on the
rear of the Blu-ray Disc Player to the HDMI, COMPONENT, S-VIDEO, or VIDEO IN terminal of your TV as
described on pages 20 to 25.
3.
Turn on the Blu-ray Disc Player, TV and Amplifi er.
4.
Press the input select button of the Amplifi er to select the external input in order to hear sound from the Blu-ray
Disc Player. Refer to your Amplifi er's user manual to set the Amplifi er's audio input.
2-Channel stereo amp
Manufactured under license from Dolby Laboratories. “Dolby” and the double-D symbol are trademarks of
M
Dolby Laboratories.
“DTS” and “DTS Digital Surround” are registered trademarks of DTS, Inc.
Audio Cable
WhiteRed
26_ connections
Page 28
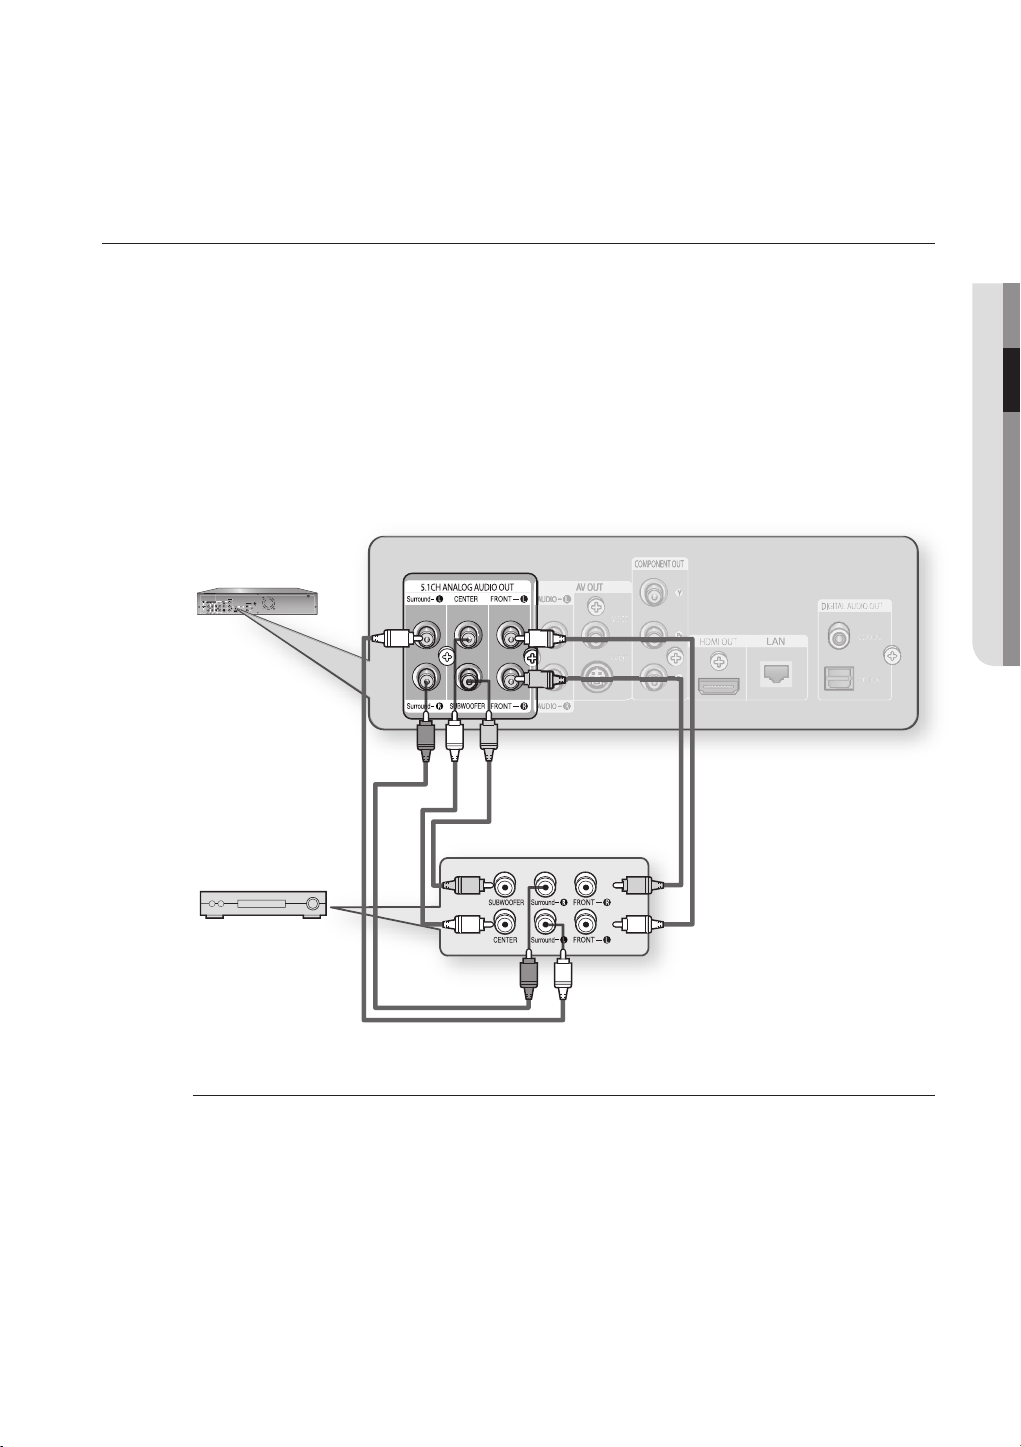
CONNECTING TO AN AUDIO SYSTEM (5.1 CHANNEL AMPLIFIER)
Using the audio cables, connect the 5.1 ANALOG AUDIO OUT (Front R, Front L, CENTER, SUBWOOFER,
1.
Surround L, Surround R) terminals on the rear of the Blu-ray Disc Player to the 5.1 Channel ANALOG AUDIO
IN (Front R, Front L, CENTER, SUBWOOFER, Surround L, Surround R) terminals of your Amplifi er.
Using the video signal cable(s), connect the HDMI, COMPONENT, S-VIDEO, or VIDEO OUT terminals on the
2.
rear of the Blu-ray Disc Player to the HDMI, COMPONENT, S-VIDEO, or VIDEO IN terminal of your TV as
described on pages 20 to 25.
Turn on the Blu-ray Disc Player, TV and Amplifi er.
3.
Press the input select button of the Amplifi er to select external input in order to hear sound from the Blu-ray
4.
Disc Player. Refer to your Amplifi er's user manual to set the Amplifi er's audio input.
● CONNECTIONS
5.1 Channel Amplifi er
Please turn the volume down when you turn on the Amplifi er. Sudden loud sound may cause damage to the
M
speakers and your ears.
Please set the audio in the menu screen according to the Amplifi er. (See pages 35~36)
The position of terminals may vary depending on the Amplifi er. Please refer to the user's manual of your Amplifi er.
The front left and right outputs on your player and 5.1 channel amplifi er must be connected to hear disc menu
audio from certain Blu-Ray discs.
English _27
Page 29
connections
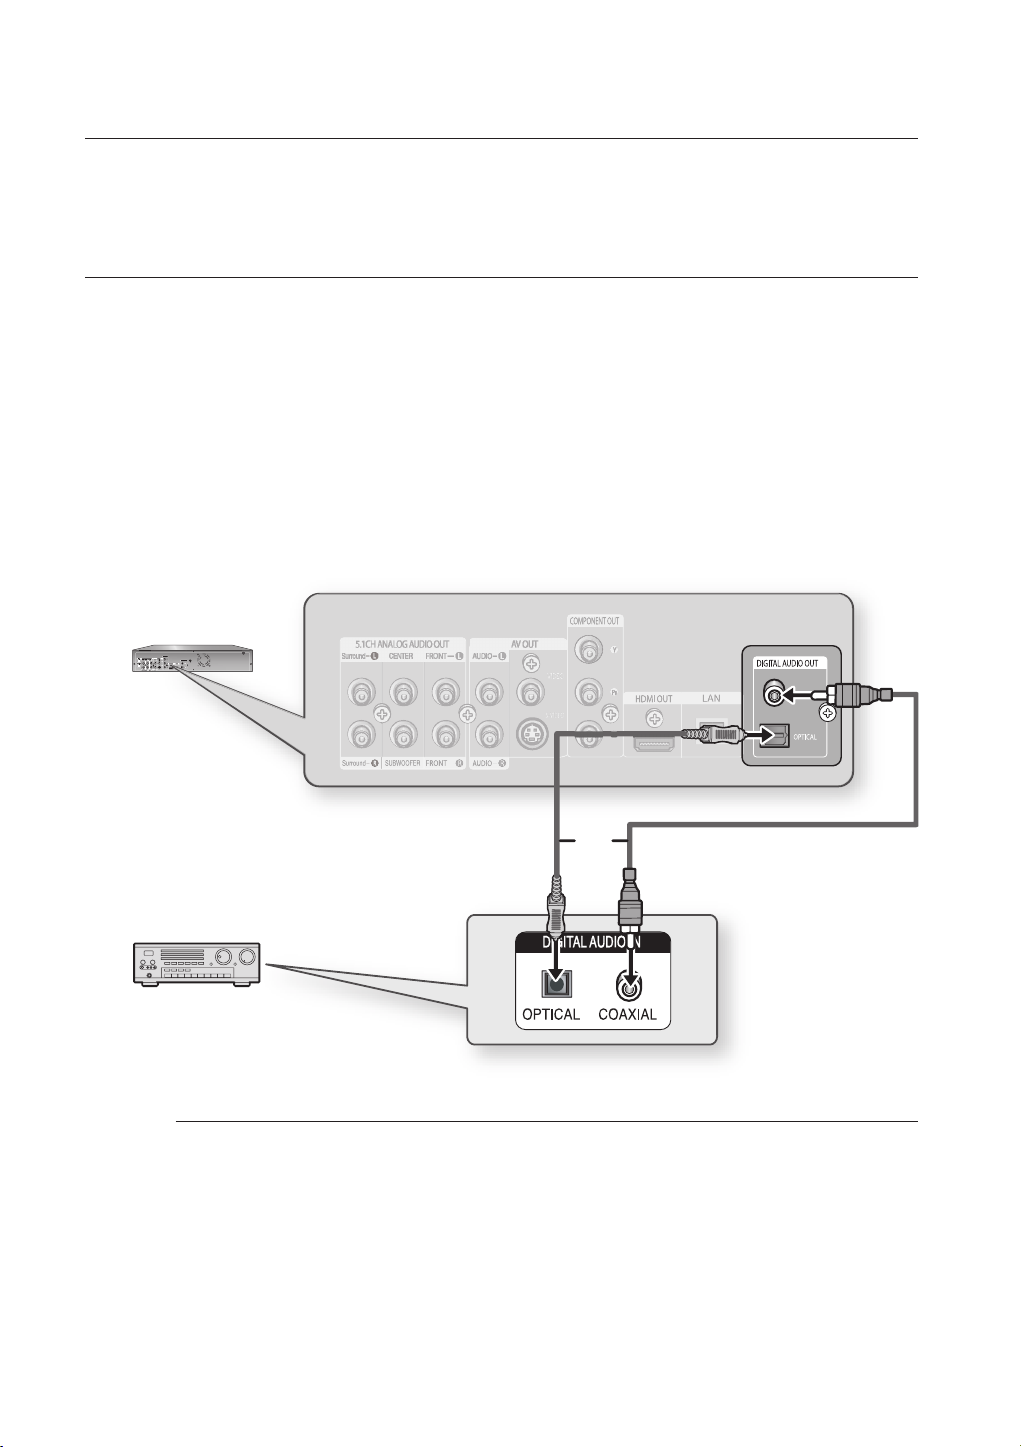
CONNECTING TO AN AUDIO SYSTEM (DOLBY DIGITAL, DTS AMPLIFIER)
1.
If using an optical cable (not included), connect the DIGITAL AUDIO OUT (OPTICAL) terminal on the rear of the
Blu-ray Disc Player to the DIGITAL AUDIO IN (OPTICAL) terminal of your Amplifi er.
If using a coaxial cable (not included), connect the DIGITAL AUDIO OUT (COAXIAL) terminal on the rear of the
Blu-ray Disc Player to the DIGITAL AUDIO IN (COAXIAL) terminal of the Amplifi er.
2.
Using the video signal cable(s), connect the HDMI , COMPONENT, S-VIDEO, or VIDEO OUT terminals on the
rear of the Blu-ray Disc Player to the HDMI, COMPONENT, S-VIDEO, or VIDEO IN terminals of your TV as
described on pages 20 to 25.
3.
Turn on the Blu-ray Disc Player, TV, and Amplifi er.
4.
Press the input select button of the Amplifi er to select the external input in order to hear sound from the Blu-ray
Disc Player. Refer to your Amplifi er's user manual to set the Amplifi er's audio input.
M
28_ connections
OR
Please turn the volume down when you turn on the Amplifi er. Sudden loud sound may cause damage to the
speakers and your ears.
Please set the audio in the menu screen according to the Amplifi er. (See pages 35~36)
The position of terminals may vary depending on the Amplifi er. Please refer to the user's manual of your Amplifi er.
When using this connection, Blu-ray Discs with an LPCM audio soundtrack will only be heard over the front
two channels.
Page 30
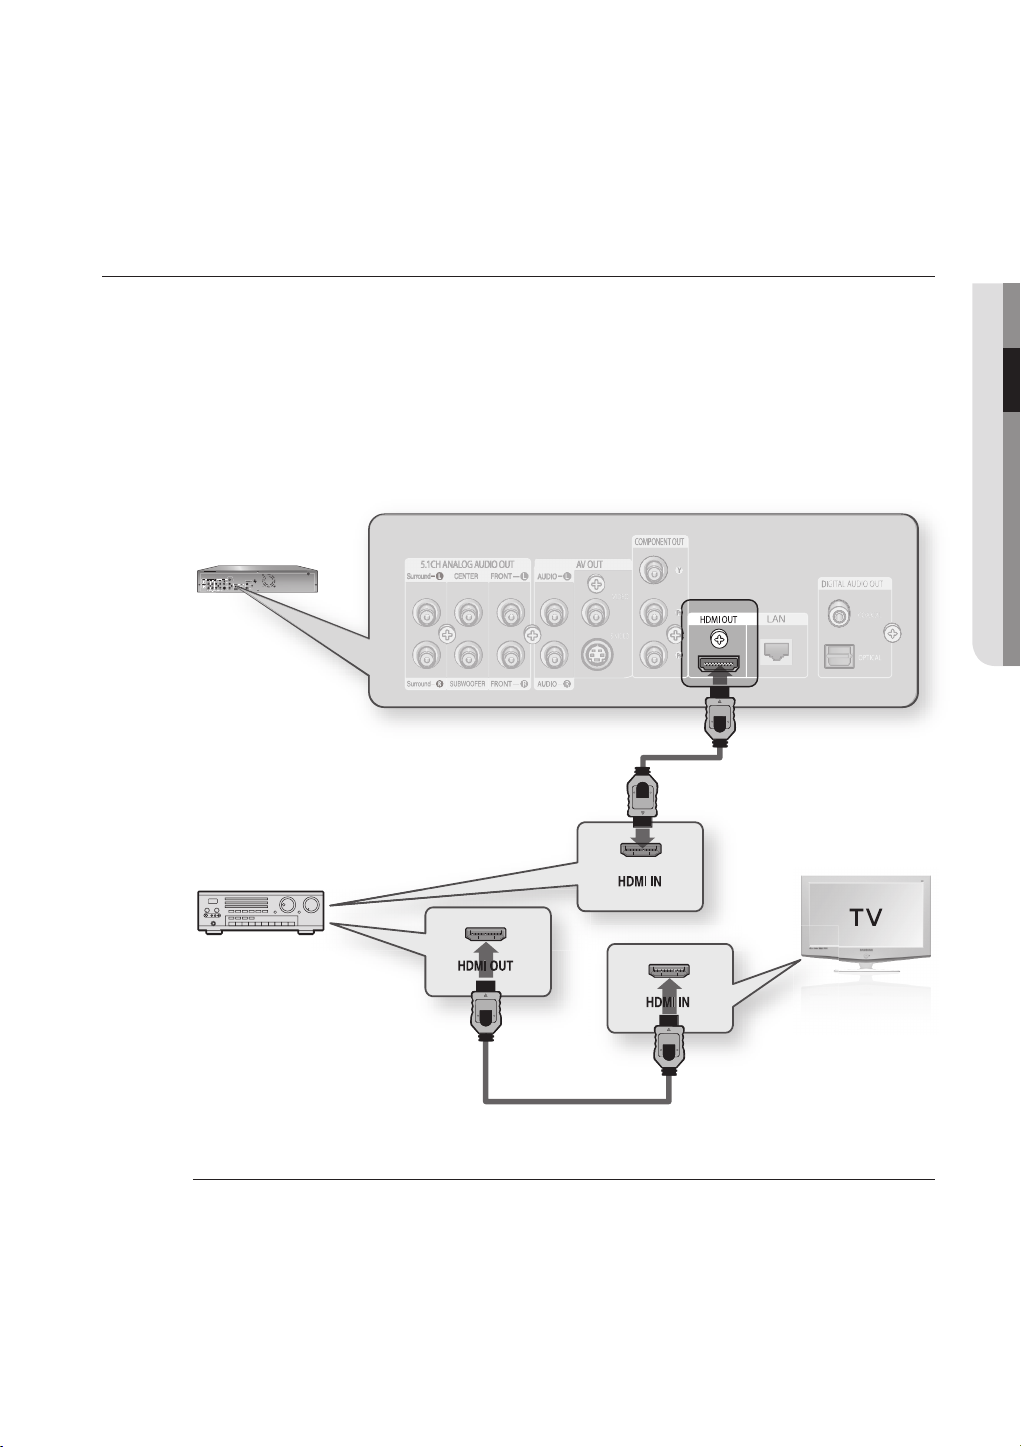
CONNECTING TO AN AUDIO SYSTEM (HDMI SUPPORTED AMPLIFIER)
Using the HDMI-HDMI cable (not included), connect the HDMI OUT terminal on the rear of the Blu-ray Disc
1.
Player to the HDMI IN terminal of your Amplifi er.
Using the HDMI-HDMI cable, connect the HDMI OUT terminal of the Amplifi er to the HDMI IN terminal of your
2.
TV.
Turn on the Blu-ray Disc Player, TV, and Amplifi er.
3.
Press the input select button of the Amplifi er to select external input in order to hear sound from the Blu-ray
4.
Disc Player. Refer to your Amplifi er's user manual to set the Amplifi er's audio input.
● CONNECTIONS
M
Please turn the volume down when you turn on the Amplifi er. Sudden loud sound may cause damage to the
speakers and your ears.
Please set the audio in the menu screen according to the Amplifi er. (See pages 35~36)
The position of terminals may vary depending on the Amplifi er. Please refer to the user's manual of your Amplifi er.
English _29
Page 31
connections
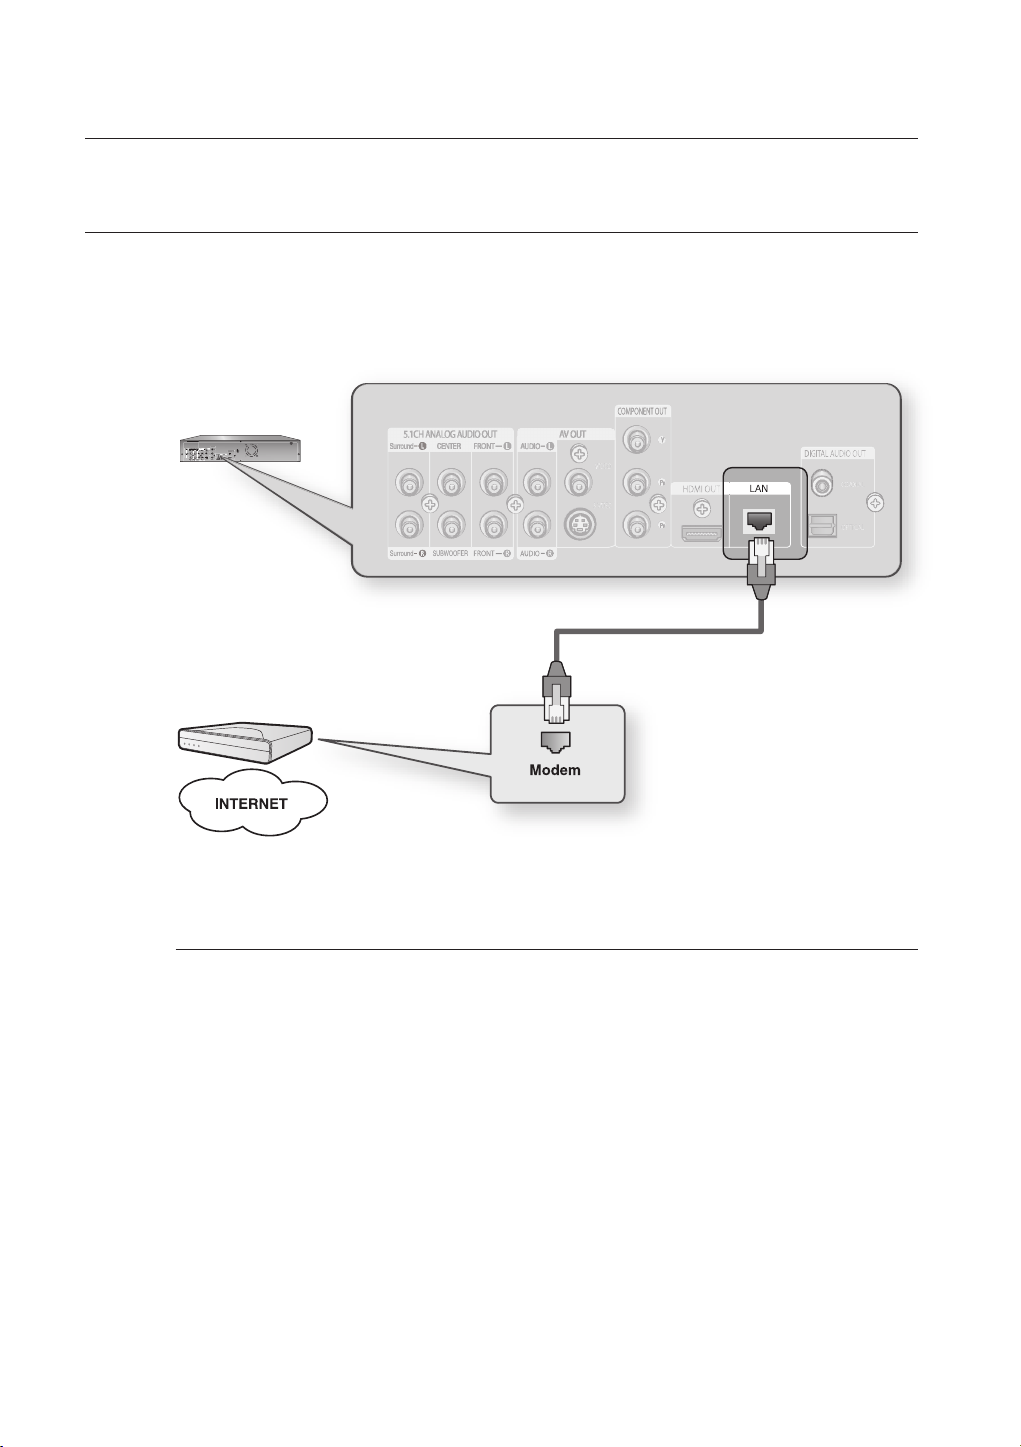
CONNECTING TO SAMSUNG'S FTP/INTERNET SITE FOR SOFTWARE UPGRADES
1.
Using the Direct LAN Cable (UTP cable), connect the LAN terminal on the rear of the Blu-ray Disc Player to the
LAN terminal of your modem.
- Connect to the Internet for future software upgrades.
M
30_ connections
See pages 45~48 for the Software Upgrade procedure.
Page 32
basic functions of your Blu-ray Disc Player
This section introduces basic playback functions and playback by disc type.
BEFORE PLAYING
•
Turn on your TV and set it to the correct Video Input (the input the Blu-ray player is connected to).
•
If you connected an external Audio System, turn on your Audio System and set it to the correct Audio Input.
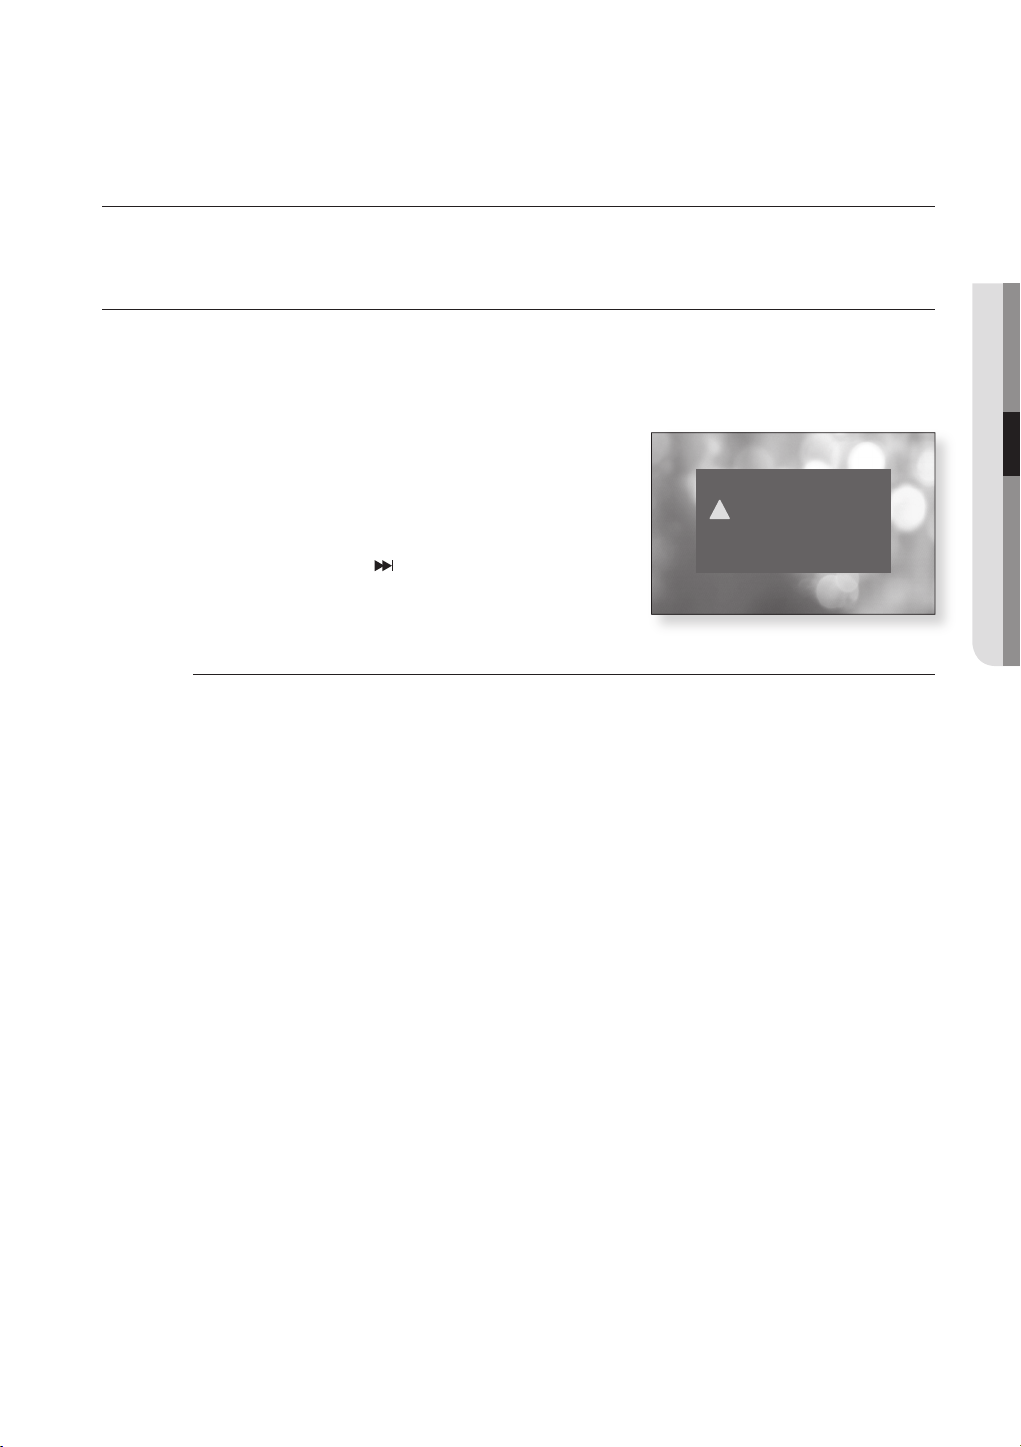
After plugging in the player, the fi rst time you press the POWER button, this screen comes up:
If you want to select a language, press a NUMBER button.
(This screen will only appear when you plug in the player for
the fi rst time.) If the language for the startup screen is not set,
the settings may change whenever you turn the power on or
off. Therefore, make sure that you select the language you
want to use. Once you select a menu language, you can
change it by pressing the
unit for more than 5 seconds with no disc in the unit. Then the
MENU LANGUAGE SELECTION window appears again
where you can reset your preferred language.
Discs which cannot be played on this player.
M
• BD-R • BD-RE • HD DVD • DVD+RW
• DVD+R • DVD-ROM • DVD-RAM • CDV
• CD-ROM • CVD • CD-I
• Super Audio CD(except CD layer) • CDGs play audio only, not graphics.
Ability to play back may depend on recording conditions.
• DVD-R • CD-RW/R • DVD-RW (V mode)
• The unit may not play certain CD-R, CD-RW and DVD-R due to the disc type or recording conditions.
Blu-ray Disc is a new and evolving format. Accordingly, disc compatibility issues with new and existing format
discs are possible. Not all discs are compatible and not every disc will playback.
For additional information, refer to the Disc Type and Characteristics and Compliance and Compatibility Notice
sections of this Manual. If you encounter compatibility problems, please contact SAMSUNG customer care
center.
The unit cannot play CD-R/-RW and DVD-RW/-R recorded content such as divx, avi, mpg, mov, wma.
button on the front panel of the
MENU LANGUAGE SELECTION
Press 1 for English
!
Pulsar 2 para Español
Touche 3 pour Français
Macrovision : BSS01
● BASIC FUNCTIONS
English _31
Page 33
basic functions of your
Blu-ray Disc Player
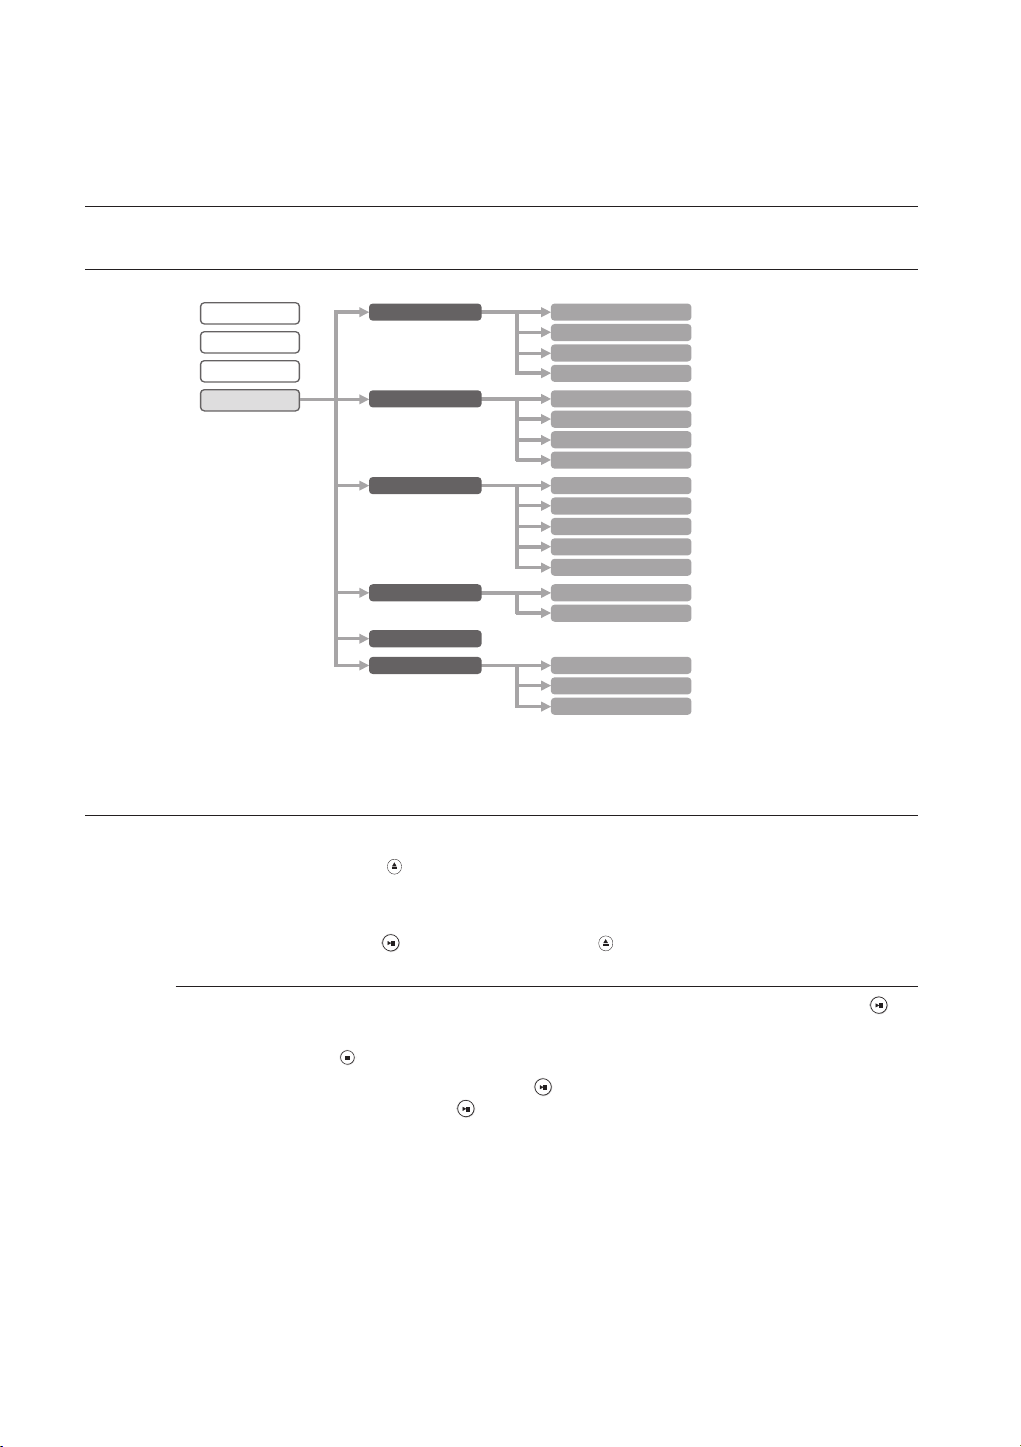
ON-SCREEN MENU NAVIGATION
Video
Music
Photo
Setup
PLAYING A DISC
1.
Press the OPEN/CLOSE ( ) button.
The STANDBY indicator light goes out and the tray opens.
2.
Place a disc gently into the tray with the disc’s label facing up.
3.
Press the PLAY/PAUSE (
Language Setup Audio
Subtitle
Disc Menu
Menu
Audio Setup Digital Output
PCM Down Sampling
Dynamic Compression
Speaker Setup
Display Setup TV Aspect
Movie Frame (24 Fs)
Resolution
Screen Message
Front Display
HDMI Setup Anynet+ (HDMI-CEC)
Format
Parental Setup
System Upgrade System Information
Network Setup
Upgrade Start
) button or OPEN/CLOSE ( ) button to close the disc tray.
When you stop disc play, the player remembers where you stopped, so when you press PLAY/PAUSE ( )
M
button again, it will pick up where you left off.
Press the STOP (
To pause the playback, press the PLAY/PAUSE (
To resume, press the PLAY/PAUSE(
If the player is left in the stop mode for more than 10 minutes without any user interface, a screen saver will
appear on your TV. If the player is left in the screen saver mode for more than 30 minutes, the power will
automatically turn off except during playback of an MP3/CDDA and/or JPEG. (Automatic Power-Off Function)
MP3/CDDA : if no button is pressed for more than 10 minutes, the screen saver appears.
JPEG : the screen saver program or the auto power off function will be deactivated when playing a photo fi le.
32_ basic functions
) button twice during playback to disable the Resume function.
) button during playback.
) button once again.
Page 34
USING THE SEARCH AND SKIP FUNCTIONS
During play, you can search quickly through a chapter or track, and use the skip function to jump to the next
selection.
Searching through a Chapter or Track
During playback, press the SEARCH ( ) button.
If you want to search at a faster speed on the BD/DVD, press this button.
•
If you press the SEARCH (
•
X2 X4 X8 X16 X32 X128
•
If you press the SEARCH (
X2 X4 X8 X16 X32 X128
No sound is heard during search mode.
M
) button,
) button,
Skipping Tracks
During playback, press the SKIP ( ) button.
When playing a BD/DVD, if you press the SKIP ( ) button, it moves to the next chapter. If you press
the SKIP ( ) button, it moves to the beginning of the chapter. One more press makes it move to the
beginning of the previous chapter.
SLOW MOTION PLAY/STEP MOTION PLAY
hZCV
● BASIC FUNCTIONS
hZCV
Slow Motion Play
In pause or step mode, press the SLOW button on the remote control for Slow Motion play.
If you press the SLOW button,
•
To return to normal speed playback, press the PLAY/PAUSE (
•
This ( ) icon indicates an invalid button press.
M
No sound is heard during slow mode.
Slow motion operates only in the forward direction.
8/1 4/1 2/1
) button.
Step Motion Play
Press the STEP button on the remote control during play for Step Motion play.
•
Each time the button is pressed a new frame will appear.
When the STEP button is pressed, the next frame will be activated.
•
Press the PLAY/PAUSE (
•
M
No sound is heard during step mode.
Step motion operates only in the forward direction.
) button to resume normal play.
hZCV
hZCV
English _33
Page 35
system setup
For your convenience, confi gure proper settings for the external device to connect
or any other environment before using the player.
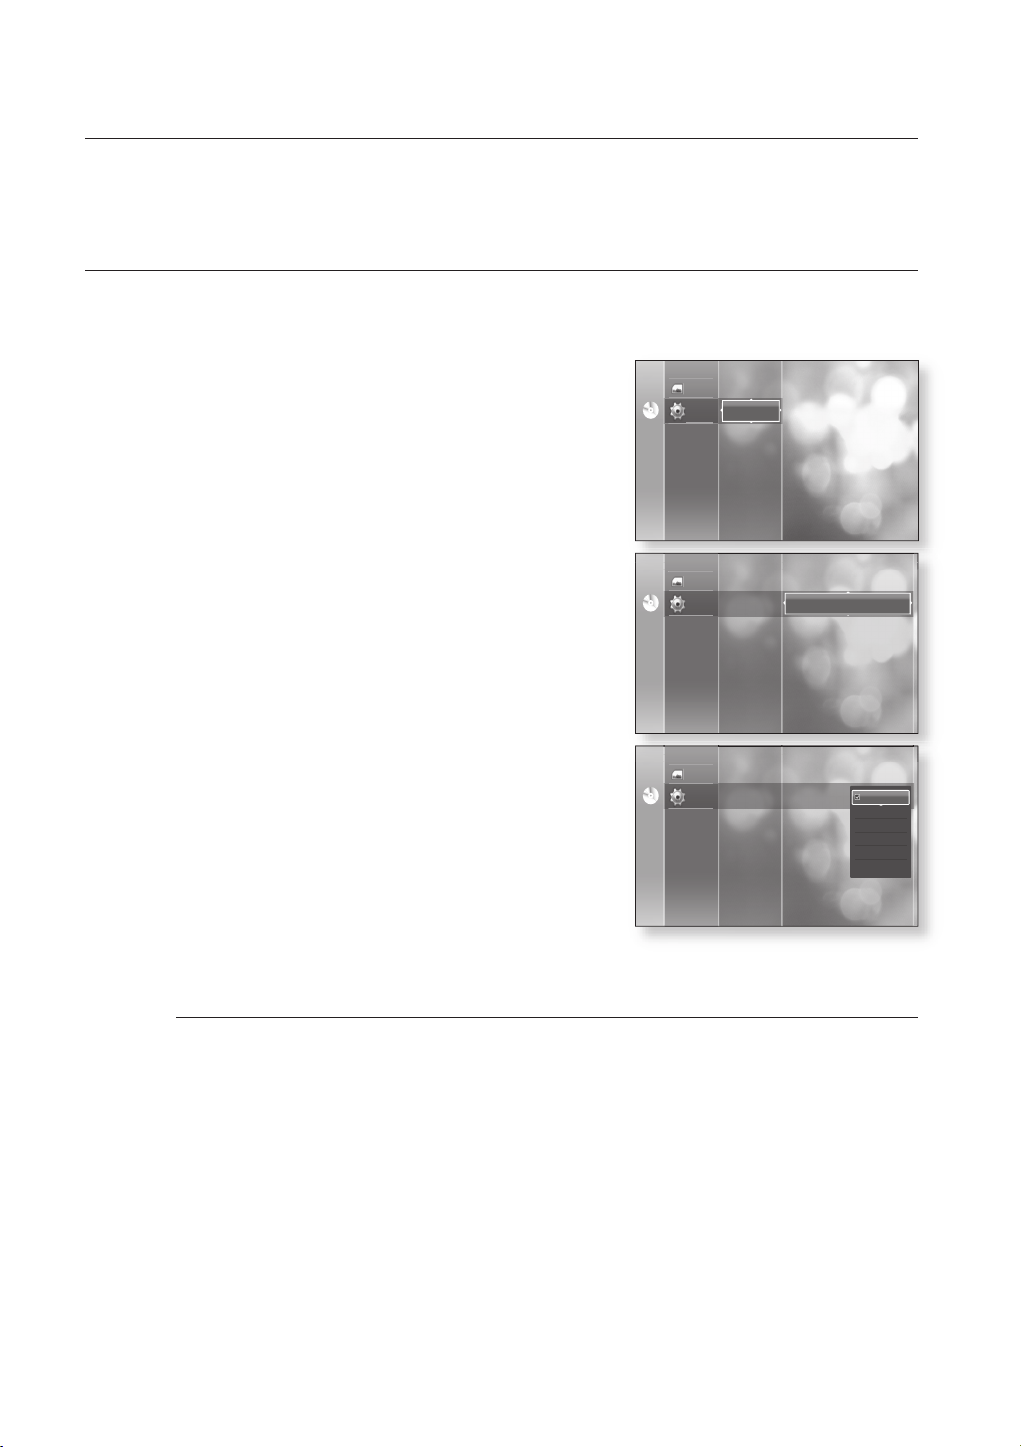
SETTING UP THE LANGUAGE OPTIONS
If you set the audio, subtitle, disc menu and player menu, in advance, they will come up automatically every time
you watch a movie.
1.
With the unit in Stop mode, press the MENU button.
2.
Press the
▲▼
buttons to select Setup, then press the
ENTER or ► button.
Photo
Language Setup
Setup
No DiscNo Disc
Audio Setup
Display Setup
HDMI Setup
Parental Setup
System Upgrade
3.
Press the
▲▼
buttons to select Language Setup, then
press the ENTER or ► button. Language setup menu will
be displayed.
4.
Press the
▲▼
buttons to select the desired language
option, press the ENTER or ► button.
•
Audio : For the disc audio language.
•
Subtitle : For the disc subtitles.
•
Disc Menu : For the disc menu contained on the disc.
•
Menu : For the on-screen menu of your Blu-ray Disc
Player.
5.
Press the
M
▲▼
buttons to select the desired language, then press the ENTER button.
Press the RETURN or ◄ button to return to the previous menu. Press the MENU button to exit the menu.
The selected language will only appear if it is supported on the disc.
Photo
No DiscNo Disc
No DiscNo Disc
Photo
Setup
Audio Setup
Display Setup
HDMI Setup
Parental Setup
System Upgrade
Language Setup
Audio Setup
Display Setup
HDMI Setup
Parental Setup
System Upgrade
Language Setup
Setup
Audio : Original
Subtitle : Automatic
Disc Menu : English
Menu : English
Audio : Original
Subtitle : Automatic
Disc Menu : English
Menu : English
Original
English
Français
Deutsch
Español
Italiano
34_ system setup
Page 36
SETTING UP THE AUDIO OPTIONS
Allows you to set up the Audio device and sound status depending on the audio system being used with the player.
1.
With the unit in Stop mode, press the MENU button.
2.
Press the
ENTER or
▲▼
buttons to select Setup, then press the
►
button.
No DiscNo Disc
Photo
Setup
Language Setup
Audio Setup
Display Setup
HDMI Setup
Parental Setup
System Upgrade
● SYSTEM SETUP
3.
Press the
the ENTER or
4.
Press the
▲▼
buttons to select Audio Setup, then press
►
button.
▲▼
buttons to select the desired audio option from the options described below, then
press the ENTER or ► button.
5.
Press the
M
▲▼
buttons to select the desired item, then press the ENTER button.
Press the RETURN or ◄ button to return to the previous menu.
Press the MENU button to exit the menu.
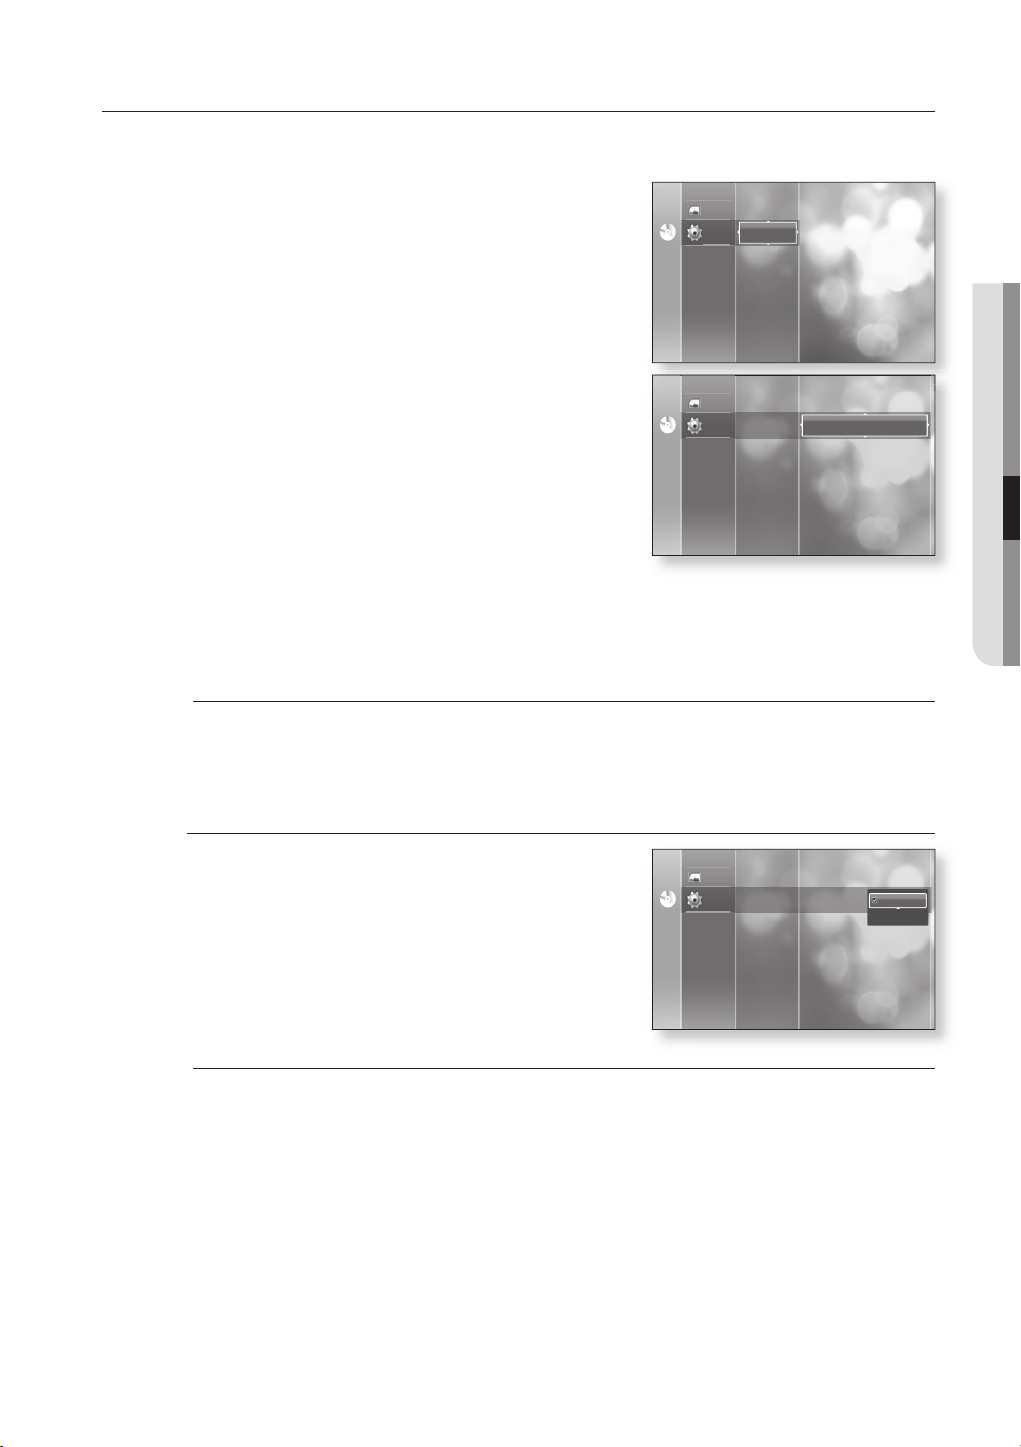
Digital Output
PCM : Select this when your equipment does not decode
•
Dolby Digital.
Bitstream : Outputs Dolby Digital or DTS audio as
•
Bitstream. Select this when your AV receiver or AV amplifi er
has a Dolby Digital or DTS Decoder.
Language Setup
Photo
No DiscNo Disc
No DiscNo Disc
Photo
Setup
Display Setup
HDMI Setup
Parental Setup
System Upgrade
Language Setup
Audio Setup
Display Setup
HDMI Setup
Parental Setup
System Upgrade
Audio Setup
Setup
Digital Output : PCM
PCM Down Sampling : On
Dynamic Compression : On
Speaker Setup
Digital Output : PCM
PCM Down Sampling : On
Dynamic Compression : On
Speaker Setup
PCM
Bitstream
M
If you have selected a LPCM sound track on a disc, the output will automatically be set to PCM.
Be sure to select the correct Digital Output or you will hear no sound or a loud noise.
When playing a Dolby Digital movie make sure the Digital Output is set to Bitstream.
If the HDMI device (Receiver, TV) is not compatible with compressed formats (Dolby digital, DTS), The audio
signal outputs as PCM.
English _35
Page 37
system setup
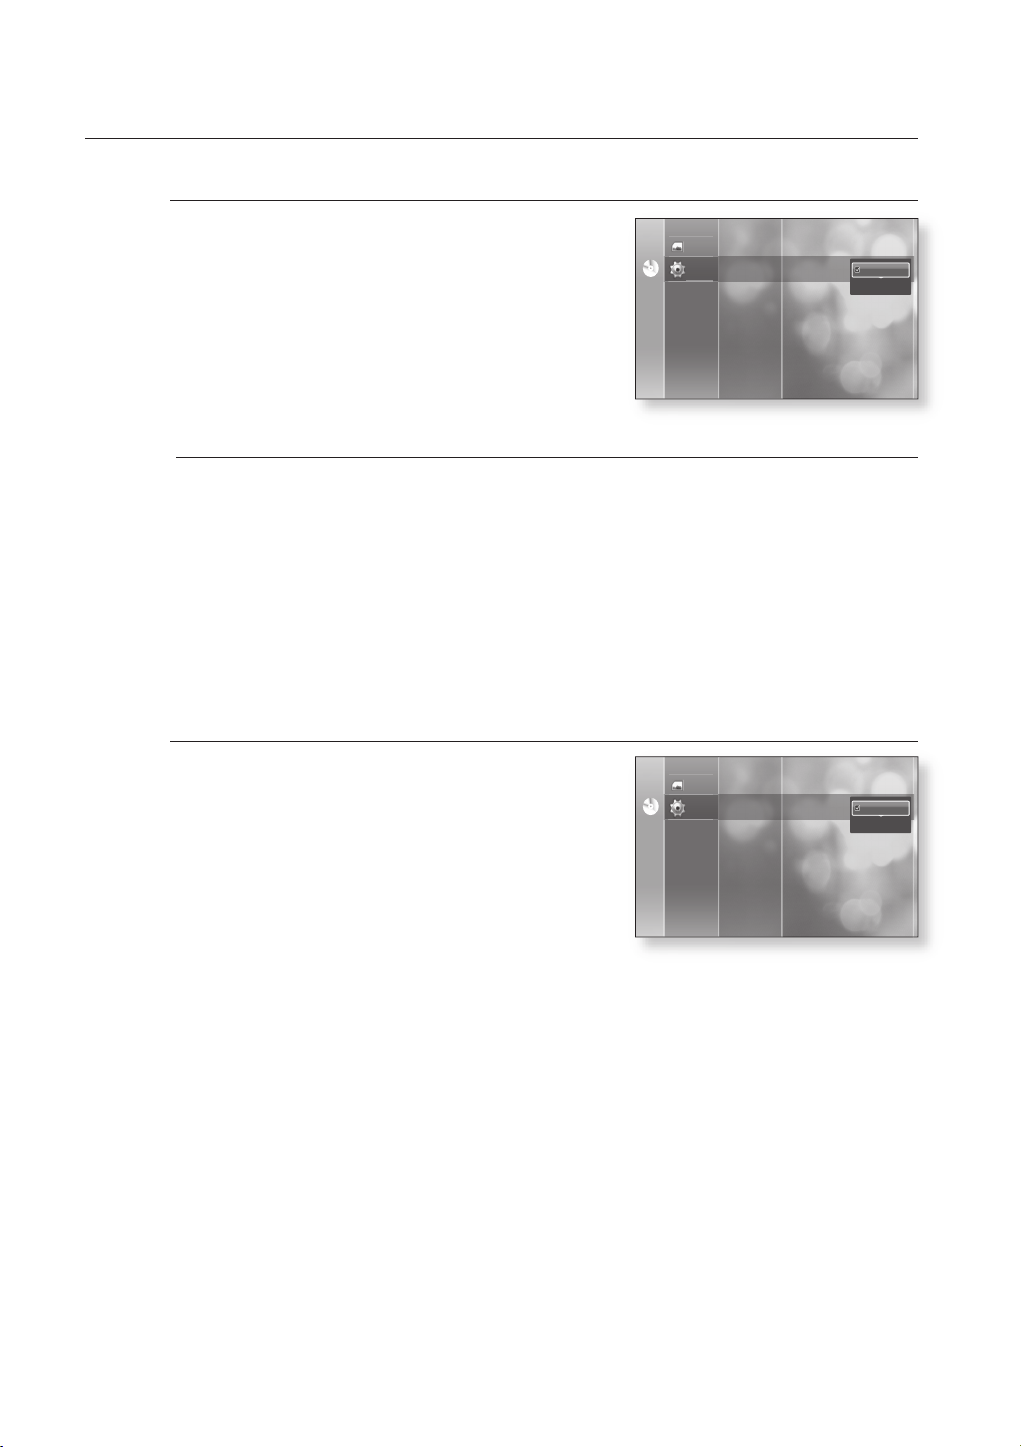
PCM Down Sampling
•
On : Select this when the Amplifi er connected to the player
is not 96KHz compatible. 96KHz signals will be down
converted to 48KHz
Off : Select this when the Amplifi er connected to the player
•
is 96KHz compatible. Signals will be output without any
changes.
Even when PCM Down Sampling is set to Off, some discs will only output downsampled audio through the
M
coaxial and optical digital outputs.
HDMI
If your TV is not compatible with compressed multi-channel formats (Dolby Digital, DTS), you should
•
set Digital Audio to PCM.
If your TV is not compatible with LPCM sampling rates over 48kHz, you should set PCM Down
•
Sampling to On.
Language Setup Digital Output : PCM
Photo
No DiscNo Disc
Display Setup
HDMI Setup
Parental Setup
System Upgrade
Audio Setup
Setup
PCM Down Sampling : On
Dynamic Compression : On
Speaker Setup
On
Off
Dynamic Compression
This is only active when a Dolby Digital signal is detected.
•
Off : You can enjoy the movie with the standard Dynamic
Range.
•
On : When Movie soundtracks are played at low volume or
from smaller speakers, the system can apply appropriate
compression to make low-level content more intelligible and
prevent dramatic passages from getting too loud.
Language Setup
Photo
Audio Setup
Setup
No DiscNo Disc
Display Setup
HDMI Setup
Parental Setup
System Upgrade
Digital Output : PCM
PCM Down Sampling : On
Dynamic Compression : On
Speaker Setup
On
Off
36_ system setup
Page 38
SETTING UP THE SPEAKER OPTIONS
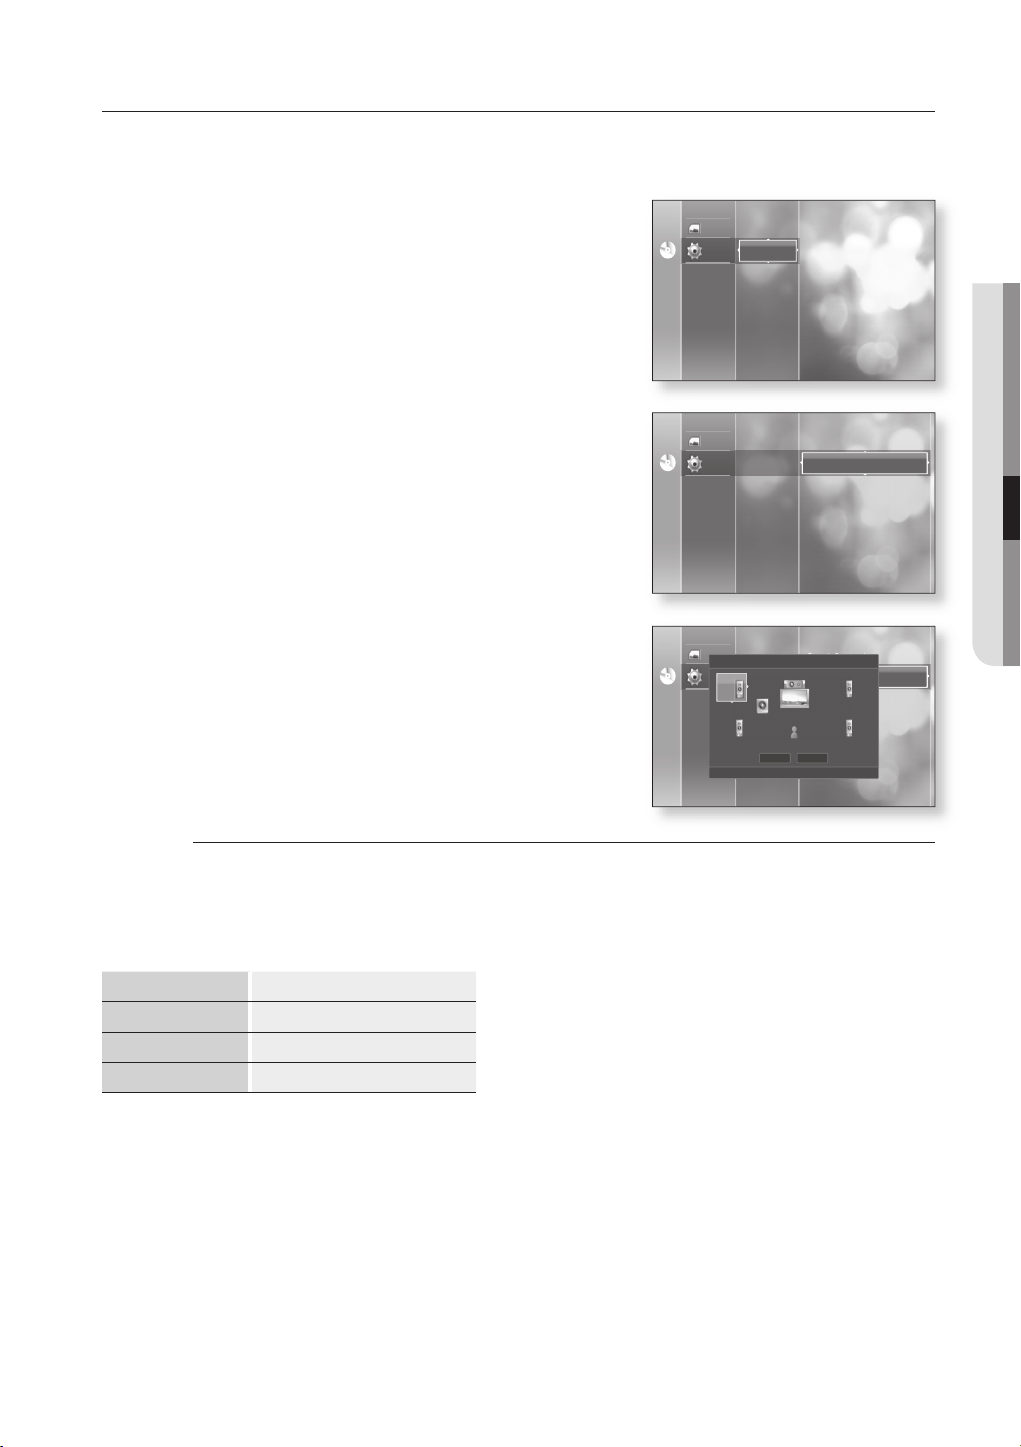
If you have connected this player to an Amp/Receiver or Home theater via the 5.1 channel Analog outputs you need
to set the Speaker Options for the best sound.
With the unit in Stop mode, press the MENU button.
1.
Press the
2.
▲▼
ENTER or ► button.
buttons to select Setup, then press the
No DiscNo Disc
Photo
Setup
Language Setup
Audio Setup
Display Setup
HDMI Setup
Parental Setup
System Upgrade
● SYSTEM SETUP
▲▼
Press the
3.
buttons to select Audio Setup, then press
the ENTER or ► button.
▲▼
Press the
4.
buttons to select Speaker Setup, then
press the ENTER or ► button.
Press the
5.
▲▼◄►
then press the ENTER button.
When done, use the
6.
press the ENTER button.
If you don’t want to save your work, use the
buttons to select Cancel, then press the ENTER button.
Press the RETURN or ◄ button to return to the previous menu.
M
Speaker Setup
Front (L, R) Large, Small
Center (C) Large, Small, None
Surround (LS, RS) Large, Small, None
Subwoofer (SW) LFE, None
buttons to select the desired Speaker,
▲▼◄►
buttons to select Save, then
▲▼◄►
Subwoofer Speaker
•
LFE : Select to use the subwoofer speaker.
None : Select to disable the subwoofer
•
speaker.
(This option can only be selected when the
Front (L+R) speakers are set to Large.)
Small
LFE
USER
Save Cancel
PCM Down Sampling : On
Dynamic Compression : On
Speaker Setup
PCM Down Sampling : On
Dynamic Compression : On
Speaker Setup
R
Small
RS
Small
Language Setup
Photo
Audio Setup
Setup
No DiscNo Disc
No DiscNo Disc
Display Setup
HDMI Setup
Parental Setup
System Upgrade
Language Setup
Photo
Speaker Setup
Audio Setup
Setup
L
Small
Display Setup
Parental Setup
LS
System Upgrade
Small
a
Test Tone s SELECT ² RETURN
Speaker
Large : Delivers full bandwidth sound with bass below 100
•
Hz.
•
Small : If LFE is on, bass below 100 Hz will be outputted
through a Subwoofer instead of the speakers. If LFE is off
and the Front Speaker is set to Large, sound will be
outputted through the Front Speaker.
• None : Select to disable the speakers.
Press the RED(A) button
A test tone will be sent to L C R RS
•
LS LFE in order so you can make sure
the speakers are set up correctly.
To end the test tone, press the RED (A)
•
button again.
The test tone can only be activated when no
•
discs are in the unit.
English _37
Page 39
system setup
SETTING UP THE VIDEO DISPLAY/OUTPUT OPTIONS
This function allows you to setup the TV screen settings. This function
depends on the disc or TV type. It may not work with some discs or TVs.
1.
With the unit in Stop mode, press the MENU button.
▲▼
2.
Press the
buttons to select Setup, then press the
ENTER or ► button.
Press the ▲▼ buttons to select Display Setup, then
3.
press the ENTER or ► button.
Video setup menu will be displayed.
▲▼
Press the
4.
buttons to select the desired display option
from the options on the following pages.
▲▼
Press the
5.
buttons to select the desired sub-menu
item from a video display option, then press the ENTER
button.
Press the RETURN or ◄ button to return to the previous menu. Press the MENU button to exit the menu.
M
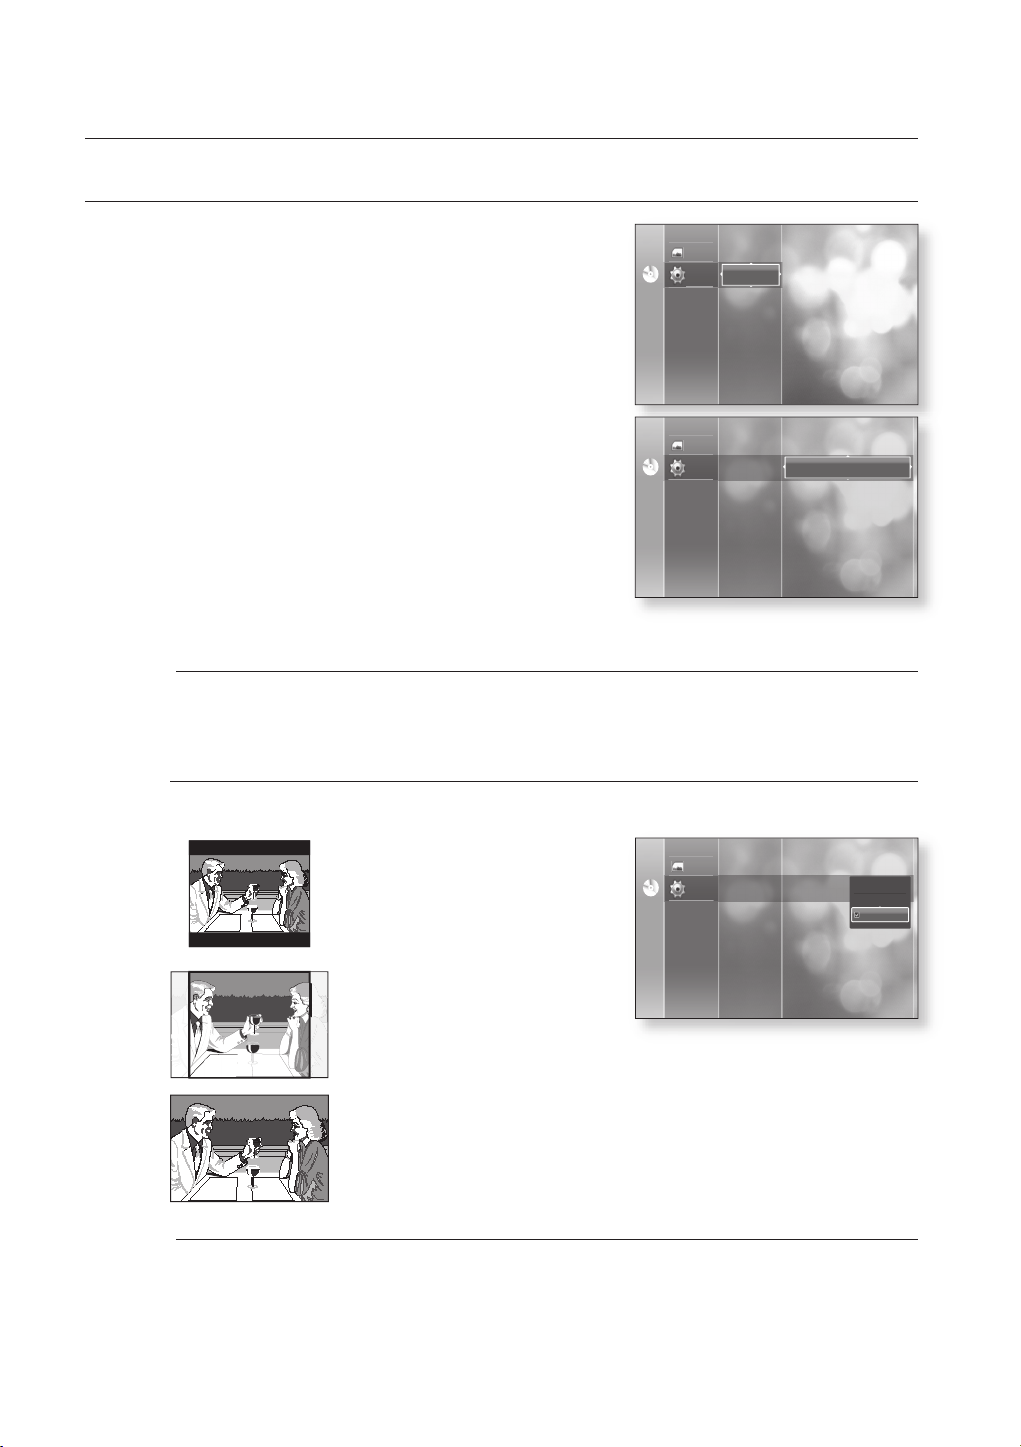
TV Aspect
Depending on the type of television you have, you may want to adjust the screen setting. (aspect ratio)
Language Setup
Audio Setup
Photo
Display Setup
Setup
No DiscNo Disc
No DiscNo Disc
Photo
Setup
HDMI Setup
Parental Setup
System Upgrade
Language Setup
Audio Setup
Display Setup
HDMI Setup
Parental Setup
System Upgrade
TV Aspect : 16:9 Wide
Movie Frame (24 Fs) : Off
Resolution : 480p
Screen Message : On
Front Display : Automatic
M
38_ system setup
• 4:3 Letter Box :
Select when you want to see the total
16:9 ratio screen BD/DVD supplies, even
though you have a TV with a 4:3 ratio
screen. Black bars will appear at the top
and bottom of the screen.
No DiscNo Disc
Photo
Setup
Language Setup
Audio Setup
Display Setup
HDMI Setup
Parental Setup
System Upgrade
TV Aspect : 16:9 Wide
Movie Frame (24 Fs) : Off
Resolution : 480p
Screen Message : On
Front Display : Automatic
4:3 Letter Box
4:3 Pan-Scan
16:9 Wide
• 4:3 Pan-Scan :
Select this for conventional size TV when
you want to see the central portion of the
16:9 screen. (Extreme left and right side
of movie picture will be cut off.)
• 16:9 Wide :
You can view the full 16:9 picture on your widescreen TV.
Depending on the disc type, some aspect ratios may not be available.
Certain movies will be displayed in 4:3 Pillarbox (black bars on sides of picture) even if 16:9 wide is selected.
Page 40
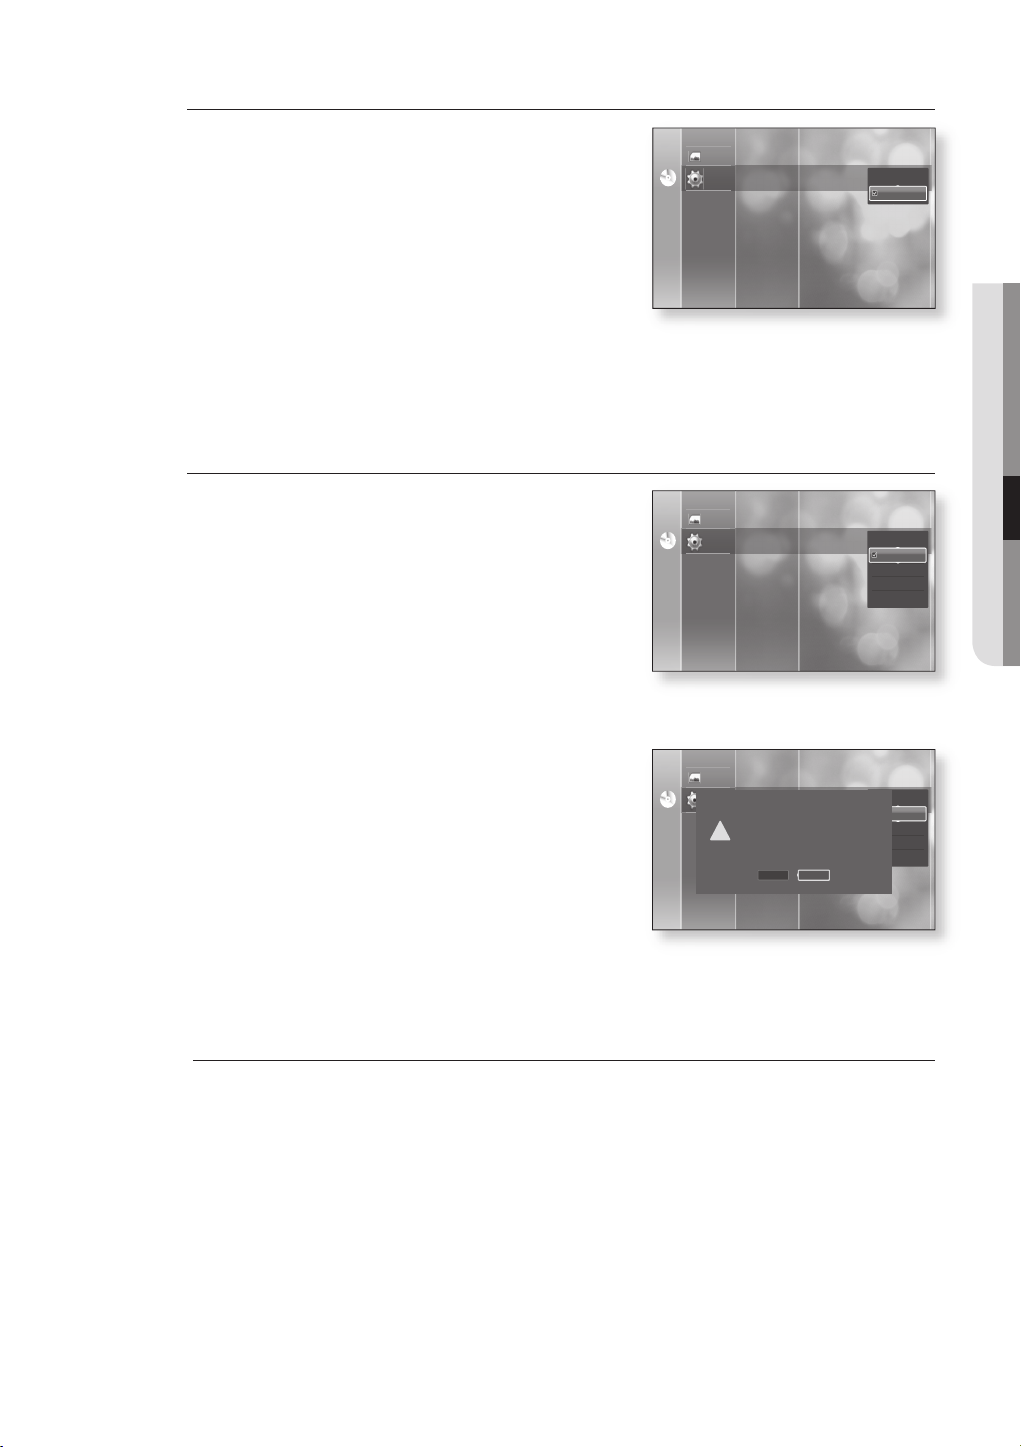
Movie Frame (24 Fs)
Movies are usually fi lmed at 24 frames per second. Some Bluray Discs have the capability of playing back at this frame rate.
Setting the Movie Frame (24Fs) feature to ON allows you to
adjust the Blu-ray player's HDMI output to 24 frames per
second for improved picture quality.
No DiscNo Disc
Photo
Setup
Language Setup
Audio Setup
Display Setup
HDMI Setup
Parental Setup
System Upgrade
TV Aspect : 16:9 Wide
Movie Frame (24 Fs) : Off
Resolution : 480p
Screen Message : On
Front Display : Automatic
On
Off
You can enjoy the Movie Fame (24Fs) feature solely on a TV
supporting this frame rate.
This menu can only be selected in 1080i or 1080p HDMI
output resolution modes.
Depending on the disc, two types of source may be included: Movie material (24 frame) and Video
material (30 frame). When the source switches between Movie and Video, the screen may blink for a few
seconds.
Resolution
Sets the output resolution of the Component and HDMI video signal.
The number in 480i, 480p, 720p, 1080p and 1080i indicates
•
the number of lines of video. The i and p indicate interlace
No DiscNo Disc
and progressive scan, respectively.
- 1080p : Outputs 1080 lines of progressive video.
- 1080i : Outputs 1080 lines of interlaced video.
- 720p : Outputs 720 lines of progressive video.
- 480p : Outputs 480 lines progressive video.
- 480i : Outputs 480 lines of interlaced video.
Photo
Setup
Language Setup
Audio Setup
Display Setup
HDMI Setup
Parental Setup
System Upgrade
TV Aspect : 16:9 Wide
Movie Frame (24 Fs) : Off
Resolution : 480p
Screen Message : On
Front Display : Automatic
1080p
1080i
720p
480p
480i
● SYSTEM SETUP
If the connected TV does not support the movie frame or the
selected resolution, you will see the following message:
If you select Yes and the resolution is not supported, the TV's
screen will be blank.
If the screen is blank, press and hold the $ button on the front of the player for more than 5 seconds
M
(no disc inserted). All settings are restored to the factory default. Follow the steps on the previous page to
access each mode and select the Display Setup that your TV will support.
Language Setup
Audio Setup
Photo
Display Setup
Setup
No DiscNo Disc
If no pictures are shown after the selection,
please wait for 15 seconds. And then,
HDMI Setup
the resolution will be reverted
!
Parental Setup
to the previous value automatically.
System Upgrade
Would you like to make a selection?
TV Aspect : 16:9 Wide
Movie Frame (24 Fs) : Off
Resolution : 480p
Screen Message : On
Front Display : Automatic
Yes No
1080p
1080i
720p
480p
480i
English _39
Page 41
system setup
❖
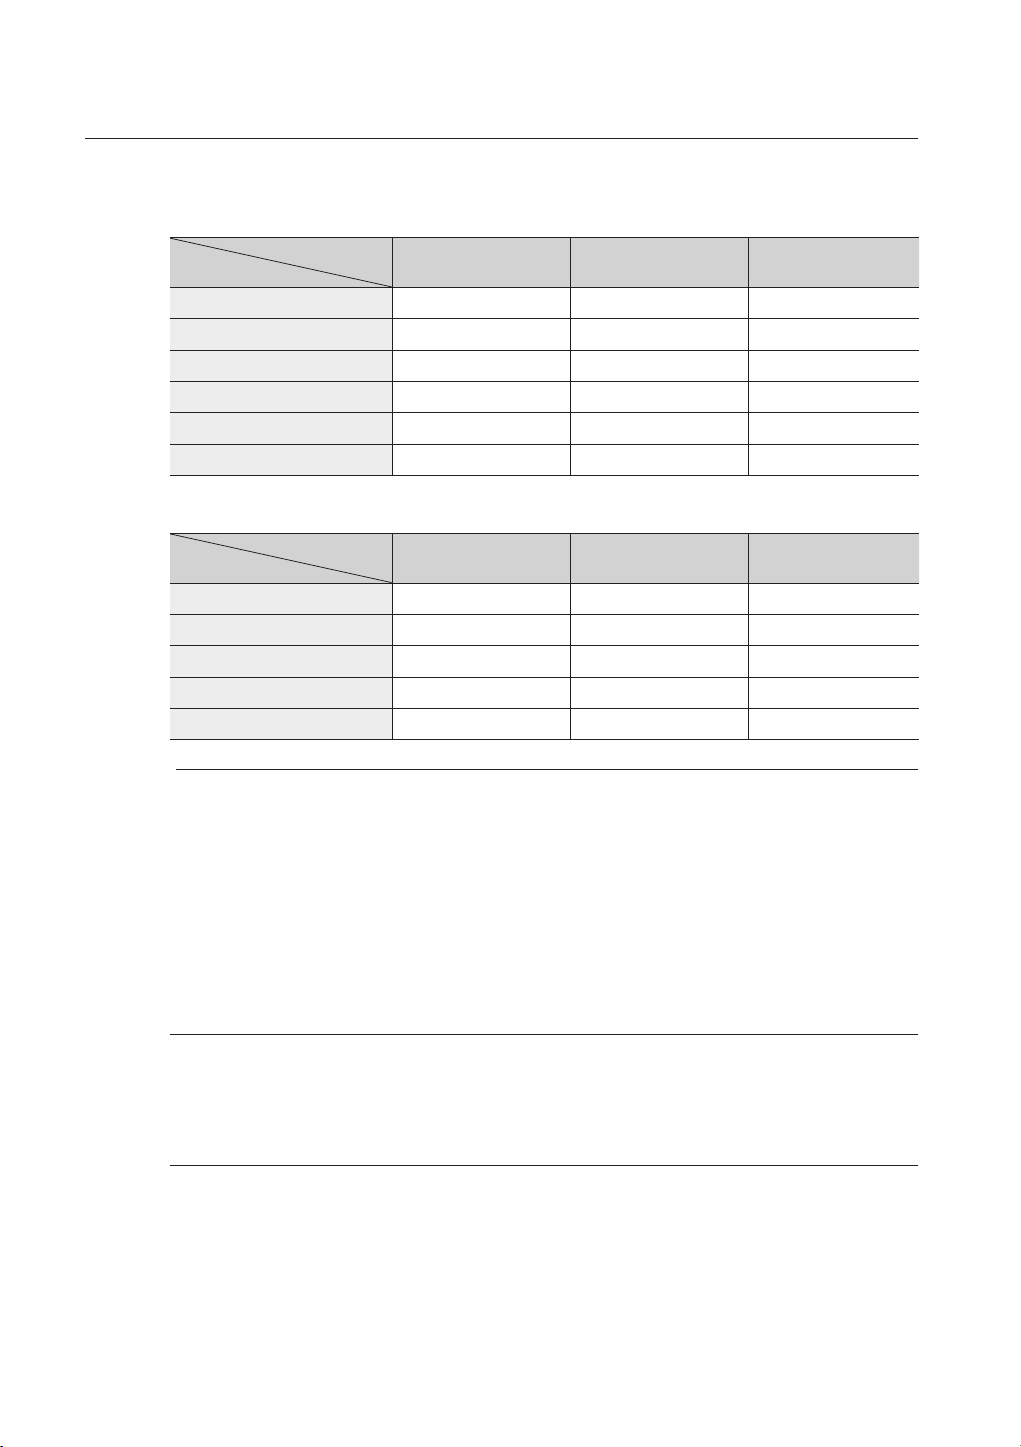
Resolution according to the output mode
BD playback
•
Output
Setup
1080p, Movie Frame(24Fs) off 1080P@60F 1080i 480i
1080p/1080i, Movie Frame (24Fs) on
1080i, Movie Frame (24Fs) off 1080i 1080i 480i
720P 720P 720P 480i
480P 480P 480P 480i
480i 480P 480i 480i
•
DVD playback
Output
Setup
1080p 1080P@60F 480P 480i
1080i 1080i 480P 480i
720P 720P 480P 480i
480P 480P 480P 480i
480i 480P 480i 480i
This player has the HDMI Auto Detect Feature. When the player is fi rst connected to a TV via HDMI, the
M
player's output will be set automatically to HDMI.
If the HDMI Auto Detection feature does not work, you can't select the 1080p resolution or Movie Frame
(24Fs).
The BD disc must have the 24 frame feature in order to use the Movie Frame (24Fs) mode.
If you have both HDMI and Component cables connected to your TV, the Component resolution may differ from
the chart above.
HDMI Component VIDEO/S-Video
1080P@24F 1080i 480i
HDMI Component VIDEO/S-Video
Screen Message
On : Displays messages related to operation mode.
•
Off : Does not display messages related to operation mode.
•
Front Display
•
Automatic : Display is dark during playback and bright when the unit is in Stop mode.
•
Dim : Select to dim the display window.
•
Bright : Select to brighten the display window.
40_ system setup
Page 42
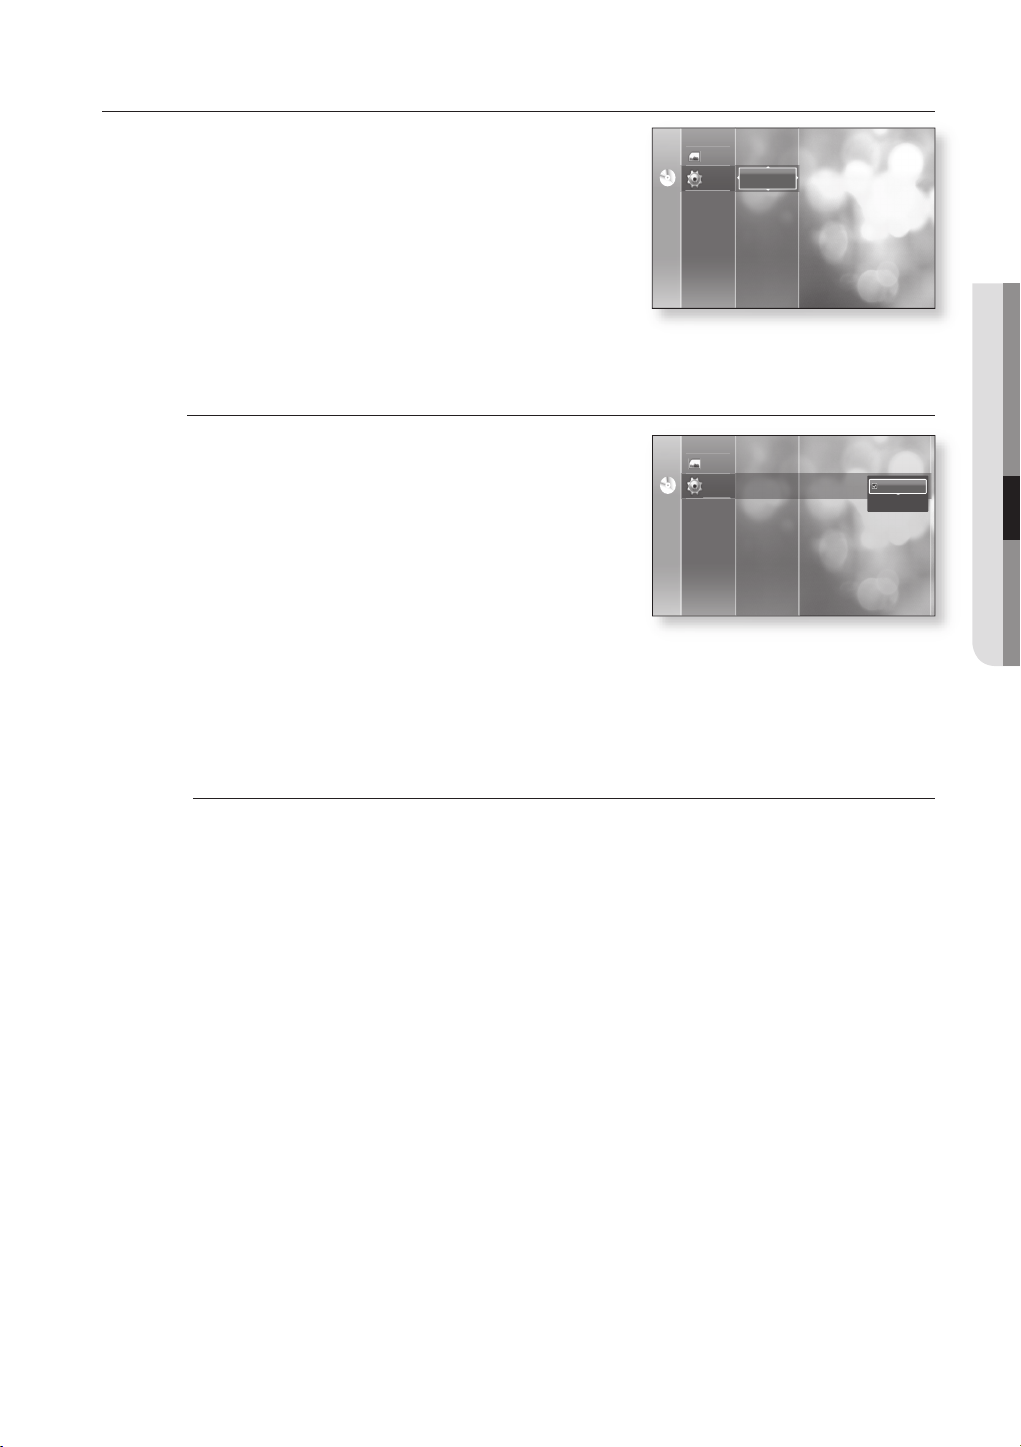
SETTING UP THE HDMI SETUP OPTIONS
With the unit in Stop mode, press the MENU button.
1.
▲▼
Press the
2.
ENTER or
Press the
3.
the ENTER or ► button.
HDMI setup menu will be displayed.
Press the ▲▼ buttons to select the desired display option
4.
(Anynet or Format), then press the ENTER or
Anynet+ (HDMI-CEC)
buttons to select Setup, then press the
►
button.
▲▼
buttons to select HDMI Setup, then press
►
button.
Audio Setup
Display Setup
Photo
HDMI Setup
Setup
No DiscNo Disc
Parental Setup
System Upgrade
● SYSTEM SETUP
When HDMI is set to on, you can operate Anynet+ function.
On : Anynet+ functions will work.
•
Off : Anynet+ function will not work.
•
No DiscNo Disc
Photo
Setup
Audio Setup
Display Setup
HDMI Setup
Parental Setup
System Upgrade
Anynet+ (HDMI-CEC) : On
Format : TV
On
Off
What is Anynet+?
Anynet+ is a convenient function that offers linked operations with other Samsung products with the
Anynet+ feature.
You can operate this unit using a Samsung TV remote control or power on the Samsung TV and Home
theater and start disc playback simply by pressing the PLAY button on the Blu-ray player's remote.
This function is not available if the HDMI cable does not support CEC.
M
To use Anynet+
1.
Connect the BD Player to a Samsung TV with an HDMI cable. (See pages 20~21)
2.
Set the Anynet+ (HDMI CEC) to “On” on your BD Player.
3.
Set the Anynet+ function on your TV. (See the TV instruction manual for more information.)
Anynet+ Functions
•
One touch play
You can power on your Samsung TV and Home Theater, and play the disc in this unit simply by
pressing the PLAY button on the Blu-ray player's remote.
•
One touch watching
Select “Watching BD" or "Connected to BD player" (depending on your TV's menu) in the Anynet+
menu on the TV. The Blu-ray player will automatically turn on and the TV will be switched to HDMI
mode.
•
Remote control Link
You can operate this player with your Samsung TV remote control.
English _41
Page 43
system setup
Available buttons on the Samsung TV remote: These buttons work the same as this player's remote
•
control.
- Playback control buttons :
- Menu operation button :
- Numeric buttons :
- Color buttons :
ABCD
ENTER
TV Anynet+ Menu
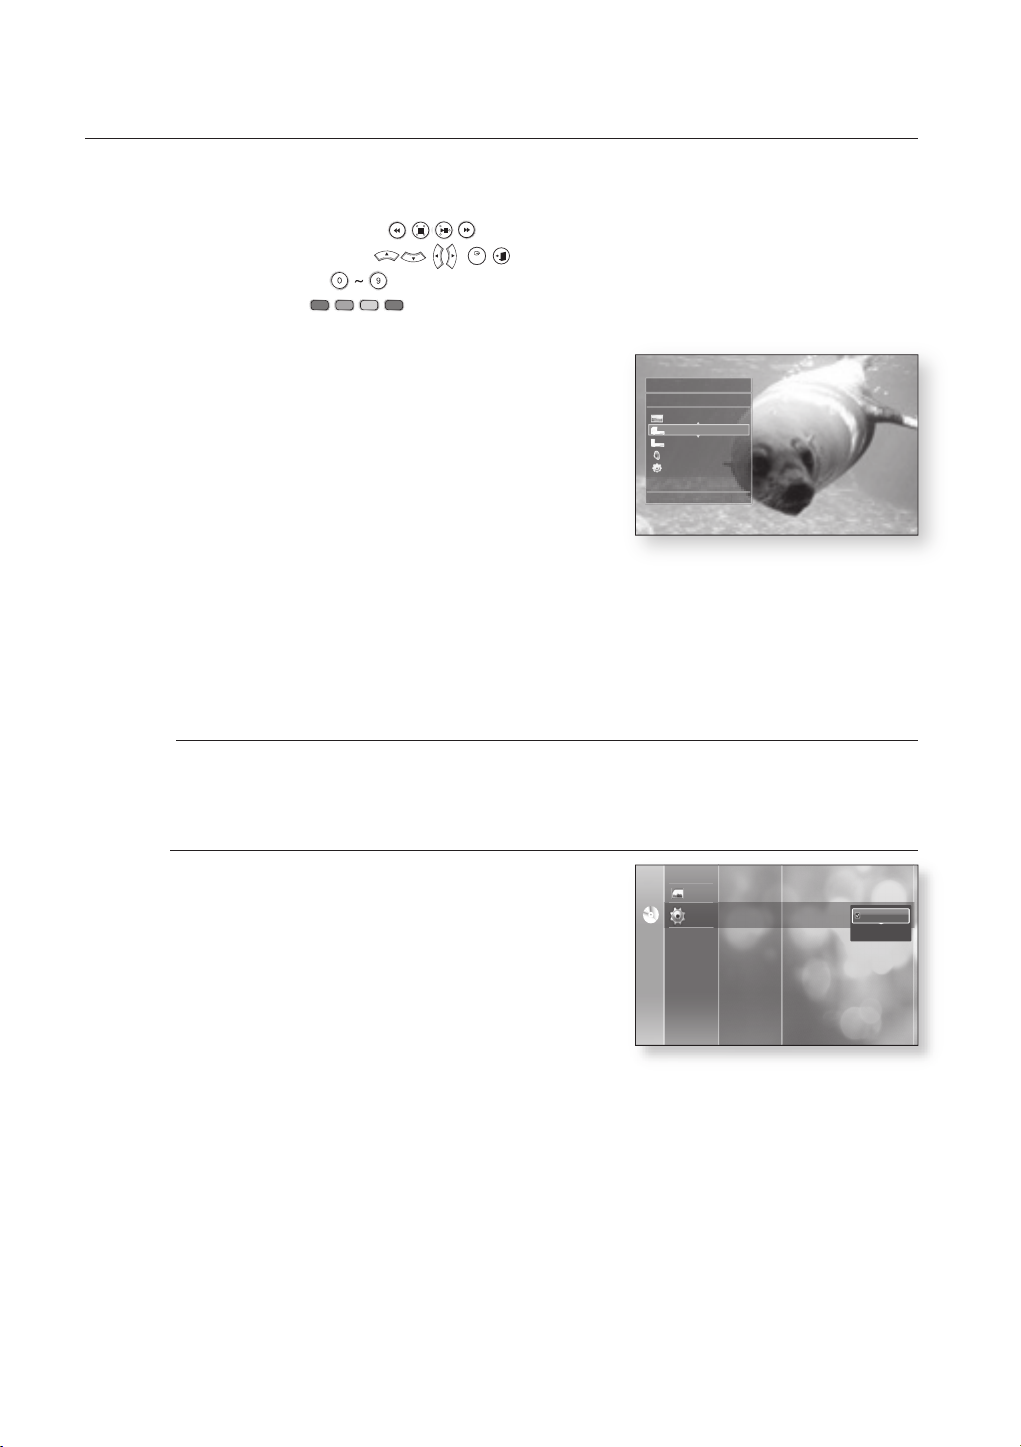
When pressing the Anynet+ button on your Samsung TV's
remote control, the following On-Screen Display (OSD) will be
shown.
•
BD Player Menu
- When playing a movie : brings up the disc’s menu (same
BD Player
m
MOVE s ENTER e EXIT
n
View TV
BD Player Menu
BD Player Operation
Receiver : Off
Setup
as DISC MENU button on the Blu-ray player’s remote
control)
- In Stop mode : brings up the SETUP menu (same as the MENU button on the Blu-ray player’s
remote control.)
BD Player Operation Menu
•
- When playing a DVD VIDEO, DVD-RW/-R, BD-ROM :
shows INFO OSD (same as INFO button on the player's remote control)
These menus will vary from Samsung TV to TV.
M
Format
You can optimize the HDMI output for connection to a TV or
Monitor.
• TV : Select if connected to a TV via HDMI.
• Monitor : Select if connected to a Monitor via HDMI.
If the player is connected to a TV, the Monitor option is
unavailable.
No DiscNo Disc
Audio Setup
Display Setup
Photo
HDMI Setup Format : TV
Setup
Parental Setup
System Upgrade
Anynet+ (HDMI-CEC) : On
TV
Monitor
42_ system setup
Page 44
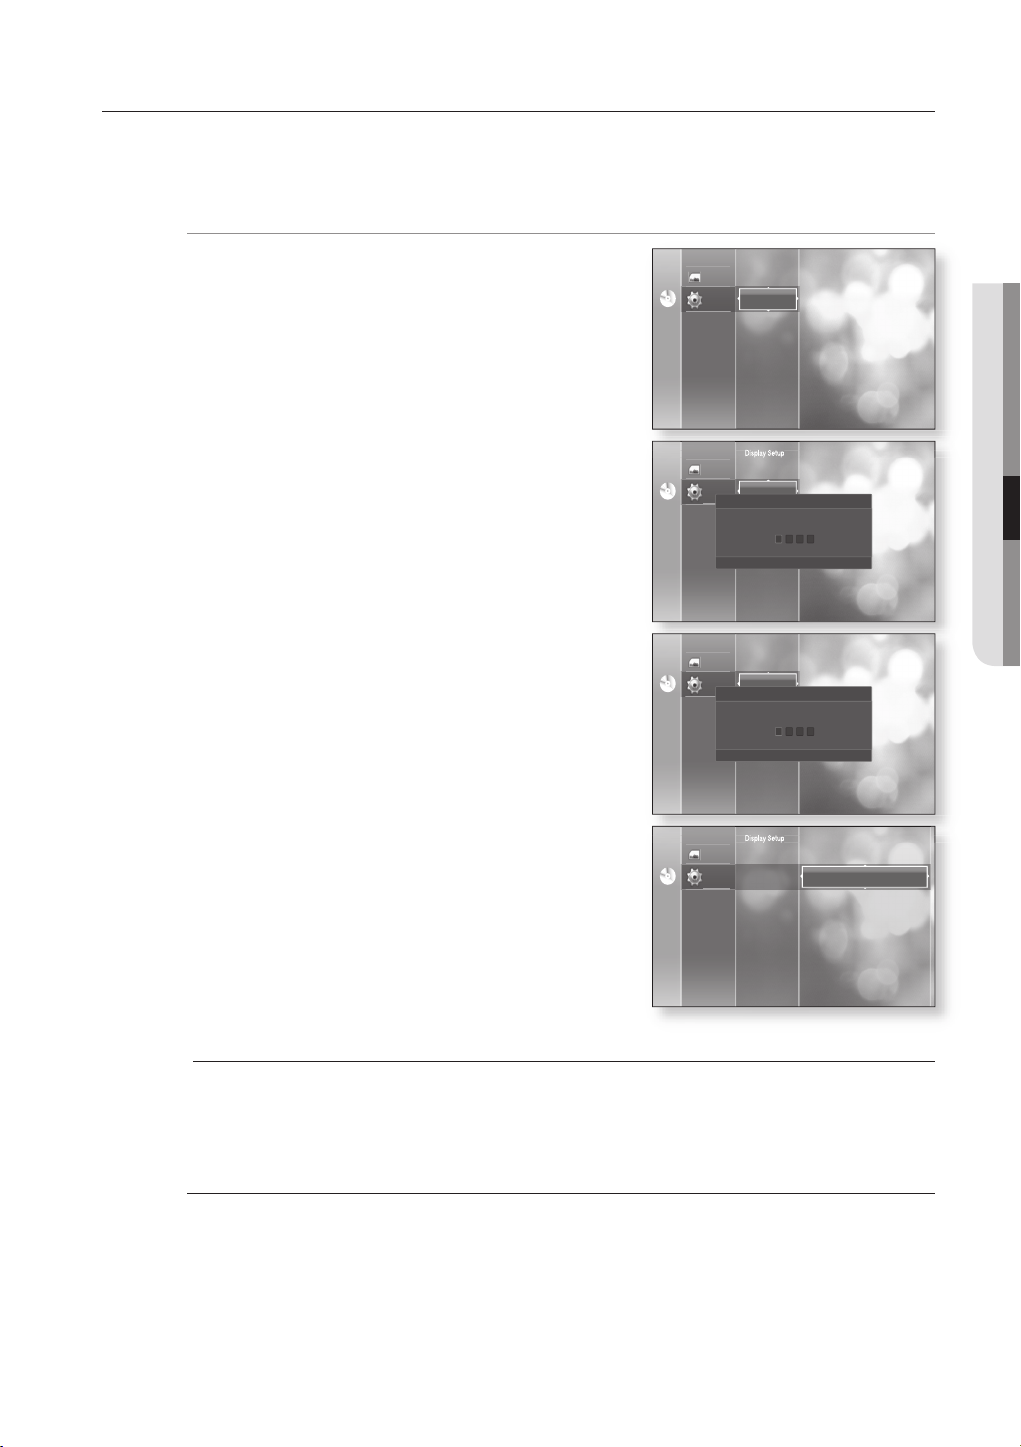
SETTING UP THE PARENTAL LOCK
The Parental Lock function works in conjunction with BD/DVDs that have been assigned a rating which helps you
control the types of BD/DVDs that your family watches. There are up to 8 rating levels on a disc.
1.
With the unit in Stop mode, press the MENU button.
▲▼
2.
Press the
ENTER or ► button.
Press the
3.
press the ENTER or
When you operate your Blu-ray Disc Player for the fi rst
time, the “Enter New password” message will be
displayed.
4.
Enter the 4-digit password using the number buttons on
the remote control.
The “Confi rm the password” message will be displayed.
Enter your password again.
buttons to select Setup, then press the
▲▼
buttons to select Parental Setup, then
►
button.
hZ
Display Setup
HDMI Setup
Photo
Parental Setup
Setup
No DiscNo Disc
No DiscNo Disc
No DiscNo Disc
Photo
Setup
Parental Setup
«
Photo
Setup
Parental Setup
«
System Upgrade
Display Setup
HDMI Setup
Parental Setup
System Upgrade
Enter New password.
NUMBER
Display Setup
HDMI Setup
Parental Setup
System Upgrade
Confi rm the password.
NUMBER
²
RETURN
²
RETURN
● SYSTEM SETUP
5.
Press the ENTER or
6.
Press the
▲▼
►
button to select Parental Lock.
buttons to select On or Off, then press the
No DiscNo Disc
ENTER button.
M
Press the RETURN or ◄ button to return to the previous menu.
Press the MENU button to exit the menu.
If you forgot your password
Remove the disc.
1.
Press and hold the $ button on the front panel for 5 seconds or more.
2.
All settings will revert to the factory settings.
•
Photo
Setup
Display Setup
HDMI Setup
Parental Setup
System Upgrade
Parental Lock : Off
Rating Level : 1 (Kids)
New Password
English _43
Page 45
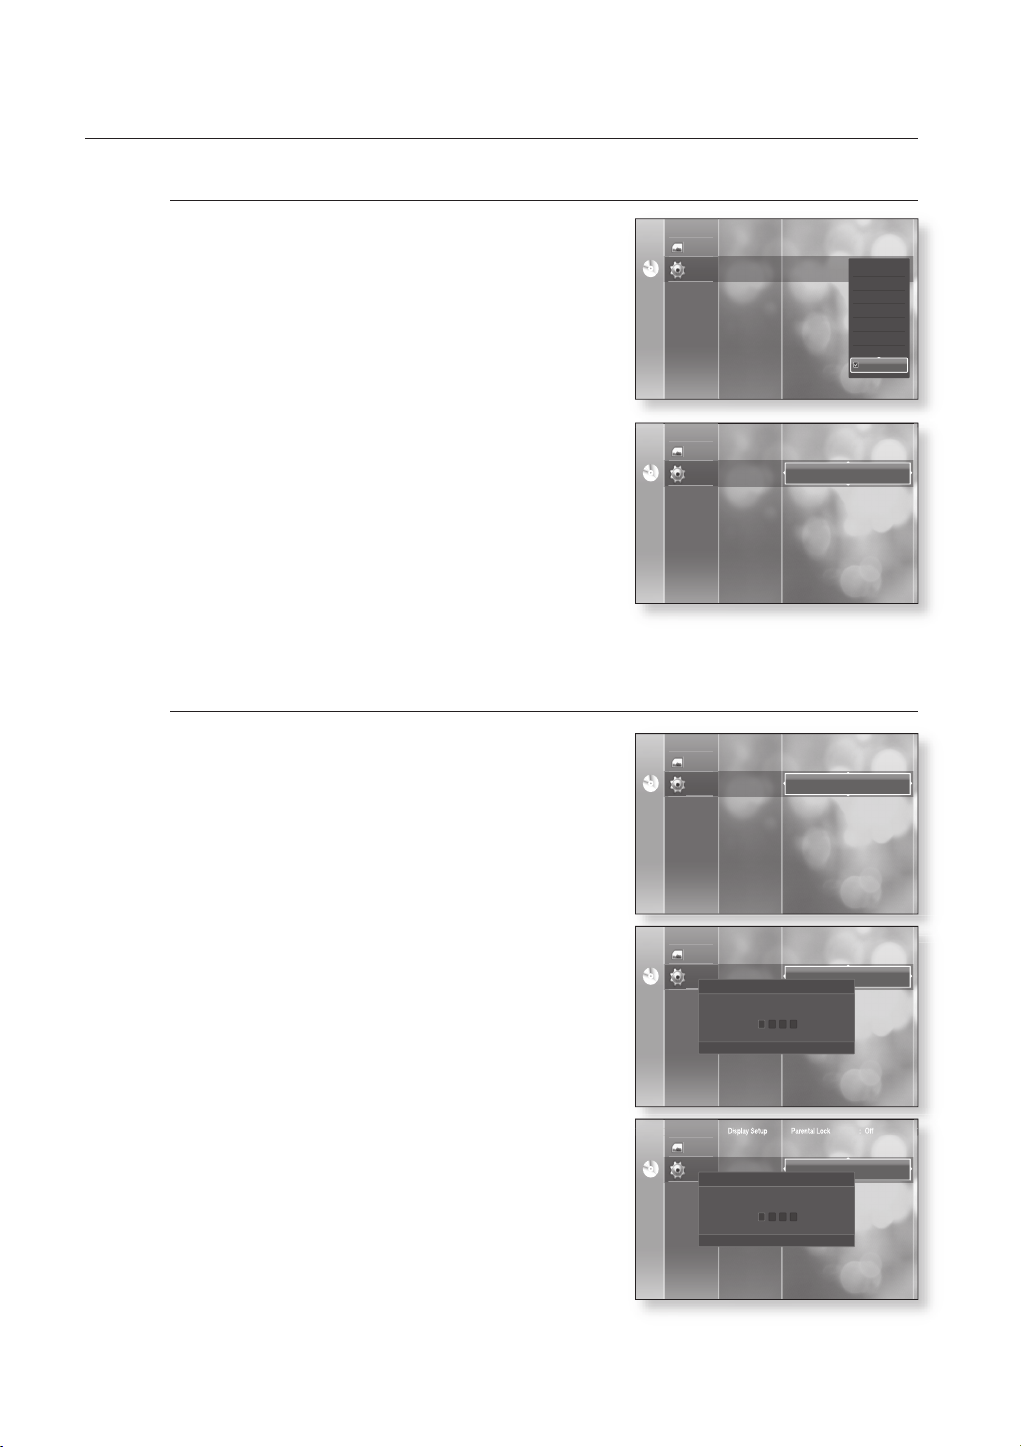
system setup
Setting the Rating Level
Press the ▲▼ buttons to select Rating Level, then press
1.
the ENTER or ► button.
Display Setup
HDMI Setup Parental Lock : Off
Photo
No DiscNo Disc
System Upgrade
Parental Setup
Setup
Rating Level : 8 (Adults)
New Password
8 (Adults)
7
6
5
4
3
2
1 (Kids)
▲▼
Press the
2.
buttons to select the rating level you want,
then press the ENTER button. For example, if you select
up to Level 6, discs that contain Level 7, 8 will not play.
A larger number indicates that the program is intended for
adult use only.
Level 1 is the most restrictive and Level 8 is the least.
Changing the Password
Press the ▲▼ buttons to select New Password, then
1.
press the ENTER or ► button.
Enter the 4-digit password using the number buttons on
2.
the remote control. The “Enter New password.” message
will be displayed.
Display Setup
HDMI Setup Parental Lock : Off
Photo
No DiscNo Disc
No DiscNo Disc
No DiscNo Disc
Photo
Setup
Photo
Setup
Parental Setup
System Upgrade
Display Setup
HDMI Setup
Parental Setup
System Upgrade
Display Setup
HDMI Setup
Parental Setup
System Upgrade
Parental Setup
Setup
Rating Level : 1 (Kids)
New Password
Parental Lock : Off
Rating Level : 1 (Kids)
New Password
Parental Lock : Off
Rating Level : 1 (Kids)
New Password
Enter New password.
Enter your password again using the number buttons on
3.
the remote control.
44_ system setup
«
NUMBER
Display Setup
HDMI Setup
Photo
Parental Setup
Setup
No DiscNo Disc
Parental Setup
System Upgrade
Confi rm the password.
«
NUMBER
²
RETURN
Parental Lock : Off
Rating Level : 1 (Kids)
New Password
²
RETURN
Page 46
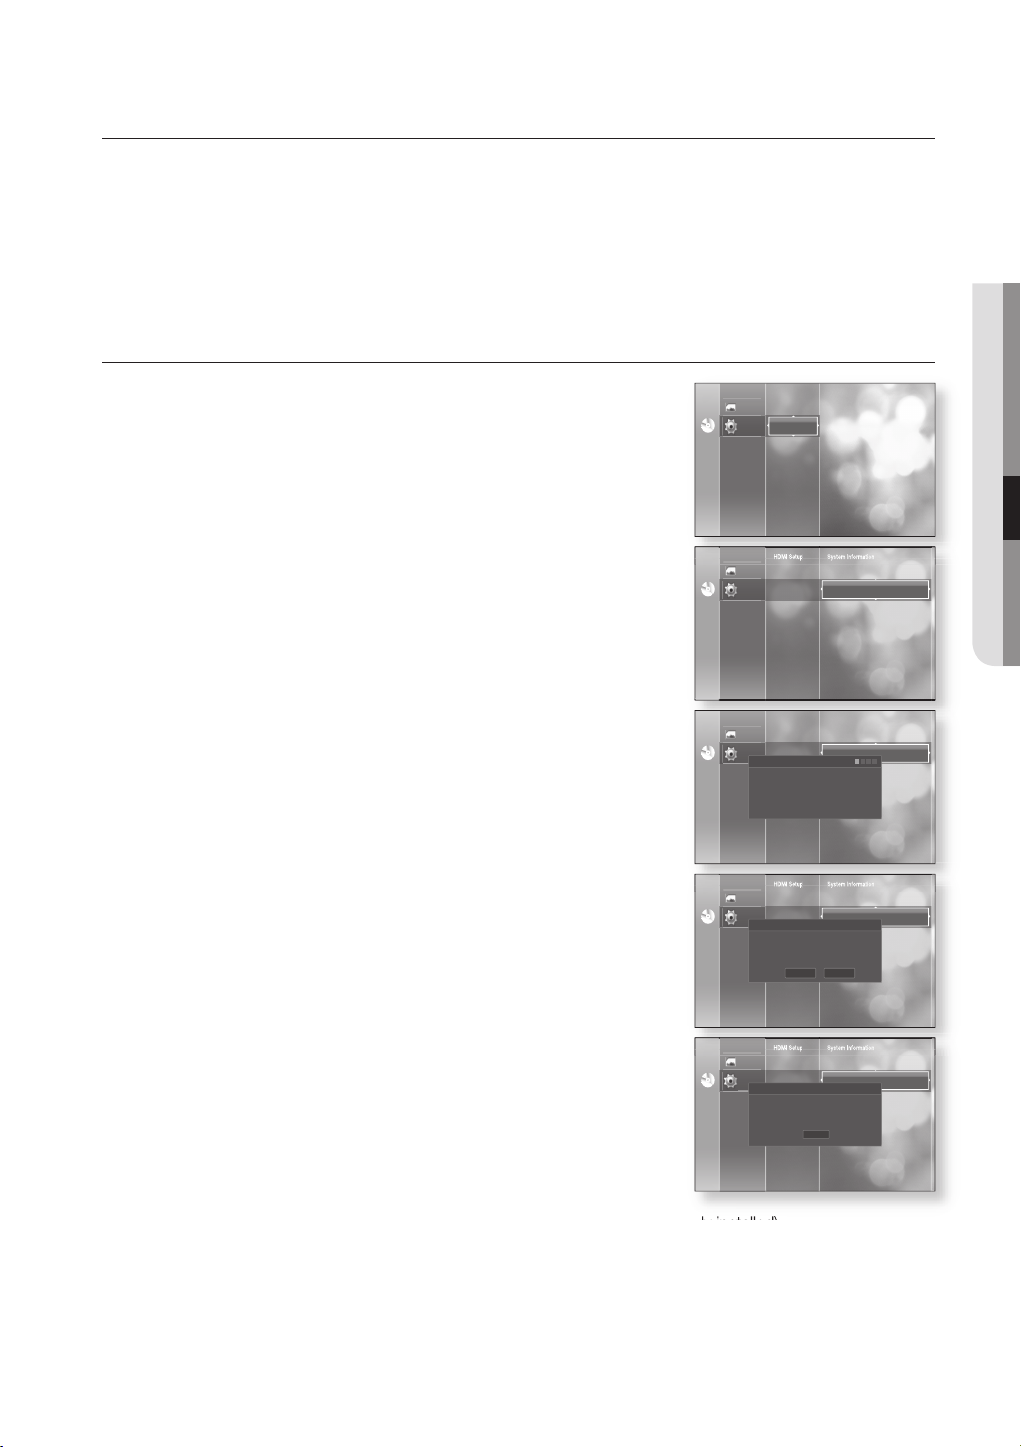
system upgrade
Samsung may offer upgrades to your Blu-ray player's fi rmware in the future. To upgrade this fi rmware you must :
1.
Go to samsung.com and refer to 'SUPPORT' page to download the fi rmware and burn an update CD.
or
2.
Connect this player's LAN terminal to the LAN terminal on your modem (see page 30) and follow the steps
below.
FIRMWARE UPGRADE
1.
With the unit in No Disc mode, press the MENU button.
2.
Press the ▲▼ buttons to select Setup, then press the ENTER
or ► button.
3.
Press the ▲▼ buttons to select System Upgrade, then press
the ENTER or ► button.
▲▼
4.
Press the
ENTER or
buttons to select Upgrade Start, then press the
►
button.
No DiscNo Disc
No DiscNo Disc
HDMI Setup
Parental Setup
Photo
System Upgrade
Setup
HDMI Setup
Parental Setup
Photo
System Upgrade Upgrade Start
Setup
System Information
Network Setup
● SYSTEM UPGRADE
You will see a window that allows you to check the cable or
5.
network connection status.
If the upgrade is possible : You will see information on the
current and new versions of fi rmware in a message box.
If the upgrade is not possible : You will see the following
description in the message box.
If the cable is not connected :
•
"This system can not connect to internet for update.
Please, check the network setup."
If the network connection has failed :
•
"This system can not connected to internet for update.
Please, check the network setup"
If no later version is released (the latest version has been already installed) :
•
"The latest version of the fi rmware is already installed. There is no need to update."
If there is a disc in the player :
•
"Please maintain "No Disc" state for network update."
This indicates that you must remove all discs from the unit to perform the update.
HDMI Setup
System Information
Parental Setup
Photo
Setup
No DiscNo Disc
System Upgrade
Photo
Setup
No DiscNo Disc
System Upgrade
Photo
Setup
No DiscNo Disc
System Upgrade
Network Setup
System Upgrade Upgrade Start
Now, Checking.
Please wait...
HDMI Setup
Parental Setup
System Upgrade Upgrade Start
The new update data was found.
Current Version : XXXXX
New Version : XXXXX
HDMI Setup
Parental Setup
System Upgrade Upgrade Start
This system can not connect
to internet for update.
Please, check the network setup.
System Information
Network Setup
CancelStart
System Information
Network Setup
OK
2 3 4
1
English _45
Page 47
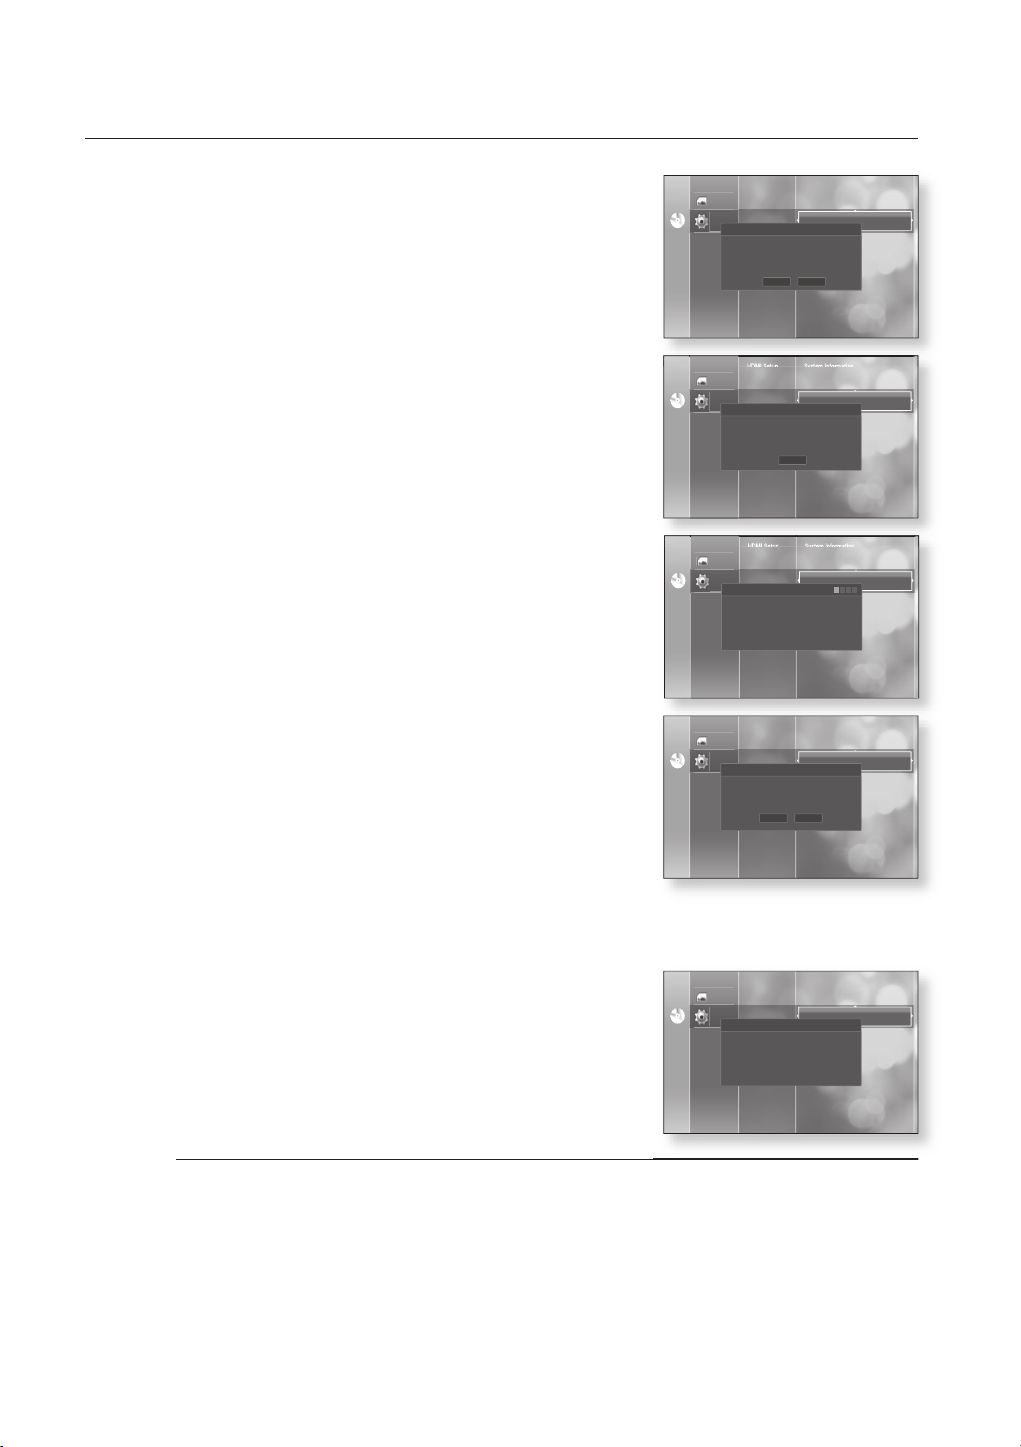
system upgrade
6.
To perform the system upgrade, press the ◄► buttons to
select Start and then press the ENTER button.
7.
The system update gets started.
HDMI Setup
System Information
Parental Setup
Photo
Setup
No DiscNo Disc
System Upgrade
Photo
Setup
No DiscNo Disc
System Upgrade
Photo
Setup
No DiscNo Disc
System Upgrade
Network Setup
System Upgrade Upgrade Start
The new update data was found.
Current Version : XXXXX
New Version : XXXXX
CancelStart
HDMI Setup
System Information
Parental Setup
Network Setup
System Upgrade Upgrade Start
Downloading update data...
Please, do not turn off the power.
Cancel
HDMI Setup
System Information
Parental Setup
Network Setup
System Upgrade Upgrade Start
Verifying update data
Please wait...
2 3 4
1
8.
When the verifi cation is done, you will see a window that
allows you to update fi rmware. To perform the fi rmware
update,press the
◄►
buttons to select Yes and then press
the ENTER button.
•
You will see a message about the upgrade process for
3seconds.
- When update is fi nished, the power will turn off.
If you do not want to update fi rmware, select No and then
•
press the ENTER button.
When the installation is done, you will see a message of
9.
“Update Completed”.
The player will automatically turn off in 3 seconds.
All settings will revert to the factory settings. And the next time
you start the system, you will see the menu language selection
window.
If you want to cancel the upgrade in the process of downloading the upgrade data, press the ENTER button.
M
You will see a confi rmation message.
Selecting Yes will end the upgrade process, and selecting No will proceed with the verifi cation step.
When the system upgrade is done, check the fi rmware details in the System Upgrade menu.
Do not turn off the player during the System Upgrade Otherwise, the player may not work properly.
HDMI Setup
System Information
Parental Setup
Photo
Setup
No DiscNo Disc
System Upgrade
Photo
Setup
No DiscNo Disc
System Upgrade
Network Setup
System Upgrade Upgrade Start
Do you want to update Firmware?
NoYes
HDMI Setup
System Information
Parental Setup
Network Setup
System Upgrade Upgrade Start
Update completed.
46_ system upgrade
Page 48
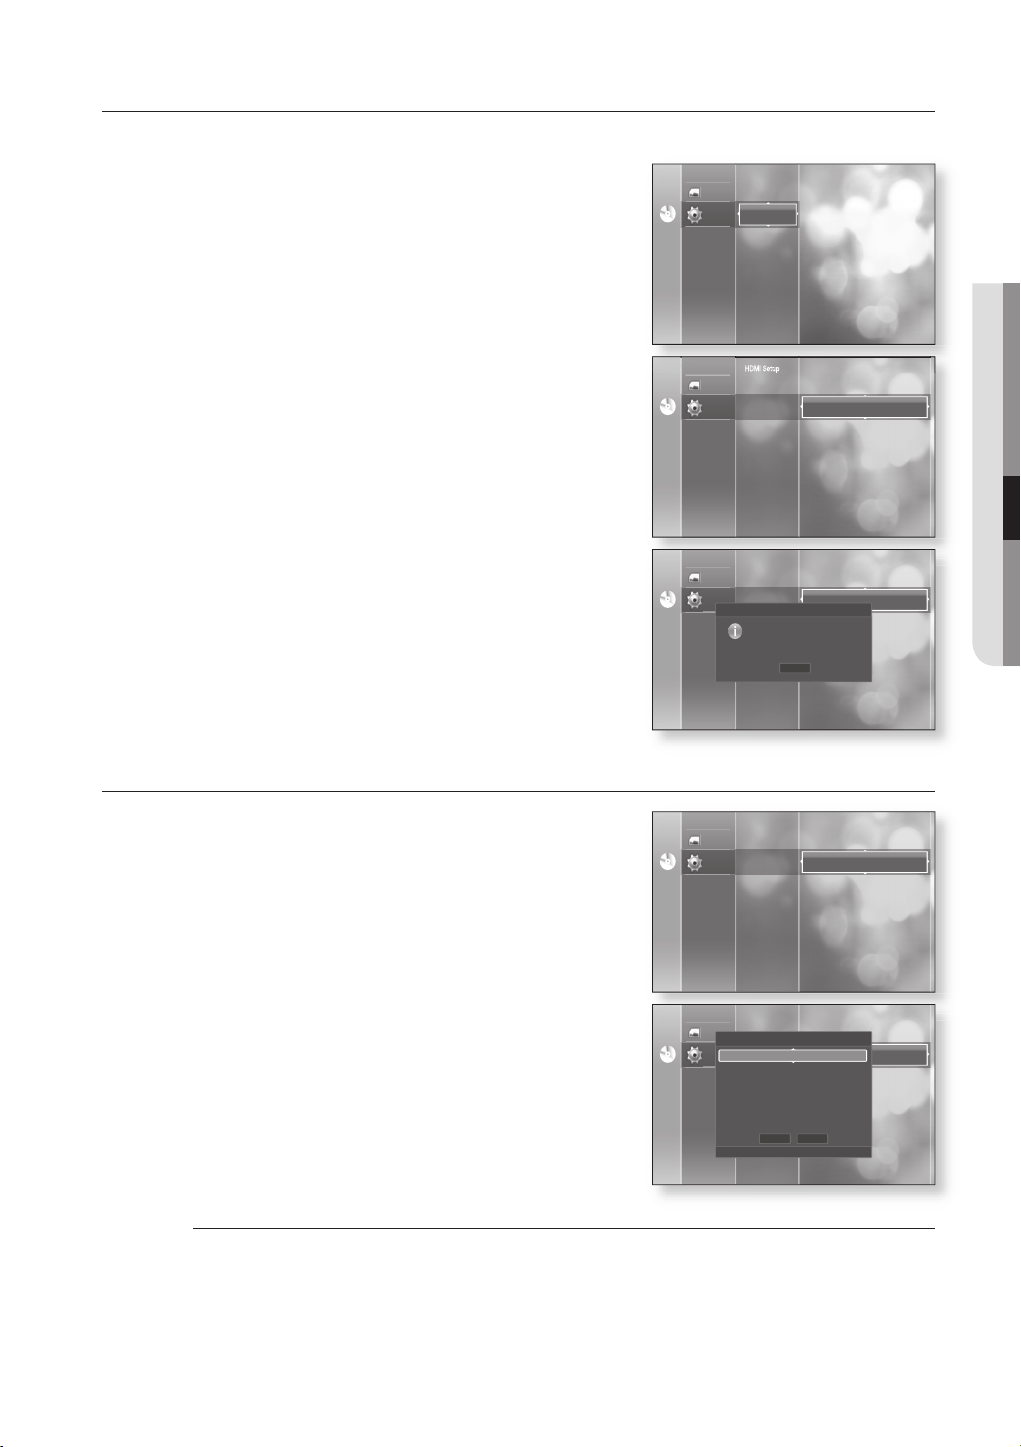
SYSTEM INFORMATION
When the fi rmware upgrade is done, check the fi rmware details by following the steps below.
1.
With the unit in Stop mode, press the MENU button.
2.
Press the
ENTER or
Press the ▲▼ buttons to select System Upgrade, then
3.
▲▼
buttons to select Setup, then press the
►
button.
press the ENTER or ► button.
▲▼
Press the
4.
buttons to select System Information,
then press the ENTER or ► button.
You can see detailed information about the current
fi rmware.
Press the ENTER button to select OK.
5.
System Upgrade menu will be displayed.
No DiscNo Disc
No DiscNo Disc
No DiscNo Disc
Photo
Setup
Photo
Setup
Photo
Setup
System Information
HDMI Setup
Parental Setup
System Upgrade
HDMI Setup
Parental Setup
System Upgrade
HDMI Setup
Parental Setup
System Upgrade
S/W : XXXXXX_XXX
Region : A/01 (BD/DVD)
System Information
Network Setup
Upgrade Start
System Information
Network Setup
Upgrade Start
OK
● SYSTEM UPGRADE
NETWORK SETUP
In some rare cases, the fi rmware upgrade may not succeed.
If this occurs, you may need to set up your IP address, Subnet, Mask,
Gateway and DNS by following the steps below.
To setup, follow steps 1 and 3 above
▲▼
Press the
4.
press the ENTER or ► button.
You will see a menu that allows you to make network
settings.
Press the
5.
ENTER button.
If DHCP is set to On, you can't select IP Address, Subnet Mask or Gateway.
M
If DNS is set to Automatic, you can’t select Primary/ Secondary DNS.
buttons to select Network setup, then
▲▼
buttons to select DHCP, then press the
HDMI Setup
Parental Setup System Information
Photo
System Upgrade
Setup
No DiscNo Disc
HDMI Setup
Parental Setup System Information
Photo
Network Setup
System Upgrade
Setup
No DiscNo Disc
DHCP : On
IP Address : 000 . 000 . 000 . 000
Subnet Mask : 255 . 255 . 255 . 000
Gateway : 000 . 000 . 000 . 000
DNS : Automatic
Primary DNS : 000 . 000 . 000 . 000
Secondary DNS : 000 . 000 . 000 . 000
Network Setup
Upgrade Start
Network Setup
Upgrade Start
Save Cancel
s
SELECT ² RETURN
English _47
Page 49
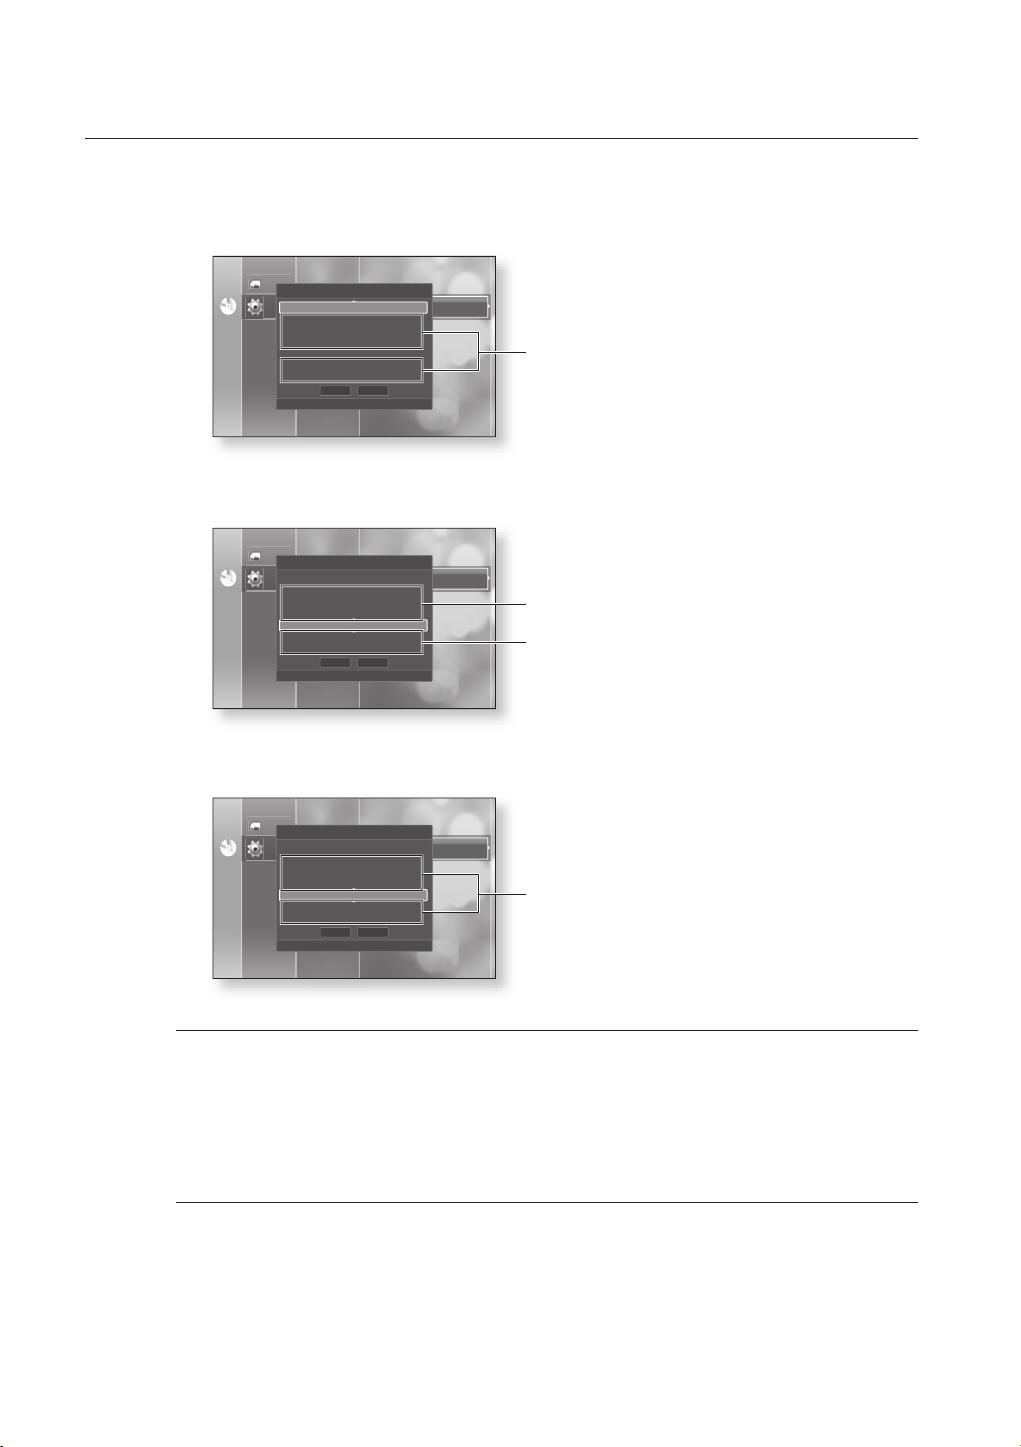
system upgrade
6.
Press the ▲▼ buttons to select a desired item, then press the ENTER button.
•
If DHCP is set to Off and DNS is set to Manual
HDMI Setup
Parental Setup System Information
Photo
Network Setup
System Upgrade
Setup
No DiscNo Disc
•
If DHCP is set to On and DNS is set to Manual
No DiscNo Disc
DHCP : Off
IP Address : 000 . 000 . 000 . 000
Subnet Mask : 255 . 255 . 255 . 000
Gateway : 000 . 000 . 000 . 000
DNS : Manual
Primary DNS : 000 . 000 . 000 . 000
Secondary DNS : 000 . 000 . 000 . 000
HDMI Setup
Parental Setup System Information
Photo
Network Setup
System Upgrade
Setup
DHCP : On
IP Address : 000 . 000 . 000 . 000
Subnet Mask : 255 . 255 . 255 . 000
Gateway : 000 . 000 . 000 . 000
DNS : Manual
Primary DNS : 000 . 000 . 000 . 000
Secondary DNS : 000 . 000 . 000 . 000
Network Setup
Upgrade Start
Save Cancel
s
SELECT ² RETURN
Network Setup
Upgrade Start
Save Cancel
s
SELECT ² RETURN
Setup available
Setup not available
Setup available
•
If DHCP is set to On and DNS is set to Automatic
HDMI Setup
Parental Setup System Information
Photo
Network Setup
System Upgrade
Setup
No DiscNo Disc
M
When done, use the ▲▼ buttons to select Save, then press the ENTER button.
7.
If you don’t want to save your work, use the
8.
DHCP : On
IP Address : 000 . 000 . 000 . 000
Subnet Mask : 255 . 255 . 255 . 000
Gateway : 000 . 000 . 000 . 000
DNS : Automatic
Primary DNS : 000 . 000 . 000 . 000
Secondary DNS : 000 . 000 . 000 . 000
When you select an item, use the number and ▲▼◄► buttons.
Network Setup
Upgrade Start
Save Cancel
s
SELECT ² RETURN
Setup not available
▲▼◄►
buttons to select Cancel, then press the
ENTER button.
The IP address used in this manual is for illustrative purposes only. You must refer to the your network settings
M
for the actual IP address.
48_ system upgrade
Page 50
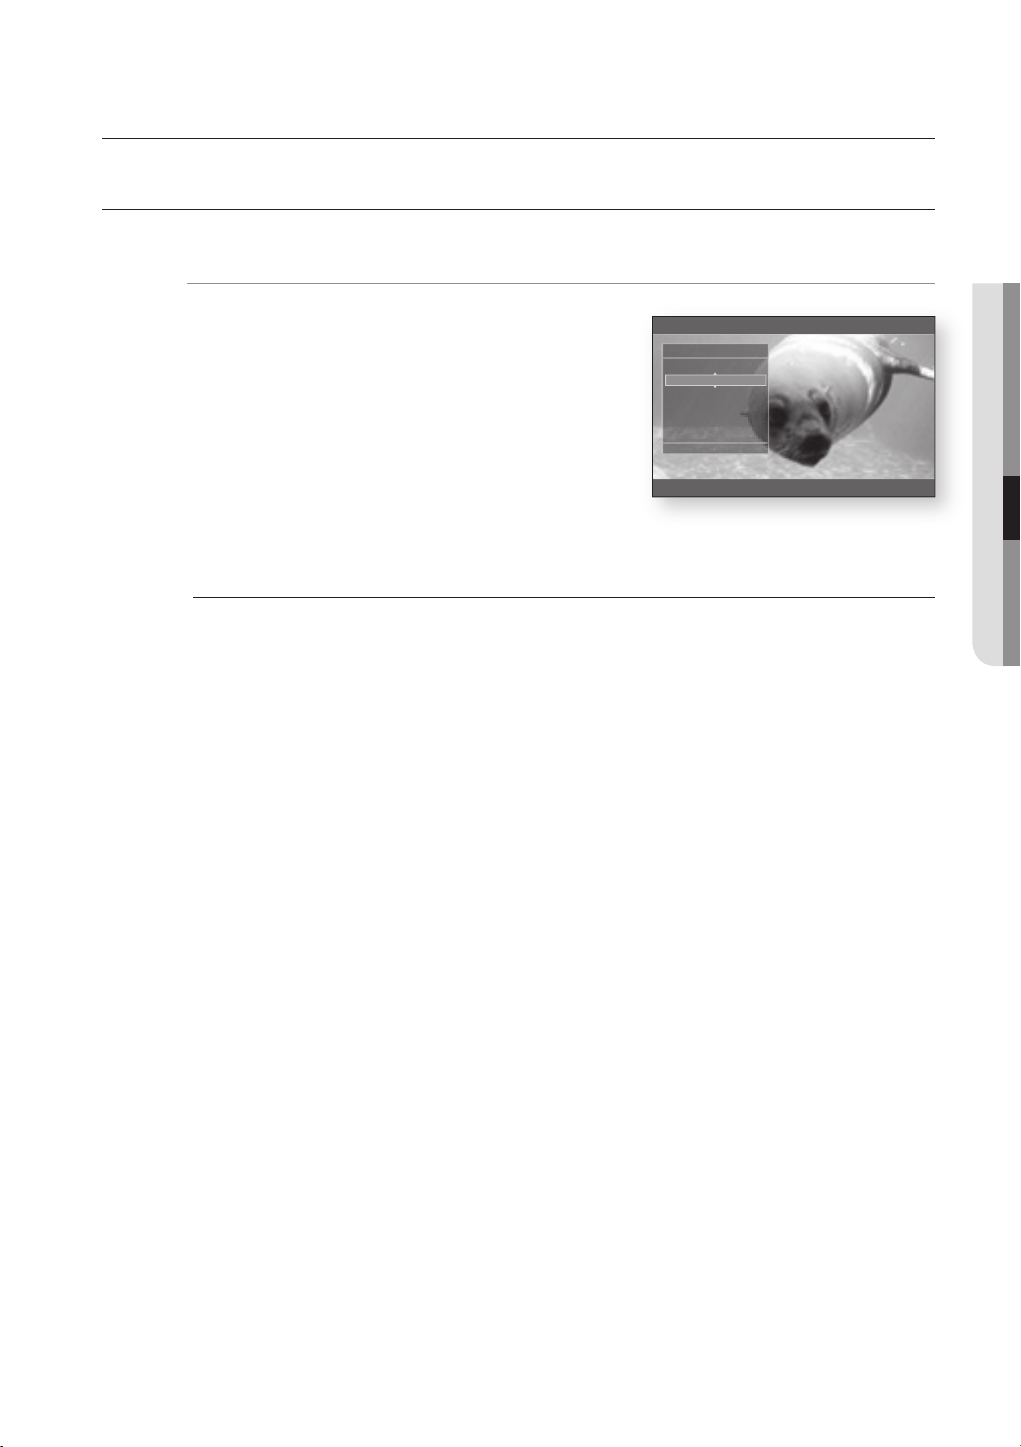
watching a movie
USING THE DISPLAY FUNCTION
1.
During playback, press the INFO button on the remote
control.
2.
Press the
3.
Press the
press the ENTER button.
•
You may use the number buttons of the remote control
to directly access a title, chapter or to start the playback
from a desired time.
4.
To make the screen disappear, press the INFO button again.
If you are playing contents from the Info menu, in some cases, playback may malfunction depending on the
M
title.
Title : To access the desired title when there is more than one in the disc. For example, if there is more than
one movie on a BD/DVD, each movie will be identifi ed as a Title.
Chapter: Most BD/DVD discs are recorded in chapters so that you can quickly fi nd a specifi c passage.
Audio : Refers to the fi lm's soundtrack language. A BD disc can contain up to 32 audio languages and a DVD
up to 8.
Playing Time : Allows playback of the fi lm from a desired time. You must enter the starting time
as a reference. The time search function does not operate on some discs.
Subtitle : Refers to the subtitle languages available in the disc. You will be able to choose the subtitle
languages or, if you prefer, turn them off from the screen. A BD disc can contain up to 255 subtitle languages,
and a DVD up to 32.
Angle : When a BD/DVD contains multiple angles of a particular scene, you can use the ANGLE function.
buttons to select the desired item.
▲▼
◄►
buttons to make the desired setup and then
hZCV
BD Info
Title
: 001/006
Chapter
: 001/016
Playing Time
: 00:04:17
Audio
: ENG Multi CH
Subtitle
: Off
Angle
: 01/01
§
CHANGE s SELECT
● WATCHING A MOVIE
English _49
Page 51
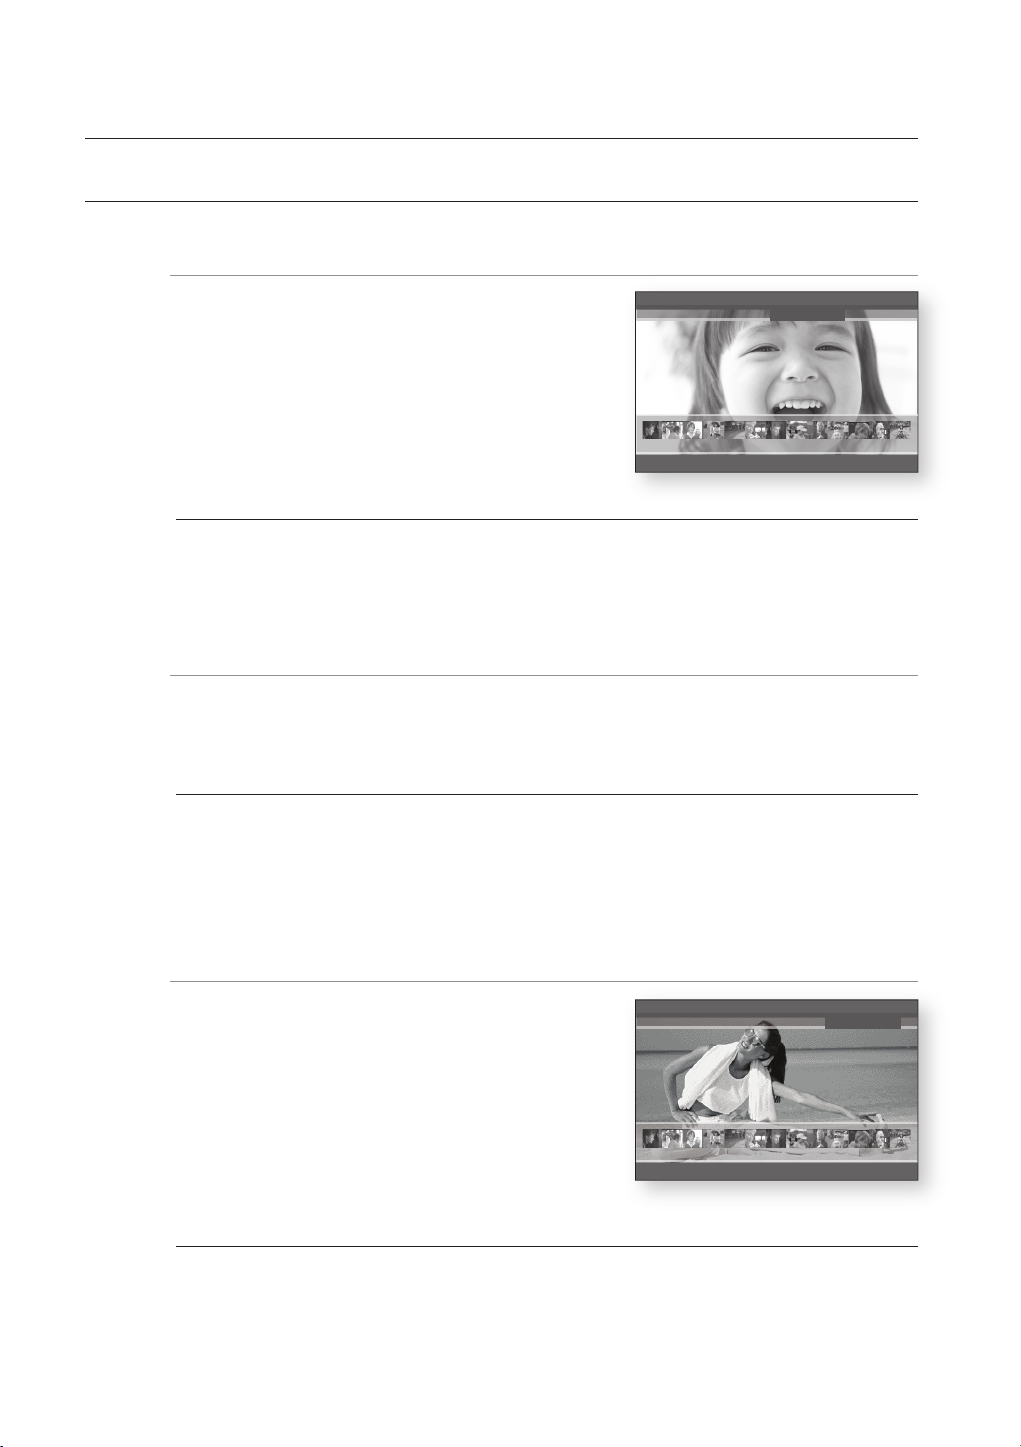
watching a movie
USING THE DISC MENU & POPUP/TITLE MENU
Using the Disc Menu
1.
During playback, press the DISC MENU button on the
remote control.
2.
Press the
then press the ► or ENTER button.
•
M
▲▼◄►
The Disc menu setup items may vary from disc to disc.
Depending on the disc, the Disc Menu may not be available.
buttons to make the desired setup,
PLAY MOVIE LANGUAGES SCENE SELECTIONS PREVIEWS
3 4 5 6 7 8 9 10 11 12 13 14 15
Using the Title Menu
During playback, press the TITLE MENU button on the remote control.
1.
Press the
2.
•
M
▲▼◄►
The Title menu setup options may vary from disc to disc.
Depending on the disc, the Title Menu may not be available.
Title Menu will only be displayed if there are at least two titles in the disc.
buttons to make the desired setup, then press the ENTER button.
hZ
▼
Z
Using the Popup Menu
During playback, press the POPUP MENU button on the
1.
remote control.
Press the
2.
desired menu.
The Popup menu setup options may vary from disc to
•
disc.
Depending on the disc, the Popup Menu may not be available.
M
50_ watching a movie
▲▼◄►
h
MAIN MENU AUDIO SET UP SUBTITLES SCENE SELECTIONS
buttons or ENTER button to select the
▼
3 4 5 6 7 8 9 10 11 12 13 14 15
Page 52
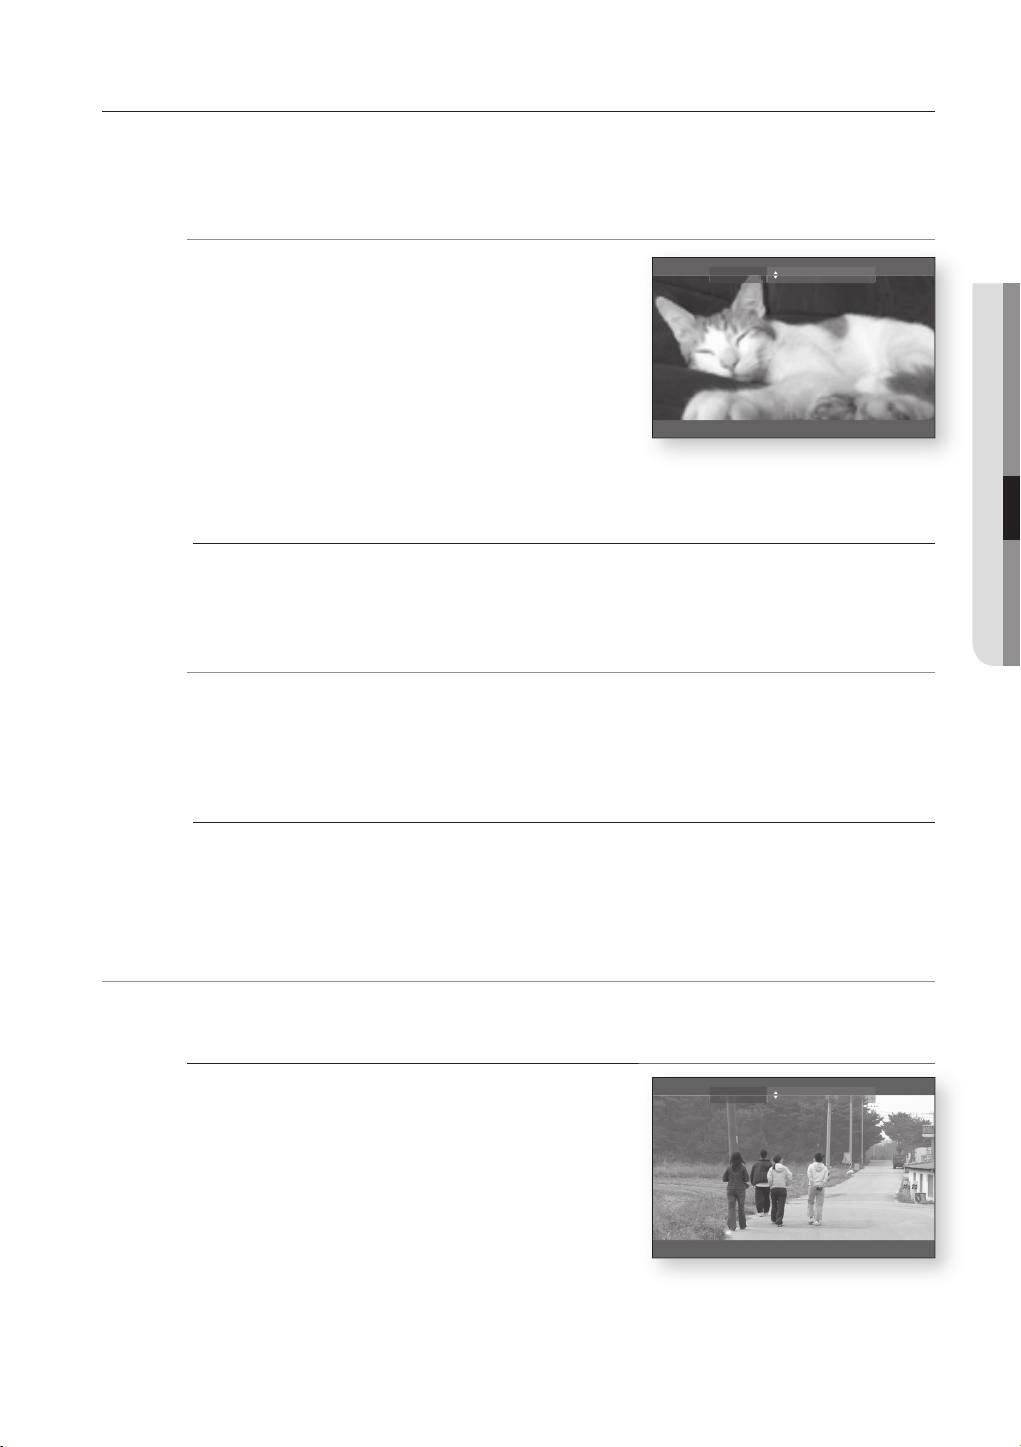
REPEAT PLAY
Repeat the current chapter or title.
Repeat playback
During playback, press the REPEAT button on the remote
1.
control. Repeat screen appears.
▲▼
Press the
2.
BD/DVD repeats play by chapter or title.
•
To return to normal play, press the REPEAT button again, then press the
3.
Depending on the disc, the Repeat function may not be available.
M
buttons to select Chapter or Title.
Repeat Off
▲▼
Using the A-B Repeat function
Press the Repeat A-B button on the remote control.
1.
Press the Repeat A-B button at the point where you want repeat play to start (A).
2.
Press the Repeat A-B button at the point where you want repeat play to stop (B).
3.
To return to normal play, press the CANCEL button.
4.
hZCV
● WATCHING A MOVIE
buttons to select Off.
hZCV
Point B cannot be set until 5 seconds of playback has elapsed from point A.
M
SELECTING THE AUDIO LANGUAGE
You can select a desired audio language quickly and easily with the AUDIO button.
Using the AUDIO button
Press the AUDIO button during playback. The Audio
1.
changes when the button is pressed repeatedly.
The audio languages are represented by abbreviations.
•
To remove the AUDIO icon, press the CANCEL or
2.
RETURN button.
hZ
Audio ENG Dolby Digital Multi CH
English _51
Page 53
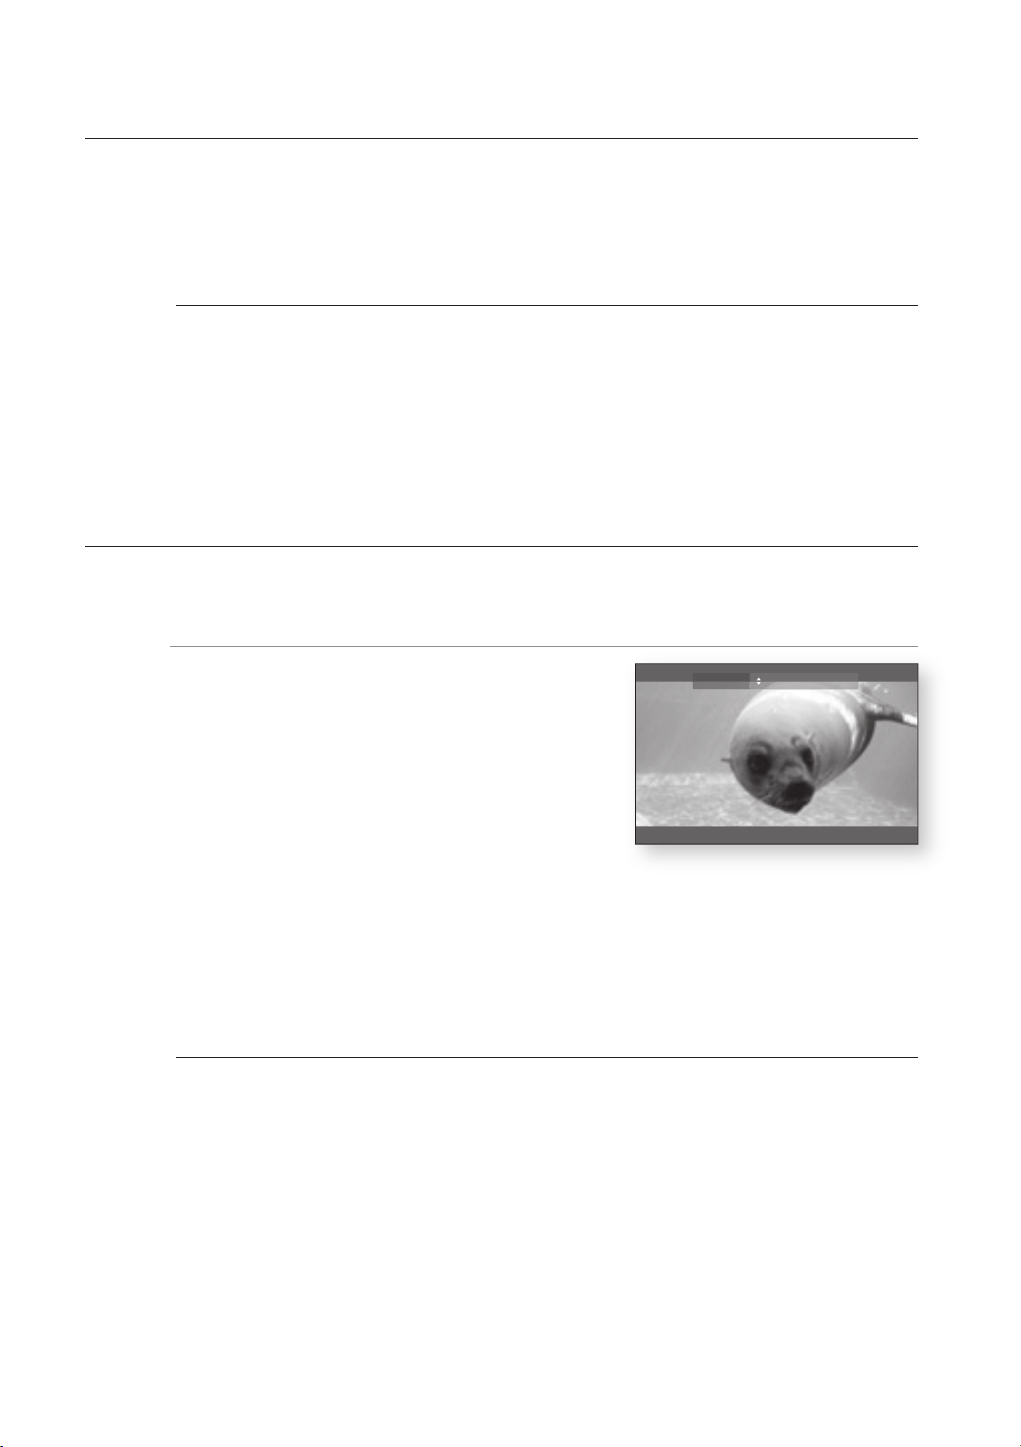
watching a movie
Using the INFO button
1.
During playback, press the INFO button on the remote control.
2.
Press the
3.
Press the
M
SELECTING THE SUBTITLE LANGUAGE
You can select a desired subtitle quickly and easily with the SUBTITLE button.
▲▼
buttons to select Audio language.
◄►
buttons on the remote control to select the desired audio.
This function depends on what audio languages are encoded on the disc and may not be available.
A BD disc can contain up to 32 audio languages and a DVD up to 8.
Depending on the disc type, you can use the Audio button to change the audio sound track as well as the
audio language.
Some Blu-ray Discs may allow you to select either multi-channel LPCM or Dolby digital audio sound track in
English sound tracks.
Using the SUBTITLE button
Press the SUBTITLE button. The subtitle changes when
1.
the button is pressed repeatedly. The subtitle languages
are represented by abbreviations.
To remove the SUBTITLE icon, press the CANCEL or
2.
RETURN button.
Using the INFO button
During playback, press the INFO button on the remote control.
1.
▲▼
Press the
2.
Press the ◄► buttons on the remote control to select the desired subtitle language.
3.
Depending on BD/DVDs, you may have to change the desired subtitle in the Disc Menu. Press the DISC MENU
M
button.
This function depends on what subtitles are encoded on the disc and may not be available on all BD/DVDs.
A BD disc can contain up to 255 subtitle languages and a DVD up to 32.
buttons to select Subtitle.
Subtitle ENG
hZ
52_ watching a movie
Page 54
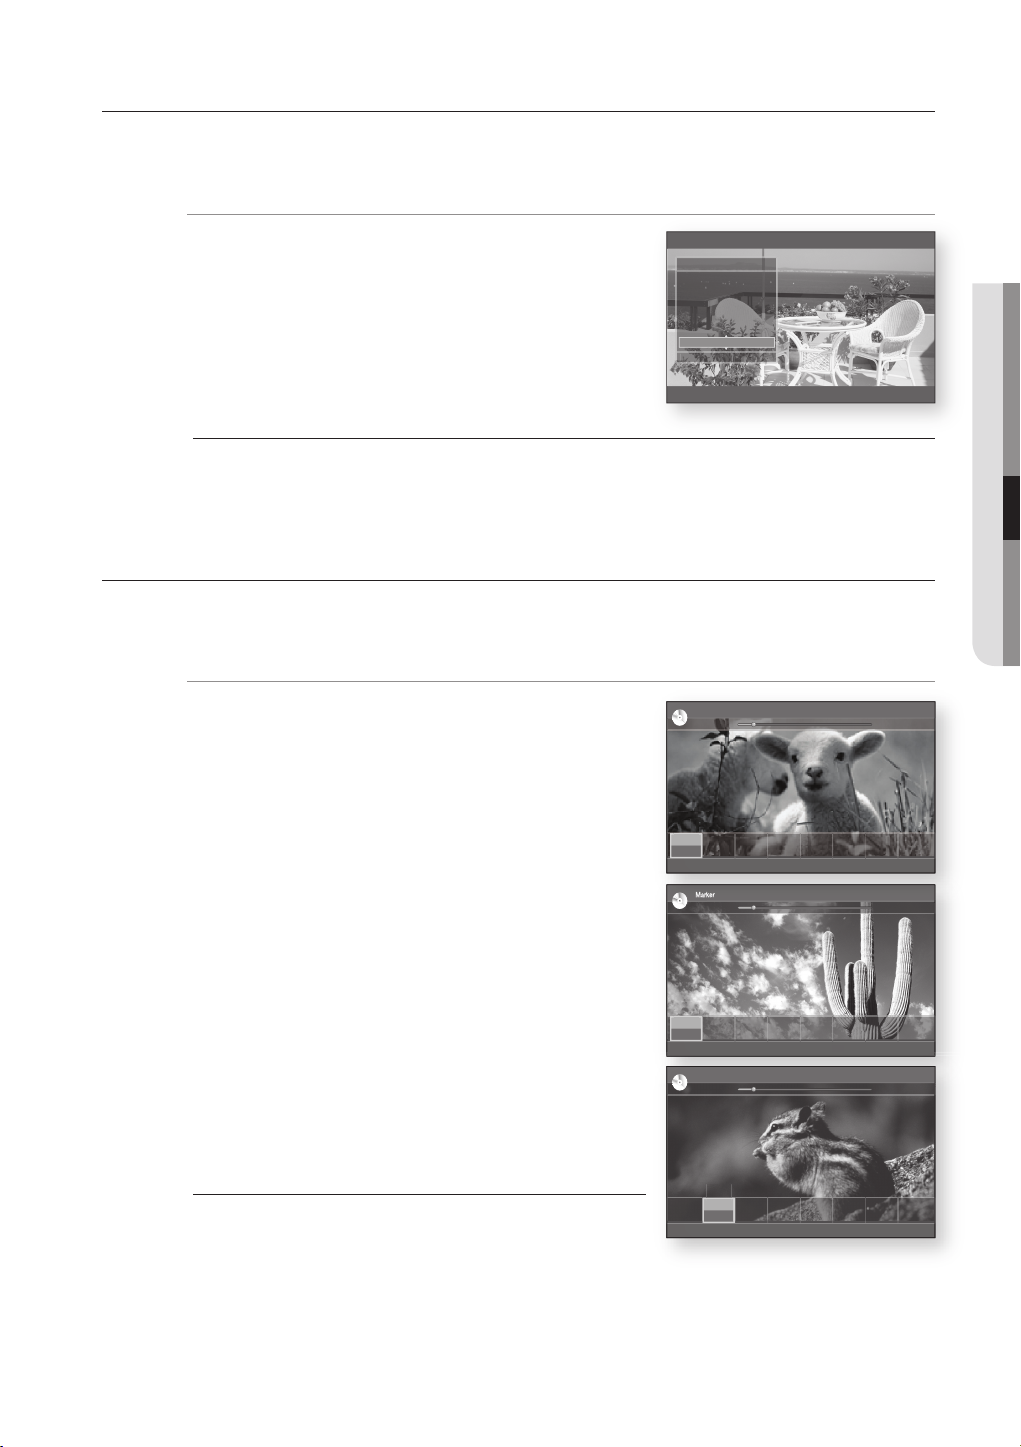
CHANGING THE CAMERA ANGLE
When a BD/DVD contains multiple angles of a particular scene, you can use the ANGLE function.
Using the ANGLE function
During playback, press the INFO button on the remote control.
1.
Press the ▲▼ buttons to select Angle.
2.
Press the
3.
◄► buttons or you can use the number buttons
BD Info
Title
: 001/006
Chapter
: 003/016
Playing Time
: 00:11:14
Audio
: ENG Multi CH
Subtitle
: ENG
Angle
: 01/01
§
CHANGE ¨ MOVE
on the remote control to select the desired angle.
M
If the disc has only one angle, this feature won’t work. Currently, very few discs have this feature.
Depending on the disc, these functions may not work.
USING THE BOOKMARK FUNCTION
The features lets you bookmarks sections of a DVD so you can quickly fi nd them at a later time.
Using the MARKER button
During playback, press the MARKER button on the remote
1.
control.
The Bookmark screen appears.
Marker
BD
►
hZCV
hZ
● WATCHING A MOVIE
00:12:13 / 01:53:26
Press the ENTER button when the desired scene appears.
2.
The selected scene will be stored.
◄►
Press the
3.
Press the ENTER button again when the desired scene
4.
buttons to move to the next position.
appears.
The scene will be stored at the selected position and the
bookmark time information will be shown.
Repeat above to bookmark other positions.
•
You can bookmark up to 8 scenes.
•
When the disc tray is opened and then closed, bookmarks will
M
disappear.
Add Add Add Add Add Add Add Add
§ MOVE s ADD e EXIT
Marker
BD
►
T:1
Add Add Add Add Add Add Add
00:12:17
a
DELETE § MOVE s Play e EXIT
Marker
BD
►
T:1
T:1
00:12:17
a
Add Add Add Add Add Add
00:12:27
DELETE § MOVE s Play e EXIT
00:12:21 / 01:53:26
00:12:33 / 01:53:26
English _53
Page 55
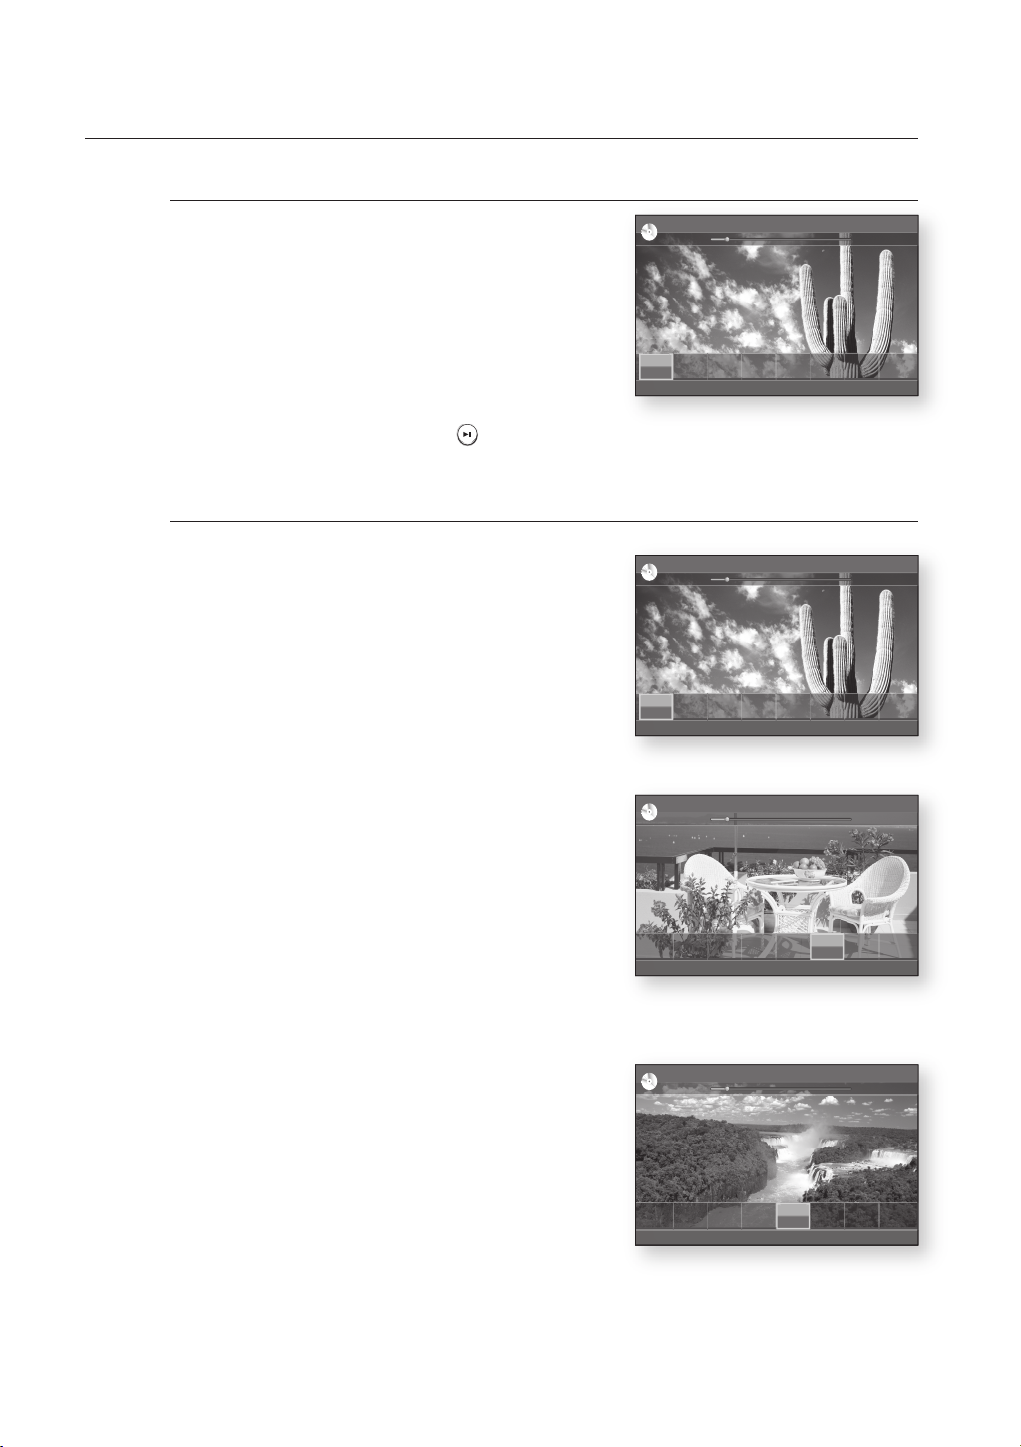
watching a movie
Playing back a bookmark
During playback, press the MARKER button on the
1.
remote control.
◄►
Press the
2.
Press the ENTER or PLAY/PAUSE(
3.
buttons to select a bookmarked scene.
) button to start playing from the selected scene.
Clearing a bookmark
During playback, press the MARKER button on the
1.
remote control.
◄►
Press the
2.
buttons to select a bookmarked scene.
Marker
BD
►
T:1
T:1
00:12:17
a
DELETE § MOVE s Play e EXIT
BD
T:1
00:12:17
a
DELETE § MOVE s Play e EXIT
BD
Add Add Add Add Add Add
00:12:27
Marker
►
T:1
T:1
00:12:53
T:1
00:12:55
00:12:57
Marker
►
00:12:27
T:1
T:1
00:12:59
00:12:21 / 01:53:26
00:13:11 / 01:53:26
Add Add
00:13:27 / 01:53:26
Press the RED(A) or CANCEL button to delete the
3.
selected bookmark.
54_ watching a movie
T:1
T:1
T:1
T:1
T:1
00:12:17
00:12:27
00:12:53
T:1
00:12:53
00:12:55
T:1
00:12:55
a
DELETE § MOVE s Play e EXIT
Marker
BD
►
T:1
T:1
00:12:17
00:12:27
a
DELETE § MOVE s Play e EXIT
00:12:57
T:1
00:12:57
T:1
00:12:59
Add Add Add
Add Add
00:13:38 / 01:53:26
Page 56
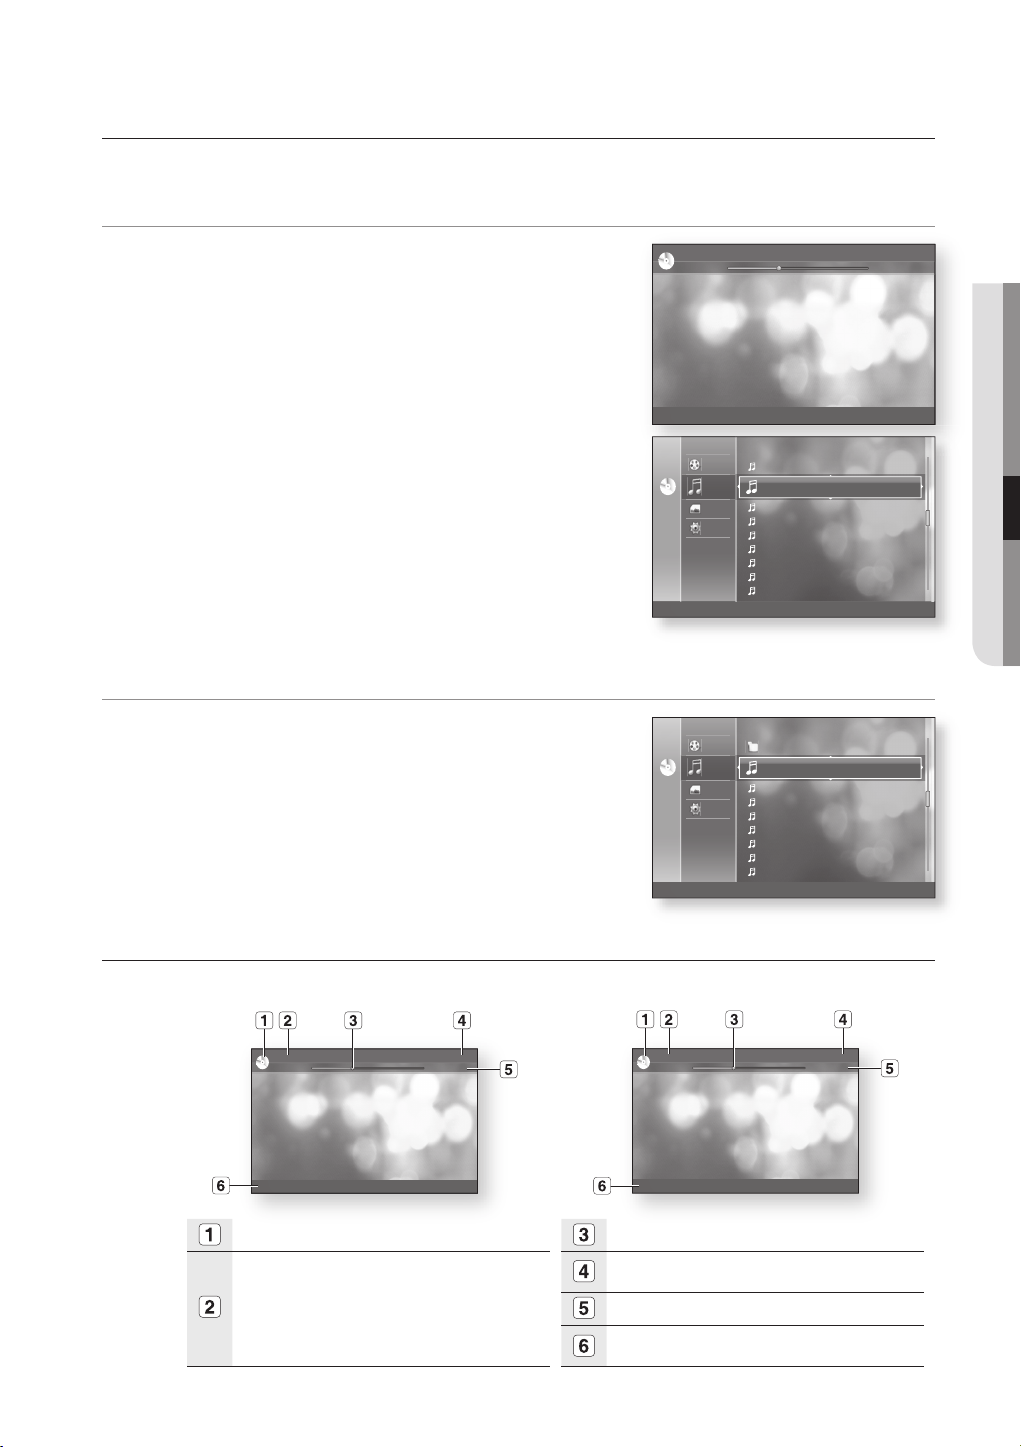
listening to music
PLAYING AN AUDIO CD(CD-DA)
Insert an Audio CD(CD-DA) into the disc tray.
1.
For an audio CD, the fi rst track will be played
automatically.
To move to the Music List, press the STOP or RETURN
2.
button.
The Music List screen is displayed
▲▼
Press the
3.
buttons to select the track you want to play,
and then press the ENTER button.
PLAYING AN MP3
1.
Insert an MP3 disc into the disc tray.
•
The Menu screen is displayed.
2.
Press the
ENTER button.
•
3.
Press the
play, and then press the ENTER button.
▲▼
buttons to select Music, then press the
The Music List is displayed.
▲▼
buttons to select the MP3 fi le you want to
TRACK 001 01/12
CDCD
►
a
Play Mode
Video
TRACK 005 00:03:20
Music
CDCD
Photo
Setup
Video
Music
CDCD
Photo
Setup
TRACK 006 00:03:20
TRACK 007
TRACK 008
TRACK 009
TRACK 010
TRACK 011
TRACK 012
TRACK 013
b
Playlist
Root
Song01.mp3 00:03:06
Song02.mp3
Song03.mp3
Song04.mp3
Song05.mp3
Song06.mp3
Song07.mp3
Song08.mp3
b
Playlist
21 Jun 2007
21 Jun 2007
21 Jun 2007
21 Jun 2007
21 Jun 2007
21 Jun 2007
21 Jun 2007
21 Jun 2007
B
00:01:29 / 00:04:06
00:03:32
00:04:36
00:04:17
00:04:11
00:04:07
00:04:46
00:04:21
A
00:03:32
00:03:38
00:03:41
00:03:43
00:04:05
00:03:27
00:03:51
● LISTENING TO MUSIC
AUDIO CD(CD-DA)/MP3 SCREEN ELEMENTS
<Audio CD(CD-DA)>
TRACK 001 01/12
CDCD
a
►
Play Mode
00:01:29 / 00:04:06
Displays the media type. Play Status Bar.
Current track (song)
Audio CD(CD-DA) : Displays the number of the
track currently being played.
MP3 : Displays the name of the track currently
being played.
<MP3>
a
Displays the current play index, total track number.
Current /Total Play Time.
Displays available COLOR buttons.
(see next page for Color button usage).
Song01.mp3 01/04
CDCD
►
Play Mode
00:00:05 / 00:05:02
English _55
Page 57
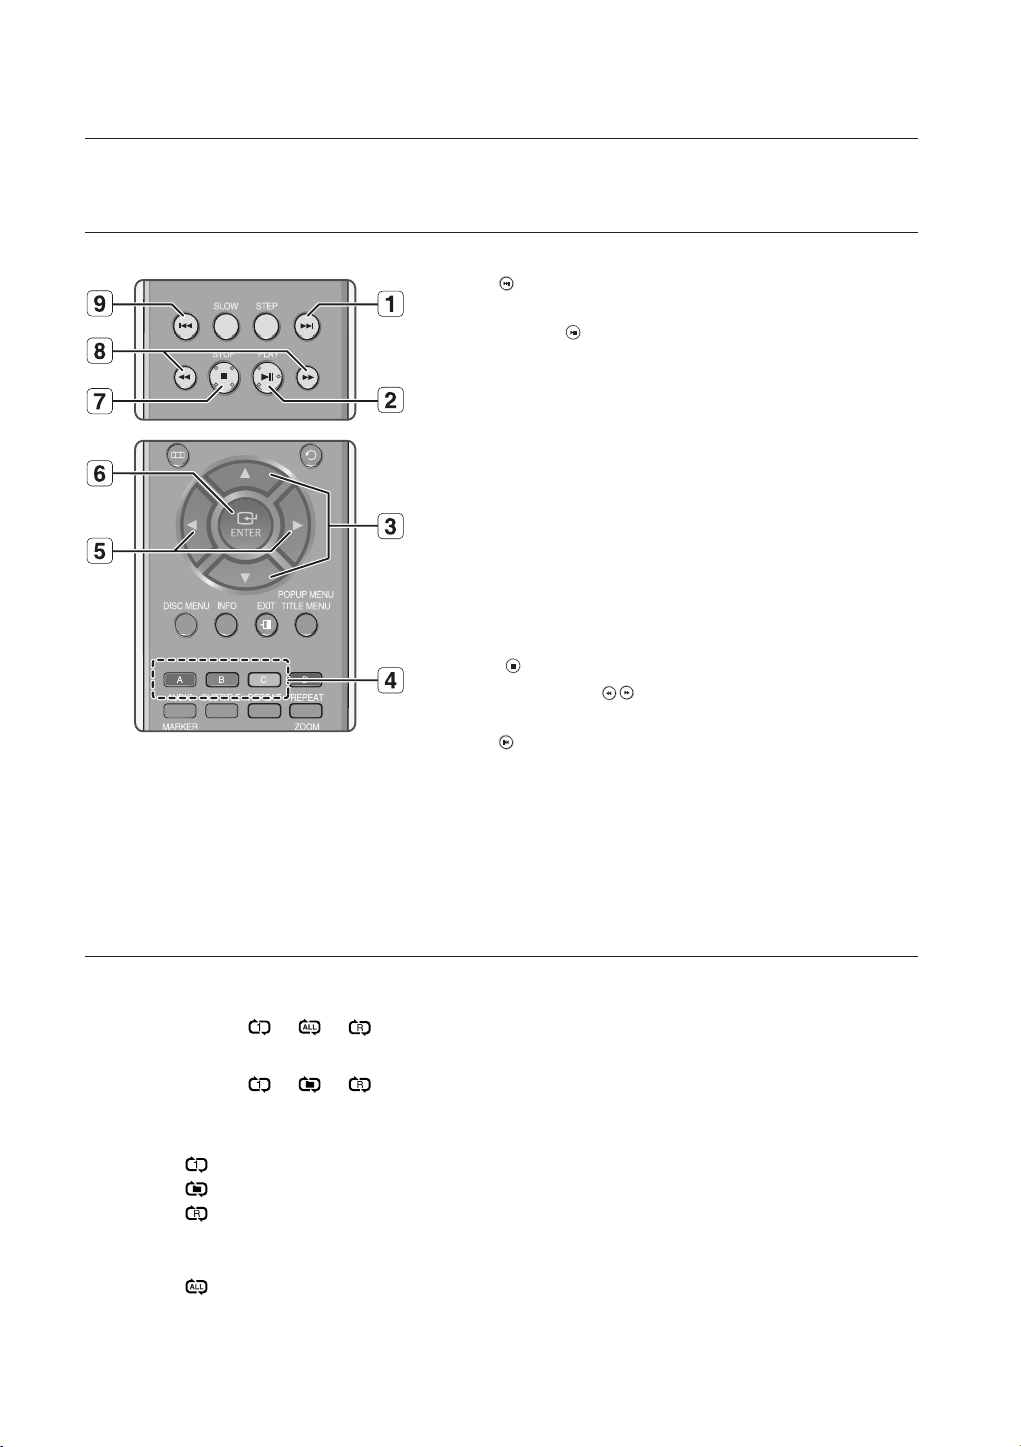
listening to music
BUTTONS ON THE REMOTE CONTROL USED FOR AUDIO CD (CD-DA)/ MP3 DISC PLAYBACK
SKIP ( ) button: During playback, plays the next track. Moves
1.
to the next page in the Music List or the Playlist.
PLAY/PAUSE ( ) button: Plays the currently selected track. If
2.
pressed during playback, the current track is paused.
▲▼
buttons : Selects a track(song) or a folder in Music List or
3.
Playlist.
COLOR buttons: RED(A), GREEN(B), YELLOW(C)
4.
RED(A) button :
•
GREEN(B) button : Go to Playlist from Music List/Go to Music
•
list from Playlist.
YELLOW(C) button : Playlist play.
•
◄►
buttons
5.
►
: Moves to the applicable folder or plays the applicable track,
according to the current position.
◄
: Moves to the parent folder.
ENTER button : Plays the selected track (song).
6.
STOP ( ) button: Stops a track(song).
7.
Press the SEARCH (
8.
Fast Play (only Audio CD(CD-DA)).
SKIP (
9.
when pressed during playback. If pressed again, your Blu-ray
Disc Player moves to and plays the previous track.
If you press this button within three seconds after playback
starts, the previous track will be played.
If you press this button after three seconds, the current track will
be replayed from the beginning.
Moves by the page in the Music List or the Playlist.
) button: Returns to the beginning of the current track
Selects the Play Mode(Repeat) during playback.
) buttons :
REPEAT AUDIO CD(CD-DA) & MP3
During playback, press the REPEAT or RED(A) button repeatedly to select the repeat mode you want.
When playing an Audio CD(CD-DA) :
Normal
When playing an MP3 disc :
Normal
Normal (Audio CD(CD-DA)/MP3): Tracks on a disc are played in the order in which they were
•
recorded on the disc.
Repeat Track (Audio CD(CD-DA)/MP3)
•
Repeat Folder (MP3)
•
Random (Audio CD(CD-DA)/MP3)
•
- When playing an Audio CD(CD-DA): The random option plays a disc’s track in random order.
- When playing an MP3 disc : The random option plays a folder’s fi le in random order.
•
Repeat All (Audio CD(CD-DA)): All tracks are repeated.
- To return to normal playback Press the REPEAT or
56_ listening to music
RED(A)
button repeatedly to return to normal playback.
Page 58
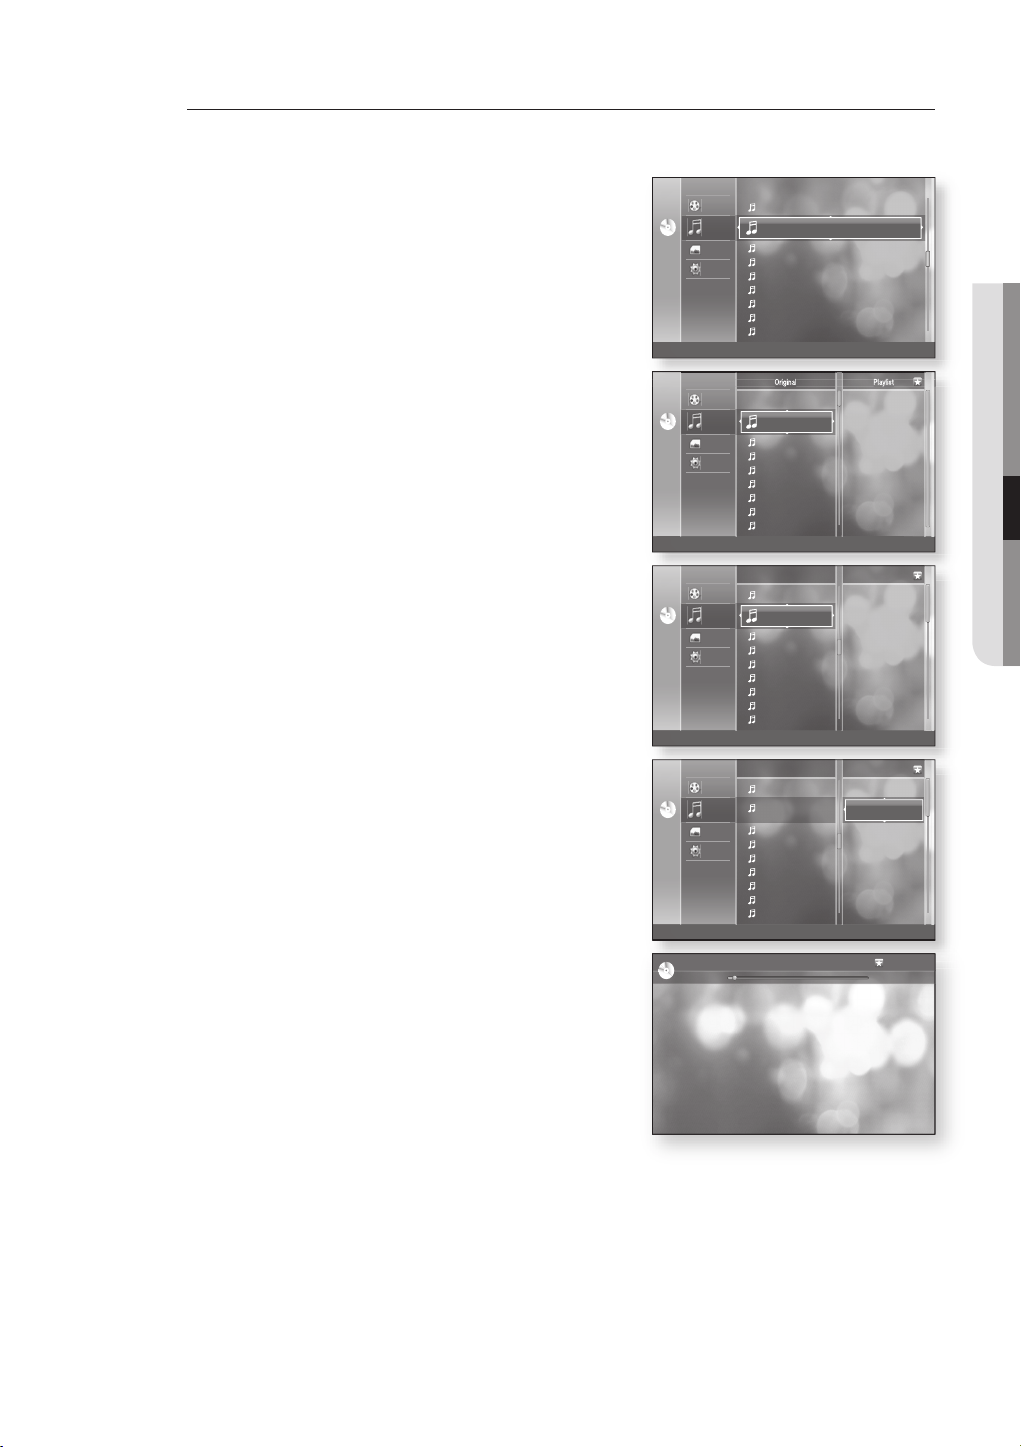
Playlist
You can create a playlist with up to 99 tracks.
To setup, follow steps 1 to 2 in page 55.
1.
Press the GREEN(B) button.
▲▼
2.
Press the
buttons to select a track, then press the
ENTER button to add it to the Playlist. Repeat this
procedure to add additional tracks.
If there is an undesired track in the playlist, press the
3.
►▲▼
button to select that track, and then press the
ENTER button.
The selected track will be deleted.
•
Press the YELLOW(C) button to play the selected tracks.
4.
When the track is fi nished, the next track will automatically
play.
To go back to the Music List, press the STOP or
5.
RETURN button.
Video
TRACK 006 00:03:20
Music
CDCD
Photo
Setup
Video
Music
CDCD
Photo
Setup
Video
Music
CDCD
Photo
Setup
Video
Music
CDCD
Photo
Setup
TRACK 002 01/04
CDCD
►
TRACK 007 00:03:32
TRACK 008
TRACK 009
TRACK 010
TRACK 011
TRACK 012
TRACK 013
TRACK 014
b
Playlist
Original Playlist
TRACK 001
TRACK 002
TRACK 003
TRACK 004
TRACK 005
TRACK 006
TRACK 007
TRACK 008
b
Music List Playlist Play
Original Playlist
TRACK 005
TRACK 006
TRACK 007
TRACK 008
TRACK 009
TRACK 010
TRACK 011
TRACK 012
TRACK 013
b
Music List Playlist Play
Original Playlist
TRACK 005
TRACK 006
TRACK 007
TRACK 008
TRACK 009
TRACK 010
TRACK 011
TRACK 012
TRACK 013
b
Music List Playlist Play
s
Add © Play
01.TRACK 002
02.TRACK 003
03.TRACK 004
04.TRACK 006
s
Add © Play
01.TRACK 002
02.TRACK 003
03.TRACK 004
04.TRACK 006
s
Delete © Play
00:04:36
00:04:17
00:04:11
00:04:07
00:04:46
00:04:21
00:03:43
00:00:05 / 00:05:02
● LISTENING TO MUSIC
English _57
Page 59
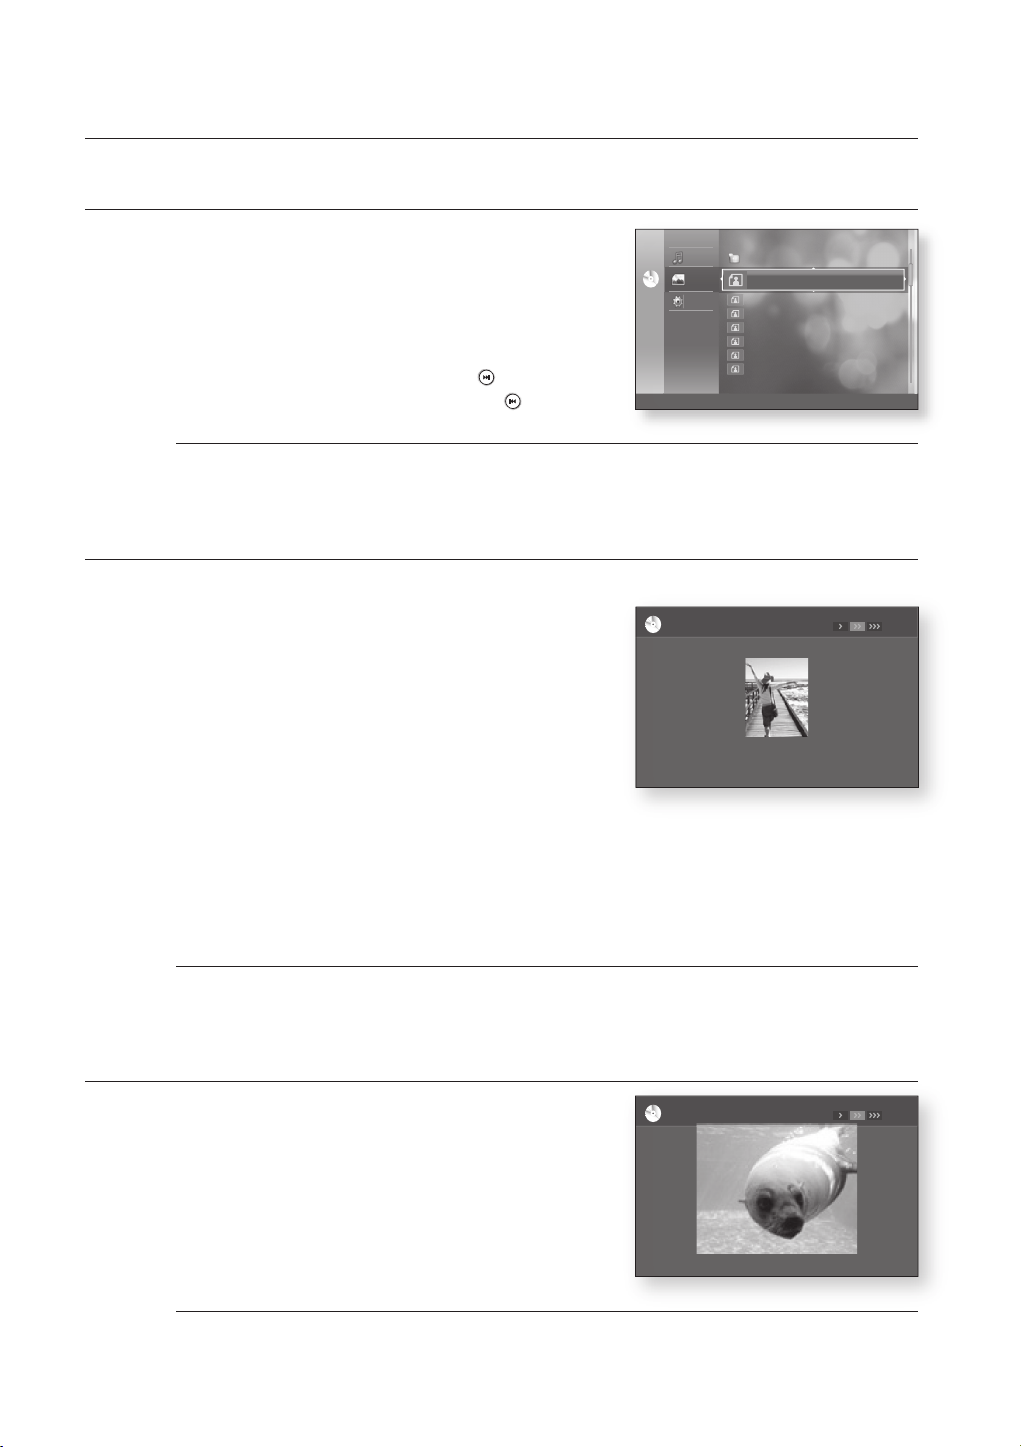
Viewing a Picture
VIEWING A PICTURE
1.
Insert a JPEG disc into the disc tray.
The Menu screen is displayed.
•
2.
Press the ▲▼ buttons to select Photo, then press the
ENTER button.
The Photo List is displayed.
•
Press the ▲▼ buttons to select a picture.
3.
To see the next page, press the SKIP (
•
To see the previous page, press the SKIP(
•
M
SLIDE SHOW
To setup, follow steps 1 and 2 above.
3.
Press the BLUE(D) button.
The slide show starts.
Photo fi les larger than 6Mb or with more than 7 million pixels may not be played.
) button.
) button.
Music
Root
Photo
CDCD
Setup
d Slide Show
►
_____1_.JPG
CDCD
176.JPG 127 KB
BEACH.JPG
KE.JPG
KE2.JPG
MBHONG.JPG
NEW_BEE.JPT
_____1_.JPG
08 Feb 2003
17 Feb 2004
10 Apr 2003
10 Apr 2003
20 Apr 2002
08 Jul 2004
18 Feb 2004
27 KB
194 KB
191 KB
30 KB
76 KB
17 KB
07/07
4.
- To stop the Slide Show -
Press the STOP or RETURN button.
M
ROTATE
To setup, follow steps 1 and 3 above.
4.
5.
When the SlideShow starts, press the BLUE(D) button to
adjust the play speed.
Each time you press the button, the play speed will increase
d Speed ¦ Stop
accordingly.
JPEG's smaller than 1920 x 1080 will be displayed at normal resolution. They will not fully fi ll the screen.
KE.JPG
CDCD
Press the ENTER button.
Use the RED(A) and GREEN(B) buttons to rotate the image in a
desired direction.
ar
90
b u
90 Zoom d Speed © Slide Show
04/07
M
Photo fi les larger than 6Mb or with more than 7 million pixels cannot be rotated.
58_ Viewing a Picture
Page 60
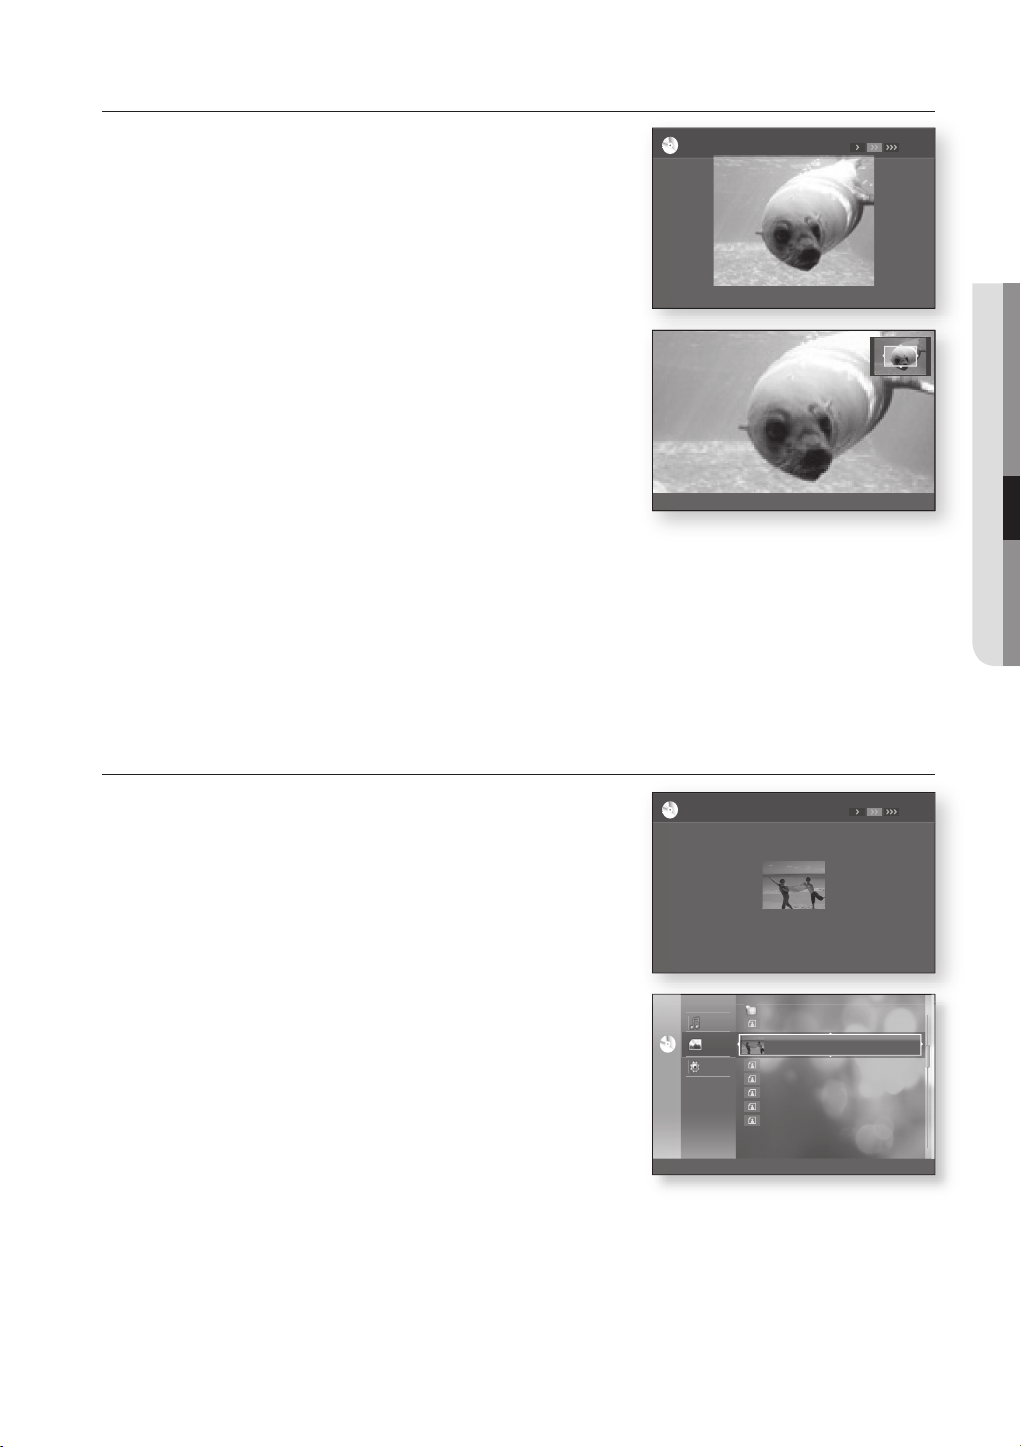
ZOOM
To setup, follow steps 1 to 3 in "Viewing a Picture" on page 58.
Press the ENTER button.
4.
Press the YELLOW(C) button.
5.
6.
Use the RED(A) and GREEN(B) buttons to zoom in/out the
image.
- To stop the Zoom Press the YELLOW(C) button.
KE.JPG
CDCD
ar
90
b u
90 Zoom d Speed © Slide Show
a
Zoom In b Zoom Out Zoom Off
04/07
● VIEWING A PICTURE
x2
m
MOVE
GO TO PHOTO LIST
To setup, follow steps 1 to 3 in "Viewing a Picture" on page
58.
4.
Press the ENTER button.
To go Photo List, press the RETURN or STOP button.
5.
BEACH.JPG
CDCD
ar
90
b u
90 Zoom d Speed © Slide Show
Music
Photo
CDCD
Setup
d Slide Show
..
176.JPG
BEACH.JPG 27 KB
KE.JPG
KE2.JPG
MBHONG.JPG
NEW_BEE.JPT
_____1_.JPG
17 Feb 2004
10 Apr 2003
10 Apr 2003
20 Apr 2002
08 Jul 2004
18 Feb 2004
03/07
127 KB08 Feb 2003
194 KB
191 KB
30 KB
76 KB
17 KB
English _59
Page 61
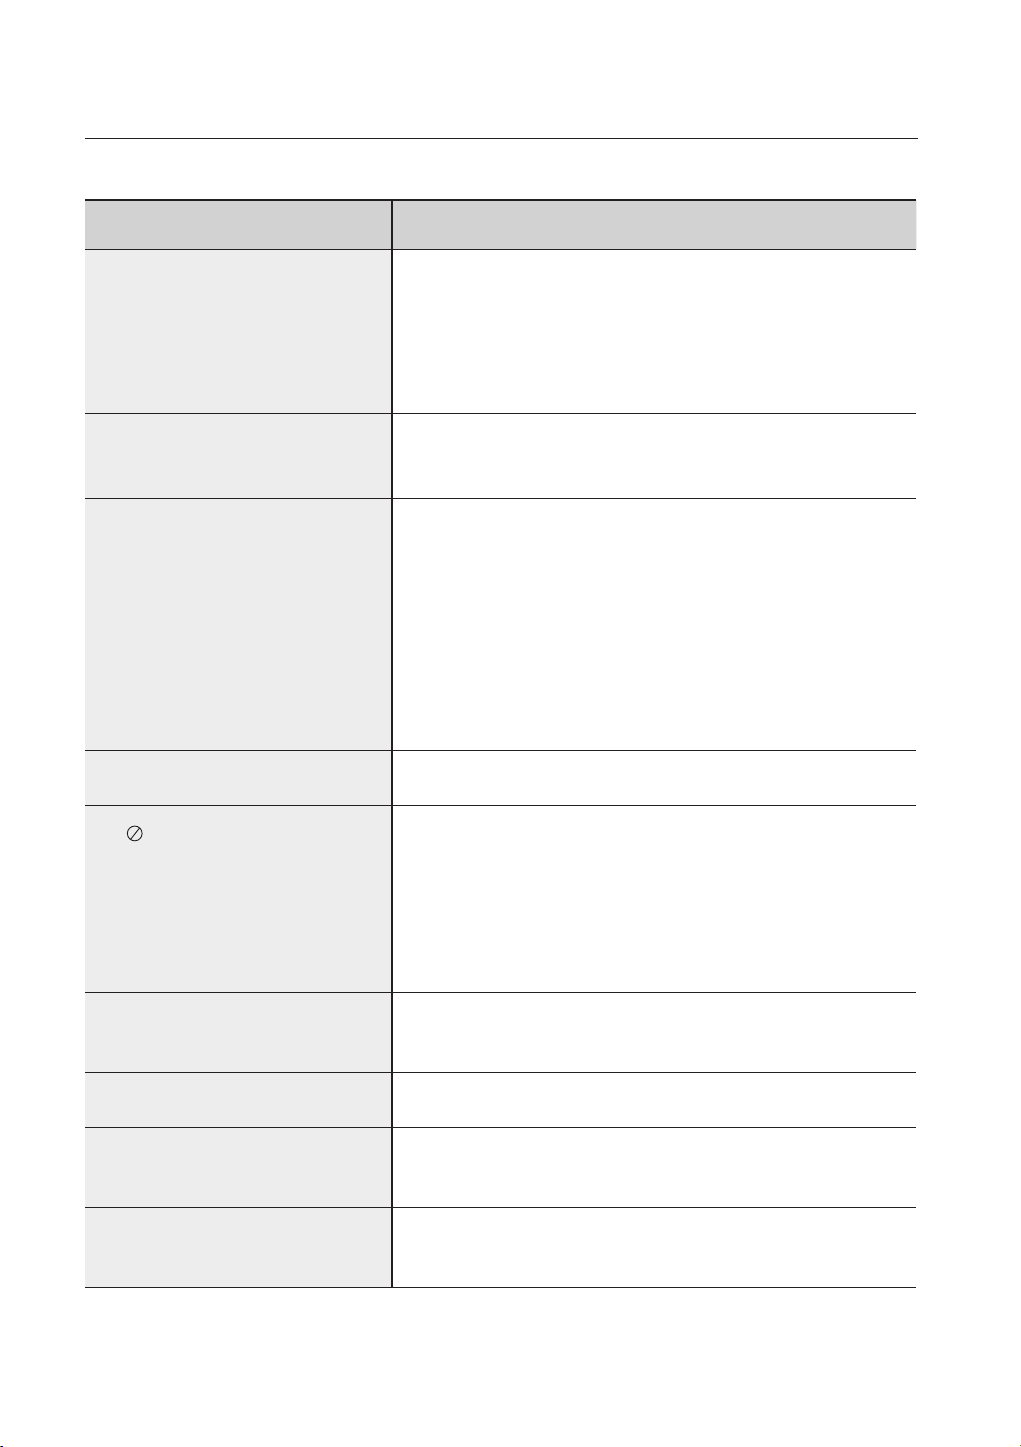
troubleshooting
Before requesting service, please check the following.
PROBLEM SOLUTION
No operations can be performed with
the remote control.
Disc does not play.
5.1 channel sound is not being
reproduced.
Disc Menu doesn’t appear.
The icon appears on screen.
• Check the batteries in the remote control. They may need replacing.
• Operate the remote control at a distance of no more than 20 feet.
• Remove batteries and hold down one or more buttons for several minutes
to drain the microprocessor inside the remote control to reset it. Reinstall
batteries and try to operate the remote control again.
• Ensure that the disc is installed with the label side facing up.
• Check the region number of the BD/DVD.
• 5.1 channel sound is reproduced only when the following conditions are
met. :
1. The Blu-ray Disc Player is connected with the proper Amplifi er
2. The disc is recorded with 5.1 channel sound.
• Check whether the disc being played has the “5.1 ch” mark on the
outside.
• Check if your audio system is connected and working properly.
• In a SETUP Menu, is the Audio Output set to Bitstream?
• Check if the disc has a Menu.
• The features or action cannot be completed at this time because:
1. The BD/DVD’s software restricts it.
2. The BD/DVD’s software doesn’t support the feature (e.g., angles)
3. The feature is not available at the moment.
4. You’ve requested a title or chapter number or search time that is out of
range.
Play mode differs from the Setup Menu
selection.
The screen ratio cannot be changed.
No audio.
The screen is blocked
60_ troubleshooting
• Some of the functions selected in the Setup Menu may not work properly
if the disc is not encoded with the corresponding function.
• The Screen Ratio is fi xed on your BD/DVDs.
• Make sure you have selected the correct Digital Output in the Audio
Options Menu.
• Press the $ button (in front panel) for more than 5 seconds with no disc
inside. All settings will revert to the factory settings.
Page 62
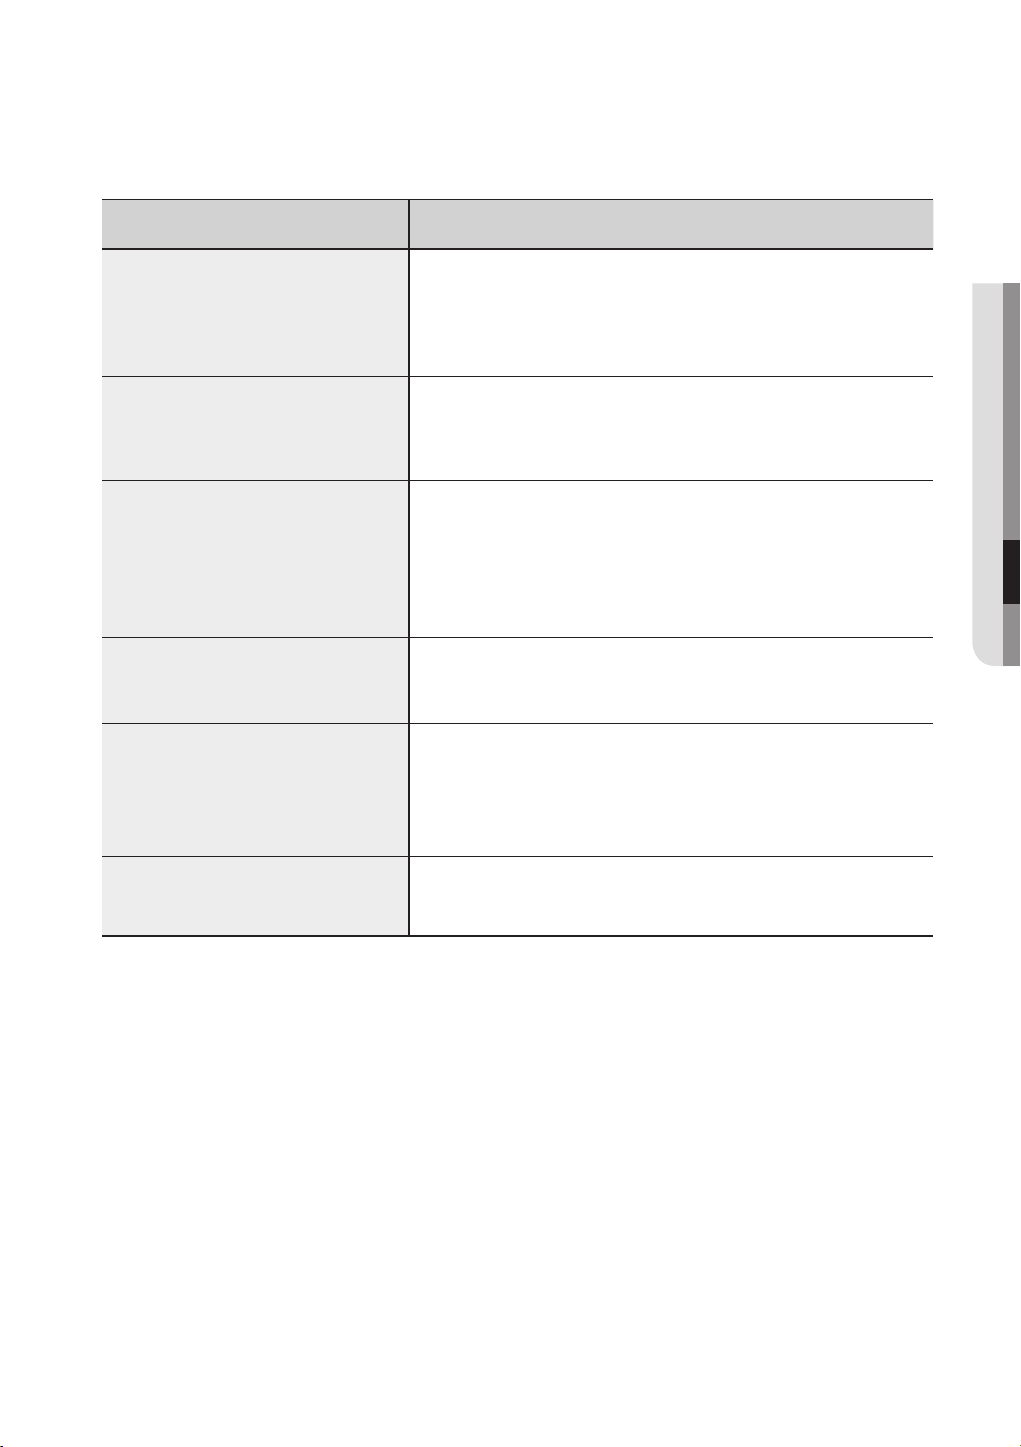
PROBLEM SOLUTION
If the HDMI output is set to a resolution
your TV cannot support (for example,
1080p), you may not see a picture on
your TV.
Forgot password
If you experience other problems.
The picture is noisy or distorted
No HDMI output.
• Press the $ button (in front panel) for more than 5 seconds with no disc
inside. All settings will revert to the factory settings.
• Press the $ button (in front panel) for more than 5 seconds with no disc
inside. All settings including the password will revert to the factory
settings. Don't use this unless absolutely necessary.
• Go to the contents and fi nd the section of the instruction book that
contains the explanations regarding the current problem, and follow the
procedure once again.
• If the problem still cannot be solved, please contact your nearest Samsung
authorized service center.
• Make sure that the disc is not dirty or scratched.
• Clean the disc.
• Check the connection between the TV and the HDMI jack of the Blu-ray
Disc Player.
• Check if your TV supports 480p/720p/1080i/1080p HDMI input
resolution.
● TROUBLESHOOTING
Abnormal HDMI output screen.
• If random noise appears on the screen, it means that TV does not support
HDCP (High-bandwidth Digital Content Protection).
English _61
Page 63

appendix
SPECIFICATIONS
Power Requirements AC 120V, 60Hz
Power Consumption 29 W
General
Disc
Video Output
Video/Audio HDMI
Audio Output
Weight 9.3 Ibs
Dimensions 16.9 (W) x 12.8 (D) x 3.1 (H) inches
Operating Temperature Range +41°F to +95°F
Operating Humidity Range 10 % to 75 %
BD (Blu-ray Disc) Reading Speed : 4.917m/sec
DVD (Digital Versatile Disc)
CD : 5 inches (COMPACT DISC)
1
/2 inches (COMPACT DISC)
CD : 3
Composite Video
Component Video
S-Video
2 Channel L(1/L), R(2/R)
5.1 Channel F/L, F/R, R/L, R/R, C/T, S/W
Digital Audio Output Optical/Coaxial
*Frequency Response
*S/N Ratio 110 dB
*Dynamic Range 100 dB
*Total Harmonic Distortion 0.003%
Reading Speed : 3.49 ~ 4.06 m/sec.
Approx. Play Time (Single Sided, Single Layer Disc) : 135 min.
Reading Speed : 4.8 ~ 5.6 m/sec.
Maximum Play Time : 74 min.
Reading Speed : 4.8 ~ 5.6 m/sec.
Maximum Play Time : 20 min.
1 channel : 1.0 Vp-p (75 Ω load)
Blu-ray Disc : 480i DVD : 480i
Y : 1.0 Vp-p (75 Ω load)
Pr : 0.70 Vp-p (75 Ω load)
Pb : 0.70 Vp-p (75 Ω load)
Blu-ray Disc : 1080i, 720p, 480p, 480i DVD : 480p, 480i
Luminance Signal : 1.0 Vp-p (75 Ω load)
Chrominance Signal : 0.3 Vp-p (75 Ω load)
Blu-ray Disc : 480i DVD : 480i
1080p, 1080i, 720p, 480p
PCM multichannel audio, Bitstream audio, PCM audio
48 kHz Sampling : 4 Hz to 22 kHz
96 kHz Sampling : 4 Hz to 44 kHz
*: Nominal specifi cation
- Samsung Electronics Co., Ltd reserves the right to change the specifi cations without notice.
- Weight and dimensions are approximate.
62_ appendix
Page 64

COPY PROTECTION
Because AACS (Advanced Access Content
•
System) is approved as content protection
system for BD format, similar to use of CSS
(Content Scramble System) for DVD format,
certain restrictions are imposed on playback,
analog signal output, etc., of AACS protected
contents. The operation of this product and
restrictions on this product may vary depending
on your time of purchase as those restrictions
may be adopted and/or changed by AACS after
the production of this product. Furthermore, BDROM Mark and BD+ are additionally used as
content protection system for BD format, which
imposes certain restrictions including playback
restrictions for BD-ROM Mark and/or BD+
protected contents. To obtain additional
information on AACS, BD-ROM Mark, BD+, or
this product, please contact SAMSUNG
customer care center.
Many BD/DVD discs are encoded with copy
•
protection. Because of this, you should only
connect your Blu-ray Disc Player directly to your
TV, not to a VCR. Connecting to a VCR results in
a distorted picture from copy-protected BD/DVD
discs.
This product incorporates copyright protection
•
technology that is protected by methods claims
of certain U.S. patents and other intellectual
property rights owned by Macrovision
Corporation and other rights owners. Use of this
copyright protection technology must be
authorized by Macrovision Corporation and is
intended for home and other limited viewing uses
only, unless otherwise authorized by Macrovision
Corporation. Reverse engineering or disassembly
is prohibited.
Under the U.S. Copyright laws and Copyright
•
laws of other countries, unauthorized recording,
use, display, distribution, or revision of television
programs, videotapes, BDs, DVDs, CDs and
other materials may subject you to civil and/or
criminal liability.
For DVD Players with 525p, but not 625p,
•
progressive scan output :
CONSUMERS SHOULD NOTE THAT NOT ALL
HIGH DEFINITION TELEVISION SETS ARE
FULLY COMPATIBLE WITH THIS PRODUCT
AND MAY CAUSE ARTIFACTS TO BE
DISPLAYED IN THE PICTURE. IN CASE OF 525
PROGRESSIVE SCAN PICTURE PROBLEMS, IT
IS RECOMMENDED THAT THE USER SWITCH
THE CONNECTION TO THE `STANDARD
DEFINITION' OUTPUT. IF THERE ARE
QUESTIONS REGARDING OUR TV SET
COMPATIBILITY WITH THIS MODEL 525p DVD
PLAYER, PLEASE CONTACT OUR CUSTOMER
SERVICE CENTER.
Compliance and Compatibility Notice
NOT ALL discs are compatible
Subject to the restrictions described below and those
•
noted throughout this Manual, including the Disc Type
and Characteristics section of this Manual, disc types
that can be played are: pre-recorded commercial BDROM, DVD-Video, and Audio CD discs; DVD-RW / DVDR discs; and CD-RW/CD-R discs.
•
Discs other than the above cannot and/or is not intended
to be played by this player. And some of the above discs
may not play due to one or more reasons provided
below.
•
HD DVD discs cannot be played in this player.
•
Samsung cannot assure that this player will play every
disc bearing the BD-ROM, DVD-Video, DVD-RW / DVDR and CD-RW / CD-R logos, and this player may not
respond to all operating commands or operate all
features of every disc. These and other disc compatibility
and player operation issues with new and existing format
discs are possible because:
- BD format is a new and evolving format and this player may
not operate all features of BD discs because some features
may be optional, additional features may have been added to
the BD format after the production of this player, and certain
available features may be subject to delayed availability;
- not all new and existing disc format versions are supported by
this player;
- new and existing disc formats may be revised, changed,
updated, improved and/or supplemented;
- some discs are produced in a manner that allows specifi c or
limited operation and feature during playback;
- some features may be optional, additional features may have
been added after the production of this player or certain
available features may be subject to delayed availability;
- some discs bearing the BD-ROM, DVD-Video, DVD-RW/
DVD-R and CD-RW/ CD-R logos may still be nonstandardized discs;
- some discs may not be played depending on their physical
state or recording conditions;
- problems and error can occur during the creation of BD, DVD
and CD software and/or the manufacture of discs;
- this player operates differently than a standard DVD player or
other AV equipment; and/or
- for reasons noted throughout this Manual and for other
reason(s) discovered and posted by SAMSUNG customer
care center.
•
If you encounter disc compatibility or player operation
problems, please contact SAMSUNG customer care
center. You may also contact SAMSUNG customer care
center for possible updates on this player.
•
For additional information on playback restrictions and
disc compatibility, refer to the Precautions, Before
Reading the User’s Manual, Disc Types and
Characteristics, and Before Playing sections of this
Manual.
● APPENDIX
English _63
Page 65

appendix
WARRANTY (FOR USA USERS ONLY)
LIMITED WARRANTY TO ORIGINAL PURCHASER
This SAMSUNG brand product, as supplied and distributed by SAMSUNG ELECTRONICS AMERICA, INC. (SAMSUNG) and delivered
new, in the original carton to the original consumer purchaser, is warranted by SAMSUNG against manufacturing defects in materials and
workmanship for the following limited warranty period:
One (1) Year Parts / Ninety Days (90) Labor
This limited warranty begins on the original date of purchase, and is valid only on products purchased and used in the United States, and
does not include transportation, installation, removal or reinstallation. Warranty repairs must be performed by SAMSUNG’s authorized
service center. To receive warranty service, the original dated bill of sale must be presented upon request as proof of purchase to
SAMSUNG or SAMSUNG’s authorized service center. Transportation to and from the service center is the responsibility of the purchaser.
SAMSUNG will repair or replace this product, at our option and at no charge with new or reconditioned parts, if found to be defective
during the limited warranty period specified above. The product must be returned during the warranty period with transportation charges
prepaid to SAMSUNG’s designated service center. Prior to returning any product for warranty service, the purchaser must contact
SAMSUNG for problem determination and service procedures. SAMSUNG does not warrant uninterrupted or error-free operation of the
product.
All replaced parts and products become the property of SAMSUNG and must be returned to SAMSUNG. Replacement parts and products
assume the remaining original warranty, or ninety (90) days, whichever is longer.
This limited warranty covers manufacturing defects in materials and workmanship encountered in normal, noncommercial use of this
product and shall not apply to the following, including, but not limited to: damage which occurs in shipment; applications and uses for
which this product was not intended; failures or problems which are caused by products or equipment not supplied by SAMSUNG;
accidents, misuse, abuse, neglect, misapplication, fire, water, lightning or other acts of nature; incorrect electrical line voltage, fluctuations
or surges; damage caused by improper or faulty installation; improper connection with any peripheral; product alteration or modification;
improper or unauthorized repair; cosmetic damage or exterior finish; product with altered serial numbers; failure to follow operating
instructions, customer adjustments, maintenance and environmental instructions that are covered and prescribed in the instruction book;
use of non-SAMSUNG or unauthorized parts, supplies, accessories or equipment which damage this product or result in service problems;
failures or problems due to incompatibility with other equipment.
No person, agent, distributor, dealer or company is authorized to change, modify or extend the terms of these warranties in any manner
whatsoever. The time within which an action must be commended to enforce any obligations of SAMSUNG arising under the warranty or
under any statute, or law of the United States or of any state thereof, is hereby limited to ninety (90) days from the date you discovered or
should have discovered the defect. This limitation does not apply to implied warranties arising under state law, if any.
SAMSUNG does not warrant (i) disc compatibility with new and existing format discs or (ii) error free playback in full compliance with
specifications of the compatible disc formats, and SAMSUNG shall not be liable for any data loss recorded in your discs.
SAMSUNG’s responsibility shall be limited to appropriate warranty services during the warranty period through SAMSUNG customer care
center. If you encounter compatibility or data loss problems, please contact SAMSUNG customer care center.
THERE ARE NO EXPRESS WARRANTIES OTHER THAN THOSE LISTED AND DESCRIBED ABOVE, AND NO WARRANTIES
WHETHER EXPRESS OR IMPLIED, INCLUDING, BUT NOT LIMITED TO, ANY IMPLIED WARRANTIES OF MERCHANTABILITY OR
FITNESS FOR A PARTICULAR PURPOSE, SHALL APPLY AFTER THE EXPRESS WARRANTY PERIODS STATED ABOVE, AND
NO OTHER EXPRESS WARRANTY OR GUARANTY GIVEN BY ANY PERSON, FIRM OR CORPORATION WITH RESPECT TO
THIS PRODUCT SHALL BE BINDING ON SAMSUNG. SAMSUNG SHALL NOT BE LIABLE FOR LOSS OF REVENUE OR PROFITS,
FAILURE TO REALIZE SAVINGS OR OTHER BENEFITS, OR ANY OTHER SPECIAL, INCIDENTAL OR CONSEQUENTIAL DAMAGES
CAUSED BY THE USE, MISUSE OR INABILITY TO USE THIS PRODUCT, REGARDLESS OF THE LEGAL THEORY ON WHICH
THE CLAIM IS BASED, AND EVEN IF SAMSUNG HAS BEEN ADVISED OF THE POSSIBILITY OF SUCH DAMAGES. NOR SHALL
RECOVERY OF ANY KIND AGAINST SAMSUNG BE GREATER IN AMOUNT THAN THE PURCHASE PRICE OF THE PRODUCT
SOLD BY SAMSUNG AND CAUSING THE ALLEGED DAMAGE. WITHOUT LIMITING THE FOREGOING, PURCHASER ASSUMES
ALL RISK AND LIABILITY FOR LOSS, DAMAGE OR INJURY TO PURCHASER AND PURCHASER’S PROPERTY AND TO OTHERS
AND THEIR PROPERTY ARISING OUT OF THE USE, MISUSE OR INABILITY TO USE THIS PRODUCT SOLD BY SAMSUNG NOT
CAUSED DIRECTLY BY THE NEGLIGENCE OF SAMSUNG. THIS LIMITED WARRANTY SHALL NOT EXTEND TO ANYONE OTHER
THAN THE ORIGINAL PURCHASER OF THIS PRODUCT, IS NONTRANSFERABLE AND STATES YOUR EXCLUSIVE REMEDY.
Some states do not allow limitations on how long an implied warranty lasts, or the exclusion or limitation of incidental or consequential
damages, so the above limitations or exclusions may not apply to you. This warranty gives you specific legal rights, and you may also
have other rights which vary from state to state.
To obtain warranty service, please contact SAMSUNG customer care center.
Page 66
Contact SAMSUNG WORLD WIDE
If you have any questions or comments relating to Samsung products, please contact the SAMSUNG customer care
center.
Region Country
North America
Latin America
Europe
CIS
Asia Pacifi c
Middle East &
Africa
CANADA 1-800-SAMSUNG(726-7864) www.samsung.com/ca
MEXICO 01-800-SAMSUNG(726-7864) www.samsung.com/mx
U.S.A 1-800-SAMSUNG(726-7864) www.samsung.com/us
ARGENTINE 0800-333-3733 www.samsung.com/ar
BRAZIL 0800-124-421 , 4004-0000 www.samsung.com/br
CHILE 800-SAMSUNG(726-7864) www.samsung.com/cl
COSTA RICA 0-800-507-7267 www.samsung.com/latin
ECUADOR 1-800-10-7267 www.samsung.com/latin
EL SALVADOR 800-6225 www.samsung.com/latin
GUATEMALA 1-800-299-0013 www.samsung.com/latin
JAMAICA 1-800-234-7267 www.samsung.com/latin
PANAMA 800-7267 www.samsung.com/latin
PUERTO RICO 1-800-682-3180 www.samsung.com/latin
REP. DOMINICA 1-800-751-2676 www.samsung.com/latin
TRINIDAD & TOBAGO 1-800-SAMSUNG(726-7864) www.samsung.com/latin
VENEZUELA 0-800-100-5303 www.samsung.com/latin
COLOMBIA 01-8000112112 www.samsung.com.co
BELGIUM 0032 (0)2 201 24 18 www.samsung.com/be
CZECH REPUBLIC
DENMARK 70 70 19 70 www.samsung.com/dk
FINLAND 030-6227 515 www.samsung.com/fi
FRANCE
GERMANY
HUNGARY 06-80-SAMSUNG(726-7864) www.samsung.com/hu
ITALIA 800-SAMSUNG(726-7864) www.samsung.com/it
LUXEMBURG 0035 (0)2 261 03 710 www.samsung.com/be
NETHERLANDS
NORWAY 815-56 480 www.samsung.com/no
POLAND 0 801 801 881 , 022-607-93-33 www.samsung.com/pl
PORTUGAL 80 8 200 128 www.samsung.com/pt
SLOVAKIA 0800-SAMSUNG(726-7864) www.samsung.com/sk
SPAIN 902 10 11 30 www.samsung.com/es
SWEDEN 0771-400 200 www.samsung.com/se
U.K 0870-SAMSUNG(726-7864) www.samsung.com/uk
Republic of Ireland 0818 717 100 www.samsung.com/ie
AUSTRIA 0800-SAMSUNG(726-7864) www.samsung.com/at
Switzerland 0800-SAMSUNG(726-7864) www.samsung.com/ch
RUSSIA 8-800-555-55-55 www.samsung.ru
KAZAHSTAN 8-10-800-500-55-500 www.samsung.kz
UZBEKISTAN 8-800-120-0-400 www.samsung.uz
KYRGYZSTAN 00-800-500-55-500
UKRAINE 8-800-502-0000 www.samsung.ua
LITHUANIA 8-800-77777 www.samsung.lt
LATVIA 800-7267 www.samsung.com/lv
ESTONIA 800-7267 www.samsung.ee
AUSTRALIA 1300 362 603 www.samsung.com/au
New zealand 0800SAMSUNG(726-7864) www.samsung.com/nz
CHINA 800-810-5858 , 010-6475 1880 www.samsung.com.cn
HONG KONG 3698-4698 www.samsung.com/hk
INDIA 3030 8282 , 1800 110011 www.samsung.com/in
INDONESIA 0800-112-8888 www.samsung.com/id
JAPAN 0120-327-527 www.samsung.com/jp
MALAYSIA 1800-88-9999 www.samsung.com/my
PHILIPPINES 1800-10-SAMSUNG(726-7864) www.samsung.com/ph
SINGAPORE 1800-SAMSUNG(726-7864) www.samsung.com/sg
THAILAND 1800-29-3232 , 02-689-3232 www.samsung.com/th
TAIWAN 0800-329-999 www.samsung.com/tw
VIETNAM 1 800 588 889 www.samsung.com/vn
Turkey 444 77 11 www.samsung.com.tr
SOUTH AFRICA 0860-SAMSUNG(726-7864 ) www.samsung.com/za
U.A.E
Customer Care Center
844 000 844
Distributor pro Českou republiku :
Samsung Zrt., česka organizační složka
Vyskočilova 4, 14000 Praha 4
3260 SAMSUNG(726-7864) or
08 25 08 65 65 (
01805 - 121213 (
0900 20 200 88 ( 0,10/Min)
800-SAMSUNG (726-7864),
8000-4726
0,15/Min)
0,14/Min)
Web Site
www.samsung.com/cz
www.samsung.com/fr
www.samsung.de
www.samsung.com/nl
www.samsung.com/mea
Page 67
Contact SAMSUNG WORLD WIDE
If you have any questions or comments relating to Samsung products,
please contact the SAMSUNG customer care center.
1-800-SAMSUNG (7267864)/www.samsung.com/us
Samsung Electronics America,Inc.
105 Challenger Road
Ridgefield Park,NJ 07660-0511
1-800-SAMSUNG (7267864)
www.samsung.com/us
AK68-01454A
 Loading...