

Page 1

imagine the possibilities
Thank you for purchasing this Samsung product.
To receive a more complete service,
please register your product at
www.samsung.com/register
BD-HDD Combo
user manual
BD-D8900A
Page 2

2 English
Blu-ray™ Disc Features
Blu-ray Discs support the highest quality HD video
available in the industry - Large capacity means
no compromise on video quality.
The following Blu-ray Disc features are disc
dependant and will vary.
Appearance and navigation of features will also
vary from disc to disc.
Not all discs will have the features described
below.
For High-Definition Playback
To view high-definition contents on a Blu-ray Disc,
you need an HDTV (High Definition Television).
Some Blu-ray Discs may require you to use the
product’s HDMI OUT to view high-definition
content.
The ability to view high-definition content on
Blu-ray Discs may be limited depending on the
resolution of your TV.
BD-LIVE
You can use a Blu-ray Disc that supports
BD-LIVE to download content provided by the
disc manufacturer through a network connection.
BD-HDD Combo Features
3D
This product can play 3D contents through an
HDMI cable.
To implement the 3D effect, connect a 3D device
(3D-compliant AV receiver, 3D-compliant TV) to
the product using an HDMI cable, and play the 3D
content while wearing 3D vision glasses.
3D Conversion
When you play 2D contents, you can convert 2D
into 3D contents by pressing the 2D3D button
on the remote control.
Smart Hub
You can download various for pay or freeof-charge applications through a network
connection. These applications provide a range
of Internet services and content including news,
weather forecasts, stock market quotes, games,
movies, and music.
AllShare
You can play videos, music, and photos saved on
your devices (such as your PC, mobile phones, or
NAS) through a network connection.
Playing multimedia files
You can use the USB connection to play various
kinds of multimedia files (MP3, JPEG, DivX, etc.)
located from a USB storage device.
Digital TV
This product have dual DTV Tuner. So user
can change DTV Programme during recording
a programme. As the benefit of dual tuner
eliminates the unconvinience of retaining
channel when you want to record it.
Functionalities related to Digital TV (DVB) are
only available in countries/areas where DVB-T
(MPEG2 and MPEG4 AVC) digital terrestrial
signals are broadcasted or where you are
able to access to a compatible cable-TV
service. Please check with your local dealer the
possibility to receive DVB-T signal.
DVB-T is the DVB European consortium
standard for the broadcast transmission
of digital terrestrial television is that for the
broadcast transmission of digital TV over cable.
However, some differentiated features like EPG
(Electric Programme Guide), VOD (Video On
Demand) and so on, are not included in this
specification. So, they cannot be workable at
this moment.
Some Digital TV functions might be unavailable
in some countries or regions might not work
correctly with some cable service providers.
This product can record TV channel in HDD or
external devices.
•
•
•
•
•
Key features
Page 3
English 3
02 Safety Information
Do not install this equipment in a confined space
such as a bookcase or similar unit.
WARNING
To prevent damage which may result in fire
or electric shock hazard, do not expose this
appliance to rain or moisture.
CAUTION
BD-HDD Combo USES AN INVISIBLE LASER
BEAM WHICH CAN CAUSE HAZARDOUS
RADIATION EXPOSURE IF DIRECTED. BE SURE
TO OPERATE BD-HDD Combo CORRECTLY AS
INSTRUCTED.
CAUTION
THIS PRODUCT UTILIZES A LASER. USE
OF CONTROLS OR ADJUSTMENTS OR
PERFORMANCE OF PROCEDURES OTHER
THAN THOSE SPECIFIED HEREIN MAY RESULT
IN HAZARDOUS RADIATION EXPOSURE. DO
NOT OPEN COVERS AND DO NOT REPAIR
YOURSELF. REFER SERVICING TO QUALIFIED
PERSONNEL.
This product satisfies CE regulations when
shielded cables and connectors are used to
connect the unit to other equipment. To prevent
electromagnetic interference with electric
appliances, such as radios and televisions, use
shielded cables and connectors for connections.
Warning
TO REDUCE THE RISK OF ELECTRIC SHOCK, DO NOT REMOVE THE COVER (OR BACK).
NO USER-SERVICEABLE PARTS ARE INSIDE. REFER SERVICING TO QUALIFIED SERVICE PERSONNEL.
CAUTION
RISK OF ELECTRIC SHOCK
DO NOT OPEN
This symbol indicates “dangerous voltage”
inside the product that presents a risk of
electric shock or personal injury.
CAUTION:
TO REDUCE THE RISK OF ELECTRIC
SHOCK, DO NOT REMOVE COVER (OR BACK)
NO USER SERVICEABLE PARTS INSIDE. REFER
SERVICING TO QUALIFIED SERVICE PERSONNEL.
This symbol indicates important instructions
accompanying the product.
IMPORTANT NOTE
The mains lead on this equipment is supplied with
a molded plug incorporating a fuse. The value of
the fuse is indicated on the pin face of the plug.
If it requires replacing, a fuse approved to BS1362
of the same rating must be used.
Never use the plug with the fuse cover omitted
if the cover is detachable. If a replacement fuse
cover is required, it must be of the same colour as
the pin face of the plug. Replacement covers are
available from your dealer.
If the fitted plug is not suitable for the power points
in your house or the cable is not long enough to
reach a power point, you should obtain a suitable
safety approved extension lead or consult your
dealer for assistance.
However, if there is no alternative to cutting off the
plug, remove the fuse and then safely dispose of
the plug. Do not connect the plug to a mains jack,
as there is a risk of shock hazard from the bared
flexible cord.
To disconnect the apparatus from the mains, the
plug must be pulled out from the mains socket,
therefore the mains plug shall be readily operable.
The product unit accompanying this user manual
is licenced under certain intellectual property rights
of certain third parties.
Safety Information
Page 4
4 English
Safety Information
CLASS 1 LASER PRODUCT
This Compact Disc player is classified as a CLASS
1 LASER product. Use of controls, adjustments
or performance of procedures other than those
specified herein may result in hazardous radiation
exposure.
CAUTION :
CLASS 3B VISIBLE AND INVISIBLE LASER
RADIATION WHEN OPEN. AVOID EXPOSURE
TO THE BEAM (IEC 60825-1)
THIS PRODUCT UTILIZES A LASER. USE
OF CONTROLS OR ADJUSTMENTS OR
PERFORMANCE OF PROCEDURES OTHER
THAN THOSE SPECIFIED HEREIN MAY
RESULT IN HAZARDOUS RADIATION
EXPOSURE. DO NOT OPEN COVER AND DO
NOT REPAIR YOURSELF. REFER SERVICING
TO QUALIFIED PERSONNEL.
CLASS 1 LASER PRODUCT
KLASSE 1 LASER PRODUKT
LUOKAN 1 LASER LAITE
KLASS 1 LASER APPARAT
PRODUCTO LÁSER CLASE 1
Precautions
Important Safety Instructions
Read these operating instructions carefully before
using the unit. Follow all the safety instructions
listed below.
Keep these operating instructions handy for future
reference.
Read these instructions.
Keep these instructions.
Heed all warnings.
Follow all instructions.
Do not use this apparatus near water.
Clean only with a dry cloth.
Do not block any ventilation openings. Install
in accordance with the manufacturer’s
instructions.
Do not install near any heat sources such
as radiators, heat registers, stoves, or other
•
•
1.
2.
3.
4.
5.
6.
7.
8.
apparatus (including AV Receivers) that
produce heat.
Do not defeat the safety purpose of the
polarized or grounding-type plug. A polarized
plug has two blades with one wider than the
other. A grounding type plug has two blades
and a third grounding prong. The wide blade
or the third prong are provided for your safety.
If the provided plug does not fit into your
outlet, consult an electrician for replacement
of the obsolete outlet.
Protect the power cord from being walked on
or pinched particularly at plugs, convenience
receptacles, and the point where they exit
from the apparatus.
Only use attachments/accessories specified
by the manufacturer.
Use only with the cart,
stand, tripod, bracket,
or table specified by the
manufacturer, or sold with
the apparatus. When a cart
is used, use caution when
moving the cart/apparatus combination to
avoid injury from tip-over.
Unplug this apparatus during lightning storms
or when unused for long periods of time.
Refer all servicing to qualified service
personnel. Servicing is required when the
apparatus has been damaged in any way,
such as power-supply cord or plug is
damaged, liquid has been spilled or objects
have fallen into the apparatus, the apparatus
has been exposed to rain or moisture, does
not operate normally, or has been dropped.
9.
10.
11.
12.
13.
14.
Page 5
English 5
02 Safety Information
Viewing using 3D function
IMPORTANT HEALTH AND SAFETY
INFORMATION FOR 3D PICTURES.
Read and understand the following safety
information before using the 3D function.
Some viewers may experience discomfort while
viewing 3D TV such as dizziness, nausea, and
headaches.
If you experience any such symptom, stop
viewing 3D TV, remove the 3D Active Glasses,
and rest.
Watching 3D images for an extended period of
time may cause eye strain. If you feel eye strain,
stop viewing 3D TV, remove your 3D Active
Glasses, and rest.
A responsible adult should frequently check on
children who are using the 3D function.
If there are any reports of tired eyes, headaches,
dizziness, or nausea, have the child stop viewing
3D TV and rest.
Do not use the 3D Active Glasses for other
purposes (such as general eyeglasses,
sunglasses, protective goggles, etc.)
Do not use the 3D function or 3D Active Glasses
while walking or moving around. Using the 3D
function or 3D Active Glasses while moving
around may cause you to bump into objects,
trip, and/or fall, and cause serious injury.
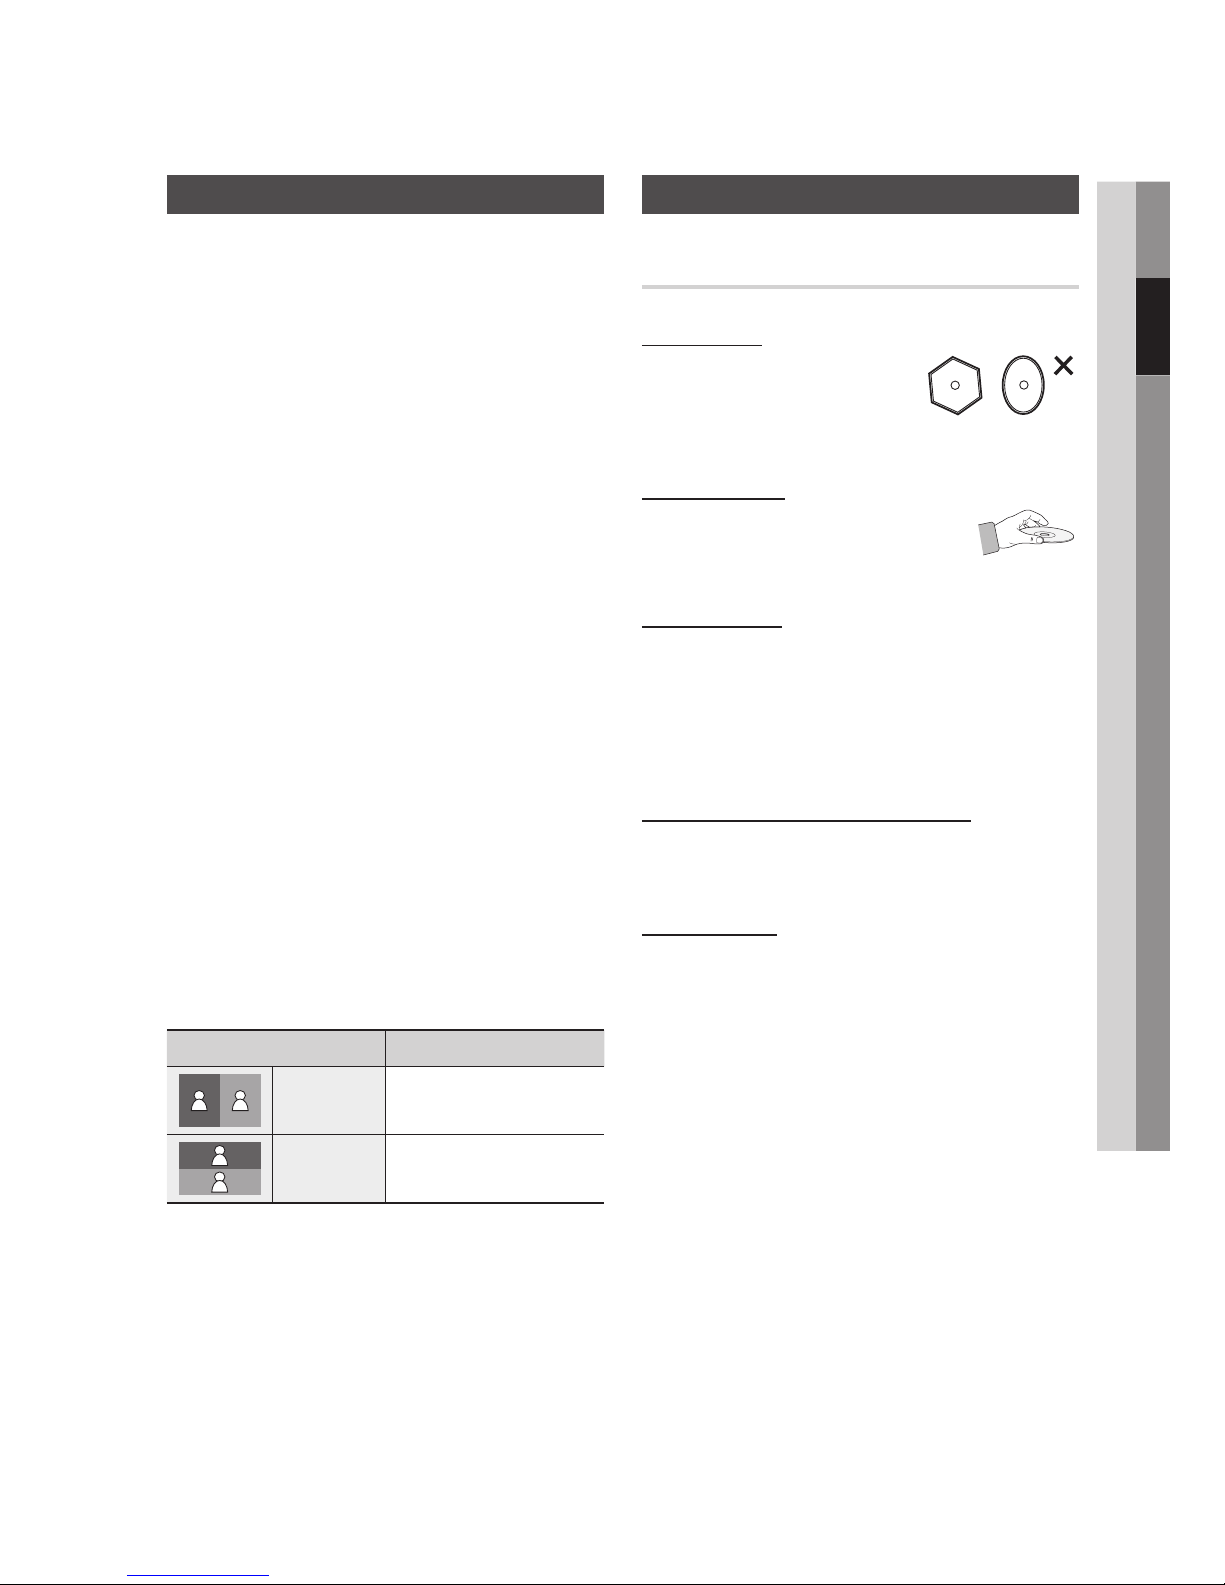
When displaying 3D programme with this
model, the actual screen may appear as shown
below:
Screen Display Description
Side by Side
Same screen duplicates
horizontally.
Top & Bottom
Same screen duplicates
vertically.
3D programme reception, recording and
playback of this model may not fully support
3D, due to the 3D broadcast format is not yet
standardized worldwide. It is not the product’s
malfunction or disorder.
•
•
•
•
•
•
•
Disc Storage & Management
Disc Handling
Disc Shape
Use discs with regular
shapes. If you use an irregular
disc (a disc with a special
shape), you can damage the product.
Holding discs
Avoid touching the surface of
a disc where data has been
recorded.
Blu-ray Discs
Do not leave a Blu-ray Disc in the product for
long periods of time. Remove the Blu-ray Disc
from the product and store it in its case.
Be careful not to scratch or leave fingerprints on
the surface of the Blu-ray Disc.
DVD-VIDEO, Audio CD (CD-DA)
Wipe off dirt or contamination on the disc with a
soft cloth.
Disc Storage
Be careful not to damage the disc because the
data on these discs is highly vulnerable to the
environment.
Do not keep under direct sunlight.
Keep in a cool ventilated area.
Store vertically.
Keep in a clean protection jacket.
If you move your product suddenly from a cold
place to a warm place, condensation may occur
on the operating parts and lens and cause
abnormal disc playback. If this occurs, unplug
the product, wait for two hours, and then
connect the plug to the power outlet. Then,
insert the disc, and try to play back again.
•
•
•
•
•
•
•
•
•
•
Page 6

6 English
Safety Information
HDD (Hard Disk Drive)
The hard disk has a high storage density, which
enables long recording durations and quick
access to written data. However, it can easily be
damaged by shock, vibration or dust and should
be kept away from magnets.
To avoid losing important data, observe the
following precautions.
Do not use the BD-HDD Combo in a place
subject to extreme changes in temperature.
Do not apply a strong shock to the BD-HDD
Combo.
Do not place the BD-HDD Combo in a location
subject to mechanical vibrations or in an
unstable location.
Do not place the BD-HDD Combo on top of a
heat source.
Do not disconnect the AC power cord while the
power is on.
Do not attempt to change the hard disk. This
may result in a malfunction.
Should the hard disk be damaged, you cannot
recover lost data. The hard disk is only a
temporary storage space.
Handling Cautions
Do not write on the printed side with a ball-point
pen or pencil.
Do not use record cleaning sprays or antistatic
sprays to clean discs. Also, do not use volatile
chemicals, such as benzene or thinner.
Do not apply labels or stickers to discs. (Do not
use discs fixed with exposed tape adhesive or
leftover peeled-off stickers.)
Do not use scratch-proof protectors or covers.
Do not use discs printed with label printers
available on the market.
Do not load warped or cracked discs.
Before connecting other components to this
product, be sure to turn them off.
•
•
•
•
•
•
•
•
•
•
•
•
•
Do not move the product while it is playing a
disc. The disc can be scratched or damaged
and the product’s internal parts can be
damaged.
Do not put a flower vase filled with water or any
small metal objects on the product.
Be careful not to put your hand into the disc
slot.
Do not place anything other than the disc in the
disc slot.
Interference from exterior sources such as
lightening and static electricity can affect
the normal operation of this product. If this
occurs, turn the product off and on again with
the POWER button, or disconnect and then
reconnect the AC power cord to the AC power
outlet. The product will operate normally.
Be sure to remove the disc and turn off the
product after use.
Disconnect the AC power cord from the AC
outlet when you don’t intend to use the product
for long periods of time.
To clean a disc, wipe it in a straight
line from the inside to the outside of
the disc.
Do not expose the product to any
liquid.
When the AC plug is connected to a wall outlet,
the product will still draw power (standby mode)
when it is turned off.
Apparatus shall not be exposed to dripping or
splashing and no objects filled with liquids, such
as vases, shall be placed on the apparatus.
The main plug is used as a disconnect device
and shall stay readily operable at any time.
Do not touch the power plug with a wet hand.
Otherwise, it can cause an electric shock.
Do not share one power socket with multiple
electric devices. Otherwise, it may cause an
overheat, resulting in a fire.
If you encounter an abnormal noise, burning
smell or smoke, turn off the power switch
immediately and disconnect the power plug
from the wall outlet. Then, contact the nearest
customer centre for technical assistance. If you
still use the product as it is, this may cause an
electric shock or fire.
•
•
•
•
•
•
•
•
•
•
•
•
•
•
•
Page 7

English 7
02 Safety Information
Maintenance of Cabinet
Before you clean the Blu-ray Disc’s cabinet, be
sure to disconnect the AC power cord from the
AC outlet.
Do not use benzene, thinner, or other solvents
for cleaning.
Wipe the cabinet with a soft cloth.
Restrictions on Playback
This product may not respond to all operating
commands because some Blu-ray Disc, DVD,
and CD discs allow specific or limited operation
and provide only certain features during
playback.
Please note that this is not a defect in the
product.
Samsung cannot guarantee that this product
will play every disc bearing the Blu-ray Disc,
DVD or CD logo because disc formats evolve,
and problems and errors may occur during the
creation of Blu-ray Disc, DVD, and CD software
and/or the manufacture of discs.
Please contact the SAMSUNG customer care
centre if you have questions or encounter
difficulty in playing Blu-ray Disc, DVD, or CD
discs in this product. Also, refer to rest of
this user manual for additional information on
playback restrictions.
•
•
•
•
Page 8

8 English
Contents
KEY FEATURES
2 Blu-ray™ Disc Features
2 BD-HDD Combo Features
SAFETY INFORMATION
3 Warning
4 Precautions
4 Important Safety Instructions
5 Viewing using 3D function
5 Disc Storage & Management
5 Disc Handling
GETTING STARTED
12 Before using the User Manual
12 Disc Types and Contents your product can play
12
Disc types your product cannot play
13
HDD Recording
13
Blu-ray Disc Compatibility
13
Disc Types
14
Region Code
14
Copyright
15
Supported File Formats
17
Connect a USB device before using the Time shift
and Recorded TV functions
18
Logos of Discs the Product Can Play
18 Accessories
19 Front Panel
20 Rear Panel
21 Remote Control
21 Tour of the Remote Control
22
Setting the Remote Control to Operate Your TV
23
TV Control Codes
CONNECTIONS
24 Connecting to a TV with an Audio/Video cables
and RF cable
25 Connecting to a TV
25 Case 1 : Connecting to a TV with an HDMI Cable
- Best Quality (Recommended)
26
Case 2 : Connecting to a TV with a Component
Cable - Better Quality
27
Case 3 : Connecting to a TV with an Audio/Video
cable - Good Quality
Page 9

English 9
ENGLISH
CONNECTIONS
28 Connecting to an Audio System
28 Case 1 : Connecting to an Audio System
(HDMI supported AV receiver) - Best Quality
(Recommended)
29 Case 2 : Connecting to an Audio System
(HDMI Supported AV Receiver)
- Best Quality
(Recommended)
30
Case 3 : Connecting to an Audio System
(Stereo Amplifier) - Good Quality
30
Case 4 : Connecting to an Audio System
(AV receiver with Dolby Digital or DTS decoder)
- Better Quality
31 Connecting to the Network
31 Cable Network
32
Wireless Network
SETUP
33 Before Starting (Plug & Play)
33
Accessing the Settings Menu
34
Watch TV
34 Channel List
35
Channel Manager
36 Settings
36 Display
40
Audio
43
Channel
44
Network
48
System
50
Language
51
Security
51
General
52
Support
53
Contact Samsung
BASIC FUNCTIONS
54 Playing a Video
54 Playback
54
3D Converter
55
Disc Structure
55 Using the Disc Menu/Title Menu/Popup Menu
55 Using the Disc Menu
55
Using the Title Menu
55
Playing the Title List
56
Using the Popup Menu
Page 10

10 English
Contents
BASIC FUNCTIONS
56 Using the Search and Skip Functions
56 Searching for a Desired Scene
56
Skipping Chapters
56 Slow Motion Play/Step Motion Play
56 Slow Motion Play
56
Step Motion Play
57 Using the TOOLS button
57 Moving to a Desired Scene Directly
57
Repeating the Title or Chapter
57
Repeating the Title or Chapter
58
Repeating a Section
58
Selecting the Picture Settings
58
Selecting the Audio Language
59
Selecting the Subtitle Language
59
Changing the Camera Angle
59
Selecting the Information
59
Setting BONUSVIEW
60 Listening to Music
60 Playing an Audio CD (CD-DA)/MP3
60
AMG function
60
Repeat an Audio CD (CD-DA)/MP3
61
Playlist
61 Playing back a Pictures
61 Playing JPEG files
62
Using the TOOLS button
62 Media Play
DTV FUNCTIONS
64 Display Screen
64
Using the TOOLS button
64 Picture Settings
64
Selecting the Audio Language
65
Selecting the Dual I II
65
Lock current channel
65
Add to Favourites
65
Signal Information
Page 11

English 11
ENGLISH
DTV FUNCTIONS
65 Setting Audio Description & Subtitle Language
65 Setting the Audio Description
65
Setting the Subtitle Language
66 Viewing the Guide Screen
66
Schedule Manager
67 To Cancel or Edit Schedule
67 Viewing DTV with the 3D effect
68
Using the Teletext Service
ADVANCED FUNCTIONS
69 Recording
69 Recording the current TV channel you are
watching
70
Watching other channels during Recording a TV
channel
70
Playing a Disc while Recording a TV channel
70
Time Shift function
71 Playing the Recorded Title
72
Edit the Recorded Title
72 Renaming a Recorded Title
72
Splitting a Section of a Title (Divide into two)
72
Splitting a Section of a Title (Partial Delete)
73 Copy
73 Copying Videos, Music or Photos
73
Ripping from a Audio CD (CD-DA)
NETWORK SERVICES
74 Using Smart Hub
74 Starting Smart Hub for the First Time
77
The Settings Menu - BLUE (D)
79
The Edit Mode Menu - YELLOW (C)
81
The Sort Menu - GREEN (B)
81 Samsung Apps
81 For Pay Apps
83 BD-LIVE™
83
Using the AllShare Function
APPENDIX
84 Troubleshooting
86 Repairs
87 Specifications
Page 12
12 English
Before using the User Manual
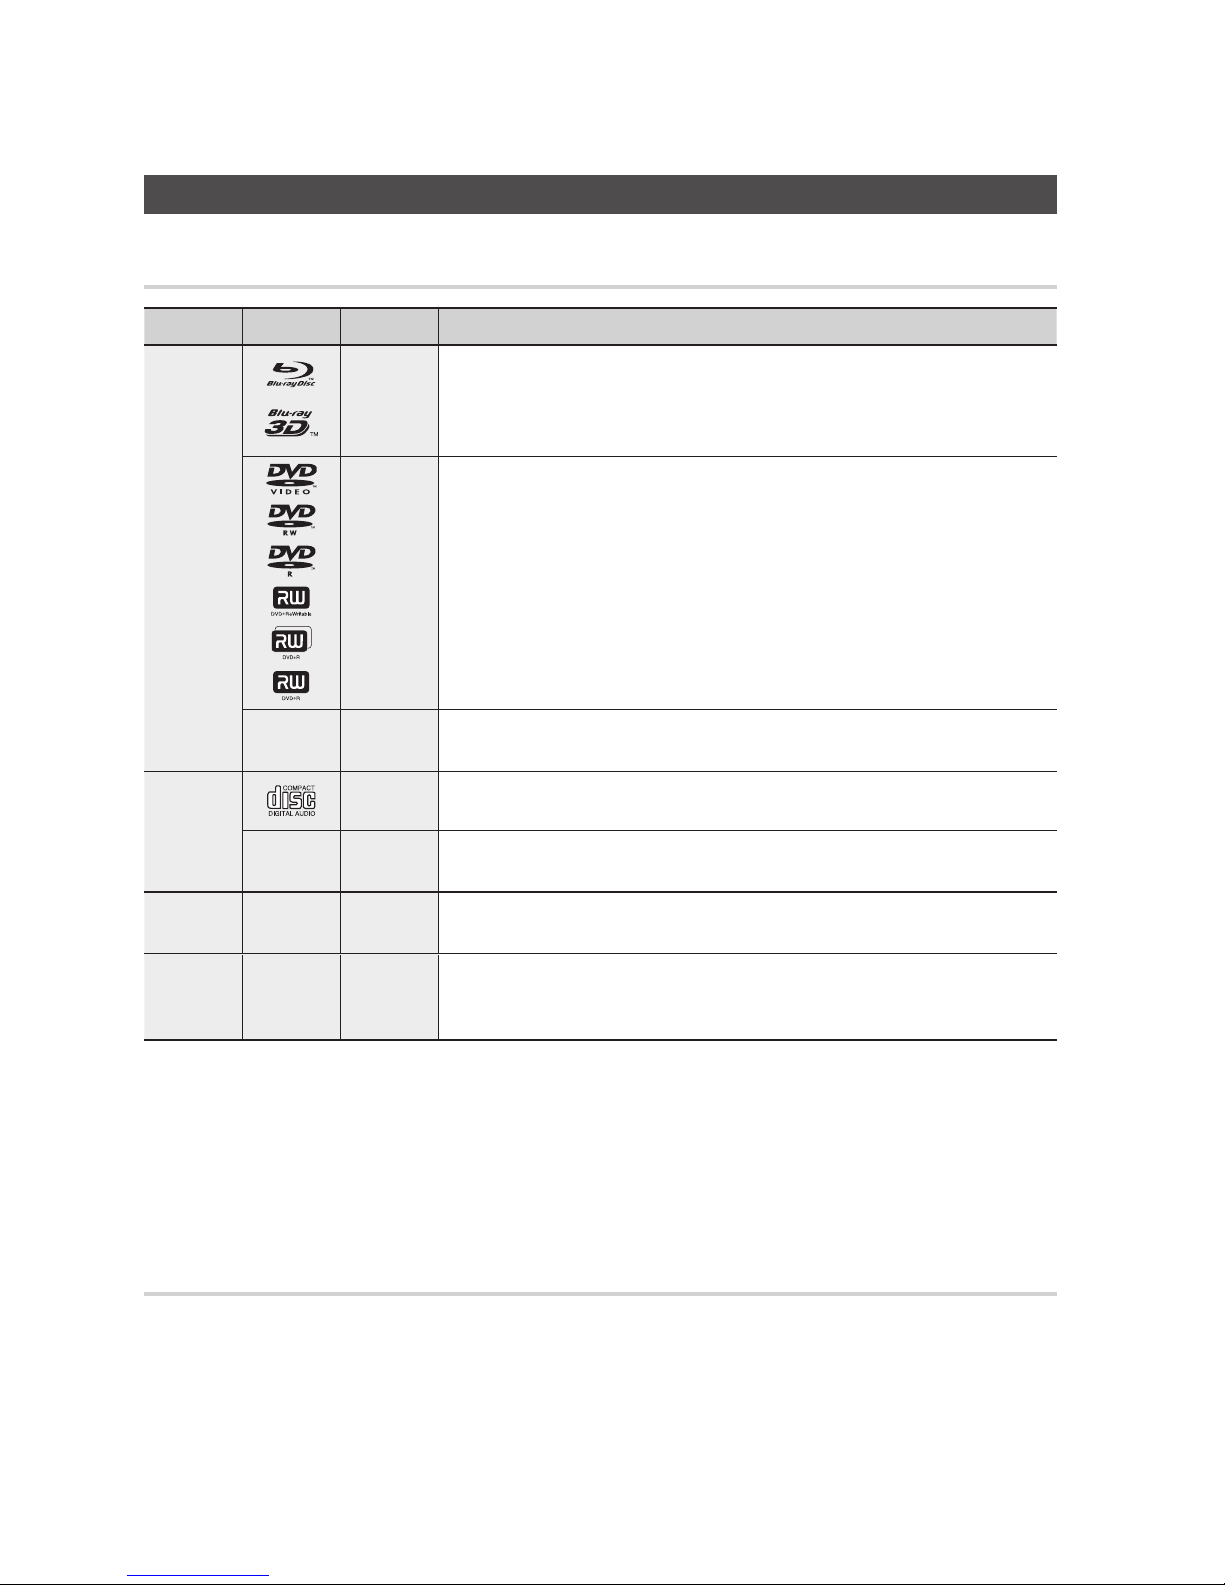
Disc Types and Contents your product can play
Term Logo Icon Definition
VIDEO
h
z
Indicates a function available on a BD-ROM or BD-RE/-R disc recorded in the BD-RE
format.
Z
y
Indicates a function available on a DVD-VIDEO or recorded DVD+RW/
DVD-RW(V)/DVD-R/+R discs that have been recorded and finalized.
-
x
Indicates a function available in a CD-RW/-R, DVD-RW/-R, BD-RE/-R disc or a USB
storage media containing DivX, MKV, MP4 contents.
MUSIC
o
Indicates a function available on an audio CD-RW/-R (CD-DA format).
-
w
Indicates a function available in a CD-RW/-R, DVD-RW/-R, BD-RE/-R disc or a USB
storage media containing MP3 or WMA contents.
PHOTO
-
G
Indicates a function available in a CD-RW/-R, DVD-RW/-R, BD-RE/-R disc or a USB
storage media containing JPEG contents.
VIDEO
MUSIC
PHOTO
-
T
Indicates a function available on the HDD.
NOTE
The product may not play certain CD-RW/-R and DVD-R because of the disc type or recording conditions.
If a DVD-RW/-R disc has not been recorded properly in DVD video format, it will not be playable.
Your product will not play content that has been recorded on a DVD-R at a bit-rate that exceeds 10 Mbps.
Your product will not play content that has been recorded on a BD-R or USB device at a bit rate that exceeds 30 Mbps.
Disc types your product cannot play
HD DVD
DVD-ROM/PD/
MV-Disc, etc
•
•
DVD-RAM
Super Audio CD
(except CD layer)
•
•
DVD-RW(VR mode)
CVD/CD-ROM/CDV/
CD-G/CD-I/LD
(CD-Gs play audio only,
not graphics.)
•
•
3.9 GB DVD-R Disc for
Authoring.
•
✎
▪
▪
▪
▪
Getting Started
Page 13
English 13
03 Getting Started
NOTE
Some commercial discs and DVDs purchased
outside your region may not play on this product.
Playback may not work for some types of discs, or
when you use specific operations, such as angle
change and aspect ratio adjustment. Information
about the discs is written in detail on the disc box.
Please refer to this if necessary.
Do not allow the disc to become dirty or scratched.
Fingerprints, dirt, dust, scratches or deposits of
cigarette smoke on the recording surface may make
it impossible to use the disc for playback.
When you play a BD-J title, loading may take longer
than a normal title or some functions may perform
slowly.
This product may not respond to all operating
commands because some Blu-ray Disc, DVD, and
CD discs allow specific or limited operation and
provide only certain features during playback.
Please note that this is not a defect in the product.
Samsung cannot guarantee that this product will
play every disc bearing the Blu-ray Disc, DVD or CD
logo because disc formats evolve, and problems and
errors may occur during the creation of Blu-ray Disc,
DVD, and CD software and/or the manufacture of
discs.
Please contact the SAMSUNG customer care centre
if you have questions or encounter difficulty when
playing Blu-ray Disc, DVD, or CD discs in this
product. Also, refer to rest of this user manual for
additional information on playback restrictions.
HDD Recording
You can record digital broadcast on the internal
HDD as below.
Broadcast Type Recording Time Estimated Bitrate
HD 105 Hrs 20 Mpbs
SD
420 Hrs
5 Mpbs
Depending on the bitrate of broadcast
programme, available recording time may be
decreased or increased.
✎
▪
▪
▪
▪
▪
▪
Blu-ray Disc Compatibility
Blu-ray Disc is a new and evolving format.
Accordingly, disc compatibility issues are possible.
Not all discs are compatible and not every disc will
play back. For additional information, refer to the
Compliance and Compatibility Notice section of
this user manual.
Disc Types
BD-ROM
Blu-ray ROM discs can only be played back.
This product can play back pre-recorded
commercial BD-ROM discs.
BD-RE/-R
Blu-ray RE/-R discs can be recorded on and
played back.
This product can play back a BD-RE/-R disc
recorded by other compatible Blu-ray Disc
recorders.
DVD-VIDEO
This product can play back pre-recorded
commercial DVDs (DVD-VIDEO discs) with
movies.
When switching from the first layer to the
second layer of a dual-layered DVD-VIDEO disc,
there may be momentary distortion in the image
and sound. This is not a malfunction of the
product.
DVD-RW/-R/+R
This product can play back a DVD-RW/-R/+R disc
recorded and finalized with a DVD video recorder.
The ability to play back may depend on recording
conditions.
DVD+RW
This product can play back a DVD+RW disc
recorded with a DVD Video recorder. The
ability to play back may depend on recording
conditions.
•
•
•
Page 14
14 English
Getting Started
Audio CD (CD-DA)
This product can play back CD-DA format audio
CD-RW/-R discs.
The product may not be able to play some
CD-RW/-R discs due to the condition of the
recording.
CD-RW/-R
Use a 700MB (80 minute) CD-RW/-R disc.
If possible, do not use an 800MB (90 minute) or
larger disc, as the disc may not play back.
If the CD-RW/-R disc was not recorded as a
closed session, you may experience delays
when playing back the beginning of the disc or
all recorded files may not play.
Some CD-RW/-R discs may not play on this
product, depending on the device which was
used to burn them. For contents recorded on
CD-RW/-R media from CDs for your personal
use, playability may vary depending on the
contents and discs.
AVCHD (Advanced Video Codec High
Definition)
This product can play back AVCHD format
discs. These discs are normally recorded and
used in camcorders.
The AVCHD format is a high definition digital
video camera format.
The MPEG-4 AVC/H.264 format compresses
images with greater efficiency than the
conventional image compressing format.
Some AVCHD discs use the “x.v.Colour” format.
This product can play back AVCHD discs that
use “x.v.Colour” format.
“x.v.Colour” is a trademark of Sony Corporation.
“AVCHD” and the AVCHD logo are trademarks
of Matsushita Electronic Industrial Co., Ltd. and
Sony Corporation.
NOTE
Some AVCHD format discs may not play, depending
on the recording condition.
AVCHD format discs need to be finalized.
“x.v.Colour” offers a wider colour range than normal
DVD camcorder discs.
Some DivX, MKV and MP4 format discs may not
play, depending on the video resolution and frame
rate condition.
•
•
•
•
•
•
•
•
•
•
•
✎
▪
▪
▪
Region Code
Both products and discs are coded by region.
These regional codes must match for a disc to
play. If the codes do not match, the disc will not
play.
The Region Number for this product is displayed
on the rear panel of the product.
Disc Type
Region
Code
Area
Blu-ray Disc
A
North America, Central America,
South America, Korea, Japan,
Taiwan, Hong Kong and South
East Asia.
B
Europe, Greenland, French
territories, Middle East, Africa,
Australia and New Zealand.
C
India, China, Russia, Central
and South Asia.
DVD-VIDEO
1
The U.S., U.S. territories and
Canada
2
Europe, Japan, the Middle East,
Egypt, South Africa, Greenland
3
Taiwan, Korea, the Philippines,
Indonesia, Hong Kong
4
Mexico, South America,
Central America, Australia,
New Zealand, Pacific Islands,
Caribbean
5
Russia, Eastern Europe, India,
most of Africa, North Korea,
Mongolia
6
China
Copyright
© 2011 Samsung Electronics Co.,Ltd.
All rights reserved; No part or whole of this user’s
manual may be reproduced or copied without the
prior written permission of Samsung Electronics
Co.,Ltd.
Page 15

English 15
03 Getting Started
Supported File Formats
Notes on the USB connection
Supported devices: USB storage media, MP3
product, digital camera, USB card reader
Does not support if a folder or file name is
longer than 128 characters.
A certain USB/digital camera device may not be
compatible with the product.
FAT16, FAT32 and NTFS file systems are
supported.
Connect directly to the product's USB port.
Connecting through another cable may raise
problems with USB compatibility.
Inserting more than one memory device to a
multi-card reader may not operate properly.
Supports the PTP protocol.
Do not disconnect USB device during a
"loading" process.
Bigger the image resolution, the longer the delay
to displaying.
DRM applied MP3 files downloaded from a
commercial site are not played back.
If the problem of the unrecognized USB device
persists or the internal file list is corrupt or a
certain file could not be played, connect the
USB device to the PC and format it in a proper
file system, then check it again.
If the file deleted from your PC still appears in
Media Play, use “Empty Recycle Bin” on your
desktop to delete it completely.
Some USB devices supporting the power saving
mode may switch the saving mode of the BD
product to Off automatically when connected
with each other.
Need-to-Know List before using Media Play
Media Play only supports USB Mass Storage
Class (MSC) devices. MSC is a Mass Storage
Class Bulk-Only Transport device. Examples
of MSC are Thumb drives, Flash Card Readers
and USB HDD. (HUB is not supported.)
MSC supports Music, Photo and Video files,
while a PTP device supports Photo files only.
•
•
•
•
•
•
•
•
•
•
•
•
•
•
-
-
MTP (Media Transfer Protocol) is not
supported.
The file system supports FAT16, FAT32 and
NTFS (read only).
Before connecting your device to the product,
please back up your files to prevent them
from damage or loss of data. SAMSUNG is
not responsible for any data file damage or
data loss.
Do not disconnect the USB device while it is
loading.
If some devices require excessive power, USB
device may be limited by the circuit safety
device.
You must remove the USB storage device
safely (by performing the “Safely Remove USB”
function) in order to prevent a possible damage
to the USB memory. Press the MENU button
to move to the home menu, and select the
YELLOW (C) button and press the ENTER
button.
If you insert the disc when playing USB storage
device, the device mode is changed to “DVD or
CD” automatically.
When the Audio CD (CD-DA), MP3 and JPEG
files are in stop mode, you can’t see full screen
by pressing the FULL SCREEN button on the
remote control.
A Certain USB HDD Device may not be
compatible with this product.
-
-
-
-
-
•
•
•
•
Page 16

16 English
Getting Started
Video File Support
File
Extention
Container Video Codec Resolution
Frame rate
(fps)
Bit rate
(Mbsp)
Audio Codec
*.avi
AVI
DivX 3.11/4.x/5.1/6.0 1920x1080 6 ~ 30
8
MP3
AC3
LPCM
ADPCM
DTS Core
XviD 1920x1080 6 ~ 30
8
H.264 BP/MP/HP 1920x1080 6 ~ 30
25
MPEG4 SP/ASP 1920x1080 6 ~ 30
8
Motion JPEG 1920x1080 6 ~ 30
8
*.mkv
MKV
DivX 3.11/4.x/5.1/6.0 1920x1080 6 ~ 30
8
MP3
AC3
LPCM
ADPCM
DTS Core
XviD 1920x1080 6 ~ 30
8
H.264 BP/MP/HP 1920x1080 6 ~ 30
25
MPEG4 SP/ASP 1920x1080 6 ~ 30
8
Motion JPEG 1920x1080 6 ~ 30
8
*.asf
ASF
DivX 3.11/4.x/5.1/6.0 1920x1080 6 ~ 30
8
MP3
AC3
LPCM
ADPCM
WMA
XviD 1920x1080 6 ~ 30
8
H.264 BP/MP/HP 1920x1080 6 ~ 30
25
MPEG4 SP/ASP 1920x1080 6 ~ 30
8
Motion JPEG 1920x1080 6 ~ 30
8
*.wmv
ASF Window Media Video v9 1920x1080 6 ~ 30
25 WMA
*.mp4
MP4
H.264 BP/MP/HP 1920x1080 6 ~ 30
25
MP3
ADPCM
AAC
MPEG4 SP/ASP 1920x1080 6 ~ 30
8
XVID 1920x1080 6 ~ 30
8
*.3gp
3GPP
H.264 BP/MP/HP 1920x1080 6 ~ 30
25
ADPCM
AAC
HE-AAC
MPEG4 SP/ASP 1920x1080 6 ~ 30
8
*.vro
VRO
VOB
MPEG2 1920x1080 24/25/30
30
AC3
MPEG
LPCM
MPEG1 352x288 24/25/30
30
*.mpg
*.mpeg
PS
MPEG1 352x288 24/25/30
30
AC3
MPEG
LPCM
AAC
MPEG2 1920x1080 24/25/30
30
H.264 1920x1080 6 ~ 30
25
*.ts
*.tp
*.trp
TS
MPEG2 1920x1080 24/25/30
30
AC3
AAC
MP3
DD+
HE-AAC
H.264 1920x1080 6 ~ 30
25
VC1 1920x1080 6 ~ 30
25
Limitations
Even when the file is encoded by a supported codec mentioned above, a file might not be played if its
content has a problem.
Normal playback is not guaranteed if the file's container information is wrong or the file itself is
corrupted.
-
-
Page 17
English 17
03 Getting Started
Files having higher Bit rate/frame rate than
standard may stutter with sound/video
playback.
Seek (skip) function is not available if the file's
index table is damaged.
When you playback a file remotely through
network connection, video playback may stutter
depending on established network speed.
Video decoder
Supports up to H.264 Level 4.1
Does not support H.264 FMO/ASO/RS, VC1
SP/MP/AP L4 and AVCHD
XVid, MPEG4 SP, ASP:
Below 1280x720: 60 frames max
Above 1280x720: 30 frames max
Does not support GMC 2 or higher
Audio decoder
Supports WMA 7, 8, 9 and STD
Does not support WMA 9 PRO multi-channel
lossless audio decoding if number of channels
is more than 2
Does not support WMA sampling rate of
220/50Hz mono
Supports DTS Core (5.1 ch, 16 bit, 48kHz) only
Does not support APDCM MULAW, ALAW
Optical Media
CD Media
Bit Rate : Max 9.6Mbps
DVD Media
Bit Rate : Max 22.16Mbps
Music File Support
File
Extension
Container
Audio
Codec
Support Range
*.mp3
MP3
MP3 -
*.wma
WMA
WMA
Compliant with
WMA version 10
* Sampling rates (in
kHz) - 8, 11, 16,
22, 32, 44.1, 48
* Bit rates - All bit-
rates in the range
5kbps to 384kbps
-
-
-
-
-
-
-
-
-
-
-
-
-
-
Connect a USB device before
using the Time shift and Recorded
TV functions
Do not use a USB memory stick. We do not
support a USB memory stick.
We recommend using a USB HDD with at
least 5400 rpm, but a USB HDD of RAID type
is not supported.
•
•
To use the Time shift mode or the Recorded
TV function, a connected USB device must be
execute the Device Format function to proper
form for recording.
During the device formatting, do not
disconnect the device while formatting is in
progress. If you format the device, all files will
be deleted.
Before formatting your device to this product,
please back up your files to prevent them
from damage or loss of data. SAMSUNG is
not responsible for any data file damage or
data loss.
Recorded videos are DRM (digital rights
managements) protected and cannot be played
on a PC or other product. Note that files saved
on the TV cannot be used after the main board
is changed.
If available storage is left less than 10MB
during the recording, recording is finished
automatically.
If the USB device has failed the Device
Performance Test, the USB device must
go through the Device Format and Device
Performance Test again before you record with
the Guide or Channel Manager.
For more information, see your user’s manual.
•
-
-
•
•
•
•
Page 18
18 English
Getting Started
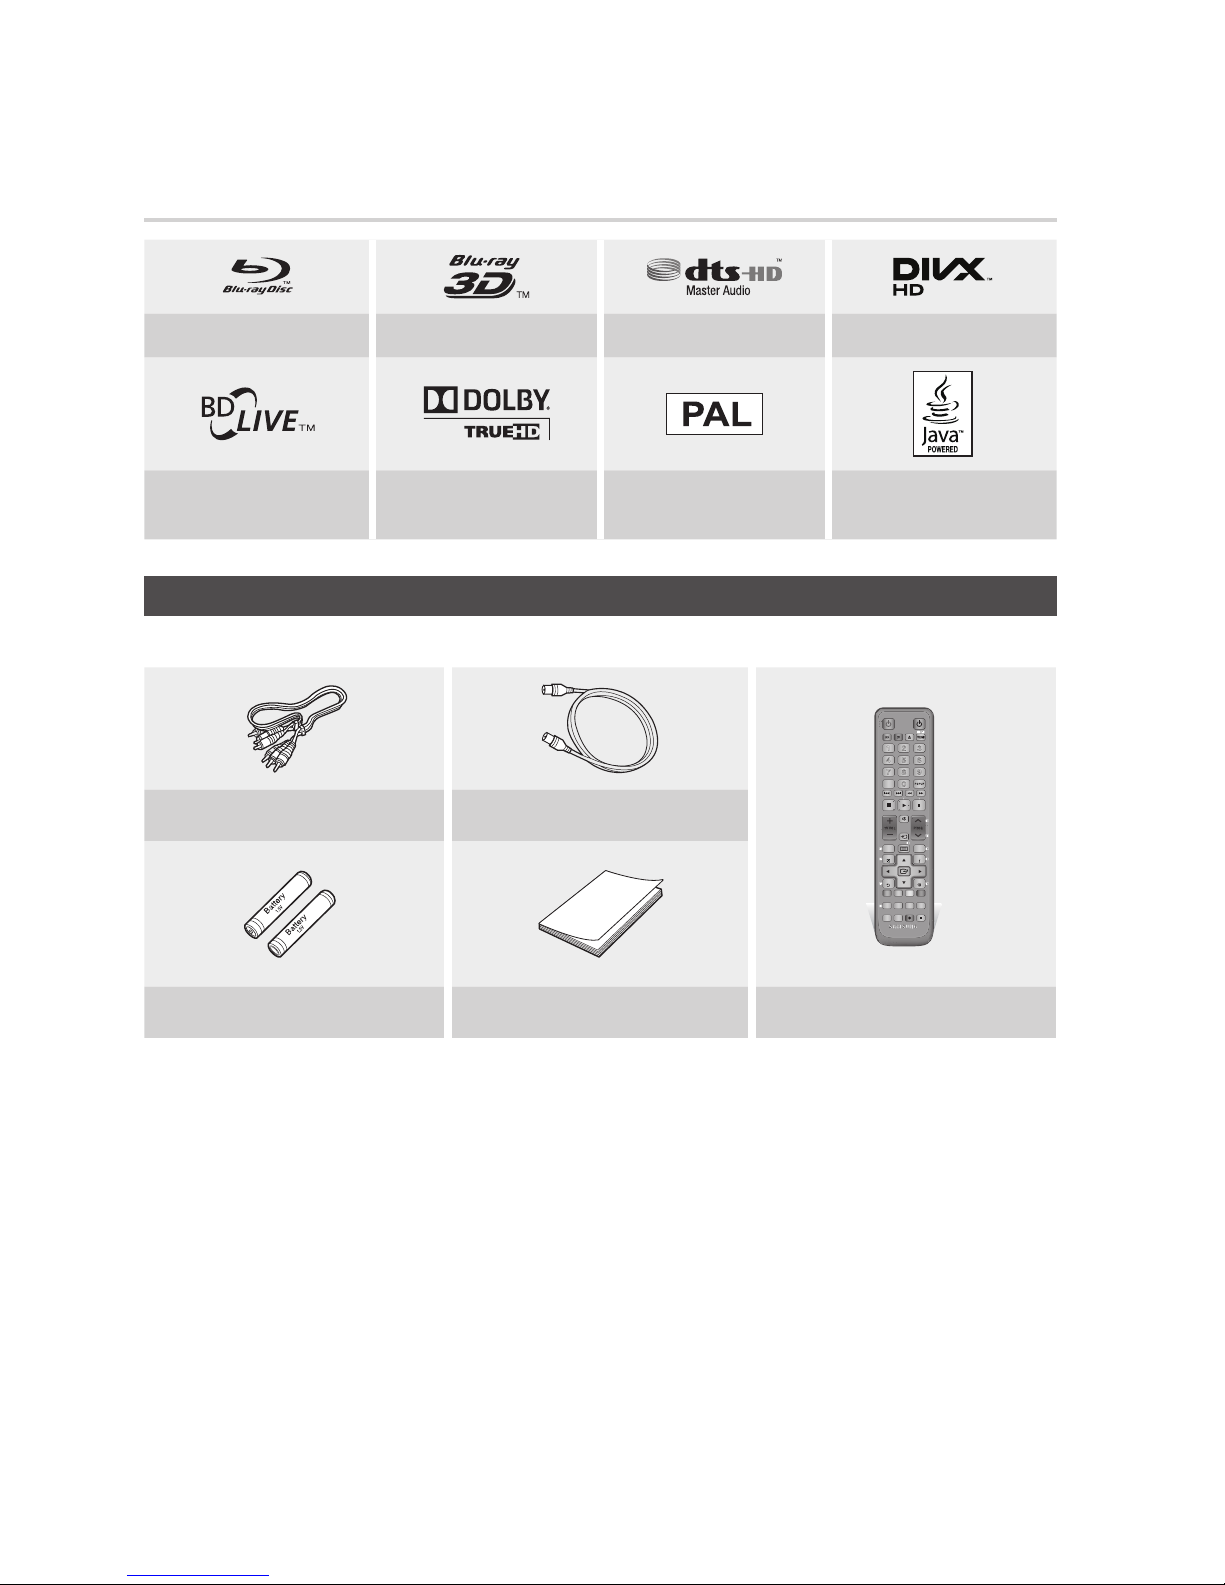
Logos of Discs the Product Can Play
Blu-ray Disc 3D Blu-ray Disc DTS-HD Master Audio DivX
BD-LIVE Dolby TrueHD
PAL broadcast System in U.K.,
France, Germany, etc.
Java
Accessories
Check for the supplied accessories below.
BD-HDD/TV
2D�3D
0000-000000
POWER
1 2 3
4 5 6
7 8 9
DISC MENU
TITLE MENU
0
TTX/MIX
BD TV
TIME SHIFT
TV VOL PROG
TV SOURCE
1
1
CH LIST
SMART
GUIDEiMENU
2D�3D
FULL
SCREEN
A B C D
INFOTOOLS
EXIT
RETURN
...
?
×
HUB
SEARCH
AD/
SUBTITLE
REC PAUSERECAUDIO
TV MUTE
TV
POWER
Audio/Video cable RF cable for TV
Batteries for Remote Control (AAA Size) User Manual Remote Control
Page 19
English 19
03 Getting Started
Front Panel
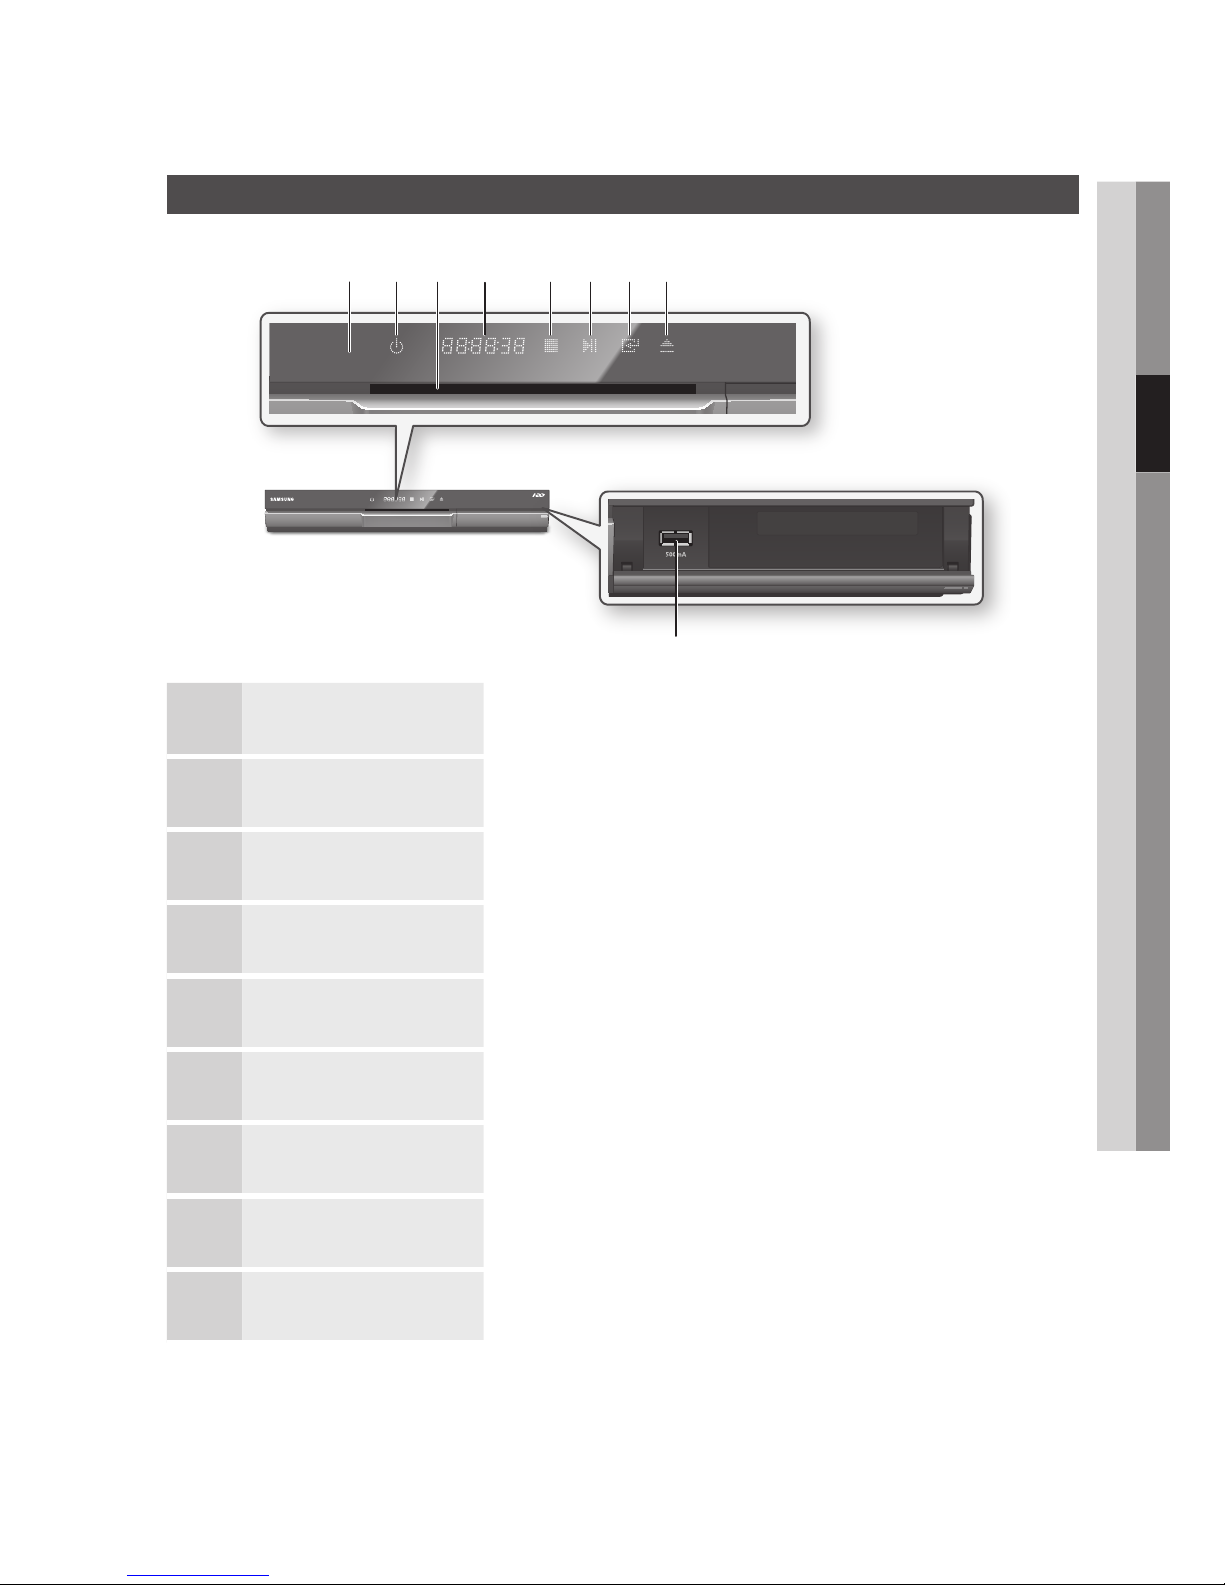
1
REMOTE CONTROL SENSOR Detects signals from the remote control.
2
POWER BUTTON Turns the product on and off.
3
DISC SLOT Inserts a disc.
4
DISPLAY Displays the playing status, time, etc.
5
STOP BUTTON Stops disc playback.
6
PLAY/PAUSE BUTTON Plays a disc or pauses playback.
7
ENTER BUTTON Selects menu items or starts a disc.
8
EJECT BUTTON Ejects a disc.
9
USB HOST It can be used for software upgrades and MP3/JPEG/DivX/MKV/MP4 playback.
a bc d efgh
i
Page 20
20 English
Getting Started
Rear Panel
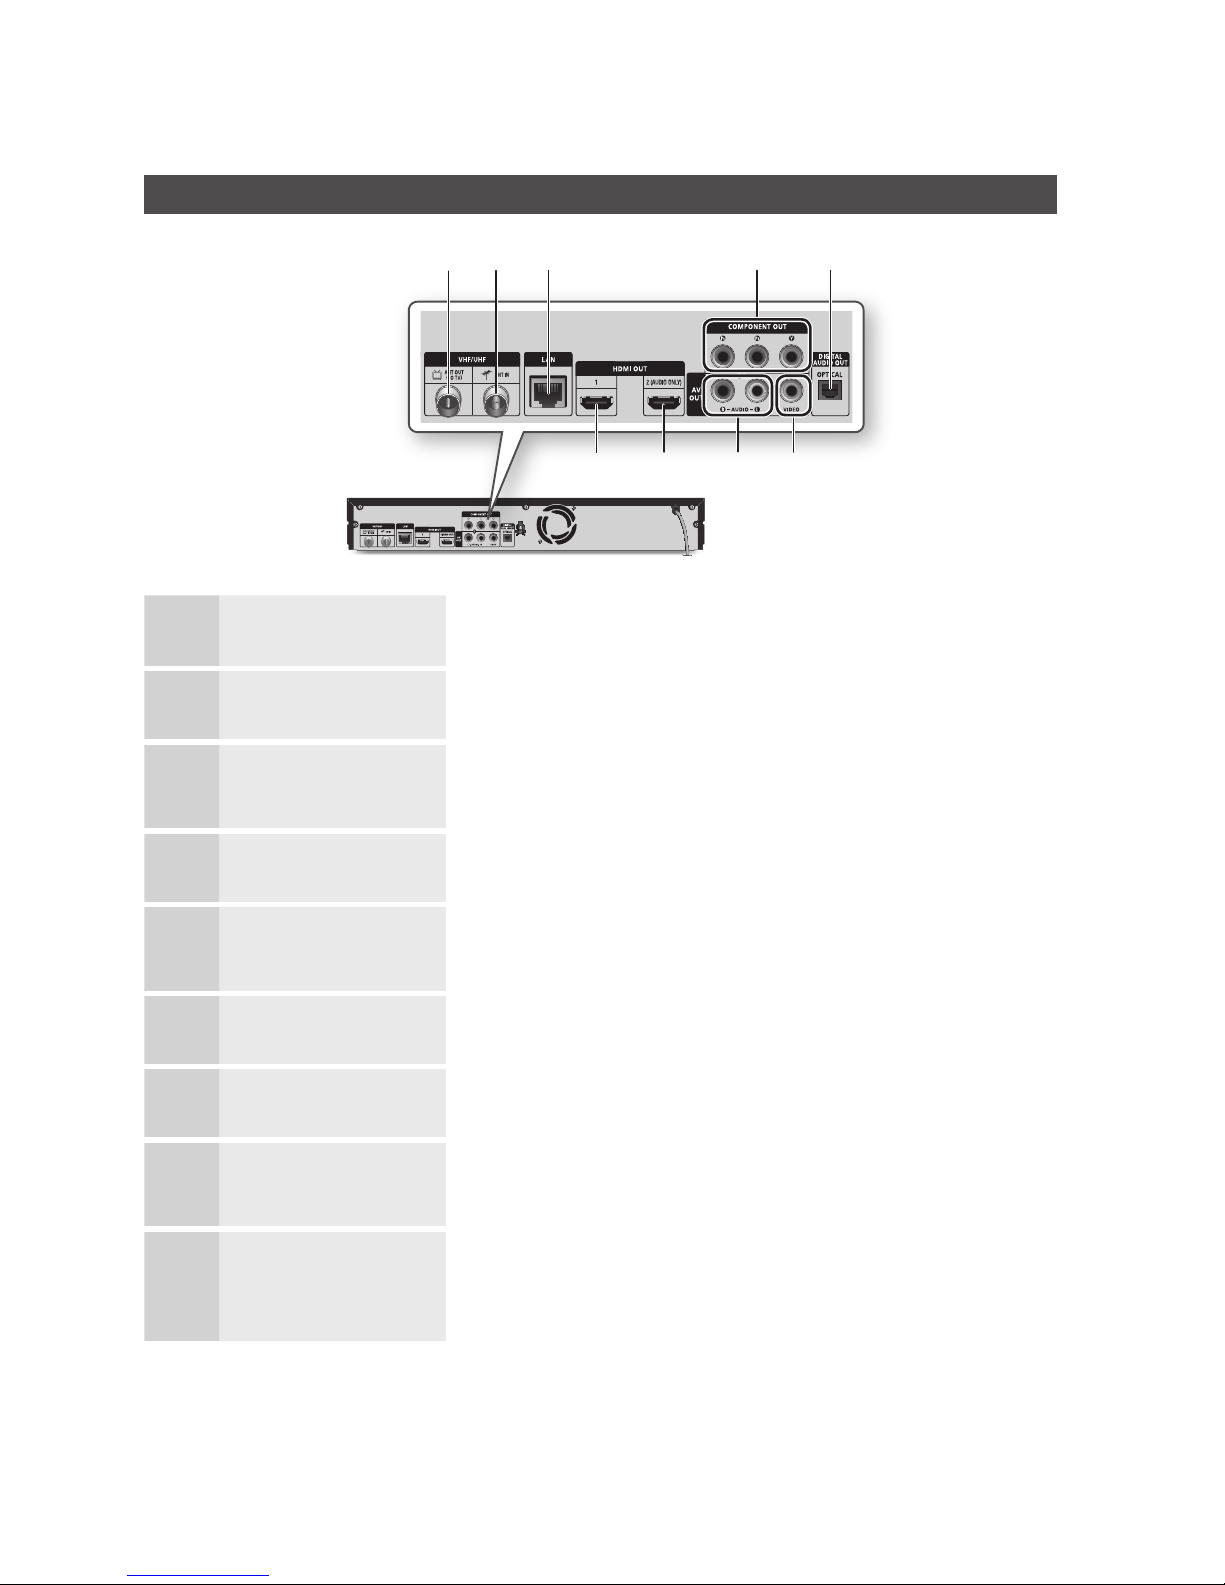
1
ANT OUT (TO TV) Connects RF cable to TV antenna input.
2
ANT IN Connects RF cable from antenna.
3
LAN
Use for network based services (See pages 74~83), BD-LIVE, and software
upgrades using a network connection.
4
COMPONENT OUT Connects to external devices that have Component video input.
5
DIGITAL AUDIO OUT
(OPTICAL)
Connects to an AV receiver.
6
VIDEO OUT Connects to the video input of external devices using a video cable.
7
AUDIO OUT Connects to the audio input of external devices using audio cables.
8
HDMI OUT 2
(AUDIO ONLY)
Using an HDMI cable, connect this HDMI output terminal to the HDMI input terminal
on your AV receiver for the best quality sound.
9
HDMI OUT 1
Using an HDMI cable, connect this HDMI output terminal to the HDMI input terminal
on your TV for the best quality picture or to your AV receiver for the best quality
sound.
a b c d e
i h g f
Page 21
English 21
03 Getting Started
Remote Control
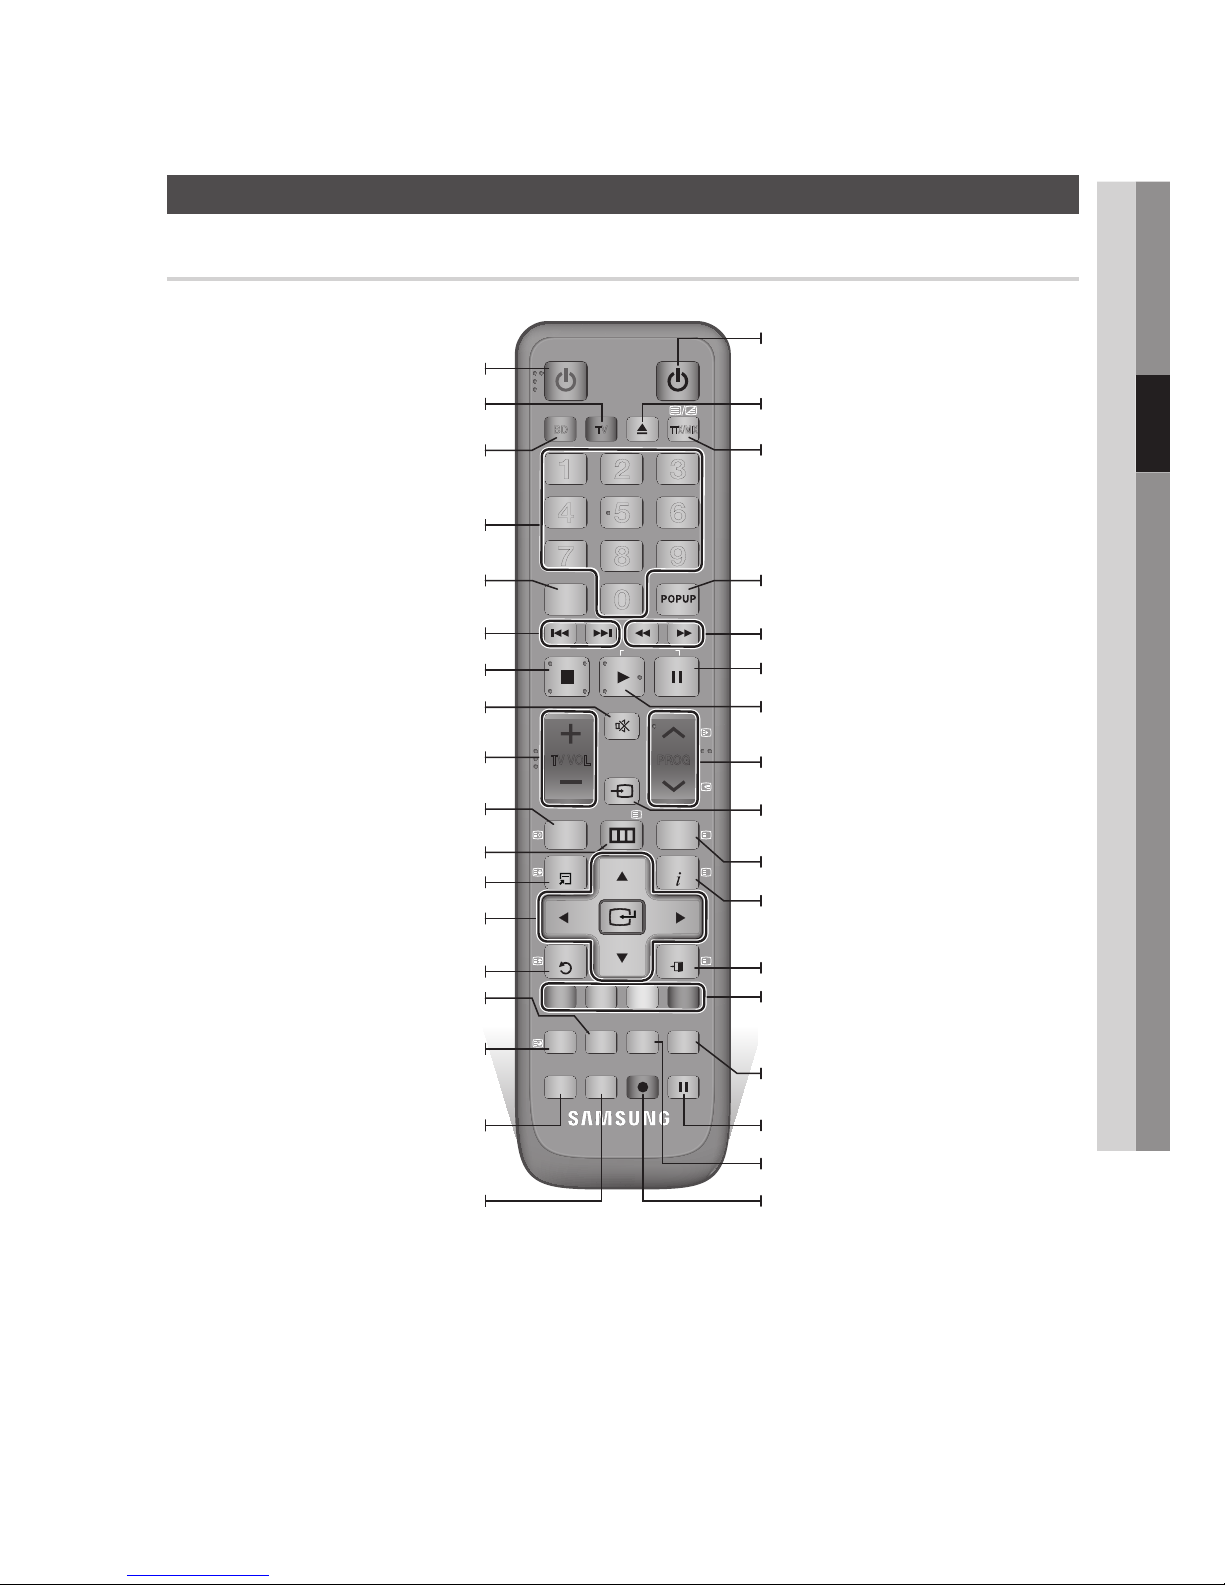
Tour of the Remote Control
Press this to operate a TV.
Turn the product on and off.
Press to use Tools menu.
Return to the previous menu.
Press numeric buttons to operate options or
to access channels directly.
Use to enter the disc menu.
Press this to operate BD-HDD Combo.
Press to use Smart Hub.
Press to move to the home menu.
Use to select menu items and change
menu value.
Turn the TV on and off.
(To operate your TV, please refer to pages
22~23)
Press to exit the menu.
Alternately selects Teletext, Double or Mix.
Use to enter the popup menu/title menu.
Press this when you want to use 3D function.
After setup, allows you to set the input
source on your TV.
Press this to display the playback information
during playing a Blu-ray Disc/DVDs or
display the information of TV channel.
These buttons are used both for menus on
the product and also several Blu-ray Disc
functions.
Press to search backwards or forwards.
Press to skip backwards or forwards.
Stops playback or recording.
TV volume adjustment.
Mutes the speakers of your TV.
Displays channel lists on the screen.
Press this to pause a playback or pause the
Time Shift function.
Press this to play or start the Time Shift
function.
Press this to select a TV channel.
Displays the EPG (Electronic Programme
Guide.)
Press this to set audio description and
subtitle.
Press this to pause during recording.
BD-HDD/TV
2D3D
0000-000000
POWER
1 2 3
4 5 6
7 8 9
DISC MENU
TITLE MENU
0
TTX/M IX
BD TV
TIME SHIFT
TV VOL
PROG
TV SOURCE
1
1
CH LIST
SMART
GUIDE
i
MENU
2D3D
FULL
SCREEN
A B C D
INFOTOOLS
EXIT
RETURN
...
?
×
HUB
SEARCH
AD/
SUBTITLE
REC PAUSERECAUDIO
TV MUTE
TV
POWER
Press to eject a disc.
Press this to make a recording.
Press to search contents.
Press this to see the full screen on a TV.
Press this to set audio.
Page 22
22 English
Getting Started
Setting the Remote Control to
Operate Your TV
To determine whether your television is
compatible, follow the instructions below.
Turn your television on.
Point the remote control towards the
television.
Press the TV button to set the TV mode.
Press and hold the TV POWER button, and
then enter the two-figure code in the table
to the right that corresponds to the brand of
your television by pressing the appropriate
number buttons.
If your television is compatible with the remote
control, it will Turn off.
The remote is now programmed to operate
the TV.
NOTE
If several codes are listed for your television brand,
try each one in turn until you find one that works.
If you replace the remote control’s batteries, you
must set the brand code again.
You can control certain functions of your TV with
this remote control.
Button Function
TV POWER Used to Turn the television on and off.
Number Used to input number directly.
TV VOL +/–
Used to adjust the volume of the
television.
TV MUTE Used to toggle the sound on and off.
PROG (,/.) Used to select the desired channel.
TV SOURCE
Used to select an external source
connected to the TV.
1.
2.
3.
4.
✎
▪
▪
In case of Samsung TV, below buttons are also
compatible with this remote control.
Button Function
MENU Used to move to the TV menu.
TOOLS Used to display Tools menu.
▲▼◄►
Used to move the cursor or select an
item.
ENTER Used to select menu items.
INFO Used to display INFO menu.
RETURN Return to the previous menu.
EXIT Used to exit the menu.
COLOUR (A,B,C,D)
These buttons are used for several
functions.
NOTE
The functions listed above will not necessarily work
on all televisions. If you encounter problems, use the
TV remote control.
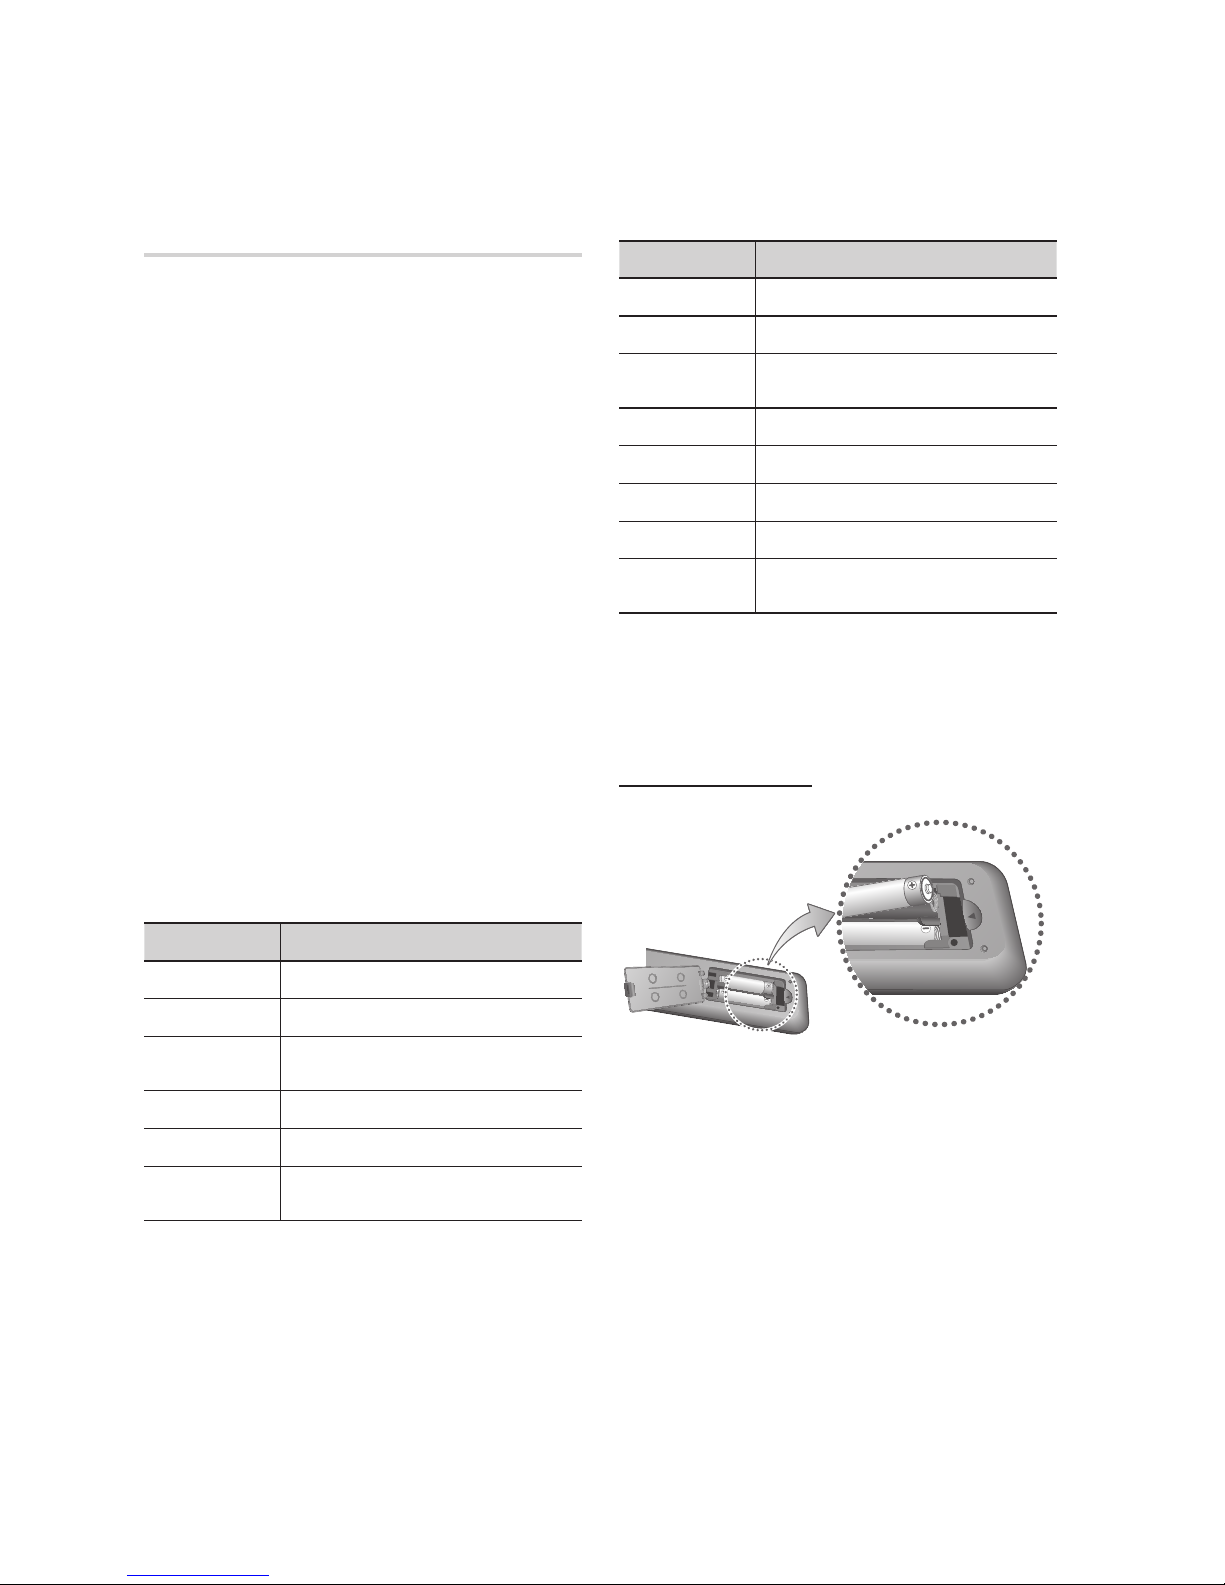
Installing batteries
NOTE
If the remote does not operate properly:
Check the polarity +/– of the batteries.
Check if the batteries are drained.
Check if the remote sensor is blocked by
obstacles.
Check if there is any fluorescent lighting nearby.
CAUTION
Dispose of batteries according to local environmental
regulations. Do not put them in the household trash.
✎
▪
✎
▪
•
•
•
•
!
▪
Page 23

English 23
03 Getting Started
TV Control Codes
Brand Code
SAMSUNG
TV POWER+01, +02, +03, +04, +05,
+06, +07, +08, +09
AIWA TV POWER+82
ANAM
TV POWER+10, +11, +12, +13, +14,
+15, +16, +17, +18
BANG &
OLUFSEN
TV POWER+57
BLAUPUNKT TV POWER+71
BRANDT TV POWER+73
BRIONVEGA TV POWER+57
CGE TV POWER+52
CONTINENTAL
EDISON
TV POWER+75
DAEWOO
TV POWER+19, +20, +23, +24, +25, +26,
+27, +28, +29, +30, +31, +32, +33, +34
EMERSON TV POWER+64
FERGUSON TV POWER+73
FINLUX TV POWER+06, +49, +57
FORMENTI TV POWER+57
FUJITSU TV POWER+84
GRADIENTE TV POWER+70
GRUNDIG TV POWER+49, +52, +71
HITACHI TV POWER+60, +72, +73, +75
IMPERIAL TV POWER+52
JVC TV POWER+61, +79
LG
TV POWER+06, +19, +20, +21, +22, +78
LOEWE TV POWER+06, +69
LOEWE OPTA TV POWER+06, +57
MAGNAVOX TV POWER+40
METZ TV POWER+57
MITSUBISHI TV POWER+06, +48, +62, +65
MIVAR TV POWER+52, +77
NEC TV POWER+83
Brand Code
NEWSAN TV POWER+68
NOBLEX TV POWER+66
NOKIA TV POWER+74
NORDMENDE TV POWER+72, +73, +75
PANASONIC TV POWER+53, +54, +74, +75
PHILIPS TV POWER+06, +55, +56, +57
PHONOLA TV POWER+06, +56, +57
PIONEER TV POWER+58, +59, +73, +74
RADIOLA TV POWER+06, +56
RADIOMARELLI
TV POWER+57
RCA TV POWER+45, +46
REX TV POWER+74
SABA TV POWER+57, +72, +73, +74, +75
SALORA TV POWER+74
SANYO TV POWER+41, +42, +43, +44, +48
SCHNEIDER TV POWER+06
SELECO TV POWER+74
SHARP TV POWER+36, +37, +38, +39, +48
SIEMENS TV POWER+71
SINGER TV POWER+57
SINUDYNE TV POWER+57
SONY TV POWER+35, +48
TELEAVA TV POWER+73
TELEFUNKEN TV POWER+67, +73, +75, +76
THOMSON TV POWER+72, +73, +75
THOMSON
ASIA
TV POWER+80, +81
TOSHIBA
TV POWER+47, +48, +49, +50, +51,
+52
WEGA TV POWER+57
YOKO TV POWER+06
ZENITH TV POWER+63
Page 24
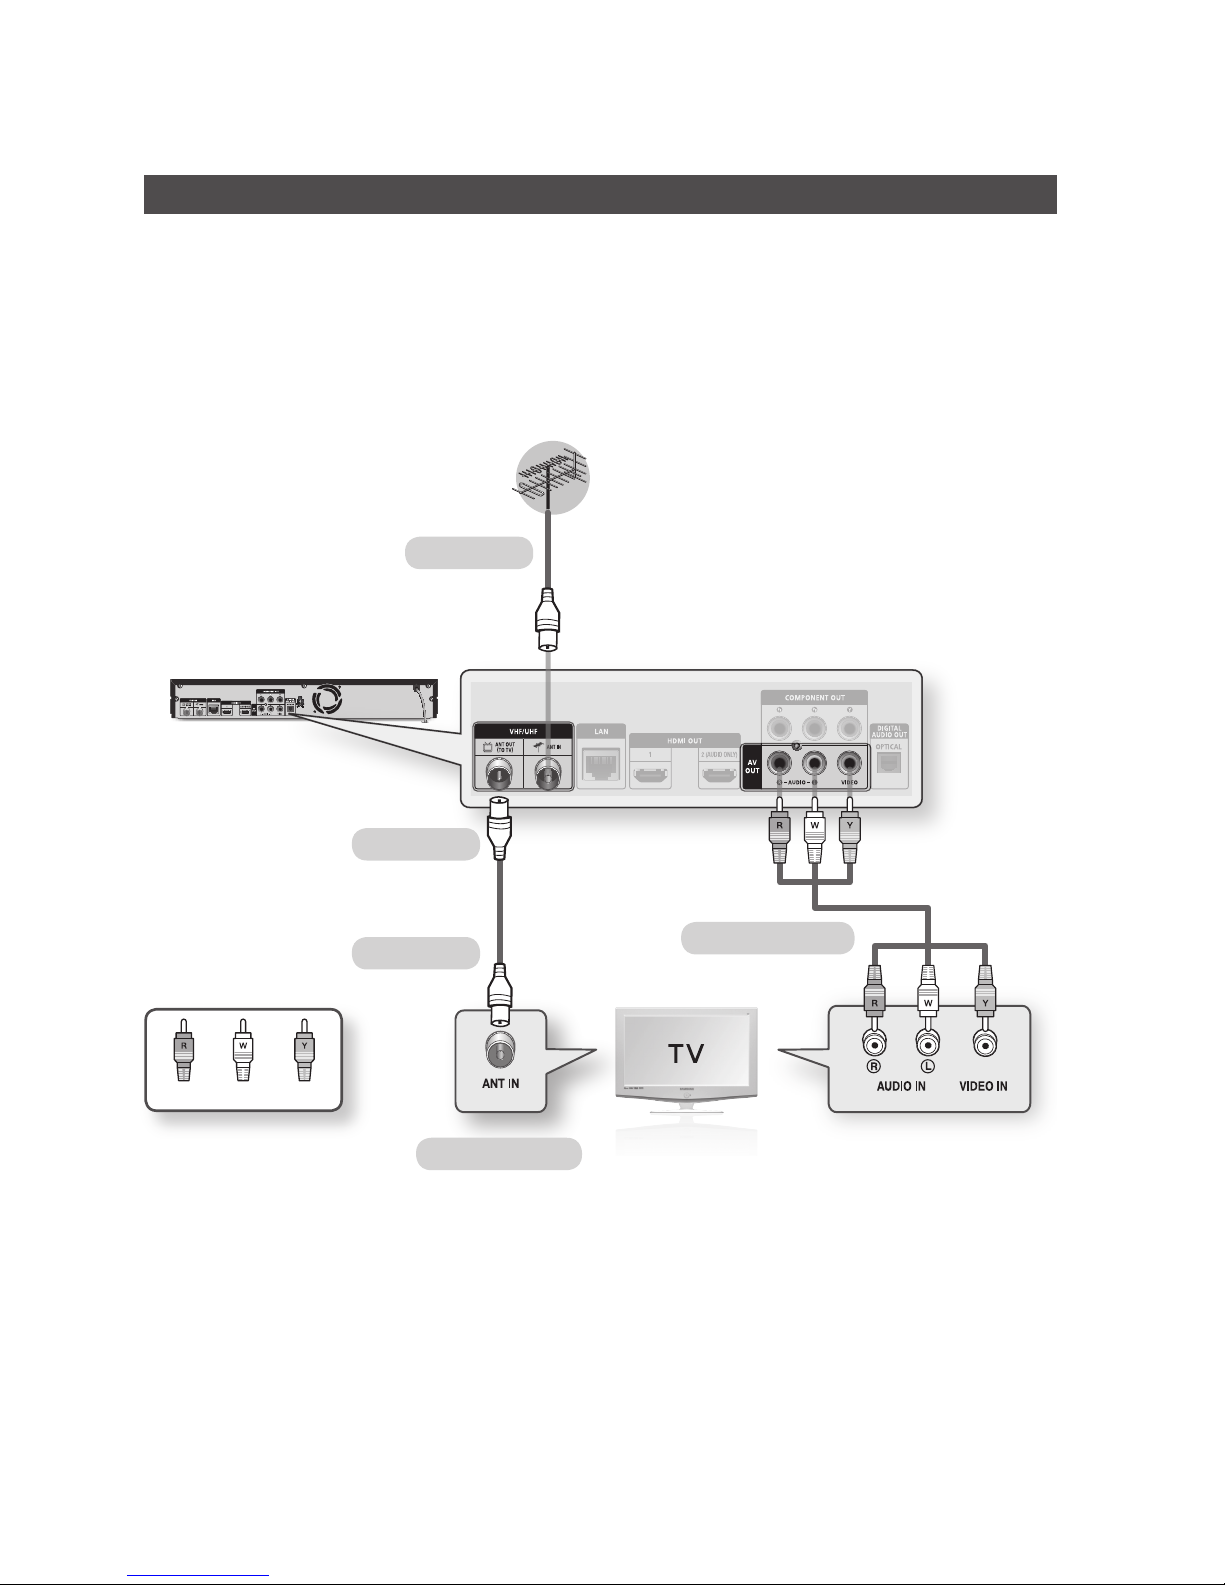
24 English
Connecting to a TV with an Audio/Video cables and RF cable
Connect the RF cable as shown.
Using video/audio cables, connect the VIDEO OUT (yellow) / AUDIO OUT (white and red)
terminals on the rear of the product to the VIDEO IN (yellow) / AUDIO IN (white and red) terminals
of your TV.
Plug in the product and TV.
Turn on the product and TV.
NOTE
The RF cable connection of this product sends only signals of TV. You must connect the Audio/Video cables to watch
output from your product.
Noise may be generated if the audio cable is placed too close to the power cable.
If you want to connect to an AV receiver, please refer to the AV receiver connection pages. (See pages 28~30)
The number and position of terminals may vary depending on your TV set. Please refer to the user manual of your TV.
If there is only one audio input terminal on the TV, connect it to the AUDIO OUT (right/white) terminal of the product.
1.
2.
3.
4.
✎
▪
▪
▪
▪
▪
Connections
To ANT IN
To TV
RF cable
To ANT INPUT
Audio/Video cable
WhiteRed Yellow
Page 25
English 25
04 Connections
Connecting to a TV
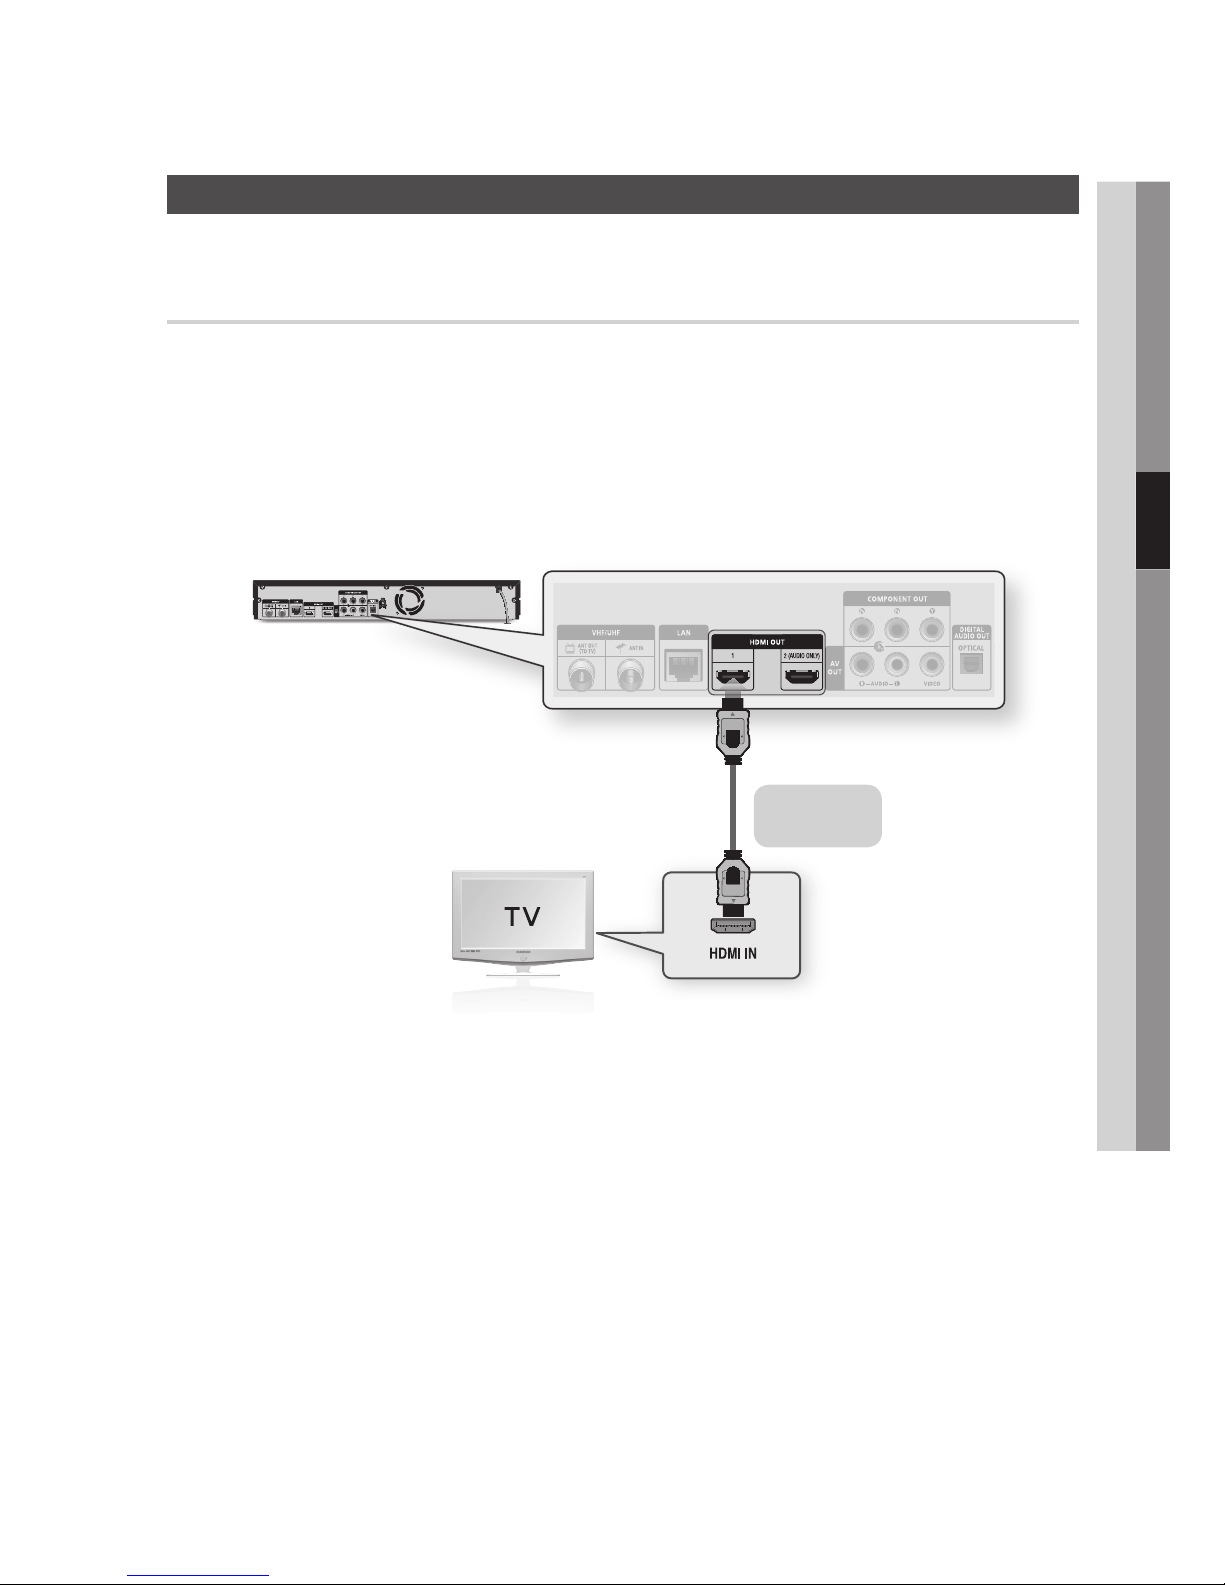
Case 1 : Connecting to a TV with an HDMI Cable - Best Quality
(Recommended)
Using an HDMI cable, connect the HDMI OUT 1 terminal on the rear of the product to the HDMI IN
terminal of your TV.
Turn on the product and TV.
Press the input selector on your TV remote control until the HDMI signal from the product appears
on your TV screen.
If you have set the remote control to operate your TV (See pages 22~23), press the TV SOURCE
button on the remote control and select HDMI as the external source of the TV.
NOTE
An HDMI cable outputs digital video/audio, so you don't need to connect an audio cable.
Connect only the HDMI 1 terminal on the rear of the product to the HDMI IN terminal on your TV. Do not use the HDMI 2
terminal. The HDMI 2 terminal does not output a video signal.
If the product is connected to your TV in the HDMI 720p, 1080i, or 1080p output mode, you must use a High speed
(category 2) HDMI cable.
HDMI outputs only a pure digital signal to the TV.
If your TV does not support HDCP (High-bandwidth Digital Content Protection), random noise appears on the screen.
Depending on your TV, certain HDMI output resolutions may not work. Please refer to the user manual of your TV.
When you connect the product to the TV using the HDMI cable for the first time or to a new TV, the HDMI output
resolution will be automatically set to the highest supported by the TV.
You must have an HDMI connection to enjoy videos with 3D technology.
A long HDMI cable may cause a screen noise. If this occurs, set Deep Colour to Off in the menu.
If you use HDMI-to-DVI cable to connect to your display device, you must also connect the AV OUT or Digital Audio OUT
to your display device or an audio system to hear audio.
1.
2.
3.
•
✎
▪
▪
▪
▪
▪
▪
▪
▪
▪
HDMI cable
(not included)
Page 26
26 English
Connections
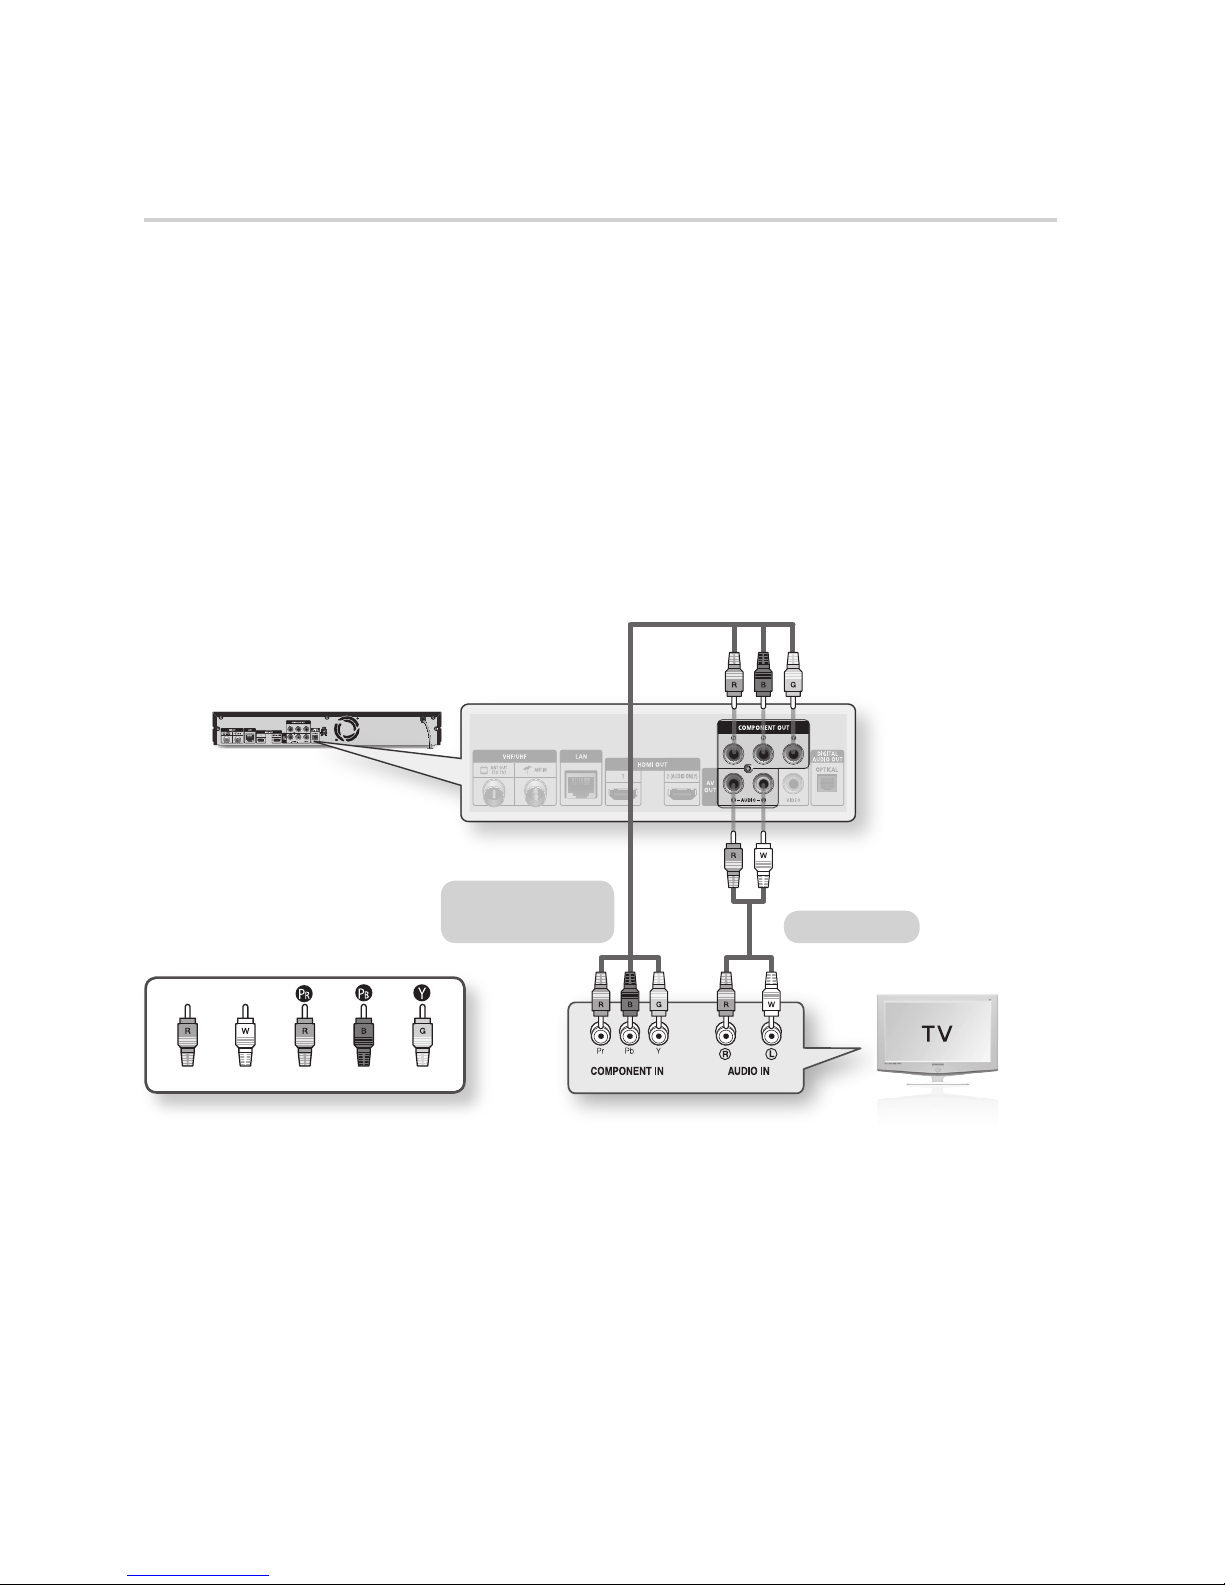
Case 2 : Connecting to a TV with a Component Cable - Better Quality
You can connect the product to your TV using Component video cables.
You will enjoy high quality images with accurate colour reproduction. Component video separates
the picture element into black and white (Y), blue (PB) and red (PR) signals to present clear and clean
images. (Audio signals are delivered through the audio output.)
Using a Component video cable, connect the COMPONENT OUT terminals on the rear of the
product to the COMPONENT IN terminals of your TV.
Using audio cables, connect the AUDIO OUT (white and red) terminals on the rear of the product
to the AUDIO IN (white and red) terminals of your TV.
Turn on the product and TV.
Press the input selector on your TV remote control until the “COMPONENT” signal from the product
appears on the TV screen.
If you have set the remote control to operate your TV (See pages 22~23), press the TV SOURCE
button on the remote control and select COMPONENT as the external source of the TV.
NOTE
Depending on the manufacturer, the component terminals on your TV may be marked “R-Y, B-Y, Y ” or “Cr, Cb, Y”
instead of “PB, PR, Y”. The number and position of terminals may vary depending on the TV set.
Please refer to the user manual of your TV.
You can select from a variety of resolution settings as 1080i, 720p, 576p/480p or 576i/480i, depending on the
contents type. (See pages 37~39)
The actual resolution may differ from the setting in the setup menu if you have connected both Component and HDMI
cables. The resolution may also be different depending on the contents type. (See pages 37~39)
-
-
1.
2.
3.
4.
•
✎
▪
▪
▪
White Red Blue Green
Red
Audio cable
Component cable
(not included)
Page 27
English 27
04 Connections
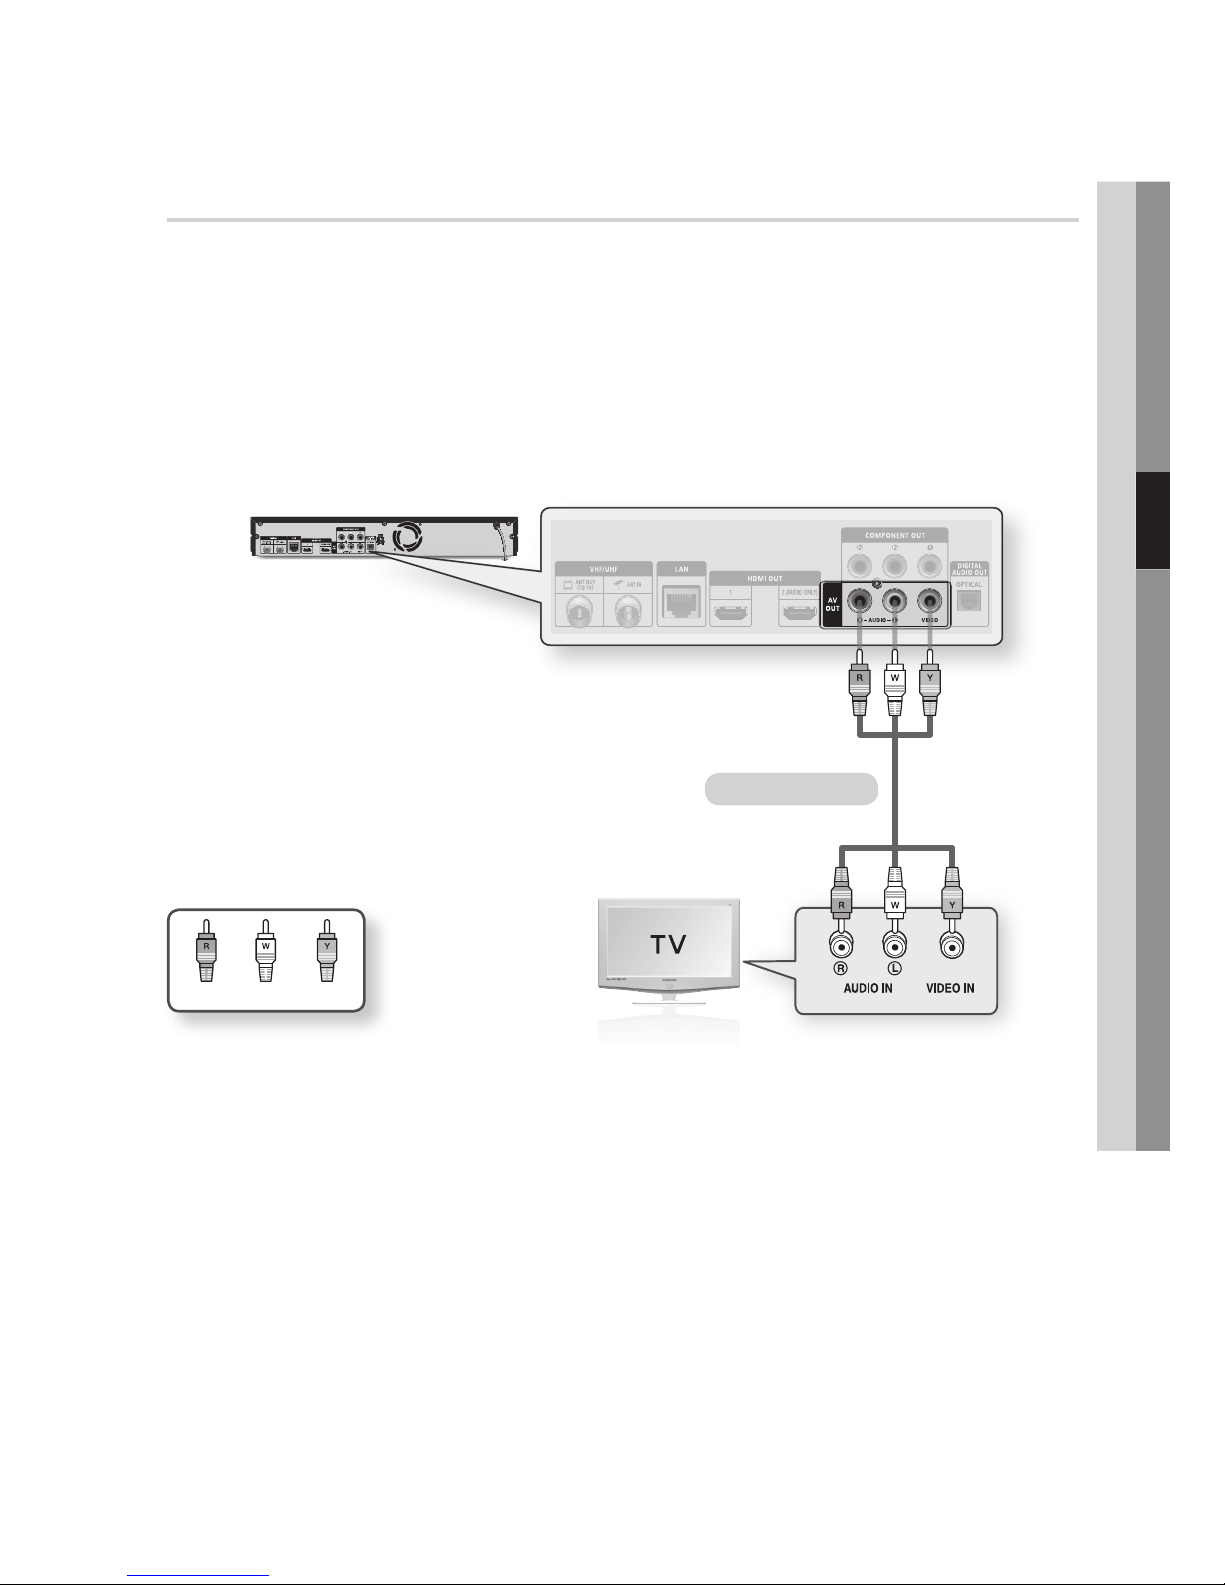
Case 3 : Connecting to a TV with an Audio/Video cable - Good Quality
Using an Audio/Video cable, connect the VIDEO OUT (yellow) / AUDIO OUT (white and red)
terminals on the rear of the product to the VIDEO IN (yellow) / AUDIO IN (white and red) terminals
of your TV.
Turn on the product and TV.
Press the input selector on your TV remote control until the “VIDEO” signal from the product appears
on the TV screen.
If you have set the product's remote control to operate your TV (See pages 22~23), press the TV
SOURCE button on the remote control and select VIDEO as the external source of the TV.
NOTE
Noise may be generated if the audio cable is placed too close to the power cable.
If you want to connect to an AV receiver, please refer to the AV receiver connection pages. (See pages 28~30)
The number and position of
input terminals
may vary depending on your TV set. Please refer to the user manual of your
TV.
CAUTION
Do not connect the product to your TV through a VCR. Video signals fed through VCRs may be affected by copyright
protection systems and the picture will be distorted on the television.
1.
2.
3.
•
✎
▪
▪
▪
!
▪
WhiteRed Yellow
Audio/Video cable
Page 28
28 English
Connecting to an Audio System
Please turn the volume down when you turn on the AV receiver. A sudden loud sound may cause
damage to the speakers and your ears.
Set the audio output format according to the capabilities of your AV receiver. (See pages 40~43)
The position of HDMI input terminals may vary depending on your AV receiver. Please refer to the
user manual of your AV receiver.
•
•
•
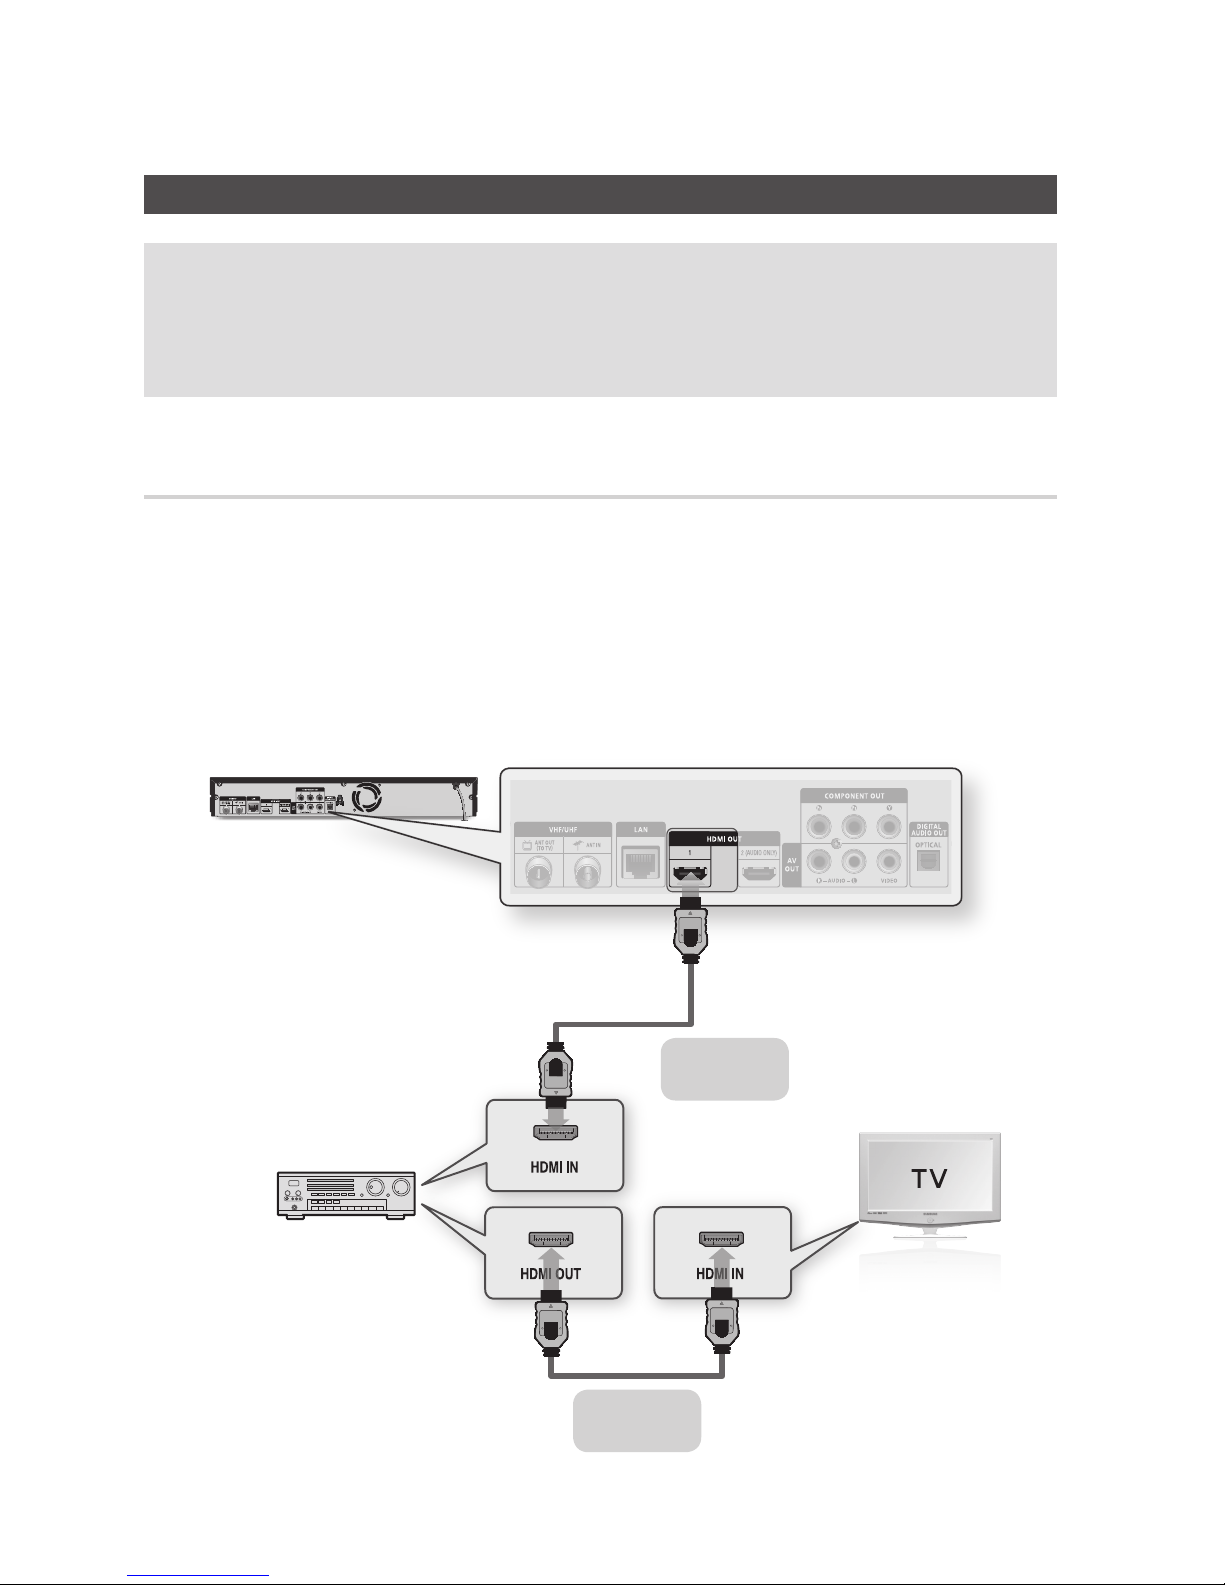
Case 1 : Connecting to an Audio System (HDMI supported AV receiver)
- Best Quality (Recommended)
Using an HDMI cable, connect the HDMI OUT 1 terminal on the rear of the product to the HDMI IN
terminal of your AV receiver.
Using an HDMI cable, connect the HDMI OUT terminal of the AV receiver to the HDMI IN terminal of
your TV.
Turn on the product, TV, and AV receiver.
Press the input select button of the AV receiver and TV to select the external input to hear sound
from the player. Refer to your AV receiver’s user manual to set the AV receiver’s audio input.
1.
2.
3.
4.
HDMI cable
(not included)
HDMI cable
(not included)
3D supported AV receiver
Page 29
English 29
04 Connections
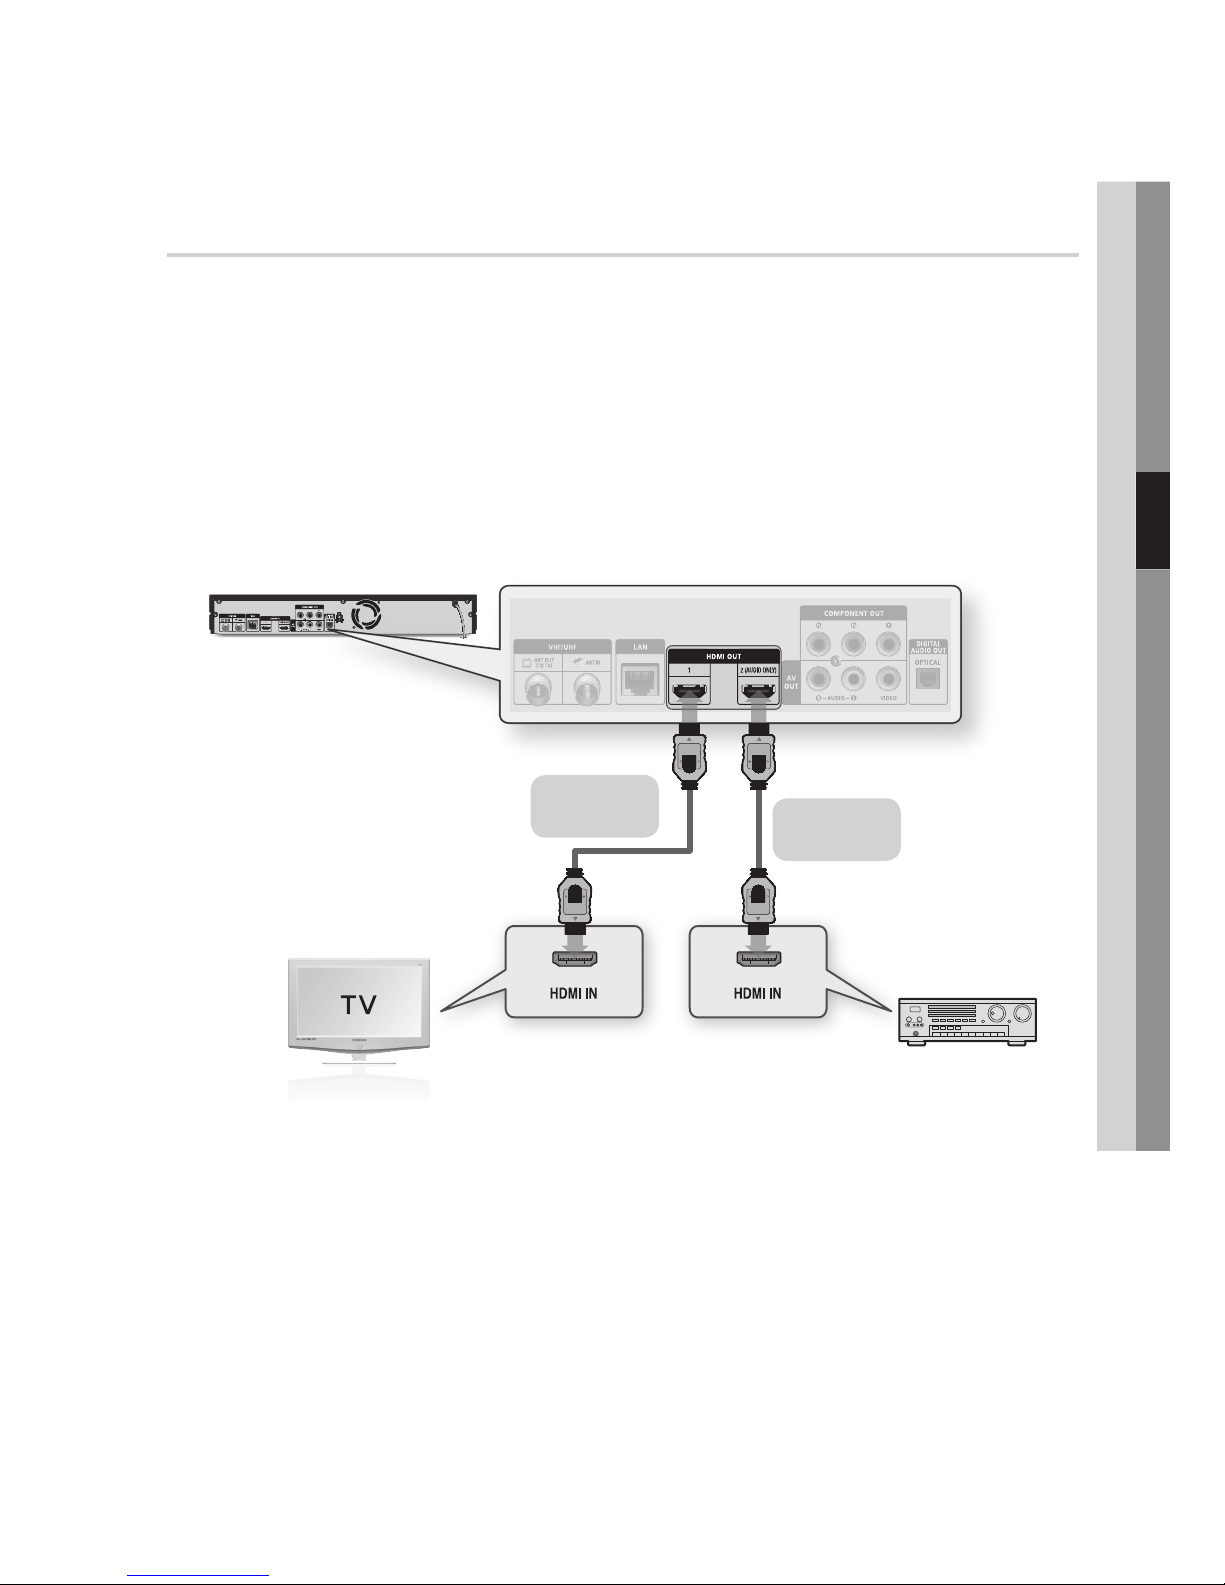
Case 2 : Connecting to an Audio System (HDMI Supported AV Receiver)
- Best Quality (Recommended)
Using an HDMI cable, connect the HDMI OUT 1 terminal on the rear of the product to the HDMI IN
terminal of your TV.
Using an HDMI cable, connect the HDMI OUT 2 terminal on the rear of the product to the HDMI IN
terminal of your AV receiver.
Turn on the product, TV, and AV receiver.
Press the input select button of the AV receiver to select the external input to hear sound from the
product. Refer to your AV receiver’s user manual to set the AV receiver’s audio input.
Press the input selector on your TV remote control until the HDMI signal from the product appears
on your TV screen.
CAUTION
Do not connect the HDMI OUT 1 and HDMI OUT 2 terminals of the product with an HDMI cable.
NOTE
The HDMI OUT 1 terminal outputs both video and audio signals. The HDMI OUT 2 terminal outputs audio only.
The HDMI OUT 2 terminal does not output video.
If HDMI OUT 2 terminal is connected to a TV or an AV receiver which is turned on and HDMI Audio Output set to Auto,
then HDMI OUT 1 terminal does not output Audio.
If you want to hear from both HDMI OUT 1 and HDMI OUT 2 terminal, please set the HDMI Audio Output set to Dual.
(See page 43)
1.
2.
3.
4.
5.
!
▪
✎
▪
▪
HDMI cable
(not included)
2D supported AV receiver
HDMI cable
(not included)
Page 30
30 English
Connections
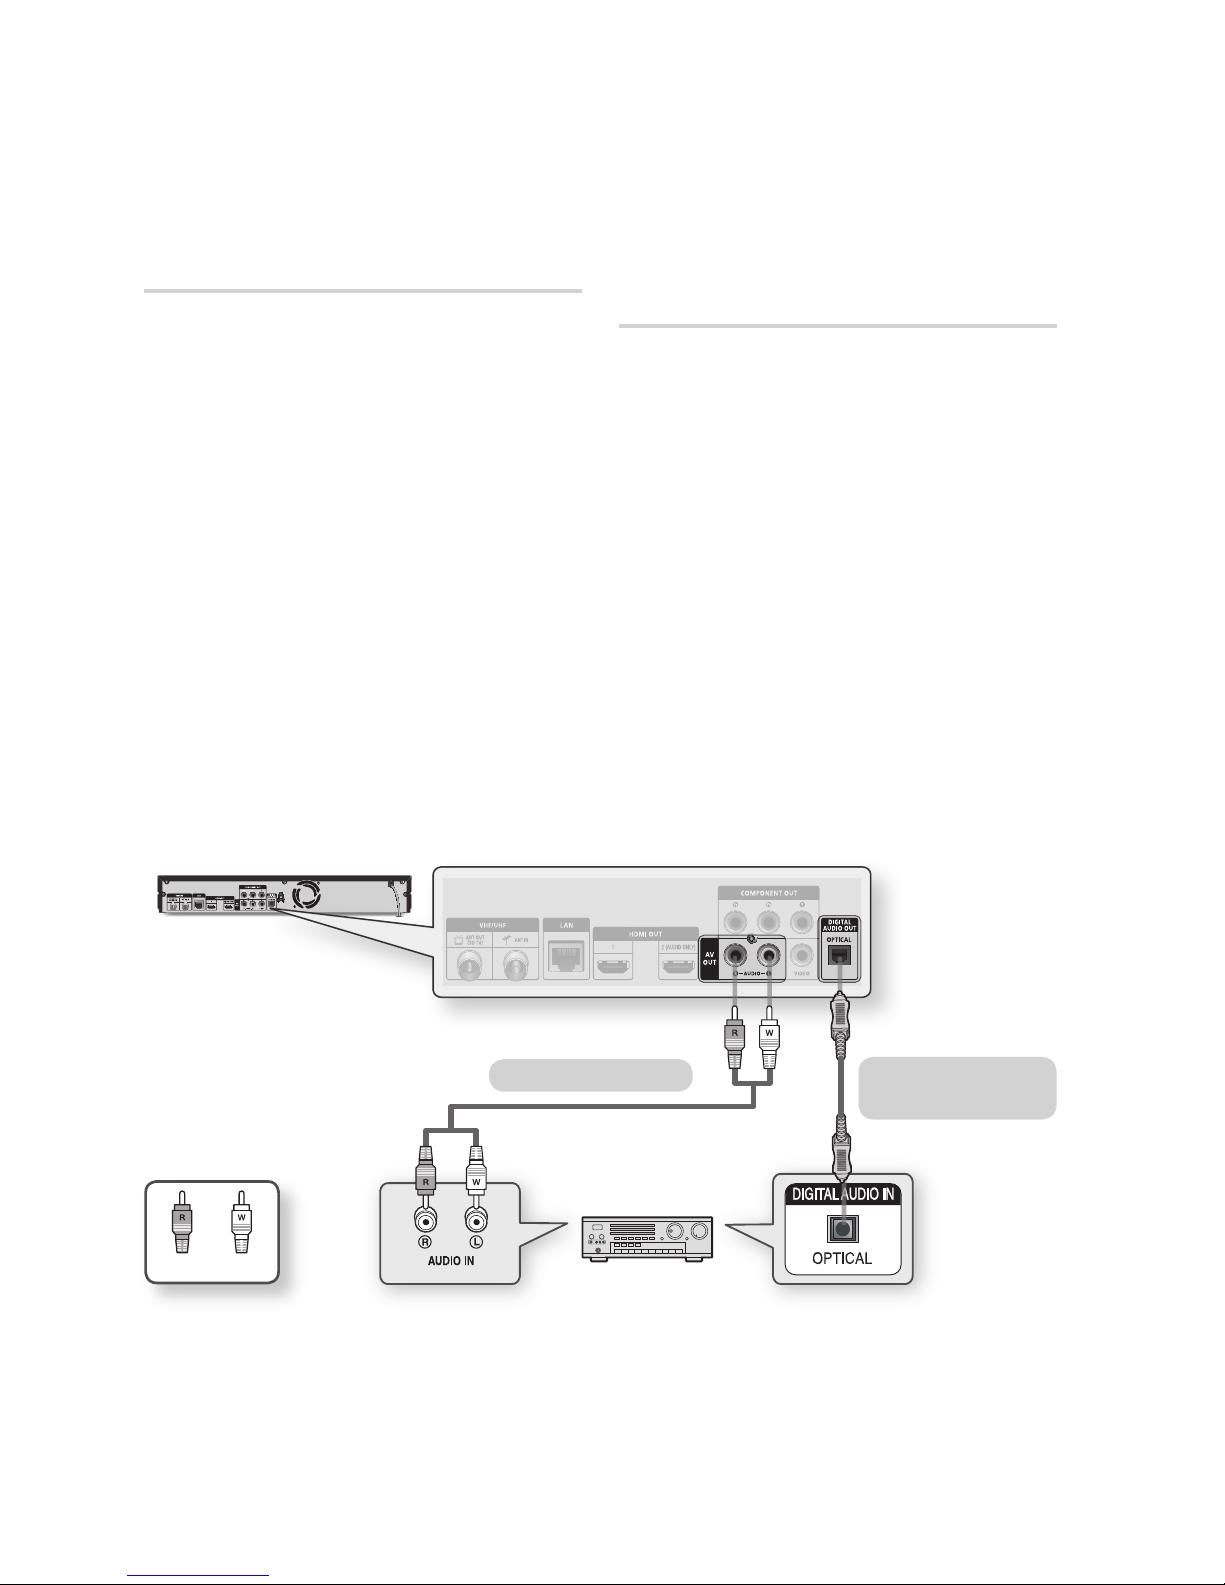
Case 3 : Connecting to an Audio
System (Stereo Amplifier)
- Good Quality
Using the audio cables, connect the AUDIO
OUT (white and red) terminals on the rear of
the product to the AUDIO IN (white and red)
terminals of your Stereo Amplifier.
Using the video signal cable(s), connect the
HDMI 1, COMPONENT, or VIDEO OUT
terminals on the rear of the product to the
HDMI, COMPONENT, or VIDEO IN terminal
of your TV. (See pages 25~27)
Turn on the product, TV, and Stereo Amplifier.
Press the input select button of the Stereo
Amplifier to select the external input and hear
sound from the product. Refer to your
Stereo Amplifier's user manual to set the
Stereo Amplifier's audio input.
Press the input selector on your TV remote
control to select the video source (HDMI,
Component, or Video.)
1.
2.
3.
4.
5.
Case 4 : Connecting to an Audio
System (AV receiver with Dolby
Digital or DTS decoder) - Better
Quality
Using an optical cable, connect the DIGITAL
AUDIO OUT (OPTICAL) terminal on the rear
of the product to the DIGITAL AUDIO IN
(OPTICAL) terminal of your AV receiver.
Using the video signal cable(s), connect the
HDMI 1, COMPONENT, or VIDEO OUT
terminals on the rear of the product to the
HDMI, COMPONENT, or VIDEO IN terminal
of your TV. (See pages 25~27)
Turn on the product, TV, and AV receiver.
Press the input select button of the
AV receiver
to select the external input in order to hear sound
from the product. Refer to your
AV receiver’s
user manual to set the
AV receiver’s
audio input.
Press the input selector on your TV remote
control to select the video source (HDMI,
Component, or Video.)
1.
2.
3.
4.
5.
WhiteRed
Case 3 : Audio cable
Case 4 : Optical cable
(not included)
NOTE
If you use the Digital Audio connection described in Case 4, you will hear only front two speakers with Digital Output
setting as PCM.
✎
▪
Page 31
English 31
04 Connections
Connecting to the Network
This product lets you use network based services (See pages 74~83) such as Smart Hub and BD-LIVE,
and software upgrades when it is connected to a network. We recommend using an AP (Access Point)
or IP router for the connection. For more information on router connections, refer to the user manual of
the router or contact the router manufacturer for technical assistance.
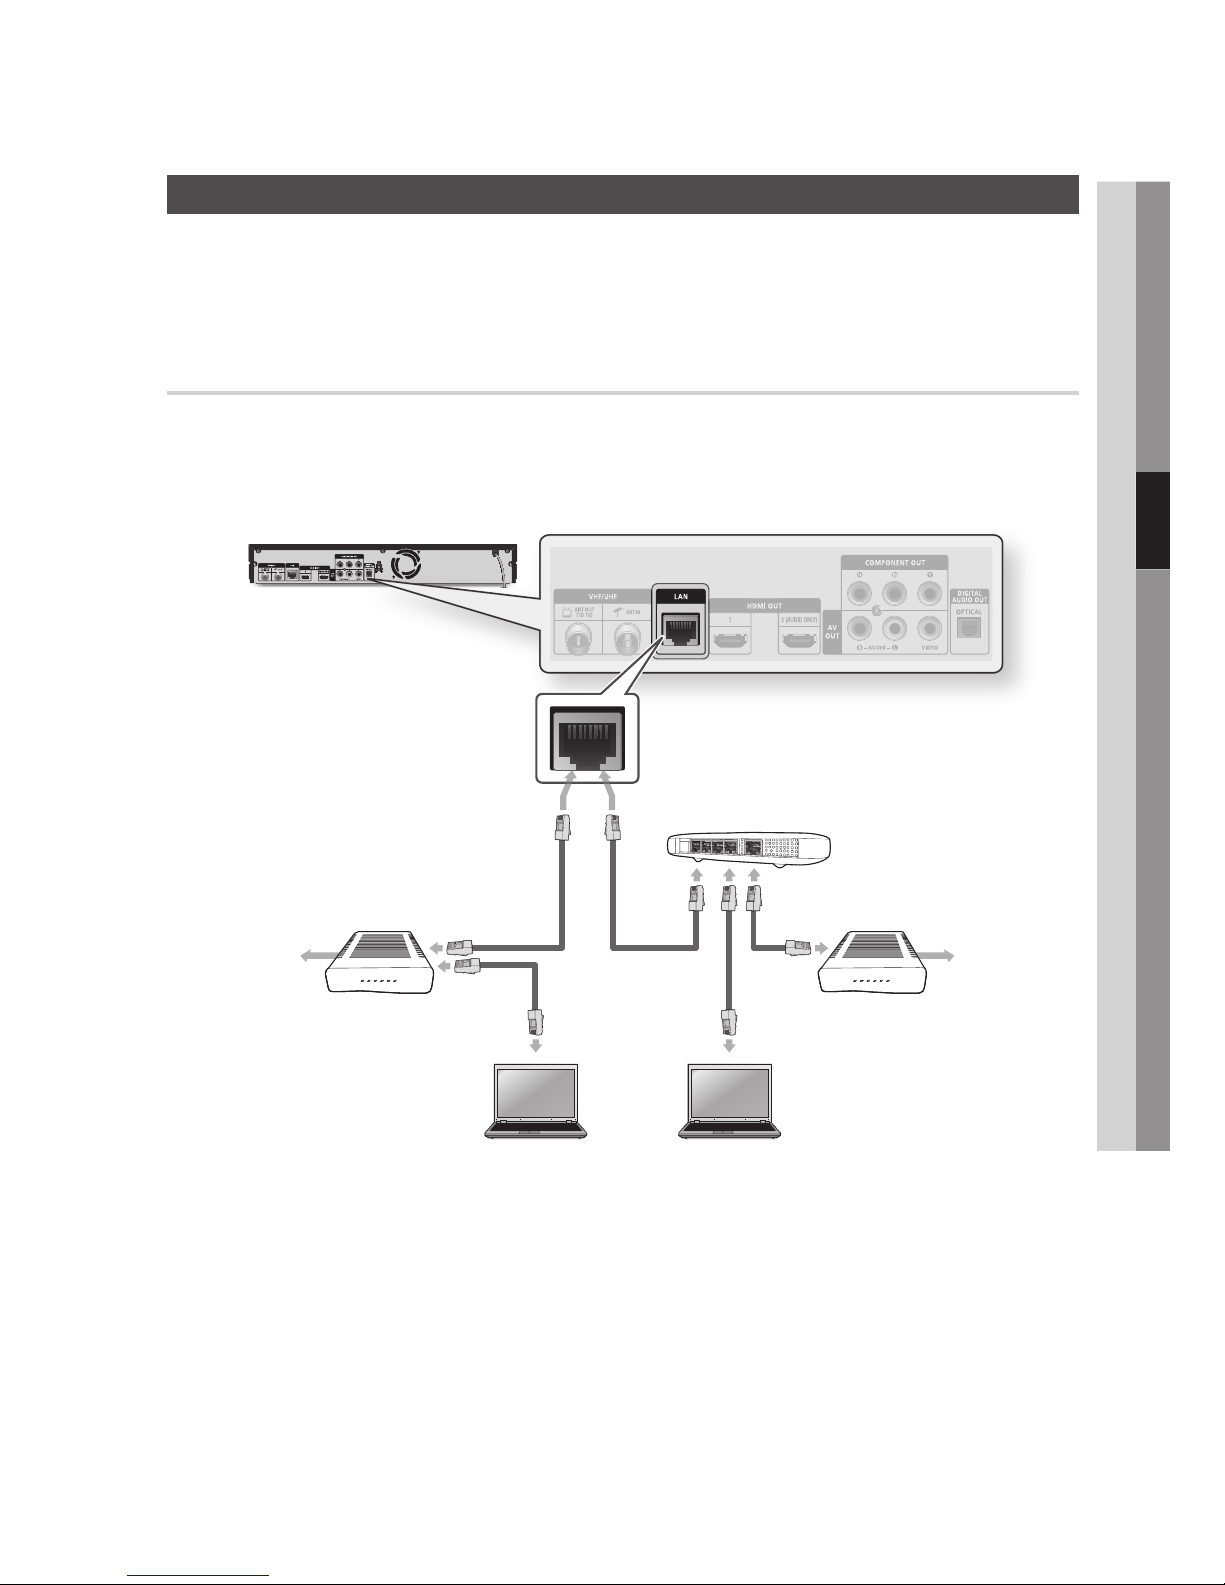
Cable Network
Using the Direct LAN Cable (UTP cable), connect the LAN terminal of the product to the LAN
terminal of your modem or router.
To set the network options, see pages 44~48.
NOTE
Internet access to Samsung’s software update server may not be allowed, depending on the router you use or
your
ISP’
s policy. For more information, contact your ISP (Internet Service Provider).
For DSL users, please use a router to make a network connection.
To use the AllShare function, you must connect your PC to your network as shown in the figure.
The connection can be wired or wireless.
1.
2.
✎
▪
▪
▪
Broadband
service
Broadband modem
(with integrated router)
Router
Broadband modem
Broadband
service
Or
Networking with PC for
AllShare function
Page 32
32 English
Connections
Wireless Network
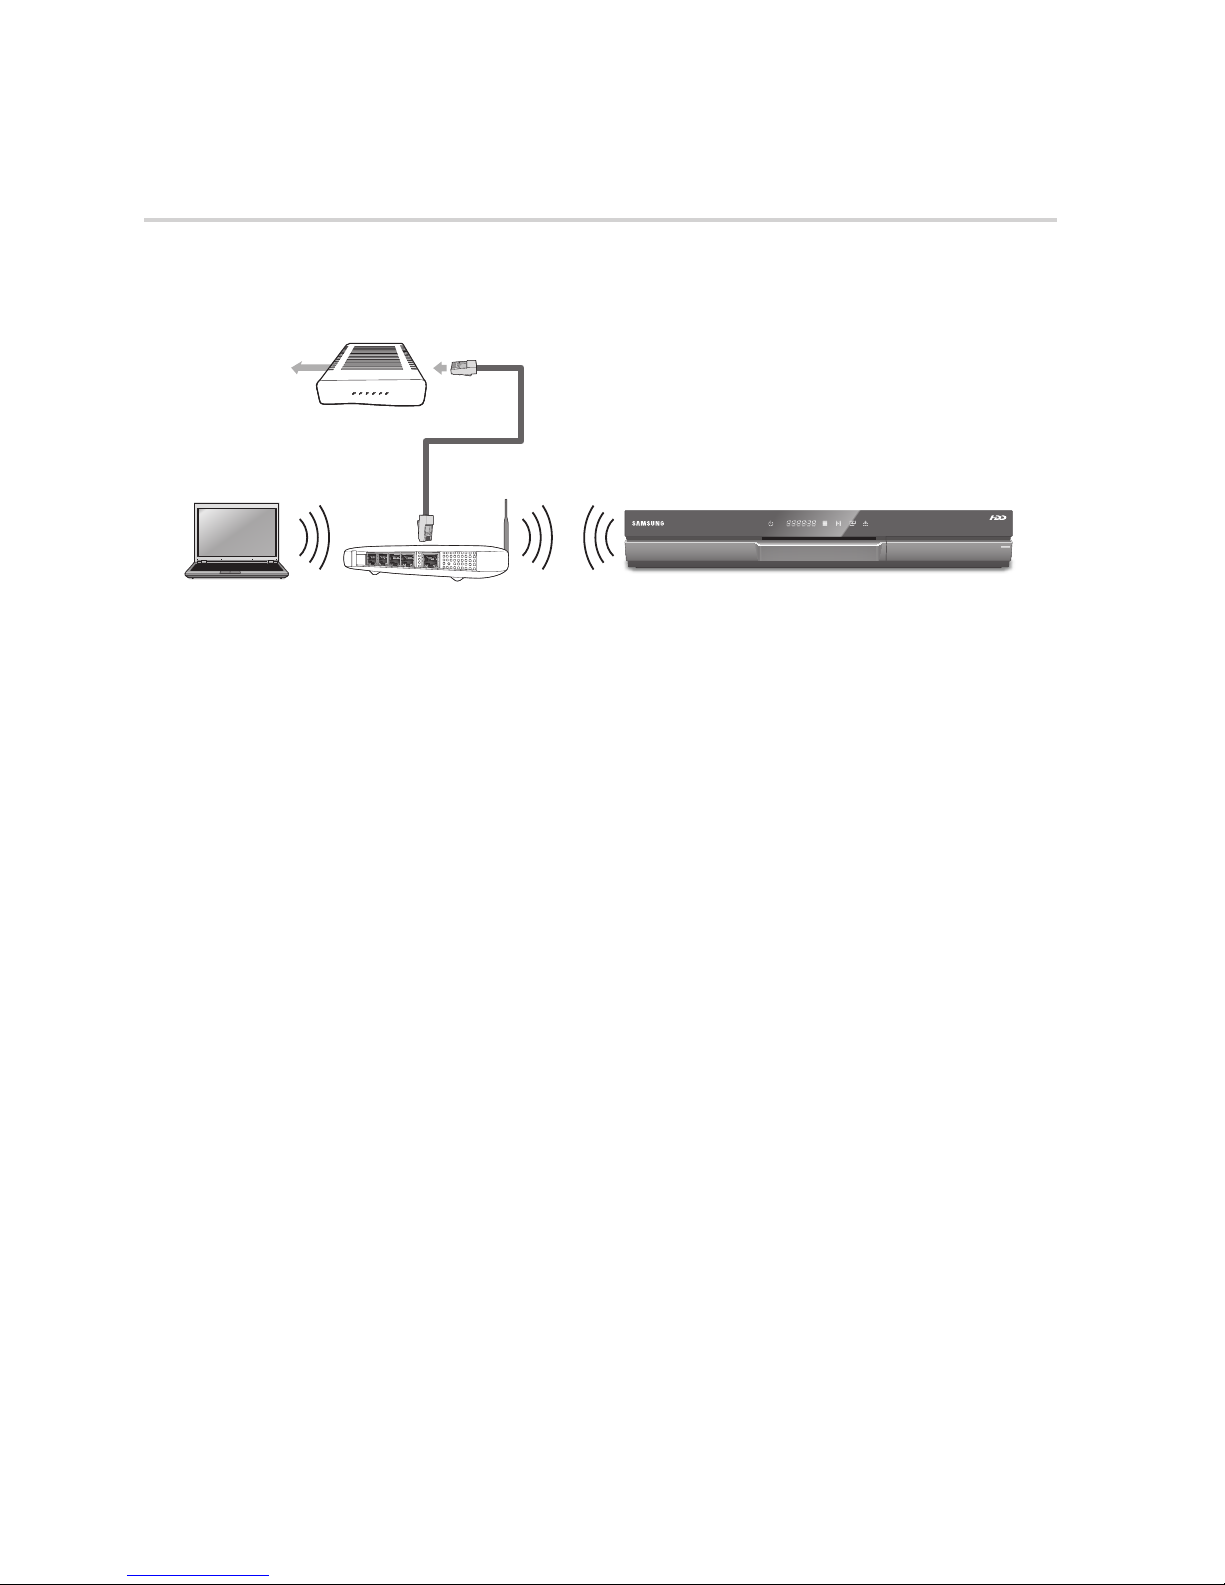
Your product has built in Wi-Fi capability. You can connect to a network through a Wireless IP sharer
(a router or modem).
To set the network options, see pages 44~48.
NOTE
To use a wireless network, your product must be connected to a wireless IP sharer (router). If the wireless IP sharer
supports DHCP, your product can use a DHCP or static IP address to connect to the wireless network.
Select a channel for the wireless IP sharer that is not currently being used. If the channel set for the wireless IP sharer
is currently being used by another device nearby, this will result in interference and communication failure.
If Pure High-throughput (Greenfield) 802.11n mode is selected and the Encryption type is set to WEP, TKIP or TKIPAES (WPS2Mixed) for your AP, this product will not support a connection in compliance with new Wi-Fi certification
specifications.
If your AP supports WPS (Wi-Fi Protected Setup), you can connect to the network via PBC (Push Button Configuration)
or PIN (Personal Identification Number). WPS will automatically configure the SSID and WPA key in either mode.
You can setup a wireless network three ways:
Wireless (general)
Using WPS(PBC)
One Foot Connection
Wireless (general) includes both Automatic and Manual setup procedures.
Wireless LAN, by its nature, may cause interference, depending on the operating conditions (AP performance, distance,
obstacles, interference by other radio devices, etc).
Set the wireless IP sharer to Infrastructure mode. Ad-hoc mode is not supported.
The product supports only the following wireless security key protocols :
WEP(OPEN/SHARED), WPA-PSK(TKIP/AES), WPA2-PSK(TKIP/AES).
To use the AllShare function, you must connect your PC to your network as shown in the figure.
The connection can be wired or wireless.
✎
▪
▪
▪
▪
▪
-
-
-
▪
▪
▪
-
▪
Wireless IP sharer
Broadband
service
Networking with PC for
AllShare function
Page 33
English 33
05 Setup
Setup
Before Starting (Plug & Play)
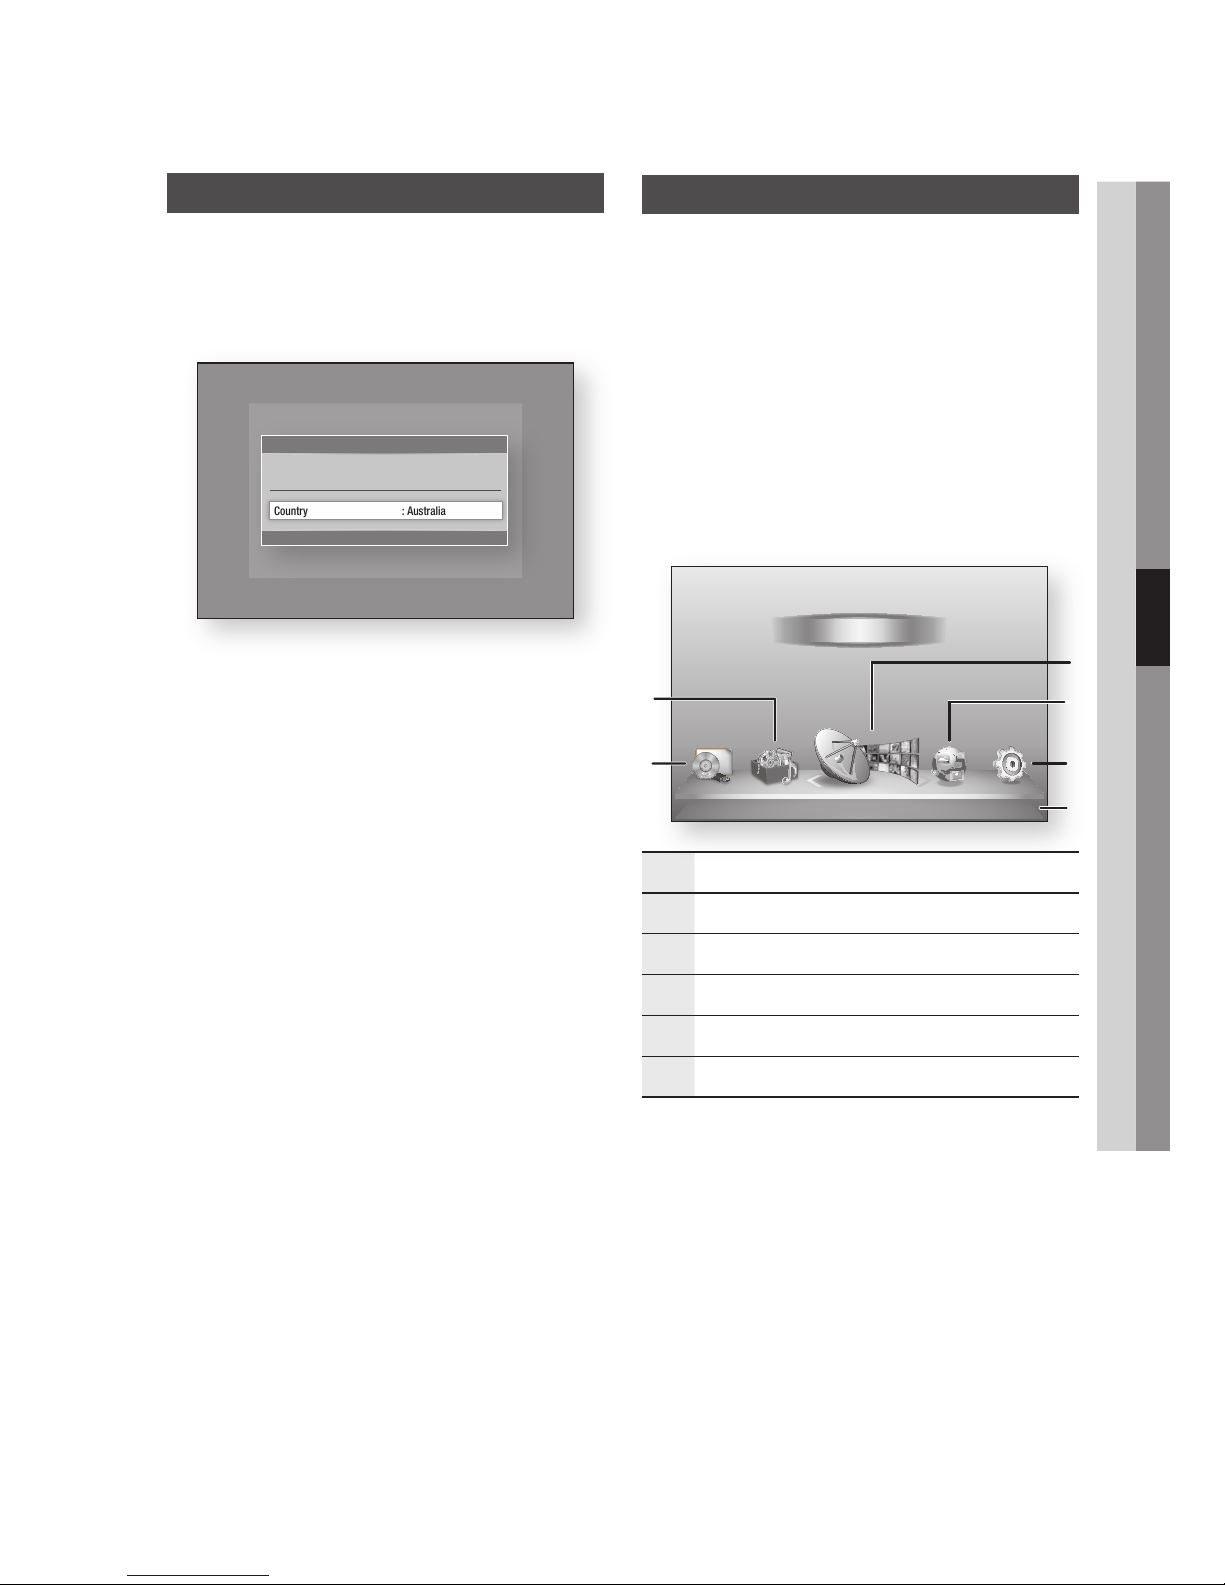
Turn on your TV after connecting the product.
When you connect the product to a TV for the
first time, product turns on automatically and
the Plug & Play screen appears.
Press the ►▲▼ buttons to select the desired
country, and then press the ENTER button.
Press the ►▲▼ buttons to select the desired
Clock Mode.
If you select Auto : Press the ENTER
button.
If you select Manual : Press the ▲▼◄
► button to set the clock, then press the
ENTER button.
Press the ENTER button to start scanning.
Press the ◄► buttons to the select the
Network Settings or Watch TV, then press
the ENTER button.
(For more information about Network settings,
please refer to pages 44~48)
NOTE
When the product is connected to the TV for the
first time, the product turns on automatically. This is
normal operation.
1.
2.
3.
•
•
4.
5.
✎
▪
Accessing the Settings Menu
Press the MENU button.
The home menu will be displayed.
Press the ◄► buttons to select the desired
home menu, and then press the ENTER button.
Press the ▲▼ buttons to select the desired
submenu, and then press the ENTER button.
Press the ▲▼ buttons to select the desired
item, and then press the ENTER button.
Press the EXIT button to exit the menu.
Home Menu
1
Selects My Devices.
2
Selects My Contents.
3
Selects Watch TV.
4
Selects Internet.
5
Selects Settings.
6
Displays the buttons available.
1.
2.
3.
4.
5.
•
Plug & Play
" Enter
Country : Australia
Select Country.
►
d WPS(PBC)
My Devices Internet Settings
Guide
Schedule Manager
Channel List
Channel Manager
My Contents
Watch TV
5
6
1
4
3
2
Page 34
34 English
Setup
NOTE
When the product is connected to a network, select
Smart Hub from the Home menu.
Download the desired content from Samsung Apps.
(See pages 81~82)
The access steps may differ depending on the menu
you selected.
The OSD (On Screen Display) may change in this
product after you upgrade the software version.
If the product is left in the home menu more than 3
minutes without being used, DTV screen will appear.
If the product is left in the other menu including
settings more than 5 minutes without being used, a
screen saver will appear on your TV.
Watch TV
Press the MENU button.
The home menu will be displayed.
Press the ◄► buttons to select the Watch
TV.
Press the ▲▼ buttons to select the desired
submenu, then press the ENTER button.
Press the ▲▼ buttons to select the desired
item, then press the ENTER button.
Press the EXIT button to exit the menu.
NOTE
The Guide menu is not displayed if you select a
country to New Zealand.
✎
▪
▪
▪
▪
▪
1.
2.
3.
4.
5.
✎
▪
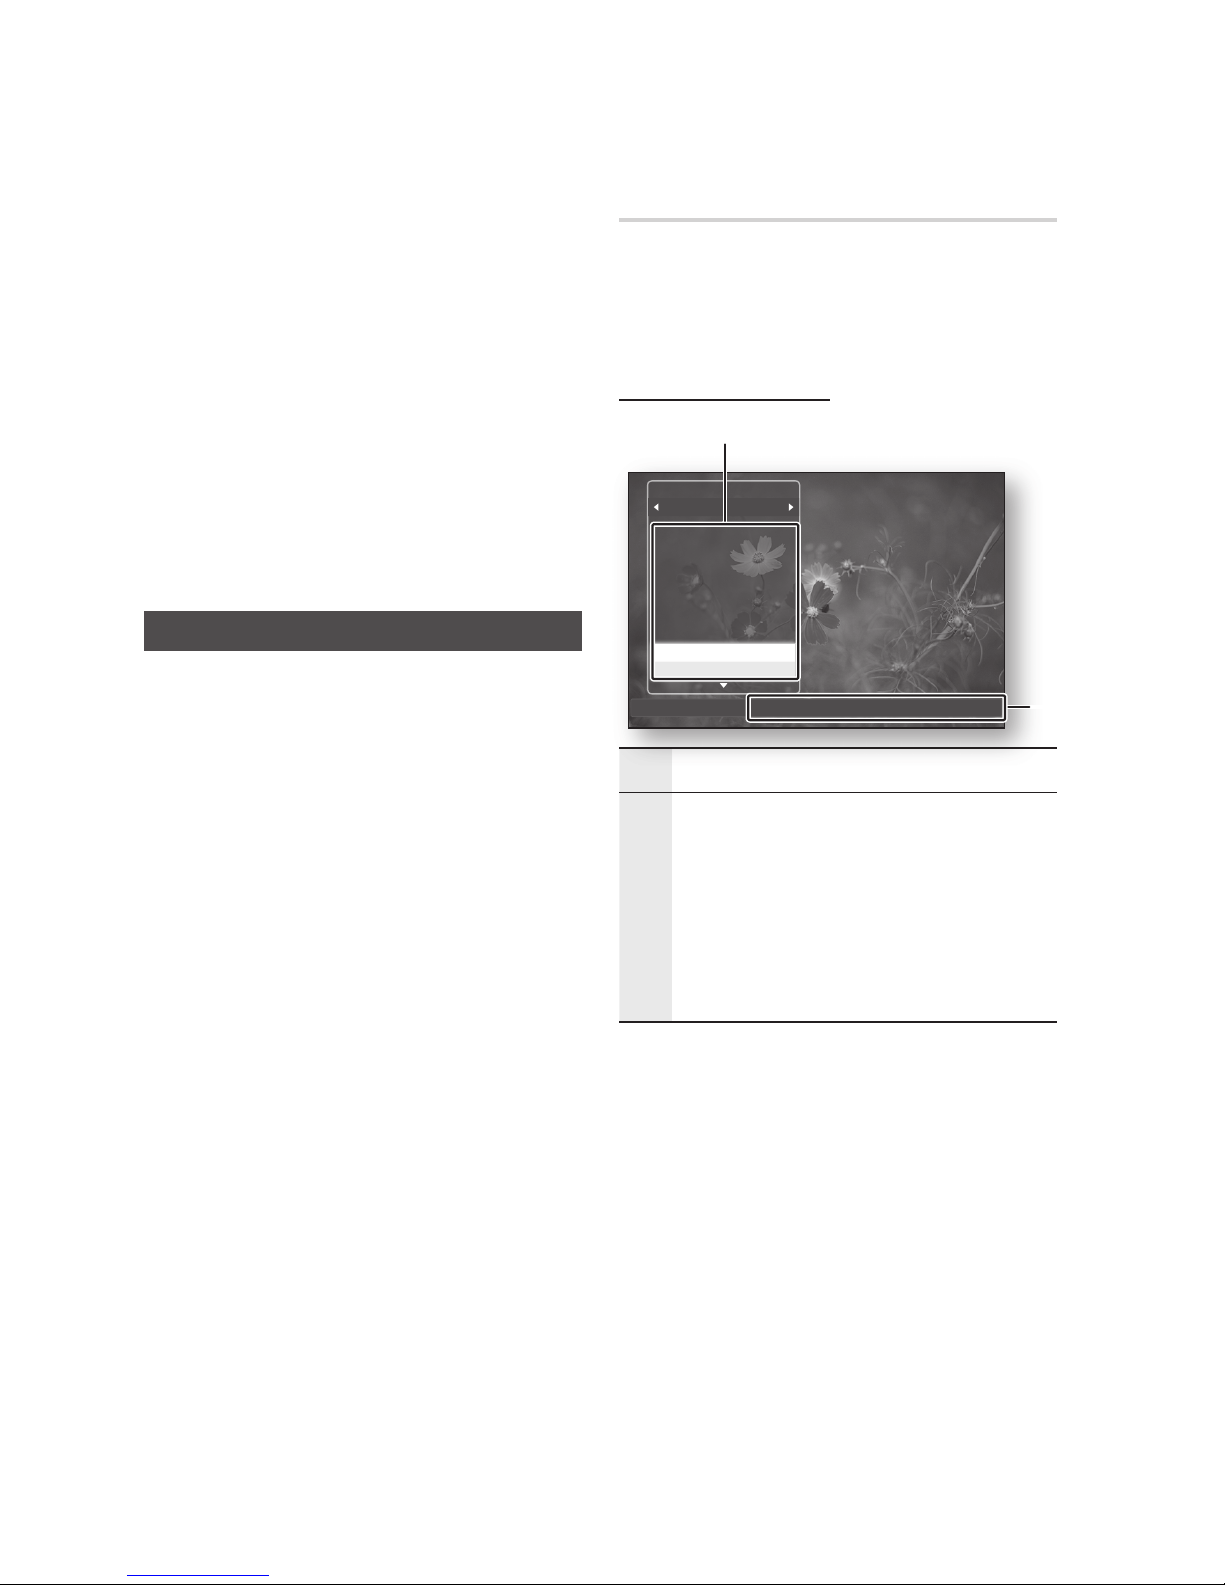
Channel List
You can see all channels searched.
Press the CH LIST button on the remote
control.
The Channel List will be displayed.
Channel List Screen
1
Shows the stored channels.
2
Navigation Help : Displays remote control buttons
available.
YELLOW (C) : Displays the Programme
information.
Ch. Mode : Shows the channel mode according
to channel type. (All, TV, Radio, Data/Other)
Watch : Displays the selected channel.
Page : Moves to next or previous page.
•
•
•
•
Press the ▲▼ buttons to select desired
channel, press the ENTER button.
The selected channel will be displayed.
NOTE
By pressing the INFO button, you can watch or
record the selected channel.
1.
2.
✎
▪
808
809
810
811
812
813
814
BBC World
bid-up.tv
Boomerang
Cartoon Nwk
Class News
Coming Soon
Discovery
No Information
All
Channel List
Programme View < Ch. Mode " Watch ƒ Page
2
1
Page 35
English 35
05 Setup
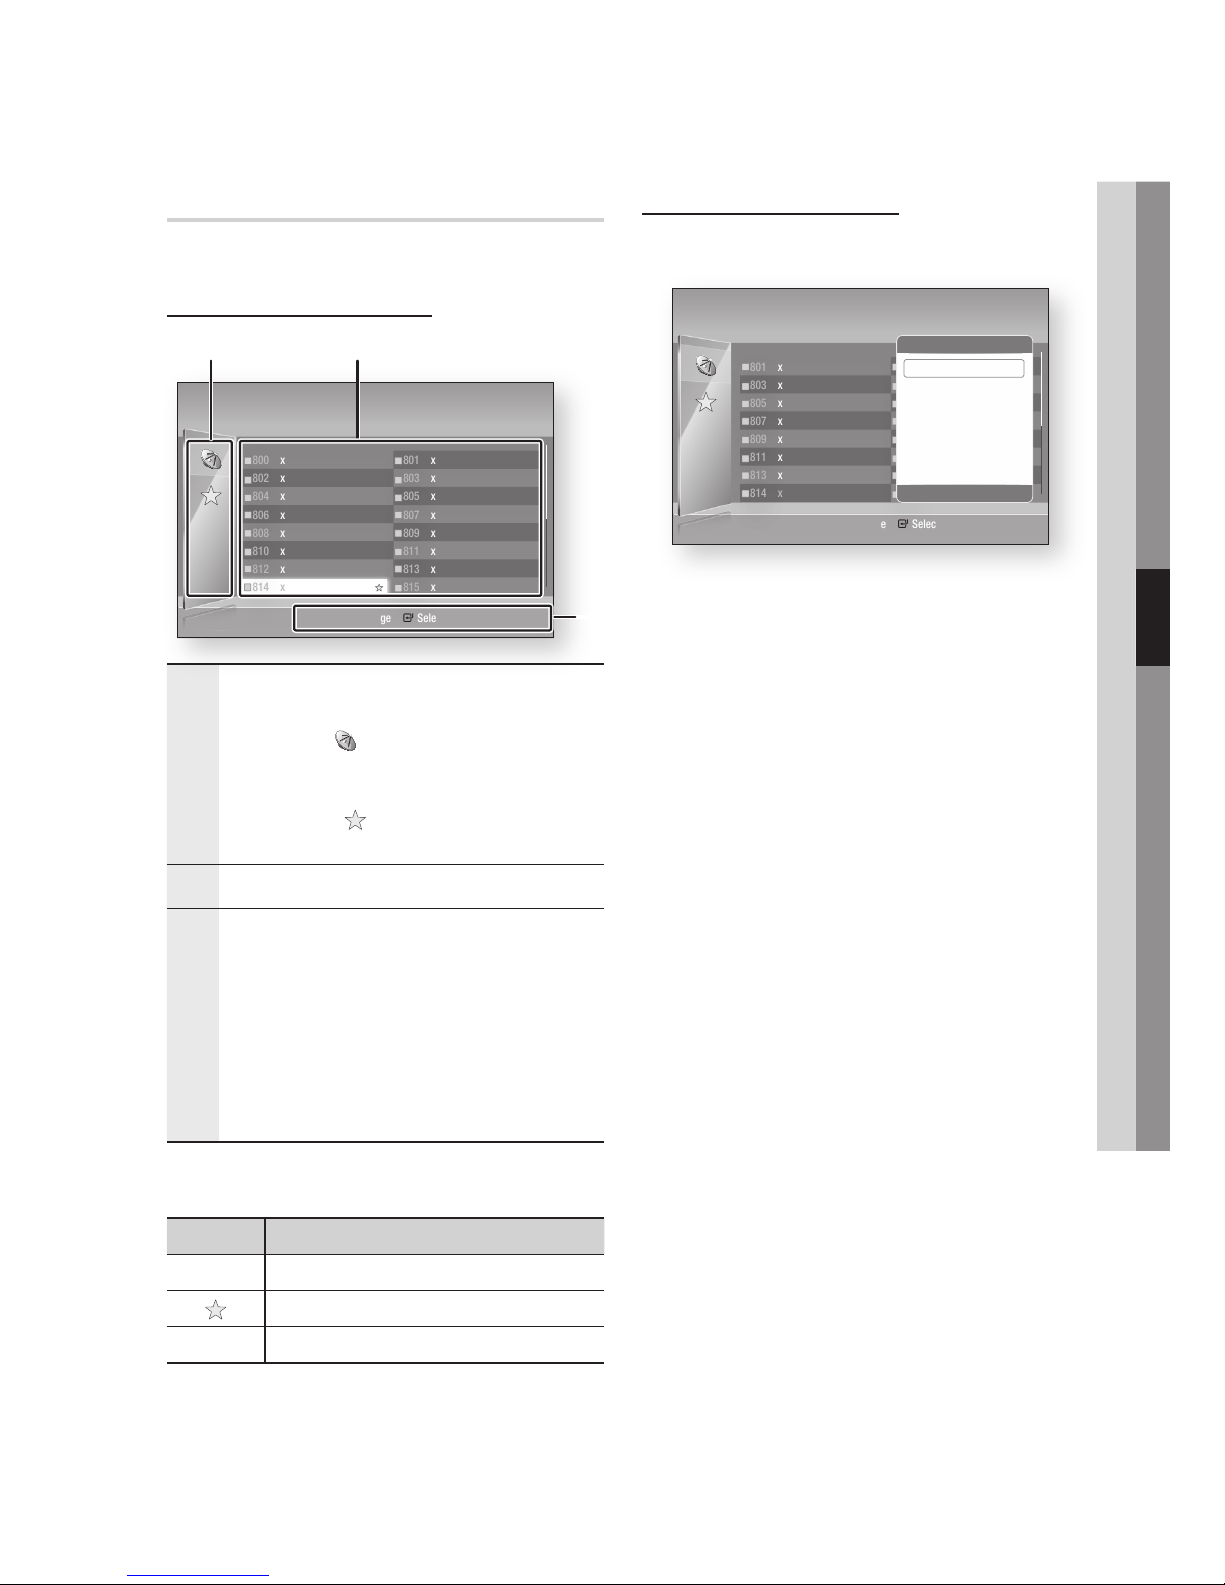
Channel Manager
You can manage the stored channels.
Channel Manager Screen
1
Edited Channels : Press the ◄▲▼ buttons to
check edited channels.
Channels ( ) : Shows the channel list
according to channel type. (All, TV, Radio,
Data/Other)
Favourites ( ) : Shows all favourite channel.
(Favourites 1, Favourites 2, Favourites 3......)
•
•
2
Shows the stored channels.
3
Navigation Help : Displays remote control buttons
available.
BLUE (D) : Sorts the list ordered by channel
number or channel name.
Page : Moves to next or previous page.
Select : Selects desired Channel.
Tools : Displays the Channel Manager option.
Return : Returns to previous menu.
•
•
•
•
•
Channel Status Display Icons
Icons Operations
c
A channel selected.
A channel set as Favourites.
\
A locked channel.
Using the TOOLS button
Press the ▲▼ buttons to select the desired
channel, then press the TOOLS button.
Watch
Select this to watch the channel.
Add to Favourites / Edit Favourites
Select this to add the desired favourite channel.
Lock / Unlock
Select this to lock the channel.
Edit Channel Number
Select this to edit the channel number.
If the Edit Channel Number option is not displayed
in the Channel Manager, set it to Enable in the
channels menu. (See page 44).
This menu will be displayed only when you set the
country to New Zealand.
Delete
Select this to delete the Channel.
Deselect All
Select this to deselect all channel.
Select All
Select this to select all channel.
NOTE
For satellite broadcasting, editing the channel
numbers may be possible depending on the
specification.
✎
▪
801
803
805
807
809
811
813
815
xxxxxxxx
xxxxxxxx
xxxxxxxx
xxxxxxxx
xxxxxxxx
xxxxxxxx
xxxxxxxx
xxxxxxxx
1/2 Pages
Channel Manager | All
d
Sorting ƒ Page " Select / Tools ' Return
Selected item: 1
Channel number
801 xxxxxxxx
803 xxxxxxxx
805 xxxxxxxx
807 xxxxxxxx
809 xxxxxxxx
811 xxxxxxxx
813 xxxxxxxx
815 xxxxxxxx
801 xxxxxxxx
803 xxxxxxxx
805 xxxxxxxx
807 xxxxxxxx
809 xxxxxxxx
811 xxxxxxxx
813 xxxxxxxx
814 xxxxxxxx
Tools
"
Enter ' Return
Watch
Add to Favourites
Lock
Edit Channel Number
Delete
Deselect All
Select All
1/2 Pages
Channel Manager | All
d
Sorting ƒ Page " Select / Tools ' Return
Channel number
3
1 2
801 xxxxxxxx
803 xxxxxxxx
805 xxxxxxxx
807 xxxxxxxx
809 xxxxxxxx
811 xxxxxxxx
813 xxxxxxxx
815 xxxxxxxx
800 xxxxxxxx
802 xxxxxxxx
804 xxxxxxxx
806 xxxxxxxx
808 xxxxxxxx
810 xxxxxxxx
812 xxxxxxxx
814 xxxxxxxx
Page 36
36 English
Setup
Settings
Press the MENU button.
The home menu will be displayed.
Press the ◄► buttons to select the Settings,
then press the ENTER button.
Press the ▲▼ buttons to select the desired
submenu, then press the ENTER button.
Press the ▲▼ buttons to select the desired
item, then press the ENTER button.
Press the EXIT button to exit the menu.
Display
You can configure various display options such as
the TV Aspect Ratio, Resolution, etc.
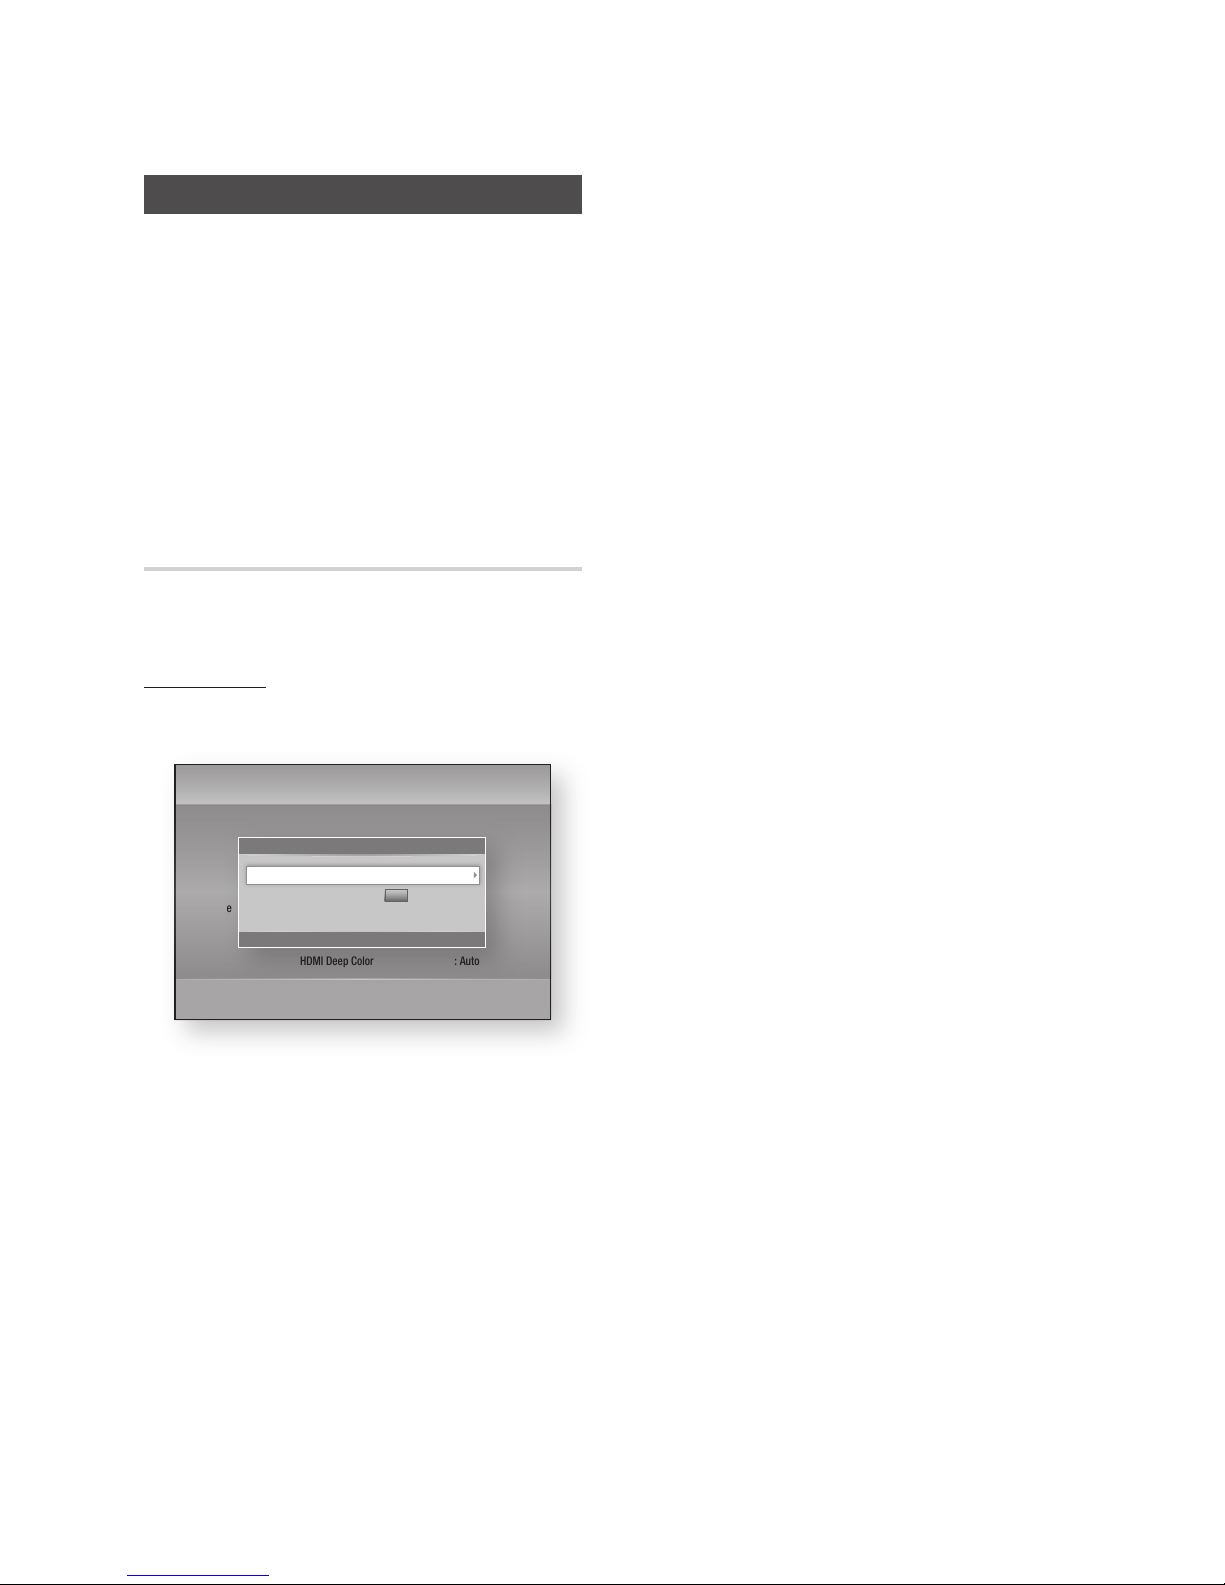
3D Settings
Select whether to play a Blu-ray Disc with 3D
contents in 3D Mode.
3D Blu-ray Playback Mode
3D Blu-ray Discs are available in two formats :
Blu-ray 3D and 3D only. You can choose to watch
a Blu-ray 3D disc in 3D or 2D mode before playing
the disc.
Auto : Automatically detect if a connected TV
has 3D capability and play a Blu-ray 3D disc in
3D or 2D accordingly or a 3D only disc in 3D if
the TV supports 3D.
3D only discs will not be played if your TV does
not support 3D.
3D 3D : Play 3D only and Blu-ray 3D discs in
3D mode at all times.
3D 2D : Play Blu-ray 3D discs in 2D mode at
all times. 3D only discs will not be played.
1.
2.
3.
4.
5.
•
•
•
NOTE
Depending on the content and the position of the
picture on your TV screen, you may see vertical
black bars on the left side, right side, or both sides.
Screen Size
Lets you enter the actual screen size of your TV so
that the product can adjust the image according
to the screen size and display an optimal 3D
image.
(For 3D displays bigger than 116 inches, simply
setting it as 116 is a safe choice.)
CAUTION
If you want to enjoy 3D content, connect a 3D device
(3D compliant AV receiver or TV) to the product’s
HDMI OUT port using a high-speed HDMI cable. Put
on 3D glasses before playing the 3D content.
The product outputs 3D signals only through HDMI
cable connected to the HDMI OUT port.
As the video resolution in 3D play mode is fixed
according to the resolution of the original 3D
video, you can not change the resolution to your
preference.
Some functions such as BD Wise, screen size
adjustment, and resolution adjustment may not
operate properly in 3D play mode.
You must use a high-speed HDMI cable for proper
output of the 3D signal.
Stay at least three times the width of the screen from
the TV when watching 3D images. For example, if
you have a 46 inch screen, stay 138 inches (11.5
feet) from the screen.
Place the 3D video screen at eye level for the
best 3D picture.
When the product is connected to some 3D devices,
the 3D effect may not function properly.
“Blu-ray 3D” and “Blu-ray 3D” logo are trademarks
of the Blu-ray Disc Association.
✎
▪
!
▪
▪
▪
▪
▪
▪
-
▪
▪
Settings
Display
Audio
Channel
Network
System
Language
Security
General
Support
3D Settings
HDMI Deep Color : Auto
3D Settings
>
Move " Enter ' Return
3D Blu-ray Playback Mode : Auto
Screen Size :
55
inch
Page 37

English 37
05 Setup
TV Aspect
Depending on the type of television you have, you
may want to adjust the screen size setting.
16:9 Original : Select when you connect the
product to a 16:9 TV screen. The product will
display all content in its original aspect ratio.
Content formatted in 4:3 will be displayed with
black bars on the left and right.
16:9 Full : Select when you connect the
product to a 16:9 TV screen. All content will fill
the full screen. Content formatted in 4:3 will be
stretched.
4:3 Letter Box : Select when you connect the
product to a 4:3 TV screen. The product will
display all content in its original aspect ratio.
Content formatted in 16:9 will be displayed with
black bars on the top and bottom.
4:3 Pan-Scan : Select when you connect the
product to a 4:3 TV screen. 16:9 content will
have the extreme left and right portions cut off.
NOTE
Depending on the disc type, some aspect ratios may
not be available.
If you select an aspect ratio and option which is
different than the aspect ratio of your TV screen,
then the picture might appear to be distorted.
If you select the 16:9 Original, your TV may display
4:3 Pillarbox (black bars on sides of picture).
Smart Hub Screen Size
Set the Smart Hub Screen to the optimal size.
Size 1 : Smart Hub screen size will be smaller
than default. You may see some black on sides
of screen.
Size 2 : This is the default setting for Smart
Hub. The product displays the normal Smart
Hub screen size.
Size 3 : This will display a larger Smart Hub
screen size. The image may be too large for
your TV screen.
BD Wise (Samsung Products only)
BD Wise is Samsung’s latest inter-connectivity
feature.
•
•
•
•
✎
▪
▪
▪
•
•
•
When you connect a Samsung product and a
Samsung TV with BD Wise to each other via HDMI,
and BD Wise is on in both the product and TV, the
product outputs video at the video resolution and
frame rate of the Blu-ray Disc/DVDs.
Off : The output resolution stays fixed at the
resolution you set previously in the Resolution
menu, regardless of the resolution of the disc.
See Resolution below.
On : The product outputs video at the original
resolution and frame rate of the Blu-ray Disc/
DVDs.
NOTE
When BD Wise is on, the Resolution setting
automatically defaults to BD Wise and BD Wise
appears in the Resolution menu.
If the product is connected to a device that does
not support BD Wise, you can not use the BD Wise
function.
For proper operation of BD Wise, set the BD Wise
menu of both the product and the TV to On.
Resolution
Lets you set the output resolution of the
Component and HDMI video signal to Auto,
1080p, 1080i, 720p, 576p/480p, or 576i/480i.
The number indicates the number of lines of video
per frame. The i and p indicate interlaced and
progressive scan, respectively. The more lines, the
higher the quality.
Auto : Automatically sets the output resolution
to the connected TV’s maximum resolution.
BD Wise : Automatically sets the resolution to
the resolution of the Blu-ray Disc/DVDs if you
have connected the product via HDMI to a TV
with the BD Wise feature. (The BD Wise menu
item appears only if BD Wise is set to On. See
BD Wise above.)
1080p : Outputs 1080 lines of progressive
video.
1080i : Outputs 1080 lines of interlaced video.
720p : Outputs 720 lines of progressive video.
576p/480p : Outputs 576/480 lines of
progressive video.
576i/480i : Outputs 576/480 lines of interlaced
video.
•
•
✎
▪
▪
▪
•
•
•
•
•
•
•
Page 38
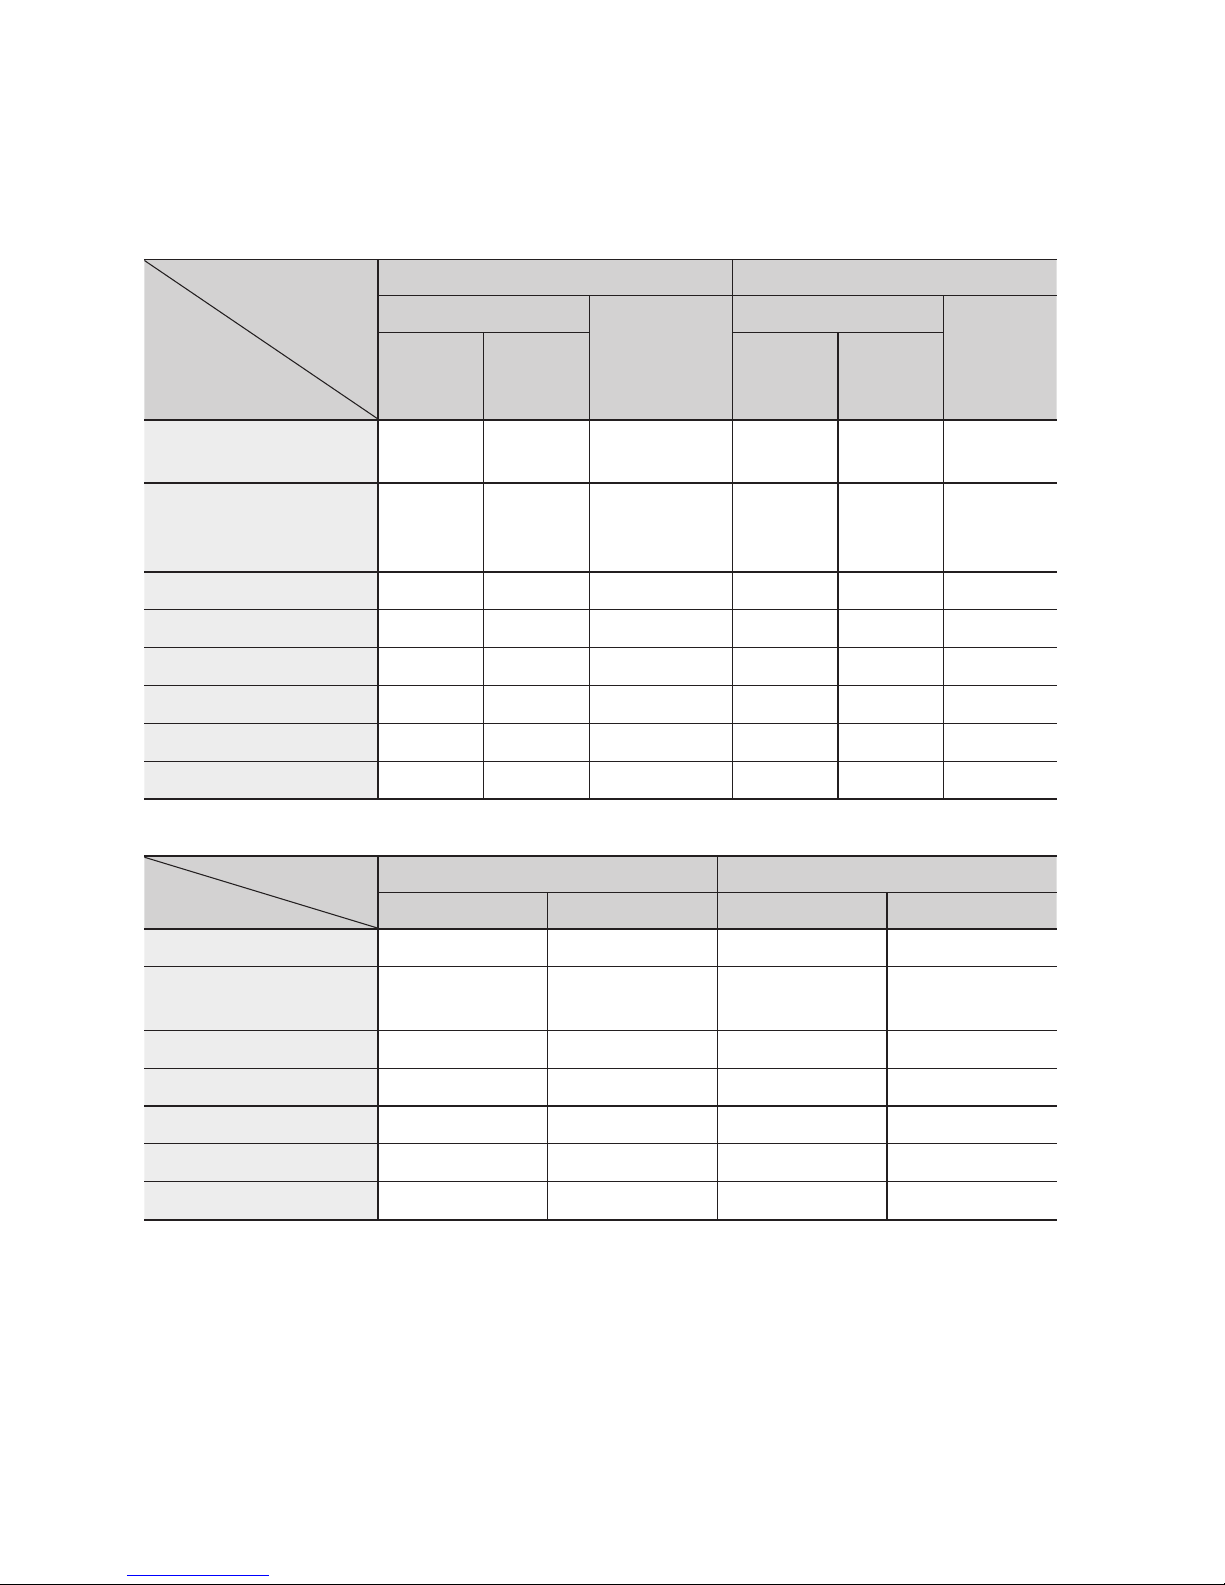
38 English
Setup
Resolution according to the output mode
Blu-ray Disc/E-contents/Digital Contents playback
Output
Setup
HDMI / connected HDMI / not connected
HDMI Mode
Component/
VIDEO Mode
Component Mode
VIDEO Mode
Blu-ray Disc
E-contents/
Digital
contents
Blu-ray Disc
E-contents/
Digital
contents
BD Wise
Resolution of
Blu-ray Disc
1080p 576i/480i - - -
Auto
Max.
Resolution of
TV input
Max.
Resolution of
TV input
576i/480i - - -
1080p 1080p 1080p 576i/480i - - -
Movie Frame : Auto (24Fs) 1080p@24F 1080p@24F 480i - - -
1080i 1080i 1080i 576i/480i 576i/480i 576p/480p 576i/480i
720p 720p 720p 576i/480i 576i/480i 576p/480p 576i/480i
576p/480p 576p/480p 576p/480p 576i/480i 576i/480i 576p/480p 576i/480i
576i/480i - - - 576i/480i 576i/480i 576i/480i
DVD playback
Output
Setup
HDMI / connected HDMI / not connected
HDMI Mode
Component/VIDEO Mode
Component Mode VIDEO Mode
BD Wise 576i/480i 576i/480i - -
Auto
Max. Resolution of TV
input
576i/480i - -
1080p 1080p 576i/480i - -
1080i 1080i 576i/480i 576p/480p 576i/480i
720p 720p 576i/480i 576p/480p 576i/480i
576p/480p 576p/480p 576i/480i 576p/480p 576i/480i
576i/480i - - 576i/480i 576i/480i
Page 39
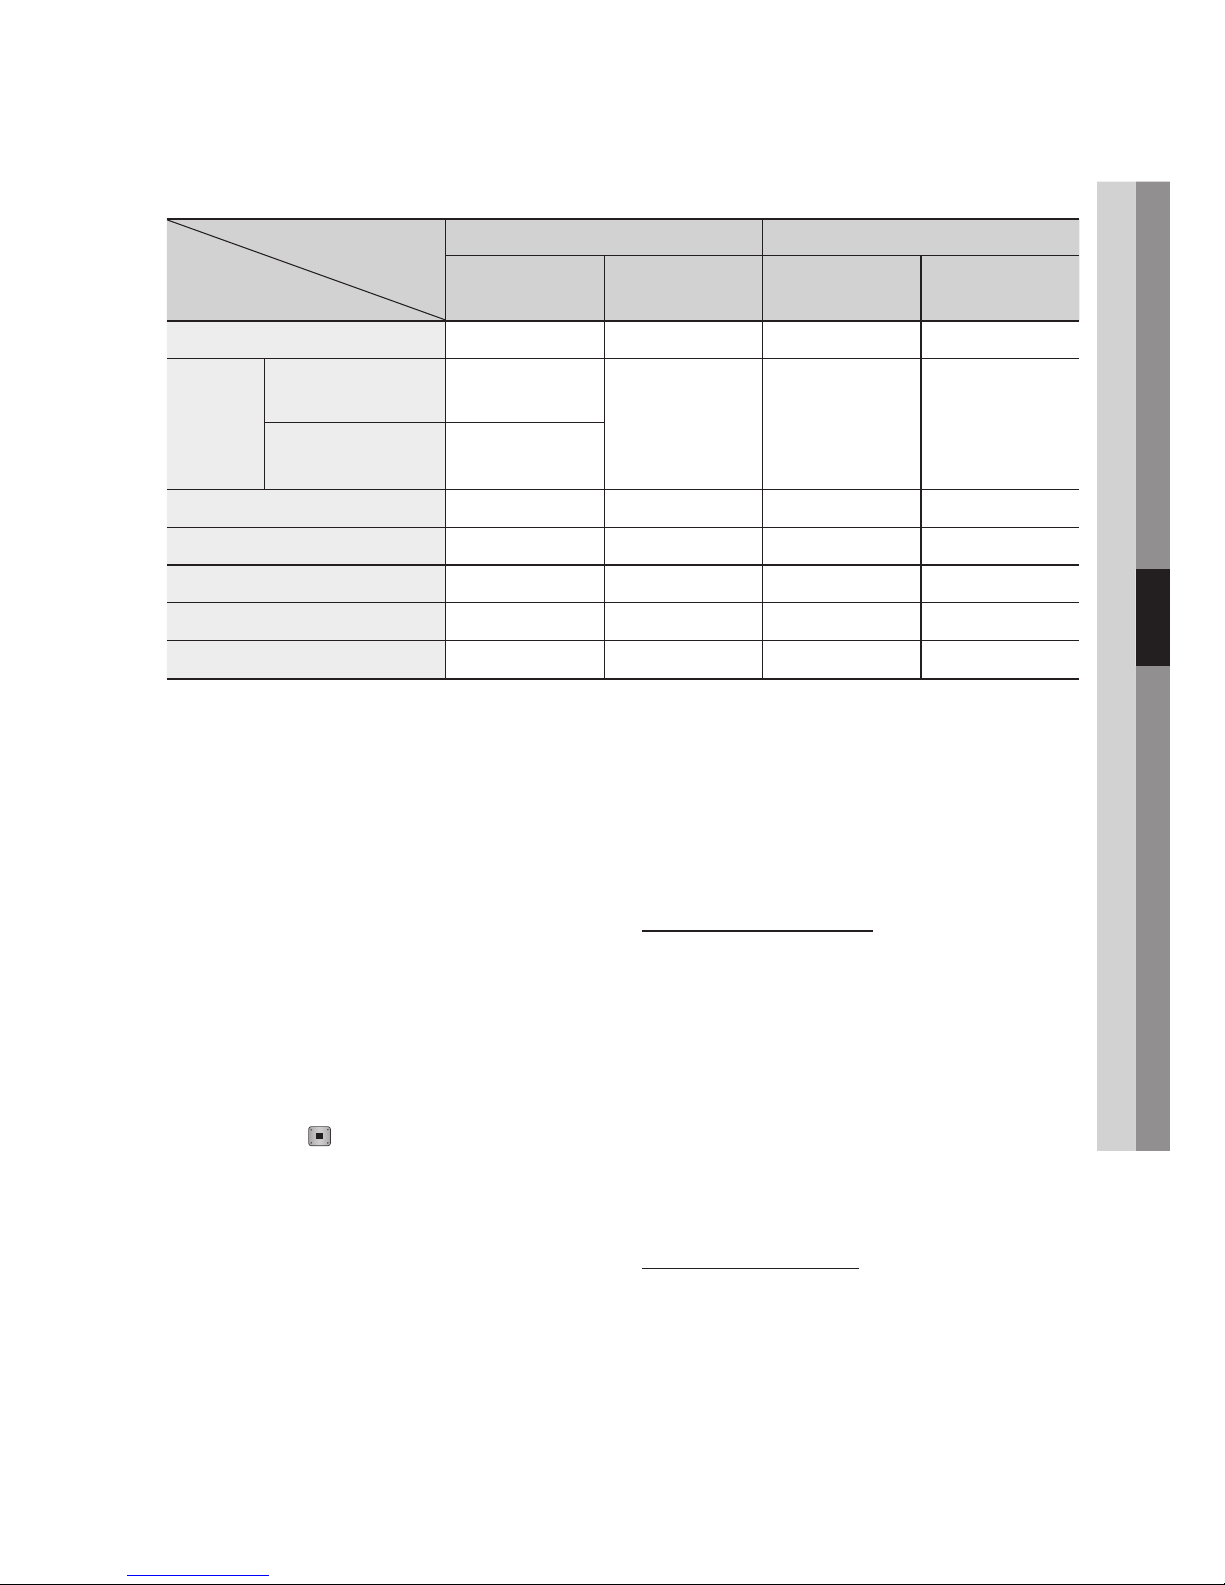
English 39
05 Setup
DTV View
Output
Resolution
HDMI connected HDMI not connected
HDMI Mode
Component/
VIDEO MODE
Component Mode VIDEO Mode
BD Wise 1080p 576i/480i - -
Auto
DTV Smart Resolution
“Auto”
Resolution of
Broadcast stream
576i/480i - -
DTV Smart Resolution
“Off”
Max Resolution of
TV input
1080p 1080p 576i/480i - -
1080i 1080i 576i/480i 576p/480p 576i/480i
720p 720p 576i/480i 576p/480p 576i/480i
576p/480p 576p/480p 576i/480i 576p/480p 576i/480i
576i/480i - - 576i/480i 576i/480i
NOTE
DTV smart resolution is activated only when
resolution option is set to Auto.
If the TV you connected to the product does not
support Movie Frame or the resolution you selected,
the message “If no pictures are shown after
selecting ‘Yes’, please wait for 15 seconds to return
to the previous resolution. Do you want to change
the resolution?” appears.
If you select Yes, the TV’s screen will go blank for
15 seconds, and then the resolution will revert to the
previous resolution automatically.
If the screen stays blank after you have changed the
resolution, remove all discs, and then press and hold
the STOP (
) button on the front of the product for
more than 5 seconds. All settings are restored to the
factory default. Follow the steps on the previous page
to access each mode and select the Display Setup
that your TV will support.
When the factory default settings are restored, all
stored user BD data is deleted.
The Blu-ray Disc must have the 24 frame feature for
the product to use the Movie Frame (24Fs) mode.
If both HDMI and Component jacks are connected
and you are currently viewing Component output,
the resolution is fixed to 576i/480i.
✎
▪
▪
▪
▪
▪
▪
For Copy protected DivX content, the ouput resolution
of component Video is forced to 576i/480i.
When the HDMI cable is not connected and video
output is component mode, DivX contents with copy
protection can only be output 576i/480i.
DTV Smart Resolution
Use this function to automatically optimised
screen resolution for digital broadcasts.
Auto : Screen resolution is automatically
optimised for digital broadcast.
Off : Turn off DTV Smart Resolution.
NOTE
When you change your TV channel with this function
set to Auto, according your TV, the display time of
next channels may take longer than the function set
to Off.
HDMI Colour Format
Lets you set the colour space format for HDMI
output to match the capabilities of the connected
device (TV, monitor, etc).
Auto : Automatically sets the product to the
optimum format supported by your device.
YCbCr (4:4:4) : If your TV supports the YCbCr
colour space via HDMI, select this to output the
normal YCbCr colour gamut.
▪
▪
•
•
✎
▪
•
•
Page 40

40 English
Setup
RGB (Standard) : Select this to output the
normal RGB colour gamut.
RGB (Enhanced) : If you have connected
the product to a DVI display device such as
a monitor, select this to output the enhanced
RGB colour gamut.
Movie Frame (24Fs)
Setting the Movie Frame (24Fs) feature to Auto
allows you to adjust the product’s HDMI output to
24 frames per second for improved picture quality.
You can enjoy the Movie Frame (24Fs) feature only
on a TV supporting this frame rate. You can select
Movie Frame only when the product is in the
HDMI 1080i or 1080p output resolution modes.
Auto : Movie Frame (24Fs) functions work.
Off : Movie Frame (24Fs) functions are off.
HDMI Deep Color
Lets you output video from the HDMI OUT jack
with Deep Colour. Deep Colour provides more
accurate colour reproduction with greater colour
depth.
Auto : The product outputs video with Deep
Colour to a connected TV which supports HDMI
Deep Colour.
Off : The picture is output without Deep Colour.
Still Mode
Lets you set the type of picture the product
displays when you pause DVD playback.
Auto : Automatically shows the best still picture
depending on the content.
Frame : Select when pausing a scene with a
little action.
Field : Select when pausing a scene with a lot
of action.
Progressive Mode
Lets you improve picture quality when viewing
DVDs.
Auto :
Select to have the
product
automatically
select the best picture quality for the DVD you’re
watching.
Video : Select for the best picture quality from
concert or TV show DVDs.
•
•
•
•
•
•
•
•
•
•
•
Audio
Digital Output
You set the Digital Output to match the
capabilities of the AV receiver you’ve connected to
the product :
PCM : Choose if you have connected an HDMI
supported AV receiver.
Bitstream (Unprocessed) : Select if you have
connected an HDMI supported AV receiver
with Dolby TrueHD and DTS-HD Master Audio
decoding capabilities.
Bitstream (Re-encoded DTS) : Choose if you
have connected an AV receiver using a Digital
Optical input that can decode DTS.
Bitstream (Re-encoded Dolby D) : Select if
you don’t have an HDMI supported AV receiver,
but have an AV receiver with Dolby Digital
decoding capabilities.
Blu-ray Discs may include three audio streams :
Main Feature Audio : The audio soundtrack of
the main feature.
BONUSVIEW audio : An additional soundtrack
such as the director or actor’s commentary.
Navigation Sound Effects : When you choose
some menu navigation, Navigation Sound
Effects may sound. Navigation Sound Effects
are different on each Blu-ray Disc.
NOTE
Be sure to select the correct Digital Output or you
will hear no sound or a loud noise.
If the HDMI device (AV receiver, TV) is not compatible
with compressed formats (Dolby digital, DTS), the
audio signal outputs as PCM.
Regular DVDs do not have BONUSVIEW audio and
Navigation Sound Effects.
Some Blu-ray Discs do not have BONUSVIEW audio
and Navigation Sound Effects.
This Digital Output setup does not effect the analogue
(L/R) audio or HDMI audio output to your TV.
It effects the optical and HDMI audio output when
connected to an AV receiver.
•
•
•
•
-
-
-
✎
▪
▪
▪
▪
▪
Page 41
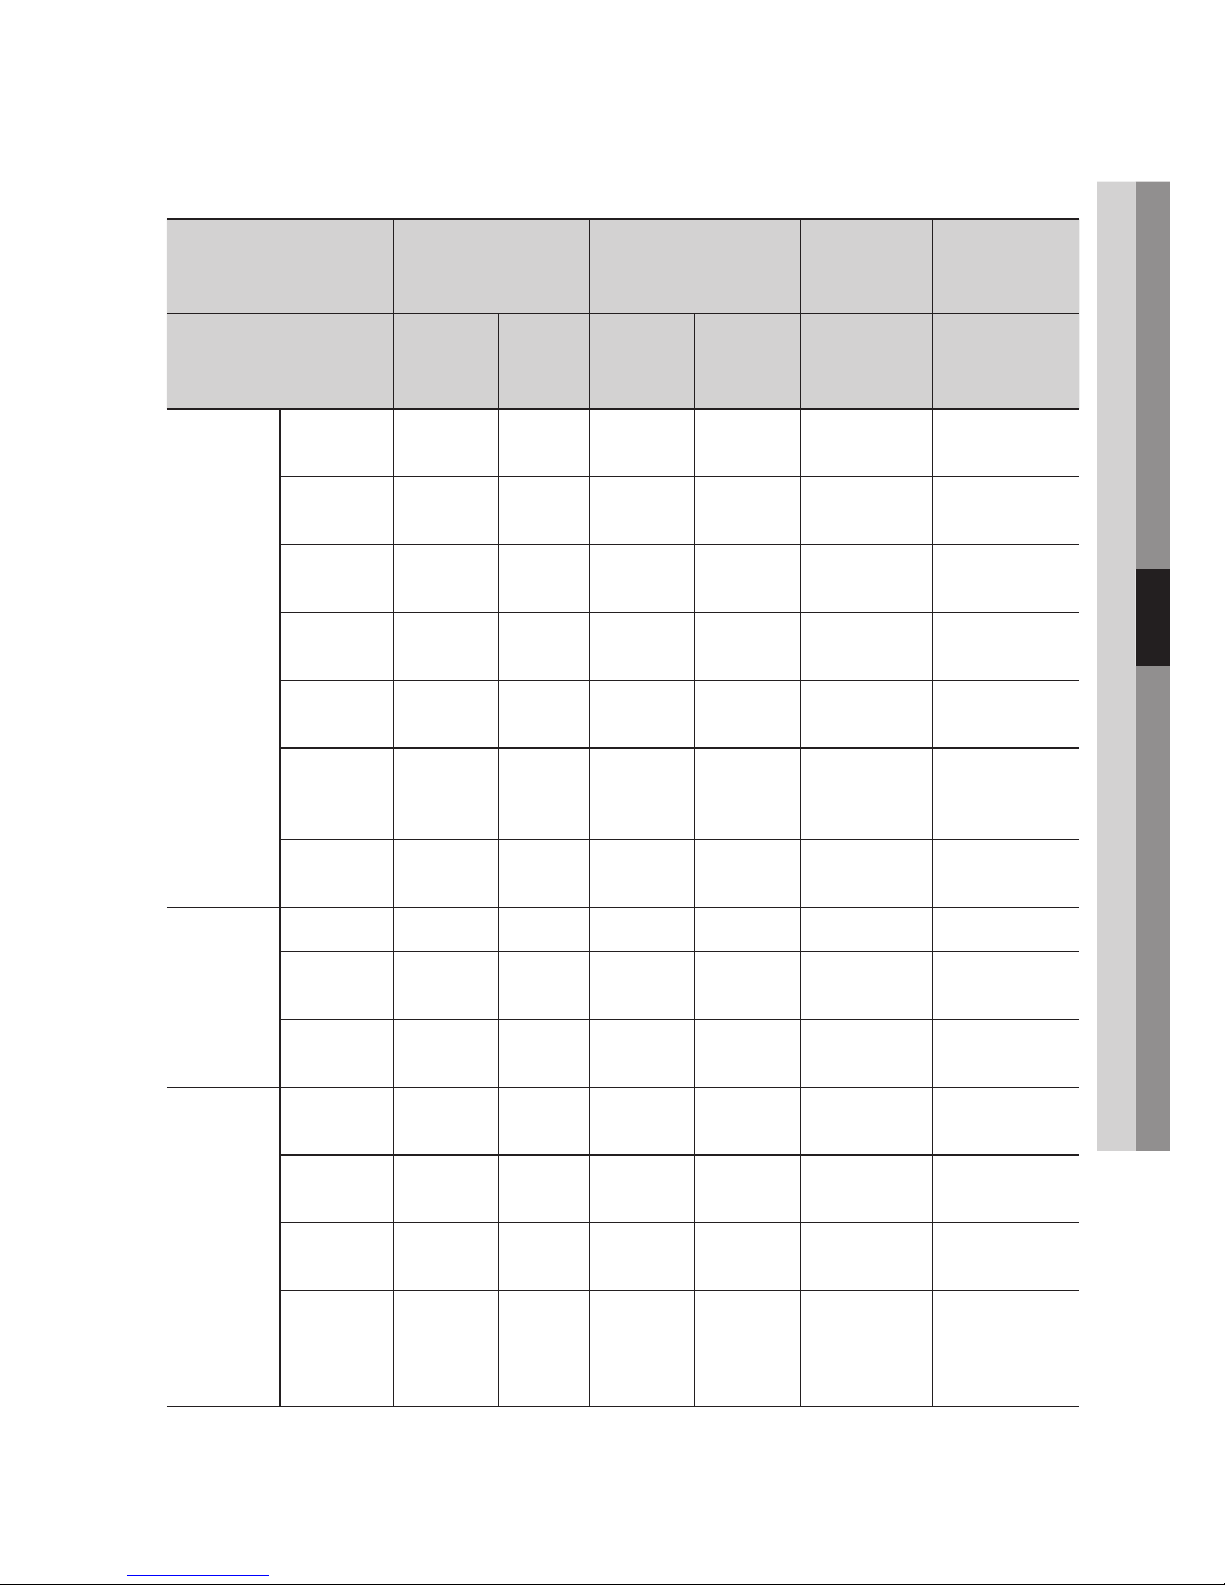
English 41
05 Setup
Digital Output Selection
Setup PCM
Bitstream
(Unprocessed)
Bitstream
(Re-encoded
DTS)
Bitstream
(Re-encoded
Dolby D)
Connection
HDMI
supported
AV receiver
Optical
HDMI
supported
AV receiver
Optical
HDMI supported
AV receiver or
Optical
HDMI supported
AV receiver or
Optical
Audio Stream
on Blu-ray
Disc
PCM
Up to PCM
7.1ch
PCM 2ch PCM PCM 2ch Re-encoded DTS
Re-encoded
Dolby Digital *
Dolby Digital
Up to PCM
7.1ch
PCM 2ch Dolby Digital Dolby Digital Re-encoded DTS
Re-encoded
Dolby Digital *
Dolby Digital
Plus
Up to PCM
7.1ch
PCM 2ch
Dolby Digital
Plus
Dolby Digital Re-encoded DTS
Re-encoded
Dolby Digital *
Dolby TrueHD
Up to PCM
7.1ch
PCM 2ch Dolby TrueHD Dolby Digital Re-encoded DTS
Re-encoded
Dolby Digital *
DTS
Up to PCM
6.1ch
PCM 2ch DTS DTS Re-encoded DTS
Re-encoded
Dolby Digital *
DTS-HD High
Resolution
Audio
Up to PCM
7.1ch
PCM 2ch
DTS-HD High
Resolution
Audio
DTS Re-encoded DTS
Re-encoded
Dolby Digital *
DTS-HD
Master Audio
Up to PCM
7.1ch
PCM 2ch
DTS-HD
Master Audio
DTS Re-encoded DTS
Re-encoded
Dolby Digital *
Audio Stream
on DVD
PCM PCM 2ch PCM 2ch PCM 2ch PCM 2ch PCM 2ch PCM 2ch
Dolby Digital
Up to PCM
5.1ch
PCM 2ch Dolby Digital Dolby Digital Dolby Digital Dolby Digital
DTS
Up to PCM
6.1ch
PCM 2ch DTS DTS DTS DTS
Audio Stream
of Broadcast
Dolby Digital
Up to PCM
5.1ch
PCM 2ch Dolby Digital Dolby Digital Re-encoded DTS
Re-encoded
Dolby Digital *
Dolby Digital
Plus
Up to PCM
5.1ch
PCM 2ch
Dolby Digital
Plus***
Dolby Digital Re-encoded DTS
Re-encoded
Dolby Digital *
MPEG1
Up to PCM
5.1ch
PCM 2ch
PCM
(up to 5.1ch)
PCM 2ch Re-encoded DTS
Re-encoded
Dolby Digital *
HE-AAC
Up to PCM
5.1ch
PCM 2ch
Re-encoded
Dolby Digital**
(for Multichannel
Programme)
Re-encoded
Dolby Digital**
(for Multichannel
Programme)
Re-encoded DTS
Re-encoded
Dolby Digital *
Page 42
42 English
Setup
PCM Downsampling
Lets you set 48kHz and 96kHz PCM downsampling on or off.
Off : Select when the AV receiver connected to
the product is 96kHz compatible.
On : Select when the AV receiver connected
to the product is not 96kHz compatible. 96kHz
signals will be down converted to 48kHz.
NOTE
Even when PCM Downsampling is set to Off, some
discs will only output downsampled audio through
the optical digital outputs.
HDMI
If your TV is not compatible with compressed
multi-channel formats (Dolby Digital, DTS), the
product may output PCM 2ch downmixed
audio even though you set the digital output as
Bitstream (unprocessed/Re-encoded DTS/Reencoded Dolby D) on your setup menu.
If your TV is not compatible with PCM sampling
rates over 48kHz, the product may output
48kHz downsampled PCM audio even though
you set PCM Downsampling to Off.
•
•
✎
▪
•
•
Dynamic Range Control
You can listen at low volumes, but still hear dialog
clearly.
This is only active if your product detects a Dolby
Digital, Dolby Digital Plus or Dolby TrueHD signal.
Auto : The Dynamic Range Control will be set
automatically based on the information provided
by the Dolby TrueHD Soundtrack.
Off : You can enjoy the movie with the standard
Dynamic Range.
On : When Movie soundtracks are played at low
volume or through smaller speakers, the system
can apply appropriate compression to make
low-level content more intelligible and prevent
dramatic passages from getting too loud.
Downmixing Mode
Lets you select how the product will downmix
multi-channel audio into fewer channels.
Normal Stereo : Downmixes the multi-channel
audio into two channel stereo. Choose when
connected to equipment that does not support
virtual surround functions such as Dolby Pro
Logic.
Surround Compatible : Downmixes multichannel audio into surround compatible stereo.
Choose when connected to equipment that
supports virtual surround functions such as
Dolby Pro Logic.
•
•
•
•
•
Definition for
Blu-ray Disc
Any
Decodes the main feature
audio and BONUSVIEW
audio stream together
into PCM audio and adds
Navigation Sound Effects.
Outputs only the main
feature audio stream so that
your AV receiver can decode
the audio bitstream.
You will not hear
BONUSVIEW audio or
Navigation Sound Effects.
Decodes the main
feature audio and
BONUSVIEW audio
stream together
into PCM audio and
adds Navigation
Sound Effects, then
re-encodes the
PCM audio into DTS
bitstream.
Decodes
the
main
feature audio and
BONUSVIEW audio
stream together
into PCM audio and
adds
Navigation
Sound Effects,
then re-encodes
the PCM audio
into Dolby digital
bitstream.
* If the Source Stream is 2ch or mono, “Re-encoded Dolby D” Setting are not applied. Output will be
PCM 2ch.
** If HE-AAC Source Stream is 2ch or 1ch, Output shall be 2ch PCM.
For Dolby Digital Plus stream on Internet Content, PCM Output via HDMI supported up to 5.1ch.
*** If the Audio Description is set to
On and the Number of Audio Channel is more than 2, audio output
will be changed Dolby Digital even if the original broadcast stream is Dolby Digital Plus.
But, if the Number of Audio Channel is 2 (stereo) or 1 and Audio Description is set to On, Output
format will be PCM.
Page 43

English 43
05 Setup
DTS Neo:6 Mode
You can enjoy multi-channel sound from an Audio
CD (CD-DA).
Off : Outputs a 2-channel audio signal through
the front speakers only.
Cinema : Select to play 2-channel movie sound
over multi-channels.
Music : Select to play 2-channel music over
multi-channels.
NOTE
If you are using an HDMI supported AV receiver, this
option is available when you set Digital Output setup
as PCM.
Audio Sync
In some cases when the product is connected to
a digital TV, the audio signal may not synchronize
with the video signal. If this occurs, adjust the
audio delay time to match the video signal.
You can set the audio delay time between 0
msec and 200 msec.
Adjust it to the optimal setting.
NOTE
The audio delay time you specify may not be exact
depending on the played content.
HDMI Audio Output
Set the audio method when a receiver is
connected to the product.
Auto : Listen to the audio from AV receiver
speakers. If an AV receiver is not connected or
turned off, listen to the audio from TV speaker.
Dual Output : Listen to the audio from both
AV receiver and TV speaker.
Channel
You can configure your TV channels with features
such as country and auto tune.
•
•
•
✎
▪
•
✎
▪
•
•
Country
Select this to change the country.
Enter the desired 4-digit password using the
number buttons.
Press the ►▲▼ buttons to select the desired
country, then press the ENTER button.
Press the RETURN button.
Auto Tuning
Scans for all channels with active broadcast
stations and stores them.
Scans for a channel automatically and stores in
the product.
Automatically allocated programme numbers may
not correspond to actual or desired programme
numbers.
If a channel is locked using the Child Lock
function, the PIN input window appears.
Manual Tuning
Scans for a channel manually and stores in the
product.
When scanning has finished, channels are
updated in the channel list.
Transfer Channel List
This function can import or export the channel
map. You should connect a USB storage to use
this function. Enter your 4 digit PIN number when
the PIN input screen appears.
Import from USB : Import channel list from USB.
Export to USB : Export channel list to USB.
This function is available when USB is
connected.
1.
2.
-
•
•
Page 44

44 English
Setup
Edit Channel Number
Select this to edit the channel number in the
channel manager. (See page 35)
This menu will be displayed only when you set the
country to New Zealand.
Disable : Select disable if you do not want to
edit channel number.
Enable : Select enable if you want to edit
channel number.
Digital Text (only New Zealand)
If the programme broadcasts with digital text, this
feature is enabled.
Disable : Select disable if you do not want to use
digital text.
Enable : Select enable if you want to use digital
text.
MHEG (Multimedia and Hypermedia
Information Coding Experts Group) : An
International standard for data encoding systems
used in multimedia and hypermedia.
This is at a higher level than the MPEG system
which includes data-linking hypermedia such as
still images, character service, animation, graphic
and video files as well as multimedia data.
MHEG is user runtime interaction technology
and is being applied to various fields including
VOD (Video-On-Demand), ITV (Interactive TV),
EC (Electronic Commerce), teleeducation,
teleconferencing, digital libraries and network
games.
•
•
•
•
•
Network
Before you begin, contact your ISP to find out
if your IP address is static or dynamic. If it is
dynamic, and you are using a wired or wireless
connection, we recommend using the Auto
procedures. If you are using a wireless connection
and your router has the capability, you can use
WPS(PBC) or One Foot Connection.
If your IP address is static, you must use the
manual set up procedure for both wired and
wireless connections.
Network Settings
To begin setting up the network connection for
your product, follow these steps:
In the Home menu, press the ◄► buttons to
select Settings, and then press the ENTER
button.
Press the ▲▼ buttons to select Network, and
then press the ENTER button.
Press the ▲▼ buttons to select Network
Settings, and then press the ENTER button.
Press the ▲▼ buttons to select Wired,
Wireless (general), WPS(PBC) or One Foot
Connection, and then press the ENTER
button.
If you have a wired network, go to Wired
Network below. If you have a wireless
network, go to Wireless Network on pages
46~48.
1.
2.
3.
4.
5.
Page 45
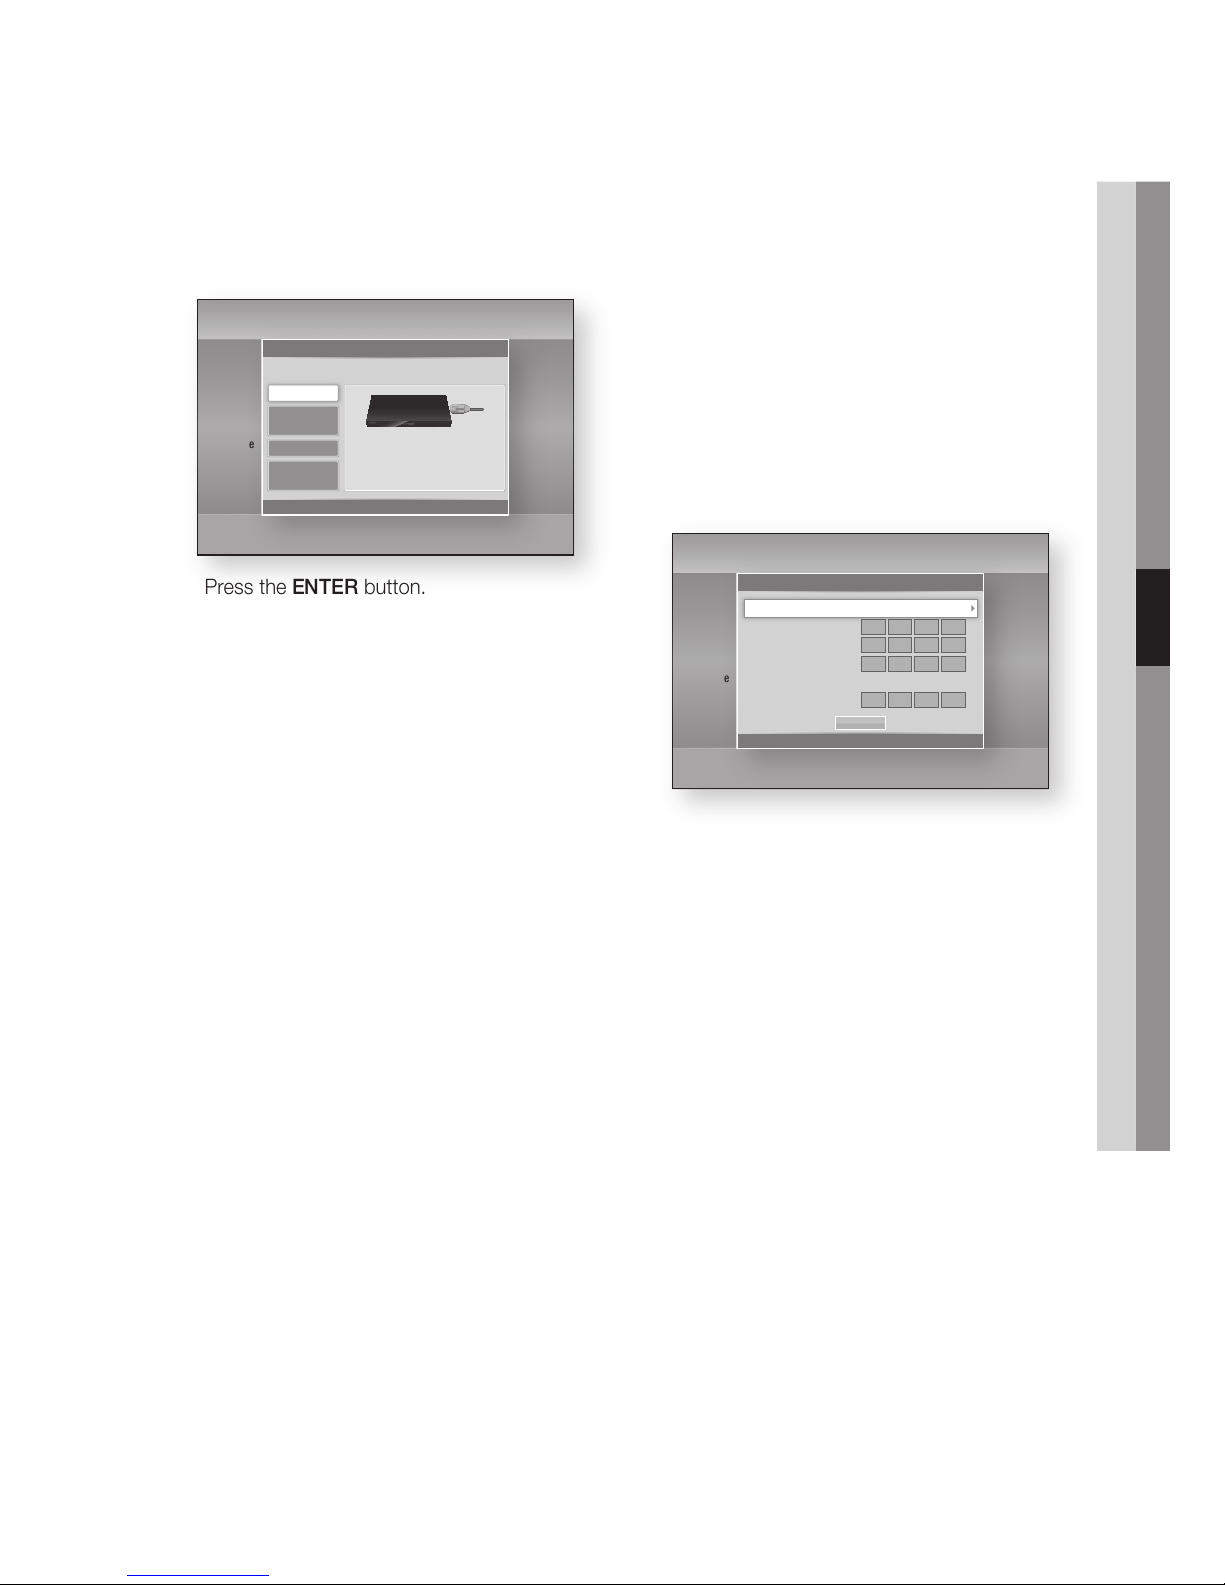
English 45
05 Setup
NOTE
Depending on your Windows version, the information
may differ.
To enter the Network settings into your product,
follow these steps:
Press the ▲▼ buttons to select Wired, and
then press the ENTER button.
Press the ◄► buttons to select IP Settings,
and then press the ENTER button.
On the Network Status screen, select Cancel,
and then press Enter.
Press the ENTER button to select IP Mode.
Press the ▲▼ buttons to select Manual, and
then press the ENTER button.
Press the ▼ button to go to the first entry field
(IP Address).
Use the number buttons on your remote to
enter numbers.
When done with each field, press the ►
button to move successively to the next field.
You can also use the other arrow buttons to
move up, down, and back.
Enter the IP Address, Subnet Mask, and
Gateway values.
Press the ▼ button to go to DNS Mode.
Press the ▼ button to go to the first DNS
entry field. Enter the numbers as above.
Press the ENTER button to select OK.
The Network Status screen appears. The
product connects to the network after the
network connection is verified.
✎
▪
1.
2.
3.
4.
5.
6.
7.
8.
9.
10.
11.
12.
Wired Network
Setting Up a Wired Connection - Auto
Press the ▲▼ buttons to select Wired.
Press the ENTER button.
The Network Status screen appears. The
product connects to the network after the
network connection is verified.
Setting Up a Wired Connection - Manual
If you have a static IP address or the Auto Setting
does not work, you’ll need to set the Network
Settings values manually.
To view your Network Settings values on most
Windows computers, follow these steps:
Windows XP
Right click the Network icon on the bottom
right of the Windows desktop.
In the pop-up menu, click Status.
On the dialog that appears, click the Support
tab.
On the Support tab, click the Details button.
The Network settings are displayed.
Windows 7
Click the Network icon on the bottom right of
the Windows desktop.
In the pop-up menu, click Network and
Sharing Centre.
On the dialog that appears, click the Local
Area Connection or Wireless Network
Connection depending on your network
connection.
On the Support tab, click the Details button.
The Network settings are displayed.
1.
2.
1.
2.
3.
4.
1.
2.
3.
4.
Settings
Display
Audio
Channel
Network
System
Language
Security
General
Support
IP Settings
>
Move " Enter ' Return
IP Mode Manual
IP Address
0.0.0.0
Subnet Mask
0.0.0.0
Gateway
0.0.0.0
DNS Mode Manual
DNS Server
0.0.0.0
OK
Settings
Display
Audio
Channel
Network
System
Language
Security
General
Support
Network Settings
>
Move " Enter ' Return
Select a network connection type.
Wired
Wireless
(general)
WPS(PBC)
One Foot
Connection
Connect to the network using a LAN cable. Please
make
sure that the LAN cable is connected.
Page 46
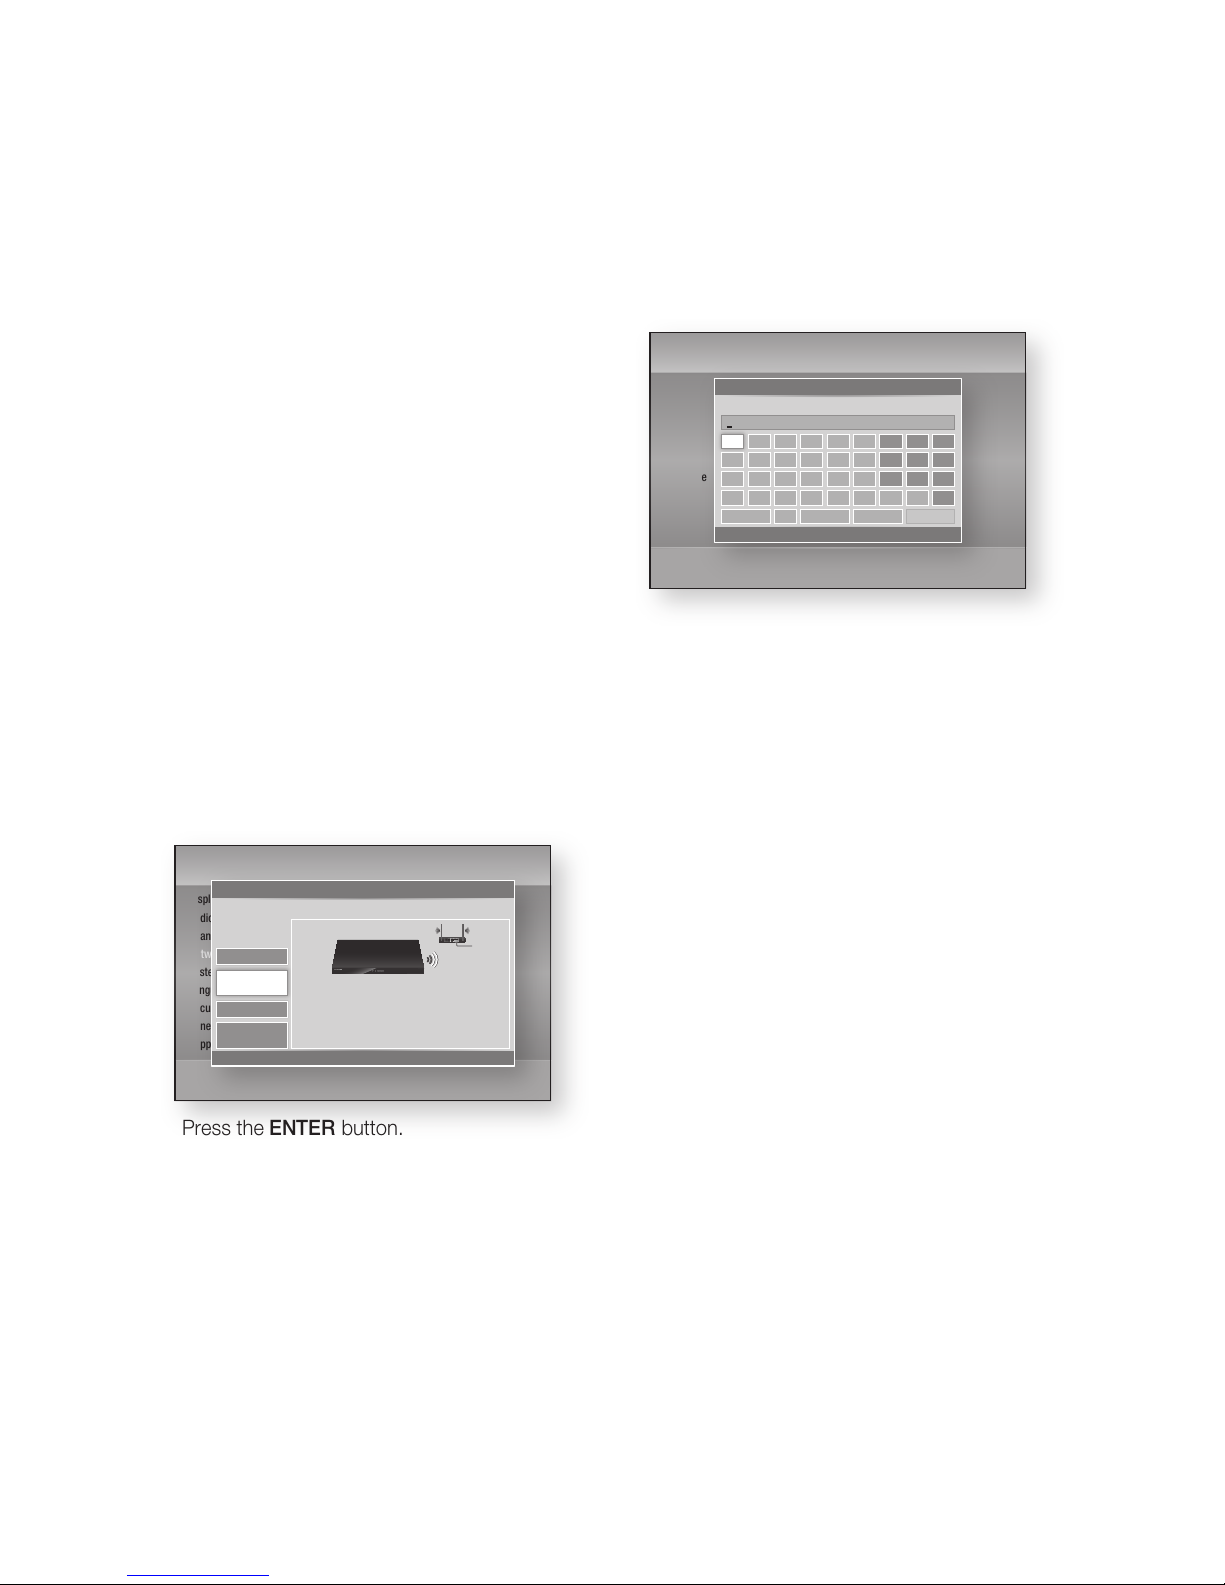
46 English
Setup
Wireless Network
You can setup a wireless network three ways:
Wireless (general)
Using WPS(PBC)
One Foot Connection
Wireless (general) includes both Automatic and
Manual setup procedures.
Setting Up the Wireless Network Connection Auto
Most wireless networks have an optional security
system that requires devices that access the
network to transmit an encrypted security code
called an Access or Security Key. The Security
Key is based on a Pass Phrase, typically a word
or a series of letters and numbers of a specified
length you were asked to enter when you set up
security for your wireless network. If you use this
method of setting up the network connection, and
have a Security Key for your wireless network, you
will have to enter the Pass Phrase during the Auto
setup process.
Press the ▲▼ buttons to select Wireless
(general).
Press the ENTER button.
When done, it displays a list of the available
networks.
Press the ▲▼ buttons to select the desired
network, and then press the ENTER button.
The Security screen appears.
•
•
•
1.
2.
3.
On the Security screen, enter your network’s
Pass Phrase. Enter numbers directly using your
remote control.
To select a letter, press the ▲▼◄► buttons to
move the cursor, then press the ENTER button.
NOTE
You should be able to find the Pass Phrase on one of
the set up screens you used to set up your router or
modem.
When done, press the GREEN (B) button on
your remote, or press the ▲▼◄► buttons to
move the cursor to Done, and then press the
ENTER button.
The Network Status screen appears. The
product connects to the network after the
network connection is verified.
Setting Up the Wireless Network Connection Manual
If the Auto Setting does not work, you need to
enter the Network setting values manually.
To view your Network Settings values on most
Windows computers, follow these steps:
Windows XP
Right click the Network icon on the bottom
right of the Windows desktop.
In the pop-up menu, click Status.
On the dialog that appears, click the Support
tab.
On the Support tab, click the Details button.
The Network settings are displayed.
4.
✎
▪
5.
1.
2.
3.
4.
Settings
Display
Audio
Channel
Network
System
Language
Security
General
Support
Network Settings
>
Move " Enter ' Return
Wireless
(general)
One Foot
Connection
WPS(PBC)
Wired
Select a network connection type.
Set up a wireless network by selecting your wireless
router. You may need to enter a security key
depending on the settings of the wireless router.
Settings
Display
Audio
Channel
Network
System
Language
Security
General
Support
Network Settings
a
Previous m Move " Enter ' Return
Enter security key. 0 entered
a b c d e f 1 2 3
g h i j k l 4 5 6
m n o p q r 7 8 9
s t u v w x y z 0
a/A
*
Delete Space Done
Page 47
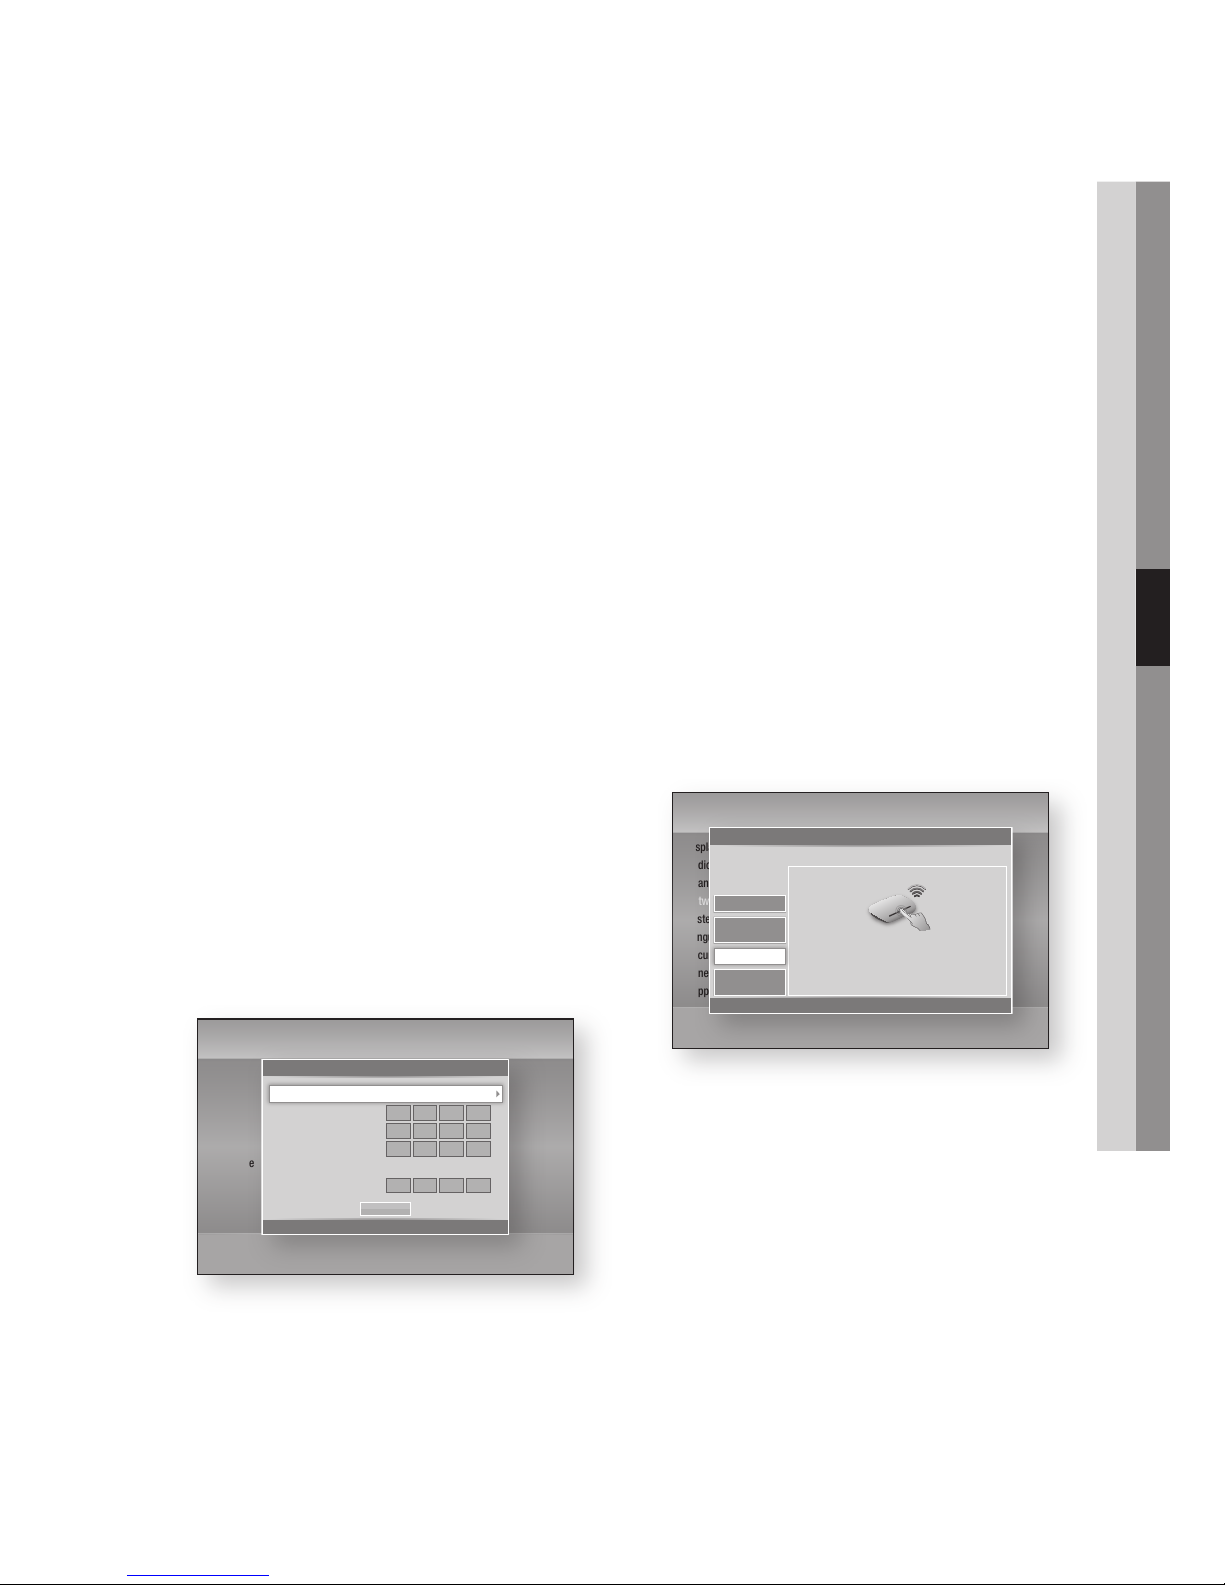
English 47
05 Setup
Windows 7
Click the Network icon on the bottom right of
the Windows desktop.
In the pop-up menu, click Network and
Sharing Centre.
On the dialog that appears, click the Local
Area Connection or Wireless Network
Connection depending on your network
connection.
On the Support tab, click the Details button.
The Network settings are displayed.
NOTE
Depending on your Windows version, the information
may differ.
To enter the Network settings into your product,
follow these steps:
Follow Steps 1 through 4 in the ‘Setting Up
the Wireless Network Connection - Auto’
procedure.
When done, press the GREEN (B) button on
your remote, or press the ▲▼◄► buttons to
move the cursor to Done, and then press the
ENTER button. The Network Status screen
appears.
On the Network Status screen, select Cancel,
and then press Enter.
Press the ◄► buttons to select IP Settings,
and then press the ENTER button.
Press the ENTER button to select IP Mode.
Press the ▲▼ buttons to select Manual, and
then press the ENTER button.
Press the ▼ button to go to the first entry field
(IP Address).
Use the number buttons to enter numbers.
1.
2.
3.
4.
✎
▪
1.
2.
3.
4.
5.
6.
7.
8.
When done with each field, press the ►
button to move successively to the next field.
You can also use the other arrow buttons to
move up, down, and back.
Enter the IP Address, Subnet Mask, and
Gateway values.
Press the ▼ to go to DNS Mode.
Press the ▼ button to go to the first DNS
entry field. Enter the numbers as above.
Press the OK button.
The Network Status screen appears. The
product connects to the network after the
network connection is verified.
WPS(PBC)
The easiest way to set up the wireless network
connection is using the WPS(PBC) function or the
One Foot Connection function.
If your wireless router has a WPS(PBC) button,
follow these steps:
Press the ▲▼ buttons to select WPS(PBC).
Press the ENTER button.
Press the WPS(PBC) button on your
router within two minutes. Your product
automatically acquires all the network settings
values it needs and connects to your network.
The Network Status screen appears. The
player connects to the network after the
network connection is verified.
One Foot Connection
You can set up the wireless connection
automatically if you have a Samsung Wireless
Router which supports One Foot Connection. To
connect using the One Foot Connection function,
follow these steps:
9.
10.
11.
12.
13.
14.
1.
2.
3.
4.
Settings
Display
Audio
Channel
Network
System
Language
Security
General
Support
Network Settings
>
Move " Enter ' Return
One Foot
Connection
Wireless
(general)
Wired
Select a network connection type.
Connect to the wireless router easily by pressing the
WPS(PBC) button. Choose this if your wireless router
supports push button configuration(PBC).
WPS(PBC)
Settings
Display
Audio
Channel
Network
System
Language
Security
General
Support
IP Settings
>
Move " Enter ' Return
IP Mode Manual
IP Address
0.0.0.0
Subnet Mask
0.0.0.0
Gateway
0.0.0.0
DNS Mode Manual
DNS Server
0.0.0.0
OK
Page 48
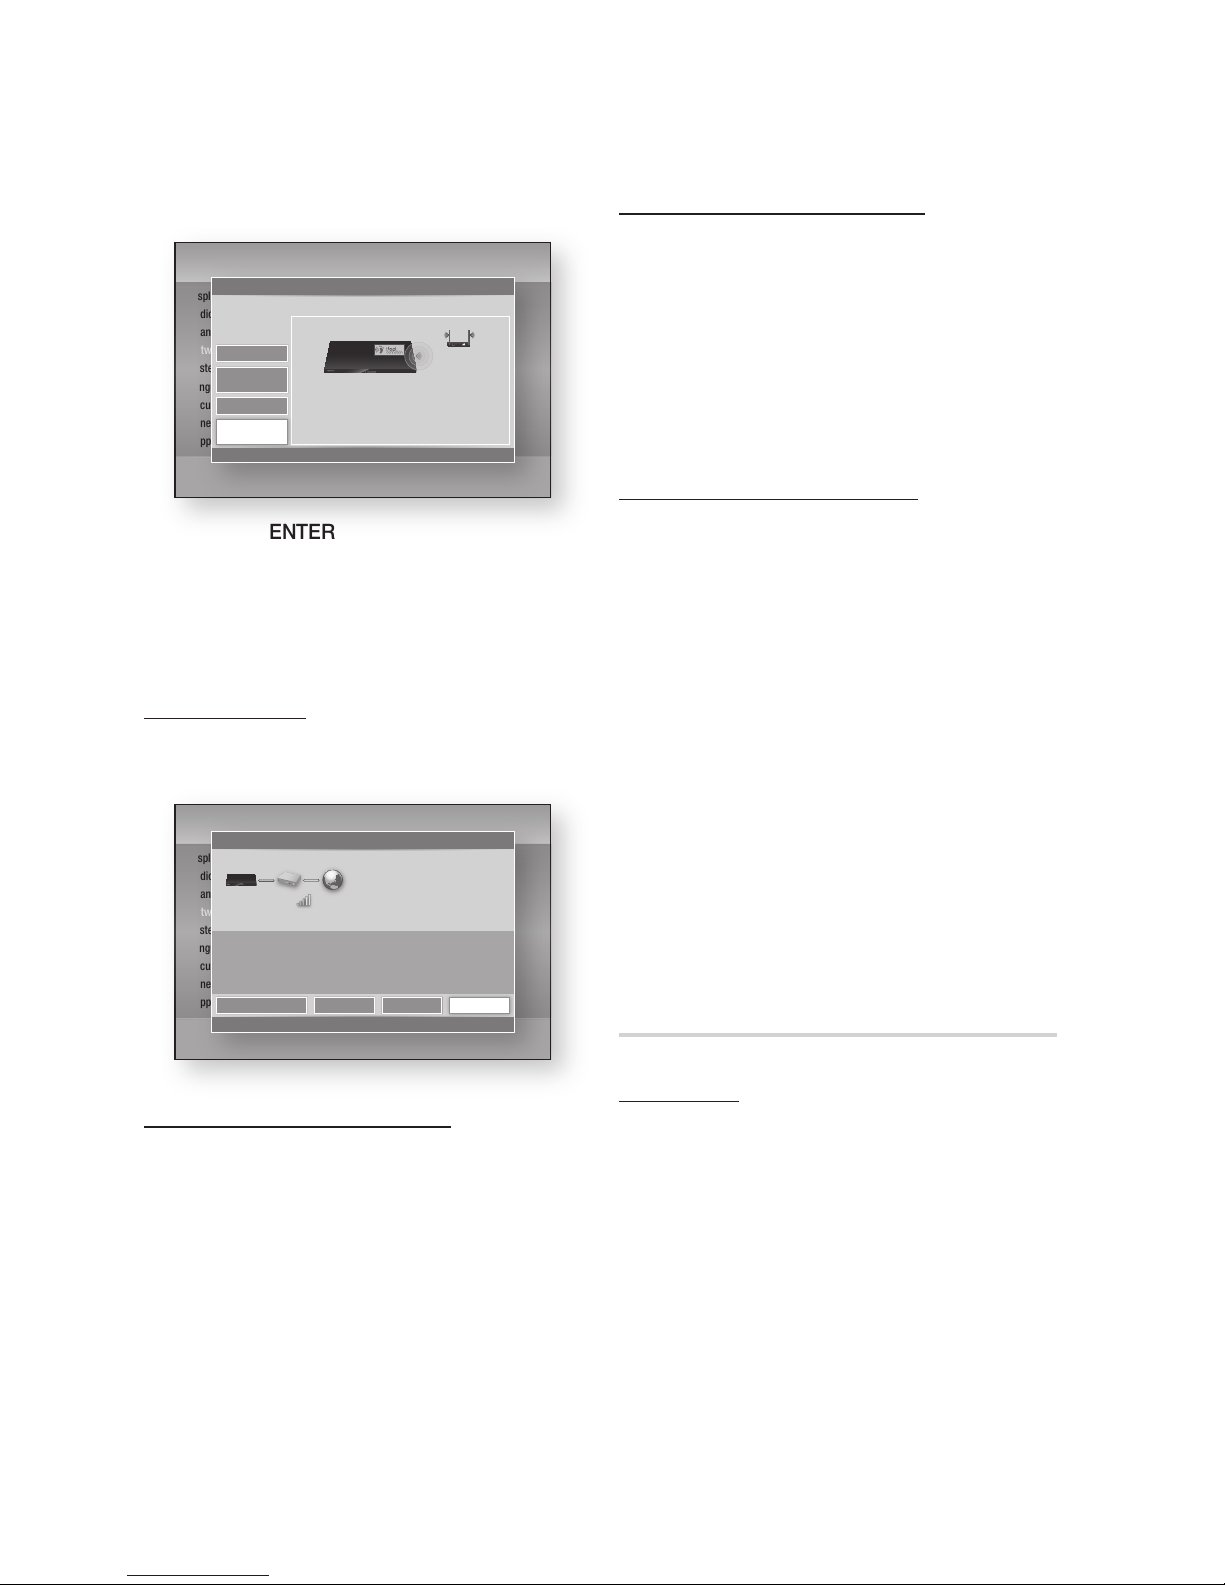
48 English
Setup
Press the ▲▼ buttons to select One Foot
Connection.
Press the ENTER button.
Place the Samsung Wireless Router within 25
cm (10 inches) of your product to connect.
Wait until the connection is automatically
established.
Network Status
Check whether a connection to the network and
the Internet have been established.
SWL(Samsung Wireless Link)
Mobile devices with Samsung Wireless Link
capability can be connected to your network via
this product.
Off : Set Samsung Wireless Link off.
On : Set Samsung Wireless Link On.
If you select On, press the ▲▼ buttons to
select the Connect SWL, then press the
ENTER button. Please follow the instruction
on TV Screen.
NOTE
If this product turned off, the network connection
using SWL will be disconnected.
1.
2.
3.
4.
•
•
1.
✎
▪
AllShare Server Management
Manage content sharing function. You can share
media contents (videos, music, photos) via the
AllShare function.
AllShare Server : Set the server function.
Change Server Name : Set the server name.
Enables you to identify the server on a network.
Device Access Control : Configures access
authorization for individual device.
BD-Live Internet Connection
Set to allow or prohibit an Internet connection
when you use the BD-LIVE service.
Allow (All) : The Internet connection is allowed
for all BD-LIVE contents.
Allow (Valid Only) : The Internet connection is
allowed only for BD-LIVE contents containing a
valid certificate.
Prohibit : No Internet connection is allowed for
any BD-LIVE content.
NOTE
What is a valid certificate?
When the product uses BD-LIVE to send the disc data
and a request to the server to certify the disc, the
server uses the transmitted data to check if the disc is
valid and sends the certificate back to the product.
The Internet connection may be restricted while you
are using BD-LIVE contents.
System
Plug & Play
By using Plug & Play, you can set country, clock
mode and Network Settings, etc.
For more information about the Plug & Play
function, refer to the Plug & Play section of this
user manual. (See pages 33~53)
NOTE
If you want to change plug & play options, you
should enter the password.
•
•
•
•
•
•
✎
▪
▪
✎
▪
Settings
Display
Audio
Channel
Network
System
Language
Security
General
Support
Network Settings
>
Move " Enter ' Return
Wireless
(general)
Wired
Select a network connection type.
Connect to the wireless network automatically if your
wireless router supports One Foot Connection. Select
this connection type after placing the wireless router
within 10 inches (25 cm) of product.
One Foot
Connection
WPS(PBC)
Settings
Display
Audio
Channel
Network
System
Language
Security
General
Support
Network Status
< Move " Enter ' Return
MAC Address XX:XX:XX:XX:XX:XX
IP Address 0.0.0.0
Subnet Mask 0.0.0.0
Gateway 0.0.0.0
DNS Server 0.0.0.0
Internet is connected successfully.
If you have a problem using any Internet services, contact your Internet service
provider.
IP Settings Retry
OK
Network Settings
iptime
Page 49
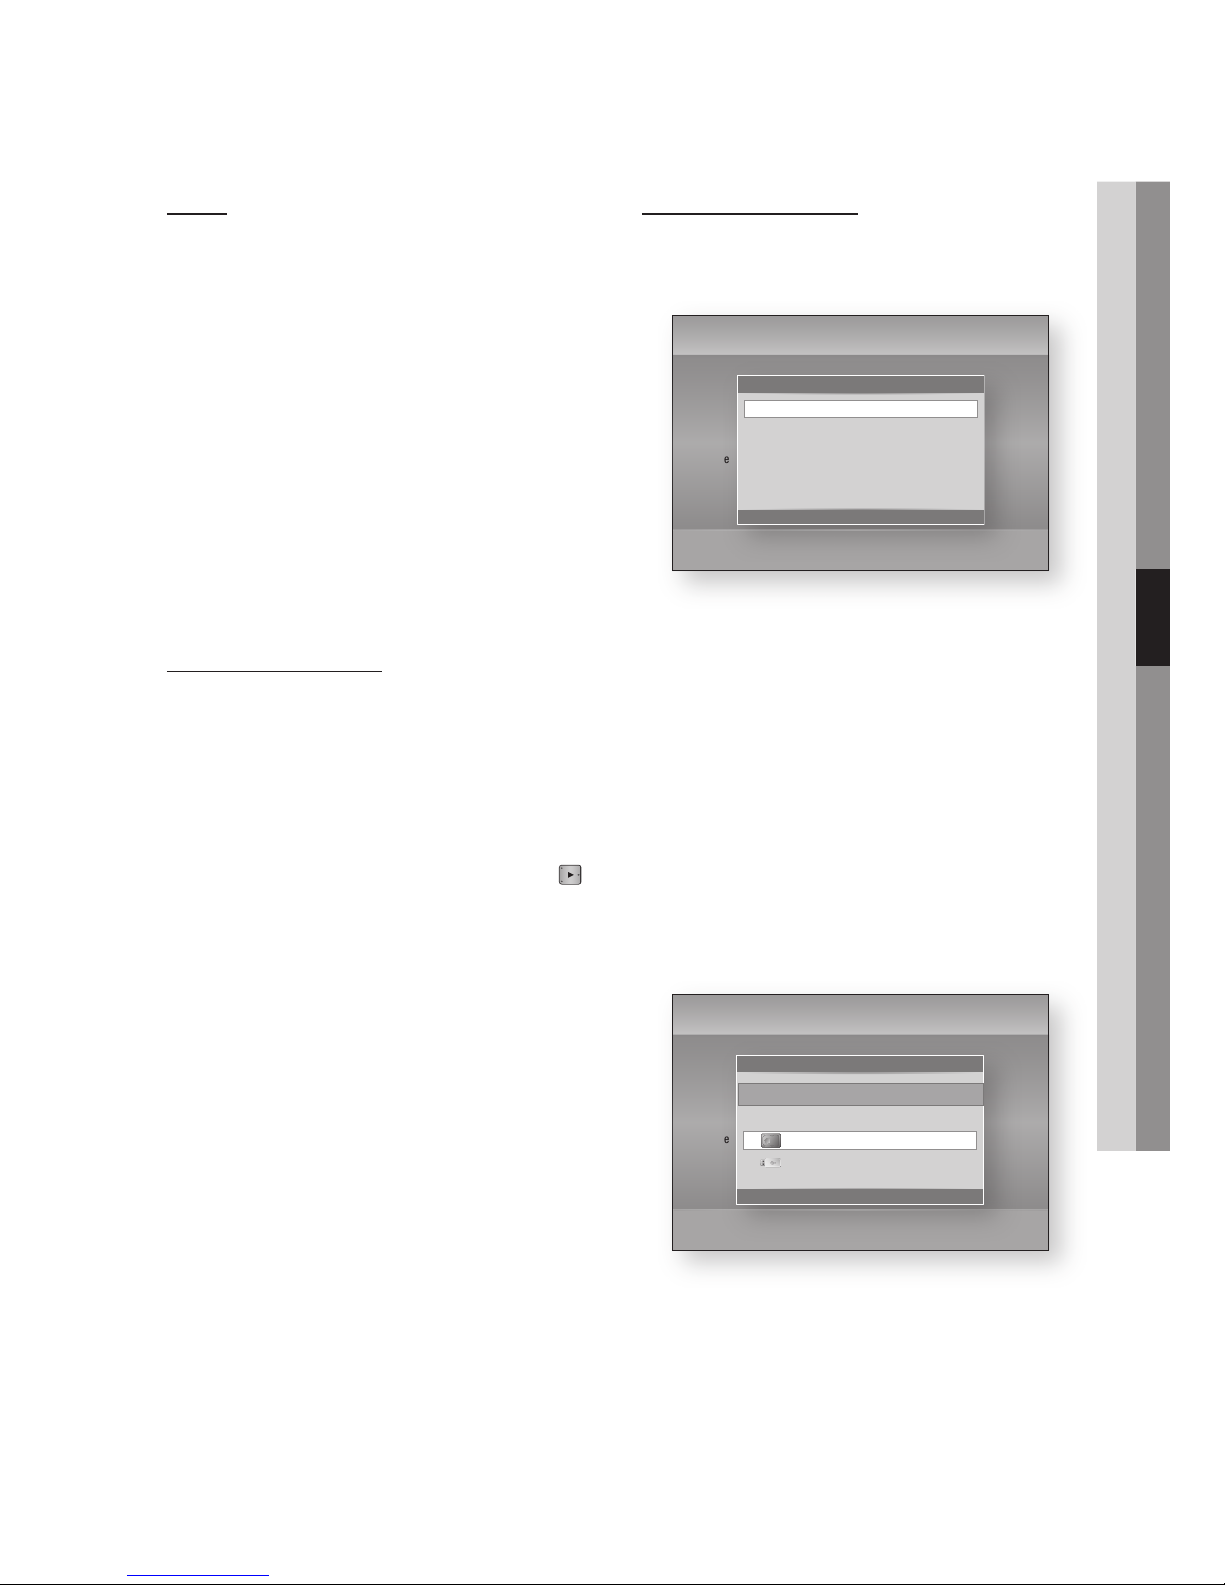
English 49
05 Setup
Clock
Set time-related functions.
Clock Mode : You can set it to Auto or Manual.
Clock Set : If Clock Mode set to Manual, the
this menu will be activated.
Time Zone : If you set the Country to Australia,
and Clock Mode set to Auto, this menu will
appear.
NOTE
If Timer Viewing and Timer Recording is set using
GUIDE, Channel List, or Info menu, It will work based
on the time information of the TV programme.
If you set the Clock Mode to Manual and change
time manually, Timer Viewing and Timer Recording
function can be limited or work abnormally.
Anynet+(HDMI-CEC)
Anynet+ is a convenient function that offers linked
operations with other Samsung products that
have the Anynet+ feature.
To operate this function, connect this product to a
Samsung TV with an HDMI cable.
With Anynet+ on, you can operate this product
using a Samsung TV remote control and start
disc playback simply by pressing the PLAY ( )
button on the TV’s remote control.
For more information, please see the TV user
manual.
Off : Anynet+ functions will not work.
On : Anynet+ functions will work.
NOTE
This function is not available if the HDMI cable does
not support CEC.
If your Samsung TV has an Anynet+ logo, then it
supports the Anynet+ function.
Depending on your TV, certain HDMI output
resolutions may not work.
Please refer to the user manual of your TV.
If you press the Play button of TV when product is in
DTV mode, Time Shift function will start.
•
•
•
✎
▪
•
•
✎
▪
▪
▪
▪
Device Management
Manage internal HDD and external devices.
You can manage options such as device format
and default recording device.
Device Format : Format the device.
Checking Device : Checks for errors on the
device.
Device Performance Test : Test the recording
performance of the device.
Default Recording Device : Select default
recording device.
By HDD
Select the Default Recording Device, and
then press the ENTER button.
Select recording device to HDD. (You can
also check available storage in this menu.)
•
•
•
•
1.
2.
Settings
Display
Audio
Channel
Network
System
Language
Security
General
Support
Plug & Play
HDMI Deep Color : Auto
Device Management
Device Format
Checking Device
Device Performance Test
Default Recording Device : HDD
>
Move " Enter ' Return
Settings
Display
Audio
Channel
Network
System
Language
Security
General
Support
Plug & Play
HDMI Deep Color : Auto
Default Recording Device
>
Move " Enter ' Return
Select default device for recording.
HDD XXX.XX GB/XXX.XX GB
HDD Internal storage
abc Recordable
Page 50
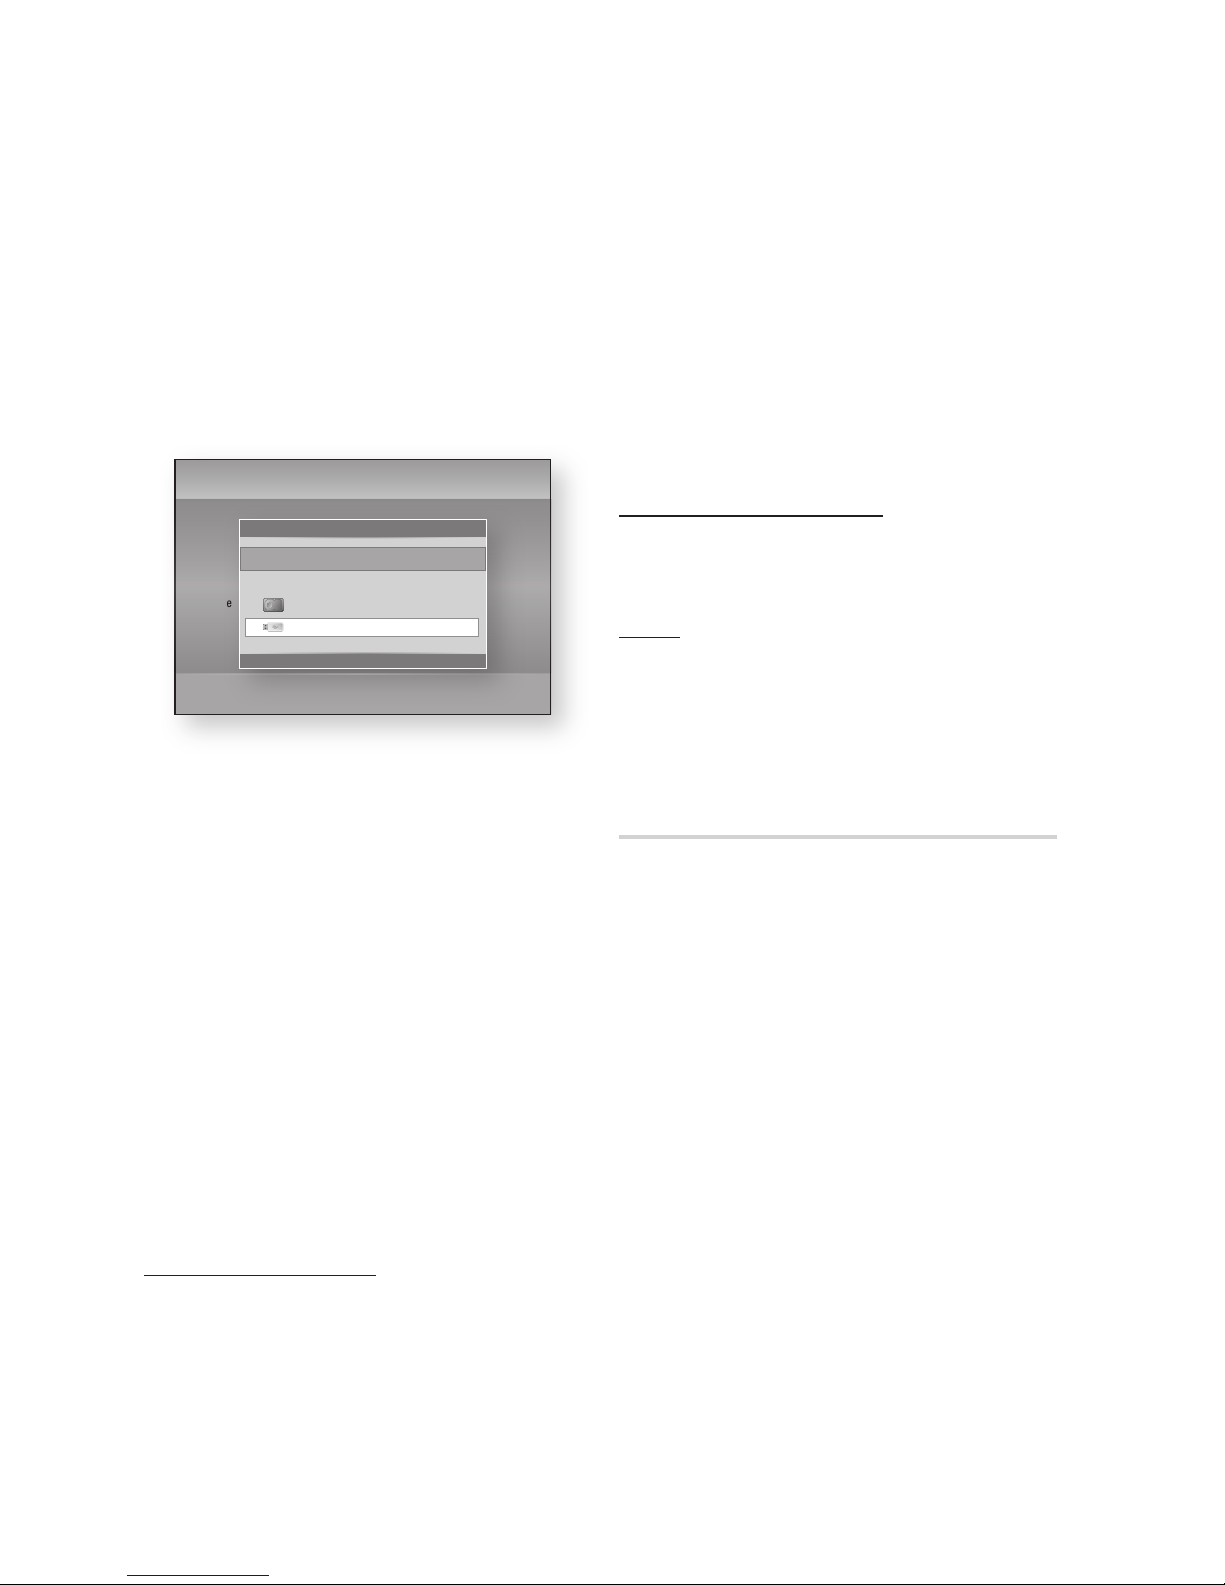
50 English
Setup
By External Device
In Stop mode, connect the external storage
device to the USB port on the front panel of
the product.
Select the Device Format, and then press
the ENTER button. Device format will be
started.
Select the Default Recording Device, and
then press the ENTER button.
Select recording device to connected external
device. (You can also check available storage
in this menu.)
NOTE
It may take several times to detect a connected
external device.
The total size of device must have at least 375MB of
free space to use the time shift function.
In case of USD HDD is used for recording, Don't
plug-out USB HDD Device during format.
Recording Function is supported only for DTV.
Recording Function is not supported for data
channel.
Maximum length of Recording or Time shift is
affected by available size of storage device and the
Video resolution of TV Programme.
BD Data Management
Enables you to manage the downloaded contents
from a Blu-ray Disc that supports the BD-LIVE
service.
You can check the device information including
the storage size, delete the BD data.
1.
2.
3.
4.
✎
▪
▪
▪
▪
▪
▪
Current Device : Displays the current device.
Total Size : Displays the total size of the device.
(Storage)
Available Size : Displays the available size of
the device. (Storage)
Delete BD Data : Press this to delete the BD
data.
NOTE
The total size of BD Data Management may differ,
depending on the conditions.
DivX® Video On Demand
View DivX® VOD Registration Codes to purchase
and play DivX® VOD contents.
Reset
All settings will revert to the default except for the
network and Smart Hub settings.
NOTE
The default password is 0000.
Language
You can select the language you prefer for the
Home menu, disc menu, etc.
On-Screen Menu : Select the language for the
on-screen displays.
BD/DVD Disc Menu : Select the language for
the disc menu displays.
BD/DVD Audio : Select the language for disc
audio language.
BD/DVD Subtitle : Select the language for disc
subtitle language.
DTV Primary Audio : Select the language for
DTV primary audio language.
DTV Secondary Audio : Select the language
for DTV secondary audio language.
DTV Primary Subtitle : Select the language for
DTV primary subtitle language.
DTV Secondary Subtitle : Select the language
for DTV secondary subtitle language.
DTV Primary Teletext : Select the language for
DTV primary teletext language.
DTV Secondary Teletext : Select the language
for DTV secondary teletext language.
NOTE
The selected language will only appear if it is
supported on the disc or broadcast channel.
•
•
•
•
✎
▪
✎
▪
•
•
•
•
•
•
•
•
•
•
✎
▪
Settings
Display
Audio
Channel
Network
System
Language
Security
General
Support
Plug & Play
HDMI Deep Color : Auto
Default Recording Device
>
Move " Enter ' Return
Select default device for recording.
HDD XXX.XX GB/XXX.XX GB
HDD Internal storage
abc Recordable
Page 51
English 51
05 Setup
Security
This function works in conjunction with Blu-ray
Disc/DVDs that have been assigned an age rating
or numeric rating that indicates the maturity level
of the content. These numbers help you control
the types of Blu-ray Disc/DVDs that your family
can watch.
When you access this function, the security screen
appears. Enter the your Security password. (The
default password is 0000.)
DTV Channel Lock
You can lock some channels using the Channel
Lock function so that children cannot watch them.
Off : DTV Channel Lock will not work.
On : DTV Channel Lock will work.
DTV Program Rating Lock
This function works in conjunction with DTV that
have been assigned a rating, which helps you
control the types of DTV that your family watches.
Select the rating level you want to set.
BD Parental Rating
Prevent playback of Blu-ray Discs with specific
age ratings unless a password is entered.
DVD Parental Rating
Prevent playback of DVDs with specific numerical
ratings unless a password is entered.
A larger number indicates that the programme is
intended for adult use only. For example, if you
select up to Level 6, discs that contain Level 7, 8
will not play.
•
•
Change PIN
Change the 4-digit password used to access
security functions.
If you forgot your password
Press the MENU button to display home
menu with no disc inserted.
Press the STOP ( ) button on the front
panel of the product for more than 5 seconds.
All settings will revert to the factory settings.
NOTE
When the factory default settings are restored, all
the user stored BD data will be deleted.
General
Energy Saving
You can reduce power consumption by setting
the front panel to turn off automatically when the
product is in standby mode.
Off : Set not to use the energy saving function.
On : Turn off the front panel automatically when
the product is in standby mode.
Light Effect
You can adjust the light effect on the product.
Always On : Activate Light Effect at all times.
It is recommended for continuous display for
commercial or demonstration use.
Auto : Activate Light Effect when you turn the
product on or off and when you insert or eject a
disc. This is recommended for home use.
Off : Turn Light off.
Advanced Music Copy
When you copy music files, information can be
updated automatically. The copying time may be
increased.
Off : Turn Advanced Music Copy Off.
On : Turn Advanced Music Copy On.
NOTE
This feature is available only when the product is
connected to the network.
1.
2.
✎
▪
•
•
•
•
•
•
•
✎
▪
Page 52

52 English
Setup
This can be used if you copy from an external device
such as USB/ODD/AllShare to the HDD.
This will not work if you copy from the HDD to an
external device.
Network Remote Control
The Network Remote Control function lets you
control your product from a remote device such
as a smart phone through a wireless connection
to your local area network.
To use the Network Remote Control function,
follow these steps:
Select On in the Network Remote Control
menu.
Install the Samsung network remote control
application to control your product on your
compatible portable device.
Make sure your portable device and your
product are connected to the same wireless
router.
Start the application on your portable device.
The application should find your product and
display it on a list.
Select the product.
If this is the first time you are using the
function, it will ask you to allow or deny
remote control of the product. Select Allow.
Follow the instructions that came with the
application to control the product.
Support
Software Upgrade
The Software Upgrade menu allows you to
upgrade the product’s software for performance
improvements or additional services.
By Internet
To upgrade by Internet, follow these steps:
Select By Internet, and then press the
ENTER button. The Connecting to Server
message appears.
If there is a download available, the Download
pop-up appears with a progress bar and the
download starts.
▪
▪
1.
2.
3.
4.
5.
6.
7.
1.
2.
When the download is complete, the Upgrade
Query window appears with three choices:
Upgrade Now, Upgrade Later, or Don’t
Upgrade.
If you select Upgrade Now, the product
upgrades the software, turns off, and then
turns on automatically.
If you do not make a selection in one minute
or select Upgrade Later, the product stores
the new upgrade software. You can upgrade
the software later using the Via Download
function.
If you select Don’t Upgrade, the product
cancels the upgrade.
NOTE
Your product must be connected to the Internet to
use the By Internet function.
The upgrade is complete when the product turns off,
and then turns on again by itself.
Never turn the product off or back on manually
during the update process.
Samsung Electronics shall take no legal responsibility
for product malfunction caused by an unstable
Internet connection or consumer negligence during a
software upgrade.
If you want to cancel the upgrade while the upgrade
software is downloading, press the ENTER button.
By Channel
Upgrade software using the broadcasting signal.
By USB
To upgrade by USB, follow these steps:
Visit www.samsung.com/bluraysupport.
Download the latest USB software upgrade
zip archive to your computer.
Unzip the zip archive to your computer. You
should have a single folder with the same
name as the zip file.
Copy the folder to a USB flash drive.
No disc should be inserted in the product,
and then insert the USB flash drive into the
USB port of the product.
In the product’s menu, go to Settings >
Support > Software Upgrade.
Select By USB.
3.
4.
5.
6.
✎
▪
▪
▪
▪
▪
1.
2.
3.
4.
5.
6.
7.
Page 53

English 53
05 Setup
NOTE
No disc should be inserted in the product when you
upgrade the software using the USB Host jack.
When the software upgrade is done, check the
software details in the Software Upgrade menu.
Do not turn off the product during the software
upgrade. It may cause the product to malfunction.
Software upgrades using the USB Host jack must be
performed with a USB memory flash stick only.
By Disc
To upgrade by Disc, follow these steps:
Visit www.samsung.com/bluraysupport.
Download the latest disc software upgrade
zip archive to your computer.
Unzip the zip archive to your computer. You
should have a single folder with the same
name as the zip file.
Write the folder onto a disc. We recommend
a CD-R or DVD-R.
Finalize the disc before you remove it from
your computer.
Insert the disc into product.
In the product’s menu, go to Settings >
Support > Software Upgrade.
Select By Disc.
NOTE
When the system upgrade is done, check the
software details in the Software Upgrade menu.
Do not turn off the product during the Software
Upgrade. It may cause the product malfunction.
Via Download
The Via Download option lets you upgrade
using a file the product downloaded earlier but
you decided not to install immediately or a file
downloaded by the product in Standby Mode (See
Download in Standby Mode below).
To upgrade Via Download, follow these steps:
If upgrade software has been downloaded,
you will see the software version number to
the right of Via Download.
Select Via Download, and then press the
ENTER button.
✎
▪
▪
▪
▪
1.
2.
3.
4.
5.
6.
7.
8.
✎
▪
▪
1.
2.
The product displays a message asking if you
want to upgrade. Select Yes. The product
begins the upgrade.
When the update is complete, the product
turns off automatically, and then turns on.
NOTE
When the system upgrade is done, check the
software details in the Software Upgrade menu.
Do not turn off the product during the Software
Upgrade. It may cause malfunction to the product.
Download in Standby Mode
You can set the Download in Standby Mode
function so that the product downloads new
upgrade software when it is in Standby mode. In
Standby mode, the product is off, but its Internet
connection is active. This allows the product to
download upgrade software automatically, when
you are not using it.
To set Download in Standby Mode, follow these
steps:
Press the ▲▼ buttons to select Download in
Standby Mode, and then press the ENTER
button.
Select the desired downloaded time.
If you select Off, the product will notify you
with a pop up message when new upgrade
software is available.
If you select the desired downloaded time,
the product will automatically download new
upgrade software when it is in Standby mode
with the power off.
If it downloads new upgrade software, the
product will ask you if you want to install it
when you turn the product on.
NOTE
To use the Download in Standby Mode function, your
product must be connected to the Internet.
Contact Samsung
Provides contact information for assistance with
your product.
3.
4.
✎
▪
▪
1.
2.
✎
▪
Page 54
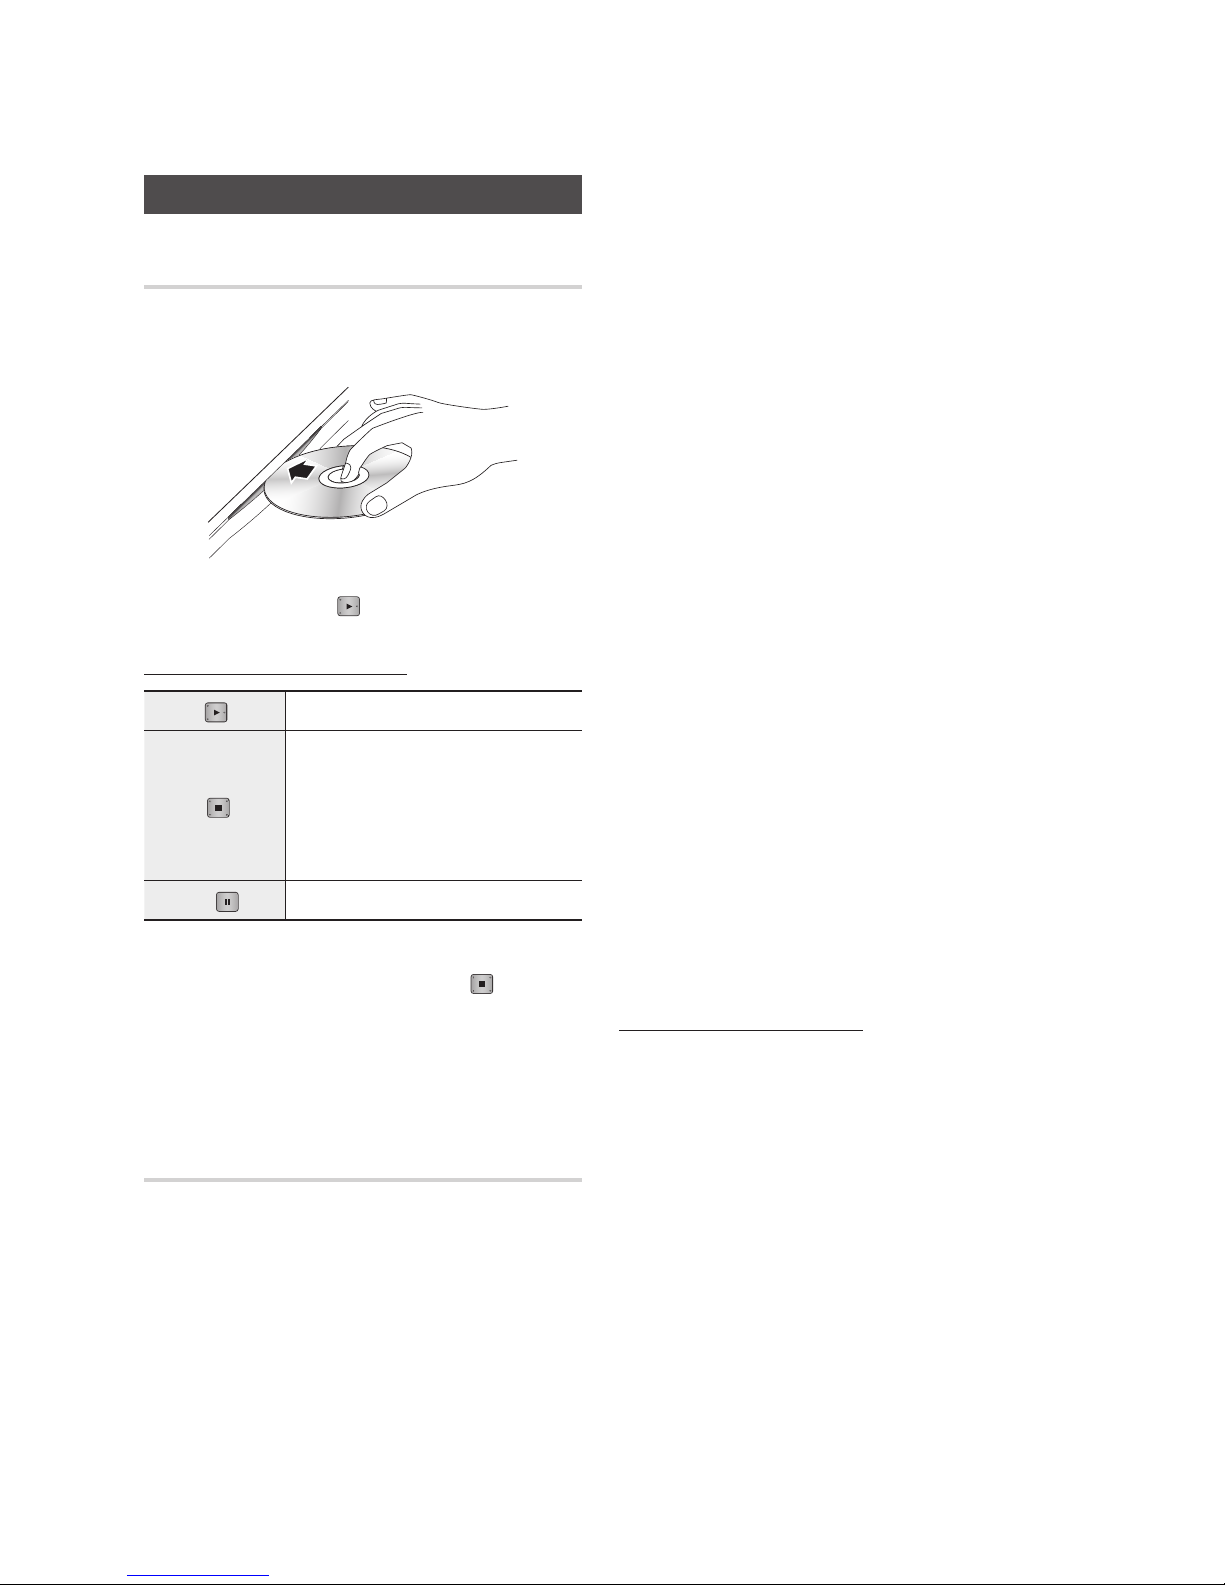
54 English
Playing a Video
Playback
Push a disc into the product with the disc’s
label facing up.
Press the PLAY ( ) button.
Playback related buttons
PLAY (
) Starts playback.
STOP (
)
Stops playback.
If you press the button once : The
stop position is memorized.
If you press the button twice : The
stop position is not memorized.
•
•
PAUSE (
) Pauses playback.
NOTE
For some discs, pressing the STOP ( ) button
once may not memorize the stop position.
Video files with high bit rates of 20Mbps or more
strain the product’s capabilities and may stop
playing during playback.
3D Converter
This function can convert the 2D output of 2D
contents into 3D.
Connect this product to a TV that supports
3D using an HDMI cable.
When you play 2D contents, press the 2D
3D button on the remote control to convert
2D into 3D contents.
1.
2.
✎
▪
▪
1.
2.
You can toggle between 2D and 3D by
pressing the 2D3D button repeatedly.
If you are playing 3D contents in the 3D
mode, you cannot use this function.
NOTE
You can’t convert 2D contents into 3D or use the 2D
3D button In the following cases:
When the product is not connected with an HDMI
cable
When the connected TV does not support 3D
When you are playing 3D contents (disc, file).
2D content is converted into the following 3D
formats:
1080p 24fps : Output to 1080p 24 fps 3D.
Others : Output to 720p 3D.
Photo files : Output to 720p 3D.
2D content that the product can convert to 3D:
2D content that supports 3D conversion
Smart Hub content, DVD Video, BD-ROM, VCD,
Video files, photo files, DTV programme, and
recorded DTV programme.
When you use the 3D converter, the BONUSVIEW
function is not available.
(Depending on the disc, a black outline appears.)
Some viewers may experience discomfort while
viewing 3D contents such as dizziness, nausea, and
headaches.
Adjusting the 3D Depth
The 3D Depth function lets you adjust the 3D
depth of 2D to 3D conversions. Values range from
1 to 10. The higher the number, the deeper the
3D depth.
When you are viewing converted 3D contents,
press the TOOLS button.
Press the ▲▼ buttons to select 3D Depth,
and then press the ENTER button.
Adjust the 3D Depth using the ◄► buttons.
3.
✎
▪
-
-
-
▪
-
-
-
▪
-
-
▪
▪
1.
2.
3.
Basic Functions
Page 55
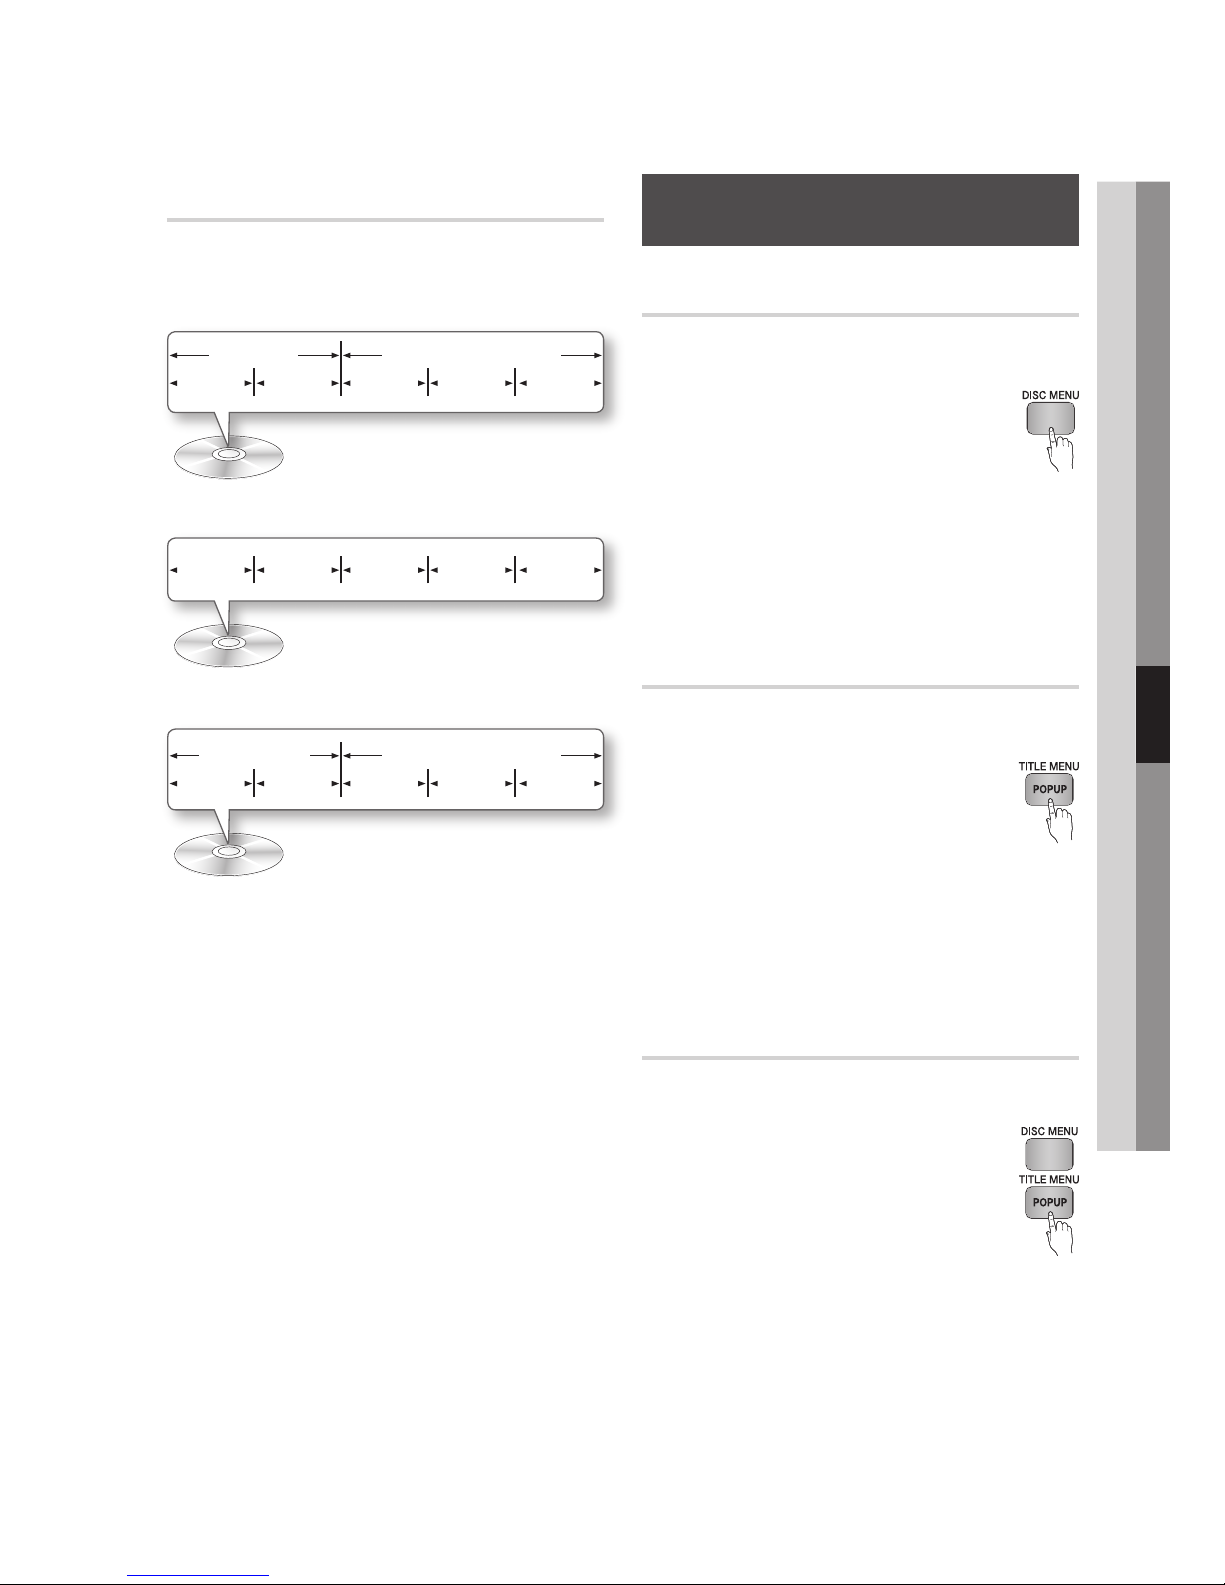
English 55
06 Basic Functions
Using the Disc Menu/Title Menu/Pop-
up Menu
Using the Disc Menu
hZ
During playback, press the DISC
MENU button on the remote control.
Press the ▲▼◄► buttons to make a
selection, and then press the ENTER
button.
NOTE
Depending on the disc, the menu items may differ
and this menu may not be available.
Using the Title Menu
Z
During playback, press the TITLE
MENU button on the remote control.
Press the ▲▼◄► buttons to make
the desired selection, then press the
ENTER button.
NOTE
Depending on the disc, the menu items may differ
and this menu may not be available.
Playing the Title List
z
During playback, press the DISC
MENU or TITLE MENU button.
Press the ▲▼ buttons to select an
entry you want to play from the Title
List, and then press the ENTER
button.
NOTE
If your disc has a playlist, press the GREEN (B) button
to go to the playlist.
1.
2.
✎
▪
1.
2.
✎
▪
1.
2.
✎
▪
Disc Structure
The content of discs are usually divided as shown
below.
Blu-ray Disc, DVD-VIDEO
Audio CD (CD-DA)
MP3, WMA, DivX, MKV and MP4
NOTE
Playback during recording converts the media into
profile 1.0, while normal playback only supports
profile 2.0. In such cases, the following limitations
are applied:
BONUSVIEW is not available.
Browsable slideshow audio is not available.
(Audio may not be produced in Disc Menu mode
for some discs.)
•
•
•
✎
▪
-
-
title 1 title 2
chapter 1 chapter 2 chapter 1 chapter 2 chapter 3
folder (group) 1 folder (group) 2
file 1 file 2 file 1 file 2 file 3
track 1 track 2 track 3 track 4 track 5
Page 56
56 English
Basic Functions
Using the Popup Menu
h
During playback, press the POPUP
MENU button on the remote control.
Press the ▲▼◄► buttons or ENTER
button to select the desired menu.
NOTE
Depending on the disc, the menu items may differ
and this menu may not be available.
Using the Search and Skip Functions
During play, you can search quickly through a
chapter or track, and use the Skip function to
jump to the next selection.
Searching for a Desired Scene
ThzZyx
During playback, press the SEARCH ( )
button.
Each time you press the SEARCH ( )
button, the playback speed will change as follows
:
HDD,
BD-ROM,
BD-RE/-R,
DVD-RW/-R,
DVD+RW/+R,
DVD-VIDEO
)
1
)
2 ) 3
)
4
)
5 ) 6 ) 7
(
1
(
2 ( 3
(
4
(
5 ( 6 ( 7
DivX, MKV, MP4
)
1
)
2 ) 3
(
1
(
2 ( 3
To return to normal speed playback, press the
PLAY ( ) button.
NOTE
The product does not play sound in search mode.
1.
2.
✎
▪
•
•
✎
▪
Skipping Chapters
ThzZyx
During playback, press the SKIP ( )
button.
If you press the SKIP ( ) button, the disc
moves to the next chapter.
If you press the SKIP ( ) button, the disc
moves to the beginning of the chapter. One
more press makes the disc move to the
beginning of the previous chapter.
Slow Motion Play/Step Motion Play
Slow Motion Play
ThzZyx
In pause mode, press the SEARCH ( )
button.
Each time you press the SEARCH ( ) button,
the playback speed will change as follows:
*
1/8 * 1/4 * 1/2
To return to normal speed playback, press the
PLAY ( ) button.
NOTE
The product does not play sound in Slow mode.
Step Motion Play
hzZyx
In pause mode, press the PAUSE ( ) button.
Each time you press the PAUSE ( ) button, a
new frame appears.
To return to normal speed playback, press the
PLAY ( ) button.
NOTE
The product does not play sound in Step mode.
•
•
•
✎
▪
•
•
✎
▪
Page 57
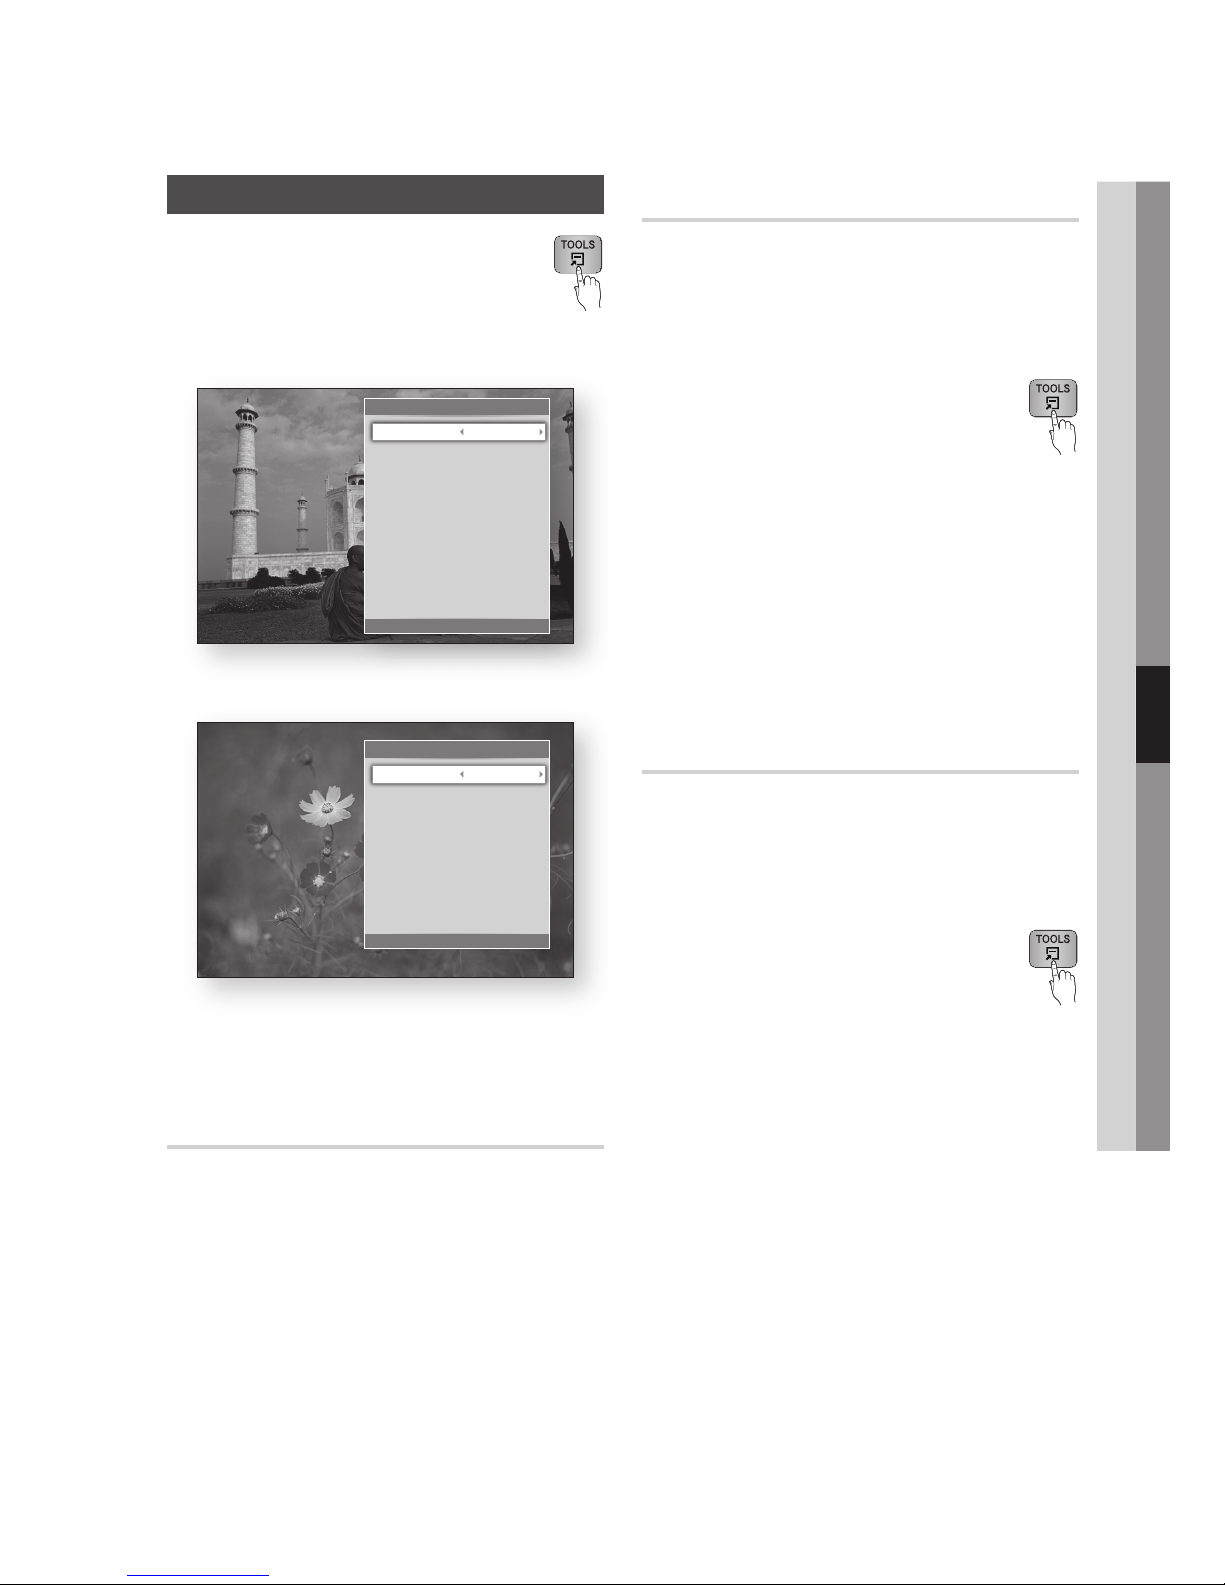
English 57
06 Basic Functions
Using the TOOLS button
During playback, you can operate the disc
menu by pressing the TOOLS button.
Tools Menu Screen
<BD-ROM / DVD>
<HDD>
NOTE
Depending on the disc, the Tools menu may differ.
Moving to a Desired Scene Directly
ThzZyx
During playback, press the TOOLS button.
Press the ▲▼ buttons to select Title Search,
Chapter Search, or Time Search.
Press the ◄► or number button to select
desired Title, Chapter or Time, then press the
ENTER button.
•
✎
▪
1.
2.
3.
Repeating the Title or Chapter
hzZy
To repeat the disc title or chapter.
Depending on the disc, the Repeat function may
not be available.
During playback, press the TOOLS
button.
Press the ▲▼ buttons to select Repeat Mode.
Press the ◄► buttons to select Chapter or
Title, then press the ENTER button.
To return to normal play, press the TOOLS
button again.
Press the ▲▼ buttons to select Repeat Mode.
Press the ◄► buttons to select Off, then
press the ENTER button.
Repeating the Title or Chapter
Tx
Repeat the disc title or all.
Depending on the disc, the Repeat function may
not be available.
During playback, press the TOOLS
button.
Press the ▲▼ buttons to select Repeat
Mode, then press the ◄► buttons to select
Title or All.
To return to normal play, press the TOOLS
button again.
Press the ▲▼ buttons to select Repeat
Mode.
Press the ◄► buttons to select Off, the
press the ENTER button.
1.
2.
3.
4.
5.
6.
1.
2.
3.
4.
5.
Tools
=
Number < Adjust e Exit
Title Search 1/3
Time Search : 00:24/01:46
Repeat Mode : Off
Picture Settings
Audio Language : 1.English
Dual I II : Dolby Digital
Detailed Information
Tools
<
Change
"
Enter ' Return
Title Search 1/2
Chapter Search : 1/20
Time Search : 00:00:13/01:34:37
Repeat Mode : 0ff
Picture Settings : Normal
Audio : 1/1 JPN 2CH
Subtitle : 0/2 Off
Angle : 1/1
BONUSVIEW Video : Off
BONUSVIEW Audio : 0/1 Off
Page 58
58 English
Basic Functions
Repeating a Section
hzZy
During playback, press the TOOLS
button.
Press the ▲▼ buttons to select Repeat Mode.
Press the ◄► buttons to select Repeat A-B,
then press the ENTER button.
Press the ENTER button at the point where
you want repeat play to start (A).
Press the ENTER button at the point where
you want repeat play to stop (B).
To return to normal play, press the TOOLS
button again.
Press the ▲▼ buttons to select Repeat Mode.
Press the ◄► buttons to select Off, and then
press the ENTER button.
NOTE
If you set point (B) before 5 seconds has lapsed, a
prohibition message appears.
Depending on the disc, the menu items may differ
and this menu may not be available.
Selecting the Picture Settings
ThzZy
This function enables you to adjust video quality
when the product is connected to a TV.
During playback, press the TOOLS button.
Press the ▲▼ buttons to select Picture
Settings, and then press the ENTER button.
Press the ◄► buttons to select the desired
Picture Settings, and then press the ENTER
button.
Dynamic : Choose this setting to increase
Sharpness.
Normal : Choose this setting for most
viewing applications.
1.
2.
3.
4.
5.
6.
7.
8.
✎
▪
▪
1.
2.
3.
•
•
Movie : This is the best setting for watching
movies.
User : Lets you adjust the advanced settings.
NOTE
When you use BD wise function, this menu will not
appear.
Selecting the Audio Language
ThzZx
You can also operate this function by
pressing the AUDIO button on the
remote control.
During playback, press the TOOLS button.
Press the ▲▼ buttons to select Audio.
Press the ◄► buttons to select the desired
audio language.
NOTE
The ◄► indicator will not appear on the screen
if the BONUSVIEW section does not contain any
BONUSVIEW audio settings.
Information about the main feature/BONUSVIEW
mode will also appear if the Blu-ray Disc has a
BONUSVIEW section.
Press the ◄► button to switch between main
feature and BONUSVIEW audio modes.
The languages available through the Audio Language
function depend on the languages that are encoded
on the disc. This function or certain languages may
not be available.
A Blu-ray Disc can contain up to 32 audio languages
and a DVD up to 8.
Some Blu-ray Discs may allow you to select either
the PCM or Dolby digital audio soundtrack in English.
If you press the AUDIO button on the remote control,
Audio bar appears.
Press the RETURN button to remove the Audio bar.
•
•
✎
▪
1.
2.
3.
✎
▪
▪
▪
▪
▪
▪
Page 59
English 59
06 Basic Functions
Selecting the Subtitle Language
ThZx
You can also operate this function by
pressing the AD/SUBTITLE button on
the remote control.
During playback, press the TOOLS button.
Press the ▲▼ buttons to select Subtitle.
Press the ◄► buttons to select the desired
subtitle language.
NOTE
Depending on the Blu-ray Disc / DVD, you may be
able to change the desired subtitle in the Disc Menu.
Press the DISC MENU button.
This function depends on the selection of subtitles
that are encoded on the disc and may not be
available on all Blu-ray Discs/DVDs.
A Blu-ray Disc can contain up to 255 subtitle
languages and a DVD up to 32.
Information about the main feature/BONUSVIEW
mode will also appear if the Blu-ray Disc has a
BONUSVIEW section.
This function changes both the primary and
secondary subtitles at the same time.
The total number of primary and secondary subtitles
are displayed respectively.
If you press the AD/SUBTITLE button on the remote
control, the subtitle bar appears.
Press the RETURN button to remove the subtitle bar.
1.
2.
3.
✎
▪
▪
▪
▪
▪
▪
▪
Changing the Camera Angle
hZ
When a Blu-ray Disc/DVD contains multiple angles
of a particular scene, you can use the ANGLE
function.
During playback, press the TOOLS button.
Press the ▲▼ buttons to select Angle.
Press the ◄► buttons to select the desired
Angle.
Selecting the Information
Tx
This function enables you to check the contents
information including the name and size, etc.
During playback, press the TOOLS
button.
Press the ▲▼ buttons to select the Detailed
Information, then press the ENTER button.
Setting BONUSVIEW
h
The BONUSVIEW feature allows you to view
additional content (such as commentaries) in a
small screen window while the movie is playing.
This function is only available if the disc has the
BONUSVIEW feature.
During playback, press the TOOLS button.
Press the ▲▼ buttons to select BONUSVIEW
Video or BONUSVIEW Audio.
Press the ◄► buttons to select the desired
BONUSVIEW.
NOTE
If you switch from BONUSVIEW Video, BONUSVIEW
Audio will change automatically in accordance with
BONUSVIEW Video.
2D contents are playing convert into 3D, bonusview
function is not available. (Depending on discs, black
outline may be shown)
1.
2.
3.
1.
2.
1.
2.
3.
✎
▪
▪
Page 60
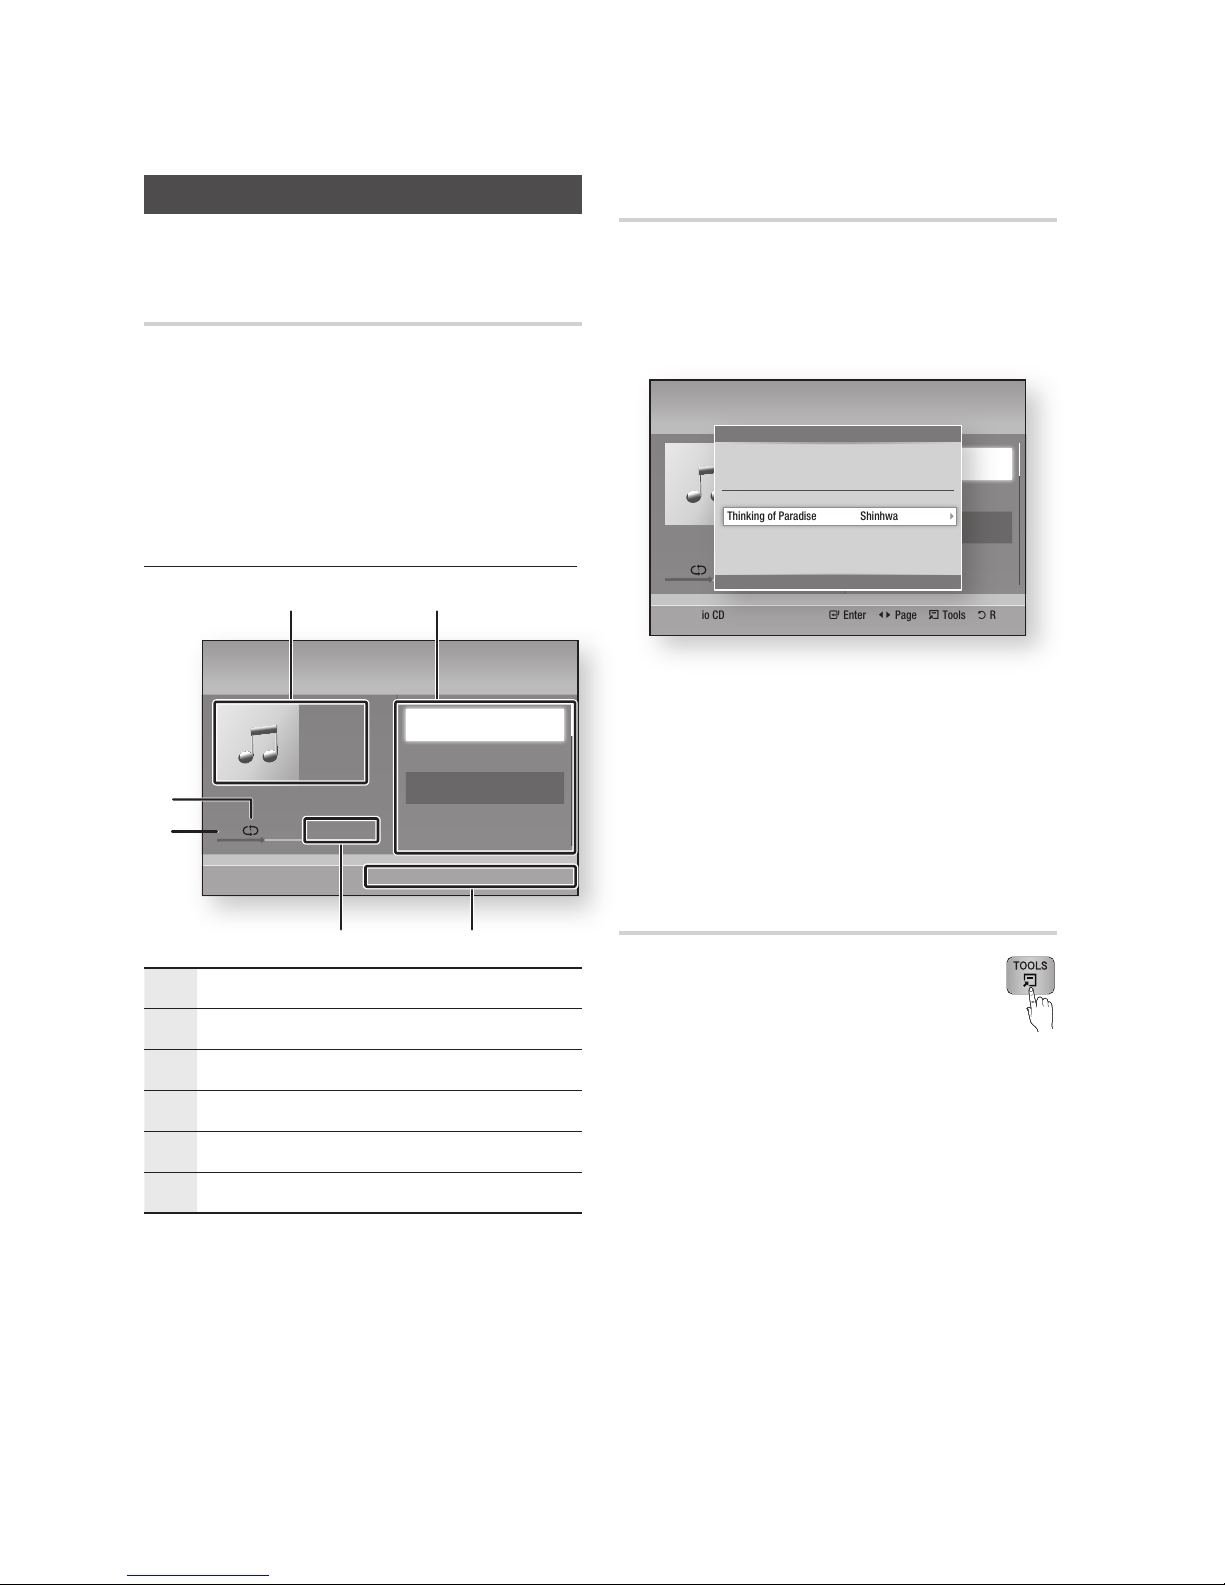
60 English
Basic Functions
Listening to Music
ow
Playing an Audio CD (CD-DA)/MP3
Insert an Audio CD (CD-DA) or an MP3 Disc.
For an Audio CD (CD-DA), the first track
plays automatically.
For an MP3 disc, press the ▲▼ buttons
to select Music, then press the ENTER
button.
Audio CD (CD-DA)/MP3 Screen Elements
1
Displays the music information.
2
Displays the playlist.
3
Displays buttons available.
4
Shows the current play time/total play time.
5
Displays the current playback status.
6
Displays the repeated playback status.
Press the ▲▼ buttons to select the track
you want to play, and then press the ENTER
button.
1.
•
•
2.
AMG function
You can use AMG function to display the
information of an Audio CD (CD-DA).
Insert an Audio CD (CD-DA).
If your disc has a CD information, the below
pop-up screen will be displayed.
Press the ENTER button.
The CD information will be displayed and the
first track will be played automatically.
NOTE
When the product is disconnected from the network,
it may not retrieve the CD information from the Audio
CD (CD-DA) if it's the latest version.
Repeat an Audio CD (CD-DA)/MP3
During the Playlist playback, press the
TOOLS button.
Press the ▲▼ buttons to select Repeat
Mode, and then press the ◄► buttons to
select the desired repeat mode.
Press the ▲▼ buttons to select Shuffle
Mode, and then press the ◄► buttons to
select the On or Off.
Press the ENTER button.
1.
2.
✎
▪
1.
2.
3.
4.
+
00:13 / 00:43
TRACK 001
Music
Audio CD
"
Enter < Page / Tools ' Return
1
5
4
6
3
2
TRACK 001
00:43
TRACK 002
03:56
TRACK 003
04:41
TRACK 004
04:02
+
00:13 / 00:43
TRACK 001
Music
Audio CD
"
Enter < Page / Tools ' Return
TRACK 001
00:43
TRACK 002
03:56
TRACK 003
04:41
TRACK 004
04:02
CD Information
Thinking of Paradise Shinhwa
Multiple items of CD information found.
Select the appropriate item of CD information.
Page 61
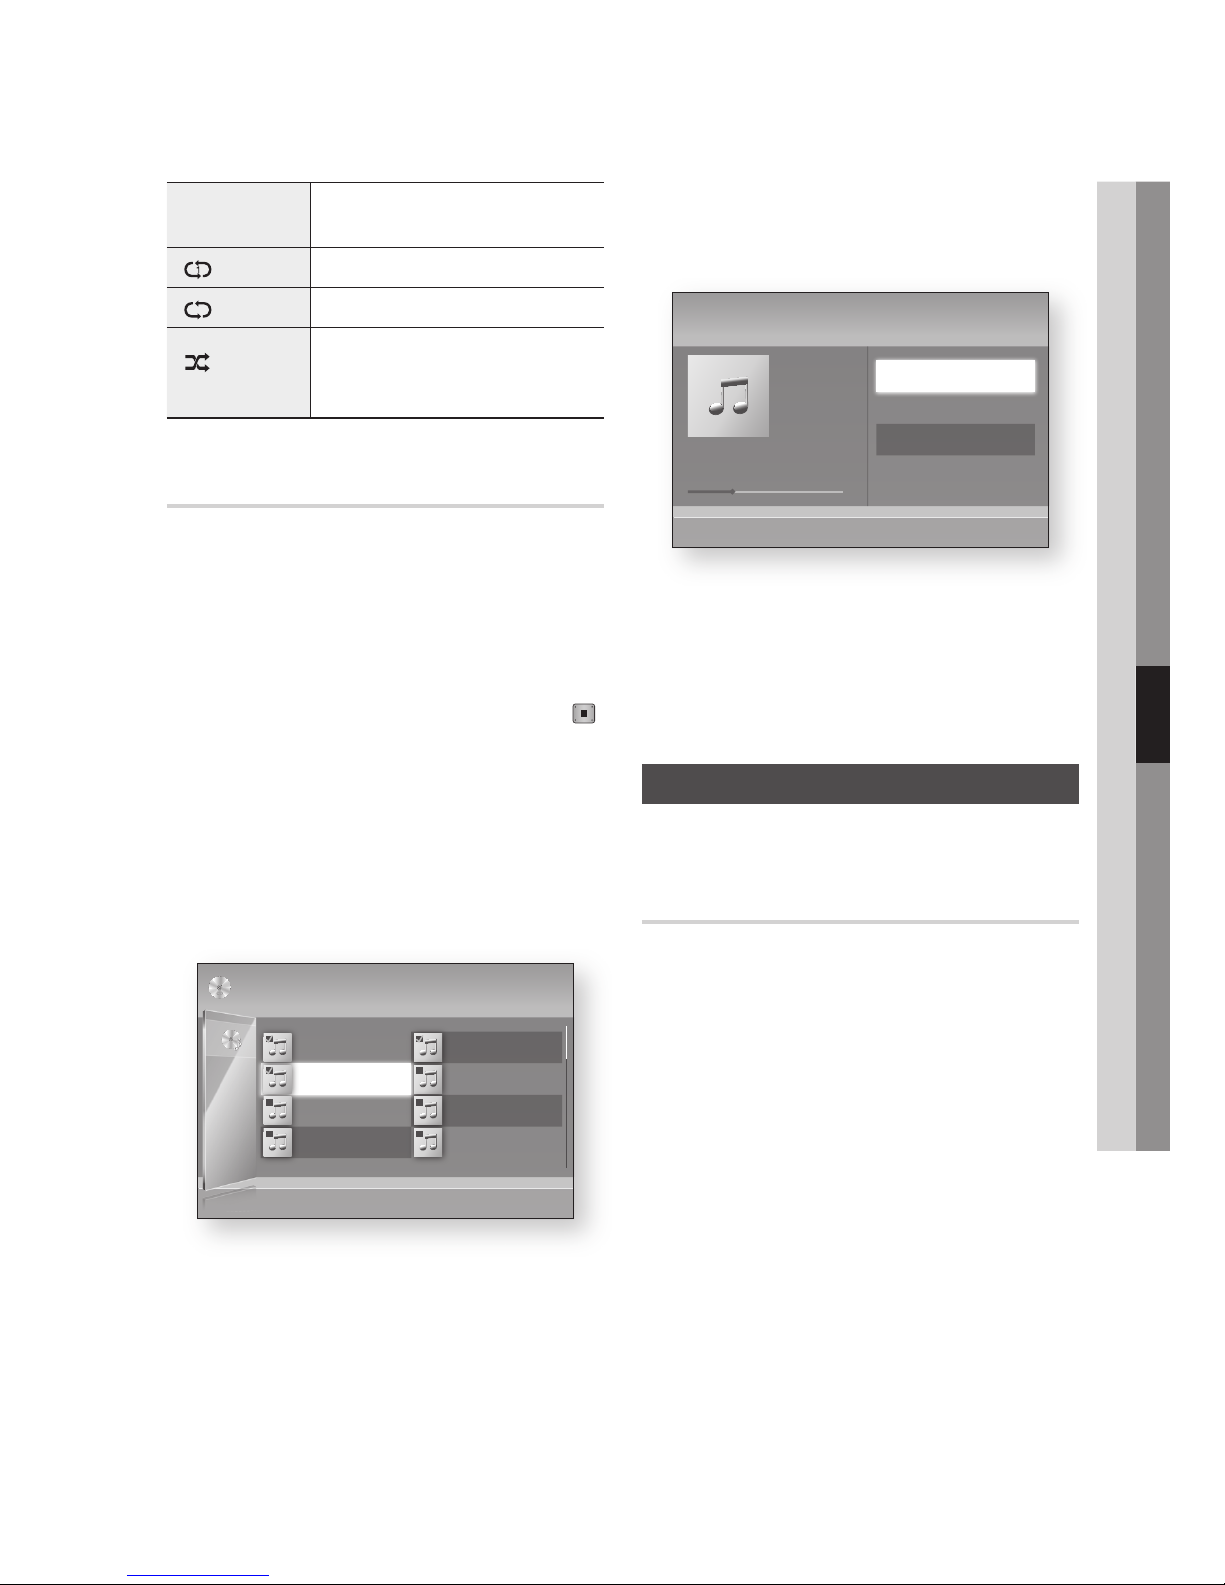
English 61
06 Basic Functions
Off
Songs are played in the order in which
they were recorded.
(
) One Song The current song is repeated.
(
) All All songs are repeated.
( ) Shuffle
Mode
The random option plays songs in
random order. To operate this function,
please set the shuffle mode to On.
Playlist
Insert an Audio CD (CD-DA) or an MP3 Disc.
For an Audio CD (CD-DA), the first track
plays automatically.
For an MP3 disc, press the ▲▼ buttons
to select Music, then press the ENTER
button.
To move to the Music List, press the STOP ( )
or RETURN button.
The Music List screen appears.
Press the YELLOW (C) button.
Press the ▲▼◄► buttons to move to a
desired track, and then press the ENTER
button. A check appears on the track.
Repeat this procedure to select additional
tracks.
To remove a track from the list, move to the
track, and then press the ENTER button
again.
The check on the track is cancelled.
When done, press the TOOLS button.
1.
•
•
2.
3.
4.
5.
6.
Press the ▲▼ buttons to select Play
Selected, and then press the ENTER button.
The tracks you selected will be played
automatically.
To go to the Music List, press the RETURN
button.
NOTE
You can create a playlist with up to 99 tracks on
Audio CDs (CD-DA).
Playing back a Pictures
G
Playing JPEG files
Insert a JPEG disc.
Press the ▲▼ buttons to select Photos, and
then press the ENTER button.
Press the ▲▼◄► buttons to select the folder
you want to play, and then press the ENTER
button.
Press the ▲▼◄► buttons to select the photo
you want to play, and then press the ENTER
button.
NOTE
You can’t enlarge the subtitle and PG graphic in the
full screen mode.
7.
8.
✎
▪
1.
2.
3.
4.
✎
▪
TRACK 002
03:56
TRACK 004
04:02
TRACK 006
03:40
TRACK 008
03:52
1/2 Page
Audio CD | Music
Close Edit Mode
( )
Page / Tools " Select ' Return
TRACK 001
00:43
TRACK 003
04:41
TRACK 005
03:43
TRACK 007
04:06
Selected Items : 3
+
00:13 / 00:43
TRACK 001
TRACK 001
00:43
TRACK 002
03:56
TRACK 003
04:41
Music
Audio CD
"
Enter / Tools ' Return
Page 62
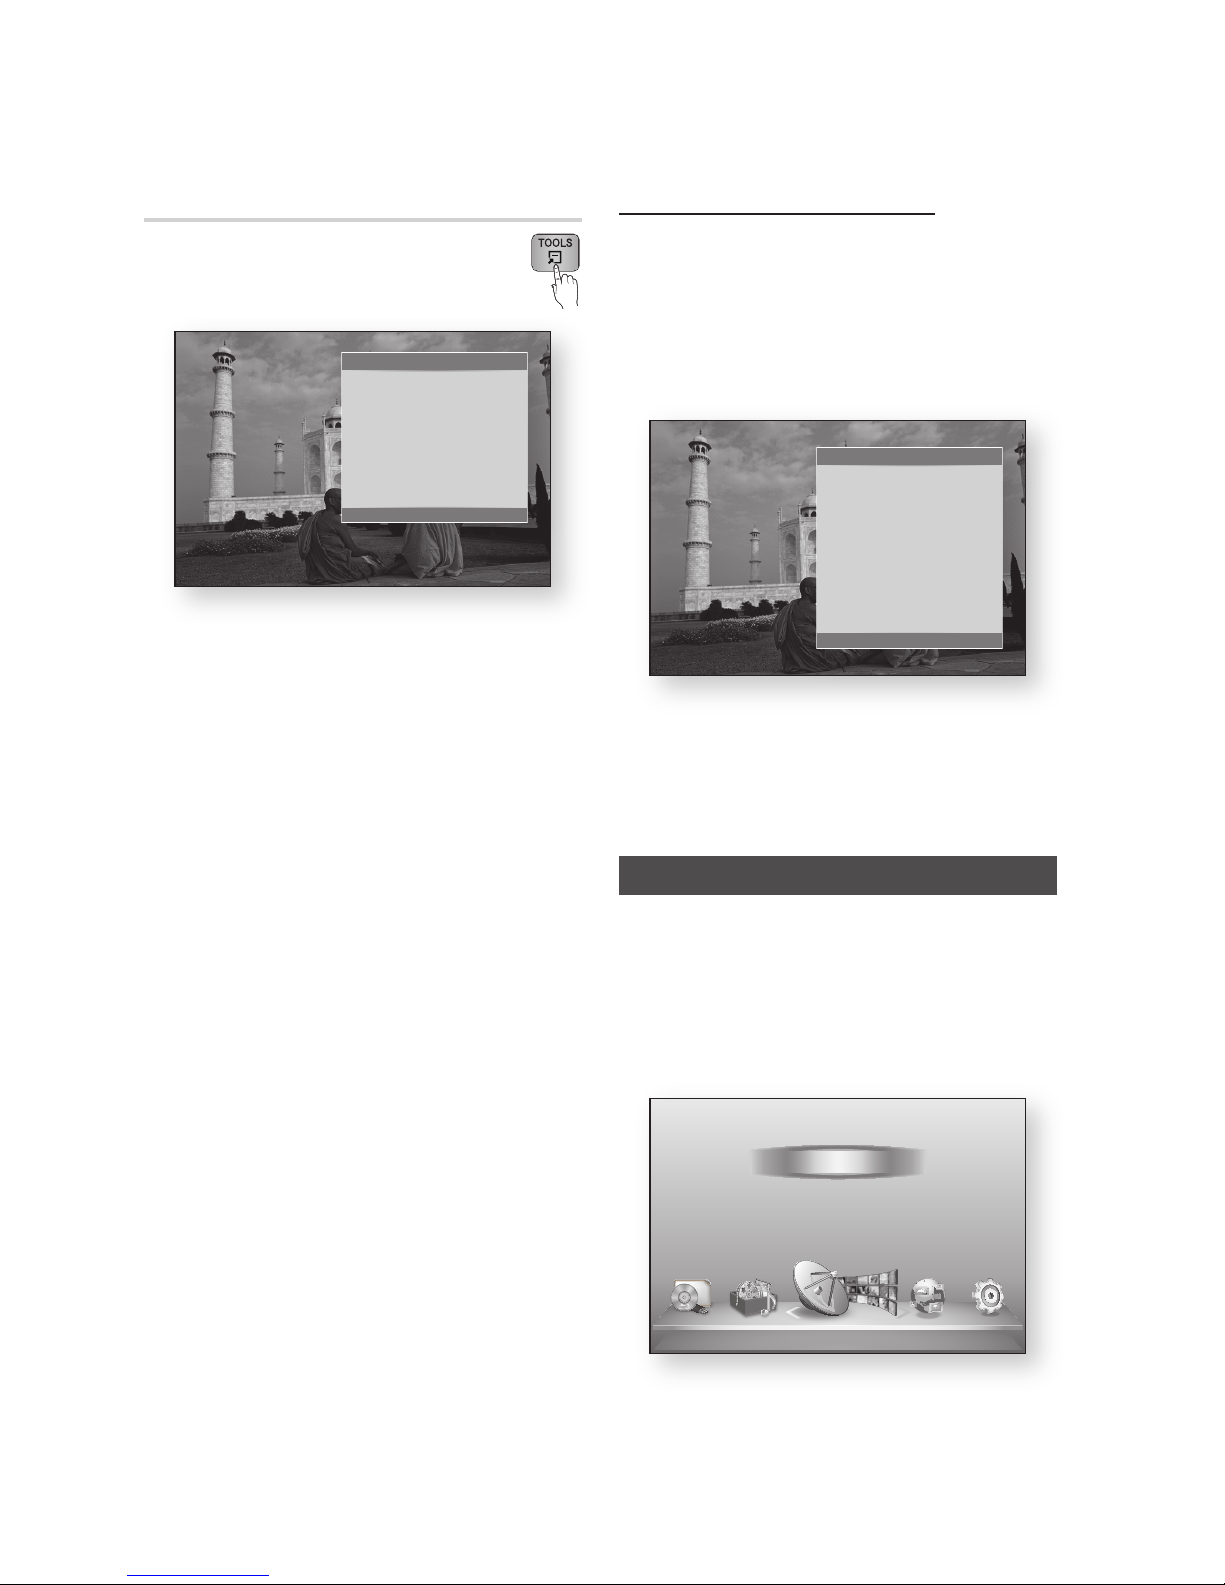
62 English
Basic Functions
Using the TOOLS button
You can use various function by pressing
the TOOLS button.
Start Slide Show : Select to start the slide
show.
Background Music : Select to listen to music
while viewing a picture.
Background Music Setting : Select to set the
background music setting.
Zoom : Select to enlarge the current picture.
(Enlarged up to 4 times)
Rotate : Select to rotate the picture. (This will
rotate the picture either clockwise or counter
clockwise.)
Picture Settings : Select this if you want to
adjust the picture quality.
Information : Shows the picture information
including the name and size, etc.
NOTE
To enable the background music function, the photo
file must be in the same storage media as the music
file. However, the sound quality can be affected by
the bit rate of the MP3 file, the size of the photo, and
the encoding method.
•
•
•
•
•
•
•
✎
▪
Using the Slide Show function
Press the TOOLS button.
Press the ▲▼ buttons to select Start Slide
Show, and then press the ENTER button.
The Slide Show starts.
To pause the slide show, press the TOOLS
button again.
Press the ▲▼ buttons to select Pause Slide
show, and then press the ENTER button.
You can also set the slide show speed and
effect using the same method.
Media Play
Media Play will enable you to play HDD/USB
contents or the contents transferred to your PC
using the AllShare function.
For more information about AllShare, refer to page 83.
Press the MENU button.
The home menu will be displayed.
1.
2.
3.
4.
5.
1.
Tools
Start Slide Show
Background Music : Off
Background Music Setting
Zoom
Rotate
Picture Settings
Information
"
Enter ' Return
Tools
Pause Slide show
Slide Show Speed : Normal
Slide Show Effect : Blind
Background Music : Off
Background Music Setting
Zoom
Rotate
Picture Settings
Information
"
Enter ' Return
d WPS(PBC)
My Devices Internet Settings
Guide
Schedule Manager
Channel List
Channel Manager
My Contents
Watch TV
Page 63
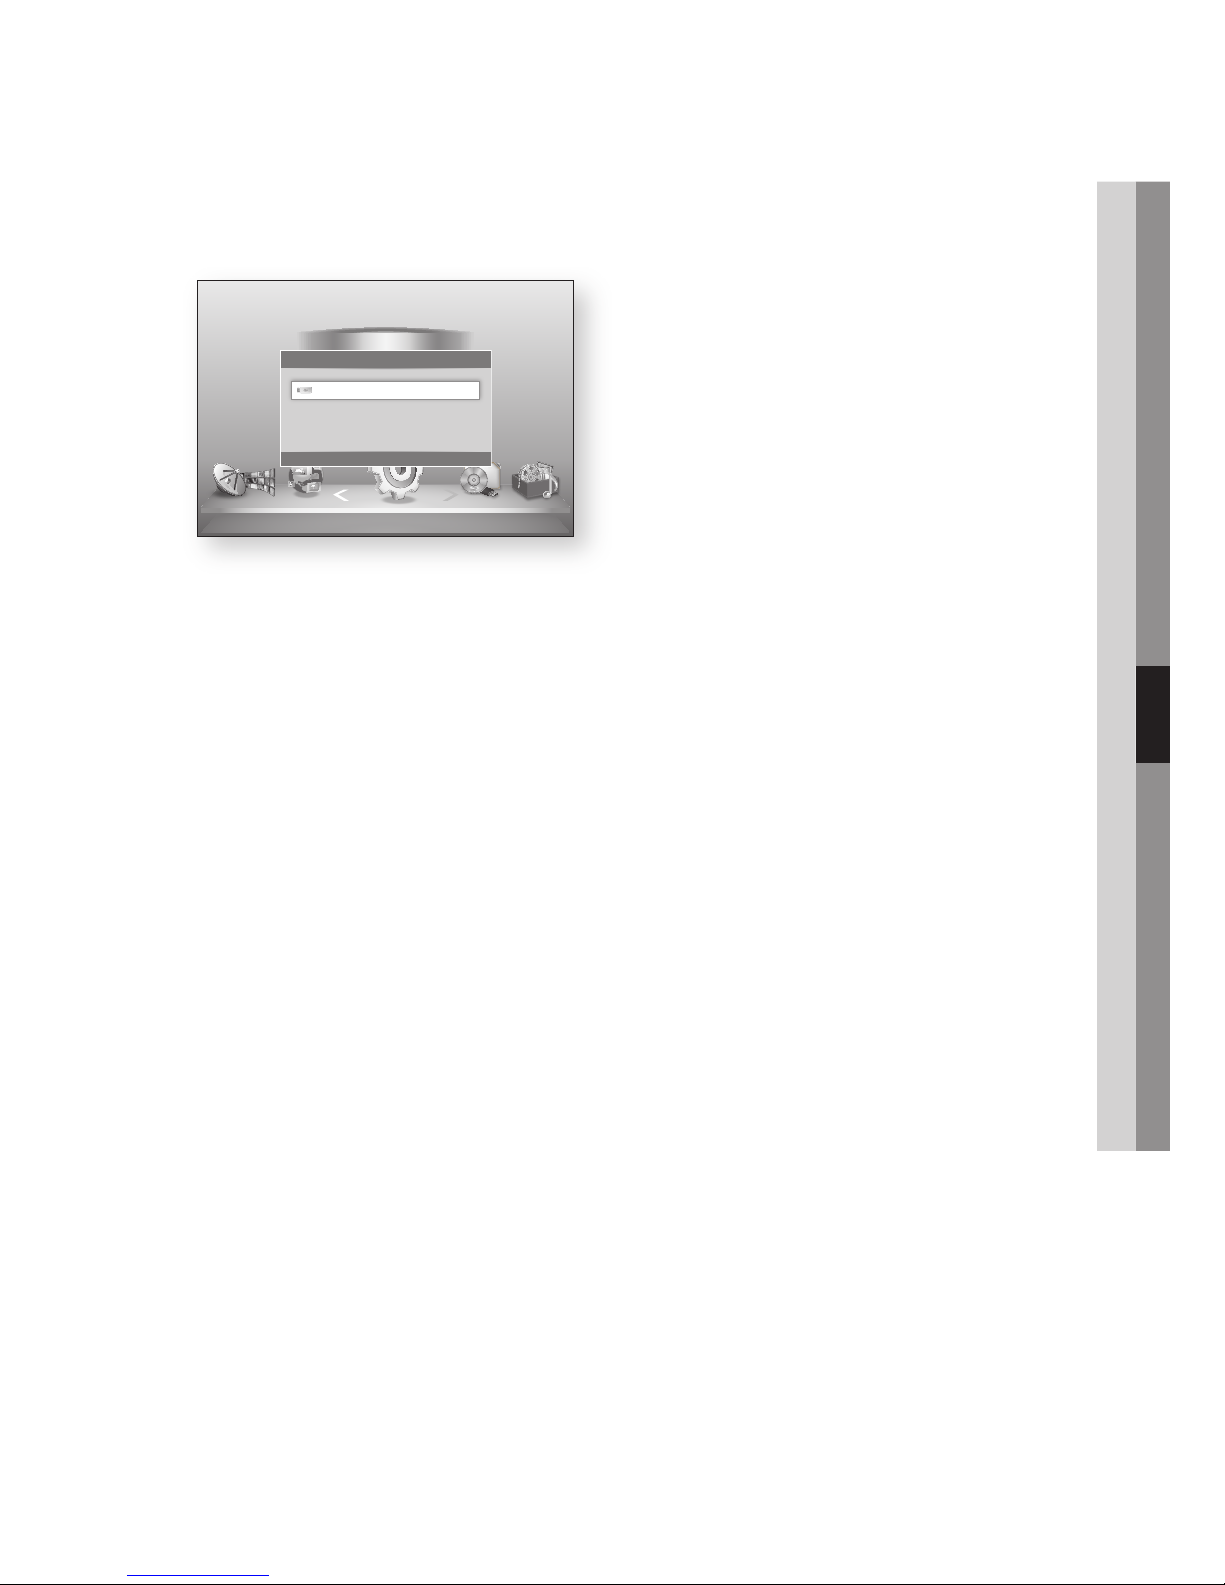
English 63
06 Basic Functions
In Stop mode, connect the USB storage
device to the USB port on the front panel of
the product.
Press the ENTER button.
Press the ▲▼◄► buttons to select the
desired Videos, Music, or Photos, and then
press the ENTER button.
For playing back Video, Music or Photo files,
see pages 54~63.
NOTE
You must remove the USB storage device safely
(by performing the “Safely Remove USB” function)
in order to prevent a possible damage to the USB
memory. Press the MENU button to move to the
Home menu, select the YELLOW (C) button, and
then press the ENTER button.
If you insert a disc when playing a USB storage
device, the device mode changes to “DVD or CD”
automatically.
2.
3.
4.
5.
✎
▪
▪
Safely Remove USB d WPS(PBC)
Watch TV My Devices My Contents
Settings
Schedule Manager
Channel List
Channel Manager
Internet
Settings
123
New device connected
"
Enter ' Return
Page 64
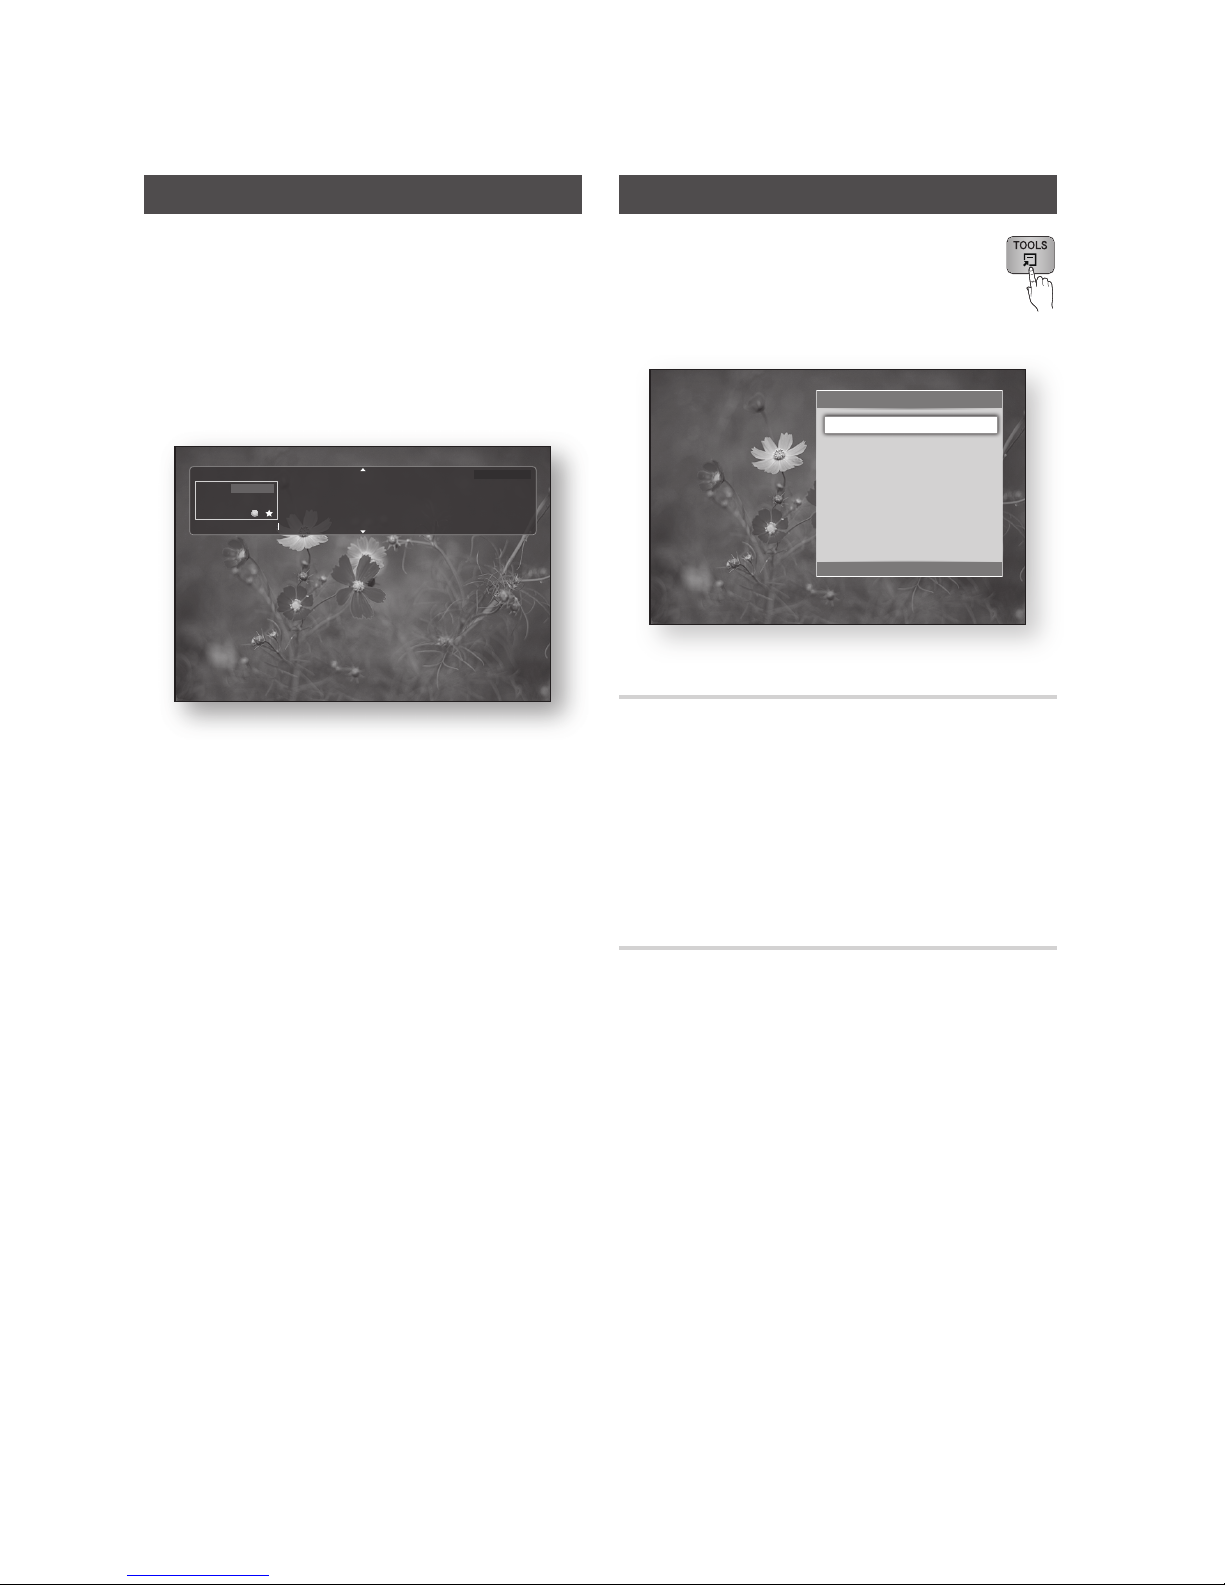
64 English
DTV Functions
Display Screen
After Tuning is completed, you can watch TV
channel.
To change TV channels, press the PROG
(,/.) button. (To move TV channel directly,
press the channel numbers of desired TV
channel using the number buttons on the
remote control.)
If you want to watch TV after seeing Bluray/DVD/CD or any other contents including
Internet contents via Smart Hub or Allshare,
press the MENU button on your remote
control to go Home menu.
If tuning is already completed, you can move
to DTV mode by pressing MENU button
again.
NOTE
The icon may differ depending on the service
information of signal.
1.
2.
3.
4.
✎
▪
DTV Functions
Using the TOOLS button
Press the TOOLS button while you are
viewing a channel.
Tools Menu Screen
Picture Settings
Press the TOOLS button while you are
viewing a channel.
Press the ▲▼ buttons to select Picture
Settings, then press the ENTER button.
For more information about this menu, please
refer to page 58.
Selecting the Audio Language
Press the TOOLS button while you are
viewing a channel.
Press the ▲▼ buttons to select the Audio
Language.
Press the ◄► buttons to select the desired
Audio Language, then press the ENTER
button.
•
1.
2.
1.
2.
3.
No title
BBC World
DTV
Dolby Digital
808
All
18:12 Sat 15 Nov
No detailed information.
800
a Information
What’s on
Tools
>
Move " Enter e Exit
Picture Settings
+
Audio Language 1.English
Dual I II : Dolby Digital
Lock Current Channel
Add to Favourites
Signal Information
Page 65
English 65
07 DTV Functions
Selecting the Dual I II
You can also operate this function by
pressing the AUDIO button on the
remote control.
Press the TOOLS button while you are
viewing a channel.
Press the ▲▼ buttons to select the Dual I II.
Press the ◄► buttons to select the desired
Audio, then press the ENTER button.
Lock current channel
You can lock a TV channel by setting PIN.
Press the TOOLS button while you are
viewing a channel.
Press the ▲▼ buttons to select Lock current
channel then press the ENTER button.
PIN setting menu appears.
Enter 4-digit PIN number.
If PIN setting is finished, Viewing locked
channel is impossible unless you unlock.
If you want unlock a lock channel, press
TOOLS button while you are viewing Lock
Channels.
Press ▲▼ to select Lock current channel,
then press the ENTER button.
Enter PIN to unlock a TV channel.
NOTE
Lock current channel menu can be displayed when
the country set to Netherlands.
1.
2.
3.
1.
2.
3.
4.
5.
6.
✎
▪
Add to Favourites
Press the TOOLS button while you are
viewing a channel.
Press the ▲▼ buttons to select the Add to
Favourites, then press the ENTER button.
Press the ▲▼ buttons to edit the desired
channel, then press the ENTER button.
Press the ◄► buttons to select the OK, then
press the ENTER button.
Signal Information
Press the TOOLS button while you are
viewing a channel.
Press the ▲▼ buttons to select the Signal
Information, then press the ENTER button.
You can check the signal information.
Setting Audio Description & Subtitle
Language
Setting the Audio Description
You can add a verbal description to the main
audio to help the visually impaired.
Press AD/SUBTITLE button while you are
viewing a TV channel.
Press ▲▼ buttons to select Audio
Description, then press the ENTER button.
If you select On, volume menu will be
activated. Adjust the audio description volume
from 0~100.
NOTE
You can also toggle Audio Description by pressing
AD/SUBTITLE button once again after you press
AD/SUBTITLE button first time.
Setting the Subtitle Language
Press the AD/SUBTITLE button while you are
viewing a TV channel.
Press ▲▼ button to select Subtitle menu,
then press the ENTER button.
1.
2.
3.
4.
1.
2.
1.
2.
3.
✎
▪
1.
2.
Page 66
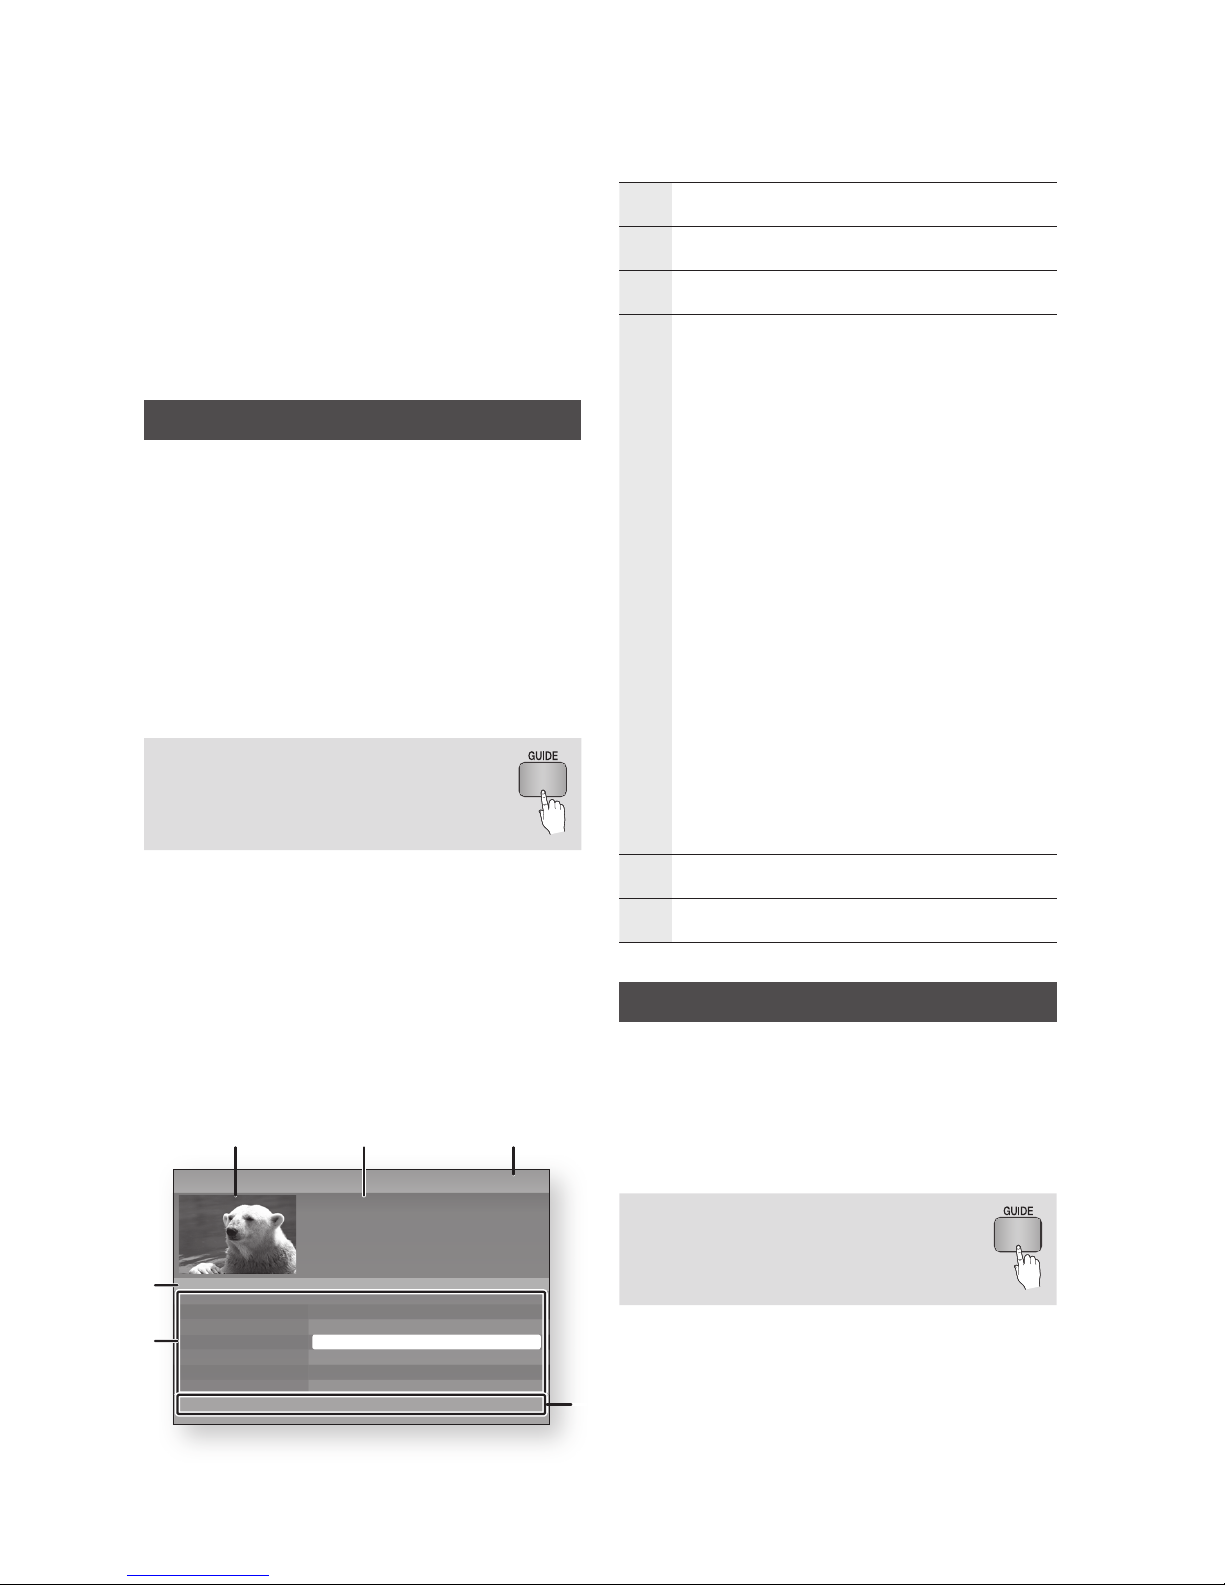
66 English
DTV Functions
Subtitle : You can set it to On or Off.
If you select On, the Subtitle Mode and
Subtitle Language will be activated.
Subtitle Mode : Select the desired subtitle
mode.
Subtitle Language : Select the desired
subtitle language.
Viewing the Guide Screen
The EPG (Electronic Programme Guide) information
is provided by broadcasters. Using channel
schedules provided by broadcasters, you can
specify channels you want to watch in advance
so that the channel automatically changes to the
selected channel at the specified time. Channel
entries may appear blank or out of date depending
on a channel status.
If you set the Country to New Zealand , Guide
screen and Functional Specification on this
manual may differ.
You can also operate this function by
pressing the GUIDE button on the
remote control.
Press the MENU button.
The home menu will be displayed.
Press the ◄► buttons to select the Watch
TV.
Press the ▲▼ buttons to select the Guide,
then press the ENTER button.
The guide screen will be displayed.
Guide Screen
•
•
•
1.
2.
3.
•
1
Displays the channel screen.
2
Displays the channel information.
3
Displays the current date and time.
4
Nevigation Help : Displays remote control buttons
available.
RED (A) : To set the programme schedule.
YELLOW (C) : It displays channel from now to 24
hours after.
If you select YELLOW (C) button, GREEN (B)
button will be displayed. Press this to display the
list of channels before 24 hours.
BLUE (D) :
To change the Channel View (All, TV,
Radio, Data/Other, Favourites 1,2,3...)
PROG (,/.) buttons :
Go to previous page or
next page.
ENTER button
When you select a programme currently
being broadcast, you can watch the selected
channel in the full screen.
When you select a programme scheduled to
broadcast, you can set the Timer viewing or
Timer recording. Press the ◄► button to
select the Timer viewing or Timer recording,
then press the ENTER button again. The
Timer icon appears on the guide screen.
•
•
•
•
•
-
-
5
Displays the Stored channels.
6
Displays view mode.
Schedule Manager
Make sure that clock must be set before operating
this function. (See page 48)
If you set the Country to New Zealand, you can go
to schedule manager through home menu.
In the home menu, go to Watch TV >Schedule
Manager.
You can also operate this function by
pressing the GUIDE button on the
remote control.
Press the MENU button.
The home menu will be displayed.
Press the ◄► buttons to select the Watch TV.
Press the ▲▼ buttons to select the Guide,
then press the ENTER button.
The guide screen will be displayed.
1.
2.
3.
a
Sche.Mgr +24 Hours d Ch. Mode ƒ Page " Watch
7:11 Sat 1 Jan
Guide
No Information
DTV 814 Discovery
Channel View - All
814 Discovery
▲
812 Class News No Information
813 Coming Soon No Information
814 Discovery No Information
815 DiscoveryH&L No Information
816 five No Information
▼
817 heat No Information
4
1 2 3
5
6
15:00Today 15:30 16:00 16:30
Page 67
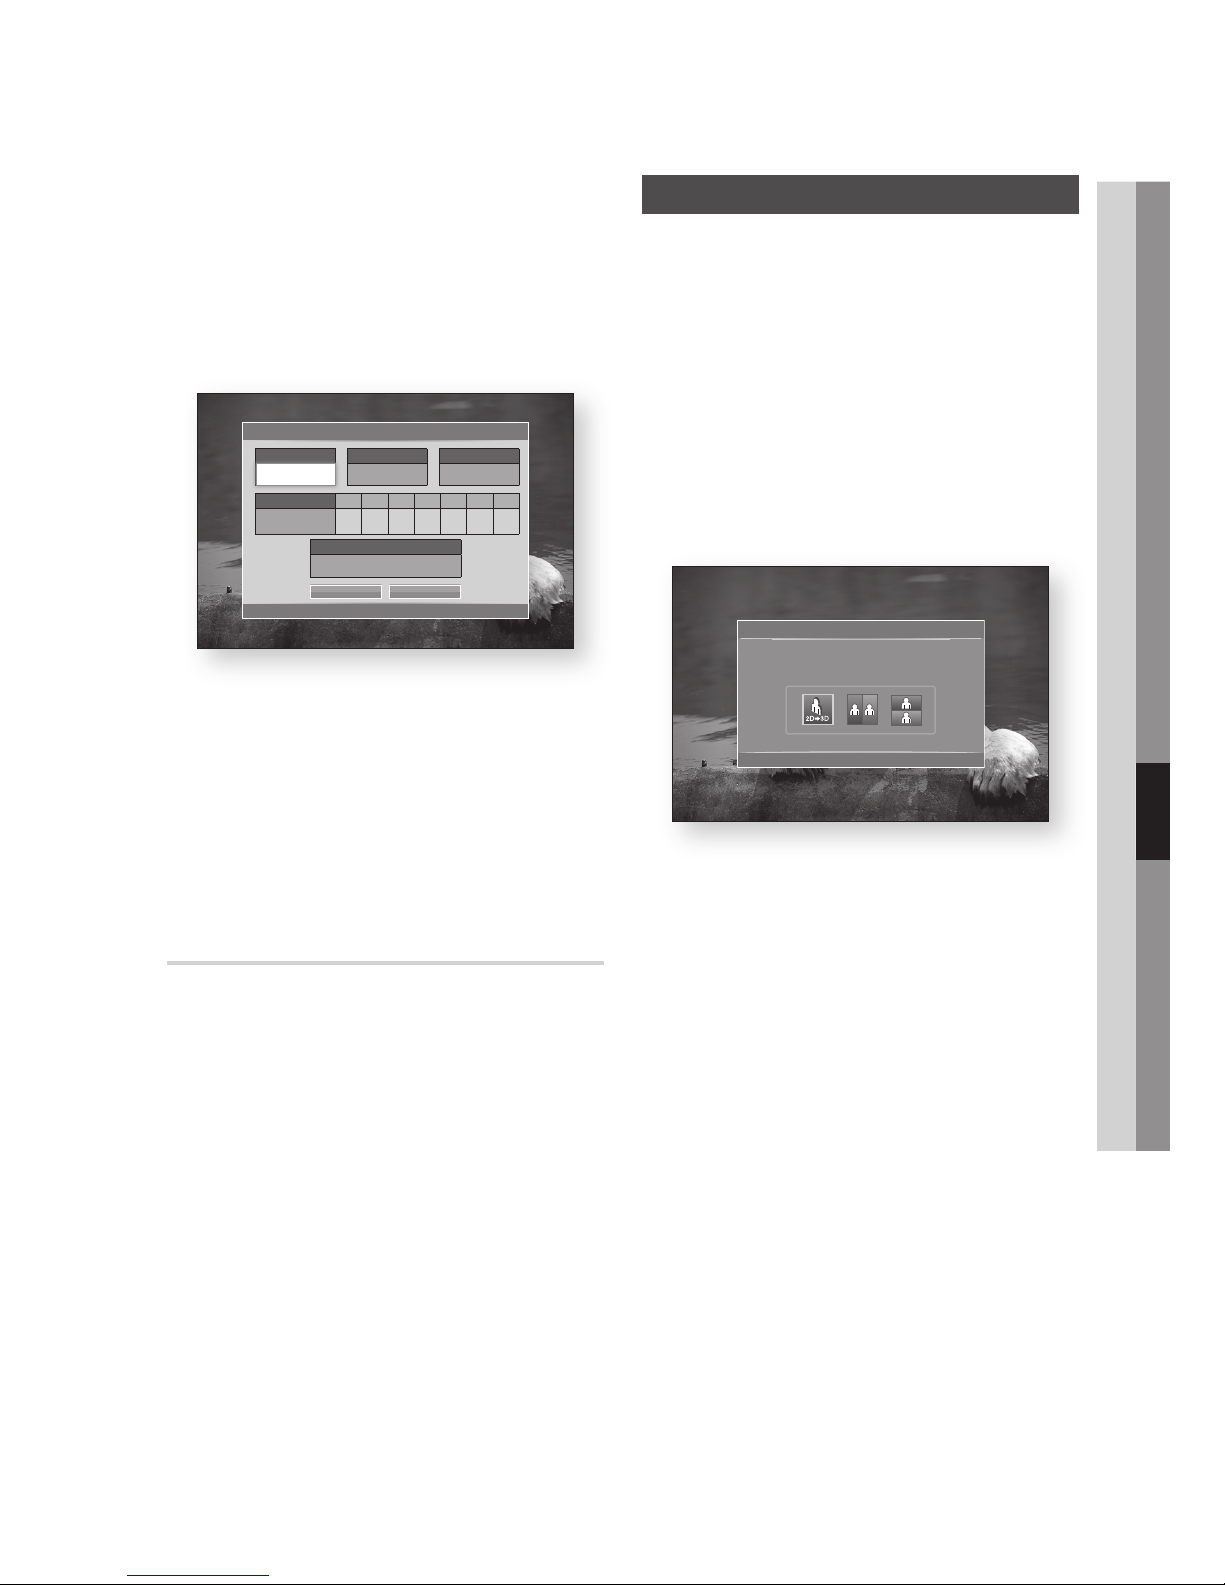
English 67
07 DTV Functions
Press the ▲▼◄►buttons to select the
channel you want to set Timer Recording (or
Timer Viewing), press the RED (A) button.
Press the ENTER button.
Press the ◄► buttons to select Timer
Viewing or Timer Recording, then press the
ENTER button.
Fill the input items using ▲▼◄► buttons,
then press the ENTER button.
Press the ENTER button again.
NOTE
If the programme is set to Timer Viewing or Timer
Recording in the schedule manager, the Timer icon
does not appear on the guide screen.
To Cancel or Edit Schedule
Press the RED (A) button in the guide screen.
Press the ▲▼◄► buttons to select the
scheduled channel you want to cancel or edit,
then press the ENTER button.
Press the ◄► buttons to select the Cancel
Schedules or Edit, then press the ENTER
button.
NOTE
If the reserved programme is edited in the schedule
manager, the Timer icon does not appear on the
guide screen.
4.
5.
6.
7.
8.
✎
▪
1.
2.
3.
✎
▪
Viewing DTV with the 3D effect
You can experience 3D effect with all live TV
programme and recorded TV programme.
During watching the TV programme or playing
recorded TV programme, press the 2D3D
button on your remote control. The 3D menu
will appear.
2D3D : Changes a 2D image to 3D.
Side by Side : Displays two images next to
each other.
Top and bottom : Displays one image
above another.
Press the ◄► buttons to select the desired
3D mode, then press the ENTER button.
If you press the 2D3D button once more
during 3D viewing, displayed image will be
changed into 2D mode.
NOTE
If you change TV channel during watching DTV in 3D
mode of Side by Side mode, displayed image will be
changed into 2D mode automatically.
When 3D effect of Side by Side mode is enabled,
you can not adjust 3D mode.
If TV programme is not support Side by Side, Top
and Bottom mode or Auto Detection function, 3D
menu selection OSD is not appear.
1.
•
•
•
2.
3.
✎
▪
▪
▪
Timer Viewing
<
Move " Enter ' Return
Antenna
DTV Air
Date Sun Mon Tue Wed Thu Fri Sat
01 / 01 / 2011
Channel
806
Repeat
Once
DTV
Start Time
01 :0 2
OK Cancel
3D
<
Move " Enter e Exit
Using the LEFT / RIGHT keys on the remote control, select the
icon suitable for the picture on screen.
Page 68
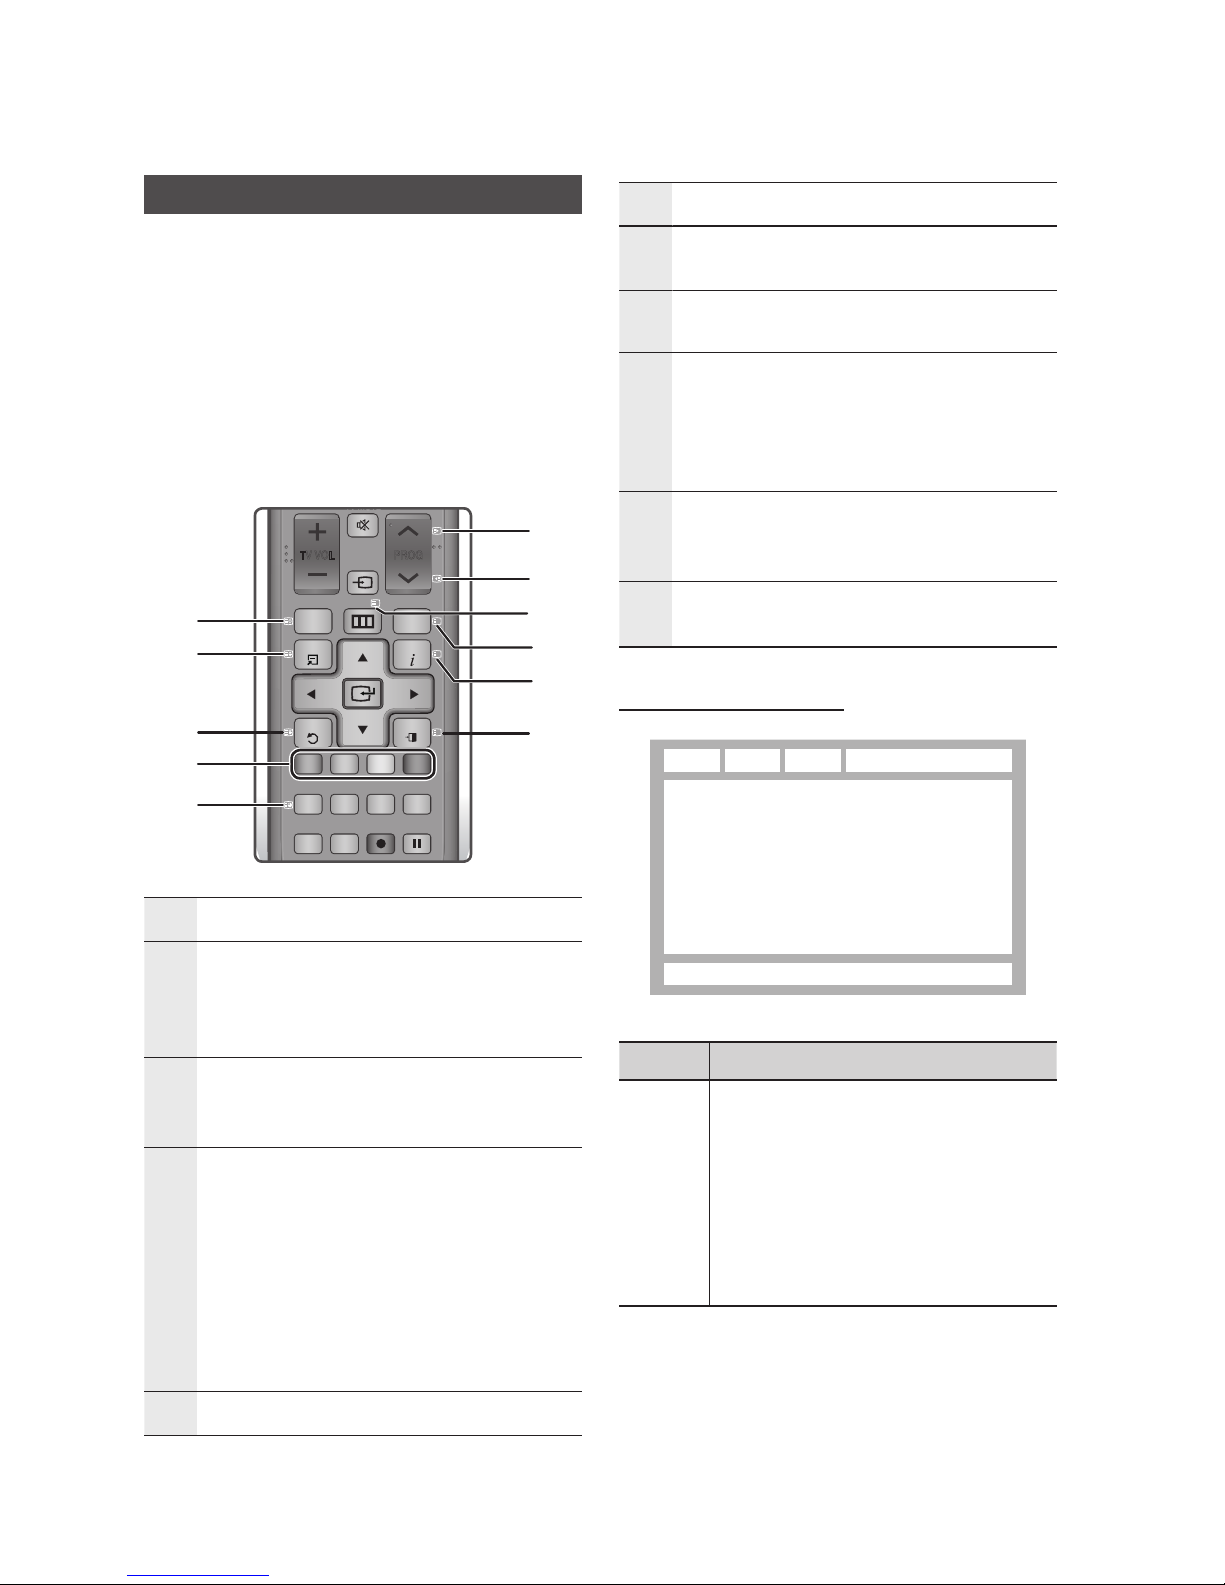
68 English
DTV Functions
Using the Teletext Service
If DTV programme supports teletext signal, you
can use teletext service. For Teletext information
is displayed correctly, channel reception must be
stable. Otherwise, information may be missing or
some pages may not be displayed.
Press TTX/MIX button while you are viewing
a TV channel.
By pressing the TTX/MIX button repeatedly,
you can change or exit the teletext mode.
1
8
(store) : Stores the Teletext pages.
2
4
(size) : Displays the teletext on the upper half
of the screen in double-size. To move the text to
the lower half of the screen, press it again. For
normal display, press it once again.
3
9
(hold) : Holds the display at the current page,
in the case that there are several secondary pages
that follow automaticially. To undo, press it again.
4
Colour buttons (red, green, yellow, blue) : If the
FASTEXT system is used by the broadcasting
company, the different topics on a Teletext page are
colour-coded and can be selected by pressing the
coloured buttons. Press the colour corresponding to
the topic of your choice. A new colourcoded page is
displayed. Items can be selected in the same way.
To display the previous or next page, press the
corresponding coloured button.
5
1
(sub-page) : Displays the available sub-page.
1.
2.
6
2
(page up) : Displays the next Teletext page.
7
3
(page down) : Displays the previous Teletext
page.
8
6
(index) : Displays the index (contents) page at
any time while you are viewing Teletext.
9
0
(mode) : Selects the Teletext mode (LIST/
FLOF). If pressed during LIST mode, switches the
mode to List savemode. In List save mode, you can
save a Teletext page into a list using the 8(store)
button.
0
5
(reveal) : Displays the hidden text (answers to
quiz games, for example). To display the normal
screen, press it again.
!
7
(cancel) : Shrinks the Teletext display to
overlap with the current broadcast.
Typical Teletext page
Part Contents
A Selected page number.
B Broadcasting channel identity.
C Current page number or search indications.
D Date and time.
E Text.
F Status information. FASTEXT information.
NOTE
Teletext TTX/MIX control is available only when the
DTV programme support teletext signal.
✎
▪
BD-HDD/TV
2D�3D
0000-000000
POWER
1 2 3
4 5 6
7 8 9
DISC MENU
TITLE MENU
0
TTX/MI X
BD T V
TIME SHIFT
TV VOL PROG
TV SOURCE
1
1
CH LIST
SMART
GUIDE
i
MENU
2D�3D
FULL
SCREEN
A B C D
INFOTOOLS
EXIT
RETURN
...
?
×
HUB
SEARCH
AD/
SUBTITLE
REC PAUSERECAUDIO
TV MUTE
TV
POWER
1
2
3
4
5
6
7
8
9
0
!
E
F
DA B C
Page 69
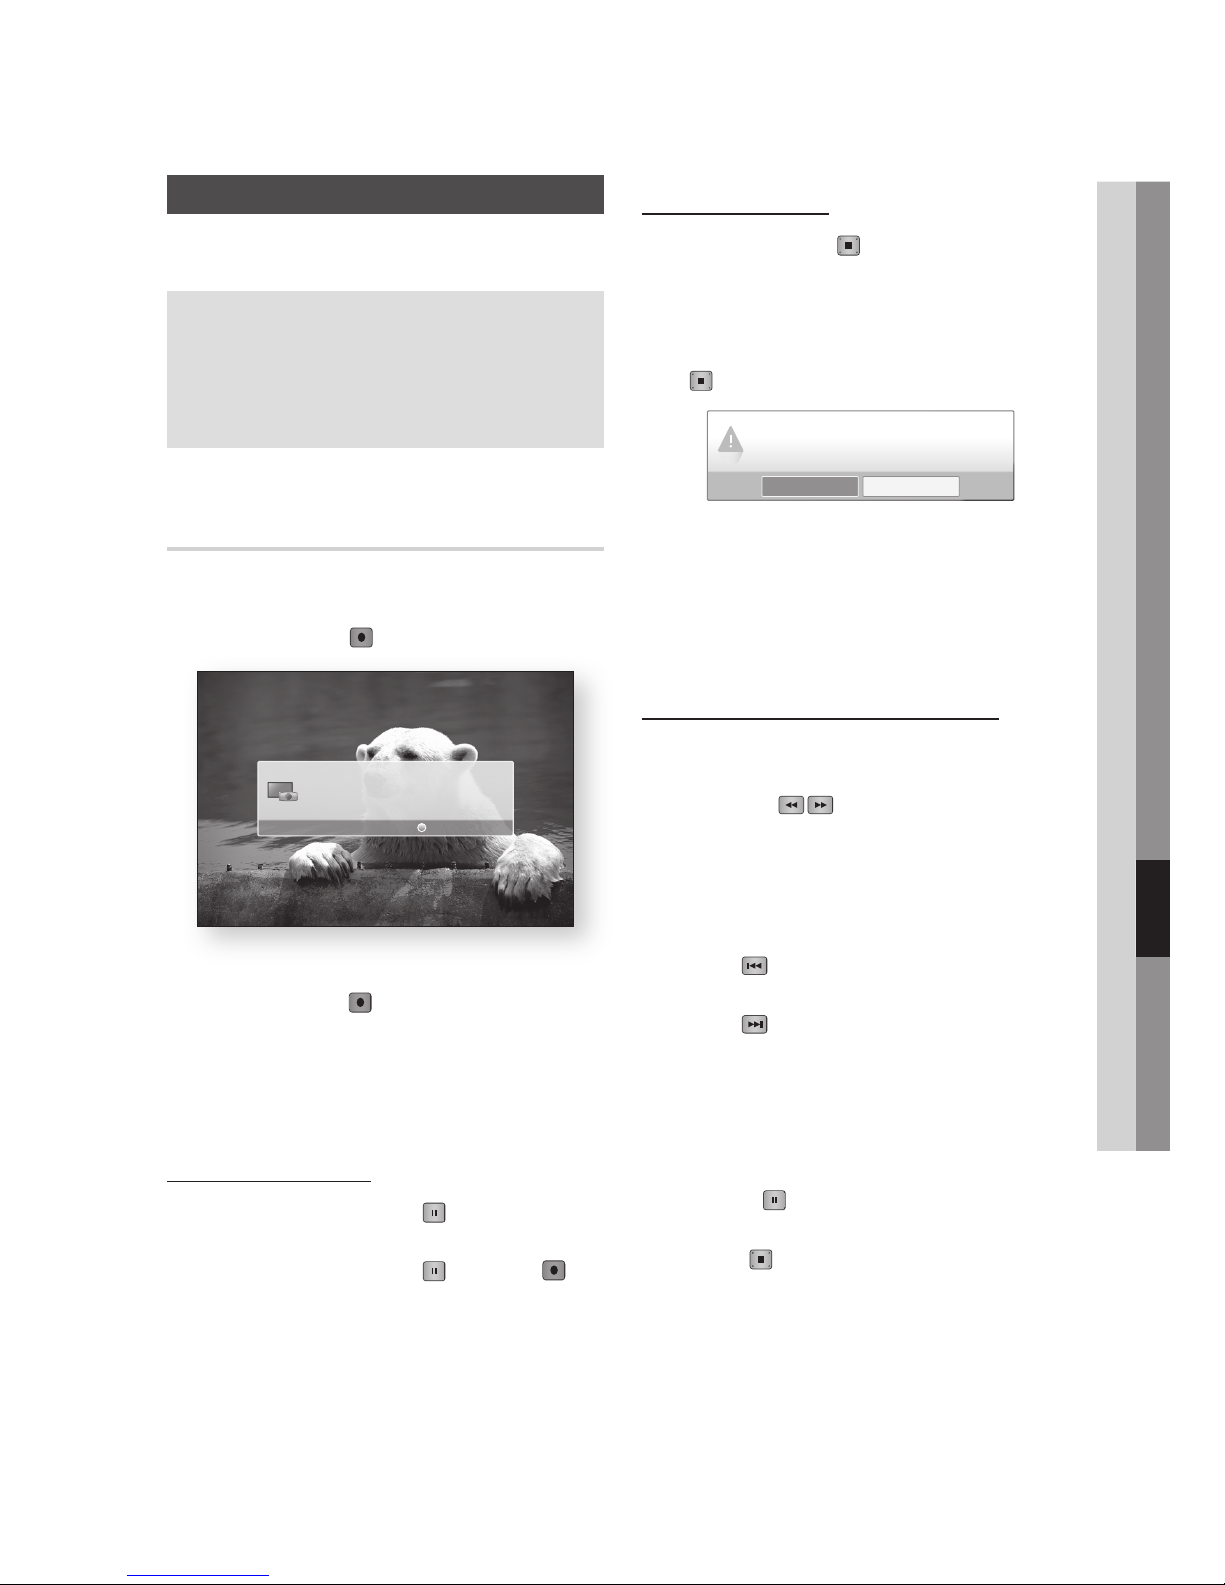
English 69
08 Advanced Functions
Recording
This product can record in HDD or external
devices.
Before recording
Please check the default recording device and
available storage size in Device management.
(For more information about device
management, please refer to pages 49~50)
Recording the current TV channel
you are watching
Press the PROG (,/.) or number buttons to
select a TV Channel you want to record.
Press the REC ( ) button.
If you want to adjust length of the recording,
press the REC ( ) button during the
recording.
Press the ▲▼ buttons to select the desired
length of the recording, then press the
ENTER button.
To pause recording
Press the REC PAUSE ( ) button to pause
a recording in progress.
Press the REC PAUSE ( ) or REC ( )
button resume recording.
1.
2.
3.
4.
1.
2.
To stop recording
Press the STOP ( ) button to stop
a recording in progress. The message
“Recording completed.”will appear.
When you are recording a TV channel other
than you are watching now, press the STOP
( ) button, then message appears as below.
Press the ◄► buttons to select Yes, then
press the ENTER button to stop recording.
During these process, there are no need to
change TV channels to the channel under
recording.
Playback control during recording
During recording a TV channel, you can search
scene or move to the beginning point of recording.
SEARCH ( ) buttons : Search the
desired scene.
)
1
)
2 ) 3
)
4
)
5 ) 6 ) 7
(
1
(
2 ( 3
(
4
(
5 ( 6 ( 7
SKIP ( ) button : Return to the beginning
point of recording.
SKIP ( )button : Jump to the same scene
with Live TV.
◄ button : Jump to - 20 sec from current
positon.
► button : Jump to + 20 sec from current
position.d
PAUSE ( ) button : Pause the scene while
keeping recording progress.
STOP ( ) button : If you are watching the
past scene, the playback point will jump
to the same scene with Live TV. If you are
watching same scene with Live TV, recording
will be stopped.
1.
2.
3.
4.
1.
2.
3.
4.
5.
6.
7.
Advanced Functions
Recording Started
3 NOVA
REC Setting
Do you want to stop recording XXXXX
from XXXXX?
NoYes
Page 70

70 English
Checking Recordable Time
You can check recordable time in your HDD.
In the Home menu, press the ◄► buttons to
select My contents.
Press the ▲▼ buttons to select the Recorded
TV, and then press the ENTER button.
The Recorded TV List will be displayed.
Press ◄ button to select HDD, then press
INFO button.
NOTE
After formatting, the capacity of HDD is displayed
as roughly 93% when compared to the vendor
specification of HDD.
This product store some data in HDD for functional
purpose.
If available storage is left less than 10MB during the
recording, recording is finished automatically.
Watching other channels during
Recording a TV channel
While a TV programme is being recorded, you can
also watch other free TV channels.
However, you can not watch scrambled TV
channels while other TV channel is being recorded.
During the recording, press the PROG (,/.)
or number buttons to change the channel you
want to watch.
NOTE
Recored files of less than 10 seconds are not saved.
If the free space available for recording and
multimedia files in the HDD is less than 10MB,
recording will be not enabled.
Playing a Disc while Recording a
TV channel
You can play a disc while you are recording a TV
channel.
When disc is already loaded before start
recording
Press the MENU button on your remote while
recording a TV channel.
In the Home menu, press the ◄► buttons to
move to My Devices.
1.
2.
3.
✎
▪
▪
1.
✎
▪
▪
1.
2.
Press the ▲▼ buttons to select a disc to play
and press the ENTER button.
When Disc is not loaded
Insert a disc into Disc Slot.
Disc will be loaded and played while keeping
recording.
NOTE
This product supports Blu-ray Video, DVD Video and
CD-DA.
Playing Recorded TV contents while
Recording a TV channel
Press the MENU button on your remote while
recording a TV channel.
In the Home menu, press the ◄► buttons to
move to My Contents.
Press the ENTER button to Recorded TV.
NOTE
To stop recording, please change operation mode to
DTV view and press the
STOP (
) button.
The TV programme under recording is not displayed
at ‘Recorded TV’ page in ‘My contents’.
Time Shift function
You can pause a live TV or start watching the TV
programme from the beginning point you started
Time Shift function.
Start Time Shift function with PAUSE button
When you are watching a TV channel, press
the PAUSE ( ) button.
The image of TV programme will be paused,
and then Time Shift bar will appear.
#
Pause is displayed on the left side of Time
Shift bar.
Start Time Shift with PLAY button
When you are watching a TV channel, press
the PLAY ( ) button.
The Time Shift function starts and the Time
Shift bar will appear. Live TV is displayed on
the left side of Time Shift bar.
3.
1.
2.
✎
▪
1.
2.
3.
✎
▪
▪
1.
2.
1.
2.
Page 71
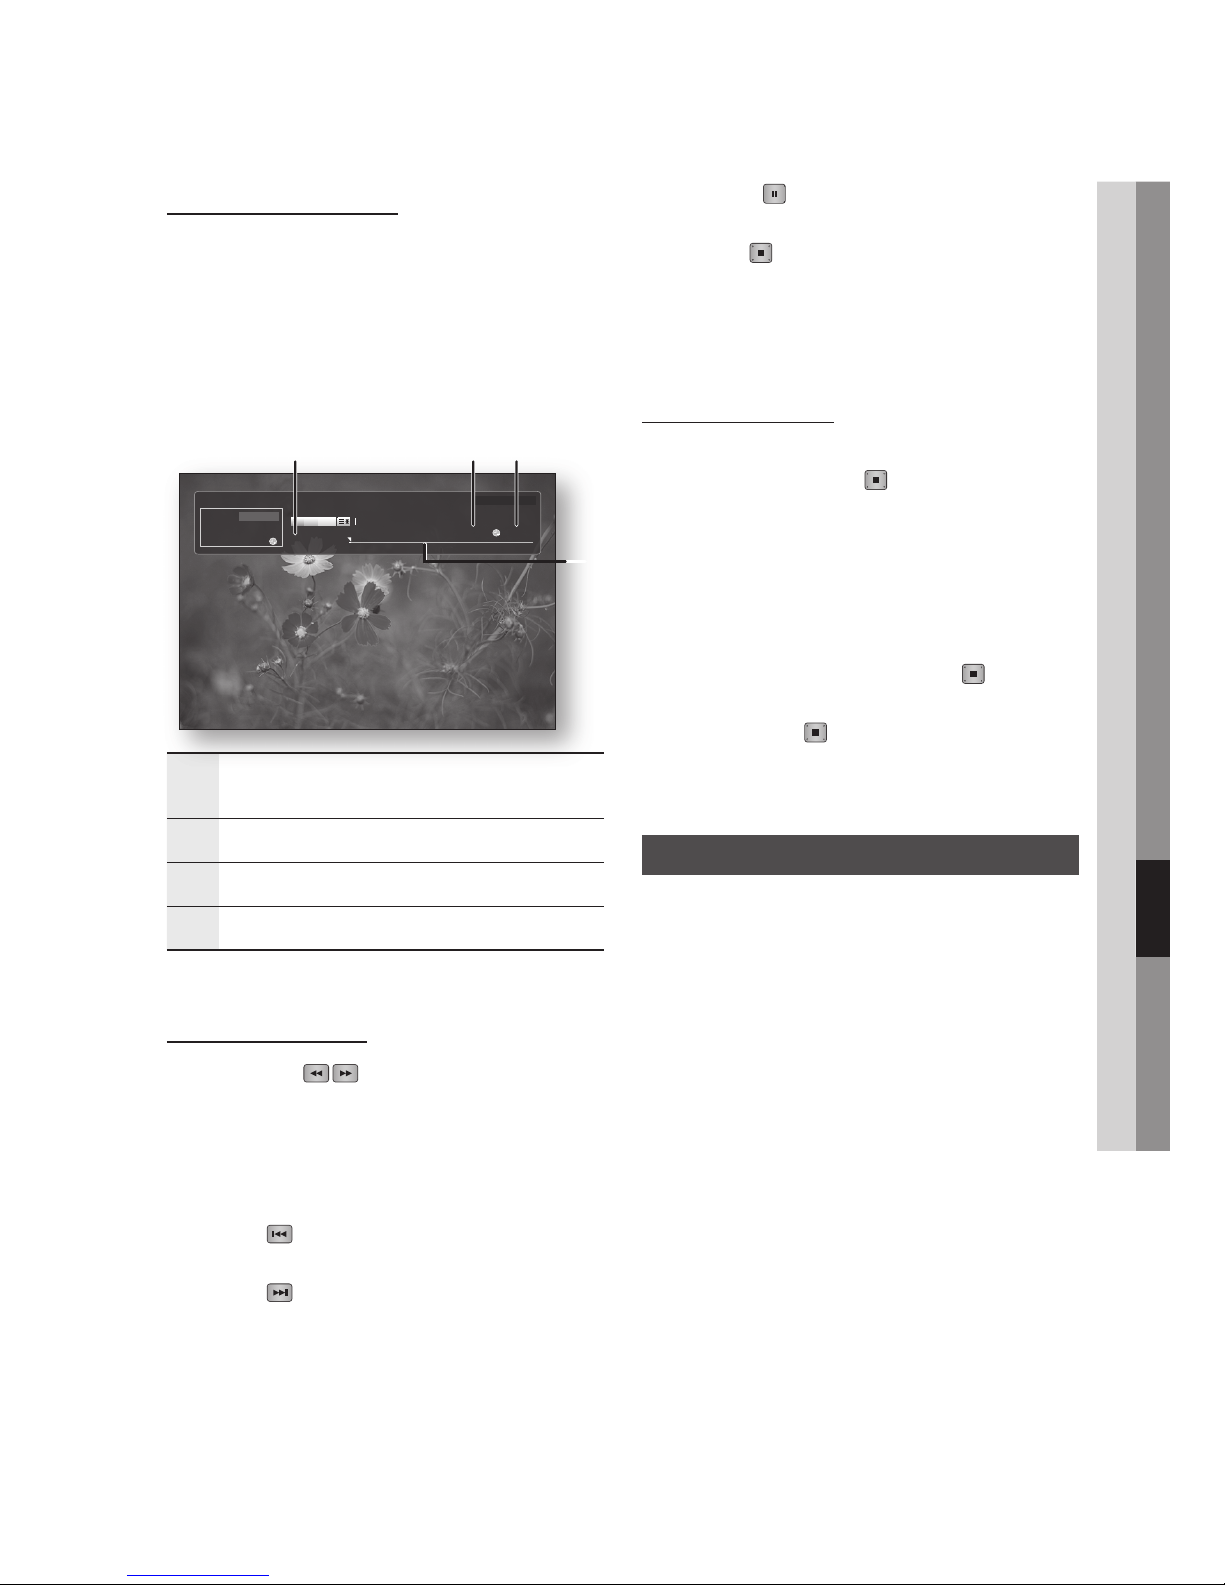
English 71
08 Advanced Functions
PAUSE ( ) button : Pause the scene while
keeping Time shift operation.
STOP ( ) button : If you are watching the
past scene, playback point will jump to the
same scene with Live TV. If you are watching
the same scene with Live TV, the Time shift
function will be stopped.
To stop Time Shift
If Time Shift bar is not in PAUSE or PAST
mode, press STOP ( ) button.
The message “Do you want to stop Timeshift.”
will appear.
Select Yes button and press ENTER button
to stop Time Shift.
If the Time Shift bar is in PAUSE or PAST
mode, Time Shift mode will be changed into
Live TV when you press STOP ( ) button
first time.
Press STOP ( ) button again, then same
message with above image appears.
Select Yes then press the ENTER button.
Playing the Recorded Title
In the Home menu, press the ◄► buttons to
select the My Contents.
Press the ▲▼ buttons to select the Recorded
TV, and then press the ENTER button.
The Recorded TV List will be displayed.
Press the ▲▼◄► buttons to select the title
you want to play, then press the ENTER
button.
The selected title will be played back.
During the playback, press the ENTER
button. Display five scenes as thumbnails.
Press the ◄► buttons to select desired
scene, then press the ENTER button to start
playback from the beginning of the scene.
6.
7.
1.
2.
3.
4.
5.
1.
2.
3.
4.
5.
Time Shift information
You can see current information about Time Shift
function.
Press the ENTER button on your remote
while Time Shift function is enabled.
Time Shift bar appears as below.
Time Shift Screen
1
Mode Display : Shows current status of Time Shift
function.
2
Shows current playback point.
3
Shows recorded time by Time Shift function.
4
Shows progress bar.
Playback control button during Time Shift
function is enabled
SEARCH ( ) buttons : Search the
desired scene.
)
1
)
2 ) 3
)
4
)
5 ) 6 ) 7
(
1
(
2 ( 3
(
4
(
5 ( 6 ( 7
SKIP ( ) button : return to the beginning of
Time Shift.
SKIP ( ) button : Shows same scene with
Live TV.
◄ button : Jump to - 20 sec from current
positon.
► button : Jump to + 20 sec from current
position.
1.
2.
•
1.
2.
3.
4.
5.
SD 4:3 576i
Fanfan
DTV
Dual
3
TV
18:12 Sat 15 Nov
+
English
+
00:00:3400:00:06/
NOVA
1 2 3
4
Page 72
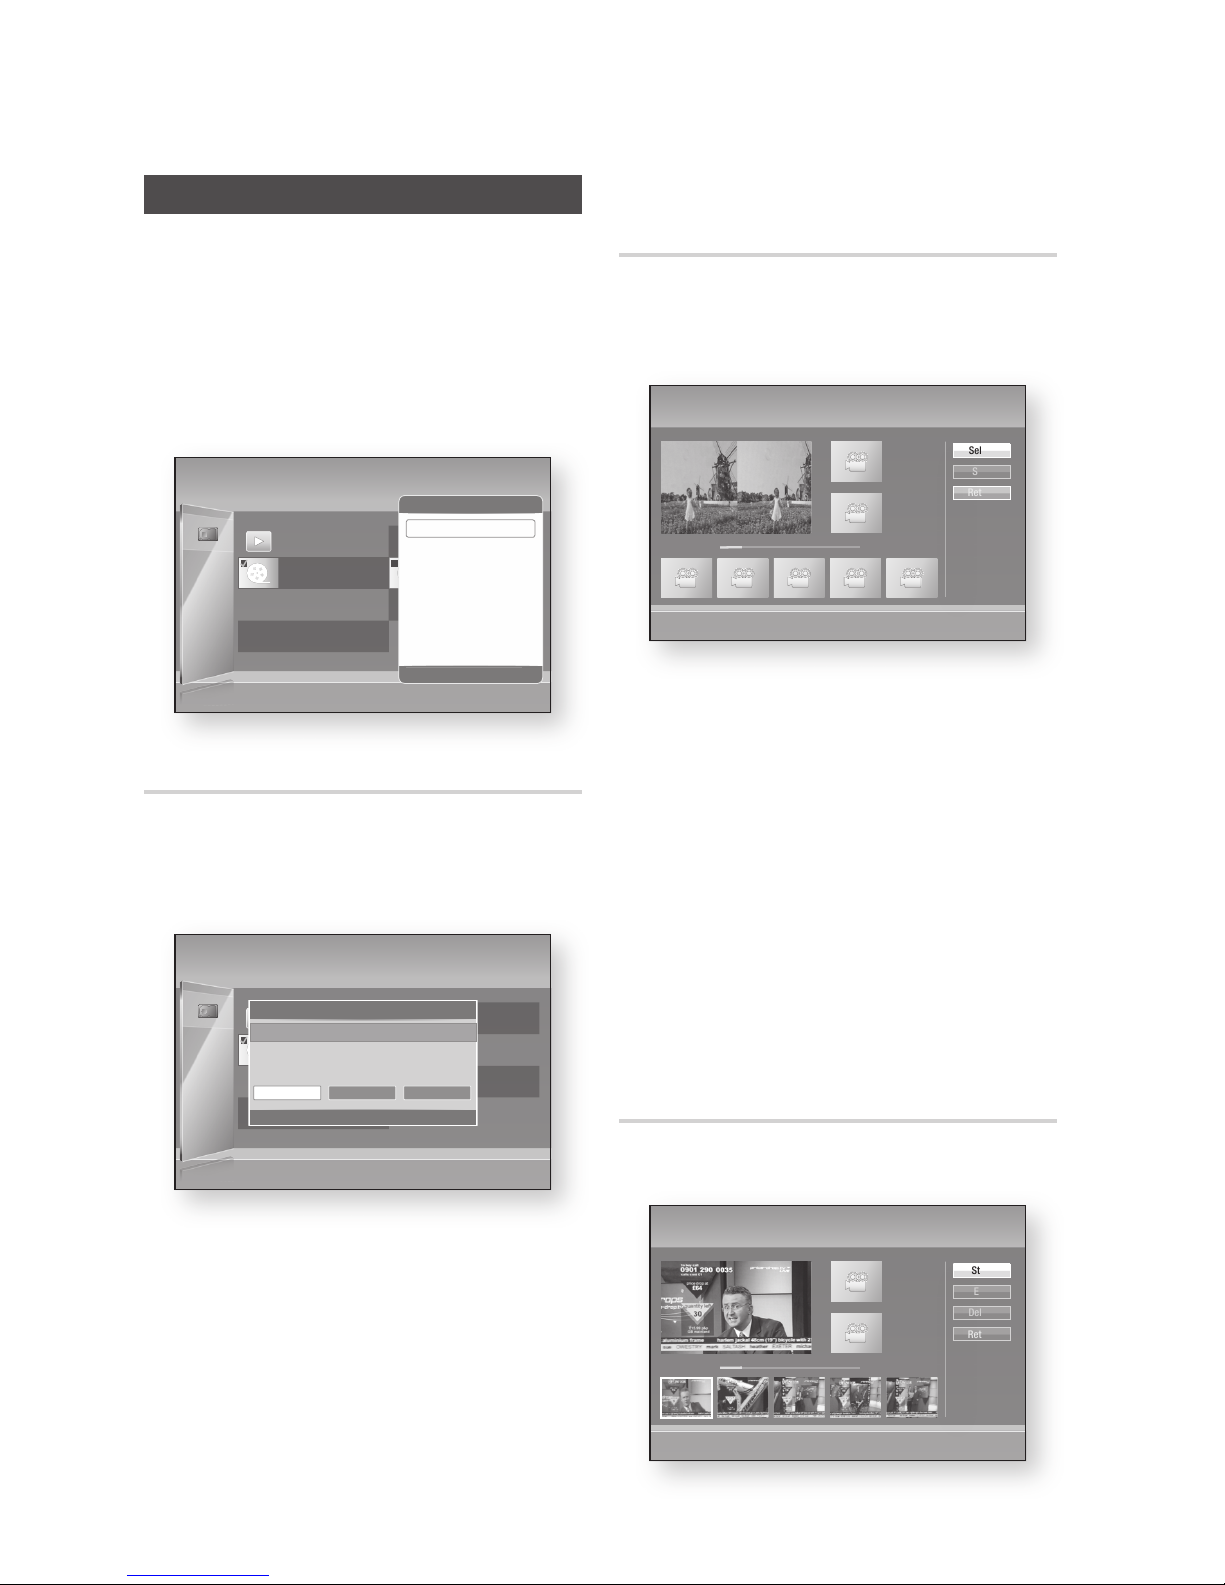
72 English
Advanced Functions
Edit the Recorded Title
In the Recorded TV screen, press the
YELLOW (C) button to display check box.
Press the ENTER button to select the desired
title you want to edit.
Press the TOOLS button.
Press the ▲▼ buttons to select the Edit, then
press the ENTER button.
Renaming a Recorded Title
Follow Steps 1 through 4 in the ‘Edit the Recorded
Title’.
Press the ◄► buttons to select the Rename,
then press the ENTER button.
Select the desired characters using the ▲▼◄
► buttons, then press the ENTER button.
Press the ▲▼◄► buttons to select Done,
then press the ENTER button.
1.
2.
3.
4.
1.
2.
3.
Splitting a Section of a Title (Divide
into two)
Follow Steps 1 through 4 in the ‘Edit the Recorded
Title’.
Press the ◄► buttons to select the Split,
then press the ENTER button.
Using the playback-related buttons, move to
a point for splitting and then press the ENTER
button.
Press the ENTER button to select Split.
Press the ◄► buttons to select Yes, then
press the ENTER button.
The split title is divided into two, and the
following titles will be shifted down by one.
Press the ENTER button to select OK.
NOTE
The minimum length of split section should be longer
than 10 seconds.
Splitting a Section of a Title
(Partial Delete)
Press the ◄► buttons to select the Partial
Delete, then press the ENTER button.
1.
2.
3.
4.
5.
✎
▪
1.
No title
xx.xxx.xxxx xx:xx:xx
1/1 Page
Recorded TV | HDD
Play Mode d Sorting / Tools ' Return
N
(x)
No title
xx.xxx.xxxx xx:xx:xx
1 file selected. Title
Tools
" Enter ' Return
Play Selected File
Select Group
Deselect All
Lock/Unlock
Delete
Edit
Detailed Information
Part 1
00:00:00
Split | No title
+
( )
Playback Controls
[ ]
Scene Search < Jump > Move " Enter
Select
Split
Return
00:00:22 / 00:04:37
+
Part 2
00:00:00
Play
No title
xx.xxx.xxxx xx:xx:xx
1/1 Page
Recorded TV | HDD
Play Mode d Sorting / Tools ' Return
N
(x)
No title
xx.xxx.xxxx xx:xx:xx
1 file selected Title
No title
Edit
<
Move " Enter ' Return
Select Edit Features
Rename
Split Partial Delete
Part 1
00:00:00
Partial Delete | No title
+
( )
Playback Controls
[ ]
Scene Search < Jump > Move " Enter
Start
End
Delete
Return
Part 2
00:00:00
00:00:33 / 00:08:21
+
Play
Page 73
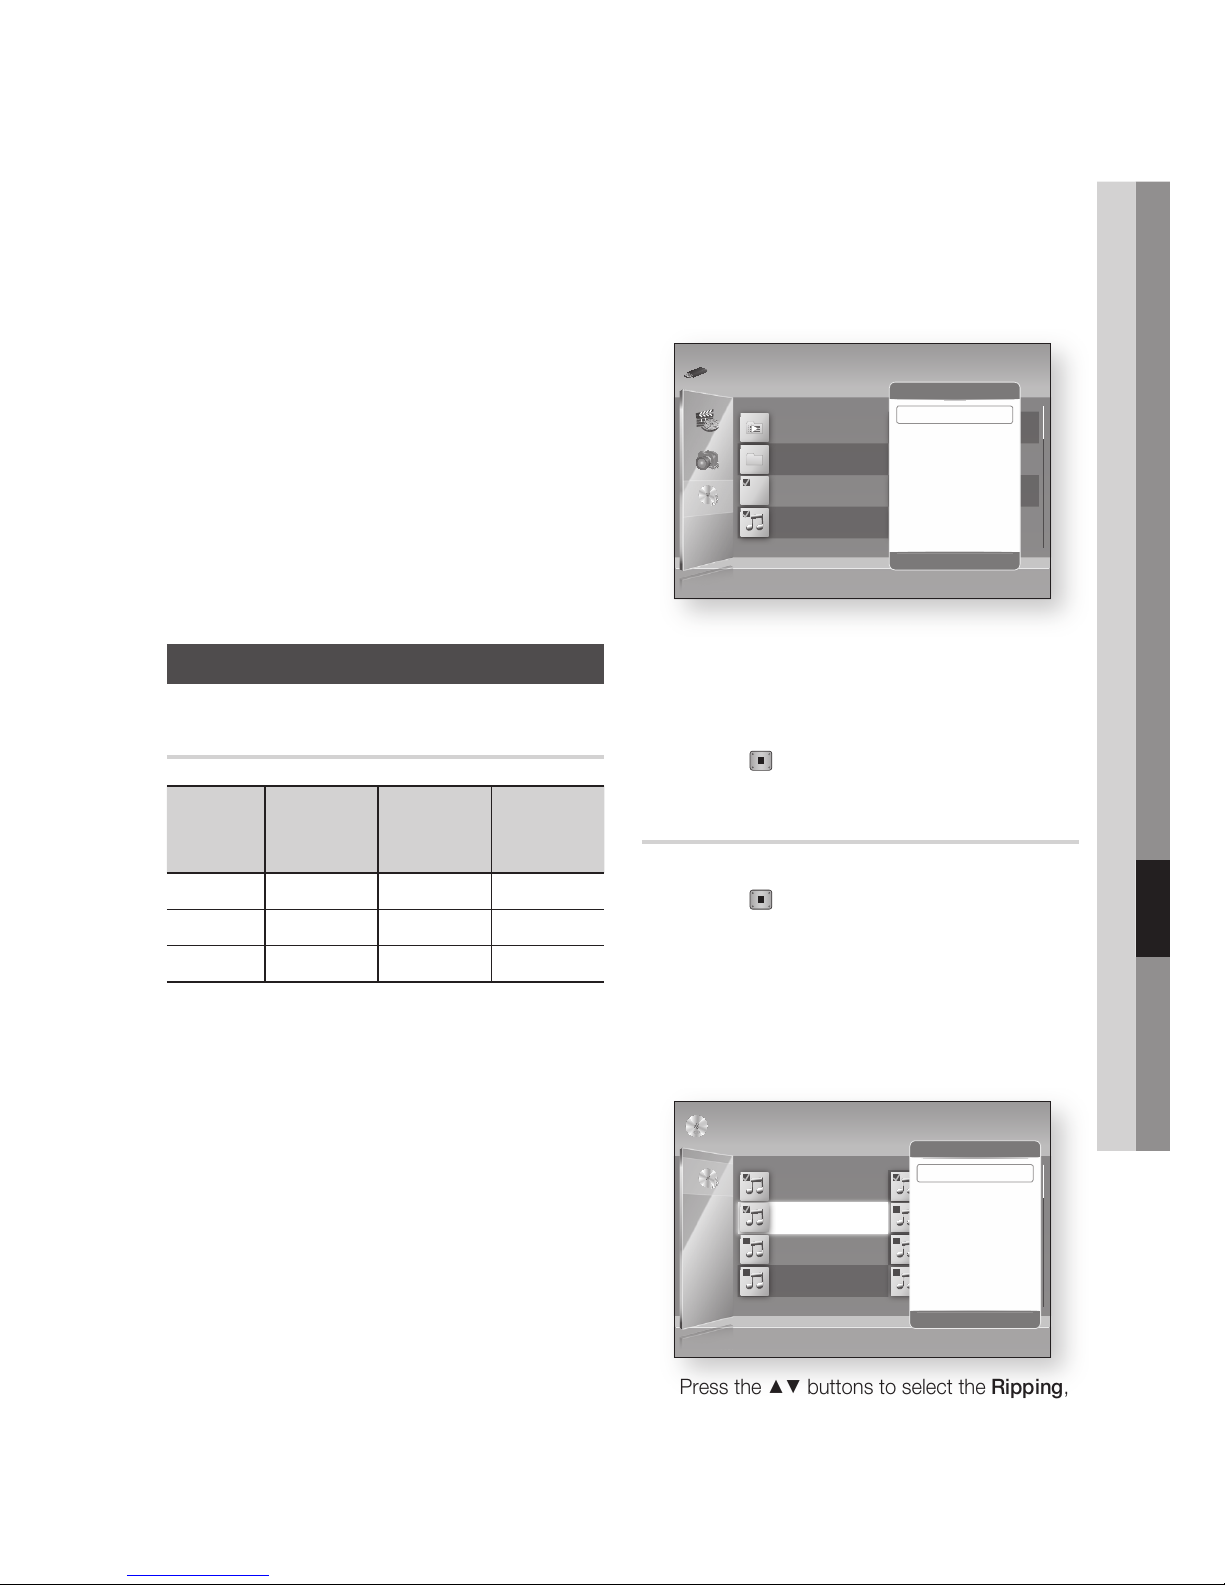
English 73
08 Advanced Functions
Press the ENTER button at the starting point.
The image and starting point time is displayed
in the section deletion starting point window.
Select the start and end points of the
section you want to delete using the
playback related buttons.
Press the ENTER button at the end point.
The image and end point time is displayed in
the Section deletion ending point window.
Press the ENTER button to select Delete.
Press the ◄► buttons to select OK, then
press the ENTER button.
NOTE
The minimum length of delete section should be
longer than 10 seconds.
Copy
Copying Videos, Music or Photos
Contents
HDD/DISC/
AllShare
USB
DISC/USB/
AllShare
HDD
HDD/DISC/
USB
AllShare
Music
Supported Supported Supported
Photos
Supported Supported Supported
Videos
Supported Supported Supported
Disc (CD-DA/CD-R/CD-RW, DVD±R(Finalise)/
DVD+RW/DVD-RW(Finalise)) ; HDD or USB
PTP USB is not available when you copy to
USB.
The copy function is not supported if the device
is formatted with NTFS.
The broadcast signal can be recorded on HDD
but copy feature is not supported.
Press the MENU button.
The home menu will be displayed.
In Stop mode, connect the USB storage
device to the USB port on the front panel of
the product.
Press the ENTER button.
Press the ▲▼◄► buttons to select the
Music, then press the ENTER button.
2.
•
3.
4.
5.
✎
▪
•
•
•
•
1.
2.
3.
4.
Press the YELLOW (C) button to display the
check box.
Press the ENTER button to check desired
track.
Press the TOOLS button.
Press the ▲▼ buttons to select the Copy,
then press the ENTER button.
Press the ENTER button again.
To cancel the copying in progress, press the
STOP ( ) button.
Ripping from a Audio CD (CD-DA)
Insert an Audio CD (CD-DA), then press the
STOP ( ) or RETURN button to move to
the Music List.
Press the YELLOW (C) button to display the
check box.
Press the ENTER button to check desired
track.
Press the TOOLS button.
Press the ▲▼ buttons to select the Ripping,
then press the ENTER button.
5.
6.
7.
8.
9.
1.
2.
3.
4.
5.
TRACK 002
03:56
TRACK 004
04:02
TRACK 006
03:40
TRACK 008
03:52
1/2 Page
Audio CD | Music
Close Edit Mode
( )
Page / Tools " Select ' Return
TRACK 001
00:43
TRACK 003
04:41
TRACK 005
03:43
TRACK 007
04:06
Selected Items : 3
Tools
"
Enter ' Return
Play Selected
Ripping
Select All
Deselect All
TRACK 002
03:56
TRACK 004
04:02
TRACK 006
03:40
TRACK 008
03:52
1/2 Page
m80 | Music
Play Mode d Sorting " Select
( )
Page / Tools '
Return
My Playlist (0)
tmp
TRACK 001
xxxxx
TRACK 002
xxxxx
Selected Items : 31 file selected Title Search
Tools
"
Enter ' Return
Add to My Playlist
Play Selected Contents
Copy
Select All
Deselect All
Page 74
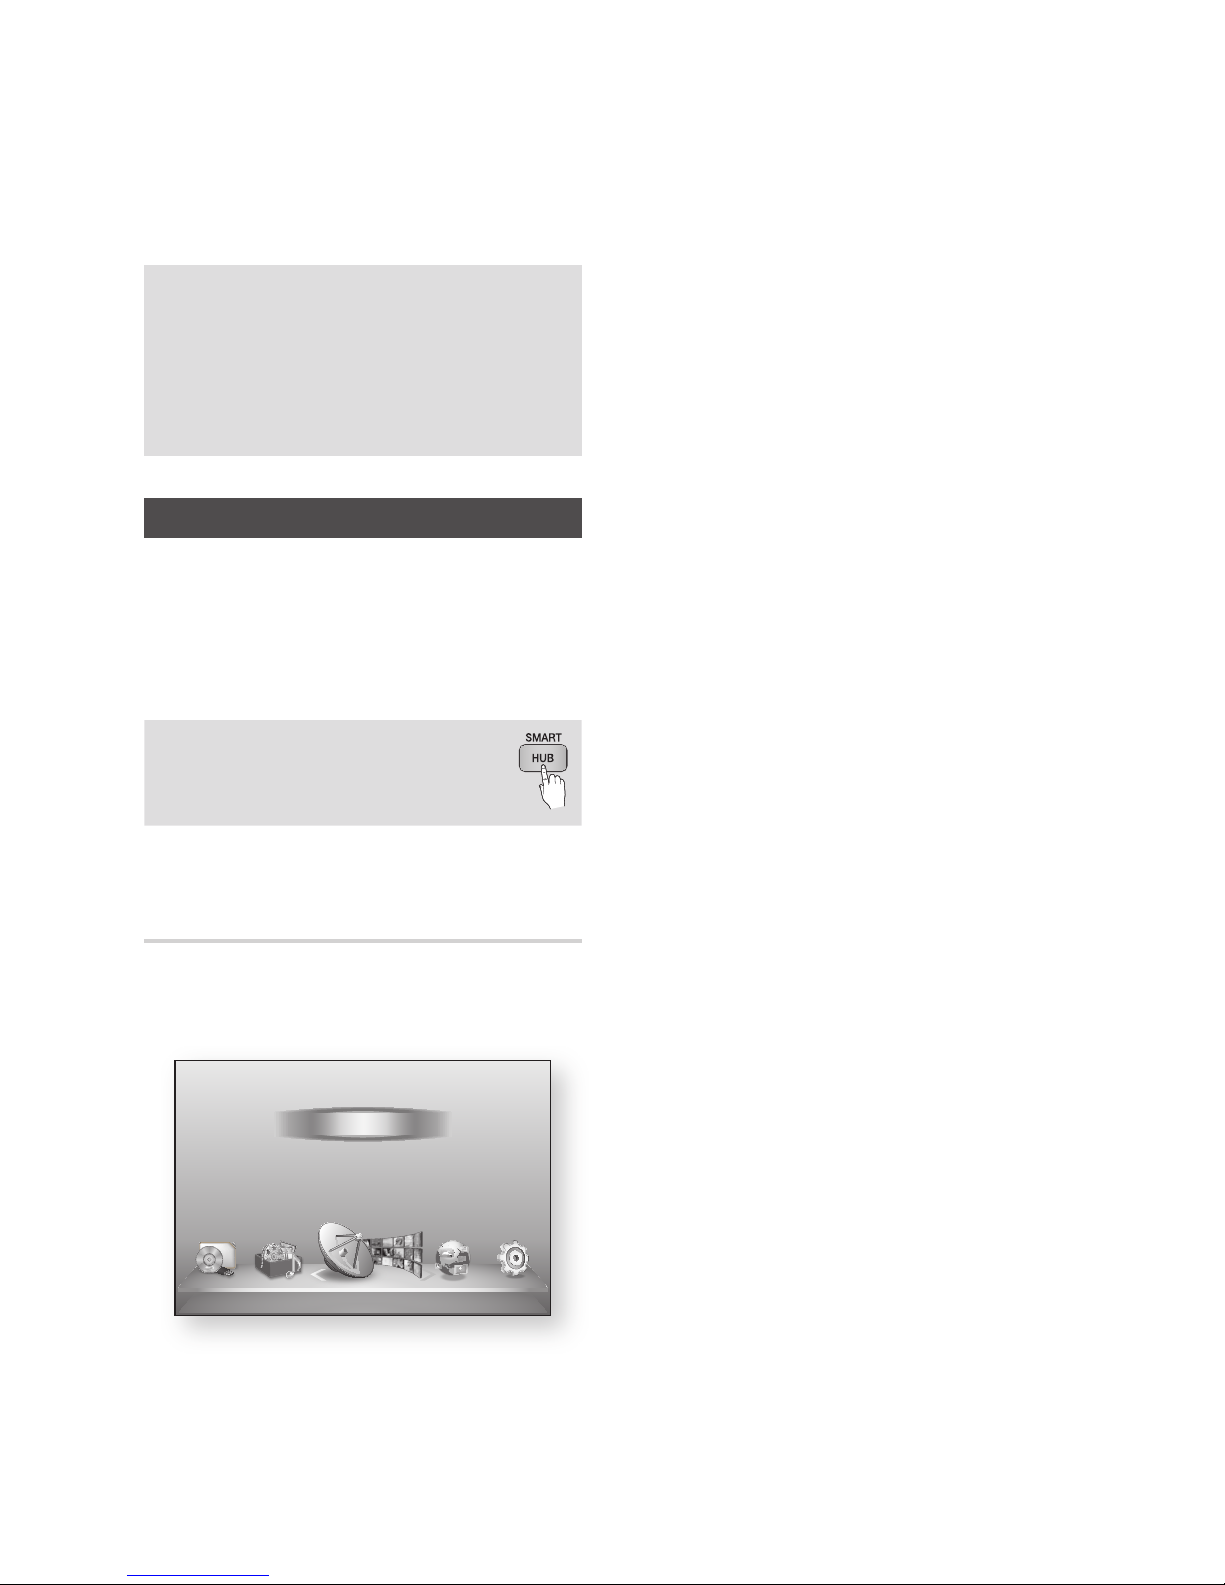
74 English
Network Services
You can enjoy various network services such as
Smart Hub or BD-LIVE by connecting the product
to your network.
Read the following instructions before using any
network service.
Connect the product to the network.
(See pages 31~32)
Configure the network settings.
(See pages 44~48)
1.
2.
Using Smart Hub
Using Smart Hub, you can stream movies, videos,
and music from the Internet, access various for
pay or free-of-charge applications and view them
on your TV. Application content includes news,
sports, weather forecasts, stock market quotes,
maps, photos, and games.
You can also start this function by
pressing the SMART HUB button on
the remote control.
Starting Smart Hub for the First
Time
To start Smart Hub for the first time, follow these
steps :
Go to the Home menu.
Press the ◄► buttons to select Internet, and
then press the ENTER button.
1.
2.
The Smart Hub screen appears.
In a few cases, the Country screen appears
immediately after.
If the Country screen has appeared, press
the ▲▼ buttons to select your country, then
press the ENTER button.
NOTE
Certain applications are available only in certain
countries.
The Terms of Service Agreement screen
appears.
If you want to agree, press the ◄► buttons
to select Agree, then press the ENTER
button.
NOTE
Screens can take a few seconds to appear.
The Service Update screen appears and
installs a number of services and applications.
When done, it closes. The applications and
services downloaded are displayed on the
Smart Hub screen. This may take some time.
NOTE
Smart Hub may close momentarily during the
installation process.
A number of screens may appear after installation.
You can press the ENTER button to close them or let
them close on their own.
To start an application, press the ▲▼◄►
buttons to highlight a widget, then press the
ENTER button.
3.
4.
✎
▪
5.
✎
▪
6.
✎
▪
▪
7.
d WPS(PBC)
My Devices Internet Settings
Guide
Schedule Manager
Channel List
Channel Manager
My Contents
Watch TV
Page 75
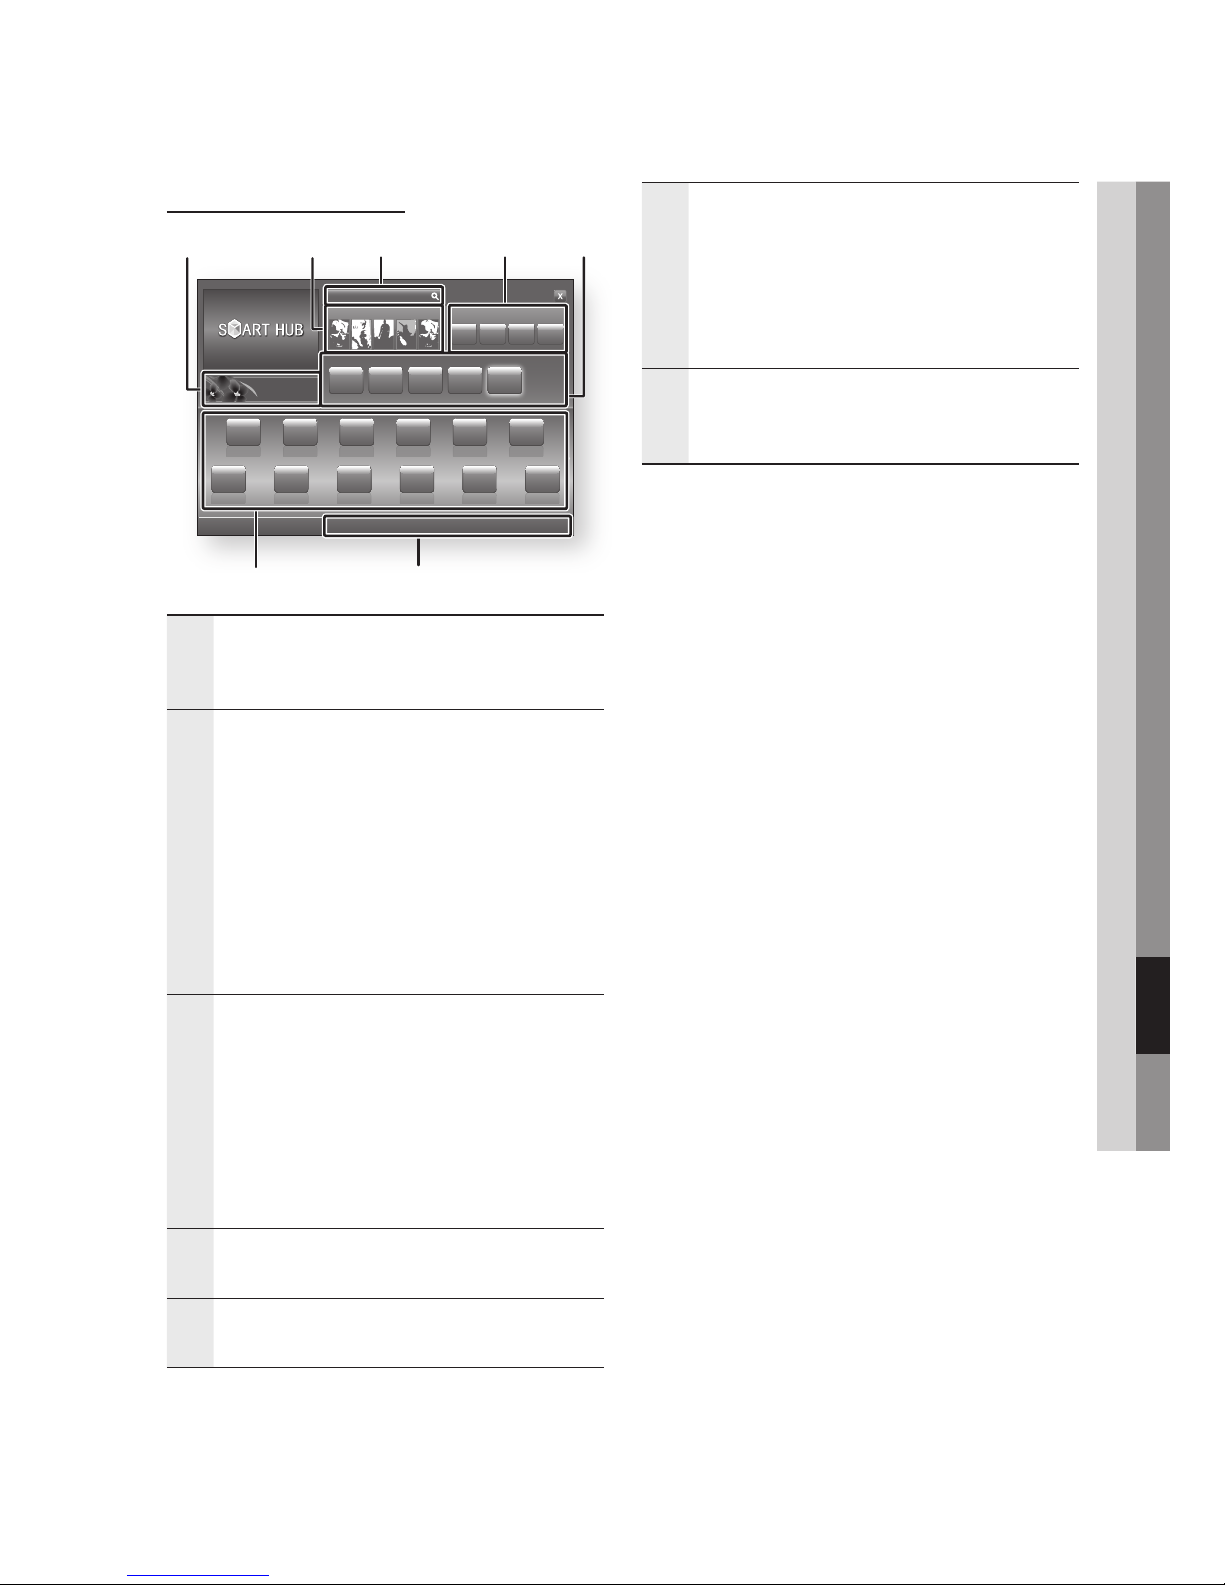
English 75
09 Network Services
Smart Hub at a Glance
1
Commercial : Displays the Smart Hub Guide, an
introduction to the product, and new application
introductions.
2
Your Video : Provides recommendations for videos
based on your tastes.
Lets you see movie recommendations based on
your previous preferences.
Lets you select a movie, displays a list of VOD
(Video on Demand) providers that have the movie,
and then lets you choose a provider for streaming.
(Streaming is unavailable in some areas.)
For instructions to use Your Video, please visit
www.samsung.com.
•
•
•
3
Search : Provides an integrated search of your video
providers and connected AllShare devices.
Usable while using Smart Hub (except when you
are watching a Blu-ray Disc).
For easy access, use the SEARCH button on the
remote control.
For instructions to use search function, please
visit www.samsung.com.
•
•
•
4
Samsung Apps : You can download various for pay
or free-of-charge application services.
5
Recommended : Displays recommended contents
managed by Samsung.
6
Navigation Help : Displays the remote control
buttons you can use to navigate in Smart Hub.
RED (A) : To log in to Smart Hub.
GREEN (B) : To sort the applications.
YELLOW (C) : To edit the applications.
BLUE (D) : To change the settings of Smart Hub.
•
•
•
•
7
My Applications : Displays your personal gallery
of applications which you can add to, modify, and
delete.
NOTE
Samsung Electronics takes no legal responsibility for
any interruption of the Smart Hub service caused by
the service provider for any reason.
The Smart Hub service downloads and processes
data via the Internet so that you can enjoy the
Internet contents on your TV screen.
If the Internet connection is unstable, the service
may be delayed or interrupted.
Furthermore, the product may turn off automatically
in response to conditions on the Internet.
If this occurs, check the Internet connection and try
again.
Application services may be provided in English only
and the contents available may vary, depending on
your area.
For more information about a Smart Hub service,
visit the web site of the applicable service provider.
The services provided are subject to change by the
Smart Hub service provider without notice.
The Smart Hub service contents may differ
depending on the product’s firmware version.
✎
▪
▪
▪
▪
▪
▪
xxxxxxxx
Contents 1
xxxxxxxx
Contents 6
xxxxxxxx
Contents 5
xxxxxxxx
Contents 4
xxxxxxxx
Contents 3
xxxxxxxx
Contents 2
xxxxxxxx
Contents 7
xxxxxxxx
Contents 8
xxxxxxxx
Contents 9
xxxxxxxx
Contents 10
xxxxxxxx
Contents 11
xxxxxxxx
Contents 12
xxxxxxxx
Contents 1
xxxxxxxx
Contents 2
xxxxxxxx
Contents 3
xxxxxxxx
Contents 4
xxxxxxxx
Contents 5
Contents 1 Contents 2 Contents 3 Contents 4
a
Login b Sort by Edit Mode d Settings
Search
Your Video
Recommended
Samsung Apps
1 2 3 5
7 6
4
Page 76
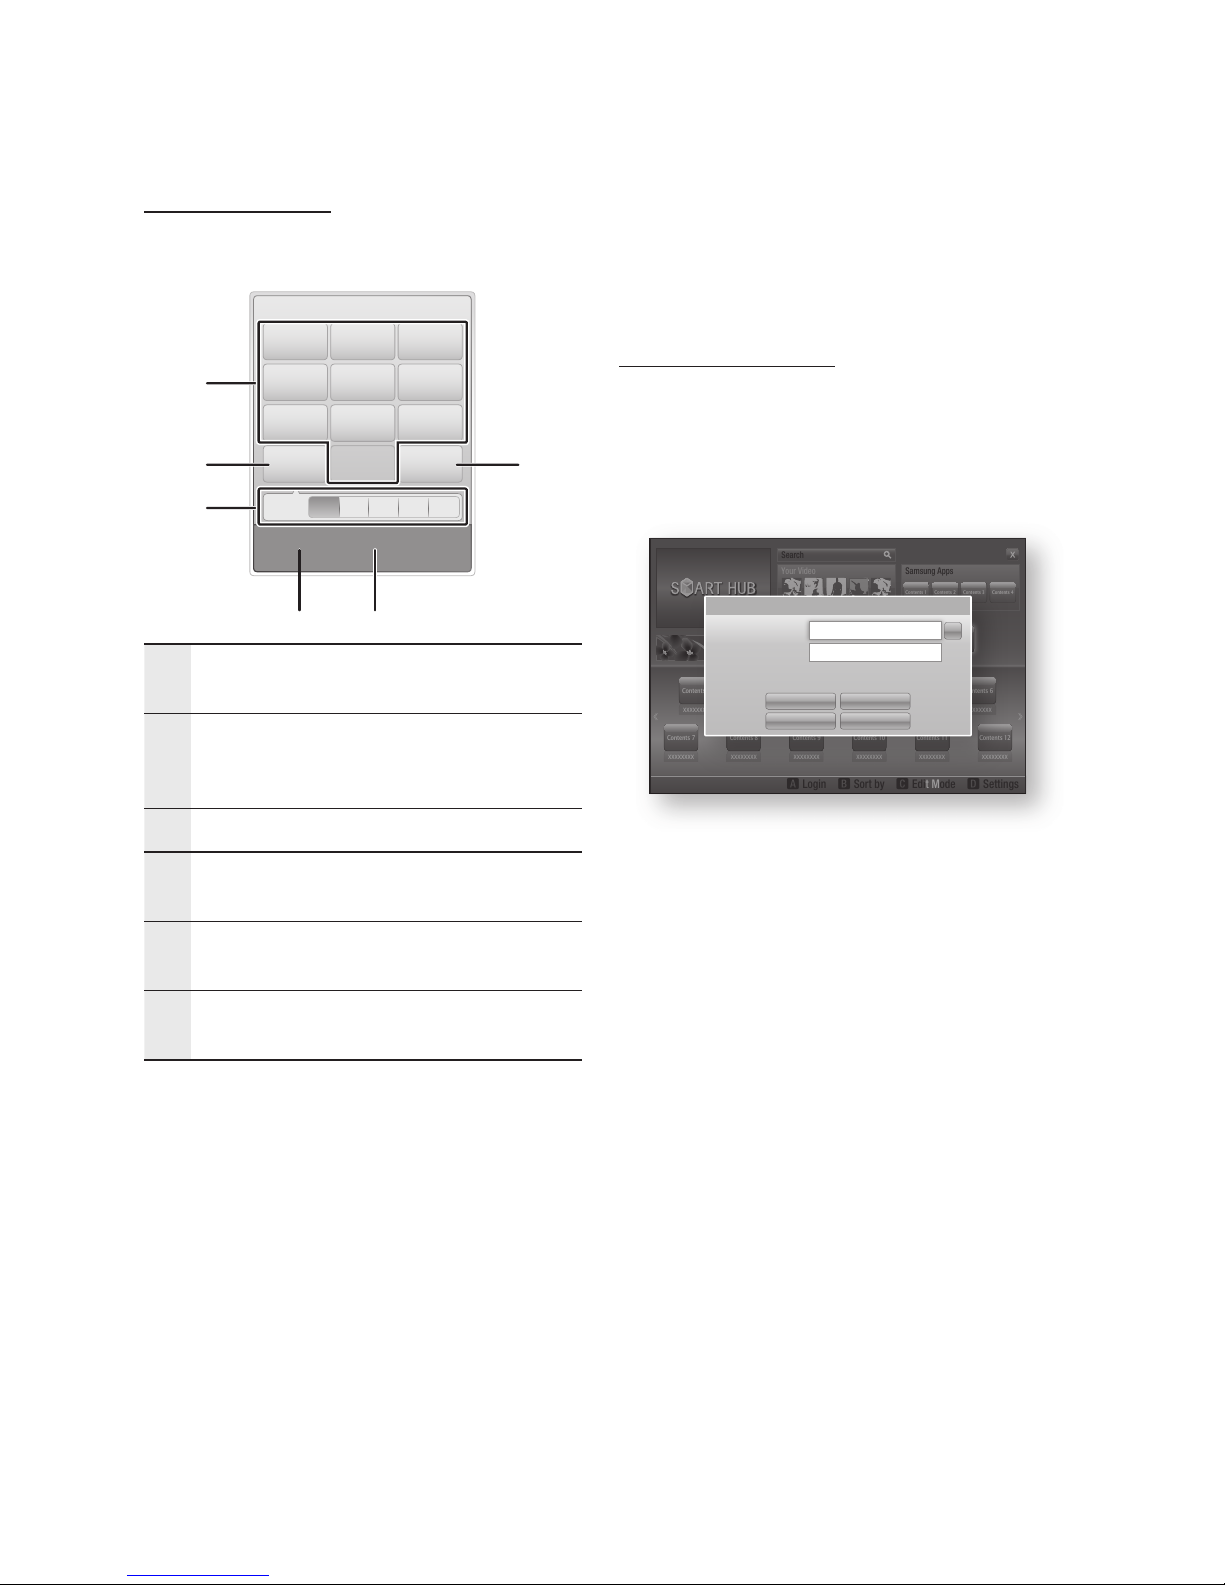
76 English
Network Services
Using the Keypad
Through your remote, you can use the On-Screen
Keypad to enter letters, numbers, and symbols.
1
The current keypad.
Use to enter letters, numbers, and symbols.
2
Press the DISC MENU button on the remote control
to shift the input mode.
: ab, Ab, AB, numbers or icons.
3
Displays the current input mode.
4
Press the GREEN (B) button on the remote control
to change the input method. (T9 or ABC)
5
Press the TOOLS button on the remote control to
change the language.
6
Press the TITLE MENU button on the remote control
to delete a character.
Entering Text, Numbers and Symbols
To enter text, press the number button on the
remote that corresponds to the letter you want
to enter. Press the button rapidly to enter a letter
that is not the first letter listed on the On-Screen
keypad button. For example, if you want to enter
the letter b, press the 2 button on your remote
rapidly twice. To enter the first letter listed on a
button, press, release, and then wait.
To move within the text, use the Arrow buttons.
To delete text, move the cursor to the right of the
character you want to delete, and then press the
TITLE MENU button. To change case or enter
numbers or punctuation, press the DISC MENU
button.
Creating an Account
To establish your own, exclusive, configuration of
Smart Hub, create your own Smart TV Account.
To create an account, follow these steps:
Press the RED (A) button on your remote
control. The Create Account screen appears.
Press the ▲▼◄► buttons to select Create
Account, and then press the ENTER button.
On the next screen, select Smart TV ID, and
then press the ENTER button.
An entry screen and keypad appear.
Use the keypad to enter your e-mail address.
This will serve as your ID.
NOTE
The keypad works like the keypad on a cell phone.
When done, press the ENTER button to select
OK, and then press the ENTER button again.
The Create Account screen re-appears.
Select Password, and then press the ENTER
button. An entry screen and a keypad appear.
Use the keypad to enter a password.
The password can be any combination of
letters, numbers, and symbols.
NOTE
Press the RED (A) button on your remote to show or
hide the password as you enter it.
1.
2.
3.
4.
✎
▪
5.
6.
7.
✎
▪
xxxxxxxx
Contents 1
xxxxxxxx
Contents 6
xxxxxxxx
Contents 5
xxxxxxxx
Contents 4
xxxxxxxx
Contents 3
xxxxxxxx
Contents 2
xxxxxxxx
Contents 7
xxxxxxxx
Contents 8
xxxxxxxx
Contents 9
xxxxxxxx
Contents 10
xxxxxxxx
Contents 11
xxxxxxxx
Contents 12
xxxxxxxx
Contents 1
xxxxxxxx
Contents 2
xxxxxxxx
Contents 3
xxxxxxxx
Contents 4
xxxxxxxx
Contents 5
Contents 1 Contents 2 Contents 3 Contents 4
a
Login b Sort by Edit Mode d Settings
Search
Your Video
Recommended
Samsung Apps
Login
Login Cancel
Create Account Forgot Password
Remember my Smart TV ID and password
Smart TV ID
Password
Press [ENTER]
Press [ENTER]
. , –
abc def
1 2 3
ghi jkl mno
4 5 6
pqrs tuv wxyz
7 8 9
Shift Delete
0
b
Input Method / Language: English
T9
ab Ab AB 1
1
4 5
2 6
3
Page 77

English 77
09 Network Services
When done, press the ENTER button to
select OK, and then press the ENTER
button again. The Create Account screen reappears.
Select Confirm password, and then press
the ENTER button.
Repeat Steps 7 and 8.
When the Create Account screen re-appears,
select Create Account, and then press the
ENTER button. The Confirmation window
appears.
Select OK, and then press the ENTER
button. The Continue to Register Service
window appears.
Select Go Register, and then press the
ENTER button.
The Register Service Account Window
appears.
If you have existing accounts with any of
the listed providers, you can associate the
provider account and the provider account
password with your Smart TV Account.
Registration makes it easier to access
the providers web site. For registration
instructions, go to Step 2 in Account
Management under the Settings Menu.
If you don’t have existing provider accounts
or do not want to register existing accounts
at this time, select OK, and then press
the ENTER button. You can also let the
window close on its own in about a minute.
NOTE
You must use an e-mail address as an ID.
You can register up to 10 User Accounts.
You do not need an account to use Smart Hub.
Account Log In
To log in to your Smart TV Account, follow these
steps:
With the Smart Hub main screen displayed
on your TV, press the RED (A) button on your
remote. The Create Account screen appears.
Select the Down Arrow next to the Smart TV
ID field, and then press the ENTER button.
8.
9.
10.
11.
12.
13.
14.
•
•
✎
▪
▪
▪
1.
2.
Select your ID from the list that appears, and
then press the ENTER button. The Create
Account screen re-appears.
Select Password, and then press the ENTER
button. An entry screen and a keypad
appears.
Using the keypad and your remote, enter your
password. When done, press the ENTER
button, select OK, and then press the ENTER
button again.
NOTE
If you want Smart Hub to enter your password
automatically, select Remember my Smart TV ID and
password after you have entered your password,
and then press the ENTER button. A check
appears. Smart Hub will now enter your password
automatically when you select or enter your ID.
The Settings Menu - BLUE (D)
The Settings Menu Screen gives you access to
account management, service manager, reset,
and properties functions.
To access the Settings Menu, and then select a
menu item, follow these steps:
Press the BLUE (D) button on your remote.
Press the ▲▼ to select a menu item, and
then press the ENTER button.
The functions on the Settings Menu screen are
described below.
NOTE
The Service Manager item listed in the Settings
Menu is not available for BD-HDD Combo.
Account Management
The Account Management Menu contains
functions that let you register your service provider
accounts, change your Smart Hub password, and
delete or deactivate your Smart TV ID.
3.
4.
5.
✎
▪
1.
2.
✎
▪
Page 78

78 English
Network Services
Register Service Account
If you have existing accounts with any of the
providers listed by the Register Service Account
function, you can associate the provider account
and the provider account password with your
Smart TV Account. If you associate the account,
you will be able to log onto the account through
Smart Hub easily, without entering your account
name or password.
To use the Register Service Account function,
follow these steps:
In the Account Management menu, select
Register Service Account, and then press the
ENTER button. The Register Service Account
Window appears.
Press the ▲▼ buttons to select a Service
Provider you want to associate with your
Smart TV Account, and then press the
ENTER button.
NOTE
If you have a Samsung apps account and you want
to use the Samsung Apps function in Smart Hub,
you must register your Samsung Apps account here.
See pages 81~82 for more information.
Press the ▲▼ buttons to select Register, and
then using your remote and the on-screen
Keypad, enter your site ID and password.
When done, press the ENTER button.
NOTE
This is the ID and password you normally use to
access your account on this site.
If you have entered the ID and password
correctly, the Registered Successfully
message appears.
If you pressed OK, repeat Steps 2 through 4
to associate another Service Provider.
When you are done, press the RETURN
button.
1.
2.
✎
▪
3.
✎
▪
4.
5.
6.
Change Password
The Change Password function lets you change
your Smart Hub password. To change the
password, follow these steps:
Select Change Password, and then press
the ENTER button.
Enter your current password. The next screen
appears.
On the next screen, enter a new password on
the first line. Enter it again on the second line
to confirm.
The Changing Password Complete message
screen appears. Press the ENTER button
or wait for the screen to close - about 5
seconds.
Remove from TV Account list
The Remove Service Accounts function cancels
all your current registered Service Accounts that
you registered on the Register Service Account
screen.
Deactivate Account
The Deactivate Account function deactivates
your Smart TV Account and deletes it and all your
account settings entirely from Smart Hub.
Reset
The Reset function initializes all downloaded
widgets, erases all user accounts and settings from
the product, and resets all Smart Hub settings to
the factory default settings. It then restarts Smart
Hub as if it were starting for the first time. Your
account, however, remains on the Smart Hub
server. To log into your account, enter your ID and
password on the Create Account screen.
To use the Reset function, follow these steps:
In the Settings menu, select Reset, and then
press the ENTER button.
The Reset screen appears.
Enter the your Security password. This is the
password you entered if you set up a BD or
DVD Parental rating (See page 51). If you did
not, enter 0000.
1.
2.
3.
4.
1.
2.
Page 79

English 79
09 Network Services
After a few moments, Smart Hub automatically
resets. The screen may go black, then Smart
Hub re-appears. In a few moments, it starts
the re-initialization procedure.
To complete the re-initialization, go to Step 4
in Starting Smart Hub for the First Time. (See
page 74)
NOTE
If you forgot your password, press the STOP ( )
button on the front panel of the product for more than
5 seconds with no disc inserted.
Properties
The Properties menu item lists three functions that
display information about Smart Hub :
Detail
Lists information about Smart Hub including
version number, the number of services installed,
memory usage, and the unique product ID.
Terms of Service Agreement
Displays the Terms of Service Agreement.
The Edit Mode Menu - YELLOW (C)
The functions in the Edit Mode menu let you
manipulate the widgets in the My Applications
section of the Smart Hub screen. Using these
functions, you can lock and unlock access to
some widgets, New Folder and move widgets to
them, rename folders, delete widgets, and change
the position of widgets on the screen.
To access the Edit Mode Menu, and then select a
menu item, follow these steps:
Press the YELLOW (C) button on your
remote. The Edit Mode menu bar appears on
the bottom of the screen.
Press the ▲▼◄► to select a menu item, and
then press the ENTER button.
3.
4.
✎
▪
1.
2.
The functions in the Edit Mode Menu bar are
described below.
NOTE
Some menu items may not appear on the screen.
To see these items, press the ◄► to move to the
screen edge, and then press one more time to reveal
the items.
You can close the bar by highlighting the X on the
bottom right side, and then pressing the ENTER
button.
Move
The Move function lets you change the screen
position of a widget. To use the Move function,
follow these steps:
Press the YELLOW (C) button on your
remote.
Select a widget, and then press the ENTER
button. A check appears above the widget.
Press the ▲▼◄► to select Move, and then
press the ENTER button. A position change
icon appears above the widget.
Press the ▲▼◄► to move the icon. Press
the ENTER button when the icon is in the
position of your choice. The widget moves to
its new location.
Move to Folder
The Move to Folder function lets you move a
widget to a folder. To use the Move to Folder
function, follow these steps:
Press the YELLOW (C) button on your
remote.
Select a widget, and then press the ENTER
button. If you already create a folder, the
widget can be moved.
Press the ▲▼◄► to select Move to Folder,
and then press the ENTER button. The Move
to Folder window opens.
Press the ▲▼◄► to select a folder, and then
press the ENTER button. The Move to Folder
message appears, and then closes. The
widget has been moved to the folder.
✎
▪
▪
1.
2.
3.
4.
1.
2.
3.
4.
Page 80

80 English
Network Services
To Access Widgets in a Folder
Close the Edit Mode menu.
In My Applications, press the ▲▼◄► to
select a folder, and then press the ENTER
button. The folder opens.
Select a widget, and then press the ENTER
button. The widget’s application or service
starts.
To Edit Items in a Folder
Select a folder, and then press the ENTER button.
The folder opens.
Press the YELLOW (C) button on your remote.
The Edit buttons appear at the bottom of the
screen.
These buttons work the same as the Edit Mode
menu buttons on the main screen. For example,
to move a widget back to the My Applications
main screen:
Select the widget.
Select Move to Folder, and then press the
ENTER button. The Move to Folder window
appears.
Select My Applications, and then press the
ENTER button. The Move to Folder window
closes and the widget returns to the main My
Applications screen.
New Folder
The New Folder function lets you create and name
new folders. Once you have created a folder, you
can move widgets into it. To use the New Folder
function, follow these steps:
Press the YELLOW (C) button on your
remote.
Press the ▲▼◄► to move the cursor to New
Folder, and then press the ENTER button.
The New Folder window and a keypad
appear.
Use the keypad to enter the name of the
folder, and then press the ENTER button.
The New Folder screen closes and the New
Folder appears on the Smart Hub screen.
1.
2.
3.
1.
2.
3.
1.
2.
3.
Rename Folder
The Rename Folder function lets you rename
folders. To use the Rename Folder function, follow
these steps:
Press the YELLOW (C) button on your
remote.
Press the ▲▼◄► to select a folder, and then
press the ENTER button.
Press the ▲▼◄► to select Rename a Folder,
and then press the ENTER button. The Folder
Rename window and a keypad appears.
Use the keypad to enter a new name, and
then press the ENTER button. The Rename
window closes and the new name appears
below the folder.
Lock
The Lock function lets you lock some widgets
in My Applications so they can not be opened
without entering the Parental Security Code.
To use the Lock function, follow these steps:
Press the YELLOW (C) button on your
remote.
Press the ▲▼◄► to select a widget, and
then press the ENTER button. If the widget
can be locked, the Lock menu item is enabled.
Press the ▲▼◄► to select Lock, and then
press the ENTER button. The Lock Service
window appears.
Enter your Parental Security Code (See page
51). If you have not created a Parental Security
Code, enter 0000.
Press the ENTER button. The Lock Service
window appears confirming the lock, and
then closes. A lock symbol appears next to
the widget.
1.
2.
3.
4.
1.
2.
3.
4.
5.
Page 81
English 81
09 Network Services
Unlock
Press the YELLOW (C) button on your
remote.
Press the ▲▼◄► to select a locked widget,
and then press the ENTER button.
Press the ▲▼◄► to select Unlock, and then
press the ENTER button. The Lock Service
window appears.
Enter the Parental Security Code (See page
51). If you have not created a Parental
Security Code, enter 0000.
Press the ENTER button. The Lock Service
Released window appears confirming the lock
has been release, and then closes.
Delete
The Delete function lets you delete widgets from
My Applications. To use the Delete function, follow
these steps:
Press the YELLOW (C) button on your
remote.
Press the ▲▼◄► to select a widget, and
then press the ENTER button.
Press the ▲▼◄► to select Delete, and then
press the ENTER button. The message, “Do
you want to delete selected item(s)?” appears.
Select Yes, and then press the ENTER button.
The widget is deleted.
The Sort Menu - GREEN (B)
The functions in the Sort Menu let you sort the
widgets in My Applications by Name, Date,
Frequency (of use), and Category. If you manually
change the position of a widget, the Sort Menu
automatically highlights User Defined when you
start it.
To sort the widgets in My Applications, follow
these steps:
Press the GREEN (B) button on your remote.
Press the ◄► to select a sorting method,
and then press the ENTER button. Smart
Hub sorts the widgets by the method you
have chosen.
1.
2.
3.
4.
5.
1.
2.
3.
4.
1.
2.
Samsung Apps
Samsung Apps lets you download for pay or
free-of-charge applications and services to your
product and view or use them on your TV.
These applications and services include videos,
music, photos, games, news, sports, etc. Widgets
for the new apps appear in My Applications.
Additional applications and services are added
regularly.
For Pay Apps
To download for pay apps, you need to create a
Samsung Apps account and add a credit card to
the account.
To create a Samsung Apps account, please visit
www.samsung.com
NOTE
This service may not provided in some countries.
Accessing the Samsung Apps Screen
To access Samsung Apps, press the ▲▼◄►
buttons to navigate to the Samsung Apps area
on the Smart Hub main screen, and then press
the ENTER button. The Samsung Apps screen
appears.
NOTE
If this is the first time you are accessing this screen,
the terms of service window appears. If you want
to agree, Select Agree, and then press the ENTER
button.
Using the Samsung Apps Screen
To use the Samsung Apps screen, follow these
steps:
Press the ◄► buttons to move to the
category list on the left.
Press the ▲▼ to highlight a category. In a few
seconds, the Samsung Apps screen displays
the applications in that category. The Sort
tabs appear across the top.
Press the ► button to move to the displayed
applications or services.
✎
▪
✎
▪
1.
2.
3.
Page 82

82 English
Network Services
Press the ▲▼◄► buttons to select an
application or service, and then press the
ENTER button. The Application Details screen
appears describing the service or application.
Select Download Now, and then press the
ENTER button. If the application or service is
free, it downloads and runs. If not, and there
is a fee, follow the directions on the screen to
complete the download.
NOTE
Some apps are free to download, but require
registration with the provider or a paid account with
the provider to use.
Widgets for applications and services you have
downloaded from Samsung Apps appear in My
Applications.
Sort By Tabs
You can access the Sort By tabs on the top of
the screen using the ▲▼◄► buttons. Each
tab displays the services or applications in the
category you chose, sorted by the criteria on the
tab (Recommended, Most Downloaded, Most
Recent, Name).
You can also use the BLUE (D) button on your
remote to access the Sort By tabs. Each time
you press the BLUE (D) button, you change the
display from one sort tab to the next.
Samsung Apps by category
The following categories are available:
What’s New? : Displays newly registered
applications.
Video : Displays various video media such as
movies, TV shows, and short length videos.
Game : Displays various games such as sudoku
and chess.
Sports : Displays various sports media services
such as match information, images, and short
length videos.
Lifestyle : Includes various lifestyle media
services such as music, personal photo
management tools, and social networking such
as Facebook and Twitter.
Information : Includes various information
services such as news, stocks, and weather.
Other : Includes other miscellaneous services.
4.
5.
✎
▪
▪
•
•
•
•
•
•
•
My Account
My Account gives you access to your Samsung
Apps order and download history, and to the My
Apps Cash screen. You must have a Samsung
Apps account to access this information.
Help
If you have questions about Samsung Apps,
check Help first. If none of the tips apply, please
visit the www.samsung.com.
To use the Help function, follow these steps:
Press the ▲▼◄► buttons to select Help,
and then press the ENTER button.
Press the ▲▼ to scroll the Help text.
Press the ◄ to exit Help.
Using the colored buttons on your remote
with Samsung Apps
RED (A) (Login) : To log into your Smart TV
Account.
GREEN (B) (Thumbnail View/List View) : To
toggle applications between Thumbnail and List
view.
BLUE (D) (Sort By) : To sort the applications
in a category by Recommended, Most
Downloaded, Most Recent, or Name.
Return : To return to the previous menu.
NOTE
The Internet contents services may be added or
deleted by providers without notice.
For instructions to use Your Video or Search
Function, please visit www.samsung.com
1.
2.
3.
•
•
•
•
✎
▪
Page 83

English 83
09 Network Services
BD-LIVE™
Once the product is connected to the network,
you can enjoy various movie-related service
contents using a BD-LIVE compliant disc.
Check the size of the remaining memory.
The total size of HDD must have at least 1GB
of free space to accommodate the BD-LIVE
services.
Insert a Blu-ray Disc that supports BD-LIVE.
Select an item from various BD-LIVE service
contents provided by the disc manufacturer.
NOTE
The way you use BD-LIVE and the provided contents
may differ, depending on the disc manufacturer.
Using the AllShare Function
AllShare lets you play music, video, and photo
files located in your PC or your DLNA compatible
mobile phone or NAS on the product.
To use AllShare with your product, you must
connect the product to your network (See pages
31~32).
To use AllShare with your PC, you must install
AllShare software on your PC.
If you have a DLNA compatible mobile phone or
NAS, you can use AllShare without any additional
software.
You can download the PC software and get
detailed instructions for using AllShare from the
Samsung.com web site.
Auto Back up
You can save and play video, photos, and music
saved in Samsung products using Auto backup to
this product without USB connecting.
When the external device is connected to this
product for the first time, Device Access Control
message pop-up appears on this product’s
display. If you want to use Auto Backup function,
select Allow.
Device Access Control setting is able to set in
AllShare Server Management. (See page 48)
1.
2.
3.
✎
▪
NOTE
The Auto Backup function cannot be used these
following functions at the same time.
Playing back files (Recorded TV, Videos, Photos,
Music) or access to browser, in My Contents or
My Devices menu.
Software Upgrade
HDD Format, Performance test, Device test
Network Settings.
✎
▪
-
-
-
-
Page 84
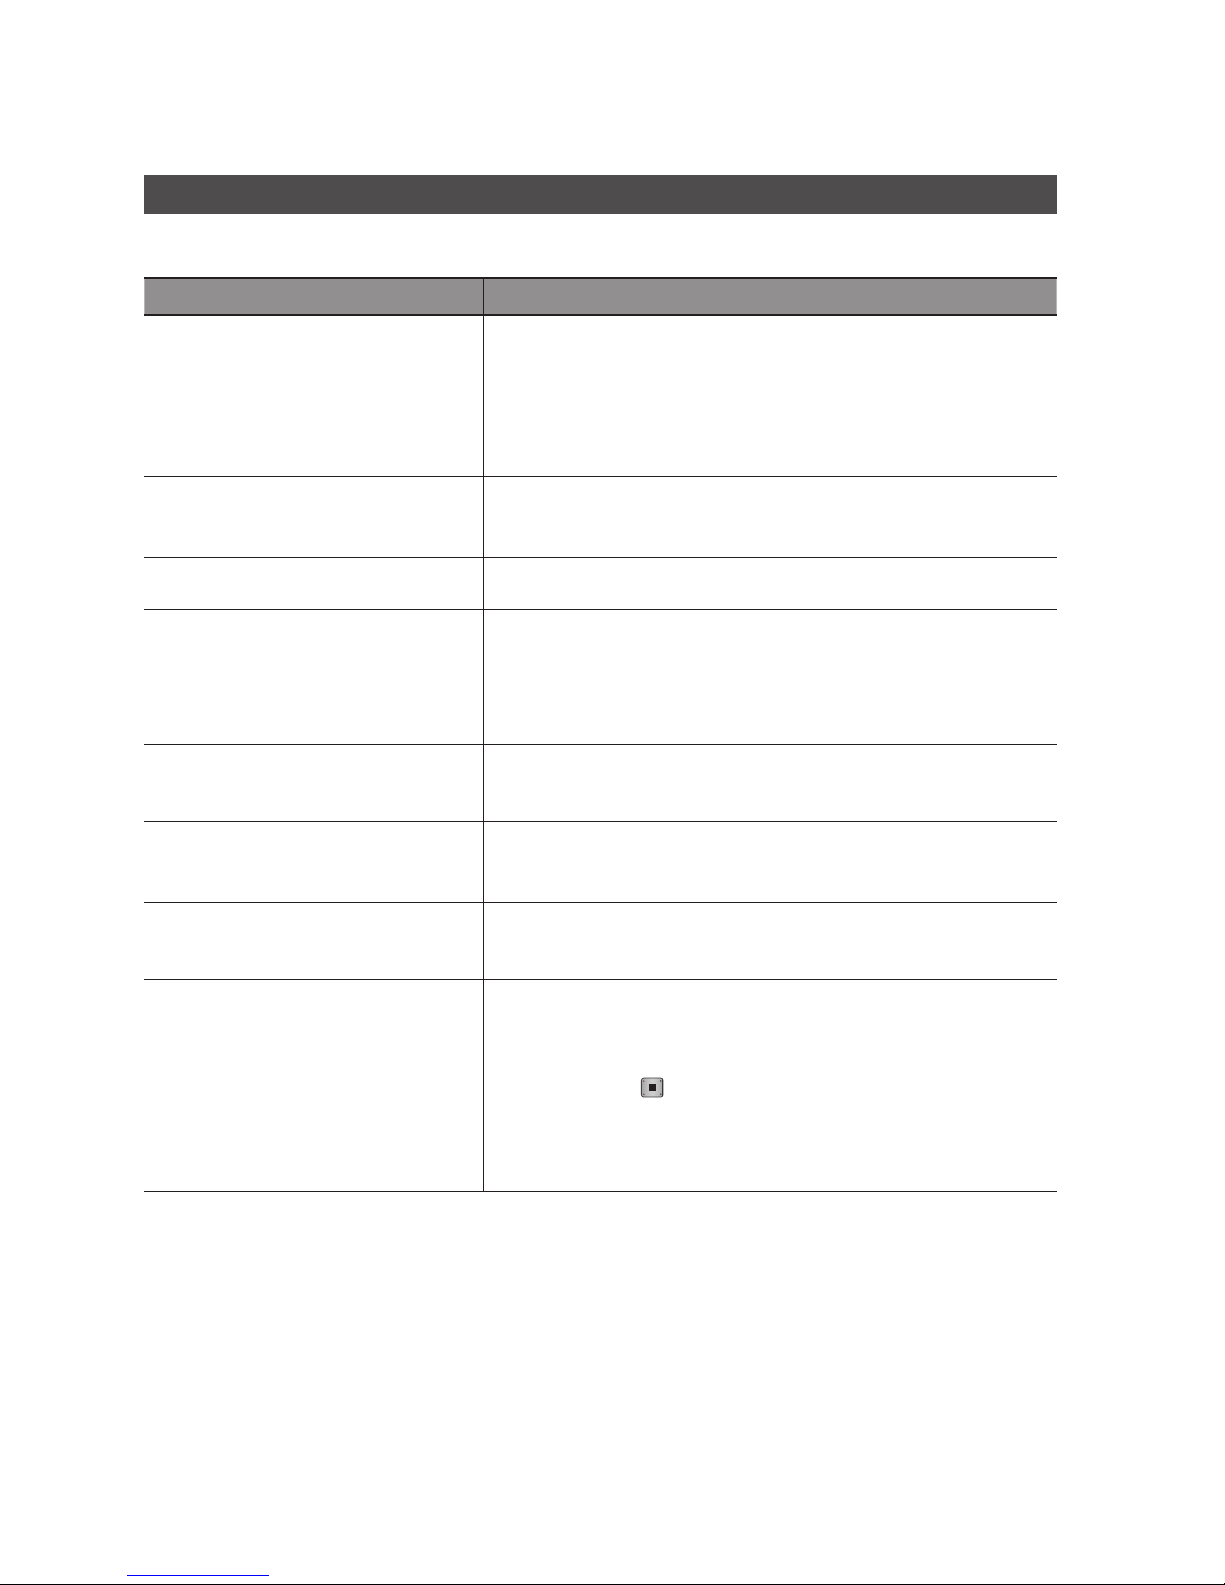
84 English
Troubleshooting
Before requesting service, please check the following.
PROBLEM SOLUTION
No operation can be performed with the
remote control.
Check the batteries in the remote control. They may need replacing.
Operate the remote control at a distance of no more than 6.1m.
Remove batteries and hold down one or more buttons for several minutes
to drain the microprocessor inside the remote control to reset it. Reinstall
batteries and try to operate the remote control again.
•
•
•
Disc does not play. Ensure that the disc is installed with the label side facing up.
Check the region number of the Blu-ray Disc/DVD.
•
•
Disc Menu does not appear. Ensure that the disc has disc menus.
•
The prohibition message appears on the
screen.
This message appears when an invalid button is pressed.
The Blu-ray Disc/DVD’s software doesn’t support the feature (e.g., angles).
You’ve requested a title or chapter number or search time that is out of
range.
•
•
•
Play mode differs from the Setup Menu
selection.
Some of the functions selected in the Setup Menu may not work properly if
the disc is not encoded with the corresponding function.
•
The screen ratio cannot be changed. The Screen Ratio is fixed on your Blu-ray Disc/DVD.
This is not a problem with the product.
•
•
No audio. Make sure you have selected the correct Digital Output in the Audio Options
Menu.
•
The screen is blocked If the HDMI output is set to a resolution your TV cannot support (for
example, 1080p), you may not see a picture on your TV.
Press the MENU button to display home menu.
Press the STOP ( ) button on the front panel of the product for more
than 5 seconds with no disc inserted.
When the factory default settings are restored, all stored user BD data is
deleted.
•
•
•
Appendix
Page 85
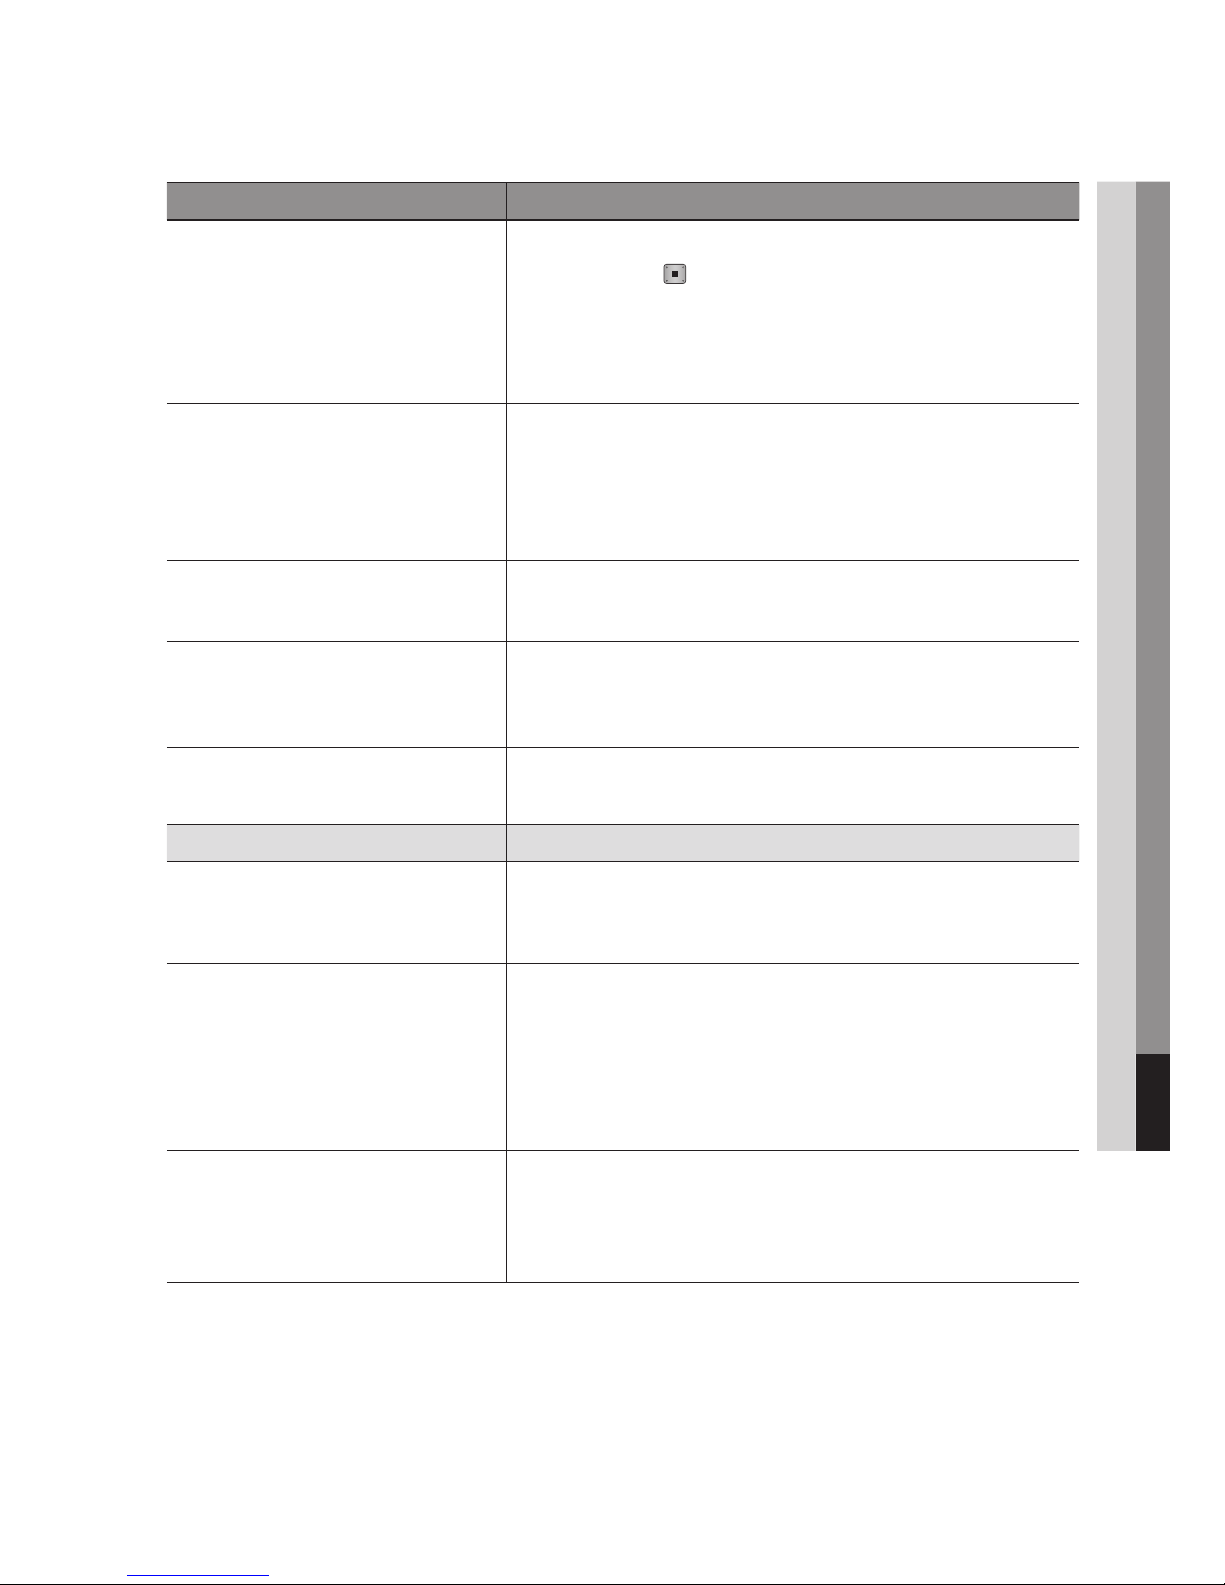
English 85
10 Appendix
PROBLEM SOLUTION
Forgot password Press the MENU button to display home menu.
Press the STOP ( ) button on the front panel of the product for more
than 5 seconds with no disc inserted.
Don’t use this unless absolutely necessary.
When the factory default settings are restored, all stored user BD data is
deleted.
•
•
If you experience other problems. Go to the contents and find the section of the user manual that contains the
explanations regarding the current problem, and follow the procedure once
again.
If the problem still cannot be solved, please contact your nearest Samsung
authorized service centre.
•
•
The picture is noisy or distorted Make sure that the disc is not dirty or scratched.
Clean the disc.
•
•
No HDMI output. Check the connection between the TV and the HDMI jack of the product.
Check if your TV supports 576p/480p, 720p, 1080i, 1080p HDMI input
resolution.
•
•
Abnormal HDMI output screen. If random noise appears on the screen, it means that TV does not support
HDCP (High-bandwidth Digital Content Protection).
•
AllShare function
I can see folders shared through AllShare,
but I cannot see the files.
AllShare shows only files corresponding to the Image, Music, and Movie
categories. Files that do not correspond to these categories may not be
displayed.
•
Video is played intermittently. Check if the network is stable.
Check if the network cable is properly connected and if the network is not
overloaded.
The wireless connection between the DLNA compatible device and the
product is unstable.
Check the connection.
•
•
•
AllShare connection between BD-HDD
Combo and PC is unstable.
The IP address under the same subnetwork should be unique. If they are
not, IP interference can cause this phenomenon.
Check if you have a firewall enabled.
If so, disable the firewall function.
•
•
Page 86
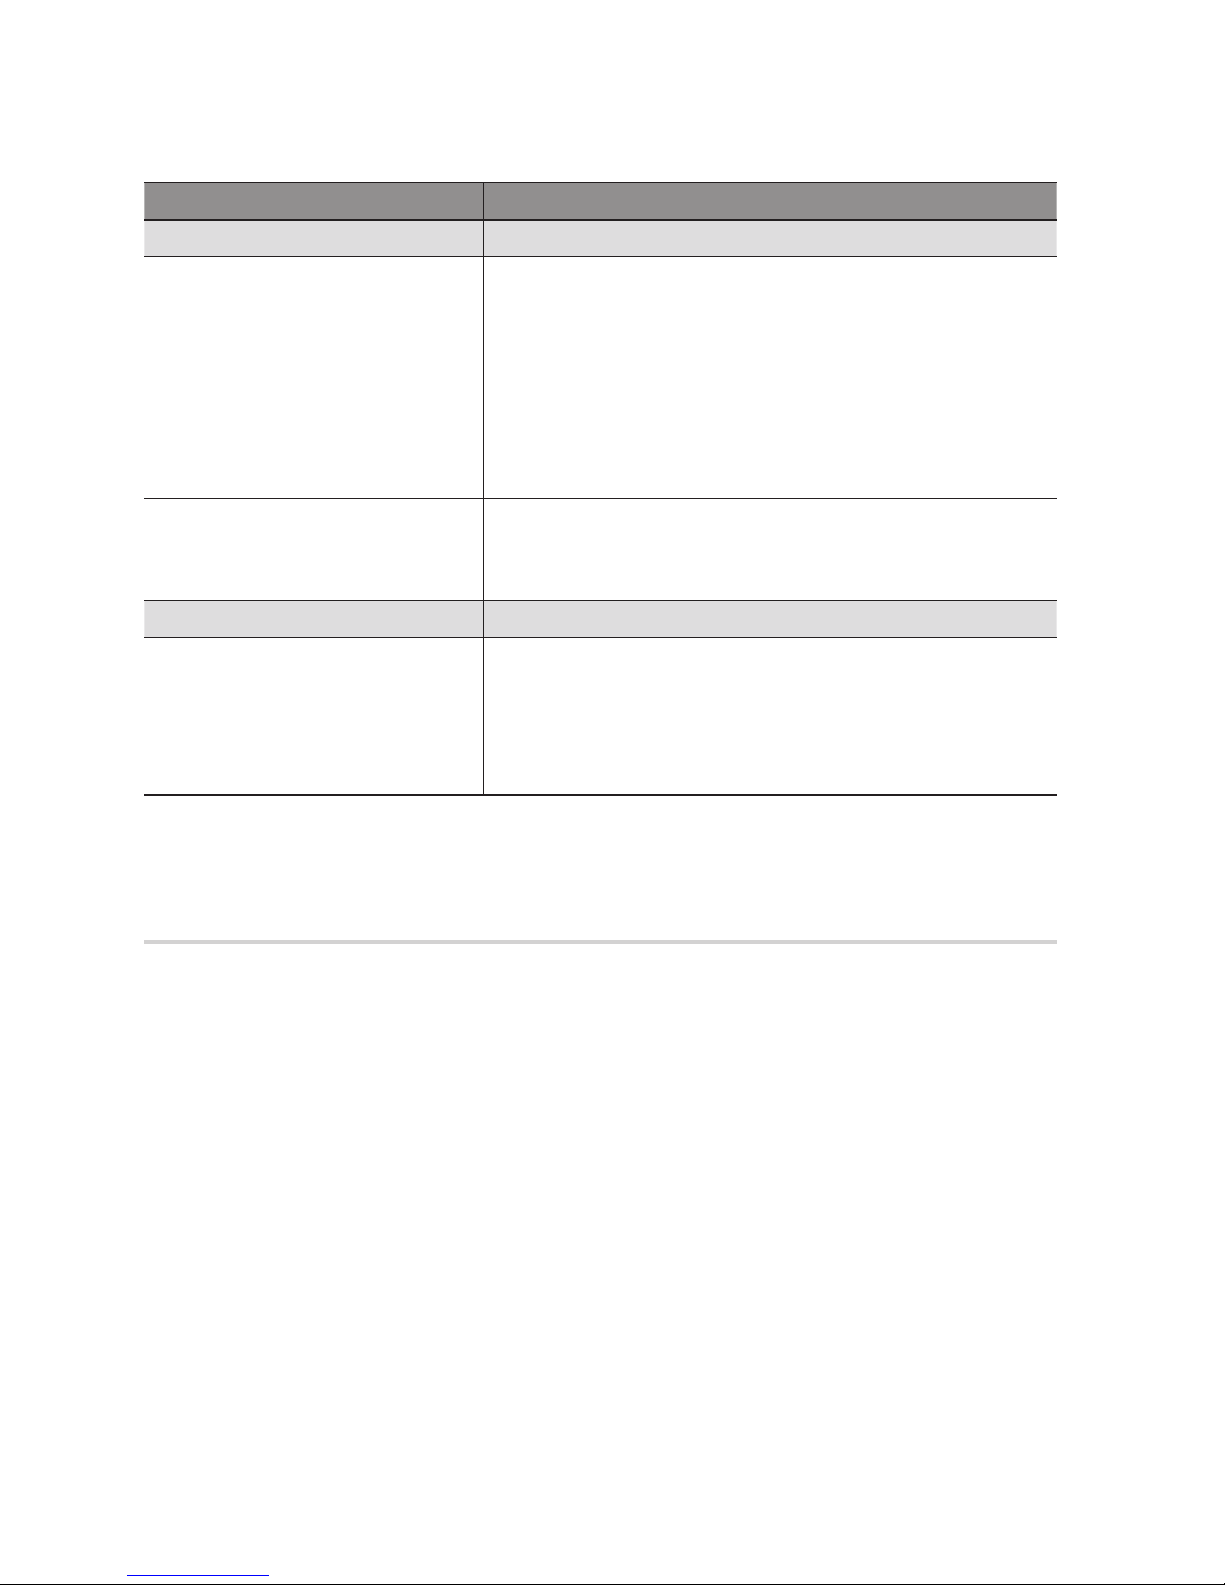
86 English
Appendix
PROBLEM SOLUTION
BD-LIVE
I cannot connect to the BD-LIVE server. Check whether the network connection is successful or not by using the
Network Status menu. (See page 48)
The total size of device must have at least 1GB of free space to
accommodate the BD-Live service.
You can check the available size in BD Data Management. (See page 50)
Check whether the BD-Live Internet Connection menu is set to Allow(All).
If all above fails, contact the contents provider or update the product to the
latest firmware.
•
•
•
•
When using the BD-LIVE service, an error
occurs.
The total size of device must have at least 1GB of free space to
accommodate the BD-LIVE service.
You can check the available size in BD Data Management. (See page 50)
•
Recording
“Performance test failed.” message appears,
and also Timer recording and Time Shift
function does not work.
Using lower quality USB storage device not supporting Recording function
can cause this kind of problem.
It is recommended to use USB HDD storage device.
Recommended specification of USB HDD is at least 5400 rpm.
USB HDD of RAID type is not supported.
•
•
NOTE
When the factory default settings are restored, all stored user BD data is deleted.
Repairs
If you contact us to repair your product, an administration fee may be charged if either:
An engineer is called out to your home at your request and there is no defect in the product.
You bring the unit to a repair centre and there is no defect in the product.
We will provide you with the amount of the administration fee before we make a home visit or begin any
work on your product.
We recommend you read this manually thoroughly, search for a solution on line at www.samsung.com,
or contact Samsung Customer Care before seeking to repair your product.
✎
▪
1.
2.
Page 87
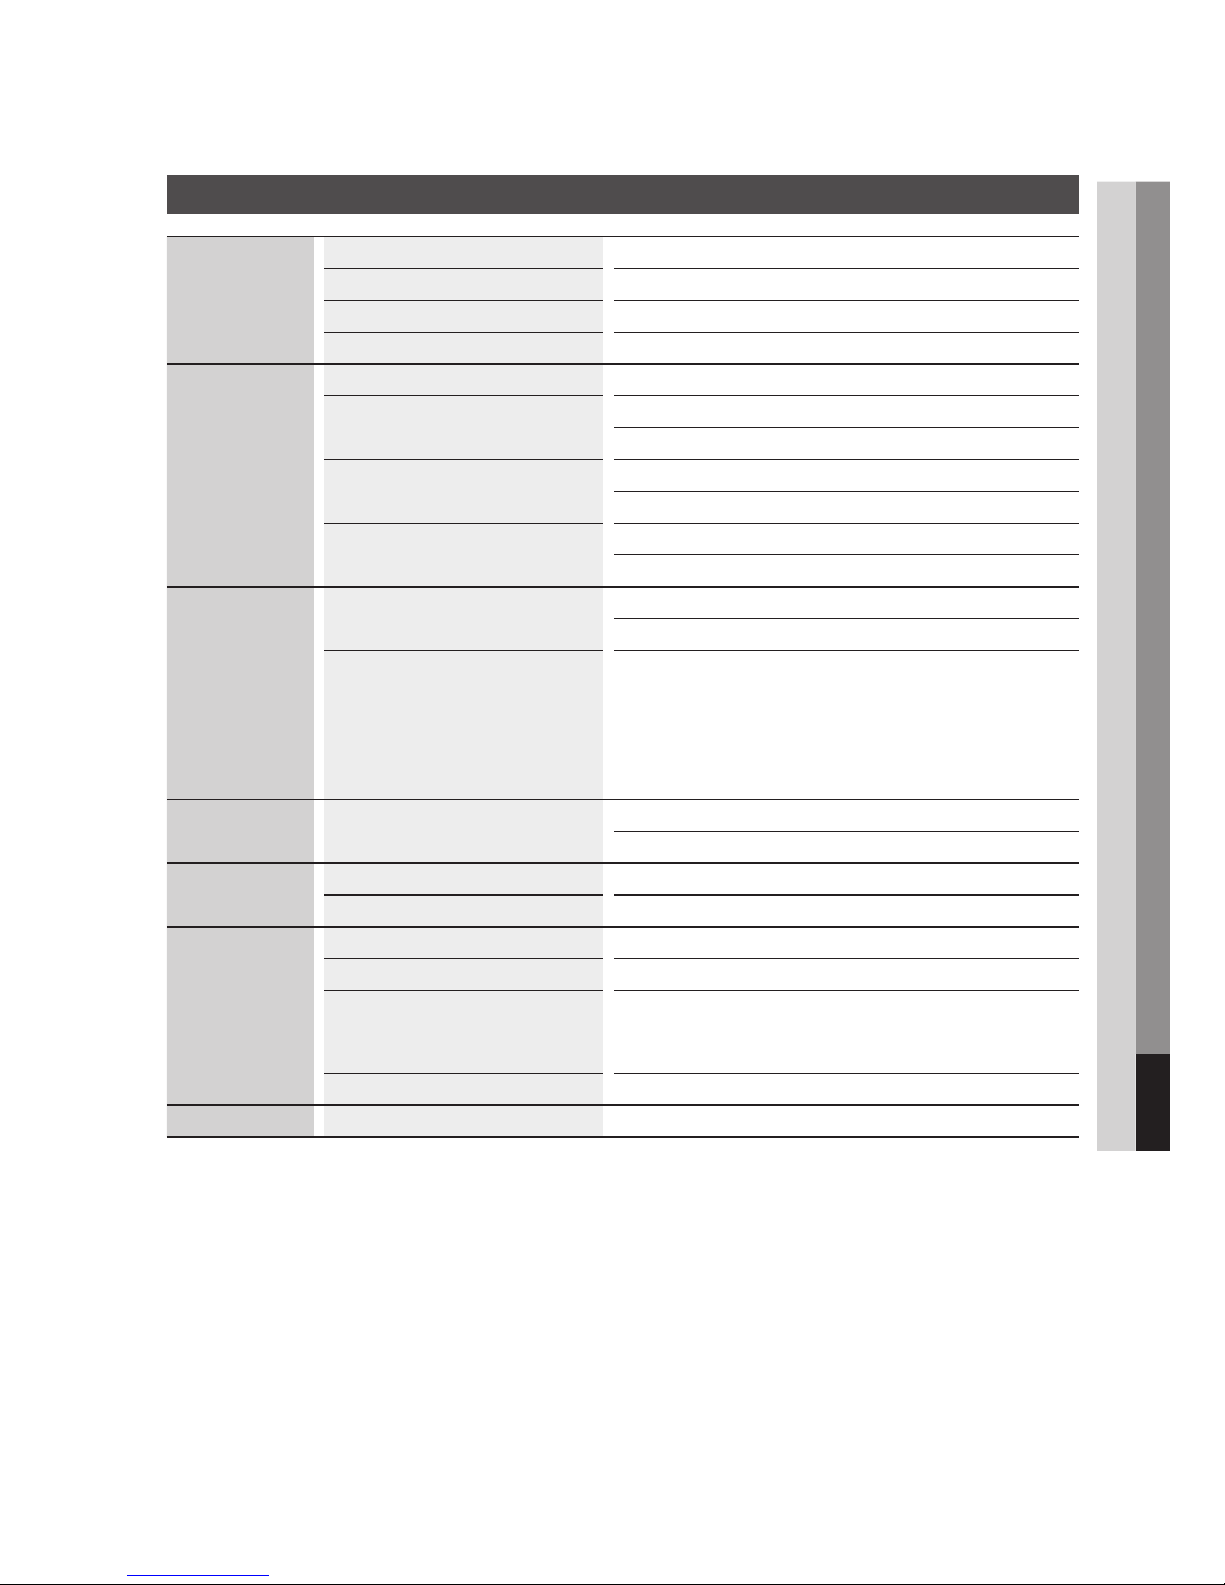
English 87
10 Appendix
Specifications
General
Weight 3.9 Kg
Dimensions 430 (W) X 299 (D) X 64 (H) mm
Operating Temperature Range +5°C to +35°C
Operating Humidity Range 10 % to 75 %
Disc
BD (Blu-ray Disc) Reading Speed : 4.917 m/sec.
DVD (Digital Versatile Disc)
Reading Speed : 3.49 ~ 4.06 m/sec.
Approx. Play Time (Single Sided, Single Layer Disc) : 135 min.
CD : 12 cm (COMPACT DISC)
Reading Speed : 4.8 ~ 5.6 m/sec.
Maximum Play Time : 74 min.
CD : 8 cm (COMPACT DISC)
Reading Speed : 4.8 ~ 5.6 m/sec.
Maximum Play Time : 20 min.
Video Output
Composite Video
1 Channel : 1.0 Vp-p (75Ω load)
Blu-ray Disc/DVDs : 576i/480i
Component Video
Y : 1.0 Vp-p (75Ω load)
PR : 0.70 Vp-p (75Ω load)
PB : 0.70 Vp-p (75Ω load)
Blu-ray Disc : 576i/480i
DVD : 576p/480p, 576i/480i
Video/Audio HDMI
1080p, 1080i, 720p, 576p/480p
PCM audio, Bitstream audio
Audio Output
Analogue Audio Output 2 Channel, (2Vrms ± 10%)
Digital Audio Output Optical
Network
Ethernet 10/100BASE-TX Terminal
Wireless LAN Built-in
Security
WEP(OPEN/SHARED)
WPA-PSK(TKIP/AES)
WPA2-PSK(TKIP/AES)
WPS(PBC) Supported
HDD Capacity BD-D8900 1 TB
Design and specifications are subject to change without prior notice.
For the power supply and power consumption, refer to the label attached to the product.
Weight and dimensions are approximate.
※
The HDMI 2 terminal does not output a video signal.
-
-
-
Page 88

88 English
Appendix
Compliance and Compatibility Notice
NOT ALL discs are compatible
Subject to the restrictions described below and those noted throughout this Manual, including the Disc
Type and Characteristics section of this user manual, disc types that can be played are: pre-recorded
commercial BD-ROM, DVD-VIDEO, and Audio CD (CD-DA) discs; BD-RE/-R, DVD-RW/-R discs; and
CD-RW/-R discs.
Discs other than the above cannot and/or is not intended to be played by this product. And some of
the above discs may not play due to one or more reasons provided below.
Samsung cannot assure that this product will play every disc bearing the BD-ROM, BD-RE/-R,
DVD-VIDEO, DVD-RW/-R, DVD+RW/+R and CD-RW/-R logos, and this product may not respond to
all operating commands or operate all features of every disc. These and other disc compatibility and
product operation issues with new and existing format discs are possible because:
Blu-ray is a new and evolving format and this product may not operate all features of Blu-ray Discs
because some features may be optional, additional features may have been added to the Blu-ray
Disc format after the production of this product, and certain available features may be subject to
delayed availability;
not all new and existing disc format versions are supported by this product;
new and existing disc formats may be revised, changed, updated, improved and/or supplemented;
some discs are produced in a manner that allows specific or limited operation and feature during
playback;
some features may be optional, additional features may have been added after the production of this
product or certain available features may be subject to delayed availability;
some discs bearing the BD-ROM, BD-RE/-R, DVD-VIDEO, DVD-RW/-R, DVD+RW/+R and
CD-RW/-R logos may still be non-standardized discs;
some discs may not be played depending on their physical state or recording conditions;
problems and errors can occur during the creation of Blu-ray Disc, DVD software and/or the
manufacture of discs;
this product operates differently than a standard DVD product or other AV equipment; and/or
for reasons noted throughout this user manual and for other reason(s) discovered and posted by
SAMSUNG customer care centre.
If you encounter disc compatibility or product operation problems, please contact SAMSUNG customer
care centre.
You may also contact SAMSUNG customer care centre for possible updates on this product.
For additional information on playback restrictions and disc compatibility, refer to the Precautions,
Before Reading the user manual, Disc Types and Characteristics, and Before Playing sections of this
user manual.
Copy Protection
Because AACS (Advanced Access Content System) is approved as content protection system for
Blu-ray Disc format, similar to use of CSS (Content Scramble System) for DVD format, certain
restrictions are imposed on playback, analogue signal output, etc., of AACS protected contents.
The operation of this product and restrictions on this product may vary depending on your time of
purchase as those restrictions may be adopted and/or changed by AACS after the production of this
product. Furthermore, BD-ROM Mark and BD+ are additionally used as content protection system for
Blu-ray Disc format, which imposes certain restrictions including playback restrictions for BD-ROM
Mark and/or BD+ protected contents. To obtain additional information on AACS, BD-ROM Mark, BD+,
or this product, please contact SAMSUNG customer care centre.
•
•
•
-
-
-
-
-
-
-
-
-
-
•
•
•
Page 89

English 89
10 Appendix
Many Blu-ray Disc/DVDs are encoded with copy protection. Because of this, you should only connect
your Product directly to your TV, not to a VCR. Connecting to a VCR results in a distorted picture from
copy-protected Blu-ray Disc/DVDs.
This item incorporates copy protection technology that is protected by U.S. patents and other
intellectual property rights of Rovi Corporation. Reverse engineering and disassembly are prohibited.
Under the U.S. Copyright laws and Copyright laws of other countries, unauthorized recording, use,
display, distribution, or revision of television programs, videotapes, Blu-ray Discs, DVDs, and other
materials may subject you to civil and/or criminal liability.
For BD-HDD Combo progressive scan output : CONSUMERS SHOULD NOTE THAT NOT ALL
HIGH DEFINITION TELEVISION SETS ARE FULLY COMPATIBLE WITH THIS PRODUCT AND MAY
CAUSE ARTIFACTS TO BE DISPLAYED IN THE PICTURE. IN CASE OF PROGRESSIVE SCAN
PICTURE PROBLEMS, IT IS RECOMMENDED THAT THE USER SWITCH THE CONNECTION TO
THE ‘STANDARD DEFINITION’ OUTPUT. IF THERE ARE QUESTIONS REGARDING OUR TV SET
COMPATIBILITY WITH THIS PRODUCT, PLEASE CONTACT OUR CUSTOMER SERVICE CENTRE.
Network Service Disclaimer
All content and services accessible through this device belong to third parties and are protected by
copyright, patent, trademark and/or other intellectual property laws. Such content and services are
provided solely for your personal noncommercial use. You may not use any content or services in a
manner that has not been authorized by the content owner or service provider. Without limiting the
foregoing, unless expressly authorized by the applicable content owner or service provider, you may
not modify, copy, republish, upload, post, transmit, translate, sell, create derivative works, exploit, or
distribute in any manner or medium any content or services displayed through this device.
THIRD PARTY CONTENT AND SERVICES ARE PROVIDED “AS IS.” SAMSUNG DOES NOT WARRANT
CONTENT OR SERVICES SO PROVIDED, EITHER EXPRESSLY OR IMPLIEDLY, FOR ANY PURPOSE.
SAMSUNG EXPRESSLY DISCLAIMS ANY IMPLIED WARRANTIES, INCLUDING BUT NOT LIMITED
TO, WARRANTIES OF MERCHANTABILITY OR FITNESS FOR A PARTICULAR PURPOSE. SAMSUNG
DOES NOT GUARANTEE THE ACCURACY, VALIDITY, TIMELINESS, LEGALITY, OR COMPLETENESS
OF ANY CONTENT OR SERVICE MADE AVAILABLE THROUGH THIS DEVICE AND UNDER NO
CIRCUMSTANCES, INCLUDING NEGLIGENCE, SHALL SAMSUNG BE LIABLE, WHETHER IN
CONTRACT OR TORT, FOR ANY DIRECT, INDIRECT, INCIDENTAL, SPECIAL OR CONSEQUENTIAL
DAMAGES, ATTORNEY FEES, EXPENSES, OR ANY OTHER DAMAGES ARISING OUT OF, OR IN
CONNECTION WITH, ANY INFORMATION CONTAINED IN, OR AS A RESULT OF THE USE OF ANY
CONTENT OR SERVICE BY YOU OR ANY THIRD PARTY, EVEN IF ADVISED OF THE POSSIBILITY OF
SUCH DAMAGES.
Third party services may be terminated or interrupted at any time, and Samsung makes no representation
or warranty that any content or service will remain available for any period of time. Content and services
are transmitted by third parties by means of networks and transmission facilities over which Samsung
has no control. Without limiting the generality of this disclaimer, Samsung expressly disclaims any
responsibility or liability for any interruption or suspension of any content or service made available
through this device.
Samsung is neither responsible nor liable for customer service related to the content and services.
Any question or request for service relating to the content or services should be made directly to the
respective content and service providers.
•
•
•
•
Page 90

90 English
Appendix
Licence
Manufactured under licence from Dolby Laboratories. Dolby and the double-D symbol
are trademarks of Dolby Laboratories.
Manufactured under licence under U.S. Patent #’s : 5,451,942; 5,956,674; 5,974,380;
5,978,762; 6,226,616; 6,487,535; 7,212,872; 7,333,929; 7,392,195; 7,272,567 &
other U.S. and worldwide patents issued & pending. DTS and the Symbol are registered trademarks,
& DTS-HD, DTS-HD Master Audio, and the DTS logos are trademarks of DTS, Inc. Product includes
software. © DTS, Inc. All Rights Reserved.
DivX
ABOUT DIVX VIDEO : DivX® is a digital video format created by DivX, Inc.
This is an official DivX Certified® device that plays DivX video.
Visit www.divx.com for more information and software tools to convert your files into DivX video.
ABOUT DIVX VIDEO-ON-DEMAND : This DivX Certified® device must be registered in order to
play purchased DivX Video-on-Demand (VOD) movies. To obtain your registration code, locate the
DivX VOD section in your device setup menu. Go to vod.divx.com for more information on how to
complete your registration.
DivX Certified® to play DivX® video up to HD 1080p, including premium content.
DivX®, DivX Certified® and associated logos are trademarks of DivX, Inc. and are used under licence.
Covered by one or more of the following U.S. patents : 7,295,673; 7,460,668; 7,515,710; 7,519,274.
HDMI, the HDMI Logo, and High-Definition Multimedia Interface are trademarks
or registered trademarks of HDMI Licensing LLC in the United States and other
countries.
Oracle and Java are registered trademarks of Oracle and/or its affiliates. Other names
may be trademarks of their respective owners
Rovi Flow-Down Licence Terms (Terms of Use)
This application incorporates software and technology of Rovi Corporation (“Rovi”). The Rovi software
and technology (collectively, the “Rovi Technology”) allows End Users to access music-related data
(“Rovi Data”) over the Internet and otherwise from proprietary Rovi databases (the “Rovi Databases”)
located on Rovi servers (the “Rovi Servers”) and to perform other functions. You may access and use
Rovi Data only by means of the intended End User functions of this application software.
You agree that you will use the Rovi Data, the Rovi Technology, and the Rovi Servers for your own
personal non-commercial use only. You agree not to assign, copy, transfer or transmit the Rovi
Data to any third party. You agree not to use or exploit Rovi Data, the Rovi Technology, the Rovi
Databases, or the Rovi Servers, except as expressly permitted herein.
You agree that your non-exclusive licence to access the Rovi Databases and to use the Rovi Data,
the Rovi Technology, and the Rovi Servers will terminate if you violate these restrictions. If your
licence terminates, you agree to cease any and all use of the Rovi Data, the Rovi Technology, and
the Rovi Servers. Rovi reserves all rights in Rovi Data, the Rovi Technology, and Rovi Servers,
including all ownership rights. You agree that Rovi may enforce its rights under this Agreement
against you directly in its own name.
•
•
•
-
-
-
-
-
•
•
•
-
-
-
Page 91

English 91
10 Appendix
Rovi reserves the right to delete data from the Rovi Databases or to change data categories for any
cause that Rovi deems sufficient. No warranty is made that the Rovi Technology or Rovi Servers are
error-free or that functioning of Rovi Technology or Rovi Servers will be uninterrupted. Rovi is not
obligated to provide you with any new enhanced or additional data types or categories that Rovi may
choose to provide in the future and is free to discontinue its online services at any time.
The data you submit to use will not be personal data or personally identifiable data, but rather
only data respecting music albums and associated data that does not appear in the Rovi Lookup
Database. You certify that to the best of its knowledge the album to which the submitted data
corresponds is commercially available and that you End User are lawfully permitted to submit the
data.
To the extent that you, the End User, provide any information or original works of authorship to be
added to Rovi Databases, you represent and warrant that you are the sole author of such work(s)
and further hereby assign to Rovi all rights of copyright therein, including the right to register the
copyright in such work(s) as part of the Rovi Database.
THE ROVITECHNOLOGY AND EACH ITEM OF ROVI DATA ARE LICENCED TO YOU “AS IS.” ROVI
MAKES NO REPRESENTATIONS OR WARRANTIES, EXPRESS OR IMPLIED, REGARDING THE
ACCURACY OF ANY ROVI DATA ON THE ROVI SERVERS. ROVI DISCLAIMS ALL WARRANTIES
EXPRESS OR IMPLIED, INCLUDING, BUT NOT LIMITED TO, IMPLIED WARRANTIES OF
MERCHANTABILITY, FITNESS FOR A PARTICULAR PURPOSE, TITLE AND NON-INFRINGEMENT.
ROVI DOES NOT WARRANT THE RESULTS THAT WILL BE OBTAINED BY YOUR USE OF THE
ROVI TECHNOLOGY OR ANY ROVI SERVER. IN NO CASE WILL ROVI BE LIABLE TO YOU OR
ANY THIRD PARTY FOR ANY CONSEQUENTIAL OR INCIDENTAL DAMAGES OR FOR ANY
LOST PROFITS OR LOST REVENUES RESULTING FROM YOUR USE OF ROVI DATA, THE ROVI
TECHNOLOGY OR OTHERWISE.
Open Source Licence Notice
In the case of using open source software, Open Source Licences are available on the product
menu.
Blu-ray Disc™, Blu-ray™, and the logos are trademarks of Blu-ray Disc Association.
DGTVi Licence Related Notice
This Blu-ray works with CI and CI+ CAM but it is not Certify from DGTVi association.
-
-
-
-
•
-
•
•
-
Page 92
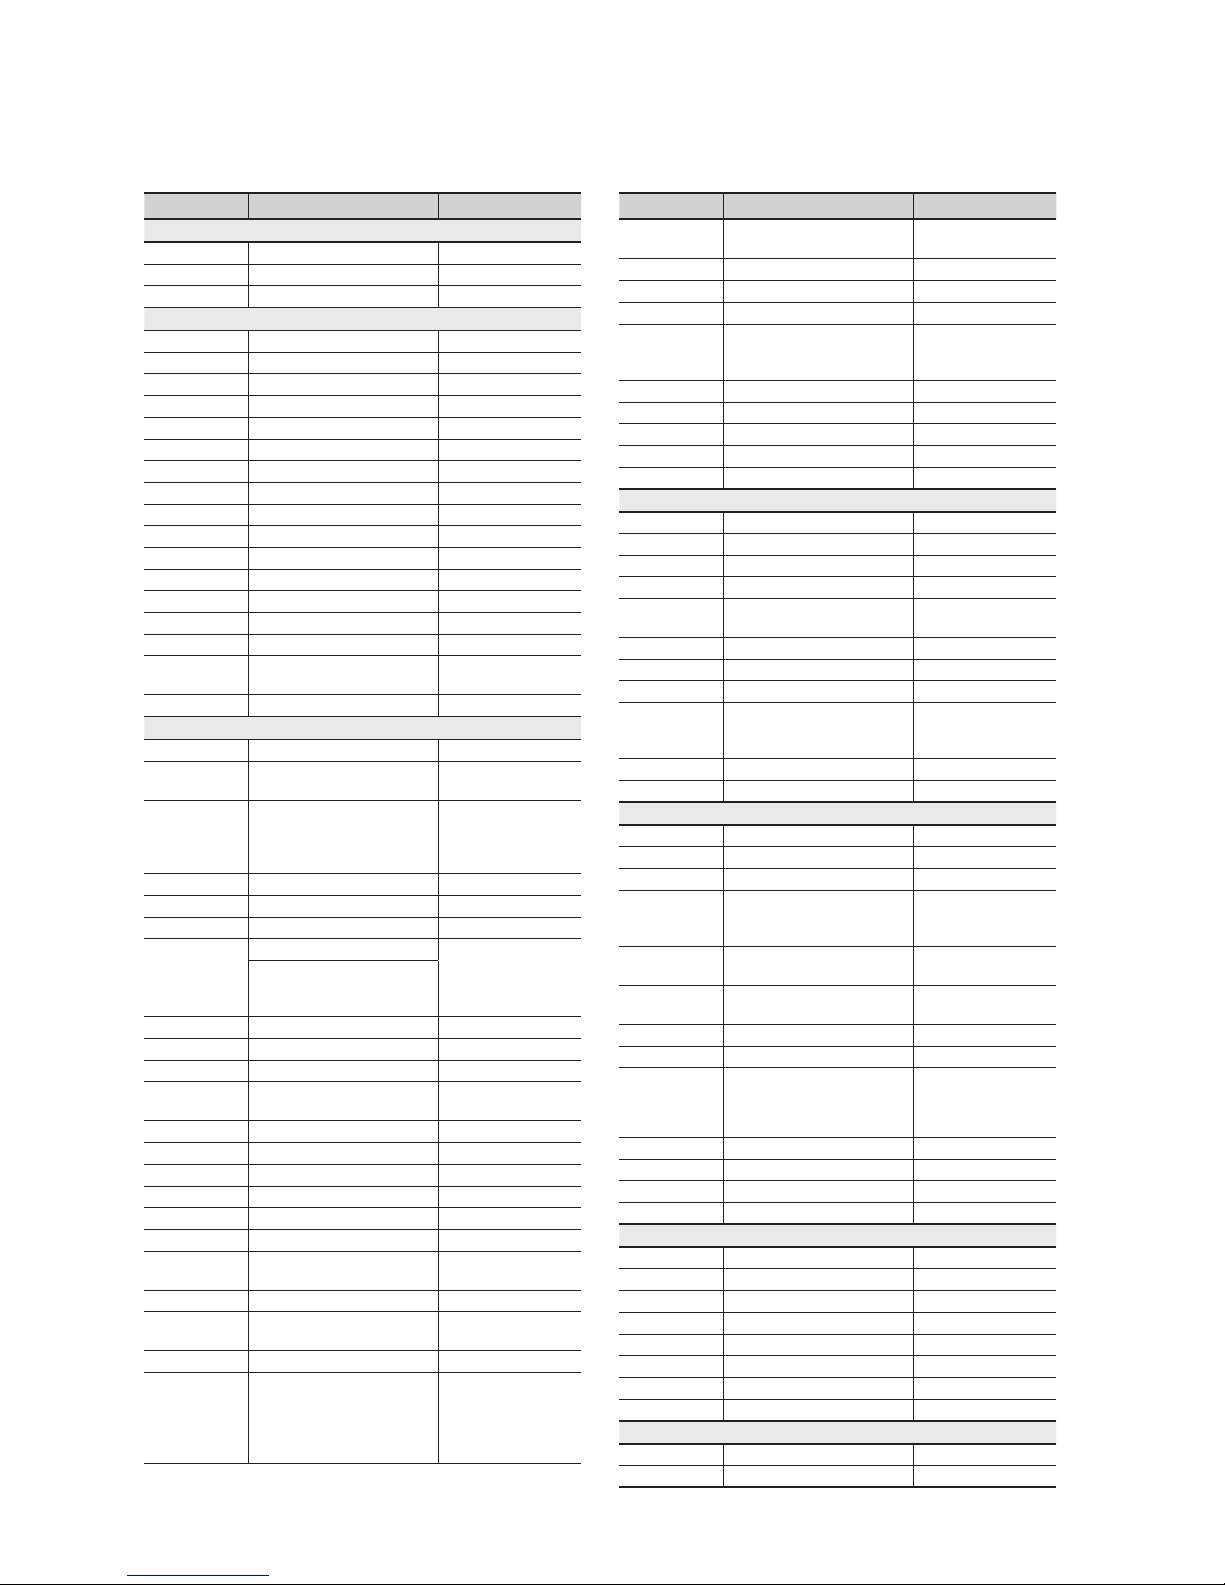
Area Contact Centre
Web Site
`
North America
Canada 1-800-SAMSUNG (726-7864) www.samsung.com
Mexico 01-800-SAMSUNG (726-7864) www.samsung.com
U.S.A 1-800-SAMSUNG (726-7864) www.samsung.com
`
Latin America
Argentine 0800-333-3733 www.samsung.com
Brazil 0800-124-421 / 4004-0000 www.samsung.com
Chile 800-SAMSUNG (726-7864) www.samsung.com
Colombia 01-8000112112 www.samsung.com
Costa Rica 0-800-507-7267 www.samsung.com
Dominica 1-800-751-2676 www.samsung.com
Ecuador 1-800-10-7267 www.samsung.com
El Salvador 800-6225 www.samsung.com
Guatemala 1-800-299-0013 www.samsung.com
Honduras 800-7919267 www.samsung.com
Jamaica 1-800-234-7267 www.samsung.com
Nicaragua 00-1800-5077267 www.samsung.com
Panama 800-7267 www.samsung.com
Peru 0-800-777-08 www.samsung.com
Puerto Rico 1-800-682-3180 www.samsung.com
Trinidad &
Tobago
1-800-SAMSUNG (726-7864) www.samsung.com
Venezuela 0-800-100-5303 www.samsung.com
`
Europe
Albania 42 27 5755 -
Austria
0810 - SAMSUNG (7267864,
€ 0.07/min)
www.samsung.com
Belgium 02-201-24-18
www.samsung.com/
be (Dutch)
www.samsung.com/
be_fr (French)
Bosnia 05 133 1999 Bulgaria 07001 33 11 www.samsung.com
Croatia 062 SAMSUNG (062 726 7864) www.samsung.com
Czech
800-SAMSUNG (800-726786)
www.samsung.com
Samsung Zrt., česká organizační
složka, Oasis Florenc, Soko-
lovská394/17, 180 00, Praha 8
Denmark 70 70 19 70 www.samsung.com
Finland 030 - 6227 515 www.samsung.com
France 01 48 63 00 00 www.samsung.com
Germany
01805 - SAMSUNG (726-7864
€ 0,14/Min)
www.samsung.com
Hungary 06-80-SAMSUNG (726-7864) www.samsung.com
Italia 800-SAMSUNG (726-7864) www.samsung.com
Kosovo +381 0113216899 Luxemburg 261 03 710 www.samsung.com
Macedonia 023 207 777 Montenegro 020 405 888 -
Netherlands
0900-SAMSUNG
(0900-7267864) (€ 0,10/Min)
www.samsung.com
Norway 815-56 480 www.samsung.com
Poland
0 801 1SAMSUNG (172678)
/ 022-607-93-33
www.samsung.com
Portugal 80820-SAMSUNG (726-7864) www.samsung.com
Rumania
1. 08010 SAMSUNG (72678) doar din reţeaua Romtelecom,
tarif local
2. 021.206.01.10 - din orice
reţea, tarif normal
www.samsung.com
Area Contact Centre
Web Site
Serbia
0700 Samsung (0700 726
7864)
www.samsung.com
Slovakia 0800-SAMSUNG (726-7864) www.samsung.com
Spain 902-1-SAMSUNG (902 172 678) www.samsung.com
Sweden 0771 726 7864 (SAMSUNG) www.samsung.com
Switzerland
0848-SAMSUNG (7267864,
CHF 0.08/min)
www.samsung.com/ch
www.samsung.com/
ch_fr/(French)
U.K
0330 SAMSUNG (7267864) www.samsung.com
Eire 0818 717100 www.samsung.com
Lithuania 8-800-77777 www.samsung.com
Latvia 8000-7267 www.samsung.com
Estonia 800-7267 www.samsung.com
`
CIS
Russia 8-800-555-55-55 www.samsung.com
Georgia 8-800-555-555 Armenia 0-800-05-555 Azerbaijan 088-55-55-555 -
Kazakhstan
8-10-800-500-55-500
(GSM: 7799)
www.samsung.com
Uzbekistan 8-10-800-500-55-500 www.samsung.com
Kyrgyzstan 00-800-500-55-500 www.samsung.com
Tadjikistan 8-10-800-500-55-500 www.samsung.com
Ukraine 0-800-502-000
www.samsung.ua
www.samsung.com/
ua_ru
Belarus 810-800-500-55-500 Moldova 00-800-500-55-500 -
`
Asia Pacific
Australia 1300 362 603 www.samsung.com
New Zealand
0800 SAMSUNG (0800 726 786)
www.samsung.com
China
400-810-5858 / 010-6475 1880
www.samsung.com
Hong Kong (852) 3698 4698
www.samsung.com/hk
www.samsung.com/
hk_en/
India
3030 8282 / 1800 110011 /
1800 3000 8282 / 1800 266 8282
www.samsung.com
Indonesia
0800-112-8888 /
021-5699-7777
www.samsung.com
Japan 0120-327-527 www.samsung.com
Malaysia 1800-88-9999 www.samsung.com
Philippines
1-800-10-SAMSUNG(726-7864) /
1-800-3-SAMSUNG(726-7864) /
1-800-8-SAMSUNG(726-7864) /
02-5805777
www.samsung.com
Singapore 1800-SAMSUNG (726-7864) www.samsung.com
Thailand 1800-29-3232 / 02-689-3232 www.samsung.com
Taiwan 0800-329-999 www.samsung.com
Vietnam 1 800 588 889 www.samsung.com
`
Middle East
Bahrain 8000-4726 www.samsung.com
Egypt 08000-726786 www.samsung.com
Jordan 800-22273 www.samsung.com
Morocco 080 100 2255 www.samsung.com
Oman 800-SAMSUNG (726-7864) www.samsung.com
Saudi Arabia 9200-21230 www.samsung.com
Turkey 444 77 11 www.samsung.com
U.A.E 800-SAMSUNG (726-7864) www.samsung.com
`
Africa
Nigeria 0800-SAMSUNG (726-7864) www.samsung.com
South Africa 0860-SAMSUNG (726-7864 ) www.samsung.com
Contact SAMSUNG WORLD WIDE
If you have any questions or comments relating to Samsung products, please contact the SAMSUNG
customer care centre.
Page 93
AK68-02063K-00
 Loading...