

Page 1

Blu-ray Disc Player
user manual
BD-C5500
imagine the possibilities
Thank you for purchasing this Samsung product.
To receive a more complete service,
please register your product at
www.samsung.com/register
Page 2

2 English
Key features
Blu-ray Disc Features
Blu-ray Discs support the highest quality HD video
available in the industry - Large capacity means
no compromise on video quality. Furthermore, a
Blu-ray Disc has the same familiar size and look
as a DVD.
The following Blu-ray Disc features are disc
dependant and will vary.
Appearance and navigation of features will also
vary from disc to disc.
Not all discs will have the features described
below.
Video highlights
The BD-ROM format supports three highly advanced
video codecs, including AVC, VC-1 and MPEG-2.
HD video resolutions are also available:
1920 x 1080 High Definition
•
1280 x 720 High Definition
•
For High-Definition Playback
To view high-definition contents on a Blu-ray Disc,
an HDTV (High Definition Television) is required.
Some Blu-ray Discs may require using the
product’s HDMI OUT to view high-definition
content.
The ability to view high-definition content on
Blu-ray Discs may be limited depending on the
resolution of your TV.
Subtitles
Depending on what is contained on the Blu-ray
Disc, you may be able to select different font
styles, sizes and colours for the subtitles. Subtitles
may also be animated, scrolled or faded in and
out.
BD-LIVE
You can use a Blu-ray Disc supporting BD-LIVE
through network connection to enjoy various
contents provided by the disc manufacturer.
Blu-ray Disc Player Features
Internet@TV
You can download various chargeable or free-ofcharge applications through network connection.
Various internet service and contents will be
provided, which include news, weather forecast,
stock market, games, movies and music.
Interactivity
Certain Blu-ray Discs may contain Animated
menus and Trivia games.
User Browsable Slideshows
With Blu-ray Discs, you can browse through
various still pictures while the audio remains
playing.
Page 3

English 3
Safety Information
Warning
TO REDUCE THE RISK OF ELECTRIC SHOCK, DO NOT REMOVE THE COVER (OR BACK).
NO USER-SERVICEABLE PARTS ARE INSIDE. REFER SERVICING TO QUALIFIED SERVICE PERSONNEL.
CAUTION
RISK OF ELECTRIC SHOCK
DO NOT OPEN
This symbol indicates “dangerous voltage”
inside the product that presents a risk of
electric shock or personal injury.
Do not install this equipment in a confined space
such as a bookcase or similar unit.
WARNING
To prevent damage which may result in fire
or electric shock hazard, do not expose this
appliance to rain or moisture.
CAUTION
Blu-ray Disc Player USES AN INVISIBLE LASER
BEAM WHICH CAN CAUSE HAZARDOUS
RADIATION EXPOSURE IF DIRECTED. BE SURE
TO OPERATE Blu-ray Disc Player CORRECTLY
AS INSTRUCTED.
CAUTION
THIS PRODUCT UTILIZES A LASER. USE
OF CONTROLS OR ADJUSTMENTS OR
PERFORMANCE OF PROCEDURES OTHER
THAN THOSE SPECIFIED HEREIN MAY RESULT
IN HAZARDOUS RADIATION EXPOSURE. DO
NOT OPEN COVERS AND DO NOT REPAIR
YOURSELF. REFER SERVICING TO QUALIFIED
PERSONNEL.
This product satisfies CE regulations when
shielded cables and connectors are used to
connect the unit to other equipment. To prevent
electromagnetic interference with electric
appliances, such as radios and televisions, use
shielded cables and connectors for connections.
IMPORTANT NOTE
The mains lead on this equipment is supplied with
a molded plug incorporating a fuse. The value of
the fuse is indicated on the pin face of the plug.
If it requires replacing, a fuse approved to BS1362
of the same rating must be used.
CAUTION:
TO REDUCE THE RISK OF ELECTRIC
SHOCK, DO NOT REMOVE COVER (OR BACK)
NO USER SERVICEABLE PARTS INSIDE. REFER
SERVICING TO QUALIFIED SERVICE PERSONNEL.
Never use the plug with the fuse cover omitted
if the cover is detachable. If a replacement fuse
cover is required, it must be of the same colour as
the pin face of the plug. Replacement covers are
available from your dealer.
If the fitted plug is not suitable for the power points
in your house or the cable is not long enough to
reach a power point, you should obtain a suitable
safety approved extension lead or consult your
dealer for assistance.
However, if there is no alternative to cutting off the
plug, remove the fuse and then safely dispose of
the plug. Do not connect the plug to a mains jack,
as there is a risk of shock hazard from the bared
flexible cord.
To disconnect the apparatus from the mains, the
plug must be pulled out from the mains socket,
therefore the mains plug shall be readily operable.
The product unit accompanying this user manual
is licenced under certain intellectual property
rights of certain third parties. This licence is limited
to private non-commercial use by end-user
consumers for licenced contents.
No rights are granted for commercial use.
The licence does not cover any product unit other
than this product unit and the licence does not
extend to any unlicenced product unit or process
conforming to ISO/IEC 11172-3 or ISO/IEC
13818-3 used or sold in combination with this
product unit. The licence only covers the use
of this product unit to encode and/or decode
audio files conforming to the ISO/IEC 11172-3 or
ISO/IEC 13818-3. No rights are granted under this
licence for product features or functions that do
not conform to the ISO/IEC 11172-3 or ISO/IEC
13818-3.
This symbol indicates important instructions
accompanying the product.
02 Safety Information
Page 4
4 English
Safety Information
Precautions
Important Safety Instructions
Read these operating instructions carefully before
using the unit. Follow all the safety instructions
listed below.
Keep these operating instructions handy for future
reference.
Read these instructions.
1.
Keep these instructions.
2.
Heed all warnings.
3.
Follow all instructions.
4.
Do not use this apparatus near water.
5.
Clean only with dry cloth.
6.
Do not block any ventilation openings. Install
7.
in accordance with the manufacturer’s
instructions.
Do not install near any heat sources such
8.
as radiators, heat registers, stoves, or other
apparatus (including amplifiers) that produce
heat.
Do not defeat the safety purpose of the
9.
polarized or grounding-type plug. A polarized
plug has two blades with one wider than the
other. A grounding type plug has two blades
and a third grounding prong. The wide blade
or the third prong are provided for your safety.
If the provided plug does not fit into your
outlet, consult an electrician for replacement
of the obsolete outlet.
Protect the power cord from being walked on
10.
or pinched particularly at plugs, convenience
receptacles, and the point where they exit
from the apparatus.
Only use attachments/accessories specified
11.
by the manufacturer.
Use only with the cart,
12.
stand, tripod, bracket,
or table specified by the
manufacturer, or sold with
the apparatus. When a cart
is used, use caution when
moving the cart/apparatus combination to
avoid injury from tip-over.
Unplug this apparatus during lightning storms
13.
or when unused for long periods of time.
Refer all servicing to qualified service
14.
personnel. Servicing is required when the
apparatus has been damaged in any way,
such as power-supply cord or plug is
damaged, liquid has been spilled or objects
have fallen into the apparatus, the apparatus
has been exposed to rain or moisture, does
not operate normally, or has been dropped.
Disc Storage & Management
Disc Handling
Disc Shape
Use discs with regular
•
shapes. If an irregular disc
(a disc with a special shape)
is used, this product may be damaged.
Holding discs
Avoid touching the surface of a
•
disc where recording is performed.
Blu-ray Discs
If the product is not used for a long period of
•
time, remove the Blu-ray Disc from the product
and store it in its case.
Be careful not to leave fingerprints or scratches
•
on the surface of the Blu-ray Disc.
DVD-VIDEO, Audio CD (CD-DA)
Wipe off dirt or contamination on the disc with a
•
soft cloth.
Page 5

English 5
02 Safety Information
Disc Storage
Be careful not to damage the disc because the
data on these discs is highly vulnerable to the
environment.
Do not keep under direct sunlight.
•
Keep in a cool ventilated area.
•
Store vertically.
•
Keep in a clean protection jacket.
•
If you move your product suddenly from a cold
•
place to a warm place, condensation may
generate on the operating parts and lens and
cause abnormal disc playback. If this occurs,
wait for two hours before connecting the plug to
the power outlet.
Then insert the disc and try to play back again.
Handling Cautions
Do not write on the printed side with a ball-point
•
pen or pencil.
Do not use record cleaning sprays or antistatic.
•
Also, do not use volatile chemicals, such as
benzene or thinner.
Do not apply labels or stickers to discs. (Do not
•
use discs fixed with exposed tape adhesive or
leftover peeled-off stickers.)
Do not use scratch-proof protectors or covers.
•
Do not use discs printed with label printers
•
available on the market.
Do not load warped or cracked discs.
•
Before connecting other components to this
•
product, be sure to turn them all off.
Do not move the product while a disc is being
•
played as the disc may be scratched or broken,
or the product’s internal parts may be damaged.
Do not put a flower vase filled with water or any
•
small metal objects on the product.
Be careful not to put your hand into the disc
•
tray.
Do not place anything other than the disc in the
•
disc tray.
Exterior interferences such as lightning and
•
static electricity can affect the normal operation
of this product. If this occurs, turn the product
off and on again with the POWER button, or
disconnect and then reconnect the AC power
cord to the AC power outlet. The product will
operate normally.
Be sure to remove the disc and turn off the
•
product after use.
Disconnect the AC power cord from the AC
•
outlet when you don’t intend to use the product
for long periods of time.
To clean a disc, wipe it in a straight
•
line from the inside to the outside of
the disc.
Do not expose the product to any
•
liquid.
When the AC plug is connected to a wall outlet,
•
the product will still draw power (standby mode)
when it is turned off.
Apparatus shall not be exposed to dripping or
•
splashing and no objects filled with liquids, such
as vases, shall be placed on the apparatus.
The main plug is used as a disconnect device
•
and shall stay readily operable at any time.
Maintenance of Cabinet
For safety reasons, be sure to disconnect the AC
power cord from the AC outlet.
Do not use benzene, thinner, or other solvents
•
for cleaning.
Wipe the cabinet with a soft cloth.
•
Restrictions on Playback
This product may not respond to all operating
•
commands because some Blu-ray, DVD and
CD discs allow specific or limited operation and
features during playback.
Please note that this is not a defect in the
product.
Samsung cannot assure that this product will
•
play every disc bearing the Blu-ray Disc, DVD
or CD logo because disc formats evolve, and
problems and errors may occur during the
creation of Blu-ray Disc, DVD, CD software
and/or the manufacture of discs.
Please contact the SAMSUNG customer care
center if you have questions or encounter
difficulty in playing Blu-ray, DVD, or CD discs
in this product. Also, refer to rest of this user
manual for additional information on playback
restrictions.
Page 6

6 English
Contents
KEY FEATURES
SAFETY INFORMATION
GETTING STARTED
2 Blu-ray Disc Features
2
Blu-ray Disc Player Features
3 Warning
4
Precautions
4 Important Safety Instructions
4 Disc Storage & Management
4 Disc Handling
10 Before Using the user manual
10 Disc Types and Contents that can be played.
10
11
11
12
13
13
14
14 Accessories
15
16
17
18
18 Tour of the Remote Control
19
19
Disc types that cannot be played
Blu-ray Disc Compatibility
Disc Types
Supported File Formats
Region Code
Copyright
Logos of Discs that can be played
Front Panel
Front Panel Display
Rear Panel
Remote Control
Setting the Remote Control
Controllable TV Codes
CONNECTIONS
20 Connecting to a TV
20 Case 1 : Connecting to a TV with an HDMI Cable
21
22
23
- Best Quality (Recommended)
Case 2 : Connecting to a TV with DVI Cable
- Best Quality (Recommended)
Case 3 : Connecting to a TV (Component)
- Better Quality
Case 4 : Connecting to a TV (Video)
- Good Quality
Page 7

English 7
ENGLISH
CONNECTIONS
24 Connecting to an Audio System
24 Case 1 : Connecting to an Audio System
25
25
26 Connecting to the Network
26 Cable Network
27
(HDMI Supported Amplifier) - Best Quality
(Recommended)
Case 2 : Connecting to an Audio System
(Dolby Digital, DTS Amplifier) - Better Quality
Case 3 : Connecting to an Audio System
(2 Channel Amplifier) - Good Quality
Wireless Network
SETUP
28 Before Starting (Initial Settings)
29
Setting the Menu
30
Display
30 TV Aspect
30
30
32
32
32
32
32
32 Audio
32 Digital Output
33
34
34
34
34 System
34 Initial Settings
34
34
35
35
35
36
36 Network Setup
36 Network Settings
39
39
BD Wise (Samsung Products only)
Resolution
HDMI Format
Movie Frame (24Fs)
Progressive Mode
Still Mode
HDMI Deep Color
PCM Downsampling
Dynamic Range Control
Downmixing Mode
DTS Neo:6
Internet@TV Screen Size
Anynet+(HDMI-CEC)
BD Data Management
Clock
DivX(R) Registration
DivX(R) Deactivation
Network Status
BD-LIVE Internet Connection
Page 8

8 English
Contents
SETUP
BASIC FUNCTIONS
40 Language
40
Security
40 Parental Rating
40
40 General
40 Background
41
41
41
41 Support
41 Software Upgrade
42
43 Playing a Disc
43 Playback
43
43 Using the Disc menu/Title menu/Popup menu
43 Using the Disc Menu
43
43
44
44 Using the Search and Skip Functions
44 Searching for a Desired Scene
44
44 Slow Motion Play/Step Motion Play
44 Slow Motion Play
44
45 Repeat Playback
45 Repeat the Title or Chapter
45
45 Using the TOOLS button
45 Moving to a Desired Scene Directly
46
46
46
46
47
Change Password
Energy Saving
Front Display
Power On/Off Sound
Contact Samsung
Disc Structure
Using the Title Menu
Playing the Title List
Using the Popup Menu
Skipping Chapters
Step Motion Play
Repeat the Section
Selecting the Audio Language
Selecting the Subtitle Language
Changing the Camera Angle
Selecting the Picture Setting
Setting BONUSVIEW
Page 9

English 9
ENGLISH
BASIC FUNCTIONS
47 Listening to Music
47 Buttons on the Remote Control used for Music
48
48
48
49 Playing back a Picture
49 Playing a JPEG Disc
49
50 Playing back a USB Storage Device
Playback
Playing an Audio CD (CD-DA)/MP3
Repeat an Audio CD (CD-DA)/MP3
Playlist
Using the TOOLS button
NETWORK SERVICES
APPENDIX
51 Using Internet@TV
51 Getting Started with Internet@TV
53
54
55 BD-LIVE™
55
55
57 Troubleshooting
60
61
62 Compliance and Compatibility Notice
62
63
64 Licence
Settings
Samsung Apps
Software Upgrade Notification
Using the AllShare Function
Index
Specifications
Copy Protection
Network Service Disclaimer
Page 10
10 English
Getting Started
Before Using the user manual
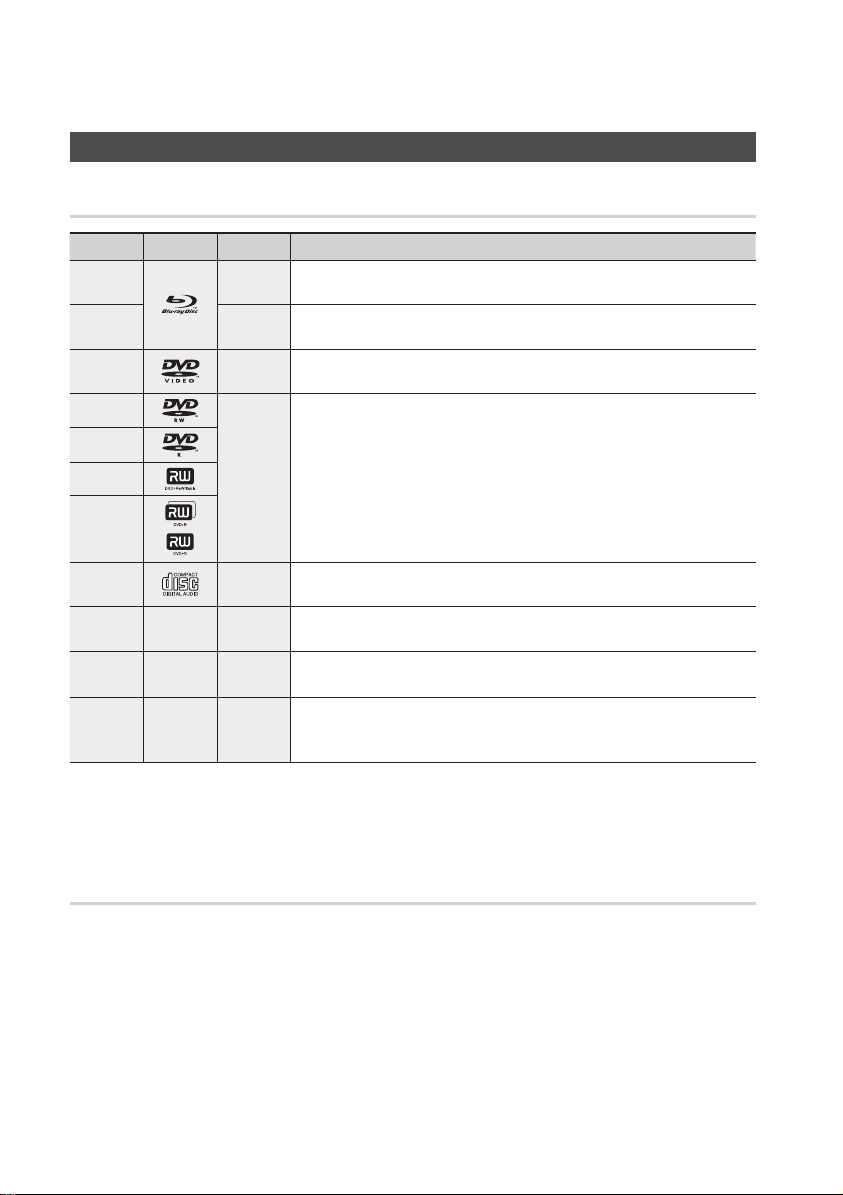
Disc Types and Contents that can be played.
Term Logo Icon Definition
BD-ROM
BD-RE/-R
DVD-VIDEO
DVD-RW(V)
DVD-R
DVD+RW
DVD+R
Audio CD
MP3
WMA
JPEG
DivX
MKV
MP4
NOTE
✎
The product may not play certain CD-RW/-R and DVD-R due to the disc type or recording conditions.
▪
If a DVD-RW/-R disc has not been recorded properly in DVD video format, it will not be playable.
▪
h
z
Z
y
o
-
w
-
G
-
x
This involves a function available on a BD-ROM.
This involves a function available on a BD-RE/-R disc recorded in the BD-RE format.
This involves a function available on a DVD-VIDEO.
This involves a function available on recorded DVD+RW or DVD-RW(V)/DVD-R/+R
discs that have been recorded and finalized.
This involves a function available on an audio CD-RW/-R (CD-DA format).
This involves a function available in a CD-RW/-R, DVD-RW/-R disc or a USB storage
media containing MP3 or WMA contents.
This involves a function available in a CD-RW/-R, DVD-RW/-R disc or a USB storage
media containing JPEG contents.
This involves a function available in a CD-RW/-R, DVD-RW/-R disc or a USB storage
media containing DivX, MKV, MP4 contents.
Disc types that cannot be played
HD DVD
•
DVD-ROM/PD/MV-
•
Disc, etc
DVD-RAM
•
Super Audio CD
•
(except CD layer)
DVD-RW(VR mode)
•
CVD/CD-ROM/CDV/
•
CD-G/CD-I/LD
(CD-Gs play audio only,
not graphics.)
3.9 GB DVD-R Disc for
•
Authoring.
Page 11

English 11
03 Getting Started
NOTE
✎
Some commercial discs and DVD discs purchased
▪
outside your region may not be playable with this
product. When these discs are played, either “This
disc can not be played.” or “Cannot read this disc.
Please check the regional code of the disc.” will be
displayed.
Playback may not work for some types of discs, or
▪
when specific operations, such as angle change and
aspect ratio adjustment, are being performed.
Information about the discs is written in detail on the
disc box. Please refer to this if necessary.
Do not allow the disc to become dirty or scratched.
▪
Fingerprints, dirt, dust, scratches or deposits of
cigarette smoke on the recording surface may make
it impossible to use the disc for playback.
When a BD-J title is played, loading may take longer
▪
than a normal title, or some functions may perform
slowly.
This product may not respond to all operating
▪
commands because some Blu-ray, DVD and CD
discs allow specific or limited operation and features
during playback.
Please note that this is not a defect in the product.
Samsung cannot assure that this product will play
▪
every disc bearing the Blu-ray Disc, DVD or CD logo
because disc formats evolve, and problems and
errors may occur during the creation of Blu-ray Disc,
DVD, CD software and/or the manufacture of discs.
Please contact the SAMSUNG customer care centre
if you have questions or encounter difficulty when
playing Blu-ray, DVD, or CD discs in this product.
Also, refer to rest of this user manual for additional
information on playback restrictions.
Blu-ray Disc Compatibility
Blu-ray Disc is a new and evolving format.
Accordingly, disc compatibility issues are possible.
Not all discs are compatible and not every disc will
play back. For additional information, refer to the
Compliance and Compatibility Notice section of
this user manual.
Disc Types
BD-ROM
This Blu-ray disc can only be played back.
This product can play back pre-recorded
commercial BD-ROM discs.
BD-RE/-R
This Blu-ray disc can be recorded and played
back.
This product can play back a BD-RE/-R disc
recorded by other compatible Blu-ray disc
recorders.
DVD-VIDEO
This product can play back pre-recorded
•
commercial DVD discs (DVD-VIDEO discs) with
movies.
When switching from the first layer to the
•
second layer of a dual-layered DVD-VIDEO disc,
there may be momentary distortion in the image
and sound. This is not a malfunction of the
product.
DVD-RW
This product can play back a DVD-RW disc
recorded and finalized with a DVD video recorder.
Ability to play back may depend on recording
conditions.
DVD-R
This product can play back a DVD-R disc
recorded and finalized with a DVD Video recorder.
Ability to play back may depend on recording
conditions.
DVD+RW
This product can play back a DVD+RW disc
•
recorded with a DVD Video recorder. Ability to
play back may depend on recording conditions.
Page 12

12 English
Getting Started
DVD+R
This product can play back a DVD+R disc
•
recorded and finalized with a DVD Video
recorder. Ability to play back may depend on
recording conditions.
Audio CD (CD-DA)
This product can play back CD-DA format audio
•
CD-RW/-R discs.
The product may not be able to play some
•
CD-RW/-R discs due to the condition of the
recording.
CD-RW/-R
Use a 700MB(80 minutes) CD-RW/-R disc.
•
If possible, do not use a 800MB(90 minutes) or
above disc, as the disc may not play back.
If the CD-RW/-R disc was not recorded as a
•
closed session, you may experience delays
when playing back the beginning of the disc or
all recorded files may not play.
Some CD-RW/-R discs may not be playable
•
with this product, depending on the device
which was used to burn them. For contents
recorded on CD-RW/-R media from CDs
for your personal use, playability may vary
depending on contents and discs.
Supported File Formats
Video File Support
File Extension Container Video Codec Audio Codec Resolution
1920x1080
1920x1080
1920x1080
1920x1080
1920x1080
1920x1080
1920x1080
1920x1080
1920x1080
1920x1080
1920x1080
1920x1080
1920x1080
1920x1080
1920x1080
*.avi
*.mkv
*.wmv
*.mp4
*.mpg
*.mpeg
AVI
MKV
WMV
MP4
PS
Divx 3.11/4.x/5.1/6.0
XviD
MP4v3
H.264 BP/MP/HP
VC-1 AP(wmv1)
DivX 5.1/6.0
XviD
H.264 BP/MP/HP
VC-1 AP
VC-1 SM
MP4 (mp4v)
H.264 BP/MP/HP
MPEG1
MPEG2
H.264 BP/MP/HP
MP3
AC3
DTS
WMA
PCM
MP3
AC3
DTS
WMA
AAC
MP1, 2
AC3
DTS
Page 13
English 13
03 Getting Started
Music File Support
File
Extension
*.mp3
*.wma
Container
MP3
WMA
Audio
Codec
MP3 -
WMA
Support Range
Compliant with
WMA version 10
* Sampling rates (in
kHz) - 8, 11, 16,
22, 32, 44.1, 48
* Bit rates - All bit-
rates in the range
5kbps to 384kbps
AVCHD (Advanced Video Codec High
Definition)
This product can playback AVCHD format
•
discs. These discs are normally recorded and
used in camcorders.
The AVCHD format is a high definition digital
•
video camera format.
The MPEG-4 AVC/H.264 format is capable of
•
compressing images at higher efficiency than
that of the conventional image compressing
format.
Some AVCHD discs use the “x.v.Color” format.
•
This product can playback AVCHD discs using
•
“x.v.Color” format.
“x.v.Color” is a trademark of Sony Corporation.
•
“AVCHD” and the AVCHD logo are trademarks
•
of Matsushita Electronic Industrial Co., Ltd. and
Sony Corporation.
NOTE
✎
Some AVCHD format discs may not play, depending
▪
on the recording condition.
AVCHD format discs need to be finalized.
“x.v.Color” offers a wider colour range than normal
▪
DVD camcorder discs.
Some DivX, MKV and MP4 format discs may not
▪
play, depending on the video resolution and frame
rate condition.
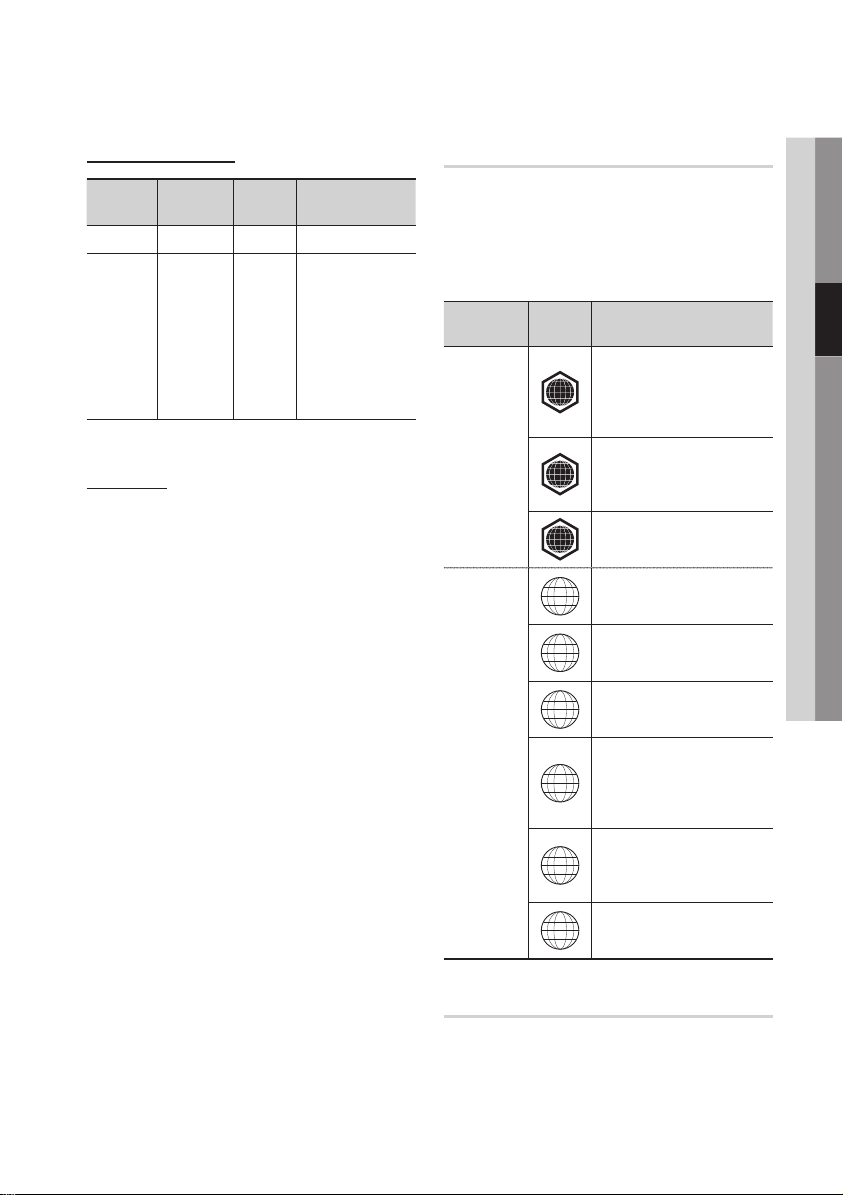
Region Code
Both the product and the discs are coded by
region. These regional codes must match in order
to play the disc. If the codes do not match, the
disc will not play.
The Region Number for this product is described
on the rear panel of the product.
Disc Type
Blu-ray
DVD-VIDEO
Region
Code
North America, Central America,
South America, Korea, Japan,
A
Taiwan, Hong Kong and South
East Asia.
Europe, Greenland, French
territories, Middle East, Africa,
B
Australia and New Zealand.
India, China, Russia, Central
C
and South Asia.
The U.S., U.S. territories and
1
Canada
Europe, Japan, the Middle East,
2
Egypt, South Africa, Greenland
Taiwan, Korea, the Philippines,
3
Indonesia, Hong Kong
Mexico, South America,
Central America, Australia,
4
New Zealand, Pacific Islands,
Caribbean
Russia, Eastern Europe, India,
most of Africa, North Korea,
5
Mongolia
China
6
Area
Copyright
© 2010 Samsung Electronics Co.,Ltd.
All rights reserved; No part or whole of this user’s
manual may be reproduced or copied without the
prior written permission of Samsung Electronics
Co.,Ltd.
Page 14
14 English
Getting Started
79
MUTE
VOL CH
POWER
TV
POWER
BONUSVIEW
SOURCE
DISC MENU TITLE MENUMENU
INTERNET@
REPEAT
FULL SCREEN
SUBTITLE
AUDIO
INFO
POPUP
TOOLS
EXITRETURN
AK59-00104R
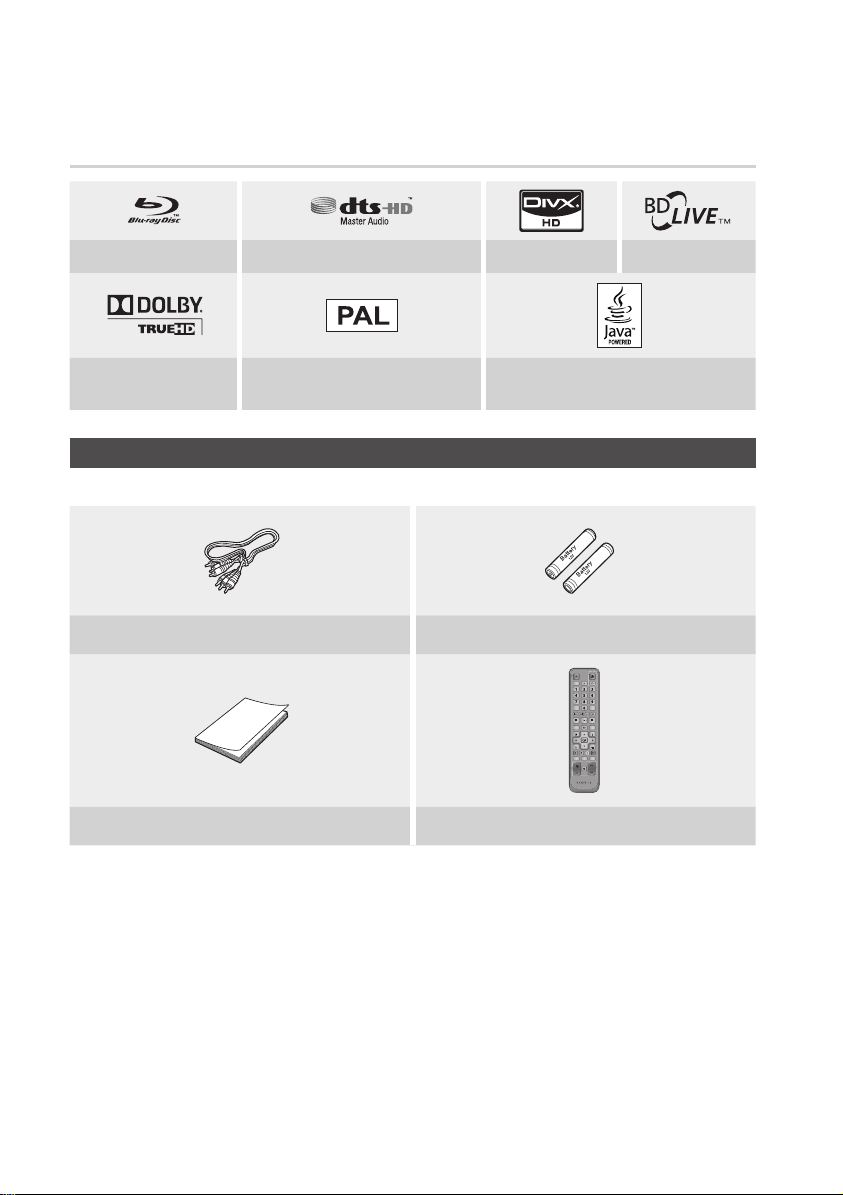
Logos of Discs that can be played
Blu-ray Disc DTS-HD Master Audio DivX BD-LIVE
Dolby TrueHD
PAL broadcast System in U.K., France,
Germany, etc.
Check for the supplied accessories below.
Audio/Video cable Batteries for Remote Control (AAA Size)
User Manual Remote Control
Java
Accessories
Page 15
English 15
03 Getting Started
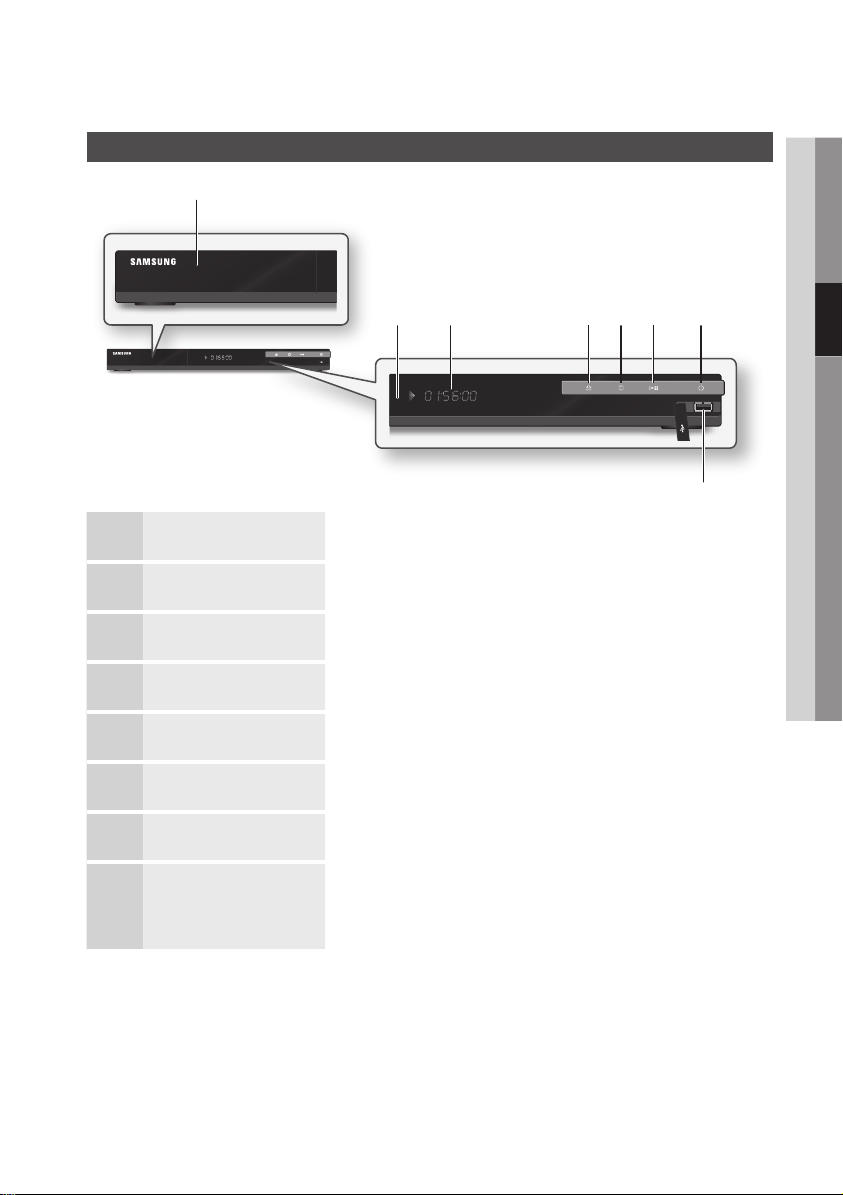
Front Panel
a
b c defhg
DISC TRAY Opens to accept a disc.
1
REMOTE CONTROL SENSOR Detects signals from the remote control.
2
DISPLAY Displays the playing status, time, etc.
3
OPEN/CLOSE BUTTON Opens and closes the disc tray.
4
STOP BUTTON Stops disc playback.
5
PLAY/PAUSE BUTTON Plays a disc or pauses playback.
6
POWER BUTTON Turns the product on and off.
7
USB HOST
8
NOTE
✎
Software upgrades using the USB Host jack must be performed with a USB memory flash stick only.
▪
A USB device consuming more than 500mA requires a separate power supply device for normal operation.
▪
A USB HDD device cannot be used for BD Data storage (BD-LIVE).
▪
A USB memory flash stick can be connected here and used as storage when
connected to BD-LIVE. It can also be used for software upgrades and MP3/JPEG/
DivX/MKV/MP4 playback.
Page 16
16 English
Getting Started
a b
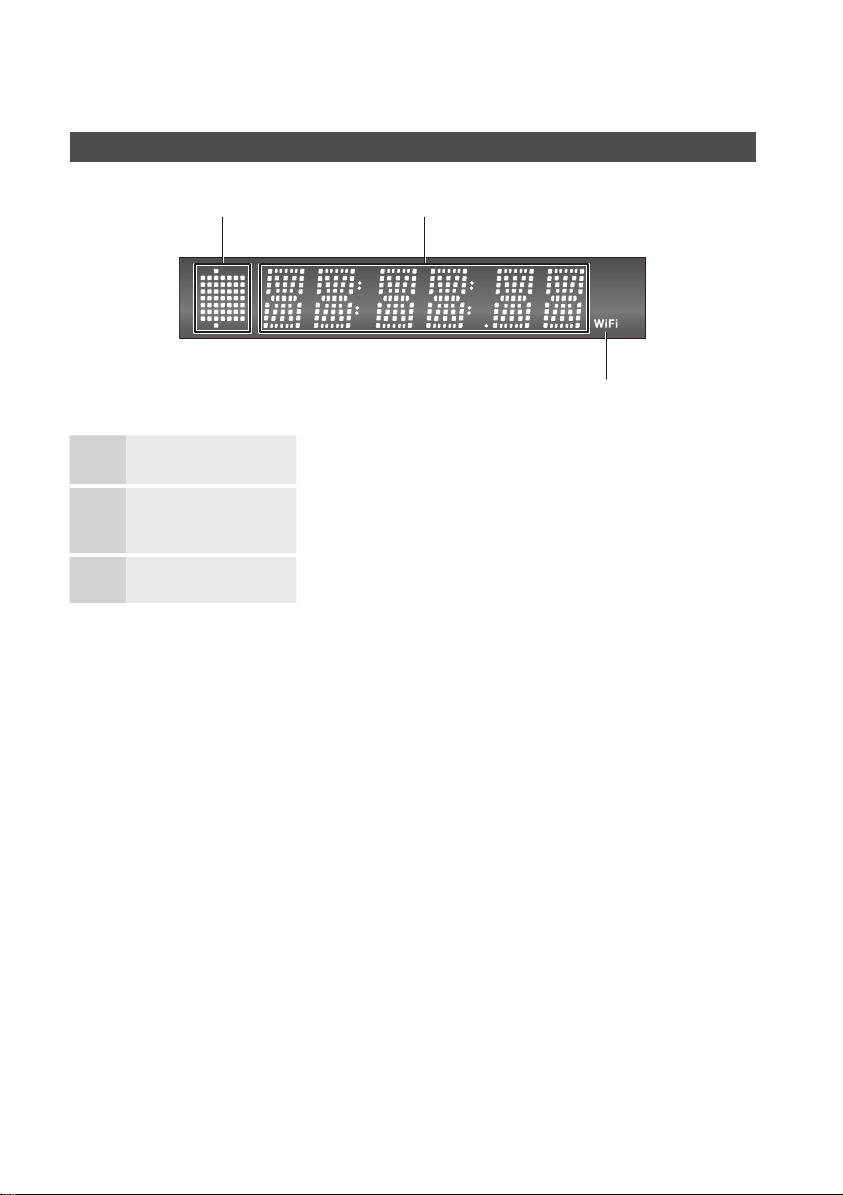
IN DISC INDICATOR Lights when a disc is inserted or played back.
1
Front Panel Display
c
CURRENT TIME AND
2
STATUS INDICATOR
WIFI INDICATOR Lights when the wireless network is connected.
3
Displays the play time and the current status.
Page 17
English 17
03 Getting Started
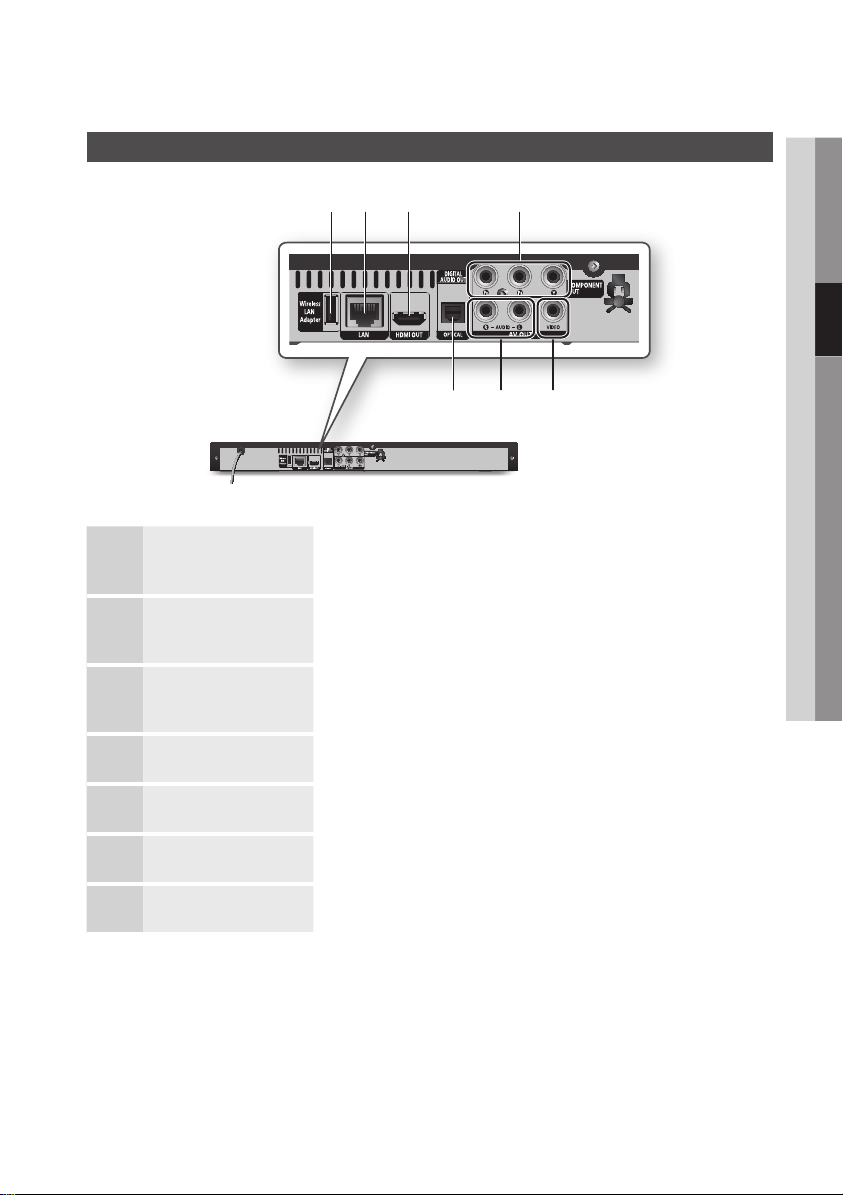
Rear Panel
b c
a d
f eg
WIRELESS LAN ADAPTER
1
LAN
2
HDMI OUT
3
COMPONENT OUT Connects to equipment having component video input.
4
VIDEO OUT Connects the input of external equipment using a video cable.
5
AUDIO OUT Connects to the audio input of external equipment using audio cables.
6
DIGITAL AUDIO OUT Connects to a Receiver.
7
Connect the optional Wireless LAN Adapter (WIS09ABGN) here to use the Wireless
network.
Can be used for network based services (See pages 51~56), BD-LIVE and software
upgrades using a network connection.
Using an HDMI cable, connect this HDMI output terminal to the HDMI input terminal
on your TV for the best quality picture or to your Receiver for the best quality sound.
Page 18
18 English
Getting Started
79
MUTE
VOL CH
POWER
TV
POWER
BONUSVIEW
SOURCE
DISC MENU TITLE MENUMENU
INTERNET@
REPEAT
FULL SCREEN
SUBTITLE
AUDIO
INFO
POPUP
TOOLS
EXITRETURN
AK59-00104R
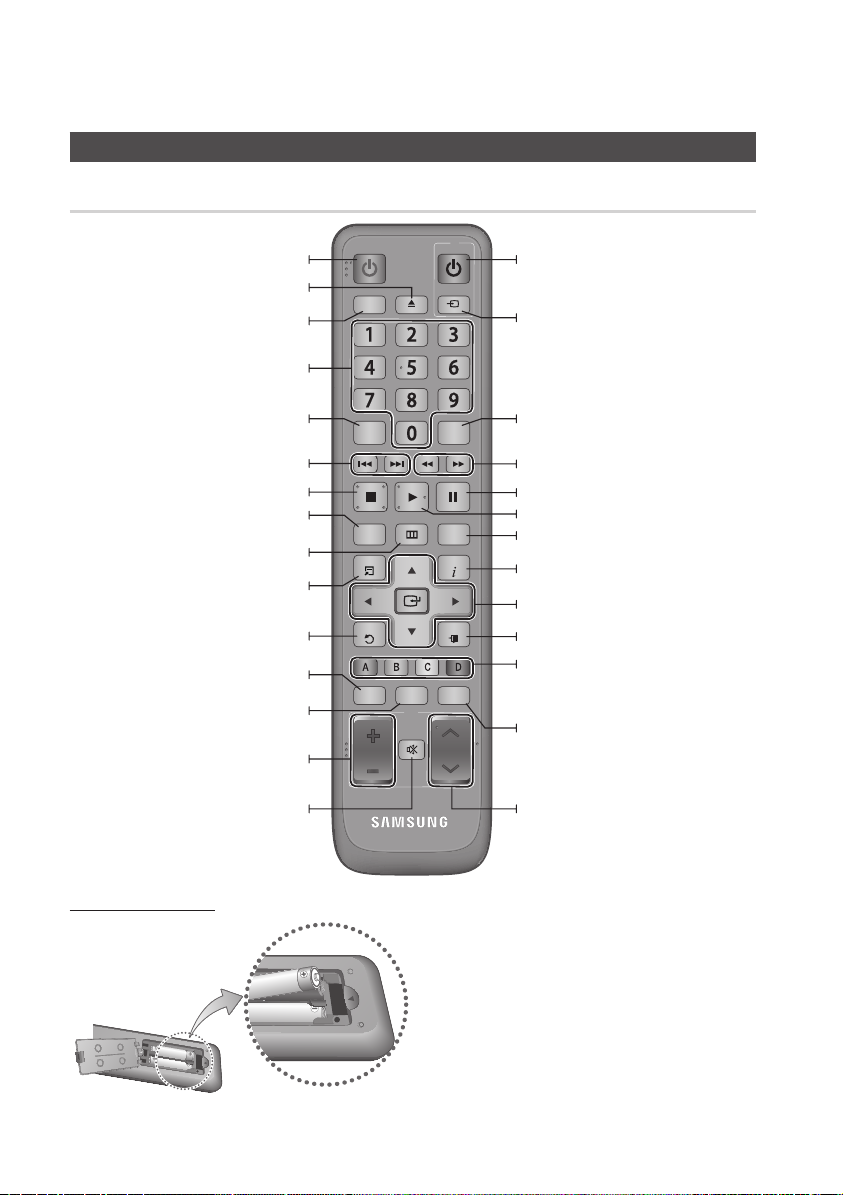
Tour of the Remote Control
Remote Control
Turn the product on and off.
To open and close the disc tray.
Press this to use Bonusview function.
Press numeric buttons to operate options.
Press this to switch the Blu-ray Disc/DVD’s
Press to skip backwards or forwards.
Use this to enter the disc menu.
Press this to move to the home menu.
Press this to use Tools menu.
Return to the previous menu.
Press this to link to various Internet@TV
Press this to see the full screen on a TV.
Mutes the speakers of your TV.
subtitle language.
Press to stop a disc.
TV volume adjustment.
services.
Turn the TV on and off.
(To operate your TV, please refer to page 19)
After setup, allows you to set the input
source on your TV.
Use this to access various audio functions
on a disc (Blu-ray Disc/DVD).
Press to search a disc backwards or
forwards.
Press to pause a disc.
Press to play a disc.
Use this to enter the popup menu/title
menu.
Use this to display the playback information
during playing a Blu-ray/DVD disc.
Select menu items and change menu value.
Press this to exit the menu.
These buttons are used both for menus on
the product and also several Blu-ray Disc
functions.
Allows you to repeat a title, chapter, track
or disc.
Use this to select a TV program.
Installing batteries
NOTE
✎
If the remote does not operate properly :
▪
Check the polarity +/– of the batteries (Dry-Cell)
•
Check if the batteries are drained.
•
Check if remote sensor is blocked by obstacles.
•
Check if there is any fluorescent lighting nearby.
•
CAUTION
!
The rechargeable battery incorportabed in this
▪
product is not user replaceable. For the information
on its replacement, go to your service provider.
Page 19

English 19
03 Getting Started
Setting the Remote Control
You can control certain functions of your TV with
this remote control.
Button Function
TV POWER Used to switch the television on and off.
TV SOURCE
TV VOL (+/–) Used to adjust the volume of the television.
TV CH (,/.) Used to select the desired channel.
TV MUTE Used to toggle the sound on and off.
NOTE
✎
▪
To determine whether your television is
compatible, follow the instructions below.
Switch your television on.
1.
Point the remote control towards the
2.
television.
Press and hold the TV POWER button and
3.
enter the two-figure code corresponding to
the brand of your television by pressing the
appropriate number buttons.
If your television is compatible with the remote
control, it will switch off.
It is now programmed to operate with the
remote control.
NOTE
✎
▪
▪
Used to select an external source
connected to the TV.
The functions listed above will not necessarily work
on all televisions. If you encounter problems, operate
the television directly.
If several codes are listed for your television brand,
try each one in turn until you find one that works.
If you replace the remote control’s batteries, you
must set the brand code again.
Controllable TV Codes
Brand Code
SAMSUNG
BANG & OLUFSEN
BLAUPUNKT TV POWER+71
BRIONVEGA TV POWER+57
CONTINENTAL
EMERSON TV POWER+64
FERGUSON TV POWER+73
FORMENTI TV POWER+57
GRADIENTE TV POWER+70
IMPERIAL TV POWER+52
LOEWE OPTA TV POWER+06, +57
MAGNAVOX TV POWER+40
MITSUBISHI
TV POWER+01, +02,
+03, +04, +05,
+06, +07, +08, +09
AIWA TV POWER+82
TV POWER+10, +11,
ANAM
+12, +13, +14,
+15, +16, +17, +18
TV POWER+57
BRANDT TV POWER+73
CGE TV POWER+52
TV POWER+75
EDISON
TV POWER+19, +20,
+23, +24, +25,
DAEWOO
+26, +27, +28,
+29, +30, +31,
+32, +33, +34
TV POWER+06, +49,
FINLUX
+57
FUJITSU TV POWER+84
TV POWER+49, +52,
GRUNDIG
+71
TV POWER+60, +72,
HITACHI
+73, +75
JVC TV POWER+61, +79
TV POWER+06, +19,
LG
+20, +21, +22, +78
LOEWE TV POWER+06, +69
METZ TV POWER+57
TV POWER+06, +48,
+62, +65
MIVAR TV POWER+52, +77
NEC TV POWER+83
NEWSAN TV POWER+68
Brand Code
NOBLEX TV POWER+66
NOKIA TV POWER+74
NORDMENDE
PANASONIC
PHILIPS
PHONOLA
PIONEER
RADIOLA TV POWER+06, +56
RADIOMARELLI TV POWER+57
RCA TV POWER+45, +46
REX TV POWER+74
SABA
SALORA TV POWER+74
SANYO
SCHNEIDER TV POWER+06
SELECO TV POWER+74
SHARP
SIEMENS TV POWER+71
SINGER TV POWER+57
SINUDYNE TV POWER+57
SONY TV POWER+35, +48
TELEAVA TV POWER+73
TELEFUNKEN
THOMSON
THOMSON ASIA TV POWER+80, +81
TOSHIBA
WEGA TV POWER+57
YOKO TV POWER+06
ZENITH TV POWER+63
TV POWER+72, +73,
+75
TV POWER+53, +54,
+74, +75
TV POWER+06, +55,
+56, +57
TV POWER+06, +56,
+57
TV POWER+58, +59,
+73, +74
TV POWER+57, +72,
+73, +74, +75
TV POWER+41, +42,
+43, +44, +48
TV POWER+36, +37,
+38, +39, +48
TV POWER+67, +73,
+75, +76
TV POWER+72, +73,
+75
TV POWER+47, +48,
+49, +50, +51, +52
Page 20
20 English
Connections
Connecting to a TV
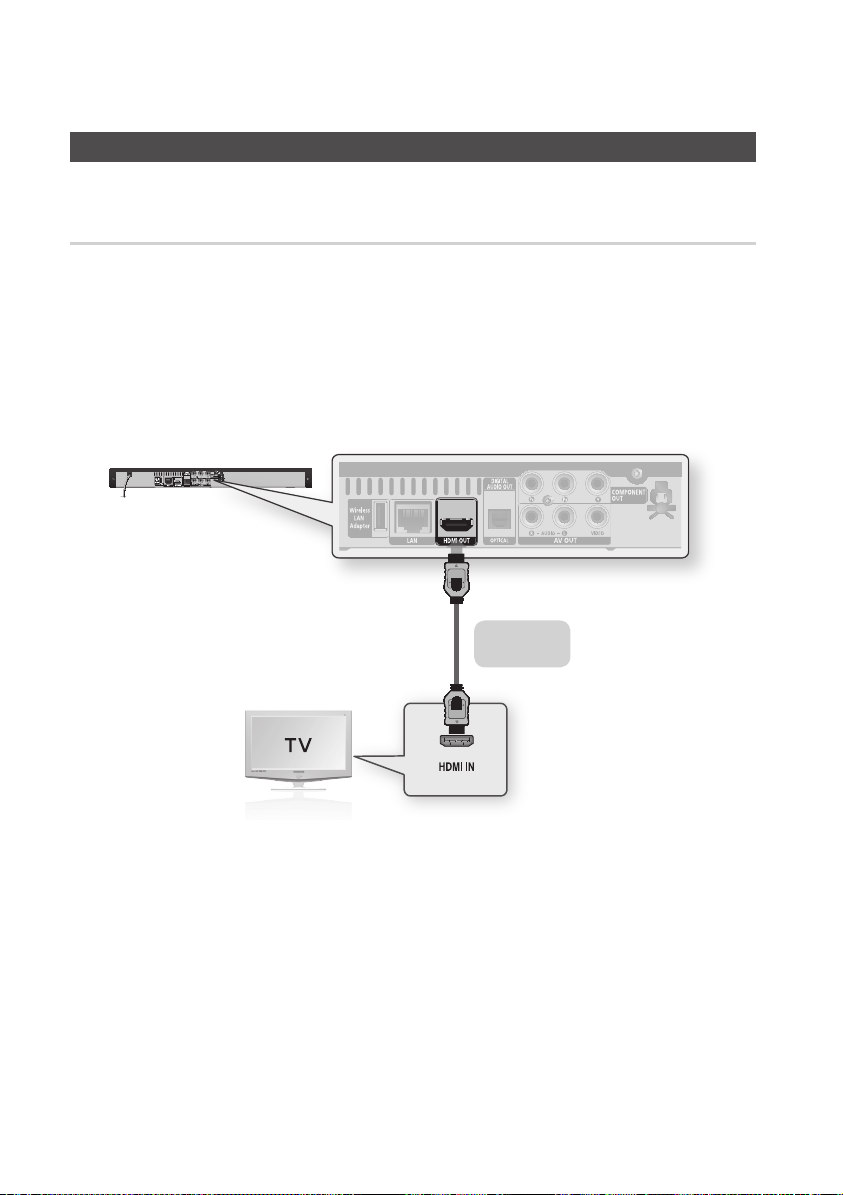
Case 1 : Connecting to a TV with an HDMI Cable - Best Quality
(Recommended)
Using an HDMI cable, connect the HDMI OUT terminal on the rear of the product to the HDMI IN
1.
terminal of your TV.
Turn on the product and TV.
2.
Press the input selector on your TV remote control until the HDMI signal from the product appears
3.
on your TV screen.
If you have set the remote control to operate your TV (See page 19), press the TV SOURCE
•
button on the remote control and select HDMI as the external source of the TV.
HDMI cable
(not included)
NOTE
✎
An HDMI cable outputs digital video/audio, so you don’t need to connect an audio cable.
▪
If the product is connected to your TV in HDMI 720p, 1080i, 1080p output mode, you must use a High
▪
speed(category2) HDMI cable.
HDMI outputs only a pure digital signal to the TV.
▪
If your TV does not support HDCP (High-bandwidth Digital Content Protection), random noise appears on the screen.
Depending on your TV, certain HDMI output resolutions may not work. Please refer to the user manual of your TV.
▪
When you connect the product to the TV using the HDMI cable for the first time or to a new TV, the HDMI output
▪
resolution will be automatically set to the highest supported by the TV.
Page 21
English 21
04 Connections
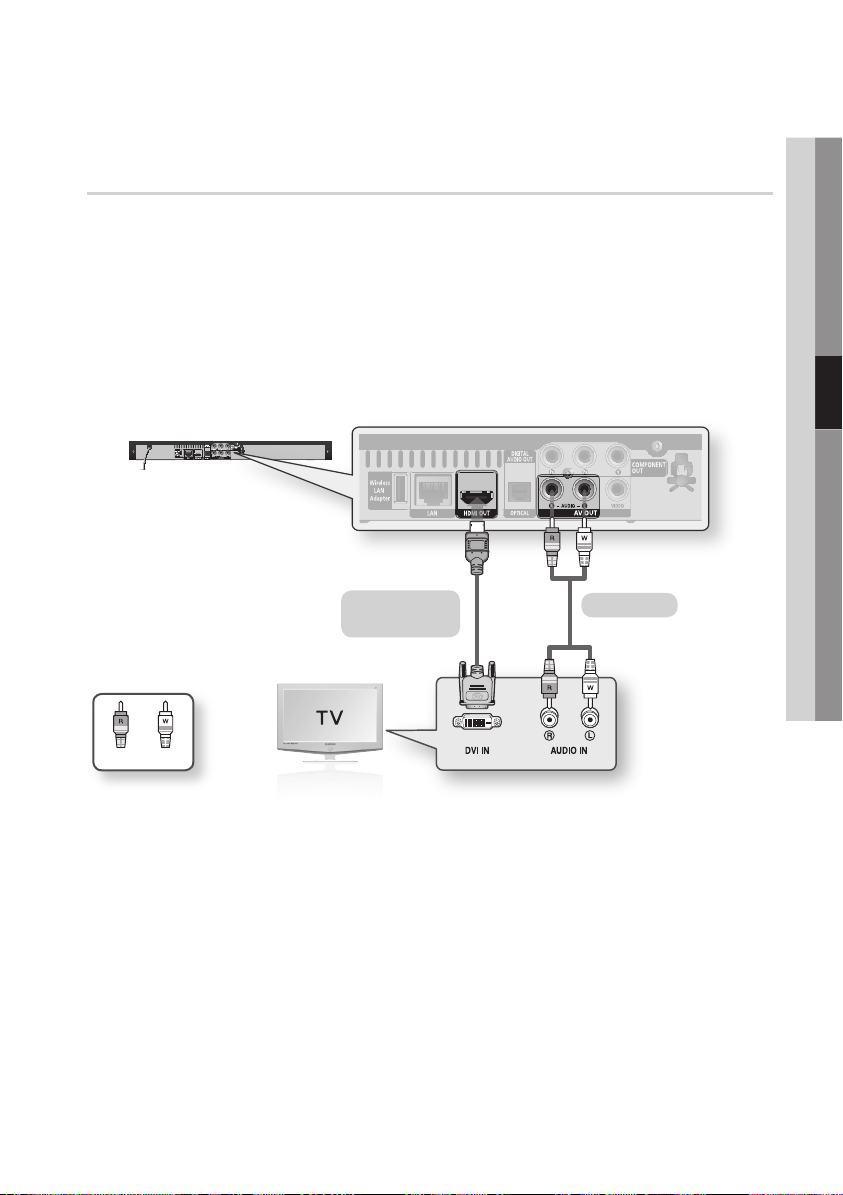
Case 2 : Connecting to a TV with DVI Cable - Best Quality
(Recommended)
Using an HDMI-DVI cable, connect the HDMI OUT terminal on the rear of the product to the DVI IN
1.
terminal of your TV.
Using the audio cables, connect the AUDIO OUT (red and white) terminals on the rear of the
2.
product to the AUDIO IN (red and white) terminals of your TV.
Turn on the product and TV.
3.
Press the input selector on your TV remote control until the DVI signal from the product appears on
4.
your TV screen.
If you have set the remote control to operate your TV (See page 19), press the TV SOURCE
•
button on the remote control and select HDMI as the external source of the TV.
HDMI-DVI cable
(not included)
White Red
NOTE
✎
HDMI outputs only a pure digital signal to the TV. If your TV does not support HDCP (High-bandwidth Digital Content
▪
Protection), random noise appears on the screen.
Depending on your TV, certain HDMI output resolutions may not work. Please refer to the user manual of your TV.
▪
When you connect the product to the TV using the HDMI-DVI cable for the first time or to a new TV, the HDMI output
▪
resolution will be automatically set to the highest supported by the TV.
Audio cable
Page 22
22 English
Connections
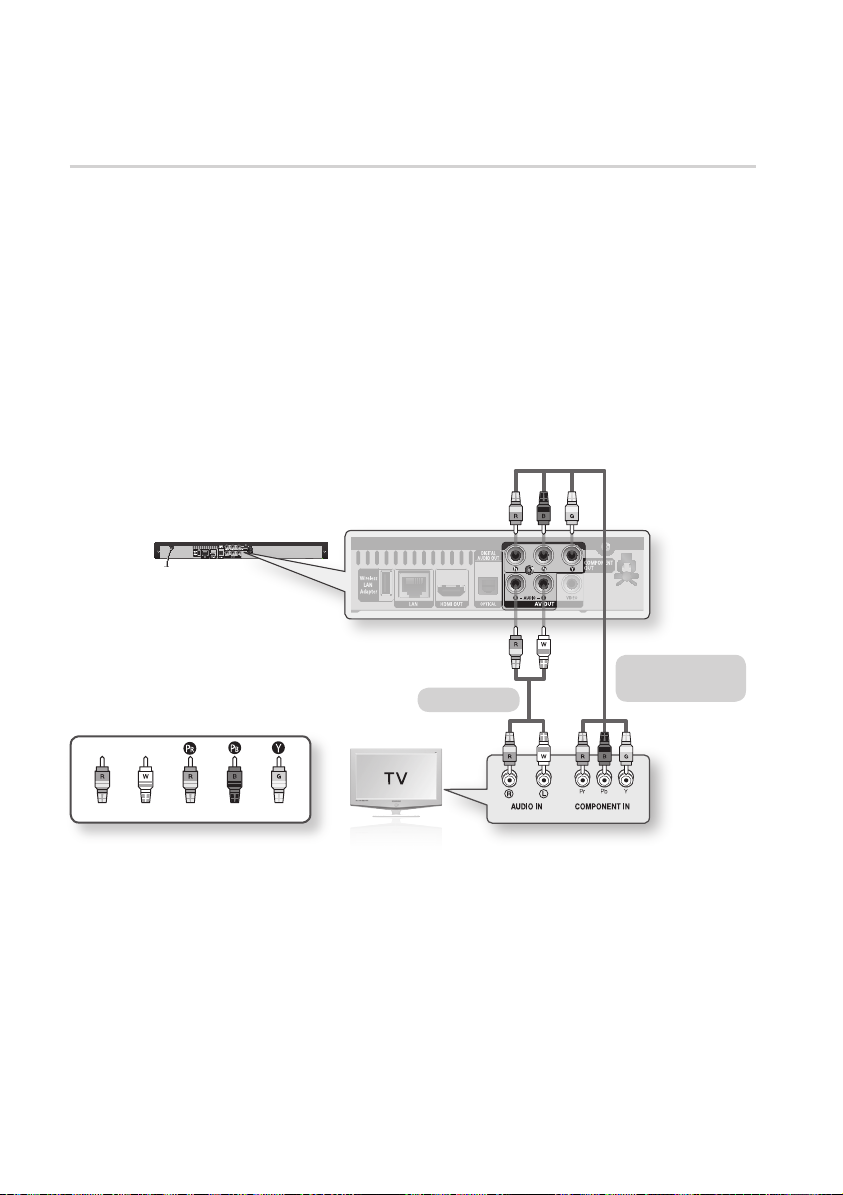
Case 3 : Connecting to a TV (Component) - Better Quality
Connecting to your TV using Component video cables.
You will enjoy high quality images with accurate colour reproduction. Component video separates the
picture element into black and white(Y), blue(PB) and red(PR) signals to present clear and clean images.
(Audio signals are delivered through the audio output.)
Using Component video cables, connect the COMPONENT VIDEO OUT terminals on the rear of
1.
the product to the COMPONENT IN terminals of your TV.
Using the audio cables, connect the AUDIO OUT (red and white) terminals on the rear of the
2.
product to the AUDIO IN (red and white) terminals of your TV.
Turn on the product and TV.
3.
Press the input selector on your TV remote control until the “COMPONENT” signal from the product
4.
appears on the TV screen.
If you have set the remote control to operate your TV (See page 19), press the TV SOURCE
•
button on the remote control and select COMPONENT as the external source of the TV.
Component cable
Audio cable
(not included)
Red
White Red Blue Green
NOTE
✎
Depending on the manufacturer, the component terminals on your TV may be marked “R-Y, B-Y, Y ” or “Cr, Cb, Y”
▪
instead of “PB, PR, Y”. The number and position of terminals may vary depending on the TV set.
Please refer to the user manual of your TV.
You can select from a variety of resolution settings for Blu-ray Discs such as 1080i, 720p, 576p/480p, 576i/480i,
▪
depending on the disc type. (See pages 30~31)
The actual resolution may differ from the setting in the setup menu if both Component and HDMI cables are connected.
▪
The resolution may also be different depending on the disc. (See pages 30~31)
In DVD playback, if both HDMI and Component jacks are connected and you select the Component 1080p, 1080i or
▪
720p mode, the Display Setup menu will show the output resolution as 1080p, 1080i or 720p in the menu.
The resolution is actually 576i/480i.
Page 23
English 23
04 Connections
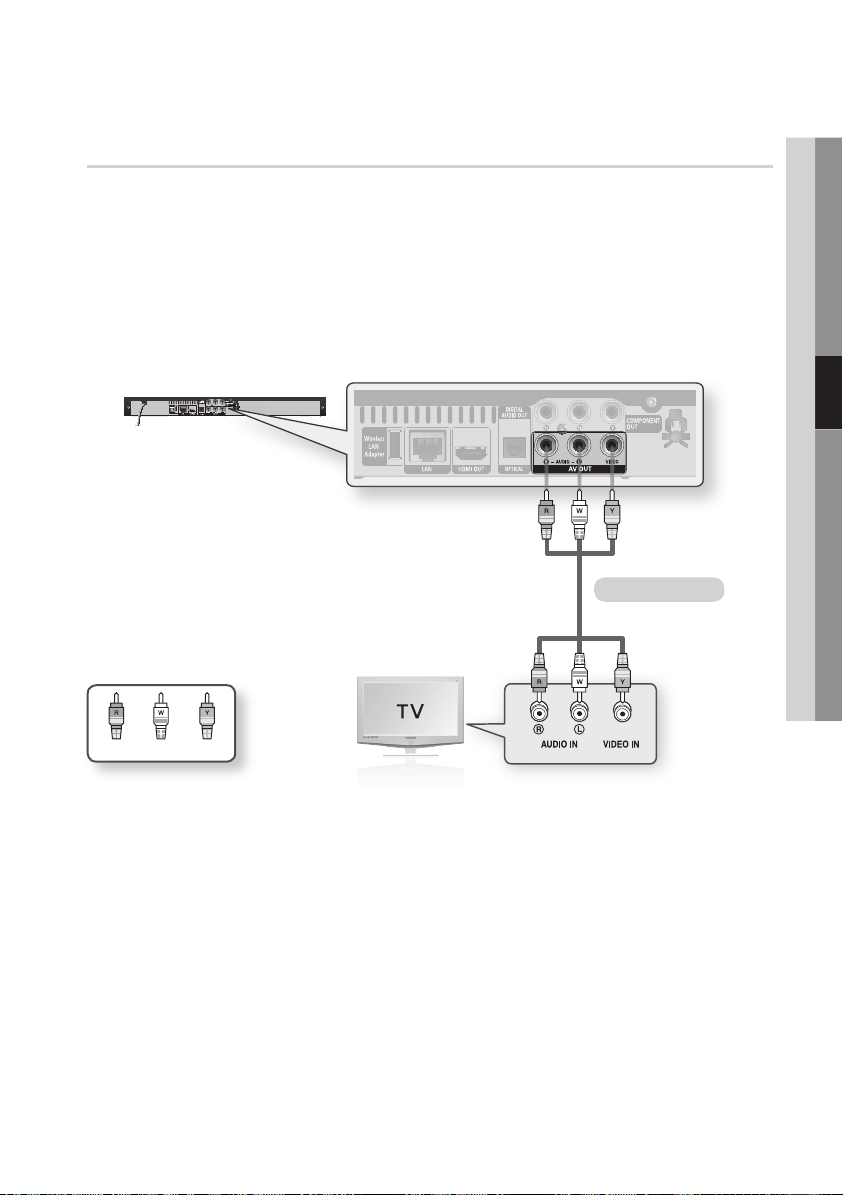
Case 4 : Connecting to a TV (Video) - Good Quality
Using video/audio cables, connect the VIDEO OUT (yellow) / AUDIO OUT (red and white)
1.
terminals on the rear of the product to the VIDEO IN (yellow) / AUDIO IN (red and white) terminals
of your TV.
Turn on the product and TV.
2.
Press the input selector on your TV remote control until the “VIDEO” signal from the product appears
3.
on the TV screen.
If you have set the remote control to operate your TV (See page 19), press the TV SOURCE
•
button on the remote control and select VIDEO as the external source of the TV.
Audio/Video cable
WhiteRed Yellow
NOTE
✎
Noise may be generated if the audio cable is placed too close to the power cable.
▪
If you want to connect to an Amplifier, please refer to the Amplifier connection pages. (See pages 24~25)
▪
The number and position of terminals may vary depending on your TV set. Please refer to the user manual of your TV.
▪
Page 24
24 English
Connections
Connecting to an Audio System
Please turn the volume down when you turn on the Amplifier. Sudden loud sound may cause
•
damage to the speakers and your ears.
Please set the audio in the menu screen according to the Amplifier. (See pages 32~34)
•
The position of HDMI terminals may vary depending on the Amplifier. Please refer to the user manual
•
of your Amplifier.
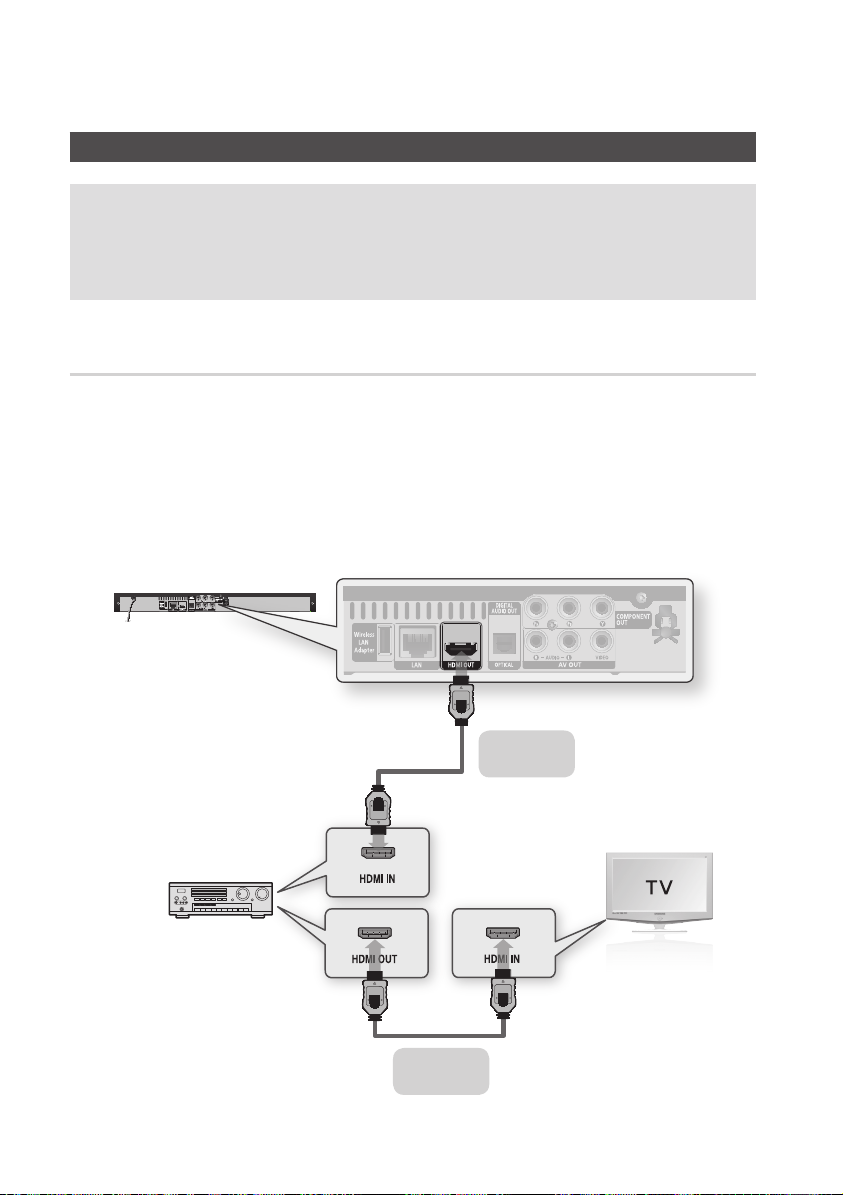
Case 1 : Connecting to an Audio System (HDMI Supported Amplifier)
- Best Quality (Recommended)
Using an HDMI cable, connect the HDMI OUT terminal on the rear of the product to the HDMI IN
1.
terminal of your Amplifier.
Using an HDMI cable, connect the HDMI OUT terminal of the Amplifier to the HDMI IN terminal of
2.
your TV.
Turn on the product, TV and Amplifier.
3.
Press the input select button of the Amplifier to select the external input in order to hear sound from
4.
the product. Refer to your Amplifier’s user manual to set the Amplifier’s audio input.
HDMI cable
(not included)
HDMI cable
(not included)
Page 25
English 25
04 Connections
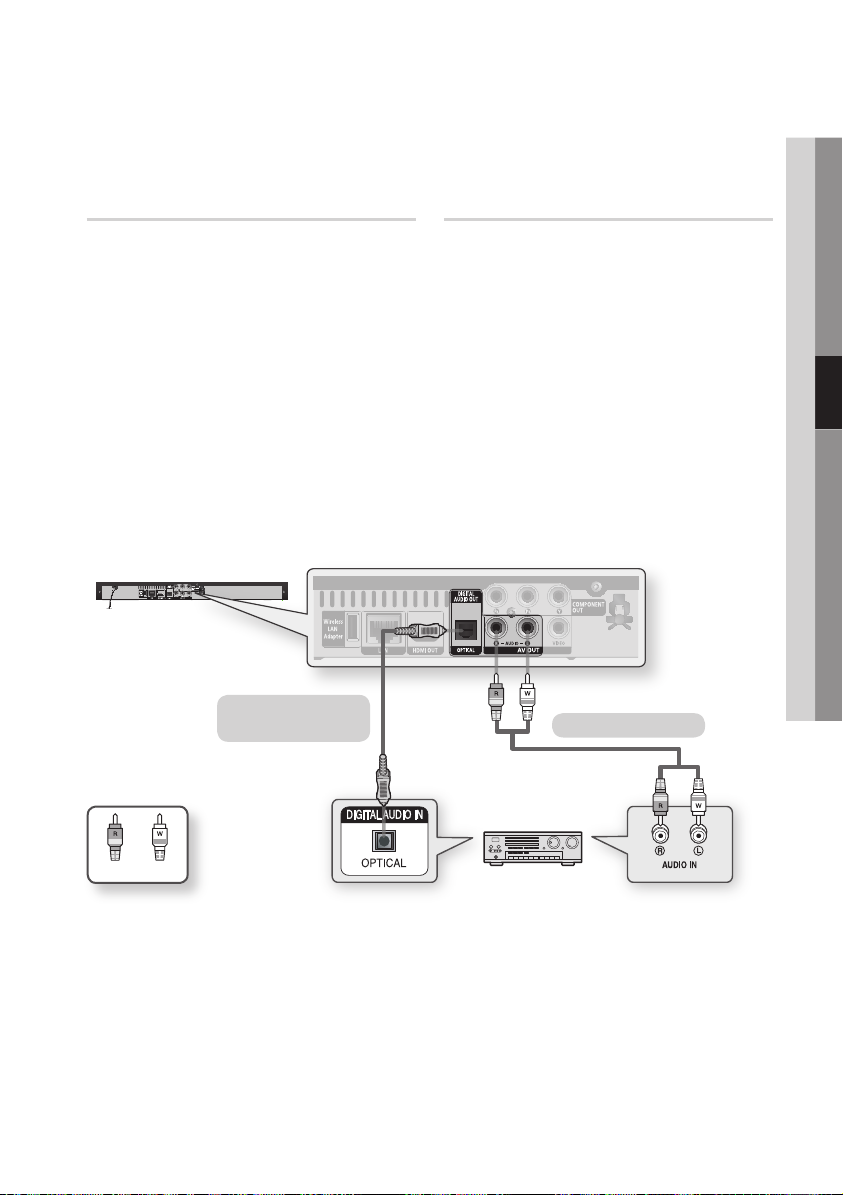
Case 2 : Connecting to an Audio
System (Dolby Digital, DTS
Amplifier) - Better Quality
Using an optical cable, connect the DIGITAL
1.
AUDIO OUT (OPTICAL) terminal on the rear
of the product to the DIGITAL AUDIO IN
(OPTICAL) terminal of your Amplifier.
Using the video signal cable(s), connect
2.
the HDMI, COMPONENT or VIDEO OUT
terminals on the rear of the product to the
HDMI, COMPONENT or VIDEO IN terminal
of your TV. (See pages 20~23)
Turn on the product, TV and Amplifier.
3.
Press the input select button of the Amplifier
4.
to select the external input in order to hear
sound from the product. Refer to your
Amplifier’s user manual to set the Amplifier’s
audio input.
Case 3 : Connecting to an Audio
System (2 Channel Amplifier)
- Good Quality
Using the audio cables, connect the AUDIO
1.
OUT (red and white) terminals on the rear of
the product to the AUDIO IN (red and white)
terminals of your Amplifier.
Using the video signal cable(s), connect
2.
the HDMI, COMPONENT or VIDEO OUT
terminals on the rear of the product to the
HDMI, COMPONENT or VIDEO IN terminal
of your TV. (See pages 20~23)
Turn on the product, TV and Amplifier.
3.
Press the input select button of the Amplifier
4.
to select the external input in order to hear
sound from the product. Refer to your
Amplifier’s user manual to set the Amplifier’s
audio input.
Case 2 : Optical cable
(not included)
WhiteRed
NOTE
✎
When following the case 2 connection, discs with PCM audio soundtracks will only be heard over the front two
▪
channels.
Case 3 : Audio cable
Page 26
26 English
Connections
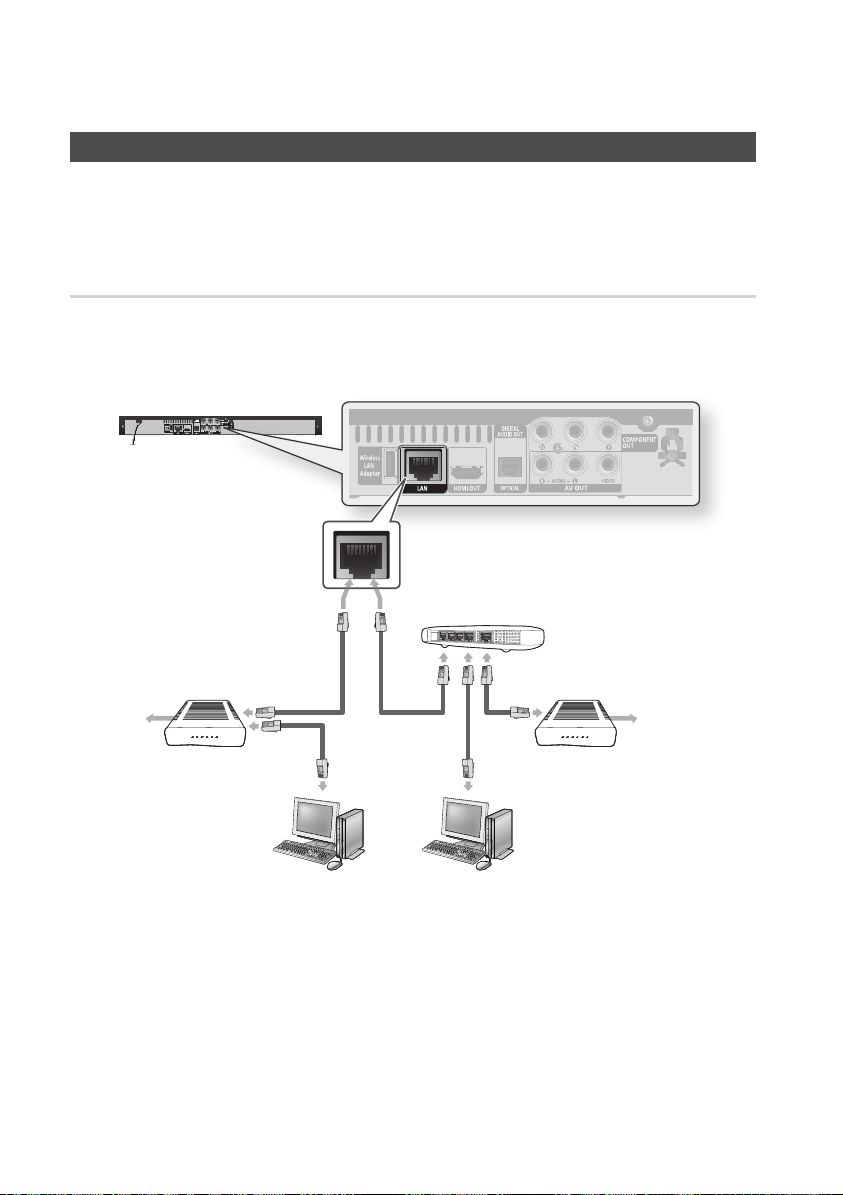
Connecting to the Network
This product enables you to view network based services (See pages 51~56) such as Internet@TV and
BD-LIVE, as well as receive software upgrades when a network connection is made. We recommend
using an AP (Access Point) or IP router for the connection. For more information on router connection,
refer to the user manual of the router or contact the router manufacturer for technical assistance.
Cable Network
Using the Direct LAN Cable (UTP cable), connect the LAN terminal of the product to the LAN
1.
terminal of your modem.
Set the network options. (See pages 36~39)
2.
Router
Broadband modem
(with integrated router)
Broadband
service
NOTE
✎
Internet access to Samsung’s software update server may not be allowed, depending on the router you use or the ISP’s
▪
policy. For more information, contact your ISP (Internet Service Provider).
For DSL users, please use a router to make a network connection.
▪
For the AllShare function, a PC must be connected in the network as shown in the figure.
▪
Or
Broadband modem
Broadband
service
Networking with PC for
AllShare function
(See pages 55~56)
Page 27
English 27
04 Connections
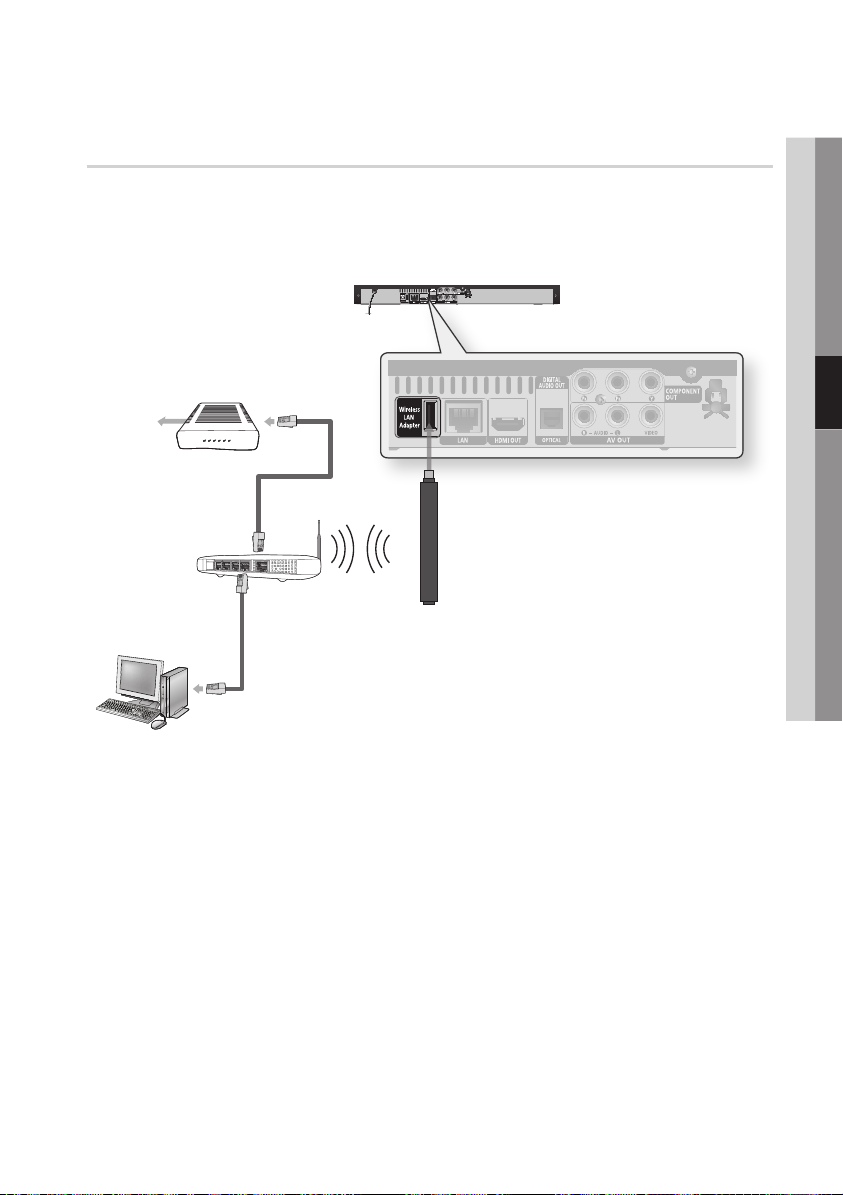
Wireless Network
You can connect to network with a Wireless IP sharer.
A wireless AP/IP router is required to make a wireless network connection. Connect the wireless
1.
LAN adapter to the Wireless LAN Adapter on the rear panel of the product.
Set the network options. (See pages 36~39)
2.
Broadband
service
Wireless LAN Adapter
Wireless IP sharer
Networking with PC for
AllShare function
(See pages 55~56)
(not included)
NOTE
✎
To operate this function, please update software version.
▪
Use only the Samsung wireless LAN adapter with this product. (Model name: WIS-08BG
▪
Do not use this adapter with any other third-party products.
Please contact the retailer of this product for purchasing the wireless LAN adapter.
You must use a wireless IP sharer that supports IEEE 802.11 b/g. (n is recommended for stable operation of the
▪
wireless network.)
Wireless LAN, by its nature, may cause interference, depending on the use condition (AP performance, distance,
▪
obstacles, interference by other radio devices, etc).
Set the wireless IP sharer to Infrastructure mode. Ad-hoc mode is not supported.
▪
When applying the security key for the AP (wireless IP sharer), only the following is supported.
▪
Authentication Mode : WEP, WPAPSK, WPA2PSK
1)
Encryption Type : WEP, AES
2)
For the AllShare function, a PC must be connected in the network as shown in the figure.
▪
).
Page 28
28 English
Setup
internet radio
You Tube
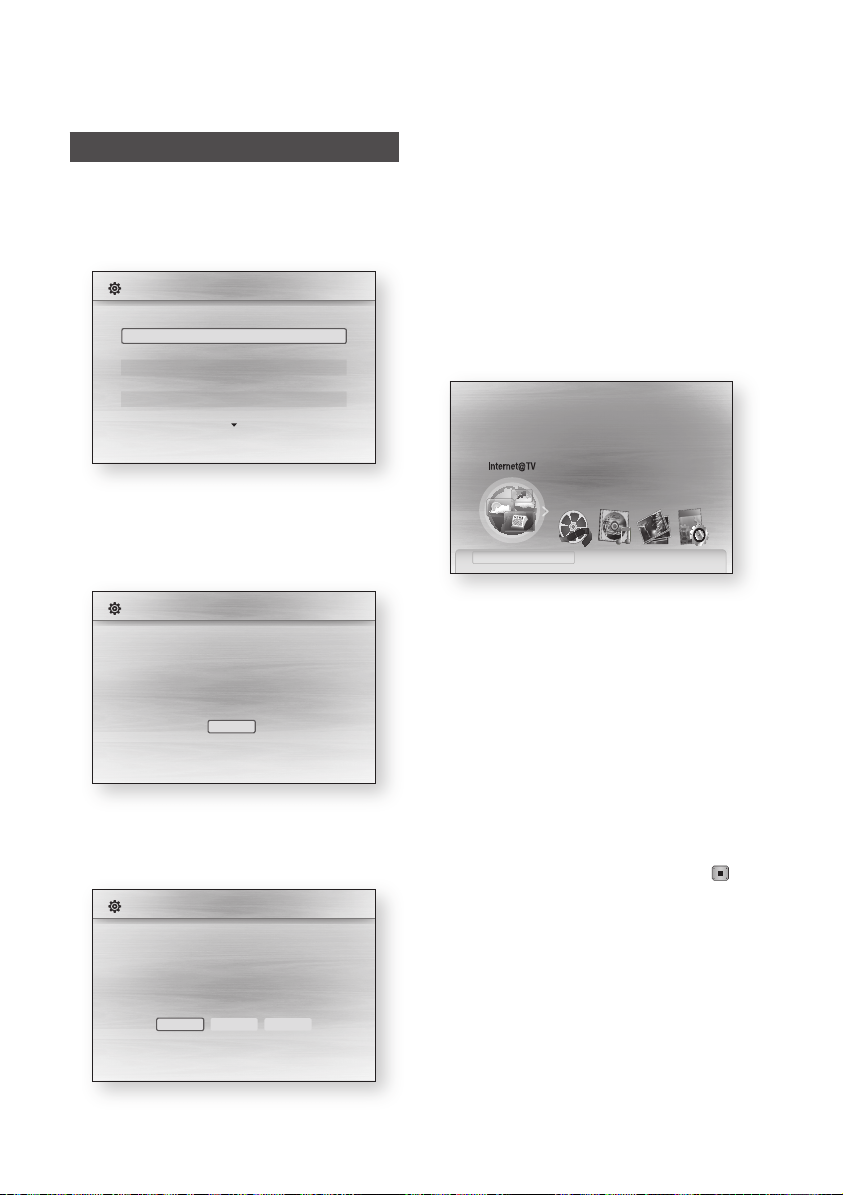
Before Starting (Initial Settings)
Turn on your TV after connecting the product.
1.
(When the product is connected to TV for the
first time, product will turn on automatically and
the Initial Settings screen will be displayed.)
Initial Settings I On-Screen Language
Select a language for the on-screen displays.
English
Français
Deutsch
Español
Italiano
Nederlands
> Move " Select
Press the ▲▼ buttons to select desired
2.
language, then press the ENTER button.
Press the ENTER button to select Start
3.
button.
Press the ◄► buttons to the select the
5.
desired Network Settings: Wired, Wireless or
PBC (WPS), then press the ENTER button.
(See pages 36~39)
The Network Test will start and Initial Settings
will be completed.
Press the OK button.
6.
The home menu will be displayed. (For more
information about home menu, please see
page 29)
Home Menu
•
Please activate Internet@TV service
to enjoy a variety of Internet Services.
No Disc a Change Device d View Devices " Enter
Initial Settings
TV Aspect and Network will be set.
Each setting may be changed later under "Settings"
Start
a Previous " Select
Press the ▲▼ buttons to select the desired
4.
TV Aspect ratio, then press the ENTER
button. (See page 30)
Initial Settings I Network
Network Setting is needed to use various Internet services.
Choose the primary method for connecting to network.
Wired : Set the network by using Ethernet cable.
Please make sure that Ethernet cable is connected.
Wireless PBC (WPS)
Wired
a Previous d Skip < Move " Select
NOTE
✎
When the product is connected to TV for the first
▪
time, product will turn on automatically.
Do not confuse because this is not malfunction.
The home menu will not be displayed if you do not
▪
configure the initial settings.
If you press the BLUE(D) button during the network
▪
setup, you can access the home menu even if the
network setup is not completed yet.
When you return to home menu, the full screen
▪
mode will be cancelled automatically.
If you want to display Initial Setting screen again
▪
in order to make changes, press the STOP ( )
button on the front panel of the product for more
than 5 seconds with no disc inserted.
Use the HDMI cable to connect the product to an
▪
Anynet+(HDMI-CEC)-compliant Samsung TV.
If the TV uses a language supported by the product,
that language will be set to a preferred language
automatically.
However, the Anynet+(HDMI-CEC) feature should
be set to On in both TV and the product.
Page 29
English 29
05 Setup
If the product is left in the stop mode more than
POWER
TV
POWER
BONUSVIEW
SOURCE
DISC MENU TITLE MENUMENU
SUBTITLE
AUDIO
INFO
POPUP
TOOLS
EXITRETURN
internet radio
You Tube
▪
5 minutes without being used, a screen saver will
appear on your TV. If the product is left in the screen
saver mode for more than 25 minutes, the power
will automatically turn off.
Setting the Menu
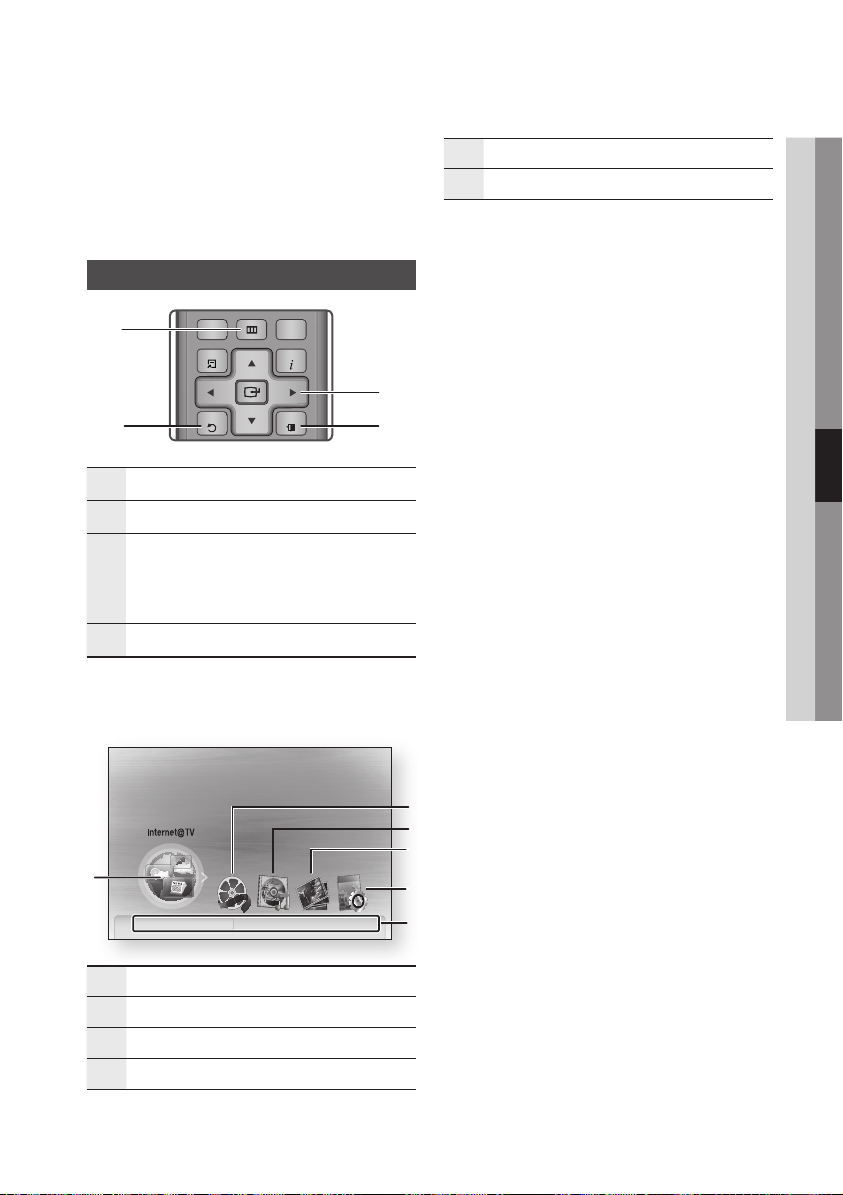
1
2 4
MENU Button :
1
RETURN Button : Return to the previous menu.
2
ENTER / DIRECTION Button :
Move the cursor or select an item.
3
Select the currently selected item.
Confirm the setting.
EXIT Button :
4
1.
Press the POWER button.
The Home Menu will appear.
Home Menu
•
Press this to move to the home menu.
Press this to exit the menu.
3
Selects the Settings.
5
Displays buttons available.
6
Press the ◄► buttons to select Settings,
2.
then press the ENTER button.
Press the ▲▼ buttons to select the desired
3.
submenu, then press the ENTER button.
Press the ▲▼ buttons to select the desired
4.
item, then press the ENTER button.
Press the EXIT button to exit the menu.
5.
NOTE
✎
When the product is connected to the network,
▪
select Internet@TV from the home menu.
Download desired content from Samsung Apps.
(See page 54)
The access step may differ depending on the
▪
selected menu.
The OSD (On Screen Display) may change in this
▪
product after upgrading the software version.
1
No Disc a Change Device d View Devices " Enter
Selects the Internet@TV.
1
Selects the Videos.
2
Selects the Music.
3
Selects the Photos.
4
Please activate Internet@TV service
to enjoy a variety of Internet Services.
2
3
4
5
6
Page 30
30 English
Setup
Display
You can configure various display options such as
the TV Aspect, Resolution, etc.
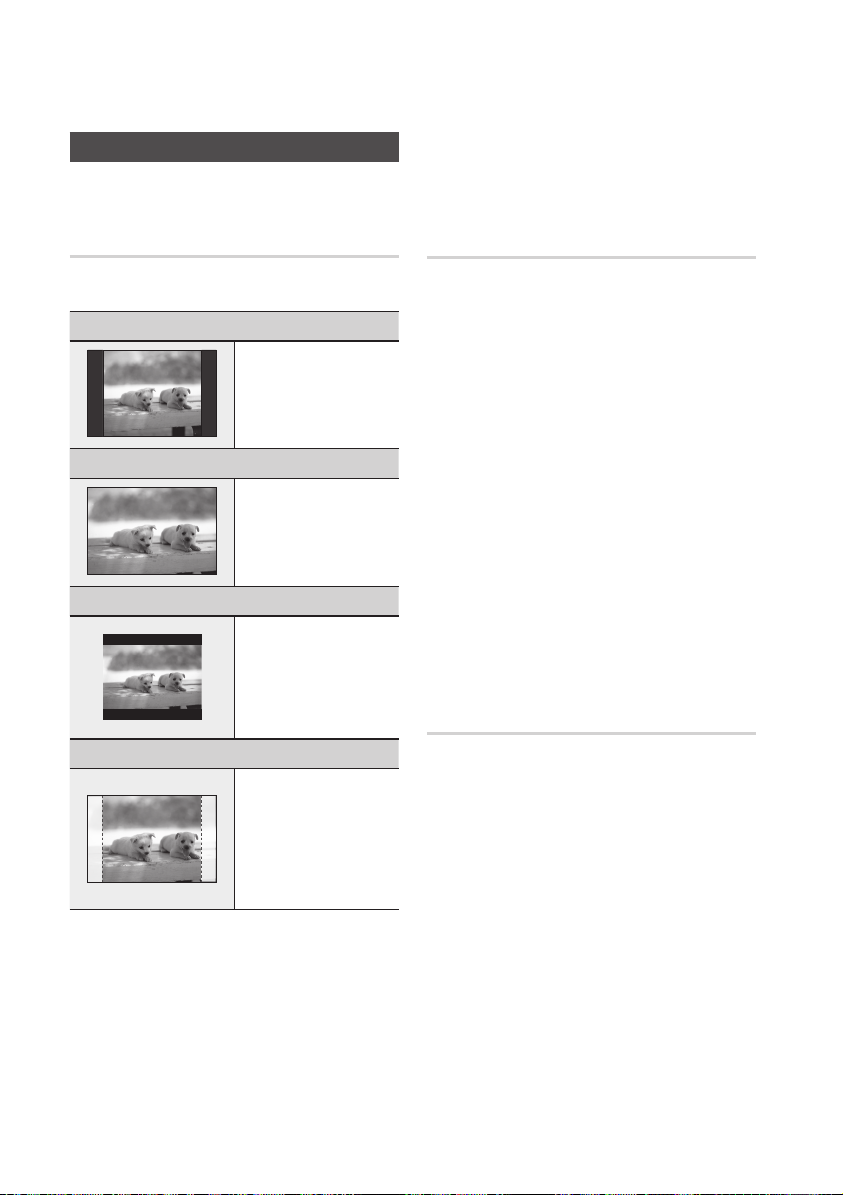
TV Aspect
Depending on the type of television you have, you
may want to adjust the screen setting.
16:9 Normal
•
Certain movies(4:3 source) will be
displayed in 4:3 Pillarbox (black
bars on sides of picture) if 16:9
normal is selected.
16:9 Wide
•
You can view the full 16:9 picture
on your widescreen TV.
4:3 Letter Box
•
Select when you want to see the
total 16:9 ratio screen a Blu-ray
Disc/DVD supplies, even though
you have a TV with a 4:3 ratio
screen. Black bars will appear at
the top and bottom of the screen.
4:3 Pan-Scan
•
Select when you want to see the
16:9 video supplied by the Blu-ray
Disc/DVD without the black bars
on top and bottom, even though
you have a TV with a 4:3 ratio
screen(extreme left and right portion
of the movie picture will be cut off).
NOTE
✎
Depending on the disc type, some aspect ratios may
▪
not be available.
If you select an aspect ratio and option which is
▪
different than the aspect ratio of your TV screen,
then the picture might appear to be distorted.
If you select the 4:3 Pan-Scan or 4:3 Letter Box, you
▪
can’t see full screen by pressing the FULL SCREEN
button on the remote control.
If you select the 16:9 Normal, 4:3 Pillarbox may
▪
displayed.
In this case, you can’t see full screen by pressing
the FULL SCREEN button on the remote control.
BD Wise (Samsung Products only)
BD Wise is Samsung’s latest inter-connectivity
feature.
When you connect Samsung products with
BD Wise to each other via HDMI, the optimum
resolution will be set automatically.
On : The original resolution of the BD/DVD disc
•
will be output to the TV.
Off : The output resolution will be fixed
•
according to the Resolution previously set,
regardless of the resolution of the disc.
NOTE
✎
If you want to change the resolution in BD Wise, you
▪
must set BD Wise to Off in advance.
If you set off the BD Wise, the resolution of the
▪
connected TV will be adjusted to its maximum
resolution automatically.
If the product is connected to a device that does not
▪
support BD Wise, you can not use the BD Wise function.
For proper operation of BD Wise, set the BD Wise
▪
menu of both the product and the TV to On.
Resolution
Sets the output resolution of the Component and
HDMI video signal.
The number in 1080p, 1080i, 720p, 576p/480p,
576i/480i indicates the number of lines of video.
The i and p indicate interlace and progressive
scan, respectively.
Auto : It automatically checks and sets the
•
optimal resolution.
BD Wise : Automatically sets the optimal
•
resolution when connected via HDMI to a TV
with the BD Wise feature. (The BD Wise menu
item appears only if BD Wise is set to On.)
1080p :
•
•
•
•
•
Outputs 1080 lines of progressive video.
1080i : Outputs 1080 lines of interlaced video.
720p : Outputs 720 lines of progressive video.
576p/480p :
video.
576i/480i : Outputs 576/480 lines of interlaced
video.
Outputs 576/480 lines of progressive
Page 31

English 31
05 Setup
Resolution according to the output mode
Blu-ray Disc playback
•
Setup
1080p, Movie Frame(24Fs) off 1080p@60F 576i/480i - -
1080p/1080i,
Movie Frame(24Fs) on
1080i, Movie Frame(24Fs) off 1080i 576i/480i 1080i 576i/480i
576p/480p 576p/480p 576i/480i 576p/480p 576i/480i
576i/480i - - 576i/480i 576i/480i
•
DVD playback
Setup
1080p 1080p@60F 576i/480i - -
1080i 1080i 576i/480i 576p/480p 576i/480i
576p/480p 576p/480p 576i/480i 576p/480p 576i/480i
576i/480i - - 576i/480i 576i/480i
Output
Auto Optimal Resolution 576i/480i - -
720p 720p 576i/480i 720p 576i/480i
Output
Auto Optimal Resolution 576i/480i - -
720p 720p 576i/480i 576p/480p 576i/480i
HDMI / connected HDMI / not connected
HDMI Mode
1080p@24F 576i/480i - -
HDMI Mode
Component/VIDEO Mode
HDMI / connected HDMI / not connected
Component/VIDEO Mode
Component Mode VIDEO Mode
Component Mode VIDEO Mode
NOTE
✎
If the connected TV does not support Movie Frame or
▪
the selected resolution, the message “If no pictures
are shown after the selection, please wait for 15
seconds. And then, the resolution will be reverted to
the previous value automatically. Would you like to
make a selection?” will be displayed.
If you select Yes and the resolution is not supported,
the TV’s screen will be blank. Please wait for 15
seconds and the resolution will be reverted to the
previous value automatically.
If the screen is blank, press and hold the STOP ( )
▪
button on the front of the product for more than 5
seconds (no disc inserted). All settings are restored to
the factory default. Follow the steps on the previous
page to access each mode and select the Display
Setup that your TV will support.
When the factory default settings are restored, all
▪
the user data stored in the BD data will be deleted.
The Blu-ray Disc must have the 24 frame feature in
▪
order to use the Movie Frame (24Fs) mode.
If both HDMI and Component jacks are connected
▪
and you are currently viewing component output,
there is a difference between resolution table and
acutal resuloution depending on your TV.
Page 32

32 English
Setup
HDMI Format
You can optimize the colour setting from the
HDMI output.
Select a connected device Type.
TV : Select if connected to a TV via HDMI.
•
Monitor : Select if connected to a Monitor via
•
HDMI.
Movie Frame (24Fs)
Setting the Movie Frame (24Fs) feature to On
allows you to adjust the product’s HDMI output to
24 frames per second for improved picture quality.
You can enjoy the Movie Frame (24Fs) feature only
on a TV supporting this frame rate. This menu can
only be selected in 1080i or 1080p HDMI output
resolution modes.
On : Movie Frame (24Fs) functions will work.
•
Off : Movie Frame (24Fs) functions will not work.
•
NOTE
✎
If your TV does not support Movie Frame (24Fs)
▪
function, the pop-up message will be displayed.
Progressive Mode
Set to improve picture quality when viewing DVDs.
Auto : Select this to have the product
•
automatically set the best picture for the DVD
you’re watching.
Video : Select for the best picture quality from
•
concert or TV show DVDs.
Still Mode
Set the type of picture shown when you pause
DVD playback.
Auto : Automatically set the best still picture
•
depending on the content.
Frame : Select when pausing a scene with a
•
little action.
Field : Select when pausing a scene with a lot
•
of action.
HDMI Deep Color
Set to output the picture from the HDMI OUT jack
with Deep Colour or not. Deep Colour allows more
accurate colour reproduction with deeper colour
depth.
Auto : The picture will be output with Deep
•
Colour to the connected TV which supports
HDMI Deep Colour.
Off : The picture will be output without Deep
•
Colour.
Audio
Digital Output
Set Digital Output depending on the connected
receiver. (For more details, please refer to the
digital output selection on the next page)
PCM
•
Bitstream(Re-encode)
•
Bitstream(Audiophile)
•
NOTE
✎
Be sure to select the correct Digital Output or you
▪
will hear no sound or a loud noise.
If the HDMI device (Receiver, TV) is not compatible
▪
with compressed formats (Dolby digital, DTS), the
audio signal outputs as PCM.
Secondary and Effect audio will not be heard with
▪
regular DVDs.
Some Blu-ray Discs do not have Secondary and
▪
Effect audio.
This Digital Output setup does not effect the analogue
▪
(L/R) audio or HDMI audio output to your TV.
It effects the optical and HDMI audio output when
connected to a receiver.
If you play MPEG audio soundtracks, audio signal
▪
outputs PCM regardless of Digital Output Selections
(PCM or Bitstream).
Page 33

English 33
05 Setup
Digital Output Selection
Setup PCM
Connection HDMI Receiver Optical HDMI Receiver or Optical HDMI Receiver Optical
PCM Up to 7.1ch PCM 2ch DTS re-encoded PCM PCM 2ch
Dolby Digital Up to 5.1ch PCM 2ch DTS re-encoded Dolby Digital Dolby Digital
Audio Stream
on Blu-ray
Disc
Audio Stream
on DVD
Definition for
Blu-ray Disc
Blu-ray Discs may include three audio streams.
Primary Audio : The audio soundtrack of the
main feature
Secondary Audio : Addional soundtrack such as
director or actor’s commentary.
Interactive Audio : Interactive sounds will be
heard when selected.
Interactive Audio is different on each Blu-ray
Disc.
Dolby Digital
Plus
Dolby TrueHD Up to 7.1ch PCM 2ch DTS re-encoded Dolby TrueHD Dolby Digital
DTS Up to 6.1ch PCM 2ch DTS re-encoded DTS DTS
DTS-HD HRA Up to 7.1ch PCM 2ch DTS re-encoded DTS-HD HRA DTS
DTS-HD MA Up to 7.1ch PCM 2ch DTS re-encoded DTS-HD MA DTS
PCM PCM 2ch PCM 2ch PCM 2ch PCM 2ch PCM 2ch
Dolby Digital Up to 5.1ch PCM 2ch Dolby Digital Dolby Digital Dolby Digital
DTS Up to 6.1ch PCM 2ch DTS DTS DTS
Any
Up to 7.1ch PCM 2ch DTS re-encoded
Decodes Primary, Secondary
and Effect audio streams
together into PCM audio.
Bitstream
(Re-encode)
Dolby Digital
Plus
Decodes Primary, Secondary
and Effect audio streams
together into PCM audio, then
reencodes the PCM audio into
DTS bitstream.
Outputs only the Primary audio
soundtrack (main soundtrack of
the movie) so that your receiver
can decode the audio bitstream.
You will not hear Secondary and
PCM Downsampling
Set whether to downsample 96KHz signals.
On : Select this when the Amplifier connected
•
to the product is not 96KHz compatible. 96KHz
signals will be down converted to 48KHz.
Off : Select this when the Amplifier connected
•
to the product is 96KHz compatible.
NOTE
✎
Even when PCM Downsampling is set to Off, some
▪
discs will only output downsampled audio through
the optical digital outputs.
Bitstream
(Audiophile)
Dolby Digital
Effect audio.
Page 34

34 English
Setup
HDMI
If your TV is not compatible with compressed
•
multi-channel formats (Dolby Digital, DTS), the
product may output PCM 2ch downmixed
audio even though you set Bitstream(either Reencode or Audiophile) on your setup menu.
If your TV is not compatible with PCM sampling
•
rates over 48kHz, the product may output
48kHz downsampled PCM audio even though
you set PCM Downsampling to Off.
Cinema : Select this if you want to play
•
2-channel movie sound over multi-channels.
Music : Select this if you want to play 2-channel
•
music sound over multi-channels.
NOTE
✎
If you are using HDMI receiver, this option is
▪
available when you set Digital Output setup as PCM.
System
Dynamic Range Control
You can listen at low volumes but still hear dialog
clearly.
This is only active when a Dolby Digital signal is
detected.
On : When Movie soundtracks are played at low
•
volume or from smaller speakers, the system
can apply appropriate compression to make
low-level content more intelligible and prevent
dramatic passages from getting too loud.
Off : You can enjoy the movie with the standard
•
Dynamic Range.
Downmixing Mode
Set whether to downmix the multi-channel audio
into fewer channels.
Normal Stereo : Downmixes the multi-channel
•
audio into two channel stereo. Choose when
connected to equipment that does not support
virtual surround functions such as Dolby Pro
Logic.
Surround Compatible : Downmixes multi-
•
channel audio into surround compatible stereo.
Choose when connected to equipment that
supports virtual surround functions such as
Dolby Pro Logic.
DTS Neo:6
You can enjoy multi-channel sound from a simple
2-channel audio source.
Off : Outputs a 2-channel audio signal through
•
the front speakers only.
Initial Settings
By using Initial Settings, you can set language, TV
aspect and Network Settings, etc.
For more information on the settings, refer to the
corresponding section in this user manual.
(See pages 28~42)
Internet@TV Screen Size
Set the Internet@TV Screen to the optimal size.
Size 1 : Display smaller application icons, you
•
may see some black on sides of screen.
Size 2 : Display normal application icons, image
•
may be too large for your TV screen.
Size 3 : Display larger application icons, image
•
may be too large for your TV screen.
Anynet+(HDMI-CEC)
Anynet+ is a convenient function that offers linked
operations with other Samsung products with the
Anynet+ feature.
To operate this function, connect this product to a
Samsung TV with an HDMI cable.
You can operate this product using a Samsung
TV remote control and start disc playback simply
by pressing the PLAY ( ) button on the TV’s
remote control.
For more information, please see the TV user
manual.
On : Anynet+ functions will work.
•
Off : Anynet+ function will not work.
•
Page 35

English 35
05 Setup
NOTE
✎
This function is not available if the HDMI cable does
▪
not support CEC.
If your Samsung TV has an
▪
n
logo, then it
supports the Anynet+ function.
Depending on your TV, certain HDMI output
▪
resolutions may not work.
Please refer to the user manual of your TV.
BD Data Management
Enables you to manage the downloaded contents
from a Blu-ray disc that supports the BD-LIVE
service.
You can check the device information including
the storage size, delete the BD data or change the
Flash memory device.
Settings
Display
Audio
System
Network
Language
Security
General
Support
Delete all BD data in the storage.
BD Data Management
Current Device : External Memory
Total Size : 955MB
Available Size : 949MB
Delete BD Data
Change Device : External Memory
" Select ' Return
The total size of BD Data Management may differ,
▪
depending on the conditions.
Clock
Set time-related functions.
Settings
Display
Audio
System
Network
Language
Security
General
> Move " Enter ' Return
Support
Choose your preferred method of setting clock.
Clock Mode : You can set it to Auto or
•
Manual.
If you select Manual, the Clock Set menu will
be activated while DST will be deactivated.
Clock Set : You can specify the current time
•
and date manually.
Time Zone : You can specify the time zone that
•
is applicable to your area.
DST : You can set DST (Daylight Saving Time)
•
on or off.
Clock
Clock Mode : Auto
Clock Set
Time Zone : GMT + 0:00
DST : Off
Description of Device(Storage) Information on
the Product
Total Size : Total size of the Device(Storage).
•
Available Size : Available size of the Device
•
(Storage).
NOTE
✎
In the external memory mode, disc playback will
▪
be stopped if you disconnect the USB device in the
middle of the playback.
Only those USB devices formatted in FAT file system
▪
(DOS 8.3 volume label) are supported, and it is
recommended to use USB devices that support USB
2.0 protocol, 4 MB/sec or faster read/write speed.
A USB HDD device cannot be used for BD Data
▪
storage (BD-LIVE).
The Resume Play function may not work after
▪
formatting the storage device.
DivX(R) Registration
View DivX(R) VOD Registration Code to purchase
and play DivX(R) VOD content.
Settings
Display
Audio
System
Network
Language
Security
General
Support
NOTE
✎
This option is not activated if you select OK.
▪
To activate this option, please activate the DivX(R)
Deactivation.
Initial Setting
Disc Menu :
Audio :
DivX(R) Video On Demand
Subtitle :
Your registration code is : XXXXXXXXXX
To learn more visit www.divx.com/vod
OK
Page 36

36 English
Setup
DivX(R) Deactivation
Select this to get a new registration code.
Settings
Display
Audio
System
Network
Language
Security
General
Support
NOTE
✎
This function can be operated when DivX(R)
▪
Registration function is deactivated.
To begin setting up the network connection for
your product, follow these steps:
In the Home menu, press the ◄► buttons
1.
to select the Settings, and then press the
ENTER button.
Press the ▲▼ buttons to select Network, and
2.
then press the ENTER button.
Press the ▲▼ buttons to select Network
3.
Settings, and then press the ENTER button.
Press the ▲▼ buttons to select Network
4.
Type, and then press the ENTER button.
Press the ▲▼ buttons to select Wired or
5.
Wireless, and then press the ENTER button.
Go to the next section.
6.
Initial Setting
Disc Menu :
Audio :
Subtitle :
Do you want to deactivate your device?
Yes No
Network Setup
Wired Network
In the Network Settings menu, press the ▲▼
1.
buttons to select Network Settings, and then
press the ENTER button.
The Internet Protocol Setup screen appears.
Press the ► button, then select Auto or
2.
Manual, and then press the ENTER button.
Setting Up a Wired Connection - Auto
If you selected Auto, the Network Function
1.
acquires and fills in the values for IP Address,
Subnet Mask, etc., automatically.
NOTE
✎
This process can take up to five minutes.
▪
Settings
Display
Audio
System
Network
Language
Security
General
Support
After the Network Function has acquired the
2.
network values, press the RETURN button.
Then, run a Network Test to ensure the product
has connected to your network (See page 39).
If the Network Function does not acquire the
3.
network values or you selected Manual, go to
the directions for Manual Setup.
Network Settings
Internet Protocol Setup : Auto
IP Address : 0 0 0 0
Subnet Mask :
Gateway :
DNS : Auto
DNS Server : 0 0 0 0
> Move " Select ' Return
0 0 0 0
0 0 0 0
Network Settings
Please contact your ISP to find out if your IP
address is static or dynamic. If it is dynamic, we
recommend using the Auto setting. This is the
easiest and will work in the majority of cases. If it is
static, you must use the manual set up procedure.
Directions for wired networks are below. Directions
for wireless networks are after the directions for
wired networks.
Page 37

English 37
05 Setup
Setting Up a Wired Connection - Manual
If the Auto Setting does not work, you’ll need to
set the Network Setting values manually.
To get the Network setting values from most
Windows computers, follow these steps:
Right click the Network icon on the bottom
1.
right of the screen.
In the pop-up menu, click Status.
2.
On the dialog that appears, click the Support
3.
tab.
On the Support tab, click the Details button.
4.
The Network settings are displayed.
To enter the Network settings into your product,
follow these steps:
On the Internet Protocol Setup screen, press
1.
the ENTER button.
Press the ▲▼ buttons to select Manual, and
2.
then press the ENTER button.
Press the ▼ button to go to the first entry field
3.
(IP Address).
Settings
Display
Audio
System
Network
Language
Security
General
Support
Select to configure your network type and IP address, or to perform a Network Test.
Use the number buttons on your remote to
4.
Network Settings
Internet Protocol Setup : Manual
IP Address : 0 0 0 0
Subnet Mask :
Gateway :
DNS : Manual
DNS Server :
> Move " Select ' Return
255 255 255 0
0 0 0 0
0 0 0 0
\
enter numbers.
When done with each field, use the ► button
5.
to move successively to the next field.
You can also use the other arrow buttons to
move up, down, and back.
Enter the IP Address, Subnet Mask, and
6.
Gateway values.
Press the ▼ button to go to DNS.
7.
Press the ▼ button to go to the first DNS
8.
entry field. Enter the numbers as above.
Press the RETURN button on your remote.
9.
Run a Network Test to ensure the product has
10.
connected to your network (See page 39).
NOTE
✎
To operate this function, please update software
▪
version.
Wireless Network
You can setup the wireless network three ways:
Using PBC (WPS)
•
Using the Auto Network Search function.
•
Manually.
•
Each method is described below.
Setting Up the Wireless Network Connection
- PBC (WPS)
The easiest way to set up the wireless network
connection is using the PBC (WPS) function.
If your wireless router has a PBC (WPS) button,
follow these steps:
In the Network Settings menu, press the ▲▼
1.
buttons to select Network Settings, and then
press the ENTER button.
The Internet Protocol Setup screen appears.
Press the RED(A) button on the remote
2.
control.
Press the PBC (WPS) button on your router
3.
within two minutes. Your product displays the
Network Selection Screen, and automatically
acquires all the network setting values it
needs and connects to your network. When
it is done, it displays an OK button. Press the
ENTER button on your remote.
After the network connection is set up, press
4.
the RETURN button to exit the Network
Setting screen.
NOTE
✎
To operate this function, please update software
▪
version.
Page 38

38 English
Setup
Setting Up the Wireless Network Connection
- Auto Network Search
Most wireless networks have an optional security
system that requires devices that access the
network to transmit an encrypted security code
called an Access or Security Key. The Security
Key is based on a Pass Phrase, typically a word
or a series of letters and numbers of a specified
length you were asked to enter when you set up
security for your wireless network. If you use this
method of setting up the network connection, and
have a Security Key for your wireless network,
you will have to enter the Pass Phrase during the
setup process.
Setting Up the Network Connection
To set up the wireless connection using Auto
Network Search, follow these steps:
In the Network Settings menu, press the ▲▼
1.
buttons to select Network Settings, and then
press the ENTER button.
The Internet Protocol Setup screen appears.
Press the ▲▼ buttons to select the Internet
2.
Protocol Setup, and then press the ENTER
button.
Press the ▲▼ buttons to select Auto or
3.
Manual, and then press the ENTER button.
If you selected Auto, press the ▲ button to
4.
go to Access Point Selection, and then
press the ENTER button.
The Network function searches for available
wireless networks.
When done, it displays a list of the available
networks.
Settings
Display
Audio
System
Network
Language
Security
General
Support
Network Settings
Network Selection
Connecting to network.
Network Name(SSID) : shj
" Select ' Return
Stop
In the list of networks, press the ▲▼ buttons
5.
to select a network, and then press the
ENTER button.
If the PIN/Security pop-up appears, go to
6.
Step 7. If the Network Connecting Screen
appears, go to Step 11.
Press the ▲▼ buttons to select PIN or
7.
Security.
For most home networks, you would select
Security (for Security Key).
On the Security screen, enter your network’s
8.
Pass Phrase.
NOTE
✎
You should be able to find the Pass Phrase on one of
▪
the set up screens you used to set up your router or
modem.
To enter the Pass Phrase, follow these
9.
general directions:
Press the number keys on your remote to
•
enter numbers.
Use the arrow keys on your remote to move
•
from button to button on the Security Key
screen.
To enter letters, move to the button labelled
•
a/A/1/, and then press the ENTER button.
Each time you press the ENTER button,
you change the kind of characters you can
enter (a/A/1/).
To enter a letter, press the number button
•
that corresponds to the letter. Pressing the
button repeatedly changes the letter.
To delete the last letter or number you
•
entered, move to the Delete button, and
then press the ENTER button.
To clear all entered letters and numbers,
•
move to the Clear key, and then press the
ENTER button. You can also just press the
RED(A) button on your remote.
When done, press the YELLOW(C) button
10.
on your remote, or move to the Done button,
and then press the ENTER button.
The Network Connecting screen appears.
Wait until the connection confirmation
11.
message is displayed, and then press the
ENTER button. The Network Settings screen
reappears.
Page 39

English 39
05 Setup
To test the connection, press the ▼ button
12.
to select Network Test, and then press the
ENTER button.
Setting Up the Wireless Network Connection
- Manual
If the Auto Setting does not work, you need to
enter the Network settng values manually.
To get the Network setting values from most
Windows computers, follow these steps:
Right click the Network icon on the bottom
1.
right of the screen.
In the pop-up menu, click Status.
2.
On the dialog that appears, click the Support
3.
tab.
On the Support tab, click the Details button.
4.
The Network settings are displayed.
To Enter the Network settings into your product,
follow these steps:
On the Internet Protocol Setup screen, press
1.
the ENTER button.
Press the ▲▼ buttons to select Manual, and
2.
then press the ENTER button.
Press the ▼ button to go to the first entry field
3.
(IP Address).
Enter the IP Address, Subnet Mask, and
6.
Gateway values.
Press the ▼ to go to DNS.
7.
Press the ▼ button to go to the first DNS
8.
entry field. Enter the numbers as above.
When done, press the ▲ button to return to
9.
Access Point Selection. Select the network,
and then press the ENTER button.
Go to Step 6 in the Automatic Wireless
10.
procedure above, and follow the directions
from that point on.
Network Test
Use this menu to connect the wired network
or check whether your network connection is
working or not.
Settings
Display
Audio
System
Network
Language
Security
General
Support
Test your Internet Protocol setup to see if it works correctly.
Network Test
MAC Address (00:00:00:00:00:00)
IP Address,Subnet Mask,Gateway,DNS Server
Gateway Ping
Internet Service Test
Network testing...
Settings
Display
Audio
System
Network
Language
Security
General
Support
Use the number buttons to enter numbers.
4.
When done with each field, use the ► button
5.
Network Settings
Access Point Selection : Not Selected
Internet Protocol Setup : Manual
IP Address :
Subnet Mask :
Gateway :
DNS : Manual
DNS Server :
a PBC (WPS) > Move " Select ' Return
0 0 0
0
255 255 255 0
0 0 0 0
0 0 0 0
to move successively to the next field.
You can also use the other arrow buttons to
move up, down, and back.
Network Status
Check whether a connection to the network and
the Internet have been established.
BD-LIVE Internet Connection
Set to allow internet connection when BD-LIVE
service is used.
Allow (All) : The Internet connection will be
•
allowed for all BD-LIVE contents.
Allow (Valid Only) : The Internet connection will
•
be allowed only for BD-LIVE contents containing
a valid certificate.
Prohibit : No Internet connection will be allowed
•
for any BD-LIVE content.
Page 40

40 English
Setup
NOTE
✎
What is a valid certificate?
▪
When the product uses BD-LIVE to send the disc data
and a request to the server to certify the disc, the
server uses the transferred data to check if the disc is
valid and sends the certificate back to the product.
The Internet connection may be restricted while you
▪
are using BD-LIVE contents.
Settings
Display
Audio
System
Network
Language
Security
General
Support
Parental Rating
Change Password
Off
8(Adults)
7
6
5
4
|
Language
You can select the language you prefer for home
menu, disc menu, etc.
On-Screen Menu : Select the language for the
•
on-screen displays.
Disc Menu : Select the language for the disc
•
menu displays.
Audio : Select the language for disc audio.
•
Subtitle : Select the language for disc subtitles.
•
NOTE
✎
The selected language will only appear if it is
▪
supported on the disc.
Security
When you operate this menu for the first time,
password setup screen will be displayed.
Enter the desired 4-digit password using the
number buttons. (Default password is set to 0000.)
Parental Rating
This function works in conjunction with Blu-ray
Disc/DVDs that have been assigned a rating,
which helps you control the types of Blu-ray Disc/
DVDs that your family watches.
Select the rating level you want to set.
A larger number indicates that the program is
intended for adult use only. For example, if you
select up to Level 6, discs that contain Level 7, 8
will not play.
Change Password
Change the 4-digit password used to access
security functions.
If you forgot your password
Remove the disc.
1.
Press and hold the STOP ( ) button on the
2.
front panel for 5 seconds or more.
All settings will revert to the factory settings.
NOTE
✎
When the factory default settings are restored, all
▪
the user data stored in the BD data will be deleted.
General
Background
Change the background theme of the menu screen.
Settings
Display
Audio
System
Network
Language
Security
General
Support
> Move " Select ' Return
Background
Skin 1
Skin 2
Skin 3
Skin 4
Skin 5
Page 41

English 41
05 Setup
Energy Saving
You can reduce power consumption by setting
the front panel to turn off automatically when there
is no operation for 5 seconds.
On : The front panel will automatically turn off
•
when there is no operation for 5 seconds.
Off : Energy Saving function is not used.
•
Front Display
Change the brightness of the front panel.
Auto : Dim during playback.
•
Dim : Dim the display window.
•
Bright : Brighten the display window.
•
Power On/Off Sound
Play a melody when the product is turned on and
off.
On : Turn Power Sound On.
•
Off : Turn Power Sound Off.
•
Support
Software Upgrade
This menu allows you to upgrade software for
performance improvements or additional services.
You can check the current software version,
upgrade using the internet and set the Auto
upgrade notification. If the product is properly
connected to the network by cable or wirelessly,
the product will automatically connect to
Samsung’s website each time it is turned on and
download update files if any valid upgrade exists.
Settings
Display
Audio
System
Network
Language
Security
General
Support
To select By Internet, press the ENTER
1.
button.
A popup message will appear if an update is
available.
If you select Yes, the product will turn off
2.
automatically before restarting.
(Never turn it on manually.)
The update progress popup will appear.
3.
When the update is completed, the product
will turn back off automatically.
Press the POWER button to turn on the
4.
product.
NOTE
✎
The Update will be completed when the product
▪
turns off after restarting. Press the POWER button to
turn on the updated product for your use.
Never turn off or on the product manually during the
update process.
Samsung Electronics shall take no legal responsibility
▪
for product malfunction caused an unstable internet
connection or consumer negligence during software
upgrade.
Software Upgrade
Software Upgrade
Disc Menu :
Audio :
Current Version : XXX-XXXXXXXXX
Subtitle :
By Internet
Auto Upgrade Notification
" Select ' Return
: On
Page 42

42 English
Setup
You can also update software in any of the two
ways as follows: Software update is the same as
in the By Internet menu.
USB : Visit www.samsung.com/bluraysupport,
•
then download and store the latest software
(RUF file) into a USB flash drive. Connect the
USB flash drive to the USB port of the product
(disc tray must be empty) to update the
software, then follow the on-screen instructions.
CD/DVD : Visit www.samsung.com/
•
bluraysupport, download and write the latest
software (RUF file) onto a disc. Insert and play
the disc in the product to start the update, then
follow the on-screen instructions.
NOTE
✎
Software upgrades using the USB Host jack must be
▪
performed with no disc inside.
If you want to cancel the upgrade in the process of
▪
downloading the upgrade data, press the ENTER
button.
When the system upgrade is done, check the
▪
software details in the software Upgrade menu.
Do not turn off the product during the System
▪
Upgrade, as it may cause the product to not work
properly.
Software upgrades using the USB Host jack must be
▪
performed with a USB memory flash stick only.
Contact Samsung
Provide contact information for assistance with
your product.
Page 43

English 43
Basic Functions
Playing a Disc
Playback
Press the OPEN/CLOSE ( ) button to
1.
open the disc tray.
Place a disc gently into the tray with the disc’s
2.
label facing up.
Press the OPEN/CLOSE ( ) button to
3.
close the disc tray.
Press the PLAY ( ) button.
4.
Playback related buttons
PLAY (
) Starts playback.
Stops playback.
If pressing the button once : The
STOP (
PAUSE (
•
)
stop position will be memorized.
If pressing the button twice : The
•
stop position will be not memorized.
) Pauses playback.
Disc Structure
The contents of disc are usually divided as below.
Blu-ray Disc, DVD-VIDEO
•
title 1 title 2
chapter 1 chapter 2 chapter 1 chapter 2 chapter 3
Audio CD (CD-DA)
•
track 1 track 2 track 3 track 4 track 5
MP3, WMA, DivX, MKV and MP4
•
folder (group) 1 folder (group) 2
file 1 file 2 file 1 file 2 file 3
Using the Disc menu/Title menu/
Popup menu
Using the Disc Menu
hZ
During playback, press the DISC
1.
MENU button on the remote control.
Press the ▲▼◄► buttons to make
2.
the desired selection, then press the
ENTER button.
NOTE
✎
Depending on the disc, the menu items may differ
▪
and this menu may not be available.
Using the Title Menu
During playback, press the TITLE
1.
MENU button on the remote control.
Press the ▲▼◄► buttons to make
2.
the desired selection, then press the
ENTER button.
NOTE
✎
Depending on the disc, the menu items may differ
▪
and this menu may not be available.
Playing the Title List
During playback, press the DISC
1.
MENU or TITLE MENU button.
Press the ▲▼ buttons to select an
2.
entry you want to play from Title List,
then press the ENTER button.
NOTE
✎
If your disc has the playlist, press the GREEN(B)
▪
button to go to the Playlist.
06 Basic Functions
Z
z
Page 44

44 English
Basic Functions
Using the Popup Menu
h
During playback, press the POPUP
1.
MENU button on the remote control.
Press the ▲▼◄► buttons or ENTER
2.
button to select the desired menu.
NOTE
✎
Depending on the disc, the menu items may differ
▪
and this menu may not be available.
Using the Search and Skip Functions
During play, you can search quickly through a
chapter or track, and use the skip function to
jump to the next selection.
Searching for a Desired Scene
hzZyx
During playback, press the SEARCH ( )
•
button.
Each time you press the SEARCH ( )
button, the playback speed will change as follows.
BD-ROM,
BD-RE/-R,
DVD-RW/-R,
DVD+RW/+R,
DVD-VIDEO
DivX, MKV, MP4
To return to normal speed playback, press the
•
PLAY ( ) button.
NOTE
✎
No sound is heard during search mode.
▪
)
)
(
(
)
(
)
1
)
4
(
1
(
4
)
1
(
1
2 ) 3
5 ) 6 ) 7
2 ( 3
5 ( 6 ( 7
2 ) 3
2 ( 3
Skipping Chapters
hzZyx
During playback, press the SKIP ( )
•
button.
If you press the SKIP ( ) button, it moves to
the next chapter.
If you press the SKIP ( ) button, it moves to
the beginning of the chapter. One more press
makes it move to the beginning of the previous
chapter.
Slow Motion Play/Step Motion Play
Slow Motion Play
hzZyx
In pause mode, press the SEARCH ( )
•
button.
If you press the SEARCH ( ) button, the
playback speed is reduced to
*
1/8 * 1/4 * 1/2
To return to normal speed playback, press the
•
PLAY ( ) button.
NOTE
✎
No sound is heard during slow mode.
▪
Slow motion operates only in the forward direction.
▪
Step Motion Play
hzZyx
In pause mode, press the PAUSE ( ) button.
•
Each time the PAUSE ( ) button is pressed,
a new frame will appear.
To return to normal speed playback, press the
•
PLAY ( ) button.
NOTE
✎
No sound is heard during step mode.
▪
Step motion operates only in the forward direction.
▪
Page 45

English 45
06 Basic Functions
Repeat Playback
Repeat the Title or Chapter
hzZy
Repeat the disc title or chapter.
Depending on the disc, the Repeat function may
not be available.
During playback, press the REPEAT
1.
button on the remote control.
Press the ▲▼ buttons to select Chapter or
2.
Title, then press the ENTER button.
Repeat > Chapter
To return to normal play, press the REPEAT
3.
button again.
Press the ▲▼ buttons to select Off, the press
4.
the ENTER button.
Repeat the Section
hzZy
During playback, press the REPEAT
1.
button on the remote control.
Press the ENTER button at the point where
4.
you want repeat play to stop (B).
To return to normal play, press the REPEAT
5.
button again.
Press the ENTER button.
6.
NOTE
✎
If you set point (B) before 5 seconds has lapsed, the
▪
prohibition message will appear.
Using the TOOLS button
During playback, you can operate disc
menu by pressing the TOOLS button.
Tools Menu Screen
•
Tools
Title : 1/1
Chapter
Playing Time : 00:12:06
Audio : 1/7 ENG Multi CH
Subtitle : 1/6 ENG
Angle : 1/1
BONUSVIEW Video : Off
BONUSVIEW Audio : 0/1 Off
Picture Setting
< Change " Select
NOTE
✎
Depending on the disc, the Tools menu may differ.
▪
< 4/21 >
Moving to a Desired Scene Directly
Press the ▲▼ buttons to select Repeat A-B.
2.
Repeat A-B : Off
Repeat
>
Press the ENTER button at the point where
3.
" Mark A
you want repeat play to start (A).
hzZy
During playback, press the TOOLS button.
1.
Press the ▲▼ buttons to select Title, Chapter
2.
or Playing Time.
Enter the desired Title, Chapter or Playing
3.
Time using the number buttons, then press
the ENTER button.
Page 46

46 English
Basic Functions
Selecting the Audio Language
hzZx
You can also operate this function by
pressing the AUDIO button on the
remote control.
During playback, press the TOOLS button.
1.
Press the ▲▼ buttons to select Audio.
2.
Press the ◄► buttons to select the desired
3.
audio language.
NOTE
✎
The ◄► indicator will not be displayed on the
▪
screen if the BONUSVIEW section does not contain
any BONUSVIEW audio settings.
Information about the primary / secondary mode
▪
will be also displayed if the Blu-ray Disc has a
BONUSVIEW section.
Use the ◄► button to switch between primary and
secondary audio modes.
This function depends on what audio languages are
▪
encoded on the disc and may not be available.
A Blu-ray Disc can contain up to 32 audio languages
▪
and a DVD up to 8.
Some Blu-ray Discs may allow you to select either
▪
the multi-channel LPCM or Dolby digital audio
soundtrack in English.
If you press the AUDIO button on the remote control,
▪
Audio bar will be displayed.
Press the RETURN button to remove the Audio bar.
NOTE
✎
Depending on the Blu-ray Disc / DVD, you may be
▪
able to change the desired subtitle in the Disc Menu.
Press the DISC MENU button.
This function depends on what subtitles are encoded
▪
on the disc and may not be available on all Blu-ray
Discs/DVDs.
A Blu-ray Disc can contain up to 255 subtitle
▪
languages and a DVD up to 32.
Information about the primary / secondary mode
▪
will also be displayed if the Blu-ray Disc has a
BONUSVIEW section.
This function changes both the primary and
▪
secondary subtitles at the same time.
The total number of subtitles is the sum of the
▪
primary and secondary ones.
If you press the SUBTITLE button on the remote
▪
control, the subtitle bar will be displayed.
Press the RETURN button to remove the subtitle bar.
Changing the Camera Angle
hZ
When a Blu-ray Disc/DVD contains multiple angles
of a particular scene, you can use the ANGLE
function.
During playback, press the TOOLS button.
1.
Press the ▲▼ buttons to select Angle.
2.
Press the ◄► buttons to select the desired
3.
Angle.
Selecting the Subtitle Language
hZx
You can also operate this function by
pressing the SUBTITLE button on the
remote control.
During playback, press the TOOLS button.
1.
Press the ▲▼ buttons to select Subtitle.
2.
Press the ◄► buttons to select the desired
3.
subtitle language.
Selecting the Picture Setting
hzZy
This function enables you to adjust video quality
when you are connected to a TV via HDMI.
During playback, press the TOOLS button.
1.
Press the ▲▼ buttons to select Picture Setting,
2.
then press the ENTER button.
Press the ◄► buttons to select the desired
3.
Picture Setting, then press the ENTER button.
Page 47

English 47
06 Basic Functions
Dynamic : Choose this setting to increase
POWER
TV
POWER
BONUSVIEW
SOURCE
SUBTITLE
AUDIO
POWER
TV
POWER
BONUSVIEW
SOURCE
DISC MENU TITLE MENUMENU
INTERNET@
REPEAT
FULL SCREEN
SUBTITLE
AUDIO
INFO
POPUP
TOOLS
EXITRETURN
•
Sharpness.
Normal : Choose this setting for most
•
viewing applications.
Movie : This is the best setting for watching
•
movies.
User : The user can adjust the sharpness
•
and noise reduction function respectively.
Listening to Music
ow
Buttons on the Remote Control
used for Music Playback
Setting BONUSVIEW
The BONUSVIEW feature allows you to view
additional content (such as commentaries) in a
small screen window while the movie is playing.
This function is only available if the disc has the
bonusview feature.
You can also operate this function by
pressing the BONUSVIEW button on
the remote control.
During playback, press the TOOLS button.
1.
Press the ▲▼ buttons to select BONUSVIEW
2.
Video or BONUSVIEW Audio.
Press the ◄► buttons to select the desired
3.
bonusview.
NOTE
✎
If you switch from BONUSVIEW Video, BONUSVIEW
▪
Audio will change automatically in accordance with
BONUSVIEW Video.
< Change " Select
Tools
BONUSVIEW Video < Off >
BONUSVIEW Audio : 0/1 Off
Picture Setting
h
@
!
0
9
8
7
SEARCH buttons : Fast Play.
1
(Audio CD (CD-DA) only)
PAUSE button : Pauses playback.
2
PLAY button : Plays the currently selected track.
3
▲▼ buttons : Selects a track in the Music List or
4
Playlist.
YELLOW(C) button : Select or deselect a track in
5
the music list.
REPEAT button : Selects the play mode in the
6
Playlist.
ENTER button : Plays and pauses the selected
7
track.
◄► buttons : Jump Play.
8
(except for Audio CD (CD-DA))
STOP button :
9
SKIP button : During playback, moves to the next
page in the Music List or moves to the next track in
0
the Playlist.
Stops a
track
.
1
2
3
4
5
6
Page 48

48 English
Basic Functions
SKIP button : During playback, moves to the
previous page in the Music List or moves to the
previous track in the Playlist.
If you press this button after three seconds of
!
playback in the Playlist, the current track will be
replayed from the beginning. But, if you press this
button within three seconds after playback starts in
the Playlist, the previous track will be played.
NUMBER buttons : During the Playlist playback,
press the desired track number. The selected track
@
will be played.
Playing an Audio CD (CD-DA)/MP3
Insert an Audio CD (CD-DA) or an MP3 Disc
1.
into the disc tray.
For an Audio CD (CD-DA), the first track will
•
be played automatically.
For an MP3 disc, press the ◄► buttons
•
to select Music, then press the ENTER
button.
Audio CD (CD-DA)/MP3 Screen Elements
31 2
TRACK 001
7
6
+ 00:08 / 05:57
Displays the music information.
1
Displays the playlist.
2
Display the current track/total tracks.
3
Displays buttons available.
4
TRACK 001
TRACK 002
TRACK 003
TRACK 004
TRACK 005
TRACK 006
Pause
"
Playlist
1/6
05:57
04:27
04:07
03:41
03:17
03:35
Tools ' Return
45
Shows the current play time/total play time.
5
Displays the current playback status
6
Displays the repeated playback status.
7
Press the ▲▼ buttons to select the track
2.
you want to play, and then press the ENTER
button.
Repeat an Audio CD (CD-DA)/MP3
During the Playlist playback, press the
1.
REPEAT button.
Select the desired play mode by
2.
pressing the REPEAT button repeatedly.
Tracks on a disc are
Off
Audio CD
(CD-DA)/MP3
played in the order in
which they were recorded
on the disc.
(
) Track
(
) One MP3 Current track is repeated.
(
) All
( ) Shuffle
Audio CD
(CD-DA)
Audio CD
(CD-DA)/MP3
Audio CD
(CD-DA)/MP3
Current track is repeated.
All tracks are repeated.
The random option plays
a disc’s track in random
order.
Playlist
Insert an Audio CD (CD-DA) or an MP3 Disc
1.
into the disc tray.
For an Audio CD (CD-DA), the first track will
•
be played automatically.
For an MP3 disc, press the ◄► buttons
•
to select Music, then press the ENTER
button.
To move to the Music List, press the STOP ( )
2.
or RETURN button.
The Music List screen is displayed.
Page 49

English 49
06 Basic Functions
Press the ▲▼◄► buttons to move desired
3.
track, then press the YELLOW(C) button to
check desired tracks.
Repeat this procedure to select additional
tracks.
Music TRACK 003
TRACK 001
00:05:57
TRACK 003
00:04:07
TRACK 005
00:03:17
TRACK 007
00:03:47
TRACK 009
00:03:53
Select () Jump page ' Return
CDDA
If there is an undesired track in the playlist,
4.
3 files selected 1/2 Page
TRACK 002
00:04:27
TRACK 004
00:03:41
TRACK 006
00:03:35
TRACK 008
00:03:49
TRACK 010
00:03:45
press the YELLOW(C) button again.
The selected track will be deleted.
Press the ENTER button to play the selected
5.
tracks.
Selected tract will automatically play.
TRACK 001
+ 00:08 / 05:57
To go to the Music List, press the STOP ( )
6.
TRACK 001
TRACK 002
TRACK 003
Pause
"
Playlist
Tools ' Return
or RETURN button.
To go to the Playlist, press the ENTER
7.
button.
Playing back a Picture
G
Playing a JPEG Disc
Insert a JPEG disc into the disc tray.
1.
Press the ◄► buttons to select the Photos,
2.
and then press the ENTER button.
Press the ▲▼◄► buttons to select the folder
3.
you want to play, and then press the ENTER
button.
Press the ▲▼◄► buttons to select the photo
4.
you want to play, and then press the ENTER
button.
The Slide Show starts automatically.
NOTE
✎
You can’t enlarge the subtitle and PG graphic in the
▪
full screen mode.
1/3
05:57
04:27
04:07
Using the TOOLS button
During the slide show playback, you
can use various function by pressing the
TOOLS button.
Tools
Stop Slide Show
Slide Show Speed : Normal
Background Music
Zoom
Rotate
Information
> Move " Enter ' Return
NOTE
✎
You can create a playlist with up to 99 tracks on
▪
Audio CD (CD-DA).
Stop Slide Show : Select this if you want to
•
stop the slide show.
Slide Show Speed : Select this if you want to
•
adjust the Slide Show speed.
Background Music : Select this if you want to
•
listen to music while viewing a picture.
Page 50

50 English
Basic Functions
internet radio
You Tube
Zoom : Select this if you want to enlarge the
•
current picture. (Enlarged up to 4 times)
Rotate : Select this if you to rotate the picture.
•
(This will rotate the picture either clockwise or
counter clockwise.)
Information : Shows the picture information
•
including the name and size, etc.
NOTE
✎
To enable the Background Music function, both
▪
music and MP3 files must be contained in the same
folder. However, the sound quality can be affected
by the bit rate of the MP3 file, the size of the photo
and the encoding method.
Playing back a USB Storage Device
Press the ▲▼ buttons to select the USB, then
5.
press the ENTER button.
Press the ◄► buttons to select the desired
6.
Videos, Music or Photos, then press the
ENTER button.
4-1. Press the BLUE(D) button.
Please activate Internet@TV service
to enjoy a variety of Internet Services.
USB
USB d Home " Enter
You can use the USB connection to play multimedia
files (MP3, JPEG, DivX, etc) downloaded from the
USB storage device.
Move to the home menu.
1.
In Stop mode, connect the USB storage
2.
device to the USB port on the front panel of
the product.
The message “Do you want to access the
device?” will be displayed.
Press the ◄► button to select Yes, then
3.
press the ENTER button.
Press the RED(A) button.
4.
Please activate Internet@TV service
to enjoy a variety of Internet Services.
CD
USB
USB a Change Device
Safely Remove USB
d
View Devices
" Enter
5-1. Press the ◄► buttons to select the USB,
then press the ENTER button.
6-1. Press the ▲▼ buttons to select the desired
Videos, Music or Photos, then press the
ENTER button.
For playing back Video, Music or Photo files,
7.
refer to pages 47~50.
NOTE
✎
You must remove the USB storage device safely
▪
(by performing the “Safe to Remove USB” function)
in order to prevent a possible damage to the USB
memory. Press the MENU button to move to the
home menu, and select the YELLOW(C) button and
press the ENTER button.
When the Audio-CD (CD-DA), MP3 and JPEG files
▪
are in stop mode, you can’t see full screen by
pressing the FULL SCREEN button on the remote
control.
If you insert the disc when playing USB storage
▪
device, the device mode is changed to “DVD or CD”
automatically.
Page 51

English 51
Network Services
internet radio
You Tube
You can enjoy various network services such
as Internet@TV or BD-LIVE by connecting the
product to the network system.
Check the following instructions before using
any network service.
Connect the product to the network.
1.
(See pages 26~27)
Configure the network settings.
2.
(See pages 36~39)
Using Internet@TV
Connect this product to the network to download
various for a fee or free-of-charge applications.
Internet@TV brings useful and entertaining content
and services directly from the web to your product
such as news, weather forecasts, stock market
quotes, games, movies and music.
You can also operate this function by
pressing the INTERNET@ button on
the remote control.
Getting Started with Internet@TV
Move to the home menu.
1.
Please activate Internet@TV service
to enjoy a variety of Internet Services.
No Disc a Change Device d View Devices " Enter
Press the ◄► buttons to select Internet@TV
2.
and press the ENTER button.
In the start screen of the Internet@TV service,
3.
you will see the service agreement screen.
You should agree to the service terms and
conditions before you can use the Internet@
TV service.
When you have agreed on the service
4.
agreement, the Internet@TV service will start
being updated. It takes several minutes.
When the update is completed, you will see
the Internet@TV menu screen.
Internet@TV at a Glance
1
Samsung Apps Settings
a Login b Mark as Favorite d Sort by ' Return
2 3
Recommended
My Applications
by Date 1/3
56 4
Commercial : Displays Internet@TV Guide, product
1
introduction and new application introduction.
Recommended : Displays recommended contents
2
managed by Samsung.
My Applications : Displays your personal gallery
3
which can be added and deleted by you.
Navigation Help : Displays remote control buttons
available.
RED(A) : To log in to Internet@TV.
•
4
GREEN(B) :
•
BLUE(D) : To sort the applications.
•
Return : To return to the previous menu.
•
Settings : You can set the system setup and create
5
accounts, etc.
Samsung Apps : You can download various
6
chargeable or free-of-charge application services.
To mark the application as a favourite
07 Network Services
.
Page 52

52 English
Network Services
Using the Keypad
Through your remote, you can use the On-Screen
Keypad in several Internet@TV applications to enter
text.
Pressing the SUBTITLE button on the remote while
you are using the Screen Keypad lets you change
the text fields to lower case, upper case, numbers
and icons.
1 2 3
4 5 6
7 8 9
Input Mode
For example, here is how to search an address in
Google Maps:
Press the ENTER button on the remote at the
1.
Google Maps icon at the Internet@TV.
Press GREEN(B) button to use the SEARCH
2.
function.
Press the ◄► buttons to move to the “Search
3.
or address” window.
Press the ENTER button to use Search or
4.
address function.
For example, suppose that you want to input
5.
‘105 Challenger Rd., Ridgefield Park NJ’.
Press the SUBTITLE button on the remote
6.
twice to change the input mode from lower
case to numbers.
Press ‘1’, ‘0’, ‘5’.
7.
Press the YELLOW(C) button on the remote
8.
to input a blank space.
Press the SUBTITLE button on the remote
9.
3 times to change the input mode from
numbers to upper case.
Press ‘2’ button on the remote 3 times to
10.
input C.
Press the SUBTITLE button on the remote 3
11.
times to change the input mode from upper
case to lower case.
abc def
ghi jkl mno
pqrs tuv wxyz
Delete
0
a A 1
Press buttons on the remote to input the rest
12.
of ‘Challenger Rd., Ridgefield Park NJ’.
Press the ENTER button.
13.
The map and address appear on the screen.
14.
NOTE
✎
Samsung Electronics shall take no legal responsibility
▪
for any interruption of the Internet@TV service
caused by the service provider for any reasons.
The Internet@TV service is to download and process
▪
data via the Internet so that you can enjoy the
contents on the TV screen.
If the Internet connection is unstable, the service
may be delayed or interrupted.
Furthermore, the product may be turned off
automatically.
If this is the case, check the Internet connection and
try again.
The application service may be provided in English
▪
only and the contents available may vary, depending
on the area.
When using a application service, you can not
▪
operate FULL SCREEN button on the remote control.
For more information about the Internet@TV service,
▪
visit the web site of the applicable service provider.
The provided services are subject to change,
▪
depending on the Internet@TV service provider.
The Internet@TV service contents may differ
▪
according to the firmware version.
For-a-fee DivX contents with copy protection can
▪
only be played using HDMI cable.
If you have connected your product to your TV using
Component or video cables, the DivX video signal
can not output or the popup message “Connect
with a HDMI cable to play this file.” or “Cannot play
current file.” will be displayed.
Page 53

English 53
07 Network Services
Account Login
For a more enjoyable application experience,
register and log in to your account.
To do this, you must create an account first.
(For instructions on creating an account, refer to
Internet@TV ID on this page)
Press the ▲▼◄► buttons to select the
1.
desired application and press the RED(A)
button.
Login
User Account :
Password :
Enter the user account and password.
2.
admin
a
Create [0~9] Enter PIN
' Cancel
System Setup
Reset
Resets Internet@TV settings to factory default
settings.
NOTE
✎
If you forgot your password, press the STOP ( )
▪
button on the front panel of the product for more than
5 seconds with no disc inserted.
Internet@TV ID
Use this menu to create or delete an account and
enter or delete account information.
You can control your account including contents
site’s account information.
This account is only for Internet@TV.
Create
Create an account and link it with desired service
applications.
Settings
Create IDs and configure Internet@TV settings
from this screen.
Settings
System setup
Internet@TV ID
Service Manager
Properties
' Cancel
Change the Service Lock password
Reset
NOTE
✎
The account name must be at least 1 character in
▪
length but no more than 8.
You can register up to 10 User Account Names.
▪
Manager
Service Site : Register login information for
•
service sites.
Change Password : Change account
•
password.
Delete : Delete the account.
•
Page 54

54 English
Network Services
YouTube
TV store Test User002
Service Manager
Delete and lock applications installed to Internet@
TV.
Lock
Lock the application. Accessing a locked
application requires the password.
Delete
Delete the application.
Properties
Display information about Internet@TV. Use the
“Check the speed of your internet connection”
option to test your network connection.
Samsung Apps
Various applications are available from here,
organized into different categories. Some
applications have a download fee.
Samsung Apps
What's New?
Video
Sports
Lifestyle
Games
Infomation
Other
My page
Help
a Login b Thumbnail View d Sort By ' Return
Video
Featured
Most downloaded
1/1
Most recent Name
Free
Using the colour buttons with the Samsung
Apps
RED(A) (Login) : To log in to the internet
•
service.
GREEN(B) (Thumbnail View) : To change the
•
view mode.
BLUE(D) (Sort By) : To sort the applications by
•
Featured, Most Downloaded, Most Recent or
Name.
NOTE
✎
The available Internet contents services may be
▪
added or deleted.
My page
Displays the application list.
Help
If you questions about Internet@TV, check this
section first. If none of the tips apply, please visit
the help website.
Page 55

English 55
07 Network Services
BD-LIVE™
Using the AllShare Function
Once the product is connected to the network,
you can enjoy various movie-related service
contents using a BD-LIVE compliant disc.
Check the size of the remaining memory.
1.
The memory device must have at least 1GB
of free space to accommodate the BD-LIVE
services.
Insert a Blu-ray disc that supports BD-LIVE.
2.
Select an item from various BD-LIVE service
3.
contents provided by the disc manufacturer.
NOTE
✎
The way you use BD-LIVE and the provided contents
▪
may differ, depending on the disc manufacturer.
Software Upgrade Notification
In network connection, the product will notice
you of any new software version with a popup
message.
Turn on the product.
1.
From the Software Upgrade menu, set Auto
2.
Upgrade Notification to On. (See page 41)
If there is a new software version available, the
product
will notice you with a popup message.
To upgrade the firmware, select Yes.
3.
It will turn off automatically before restarting.
(Never turn it on manually.)
The update progress popup will appear.
4.
When the update is completed, it will turn
back off automatically.
Press the POWER button to turn on the
5.
product.
NOTE
✎
Update will be completed when the product turns off
▪
after restarting. Press the POWER button to turn on
the updated product for your use.
Never turn off or on the product manually during the
update process.
Samsung Electronics shall take no legal responsibility
▪
for product malfunction caused by unstable of
internet connection or consumer negligence during
software upgrade.
AllShare enables you to play music, video and
photo files in your PC using the product.
To use AllShare, you must connect the product to
your PC via the network (See pages 26~27) and
install the SAMSUNG PC Share Manager on the
PC.
Visit the Samsung website at www.samsung.
1.
com.
Download the SAMSUNG PC Share Manager
2.
and install it on the PC.
When the installation is completed, you will
3.
see the SAMSUNG PC Share Manager icon
on your desktop.
Double-click the icon to launch the application.
Application Program at a Glance
Server : PC Share Manager
Folder 1 C:
6
Document and settin..
1
SAMSUNG PC Share Manager
File Share Server Help
2 3 4 5
My Computer
C: Document and settings Admin
Name Size Kind
Folder 1 File
Folder 2 File
Folder 3 File
Shared Folder
Folder Full Path
78
Menu Bar
1
Share Folder Enabled icon : Use this if you want to
2
select a folder in your PC to share.
Share Folder Disabled icon : Use this if you want
3
to set folder sharing off.
Refresh icon : Use this if you want to refresh list of
4
folders and files in My Computer.
Set Change State icon : Select a folder to share
and don’t forget to press this button.
5
The updated state will be applied to the server.
Server : Displays the name of the sharing server.
6
Page 56

56 English
Network Services
internet radio
You Tube
Shared Folder : Displays a list of the shared folders.
7
My Computer : Displays a list of the folders and
8
files in the PC.
Select a folder to share from the My computer
4.
pane, and click the Share Folder Enabled
icon (
).
(To remove a shared folder : Select a folder to
remove from the shared folders, and click the
Share Folder Disabled icon (
To apply the updated sharing state to the
5.
server, click the Set Change State icon (
To enable the product to locate a PC server,
6.
click Share from the menu bar.
Click Set Device Policy and click Accept.
SAMSUNG PC Share Manager
File Share Server Help
Set Device Policy
My Computer
C: Document and settings Admin
IP Device State Set State
Name Size Kind
XXX.XXX.X.XX SAMSUNG Blu-ray Disc Player Deny
Folder 1 File
Folder 2 File
Folder 3 File
OK Cancel
).)
Server : PC Share Manager
Shared Folder
Delete Selected Item
Folder Full Path
Folder 1 C:
Document and settin..
Accept
NOTE
✎
Depending on the performance of the external
▪
modem or router, HD video may not play properly.
If your system uses a firewall, the product may not
▪
locate your PC on the TV screen.
AllShare does not support the following functions.
▪
The Background Music and Background Music
-
Setting functions.
Sorting files by preference in the Photo, Music,
-
and Movie folders.
The Change Group function.
).
-
The Safe Remove function.
-
The Sorting method may differ depending on the
▪
sever function.
The search and skip operation may differ depending
▪
on the sever function.
If you press the STOP ( ) button during video
▪
playback, stop position will be memorized and it will
be memorized only end user’s operation.
But stop position will not be memorized depending
on the sever function.
During video playback, play time will not display.
▪
To use AllShare function, please locate both this
▪
product and PC in same subnet.
Click the Set Change State icon (
7.
move to the home menu on product.
To select a device, use the RED(A) or BLUE(D)
8.
button to select a file to play.
(For playing back Video, Music or Photos files,
see pages 47~50.)
Please activate Internet@TV service
to enjoy a variety of Internet Services.
No Disc a Change Device d View Devices " Enter
) and
Page 57

English 57
Appendix
Troubleshooting
Before requesting service, please check the following.
PROBLEM SOLUTION
No operation can be performed with the
remote control.
Disc does not play. Ensure that the disc is installed with the label side facing up.
Disc Menu does not appear. Ensure that the disc has disc menus.
The prohibition message appears on the
screen.
Play mode differs from the Setup Menu
selection.
The screen ratio cannot be changed. The Screen Ratio is fixed on your Blu-ray Disc/DVDs.
No audio. Make sure you have selected the correct Digital Output in the Audio Options
Check the batteries in the remote control. They may need replacing.
•
Operate the remote control at a distance of no more than 6.1m.
•
Remove batteries and hold down one or more buttons for several minutes
•
to drain the microprocessor inside the remote control to reset it. Reinstall
batteries and try to operate the remote control again.
•
Check the region number of the Blu-ray Disc/DVD.
•
•
This message appears when an invalid button is pressed.
•
The Blu-ray Disc/DVD’s software doesn’t support the feature (e.g., angles)
•
You’ve requested a title or chapter number or search time that is out of
•
range.
Some of the functions selected in the Setup Menu may not work properly if
•
the disc is not encoded with the corresponding function.
•
This is not a problem with the product.
•
•
Menu.
08 Appendix
The screen is blocked Press the STOP ( ) button (on front panel) for more than 5 seconds with
If the HDMI output is set to a resolution your
TV cannot support (for example, 1080p), you
may not see a picture on your TV.
•
no disc inside. All settings will revert to the factory settings.
When the factory default settings are restored, all the user data stored in
•
the BD data will be deleted.
Press the STOP ( ) button (on front panel) for more than 5 seconds with
•
no disc inside. All settings will revert to the factory settings.
When the factory default settings are restored, all the user data stored in
•
the BD data will be deleted.
Page 58

58 English
Appendix
PROBLEM SOLUTION
Forgot password Press the STOP ( ) button (on front panel) for more than 5 seconds with
•
no disc inside. All settings including the password will revert to the factory
settings.
Don’t use this unless absolutely necessary.
When the factory default settings are restored, all the user data stored in
•
the BD data will be deleted.
If you experience other problems. Go to the contents and find the section of the user manual that contains the
The picture is noisy or distorted Make sure that the disc is not dirty or scratched.
No HDMI output. Check the connection between the TV and the HDMI jack of the product.
Abnormal HDMI output screen. If random noise appears on the screen, it means that TV does not support
PC Share Manager function
I can see folders shared through the PC
Share Manager, but I cannot see the files.
AllShare function
Video is played intermittently. Check if the network is stable.
AllShare connection between TV and PC is
unstable.
•
explanations regarding the current problem, and follow the procedure once
again.
If the problem still cannot be solved, please contact your nearest Samsung
•
authorized service centre.
•
Clean the disc.
•
•
Check if your TV supports 576p/480p, 720p, 1080i, 1080p HDMI input
•
resolution.
•
HDCP (High-bandwidth Digital Content Protection).
Since it shows only files corresponding to the Image, Music, and Movie
•
categories, files that do not correspond to these categories may not be
displayed.
•
Check if the network cable is properly connected and if the network is not
•
overloaded.
Wireless connection between the server and the product is unstable.
•
Check the connection.
IP address under the same subnetwork should be unique, otherwise IP
•
collision can results in such a phenomenon.
Check if you have a firewall enabled.
•
If so, disable the firewall function.
Page 59

English 59
08 Appendix
PROBLEM SOLUTION
BD-LIVE
I cannot connect to the BD-LIVE server. Check whether the network connection is successful or not by using
•
Network Test menu. (See page 39)
Check whether the USB memory device is connected with product
•
or not.
The memory device must have at least 1GB of free space to accommodate
•
the BD-LIVE service.
You can check the available size in BD Data Management. (See page 35)
Please check whether the BD-LIVE Internet Connection menu is set to
•
Allow(All).
If all above fails, contact the contents provider or update the latest
•
firmware.
When using the BD-LIVE service, an error
occurs.
NOTE
✎
When the factory default settings are restored, all the user data stored in the BD data will be deleted.
▪
The memory device must have at least 1GB of free space to accommodate
•
the BD-LIVE service.
You can check the available size in BD Data Management. (See page 35)
Page 60

60 English
Appendix
Index
A
Accessories 14
Ad-hoc 27
Anynet+ (HDMI-CEC) 34
Audio Language 46
AllShare 55~56
B
BD Wise 30
BD Data Management 35
BD-LIVE 39, 55
BONUSVIEW 47
Background Music 49
C
Component 22
Cable Network 26
Camera Angle 46
D
Digital Output 32~33
Dynamic Range Control 34
Downmixing Mode 34
DTS Neo:6 34
DST (Daylight Saving Time) 35
DivX 35~36
Disc Menu 43
Disc Structure 43
H
HDMI 20, 34
HDMI Supported Amplifier 24
HDMI Deep Color 32
I
Internet@TV 36, 50
Initial Settings 28, 34
J
JPEG 49
M
Movie Frame (24F) 32
MP3 48~49
N
Network Setup 36~38
O
Optimal Resolution 30~31
P
PCM Downsampling 33
Popup Menu 43~44
Picture Setting 46
R
Region Code 13
Romote Control Sensor 15
Romote Control 18
Resolution 30
Repeat 45, 48
S
Supported File Format 12
Software Upgrade 41, 55
Search and Skip 44
Slow and Step 44
Subtitle Language 46
Slide Show 49
SAMSUNG PC Share
Manager 55~56
T
TV Aspect 30
Title Menu 43
Tools Menu 45~47
U
USB Storage Device 50
W
Wireless Network 27, 37
Wireless LAN Adapter 27
Z
Zoom 50
Page 61

English 61
08 Appendix
Specifications
Weight 1.7 kg
General
Disc
Video Output
Video/Audio HDMI
Audio Output
Design and specifications are subject to change without prior notice.
For the power supply and power consumption, refer to the label attached to the product.
Weight and dimensions are approximate.
-
Dimensions 433 (W) X 205 (D) X 43 (H) mm
Operating Temperature Range +5°C to +35°C
Operating Humidity Range 10 % to 75 %
BD (Blu-ray Disc) Reading Speed : 4.917m/sec
DVD (Digital Versatile Disc)
CD : 12 cm (COMPACT DISC)
CD : 8 cm (COMPACT DISC)
Composite Video
Component Video
2 Channel L(1/L), R(2/R)
Digital Audio Output Optical
*Frequency Response
*S/N Ratio 110 dB
*Dynamic Range 100 dB
*Total Harmonic Distortion 0.003%
Reading Speed : 3.49 ~ 4.06 m/sec.
Approx. Play Time (Single Sided, Single Layer Disc) : 135 min.
Reading Speed : 4.8 ~ 5.6 m/sec.
Maximum Play Time : 74 min.
Reading Speed : 4.8 ~ 5.6 m/sec.
Maximum Play Time : 20 min.
1 Channel : 1.0 Vp-p (75Ω load)
Blu-ray/DVD Disc : 576i/480i
Y : 1.0 Vp-p (75Ω load)
PR : 0.70 Vp-p (75Ω load)
PB : 0.70 Vp-p (75Ω load)
Blu-ray Disc : 1080i, 720p, 576p/480p, 576i/480i
DVD : 576p/480p, 576i/480i
1080p, 1080i, 720p, 576p/480p
PCM multichannel audio, Bitstream audio
48 kHz Sampling : 4 Hz to 22 kHz
96 kHz Sampling : 4 Hz to 44 kHz
*: Nominal specification
Page 62

62 English
Appendix
Compliance and Compatibility Notice
NOT ALL discs are compatible
Subject to the restrictions described below and those noted throughout this Manual, including the Disc
•
Type and Characteristics section of this user manual, disc types that can be played are: pre-recorded
commercial BD-ROM, DVD-VIDEO, and Audio CD (CD-DA) discs; BD-RE/-R, DVD-RW/-R discs; and
CD-RW/-R discs.
Discs other than the above cannot and/or is not intended to be played by this product. And some of
•
the above discs may not play due to one or more reasons provided below.
Samsung cannot assure that this product will play every disc bearing the BD-ROM, BD-RE/-R,
•
DVD-VIDEO, DVD-RW/-R, DVD+RW/+R and CD-RW/-R logos, and this product may not respond to
all operating commands or operate all features of every disc. These and other disc compatibility and
product operation issues with new and existing format discs are possible because:
Blu-ray is a new and evolving format and this product may not operate all features of Blu-ray Discs
-
because some features may be optional, additional features may have been added to the Blu-ray
Disc format after the production of this product, and certain available features may be subject to
delayed availability;
not all new and existing disc format versions are supported by this product;
-
new and existing disc formats may be revised, changed, updated, improved and/or supplemented;
-
some discs are produced in a manner that allows specific or limited operation and feature during
-
playback;
some features may be optional, additional features may have been added after the production of this
-
product or certain available features may be subject to delayed availability;
some discs bearing the BD-ROM, BD-RE/-R, DVD-VIDEO, DVD-RW/-R, DVD+RW/+R and
-
CD-RW/-R logos may still be non-standardized discs;
some discs may not be played depending on their physical state or recording conditions;
-
problems and errors can occur during the creation of Blu-ray Disc, DVD software and/or the
-
manufacture of discs;
this product operates differently than a standard DVD product or other AV equipment; and/or
-
for reasons noted throughout this user manual and for other reason(s) discovered and posted by
-
SAMSUNG customer care centre.
If you encounter disc compatibility or product operation problems, please contact SAMSUNG customer
•
care centre.
You may also contact SAMSUNG customer care centre for possible updates on this product.
For additional information on playback restrictions and disc compatibility, refer to the Precautions,
•
Before Reading the user manual, Disc Types and Characteristics, and Before Playing sections of this
user manual.
Copy Protection
Because AACS (Advanced Access Content System) is approved as content protection system for
•
Blu-ray Disc format, similar to use of CSS (Content Scramble System) for DVD format, certain
restrictions are imposed on playback, analog signal output, etc., of AACS protected contents.
The operation of this product and restrictions on this product may vary depending on your time of
purchase as those restrictions may be adopted and/or changed by AACS after the production of this
product. Furthermore, BD-ROM Mark and BD+ are additionally used as content protection system for
Blu-ray Disc format, which imposes certain restrictions including playback restrictions for BD-ROM
Mark and/or BD+ protected contents. To obtain additional information on AACS, BD-ROM Mark, BD+,
or this product, please contact SAMSUNG customer care center.
Page 63

English 63
08 Appendix
Many Blu-ray Disc/DVD discs are encoded with copy protection. Because of this, you should only
•
connect your Product directly to your TV, not to a VCR. Connecting to a VCR results in a distorted
picture from copy-protected Blu-ray Disc/DVD discs.
This product incorporates copyright protection technology that is protected by U.S. patents and other
•
intellectual property rights. Use of this copyright protection technology must be authorized by Rovi
Corporation, and is intended for home and other limited viewing uses only unless otherwise authorized
by Rovi Corporation. Reverse engineering or disassembly is prohibited.
Under the U.S. Copyright laws and Copyright laws of other countries, unauthorized recording, use,
•
display, distribution, or revision of television programs, videotapes, Blu-ray Discs, DVDs, and other
materials may subject you to civil and/or criminal liability.
For Blu-ray Disc Player progressive scan output : CONSUMERS SHOULD NOTE THAT NOT
•
ALL HIGH DEFINITION TELEVISION SETS ARE FULLY COMPATIBLE WITH THIS PRODUCT AND
MAY CAUSE ARTIFACTS TO BE DISPLAYED IN THE PICTURE. IN CASE OF PROGRESSIVE SCAN
PICTURE PROBLEMS, IT IS RECOMMENDED THAT THE USER SWITCH THE CONNECTION TO
THE ‘STANDARD DEFINITION’ OUTPUT. IF THERE ARE QUESTIONS REGARDING OUR TV SET
COMPATIBILITY WITH THIS PRODUCT, PLEASE CONTACT OUR CUSTOMER SERVICE CENTER.
Network Service Disclaimer
All content and services accessible through this device belong to third parties and are protected by
copyright, patent, trademark and/or other intellectual property laws. Such content and services are
provided solely for your personal noncommercial use. You may not use any content or services in a
manner that has not been authorized by the content owner or service provider. Without limiting the
foregoing, unless expressly authorized by the applicable content owner or service provider, you may
not modify, copy, republish, upload, post, transmit, translate, sell, create derivative works, exploit, or
distribute in any manner or medium any content or services displayed through this device.
THIRD PARTY CONTENT AND SERVICES ARE PROVIDED “AS IS.” SAMSUNG DOES NOT WARRANT
CONTENT OR SERVICES SO PROVIDED, EITHER EXPRESSLY OR IMPLIEDLY, FOR ANY PURPOSE.
SAMSUNG EXPRESSLY DISCLAIMS ANY IMPLIED WARRANTIES, INCLUDING BUT NOT LIMITED
TO, WARRANTIES OF MERCHANTABILITY OR FITNESS FOR A PARTICULAR PURPOSE. SAMSUNG
DOES NOT GUARANTEE THE ACCURACY, VALIDITY, TIMELINESS, LEGALITY, OR COMPLETENESS
OF ANY CONTENT OR SERVICE MADE AVAILABLE THROUGH THIS DEVICE AND UNDER NO
CIRCUMSTANCES, INCLUDING NEGLIGENCE, SHALL SAMSUNG BE LIABLE, WHETHER IN
CONTRACT OR TORT, FOR ANY DIRECT, INDIRECT, INCIDENTAL, SPECIAL OR CONSEQUENTIAL
DAMAGES, ATTORNEY FEES, EXPENSES, OR ANY OTHER DAMAGES ARISING OUT OF, OR IN
CONNECTION WITH, ANY INFORMATION CONTAINED IN, OR AS A RESULT OF THE USE OF ANY
CONTENT OR SERVICE BY YOU OR ANY THIRD PARTY, EVEN IF ADVISED OF THE POSSIBILITY OF
SUCH DAMAGES.
Third party services may be terminated or interrupted at any time, and Samsung makes no representation
or warranty that any content or service will remain available for any period of time. Content and services
are transmitted by third parties by means of networks and transmission facilities over which Samsung
has no control. Without limiting the generality of this disclaimer, Samsung expressly disclaims any
responsibility or liability for any interruption or suspension of any content or service made available
through this device.
Samsung is neither responsible nor liable for customer service related to the content and services.
Any question or request for service relating to the content or services should be made directly to the
respective content and service providers.
Page 64

64 English
Appendix
License
Manufactured under license from Dolby Laboratories. “Dolby” and the double-D symbol
•
are trademarks of Dolby Laboratories.
Manufactured under license under U.S. Patent #’s : 5,451,942; 5,956,674; 5,974,380;
•
5,978,762; 6,226,616; 6,487,535; 7,212,872; 7,333,929; 7,392,195; 7,272,567
& other U.S. and worldwide patents issued & pending. DTS and the Symbol are
registered trademarks, & DTS-HD, DTS-HD Master Audio, and the DTS logos are
trademarks of DTS, Inc. Product includes software. © DTS, Inc. All Rights Reserved.
ABOUT DIVX VIDEO : DivX® is a digital video format created by DivX,Inc. This is an official
•
DivX Certified device that plays DivX video. Visit www.divx.com for more information and
software tools to convert your files into DivX video.
ABOUT DIVX VIDEO-ON-DEMAND : This DivX Certified® device must be registered in order to play
•
DivX Video-on-Demand (VOD) content. To generate the registration code, locate the DivX VOD section
in the device setup menu. Go to vod.divx.com with this code to complete the registration process and
learn more about DivX VOD.
DivX Certified to play DivX video up to HD 1080p, including premium content.
•
The product unit accompanying this user manual is licensed under certain intellectual property rights of
•
certain third parties. This product is covered by one or more of the following U.S. patents : 5,060,220
5,457,669 5,561,649 5,705,762 6,043,912 6,438,099 6,467,061 6,556,521 6,578,163 6,697,307
6,728,474 6,771,891 6,894,963 6,895,593 6,937,815 6,996,327 7,009,926 7,085,221 7,088,649
7,092,327 7,099,566 7,123,564 7,142,493 7,142,495 7,145,861 7,146,624 7,151,729 7,161,879
7,164,647 7,167,437 7,173,891 7,177,250 7,194,187 7,203,891 7,209,423 7,210,067 7,228,062
7,245,566 7,245,567 7,257,065 7,263,045 7,269,110 7,272,086 7,272,106 7,280,460 7,283,729
7,286,454 7,304,938
This license is limited to private non-commercial use by end-user consumers for licensed contents.
•
No rights are granted for commercial use. The license does not cover any product unit other than this
product unit and the license does not extend to any unlicensed product unit or process conforming to
ISO/IEC 11172-3 or ISO/IEC 13818-3 used or sold in combination with this product unit.
The license only covers the use of this product unit to encode and/or decode audio files conforming to
the ISO/IEC 11172-3 or ISO/IEC 13818-3. No rights are granted under this license for product features
or functions that do not conform to the ISO/IEC 11172-3 or ISO/IEC 13818-3.
Open Source License Notice
•
In the case of using open source software, Open Source Licenses are available on the product
-
menu.
Page 65

Contact SAMSUNG WORLD WIDE
If you have any questions or comments relating to Samsung products, please contact the SAMSUNG
customer care center.
Area Contact Center
`
North America
Canada 1-800-SAMSUNG (726-7864) www.samsung.com
Mexico
U.S.A 1-800-SAMSUNG (726-7864) www.samsung.com
`
Latin America
Argentine 0800-333-3733 www.samsung.com
Brazil
Chile 800-SAMSUNG (726-7864) www.samsung.com
Nicaragua 00-1800-5077267 www.samsung.com
Honduras 800-7919267 www.samsung.com
Costa Rica 0-800-507-7267 www.samsung.com
Ecuador 1-800-10-7267 www.samsung.com
El Salvador 800-6225 www.samsung.com
Guatemala 1-800-299-0013 www.samsung.com
Jamaica 1-800-234-7267 www.samsung.com
Panama 800-7267 www.samsung.com
Puerto Rico 1-800-682-3180 www.samsung.com
Rep. Dominica 1-800-751-2676 www.samsung.com
Trinidad &
Tobago
Venezuela 0-800-100-5303 www.samsung.com
Colombia 01-8000112112 www.samsung.com
`
Europe
Austria
Belgium 02-201-24-18
Czech
Denmark 70 70 19 70 www.samsung.com
Finland 030 - 6227 515 www.samsung.com
France 01 48 63 00 00 www.samsung.com
Germany
Hungary 06-80-SAMSUNG (726-7864) www.samsung.com
Italia 800-SAMSUNG (726-7864) www.samsung.com
Luxemburg 261 03 710 www.samsung.com
Netherlands
Norway 815-56 480 www.samsung.com
Poland
Portugal
Slovakia 0800-SAMSUNG (726-7864) www.samsung.com
Spain
Sweden 0771 726 7864 (SAMSUNG) www.samsung.com
U.K
Eire 0818 717100 www.samsung.com
01-800-SAMSUNG (726-7864)
0800-124-421
4004-0000
1-800-SAMSUNG (726-7864) www.samsung.com
0810 - SAMSUNG
(7267864, € 0.07/min)
800 - SAMSUNG
(800-726786)
01805 - SAMSUNG
(726-7864 € 0,14/Min)
0900-SAMSUNG
(0900-7267864) (€ 0,10/Min)
0 801 1SAMSUNG (172678)
022-607-93-33
80820-SAMSUNG (726-7864)
902 - 1 - SAMSUNG
(902 172 678)
0845 SAMSUNG (7267864) www.samsung.com
Web Site
www.samsung.com
www.samsung.com
www.samsung.com
www.samsung.com/
be (Dutch)
www.samsung.com/
be_fr (French)
www.samsung.com
www.samsung.com
www.samsung.com
www.samsung.com
www.samsung.com
www.samsung.com
Area Contact Center
Switzerland
Lithuania 8-800-77777 www.samsung.com
Latvia 8000-7267 www.samsung.com
Estonia 800-7267 www.samsung.com
`
CIS
Russia 8-800-555-55-55 www.samsung.com
Georgia 8-800-555-555
Armenia 0-800-05-555
Azerbaijan 088-55-55-555
Kazakhstan 8-10-800-500-55-500
Uzbekistan 8-10-800-500-55-500 www.samsung.com
Kyrgyzstan 00-800-500-55-500 www.samsung.com
Tadjikistan 8-10-800-500-55-500 www.samsung.com
Ukraine 0-800-502-000
Belarus 810-800-500-55-500
Moldova 00-800-500-55-500
`
Asia Pacific
Australia 1300 362 603 www.samsung.com
New Zealand
China
Hong Kong (852) 3698-4698
India
Indonesia
Japan 0120-327-527 www.samsung.com
Malaysia 1800-88-9999 www.samsung.com
Philippines
Singapore 1800-SAMSUNG (726-7864) www.samsung.com
Thailand
Taiwan 0800-329-999 www.samsung.com
Vietnam 1 800 588 889 www.samsung.com
`
Middle East & Africa
Turkey 444 77 11 www.samsung.com
South Africa 0860-SAMSUNG (726-7864) www.samsung.com
U.A.E
Bahrain 8000-4726
Jordan 800-22273
0848 - SAMSUNG (7267864,
CHF 0.08/min)
0800 SAMSUNG (0800 726 786)
400-810-5858
010-6475 1880
3030 8282
1800 110011
1800 3000 8282
1800 266 8282
0800-112-8888
021-5699-7777
1-800-10-SAMSUNG
(726-7864)
1-800-3-SAMSUNG
(726-7864)
1-800-8-SAMSUNG
(726-7864)
02-5805777
1800-29-3232
02-689-3232
800-SAMSUNG (726-7864) www.samsung.com
Web Site
www.samsung.com/ch
www.samsung.com/
ch_fr/ (French)
www.samsung.ua
www.samsung.com/
ua_ru
www.samsung.com
www.samsung.com
www.samsung.com/
hk
www.samsung.com/
hk_en/
www.samsung.com
www.samsung.com
www.samsung.com
www.samsung.com
Page 66

Correct Disposal of This Product (Waste Electrical & Electronic Equipment)
(Applicable in the European Union and other European countries with separate collection systems)
This marking on the product, accessories or literature indicates that the product and its electronic accessories (e.g.
charger, headset, USB cable) should not be disposed of with other household waste at the end of their working life.
To prevent possible harm to the environment or human health from uncontrolled waste disposal, please separate
these items from other types of waste and recycle them responsibly to promote the sustainable reuse of material
resources.
Household users should contact either the retailer where they purchased this product, or their local government office,
for details of where and how they can take these items for environmentally safe recycling.
Business users should contact their supplier and check the terms and conditions of the purchase contract.
This product and its electronic accessories should not be mixed with other commercial wastes for disposal.
AK68-01854U
Page 67

BD-C5500
Проигрыватель дисков Blu-ray
руководство пользователя
представьте возможности
Благодарим Вас за приобретение этого продукта компании Samsung.
Для получения более полного обслуживания зарегистрируйте
свое устройство по адресу:
www.samsung.com/register
Page 68

2 Русский
Основные характеристики
Особенности дисков Blu-ray
Диски Blu-ray поддерживают видео наивысшего
качества в индустрии (HD) – Большая емкость
подразумевает полное отсутствие компромиссов в
вопросе качества видео. Более того, диск Blu-ray
обладает тем же размером и видом, что и DVD-диск.
Приведенные ниже функции дисков Blu-ray
зависят от записанного на конкретный диск
программного обеспечения и могут изменяться.
Внешний вид меню и навигация по его функциям
также будут изменяться от диска к диску.
Не все диски будут обладать описанными ниже
функциями.
Основные факты о видеосигнале
Формат BD-ROM поддерживают три самых
современных видеокодека: AVC, VC-1 и MPEG-2.
Также поддерживается видеосигнал с
разрешением телевидения высокой четкости:
1920 x 1080 Высокая четкость
•
1280 x 720 Высокая четкость
•
Для воспроизведения с высокой
четкостью
Для просмотра содержимого высокой четкости
на Диск Blu-ray необходима технология HDTV
(телевидение высокой четкости).
Для просмотра содержимого высокой четкости
некоторых дисков необходимо использование
гнезда HDMI OUT.
В зависимости от поддерживаемого вашим
телевизором разрешения видеосигнала,
возможность просмотра контента высокой
четкости, записанного на диски Blu-ray, может
быть ограниченной.
Субтитры
В зависимости от содержимого диска Bluray, может иметься возможность выбора для
субтитров различных стилей, размеров и цветов
шрифтов. Кроме того, субтитры могут быть
анимированными, прокручиваться по экрану
или постепенно появляться и исчезать.
BD-LIVE
Чтобы использовать разнообразные услуги,
предоставляемые производителем диска,
можно использовать диск Blu-ray с поддержкой
функции BD-LIVE через сетевое подключение.
Функции проигрывателя дисков
Blu-ray
Служба Internet@TV
Подключившись к сети, пользователь может
загрузить различные платные или бесплатные
приложения.
Пользователь получит доступ к различным
службам и содержимому Интернет, включая
новости, прогноз погоды, котировки акций,
игры, фильмы и музыку.
Интерактивность
Некоторые диски Blu-ray могут содержать
анимированные меню или простые игры.
Слайд-шоу, доступные для просмотра
пользователем
Диски Blu-ray позволяют просматривать
различные неподвижные изображения с
одновременным воспроизведением звука.
Page 69

Русский 3
Меры предосторожности
Предупреждение
ВО ИЗБЕЖАНИЕ ПОРАЖЕНИЯ ЭЛЕКТРИЧЕСКИМ ТОКОМ, НЕ СНИМАЙТЕ КОЖУХ (ИЛИ ЗАДНЮЮ КРЫШКУ).
ВНУТРИ НЕТ ДЕТАЛЕЙ, ОБСЛУЖИВАЕМЫХ ПОЛЬЗОВАТЕЛЕМ.
ДЛЯ ТЕХНИЧЕСКОГО ОБСЛУЖИВАНИЯ ОБРАЩАЙТЕСЬ К КВАЛИФИЦИРОВАННОМУ СПЕЦИАЛИСТУ.
ВНИМАНИЕ
Опасность поражения электрическим
током! Не открывать!
Этот символ указывает, что внутри данного
изделия имеется "опасное напряжение",
которое может привести к поражению
электрическим током или травме.
Не устанавливайте это изделие в ограниченном пространстве,
например, в книжную полку или аналогичное место.
ПРЕДУПРЕЖДЕНИЕ
Во избежание повреждения, которое может
привести к пожару или поражению электрическим
током не допускайте попадания данного изделия
под дождь или в условия высокой влажности.
ВНИМАНИЕ
В BLU-RAY ПРОИГРЫВАТЕЛЕ ИСПОЛЬЗУЕТСЯ ЛАЗЕР С
НЕВИДИМЫМ ЛУЧОМ, КОТОРЫЙ МОЖЕТ ПРИВЕСТИ К ОПАСНОМУ
ОБЛУЧЕНИЮ, ЕСЛИ ОН НАПРАВЛЕН НА ЧЕЛОВЕКА. ОБЯЗАТЕЛЬНО
УБЕДИТЕСЬ В ТОМ, ЧТО ВЫ ПРАВИЛЬНО ПОЛЬЗУЙТЕСЬ BLU-RAY
ПРОИГРЫВАТЕЛЕМ В СООТВЕТСТВИИ С ИНСТРУКЦИЕЙ.
ВНИМАНИЕ
В ЭТОМ ИЗДЕЛИИ ИМЕЕТСЯ ЛАЗЕР. ИСПОЛЬЗОВАНИЕ
ОРГАНОВ РЕГУЛИРОВКИ ИЛИ ВЫПОЛНЕНИЕ ПРОЦЕДУР,
НЕ ОПИСАННЫХ В ДАННОЙ ИНСТРУКЦИИ, МОЖЕТ
ПРИВЕСТИ К ОПАСНОМУ ОБЛУЧЕНИЮ ЛАЗЕРОМ. НЕ
ОТКРЫВАЙТЕ КРЫШКИ И НЕ ПЫТАЙТЕСЬ РЕМОНТИРОВАТЬ
САМОСТОЯТЕЛЬНО. ДЛЯ ТЕХНИЧЕСКОГО ОБСЛУЖИВАНИЯ
ОБРАЩАЙТЕСЬ К КВАЛИФИЦИРОВАННОМУ СПЕЦИАЛИСТУ.
Данное изделие удовлетворяет требованиям положений ЕС, когда
для соединения изделия с другим оборудованием используются
экранированные кабели и разъемы. Для предотвращения
электромагнитных помех работе другого электронного
оборудования, такого, как радиоприемники и телевизоры,
используйте для соединений экранированные кабели и разъемы.
ВАЖНЫЕ ЗАМЕЧАНИЯ
Сетевой шнур этого оборудования снабжен прессованной
вилкой, содержащей плавкий предохранитель. Номинал
предохранителя указан на той поверхности вилки, где
расположены контактные штыри.
Если требуется замена предохранителя, должен использоваться
плавкий предохранитель того же номинала, соответствующий
стандарту BS1362.
ВНИМАНИЕ: ВО ИЗБЕЖАНИЕ ПОРАЖЕНИЯ
ЭЛЕКТРИЧЕСКИМ ТОКОМ НЕ ОТКРЫВАЙТЕ КРЫШКУ (ИЛИ
ЗАДНЮЮ ПАНЕЛЬ) УСТРОЙСТВА. ВНУТРИ ОТСУТСТВУЮТ
ДЕТАЛИ, ОБСЛУЖИВАНИЕ КОТОРЫХ МОЖЕТ ВЫПОЛНЯТЬ
ПОЛЬЗОВАТЕЛЬ. ОБСЛУЖИВАНИЕ ДОЛЖНО ВЫПОЛНЯТЬСЯ
КВАЛИФИЦИРОВАННЫМИ СПЕЦИАЛИСТАМИ.
Никогда не пользуйтесь вилкой со снятой крышкой
отделения для предохранителя. Если эта крышка
съемная и потребовалась ее замена, она должна иметь
такой же цвет, как цвет предохранителя, вставляемого в
отделение для предохранителя. Запасные крышки можно
приобрести через дилера, продавшего вам систему.
Если вилка, входящая в комплект поставки, не
подходит к сетевым розеткам, установленным
в вашем доме, или если сетевой шнур слишком
короток для подключения к розетке, вы должны
подобрать соответствующий удлинитель или
проконсультироваться с вашим дилером.
Однако если нет никакой альтернативы, кроме как
отрезать вилку, выньте из нее предохранитель, а затем
избавьтесь от вилки с соблюдением осторожности.
Не вставляйте отрезанную вилку в розетку, так как
имеется опасность поражения электрическим током
при прикосновении к оголенному гибкому проводу.
Чтобы полностью отсоединить изделие от сети переменного тока,
необходимо выдернуть вилку сетевого шнура из розетки, поэтому
к вилке сетевого шнура доложен быть обеспечен легкий доступ.
На изделие, к которому прилагается данная Инструкция
для пользователя, предоставлена лицензия определенными
третьими сторонами, обладающими определенными правами
на интеллектуальную собственность. Эта лицензия ограничена
правом на частное некоммерческое использование
лицензированного содержимого конечными пользователями.
Не предоставляется никаких прав на коммерческое использование.
Лицензия не распространяется ни на какое другое изделие кроме
данного изделия и, кроме того, она не распространяется на любое
не лицензированное изделие или процесс, соответствующие
стандартам ISO/IEC 11172-3 или ISO/IEC 13818-3, используемые
или продаваемые в сочетании с этим изделием. Лицензия
распространяется только на использование этого изделия для
кодирования и/или декодирования аудио файлов, соответствующих
стандартам ISO/IEC 11172-3 или ISO/IEC 13818-3. Эта лицензия
не дает никаких прав на возможности и функции изделия, не
соответствующие стандартам ISO/IEC 11172-3 или ISO/IEC 13818-3.
Этот символ указывает, что в документации на
изделие имеется важная инструкция.
02 Меры предосторожности
Page 70

4 Русский
Меры предосторожности
Отсоединяйте проигрыватель во время
Меры Предосторожности
Важные инструкции по технике
безопасности
Перед использованием изделия внимательно
прочтите данную Инструкцию по эксплуатации.
Выполняйте все перечисленные ниже инструкции
по технике безопасности.
Держите Инструкцию под рукой для обращения к
ней в последующем.
Прочтите данные инструкции.
1.
Сохраните данные инструкции.
2.
Принимайте во внимание все
3.
предупреждения.
Следуйте всем инструкциям.
4.
Не используйте проигрыватель вблизи воды.
5.
Выполняйте чистку изделия только сухой тканью.
6.
Не загораживайте никакие вентиляционные
7.
отверстия. Выполните установку изделия в
соответствии с инструкциями изготовителя.
Не размещайте устройство вблизи каких-
8.
либо источников тепла, таких как радиаторы,
обогреватели или другие проигрыватели
(включая усилители), выделяющие тепло.
Полярная вилка или вилка с заземлением имеет
9.
важное назначение для обеспечения безопасности.
Вилка поляризованного типа имеет два ножевых
контакта, один из которых шире другого. Вилка
заземляющего типа имеет два ножевых контакта
и третий заземляющий контакт. Широкое лезвие
или третий заземляющий контакт предусмотрены
для вашей безопасности. Если поставляемая
вместе с аппаратом вилка не подходит для вашей
розетки, попросите квалифицированного электрика
заменить старую розетку.
Предохраняйте шнур питания от деформации
10.
или защемления в области вилки, электрических
розеток и мест их прикрепления к проигрывателю.
Пользуйтесь только теми приспособлениями/
11.
принадлежностями, которые рекомендованы
изготовителем.
Используйте только подставку,
12.
треногу, кронштейн или стол,
которые указаны изготовителем
или прилагаются к
проигрывателю. Во избежание
получения травм вследствие опрокидывания
тележки с проигрывателем соблюдайте
осторожность при ее передвижении.
13.
грозы или если он не используется в
течение длительного времени.
Техобслуживание должно производиться
14.
квалифицированными специалистами
по обслуживанию. Техобслуживание
необходимо при любом повреждении
проигрывателя, например, при
повреждении шнура питания или вилки,
при попадании жидкости или предметов
внутрь проигрывателя, при попадании
проигрывателя под дождь или при его
сильном увлажнении, сбоях в работе или
падении.
Хранение и обращение с дисками
Обращение с дисками
Форма диска
Используйте диски
•
правильной формы.
Использование дисков
нестандартной формы может привести к
повреждению устройства.
Как следует держать диск
Не прикасайтесь к записываемой
•
поверхности диска.
Диски Blu-ray
Если устройство не используется в течение
•
долгого времени, извлеките диск Blu-ray из
устройства и уберите его в футляр.
Старайтесь не оставлять отпечатки пальцев
•
или царапины на поверхности диска Blu-ray.
Диски DVD-VIDEO, аудио компактдиски (CD-DA)
Удаляйте загрязнения на диске мягкой тканью.
•
Page 71

Русский 5
02 Меры предосторожности
Обязательно извлекайте диск и выключайте
Хранение диска
Будьте осторожны, чтобы не повредить диск,
поскольку данные, записанные на данном диске,
могут быть легко потеряны из-за условий хранения.
Не подвергайте воздействию прямых
•
солнечных лучей.
Храните в хорошо вентилируемом месте.
•
Храните в вертикальном положении.
•
Храните диск в чистом чехле.
•
При перемещении устройства из холодного места
•
сразу в теплое на рабочих деталях и линзах может
образоваться конденсат, что может привести к сбоям
при воспроизведении дисков. При возникновении
подобных проблем не подключайте кабель питания к
розетке в течение двух часов.
Затем вставьте диск и повторите попытку
воспроизведения.
Меры предосторожности при использовании
Не пишите на стороне для печати шариковой
•
ручкой или карандашом.
Не используйте аэрозоли для очистки
•
пластинок или антистатические аэрозоли.
Не следует также использовать летучие химические
вещества, например бензин или растворитель.
Не наклеивайте на диски ярлыки или наклейки. (Не
•
используйте диски, на поверхности которых осталось клеящее
вещество от клейкой ленты или остатки старых наклеек.)
Не используйте протекторы или накладки против царапин.
•
Не используйте диски, печать на которых выполнена с
•
помощью принтеров для печати наклеек, доступных на рынке.
Не загружайте деформированные или поцарапанные диски.
•
Перед подключением других компонентов к
•
устройству обязательно выключите их.
Не перемещайте устройство во время
•
воспроизведения диска, поскольку это может привести
к его повреждению или появлению на нем царапин, а
также повреждению внутренних деталей устройства.
Не ставьте на устройство вазу с цветами или
•
мелкие металлические предметы.
Будьте осторожны - не допускайте попадания
•
руки в лоток для диска.
Не вставляйте в лоток для диска посторонние предметы.
•
Внешнее воздействие, например молния или
•
статическое электричество, может повлиять на
нормальную работу данного устройства. В данном
случае выключите и снова включите устройство с
помощью кнопки POWER или отключите, а затем
снова подключите кабель питания переменного тока к
розетке питания переменного тока. Устройство будет
работать надлежащим образом.
•
устройство после использования.
Отключите кабель питания переменного тока
•
от розетки питания переменного тока, если
не планируется использовать устройство в
течение длительного времени.
Для очистки диска протирайте его
•
по прямой линии в направлении от
внутренней к внешней части диска.
Не допускайте попадания
•
жидкости на устройство.
Если сетевой шнур подключен к электророзетке,
•
устройство даже в выключенном состоянии
использует электроэнергию (режим ожидания).
Устройство не следует подвергать воздействию
•
жидкостей, на него не стоит ставить предметы,
заполненные жидкостью, например вазы.
Сетевая вилка используется в качестве устройства для
•
отсоединения от сети питания. Она должна все время
находиться в легкодоступном месте.
Обслуживание корпуса
В целях безопасности обязательно отключите
кабель питания переменного тока от розетки
питания переменного тока.
Не используйте для чистки бензол, растворитель
•
для краски или другие растворители.
Протирайте корпус мягкой тканью.
•
Ограничения воспроизведения
Данное устройство может реагировать
•
не на все рабочие команды, поскольку
некоторые диски Blu-ray, DVD и компактдиски поддерживают только определенные
или ограниченные функции во время
воспроизведения.
Обратите внимание, что это не является
дефектом устройства.
Компания Samsung не гарантирует, что на данном
•
устройстве будут воспроизводиться все диски с
логотипом Blu-ray, DVD или CD, поскольку форматы
дисков развиваются. Кроме того, при создании
программного обеспечения или дисков Blu-ray, DVD
и CD возможно возникновение проблем и ошибок.
Обратитесь в центр поддержки покупателей SAMSUNG,
если у вас возникнут вопросы или проблемы при
воспроизведении дисков Blu-ray, DVD или CD на
данном устройстве. Кроме того, дополнительные
сведения об ограничении воспроизведения можно
найти в следующих разделах настоящего руководства
пользователя.
Page 72

6 Русский
Содержание
ХАРАКТЕРИСТИК
ОСНОВНЫЕ
МЕРЫ ПРЕДОСТОРОЖНОСТИ
НАЧАЛО РАБОТЫ
2 Особенности дисков Blu-ray
И
2
Функции проигрывателя дисков Blu-ray
3 Предупреждение
4
Меры Предосторожности
4 Важные инструкции по технике безопасности
4 Хранение и обращение с дисками
4 Обращение с дисками
10 Перед прочтением руководства
пользователя
10 Типы воспроизводимых дисков и содержимого.
10
11
11
12
13
13
14
14 Принадлежности
15
16
17
18
18 Знакомство с пультом дистанционного
19
19
Типы невоспроизводимых дисков
Совместимость дисков Blu-ray
Типы дисков
Поддерживаемые форматы файлов
Региональный код
Авторское право
Логотипы дисков, доступных для
воспроизведения
Передняя панель
Дисплей передней панели
Задняя панель
Пульт дистанционного управления
управления
Настройка пульта дистанционного управления
Управляемые коды ТВ
ПОДКЛЮЧЕНИЯ
20 Подключение к телевизору
20 Вариант 1. Подключение к телевизору с
21
22
23
помощью кабеля HDMI - Наилучшее качество
(Рекомендуется)
Вариант 2. Подключение к телевизору с
помощью кабеля DVI - Наилучшее качество
(Рекомендуется)
Вариант 3. Подключение к телевизору
(Компонентный сигнал) - Лучшее качество
Вариант 4. Подключение к телевизору (Видео) Хорошее качество
Page 73

Русский 7
РУССКИЙ
ПОДКЛЮЧЕНИЯ
24 Подключение к аудиосистеме
24 Вариант 1. Подключение к аудиосистеме
25
25
26 Подключение к сети
(усилитель с поддержкой HDMI) - Наилучшее
качество (Рекомендуется)
Вариант 2. Подключение к аудиосистеме (Dolby
Digital, усилитель DTS) - Лучшее качество
Вариант 3. Подключение к аудиосистеме
(двухканальный усилитель) - Хорошее качество
НАСТРОЙКА
27 Подготовка к использованию
(начальная настройка)
28
Настройка меню
29
Дисплей
29 Формат ТВ-экрана
29
29
31
31
31
31
31
31 Аудио
31 Цифровой выход
32
33
33
33
33 Система
33 Начальная настройка
33
33
34
34
34
35
35 Настройка сети
35 Настройка сети
36
36
BD Wise (только продукты Samsung)
Разрешение
Формат HDMI
Видеокадр(24Fs)
Прогрессивная развертка
Стабилизация изображения
Насыщенный цвет HDMI
Субдискретизация ИКМ
Упр. динамическим диапазоном
Режим смешивания звуковых каналов
DTS Neo:6
Размер экрана Internet@TV
Anynet+ (HDMI-CEC)
Управл. BD-данными
Часы
Регистрация DivX®
DivX® Дезактивация
Состояние сети
Интернетсоединение BD-Live
Page 74

8 Русский
Содержание
НАСТРОЙКА
ОСНОВНЫЕ ФУНКЦИИ
37 Язык
37
Безопасность
37 Родит. ограничения
37
37 Общее
37 Фон
38
38
38
38 Поддержка
38 Обновление ПО
39
40 Воспроизведение диска
40 Воспроизведение
40
40 Использование меню диска/Меню названий/
40 Использование меню диска
40
40
41
41 Использование функций поиска и пропуска
41 Поиск необходимой сцены
41
41 Замедленное воспроизведение/Покадровое
41 Замедленное воспроизведение
41
42 Повторное воспроизведение
42 Повторное воспроизведение названия или
42
42 Использование кнопки TOOLS
42 Переход к необходимой сцене напрямую
43
43
43
43
44
Изменение пароля
Экон. энергии
Передний дисплей
Звук при ВКЛ/ВЫКЛ
Обращение в Samsung
Структура диска
Всплывающего меню
Использование меню названий
Воспроизведение списка сюжетов
Использование всплывающего меню
Пропуск глав
воспроизведение дисков
Покадровое воспроизведение
главы
Повторное воспроизведение раздела
Выбор языка звуковой дорожки
Выбор языка субтитров
Изменение ракурса камеры
Выбор настроек изображения
Настройка функции BONUSVIEW
Page 75

Русский 9
РУССКИЙ
ОСНОВНЫЕ ФУНКЦИИ
44 Прослушивание музыки
44 Кнопки пульта дистанционного управления,
45
45
45
46 Воспроизведение диска с изображениями
46 Воспроизведение диска с файлами JPEG
46
47 Воспроизведение файлов с устройства
используемые для воспроизведения музыки
Воспроизведение аудио компакт-дисков (CD-
DA)/MP3
Повторное воспроизведение аудио компакт-
диска/диска MP3
Список воспроизведения
Использование кнопки TOOLS
хранения USB
СЕТЕВЫЕ СЛУЖБЫ
ПРИЛОЖЕНИЕ
48 Использование службы Internet@TV
48 Начало работы с Internet@TV
50
51
52 Служба BD-LIVE™
52
52
54 Поиск и устранение неисправностей
57
58 Уведомление о соответствии стандарту и
58
59
60
Параметры
Samsung Apps
Уведомление об обновлении программного
обеспечения
Использование функции AllShare
Технические характеристики
совместимости
Защита от копирования
Network Service Disclaimer
Лицензия
Page 76

10 Русский
Начало работы
Перед прочтением руководства пользователя
Типы воспроизводимых дисков и содержимого.
Термин Логотип Значок Определение
BD-ROM
BD-RE/-R
DVD-VIDEO
DVD-RW(V)
DVD-R
DVD+RW
DVD+R
Аудио
компакт-диск
MP3
WMA
JPEG
DivX
MKV
MP4
ПРИМЕЧАНИЕ
✎
Данное устройство может не поддерживать воспроизведение определенных дисков CD-RW/-R и DVD-R из-за типа диска или
▪
условий записи.
Если диск DVD-RW/-R записан в видеоформат DVD неправильно, он не будет воспроизводиться.
▪
h
z
Z
y
o
-
w
-
G
-
x
Это означает работу с использованием BD-ROM.
Это означает функцию, доступную для данных на дисках BD-RE/-R, записанных в формате
BD-RE.
Это означает функцию, доступную для DVD-VIDEO.
Это означает функцию, доступную для дисков DVD+RW или DVD-RW(V)/DVD-R/+R,
которые были записаны и закрыты.
Это означает функцию, доступную для аудиодисков CD-RW/-R (формат CD-DA).
Это означает функцию, доступную для дисков CD-RW/-R, DVD-RW/-R или внешних
носителей USB с содержимым в формате MP3 или WMA.
Это означает функцию, доступную для дисков CD-RW/-R, DVD-RW/-R или внешних
носителей USB с содержимым в формате JPEG.
Это означает функцию, доступную для дисков CD-RW/-R, DVD-RW/-R или внешних
носителей USB с содержимым в формате DivX, MKV, MP4.
Типы невоспроизводимых дисков
HD DVD
•
Диски DVD-ROM/PD/
•
MV и т.п.
Диски DVD-RAM
•
Диски Super Audio CD
•
(кроме слоя CD)
•
•
Диски DVD-RW
(режим VR)
CVD/CD-ROM/CDV/
CD-G/CD-I/LD
(CD-G: воспроизводится
только аудио без графики)
DVD-R 3,9 ГБ для
•
авторских записей
Page 77

Русский 11
03 Начало работы
ПРИМЕЧАНИЕ
✎
Некоторые коммерческие диски DVD, приобретенные
▪
за пределами соответствующего региона, могут не
воспроизводиться на данном устройстве. При попытке
воспроизведения таких дисков отобразится сообщение
"Этот диск нельзя воспроизвести." или "Не удается
прочитать диск. Проверьте региональный код диска."
Воспроизведение может быть невозможно при
▪
использовании определенных типов дисков, а также при
выполнении таких операций, как изменение угла или
настройка форматного соотношения.
Сведения о диске указаны на коробке диска. Обращайтесь
к ним при необходимости.
Не допускайте загрязнения или появления царапин на диске.
▪
Отпечатки пальцев, загрязнения, пыль, царапины или
налет от сигаретного дыма на рабочей поверхности
могут сделать диск непригодным для воспроизведения.
При воспроизведении главы BD-J загрузка может занять
▪
больше времени, чем при воспроизведении обычной главы,
или некоторые функции могут выполняться медленнее.
Данное устройство может реагировать не на все рабочие
▪
команды, поскольку некоторые диски Blu-ray, DVD и
компакт-диски поддерживают только определенные или
ограниченные функции во время воспроизведения.
Обратите внимание, что это не является дефектом
устройства.
Компания Samsung не гарантирует, что на данном
▪
устройстве будут воспроизводиться все диски с
логотипом Blu-ray, DVD или CD, поскольку форматы
дисков развиваются. Кроме того, при создании
программного обеспечения или самих дисков Blu-ray,
DVD и CD возможно возникновение проблем и ошибок.
Обратитесь в центр поддержки покупателей SAMSUNG,
если у вас возникнут вопросы или проблемы при
воспроизведении дисков Blu-ray, DVD или CD на
данном устройстве.
Кроме того, дополнительные сведения об ограничении
воспроизведения можно найти в следующих разделах
настоящего руководства пользователя.
Совместимость дисков Blu-ray
Диск Blu-ray имеет новый и более совершенный
формат.
Таким образом, возможно возникновение
проблем, связанных с совместимостью дисков.
Не все диски совместимы и не каждый диск
будет воспроизводиться. Дополнительную
информацию см. в разделе "Уведомление о
соответствии стандарту и совместимости"
данного руководства пользователя.
Типы дисков
BD-ROM
Эти диски Blu-ray предназначены только для
воспроизведения.
На данном устройстве могут воспроизводиться
предварительно записанные диски BD-ROM,
предназначенные для коммерческих целей.
BD-RE/-R
Эти диски Blu-ray предназначены для записи и
воспроизведения.
На данном устройстве можно воспроизводить диски
BD-RE/-R, записанные другими совместимыми
устройствами записи дисков Blu-ray.
DVD-VIDEO
На данном устройстве могут воспроизводиться
•
предварительно записанные диски DVD (диски
DVD-VIDEO) с фильмами.
При переключении с первого на второй
•
слой двухслойного диска DVD-VIDEO может
наблюдаться кратковременное искажение
изображения и звука. Это не является
неисправностью устройства.
DVD-RW
На данном устройстве могут воспроизводиться
диски DVD-RW, запись и закрытие сессии
которых выполнялись с помощью устройства
записи DVD.
Возможность воспроизведения зависит от
условий записи.
DVD-R
На данном устройстве могут воспроизводиться
диски DVD-R, запись и закрытие сессии
которых выполнялись с помощью устройства
записи DVD. Возможность воспроизведения
зависит от условий записи.
DVD+RW
На данном устройстве можно воспроизводить
•
диски DVD+RW, запись которых выполнялись
с помощью устройства записи DVD.
Возможность воспроизведения зависит от
условий записи.
Page 78

12 Русский
Начало работы
DVD+R
На данном устройстве могут
•
воспроизводиться диски DVD+R, запись
и закрытие сессии которых выполнялись
с помощью устройства записи DVD.
Возможность воспроизведения зависит от
условий записи.
Аудио компакт-диски (CD-DA)
На данном устройстве могут воспроизводиться
•
аудиодиски CD-RW/-R в формате CD-DA.
На данном устройстве воспроизведение
•
отдельных дисков CD-RW/-R может быть
невозможно из-за условий записи.
CD-RW/-R
Используйте диск CD-RW/-R емкостью
•
700МБ(80 минут).
По возможности не используйте диски емкостью
800МБ(90 минут) или диски большей емкости.
Они могут не воспроизводиться.
Если диск CD-RW/-R был записан без
•
закрытия сессии, то при воспроизведении
начала диска могут происходить задержки
или все записанные файлы могут не
воспроизводиться.
Некоторые диски CD-RW/-R могут не
•
воспроизводиться на данном устройстве.
Это зависит от устройства, с помощью
которого выполнялась запись. Возможность
воспроизведения содержимого, записанного
на диски CD-RW/-R с компакт-дисков
для личного использования, зависит от
содержимого и типа дисков.
Поддерживаемые форматы файлов
Поддержка видеофайлов
Расширение файла Контейнер Видеокодек Аудиокодек Разрешение
1920x1080
1920x1080
1920x1080
1920x1080
1920x1080
1920x1080
1920x1080
1920x1080
1920x1080
1920x1080
1920x1080
1920x1080
1920x1080
1920x1080
1920x1080
*.avi
*.mkv
*.wmv
*.mp4
*.mpg
*.mpeg
AVI
MKV
WMV
MP4
PS
Divx 3.11/4.x/5.1/6.0
XviD
MP4v3
H.264 BP/MP/HP
VC-1 AP(wmv1)
DivX 5.1/6.0
XviD
H.264 BP/MP/HP
VC-1 AP
VC-1 SM
MP4 (mp4v)
H.264 BP/MP/HP
MPEG1
MPEG2
H.264 BP/MP/HP
MP3
AC3
DTS
WMA
PCM
MP3
AC3
DTS
WMA
AAC
MP1, 2
AC3
DTS
Page 79

Русский 13
03 Начало работы
Поддержка музыкальных файлов
Расширение
файла
*.mp3
*.wma
Контейнер
MP3
WMA
Аудиокодек
MP3 -
WMA
Диапазон
поддержки
Совместимость с
WMA версии 10
*
Частота дискретизации
(в кГц) - 8, 11, 16,
22, 32, 44,1, 48
*
Скорость передачи битов
- все скорости передачи
битов в диапазоне от 5
до 384 Кбит/с
Формат AVCHD (Advanced Video Codec
High Definition)
На данном устройстве могут воспроизводиться
•
диски в формате AVCHD. Диски такого формата,
как правило, используются и записываются с
помощью видеокамер.
Формат AVCHD - это формат высокого
•
разрешения для цифровых видеокамер.
Формат MPEG-4 AVC/H.264 подходит для
•
записи изображений с более высокой
степенью сжатия, чем при использовании
традиционных форматов сжатия
изображений.
В некоторых дисках AVCHD используется
•
формат "x.v.Color".
На данном устройстве могут воспроизводиться
•
диски AVCHD в формате "x.v.Color".
"x.v.Color" является товарным знаком
•
корпорации Sony.
"AVCHD" и эмблема AVCHD являются
•
товарными знаками Matsushita Electronic
Industrial Co.,Ltd. и корпорации Sony.
ПРИМЕЧАНИЕ
✎
Некоторые диски в формате AVCHD не могут быть
▪
воспроизведены. Это зависит от условий записи.
Сессия диска формата AVCHD должна быть завершена.
Формат "x.v.Color" позволяет отображать большую
▪
палитру цветов, чем обычный диск DVD, записанный с
помощью видеокамеры.
Некоторые диски в формате DivX, MKV и MP4
▪
воспроизвести не получится. Это зависит от разрешения
видео и частоты кадров.
Региональный код
Как устройство, так и диски кодируются по регионам.
Для того, чтобы диск мог воспроизводиться,
эти коды должны совпадать. Если коды не
совпадают, диск воспроизводиться не будет.
Номер региона данного устройства указан на
задней панели устройства.
Тип диска
Blu-ray
DVD-VIDEO
Региональный
код
A
B
C
1
2
3
4
5
6
Область
Северная Америка, Центральная
Америка, Южная Америка, Корея,
Япония, Тайвань, Гонконг и Юговосточная Азия.
Европа, Гренландия, территории
Франции, Ближний Восток, Африка,
Австралия и Новая Зеландия.
Индия, Китай, Россия, Центральная
и Южная Азия.
США, территории США и Канада
Европа, Япония, Ближний Восток,
Египет, Южная Африка, Гренландия
Тайвань, Корея, Филиппины,
Индонезия, Гонконг
Мексика, Южная Америка,
Центральная Америка, Австралия,
Новая Зеландия, Тихоокеанские
острова, район Карибского моря
Россия, Восточная Европа, Индия,
большинство стран Африки,
Северная Корея, Монголия
Китай
Авторское право
© Samsung Electronics Co.,Ltd., 2010
Все права защищены. Никакая часть настоящего
руководства не может быть воспроизведена или
скопирована без предварительного письменного
согласия компании Samsung Electronics Co.,Ltd.
Page 80

14 Русский
Начало работы
79
MUTE
VOL CH
POWER
TV
POWER
BONUSVIEW
SOURCE
DISC MENU TITLE MENUMENU
INTERNET@
REPEAT
FULL SCREEN
SUBTITLE
AUDIO
INFO
POPUP
TOOLS
EXITRETURN
AK59-00104R
Логотипы дисков, доступных для воспроизведения
Диск Blu-ray DTS-HD Master Audio DivX Служба BD-LIVE
Dolby TrueHD
Система вещания PAL, принятая в
Великобритании, Франции, Германии и т.д.
Java
Принадлежности
Проверьте наличие прилагающихся принадлежностей, перечисленных ниже.
Аудио-/видеокабель Батареи для пульта дистанционного управления (размер AAA)
Руководство пользователя Пульт дистанционного управления
Page 81

Русский 15
03 Начало работы
Передняя панель
a
b c defhg
ЛОТОК ДЛЯ ДИСКА Открывается для принятия диска.
1
ДАТЧИК ПРИЕМА СИГНАЛА ПУЛЬТА
2
ДИСТАНЦИОННОГО УПРАВЛЕНИЯ
ДИСПЛЕЙ Отображение состояния воспроизведения, времени и т.д.
3
Кнопка ОТКРЫТЬ/ЗАКРЫТЬ Открытие и закрытие лотка для компакт-дисков.
4
КНОПКА ОСТАНОВКИ Остановка воспроизведения диска.
5
КНОПКА ВОСПРОИЗВЕДЕНИЯ/
6
ПАУЗЫ
КНОПКА ПИТАНИЯ Включение и выключение устройства.
7
USB-ХОСТ
8
ПРИМЕЧАНИЕ
✎
Обновление программного обеспечения с помощью гнезда хоста USB должно выполняться только с использованием накопителя USB.
▪
Для нормальной работы устройства USB, потребляющего более 500мА, необходим отдельный источник питания.
▪
Жесткий диск USB нельзя использовать для хранения базы данных (BD-LIVE).
▪
Прием сигналов пульта дистанционного управления.
Воспроизведение диска и пауза при воспроизведении.
Гнездо для подключения накопителя USB, который может использоваться как устройство
хранения при подключении к BD-LIVE. Его также можно использовать для обновления
программного обеспечения и воспроизведения содержимого MP3/JPEG/DivX/MKV/MP4.
Page 82

16 Русский
Начало работы
Дисплей передней панели
a b
ИНДИКАТОР
1
УСТАНОВЛЕННОГО ДИСКА
ИНДИКАТОР ТЕКУЩЕГО
2
ВРЕМЕНИ И СОСТОЯНИЯ
Загорается при загрузке или воспроизведении диска.
Отображение времени воспроизведения и текущего состояния.
Page 83

Русский 17
03 Начало работы
Задняя панель
b c
a d
f eg
WIRELESS LAN ADAPTER
1
LAN
2
HDMI OUT
3
COMPONENT OUT Подключение к оборудованию, имеющему компонентный видеовход.
4
VIDEO OUT Подключение входа внешнего оборудования с помощью видеокабеля.
5
AUDIO OUT Подключение к аудиовыходу внешнего оборудования с помощью аудиокабелей.
6
DIGITAL AUDIO OUT Подключение к ресиверу.
7
Гнездо для подключения накопителя USB, который может использоваться как устройство
хранения при подключении к BD-LIVE. Его также можно использовать для обновления
программного обеспечения и воспроизведения содержимого MP3/JPEG/DivX/MKV/MP4.
Используется для обновления сетевых служб (См. стр. 48-53), BD-LIVE и программного
обеспечения через сетевое соединение.
С помощью кабеля HDMI подсоедините выходной разъем HDMI к входному разъему
HDMI на телевизоре для получения наилучшего качества изображения или к ресиверу
для наилучшего качества звучания.
Page 84

18 Русский
Начало работы
79
MUTE
VOL CH
POWER
TV
POWER
BONUSVIEW
SOURCE
DISC MENU TITLE MENUMENU
INTERNET@
REPEAT
FULL SCREEN
SUBTITLE
AUDIO
INFO
POPUP
TOOLS
EXITRETURN
AK59-00104R
Пульт дистанционного управления
Знакомство с пультом дистанционного управления
Включение и выключение устройства.
Открытие и закрытие лотка для диска.
Нажмите эту кнопку для включения
Используйте цифровые кнопки для
Нажмите эту кнопку для изменения языка
Нажмите эту кнопку для перехода назад или вперед.
Нажмите эту кнопку для остановки диска.
Используйте для открытия меню диска.
Нажмите для перехода к главному меню.
Нажмите для использования меню
Нажмите для подключения к различным
Нажмите для отображения содержимого
Регулировка громкости телевизора.
Отключение звука громкоговорителей
функции Bonusview.
управления параметрами.
субтитров диска Blu-ray/DVD.
Возврат к предыдущему меню.
во весь экран телевизора.
Инструменты.
службам Internet@TV.
телевизора.
Включение и выключение телевизора.
(Для получения информации по
эксплуатации телевизора См. стр. 19)
После выполнения установки можно
установить входной источник для
телевизора.
Используйте эту кнопку для получения
доступа к различным функциям звука на
диске (диск Blu-ray/DVD).
Нажмите эту кнопку для поиска назад или
вперед на диске.
Нажмите кнопку, чтобы приостановить воспроизведение с диска.
Нажмите кнопку, чтобы начать воспроизведение.
Используйте для открытия всплывающего
меню/меню глав.
Используется для отображения информации о воспроизведении
во время воспроизведения диска Blu-ray/DVD.
Выбор элементов меню и изменение
значений меню.
Нажмите для выхода из меню.
Эти кнопки используются для выбора
как элементов меню устройства, так и
функций диска Blu-ray.
Можно повторно воспроизвести главу,
раздел, дорожку или диск.
Используется для выбора телевизионной
программы.
Установка батарей
ПРИМЕЧАНИЕ
✎
Если пульт дистанционного управления работает
▪
ненадлежащим образом :
Проверьте полярность батарей +/– (сухие батареи)
•
Проверьте, не разряжены ли батареи.
•
Проверьте, не заблокирован ли датчик дистанционного управления.
•
Проверьте, нет ли рядом источника флуоресцентного освещения.
•
ВНИМАНИЕ!
!
Встроенную аккумуляторную батарею в данном устройстве
▪
может заменить только специалист. Для получения информации
о ее замене обратитесь к своему поставщику услуг.
Page 85

Русский 19
03 Начало работы
Настройка пульта дистанционного
управления
С помощью данного пульта управления можно
управлять определенными функциями телевизора.
Кнопка Функция
TV POWER
TV SOURCE
TV VOL (+/–)
TV CH (,/.) Используется для выбора нужного канала.
TV MUTE
ПРИМЕЧАНИЕ
✎
▪
Чтобы определить совместимость
телевизора, выполните следующие действия.
Включите телевизор.
1.
Направьте пульт дистанционного
2.
управления в сторону телевизора.
Нажмите и удерживайте кнопку TV POWER
3.
и введите двузначный код, соответствующий
марке телевизора, нажав соответствующие
цифровые кнопки.
Если телевизор совместим с пультом
дистанционного управления, он выключится.
Теперь телевизор запрограммирован
для работы с пультом дистанционного
управления.
ПРИМЕЧАНИЕ
✎
▪
▪
Используется для включения и выключения
телевизора.
Используется для выбора внешнего
источника, подключенного к телевизору.
Используется для регулировки громкости
телевизора.
Используется для включения и выключения
звука.
Указанные выше функции могут работать не на всех
телевизорах. При возникновении проблем управляйте
телевизором напрямую.
Если для вашей марки телевизора указано несколько
кодов, пробуйте каждый из них, пока не обнаружите
действующий код.
После замены батарей в пульте дистанционного
управления необходимо установить код марки повторно.
Управляемые коды ТВ
Марка Код
SAMSUNG
BANG & OLUFSEN
BLAUPUNKT TV POWER+71
BRIONVEGA TV POWER+57
CONTINENTAL
EMERSON TV POWER+64
FERGUSON TV POWER+73
FORMENTI TV POWER+57
GRADIENTE TV POWER+70
IMPERIAL TV POWER+52
LOEWE OPTA TV POWER+06, +57
MAGNAVOX TV POWER+40
MITSUBISHI
TV POWER+01, +02,
+03, +04, +05,
+06, +07, +08, +09
AIWA TV POWER+82
TV POWER+10, +11,
ANAM
+12, +13, +14,
+15, +16, +17, +18
TV POWER+57
BRANDT TV POWER+73
CGE TV POWER+52
TV POWER+75
EDISON
TV POWER+19, +20,
+23, +24, +25,
DAEWOO
+26, +27, +28,
+29, +30, +31,
+32, +33, +34
TV POWER+06, +49,
FINLUX
+57
FUJITSU TV POWER+84
TV POWER+49, +52,
GRUNDIG
+71
TV POWER+60, +72,
HITACHI
+73, +75
JVC TV POWER+61, +79
TV POWER+06, +19,
LG
+20, +21, +22, +78
LOEWE TV POWER+06, +69
METZ TV POWER+57
TV POWER+06, +48,
+62, +65
MIVAR TV POWER+52, +77
NEC TV POWER+83
NEWSAN TV POWER+68
Марка Код
NOBLEX TV POWER+66
NOKIA TV POWER+74
NORDMENDE
PANASONIC
PHILIPS
PHONOLA
PIONEER
RADIOLA TV POWER+06, +56
RADIOMARELLI TV POWER+57
RCA TV POWER+45, +46
REX TV POWER+74
SABA
SALORA TV POWER+74
SANYO
SCHNEIDER TV POWER+06
SELECO TV POWER+74
SHARP
SIEMENS TV POWER+71
SINGER TV POWER+57
SINUDYNE TV POWER+57
SONY TV POWER+35, +48
TELEAVA TV POWER+73
TELEFUNKEN
THOMSON
THOMSON ASIA TV POWER+80, +81
TOSHIBA
WEGA TV POWER+57
YOKO TV POWER+06
ZENITH TV POWER+63
TV POWER+72, +73,
+75
TV POWER+53, +54,
+74, +75
TV POWER+06, +55,
+56, +57
TV POWER+06, +56,
+57
TV POWER+58, +59,
+73, +74
TV POWER+57, +72,
+73, +74, +75
TV POWER+41, +42,
+43, +44, +48
TV POWER+36, +37,
+38, +39, +48
TV POWER+67, +73,
+75, +76
TV POWER+72, +73,
+75
TV POWER+47, +48,
+49, +50, +51, +52
Page 86

20 Русский
Подключения
Подключение к телевизору
Вариант 1. Подключение к телевизору с помощью кабеля HDMI
- Наилучшее качество (Рекомендуется)
С помощью кабеля HDMI подключите выход HDMI OUT на задней панели устройства к входу
1.
HDMI IN на телевизоре.
Включите устройство и телевизор.
2.
Нажимайте кнопку переключения входного сигнала на пульте дистанционного управления
3.
телевизором до тех пор, пока на экране телевизора не появится сигнал HDMI устройства.
Если пульт дистанционного управления настроен на управление телевизором (См. стр. 19),
•
нажмите кнопку TV SOURCE на пульте дистанционного управления и выберите HDMI в
качестве внешнего источника телевизора.
Кабель HDMI
(не входит в комплект)
ПРИМЕЧАНИЕ
✎
При использовании кабеля HDMI выводится цифровой видео/аудио сигнал, поэтому нет необходимости подключать
▪
аудиокабель.
Если устройство подключено к телевизору в режиме HDMI 720p, 1080i, 1080p, необходимо использовать высокоскоростной
▪
кабель HDMI(категории 2).
При использовании кабеля HDMI на телевизор выводится только чистый цифровой сигнал.
▪
Если на экране отобразятся случайные помехи, это значит, что телевизор не поддерживает HDCP (High-bandwidth Digital
Content Protection).
В зависимости от типа телевизора определенные режимы разрешения выхода HDMI могут не поддерживаться. См. руководство
▪
пользователя телевизора.
При первом подключении устройства к телевизору с помощью кабеля HDMI или при подключении к новому телевизору
▪
в качестве разрешения выходного сигнала HDMI автоматически будет установлено самое высокое значение, которое
поддерживается телевизором.
Page 87

Русский 21
04 Подключения
Вариант 2. Подключение к телевизору с помощью кабеля DVI
- Наилучшее качество (Рекомендуется)
С помощью кабеля HDMI-DVI подключите выход HDMI OUT на задней панели устройства к
1.
входу DVI IN на телевизоре.
С помощью аудиокабелей соедините выходы AUDIO OUT (красный и белый), расположенные
2.
на задней панели устройства с входами AUDIO IN (красный и белый) на телевизоре.
Включите устройство и телевизор.
3.
Нажимайте кнопку переключения входного сигнала на пульте дистанционного управления
4.
телевизором до тех пор, пока на экране телевизора не появится сигнал DVI устройства.
Если пульт дистанционного управления настроен на управление телевизором (См. стр. 19),
•
нажмите кнопку TV SOURCE на пульте дистанционного управления и выберите HDMI в
качестве внешнего источника телевизора.
Кабель HDMI-DVI
(не входит в комплект)
БелыйКрасный
ПРИМЕЧАНИЕ
✎
При использовании кабеля HDMI на телевизор выводится только чистый цифровой сигнал. Если на экране появятся помехи,
▪
значит телевизор не поддерживает HDCP (High-bandwidth Digital Content Protection).
В зависимости от типа телевизора определенные режимы разрешения выхода HDMI могут не поддерживаться. См. руководство
▪
пользователя телевизора.
При первом подключении устройства к телевизору с помощью кабеля HDMI-DVI или при подключении к новому телевизору
▪
в качестве разрешения выходного сигнала HDMI автоматически будет установлено самое высокое значение, которое
поддерживается телевизором.
Аудиокабель
Page 88

22 Русский
Подключения
Вариант 3. Подключение к телевизору (Компонентный сигнал)
-
Лучшее качество
Подключение к телевизору с помощью компонентных видеокабелей.
-
Получение высококачественных изображений с точной цветопередачей. Для получения
-
четких и высококачественных изображений компонентный видеоинтерфейс разделяет элемент
изображения на черно-белые(Y), синие(PB) и красные(PR) сигналы.
(Звуковые сигналы передаются через аудиовыход.)
С помощью компонентных видеокабелей соедините выходы COMPONENT VIDEO OUT на
1.
задней панели устройства с входами COMPONENT IN на телевизоре.
С помощью аудиокабелей соедините выходы AUDIO OUT (красный и белый), расположенные
2.
на задней панели устройства с входами AUDIO IN (красный и белый) на телевизоре.
Включите устройство и телевизор.
3.
Нажимайте кнопку переключения входного сигнала на пульте дистанционного управления телевизором
4.
до тех пор, пока на экране телевизора не появится сигнал сигнал устройства "КОМПОНЕНТНЫЙ".
Если пульт дистанционного управления настроен на управление телевизором (См. стр. 19),
•
нажмите кнопку TV SOURCE на пульте дистанционного управления и выберите КОМПОНЕНТНЫЙ
в качестве внешнего источника телевизора.
Компонентный кабель
Аудиокабель
Красный
Белый Красный Синий Зеленый
ПРИМЕЧАНИЕ
✎
В зависимости от производителя компонентный вход телевизора может быть промаркирован "R-Y, B-Y, Y" или "Cr, Cb, Y"
▪
вместо "PB, PR, Y". Количество и расположение входов/выходов зависит от телевизора.
См. руководство пользователя телевизора.
Можно выбрать различные значения разрешения для дисков Blu-ray, например 1080i, 720p, 576p/480p, 576i/480i, в
▪
зависимости от типа диска. (См. стр. 29-30)
Действительное значение разрешения может отличаться от значения в меню настройки, если подсоединены оба кабеля: HDMI и компонентный.
▪
Кроме того, значения разрешения могут различаться в зависимости от типа диска. (См. стр. 29-30)
Если при воспроизведении диска DVD подключить оба гнезда (HDMI и компонентное) и выбрать компонентный режим 1080p,
▪
1080i или 720p, в меню настройки отображения будет указано разрешение 1080p, 1080i или 720p.
Фактическое разрешение составляет 576i/480i.
(не входит в комплект)
Page 89

Русский 23
04 Подключения
Вариант 4. Подключение к телевизору (Видео) - Хорошее качество
С помощью видео-/аудиокабелей соедините выходы VIDEO OUT (желтый) / AUDIO OUT
1.
(красный и белый) на задней панели устройства с входами VIDEO IN (желтый) / AUDIO IN
(красный и белый) на телевизоре.
Включите устройство и телевизор.
2.
Нажимайте кнопку переключения входного сигнала на пульте дистанционного управления
3.
телевизором до тех пор, пока на экране телевизора не появится сигнал устройства "ВИДЕО".
Если пульт дистанционного управления настроен на управление телевизором (См. стр. 19),
•
нажмите кнопку TV SOURCE на пульте дистанционного управления и выберите ВИДЕО в
качестве внешнего источника телевизора.
Аудио-/видеокабель
БелыйКрасный Желтый
ПРИМЕЧАНИЕ
✎
Если аудиокабель находится вблизи кабеля питания, может возникнуть шум.
▪
При необходимости подключения усилителя см. раздел "Подключение усилителя". (См. стр. 24-25)
▪
Количество и расположение входов/выходов зависит от телевизора. См. руководство пользователя телевизора.
▪
Page 90

24 Русский
Подключения
Подключение к аудиосистеме
При включении усилителя уменьшите уровень громкости. Внезапный громкий звук может
•
привести к повреждению динамиков и ухудшению слуха.
Выполните настройку аудио в экране меню в соответствии с характеристиками усилителя.
•
(См. стр. 31-33)
Расположение разъемов HDMI зависит от типа усилителя. См. руководство пользователя
•
усилителя.
Вариант 1. Подключение к аудиосистеме (усилитель с поддержкой
HDMI) - Наилучшее качество (Рекомендуется)
С помощью кабеля HDMI подключите выход HDMI OUT на задней панели устройства к входу
1.
HDMI IN на усилителе.
С помощью кабеля HDMI подключите выход HDMI OUT на усилителе к входу HDMI IN на
2.
телевизоре.
Включите устройство, телевизор и усилитель.
3.
Нажмите кнопку выбора ввода на усилителе и выберите внешний источник сигнала для
4.
прослушивания звука, исходящего из устройства. Информацию о настройке аудиовхода
усилителя см. в руководстве пользователя усилителя.
Кабель HDMI
(не входит в комплект)
Кабель HDMI
(не входит в комплект)
Page 91

Русский 25
04 Подключения
Вариант 2. Подключение к
аудиосистеме (Dolby Digital,
усилитель DTS) - Лучшее качество
С помощью оптического кабеля подключите
1.
выход DIGITAL AUDIO OUT (OPTICAL) на
задней панели устройства к входу DIGITAL
AUDIO IN (OPTICAL) на усилителе.
С помощью кабелей видеосигнала
2.
подключите выход HDMI, COMPONENT или
VIDEO OUT на задней панели устройства к
входу HDMI, COMPONENT или VIDEO IN на
телевизоре. (См. стр. 20-23)
Включите устройство, телевизор и усилитель.
3.
Нажмите кнопку выбора ввода на усилителе
4.
и выберите внешний источник сигнала
для прослушивания звука, исходящего
из устройства. Информацию о настройке
аудиовхода усилителя см. в руководстве
пользователя усилителя.
Вариант 3. Подключение к
аудиосистеме (двухканальный
усилитель) - Хорошее качество
С помощью аудиокабелей подключите
1.
выходы AUDIO OUT (красный и белый) на
задней панели устройства к входам AUDIO
IN (красный и белый) на усилителе.
С помощью кабелей видеосигнала
2.
подключите выход HDMI, COMPONENT или
VIDEO OUT на задней панели устройства к
входу HDMI, COMPONENT или VIDEO IN
на телевизоре. (См. стр. 20-23)
Включите устройство, телевизор и усилитель.
3.
Нажмите кнопку выбора ввода на усилителе
4.
и выберите внешний источник сигнала
для прослушивания звука, исходящего
из устройства. Информацию о настройке
аудиовхода усилителя см. в руководстве
пользователя усилителя.
Вариант 2.
Оптический кабель
(не входит в комплект)
БелыйКрасный
ПРИМЕЧАНИЕ
✎
При подключении с использованием второго варианта звук дисков со звуковыми дорожками в формате ИКМ будет
▪
воспроизводиться только через два передних канала.
Вариант 3. Аудиокабель
Page 92

26 Русский
Подключения
Подключение к сети
Данное устройство обеспечивает возможность просмотра сетевых служб (См. стр. 48-53), например
Internet@TV и BD-LIVE, а также получения обновлений программного обеспечения при подключении к
сети. Для подключения рекомендуется использовать точку доступа или IP-маршрутизатор. Для получения
дополнительной информации о подключении через маршрутизатор см. руководство пользователя
маршрутизатора или обратитесь к производителю маршрутизатора для получения технической поддержки.
С помощью сетевого кабеля прямого подключения (кабель UTP) подключите разъем LAN на
1.
устройстве к разъему LAN на модеме.
Задайте параметры сети. (См. стр. 35-36)
2.
Маршрутизатор
Модем широкополосного вещания
(со встроенным маршрутизатором)
Служба
широкополосного
вещания
ПРИМЕЧАНИЕ
✎
Доступ к серверу обновления программного обеспечения Samsung по сети Интернет может быть запрещен. Это зависит
▪
от используемого маршрутизатора или политики поставщика услуг. Для получения дополнительных сведений обратитесь к
поставщику услуг Интернета.
Для подключения к сети пользователям DSL необходимо использовать маршрутизатор.
▪
Для использования функции AllShare компьютер должен быть настроен в сети, как показано на рисунке.
▪
или
Модем широкополосного вещания
Подключение к ПК для
использования функции AllShare
(См. стр. 52-53)
Служба
широкополосного
вещания
Page 93

Русский 27
Настройка
internet radio
You Tube
Подготовка к использованию
(начальная настройка)
Включите телевизор, подключив к нему
1.
предварительно устройство.
(При первом подключении устройства к телевизору,
устройство включится автоматически и отобразится
экран Начальная настройка.)
Initial Settings I On-Screen Language
Select a language for the on-screen displays.
English
Français
Deutsch
Español
Italiano
Nederlands
> Move " Select
С помощью кнопок ▲▼ выберите нужный
2.
язык, затем нажмите кнопку ВВОД.
Нажмите кнопку ВВОД и выберите Начать.
3.
Начальная настройка
Будут установлены настройки формата ТВ и сети.
Позже можно будет изменить каждую настройку в разделе "Настройки"
Начать
a Предыдущ " Выбрать
С помощью кнопок ▲▼ выберите нужное
4.
форматное соотношение телевизора и
нажмите кнопку ВВОД. (См. стр. 29)
Нажмите кнопку ВВОД.
5.
Запустится проверка сети, после которой
процесс начальной настройки будет
завершен.
Нажмите кнопку OK.
6.
Отобразится главное меню. (Для получения
дополнительной информации о главном
меню См. стр. 28)
Главное меню
•
Активируйте службу Internet@TV
для использования разнообразных Интернет-услуг.
Нет диска a Сменa устр. d Просмотр устройств " Ввод
ПРИМЕЧАНИЕ
✎
При первом подключении устройства к телевизору
▪
устройство включится автоматически.
Не волнуйтесь - это не является неисправностью.
Главное меню не отобразится, если не выполнены
▪
начальные настройки.
Если нажать СИНЮЮ кнопку (D) во время настройки
▪
сети, главное меню откроется, даже если исходные
настройки еще не выполнены.
При возврате в главное меню полноэкранный режим
▪
будет отменен автоматически.
Чтобы повторно отобразить экран Начальная настройка
▪
для внесения изменений, нажмите кнопку СТОП ( ) на
передней панели устройства и удерживайте ее в течение
более 5 секунд при отсутствии диска в устройстве.
С помощью кабеля HDMI подключите устройство к
▪
телевизору с поддержкой функции Anynet+ (HDMI-CEC).
Если в телевизоре используется язык, поддерживаемый
устройством, он будет автоматически установлен в
качестве предпочтительного.
Однако для функции Anynet+ (HDMI-CEC)
необходимо установить значение Вкл. как на
телевизоре, так и на устройстве.
Если устройство находится в режиме остановки и не
▪
используется в течение более 5 минут, на экране
телевизора появляется экранная заставка. Если
устройство находится в режиме экранной заставки более
25 минут, питание автоматически отключается.
05 Настройка
Page 94

28 Русский
Настройка
POWER
TV
POWER
BONUSVIEW
SOURCE
DISC MENU TITLE MENUMENU
SUBTITLE
AUDIO
INFO
POPUP
TOOLS
EXITRETURN
internet radio
You Tube
1
2 4
Кнопка MENU : Нажмите для перехода к главному меню.
1
Кнопка RETURN : Возврат к предыдущему меню.
2
Кнопка ВВОД/НАПРАВЛЕНИЕ :
Перемещение курсора или выбор элемента.
3
Выбор элемента, на который наведен курсор.
Подтверждение настройки.
Кнопка EXIT : Нажмите для выхода из меню.
4
Нажмите кнопку POWER.
1.
Отобразится главное меню.
Главное меню
•
для использования разнообразных Интернет-услуг.
1
Нет диска a Сменa устр. d Просмотр устройств " Ввод
Настройка меню
Активируйте службу Internet@TV
3
2
3
4
5
6
С помощью кнопок ◄► выберите
2.
Настройки и нажмите кнопку ВВОД.
С помощью кнопок ▲▼ выберите нужное
3.
подменю и нажмите кнопку ВВОД.
С помощью кнопок ▲▼ выберите нужный
4.
элемент и нажмите кнопку ВВОД.
Нажмите кнопку EXIT, чтобы выйти из
5.
меню.
ПРИМЕЧАНИЕ
✎
Когда устройство подключено к сети, выберите службу
▪
Internet@TV в главном меню.
Загрузите необходимое содержимое из раздела
Samsung Apps. (См. стр. 51)
Набор доступных параметров зависит от того, какое
▪
меню выбрано.
Экранные меню данного устройства могут измениться
▪
после обновления версии программного обеспечения.
Выбор службы Internet@TV.
1
Выбор видео.
2
Выбор музыки.
3
Выбор фотографий.
4
Выбор экрана настроек.
5
Отображение доступных кнопок.
6
Page 95

Русский 29
05 Настройка
Дисплей
Пользователь может настроить различные
параметры отображения, такие как Формат ТВэкрана, Разрешение и т.д.
Формат ТВ-экрана
В зависимости от модели телевизора может
потребоваться выполнить настройку экрана.
16:9 стандарт.
•
Если выбран этот режим, определенные
фильмы (источник 4:3) будут
отображаться в ТВ-формате 4:3 (черные
полосы по сторонам изображения)
16:9 широкоформ
•
Просмотр полного изображения16:9
на широком экране телевизора.
4:3 впис в экран
•
Выбор просмотра на полном экране
в форматном соотношении 16:9 при
поступлении сигнала с диска Blu-ray/
DVD, даже если форматное соотношение
экрана телевизора 4:3. В верхней и
нижней части экрана отображаются
черные полосы.
4:3 во весь экр
•
Выберите этот режим для просмотра
видео в формате 16:9 на дисках Bluray/DVD без черных полос в верхней
и нижней части экрана, даже на
телевизоре с экраном 4:3 (крайняя левая
и правая стороны видеоизображения
отображаться не будут).
ПРИМЕЧАНИЕ
✎
В зависимости от типа диска некоторые форматные
▪
соотношения могут быть недоступны.
Если выбрать форматное соотношение и параметр,
▪
отличные от форматного соотношения, установленного для
экрана телевизора, изображение может быть искажено.
Если выбрано форматное соотношение 4:3 во весь экр
▪
или 4:3 впис в экран, пользователь не сможет перейти
в полноэкранный режим, нажав кнопку FULL SCREEN
на пульте дистанционного управления.
В режиме 16:9 стандарт возможен переход на формат 4:3.
▪
В этом случае переход в полноэкранный режим с помощью
кнопки FULL SCREEN на пульте дистанционного
управления будет невозможен.
BD Wise (только продукты Samsung)
BD Wise - это новая функция подключения Samsung.
При подключении устройств Samsung с функцией
BD Wise с помощью HDMI оптимальное разрешение
будет установлено автоматически.
Вкл. : оригинальное разрешение диска BD/
•
DVD будет выдаваться на ТВ напрямую.
Выкл.
: разрешение вывода будет выбрано
•
в соответствии с ранее установленным
значением независимо от разрешения диска.
ПРИМЕЧАНИЕ
✎
Если требуется изменить разрешение в BD Wise,
▪
необходимо предварительно Выкл. BD Wise.
Если отключить BD Wise, на подключенном телевизоре
▪
будет автоматически установлено максимальное разрешение.
Если данное устройство подключено к другому устройству, не
▪
поддерживающему функцию BD Wise, то ее нельзя использовать.
Для правильной работы функции BD Wise Вкл. ее в
▪
меню BD Wise на устройстве и на телевизоре.
Разрешение
Установка выходного разрешения для компонентного
видеосигнала и видеосигнала HDMI.
Число в 1080p, 1080i, 720p, 576p/480p,
576i/480i указывает на количество строк видео.
Буквы i и p указывают на чересстрочное или
прогрессивное сканирование, соответственно.
Авто : автоматическая проверка и настройка
•
оптимального разрешения.
BD Wise : автоматическая установка
•
оптимального разрешения при подключении к
телевизору с функцией BD Wise через кабель
HDMI. (Пункт меню BD Wise отображается
только в том случае, если для функции BD
Wise установлено значение Вкл.)
1080p : воспроизведение 1080 строк видео с
•
прогрессивной разверткой.
1080i : воспроизведение 1080 строк видео с
•
чересстрочной разверткой.
720p : воспроизведение 720 строк видео с
•
прогрессивной разверткой.
576p/480p : воспроизведение 576/480 строк
•
видео с прогрессивной разверткой.
576i/480i : воспроизведение 576/480 строк
•
видео с чересстрочной разверткой.
Page 96

30 Русский
Настройка
Разрешение в соответствии с режимом выходного сигнала
Воспроизведение диска Blu-ray
•
Настройка
Авто
1080p, режим видеокадра
(24 кадра) выключен
1080p/1080i, режим
видеокадра (24 кадра) включен
1080i, режим видеокадра
(24 кадра) выключен
720p 720p 576i/480i 720p 576i/480i
576p/480p 576p/480p 576i/480i 576p/480p 576i/480i
576i/480i - - 576i/480i 576i/480i
Воспроизведение диска DVD
•
Настройка
Авто
1080p 1080p@60F 576i/480i - -
1080i 1080i 576i/480i 576p/480p 576i/480i
720p 720p 576i/480i 576p/480p 576i/480i
576p/480p 576p/480p 576i/480i 576p/480p 576i/480i
576i/480i - - 576i/480i 576i/480i
Выход
Оптимальное разрешение
Выход
Оптимальное разрешение
HDMI / подключен HDMI / не подключен
Режим HDMI
1080p@60F 576i/480i - -
1080p@24F 576i/480i - -
1080i 576i/480i 1080i 576i/480i
Режим HDMI
Компонентный режим/
режим ВИДЕО
576i/480i - -
HDMI / подключен HDMI / не подключен
Компонентный режим/
режим ВИДЕО
576i/480i - -
Компонентный режим Режим ВИДЕО
Компонентный режим Режим ВИДЕО
ПРИМЕЧАНИЕ
✎
Если подключенный телевизор не поддерживает режим
▪
видеокадра или выбранное разрешение, отобразится
следующее сообщение: "Если после сделанного выбора
на экране не будет ничего отображатъся, подождите 15
с. Произойдет автоматический переход к предыдущей
настройке разрешения экрана. Хотите выбратъ новое
разрешение?".
При выборе значения Да для неподдерживаемого
разрешения экран телевизора будет пустым. Подождите
15 секунд, пока для разрешения не будет автоматически
установлено предыдущее значение.
Если на экране ничего не отображается, нажмите и
▪
удерживайте кнопку СТОП ( ) на передней панели
устройства в течение более 5 секунд (при отсутствии диска
в устройстве). Будут восстановлены заводские установки.
Выполните действия, описанные на предыдущей странице,
чтобы перейти к каждому режиму, и выберите ту
настройку отображения, которую поддерживает телевизор.
При восстановлении заводских настроек все данные
▪
пользователя, сохраненные в базе данных, будут удалены.
Диск Blu-ray должен иметь функцию 24 кадров, чтобы
▪
использовать режим кадра фильма (24 кадра).
Если выполнено одновременное подключение к компонентному
▪
разъему и разъему HDMI, но в данный момент используется
компонентное подключение, разрешение, указанное в таблице,
и фактическое разрешение экрана будут различаться в
зависимости от модели телевизора.
Page 97

Русский 31
05 Настройка
Формат HDMI
Пользователь может оптимизировать отображение
цветов в режиме HDMI.
Выберите тип подключенного устройства.
ТВ : выберите этот параметр при
•
подключении к телевизору через HDMI.
Монитор : выберите этот параметр при выполнении
•
подключения к монитору через выход HDMI.
Видеокадр(24Fs)
Если для функции Видеокадр(24Fs) установлено
значение Вкл., можно настроить выход HDMI
устройства на воспроизведение 24 кадров в
секунду для достижения улучшенного качества
изображения.
Функцию Видеокадр(24Fs) можно использовать только
на телевизорах, поддерживающих данную частоту
кадров. Данное меню можно выбрать только в режимах
разрешения выходного сигнала HDMI 1080i или 1080p.
Вкл. : функция Видеокадр(24Fs) будет работать.
•
Выкл. : функция Видеокадр(24Fs) не будет работать.
•
ПРИМЕЧАНИЕ
✎
Если телевизор не поддерживает функцию Видеокадр(24Fs),
▪
отобразится всплывающее сообщение.
Прогрессивная развертка
Устанавливается для улучшения качества
изображения при просмотре DVD.
Авто : установите этот параметр, чтобы на
•
устройстве было автоматически задано наилучшее
качество изображения при просмотре DVD.
Видео : установите этот параметр для
•
получения изображения наилучшего качества
при просмотре DVD с записью концертов или
телевизионных передач.
Насыщенный цвет HDMI
Выбор типа вывода сигнала через выход
HDMI OUT с включенным или отключенным
параметром Насыщенный цвет. Параметр
Насыщенный свет обеспечивает более точную
цветопередачу с большей глубиной цвета.
Авто : Изображение в режиме Насыщенный
•
цвет будет выводиться на экран подключенного
телевизора, который поддерживает функцию
Насыщенный цвет HDMI.
Выкл. : изображение будет выводиться без
•
применения режима Насыщенный цвет.
Цифровой выход
Цифровой выход задается в зависимости от
подключенного ресивера. (Для получения
дополнительной информации см. раздел,
посвященный выбору цифрового выхода, на
следующей странице)
ИКМ
•
Битовый поток (перекодировка)
•
Битовый поток (аудиофайл)
•
ПРИМЕЧАНИЕ
✎
▪
▪
▪
▪
Стабилизация изображения
Задание типа изображения, которое отображается
при приостановке воспроизведения DVD.
Авто : автоматический выбор наилучшего
•
качества изображения в зависимости от
содержимого.
Кадр : выберите во время приостановки
•
воспроизведения малоактивной сцены.
Поле : выберите во время приостановки
•
воспроизведения активной сцены.
▪
▪
Аудио
Убедитесь, что выбран правильный цифровой выход. В
противном случае звук будет отсутствовать или появится
громкий шум.
Если устройство HDMI (ресивер, телевизор) не
используется с сжатыми форматами (Dolby digital,
DTS), аудиосигнал выводится в формате ИКМ.
При просмотре обычного диска DVD вторичный поток
аудио и звуковые эффекты не воспроизводятся.
На некоторых дисках Blu-ray нет вторичного потока
аудио и звуковых эффектов.
Данная настройка цифрового вывода не влияет на вывод
аналогового (Л/П) или HDMI-звука на телевизор.
Она влияет на оптический и HDMI-выход при
подключении ресивера.
При воспроизведении звуковых дорожек в формате
MPEG независимо от того, какой цифровой выход
выбран (ИКМ или битовый поток), сигнал выводится в
формате ИКМ.
Page 98

32 Русский
Настройка
Выбор цифрового выхода
Настройка ИКМ
Подключение HDMI-ресивер
PCM
Dolby Digital
Dolby Digital
Plus
Аудиопоток на
диске Blu-ray
Аудиопоток на
DVD-диске
Разрешение
изображения
для диска
Blu-ray
Dolby TrueHD
DTS
DTS-HD HRA
DTS-HD MA
PCM PCM 2ch PCM 2ch PCM 2ch PCM 2ch PCM 2ch
Dolby Digital
DTS
Все
Оптический
До 7.1-канального
сигнала
До 5.1-канального
сигнала
До 7.1-канального
сигнала
До 7.1-канального
сигнала
До 6.1-канального
сигнала
До 7.1-канального
сигнала
До 7.1-канального
сигнала
До 5.1-канального
сигнала
До 6.1-канального
сигнала
Декодирование первичного,
вторичного потоков аудио
и звуковых эффектов в
аудиосигналы ИКМ.
PCM 2ch Перекодированный DTS PCM PCM 2ch
PCM 2ch Перекодированный DTS Dolby Digital Dolby Digital
PCM 2ch Перекодированный DTS
PCM 2ch Перекодированный DTS Dolby TrueHD Dolby Digital
PCM 2ch Перекодированный DTS DTS DTS
PCM 2ch Перекодированный DTS DTS-HD HRA DTS
PCM 2ch Перекодированный DTS DTS-HD MA DTS
PCM 2ch Dolby Digital Dolby Digital Dolby Digital
PCM 2ch DTS DTS DTS
Битовый поток
(перекодировка)
HDMI-ресивер или оптический
Декодирование первичного,
вторичного потоков аудио и
звуковых эффектов в сигналы
аудио ИКМ, затем повторное
кодирование аудио ИКМ в
битовый поток DTS.
Битовый поток
(аудиофайл)
HDMI-ресивер Оптический
Dolby Digital
Plus
Возможен вывод только первичной
звуковой дорожки (основная звуковая
дорожка фильма), таким образом,
используемый ресивер позволяет
декодировать битовый поток аудио.
Вторичный поток аудио и звуковые
эффекты воспроизводиться не будут.
Dolby Digital
Диски Blu-ray могут иметь три потока аудио.
Первичный поток аудио : звуковая дорожка
основного видео.
Вторичный поток аудио : дополнительная
звуковая дорожка, например комментарии
режиссера или актера.
Интерактивный звук : интерактивные звуки
будут воспроизводиться по мере выбора.
На каждом диске Blu-ray записан
индивидуальный интерактивный звук.
Субдискретизация ИКМ
Включение или отключение функции
субдискретизации сигналов 96кГц.
Вкл. : выберите этот параметр, если подключенный
•
к устройству усилитель не поддерживает
частоту 96кГц. Сигналы с частотой 96кГц будут
преобразованы в сигналы с частотой 48кГц.
Выкл. : выберите этот параметр, если подключенный
•
к устройству усилитель поддерживает частоту 96кГц.
ПРИМЕЧАНИЕ
✎
Если для параметра Субдискретизация ИКМ установлено
▪
значение Выкл., на некоторых дисках будет выводиться
только субдискретизированный звук через оптические
цифровые выходы.
Page 99

Русский 33
05 Настройка
Кино : выберите этот параметр для
HDMI
Если телевизор не поддерживает форматы
•
сжатого многоканального звука (Dolby Digital,
DTS), устройство будет выводить только
двухканальный декодированный звук ИКМ, даже
если в меню настройки задан битовый поток
(перекодированный или звуковая дорожка).
Если телевизор не поддерживает частоту
•
дискретизации ИКМ выше 48кГц, устройство будет
выводить звук ИКМ с частотой дискретизации
48кГц, даже если для параметра Субдискретизация
ИКМ установлено значение Выкл..
•
воспроизведения двухканального звука
фильма через несколько каналов.
Музыка : выберите этот параметр для
•
воспроизведения двухканального звука
музыки через несколько каналов.
ПРИМЕЧАНИЕ
✎
▪
Упр. динамическим диапазоном
Четкое звучание диалогов даже при низкой громкости.
Данная функция активна только при обнаружении
сигнала Dolby Digital.
Вкл. : при воспроизведении звуковых дорожек фильма
•
на низкой громкости или с использованием малых
громкоговорителей в системе может быть применено
соответствующее сжатие, которое обеспечит более
отчетливое звучание тихого содержимого и позволит
избежать резких переходов на громкое звучание.
Выкл. : просмотр фильма в стандартном
•
динамическом диапазоне.
Режим смешивания звуковых каналов
Включение или отключение функции смешивания
звуковых каналов для сокращения их числа.
Обычное Cтерео : смешивание многоканального
•
звука с сокращением числа каналов до двух
стереоканалов. Выберите этот параметр при
подключении к оборудованию, которое не
поддерживает функции виртуального объемного
звука, например, "Dolby Pro Logic".
Поддержка объемного звука : смешивание
•
многоканального звука и обеспечение
эффекта объемного стерео.
Выберите этот параметр при подключении
к оборудованию, которое поддерживает
функции виртуального объемного звука,
например, "Dolby Pro Logic".
DTS Neo:6
Возможность воспроизведения
многоканального звука при использовании
простого двухканального источника звука.
Выкл. : воспроизведение двухканального
•
звукового сигнала только через передние
громкоговорители.
Начальная настройка
В разделе Начальная настройка можно
установить язык, форматное соотношение
телевизора, выполнить сетевые настройки и т.д.
Для получения дополнительной информации
о настройке см. соответствующий раздел в
руководстве пользователя.
(См. стр. 27-39)
Размер экрана Internet@TV
Задайте для параметра Размер экрана Internet@
TV оптимальное значение.
Размер 1 : значки приложений будут небольшими,
•
по краям экрана будут отображаться черные полосы.
Размер 2 : значки приложений будут обычного
•
размера, размер изображения может быть
слишком большим для экрана телевизора.
Размер 3 : значки приложений будут
•
большими, размер изображения может быть
слишком большим для экрана телевизора.
Anynet+ (HDMI-CEC)
Anynet+ это удобная функция для связи с другими
устройствами Samsung с поддержкой Anynet+.
Для использования данной функции подключите устройство
к телевизору Samsung с помощью кабеля HDMI.
Данным устройством можно управлять с помощью пульта
дистанционного управления телевизора Samsung. Для
начала воспроизведения диска просто нажмите кнопку
ВОСПРОИЗВЕДЕНИЕ ( ) на пульте дистанционного
управления телевизора.
Для получения дополнительной информации см.
руководство пользователя телевизора.
Вкл. : функция Anynet+ работает.
•
Выкл. : функция Anynet+ не работает.
•
При использовании ресивера HDMI данный параметр
доступен, только когда для параметра Цифровой выход
установлено значение ИКМ.
Система
Page 100

34 Русский
Настройка
ПРИМЕЧАНИЕ
✎
Данная функция недоступна, если кабель HDMI не
▪
поддерживает CEC.
Если на телевизоре Samsung имеется логотип
▪
n
, значит он поддерживает функцию Anynet+.
В зависимости от типа телевизора определенные режимы
▪
разрешения выхода HDMI могут не поддерживаться.
См. руководство пользователя телевизора.
Управл. BD-данными
Возможность управление содержимым,
загруженным с диска Blu-ray, который
поддерживает службу BD-LIVE.
Пользователь может просмотреть сведения
об устройстве, включая размер хранилища,
удалить данные из базы данных или изменить
устройство флэш-памяти.
Hастрoйки
Дисплей
Аудио
Система
Сеть
Язык
Безопасность
Общее
Поддержка
Удаление всех данных BD с устройства хранения.
Управл. BD-данными
Текущее устройство : Внешняяя
Общий размер : 955MB
Доступный размер : 949MB
Удалить данные BD
Сменить устройство : Внешняяя
" Выбрать ' Возврат
Общий размер управления базой данных может варьироваться в
▪
зависимости от установленной версии программного обеспечения.
Часы
Задайте функции, относящиеся ко времени.
Hастрoйки
Дисплей
Аудио
Режим часов : Авто
Система
Настройка часов
Сеть
Часовой пояс : GMT + 0:00
Язык
Летнее время : Выкл.
Безопасность
Общее
>
Поддержка
Выбор предпочитаемого метода настройки часов.
Режим часов : Можно выбрать значение
•
Авто или Вручную.
Если выбрать значение Вручную, будет
активировано меню Настройка часов, а
параметр Летнее время станет недоступным.
Настройка часов : Текущее время и дату
•
можно установить вручную.
Часовой пояс : пользователь может указать
•
часовой пояс для конкретной области.
Летнее время : включение или выключение
•
функции DST (Летнее время).
Переместить
"
Часы
Ввод
'
Возврат
Информация об устройстве хранения на
устройстве
Общий размер : общий размер устройства
•
(хранения).
Доступный размер : свободное место на
•
устройстве (хранения).
ПРИМЕЧАНИЕ
✎
При выборе внешней флэш-памяти и отключении
▪
устройства USB во время воспроизведения
воспроизведение диска будет остановлено.
Поддерживаются только устройства USB,
▪
отформатированные в файловой системе FAT (метка
тома DOS 8.3). Рекомендуется использовать устройства
USB, поддерживающие протокол USB 2.0 со скоростью
чтения/записи 4МБ/сек или выше.
Жесткий диск USB нельзя использовать для хранения
▪
базы данных (BD-LIVE).
Функция Возобновить воспроизведение может не
▪
работать после форматирования устройства хранения.
Регистрация DivX®
Просмотр регистрационного кода DivX(R)-видео
по заказу для приобретения и воспроизведения
содержимого DivX(R)-видео по заказу.
Hастрoйки
Дисплей
Аудио
Система
Сеть
Язык
Безопасность
Общее
Поддержка
ПРИМЕЧАНИЕ
✎
При выборе значения OK этот параметр активирован не будет.
▪
Для активации данного параметра выберите пункт
DivX(R) дезактивация.
Начальная настройка
Меню диска :
DivX(R)-видео по заказу
Audio :
Ваш регистрационный код : XXXXXXXXXX
Subtitle :
Чтобы получить более подробную информацию,
посетите www.divx.com/vod.
OK
 Loading...