

Page 1
OWNER’S
INSTRUCTIONS
AW0560A
AW0660A
WINDOW-TYPE
ROOM AIR CONDITIONER
( Cool )
E
DB98-04345A(1)
S
Page 2
E-
2
The manufacturer does not assume responsibility for accidents or injury
caused by an incorrectly installed air conditioner. If you are unsure about
installation, contact an installation specialist.
CCCCAAAAUUUUTTTTIIIIOOOONN
NN
The following safety precautions must be taken when using your air conditioner.
Safety Precautions
1 The unit must be plugged into an independent circuit.
The air conditioner must be installed in accordance with national wiring regulations and
safety regulations wherever applicable.
2 Some installation locations may require installation of a short circuit breaker or grounding.
4 MAKE sure that the unit is correctly ventilated at all times :
do NOT place clothing or other materials over it.
5 NEVER spill any kind of liquid into the unit. Should this happen, unplug the unit and contact
an authorized service center.
6 Do NOT insert anything between the air outlet blades because the inner fan may be damaged
and could cause injury. Keep children away from the unit.
7 Do NOT place any obstacles in front of the unit.
8 Users of this product are cautioned not to attempt repairs.
Instead, they are requested to directly contact a designated service center or the outlet
at which the product was purchased.
9 Do not use an extension cord with this product.
10 The appliance is not intended for use by young children without supervision ;
young children should be supervised to ensure that they do not play with the appliance.
11 Never store or ship the air conditioner upside down or sideways to avoid damage to the
compressor.
12 If the remote control will not be used for a long time, remove the batteries.
3 If the supply cord is damaged, it must be replaced by a special cord or assembly available
from the manufacturer or its service agent.
Page 3

E-
3
Contents
◆ PREPARING YOUR AIR CONDITIONER
■ Safety Precautions ......................................................................................... 2
■ Description of Each Component .................................................................... 4
■ Remote Control - Buttons .............................................................................. 5
■ Getting Started ............................................................................................... 6
■ Inserting the Remote Control Batteries .......................................................... 7
◆ OPERATING YOUR AIR CONDITIONER
■ Cooling Your Room ........................................................................................ 8
■ Airing Your Room ........................................................................................... 9
■ Adjusting the Air Flow Direction Horizontally ................................................. 10
◆ P
ROGRAMMING YOUR AIR CONDITIONER
■ Setting the On Timer ...................................................................................... 11
■ Setting the Off Timer ...................................................................................... 12
■ Setting the Sleep Timer .................................................................................. 13
■ Selecting Energy Saving mode ...................................................................... 14
◆ RECOMMENDATIONS FOR USE
■ Temperature and Humidity Ranges ............................................................... 15
■ Cleaning Your Air Conditioner ........................................................................ 16
■ Solving Common Problems ............................................................................ 17
■ Technical Specifications ................................................................................. 17
◆ INSTALLATION
Page 4
E-
4
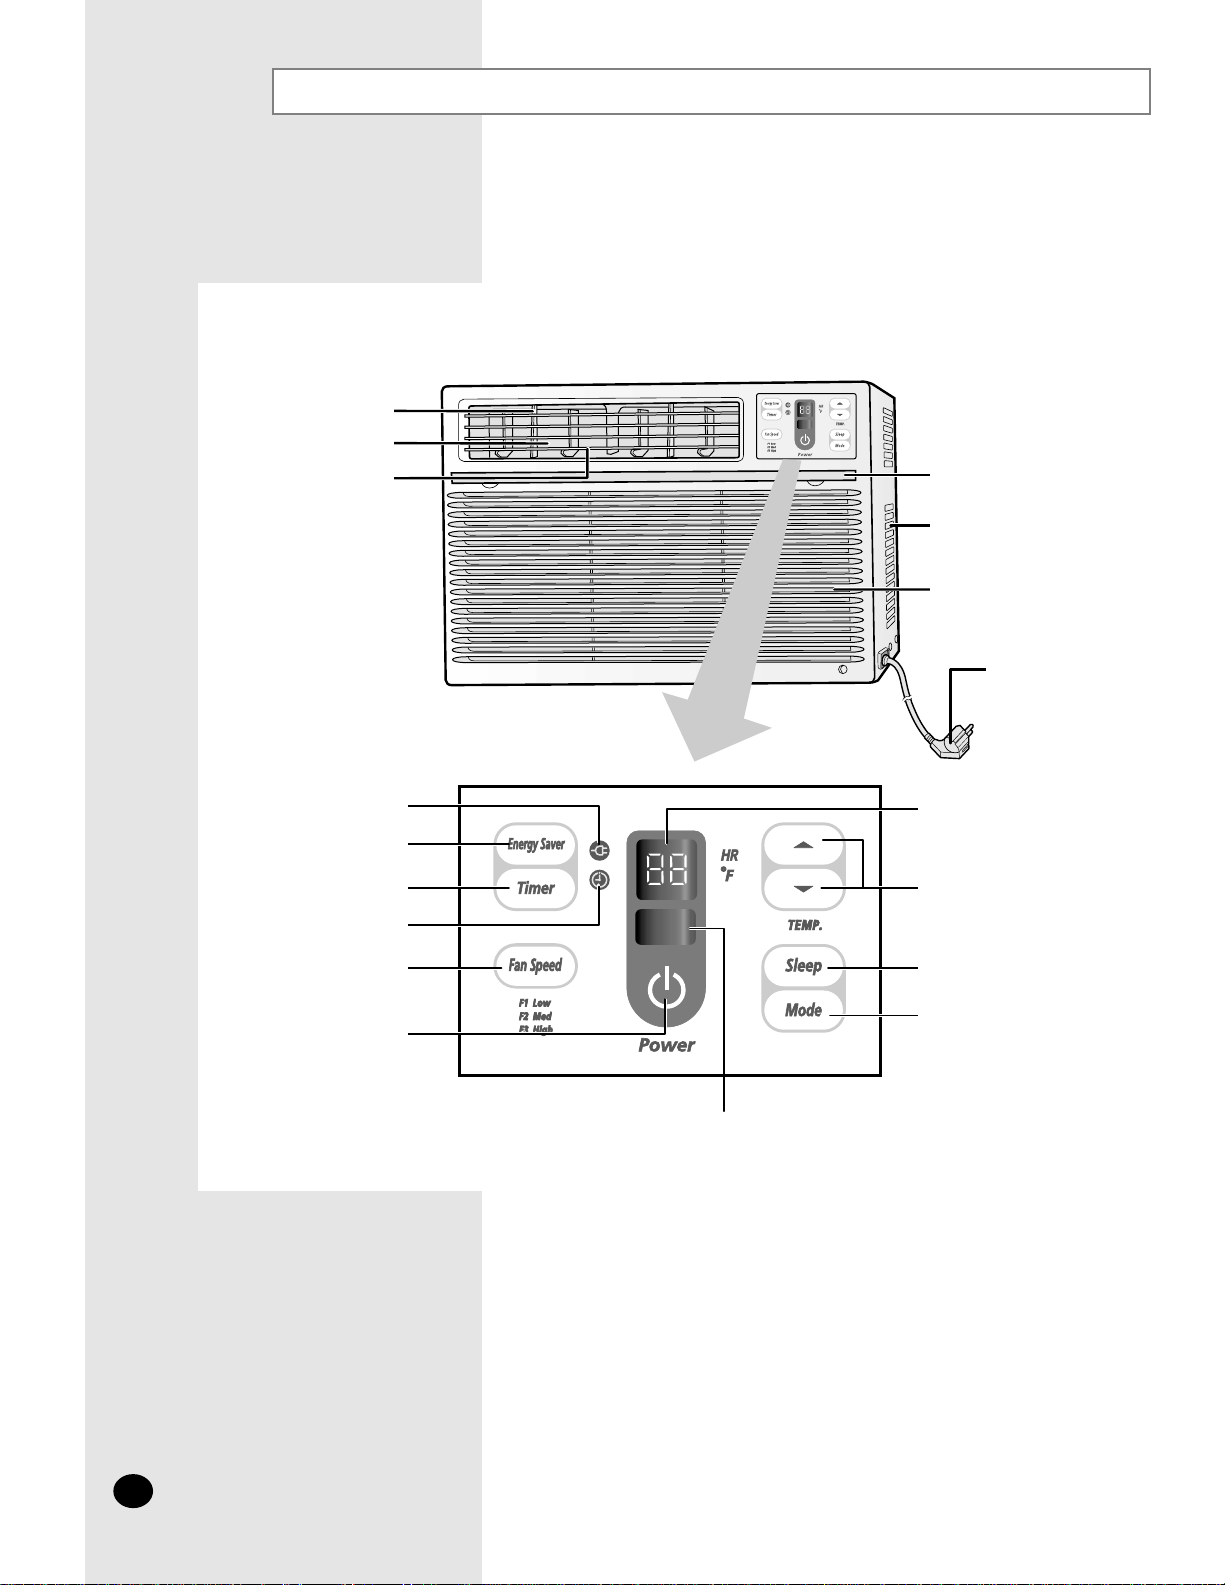
Description of Each Component
Air inlet (inside)
Air filter
Inner air flow blades
(right/left orientation)
Air outlet
Outer air flow blades
Air inlet (Outside)
Power plug
(The type of the
power plug may
differ, depending
on the local
power supply.)
Temperature/Timer
settings
Temperature adjustment
buttons
Remote control sensor
Fan speed adjustment button
Energy Saver indicator
Sleep timer setting button
Timer indicator
Energy Saver button
ON/OFF button
Operating mode selection
button
(COOL, FAN)
Timer setting button
❄ The design and shape are subject to
change, depending on the model.
Page 5
E-
5
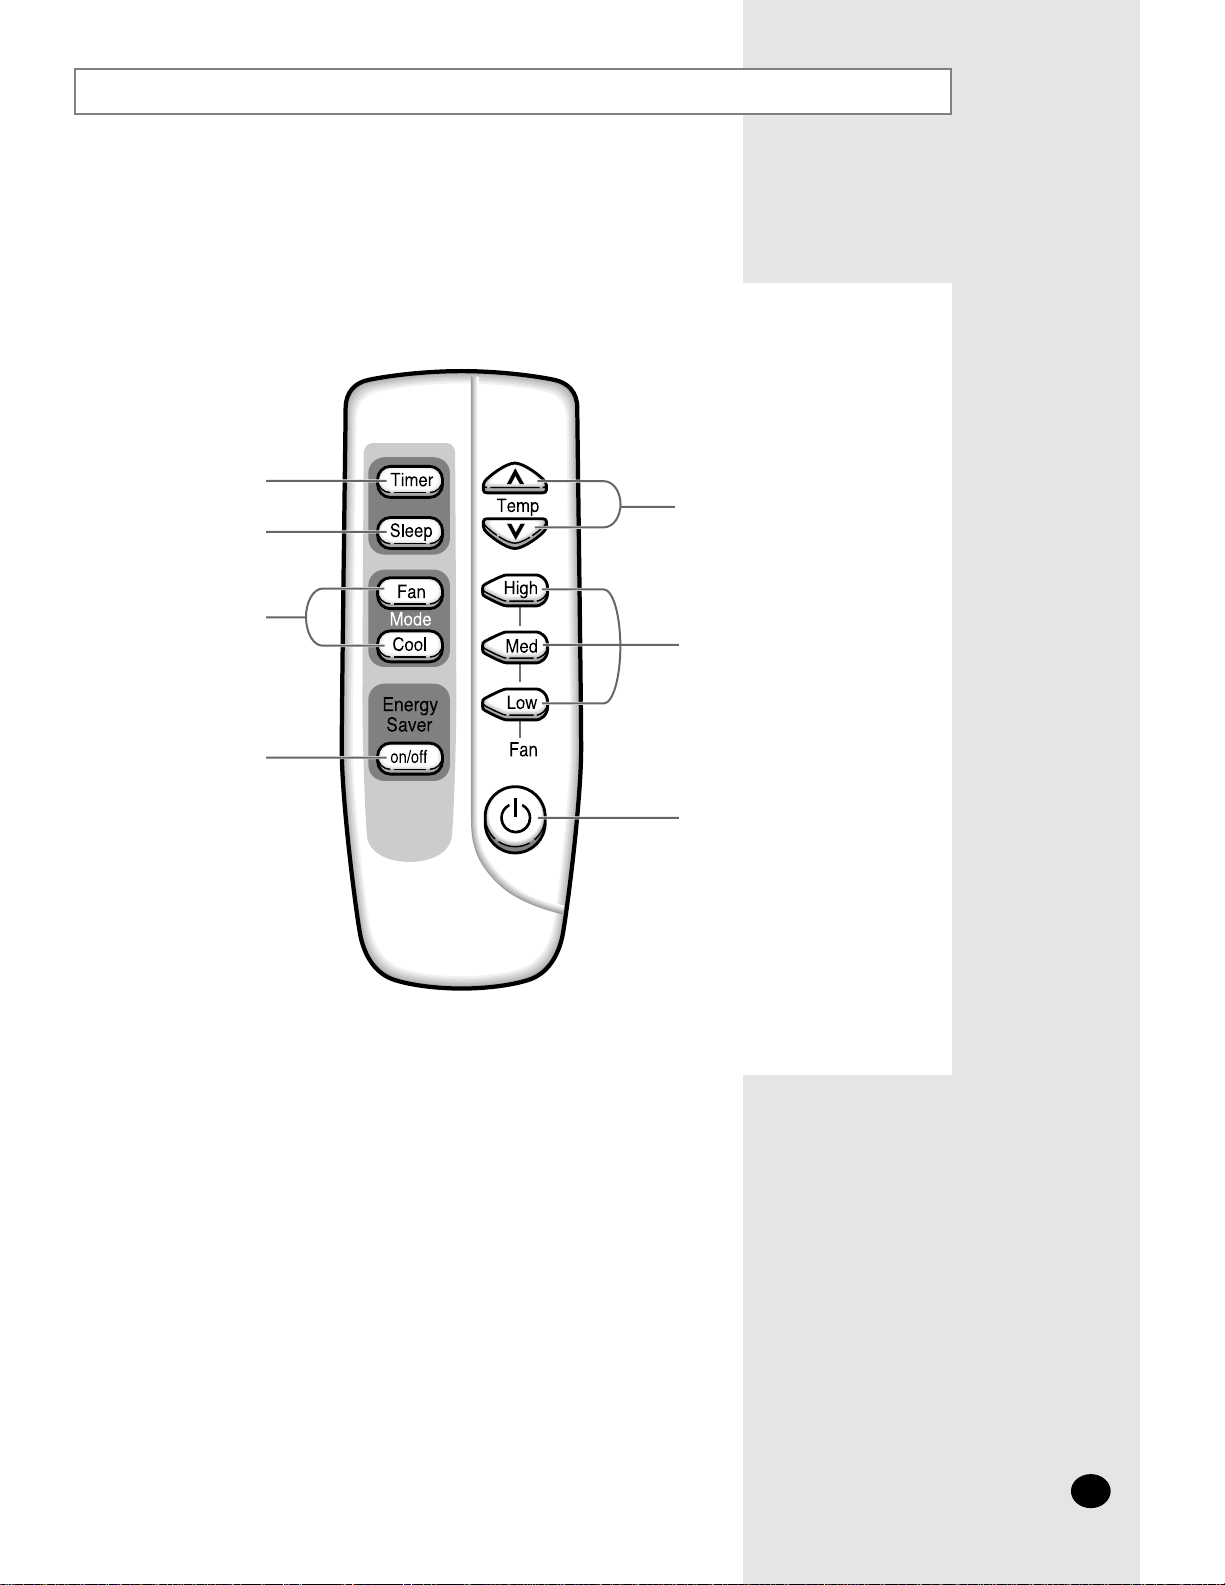
Remote Control - Buttons
Temperature adjustment
buttons
Fan speed
adjustment buttons
ON/OFF button
Timer setting button
Sleep timer setting button
Operating mode
selection buttons
Energy Saver button
Page 6
E-
6
Getting Started
IMPORTANT NOTE
You have just purchased a Samsung window-type room air conditioner which should be installed
following your installation manual.
Your Owner’s Instructions contain much valuable information on using your air conditioner.
Please take the time to read them as they will help you take full advantage of the unit’s features.
The booklet is organized as follows.
◆ The following figures are shown on pages 4 and 5:
- Description of Each Component
- Remote control (buttons)
They will help you find the buttons and understand the symbols displayed.
◆ In the main part of the document, you will find a series of step-by-step procedures for each
function available.
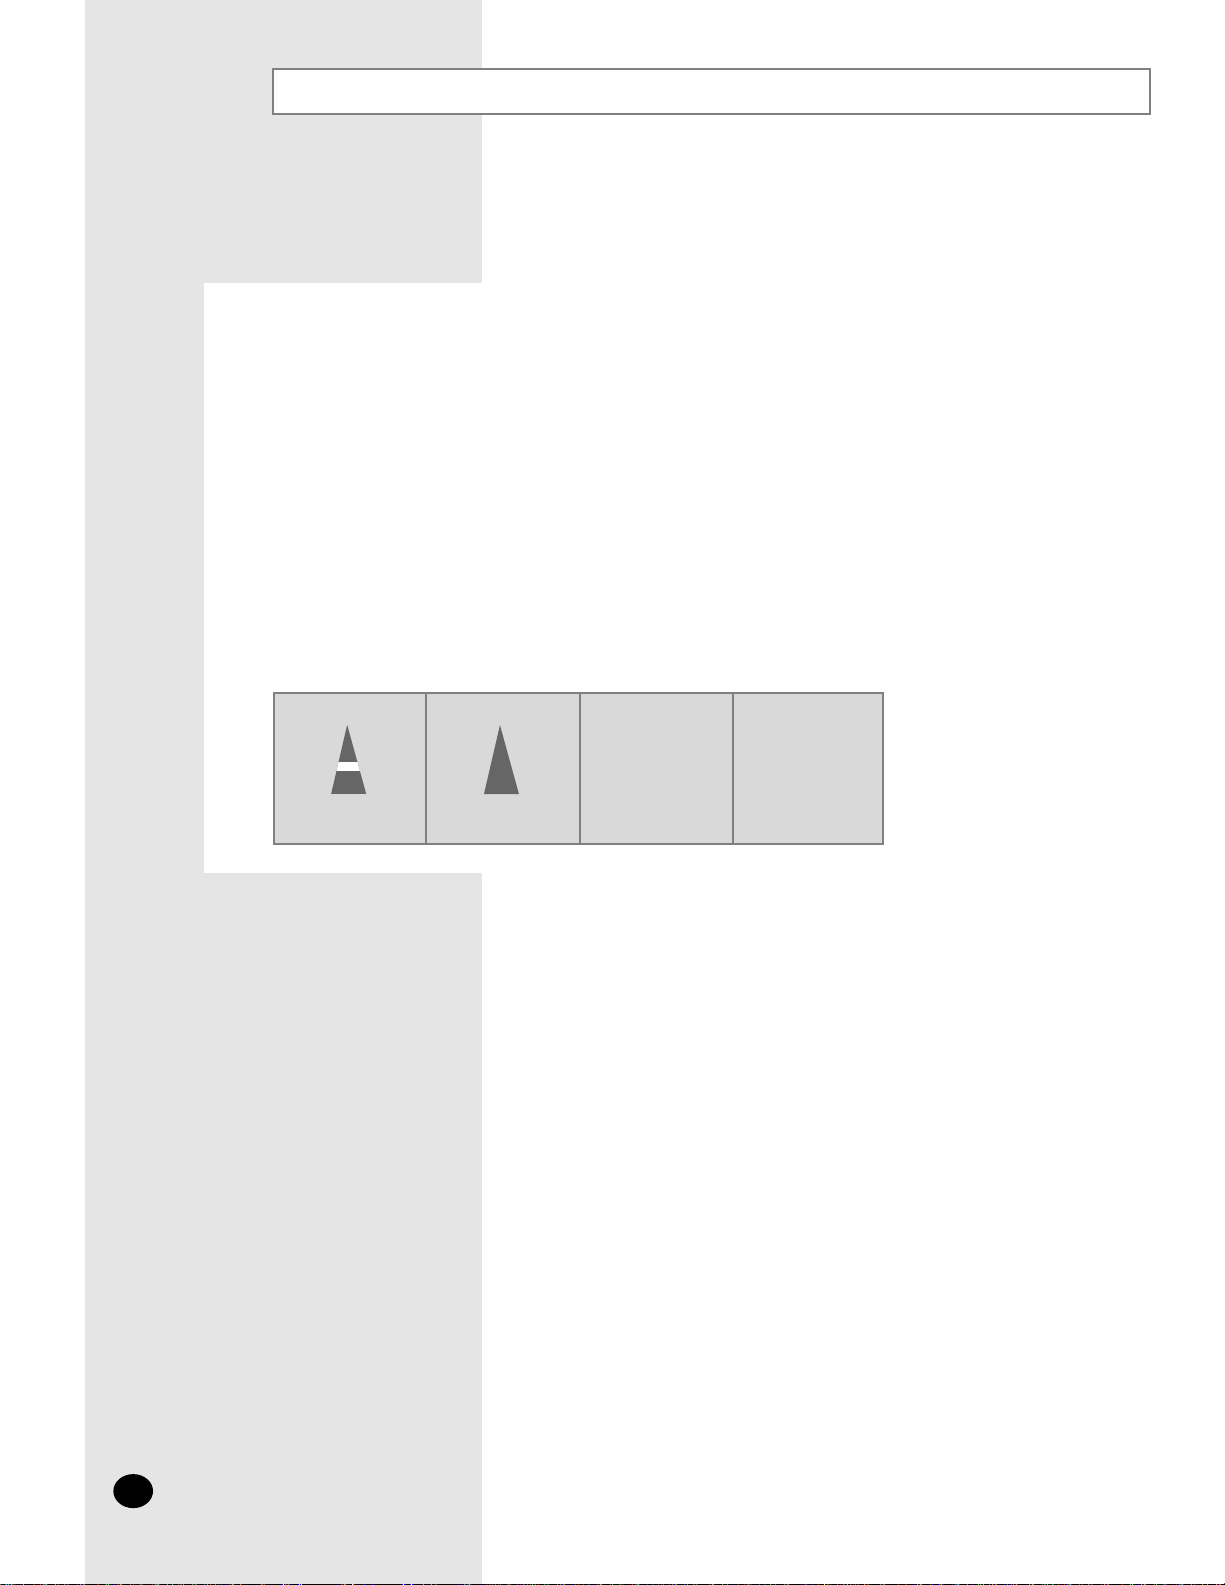
The illustrations in the step-by-step procedures use four different symbols:
☛
➢
PRESS PUSH
Page 7
E-
7
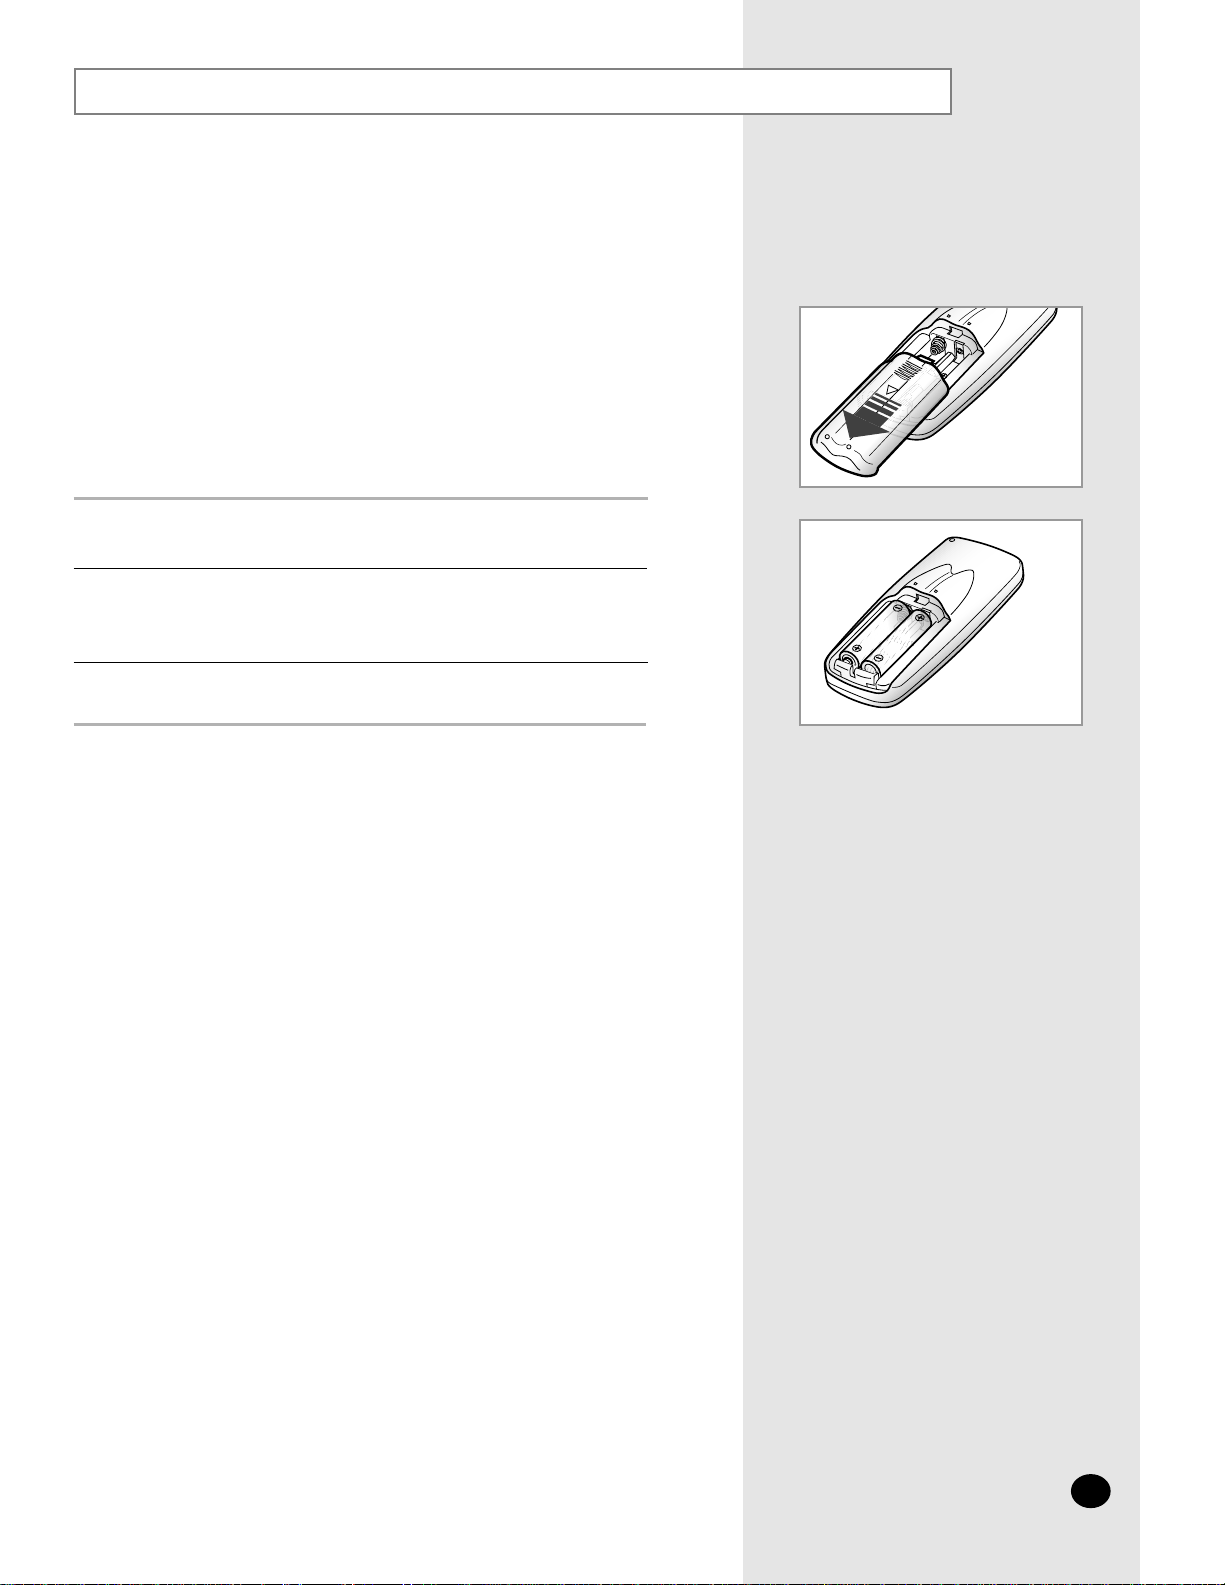
Inserting the Remote Control Batteries
Push the battery cover on the rear of the remote control with your thumb
in the direction of the arrow and remove it.
Insert the two batteries, taking care to respect the polarities :
◆ + on the battery with + on the remote control.
◆ - on the battery with - on the remote control.
1
2
Close the cover by sliding it back until it clicks into place.
3
◆ Use two AAA, LR03 1.5V batteries.
◆ Do not use old batteries or different kinds of batteries together.
◆ Batteries may be completely discharged after 12 months, even
if they have not actually been used.
You must insert or replace the remote control batteries when :
◆ You purchase the air conditioner
◆ The remote control does not work correctly
➢
Page 8
E-
8
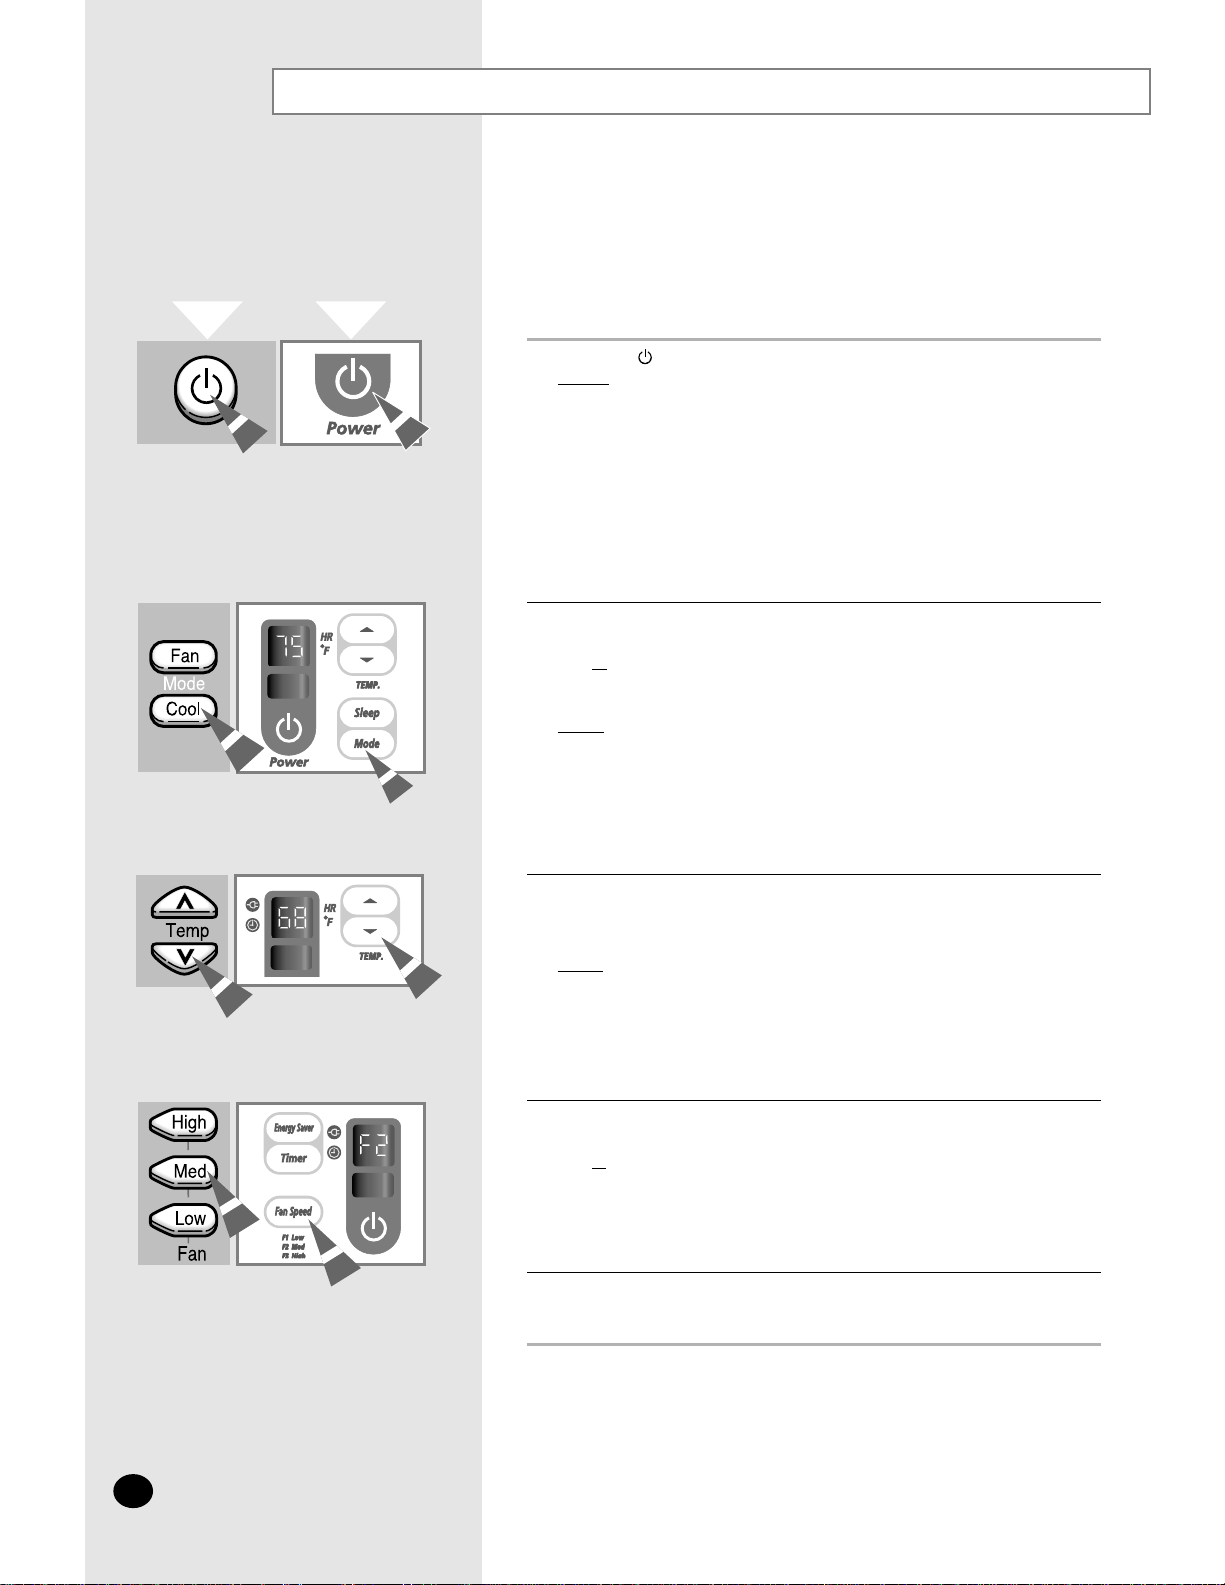
Cooling Your Room
To adjust the temperature, press the Temperature buttons on the remote
control or unit one or more times until the desired temperature is displayed.
The temperature can be set between 64°F and 86°F.
Result
:◆ Each time you press the temperature buttons:
– The temperature is adjusted by 1°F and displayed on
the control panel
– The unit beeps
◆
The air conditioner starts cooling if the room temperature is
higher than the selected temperature.
3
Press the (On/Off) button.
Result:
◆ The air conditioner starts up in the mode selected when the
unit was last used.
◆ The unit beeps twice.
☛
The air conditioner is fitted with a protection mechanism to prevent
the unit from being damaged when it is started immediately after
being:
◆ Plugged in
◆ Stopped
It will start up normally after three minutes.
If the temperature is not displayed on the control panel:
◆
Press the COOL button on the remote control
or
◆
Press the Mode button on the unit one or more times until the
temperature is displayed.
Result
:◆ The unit beeps each time you press the COOL/Mode button.
◆
The air conditioner starts up in the Cool mode.
➢
You can change modes at any time.
You must select the Cool mode if you wish to lower the temperature
in your room. You can also set the fan speed.
1
2
To set the fan speed:
◆
Press the HIGH, MED or LOW button on the remote control as desired.
or
◆
Press the Fan Speed button on the unit one or more times until the
desired Fan speed(F1, F2 or F3) is displayed.
4
To control the direction of the air flow, refer to page 10.
5
Remote Control
Control Panel
Page 9

E-
9
Airing Your Room
If you want to provide air circulation without cooling, you can use the Fan mode.
If necessary, press the (On/Off) button.
Result: ◆
The air conditioner starts up in the mode selected when
the unit was last used.
◆ The unit beeps twice.
1
To set the fan speed:
◆
Press the HIGH, MED or LOW button on the remote control as desired.
or
◆
Press the Fan Speed button on the unit one or more times until the
desired fan speed(F1, F2 or F3) is displayed.
3
To control the direction of the air flow, refer to page 10.
4
If the fan speed(F1, F2 or F3) is not displayed on the control panel:
◆ Press the FAN button on the remote control
or
◆ Press the Mode button on the unit one or more times until the fan speed
(F1, F2 or F3) is displayed.
Result:
◆ The unit beeps each time you press the Fan/Mode button.
◆ The air conditioner starts up in Fan mode.
➢
◆ You can change modes at any time.
◆ When the air conditioner is in the Fan mode, the temperature
cannot be set or displayed.
2
Remote Control Control Panel
Page 10

E-
10
Adjusting the Air Flow Direction Horizontally
Depending on the position of the unit in your room, you can adjust
the orientation of the inner air flow blades on the unit.
Adjust the air flow blades to the desired position, by pushing them side to side.
Page 11

E-
11
Setting the On Timer
The On Timer enables you to switch on the air conditioner automatically after a
given time. You can select the On timer only when the air conditioner is off. You
can select the On timer only when the air conditioner operates in the Cool mode.
1 Check that the air conditioner has been switched off; if necessary,
press the (On/Off) button.
2
Set the operating time by pressing the Timer button on the remote control
or unit one or more times until the desired time is displayed. The operating
time can be set between 1 and 12 hours.
Result
: ◆ Each time you press the Timer button:
– The time is adjusted by 1 hour and displayed on the control
panel
– The unit beeps
◆ The operating time is displayed and decreases automatically to
indicate the remaining time.
◆ The air conditioner starts up in the Cool mode automatically
when the operating time reaches zero.
➢
You can adjust the temperature and fan speed after setting
the On timer.
To cancel the timer, press:
◆ Timer on the remote control or unit one or more times until "--" is
displayed.
or
◆ on the remote control or unit (The air conditioner operates in the mode
selected when the unit was last used.)
To Cancel the On Timer
Remote Control
Control Panel
Page 12

E-
12
Setting the Off Timer
The Off Timer enables you to switch off the air conditioner
automatically after a given time. You can select the Off timer only
when the air conditioner operates in the Cool mode.
1 Check that the air conditioner has been switched on; if necessary,
press the (On/Off) button.
2
Set the operating time by pressing the Timer button on the remote control
or unit one or more times until the desired time is displayed. The operating
time can be set between 1 and 12 hours.
Result
: ◆ Each time you press the Timer button:
– The time is adjusted by 1 hour and displayed on the control
panel
– The unit beeps
◆ The operating time is displayed and decreases automatically to
indicate the remaining time.
◆ The air conditioner switches off automatically when the
operating time reaches zero.
➢
You can adjust the temperature and fan speed after setting
the Off timer.
To Cancel the Off Timer
Remote Control
Control Panel
To cancel the timer, press:
◆ Timer on the remote control or unit one or more times until "--" is
displayed.
or
◆ on the remote control or unit (The air conditioner operates in the mode
selected when the unit was last used.)
Page 13

E-
13
Setting the Sleep Timer
The Sleep Timer can be used when you are cooling your room to
switch the air conditioner off automatically after 8 hours.
➢
If you wish to switch the unit off at a specific time, refer to page 12.
1 Make sure that you have selected COOL mode.
2
Press the Sleep button on the remote control
or
Press the Sleep button on the unit.
Result
: ◆ Each time you press a button, the unit beeps.
◆ The “SLEEP” passes through the control panel for about
15 seconds and the " " will be displayed.
◆ The remaining time is displayed and decreased by 1 hour
automatically to indicate the remaining time.
◆ The air conditioner will be controlled as illustration below.
To cancel the timer, press:
◆ Sleep on the remote control.
or
◆ Sleep on the unit.
Result
: ◆ The unit beeps.
◆ The SLEEP indicator is no longer displayed.
◆ The air conditioner operates in the mode selected last.
➢
If you select the Energy Saving mode in the Sleep Timer mode,
the Sleep Timer will be cancelled and the air conditioner will start up
in the Energy Saving mode.
To Cancel the Sleep Timer
Cooling When the temperature has
been increased by 2°F (after 1
hour), it is maintained
for 7 hours.
Remote Control
Control Panel
Page 14

E-
14
Selecting Energy Saving Mode
To select the energy saving mode, press the Energy Saver button on the
remote control or unit one or more times until the Energy Saver indicator
lights up.
Result
:
◆
The fan and compressor cycle on and off together.
◆
The fan will continue to run for a short time after the
compressor cycles off.
➢
If you would like the air conditioner to run in Fan mode, do not press
the Energy Saver button. You cannot use the Fan mode in the
energy saving mode.
To stop the energy saving mode, press the Energy Saver button on the
remote control or unit again.
Result: The fan runs at all times, while the compressor cycles on and off.
➢
If you select the Sleep Timer in the Energy Saving mode, the Energy
Saving will be cancelled and the air conditioner will start up in the
Sleep Timer mode.
If you wish to save energy when using your air conditioner,
select the energy saving mode with the Energy Saver button.
1
2
Remote Control
Control Panel
Page 15

E-
15
Temperature and Humidity Ranges
If the air conditioner is used at... Then...
Higher temperature The automatic protection feature may be triggered and the air
conditioner stopped.
Lower temperature A water leakage or some other malfunction may happen if
the heat exchanger freezes.
Higher humidity levels Water may condense on and drip from the surface of the unit
if it is used for long periods.
The following table indicates the temperature and humidity ranges
within which the air conditioner can be used.
Mode Indoor Temperature Outdoor Temperature Indoor Humidity
Cooling 70°F to 90°F approx. 70°F to 110°F approx. 80% or less
Page 16

E-
16
Cleaning Your Air Conditioner
Grab the tabs on the filter and pull it up and out.
1
Remove all dust on the air filter with a vacuum cleaner or brush.
2
When you have finished, insert the air filter back into its original position.
3
Wipe the surface of the unit with a neutral detergent
and then wipe it again with dry cloth.
(Be sure not to use benzene, solvent or other chemical products.)
4
Be sure to clean the air filter periodically to maintain the air conditioner
in the best condition for a long period of time.
When cleaning the air conditioner, turn it off and pull out the
power plug.
Set the fan to “F1” and let it run for
a few hours to dry the inside of the air
conditioner thoroughly.
If you... Then...
Will not be using the
air conditioner for a
long period of time
◆ Set the fan to “F1” and let it for a few
hours to dry the inside of the air
conditioner thoroughly.
◆ Switch the air conditioner off and
unplug it from the wall socket.
◆ Clean the filter and outer surfaces.
Have not used the air
conditioner for a long
period of time
➢
☛
Page 17

E-
17
Solving Common Problems
Technical Specifications
Explanation / Solution
◆ Check that the circuit breaker used for the air conditioner has not been
triggered.
◆ Check that the power cable is plugged into a wall socket and the socket is
switched on, if necessary.
◆ Check that the temperature indicator on the unit is lit; if necessary,
press (On/Off) on the remote control or unit.
◆ Check that there are no obstacles between you and the unit.
◆ Replace the remote control batteries if necessary.
◆ Check that you are close enough to the unit (seven metres/yards or less).
◆
Ventilate the room.
Problem
The air conditioner does
not
operate at all
The air conditioner does not
operate with the remote
control
Odors are permeating the
room during air conditioning
◆ Check that you are pointing the remote control at the remote control sensor
on the unit.
◆ Replace the remote control batteries if necessary.
No beep is heard when you
press (On/Off) on the
remote control
◆ Check that the correct operating mode has been selected(COOL).
◆ The room temperature may be too low.
◆ Dust may be blocking the air filter; refer to page 14 for cleaning instructions.
◆ Check that there is no obstacle blocking the air flow into or out of the unit.
The air conditioner does not
cool
◆ Check that the timer has been programmed correctly; refer to page 11~13.
The timer is not correctly
triggered
Before contacting an authorized service center, perform the following simple checks.
They may save you the time and expense of an unnecessary call.
Model
Power Supply
AW0560A
AW0660A
Design and specifications are subject to change without notice.
115V~, 60Hz
Page 18

E-
18
Installation
Before installation, please read the INSTALLATION instructions, then follow the
procedures in order after considering the installation area and drain hose.
Checkpoints prior to installation
Check the cabinet and front grille of the unit for any defects
such as scratches.
1
Be sure to check the power supply.
- Refer to the specifications on the label attached to the unit.
2
Installation instructions
Electrical Requirements
For personal safety:
◆ This appliance must be properly grounded.
◆ Do not, under any circumstances, cut or remove the third grounding
prong from the power cord.
◆ We recommend that you do not use an extension cord or an adapter
plug with this appliance.
◆ Do not change the plug on the power cord of this appliance.
◆ Follow national electrical codes or local codes and ordinances.
1
◆ If the electric supply provided does not meet the above specifications,
call a licensed electrician.
◆ Aluminum house wiring may pose special problems - consult a qualified
electrician.
◆ This unit requires a separate circuit, serving only this appliance.
115V
15 AMP circuit
"parallel" type
230V/208V
20 AMP circuit
"perpendicular" type
230V/208V
15 AMP circuit
"tandem" type
230V/208V
30 AMP circuit
"tandem" type
22" to 36"
12 7/8" min
Window Requirements
◆ Standard double-hung window with actual opening width of 22" to 36".
The installation will need to be modified for windows other than
the standard double-hung type.
◆ Clear vertical opening of 12 7/8" minimum, from bottom of sash to sill.
◆ Install the air conditioner in a window where there will be enough
clearance around the cabinet to allow ample circulation of air through
the unit.
➢
All supporting parts should be secured to firm wood,
masonry or metal.
2
♦
The manufacturer does not assume responsibility for accident or
injury caused by an incorrectly installed air conditioner. If you are
unsure about installation, contact an installation specialist.
CCCCAAAAUUUUTTTTIIIIOOOONN
NN
Page 19

E-
19
Top support channel
Adhesive seal strip
Window gasket
Long wood screw (5X16)
Screw (4X10)
Window bracket
Window installation
Tools needed
◆ Philips head screwdriver
◆ Adjustable wrench
◆ Scissors
◆ Ruler or tape measure
◆ Pencil
Parts furnished
Type
A
B
C
7
9
2
Name of part Q’ty
Type
D
E
F
1
1
1
Name of part
Q’ty
Window filler panel(Right)
Window filler panel(Left)
Type
G
H
1
1
Name of part
Q’ty
Install the top support channel with three Type B screws provided.
1
➢
The screw holes are larger gauge on the channel and smaller on the
cabinet. The top support channel is “L” shaped. The high side of the
channel must always face inwards.
Assemble the window brackets on the cabinet.
2-1 Loosen the lower screw slightly on each side of the cabinet and install
the Type C window bracket.
2-2 Tighten the screws securing the brackets.
2
Top support
channel
Window bracket
(Type “C”)
Attach the window filler panels to the unit.
3-1 Slide the window filler panels and their frames into the channels on
the top and bottom of the cabinet.
3-2 Assemble the window filler panels to the cabinet using six Type B
screws.
3
Page 20

E-
20
Installation (Cont.)
Attach the seal strip to the window.
4-1 Cut the adhesive-backed foam seal strip gasket to the window width.
4-2 Remove the backing from the seal strip and attach the strip to
the underside of the bottom window.
4
1/4"
Install the unit in the window.
5-1 Place the air conditioner cabinet into the window with the top
support channel positioned just in front of the bottom sash.
5-2 Center the cabinet, side to side in the window then pull the window
down until it rests on the air conditioner, just behind the mounting
channel front flange on top of the cabinet.
5-3 Make sure the cabinet maintains a slightly downward slant to
the outside. A 1/4" slant, cabinet front to rear is desirable to help
prevent water from entering the room.
5
Type “A” screws
Type “A” screw
Window bracket (Type “C”)
Extend the window filler panels.
6-1
Secure the window brackets to the stool using the Type A screw at
each side.
6-2 Secure the top mounting channel to the bottom sash with the Type
A screw in the center.
6-3 Extend the window filler panels into the window sash tracks
on both sides. When the window is pulled down, the window should
rest on the unit just behind the window filler panel frames.
6-4 Slide the window filler panels outward until they touch the sides
of the window. Secure the panels by putting four Type A screws
through the mounting holes in the panels and driving them into the
window stool and sash.
6
Page 21

E-
21
➢
After several minutes the unit will be blowing out cold air.
If the unit is not cold, please return it to the dealer.
Install the window gasket.
Cut the foam window gasket to the window width and stuff it between the
window and the glass to prevent air and insects from getting into the room.
7
Check for air leaks and seal.
8
Plug in the power, switch on the air conditioner, turn the air conditioner
on and operate it in Cool mode and check for unusual vibrations.
9
Page 22

E-
22
Installation (Cont.)
If you need to remove the front grille for replacement, follow the steps below.
Remove the screw that holds the grille in place.
1
➢
Remove the shipping tape before pulling out the air filter,
if necessary.
Disassemble the front grille.
2-1 Press both sides of the cabinet in the direction of the arrow as shown
in the figure.
2-2 Pull the lower part of the front grille slightly forward.
2-3 Grasp the grille at both sides near the bottom and carefully lift it straight
up to disengage the grille’s two top tabs from slots near the top of the
cabinet.
2
➢
Do not pull bottom edge of grille toward you more than 3".
Damage to the grille’s two top tabs may occur.
Reinstall the front grille.
3-1 Fix the upper front grille.
3-2 Slide one side of the lower part of the front grille slightly backward.
3-3 Slide the other side backward.
3-4 Reinstall the screw and the air filter.
3
2-1
2-1
2-3
2-2
Removal of the Front Grille
Page 23

E-
23
Memo
Page 24

This limited warranty begins on the original date of purchase, and is valid only on products purchased and used in the United
States. Warranty repairs must be performed by SAMSUNG's authorized service center. To receive warranty service, the original dated bill of sale must be presented upon request as proof of purchase to SAMSUNG or SAMSUNG's authorized service
center.
SAMSUNG will repair or replace any part found to be defective at no charge, as stipulated herein, with new or reconditioned
parts during the limited warranty period specified above. To request warranty service, the purchaser must contact SAMSUNG
for problem determination and service procedures. SAMSUNG does not warrant uninterrupted or error-free operation of the
product. All replaced parts and products become the property of SAMSUNG and must be returned to SAMSUNG.
Replacement parts and products assume the remaining original warranty, or ninety (90) days, whichever is longer.
This limited warranty covers manufacturing defects in materials and workmanship encountered in normal, noncommercial
use of this product and shall not apply to the following, including, but not limited to: delivery and installation; damage which
occurs in shipment; applications and uses for which this product was not intended; failures or problems which are caused by
products or equipment not supplied by SAMSUNG; accidents, misuse, abuse, neglect, misapplication, fire, water, lightning or
other acts of nature; incorrect electrical line voltage, fluctuations or surges; damage caused by improper or faulty installation;
product alteration or modification; improper or unauthorized repair; cosmetic damage or exterior finish; product with altered
serial numbers; failure to follow operating and environmental instructions that are covered and prescribed in the instruction
book; customer adjustments, routine maintenance and cleaning; consumable items such as filters; use of non-SAMSUNG or
unauthorized parts, supplies, accessories or equipment which damage this product or result in service problems.
THERE ARE NO EXPRESS WARRANTIES OTHER THAN THOSE LISTED AND DESCRIBED ABOVE, AND NO WARRANTIES WHETHER EXPRESS OR IMPLIED, INCLUDING, BUT NOT LIMITED TO, ANY IMPLIED WARRANTIES OF
MERCHANTABILITY OR FITNESS FOR A PARTICULAR PURPOSE, SHALL APPLY AFTER THE EXPRESS WARRANTY PERIODS STATED ABOVE, AND NO OTHER EXPRESS WARRANTY OR GUARANTY GIVEN BY ANY PERSON,
FIRM OR CORPORATION WITH RESPECT TO THIS PRODUCT SHALL BE BINDING ON SAMSUNG. SAMSUNG
SHALL NOT BE LIABLE FOR LOSS OF REVENUE OR PROFITS, FAILURE TO REALIZE SAVINGS OR OTHER BENEFITS, OR ANY OTHER SPECIAL, INCIDENTAL OR CONSEQUENTIAL DAMAGES CAUSED BY THE USE, MISUSE OR
INABILITY TO USE THIS PRODUCT, REGARDLESS OF THE LEGAL THEORY ON WHICH THE CLAIM IS BASED, AND
EVEN IF SAMSUNG HAS BEEN ADVISED OF THE POSSIBILITY OF SUCH DAMAGES. NOR SHALL RECOVERY OF
ANY KIND AGAINST SAMSUNG BE GREATER IN AMOUNT THAN THE PURCHASE PRICE OF THE PRODUCT SOLD
BY SAMSUNG AND CAUSING THE ALLEGED DAMAGE. WITHOUT LIMITING THE FOREGOING, PURCHASER
ASSUMES ALL RISK AND LIABILITY FOR LOSS, DAMAGE OR INJURY TO PURCHASER AND PURCHASERS PROPERTY AND TO OTHERS AND THEIR PROPERTY ARISING OUT OF THE USE, MISUSE OR INABILITY TO USE THIS
PRODUCT SOLD BY SAMSUNG NOT CAUSED DIRECTLY BY THE NEGLIGENCE OF SAMSUNG. THIS LIMITED
WARRANTY SHALL NOT EXTEND TO ANYONE OTHER THAN THE ORIGINAL PURCHASER OF THIS PRODUCT, IS
NONTRANSFERABLE AND STATES YOUR EXCLUSIVE REMEDY.
Some states do not allow limitations on how long an implied warranty lasts, or the exclusion or limitation of incidental or consequential damages, so the above limitations or exclusions may not apply to you. This warranty gives you specific legal
rights, and you may also have other rights which vary from state to state.
To obtain warranty service, please contact SAMSUNG at:
One (1) Year Parts and Labor, Five (5) Years Parts Warranty for Compressor
SAMSUNG ELECTRONICS AMERICA, INC. - CONSUMER ELECTRONICS CUSTOMER SERVICE
400 Valley Road, Suite 201 Mount Arlington, NJ 07856
Tel: 973-601-6000, Fax: 973-601-6001
1-800-SAMSUNG (1-800-726-7864)
www.sosimple.com
SAMSUNG ROOM AIR CONDITIONER
This SAMSUNG brand product, as supplied and distributed by SAMSUNG ELECTRONICS AMERICA, INC. (SAMSUNG) and delivered new, in the original carton to the original consumer purchaser, is warranted by SAMSUNG against
manufacturing defects in materials and workmanship for a limited warranty period of:
LIMITED WARRANTY TO ORIGINAL PURCHASER
 Loading...